User manual

ZW10
User Manual

1
About This Manual
Thank you for choosing this ZTE mobile device. In order to keep
your device in its best condition, please read this manual and keep it
for future reference.
Copyright
Copyright © 2017 ZTE CORPORATION
All rights reserved.
No part of this publication may be quoted, reproduced, translated or
used in any form or by any means, electronic or mechanical,
including photocopying and microfilm, without the prior written
permission of ZTE Corporation.
Notice
ZTE Corporation reserves the right to make modifications on print
errors or update specifications in this guide without prior notice. This
manual has been designed with the utmost care to ensure the
accuracy of its content. However, all statements, information and
recommendations contained therein do not constitute a warranty of
any kind, either expressed or implied. Please refer to For Your
Safety to be sure to use your watch properly and safely.
We offer self-service for our smart terminal device users. Please visit
the ZTE official website (at www.ztedevice.com) for more information
on self-service and supported product models. Information on the
website takes precedence.
2
Disclaimer
ZTE Corporation expressly disclaims any liability for faults and
damages caused by unauthorized modifications of the software.
Images and screenshots used in this manual may differ from the
actual product. Content in this manual may differ from the actual
product or software.
Trademarks
ZTE and the ZTE logos are trademarks of the ZTE Corporation.
The Bluetooth® trademark and logos are owned by the Bluetooth
SIG, Inc. and any use of such trademarks by ZTE Corporation is
under license.
Android Wear™ is a trademark of Google Inc.
Qualcomm are trademarks of Qualcomm Incorporated, registered in
the United States and other countries. Used with permission.
Other trademarks and trade names are the property of their
respective owners.
Version No.: R1.0
Edition Time: January 12, 2017

3
Contents
Getting Started ....................................................................... 7
Getting to Know Your Device .................................................. 7
Charging the Watch ................................................................. 9
Using the Touch Screen ........................................................ 10
Setting Up for the First Time ................................................. 12
Waking Up the Watch ............................................................ 13
Getting to Know the Screen .................................................. 14
Personalizing........................................................................ 15
Setting the Date and Time .................................................... 15
Changing the Ringtone .......................................................... 15
Adjusting Volume ................................................................... 16
Switching to Silent Mode ....................................................... 16
Do Not Disturb Mode ............................................................. 16
Adding a Watch Face to Favorites ....................................... 17
Adjusting Screen Brightness ................................................ 18
Changing the Font Size ......................................................... 18
Setting the Screen Always on ............................................... 18
4
Connecting to Networks and Devices ................................ 19
Connecting to Mobile Networks ........................................... 19
Connecting to Wi-Fi®.............................................................. 20
Bluetooth Connectivity ........................................................ 22
Turning On/Off Bluetooth ...................................................... 22
Pairing With Bluetooth Devices ............................................ 22
Knowing the Basics ............................................................. 23
Checking Status and Notification Cards.............................. 23
Notification Cards ................................................................... 24
Entering Text ........................................................................... 26
Contact and Phone .............................................................. 27
Adding a New Contact ........................................................... 27
Calling a Contact .................................................................... 27
Placing and Ending Calls ...................................................... 28
Answering or Rejecting a Call .............................................. 28
Call forwarding ........................................................................ 28
Using Options During a Call ................................................. 29
Messenger ............................................................................ 30
5
Checking Messages .............................................................. 30
Sending a Message ............................................................... 30
Replying to a Message .......................................................... 31
Google Fit ............................................................................. 32
Setting fitness Goals .............................................................. 32
Exercising with the watch ...................................................... 33
Checking Workout Statistics ................................................. 34
Timer ..................................................................................... 35
Stopwatch ............................................................................. 36
Alarm .................................................................................... 37
Find My Phone ..................................................................... 37
Flashlight .............................................................................. 37
Agenda ................................................................................. 38
Settings ................................................................................ 38
FAQ ....................................................................................... 44
For Your Safety..................................................................... 47
General Safety ........................................................................ 47
FCC Regulations .................................................................... 48
6
FCC RF Exposure Information (SAR) ................................. 49
Distraction While Walking ..................................................... 50
Product Handling .................................................................... 50
Electrical Safety ...................................................................... 55
Radio Frequency Interference .............................................. 55
Explosive Environments ........................................................ 57
7
Getting Started
Getting to Know Your Device
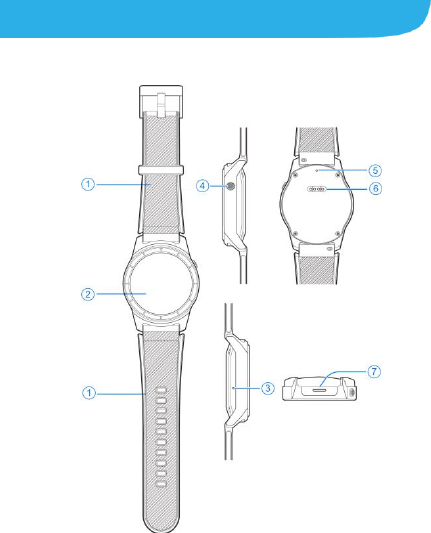
8
1. Watch bands
2. Touch screen
3. Microphone
4. Power button
Press and hold to power on the watch.
When the screen is on, press to access the applications list.
When the screen is dimmed, press to wake up the watch.
When the screen is on, press and hold to access Speak
now.
When there is no ongoing phone call, press to return to the
clock face from any other interface.
5. Barometer
6. Charging connector
7. Speaker
9
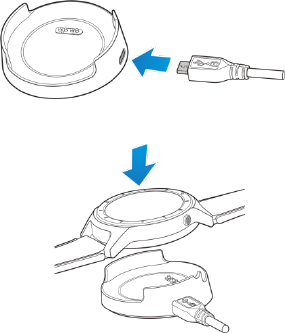
Charging the Watch
It is recommended to only use the included ZTE charging dock and
cable to charge your watch.
1. Connect the charging cable to the micro-USB port on the
charging terminal.
2. Place the watch on the charging dock, making sure is oriented
correctly so the watch and charging dock contacts are aligned.

10
NOTES:
You can also connect the cable to a USB port on your
computer to charge the watch.
It is normal for the device to become slightly warm during
charging.
Use the ZTE charging dock that came with your device. Use of
other chargers may damage the device and void the warranty.
CAUTION:
To save battery power, some non-essential applications will be
disabled when the battery is low.
Using the Touch Screen
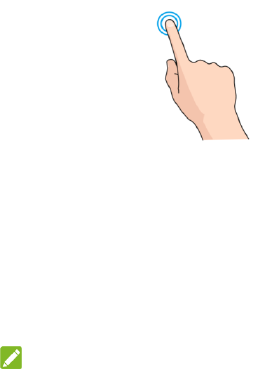
Touch
When you want to type using the onscreen keyboard, select
items on the screen such as the application and settings icons,
or press the onscreen buttons, simply touch them with your
finger.

11
Touch and Hold
To open the available options for an item (for example, a
message or link in a web page), touch and hold the item.
Swipe or Slide
To swipe or slide means to quickly drag your finger vertically or
horizontally across the screen.
12
Double-tap
Quickly touch the same place on the screen twice.
Setting Up for the First Time
Before using the watch normally, you need to set it up when
powering it on for the first time.
1. Touch the screen to begin.
2. Slide on the screen and select the language you want to use.
3. Follow the prompts displayed to download Android Wear™
from Google Play Store and install it on your phone.
4. Open Android Wear on your phone and touch SET IT UP.
NOTES:
Android Wear™ App requires a phone running Android 4.3+
or iOS 8.2+. Supported features may vary between platforms.
Visit g.co/wearcheck on your Android phone or iPhone® to
see if it’s compatible.
Your phone automatically scans for and displays the IDs of
all available devices in range.
5. Select the name of your watch.

13
6. Confirm that the pairing codes are the same between the two
devices and touch Pair.
NOTE:
After connected, the phone and watch will automatically check
for updates.
7. Select or add a Google account to copy it to your watch.
8. Follow the on screen instructions to complete the setup and
touch DONE.
NOTES:
Make sure your phone is next to your watch.
Make sure your phone is connected to mobile data or Wi-Fi.
You need a data connection to set up your watch for the first
time.
Depending on the network condition, the setup process might
take a few minutes.
Waking Up the Watch
After some time of inactivity, the screen of the watch dims to save
battery power. You can wake up the watch using the following two
methods.
Touch the screen.
Press the Power button.
Turn your wrist so your clock face is upright.
14
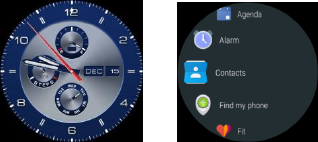
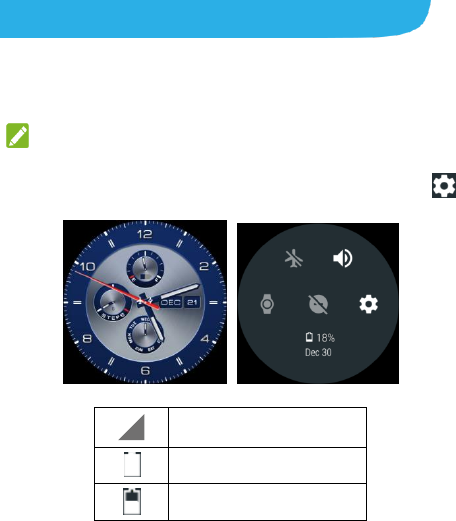
Getting to Know the Screen
After powering on, the default clock face is displayed as the starting
point for the watch’s applications and menus.
Clock Face Applications list
The clock face displays the time and other information such as
event and battery status.
From the clock face, press the Power button to display all
applications on the watch. Swipe up and down to view the
whole list of apps. You can select an app to open it and swipe
right to return to the previous screen. If you want to move a
app to top, select and hold it.

15
Personalizing
Setting the Date and Time
1. If your screen is dimmed, touch the screen to wake up the
watch.
2. From the clock face, press the Power button and select
Settings > System > Date & time.
3. Select Automatic date & time/Automatic time zone >
OFF if you want to set the date, time and time zone by
yourself.
4. Set the date, time, time zone, and date/time format.
Changing the Ringtone
1. If your screen is dimmed, touch the screen to wake up the
watch.
2. From the clock face, press the Power button and select
Settings > Sound & notifications > Watch ringtone.
3. In the ringtone list, select the sound you want to use. The sound
will play briefly.
4. Swipe right to return to the previous menu.

16
Adjusting Volume
1. If your screen is dimmed, touch the screen to wake up the
watch.
2. From the clock face, press the Power key and select Settings >
Sound & notifications.
3. Select Media volume, Alarm volume, or Ring volume.
4. Drag the sliders to adjust the volume for each type of audio.
5. Swipe right to return to the previous menu.
Switching to Silent Mode
You can set the watch to silent mode.
Swipe down from the top of the clock face and select .
Do Not Disturb Mode
You can set whether or not to allow notification cards to show up on
your watch. Swipe down from the top of the screen in the clock face
and select or to turn on or off the Do not disturb mode.
NOTE:
From the clock face, press the Power button and select Settings >
Sound & notifications > Do not disturb unless... to select specific
notifications to sound in the Do not disturb mode.

17
Adding a Watch Face to Favorites
You can add a watch face to your favorites in few ways:
From the watch:
1. If your screen is dimmed, touch the screen to wake up the
watch.
2. Swipe left from the clock face and select Add more watch
faces.
3. Swipe up or down to browse available watch faces. Select the
one you prefer.
From the phone:
1. Open Android Wear™ on your phone.
2. Select MORE next to Watch faces.
3. Swipe up or down and select the watch face you want to use.
NOTE:
Touch and hold a watch face, slide left or right to browse your
favorites watch faces thumbnails.
-or-
Select a watch face thumbnail to set it as the clock face.
- or-
Swipe a thumbnail up or down to remove it from your favorites.
18
Adjusting Screen Brightness
1. If your screen is dimmed, touch the screen to wake up the
watch.
2. From the clock face, press the Power button and select
Settings > Display > Adjust brightness.
3. Select the level you want to use.
Changing the Font Size
You can set the size of the font displayed on your watch.
1. If your screen is dimmed, touch the screen to wake up the
watch.
2. From the clock face, press the Power button and select
Settings > Display > Font size.
3. Select Small, Normal or Large.
Setting the Screen Always on
You can set the screen to show the time or turn off completely when
you’re not using the watch.
1. If your screen is dimmed, touch the screen to wake up the
watch.
2. From the clock face, press the Power button and select
Settings > Display > Always on.
On: A dimmed clock face is shown when your watch is idle.
Off: The clock screen darkens when your watch is idle.

19
Connecting to Networks and
Devices
Connecting to Mobile Networks
Control Mobile Data Use
You can use or disable the mobile data service of the SIM card.
To enable or disable cellular:
1. If your screen is dimmed, touch the screen to wake up the watch.
2. From the clock face, press the Power button and select
Settings > Connectivity > Cellular.
3. Select Cellular.
To get data services when roaming:
1. If your screen is dimmed, touch the screen to wake up the watch.
2. From the clock face, press the Power button and select
Settings > Connectivity > Cellular.
3. Select Data roaming and select .
NOTE:
Data roaming may incur significant roaming charges.
Select Preferred Network Type
Set the preferred type of network for the SIM card installed in the
watch.

20
1. If your screen is dimmed, touch the screen to wake up the watch.
2. From the clock face, press the Power button and select
Settings > Connectivity > Cellular > Advanced > Preferred.
3. Select the network type you would prefer the phone to connect
with.
Connecting to Wi-Fi®
Wi-Fi is a wireless networking technology that can provide Internet
access at distances of up to 100 meters, depending on the Wi-Fi
router and your surroundings.
Turn Wi-Fi On and Connect to a Wi-Fi Network
1. If your screen is dimmed, touch the screen to wake up the watch.
1. From the clock face, press the Power button and select
Settings > Connectivity > Wi-Fi.
2. Select Wi-Fi to turn on Wi-Fi.
3. Select Add network.
4. Select a network name.
5. Select Enter on phone to enter the password of the network on
the phone and connect to it.
NOTE:
Your watch automatically connects to previously used Wi-Fi
networks when they are in range.
21
Add a Hidden Network
You can add a hidden Wi-Fi network if the network does not
broadcast its name (SSID).
To connect to a secured network, you first need to get the security
details from the network's administrator.
1. If your screen is dimmed, touch the screen to wake up the watch.
1. From the clock face, press the Power button and select
Settings > Connectivity > Wi-Fi.
2. Select Wi-Fi to turn on Wi-Fi.
3. Select Add network > Add hidden network.
4. Select Open on phone.
5. Enter the network SSID (name). If necessary, enter security or
other network configuration details on the phone.
6. Save and connect to the network.
Forget a Wi-Fi Network
You can make your watch forget about the details of a Wi-Fi network
that you added - for example, if you don’t want the phone to connect
to it automatically or if it is a network that you no longer use.
1. If your screen is dimmed, touch the screen to wake up the watch.
1. From the clock face, press the Power button and select
Settings > Connectivity > Wi-Fi.
2. Select Wi-Fi to turn on Wi-Fi..
3. Select Saved networks.

22
4. Select next to the Wi-Fi network name.
Bluetooth Connectivity
Turning On/Off Bluetooth
1. If your screen is dimmed, touch the screen to wake up the
watch.
2. From the clock face, press the Power button and select
Settings > Connectivity > Bluetooth.
3. Select Bluetooth to turn on or off Bluetooth.
Pairing With Bluetooth Devices
Pairing with phone:
Use Android Wear™ on your phone and follow the on screen
instructions to pair with your watch. See Setting Up for the First
Time.
Pairing with other devices:
1. If your screen is dimmed, touch the screen to wake up the
watch.
2. From the clock face, press the Power button and select
Settings > Connectivity > Bluetooth and turn Bluetooth on.
3. Select Available devices to scan for and display the IDs of all
available devices in range.
23
4. Select the name of the device.
Knowing the Basics
Checking Status and Notification Cards
You can check the status on the clock face or in the drop-down
panel.
NOTE:
In the drop-down panel, you can turn on or off airplane mode, theatre
mode and Do not disturb mode, control sound modes, or select
to open the Settings app.
Below are some of the icons you may see.
Signal strength
Battery full
Battery partially drained
24
Battery low
Connected to a Wi-Fi
network
Do not disturb enabled
Airplane mode on
Battery charging
Out of line
Notification Cards
Most notifications you see on your phone also show up on your
watch. These include notifications for missed calls, messages, event
reminders, and so on.
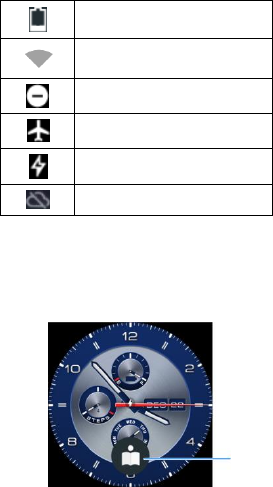
Seeing Notification Cards
Swipe up from the bottom of the clock face to see a notification. To
see more cards, keep swiping up from the bottom of the screen.
Swipe up to
see detail

25
Removing a Card
To remove a card, swipe it to the right. If you remove a card on your
watch, its corresponding notification on the phone will be dismissed.
Blocking Apps Notifications
If you get notification on your phone that you don’t want to see on
your watch, you can stop specific apps from showing their
notifications on your watch.
1. On your phone, select Android Wear™.
2. Select > Block app notifications > .
3. Select the app you want to block.
26
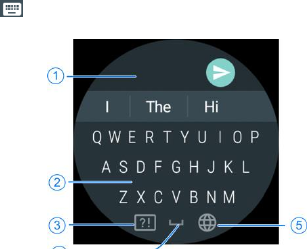
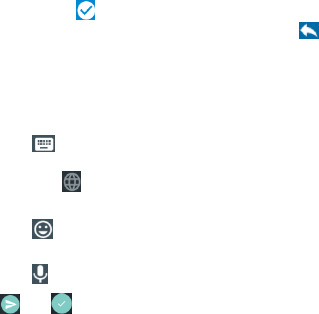
Entering Text
Select in any text entry field to open the onscreen keyboard.
1. Text entry area
2. keyboard
3. Number/symbol switch
4. Space key
5. Change to write words
input method

Contact and Phone
Adding a New Contact
Your watch cannot exchange phone calls and messages with
unknown numbers, so please save the numbers you are going to
use as contacts to the address book.
You can use the Contacts app on the phone that has been bound
with the watch to add new contacts. The added contacts will be
automatically synchronized to the watch.
Calling a Contact
1. If your screen is dimmed, touch the screen to wake up the
watch.
2. From the clock face, press the Power button and select
Contacts / Phone.
3. Swipe the screen to find the contact you want to call. If the
contact is in a group, select the group to find the contact.
4. Select the contact name.
In the Phone app, the watch begins to dial the call.
In the Contacts app, select to dial the call.
5. When the call finishes, select to hang up.
28
Placing and Ending Calls
1. If your screen is dimmed, touch the screen to wake up the watch.
2. From the clock face, press the Power button and select Phone.
3. Swipe left or right to switch between different screen. Use one of
the following methods to place a call.
In the Contacts screen, Swipe the screen to select the
contact you want to call and select .
In the Recents screen, scroll through the history and
selecrt the log you want to call.
In the dialpald screen, enter a number using the dialpad
and select .
4. When the call finishes, select to hang up.
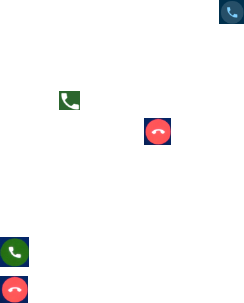
Answering or Rejecting a Call
When a call comes in, the watch will send notification through
ringtone or vibration.
Select to answer the call.
Select to reject the call.
Call forwarding
Call forwarding feature allows you to forward calls to your watch
when incoming calls are not answered on the phone.

29
1. If your screen is dimmed, touch the screen to wake up the watch.
2. From the clock face, press the Power button and select
Settings > Connectivity > Cellular > Call forwarding.
3. Select Turn on, Open on phone or Turn off.
Using Options During a Call
During a call, select and you will see a number of onscreen
options. Select an option to select it.
Select to switch to the keypad when you need to enter a code
(for example, the PIN for your voicemail or bank account) during
the call.
Select to mute or unmute your microphone.
Select to put the call on hold.
Select to turn on or off the speakerphone.

30
Messenger
Checking Messages
When new messages are received, the watch would play a ringtone,
vibrate, or display a card previews at the bottom of the clock face as
a notification.
1. If your screen is dimmed, touch the screen to wake up the
watch.
2. From the clock face, press the Power button and select
Messenger. All sent and received messages are grouped into
conversations.
3. Select a conversation to check the message exchanges with a
certain number.
NOTE:
You can also swipe up from the bottom of the clock face to view the
message you received.
Sending a Message
1. If your screen is dimmed, touch the screen to wake up the
watch.
2. From the clock face, press the Power button and select
Messenger.
3. Select to switch number between watch and phone.
31
4. Select New message and select recipient displayed in the
screen and select . If there is an ongoing conversation with
the contact, select the conversation and then select .
5. Enter the content of the message. You can use text templates,
write new text, or send an MMS with doodles.
Swipe up or down to select a text template from fixed
phrases or recently used texts from the list.
Select to open the text screen. Select the text field to
open the onscreen keyboard and enter the text. You can
also select to write words with your finger on the
screen.
Select to open the doodle screen. You can draw an
image with your finger.
Select to use Speak now to enter your message.
6. Select or .
Replying to a Message
Messages you receive are appended to existing threads of the same
number. If the new message comes from a new number, a new
thread is created.
1. If your screen is dimmed, touch the screen to wake up the
watch.
2. From the clock face, press the Power button and select
Messenger.

32
3. Touch the thread that has the message you want to reply to,
and swipe up to select .
4. Enter your reply and select or .
Google Fit
From the clock face, press the Power button and touch Fit. Installing
the Google Fit app on the phone that your watch is paired with lets
you sync data between the two devices and enjoy all of Fit's
features.
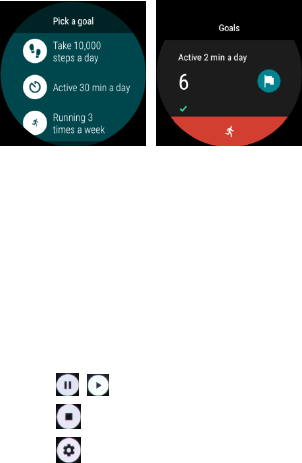
Setting fitness Goals
Set fitness goals can help you stay motivated. You can pick or set
goals around personal fitness. When you reach the goal, a green
flag is awarded.
1. If your screen is dimmed, touch the screen to wake up the
watch.
2. From the clock face, press the Power button and select Fit.
3. Select Add goal.
4. Pick or create a goal.
33
Exercising with the watch
Fit can track your walks, runs, bike rides and count reps of squats,
push-ups, and sit-ups.
1. If your screen is dimmed, touch the screen to wake up the
watch.
2. From the clock face, press the Power button and select Fit
Workout.
3. Select the type of workout you want to monitor.
4. Select START to start monitoring your workout.
Select / to pause or resume the workout.
Select to end the workout.
Select to change metrics.
34
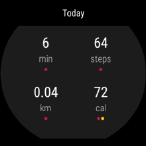
Checking Workout Statistics
1. If your screen is dimmed, touch the screen to wake up the
watch.
2. From the clock face, press the Power button and select Fit.
3. Swipe up on the screen to check the workout statistics in a day.
35
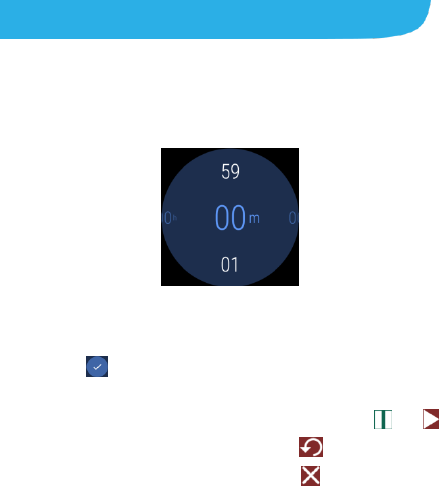
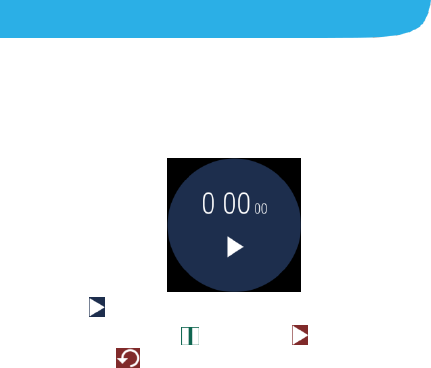
Timer
The watch can be used as a countdown timer.
1. If your screen is dimmed, touch the screen to wake up the
watch.
2. From the clock face, press the Power button and touch Timer.
3. In the screen above, swipe through the available durations to
set the start time.
4. Swipe left until you see Start timer.
5. Touch to begin countdown.
During the countdown, you can do follow things:
Pause or resume the countdown by touching or .
Reset the countdown by touching .
End the countdown by touching .
36
Stopwatch
Measure how much time has passed with the Stopwatch app.
1. If your screen is dimmed, touch the screen to wake up the
watch.
2. From the clock face, press the Power button and touch
Stopwatch.
3. Touch to begin timing.
4. During timing, touch to pause or to resume. You can
also touch to end.

37
Alarm
1. If your screen is dimmed, touch the screen to wake up the
watch.
2. From the clock face, press the Power button and select Alarm.
3. Set a new alarm.
To set a new alarm, swipe on the screen to set up the
alarm time, repeat, sound, vibration. Select Set alarm to
save and enable the alarm.
To delete an alarm, touch it to open the alarm details
screen. Then select Remove at the bottom.
Find My Phone
If you misplace the phone, the watch can help you find it.
From the clock face, press the Power button and select Find my
phone. The phone emits sounds and turns on the screen.
Touch to stop.
Flashlight
From the clock face, press the Power button and select Flashlight.
The screen will display a bright white background. Select to
turn off the flash light.

38
Agenda
You can view events scheduled on your phone’s calendar using
your watch.
1. If your screen is dimmed, touch the screen to wake up the
watch.
2. From the clock face, press the Power button and select
Agenda. You will see a list of scheduled events.
3. Select an event to view the event’s details.
Settings
From the clock face, press the Power button and select Settings
to configure options related to sound, display, Bluetooth, and check
information of the owner and emergency contacts.
Display
Configure screen brightness, font size, and more. See Adjusting
Screen Brightness, Changing the Font Size and Setting the Screen
Always on.
Sound & Notifications
Set the ringtones for incoming calls, or adjust the volume for calls,
alarms and apps. See Changing the Ringtone and Adjusting
Volume. Set specific notifications to sound in Do not disturb mode.

39
Apps
See apps installed on your watch and manage them.
Select an app to see its information. The following options may be
available:
Uninstall: Uninstall the app.
Disable/Enable: Disable or enable the app.
Force stop: Stop the app.
Permissions: Check or change the app permissions.
Advanced: Enable/disable draw over other apps, or allow the
app to modify system settings.
APP Info: Check the version of the app, storage information and
data usage, or clear data and cache.
NOTE:
Not all options are available for the apps.
Gestures
From the clock face, press the Power button and select Settings >
Gestures to use gestures to control your watch.
Tilt-to-wake: Select the screen to wake up the watch.
Wrist gestures: Turn on or off wrist gestures.
Launch tutorial: Select to view how to use wrist gestures.
More tips: Select to view more information on the phone.

40
Bluetooth
From the clock face, press the Power button and select Settings >
Connectivity > Bluetooth to configure options related to the
Bluetooth feature of the watch. See Bluetooth Connectivity.
Wi-Fi
From the clock face, press the Power button and select Settings >
Connectivity > Wi-Fi. You can turn Wi-Fi on or off and configure
your Wi-Fi connections. See Connecting to Wi-Fi.
Cellular
From the clock face, press the Power button and select Settings >
Connectivity > Cellular to control mobile data use, set mobile
data limit and warning and default SMS app, and more.
Airplane Mode
From the clock face, press the Power button and select Settings >
Connectivity > Airplane mode. When airplane mode is on, your
watch cannot sync information stored on your phone.
Location
From the clock face, press the Power button and select Settings >
Connectivity > Location to manage location services, which help
your watch and apps determine your location. To use
location-related applications, such as tracking your location on
Google Fit, you must have location services enable on your watch.
41
1. Select Location to turn location services on or off.
2. When location is enabled, select Mode to select location
sources you want to use.
High accuracy: Get accurate location using GPS, Wi-Fi,
Bluetooth as well as cellular networks.
Battery saving: Use Wi-Fi, Bluetooth, or cellular networks to
get accurate location.
Device only: Use phone and watch GPS to pinpoint your
location.
Accessibility
From the clock face, press the Power button and select Settings >
Accessibility > Magnification gestures to enable/disable
magnification to zoom in and out with triple touch. Or enable Power
button ends call to end a call by pressing Power button.
Input Methods
From the clock face, press the Power button and select Settings >
Personalization > Input methods to configure options related to
input methods.
Accounts
From the clock face, press the Power button and select Settings >
Personalization > Accounts to sign in to accounts on your phone
or remove accounts.
42
Smart Reply
From the clock face, press the Power button and select Settings >
Personalization > Smart Reply to turn on or off smart reply. Set
the phone to display notification information that displays on the
watch when you pick up the phone.
Device administration
From the clock face, press the Power button and select Settings >
Personalization > Device administration to activate Android
Device manager.
Screen lock
From the clock face, press the Power button and select Settings >
Personalization > Screen lock to disable the screen lock or
enable it with pattern, PIN, or password.
Data & Time
From the clock face, press the Power button and select Settings >
System > Data & time to set date, time, time zone, time format.
See Setting the Date and Time.
Disconnect & Reset
From the clock face, press the Power button and select Settings >
System > Disconnect & reset to unpair and factory reset your
watch settings and delete all user data.
43
Restart
From the clock face, press the Power button and to select
Settings > System > Restart to restart your watch.
Power off
From the clock face, press the Power button and select Settings >
System > Power off to turn off your watch.
About
From the clock face, press the Power button and select Settings >
System > About to View watch status and legal information. You
can also check and upgrade your watch system on line.
44
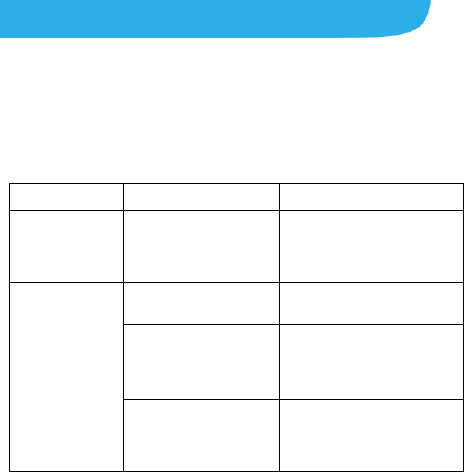
FAQ
If you encounter problems while using the watch, or if it performs
abnormally, you can refer to the chart below. If your particular
problem cannot be resolved using the information in the chart,
contact the dealer where you purchased the device.
Problem
Possible Causes
Possible Solution
Unable to
power on
Battery power has
been depleted.
Charge the battery. The
watch will power on
automatically when the
battery is enough.
Unable to
charge the
battery
The battery or charger
is damaged.
Contact the dealer.
The watch’s
temperature is below
0℃ or higher than
45℃.
Adjust the battery charging
environment to avoid
extremes of temperature.
The connection
between the battery
and the charger is
poor.
Check all connectors to
ensure that all connections
have been properly made.

45
Problem
Possible Causes
Possible Solution
Poor network
reception (for
example, no or
weak signal,
or poor call
quality)
The network signal is
too weak at your
current location, for
example, in a
basement or near a tall
building, because
wireless transmissions
cannot effectively
reach it.
Move to a location where
the network signal can be
properly received.
The network is busy at
the current time (for
example, during peak
hours, there may be
too much network
traffic to handle
additional calls).
Avoid calls at such times, or
try again after waiting a
short time.
You are too far away
from a base station for
your service provider.
Confirm with your service
provider that you are in the
service area.
Unable to
receive
notification for
calls and
messages, or
the watch
does not
vibrate or light
up the screen
The watch is in silent
mode.
Turn off silent mode. See
Switching to Silent Mode.
The battery is too low.
Some apps are
disabled automatically
to save power.
Charge the battery.

46
Problem
Possible Causes
Possible Solution
Unable to
open or use
some
applications.
The temperature of the
watch is too high.
Some apps are
disabled automatically
to help the watch cool
down.
Wait for the watch to cool
down or put the watch in a
cooler environment.
The battery is
depleted. In high
temperature
environments, battery
life will be shortened.
Avoid using the watch in
high temperature
environment.
Shortened
standby time
If you are not able to
connect to the
network, the watch will
continue to send out
signals as it attempts
to locate a base
station. Doing so
consumes battery
power and will
consequently shorten
standby time.
Change your location to one
where the network is
accessible.
Unable to
connect to the
network
The nano-SIM card is
invalid.
Please contact your service
provider.
You are not in the
network’s service area.
Confirm with your service
provider that you are in the
service area.
The reception is poor.
Move to an open space, or if
you are inside a building,
move closer to a window.
47
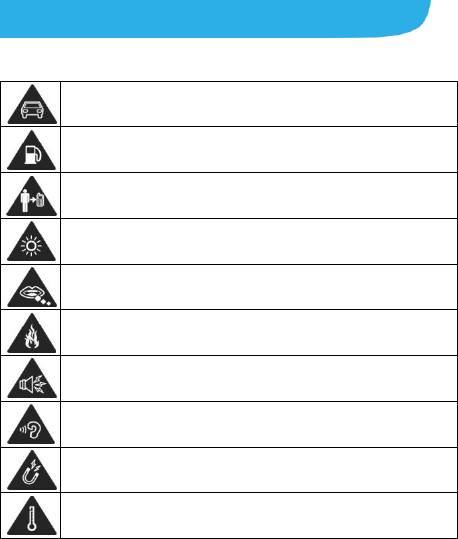
For Your Safety
General Safety
Don’t use while walking or running. Pay attention on the traffic.
Don’t use at gas stations.
Keep your device at least 10 mm away from your body while making
calls.
Your device may produce a bright or flashing light.
Small parts may cause choking.
Don’t dispose of your device in fire.
Your device can produce a loud sound.
To prevent possible hearing damage, do not listen at high volume
levels for long periods.
Avoid contact with anything magnetic.
Avoid extreme temperatures.
48
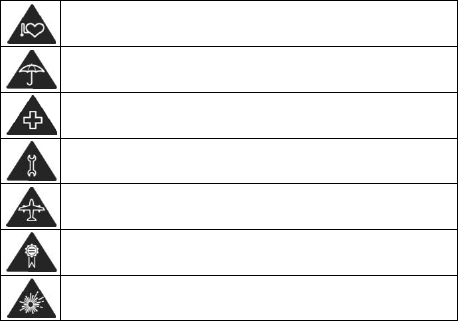
Keep away from pacemakers and other electronic medical devices.
Avoid contact with liquids. Keep your device dry.
Turn off when asked to in hospitals and medical facilities.
Don’t take your device apart.
Turn off when told to in aircrafts and airports.
Only use approved accessories.
Turn off when near explosive materials or liquids.
FCC Regulations
This device complies with part 15 of the FCC Rules. Operation is
subject to the following two conditions: (1) This device may not
cause harmful interference, and (2) this device must accept any
interference received, including interference that may cause
undesired operation.
This device has been tested and found to comply with the limits for a
Class B digital device, pursuant to Part 15 of the FCC Rules. These
limits are designed to provide reasonable protection against harmful
interference in a residential installation. This equipment generates,
uses and can radiated radio frequency energy and, if not installed

49
and used in accordance with the instructions, may cause harmful
interference to radio communications. However, there is no
guarantee that interference will not occur in a particular installation If
this equipment does cause harmful interference to radio or television
reception, which can be determined by turning the equipment off and
on, the user is encouraged to try to correct the interference by one or
more of the following measures:
-Reorient or relocate the receiving antenna.
-Increase the separation between the equipment and receiver.
-Connect the equipment into an outlet on a circuit different from that
to which the receiver is connected.
-Consult the dealer or an experienced radio/TV technician for help.
Caution: Changes or modifications not expressly approved by the
party responsible for compliance could void the user‘s authority to
operate the equipment.
FCC RF Exposure Information (SAR)
This device is designed and manufactured not to exceed the
emission limits for exposure to radio frequency (RF) energy set by
the Federal Communications Commission of the United States.
The exposure standard for wireless employs a unit of measurement
known as the Specific Absorption Rate, or SAR. The SAR limit set
by the FCC is 1.6W/kg for 1g SAR and 4.0W/kg for 10g SAR.
The FCC has granted an Equipment Authorization for this model
device with all reported SAR levels evaluated as in compliance with
the FCC RF exposure guidelines. SAR information on this model
device is on file with the FCC and can be found under the Display
Grant section of www.fcc.gov/oet/ea/fccid after searching on
50
FCC ID: SRQ-ZW10.
For this device, the highest reported next to mouth SAR value is 0.95
W/kg and the highest wrist-worn SAR value is 1.90 W/kg.
Distraction While Walking
Full attention must be given to traffic at all times when walking or
running in order to reduce the risk of an accident. Please observe
relevant provisions on prohibitions or restrictions on the use of
mobile phones.
Product Handling
General Statement on Handling and Use
You alone are responsible for how you use your device and any
consequences of its use.
Always treat your device and its accessories with care.
Do not cover or touch the antenna area during phone calls.
Doing so may affect signal transmission and consume more
battery power.
Clean the device and its accessories with a soft material such as
cleaning cloth for eyeglass lenses. Do not use alcohol or other
corrosive substances for cleaning or allow them to get inside.
Do not expose your device or its accessories to open flames or lit
tobacco products.
Do not expose your device or its accessories to liquid, moisture
or high humidity.
51
Do not drop, puncture, crush, throw or try to bend your device or
its accessories.
Do not paint your device or its accessories.
Do not attempt to disassemble your device or its accessories.
Only authorized personnel can do so.
Do not attempt to disassemble the screen. You may get cut by
broken glass.
When the decoration ring breaks, replace with a new one before
using the watch to avoid cutting yourself.
Do not wrap your device, charging cable or adapter in quilts or
other packages during use or charging. Poor ventilation may
cause heat build-up and damage internal components or cause
fire.
Do not wear or play with the device while it is being charged.
Do not use conductive foreign objects (such as metal plates,
pencils, etc) to contact with the charging port or connectors.
Do not expose or use your device or its accessories in an
environment with or that can reach extreme temperatures.
Do not place your device inside or near heating equipments or
high pressure containers, such as water heaters, microwave
ovens, or hot cooking utensils. Otherwise, your device may be
damaged.
Please check local regulations for disposal of electronic
products.
52
Small Children
Do not leave your device and its accessories within the reach of
small children or allow them to play with it.
They could hurt themselves or others, or could accidentally damage
the device.
Your device contains small parts that may cause an injury or may
become detached and create a choking hazard.
Do not allow children to removed or install the decoration ring by
themselves. They may break the ring and cut themselves or others.
Never allow children to assemble or remove the watch bands by
themselves. They may scratch themselves or eat the screws by
accident.
Children should use the device under adult supervision.
Watch bands may cause infant suffocation. Put the device out of
your baby’s reach.
Demagnetization
To avoid the risk of demagnetization, do not allow electronic devices
or magnetic media to be close to your device for a long time.
Seizures/Blackouts
The device can produce a bright or flashing light. A small percentage
of people may be susceptible to blackouts or seizures (even if they
have never had one before) when exposed to flashing lights or light
patterns such as when playing games or watching video. If you have
experienced seizures or blackouts or have a family history of such
53
occurrences, please consult a physician.
Emergency Calls
This device operates using radio signals, which cannot guarantee
connection in all conditions.
Loud Noise
This device is capable of producing loud noises, which may damage
your hearing. Turn down the volume if necessary.
Users who have heart disease should pay attention to the vibration
and volume settings.
Sensitive Skin
Some people may have allergic reaction when their skin is exposed
to wearable items for a long time. This may be due to allergies,
environmental factors, exposure to irritants (such as soap or sweat)
or other factors. If you have allergies, you may feel uncomfortable
when using a wearable device. If you do have skin allergy, please
pay special attention.
Do not wear the device too tight. Let the skin breathe by removing
the device regularly. Keep the device clean and dry will reduce the
likelihood of skin discomfort. If the skin shows redness, swelling,
itching or other allergic symptoms around the area where you wear
the device, please remove the device and consult a physician.
Even when the symptoms alleviate, they may be induced again if
you continue to wear the device.
54
Device Cleaning
Keep your watch clean and dry. After exercising or sweating, clean
and dry the watch, the bands and your skin. If exposed to water, dry
the device thoroughly.
Clean the watch when following situations appear: contact with dirt
or other damaging substances (such as dust or sand, cosmetics, ink,
soap, cleaning agent, acid or acid food), contact with non-water
liquid and liquid that may cause skin allergy (such as sweat, brine,
soap water, perfume, pesticide spray, lotion, sunscreen, oil, hair dyer,
or solvent).
Watch and bands color may vary, or fade over time. Clean the watch
with a soft non-fleece cloth. If necessary, moisten the cloth with
clean water.
Device Heating
Your device may become warm during charging and during normal
use.
During use in high temperature environments, such as inside a car
or under direct sunshine for a long time, the watch may start to
control its temperature to prevent users from being burned. You may
encounter the following situations: charging slows down or stops, the
screen turns dark, temperature warning appears on the screen, data
transmission is suspended or delayed, or phone call may be turned
off. If your arm feels uncomfortable, please take off the watch
temporarily.
The watch may become warm during FOTA upgrade. Please take off
the watch during the upgrade.
The surface temperature of the watch complies with standards and
55
limits on temperature rise. However, even within these limits,
prolonged contact with a warm surface may cause discomfort or
injury. If the temperature of the watch makes you uncomfortable,
take it off.
Electrical Safety
Accessories
Use only approved accessories.
Do not connect with incompatible products or accessories.
Never puncture the surface of the device with sharp objects.
Faulty and Damaged Products
Do not attempt to disassemble the device or its accessories.
Only qualified personnel can service or repair the device or its
accessories.
If your device (or its accessories) has been submerged in water,
punctured, or subjected to a severe fall, do not use it until you have
taken it to be checked at an authorized service center.
Radio Frequency Interference
General Statement on Interference
Care must be taken when using the device in close proximity to
personal medical devices, TVs, radios, and personal computers.
56
Pacemakers
Pacemaker manufacturers recommend that a minimum separation
of 20 cm be maintained between a mobile device and a pacemaker
to avoid potential interference with the pacemaker.
Hearing Aids
People with hearing aids or other cochlear implants may experience
interfering noises when using wireless devices or when one is
nearby.
The level of interference will depend on the type of hearing device and
the distance from the interference source. Increasing the separation
between them may reduce the interference. You may also consult your
hearing aid manufacturer to discuss alternatives.
Medical Devices
Please consult your doctor and the device manufacturer to
determine if operation of your watch may interfere with the operation
of your medical device.
Hospitals
Turn off your wireless device when requested to do so in hospitals,
clinics or health care facilities. These requests are designed to
prevent possible interference with sensitive medical equipment.
Aircraft
Turn off your wireless device whenever you are instructed to do so
by airport or airline staff.
57
Consult the airline staff about the use of wireless devices onboard
the aircraft. If your device offers a ‘flight mode’, this must be enabled
prior to boarding an aircraft.
Interference in Cars
Please note that because of possible interference with electronic
equipment, some vehicle manufacturers forbid the use of mobile
devices in their vehicles unless a hands-free kit with an external
antenna is included in the installation.
Explosive Environments
Gas Stations and Explosive Atmospheres
In locations with potentially explosive atmospheres, obey all posted
signs to turn off wireless devices such as your watch or other radio
equipment. Do not use or charge the device.
Areas with potentially explosive atmospheres include fuelling areas,
below decks on boats, fuel or chemical transfer or storage facilities,
and areas where the air contains chemicals or particles, such as
grain, dust, or metal powders.
Blasting Caps and Areas
Power off your mobile device when in a blasting area or in areas
posted power off “two-way radios” or “electronic devices” to avoid
interfering with blasting operations.