User Manual

- 1 -
H560N
Quick Start Guide
Wireless Router
Package Contents: ZXHN H560N Wireless Router, Power Adapter, Quick Start Guide, Warranty
Card
This product is a low Low-power product mainly used to extend the Wi-Fi signal, This product
is targeted to provide 24 hours continuous service.
- 2 -
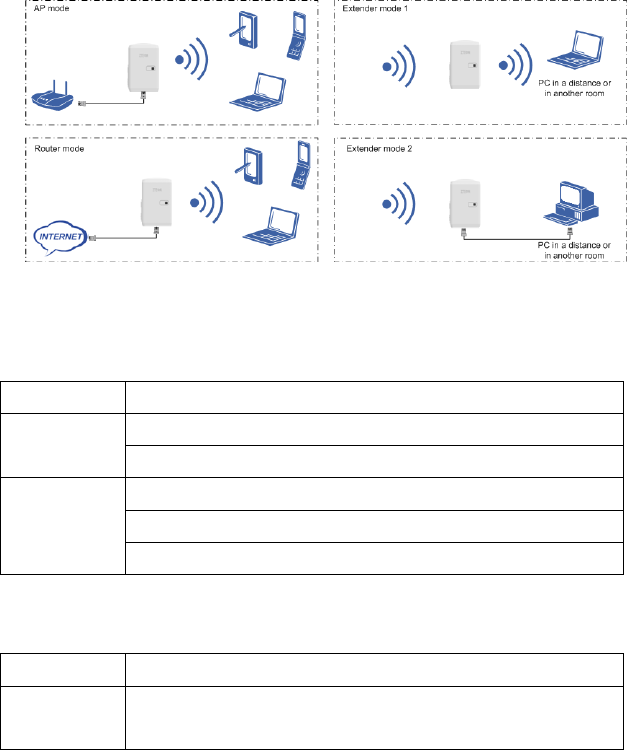
1 Connecting the Equipment
Figure 1-1 Connecting the Equipment
After the connections, check the LED indicators of your H560N.
2 LED indicator
ZXHN H560N uses a 2-color LED, red and green, to indicate the status as follow.
Color Direction
RED ON: The device is booting or hardware error.
Flashing: In Extender mode, H560N doesn’t associate any wireless router.
Green ON: Device runs normally no wireless data transmitted
Random Flashing: Data is being transmitted.
5Hz Flashing: In WPS mode
3 Buttons
ZXHN H560N buttons show as follow.
Button Direction
WPS Users can easily push the WPS button for quick and safe WLAN configuration
with other WLAN devices.

- 3 -
Reset Reset to factory default setting.
4 Safety Precautions
Keep away from heat and keep good ventilation.
Power off your H560N and remove all cable connections on thundery or rainy days.
Only use the power adapter that is provided with the H560N.
Keep your H560N dry during the storage, transportation, and operation.
5 Configuring the Computer
For a computer connecting to your H560N with cables, perform the following steps to set the IP
address:
Windows 7/Vista
1. Select Start → Control Panel. The Control Panel window is displayed.
2. Click Network and Internet. The Network and Internet window is displayed.
3. Click Network and Sharing Center. The Network and Sharing Center window is displayed.
4. Click Change adapter settings. The Network Connections window is displayed.
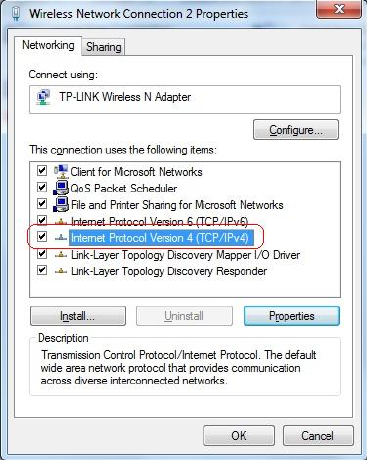
5. Right-click Local Area Connection and then select Properties from the shortcut menu. The Local Area
Connection Properties dialog box is displayed, Double-click Internet Protocol Version 4 (TCP/IPv4). .
- 4 -
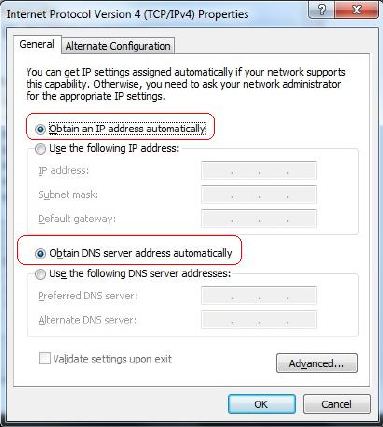
6. Click the Obtain an IP address automatically and Obtain DNS server address automatically option
buttons, and then click OK.
- 5 -
7. On the Local Area Connection Properties dialog box, click OK.
Windows XP/2000
1. Right-click My Network and then select Properties from the shortcut menu. The Network Connections
window is displayed.
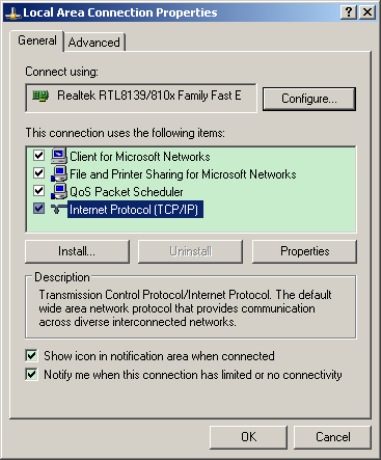
2. Right-click Local Area Connection and then select Properties from the shortcut menu. The Local Area
Connection Properties dialog box is displayed, Double-click Internet Protocol (TCP/IP):
- 6 -
3. Click the Obtain an IP address automatically and Obtain DNS server address automatically option
buttons, and then click OK:

- 7 -
4. On the Local Area Connection Properties dialog box, click OK.
6 Accessing Radio Network
To access a radio network, you must ensure that a wireless network adapter is installed in your computer.
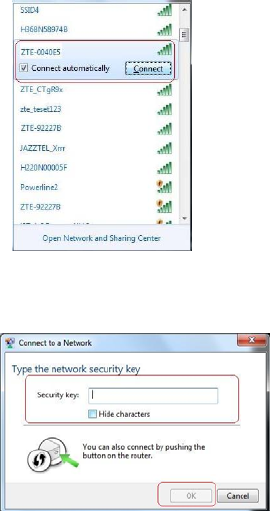
Windows 7
1. In the notification area of the computer desktop, click icon. Select the radio network and then
click Connect.
- 8 -
2. Input security key and click OK. There is no security key setting by default. You can access it without
input security key. If the security key is set, you must enter the correct key and click OK..
3. Then the status of the wireless connection will be changed into Connected, your E5501/E5502 is
successfully accessed.
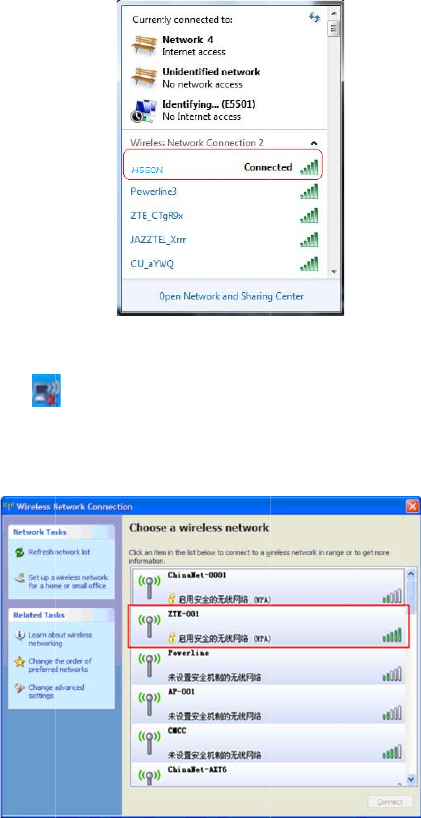
Win
1.
R
dows XP
R
ight-click the
The Wireless Net
w
click Connect.
icon, and then sel
e
w
ork Connection d
i
- 9 -
e
ct View Available
W
i
alog box is displaye
d
W
ireless Networks
fr
d
, Select the SSID o
f
fr
om the shortcut me
n
f
your H560N, and t
h
n
u.
h
en
- 10 -
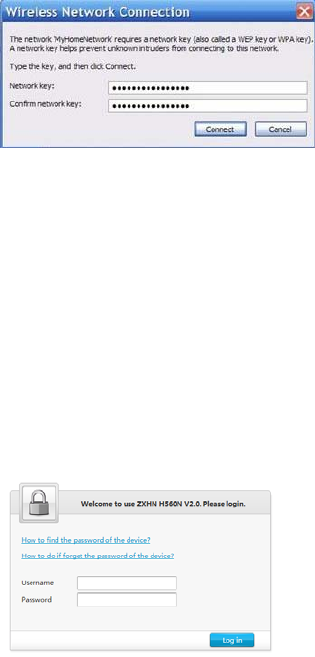
2. Input security key and click Connect. There is no security key setting by default. You can access
it without input security key. If the security key is set, you must enter the correct key and click
Connect.
4. Then the status of the wireless connection will be changed into Connected, your H560N is successfully
accessed.
7 Configuring the AP/Router
1. Set the slide switch on side to AP mode
2. Start a web browser, enter 192.168.1.253 in the address bar, then enter the username and
password, and click log in. (The default username and password are admin). Please note, In
this mode, Ethernet port only can be used as WAN port, You only can use wireless terminal to
access H560N. In default mode the DHCP is off, Please set a static IP 192.168.1.x to your
computer.
3. The router web configuration widow is displayed, click Enter wizard for Quick Setup.

- 11 -
4. Select Bridge or Router Mode,then click Next. If you select bridge mode,you will directly skip to
STEP 7.
5. If you select router mode, Please select Internet connection type (PPPoE e.g.) and click Next.

- 12 -
6. Then input the username and password for connecting to the Internet, click Next.
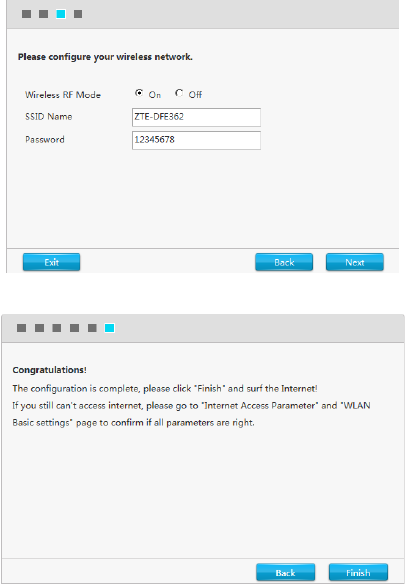
7. Input the SSID Name and Password to set the wireless network, and then click Next.
Note: To ensure wireless network security, WPA/WPA2-PSK-TKIP/AES are default configuration.
- 13 -
8. Click Finish. The web configuration for your H560N is completed.
8 Configuring the Extender
1. Set the slide switch on side to Extender mode,The Led indicator should be red at first, This
means H560N doesn’t associated to any wireless router.
2. You can press the WPS buttons both of the H560N and the associated wireless router within 2
minutes, if the lights become green and first flash in 5Hz and then random blinking which
shows the configuration is successful. The extender mode can be used now.
3. If the associated wireless routers haven’t WPS button or the lights RED flash (Means association
- 14 -
failed), you can access H560N through web configuration(address is 192.168.1.253) to
“Networking”->”Wireless Extender” item to configure it manually.
9 Environmental Requirements
Working temperature: 0 ~ 40 ℃
Storage temperature: -40 ℃ ~ 60 ℃
Working Humidity: 20% ~ 90% (non-condensing)
Storage Humidity: 5% ~ 95% (non-condensing)
10 Frequently Asked Questions
Q. Why can’t I connect my computer to H560N by Ethernet port?
In AP mode(Both Router and Bridge), Ethernet port only can be used as WAN port. Only
wireless terminal can connect to H560N.
Q. Why my computer can’t access internet when H560N work in extender mode?
In Extender mode, if the indicator LED is in red flashing, this mean H560N fails to connect to the
wireless router. In this case the terminals connected to H560N can’t access the internet.
Q. How can I do if the computer cannot access the Internet after router
configuration?
A. Perform the following operations as required:
Verify that the Ethernet cables are properly connected to your H560N and the corresponding
indicators are lit.
Log in to your H560N, and then select Left arrow in the home page from the menu. Verify that
the Internet WAN Status can obtain an IP address.
Q: Why cannot my laptop computer receive wireless signal?
A: Perform the following operations to handle the problem:
If your wireless network adapter is a built-in one, verify that the wireless switch is enabled. It is
- 15 -
recommended to contact the computer manufacturer, or refer to the user’ guides of your
computer.
Perform the following steps to verify that the driver of the wireless network adapter is properly
installed and the wireless network adapter is enabled:
a. Right-click the My Computer icon, and then select Properties from the shortcut menu. The
System Properties dialog box is displayed.
b. On the Hardware tab, click Device Manager. The Device Manager window is displayed.
In the Device Manager window, if the mark before the wireless network adapter is green, the driver is
properly installed and activated. If there is a red cross before the wireless network adapter, the
adapter is disabled. Right-click the adapter, and then select Enable from the shortcut menu. If there is
a question mark or exclamation mark before the wireless network adapter, the adapter driver is not
properly installed. Reinstall the adapter driver. If the wireless network adapter is not in the list,
right-click any device, and then select Scan for hardware changes from the shortcut menu. You can
also reinstall the adapter.
Perform the following steps to verify that the wireless service of your computer is enabled (this
procedure uses Windows XP as an example):
a. Right-click the My Computer icon, and then select Manage from the shortcut menu. The
Computer Management window is displayed.
b. Select Services and Applications → Services. The Services list is displayed.
c. Check the status of Wireless Zero Configuration. If Wireless Zero Configuration is not
enabled, right-click it, and then select Enable from the shortcut menu.
Verify that the wireless function of your H560N and SSID broadcast are enabled.
Search for a wireless signal from a shorter distance to avoid signal weakness caused by
obstacles.
If no wireless signal is received, use another wireless network adapter to access your H560N. If it still
cannot be accessed, reset it to factory defaults, and then reconfigure it.
- 16 -
11 FCC statement
FCC Statement
This equipment has been tested and found to comply with the limits for a Class B digital device,
pursuant to part 15 of the FCC rules. These limits are designed to provide reasonable protection
against harmful interference in a residential installation. This equipment generates, uses and can
radiate radio frequency energy and, if not installed and used in accordance with the instructions, may
cause harmful interference to radio communications. However, there is no guarantee that interference
will not occur in a particular installation. If this equipment does cause harmful interference to radio or
television reception, which can be determined by turning the equipment off and on, the user is
encouraged to try to correct the interference by one or more of the following measures:
-Reorient or relocate the receiving antenna.
-Increase the separation between the equipment and receiver.
-Connect the equipment into an outlet on a circuit different from that to which the receiver is
connected.
-Consult the dealer or an experienced radio/TV technician for help.
To assure continued compliance, any changes or modifications not expressly approved by the party
responsible for compliance could void the user’s authority to operate this equipment. (Example- use
only shielded interface cables when connecting to computer or peripheral devices).
FCC Radiation Exposure Statement
This equipment complies with FCC RF radiation exposure limits set forth for an uncontrolled
environment. This transmitter must not be co-located or operating in conjunction with any other
antenna or transmitter. This equipment should be installed and operated with a minimum distance of
20 centimeters between the radiator and your body.
This device complies with Part 15 of the FCC Rules. Operation is subject to the following two
conditions: (1) this device may not cause harmful interference, and (2) this device must accept
- 17 -
any interference received, including interference that may cause undesired operation.
Caution!
Any changes or modifications not expressly approved by the party responsible for compliance could
void the user's authority to operate the equipment.