Users Manual
ZXV10 P802 IP 电话
用户手册
20111013-V1.0
中兴通讯股份有限公司

声 明
本资料著作权属中兴通讯股份有限公司所有。未经著作权人书面许可,任
何单位或个人不得以任何方式摘录、复制或翻译。
侵权必究。
和是中兴通讯股份有限公司的注册商标。中兴通讯产品的名称和
标志是中兴通讯的专有标志或注册商标。在本手册中提及的其他产品或公司的名
称可能是其各自所有者的商标或商名。在未经中兴通讯或第三方商标或商名所有
者事先书面同意的情况下,本手册不以任何方式授予阅读者任何使用本手册上出
现的任何标记的许可或权利。
本产品符合关于环境保护和人身安全方面的设计要求,产品的存放、使用
和弃置应遵照产品手册、相关合同或相关国法律、法规的要求进行。
由于产品和技术的不断更新、完善,本资料中的内容可能与实际产品不完
全相符,敬请谅解。如需查询产品的更新情况,请联系当地办事处。
若需了解最新的资料信息,请访问中兴通讯技术支持网站
http://support.zte.com.cn
目录
了解 ZXV10 P802.......................................................................................... 1
话机特点 .............................................................................................................1
话机结构 .............................................................................................................2
外观............................................................................................................2
接口............................................................................................................4
LCD 图标 ...................................................................................................5
话机安装 .............................................................................................................5
使用 ZXV10 P802.......................................................................................... 6
手柄、耳机和免提模式......................................................................................6
多账号多线路 .....................................................................................................7
拨打电话 .............................................................................................................8
直接拨号 ....................................................................................................8
重拨............................................................................................................8
使用呼叫记录 ............................................................................................8
使用电话簿 ................................................................................................9
直接 IP 呼叫...............................................................................................9
快速 IP 呼叫.............................................................................................10
接听电话 ...........................................................................................................10
单一来电 ..................................................................................................10
多个来电 ..................................................................................................11
免打扰......................................................................................................11
静音 ...................................................................................................................11
呼叫保持与恢复 ...............................................................................................11
呼叫转移 ...........................................................................................................12
呼叫前转移 ..............................................................................................12
呼叫后转移 ..............................................................................................12
结束通话 ...........................................................................................................12
三方会议 ...........................................................................................................13
开始会议 ..................................................................................................13
取消会议 ..................................................................................................13
结束会议 ..................................................................................................13
高级应用 ...........................................................................................................13
语音邮箱 ..................................................................................................13
共享呼叫线路(SCA)...........................................................................14
呼叫特性 ..................................................................................................14
设置 ZXV10 P802........................................................................................ 16
通过话机界面设置 ...........................................................................................16
管理电话簿 ..............................................................................................17
设置显示语言 ..........................................................................................17
设置个性化铃声 ......................................................................................18
重启..........................................................................................................18
通过 WEB 页面设置.........................................................................................18
访问 WEB 页面 .......................................................................................18
WEB 页面说明 ........................................................................................19
常见问题解答 .............................................................................................. 24
附录 .............................................................................................................. 25
ZTE ZXV10 P802........................................................................................ 28
SIP Enterprise Phone.................................................................................. 28
User Manual................................................................................................ 28
Installation ................................................................................................. 31
Equipment Packaging.....................................................................................31
Connecting Your Phone .................................................................................31
Safety Compliances ...........................................................................................32
Warranty ............................................................................................................32
Product Overview ....................................................................................... 33
Using the ZXV10 P802 SIP Enterprise Phone.......................................... 37
Getting Familiar with the LCD ..........................................................................37
Making Phone Calls...........................................................................................41
Handset, Speakerphone and Headset Mode..............................................41
Multiple SIP Accounts and Lines .............................................................42
Completing Calls ......................................................................................42
Making Calls using IP Addresses .............................................................45
Quick IP Call Mode ..............................................................................45
Setting up the phone to make Quick IP calls ............................................46
Answering Phone Calls......................................................................................46
Receiving Calls.........................................................................................46
Do Not Disturb .........................................................................................47
Phone Functions During a Phone Call ...............................................................47
Call Waiting/ Call Hold............................................................................47
Mute .........................................................................................................48
Call Transfer.............................................................................................48
3-Way Conferencing.................................................................................49
Voice Messages (Message Waiting Indicator)..........................................51
Shared Call Appearance (SCA) ................................................................52
Call Features ......................................................................................................52
Customized LCD Screen & XML......................................................................54
Configuration Guide................................................................................... 55
Configuration Via Keypad.................................................................................55
Configuration VIA Web Browser ......................................................................57
Access the Web Configuration Menu .......................................................57
Definitions ................................................................................................58
Saving the Configuration Changes ....................................................................82
Rebooting the Phone Remotely..........................................................................82
Software Upgrade & Customization ......................................................... 83
Firmware Upgrade Through TFTP/HTTP .........................................................83
Key Pad Menu ..........................................................................................83
Web Configuration Interface ....................................................................83
No Local TFTP/HTTP Server...................................................................84
INSTRUCTIONS FOR LOCAL TFTP UPGRADE: ............................84
Configuration File Download ............................................................................85
Managing Firmware and Configuration File Download ...........................85
Restore Factory Default Setting................................................................. 86
INSTRUCTIONS FOR RESTORATION:......................................................86

1
了解 ZXV10 P802
ZXV10 P802 是一款功能丰富的双线普及商务 IP 电话,它具有高清晰的语音质
量和丰富先进的电话功能,支持个性化的信息服务和可定制的应用程序服务。
ZXV10 P802 广泛兼容第三方 SIP 设备及主流 SIP/NGN/IMS 平台,对于追求高
性价比和办公高效率的企业用户来说,ZXV10 P802 是最理想的选择。
话机特点
z 180x60 图形化 4级灰度背光 LCD 显示屏
z 三个 XML 可编程按键
z 支持 2个SIP 账号、两条通话线路
z 高清晰宽带音频,具有回声消除功能的全双工免提
z 支持三方会议
z 支持城市天气预报和多种语言显示
z 两个 10/100 Mbps 自适应交换式以太网接口,支持 PoE
z RJ9 耳麦接口
z 支持批量配置和升级

2
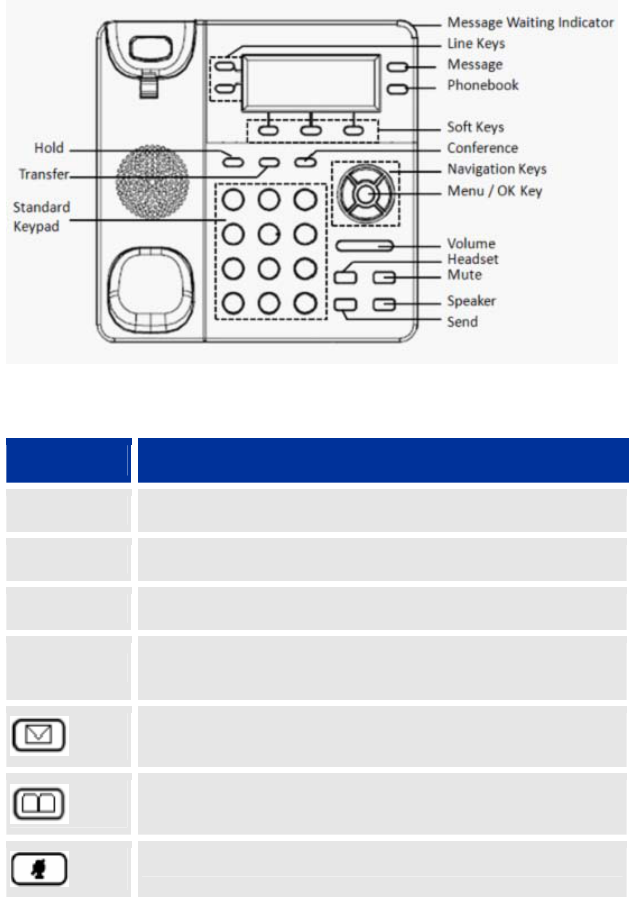
话机结构
外观
编号 图标 说明
1 手柄 话机手柄
2 线路按键 用于选择线路和账号。
3 屏幕 显示拨号信息、通话信息、软按键选项等信息。
4 语音留言 拨打语音邮箱,收听留言。
5 电话簿 用于打开电话簿。
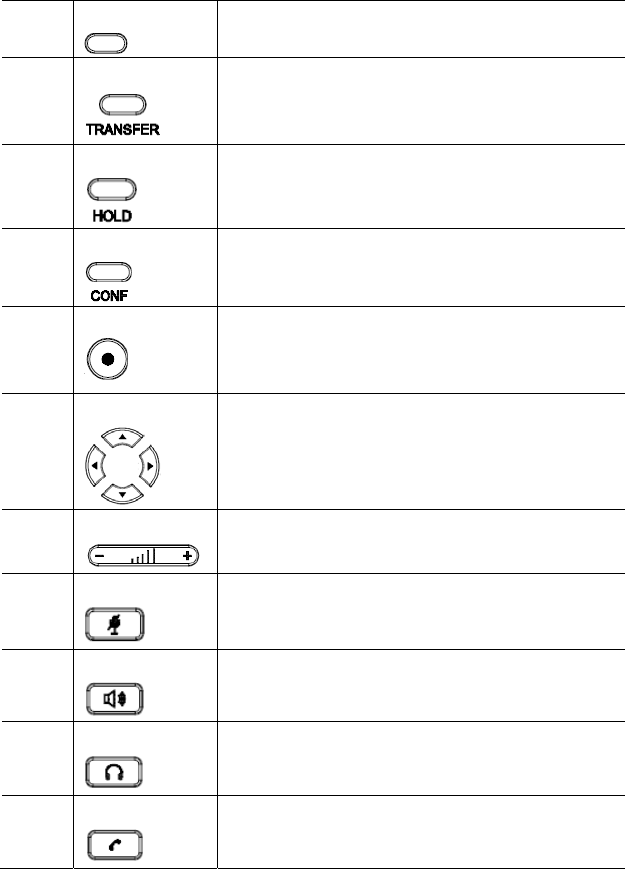
3
6 软按键
根据屏幕显示的选项实现相应的功能。
7 TRANSFER 键
用于呼叫转移。
8 HOLD 键
用于呼叫保持。
9 CONF 键
用于发起三方会议。
10 菜单键
菜单键:
z 进入主菜单
确认当前选择或输入
11 方向键
用于菜单选项的滚动选择。
12 音量键
用于音量调节。
13 静音键
通话状态下,用于开启或关闭静音。
14 免提键
用于开启或关闭免提模式。
15 耳机模式
用于开启或关闭耳机模式。
16 发送键
用于发送呼叫。
4
17 拨号区 z “0-9”数字键用于输入电话号码。
z “*”键用于选择语音菜单或输入特殊字符。
z “#”键用于发送呼叫或输入特殊字符。
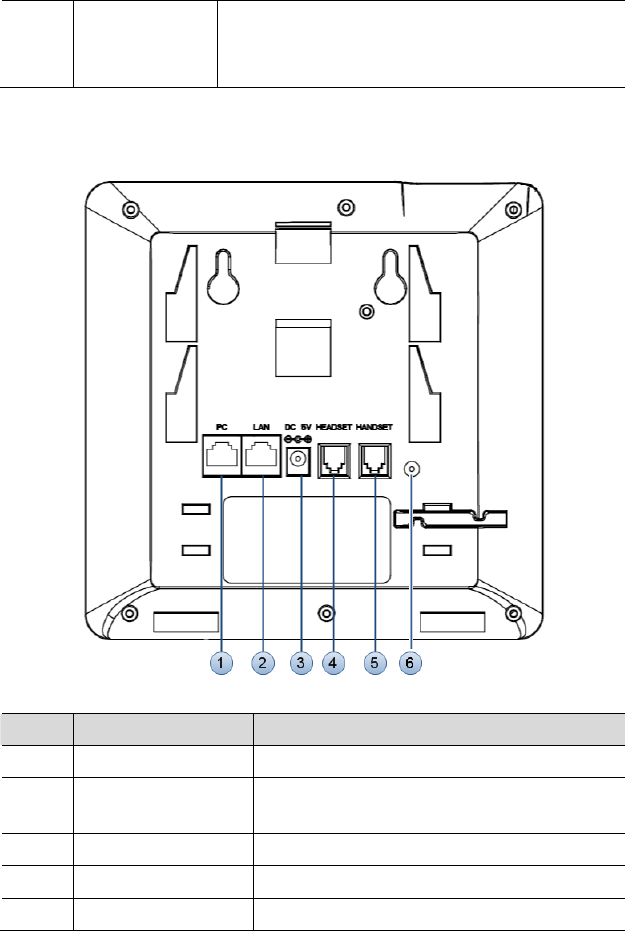
接口
编号 名称 说明
1 PC 10/100M 以太网端口,用于连接 PC。
2 LAN 10/100M 以太网端口,用于连接 LAN,支持
PoE。
3 DC 5V 5V 电源接口,用于连接电源适配器。
4 HEADSET RJ9 接口,用于连接耳机。
5 HANDSET RJ9 接口,用于连接手柄。
5
6 耳机接口 2.5mm 耳机接口
LCD 图标
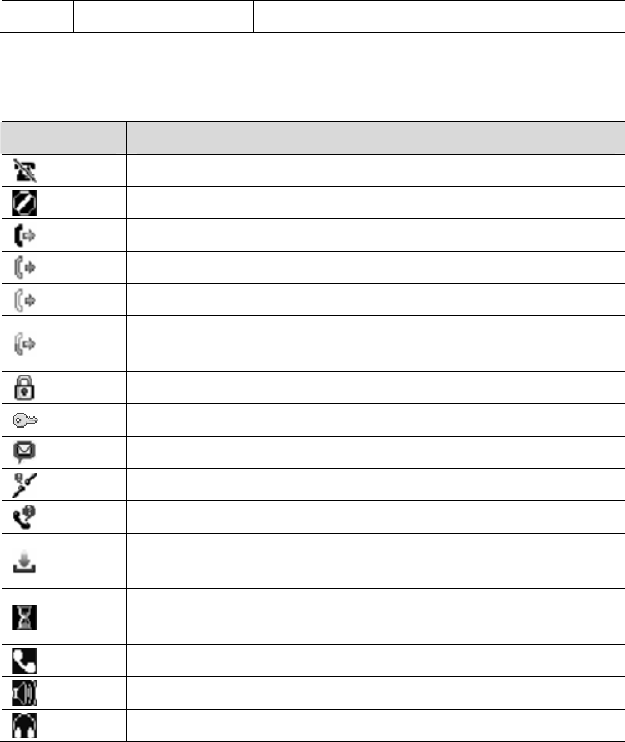
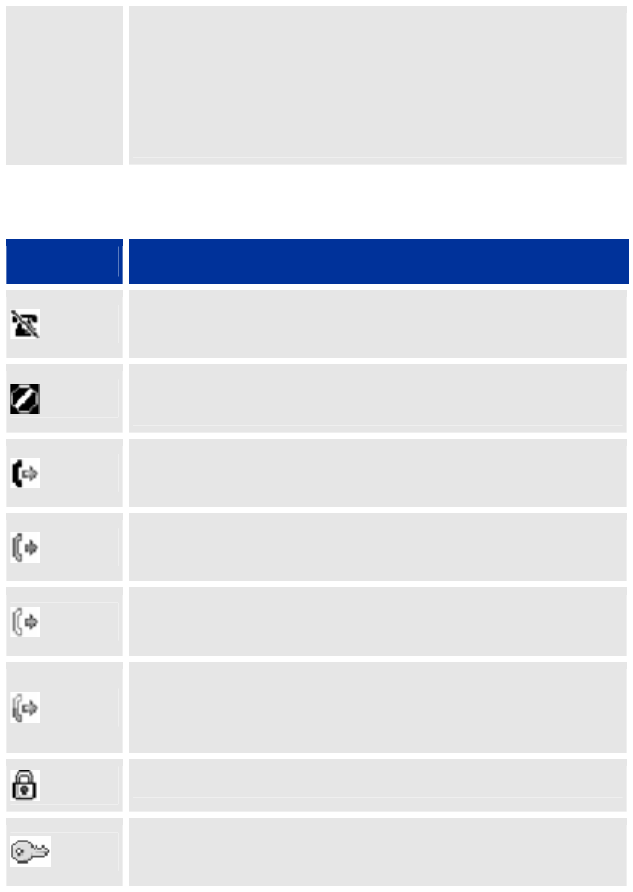
图标 说明
免打扰图标,表示话机开启了免打扰功能。
静音图标,表示通话状态时开启了静音。
呼叫转移图标,表示开启了无条件呼叫转移。
呼叫转移图标,表示开启了遇忙呼叫转移。
呼叫转移图标,表示开启了无应答呼叫转移。
呼叫转移图标,表示当无条件呼叫转移和无应答呼叫转移同时
开启时,呼叫将被转移。
键盘锁图标,表示键盘已经上锁。
解锁密码图标,表示输入键盘锁密码为键盘解锁。
语音留言图标,表示话机有新的语音留言。
网络状态图标,表示网络已断开。
未接来电图标,表示话机有新的未接来电。
保存呼叫记录图标,表示话机正在保存呼叫记录,需要 10-20
秒时间完成该操作。
等待响应图标,表示话机正在处理请求,请等待话机响应后再
进行输入。
手柄图标,表示当前通话使用手柄模式。
扬声器图标,表示当前通话使用扬声器模式。
耳机图标,表示当前通话使用耳机模式。
话机安装
话机的安装请参见包装盒中附带的《快速安装指南》。
6
使用 ZXV10 P802
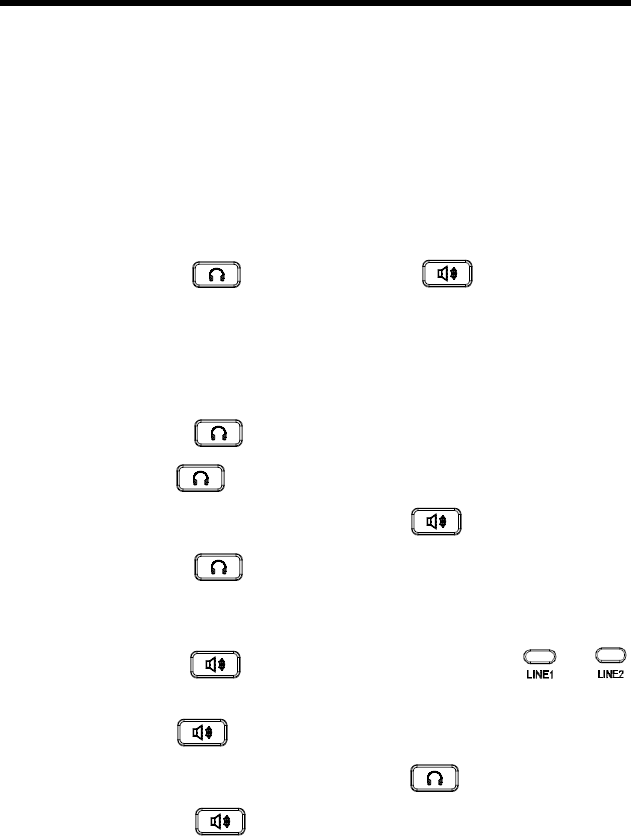
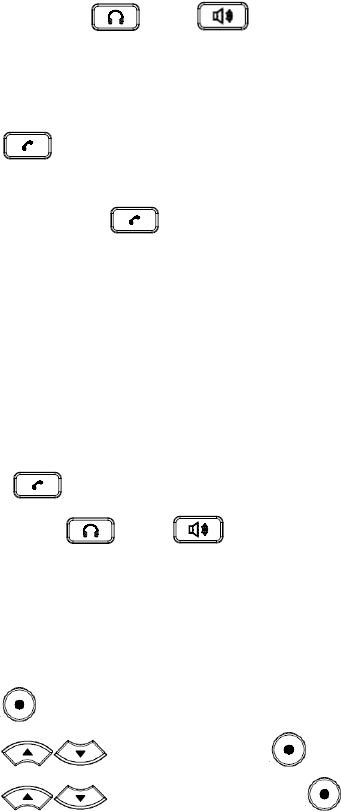
手柄、耳机和免提模式
用户可以使用手柄、耳机或免提模式拨打和接听电话。在通话过程中三种模式可
以相互切换。
手柄模式
z 拨打电话时,摘起手柄,听到拨号音后开始拨号。
z 有来电时,摘起手柄接听电话。
z 通话过程中,按 键切换到耳机模式,按 键切换到免提模式。
z 通话完成后,将手柄放回话机叉簧处,结束通话。
耳机模式
将耳机接入 HEADSET 接口:
z 拨打电话时,按 键,听到拨号音后开始拨号。
z 有来电时,按 键接听电话。
z 通话过程中,摘起手柄切换到手柄模式,按 键切换到免提模式。
z 通话完成后,按 键结束通话。
免提模式
z 拨打电话时,按 键,听到拨号音后开始拨号。直接按 键或
键也可以激活免提模式。
z 有来电时,按 键接听电话。
z 通话过程中,摘起手柄切换到手柄模式,按 键切换到耳机模式。
z 通话完成后,按 键结束通话。
7
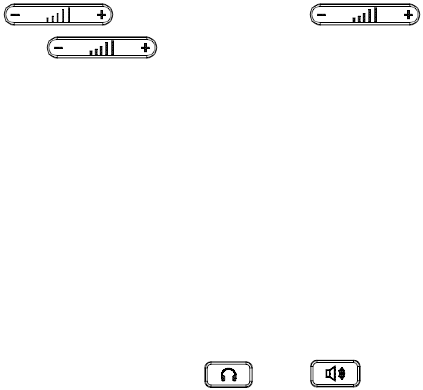
调节音量
通话过程中,按 键可以调节音量大小。按 键右端“+”
部分,音量增大;按 键左端“-”部分,音量减小。
多账号多线路
ZXV10 P802 可以同时注册两个独立的 SIP 账号,分别对应不同的 SIP 服务器、
用户号码和 NAT 设置。ZXV10 P802 支持两条通话线路,两条线路可以同时建
立两组通话,其中一组通话处于激活状态时,另一组通话处于呼叫保持状态。用
户可以在这一特性的基础上实现呼叫转移和三方会议功能。
账号选择
默认状态下,线路按键 1对应账号 1,线路 2按键对应账号 2。用户可以通过按
线路按键在账号之间进行切换。
例如,在待机状态下,用户摘起手柄、按 键、按 键或直接按线路按
键1后,线路按键 1显示为绿灯静止,表示话机当前使用线路 1、账号 1:
z 此时用户按线路按键 1,则切换到线路 1、账号 2。
z 此时用户按线路按键 2,则切换到线路 2、账号 2,线路按键 2显示为绿
灯静止。
z 在选中线路 2、账号 2后,用户再次按线路按键 2,则切换到线路 2、账
号1。
典型应用
步骤 1 用户正在使用线路1进行通话,此时线路按键1显示为绿灯静止。
步骤 1 有新来电呼入,线路按键2显示为红灯闪烁。
步骤 2 用户按线路按键2接听来电,线路按键2显示绿灯静止。
步骤 3 话机自动将线路1的通话转为呼叫保持,线路按键1显示为绿色闪烁。
步骤 4 此时可以按线路按键1或线路按键2在两个通话间进行切换。
8
拨打电话
直接拨号
步骤 1 摘起手柄、按 键或按 键后,将听到拨号音。
步骤 1 线路
1对应的线路按键1显示绿灯静止,此时用户可以按线路按键选择
想要使用的线路和账号。
步骤 2 使用键盘输入想要拨打的电话号码。
步骤 3 按 键或“#”键发送呼叫。
说明
如果用户输入号码后没有按 键或“#”键发送呼叫,话机默认等待 4秒后
自动发送呼叫。系统管理员有权限关闭此功能或设置等待时长。
主被叫用户建立通话连接后,话机对通话进行计时,将通话时长显示在屏幕上。
如果输入了正确的电话号码后呼叫不能接通,请确认此话机是否有权限拨打该号
码,或者联系系统管理员。
重拨
重拨功能即重拨上一次拨打的电话。当话机中存在呼叫记录时,重拨功能可用。
z 直接按 键,话机将使用免提模式重拨上一次拨打的号码。
z 摘起手柄、按 键或按 键,听到拨号音后,根据屏幕提示,
按“重拨”选项对应的软按键,话机将使用选定模式重拨上一次拨打的
号码。
使用呼叫记录
拨打呼叫记录中的号码。
步骤 1 按 键进入主菜单。
步骤 1 按 键选择呼叫记录,按 键确认选择。
步骤 2 按 选择呼叫记录的类型,按 键确认选择。

9
步骤 3 按 选择想要拨打的号码。
步骤 4 根据屏幕显示的选项,按“拨打”对应的软按键。
话机默认使用免提模式拨打电话。电话拨出后,用户可以切换到手柄模式或者耳
机模式进行通话。
使用电话簿
拨打电话簿中的号码。
步骤 1 进入电话簿,有以下两种方式。
z 按 键进入电话簿。
z 按 键进入主菜单,按 键选择电话簿,按 键进
入电话簿。
步骤 2 按 选择想要拨打的号码。
步骤 3 根据屏幕提示的选项,按“更多”对应的软按键,切换选项。
步骤 4 根据屏幕提示的选项,按“拨打”对应的软按键。
直接 IP 呼叫
直接 IP 呼叫允许两台话机在没有 SIP 代理的情况下建立通话。直接 IP 呼叫需要
具备以下条件之一:
z 两台话机都有公网 IP 地址。
z 两台话机在同一个局域网(LAN)、虚拟专用网(VPN)获取私有或公
网IP 地址。
z 两台话机通过一个路由器连接使用私有或公网 IP 地址(需配置有效端口
或DMZ)。
请按照如下步骤建立直接 IP 呼叫。
步骤 1 按 键进入主菜单。
步骤 2 按 键选择直接IP呼叫,按 键确认选择。
步骤 3 输入目标IP地址。
步骤 4 按 键或根据屏幕提示按“确定”选项对应的软按键发送呼叫。

10
假设目标 IP 地址为 192.168.1.60,端口号为 5062,则键盘输入的方式如下:
192*168*1*60#5062(*键代表“.”,#键代表“:”)。
快速 IP 呼叫
ZXV10 P802 支持快速 IP 呼叫。用户可以通过拨打目标 IP 地址的最后几位进行
直接 IP 呼叫。此功能是在没有 SIP 代理的情况下使用 CMSA/CD 模拟 PBX 功能,
只有两台话机在同一 LAN/VPN 中才能实现。推荐使用静态 IP 地址。
说明
系统管理员有权限关闭此功能。如果使用此功能,需要关闭#键发送呼叫的功能。
当用户拨打#xxx(x是0-9 之间的整数,xxx≤255)时,呼叫发送至 aaa.bbb.ccc.xxx。
其中 aaa.bbb.ccc 是目的 IP 地址所在子网的子网掩码。#x,#xx 格式的呼叫也是
允许的。
假设当前话机 IP 为:192.168.0.2,发起快速 IP 呼叫的方法是:
目的 IP:192.168.0.3,用户可以输入#3 后按 键发送呼叫。
说明
用户输入#3,#03,#003,呼叫都会发送至 192.168.0.3。
目的 IP:192.168.0.23,用户可以输入#23 后按 键发送呼叫。
目的 IP:192.168.0.123,用户可以输入#123 后按 键发送呼叫。
接听电话
单一来电
话机在空闲状态下,如果有来电呼入,话机振铃,相应的线路按键显示红灯闪烁。
用户可以通过以下方法接听电话:
z 摘起手柄,用手柄模式接听电话。
z 按 键,用耳机模式接听电话。
z 按 键,用免提模式接听电话。

11
多个来电
用户正在使用一条线路进行通话时,如果有来电呼入,用户将听到呼叫等待提示
音,另一条线路的线路按键显示红灯闪烁。用户可以按相应的线路按键接听新来
电,正在进行的通话将转为呼叫保持状态。
免打扰
免打扰功能可以帮助用户自动拒绝来电。免打扰功能开启后,话机屏幕显示 图
标,所有来电话机均不振铃。用户可以使用以下方法开启或关闭免打扰功能。
步骤 1 按 键进入主菜单。
步骤 2 按 键选择个性化设置,按 确认选择。
步骤 3 按 键选择免打扰,按 确认选择。
步骤 4 启用或禁用免打扰功能。
z 选择启动免打扰,按 确认选择,免打扰功能开启。
z 选择禁用免打扰,按 确认选择,免打扰功能关闭。
静音
通话过程中,按 键开启或关闭静音。静音开启时,话机麦克风关闭。您可
以听到对方的声音,对方听不到您的声音。
呼叫保持与恢复
z 呼叫保持:通话过程中,按 键,当前通话转为呼叫保持,相应的线
路按键显示绿灯闪烁。
z 恢复通话:想要将被保持的呼叫恢复通话,按相应的线路按键。线路按
键显示绿灯静止,表示通话已恢复。
z 多路通话:通话过程中,按另一路线路按键接听或拨打电话,当前通话
自动转为呼叫保持,对方用户将听到呼叫等待提示音。
12
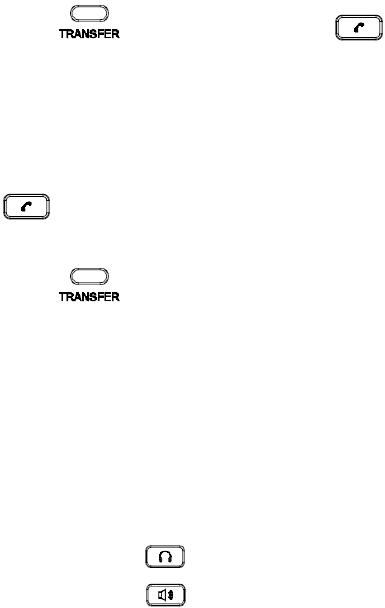
呼叫转移
假设用户 A需要将与用户 B的通话转移至用户 C,则可以选择呼叫前转移或呼
叫后转移。
呼叫前转移
步骤 1 用户
A与用户B建立通话。
步骤 2 用户
A按 键,输入用户C的号码后按 键发送呼叫。
步骤 3 当前通话被无条件转移至用户C,用户A退出通话。
呼叫后转移
步骤 1 用户
A与用户B建立通话。
步骤 2 用户
A按另一路线路按键,选择相同的账号,输入用户C的号码后按
键发送呼叫。此时用户A与用户B的通话被保持。
步骤 3 用户
C接听电话,与用户A建立通话。
步骤 4 用户
A按键,然后按需要转移的呼叫对应的线路按键。
步骤 5 通话被转移至用户C,用户A退出通话。
结束通话
根据屏幕提示,按“结束”对应的软按键结束通话。如果通话处于保持状态,按
相应的线路按键恢复通话后再结束通话。
用户还可以通过以下方法结束通话:
z 使用手柄模式通话,将手柄放回话机叉簧结束通话。
z 使用耳机模式通话,按 键结束通话。
z 使用免提模式通话,按 键结束通话。
z 根据屏幕提示,按“结束”对应的软按键结束通话。
13
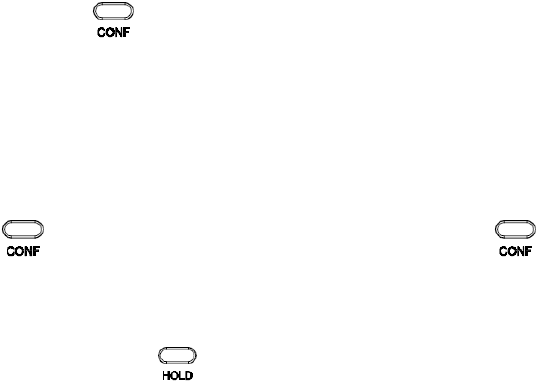
三方会议
ZXV10 P802 最多可以支持三方电话会议。
开始会议
步骤 1 会议发起者使用一条线路与参与者A建立通话连接。
步骤 2 按另一路线路按键,选择相同账号,与参与者B建立通话连接,此时
参与者A的通话被保持。
步骤 3 按 键发起会议。
步骤 4 按线路按键将相应的线路加入会议。
说明
电话会议开始后,会议发起者不能中途退出会议。用户可以开启静音以避免在会
议中发言。
取消会议
按 后,如果用户决定不添加任何参与者进入会议,则再次按 ,就恢复
到正常通话状态了。
结束会议
z 会议发起者按 键结束会议,发起者与参与者之间的通话转为呼叫保
持。按线路按键可以与相应的参与者进行单独通话。
z 会议发起者结束通话,则会议中的各方均断开通话连接。结束通话的详
细信息请参见结束通话。
高级应用
语音邮箱
话机右上角的 LED 指示灯显示红灯闪烁,表示有未收听的语音信息。用户可以
拨打语音邮箱号码,根据 IVR 提示收听语音信息。

14
共享呼叫线路(SCA)
ZXV10 P802 支持共享呼叫线路功能。共享呼叫线路是指 SCA 组里的所有成员可
以共享线路及显示监视线路呼叫状态(空闲、通话中、保持等)。当 SCA 组里
的成员有来电呼叫时,所有成员的话机都将振铃并均可接听电话。
SCA 组里的所有成员都可以监视线路当前的呼叫状态,不管是来电还是去电。
但当组里成员在通话过程时,组里的其他成员无法再进行另外一个呼叫,除非当
前通话被挂断或处于保持状态。
在通话的过程中,有两种方式的保持状态:“公开保持”和“私有保持”。
z 当组里的一个成员将当前通话置于“公开保持”状态时,组里其他成员
将看到线路键上闪烁红灯,这时任何一个成员都可以通过按下相应的线
路键来恢复被保持的通话。
z 当组里的一个成员将通话置于“私有保持”状态时,只有保持者本人可
以恢复通话。
要启用“共享线路功能”,用户需要先在 WEB 配置页面进行相应的配置。在“基
本配置”页面打开相应账号的共享线路功能。
呼叫特性
ZXV10 P802 支持一般的和特殊的呼叫特性,如匿名呼叫、呼叫转移等。呼叫特
性的启用方法如下表所示:
特性代码 功能 说明
*30 启用匿名拨
号
呼叫以匿名的方式发送,被叫方话机无法显
示主叫号码。
操作方法:摘机后键入“*30”,听到拨号音
后挂机。
*31 取消匿名拨
号
操作方法:摘机后键入“*31”,听到拨号音
后挂机。
*50 取消呼叫等
待
该号码处于通话状态时,后续呼入电话直接
听到忙音,不会进入呼叫等待。
操作方法:摘机后键入“*50”,听到拨号音
后挂机。
*51 启用呼叫等
待
操作方法:摘机后键入“*51”,听到拨号音
后挂机。

15
*67 一次性匿名
呼叫
启用后第一个呼叫为匿名呼叫。
操作方法:摘机后键入“*67”,听到拨号音
后挂机。
*82 一次性显示
号码
启用后第一个呼叫发送主叫号码。
操作方法:摘机后键入“*82”,听到拨号音
后挂机。
*70 一次性取消
呼叫等待
启用后第一个需要进入等待的呼叫不进入呼
叫等待。
操作方法:摘机后键入“*70”,听到拨号音
后挂机。
*71 一次性启用
呼叫等待
启用后第一个需要进入等待的呼叫可以进入
呼叫等待。
操作方法:摘机后键入“*71”,听到拨号音
后挂机。
*72 无条件呼叫
转移
此功能设置后,所有呼叫将全部被转移到用
户预先设置的另一号码,您的电话不再振铃。
操作方法:摘机后键入“*72”,听到拨号音
后输入想转移到的号码。
*73 取消无条件
呼叫转移
操作方法:摘机后键入“*73”,听到拨号音
后挂机。
*90 遇忙转移
此功能设置后,当您正在通话时,所有其它
来电均将被转移至预先设置的另一号码,您
的电话将不振铃。
操作方法:摘机后键入“*90”,听到拨号音
后,输入想转移到的号码。
*91 取消遇忙转
移
操作方法:摘机后键入“*91”,听到拨号音
后挂机。
*92 无应答转移
此功能一经设置,当无人接听时,来电被转
移至预先设置的另一号码。
操作方法:摘机后键入“*92”,听到拨号音
后输入想转移到的号码。
*93 取消无应答
转移
操作方法:摘机后键入“*93”,听到拨号音
后挂机。
16
设置 ZXV10 P802
通常情况下,管理员已经对话机进行了统一设置,用户开机后就可以直接使用话
机。用户也可以修改某些基本设置参数,使话机更加个性化。
通过话机界面设置
用户可以按 进入主菜单,使用方向键 选择配置项,按 确认选择,
按键返回上一级菜单。用户还可以根据屏幕显示的选项按相应的软功能按键,
做删除输入或其他操作。
有来电时话机自动退出菜单。用户摘机或者停留 20 秒未做选择时,话机也将退
出菜单。
菜单选项如下表所示:
编号 设置项
1 呼叫记录
2 状态
3 电话簿
4 LDAP 号码簿
5 即时信息
6 直接 IP 拨打
7 个性化设置
8 配置
9 出厂功能
10 网络
11 重启
12 退出

17
管理电话簿
手动添加新条目
步骤 1 按 键进入主菜单。
步骤 2 按 键选择电话簿,按 键确认选择。
步骤 3 按 键选择新条目,按 键确认选择。
步骤 4 输入名、姓、号码、账号等信息,根据屏幕提示按“确定”键确认输
入。
步骤 5 按 键选择“确定添加”,按 键确认选择。
说明
话机不支持中文输入,姓名只能输入字母或拼音。话机键盘的每个数字键上都标
有一个数字和三个字母,输入规则是:按一次输入数字,快速按两次输入第一个
字母,快速按三次输入第二个字母,快速按四次输入第三个字母。
下载 XML 电话簿
使用此功能需要满足以下条件:
z 系统管理员为话机设置了电话簿下载路径。
z 电话簿服务器上存在可下载的电话簿文件。
下载 XML 电话簿的方法是:
步骤 1 按 键进入主菜单。
步骤 6 按 键选择“电话簿”,按 键确认选择。
步骤 7 按 键选择“下载电话簿”,按 键确认选择。
设置显示语言
步骤 1 按 进入主菜单页面。
步骤 2 按 选择“个性化设置”,按 确认选择。
步骤 3 按 选择“显示语言”,按 确认选择。

18
步骤 4 按 选择语言类型,如“简体中文”,按 键确认。
设置个性化铃声
ZXV10 P802 支持一组默认铃声和三组自定义铃声,其中自定义铃声由系统管理
员统一加载,终端用户没有修改自定义铃声的权限。
在选择铃声的过程中,话机会自动播放被选中的铃声,便于用户试听。
步骤 1 按 进入主菜单页面。
步骤 2 按 选择“个性化设置”,按 确认选择。
步骤 3 按 选择“铃音音调”,按 确认选择。
步骤 4 按 选择想要设置的铃声,按 确认选择。
重启
步骤 1 按 进入主菜单页面。
步骤 2 按 选择“重启”,按 确认选择。
通过 WEB 页面设置
访问 WEB 页面
查看 IP
用户需要通过话机的 IP 地址访问 WEB 页面。查看话机 IP 的方法是:在话机空
闲状态下,查看话机屏幕上显示的 IP 地址。
访问步骤
步骤 1 将
PC机与话机连接到同一LAN中。可以将话机和PC接入同一个交换
机,或者将PC直接连接在话机的PC接口。
步骤 1 打开网页浏览器,在地址栏中输入话机IP地址,例如:
http://192.168.1.168。
步骤 2 按
Enter键,在弹出的提示框中输入用户密码。默认用户密码为:
123。
19
步骤 3 单击登录,进入WEB页面。
WEB 页面说明
ZXV10 P802 的WEB 页面包括状态、设置、账户三个部分。其中设置页面又分
为基本设置和高级设置。终端用户的权限较低,仅能对状态和基本设置两个页面
进行操作。
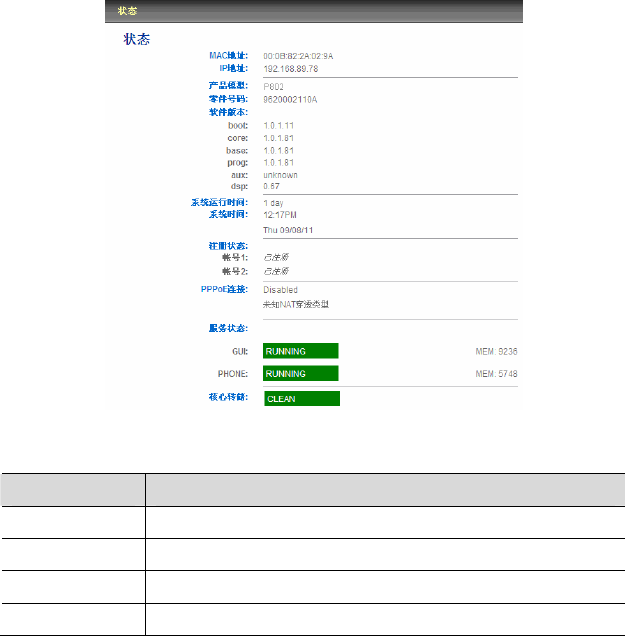
状态页面
状态页面显示话机的账号信息、网络信息、版本信息和 MAC 地址。用户可以在
WEB 界面的菜单栏中单击状态,进入状态页面,如下图所示。
表1-1 状态页面说明
参数名称 说明
MAC 地址 设备的 ID,十六进制格式。每台话机的 MAC 地址唯一。
IP 地址 话机的 IP 地址。
产品模型 显示产品型号信息。
零件号码 产品零件号码。

20
软件版本 用户可以根据软件版本判断软件升级是否成功。
z prog:软件发布号码,识别软件版本
z boot:启动代码版本号
z core:core 版本号
z base:base 版本号
z aux:aux 版本号
z dsp:dsp 版本号
系统运行时间 从上一次启动到目前的系统运行时长。
系统时间 电话目前的系统时间。
注册状态 显示账户是否已经注册到 SIP 服务器上。
PPPoE 连接 显示 PPPoE 连接是否已经激活。
服务状态 显示话机的服务状态是否正常。
核心转储 显示话机是否存在 Core 文件。
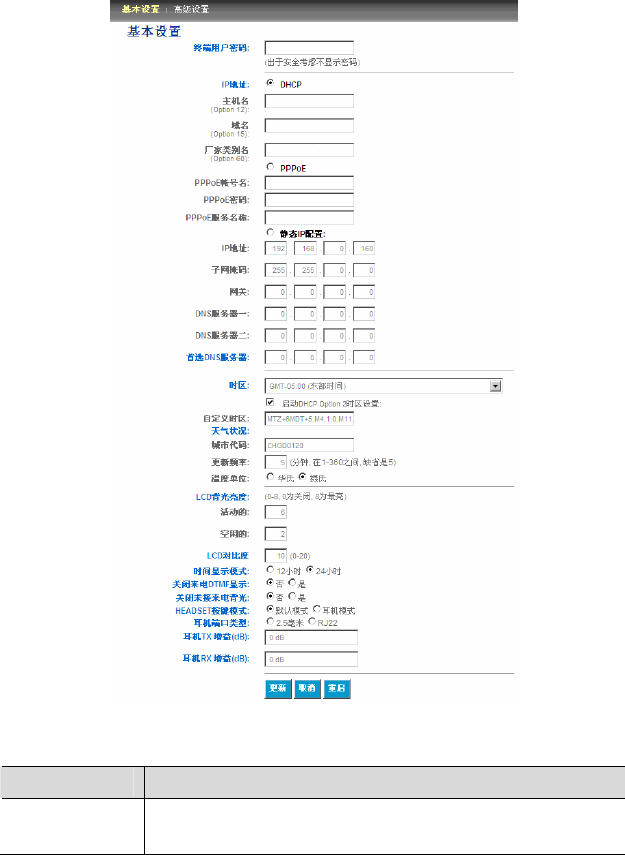
基本设置页面
基本设置页面用于设置话机的基本特性,包括 IP 信息、用户密码设置、时间和
日期设置等。用户可以在 WEB 界面的菜单栏中选择设置 > 基本设置,进入基
本设置页面,如下图所示。
21
表1-2 基本设置页面说明
参数名称 说明
终端用户密码 终端用户进入网页配置页面的密码。25 字符以内,区分大
小写

22
参数名称 说明
IP 地址 ZXV10 P802 有三种设置形式:
z DHCP:ZXV10 P802 自动从 LAN 的首个 DHCP 服务器获
取IP 地址,DHCP 选择被 NAT 路由保留。
z PPPOE:设置 PPPOE 账号(账号名、密码和名称)。
z 静态 IP 配置:设置项包括 IP 地址、子网掩码、网关、DNS
服务器 1和2以及首选 DNS 服务器。
用户根据需求选择设置其中一种形式即可。
802.1x 模式 启用和禁用 802.1x 模式。选择了 EAP-MD5 模式后,用户
需输入以下的验证信息:
z 802.1x 身份
z MD5 密码(出于安全考虑密码将不会显示)
线路按键 设置话机上的线路按键所对应的账号及账号开启共享线路
(SCA)功能。
时区 设置话机所在的时区。
自定义时区 运行用户设置自定义时区,语法遵循默认设置。
天气状况 设置显示在屏幕上的城市天气状况:
开启天气状况更新。如果选择开启,按下屏幕左下方“切换”
键切换屏幕显示。
z 城市代码:输入所在城市的天气预报城市代码。
说明
城市代码请参考附录中的天气预报城市代码表。如果找不
到您需要设置的城市,请上网搜索相关城市代码。
z 更新频率:更新时间间隔(默认为 5分钟)
z 温度单位:选择温度的单位:自动、摄氏或者华氏
LCD 背光亮度 开启和关闭 LCD 背光,设置在活动或空闲时的亮度数值。
LCD 对比度 设置 LCD 的对比度数值。
时间显示模式 12/24 小时显示格式。

23
参数名称 说明
关闭来电
DTMF 显示
z 否:在通话过程中不屏蔽按键输入。
z 是:在通话过程中屏蔽按键输入。
默认值为否。
关闭未接来电
背光
z 否:话机有未接来电时,显示屏背光常亮。
z 是:话机有未接来电时,显示屏背光不会常亮。
默认值为否。
HEADSET 按键
模式
z 默认模式:当使用耳机时,用于接听/挂断电话
z 耳机模式:用于切换使用耳机/扬声器免提模式
耳机端口类型 z 选择需要修改增益的耳机端口。
z 2.5mm:耳机增益设置对 2.5mm 耳机端口生效。
z RJ22:耳机增益设置对 RJ22 耳机端口生效。
耳机 TX 增益
(dB)
通过+/-6dB 来修改被选的耳机的(2.5mm 或RJ22)TX 增
益;默认为 0dB
耳机 RX 增益
(dB)
通过+/-6dB 来修改被选的耳机的(2.5mm 或RJ22)RX 增
益;默认为 0dB
保存更改的设置
用户对参数进行设置或修改后,请单击配置页面下方的更新按钮或按 Enter 键保
存设置。网页浏览器将弹出提示信息:
z 选择继续,则返回配置页面。
z 选择重启,则重启设备。
部分参数设置需要重启设备才能生效,建议用户修改配置后重启设备。
重启
单击配置页面下方的重启按钮,网页浏览器会显示确认重启的信息页面。等待
60 秒设备启动后,就可以重新登录或者使用设备了。

24
常见问题解答
为什么我的话机是黑屏的?
检查话机是否已经通电。请确认话机与电源适配器正确连接。
为什么我的话机听不到拨号音?
请确认话机的各个部分是否已经正确的安装和连接。话机的安装方法请参见包装
盒中附带的《ZTE ZXV10 P802 快速安装手册》。
为什么我的话机来电时不振铃?
检查话机的音量设置是否被调节到最小值。请在话机挂机并空闲的状态下,按
键调节振铃音量。
如何查看话机 IP?
查看话机 IP 的方法请参见第 Error! Bookmark not defined.页的 Error!
Reference source not found.。
如何修改用户密码?
登录话机 WEB 页面,打开基本设置页面,在参数“终端用户密码”的文本框中
输入新密码,保存设置并重启话机。详细信息请参见第 18 页的通过 WEB 页面
设置。

25
附录
表1-3 ZXV10 P802 技术指标
名称 规范
协议/标准 支持 SIP RFC3261,TCP/IP/UDP,RTP/RTCP,HTTP/HTTPS,
ARP/RARP,ICMP,DNS(A record,SRV and NAPTR),
DHCP(client and server),PPPoE,TELNET,FTP,NTP,
STUN,SIMPLE,SIP over TLS,802.1x,TR-069
网络接口 2个10/100mbps 以太网口,支持 PoE 供电
图形显示 180x60 像素图形化 4级灰度 LCD
功能按键 3个XML 可编程软按键;2个双色 LED 线路选择键;10 个功
能按键:HOLD,TRAN,CONF,语音邮箱,通讯录,发送/
重拨,静音,耳机,免提,音量调节;5个菜单/导航按键
语音编码 支持 G.723.1,G.729A/B,G.711µ/a-law,G.726,G.722
(wide-band)和 iLBC,带内和带外 DTMF(in audio,RFC2833,
SIP INFO)
电话功能 呼叫保持,静音,转接,呼叫驻留,抢接,SCA
(shared-call-appearance)/ BLA(bridged-line-appearance),
摘机自动拨号,自动应答,点击拨号,下载通讯录(XML,
DLAP),呼叫记录(最多 2000 条),XML 自定义屏幕,灵
活的拨号规则,自定义来电铃声,回铃音和等待音,服务器冗
余及 Fail-over 功能
高清语音 支持手柄,免提和耳机高清晰语音通话
支架 支持,两个角度可选
墙体安装 支持
QoS 支持第二层(802.1Q, 802.1p)和第三层(ToS,DiffServ,MPLS)
QoS
安全性 普通用户和管理员密码,MD5 和MD5-sess based 鉴权,AES
安全配置文件,SRTP 和TLS 通话加密,802.1x 媒体访问控制
多语言支持 支持简体中文,英语,德语,意大利语,法语,西班牙语,韩
语,日语等

26
升级和部署 通过 TFTP/HTTP/HTTPS 方式升级固件,通过 TR-069 或者加
密的 XML 配置文件进行大规模部署
电源和绿色
节能
通用电源适配器:
输入:100-240VAC,50-60Hz;输出:+5VDC,800mA
最大功耗:2.5W(电源适配器)或者 3W(PoE 供电)
物理特性 尺寸:222mm(W)×210mm(L)×93mm(H)
重量:0.98KG
工作温度及
环境湿度
32-104oF/0-40oC,10-90%(无冷凝)
包装清单 ZXV10 P802 电话机,带线手柄,支架,通用电源适配器,网
线,快速安装手册
表1-4 天气预报城市代码
城市 代码 城市 代码 城市 代码
北京 CHXX0008 大理 CHXX0371 济南 CHXX0064
上海 CHXX0116 大同 CHXX0251 九江 CHXX0068
广州 CHXX0037 佛山 CHXX0028 开封 CHXX0072
安顺 CHXX0005 抚顺 CHXX0029 昆明 CHXX0076
保定 CHXX0308 福州 CHXX0031 兰州 CHXX0079
保山 CHXX0370 桂林 CHXX0434 拉萨 CHXX0080
长沙 CHXX0013 贵阳 CHXX0039 洛阳 CHXX0086
长春 CHXX0010 哈尔滨 CHXX0046 柳州 CHXX0479
常州 CHXX0015 海口 CHXX0502 南昌 CHXX0097
成都 CHXX0016 杭州 CHXX0044 南京 CHXX0099
重庆 CHXX0017 合肥 CHXX0448 南宁 CHXX0100
赤峰 CHXX0286 惠州 CHXX0053 南通 CHXX0101
大连 CHXX0019 吉林 CHXX0063 绵阳 CHXX0351

27
牡丹江 CHXX0278 乌鲁木齐 CHXX0135 张家口 CHXX0300
青岛 CHXX0110 西安 CHXX0141 郑州 CHXX0165
泉州 CHXX0114 西宁 CHXX0236 天津 CHXX0133
绍兴 CHXX0117 厦门 CHXX0140 温州 CHXX0462
汕头 CHXX0493 咸阳 CHXX0143 岳阳 CHXX0411
沈阳 CHXX0119 新乡 CHXX0148 香港 CHXX0049
深圳 CHXX0120 武汉 CHXX0138 台北 CHXX0021
石家庄 CHXX0122 徐州 CHXX0437 台中 CHXX0019
太原 CHXX0129 银川 CHXX0259 高雄 TWXX0013
ZTE ZXV10 P802
SIP Enterprise Phone
User Manual
20111013-V1.0
29
Contents
Installation ...............................................................................................................31
Equipment Packaging.....................................................................................31
Connecting Your Phone..................................................................................31
Safety Compliances.........................................................................................32
Warranty ...........................................................................................................32
Product Overview.................................................................................................33
Using the ZXV10 P802 SIP Enterprise Phone.............................................37
Getting Familiar with the LCD........................................................................37
Making Phone Calls .........................................................................................41
Handset, Speakerphone and Headset Mode.......................................41
Multiple SIP Accounts and Lines ..........................................................42
Completing Calls.....................................................................................42
Making Calls using IP Addresses..........................................................45
Quick IP Call Mode ..............................................................................45
Setting up the phone to make Quick IP calls.....................................46
Answering Phone Calls....................................................................................46
Receiving Calls........................................................................................46
Do Not Disturb........................................................................................47
Phone Functions During a Phone Call...........................................................47
Call Waiting/ Call Hold...........................................................................47
Mute.........................................................................................................48
Call Transfer............................................................................................48
3-Way Conferencing...............................................................................49
Voice Messages (Message Waiting Indicator) ....................................51
30
Shared Call Appearance (SCA).............................................................52
Call Features.....................................................................................................52
Customized LCD Screen & XML.....................................................................54
Configuration Guide..............................................................................................55
Configuration Via Keypad...............................................................................55
Configuration VIA Web Browser....................................................................57
Access the Web Configuration Menu...................................................57
Definitions...............................................................................................58
Saving the Configuration Changes................................................................82
Rebooting the Phone Remotely.....................................................................82
Software Upgrade & Customization ..............................................................83
Firmware Upgrade Through TFTP/HTTP......................................................83
Key Pad Menu .........................................................................................83
Web Configuration Interface.................................................................83
No Local TFTP/HTTP Server..................................................................84
INSTRUCTIONS FOR LOCAL TFTP UPGRADE: ............................84
Configuration File Download..........................................................................85
Managing Firmware and Configuration File Download......................85
Restore Factory Default Setting......................................................................86
INSTRUCTIONS FOR RESTORATION:......................................................86
31
Installation
Equipment Packaging
Table 1: Equipment Packaging
ZXV10 P802
Main Case Yes
Handset Yes
Phone Cord Yes
Power Adaptor Yes
Ethernet Cable Yes
Base Stand Yes
Quick Start Guide Yes
Connecting Your Phone
The connectors of the ZXV10 P802 are located on the bottom of the device.
Table 2: ZXV10 P802 Connectors
PC 10/100Mbps RJ-45 ports for PC (downlink) connection.
LAN 10/100Mbps RJ-45 port for LAN (uplink) connection.
Supports PoE (802.3af).
Power Jack 5V DC power port; UL Certified
Headset Jack RJ9
Handset Jack RJ9
32
Safety Compliances
The ZXV10 P802 complies with FCC/CE and various safety standards. The
ZXV10 P802 power adaptor is compliant with the UL standard. Only use the
universal power adaptor provided with the ZXV10 P802 package. The
manufacturer’s warranty does not cover damages to the phone caused by
unsupported power adaptors.
Warranty
If you purchased your ZXV10 P802 from a reseller, please contact the
company where you purchased your phone for replacement, repair or refund. If
you purchased the product directly from ZTE, contact your ZTE Sales and
Service Representative for a RMA (Return Materials Authorization) number
before you return the product. ZTE reserves the right to remedy warranty policy
without prior notification.

33
Product Overview
Table 3: ZXV10 P802 Feature Guide
Features ZXV10 P802
LCD Display 180x60 pixel
Number of Lines 2
Programmable Soft Keys 3
Extension Module N/A
Table 4: ZXV10 P802 Key Features in a Glance
Features Benefits
Open Standards Compatible SIP RFC3261, TCP/IP/UDP, RTP,
HTTP/HTTPS, ARP/RARP, ICMP,
DNS (A record, SRV and NAPTR),
DHCP (both client and server), PPPoE,
TELNET, TFTP, NTP, STUN, SIMPLE,
SIP over TLS, 802.1x, TR-069
Superb Audio Quality Advanced Digital Signal Processing
(DSP), Silence Suppression, VAD,
CNG, AGC
Network Interfaces Dual 10/100mbps Ethernet ports with
integrated PoE
Feature Rich Traditional voice features including
caller ID, call waiting, hold, transfer,
forward, block, auto-dial, off-hook dial
Advanced Features 2 line keys with dual-color LED and 2
SIP accounts, 3 way conferencing,
backlit graphic 180x60 LCD, 3 XML
programmable context sensitive soft
keys, 5 navigation keys, 10 dedicated
buttons for HOLD, TRANSFER,
CONFERENCE, VOLUME, HEADSET,
MUTE, SPEAKERPHONE,
SEND/REDIAL, PHONEBOOK,
MESSAGE

34
Advanced Functionality Customized downloadable ring-tones,
SRTP, SIP over TLS, multi-language
support and XML enabled, adjustable
positioning angles, wall mountable,
AES encryption, automatic multimedia
service (eg., weather information)
Table 5: ZXV10 P802 Hardware Specifications
ZXV10 P802
LAN Interface (Ethernet
ports)
Two (2) 10/100 Mbps Full/Half Duplex
Ethernet Switch with LAN and PC port with
auto detection
Graphic LCD Display 180x60 pixel
Expansion Module
Support
No
Headset Jack RJ9
Call Appearance LED 2 Dual color (green/red)
Power over Ethernet Built-in auto-sensing: Cisco and IEEE 802.3af
standard
Universal Switching Input: 100-240VAC 50-60 Hz
Power Adaptor Output: +5VDC, 800mA, UL certified
Dimension 186mm (W) x 210mm (L) x 81mm (D)
Weight 0.8KG
Temperature 32 –104° F/ 0 – 40°C
Humidity 10% – 90% (non-condensing)

35
Compliance FCC / CE / C-Tick
Table 6: ZXV10 P802 Technical Specifications
Lines 2 lines with 2 independent SIP accounts
Protocol
Support Support SIP 2.0, TCP/UDP/IP, PPPoE, RTP, SRTP by
SDES, HTTP, ARP/RARP, ICMP, DNS, DHCP, NTP,
TFTP, SIMPLE/PRESENCE protocols, TR-069, 802.1x
Support multiple SIP accounts and up to 11 media
channels concurrently
Support SIP PUBLISH method (RFC 3903), SIP
Presence package (RFC 3856, 3863) for use of MFKs,
SIP Dialog package (RFC 4235)
Support for SIP MESSAGE method (RFC 3428)
Display Backlit graphic LCD display, up to 4 level grayscale
Feature Keys HOLD, TRANSFER, CONF, VOLUME, HEADSET,
MUTE, SPEAKERPHONE, SEND/REDIAL,
PHONEBOOK, MESSAGE, 3 XML Programmable
Softkeys, 5 Navigation keys,
Device
Management
NAT-friendly remote software upgrade (via TFTP/HTTP)
for deployed devices including behind firewall/NAT
Auto/manual provisioning system, Web GUI Interface
Address Book
Audio Features Full-duplex hands-free speakerphone
Advanced Digital Signal Processing (DSP)
Dynamic negotiation of codec and voice payload length
Support for G.723,1 (5.3/6.3K), G.729A/B, G.711
a/µ-law, G.726-32, G.722 (wide-band), and iLBC codecs
In-band and out-of-band DTMF (in audio, RFC2833, SIP
INFO)
Silence Suppression, VAD (voice activity detection),
CNG (comfort noise generation), ANG (automatic gain
control)
Acoustic Echo Cancellation (AEC) with Acoustic Gain
Control (AGC) for speakerphone mode, Support side
tone

36
Adaptive jitter buffer control (patent-pending) and packet
delay and loss concealment
HD audio handset with HD wideband audio codecs for
excellent double-talk performance
Telephony
Features Intuitive graphic user interface (GUI), downloadable
phone book (XML, LDAP), support for anonymous call
using privacy header, MLS (multi language support)
Voice mail indicator, downloadable custom ring-tones,
call hold, call transfer (attended/blind), call forward, call
waiting, caller ID, mute, redial, call log, caller ID display
or block, Do-Not-Disturb (DND) and volume control
3-way conference, dial plan prefix, dial-plan support,
off-hook auto dial, auto answer, early dial and speed dial
Network and
Provisioning Via keypad/LCD, Web browser, or secure (AES
encrypted) central configuration file, manual or dynamic
host configuration protocol (DHCP) network setup
Support NAT traversal using IETF STUN and Symmetric
RTP
Support for IEEE 802.1p/Q tagging (VLAN), Layer 3 ToS
Firmware
Upgrade Support firmware upgrade via TFTP or HTTP
Support for Authenticating configuration file before
accepting changes
User specific URL for configuration file and firmware
files
Mass provisioning using TR-069 or encrypted XML
configuration file
Advanced
Server Features Message waiting indication, support DNS SRV Look up
and SIP Server Fail Over, Support customizable idle
screen via downloading XML by HTTP/TFTP
Security User and administrator level passwords, MD5 and
MD5-sess based
authentication, AES based secure configuration file,
SRTP, TLS, 802.1x
media access control

37
Using the ZXV10 P802 SIP Enterprise
Phone
Getting Familiar with the LCD
ZXV10 P802 has a dynamic and customizable screen. The screen displays
differently depending on whether the phone is idle or in use (active screen).
Table 7: LCD Display Definition
Item Definitions
DATE AND
TIME
Displays the current date and time. Can be synchronized with
Internet time servers.
LOGO/NAME Displays company logo/name. This logo/name can be customized
via xml screen customization.
NETWORK
STATUS
Displays the status of the phone and network. It will indicate
whether the network is down, starting or running (IP address). “##
MISSED CALLS” is shown here too.
STATUS
ICON
Shows the status of the phone, using icons as shown in the next
table.
LINE
STATUS
INDICATOR
Displays the name of the account that is in use. Select another
account by pressing the LINE key on the left side.
SOFTKEYS
The softkeys are context sensitive and will change depending on
the status of the phone. Typical functions assigned to soft-buttons
are:
· FORWARD ALL
Unconditionally forwards the phone line to another phone.
· MISSED CALL
This option shows up there were unanswered calls to this phone.
The Missed Calls option shows a list of the missed calls.
· NEXTSCR
38
Press this button to toggle between idle screen, weather and IP
Address.
· REDIAL
Redials the last number.
· END CALL
Hangs up phone.
Table 8: LCD Icons
Icon LCD Icon Definitions
DND (idle): ON when “Do Not Disturb” is activated in idle
screen
DND (talking): ON when “Do Not Disturb” is activated in
talking
Forward All: INDICATES all incoming calls will be
forwarded to the configured number
Forward on Busy: INDICATES calls will be forwarded
when phone is busy
Forward on No Answer: INDICATES calls will be
forwarded if the phone does not answer
Forward All and No Answer: INDICATES calls will be
forwarded if Forward All and Forward on No Answer are
enabled
Keypad Locked: ON when the keypad is locked
Enter Keypad Password: Enter the keypad password to
unlock the keypad
39
Voice Mail: ON when there are new voice messages
Network Status: Network is down
Missed Call Icon: Indicates missed call(s)
Save Call Record: Indicates phone system writing the call
records into the flash. It might take 10 to 20 seconds to
finish the process
Waiting For Response: Please wait for the phone system to
response before the keypad entry.
Handset Mode
Speaker Mode
Headset Mode
FIGURE 1: ZXV10 P802 KEYPAD LAYOUT
40
Table 9: ZXV10 P802 Keypad Buttons
Key Button Key Button Definitions
LINE KEYS 2 Line keys with LED, can be configured to different SIP profiles
HOLD Place ACTIVE call on hold
TRANSFER Transfer an ACTIVE call to another number
CONF Press CONF button to connect Calling/Called party into
conference
Enter to retrieve voice mails or other messages
Brings phonebook on screen
Mute an active call
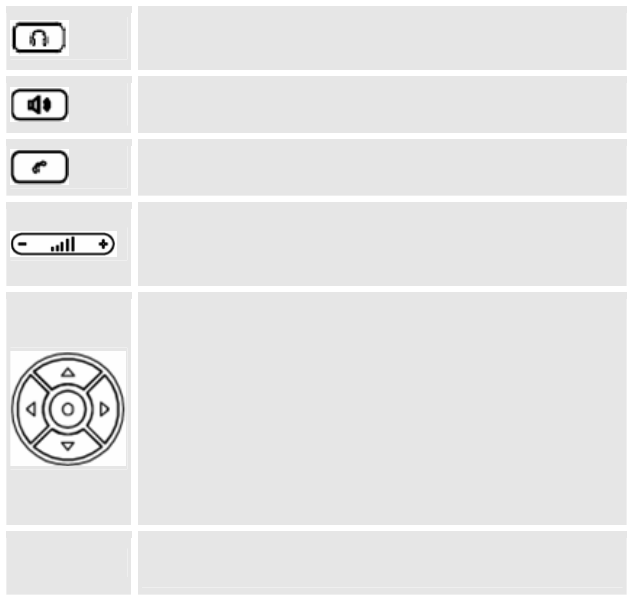
41
Press HEADSET key to answer/hang up phone calls while using
headset. It also allows user to toggle between headset and speaker
Enable/Disable hands-free speaker
Enable/Disable handset mode ; or used as SEND/REDIAL
Press on “–” or “+” of the button to adjust the volume for
handset/speakerphone/headset when the phone in idle or during
call
MENU/OK:
· Enter Keypad Configuration “MENU” mode when phone is in
IDLE mode
· Use as ENTER/OK key when in Keypad Configuration.
Navigation keys “Up” “Down” “Left” and “Right”
· Press to navigate in menu options
· When the phone is idle, press “Up” to view missed call; press
“Down” to view phonebook
0 - 9, *, # Standard phone keypad; press # key to send call; press * key to for
IVR functions
Making Phone Calls
Handset, Speakerphone and Headset Mode
The ZXV10 P802 allows you to make phone calls via handset, speakerphone
or headset mode. During the active calls the user can switch between the
handset and the speaker by pressing the speaker key. For headsets to operate,
the user must plug the headset to an RJ9 port on the back of the phone, which
allows the user to pick-up, speak or hang-up calls.
42
Multiple SIP Accounts and Lines
ZXV10 P802 can support up to two independent SIP accounts. Each account is
capable of independent SIP server, user and NAT settings. Each of the line
buttons is “virtually” mapped to an individual SIP account. The name of each
account is conveniently printed next to its corresponding button. In off-hook
state, select an idle line and the name of the account (as configured in the web
interface) is displayed on the LCD and a dial tone is heard.
For example: Configure ACCOUNT 1 and ACCOUNT 2 with Account Name as
“VoIP 1”, “VoIP 2”, respectively and ensure that they are active and registered.
When LINE1 is pressed, you will hear a dial tone and see “VoIP 1” on the LCD
display; when LINE2 is pressed, you will hear a dial tone and see “VoIP 2” on
the LCD display.
To make a call, select the line you wish to use. The corresponding LINE LED
will light up in green. User can switch lines before dialing any number by
pressing the same LINE button one or more times. If you continue to press a
LINE button, the selected account will circulate among the registered accounts.
For example: when LINE1 is pressed, the LCD displays “VoIP 1”; If LINE1 is
pressed twice, the LCD displays “VoIP 2” and the subsequent call will be made
through SIP account 2.
Incoming calls to a specific account will attempt to use its corresponding LINE
if it is not in use. When the “virtually” mapped line is in use, the ZXV10 P802
will flash the next available LINE in red. A line is ACTIVE when it is in use and
the corresponding LED is red.
Completing Calls
There are five ways to complete a call:
1. DIAL: To make a phone call.
1. Take Handset/SPEAKER/Headset off-hook
or press an available LINE key (activates speakerphone)
or press the NEW CALL soft-key
43
2. The line will have a dial tone and the primary line (LINE1) LED
is red
If you wish, select another LINE key (alternative SIP account)
3. Enter the phone number
4. Press the SEND key
or press the “DIAL” softkey
2. REDIAL: To redial the last dialed phone number.
When redialing the phone will use the same SIP account as was used for the
last call. Thus, when the second SIP account was made for the last call/call
attempt, the phone will use the second account to redial.
1. Take Handset/SPEAKER/Headset off-hook or
press an available LINE key (activates speakerphone), the
corresponding LED will be red
2. Press the SEND button
or press the REDIAL softkey
3. USING THE CALL HISTORY: To call a phone number in the phone’s
history.
When using the call history, the phone will use the same SIP account as was
used for the last call/call attempt. Thus, when returning a call made to the
second SIP account, the phone will use the second SIP account return the call.
1. Press the MENU button to bring up the Main Menu
2. Select Call History and then “Received Calls”, “Missed Calls”
or “Dialed Calls” depending on your needs
3. Select phone number using the arrow keys
4. Press OK to select
44
5. Press OK again to dial
4. USING THE PHONEBOOK: To call a phone in from the phone’s
phonebook.
Each entry in the phonebook can be attached to an individual SIP account. The
phone will use that SIP account to make the phone call.
1. Go to the phonebook by:
i. Pressing the phonebook button (bottom, left-hand side
of phone), or
ii. Pressing the DOWN arrow key, or
iii. Pressing the menu button and
Selecting “Phone Book” and
Press MENU
2. Select the phone number by using the arrow keys
3. Press OK so select
4. Press OK again to dial
5. PAGING/INTERCOM:
The paging/intercom function can only be used if the SERVER/PBX supports
this feature and both the phones and PBX are correctly configured.
1. Take the Handset/SPEAKER/Headset off-hook
2. Select the LINE key associated with account
3. Press OK key to display LCD: LINEx: PAGE
4. Dial the phone number you want to Page/Intercom
5. Press SEND key.
45
NOTE: Dialtone and dialed number display occurs after the phone is
off-hook and the line key is selected. The phone waits 4 seconds (by
default; No key Entry Timeout) before sending and initiating the call.
Press the “SEND” or “#” button to override the 4 second delay.
Making Calls using IP Addresses
Direct IP calling allows two phones to talk to each other in an ad-hoc fashion
without a SIP proxy. VoIP calls can be made between two phones if:
z Both phones have public IP addresses, or
z Both phones are on a same LAN/VPN using private or public IP
addresses, or
z Both phones can be connected through a router using public or private
IP addresses (with necessary port forwarding or DMZ)
To make a direct IP call, please follow these steps:
1. Press MENU button to bring up MAIN MENU
2. Select “Direct IP Call” using the arrow-keys
3. Press OK to select
4. Input the 12-digit target IP address. (Please see example
below)
5. Press OK key to initiate call
To make a quick IP call, please refer to next section.
For example: If the target IP address is 192.168.1.60 and the port is 5062 (e.g.
192.168.1.60:5062), input the following: 192*168*1*60#5062 - The “ * ” key
represent the dot“.” ; The “#” key represent colon “:”. Press OK to dial out.
Quick IP Call Mode
The ZXV10 P802 also supports Quick IP call mode. This enables the phone to
make direct IP-calls, using only the last few digits (last octet) of the target
phone’s IP-number.
46
This is possible only if both phones are in under the same LAN/VPN. This
simulates a PBX function using the CMSA/CD without a SIP server. Controlled
static IP usage is recommended.
Setting up the phone to make Quick IP calls
To enable Quick IP calls, the phone has to be setup first. This is done through
the web-setup function. In the “Advanced Settings” page, set the "Use Quick
IP-call mode to YES. When #xxx is dialed, where x is 0-9 and xxx <=255, a
direct IP call to aaa.bbb.ccc.XXX is completed. “aaa.bbb.ccc” is from the local
IP address regardless of subnet mask. The numbers #xx or #x are also valid.
The leading 0 is not required (but OK).
For example:
z 192.168.0.2 calling 192.168.0.3 -- dial #3 follow by SEND or #
z 192.168.0.2 calling 192.168.0.23 -- dial #23 follow by SEND or #
z 192.168.0.2 calling 192.168.0.123 -- dial #123 follow by SEND or #
z 192.168.0.2: dial #3 and #03 and #003 results in the same call -- call
192.168.0.3
NOTE: If you have a SIP Server configured, a Direct IP-IP still works.
If you are using STUN, the Direct IP-IP call will also use STUN.
Configure the “Use Random Port” to “NO” when completing Direct IP
calls.
Answering Phone Calls
Receiving Calls
1. Incoming single call: Phone rings with selected ring-tone. The
corresponding account LINE flashes red. Answer call by taking
Handset/SPEAKER/Headset off hook or pressing SPEAKER or by
pressing the corresponding account LINE button.
47
2. Incoming multiple calls: When another call comes in while having an
active call, the phone will produce a Call Waiting tone (stutter tone).
Next available lines will flash red (as described in section 4.3.2).
Answer the incoming call by pressing its corresponding LINE button.
The current active call will be put on hold.
3. Paging/Intercom Enabled: Phone beeps once and automatically
establishes the call via SPEAKER. (PBX or Server must also supports
this feature)
Do Not Disturb
1. Press the menu button, and scroll down to “Preference”.
2. Select “Do Not Disturb” by pressing menu button.
3. Use arrow keys to either enable or disable “Do Not Disturb” feature.
4.Whenenabled,therewillbeaspecial“DoNotDisturb”icon
appearingonthedisplay.Thiswillsendtheincomingcaller
directlytovoicemail.
Phone Functions During a Phone Call
Call Waiting/ Call Hold
1. Hold: Place a call on hold by pressing the “HOLD” button.
2. Resume: Resume call by pressing the corresponding blinking LINE.
48
3. Multiple Calls: Automatically place ACTIVE call on hold by selecting
another available LINE to place or receive another call. Call Waiting
tone (stutter tone) audible when line is in use.
Mute
1. Press the MUTE button to enable/disable muting the microphone.
2. The “Line Status Indicator” will show “LINEx: SPEAKING” or “LINEx:
MUTE” to indicate whether the microphone is muted.
Call Transfer
ZXV10 P802 supports both Blind and Attended transfer. Also, users could
make auto-attended transfer when this feature is enabled from web GUI.
1. Blind Transfer: Press “TRANSFER” button, then dial the number and
press the “SEND” button to complete transfer of active call.
2. Attended Transfer: Press “LINEx” button to make a call and
automatically place the ACTIVE LINE on HOLD. Once the call is
established, press “TRANSFER” key then the LINE button of the
waiting line to transfer the call. Hang up the phone call after “Transfer
Successful” is displayed in the screen.
3. Auto-Attended Transfer: Users could enable Auto-Attended Transfer
under Web GUI->Advanced Setting Page. During the first call, press
“TRANSFER” hard button and it will bring up another line. The first
call will be on hold. Enter the number and press SEND key to
establish the second call (If pressing soft key “transfer” after entering
the number, it will do blind transfer instead). After the second call is
49
established, press “TRANSFER” hard button again. Now the phone
will hang up and the call will be transferred.
NOTE:To transfer calls across SIP domains, SIP service providers
must support transfer across SIP domains. Blind transfer will usually
use the primaryaccountSIPprofile.
3-Way Conferencing
ZXV10 P802 can host conference calls and supports up to 3-way conference
calling.
1. Initiate a Conference Call:
a) Establish a connection with two parties
b) Press CONF button
c) Choose the desired line to join the conference by pressing
the corresponding LINE button
d) Repeat previous two steps for all other parties that would
like to join the conference. This can be done at any time.
However, if a new call comes in, the other calls will be
placed on hold and the host will have to individually re-join
the held lines back into the conference by repeating the
previous two steps again
2. Cancel Conference:
a) If after pressing the “CONF” button, a user decides not to
conference anyone, press CONF again or the original LINE
button
b) This will resume two-way conversation
50
3. End Conference:
a) Press HOLD to end the conference call and put all parties
on hold
b) To speak with an individual party, select the corresponding
blinking LINE
ZXV10 P802 also supports Easy Conference mode. In Easy Conference
mode, users can initiate conference by calling another number when the
current line is in talking or conference. Also the conference can be
re-established by pressing the ReConf softkey when the conference is on hold.
Easy Conference mode can be used combined with the traditional ways to
establish the 3-way conference above.
1. Initiate a Conference Call:
a) Establish one call
b) Press CONF button and a new line will be brought up
c) Dial the number and press SEND button to establish the
second call
d) Press CONF button again or press the ConfCall softkey to
establish the 3-way conference
2. Join More Parties in Existed Conference:
a) Establish conference call
b) Press CONF button and a new line will be brought up
c) Dial the number and press SEND button to establish the
new call
d) Press CONF button again or press the ConfCall softkey to
join the new party in the existed conference
3. Hold Conference:
51
During the conference, press HOLD button and the conference
will be put on hold
a) To resume the conference, press the ReConf softkey
b) To split the conference and resume the call with each party,
press the corresponding line key
4. End Conference:
a) If the users decide not to conference after establishing the
second call, press EndCall softkey instead of ConfCall
softkey/CONF button. It will end the second call and the
screen will show the first call/conference is on hold.
b) During the conference, press EndCall softkey or hang up to
end the conference
NOTE:
z The party that starts the conference call has to remain in the
conference for its entire duration, you can put the party on mute but it
must remain in the conversation. Also, this is not applicable when the
feature “Transfer on call hangup” is turned on.
z When using Easy Conference mode, press SEND button to establish
the second call after entering the number instead of using “#”.
Voice Messages (Message Waiting Indicator)
A blinking red MWI (Message Waiting Indicator) indicates a message is waiting.
Press the MSG button to retrieve the message. An IVR will prompt the user
through the process of message retrieval. Press a specific LINE to retrieve
messages for a specific line account.
NOTE:
52
z Each line has a separate voicemail account. Each account requires a
voicemail portal number to be configured in the “voicemail user id”
field.
z To check which line account has a message 1) press the message
button (this always checks the primary account), 2) check each line for
stutter tone or 3) check missed calls using the menu.
Shared Call Appearance (SCA)
The ZXV10 P802 phone supports shared call appearance by Broadsoft
standard. This feature allows members of the SCA group to shared SIP lines
and provides status monitoring (idle, active, progressing, hold) of the shared
line. When there is an incoming call designated for the SCA group, all of the
members of the group will be notified of an incoming call and will be able to
answer the call from the phone with the SCA extension registered.
All the users that belong to the same SCA group will be notified by visual
indicator when a user seizes the line and places an outgoing call, and all the
users of this group will not be able to seize the line until the line goes back to
an idle state or when the call is placed on hold. (With the exception of when
multiple call appearances are enabled on the server side)
In the middle of the conversation, there are two types of hold: Public Hold and
Private Hold. When a member of the group places the call on public hold, the
other users of the SCA group will be notified of this by the red-flashing button
and they will be able to resume the call from their phone by pressing the line
button. However, if this call is placed on private-hold, no other member of the
SCA group will be able to resume that call.
To enable shared call appearance, the user would need to register the shared
line account on one of the accounts on the phone. In addition, they would need
to navigate to “Settings”->”Basic Settings” on the web GUI and set the line to
“Shared Line” with the corresponding account. If the user requires more shared
call appearances, the user can configure multiple line buttons to be “shared
line” buttons associated with the account.
Call Features
The ZXV10 P802 supports traditional and advanced telephony features
including caller ID, caller ID w/name, call forward/transfer/park/hold as well as
intercom/paging.
Table 10: ZXV10 P802 Call Features

53
Key Call Features
*30 Block Caller ID (for all subsequent calls)
Offhook and dial “*30”.
*31 Send Caller ID (for all subsequent calls)
Offhook and dial “*31”.
*67 Block Caller ID (per call)
Offhook, dial “*67” and then enter the number to dial out.
*82 Send Caller ID (per call)
Offhook, dial “*82” and then enter the number to dial out.
*70 Disable Call Waiting (per Call)
Offhook, dial “*70” and then enter the number to dial out.
*71 Enable Call Waiting (per Call)
Offhook, dial “*71” and then enter the number to dial out.
*72 Unconditional Call Forward
Offhook, dial “*72”. Then enter the number to forward the call and
press “#” or OK softkey.
*73 Cancel Unconditional Call Forward
Offhook, dial “*73” and the phone will hang up.
*90 Busy Call Forward
Offhook, dial “*90”. Then enter the number to forward the call and
press “#” or OK softkey.
*91 Cancel Busy Call Forward
Offhook, dial “*91” and the phone will hang up.
*92 Delayed Call Forward
Offhook, dial “*92”. Then enter the number to forward the call and
press “#” or OK softkey.
*93 Cancel Delayed Call Forward
Offhook, dial “*93” and the phone will hang up.
54
Customized LCD Screen & XML
ZXV10 P802 Enterprise IP phone supports both simple and advanced XML
applications: 1) XML Custom Screen and 2) XML Downloadable Phonebook.
For more information on how to create a downloadable XML phonebook,
creating a custom idle screen and/or reprogramming the softkeys on ZXV10
P802, please visit our website at: http://www.zte.com.cn

55
Configuration Guide
The ZXV10 P802 can be configured in two ways. Firstly, using the Key Pad
Configuration Menu on the phone; secondly, through embedded
web-configuration menu.
Configuration Via Keypad
To enter the MENU, press the round button. Navigate the menu by using the
arrow keys: up/down and left/right. Press the OK button to confirm a menu
selection, delete an entry by pressing the MUTE/DEL button. The phone
automatically exits MENU mode with an incoming call, the phone is off-hook or
the MENU mode if left idle for 20 seconds.
Press the MENU button to enter the Key Pad Menu. The menu options
available are listed in table 11.
Table 11: Key Pad Configuration Menu
Item Description
Call History Displays histories of answered, dialed, missed, and transferred
and forwarded calls
Status Displays the network status, account status, software version,
MAC-address and hardware version of the phone
Phone Book Displays the phonebook and downloads phonebook XML
LDAP Directory Displays the LDAP directory and downloads directory
Instant
Messages
Goes to instant messages
Direct IP Call Dials IP address for direct IP call
Preference Press Menu button to enter this sub menu including:
z Do NOT Disturb
DND (Do Not Disturb) function could be turned on or
off in the “Do Not Disturb” menu.
z Ring Tone
Choose different ring tones in the “Ring Tone” menu.
z Ring Volume

56
Press Menu button to hear the selected ring volume,
press “←” or “→” to hear and adjust the ring tone
volume.
z LCD Contrast
Press “←” or “→” to adjust the LCD contrast.
z LCD Brightness
Press “←” or “→” to adjust the LCD brightness for
active/idle screen.
z Download SCR XML
The phone will download the custom idle screen
if available.
z Erase Custom SCR
Custom idle screen will be erased and will be replaced
with default logo.
z Display Language
Users can choose English, Simplified Chinese,
Traditional Chinese, Korean, Japanese, Italian,
Spanish, French, German, Portuguese, Russian,
Croatian, Hungarian, Polish, Slovenian, Arabic,
Hebrew or Dutch which are built in the phone. Users
could select Automatic for local language based on IP
location if available. Also, the phone will download
secondary language if available.
z Time Settings
Users can set the date and time on the phone.
Press Menu button to choose the menu item
Press “←” or follow the soft keys to return to the main menu
Config Press Menu button to display the configuration selections:
z SIP
To change SIP server settings for SIP account (SIP
Proxy, Outbound Proxy, SIP User ID, SIP Auth ID,
SIP Password, SIP Transport and Audio).
z Upgrade
To configure the firmware server and Config server for
upgrading or provisioning the phone.
z Factory Reset
Key in the physical/MAC address on the back of the
phone.
Press OK softkey to reset to FACTORY DEFAULT

57
setting. Do not use Factory Reset unless you want to
restore factory settings.
z Layer 2 QoS
Configure 802.1Q/VLAN Tag and priority value.
Factory
Functions
Press Menu to display the factory function items including
z Audio Loopback
Speak into the handset. If you hear your voice in the
handset, your audio is working fine. Press Menu button
to exit the mode.
z Diagnostic Mode
All LEDs will light up.
Press any key on the keypad, to display the button
name in the LCD. Lift and put back the handset or
press Menu button to exit the diagnostic mode.
Press ‘←’ to return the main menu
Network To select IP mode (DHCP/Static IP/PPPoE); to setup PPPoE, IP
address, Netmask, Gateway address and DNS Server 1 and
DNS Server 2.
Call Features To enable/disable and configure Forward All, Forward Busy,
Forward No Answer, No Answer Timeout, press Call Features
and select the Account x to set the forward call features on this
account.
Reboot Select on Reboot and press Menu button to reboot the device.
Exit Exit from this menu
Configuration VIA Web Browser
The ZXV10 P802 embedded Web server responds to HTTP/HTTPS
GET/POST requests. Embedded HTML pages allow a user to configure the IP
phone through a Web browser such as Microsoft’s IE, Mozilla Firefox, Google
Chrome.
Access the Web Configuration Menu
To access the phone’s Web Configuration Menu
58
1. Connect the computer to the same network as the phone1
2. Make sure the phone is turned on and shows its IP address
3. Start a Web browser on your computer
4. Enter the phone’s IP address in the address bar of the browser2
5. Enter the administrator’s password to access the Web Configuration
Menu3
z The Web-enabled computer has to be connected to the same
sub-network as the phone. This can easily be done by connecting the
computer to the same hub or switch as the phone is connected to. In
absence of a hub/switch (or free ports on the hub/switch), please
connect the computer directly to the phone using the PC port on the
phone.
z If the phone is properly connected to a working Internet connection,
the phone will display its IP address. This address has the format:
xxx.xxx.xxx.xxx, where xxx stands for a number from 0 to 255. You will
need this number to access the Web Configuration Menu. For example,
if the phone shows 192.168.0.60, please use “http://192.168.0.60” in
the address bar of your browser.
z The default administrator password is “admin”; the default end-user
password is “123”.
NOTE:
z When changing any settings, always SUBMIT them by pressing
“UPDATE” button on the bottom of the page. If, after having submitted
some changes, more settings have to be changed, press the menu
option needed.
z All the options under Basic Setting and Account Setting, and most of
the options under Advanced Setting do not require reboot after
submitting the changes. Under Advanced Setting, the parameters on
network configuration require reboot after update.
Definitions
This section will describe the options in the Web configuration user interface.
As mentioned, a user can log in as an administrator or end-user.
Functions available for the end-user are:
z Status: Displays the network status, account status, software version
and MAC address of the phone, and service status.

59
z Basic Settings: Basic preferences such as date and time settings,
multi-purpose keys and LCD settings can be set here.
Additional functions available to administrators are:
z Advanced Settings: To set advanced network settings, codec
settings and XML configuration settings and etc.
z Account: To configure the SIP account.
Table 12: Device Configuration - Status
MAC
Address The device ID, in HEXADECIMAL format.
IP Address This field shows IP address of ZXV10 P802.
Product
Model This field contains the product model information.
Part
Number This field contains the product part number.
Software
Version • Prog: This is the main firmware release number, which is
always used for identifying the software (or firmware) system of
the phone.
• Boot: Booting code version number
• Core: Core code version number
• Base: Base code version number
• DSP: DSP code version number
• Aux: Aux code version number
System Up
Time This field shows system up time since the last reboot.
System
Time This field shows the current time on the phone system.
Registered Indicates whether accounts are registered to the related SIP
server.
PPPoE Link
Up Indicates whether the PPPoE connection is enabled (connected
to a modem).

60
Service
Status • GUI: shows the GUI status: running or stopped
• Phone: shows the phone status: running or stopped
Core Dump Download core dump file for troubleshooting when necessary.
Table 13: Device Configuration – Settings/Basic Settings
End
User Passwor
d
This contains the password to access the Web Configuration
Menu. This field is case sensitive with a maximum length of
25 characters.
IP Address The ZXV10 P802 operates in three modes:
1. DHCP mode: The ZXV10 P802 acquires its IP address
from the first DHCP server it discovers on its LAN. The DHCP
option is reserved for NAT router mode. In DHCP mode, all
the field values for the Static IP mode are not used (even
though they are still saved in the Flash memory).
2. PPPoE mode: To use the PPPoE feature, set the PPPoE
account settings (PPPoE account ID, PPPoE password and
PPPoE service name). The ZXV10 P802 establishes a
PPPoE session if any of the PPPoE fields is set.
3. Static IP mode: Configure all of the following fields: IP
address, Subnet Mask, Gateway, DNS Server 1, DNS Server
2 and Preferred DNS Server.
802.1x Mode This option allows the user to enable/disable 802.1x mode on
the phone. The default value is disabled. To enable 802.1x
mode, this field should be set to EAP-MD5. Once enabled,
the user would be required to enter the following information
below to be authenticated on the network:
· Identity
· MD5 Password
Line Keys x This allows the user to configure the account mapped to each
line key, as well as enabling Shared Call Appearance for the
line. Options available for Key Mode are :

61
1. Line
2. Shared Line
Time Zone This parameter controls the date/time display according to the
specified time zone.
If “Allow DHCP Option 2 to override Time Zone setting” is
checked, the time zone will be overridden by the DHCP
server.
Self-Defined
Time Zone This parameter allows the users to define their own time
zone.
The syntax is: std offset dst [offset], start [/time], end [/time]
Default is set to: MTZ+6MDT+5,M4.1.0,M11.1.0
MTZ+6MDT+5,
This indicates a time zone with 6 hours offset with 1 hour
ahead which is U.S central time. If it is positive (+) if the local
time zone is west of the Prime Meridian (A.K.A: International
or Greenwich Meridian) and negative (-) if it is east.
M4.1.0,M11.1.0
The 1st number indicates Month: 1,2,3.., 12 (for Jan, Feb, ..,
Dec)
The 2nd number indicates the nth iteration of the weekday:
(1st Sunday, 3rd Tuesday…)
The 3rd number indicates weekday: 0,1,2,..,6( for Sun, Mon,
Tues, … ,Sat)
Therefore, this example is the DST which starts from the first
Sunday of April to the 1st Sunday of November.
Weather
Update By default, “Enable Weather Update:” is set to “Yes”. If set to
“No”, weather information will not display on the phone.
Settings to customize the display of weather via:
· City Code – Enter city code
· Update Interval – Refresh time in minutes
· Degree Unit – Select Automatic, Fahrenheit or Celsius
Weather information is displayed on ZXV10 P802 LCD when

62
“Enable Weather Update” is set to “Yes” and pressing the
“SwitchSCR” soft-key once.
LCD Backlight
Brightness Set the LCD brightness level for idle state and active state.
Range from 0 to 8 where 0 means off and 8 means the
brightest.
LCD Contrast Set LCD contrast. Range from 0 to 20.
Time Display
Format LCD time display in 12 hour or 24 hour format.
Disable in-call
DTMF display Default is “No”. This field is used to hide the keypad input
during a call.
Disable
Missed Call
Backlight
Default is “No”. By default, LCD backlight will light up
whenever there is a missed call.
HEADSET
Key Mode Default Mode:
- Toggle to Headset when using Speaker/Handset
- Dial, pick up call or hang up call using Headset
Toggle Headset/Speaker:
- toggle between using Headset and using Speaker
Headset TX
gain (dB) Set headset TX gain to -6, 0 or +6. Default is 0 db.
Headset RX
gain (dB) Set headset RX gain to -6, 0 or +6. Default is 0 db.
Table 14: Device Configuration – Settings /Advanced Settings

63
Admin
Password
Administrator password. Only the administrator can access
the “Advanced Settings” and “Account Settings” page.
Password field is purposely blank for security reasons after
clicking update and saved. The maximum password length
is 25 characters.
Layer 3 QoS This field defines the layer 3 QoS parameter. It is the value
used for IP Precedence or Diff-Serv or MPLS. Default value
is 12.
Layer 2 QoS This contains the value used for layer 2 802.1Q/VLAN tag
and 802.1p priority value.
Default setting is 0.
Local RTP port This parameter defines the local RTP port pair used to listen
and transmit. It is the base RTP port for channel 0. When
configured, channel 0 will use this port _value for RTP;
channel 1 will use port_value+2 for RTP. Local RTP port
ranges from 1024 to 65400 and must be even. The default
value is 5004.
Use Random
Port This parameter, when set to “Yes”, will force random
generation of both the local SIP and RTP ports. This is
usually necessary when multiple GXPs are behind the same
NAT. Default is “No”.
Keep-alive
interval This parameter specifies how often the ZXV10 P802 sends
a blank UDP packet to the SIP server in order to keep the
“hole” on the NAT open. Default is 20 seconds.
Use NAT IP NAT IP address used in SIP/SDP message. Default is blank.
STUN Server IP address or Domain name of the STUN server. STUN
resolution result will display in the STATUS page of the Web
UI.
Firmware
Upgrade and
Provisioning
Allows the user to select the following options for firmware
upgrade:
· Always Check for New Firmware

64
· Check New Firmware only when F/W pre/suffix changes
· Always Skip the Firmware Check.
Firmware upgrade may take up to 10 minutes depending on
network environment. Do not interrupt the firmware
upgrading process.
Note: ZTE strongly recommends that the user upgrade
firmware locally in a LAN environment if using TFTP to
upgrade. Please DO NOT interrupt the upgrade process
(especially the power supply) as this will damage the
device.
XML Config
File Password The password used for encrypting the XML configuration file
using OpenSSL. This is required for the phone to decrypt
the encrypted XML configuration file.
HTTP/HTTPS
User Name The user name for the HTTP/HTTPS server.
HTTP/HTTPS
Password The password for the HTTP/HTTPS server.
Upgrade Via This field allows the user to choose the firmware upgrade
method: TFTP, HTTP or HTTPS.
Firmware
Server Path Defines the server path for the firmware server. It can be
different from the Configuration server which is used for
provisioning.
Config Server
Path Defines the server path for provisioning; it can be different
from the firmware server.
Firmware File
Prefix/Postfix Default is blank. If configured, ZXV10 P802 will request the
firmware file with the prefix/postfix and only the firmware
with the matching encrypted prefix will be downloaded and
flashed into the phone.
This setting is useful for ITSPs. End user should keep it
blank.

65
Config File
Prefix/Postfix
Default is blank. If configured, ZXV10 P802 will request the
config file with the prefix/postfix and only the file with the
matching encrypted prefix will be downloaded and flashed
into the phone.
This setting is useful for ITSPs. End user should keep it
blank.
Allow DHCP
Option 43 and
Option 66 to
override server
Default is “Yes”. This allows device gets provisioned from
the server automatically.
Automatic
Upgrade This function is used by ITSP. End user should NOT touch
these parameters.
Default is “No”. Choose “Yes” to enable automatic HTTP
upgrade and provisioning.
In “Check for upgrade every” field, enter the number of
minutes to check the HTTP server for firmware upgrade or
configuration changes. When set to “No”, the phone will only
perform HTTP upgrade and configuration check once at
boot up.
Authenticate
Conf File Default is “No”. If set to “Yes”, configuration file would be
authenticated before acceptance. End user should use
default setting.
Enable TR-069 Default is “No”.
ACS URL URL for TR-069 Auto Configuration Servers (ACS).
TR-069
Username Enter username for TR-069.
TR-069
Password Enter password for TR-069.
Periodic Inform
Enable Enable periodic inform. Default is “No”.

66
Periodic Inform
Interval When enabling periodic inform, set up the periodic inform
interval.
Connection
Request
Username
Enter the connection request username.
Connection
Request
Password
Enter the connection request password.
Authentication
Method Select the authentication method among “No
authentication”, “Basic” or Digest.
Connection
Request Port Enter the connection request port.
Phonebook
XML Download Selects the file download mode for the download server.
Users can choose from TFTP/HTTP/No.
Phonebook
XML Server
Path
The URL/IP address of the phonebook download server.
Phonebook
Download
Interval
The interval at which the phonebook will be downloaded
from the download server (in Minutes). The default setting is
0.
Remove
Manually-edite
d entries on
Downloads
If set to “Yes”, the phone will remove the manually-edited
entries in the old phonebook list before downloading the
new file. The default setting is set to “Yes”.
LDAP Directory IP address or domain name of LDAP script server.
Idle Screen
XML Download Enable XML Idle Screen download via TFTP or HTTP.
Select whether to “Use Custom Filename” or not, and define
the “XML server path”.

67
Download
Screen XML At
Boot-up
The phone will download the idle screen xml file if set to
“Yes”. The default setting is “No”.
Use custom
filename The phone will use custom filename specified in XML server
path if set to “Yes”. The default setting is “No”.
Idle Screen
XML Server
Path
Specify the idle screen XML server path.
Offhook Auto
Dial To configure a User ID/extension to dial automatically when
the phone is taken offhook.
Syslog Server The IP address or URL of System log server. This feature is
especially useful for ITSPs.
Syslog Level Select the ATA to report the log level. Default is NONE. The
level is one of DEBUG, INFO, WARNING or ERROR. Syslog
messages are sent based on the following events:
· product model/version on boot up (INFO level)
· NAT related info (INFO level)
· sent or received SIP message (DEBUG level)
· SIP message summary (INFO level)
· inbound and outbound calls (INFO level)
· registration status change (INFO level)
· negotiated codec (INFO level)
· Ethernet link up (INFO level)
· SLIC chip exception (WARNING and ERROR levels)
· memory exception (ERROR level)
The Syslog uses USER facility. In addition to standard
Syslog payload, it contains the following components:
GS_LOG: [device MAC address][error code] error message.
For example: May 19 02:40:38 192.168.1.14 GS_LOG:
[00:0b:82:00:a1:be][000]. Ethernet link is up.
Send SIP Log When setting the “Yes”, phone will send out SIP Log to

68
syslog server. Default setting is “No”.
NTP server This parameter defines the URI or IP address of the NTP
(Network Time Protocol) serve. It is used to display the
current date/time.
Allow DHCP
Option 42 to
override NTP
server
Default is “Yes”. This allows device gets provisioned for
DHCP Option 42 from the server automatically.
SSL Certificate This defines the SSL certificate needed to access certain
websites.
SSL Private
Key This defines the SSL Private key.
SSL Private
Key Password This defines the SSL private key password.
Distinctive Ring
Tone Caller ID must be configured. Select a Distinctive Ring Tone
1 through 3 for a particular Caller ID. The ZXV10 P802 will
ONLY use selected ring tones for particular Caller IDs. For
all other calls, the ZXV10 P802 will use System Ring Tone.
When selected and no Caller ID is configured, the selected
ring tone will be used for all incoming calls.
System Ring
Tone System ring tone. Default is North American standard.
Adjust system ring tone frequencies and cadences based
on local telecom standard.

69
Call Progress
Tones Using these settings, users can configure ring or tone
frequencies based on parameters from local telecom. By
default, they are set to North American standard.
Frequencies should be configured with known values to
avoid uncomfortable high pitch sounds.
Syntax: f1=val,f2=val[,c=on1/off1[-on2/off2[-on3/off3]]];
(Frequencies are in Hz and cadence on and off are in 10ms)
ON is the period of ringing (“On time” in “ms”) while OFF is
the period of silence. In order to set a continuous ring, OFF
should be zero. Otherwise it will ring ON ms and a pause of
OFF ms and then repeat the pattern. Up to three cadences
are supported.
Disable Call
Waiting Default is “No”. If set to “Yes”, the call waiting feature will be
disabled.
Disable Call
Waiting Tone
Default is “No”. If set to “Yes”, the call waiting tone will be
disabled.
Disable Direct
IP Calls Default is “No”. If set to “Yes”, direct IP calls will be disabled.
Use Quick IP
Call Mode Dial an IP address under the same LAN/VPN segment by
entering the last octet in the IP address.
In the Advanced Settings page there is an option “Use Quick
IP-call mode”. Default setting is “No”. When set to “Yes”, and
#XXX is dialed, where X is 0-9 and XXX <=255, phone will
make direct IP call to aaa.bbb.ccc.XXX where aaa.bbb.ccc
comes from the local IP address REGARDLESS of subnet
mask.
#XX or #X are also valid so leading 0 is not required (but
OK). See Quick IP Call Mode for details.
Disable
Conference Default is “No”. If set to “Yes”, conference will be disabled.

70
Disable DND
Button Default is “No”. If set to “Yes”, the “DND” button on keypad
will be disabled.
Disable
Transfer Default is “No”. If set to “Yes”, transfer will be disabled.
Auto-Attended
Transfer Default is “No”. If set to “Yes”, the phone will use attended
transfer by default.
Configuration
via Keypad
Menu
Configures the access control of configurations via the
phone keypad menu. There are three modes:
· Unrestricted
· Basic Settings Only
· Constraint Mode
Enable STAR
key Keypad
locking
Default is No. If set to “Yes”, when pressing STAR key for
4-5 seconds, there will be a lock icon shown in the right side
of the screen indication the keypad is locked.
To unlock, pressing STAR key for 4-5 seconds and there will
be a window prompted asking for password.
Password to
lock/unlock Enter the password to lock the keypad in web GUI.
To unlock the keypad, enter the password in the prompted
window in the phone’s LCD screen.
Do not escape
“#” as %23 in
SIP URI
Default is “No”. By default, # will be replaced as %23 in SIP
URI.
Display
Language Allows user to choose preferred display language in web UI
and keypad UI. Currently, the phone supports these
languages: Arabic, German, English, Spanish, French,
Hebrew, Croatian, Hungarian, Italian, Japanese, Korean,
Dutch, Polish, Portuguese, Russian, Slovenian, Simplified
Chinese and Traditional Chinese.
Note: The “Automatic” setting in language refers to ZTE’s
IP2Location client which when connected to Internet would
attempt to lookup a database (driven by ZTE) with the IP

71
address for its geographical location.
Language file postfix allows the language file to have
different postfixes so the phone can request a particular file.
It will append an underscore "_" plus the string in the
language file postfix.
The default language file name is "gxp.txt". If the field
“Language File postfix “has "NL" string in it, then the phone
will request "gxp_NL.txt" instead of "gxp.txt".
User can only load one secondary language.
Supported downloadable language: Czech, Croatian,
Estonian, French, German, Italian, Polish, Portuguese,
Slovak, Slovenian and Spanish.
How to set up Download Language:
This is similar to updating firmware in your local network
environment.
1. Get the language file gxp.txt ready. Make sure the file is
using UTF-8 encoding.
2. Copy gxp.txt to the firmware server directory using your
local TFTP or HTTP server.
3. Access the advanced settings of the Web GUI, set
“Display Language” to “Download Language” and enter the
server path in Firmware Server Path. Select TFTP or HTTP
for firmware upgrade.
4. Update and reboot the phone.
ZXV10 P802 has up to two line appearances, each with an independent SIP
account. Each SIP account requires its own configuration page. Their
configurations are identical.
Table 15: SIP Account Settings
Account Active This field indicates whether the account is active. The
default value is “Yes”.

72
Account Name The name associated with each account - displayed on
LCD.
SIP Server SIP Server’s IP address or Domain name provided by
VoIP service provider.
Secondary SIP
Server This field allows administrator to configure a backup
SIP Server.
Outbound Proxy IP address or Domain name of Outbound Proxy, Media
Gateway, or Session Border Controller. Used for
firewall or NAT penetration in different network
environment. If the system detects symmetric NAT,
STUN will not work. ONLY outbound proxy can provide
solution for symmetric NAT.
SIP User ID User account information provided by VoIP service
provider (ITSP); either an actual phone number or
formatted like one.
Authenticate ID SIP service subscriber’s Authenticate ID used for
authentication. It can be identical to or different from
SIP User ID.
Authenticate
Password SIP service subscriber’s account password for ZXV10
P802 to register to (SIP) servers of ITSP.
Name SIP service subscriber’s name that is used for Caller
ID display.
DNS Mode The default is set to A Record. If user wishes to locate
the server by DNS SRV,
the user may select SRV or NATPTR/SRV. When "Use
Configured IP" option is
selected, if SIP server is configured as domain name,
phone will not send DNS
query, but use "Primary IP" or "Secondary IP" to send
sip message if at least one
of them are not empty.

73
Primary IP This option applies only if “Use Configured IP” is
selected, the phone will send DNS query to the
Primary IP. Insert IP address here.
Backup IP 1 Insert the first back up IP here.
Backup IP 2 Insert the second back up IP here.
TEL URI Select Tel URI as “Disabled”, “User=Phone” or
“Enabled”. Default is “Disabled”.
SIP Registration This parameter controls sending REGISTER
messages to the proxy server. The default setting is
“Yes”.
Unregister on
Reboot Default is “No”. If set to “Yes”, the SIP user’s
registration information will be cleared on reboot.
Register Expiration This parameter allows user to specify the time
frequency (in minutes) that ZXV10 P802 refreshes its
registration with the specified registrar. The default
interval is 60 minutes. The maximum interval is 65,535
minutes (about 45 days).
Reregister Before
Expiration This parameter allows user to specify the time
frequency (in seconds) that ZXV10 P802 sends out a
re-registration request before the Register Expiration.
By default is 0 second.
Local SIP Port This parameter defines the local SIP port used to listen
and transmit. The default value for Account 1 is 5060
and 5062 for Account 2.
SIP Registration
Failure Retry Wait
Time
Retry registration if the process failed. Default is 20
seconds.
SIP T1 Timeout RFC 3261 SIP T1 timer. Default is 0.5 second.

74
SIP T2 Interval RFC 3261 SIP T2 timer. Default is 4 seconds.
SIP Transport Choose SIP Transport between UDP and TCP. Default
is UDP.
SIP URI Scheme
when using TLS Select “sip:” or “sips:”. Default is “sips:”.
Use Actual
Ephemeral Port in
Contact with
TCP/TLS
Enable to use actual ephemeral port in contact with
TCP/TLS. Default is “No”.
Check Domain
Certificate Enable to check the domain certificate. Default is “No”.
Remove OBP from
Route The SIP Extension notifies the SIP server that it is
behind a NAT/firewall.
Validate Incoming
Messages This configuration selects whether or not the incoming
messages should be validated.
Support SIP
Instance ID Selects whether or not SIP Instance ID is supported.
NAT Traversal This parameter activates the NAT traversal
mechanism. It has options: No, STUN, Keep-Alive,
UPnP, Auto, VPN.
If selecting STUN and a STUN server is also specified,
the phone performs according to the STUN client
specification. Using this mode, the embedded STUN
client detects if and what type of NAT/Firewall
configuration is used. If the detected NAT is a Full
Cone, Restricted Cone, or a Port-Restricted Cone, the
phone will use its mapped public IP address and port in
all of its SIP and SDP messages.
If selecting Keep-Alive with no specified STUN server,
the ZXV10 P802 will periodically (every 20 seconds or
so) send a blank UDP packet (with no payload data) to

75
the SIP server to keep the “hole” on the NAT open.
SUBSCRIBE for
MWI Default is “No”. When set to “Yes” a SUBSCRIBE for
Message Waiting Indication will be sent periodically.
SUBSCRIBE for
Registration Default is “No”. When set to “Yes” a SUBSCRIBE for
Registration will be sent periodically.
Feature Key
Synchronization Default is “No”. This option is to synchronize DND/Call
Forward features with Broadsoft. When set to “Yes”, a
SUBSCRIBE will be sent out periodically to the server.
Then when DND/Call Forward features (Call Forward
No Answer, Unconditional Call Forward and Call
Forward on Busy) are configured or changed on the
phone and the Broadsoft server side, those features
will be synchronized on the phone side and the
Broadsoft server side.
PUBLISH for
Presence Enable Presence feature.
Proxy-Require SIP Extension to notify SIP server that the unit is
behind the NAT/Firewall.
Voice Mail UserID When configured, user can access messages by
pressing “MSG” button. This ID is usually the VM portal
access number.
Send DTMF This parameter specifies the mechanism to transmit
DTMF digit. There are 3 supported modes: in audio
which means DTMF is combined in audio signal (not
very reliable with low-bit-rate codec), via RTP
(RFC2833), or via SIP INFO.
DTMF Payload
Type Sends DTMF using RFC2833. The default is 101.
Early Dial Default is “No”. Use only if proxy supports 484
responses.

76
Dial Plan Prefix Sets the prefix added to each dialed number.
Dial Plan Dial Plan Rules:
1. Accepted Digits: 1,2,3,4,5,6,7,8,9,0 , *, #,
A,a,B,b,C,c,D,d
2. Grammar: x - any digit from 0-9;
a) xx+ - at least 2 digit numbers
b) xx. - only 2 digit numbers
c) ^ - exclude
d) [3-5] - any digit of 3, 4, or 5
e) [147] - any digit of 1, 4, or 7
f) <2=011> - replace digit 2 with 011 when dialing
g) | - the OR operand
• Example 1: {[369]11 | 1617xxxxxxx}
Allow 311, 611, and 911 or any 10 digit numbers with
leading digits 1617
• Example 2: {^1900x+ | <=1617>xxxxxxx}
Block any number of leading digits 1900 or add prefix
1617 for any dialed 7 digit
numbers
• Example 3: {1xxx[2-9]xxxxxx | <2=011>x+}
Allows any number with leading digit 1 followed by a 3
digit number, followed by any number between 2 and
9, followed by any 7 digit number OR Allows any length
of numbers with leading digit 2, replacing the 2 with
011 when dialed.
3. Default: Outgoing – {x+}
Allow any length of numbers.
Example of a simple dial plan used in a Home/Office in
the US:
{ ^1900x. | <=1617>[2-9]xxxxxx | 1[2-9]xx[2-9]xxxxxx |
011[2-9]x. | [3469]11 }
Explanation of example rule (reading from left to right):
• ^1900x. - prevents dialing any number started with
1900

77
• <=1617>[2-9]xxxxxx - allows dialing to local area
code (617) numbers by dialing
7 numbers and 1617 area code will be added
automatically
• 1[2-9]xx[2-9]xxxxxx |- allows dialing to any
US/Canada Number with 11 digits
length
• 011[2-9]x. - allows international calls starting with 011
• [3469]11 - allow dialing special and emergency
numbers 311, 411, 611 and 911
Note: In some cases where the user wishes to dial
strings such as *123 to activate voice mail or other
applications provided by their service provider, the *
should be predefined inside the dial plan feature. An
example dial plan will be: { *x+ } which allows the user
to dial * followed by any length of numbers.
Delayed Call
Forward Wait Time Time waited before the call is forward to a number or
VM.
Default is 20 seconds.
Enable Call
Features Default is “Yes”. If set to “No”, Call transfer, Call
Forwarding & Do-Not-Disturb are supported locally
provided ITSP support those features. In addition,
“ForwardAll” softkey will be hidden if call feature code
is disabled for Account 1.
Call Log User can choose to disable Call Log and what kind of
calls to log.
Session Expiration The SIP Session Timer extension enables SIP
sessions to be periodically “refreshed” via a SIP
request (UPDATE, or re-INVITE. Once the session
interval expires, if there is no refresh via a UPDATE or
re-INVITE message, the session is terminated.
Session Expiration is the time (in seconds) at which
the session is considered timed out, provided no
successful session refresh transaction occurs
beforehand. The default value is 180 seconds.

78
Min-SE Defines the minimum session expiration (in seconds).
Default is 90 seconds.
Caller Request
Timer If set to “Yes”, the phone will use session timer when it
makes outbound calls if remote party supports session
timer.
Callee Request
Timer If selecting “Yes”, the phone will use session timer
when it receives inbound calls with session timer
request.
Force Timer If set to “Yes”, the phone will use session timer even if
the remote party does not support this feature. If set to
“No”, the session timer is enabled only when the
remote party supports this feature. To turn off Session
Timer, select “No” for Caller Request Timer, Callee
Request Timer, and Force Timer.
UAC Specify
Refresher As a Caller, select UAC to use the phone as the
refresher, or UAS to use the Callee or proxy server as
the refresher.
UAS Specify
Refresher As a Callee, select UAC to use caller or proxy server
as the refresher, or UAS to use the phone as the
refresher.
Force INVITE Session Timer can be refreshed using INVITE method
or UPDATE method. Select “Yes” to use INVITE
method to refresh the session timer.
Enable 100rel PRACK (Provisional Acknowledgment) method
enables reliability to SIP provisional responses (1xx
series). This is required to support PSTN
inter-networking.

79
Account Ring Tone There are 4 uniquely defined ring tones:
· One (1) System Ring Tone: when selected, all calls
will ring with system ring tone.
· Three (3) Customer Ring Tones: when selected,
incoming calls from designated account will play
selected ring tone.
Ring Timeout Defines how long ring will ring when receiving a call.
Default is 60 seconds.
Line-seize Timeout Defines how long it will take before seizing the line in
Shared Call Appearance group. Default is 15 seconds.
Send Anonymous
If this parameter is set to “Yes”, the “From” header in
outgoing INVITE message will be set to anonymous,
essentially blocking the Caller ID from displaying.
Anonymous Call
Rejection Default is “No”. If set to “Yes”, anonymous call will be
rejected.
Auto Answer Default is “No”. If set to “Yes”, ZXV10 P802 will
automatically switch on speaker to answer the
incoming call. Set to Intercom/Paging mode, it will
answer the call based on the SIP info header from the
server.
Allow Auto Answer
by Call-Info If the Call-Info header contains answer-after=0, the call
be answered automatically (so called paging mode).
Refer-To Use
Target Contact Default is “No”. If set to “Yes”, then for Attended
Transfer, the “Refer-To” header uses the transferred
target’s Contact header information.
Transfer on
Conference Hangup Defines whether or not the call is transferred to the
other party if the initiator of the conference hangs up.
Default setting is set to “No”.
Preferred Vocoder ZXV10 P802 supports up to 7 different Vocoder types

80
including G.711(a/µ) (also known as PCMU/PCMA),
G.723.1, G.729A/B, G.726-32, iLBC, G.722
(wide-band).
Configure Vocoders in a preference list that is included
with the same preference order in SDP message.
Enter the first Vocoder in this list by choosing the
appropriate option in “Choice 1”. Similarly, enter the
last Vocoder in this list by choosing the appropriate
option in “Choice 8”.
SRTP Mode Enable SRTP mode based on selection. Default is
“No”.
Symmetric RTP Selects whether or not symmetric RTP is supported.
Silence Suppression This controls the silence suppression/VAD feature of
the audio codec G.723 and G.729. If set to “Yes”, when
silence is detected, a small quantity of VAD packets
(instead of audio packets) will be sent during the period
of no talking. If set to “No”, this feature is disabled.
Voice Frames per
TX This field contains the number of voice frames to be
transmitted in a single Ethernet packet (be advised the
IS limit is based on the maximum size of Ethernet
packet is 1500 byte (or 120kbps)).
When setting this value, be aware of the requested
packet time (ptime, used in SDP message) is a result
of configuring this parameter. This parameter is
associated with the first codec in the above codec
Preference List or the actual used payload type
negotiated between the 2 conversation parties at run
time. E.g., if the first codec is configured as G.723 and
the “Voice Frames per TX” is set to 2, then the “ptime”
value in the SDP message of an INVITE request will be
60ms because each G.723 voice frame contains 30ms
of audio. Similarly, if this field is set to 2 and the first
codec is G.729 or G.711 or G.726, then the “ptime”
value in the SDP message of an INVITE request will be
20ms.

81
If the configured voice frames per TX exceeds the
maximum allowed value, the IP phone will use and
save the maximum allowed value for the
corresponding first codec choice. The maximum value
for PCM is 10 (x10ms) frames; for G.726, it is 20
(x10ms) frames; for G.723, it is 32 (x30ms) frames; for
G.729/G.728, 64 (x10ms) and 64 (x2.5ms) frames
respectively.
Please be careful when editing these parameters.
Adjusting these parameters will also change the
dynamic jitter buffer. The ZXV10 P802 has a patent
dynamic jitter buffer handling algorithm. The jitter
buffer range is 20 ~ 200 ms.
We recommend using the default settings provided.
We do not recommend adjusting these parameters if
you are an average user. Incorrect settings will affect
the voice quality.
No Key Entry
Timeout Default is 4 seconds. After the timeout, the phone will
send out the dialed number.
Use # as Dial Key This parameter allows users to configure the “#” key as
the “Send” (or “Dial”) key. If set to “Yes”, the “#” key will
immediately send the call. In this case, this key is
essentially equivalent to the “(Re)Dial” key. If set to
“No”, the “#” key is included as part of the dial string.
G723 Rate Encoding rate for G723 codec. By default, 6.3kbps rate
is set.
G726-32 Packing
Mode Select “ITU” or “IETF” for G726-32 packing mode.
iLBC Frame Size iLBC packet frame size. Default is 20ms. For Asterisk
PBX, 30ms might be required.
iLBC Payload Type Payload type for iLBC. Default value is 97. The valid

82
range is between 96 and 127.
Conference URI Configure the conference URI when using Broadsoft
N-way calling feature.
Special Feature Default is Standard. Choose the selection to meet
special requirements from Soft Switch vendors.
Saving the Configuration Changes
After the user makes a change to the configuration, press the “Update” button
in the Configuration Menu. The web browser will then display a message
window to confirm saved changes.
We recommend rebooting or powering cycle the IP phone after saving
changes.
Rebooting the Phone Remotely
Press the “Reboot” button at the bottom of the configuration menu to reboot the
phone remotely. The web browser will then display a message window to
confirm that reboot is underway. Wait 30 seconds to log in again.

83
Software Upgrade & Customization
Software (or firmware) upgrades are completed via either TFTP or HTTP. The
corresponding configuration settings are in the ADVANCED SETTINGS
configuration page.
Firmware Upgrade Through TFTP/HTTP
To upgrade via TFTP or HTTP, select TFTP or HTTP upgrade method.
“Upgrade Server” needs to be set to a valid URL of a HTTP server. Server
name can be in either FQDN or IP address format. Here are examples of some
valid URLs.
z firmware.mycompany.com:6688/ZTE/1.2.3.5
z 72.172.83.110
There are two ways to set up the Upgrade Server to upgrade firmware: via Key
Pad Menu or Web Configuration Interface.
Key Pad Menu
To configure the Upgrade Server via Key Pad Menu options, select “Config”
from the Main Menu, then select “Upgrade”. Under this sub Menu, user can
edit Upgrade Server in either an IP address format or FQDN format. Choose
“Save and use TFTP” or “Save and use HTTP” to select upgrade method.
Select “Reboot” from the Main Menu to reboot the phone.
Web Configuration Interface
To configure the Upgrade Server via the Web configuration interface, open the
web browser. Enter the ZXV10 P802 IP address. Enter the admin password to
access the web configuration interface. In the ADVANCED SETTINGS page,
enter the Upgrade Server’s IP address or FQDN in the “Firmware Server Path”
field. Select TFTP or HTTP upgrade method. Update the change by clicking
the “Update” button. “Reboot” or power cycle the phone to update the new
firmware.
During this stage, the LCD will display the firmware file downloading process.
Please do NOT disrupt or power down the unit. If a firmware upgrade fails for
any reason (e.g., TFTP/HTTP server is not responding, there are no code
image files available for upgrade, or checksum test fails, etc), the phone will
stop the upgrading process and re-boot using the existing firmware/software.

84
Firmware upgrades take around 60 seconds in a controlled LAN or 5-10
minutes over the Internet. We recommend completing firmware upgrades in a
controlled LAN environment whenever possible.
No Local TFTP/HTTP Server
For users who do not have a local TFTP/HTTP server, we provide a HTTP
server on the public Internet for users to download the latest firmware upgrade
automatically. Please check the Support/Download section of our website to
obtain this HTTP server IP address: http://www.zte.com.cn.
Alternatively, download and install a free TFTP or HTTP server to the LAN to
perform firmware upgrades. A free Windows version TFTP server is available:
http://support.solarwinds.net/updates/New-customerFree.cfm.
INSTRUCTIONS FOR LOCAL TFTP UPGRADE:
1. Unzip the file and put all of them under the root directory of the
TFTP server.
2. The PC running the TFTP server and the ZXV10 P802 should
be in the same LAN segment.
3. Go to File -> Configure -> Security to change the TFTP
server's default setting from "Receive Only" to "Transmit
Only" for the firmware upgrade.
4. Start the TFTP server, in the phone’s web configuration page
5. Configure the Firmware Server Path with the IP address of the
PC
6. Update the change and reboot the unit
User can also choose to download the free HTTP server from
http://httpd.apache.org/ or use Microsoft IIS web server.
NOTE:

85
When ZXV10 P802 phone boots up, it will send TFTP or HTTP request to
download configuration file “cfg000b82xxxxxx”, where “000b82xxxxxx” is the
MAC address of the ZXV10 P802 phone. This file is for provisioning purpose.
For normal TFTP or HTTP firmware upgrades, the following error messages in
a TFTP or HTTP server log can be ignored: “TFTP Error from [IP ADRESS]
requesting cfg000b82023dd4 : File does not exist.Configuration File
Download”
Configuration File Download
The ZXV10 P802 can be configured via Web Interface as well as via
Configuration File (binary or XML) through TFTP or HTTP/HTTPS. The “Config
Server Path” is the TFTP or HTTP server path for the configuration file. It
needs to be set to a valid URL, either in FQDN or IP address format. The
“Config Server Path” can be the same or different from the “Firmware Server
Path”.
A configuration parameter is associated with each particular field in the web
configuration page. A parameter consists of a Capital letter P and 2 to 4 digit
numeric numbers, i.e., P2 is associated with “Admin Password” in the
ADVANCED SETTINGS page. For a detailed parameter list, please refer to the
corresponding configuration template of the firmware.
Once the ZXV10 P802 boots up (or re-booted), it will request a configuration
file named “cfgxxxxxxxxxxxx” followed by a request for configuration XML file
named “cfgxxxxxxxxxxxx.xml”, where “xxxxxxxxxxxx” is the MAC address of
the device, i.e., “cfg000b820102ab”. The configuration file name should be in
lower cases.
For more details on XML provisioning, please refer to http://www.zte.com.cn.
Managing Firmware and Configuration File Download
When “Automatic Upgrade” is set to “Yes”, a Service Provider can use P193
(Auto Check Interval, in minutes, default and minimum is 60 minutes) to have
the devices periodically check for upgrades at pre-scheduled time intervals. By
defining different intervals in P193 for different devices, a Server Provider can
manage and reduce the Firmware or Provisioning Server load at any given
time.

86
Restore Factory Default Setting
WARNING: Restoring the Factory Default Setting will delete all configuration
information of the phone. Please backup or print all the settings before you
restoring factory default settings. We are not responsible for restoring lost
parameters and cannot connect your device to your VoIP service provider.
INSTRUCTIONS FOR RESTORATION:
Step 1: Press “OK” button to bring up the keypad configuration menu,
select “Config”, press “OK” to enter submenu, select “Factory Reset”
(Please refer to Table 5-1 of keypad flow chart)
Step 2: Enter the MAC address printed on the bottom of the sticker.
Please use the following mapping:
0-9: 0-9
A: 22 (press the “2” key twice, “A” will show on the LCD)
B: 222
C: 2222
D: 33 (press the “3” key twice, “D” will show on the LCD)
E: 333
F: 3333
Example: if the MAC address is 000b8200e395, it should be key in as
“0002228200333395”.
NOTE: If there are digits like “22” in the MAC, you need to type “2” then
press “->” right arrow key to move the cursor or wait for 4 seconds to
continue to key in another “2”.
87
Step 3: Press the “OK” button to move the cursor to “OK”. Press “OK”
button again to confirm. If the MAC address is correct, the phone will
reboot. Otherwise, it will exit to previous keypad menu interface.
FCC Warning:
This device complies with part 15 of the FCC Rules. Operation is subject to
the following two conditions:
(1) This device may not cause harmful interference, and (2) this device must
accept any interference received, including interference that may cause
undesired operation.
Any Changes or modifications not expressly approved by the party
responsible for compliance could void the user's authority to operate the
equipment.
FCC 15.105 Class B (b) For a Class B digital device or peripheral, the
instructions furnished the user shall include the following or similar statement,
placed in a prominent location in the text of the manual:
Note: This equipment has been tested and found to comply with the limits for
a Class B digital device, pursuant to part 15 of the FCC Rules. These limits are
designed to provide reasonable protection against harmful interference in a
residential installation. This equipment generates, uses and can radiate radio
frequency energy and, if not installed and used in accordance with the
instructions, may cause harmful interference to radio communications. However,
there is no guarantee that interference will not occur in a particular installation.
If this equipment does cause harmful interference to radio or television
reception, which can be determined by turning the equipment off and on, the
user is encouraged to try to correct the interference by one or more of the
following measures:
—Reorient or relocate the receiving antenna.
—Increase the separation between the equipment and receiver.
—Connect the equipment into an outlet on a circuit different from that to which
the receiver is connected.
—Consult the dealer or an experienced radio/TV technician for help.