ZTE ZXV10P802L IP PHONE User Manual USERS MANUAL
ZTE Corporation IP PHONE USERS MANUAL
UserManual.wiki
>
ZTE
>
ZXV10P802L User Manual
USERS MANUAL
Navigation menu
Upload a User Manual
Namespaces
Wiki Guide
HTML
PDF
Info
Views
User Manual
Discussion / Help
Navigation

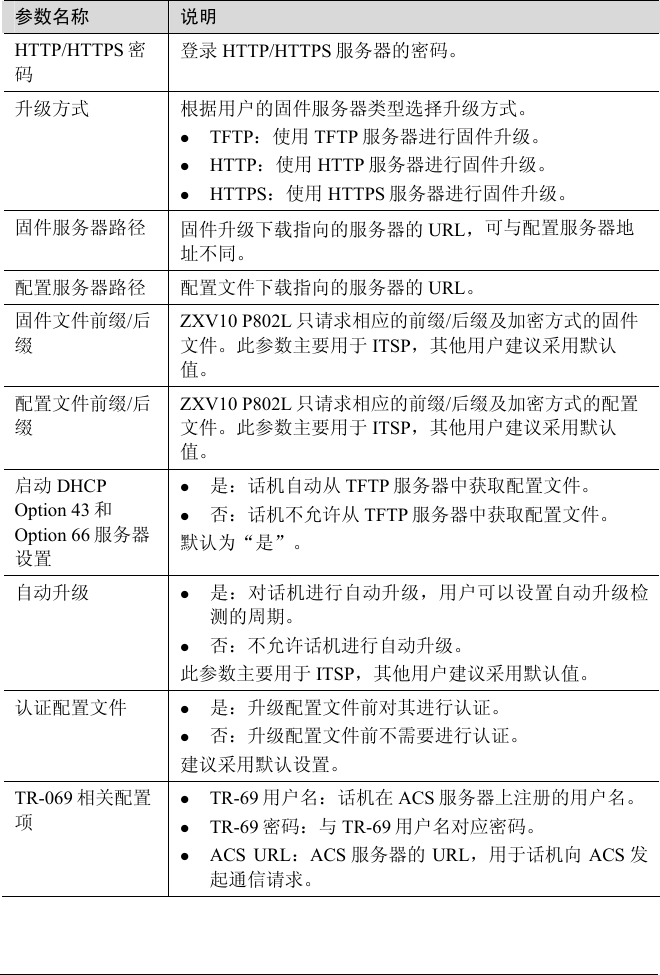
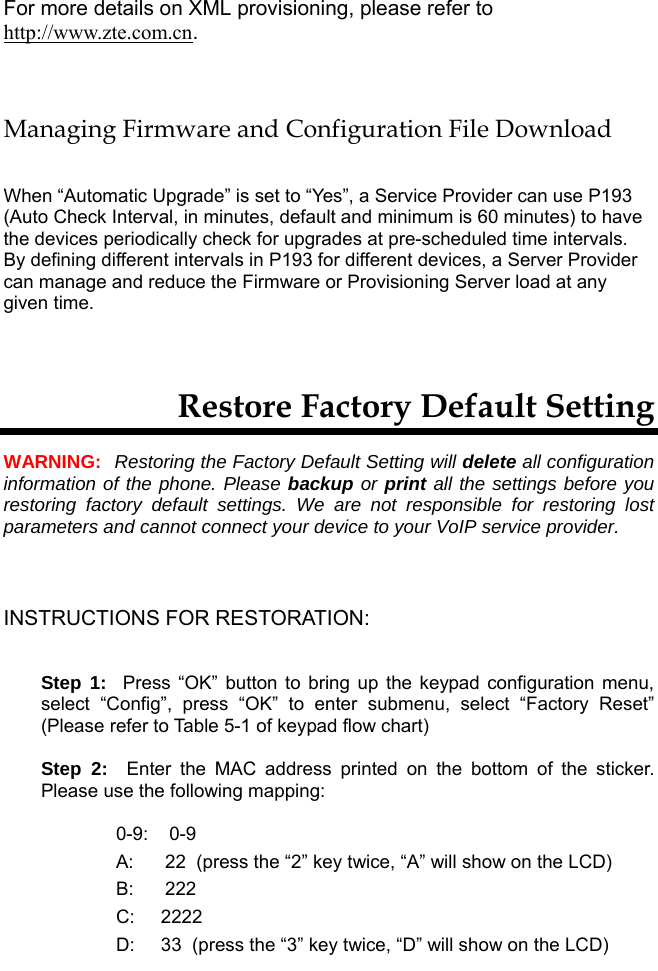
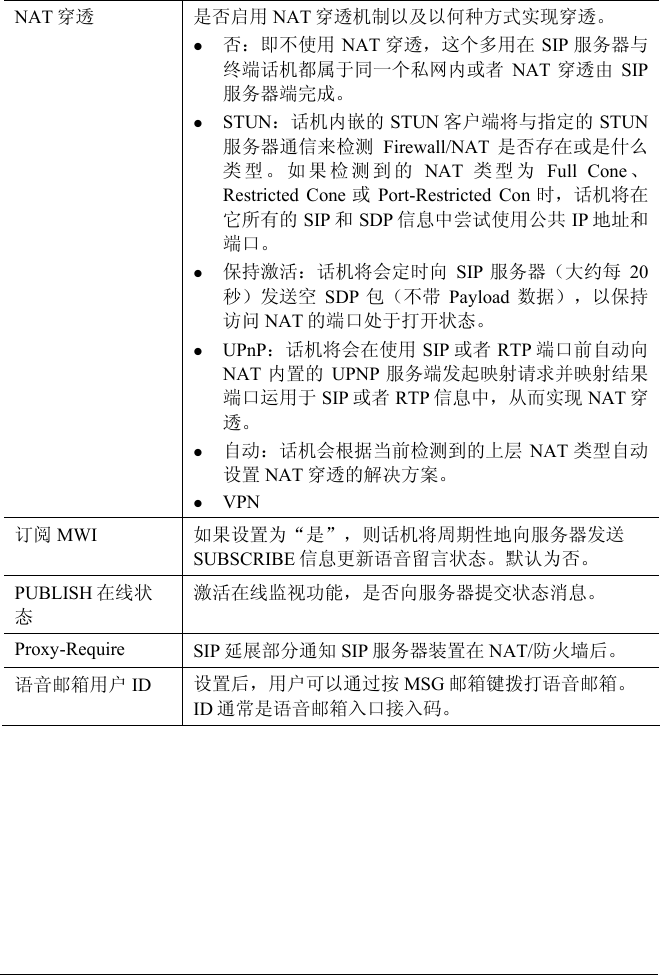
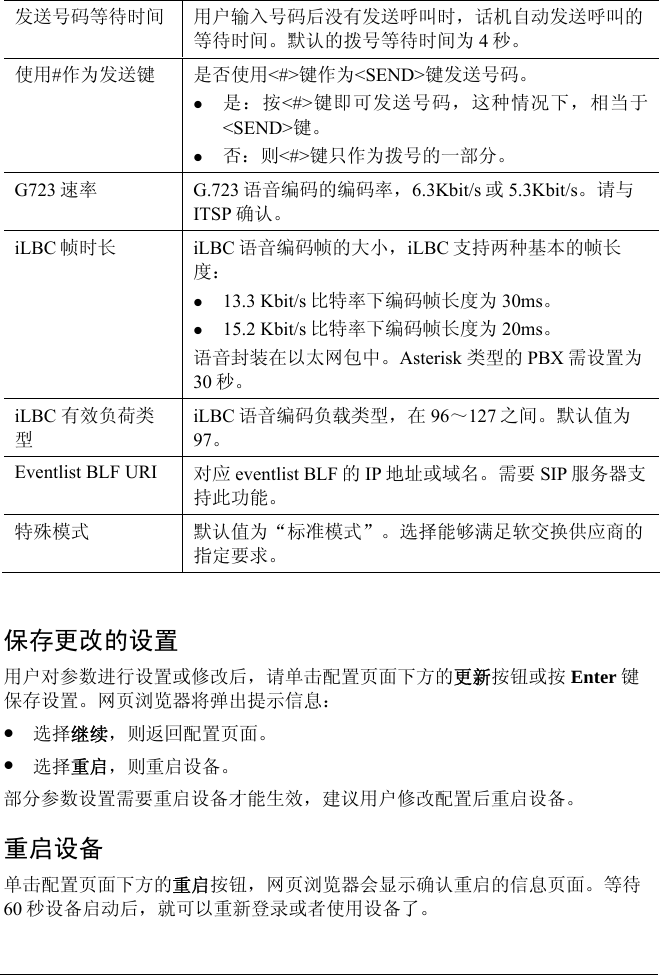
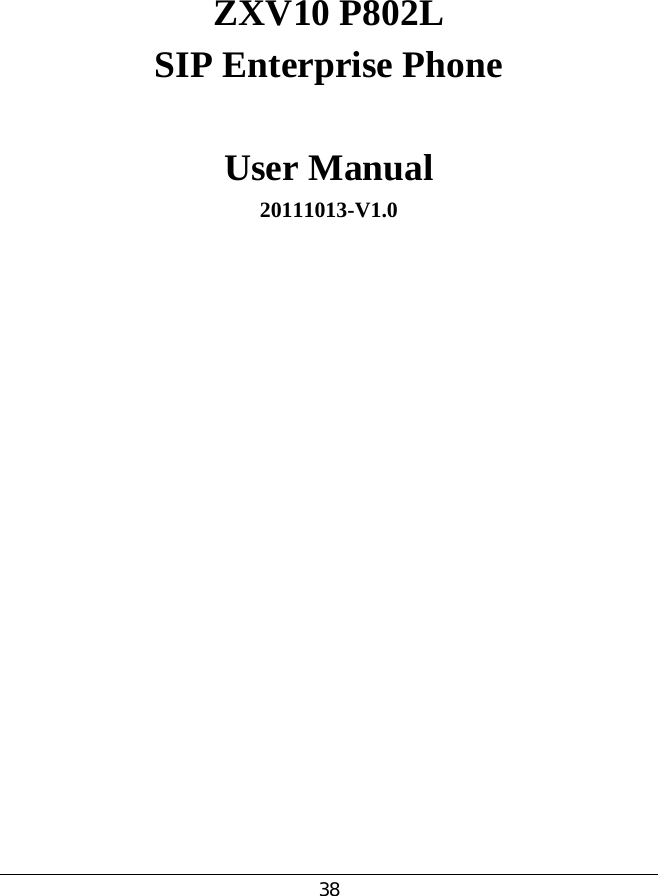
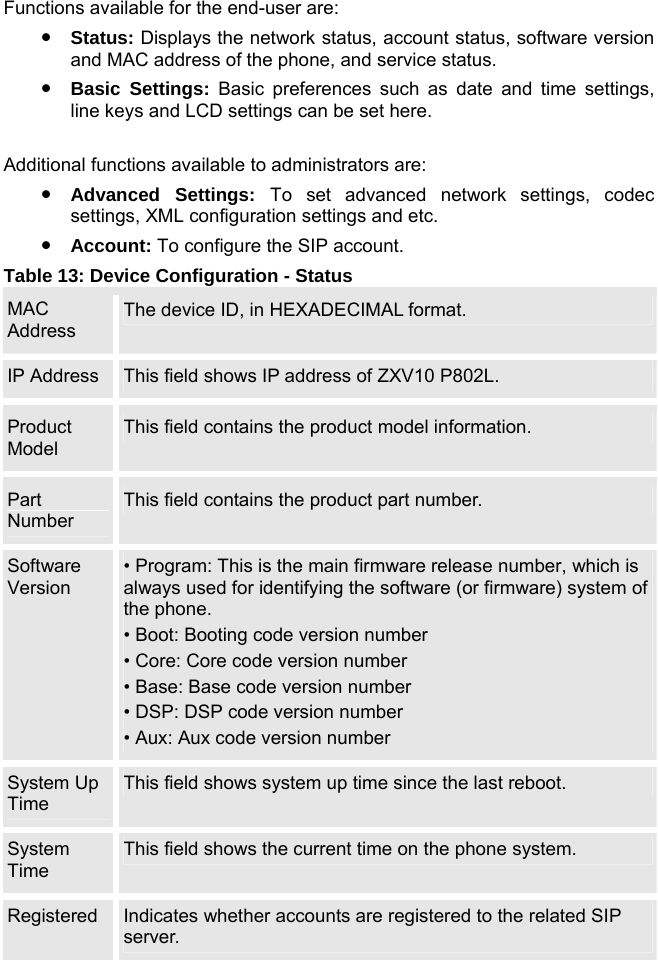
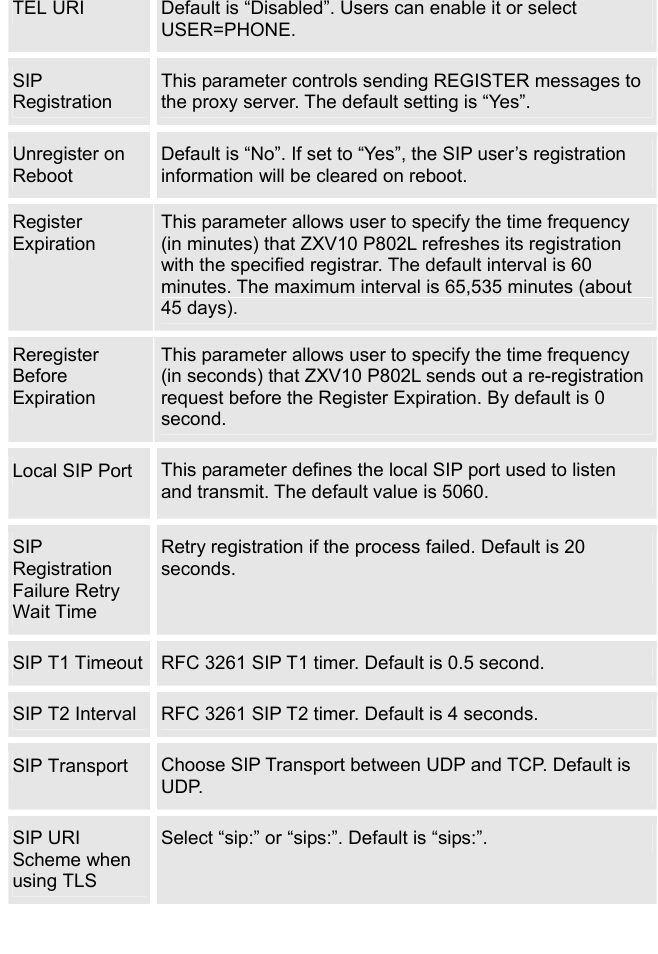
![参数名称 说明 Syslog 级别 选择系统日志等级;默认为 NONE,等级:DEBUG,INFO,WARNING,ERROR;系统日志在以下情况被发送: --产品型号/版本启动(INFO) --NAT 相关信息(INFO) --发送或接收 SIP 信息(DEBUG) --SIP 信息摘要(INFO) --呼入和呼出(INFO) --注册状态更改(INFO) --协商编码(INFO) --以太网连接(INFO) --SLIC chip exception(WARNING/ERROR) --特殊记忆(ERROR) Syslog 使用用户设备;除了标准的 Syslog 有效荷载外,他还包含一下部分:GS_LOG: [device MAC address][error code]错误信息。 例如:May 19 02:40:38 192.168.1.14 GS_LOG: [00:0b:82:00:a1: be][000]Ethernet link is up. NTP 服务器 NTP 服务器的 IP 地址或者 URL,用于同步时间。 启动 DHCP option 42 设定NTP 服务器 是:话机自动与 NTP 服务器同步时间。 否:不允许话机自动同步时间。 SSL 认证 SSL 认证需要访问的网站信息。 SSL 私钥 SSL 认证时使用的私钥。 SSL 私钥密码 设置 SSL 认证时使用的私钥密码。 个性化铃音 为特定的用户 ID 设置个性化铃音,话机接收到此 ID 的来电时,播放个性化铃音。其他来电播放系统铃音。最多可以设置三组。 系统铃音 默认为北美标准。用户可在本地电信标准的基础上调整系统铃声的频率和音调。](https://usermanual.wiki/ZTE/ZXV10P802L/User-Guide-1604181-Page-29.png)
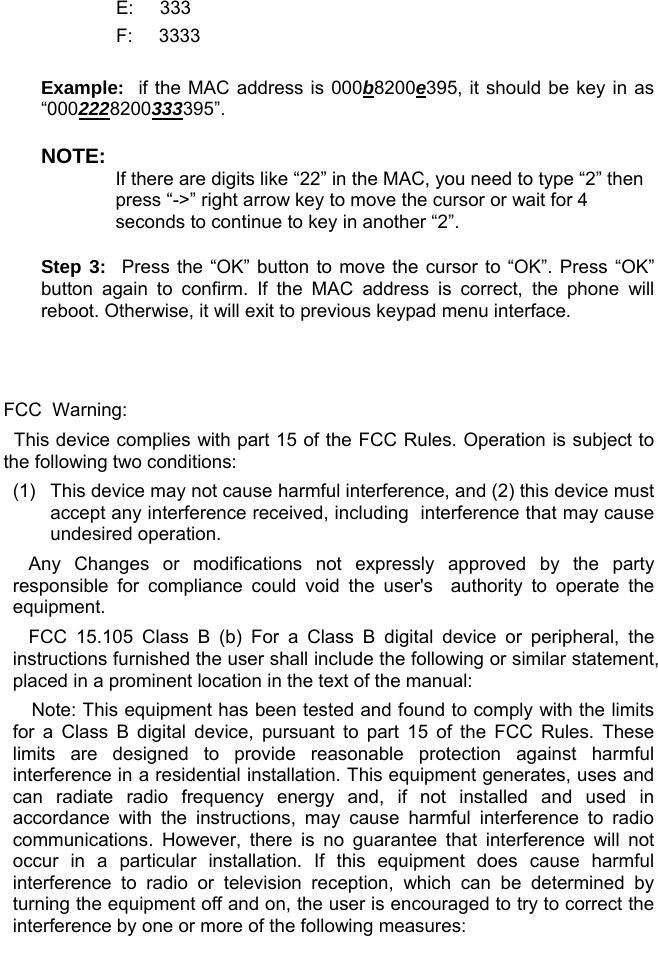
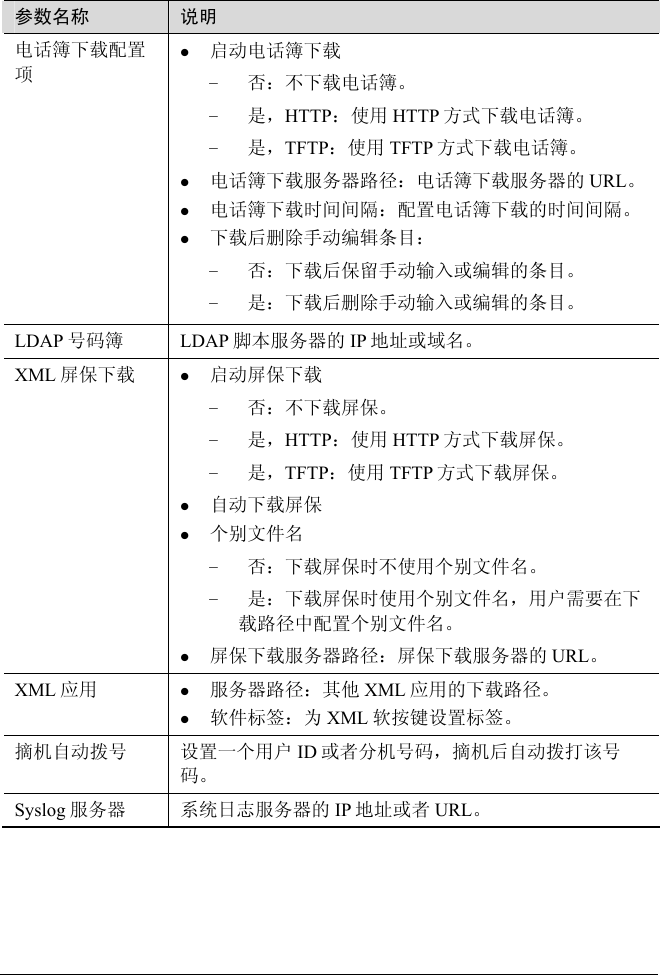
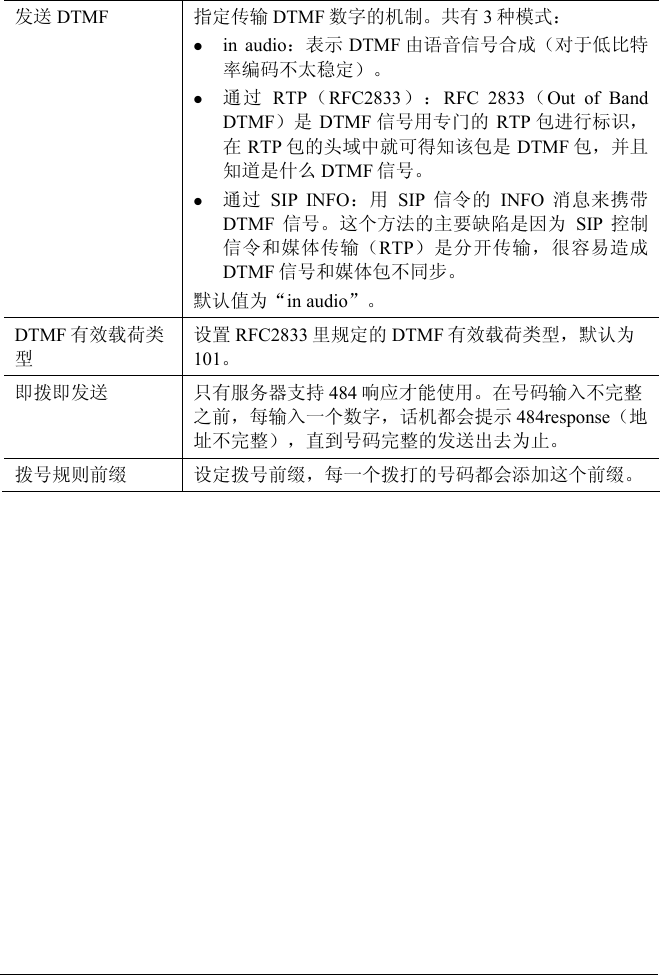
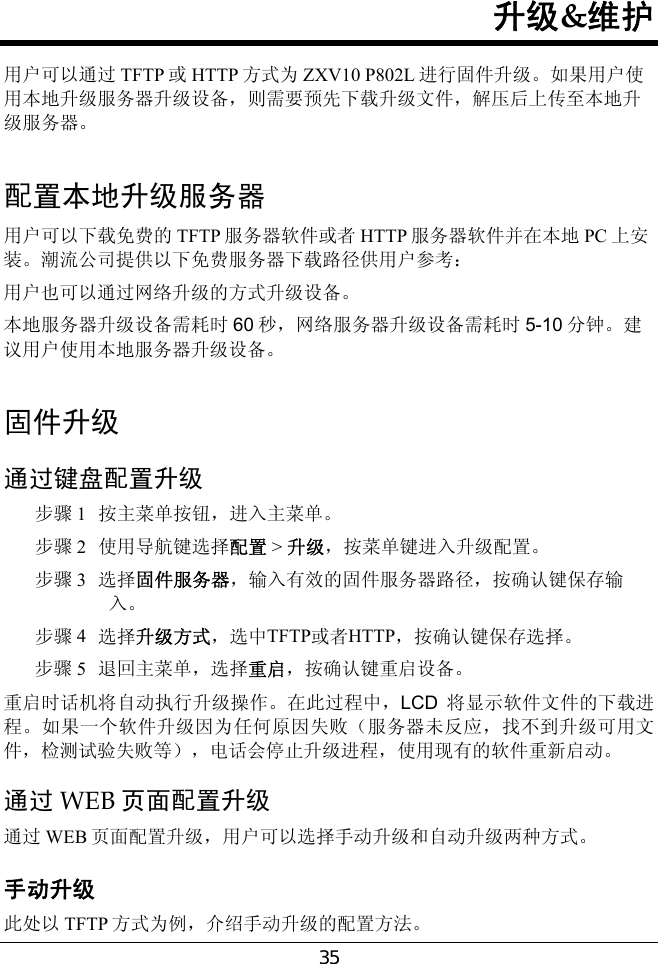
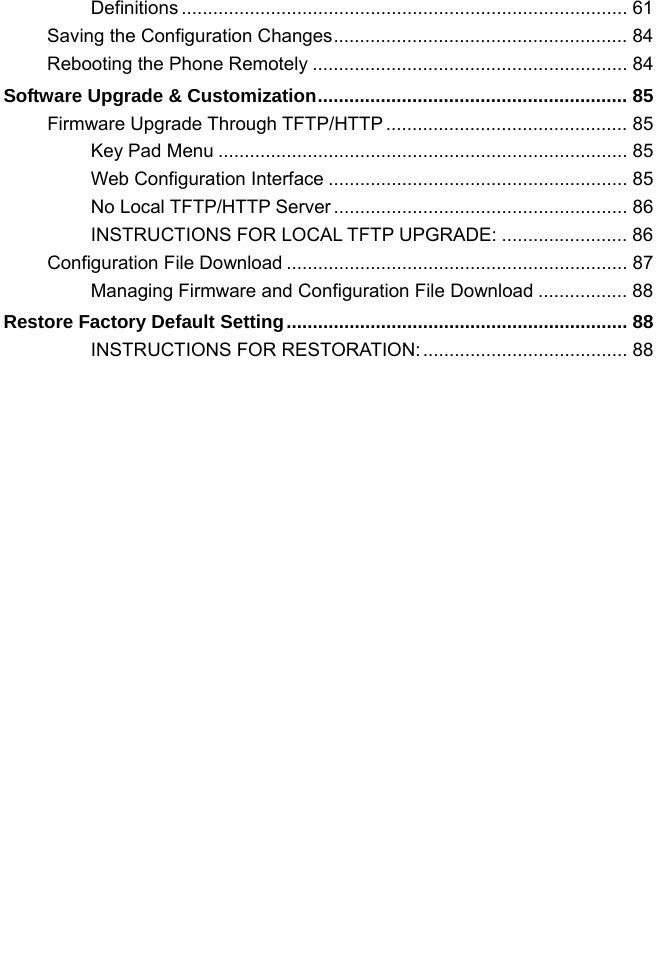
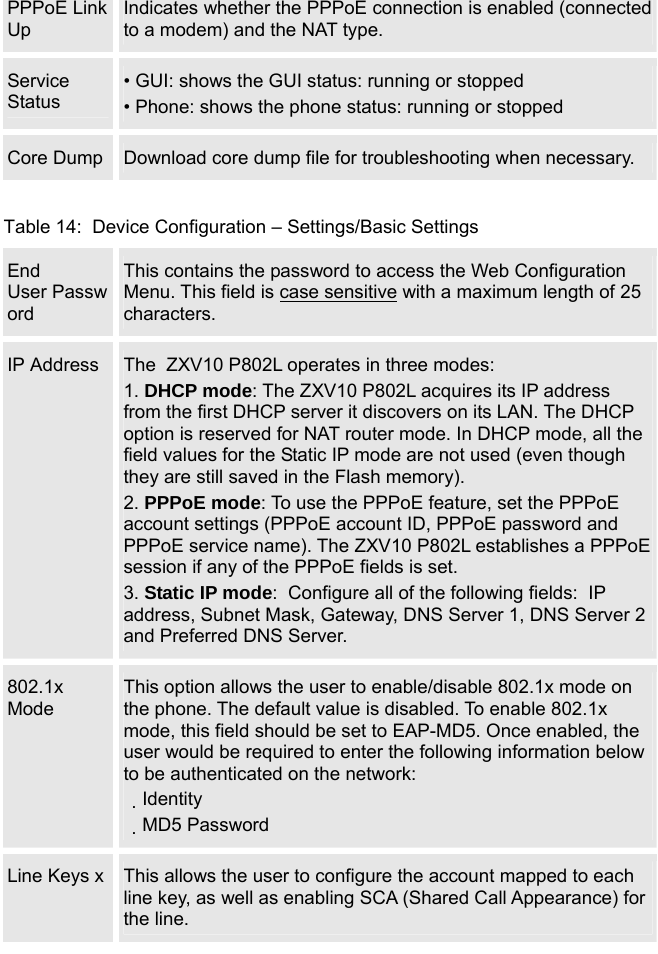
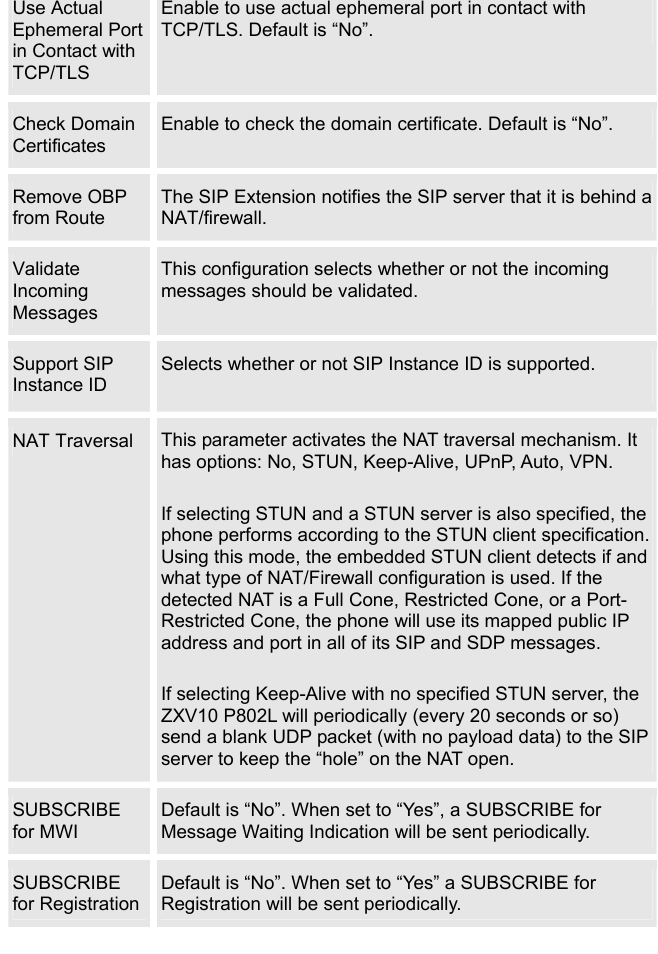
![参数名称 说明 呼叫音调 用户可以根据本地电信的参数来设置各种音调(如拨号音、忙音等)的频率;默认的为北美标准。音频应用已知的值设置,避免不和谐的高音调声音。 句法:f1=val,f2=val[,c=on1/off1[-on2/off2[-on3/off3]]];(频率单位为赫兹,韵律断续 10ms);ON 为振铃,OFF为无声,为了设置一个持续的铃音,OFF 应设置为 0;支持三种音调。 Intercom 用户 ID 当使用 Intercom 功能时,用户需要在此设置用户 ID。 禁止呼叫等待 是:呼叫等待功能被禁用。 否:呼叫等待功能被启用。 禁止呼叫等待铃音 是:呼叫等待铃音被禁用。 否:呼叫等待铃音被启用。 禁止直接 IP 拨打 是:直接 IP 拨打功能被禁用。 否:直接 IP 拨打功能被启用。 使用快速 IP 拨打 是:快速 IP 拨打功能被启用。 否:快速 IP 拨打功能被禁用。 禁止会议 是:会议功能被禁用。 否:会议功能被启用。 多功能键发送DTFM 是:多功能键发送 DTFM 功能被启用。 否:多功能键发送 DTFM 功能被禁用。 禁止转移 是:呼叫转移功能被禁用。 否:呼叫转移功能被启用。 通过 Menu 菜单配置 不限制:允许用户通过 Menu 菜单配置所有参数。 仅基本配置:允许用户通过 Menu 菜单对话机进行基本配置。 控制模式:不允许用户通过 Menu 菜单对话机进行配置。 显示语言 设置网页界面和话机屏幕界面显示的语言类型。自动模式下话机将通过 IP 地址所处国家区域自动显示相应的国家语言,默认显示为英语。 同时用户也可以在 ZTE 网站下载其他支持的语言文件,用户只能上传一种其他语言。](https://usermanual.wiki/ZTE/ZXV10P802L/User-Guide-1604181-Page-30.png)
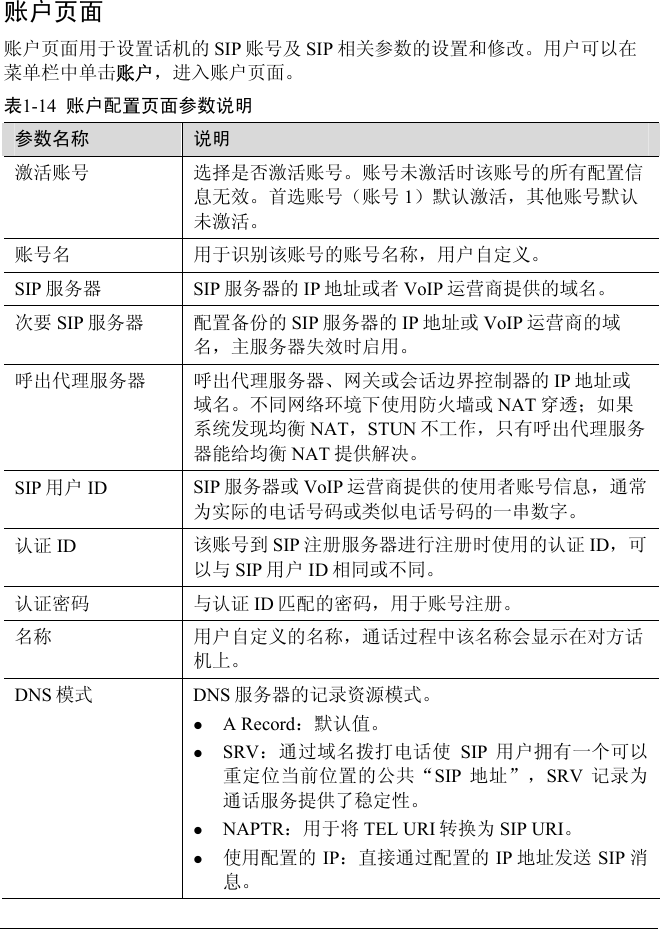
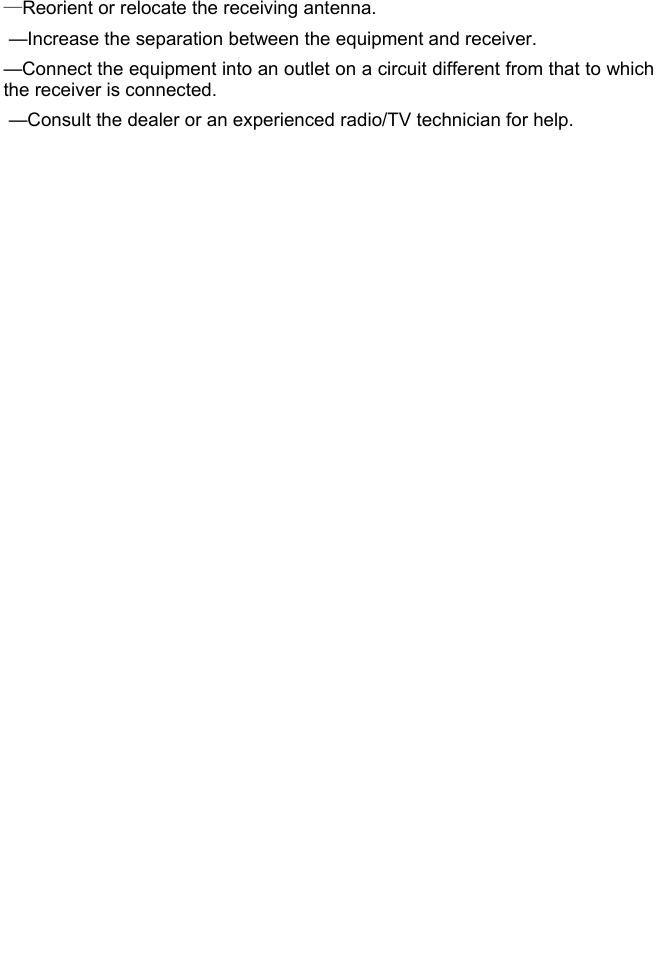
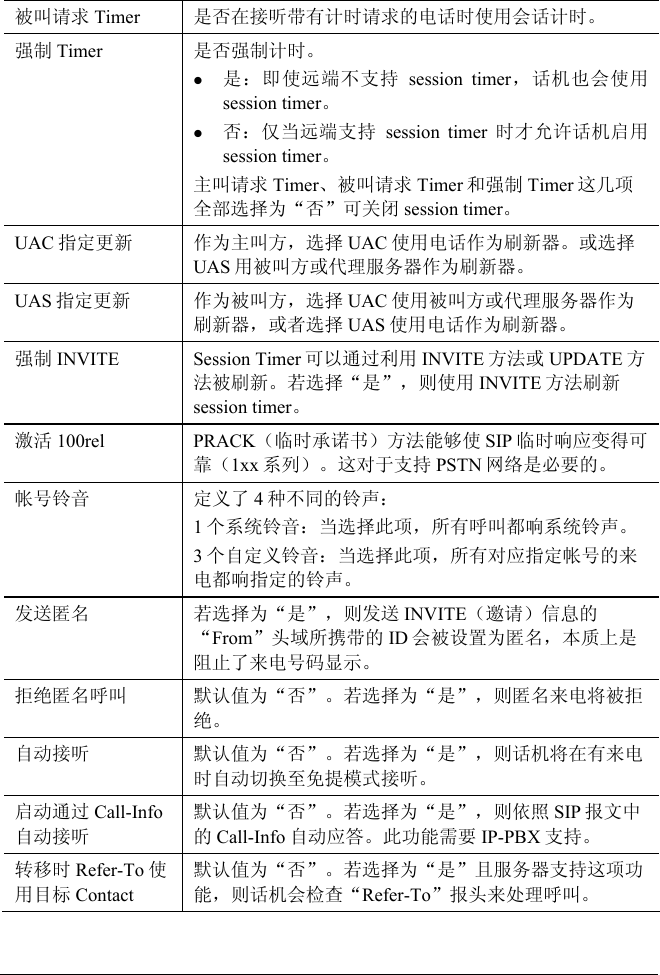
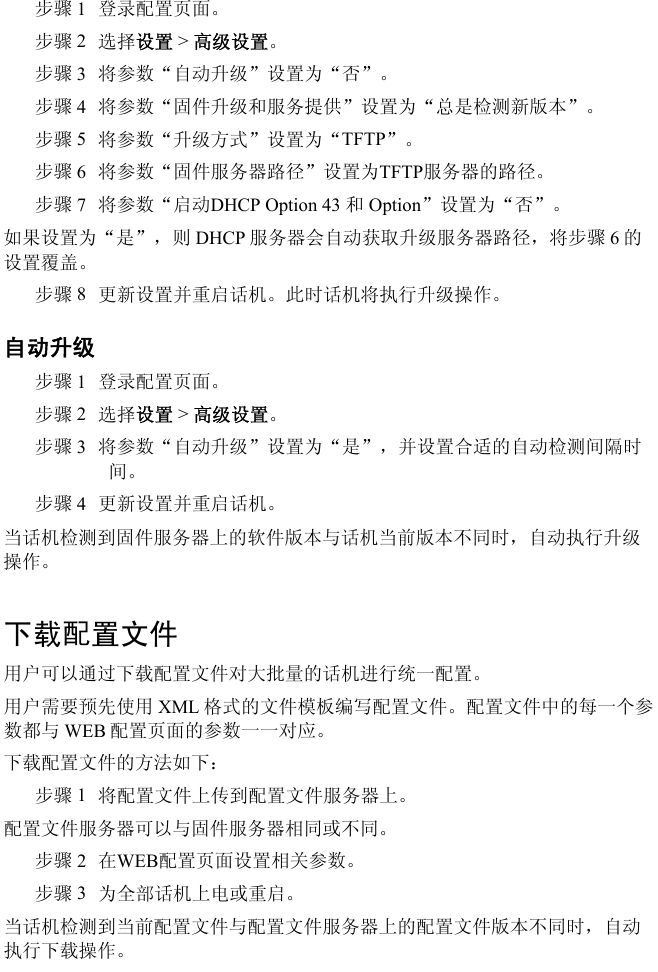
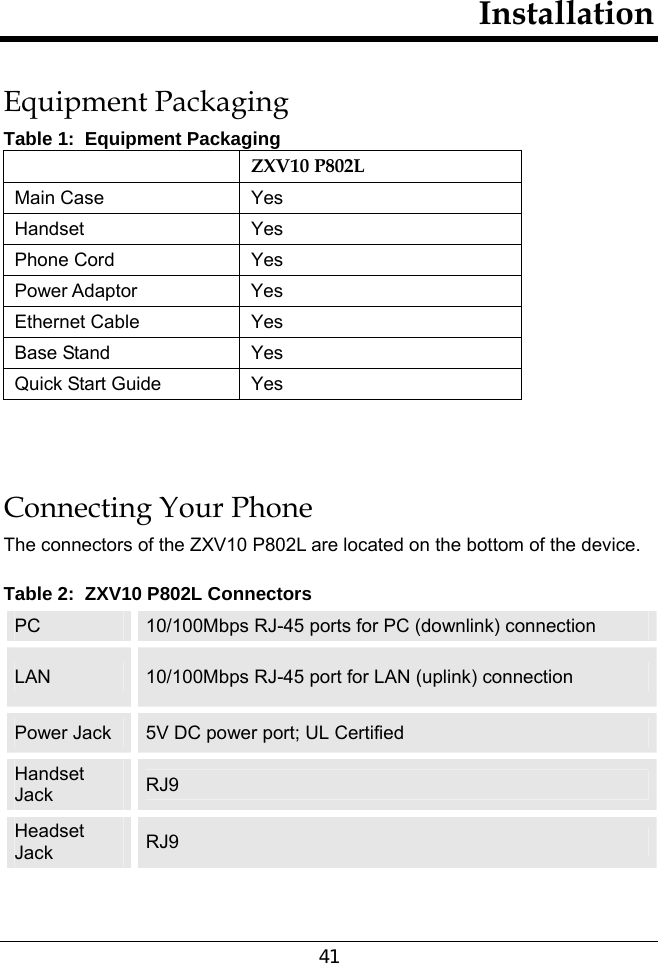
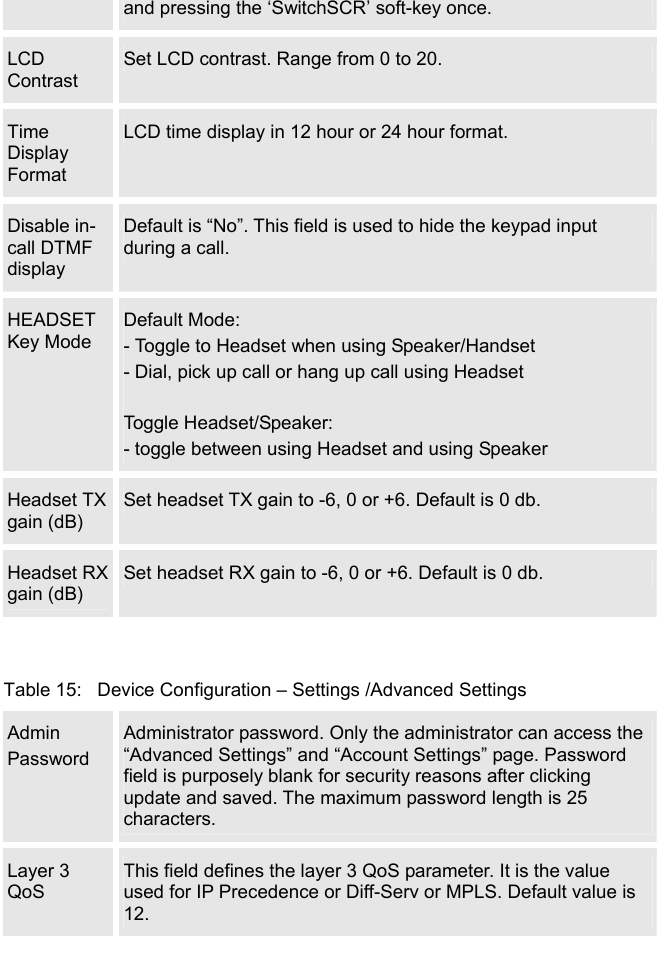
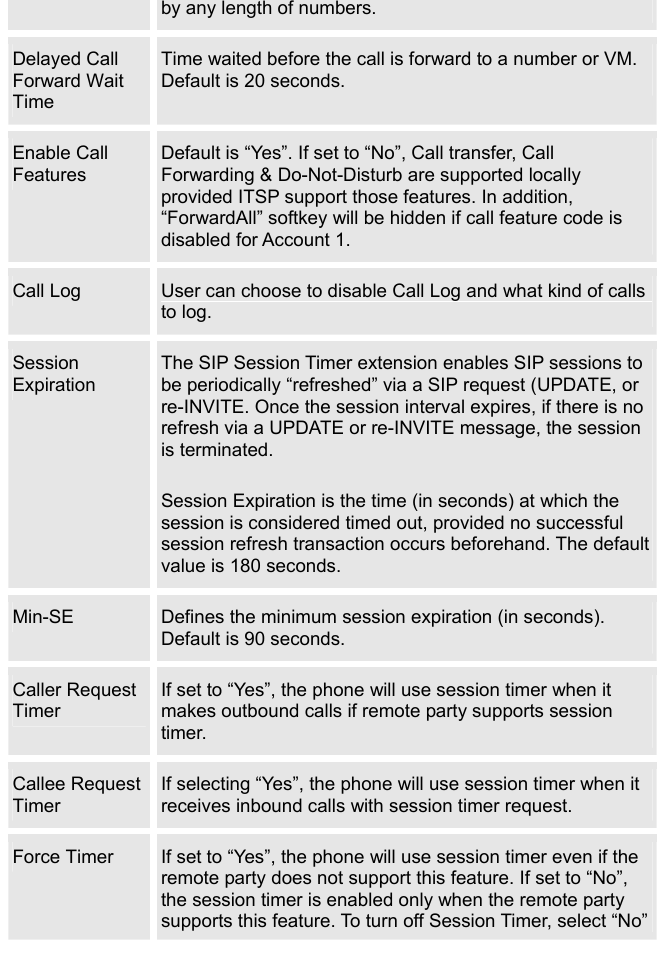
![拨号规则 设置话机所接受的号码范围或者实现快捷缩位拨号等。其语法规则如下: 1.有效值 1,2,3,4,5,6,7,8,9,0,*,# 2.拨号规则 x:表示任何 0-9 数; xx:标准两位任何 0-9 数; ∧:拒绝; [3-5]:3-5 之间的任意数; [147]:拨数 1,4,或者 7; <2=011>:当拨号数字 2的时候将替换为 011; {x+}:允许所有的号码呼出; |:或运算。 2.实例 {[369]11 | 1617xxxxxxx}:允许 311, 611, 911, 和任何10 位数字开始为 1617 的呼叫出去; {^1900x+ | <=1617>xxxxxxx}:将拒绝拨打号码为1900 开头的号码,与拨打任何 7位数增加前缀1617。 BLF 接电话前缀 BLF 事件抢接电话时自动加上的前缀,以兼容不同服务器的 BLF 抢接功能。默认值为“**”。 延迟呼叫等待时间 呼叫被转移或者被接入语音邮箱前的等待时间。默认为20 秒。 激活呼叫功能 设置为是,则本地支持呼叫转接、呼叫转移和免打扰功能。 呼叫日志 设置是否保存呼叫日志以及呼叫日志的保存类型。 Session Expiration SIP 会话期限是在没有成功的 SIP 会话刷新事务发生的前提下,会话从开始到被认为会话超时的 SIP 会话的时间,默认值是 180 秒。 Session Expiration 是会话被认定为超时的时间(秒),前提条件是没有成功的刷新处理预先发生。 Min-SE 会话过期时间的最小值(秒);默认为 90 秒。 主叫请求 Timer 是否主叫时使用会话计时。](https://usermanual.wiki/ZTE/ZXV10P802L/User-Guide-1604181-Page-35.png)
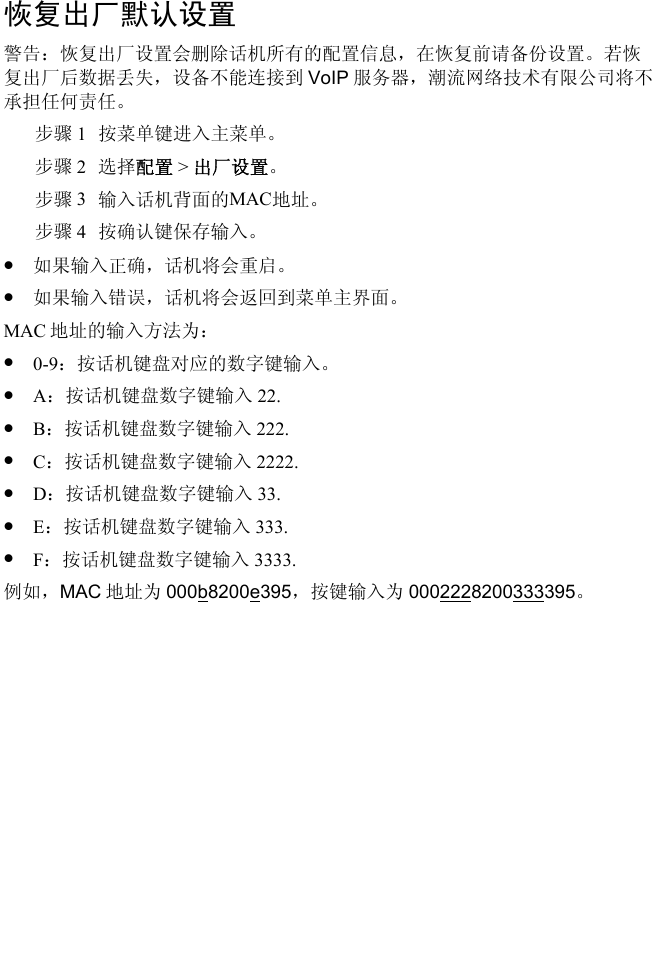

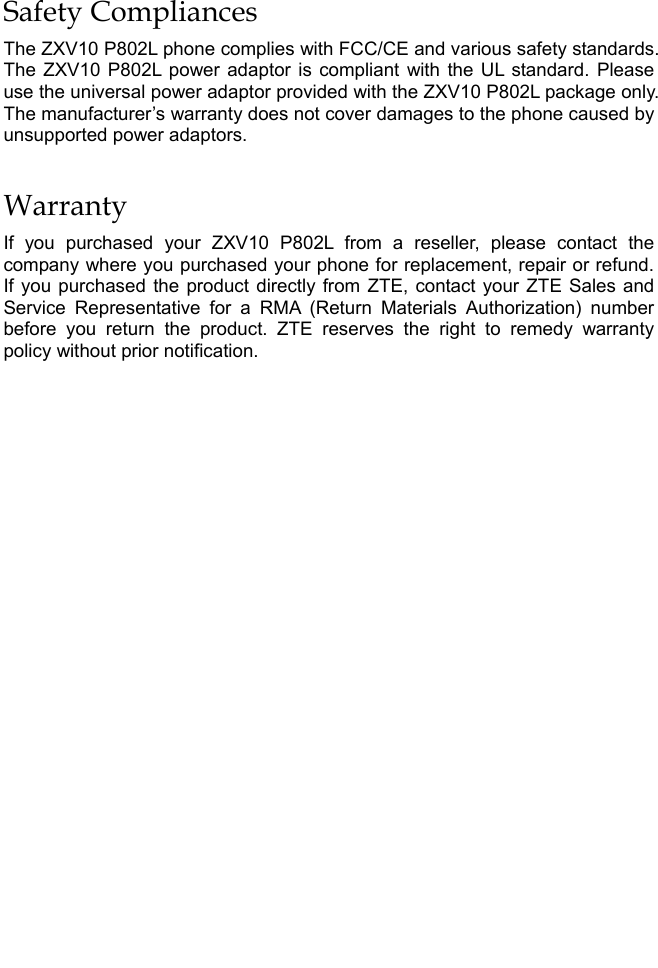


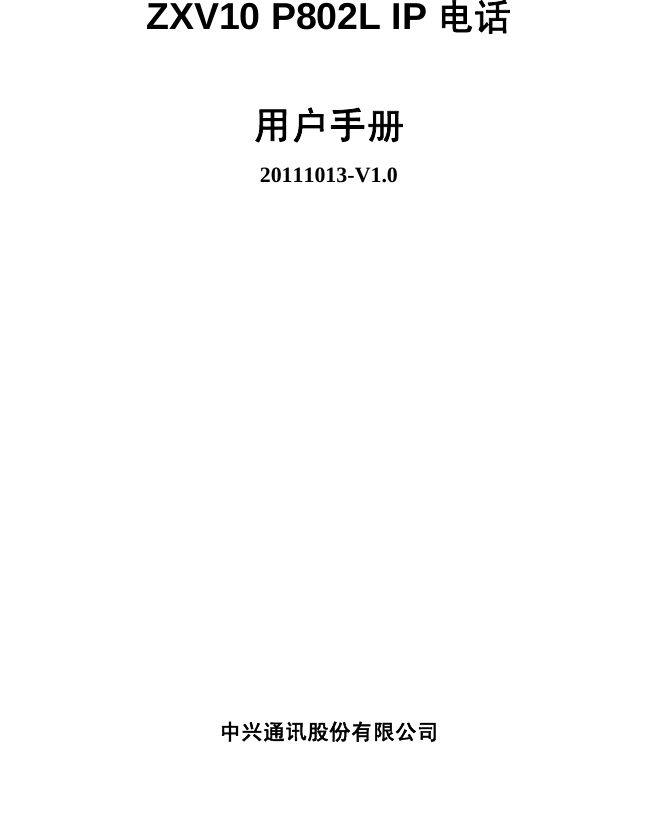
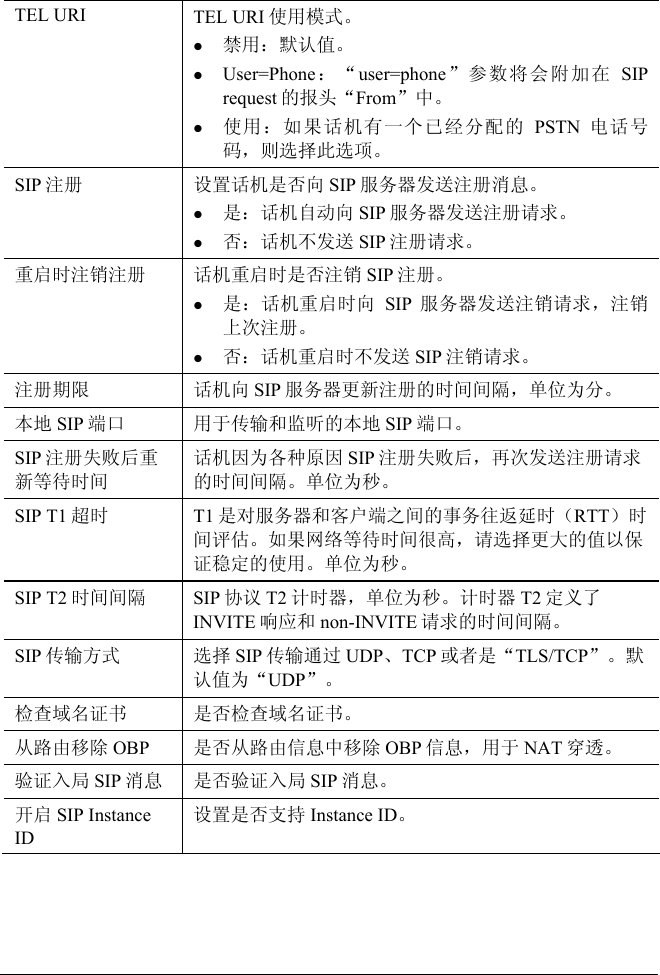
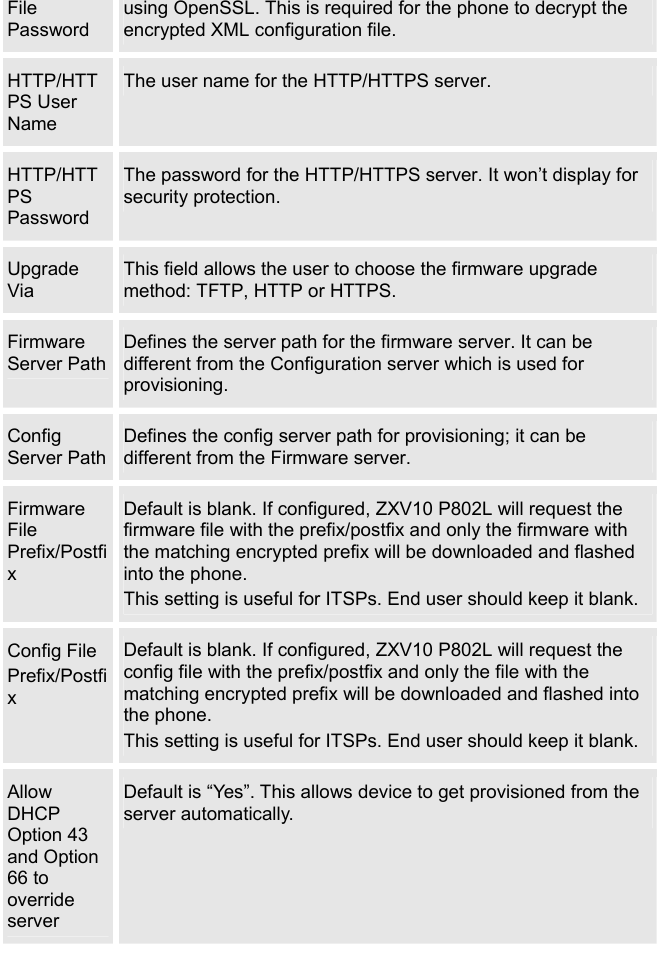
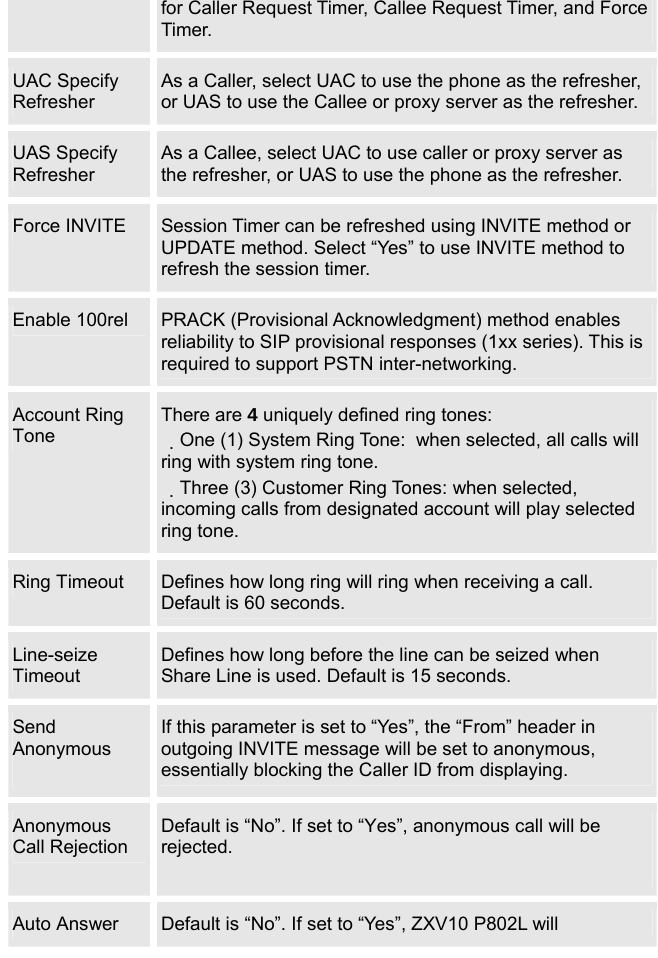
![Options available for Key Mode are : 1. Line 2. Shared Line Time Zone This parameter controls the date/time display according to the specified time zone. If “Allow DHCP Option 2 to override Time Zone setting” is checked, the time zone will be overridden by the DHCP server. Self-Defined Time Zone This parameter allows the users to define their own time zone. The syntax is: std offset dst [offset], start [/time], end [/time] Default is set to: MTZ+6MDT+5,M4.1.0,M11.1.0 MTZ+6MDT+5, This indicates a time zone with 6 hours offset with 1 hour ahead which is U.S central time. If it is positive (+) if the local time zone is west of the Prime Meridian (A.K.A: International or Greenwich Meridian) and negative (-) if it is east. M4.1.0,M11.1.0 The 1st number indicates Month: 1,2,3.., 12 (for Jan, Feb, .., Dec) The 2nd number indicates the nth iteration of the weekday: (1st Sunday, 3rd Tuesday…) The 3rd number indicates weekday: 0,1,2,..,6( for Sun, Mon, Tues, … ,Sat) Therefore, this example is the DST which starts from the first Sunday of April to the 1st Sunday of November. Weather Update By default, “Enable Weather Update:” is set to “Yes”. If set to “No”, weather information will not display on the phone. Settings to customize the display of weather via: City Code – Automatic or enter city code (default is Automatic) Update Interval – Refresh time in minutes (default is 5 mins) Degree Unit – Select Automatic, Fahrenheit or Celsius (default is Automatic) This is displayed when “Enable Weather Update” is set to “Yes”](https://usermanual.wiki/ZTE/ZXV10P802L/User-Guide-1604181-Page-68.png)


![Use custom filename The phone will use custom filename specified in XML server path if set to “Yes”. The default setting is “No”. Idle Screen XML Server Path Specify the idle screen XML server path. Offhook Auto Dial To configure a User ID/extension to dial automatically when the phone is taken offhook. Syslog Server The IP address or URL of System log server. This feature is especially useful for ITSPs. Syslog Level Select the ATA to report the log level. Default is NONE. The level is one of DEBUG, INFO, WARNING or ERROR. Syslog messages are sent based on the following events: product model/version on boot up (INFO level) NAT related info (INFO level) sent or received SIP message (DEBUG level) SIP message summary (INFO level) inbound and outbound calls (INFO level) registration status change (INFO level) neg otiated codec (INFO level) Ethernet link up (INFO level) SLIC chip exception (WARNING and ERROR levels) memory exception (ERROR level) The Syslog uses USER facility. In addition to standard Syslog payload, it contains the following components: GS_LOG: [device MAC address][error code] error message. For example: May 19 02:40:38 192.168.1.14 GS_LOG: [00:0b:82:00:a1:be][000]. Ethernet link is up. Send SIP Log When setting the “Yes”, phone will send out SIP Log to syslog server. Default setting is “No”. NTP server This parameter defines the URI or IP address of the NTP (Network Time Protocol) serve. It is used to display the current](https://usermanual.wiki/ZTE/ZXV10P802L/User-Guide-1604181-Page-74.png)
![date/time. Allow DHCP Option 42 to override NTP server Default is “Yes”. This allows device gets provisioned for DHCP Option 42 from the server automatically. SSL Certificate This defines the SSL certificate needed to access certain websites. SSL Private Key This defines the SSL Private key. SSL Private Key Password This defines the SSL private key password. Distinctive Ring Tone Caller ID must be configured. Select a Distinctive Ring Tone 1 through 3 for a particular Caller ID. The ZXV10 P802L will ONLY use selected ring tones for particular Caller IDs. For all other calls, the ZXV10 P802L will use System Ring Tone. When selected and no Caller ID is configured, the selected ring tone will be used for all incoming calls. System Ring Tone System ring tone. Default is North American standard. Adjust system ring tone frequencies and cadences based on local telecom standard. Call Progress Tones Using these settings, users can configure ring or tone frequencies based on parameters from local telecom. By default, they are set to North American standard. Frequencies should be configured with known values to avoid uncomfortable high pitch sounds. Syntax: f1=val,f2=val[,c=on1/off1[-on2/off2[-on3/off3]]]; (Frequencies are in Hz and cadence on and off are in 10ms) ON is the period of ringing (“On time” in ‘ms’) while OFF is the period of silence. In order to set a continuous ring, OFF should be zero. Otherwise it will ring ON ms and a pause of OFF ms](https://usermanual.wiki/ZTE/ZXV10P802L/User-Guide-1604181-Page-75.png)
![Feature Key Synchronization Default is “No”. This option is to synchronize DND/Call Forward features with Broadsoft. When set to “Yes”, a SUBSCRIBE will be sent out periodically to the server. Then when DND/Call Forward features (Call Forward No Answer, Unconditional Call Forward and Call Forward on Busy) are configured or changed on the phone and the Broadsoft server side, those features will be synchronized on the phone side and the Broadsoft server side. PUBLISH for Presence Enable Presence feature. Proxy-Require SIP Extension to notify SIP server that the unit is behind the NAT/Firewall. Voice Mail UserID When configured, user can access messages by pressing “MSG” button. This ID is usually the VM portal access number. Send DTMF This parameter specifies the mechanism to transmit DTMF digit. There are 3 supported modes: in audio which means DTMF is combined in audio signal (not very reliable with low-bit-rate codec), via RTP (RFC2833), or via SIP INFO. DTMF Payload Type Sends DTMF using RFC2833. The default is 101. Early Dial Default is “No”. Use only if proxy supports 484 responses. Dial Plan Prefix Sets the prefix added to each dialed number. Dial Plan Dial Plan Rules: 1. Accepted Digits: 1,2,3,4,5,6,7,8,9,0 , *, #, A,a,B,b,C,c,D,d 2. Grammar: x - any digit from 0-9; a) xx+ - at least 2 digit numbers b) xx. - only 2 digit numbers c) ^ - exclude d) [3-5] - any digit of 3, 4, or 5](https://usermanual.wiki/ZTE/ZXV10P802L/User-Guide-1604181-Page-82.png)
![e) [147] - any digit of 1, 4, or 7 f) <2=011> - replace digit 2 with 011 when dialing g) | - the OR operand • Example 1: {[369]11 | 1617xxxxxxx} Allow 311, 611, and 911 or any 10 digit numbers with leading digits 1617 • Example 2: {^1900x+ | <=1617>xxxxxxx} Block any number of leading digits 1900 or add prefix 1617 for any dialed 7 digit numbers • Example 3: {1xxx[2-9]xxxxxx | <2=011>x+} Allows any number with leading digit 1 followed by a 3 digit number, followed by any number between 2 and 9, followed by any 7 digit number OR Allows any length of numbers with leading digit 2, replacing the 2 with 011 when dialed. 3. Default: Outgoing – {x+} Allow any length of numbers. Example of a simple dial plan used in a Home/Office in the US: { ^1900x. | <=1617>[2-9]xxxxxx | 1[2-9]xx[2-9]xxxxxx | 011[2-9]x. | [3469]11 } Explanation of example rule (reading from left to right): • ^1900x. - prevents dialing any number started with 1900 • <=1617>[2-9]xxxxxx - allows dialing to local area code (617) numbers by dialing 7 numbers and 1617 area code will be added automatically • 1[2-9]xx[2-9]xxxxxx |- allows dialing to any US/Canada Number with 11 digits length • 011[2-9]x. - allows international calls starting with 011 • [3469]11 - allow dialing special and emergency numbers 311, 411, 611 and 911 Note: In some cases where the user wishes to dial strings such as *123 to activate voice mail or other applications provided by their service provider, the * should be predefined inside the dial plan feature. An example dial plan will be: { *x+ } which allows the user to dial * followed](https://usermanual.wiki/ZTE/ZXV10P802L/User-Guide-1604181-Page-83.png)

![4. Start the TFTP server, in the phone’s web configuration page 5. Configure the Firmware Server Path with the IP address of the PC 6. Update the change and reboot the unit User can also choose to download the free HTTP server from http://httpd.apache.org/ or use Microsoft IIS web server. NOTE: When ZXV10 P802L phone boots up, it will send TFTP or HTTP request to download configuration file “cfg000b82xxxxxx”, where “000b82xxxxxx” is the MAC address of the ZXV10 P802L phone. This file is for provisioning purpose. For normal TFTP or HTTP firmware upgrades, the following error messages in a TFTP or HTTP server log can be ignored: “TFTP Error from [IP ADRESS] requesting cfg000b82023dd4 : File does not exist. Configuration File Download” Configuration File Download The ZXV10 P802L can be configured via Web Interface as well as via Configuration File (binary or XML) through TFTP or HTTP/HTTPS. The “Config Server Path” is the TFTP or HTTP server path for the configuration file. It needs to be set to a valid URL, either in FQDN or IP address format. The “Config Server Path” can be the same or different from the “Firmware Server Path”. A configuration parameter is associated with each particular field in the web configuration page. A parameter consists of a Capital letter P and 2 to 4 digit numeric numbers. i.e., P2 is associated with “Admin Password” in the ADVANCED SETTINGS page. For a detailed parameter list, please refer to the corresponding configuration template of the firmware. Once the ZXV10 P802L boots up (or re-booted), it will request a configuration file named “cfgxxxxxxxxxxxx” followed by a request for configuration XML file named “cfgxxxxxxxxxxxx.xml”, where “xxxxxxxxxxxx” is the MAC address of the device, i.e., “cfg000b820102ab”. The configuration file name should be in lower cases.](https://usermanual.wiki/ZTE/ZXV10P802L/User-Guide-1604181-Page-91.png)