ZTE ZXV10W300V2 Wireless Terminal User Manual ZXV10 W300 Wireless ADSL Router User s Manual
ZTE Corporation Wireless Terminal ZXV10 W300 Wireless ADSL Router User s Manual
ZTE >
Contents
- 1. User Manual 1
- 2. User Manual 2
- 3. User Manual3
User Manual 1
ZXV10 W300
Wireless Access Point
Quick Installation Manual
ZTE CORPORATION
1
ZXV10 W300 Wireless Access Point
Quick Installation Manual
Manual version 20060810-R1.0
Product version
Copyright © 2005 ZTE CORPORATION
All rights reserved.
No part of this documentation may be excerpted, reproduced, translated,
annotated or duplicated, in any form or by any means without the prior
written permission of ZTE CORPORATION.
* * * *
ZTE CORPORATION
ZTE Plaza, Keji Road South, Hi-Tech Industrial Park, Nanshan District, Shenzhen, P.
R. China
Website: http://support.zte.com.cn
Post code: 518057
Customer Support Center: (86) 755 26771900 800-9830-9830
Fax: (86) 755 26772236
E-mail: doc@zte.com.cn
* * * *
S.N.: ×××××××
2
Contents
1 PRODUCT INTRODUCTION ...............................................................................5
1.1 PRODUCT FEATURES .............................................................................................5
1.2 PACKING LIST .......................................................................................................6
1.3 SYSTEM REQUIREMENT.........................................................................................6
2 INTRODUCTION TO THE HARDWARE ...........................................................8
2.1 INDICATORS ..........................................................................................................8
2.2 PORTS AND BUTTONS..........................................................................................10
3 QUICK INSTALLATION .....................................................................................11
3.1 HARDWARE CONNECTIONS .................................................................................11
3.2 FACTORY DEFAULTS............................................................................................12
3.3 COMPUTER SETUP...............................................................................................13
3.3.1 Checking Computer Settings ......................................................................13
3.3.2 Configuring TCP/IP ...................................................................................13
4 WIZARD.................................................................................................................15
4.1 LOGGING ON TO THE ZXV10 W300 DEVICE........................................................15
4.2 SETTING ATM PVC............................................................................................16
4.3 CONNECTIONS ....................................................................................................17
4.4 SETTING CONFIGURATIONS .................................................................................18
4.5 CONFIGURATION INFORMATION...........................................................................19
4.6 CONFIGURATION COMPLETED .............................................................................19
4.7 OTHER COMMON CONFIGURATIONS ....................................................................20
4.7.1 Creating New WAN Connections................................................................20
4.7.2 UPnP..........................................................................................................25
4.7.3 DMZ ...........................................................................................................26
3
4.7.4 Dynamic DNS.............................................................................................27
4.7.5 TR069.........................................................................................................29
5 TECHNICAL SPECIFICATIONS .......................................................................31
5.1 HARDWARE SPECIFICATIONS ...............................................................................31
5.2 SOFTWARE SPECIFICATIONS ................................................................................32
6 QS AND AS.............................................................................................................34
4
1 Product Introduction
Welcome you to use the ZXV10 W300 Wireless Access Point
ZXV10 W300 series products are home user oriented wireless broadband
router integrating ADSL, AP and LAN Switch. The ZXV10 W300 series
wireless access point support PoE standard(IEEE802.3af), acts as the
center of a home network and lets all of the devices in a home network
share the same Internet connection, providing the users with Triple play
services integrating wired or wireless communications, voice and video.
It supports the classification of message contents based on service traffic
and priority tagging for different service requirements, provides superior
QoS based IP, and meets the requirement of access bandwidth for
different services. It provides secure wireless encryption and powerful
firewall to prevent unauthorized users access. In addition, it uses the
TR069 system providing unified management to meet different
requirements of carrier-level and user-level network management.
Besides all of the previous SNMP functions, the TR069 system is added
with terminal device and user management functions to provide the
overall remote network management capability.
1.1 Product Features
Provide four 10/100Base-T Ethernet interfaces for WAN
connection, supporting automatic identification of crossover
cable and straight-through cable.
Provide four 10/100Base-T Ethernet interfaces supporting
automatic identification of crossover cable and
straight-through cable.
Support IEEE802.3af
Provide one IEEE 802.11g/b wireless interface
Provide wireless data security using WEP-64/128/256,
WPA/WPA2 and MAC address filtering.
Provide functional features including subscriber isolation,
ESSID hiding and multi-ESSID
Support Bridge and Router modes
5

ZXV10 W300 Wireless Access Point Quick Installation Manual
Support PPPoE, Static, DHCP, Bridge connections.
Support NAT, IP filtering and firewall functions.
Support network configuration using DHCP
Support UPnP, SNTP, DMZ, IGMP Snooping, IGMP Proxy
and DNS Proxy.
Support IP QoS functions
Support configuration via web and SNMP management
High reliability, ease of use and low power consumption
Note:
Corresponding ISP services are required for the above functions.
1.2 Packing List
The package of the W300 product should contain the following
components:
W300 Wireless Access point 1
Power supply adapter1
Straight-through cables1
Warranty card 1
Quality certificate1
ZXV10 W300 series Wireless Access Point Quick
Installation Manual1
If any of the above components is missing or damaged, please contact
your dealer.In case of replacement, please keep the package and existing
components of the product well.
1.3 System Requirement
Before using the ZXV10 W300 product, please ensure the following
system requirements:
6

Chapter 1 Product Introduction
You have subscribed the WAN service. Your WAN Service
Provider must provide you with at least one legal IP address
(allocated dynamically via dial-up or statically)
One or more PCs with 10/100 M Ethernet Network Interface
Card (NIC)
For wireless access, an external or built-in 802.11g/b
wireless NIC is required.
To set up the system via web, a browser is required, e.g.
Internet Explorer V5.0 or later, or Netscape V4.7 or later.
7

2 Introduction to the Hardware
2.1 Indicators
There area eight indicators on the front panel of the ZXV10 W300. These
indicators indicate the service running status of the ZXV10 W300. The
indicates are described in the table below.
No.Indicators IdentificationColorDescription
1Power
supplyRed
Steady ON: Indicates
the power supply is
connected and turned
on. OFF: Indicates the
power supply is
disconnected or a
failure.
2InternetGreen
Steady ON: The
device is connected to
the Internet
successfully via
built-in dial-up.
3RunningGreen
Flashing: Indicates
the device operates
normally. OFF:
8

Chapter 2 Introduction to the Hardware
No.Indicators IdentificationColor Description
Indicates a device
operation failure.
4WLANGreen
Steady ON: Indicates
Wi-Fi is switched on.
Flashing: The
indicator flashes
according to the
network traffic flow.
OFF; Indicates Wi-Fi
is switched off.
5LAN
Green
Steady ON: Indicates
the device has been
connected to the
LAN. Flashing: The
indicator flashes
according to the
network traffic flow.
OFF: Indicates the
device has not been
connected to the LAN
6WA N
linkGreen
Steady ON: Indicates
an WAN connection is
established and
activated.
Flashing: The
indicator flashes
according to the
network traffic flow.
OFF: Indicates the
device has not been
connected to the
WA N
9
ZXV10 W300 Wireless Access Point Quick Installation Manual
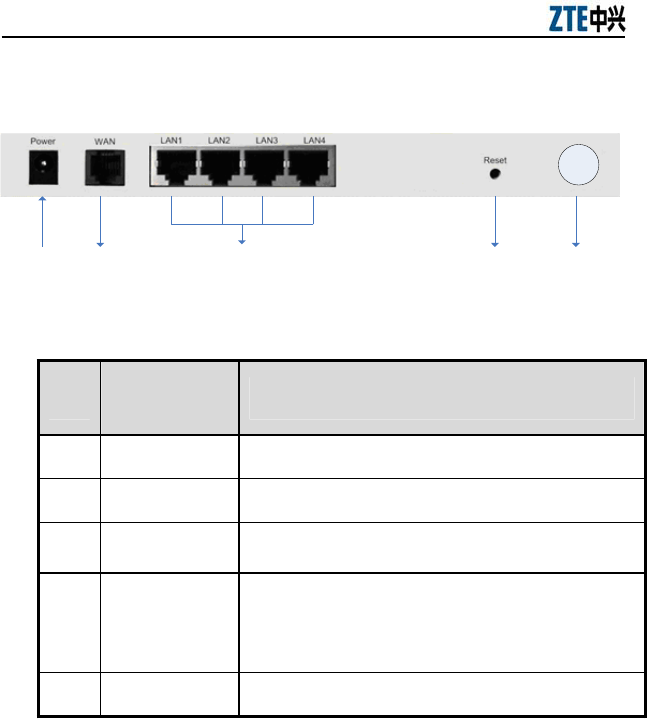
2.2 Ports and Buttons
ķĹĺ
ĸĻ
There are nine ports and buttons on the side of the ZXV10 W300 device.
Ports and buttons are described in the table below.
No.Port
identificationDescription
1 Power Connected to the associated power adaptor
2WA N Connected to the WAN via RJ-45 ethernet cable
3LAN1~ LAN4 Connected to the PC NIC via RJ-45 ethernet
cable
4Reset
The device is power on. Holding on the button for
more than 10 seconds will reset the current settings
to the factory default settings, and the system will
then restart automatically.
5AntennaAntenna
10
3 Quick Installation
It is assumed that you have signed up for the WAN service from the
Service Provider. In addition, this chapter contains the basic product
configuration only, which is applicable to the network environment of
general subscribers or enterprise users.
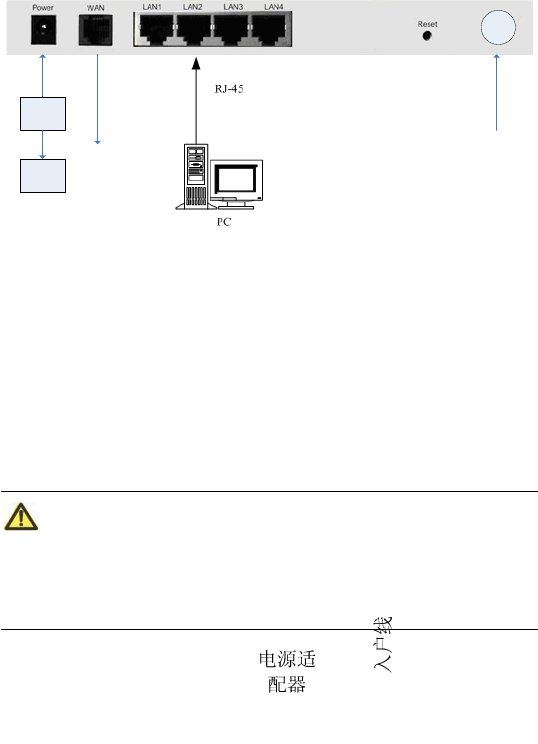
3.1 Hardware Connections
The following diagram illustrates the recommended connections and
installation.
1. Installation position
The ZXV10 W300 device can be placed on a plane surface like
desktop, or installed on the wall. It is recommended to place the
device on the center of the network to be established and keep it
far away from possible interference sources, e.g. metal wall and
microwave oven, for the highest efficiency. It is also
recommended to place it on a relatively higher position so that it
covers all of the physical space.
Note:
In the case it is installed on the wall, you must secure the device to
prevent it from being damaged due to fall-off. Enough space should be
reserved around of the device for normal heat dissipation.
11

ZXV10 W300 Wireless Access Point Quick Installation Manual
2.Connect the WAN port of the device to the ethernet line providing the
WAN service, as shown in the hardware connection diagram.
3.Connect the LAN port of the device to a PC with a NIC using an
RJ45 cable.
4.Connect the power adapter to the Power port of the device, and plug
the adapter to the AC power socket. The device will be powered on
and operate after you pushing the power switch button.
Warning
Please use the power adaptor we provided. Other power adaptor may
make the device unable to work normally or even damage it.
3.2 Factory Defaults
Factory defaults of the ZXV10 W300 device are as follows:
IP address: 192.168.1.1; Subnet mask: 255.255.255.0
Use DHCP server by default. The IP address can be obtained
from the device via DHCP.
WLAN default ESSID: BAVO
Username and password for logging on to the device: admin,
admin.
Note:
In the cases the device does not work due to configuration errors, or you
forget the password, just insert a needle into the Reset hole of the device
and hold down the button for more than 10 seconds when the device is
powered on. This will restore the current settings to the factory defaults
and then the system will restart automatically.
12

Chapter 3 Quick Installation
3.3 Computer Setup
3.3.1 Checking Computer Settings
If your computer uses a proxy server to access the Internet, first you must
disable the proxy service. You must also close the VPN software and the
firewall running on your computer. In the Microsoft Internet Explorer,
check the proxy service settings as follows:
1.In the browser window, select Tools > Internet Options.
2.Click the Connections tab and then the LAN Settings button.
3.Make sure the Use a proxy server for your LAN box is unchecked.
If it is checked, uncheck it and click OK.
3.3.2 Configuring TCP/IP
If your computer uses Windows 95/98/ME/2000/XP, set up your
computer using one of the following two methods of which the first one
is recommended. The following examples use Windows XP as the
operating system. The setup of computers using other operating systems
is similar.
1. The PC can obtain an address from the device via DHCP.
1)From the Windows taskbar, select Start > Control
Panel.
2)Double-click the Network Connection icon.
3)From the right-button menu, select Local Area
Connection > Properties. Select Internet Protocol
(TCP/IP) > Properties.
4)From the Internet Protocol (TCP/IP) Properties
dialog box:
Ensure that Obtain IP address Automatically is checked.
5)Ensure that Obtain DNS server address
automatically is checked.
6)Click OK twice to confirm and save your settings.
2.Configure the PC to use a static address:
13

ZXV10 W300 Wireless Access Point Quick Installation Manual
1)From the Windows taskbar, select Start > Control
Panel.
2)Double-click the Network Connection icon.
3)From the right-button menu, select Local Area
Connection > Properties. Select Internet Protocol
(TCP/IP) > Properties.
4)In the Internet Protocol (TCP/IP) Properties
dialog box, click Use the following IP address to specify
the local computer's IP address to the same network
segment as the LAN port address of the device, i.e.
192.168.1.x (in which the "x" is a decimal integer between
2~254). For example, 192.168.1.2, subnet mask
255.255.255.0. The Default Gateway is set to 192.168.1.1.
5)Configure Use the following DNS server
addresses. To set the DNS server IP addresses, please
contact your local Service Provider, or set it to 192.168.1.1.
6)Click OK twice to confirm and save your settings.
3.After completing the above configuration:
1)If the device is set to the bridging mode, you can
access the Internet using the service (e.g. PPPoE dial-up)
provided by the your service provider.
2)If the device is set to the routing mode, you can
access the Internet directly when it has been connected to
the office-end device successfully.
3)To check the ZXV10 W300 device settings, visit
http://192.168.1.1 via a browser and log on to the device
using admin as both the username and the password.
14
4 Wizard
You need relevant technical knowledge and experience for configuring
the ZXV10 W300 device. To simplify your operations, it is
recommended to use the wizard for quick configuration. A little
configuration will allow you to establish the connection for basic use.
However, to use advanced functions of the device, you need to configure
other options.
Make sure the following issues before configuration:
The computer has been connected to the Ethernet port of the
device using a network cable.
TCP/IP is set properly on your computer.
All the running firewall and VPN software have been closed.
The proxy server setting of the browser you use, e.g. IE, has
been disabled.
Your service provider has provided you with required data. You
can contact your service provide for help.
Notes
ġ
ZXV10 W300 wireless access point is a ramification of the
ZXV10 W300 series ADSL router. Their software is the same. So,
the web remain ADSL settings. Users should not set the VPI and
VCI.
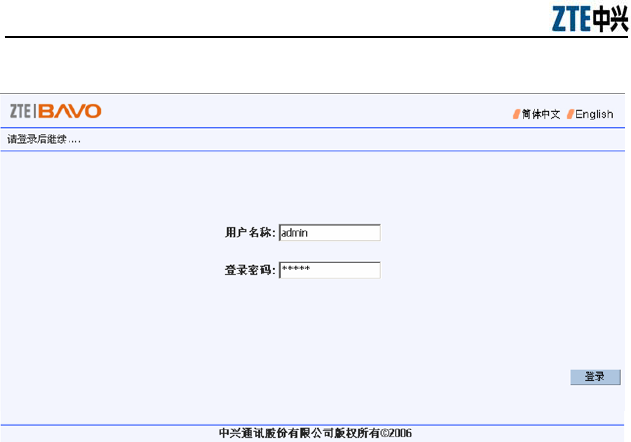
4.1 Logging on to the ZXV10 W300 Device
The ZXV10 W300 device provides a web-based configuration tool that
allows you to configure and manage the device via a web browser. Open
IE. Type in http://192.168.1.1 into the address bar and then press the
Enter key. A login page as shown below appears.
15
ZXV10 W300 Wireless Access Point Quick Installation Manual
Select the language for web configuration. Enter your Username and
Password (which are admin and admin by default), and then click the
Login button to enter the configuration main page.
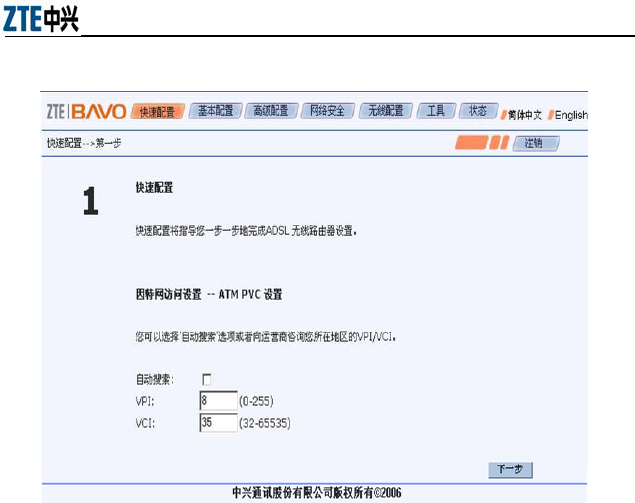
4.2 Setting ATM PVC
Click the Wizard button on the main page to enter the quick
configuration wizard which allows you to configure the DSL Modem
quickly.
In the first step, the page displays the PVC default value of the WAN
interface. The VPI/VCI value depends on the operational environment.
Please contact your service provider for the data. After completing the
setting, click Next on the page.
16
Chapter 4 Wizard
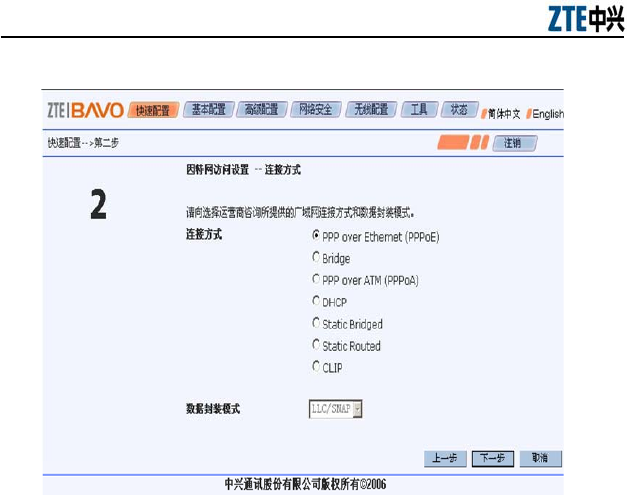
4.3 Connections
You can select one of the ADSL access modes, including PPPoE, PPPoA,
Bridge, DHCP, Static Bridged, Static Routed and CLIP, and then
configure data encapsulation. Please contact your service provider for the
settings of connection and encapsulation. After completing the setting,
click Next on the page.
17
ZXV10 W300 Wireless Access Point Quick Installation Manual
4.4 Setting Configurations
The configuration page you enter may be different depending on the type
of connection you selected. The configuration sequences in the cases of
the seven types of connections are as follows, respectively:
PPPoA and PPPoE: ATM PVC Setting > Connection Type
> PPP Username and Password > Configuration
Information > configuration completed.
DHCP and Bridge: ATM PVC Setting > Connection Type
> Configuration Information > configuration completed.
Static Bridged and Static Routed: ATM PVC Setting >
Connection Type > WAN Setting > Configuration
Information > configuration completed.
CLIP: ATM PVC Setting > Connection Type > CLIP
Setting > Configuration Information > configuration
completed.
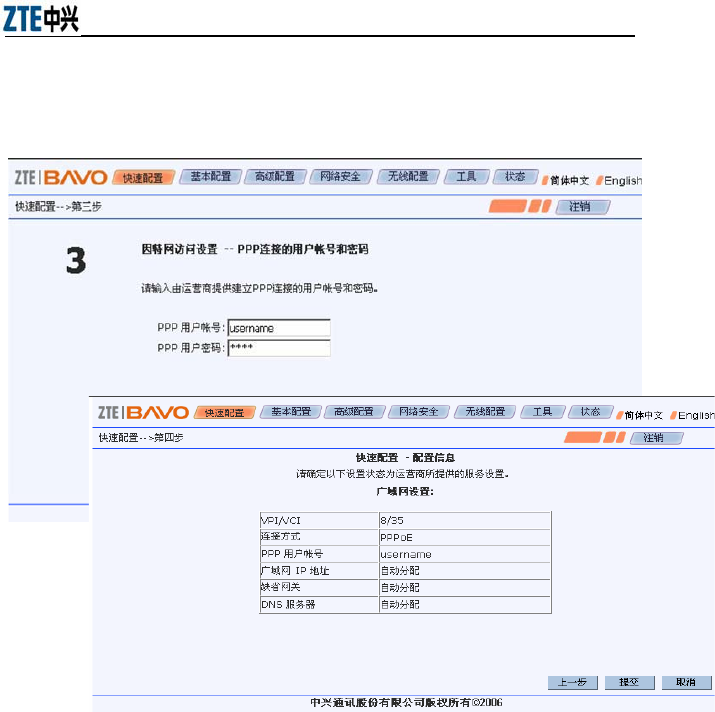
The following procedure takes the most common PPPoE as an example
to illustrate how to set the PPP user account and password. Please contact
18
Chapter 4 Wizard
your service provider for the specific parameters. After completing the
setting, click Next on the page.
4.5 Configuration Information
The configuration information page may be different depending on the
connection type you selected. You can check if the settings are correct.
To modify settings, click the Back button to return to the previous step.
Clicking the Submit button will allow all the settings take effect.
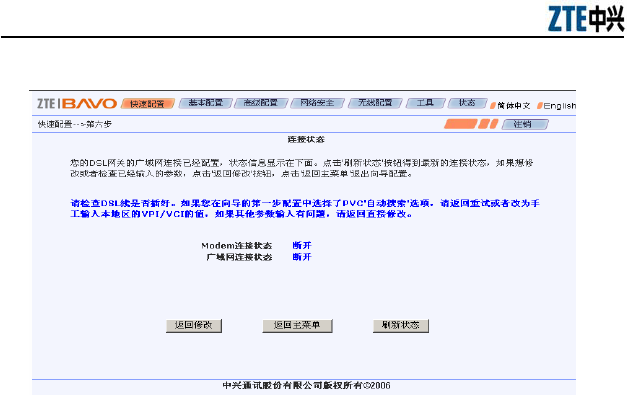
4.6 Configuration Completed
After clicking the Submit button, the device will prompt it is submitting
the data and checking the connection status. If the connection fails, check
the failure cause according to the prompt message. To modify or check
the entered parameters, click the Back button. To exit the wizard, click
the Back to Main Menu button. To view the latest connection status,
click the Update Status button.
19
ZXV10 W300 Wireless Access Point Quick Installation Manual
4.7 Other Common Configurations
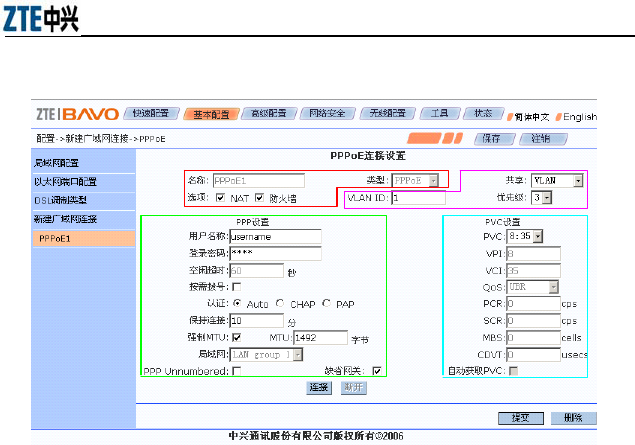
4.7.1 Creating New WAN Connections
If you have created a connection (e.g. Internet access) via the wizard, you
can also create another WAN connection (service subscription required)
for the access to the services like IPTV.
Click the Basic Configuration button on the main page, and then click
Create WAN Connection on the left side of the page to configure WAN
connections, including Bridge, CIP, PPPoA, PPPoE, Static and DHCP.
The following procedure takes PPPoE connection as an example to
describe the WAN connection parameters and operations.
20
Chapter 4 Wizard
1
24
3
PPPoE parameter description
1. Globally unique parameters of the WAN connection
Name: Specifies the name of the connection to be created
Type: Specifies the type of the connection to be created
Options: Enables firewall and NAT
2. PPP parameter description
Username: Specifies your username for the PPPoE access
Password: Specifies your password for the PPPoE access
Idle time: Specifies the idle time allowed when no flow
occurs on the PPPoE connection. The connection will be
disconnected if the idle time is exceeded. The option cannot
be configured unless the Dial as needed option is enabled.
Dial as needed: Indicates the connection should be
disconnected if no flow occurs on the connection during the
idle time.
Authentication: Provides three authentication options: Auto,
CHAP and PAP.
21

ZXV10 W300 Wireless Access Point Quick Installation Manual
Hold connection: This option can be configured when the
Dial as needed option is not selected. It specifies the waiting
time for connecting your service provider before the
connection is terminated.
MTU: Maximum transmission unit of the DSL connection,
i.e., the maximum number of bytes of data packets
transmitted using TCP/IP. The greater the MTU value, the
larger the encapsulated package, which improves the
transmission rate in theory. However, the error rate during
the transmission may increase also.
Constrained MTU: Constrains all the TCP flow changes to
match the PPP MTU
LAN: LAN cannot be configuration unless the PPP
Unnumbered option is selected. This option specifies the
LAN groups to which data packets are sent.
Default gateway: Specifies the default gateway. The WAN is
connected to the Ethernet via the default gateway.
PPP Unnumbered: Enabling this option will allow the ISP to
specify the user a public IP address area. IP addresses in the
area are allocated to the LAN side statically. It is essentially
like a network bridge.
3. VLAN parameter description
Sharing: Provides three options
Disable: Disable the sharing of connection
Enable: Enables the sharing of connection
VLAN: Selects a VLAN. You can create VLANs,
configure VLAN ID and priority levels.
VLAN ID: All the members of the same VLAN have one
VLAN ID, forming a virtual LAN. Packets sent by each host
supporting the 802.1Q protocol contain this field to indicate
the VLAN of the host.
Priority level: Selects the VLAN priority from Level 0~7.
22

Chapter 4 Wizard
4. PVC parameter description
PVC: PVC (permanent virtual circuit) provides a permanent
logical connection between two terminals within a packet
network during the contract application period. PVC does
not require the call setup or clear procedure.
VPI: VPI (virtual path identifier) contains the first part of the
ATM routing address to identify the virtual path between
users or between user and ATM network.
VCI: VCI (virtual channel identifier) contains the second
part of the ATM routing address to identify the virtual
channel between users or between user and ATM network.
QoS: AMT QoS is the quality convention for information
transmission and sharing between network and user and
between the users communicated with each other on the
network. QoS provides three types of services:
UBR: It does not guarantee any available bandwidth. The user
can only use the unoccupied bandwidth. Data are transmitted
on the basis of “best-effort”.
CBR: Ensures to provide the user with the preset, fixed
bits of available bandwidth on the entire virtual circuit.
VBR: Suitable for the services allowing bursting traffic
PCR: Peak cell rate, the maximum rate of sending cells.
SCR: Sustainable cell rate, the average cell transmission rate
in a long time
MBS: Maximum burst size. Specifies the maximum number
of cells allowed to be sent at the peak cell rate.
CDVT: Cell delay variation tolerance. Applicable to
time-sensitive services. It specifies the maximum cell delay
variation tolerance allowed between two sites.
Obtain PVC automatically: Auto-sensing permanent virtual
circuit
23

ZXV10 W300 Wireless Access Point Quick Installation Manual
To create a new PPPoE connection, perform the following steps:
1. Click the Basic Configuration button on the main page, and then
click the Create WAN Connection on the left side of the page to
enter the PPPoE Connection Settings page.
2.Type in the name of the PPPoE connection to be created in the Name
box, e.g. “PPPoE1”.
3.Set the NAT and Firewall options to default (enable).
4.If you select VLAN from Sharing, please configure VLAN ID and
Priority according to the parameter description.
5.Input parameters in the PPP settings area. Please contact your
service provider for the specific values.
6.Input the VPI and VCI values in the PVC settings area. Please
contact your service provider for the specific values.
7.Select an option from QoS. If you are not sure of the setting or your
service provider cannot provide you the required information, use the
default.
8.Click Submit to complete the PPPoE connection configuration.
After the new connection is created, the connection name is
displayed on the left side of the page. You can use the Connect,
Disconnect,Submit and Delete buttons to manage this
connection.
9.Click the Save button on the page.
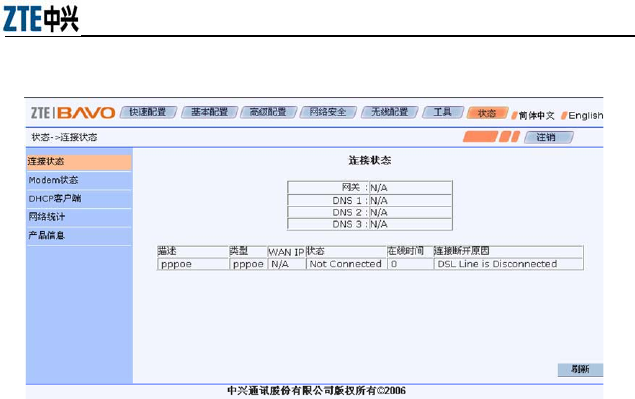
10. Click the Status button on the main page, and then the Connection
Status button on the left side of the page.
24
Chapter 4 Wizard
4.7.2 UPnP
In the case the ZXV10 W300 works in the routing mode, if the terminal
user runs special applications, e.g. BitComet and BitSpirit, you must
enable UPnP on the device to optimize the performance.
Click the Advanced Configuration button on the main page, and then
UPnP on the left side of the page to enter the UPnP configuration page.
In this page, enable or disable the UPnP function and specify the UPnP
WAN and LAN connections. To enable this function, check the Enable
UPnP check box.
25
ZXV10 W300 Wireless Access Point Quick Installation Manual
Enable UPnP: Enables/disables the UPnP function. The
default is disabled.
WAN connection: Selects the WAN side connection
LAN connection: Selects the LAN side connection
4.7.3 DMZ
When the device operates in Routing mode, if you try to access a service
on a host placed in the intranet from an external network, the DMZ host
function should be enabled.
Click the Advanced Configuration button on the main page, and then
DMZ on the left side of the page to enter the DMZ configuration page.
Select the LAN host IP address to be accessed from the WAL side. Check
the Enable DMZ check box to enable this function.
26
Chapter 4 Wizard
Enable DMZ: Enables/disables the DMZ function. The
default is disabled.
Select WAN connection: Selects the WAN connection using
DMZ.
Select LAN: Selects the LAN connection using DMZ
Select a LAN IP address: DMZ host IP address. This host is
open to the external network. Meanwhile, you must consider
the security risk of the local network.
4.7.4 Dynamic DNS
Dynamic domain name server (DNS) maps the use’s dynamic IP address
to a fixed domain name resolution server. Every time when the user is
connected to the network, the client program will send the IP address,
which the host has obtained dynamically via information transmission, to
the dynamic domain name resolution server provided by the ISP. The
dynamic domain name resolution server provides the DNS service and
allows dynamic domain name resolution.
Click the Advanced Configuration button on the main page, and then
Dynamic DNS on the left side of the page to enter the Dynamic DNS
Client configuration page, where you can select the WAN connection for
27
ZXV10 W300 Wireless Access Point Quick Installation Manual
the ZXV10 W300 device and configure DDNS (requires service
subscription from your service provider and network carrier).
WAN connection: The default is the WAN connection for the
ZXV10 W300.
DDNS server: Specifies the DDNS server.
Dynamic DNS: Enables/disables DDNS client for the WAN
connection.
Server: DDNS server URL (This option is displayed and
needs to be configured only when GNUDIP http is selected.
The default URL is
http://ns.eagleeyes.com.cn/cgi-bin/gdipupdt.cgi).
Username: Username assigned by the DDNS server vendor.
Logon Password: Password assigned by the DDNS server
vendor.
Domain name: Domain name registered for the DDNS
server.
28
Chapter 4 Wizard
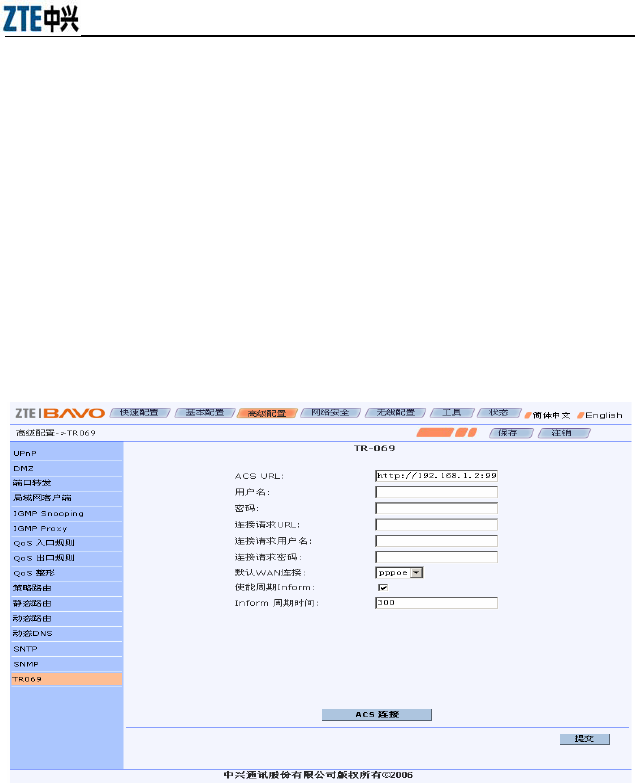
4.7.5 TR069
TR069 is the CPE WAN-side management protocol used for the
communications between CPE and ACS. CPE WAN management
protocol defines its own mechanism. It allows the automatic CPE
security configuration, and additionally, incorporates other CPE
management functions into a common framework. The TR069 protocol
allows remote device management.
Click the Advanced Configuration button on the main page, and then
TR069 on the left side of the page to enter the TR-069 configuration
page, where you can configure the URL and account for connecting CPE
and ACS.
ACS URL: ACS URL address provided by ISP. You can
also use the default.
Username: Username of the ACS.
Password: Password of the ACS
URL of connection request: Displays the URL that the CPE
provides to the ACS for reverse access.
Username for connection request: Username of the ACS for
29

ZXV10 W300 Wireless Access Point Quick Installation Manual
the authentication by CPE.
Password for connection request: Password of the ACS for
the authentication by CPE.
Default WAN connection: The default WAN connection that
TR069 uses.
Enable periodic Inform: Enables/disables the periodic
connection from the ZXV10 W300 to the ACS. If it is
enabled, you must input a value in the Inform cycle time
field.
Inform cycle time: Check the Enable periodic Inform check
box and configure the time between a successful connection
and a new connection attempt to the ACS server.
30
5 Technical Specifications
5.1 Hardware Specifications
1.WAN interface
Interface: 4 10/100 Base-T, IEEE 802.3/802.3u
Connector: RJ-45
Automatic recognition of crossover cable and
straight-through cable
Support PoE standard(IEEE802.3af).
2.LAN interface
Interface: 4 10/100 Base-T, IEEE 802.3/802.3u
Connector: RJ-45
Automatic recognition of crossover cable and
straight-through cable
3.WLAN interface
Working frequency band: 2.4GHz~2.4835GHz
Compatible standards: IEEE 802.11g, IEEE 802.11b
Rates: 1/2/5.5/11/6/9/12/18/24/36/48/54Mbps
4.Operation and Maintenance
WEB, SNMP, TR069
5.Power specification
Power adapter: 220 VAC/50Hz input, 18 VAC/500 mA
output
PoE:48V/DC, Alternative A and B. Class 0.
Power < 9 W
6.Security
31

ZXV10 W300 Wireless Access Point Quick Installation Manual
CE FCC
Enviroment requirement
Working temperature: -5 ºC ~ 45 ºC
Storage temperature: -40 ºC ~ 70 ºC
Working humidity: 5% ~ 95%
Storage humidity: 10% ~ 100%
8. Hardware specification
Dimensions: 220mm × 145mm × 39mm (W × L × H)
Weight: 0.5kg (without power supply)
5.2 Software Specifications
1.Bridging
Transparent bridging (IEEE 802.1D)
RFC 2684
Spanning-tree protocol (IEEE 802.1D)
Support 2048 MAC learning addresses
Support bridge filter
2.Routing
Static routing
Dynamic routing and policy routing
NAT, ALGs
Firewall
DNS Proxy, IGMP Proxy
UPnP DMZ
3.NM
32

Chapter 5 Technical Specifications
WEB
SNMP
TR069
4.WLAN
IEEE 802.11g/b
WEP, WPA/WPA2 and MAC address filtering
Hidden ESSID, multiple ESSID domains
Subscriber isolation
33

6 Qs and As
This chapter describes how to troubleshoot problems in the ZXV10
W300 installation and operations.For other problems not contained in
this chapter, please contact your Service Provider for help.
ProblemTroubleshooting
The indicator
is OFF when
the device is
powered on
Make sure that you use the power adapter included in the
package and the adapter is connected properly to the device and
power socket on the wall
DSL indicator
is OFF when
the telephone
wire is
connected
Make sure you use standard telephone lines (e.g. those
contained in the device package). Make sure the lines are
connected properly according to the hardware connection
procedure described in Chapter 3. Check all the ports to see if
there are any loose connections. Wait for 30 seconds for the
device to establish a connection to your ADSL service provider.
LAN indicator
is OFF when
the Ethernet
cable is
connected
Make sure the Ethernet cable is connected properly to the
hub/Ethernet switch/computer and the ZXV10 W300 device.
Make sure the hub/Ethernet switch/computer are powered on.
34

Chapter 6 Qs and As
ProblemTroubleshooting
PC unable to
access the
network
Use the Ping command to check if the network interface IP
address (preset to 192.168.1.1) of the device can be pinged
from the computer.If not, check the Ethernet cable connection.
Check if the indicator status is normal.
If the computer uses a private IP address (not a registered
illegal IP) specified manually, please check if the computer’s
gateway IP address is an illegal address.If not, use a correct
gateway, or set the computer to obtain IP information
automatically.
All the running firewall and VPN software have been closed.
The proxy server setting of the browser you use, e.g. IE, has
been disabled.
Contact your ADSL Service Provider to confirm the DNS
server designated for the computer is valid. Otherwise, use the
correct DNS, or set the computer to obtain IP information
automatically.
Make sure you have set the NAT rule to convert the private IP
address into the legal address.The computer IP address you
specified must be contained in the range set in the NAT rule.
A problem may occur in the office-end device of the ADSL
Service Provider.
WLAN unable
to be
connected
Make sure the WLAN radio frequency is turned on and the
WLAN indicator is ON.
Unable to
browse
Internet web
pages on the
computer
Make sure the DNS server designated for the computer is
correct. You can use the Ping command to check if the
computer can be connected to the DSN server of the ADSL
Service Provider.
35
Changes or modifications not expressly approved by the party
responsible for compliance could void the user's authority to
operate the equipment.
Statement: