Zebra Technologies 211486030B 21-148603-0B User Manual 8000295
Zebra Technologies Corporation 21-148603-0B 8000295
Contents
- 1. User Manual
- 2. Host User Guide
- 3. Host User Guide Regulatory
Host User Guide

WORKABOUT PRO4
HAND-HELD COMPUTER
(Windows Embedded Hand-Held 6.5)
USER GUIDE
Draft #5
Draft #5

i
WORKABOUT PRO4 HAND-HELD COMPUTER
USER GUIDE
8000295.A
December 20, 2013
Draft #5

ii Workabout Pro4 User Manual
This user manual supports the model number 7528X which contains the approved radio module 21-148603-0B. The applica-
ble FCC ID and Industry Canada numbers are as follows:
• FCC ID: UZ7211486030B
• IC: 109AN-211486030B'
Copyright
No part of this publication may be reproduced or used in any form, or by any electrical or mechanical means,
without permission in writing from Motorola. This includes electronic or mechanical means, such as
photocopying, recording, or information storage and retrieval systems. The material in this manual is subject to
change without notice.
The software is provided strictly on an “as is” basis. All software, including firmware, furnished to the user is on
a licensed basis. Motorola grants to the user a non-transferable and non-exclusive license to use each
software or firmware program delivered hereunder (licensed program). Except as noted below, such license
may not be assigned, sublicensed, or otherwise transferred by the user without prior written consent of
Motorola. No right to copy a licensed program in whole or in part is granted, except as permitted under
copyright law. The user shall not modify, merge, or incorporate any form or portion of a licensed program with
other program material, create a derivative work from a licensed program, or use a licensed program in a
network without written permission from Motorola. The user agrees to maintain Motorola’s copyright notice on
the licensed programs delivered hereunder, and to include the same on any authorized copies it makes, in
whole or in part. The user agrees not to decompile, disassemble, decode, or reverse engineer any licensed
program delivered to the user or any portion thereof.
Motorola reserves the right to make changes to any software or product to improve reliability, function, or
design.
Motorola does not assume any product liability arising out of, or in connection with, the application or use of
any product, circuit, or application described herein.
No license is granted, either expressly or by implication, estoppel, or otherwise under any Motorola, Inc.,
intellectual property rights. An implied license only exists for equipment, circuits, and subsystems contained in
Motorola products.
Disclaimer
Every effort has been made to make this material complete, accurate, and up-to-date. In addition, changes are
periodically incorporated into new editions of the publication.
Motorola reserves the right to make improvements and/or changes in the product(s) and/or the program(s)
described in this document without notice, and shall not be responsible for any damages including, but not
limited to, consequential damages, caused by reliance on the material presented.
Motorola, the Motorola logo, Workabout Pro4 and the names of other products and services provided by
Motorola are trademarks of Motorola.
Windows® and the Windows Logo are trademarks or registered trademarks of Microsoft Corporation in the
United States and/or other countries.
The Bluetooth® word mark and logos are owned by Bluetooth SIG, Inc. and any use of such marks by Motorola
is under license.
All trademarks used herein are the property of their respective owners.
Draft #5

iii
Revision History
Changes to the original guide are listed below:
Change Date Description
-01 Rev A 12/2013 Initial release.
Draft #5

iv Workabout Pro4 User Manual
Draft #5

TABLE OF CONTENTS
Table of Contents
About This Guide
About This Manual.......................................................................................................................... xi
Text Conventions ............................................................................................................................ xi
Overview of the Workabout Pro4 Hand-Held Computer................................................................. xii
Chapter 1: Basic Operation
Workabout Pro4 Features............................................................................................................... 1-3
Workabout Pro4 Modules Available................................................................................................1-3
Documents Available ..................................................................................................................... 1-3
Preparing the Workabout Pro4 for Operation ................................................................................. 1-3
The Battery ............................................................................................................................... 1-3
Switching the Workabout Pro4 On and Off..................................................................................... 1-4
Resetting the Workabout Pro4........................................................................................................ 1-5
Performing a Warm Reset..............................................................................................................1-5
Performing a Cold Reset................................................................................................................1-5
Performing a Clean Start................................................................................................................1-5
Boot to BooSt .................................................................................................................................1-6
Calibrating the Touchscreen ........................................................................................................... 1-6
Connectivity .................................................................................................................................... 1-6
Data Transfer ................................................................................................................................. 1-6
Phone Communication.................................................................................................................... 1-6
Chapter 2: Getting to Know Your Workabout Pro4
Operating System ........................................................................................................................... 2-3
Battery Details................................................................................................................................. 2-3
Battery Safety.................................................................................................................................2-3
Battery Swap Time .........................................................................................................................2-3
Charging the Battery ......................................................................................................................2-4
The Keyboard ................................................................................................................................. 2-4
The [Power] Button.........................................................................................................................2-5
Standard Keys ................................................................................................................................2-5
Draft #5

ii Workabout Pro4 (Windows Embedded Hand-Held 6.5) User Manual
Modifier Keys..................................................................................................................................2-6
Activating Modifier Keys...................................................................................................... 2-6
Locking Modifier Keys......................................................................................................... 2-6
Function Keys and Macro Keys .....................................................................................................2-7
Function Keys ..................................................................................................................... 2-7
Macro Keys (Workabout Pro4 Long only) ........................................................................... 2-8
Numeric Keyboards — Accessing Alpha Keys..............................................................................2-8
The Keypad Backlight.....................................................................................................................2-9
The Display..................................................................................................................................... 2-10
Adjusting the Display Backlight ......................................................................................................2-10
Calibrating the Touchscreen...........................................................................................................2-11
Screen Orientation.......................................................................................................................... 2-13
Locking the Touchscreen................................................................................................................2-13
Indicators ........................................................................................................................................ 2-13
LED.................................................................................................................................................2-13
Audio Indicators..............................................................................................................................2-14
Inserting the microSD Card and SIM Card ..................................................................................... 2-14
Inserting and Removing the Cards.................................................................................................2-14
Navigating in Windows Embedded Hand-Held 6.5 and Applications ............................................. 2-14
Navigating Using a Touchscreen....................................................................................................2-14
Navigating Using the Keyboard......................................................................................................2-15
The Today Screen........................................................................................................................... 2-15
Customizing the Today Screen.......................................................................................................2-16
The Today Screen Default Options ................................................................................................2-17
Pictures............................................................................................................................... 2-17
Music................................................................................................................................... 2-17
DataWedge ......................................................................................................................... 2-17
Phone.................................................................................................................................. 2-17
Voicemail............................................................................................................................. 2-17
Time, Date and Alarms ....................................................................................................... 2-17
Text Messages .................................................................................................................... 2-18
E-mail Notification...........................................................................................................................2-19
Calendar of Upcoming Appointments ............................................................................................2-20
Creating and Editing Appointments..................................................................................... 2-20
Deleting Appointments........................................................................................................ 2-22
Favorites.........................................................................................................................................2-22
Using the Navigation Bar and Hotkeys........................................................................................... 2-22
The Softkey Bar.............................................................................................................................. 2-23
The Start Button..............................................................................................................................2-24
Managing Files and Folders ........................................................................................................... 2-24
Creating a New Folder....................................................................................................................2-24
Renaming, Copying, and Deleting a File........................................................................................2-25
Using Menus................................................................................................................................... 2-25
Pop-Up Menus................................................................................................................................2-25
Programs – Using Applications....................................................................................................... 2-26
Settings........................................................................................................................................... 2-26
HomeVU ......................................................................................................................................... 2-27
Data Transfer Between Workabout Pro4 and a PC ....................................................................... 2-27
Draft #5

Table of Contents iii
Uploading Data in a Docking Station..............................................................................................2-28
Using Microsoft ActiveSync............................................................................................................2-28
Using Windows Mobile Device Center...........................................................................................2-28
General Maintenance...................................................................................................................... 2-28
Caring for the Touchscreen ............................................................................................................2-28
Cleaning the Workabout Pro4........................................................................................................2-30
Chapter 3: Programs
Programs ........................................................................................................................................ 3-3
Home .............................................................................................................................................. 3-3
The Phone ...................................................................................................................................... 3-4
The Onscreen Phone Keypad........................................................................................................3-4
Sending & Ending Phone Calls Using the Onscreen Phone Keypad.................................. 3-4
Sending & Ending Calls Using the Workabout Pro4 Keyboard........................................... 3-5
Making a Conference Call................................................................................................... 3-5
Programming Speed Dial .................................................................................................... 3-5
Managing Phone Settings..............................................................................................................3-8
Text Messages................................................................................................................................ 3-8
E-mail ............................................................................................................................................. 3-8
Folders............................................................................................................................................3-9
Synchronizing E-mail with Outlook (PC with Windows XP OS) ....................................................3-9
Changing Synchronization Settings .................................................................................... 3-10
Synchronizing E-mail with Outlook (PC with Windows Vista or Windows 7).................................3-10
Sending an E-mail ..........................................................................................................................3-11
Contacts.......................................................................................................................................... 3-12
Working with the Contacts List.......................................................................................................3-12
Communicate Tab - Adding Contacts.............................................................................................3-13
Info Tab...........................................................................................................................................3-14
Notes Tab............................................................................................................................ 3-14
Internet Explorer ............................................................................................................................. 3-15
Browsing Web Sites .......................................................................................................................3-15
Calendar ......................................................................................................................................... 3-15
Alarms............................................................................................................................................. 3-16
Pictures & Videos............................................................................................................................ 3-16
Using the Camera ..........................................................................................................................3-16
Moving Photos to the Workabout Pro4 ..........................................................................................3-17
Opening a Photo.............................................................................................................................3-17
Deleting a Photo.............................................................................................................................3-18
Editing a Photo ...............................................................................................................................3-18
Creating a Slide Show....................................................................................................................3-18
Using the Video Recorder ..............................................................................................................3-19
Windows Media............................................................................................................................... 3-20
Messenger (Windows Live)............................................................................................................. 3-20
Windows Live.................................................................................................................................. 3-20
Notes............................................................................................................................................... 3-20
Creating a Note Using the Soft Keyboard......................................................................................3-21
Draft #5

iv Workabout Pro4 (Windows Embedded Hand-Held 6.5) User Manual
Creating and Converting Handwritten Notes to Text......................................................................3-22
Renaming a Note............................................................................................................................3-23
Recording Notes.............................................................................................................................3-23
Task Notification.............................................................................................................................. 3-24
File Explorer.................................................................................................................................... 3-26
ActiveSync® .................................................................................................................................. 3-26
Synchronization ..............................................................................................................................3-27
Internet Sharing .............................................................................................................................. 3-27
Creating an Internet Connection ....................................................................................................3-27
Using Internet Sharing....................................................................................................................3-28
Task Manager ................................................................................................................................. 3-29
Search Phone................................................................................................................................. 3-29
Office Mobile................................................................................................................................... 3-30
Excel Mobile ...................................................................................................................................3-30
OneNote Mobile..............................................................................................................................3-31
Word Mobile....................................................................................................................................3-34
Text Input Modes................................................................................................................. 3-34
Sharing Documents with your PC ....................................................................................... 3-34
PowerPoint Mobile..........................................................................................................................3-35
SharePoint Workspace Mobile.......................................................................................................3-35
PartnerUp ....................................................................................................................................... 3-35
HomeVU ......................................................................................................................................... 3-35
Modem Link .................................................................................................................................... 3-36
Remote Desktop Mobile ................................................................................................................. 3-37
Connecting to a Terminal Server....................................................................................................3-37
Disconnecting Without Ending a Session ......................................................................................3-37
Ending a Session............................................................................................................................3-37
WiFiConnect?? A.R.C. ................................................................................................................... 3-37
Chapter 4: Settings
Overview of Software...................................................................................................................... 4-5
Motorola Software Advantage........................................................................................................4-5
Microsoft Software..........................................................................................................................4-5
Settings........................................................................................................................................... 4-5
Clocks & Alarms ............................................................................................................................. 4-6
Lock ................................................................................................................................................ 4-6
Home .............................................................................................................................................. 4-6
Appearance Tab – Changing the Theme (Background) ................................................................4-7
Beaming a Theme to Another Device ............................................................................................4-7
Items Tab – Customizing the Today Screen...................................................................................4-8
Power.............................................................................................................................................. 4-8
Battery Power .................................................................................................................................4-9
Advanced Tab.................................................................................................................................4-9
Battery Details Tab .........................................................................................................................4-9
Suspend Threshold and Estimated Battery Backup ......................................................................4-10
Battery Health.................................................................................................................................4-11
Draft #5

Table of Contents v
Sound & Notifications...................................................................................................................... 4-12
Sounds Tab.....................................................................................................................................4-12
Notifications Tab .............................................................................................................................4-13
Connections Folder......................................................................................................................... 4-13
Beam ..............................................................................................................................................4-13
Bluetooth Setup ............................................................................................................................4-14
The Devices Tab - Scanning for Bluetooth Devices........................................................... 4-14
Pairing a Device.................................................................................................................. 4-16
Servers Tab......................................................................................................................... 4-17
Mode Tab ........................................................................................................................... 4-18
About Tab............................................................................................................................ 4-18
Paired Tab........................................................................................................................... 4-19
Connecting Using a Bluetooth GPRS Phone.................................................................................4-20
Connections – Connecting to the Internet......................................................................................4-21
Modem Connection Setup..............................................................................................................4-22
Advanced Modem Settings ................................................................................................. 4-24
Domain Enroll.................................................................................................................................4-25
Network Cards................................................................................................................................4-26
Changing Network Card Settings........................................................................................ 4-27
VPN Connection Setup ....................................................................................................... 4-27
Managing an Existing Connection....................................................................................... 4-28
Proxy Server Tab................................................................................................................. 4-29
Selecting a Network .......................................................................................................................4-30
Fusion Wireless Companion - Setting Up the XWing2 802.11a/b/g/n Radio.................................4-31
Resetting the Radio to Default Factory Settings ................................................................. 4-35
Wireless Manager – Turning the Radio On and Off.......................................................................4-35
Personal Folder............................................................................................................................... 4-36
App Launch Keys ...........................................................................................................................4-36
Buttons............................................................................................................................................4-38
Program Buttons Tab .......................................................................................................... 4-38
Up/Down Control Tab.......................................................................................................... 4-38
OneShots ............................................................................................................................ 4-39
Macro Keys ......................................................................................................................... 4-40
Unicode Mapping ................................................................................................................ 4-41
Scancode Remapping......................................................................................................... 4-42
Lock Sequence Tab............................................................................................................. 4-44
System Folder................................................................................................................................. 4-44
About ..............................................................................................................................................4-45
Backlight – Screen and Keypad.....................................................................................................4-45
Battery Power Tab...............................................................................................................4-45
External Power Tab............................................................................................................. 4-46
Backlight Tab....................................................................................................................... 4-46
Certificates......................................................................................................................................4-46
Choosing a Certificate......................................................................................................... 4-47
Contrast ..........................................................................................................................................4-48
Customer Feedback.......................................................................................................................4-48
Dr. Debug........................................................................................................................................4-48
Status .................................................................................................................................. 4-49
Draft #5

vi Workabout Pro4 (Windows Embedded Hand-Held 6.5) User Manual
Utilities ................................................................................................................................ 4-49
Settings............................................................................................................................... 4-49
Encryption.......................................................................................................................................4-50
Error Reporting ...............................................................................................................................4-50
GPS (Global Positioning System) ..................................................................................................4-50
Manage Triggers.............................................................................................................................4-51
Trigger Mappings ................................................................................................................4-52
Managed Programs........................................................................................................................4-54
Memory...........................................................................................................................................4-54
Main Tab ............................................................................................................................. 4-54
Storage Card....................................................................................................................... 4-55
Microphone.....................................................................................................................................4-55
PartnerUp ......................................................................................................................................4-56
HomeVU .........................................................................................................................................4-56
HomeVU Menu ................................................................................................................... 4-57
Administrator Password...................................................................................................... 4-57
Shell Settings...................................................................................................................... 4-57
Restrictions.....................................................................................................................................4-62
Control Panel Settings ........................................................................................................ 4-64
Import and Export Settings ................................................................................................. 4-64
Activating a Change – User Mode ...................................................................................... 4-66
Regional Settings ...........................................................................................................................4-66
Remove Programs..........................................................................................................................4-67
Screen ............................................................................................................................................4-67
System Properties ..........................................................................................................................4-68
Task Manager .................................................................................................................................4-68
Total Recall .....................................................................................................................................4-69
Creating a Backup .............................................................................................................. 4-70
Creating a Clone................................................................................................................. 4-71
Managing Profiles ...............................................................................................................4-72
Deleting a Profile................................................................................................................. 4-74
TweakIT ..........................................................................................................................................4-74
Advanced CE Services Settings ......................................................................................... 4-75
Advanced Interface and Network Settings.......................................................................... 4-76
Advanced Services Settings ............................................................................................... 4-76
Registry Editor .................................................................................................................... 4-76
Chapter 5: Peripheral Devices & Accessories
Carrying Accessories...................................................................................................................... 5-3
The Battery ..................................................................................................................................... 5-3
Chargers and Docking Stations ...................................................................................................... 5-3
Installation – Chargers and Docking Stations ................................................................................5-3
Power Consumption Considerations..............................................................................................5-4
Operator Controls...........................................................................................................................5-4
Important Charger Safety Instructions............................................................................................5-4
Desktop Docking Station................................................................................................................. 5-4
Charging a Battery Installed in the Workabout Pro4......................................................................5-6
Draft #5

Table of Contents vii
Charging a Spare Battery...............................................................................................................5-6
Battery Charge Duration.................................................................................................................5-6
Charger LED Indicators..................................................................................................................5-6
Linking a Workabout Pro4 to a PC.................................................................................................. 5-7
Troubleshooting the Docking Station Operations............................................................................ 5-7
AC Wall Adaptor – Model #PSA15R-050P ..................................................................................... 5-7
Bluetooth Peripherals ........................................................................................................................ 5-8
Appendix A: Port Pinouts
LIF (Low Insertion Force) Pinout..................................................................................................... A-3
Tether Port Pinout ........................................................................................................................... A-3
Battery Contact Pinout – WA3010 .................................................................................................. A-4
Positive Female Battery Connector ................................................................................................ A-4
Appendix B: Workabout Pro4 Specifications
The Workabout Pro4 Hand-Held Computer.................................................................................... B-3
Hardware .................................................................................................................................. B-3
Regulatory Approvals................................................................................................................ B-3
Battery Specifications ..................................................................................................................... B-5
High Capacity Lithium-ion Battery – 4400 mAh ........................................................................ B-5
Appendix C: Wireless Zero Config Settings
Wireless Zero Config ...................................................................................................................... C-3
Configuring the Unit Using Wireless Zero Config ..................................................................... C-4
Index.............................................................................................................I
Draft #5
Draft #5

Draft #5

About This Guide xi
About This Manual
This user manual describes how to configure, operate, and maintain the Workabout Pro4 Hand-Held
Computer.
Chapter : About This Guide
provides a basic overview of the Workabout Pro4 Hand-Held.
Chapter 1: Basic Operation
describes the steps required to get the Workabout Pro4 ready for operation.
Chapter 2: Getting to Know Your Workabout Pro4
describes Workabout Pro4 features, including how to charge and maintain the battery, the key-
board features, the display, etc. This chapter also describes how to navigate the Microsoft®
Windows® Embedded Hand-Held 6.5 Today screen, how to transfer data between the Workabout
Pro4 and a PC and how to manage files and folders.
Chapter 3: Programs
provides a description of the Microsoft® Windows® Embedded Hand-Held 6.5 Programs applets
and how to use them.
Chapter 4: Settings
provides details about Microsoft® Windows® Embedded Hand-Held Settings applets and how to
use them.
Chapter 5: Peripheral Devices & Accessories
describes the peripherals and accessories available for your Workabout Pro4 computer.
Appendix A: Port Pinouts
describes pinouts for the Workabout Pro4 docking connector, snap module connectors, and
battery contacts.
Appendix B: Workabout Pro4 Specifications
lists the specifications for your Workabout Pro4 computer, radios, and battery.
Appendix C: Wireless Zero Config Settings
outlines how to launch and use Wireless Zero Config to configure the radio.
Text Conventions
NOTE Notes highlight additional helpful information.
IMPORTANT These statements provide particularly important instructions or additional information
that is critical to the operation of the equipment.
Draft #5

xii Workabout Pro4 (Windows Embedded Hand-Held 6.5) User Manual
Overview of the Workabout Pro4 Hand-Held Computer
The Workabout Pro4 is a modular, industrial hand-held computer. A variety of options are available to suit
applications in courier/delivery, field service, meter reading, asset management, warehousing and logistics,
manufacturing and other specialized data capture applications.
Model Number
• 7528X
Platform (standard)
• Texas Instruments® OMAP3® Processor 1 GHz
• RAM: 512 MB
• Flash ROM: 4 GB
Operating System
• Microsoft Windows® Embedded Hand-Held 6.5
Bundled Applications
• Internet Explorer® 6 Mobile
• Windows® Mobile Device Center
•Wordpad
®, ActiveSync®
• ActiveSync®
• Microsoft® Office (Windows Hand-Held Embedded 6.5 only)
Terminal Emulations
• TekTerm Terminal Emulation
• Stay-Linked Terminal Emulation
• Naurtech Browser
• Naurtech Terminal Emulation
• Wavelink Terminal Emulation
Device Management and Utilities
• HomeVU
• MobiControl
WARNING These statements provide critical information that may prevent physical injury, equip-
ment damage or data loss.
NOTE The Workabout Pro4 Hand-Held Computer is a body-worn device. To maintain compliance with
the FCC RF exposure guidelines, use a Motorola approved carrying case. Use of non-approved
accessories may violate FCC RF exposure guidelines.
NOTE For product specifications, refer to Appendix B: “Workabout Pro4 Specifications”
Draft #5

About This Guide xiii
• Total Recall, TweakIt, Dr. Debug
Wireless Data and Voice Communications
•Bluetooth® - Integrated Bluetooth® V2.1 + EDR (standard)
• WLAN - XWing2 802.11a/b/g/n WiFi (standard). Optional diversity antenna module available.
• GPS - Optional GPS module (supports SBAS)
User Interface
• Display
- Transflective colour/touch display 9.4 cm (3.7 in) VGA/QVGA (640 x 480) Transflective Colour/touch
display
- Sunlight visibility with 165 cd/m2 brightness
• Keyboards
- Alphanumeric (7528 Long)
- High reliability keypad with ultra-white backlight
• Voice & Audio
- Walkie-talkie style Push-to-Talk – VoIP over WiFi
In the Americas, the Workabout Pro4 is not approved to be used with any VoIP application using Wide
Area Network (WAN) or Wireless Local Area Network (WLAN).
- Standard integrated microphone and receiver.
- Standard high volume 86dBA beeper (95dBA beeper with extended ranger laser).
- Optional speech module, certified with Vocollect and Wavelink Speakeasy clients.
Power Management
• 4400 mAh high-capacity Lithium-ion battery – Model No. WA3010
• Super capacitor power backup
NOTE 802.11a/b/g/n and Bluetooth are available simultaneously.
Draft #5

xiv Workabout Pro4 (Windows Embedded Hand-Held 6.5) User Manual
Draft #5

CHAPTER 1 BASIC OPERATION
BASIC OPERATION 1
Workabout Pro4 Features ........................................1-3
Workabout Pro4 Modules Available...................................1-3
Documents Available...........................................1-3
Preparing the Workabout Pro4 for Operation..............................1-3
The Battery............................................1-3
Switching the Workabout Pro4 On and Off...............................1-4
Resetting the Workabout Pro4......................................1-5
Performing a Warm Reset....................................1-5
Performing a Cold Reset....................................1-5
Performing a Clean Start ....................................1-5
Boot to BooSt...........................................1-6
Calibrating the Touchscreen.......................................1-6
Connectivity................................................1-6
Data Transfer ...............................................1-6
Phone Communication..........................................1-6
Draft #5
Draft #5
Basic Operation 1 - 3
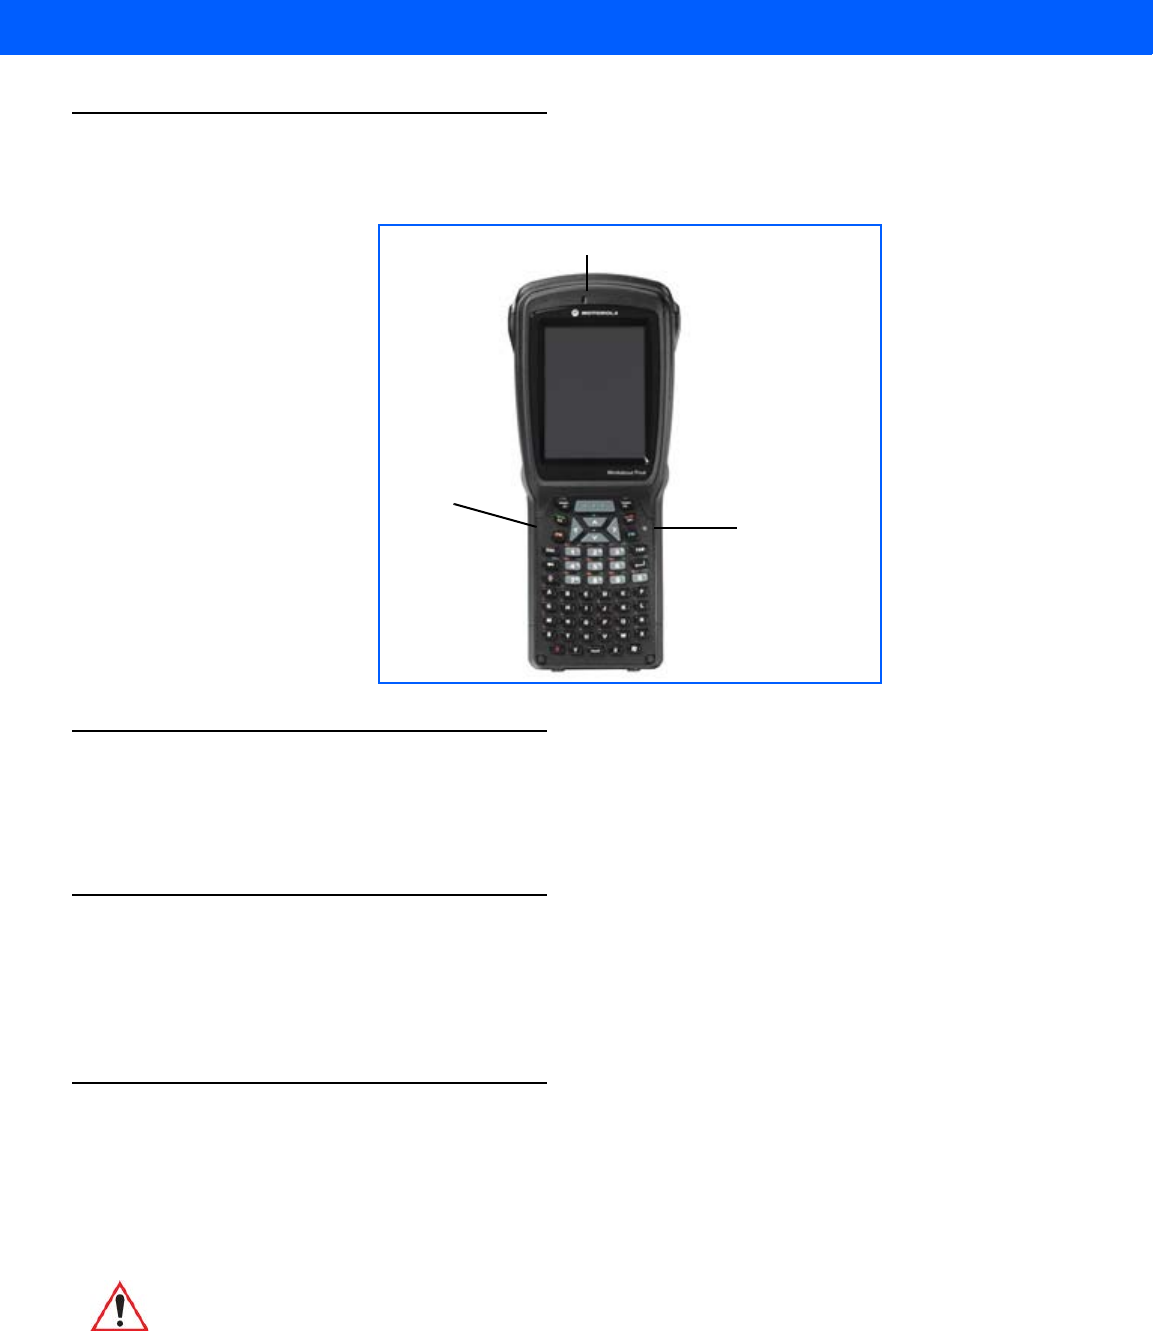
Workabout Pro4 Features
Figure 1-1
Front View of the Workabout Pro4 7528 Long with Alphanumeric Keyboard
Workabout Pro4 Modules Available
To see a current list of Workabout Pro4 accessories and modules, go to the website at: (need website)
http://www.psion.com/us/products/handheld.htm.
Documents Available
To see a current list of documents and download what you need, go to the Knowledge Base on the Psion Inge-
nuity Working community website:
http://community.psion.com/knowledge/w/knowledgebase/product-manuals.aspx
Preparing the Workabout Pro4 for Operation
The Battery
The Workabout Pro4 can be powered by the following Lithium-ion battery pack:
• High-capacity 4400 mAh – WA3010
Speaker
Microphone
LED
(Light Emitting Diode)
IMPORTANT Before charging the battery, it is critical that you review the battery
safety guidelines in the Workabout Pro4 Hand-Held Computer Reg-
ulatory & Warranty Guide (PN 8000296).
Draft #5
1 - 4 Workabout Pro4 (Windows Embedded Hand-Held 6.5) User Manual
Battery packs shipped from the factory are charged to approximately 40% and must be fully charged prior to
use. Batteries can be charged using a variety of chargers and docking stations. For detailed information, see
“Battery Details” on page 2-3.
Replacing the Battery Pack
Assuming the default power saving parameters and battery reserve level have not been altered, a battery can
be removed for up to 4 minutes without losing data. Beyond 4 minutes, the hand-held may reboot.
Removing the Battery Pack
• If your unit is equipped with a hand strap, unhook it from the base of the battery.
• Turn the latches at the bottom of the battery to unlock the battery cover. Remove the battery.
Installing the Battery Pack
• Insert the charged battery into the unit making certain that the contacts on the battery match those on the
hand-held. Replace the battery cover and lock both latches to secure the battery in place.
• If your computer is equipped with a hand strap, re-attach the clip to the slot at the base of the battery.
• Switch the unit on (see “Switching the Workabout Pro4 On and Off” on page 1-4).
Switching the Workabout Pro4 On and Off
Follow the instructions below for your Workabout Pro4.
Switching the Workabout Pro4 On
• Press and hold the [Power] button down for at least one second.
When the unit is turned off, normally it automatically enters a power-saving, “suspend” state. When the Worka-
bout Pro4 is switched on from the suspend state, operation resumes within a few seconds in the screen in
which you were working prior to turning the computer off.
IMPORTANT Always switch the unit off before changing the battery (see “Switch-
ing the Workabout Pro4 On and Off” on page 1-4). However,
assuming the default power saving parameters and battery reserve
level have not been altered, battery swap time is a minimum of
minutes — you will not lose data if the battery is replaced within this
time frame.
NOTE If you are using a docking station or an external power supply, you can insert an
uncharged battery and use the device while the battery charges.
IMPORTANT If your Workabout Pro4 fails to power up, consider the following trouble-
shooting options:
The battery may be overheated (>60C°), a non-Motorola battery may be
installed, or the battery may have fallen below the configured Suspend
Threshold. See “Suspend Threshold and Estimated Battery Backup” on
page 4-10 for details.
To switch on the hand-held, you will need to replace the overheated battery.
However, if you supply AC power to the Workabout Pro4 with a battery that
falls below the configured Suspend Threshold, the unit will switch on.
Draft #5

Basic Operation 1 - 5
Switching the Workabout Pro4 Off
• To switch off the Workabout Pro4, press the [Power] button. The Workabout Pro4 will automatically enter
the Suspend state.
Resetting the Workabout Pro4
To perform a variety of Workabout Pro4 resets, you can use the keyboard shortcuts described below.
Performing a Warm Reset
During a warm reset, running programs are halted. The contents of the file system, Application directory (Flash
Disk), and the registry are preserved. Keep in mind, however, that RAM content is not preserved.
• Press and hold down the [FN/BLUE] key and the [Power] button simultaneously for a minimum of
four seconds.
The Motorola splash screen appears, and the unit resets.
Performing a Cold Reset
A cold reset reinitializes all hardware. All RAM including the RAM disk is erased. Non-volatile storage such as
the Application directory (Flash disk) is preserved, as is the file system.
To execute a cold reset:
• Press and hold down the [FN/ORANGE] key, the [FN/BLUE] key, and the [Power] button, simultane-
ously for a minimum of four seconds.
Performing a Clean Start
A clean start returns the Workabout Pro4 to factory settings, flushes the registry keys and deletes volatile
storage.
• Press and hold down the [FN/BLUE] key, the [Power] button and the [SCAN] key simultaneously for a
minimum of six seconds.
The Workabout Pro4 displays the Boot to BooSt menu.
• On an alpha keyboard, type .clean.
• On a numeric keyboard, type .25326.
IMPORTANT Turning off the hand-held does not result in a complete shutdown;
rather, the unit enters a power-saving, “suspend” state. When the
Workabout Pro4 is turned on from suspend state, operation
resumes within a few seconds.
To shut down the unit, press and hold down the [Power] button until
the Power Option screen is displayed where you can choose the
Power off option.
NOTE You do not need to reset your unit after configuring the radio.
Draft #5

1 - 6 Workabout Pro4 (Windows Embedded Hand-Held 6.5) User Manual
Boot to BooSt
If you choose Boot to BooSt, the BooSt menu is loaded.
• Press and hold down the [FN/BLUE] key, [Power] button and [SCAN] key for a minimum of four seconds.
• Press [1] to launch the OS.
Calibrating the Touchscreen
The Workabout Pro4 touchscreen feature is factory-calibrated and ready-to-go; however, over time the touch-
screen's operating parameters may change, and it may need to be recalibrated for correct operation. Refer to
“Calibrating the Touchscreen” on page 2-11 for details.
Connectivity
For information on connecting the Workabout Pro4 to a PC, refer to “Data Transfer Between Workabout Pro4
and a PC” on page 2-27.
The Workabout Pro4 contains an 802.11a/b/g/n radio module. The Fusion Wireless Companion software
contains applications to create wireless profiles. To configure the radio, follow the steps outlined under the
heading “Fusion Wireless Companion - Setting Up the XWing2 802.11a/b/g/n Radio” on page 4-31.
To configure your Bluetooth settings, go to “Bluetooth Setup” on page 4-14.
If you have a GPS (Global Positioning System) module, you can choose from a set of GPS profiles built into
the modem and set up AGPS (Assisted Global Positioning System). See “GPS (Global Positioning System)”
on page 4-50.
Data Transfer
Data transfer options vary slightly depending on the type of operating system installed in your PC. Various
options exist depending on whether you are using Windows XP or earlier, Windows Vista® or Windows 7. For
connection details, refer to “Data Transfer Between Workabout Pro4 and a PC” on page 2-27.
Phone Communication
If the Cinterion PHS8-P HSPA+ radio modem is installed and enabled, the Phone icon and the GSM signal
strength icon will appear when you tap on the navigation bar at the top of the screen. The keyboards are
equipped with [Talk] and [End] phone keys. For details about using the phone options, refer to “The Phone” on
page 3-4.
Draft #5

CHAPTER 2 GETTING TO KNOW YOUR
WORKABOUT PRO4
GETTING TO KNOW YOUR WORKABOUT PRO4 2
Operating System.............................................2-3
Battery Details...............................................2-3
Battery Safety..........................................2-3
Battery Swap Time........................................2-3
Charging the Battery.......................................2-4
The Keyboard...............................................2-4
The [Power] Button .......................................2-5
Standard Keys..........................................2-5
Modifier Keys...........................................2-6
Activating Modifier Keys................................2-6
Locking Modifier Keys.................................2-6
Function Keys and Macro Keys.................................2-7
Function Keys .....................................2-7
Macro Keys (Workabout Pro4 Long only) ......................2-8
Numeric Keyboards — Accessing Alpha Keys ........................2-8
The Keypad Backlight......................................2-9
The Display ...............................................2-10
Adjusting the Display Backlight................................2-10
Calibrating the Touchscreen .................................2-11
Screen Orientation.......................................2-13
Locking the Touchscreen...................................2-13
Indicators.................................................2-13
LED...............................................2-13
Audio Indicators........................................2-14
Inserting the microSD Card and SIM Card ..............................2-14
Inserting and Removing the Cards..............................2-14
Navigating in Windows Embedded Hand-Held 6.5 and Applications................2-14
Navigating Using a Touchscreen...............................2-14
Navigating Using the Keyboard................................2-15
The Today Screen............................................2-15
Draft #5

2 - 2 Workabout Pro4 (Windows Embedded Hand-Held 6.5) User Manual
Customizing the Today Screen................................2-16
The Today Screen Default Options..............................2-17
Pictures........................................2-17
Music..........................................2-17
Phone.........................................2-17
Voicemail .......................................2-17
Time, Date and Alarms................................2-17
Text Messages....................................2-18
E-mail Notification .......................................2-19
Calendar of Upcoming Appointments.............................2-20
Creating and Editing Appointments.........................2-20
Deleting Appointments................................2-22
Favorites ............................................2-22
Using the Navigation Bar and Hotkeys.................................2-22
The Softkey Bar.............................................2-23
The Start Button ........................................2-24
Managing Files and Folders.......................................2-24
Creating a New Folder.....................................2-24
Renaming, Copying, and Deleting a File...........................2-25
Using Menus...............................................2-25
Pop-Up Menus.........................................2-25
Programs – Using Applications.....................................2-26
Settings..................................................2-26
HomeVU.................................................2-27
Data Transfer Between Workabout Pro4 and a PC..........................2-27
Uploading Data in a Docking Station.............................2-28
Using Microsoft ActiveSync..................................2-28
Using Windows Mobile Device Center............................2-28
General Maintenance..........................................2-28
Caring for the Touchscreen..................................2-28
Cleaning the Workabout Pro4.................................2-30
Draft #5

Getting to Know Your Workabout Pro4 2 - 3
Operating System
• Microsoft® Windows® Embedded Hand-Held 6.5
Battery Details
Workabout Pro4 Hand-Held Computer is available with the following Lithium-ion battery pack option:
• 4400 mAh high-capacity battery – Model Number WA3010
• Super capacitor power backup
Review the following sections for detailed battery information:
• Installation: “Preparing the Workabout Pro4 for Operation” on page 1-3.
• Power settings: “Power” on page 4-8.
• Chargers and docking stations: Chapter 5: “Peripheral Devices & Accessories”.
• Specifications: “Battery Specifications” on page B-5.
• Contact pinout: “Battery Contact Pinout – WA3010” on page A-4.
Battery Safety
Battery Swap Time
Assuming the default power saving parameters and battery reserve level have not been altered, battery swap
time is a minimum of 4 minutes — you will not lose data if the battery is replaced within this time frame.
To protect data, the safest place to store data is on a microSD memory card or externally on a USB memory
stick or on a PC. You can also save data in the “Application” (Flash Disk) partition of the file system.
Refer to “Suspend Threshold and Estimated Battery Backup” on page 4-10 for details about reserving battery
power for data backup purposes.
The Suspend Threshold adjustment in the Power Properties tab allows you to determine the battery capacity at
which the Workabout Pro4 will be shut down. If left at the default value, Maximum Operating Time, the unit will
run until the battery is completely empty; the RAM is only backed up for a short period of time. If you choose
Maximum Backup Time, the Workabout Pro4 shuts off with more energy left in the battery so RAM can be
backed up for a longer period of time.
IMPORTANT Before attempting to install, use, or charge the battery pack, it is crit-
ical that you review and follow the important safety guidelines in the
quick reference guide entitled Workabout Pro4 Hand-Held Compu-
ter Regulatory & Warranty Guide, PN 8000296
Draft #5
2 - 4 Workabout Pro4 (Windows Embedded Hand-Held 6.5) User Manual
Charging the Battery
Batteries shipped from the factory are charged to approximately 40% of capacity. Lithium-ion battery packs
must be fully charged before use. These batteries can be charged with a variety of chargers and docking
stations. For detailed information about these accessories, please see Chapter 5: “Peripheral Devices &
Accessories”.
Normally it takes 3 to 4 hours to charge a battery.
The Keyboard
This hand-held is equipped with a [Power] button in the lower left corner of the keyboard.
The [FN/BLUE] modifier key provides access to additional keys and system functions. These functions are
colour coded in blue print above the keyboard keys.
IMPORTANT If your Workabout Pro4 fails to power up, consider the following
troubleshooting options:
The battery may be overheated (>60C°), a non-Motorola battery
may be installed, or the battery may have fallen below the config-
ured Suspend Threshold. See “Suspend Threshold and Estimated
Battery Backup” on page 4-10 for details.
To switch on the hand-held, you will need to replace the overheated
battery.
However, if you supply AC power to the Workabout Pro4 with a
battery that falls below the configured Suspend Threshold, the
unit will switch on.
IMPORTANT RISK OF EXPLOSION IF BATTERY IS REPLACED BY AN INCORRECT TYPE.
DISPOSE OF USED BATTERIES ACCORDING TO INSTRUCTIONS.
% Charge Completed During Sleep Mode While Operating
100% 4 hrs. 8 hrs.
75% 2 hrs. 6 hrs.
IMPORTANT To avoid damaging the battery, chargers will not begin the charge
process until the battery temperature is between 0°C to 45°C (32°F
to 113°F).
Workabout Pro4 Variant Keyboard Type Available
Workabout Pro4 Long Alphanumeric only
NOTE Almost all keys can be reprogrammed to suit your requirements.
Draft #5

Getting to Know Your Workabout Pro4 2 - 5
The [Power] Button
The [Power] button in the lower left corner of the keyboard switches the unit on and off.
Standard Keys
The [ENTER] Key
The [ENTER] key is used to execute the usual Enter keyboard functions.
The [SHIFT] Key
The [SHIFT] key is used to display uppercase alpha characters and to provide access to other symbols and
functions on the numeric keyboards. Press the [SHIFT] key to turn the shift state 'on' (it will be represented in
the shift-state indicator in the navigation bar at the top of the screen), then press another key to access the
shifted function of that key.
Press the [SHIFT] key twice to lock the shift state on (the shift-state will be outlined in a black frame to indicate
it is locked ‘on’). It is now in CAPS LOCK mode. Press [SHIFT] again to turn the shift state off.
The Arrow Keys
The [Arrow] keys are located near the top of the keyboard, and are represented on the keyboard as triangles
pointing in different directions. The [Arrow] keys move the cursor around the screen in the direction of the
arrow: up, down, left and right. The left arrow key should not be confused with the [BACKSPACE] key which is
depicted as a left arrow. The cursor is the flashing box or underline character that indicates where the next
character you type will appear.
The [BACKSPACE/DEL] Key
The [BACKSPACE] key (represented on the keyboard as an arrow pointing left) moves the cursor one char-
acter to the left, erasing the previous key stroke.
The [DEL] key ([FN] +[BACKSPACE]) erases the character at the current cursor position.
The [CTRL] and [ALT] Key
The [CTRL] and [ALT] keys modify the function of the next key pressed and are application dependent.
Pressing either key twice locks it 'on'. Pressing the key once again unlocks it.
The [TAB] Key
Typically, the [TAB] key moves the cursor to the next field to the right or downward.
The [ESC] Key
Generally, this key is used as a keyboard shortcut to close the current menu, dialog box, or activity.
The [SPACE] Key
The [SPACE] key is represented on the keyboard by a long, horizontal line bracketed by a small vertical line on
each side. Pressing this key inserts a blank space between characters. In a Windows dialog box, pressing the
[SPACE] key enables or disables a checkbox.
The [SCAN] Key
The Workabout Pro4 is equipped with a single [SCAN] key at the top of the keyboard and two [SCAN] buttons
located on the left and right sides of the unit. [SCAN] keys activate the scanner beam. For units that do not
have internal scanners, these keys can be remapped to serve other functions.
Draft #5
2 - 6 Workabout Pro4 (Windows Embedded Hand-Held 6.5) User Manual
Volume Control – [UP ARROW] [DOWN ARROW]
The volume keys are located above the [UP ARROW] and [DOWN ARROW] and are labelled with blue icons -
the [UP ARROW] is labelled with a plus (+) symbol indicating volume increase while the [DOWN ARROW] is
labelled with a minus (-) symbol indicating volume decrease.
To increase the volume, press the [FN/BLUE] key followed by the [UP ARROW] key. To decrease the volume,
press [FN/BLUE] followed by the [DOWN ARROW] key.
Modifier Keys
The [SHIFT], [CTRL], [ALT], [FN/BLUE] and [FN/ORANGE] keys are modifier keys. Pressing a modifier key
changes the function of the next key pressed. For example, on a Workabout Pro4 Qwerty keyboard, a bracket
is printed in orange print above the [U] key. Pressing the [FN/ORANGE] key followed by the [U] key displays a
bracket rather than the letter U.
The [SHIFT], [CTRL] and [ALT] keys operate much like a desktop keyboard except that they are not chorded
(two keys held down simultaneously). The modifier key must be pressed first followed by the key whose func-
tion you want modified.
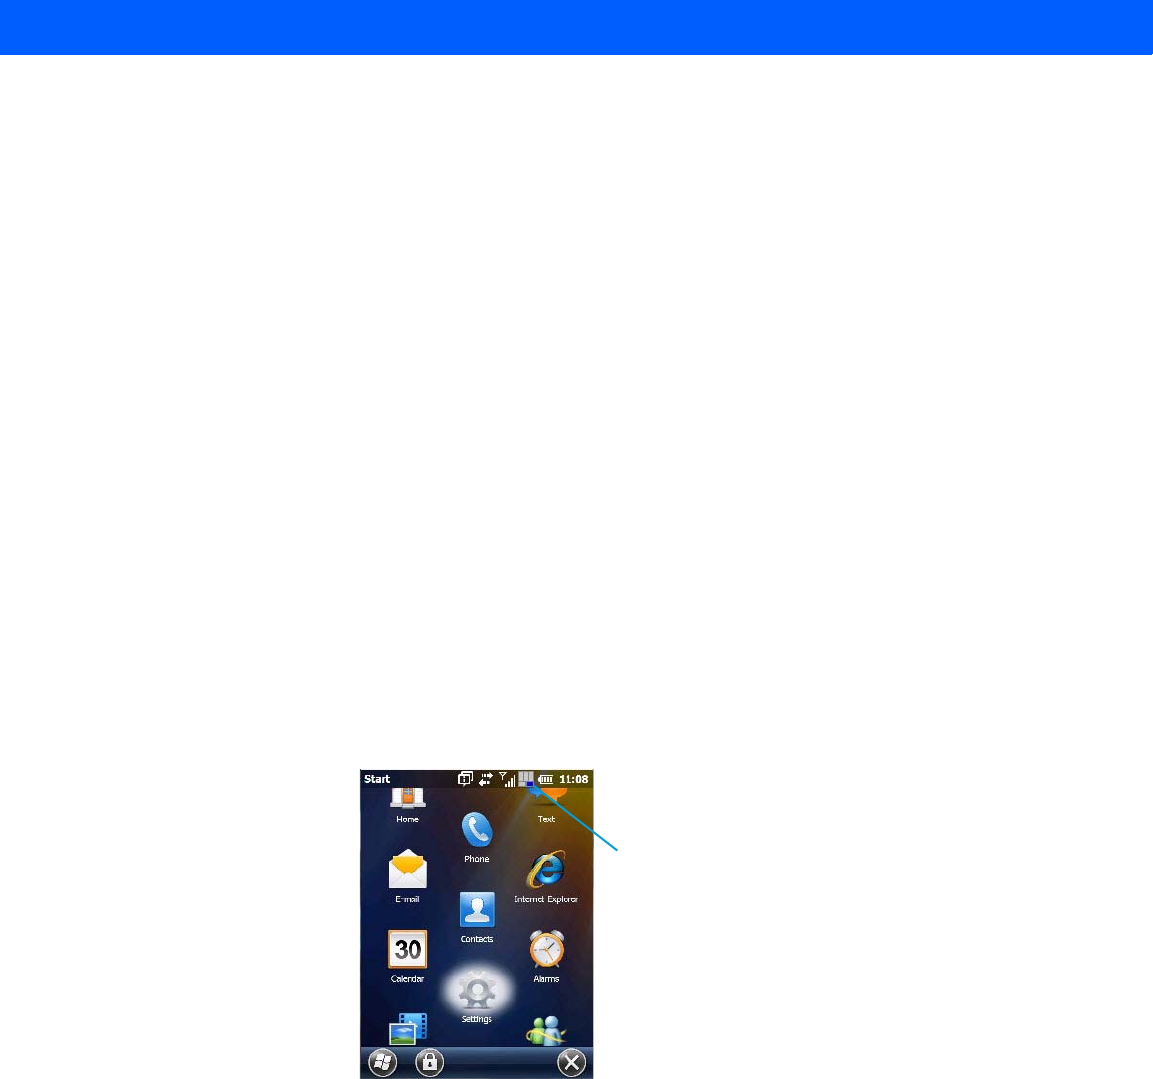
Activating Modifier Keys
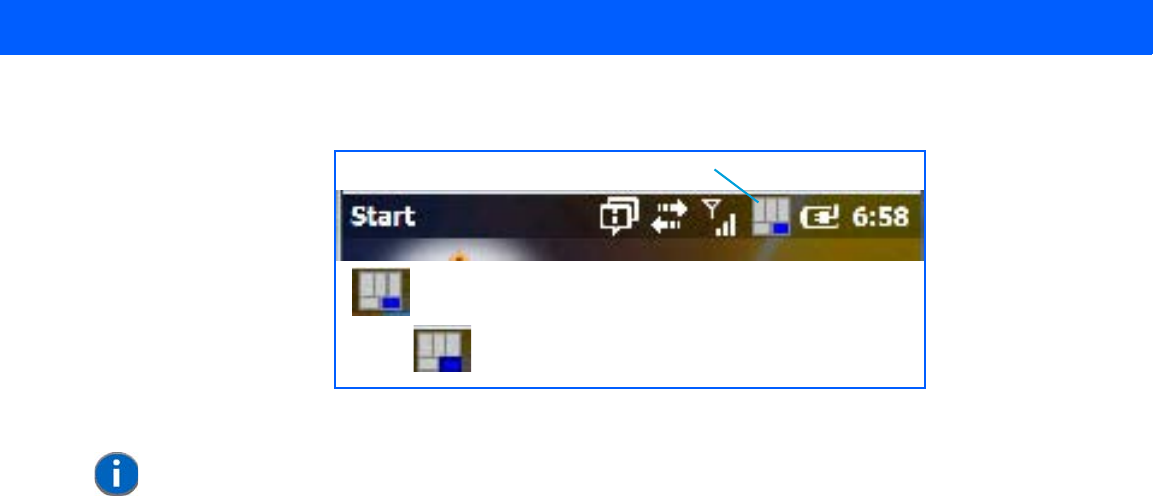
When a modifier key is pressed, it is represented in the shift-state indicator icon in the navigation bar at the top
of the screen, making it easier to determine whether or not a modifier key is active. For example, when the
[FN/BLUE] key is pressed, it is represented in blue in the shift-state indicator icon at the top of the screen.
Figure 2-1
Shift-State Indicator Icon
Locking Modifier Keys
When a modifier key is locked ‘on’, it will remain active until it is pressed again to unlock or turn it off.
To help you identify when a modifier key is locked ‘on’, the key is represented in the shift-state indicator icon
with a black frame around it.
Shift-state indicator icon
Draft #5
Getting to Know Your Workabout Pro4 2 - 7
Figure 2-2
Shift-State Indicator Icon – Locked/Unlocked Modifier Key
Once a modifier key is unlocked or turned off, it is no longer displayed in the shift-state indicator icon.
Function Keys and Macro Keys
In addition to the standard keyboard functions, the Workabout Pro4 supports Function keys and Macro keys
(Macro keys are only available on Workabout Pro4 Long units).
All function keys and macro keys can be custom defined for each application. The Tekterm application utilizes
these keys (for detailed information, see the Tekterm Software User Manual, PN 8000073).
Function Keys
Function keys perform special, custom-defined functions within an application. These keys are accessed by
pressing one of the dedicated function keys on the keyboard, or through the appropriate [SHIFT] or [FN] key
sequence, depending on the keyboard variant being used.
All Workabout Pro4 keyboards are equipped with a total of 14 function keys. Function keys [F1] to [F4] located
near the top of the keyboard are directly accessible – a key combination is not required. Ten additional function
keys from [F1] to [F10] are colour coded in blue print on the unit body; these keys are accessed by executing a
key combination, [FN/BLUE] followed by the appropriate key.
For example, to access [F6] on a QWERTY keyboard:
• Press the [FN/BLUE] key followed by the [F] alpha key – the alpha key to which function key [F6]
is mapped.
Locked modifier key indicator
Unlocked modifier key indicator
Shift-state indicator icon
NOTE The locking function of the modifier keys can be changed so that pressing a
modifier key once will lock it ‘on’.
If you disable the ‘One Shot’ function of the key, pressing it once will lock the
key ‘on’. Pressing the same key a second time will unlock or turn it ‘off’. Refer to
“OneShots” on page 4-39 for details.
Draft #5

2 - 8 Workabout Pro4 (Windows Embedded Hand-Held 6.5) User Manual
Macro Keys (Workabout Pro4 Long only)
Workabout Pro4 Long units are equipped with 10 Macro keys. Macro keys can be programmed to replace
frequently used keystrokes, along with the function of executable keys like the [ENTER] key, the [BACK-
SPACE] key, any function key and arrow key, etc.
Alphanumeric keyboards have ten macro keys: [M1] to [M10]. These keys are colour coded in orange print
above the numeric keys.
To access a macro key:
• Press the [FN/ORANGE] key followed by the appropriate numeric key from [1] to [0].
• To access macro key [M1], press [FN/ORANGE] [1].
• To access macro key [M2], press [FN/ORANGE] [2], and so on.
Whether your keyboard does or does not have macro keys physically stamped on the keyboard, up to 15
macro functions can be added using the Scancode Remapping function. Refer to “Scancode Remapping” on
page 4-42 for details about mapping keys.
Numeric Keyboards — Accessing Alpha Keys
On Numeric Workabout Pro4 keyboards, all alphabetic characters are printed on the unit plastic in blue type-
face above the keys. Alpha characters are accessed by pressing the [FN] modifier key, then pressing another
key on the keyboard.
Alpha Modified Numeric 789 keyboards have each blue alphabetic character assigned as a single [FN]-shifted
character on individual keys.
Numeric 123 keyboards have telephone-style alphabetic keys, with the blue alphabetic characters located in
groups of 3 or 4 above each of the numeric keys. To access characters on these keyboards, a few extra steps
are needed, as described below.
Choosing a Single Alpha Character
The examples below illustrate how to access A, B and C, all of which are printed in blue characters above the
numeric key [2] on a 36-Key Long Numeric 123 keyboard.
To choose the letter ‘a’:
• Press the [FN/ORANGE] key, and press the numeric key [2].
• Press the [FN/ORANGE] key again to unlock or turn it off.
IMPORTANT Refer to “Macro Keys” on page 4-40 for details about creating macros.
NOTE The following examples assume that the [FN/ORANGE] key is enabled as
‘Lock’ mode in the ‘One Shot’ screen (accessed by choosing Start>Set-
tings>Personal>Buttons icon). In ‘Lock’ mode, pressing the [FN/ORANGE] key
once locks it ‘on’. Refer to “OneShot/Lock” on page 4-39 for details.
IMPORTANT The letters you choose appear in the shift-indicator icon at the top of
the screen, providing a visual indicator of which letter will be dis-
played on the screen.
Draft #5

Getting to Know Your Workabout Pro4 2 - 9
To choose the letter ‘b’:
• Lock the [FN/ORANGE] key ‘on’, and press [2] twice.
• Press the [FN/ORANGE] key again to unlock or turn it off.
To choose the letter ‘c’:
• Lock the [FN/ORANGE] key ‘on’, and press [2] three times.
• Press the [FN/ORANGE] key again to unlock or turn it off.
Creating Uppercase Letters
To display capital letters, you need to first lock the [SHIFT] key ‘on’.
• Press the [SHIFT] key twice.
All alpha keys are displayed in uppercase until you press the [SHIFT] key again to ‘unlock’ (switch off) the func-
tion of this key.
Choosing Multiple Alpha Characters
• Lock the [FN/ORANGE] key ‘on’
Each time you press a numeric key from [2] through [9], an alpha character will be displayed on the screen.
Remember that you can refer to the softkey bar for a visual indication of which alpha key will be displayed on
the screen.
The Keypad Backlight
The intensity of the keypad backlight can be configured using the Backlight icon accessed by tapping on
Start>Settings>System>Backlight. Refer to “Backlight – Screen and Keypad” on page 4-45 for details about
this option.
NOTE To choose the second, third or fourth alpha character assigned to a numeric key,
you may want to lock the [FN/ORANGE] key ‘on’. Remember that depending on
how your Workabout Pro4 is set up in the ‘One Shots’ tab, you may find that you
need to press the [FN/ORANGE] key twice to lock it ‘on’. Refer to “One-
Shot/Lock” on page 4-39 for details.
NOTE Keep in mind that there is a timeout of one second between key presses when
sequencing through the alphabetic characters on a key. If you pause longer
than one second between key presses, the alphabetic character that is dis-
played at that time will be entered.
NOTE Once you have finished typing alpha characters, remember to turn off or unlock
the [FN/ORANGE] key. Check the shift-state indicator icon (refer to Figure
2-1 Shift-State Indicator Icon on page 2-6) to make certain that the key is
turned off.
NOTE Keep in mind that this option may be restricted to supervisory use only.
Draft #5

2 - 10 Workabout Pro4 (Windows Embedded Hand-Held 6.5) User Manual
The Display
The Workabout Pro4 is equipped with display backlighting to improve character visibility in low light conditions.
The backlight switches on when a key is pressed.
Adjusting the Display Backlight
To set the backlight intensity and the duration of time that the backlight will remain on, you’ll need to choose the
Backlight icon.
•Tap on Start>Settings and then, tap on System>Backlight icon.
Refer to “Backlight – Screen and Keypad” on page 4-45 for details.
Draft #5

Getting to Know Your Workabout Pro4 2 - 11
Calibrating the Touchscreen
If your touchscreen has never been aligned (calibrated) or if you find that the stylus pointer is not accurate
when you tap on an item, follow the steps below.
•Tap on Start>Settings>System. Tap on the Screen icon.
The General tab is displayed in which you can correct alignment and choose screen orientation (see “Screen
Orientation” on page 2-13 for details).
• Tap on the Align Screen button, and follow the directions on the screen to align (calibrate) the screen.
NOTE This window provides two additional tabs: ClearType and Text Size. Tapping on
the ClearType tab allows you to enable the ClearType option to smooth screen
font appearance. The Text Size tab allows you to increase or decrease the size
of the font displayed on the screen.
Draft #5

2 - 12 Workabout Pro4 (Windows Embedded Hand-Held 6.5) User Manual
Draft #5
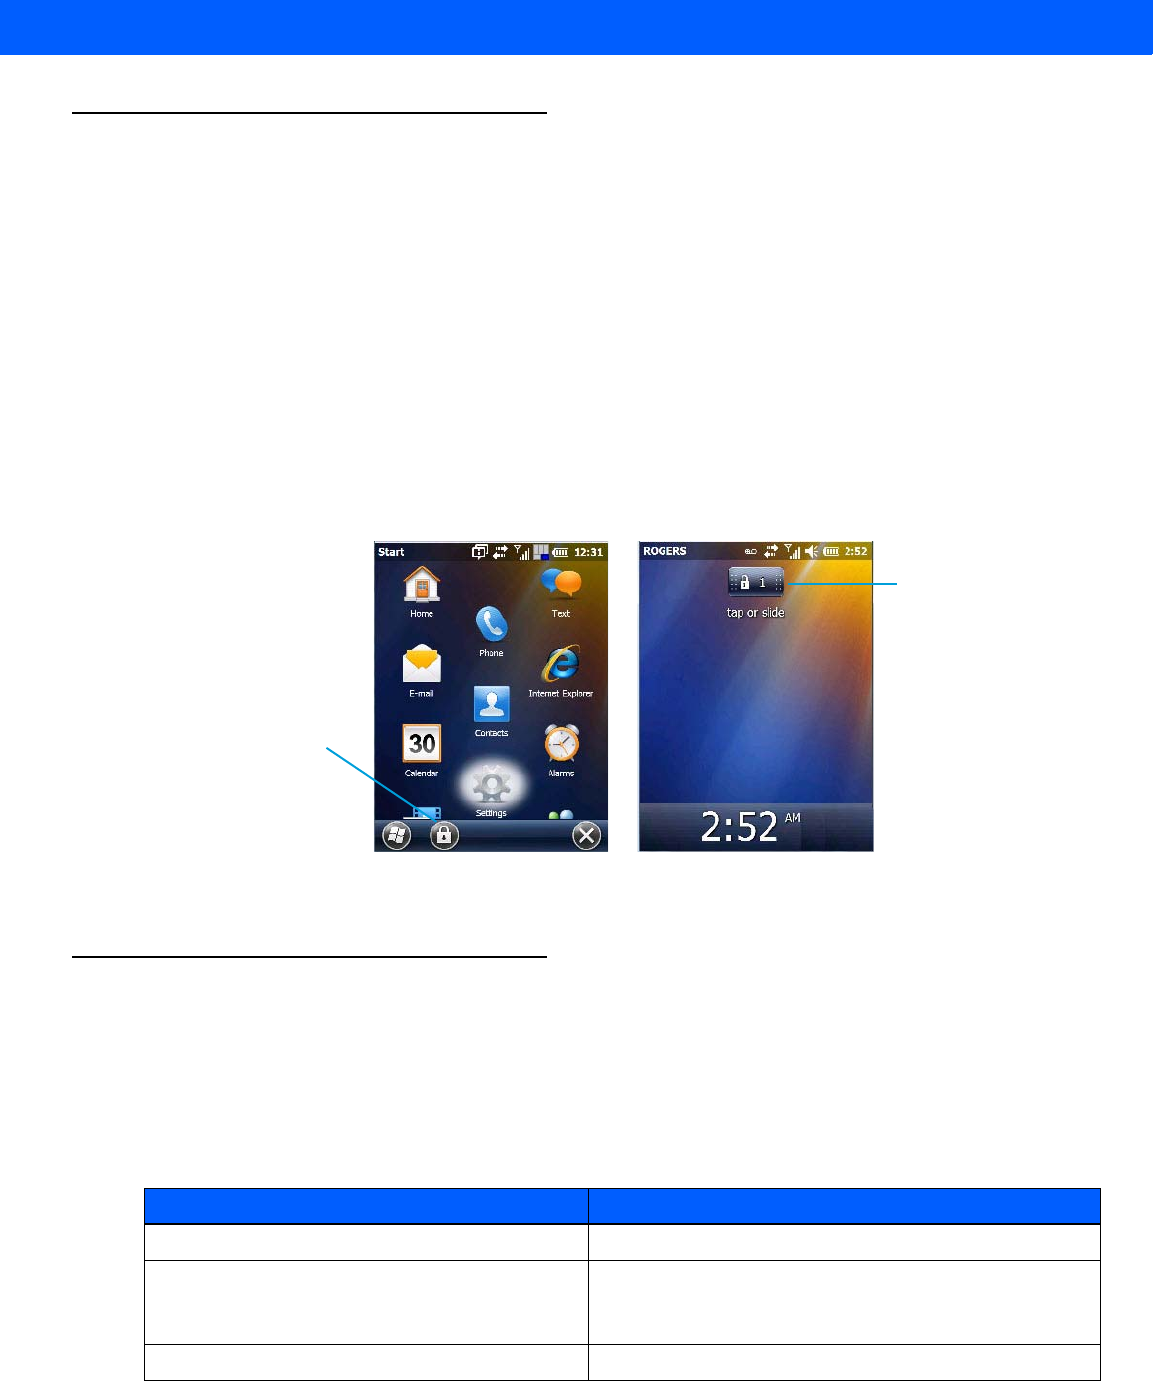
Getting to Know Your Workabout Pro4 2 - 13
Screen Orientation
In addition to screen calibration, the Screen icon allows you to determine how your screen will be oriented –
portrait or landscape (right- or left-handed).
•Tap on Start>Settings>System icon.
• Tap on the Screen icon.
• In the General tab, tap on the orientation that best suits the way in which you use your Workabout Pro4.
Locking the Touchscreen
If you need to lock your touchscreen to protect against accidental actions:
• At the Today screen, tap on the Start icon.
• Tap on the Lock icon in the softkey bar at the bottom of the screen. A sliding lock is displayed on
the screen.
• Place the stylus on the sliding lock, flick it to the right and release to unlock the touchscreen and display
the screen options.
Indicators
The Workabout Pro4 uses a LED (Light Emitting Diode), onscreen messages, and audio tones as indicators.
LED
The Workabout Pro4 is equipped with a single, orange coloured LED. This section outlines what the
LED indicates.
Lock icon
Sliding lock
Charge LED Behaviour Indication
3 flashes, pause, repeat ‘Power on’ was attempted. Unit will retry.
Rapid blinking for 1 second Reset or resume is being ignored because the battery
door is open. If the door is closed during this process,
reset or resume will proceed normally.
Fast blip (500 ms period, 13% duty cycle) Windows is in “unattended mode”.
Draft #5
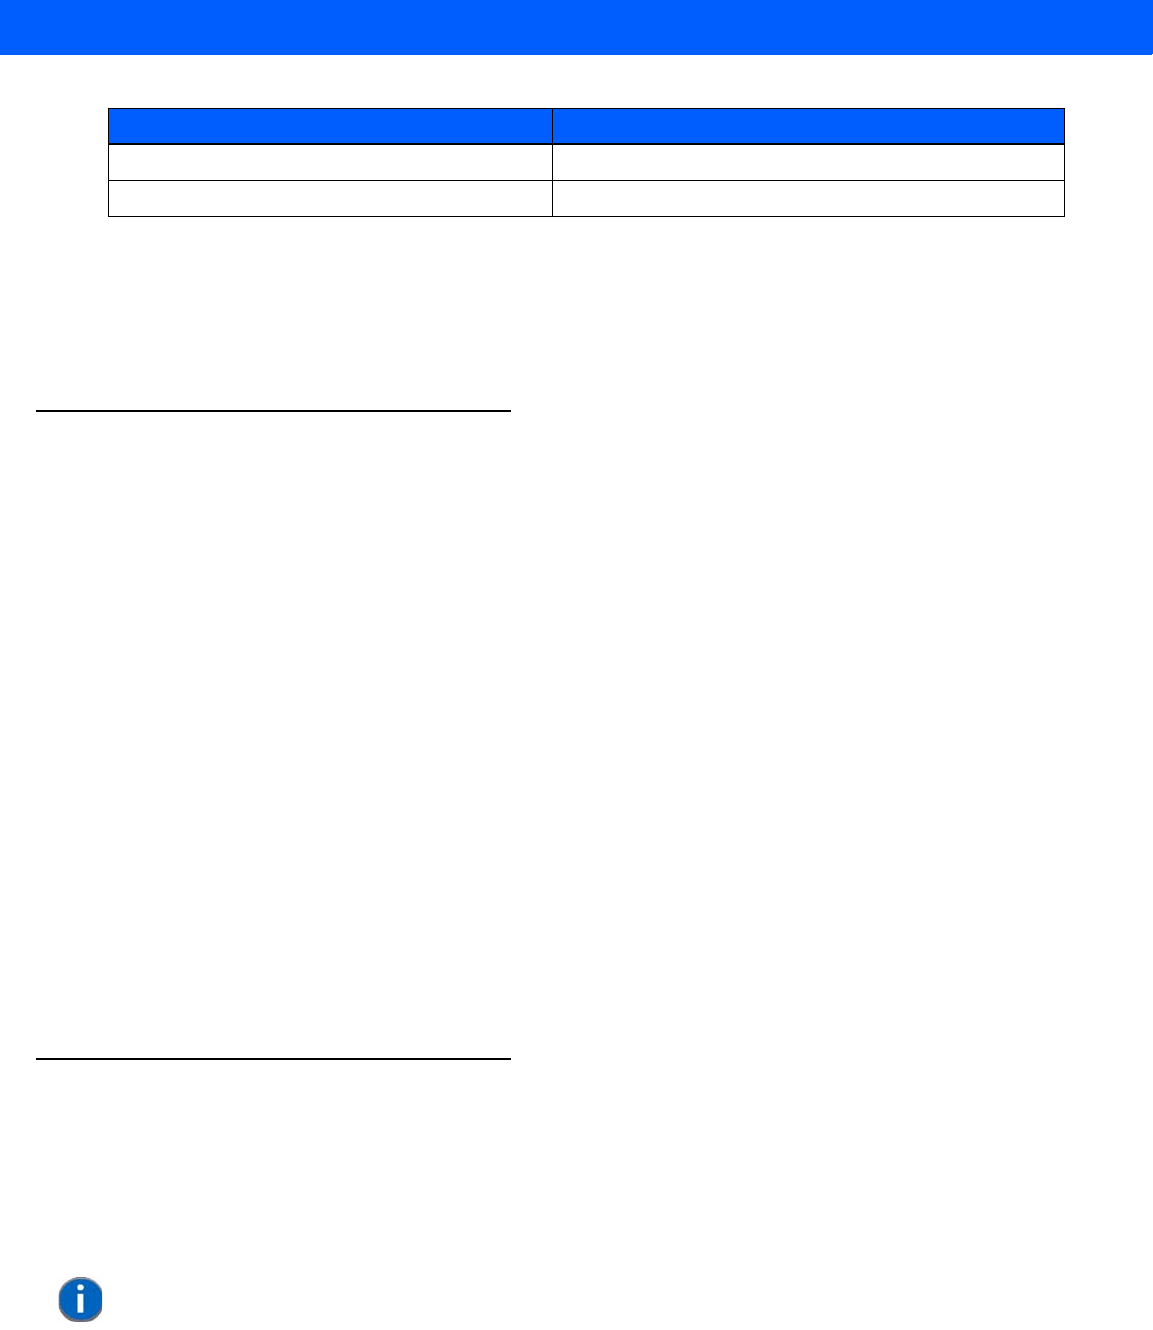
2 - 14 Workabout Pro4 (Windows Embedded Hand-Held 6.5) User Manual
Audio Indicators
The Workabout Pro4 supports several audio options, including a Bluetooth headset. Sounds are emitted
through the front receiver. The beeper provides a variety of sounds and can be configured to emit a sound to
signal a number of events such as screen taps, notifications, and so on. Information on configuring sounds is
detailed in “Sounds Tab” on page 4-12.
Inserting the microSD Card and SIM Card
There are two slots available when the battery is removed from the battery compartment — the smaller slot to
the left is used to load the microSD (Secure Digital) card, which provides additional non-volatile memory to
your Workabout Pro4, and the slot to the right is used to load a SIM (Subscriber Identity Module) card, which
allows access to the Voice option, access to the Internet, and so on.
Inserting and Removing the Cards
• Switch off the power to the Workabout Pro4.
• Remove the battery.
The microSD slot is spring-loaded. To insert a microSD card:
• Flip up the rubber cover of the microSD card door on the left.
• Slide the microSD card into the slot until it clicks into place.
• Push the rubber cover back in place.
• To remove the microSD card, lift the rubber cover and push the microSD card inward until it pops out of
the slot.
The SIM slot is equipped with a release tab. To insert a SIM card:
• Slide the SIM card into the slot on the right until it clicks into place.
• To remove the SIM card, depress the metal release tab and slide the card out of the slot.
Navigating in Windows Embedded Hand-Held 6.5 and Applications
Graphic user interfaces like Windows Embedded Hand-Held 6.5 for portable devices or desktop Windows (XP,
Windows 7, etc.) utilize ‘point and click’ navigation. On the Workabout Pro4, this is accomplished using a
touchscreen and stylus rather than a mouse.
Navigating Using a Touchscreen
A touchscreen is a standard feature on all Workabout Pro4 hand-held computers. Each is shipped with a stylus
– a pointing tool.
Slow blink (2 second period, 50% duty cycle) Charge temperature fault.
Solid Orange Booting/resuming.
Charge LED Behaviour Indication
NOTE If the touchscreen is not registering your screen taps accurately, it may need
recalibration. Refer to “Calibrating the Touchscreen” on page 2-11.
Draft #5
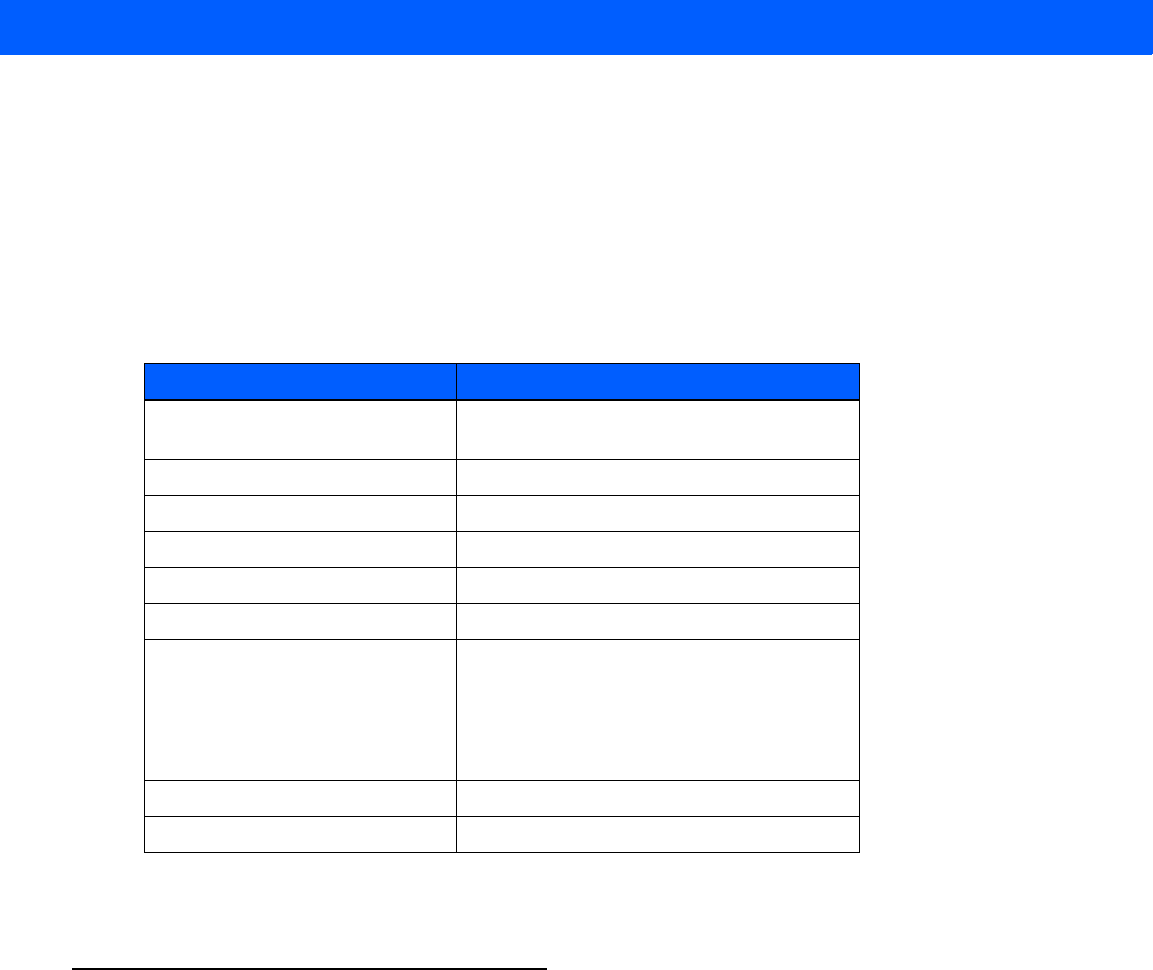
Getting to Know Your Workabout Pro4 2 - 15
• Use the stylus to tap on the appropriate icon to open files and folders, launch applications and programs,
make selections, and so on. You can also use your finger rather than the stylus.
• Tap and flick the stylus or your finger on the screen to scroll through the options on a screen.
• Tap on the navigation bar to display additional icons.
Navigating Using the Keyboard
If you prefer to use the keyboard to move the cursor around the screens on your Workabout Pro4, refer to table
following for a description of the navigation keys.
Keep in mind that unlike a desktop computer, the Workabout Pro4 does not support key chording (pressing two
keys at the same time). You must press one key followed by the next in sequence.
The Today Screen
The Today screen provides quick access to a default list of applets such as phone, voicemail, and so on. This
screen is also equipped with a navigation bar along the top of the screen which provides access to hotkeys.
Hotkeys act as shortcuts to apps. Along the bottom of the screen, a softkey bar contains softkeys that help you
navigate – in particular, the Start button which provides access to everything else you’ll need to work with
Windows Embedded Hand-Held 6.5.
Operation Key or Key Combination
Switch between active
applications [ALT] [TAB]
Open task manager [ALT] [ESC]
Move the cursor Arrow keys
Open file, folder or icon [ENTER]
Exit & Save [ENTER]
Close/Exit & Do Not Save [ESC]
Navigate Dialog Boxes [TAB]
To move cursor up [SHIFT] [TAB]
To display the contents of the next ‘tab’ in a
dialog box [CTRL] [TAB]
Select Radio Button/Press Button [SPACE]
Go to Start Menu [Windows]
Draft #5
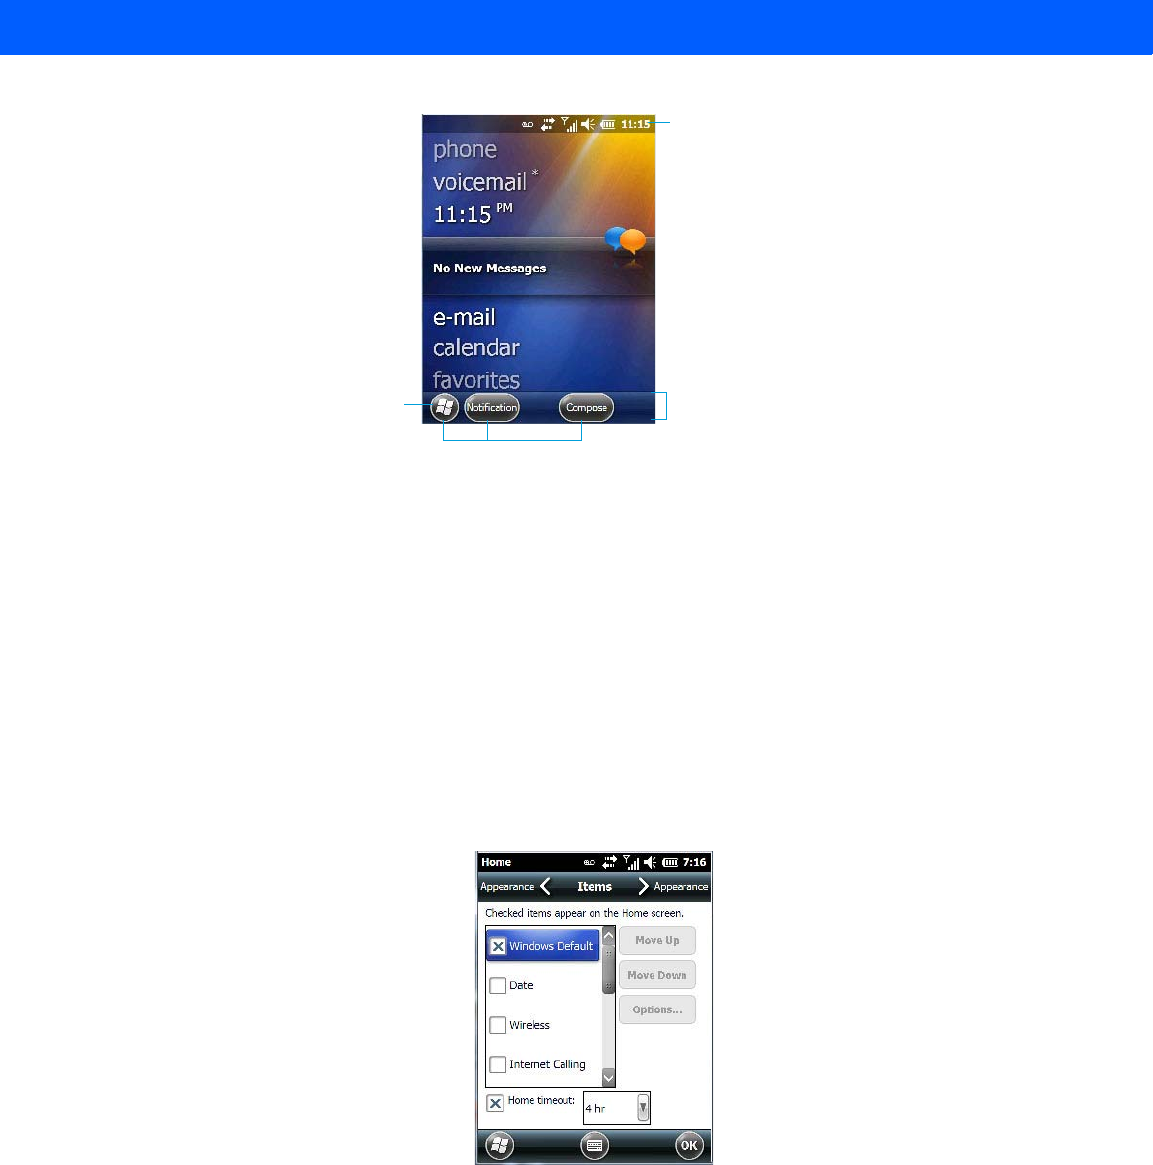
2 - 16 Workabout Pro4 (Windows Embedded Hand-Held 6.5) User Manual
• Use the stylus or your finger to scroll to and highlight the option you want to work with. The highlighted
option displays information specific to the applet. For example, highlighting the Calendar option lets you
know if there are any appointments.
• Tap on any highlighted option to display the associated dialog box. Note that you can also double-tap on
any option to display the associated dialog box.
Depending on which option you tap on, the softkeys at the bottom of the screen change to help support
working with the particular option you’ve chosen.
Customizing the Today Screen
The items you see in the Today screen are Windows defaults. To customize the screen to suit your purposes:
• Tap on the Start button. Tap on the Settings icon followed by the Home icon.
• In the scrolling tab bar at the top of the screen, scroll to the Items tab.
The items you select will appear in the Today screen. Once you’ve chosen the items to appear on the Today
screen, you can also tailor the order in which you want the items to appear:
• Highlight an item. Tap on the Move Up and Move Down buttons to order your selections.
When you choose items for the Today screen using this method, the appearance of the Today screen will
change to a list format.
Start button
Softkeys
Softkey bar
Navigation bar
Draft #5
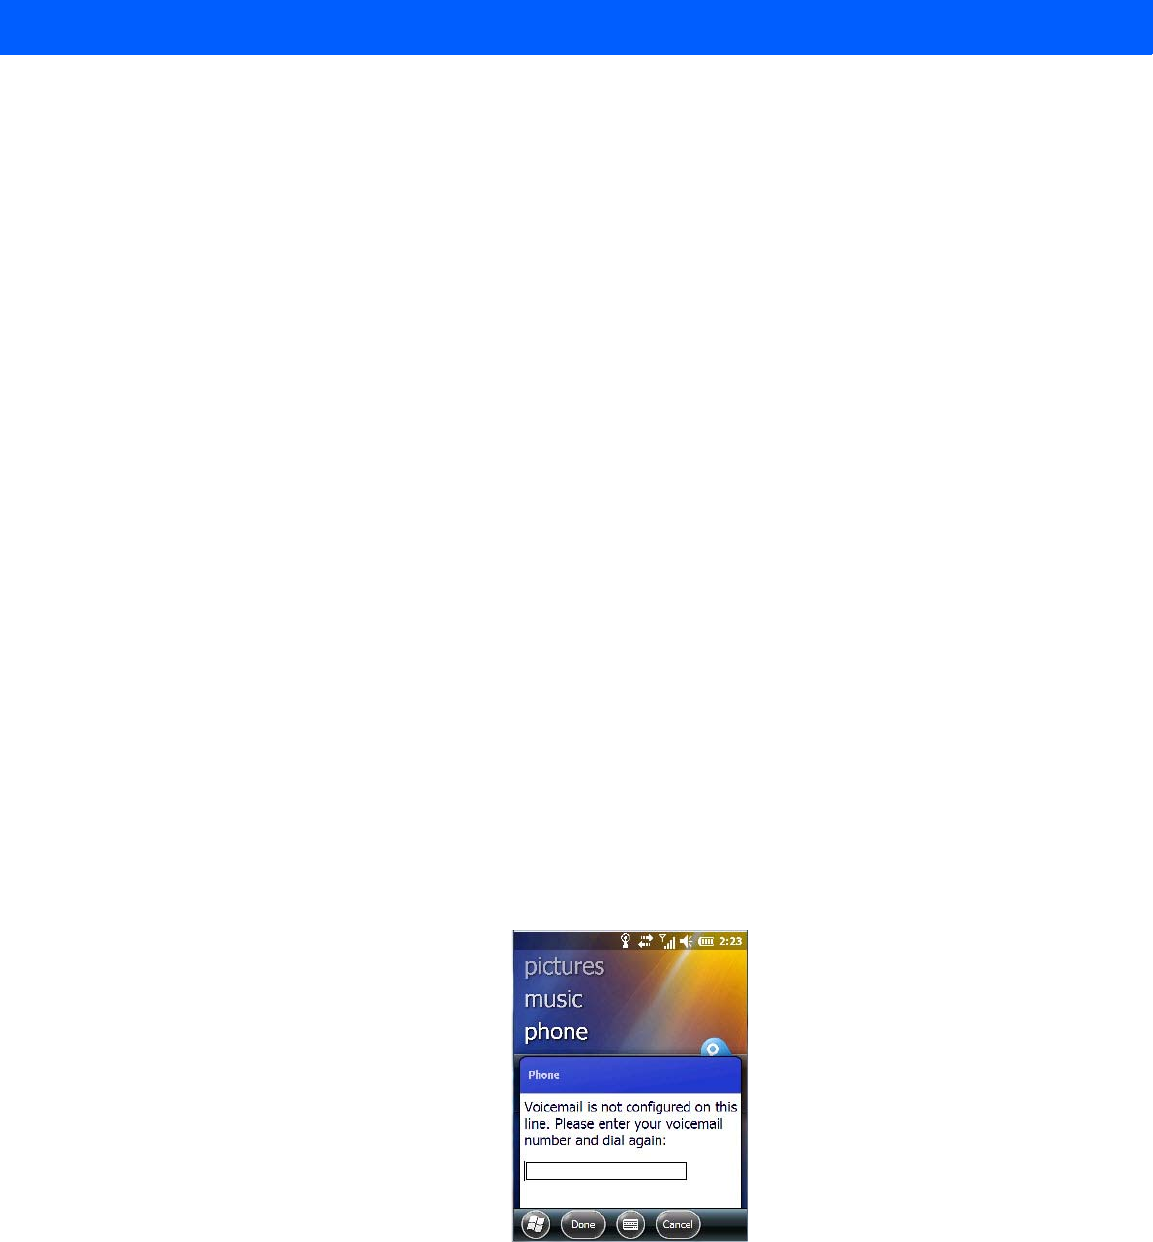
Getting to Know Your Workabout Pro4 2 - 17
The Today Screen Default Options
A list of options are available from the Today screen. Keep in mind that these can be altered using the method
described above in “Customizing the Today Screen” on page 2-16. You can also refer to “Shell Settings” on
page 4-57 for additional customization options.
Pictures
This option provides access to the Pictures & Videos applet. Refer to “Pictures & Videos” on page 3-16
for details.
Music
Tapping on the Music option displays the Windows Media applet. Refer to “Windows Media” on page 3-20
for details.
DataWedge
DataWedge is a mobile device application that allows any application to receive data from barcode, RFID,
magnetic stripe and serial devices.
Refer to Appendix B: “DataWedge” for pointers to detailed documentation.
Phone
• Scroll to and highlight the Phone option to learn if you’ve missed any calls.
• Tap the stylus on the highlighted Phone option to display the phone console.
Refer to “The Phone” on page 3-4 for details about using the phone.
Voicemail
Highlighting Voicemail lets you know if you have any new voice messages. Tapping the stylus on this option
displays the phone console so that you can dial the phone number to access your voice messages.
If your service supports voicemail but it has not been set up:
•Tap on Voicemail in the Today screen.
• Type your voicemail number.
Time, Date and Alarms
•Tap on Start>Alarms icon to display Clock & Alarms screen.
Draft #5
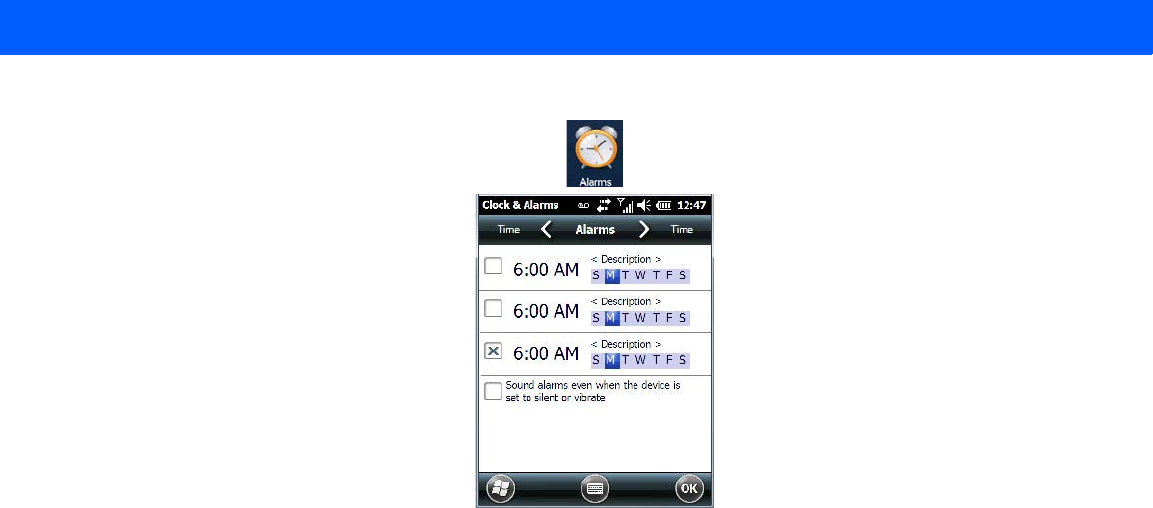
2 - 18 Workabout Pro4 (Windows Embedded Hand-Held 6.5) User Manual
Setting the Alarm
You can set a maximum of three alarms.
• In the Alarms tab, tap on the Time or Day in the Clock & Alarms screen. An Alarm Settings screen is
displayed.
• To set the time, highlight the hours and then the minutes in the clock and use the arrow keys to increase
or decrease the numbers, or type the hours and minutes directly from the keyboard or soft keyboard.
• Type a description in the Description field.
• Tap on the day on which you want the alarm to go off – Sunday through Saturday.
• Next, choose the Sound - you can tap on the Play button to experiment with the sounds. You can also
choose No Sound.
• In the drop-down menu below the Play button, you can choose how the alarm will behave, whether or not it
will repeat and so on.
•Tap on OK to save your changes.
Setting the Time and Date
To set the time on the Workabout Pro4:
• If it is not already displayed, tap on the Time tab at the top of the screen.
• Choose the appropriate Time Zone, set the Date, and the current Time.
Text Messages
In the Today screen, highlighting Text lets you know if you have any new text messages. Tapping the stylus on
this option displays the Text Messages screen.
Draft #5
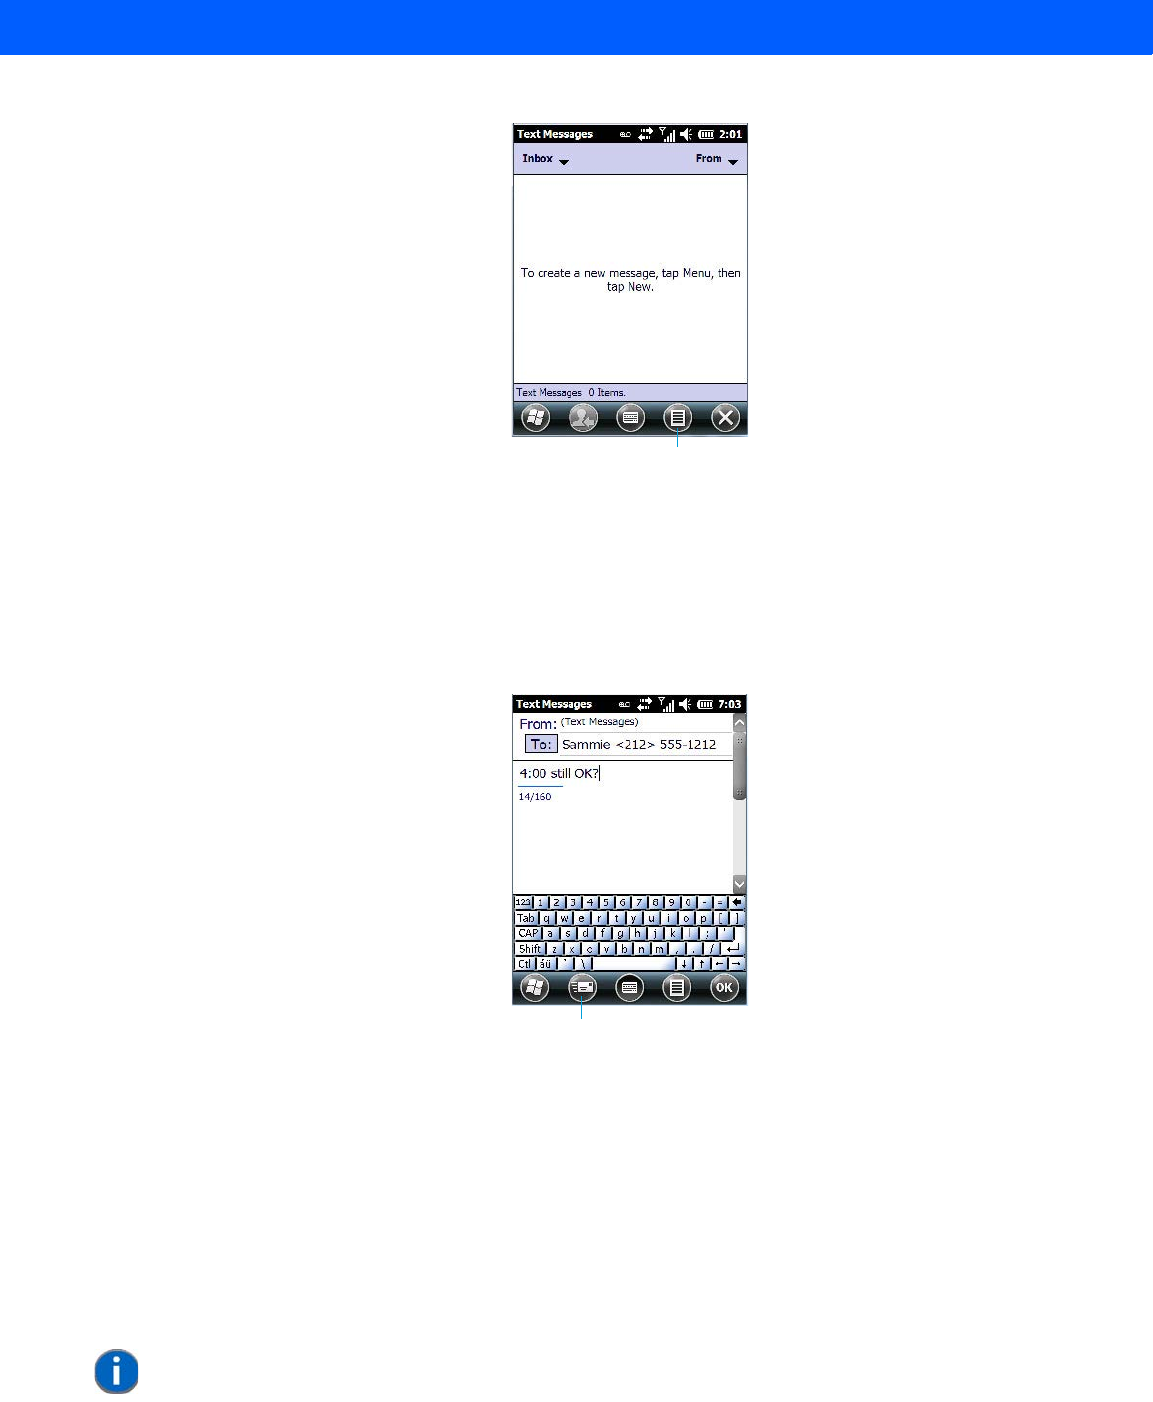
Getting to Know Your Workabout Pro4 2 - 19
To compose and send a text message on your Workabout Pro4:
• Tap on the Menu softkey, and choose New from the menu.
• In the To field, type the name of the person to whom you want to send a text message, or to insert a
number from your contacts list, tap on Menu>Add Recipient, and choose a name.
• Tap your stylus in the message area, and type your message.
• Tap on the Send softkey to deliver your message.
Once you send the message, your message is displayed in the Inbox and a conversation icon is displayed in
the softkey bar.
Highlighting the text message and tapping on the conversation softkey automatically connects to the sender’s
information so you can compose a reply.
E-mail Notification
If you have any e-mail, highlighting this option lets you know if you have any unread e-mail. To view e-mail:
• Tap on the E-mail option in the Today screen, or tap on Start followed by the E-mail icon to launch
your e-mail.
Menu softkey
Send softkey
NOTE Refer to “Synchronizing E-mail with Outlook (PC with Windows XP OS)” on
page 3-9 and “Synchronizing E-mail with Outlook (PC with Windows Vista or
Windows 7)” on page 3-10 for details about synchronizing your e-mail.
Draft #5
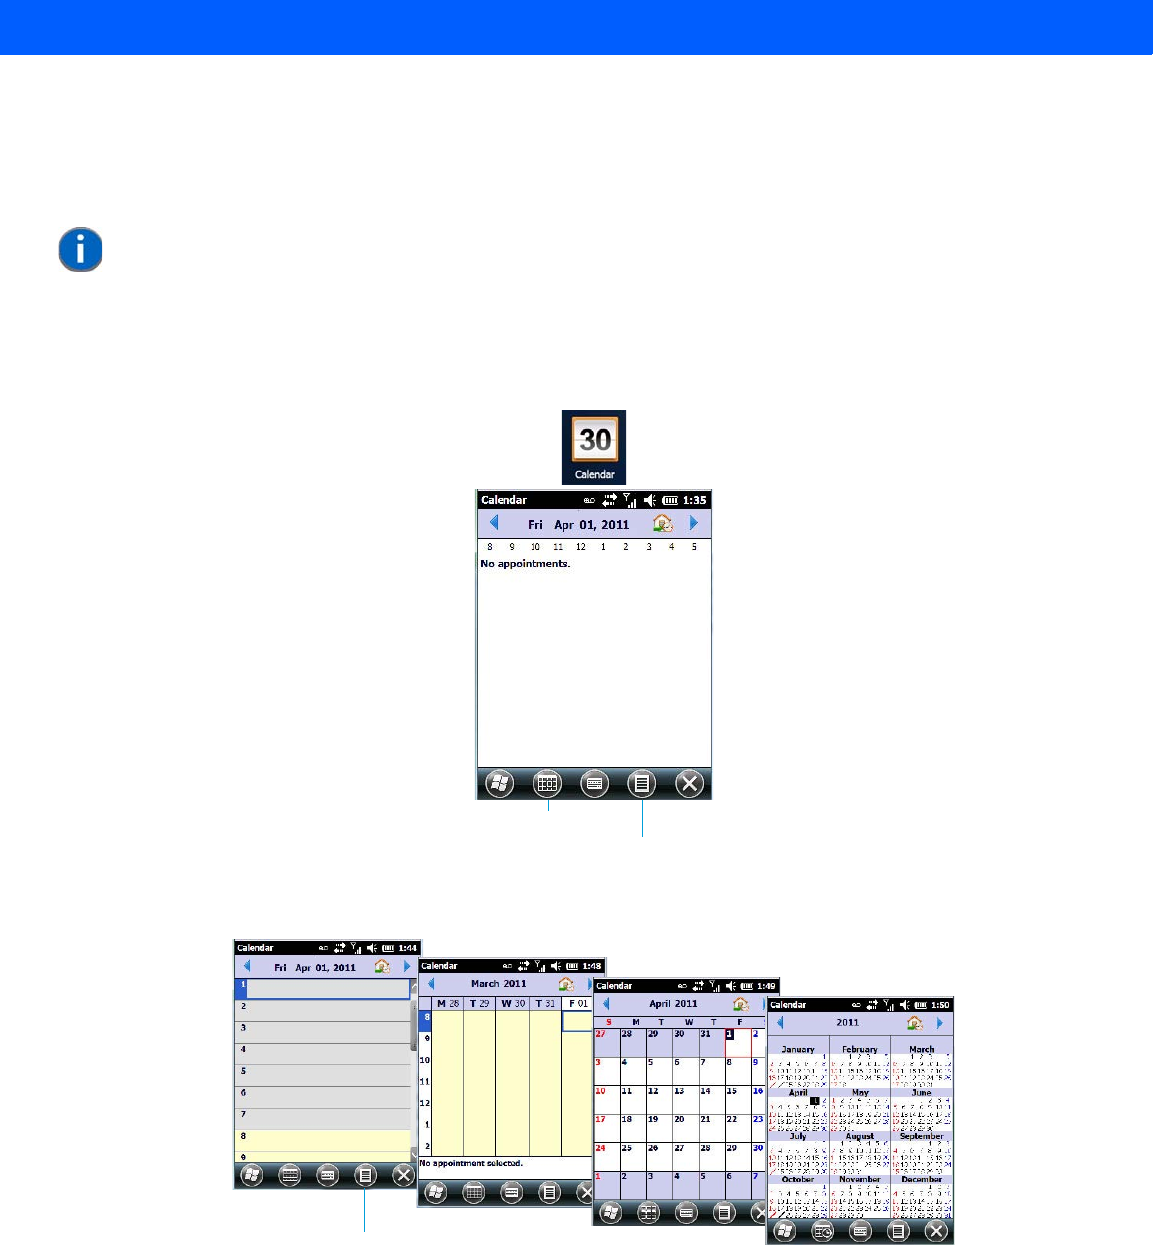
2 - 20 Workabout Pro4 (Windows Embedded Hand-Held 6.5) User Manual
Calendar of Upcoming Appointments
This option is used to map out all your upcoming appointments, meetings and so on in the weeks, months and
years ahead.
• In the Today screen, tap on Calendar, or tap on Start>Calendar icon to display the calendar applet.
The default calendar displays any scheduled appointments. To choose the format of your calendar:
• Tap on the Calendar softkey – this key scrolls through the calendar formats.
Creating and Editing Appointments
• In the Calendar screen, tap on the Menu softkey in the softkey bar, and then tap on New Appointment.
NOTE You can synchronize the Calendar so that any meetings, appointments and so
on are displayed on your Workabout Pro4 Today screen as well as on your PC.
Refer to “Synchronizing E-mail with Outlook (PC with Windows XP OS)” on
page 3-9 and “Synchronizing E-mail with Outlook (PC with Windows Vista or
Windows 7)” on page 3-10 for details about synchronizing your e-mail.
Calendar softkey
Menu softkey
Menu softkey
Draft #5
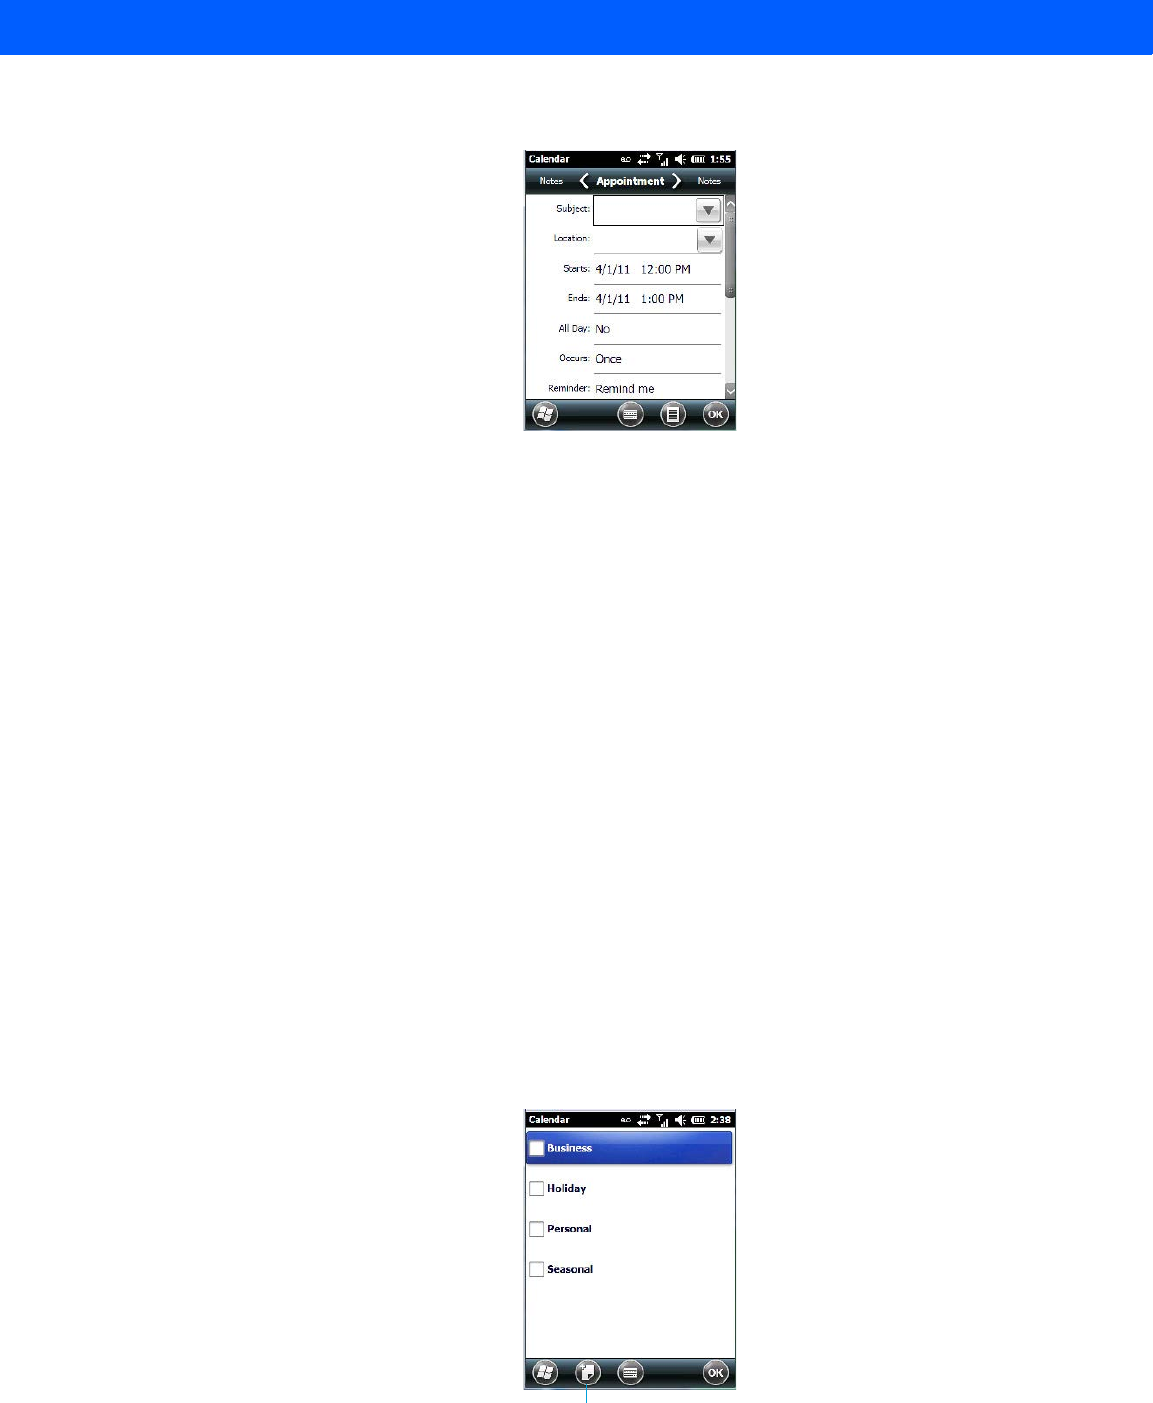
Getting to Know Your Workabout Pro4 2 - 21
Figure 2-3
Appointment Detail Screen
• In the Subject field, name the appointment.
• Complete the remaining fields to reflect your appointment details.
Adding Reminders
If you want to be reminded in advance of an appointment:
• Tap on the Reminder field, and choose Remind me from the drop-down menu.
• Tap the field below the Reminder field, and tap on the number in the field to display a drop-down menu
where you can define a numeric value of 1, 5, 10, 15, 30. Tap on minute(s) to display a drop-down menu
from which you can choose the time unit for your reminder – minute(s), hour(s), day(s) or week(s).
•Tap OK to finish. You are returned to the view you were in before adding the reminder.
• Tap the appointment in the Calendar screen to display it in a summary screen. The reminder is indicated
by the small, bell icon.
• If you’ve no further additions for the appointment, tap on OK. Otherwise, move to the Categories section
following.
Using Categories
Categories help you organize and track the different types of data you keep on your Workabout Pro4.
To assign an appointment to a category:
• Tap on the Menu softkey, and choose Edit.
The Appointment tab is displayed.
• Scroll down to the Categories field, and tap on it to display your options.
New category softkey
Draft #5
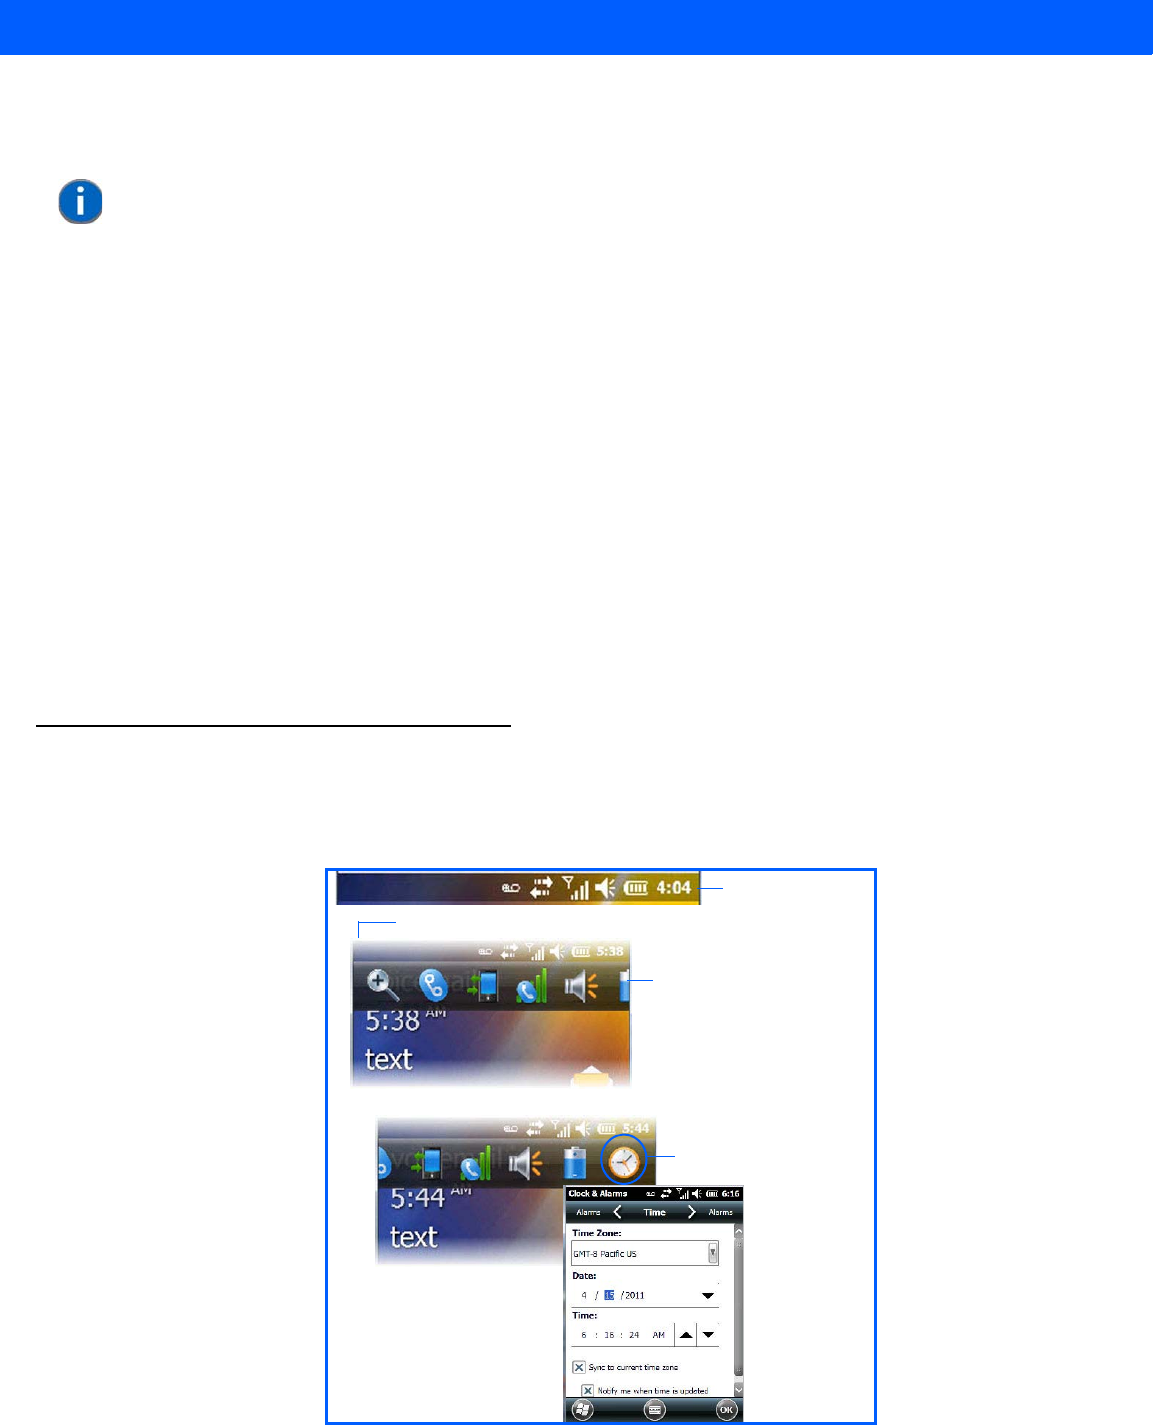
2 - 22 Workabout Pro4 (Windows Embedded Hand-Held 6.5) User Manual
• Tap in the checkbox next to the category to which you want to assign the appointment.
•Tap OK. Your appointment is assigned to the category or categories you chose.
Attendees
This option allows you to define required and optional attendees for your meeting. When you tap on this option,
your contacts are displayed where you can choose attendees.
Status
Tapping on Status lists your availability - Free, Tentative, Busy, or Out of Office.
Sensitivity
This option allows you to indicate the nature of the appointment – Normal, Personal, Private, or Confidential.
Deleting Appointments
• Tap and hold the stylus on the appointment you want to delete, and tap on Delete Appointment.
Favorites
The Favorites option connects you to Internet favourites. Tap and drag your stylus on this option, and choose
Add/Remove to edit your list of favourites.
Using the Navigation Bar and Hotkeys
The navigation bar along the top of the screen provides access to icons or hotkeys that, when tapped, provide
shortcuts to associated apps.
NOTE You can create a new category by tapping on the New softkey at the bottom of the screen.
Navigation bar
Tap anywhere in the navigation bar to display the hotkeys.
Hotkeys
Tap on a hotkey to display
Tap and drag the stylus to
the left to display additional
hotkeys.
the associated app.
Draft #5
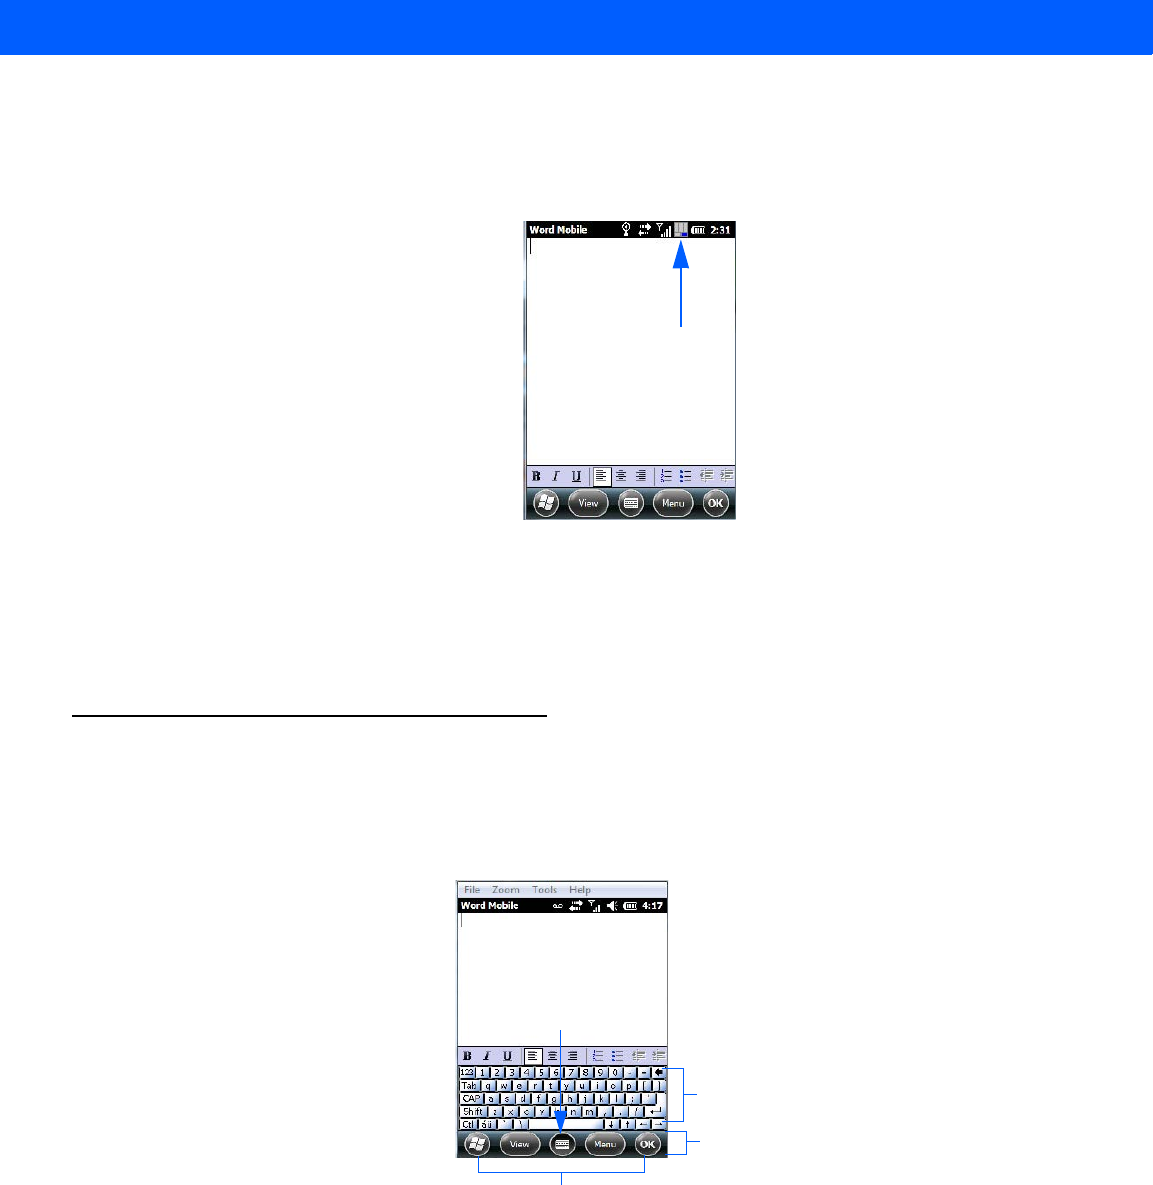
Getting to Know Your Workabout Pro4 2 - 23
Shift-State Indicator Icon
The navigation bar at the top of the screen can also display the shift-state indicator icon. This icon indicates
active modifier keys – [SHIFT], [ALT], [CTRL], [SYM] and [BLUE/FN].
When a modifier key is pressed, it is displayed in the shift-state indicator icon. In the example above, the
[BLUE/FN] key was activated.
To distinguish a ‘locked’ modifier key – a key that has been locked ‘on’ – from a modifier key that is only active
until the next key is pressed, ‘locked’ keys are encircled in a black frame in the shift-state indicator icon. Refer
to “Activating Modifier Keys” on page 2-6 for details.
The Softkey Bar
The Workabout Pro4 is equipped with a softkey bar at the bottom of the screen. It displays softkeys that allow
you to access menus and commands. Note that the softkeys change to reflect the program with which you are
working. It also displays the soft keyboard icon.
Softkeys
Tapping on a softkey displays information associated with the softkey – for example, in the sample screen
above, the Menu softkey displays the commands associated with Word Mobile. The View softkey allows you to
tailor how the Word document will be displayed.
The Soft Keyboard Icon
Tapping on the soft keyboard icon displays an onscreen keyboard you can use as an alternative to the Worka-
bout Pro4 keyboard.
Shift-state indicator icon
Softkeys
Soft keyboard icon
Soft keyboard
Softkey Bar
Draft #5
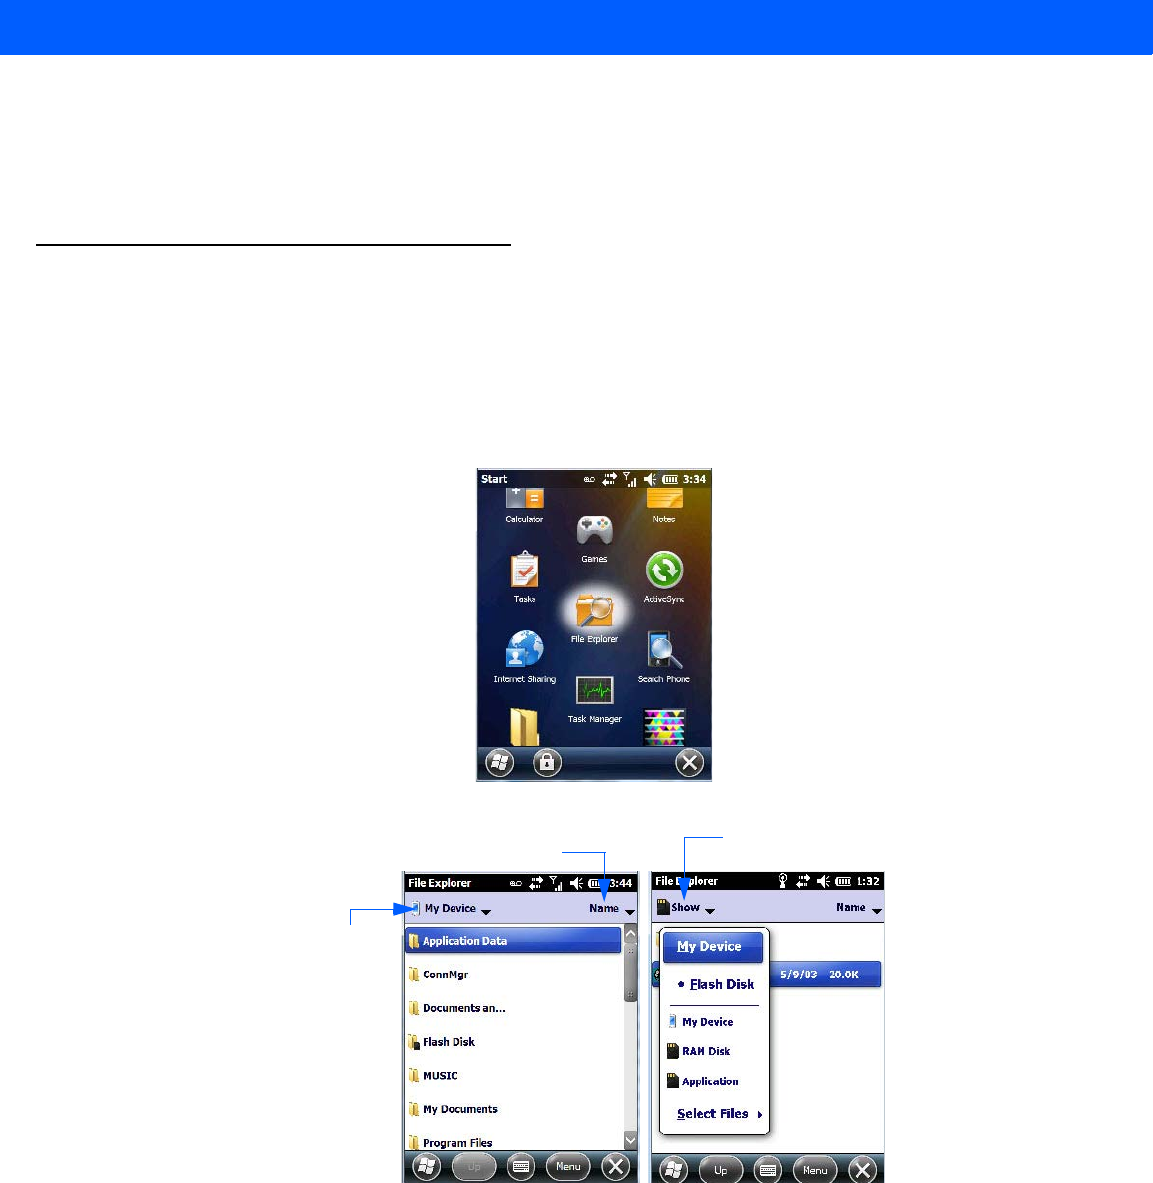
2 - 24 Workabout Pro4 (Windows Embedded Hand-Held 6.5) User Manual
The Start Button
The Start button provides access to a screen of applets available on your Workabout Pro4.
• Tap on the Start button in the lower-left corner of the softkey bar to display your programs.
Managing Files and Folders
Windows Embedded Hand-Held 6.5 files are stored in folders and sub-folders that are accessible with File
Explorer. You can open, save, rename, copy and paste files in the same manner as you would on any desktop
PC.
• Tap on the Start button.
• Use the stylus to scroll to the File Explorer icon.
• Tap on the icon to display the File Explorer screen.
Creating a New Folder
•Tap Start>File Explorer.
•Tap the Menu softkey, and in the pop-up menu, choose New Folder.
• Use the Workabout Pro4 keyboard or the soft keyboard to assign a name to the folder.
Files stored
here automa-
tically
Tap to display sorting options Tap to display additional
storage/files
Draft #5
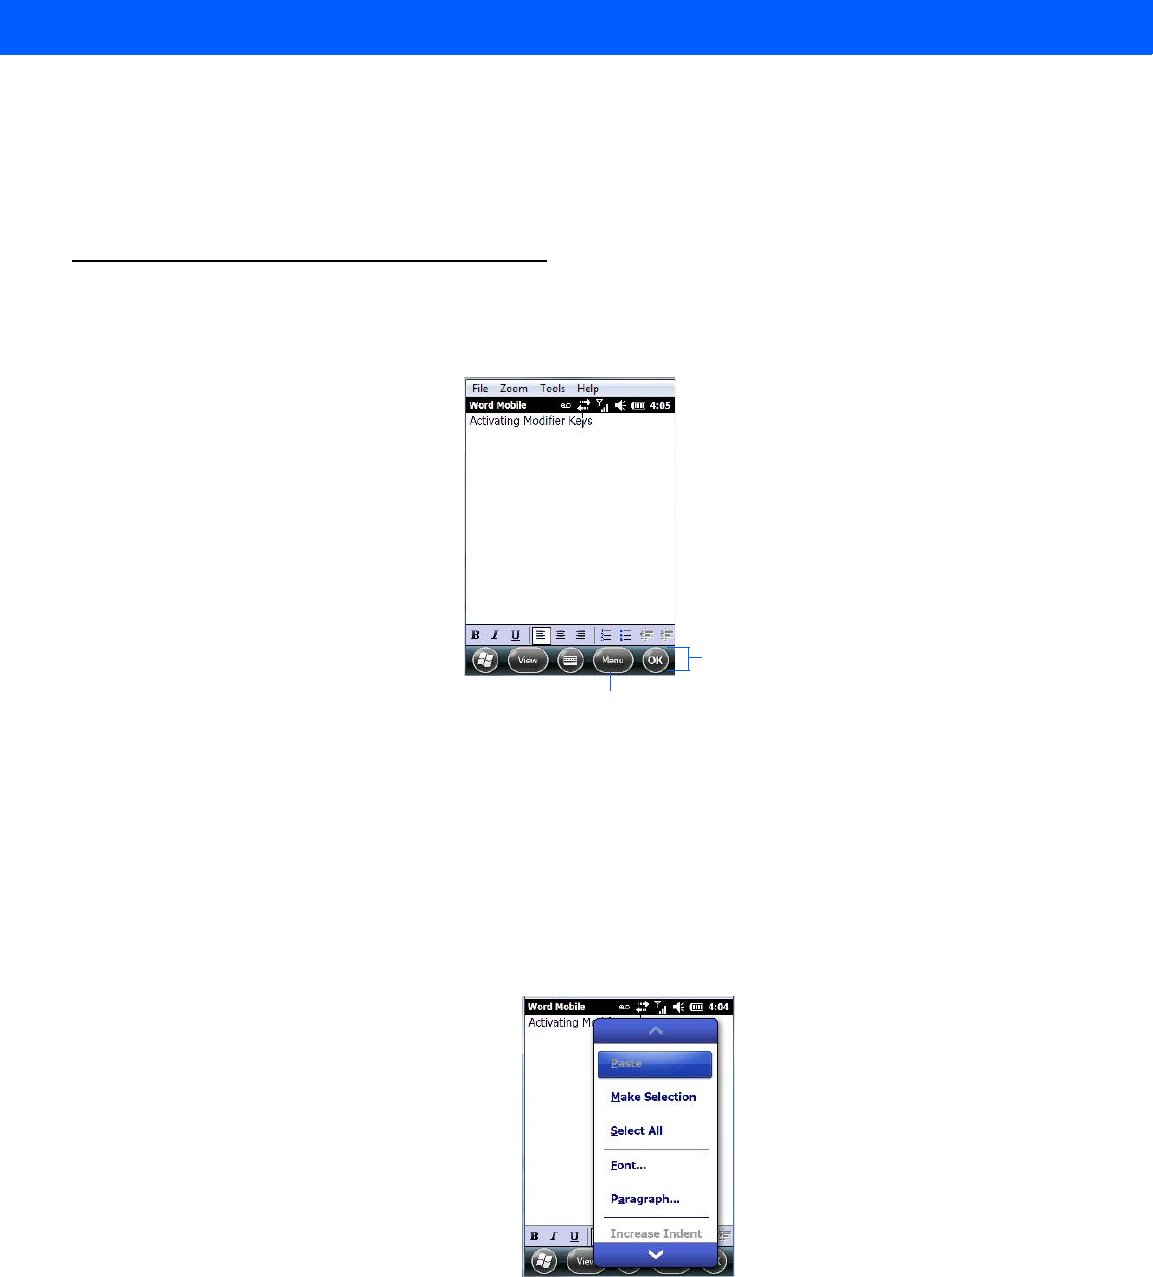
Getting to Know Your Workabout Pro4 2 - 25
Renaming, Copying, and Deleting a File
• To access any of these functions, press and hold the stylus on the file you want to work with. A ring of dots
is displayed followed by a pop- up menu.
• Choose the appropriate command from the menu.
Using Menus
In Windows Embedded Hand-Held 6.5, the menu is located in the softkey bar at the bottom of the screen.
To execute a command:
•Tap on Menu to display the commands associated with it, and then tap on the command you want
to execute.
Pop-Up Menus
Pop-up menus are available in many screens and programs. They offer quick access to a group of useful
commands in addition to those available in the menu bar. To display a pop-up menu:
• Gently press and hold the stylus on the screen. A ring of dots is displayed on the screen followed by a
pop-up menu.
• Tap on the command you want to execute.
Menu softkey
Softkey Bar
Draft #5
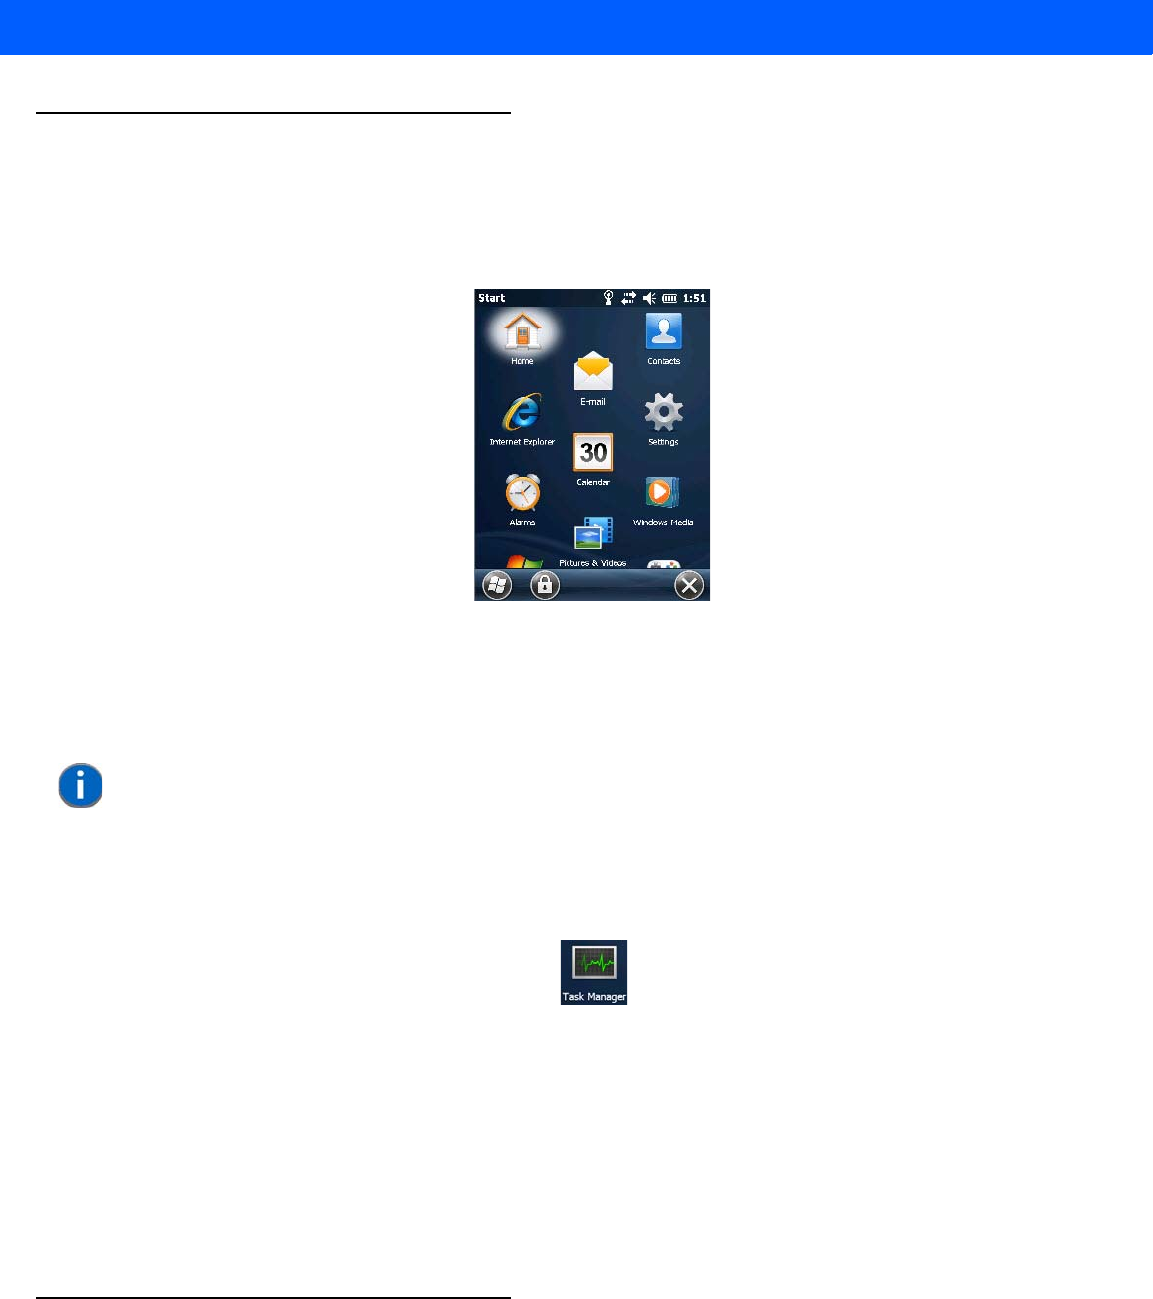
2 - 26 Workabout Pro4 (Windows Embedded Hand-Held 6.5) User Manual
Programs – Using Applications
•Tap the Start button in the softkey bar to display the programs installed on your Workabout Pro4.
Figure 2-4
Program Icons
Opening an Application
• Tap on a the Program icon to launch the associated program.
Minimizing an Application
• Tap on the X button in the lower-right corner of an application screen to minimize the application.
Opening, Closing and Switching Applications
•Tap on Start>Settings>System icon. Use your stylus to scroll to the Task Manager icon.
•Tap on Task Manager to display the associated screen.
The Task Manager screen lists all running tasks (applications). This applet provides a number of options to
manage your opened applications.
•End Task: To shut down an application, highlight the program in the list, and tap on the End Task
softkey in the softkey bar at the bottom of the screen.
•End All Tasks: To shut down all applications, tap on the Menu softkey, and choose End All Tasks.
•Switch To: To make an application listed in this screen active, highlight the application, and tap on
Menu>Switch To.
For additional information about the Task Manager, refer to “Task Manager” on page 4-68.
Settings
•Tap Start followed by the Settings icon to display the setting options for your Workabout Pro4.
NOTE Although it looks like a Close button, this button does not close the application –
it only minimizes it.
Draft #5
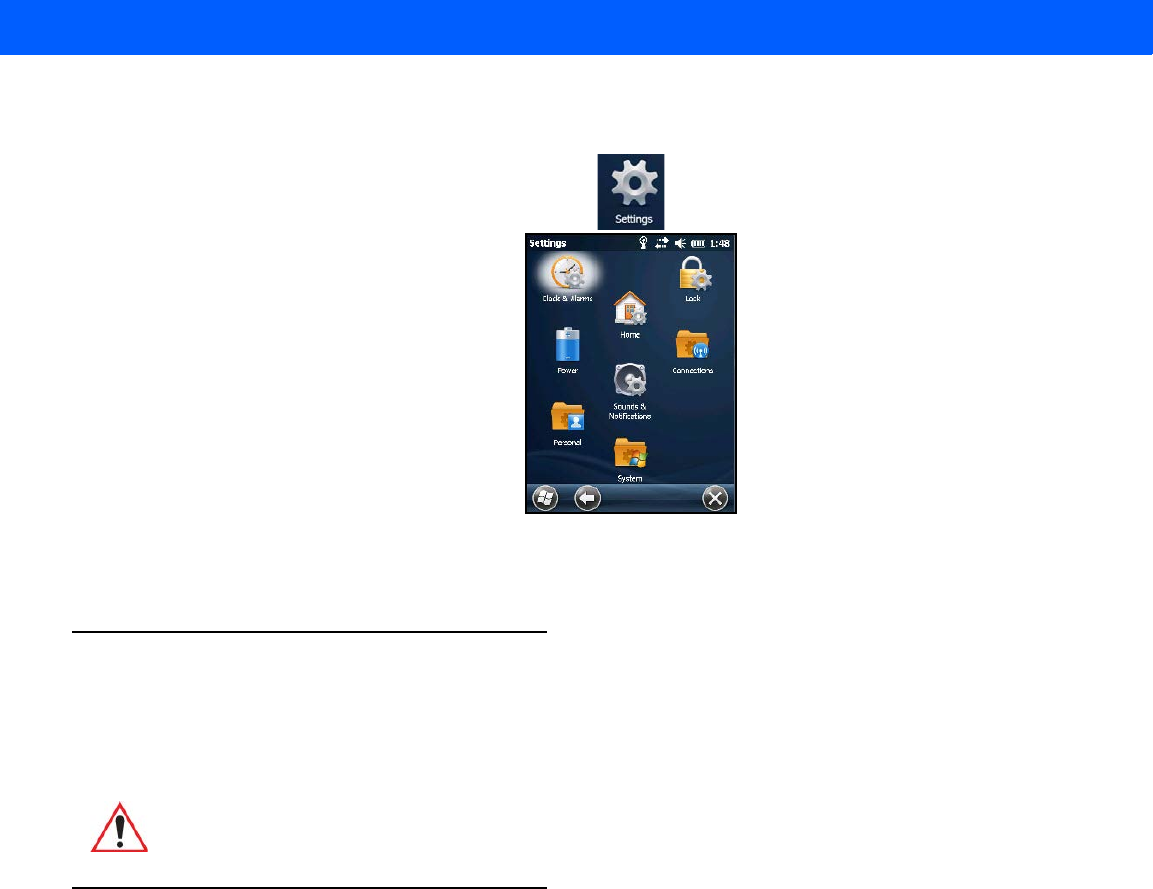
Getting to Know Your Workabout Pro4 2 - 27
Figure 2-5
Settings Icons
Along with icons that provide information about your unit and allow you to adjust the appearance and behav-
iour of your Workabout Pro4, an additional group of icons is stored in three folders – Personal, System and
Connections. Refer to Chapter 4: “Settings” for details about the options available to you.
HomeVU
Home VU allows the administrator to tailor how the Workabout Pro4 operates and the options the user can
access. Note that the look of the Today screen will change from icons that are finger accessible to a list of
items that is best accessed using a stylus.
Data Transfer Between Workabout Pro4 and a PC
Data transfer options vary slightly depending on the type of operating system installed in your PC.
For Windows XP SP2 operating systems or earlier, Microsoft® ActiveSync® connectivity software can be used
to connect your Workabout Pro4 to a PC.
If the Windows Vista®, Windows 7 or later, operating system is installed in your PC, ActiveSync is not required
to transfer data between your Workabout Pro4 and your PC. You do need to install the Windows Mobile
Device Center.
By using a Snap Module or Desktop Docking Station with your Workabout Pro4, you can connect to a PC with
a cable and:
• View Workabout Pro4 files from Windows Explorer.
• Drag and drop files between Workabout Pro4 and the PC in the same way that you would between
PC drives.
• Back up Workabout Pro4 files to the PC, restore them from the PC to the hand-held again, etc.
IMPORTANT For details about this application, refer to “HomeVU” on page 4-56.
Draft #5

2 - 28 Workabout Pro4 (Windows Embedded Hand-Held 6.5) User Manual
Uploading Data in a Docking Station
The Desktop Docking Stations allow your hand-held to upload transaction data to a server computer when a
radio link is not available. When Workabout Pro4 is properly inserted in a docking station, a dock icon is
displayed in the navigation bar at the top of the screen.
Using Microsoft ActiveSync
To install ActiveSync, follow the step-by-step instructions provided with the program’s setup wizard. For details,
go to the following website and type ActiveSync into the search box:
http://www.microsoft.com/downloads/en/default.aspx
Using Windows Mobile Device Center
If you are running Windows Vista, Windows 7, or later, your data transfers do not require ActiveSync.
Instead, you will need to download Windows Mobile Device Center. For instructions, go to the following
website and type the name into the search box:
http://www.microsoft.com/downloads/en/default.aspx
To transfer data between your PC and your hand-held:
•Tap on Start>Computer to display the drives. Workabout Pro4 will be visible here.
• Open drives, files and folders as you would on your PC.
General Maintenance
Caring for the Touchscreen
The touchscreen is covered with a thin, flexible polyester plastic sheet with a conductive coating on the inside.
The polyester can be permanently damaged by harsh chemicals and is susceptible to abrasions and
scratches. Using sharp objects on the touchscreen can scratch or cut the plastic, or crack the internal conduc-
tive coating. The chemicals listed below must not come into contact with the touchscreen:
• mustard, ketchup
• sodium hydroxide
• concentrated caustic solutions
• benzyl alcohol
• concentrated acids
NOTE If you use a serial port to connect devices like Workabout Pro4 to your desktop
computer, the connection may not succeed because ActiveSync has trouble
connecting at non-default baud rates.
To work around this problem, set the ActiveSync baud rate on the desktop to
use the same baud rate as the device. You can set the baud rate by editing the
registry on the desktop host computer, as detailed in the steps outlined at the
following website:
http://support.microsoft.com/kb/324466
Draft #5

Getting to Know Your Workabout Pro4 2 - 29
If the touchscreen is used in harsh environments, consider applying a disposable screen protector (RV6105).
These covers reduce the clarity of the display slightly but will dramatically extend the useful life of the touch-
screen. When they become scratched and abraded, they are easily removed and replaced.
Do not to expose the touchscreen to direct sunlight for prolonged periods of time. If this is unavoidable, use a
UV screen protector to extend the life of the screen.
Draft #5

2 - 30 Workabout Pro4 (Windows Embedded Hand-Held 6.5) User Manual
Cleaning the Workabout Pro4
• Use only mild detergent or soapy water to clean the hand-held unit.
• Avoid abrasive cleaners, solvents or strong chemicals for cleaning. The Workabout Pro4 has a plastic case
that is susceptible to harsh chemicals. The plastic is partially soluble in oils, mineral spirits, aircraft de-icing
fluid, and gasoline. The plastic slowly decomposes in strong alkaline solutions.
• Exposure to aircraft de-icing fluids can degrade the plastics on the Workabout Pro4. If the Workabout Pro4
is used near aircraft de-icing environments, regular rinsing with water is recommended.
• To clean ink marks from the keypad and touchscreen, use isopropyl alcohol.
IMPORTANT Do not immerse the unit in water. Dampen a soft cloth with mild
detergent to wipe the unit clean.
To prevent damage to the touchscreen, use only your finger or the
stylus (pen) supplied with your Workabout Pro4.
Draft #5

CHAPTER 3 PROGRAMS
PROGRAMS 3
Programs..................................................3-3
Home....................................................3-3
The Phone.................................................3-4
The Onscreen Phone Keypad .................................3-4
Sending & Ending Phone Calls Using the Onscreen Phone Keypad . . . . . . .3-4
Sending & Ending Calls Using the Workabout Pro4 Keyboard . . . . . . . . . . .3-5
Making a Conference Call...............................3-5
Programming Speed Dial...............................3-5
Managing Phone Settings....................................3-8
Text Messages...............................................3-8
E-mail ...................................................3-8
Folders..............................................3-9
Synchronizing E-mail with Outlook (PC with Windows XP OS) . . . . . . . . . . . . . . .3-9
Changing Synchronization Settings.........................3-10
Synchronizing E-mail with Outlook (PC with Windows Vista or Windows 7) . . . . . . . 3-10
Sending an E-mail.......................................3-11
Contacts.................................................3-12
Working with the Contacts List................................3-12
Communicate Tab - Adding Contacts ............................3-13
Info Tab.............................................3-14
Notes Tab.......................................3-14
Internet Explorer.............................................3-15
Browsing Web Sites......................................3-15
Calendar.................................................3-15
Alarms..................................................3-16
Pictures & Videos............................................3-16
Using the Camera.......................................3-16
Moving Photos to the Workabout Pro4............................3-17
Opening a Photo........................................3-17
Deleting a Photo........................................3-18
Draft #5

3 - 2 Workabout Pro4 (Windows Embedded Hand-Held 6.5) User Manual
Editing a Photo.........................................3-18
Creating a Slide Show.....................................3-18
Using the Video Recorder...................................3-19
Windows Media .............................................3-20
Messenger (Windows Live).......................................3-20
Windows Live...............................................3-20
Notes...................................................3-20
Creating a Note Using the Soft Keyboard ..........................3-21
Creating and Converting Handwritten Notes to Text.....................3-22
Renaming a Note........................................3-23
Recording Notes........................................3-23
Task Notification.............................................3-24
File Explorer...............................................3-26
ActiveSync®...............................................3-26
Synchronization.........................................3-27
Internet Sharing.............................................3-27
Creating an Internet Connection ...............................3-27
Using Internet Sharing.....................................3-28
Task Manager ..............................................3-29
Search Phone..............................................3-29
Office Mobile...............................................3-30
Excel Mobile ..........................................3-30
OneNote Mobile ........................................3-31
Word Mobile...........................................3-34
Text Input Modes...................................3-34
Sharing Documents with your PC..........................3-34
PowerPoint Mobile.......................................3-35
SharePoint Workspace Mobile ................................3-35
PartnerUp.................................................3-35
HomeVU.................................................3-35
Modem Link ...............................................3-36
Remote Desktop Mobile.........................................3-37
Connecting to a Terminal Server ...............................3-37
Disconnecting Without Ending a Session...........................3-37
Ending a Session........................................3-37
WiFiConnect?? A.R.C...........................................3-37
Draft #5
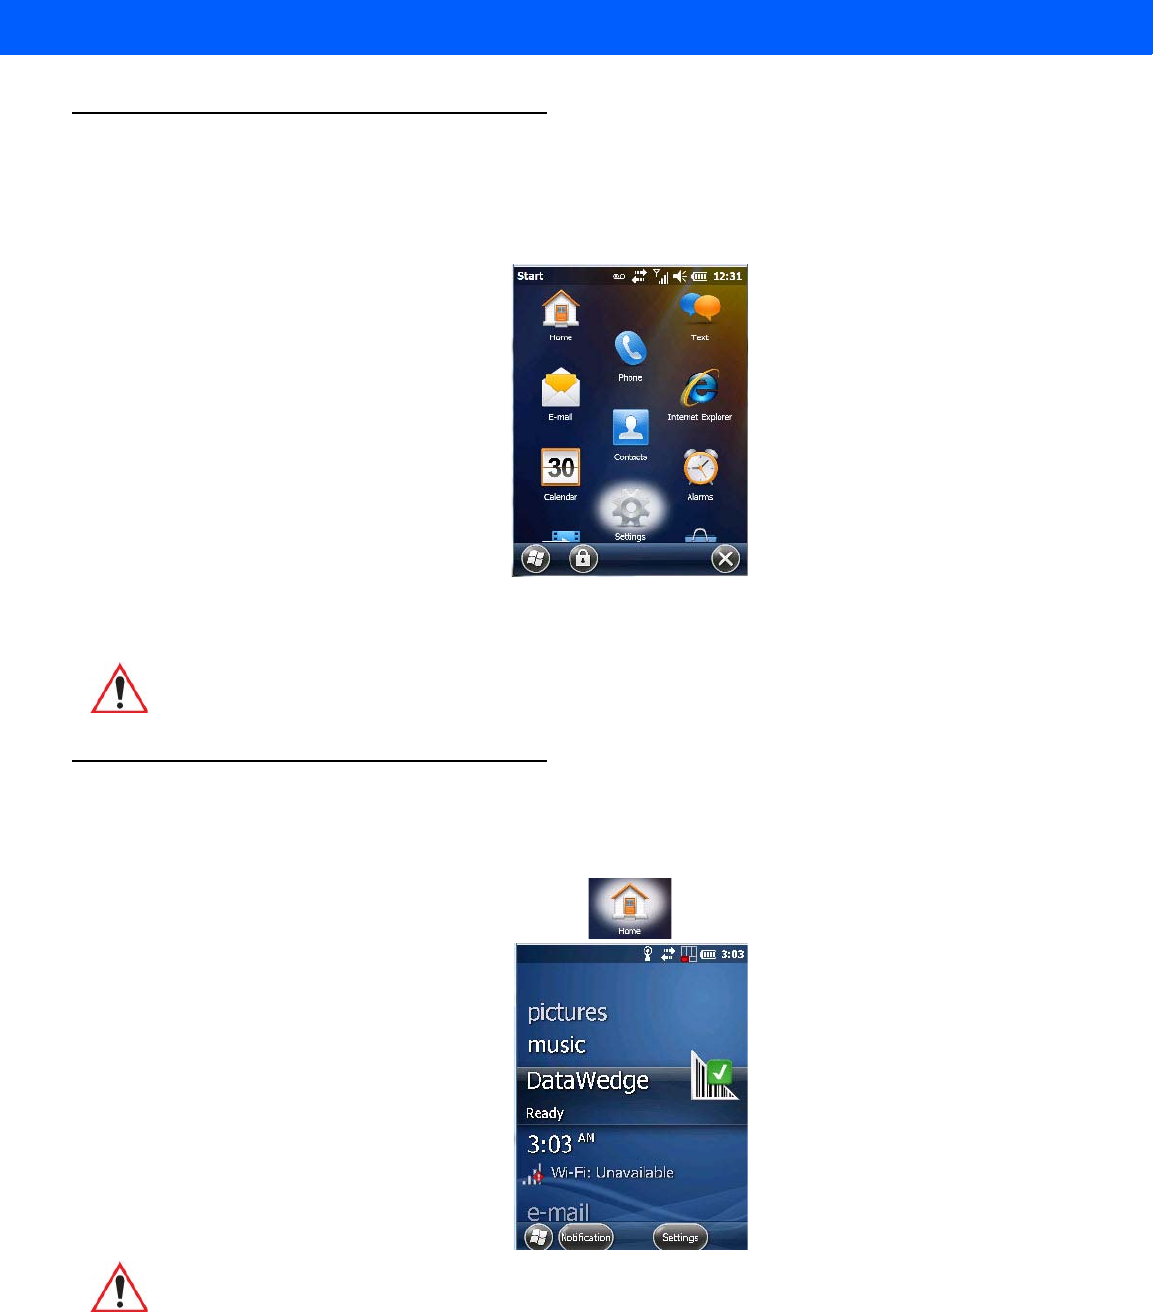
Programs 3 - 3
Programs
Workabout Pro4 programs are all available from the Start screen.
• Tap on the Start button in the lower-left corner of the Today screen to display the Start screen.
Tapping on an icon in this screen launches the associated applet.
Home
Tapping on the Home icon in the Start screen displays the Today screen.
IMPORTANT For details about the options contained under the ‘Settings’ icon,
refer to Chapter 4: “Settings”.
IMPORTANT For details about the Today screen, refer to “The Today Screen” on
page 2-15.
Draft #5
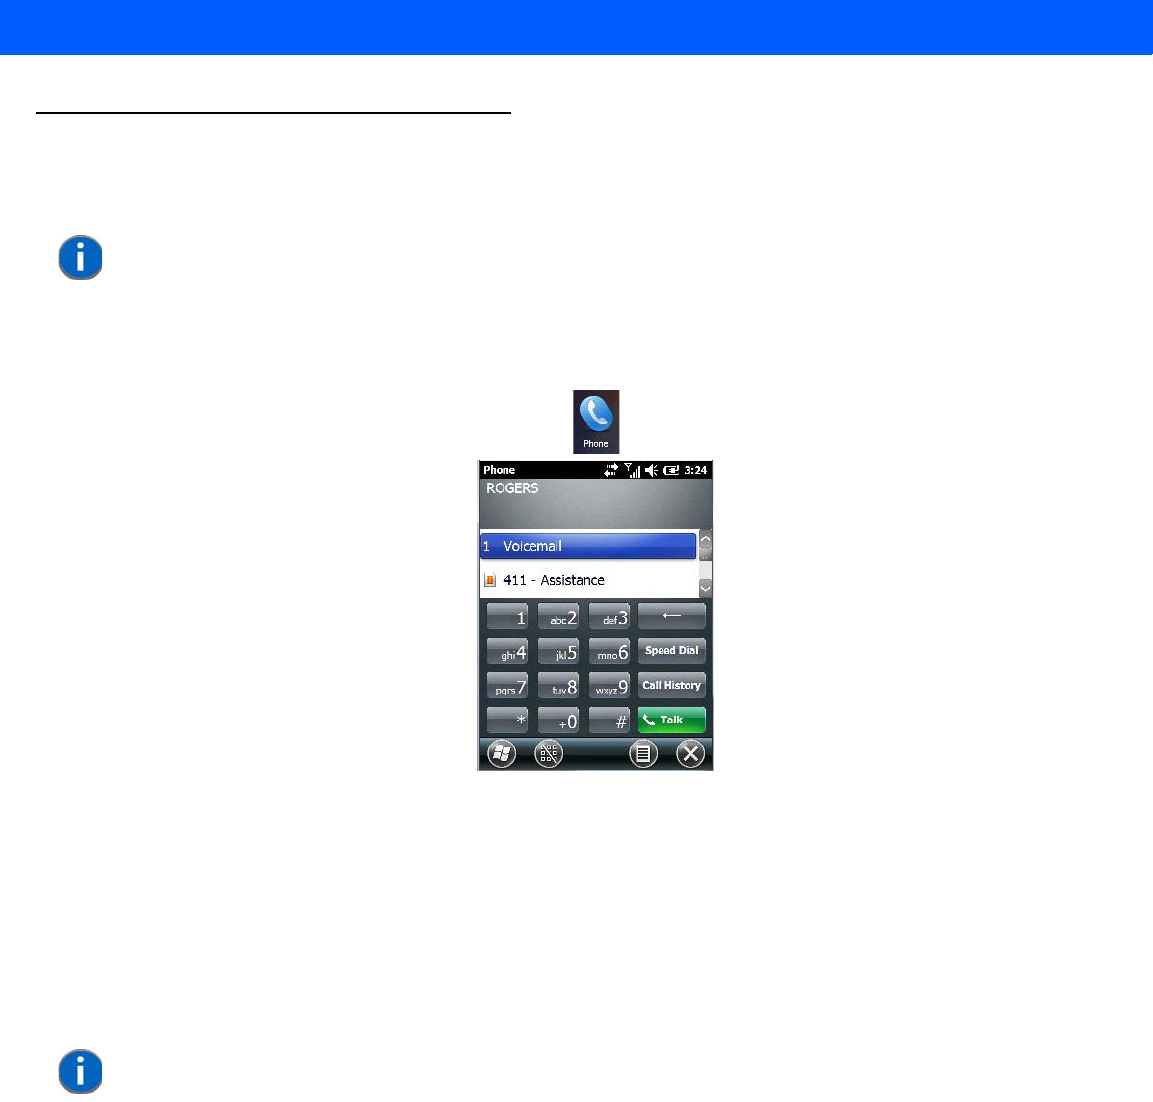
3 - 4 Workabout Pro4 (Windows Embedded Hand-Held 6.5) User Manual
The Phone
The Workabout Pro4 can be equipped with optional phone capabilities.
To access the phone pad on a unit that includes the phone option:
•Tap on Start>Phone icon.
The Onscreen Phone Keypad
The onscreen phone keypad provides phone services like those you may find on your cellular phone. You can
use the phone keypad provided with your Workabout Pro4 to, for example, send and receive phone calls,
make conference calls, view your call history, set up speed dial numbers, etc.
Sending & Ending Phone Calls Using the Onscreen Phone Keypad
To display the onscreen phone keypad:
•Tap on Start>Phone icon.
NOTE The Phone option is only available on units equipped with the Cinterion PHS8-P
GSM/GPRS/EDGE/UMTS/HSPA+ Radio.
NOTE You can also press the [Talk] key on the Workabout Pro4 keyboard to display the
phone keypad providing it has been activated. The [Talk] key is labelled with a
green telephone receiver icon.
Draft #5

Programs 3 - 5
To make a phone call:
• Use the phone keypad to enter the phone number. Tap on [Talk] to connect the call.
When you tap on the [Talk] button to connect to a phone number, the [Talk] button toggles to become the [End]
button. When you’ve completed your call and want to disconnect:
•Tap on [End] button on the onscreen phone keypad.
Sending & Ending Calls Using the Workabout Pro4 Keyboard
The keyboard provides a [Talk] and an [End] key on the physical keyboard.
• Press the [Talk] key to answer a call or to display the onscreen phone keypad so you can initiate a call.
• Press the [End] key to terminate a phone call.
Making a Conference Call
To set up a conference call between yourself and two or more other parties:
• In the phone keypad, type the first phone number. Tap on [Talk].
• While you are connected to the first number, tap on Menu>Hold.
• Type the second number. Tap on [Talk].
•Tap on Menu>Conference.
• To add another party, tap on Menu>Hold, type the number, and then tap Menu>Conference.
•Tap on [End] to disconnect all calls.
Programming Speed Dial
The phone keypad provides a Speed Dial button for quick access to frequently used numbers.
• In the phone keypad, tap on the Speed Dial button to display the speed dial Phone dialog box.
Phone settings
Directory assistance
Hide/show keypad Menu
Draft #5
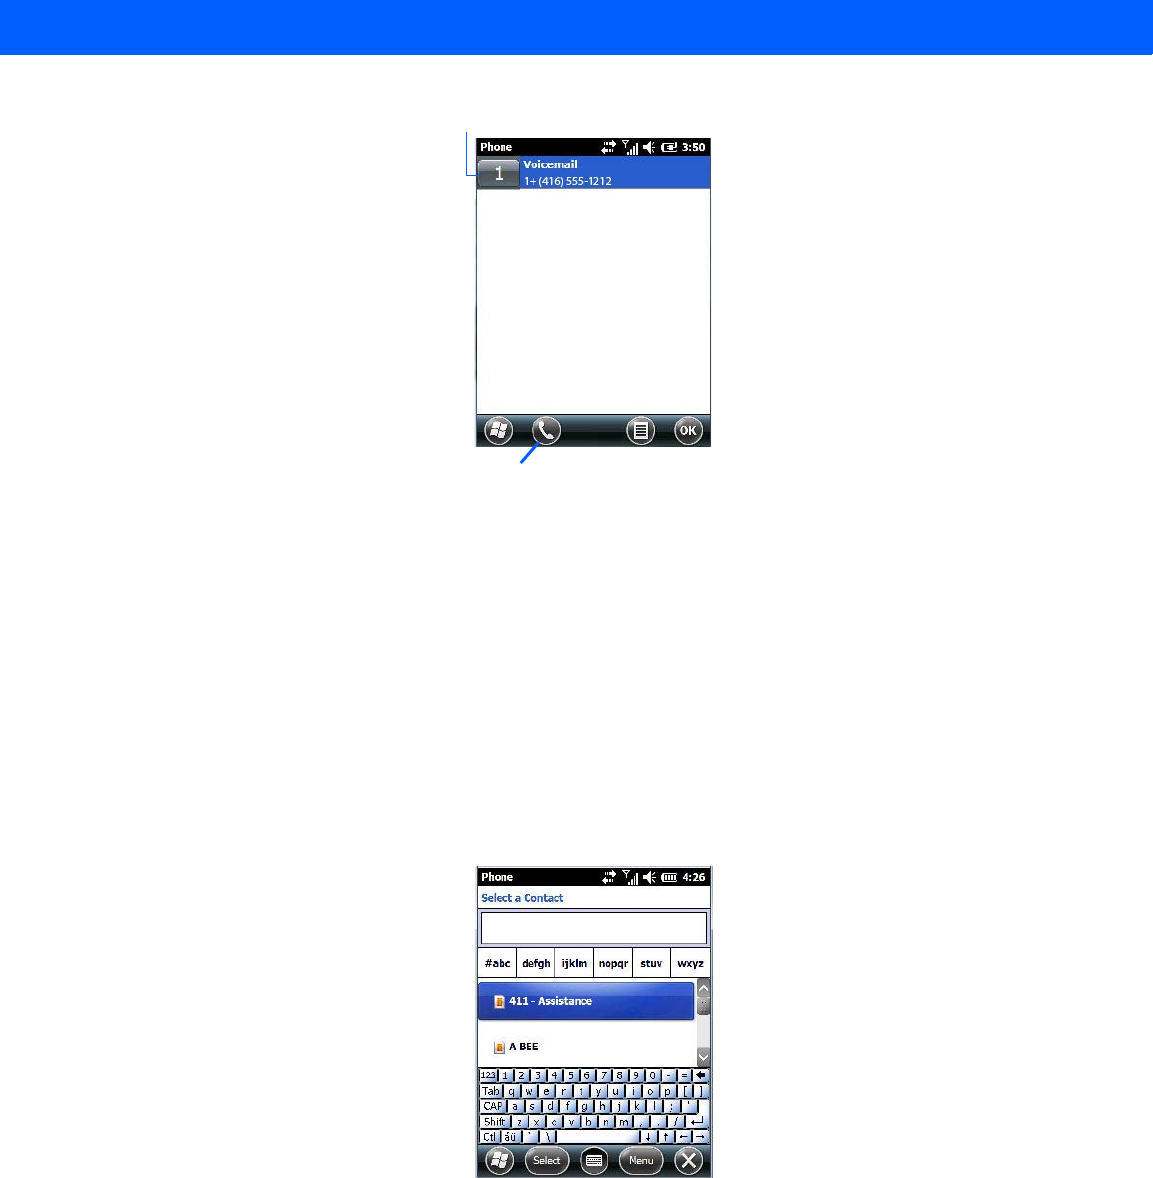
3 - 6 Workabout Pro4 (Windows Embedded Hand-Held 6.5) User Manual
This dialog box lists the phone numbers and the speed dial key to which the phone number has
been assigned.
• Tap on the Speed Dial Number (the number to the left of the phone number you want to dial), or
Tap on the Call softkey in the softkey bar at the bottom of the screen; the number is dialled for you.
Using the Phone Keypad to Program a Speed Dial
There are a number of ways to add a speed dial number. You can create a speed dial number using the
Contacts list or by using the Speed Dial button on the phone keypad.
Adding a New Phone Number
• In the phone keypad, tap on the Speed Dial button.
• In the speed dial Phone dialog box, tap on Menu>New.
• In the list, choose a contact for a speed dial.
• Type a contact name in the field where the cursor is displayed, or tap on a name in the list.
Speed dial number
Call softkey
Draft #5
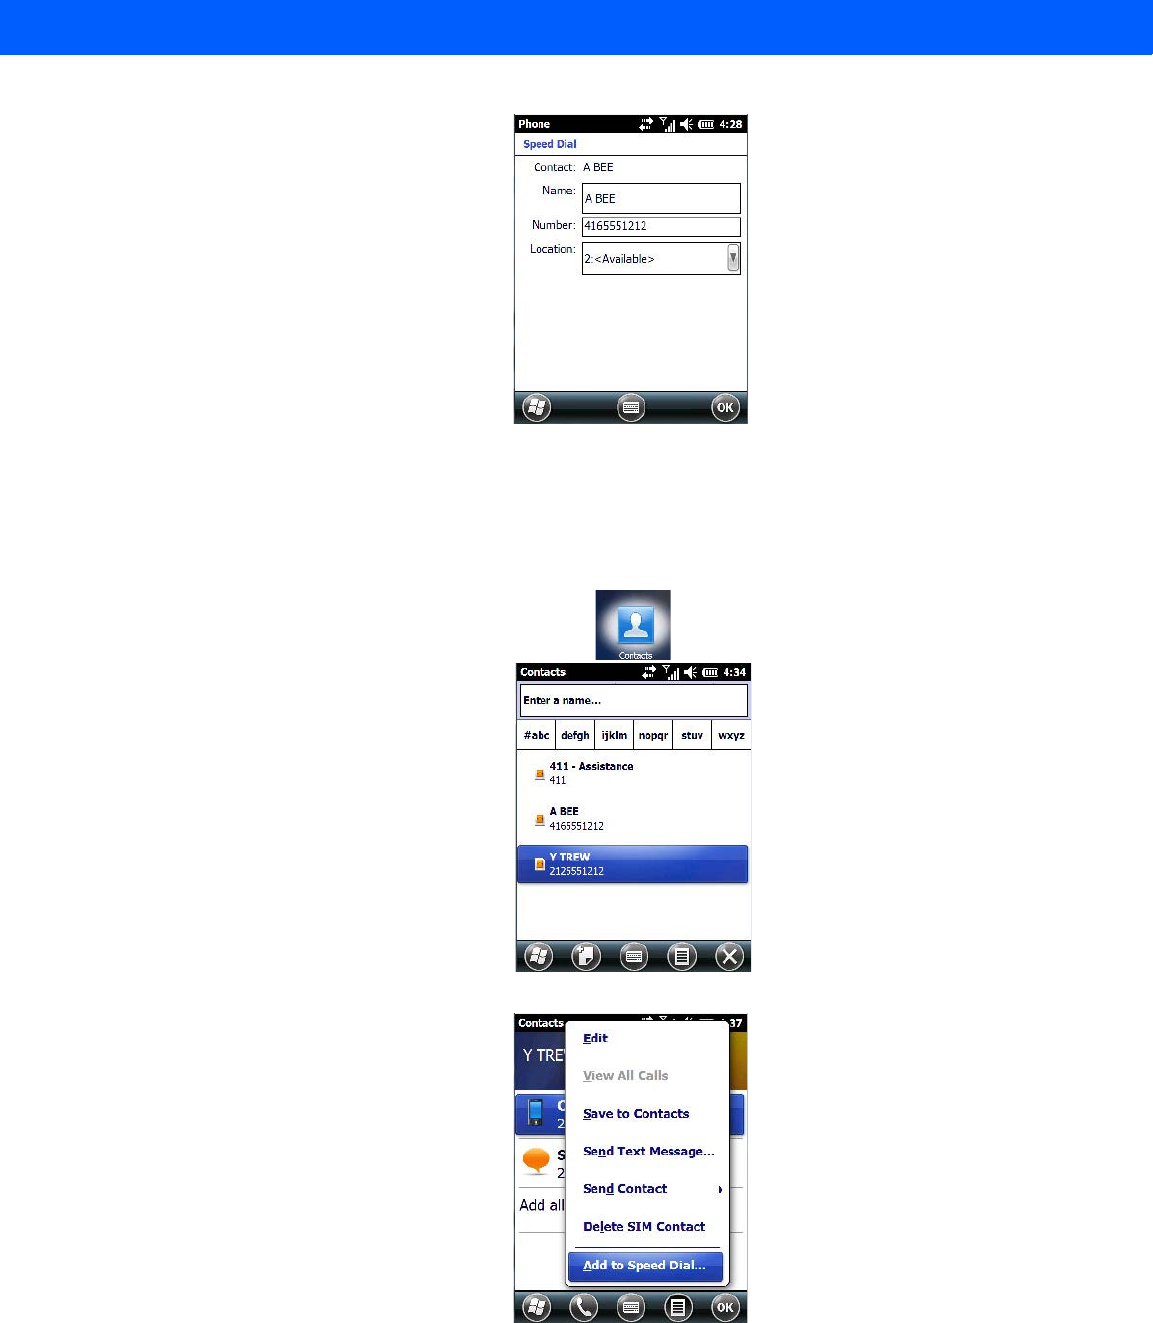
Programs 3 - 7
A sequential speed dial key is automatically assigned in the Location field. You can tap on the arrows to the
right of the Location field to change the auto assignment.
Using the Contact List to Program a Speed Dial
•Tap on Start followed by the Contacts icon.
• Tap on the Contact to which you want to assign a speed dial number.
• In the Summary screen, tap on Menu>Add to Speed Dial.
Draft #5
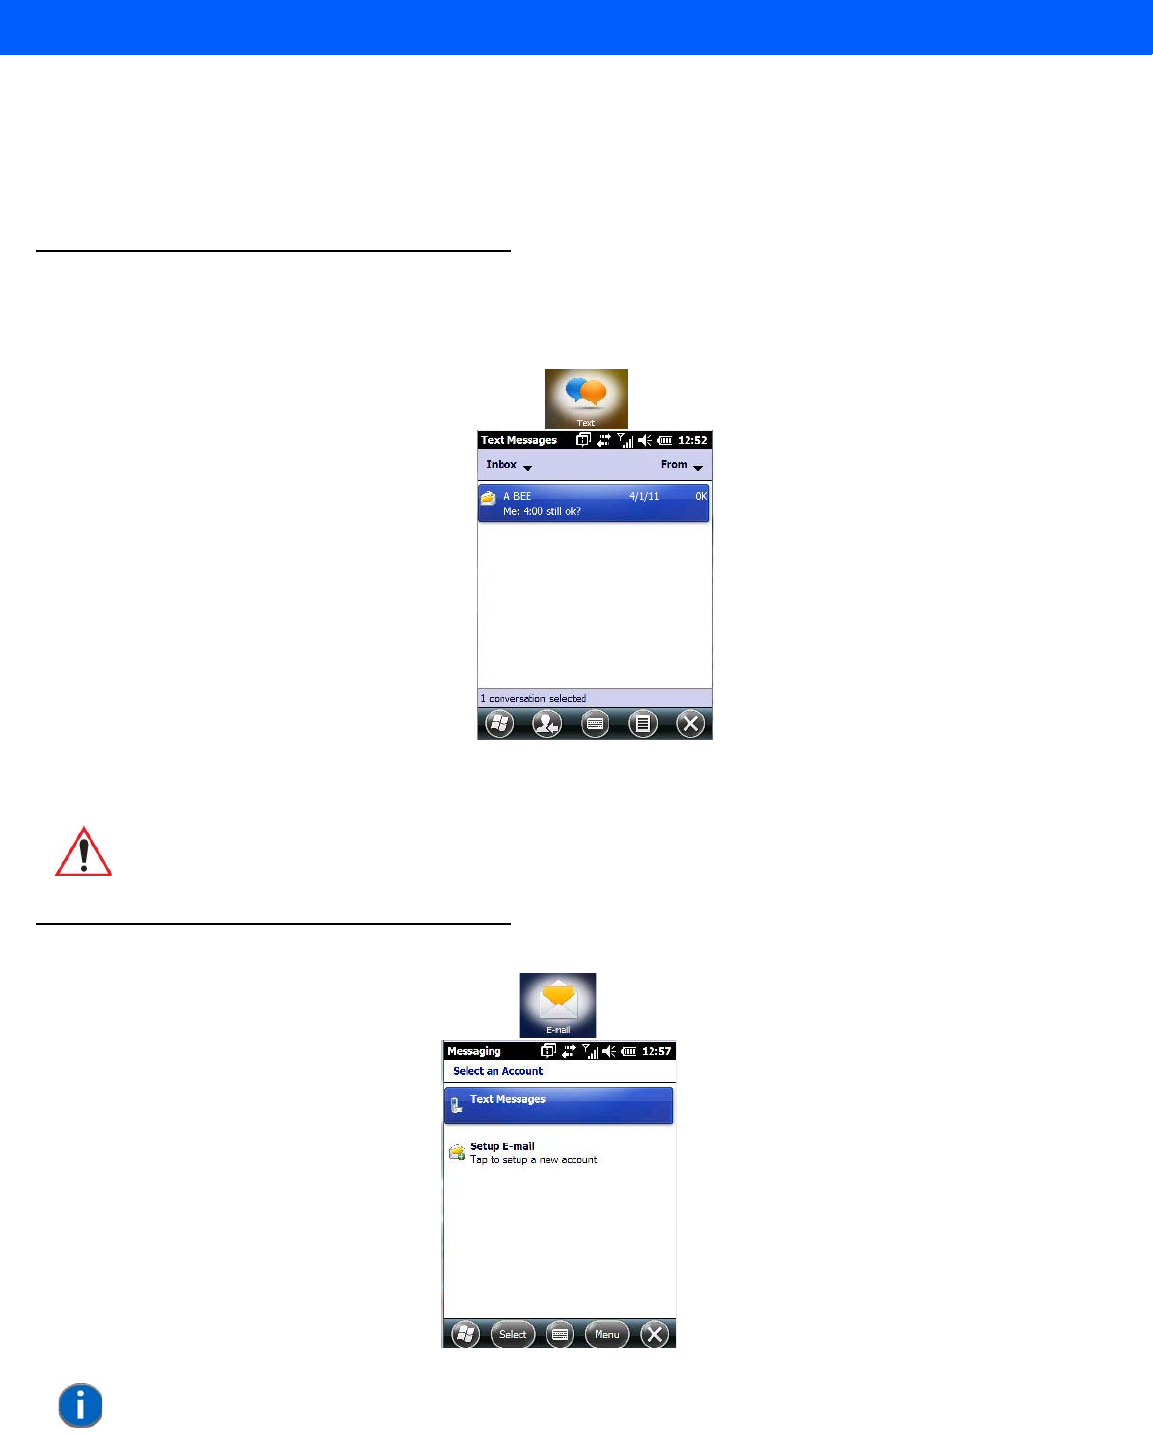
3 - 8 Workabout Pro4 (Windows Embedded Hand-Held 6.5) User Manual
Managing Phone Settings
You can adjust phone settings such as the ring type and tone, choose phone services such as barring calls,
and you can also determine network selections.
Text Messages
Tapping on the Text option in the Today screen displays this screen.
This option allows you to compose, send and receive text messages using your Workabout Pro4.
E-mail
IMPORTANT For details about using the Text Messages feature, refer to “Text
Messages” on page 2-18.
NOTE If your e-mail is already synchronized, go to “Sending an E-mail” on page 3-11.
Draft #5
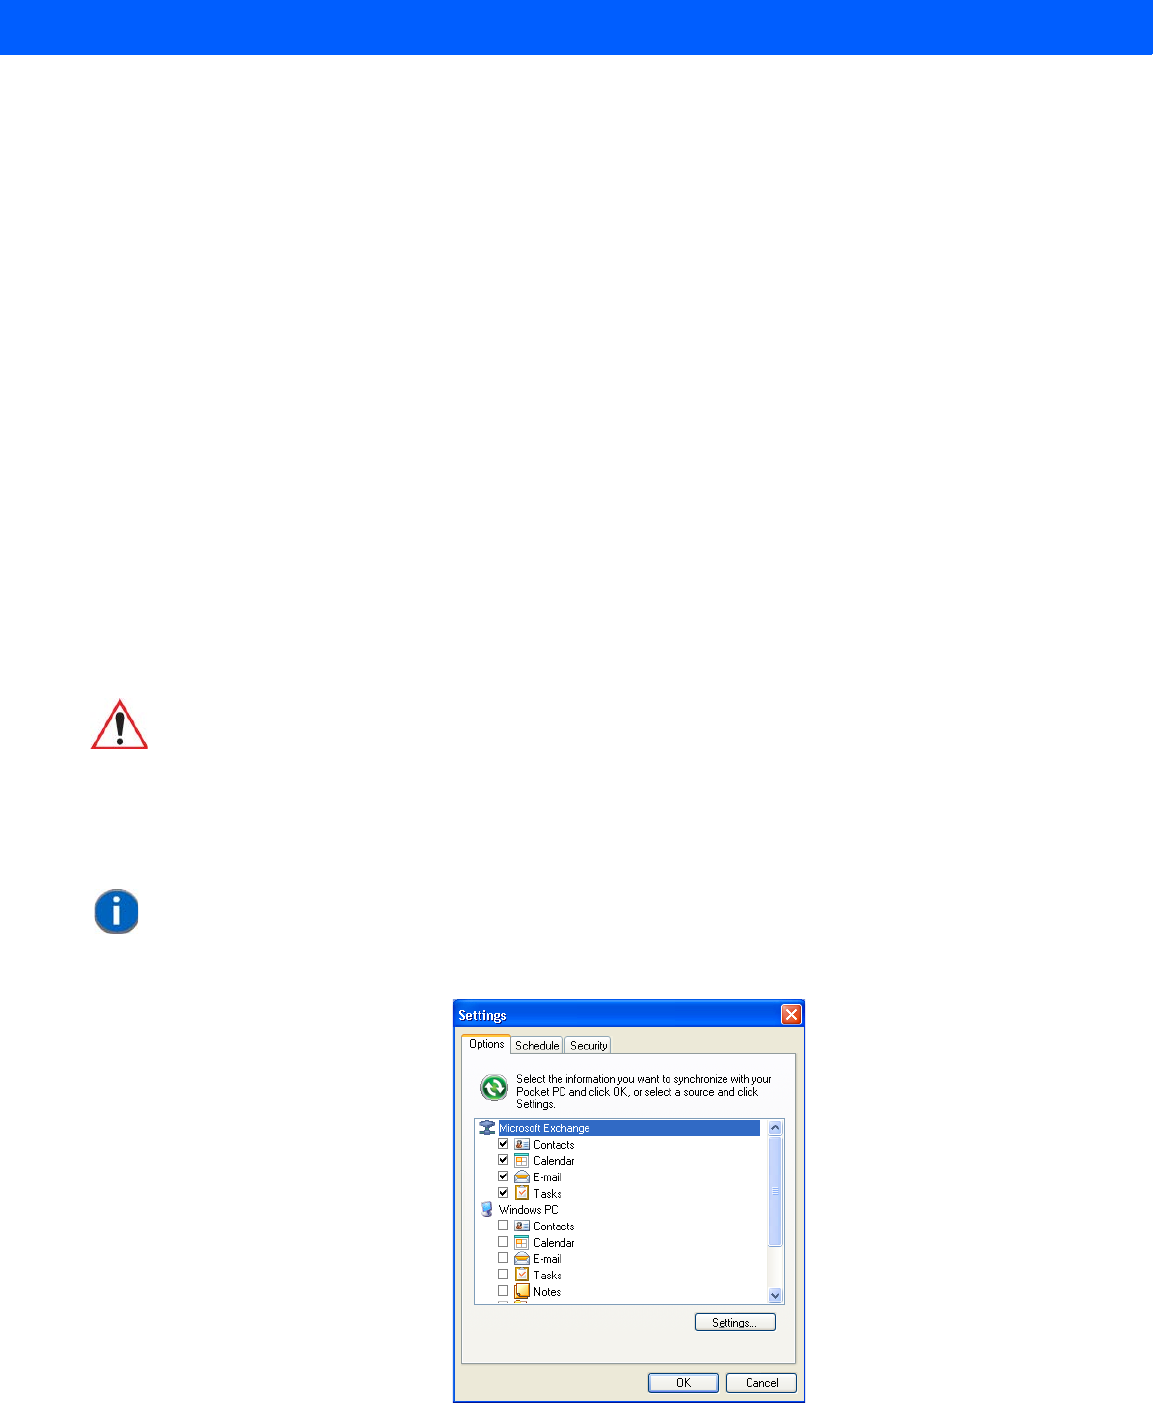
Programs 3 - 9
The E-mail program is used to send and receive e-mail on your Workabout Pro4. It also provides access to
text messages.
To send and receive e-mail, you’ll need to synchronize your PC or connect to a Post Office Protocol 3 (POP3)
or Internet Message Access Protocol 4 (IMAP4) mail server.
For each of these methods, you need to set up an e-mail account with one exception – Outlook e-mail
accounts are set up by default.
Folders
If you use an Outlook e-mail account, messages in the Inbox folder in Outlook are automatically synchronized
with your Workabout Pro4. You can use ActiveSync on your PC to synchronize additional folders. The folders
and messages you move are mirrored on the server.
For POP3 accounts, if you move e-mail messages to a folder you create, the link between the messages on
the Workabout Pro4 and the copies on the mail server are broken. When you next connect, the mail server will
recognize that the messages are missing from the Workabout Pro4 Inbox folder and delete them from the
server, preventing duplication of messages. Keep in mind however that you will not have further access to
messages that you moved to folders from anywhere except with the Workabout Pro4.
For IMAP4 accounts, the folders you create and the messages you move are reflected on the server, making
messages available any time whether you connect to your mail server from your Workabout Pro4 or your PC.
Synchronizing E-mail with Outlook (PC with Windows XP OS)
By synchronizing the Workabout Pro4 E-mail program with Outlook on your PC, your e-mail is available on
both the Workabout Pro4 and on your PC.
•In ActiveSync on your PC, tap on Tools>Options in the tool bar at the top of the screen.
IMPORTANT For PCs running Windows Vista or Windows 7, follow the guidelines
under “Synchronizing E-mail with Outlook (PC with Windows Vista or
Windows 7)” on page 3-10.
NOTE Synchronizing e-mail does not require that the Workabout Pro4 have an inde-
pendent connection to the Internet.
Draft #5
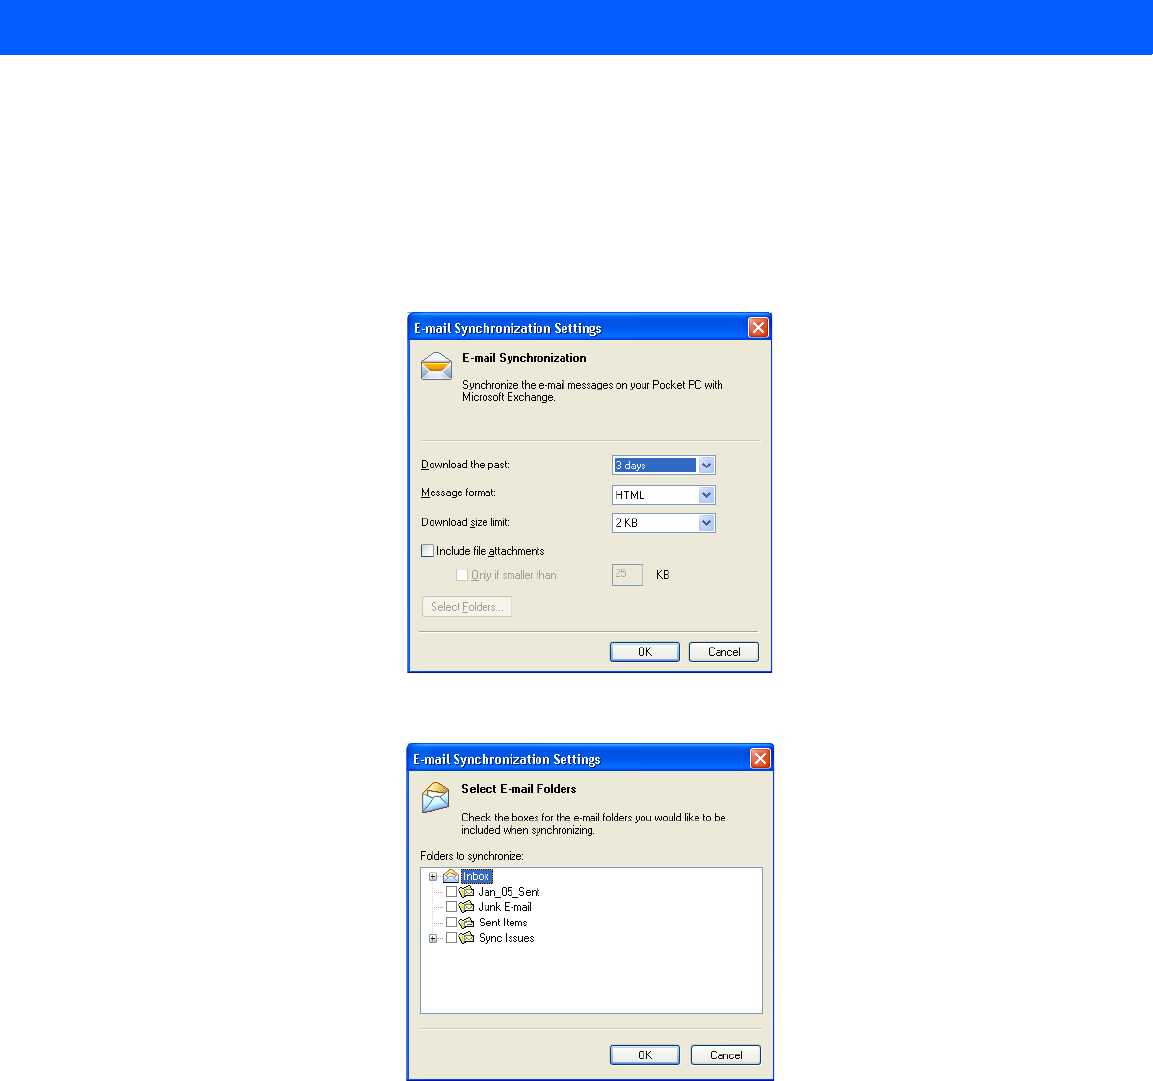
3 - 10 Workabout Pro4 (Windows Embedded Hand-Held 6.5) User Manual
• Make certain that a check mark is displayed in the checkbox next to E-mail. Tap on OK.
Once you check E-mail for synchronization, Outlook e-mail messages are synchronized as part of the general
synchronization process. The next time you synchronize with ActiveSync, the e-mail in Outlook on your PC will
be transferred to the Messaging program on your Workabout Pro4.
Changing Synchronization Settings
•In ActiveSync on your PC, double-tap the E-mail item in the Sync Options tab.
• Tap on the Select Folder button.
• Add a check mark next to the folders in this screen that you want to synchronize with your Workabout
Pro4, and tap on OK.
The E-mail Synchronization screen is displayed again.
• If you want to accept file attachments, add a check mark next to Include file attachments. To limit the size,
tap on Only if smaller than, and specify a size in the KB box.
•Tap on OK.
Synchronizing E-mail with Outlook (PC with Windows Vista or Windows 7)
PCs running Windows Vista or Windows 7 use Windows Mobile Device Center in place of ActiveSync.
Draft #5
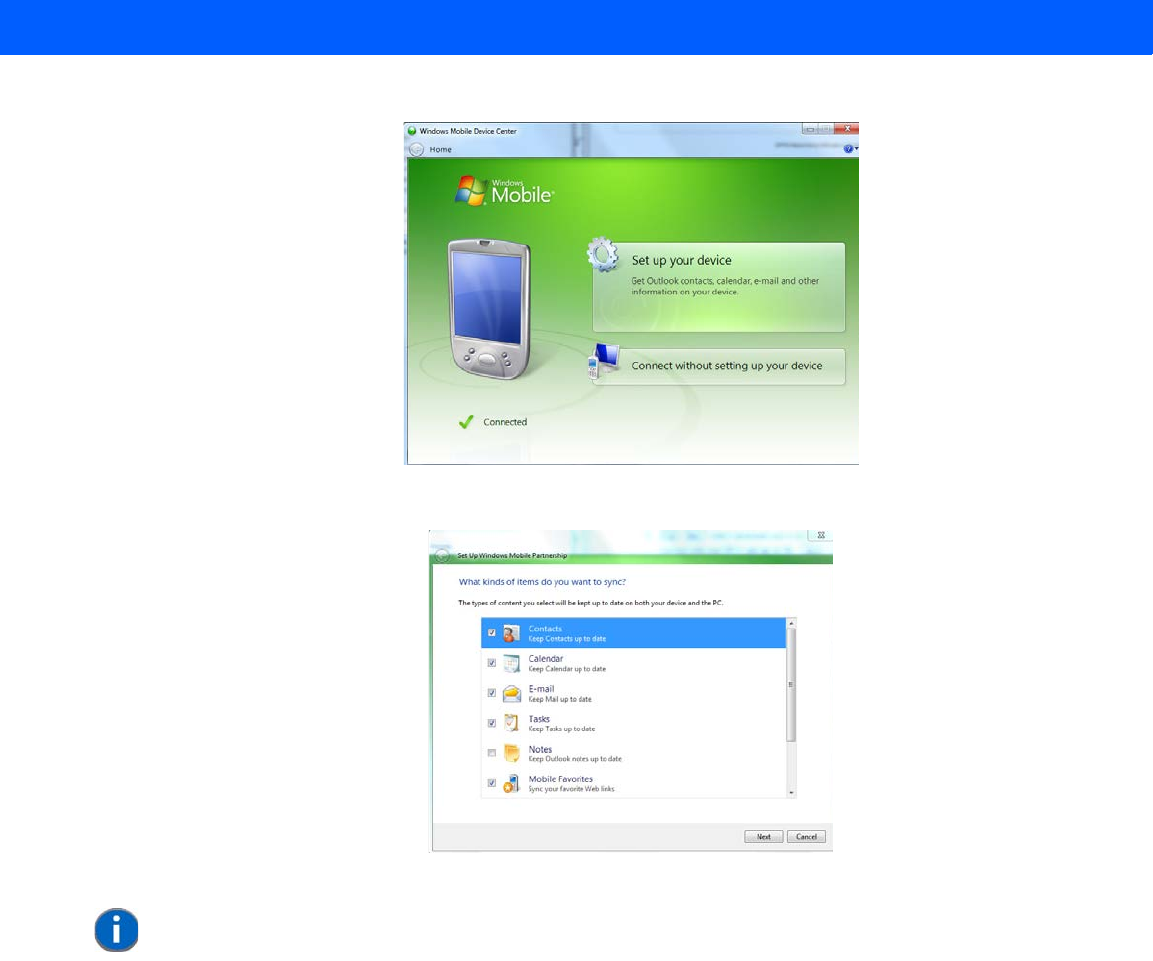
Programs 3 - 11
• In the Windows Mobile Device Center, tap on Set up your device.
• Make certain that a check mark is displayed in the checkbox next to E-mail. Tap on Next.
•Tap on Skip and then tap on Setup.
When E-mail is checked for synchronization, Outlook e-mail messages are synchronized as part of the general
synchronization process. The next time you synchronize with Windows Mobile Center, the e-mail in Outlook on
your PC will be transferred to the Messaging program on your Workabout Pro4.
Sending an E-mail
E-mail messages are stored in the Outbox folder and are sent to recipients the next time you sync or connect
to your e-mail server to send and receive mail.
•Tap on Start>E-mail.
• Choose the e-mail account you want to use.
•Tap on Menu>New.
• In the To, Cc, or Bcc fields, enter an e-mail address.
NOTE If an Exchange Server is detected, a screen is displayed where you can enter
the Server address, your user name and so on, and sync the Workabout Pro4
with the Exchange Server directly over a cellular or wireless network when
you are not connected to your PC. This is an optional step that you can skip.
Draft #5
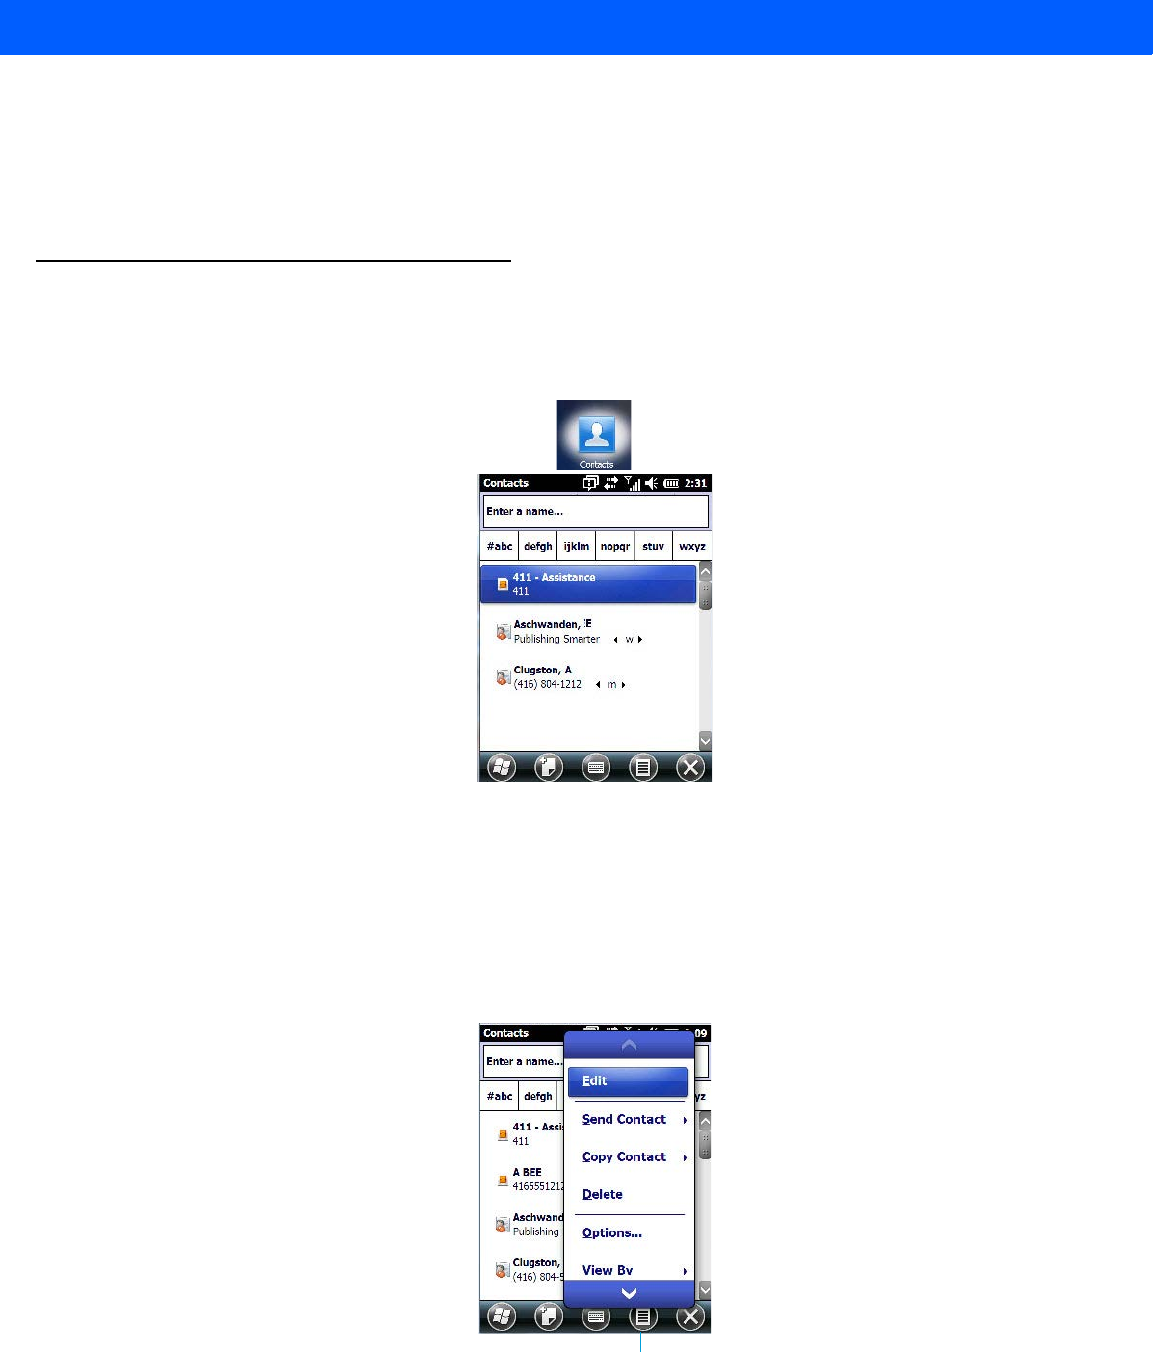
3 - 12 Workabout Pro4 (Windows Embedded Hand-Held 6.5) User Manual
Keep in mind that you can also use your Contacts to choose an e-mail recipient provided an e-mail address is
associated with the contact.
•Tap Menu>Add Recipient, and then choose a contact from the list.
• If you're sending an email to multiple people, use a semicolon (;) between addresses.
Contacts
Contacts are available with your e-mail, text messages, voice messages and your phone.
•Tap on Start>Contacts to display your contacts.
Working with the Contacts List
The Contacts screen allows you to work with existing entries, search for a particular contact and create
new entries.
Contact Menu Commands
A Menu softkey at the bottom of the screen provides additional commands that allow you to work with the
contacts in this list.
Menu
Draft #5
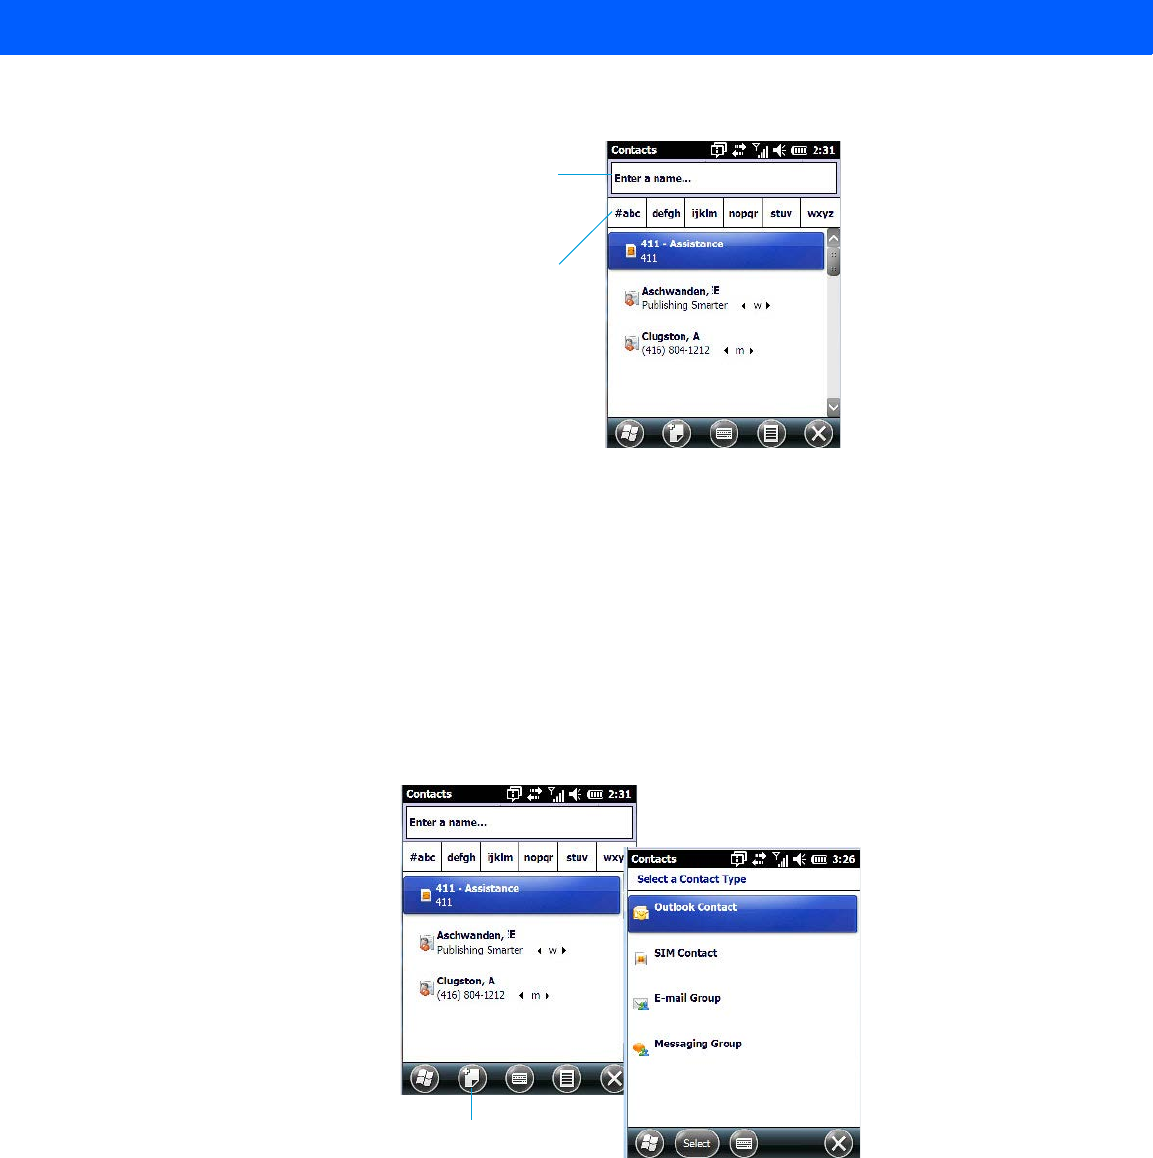
Programs 3 - 13
Searching for a Contact
To search for a particular entry:
• Tap on the Enter a name ... field, and type the name you are searching for in the Contacts list.
• To narrow your search to names beginning with a particular letter, tap on the appropriate alpha
character grouping.
Communicate Tab - Adding Contacts
Adding a New Contact
The New softkey located to the right of the Start softkey allows you to add additional entries to your contacts
list.
• Tap on the New softkey.
• Choose the contact type to which you want to add an entry.
• Tap on the Select button to display the Communicate screen. Tap on each of the options you want to com-
plete for the new contact you are creating. Each item you tap on in this screen produces an associated
pop-up screen in which you can enter the appropriate information. For example, in the sample screen fol-
lowing, tapping on Add a name displays an associated screen for you to complete.
Type a contact
name here
Tap on an alpha
group to narrow
the search
New
Draft #5
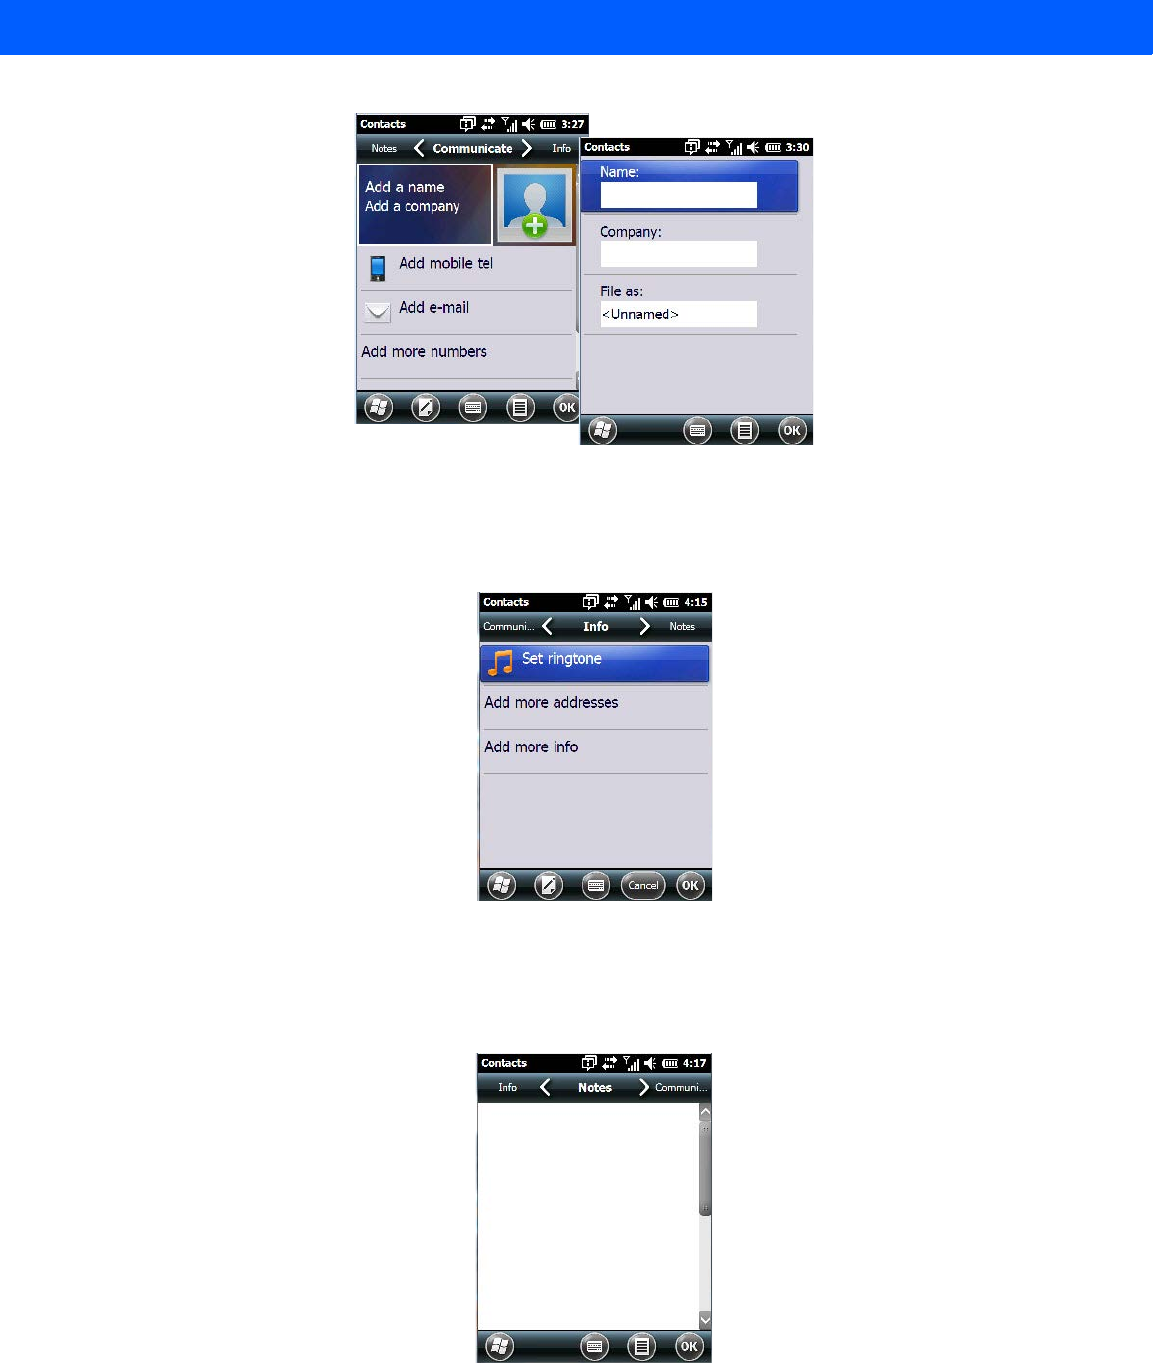
3 - 14 Workabout Pro4 (Windows Embedded Hand-Held 6.5) User Manual
• When you’ve completed the information for the contact entry, tap on OK. The new contact is displayed in
the Contacts list.
Info Tab
This tab allows you define a ring tone for a particular contact. You can also add additional addresses related to
your contact (work and home), and information about your contact such as a job title, office location and fax
number.
Notes Tab
This screen allows you to enter useful information about your contact.
Draft #5
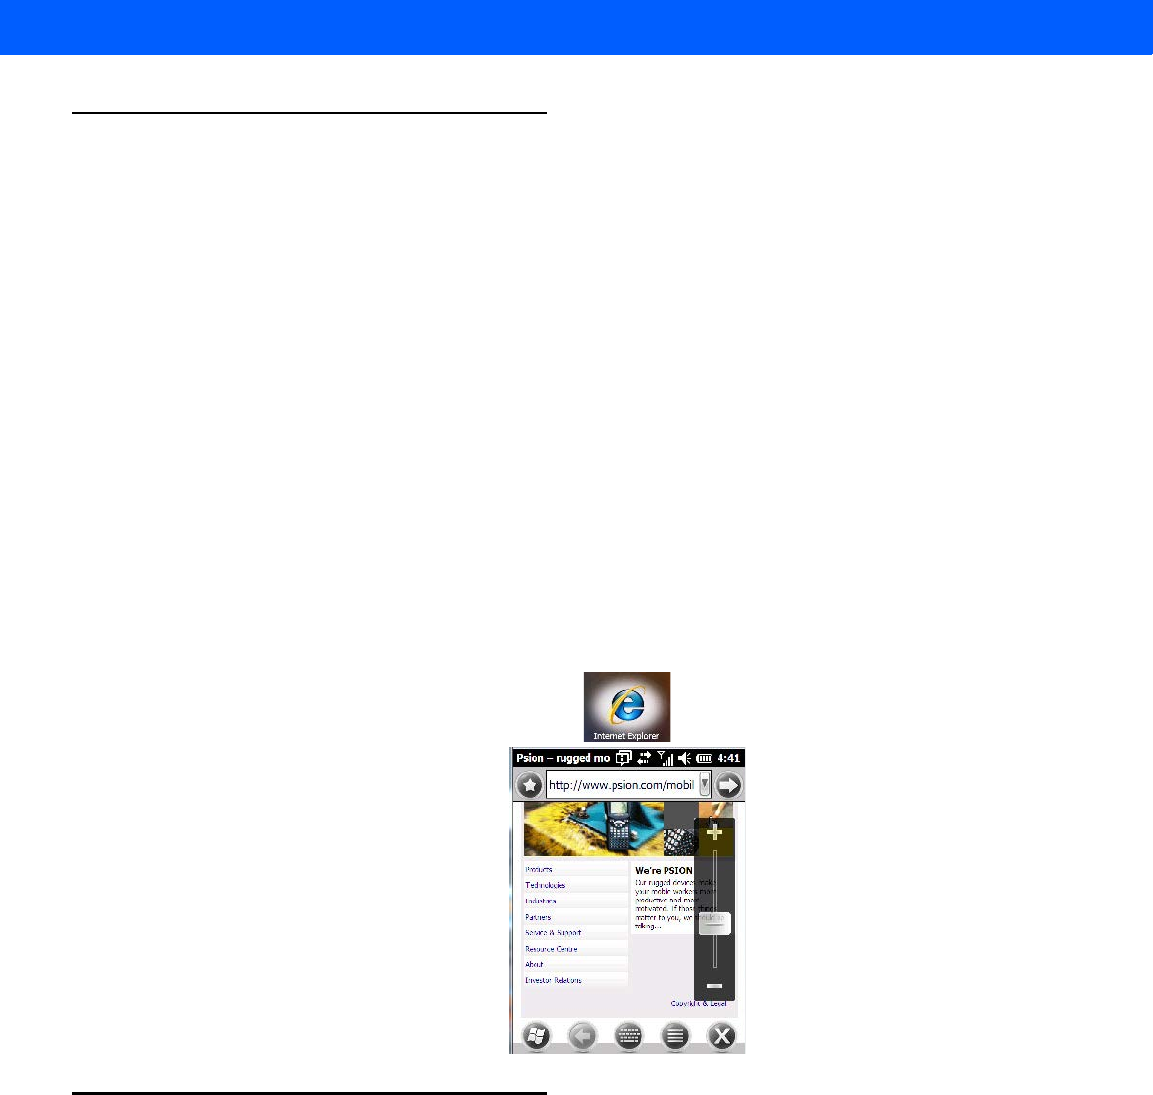
Programs 3 - 15
Internet Explorer
You can connect to Internet Explorer in two ways: by connecting the Workabout Pro4 directly to the Internet or
by connecting through your PC (see “ActiveSync®” on page 3-26).
Browsing Web Sites
There is little difference between the standard Internet Explorer found on your PC and that found on your
Workabout Pro4, sometimes referred to as Pocket Internet Explorer. You can enter URLs, set a ‘home page’,
turn images on and off, e-mail links to friends, and so on.
To go to a web site:
• Connect your Workabout Pro4 to the Internet. (If you’re not certain how to do this, refer to “Connections –
Connecting to the Internet” on page 4-21).
•Tap on Start>Internet Explorer to open Internet Explorer.
• Tap on the address bar – the field near the top of the screen where URLs are entered – to highlight the
current URL.
• Type a new URL in the address bar.
Tapping on the softkeys in the softkey bar at the bottom of the screen displays Internet Explorer commands like
those you find on your PC.
Calendar
This option is used to map out all your upcoming appointments, meetings and so on in the weeks, months and
years ahead.
Draft #5

3 - 16 Workabout Pro4 (Windows Embedded Hand-Held 6.5) User Manual
Alarms
Refer to “Time, Date and Alarms” on page 2-17 for details about this applet.
Pictures & Videos
The Pictures & Videos applet allows you to snap photographs and record video footage. It is also a photo and
video viewing program.
Using the Camera
•Tap on Start>Pictures & Videos.
IMPORTANT Refer to “Calendar of Upcoming Appointments” on page 2-20 for
details about this feature.
IMPORTANT The Pictures & Videos program can only display .bmp or .jpg for-
mats. Photos in other formats will need to be converted on your PC
before they are transferred to the Workabout Pro4.
Draft #5
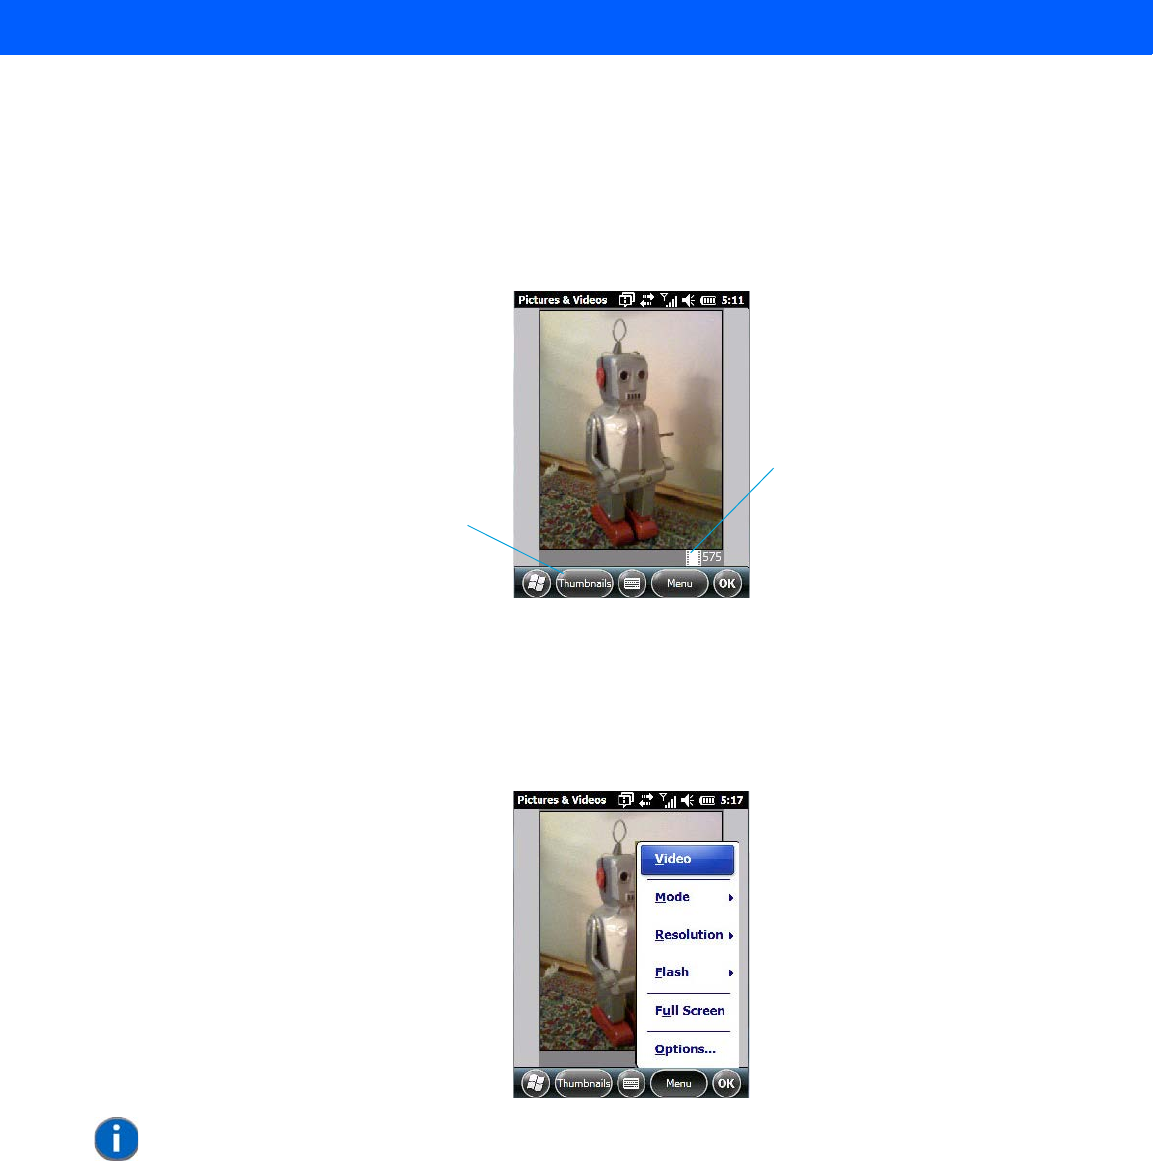
Programs 3 - 17
Keep in mind that if there are no pictures stored on your Workabout Pro4 as yet, you’ll only see the Camera
icon in this screen.
• Tap on the Camera icon to activate the camera.
The screen will display the image your camera is pointed at. (The camera is built into the back of
the Workabout Pro4.)
• Frame the image in the Workabout Pro4 screen. Press [ENTER] to snap the photograph.
Photo Menu
When the camera is activated, tapping on Menu displays a set of commands to help you modify how your
camera operates, the quality of the photos it takes, and so on. You can also use this menu to activate the video
recorder rather than the still camera.
Moving Photos to the Workabout Pro4
• Connect your device to your PC with ActiveSync.
• Locate the pictures on your PC, and drag photos from their folder to the Mobile Device (Workabout Pro4).
The Workabout Pro4 can be found under Computer (My Computer on PCs running Windows XP).
Opening a Photo
• To open a photo, tap on Start>Pictures & Videos. You’ll see a thumbnail of your photos.
Photo Film Icon indicates
the camera is active.
Tapping on this softkey
displays thumbnails of
photos stored on the Workabout Pro4.
NOTE ‘Video’ is a toggle command. When the ‘Still’ camera is activated, ‘Video’ is
available in this menu. When the video recorder is activated, ‘Still’ (camera) is
available in this menu.
Draft #5
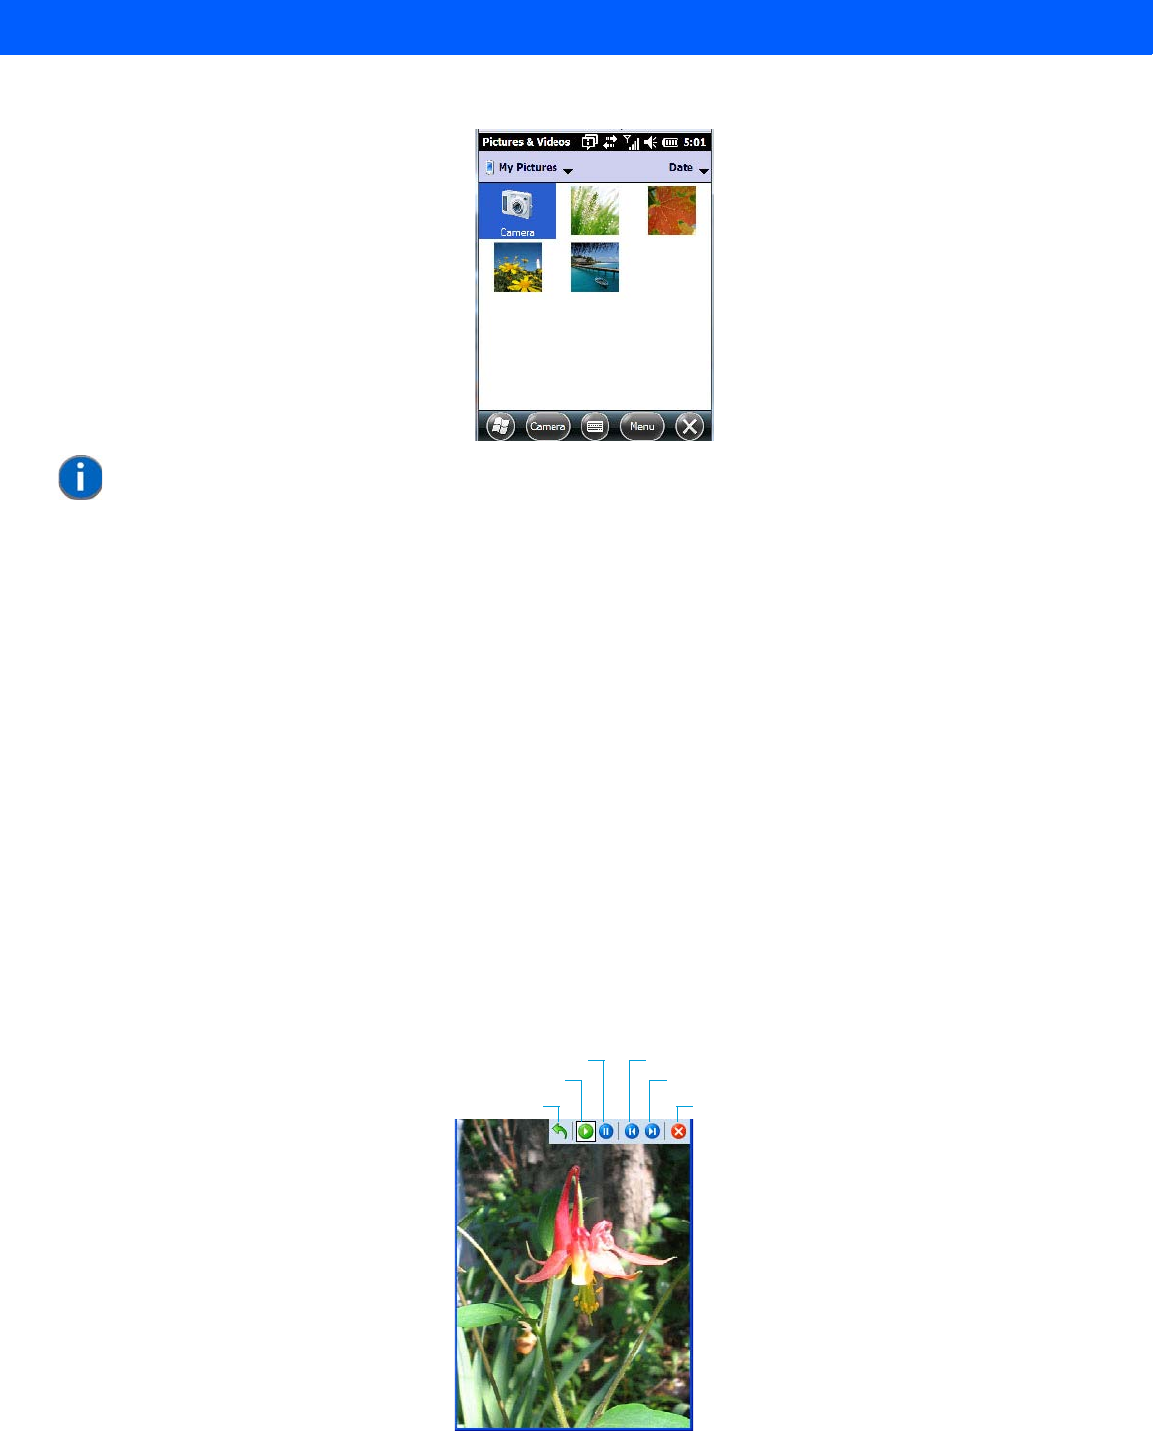
3 - 18 Workabout Pro4 (Windows Embedded Hand-Held 6.5) User Manual
• Tap on a thumbnail to open the photo.
Deleting a Photo
• Press and hold the stylus on the thumbnail photo you want to delete to display a pop-up menu. Tap
on Delete.
• Confirm your choice when prompted.
Editing a Photo
• Tap on a thumbnail photo to open it.
•Tap on Menu>Edit.
The Rotate command is now displayed in the softkey bar. Additional editing tools are listed in the Menu.
Creating a Slide Show
To view a slide show:
• Tap on the Menu>Play Slide Show.
The slide show begins – in slide show mode, photos are displayed for about five seconds, one after the other.
• To display the slide show tool bar, tap anywhere on the photo.
NOTE If you’ve stored your photos on a storage card, you’ll need to tap on the storage
card icon to display your photos.
Flip View
Play
Pause Previous
Next
Close
Draft #5
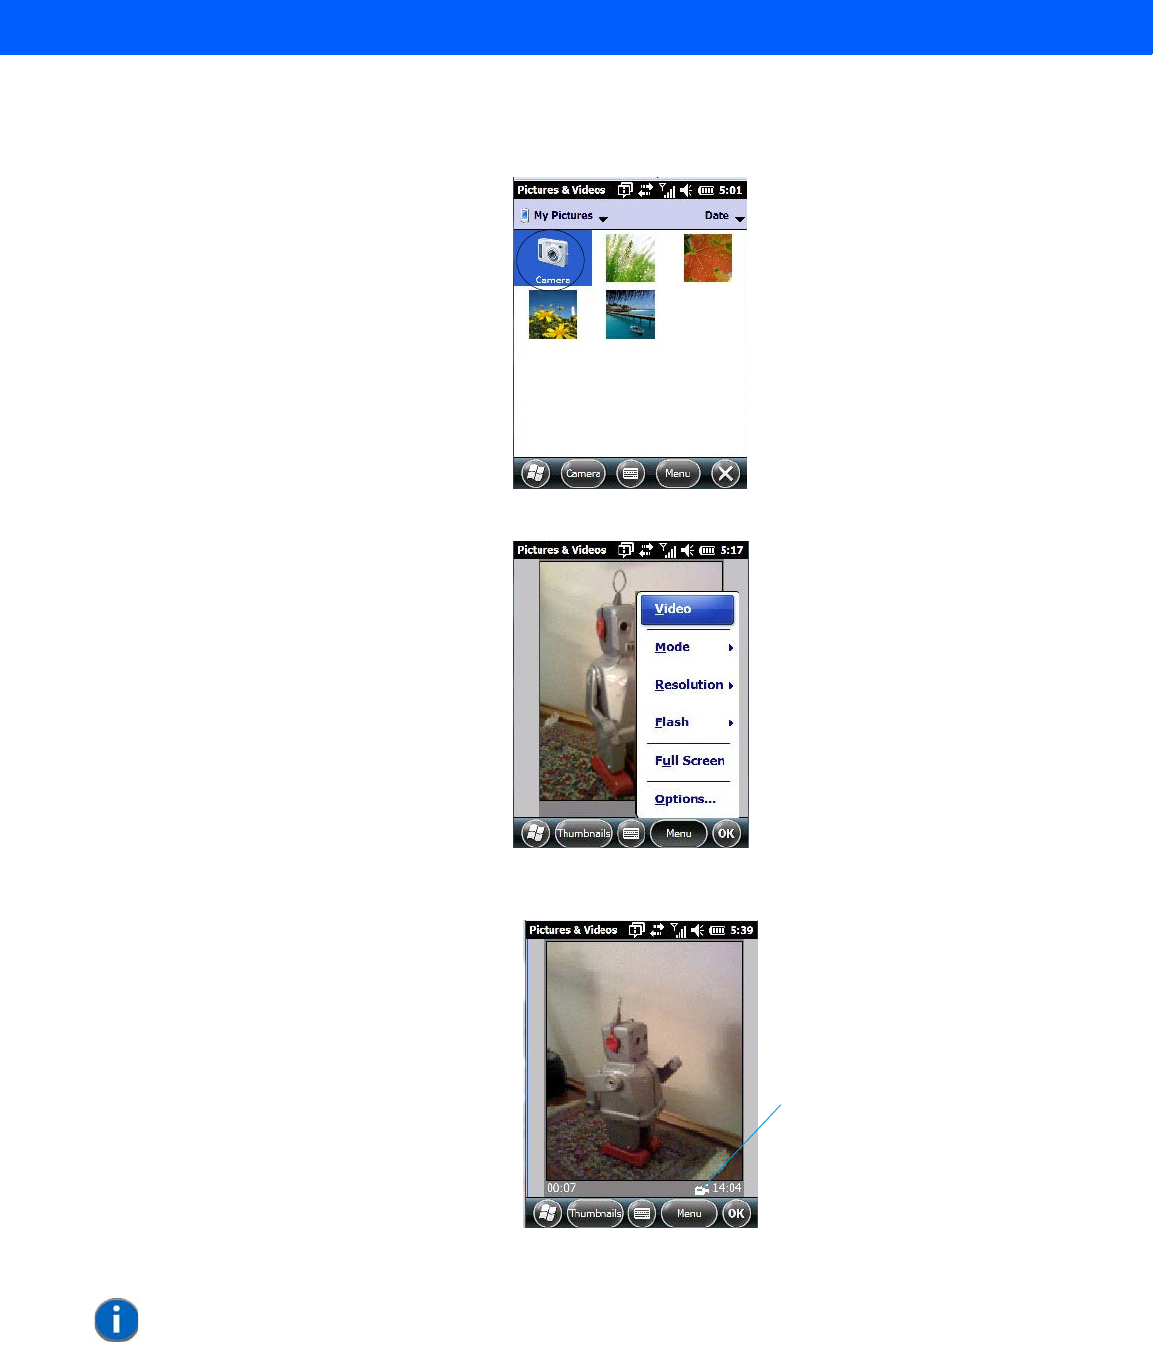
Programs 3 - 19
Using the Video Recorder
• Tap on the Camera icon.
• In the bottom-right corner of the camera screen, tap on Menu>Video.
• Press [ENTER] to begin recording.
• To end the video, press [ENTER] again, or tap on the Stop softkey.
Video Recorder Icon
Indicates that video
is active.
NOTE When the ‘Video’ recorder is activated, a Menu is available to tailor the operation
of the recorder, the quality of the recording, and so on.
Draft #5
3 - 20 Workabout Pro4 (Windows Embedded Hand-Held 6.5) User Manual
Windows Media
Windows Media allows you to play music and videos on your Workabout Pro4. You can use Windows Media to
play digital audio and video files that are stored on your Workabout Pro4 or on the web.
• To work with this applet, tap on Start>Windows Media.
For details about using this applet, refer to:
http://www.microsoft.com/windowsphone/en-us/howto/wp6/music/windows-media-player-mobile.aspx
Messenger (Windows Live)
Windows Live Messenger is an instant messaging service. Refer to the Microsoft web site for details.
Windows Live
Windows Live is a free online service that provides operators with a free mobile phone back-up solution
by wirelessly synchronizing contacts, calendar appointments, and so on with a password-protected
online portal.
When you tap on Windows Live and accept the license agreement, a Setup screen is displayed. Follow the
setup steps to set up your Windows Live ID so that you can begin using this service.
Notes
The Notes application is an electronic notepad you can use to jot down your ideas quickly. You can enter text
using the soft keyboard, the Workabout Pro4 keyboard, or you can create a handwritten note on the screen by
using the transcriber. You can also record a message.
Notes can also be shared through e-mail and synchronization with your PC.
•Tap on Start>Notes to launch this application.
Draft #5
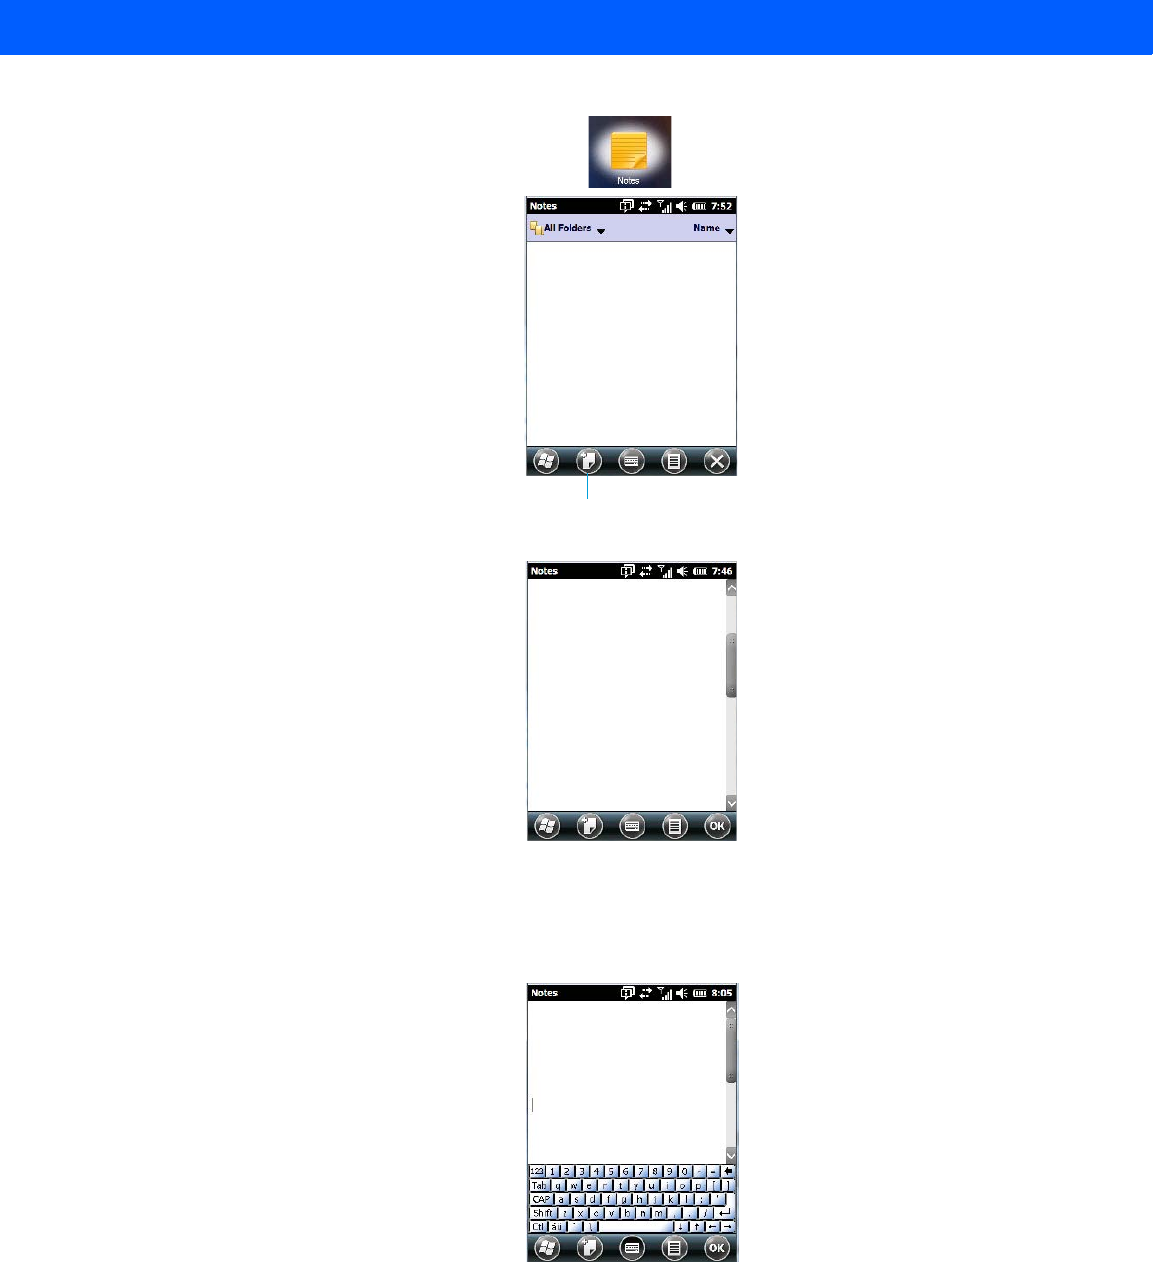
Programs 3 - 21
• Tap on the New softkey to display a blank note.
Creating a Note Using the Soft Keyboard
The soft keyboard icon is available by default. It is a replica of a standard keyboard. Use your stylus to type
letters, numbers, symbols and so on.
• When you’ve completed your note, tap on OK.
Your note is automatically saved. The file name is the first line of the note if you used the keyboard – otherwise,
it’s named Note1, Note2 and so on.
New
Draft #5
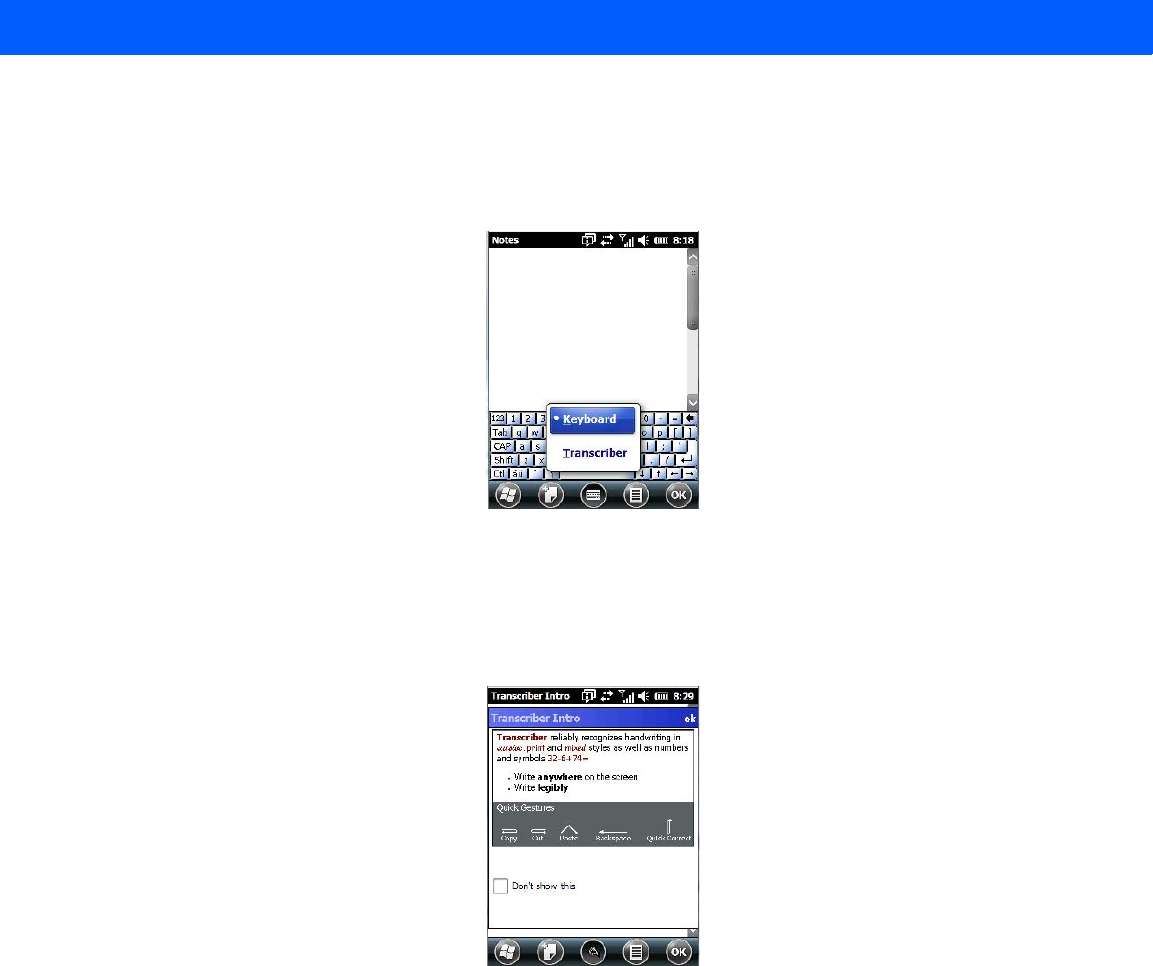
3 - 22 Workabout Pro4 (Windows Embedded Hand-Held 6.5) User Manual
Creating and Converting Handwritten Notes to Text
To create a handwritten note using the transcriber:
• Tap and hold the stylus on the soft keyboard icon to display the pop-up menu.
• Choose Transcriber from the menu.
When you choose Transcriber, you can write notes in your own handwriting. Workabout Pro4 converts the
notes into typed text for you.
A Transcriber Intro screen is displayed to provide information to help you work with the Transcriber.
When you choose Transcriber, the soft keyboard icon changes to an icon of a hand poised to write a note.
• At the top of the Transcriber Intro screen, tap on OK.
• In the blank Note screen, use your stylus to write a note as clearly as possible.
The text in the note is converted from handwritten to printed text.
Draft #5
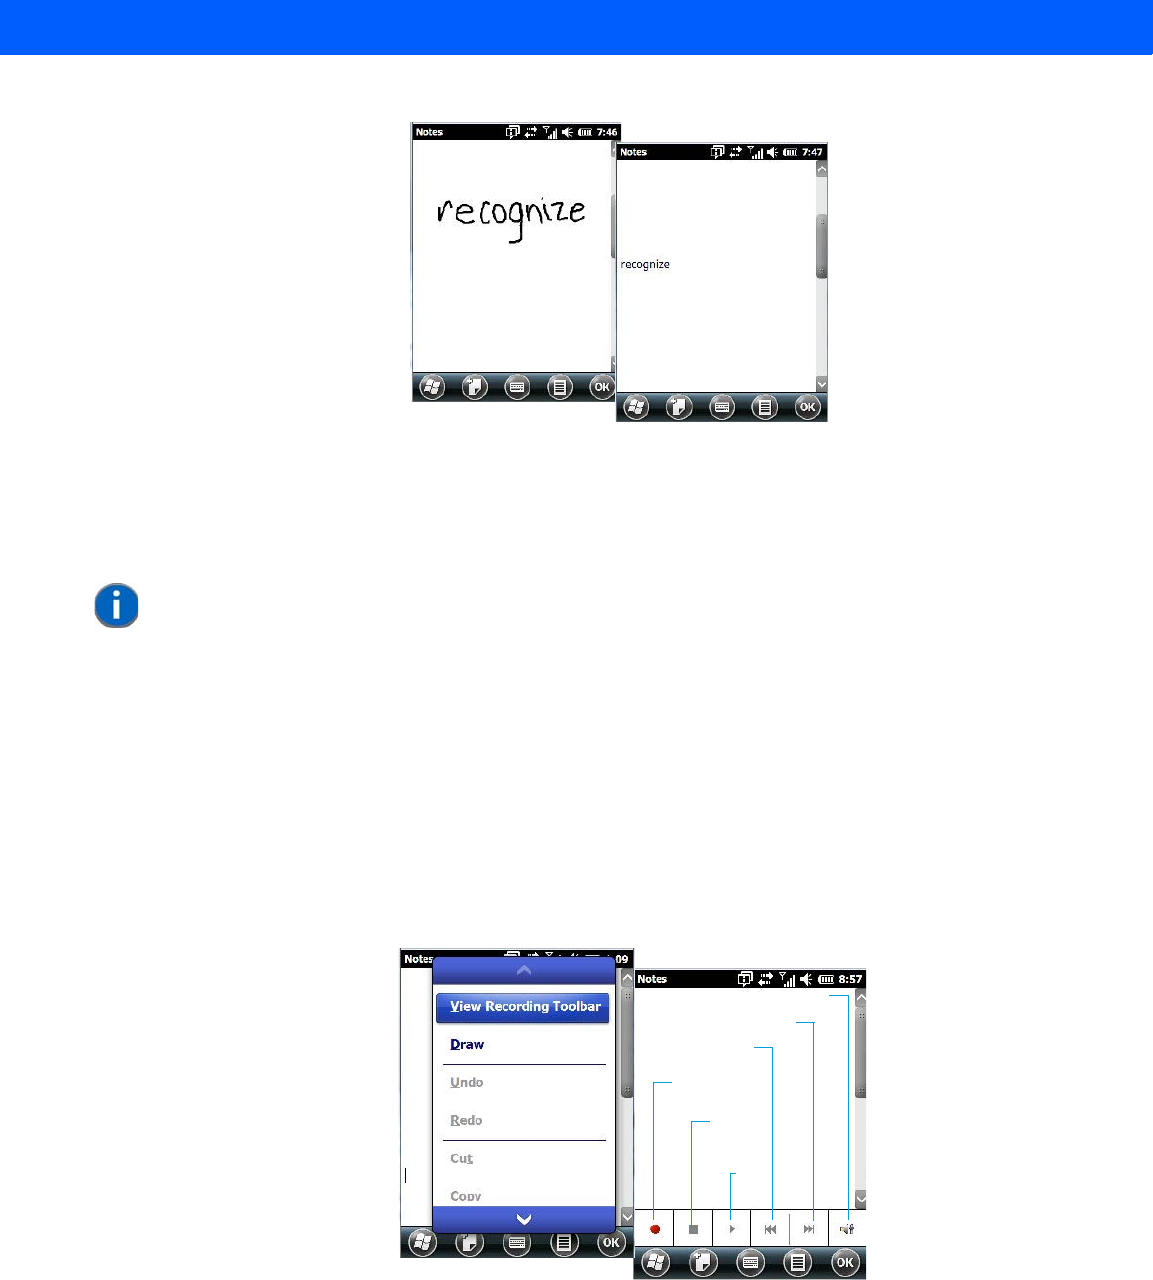
Programs 3 - 23
Renaming a Note
• Press and hold the stylus on the file name in the Notes screen that you want to rename. In the pop-up
menu, choose Rename/Move.
• In the Name field, type the new name.
You can also move the note to a new Folder and/or a new Location.
• When you’ve made the changes you need, tap on OK.
Recording Notes
It is sometimes easier to record a note than to write it down just to make certain that you’ve captured an idea
before it drifts away. To make an audio recording:
• Tap on the New softkey to open a fresh note.
•Tap on Menu>View Recording Toolbar.
• Tap on the Record button – a beep alerts you that your device is now ready to record.
• Begin speaking into the microphone on the Workabout Pro4. Make certain that you move the Workabout
Pro4 to within a few feet of the source of the sound you want to record.
• Tap on the Stop button when you’ve completed your recording.
NOTE Remember that if you want to use the soft keyboard to type a new name, you’ll
need to tap and hold the stylus on the Transcriber icon, and choose Keyboard
from the popup menu.
Volume
Skip to end
Skip to start
Record
Stop
Play
Draft #5
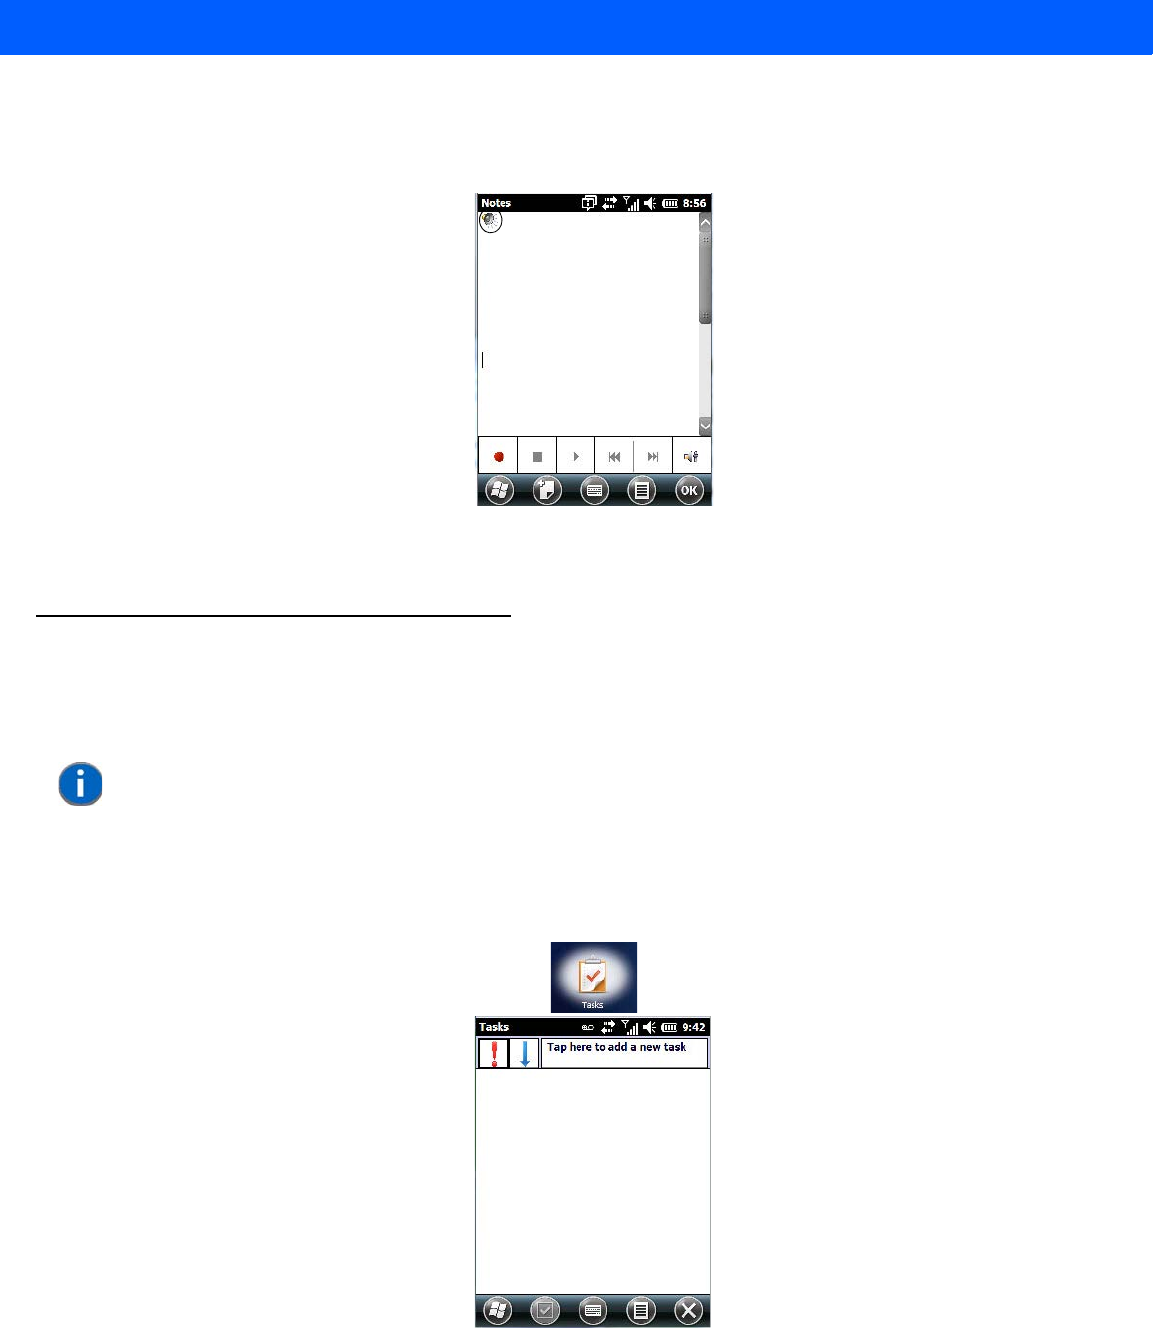
3 - 24 Workabout Pro4 (Windows Embedded Hand-Held 6.5) User Manual
•Tap on OK to save the recorded note.
A speaker icon is displayed in the note indicating the presence of a recording within the note.
• To play the recorded note, tap on the speaker icon.
•Tap on Menu, and choose View Recording Toolbar again to turn off the feature.
Task Notification
Tasks lets you create lists of entries representing your responsibilities, upcoming projects, and so on. If you’ve
assigned any tasks, this option lets you know how many active tasks you have.
•Tap on Start>Tasks to display the Tasks screen.
Creating a Task
• Tap in the field labelled Tap here to add a new task.
• Type your task description.
NOTE You can synchronize the Task Notification option so that any tasks are displayed
on your Workabout Pro4 as well as your PC. Refer to “Synchronizing E-mail with
Outlook (PC with Windows XP OS)” on page 3-9 and “Synchronizing E-mail with
Outlook (PC with Windows Vista or Windows 7)” on page 3-10. Each section out-
lines how to synchronize options other than e-mail.
Draft #5
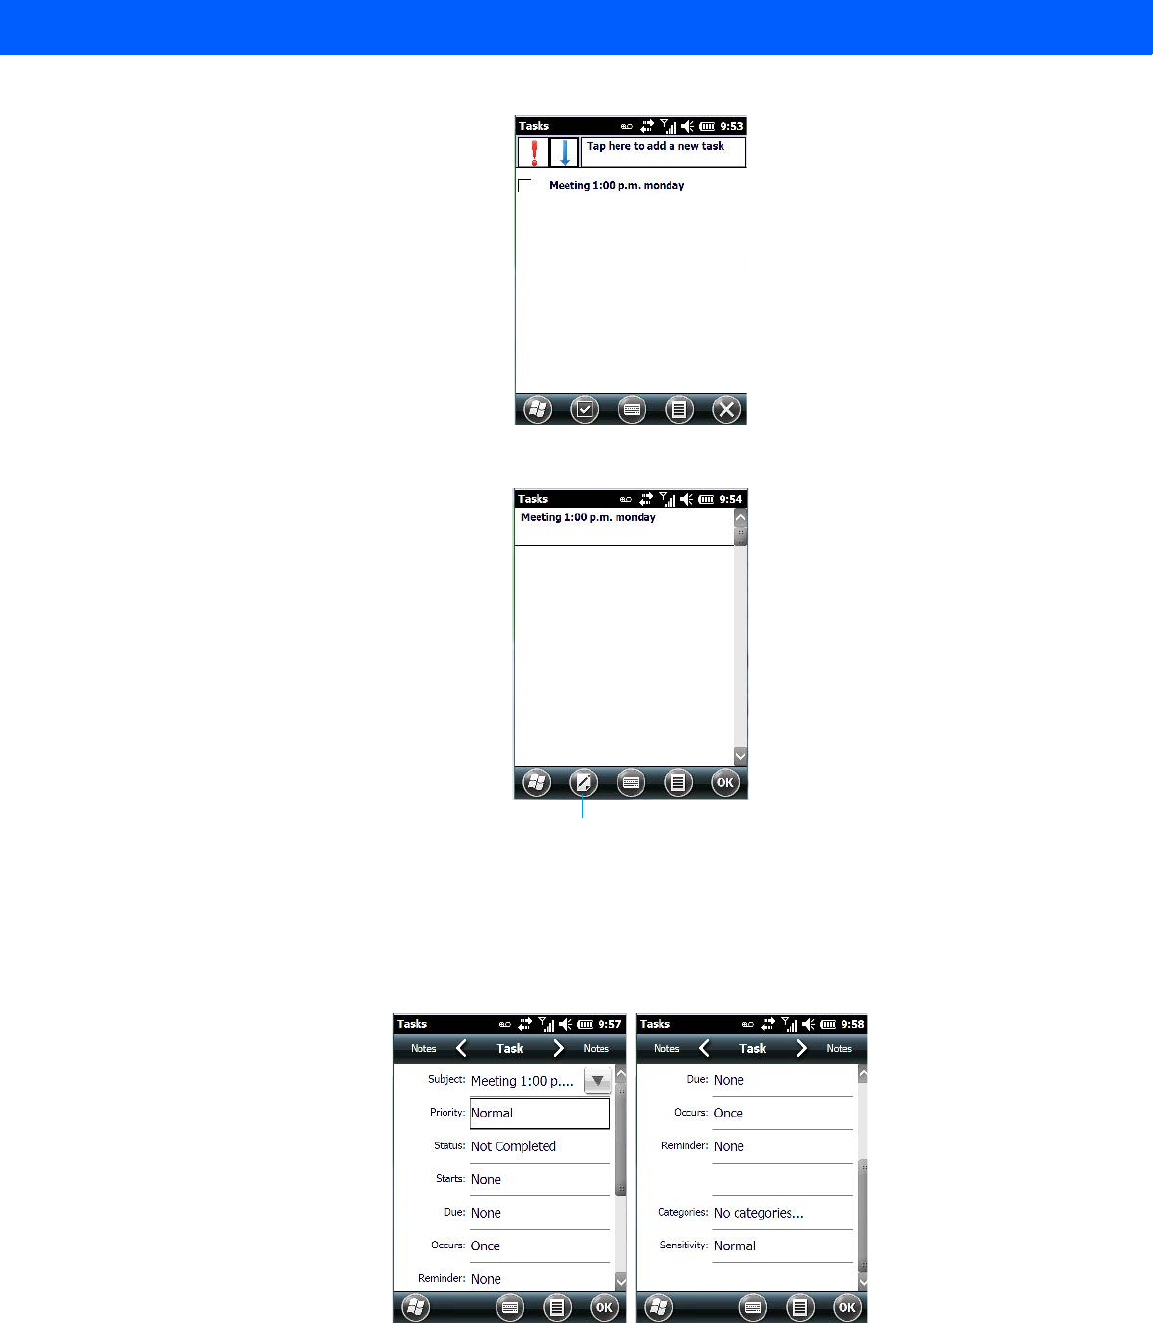
Programs 3 - 25
• Press [ENTER] to add the task to your list.
Editing a Task
• Tap on a task in the task you want to edit. Tap on the Edit softkey in the softkey bar to display a detailed
task screen where you can define task characteristics.
Figure 3-1
Task Details Screen
Each of the nine items in this screen, when tapped, displays a drop-down menu where you can choose from a
list of options.
• Once you’ve completed all the appropriate fields, tap on OK to save your changes.
Edit
Draft #5

3 - 26 Workabout Pro4 (Windows Embedded Hand-Held 6.5) User Manual
Deleting a Task
• Press and hold the stylus on a task until a pop-up menu is displayed.
•Tap on Delete Task.
Marking a Task as Completed
• In the Tasks list, tap the checkbox next to the items that are completed.
Sorting Tasks
• Tap on the Menu softkey, and tap on Sort By.
You can choose from Status, Priority, Subject, Start Date or Due Date. The tasks are arranged in the list
according to the criterion you chose.
Limiting the Tasks Displayed in the Task Screen
•Tap on Menu in the softkey bar, and tap on Filter.
You can choose All Tasks, Recently Viewed, No Categories, Active Tasks or Completed Tasks. The tasks
are displayed on the screen according to the preference you chose.
File Explorer
Windows Embedded Hand-Held 6.5 files are stored in folders and sub-folders that are accessible through File
Explorer. You can open, save, rename, copy and paste files in the same manner as you would on any desktop
PC.
ActiveSync®
ActiveSync® is Microsoft PC connectivity software that can be used to connect the Workabout Pro4 to PCs
running this software. You can synchronize the Workabout Pro4 with your PC using this utility.
NOTE You can also tap on the Notes tab to add additional information about the task
you are defining.
IMPORTANT Refer to “Managing Files and Folders” on page 2-24 for details
about this feature.
Draft #5
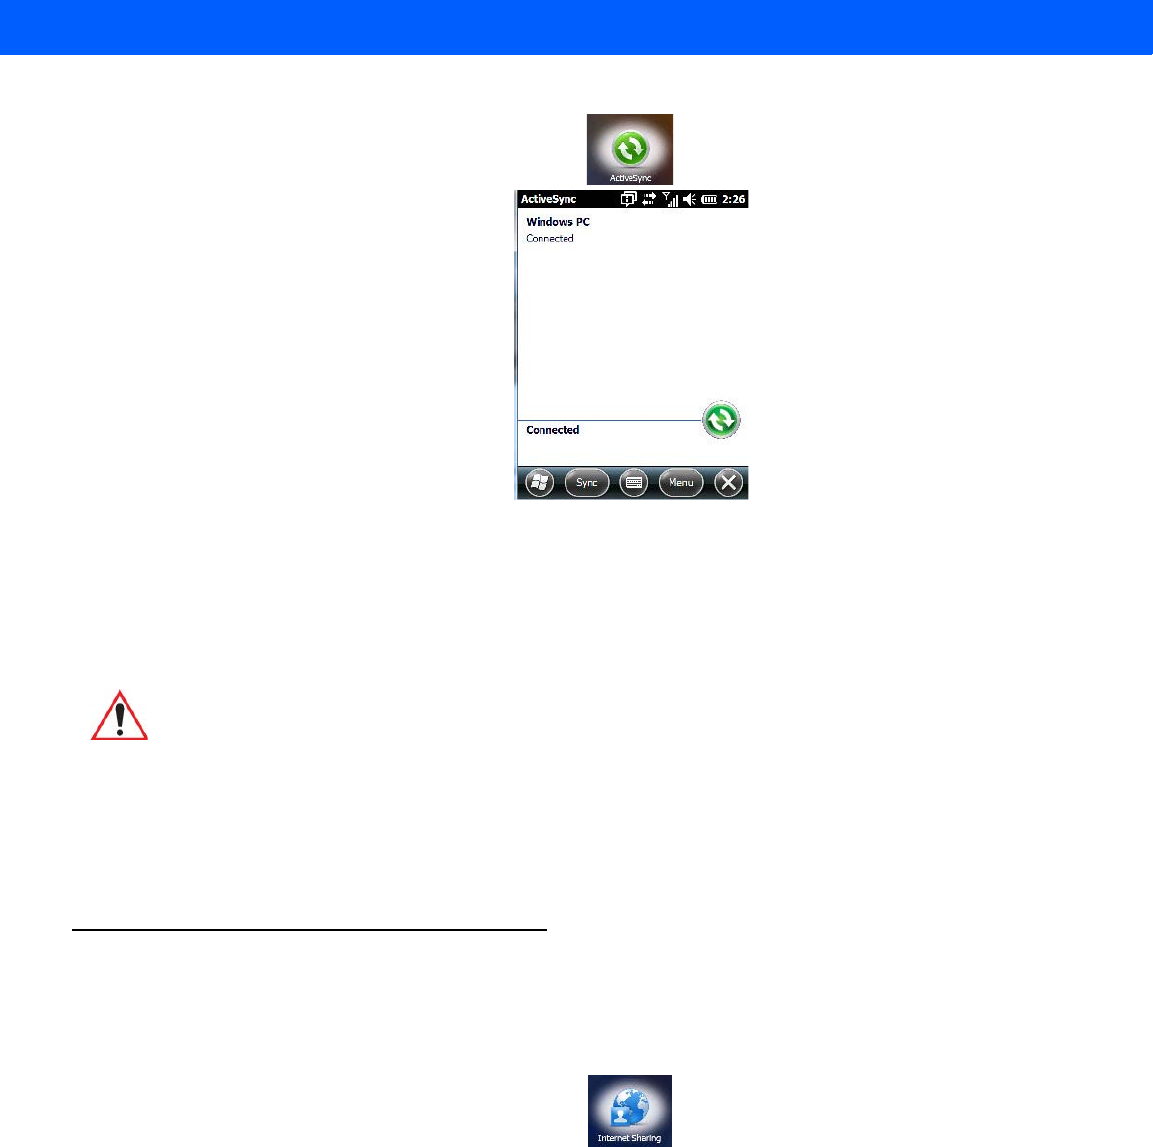
Programs 3 - 27
By connecting the Workabout Pro4 to a PC through your desktop docking station and running ActiveSync or
Mobile Device Center on your PC, you can view Workabout Pro4 files, drag and drop files between the Worka-
bout Pro4 and the PC, connect to the Internet, and so on.
Synchronization
To download either ActiveSync or Mobile Device Center, visit the following Microsoft internet site:
http://www.microsoft.com/windows-
phone/en-gb/howto/wp6/sync/prepare-to-sync-windows-phone-6-5-with-my-computer.aspx
Internet Sharing
This option allows you to use your Workabout Pro4 to connect your PC to the Internet. Before you can use
Internet Sharing, you must make certain that you have established a data connection on your Workabout Pro4.
Creating an Internet Connection
Follow the steps in this section only if you have not already setup an Internet connection.
You’ll need the following information before you begin:
From your cellular service provider: data connectivity information, access point name and PAP/CHAP security
settings.
From your Internet service provider (ISP) or wireless service provider: access point name and password and
any additional security information.
IMPORTANT For information about using ActiveSync and Mobile Device Center on
your PC, refer to “Synchronizing E-mail with Outlook (PC with
Windows XP OS)” on page 3-9 and “Synchronizing E-mail with
Outlook (PC with Windows Vista or Windows 7)” on page 3-10.
Draft #5

3 - 28 Workabout Pro4 (Windows Embedded Hand-Held 6.5) User Manual
For a GPRS, 1xRTT or dialup connection:
•Tap on Start>Settings>Connections. Tap on the Connections icon.
• Under My Work Network, tap Add a new modem connection.
• Type a name for the connection, and choose Cellular Line (GPRS), or for 1xRTT connections, choose
Cellular Line. Tap on Next.
• Type the phone number or access point name provided by your service provider, and tap Next.
• Type the credentials supplied by your service provider, and tap Finish.
Using Internet Sharing
• On your PC, open the ActiveSync window, and tap on File>Connection Settings. If you are using
Windows Mobile Device Center, tap on Mobile Device Settings>Connection Settings.
• Disable Allow USB connection by tapping in the checkbox to the left of this option.
• Connect the Workabout Pro4 to your PC using Bluetooth or a USB cable.
• On your Workabout Pro4, tap Start>Internet Sharing.
• Choose the PC Connection type – USB or Bluetooth.
• Choose the network connection that the Workabout Pro4 should use to connect to the Internet.
•Tap Connect. It takes approximately 30 seconds to establish a connection. (If you are prompted to turn on
Bluetooth, tap Yes.)
For PC Running Windows XP or Earlier
If you are using a Bluetooth connection, execute the following steps on your PC:
•Tap Start>Control Panel>Network Connections.
• Right-click on Bluetooth Network Connections, and click on Bluetooth Network Devices.
• If the Workabout Pro4 is listed as a Network Access Point, choose Connect. If it is not listed, choose
Create a new connection and use the New Connection Wizard to add the Workabout Pro4 to the list.
For PC Running Windows Vista or Windows 7
If you are using a Bluetooth connection, execute the following steps on your PC:
•Tap Start>Control Panel>Network & Sharing Center.
• Double-tap on Set up a new connection or network.
• In the Choose a connection option screen, double-click on Connect to a Bluetooth personal area
network (PAN).
A Devices and Printers screen is displayed.
NOTE Make certain that your data connection is running and that you can access the Inter-
net from the Workabout Pro4. If you are using a USB cable to connect to your PC, you
will need to disable the ActiveSync USB connection.
NOTE Make certain that Bluetooth is enabled on your Workabout Pro4 and that it is
discoverable – on your Workabout Pro4, tap on Start>Settings>Connections.
Tap on the Bluetooth icon. Scroll to the Mode tab. If they are not already
enabled, tap in the checkbox (add an ‘x’) next to Turn on Bluetooth and
Discoverable.
Draft #5
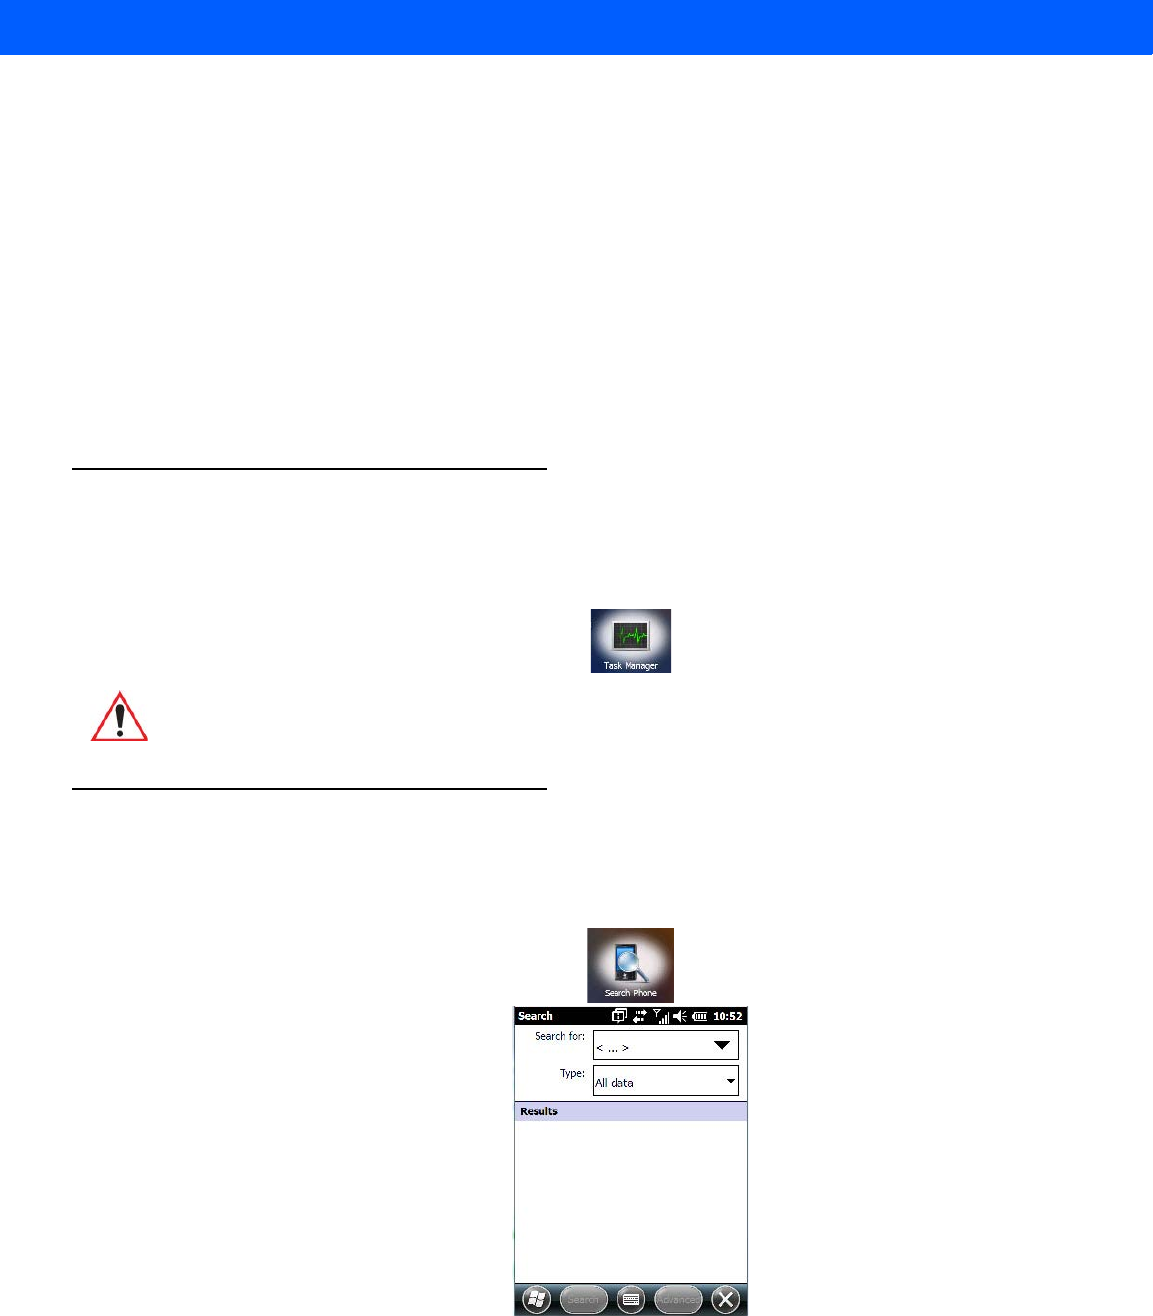
Programs 3 - 29
• In the Devices and Printers screen, tap on the Add a device button.
Your Workabout Pro4 is displayed in the Add a device screen.
• Double-tap on your Workabout Pro4 icon.
You are asked to choose a pairing option – Create a pairing code for me, or Enter the device’s pairing code.
• If a pairing code has been assigned to your Workabout Pro4, choose Enter the device’s pairing code,
and type the Workabout Pro4 passcode on your PC and on your Workabout Pro4.
• If a pairing code has not been assigned to your Workabout Pro4, choose Create a pairing code for me,
and type the Workabout Pro4 passcode on your PC and on your Workabout Pro4.
A message will appear on your Workabout Pro4 indicating that you have successfully paired your Workabout
Pro4 with your PC. Your Workabout Pro4 will appear in Control Panel>Devices and Printers.
Task Manager
The Task Manager screen lists all running tasks (applications) or processes. This applet provides a number of
options to manage these.
Search Phone
This feature allows you to conduct a search through the data stored on your phone.
•Tap on Start>Search Phone icon.
•Tap in the Search For field, and type the information or a fragment of the information for which you are
searching.
• In the Type: drop-down menu, choose the location in which you want to conduct the search.
IMPORTANT For details about using the Task Manager, refer to “Task Manager”
on page 4-68.
Draft #5
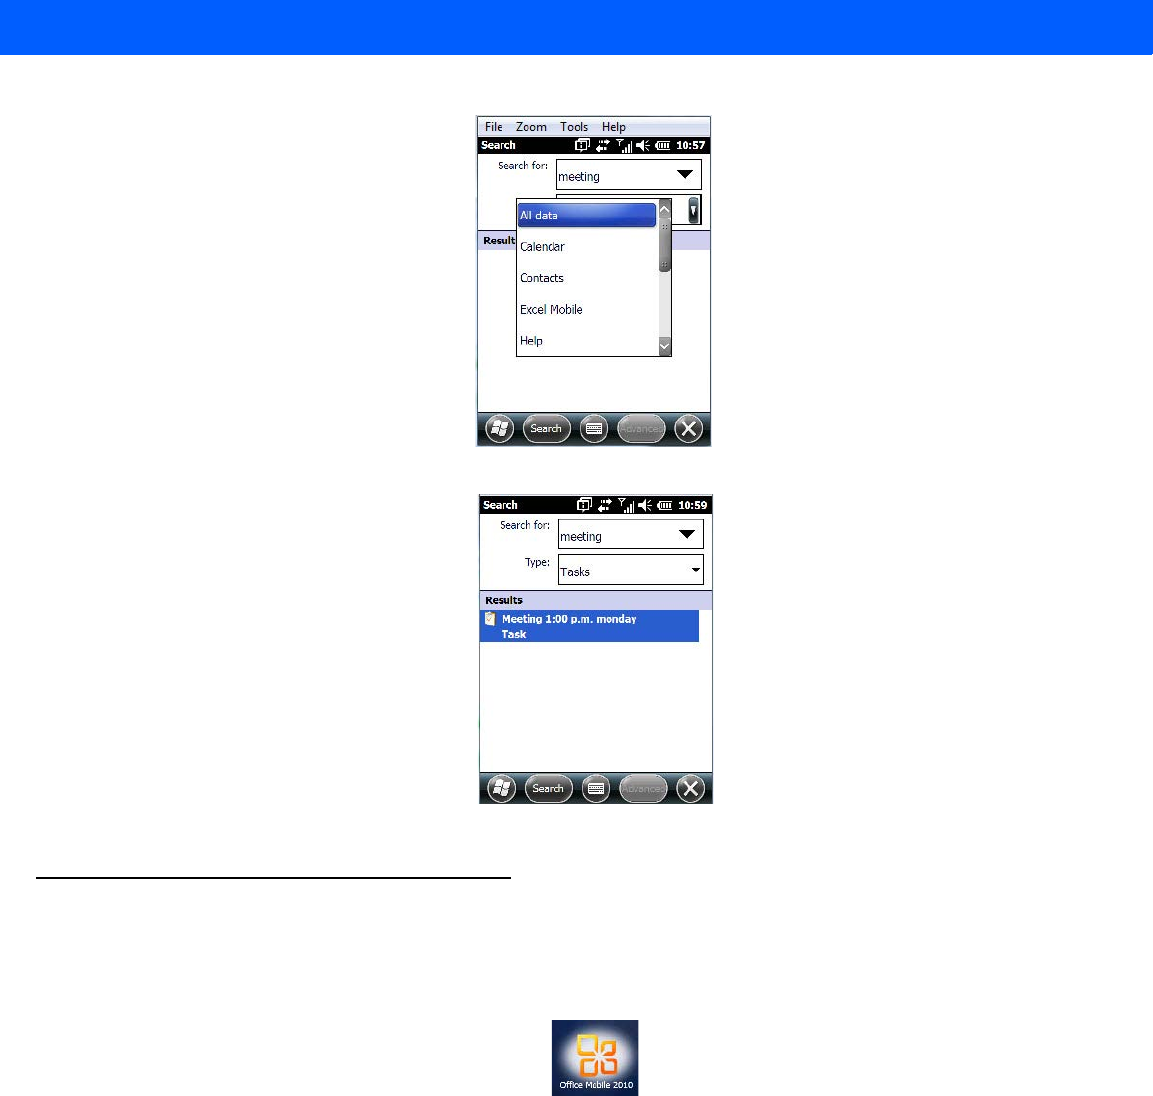
3 - 30 Workabout Pro4 (Windows Embedded Hand-Held 6.5) User Manual
• Tap on the Search softkey key.
The results of your search are displayed in the Search screen.
Office Mobile
This icon contains the following abridged Microsoft programs: Excel Mobile, OneNote Mobile, PowerPoint
Mobile, SharePoint Workspace Mobile and Word Mobile.
•Tap on Start>Office Mobile.
Excel Mobile
Excel Mobile is an abridged version of Microsoft Excel, an electronic spreadsheet program. If you’re familiar
the Excel application on your PC, you’ll be able to navigate Excel Mobile.
In addition to providing the tools to manipulate text and numeric values like statistics, percentages, using
formulas that perform calculations, and so on, this program can also include graphics such as pie charts.
Excel Mobile allows you to copy Excel workbooks from your PC onto your Workabout Pro4 and update them
while you’re away from your desk.
•Tap on Start>Office Mobile>Excel Mobile.
Draft #5
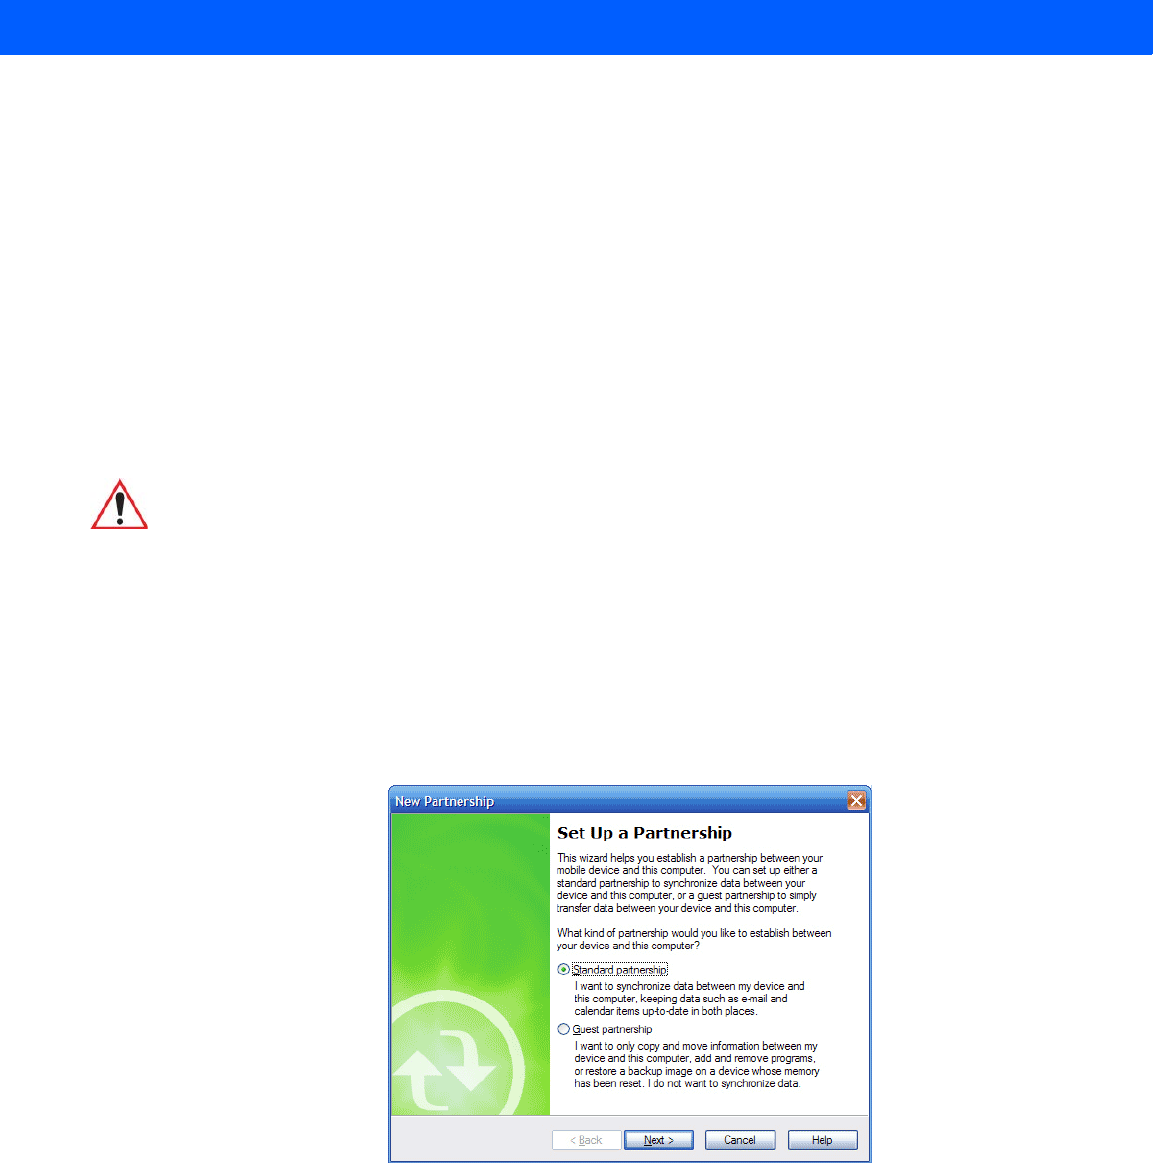
Programs 3 - 31
• If a list of workbooks is displayed rather than a new sheet, you’ll need to create a new workbook. To create
a workbook:
•In Excel Mobile, tap the Menu>File>New.
OneNote Mobile
You can use OneNote Mobile to take notes wherever you are and then synchronize your notes with a notebook
section in the OneNote version on your PC. For example, you can:
• Snap pictures of business cards on your Workabout Pro4 and then bring them into OneNote on your PC.
• Create short text notes and voice recordings on your Workabout Pro4 to remind you about important meet-
ings, ideas, etc. and synchronize them with your notes.
• Prepare information in OneNote on your PC and then transfer it to your Workabout Pro4 where it will be
available to you wherever you and your Workabout Pro4 go.
Setting Up a Partnership
•Start Office OneNote and ActiveSync or Windows Mobile Center on your PC.
• Connect the Workabout Pro4 to your PC; you can use a USB cable or a Bluetooth connection.
When a connection is established between the Workabout Pro4 and your PC, ActiveSync displays a New
Partnership screen.
• Choose Standard partnership, and tap on Next.
• To share information between OneNote Mobile and Office OneNote 2010 on your PC, tap Synchronize
with this desktop computer, and then tap on Next.
•Tap on Finish to begin the partnership between the Workabout Pro4 and the PC. Now you’ll be able to
pass notes back and forth between your PC and your Workabout Pro4.
Creating A Note
•Tap on Start>OfficeMobile>OneNote Mobile icon. Tap on New in the softkey bar to display a blank note.
IMPORTANT Remember that you must have Microsoft Office OneNote 2010 and
the latest version of ActiveSync or Windows Mobile Device Center
installed on your PC before you can set up a partnership between
your Workabout Pro4 and your PC.
Draft #5
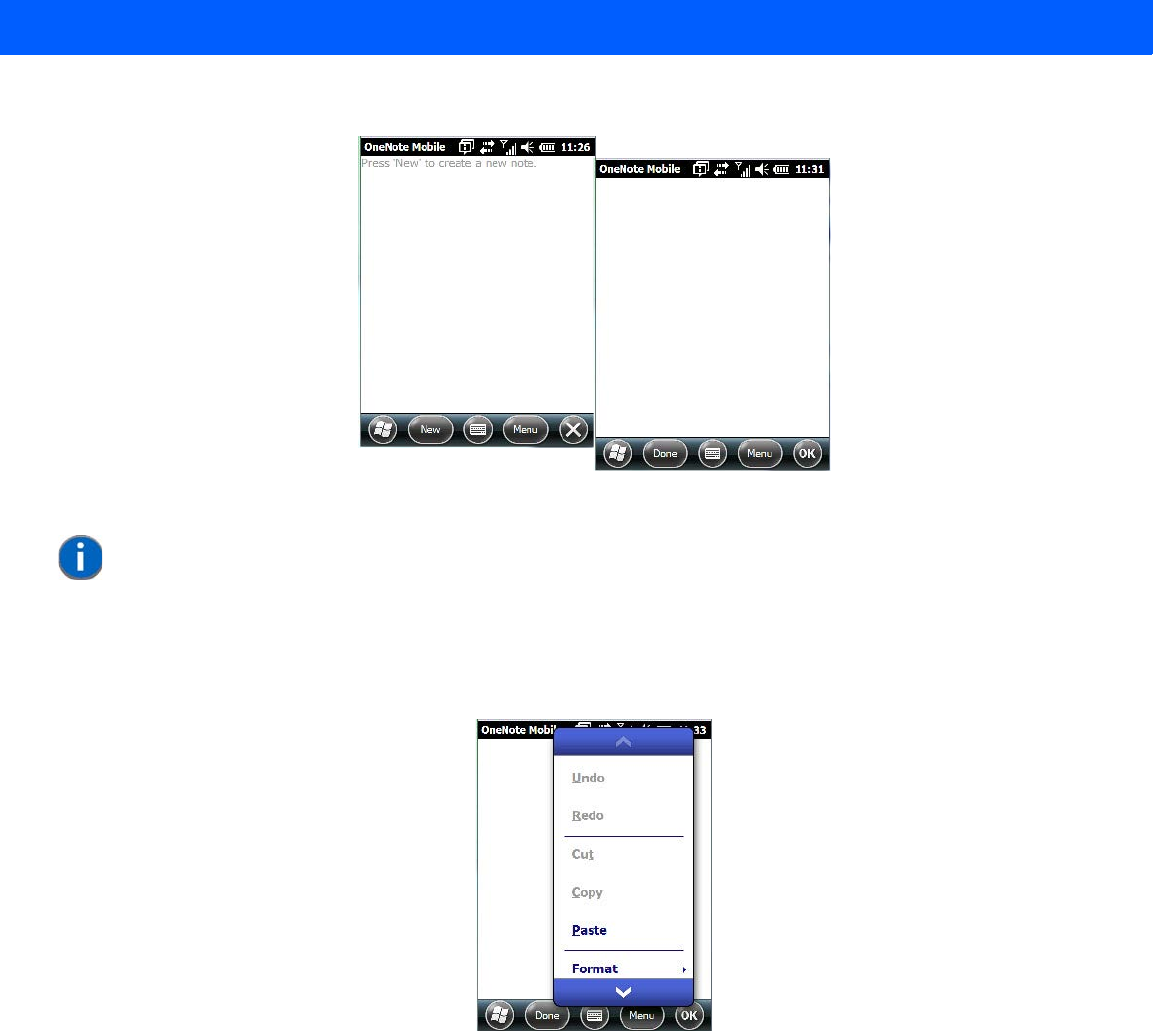
3 - 32 Workabout Pro4 (Windows Embedded Hand-Held 6.5) User Manual
•Tap on New to create a note page. Begin typing.
• When you complete your note, tap on Done.
Using the OneNote Menu
Tapping on Menu displays a list of options to help you work with the OneNote Mobile applet.
•Undo, Redo, Cut, Copy and Paste: These commands operate in the same way as they do in any
Windows Office application.
•Format: Tapping on this command lists the formatting options you can apply to your note: Bold, Italic,
Underline, Strikethrough and Clear All.
•Take Picture: When you tap on this option, the Workabout Pro4 switches to camera mode so that you can
snap a picture to include in your note.
NOTE Remember that you can tap on the Menu softkey to Undo typing, add Formats
(Bold, Italic, Underline, Strikethrough), and include Lists (Numbered, Bulleted,
Clear).
Draft #5
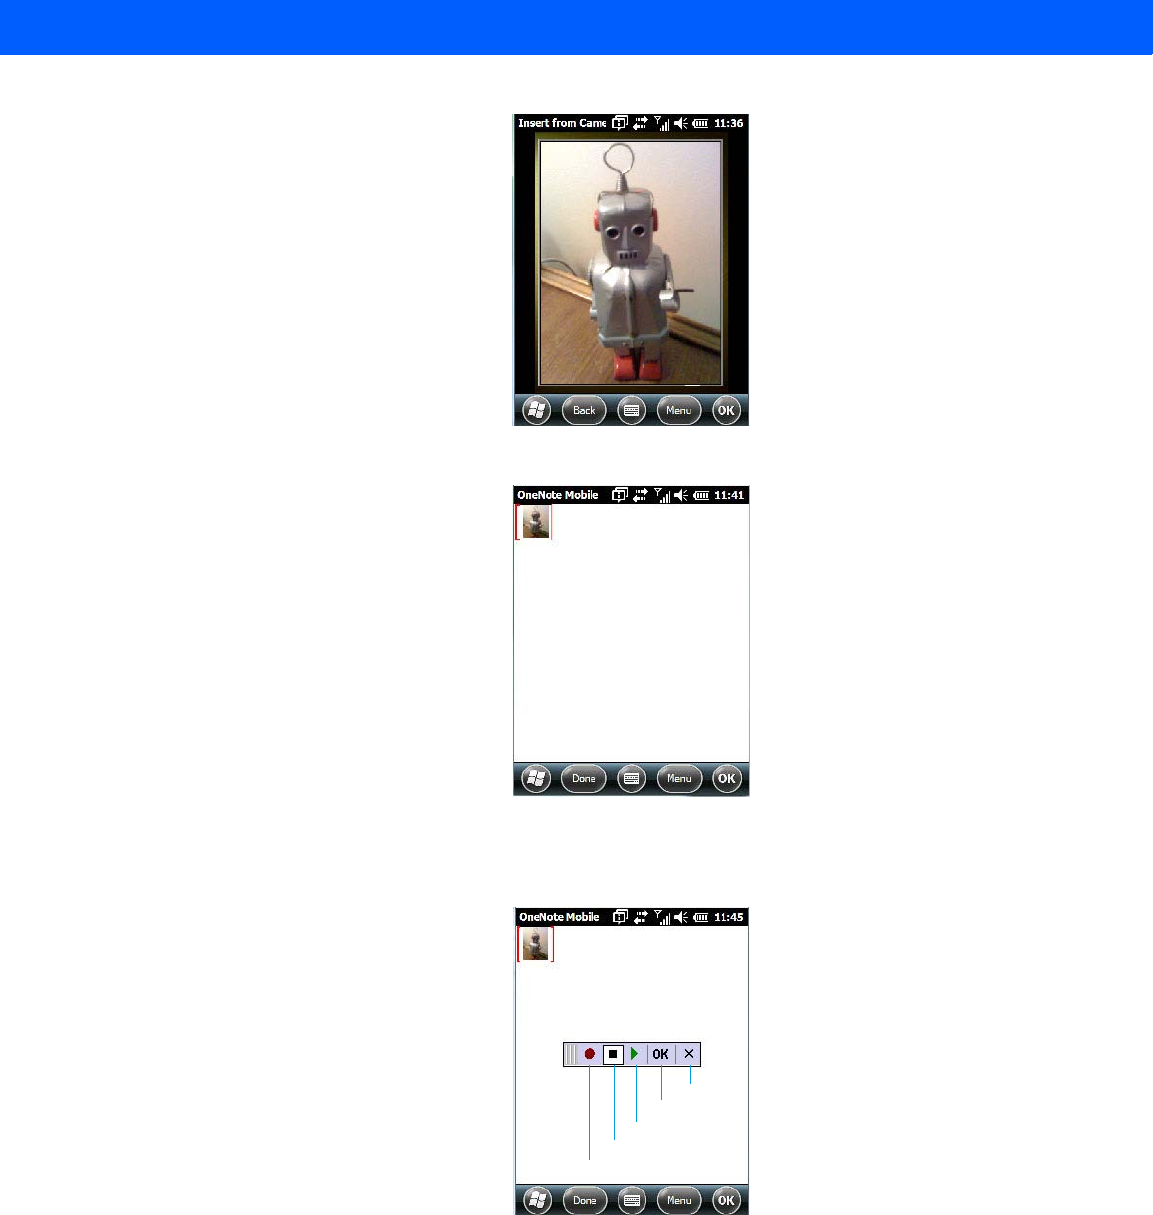
Programs 3 - 33
Press [ENTER] to snap a photo that is automatically inserted into your note.
•Insert Picture: Tapping on this command automatically displays your My Pictures folder where you can
tap on an existing picture to insert it into your note.
•Insert Recording: When you tap on this command, a recording panel is displayed.
Tap on the Record button to record your message.
Tap on Stop when you’ve completed your message.
Tap on Play to listen to your voice message.
To discard your message, tap on X – the Cancel button.
Record
Stop
Save
Play
Cancel
Draft #5
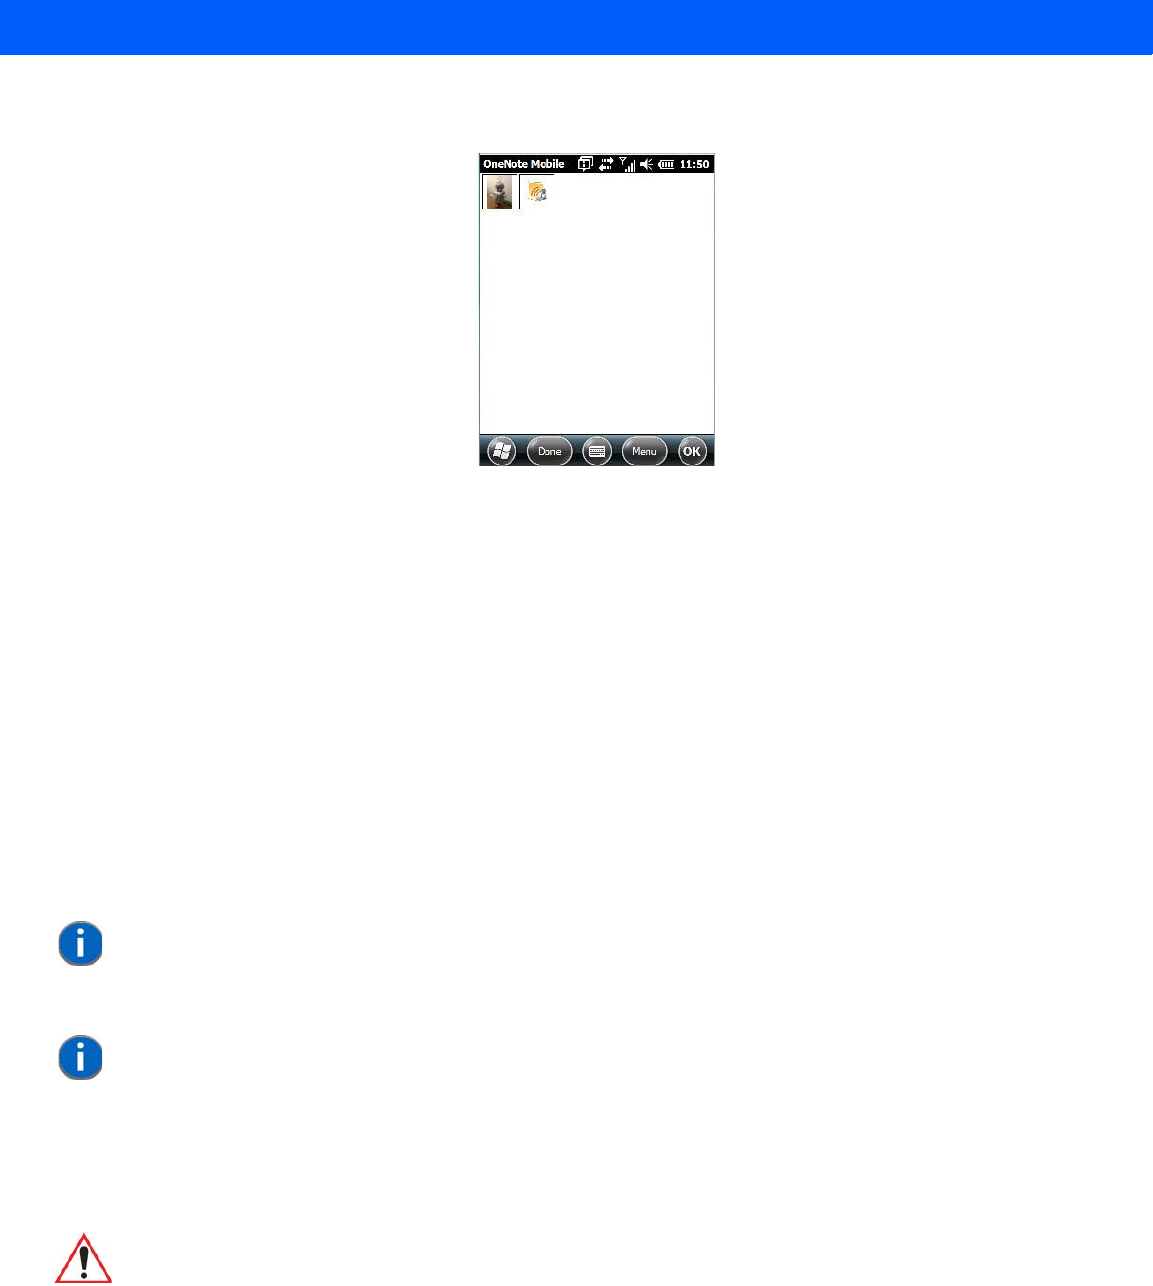
3 - 34 Workabout Pro4 (Windows Embedded Hand-Held 6.5) User Manual
To save your message, tap on OK. An audio icon is displayed in your note. You can tap on it to listen to
your message.
Synchronizing Workabout Pro4 One Note With PC OneNote
• Connect the Workabout Pro4 to your PC using either a USB cable or Bluetooth.
When the connection is complete, take one of the following steps:
•In Microsoft ActiveSync on your PC, choose Sync or
• On your Workabout Pro4, tap on Start>ActiveSync, and then tap on Sync.
During synchronization, the notes you created on your Workabout Pro4 are copied to a new Office OneNote
2010 notebook called OneNote Mobile on your PC. When synchronization is done, you can drag the trans-
ferred notes into any other sections and other notebooks on your PC.
Word Mobile
If you’ve used Microsoft Word on your PC, Word Mobile will be familiar to you. Keep in mind however that
Word Mobile is designed for a small screen and limited memory.
•Tap on Start>Office Mobile>Word Mobile.
Text Input Modes
In addition to the soft keyboard, you can enter text using the Workabout Pro4 keyboard, soft keyboard or
the transcriber.
Sharing Documents with your PC
Documents created on a PC are recognized by your Workabout Pro4. However, some formatting is lost when a
Word document is converted to a Word Mobile document. This loss also occurs when you open a .doc file and
change it on the Workabout Pro4.
NOTE Keep in mind also that a Word document created on your PC can lose key formatting
features such as styles and tables if you make changes to it on your Workabout Pro4.
NOTE If you’ve already created a Word document, it will be listed in a Word Mobile win-
dow. To launch a new Word document, you’ll need to tap on the New softkey.
IMPORTANT Refer to “Notes” on page 3-20 for details about the transcriber and
soft keyboard text input methods.
Draft #5
Programs 3 - 35
PowerPoint Mobile
PowerPoint Mobile works just like the desktop version that may be installed on your PC. To launch this
program on your Workabout Pro4:
•Tap on Start>Office Mobile>PowerPoint Mobile.
SharePoint Workspace Mobile
SharePoint Workspace Mobile allows you to open, edit, and save documents that are on a SharePoint site (a
web site that lets you and others share and collaborate on documents, projects, schedules, and so on).
•Tap on Start>Office Mobile>SharePoint Mobile.
• Tap on the Address softkey to highlight the web address field. Type the SharePoint address you want
to access.
•Tap on Go to access documents in the SharePoint site you specified.
PartnerUp
This app displays a number of pre-loaded applications. Tapping on an app in the list takes you to an associated
web site.
The operator can then install the application. If a license is required, it can be obtained by sending an e-mail to
the software license mailbox or by contacting a Sales Rep from the Psion contact web page.
www.psion.com/us/about/contact_psion-offices.htm
Additional pieces of software such as a server must be obtained through Motorola.
HomeVU
HomeVU allows the administrator to tailor how the Workabout Pro4 operates and the options the user can
access. Note that the look of the Today screen will change from icons that are finger accessible to a list of
items that is best accessed using a stylus.
IMPORTANT To avoid problems, work on copies of .doc files. In addition, keep in
mind that you can use the Terminal Services Client program to log
onto a desktop PC that is also running Terminal Services, and then
you can use any program on your PC, including Microsoft Word
(rather than Word Mobile).
Refer to “Remote Desktop Mobile” on page 3-37.
NOTE To access a SharePoint site using SharePoint Workspace Mobile from inside
your organization, you need to set up a Wi-Fi connection that lets you access a
SharePoint site on your company's network.
Draft #5

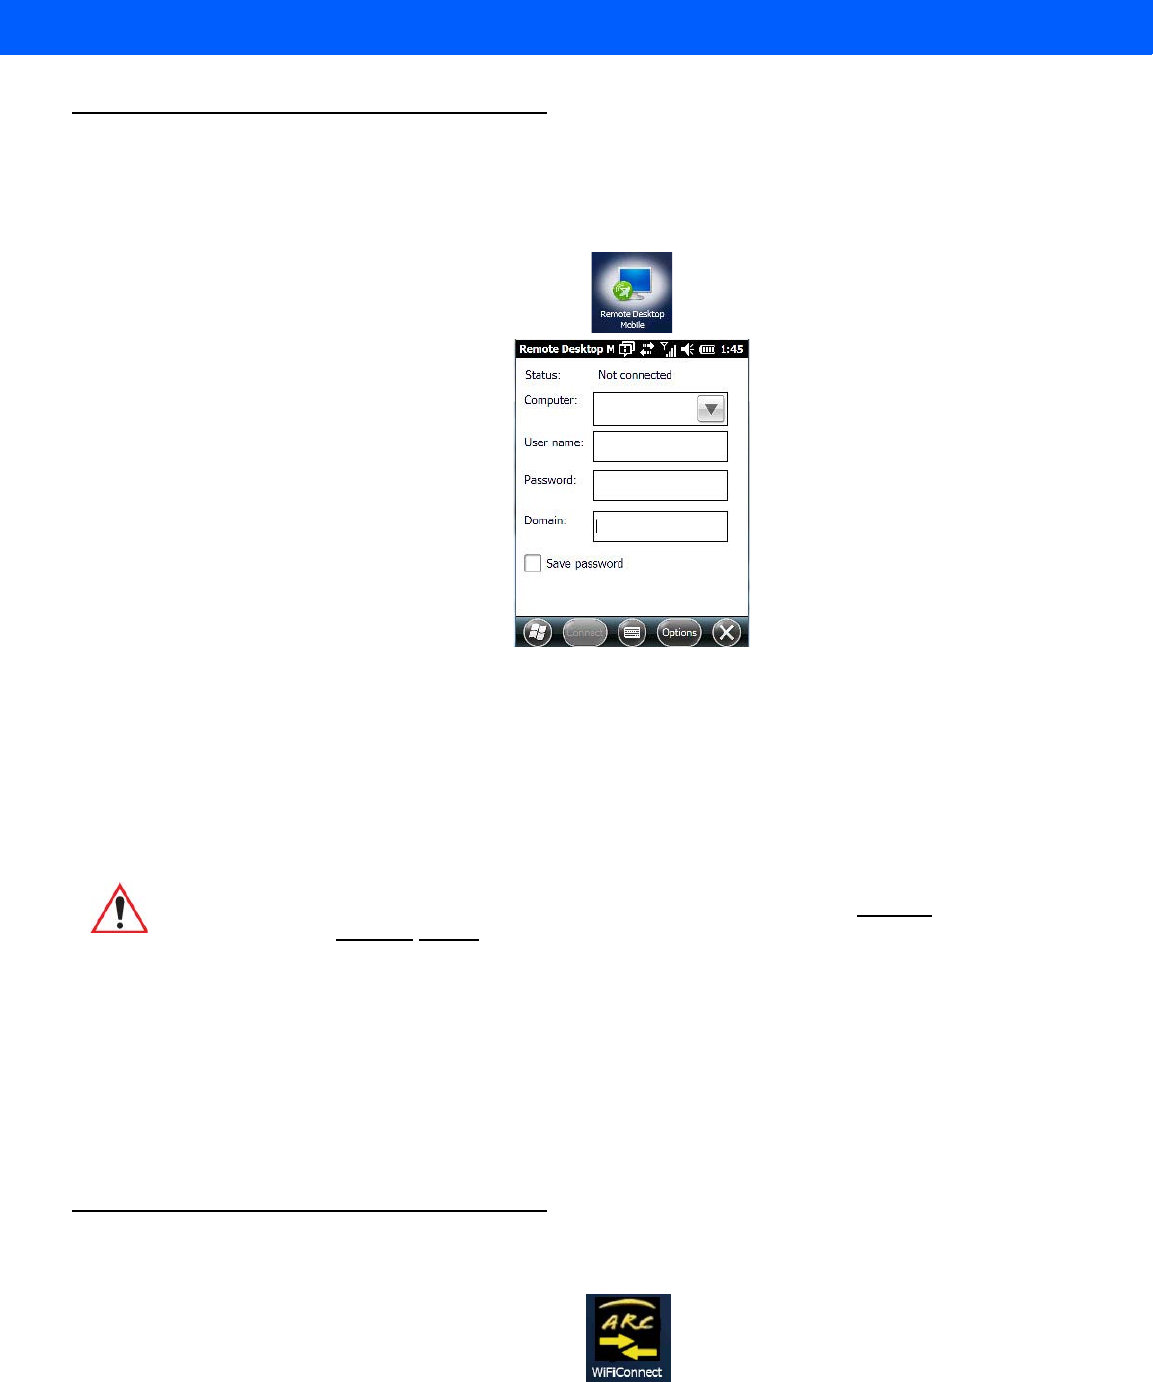
Programs 3 - 37
Remote Desktop Mobile
This program allows you to log onto a Windows Terminal Server and run the desktop programs from the server
on your Workabout Pro4.
Connecting to a Terminal Server
•Tap on Start>Remote Desktop Mobile
• In the Remote Desktop screen, choose a Computer from the drop-down menu.
• Type your User name, Password, and Domain (if required). Tap on Connect.
Disconnecting Without Ending a Session
• In the Remote Desktop Connection window, tap on Start>Shutdown.
•Tap on Disconnect>OK.
Ending a Session
• In the Terminal Services Client screen, tap on Start>Shutdown.
•Tap on Log Off>OK.
WiFiConnect?? A.R.C.
• Tap on the Start button to access the WiFiConnect A.R.C. icon.
IMPORTANT These commands are accessed from the Start menu in the Terminal
Services screen used to access the PC’s commands. Do NOT use
the Start menu on your Workabout Pro4.
Draft #5

3 - 38 Workabout Pro4 (Windows Embedded Hand-Held 6.5) User Manual
The WiFiConnect A.R.C. utility provides a quick method to configure a device for use on a private network,
primarily for use with Active Remote Configuration (A.R.C.).
WiFiConnect A.R.C. configures the default WiFi interface. The WEP key is set to PsionPsion123. The SSID is
set to Psion. The default interface becomes the active interface. Keep in mind that you must configure the
access point and the hand-held(s) to use the same settings.
Refer to the Active Remote Configuration (A.R.C.) Administrators Guide, PN 8000252, for details about
updating devices on your network. This manual is available at:
http://community.psion.com/knowledge/w/knowledgebase/1189.aspx
Draft #5

CHAPTER 4 SETTINGS
SETTINGS 4
Overview of Software...........................................4-5
Motorola Software Advantage .................................4-5
Microsoft Software........................................4-5
Settings ..................................................4-5
Clocks & Alarms..............................................4-6
Lock ....................................................4-6
Home....................................................4-6
Appearance Tab – Changing the Theme (Background). . . . . . . . . . . . . . . . . . . .4-7
Beaming a Theme to Another Device.............................4-7
Items Tab – Customizing the Today Screen..........................4-8
Power ...................................................4-8
Battery Power..........................................4-9
Advanced Tab..........................................4-9
Battery Details Tab........................................4-9
Suspend Threshold and Estimated Battery Backup.....................4-10
Battery Health.........................................4-11
Sound & Notifications..........................................4-12
Sounds Tab...........................................4-12
Notifications Tab........................................4-13
Connections Folder...........................................4-13
Beam..............................................4-13
Bluetooth Setup........................................4-14
The Devices Tab - Scanning for Bluetooth Devices................4-14
Pairing a Device...................................4-16
Servers Tab......................................4-17
Mode Tab.......................................4-18
About Tab.......................................4-18
Paired Tab ......................................4-19
Connecting Using a Bluetooth GPRS Phone........................4-20
Connections – Connecting to the Internet..........................4-21
Draft #5

4 - 2 Workabout Pro4 (Windows Embedded Hand-Held 6.5) User Manual
Modem Connection Setup...................................4-22
Advanced Modem Settings..............................4-24
Domain Enroll..........................................4-25
Network Cards.........................................4-26
Changing Network Card Settings..........................4-27
VPN Connection Setup................................4-27
Managing an Existing Connection..........................4-28
Proxy Server Tab...................................4-29
Selecting a Network......................................4-30
Fusion Wireless Companion - Setting Up the XWing2 802.11a/b/g/n Radio. . . . . . . .4-31
Resetting the Radio to Default Factory Settings..................4-35
Wireless Manager – Turning the Radio On and Off.....................4-35
Personal Folder .............................................4-36
App Launch Keys........................................4-36
Buttons.............................................4-38
Program Buttons Tab.................................4-38
Up/Down Control Tab.................................4-38
OneShots.......................................4-39
Macro Keys......................................4-40
Unicode Mapping...................................4-41
Scancode Remapping................................4-42
Lock Sequence Tab..................................4-44
System Folder..............................................4-44
About ..............................................4-45
Backlight – Screen and Keypad................................4-45
Battery Power Tab ..................................4-45
External Power Tab..................................4-46
Backlight Tab.....................................4-46
Certificates...........................................4-46
Choosing a Certificate................................4-47
Contrast.............................................4-48
Customer Feedback......................................4-48
Dr. Debug............................................4-48
Status.........................................4-49
Utilities . . . . . . . . . . . . . . . . . . . . . . . . . . . . . . . . . . . . . . . . .4-49
Settings........................................4-49
Encryption............................................4-50
Error Reporting.........................................4-50
GPS (Global Positioning System)...............................4-50
Manage Triggers........................................4-51
Trigger Mappings...................................4-52
Managed Programs ......................................4-54
Memory.............................................4-54
Main Tab........................................4-54
Draft #5

Settings 4 - 3
Storage Card.....................................4-55
Microphone...........................................4-55
PartnerUp............................................4-56
HomeVU............................................4-56
HomeVU Menu....................................4-57
Administrator Password...............................4-57
Shell Settings.....................................4-57
Restrictions...........................................4-62
Control Panel Settings................................4-64
Import and Export Settings .............................4-64
Activating a Change – User Mode .........................4-66
Regional Settings.......................................4-66
Remove Programs.......................................4-67
Screen.............................................4-67
System Properties.......................................4-68
Task Manager.........................................4-68
Total Recall...........................................4-69
Creating a Backup..................................4-70
Creating a Clone...................................4-71
Managing Profiles..................................4-72
Deleting a Profile...................................4-74
TweakIT.............................................4-74
Advanced CE Services Settings ..........................4-75
Advanced Interface and Network Settings.....................4-76
Advanced Services Settings.............................4-76
Registry Editor....................................4-76
Draft #5
Draft #5
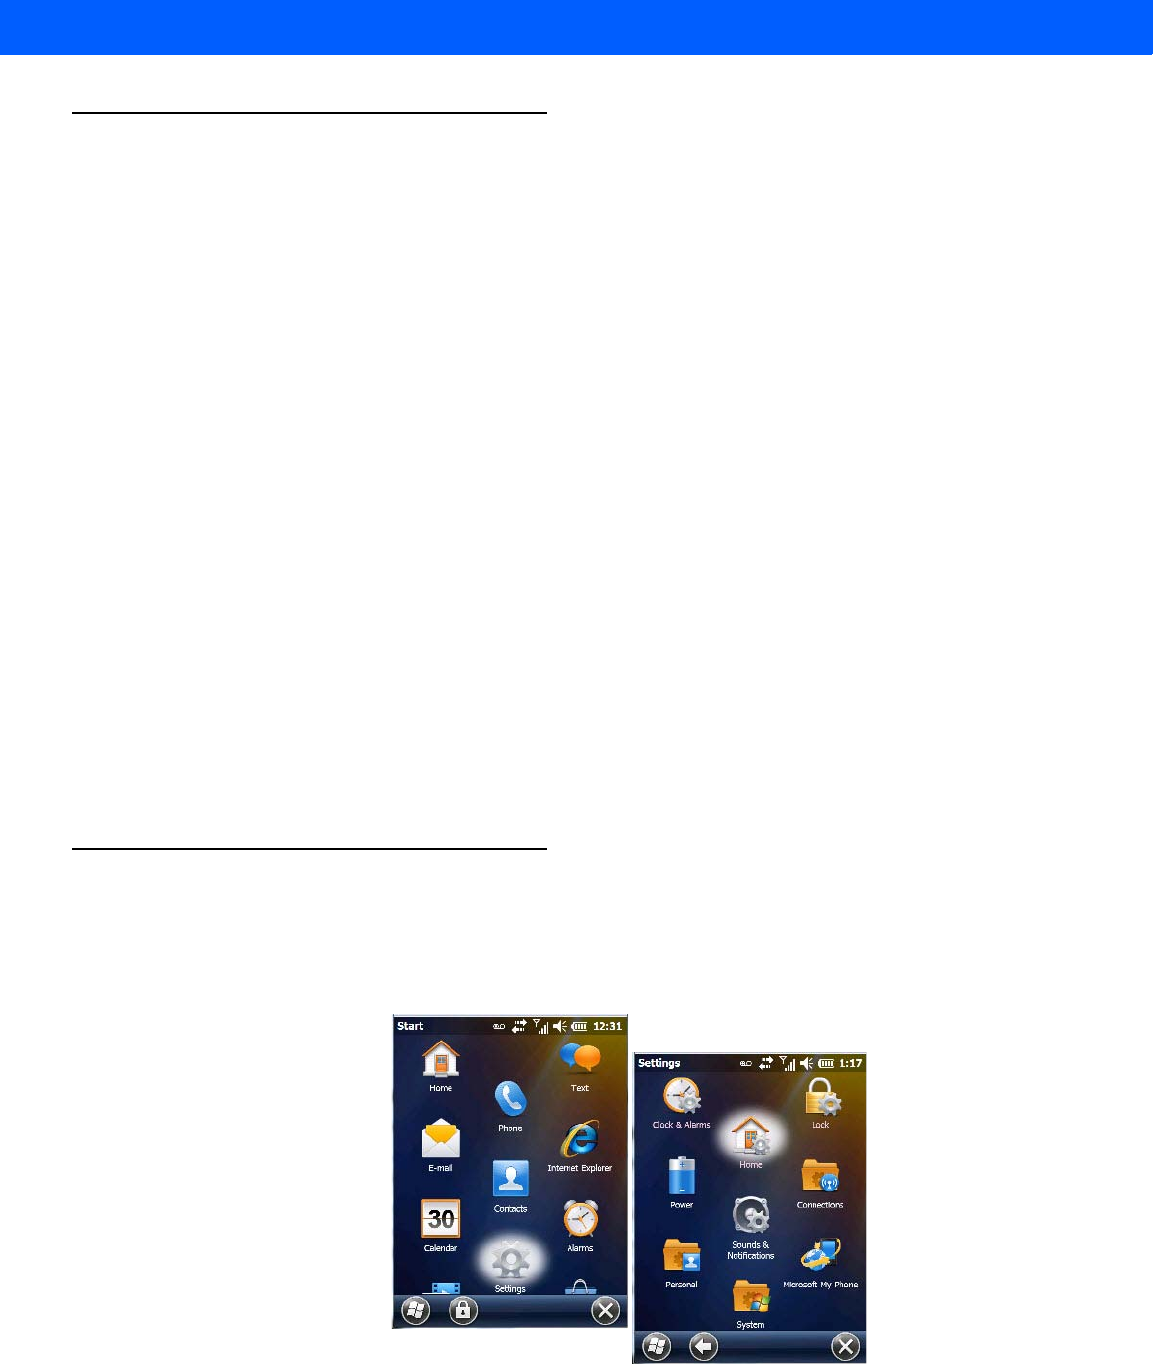
Settings 4 - 5
Overview of Software
Motorola Software Advantage
Motorola Software Advantage is a collection of applications and features designed to support system adminis-
trators and end users. These tools enable enterprises to customize the product to meet their needs and to
maximize productivity.
• App Launch KeysHomeVU
• Battery HealthTweakIt
• Bluetooth Manager
• DataWedgeManage Triggers
• Dr. DebugTotal Recall
• PartnerUpFusion Wireless Companion
Microsoft Software
Windows Embedded Hand-Held (WEH) 6.5 is a 32-bit, real-time Operating System. The OS is compatible with
line of business applications written for Windows Mobile 6.x that protects previous investments in the Windows
Mobile platform.
Some other major components of WEH 6.5 are:
• Office Mobile 2010 (Word, Excel, PowerPoint, OneNote SharePoint)
• Internet Explorer 6
• Remote Desktop protocol
Settings
The applets contained under the Settings icon in the Start screen allow you to tailor how your Workabout Pro4
behaves, the appearance of the Today screen, and so on. The Settings applications are further divided into
Personal, System, and Connection options.
Draft #5
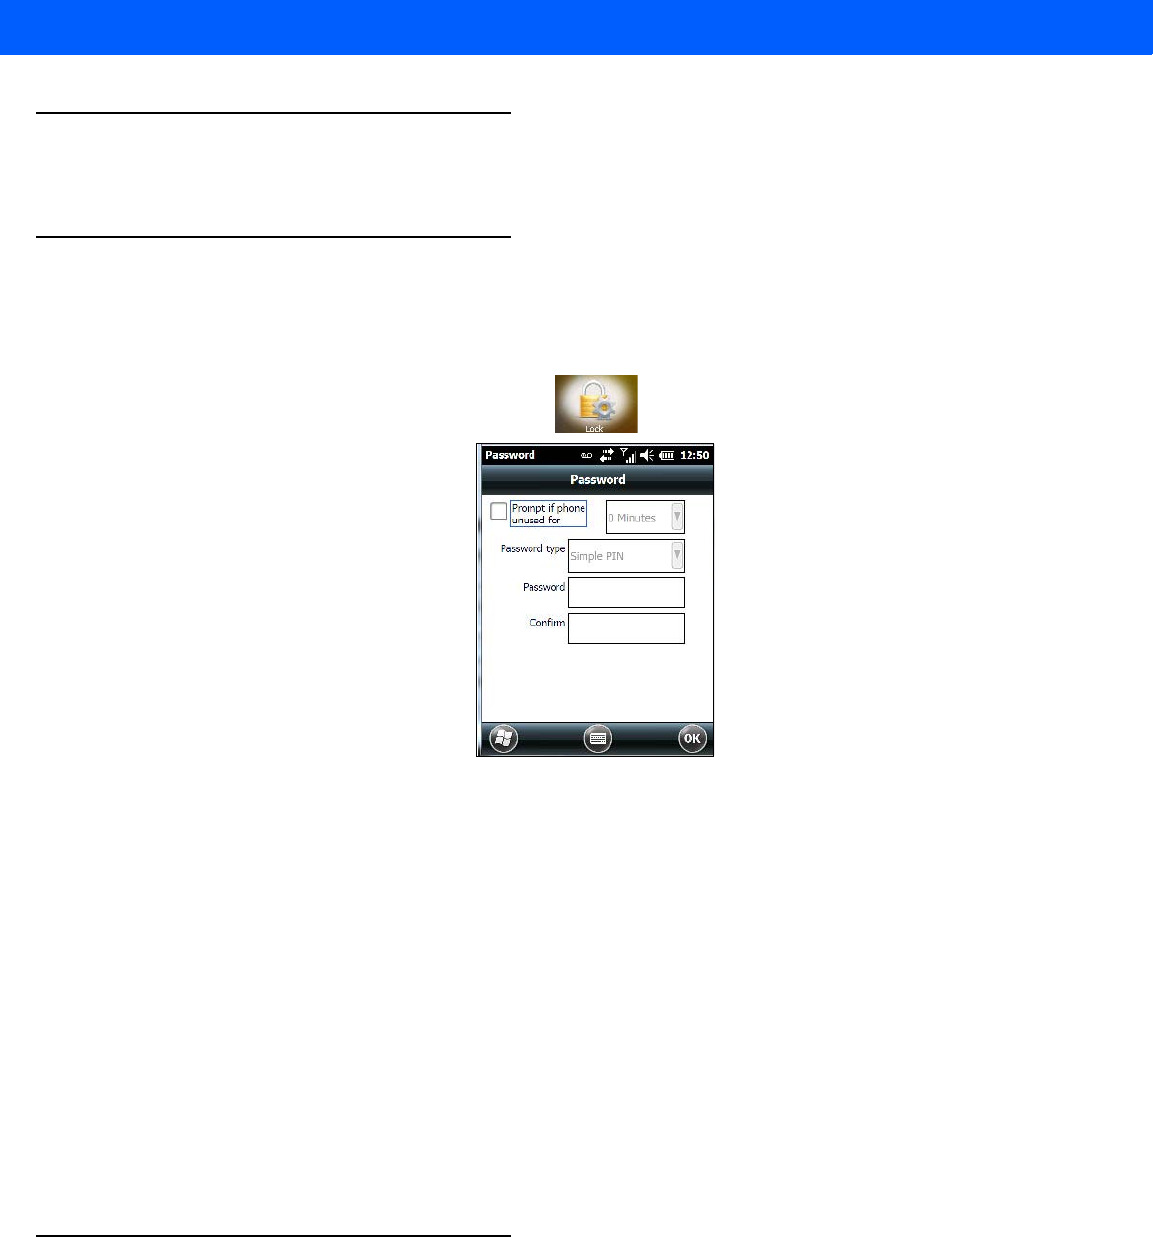
4 - 6 Workabout Pro4 (Windows Embedded Hand-Held 6.5) User Manual
Clocks & Alarms
Refer to “Time, Date and Alarms” on page 2-17 for details about this applet.
Lock
This option allows you to assign a password to protect access to your phone service.
•Tap on Start>Settings, and then tap on the Lock icon.
It is critical that you store your password in a safe place. If you forget it, a ‘clean start’ must be performed by
certified personnel. A clean start returns the Workabout Pro4 to factory settings. Only the data stored in a CF or
SD memory card are preserved.
• Tap in the checkbox next to Prompt if phone unused for to turn on password protection for your
phone service.
• Choose the amount of time that the unit can remain idle before you are prompted to enter your password.
• In the Password type drop-down menu, choose the type of password you prefer to assign. Simple PIN
allows you to enter a minimum of four numeric characters. Strong alphanumeric requires a minimum of 7
characters and must contain at least three of the following: uppercase and lowercase alpha characters,
numbers and punctuation.
• Type your password in the Password field.
• Retype your password in the Confirm field.
•Tap on OK. A dialog box asks whether or not you want to save your password settings. Tap on YES to
save your password assignment.
Home
The Home applet is used to customize your Today screen.
•Tap on Start>Home icon to display this applet.
Draft #5
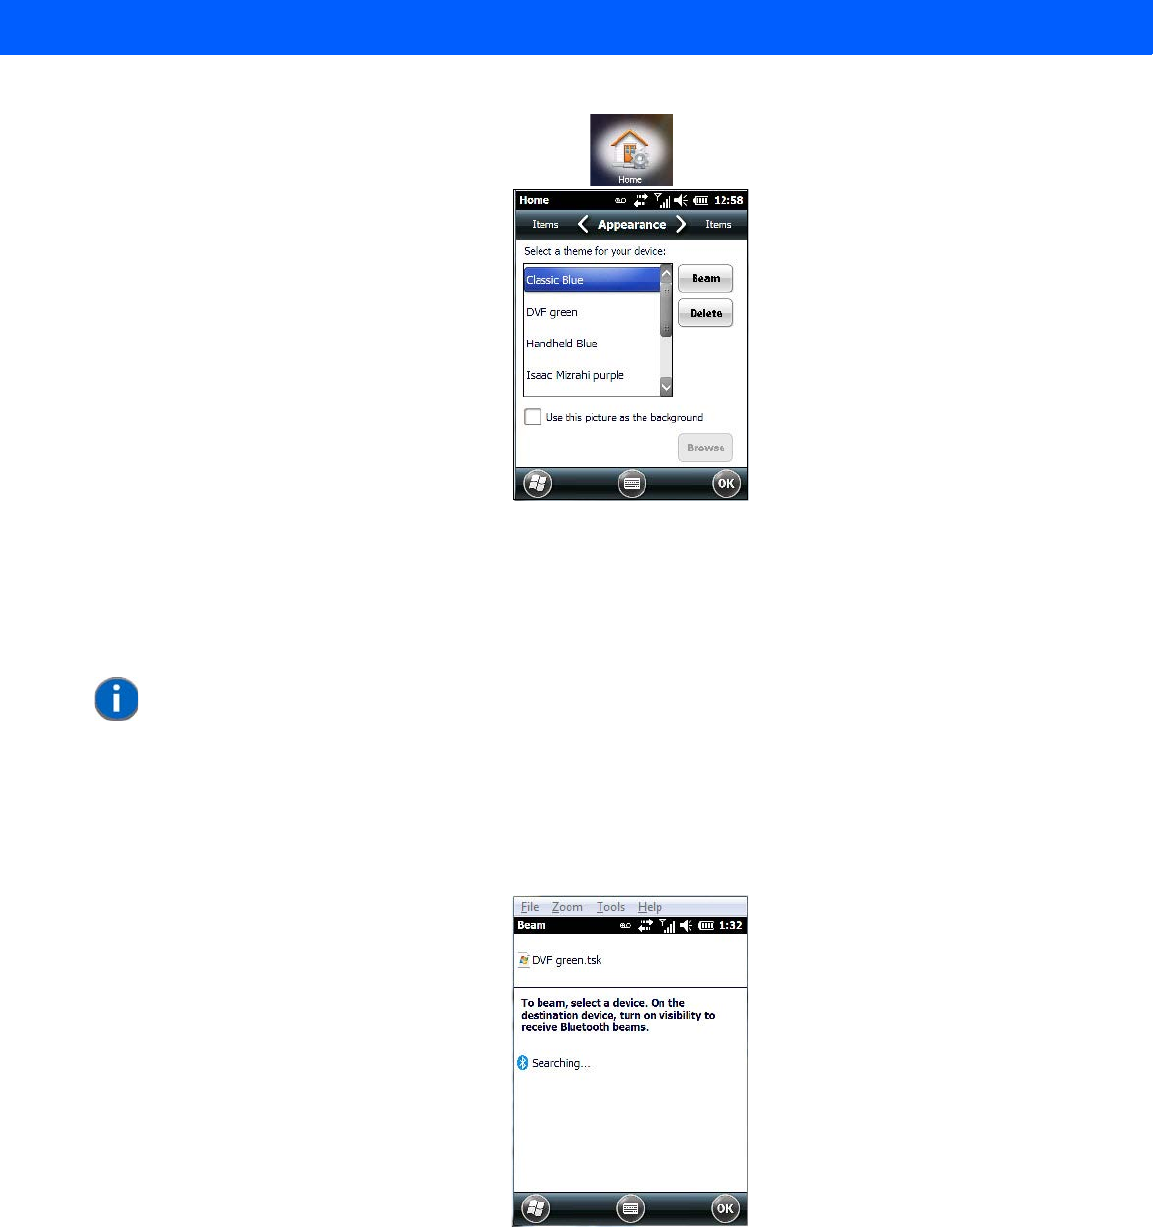
Settings 4 - 7
Appearance Tab – Changing the Theme (Background)
The Appearance tab allows you to change the background appearance of the Today screen.
• Tap on the theme or background you want to use. Tap on OK to assign the background you’ve chosen to
your Workabout Pro4.
Beaming a Theme to Another Device
You can also beam your selection to another device. To scan for visible devices and beam a theme:
• Choose a theme or background, and tap on the Beam button.
The Workabout Pro4 scans for visible devices within range of the hand-held and lists them in the Beam screen.
• Tap on the device to which you want to send the theme.
A File Receive Confirmation dialog box appears on the device to which you are beaming the theme. If the
recipient taps on OK, the file is downloaded onto their device. Note that the recipient can also tap on Browse to
store the theme file in a different location.
NOTE You can also use a personal picture as your background. Tap on the checkbox to the
left of Use this picture as the background, and tap on the Browse button to locate
your picture.
Draft #5
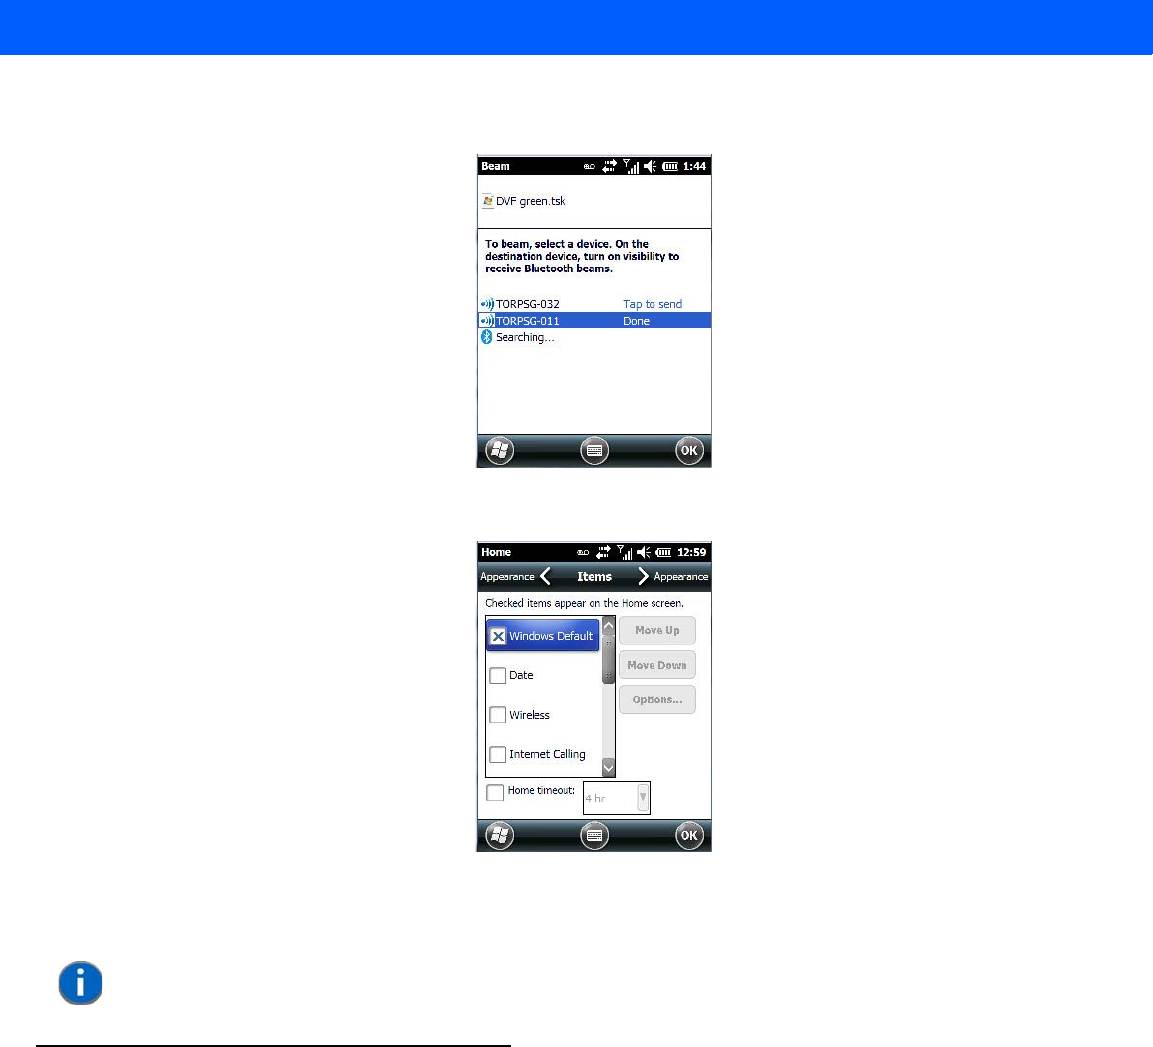
4 - 8 Workabout Pro4 (Windows Embedded Hand-Held 6.5) User Manual
Once the recipient clicks on OK to accept the file, the device you chose is marked as Done.
Items Tab – Customizing the Today Screen
The items you see in the Today screen are Windows Default items. The Items tab allows you to customize the
screen to suit your purposes.
Power
The Power applet provides information about the battery installed in your Workabout Pro4, and it allows you to
define the behaviour of your Workabout Pro4 to minimize power consumption.
•Tap on Start>Settings>Power icon.
NOTE Refer to “Customizing the Today Screen” on page 2-16 for details about this screen.
Draft #5
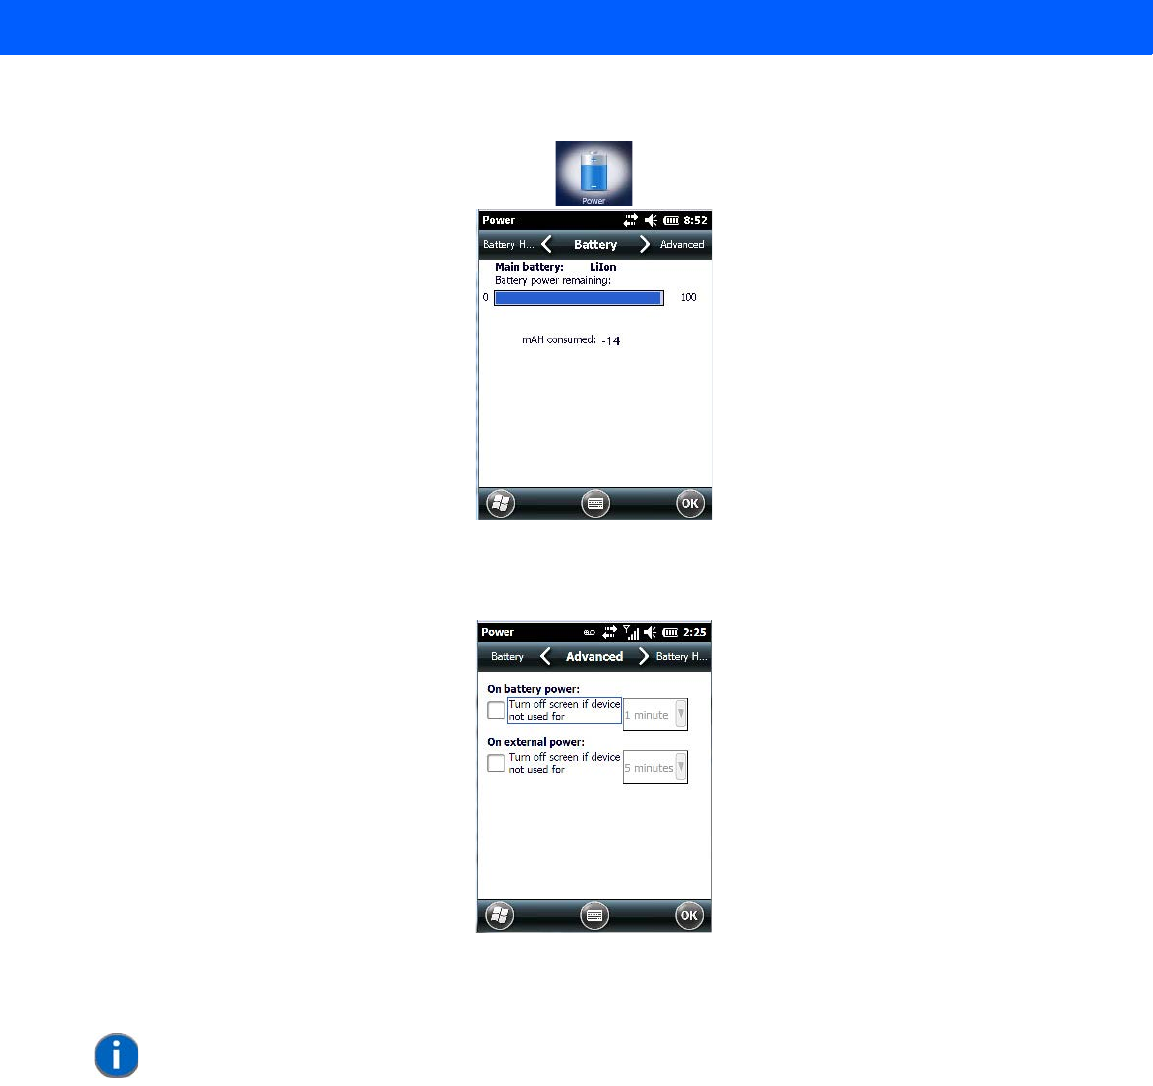
Settings 4 - 9
Battery Power
This tab monitors and displays the current battery capacity of the battery installed in the Workabout Pro4.
Advanced Tab
This tab allows you to tailor how long the Workabout Pro4 can remain idle before the screen is turned off while
running on battery power and also on external power.
• To determine behaviour when the unit is running On battery power, tap in the checkbox to the left of Turn
off screen if device is not used for.
• Tap in the drop-down menu next to this option, and choose the number of minutes the unit can remain idle
before the screen is turned off.
• To determine behaviour when the unit is running On external power, tap in the checkbox to the left of Turn
off screen if device is not used for, and choose a value in the associated drop-down menu.
Battery Details Tab
• In the scrolling tab bar, tap on the Battery Details tab.
NOTE The options in the screen behave like Suspend mode. If the screen turns off, the unit
is in suspend mode – tapping on the touchscreen or pressing a key opens the screen
in which you were working before it was ‘turned off‘.
Draft #5
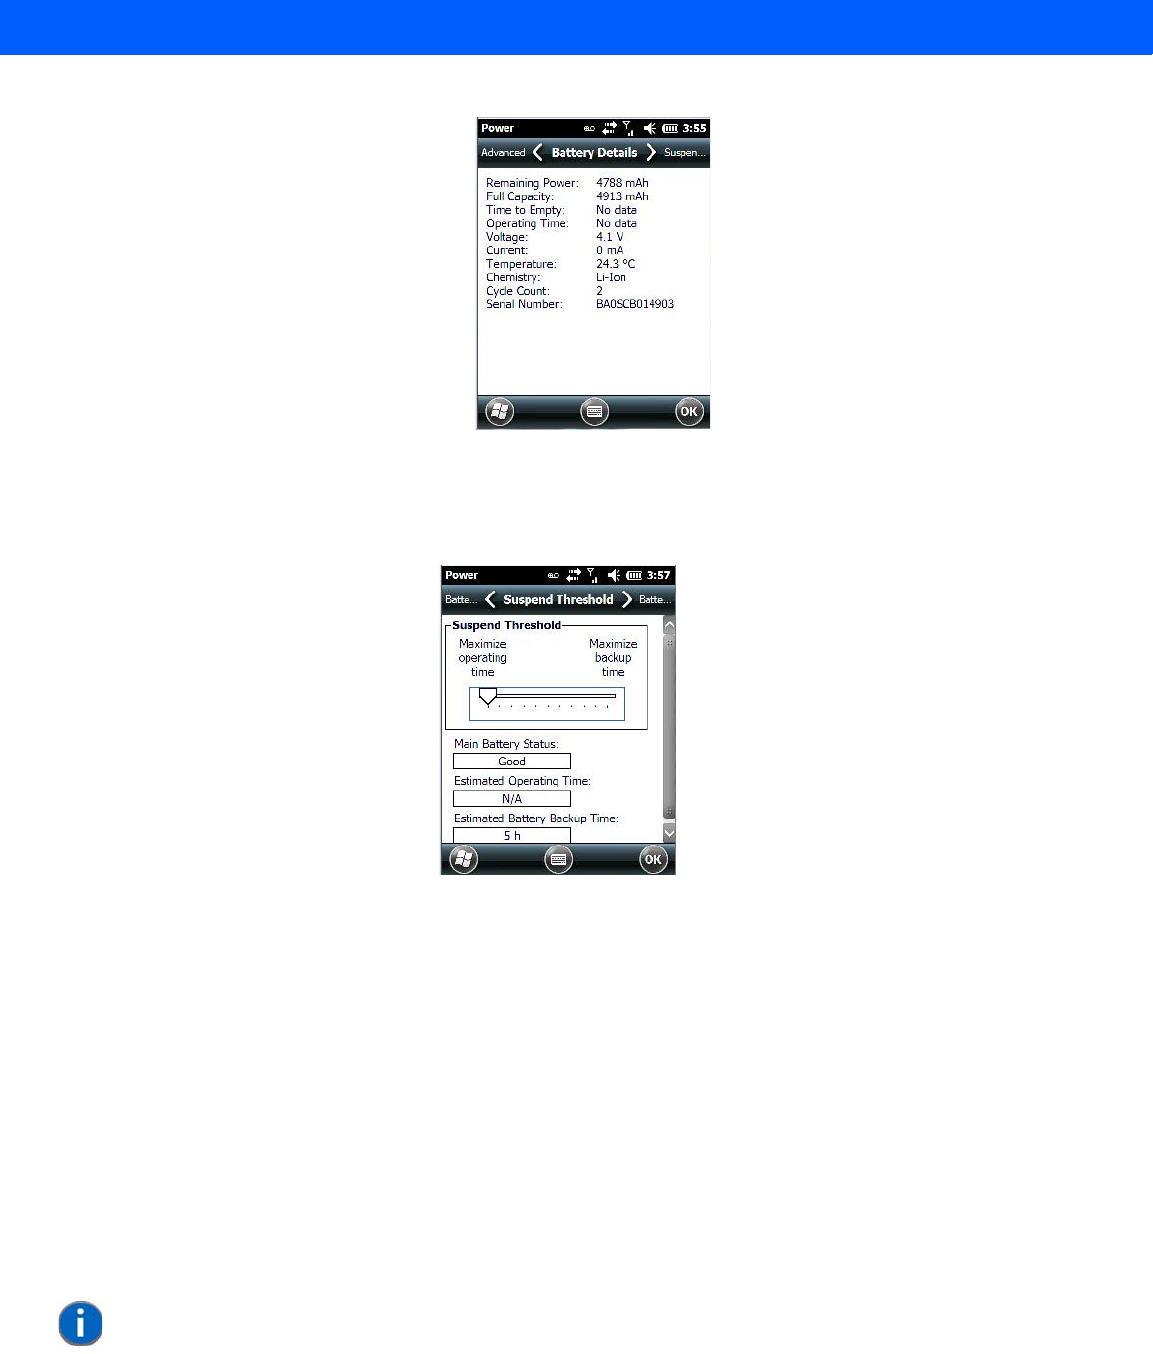
4 - 10 Workabout Pro4 (Windows Embedded Hand-Held 6.5) User Manual
This tab lists the specifications and battery capacity status of the battery installed in the Workabout Pro4. This
is a view-only screen.
Suspend Threshold and Estimated Battery Backup
The Estimated Battery Backup is the amount of battery power that has been reserved or set aside to protect
data until a fully charged battery can be installed in the Workabout Pro4. When the battery capacity is depleted
up to the Estimated Battery Backup Time reserve specified in the Suspend Threshold tab, the Workabout Pro4
shuts off automatically and uses the reserve power to preserve the data stored on the Workabout Pro4. Once
the unit shuts down, it cannot be switched on until a fresh battery is installed, or the unit is inserted in a docking
station or cradle.
• Slide the Suspend Threshold button to the right to increase the battery capacity reserved for backup pur-
poses. Data will be preserved to a maximum of 100 hours.
• Slide the Suspend Threshold button to the left to decrease the power reserved for backup purposes; this
increases the Workabout Pro4 operating time – the amount of time the Workabout Pro4 will operate before
shutting down – but reduces the power reserved for backup purposes to a minimum of 24 hours.
Internal super-capacitors will protect the data stored in the Workabout Pro4 while the depleted battery is
swapped for a fully charged one.
NOTE Once the battery is removed, the super-capacitor will preserve the data stored on the
Workabout Pro4 for approximately 4 minutes. It is critical that you install a charged
battery before this time elapses.
Draft #5
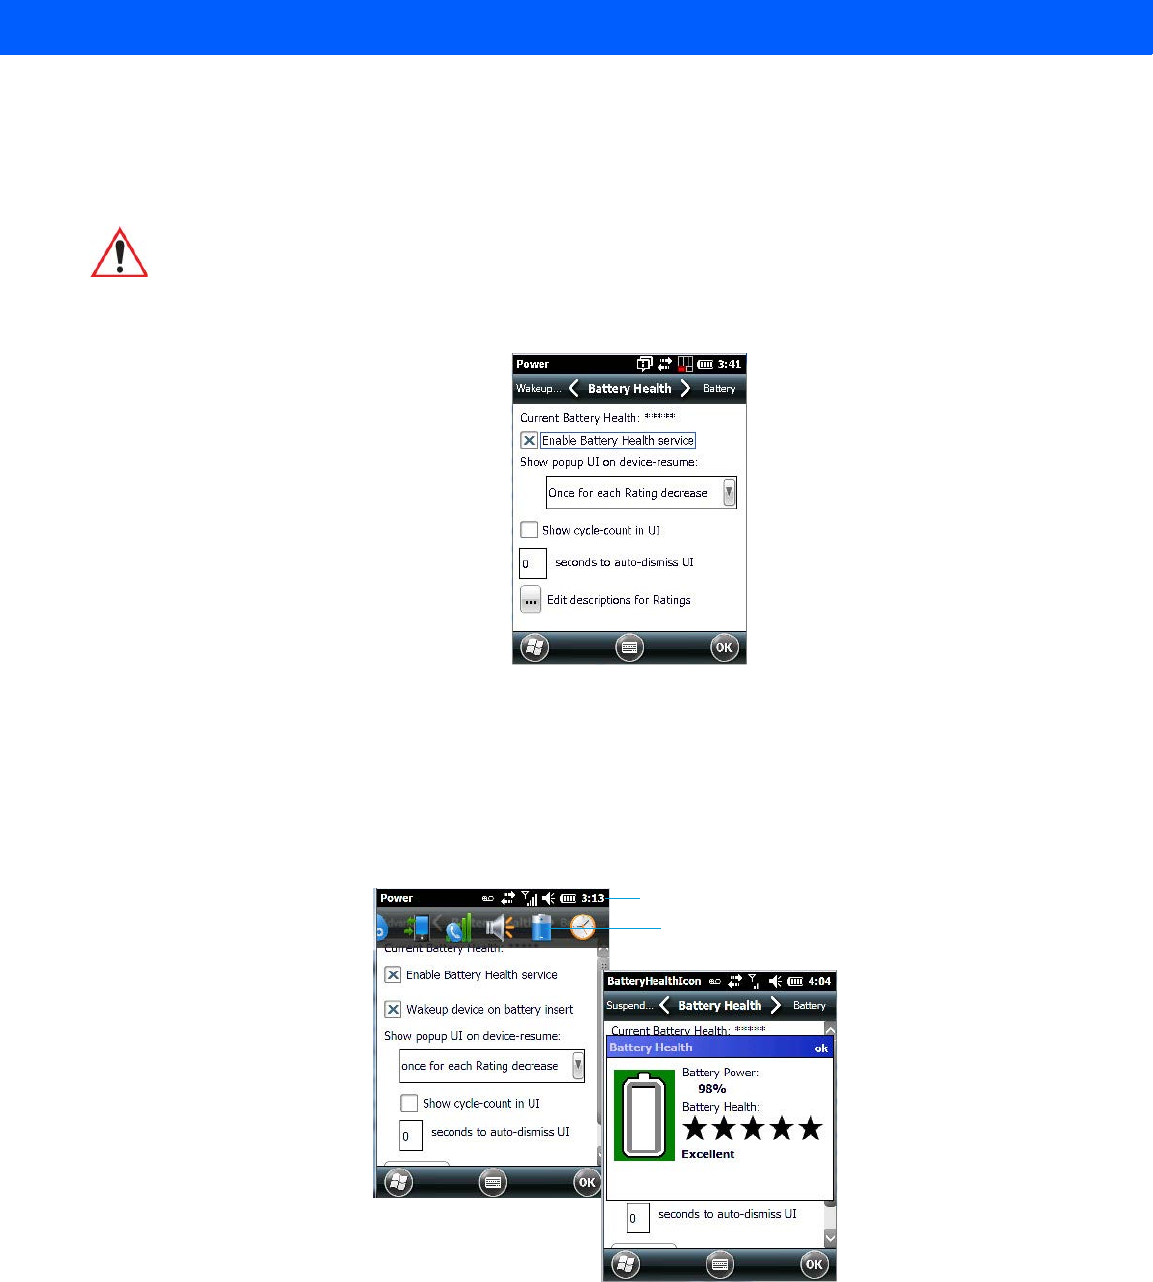
Settings 4 - 11
Battery Health
The Battery Health tab provides an estimate of battery health based on a number of different measurements,
beyond battery capacity.
• In the scrolling tab bar, tap on the Battery Health tab.
Current Battery Health Meter
The Current Battery Health Meter default values are shown here as ***** (Excellent), *** (Used), and * (Battery
should be replaced).
To display the Battery Health Meter:
• Tap on the navigation bar, scroll to and click on the battery hotkey.
The image above shows the default Excellent status screen.
Enable Battery Health Service
This option allows you to enable or disable the battery health service.
IMPORTANT The Battery Health Meter is an estimate and should not be depended on to
provide a 100% account of battery condition.
Navigation bar
Battery hotkey
Draft #5

4 - 12 Workabout Pro4 (Windows Embedded Hand-Held 6.5) User Manual
Show Popup UI on Device-Resume
The drop-down menu attached to Show Popup UI on Device-Resume allows you to determine when the
battery status pop-up user interface (UI) will appear based on the battery health.
Edit – Changing Ratings Text
You can customize the ratings text with the Edit button. By enclosing your text within the html tag used for Bold
<b> (or removing the tag to unbold the text), you can change the text that will appear in the pop-up battery
status screen. For example, the default text Excellent might be changed to: Battery is excellent, and will last
one day shift.
Wakeup Sources
This dialog box allows you to choose the actions that will wake your unit from a suspend state.
Sound & Notifications
The Sounds & Notifications icon allows you to specify when your Workabout Pro4 will emit sounds.
Sounds Tab
•Tap on Start>Settings, and then tap on the Sounds & Notifications icon to display this dialog box.
• Tap on the checkboxes and radio buttons to enable the event(s) that will cause your unit to emit a sound.
Draft #5
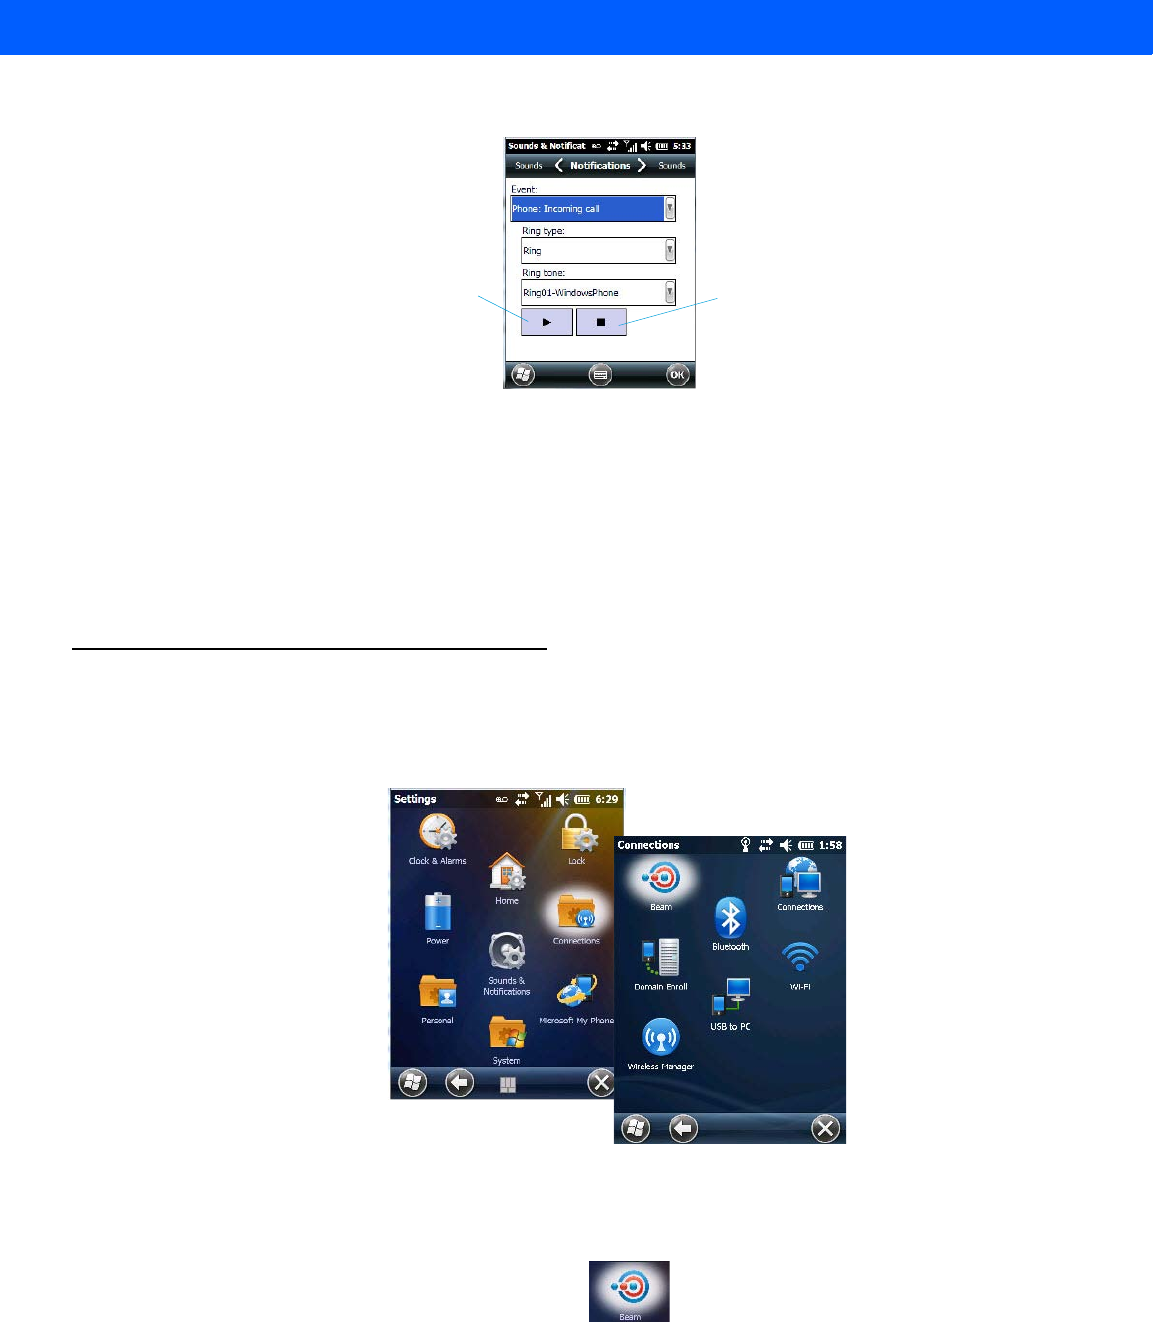
Settings 4 - 13
Notifications Tab
This tab allows you to choose an event, and for each event, choose the audio notification or sound that the
Workabout Pro4 will emit for that event. For example, suppose you choose Wireless network detected from the
Event: drop-down menu. If you check Play sound, the unit will emit an audible sound when a network is
detected. You can also choose a number of associated options to tailor this option to your needs.
• Choose an event from the Events drop-down menu.
• Choose the relevant options for the Event you’ve chosen.
• To test your choice, tap on the arrow in the dialog box.
Connections Folder
This folder icon contains the applets you’ll need to set up connections using Bluetooth and an 802.11 radio.
•Tap on Start>Settings>Connections folder icon.
Beam
Enabling the Beam applet makes your Workabout Pro4 visible and available to others wanting to beam infor-
mation to your unit.
Tap here to play
your ring choices Tap here to end
the ring test
Draft #5
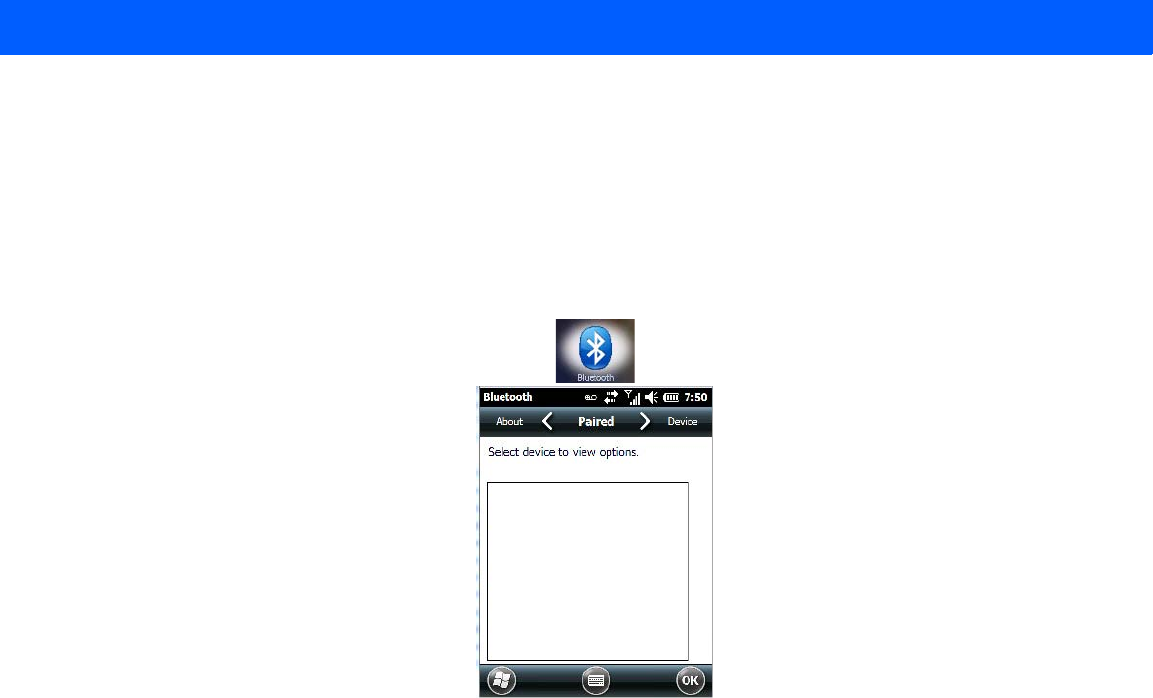
4 - 14 Workabout Pro4 (Windows Embedded Hand-Held 6.5) User Manual
Bluetooth
Setup
Bluetooth is a global standard for wireless connectivity for digital devices and is intended for Personal Area
Networks. The technology is based on a short-range radio link that operates in the ISM band at 2.4 GHz. When
two Bluetooth-equipped devices come within a 10 meter range of each other, they can establish a connection.
Because Bluetooth utilizes a radio-based link, it does not require a line-of-sight connection in order to commu-
nicate.
•Tap on Start>Settings. Tap on the Connections Folder icon followed by the Bluetooth icon.
Turning the Bluetooth Radio On
Before pairing a headset or any other Bluetooth device with your Workabout Pro4, make certain that the Blue-
tooth device power is enabled and that the radio is switched on; it is enabled by default. If, for some reason, it
has been disabled:
• Scroll to the Mode tab.
• Tap in the checkbox next to Turn on Bluetooth.
• Turn your Bluetooth device on and place it within a few feet of your Workabout Pro4.
• If needed, set your Bluetooth device to visible (discoverable) so that the hand-held can detect it and estab-
lish a connection.
The Devices Tab - Scanning for Bluetooth Devices
• Scroll to the Device tab.
Draft #5
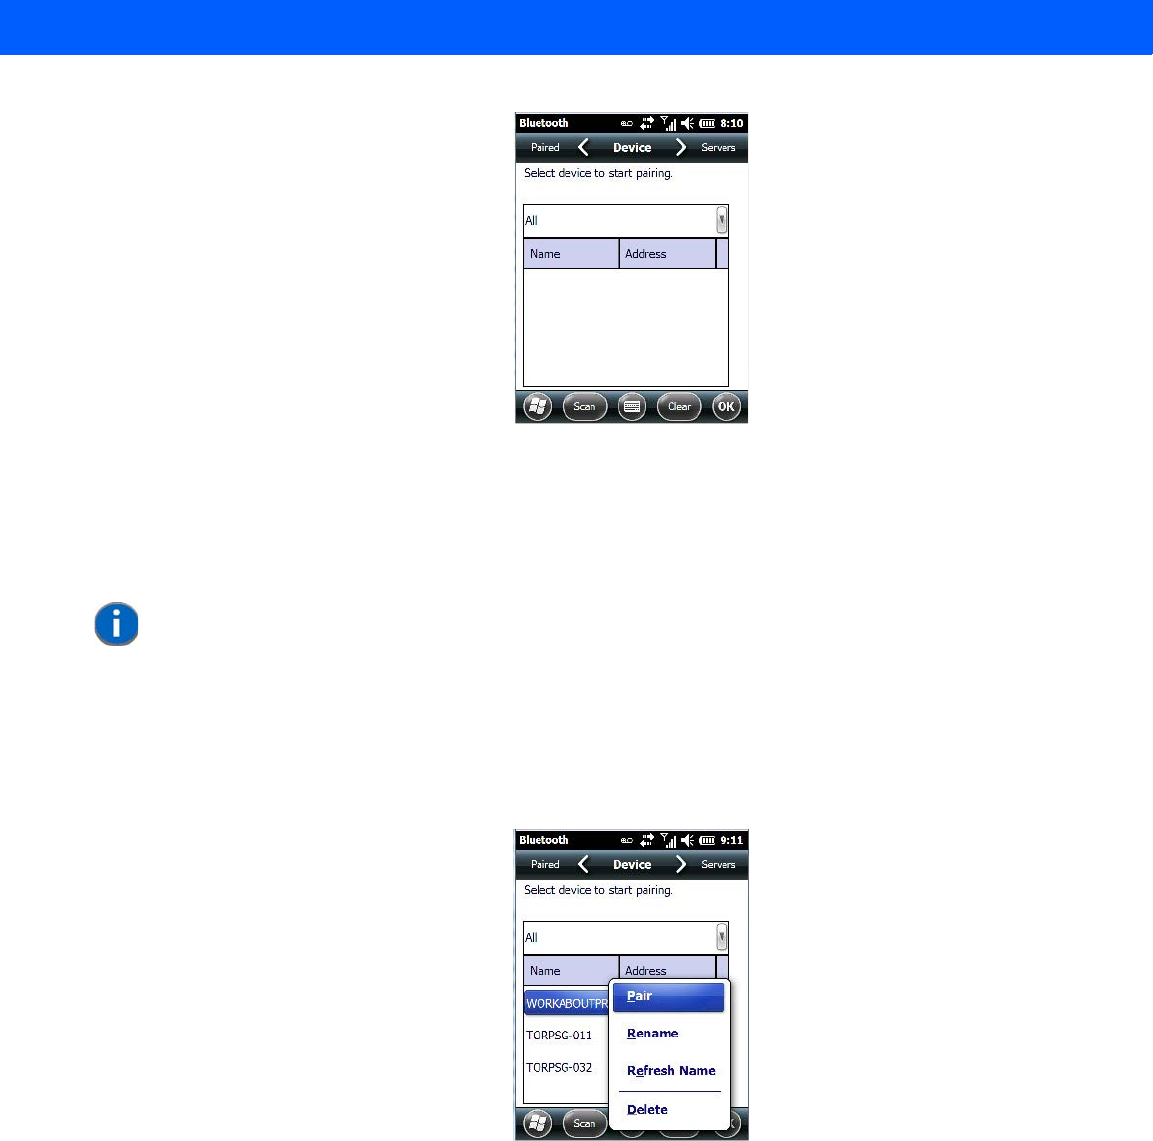
Settings 4 - 15
• To discover and list all Bluetooth devices in range of the Workabout Pro4, tap on the Scan button in the
softkey bar at the bottom of the screen.
The Workabout Pro4 scans for Bluetooth devices within a 10 meter range. Any Bluetooth devices within range
appear in the Bluetooth list box. Any existing devices previously discovered and listed will also be displayed.
The Clear button removes all Bluetooth devices listed except those with currently paired and
connected services.
Device Pop-up Menu
The Device pop-up menu allows you to pair a device, update a device name or delete a device from the list.
Pair begins the pairing process by querying the services and profiles of the discovered device. An authentica-
tion dialog box is displayed the first time a Bluetooth device is paired.
Rename allows a new name to be assigned to a highlighted device.
Refresh Name repeats the device name query, updating the name. This command is useful if a device is listed
without a name (unknown), or if a device name has been changed remotely.
Delete removes this device from the list.
Filtering by Class of Device (COD)
NOTE To limit the scope of the scan to a particular type of device, refer to ‘Filtering by Class
of Device (COD)” in the next section.
Draft #5
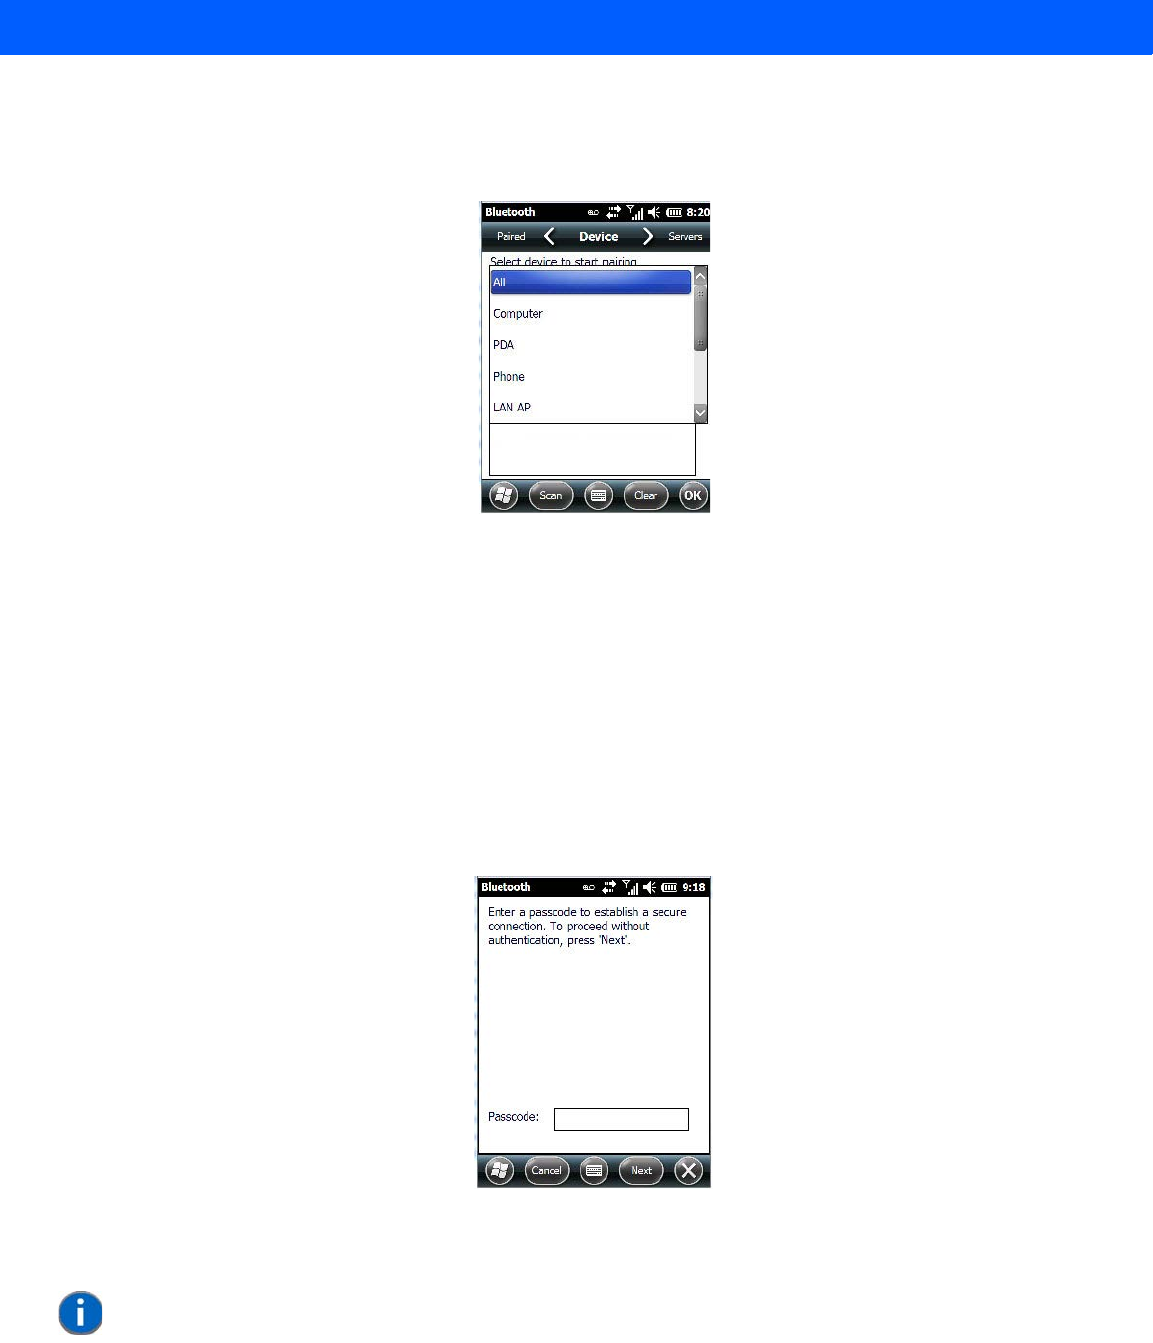
4 - 16 Workabout Pro4 (Windows Embedded Hand-Held 6.5) User Manual
The drop-down menu at the top of the Device tab allows you to limit the scope of the scan to a particular type
of device. If, for example, you choose Computer from this menu, only computers within range of the Workabout
Pro4 are listed in the Device tab. Choosing All lists all detected devices.
Pairing a Device
If you intend to pair a device (a headset, for example), power the device on and bring it within 10 meters of the
Workabout Pro4 before proceeding with the discovery process described below.
To pair devices:
• Follow the manufacturer’s instructions to place the remote device in pairing mode.
• Choose the Devices tab and Scan for devices in your area.
• When the scan is complete, tap on the device to which you want to pair.
• In the pop-up menu, choose Pair.
An authentication dialog box is displayed.
• If the remote device has authentication enabled, type the PIN in this dialog box.
• To proceed without authentication, tap on Next.
After entering the device PIN, the Services dialog appears with a list of services available for that device.
NOTE If a remote device has authentication enabled and you’ve skipped the authentication
process, a pop-up screen will ask if you want to allow the remote device to connect to
the Workabout Pro4. Tap on Yes and type the PIN. When authentication is complete,
tap on Done.
Draft #5
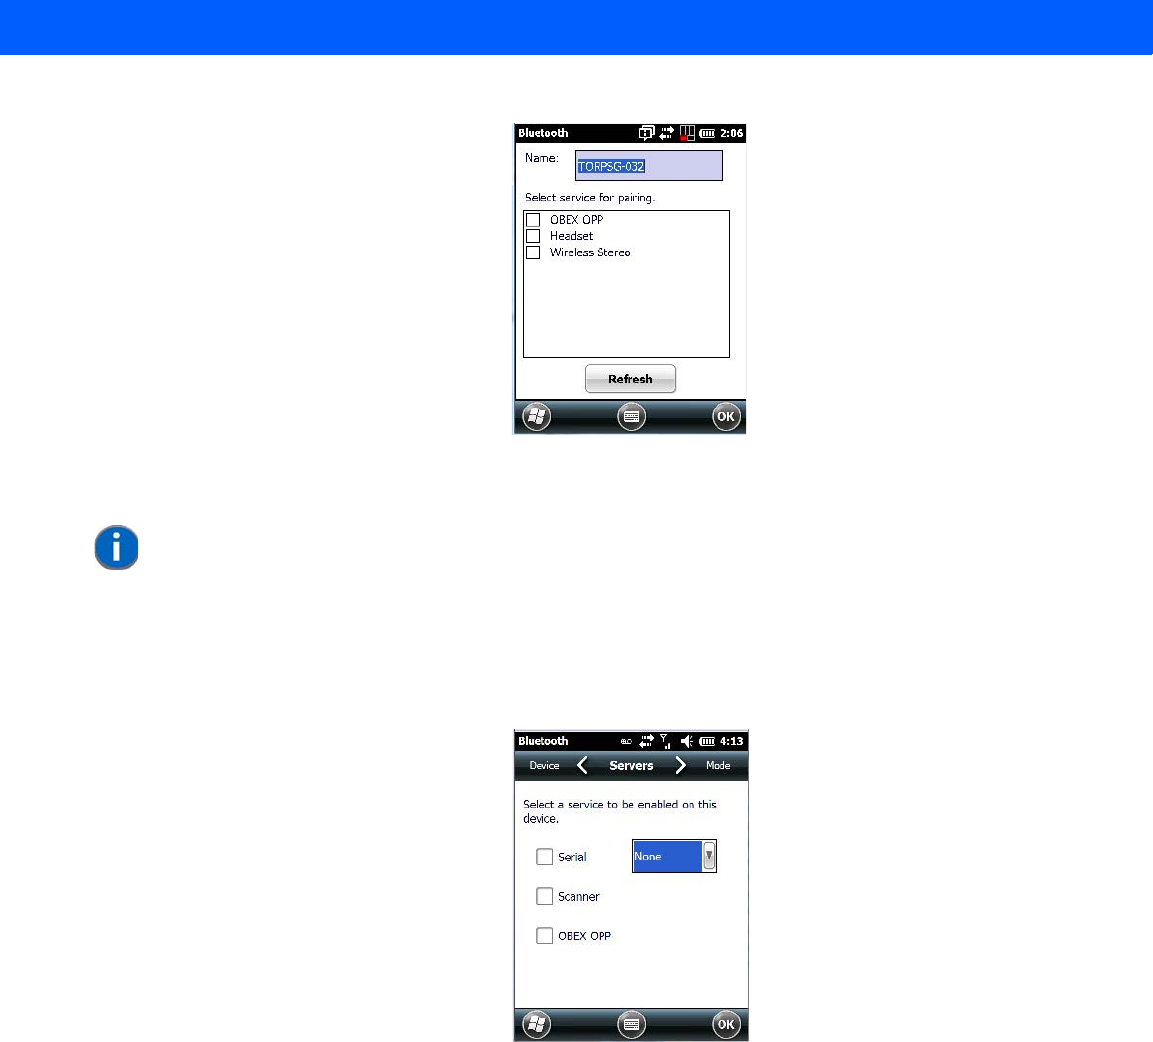
Settings 4 - 17
• Click in the checkbox to the left of the service to activate it.
• Click on Done.
Once you’ve completed the information:
•Tap on Next and then in the Services screen, tap on OK.
Servers Tab
When a remote Bluetooth device initiates a Bluetooth connection to the Workabout Pro4, the remote device is
considered the ‘Bluetooth master’ and the hand-held, the ‘Bluetooth slave’. In order for the remote device to
connect to the Workabout Pro4, the Workabout Pro4 must offer a service in the form of a server. The Servers
tab allows these services to be enabled and configured. There are three server services available: Serial,
Scanner and OBEX OPP (Object Exchange-Object Push Profile).
Serial server enables the Serial Port Profile server; a Serial Port can be selected from the drop-down menu.
Keep in mind that when a port is chosen, an application must be open (connected) to the chosen port for a
remote device to be able to connect.
Scanner server enables a Serial Port Profile server and then relays it to the Scanner Service (SCS). This is
used for Bluetooth barcode scanners that operate in client mode. SCS opens the server port and handles the
scanner input.
NOTE If you choose a service requiring additional information, associated dialog box is auto-
matically displayed where further details can be completed.
Draft #5
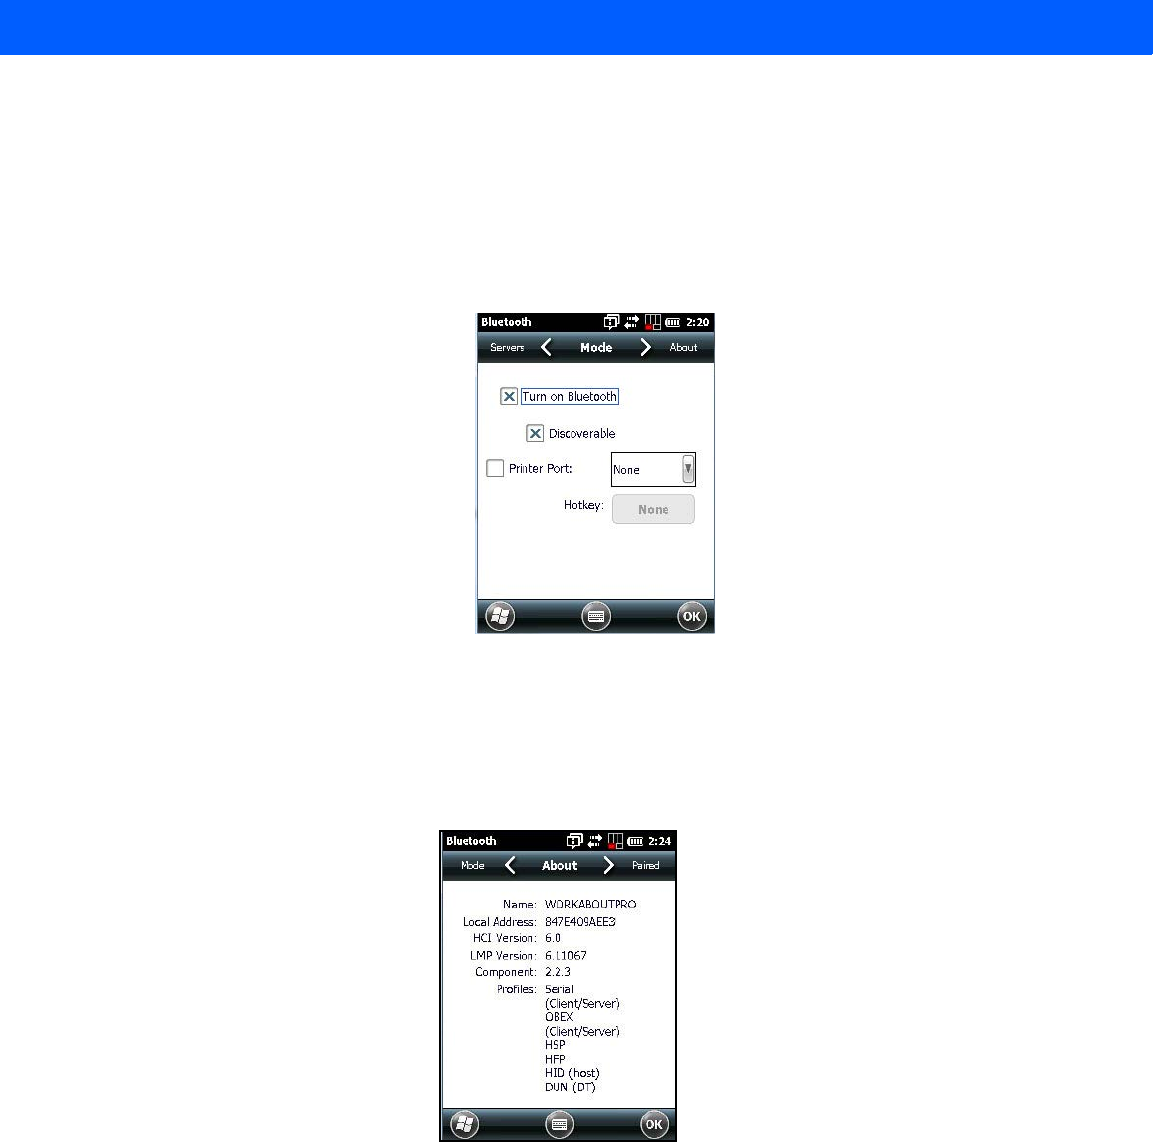
4 - 18 Workabout Pro4 (Windows Embedded Hand-Held 6.5) User Manual
OBEX OPP server enables the Object Push Profile server. A warm reset must be performed on the Workabout
Pro4 after a change is made to this option. The OPP Server allows other Bluetooth devices to send files to
this device.
• Tap on the checkbox to activate the server – the associated port name is displayed beside the
server name.
Mode Tab
When Turn on Bluetooth is checked, Bluetooth features are available. If this option is disabled, you cannot
send or receive information using Bluetooth.
When Discoverable is enabled, other Bluetooth devices within range (approximately 10 meters) can detect
your Workabout Pro4 and can establish a bond or use a Bluetooth service. Note that other devices can detect
your unit whether or not a bond has been created.
About Tab
Name displays the broadcasted name of the Workabout Pro4. The name can be changed in the About applet –
tap on Start>Settings>System>About icon. Tap on the Device ID tab, and change the name.
Local Address displays the MAC address (BD_Addr) of the Bluetooth chip.
HCI Version & LMP Version display the version of the chip firmware.
Component indicates the version of the Bluetooth Subsystem (the manager, drivers, etc).
Profiles lists the supported profiles on this specific Workabout Pro4.
Draft #5
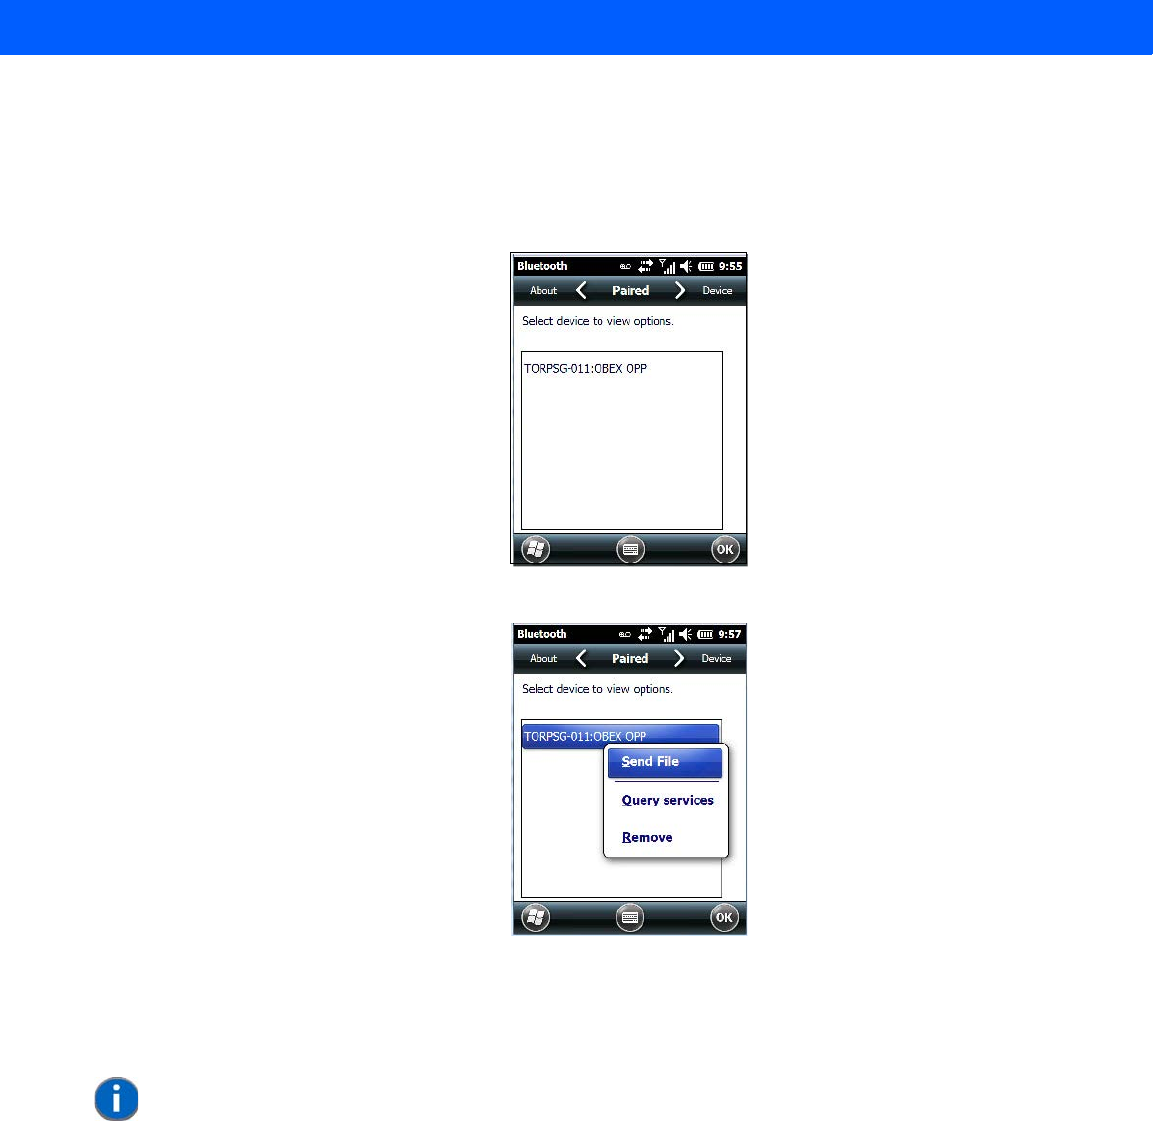
Settings 4 - 19
Paired Tab
This tab lists all paired devices and their corresponding services. The format of the name is <Device
Name>:<Service Name>. Additional information may appear in this screen such as the Port Numbers for Serial
Profiles service.
• Tap and hold down the stylus on an item in the Paired tab to display an associated pop-up menu.
This is a service-dependent menu – that is, it varies slightly depending on the service chosen in the
Servers tab.
Query Services and Remove Commands
•Query Services displays a Services dialog box where a pairing service is chosen.
•Remove unpairs the highlighted service and deletes the entry from the tab.
OBEX OPP (Object Exchange-Object Push Profile) Commands
The OPP defines two roles – a Push Server and a Push Client. Push Server is the device that provides an
object exchange server. Push Client is the device that pushes and pulls objects to and from the Push Server.
OBEX OPP contains the following unique menu option:
•Send File displays an Open File dialog box where the file to be sent can be selected. When the transmis-
sion begins, another dialog box tracks the progress of the file transmission.
NOTE The Query Services and Remove commands are available in all service-dependent
menus, regardless of the type of service chosen.
Draft #5
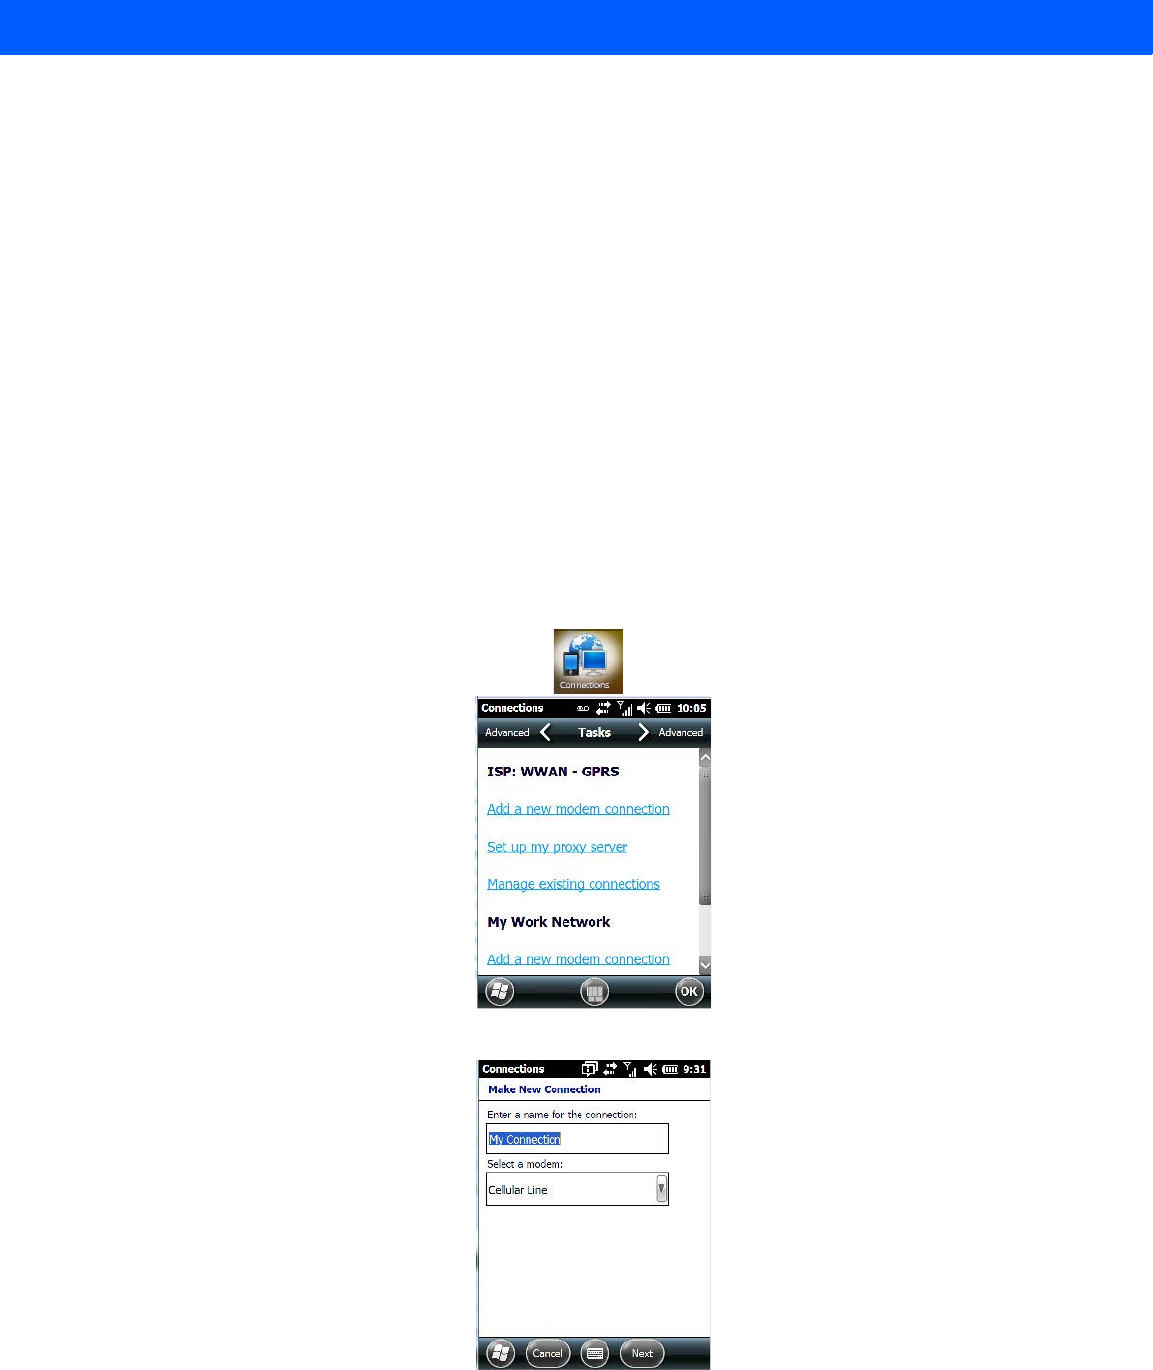
4 - 20 Workabout Pro4 (Windows Embedded Hand-Held 6.5) User Manual
HSP/HFP (Headset Profile/Hands-Free Profile) Service Commands
The HSP (Headset Profile) allows users to connect their device to Bluetooth enabled headsets and other
audio devices.
HSP/HFP services provide the following unique menu options:
•Connect Audio establishes an audio connection to the Bluetooth headset.
•Disconnect Audio disconnects the audio connection from the Bluetooth headset.
•Volume Control displays a dialog box where the headset and microphone volume can be adjusted.
Connecting Using a Bluetooth GPRS Phone
Once you’ve completed the Bluetooth settings, you can go ahead and set up communication through your
Bluetooth-equipped phone.
Before you begin, make certain that the Bluetooth phone is turned on, that the Bluetooth radios in your Worka-
bout Pro4 and phone are enabled (turned on), and that the hand-held and phone are within 10 metres of each
other. Both should be discoverable.
1. Tap on Start>Settings, and then tap on the Connections folder icon.
2. Tap on the Connections icon. Tap on Add a new modem connection.
3. Type a name for the connection.
4. Tap on the Select a modem drop-down menu, and choose Bluetooth. Tap on Next.
Draft #5
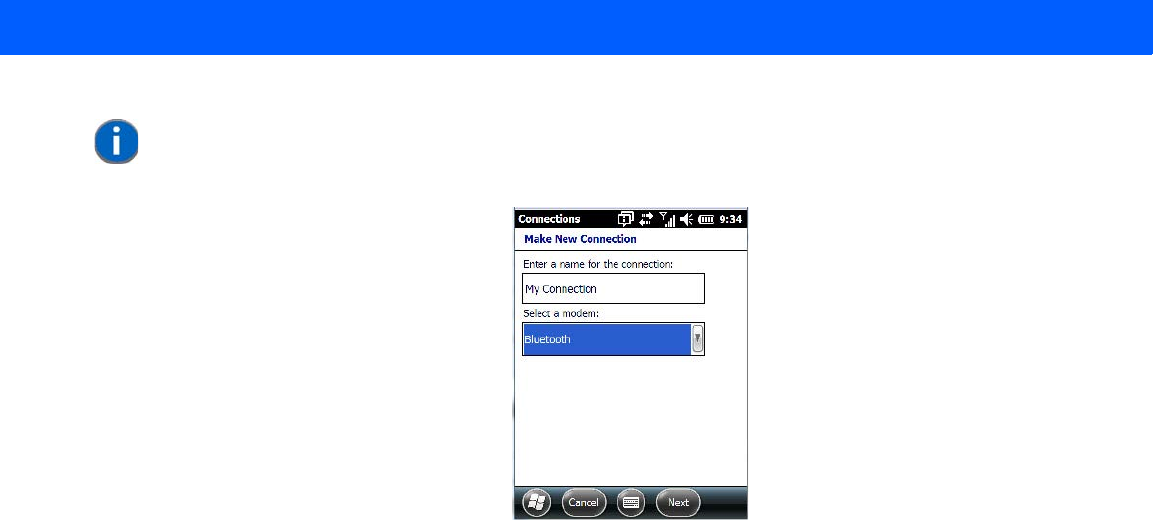
Settings 4 - 21
5. Make certain that the phone is discoverable. Some phones also need to be pairable in order to accept
a bonding request. Refer to your phone documentation for additional information.
6. If the phone appears in the My Connections list, skip to step 13. If not, go to step 7.
7. In the list, tap the phone you want to connect to, and then tap on the Next button. (Note that if your
phone is not listed, tap on Add new device, and choose the phone from the list.)
8. In the PIN screen, type a personal identification number (PIN) – you can enter up to 16 characters.
9. Enter the same PIN on the phone.
10. If you wish, you can edit the name of the phone in the Name field.
11. Tap on the Finish button.
12. In the My Connections list, tap on the phone, and then on Next.
13. Enter the dial-up phone number for this connection, and tap on Next.
14. In the User name, Password and Domain fields, enter the logon information for this connection, and
tap on Finish.
You can begin using the Bluetooth phone connection, for example, to send and receive e-mail, browse the
Internet with Internet Explorer, and so on.
Connections – Connecting to the Internet
To activate a connection, make certain that any necessary equipment (such as a radio) is installed in
your Workabout Pro4.
You’ll need the following information from your ISP to make an Internet connection:
• ISP server phone number,
• user name, and
• password.
NOTE If you are using another device to connect to the Internet, you can choose a different
modem from the drop-down menu.
Draft #5

4 - 22 Workabout Pro4 (Windows Embedded Hand-Held 6.5) User Manual
You’ll need to tap on Start>Settings, and then tap on the Connections folder icon to display the
connections applets.
1. In the Connections screen, tap on the Connections icon.
2. Tap on Add a new modem connection.
3. In the Select a modem drop-down menu, choose a modem connection. If you haven’t already created
a modem connection, refer to “Modem Connection Setup” on page 4-22.
4. To connect to the Internet, launch the program you want to use. For example, launch Internet Explorer
on your Workabout Pro4 to browse the Internet. Your Workabout Pro4 automatically connects.
Modem Connection Setup
Before you begin, you’ll need the following information from your ISP or network administrator: telephone
number, password, domain name, and TCP/IP settings.
If your Workabout Pro4 does not have access to a mobile phone network, insert a modem card in the unit.
1. Tap Start>Settings. Tap on the Connections folder icon followed by the Connections icon.
2. To create a new connection in My Work Network, tap on Add a new modem connection.
NOTE In the Connections window, the Tasks tab is used to create new connections and man-
age existing ones. The Advanced tab allows you to choose a network. If you need to
change these settings, contact your ISP or network administrator before making
changes.
NOTE To set up a network card or wireless network connection to your ISP, add a new con-
nection under My Work Network.
Draft #5
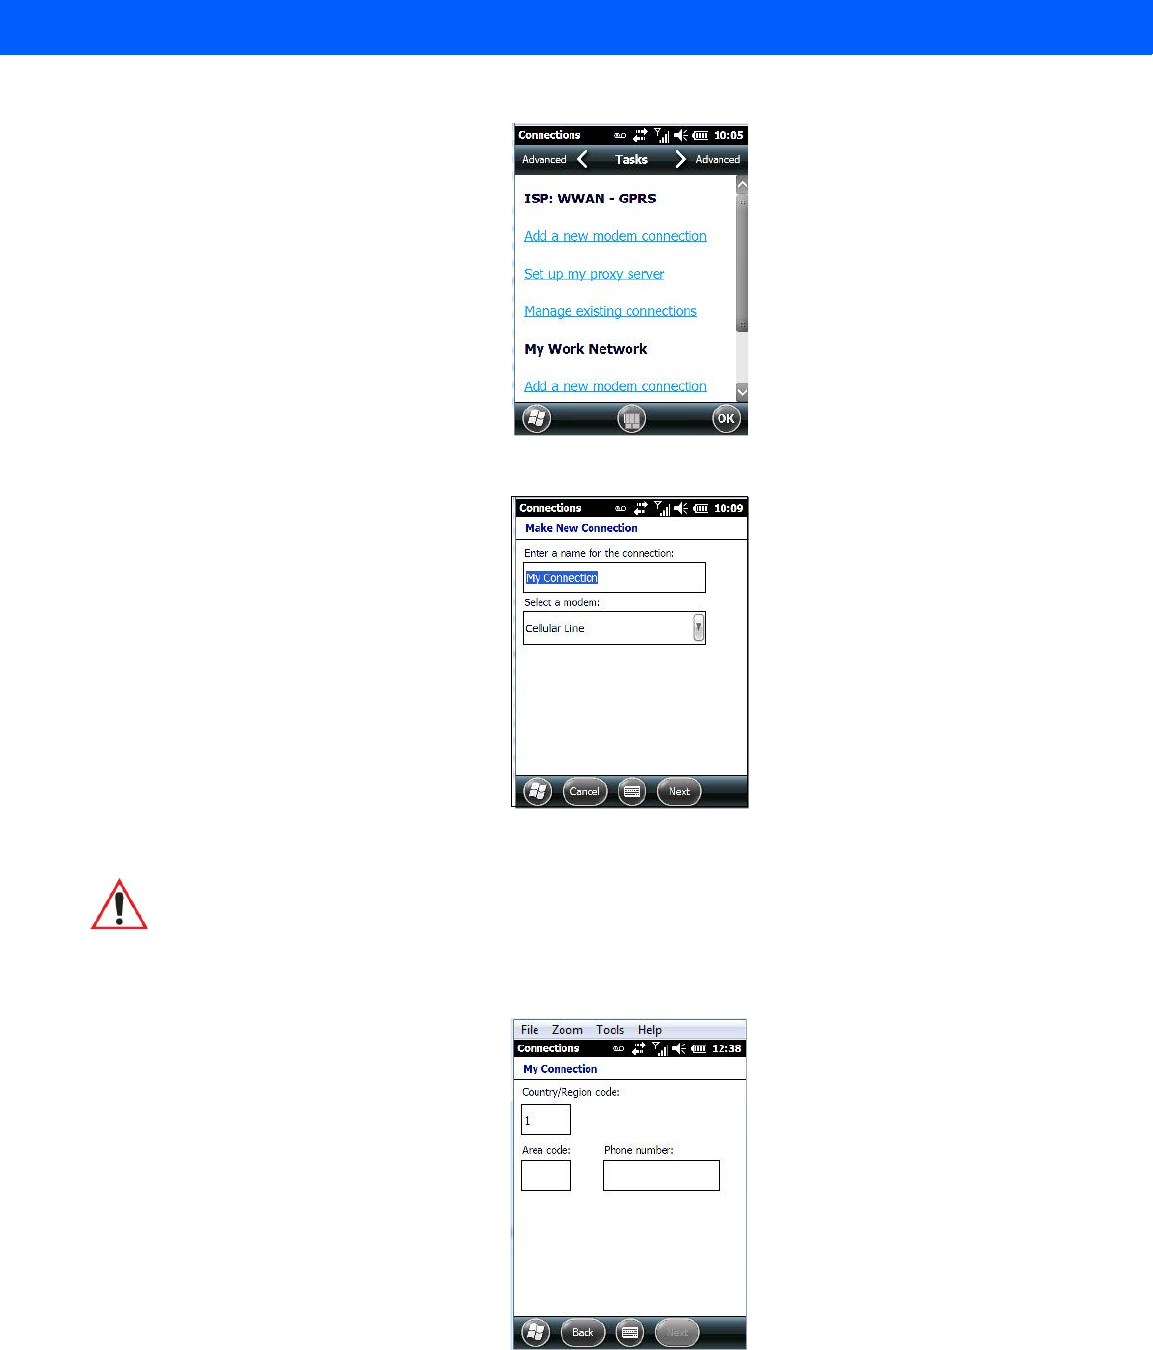
Settings 4 - 23
3. In the Make New Connection screen, type a name for the connection.
4. In the drop-down menu under Select a modem, tap on your modem type.
5. In the My Connections screen, enter the phone number exactly as you want it dialed. If, for example,
you need to dial 9 for an outside line, enter 9 at the beginning of the phone number.
6. Tap on the Next button.
WARNING If your modem is not listed in the drop-down menu, choose Hayes Com-
patible on COM1.
Draft #5
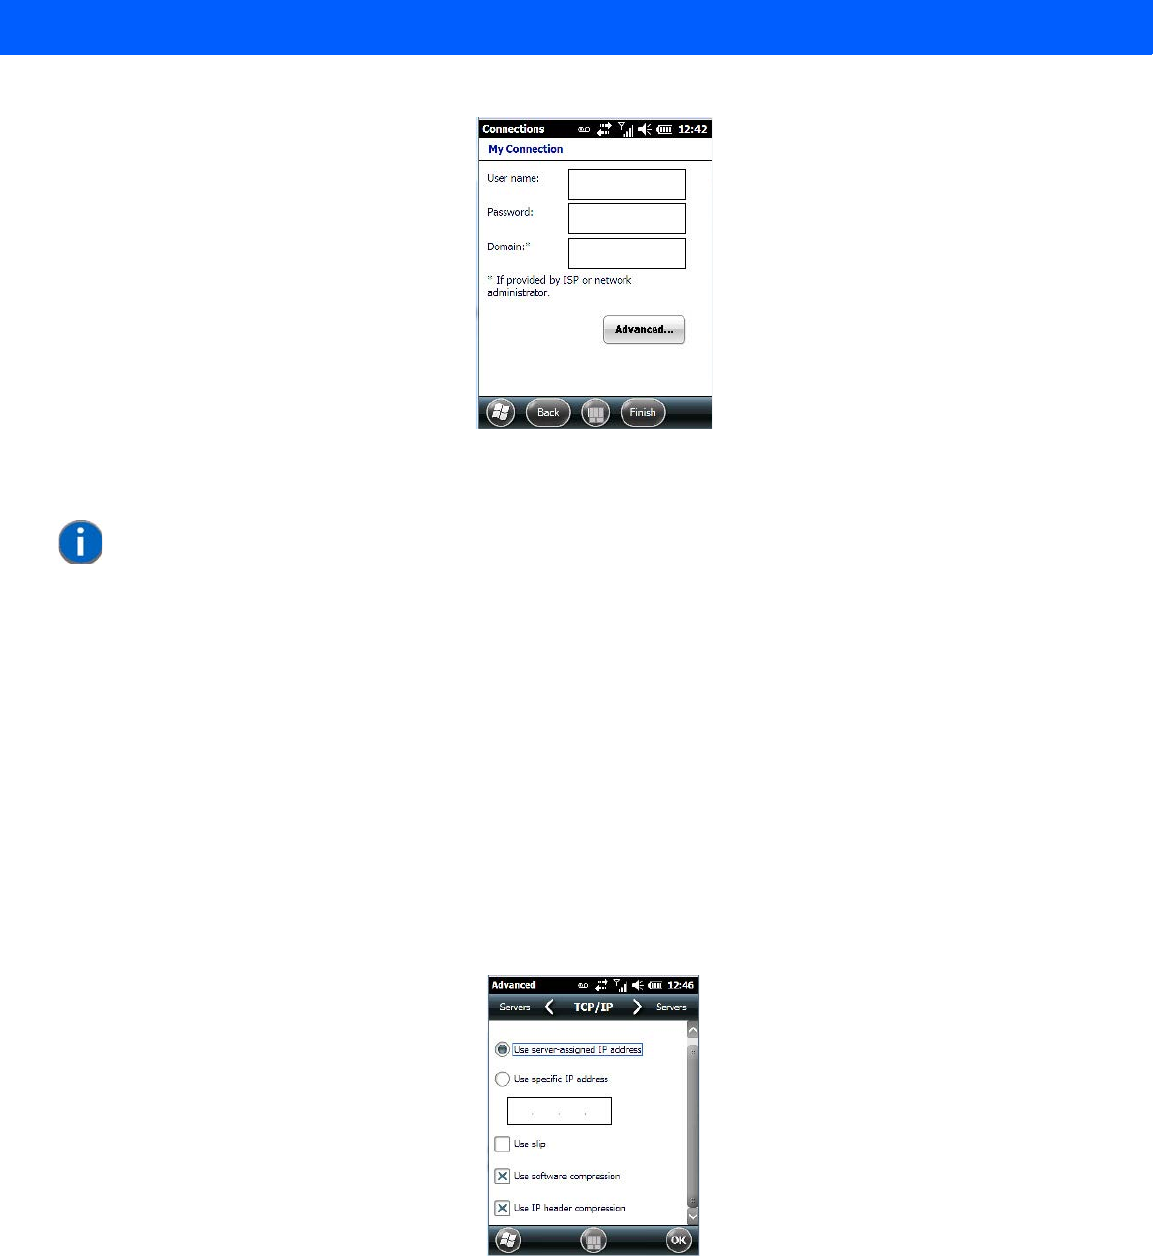
4 - 24 Workabout Pro4 (Windows Embedded Hand-Held 6.5) User Manual
7. Type the User Name, Password and Domain Name as provided by your ISP or
network administrator.
8. Tap on the Finish button.
Advanced Modem Settings
TCP/IP Settings Tab
If your server assigns IP addresses dynamically, you will not need to change these settings. If you need to
make changes, contact your ISP or network administrator for addresses.
Server Settings Tab
If your server assigns IP addresses dynamically, you will not need to change these settings.
NOTE Generally, you will not need to change any of the Advanced settings. For information
about Advanced Modem Settings, review the next section.
Changes to Advanced settings are only required in the following instances:
- To change the baud rate settings, dialing string commands or credit card options.
- To change port settings.
- To enter TCP/IP settings because the server to which you are connecting does not
dynamically assign addresses.
Draft #5

Settings 4 - 25
Servers requiring assigned IP addresses may also need a way to map computer names to IP addresses. The
Workabout Pro4 supports a variety of name resolution options: DNS, Alt DNS, WINS and Alt WINS.
Your ISP or network administrator can determine which name resolution you need, and can also provide the
server address. In addition, you will want to ask if alternate addresses are available. An alternate address may
allow you to connect when the primary server is not available.
Domain Enroll
To protect sensitive company data, businesses use firewalls and proxy servers to limit access to company
resources to company employees only. If you need to access information on your company server remotely,
the Domain Enrollment utility allows you to sync your Workabout Pro4 credentials with your company enroll-
ment server, allowing you to access your work remotely.
•Tap on Start>Settings>Connections>Domain Enroll.
• Tap on the Enroll button.
Draft #5
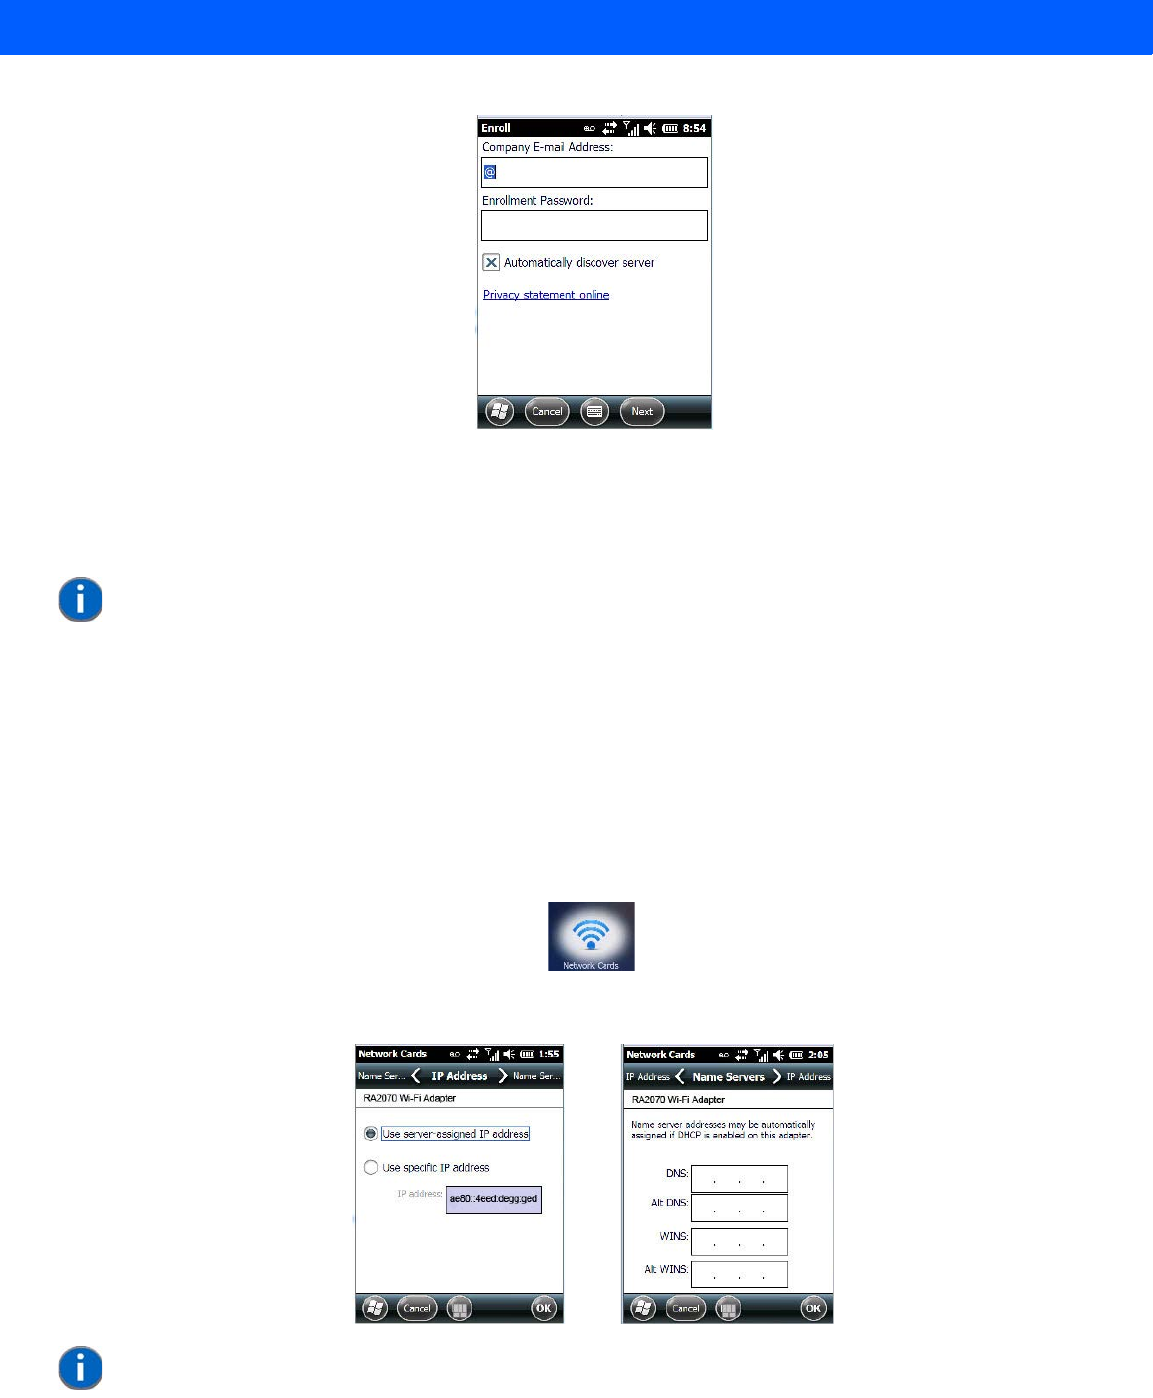
4 - 26 Workabout Pro4 (Windows Embedded Hand-Held 6.5) User Manual
• Enter your enrollment password – supplied by your company's network administrator or generated from
your company pre-enrollment wizard.
• Type your company e-mail address and the enrollment password provided by your network
administrator.
Allow a few minutes for your Workabout Pro4 to sync and enroll in your company domain. You may need to
restart your unit after the enrollment process is completed.
Network Cards
When the network card is inserted in your unit for the first time, the Network Settings screen is displayed auto-
matically so that you can configure the card. If it does not appear, or if you want to change settings:
•Tap on Start>Settings>Connections.
• Tap on the Network Cards icon.
• If you need to specify server information, double-tap on the appropriate adaptor, and then tap on the IP
Address and/or Name Servers tab.
NOTE If you uncheck Automatically discover server, a Server field is displayed where you
must manually enter the server name.
NOTE Because most networks use DHCP, you should not need to change these settings
unless instructed to do so by your network administrator.
Draft #5
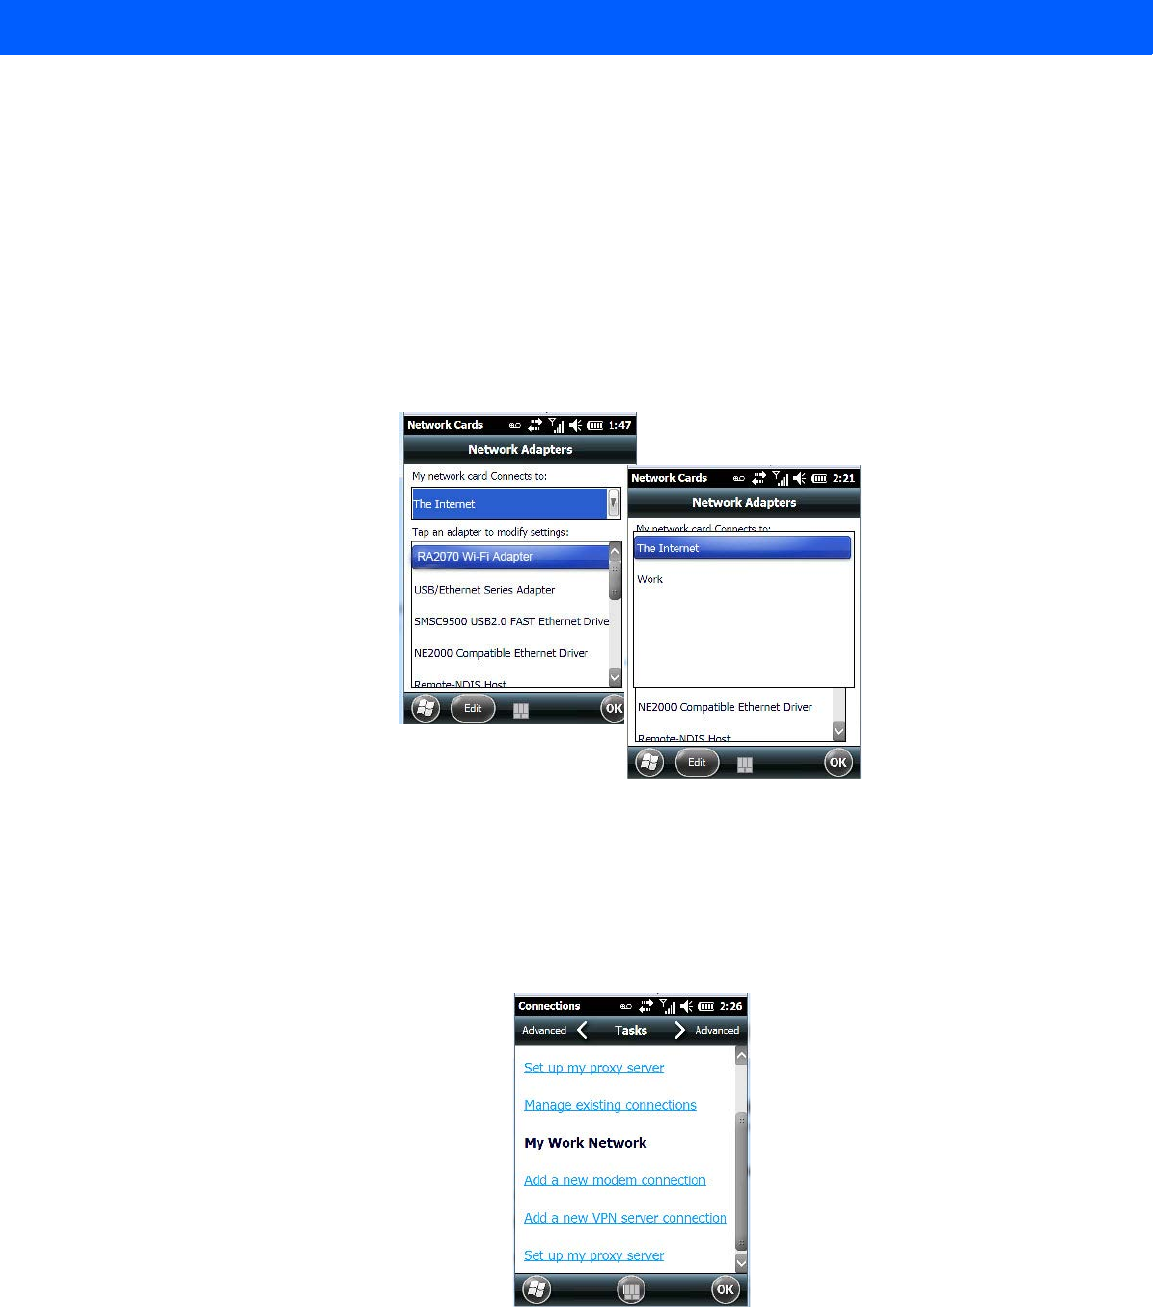
Settings 4 - 27
• If necessary, use a network cable to connect the network card to your network. Refer to the documentation
shipped with your network card for details.
• To activate the connection, launch the desired program (e.g., Internet Explorer). The Workabout Pro4 will
connect automatically.
Changing Network Card Settings
• If you use your network card in two locations like work and home, you’ll need to change the network to
which the network card connects.
•Tap on Start>Settings>Connections>Network Cards.
• In the Configure Network Adapters dialog box, tap on the drop-down menu below My network card con-
nects to, and choose either The Internet or Work.
VPN Connection Setup
A VPN connection provides a secure connection to servers through the Internet.
Before you begin, you need the following information from your network administrator: password, domain
name, TCP/IP settings and a host name or IP address of the VPN server.
•Tap on Start>Settings. Tap on the Connections folder icon followed by the Connections icon.
Draft #5
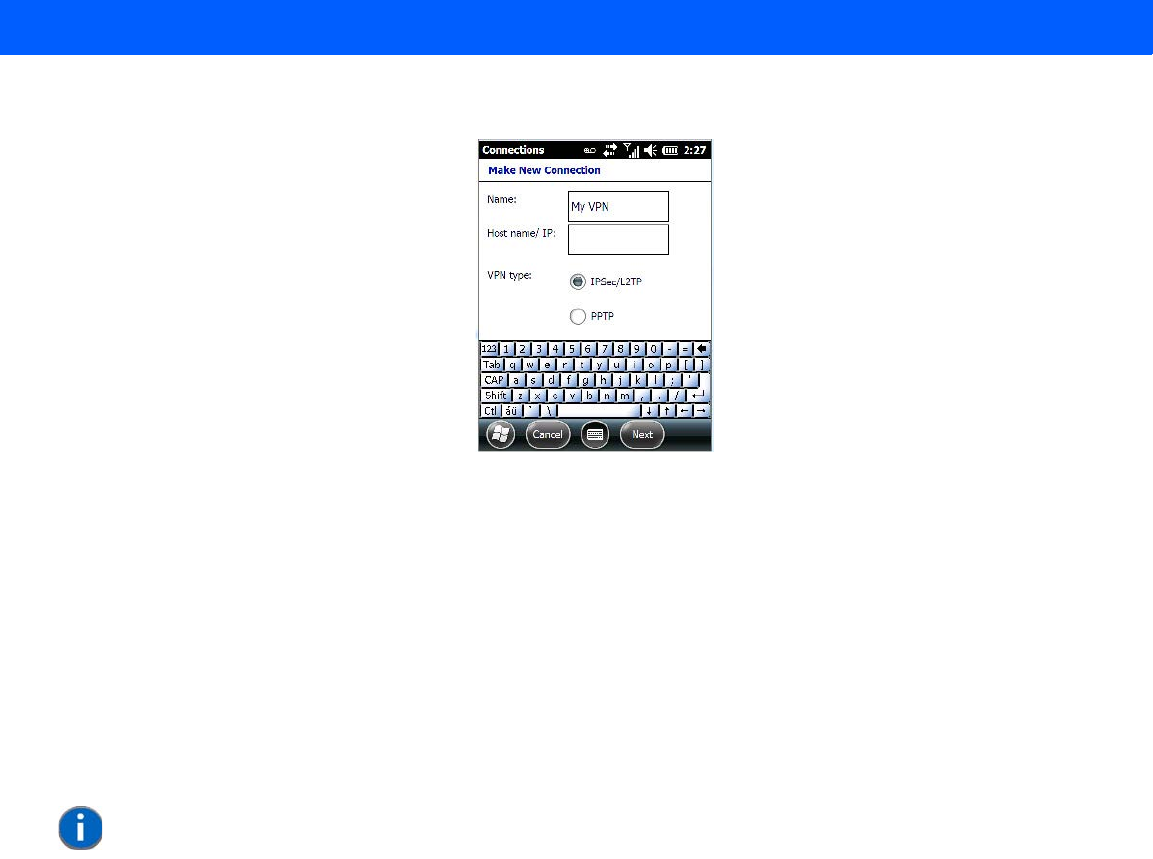
4 - 28 Workabout Pro4 (Windows Embedded Hand-Held 6.5) User Manual
• Under My Work Network, tap on Add a new VPN server connection.
• In the Name field, type a name for this connection.
•In Host name/IP, type the VPN server name or IP address.
• Tap on the VPN type radio button next to the type of authentication for your Workabout Pro4: IPSec/L2TP
or PPTP. Your network administrator will let you know which option applies to your unit.
•Tap on Next.
• Choose the type of authentication in this screen. If you choose A pre-shared key, type the key provided by
your network administrator.
•Tap on Next.
• Type your user name, password and domain name. If a domain name was not provided to you, try the
connection without entering a domain name.
If you need to edit the Advanced settings, refer to “Advanced Modem Settings” on page 4-24 for details about
this tab.
•Tap on Finish.
• Launch a program like Internet Explorer to activate the connection. The VPN connection will
start automatically.
Managing an Existing Connection
Once you’ve defined a connection, a new option appears in the first Connections screen – Manage
existing connections.
Editing a Connection
•Tap on Start>Settings>Connections folder icon. Tap on the Connections icon.
•Tap on Manage existing connections.
NOTE Normally, you will not need to change any advanced settings. You will need to make
changes only under only the following circumstances:
- The server to which you are connecting does not dynamically assign addresses, and
TCP/IP settings need to be entered.
- Server DNS or WINS settings need to be changed.
Draft #5
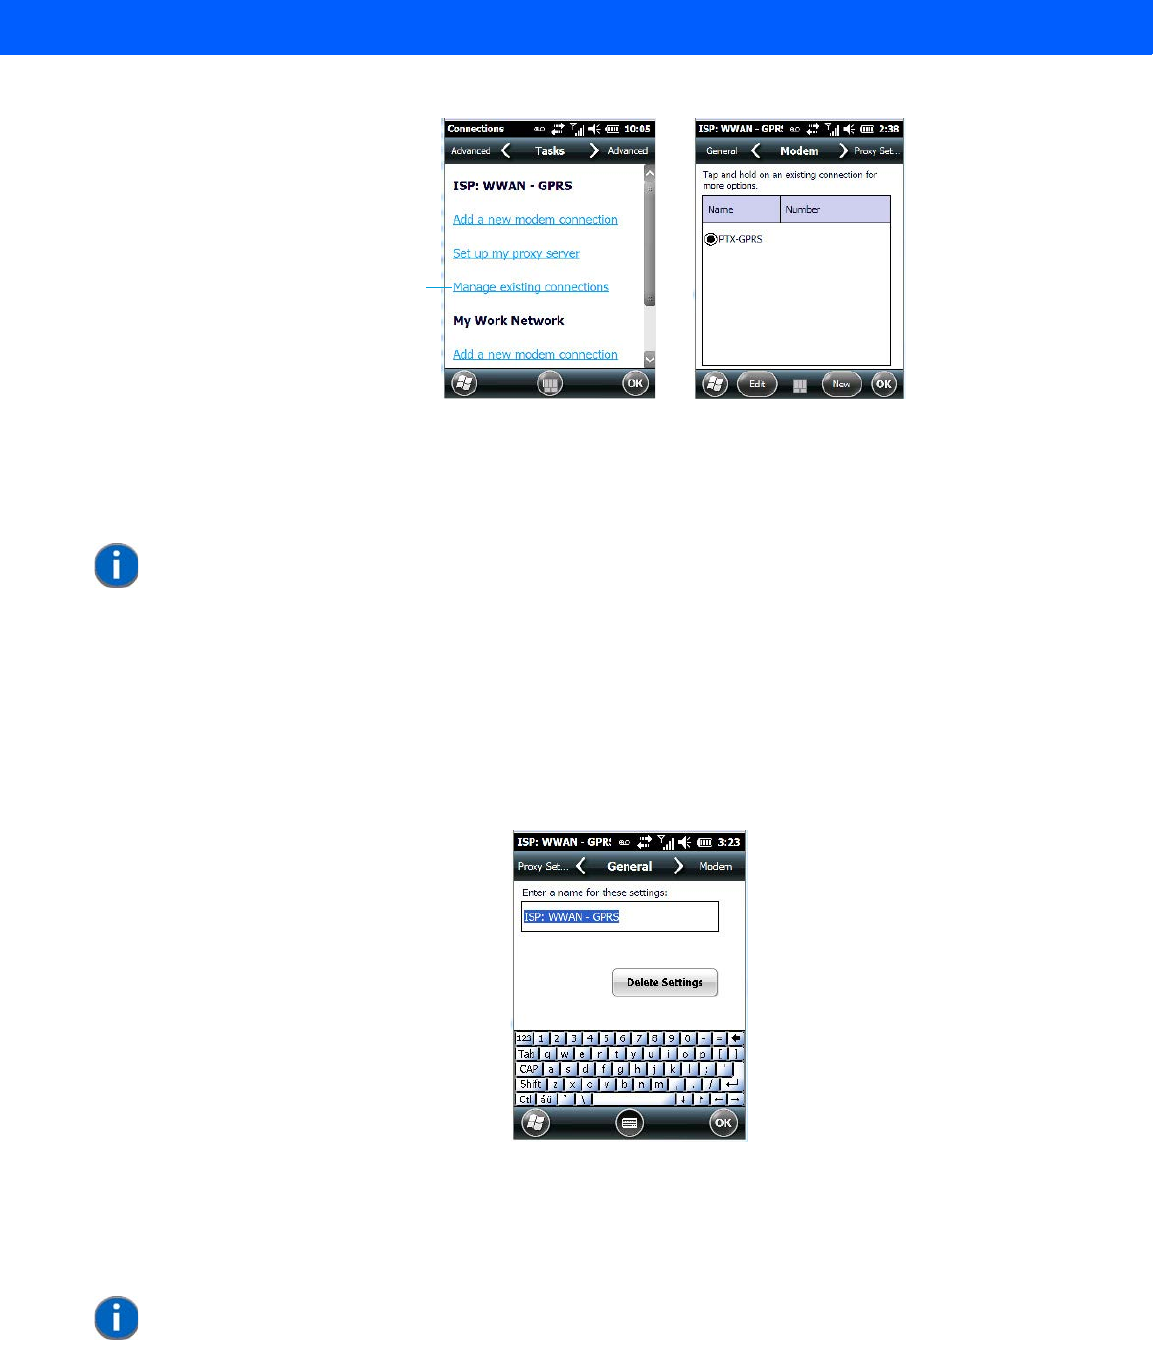
Settings 4 - 29
• To launch a connection from this screen, press and hold the stylus on the connection you want to activate.
Choose Connect from the pop-up menu.
• To delete a connection, press and hold the stylus on the connection you want to delete. Choose Delete
from the pop-up menu.
Changing a Connection Setting Name
Your Workabout Pro4 has two sets of connection settings: My ISP and My Work Network. If you want to
change one or both of these options to something more familiar to you, follow these steps.
•Tap on Start>Settings. Tap on the Connections folder icon followed by the Connections icon.
• Under My Work Network or My ISP, tap on Manage existing connections.
• Tap on the General tab.
• Type the name you prefer in the field below Enter a name for these settings.
•Tap on OK.
Proxy Server Tab
Tap here
NOTE You can also create a new connection by tapping on the New button. To make
changes to the settings for this connection, tap on Edit.
NOTE If you are connected to your ISP or private network during synchronization, the Work-
about Pro4 will download the appropriate settings during synchronization from your
PC. If these settings are not on your PC, or if they need to be changed, you’ll need to
set up the proxy server connection manually.
Draft #5
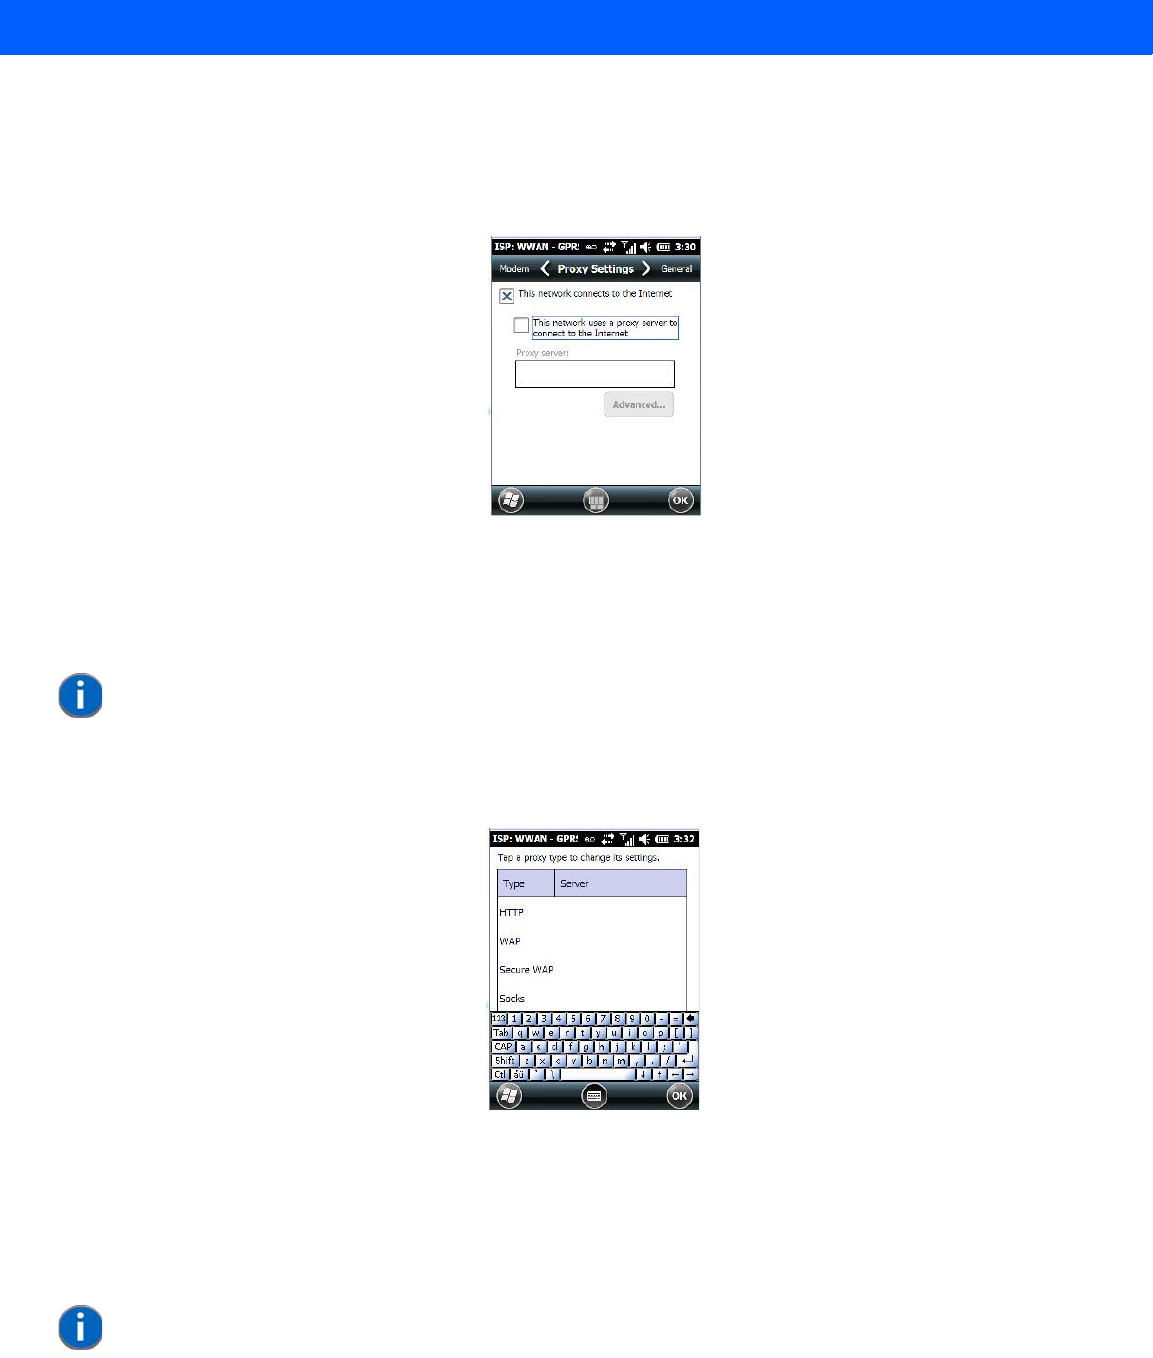
4 - 30 Workabout Pro4 (Windows Embedded Hand-Held 6.5) User Manual
To set up the proxy server connection manually, you’ll need the following information: proxy server name,
server type, port, type of Socks protocol used, and the user name and password.
•Tap Start>Settings. Tap on the Connections tab followed by the Connections icon.
• Under My Work Network, tap on Set up my proxy server.
• Tap in the checkbox next to This network connects to the Internet and This network uses a proxy
server to connect to the Internet.
• In the Proxy server field, type the proxy server name.
•Tap on OK to save your changes.
Changing Advanced Proxy Server Settings
• To change advanced settings such as the port number or proxy server type, tap on the Advanced button.
• Tap on the proxy type you want to change. For the appropriate server type, type the proxy server name
and port.
•Tap on OK.
Selecting a Network
NOTE If you need to change advanced settings such as a port number or proxy server type,
you’ll need to tap on the Advanced button rather than tapping on OK. Advanced set-
tings are described in “Changing Advanced Proxy Server Settings” in the next section.
NOTE Normally, you will not need to change these settings. Contact your ISP or network
administrator before making any changes.
Draft #5
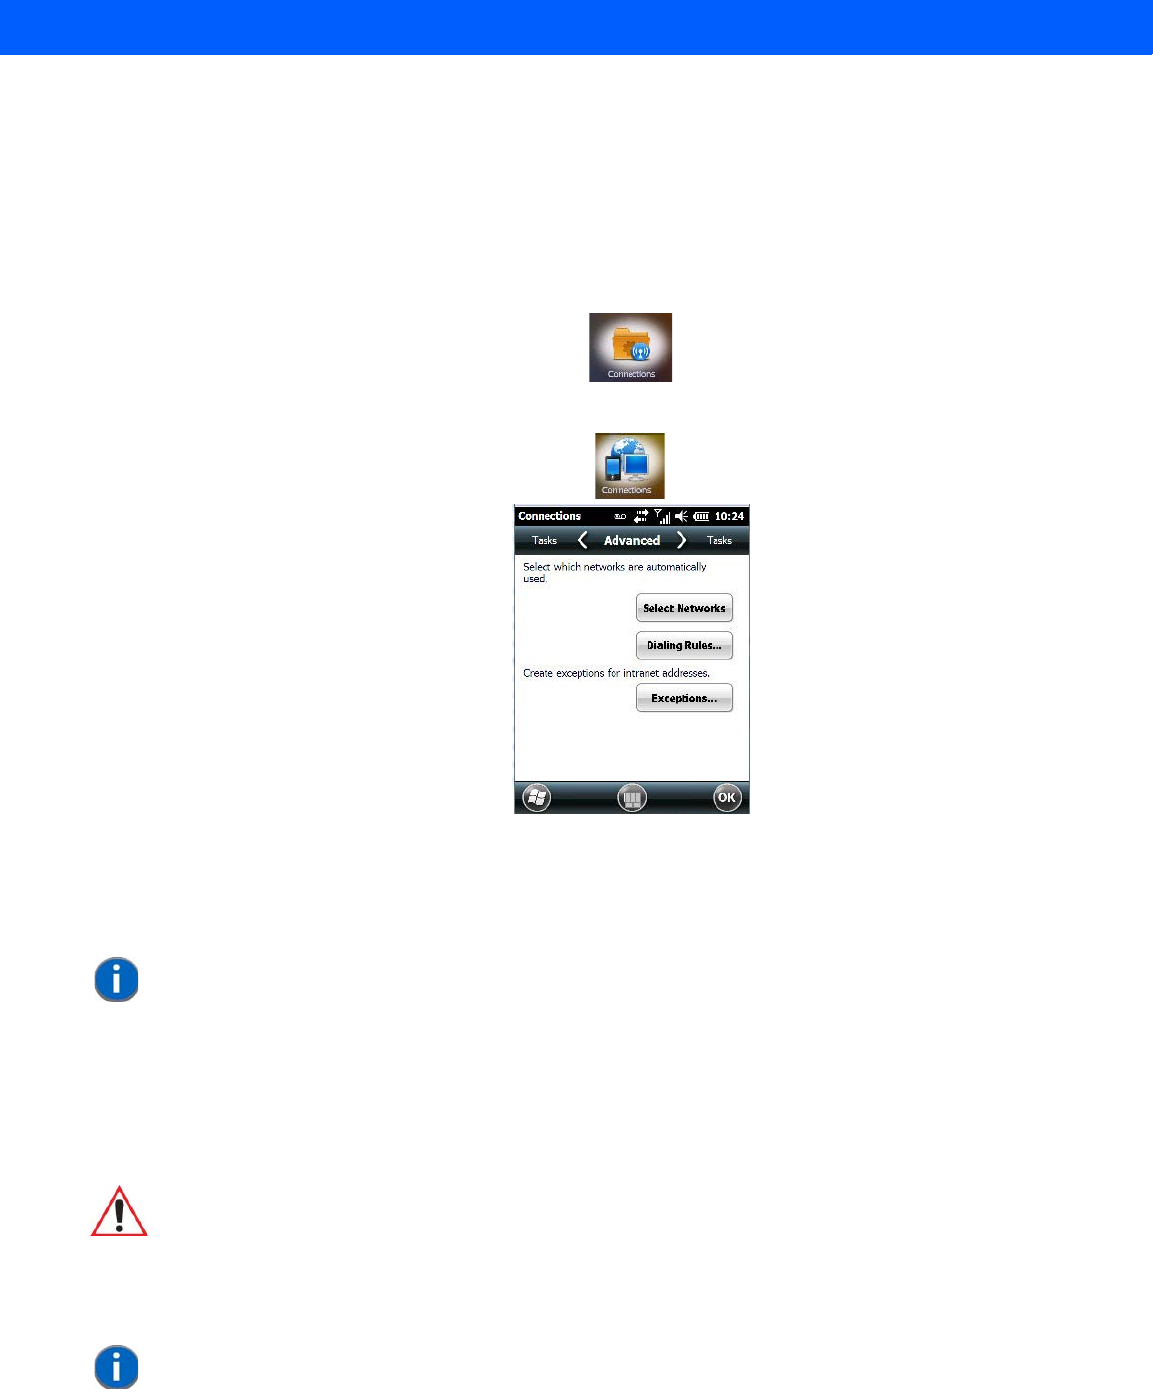
Settings 4 - 31
Private networks are used for work-related activities. Internet networks are used for home connection to your
ISP. The My Work Network settings are used for private network connections (corporate networks), while My
ISP settings are used for Internet network connections.
When you use programs such as Internet Explorer, your Workabout Pro4 automatically connects using private
network settings under My Work Network or Internet settings under My ISP, depending on specifications. You
can determine how your Workabout Pro4 connects.
•Tap Start>Settings>Connections folder icon.
• Tap on the Connections icon, and then tap on the Advanced tab.
•Tap on Select Networks.
• In the appropriate list, choose My ISP or My Work Network.
Fusion Wireless Companion - Setting Up the XWing2 802.11a/b/g/n Radio
Workabout Pro4 contains an integrated 802.11a/b/g/n radio module. The Fusion Wireless Companion software
is used to configure the radio for one or more wireless network profiles. Each profile specifies the security
parameters used to connect to a particular WLAN as identified by its Extended Service Set Identification
(ESSID). The Fusion Wireless Companion software also allows the operator to control which profile out of a set
of profiles is used to connect. Follow the steps in this section to help configure the radio in your unit.
A network profile contains settings for SSID (Service Set Identifier) and security options.
NOTE For information about setting up your radio using Windows Wireless Zero Config,
refer to Appendix C: “Wireless Zero Config Settings”.
WARNING Due to regulatory requirements, this unit is set to Enable 802.11d by default. If your
Access Point does not support this setting, your unit may not be able to properly
connect to the network.
NOTE In most situations, the configuration of your 802.11 radio will require parameter
settings and access keys from a network administrator.
Draft #5
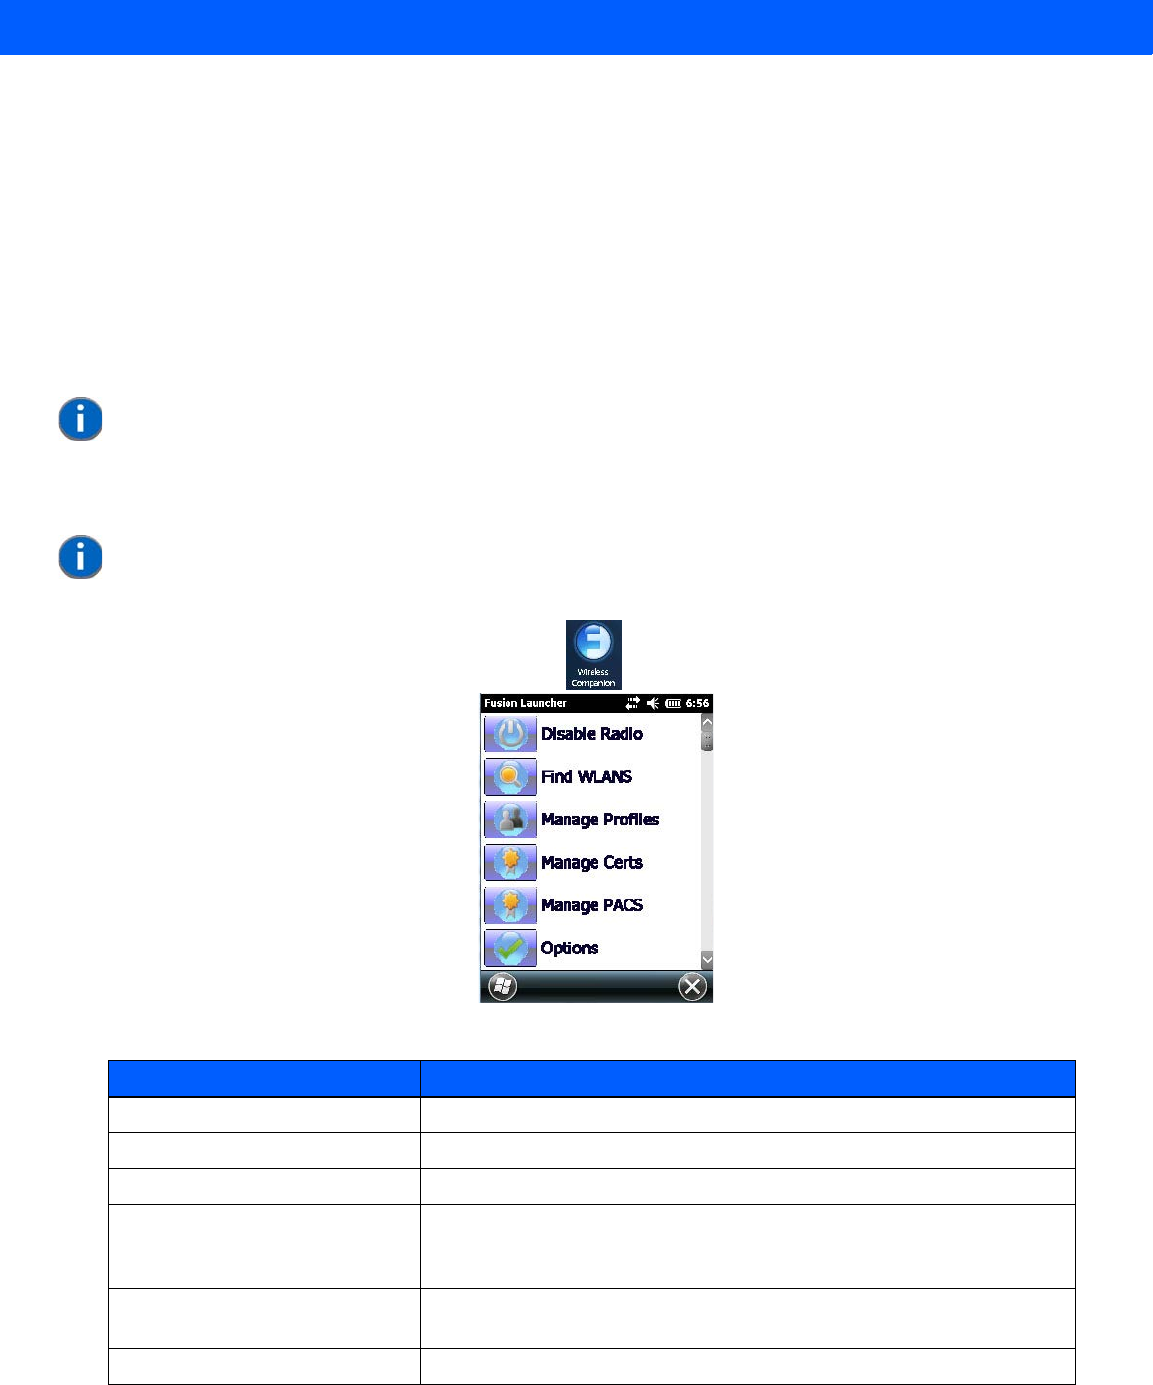
4 - 32 Workabout Pro4 (Windows Embedded Hand-Held 6.5) User Manual
Connecting to the Internet
To connect to the Internet on a WLAN when using Fusion Wireless Companion, ensure that the network card
settings is set to Internet:
• Ensure the Fusion is enabled and a profile is configured.
•Tap on Start>Settings>Connections>Wi-Fi.
• In the My network card Connects to drop-down menu, choose The Internet.
•Tap on OK.
Fusion Setup
• In the Today screen, tap on the Fusion softkey at the bottom of the screen to display the Fusion Launcher
dialog box. Alternately, you can tap on Start>Wireless Companion>Wireless Launch.
The Fusion Launcher items and their corresponding applications are summarized in the table following.
NOTE WLAN configuration information must be obtained from the system administrator
before performing Fusion setup procedures.
NOTE The Fusion setup example following uses Open encryption. Depending on what
you choose, the setup may vary slightly.
Application Description
Find WLANS Displays a list of the WLANs active in the area.
Manage Profiles Used to create new profiles and manage and edit existing profiles.
Manage Certs Used to manage authentication certificates.
Manage PACs Used to manage a list of Protected Access Credentials (PAC) used with
Extensible Authentication Protocol-Flexible Authentication via Secure
Tunneling (EAP-FAST) authentication.
Options Provides options which allow the user to configure the Fusion
option settings.
Wireless Status Displays the status of the current wireless connection (view only).
Draft #5
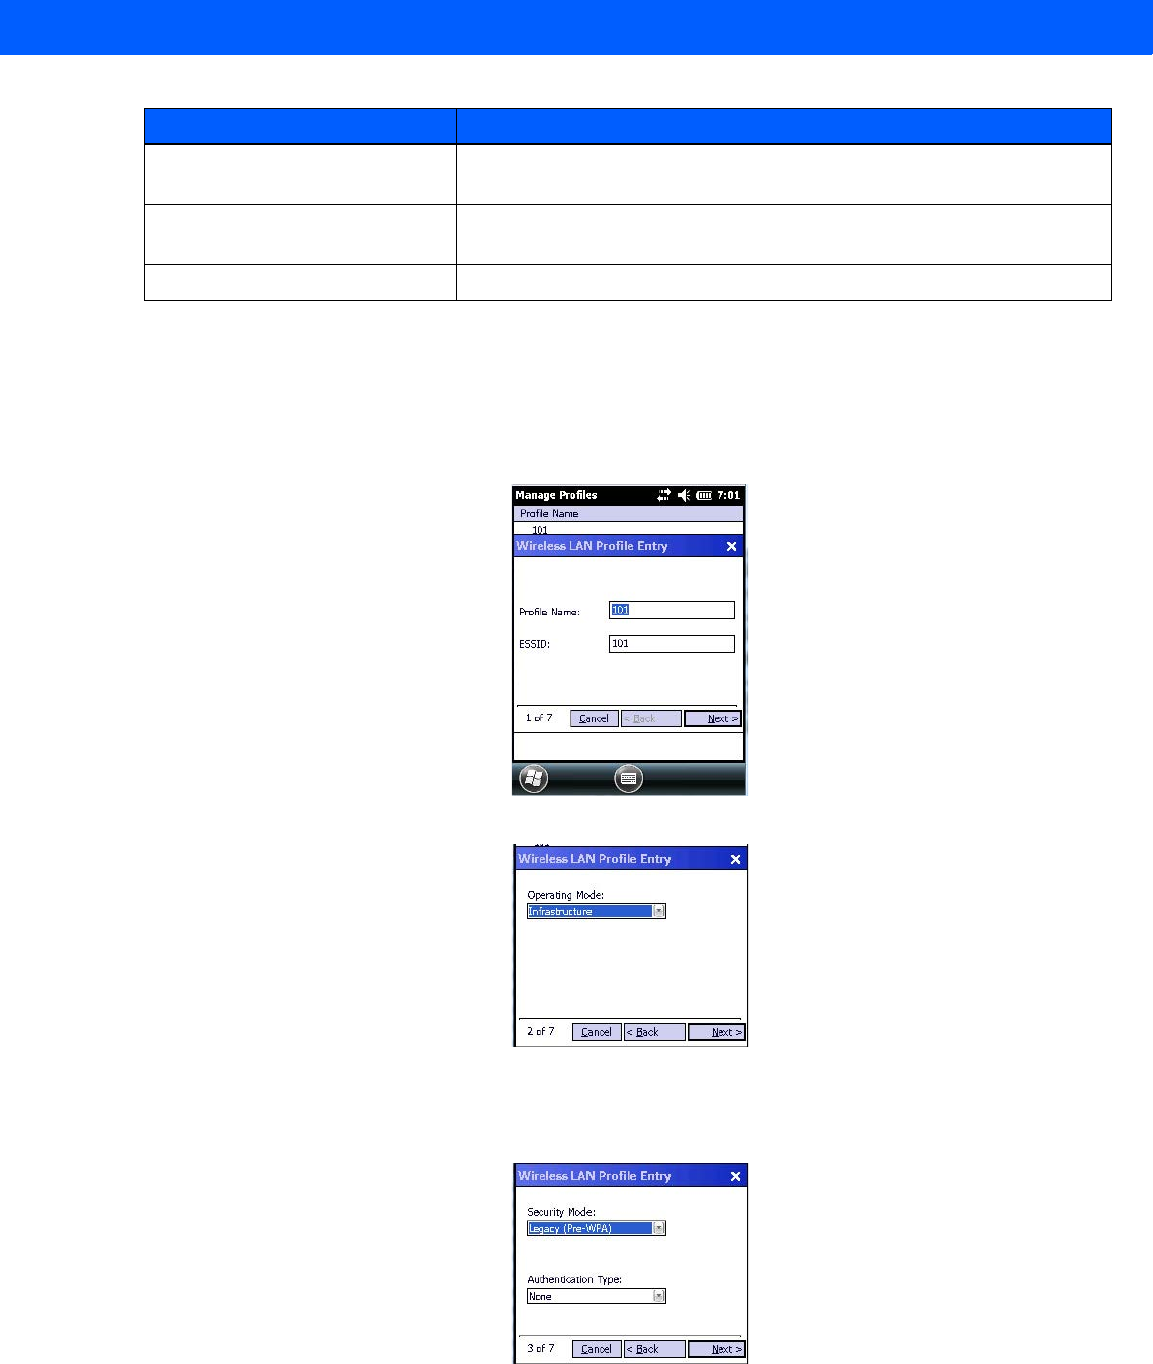
Settings 4 - 33
•Tap on Manage Profiles.
• Tap and hold the stylus on the Manage Profiles window, and choose Add from the pop-up menu to
display the Wireless LAN Profile Entry window.
• In the Profile Name dialog box, type a name for the profile
• In the ESSID Profile ID dialog box, type the ESSID.
•Tap Next to display the Operating Mode dialog box.
• In the Operating Mode drop-down menu, choose Infrastructure. (Keep in mind that because the Regula-
tory option for this unit is set to Enable 802.11d by default, the operating mode is limited to Infrastructure.
•Tap Next to display the Security Mode dialog box.
• In the Security Mode drop-down menu, choose Legacy (Pre-WPA).
Wireless Diagnostics Provides tools with which to diagnose problems encountered with the
wireless connection.
Log on/off Displays the Network Login dialog box used to log on to a particular
profile or to log off the currently active profile.
Fusion Help Displays extensive on-device Help.
Application Description
Draft #5
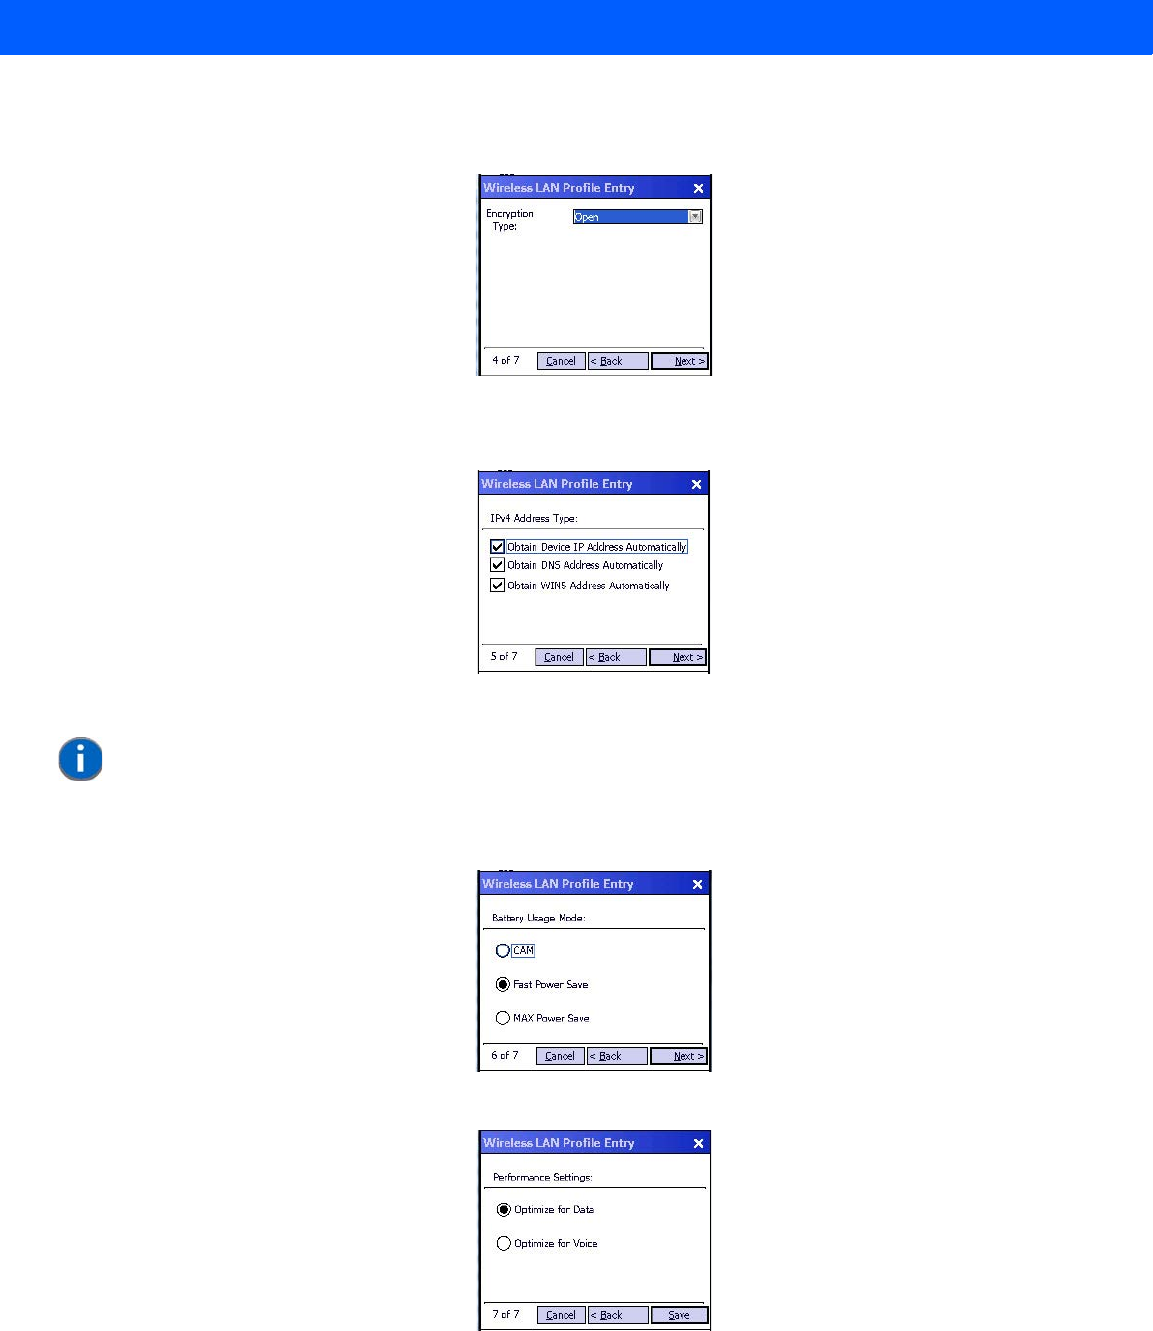
4 - 34 Workabout Pro4 (Windows Embedded Hand-Held 6.5) User Manual
• In the Authentication drop-down menu, choose None.
•Tap Next to display the Encryption dialog box.
• Choose an Encryption Type from the drop-down menu.
•Tap Next to display the IPv4 Address Entry dialog box.
• Ensure that all three items are checked. Tap on Next.
•Tap Next to display the Battery Usage dialog box, and choose a power consumption option.
•Tap Next to display the Performance Settings dialog box, and choose one of the performance options.
•Tap Save.
NOTE These IPv4 Address Type options are enabled (checked) by default. If you deselect one or more of
them, additional dialog boxes are displayed where you can specify the IP Address, Subnet Mask,
Preferred Gateway and Alternate Gateway.
Draft #5
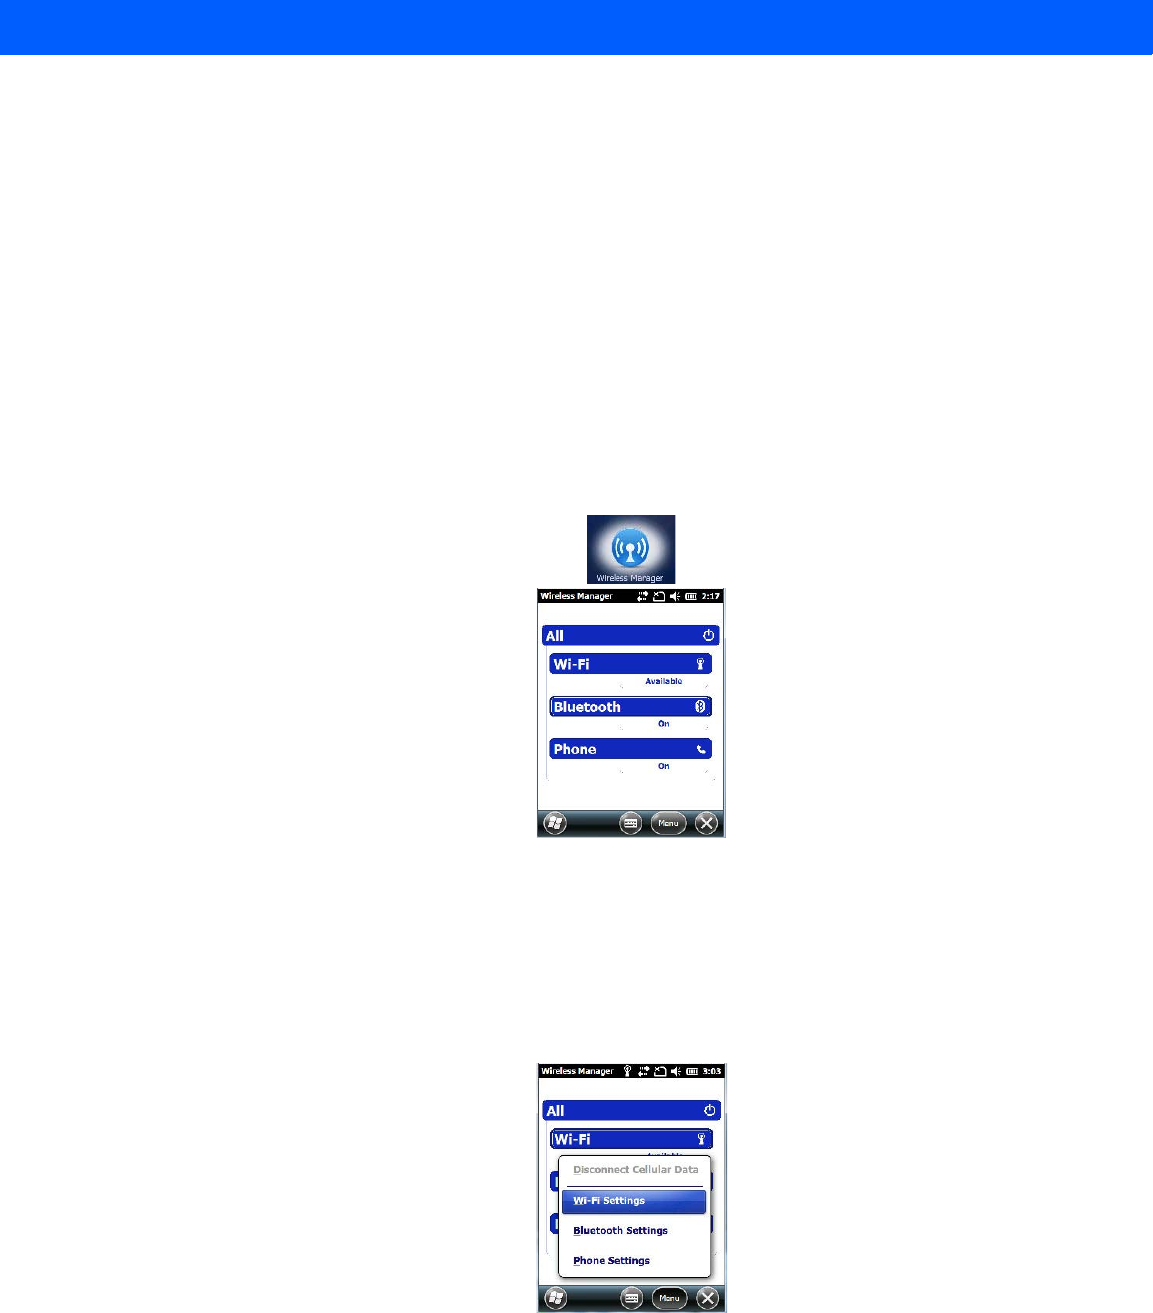
Settings 4 - 35
Resetting the Radio to Default Factory Settings
Resetting your unit, including a clean start, will not return the radio settings to the default values. To reset the
radio to factory settings:
•Tap on Start>Wireless Companion>Wireless Launch to display the Fusion Launcher screen.
• In the Fusion Launcher screen, choose Options.
• In the drop-down menu, choose Data Management. Tap on the Reset Options and Reset Datastore but-
tons, and tap on OK.
• Press and hold down the [FN/BLUE] and [Power] button to perform a warm reset.
Wireless Manager – Turning the Radio On and Off
The Wireless Manager icon acts as a connection manager, providing access to all network connection types.
•Tap on Start>Settings>Connections folder icon. Tap on the Wireless Manager icon.
This screen is used to switch the wireless network connection on and off. This screen also provides access to
the setup screens for each wireless connection.
• To turn connections on and off, tap on the item(s) in the list.
• To turn off all wireless connections, tap on All.
The Menu softkey at the bottom of the screen provides a shortcut to the setup screens for each of the options
listed in the Wireless Manager screen.
Draft #5
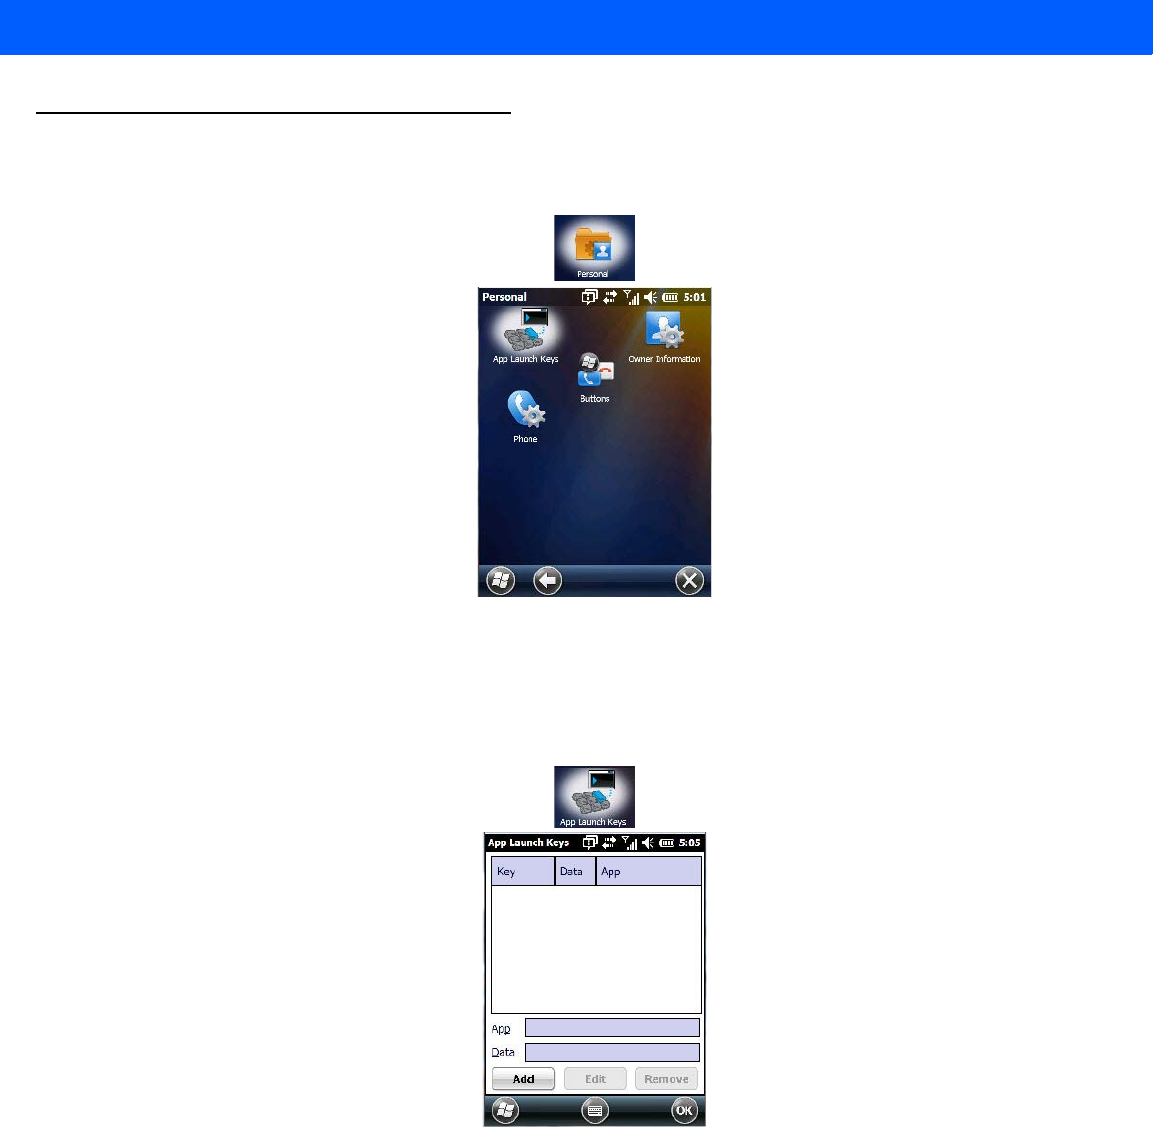
4 - 36 Workabout Pro4 (Windows Embedded Hand-Held 6.5) User Manual
Personal Folder
•Tap on Start>Settings>Personal icon.
App Launch Keys
This icon allows you to map a key to an application so that you can then launch the application from a single
key-press.
•Tap on Start>Setting>Personal>App Launch Keys icon.
To assign an application key:
•Tap the Add button.
Draft #5
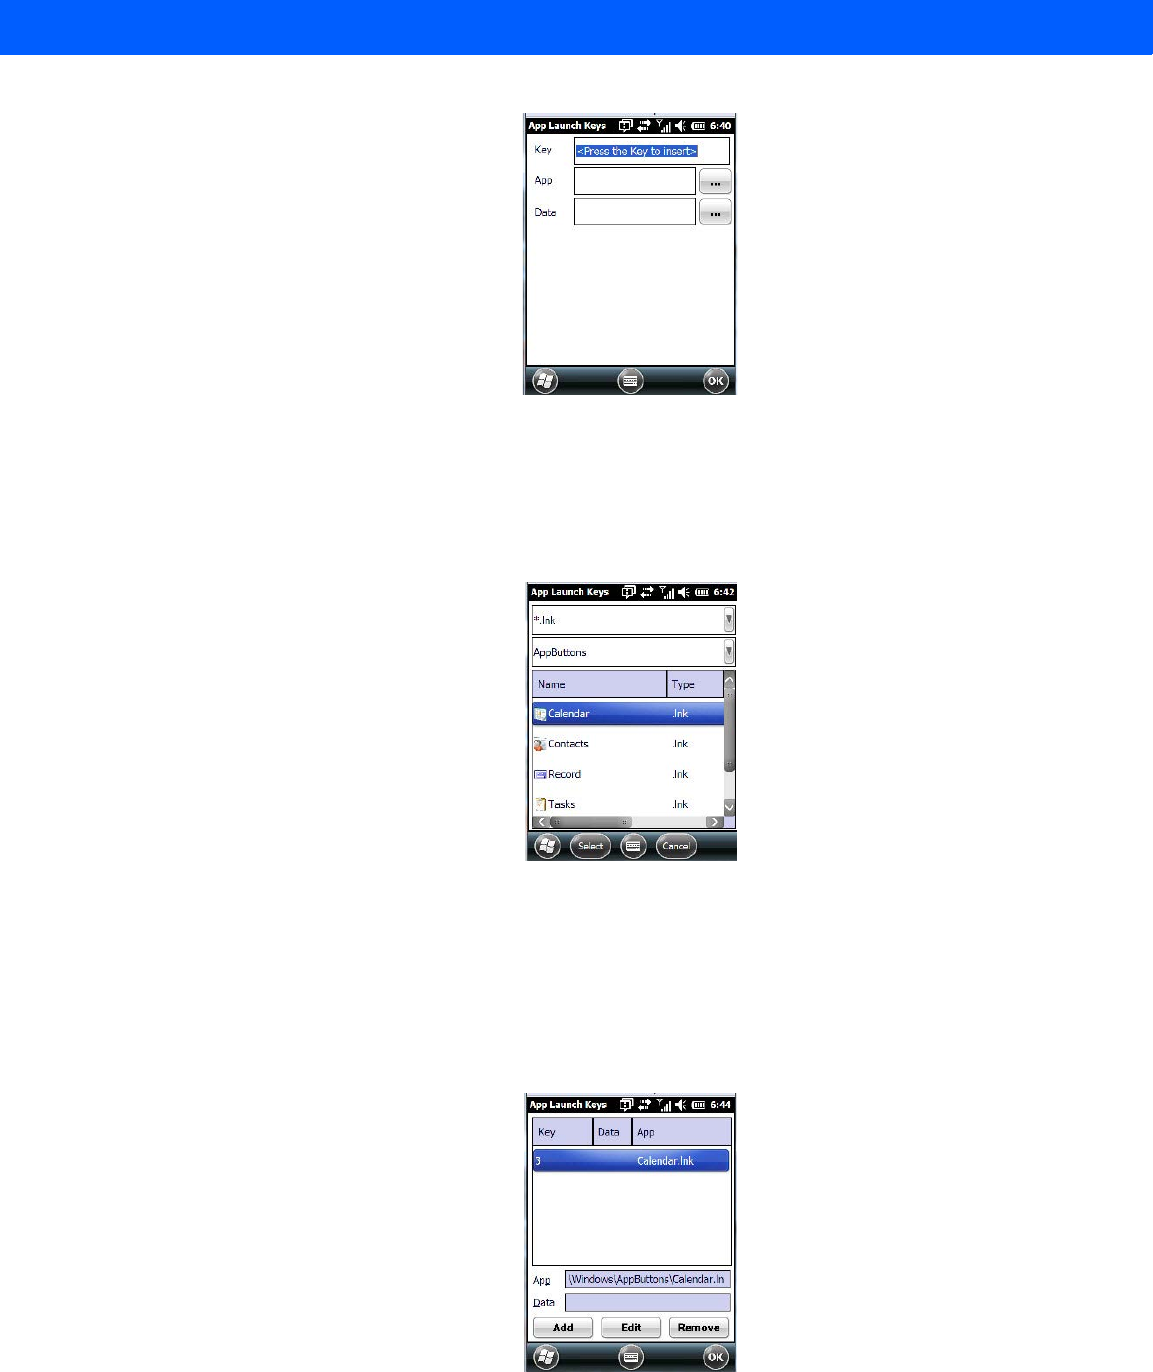
Settings 4 - 37
• Press the key you want to use to launch an application. (If an unsupported key is pressed, a message
appears on this screen letting you know.)
The cursor moves to the App field and a new screen is displayed where you can choose the application to
which you want to assign the application key. If you need to, you can Browse through the information in your
hand-held until you locate the application you want to launch.
• Once you’ve selected the file you want to map, tap on OK.
The cursor moves to the Data field. You can use this field if you need to assign special parameters to your
application launch key. If you don’t want to assign any parameters, you can leave the Data field blank. If, for
example, you want to assign an application launch key to launch the Word Mobile application, you can leave
this field blank. If you want to assign an application launch key that will open a specific document in the Word
Mobile application, you need to browse to and choose that document while the cursor is in the Data field.
•Tap on OK.
Draft #5
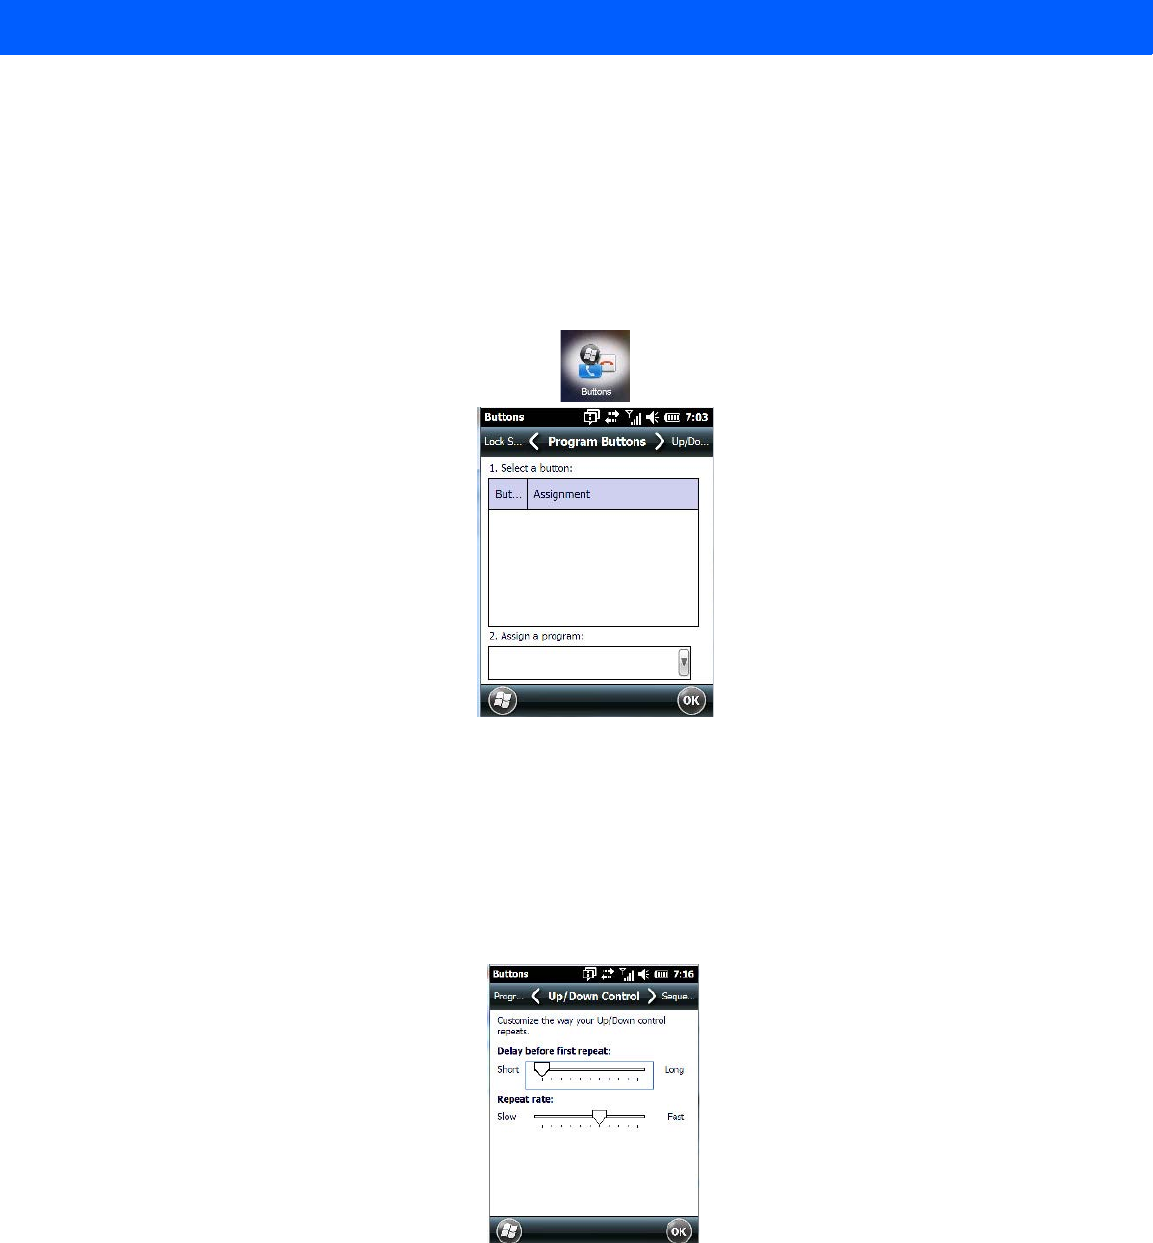
4 - 38 Workabout Pro4 (Windows Embedded Hand-Held 6.5) User Manual
• If you need to Edit, Remove or Add another App Launch Key, you can do it from this final screen. Other-
wise, tap on OK to save your Application Launch Key.
• To launch the application you chose, press the application key you assigned.
Buttons
A number of apps are included under this icon.
• Tap on the Start>Settings>Personal>Buttons icon to display the apps.
Program Buttons Tab
In the Program Buttons tab, you can customize the program hardware buttons to open your most
used programs.
• Under Select a button, tap on the button to which you want to assign a program.
• Choose a program from the Assign drop-down menu.
Up/Down Control Tab
•Tap on Start>Settings>Personal>Buttons icon to display this screen. Scroll to the
Up/Down Control tab.
Sliding the Delay before first repeat bar to the left decreases the delay between key repeats while sliding the
bar to the right increases the repeat delay time.
Draft #5
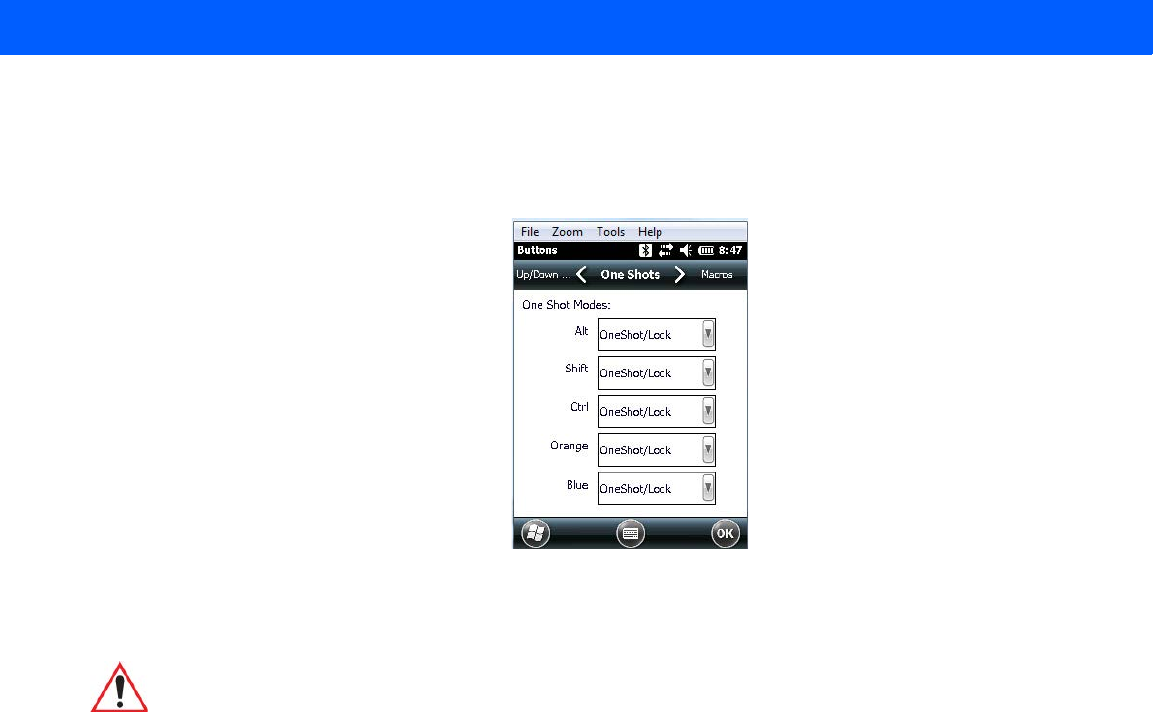
Settings 4 - 39
Sliding the Repeat rate bar to the left slows the rate at which an [Up/Down] button repeats when pressed.
Sliding the bar to the right increases the key repeat rate.
OneShots
The options in this tab allow you to determine how modifier keys on your Workabout Pro4 behave. For each
modifier key – [ALT], [SHIFT], [CTRL], [FN/ORANGE] and [FN/BLUE] – you have the following options in the
drop-down menu: Lock, OneShot, and OneShot/Lock.
Lock
If you choose Lock from the drop-down menu, pressing a modifier key once locks it ‘on’ until you press the
modifier key a second time to unlock or turn it off.
OneShot
If you choose OneShot, the modifier key remains active only until the next key is pressed.
OneShot/Lock
OneShot/Lock allows you to combine these functions. When you choose this option and you press the modifier
key once, it remains active only until the next key is pressed.
If you press the modifier key twice, it is locked ‘on’, remaining active until the modifier key is pressed a third
time to turn it ‘off’.
IMPORTANT Once you’ve assigned a OneShot mode to a modifier key, you need to tap
on the OK button at the top of the tab to activate your selection.
Draft #5
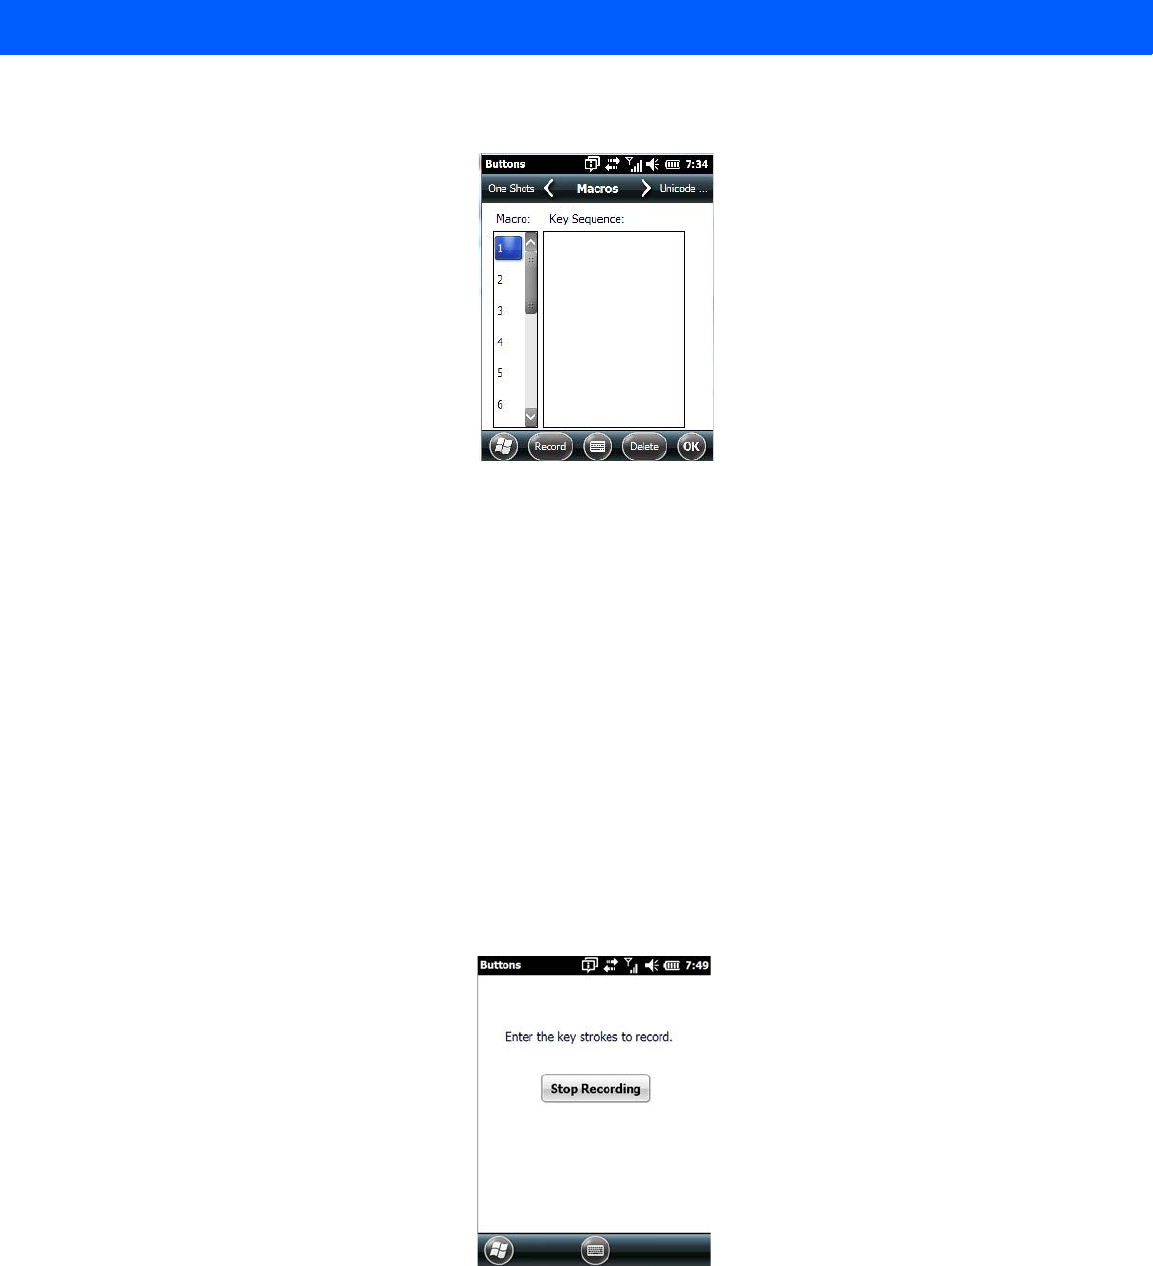
4 - 40 Workabout Pro4 (Windows Embedded Hand-Held 6.5) User Manual
Macro Keys
A macro key is a single keypress that can be configured to output up to 200 characters (including [ENTER],
[BACKSPACE], [DEL], function keys, arrow keys, etc.). This feature can save time and effort when entering
frequently used key sequences. For example, a macro key can be programmed to output a standard signature,
such as “Sincerely yours, Bob” with a single keypress.
For all keyboard types, you can program up to 15 macro keys. Some Workabout Pro4 keyboards have macros
keys ([M1], [M2] and so on) that are physically present on the keyboard. When you record a macro sequence
and assign it to one of these predetermined macro keys, pressing that key (e.g., [M1]) executes the macro and
sends the programmed key sequence to the hand-held as if it were entered from the keyboard.
If your keyboard does not have dedicated macro keys, or if you wish to use macro keys beyond the ones that
are already present on the keyboard, you need to use Scancode Remapping to remap keyboard keys to act as
macro keys (see “Scancode Remapping” on page 4-42). For example, if you record a key sequence to Macro
7, you could then use Scancode Remapping to remap the [z] key so that pressing it executes Macro 7 rather
than the letter [z].
Recording and Saving a Macro
• In the Macro menu, highlight a Macro number. Tap on the Record button.
A Record Macro screen is displayed.
•Type the macro sequence you want to assign to a keyboard key. You can type text and numbers, and you
can program the function of special keys into a macro.
• When you’ve finished recording your macro sequence, tap on the Stop Recording button.
A new screen displays the macro sequence you created.
• Tap on the Save button to save your macro. Your macro key sequence is listed in the Macro screen.
Draft #5
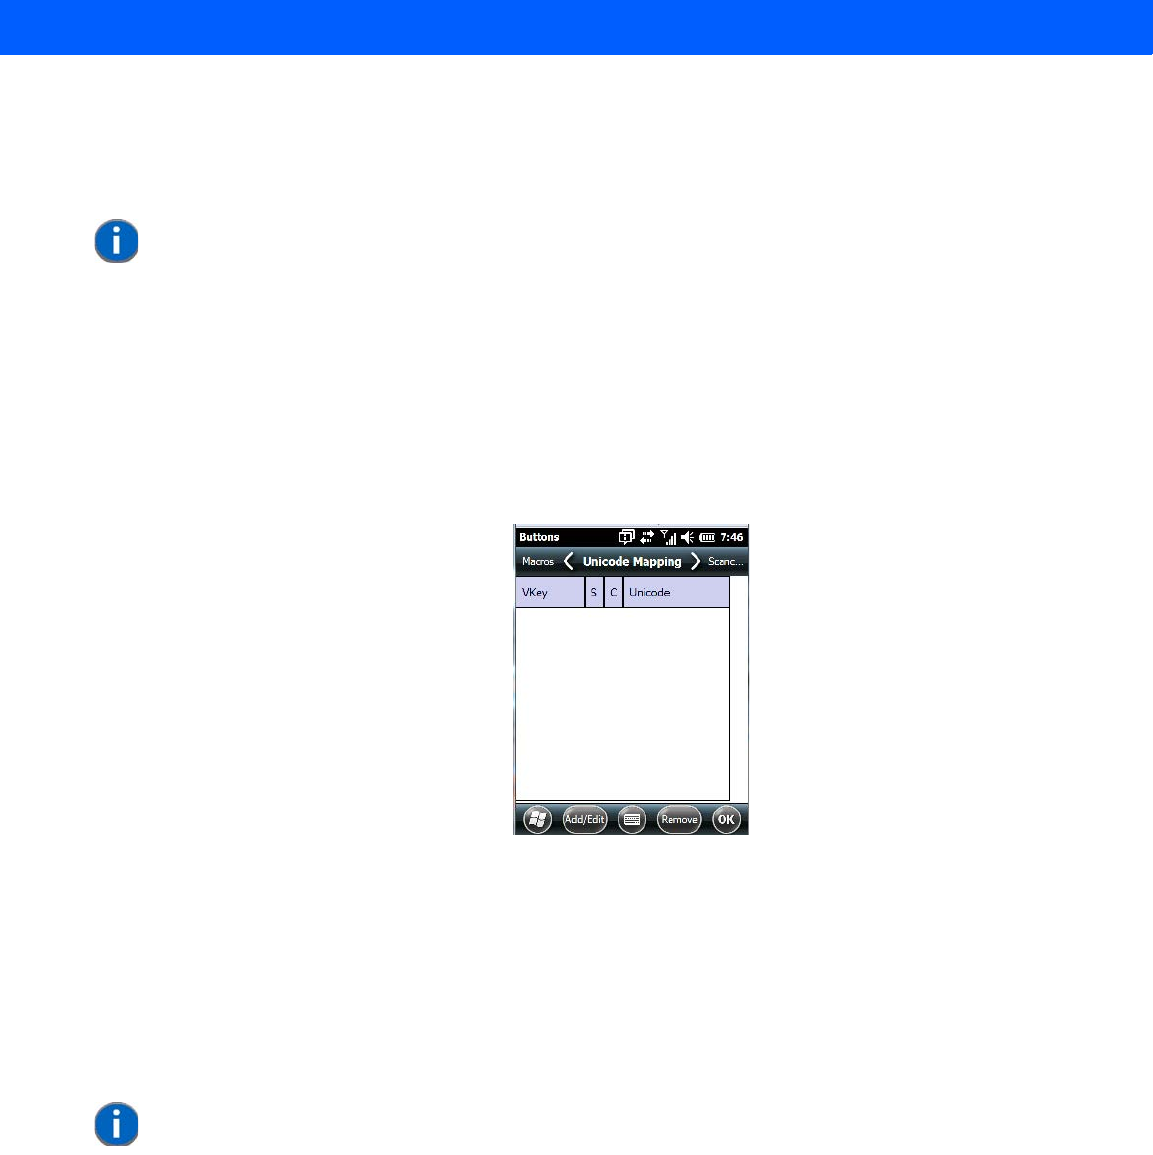
Settings 4 - 41
•Tap on OK to save your macro key assignment.
Executing a Macro
• To execute a macro, press the key to which you’ve assigned the macro.
Deleting a Macro
• In the Macros tab, highlight the macro number you want to delete.
• Tap on the Delete button.
Unicode Mapping
• Tap on the Unicode Mapping tab to display this screen.
The Unicode Mapping tab is used to map combinations of virtual key values and [CTRL] and [SHIFT] states to
Unicode™ values. This tab shows the configured Unicode character along with the Unicode value. For
example, “a (U+0061)” indicates that the character “a” is represented by the Unicode value “0061”, and so on.
Keep in mind that Unicode configurations are represented as hexadecimal rather than decimal values.
All user-defined Unicode mappings are listed in the Unicode Mapping tab in order of virtual key value, and then
by order of the shift state. If a Unicode mapping is not listed, the Unicode mapping is mapped to the default
Unicode value.
Adding and Changing Unicode Values
NOTE Keep in mind that if you plan to program additional macros beyond the Macro keys on
your keyboard, or if your keyboard is not equipped with dedicated macro keys, you
will need to use “Scancode Remapping” on page 4-42 to assign a keyboard key that
will act as a macro key.
NOTE Changes to Unicode mappings are not saved until you exit the Unicode Mapping tab
by tapping on [OK].
Draft #5
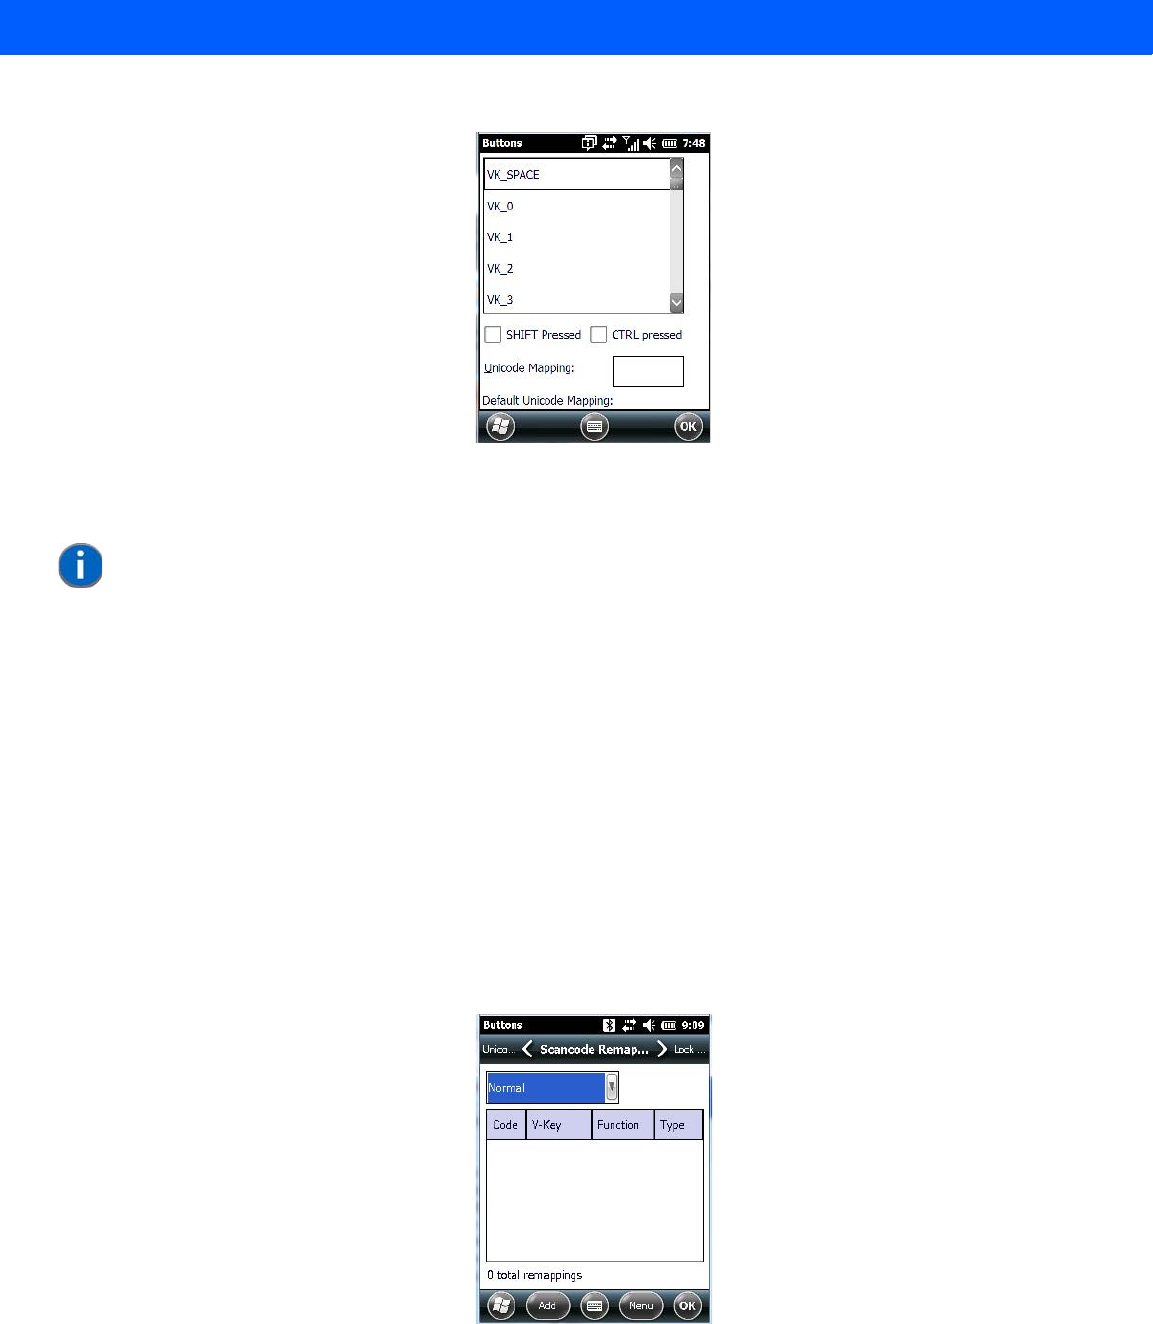
4 - 42 Workabout Pro4 (Windows Embedded Hand-Held 6.5) User Manual
• Tap on the Add/Edit button.
• Highlight a value in the Unicode mapping list.
• Position the cursor in the Unicode Mapping field, and type a Unicode value for the highlighted key.
Removing Unicode Values
• In the Unicode Mapping tab, highlight the item you want to delete, and tap on the Remove button.
Scancode Remapping
A scancode is a number that is associated with a physical key on a keyboard. Every key has a unique scan-
code that is mapped to a virtual key, a function, or a macro. Scancode Remapping allows you to change the
functionality of any key on the keyboard. A key can be remapped to send a virtual key (e.g. VK_F represents
the ‘F’ key; VK_RETURN represents the [ENTER] key, etc.), perform a function (e.g. turn the scanner on,
change volume/contrast, etc.) or run a macro.
There are four different tables of scancode mappings: the Normal table, the Orange table, the Blue table and
the Shift table. The Normal table defines unmodified key presses; the Blue table defines key presses that occur
when the [FN/BLUE] modifier is on; the Orange table defines key presses that occur when the [FN/ORANGE]
modifier is on; the Shift table defines key presses that occur when the [SHIFT] modifier is on. The default
mappings of these scancodes can be overwritten for each of these four tables using Scancode Remapping.
The first column in the Scancode Remapping tab displays the scancodes in hexadecimal. If the scancode is
remapped to a virtual key, that virtual key is displayed in the column labelled V-Key. In the column labelled
Function, virtual keys that are ‘Shifted’ or ‘Unshifted’ are displayed.
NOTE To add a shifted state – [SHIFT] and/or [CTRL], tap on the checkbox next to ‘SHIFT
Pressed’ and/or ‘CTRL Pressed’.
Draft #5
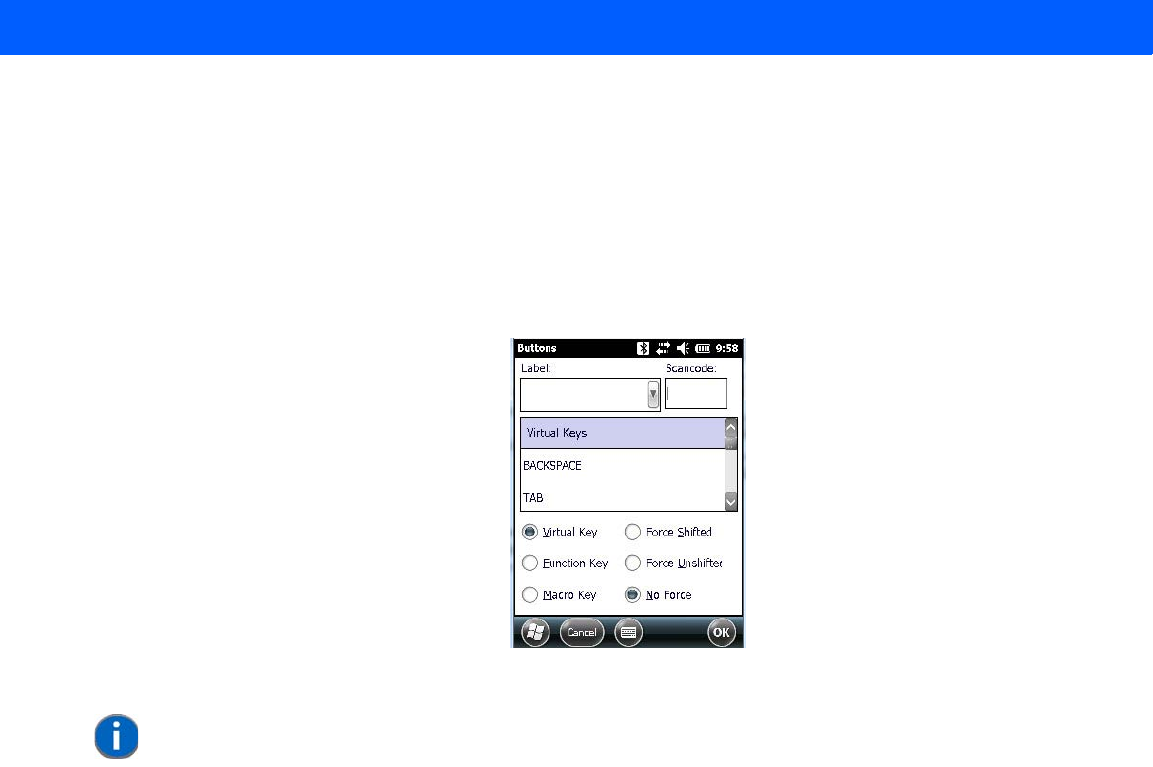
Settings 4 - 43
If the scancode is remapped to a function or a macro, the first and second columns remain blank while the third
column contains the function name or macro key number (e.g., Macro 2).
Adding a Remap
To add a new remapping:
•Tap the Add button at the bottom of the dialog box.
The Remap Scancode dialog box is displayed.
• Type the scancode in hexadecimal in the field labelled Scancode.
Virtual Key, Function and Macro
The radio buttons at the bottom of the dialog box allow you to define to what the scancode will be remapped to:
Virtual Key, Function or Macro.
When Virtual Key is selected, you can choose to force [SHIFT] to be on or off when the virtual key is sent. If No
Force is selected, the shift state is dependent on whether the shift state is on or off at the time the virtual key
is sent.
When Function is selected, a list of valid functions appears in the dialog box.
When Macro is selected, the macro keys available on your unit are listed in the dialog box.
• Choose Virtual Key>Function or Macro.
• Choose a function from the Function list, and tap on OK.
Editing a Scancode Remap
• In the Scancode Remapping tab, tap on the remap you want to edit.
• Tap on the Edit button, and make the appropriate changes.
•Tap on OK to save your changes.
Removing a Remap
• In the Scancode Remapping tab, highlight the scancode you want to delete, and tap on the Menu button,
and choose Remove.
•Tap on OK.
NOTE The Label field displays the default function of the scancode you are remapping.
Draft #5
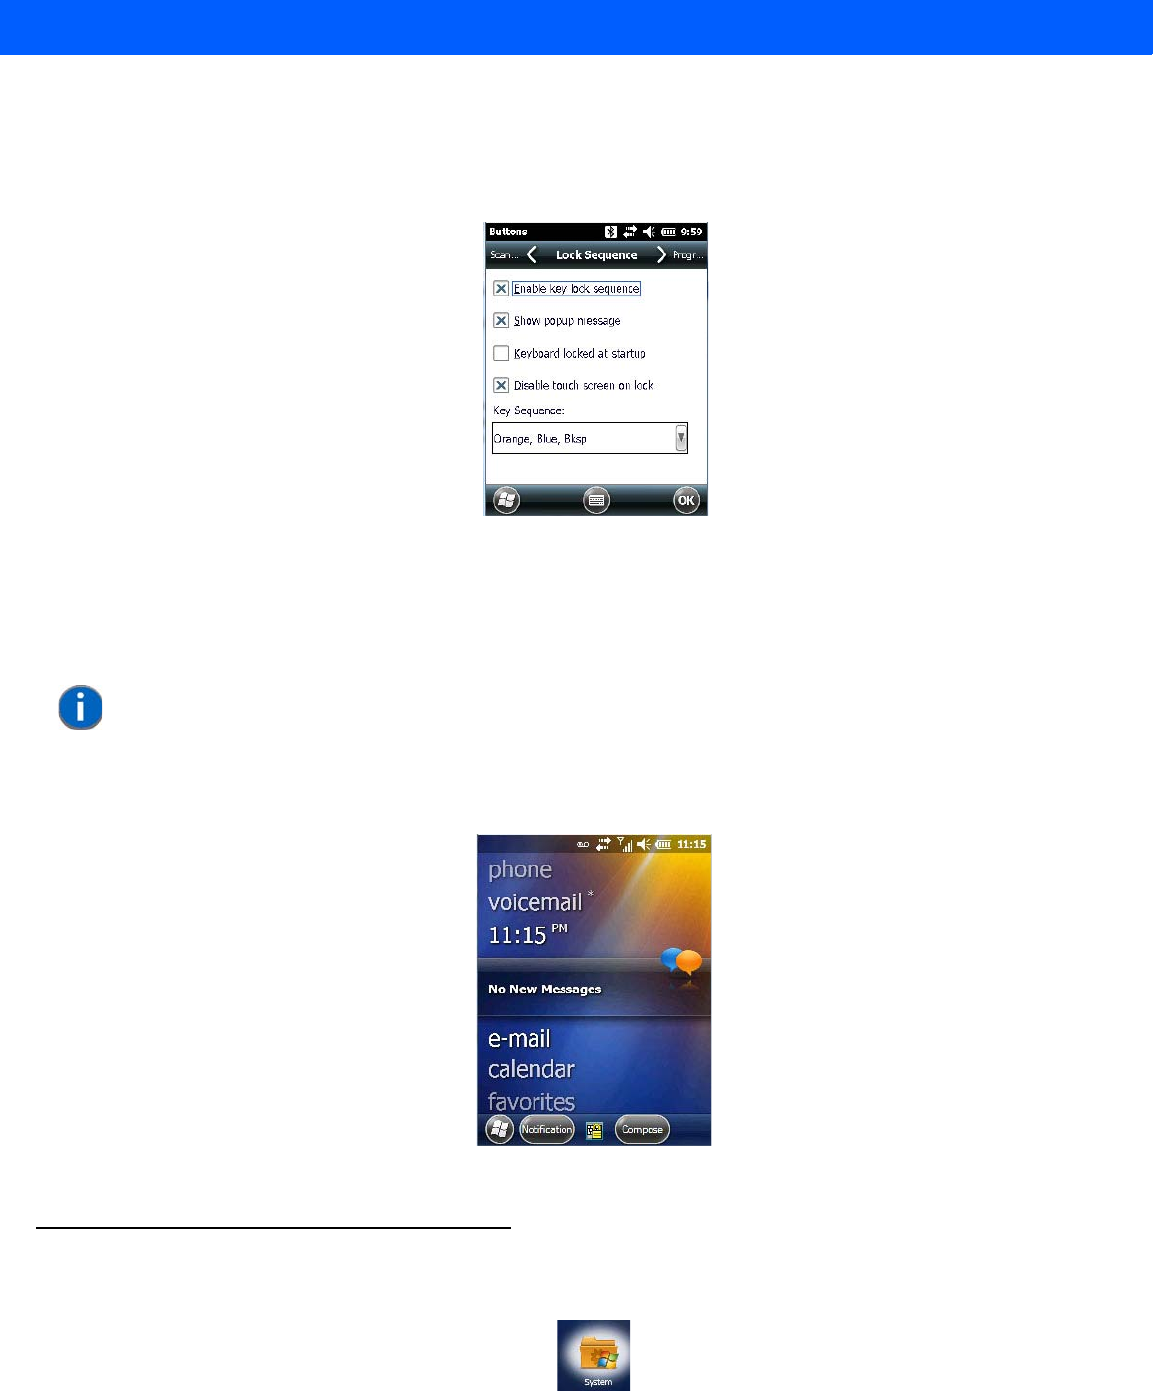
4 - 44 Workabout Pro4 (Windows Embedded Hand-Held 6.5) User Manual
Lock Sequence Tab
The Lock Sequence tab allows you to lock the hand-held keyboard to prevent keys from being pressed acci-
dentally when, for example, the unit is inserted in a holster.
• To lock the keyboard, tap in the checkbox next to Enable key lock sequence.
• Tap in the checkbox next to Keyboard locked at startup.
• In the Key sequence drop-down menu, choose the key sequence you need to type to unlock the keyboard.
• Reset the Workabout Pro4 – press and hold down the [FN/BLUE] key and the Power button.
A locked keyboard icon is displayed in the softkey bar when the keyboard is locked.
• Type the key sequence to unlock the keyboard.
System Folder
•Tap on Start>Settings>System icon to display a group of system apps.
NOTE It is useful to leave the Show popup message enabled (default) so that anyone
attempting to use the Workabout Pro4 keyboard will see the key sequence they will
need to enter to unlock the keyboard displayed on the screen.
Draft #5
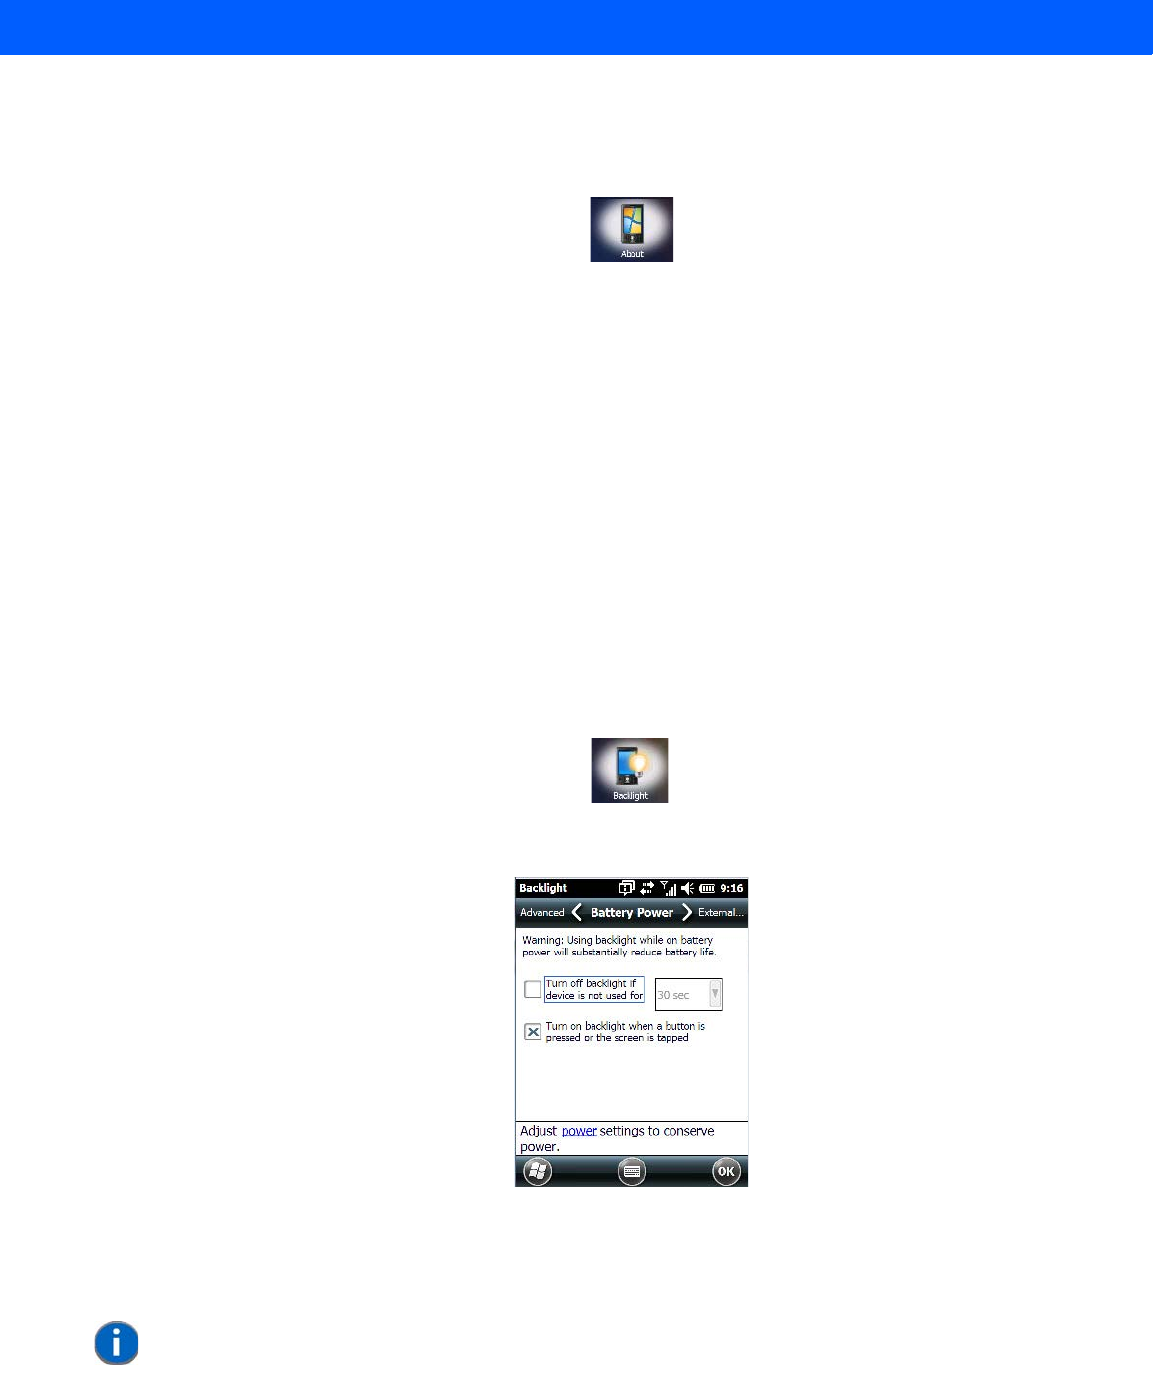
Settings 4 - 45
About
Tapping on Start>Settings>System tab, and then the About icon displays a grouping of tabs that provide device
information.
Version Tab
This tab outlines the Windows Embedded Handheld 6.5 Professional version, processor information, memory
size and a description of the expansion card, if one is in use.
Device ID Tab
This tab provides fields in which you can assign a Device name and Description (optional) for the Workabout
Pro4. This name is used by the Workabout Pro4 to identify itself to other devices.
Keep in mind that this must be a unique name across a network. If you are unable to connect to a network
because another device with the same name is already connected, you’ll need to assign a new name here.
Copyrights
The Copyrights tab lists the copyright information for the software loaded on your Workabout Pro4.
Backlight – Screen and Keypad
Tapping on Start>Settings>System icon followed by the Backlight icon allows you to determine the backlight
and power properties of the Workabout Pro4.
Battery Power Tab
This tab allows you to tailor the Workabout Pro4 backlight behaviour to best preserve battery life.
• To define how long the backlight should stay on when the Workabout Pro4 is not in use, tap in the check-
box to the left of Turn off backlight if device is not used for.
NOTE This option is essentially ‘suspend’ mode. If the backlight is turned off, tapping on the
screen or pressing a key displays the screen in which you were working before the
backlight turned off.
Draft #5

4 - 46 Workabout Pro4 (Windows Embedded Hand-Held 6.5) User Manual
• Tap on the drop-down menu, and choose the number of seconds or minutes the backlight will remain on
when the hand-held is idle.
•To Turn on backlight when a button is pressed or the screen is tapped, tap in the checkbox to the left
of this option.
External Power Tab
This tab determines the behaviour of the backlight when the hand-held is using external rather than battery
power. Refer to the instructions in “Battery Power Tab” on page 4-45.
Backlight Tab
This tab allows you to tailor the backlight behaviour of the Workabout Pro4 screen and keypad to best preserve
battery life. The top sliding button adjusts the screen brightness while the bottom sliding button adjusts the
keypad brightness.
• Slide the buttons to the left to decrease brightness and to the right to increase brightness.
Certificates
•Tap on Start>Settings, and then tap on the System icon.
• Tap on the Certificates icon.
A public key is transmitted as part of a certificate. The certificates listed in the Certificates tabs ensure that the
submitted public key is, in fact, the public key that belongs to the submitter. The hand-held checks that the
certificate has been digitally signed by a certification authority that the hand-held explicitly trusts.
Screen
backlight
Keypad
backlight
Draft #5
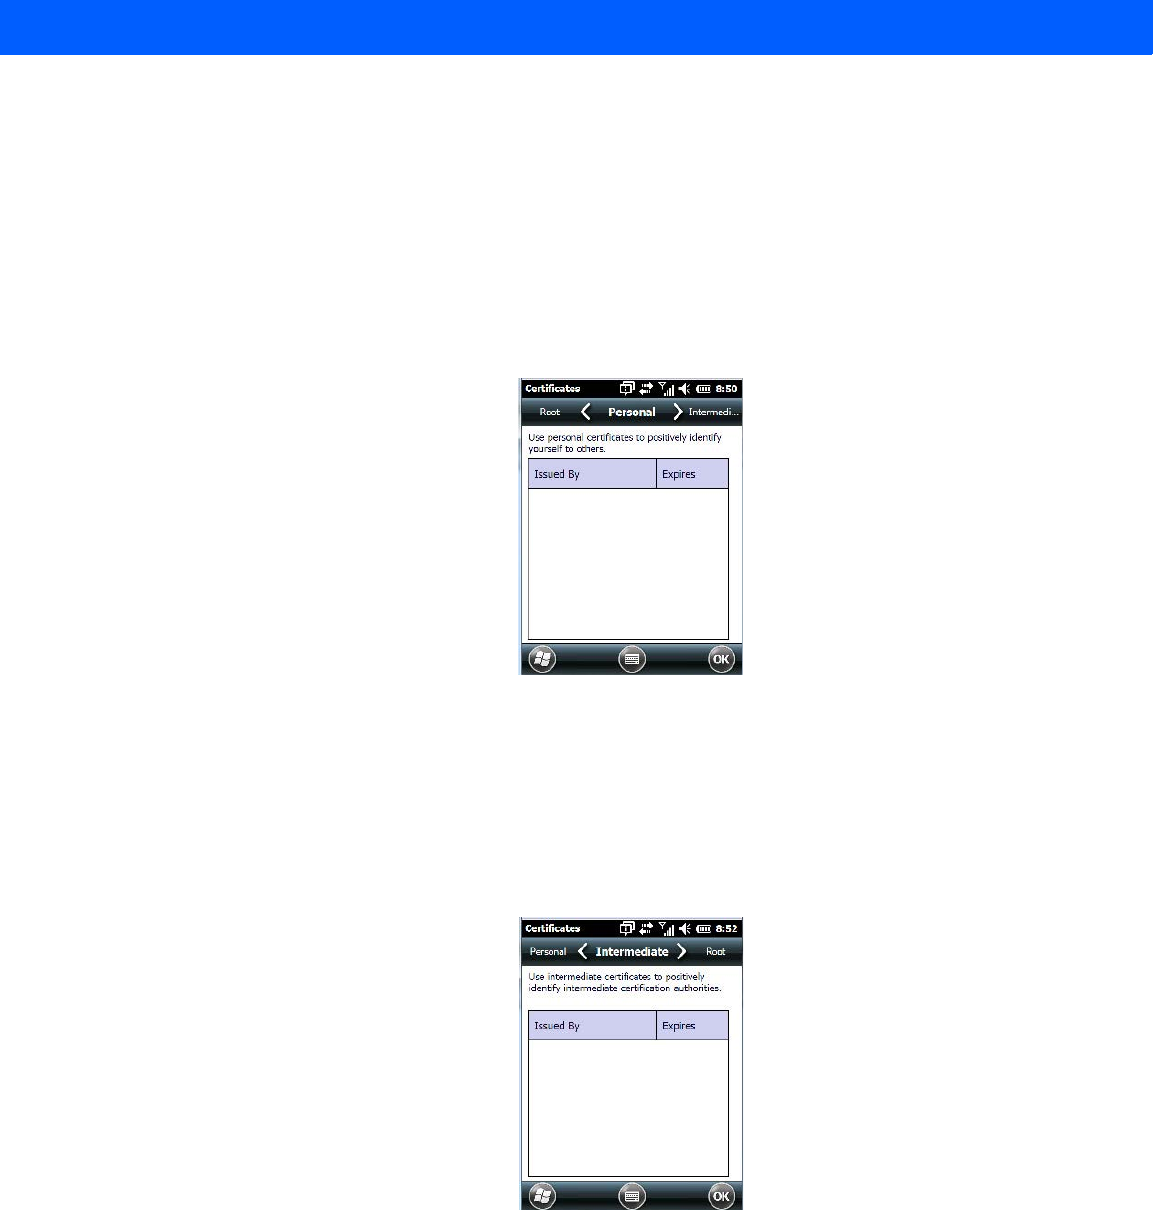
Settings 4 - 47
Your Workabout Pro4 has certificates already preinstalled in the unit. Personal certificates establish your iden-
tity, intermediate certificates, as the name suggests, identify intermediate certification authorities and root
certificates establish the identity of the servers with which you can connect.
Choosing a Certificate
Normally, certificates already configured for your network are chosen automatically by the Workabout Pro4. If a
certificate cannot be chosen automatically, you must choose it from the Certificates list.
• To choose a certificate, tap the desired certificate. Your Workabout Pro4 will connect automatically.
Personal Tab
The Personal tab lists the name of the certificate issuer and the expiration date.
• To view additional information about a personal certificate, tap on a certificate in the list.
• To delete a certificate, tap and hold the stylus on the item you want to delete until a pop-up menu is dis-
played. Tap on the Delete command.
Intermediate Certificates
The items in this list help identify intermediate certification authorities.
Draft #5
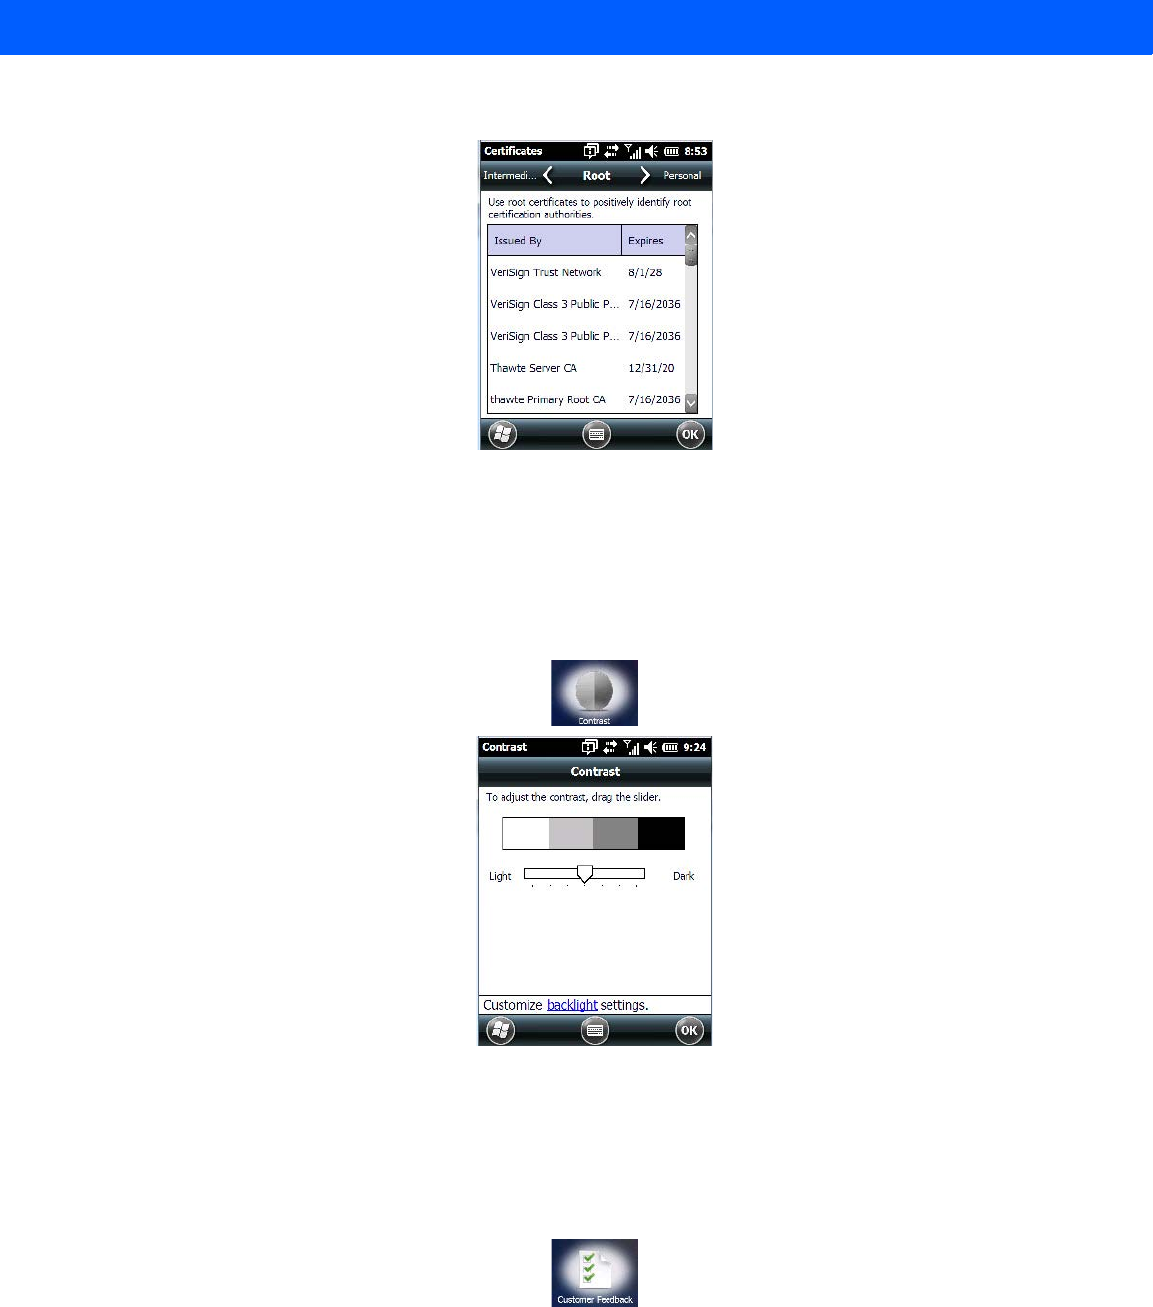
4 - 48 Workabout Pro4 (Windows Embedded Hand-Held 6.5) User Manual
Root Certificates
• To view details about a certificate – who issued the certificate, to whom it was issued, the issue date and
the expiry date – tap on a certificate in the list.
• To delete a certificate, tap and hold the stylus on a certificate. In the pop-up menu, tap on Delete.
Contrast
Tapping on the Contrast icon displays a screen in which you can tailor the screen contrast.
• Drag the sliding button between Light and Dark to achieve the desired screen colour contrast.
Customer Feedback
This option allows Microsoft to track how you use your Workabout Pro4 so that they can make improvements
to the software. The radio buttons in this screen allow you to turn this feature on or off.
Dr. Debug
Dr. Debug is an error diagnostic tool.
Draft #5
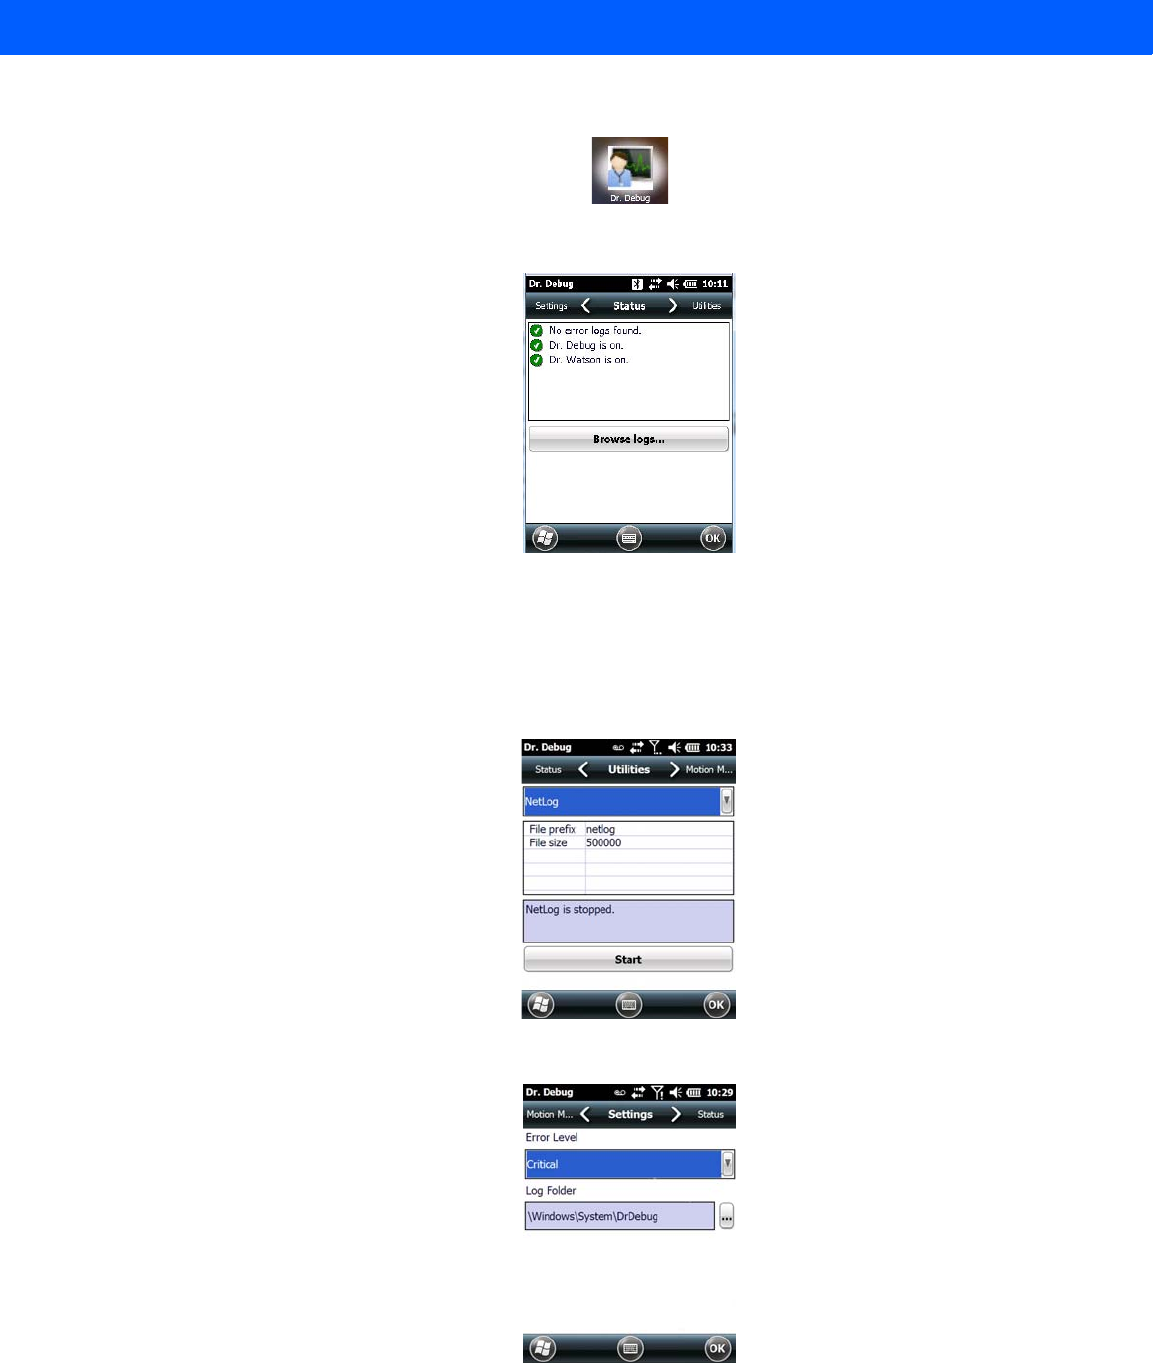
Settings 4 - 49
•Tap on Start>Settings>System. Tap on the Dr. Debug icon.
Status
This tab indicates the status (on/off) of the tools. Tapping on Browse logs displays error logs for your review.
Utilities
There are a number of utilities available through Dr. Debug. The NetLog utility is used to log network traffic.
The RilLog utility captures Radio Interface Layer (RIL) debug outputs. When you tap on the Start button, debug
data is collected so that, if necessary, it can be forwarded to a technician for evaluation.
Settings
• Choose an Error Level from the drop-down menu.
Draft #5
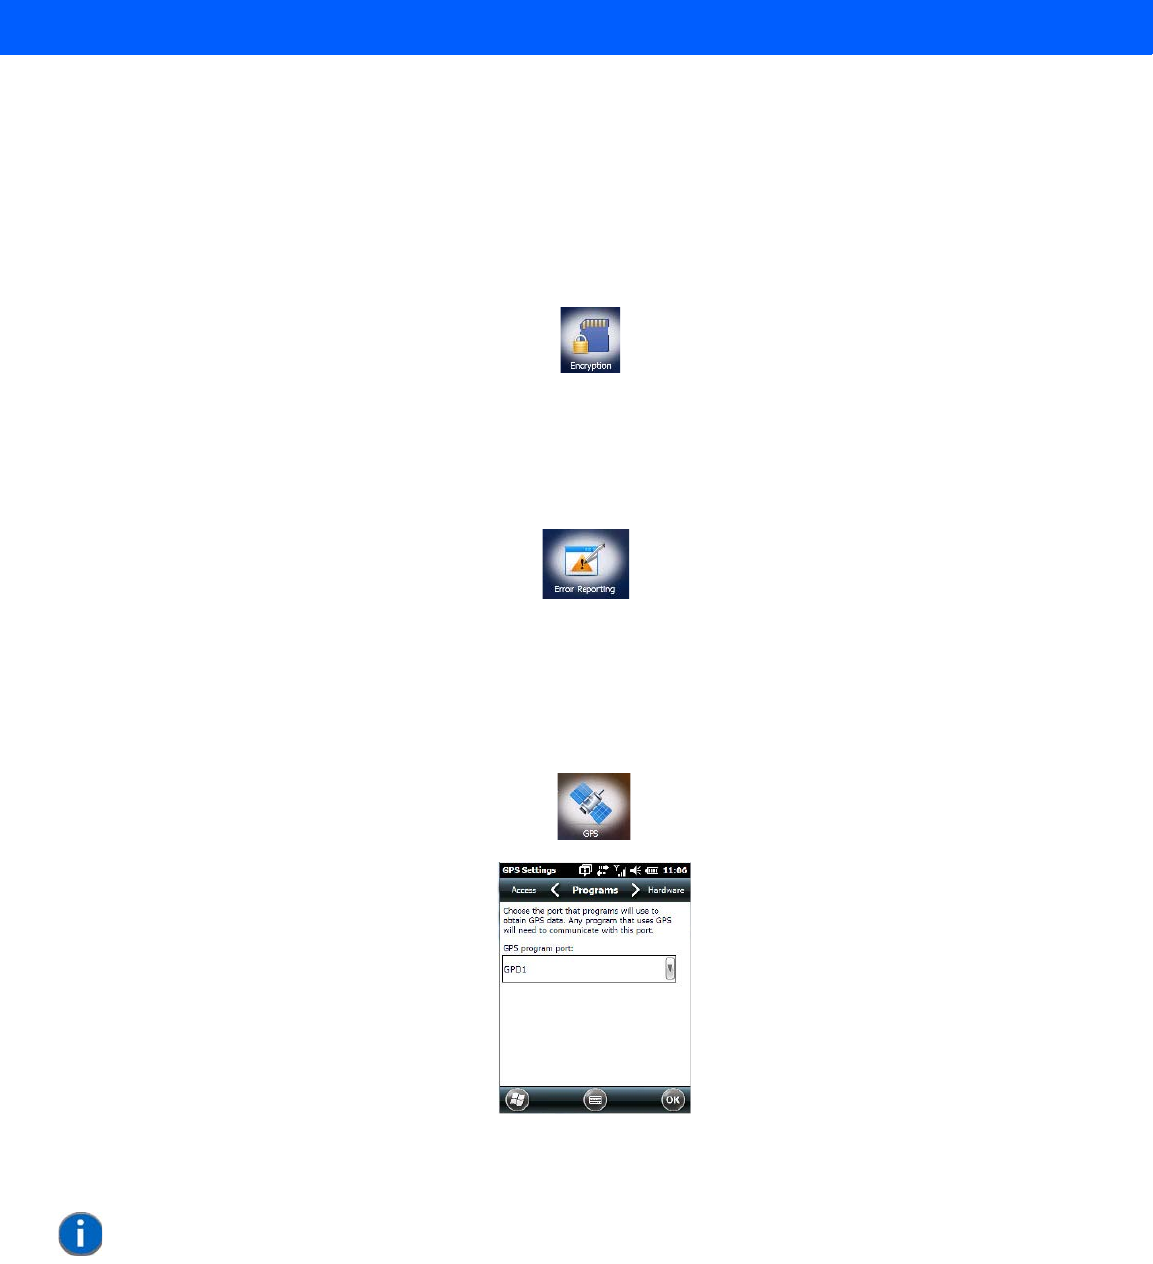
4 - 50 Workabout Pro4 (Windows Embedded Hand-Held 6.5) User Manual
• To change the location where debug information will be stored, tap on the button to the right of the Log
Folder option.
Encryption
This option allows you to encrypt the data on your storage card.
•Tap on Start>Settings>System tab>Encryption icon.
Error Reporting
Error Reporting allows you to enable or disable Microsoft error reporting prompts.
•Tap on Start>Settings. Tap on the System icon followed by the Error Reporting icon.
GPS (Global Positioning System)
With a Global Positioning System (GPS) receiver, you can locate your exact position on a map. However, even
without a GPS receiver, several different mapping programs can run on your Workabout Pro4.
•Tap on Start>Settings>System tab>GPS icon.
• Tap on the GPS program port drop-down menu, and choose the communication port that the GPS soft-
ware will use to communicate with the GPS receiver.
Windows Embedded Hand-Held automatically manages access to the GPS receiver. However, some
programs may not work with automatic configuration. If this is the case:
• Tap on the Access tab, and disable Manage GPS automatically (recommended).
NOTE Your Workabout Pro4 may automatically detect the GPS receiver that you are using
and enter the settings in the Hardware tab. If not, you’ll need to enter this information
yourself. You can find this information in the user manual of the GPS receiver.
Draft #5
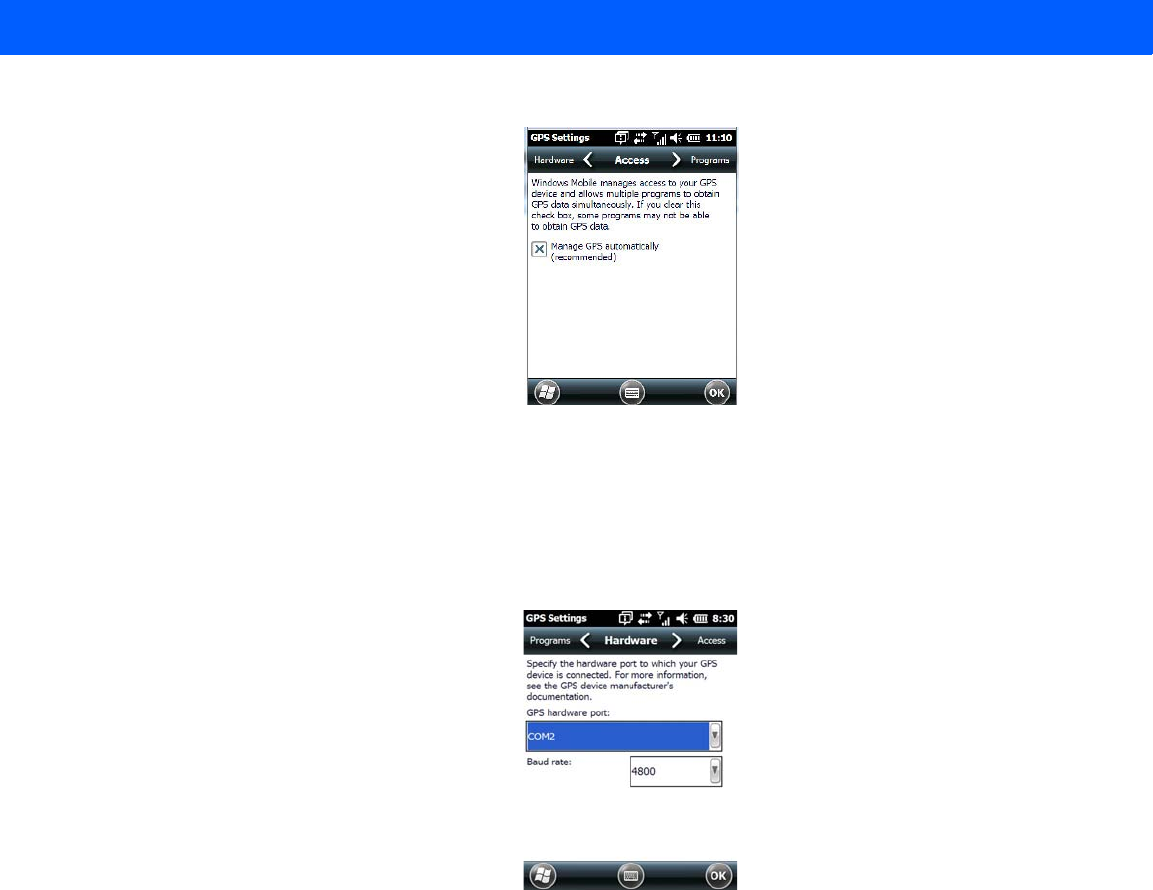
Settings 4 - 51
You can go to:
http://www.microsoft.com/windowsphone/en-gb/howto/wp7/web/use-maps-to-find-a-place.aspx
if a map-viewing program is not included with your Workabout Pro4, and copy the file to your Workabout Pro4.
• Tap on the Hardware tab, and set the GPS hardware port to COM2. Set the Baud rate to 4800.
Manage Triggers
Manage Triggers allows you to configure how barcode scanners and other devices are triggered. You can
configure the trigger ID for each trigger button for both single- and double-click, and the double-click time.
Draft #5
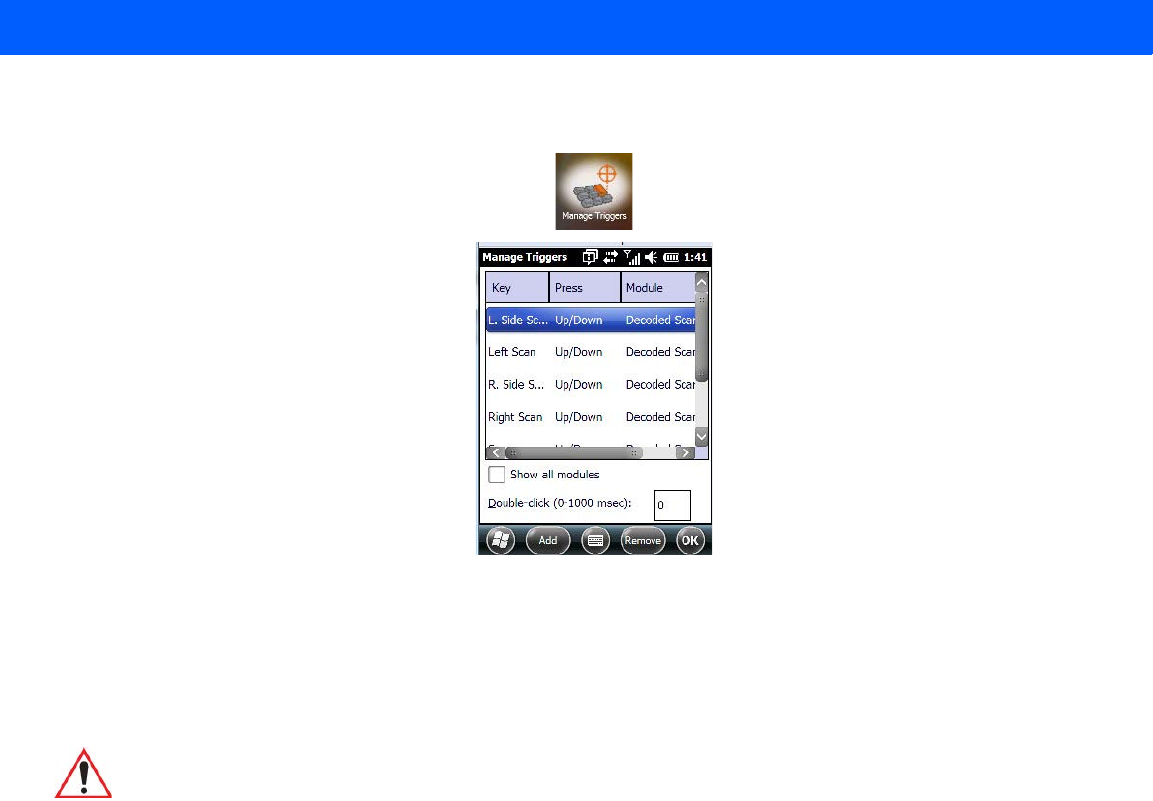
4 - 52 Workabout Pro4 (Windows Embedded Hand-Held 6.5) User Manual
•Tap on Start>Settings>System>Manage Triggers icon.
Trigger Mappings
A trigger mapping is an association between a particular key on the keyboard and a driver or application, the
module(s) – sometimes referred to as “trigger consumer(s)” – of the trigger source. Along with keyboard keys,
trigger sources can also be grip triggers, external hardware triggers or software-based. When the specified key
is pressed, the trigger consumer (for example, a decoded scanner) is sent a message.
Double-Click
When a key is pressed and released, then pressed again within the configured time (between 0 to 1000 milli-
seconds), a double-click occurs. See also “Trigger Press Type” on page 4-53.
Show All Modules
By default, the trigger mapping list only shows active mappings. Mappings for drivers or applications that are
not currently active are not normally displayed. By checking this checkbox, all mappings, both active and inac-
tive, are displayed.
Add
Tapping this button brings up the Add mapping dialog (see below), so that you can add new trigger mappings.
Edit
Tapping this button brings up the Edit mapping dialog, so that you can edit existing trigger mappings.
Remove
Tapping this button removes an existing mapping.
IMPORTANT It is not possible to have two or more identical mappings — for example
[F1] cannot be mapped to the Non-Decoded Scanner twice — even if the
trigger type is different.
A keyboard key that is used as a trigger source will no longer generate
key data or perform its normal function. For example, if the space button
is used as a trigger source, it will not be able to send space characters
to applications.
Draft #5
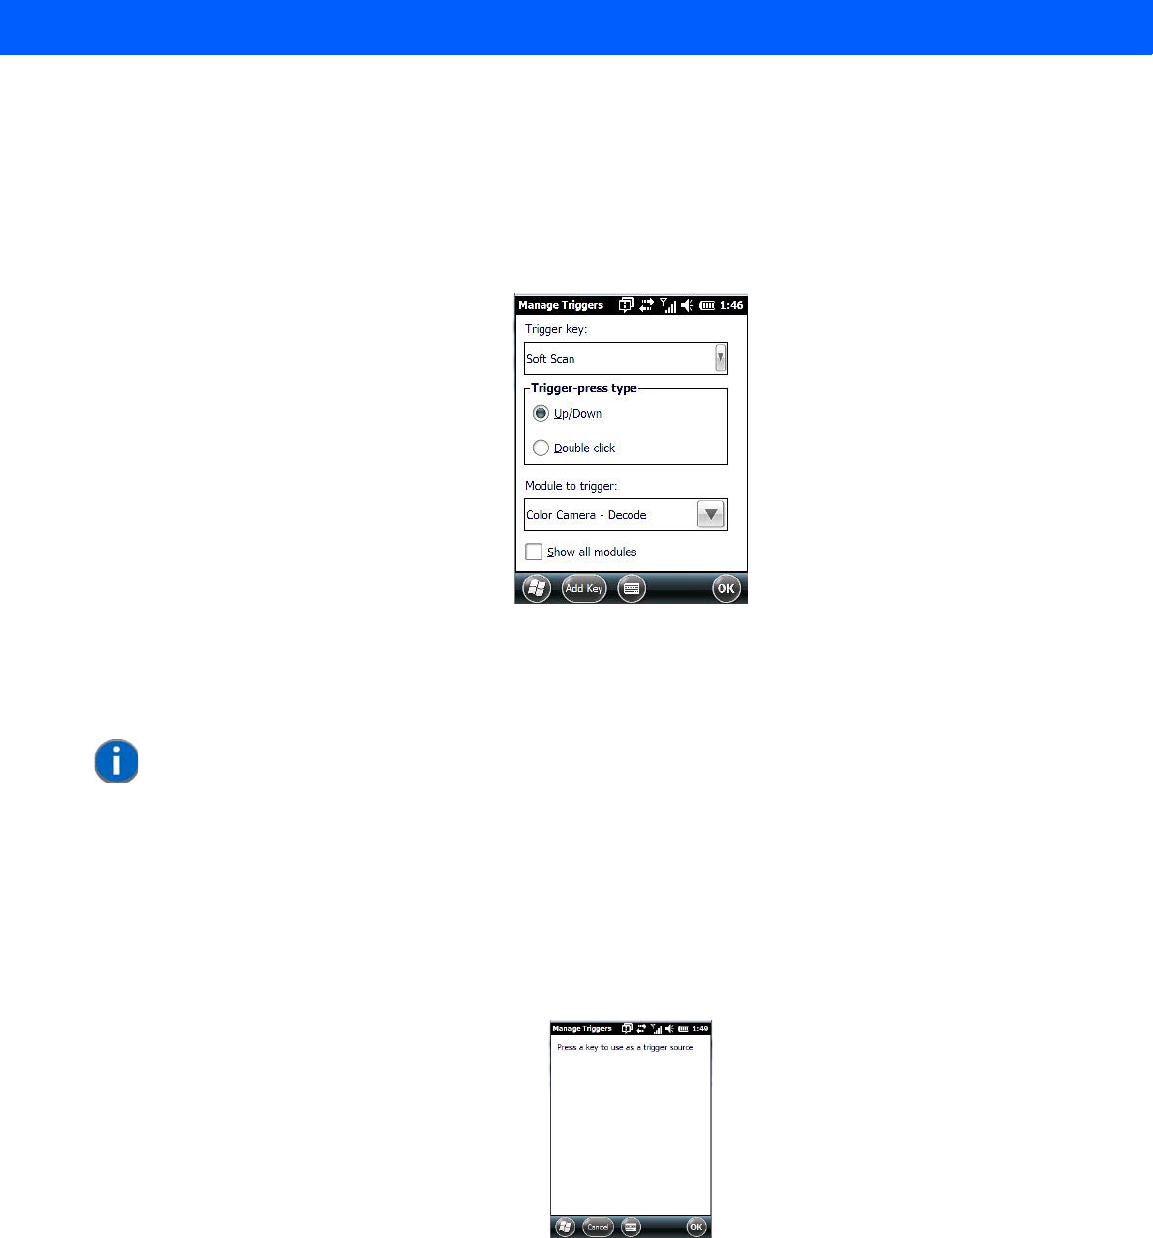
Settings 4 - 53
OK
The OK button in the Manage Triggers screen saves all changes made. If the [ESC] key is pressed, all
changes are discarded.
Add and Edit Trigger Mapping
•Tap on Add to add a new trigger map, or tap on Edit to edit an existing trigger map.
Trigger Key
This drop-down list allows you to specify the source of the trigger events, such as the Grip Trigger, Left Scan,
etc., for the trigger module selected.
Add Key
Only existing trigger sources are shown in the Source combo-box. To add a new source to this list, tap on the
Add Key button. A dialog box pops up, allowing you to select the keyboard key to use as a trigger source.
Trigger Press Type
You can enable either an Up/Down or Double Click response to a trigger press. Normally, when a trigger
(keyboard key, etc.) is pressed and released, a “trigger down” event is sent to the “owner” – that is, the applica-
tion receiving the trigger press information – followed by a “trigger up”. If Double Click is chosen in this menu,
when the trigger is pressed, released, and then pressed again, a “double-click” event will occur. If a mapping
NOTE It is possible to map the same source to different modules (trigger consumers) – for
example, to both the Imager and Non-Decoded Scanner. If so, both devices/opera-
tions will occur simultaneously. This is not recommended in most cases, especially
with devices such as Imagers.
It is also possible to map different sources to the same module (trigger consumer).
Draft #5
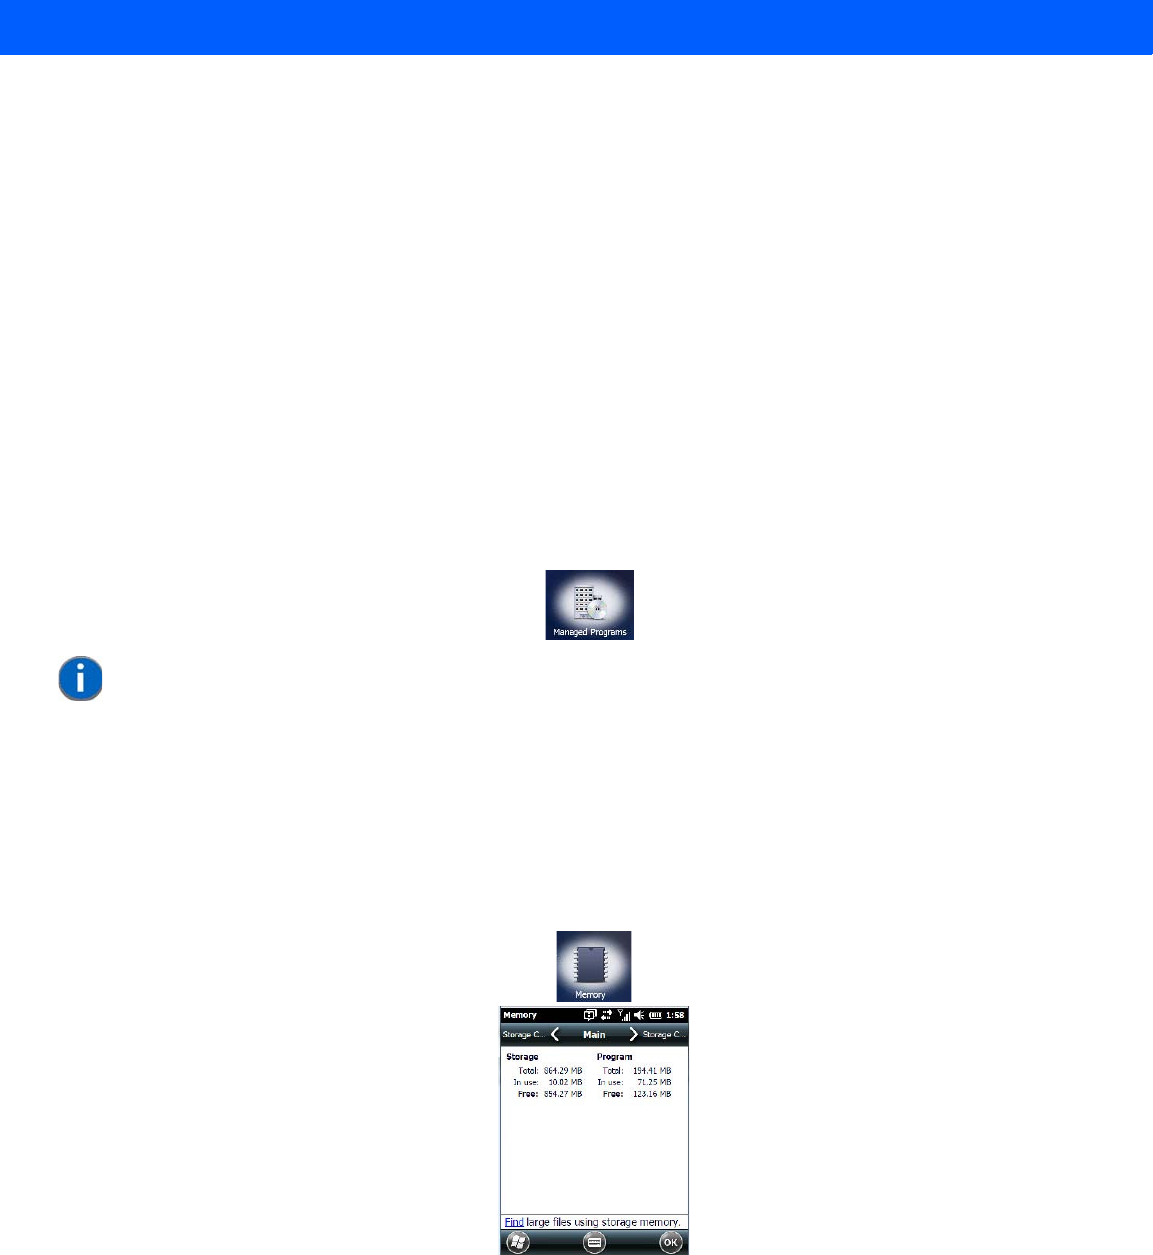
4 - 54 Workabout Pro4 (Windows Embedded Hand-Held 6.5) User Manual
with the Up/down type has also been configured for the same source, it will only receive the first set of
trigger events.
Module to Trigger
This identifies the driver or application receiving the trigger presses.
Show All Modules
By default, inactive owners are not shown. By checking this checkbox, all owners, both active and inactive, are
displayed.
Managed Programs
Managed Programs lets you view, download and install applications that are deployed by the System Center
Mobile Device Manager (a server-side solution that helps enable IT to have control of their device deployment
with respect to security, management and access to the corporate network).
To access Managed Programs:
•Tap on Start>Settings>System tab>Managed Programs icon.
Memory
This applet allows you to view memory use and storage card memory allocation. To display the options for this
applet:
•Tap on Start>Settings. Tap on the System tab followed by the Memory icon.
Main Tab
This tab lists the memory allocated for file and data storage and for program storage.
NOTE The system administrator can provide the details needed Managed
Programs effectively.
Draft #5
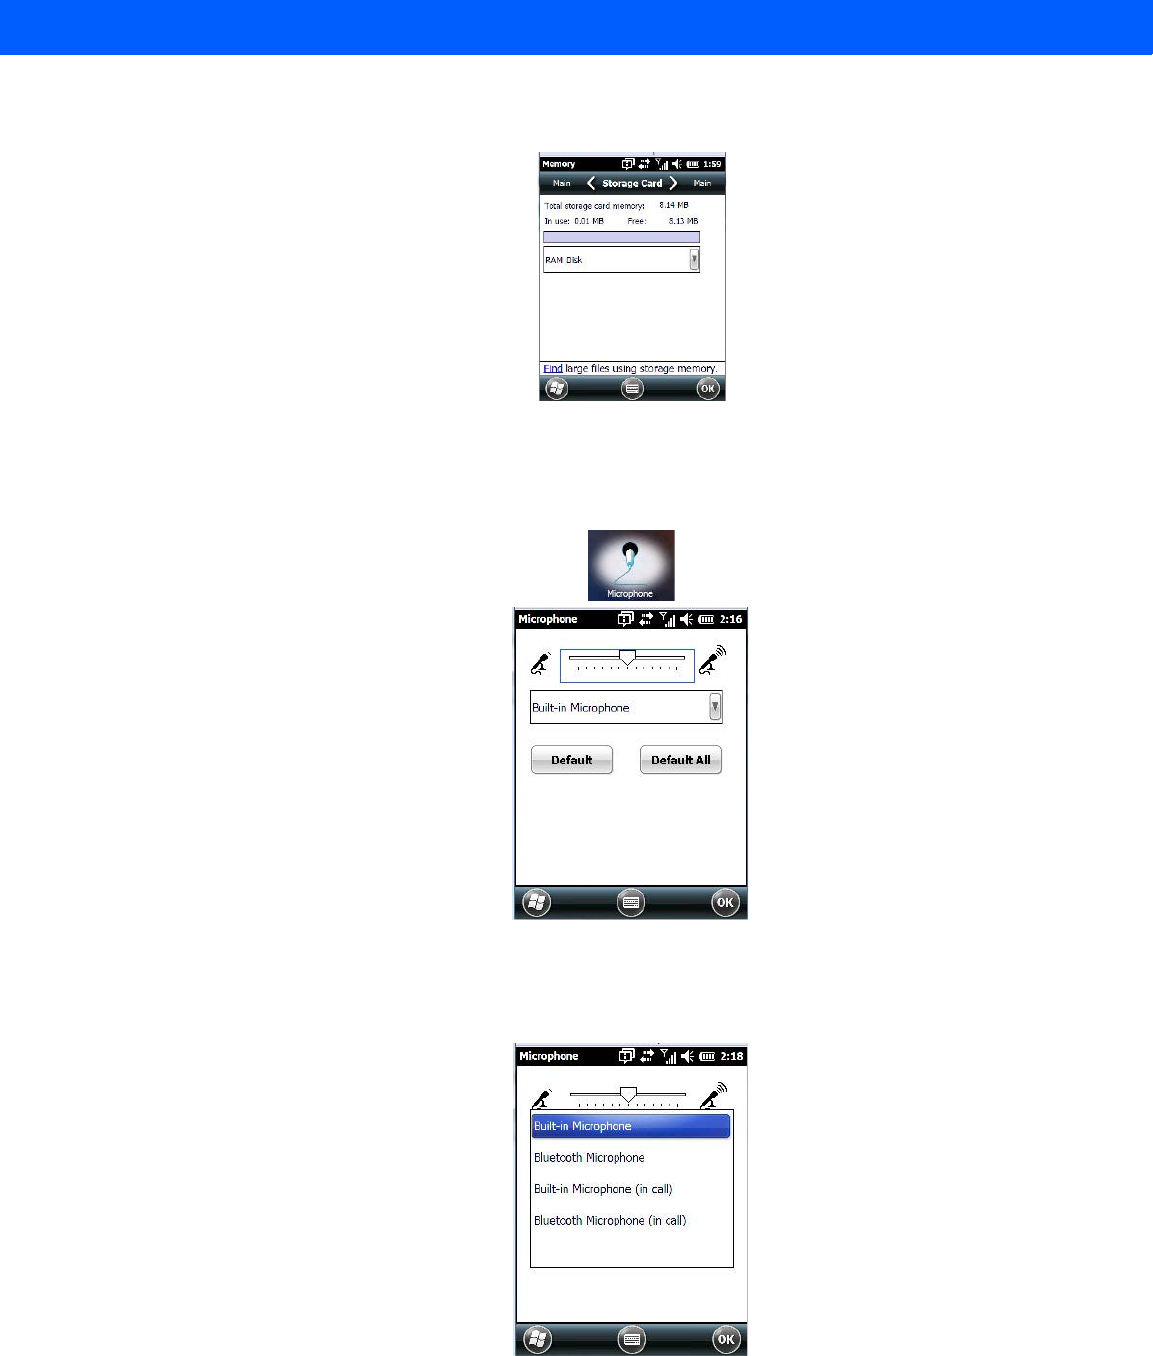
Settings 4 - 55
Storage Card
The Storage Card screen indicates the total storage card or RAM disk memory along with the amount in use.
Microphone
Use this dialog box to adjust the gain for the specific microphones associated with your hand-held.
• Tap on the drop-down menu, and choose the microphone for which you want to adjust the gain.
• Slide the tab at the top of the dialog box to the left to decrease the gain and to the right to increase
the gain.
Draft #5
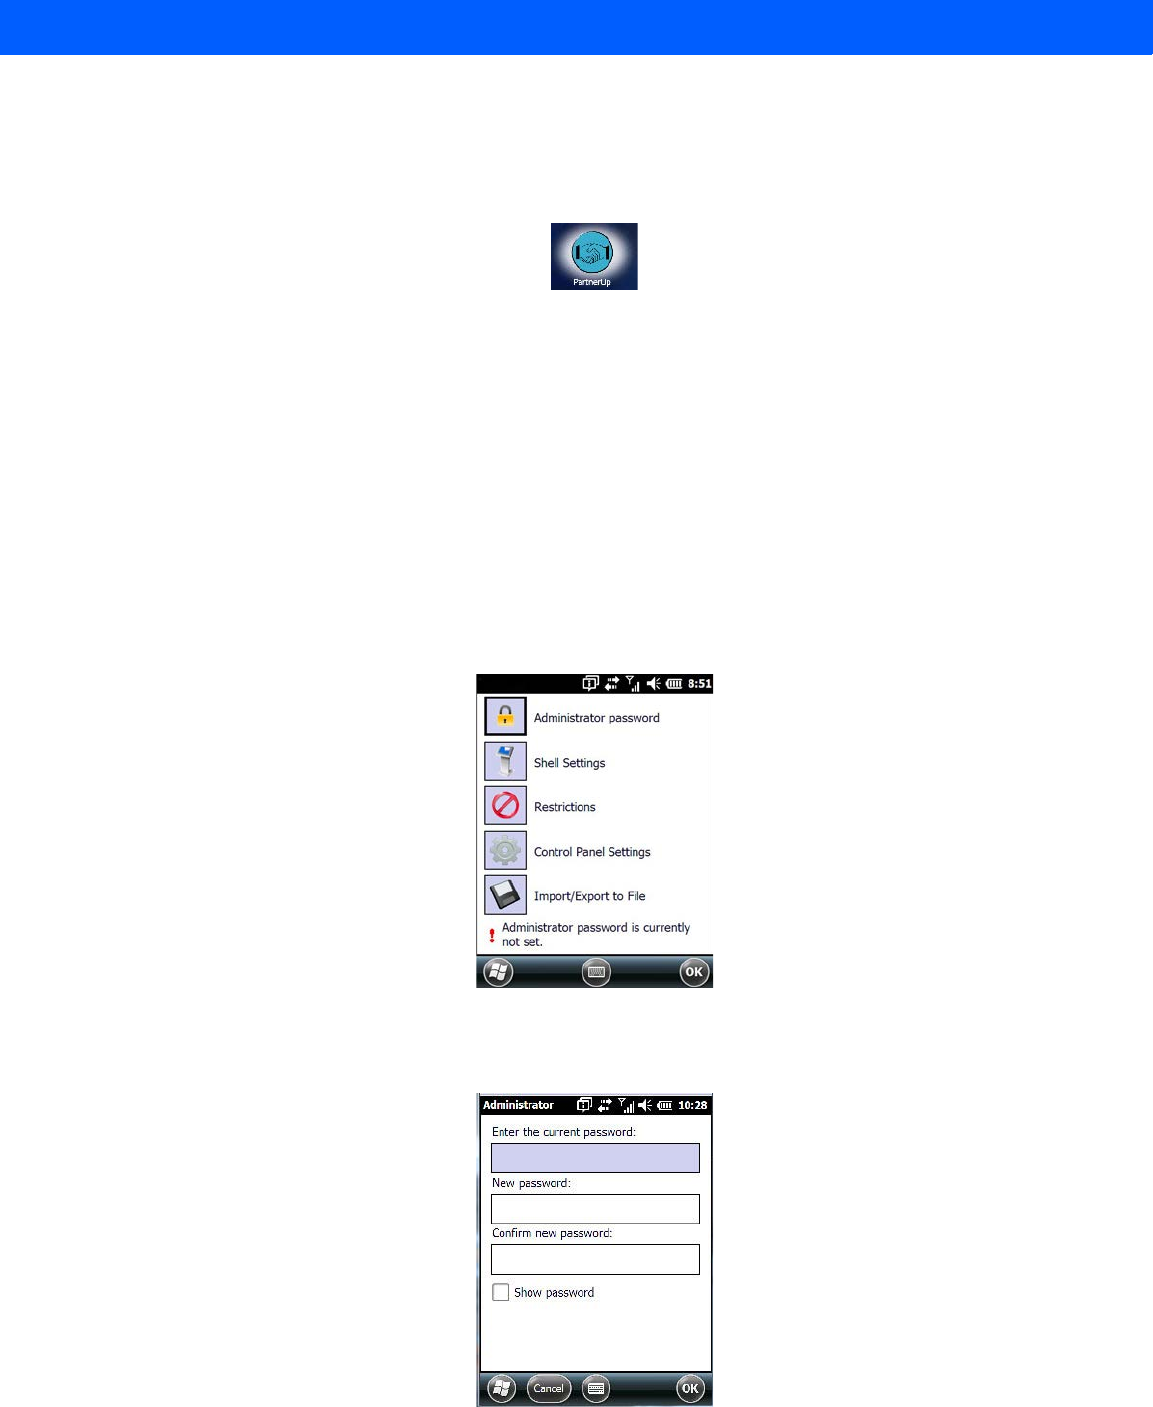
4 - 56 Workabout Pro4 (Windows Embedded Hand-Held 6.5) User Manual
Tapping on the Default button sets the current microphone you’ve chosen to the default gain. Tapping on
Default All sets all microphones listed to their default gain.
PartnerUp
Tapping on this icon displays a number of pre-loaded applications. Tapping on an app in the list takes you to an
associated web site.
The operator can then install the application. If a license is required, it can be obtained by sending an e-mail to
the software license mailbox or by contacting a Sales Rep.
Tapping on a preloaded client in the PartnerUp screen displays a drop-down menu from which the operator can
choose from an array of related options.
HomeVU
HomeVU allows the administrator to tailor how the Workabout Pro4 operates and the options the user can
access. Note that the look of the Today screen will change from icons that are finger accessible to a list of
items best accessed using a stylus.
•Tap on Start>Settings>System>HomeVU icon.
If an administrator password is not yet set, this is indicated at the bottom of this screen. Tapping on the Admin-
istrator Password option displays the following screen.
Draft #5
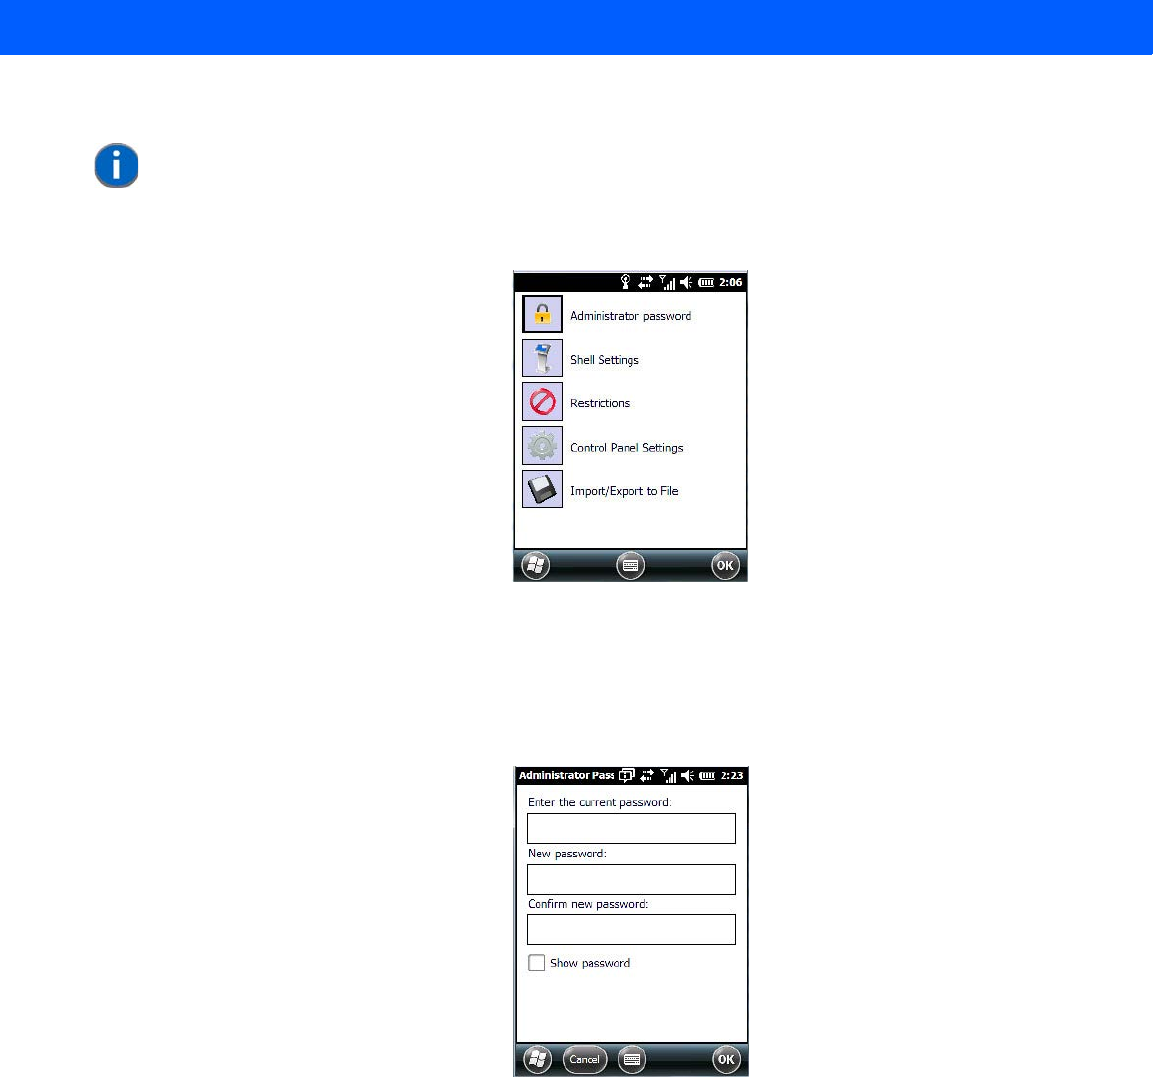
Settings 4 - 57
• Type a New password, and then re-enter it in the Confirm new password field.
HomeVU Menu
The HomeVU menu provides access to the categories to help you tailor the look and operation of the Worka-
bout Pro4 for the user.
Administrator Password
If you want to change an existing password, you need to complete the Administrator Password screen:
• Tap on the Administrator password option, and type your current password.
• In the next field, type a New password. Retype the new password in the Confirm new password field,
and tap on OK.
Shell Settings
The Shell Settings option allows the administrator to tailor what operators see and what is available to them
when Workabout Pro4 is powered on. Note that these changes are not visible until the unit switches from
Administrator Mode to User Mode. A HomeVU Access screen, the screen in which you can switch from
Administrator to User Mode, is displayed automatically once you’ve finished making changes and have tapped
on OK.
Applications Tab
This tab allows the administrator to choose the applications that will be available to the user.
NOTE Once an administrative password is assigned, each time HomeVU is launched, a
dialog box will be displayed requesting the password.
Draft #5
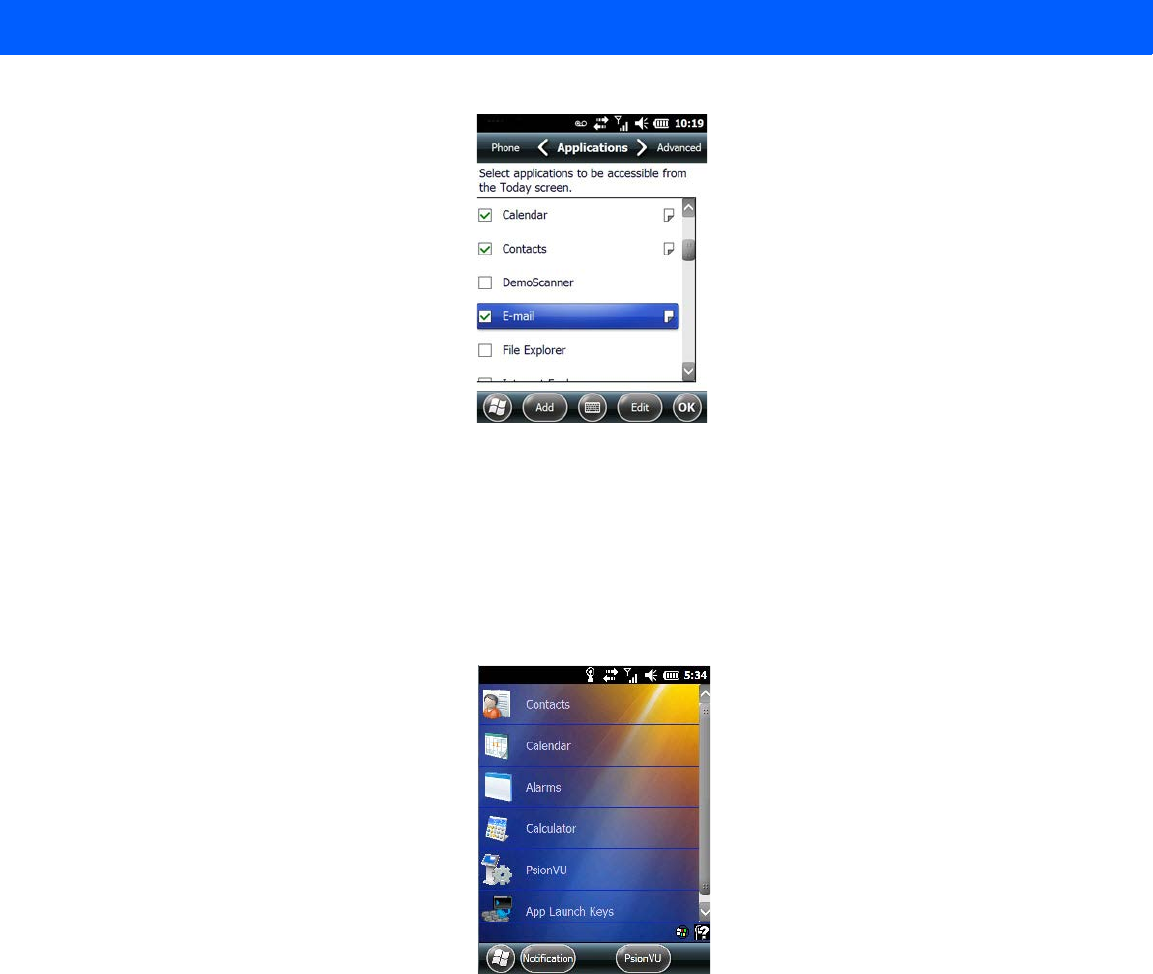
4 - 58 Workabout Pro4 (Windows Embedded Hand-Held 6.5) User Manual
• Tap in the checkbox next to each application you want displayed on the Today screen.
Once the Workabout Pro4 is set to User Mode, the selected items from the Application screen are listed in the
Today screen. A HomeVU Access screen, the screen in which you can switch from Administrator to User
Mode, is displayed automatically once you’ve finished making changes and have tapped on OK. See “Acti-
vating a Change – User Mode” on page 193 details.
The look of the Today screen differs significantly from the original version, appearing as a list of available items
more suitable for a stylus than finger touch.
Adding Applications
The Add and Edit buttons allow you to search for applications in the storage areas on your Workabout Pro4
(e.g., Windows, My Device, etc.), and add applications to the list of items in the Today screen.
You can add a maximum of 18 applications, after which the Add button is greyed out. and the following
message is displayed: Maximum 18 entries reached.
• To add additional applications that will be accessible to the user from the Today screen, tap on the Add
button at the bottom of the Application screen. The Select File screen is displayed.
Draft #5
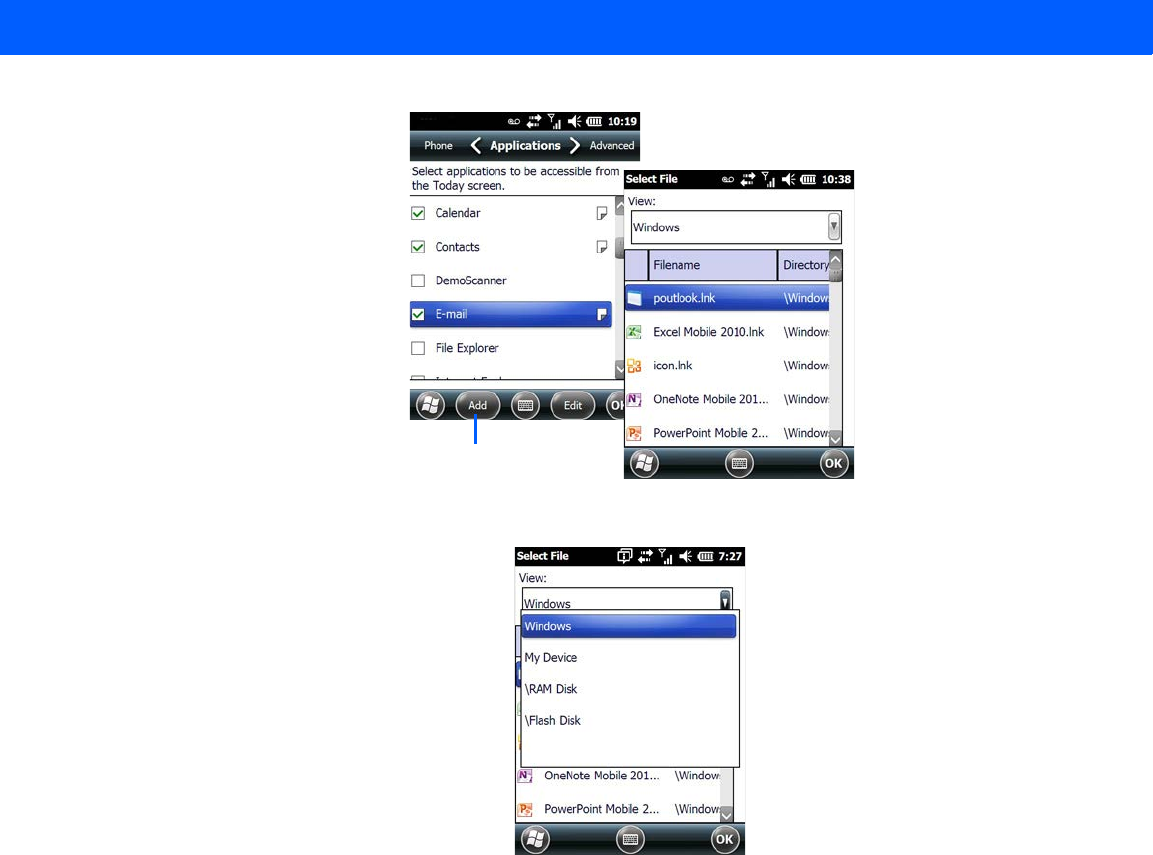
Settings 4 - 59
The View drop-down menu at the top of this screen displays the storage areas in the Workabout Pro4.
Tapping on a storage area – Windows for example – displays the applications you can add to the Today screen
from that storage area.
Tap here
Draft #5
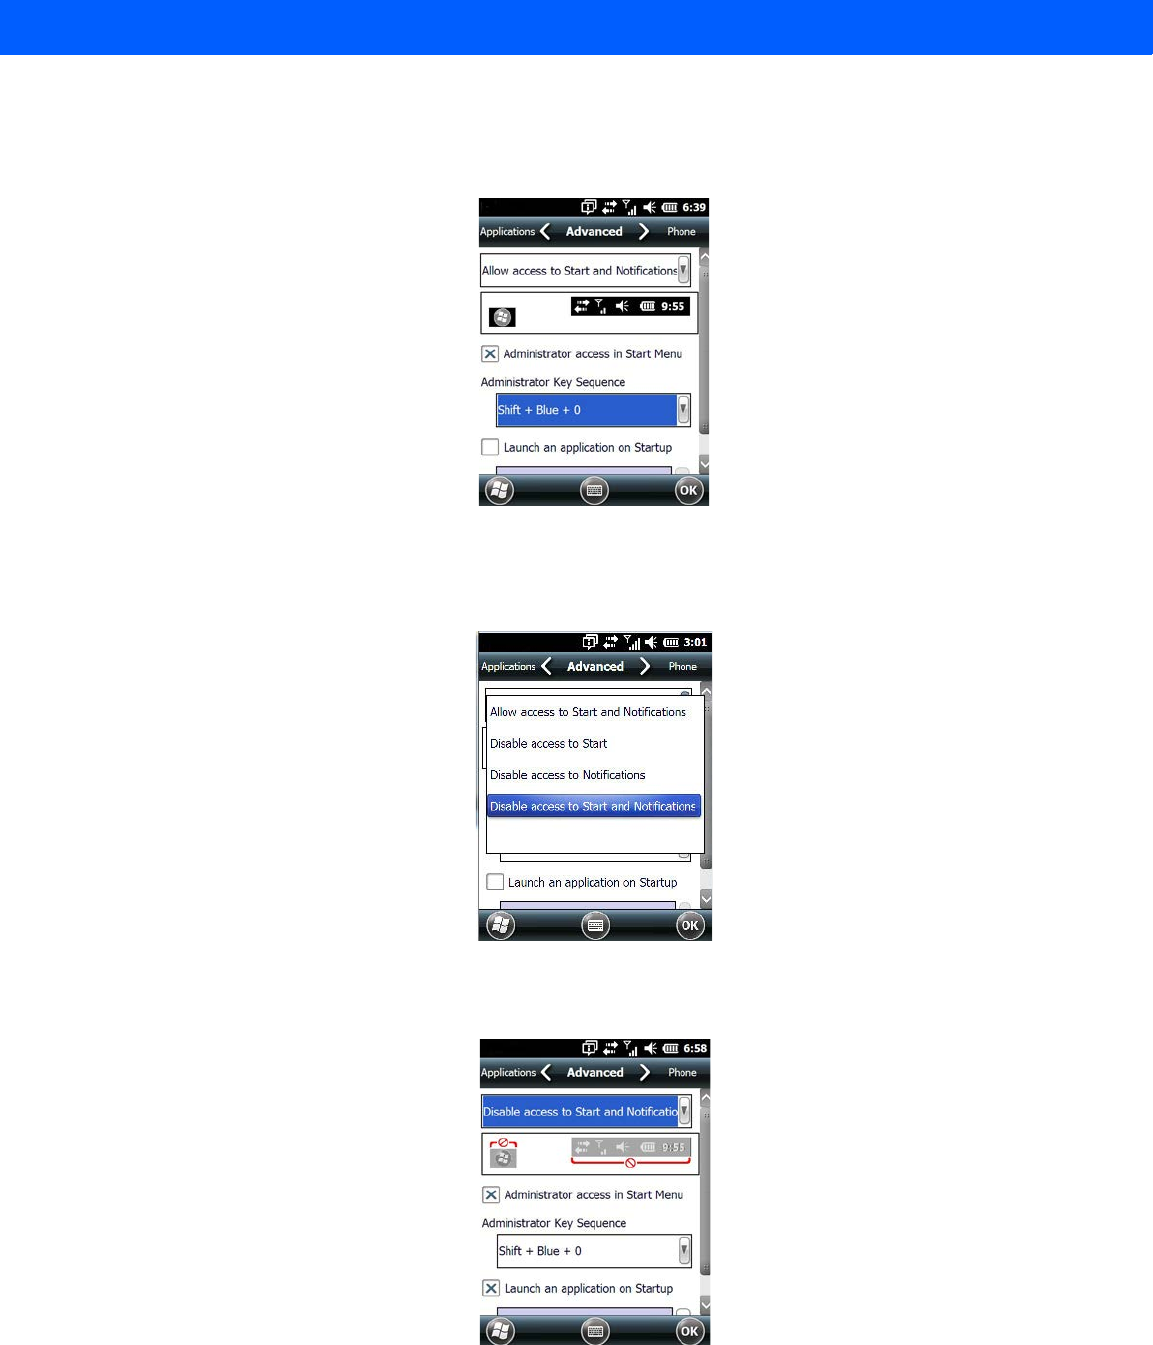
4 - 60 Workabout Pro4 (Windows Embedded Hand-Held 6.5) User Manual
Advanced Tab
This tab provides a number of options to restrict what is available on start up.
Start Button and Notification Restrictions
The drop-down menu at the top of the Advanced tab allows you to limit access to the Notifications at the top of
the screen and the Start button at the bottom of the screen.
When you choose an option, for example, Disable access to Start and Notifications, the sample bar below the
drop-down menu marks the disallowed items in red.
HomeVU App Restrictions
To remove HomeVU from the Start screen:
Draft #5
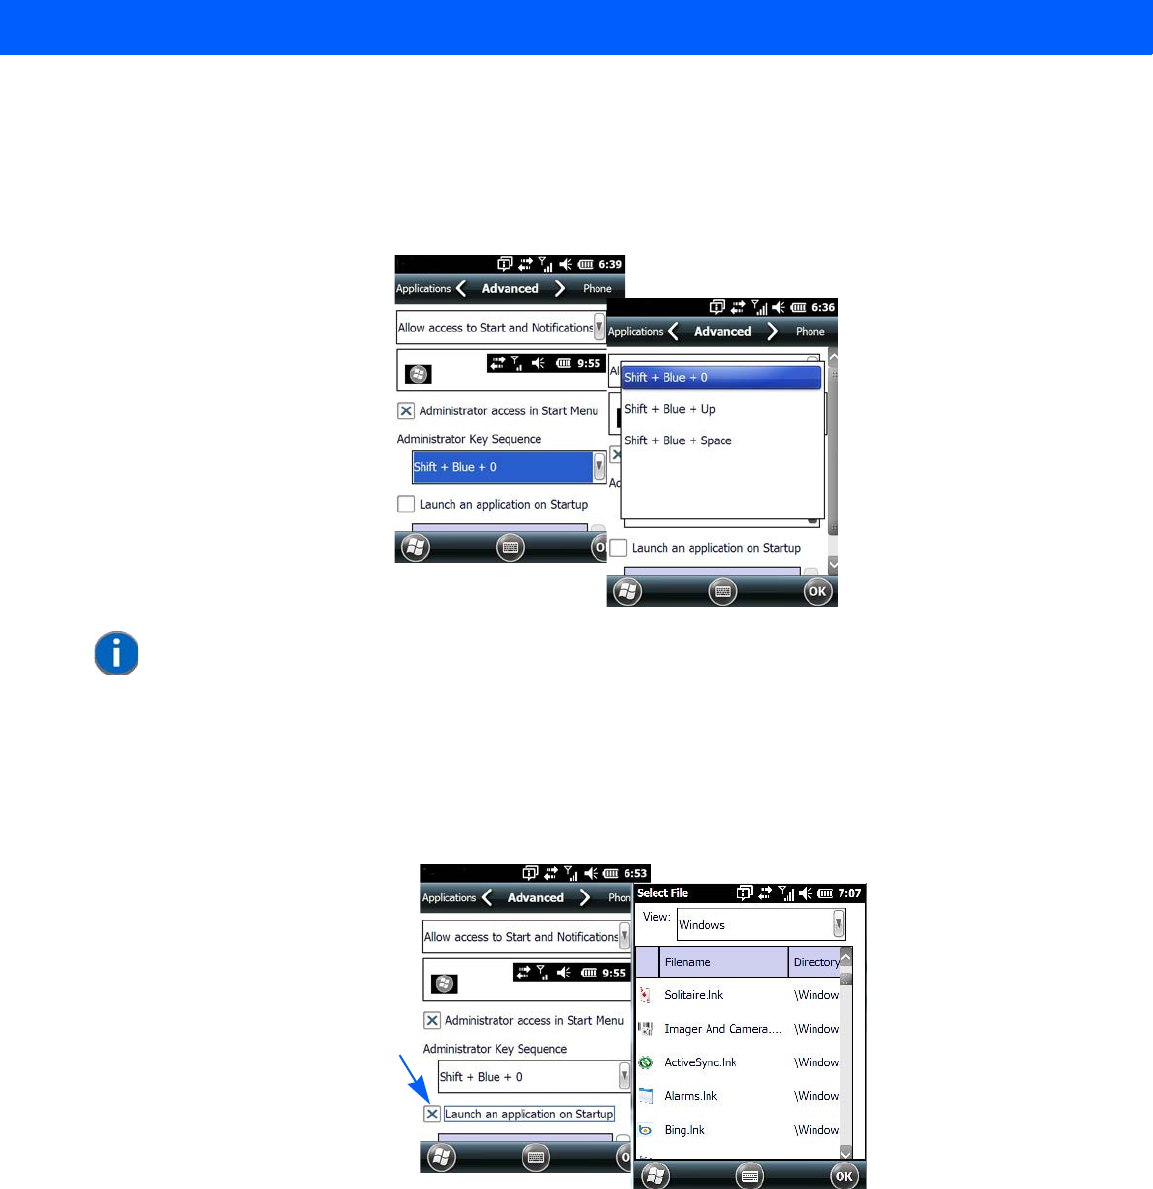
Settings 4 - 61
•Tap in the checkbox next to Administrator access in Start Menu to deselect it. The x should not be present
in the checkbox.
The Administrator Key Sequence drop-down menu provides three key sequences you can use to gain access
to HomeVU when it is not accessible from the Start screen.
Launching an Application at Startup
If you enable Launch an application on Startup, a screen is displayed where you can choose the application
that will be launched automatically when the Workabout Pro4 is powered up.
• Tap in the checkbox next to Launch an application at Startup.
•Tap in the View menu at the top of the Select File screen, and choose the storage area from which you
want to choose an application.
• Next, tap on the application you want the Workabout Pro4 to launch on startup.
Your choice is displayed in the Advanced tab.
NOTE If you disable “Administrator access in Start Menu” or if you “Disable Start”, the only
way to access HomeVU or the Start screen applications is to type an “Administrator
Key Sequence”. In these cases, it is important that you make note of the key
sequence you’ve chosen.
Tap here
Draft #5
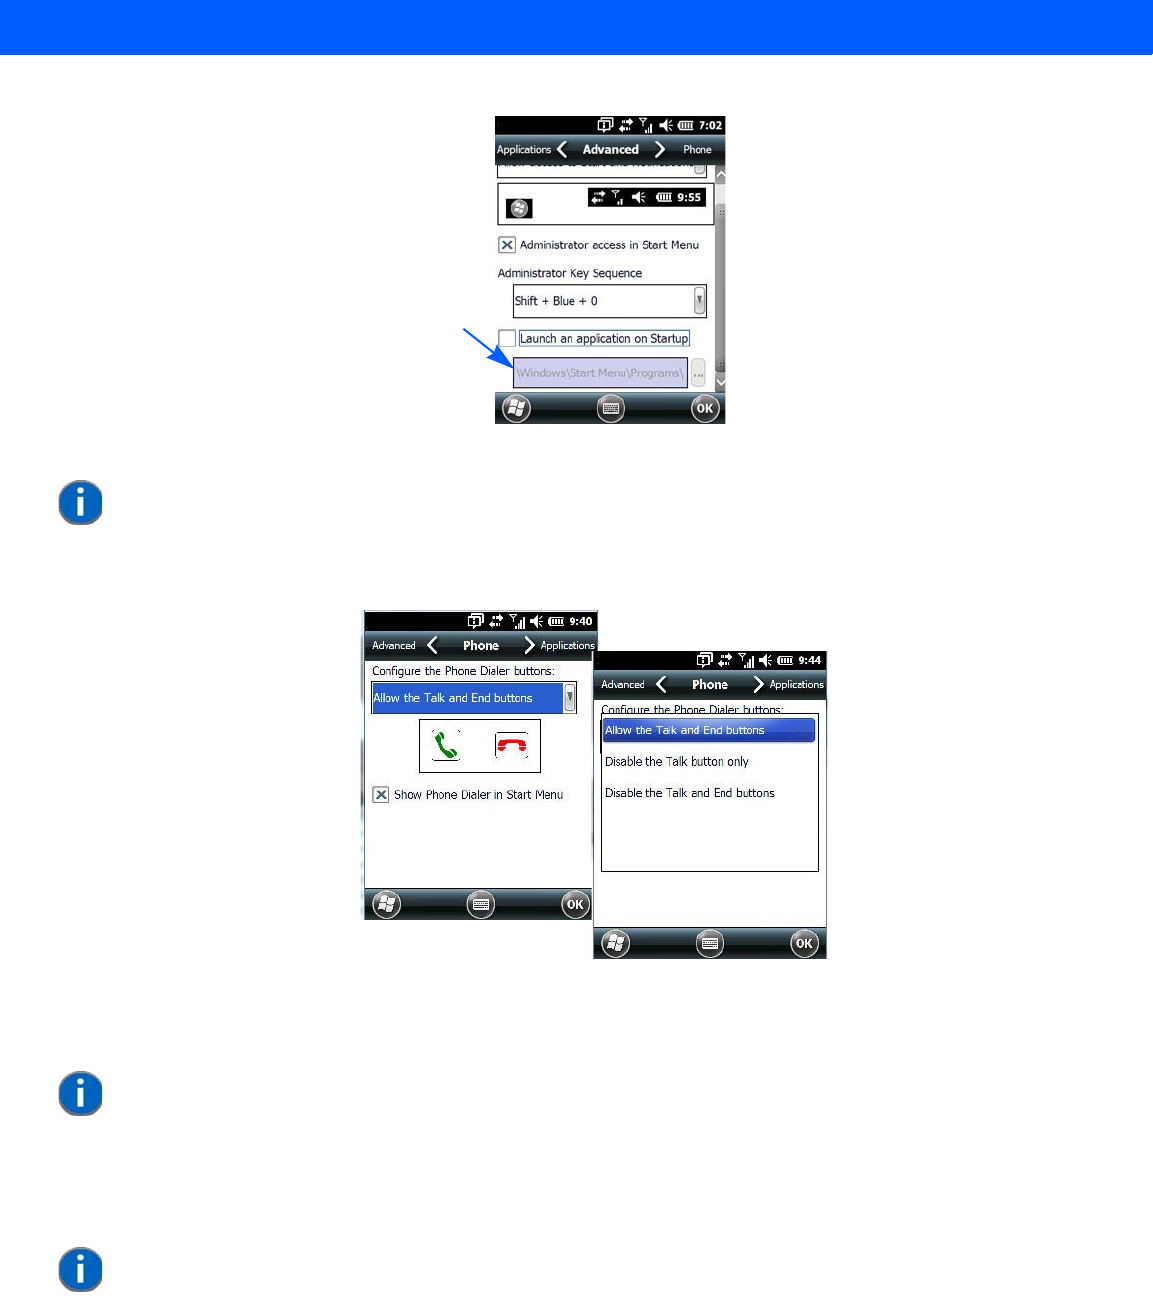
4 - 62 Workabout Pro4 (Windows Embedded Hand-Held 6.5) User Manual
•Tap on OK.
Phone Tab
The Phone tab allows you to define the phone buttons accessibility on the Workabout Pro4 keyboard by
choosing an item from the Configure the Phone Dialer buttons drop-down menu.
Restrictions
The Restrictions screen allows the administrator to restrict access to applications.
Startup program
NOTE Remember that changes do not take effect until the Workabout Pro4 is set to User
Mode and the unit is reset.
NOTE Remember that changes do not take effect until the Workabout Pro4 is set to User
Mode and the unit is reset.
NOTE Remember that changes do not take effect until the Workabout Pro4 is set to User
Mode and the unit is reset. Refer to “Activating a Change – User Mode” on
page 4-66.
Draft #5
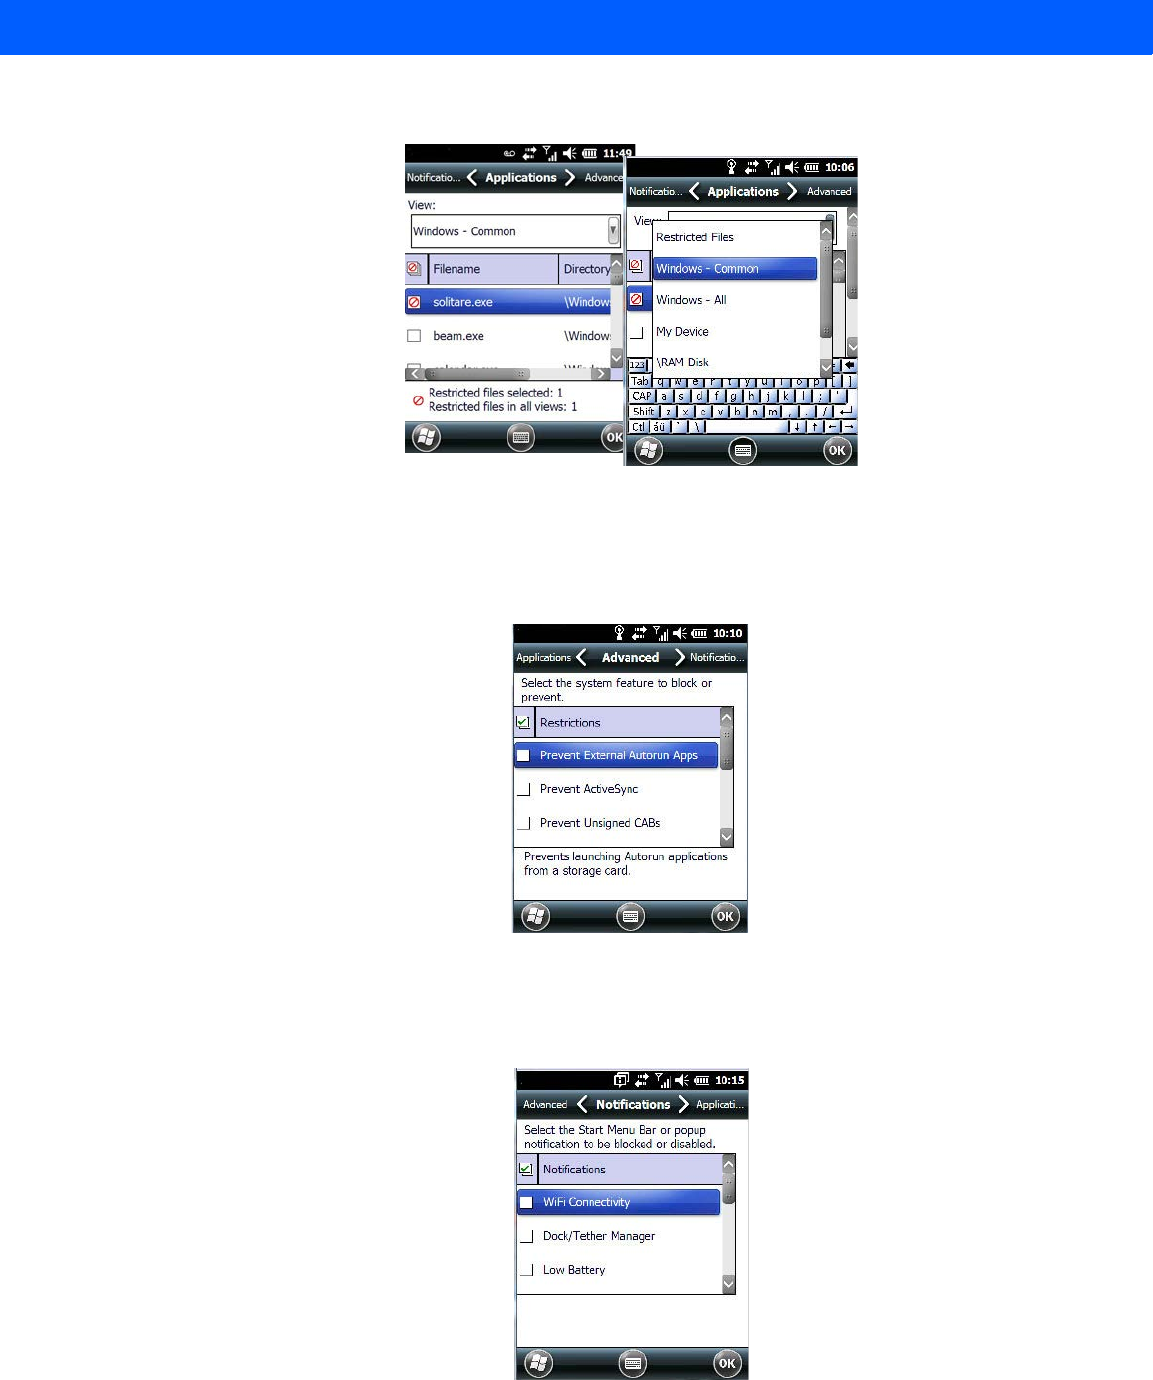
Settings 4 - 63
Application Tab
Tapping in the View menu displays a drop-down menu where you can define restrictions for each storage area
of the Workabout Pro4. Restricted items are marked in the checkbox to the left – in the sample screen above,
solitaire.exe is restricted.
Advanced Tab
The Advanced tab lists system features you can block from user access. Tapping in the checkbox to the left of
a feature adds a check mark indicating it is blocked.
Notifications
The Notifications tab allows you to choose which pop-up notifications are blocked from user view.
Draft #5
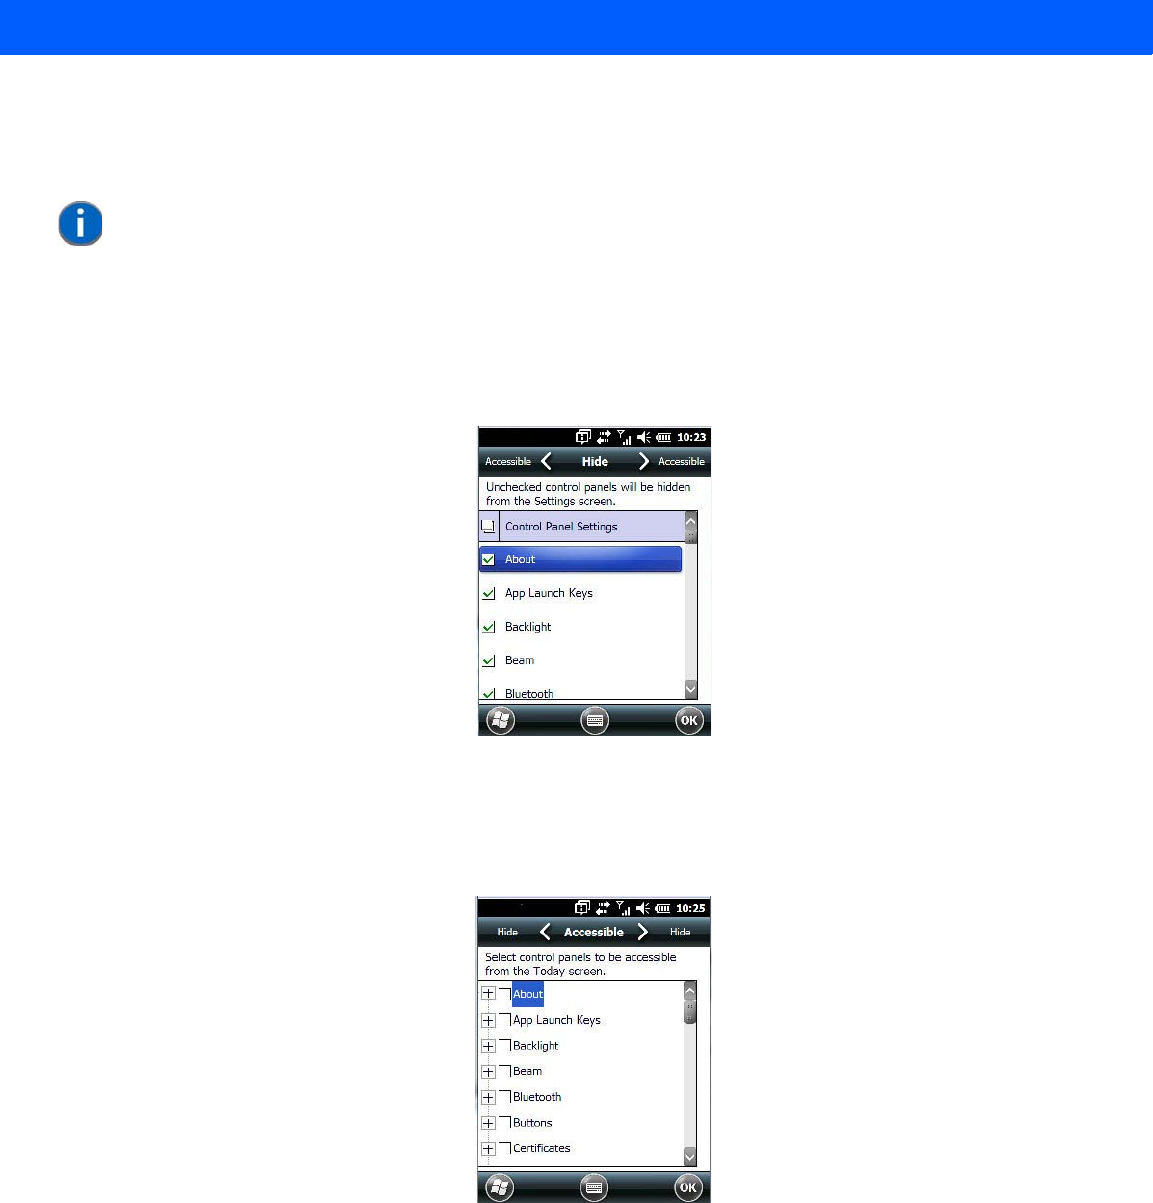
4 - 64 Workabout Pro4 (Windows Embedded Hand-Held 6.5) User Manual
Control Panel Settings
This options allows you to tailor items displayed in both the Settings screen and in the Today screen.
Hide Tab
The Hide tab under the Control Panel allows you to determine which applications will be hidden in the Settings
screen that is displayed when the operator taps on the Start button.
Remember that only unchecked items in this list are hidden.
Accessible Tab
The Accessible tab allows you to choose which items will be accessible in the Today screen.
Import and Export Settings
This option enables you to Export your settings file (.xml), and save it in the location of your choice. In addition,
an administrator has the option to Import these settings from one device to multiple devices of the same oper-
ating system.
NOTE Remember that changes do not take effect until the Workabout Pro4 is set to User
Mode and the unit is reset. Refer to “Activating a Change – User Mode” on
page 4-66.
Draft #5

Settings 4 - 65
Tapping on the Export button displays an Export Settings screen. The default Name – HomeVU_Settings – can
be changed by the administrator even after it has been saved.
The .xml file contains all of the HomeVU configured settings, including the Administrator Password. When the
file is imported to a device, the new password is applied immediately.
IMPORTANT A copy of this file should also be saved in a central repository for all .xml
files with a predefined name so that other utilities can locate it.
Draft #5
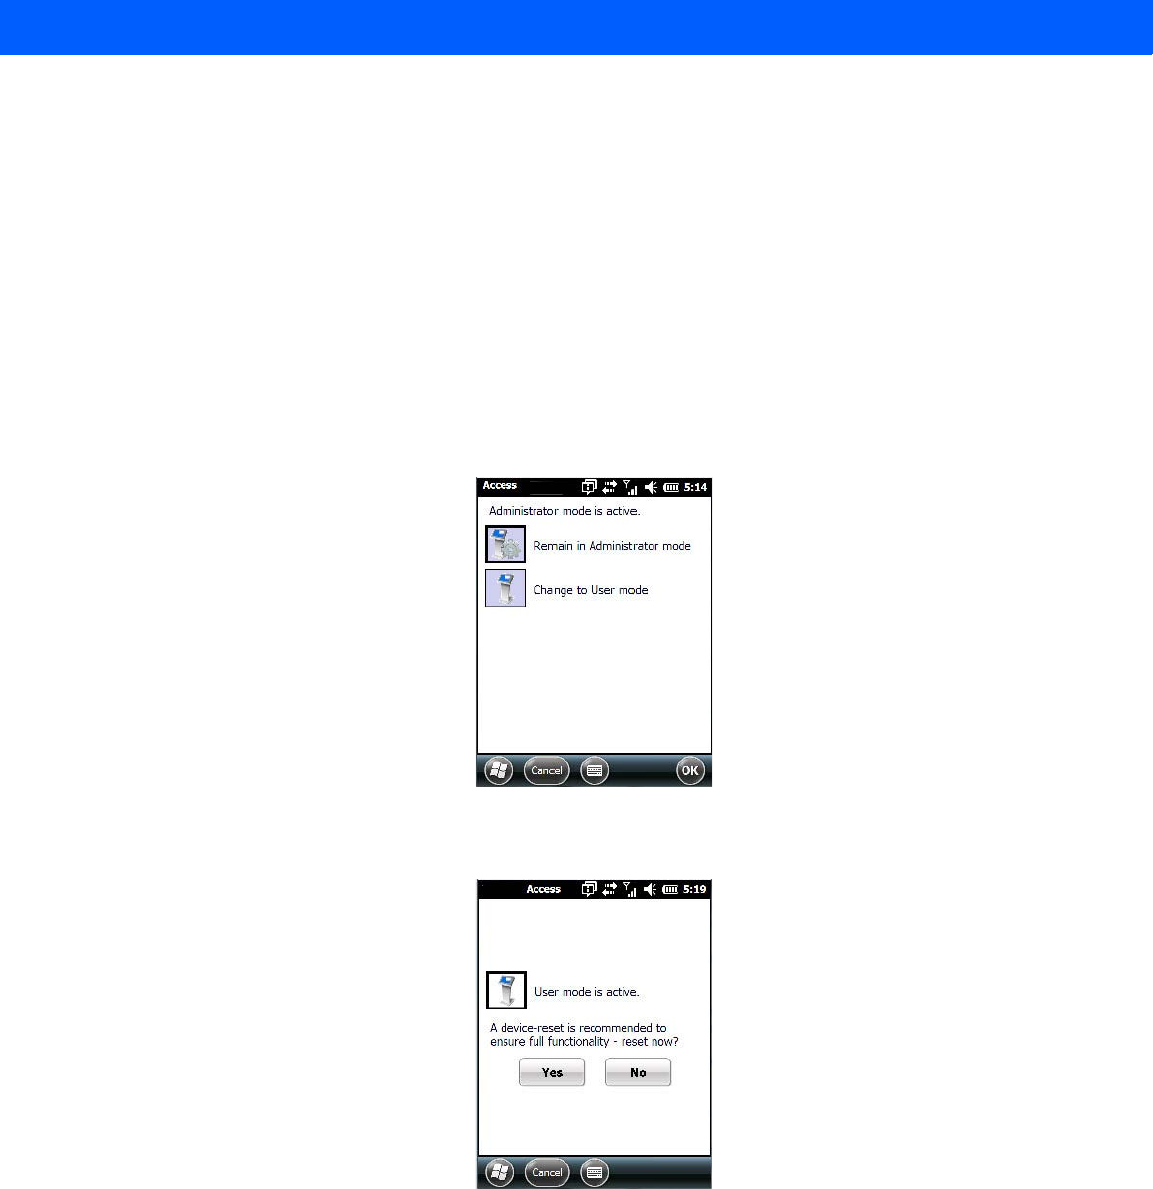
4 - 66 Workabout Pro4 (Windows Embedded Hand-Held 6.5) User Manual
• Whether choosing to import or export files, the same file location options will be listed. Following the action,
a message stating the success of the operation and the location of the file is displayed.
• With the exception of the password, changes made to settings take effect only after a warm reset. If further
changes to the configuration are made, they will overwrite the changes caused by the import operation.
After importing a file, a dialog box appears requesting a reset now or later.
Activating a Change – User Mode
To activate changes, you’ll need to switch from Administrator to User Mode. This HomeVU Access screen is
displayed automatically once you’ve finished making changes and have tapped on OK.
• In the tab where you’ve made the changes, tap on OK. In the next screen – the HomeVU menu screen –
tap on OK.
A new screen, the HomeVU Access screen, is displayed.
•Tap on Change to User mode.
You’ll need to reset the Workabout Pro4 so that the changes you specified can take effect.
•Tap on Yes to reset the Workabout Pro4 and activate your changes.
Regional Settings
To display the Regional Settings screen, tap on Start>Settings, and then tap on the System icon followed by
the Regional Settings icon.
Draft #5
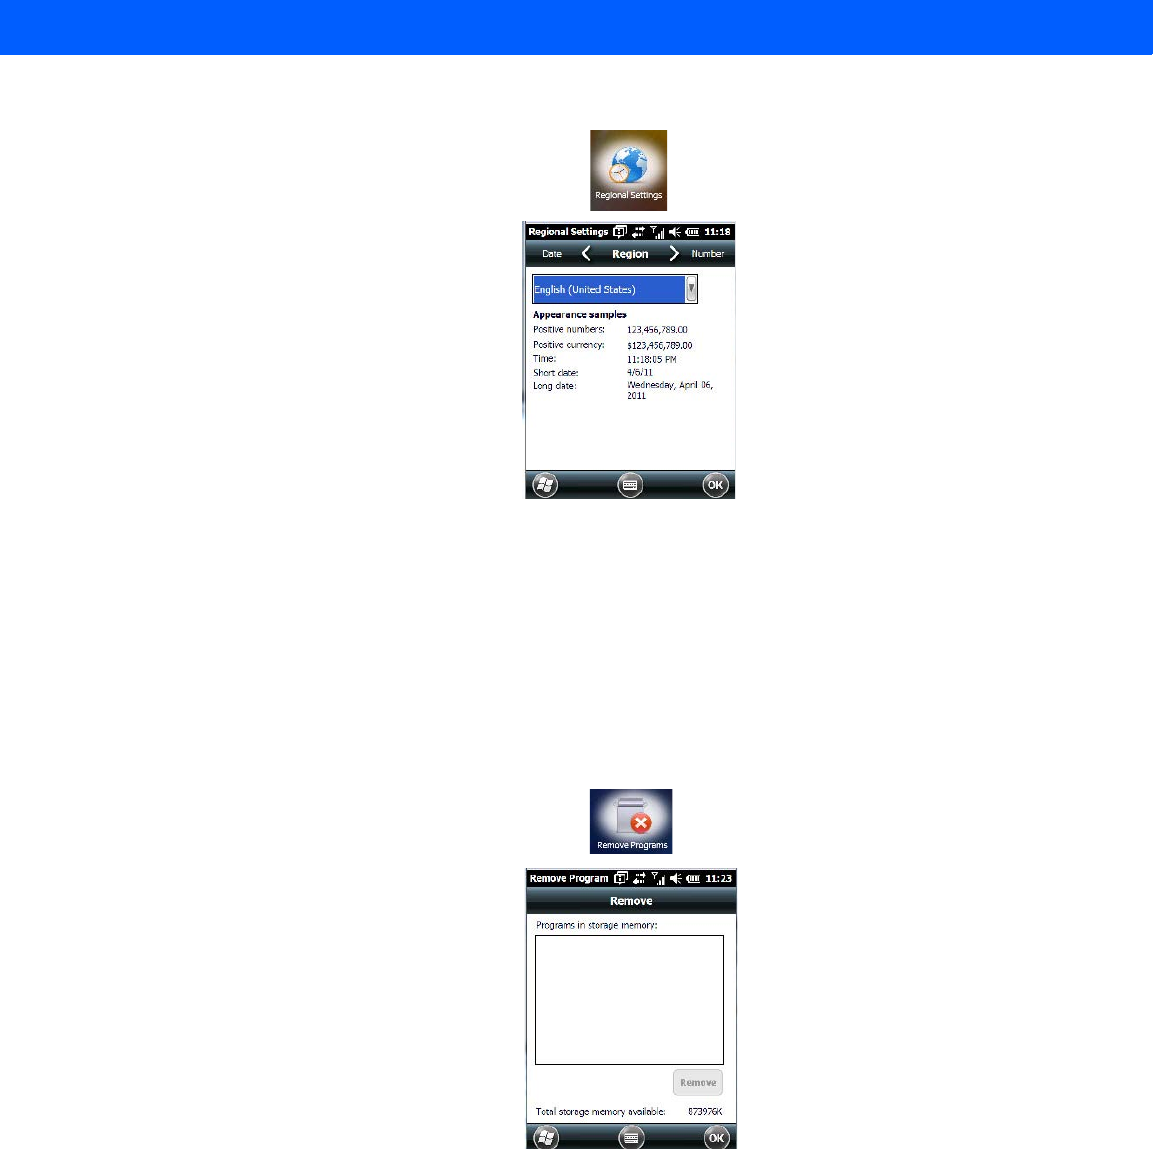
Settings 4 - 67
• Tap on the drop-down menu to choose your language and region.
Once you’ve selected a language and region, you may need to adjust the way numbers, currency, the time and
the date appear in your Workabout Pro4.
• Tap on the tab associated with each of the items, and choose how each item should be displayed on your
Workabout Pro4.
Remove Programs
•Tap on Start>Settings. Tap on the System icon followed by the Remove Program icon.
Tapping on the Remove Programs icon displays a screen listing the programs that can be removed from your
unit.
• To remove a program, highlight it and then tap on the Remove button.
Screen
•Tap Start>Settings. Tap on the System icon, and then tap on the Screen icon.
Draft #5
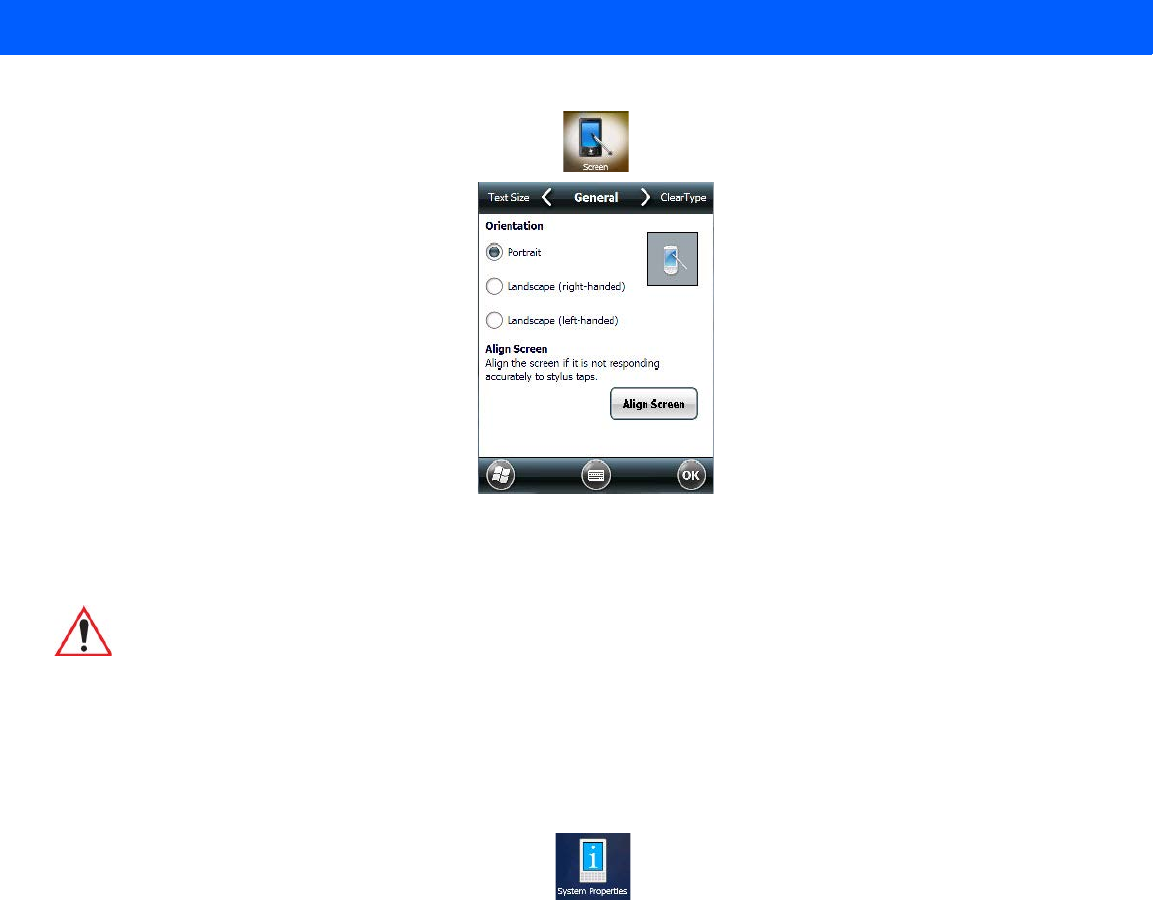
4 - 68 Workabout Pro4 (Windows Embedded Hand-Held 6.5) User Manual
This icon allows you to align (calibrate) your touchscreen, turn ClearType on and off and adjust the size of the
text displayed on the Workabout Pro4 screen.
System Properties
This program identifies the computer software and hardware components, indicating which components are
installed, their identification, version or part numbers, and whether they are enabled or disabled.
•Tap on Start>Settings>System, and then tap on the System Properties icon.
Tapping on the Export button creates a log (SystemProperties.xml) of your current components, which is
placed in the My Devices folder in Windows Explorer.
Instead of expanding each section individually, you can also choose to open all the lists at once by tapping on
the Expand button, which will then change to a Collapse button to enable you to collapse all the sections as
well.
Task Manager
The Task Manager screen lists all running tasks (applications) or processes. This applet provides a number of
options to manage these.
•Tap on Start>Settings. Tap on System, and then the Task Manager icon – the Task Manager screen
is opened.
IMPORTANT Refer to “Calibrating the Touchscreen” on page 2-11.
Draft #5
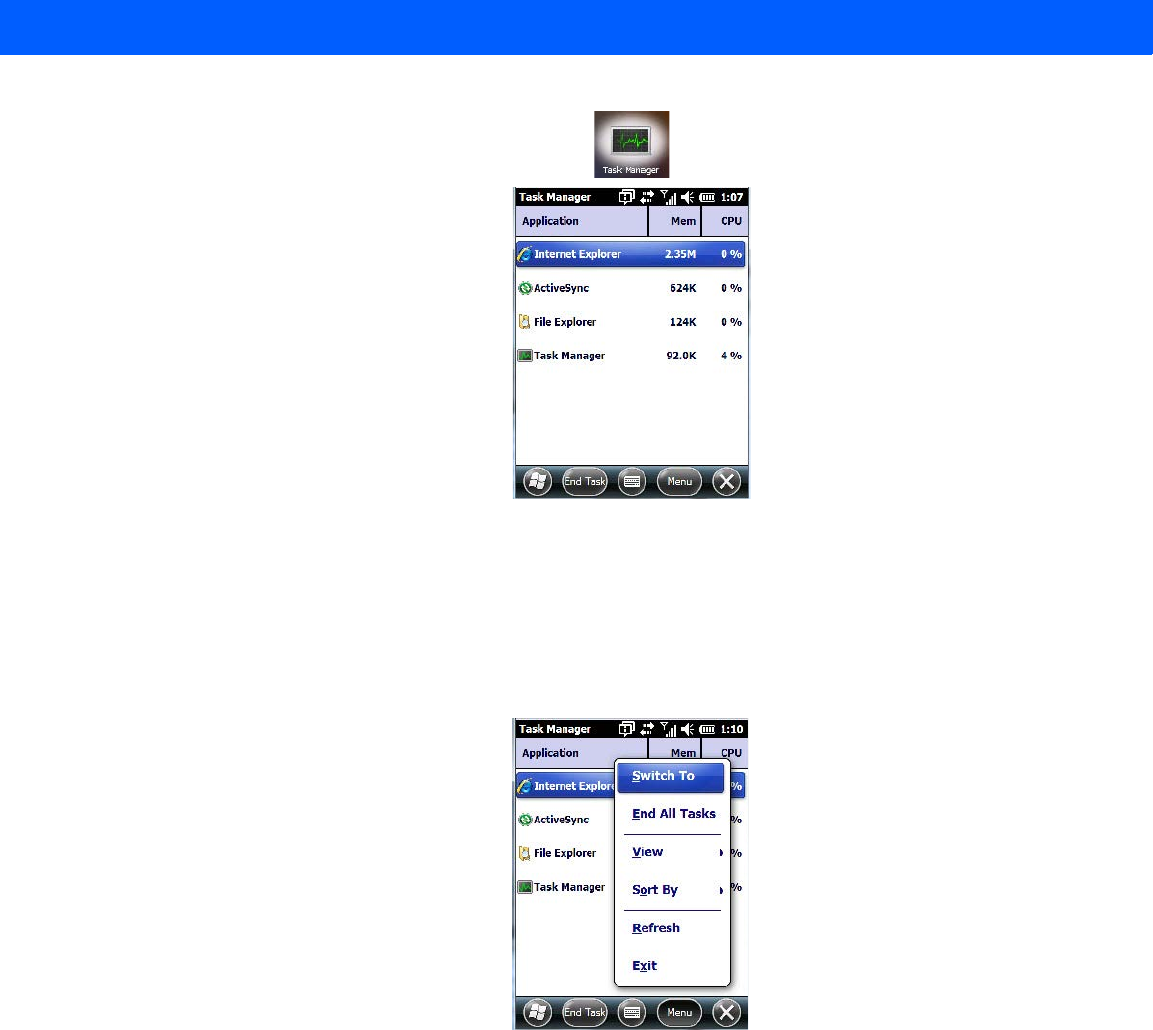
Settings 4 - 69
•End Task: To shut down an application, highlight the program in the list, and tap on the End Task
softkey in the softkey bar at the bottom of the screen.
Task Manager Menu
The Task Manager menu provides additional options to help you manage your applications.
• Tap on the Menu softkey at the bottom of the screen.
•Switch To: Makes the highlighted application active.
•End All Tasks: Shuts down all applications listed.
•View: Allows you to list either all running applications or all processes.
•Sort By: Allows you to sort active applications or processes based on Memory size, CPU or application or
process Name.
•Refresh: Updates the list of applications or processes.
•Exit: Closes the Task Manager.
Total Recall
Total Recall is a Psion utility developed to maintain applications and settings during a cold boot, as well as
clone settings to other devices. This utility creates a restore point of a device at a known state. This can be
used as a backup of the device (the administrator can clean the terminal and restore the profile at any time),
Draft #5
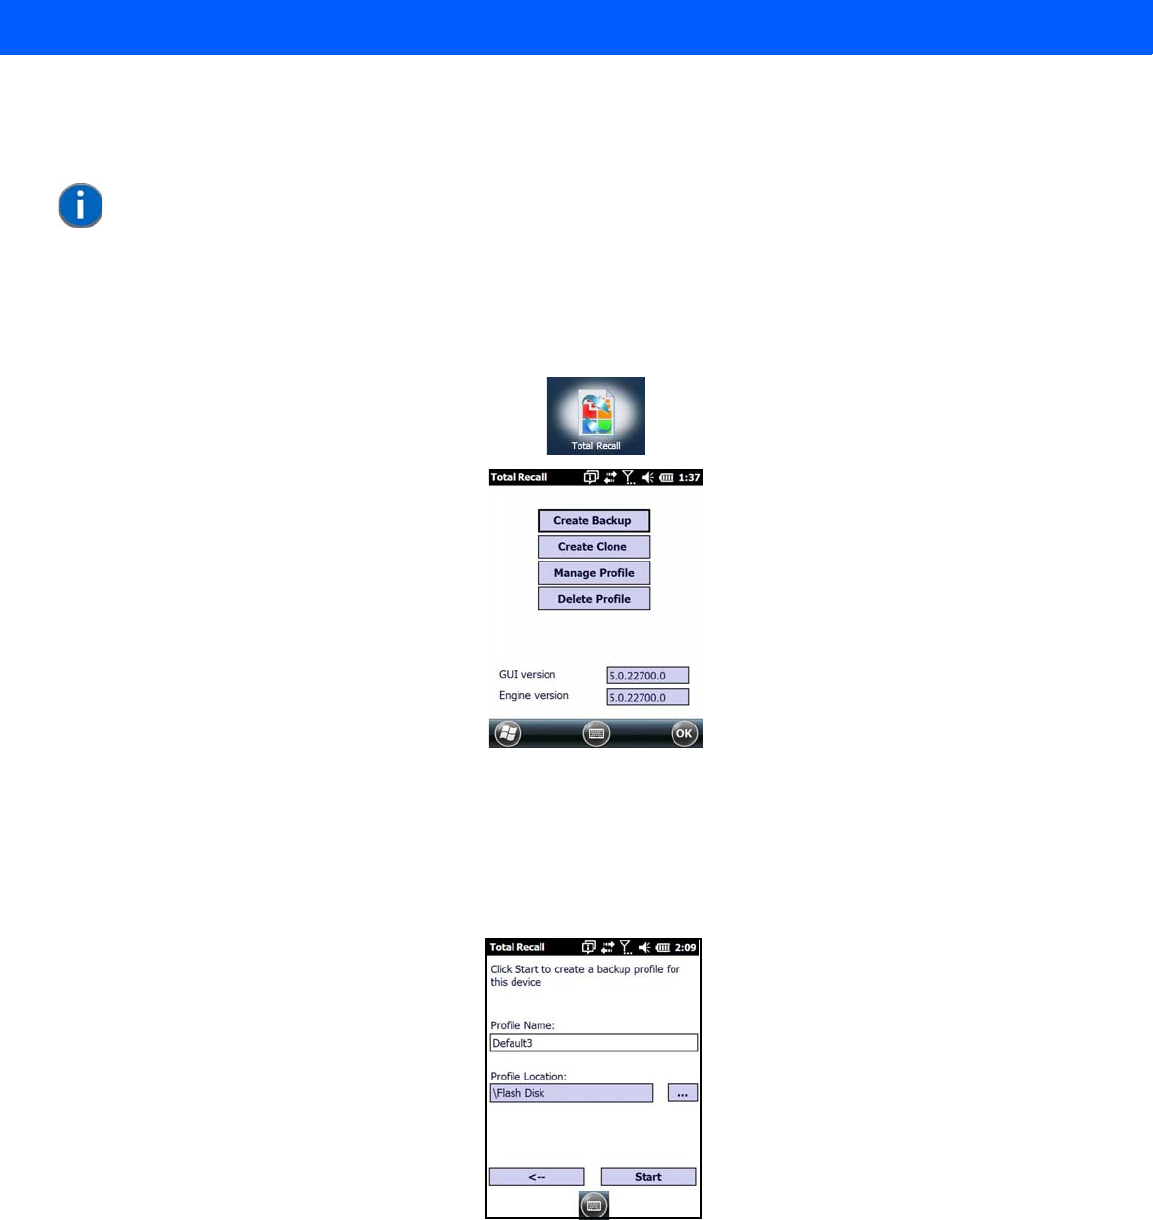
4 - 70 Workabout Pro4 (Windows Embedded Hand-Held 6.5) User Manual
or a clone (the administrator can store different configurations for different uses to clone to other
hand-held computers).
•Tap on Start>Settings>System. Tap on the Total Recall icon.
In the start up screen, you can choose from four options: Create Backup, Create Clone, Manage Profile, and
Delete Profile.
Creating a Backup
• Tap on the Create Backup button to begin the process.
This dialog box displays the Profile Name and the storage destination for the profile file.
• In the Profile Name field, type a name for a profile.
• If you want to choose another location for your backup file (optional), tap on the [...] button to the right of
the Profile Location field and choose one of a number of folders.
NOTE Total Recall works differently (e.g. restore on cold boot or on clean boot) on dif-
ferent OS platforms and versions (e.g. Windows CE 5.0, 6.0, Windows Mobile,
Windows Embedded Hand-held). For detailed information and other updates on
Total Recall information, please go to the Ingenuity Working website at:
http://community.psion.com/knowledge/w/knowledgebase/total-recall.aspx
Draft #5
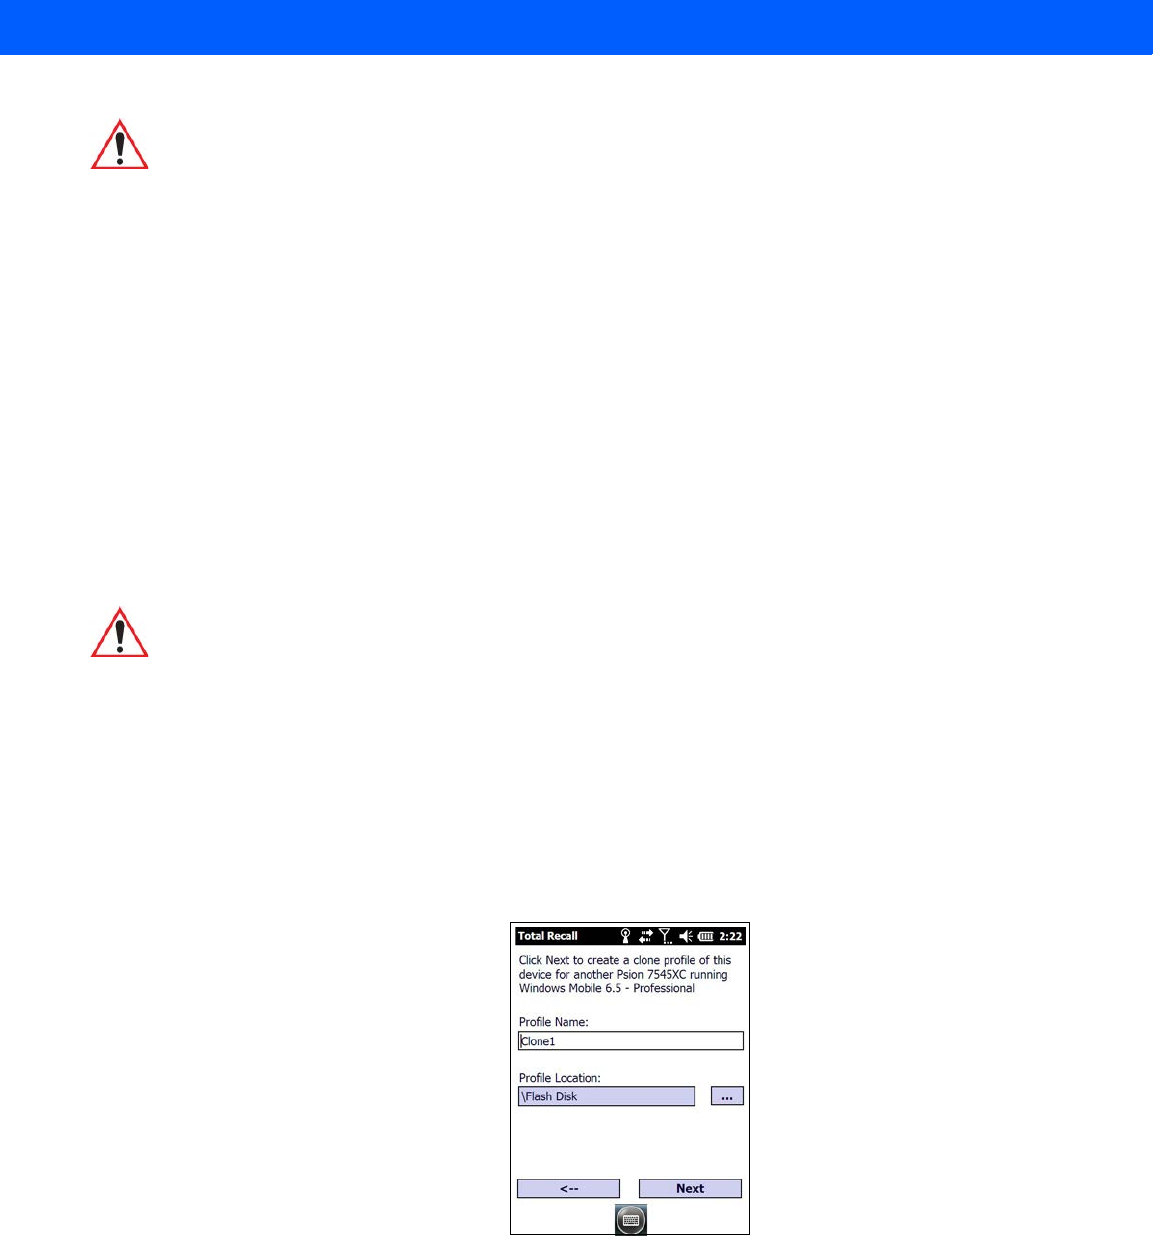
Settings 4 - 71
-Tap on Start. A backup of the current settings will be created and saved to the specified location. The
unit will then reboot.
To view profiles and choose restore options, refer to “Managing Profiles” on page 4-72.
Creating a Clone
Cloning allows you to copy settings or configurations from one computer to another. There are two types of
clones to choose from: a Full Clone and a Settings Only Clone.
A Full Clone contains all files, most of the registry, and the settings files.
A Settings Only Clone can be copied to a wider array of devices, but it should not be used as an autorestore
profile.
• Tap on the Create Clone button to begin the process. Your Workabout Pro4 model type and OS will be
identified in the cloning statement to ensure that you target devices of the same type.
• Give the clone profile a name and location.
•Tap on Next.
• In the next screen, choose All for a Full Clone, or Selected Options for a Settings Only Clone. If you
choose Selected Options, a menu will open to enable you to decide which options you want cloned.
IMPORTANT Any profile not stored in persistent memory (Application directory
(Flash Disk), external USB drive) will be erased during a clean boot;
therefore, you should store profiles on a persistent drive.
When performing an autorestore, the program only searches for the
profile located in the \Application\ or \Flash Disk\TotalRecall folder. If
you store your profile anywhere else it will not be restored. Only one
profile can reside in that folder.
IMPORTANT The target device for a Full Clone MUST have the same model type
and OS build as the source, otherwise problems can occur. For
example, if the target device has a newer build of the OS, the new
build may have a different set of registry keys that may conflict with
the source.
Draft #5
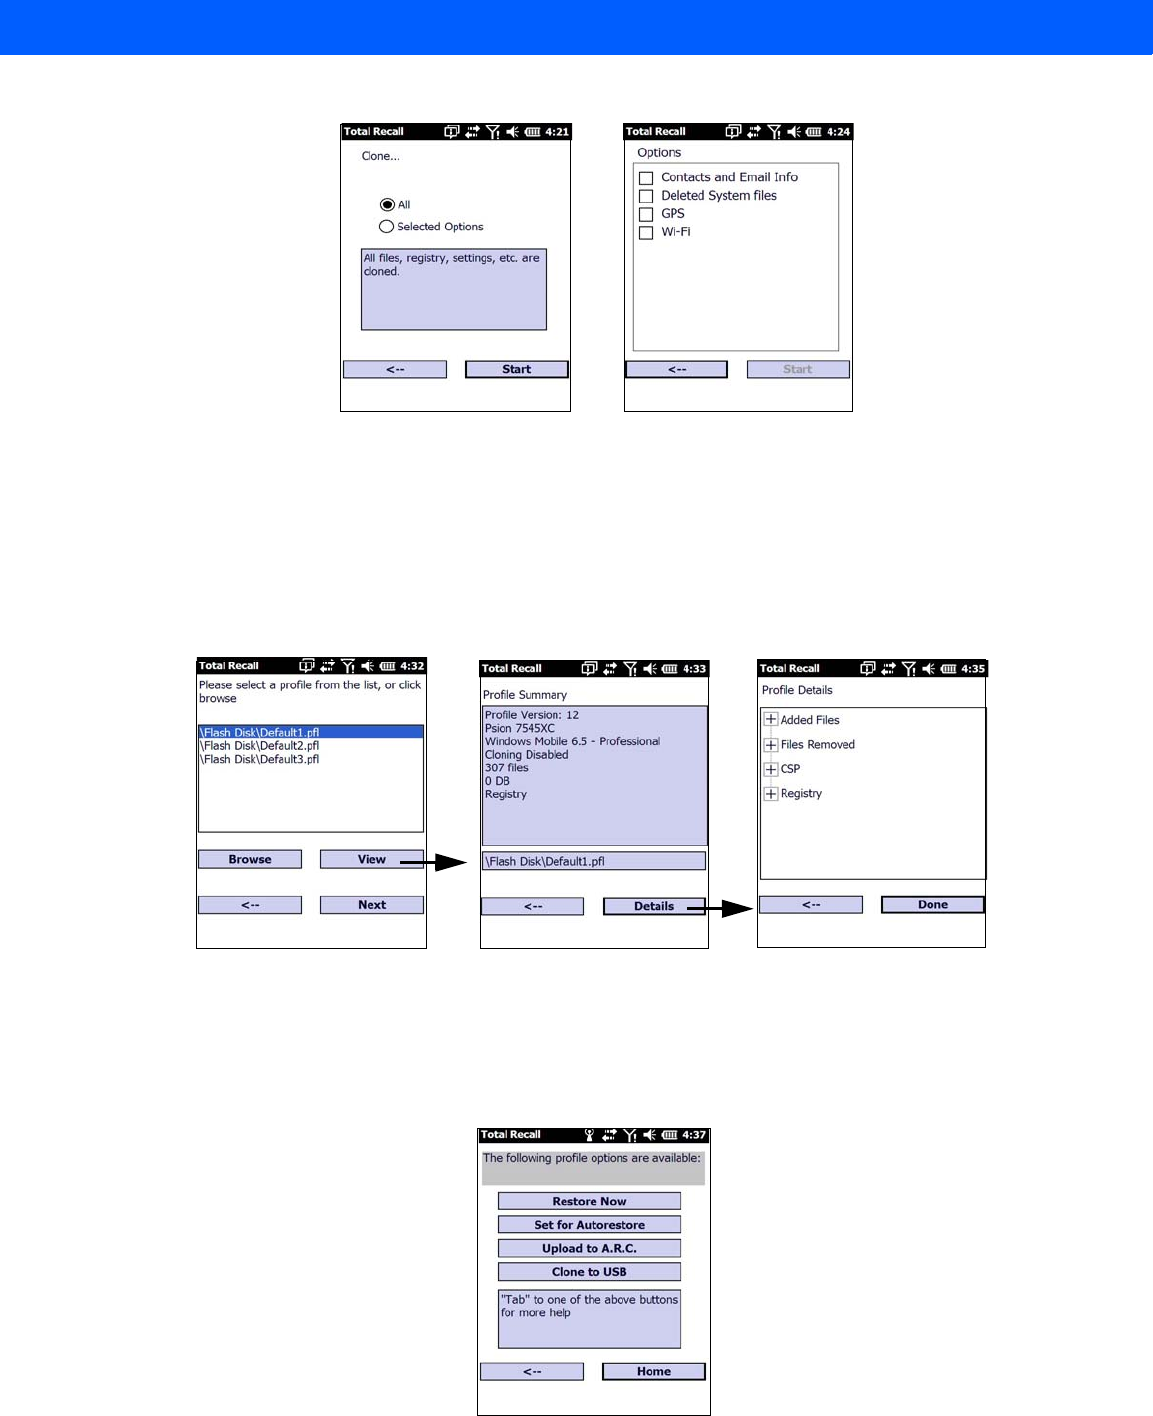
4 - 72 Workabout Pro4 (Windows Embedded Hand-Held 6.5) User Manual
Managing Profiles
You can view profiles and choose profile options from the menus in this section.
Viewing a Profile
• Tap on the Manage Profile button to see your list of profiles. Highlight a profile, and then you can choose
to View the Profile Summary and go on to the next menu, Profile Details.
Profile Options
• Tap on the Manage Profile button to see your list of profiles, as shown above. Highlight a profile, and tap
on the Next button to choose from options to restore or clone the profile. You can choose from four profile
options: Restore Now, Set for Autorestore, Upload to A.R.C., and Clone to USB.
List of profiles Profile Summary Profile Details
Draft #5
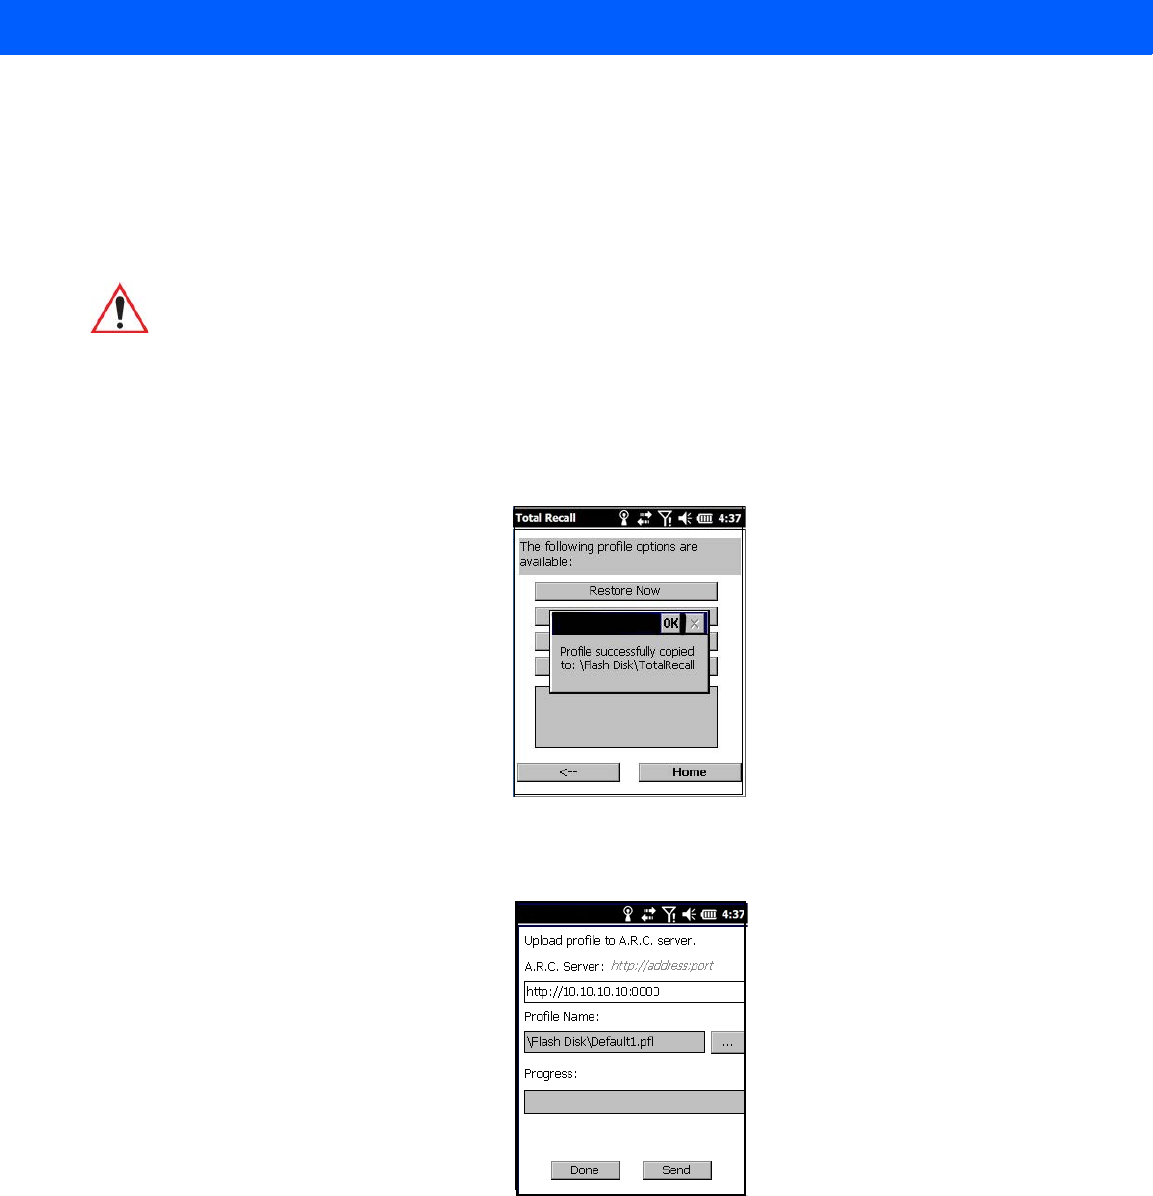
Settings 4 - 73
• Next, tap on the option button you want to use:
•Restore Now – restores the profile immediately. If you are restoring a profile that is a backup or Full Clone,
the computer will clean reset first; if the profile is a Settings Only Clone, it will not.
•Set for AutoRestore – creates a profile that is automatically restored following a cold reset or a clean
start. The profile is stored in the \Application\ or \Flash Disk\TotalRecall folder.
•Upload to A.R.C – uploads the profile to the Active Remote Configuration server. After you tap on Send, a
message will come up either confirming that the upload was complete or that the connection to the server
failed.
•Clone to USB – writes a clone of the profile to the USB drive. After you tap on the button, a message will
come up either confirming that the USB drive is ready for deployment, or that it is not available.
• When you are ready to install the profile on another unit, turn on the next computer to be cloned and insert
the USB key. The profile will be automatically installed to the computer’s \Application\ or \Flash Disk\Total-
Recall folder. There is a short delay in deployment so that you can cancel the process if needed.
IMPORTANT After setting an autorestore profile, that profile will overwrite any
other profile already placed in the \Application\ or \Flash Disk\Total-
Recall folder.
In an autorestore, Total Recall only restores the profile located in the
\Application\ or \Flash Disk\TotalRecall folder. If you store your
profile anywhere else it will not be restored.
Draft #5
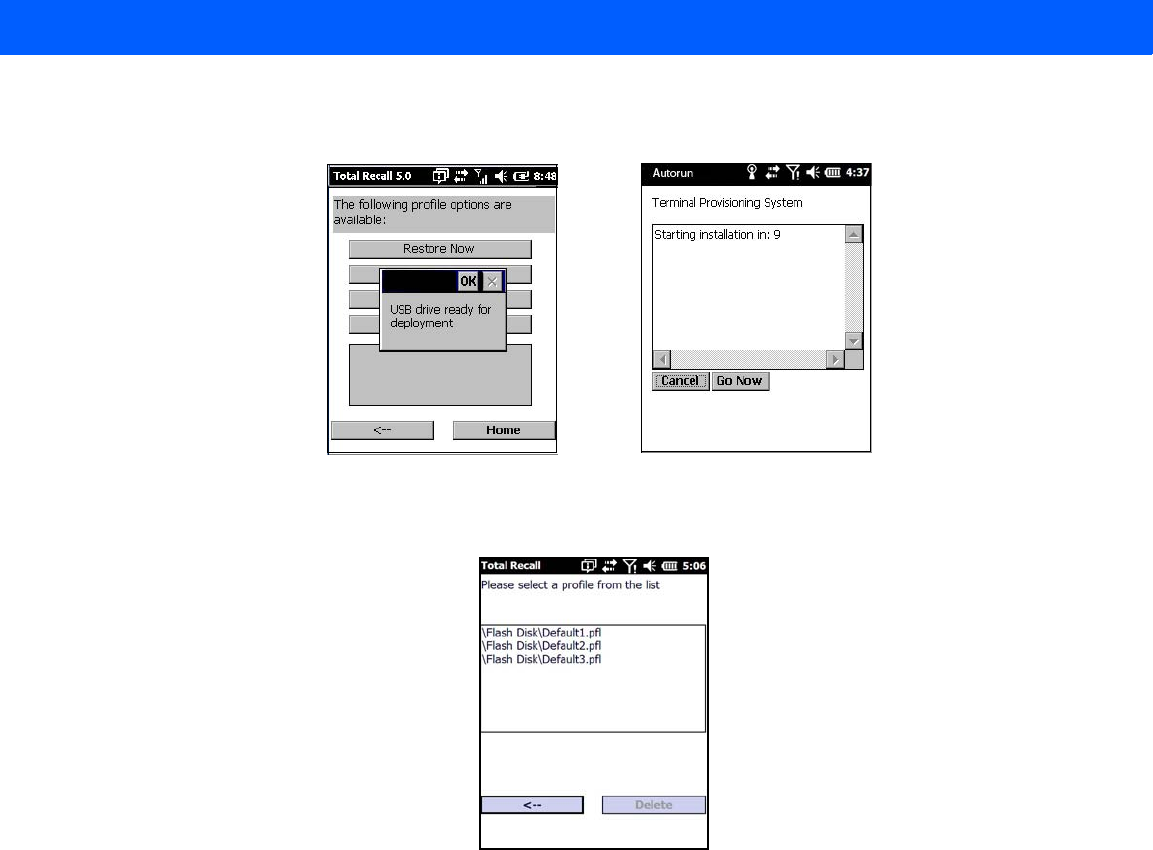
4 - 74 Workabout Pro4 (Windows Embedded Hand-Held 6.5) User Manual
Deleting a Profile
• In the Total Recall home screen, tap on Delete Profile.
• Highlight the backup you want to delete, and tap on the [-->](Next) button.
A warning pop-up screen appears asking if you’re certain that you want to delete this file.
• Tap on the Yes to delete the file.
TweakIT
•Tap on Start>Settings>System.
• Tap on the TweakIT Settings icon.
USB drive prepared for cloning Autorun installation on next Workabout Pro
Draft #5
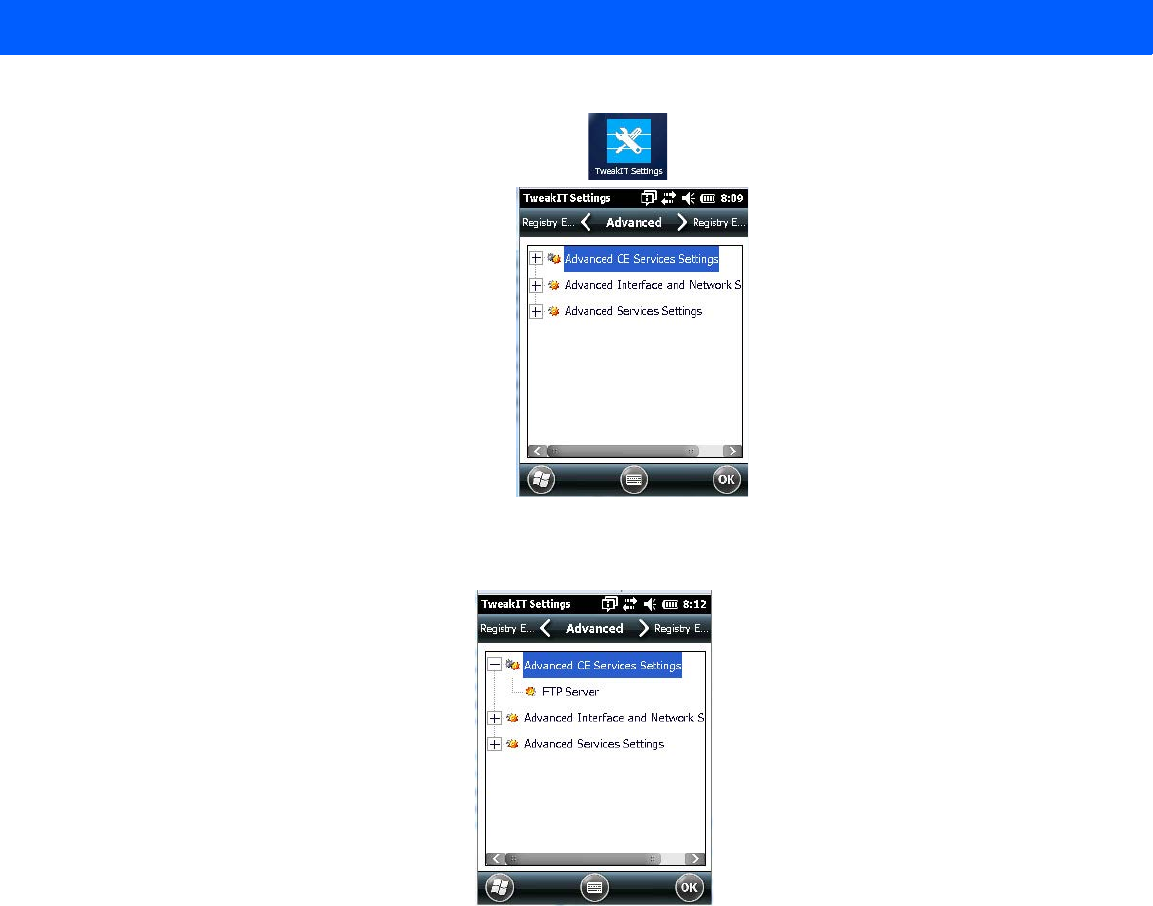
Settings 4 - 75
This utility allows you to ‘tweak’ or adjust system settings such as the interface, network and servers.
Advanced CE Services Settings
FTP Server
This option is enabled by default to allow file transfers. Keep in mind that data transfer in either direction is
restricted to the Temp folder – that is, files are always loaded from the FTP Server to the Temp folder and from
the Temp folder to the FTP Server.
If this option is disabled, a warm reset must be performed to accept the change.
Draft #5
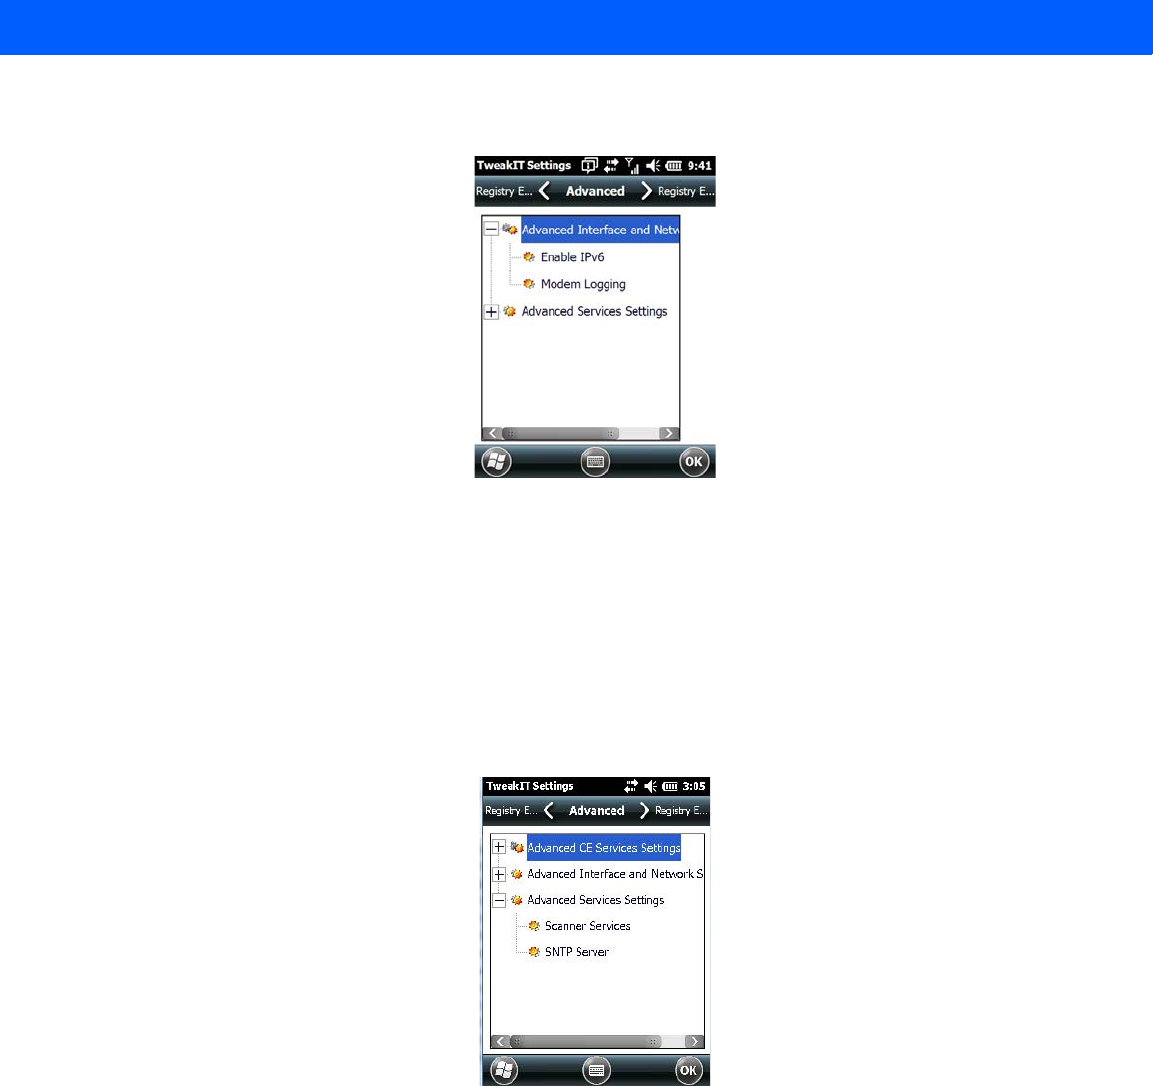
4 - 76 Workabout Pro4 (Windows Embedded Hand-Held 6.5) User Manual
Advanced Interface and Network Settings
Enable IPv6
This option allows you to enable Internet Protocol, version 6, that has been published to use 128-bit IP address
(replacing version 4).
Modem Logging
When this option is enabled, the Workabout Pro4 logs AT commands (e.g., dial-out information, password
string, etc.) that the administrator can monitor for debugging purposes. Modem commands are stored in:
\MdmLog.txt.
Advanced Services Settings
SNTP (Simple Network Time Protocol) Server
The SNTP Server Name typed in this dialog box is used to synchronize Workabout Pro4 time with that of the
time server. A warm reset must be performed once the server name has been entered.
Registry Editor
This option is reserved for senior administrators who have a strong understanding of registry keys and values.
Careless registry editing can cause irreversible damage to the Workabout Pro4.
Draft #5

Settings 4 - 77
Draft #5

4 - 78 Workabout Pro4 (Windows Embedded Hand-Held 6.5) User Manual
Draft #5

Settings 4 - 79
Draft #5

4 - 80 Workabout Pro4 (Windows Embedded Hand-Held 6.5) User Manual
Draft #5

Settings 4 - 81
Draft #5

4 - 82 Workabout Pro4 (Windows Embedded Hand-Held 6.5) User Manual
Draft #5

CHAPTER 5 PERIPHERAL DEVICES &
ACCESSORIES
PERIPHERAL DEVICES & ACCESSORIES 5
Carrying Accessories...........................................5-3
The Battery ................................................5-3
Chargers and Docking Stations .....................................5-3
Installation – Chargers and Docking Stations.........................5-3
Power Consumption Considerations..............................5-4
Operator Controls........................................5-4
Important Charger Safety Instructions.............................5-4
Desktop Docking Station.........................................5-4
Charging a Battery Installed in the Workabout Pro4 .....................5-6
Charging a Spare Battery....................................5-6
Battery Charge Duration.....................................5-6
Charger LED Indicators.....................................5-6
Linking a Workabout Pro4 to a PC....................................5-7
Troubleshooting the Docking Station Operations............................5-7
AC Wall Adaptor – Model #PSA15R-050P . . . . . . . . . . . . . . . . . . . . . . . . . . . . . . .5-7
Bluetooth Peripherals...........................................5-8
Draft #5
Draft #5
Peripheral Devices & Accessories 5 - 3
Carrying Accessories
There are a variety of carrying accessories to help the operator work safely and comfortably with
the Workabout Pro4.
The Battery
The Workabout Pro4 will operate with the following Lithium-Ion battery pack:
• High-capacity – 4400 mAh battery pack (Model Number WA3010)
Chargers and Docking Stations
Motorola offers a variety of chargers and docking stations for the Workabout Pro4. These include:
• AC Adaptor – Model No. PSA15R-050P
• Desktop Docking Station – Model No. WA4003-G2
Installation – Chargers and Docking Stations
When installing a charger or docking station, consider the following guidelines.
• Keep chargers and docking stations away from excessive dirt, dust and contaminants.
• Chargers will not charge batteries outside an ambient temperature range of 0° C to 45 °C (32° F to 113° F).
It is recommended that the charger or docking station be operated at room temperature – between 18° C
and 25° C (64° F to 77° F) for maximum performance.
After unpacking your unit:
• Visually inspect the charger for possible damage.
• Install the IEC power cord and apply power.
Carrying Accessory Model Number
Shoulder Strap for carrying case CV6021
Carry Case -Workabout Pro4 Long version Standard WA6080
Pouch Nylon WA6084
IMPORTANT Do not use adhesives such as Loctite to secure screws on carrying
accessories. These chemicals may damage the plastic casing.
NOTE Review Chapter 8: “Specifications” for details.
IMPORTANT Keep in mind when ordering a charger or docking station, you must
also order the appropriate power cord separately.
Draft #5

5 - 4 Workabout Pro4 (Windows Embedded Hand-Held 6.5) User Manual
Power Consumption Considerations
Check to ensure the mains circuit supplying chargers and/or docking stations is adequate for the load, espe-
cially if several chargers and docking stations are being powered from the same circuit.
Operator Controls
Workabout Pro4 docking stations and chargers have no operator controls or power switches.
Important Charger Safety Instructions
•SAVE THESE INSTRUCTIONS – This manual contains important safety and operating instructions for
battery chargers.
• Before using the battery charger, read all instructions and cautionary markings on (1) battery charger, (2)
battery, and (3) product using battery.
• The mains power cord shall comply with national safety regulations of the country where the equipment is
to be sold.
• Use of an attachment not recommended or sold by the battery charger manufacturer may result in fire,
electric shock, or personal injury.
• To reduce risk of damage to the electric plug and cord when unplugging the charger, pull the plug rather
than the cord.
• Make sure the cord is positioned so that it is not stepped on, tripped over, or otherwise subjected to
damage or stress.
• Do not operate the charger with a damaged cord or plug. Replace immediately.
• Do not operate the charger if it has received a sharp blow, been dropped, or otherwise damaged in any
way; it should be inspected by qualified service personnel.
• Do not disassemble the charger; it should be repaired by qualified service personnel. Incorrect reassembly
may result in electric shock or fire.
• To reduce risk of electric shock, unplug the charger from the outlet before attempting any maintenance
or cleaning.
• An extension cord should not be used unless absolutely necessary. Use of an improper extension cord
could result in fire or electric shock. If an extension cord must be used, make sure:
The plug pins on the extension cord are the same number, size and shape as those on the charger.
The extension cord is properly wired and in good electrical condition and that the wire size is larger than
16 AWG.
• Do not expose the charger to rain or snow.
• Do not place batteries in the charger if they are cold from extended exposure to a freezer or outside tem-
peratures below 10°C (50°F). Allow them to warm up to room temperature for at least two hours.
• Do not use the charger if, after an overnight charge, any of the batteries feel warmer than the charger
housing. The charger should be inspected by qualified service personnel.
• Do not use the charger if any of the batteries or the charger get more than lukewarm. The equipment
should be inspected by qualified personnel.
Desktop Docking Station
The Workabout Pro4 can be inserted in a desktop docking station, model number WA4003-G2.
Draft #5
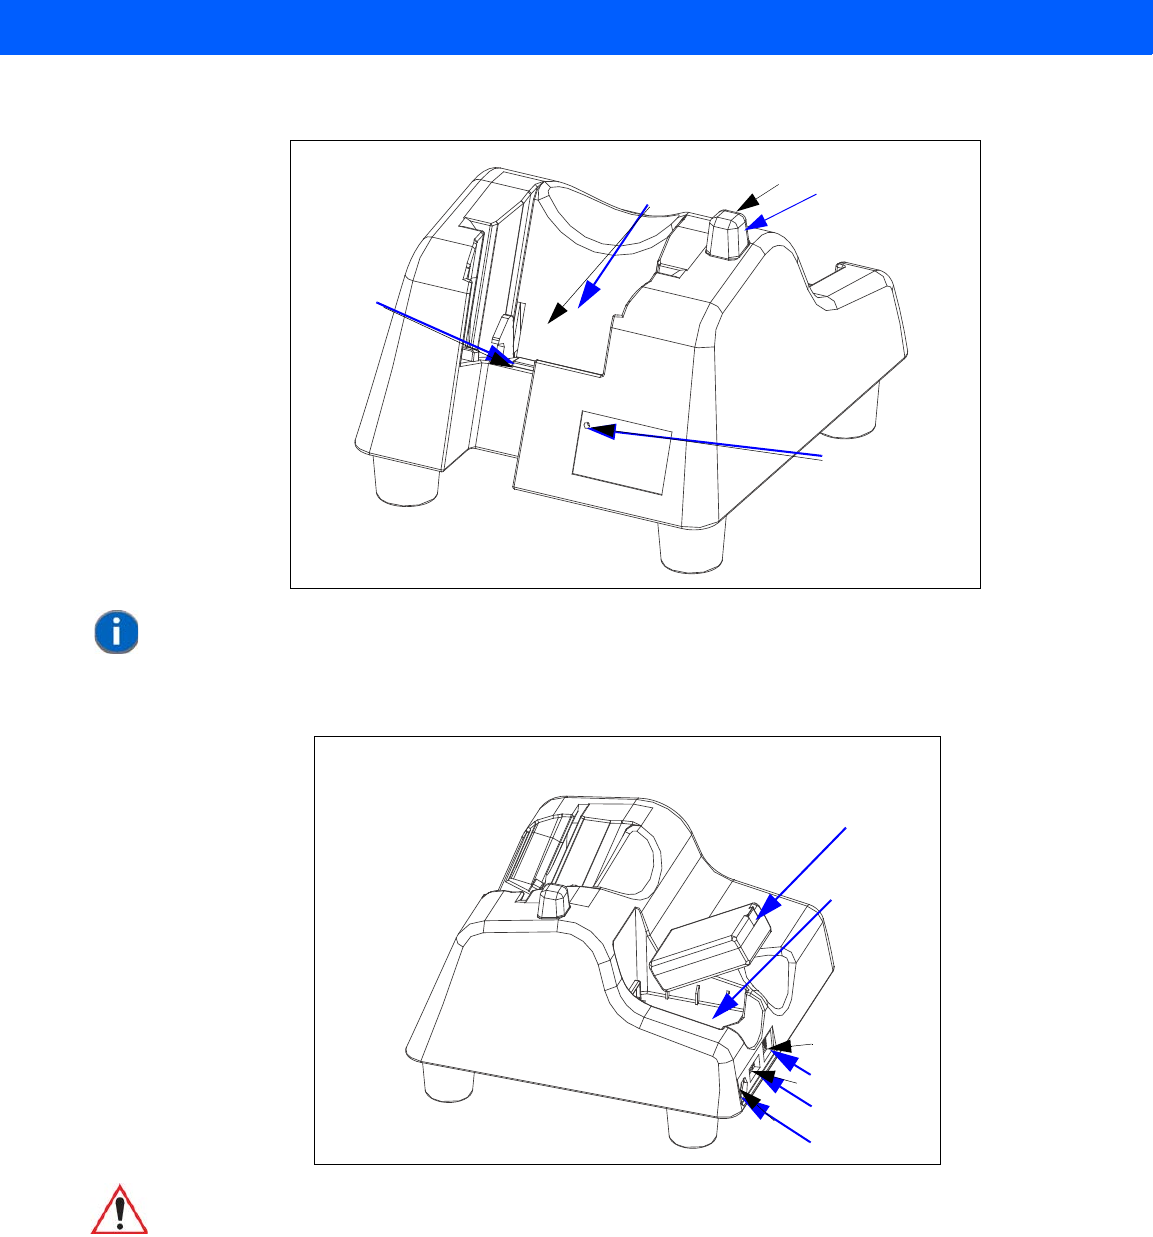
Peripheral Devices & Accessories 5 - 5
Figure 5-1
Desktop Docking Station
Figure 5-2
Back Of Desktop Docking Station
Workabout Pro44
Charge Well
LED
Connector
(Indicates charge status of
a spare battery inserted
in the rear charge well of
the docking station.)
Release Button
Pins
NOTE The desktop docking charger is shipped with its own user manual. It is critical
that it be reviewed for additional information and updates.
Spare Battery
Charge Well
DC IN Socket
Spare Battery
Client USB Port
Host USB Port
IMPORTANT This docking station can only be used to charge Motorola approved
Lithium-Ion batteries.
Draft #5
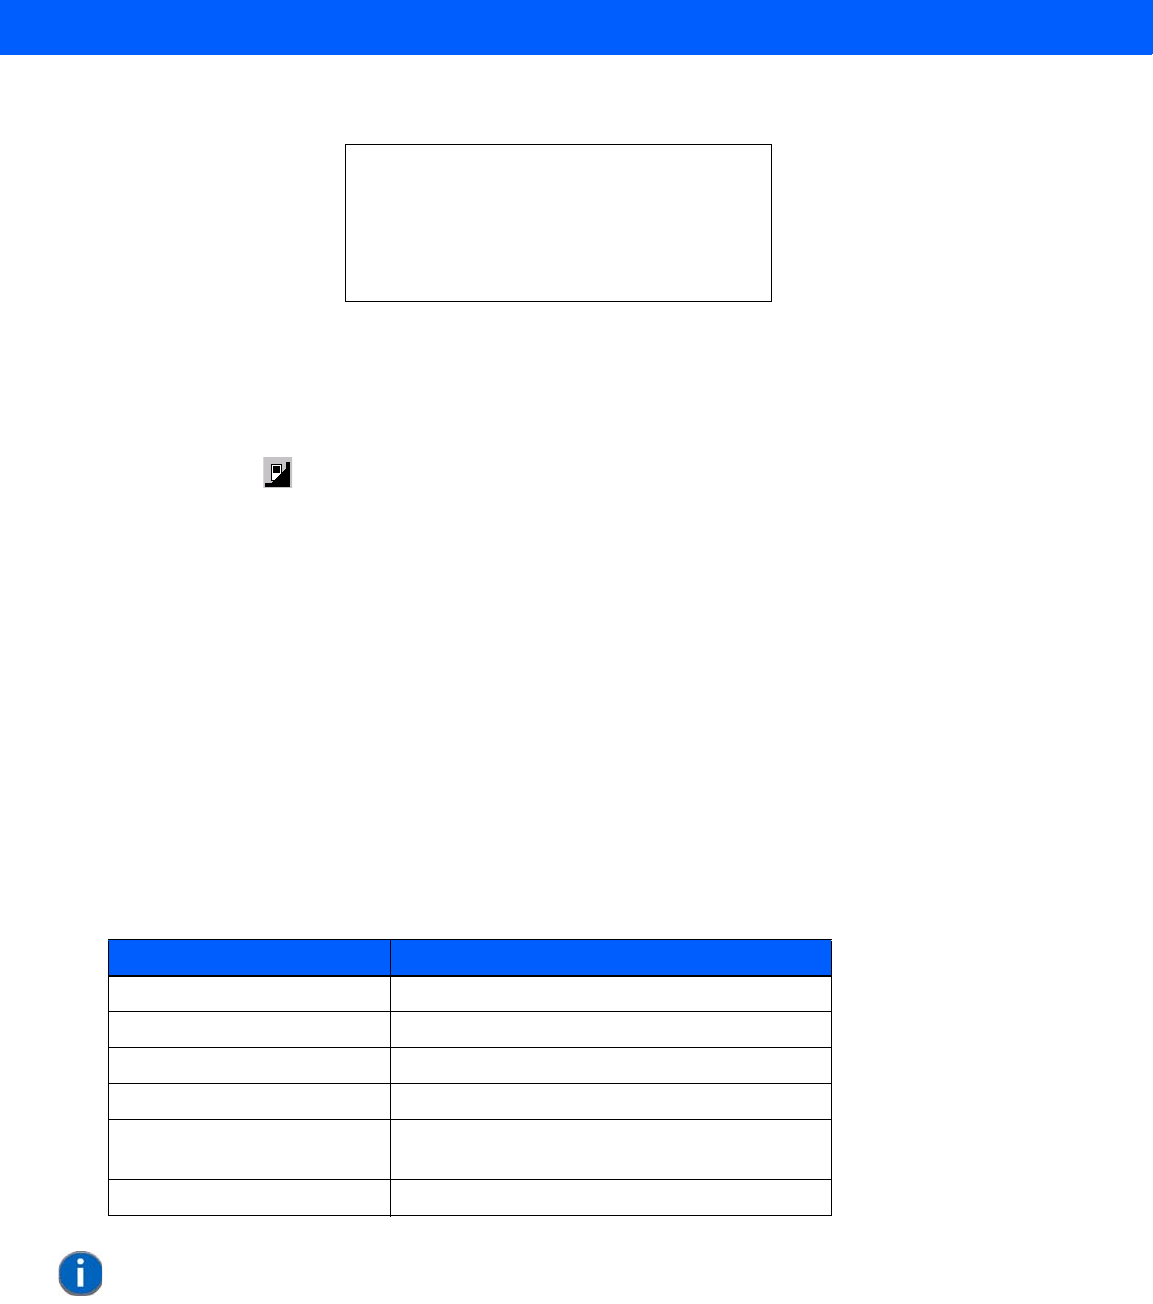
5 - 6 Workabout Pro4 (Windows Embedded Hand-Held 6.5) User Manual
Charging a Battery Installed in the Workabout Pro4
• Insert the DC power cable to the DC IN socket on the desktop docking
station. Plug the pronged end of the cable into an AC outlet.
• Slide the hand-held into the docking station, making certain that the LIF (Low Insertion Force) port on base
of the Workabout Pro4 is securely seated on the docking station connector pins. An icon is displayed
briefly in the navigation bar at the top of the hand-held screen indicating that the unit is properly installed in
the station – .
The LED on the Workabout Pro4 lights up indicating that the unit has external power and battery charging
will begin. It is safe to leave the unit in the desktop docking station while it is not in use – the battery will not
be overcharged.
Charging a Spare Battery
• Insert the battery in the spare battery charge well at the back of the docking station, aligning the contacts
on the battery with the contacts in the spare battery charge well.
Battery Charge Duration
A fully discharged battery can take up to 5 hours to charge. The desktop docking station stops applying power
to the battery when it is fully charged – there is no risk of overcharge if the battery remains in the charge well.
Charger LED Indicators
The desktop docking station is equipped with a single dual-coloured LED indicator in the lower-right corner of
the front panel.
CAUTION
RISK OF EXPLOSION IF BATTERY IS REPLACED
BY AN INCORRECT TYPE.
DISPOSE OF USED BATTERIES ACCORDING
TO THE INSTRUCTIONS.
LED Behaviour Charge Status
Off No battery detected in the slot.
Solid Green Charge complete.
Fast Flashing Green Battery charged to less than 80% of capacity.
Slow Flashing Green Battery charged to greater than 80% of capacity.
Solid Red Battery temperature outside of charge range –
0° C to 50 °C.
Flashing Red Battery is not charging. Battery fault.
NOTE Battery charging continues whether the hand-held is switched on or off.
Draft #5
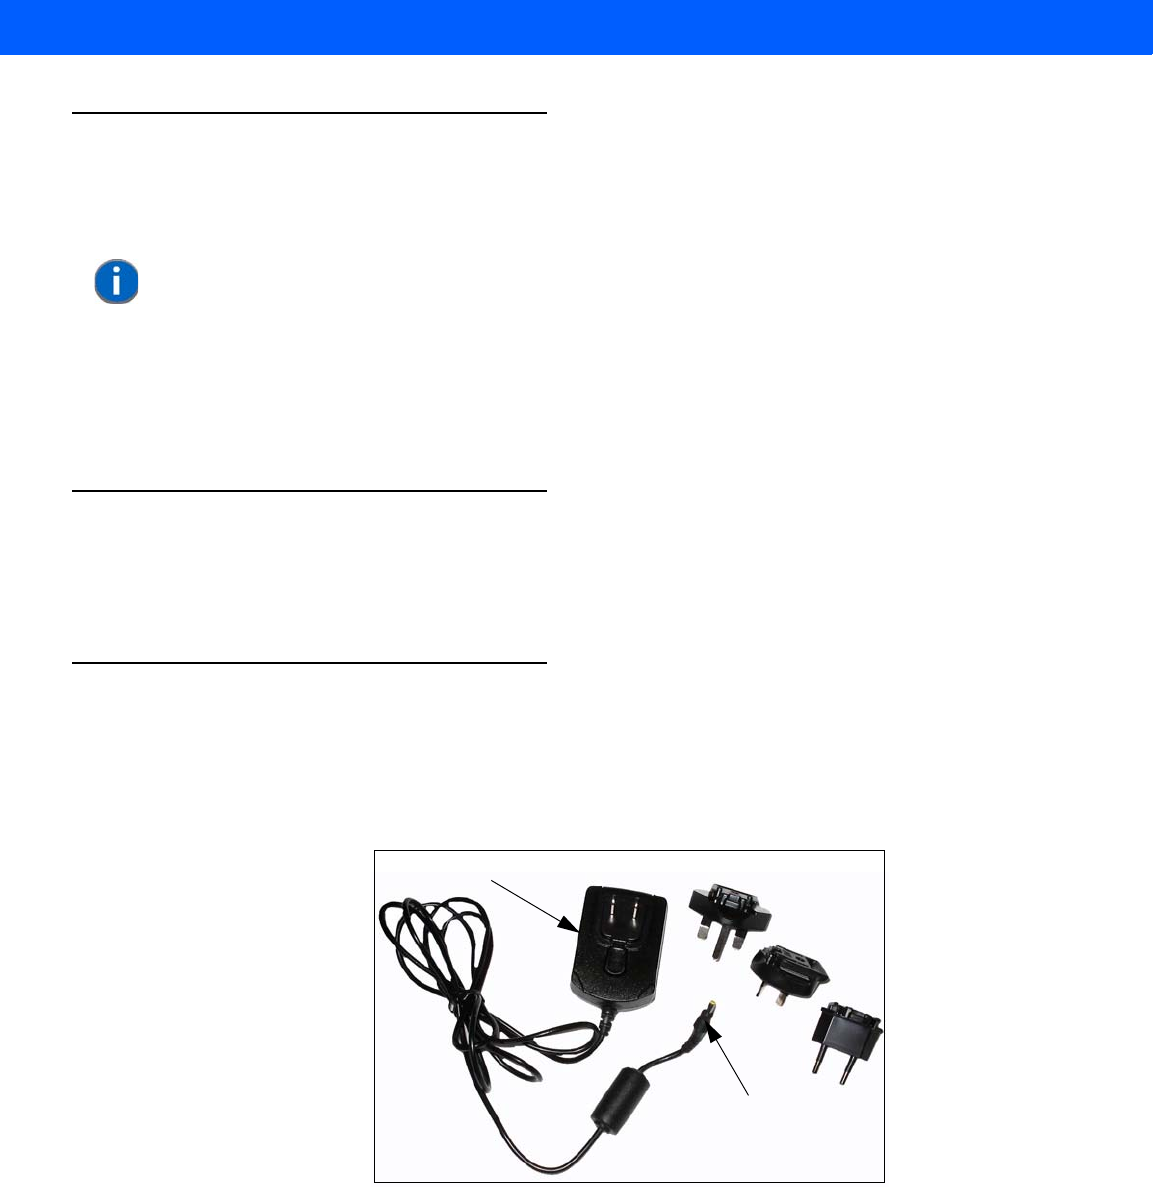
Peripheral Devices & Accessories 5 - 7
Linking a Workabout Pro4 to a PC
The desktop docking station can be connected to a PC so that you can exchange files in the same way that
you would between PC drives. A USB cable is included with your docking station.
To link the Workabout Pro4 to a PC:
• Insert the hand-held in the desktop docking station.
• Insert the USB cable into the docking station Client USB connector. Attach the other end of the cable to a
USB port on the PC.
Troubleshooting the Docking Station Operations
The indicators, applications and drivers required to use and monitor the desktop docking station as a dock (as
opposed to a charger) are installed on the Workabout Pro4 – no applications are present on the docking station
itself.
AC Wall Adaptor – Model #PSA15R-050P
The AC wall adaptor available for your Workabout Pro4 allows you to operate your hand-held using AC power
while charging the battery inserted in the unit.
Adaptor plugs suitable for use in the following countries are shipped with the AC wall adaptor: United Kingdom,
Australia, Europe and North America.
• Choose the adaptor plug that is suitable for use in your country. Slide the adaptor plug into the Universal
AC power supply, snapping it into place. These two pieces, coupled together, are referred to as an AC
wall adaptor.
• Insert the DC power plug into the DC IN socket at the base of Workabout Pro4, located between the tether
and LIF ports.
• Plug the pronged end into an AC outlet.
NOTE For details about data transfer through Windows XP and ActiveSync and through
Vista, refer to “Data Transfer Between the PC & the EP10” on page 29.
Universal AC Power Supply
Adaptor Plugs
DC Power Plug
Draft #5

5 - 8 Workabout Pro4 (Windows Embedded Hand-Held 6.5) User Manual
Bluetooth Peripherals
The Workabout Pro4 is equipped with a Bluetooth radio, making it is possible to communicate with a variety of
Bluetooth peripherals, including GSM/GPRS handsets, scanners, printers, and so on.
The range of the Bluetooth radio is limited to approximately 5 meters.
Motorola provides built-in support for the Bluetooth peripherals listed below.
• GSM/GPRS universal handset
•Bluetooth printer
•Bluetooth headset
Keep in mind that Bluetooth and IEEE 802.11b/g radios both operate in the 2.4GHz band. Although the Worka-
bout Pro4 includes features to minimize interference, performance of the system will not be optimal if you use
both radios simultaneously. Typically, when both radios operate in the hand-held at the same time, they cannot
transmit simultaneously – this has a negative impact on overall system throughput. To minimize the impact on
the backbone 802.11g network, Motorola recommends using Bluetooth peripherals that have low transaction
rates (such as printers and scanners).
Refer to “Bluetooth Setup” on page 4-14 for information about setting up your Bluetooth devices for communi-
cation. In addition, review the manual shipped with your Bluetooth device to determine the method used to pair
with the Workabout Pro4 host.
Draft #5

APPENDIX A PORT PINOUTS
APort Pinouts
LIF (Low Insertion Force) Pinout.................................... A-3
Tether Port Pinout............................................ A-3
Battery Contact Pinout – WA3010................................... A-4
Positive Female Battery Connector.................................. A-4
Draft #5
Draft #5

Port Pinouts A - 3
LIF (Low Insertion Force) Pinout
Tether Port Pinout
PIN # Signal Name
1 Ground
2 Ground
3 USB Host Data Plus, For connecting USB devices
4 USB Host Data Minus, For connecting USB devices
5 USB Host Power, for powering USB devices (5V, 100mA Max)
6 DC Power in, for supplying power to Workabout Pro4/ charging battery (5V, 3A)
7 DC Power in, for supplying power to Workabout Pro4 / charging battery (5V, 3A)
8 LIF Detect, determines if a device is attached to the LIF
9 USB Device Data Minus, for operating the Workabout Pro4 as a USB device
10 USB Device Data Plus, for operating the Workabout Pro4 as a USB device
11 Ground
12 Ground
PIN # Signal Name
1 Ground
2 USB Data Plus (can be configured as Host or Device)
3 USB Data Minus (can be configured as Host or Device)
4 USB VBUS (can provide 5V, 100mA Max for powering USB Devices)
5 RS232 Tx data
6 RS232 Rx Data
7 Tether detect resistor ID. Determines what kind of device is attached to the Tether port
8 DC Power In
9 DC Power In
10 DC Power In
11 RS232 CTS
12 RS232 RTS
13 RS232 DSR
14 RS232 DTR
15 RS232 DCD
16 RS232 RI
17 Ground
18 Ground
Draft #5
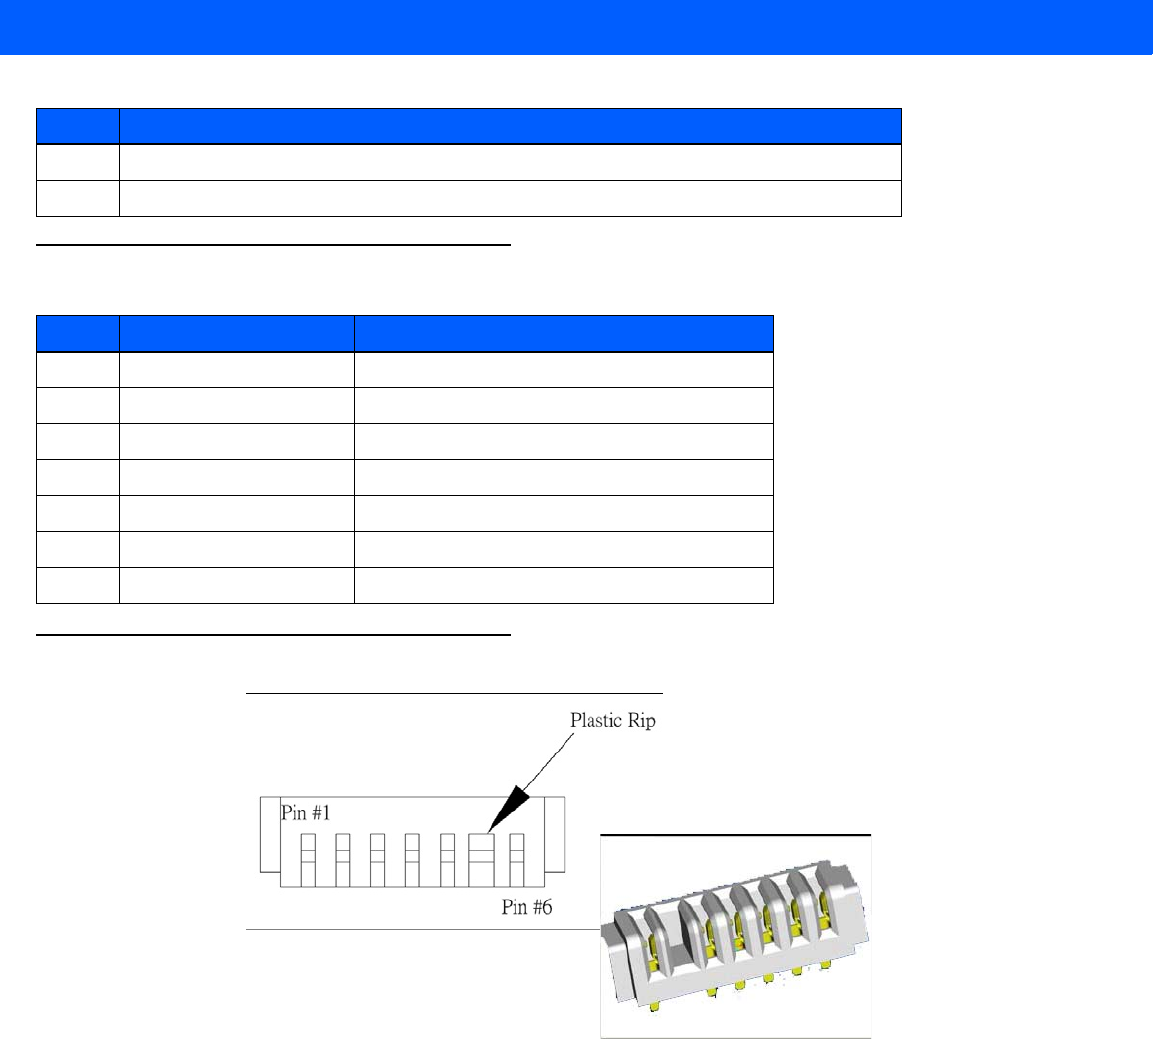
A - 4 Workabout Pro4 (Windows Embedded Hand-Held 6.5) User Manual
Battery Contact Pinout – WA3010
Positive Female Battery Connector
19 Ground
20 Ground
PIN # Signal Name Function
1 P- Power Pin for Battery Pack Negative
2 DQ Maxim DS2762 Data
3 TH (GND) Ground
4 P+ Power Pin for Battery Pack Positive
5 PS Power Switch Sensor
- Plastic Rip -
6 P- Power Pin for Battery Pack Negative
PIN # Signal Name
Draft #5

APPENDIX B WORKABOUT PRO4
SPECIFICATIONS
BWorkabout Pro4 Specifications
The Workabout Pro4 Hand-Held Computer.............................. B-3
Hardware............................................ B-3
Regulatory Approvals..................................... B-3
High Capacity Lithium-ion Battery – 4400 mAh....................... B-5
Draft #5
Draft #5

Workabout Pro4 Specifications B - 3
The Workabout Pro4 Hand-Held Computer
Hardware
Dimensions and Weight
7528 Long
• 223 mm x 75/100 mm x 31/42 mm (8.78 x 2.95/3.94 x 1.22 x 1.65 inches)
• 526g (18.6 oz)
Processor and Memory
• Texas Instruments® OMAP3®Processor 1 GHz
• RAM: 512 MB
• Flash ROM: 4 GB
Operating System
• Microsoft Windows® Embedded Hand-Held 6.5
Power Management
• Battery Pack:
- High capacity – 4400 mAh Lithium-ion
• Super capacitor power backup
Expansion Ports
•Micro SD slot
• 100 Pin Expansion Interface (non-PCMCIA)
• Dedicated USB port
• Audio port
Camera (optional)
• Optional colour, 8Mpixel, autofocus, 4X digital zoom, Dual LED flash, video capable
Environmental
• Std. Operating temp: -20°C to +50°C (-4°F to +122°F)
• Storage temp: -40°C to +60°C (-40°F to +140°F)
• Humidity: 5% to 95% non-condensing
• Rain/Dust: IP65, IEC 60529
• Drop rating: 1.5m (5 ft), 26 drops to polished concrete (powered with options and accessories), multiple
1.8m (6 ft) drops to concrete
Regulatory Approvals
• Worldwide Safety, EMC, RF, Laser approvals
NOTE Performance specifications are nominal and subject to change without notice.
Draft #5

B - 4 Workabout Pro4 (Windows Embedded Hand-Held 6.5) User Manual
• CE Mark
• RoHS compliant
• WEEE compliant
• REACH compliant
Draft #5
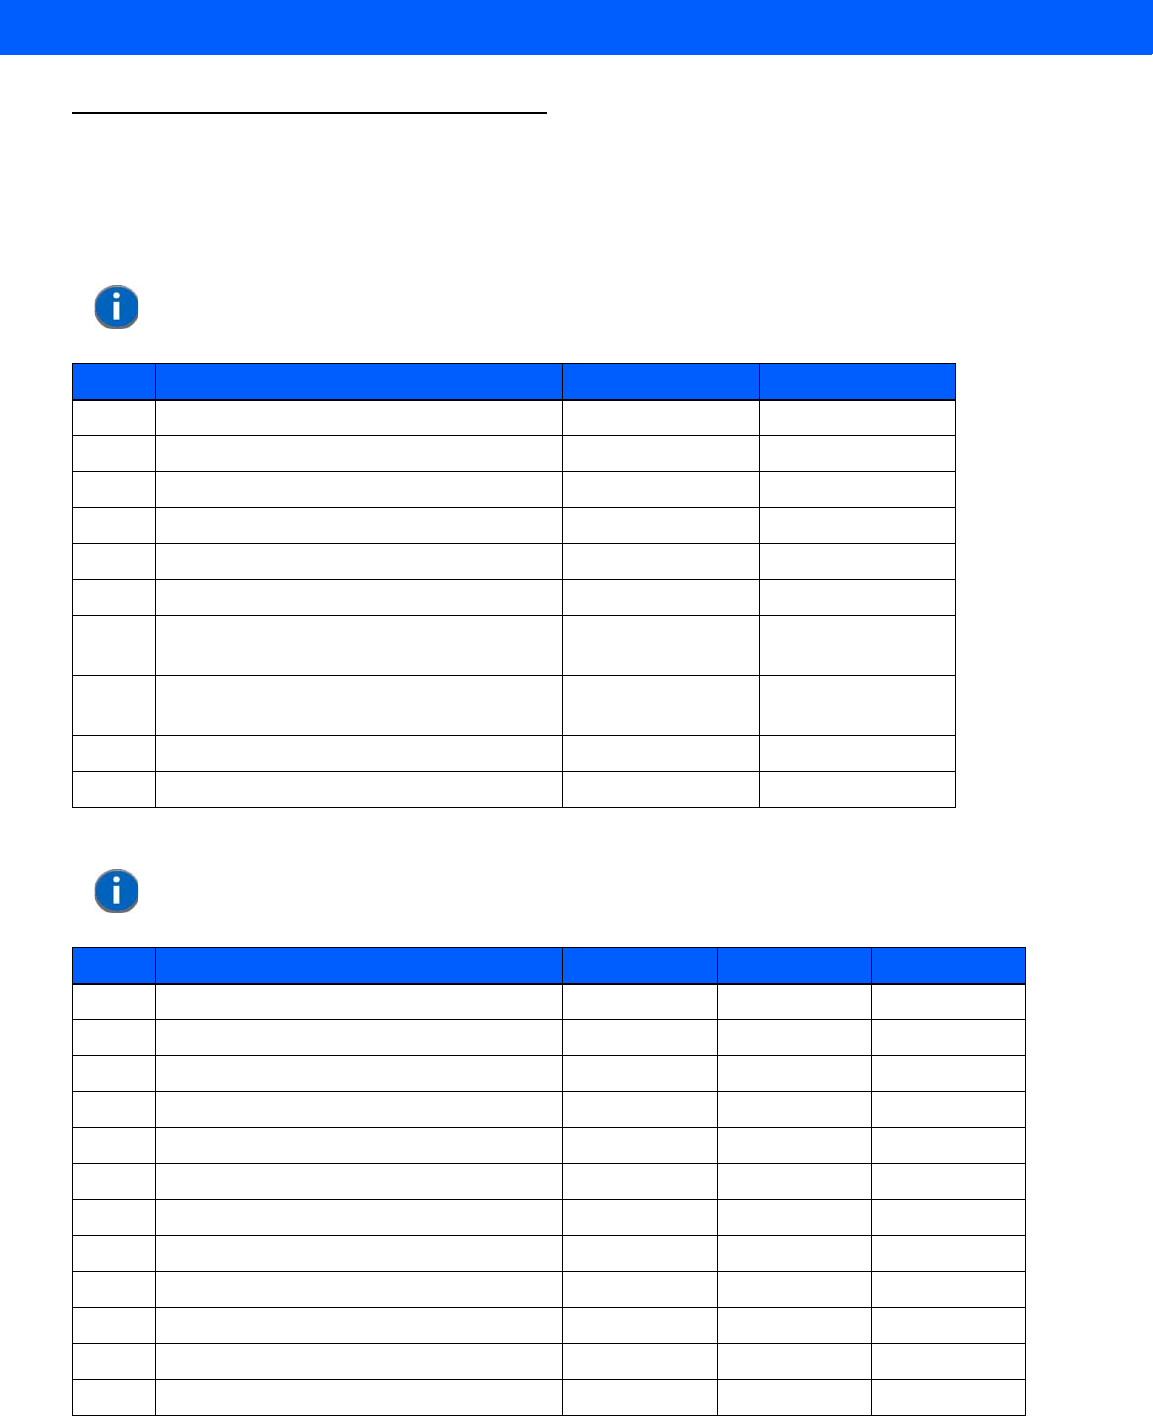
Workabout Pro4 Specifications B - 5
Battery Specifications
High Capacity Lithium-ion Battery – 4400 mAh
Electrical Specifications
Battery Pack Electrical Specifications
NOTE The electrical specifications apply for ambient temperature TAMB of 0° to +40°C unless otherwise
stated.
Item Description Specifications Remark
1 Interface Chipset Maxim DS2762 -
2 Rated Voltage 3.7V Typical
3 Rated Capacity 4400mAh Typical
4 Rated Charge Current 1.2A Maximum
5 Charge Voltage 4.2 +/- 0.05V Maximum
6 Discharge Cut-Off Voltage 2.6V Typical
7 Charge Method Constant voltage
Current limited -
8 Discharge Current 0.5C (-20°C to
60°C) Typical
9 Internal Resistance 200mW Maximum
10 Charging Temperature 0 to 40 Typical
NOTE The electrical specifications apply for ambient temperature TAMB of 0° to +40°C unless otherwise
stated.
Item Description
Minimum Typical Maximum
1 Over voltage detection voltage 4.325V 4.350V 4.375V
2 Charge enable 4.10V 4.15V 4.20V
3 Under voltage detection voltage 2.5V 2.6V 2.7V
4 Over current detection current 2.97A 3.17A 3.36A
5 Short-circuit detection current 9.9A 13.33A 16.83A
6 Short-circuit detection voltage 150mV 200mV 250mV
7 Over voltage delay time 0.8s 1s 1.2s
8 Under voltage delay time 90ms 100ms 110ms
9 Over current delay time 5ms 10ms 20ms
10 Short-circuit delay time 160µs 200µs 240µs
11 Recovery charge current 0.5mA 1mA 2mA
Draft #5

B - 6 Workabout Pro4 (Windows Embedded Hand-Held 6.5) User Manual
Safety Data
Safety License
Environmental Test
Description Condition Test Condition/Result
Short Circuit Test After a standard charge, short terminals
and discharge for 1 hr. Protection circuit board to operate.
No explosion, fire, smoke, or leakage.
Over Charging Test After a standard charge, charge continu-
ously at 4.2V and 4A for 8 hrs. Protection circuit board to operate.
No explosion, fire, smoke, or leakage.
Reverse Charging Test After a standard discharge,
reverse-charge continuously at 4.2V and
4A for 8hrs.
Protection circuit board to operate.
No explosion, fire, smoke, or leakage.
Item Licenses Standard
1 UL 1642 The lithium-ion cell has been listed and pass the UL1642 standard by UL Lab.
File No. MH12383
2 UL 2054 The battery pack is in the process to apply the UL 2054 battery standard. File
No. MH29921.
3 89/336 EEC-EMC
directive The battery pack is in the process to apply the below standard:
-EN55022 -LVD 72/23 EEC -EN55024 -EN61326
4 RoHS Directive The materials of battery pack are used in accordance with the European
RoHS directive.
Description Test References Test Condition/Result
Drop (mechanical) Drop sample battery on all faces from height
of 1.2 meters onto concrete floor.
No explosion, fire, vent, leakage and the
open circuit voltage higher than 3.7V.
Storage at high temp. EN60068-2-2 Test +60°C dry for 240 hours
No explosion, fire, vent or leakage.
Storage at low temp. EN60068-2-1 Test -20°C dry for 240 hours
No explosion, fire, vent or leakage.
Storage at high temp. and high
humidity IEC68-2-3 Test +40°C at 90%RH for 240 hours.
No explosion, fire, vent or leakage.
Storage temp. cycling IEC68-2-14 Test +60°C (2C) for 1 hour (T1), -20oC (2C) for 1
hour. 3 minutes Max allowed for change
between T1 and T2.
Cycle 10 times
No explosion, no fire, no vent, and no
leakage.
Draft #5

Workabout Pro4 Specifications B - 7
Vibration resistance BS2011 Part 2.1
FDC (IEC68-2-37)
After standard charge, tested under the fol-
lowing conditions: Random vibration
5Hz-500Hz ASD 0.02g2/Hz in 3 axis for 15
mins. After which, carry out a standard dis-
charge, charge, discharge. No parting
joints/cracks or damage to connectors. No
leakage or critical damage.
Impact shock resistance - 3 cycles of 50G 11ms, 1/2 sine pulse acceler-
ation applied in 6 directions. 18 shocks total.
ESD protection - Accordance with EN61000-4-8
Description Test References Test Condition/Result
Draft #5
Draft #5

Draft #5
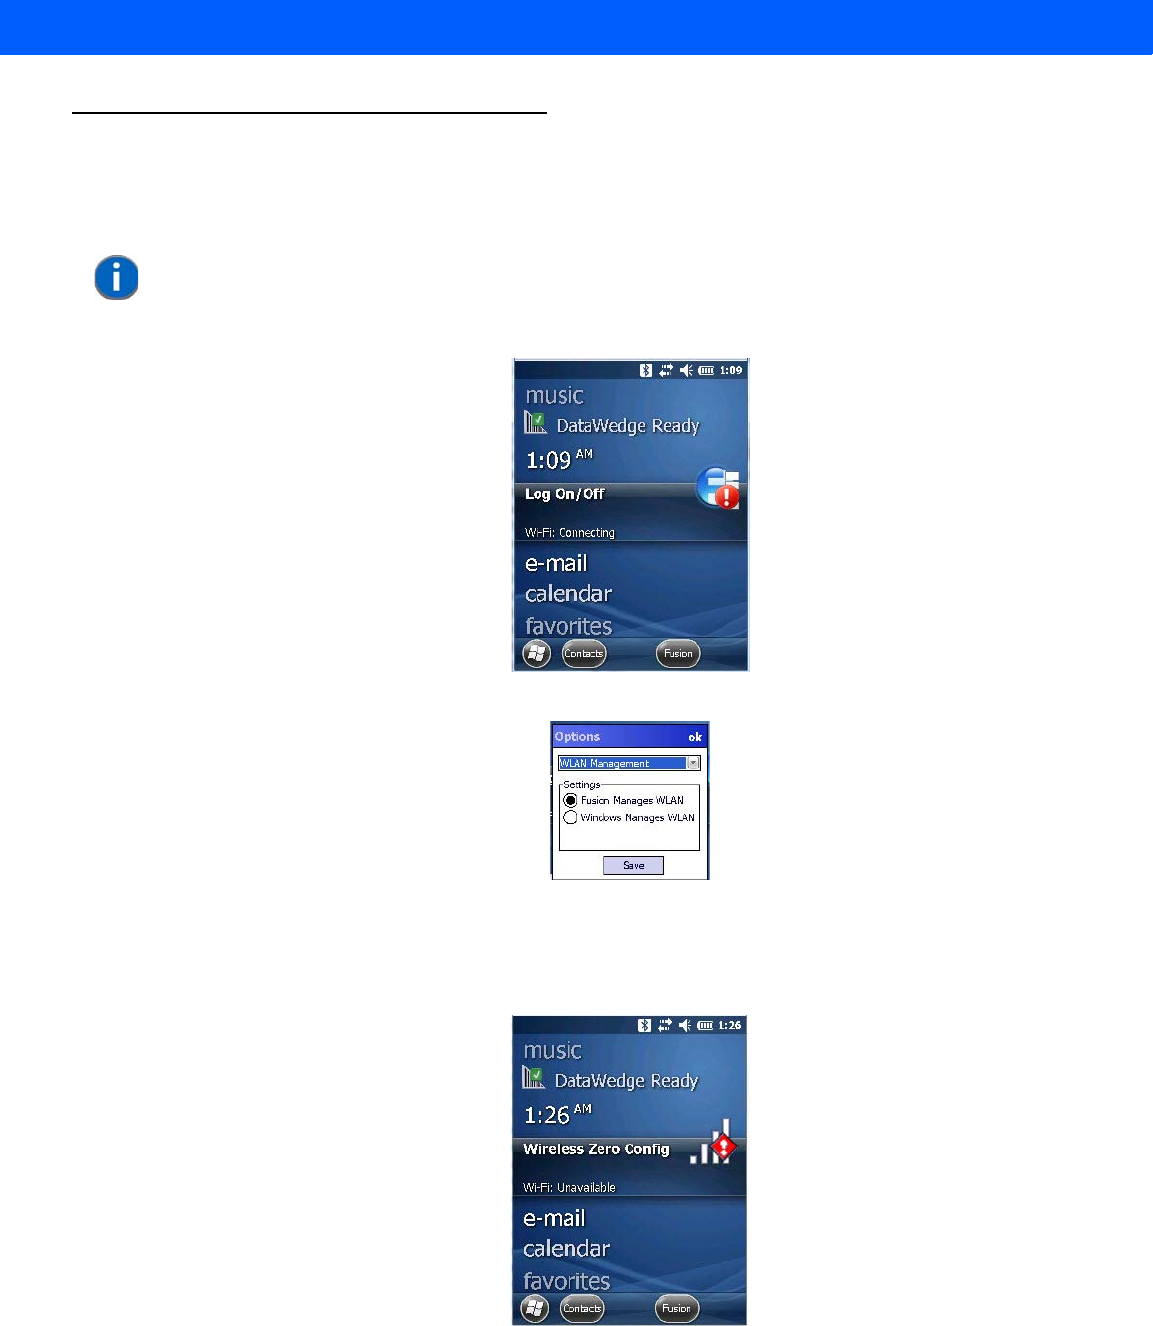
Wireless Zero Config Settings C - 3
Wireless Zero Config
This appendix describes how to set up your radio using Windows Wireless Zero Configuration – an alternative
to the Fusion Wireless Companion.
• In the Today screen, tap on the Fusion softkey at the bottom of the screen.
• In the Fusion Launch screen, tap on Options.
• Choose Windows Manages WLAN, and tap on Save and OK.
• Press and hold down the [Power] button and the [FN/BLUE] key to reset the unit.
Wireless Zero Config will be listed in the Today screen.
•Tap on Wireless Zero Config in the Today screen.
NOTE For details about using Fusion Wireless Companion, refer to “Fusion Wireless Companion - Set-
ting Up the XWing2 802.11a/b/g/n Radio” on page 4-31.
Draft #5
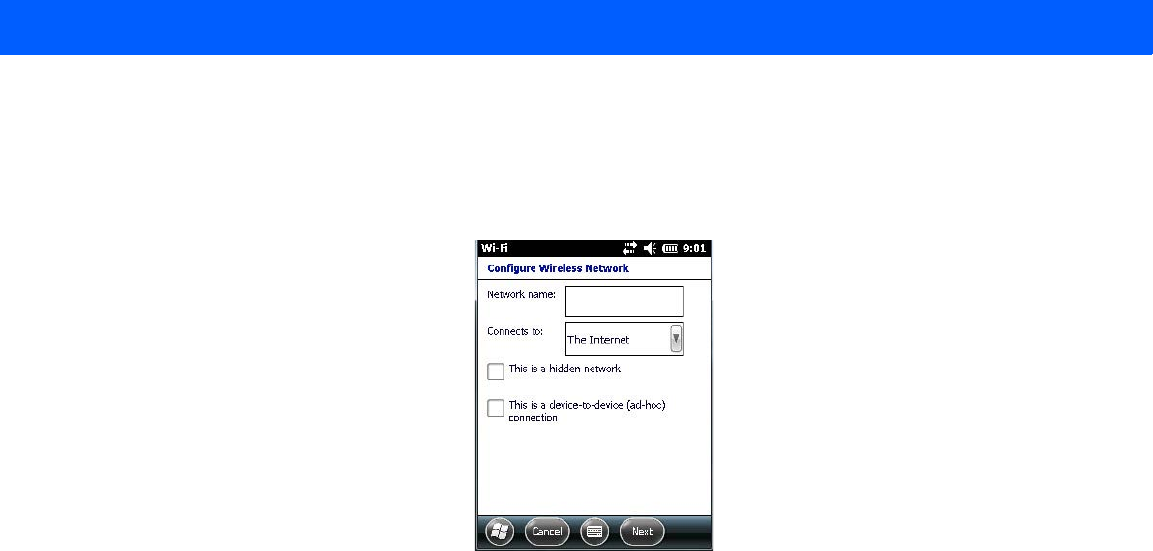
C - 4 Workabout Pro4 (Windows Embedded Hand-Held 6.5) User Manual
Configuring the Unit Using Wireless Zero Config
• In the Wi-Fi screen, tap on Add New....
• Type the appropriate SSID (Service Set Identifier) in the Network name: dialog box. The Network name
field can contain a maximum of 32 characters.
• Choose the type of connection in the drop-down menu next to Connects to.
•Tap on Next.
• In the Configure Network Authentication screen, choose the appropriate Authentication, Data Encryp-
tion, Network key and Key index for your network. These are outlined below. Keep in mind that these
options vary depending on the type of Authentication chosen.
•Authentication: Several subtypes of network authentication services are supported: Open, Shared, WPA,
and WPA-PSK, WPA2 and WPA2-PSK.
•Open authentication does not provide security. When this option is chosen, the hand-held connects to
wireless networks which do not use authentication or encryption.
• Under Shared authentication, each wireless station is assumed to have received a secret shared key over
a secure channel that is independent from the 802.11 wireless network communications channel.
• Under WPA and WPA-PSK authentication, the use of 802.1x authentication is required. For wireless net-
works without a Remote Authentication Dial-In User Service (RADIUS) infrastructure, WPA supports the
use of a preshared key. For wireless networks with a RADIUS infrastructure, Extensible Authentication
Protocol (EAP) and RADIUS is supported.
•Encryption: WEP (Wired-Equivalent Privacy) encryption prevents others from accidentally accessing your
network. If you are not using encryption, you can choose Disabled from the drop-down encryption menu.
Otherwise, leave this field as is.
•AES (Advanced Encryption Standard) is a standard for protecting data through encryption. AES supports
key sizes of 128 bits, 192 bits and 256 bits and will serve as a replacement for the Data Encryption Stand-
ard (DES). In addition to the increased security that comes with larger key sizes, the AES algorithm is a
symmetrical block cipher that can encrypt (encipher) and decrypt (decipher) information.
•TKIP (Temporal Key Integrity Protocol) uses the original WEP programming but wraps additional code at
the beginning and end to encapsulate and modify it. Like WEP, TKIP uses the RC4 stream encryption algo-
rithm as its basis. The new protocol, however, encrypts each data packet with a unique encryption key, and
the keys are much stronger than those of its predecessor.
•Network Key: This field becomes available if you deselect The key is automatically provided. This text box
is used to specify a 5 or 13 ASCII character sequence or an equivalent 10 or 26 Hexadecimal digit
sequence that matches the active WEP key on the access point. It is set to automatically provide a key
by default.
Draft #5
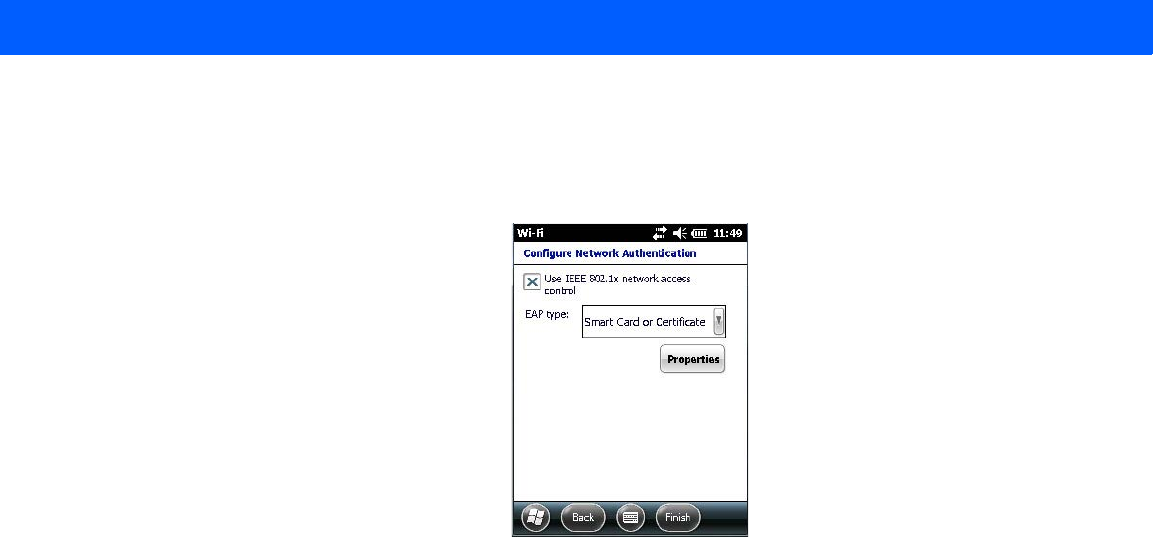
Wireless Zero Config Settings C - 5
•Key Index: This field becomes available if you deselect The key is automatically provided. This field is
used to identify the WEP key.
•Tap on Next to display the screen in which you can choose the EAP (Extensible Authentication Proto-
col) type.
When Use IEEE 802.1x network access control is enabled, EAP types are available in the drop-down menu.
The items will vary depending on your network setup.
Keep in mind that some authentication protocols require that you select a Certificate. By tapping on the Proper-
ties button, you can select a Certificate.
•Tap on Finish when the configuration is complete.
Draft #5

C - 6 Workabout Pro4 (Windows Embedded Hand-Held 6.5) User Manual
Draft #5

INDEX
Index
Numerics
36-key keyboard
alpha keys, accessing . . . . . . . . . . . . . . . . . . . . . . . . . 2-8
uppercase letters, creating . . . . . . . . . . . . . . . . . . . . . 2-9
A
A.R.C WiFiConnect (private network) . . . . . . . . . . . . . . 3-37
About, Bluetooth . . . . . . . . . . . . . . . . . . . . . . . . . . . . . . . . . . 4-18
About icon (software version) . . . . . . . . . . . . . . . . . . . . . 4-45
accessories
desktop docking station . . . . . . . . . . . . . . . . . . . . . . . . 5-4
hand strap. . . . . . . . . . . . . . . . . . . . . . . . . . . . . . . . . . . . 5-3
ActiveSync . . . . . . . . . . . . . . . . . . . . . . . . . . . . . . . . . . . . . . 3-26
setting up. . . . . . . . . . . . . . . . . . . . . . . . . . . . . . . . . . . . 3-26
ALT Key. . . . . . . . . . . . . . . . . . . . . . . . . . . . . . . . . . . . . . . . . . 2-5
App Launch Keys . . . . . . . . . . . . . . . . . . . . . . . . . . . . . . . . 4-36
arrow keys
moving the cursor . . . . . . . . . . . . . . . . . . . . . . . . . . . . . 2-5
audio indicators
adjusting volume . . . . . . . . . . . . . . . . . . . . . . . . . . . . . 2-14
description of beep conditions . . . . . . . . . . . . . . . . . 2-14
AutoRestore. . . . . . . . . . . . . . . . . . . . . . . . . . . . . . . . . . . . . 4-73
B
backlight
Battery Power tab . . . . . . . . . . . . . . . . . . . . . . . . . . . . 4-46
intensity . . . . . . . . . . . . . . . . . . . . . . . . . . . . . . . . . . . . . 2-10
Backlight tab . . . . . . . . . . . . . . . . . . . . . . . . . . . . . . . . . . . . 4-45
backlight timeout values . . . . . . . . . . . . . . . . . . . . . . . . . . . 4-9
Backspace (DEL Key) . . . . . . . . . . . . . . . . . . . . . . . . . . . . . 2-5
backup profile, creating (Total Recall) . . . . . . . . . . . . . . 4-70
backup Profile (Total Recall)
AutoRestore . . . . . . . . . . . . . . . . . . . . . . . . . . . . . . . . . 4-73
Clone to USB . . . . . . . . . . . . . . . . . . . . . . . . . . . . . . . . 4-73
Restore . . . . . . . . . . . . . . . . . . . . . . . . . . . . . . . . . . . . . 4-73
restoring . . . . . . . . . . . . . . . . . . . . . . . . . . . . . . . . . . . . 4-72
Upload to A.R.C. . . . . . . . . . . . . . . . . . . . . . . . . . . . . . 4-73
viewing. . . . . . . . . . . . . . . . . . . . . . . . . . . . . . . . . . . . . . 4-72
backups, managing profiles . . . . . . . . . . . . . . . . . . . . . . . 4-72
batteries
a description of . . . . . . . . . . . . . . . . . . . . . . . . . . . . . . . 5-3
Advanced (backlight) tab. . . . . . . . . . . . . . . . . . . . . . . 4-9
Battery (capacity) tab . . . . . . . . . . . . . . . . . . . . . . . . . . 4-9
Battery Details tab. . . . . . . . . . . . . . . . . . . . . . . . . . . . . 4-9
Battery Health tab . . . . . . . . . . . . . . . . . . . . . . . . . . . . 4-11
Battery Power tab . . . . . . . . . . . . . . . . . . . . . . . . . . . . 4-46
Suspend Threshold tab . . . . . . . . . . . . . . . . . . . . . . . 4-10
battery . . . . . . . . . . . . . . . . . . . . . . . . . . . . . . . . . . . . . . . 2-3–2-4
charging. . . . . . . . . . . . . . . . . . . . . . . . . . . . . . . . . . . . . . 2-4
installing . . . . . . . . . . . . . . . . . . . . . . . . . . . . . . . . . . . . . 1-4
removing . . . . . . . . . . . . . . . . . . . . . . . . . . . . . . . . . . . . . 1-4
replacing . . . . . . . . . . . . . . . . . . . . . . . . . . . . . . . . . . . . . 1-4
swap time . . . . . . . . . . . . . . . . . . . . . . . . . . . . . . . . . . . . 2-3
battery charger
safety instructions . . . . . . . . . . . . . . . . . . . . . . . . . . . . . 5-4
Battery Power settings. . . . . . . . . . . . . . . . . . . . . . . . . . . . 4-45
beeper
adjusting volume . . . . . . . . . . . . . . . . . . . . . . . . . . . . . 2-14
description of beep conditions . . . . . . . . . . . . . . . . . 2-14
Bluetooth
microphone, adjusting volume . . . . . . . . . . . . . . . . . 4-55
pairing . . . . . . . . . . . . . . . . . . . . . . . . . . . . . . . . . . . . . . 4-16
radio ISM band . . . . . . . . . . . . . . . . . . . . . . . . . . . . . . 4-14
Bluetooth setup
peripherals . . . . . . . . . . . . . . . . . . . . . . . . . . . . . . . . . . . 5-8
Bluetooth setup. . . . . . . . . . . . . . . . . . . . . . . . . . . . . . . . . . . 4-14
About Tab . . . . . . . . . . . . . . . . . . . . . . . . . . . . . . . . . . . 4-18
GPRS setup . . . . . . . . . . . . . . . . . . . . . . . . . . . . . . . . . 4-20
Mode tab . . . . . . . . . . . . . . . . . . . . . . . . . . . . . . . . . . . . 4-18
Paired tab . . . . . . . . . . . . . . . . . . . . . . . . . . . . . . . . . . . 4-19
Servers tab . . . . . . . . . . . . . . . . . . . . . . . . . . . . . . . . . . 4-17
Draft #5

Index - II Workabout Pro4 (Windows Embedded Hand-Held 6.5) User Manual
Boot to BooSt . . . . . . . . . . . . . . . . . . . . . . . . . . . . . . . . . . . . 1-6
built-in microphone, adjusting volume. . . . . . . . . . . . . . 4-55
C
calendar
attendees, assigning . . . . . . . . . . . . . . . . . . . . . . . . . 2-22
categories, using. . . . . . . . . . . . . . . . . . . . . . . . . . . . . 2-21
creating & editing entries . . . . . . . . . . . . . . . . . . . . . 2-20
deleting appointments . . . . . . . . . . . . . . . . . . . . . . . . 2-22
reminders, creating. . . . . . . . . . . . . . . . . . . . . . . . . . . 2-21
status, assigning . . . . . . . . . . . . . . . . . . . . . . . . . . . . . 2-22
using . . . . . . . . . . . . . . . . . . . . . . . . . . . . . . . . . . . . . . . 2-20
calibrating touchscreen. . . . . . . . . . . . . . . . . . . . . . . . . . . 2-11
camera, using . . . . . . . . . . . . . . . . . . . . . . . . . . . . . . . . . . . 3-16
Certificates. . . . . . . . . . . . . . . . . . . . . . . . . . . . . . . . . . . . . . 4-46
charger
safety instructions. . . . . . . . . . . . . . . . . . . . . . . . . . . . . 5-4
chargers . . . . . . . . . . . . . . . . . . . . . . . . . . . . . . . . . . . . . . . . . 5-3
desktop docking station. . . . . . . . . . . . . . . . . . . . . . . . 5-4
installing at a site . . . . . . . . . . . . . . . . . . . . . . . . . . . . . 5-3
operator controls. . . . . . . . . . . . . . . . . . . . . . . . . . . . . . 5-4
clean start. . . . . . . . . . . . . . . . . . . . . . . . . . . . . . . . . . . . . . . . 1-5
clone (Total Recall) . . . . . . . . . . . . . . . . . . . . . . . . . . . . . . 4-71
Clone to USB . . . . . . . . . . . . . . . . . . . . . . . . . . . . . . . . . . . 4-73
cold reset . . . . . . . . . . . . . . . . . . . . . . . . . . . . . . . . . . . . . . . . 1-5
communication
ActiveSync . . . . . . . . . . . . . . . . . . . . . . . . . . . . . . . . . . 3-26
WORKABOUT to PC . . . . . . . . . . . . . . . . . . . . . . . . . . 5-7
connecting to a server with . . . . . . . . . . . . . . . . . . . . . . . 3-37
Connections
editing settings . . . . . . . . . . . . . . . . . . . . . . . . . . . . . . 4-28
Internet . . . . . . . . . . . . . . . . . . . . . . . . . . . . . . . . . . . . . 4-21
managing . . . . . . . . . . . . . . . . . . . . . . . . . . . . . . 4-27, 4-28
modem setup. . . . . . . . . . . . . . . . . . . . . . . . . . . . . . . . 4-22
network, selecting. . . . . . . . . . . . . . . . . . . . . . . . . . . . 4-30
Network Cards. . . . . . . . . . . . . . . . . . . . . . . . . . . . . . . 4-26
Proxy Server setup. . . . . . . . . . . . . . . . . . . . . . . . . . . 4-29
VPN, setting up . . . . . . . . . . . . . . . . . . . . . . . . . . . . . . 4-27
Wi-Fi Configs . . . . . . . . . . . . . . . . . . . . . . . . . . . . . . . . 4-31
Wireless Manager. . . . . . . . . . . . . . . . . . . . . . . . . . . . 4-35
Connections (Internet). . . . . . . . . . . . . . . . . . . . . . . . . . . . 4-21
Connections (settings) . . . . . . . . . . . . . . . . . . . . . . . . . . . 4-13
Contacts (Start screen) . . . . . . . . . . . . . . . . . . . . . . . . . . . 3-12
adding new. . . . . . . . . . . . . . . . . . . . . . . . . . . . . . . . . . 3-13
working with . . . . . . . . . . . . . . . . . . . . . . . . . . . . . . . . . 3-12
Contrast adjustments . . . . . . . . . . . . . . . . . . . . . . . . . . . . 4-48
Copyright information, operating system . . . . . . . . . . . 4-45
CTRL Key . . . . . . . . . . . . . . . . . . . . . . . . . . . . . . . . . . . . . . . 2-5
D
data entry modes
handwriting. . . . . . . . . . . . . . . . . . . . . . . . . . . . . . . . . . 3-34
typing. . . . . . . . . . . . . . . . . . . . . . . . . . . . . . . . . . . . . . . 3-34
debug (error handling) . . . . . . . . . . . . . . . . . . . . . . . . . . . 4-48
DEL (Backspace) Key. . . . . . . . . . . . . . . . . . . . . . . . . . . . . 2-5
desktop docking station (WA4002). . . . . . . . . . . . . . . . . . 5-4
desktop screen (Home Screen) . . . . . . . . . . . . . . . . . . . 2-15
Device ID tab. . . . . . . . . . . . . . . . . . . . . . . . . . . . . . . . . . . . 4-45
display
backlight, adjusting. . . . . . . . . . . . . . . . . . . . . . . . . . . 2-10
docking station
uploading data using . . . . . . . . . . . . . . . . . . . . . . . . . 2-28
docking stations . . . . . . . . . . . . . . . . . . . . . . . . . . . . . . . . . . 5-3
desktop docking station. . . . . . . . . . . . . . . . . . . . . . . . 5-4
installation at site . . . . . . . . . . . . . . . . . . . . . . . . . . . . . 5-3
operator controls. . . . . . . . . . . . . . . . . . . . . . . . . . . . . . 5-4
Double-Click, Manage Triggers menu . . . . . . . . . . . . . 4-52
Dr. Debug. . . . . . . . . . . . . . . . . . . . . . . . . . . . . . . . . . 4-48, 4-49
E
E-mail . . . . . . . . . . . . . . . . . . . . . . . . . . . . . . . . . . . . . . . . . . . 3-8
folders . . . . . . . . . . . . . . . . . . . . . . . . . . . . . . . . . . . . . . . 3-9
Outlook e-mail, synchronizing (Windows Vista and 7)
3-10
Outlook e-mail, synchronizing (Windows XP) . . . . 3-9
e-mail notification . . . . . . . . . . . . . . . . . . . . . . . . . . . . . . . . 2-19
Encryption (storage card). . . . . . . . . . . . . . . . . . . . . . . . . 4-50
Error Reporting. . . . . . . . . . . . . . . . . . . . . . . . . . . . . . . . . . 4-50
ESC Key. . . . . . . . . . . . . . . . . . . . . . . . . . . . . . . . . . . . . . . . . 2-5
Excel Mobile . . . . . . . . . . . . . . . . . . . . . . . . . . . . . . . . . . . . 3-30
External Power settings . . . . . . . . . . . . . . . . . . . . . . . . . . 4-46
F
Favorites . . . . . . . . . . . . . . . . . . . . . . . . . . . . . . . . . . . . . . . 2-22
Add Remove . . . . . . . . . . . . . . . . . . . . . . . . . . . . . . . . 2-22
file, renaming. . . . . . . . . . . . . . . . . . . . . . . . . . . . . . . . . . . . 2-25
File Explorer . . . . . . . . . . . . . . . . . . . . . . . . . . . . . . . 2-24, 3-26
copying a file . . . . . . . . . . . . . . . . . . . . . . . . . . . . . . . . 2-25
deleting file. . . . . . . . . . . . . . . . . . . . . . . . . . . . . . . . . . 2-25
folders, creating. . . . . . . . . . . . . . . . . . . . . . . . . . . . . . 2-24
renaming file . . . . . . . . . . . . . . . . . . . . . . . . . . . . . . . . 2-25
files & folders, managing . . . . . . . . . . . . . . . . . . . . . . . . . 2-24
folder, creating . . . . . . . . . . . . . . . . . . . . . . . . . . . . . . . . . . 2-24
folder, deleting. . . . . . . . . . . . . . . . . . . . . . . . . . . . . . . . . . . 2-25
folder, renaming . . . . . . . . . . . . . . . . . . . . . . . . . . . . . . . . . 2-25
G
GPRS (bluetooth) . . . . . . . . . . . . . . . . . . . . . . . . . . . . . . . . 4-20
GPS (external) . . . . . . . . . . . . . . . . . . . . . . . . . . . . . . . . . . 4-50
H
hand strap . . . . . . . . . . . . . . . . . . . . . . . . . . . . . . . . . . . . . . . 5-3
Draft #5

Index - III
headset, adjusting volume . . . . . . . . . . . . . . . . . . . . . . . . 4-55
headsets, pairing (Bluetooth). . . . . . . . . . . . . . . . . . . . . . . 4-16
Home
appearance, changing . . . . . . . . . . . . . . . . . . . . . . . . . 4-6
Home icon (Start screen) . . . . . . . . . . . . . . . . . . . . . . . . . . 3-3
Home Screen (desktop screen). . . . . . . . . . . . . . . . . . . . 2-15
customizing. . . . . . . . . . . . . . . . . . . . . . . . . . . . . . . . . . 2-16
HomeVU
Shell Settings . . . . . . . . . . . . . . . . . . . . . . . . . . . . . . . . 4-57
Advanced tab . . . . . . . . . . . . . . . . . . . . . . . . . . . . 4-60
Application tab . . . . . . . . . . . . . . . . . . . . . . . . . . . 4-57
Phone tab . . . . . . . . . . . . . . . . . . . . . . . . . . . . . . . 4-62
HomeVU application . . . . . . . . . . . . . . . . . . . . . . . . . . . . . 4-56
hotkeys (navigation bar) . . . . . . . . . . . . . . . . . . . . . . . . . . 2-22
HSP HFP (Headset Profile Hands-Free Profile) Service
Commands (Bluetooth pairing). . . . . . . . . . . . . . . . . . 4-20
I
indicators
LED functions. . . . . . . . . . . . . . . . . . . . . . . . . . . . . . . . 2-13
softkey bar . . . . . . . . . . . . . . . . . . . . . . . . . . . . . . . . . . 2-23
input modes
handwriting . . . . . . . . . . . . . . . . . . . . . . . . . . . . . . . . . . 3-34
typing . . . . . . . . . . . . . . . . . . . . . . . . . . . . . . . . . . . . . . . 3-34
Internet connection. . . . . . . . . . . . . . . . . . . . . . . . . . . . . . . 4-21
Internet Explorer . . . . . . . . . . . . . . . . . . . . . . . . . . . . . . . . . 3-15
browsing web sites . . . . . . . . . . . . . . . . . . . . . . . . . . . 3-15
Internet Sharing. . . . . . . . . . . . . . . . . . . . . . . . . . . . . . . . . . 3-27
ISM band, Bluetooth radio . . . . . . . . . . . . . . . . . . . . . . . . . 4-14
K
keyboard
36-key keyboard . . . . . . . . . . . . . . . . . . . . . . . . . . . . . . 2-8
alpha keys, 36-key keyboard . . . . . . . . . . . . . . . . . . . 2-8
one shot mode. . . . . . . . . . . . . . . . . . . . . . . . . . . . . . . 4-39
Scancode remapping . . . . . . . . . . . . . . . . . . . . . . . . . 4-42
Unicode Mapping . . . . . . . . . . . . . . . . . . . . . . . . . . . . 4-41
keyboard keys . . . . . . . . . . . . . . . . . . . . . . . . . . . . . . . . . . . . 2-4
ALT . . . . . . . . . . . . . . . . . . . . . . . . . . . . . . . . . . . . . . . . . . 2-5
arrow keys. . . . . . . . . . . . . . . . . . . . . . . . . . . . . . . . . . . . 2-5
Backspace . . . . . . . . . . . . . . . . . . . . . . . . . . . . . . . . . . . 2-5
CTRL . . . . . . . . . . . . . . . . . . . . . . . . . . . . . . . . . . . . . . . . 2-5
DEL. . . . . . . . . . . . . . . . . . . . . . . . . . . . . . . . . . . . . . . . . . 2-5
ESC . . . . . . . . . . . . . . . . . . . . . . . . . . . . . . . . . . . . . . . . . 2-5
Macro keys . . . . . . . . . . . . . . . . . . . . . . . . . . . . . . . . . . 4-40
macro keys . . . . . . . . . . . . . . . . . . . . . . . . . . . . . . . . . . . 2-8
modifiers . . . . . . . . . . . . . . . . . . . . . . . . . . . . . . . . . . . . . 2-6
navigating using the keyboard . . . . . . . . . . . . . . . . . 2-15
one shot mode. . . . . . . . . . . . . . . . . . . . . . . . . . . . . . . 4-39
SCAN. . . . . . . . . . . . . . . . . . . . . . . . . . . . . . . . . . . . . . . . 2-5
Scancode Remapping . . . . . . . . . . . . . . . . . . . . . . . . 4-42
SHIFT. . . . . . . . . . . . . . . . . . . . . . . . . . . . . . . . . . . . . . . . 2-5
shift-state indicator icon. . . . . . . . . . . . . . . . . . . . . . . 2-23
SPACE. . . . . . . . . . . . . . . . . . . . . . . . . . . . . . . . . . . . . . . 2-5
Tab . . . . . . . . . . . . . . . . . . . . . . . . . . . . . . . . . . . . . . . . . . 2-5
Unicode Mapping . . . . . . . . . . . . . . . . . . . . . . . . . . . . 4-41
Volume. . . . . . . . . . . . . . . . . . . . . . . . . . . . . . . . . . . . . . . 2-6
keypad (phone) . . . . . . . . . . . . . . . . . . . . . . . . . . . . . . . . . . . 3-4
L
landscape orientation. . . . . . . . . . . . . . . . . . . . . . . . . . . . . 2-13
LEDfunctions . . . . . . . . . . . . . . . . . . . . . . . . . . . . . . . . . . . . 2-13
Lithium-ion batteries
installing . . . . . . . . . . . . . . . . . . . . . . . . . . . . . . . . . . . . . 1-4
removing . . . . . . . . . . . . . . . . . . . . . . . . . . . . . . . . . . . . . 1-4
replacing . . . . . . . . . . . . . . . . . . . . . . . . . . . . . . . . . . . . . 1-4
Lock Sequence . . . . . . . . . . . . . . . . . . . . . . . . . . . . . . . . . . 4-44
M
Macro keys
accessing . . . . . . . . . . . . . . . . . . . . . . . . . . . . . . . . . . . . 2-8
deleting a macro . . . . . . . . . . . . . . . . . . . . . . . . . . . . . 4-41
executing a macro. . . . . . . . . . . . . . . . . . . . . . . . . . . . 4-41
Macros menu, accessing. . . . . . . . . . . . . . . . . . . . . . 4-40
recording and saving . . . . . . . . . . . . . . . . . . . . . . . . . 4-40
maintenance . . . . . . . . . . . . . . . . . . . . . . . . . . . . . . . . . . . . 2-28
Managed Programs . . . . . . . . . . . . . . . . . . . . . . . . . . . . . . 4-54
mapping
Scancode . . . . . . . . . . . . . . . . . . . . . . . . . . . . . . . . . . . 4-42
Unicode . . . . . . . . . . . . . . . . . . . . . . . . . . . . . . . . . . . . . 4-41
Memory. . . . . . . . . . . . . . . . . . . . . . . . . . . . . . . . . . . . . . . . . 4-54
Storage Card tab . . . . . . . . . . . . . . . . . . . . . . . . . . . . . 4-55
menus
pop-up . . . . . . . . . . . . . . . . . . . . . . . . . . . . . . . . . . . . . . 2-25
using. . . . . . . . . . . . . . . . . . . . . . . . . . . . . . . . . . . . . . . . 2-25
Messaging
Outlook e-mail, synchronizing . . . . . . . . . . . . . 3-9, 3-10
Microphone, adjusting volume (Built-in, Headset and
Bluetooth) . . . . . . . . . . . . . . . . . . . . . . . . . . . . . . . . . . . . 4-55
microSD Card, inserting . . . . . . . . . . . . . . . . . . . . . . . . . . 2-14
Microsoft® ActiveSync® . . . . . . . . . . . . . . . . . . . . . . . . . . 2-27
Mobile Device Center (Windows), setting up . . . . . . . . 2-28
Mode, Bluetooth . . . . . . . . . . . . . . . . . . . . . . . . . . . . . . . . . . 4-18
modem setup. . . . . . . . . . . . . . . . . . . . . . . . . . . . . . . . . . . . 4-22
Server Settings . . . . . . . . . . . . . . . . . . . . . . . . . . . . . . 4-24
TCP_IP Settings . . . . . . . . . . . . . . . . . . . . . . . . . . . . . 4-24
modifier keys . . . . . . . . . . . . . . . . . . . . . . . . . . . . . . . . . . . . . 2-6
locking . . . . . . . . . . . . . . . . . . . . . . . . . . . . . . . . . . . . . . . 2-6
OneShot Mode. . . . . . . . . . . . . . . . . . . . . . . . . . . . . . . 4-39
shift-state indicator icon. . . . . . . . . . . . . . . . . . . . . . . 2-23
unlocking. . . . . . . . . . . . . . . . . . . . . . . . . . . . . . . . . . . . . 2-6
Draft #5

Index - IV Workabout Pro4 (Windows Embedded Hand-Held 6.5) User Manual
N
name, assigning to WORKABOUT PRO3 . . . . . . . . . . 4-45
navigation bar
hotkeys . . . . . . . . . . . . . . . . . . . . . . . . . . . . . . . . . . . . . 2-22
shift-state indicator . . . . . . . . . . . . . . . . . . . . . . . . . . . 2-23
network, selecting . . . . . . . . . . . . . . . . . . . . . . . . . . . . . . . 4-30
Note
recording a message (audio) . . . . . . . . . . . . . . . . . . 3-23
renaming. . . . . . . . . . . . . . . . . . . . . . . . . . . . . . . . . . . . 3-23
soft keyboard . . . . . . . . . . . . . . . . . . . . . . . . . . . . . . . . 3-21
text, converting handwriting into . . . . . . . . . . . . . . . 3-22
transcriber. . . . . . . . . . . . . . . . . . . . . . . . . . . . . . . . . . . 3-22
Notes. . . . . . . . . . . . . . . . . . . . . . . . . . . . . . . . . . . . . . . . . . . 3-20
Notification, setting. . . . . . . . . . . . . . . . . . . . . . . . . . . . . . . 4-12
Notifications and Sound, defining. . . . . . . . . . . . . . . . . . 4-12
O
OBEX OPP (Object Exchange-Object Push Profile. .4-18,
4-19
Omnii
model numbers . . . . . . . . . . . . . . . . . . . . . . . . . . . . . . . . xii
On & Off button. . . . . . . . . . . . . . . . . . . . . . . . . . . . . . . . . . . 1-4
OneShot Mode . . . . . . . . . . . . . . . . . . . . . . . . . . . . . . . . . . 4-39
OneShot tab (modifier keys) . . . . . . . . . . . . . . . . . . . . . . 4-39
orientation, screen . . . . . . . . . . . . . . . . . . . . . . . . . . . . . . . 2-13
Outlook e-mail, synchronizing (Windows Vista and 7)3-10
Outlook e-mail, synchronizing (Windows XP) . . . . . . . . 3-9
P
Paired tab (Bluetooth) . . . . . . . . . . . . . . . . . . . . . . . . . . . . . 4-19
pairing Bluetooth devices. . . . . . . . . . . . . . . . . . . . . . . . . . 4-16
Password (admin), changing (HomeVU) . . . . . . . . . . . 4-57
PC, connecting WORKABOUT to . . . . . . . . . . . . . . . . . . 5-7
Personal apps. . . . . . . . . . . . . . . . . . . . . . . . . . . . . . . . . . . 4-36
App Launch Keys . . . . . . . . . . . . . . . . . . . . . . . . . . . . 4-36
phone
keypad. . . . . . . . . . . . . . . . . . . . . . . . . . . . . . . . . . . . . . . 3-4
phone keys (on the EP10 keyboard) . . . . . . . . . . . . 3-5
settings, managing . . . . . . . . . . . . . . . . . . . . . . . . . . . . 3-8
using (Windows Mobile 6.5 Professional). . . . . . . . 3-4
Phone communication. . . . . . . . . . . . . . . . . . . . . . . . . . . . . 1-6
Pictures
deleting . . . . . . . . . . . . . . . . . . . . . . . . . . . . . . . . . . . . . 3-18
editing . . . . . . . . . . . . . . . . . . . . . . . . . . . . . . . . . . . . . . 3-18
opening . . . . . . . . . . . . . . . . . . . . . . . . . . . . . . . . . . . . . 3-17
slide show, creating . . . . . . . . . . . . . . . . . . . . . . . . . . 3-18
Pictures and Videos. . . . . . . . . . . . . . . . . . . . . . . . . . . . . . 3-16
Pocket Word . . . . . . . . . . . . . . . . . . . . . . . . . . . . . . . . . . . . 3-34
portrait orientation . . . . . . . . . . . . . . . . . . . . . . . . . . . . . . . 2-13
Power
Advanced tab (backlight timeout) . . . . . . . . . . . . . . . 4-9
Battery (capacity) tab. . . . . . . . . . . . . . . . . . . . . . . . . . 4-9
Battery Details tab . . . . . . . . . . . . . . . . . . . . . . . . . . . . 4-9
Battery Health tab. . . . . . . . . . . . . . . . . . . . . . . . . . . . 4-11
Suspend Threshold tab. . . . . . . . . . . . . . . . . . . . . . . 4-10
Power button. . . . . . . . . . . . . . . . . . . . . . . . . . . . . . . . . . . . . 1-4
private network (WiFiConnect A.R.C.) . . . . . . . . . . . . . 3-37
Profile
restoring backup . . . . . . . . . . . . . . . . . . . . . . . . . . . . . 4-72
viewing backup . . . . . . . . . . . . . . . . . . . . . . . . . . . . . . 4-72
profile, creating backup. . . . . . . . . . . . . . . . . . . . . . . . . . . 4-70
Programs . . . . . . . . . . . . . . . . . . . . . . . . . . . . . . . . . . . 2-26, 3-3
minimizing . . . . . . . . . . . . . . . . . . . . . . . . . . . . . . . . . . 2-26
opening . . . . . . . . . . . . . . . . . . . . . . . . . . . . . . . . . . . . . 2-26
proxy server, setting up. . . . . . . . . . . . . . . . . . . . . . . . . . . 4-29
punctuation marks, accessing (SHIFT Key). . . . . . . . . . 2-5
Q
Query Services (Bluetooth pairing) . . . . . . . . . . . . . . . . 4-19
R
recalibrating touchscreen. . . . . . . . . . . . . . . . . . . . . . . . . 2-11
Regional Settings. . . . . . . . . . . . . . . . . . . . . . . . . . . . . . . . 4-66
Registry Editor . . . . . . . . . . . . . . . . . . . . . . . . . . . . . . . . . . 4-76
remapping
Scancode . . . . . . . . . . . . . . . . . . . . . . . . . . . . . . . . . . . 4-42
Unicode. . . . . . . . . . . . . . . . . . . . . . . . . . . . . . . . . . . . . 4-41
Remote Desktop Mobile . . . . . . . . . . . . . . . . . . . . . . . . . . 3-37
Remove Programs. . . . . . . . . . . . . . . . . . . . . . . . . . . . . . . 4-67
resetting Omnii
Boot to BooSt. . . . . . . . . . . . . . . . . . . . . . . . . . . . . . . . . 1-6
clean start. . . . . . . . . . . . . . . . . . . . . . . . . . . . . . . . . . . . 1-5
cold reset . . . . . . . . . . . . . . . . . . . . . . . . . . . . . . . . . . . . 1-5
warm reset . . . . . . . . . . . . . . . . . . . . . . . . . . . . . . . . . . . 1-5
Restore Now . . . . . . . . . . . . . . . . . . . . . . . . . . . . . . . . . . . . 4-73
S
safety instructions
battery charger . . . . . . . . . . . . . . . . . . . . . . . . . . . . . . . 5-4
Scancode remapping . . . . . . . . . . . . . . . . . . . . . . . . . . . . 4-42
SCAN Key . . . . . . . . . . . . . . . . . . . . . . . . . . . . . . . . . . . . . . . 2-5
screen
stylus, using to navigate . . . . . . . . . . . . . . . . . . . . . . 2-14
touch pen, using . . . . . . . . . . . . . . . . . . . . . . . . . . . . . 2-14
Windows Embedded CE, navigating . . . . . . . . . . . 2-14
scrolling, adjusting speed (Up_Down tab) . . . . . . . . . . 4-38
Server Settings (modem setup) . . . . . . . . . . . . . . . . . . . 4-24
Server tab (Bluetooth). . . . . . . . . . . . . . . . . . . . . . . . . . . . . 4-17
OBEX OPP (Object Exchange-Object Push Profile)4-
17, 4-18, 4-19
Scanner. . . . . . . . . . . . . . . . . . . . . . . . . . . . . . . . . . . . . 4-17
Serial . . . . . . . . . . . . . . . . . . . . . . . . . . . . . . . . . . . . . . . 4-17
Draft #5

Index - V
Set for AutoRestore . . . . . . . . . . . . . . . . . . . . . . . . . . . . . . 4-73
Settings. . . . . . . . . . . . . . . . . . . . . . . . . . . . . . . . . . . . . . . . . 2-26
Personal Tab
OneShot tab . . . . . . . . . . . . . . . . . . . . . . . . . . . . . 4-39
Up_Down tab . . . . . . . . . . . . . . . . . . . . . . . . . . . . 4-38
Task Manager, working with . . . . . . . . . . . . . . . . . . . 2-26
Settings tab (error level & log folder) . . . . . . . . . . . . . . . 4-49
Shell Settings (HomeVU) . . . . . . . . . . . . . . . . . . . . . . . . . 4-57
Advanced tab . . . . . . . . . . . . . . . . . . . . . . . . . . . . . . . . 4-60
Application tab . . . . . . . . . . . . . . . . . . . . . . . . . . . . . . . 4-57
Phone tab . . . . . . . . . . . . . . . . . . . . . . . . . . . . . . . . . . . 4-62
SHIFT Key . . . . . . . . . . . . . . . . . . . . . . . . . . . . . . . . . . . . . . . 2-5
shift-state indicator, accessing. . . . . . . . . . . . . . . . . . . . . 2-23
shift-state indicator (navigation bar) . . . . . . . . . . . . . . . . 2-23
SIM card, inserting . . . . . . . . . . . . . . . . . . . . . . . . . . . . . . . 2-14
SNTP. . . . . . . . . . . . . . . . . . . . . . . . . . . . . . . . . . . . . . . . . . . 4-76
softkey (softkey bar). . . . . . . . . . . . . . . . . . . . . . . . . . . . . . 2-23
softkey bar
softkey . . . . . . . . . . . . . . . . . . . . . . . . . . . . . . . . . . . . . . 2-23
soft keyboard icon. . . . . . . . . . . . . . . . . . . . . . . . . . . . 2-23
softkeys . . . . . . . . . . . . . . . . . . . . . . . . . . . . . . . . . . . . . 2-23
soft keyboard, using. . . . . . . . . . . . . . . . . . . . . . . . . . . . . . 3-21
soft keyboard icon (softkey bar) . . . . . . . . . . . . . . . . . . . 2-23
softkeys (softkey bar). . . . . . . . . . . . . . . . . . . . . . . . . . . . . 2-23
Sound, setting events . . . . . . . . . . . . . . . . . . . . . . . . . . . . 4-12
Sound and Notifications, defining . . . . . . . . . . . . . . . . . . 4-12
Sound settings. . . . . . . . . . . . . . . . . . . . . . . . . . . . . . . . . . . 4-12
SPACE Key . . . . . . . . . . . . . . . . . . . . . . . . . . . . . . . . . . . . . . 2-5
Start Menu . . . . . . . . . . . . . . . . . . . . . . . . . . . . . . . . . . . . . . 2-24
Start screen
Contacts icon . . . . . . . . . . . . . . . . . . . . . . . . . . . . . . . . 3-12
Home icon. . . . . . . . . . . . . . . . . . . . . . . . . . . . . . . . . . . . 3-3
Status tab, browsing error logs . . . . . . . . . . . . . . . . . . . . 4-49
Storage Card tab. . . . . . . . . . . . . . . . . . . . . . . . . . . . . . . . . 4-55
stylus (touch pen), using. . . . . . . . . . . . . . . . . . . . . . . . . . 2-14
suspend (turn off screen) . . . . . . . . . . . . . . . . . . . . . . . . . . 4-9
swap time (for battery). . . . . . . . . . . . . . . . . . . . . . . . . . . . . 2-3
synchronizing e-mail (Windows Vista and 7) . . . . . . . . 3-10
synchronizing e-mail (Windows XP). . . . . . . . . . . . . . . . . 3-9
System apps
About . . . . . . . . . . . . . . . . . . . . . . . . . . . . . . . . . . . . . . . 4-45
Admin Password, changing (HomeVU) . . . . . . . . . 4-57
Backlight . . . . . . . . . . . . . . . . . . . . . . . . . . . . . . . . . . . . 4-45
Battery Power settings . . . . . . . . . . . . . . . . . . . . . . . . 4-45
Certificates . . . . . . . . . . . . . . . . . . . . . . . . . . . . . . . . . . 4-46
Contrast. . . . . . . . . . . . . . . . . . . . . . . . . . . . . . . . . . . . . 4-48
Encryption. . . . . . . . . . . . . . . . . . . . . . . . . . . . . . . . . . . 4-50
Error Reporting . . . . . . . . . . . . . . . . . . . . . . . . . . . . . . 4-50
External Power settings. . . . . . . . . . . . . . . . . . . . . . . 4-46
GPS (external) . . . . . . . . . . . . . . . . . . . . . . . . . . . . . . . 4-50
HomeVU . . . . . . . . . . . . . . . . . . . . . . . . . . . . . . . . . . . . 4-56
Managed Programs . . . . . . . . . . . . . . . . . . . . . . . . . . 4-54
Memory . . . . . . . . . . . . . . . . . . . . . . . . . . . . . . . . . . . . . 4-54
trigger mappings . . . . . . . . . . . . . . . . . . . . . . . . . . . . . 4-52
T
Tab Key . . . . . . . . . . . . . . . . . . . . . . . . . . . . . . . . . . . . . . . . . . 2-5
taskcompleted (marking as) . . . . . . . . . . . . . . . . . . . . . . . 3-26
creating . . . . . . . . . . . . . . . . . . . . . . . . . . . . . . . . . . . . . 3-24
deleting . . . . . . . . . . . . . . . . . . . . . . . . . . . . . . . . . . . . . 3-26
editing . . . . . . . . . . . . . . . . . . . . . . . . . . . . . . . . . . . . . . 3-25
notification. . . . . . . . . . . . . . . . . . . . . . . . . . . . . . . . . . . 3-24
sorting . . . . . . . . . . . . . . . . . . . . . . . . . . . . . . . . . . . . . . 3-26
Task Manager . . . . . . . . . . . . . . . . . . . . . . . . . . . . . . 2-26, 4-68
TCP_IP Settings (modem setup) . . . . . . . . . . . . . . . . . . 4-24
Terminal Services Client
. . . . . . . . . . . . . . . . . . . . . . . . . . . . . . . . . . . . . . . . . . . . . 3-37
session, disconnecting (without ending) . . . . . . . . 3-37
session, ending . . . . . . . . . . . . . . . . . . . . . . . . . . . . . . 3-37
Total Recall. . . . . . . . . . . . . . . . . . . . . . . . . . . . . . . . . . . . . . 4-69
AutoRestore Profile. . . . . . . . . . . . . . . . . . . . . . . . . . . 4-73
backup profile, creating . . . . . . . . . . . . . . . . . . . . . . . 4-70
backup Profile, restoring . . . . . . . . . . . . . . . . . . . . . . 4-72
clone, creating . . . . . . . . . . . . . . . . . . . . . . . . . . . . . . . 4-71
Clone to USB . . . . . . . . . . . . . . . . . . . . . . . . . . . . . . . . 4-73
managing profiles . . . . . . . . . . . . . . . . . . . . . . . . . . . . 4-72
Restore Profile. . . . . . . . . . . . . . . . . . . . . . . . . . . . . . . 4-73
Upload to A.R.C. . . . . . . . . . . . . . . . . . . . . . . . . . . . . . 4-73
view Profile . . . . . . . . . . . . . . . . . . . . . . . . . . . . . . . . . . 4-72
touch pen, using . . . . . . . . . . . . . . . . . . . . . . . . . . . . . . . . . 2-14
touchscreen
locking . . . . . . . . . . . . . . . . . . . . . . . . . . . . . . . . . . . . . . 2-13
orientation . . . . . . . . . . . . . . . . . . . . . . . . . . . . . . . . . . . 2-13
recalibration . . . . . . . . . . . . . . . . . . . . . . . . . . . . . . . . . 2-11
stylus, using . . . . . . . . . . . . . . . . . . . . . . . . . . . . . . . . . 2-14
touch pen, using . . . . . . . . . . . . . . . . . . . . . . . . . . . . . 2-14
transcriber (handwritten note) . . . . . . . . . . . . . . . . . . . . . 3-22
trigger mappings. . . . . . . . . . . . . . . . . . . . . . . . . . . . . . . . . 4-52
Trigger Press Type, Manage Triggers menu . . . . . . . 4-53
TweakIT . . . . . . . . . . . . . . . . . . . . . . . . . . . . . . . . . . . . . . . . 4-74
TweakIt
Registry Editor . . . . . . . . . . . . . . . . . . . . . . . . . . . . . . . 4-76
SNTP . . . . . . . . . . . . . . . . . . . . . . . . . . . . . . . . . . . . . . . 4-76
U
Unicode Mapping . . . . . . . . . . . . . . . . . . . . . . . . . . . . . . . . 4-41
Up_Down tab (scrolling adjustments) . . . . . . . . . . . . . . 4-38
Upload to A.R.C.. . . . . . . . . . . . . . . . . . . . . . . . . . . . . . . . . 4-73
Utilities tab . . . . . . . . . . . . . . . . . . . . . . . . . . . . . . . . . . . . . . 4-49
V
Version tab . . . . . . . . . . . . . . . . . . . . . . . . . . . . . . . . . . . . . . 4-45
vibrate, setting up for incoming calls . . . . . . . . . . . . . . . 4-13
video recorder, using . . . . . . . . . . . . . . . . . . . . . . . . . . . . . 3-19
Videos and Pictures. . . . . . . . . . . . . . . . . . . . . . . . . . . . . . 3-16
Draft #5

Index - VI Workabout Pro4 (Windows Embedded Hand-Held 6.5) User Manual
Voice
phone communication . . . . . . . . . . . . . . . . . . . . . . . . . 1-6
VPN connection, setting up . . . . . . . . . . . . . . . . . . . . . . . 4-27
W
warm reset. . . . . . . . . . . . . . . . . . . . . . . . . . . . . . . . . . . . . . . 1-5
WiFiConnect A.R.C. . . . . . . . . . . . . . . . . . . . . . . . . . . . . . 3-37
Windows 7 . . . . . . . . . . . . . . . . . . . . . . . . . . . . . . . . . . . . . . 2-27
Windows Embedded CE, navigating in. . . . . . . . . . . . . 2-14
Windows Mobile Device Center, setting up . . . . . . . . . 2-28
Windows Vista® . . . . . . . . . . . . . . . . . . . . . . . . . . . . . . . . . 2-27
Windows Zero Config . . . . . . . . . . . . . . . . . . . . . . . . . . . . . C-3
Wireless Zero Config. . . . . . . . . . . . . . . . . . . . . . . . . . . . . . C-3
Word Mobile
data entry modes . . . . . . . . . . . . . . . . . . . . . . . . . . . . 3-34
Word See Pocket Word . . . . . . . . . . . . . . . . . . . . . . . . . . . 3-34
Z
Zero Config, Wireless . . . . . . . . . . . . . . . . . . . . . . . . . . . . . C-3
Draft #5
Draft #5

8000295 Revision A - December 2013
Motorola Solutions, Inc.
1301 E. Algonquin Rd.
Schaumburg, IL 60196-1078, U.S.A.
http://www.motorolasolutions.com
MOTOROLA, MOTO, MOTOROLA SOLUTIONS and the Stylized M Logo are trademarks or
registered trademarks of Motorola Trademark Holdings, LLC and are used under license. All
other trademarks are the property of their respective owners.
© 2013 Motorola Solutions, Inc. All Rights Reserved.
Draft #5