Zebra Technologies ET1N2 ENTERPRISE TABLET User Manual QUICK START GUIDE

Zebra Technologies Corporation ENTERPRISE TABLET QUICK START GUIDE

USER MANUAL QUICK START GUIDE
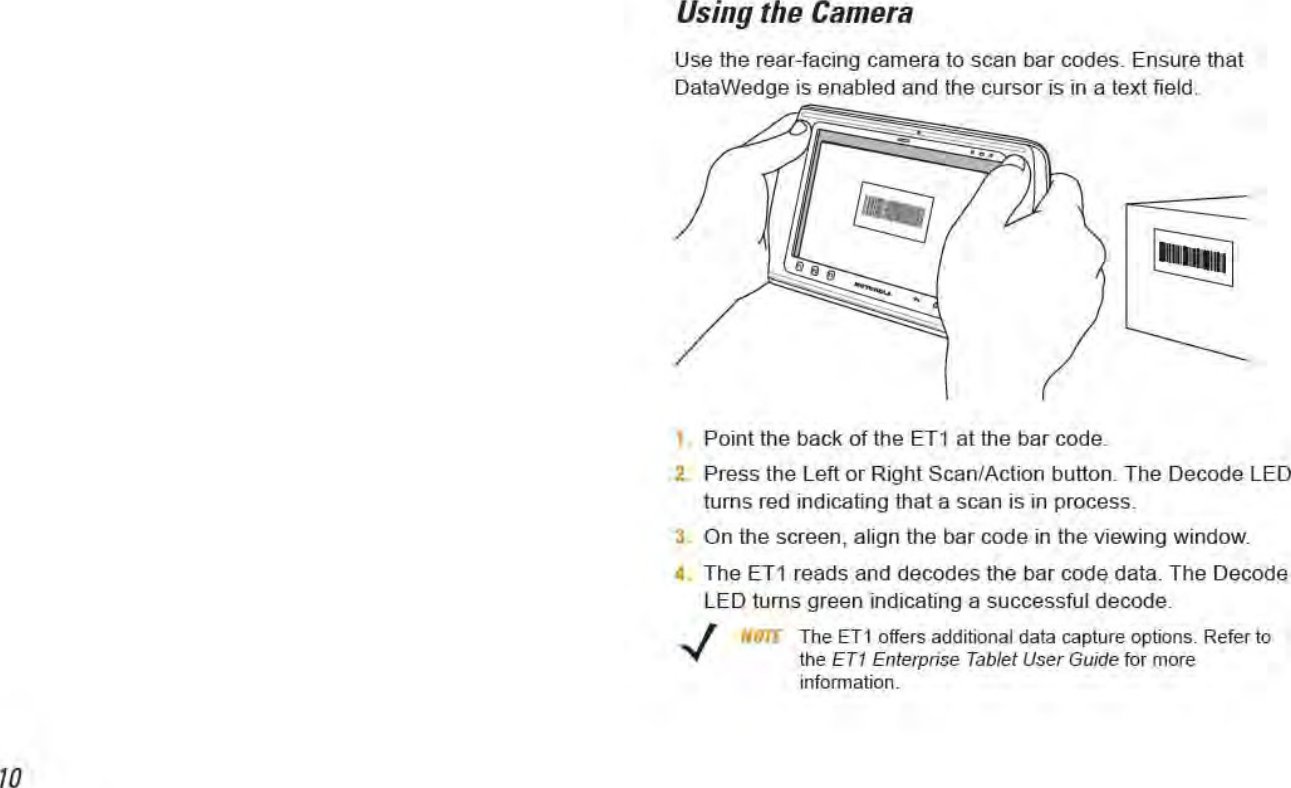
ET1ENTERPRISE TABLETQUICK START GUIDEPRELIMINARY
2Motorola Solutions reserves the right to make changes to any product to improve reliability, function, or design. Motorola Solutions does not assume any product liability arising out of, or in connection with, the application or use of any product, circuit, or application described herein. No license is granted, either expressly or by implication, estoppel, or otherwise under any patent right or patent, covering or relating to  any  combination,  system,  apparatus,  machine,   material, method, or process in which Motorola Solutions products might be used. An implied license exists only for equipment, circuits, and subsystems contained in Motorola Solutions products.WarrantyFor the complete Motorola Solutions hardware product warranty statement, go to: http://www.motorolasolutions.com/warranty.User ManualsFor more information about the ET1 Enterprise Tablet refer to the ET1 Enterprise Tablet User Guide and ET1 Enterprise Tablet Integrator Guide. For the latest version of this guide and all ET1 guides, go to: http://supportcentral.motorola.com.Service InformationIf you have a problem using the equipment, contact your facility’s Technical or Systems Support. If there is a problem with the equipment, they will contact the Motorola Solutions Global Support Center at: http://www.motorolasolutions.com/support.Software SupportMotorola Solutions wants to ensure that customers have the latest release of entitled software at the time of product purchase. To confirm that your Motorola Solutions device shipped with the latest release of entitled software, visit: www.motorolasolutions.com/support. Check for the latest software from Software Downloads > Product Line/Product > Go. If your device does not have the latest entitled software release as of your product purchase date, please e-mail a request to Motorola Solutions at: entitlementservices@motorolasolutions.com. You must include the following essential device information with your request:• Model number• Serial number• Proof of purchase• Title of the software download you are requesting.If it is determined by Motorola Solutions that your device is entitled to the latest software release, you will receive an e-mail containing a link directing you to a Motorola Solutions Web site to download the appropriate software.PRELIMINARY
3Touch ScreenDecode LEDFront-facing CameraFeaturesMenu ButtonProgrammable ButtonsCommunication LEDLight SensorMicrophone Battery Charge LEDHome ButtonBack ButtonPRELIMINARY
4Right Scan/ActionButtonCamera FlashHeadset JackBatteryBatteryRelease LatchLeft Scan/Action ButtonRear-facing Camera    USB Host Expansion          Secondary MicrophoneFeaturesHDMI Output ConnectorSpeaker SpeakerBattery ChargingLEDI/O ConnectorPower ButtonPRELIMINARY
5IntroductionThis guide covers the following configurations:•ET1N0 (WLAN only)•ET1N2 (WLAN and WAN)•ET1N0 and ET1N2 with scan modules.Getting StartedTo get started:•Install SIM card (ETN2 with GSM)•Install the battery•Charge the battery•Start the ET1•Activate the ET1 on a CDMA network.Install the SIM CardThe ET1N2 requires an activated SIM card. Obtain the card from a service provider.1. Lift access door.2. Insert SIM card into SIM holder with contacts facing down and cut edge facing away from the holder.3. Close access door.SIM CardPRELIMINARY
6Install the Battery4. Remove the battery from the packaging.5. Align the tracks on the sides of the battery with the rails of the battery compartment.6. Push the battery in until it snaps into place.Charge the BatteryBefore using the ET1, charge the battery using one of the following accessories:•Single-slot USB Docking cradle•Four-slot Charge Only Docking cradle•USB/Charge cable and power supply.1. Ensure that the accessory is connected to power. See the ET1 Enterprise Tablet User Guide for more information.2. Place the ET1 into a cradle or connect to the USB/Charge cable.The Battery Charge LEDs blinks yellow indicating that the battery is charging. When the battery is fully charged (approximately six hours) the LEDs becomes solid green.StartupPress the Power button to turn on the ET1. As the ET1 starts the splash screen displays and then the Home screen appears. Slide   up to unlock the screen.TracksRailsNOTE The battery can be charged separately using the Four-slot Battery Charger.NOTE For multi-user mode, refer to the ET1 Enterprise Tablet User Guide for login procedures.PRELIMINARY
7WAN ActivationIn order to use the WAN radio for data communication, the ET1N2 must be activated on the service provider’s network. By default, the ET1N2 is configured for a GSM network. To activate on a CDMA network, manually configuration is required.For WAN data configuration, refer to the ET1 Integrator Guide.GSM ActivationWhen the ET1N2 is turned on it automatically configures for the network. If the SIM card requires a PIN, the PIN screen appears. Enter the PIN and touch OK.CDMA ActivationPrior to using the ET1N2 on a CDMA network, the ET1 must be registered with the service provider. Contact the service provider to set up an account and provide the MEID number (located under the battery).By default the ET1N2 is configured for GSM network. To activate on a CDMA network:1. Touch Menu > Settings > Wireless & networks > Mobile networks > Technology preferences > Network mode.2. In the Network mode menu, select either CDMA (Sprint) or CDMA (Verizon). the Activate your phone screen appears.If a Connection Unsuccessful message appears reset the ET1N2:a. Press and hold the Power button until the Device options menu appears.b. Touch Reset. c. After resetting the Activate your phone screen appears.3. Touch Activate. The ET1N2 begins the activation process. If the activation is unsuccessful, contact the service provider.PRELIMINARY
8Launch ApplicationsTo launch an application:1. Touch the Launcher icon. The Launcher screen displays.2. Touch an application icon to launch the application.Configure the ET1To configure ET1 settings, touch   > Settings. Refer to the ET1 Enterprise Tablet User Guide and Integrator Guide for information on configuring the ET1.Power ButtonUse the Power button to place the ET1 in suspend mode, battery swap mode, to reset the ET1 or to power off the ET1.Suspend ModePress and release the Power button to place the ET1 in suspend mode. In Suspend Mode the ET1 turns off the display and goes into a low power state to conserve battery power.Press and release the Power button to wake the ET1, and then slide   up to unlock the screen.Battery Swap ModeBefore replacing the battery, place the ET1 in Battery Swap Mode. Press and hold the Power button until the Device options dialog box appears then touch Battery swap.The Decode LED lights red. When the LED turns off, it is safe to remove the battery.LauncherCAUTION Do not remove microSD card during Battery Swap mode.
9ResetReset the ET1 if applications stop responding. Press and hold the Power button until the Device options dialog box appears then touch Reset.Power OffTo power off the ET1, press and hold the Power button until the Device options dialog box appears, then touch Power off. When the Power off dialog box appears, touch OK.Hardware ResetIf the ET1 stop responding, perform a hardware reset. Simultaneously press the Left Scan/Action, Right Scan/Action and Power buttons.Lock the ScreenLock the screen to protect access to data. When locked, a Pattern, PIN or Password is required to unlock the ET1. Press the Power button to lock the screen. The ET1 also locks after a pre-defined time-out.Press and release the Power button to wake the ET1.The Lock screen displays. Slide   up to unlock the screen. If the Pattern screen unlock feature is enabled, the Pattern screen appears instead of the Lock screen.If the PIN or Password screen unlock feature is enabled, enter the PIN or password after unlocking the screen.Refer to the ET1 Enterprise Tablet User Guide for setup instruction for locking the screen. If the Multi-user feature is enabled, contact the system administrator for login information.Change VolumePress P1 to decrease the volume. Press P2 to increase the volume. Note that these buttons are programmable and can be changed by the user or application.
11Photos and VideosUse the rear-facing camera to take photos and capture video.To take a photo:1. Touch Launcher > Camera.2. Point the ET1 at the subject.3. On the screen, frame the subject in the window and then touch the on-screen shutter icon  .4. The ET1 takes the photo.To capture video:1. Touch Launcher > Camera and then touch the video icon .2. Point the ET1 at the subject.3. On the screen, frame the subject in the window.4. Touch the on-screen record button   to begin recording.5. Touch the on-screen stop button   to end recording.View photos and videos using the Gallery application.NOTE A microSD card is required to save photos and videos.
13Connect to a WLAN NetworkTo set up a WLAN network:1. Touch  > Settings > Wireless & networks.2. Touch the Wi-Fi checkbox to turn on Wi-Fi. A green check appears in the checkbox and the Wi-Fi icon appears in the Status Bar indicating that Wi-Fi is enabled.3. Touch Wi-Fi settings. The ET1 searches for WLANs in the area and lists them under Wi-Fi networks.4. Select the desired network.5. For open networks, touch Connect. For secure networks enter the required password or other credentials then touch Connect. See the system administrator for more information.6. Touch .Connect to a Mobile Data NetworkTo connect the ET1N2 to a mobile data network:1. Touch  > Settings > Wireless & networks > Mobile networks.2. Touch the Data enabled checkbox to turn on data connection. A green check appears in the checkbox.3. Touch Data roaming checkbox to allow data communication while roaming outside of the network. A green check appears in the checkbox.4. Touch .
14Battery ReplacementTo replace the battery:1. Press and hold the Power button until the Device options menu displays.2. Touch Battery Swap. The Scan LED lights red.3. Wait until the Scan LED turns off.4. Turn the ET1 over.5. Press thumb against the side of the ET1 and battery. Using the index and middle fingers, move the battery release latch toward thumb and pull the battery out of the battery compartment.6. Align the tracks on the side of the replacement battery with the rails in the battery compartment.7. Push the battery in until the battery release latch snaps into place.8. Press the Power button to turn on the ET1.Battery Release LatchPRELIMINARY
15AccessoriesThe following accessories are available for the ET1:•Single-slot Docking Cradle•Four-slot Charge Only Docking Cradle•Four-slot Battery Charger•    Handstrap      Holster     Protective Rubber Bezel     USB/Charge Cable      Two-way DC Cable      Power supplies. PRELIMINARY
Motorola Solutions, Inc.1301 E. Algonquin Rd.Schaumburg, IL 60196-1078, U.S.A.http://www.motorolasolutions.comMOTOROLA, MOTO, MOTOROLA SOLUTIONS and the Stylized M Logo are trademarks or registered trademarks of MotorolaTrademark Holdings, LLC and are used under license. All other trademarks are the property of their respective owners.© 2012 Motorola Solutions, Inc. All Rights Reserved.72-148508-02 Revision 061312 - June 2012PRELIMINARY

Navigation menu