Zebra Technologies MC319ZUS Mobile Computing Terminal User Manual Manual Operation
Zebra Technologies Corporation Mobile Computing Terminal Manual Operation
UserManual.wiki
>
Zebra Technologies
>
MC319ZUS User Manual
>
Manual - Operation
Contents
1.
Manual - Operation
2.
Manual - Statements
3.
Integrator Guide
Manual - Operation
Navigation menu
Upload a User Manual
Namespaces
Wiki Guide
HTML
PDF
Info
Views
User Manual
Discussion / Help
Navigation


![vi MC319Z RFID Mobile Computer Integrator GuideConfigure Region .................................................................................................... 3-3Configure LLRP ...................................................................................................... 3-7Version Information ................................................................................................. 3-7Exit LLRP ................................................................................................................ 3-8LLRP Registry Entries .................................................................................................. 3-8Chapter 4: RFID Sample Application [TBD][DEMO APPLICATION TBD] ........................................................................................ 4-1Introduction ................................................................................................................... 4-1Launching the RFID Sample Application ...................................................................... 4-2Sample Application Menu Options ................................................................................ 4-3Configuration Menu Options ................................................................................... 4-3Operations Menu Options ....................................................................................... 4-6Management Menu Options .................................................................................... 4-11About ....................................................................................................................... 4-13Reading Tags ............................................................................................................... 4-14Chapter 5: Tag LocatorIntroduction ................................................................................................................... 5-1Using Tag Locator ........................................................................................................ 5-2Locating Tags Using a .csv File .................................................................................... 5-3Chapter 6: TroubleshootingIntroduction ................................................................................................................... 6-1Troubleshooting ............................................................................................................ 6-1Appendix A: Technical SpecificationsTechnical Specifications ............................................................................................... A-1Appendix B: RFID APIsIndex](https://usermanual.wiki/Zebra-Technologies/MC319ZUS.Manual-Operation/User-Guide-1441239-Page-8.png)
![viii MC319Z RFID Mobile Computer Integrator GuideChapter DescriptionsTopics covered in this guide are as follows:•Chapter 1, Getting Started provides an overview of RFID technology and components and a description of the MC319Z RFID mobile computer and features.•Chapter 2, Updating the Mobile Computer describes how to update the device image and radio firmware.•Chapter 3, LLRP Functionality includes information on configuring the LLRP Server Module and reading tags.•Chapter 4, RFID Sample Application [TBD] provides information on the RFID sample application and how to use it to assist in custom application development.•Chapter 6, Troubleshooting describes MC319Z RFID mobile computer troubleshooting procedures. •Appendix A, Technical Specifications includes the technical specifications for the reader.•Appendix B, RFID APIs provides a reference for information on supported RFID APIs.Notational ConventionsThe following conventions are used in this document:•“Mobile computer” or “reader” refers to the MC319Z RFID mobile computer. •Italics are used to highlight the following:•Chapters and sections in this and related documents•Dialog box, window, links, software names, and screen names•Drop-down list, columns and list box names•Check box and radio button names•Icons on a screen •Bold text is used to highlight the following:•Dialog box, window and screen names•Drop-down list and list box names•Check box and radio button names•Icons on a screen•Key names on a keypad•Button names on a screen•Bullets (•) indicate:•Action items•Lists of alternatives•Lists of required steps that are not necessarily sequential.•Sequential lists (e.g., those that describe step-by-step procedures) appear as numbered lists.](https://usermanual.wiki/Zebra-Technologies/MC319ZUS.Manual-Operation/User-Guide-1441239-Page-10.png)

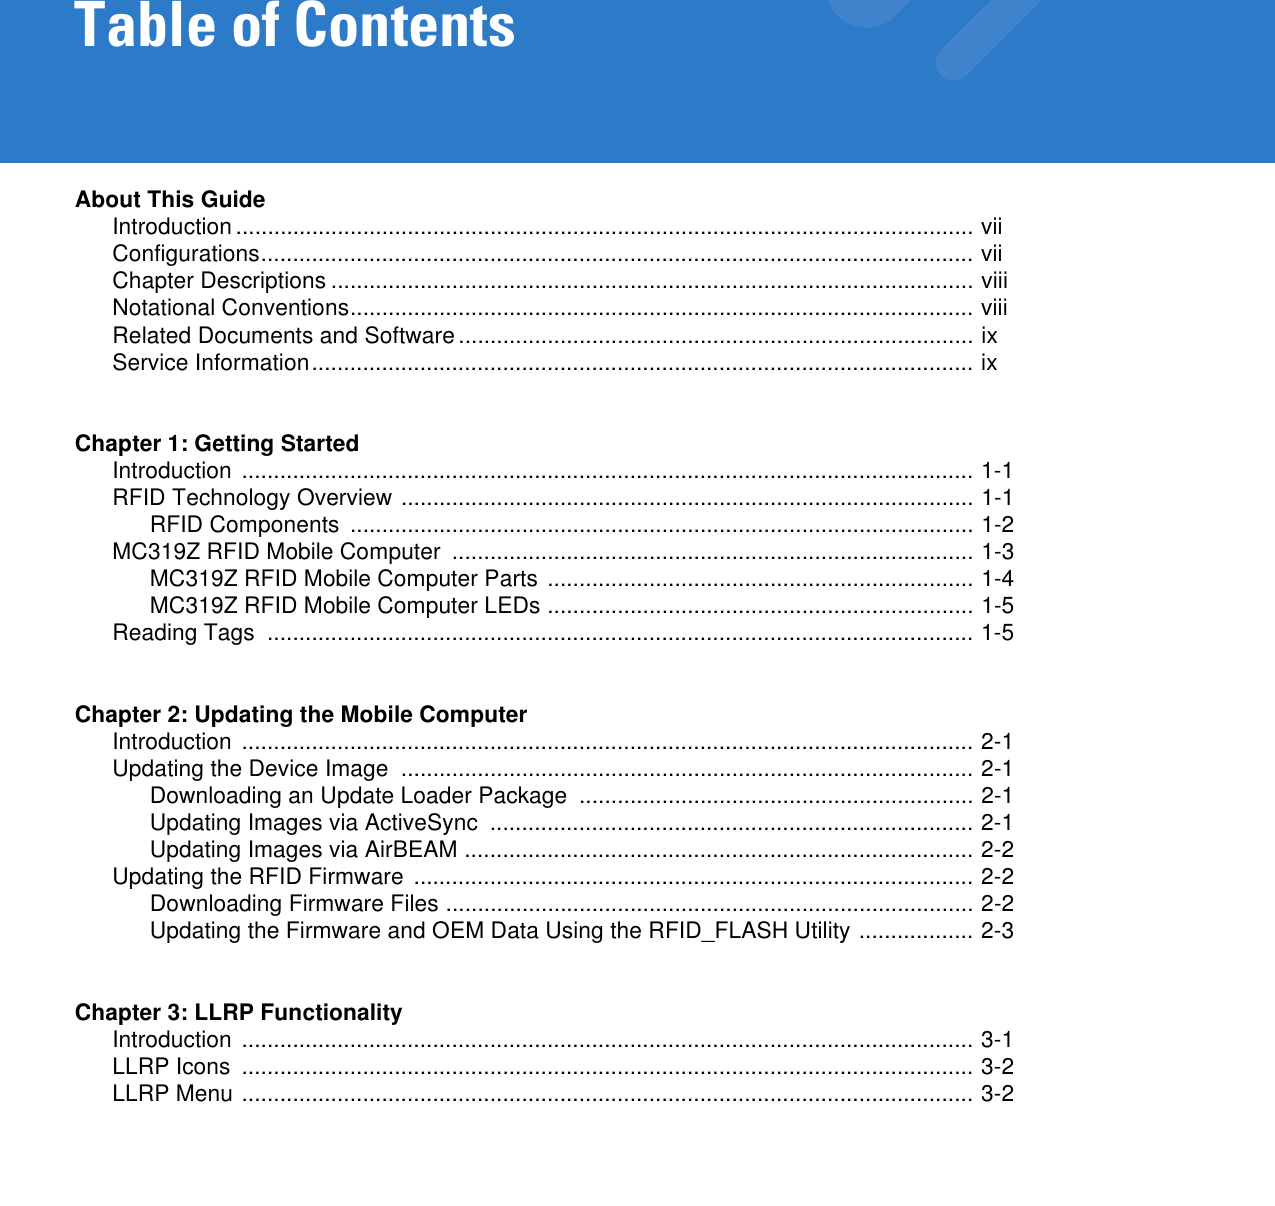
![Getting Started 1 - 5MC319Z RFID Mobile Computer LEDsThe mobile computer LEDs indicate charging and reader status as described in Table 1-1.Reading TagsTo read RFID tags: 1. Remove the MC319Z from AC power and ensure the LLRP icon is green.2. Use an RFID reader application to enable tag reading. For a sample application, browse to the MC319Z Application directory and select RFIDSample3Plus.exe. See Chapter 4, RFID Sample Application [TBD].3. Aim the mobile computer at the tag, oriented horizontally or vertically depending on the tag orientation. The distance between the tag and the antenna is the approximate read range.4. Press the trigger or tap the on-screen Read command within the application to interrogate all RFID tags within the radio frequency (RF) field of view and capture data from each new tag found. Release the trigger or tap the Stop Read command to stop interrogating tags.Table 1-1 LED Status IndicatorsLED IndicationCharging IndicatorsOff Mobile computer not placed correctly in the cradle; cable not connected correctly; charger is not powered.Fast Blinking Amber Error in charging; check placement of mobile computer. Slow Blinking Amber Mobile computer is charging.Solid Amber Charging complete.Note: When the battery is initially inserted in the mobile computer, the amber LED flashes once if the battery power is low or the battery is not fully inserted.NOTE When connected to power, the mobile computer cannot read RFID tags.](https://usermanual.wiki/Zebra-Technologies/MC319ZUS.Manual-Operation/User-Guide-1441239-Page-17.png)


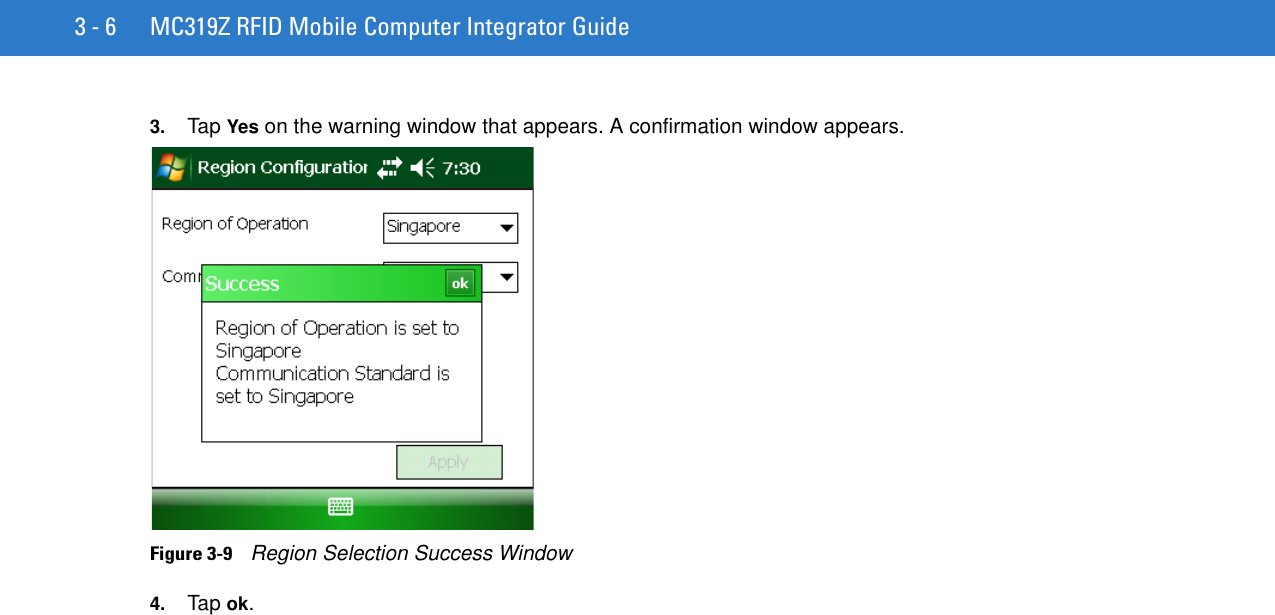
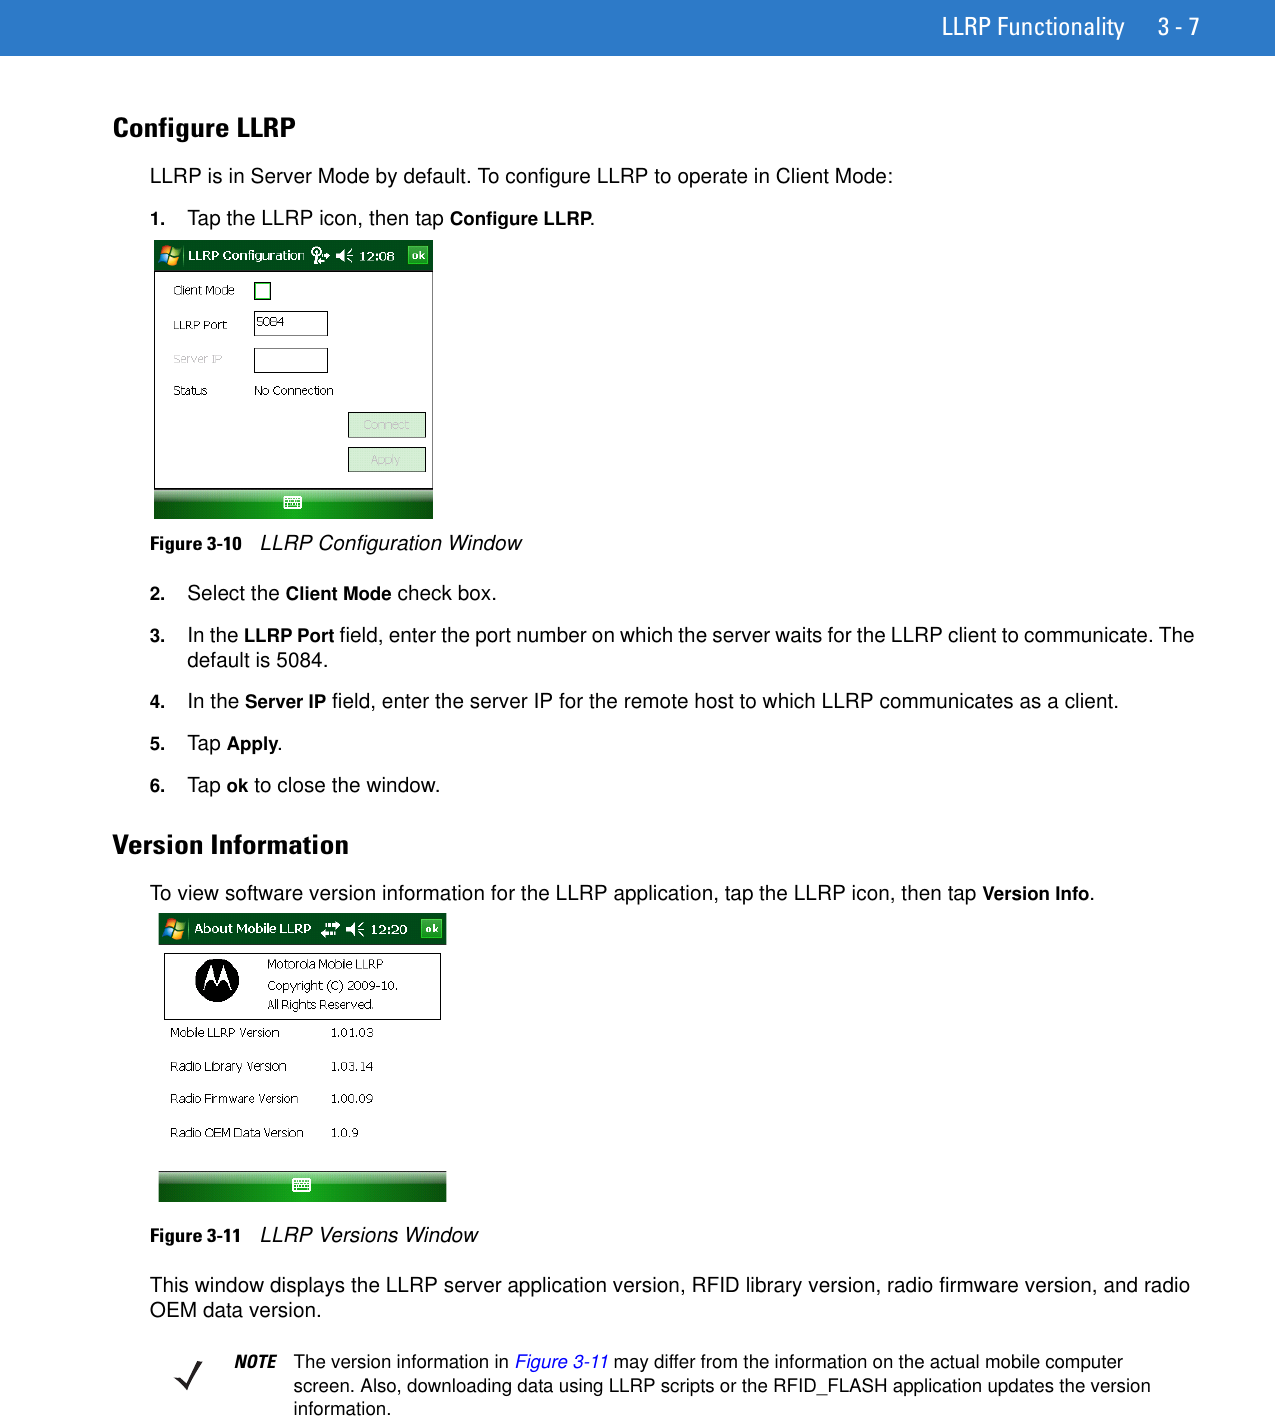
![3 - 8 MC319Z RFID Mobile Computer Integrator GuideExit LLRPTap the LLRP icon, then tap Exit to close the LLRP application. To restart LLRP after exiting, use File Explorer to browse to the \Application\LLRP folder and tap the LLRP executable (MobileLLRP.exe).LLRP Registry Entries RFID (LLRP) does not run when the MC319Z is charging. Developers who require using the cradle with RFID enabled can select Developer Mode by modifying a registry entry.•User Mode - In this default mode, placing the mobile computer in the cradle (with charging on) disables LLRP and the LLRP icon indicates that it is disconnected. Placing the mobile computer on AC power charges the device and disables LLRP. Removing AC power reconnects LLRP.•Developer Mode - Selecting Developer Mode disables charging and the developer can place the mobile computer in the cradle for debugging and development. The device remains in Developer Mode regardless of whether it is charging until re-enabling User Mode.To select Developer Mode via registry: 1. Edit the file params.reg in the \Application folder. To do this, copy the file to the PC, or use a word editor on the mobile computer. 2. Set the DevMode registry entry value to 1:[HKEY_LOCAL_MACHINE\SOFTWARE\Symbol\RFID\LLRP]"DevMode"=dword:000000013. Tap on the modified file and select Yes to merge the registry. 4. Warm boot the device by holding down the 7, 9, and Power keys.5. Restart LLRP (if it is not already running).To change back to user mode, repeat this procedure, setting DevMode to 0.LLRP checks AC power every five seconds and takes the appropriate action based on whether or not it is in User Mode.](https://usermanual.wiki/Zebra-Technologies/MC319ZUS.Manual-Operation/User-Guide-1441239-Page-30.png)
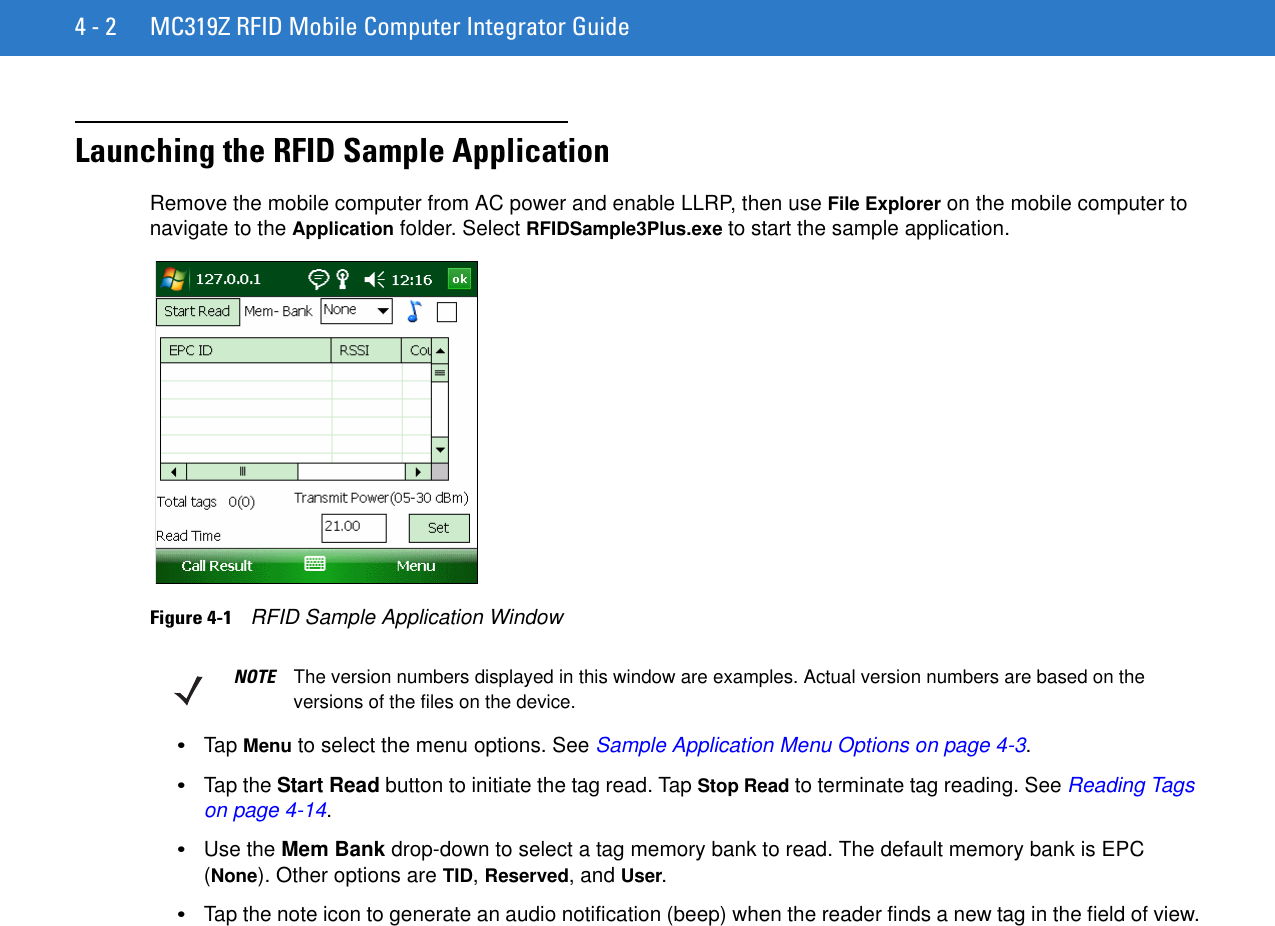
![Chapter 4 RFID Sample Application [TBD][DEMO APPLICATION TBD]IntroductionApplication developers can use the RFID sample application RFIDSample3Plus.exe for an overview of how the application works and to assist in custom application development. The mobile computer can read, write, lock, kill, and program Gen2 tags. Each tag contains the EPC number (64 or 96 bits), CRC, and kill code. The mobile computer can also collect data by decoding in-range EPC Gen2 RFID tags.Initiating the read command within the sample application causes the mobile computer to interrogate all RFID tags within the radio frequency (RF) field of view. The reader captures data from each new tag and adds it to the list box in the EPC ID window. Select Stop Read to stop interrogating tags.](https://usermanual.wiki/Zebra-Technologies/MC319ZUS.Manual-Operation/User-Guide-1441239-Page-31.png)
![RFID Sample Application [TBD] 4 - 3Sample Application Menu Options The Menu options include:•Configuration options•Operations options•Reader management options•AboutFigure 4-2 Sample Application MenuConfiguration Menu OptionsThe Config menu includes the following options:•Connection information•Configuration options•Capabilities •Reset Factory defaults •ExitFigure 4-3 Configuration Menu](https://usermanual.wiki/Zebra-Technologies/MC319ZUS.Manual-Operation/User-Guide-1441239-Page-33.png)

![RFID Sample Application [TBD] 4 - 5SingulationSelect Config > Configuration > Singulation to set the options for identifying an individual tag in a multiple-tag environment.Figure 4-6 Singulation WindowThis window includes the following fields:•Antenna - Selecting an antenna ID updates the configuration values in the other fields. •Session - The session number for the inventory operation.•Tag Transmit Time - The time in milliseconds that the tag typically remains in the RF field of the antenna.•Tag Population - The approximate tag population in the RF field of the antenna.•Inventory State - Select a tag of state A or B.•SL Flag •Apply - Select to apply the configuration changes.CapabilitiesSelect Config > Capabilities to retrieve the capabilities of the connected reader.Figure 4-7 Capabilities WindowSelect OK to close the window.](https://usermanual.wiki/Zebra-Technologies/MC319ZUS.Manual-Operation/User-Guide-1441239-Page-35.png)
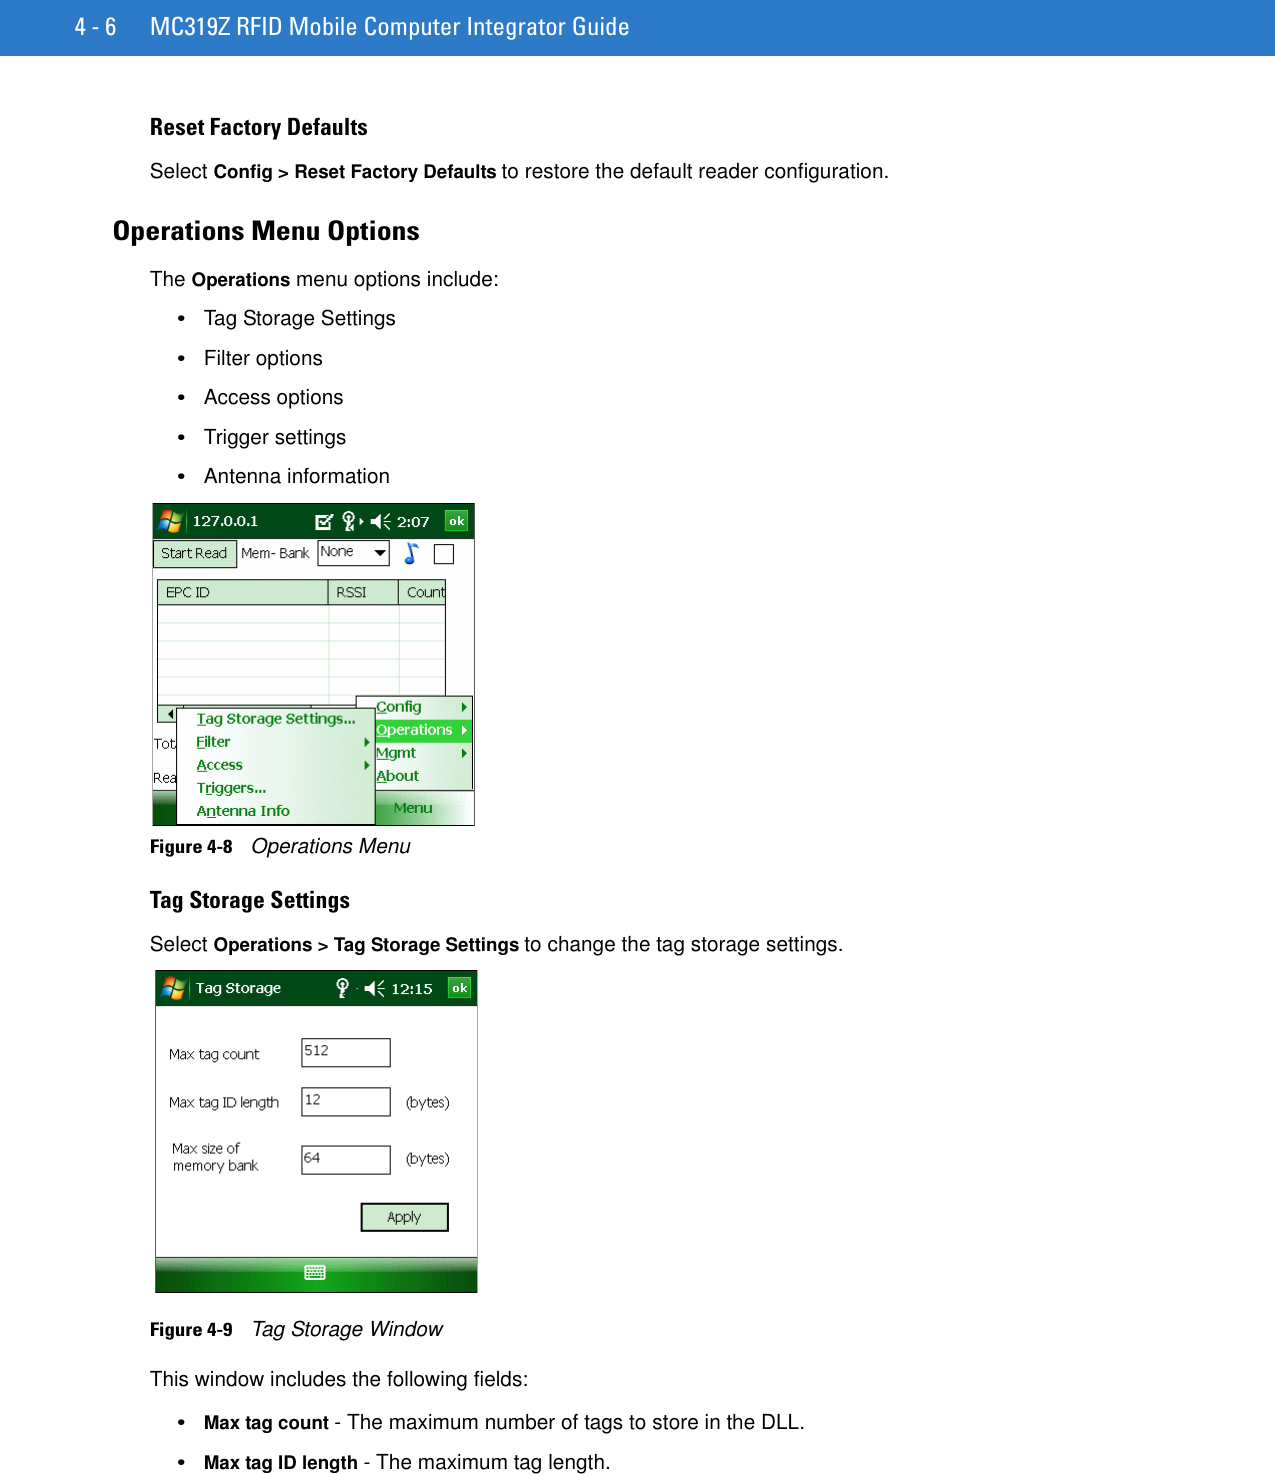
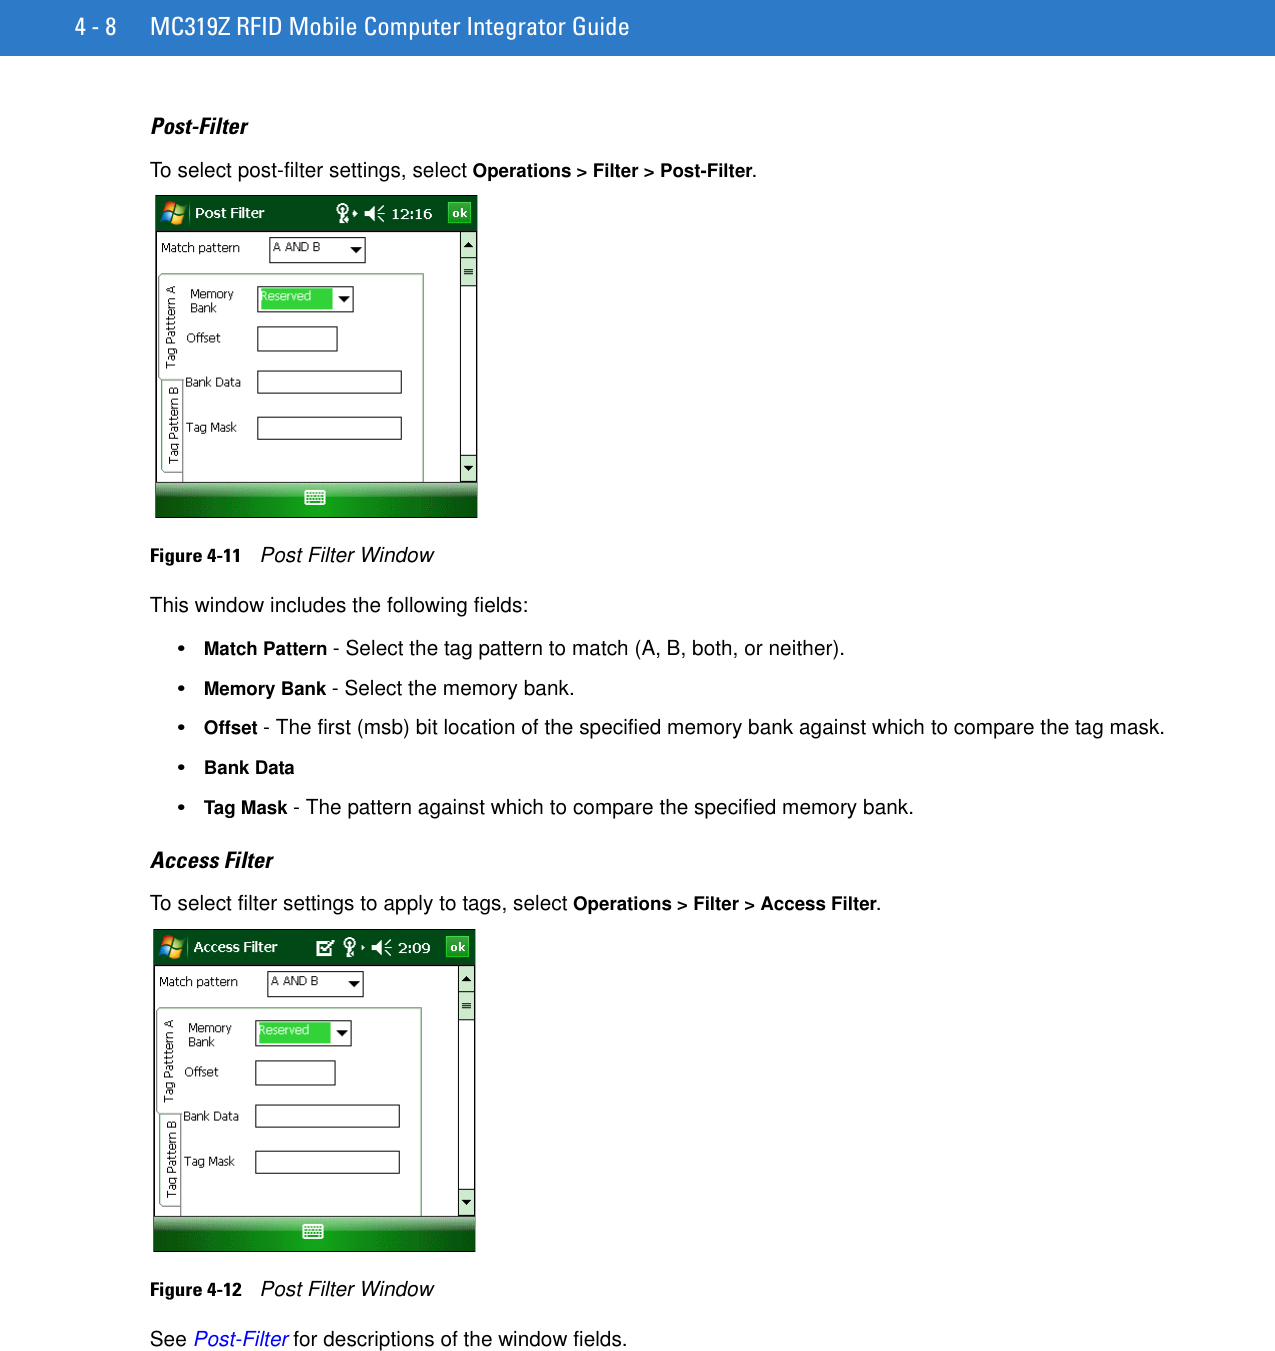
![RFID Sample Application [TBD] 4 - 7•Max size of memory bank - Storage to allocate for the memory bank's data.•Apply - Select to apply the configuration changes.Filter SettingsUse the sample application’s filter settings to set filters for tag reading. The application supports up to two pre-filters and two post-filters. By default, the window displays the latest filter information. Add or delete the filter by selecting Use Filter. Pre-FilterTo select pre-filter settings, select Operations > Filter > Pre-Filter.Figure 4-10 Pre-Filter WindowThis window includes the following fields:•Antenna - Selecting an antenna ID updates the configuration values in the other fields. •Memory Bank - Select the memory bank.•Offset - The first (msb) bit location of the specified memory bank against which to compare the tag mask.•Tag Mask - The pattern against which to compare the specified memory bank.•Filter action - Select the required filter action. For more information, refer the Gen2 specification available at http://www.epcglobalinc.org/standards/.](https://usermanual.wiki/Zebra-Technologies/MC319ZUS.Manual-Operation/User-Guide-1441239-Page-37.png)
![RFID Sample Application [TBD] 4 - 9AccessSelect Operations > Access to select from a menu of access parameters to set for tags, or tap and hold a tag in the list to open a context menu with similar options in order to set operation parameters for that tag.Figure 4-13 Access and Context MenusSelecting an option from the context menu applies the operation to the single tag selected. Selecting an option from the Access menu updates the tag data for multiple tags in the main window. Select an option from the Access or context menu to set access parameters and the access filter. Figure 4-14 Read and Access Filter WindowsWindows are similar to the Read window in Figure 4-14 for the menu options Write, Lock, Kill, Block Write, and Block Erase. Set options as required in the various parameter windows. Not all windows include all options.•Tag ID - The name of the selected tag. •Password - Set a password before performing any access operation (except Kill).•Memory Bank - Select the memory bank. Options are:•Reserved•EPC•TID •User•Offset - Offset of the first word to read from the selected memory bank.](https://usermanual.wiki/Zebra-Technologies/MC319ZUS.Manual-Operation/User-Guide-1441239-Page-39.png)
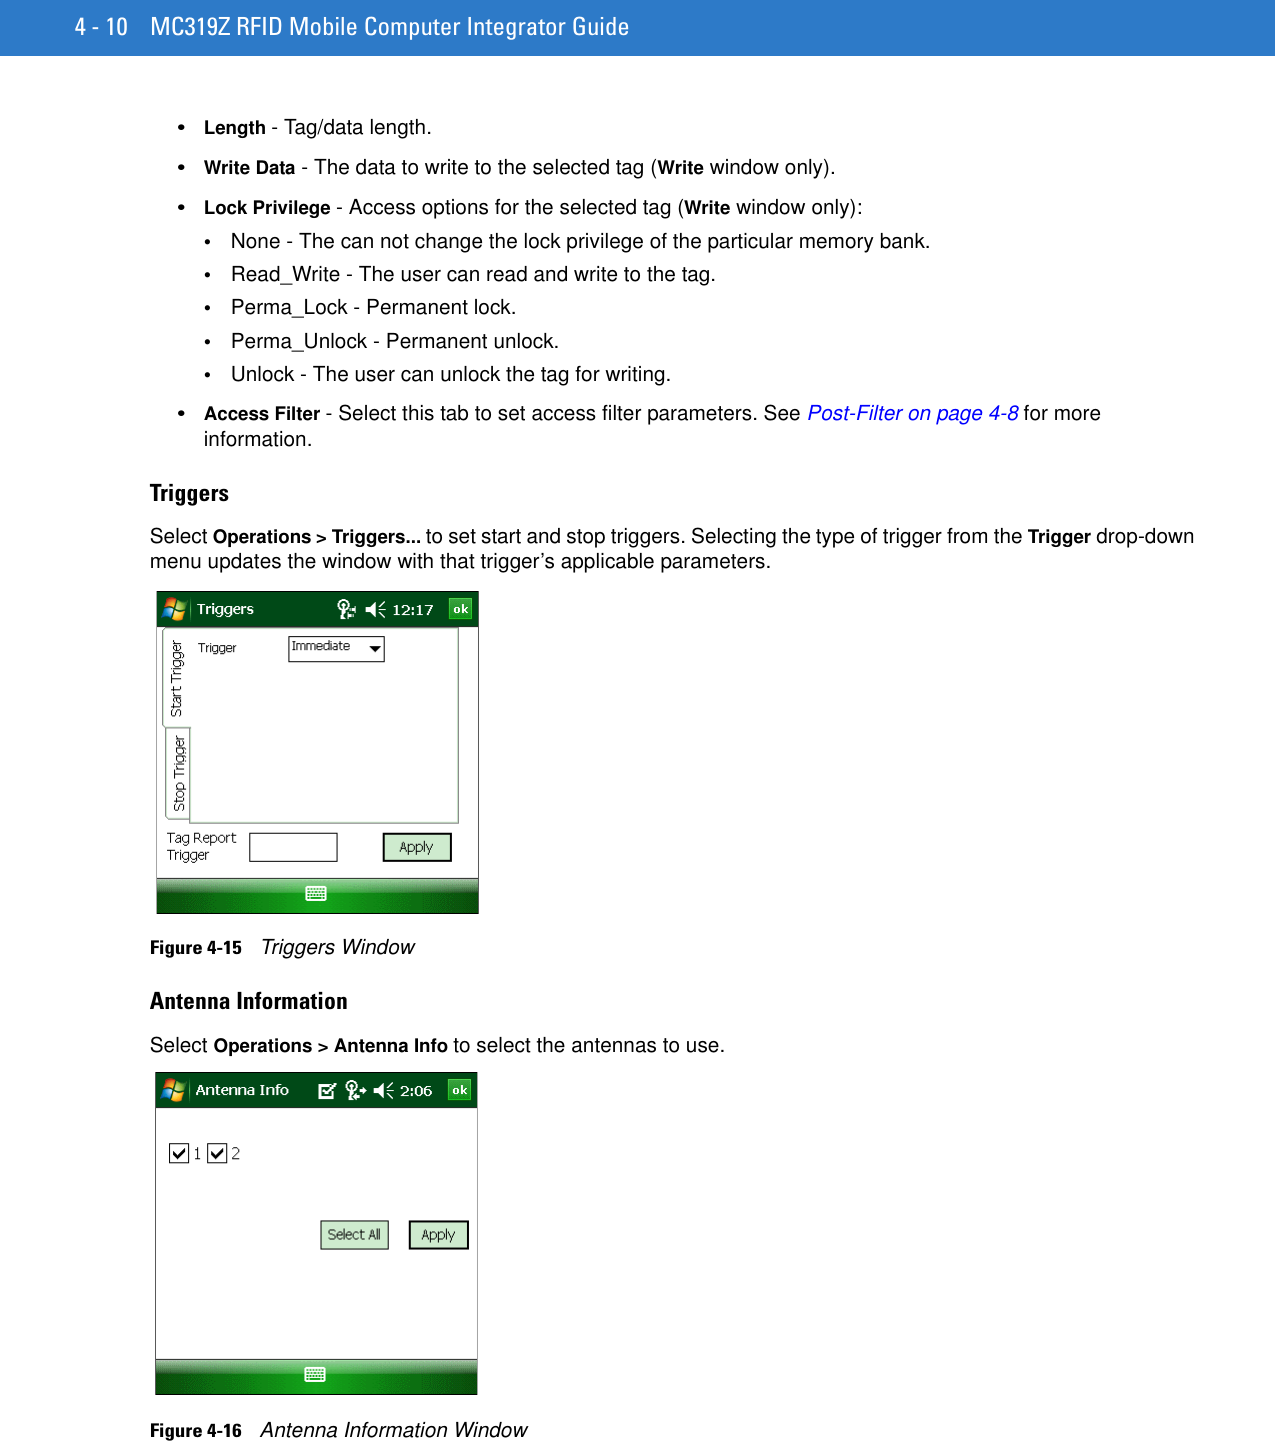
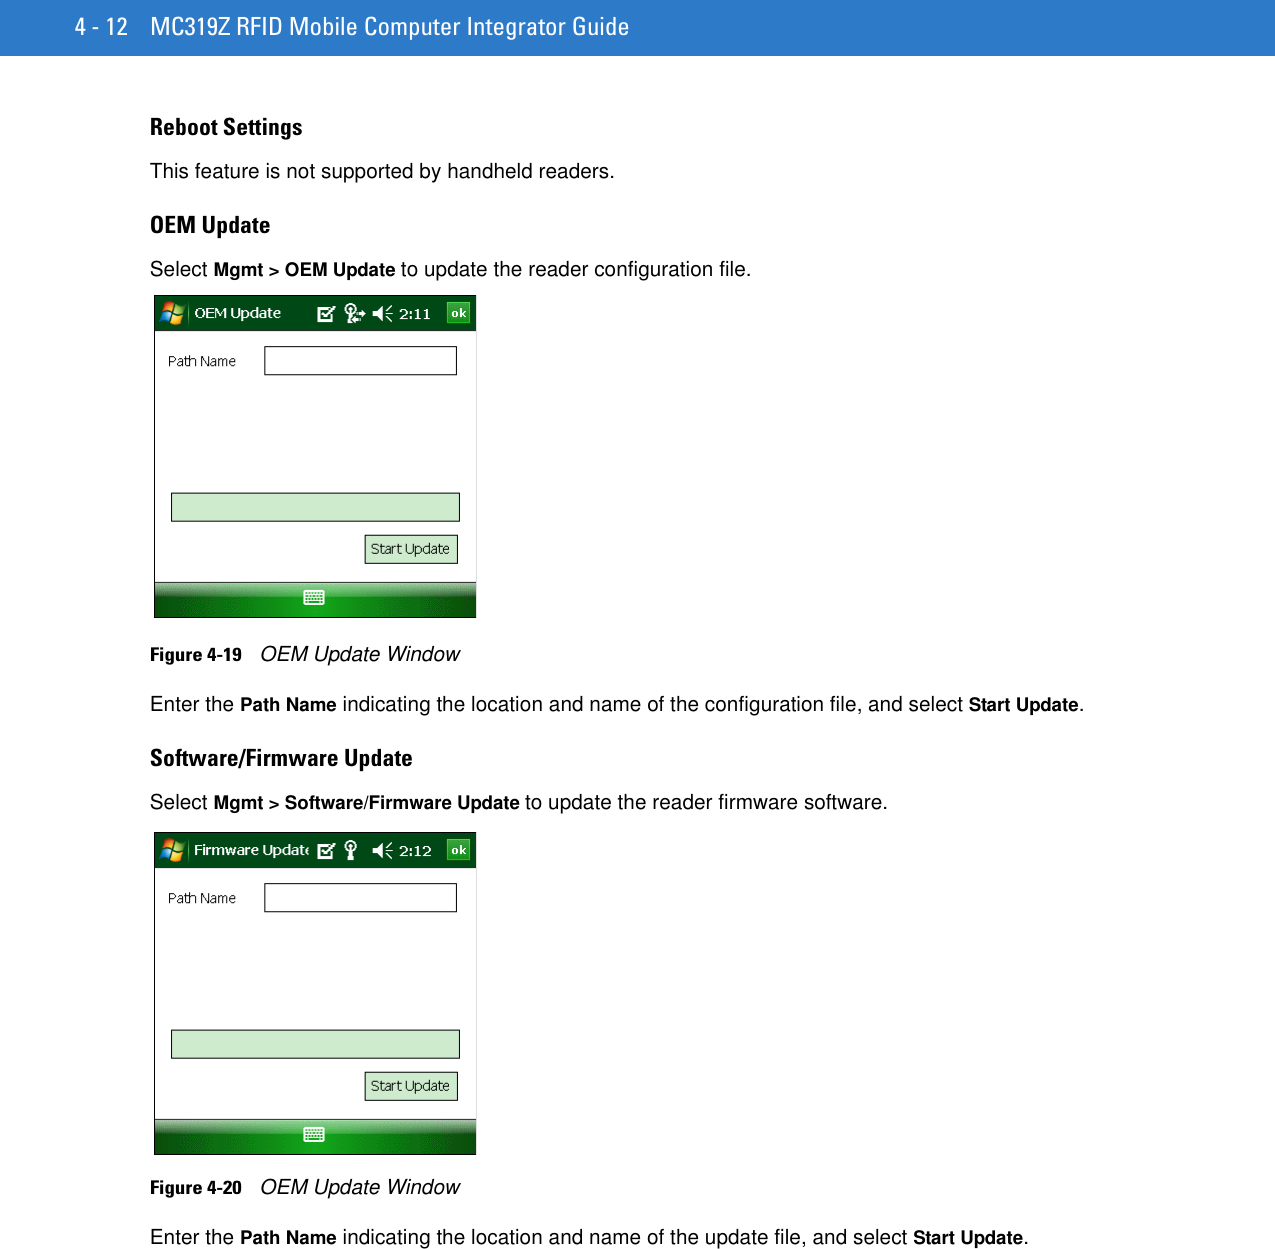
![RFID Sample Application [TBD] 4 - 11Management Menu OptionsThe Management menu provides access to reader management functionality such as updating firmware, selecting an antenna mode, and rebooting. The Management menu options include:•Login and Logout options•Reboot option•OEM Update option•Software/Firmware Update optionFigure 4-17 Management MenuLogin/Logout SettingsThe Reader Management functionality requires login authentication. Select Mgmt > Login/Logout... to log in or out of this functionality.Figure 4-18 Login WindowThis window includes the following fields:•Reader Type - MC indicates the MC319Z. •User name - Enter the user name used to gain access to reader management functionality.•Password - Enter the password used to gain access to reader management functionality.•IP - IP address of the host. For MC319Z, the default is 127.0.0.1 or localhost.](https://usermanual.wiki/Zebra-Technologies/MC319ZUS.Manual-Operation/User-Guide-1441239-Page-41.png)
![RFID Sample Application [TBD] 4 - 13AboutThe About window displays the sample application version informationFigure 4-21 About WindowNOTE The version numbers displayed in this window are examples. Actual version numbers are based on the versions of the files on the device.](https://usermanual.wiki/Zebra-Technologies/MC319ZUS.Manual-Operation/User-Guide-1441239-Page-43.png)