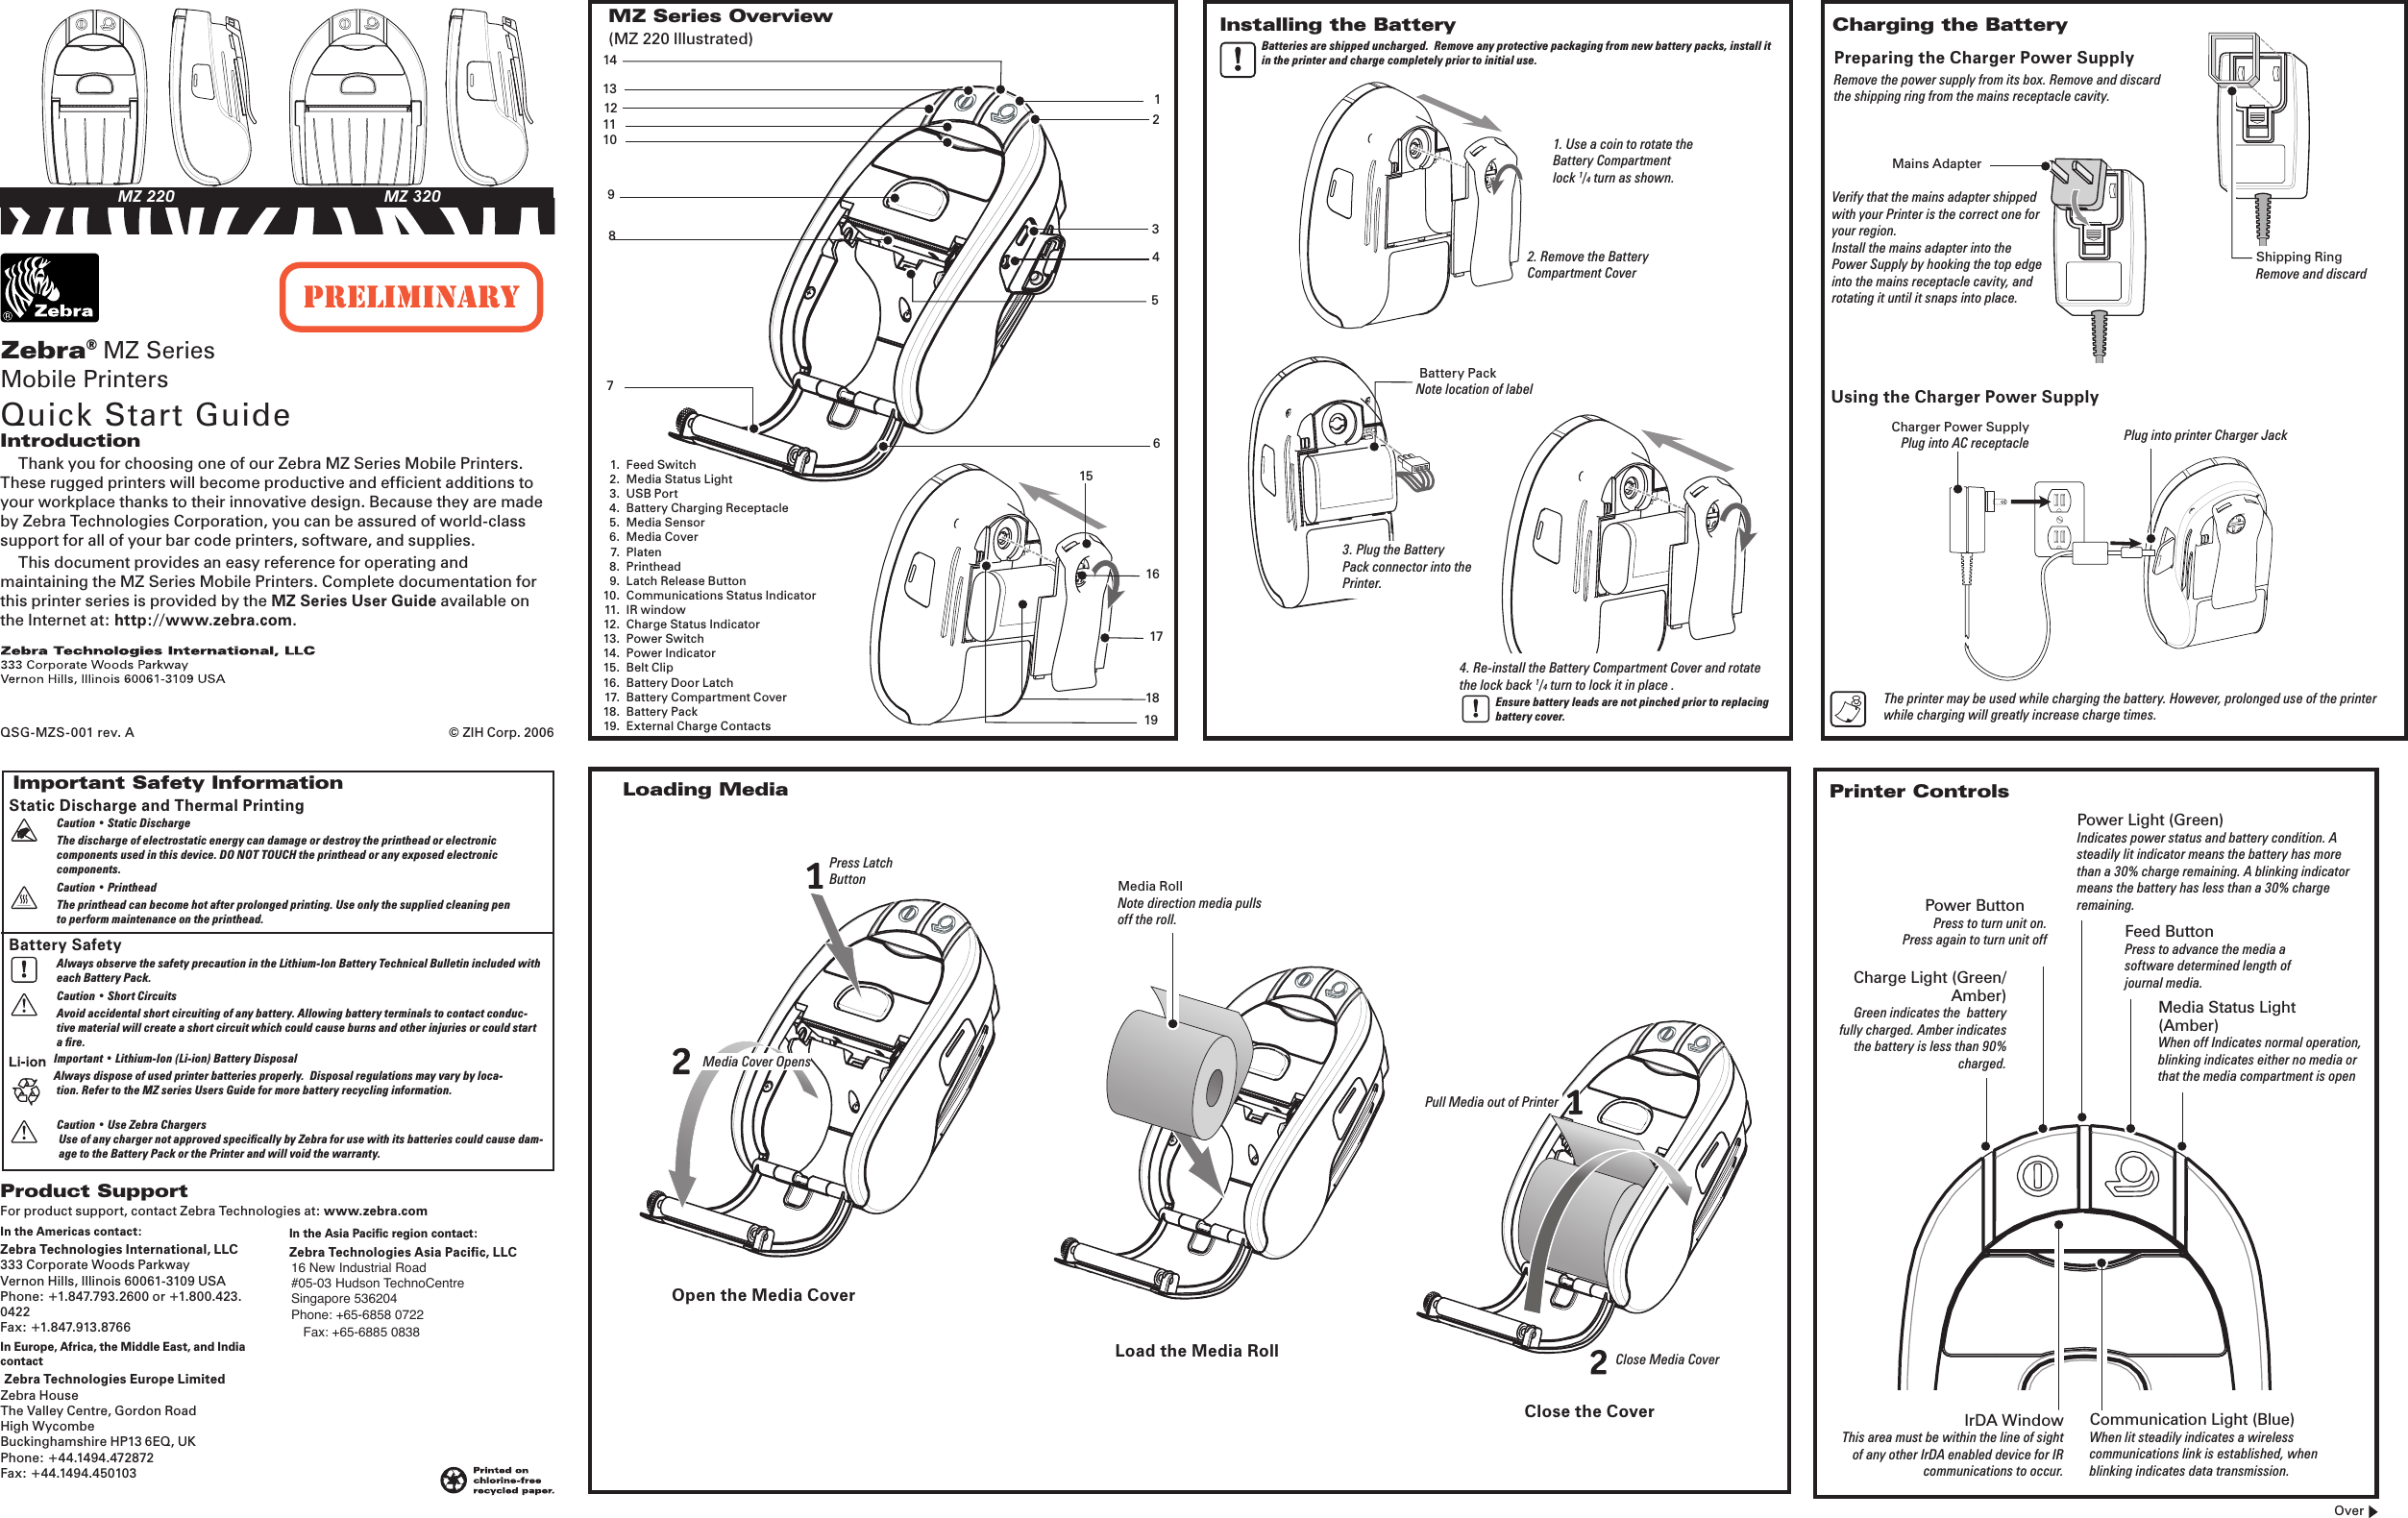
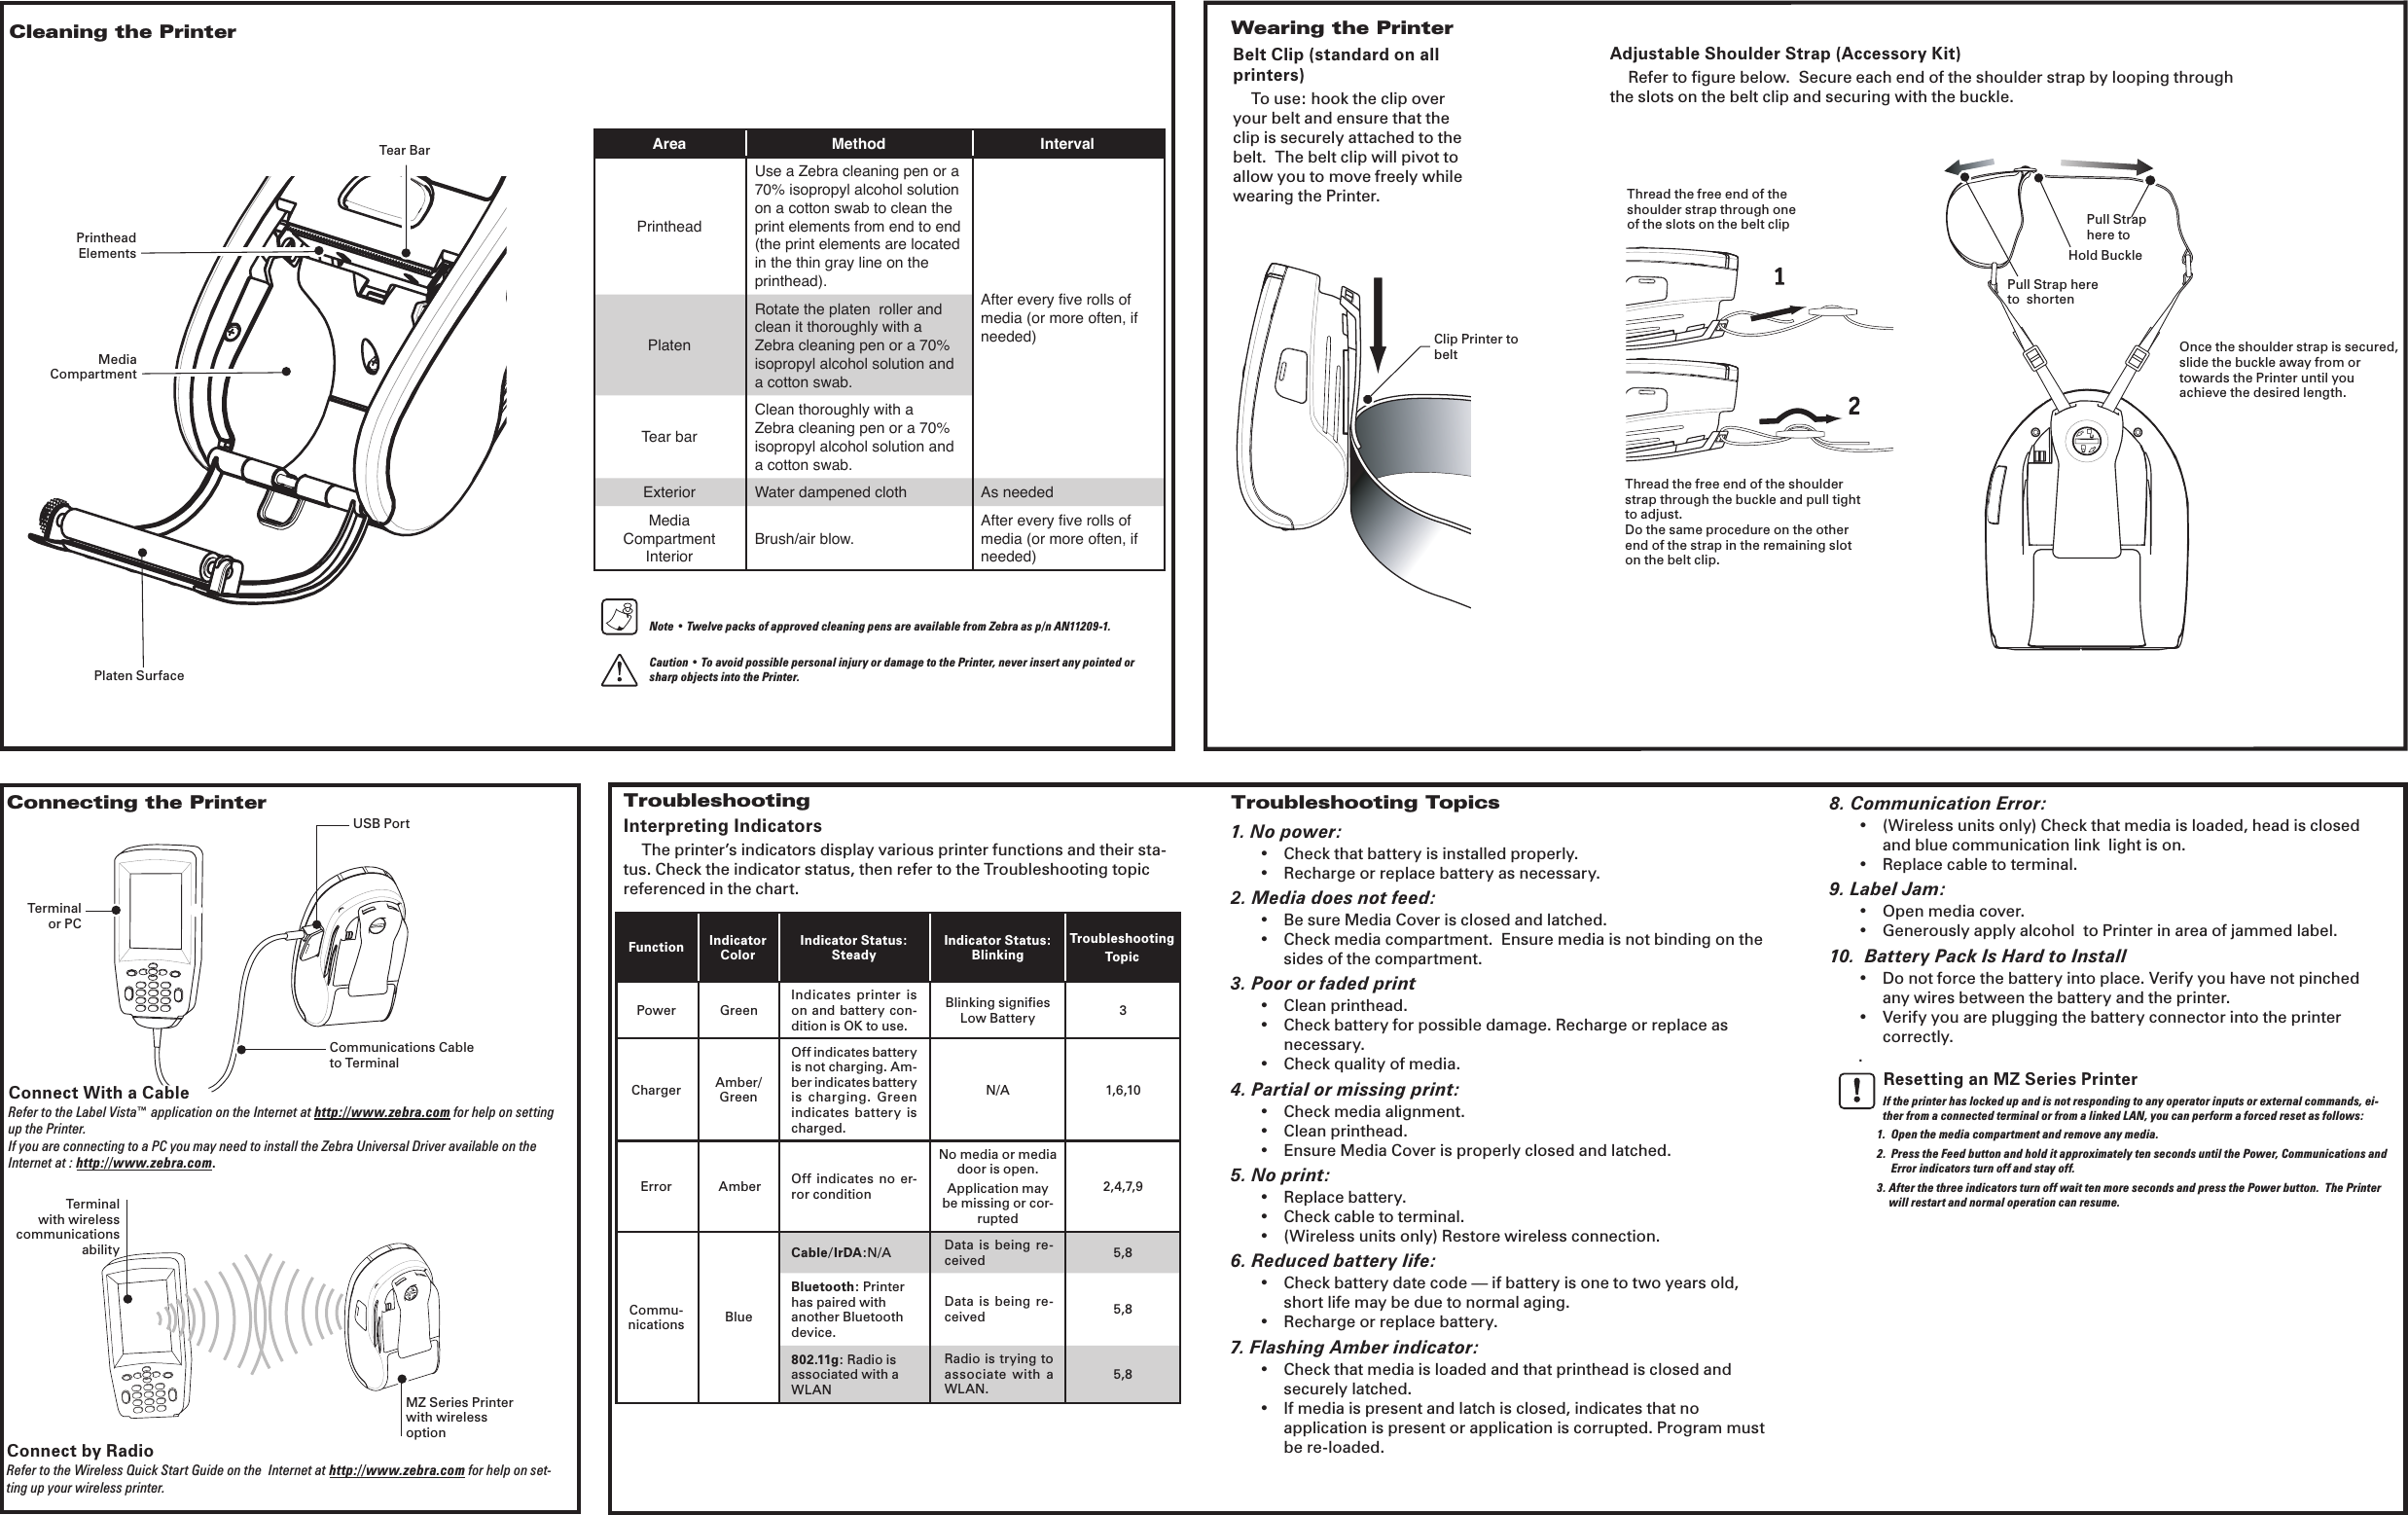
Zebra Technologies MD-BTC2TY6 Zebra MZ-ZBR3 Bluetooth Radio User Manual QSG MZS 001a

Zebra Technologies Corporation Zebra MZ-ZBR3 Bluetooth Radio QSG MZS 001a

User Manual

Installing the Battery  Batteries are shipped uncharged.  Remove any protective packaging from new battery packs, install it in the printer and charge completely prior to initial use.Important Safety InformationStatic Discharge and Thermal Printing  Caution • Static Discharge  The discharge of electrostatic energy can damage or destroy the printhead or electronic components used in this device. DO NOT TOUCH the printhead or any exposed electronic components.  Caution • Printhead   The printhead can become hot after prolonged printing. Use only the supplied cleaning pen to perform maintenance on the printhead.Battery Safety  Always observe the safety precaution in the Lithium-Ion Battery Technical Bulletin included with each Battery Pack.  Caution • Short Circuits  Avoid accidental short circuiting of any battery. Allowing battery terminals to contact conduc-tive material will create a short circuit which could cause burns and other injuries or could start a fire.Important • Lithium-Ion (Li-ion) Battery DisposalAlways dispose of used printer batteries properly.  Disposal regulations may vary by loca-tion. Refer to the MZ series Users Guide for more battery recycling information.  Caution • Use Zebra Chargers  Use of any charger not approved specifically by Zebra for use with its batteries could cause dam-age to the Battery Pack or the Printer and will void the warranty.Product SupportFor product support, contact Zebra Technologies at: www.zebra.comIn the Americas contact:Zebra Technologies International, LLC333 Corporate Woods ParkwayVernon Hills, Illinois 60061-3109 USAPhone: +1.847.793.2600 or +1.800.423. 0422Fax: +1.847.913.8766In Europe, Africa, the Middle East, and India contactZebra Technologies Europe LimitedZebra HouseThe Valley Centre, Gordon RoadHigh WycombeBuckinghamshire HP13 6EQ, UKPhone: +44.1494.472872Fax: +44.1494.450103In the Asia Pacific region contact:Zebra Technologies Asia Pacific, LLC 16 New Industrial Road#05-03 Hudson TechnoCentreSingapore 536204Phone: +65-6858 0722Fax: +65-6885 0838  MZ 220  MZ 320  1.  Feed Switch  2.  Media Status Light  3.  USB Port  4.  Battery Charging Receptacle  5.  Media Sensor  6.  Media Cover  7.  Platen  8.  Printhead  9.  Latch Release Button  10.  Communications Status Indicator  11.  IR window  12.  Charge Status Indicator  13.  Power Switch  14.  Power Indicator   15.  Belt Clip  16.  Battery Door Latch  17.  Battery Compartment Cover  18.  Battery Pack  19.  External Charge ContactsCharging the BatteryPrinter ControlsLoading MediaIntroductionThank you for choosing one of our Zebra MZ Series Mobile Printers. These rugged printers will become productive and efficient additions to your workplace thanks to their innovative design. Because they are made by Zebra Technologies Corporation, you can be assured of world-class support for all of your bar code printers, software, and supplies.This document provides an easy reference for operating and maintaining the MZ Series Mobile Printers. Complete documentation for this printer series is provided by the MZ Series User Guide available on the Internet at: http://www.zebra.com.MZ Series Overview(MZ 220 Illustrated)Load the Media RollClose the CoverZebra® MZ SeriesMobile PrintersQuick Start GuideQSG-MZS-002 rev. A  © ZIH Corp. 2006Over      The printer may be used while charging the battery. However, prolonged use of the printer while charging will greatly increase charge times.Using the Charger Power Supply1516712463818179Power ButtonPress to turn unit on.  Press again to turn unit off Feed ButtonPress to advance the media a software determined length of journal media.Communication Light (Blue)When lit steadily indicates a wireless communications link is established, when blinking indicates data transmission.Charge Light (Green/Amber)Green indicates the  battery fully charged. Amber indicates the battery is less than 90% charged. IrDA WindowThis area must be within the line of sight of any other IrDA enabled device for IR communications to occur. Media Status Light (Amber)When off Indicates normal operation,  blinking indicates either no media or that the media compartment is openPower Light (Green)Indicates power status and battery condition. A steadily lit indicator means the battery has more than a 30% charge remaining. A blinking indicator means the battery has less than a 30% charge remaining.1011121314191. Use a coin to rotate the Battery Compartment lock 1/4 turn as shown.2. Remove the Battery Compartment Cover3. Plug the Battery Pack connector into the Printer. Battery PackNote location of label4. Re-install the Battery Compartment Cover and rotate the lock back 1/4 turn to lock it in place .  Ensure battery leads are not pinched prior to replacing battery cover.Charger Power SupplyPlug into AC receptacle Plug into printer Charger JackVerify that the mains adapter shipped with your Printer is the correct one for your region.Install the mains adapter into the Power Supply by hooking the top edge into the mains receptacle cavity, and rotating it until it snaps into place.Preparing the Charger Power SupplyRemove the power supply from its box. Remove and discard the shipping ring from the mains receptacle cavity.Mains AdapterShipping RingRemove and discard5Media RollNote direction media pulls off the roll.Pull Media out of PrinterClose Media CoverPress Latch ButtonMedia Cover OpensOpen the Media CoverQSG-MZS-001 rev. A  © ZIH Corp. 2006
Area Method IntervalPrintheadUse a Zebra cleaning pen or a 70% isopropyl alcohol solution on a cotton swab to clean the print elements from end to end (the print elements are located in the thin gray line on the printhead). After every five rolls of media (or more often, if needed)PlatenRotate the platen  roller and clean it thoroughly with a Zebra cleaning pen or a 70% isopropyl alcohol solution and a cotton swab.Tear barClean thoroughly with a Zebra cleaning pen or a 70% isopropyl alcohol solution and a cotton swab.Exterior  Water dampened cloth As neededMedia Compartment InteriorBrush/air blow.After every five rolls of media (or more often, if needed)Belt Clip (standard on all printers)To use: hook the clip over your belt and ensure that the clip is securely attached to the belt.  The belt clip will pivot to allow you to move freely while wearing the Printer.Cleaning the PrinterHold BucklePull Strap here to  Pull Strap here to  shortenWearing the PrinterAdjustable Shoulder Strap (Accessory Kit)Refer to figure below.  Secure each end of the shoulder strap by looping through the slots on the belt clip and securing with the buckle.  Troubleshooting Topics1. No power:•  Check that battery is installed properly.•  Recharge or replace battery as necessary.2. Media does not feed: •  Be sure Media Cover is closed and latched.•  Check media compartment.  Ensure media is not binding on the sides of the compartment.3. Poor or faded print•  Clean printhead.•  Check battery for possible damage. Recharge or replace as necessary.•  Check quality of media.4. Partial or missing print:•  Check media alignment.•  Clean printhead.•  Ensure Media Cover is properly closed and latched.5. No print:•  Replace battery.•  Check cable to terminal.•  (Wireless units only) Restore wireless connection.6. Reduced battery life:•  Check battery date code — if battery is one to two years old, short life may be due to normal aging.•  Recharge or replace battery.7. Flashing Amber indicator:•  Check that media is loaded and that printhead is closed and   securely latched.•  If media is present and latch is closed, indicates that no application is present or application is corrupted. Program must be re-loaded.8. Communication Error:•  (Wireless units only) Check that media is loaded, head is closed and blue communication link  light is on.•  Replace cable to terminal.9. Label Jam:•  Open media cover.•  Generously apply alcohol  to Printer in area of jammed label.10.  Battery Pack Is Hard to Install•  Do not force the battery into place. Verify you have not pinched any wires between the battery and the printer.•  Verify you are plugging the battery connector into the printer correctly..TroubleshootingInterpreting IndicatorsThe printer’s indicators display various printer functions and their sta-tus. Check the indicator status, then refer to the Troubleshooting topic referenced in the chart.Function Indicator ColorIndicator Status: SteadyIndicator Status:BlinkingTroubleshootingTopicPower GreenIndicates  printer  is on and  battery con-dition is OK to use.Blinking signifies Low Battery 3Charger Amber/GreenOff indicates battery is not charging. Am-ber indicates battery is  charging.  Green indicates  battery  is charged.N/A 1,6,10Error Amber Off  indicates  no  er-ror conditionNo media or media door is open.Application may be missing or cor-rupted2,4,7,9Commu-nications BlueCable/IrDA:N/A Data  is  being  re-ceived 5,8Bluetooth: Printer has paired with another Bluetooth device.Data  is  being  re-ceived 5,8802.11g: Radio is associated with a WLANRadio is  trying  to associate  with  a WLAN.5,8  Note • Twelve packs of approved cleaning pens are available from Zebra as p/n AN11209-1.  Caution • To avoid possible personal injury or damage to the Printer, never insert any pointed or sharp objects into the Printer.Connecting the PrinterConnect With a CableRefer to the Label Vista™ application on the Internet at http://www.zebra.com for help on setting up the Printer.If you are connecting to a PC you may need to install the Zebra Universal Driver available on the Internet at : http://www.zebra.com.Connect by RadioRefer to the Wireless Quick Start Guide on the  Internet at http://www.zebra.com for help on set-ting up your wireless printer.Communications Cable to TerminalUSB PortMZ Series Printer with wireless optionTerminal with wireless communications abilityTerminal or PCOnce the shoulder strap is secured, slide the buckle away from or towards the Printer until you achieve the desired length.  Resetting an MZ Series Printer  If the printer has locked up and is not responding to any operator inputs or external commands, ei-ther from a connected terminal or from a linked LAN, you can perform a forced reset as follows:1.  Open the media compartment and remove any media.2.  Press the Feed button and hold it approximately ten seconds until the Power, Communications and Error indicators turn off and stay off. 3. After the three indicators turn off wait ten more seconds and press the Power button.  The Printer will restart and normal operation can resume.Tear BarPrinthead ElementsPlaten SurfaceMedia CompartmentClip Printer to beltThread the free end of the shoulder strap through one of the slots on the belt clipThread the free end of the shoulder strap through the buckle and pull tight to adjust.Do the same procedure on the other end of the strap in the remaining slot on the belt clip.

Navigation menu