Zephyr Technology BH3-M1 Patient Data Transmitter User Manual User s Manualx
Zephyr Technology Corporation Patient Data Transmitter User s Manualx
User Manual

Patient
Guide

2
9700.0205.v7b ©2016 Zephyr Technology, All Rights Reserved 24-NOV-2016
Patient Guide
Introduction ................................................................................................................................ 2
ZephyrLIFE Home Indications for Use ....................................................................................... 2
ZephyrLIFE Home Intended Use ............................................................................................... 2
ZephyrLIFE Home Warnings and Cautions ............................................................................... 2
ZephyrLIFE HealthHub™ .......................................................................................................... 2
ZephyrLIFE HealthHub Device Options ..................................................................................... 2
ZephyrLIFE HealthHub Dashboard ........................................................................................... 2
Measure Blood Pressure (Foracare D40d) ................................................................................ 2
Measure Blood Pressure (Foracare P20) .................................................................................. 2
Measure Blood Pressure (Foracare Test N’GO BP) .................................................................. 2
Measure Blood Glucose (Foracare D40d) ................................................................................. 2
Measure Blood Glucose (Fora MD) ........................................................................................... 2
Measure Blood Glucose (Foracare TN’G Voice) ....................................................................... 2
Measure Weight (Foracare W310 Scale) ................................................................................... 2
Measure Weight (Foracare TN’G 550 Scale) ............................................................................. 2
Measure Temperature ............................................................................................................... 2
Record Feelings ........................................................................................................................ 2
Zephyr BioModule Intended Use ............................................................................................... 2
Zephyr BioModule Warnings & Cautions ................................................................................... 2
Zephyr BioModule Contraindications ......................................................................................... 2
Prepare BioModule for Use ....................................................................................................... 2
Skin Preparation ........................................................................................................................ 2
BioModule Data ......................................................................................................................... 2
Measure ECG ............................................................................................................................ 2
BioModule Light Indicators ........................................................................................................ 2
Onyx® II Model 9560 Finger Pulse Oximeter Indications for Use .............................................. 2
Onyx® II Model 9560 Finger Pulse Oximeter Contraindications ................................................ 2
Onyx® II Model 9560 Finger Pulse Oximeter Warnings ............................................................ 2
Contents

3
9700.0205.v7b ©2016 Zephyr Technology, All Rights Reserved 24-NOV-2016
Patient Guide
Measure Blood Oxygen ............................................................................................................. 2
Accessing the Portal .................................................................................................................. 2
Navigating the Portal Screens ................................................................................................... 2
All Patients Tab Parameters ...................................................................................................... 2
Data Updates – Reading the All Patients Tab ........................................................................... 2
Dashboard ................................................................................................................................. 2
History ....................................................................................................................................... 2
Trends ....................................................................................................................................... 2
ECG ........................................................................................................................................... 2
Manage Patient ......................................................................................................................... 2
Care Circle ................................................................................................................................. 2
To Replace a Discharged BioModule ........................................................................................ 2
Care & Cleaning of the BioModule and BioModule Holder ........................................................ 2
Changing batteries on devices .................................................................................................. 2
Changing batteries on devices .................................................................................................. 2
Changing batteries on devices .................................................................................................. 2
Changing batteries on devices .................................................................................................. 2
Changing batteries on devices .................................................................................................. 2
Troubleshooting Tips ................................................................................................................. 2
Specifications ............................................................................................................................ 2
Accessories ............................................................................................................................... 2
Manufacturer’s Declaration and Guidance ................................................................................. 2
FCC Declaration ........................................................................................................................ 2
Warranty .................................................................................................................................... 2
Appendix I Active Patient Monitoring ......................................................................................... 2

4
9700.0205.v7b ©2016 Zephyr Technology, All Rights Reserved 24-NOV-2016
Patient Guide
Zephyr Technology
1 Annapolis St.
Suite 200
Annapolis
MD 21401
USA
Zephyr Support
Phone: 1-800-497-4968
5
9700.0205.v7b ©2016 Zephyr Technology, All Rights Reserved 24-NOV-2016
Patient Guide
Overview
This manual describes the features, setup and operation of the ZephyrLIFE
Home remote patient monitoring system, comprising the Zephyr BioModule,
HealthHub and associated sensors.
A companion Quick Reference Guide is provided for clinician use.
Intended Audience
This manual provides information to patients in low-acuity hospital-type or home
settings, for preparation and maintenance of the system.
Before operating, thoroughly read this manual.
Safety Symbols
Symbol Definition
Warning: warnings alert users to potential serious
outcomes (injury or adverse events) to the patient,
operator or environment
Caution: cautions inform users to exercise
appropriate care for safe and effective use of the
product.
Note: Notes provide additional guidelines or
information
Introduction

6
9700.0205.v7b ©2016 Zephyr Technology, All Rights Reserved 24-NOV-2016
Patient Guide
ZephyrLIFE Home is indicated to receive, transmit, collect, accumulate
and display a patient’s physiologic signals and other data from a remote
location to the healthcare practitioner.
External sensors supply this device with physiologic information such as,
but not limited to:
Blood pressure
Blood glucose
Blood oxygen saturation
Temperature
Heart Rate
Respiration Rate
Position
for distribution.
ZephyrLIFE Home Indications for Use

7
9700.0205.v7b ©2016 Zephyr Technology, All Rights Reserved 24-NOV-2016
Patient Guide
ZephyrLIFE Home Intended Use

8
9700.0205.v7b ©2016 Zephyr Technology, All Rights Reserved 24-NOV-2016
Patient Guide
ZephyrLIFE Home Warnings and Cautions
9
9700.0205.v7b ©2016 Zephyr Technology, All Rights Reserved 24-NOV-2016
Patient Guide
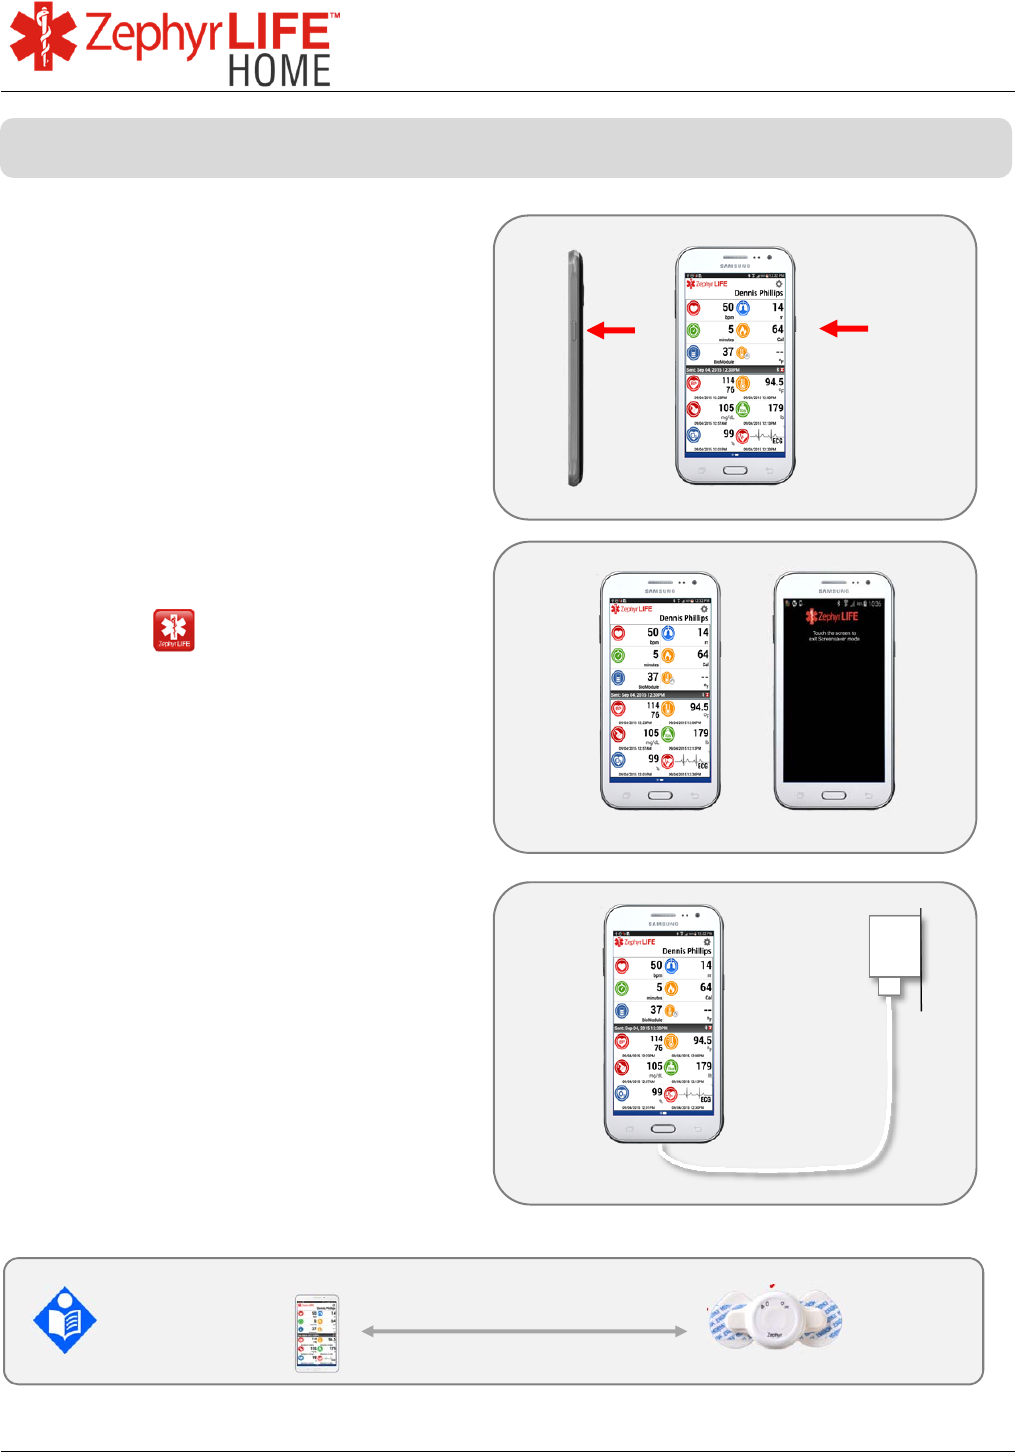
Press and Hold side button to power
ON/OFF.
Press briefly to turn screen off, and
again to turn the screen on.
ZephyrLIFE will keep running in the
background.
Tap the icon to start ZephyrLIFE.
The images shown in this guide are
for education purposes only
Tap the screensaver screen to return
to the dashboard
Keep the HealthHub connected to a
charge unit when indoors
During operation, always keep the HealthHub within 10 yards of the
BioModule and external sensors.
10 yards
ZephyrLIFE HealthHub™
10
9700.0205.v7b ©2016 Zephyr Technology, All Rights Reserved 24-NOV-2016
Patient Guide
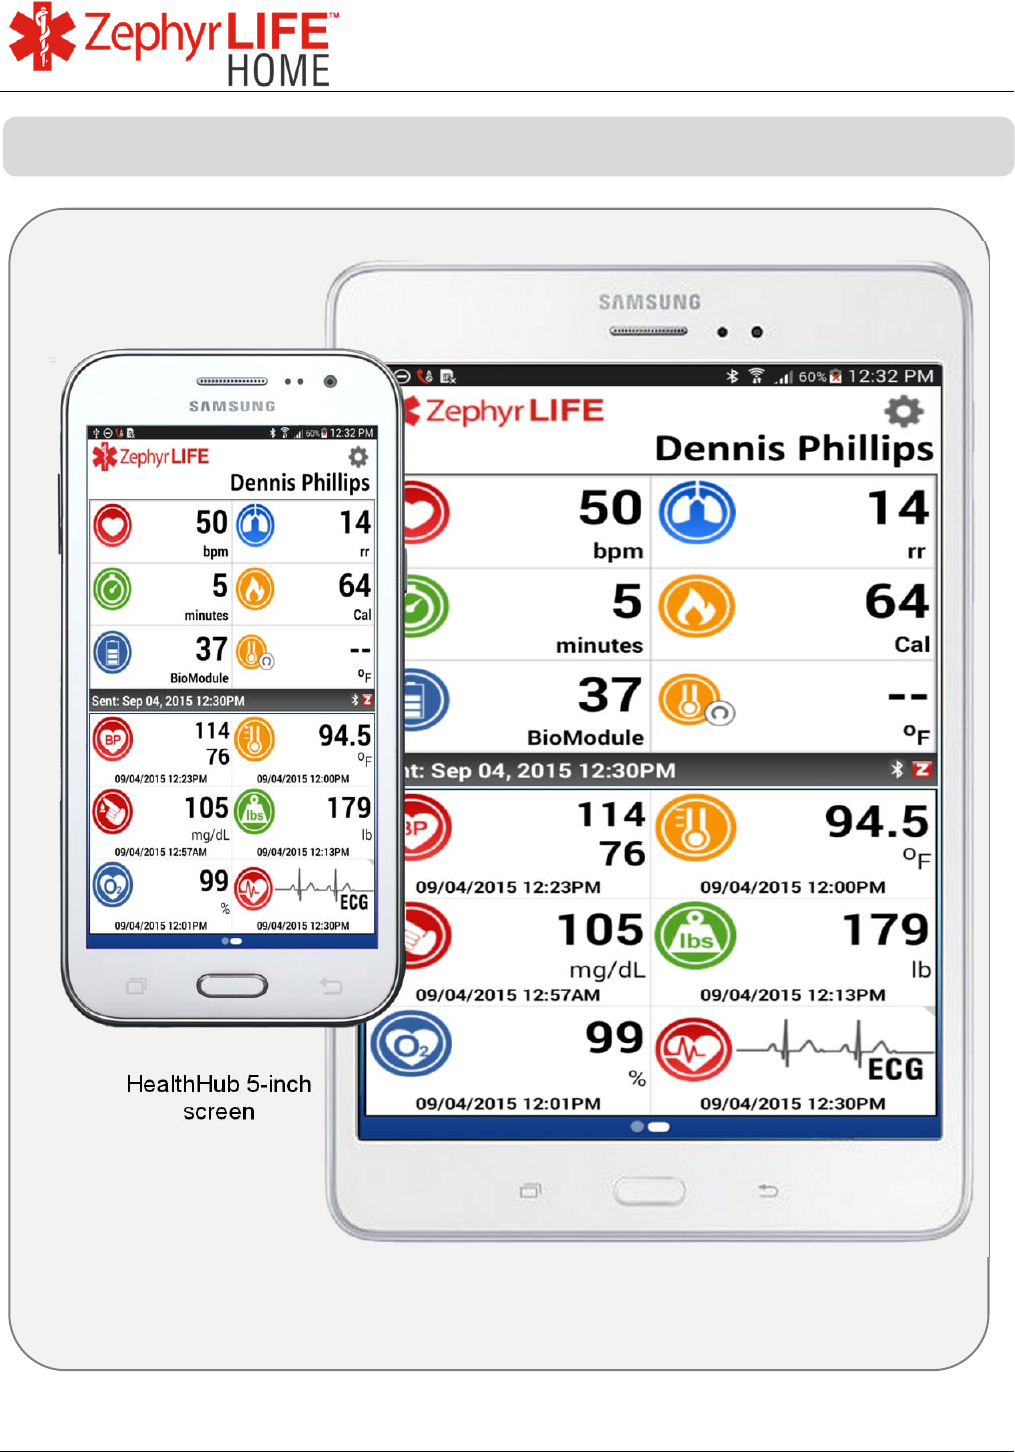
HealthHub 8-inch
screen
HealthHub 5-inch
screen
Zeph
y
rLIFE HealthHub Device Options
11
9700.0205.v7b ©2016 Zephyr Technology, All Rights Reserved 24-NOV-2016
Patient Guide
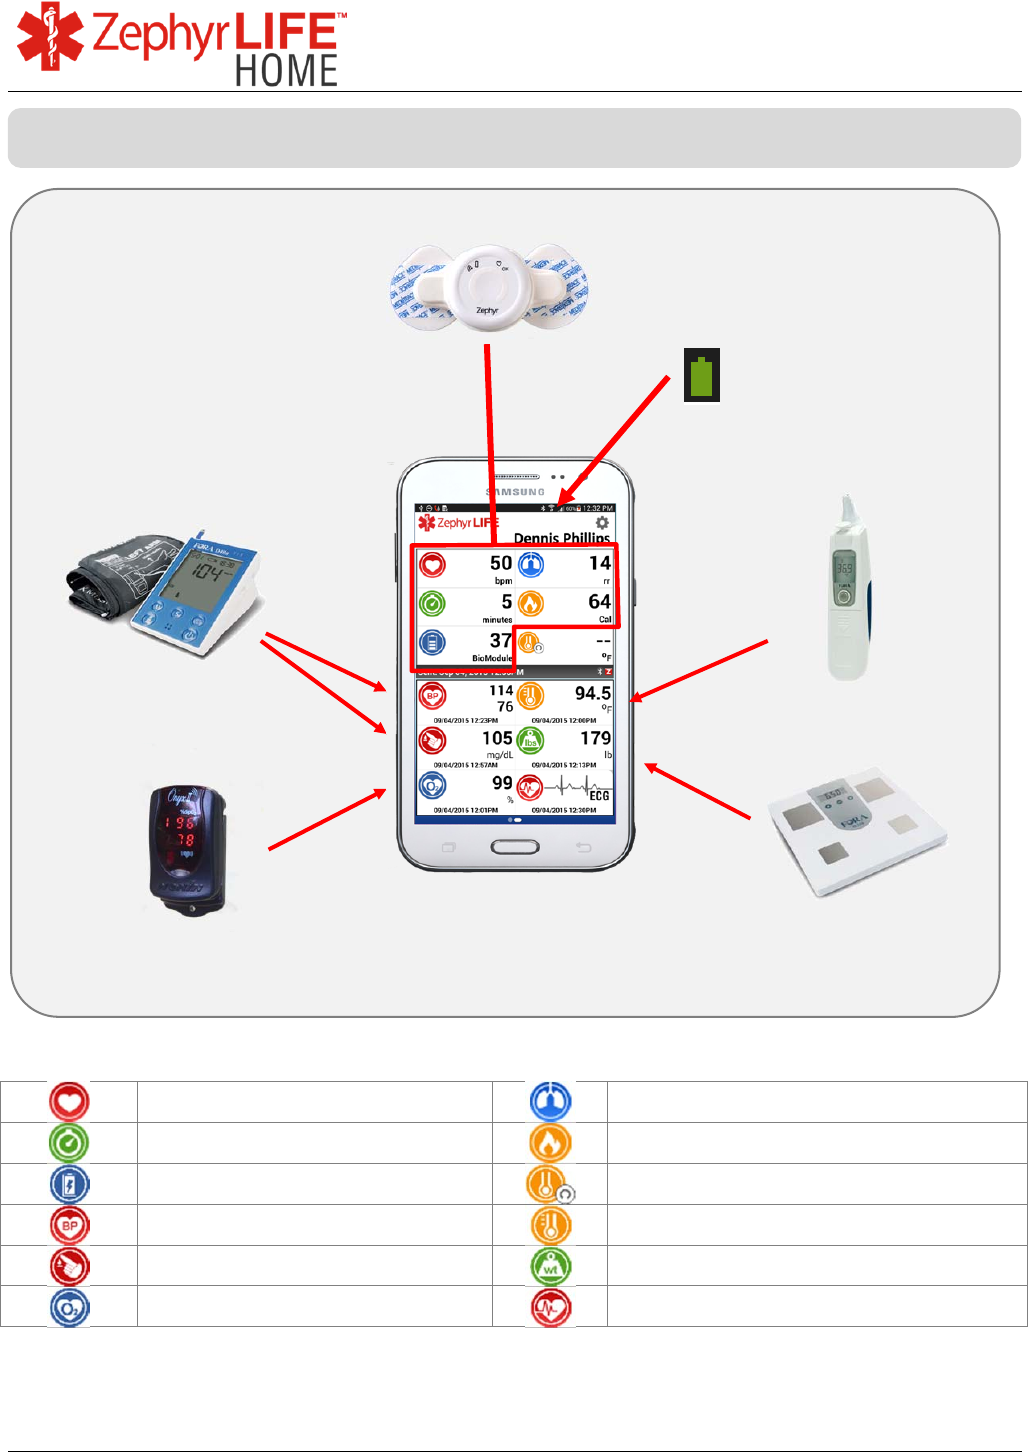
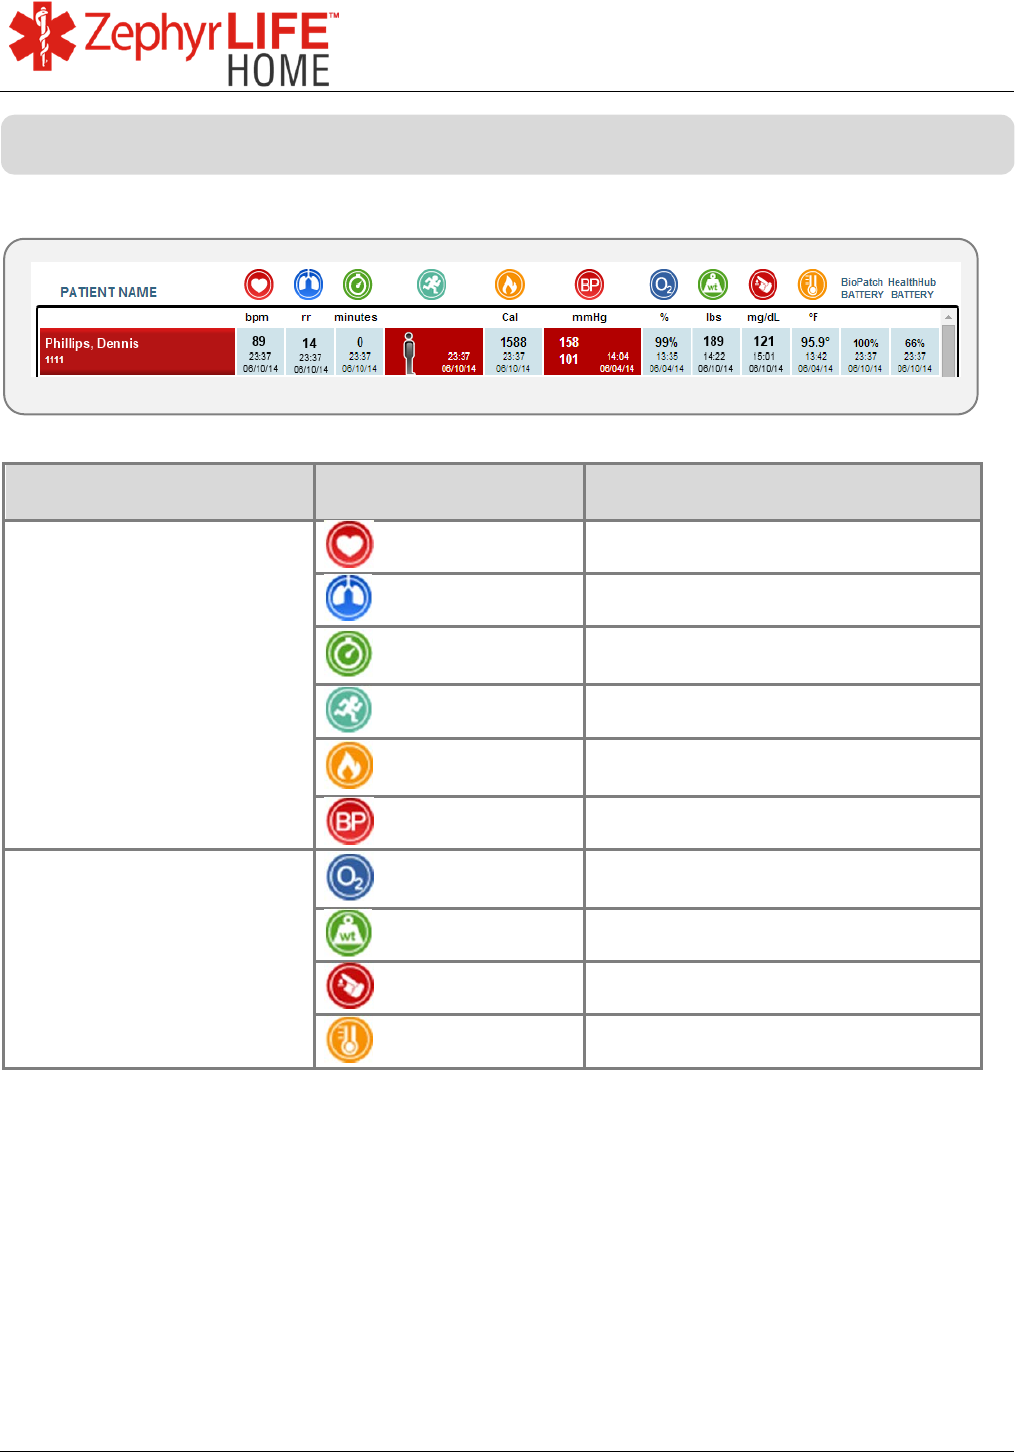
Heart Rate Respiration Rate
Activity Minutes Calories Expended
BioModule Battery Not implemented
Blood Pressure Temperature
Blood Glucose Weight
Blood Oxygen (SpO
2
) ECG request button
Zephyr BioModule
Heart Rate
Respiration Rate
Calories
Activity Minutes
Battery level
HealthHub
Battery
Level
Temperature
Weight
Blood Pressure
Blood Glucose
Blood Oxygen
ZephyrLIFE HealthHub Dashboard
12
9700.0205.v7b ©2016 Zephyr Technology, All Rights Reserved 24-NOV-2016
Patient Guide
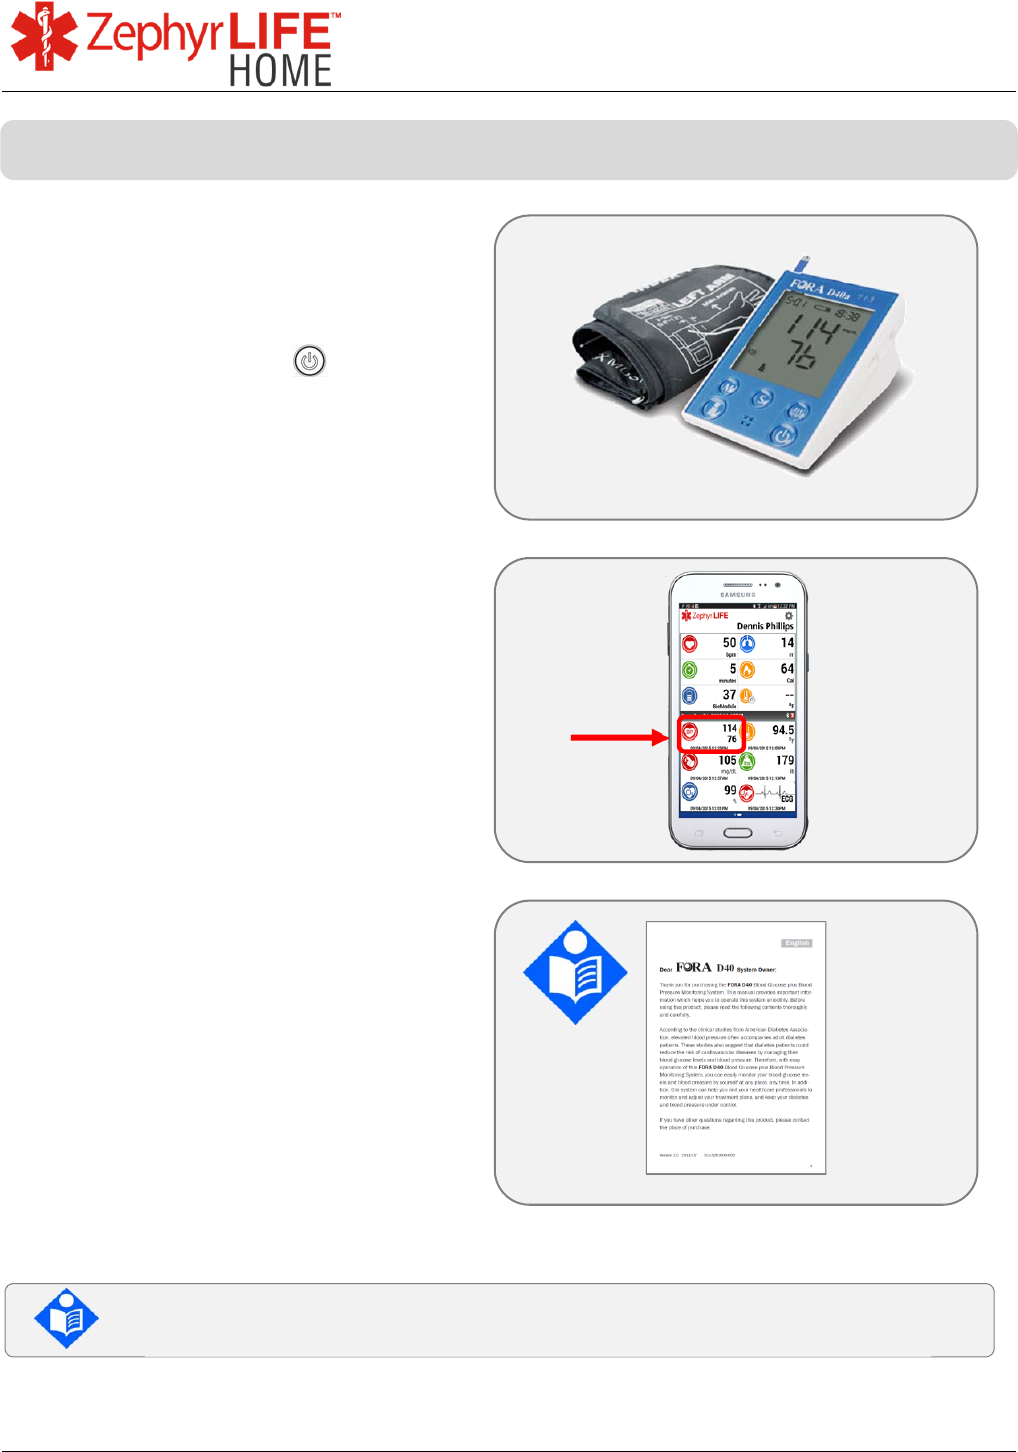
Apply cuff to the arm and start
measurement on the device, by
pressing the On/OFF button.
Follow the voice prompt for
instructions.
When complete the new
measurement will display with the time
it was taken.
Detailed instructions for measuring
blood pressure and taking test
measurements are included in the
blood pressure monitor user manual
Check the Blood Pressure monitor user manual for warnings and
cautions on its use
Measure Blood Pressure (Foracare D40d)
13
9700.0205.v7b ©2016 Zephyr Technology, All Rights Reserved 24-NOV-2016
Patient Guide
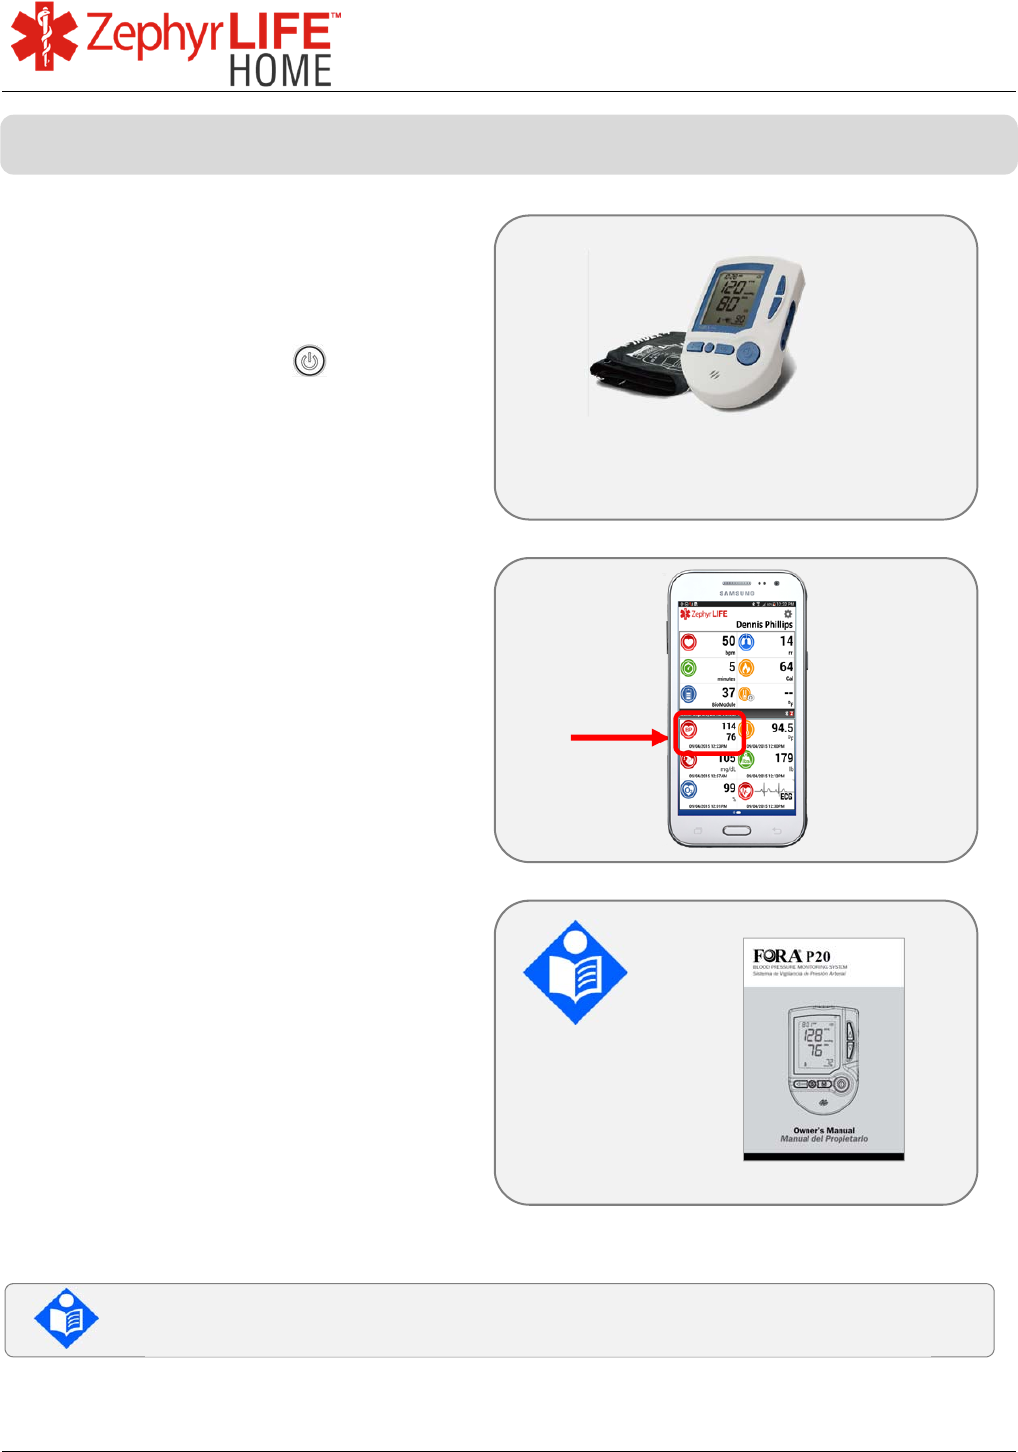
Apply cuff to the arm and start
measurement on the device, by
pressing the On/OFF button.
Follow the voice prompt for
instructions.
When complete the new
measurement will display with the time
it was taken.
Detailed instructions for measuring
blood pressure and taking test
measurements are included in the
blood pressure monitor user manual
Check the Blood Pressure monitor user manual for warnings and
cautions on its use
Measure Blood Pressure (Foracare P20)
14
9700.0205.v7b ©2016 Zephyr Technology, All Rights Reserved 24-NOV-2016
Patient Guide
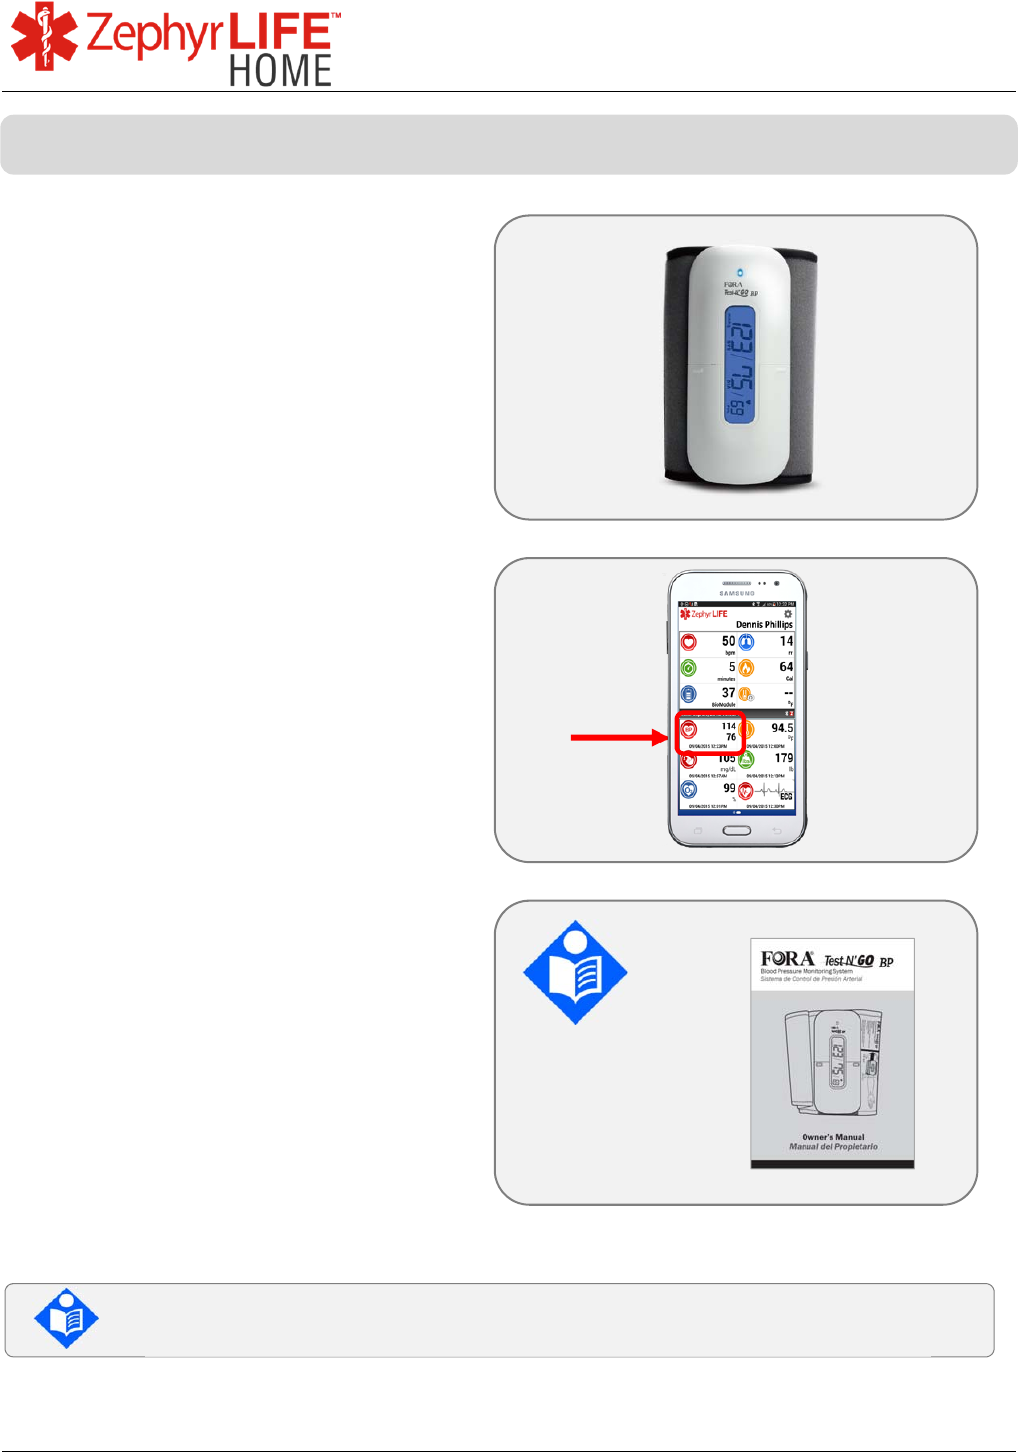
Apply cuff to the arm and start
measurement on the device, by
pressing the On/OFF button on the
top edge of the device.
When complete the new
measurement will display with the time
it was taken.
Detailed instructions for measuring
blood pressure and taking test
measurements are included in the
blood pressure monitor user manual
Check the Blood Pressure monitor user manual for warnings and
cautions on its use
Measure Blood Pressure (Foracare Test N’GO BP)
15
9700.0205.v7b ©2016 Zephyr Technology, All Rights Reserved 24-NOV-2016
Patient Guide
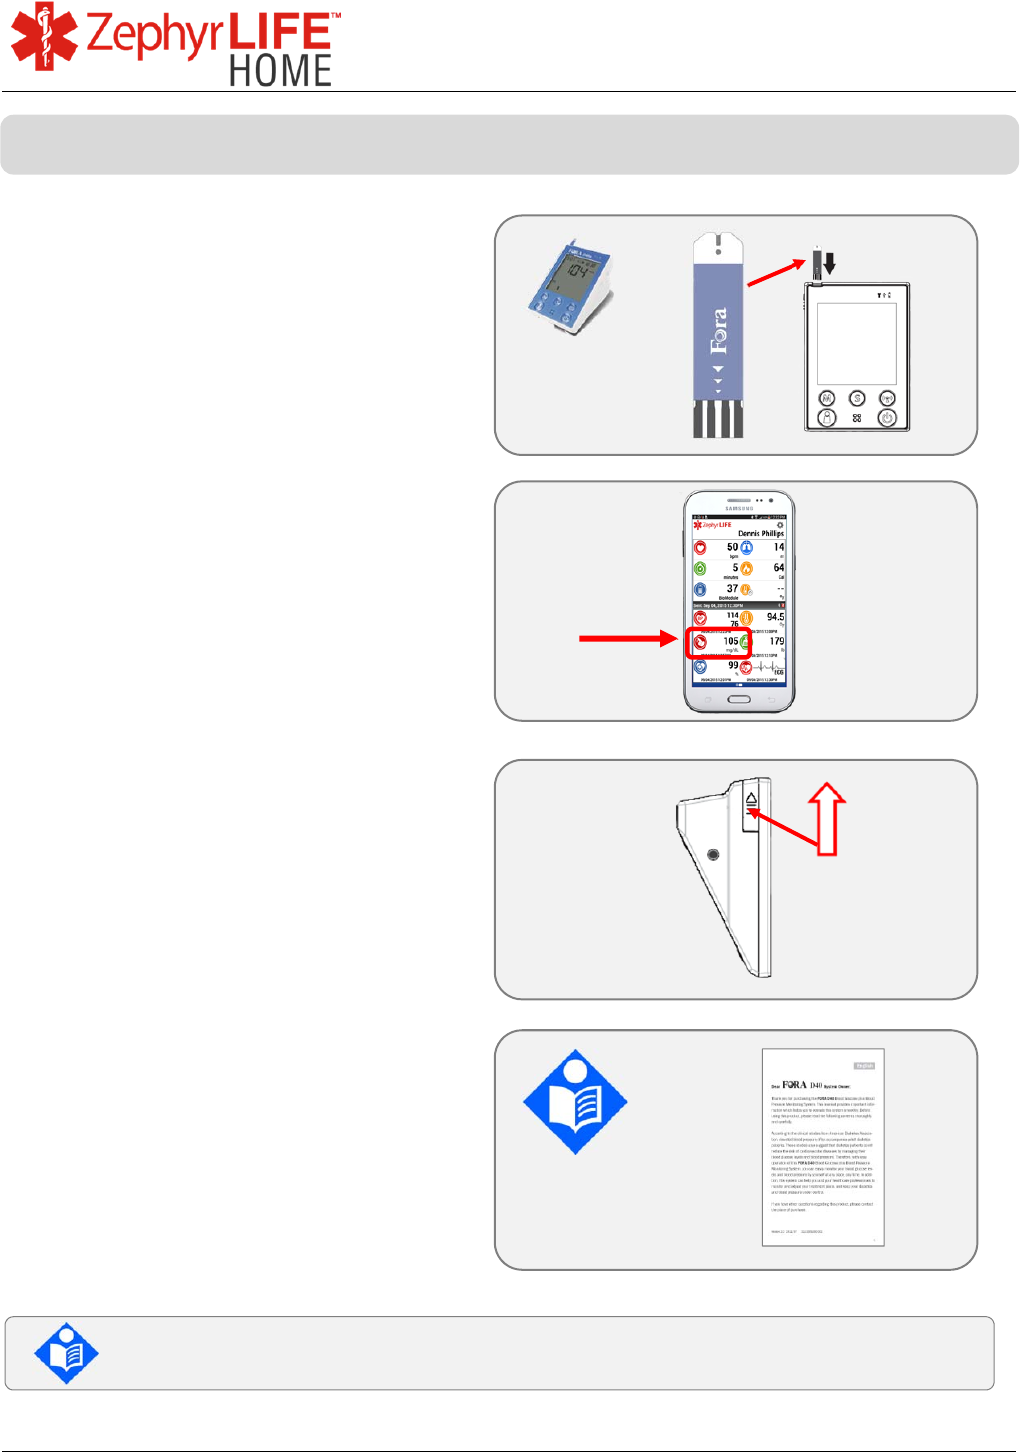
Insert test strip carefully and wait until
the glucometer prompts for the blood
drop.
Take a blood sample using the lancing
device as instructed.
Place the blood drop on the strip.
The glucometer will count down while
testing and display the result.
The result will display on the
HealthHub automatically, with the
time it was taken.
Use the side button to eject the
Glucose strip.
As the lancet and test strip may be
biohazards, please discard carefully
according to your local regulations.
Detailed instructions for obtaining a
blood sample, using the glucometer,
troubleshooting and taking test
measurements are included in the
glucometer user manual.
Check the Blood Glucose monitor user manual for warnings and
cautions on its use
Measure Blood Glucose (Foracare D40d)
16
9700.0205.v7b ©2016 Zephyr Technology, All Rights Reserved 24-NOV-2016
Patient Guide
Insert test strip carefully and wait until
the glucometer prompts for the blood
drop.
Take a blood sample using the lancing
device as instructed.
Place the blood drop on the strip.
The glucometer will count down while
testing and display the result.
The result will display on the
HealthHub automatically, with the
time it was taken.
Use the top button to eject the
Glucose strip.
As the lancet and test strip may be
biohazards, please discard carefully
according to your local regulations.
Detailed instructions for obtaining a
blood sample, using the glucometer,
troubleshooting and taking test
measurements are included in the
glucometer user manual.
Check the Blood Glucose monitor user manual for warnings and
cautions on its use
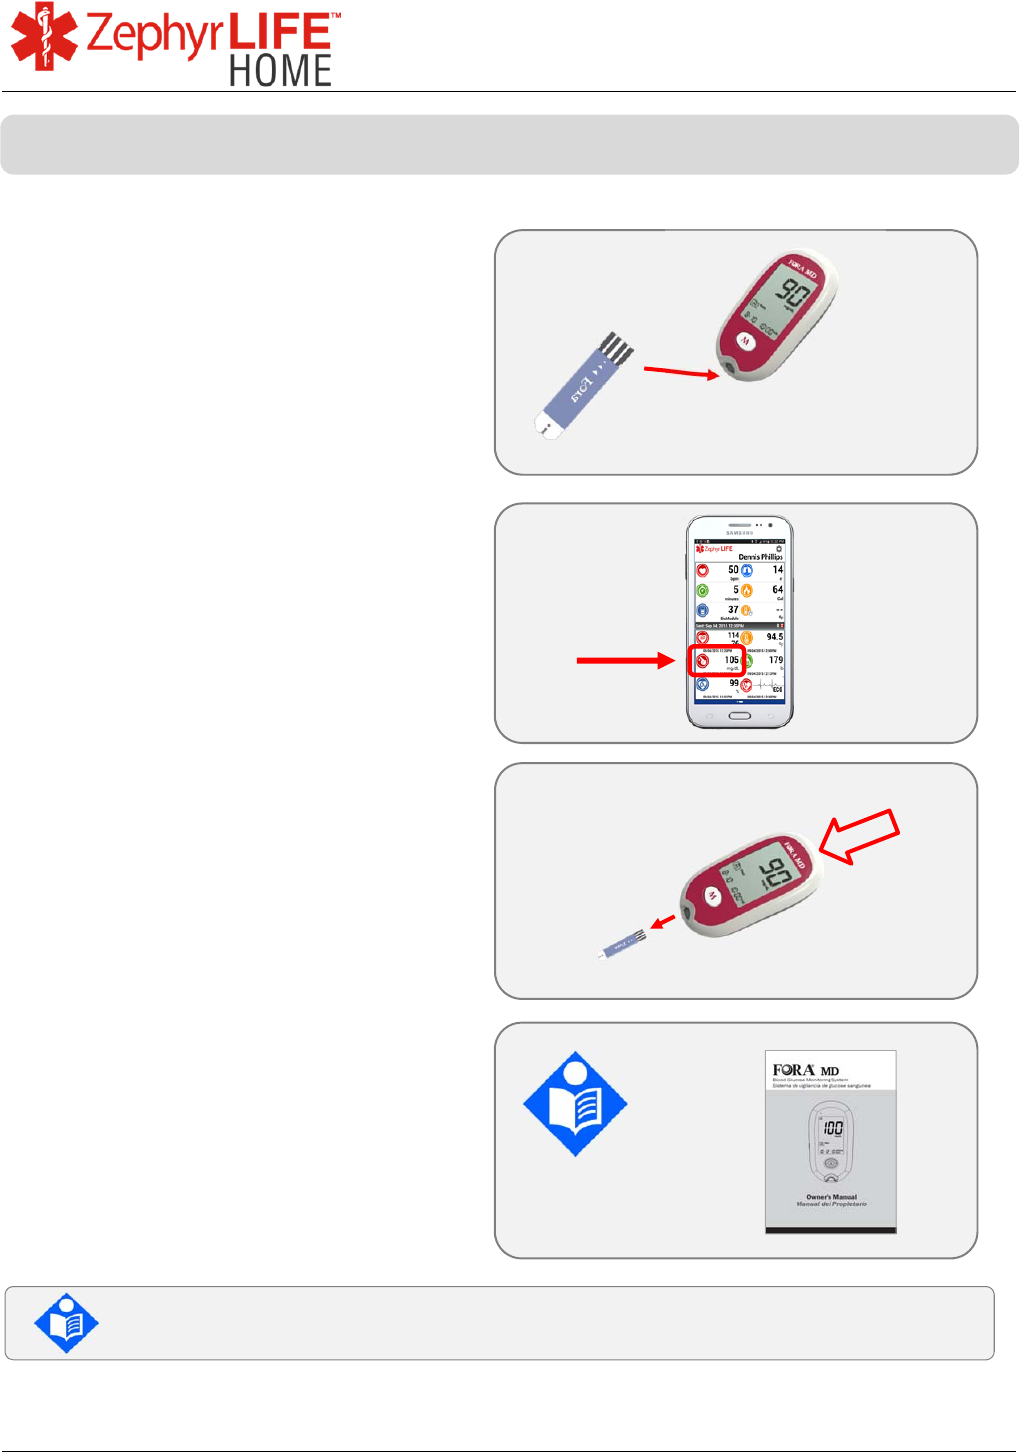
Measure Blood Glucose (Fora MD)
17
9700.0205.v7b ©2016 Zephyr Technology, All Rights Reserved 24-NOV-2016
Patient Guide
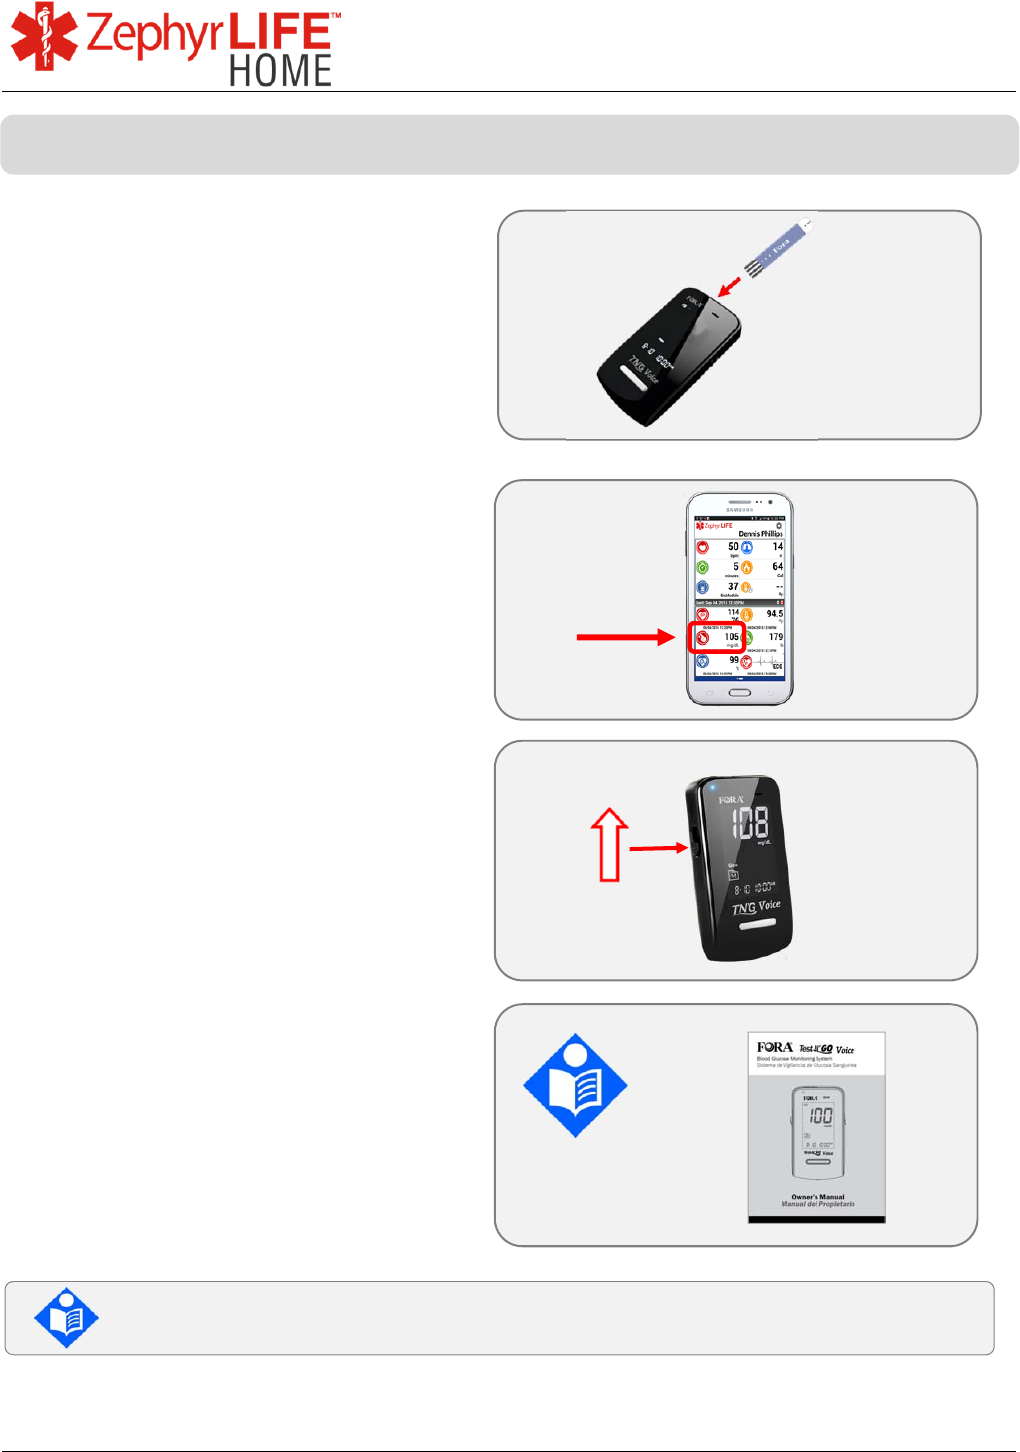
Insert test strip carefully and wait until
the glucometer prompts for the blood
drop.
Take a blood sample using the lancing
device as instructed.
Place the blood drop on the strip.
The glucometer will count down while
testing and display the result.
The result will display on the
HealthHub automatically, with the
time it was taken.
Use the side button to eject the
Glucose strip.
As the lancet and test strip may be
biohazards, please discard carefully
according to your local regulations.
Detailed instructions for obtaining a
blood sample, using the glucometer,
troubleshooting and taking test
measurements are included in the
glucometer user manual.
Check the Blood Glucose monitor user manual for warnings and
cautions on its use
Measure Blood Glucose (Foracare TN’G Voice)
18
9700.0205.v7b ©2016 Zephyr Technology, All Rights Reserved 24-NOV-2016
Patient Guide
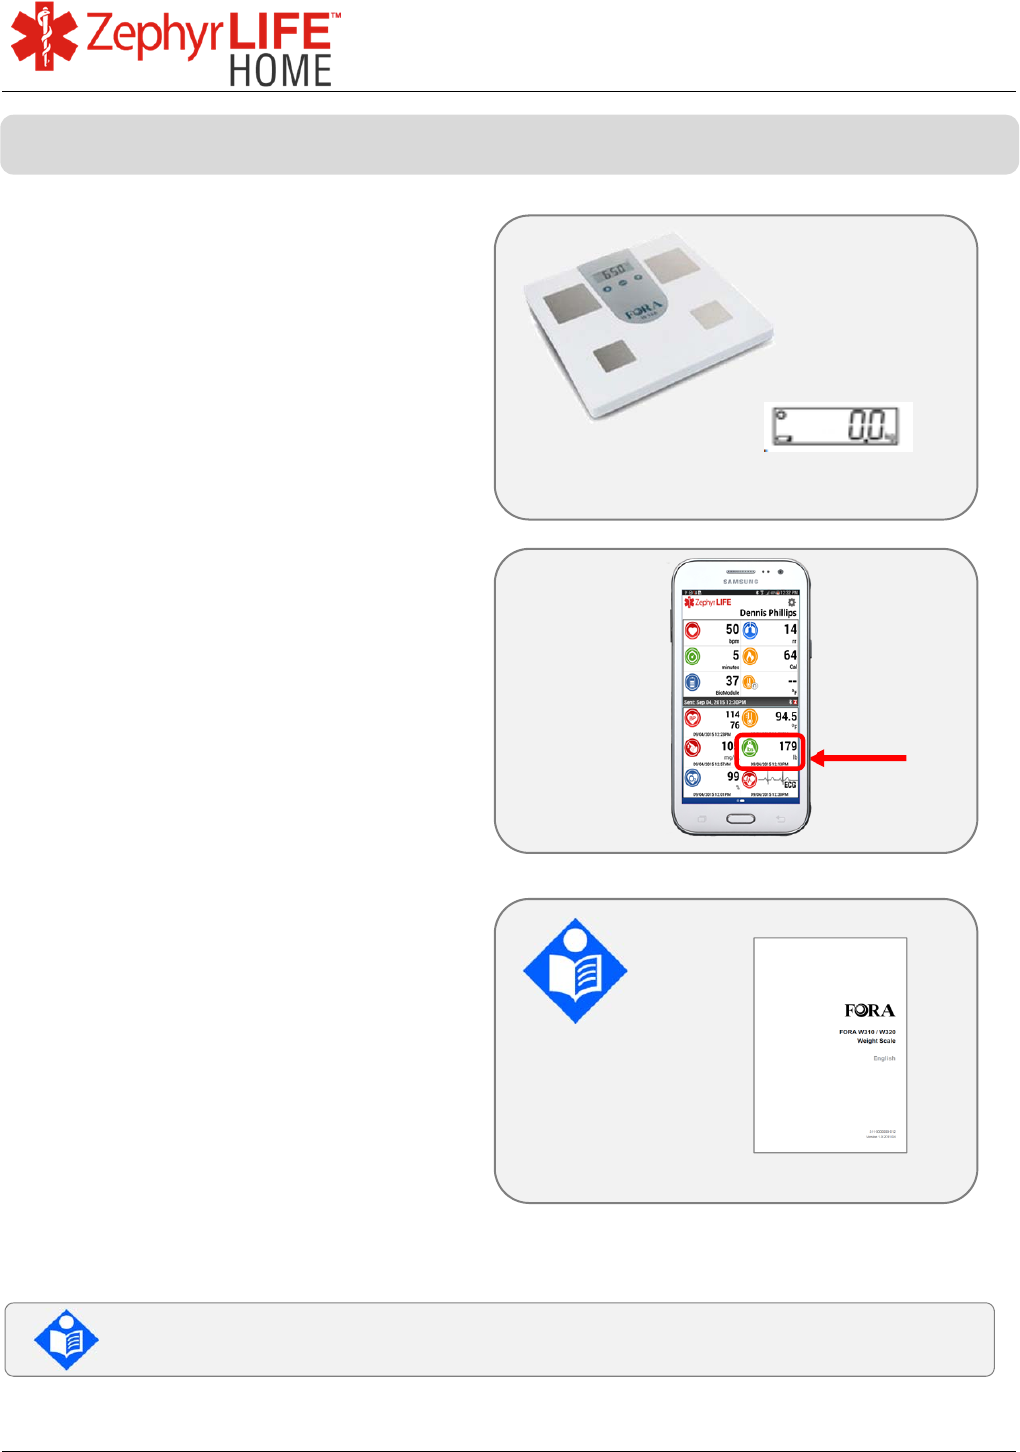
Turn on the scale by using the center
button or by tapping the weigh
platform – wait for the number ‘0.0’ to
be displayed.
Step on the scale and wait for weight
to be displayed and stop flashing.
The weight will display on the
HealthHub automatically, with the time
it was taken.
Detailed instructions for setting up the
scale and troubleshooting are
included in the weigh scale user
manual.
Check the Weigh Scale user manual for warnings and cautions on its
use
Measure Weight (Foracare W310 Scale)
19
9700.0205.v7b ©2016 Zephyr Technology, All Rights Reserved 24-NOV-2016
Patient Guide
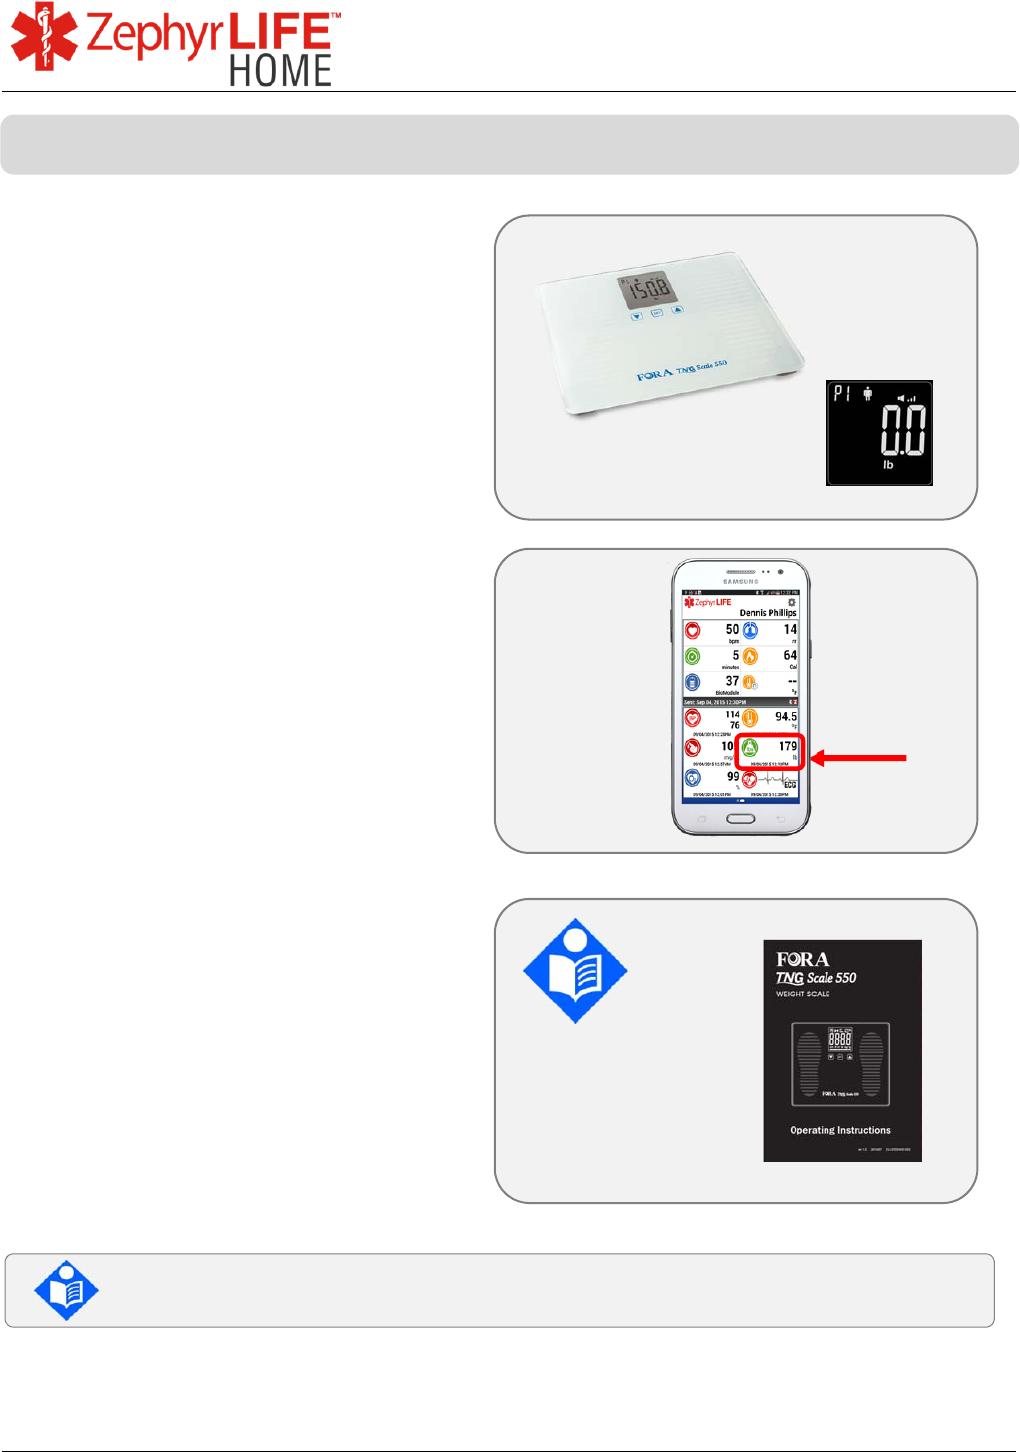
Turn on the scale by using the center
button or by tapping the weigh
platform – wait for the number ‘0.0’ to
be displayed.
Step on the scale and wait for weight
to be displayed and stop flashing.
The weight will display on the
HealthHub automatically, with the time
it was taken.
Detailed instructions for setting up the
scale and troubleshooting are
included in the weigh scale user
manual.
Check the Weigh Scale user manual for warnings and cautions on its
use
Measure Weight (Foracare TN’G 550 Scale)
20
9700.0205.v7b ©2016 Zephyr Technology, All Rights Reserved 24-NOV-2016
Patient Guide
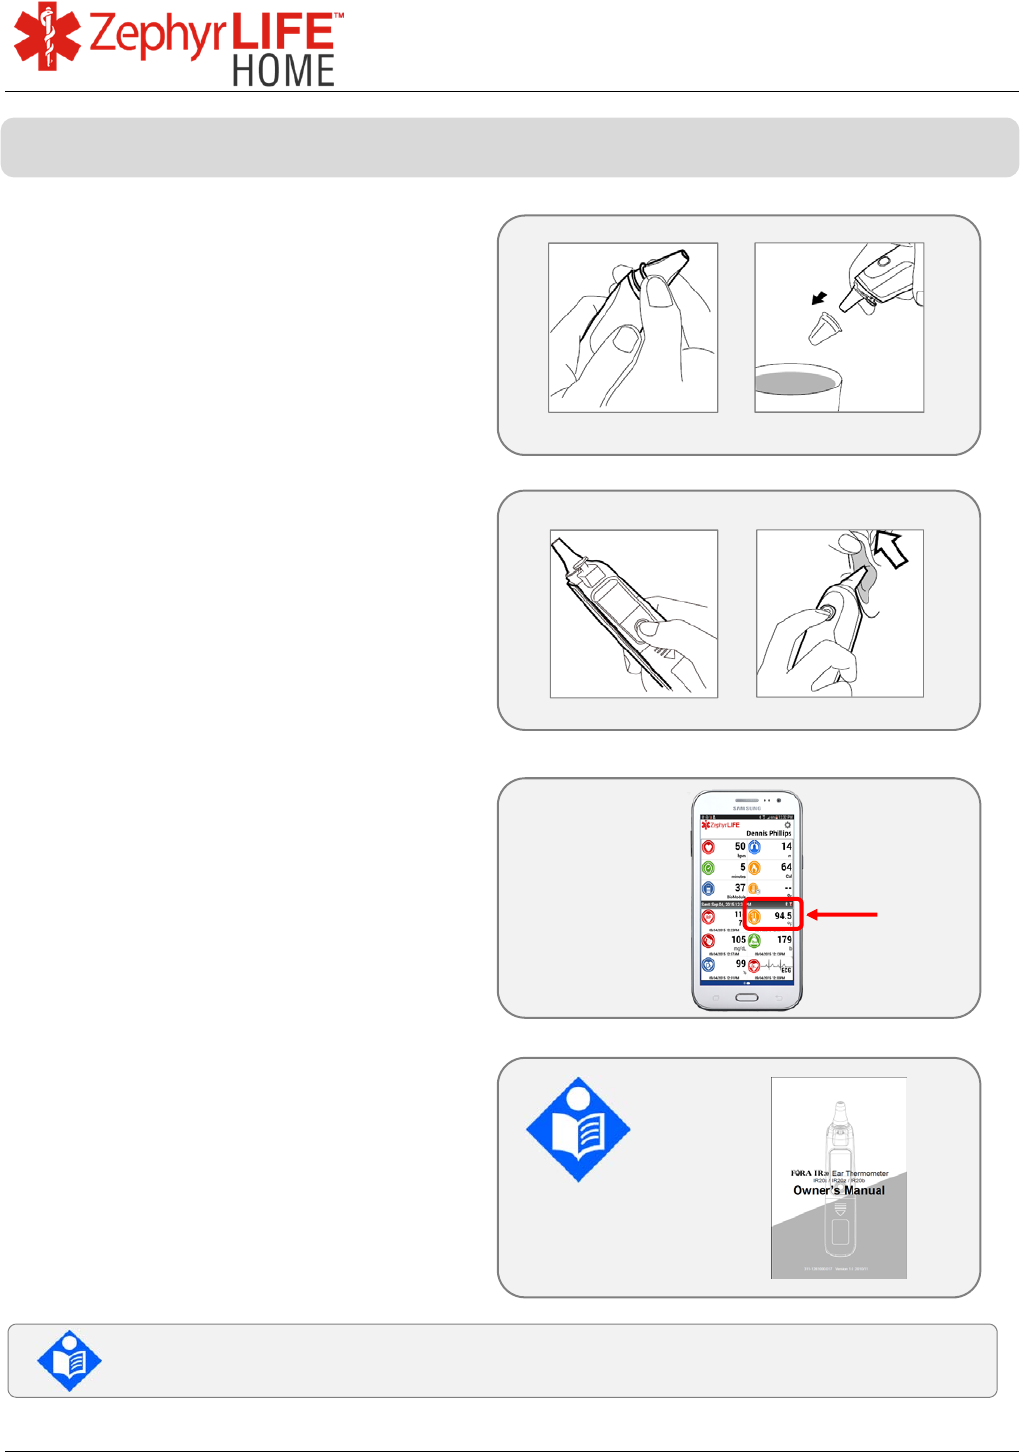
Fit a new cover on the ear probe. Use
only covers supplied by the
manufacturer.
[After taking a reading, dispose of the
cover using the eject button].
Turn on the thermometer using the
front button below the display screen.
A beep will sound.
Insert probe gently into ear canal and
press the rear button. Hold until
another beep indicates temperature
taken.
The result will display on the
HeathHub automatically along with the
time it was taken
Detailed instructions for obtaining
temperature, using the thermometer,
troubleshooting and taking test
measurements are included in the
thermometer user manual.
Check the Thermometer user manual for warnings and cautions on its
use
Measure Temperature
21
9700.0205.v7b ©2016 Zephyr Technology, All Rights Reserved 24-NOV-2016
Patient Guide
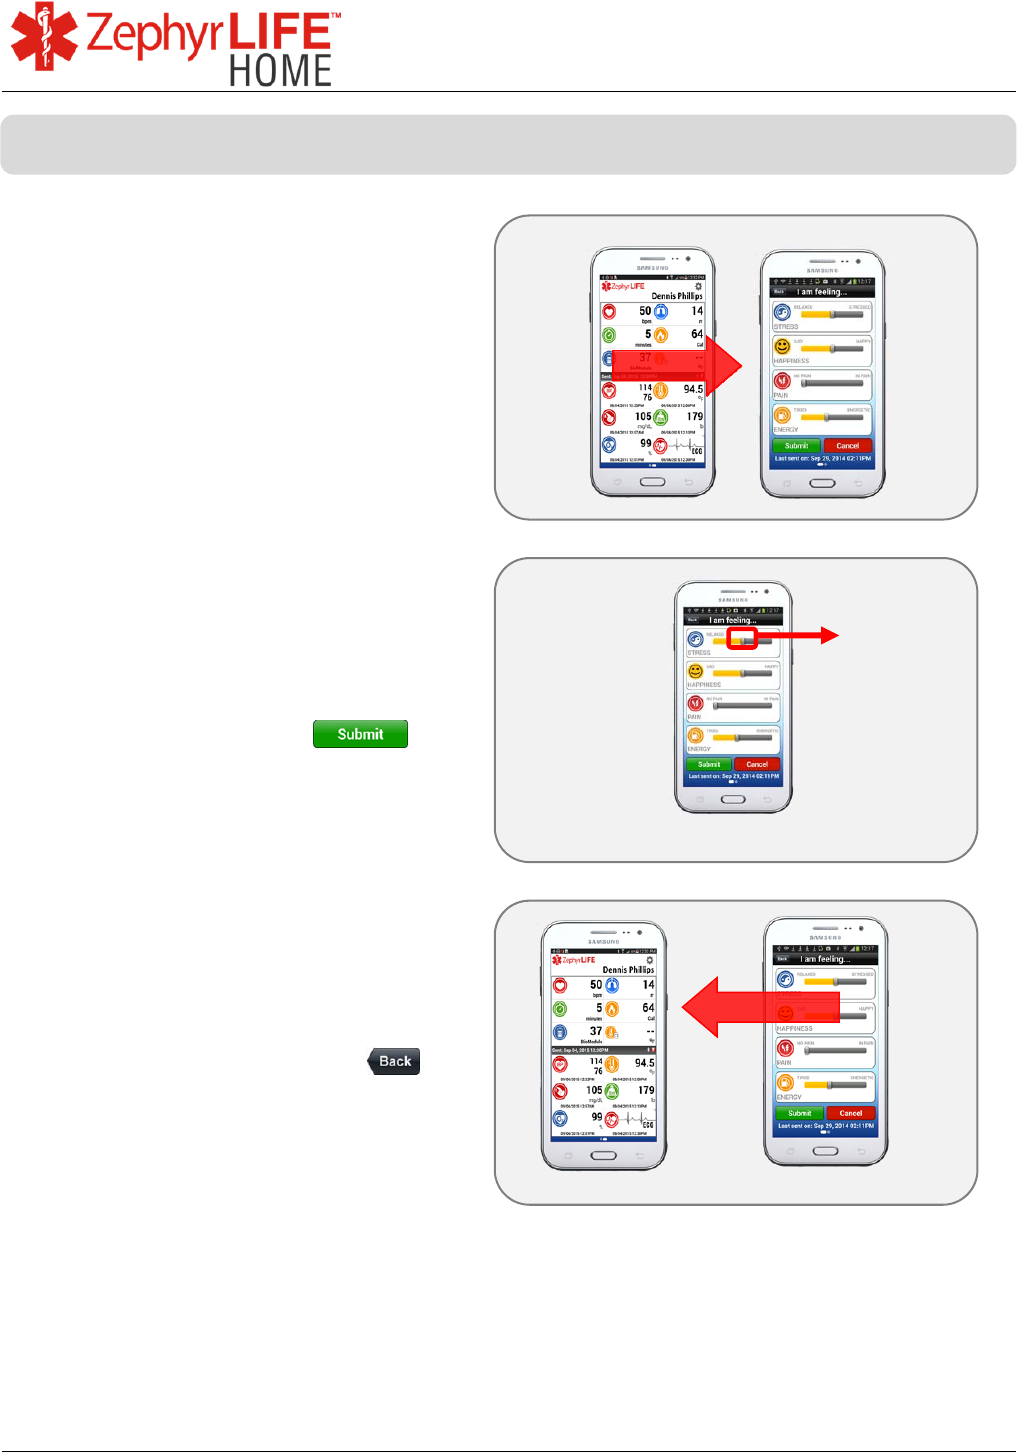
Swipe the ZephyrLIFE dashboard
from left to right to access the
Feelings screen.
Use the sliders to give an indication of
your feelings.
This is a subjective view for yourself
only.
Use the Submit button
to send information to the ZephyrLIFE
portal.
Swipe the Feelings screen in the
opposite direction to return to the
dashboard, or use the back
button.
A
ctual screen appearance may vary.
Record Feelings

22
9700.0205.v7b ©2016 Zephyr Technology, All Rights Reserved 24-NOV-2016
Patient Guide
Zephyr BioModule Intended Use

23
9700.0205.v7b ©2016 Zephyr Technology, All Rights Reserved 24-NOV-2016
Patient Guide
Zephyr BioModule Warnings & Cautions

24
9700.0205.v7b ©2016 Zephyr Technology, All Rights Reserved 24-NOV-2016
Patient Guide
25
9700.0205.v7b ©2016 Zephyr Technology, All Rights Reserved 24-NOV-2016
Patient Guide
A quality ECG signal requires that fresh electrode patches and
evaluation of skin integrity should occur every 24 hours, or per
Care Area guidelines.
BioModule holder should be disposed of as per care area
policy and product instructions.

26
9700.0205.v7b ©2016 Zephyr Technology, All Rights Reserved 24-NOV-2016
Patient Guide
Not for use with patients fitted with an implanted cardiac device
such as an internal pacemaker or automatic defibrillator.
Zephyr BioModule Contraindications
27
9700.0205.v7b ©2016 Zephyr Technology, All Rights Reserved 24-NOV-2016
Patient Guide
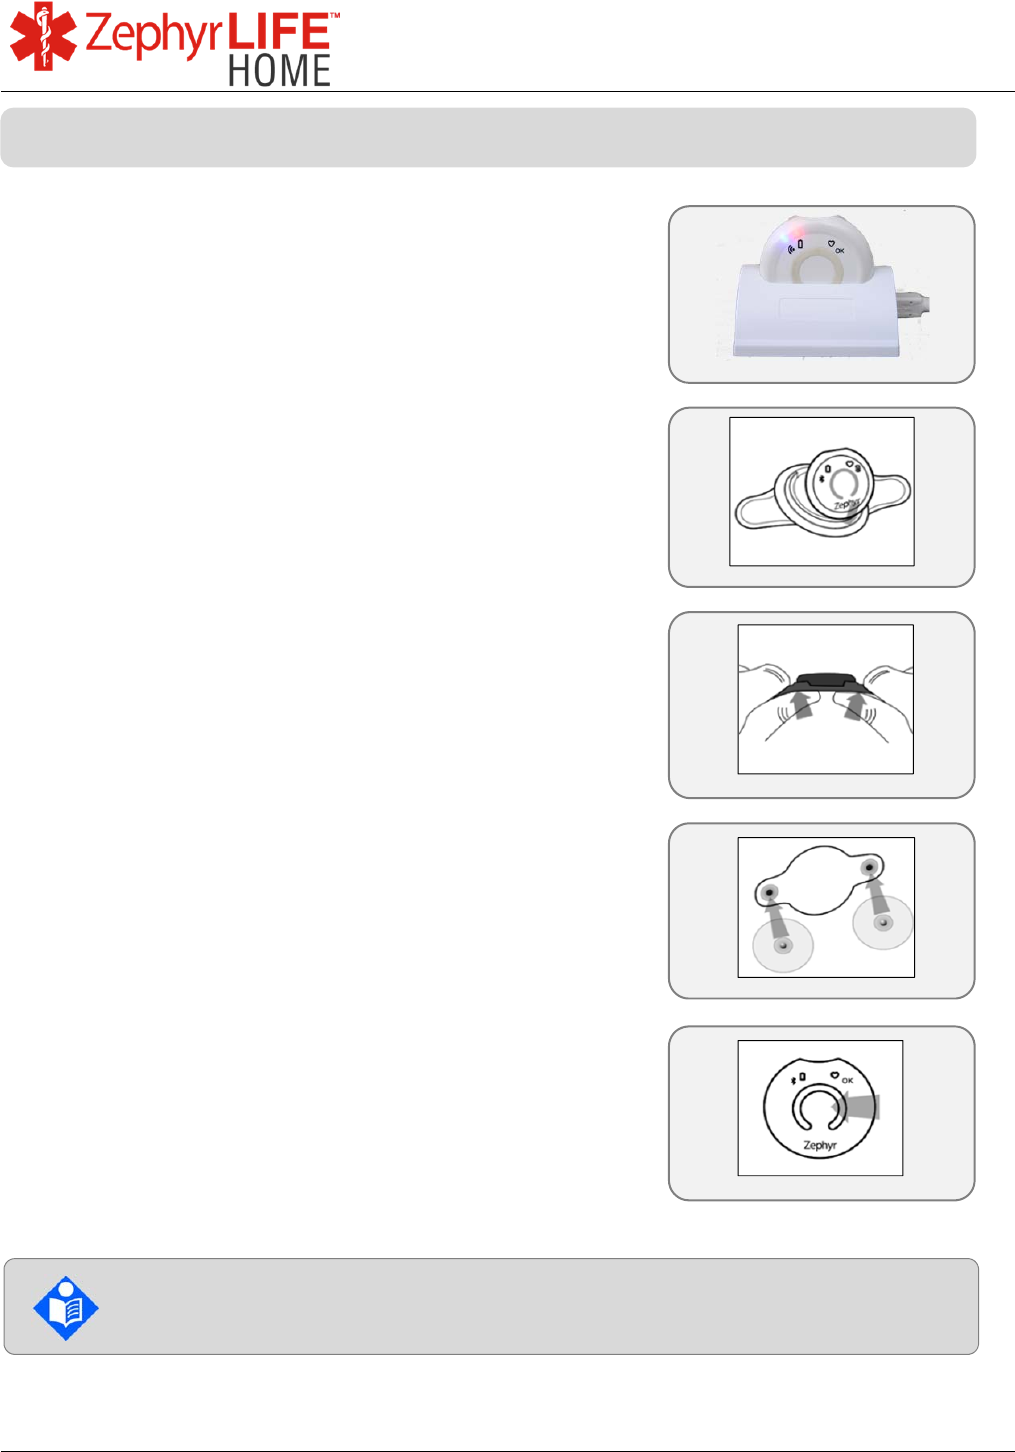
a) Obtain your clean and charged BioModule from the
charging cradle
b) Clean BioModule using instructions found in this
guide
c) Snap the BioModule into the BioModule holder
(larger notch in the upper rim). BioModule ‘Zephyr’
logo at the bottom of the holder.
d) To remove, press the BioModule holder from the
rear as shown.
e) Verify that the electrode expiration date has not
passed and the gel is moist. Keep the electrode
package in a zip top bag after opening to keep
electrodes moist.
f) Snap two (2) electrodes to the holder. It is ready to
apply.
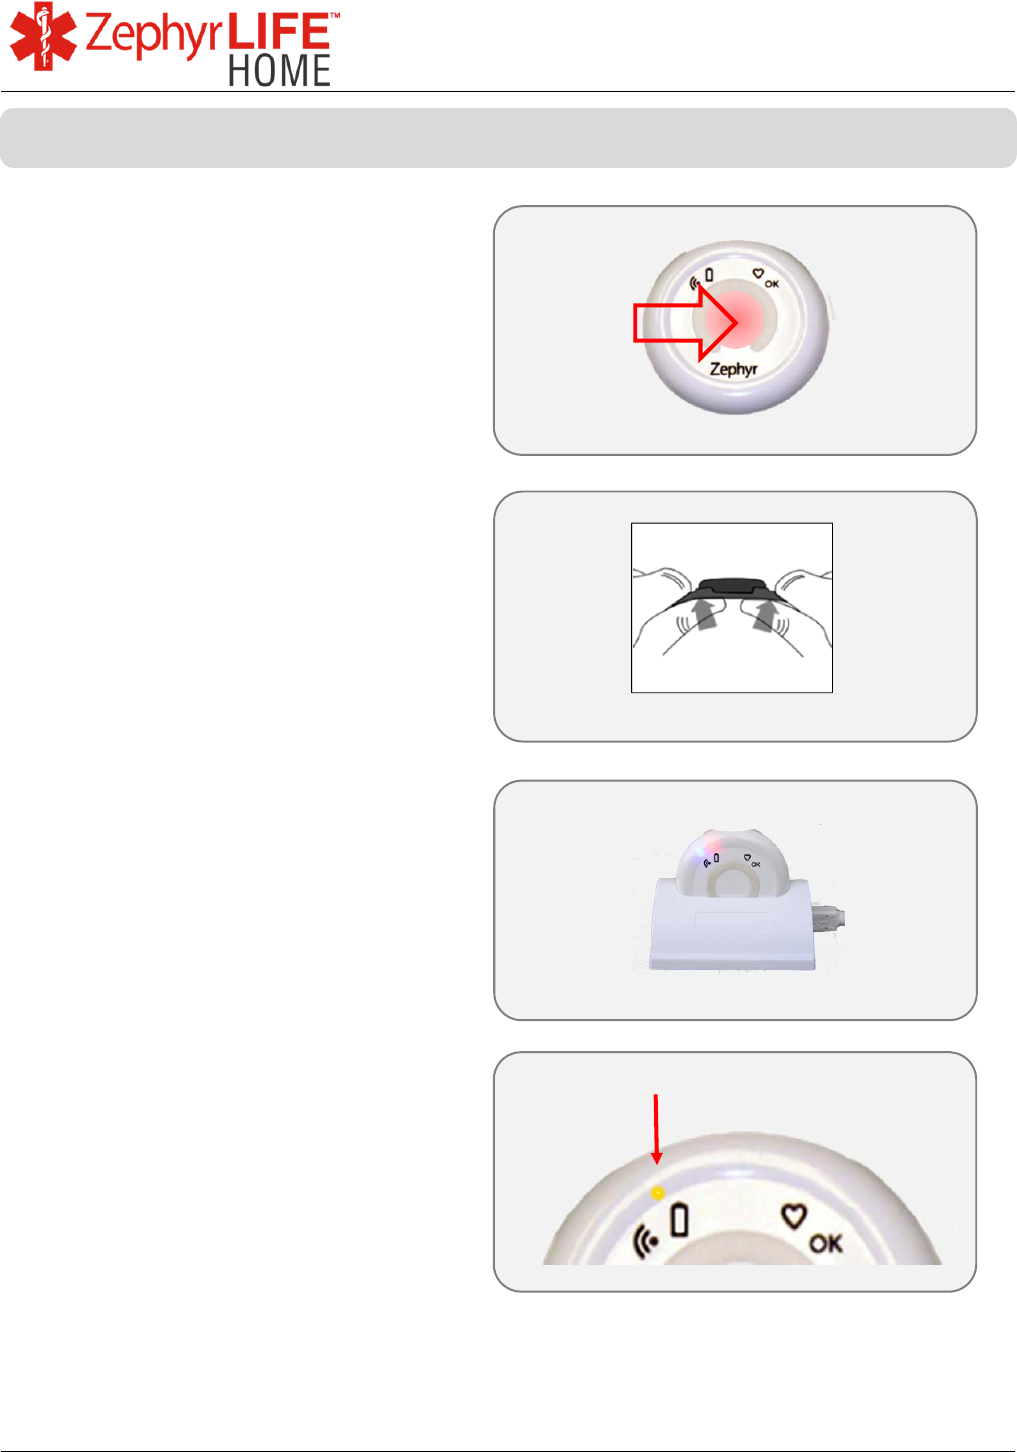
g) Press and hold the device center firmly to turn it on.
The red light will light up and the blue light will flash.
Recommended electrodes:
Covidien Kendall™ 530 Foam
Prepare BioModule for Use
28
9700.0205.v7b ©2016 Zephyr Technology, All Rights Reserved 24-NOV-2016
Patient Guide
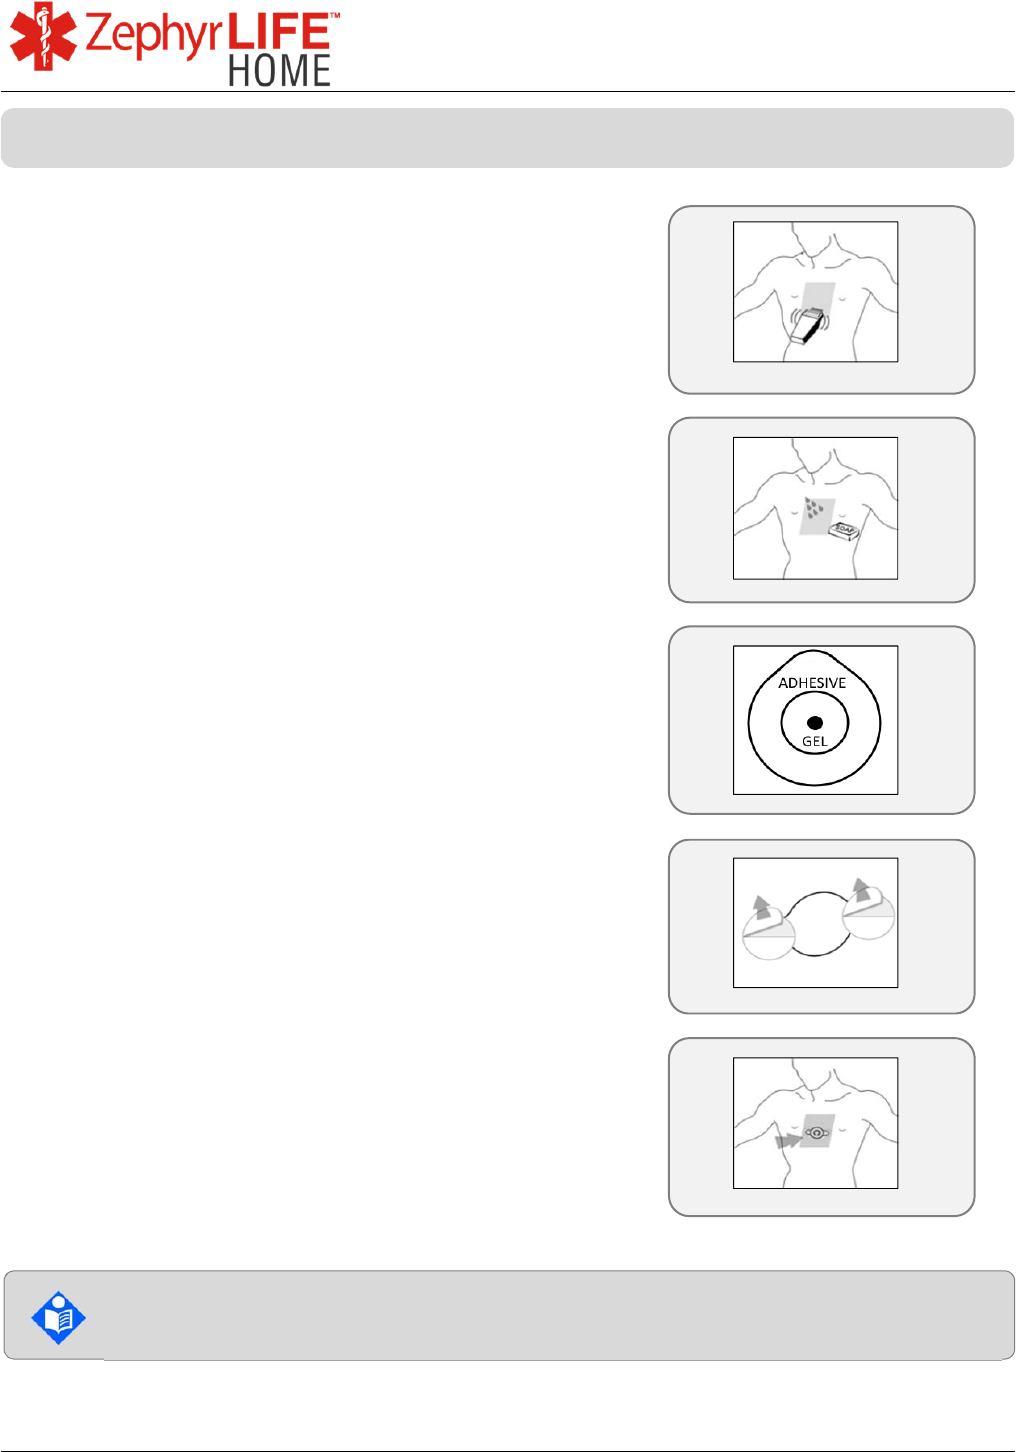
a) Select the area to prepare as indicated in the figure.
b) Clip hair to make sure electrodes adhere to the
skin.
c) Wash skin with soap and water to remove dirt,
lotions and dry skin cells. Rinse well.
d) Dry the area with a cloth to remove any hair or
soap.
e) Peel the backing from the electrodes.
f) Apply firmly in line with the breast bone as shown,
between the sternal notch and the xiphoid process.
g) The BioPatch may be removed at any time without
risk to the wearer. Replace electrodes daily or as
instructed.
Note: For best signal electrodes should be changed as directed by your prescribing
clinician. If the electrode causes skin irritation, please notify your care giver.
Skin Preparation
29
9700.0205.v7b ©2016 Zephyr Technology, All Rights Reserved 24-NOV-2016
Patient Guide
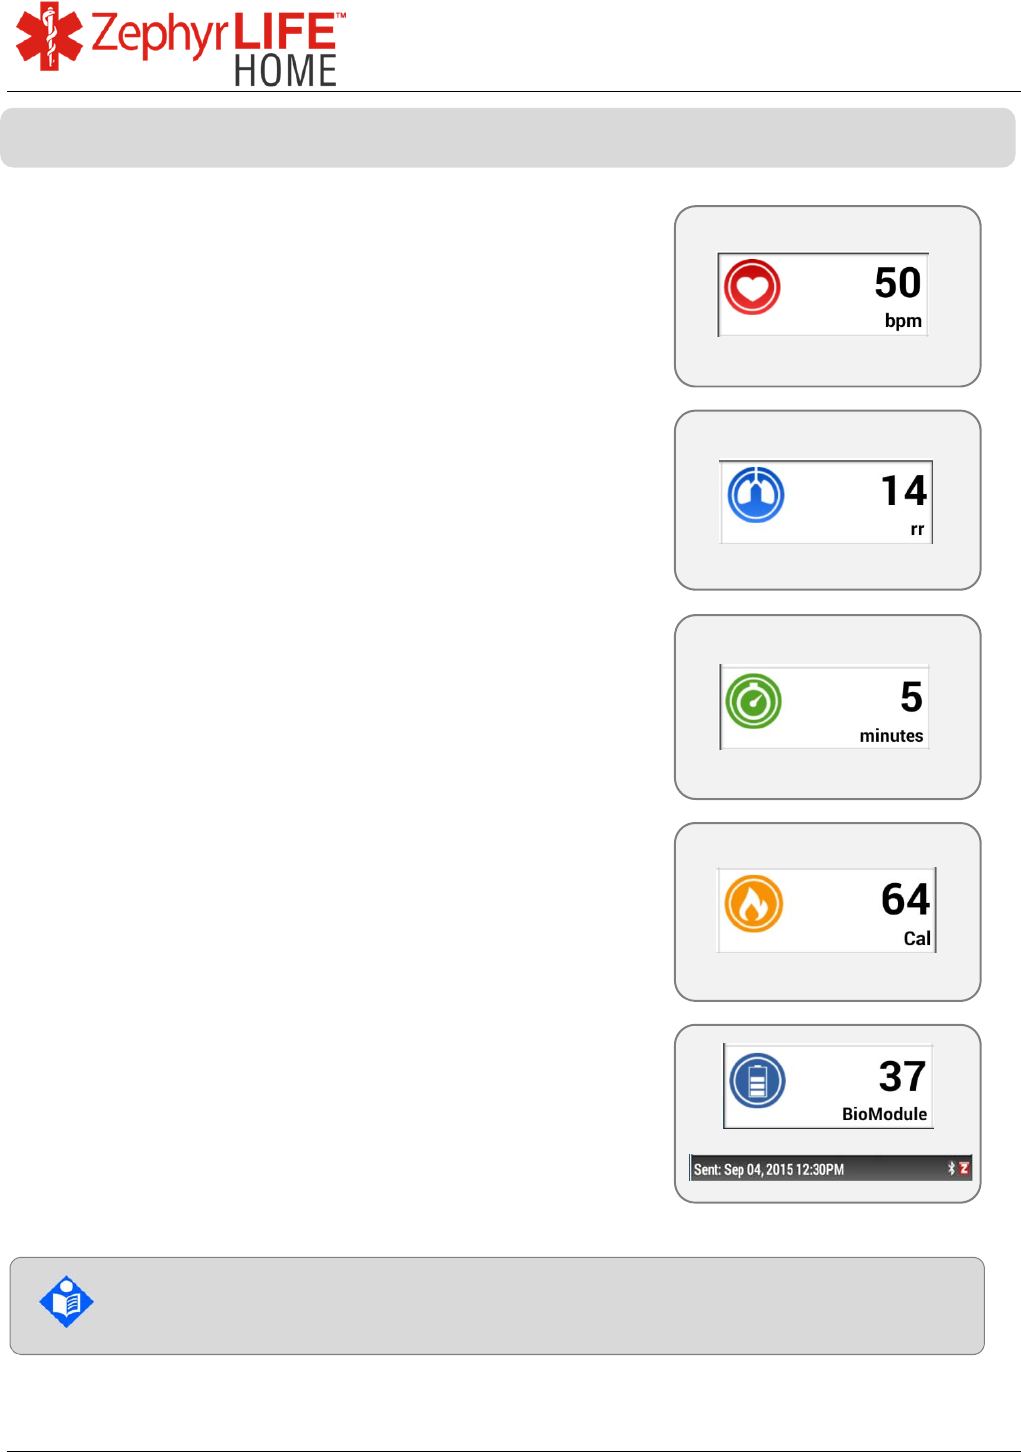
Heart Rate in beats per minute
Should appear after ~ 1 minute
Green flashing LED on BioModule
No heart rate is indicated by ‘- - ‘ on the display.
Breathing Rate in breaths per minute
No breath rate is reported during the first minute
If after the second minute no breath rate is reported,
alternative methods should be considered.
No breath rate is indicated by ‘- - ‘ on the display.
Minutes of activity while wearing BioModule
Walking effort or equivalent
Resets at midnight each day
Calories burned while wearing BioModule
Resets at midnight each day
BioModule battery – percentage full charge
remaining
Time Stamp – the date and time the last BioModule
information was uploaded to the portal – every 15
minutes
Once the BioModule is attached to the patient and flashing green, the
device is functioning properly. This may take up to a minute.
BioModule Data
30
9700.0205.v7b ©2016 Zephyr Technology, All Rights Reserved 24-NOV-2016
Patient Guide
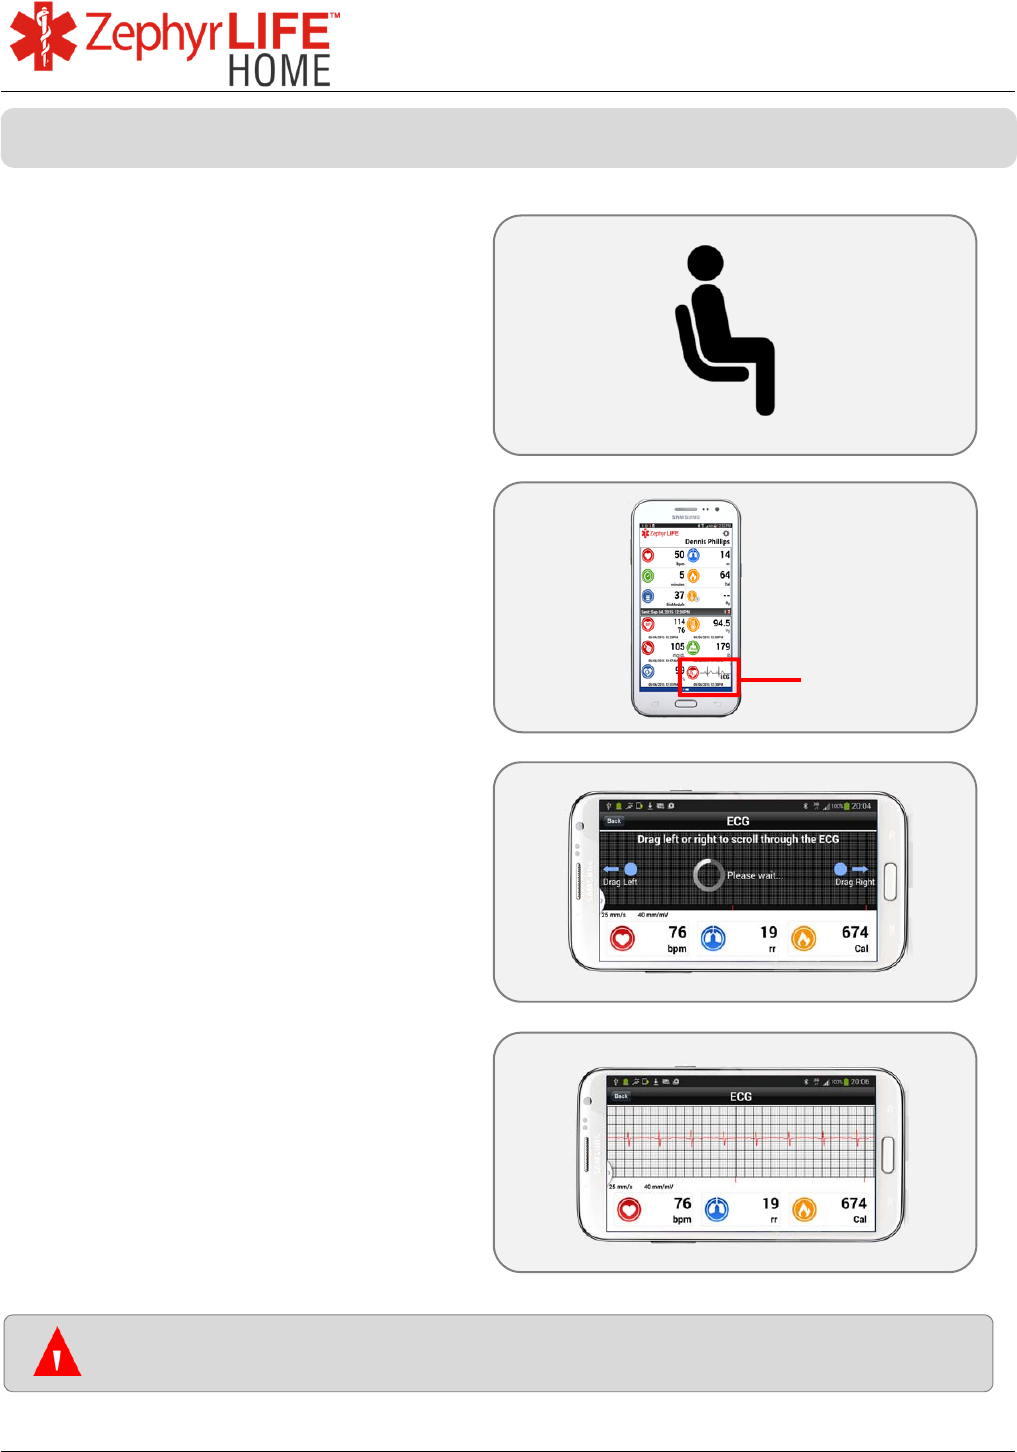
Sit down and remain still while taking
ECG.
Touch the ECG button to request a
new ECG strip.
The ECG screen will display.
Be careful not to touch the screen
again as it will stop the ECG from
being acquired.
If the BioModule has recently been
applied, a message may display
asking you to wait 1 minute.
ECG will be displayed, with time
measurement taken, and uploaded to
the web portal.
Touch the screen again to return to
the main screen (or the back button).
Touch the ECG
button on the
phone screen.
If you experience chest pain, or signs and symptoms of an acute
problem, call 911 or follow the instructions of your physician
Measure ECG
31
9700.0205.v7b ©2016 Zephyr Technology, All Rights Reserved 24-NOV-2016
Patient Guide
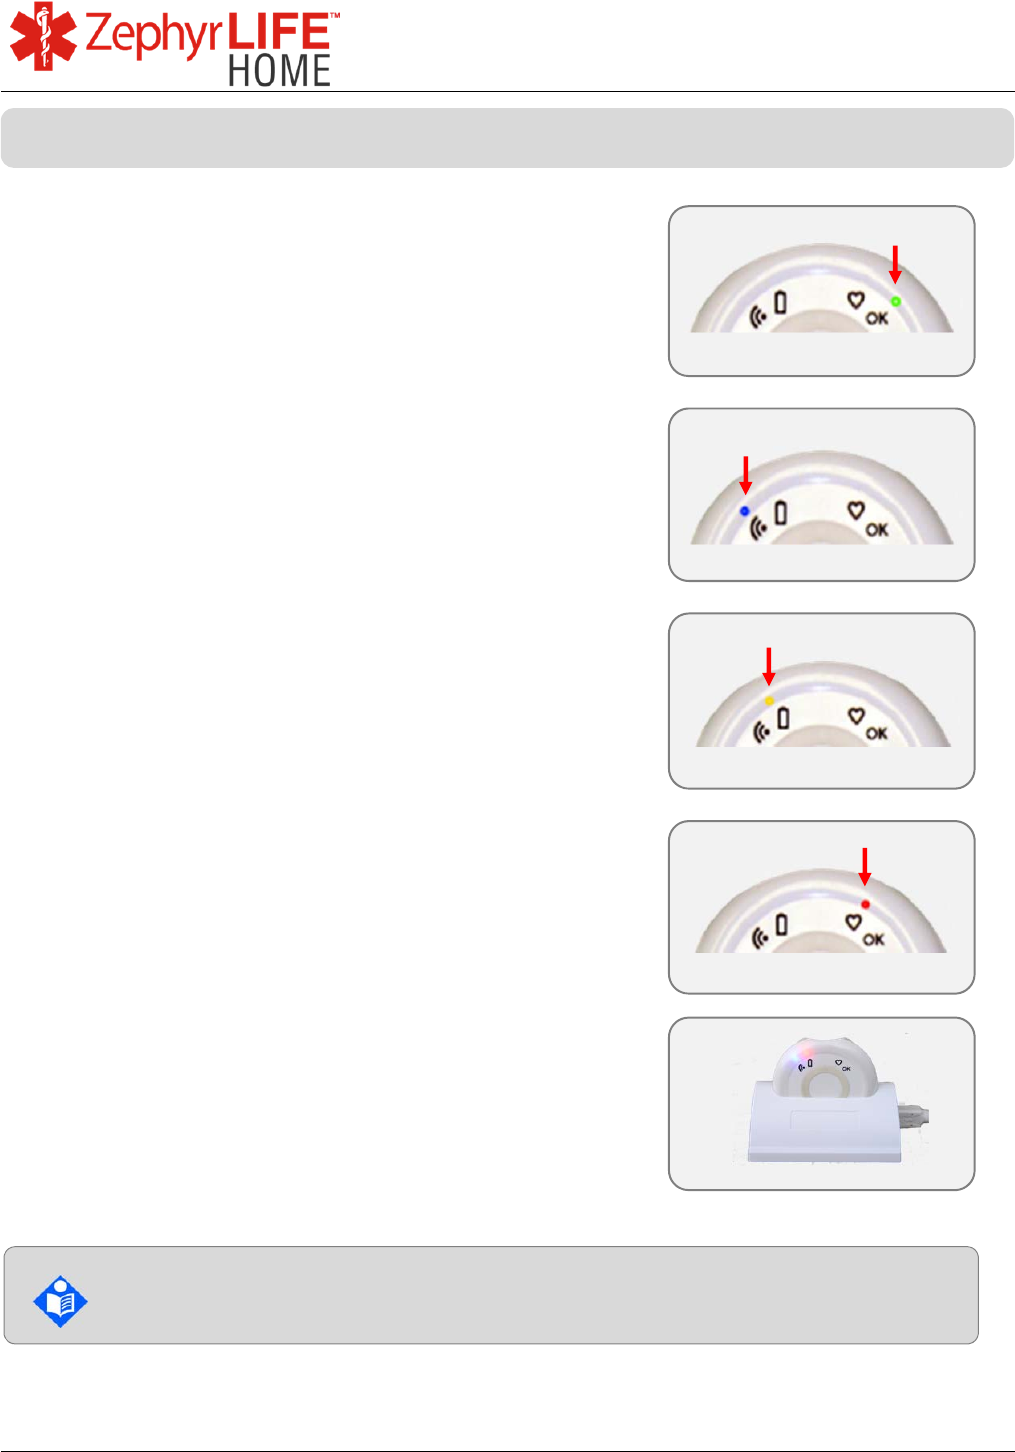
a) GREEN: flashing – working normally. Data is
transmitting.
b) BLUE: flashing – loss of Bluetooth signal. Move
closer to the HealthHub. Confirm HealthHub
application is running.
c) ORANGE: Flashing – low battery. Recharge in
cradle.
d) RED: constant – No heart rate detected. Check
electrode connection. Re-prep skin and apply fresh
electrodes if necessary.
In Charging Cradle:
a) Flashing Orange = Charging (1 hr to 90%)
b) Constant Orange = Charged (3 hrs to 100%)
Ready to use.
Once the BioModule is attached to the patient and flashing green, the
device is functioning properly. This may take up to a minute.
BioModule Light Indicators

32
9700.0205.v7b ©2016 Zephyr Technology, All Rights Reserved 24-NOV-2016
Patient Guide
The Nonin Onyx II Finger Pulse Oximeter is a small, lightweight,
wireless device indicated for use in measuring and displaying
functional oxygen saturation of arterial haemoglobin (%SpO2) and
pulse rate of patients who are well or poorly perfused.
It is intended for spot-checking of adult and pediatric patients on
fingers (other than the thumb) between 0.3 – 1.0 inch (0.8 – 2.5 cm)
thick.
The device’s intended use environments include hospitals, clinics,
long-term care facilities, skilled nursing facilities, emergency medical
services and home healthcare services
Federal Law restricts this device to sale by or on the order
of a licensed practitioner.
Onyx® II Model 9560 Finger Pulse Oximeter Indications for Use

33
9700.0205.v7b ©2016 Zephyr Technology, All Rights Reserved 24-NOV-2016
Patient Guide
Do not use the device in an MR environment, in an explosive
atmosphere, or on infant or neonatal patients.
This device is not defibrillation proof per IEC 60601-1
Onyx® II Model 9560 Finger Pulse Oximeter Contraindications
34
9700.0205.v7b ©2016 Zephyr Technology, All Rights Reserved 24-NOV-2016
Patient Guide
Further information can be found in the Onyx II® User Manual
Onyx® II Model 9560 Finger Pulse Oximeter Warnings
35
9700.0205.v7b ©2016 Zephyr Technology, All Rights Reserved 24-NOV-2016
Patient Guide
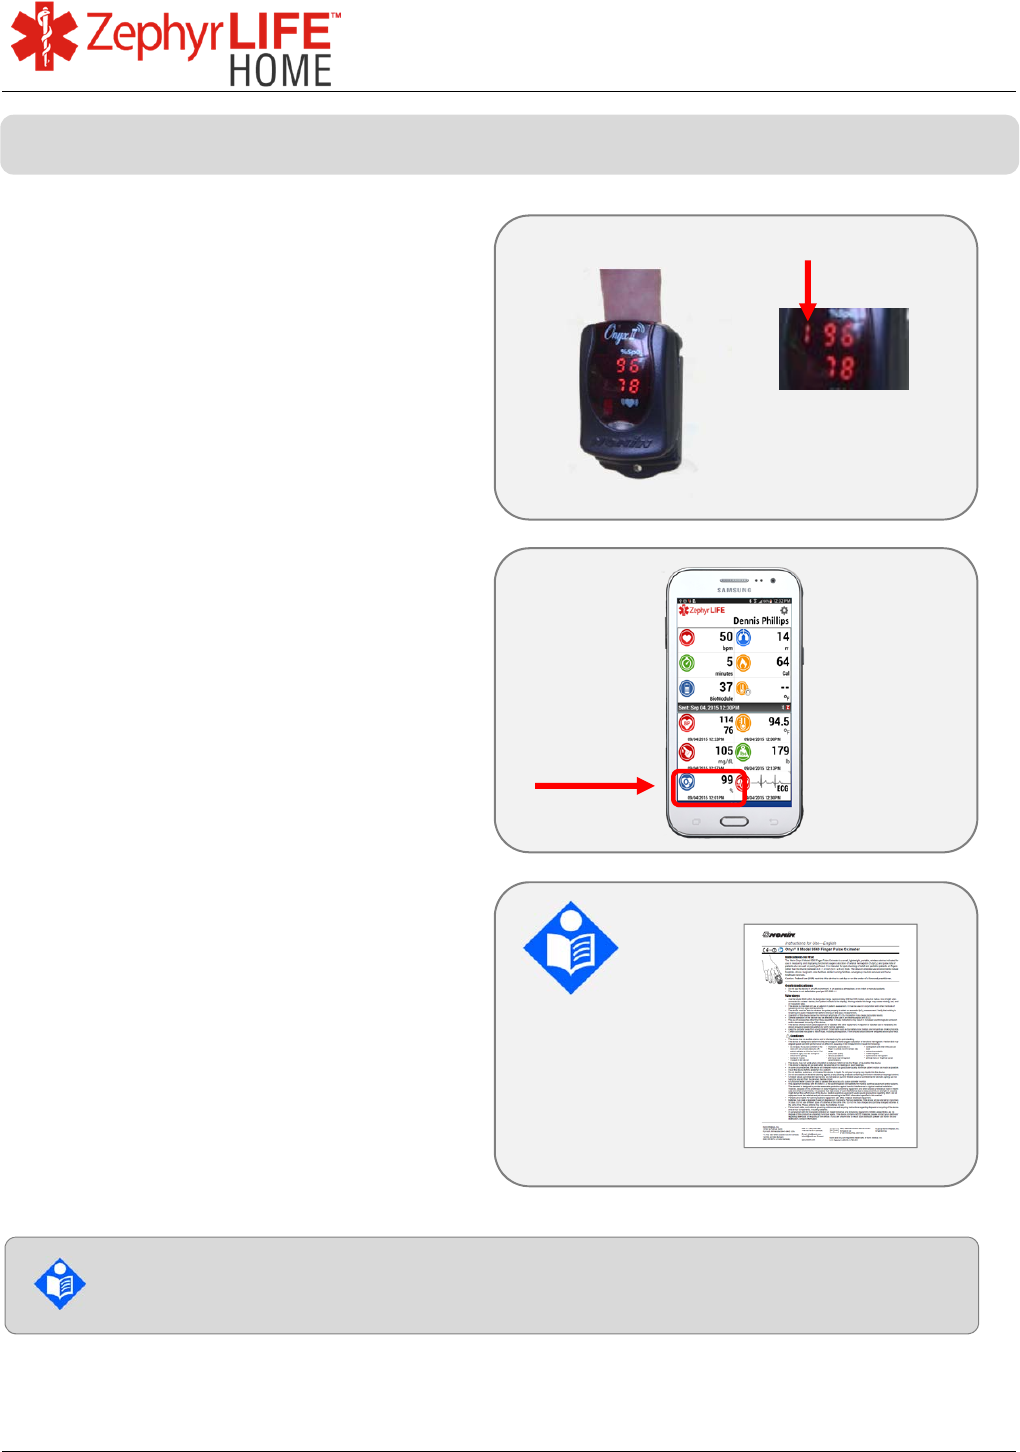
Insert index finger in sensor.
Wait until the red lines on the top row
stop flashing.
Do not wear dark nail varnish when
using the oximeter as this will affect its
ability to take a reading.
The reading will display on the
HealthHub automatically, with the time
it was taken.
Detailed instructions for taking blood
oxygen measurements and
troubleshooting are included in the
pulse oximeter user manual.
Please check the Pulse Oximeter user manual for warnings and
cautions on its use
Measure Blood Oxygen
36
9700.0205.v7b ©2016 Zephyr Technology, All Rights Reserved 24-NOV-2016
Patient Guide
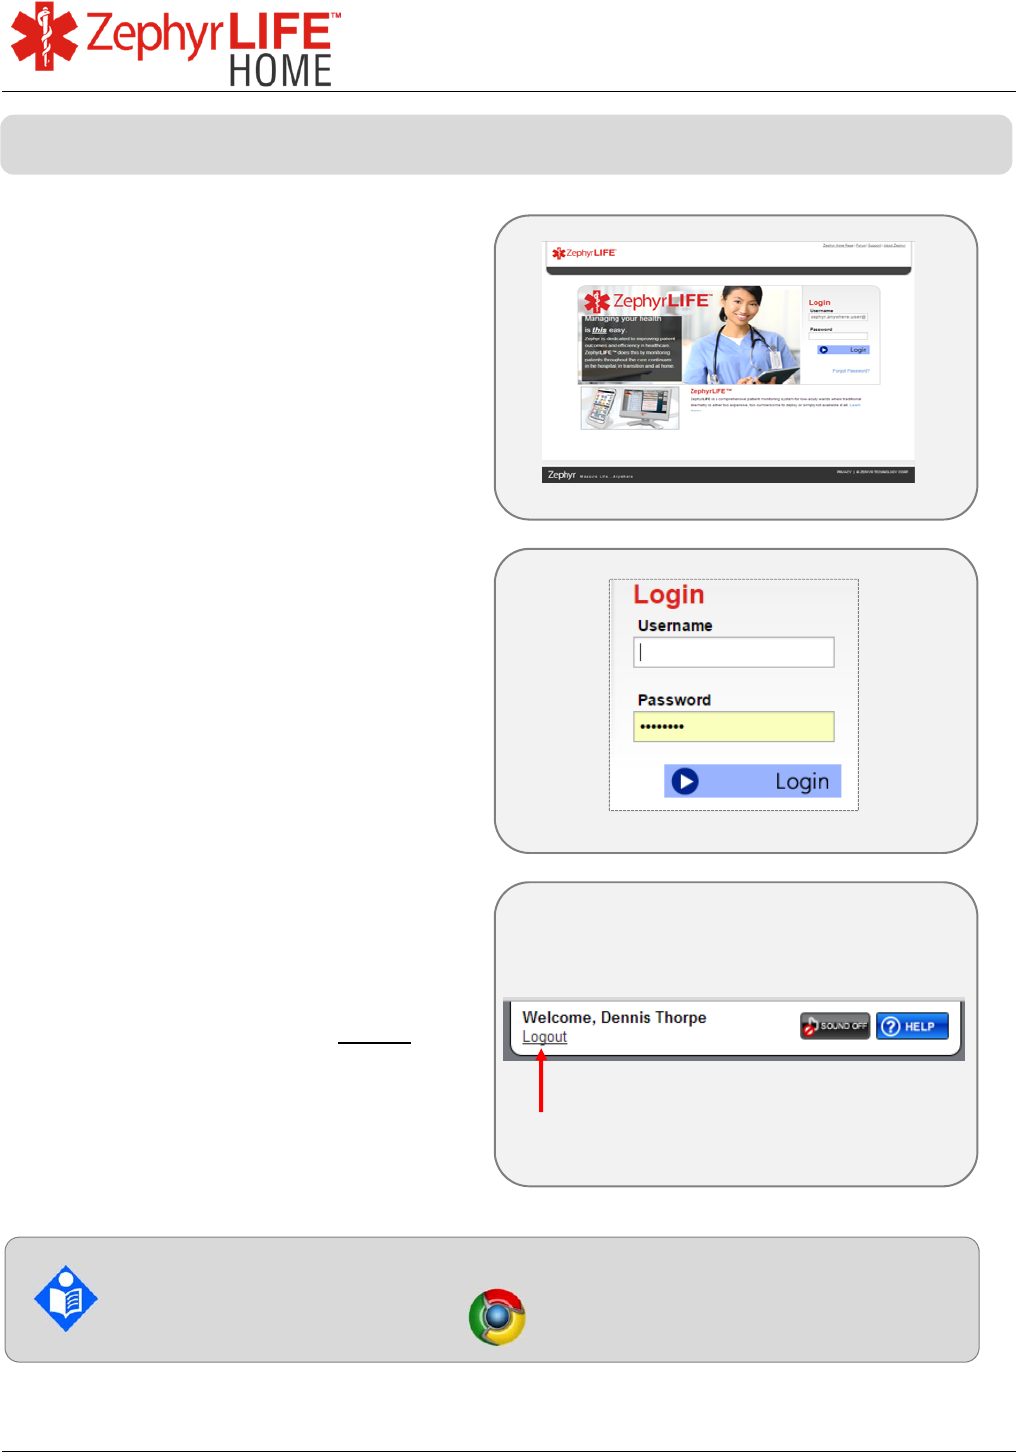
Go to the web address supplied by
your administrator
Use the login form on the right
You will need to use the Username
and Password provided to you
When you have finished accessing the
portal, log out by clicking Logout at
the top of the screen
Supported web browser is Chrome
Accessing the Portal
37
9700.0205.v7b ©2016 Zephyr Technology, All Rights Reserved 24-NOV-2016
Patient Guide
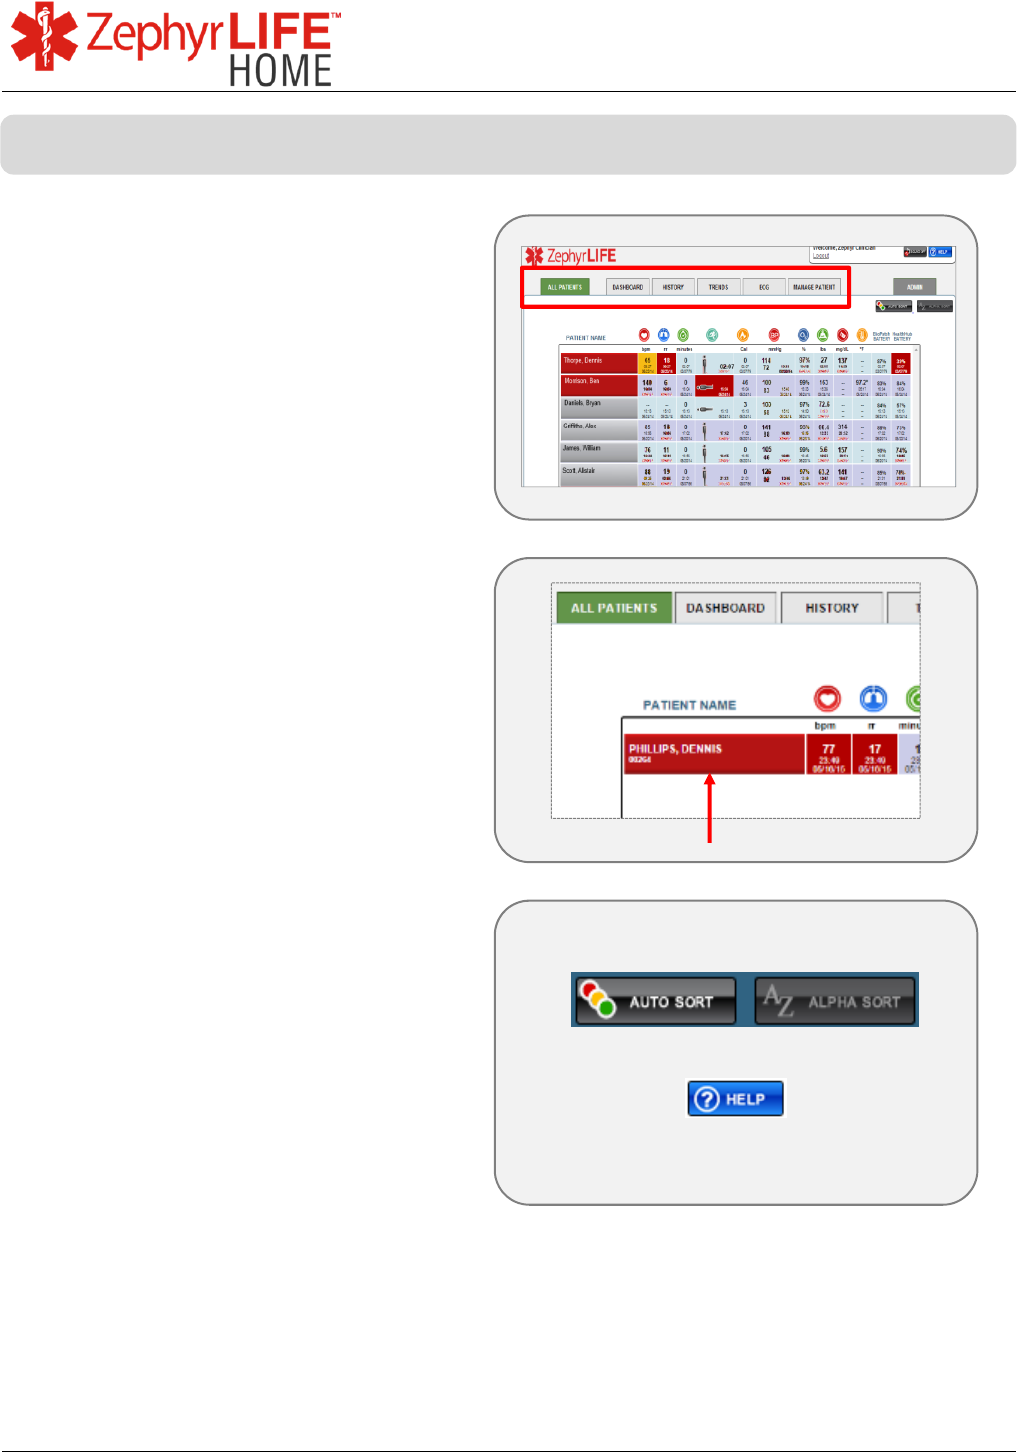
Use the tabs at the top of each
screen.
In the All Patients tab select the
patient name to open the specific
patient Dashboard tab.
Auto Sort – (default) – highest (red,
yellow) alert patients at the top.
Alpha Sort – alphabetical order by
last name.
Help – provides access to the Quick
Reference
Navigating the Portal Screens
38
9700.0205.v7b ©2016 Zephyr Technology, All Rights Reserved 24-NOV-2016
Patient Guide
Update Time Data Description/Units
Once per minute for initial
15 min
after power-on, then every
15 min
OR
Last alert generated
[Last Update value]
Heart Rate Beats/minute
Respiration Rate Breaths/minute
Activity Minutes Minutes of activity since midnight –
resets at zero every midnight
Posture Icon: Walk, upright, lying down
Calories Calories expended during the
selected time period
Blood Pressure Systolic/Diastolic in mmHg
Last measurement
[Values are individually
timestamped]
SpO
2
Peripheral blood oxygen saturation
(%)
Weight lbs
Blood Glucose mg/dL
Temperature Degrees Fahrenheit
All Patients Tab Parameters
39
9700.0205.v7b ©2016 Zephyr Technology, All Rights Reserved 24-NOV-2016
Patient Guide
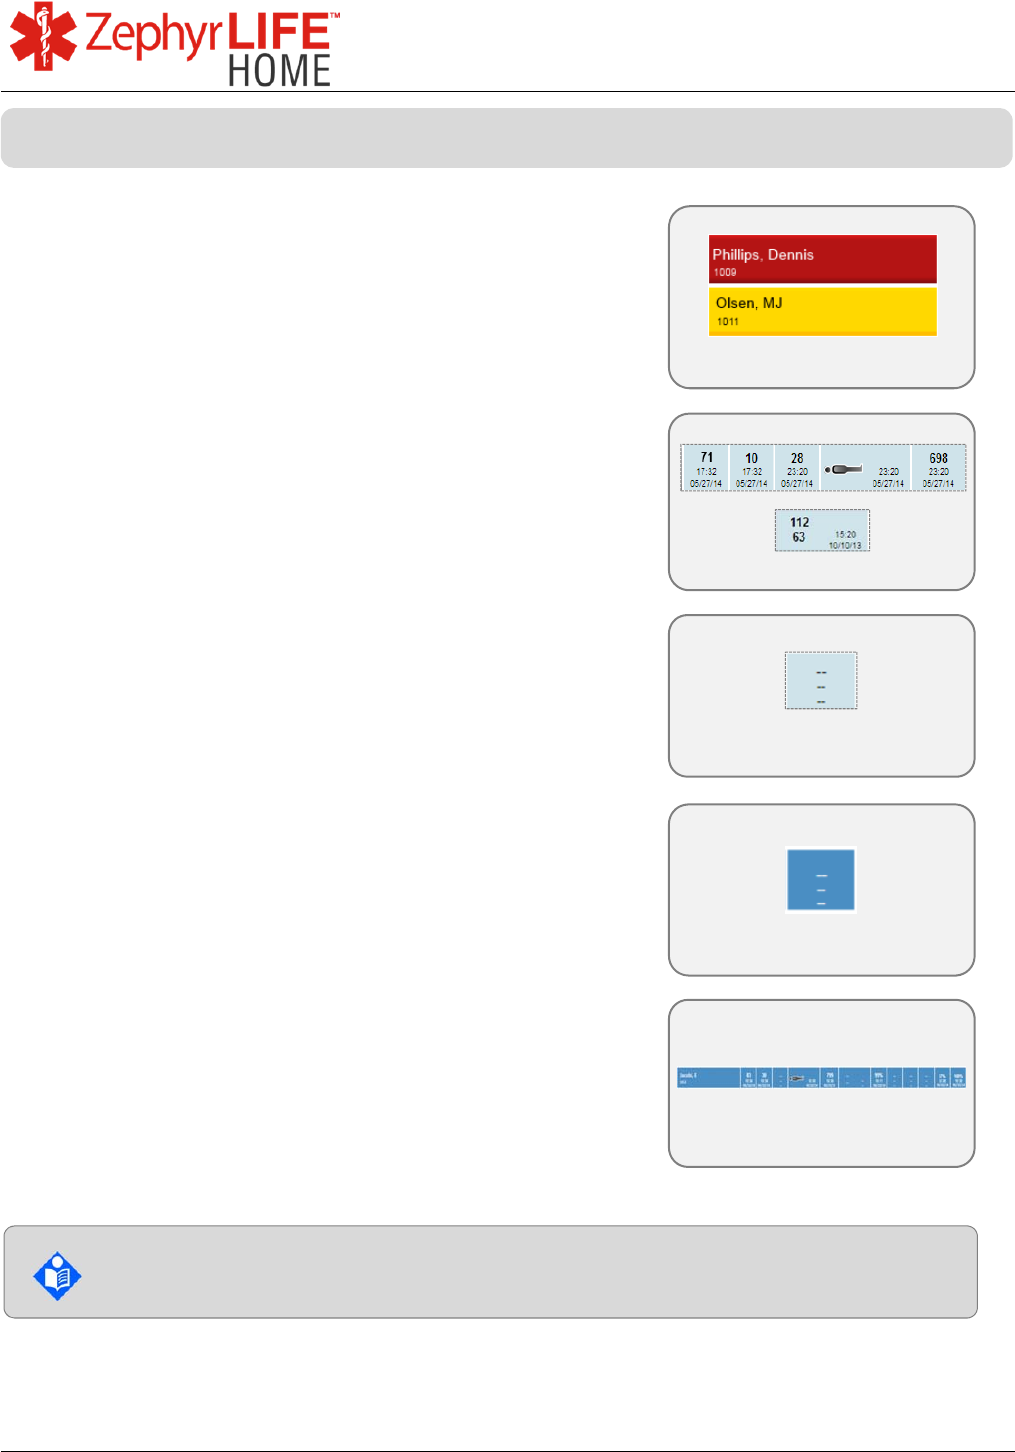
Active Alerted subject/invitees are show at the top of
the list.
BioModule Data updated every 15 minutes.
External sensor readings show time and date of last
measurement.
‘- -‘ displays if no valid measurement taken using an
external sensor.
Blue cell – a measurement has been missed inside a
period set in the portal.
Blue row – no data for 1/3/7 days, set in the portal.
You will only see this screen unless invited to the Care Circle of another patient.
Data Updates – Reading the All Patients Tab
40
9700.0205.v7b ©2016 Zephyr Technology, All Rights Reserved 24-NOV-2016
Patient Guide
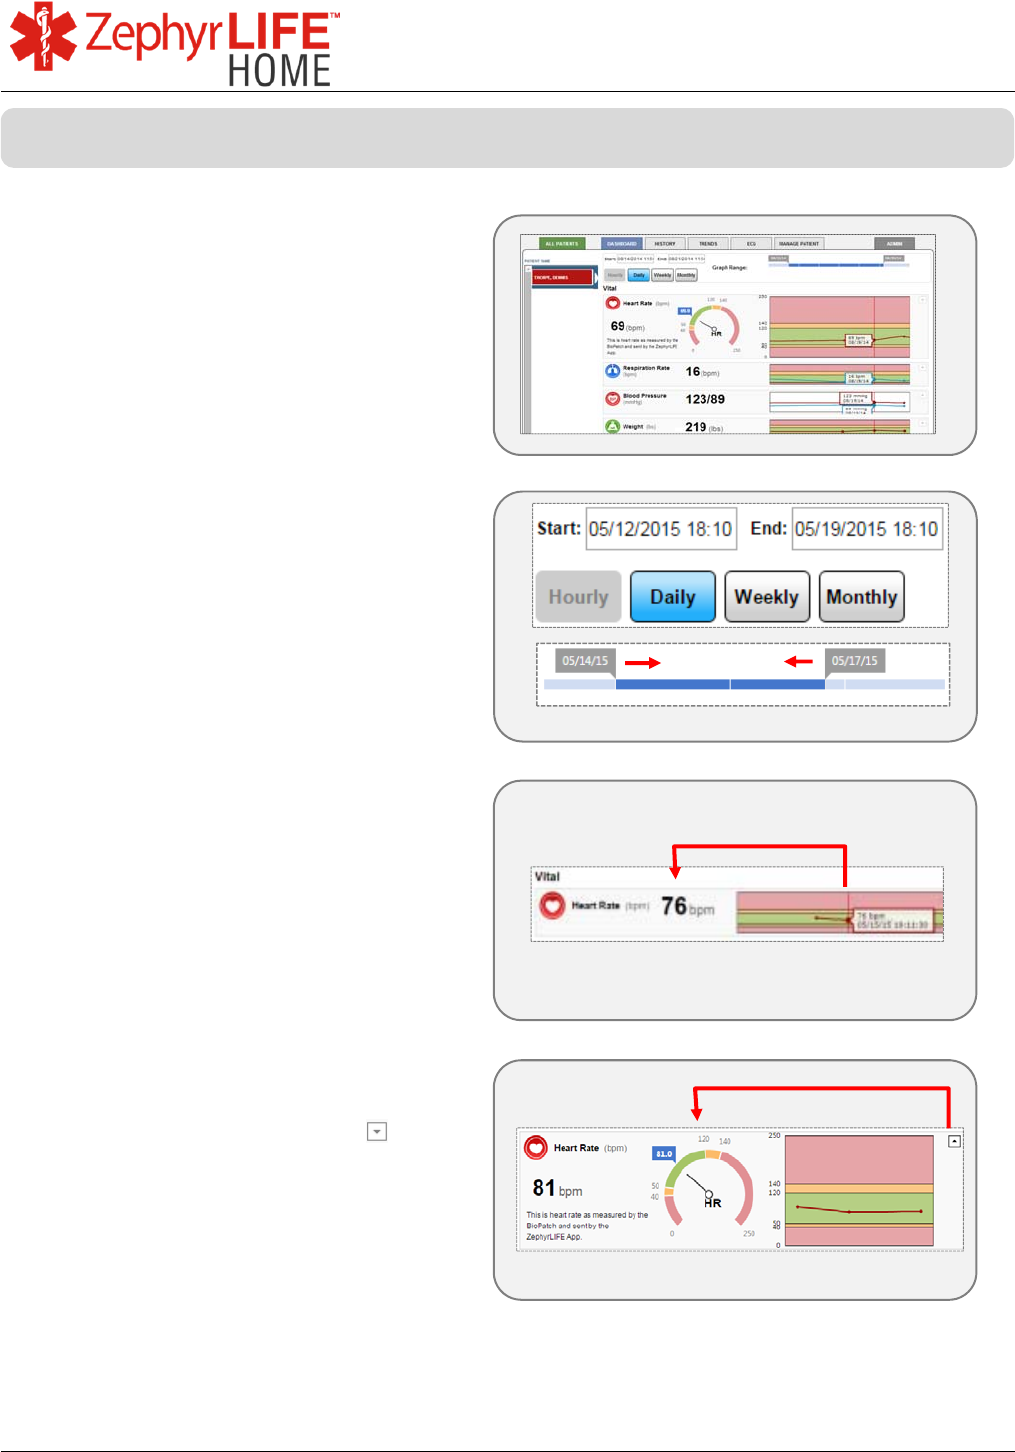
Display latest data OR cursor location
on trend graph.
Select the patient’s name from the list
on the left (single entry in example).
Select Start and End dates and time
span button.
Defaults: Previous 7 days/daily.
Drag flags above graph to zoom in.
Mouse over graph data point to show
recorded values.
No mouse = last received value.
Expand any graph using the arrow
to show sweep scale.
Green/yellow/red coloring reflects alert
thresholds set for each vital sign.
Dashboard
41
9700.0205.v7b ©2016 Zephyr Technology, All Rights Reserved 24-NOV-2016
Patient Guide
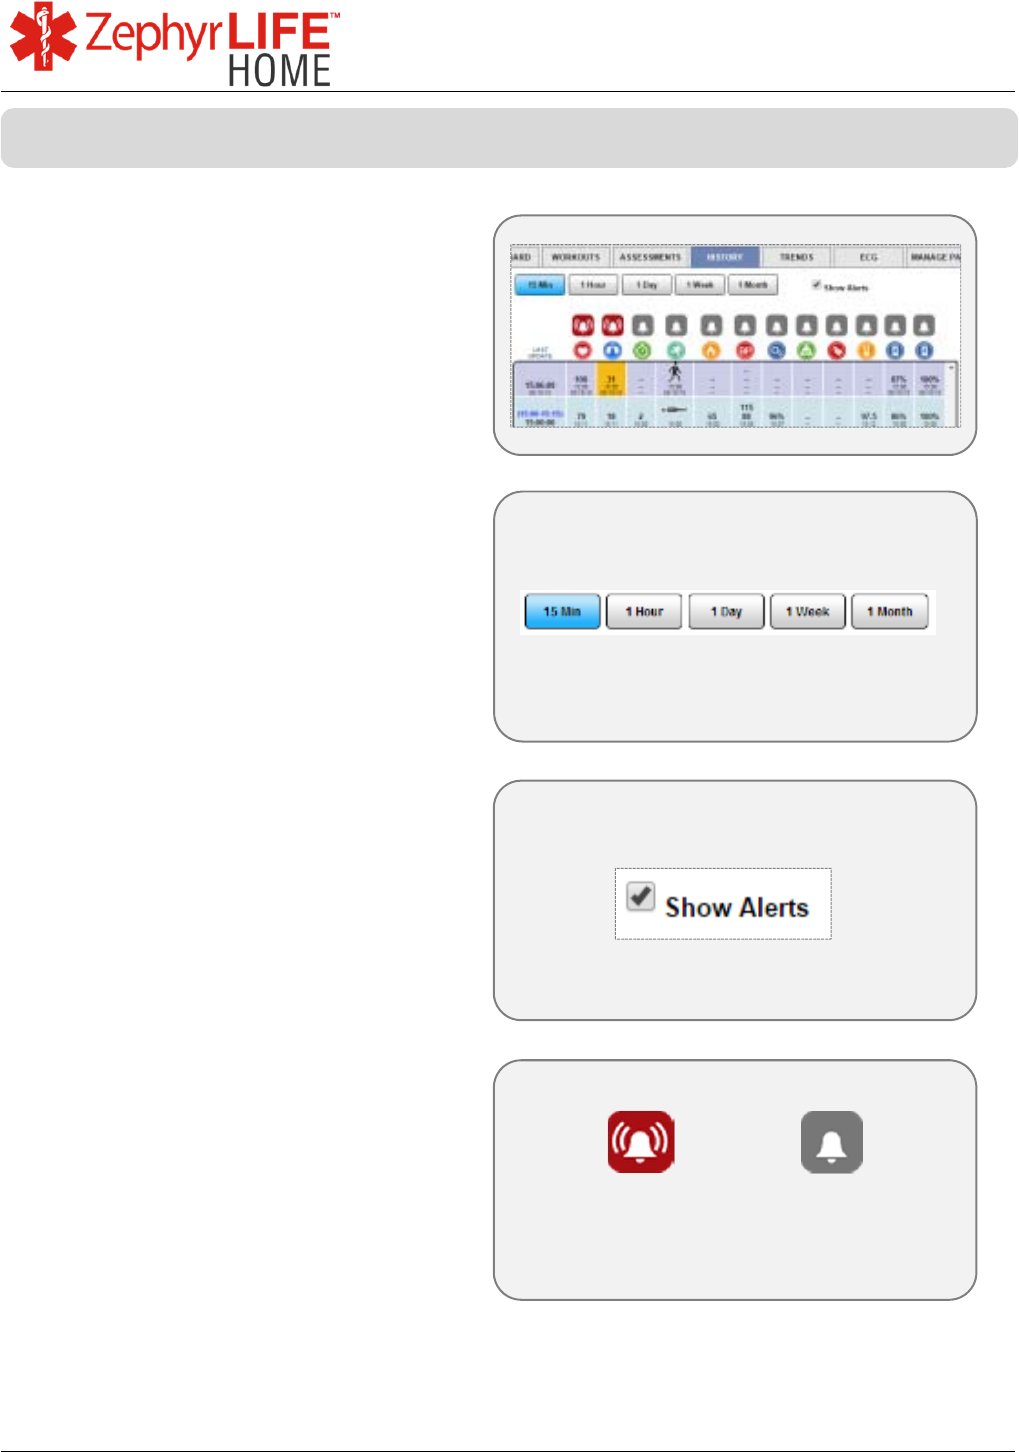
Each row shows the same data shown
on the All Patients tab.
Select time interval to display.
Show or hide alerts.
Alerting cells are red or yellow.
Alert Column Indicator – use to clear a
single alert for that column.
A
lert Cleared
Alert
History
42
9700.0205.v7b ©2016 Zephyr Technology, All Rights Reserved 24-NOV-2016
Patient Guide
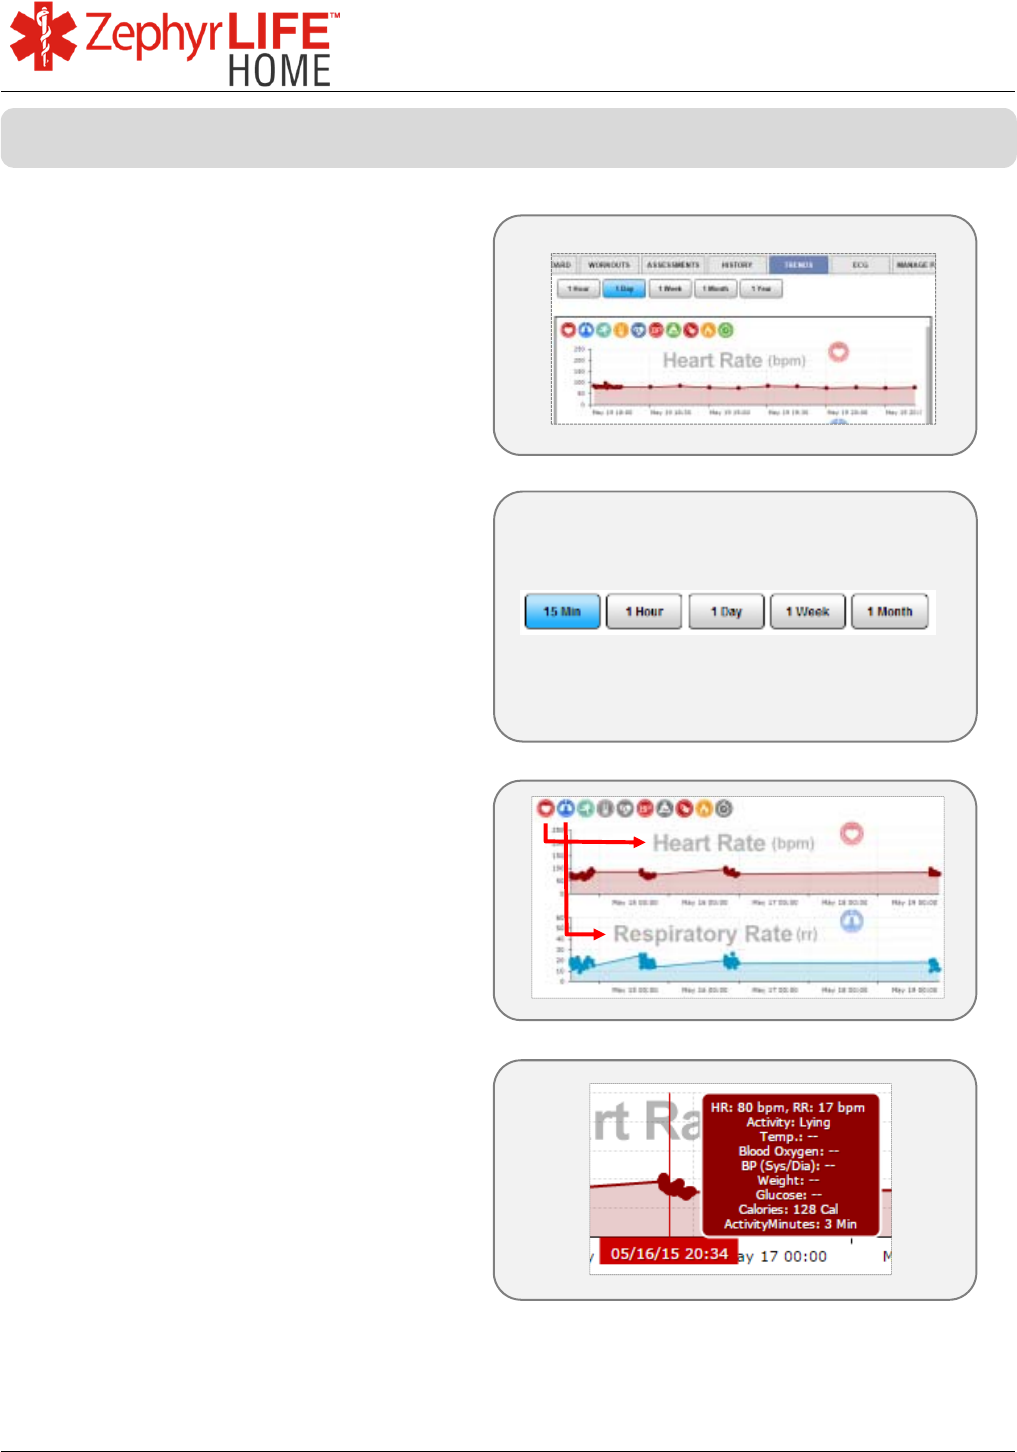
Patient history as a line graph.
Select time interval to display.
Select icons to show or hide graphs
Grey icon = graph not displayed
Mouse over any data point on graph
to show recorded values in a callout.
Trends
43
9700.0205.v7b ©2016 Zephyr Technology, All Rights Reserved 24-NOV-2016
Patient Guide
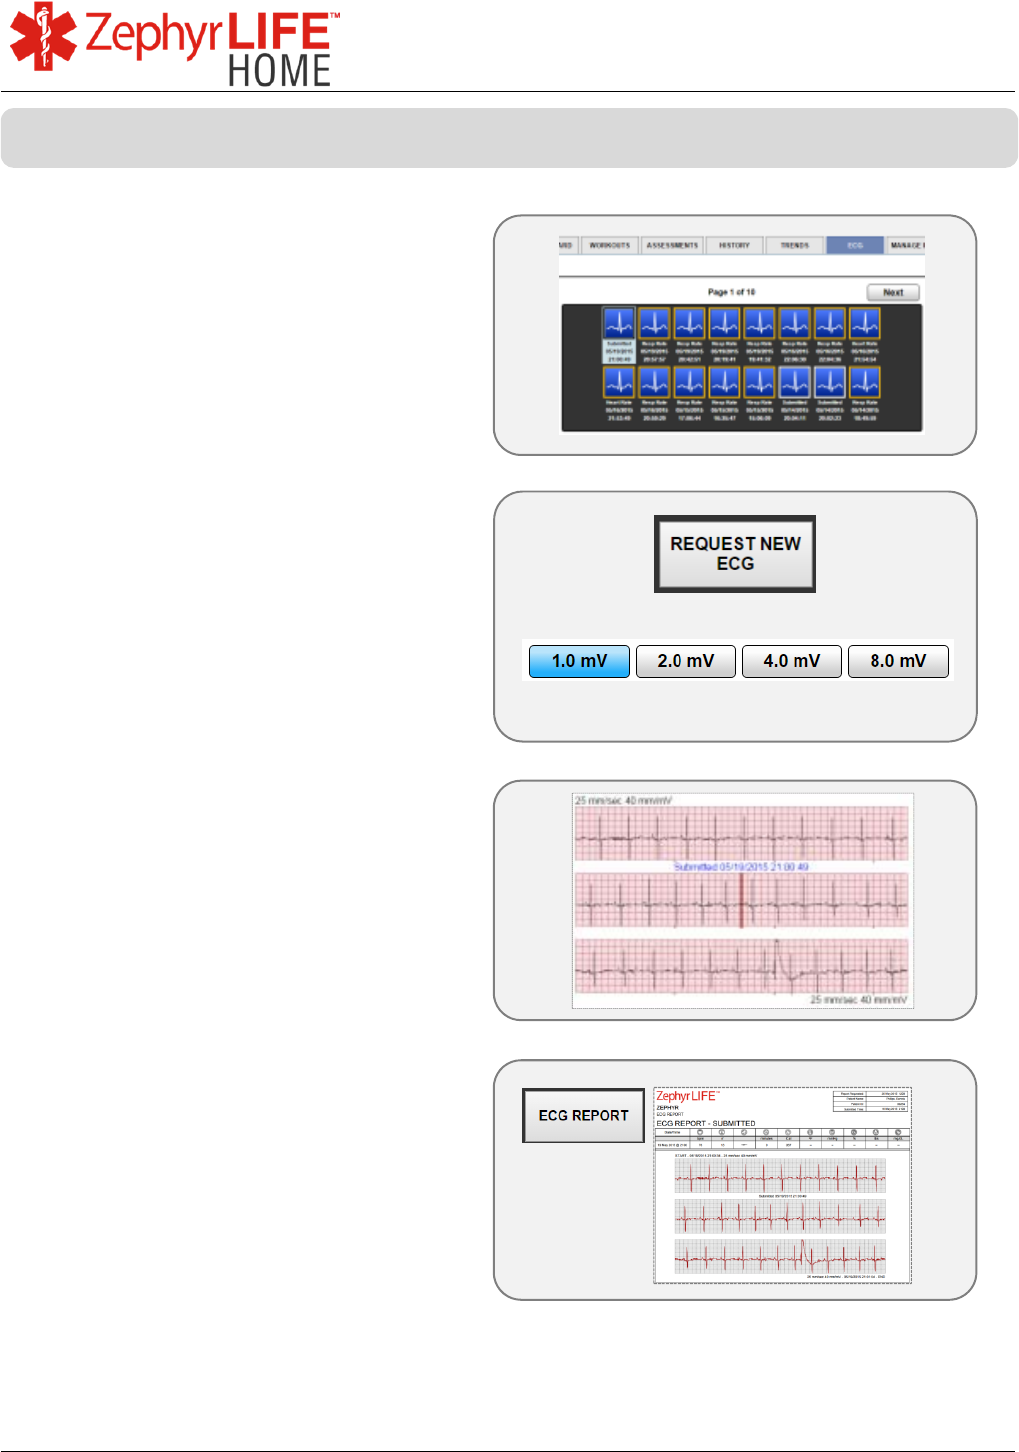
ECG strips are generated by button
request on screen (authorization
required), or automatically when a
Heart Rate or Breathing Rate alert is
triggered or when submitted by patient
on the HealthHub.
Thumbnail frame colors
o White = manual request or submit
o Yellow/Red = auto by alert trigger
Select from thumbnail archive or
REQUEST NEW ECG by clicking on
button
Set vertical scale (mV) of the strip
paper
Data are 3 x 10 second strips – 15
seconds before & after request or
trigger.
Use the ECG Report button to
generate a report
ECG
44
9700.0205.v7b ©2016 Zephyr Technology, All Rights Reserved 24-NOV-2016
Patient Guide
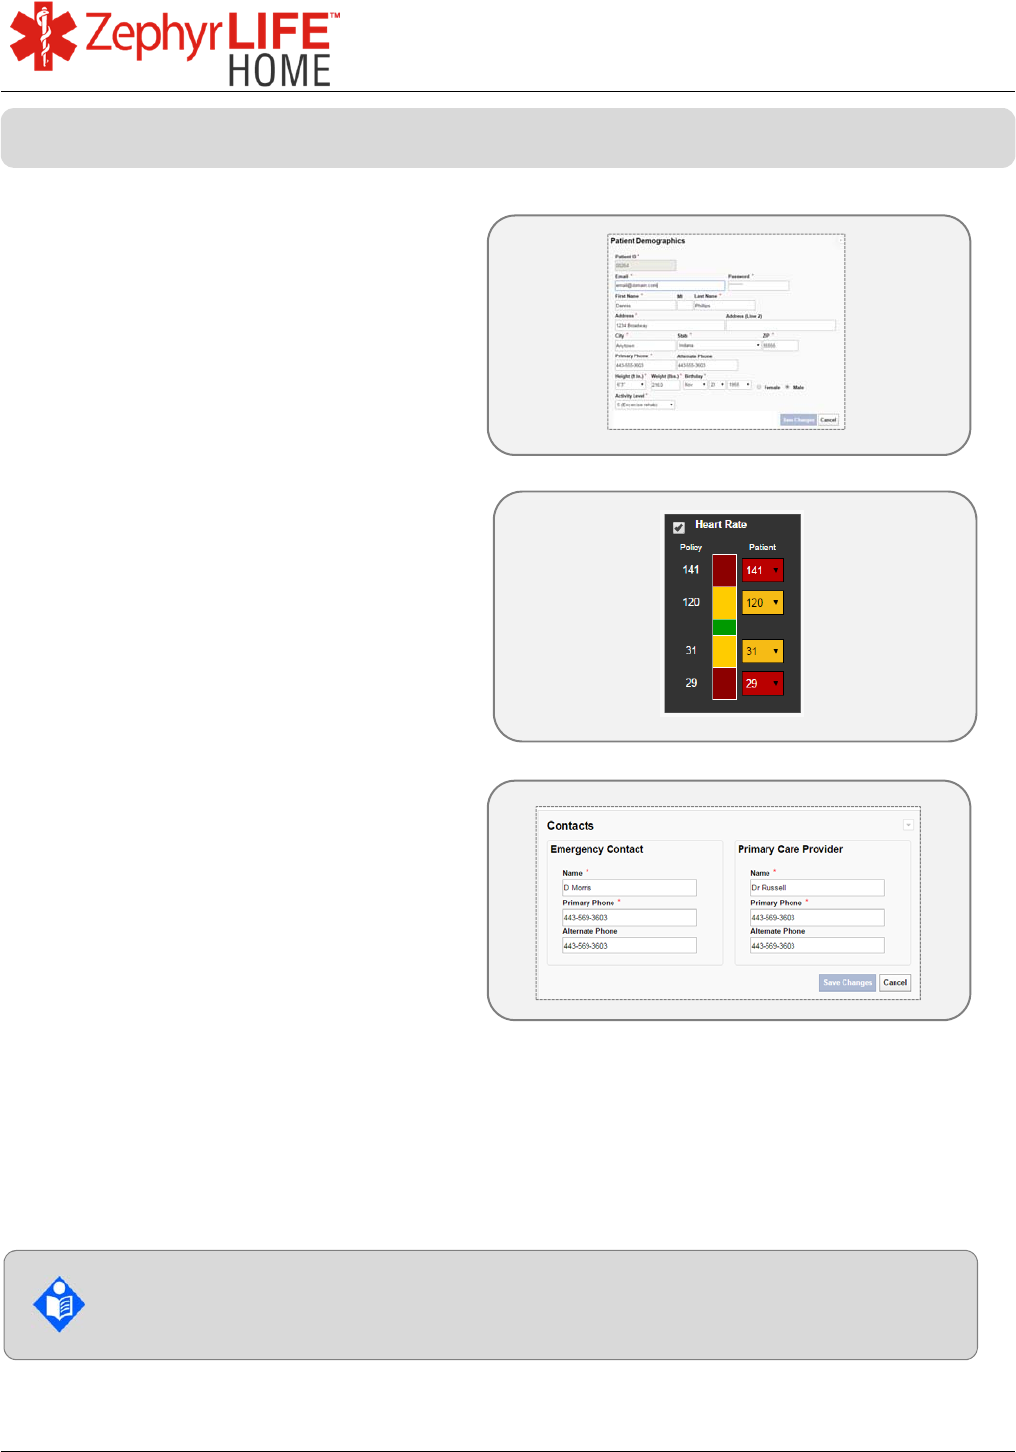
Patient Demographics
Update personal details
Email will be the patient’s own login
You may have been given permission
to change your alert thresholds, or they
may be inactive.
Alerts display as colored cells in the
Portal.
Alerts are for information only; they are
not warnings.
You should consult your clinician
before changing any alert levels.
Emergency Contact details are at the
foot of the page
Alerts are generated to inform a credentialed caregiver and are not intended by
the manufacturer to suggest any action to the caregiver or user.
An alert is for information only – it is not an alarm.
Manage Patient
45
9700.0205.v7b ©2016 Zephyr Technology, All Rights Reserved 24-NOV-2016
Patient Guide
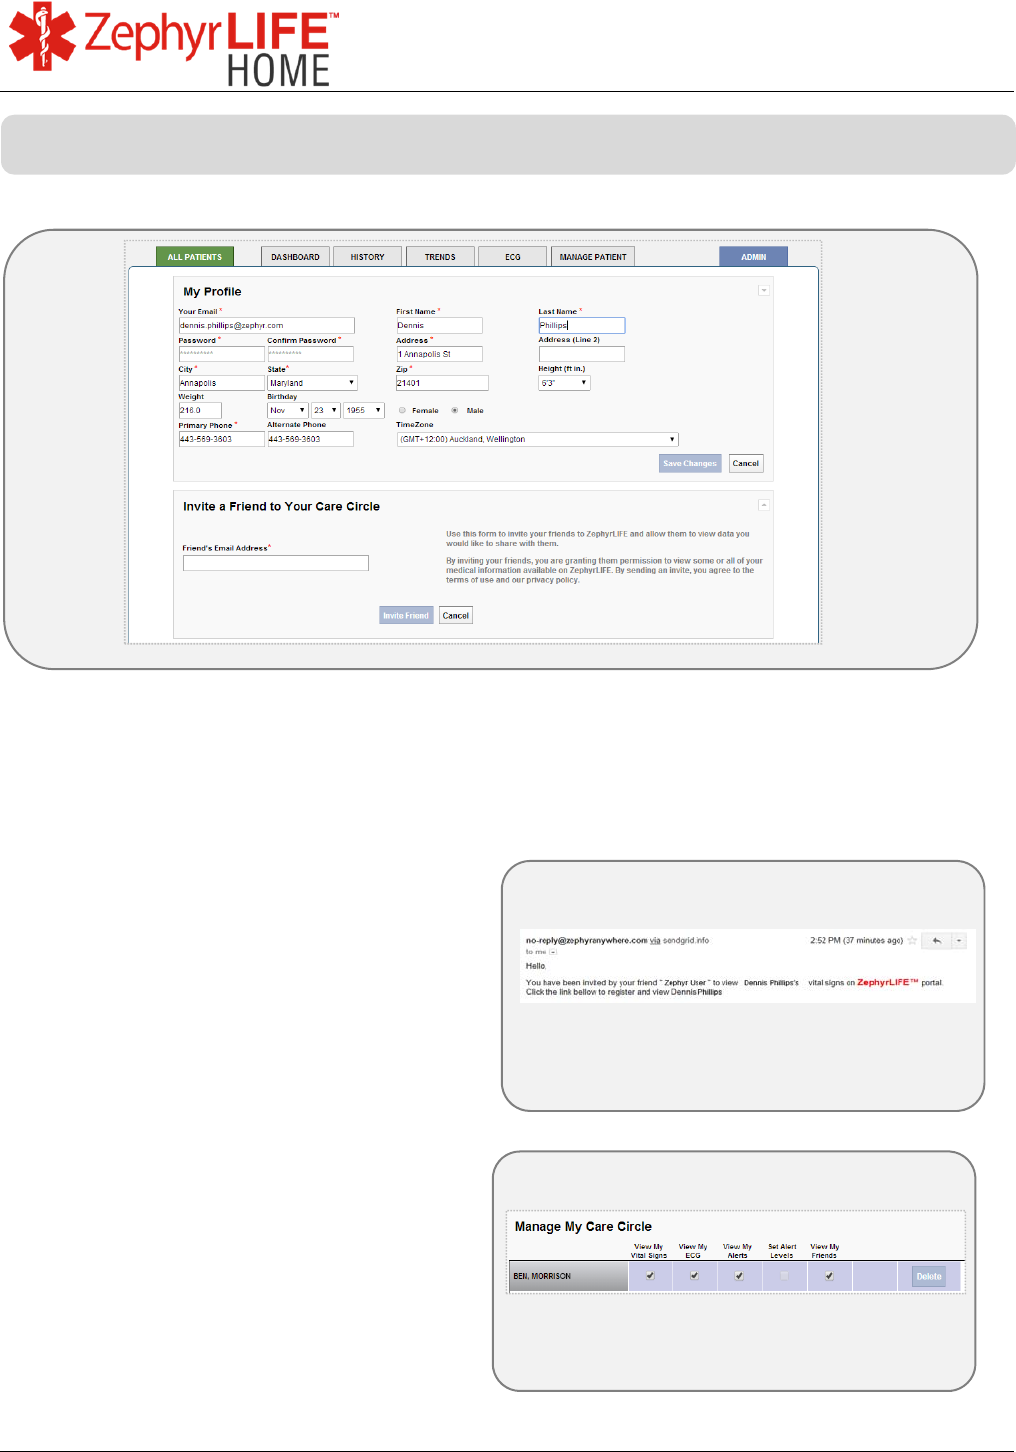
Update all Patient details in the My Profile section.
INVITE A FRIEND
A patient logged in to the portal can use the Admin tab to send an email invite to a
friend to register to view their data. Clinicians do not see this view.
An email invitation will be sent to the
friend, with a link to a registration page.
The patient can use their Admin tab to
set what their friend can see when
logged in to the portal.
Care Circle
46
9700.0205.v7b ©2016 Zephyr Technology, All Rights Reserved 24-NOV-2016
Patient Guide
Remove the BioModule from the
subject.
Turn off the BioModule by pressing
the center for five seconds or until all
the lights turn off.
Remove the BioModule from the
holder by pressing firmly on the back
while retracting on the snap wings as
shown.
Insert the BioModule in the charging
cradle, making sure the crescent
notch is upward as shown.
The cradle is powered by a wall plug
adaptor.
A full charge of a fully-depleted battery
will take approximately 3 hours.
A solid non-flashing orange light
means fully charged.
Patient
To Replace a Discharged BioModule
47
9700.0205.v7b ©2016 Zephyr Technology, All Rights Reserved 24-NOV-2016
Patient Guide
The BioModule holder is for single
patient use and can be reused by that
patient.
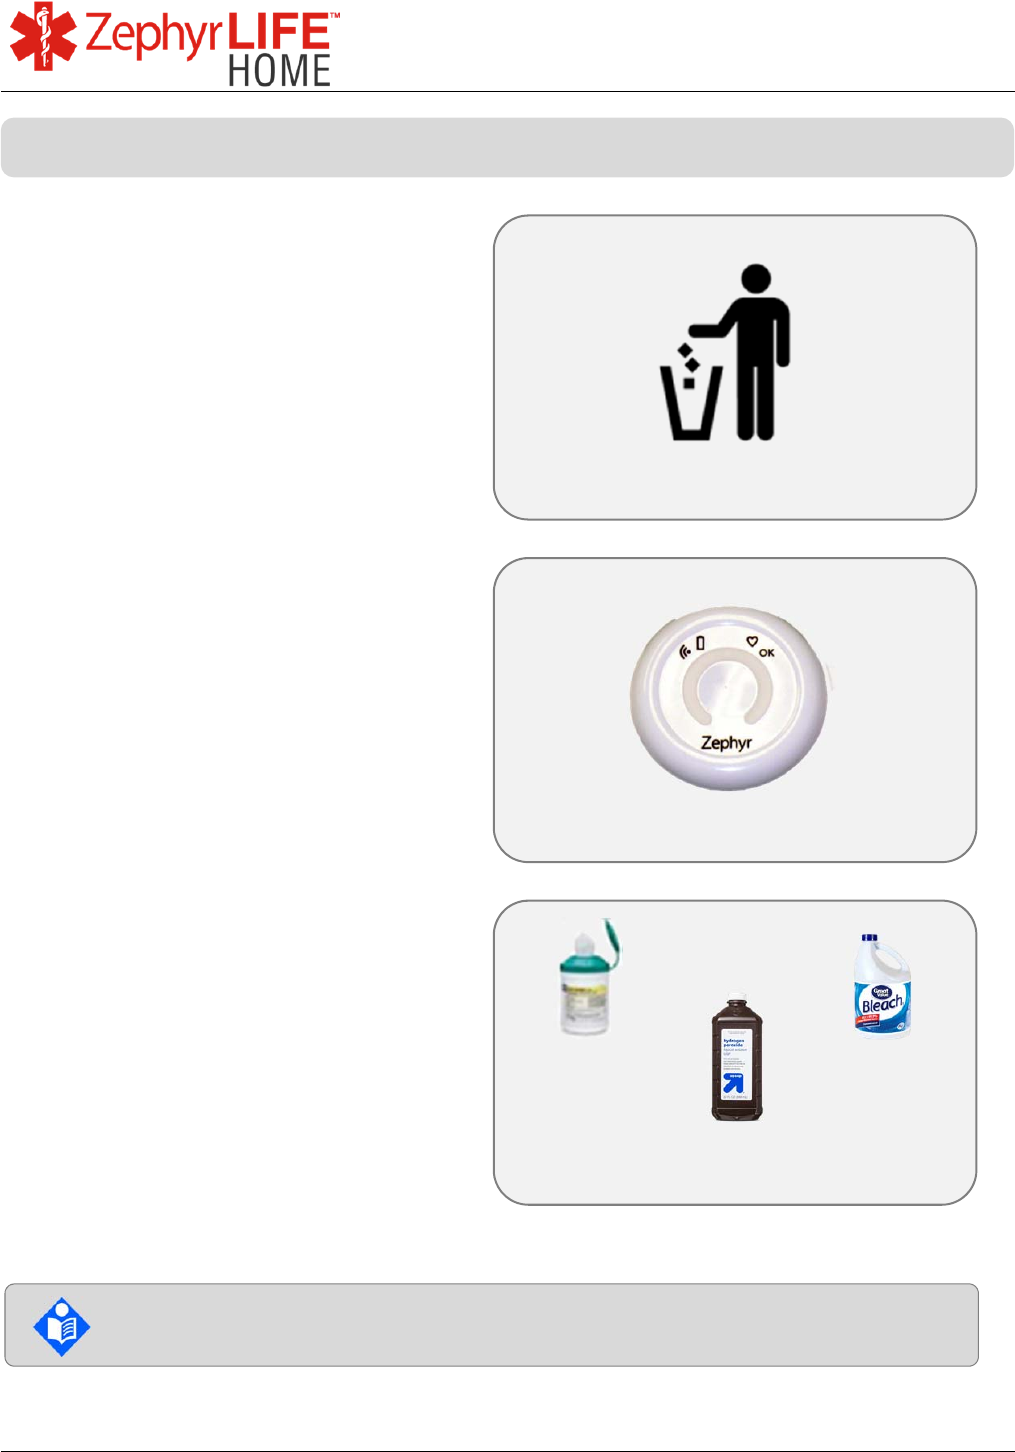
ECG electrodes may be disposed in
general home waste.
The BioModule and BioModule
Holder are reusable and should be
surface cleaned with one of the
products below.
Wipe BioModule and BioModule
Holder with a cloth soaked in bleach
or peroxide solution. Let air dry.
Recommended cleaning product options
Sani-Cloth HB
Sodium Hypochlorite (8.25% bleach,
diluted 1:10 to 1:100)
Hydrogen Peroxide (3% solution)
Sani-Cloth is a registered trade mark of Professional
Disposables International, Inc.
Bleach
Sani-Cloth
HB®
Hydrogen
Peroxide
Consult the instructions supplied with each cleaning product for
appropriate cleaning procedure
Care & Cleaning of the BioModule and BioModule Holder
48
9700.0205.v7b ©2016 Zephyr Technology, All Rights Reserved 24-NOV-2016
Patient Guide
Fora D40 Blood
Pressure/Glucometer.
4 x AA batteries.
Flashing battery symbol means
batteries are low.
After battery replacement, take a
measurement.
The first measurement after
changing batteries will be discarded
and a message displayed on the
HealthHub.
Repeat to take a valid measurement.
Fora IR20 Thermometer.
2 x AA batteries.
Constant battery symbol means
batteries are low.
After battery replacement, take a
measurement.
The first measurement after
changing batteries will be discarded
and a message displayed on the
HealthHub.
Repeat to take a valid measurement.
Flashing battery = low
power
Battery icon = low
power
For detailed instructions on changing the batteries in optional sensors,
please read the manufacturer’s manual
Changing batteries on devices
49
9700.0205.v7b ©2016 Zephyr Technology, All Rights Reserved 24-NOV-2016
Patient Guide
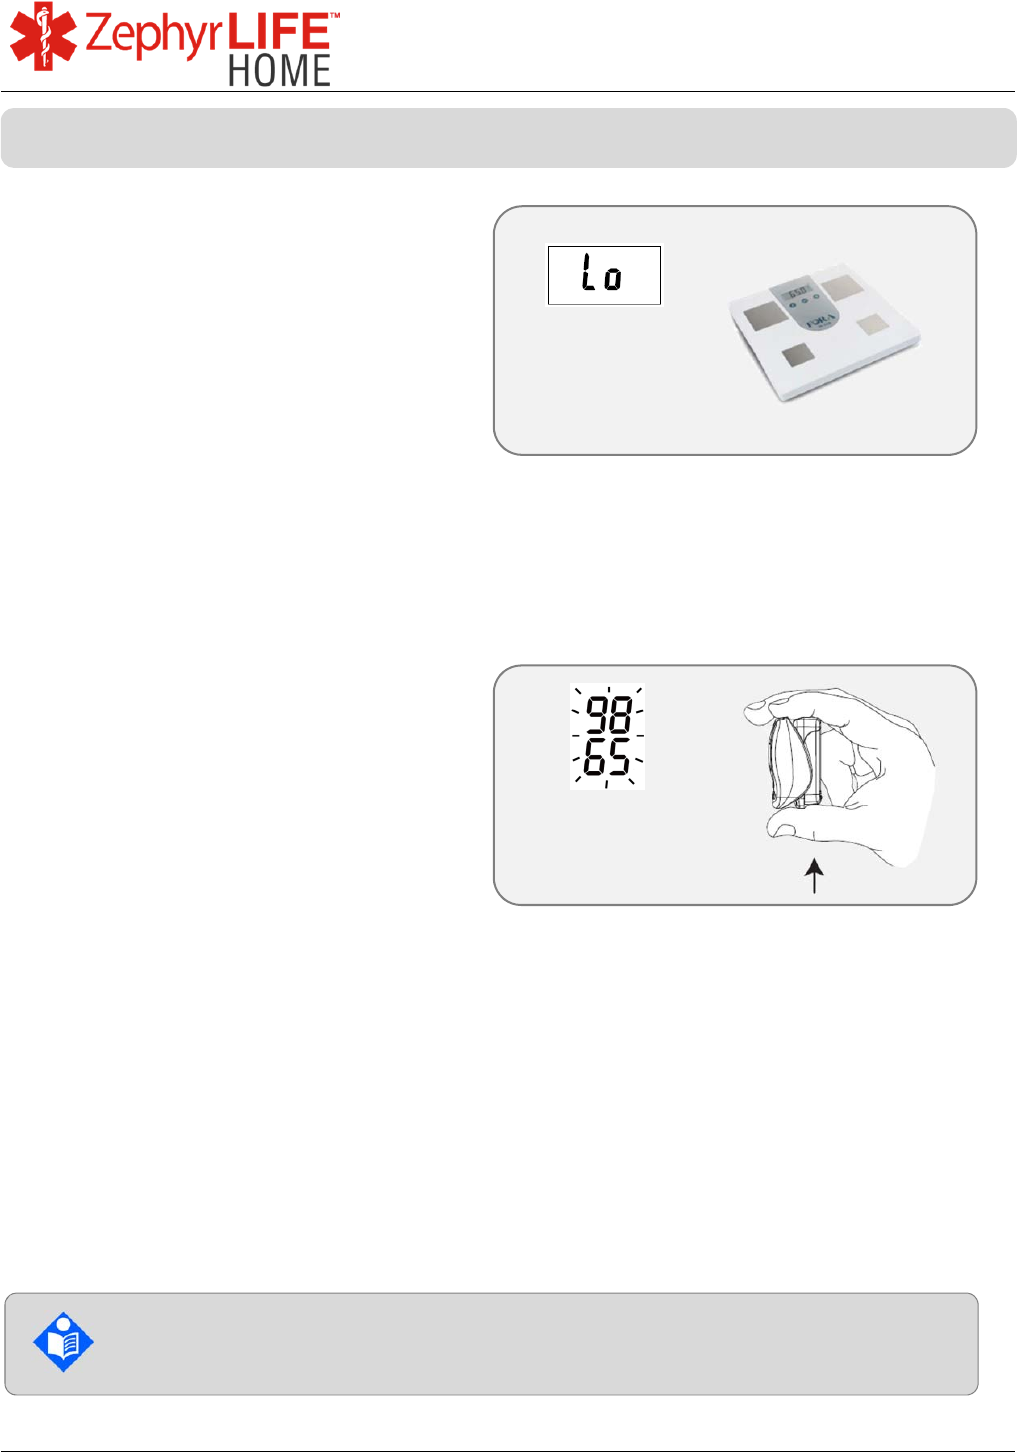
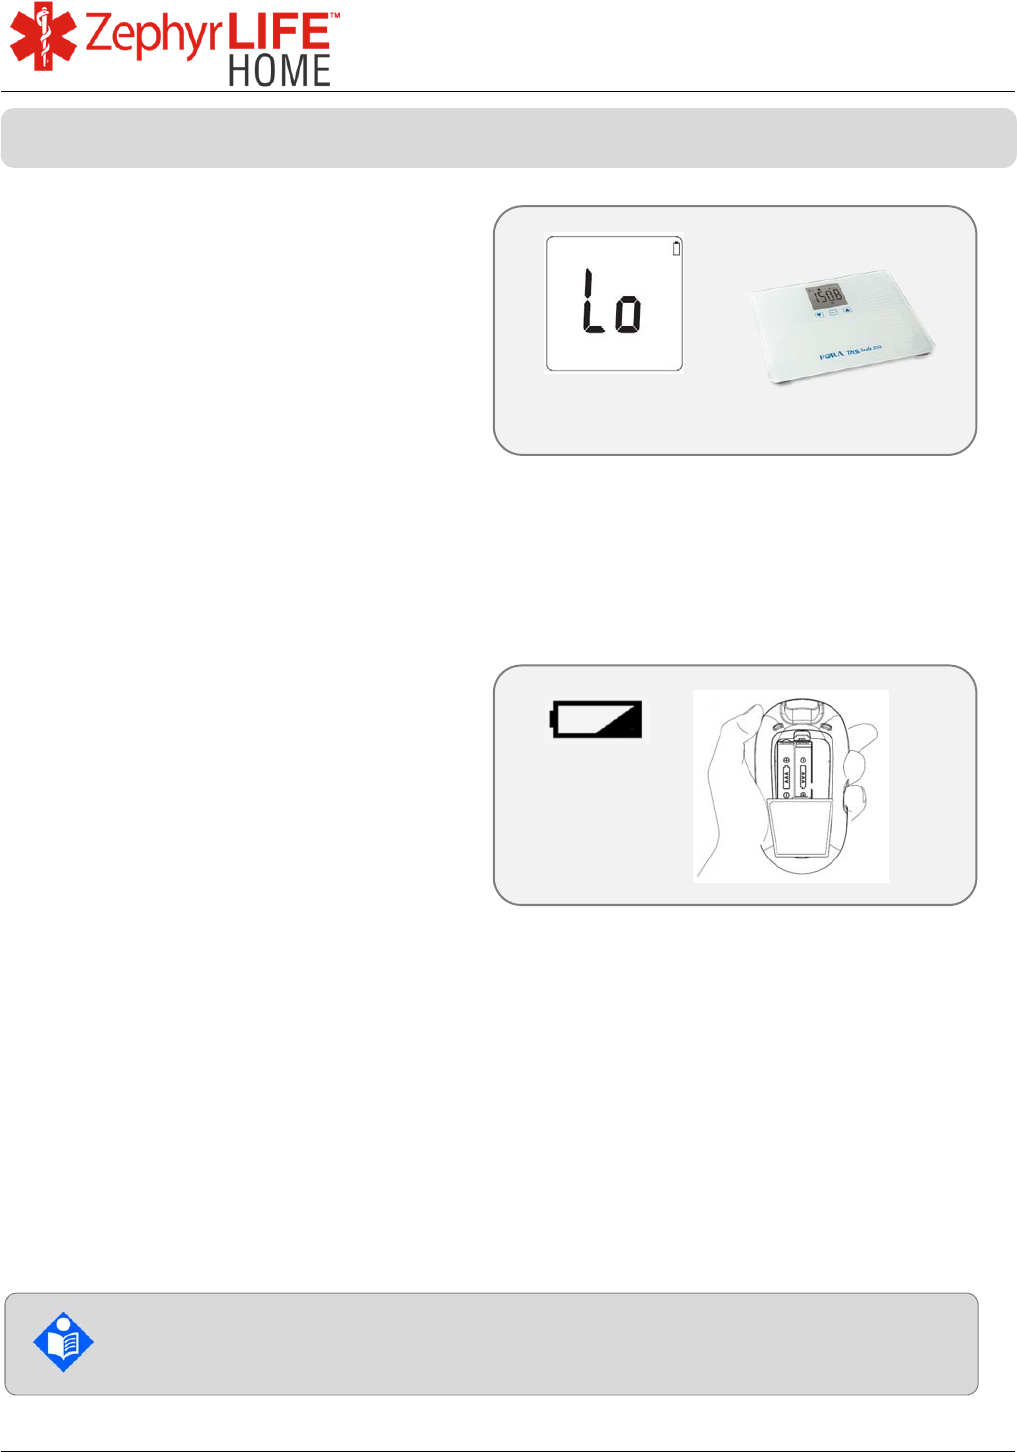
Fora W310 Weight Scale.
4 x AA batteries.
“Lo” display means batteries are low.
After battery replacement, take a
measurement.
The first measurement after
changing batteries will be discarded.
Repeat to take a valid measurement.
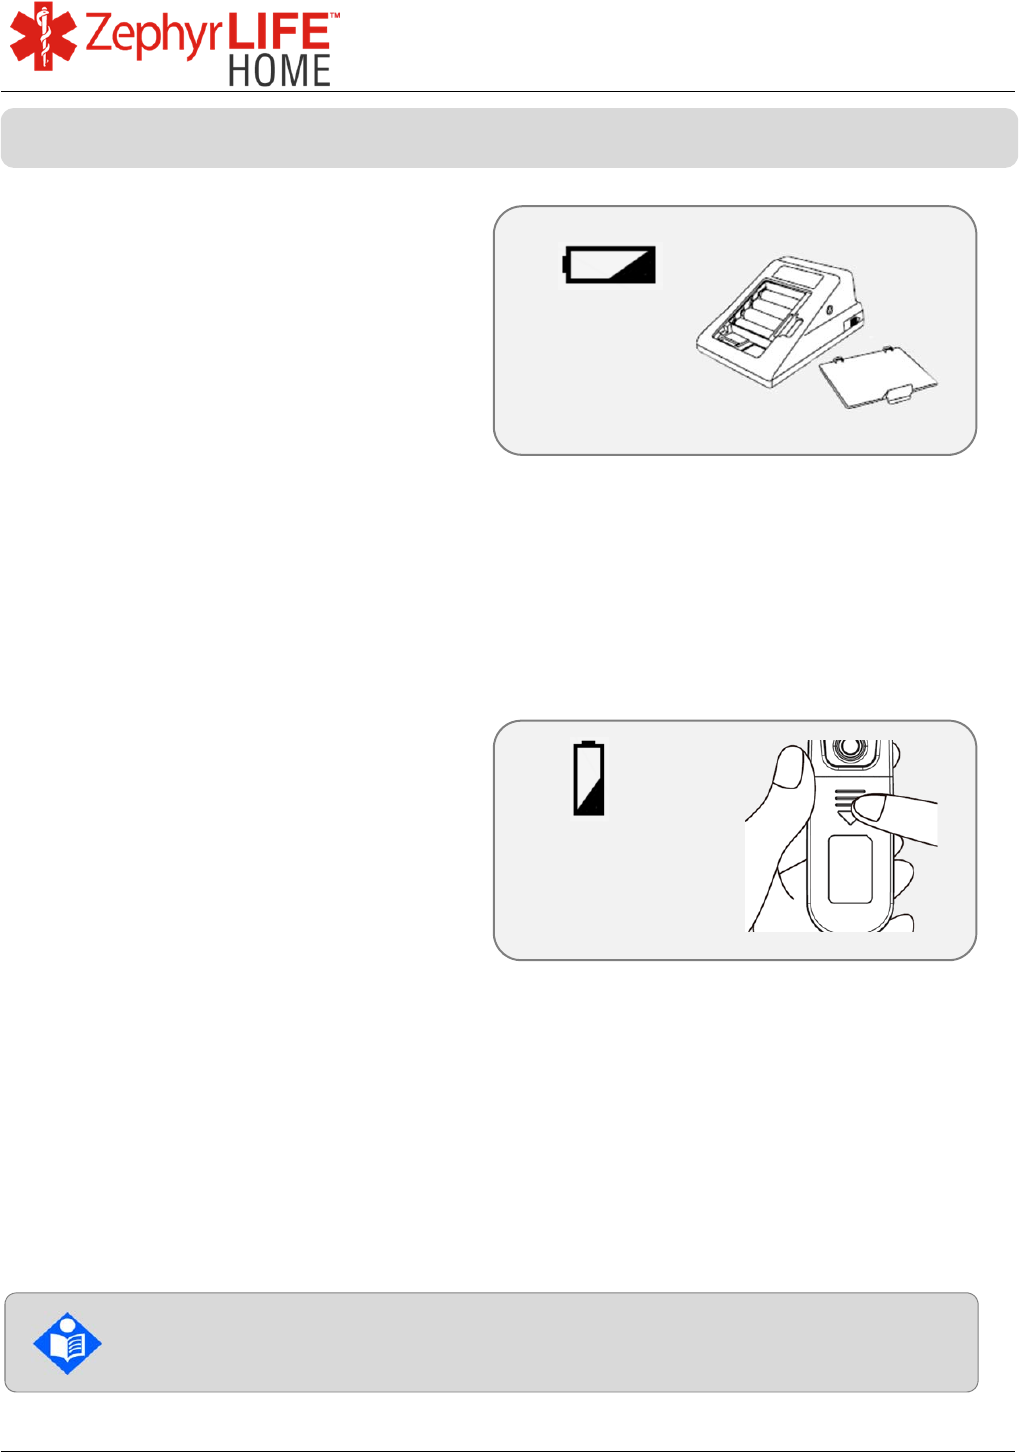
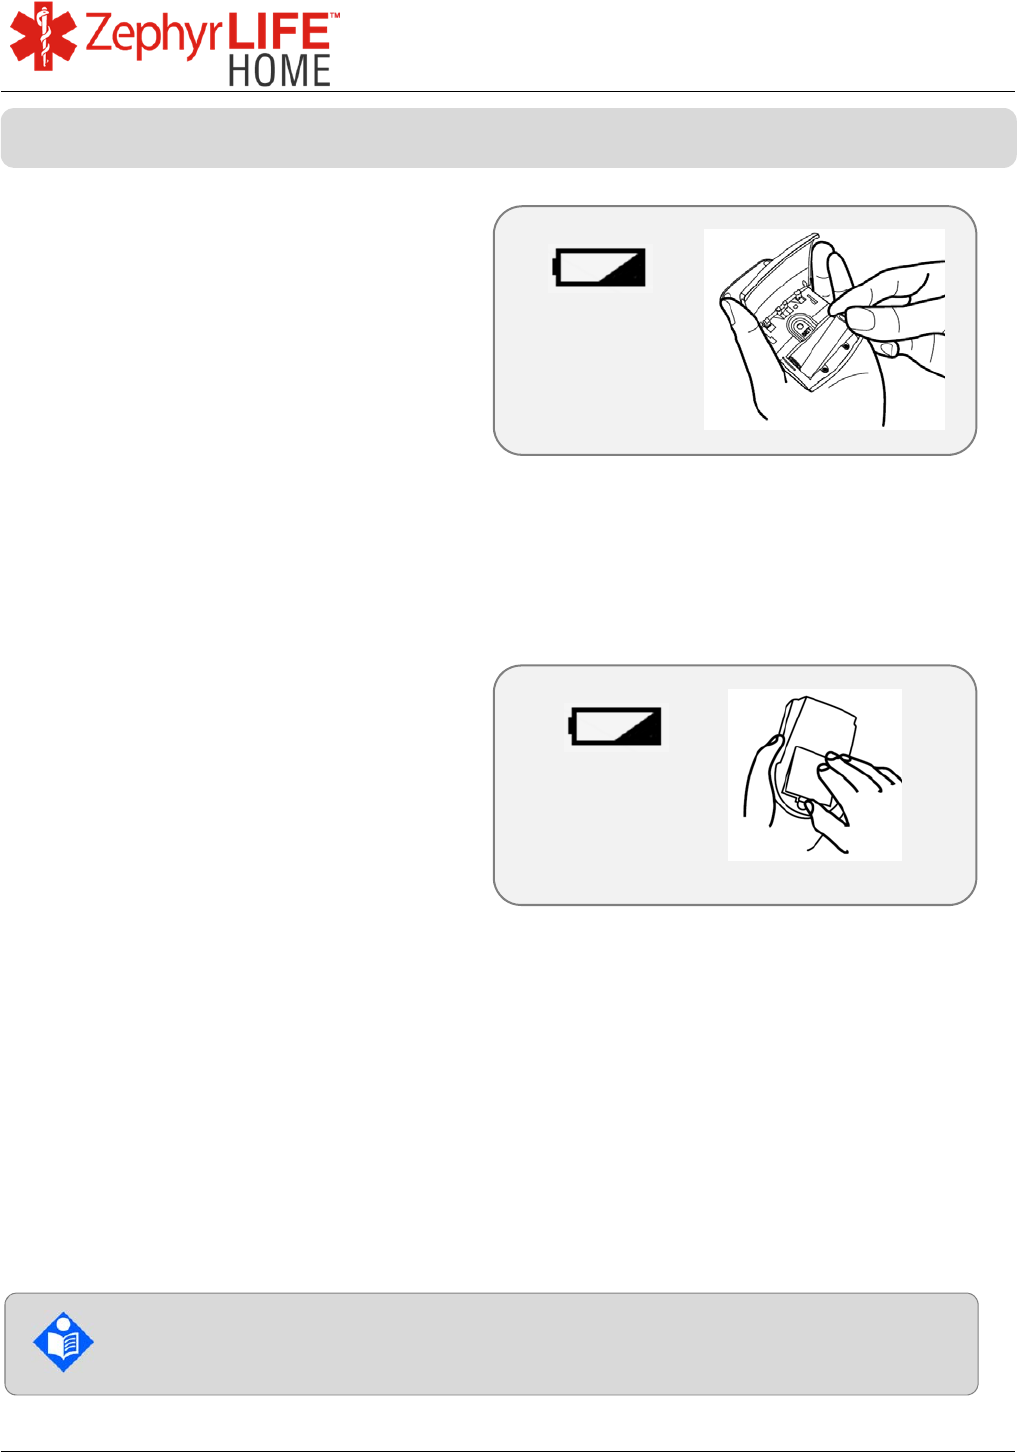
Nonin 9560 Pulse Oximeter
2 x AAA batteries.
Flashing display means batteries are
low.
Squeeze as shown to release battery
compartment.
After battery replacement, take a
measurement.
The first measurement after
changing batteries will be discarded.
Repeat to take a valid measurement.
“Lo” = low power
Flashing display = low
power
For detailed instructions on changing the batteries in optional sensors,
please read the manufacturer’s manual
Changing batteries on devices
50
9700.0205.v7b ©2016 Zephyr Technology, All Rights Reserved 24-NOV-2016
Patient Guide
ForaTN’G 550 Weight Scale.
4 x AA batteries.
“Lo” display means batteries are low.
After battery replacement, take a
measurement.
The first measurement after
changing batteries will be discarded.
Repeat to take a valid measurement.
Fora MD Glucometer
2 x AAA batteries.
After battery replacement, take a
measurement.
The first measurement after
changing batteries will be discarded.
Repeat to take a valid measurement.
“Lo” = low power
Low power
For detailed instructions on changing the batteries in optional sensors,
please read the manufacturer’s manual
Changing batteries on devices
51
9700.0205.v7b ©2016 Zephyr Technology, All Rights Reserved 24-NOV-2016
Patient Guide
Fora Test N’GO Voice.
2 x AAA batteries.
After battery replacement, take a
measurement.
The first measurement after
changing batteries will be discarded.
Repeat to take a valid measurement.
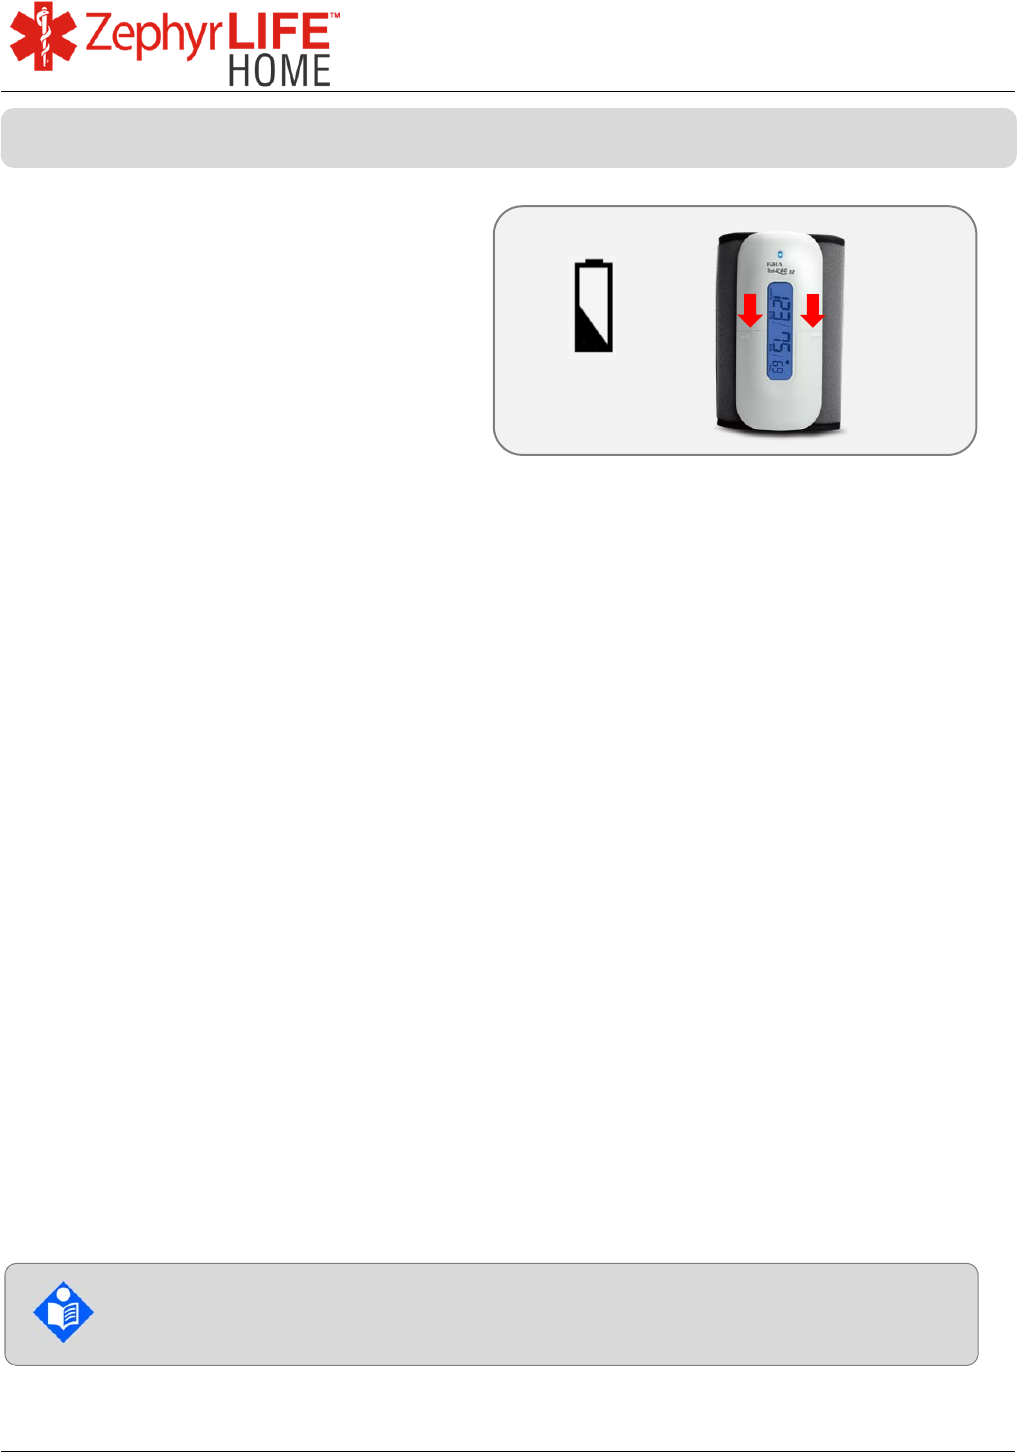
For a P20 Blood Pressure Monitor
4 x AAA batteries.
After battery replacement, take a
measurement.
The first measurement after
changing batteries will be discarded.
Repeat to take a valid measurement.
Low power
Low power
For detailed instructions on changing the batteries in optional sensors,
please read the manufacturer’s manual
Changing batteries on devices
52
9700.0205.v7b ©2016 Zephyr Technology, All Rights Reserved 24-NOV-2016
Patient Guide
Fora Test N’GO BP.
4 x AAA batteries.
After battery replacement, take a
measurement.
The first measurement after
changing batteries will be discarded.
Repeat to take a valid measurement.
Low power
For detailed instructions on changing the batteries in optional sensors,
please read the manufacturer’s manual
Changing batteries on devices

53
9700.0205.v7b ©2016 Zephyr Technology, All Rights Reserved 24-NOV-2016
Patient Guide
Question What to do
How do I know if the BioModule is fully
charged?
The orange light is steady, not flashing when in the
charging hub or cradle. See BioModule Light
Indicators page.
How long does it take to charge? 1 hour for 90% charge and 3 hours for 100%. See
BioModule Light Indicators page.
What does it mean if the red light on the
BioModule is constantly on?
A steady red light indicates no heart rate was
detected – check that the BioModule holder is
firmly attached to the electrodes and that the
electrodes are securely attached your chest. See
Page 32
What does a flashing blue light mean?
A flashing blue light indicates a loss of radio
transmission from the BioModule to the
HealthHub. Move closer to the HealthHub, or
locate it in a more central room of your home. See
BioModule Light Indicators page.
Is it important to place the BioModule in the
pictured positions?
Yes, to get the most accurate data it is very
important to position as shown. See Skin
Preparation page.
What do I do with my HealthHub while wearing
the BioModule?
Keep it in the base plugged into an outlet in the
same room, or carry the HealthHub with you if you
go outside. Make sure the HealthHub is charged
before leaving. The HealthHub can lose
communication with the BioModule if separated by
more than 10 yards.
A message appears on the HealthHub “No
Internet Connection Available”.
Make sure that the HealthHub has wireless data
connectivity. Re-start the HealthHub and the
ZephyrLIFE application.
A message appears on the HealthHub
“ZephyrLIFE Patient isn’t responding, do you
want to close it?”
Re-start the HealthHub and the ZephyrLIFE
application.
Different values are shown on the HealthHub
from the peripheral device Repeat measurement.
HealthHub and portal do not display data from
the Fora device after multiple measurements
Remove and reinsert the batteries from Fora
device and take measurement. The first
measurement will be discarded, take a second
measurement.
Troubleshooting Tips

54
9700.0205.v7b ©2016 Zephyr Technology, All Rights Reserved 24-NOV-2016
Patient Guide
BioModule Prescription Device
Heart Rate 30 – 240 bpm ±1bpm static (R-R interval)
Breathing Rate 5 – 50 brpm ±1brpm static
Battery Performance
Type
Operating
Rechargeable Lithium Polymer, 3.6 – 4.2V
24 hours minimum when new and fully charged
Place in charger 24 hours if unused for 3 months. Charge
periodically if unused to avoid full discharge state
Battery Charging
Charge Time
Single Device Charge cradle
5 Device Charge cradle
1 hr to 90% capacity, 3 hrs to 100% capacity
USB connector provided
AC Adaptor, 100-240V input 5V/0.5A output
100-240V input, 7.5V /3.0A output power supply provided
Classifications per IEC 60601-1
Installation & Use
Degree of Protection
Supply Connection
Portable, body-worn
Type CF-Applied Part
Internally powered
ECG type (BH3-M1)
ECG type (BH3-M2)
Ambulatory Electro Cardio Graph (AECG Type 3) as per
ANSI/AAMI EC38:1998 compliance
Ambulatory Electro Cardio Graph (AECG) as per IEC
60601-2-47: 2012 compliance
Transmitter
Bluetooth Compliance
Operating Frequency
Output Power
Antenna type
Operating Range
Modulation Type
FCC ID
Version 2.1 + EDR
2.4 - 2.4835 GHz
10 dBm
Internal
10 yards
FSK
VZ6-BH3
Electromagnetic Compliance
Emissions IEC 60601-1-2:2007
Immunity IEC 60601-1-2:2007
Environmental (Operating)
Temperature -20º C to +45º C (-4º F to 113º F) inclusive
Temperature - charging 0º C to +45º C (32º F to 113º F) inclusive
Relative Humidity 15% to 95% non-condensing
Ingress Protection IP67 – protected from dust and against the effect of
immersion in water to depth between 15 cm and 1 meter
(6 in to 3 ft)
Specifications

55
9700.0205.v7b ©2016 Zephyr Technology, All Rights Reserved 24-NOV-2016
Patient Guide
Environmental (Storage & Transportation)
Temperature -20º C to +45º C (-4º F to 113º F) inclusive
Relative Humidity 15% to 95% non-condensing
Atmospheric Pressure 12kPa to 107kPa
Service Life
BioModule Battery 300 charge cycles minimum
Maintenance Other than cleaning and charging, no other maintenance is
required.
BioModule Holder Single Patient use
ECG electrodes Single use
Disposal
Return The BioModule, charge cradle and BioModule holder contain no
hazardous components. All electrical components are lead-free. Zephyr
Technology will undertake to dispose of any end-of-life components which
are returned to their facility.
Local Disposal Where specific provision is made in a particular region for disposal and
recycling of electrical goods, Zephyr advises following local guidelines for
conscientious disposal of equipment.
WEEE Zephyr BioModule is WEEE compliant
Dimensions
BioModule 48 x 46 x 10 mm (1.9 x 1.8 x 0.4 in)
Holder 90 x 50 x 10 mm (3.5 x 2.0 x 0.4 in)
Weight
BioModule 18 grams (0.63 oz)
Holder 14 grams (0.49 oz)
56
9700.0205.v7b ©2016 Zephyr Technology, All Rights Reserved 24-NOV-2016
Patient Guide
Symbols on Device
Blue LED – Bluetooth transmit status/error
Orange LED – low battery indication/charging indication
Red LED – Heart Rate detection status/error
Green LED – normal operations indication
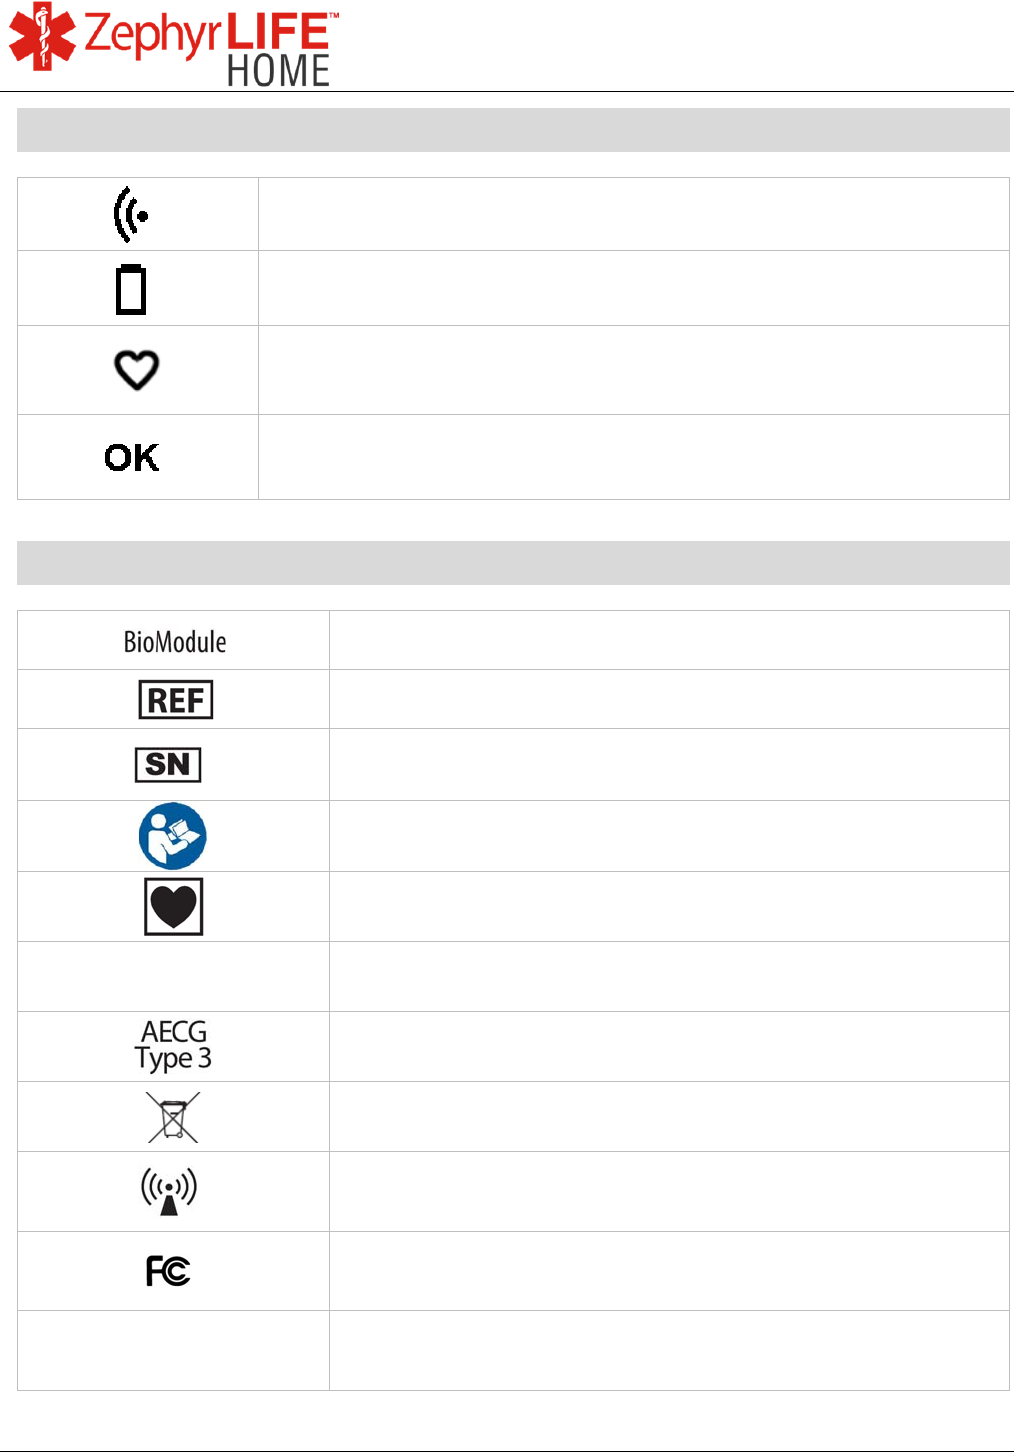
Symbols on Device Label
Manufacturer’s designation for device
Device Model
Device Serial Number XXXXXX
Consult user manual before use
Type CF-Applied Part
IP67
Ingress Protection Rating
Device Type [Ambulatory ECG Type 3]
WEEE Europe
Contains radio transmitter (non-ionizing radiation)
FCC radio emissions compliance
FCC ID
Zephyr BioModule ID
57
9700.0205.v7b ©2016 Zephyr Technology, All Rights Reserved 24-NOV-2016
Patient Guide
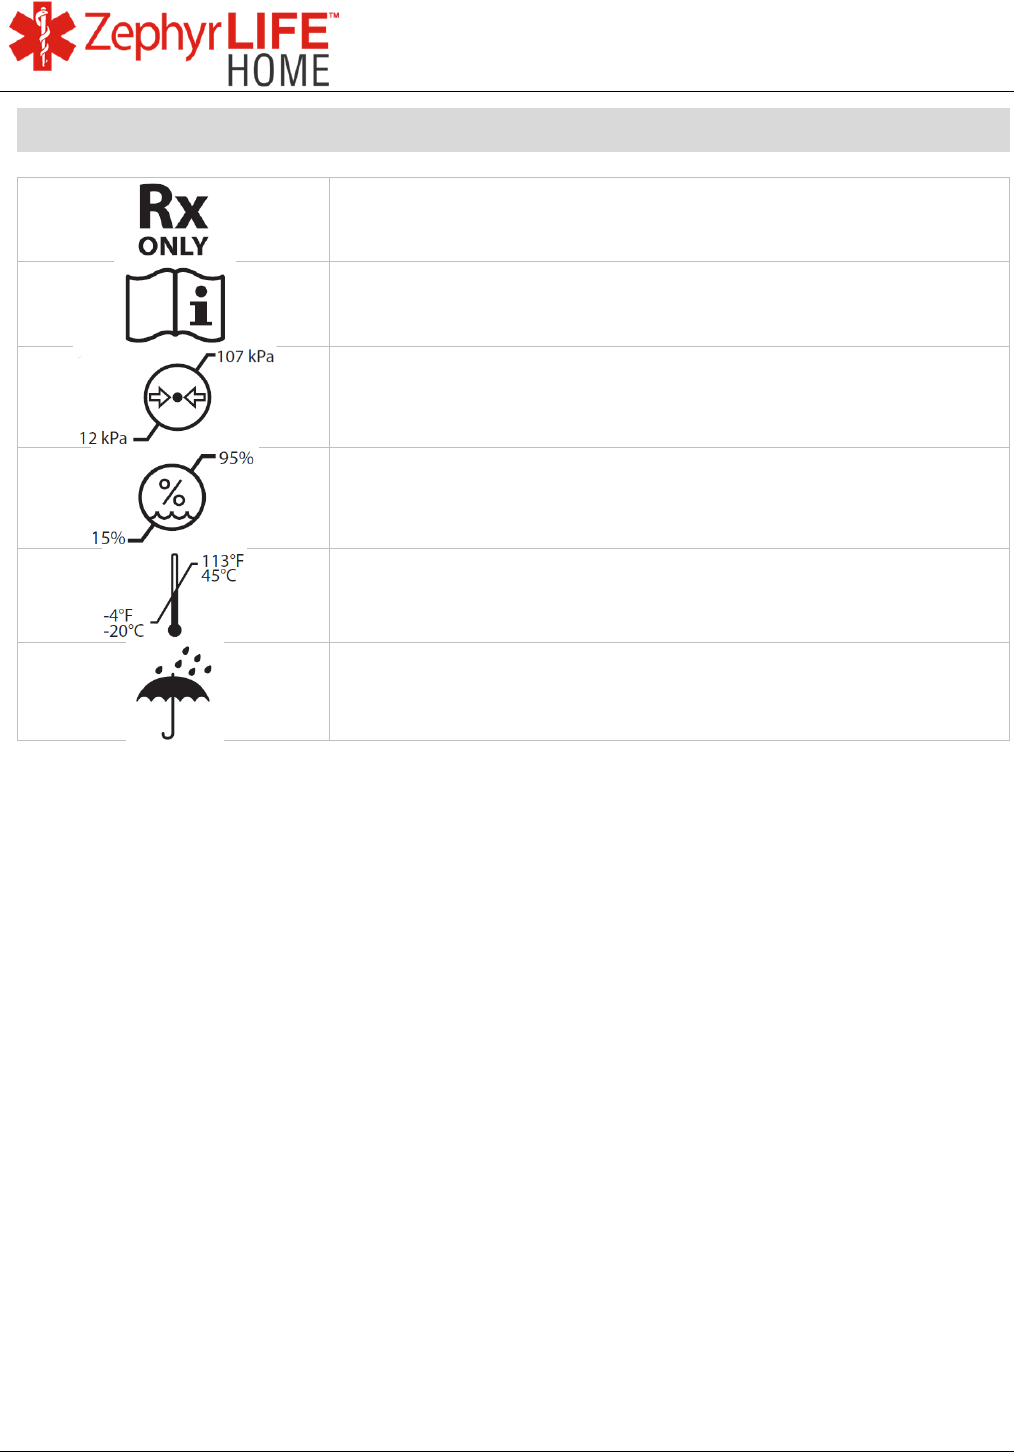
Symbols on Shipping Label
Prescription-only device
Read instruction manual (this manual) before use
Transport atmospheric pressure range 12kPa – 107 kPa
Transport humidity range 15 – 95% RH
Transport temperature range -4º - 113ºF / -20º - 45ºC
Keep dry
58
9700.0205.v7b ©2016 Zephyr Technology, All Rights Reserved 24-NOV-2016
Patient Guide
The Zephyr BioModule should only be used in conjunction with the following accessories, supplied with
the system kit:
Component Part Number Description
Zephyr BioModule BH3-M1 9607.0216 Zephyr BioModule
Zephyr BioModule BH3-M2 9607.0296 Zephyr BioModule
BioModule Holder 9607.0207 White holder, stainless steel snaps
Single charge cradle 9800.0221 White single BioModule charge cradle
USB cable 0015.0051 USB cable for single BioModule charge cradle
USB A/C Adaptor 0010.0119 AC adaptor for single BioModule cradle
5 Device charge cradle 9607.0215 White charge cradle for 5 BioModules with power
supply
Nonin 9560BT Onyx II 9607.0231 Pulse Oximeter SpO
2
sensor
Foracare W310b 9607.0223 Weigh Scale
Foracare TN’G 550 9607.0282 Weigh Scale
Foracare IR20b 9607.0230 Infrared Ear Thermometer
Foracare IR20b V4 9607.0285 Infrared Ear Thermometer
Foracare D40d 9607.0222 Blood Pressure / Blood Glucometer sensor
Foracare D40d V4 9607.294 Blood Pressure / Blood Glucometer sensor
Lancet Pen 9607.0233 Foracare Lancet Pen for D40d
Foracare P20 9607.0286 Foracare Test N’Go Blood Pressure Cuff
Fora MD 9607.0289 Blood Glucose Sensor
For a TN’G Voice 9607.0283 Blood Glucose Sensor
ZephyrLIFE HealthHub 5” 9607.0278 ZephyrLIFE HealthHub and installed software
ZephyrLIFE HealthHub 7” 9607.0277 ZephyrLIFE HealthHub and installed software
Accessories

59
9700.0205.v7b ©2016 Zephyr Technology, All Rights Reserved 24-NOV-2016
Patient Guide
Component Part Number Description
BP Cuff Large 9607.0107 Large BP cuff for D40d
BP Cuff Wide Range 9607.0108 Wide Range BP cuff for D40d
BP Cuff Small 9607.0109 Small BP cuff for D40d
ECG Electrode 9607.0104 Covidien™ Kendall™ 530 Foam Electrode, pack of
30
IR20b Lens Filter 9607.0235 Pack of single-use lens filters for ear thermometer
IR20b V4 Lens Filter 9607.0292 Pack of single-use lens filters for ear thermometer
BG Test Strips 9607.0232 Pack Test Strips for D40d blood glucose
BG Test Strips 9607.0291 Pack 50 Test Strips for Fora MD blood glucose
BG Test Strips 9607.0284 Pack 50 Test Strips for Fora TN’G Voice blood
glucose
Lancets 9607.0234 Pack Foracare lancets for lancet pen
Control Solution 9607.0237 Blood control solution for D40d glucometer
calibration
Control Solution 9607.0287 Blood control solution GDH
Control Solution 9607.0288 Blood control solution GOD

60
9700.0205.v7b ©2016 Zephyr Technology, All Rights Reserved 24-NOV-2016
Patient Guide
Electromagnetic Emissions
Electromagnetic Emissions Guidelines and Compliance
Guidance and Manufacturer’s Declaration—Electromagnetic Emissions
(IEC 60601-1-2:2007, Table 1)
The BioModule is intended for use in the electromagnetic environment specified below. The
customer or the user of the BioModule should assure that it is used in such an environment.
Emissions Test Compliance Electromagnetic Environment Guidance
RF emission
CISPR 11
Group 1,
Class B
BioModule uses RF energy only for its internal
function. Therefore, its RF emissions are very low and
are not likely to cause any interference in nearby
electronic equipment.
Harmonic Emission
IEC 61000-3-2
N/A N/A
Voltage fluctuation/ flicker
emissions
IEC 61000-3-3
N/A N/A
Manufacturer’s Declaration and Guidance

61
9700.0205.v7b ©2016 Zephyr Technology, All Rights Reserved 24-NOV-2016
Patient Guide
Electromagnetic Immunity
Electromagnetic Immunity Guidelines and Compliance
Guidance and Manufacturer’s Declaration—Electromagnetic Immunity
(IEC 60601-1-2:2007, Table 2)
The BioModule is intended for use in the electromagnetic environment specified below. The
customer or the user of BioModule should assure that it is used in such an environment.
Immunity Test IEC 60601-1-2
Test Level
Compliance
Level
Electromagnetic Environment
Guidance
Electrostatic
discharge (ESD)
IEC 61000-4-2
± 6 kV contact
± 8 kV air
± 6 kV contact
± 8 kV air
Floor should be wood, concrete, or
ceramic tile. If floors are covered with
synthetic material, the relative humidity
should be at least 30%.
Power frequency
(50/60 Hz) magnetic
field
IEC 61000-4-8
3 A/m 3 A/m Power frequency magnetic fields should
be at levels characteristic of a typical
location in a typical commercial or
hospital environment.
62
9700.0205.v7b ©2016 Zephyr Technology, All Rights Reserved 24-NOV-2016
Patient Guide
Recommended Separation Distance Calculations
Guidance and Manufacturer’s Declaration—Electromagnetic Immunity
(IEC 60601-1-2:2007, Table 4)
The BioModule is intended for use in the electromagnetic environment specified below. The
customer or the user of BioModule should assure that it is used in such an environment.
Immunity
Test
IEC 60601
Test Level
Compliance
Level
Electromagnetic Environment - Guidance
Conducted RF
IEC 61000-4-6
Radiated RF
IEC 61000-4-3
3 Vrms
150 KHz to 80
MHz
3 V/m
80 MHz to 2.5 GHz
Not
applicable
3 V/m
Portable and mobile RF communications
equipment should be used no closer to any
part of the BioModule, including cables, than
the recommended separation distance
calculated from the equation applicable to the
frequency of the transmitter.
Recommended separation distance
1.2
√ 80 MHz to 800 MHz
2.3
√ 800 MHz to 2.5 GHz
Where P is the maximum output power rating
of the transmitter in watts (W) according to
the transmitter manufacturer and d is the
recommended separation distance in meters
(m).
Field strengths from fixed RF transmitters as
determined by an electromagnetic site
survey
a
should be less than compliance level
in each frequency range
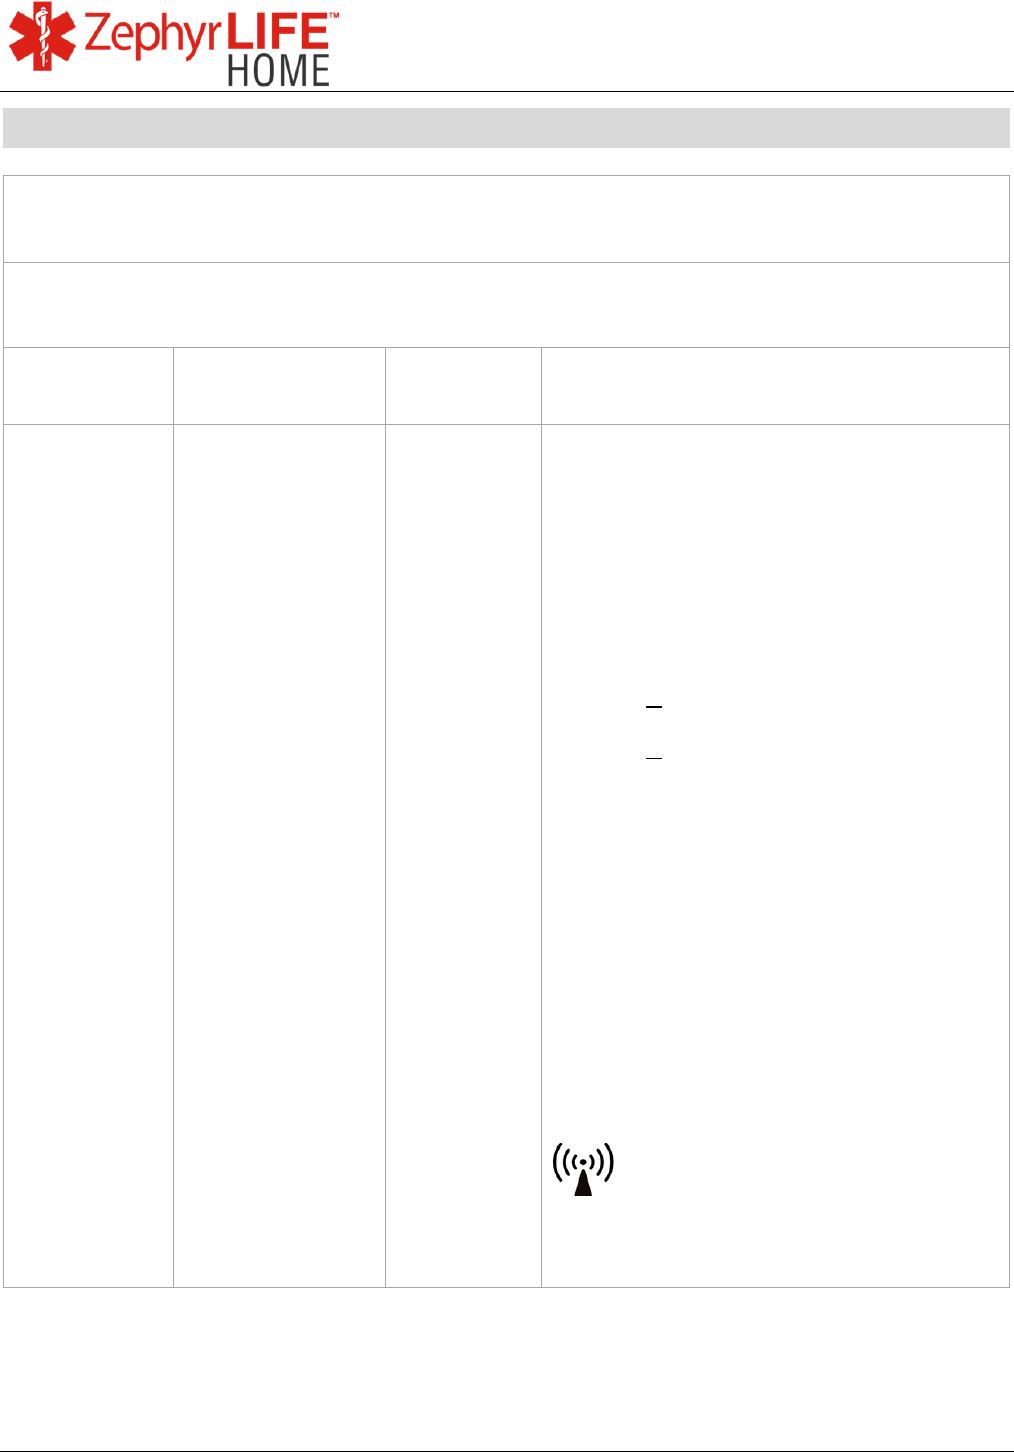
b
Interference may occur in the vicinity or
equipment marked with the following symbol:

63
9700.0205.v7b ©2016 Zephyr Technology, All Rights Reserved 24-NOV-2016
Patient Guide
Note 1 At 80 MHz and 800 MHz, the higher frequency range applies.
Note 2 These guidelines may not apply in all situations. Electromagnetic propagation is affected by
absorption and reflection from structures, objects and people.
a
Field strengths from fixed transmitters, such as base stations for radio (cellular/cordless)
telephones and land mobile radios, amateur radio, AM and FM broadcast cannot be predicted
theoretically with accuracy. To assess the electromagnetic environment due to fixed RF transmitters,
an electromagnetic site survey should be considered. If measured field strength in the location in
which the BioModule is used exceeds the applicable RF compliance level above, the BioModule
should be observed to verify normal operation. If abnormal performance is observed, additional
measures may be necessary, such as re-orienting or relocating the BioModule.
b
Over the frequency range 150 kHz to 80 MHz, fields strengths should be less than 3 V/m
Recommended Separation Distances
Recommended separation distances between portable and mobile RF communications
equipment and BioModule
The BioModule is intended for use an electromagnetic environment specified below in which radiated
RF disturbances are controlled. The customer or user of the BioModule can help prevent
electromagnetic interference by maintaining a minimum distance between portable and mobile RF
communications equipment (transmitters) and the BioModule as recommended below, according to
the maximum output power of the communications equipment.
Rated maximum output power
of transmitter
W (watts)
Separation distance according to frequency of transmitter
m (meters)
150 kHz to 80 MHz
1.2
√
80 MHz to 800 MHz
1.2
√
800 MHz to 2.5 GHz
2.3
√
0.01 0.12 0.12 0.23
0.1 0.38 0.38 0.73
1 1.2 1.2 2.3
10 3.8 3.8 7.3
100 12 12 23

64
9700.0205.v7b ©2016 Zephyr Technology, All Rights Reserved 24-NOV-2016
Patient Guide
For transmitters rated at a maximum output power not listed above, the recommended separation
distance d in meters (m) can be estimated using the equation applicable to the frequency of the
transmitter, where P is the maximum output power rating of the transmitter in watts (W) according to
the transmitter manufacturer.
Note 1 At 80 MHz and 800 MHz, the separation distance for the higher frequency range applies.
Note 2 These guidelines may not apply in all situations. Electromagnetic propagation is affected by
absorption and reflection from structures, objects and people.
NOTE: The manufacturer is not responsible for any radio or TV interference caused by unauthorized
modifications to this equipment.
This device complies with Part 15 of FCC Rules. Operation is subject to the following two conditions:
(1) This device may not cause harmful interference, and (2) This device must accept any interference
received, including interference that may cause undesired operation.
Any computer used in conjunction with this device must be covered by a Declaration of Conformity or
must be FCC certified in its own right.
The product is tested and validated with the components which are supplied with the ZephyrLIFE Home
Kit. Substituting any portion of the kit may alter functionality of the kit. Use only parts which are supplied
with the kit.
Changes or modifications to the BioModule and/or BioModule Holder may void the user’s authority to
operate this equipment.
Warranty
FCC Declaration

65
9700.0205.v7b ©2016 Zephyr Technology, All Rights Reserved 24-NOV-2016
Patient Guide
A device is considered used for active patient monitoring when it is:
relied upon for information necessary to make an immediate medical decision, or
used for continuous patient monitoring.
Appendix I Active Patient Monitoring