Zeroplus Technology N007 X1 to P4 wireless controller Adapter User Manual XoneAdapter 201801pV4 20180125
Zeroplus Technology Corporation X1 to P4 wireless controller Adapter XoneAdapter 201801pV4 20180125
User Manual
How to install
Notice!
Plug the Micro
USB properly
Step 1. Step 2.
Place X One Adapter
into Xbox One
controller.
Remove the Xbox One
controller battery cover
and take out the batteries.
X One Adapter enables you to use Xbox One controller
to play games on Nintendo Switch, PS4, PC and Xbox
One.
Micro
USB
Input
Reset
Button
• Brook Key
• Power
On/Off
• LED display
Micro
USB
Output
*If there’s any problem with
X One Adapter, press the
reset button to reset.
1. Please keep away from electrical conductive
objects.
2. Please do not disassemble the battery or place it
in high temperature enviroment.
3. Please recycle the battery when you don’t use it.
Cautions
For more details please visit our official website at
www.brookaccessory.com
We back you up Brook Gaming
version
201801pV4
本製品 X One adapter は、Xbox One シリーズ用コントローラーに
つなぐことで Nintendo Switch 、PlayStation 4、 Personal Computer 、
Xbox One 本体と接続してゲームできるようにするアダプターです。
取り付け方 注意
!プラグインマイク
ロ USB が正しく差し
込んでください
Step 1. Step 2.
X One アダプターを
Xbox One コント ロ ー
ラーにつなぎます。
Xbox One コントローラー
の電池ふたを外して電池
を取り出します。
マイクロ
USB
入力
マイクロ
USB
出
力
Reset
ボタン
• Brook Key
•
電源
On/Off
• LED
*お使いの X One アダプターが動
作していないときは Reset ボタ
ンを押して再 起動してください。
詳細は当社のホームページにてご確認ください
www.brookaccessory.com
We back you up Brook Gaming
バ ー ジョン
201801pV4
ZPMN023
マイクロ USB 5V / 500 mA (min)
DC 5V
800 mAh
L41mm x W25mm x H6.5mm
15±2g (電池を含む)
型番
入力
出力
容量
体積
重量
注意
1.導電性の物体に近づけないでください。
2.電池を取り外したり高温の場所に置いたり
しないでください。
3.電池を処分する際は環境にご留意ください。
Turbo 連打設定モード
A、B、X、Y、LB、RB、LT、RT、LTS B 、RTSB、
Paddles (1、2、3、4) の全 14 ボタン(以下 FK と
表記します)をボタン対応および連打設定に使え
ます。
Step
モードに
入る
モードを
出る
連 打 ボタン
設定
連 打 ボタン
取り消し
連打設定
の確認
すべての連打
の取り消し
+
XboxView
+
View Menu
Xbox
Menu
FK
(複数選択可)
FK
(複数
選択可)
+
View
1
2
3
4
5
備考
* 任意のモードで
Brook key
+ Menu を押
すと Turbo 設定をバックアップできます。
View ボタンを押して
いる間、押された FK
ボタン(複数可)は
連打機能を設定され
ます。例:
View + A, X, LB...
View が押されていな
い間に押された FK
(複数選択可)のボ
タン連打機能は取り
消されます。
例: A, X, LB...
モードに入ると
View+Menu を
押す。
Step
モードに
入る
モードを
出る
対応を変更
したいボタン
の選択
例:Xボタンを押す
対応を変更
したいボタン
の選択
モードに入ると組
み合わせボタン
を押す
対応設定
の確認
すべての対応
設 定 の 取り消し
+
View Menu
Xbox
Menu
1
2
3
4
5
備考
組み合わせボタン対
応設定が可能です。
例:Xを(→+A+B)
に設定
Remap 機能では↑、 ↓、 ←、 →、A、B、X、Y、
LB、RB、LT、RT、LTS B 、RTSB の全 14 ボタン(以下
FB と表記します)を組み合わせボタン対応設定に
使えます。
Remap ボタン対応変更設定モード
+
Xbox
Menu
FB
(複数選択不可)
FB
(複数
選択可)
+
View
設定を確認する
* 任意のモードで
Brook key
+ Menu を押
すと Remap 設定をバックアップできます。
View が押されてい
る間に押されたすべ
ての FB ボタンが、
対応させたいボタン
として設定されます。
例:View+(→+A+B)
を押す
Turbo Setting
Turbo function available buttons: A、B、X、Y、
LB、RB、LT、RT、LTS B 、RTSB、Paddles (1、2、
3、4) , in total 14 buttons (referred to as FK). For
paddels, you need to clear the original setting on
Xbox One before setting turbo on them.
Step
Enter
Mode
Exiting
Setting
Set
Turbo Key
When View button is
pressed, the pressed FK
buttons will be set to
have turbo function.
i.e. : View+A, X, LB...
Cancel
Turbo Key
Simply pressing the
indicated button
without pressing View.
i.e. : A, X, LB...
Cancel all turbo
settings in Enter
Mode.
Conrm
Turbo key
Cancel All
Turbo Setting
+
XboxView
+
View Menu
Xbox
Menu
FK
(multiple)
FK
(multiple)
+
View
1
2
3
4
5
Note
*Press Brook Key + Menu (LED display will
go off) to save the Turbo setting.
Step
Enter
Mode
Exiting
Setting
Remap
Button
Selection
i.e. : press X
Remap
Button
Selection
When pressing the
View button, the
pressed FB buttons
will all be set.
i.e. :
View + (→+A+B)
Cancel all remap
settings in Enter
Mode.
Conrm
Remap Setting
Cancel All
Remap Setting
+
View Menu
Xbox
Menu
1
2
3
4
5
Note
Can do complex
button setting.
i.e. : Set X to
(→ + A + B)
Remap function available buttons: ↑、 ↓、 ←、
→、A、B、X、Y、LB、RB、LT、RT、LTS B 、
RTSB, in total 14 buttons (referred to as FB) .
Remap Setting
+
Xbox
Menu
FB
(Choice one)
FB
(Optional)
+
View
Setting confirm.
*Press Brook Key + Menu (LED display will
go off) to save the Remap setting.
xbox one wireless
adapter &
rechargeable
battery
xbox one wireless
adapter &
rechargeable
battery
Y
A
XB
3
On Xbox One
+X
1X One Adapter
in Xbox One mode
Wireless
Xbox One
*Make sure the controller has synced with
the Xbox One console before.
2Short press the Brook Key
then immediately
press and hold
the Xbox Key until the paring
is completed. When Xbox
One is off, it can also boot
the Xbox One.
When X One Adapter is off:
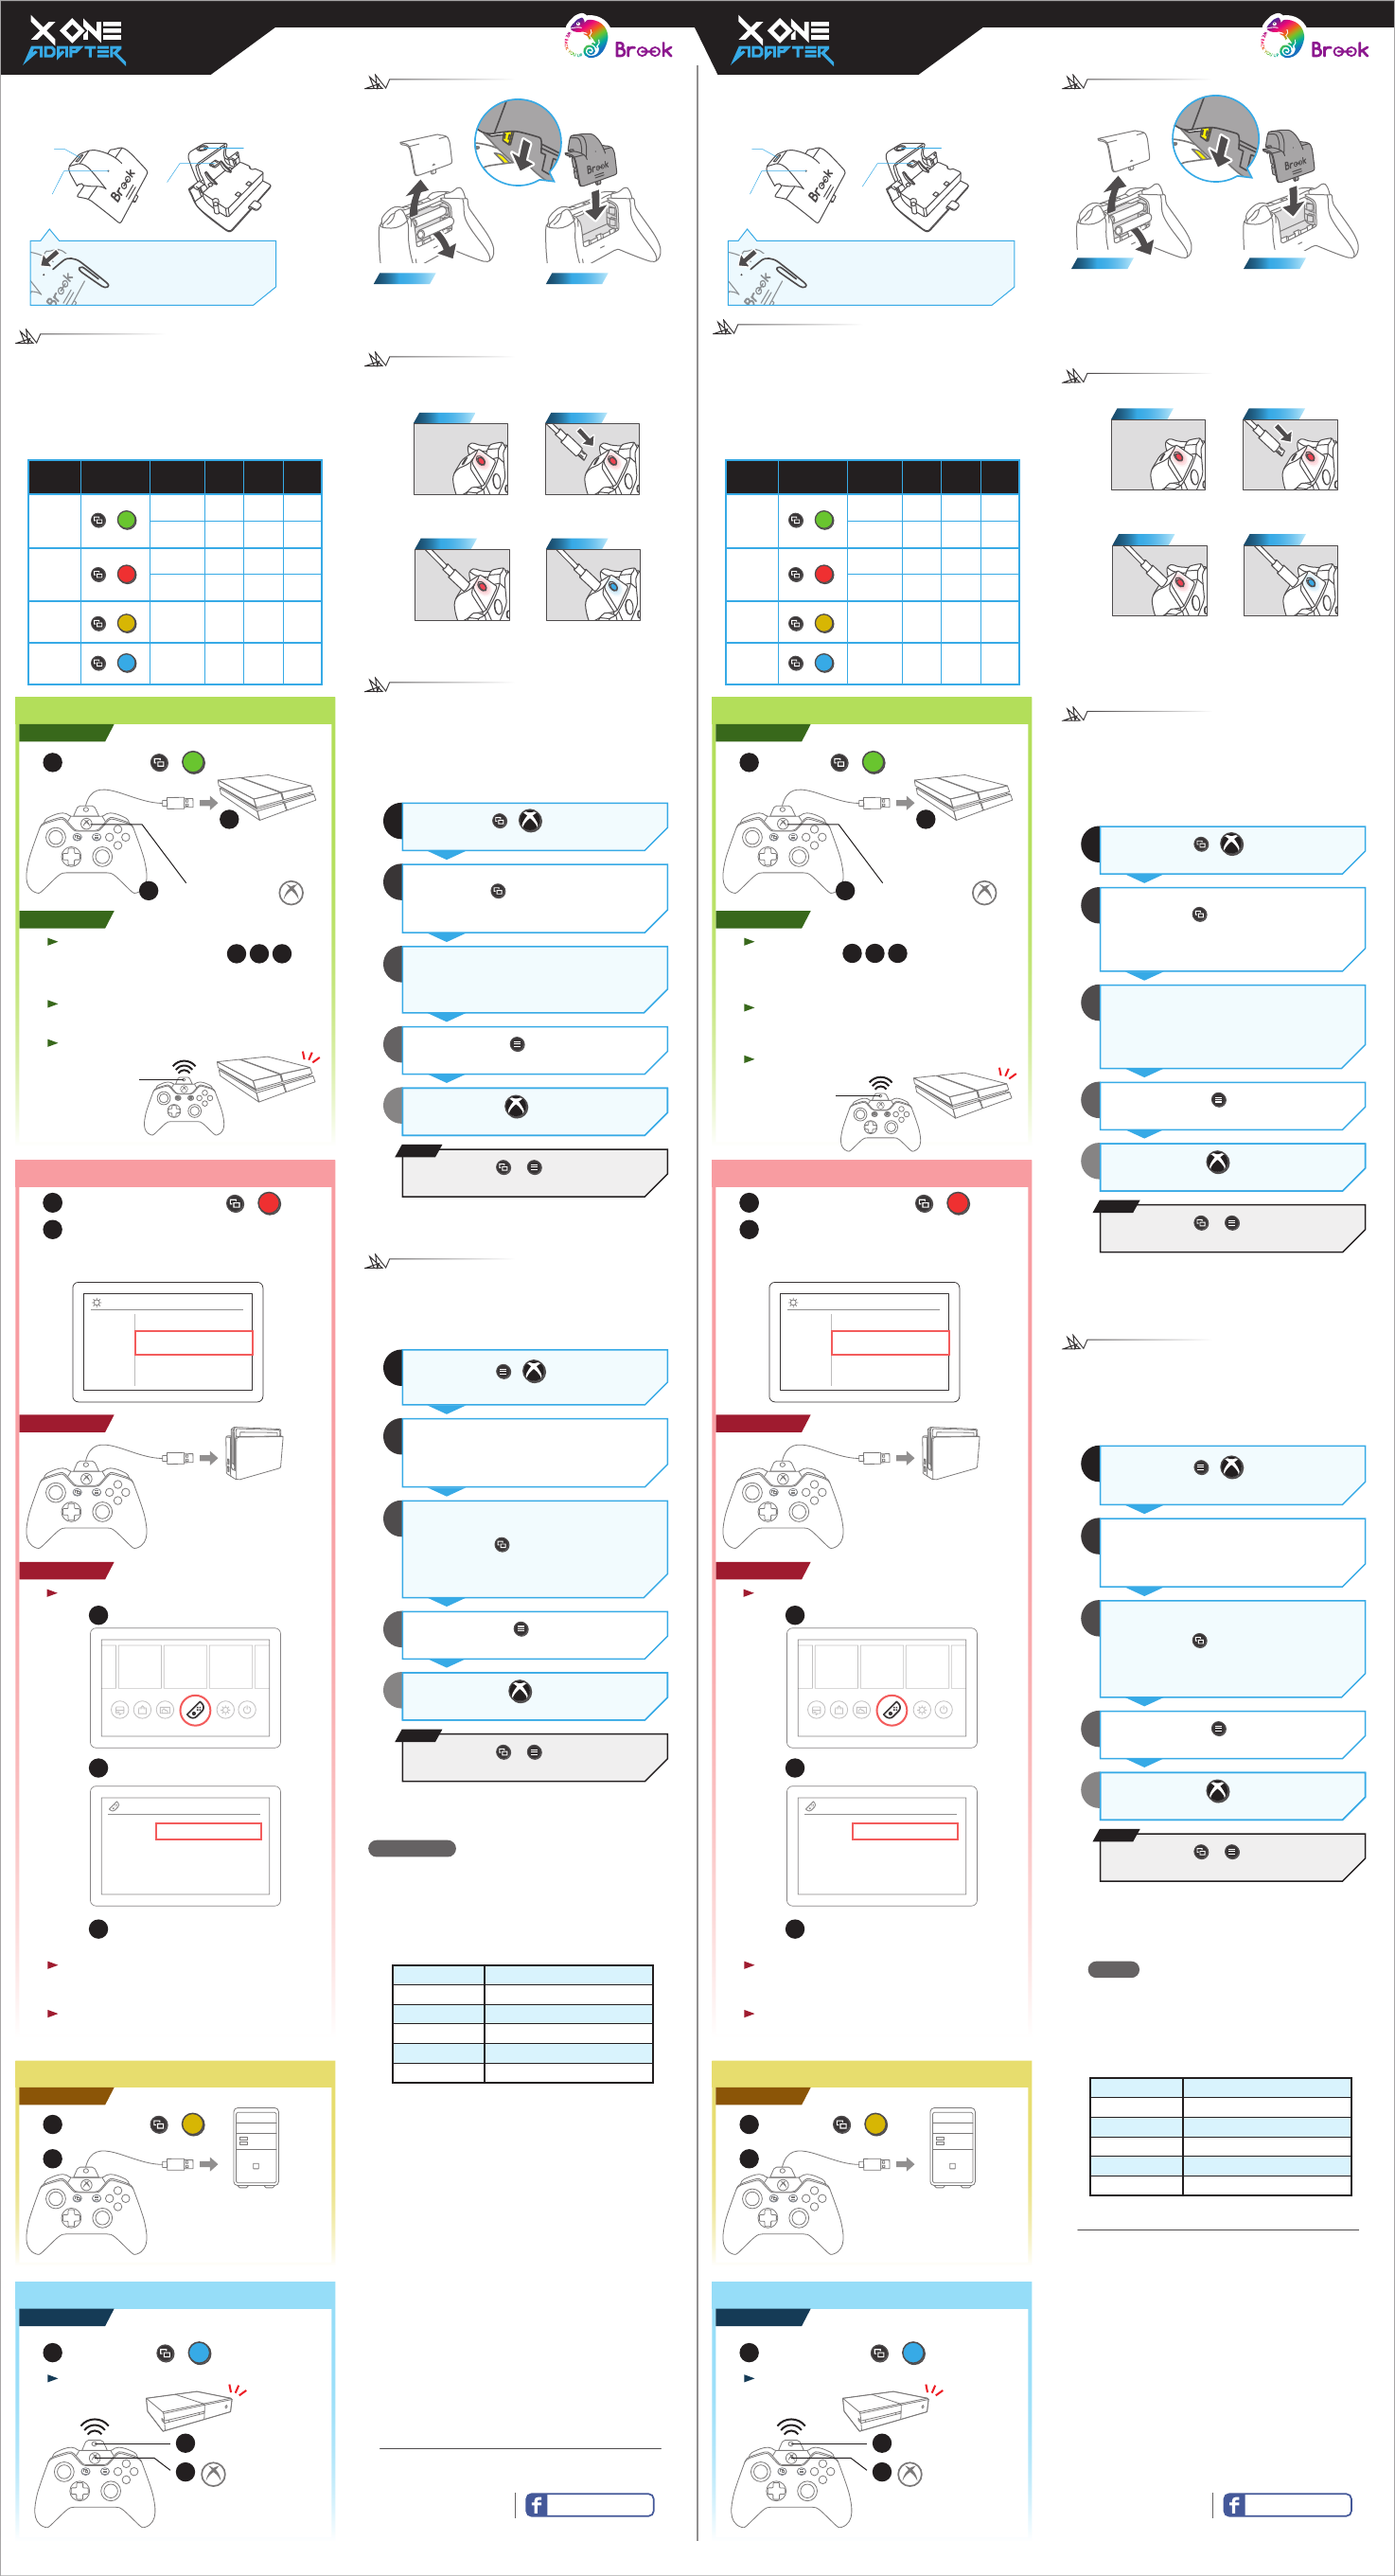
Device mode and pairing instruction
Mode Combo
Keys
Wired/
Wireless
Motion
Sensor
Vibration
Headset
Support
PS4
Switch
V V
V V
V V
V V
V
V
+A
+B
Xbox
One
V V
+X
Wired
Wireless
Wired
Wireless
Wired
Wireless
V+Y
XID
(PC)
How to switch between different modes:
1. When X One Adapter is off, long press the Brook Key for
about 2 seconds until the Brook Key LED starts to flash.
2. When the Brook Key LED starts to flash, long press the
combo keys until the LED goes off to switch to
according mode.
Wireless
For the first time use:
123
After completing wired use ,
disconnect the USB cable, and short press the
Brook Key to awake the controller for ues.
On PS4 (*Wired use for the rst time)
Wired
PS4
Y
A
X B
2
+A
1X One Adapter
in PS4 mode
3short press the Xbox key
PS4
short press the
Brook Key to
boot the PS4.
Y
A
XB
For future use:Short press the Brook Key to awake
the controller for wireless use.
When X One Adapter and PS4 are off:
Connect X One Adapter
to PS4 directly with a USB
cable.
Wired
Wireless
On Switch (*Wired use for the rst time)
+B
X One Adapter in Switch mode
1
Controllers
and Sensors
System Settings
Pro Controller
Wired Communication ON
On switch, go to System Settings → Controllers
and Sensors, and turn ON Pro Controller Wired
Communication.
2
Switch
Y
A
XB
Controllers
Change Grip/Order
Pair New Controllers
Close
Go to controllers
For the first time use:
1
“ Change Grip/Order ” and disconnect
the USB cable.
2
Long press the Brook Key for about
2 seconds for pairing.
3
For future use:When Switch has turned on, short
press the Brook Key to awake the
controller for wireless use.
Reboot Switch and do it again.
If it cannot be successfully paired:
1
Connect X One Adapter
to Switch dock directly with
a USB cable.
On PC
+Y
1X One Adapter
in XID mode
2
Wired
PC
Y
A
XB
Connect X One Adapter
to PC directly with a USB
cable.
Y
A
XB
3
Xbox One
とペアリング
+X
1Xbox One モード ー に
切り替えください。
無線でつなぐ
Xbox One
*事前にコントローラーが Xbox One とペア
リングできたかどうかご確認ください。
2短く Brook Key を押して
直ぐ Xbox キーを
長く押して本体と
つなぎます。 Xbox がOFF に
しても ON にさせられます。
X One Adapter が点灯していない状態 :
無線でつなぐ
初回設定 :
有線でつないで までのステプを完成す
る前提として、USB ケープルを本体からはずし、Brook
Key を押して無線でコントローラーを使えます。
123
PS4
とペアリング
(*初回必ず有線でつなぐ )
有線でつなぐ
PS4
Y
A
X B
2
+A
1PS4 モードに
切り替えます
3Xbox キーを短く押して
PS4
短く Brook
Key を押せば
PS4 本体を
ON にしさせ
ます。
Y
A
XB
初回設定済み :本体とつなぐ必要がありません。
そのままで Brook Key を押せば
PS4 で操作できます。
X One Adapter が点灯していない状態 :
USB ケープルで本体に
差し込みます
有線でつなぐ
無線でつなぐ
Switch
とペアリング
(*初回必ず有線でつなぐ )
+B
Swich モードー に 切り替えます
1
Controllers
and Sensors
System Settings
Pro Controller
Wired Communication ON
Switch 本体の設定画面の System Settings ->
Controllers and Sensors の Pro Controller Wired
Communication をON にしてください 。
2
Switch
Y
A
XB
Controllers
Change Grip/Order
Pair New Controllers
Close
Controller アイコ ン をクリックくだ さ い
初回設定 :
1
“ Change Grip/Order ” を選んで
2
Brook Key を2秒ぐらい 長押しペアリン
グ くだ さ い 。
3
初回設定済み :本体とつなぐ必要がありません。そ
のままで Brook Key を押せば
Switch で操作できます。
Switch 本 体 を レ ストくだ さ い 。
ペアリングよく出 来 ない 場 合 :
1
USB ケープルで本体に差し
込みましたら操作できます。
PC
とペアリング
+Y
1XID モードに
切り替えます
2
有線でつなぐ
PC
Y
A
XB
PC と接続すれば操作
できます。
How to charge
the battery and the LED display
Step 1.
Red light
Low power alert
Step 3.
Red light
In charging
Step 4.
Blue light
Fully Charged
Step 2.
Plug in with Micro
USB cable
充電方法 & LED
Step 1.
赤く点灯
充電残量が少なく
Step 3.
赤く点灯
充電中
Step 4.
青く点灯
充電完了
Step 2.
USB 充電ケーブルをジ
ャックに差し込みます
プラットフォー ム 選 択と本 体 ペアリング
設定方法
モード コンボ
キー
有線/
無線
モ ー ショ
ンセンサー
モーター
振動
オ ー ディ
オ入出力
PS4
Switch
V V
V V
V V
V V
V
V
+A
+B
Xbox
One
V V
+X
V+Y
XID
(PC)
1. X One Adapter が点灯していない時 , Brook Key ボタ
ン点灯するまで 2 秒長押しくだ さ い 。
2. 点灯してから、以下の表に合わせてコンボキーを
押して各プラットフォーム選択ください。
有線
無線
有線
無線
有線
無線
Model Number
Input
Output
Capacitance
Dimensions
Weight
ZPMN023
Micro USB 5V / 500 mA (min)
DC 5V
800 mAh
L41mm x W25mm x H6.5mm
15±2g (Battery Included)
FCC Statement
This device complies with part 15 of the FCC Rules. Operation is subject
to the following two conditions:
(1) This device may not cause harmful interference, and
(2) This device must accept any interference received, including
interference that may cause undesired operation.
NOTE
This equipment has been tested and found to comply with the limits for
a Class B digital device, pursuant to part 15 of the FCC Rules. These
limits are designed to provide reasonable protection against harmful
interference in a residential installation.
This equipment generates, uses and can radiate radio frequency energy
and, if not installed and used in accordance with the instructions, may
cause harmful interference to radio communications. However, there is
no guarantee that interference will not occur in a particular installation.
If this equipment does cause harmful interference to radio or television
reception, which can be determined by turning the equipment off and
on, the user is encouraged to try to correct the interference by one or
more of the following measures:
- Reorient or relocate the receiving antenna.
- Increase the separation between the equipment and receiver.
- Connect the equipment into an outlet on a circuit different from
that to which the receiver is connected.
- Consult the dealer or an experienced radio/TV technician for help.
Changes or modifications not expressly approved by the party
responsible for compliance could void the user’s authority to operate
the equipment.
X One 轉接器可將 Xbox One 系列手把透過轉接器與
Nintendo Switch 、PlayStation 4、 Personal Computer
和 Xbox One 主機連線進行遊戲。
Micro
USB
輸入
重置鈕
Micro
USB
輸出
• Brook Key
• 電源
On/Off
• 燈號顯示
如何充電 &燈號顯示
Step 1.
紅燈長亮
低電量警示 :
Step 3.
紅燈長亮
充電中 :
Step 4.
藍燈
充電完成 :
Step 2.
將USB 充電線插入
X One 轉接器的接頭
如何安裝
注意 :
Micro USB 須確實
與插孔緊合
Step 1. Step 2.
將 X One 轉接器與
Xbox One 手把結合
將Xbox One 手把的電
池背蓋取下,並將電
池取出
當您的 X One 轉接器當機或
停止運作時,請按下 reset
按鈕重啟
*
We back you up Brook Gaming
版本
201801pV4
更多詳細操作請上 Brook 官網查詢
www.brookaccessory.com
型號
輸入
輸出
容量
尺寸
重量
ZPMN023
/ Model: X One Adapter
Micro USB 5V / 500 mA (min)
DC 5V
800 mAh
長41mm x 寬25mm x 高6.5mm
15±2 公克 ( 包含電池 )
1. 請遠離相關導電物體
2. 請勿隨意拆解電池或放置於高溫中
3. 電池請回收處理,不任意拋棄
注 意
X One 轉接器可將 Xbox One 系列手把透過轉接器與
Nintendo Switch 、PlayStation 4、 Personal Computer
和 Xbox One 主機連線進行遊戲。
Micro
USB
輸入
重置鈕
Micro
USB
輸出
• Brook Key
• 電源
On/Off
• 燈號顯示
如何充電 &燈號顯示
步驟
1.
紅燈長亮
低電量警示 :
步驟
3.
紅燈長亮
充電中 :
步驟
4.
藍燈
充電完成 :
步驟
2.
將USB 充電線插入
X One 轉接器的接頭
如何安裝
注意 :
Micro USB 須確實
與插孔緊合
Step 1. Step 2.
將 X One 轉接器與
Xbox One 手把結合
將Xbox One 手把的電
池背蓋取下,並將電
池取出
當您的 X One 轉接器當機
或停止運作時,請按下
reset 按鈕重啟
*
We back you up Brook Gaming
版本
201801pV4
更多詳細操作請上 Brook 官網查詢
www.brookaccessory.com
型號
輸入
輸出
容量
尺寸
重量
ZPMN023
Micro USB 5V / 500 mA (min)
DC 5V
800 mAh
長41mm x 寬25mm x 高6.5mm
15±2 公克 ( 包含電池 )
1. 請遠離相關導電物體
2. 請勿隨意拆解電池或放置於高溫中
3. 電池請回收處理,不任意拋棄
注 意
Turbo 按鍵連發設定
可設定連發按鍵 (Turbo):A、B、X、Y、LB、
RB、LT、RT、LTSB、RTSB、按板 (1、2、3、4)
共14 顆按鍵 (以下稱為 FK )。 設定按板前,需
先將原設定清除。
Step
進入模式
退出模式
連發鍵
設定
連發鍵
取消
連發設定
確認
所有連發
取消
+
XboxView
+
View Menu
Xbox
Menu
FK
(可複選 )
FK
(可複選 )
+
View
1
2
3
4
5
附註
*按壓 Brook key + Menu (LED 燈會熄滅 )
可儲存 Turbo 設定
View 按壓期間內,
按下的 FK ( 可複
選)會被設定有連
發功能。例: View
+ A, X, LB...
View 未按壓,按下
的FK ( 可複選 )會
被取消連發功能。
例: A, X, LB...
進入模式後再按壓
組合鍵
Step
進入模式
退出模式
欲變更
對應之
按鍵選擇
例:單按 X
欲對應之
按鍵選擇
View 按住期間內
被按下的所有 FB
鍵,皆會被設定為
欲對應之按鍵。
例:按 View + (→
+A+B)
進入模式後再按壓
組合鍵
對應設定
確認
所有對應
設定取消
+
View Menu
Xbox
Menu
1
2
3
4
5
附註
能夠做複合按鍵對
應。例:X設為
(→+A+B)
可變更位置的按鍵 (Remap):↑、 ↓、 ←、
→、A、B、X、Y、LB、RB、LT、RT、LTSB、
RTSB 共14 顆按鍵功能 (以下稱為 FB )。
Remap 按鍵對應變更設定
+
Xbox
Menu
FB
(僅能單選 )
FB
(可複選 )
+
View
確認設定
*按壓 Brook key + Menu (LED 燈會熄滅 )
可儲存 Remap 設定
Turbo 按鍵連發設定
可設定連發按鍵 (Turbo):A、B、X、Y、LB、
RB、LT、RT、LTS B 、RTSB、按板 (1、2、3、4) 共
14 顆按鍵 (以下稱為 FK)。 設定按板前,需先將
原設定清除。
Step
進入模式
退出模式
連發鍵
設定
連發鍵
取消
連發設定
確認
所有連發
取消
+
XboxView
+
View Menu
Xbox
Menu
FK
( 可複選 )
FK
( 可複選 )
+
View
1
2
3
4
5
附註
*按壓 Brook key + Menu (LED 燈會 熄滅 )
可儲存 Turbo 設定
View 按壓期間內,
按下的 FK ( 可複
選)會被設定有連
發功能。例: View
+ A, X, LB...
View 未按壓,按下
的FK ( 可複選 )會
被取消連發功能。
例: A, X, LB...
進入模式後再按壓
組合鍵
Step
進入模式
退出模式
欲變更
對應之
按鍵選擇
例:單按 X
欲對應之
按鍵選擇
View 按住期間內
被按下的所有 FB
鍵,皆會被設定為
欲對應之按鍵。
例:按 View + (→
+A+B)
進入模式後再按壓
組合鍵
對應設定
確認
所有對應
設定取消
+
View Menu
Xbox
Menu
1
2
3
4
5
附註
能夠做複合按鍵對
應。例:X設為
(→+A+B)
可變更位置的按鍵 (Remap):↑、 ↓、 ←、 →、
A、B、X、Y、LB、RB、LT、RT、LTSB、 RTSB
共14 顆按鍵功能 (以下稱為 FB )。
Remap 按鍵對應變更設定
+
Xbox
Menu
FB
(僅能單選 )
FB
(可複選)
+
View
確認設定
*按壓Brook key + Menu (LED 燈會熄滅 )
可儲存 Remap 設定
在PC 上使用
+Y
1切至 XID 模式
2
有線使用
PC
Y
A
XB
接至 PC 即可使用
首次設定 : 完成有線使用設定 後,拔
掉USB,短按 Brook Key 喚醒手把使用。
123
在PS4 上使用 (*首次需有線使用 )
有線使用
無線使用
PS4
Y
A
X B
2
接至主機
+A
1切至 PS4 模式
3短按 鍵
PS4
短按 Brook Key
可將 PS4 開機
Y
A
XB
之後使用 : 不需接線,可直接短按 Brook Key 連接
至PS4 使用。
X One Adapter 熄燈狀態下 :
在Switch 上使用 (*首次需有線使用 )
有線使用
+B
1切至 Switch 模式
之後使用 : 不需接線,當 Switch 已開機,可直接短
按Brook Key 連接至 Switch 使用。
無法配對時 : 請將 Switch 重新開機。
Controllers
and Sensors
System Settings
Pro Controller
Wired Communication ON
打開 Switch 主機上的 System Settings →
Controllers and Sensors, 將 Pro Controller Wired
Communication 設定改為 ON。
2
Switch
Y
A
XB
接至主機即可使用
無線使用
Controllers
Change Grip/Order
Pair New Controllers
Close
點選 controllers 圖案
1
選擇 “ Change Grip/Order ”
2
長按 Brook Key 2秒進行配對。
3
首次設定 :
在PC 上使用
+Y
1切至 XID 模式
2
有線使用
PC
Y
A
XB
接至 PC 即可使用
首次設定 :完成有線使用設定 後,拔
掉USB,短按 Brook Key 喚醒手把使用。
123
在PS4 上使用 (*首次需有線使用 )
有線使用
無線使用
PS4
Y
A
X B
2
接至主機
+A
1切至 PS4 模式
3短按 鍵
PS4
短按 Brook Key
可將 PS4 開機
Y
A
XB
之後使用 :不需接線,可直接短按 Brook Key 連接
至PS4 使用。
X One Adapter 熄燈狀態下 :
在Switch 上使用 (*首次需有線使用 )
有線使用
+B
1切至 Switch 模式
之後使用 : 不需接線,當 Switch 已開機,可直接
短按 Brook Key 連接至 Switch 使用。
無法配對時 : 請將 Switch 重新開機。
Controllers
and Sensors
System Settings
Pro Controller
Wired Communication ON
打開 Switch 主機上的 System Settings →
Controllers and Sensors, 將 Pro Controller Wired
Communication 設定改為 ON。
2
Switch
Y
A
XB
接至主機即可使用
無線使用
Controllers
Change Grip/Order
Pair New Controllers
Close
點選 controllers 圖案
1
選擇 “ Change Grip/Order ”
2
長按 Brook Key 2秒進行配對。
3
首次設定 :
Y
A
X B
3
在Xbox One 上使用
+X
1切至 Xbox One 模式
無線使用 *需先確認此手把已跟 Xbox One 配對過
2短按 Brook Key
馬上長按 鍵至連
線至主機。Xbox One
主機關機狀態下,亦可
同時將主機開機。
Xbox One
X One Adapter熄燈狀態下:
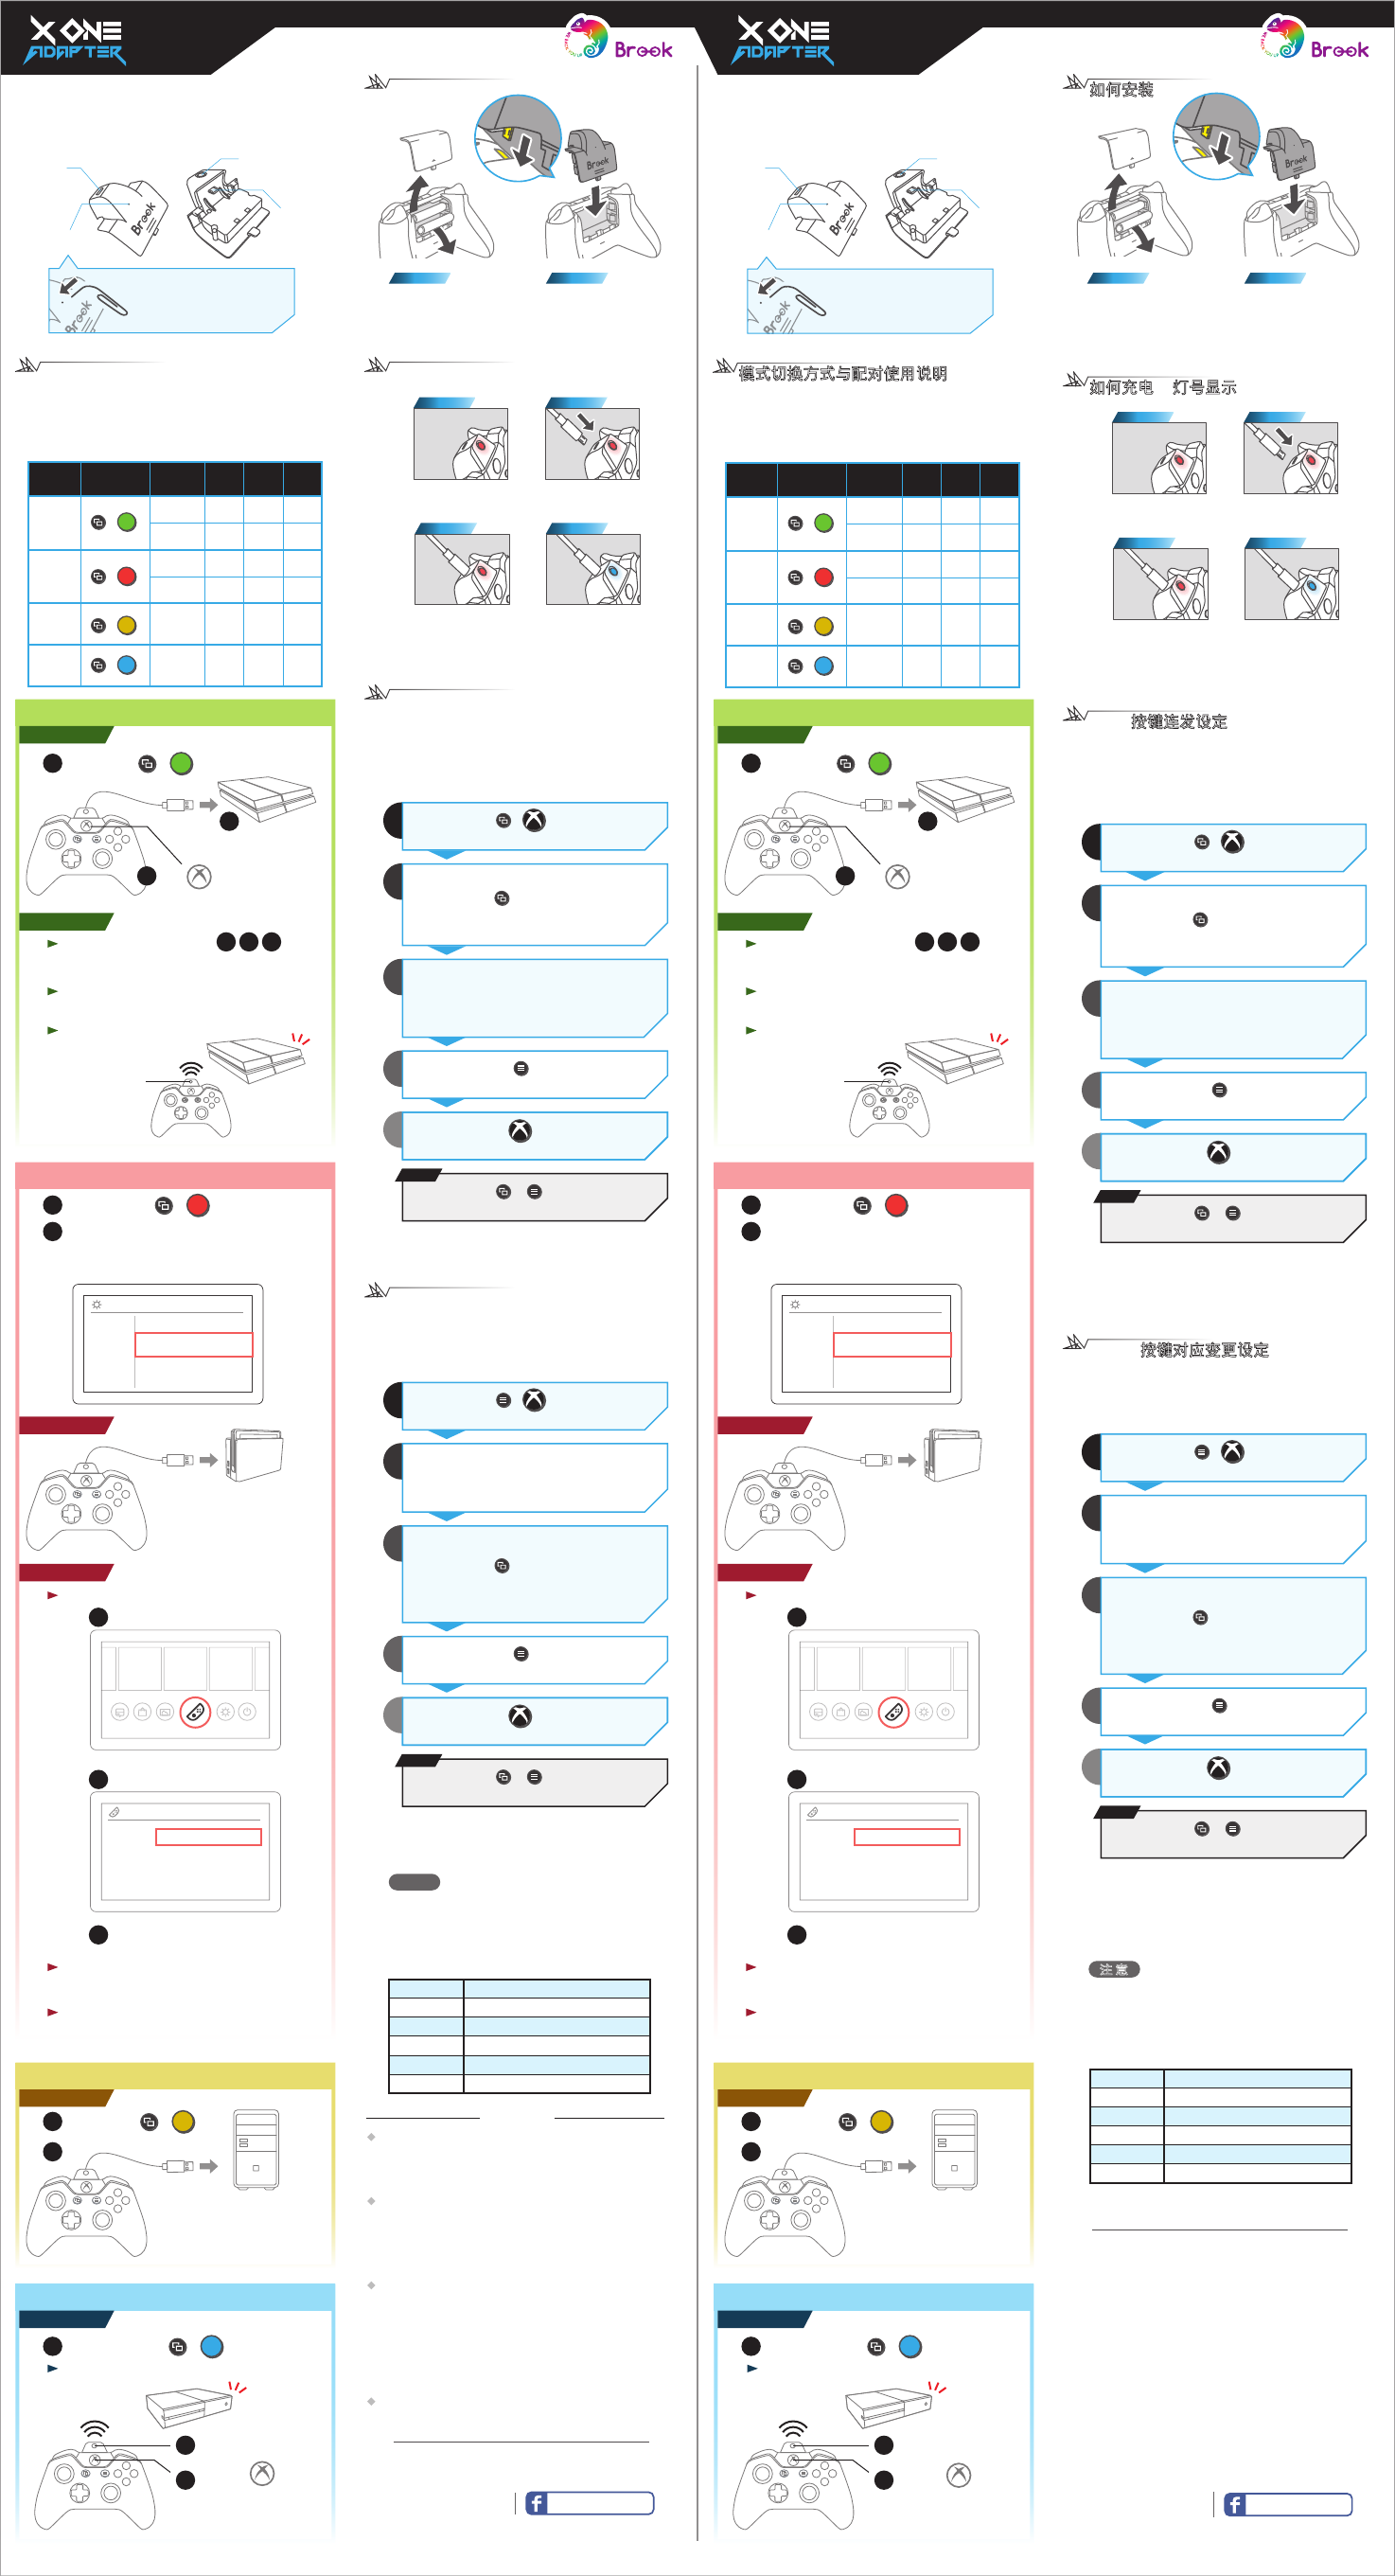
模式切換方式與配對使用說明
模式 組合鍵 體感
操作
使用 馬達
震動
耳機
麥克風
有線
PS4
Switch
無線
有線
無線
V V
V V
V V
V V
V
V
+A
+B
Xbox
One
無線 V V
+X
有線 V+Y
XID
(PC)
X One Adapter 熄燈狀態下 :
1. 長按 Brook Key 2 秒至 Brook Key 閃燈
2. 閃燈時,按壓組合鍵至熄燈以切至不同模式
模式切換方式與配對使用說明
模式 組合鍵 體感
操作
使用 馬達
震動
耳機
麥克風
有線
PS4
Switch
無線
有線
無線
V V
V V
V V
V V
V
V
+A
+B
Xbox
One
無線 V V
+X
有線 V+Y
XID
(PC)
X One Adapter 熄燈狀態下 :
1. 長按 Brook Key 2 秒至 Brook Key 閃燈
2. 閃燈時,按壓組合鍵至熄燈以切至不同模式
Y
A
X B
3
在Xbox One 上使用
+X
1切至 Xbox One 模式
無線使用
Xbox One
*需先確認此手把已跟 Xbox One 配對過
2短按 Brook Key
馬上長按 鍵至連
線至主機。Xbox One 主
機關機狀態下,亦可同
時將主機開機。
X One Adapter 熄燈狀態下 :
xbox one wireless
adapter &
rechargeable
battery
xbox one wireless
adapter &
rechargeable
battery
一般使用安全須知
使用本產品之前,請閱讀安全須知和操作指示的全部內容。請遵守所
有操作和使用指示。產品內部電池有任何損壞或洩漏跡象時,請勿對
產品進行充電。請勿焚燒本產品,請勿將本產品浸入任何液體中。
電池和充電
本產品只能使用所附帶之充電插座進行充電,不得搭配使用任何類型
的電源轉換器。一旦使用其他電源轉換器,產品保固將立即失效。
警告:請勿讓本電子產品電池或充電座 的電子元件外露。產品內部
組件一律不得由使用者自行維修,而應交由合格人員進行維修。
低功率電波輻射性電機管理辦法
第十二條:經型式認證合格之低功率射頻電機,非經許可,公司、商
號或使用者均不得擅自變更頻率、加大功率或變更原設計之特性及功
能。第十四條:低功率射頻電機之使用不得影響飛航安全及干擾合法
通信;經發現有干擾現象時,應立即停用,並改善至無干擾時方得繼
續使用。前項合法通信,指依電信法規定作業之無線電通信。低功率
射頻電機須忍受合法通信或工業、科學及醫療用電波輻射性電機設備
之干擾。
電氣安全相關注意事項
請勿讓兒童把玩本電子產品。
NCC 聲明