Zhejiang Dahua Vision Technology DH-PFWB5 Wireless Transmission Device User Manual 1
Zhejiang Dahua Vision Technology Co., Ltd Wireless Transmission Device 1
Users Manual
IP address Login
DHCP client Username: admin
(Fallback IP: 192.168.1.36) Password: admin
Model name DH-PFWB5-10n
Frequency -
Tx power Up to 13 dBm
(country
dependent)
EIRP 36 dBm
(country
dependent)
Antenna gain 20dBi
Power supply 24V DC
passive
PoE
Power consumption 4.5W
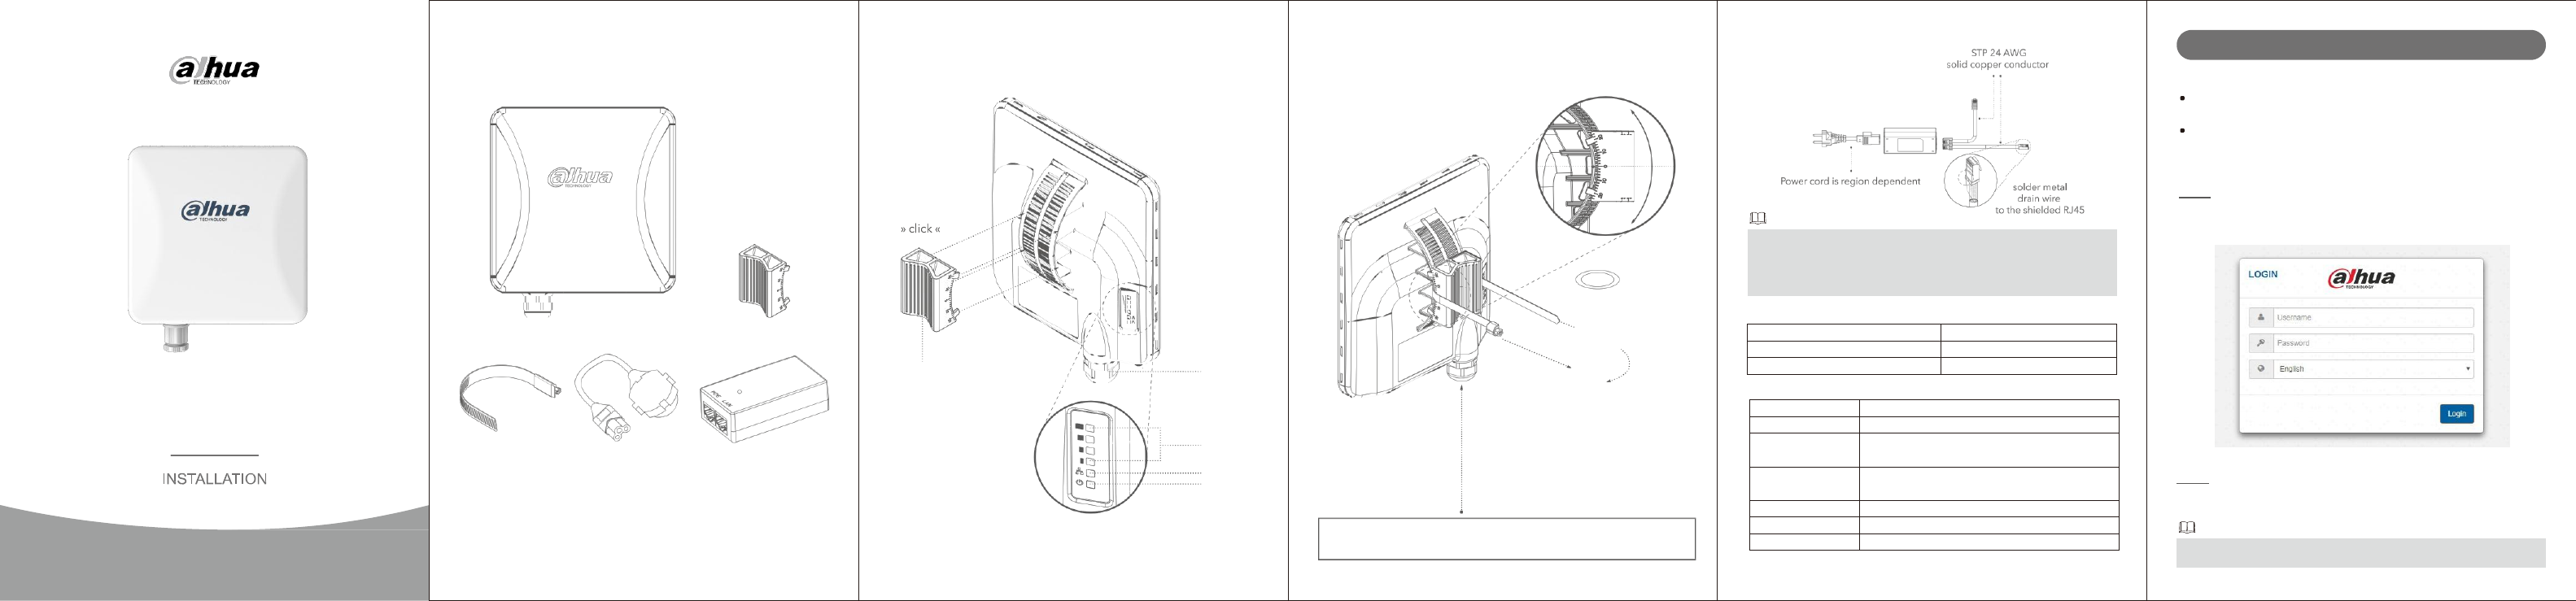
Package content Overview Mounting PoE
Connection
Configuration Steps
x1 x1
Mounting Part ETH+PoE
Note
Installation Requirements
Shielded Category 5 (or above) cabling should be used for all wired Ethernet
connections and grounded through AC ground of PoE. For all outdoor
installations, we recommend that you use Ethernet Surge Protectors near the
device, which will absorb power surges and discharge them into the ground.
Default Login
settings
Parameters
Precondition
Please ensure that PC has been connected with LAN port of PoE power
of wireless device.
IP address of PC and IP address of the device (default one is 192.168.
1.36) are set to be in the same network segment.
Operating
Steps
Step 1
Open Internet Explorer, input default IP address of wireless device in the
address bar and press [Enter] key.
x1 x1 x1 RSSI LEDs
LAN LED
Power LED
Step 2
Figure 1-1
1.2.51.32.13587-000
Device cable gland must be positioned vertically downwards
to protect it against water ingress.
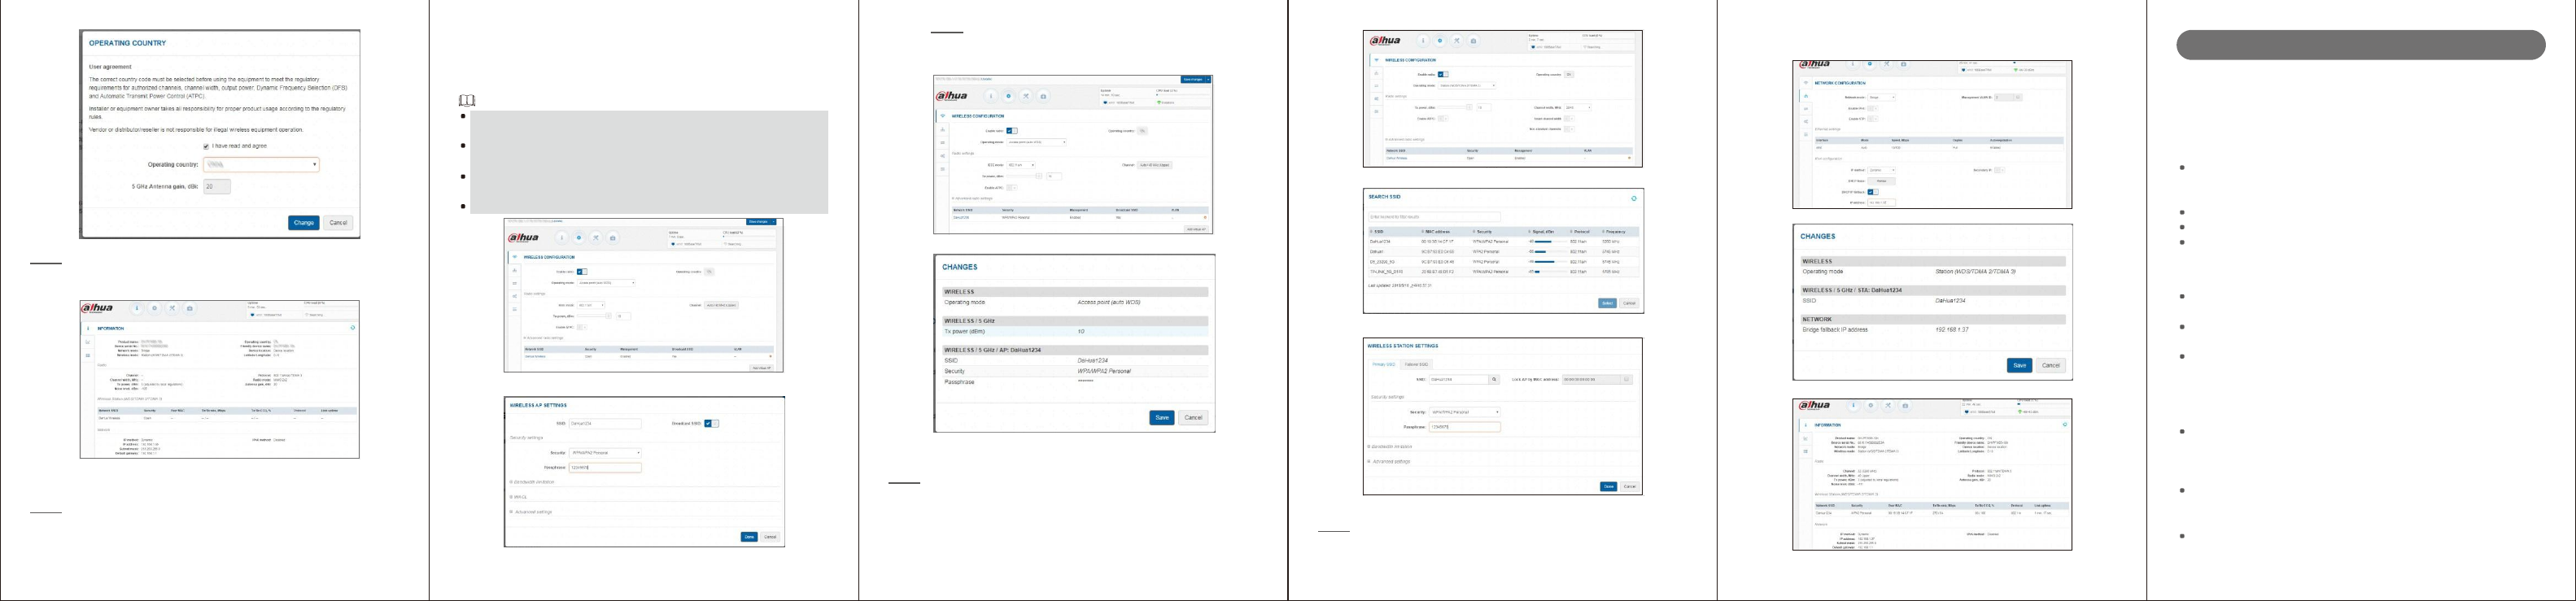
Input the username and password, and click “Login”.
The system displays the following interface, as shown in Figure 1-2.
Note
Default username and password are admin. It is suggested that a password
with high security should be set and password should be modified regularly.
- 01 - - 02 - - 03 - - 04 - - 05 -
5.150-5.250GHz 5.725-5.850GHz
Wireless Access Point (TDMA2), Access Point (TDMA3), Station (WDS/
TDMA2/TDMA3) . Click setting icon at the lower right corner of SSID, set
SSID and security info, and click “Done”, as shown in Figure 1-5.
Note
There is no occlusion between the devices
The device connected with camera is set to be “Station (WDS/TDMA2/
TDMA3)” mode.
The device connected with machine room is set to be "Access Point
(Auto WDS)" mode.
Step 5
Click “Save Changes” at the top right corner as shown in Figure 1-6, and
then click “Save” as shown in Figure 1-7.
Figure 1-8
top right corner, as shown in Figure 1-12, and click “Done”. It displays
normal connection status, as shown in Figure 1-13. Important Safeguards and Warnings
The following description is the correct application method of the device.
Please read the manual carefully before use, in order to prevent danger
and property loss. Strictly conform to the manual during application and
keep it properly after reading.
Operating
Requirement
Please don’t drip or splash liquids onto the device; don’t put on the device
anything filled with liquids, in order to prevent liquids from flowing into
the device.
Step 3
Figure 1-2
Please select WDS mode for transparent transmission of data.
Figure 1-6
Figure 1-11 Use the device only within rated input and output range.
Please don’t dismantle the device arbitrarily.
Please transport, use and store the device within allowed humidity and
temperature range.
Tick “I have read and agree”, select operating country and click “Change”.
The system displays the following interface, as shown in Figure 1-3.
Figure 1-3
Figure 1-4
Station
Configuration
Step 6
Figure 1-7
Figure 1-9
Figure 1-12
About this
Document
The Manual is for reference only. If there is inconsistency between the
Manual and the actual product, the actual product shall prevail.
We are not liable for any loss caused by the operations that do not comply
with the Manual.
The Manual would be updated according to the latest laws and regulations
of related regions. For detailed information, see the paper User's Manual,
CD-ROM, QR code or our official website. If there is inconsistency
between paper User's Manual and the electronic version, the electronic
version shall prevail.
All the designs and software are subject to change without prior written
notice. The product updates might cause some differences between the
actual product and the Manual. Please contact the customer service for
the latest program and supplementary documentation.
Wireless Access Point
Configuration:
Step 4
Click “Settings > Wireless Configuration”, as shown in Figure 1-4. Set
Click “Settings > Wireless Configuration”, as shown in Figure 1-8; select
operating mode to be “Station (WDS/TDMA2/TDMA3)”. Click setting icon
at the lower right corner of SSID, as shown in Figure 1-9. Click "Refresh"
Step 7
Figure 1-10
There still might be deviation in technical data, functions and operations
description, or errors in print. If there is any doubt or dispute, please refer
to our final explanation.
frequency and channel; set the wireless operating mode to be Access
Point (auto WDS). There are 5 operating modes: Access Point (auto WDS),
Figure 1-5
icon at the top right corner. Search SSID of access point, click “Select”,
enter SSID passphrase and click “Done”, as shown in Figure 1-10.
Select “Network Configuration”, and modify IP address to be 192.168.1.37
as shown in Figure 1-11, in order to avoid IP conflict. Click “Save” at the
Figure 1-13
Upgrade the reader software or try other mainstream reader software if
the Guide (in PDF format) cannot be opened.
- 06 - - 07 - - 08 - - 09 - - 10 - - 11 -

Regulatory Information
FCC Information
Changes or modifications not expressly approved by the party
responsible for compliance could void the user's authority to
operate the equipment.
CAUTION
FCC conditions:
This device complies with part 15 of the FCC Rules. Operation
is subject to the following two conditions:
This device may not cause harmful interference.
This device must accept any interference received, including
interference that may cause undesired operation.
FCC compliance:
The regulatory information herein might vary according to the
model you purchased. Some information is only applicable for
the country or region where the product is sold.
This equipment has been tested and found to comply with the
limits for a digital device, pursuant to part 15 of the FCC Rules.
This equipment generates, uses, and can radiate radio frequency
en ergy a nd, if not i nstalle d and u sed in accord ance w ith the
instructions, may cause harmful interference to radio
communication.
For class A device, these limits are designed to provide
reasonable protection against harmful interference in a
commercial environment. Operation of this equipment in a
residential area is likely to cause harmful interference in which
case the user will be required to correct the interference at his
own expense.
For class B device, these limits are designed to provide
reasonable protection against harmful interference in a
residential installation. However, there is no guarantee that
interference will n ot occur in a p articular installation. If this
equipment does cause harmful interference to radio or
television reception, which can be determined by turning the
equipment off and on, the user is encouraged to try to correct
the interference by one or more of the following measures:

Reorient or relocate the receiving antenna.
Increase the separation between the equipment and receiver.
Connect the equipment into an outlet on a circuit different
from that to which the receiver is connected.
Consult the dealer or an experienced radio/TV technician for
help.
SDOC Statement: https://us.dahuasecurity.com/support/notices/
Privacy Protection Notice
As the device user or data controller, you might collect personal data
of others such as face, fingerprints, car plate number, Email address,
phone number, GPS and so on. You need to be in compliance with
the local privacy protection laws and regulations to protect the
legitimate rights and interests of other people by implementing
measures include but not limited to: providing clear and visible
identification to inform data subject the existence of surveillance
area and providing related contact.
1.2.51.32.13688-000
Please take attention that changes or modification not expressly
approved by the party responsible for compliance could void the
user’s authority to operate the equipment.
This equipment complies with FCC/IC RSS-102 radiation exposure
limits set forth for an uncontrolled environment. This equipment
should be installed and operated with minimum distance 20cm
between the radiator & your body.