Zhejiang Dahua Vision Technology VCS-TS51A0 VIDEO CONFERENCING ENDPOINT User Manual
Zhejiang Dahua Vision Technology Co., Ltd VIDEO CONFERENCING ENDPOINT Users Manual
User manual

Dahua Video Conference Terminal User’s Manual
Dahua Video Conference Terminal User’s Manual
Version 1.0.0
Dahua Technology Co., LTD

Dahua Video Conference Terminal User’s Manual
i
Welcome
Thank you for purchasing our video conference terminal!
This quick start guide is designed to be a reference tool for your system.
Please read the following safeguard and warnings carefully before you use this series product!
Please keep this user’s manual well for future reference!
Important Safeguards and Warnings
1.Attention
Please modify the user’s default password after the device operates in case of being stolen.
Please do not keep or install the device in a place with direct sunlight or near heat-producing
equipment.
Please do not install the device in a place which is wet, dusty or with soot.
Please ensure horizontal installation for the device or it is installed in a stable place, and pay
attention not to make the product fall.
Please do not allow liquid dripping or splashing onto the device and make sure no object filled with
liquid is placed on the device, which is to avoid the liquid flowing into the device.
Please install the device in a place with sound ventilation, and do not block the ventilation opening
of the device.
Please use the device only within the rated input output range.
Please do not dismantle the device unprofessionally.
2.Warning
All installation and operation here should use your locally recommended wire module (power cable),
and make sure it is applied within the fixed standard.
The power shall conform to the requirement in the SELV (Safety Extra Low Voltage) and the rated
voltage power supply of Limited power source according to the IEC60950-1. The exact power
supply requirement is subject to the device label.
Please make disconnecting device conveniently operable if using power plug or appliance coupler
as disconnecting device.
3. Statement
Please refer to the actual product for more details; the manual is just for reference.
The manual will be regularly upgraded according to the product update; the upgraded content will
be added in the manual without prior announcement.
The company is not liable for any loss caused by the operation which is not followed by the manual.
There may be deviation between the actual value of some data and the value provided in the
manual due to the reasons such as the real environment is not stable and so on. Please refer to
the company’s final explanation if there is any doubt or dispute.
Other trademarks or company names may be mentioned in this manual, which belong to their
respective owners.

Dahua Video Conference Terminal User’s Manual
ii
Table of Contents
1 Product Overview ....................................................................................................................... 1
1.1 Brief Introduction .......................................................................................................... 1
1.2 Features ......................................................................................................................... 1
1.3 Structure Figure ............................................................................................................ 1
1.3.1 Structure Figure of Video Conference Terminal ............................................... 1
1.3.2 Remote Control ...................................................................................................... 2
2 Product Networking .................................................................................................................... 6
3 Product Installation ..................................................................................................................... 7
3.1 Packing List ................................................................................................................... 7
3.2 Video Conference Terminal Installation .................................................................... 7
3.2.1 Hang Mount ............................................................................................................ 7
3.2.2 Wall Mount .............................................................................................................. 8
3.2.3 Pendant ................................................................................................................... 9
4 Login ........................................................................................................................................... 11
4.1 Explanation before Login .......................................................................................... 11
4.2 Common Button Description of Remote Control ................................................... 11
4.3 Interface Introduction ................................................................................................. 11
5 System Operation ..................................................................................................................... 12
5.1 General ........................................................................................................................ 12
5.2 Network ........................................................................................................................ 12
5.3 Audio ............................................................................................................................ 13

Dahua Video Conference Terminal User’s Manual
iii
5.4 Video ............................................................................................................................ 14
5.4.1 Image Parameter ................................................................................................. 14
5.4.2 Encode .................................................................................................................. 16
5.5 Meeting ........................................................................................................................ 17
6 System Operation ..................................................................................................................... 19
6.1 Local Preview .............................................................................................................. 19
6.1.1 Adjust Local Preview Image .............................................................................. 19
6.1.2 Camera Preset Memory ..................................................................................... 19
6.2 Contacts ....................................................................................................................... 20
6.2.1 Create New Contact ............................................................................................ 20
6.2.2 Delete Contact ..................................................................................................... 21
6.2.3 Create New Group .............................................................................................. 22
6.2.4 Delete Group ........................................................................................................ 23
6.3 Join Meeting ................................................................................................................ 24
6.3.1 Create Meeting .................................................................................................... 24
6.3.2 Join Meeting ......................................................................................................... 27
6.4 Control Meeting .......................................................................................................... 28
6.4.1 Host Meeting Place ............................................................................................. 29
6.4.2 Non-host Meeting Place ..................................................................................... 41
6.5 Agenda ......................................................................................................................... 44
6.6 History .......................................................................................................................... 44
7 Appendix Ⅰ Technical Parameters .......................................................................................... 46
Dahua Video Conference Terminal User’s Manual
1
1 Product Overview
1.1 Brief Introduction
TS51A0 is a type of integrated video conference terminal with small size which is presented by
Dahua; it integrates HD digital camera and stereo microphone. The operation is so convenient
that it only needs to connect to power and network to realize video communication; the device
can be operated and controlled via remote control, keyboard, mouse and etc, which is quite
suitable for the video conference in the enterprise, government and crossed region; besides, it is
fit for home users as well.
1.2 Features
Apart from being portable and convenient installation of TS51A0, the device also owns the
following features:
Support mouse and keyboard operation, quick configuration.
Built-in Wi-Fi module, support wireless network connection.
Support data sharing.
Support built-in MCU.
1.3 Structure Figure
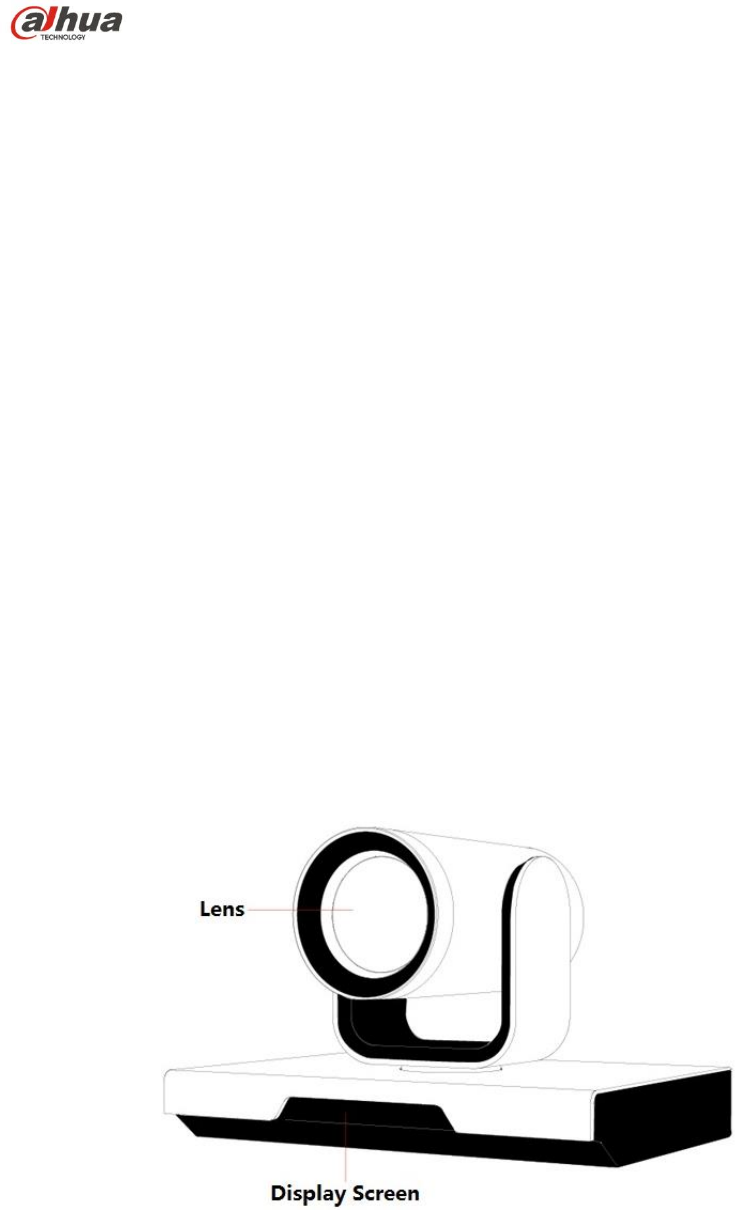
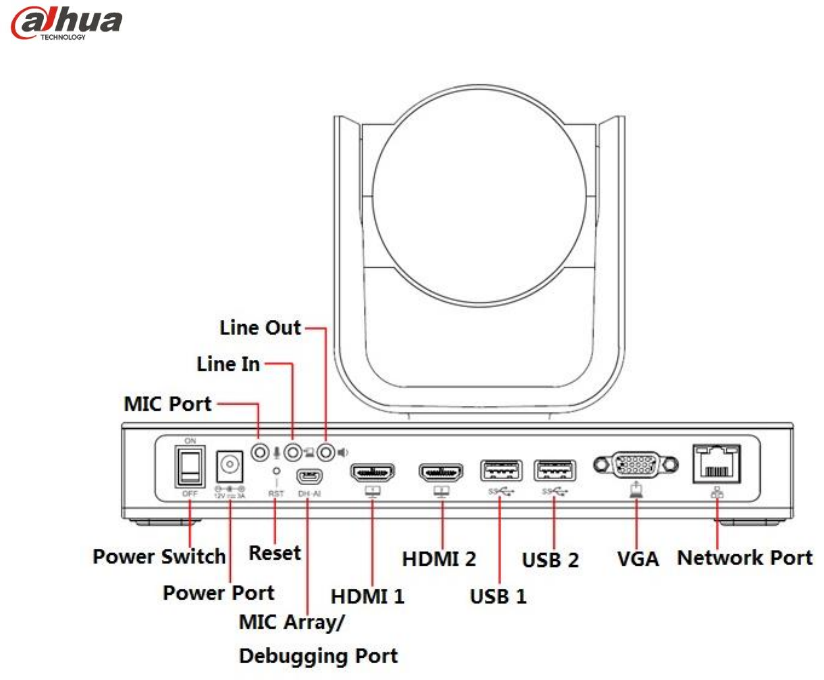
1.3.1 Structure Figure of Video Conference Terminal
Please refer to Figure 1-1 and 1-2 for the structure figure of video conference terminal.
Figure 1-1
Dahua Video Conference Terminal User’s Manual
2
Figure 1-2
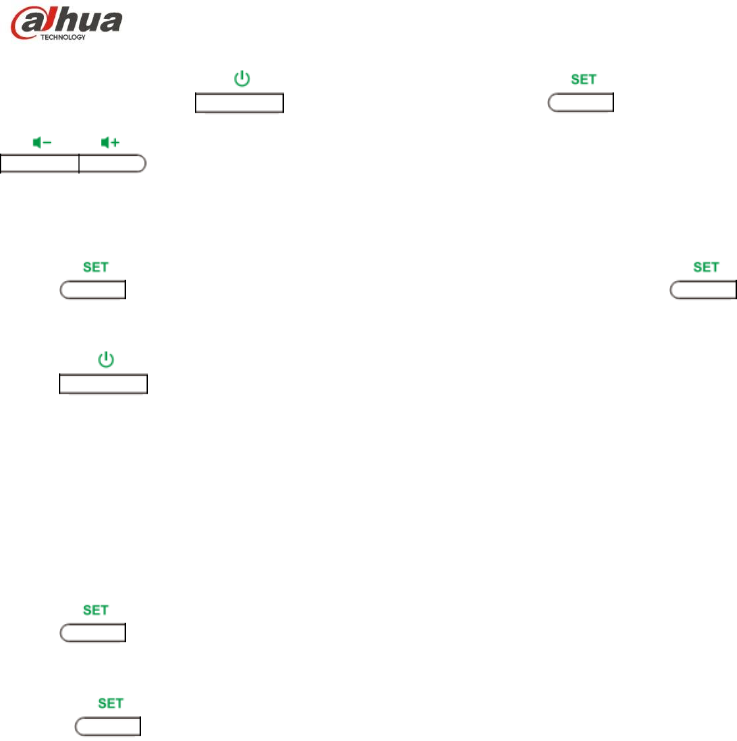
1.3.2 Remote Control
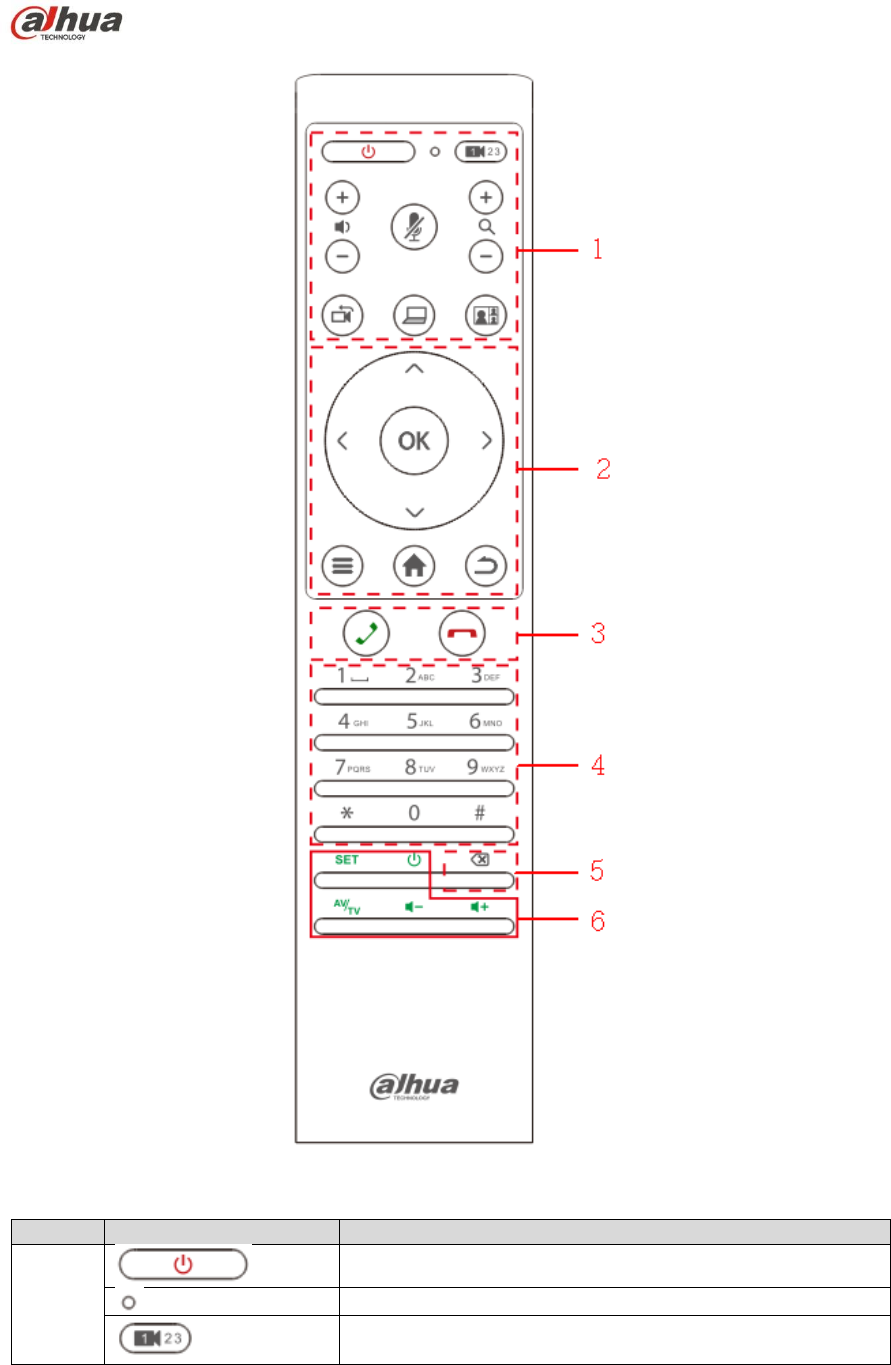
1.3.2.1 Structure Figure of Remote Control
Please refer to Figure 1-3 and Sheet 1-1 for the structure and button description of the remote
control.
Dahua Video Conference Terminal User’s Manual
3
Figure 1-3
SN
Name
Description
1
Used to turn on/off the device.
Indicator light
Option button for remote camera.
Dahua Video Conference Terminal User’s Manual
4
SN
Name
Description
Volume button for voice output
Mic mute
Zoom in or out, which can be checked via local preview
interface.
Remote/local camera switch.
One button to send demo after the device is correctly
connected to laptop.
Switch button for local screen layout.
2
UDLR direction button.
OK button
Menu button.
Home button.
Return button.
3
Call or have a meeting.
Hang up meeting.
4
Number button
Press number button continuously and it can switch to
English, character.
5
Backspace/Delete
6
Setting button.
TV power button.
HDMI signal source switch button.
TV volume button
Sheet 1-1
1.3.2.2 Button Matching
Dahua Video Conference Terminal User’s Manual
5
The TV power button , signal source switch button and TV volume adjust button
can work normally after they are matched.
Take TV power button matching for example, the operation steps are as follows:
Step 1
Press button till the red indicator light is on and then release the button.
Step 2
Press button, the red indicator light flashes.
Step 3
Match the device remote control with TV remote control; please keep the distance between 1 and
3cm.
If matching succeeds, then the red indicator light will flash three times and will be always on.
If matching fails, then the red indicator light will flash slowly once and will be normally on.
Step 4
Press button, the red light is off. Save matching code value and exit matching mode.
Note:
If press button and there is no signal input after 10 seconds, then the red indicator light
will be off and it will exit matching mode automatically.
Dahua Video Conference Terminal User’s Manual
6
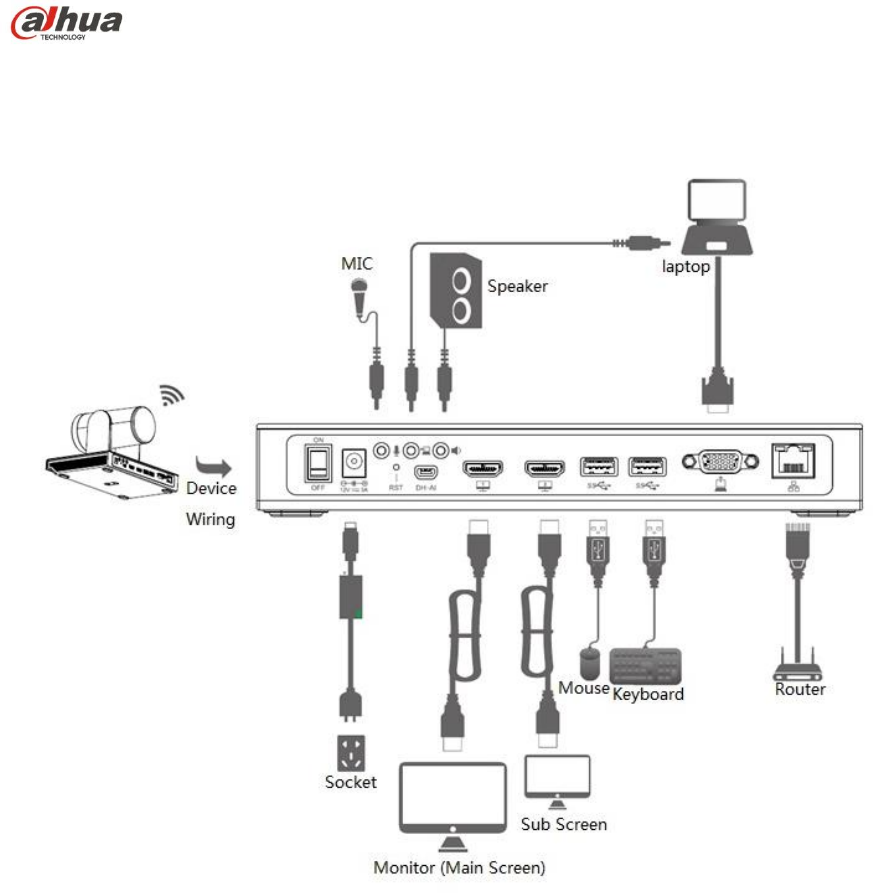
2 Product Networking
The networking of video conference terminal is shown in Figure 2-1.
Figure 2-1

Dahua Video Conference Terminal User’s Manual
7
3 Product Installation
3.1 Packing List
Please check the stuff according to sheet 3-1 before installation.
SN
Name
Figure
Quantity
Description
1
Terminal TS51A0
1
-
2
L-shaped bracket
1
Used for wall mount
and pendant of the
device.
3
Remote control
1
-
4
Battery
4
Used to provide
power for remote
control.
5
Power adapter
1
Used to connect to
power.
6
Power
connection
cable
1
Plug of power cable,
used to connect to
power cable and
switch on.
7
Network cable
1
Used to connect to
network.
8
HDMI cable
2
Used to connect to
monitor.
9
Screw
1
Used to fix the
pendant and device
bracket.
10
Quick start guide
1
Used to guide users
for quick installation,
how to connect and
use video terminal
device.
Sheet 3-1
3.2 Video Conference Terminal Installation
It supports three installation modes: hang mount, wall mount and pendant.
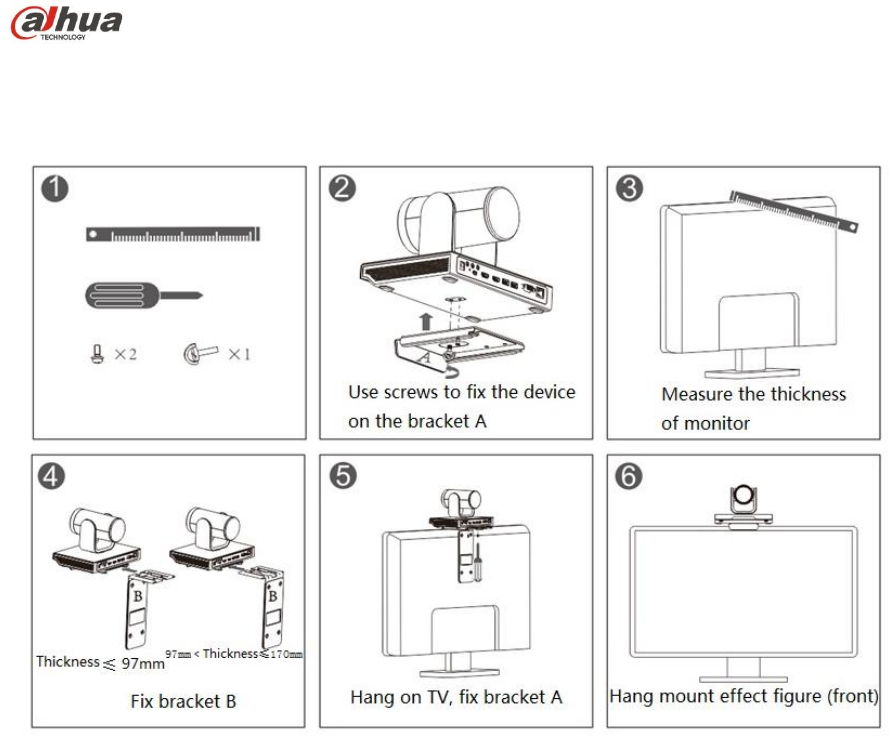
3.2.1 Hang Mount
Dahua Video Conference Terminal User’s Manual
8
Users can select hang mount if the thickness of monitor is ≤170mm, hang the video terminal
device on the monitor. Please refer to Figure 3-1 for the exact installation steps.
Figure 3-1
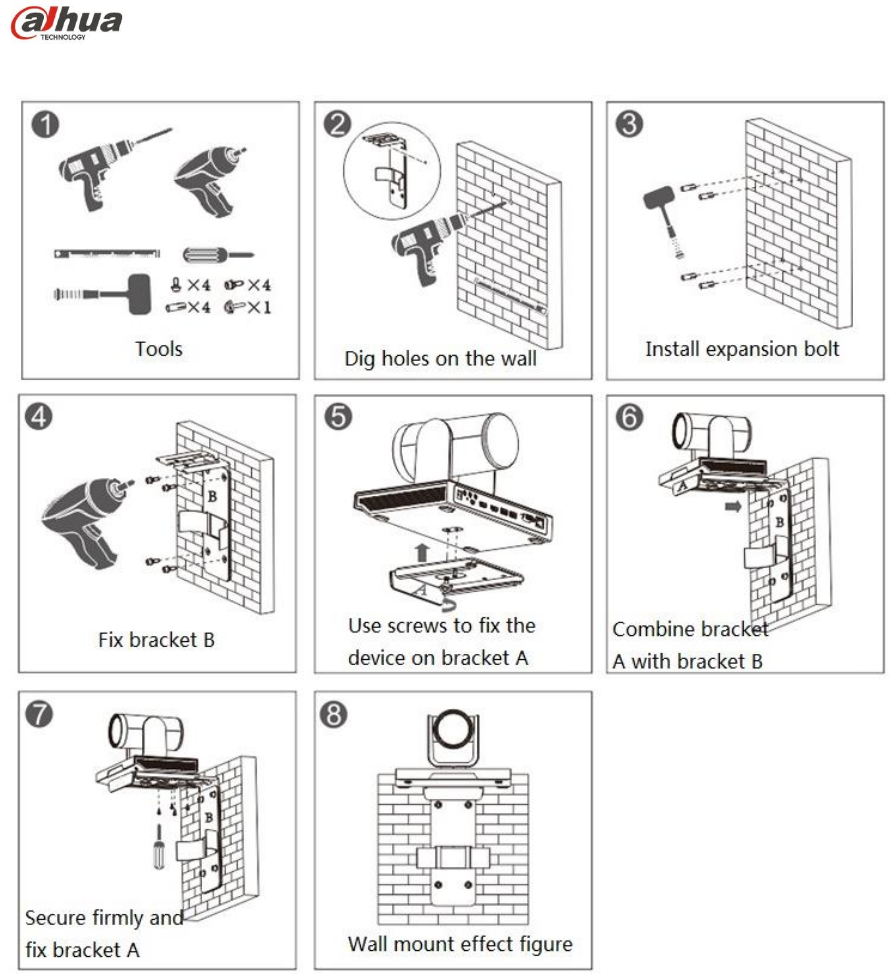
3.2.2 Wall Mount
Users can select wall mount mode if the monitor thickness is more than 170mm or it needs to be
installed on the wall. Please refer to Figure 3-2 for the exact installation steps.
Dahua Video Conference Terminal User’s Manual
9
Figure 3-2
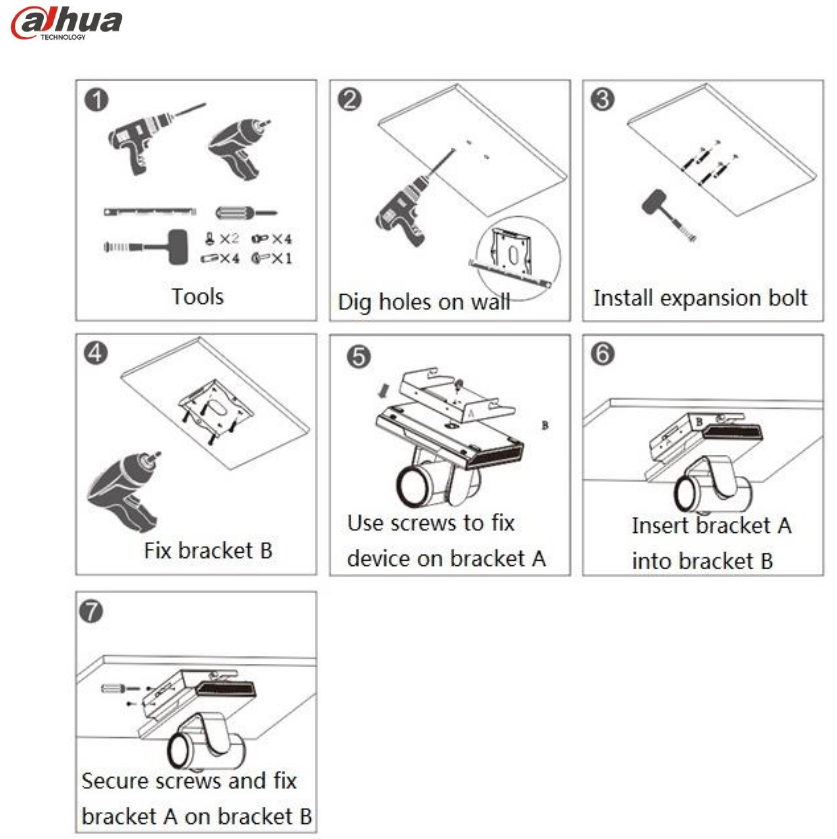
3.2.3 Pendant
Users can select pedant if the monitor fails to be installed via hang mount or wall mount. Please
refer to Figure 3-3 for the exact installation steps.
Dahua Video Conference Terminal User’s Manual
10
Figure 3-3
Dahua Video Conference Terminal User’s Manual
11
4 Login
4.1 Explanation before Login
Please make sure the device cable is correctly connected and turn on the monitor.
Video terminal device supports three kinds of control operation which are remote control,
keyboard and mouse, take the control operation of remote control as an example.
Press button to turn on/off the device.
After the device is powered on, please press to switch the HDMI output channel of
monitor to implement meeting operation.
Note:
It can use button before it is matched successfully, otherwise, it becomes invalid. Please
refer to 1.3.2.2 for remote control button matching.
4.2 Common Button Description of Remote Control
The following button operation description is the common operation command of the device.
Press button to select parameter.
Press button to select confirm/OK.
Press “number button” to input parameter information.
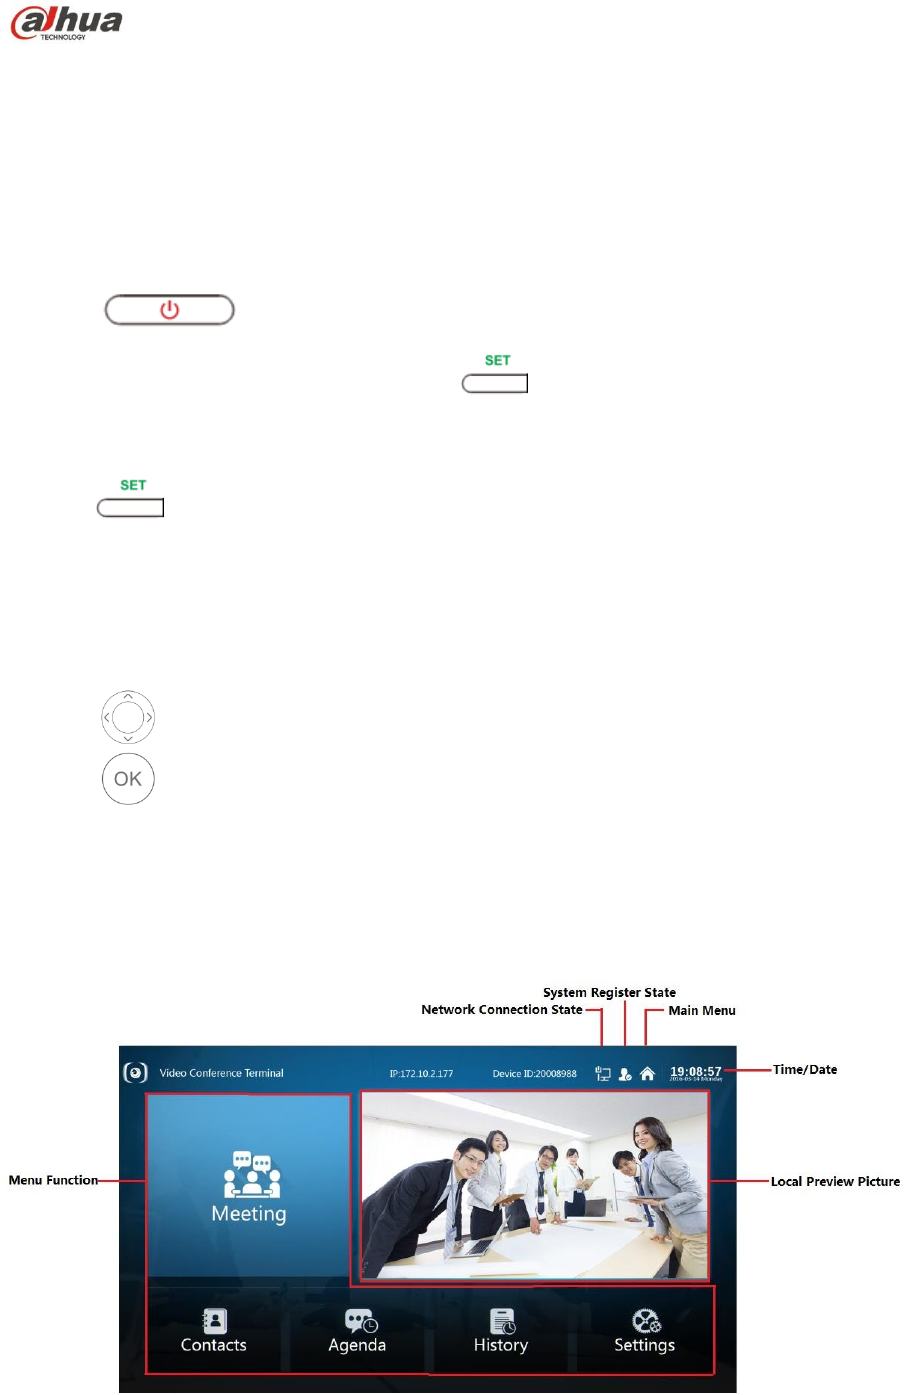
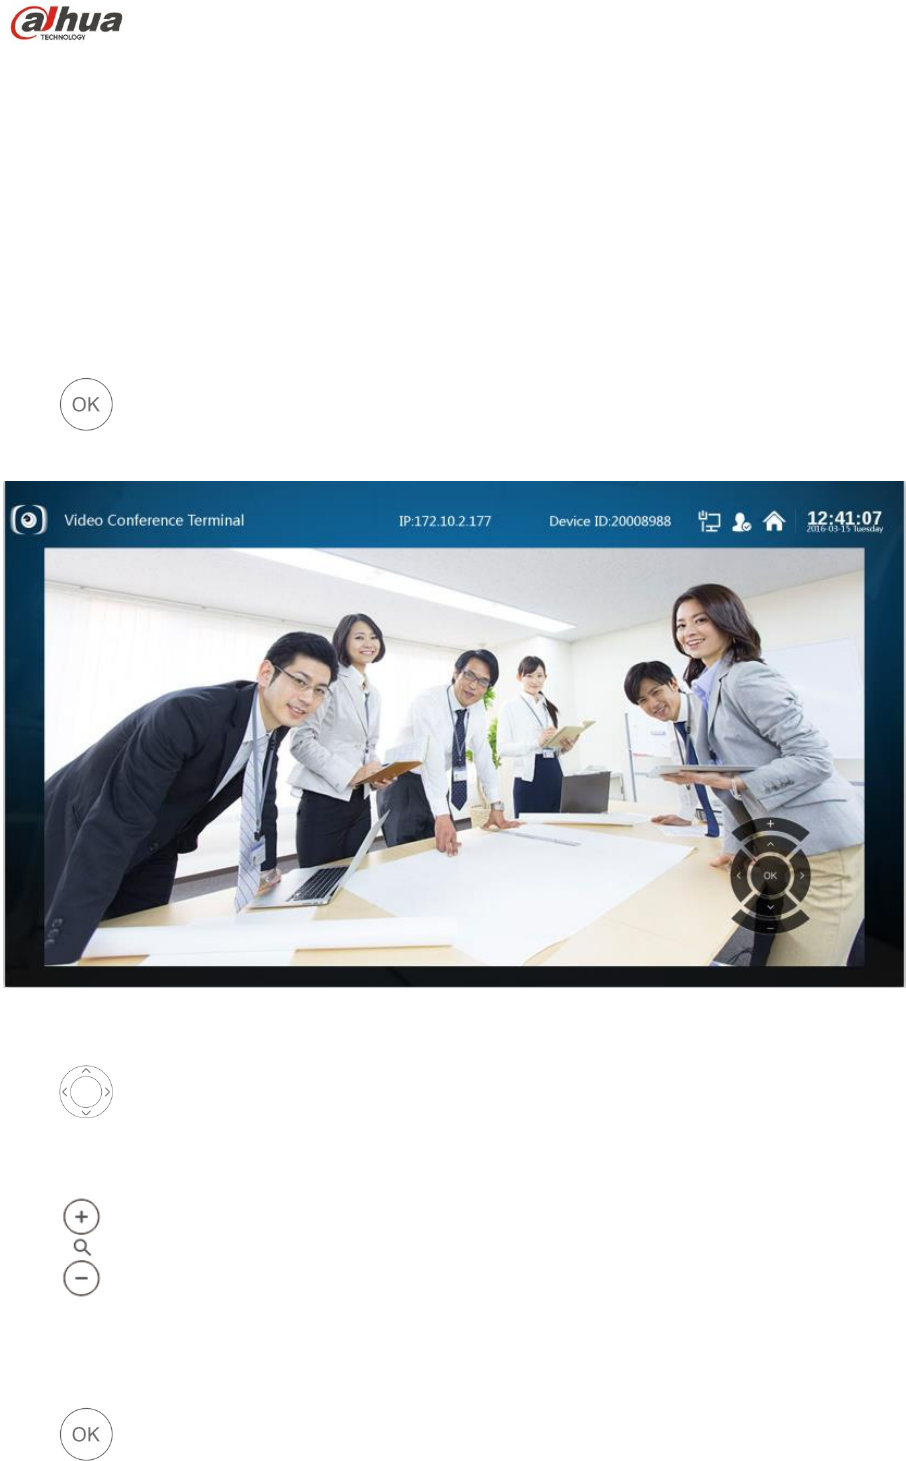
4.3 Interface Introduction
The interface is shown in Figure 4-1 after switching the HDMI output channel of the monitor.
Figure 4-1
Dahua Video Conference Terminal User’s Manual
12
5 System Operation
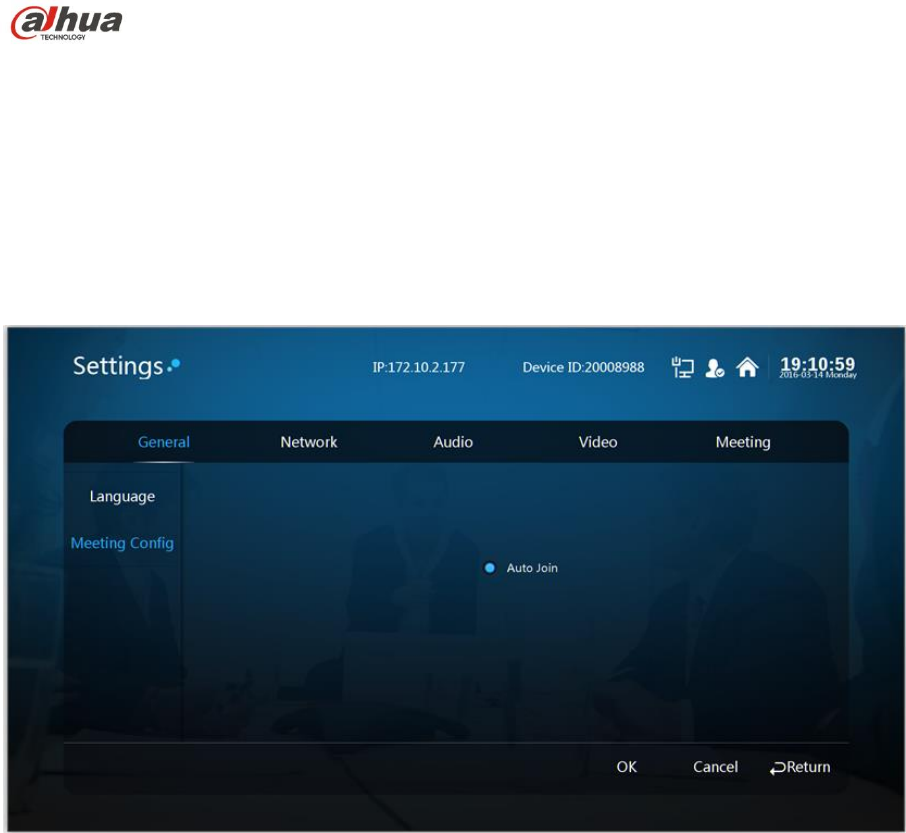
5.1 General
It is to set meeting config.
Step 1
Select “Settings> General”.
The system displays “Meeting Config” interface, which is shown in Figure 5-1.
Figure 5-1
Step 2
Select “Auto Join”
It will auto join meeting for the first time, but it won’t join meeting automatically or be invited if
users exit actively during the meeting.
Note:
It will show the inquiry box before joining meeting every time if it is not checked.
Step 3
Select “OK” and complete config.
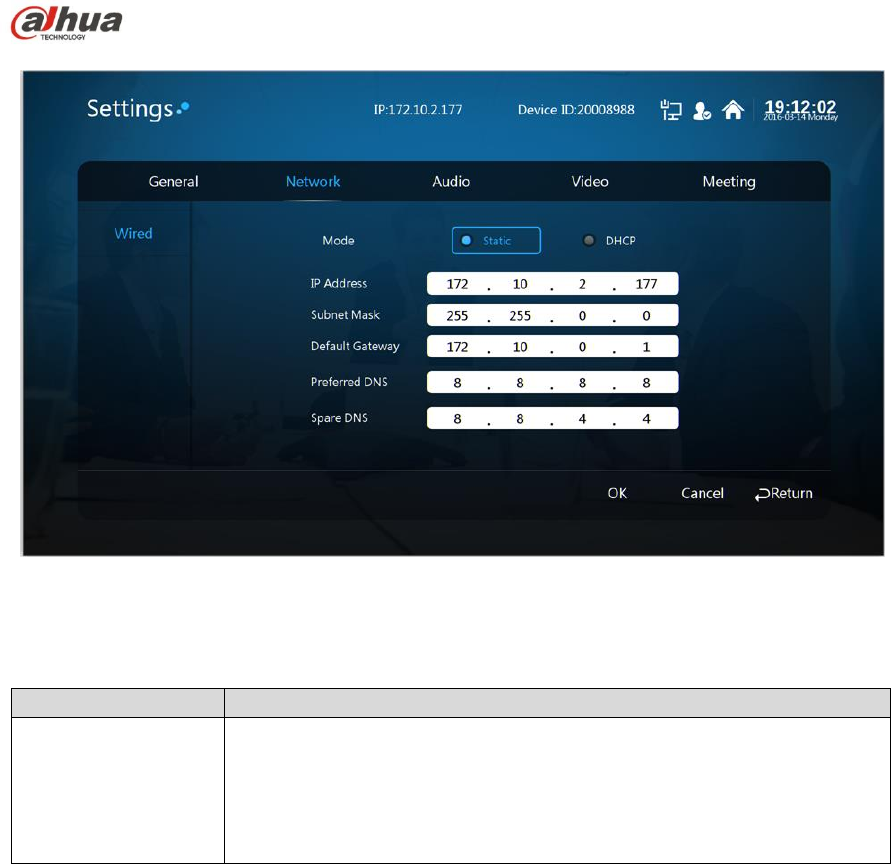
5.2 Network
Step 1
Select “Settings > Network”. The system displays “Network” interface, which is shown in Figure
5-2.
Dahua Video Conference Terminal User’s Manual
13
Figure 5-2
Step 2
Configure the interface parameter; please refer to sheet 5-1 for more details about the
parameters description.
Parameter
Note
Mode
Static
It needs to set IP address/Subnet mask/default gateway
manually.
DHCP
It is to search IP address automatically, at this moment,
IP/subnet mask/default gateway can’t be set.
Sheet 5-1
Step 3
Select “OK”.
Step 4
Complete network setting.
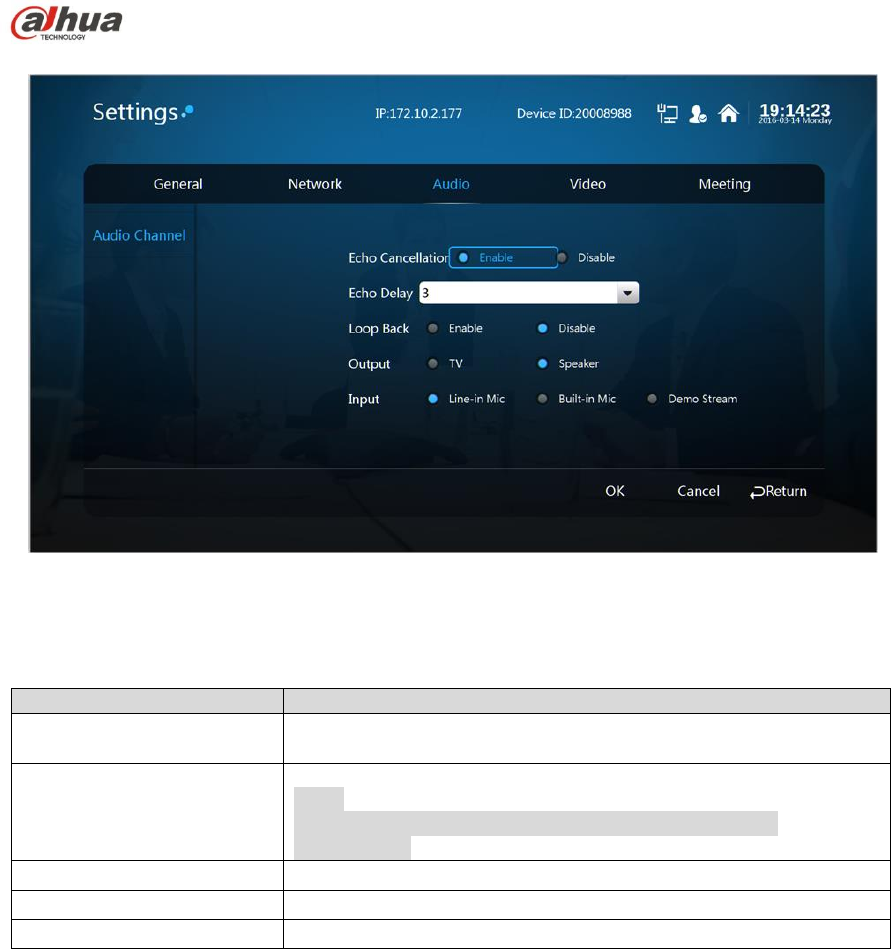
5.3 Audio
Users can select relative output/input format according to the actual speaker and Mic port.
Step 1
Select “Settings > Audio”. The system displays the “Audio” interface, which is shown in Figure 5-
3.
Dahua Video Conference Terminal User’s Manual
14
Figure 5-3
Step 2
Configure interface parameter; please refer to Sheet 5-2 for more details about parameter
description.
Parameter
Note
Echo Cancellation
It is to enable or disable echo cancellation, it is enable by
default.
Echo Delay
It is to adjust level to eliminate echo.
Note:
The echo delay box will be hidden if it disables echo
cancellation.
Loop Back
Enable the function to realize self-check of local audio input.
Output
TV output and speaker output.
Input
Line-in Mic, built-in Mic and demo stream.
Sheet 5-2
Step 3
Select “OK”.
Step 4
Complete audio setting.
5.4 Video
It is to set preview image, encode and other relevant parameters.
5.4.1 Image Parameter
The parameter can be adjusted according to your practical camera image.
Step 1
Select “Settings > Video > Image”. The system displays the image parameter interface, which is
shown in Figure 5-4.

Dahua Video Conference Terminal User’s Manual
15
Figure 5-4
Step 2
It is to set interface parameter, please refer to sheet 5-3 for more details about the parameter
description.
Parameter
Note
Brightness
It is used to adjust image chroma and show image hue and
saturation. The value range is 0~100, and it is 50 by default.
Contrast
It is used to adjust the image contrast. It is 50 by default. The
bigger the value is, the bigger the image bright contrast
becomes; on the contrary, it becomes smaller. Users can
adjust the value when the image total brightness is appropriate
but the image contrast is not enough. When the value is set to
high, the dark part of the image becomes darker and the bright
part is likely to be overexposed. The image becomes blurry
when the value is set to low. The recommended value is
40~60, and the range is 0~100.
Saturation
The threshold is used to adjust the color darkness and
lightness. It is 50 by default, the bigger the value is, the darker
the color becomes, and on the contrary, it is opposite. The
threshold won’t affect the total brightness of the image. When
the value is set too high, image color is too strong and if the
white balance is not correct, which may cause color cast to the
gray part of the image. The image color is not bright enough
when the value is set too low. The recommended value is
40~60, the range is 0~100.
Sheet 5-3
Step 3
Select and to adjust parameter.
Step 4
Select “OK” to complete image setting.
Dahua Video Conference Terminal User’s Manual
16
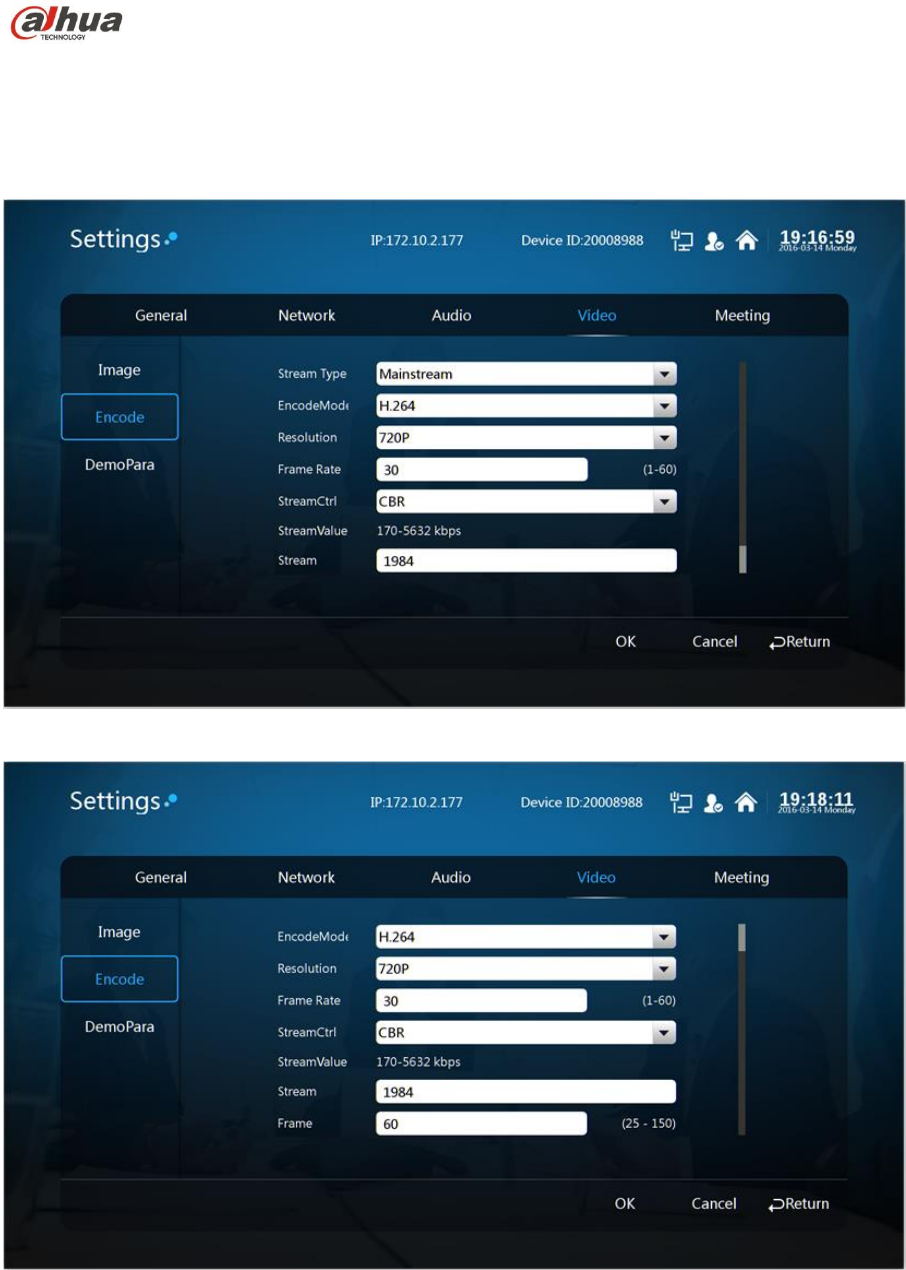
5.4.2 Encode
Step 1
Select “Settings > Video > Encode”. The system displays “Encode” interface, which is shown in
Figure 5-5 and 5-6.
Figure 5-5
Figure 5-6
Step 2
It is to set interface parameter, please refer to sheet 5-4 for more details about encode parameter
description.

Dahua Video Conference Terminal User’s Manual
17
Parameter
Note
Stream type
It can configure main stream.
Encode
mode
Users can select H.264, MJPEG and H.265 encoding.
H.264:Main Profile encoding mode
MJPEG:It needs higher stream value to guarantee image definition in
this encoding mode. It is recommended to use the max stream value of
the corresponding reference stream value in order to make the video
image reach better result.
H.265:Main Profile encoding mode.
Resolution
It includes several resolution types, each corresponding recommended
stream value is different.
Frame rate
(FPS)
PAL:1 frame/s~25 frame/s or 1 frame/s~60 frame/s. The frame rate
varies according to different resolution.
Stream
control
It includes CBR and VBR.
It can set image quality in VBR mode; it is not allowed to set image
quality in CBR.
The stream control mode can only be CBR in the MJPEG encoding
mode.
Reference
stream value
It is to advise users to set a reasonable stream value range according to the
resolution and frame rate configured by users.
Stream
In the VBR mode, the value is the upper limit of stream; in the CBR, the
value is fixed.
Refer to the “reference stream value”, the stream value provides best
reference range.
Frame
interval
The number of P frame between two I frames, the range changes according
to the frame rate, the max is 150, it is recommended to set it twice as big as
frame rate.
Sheet 5-4
Step 3
Select “OK” to complete encode setting.
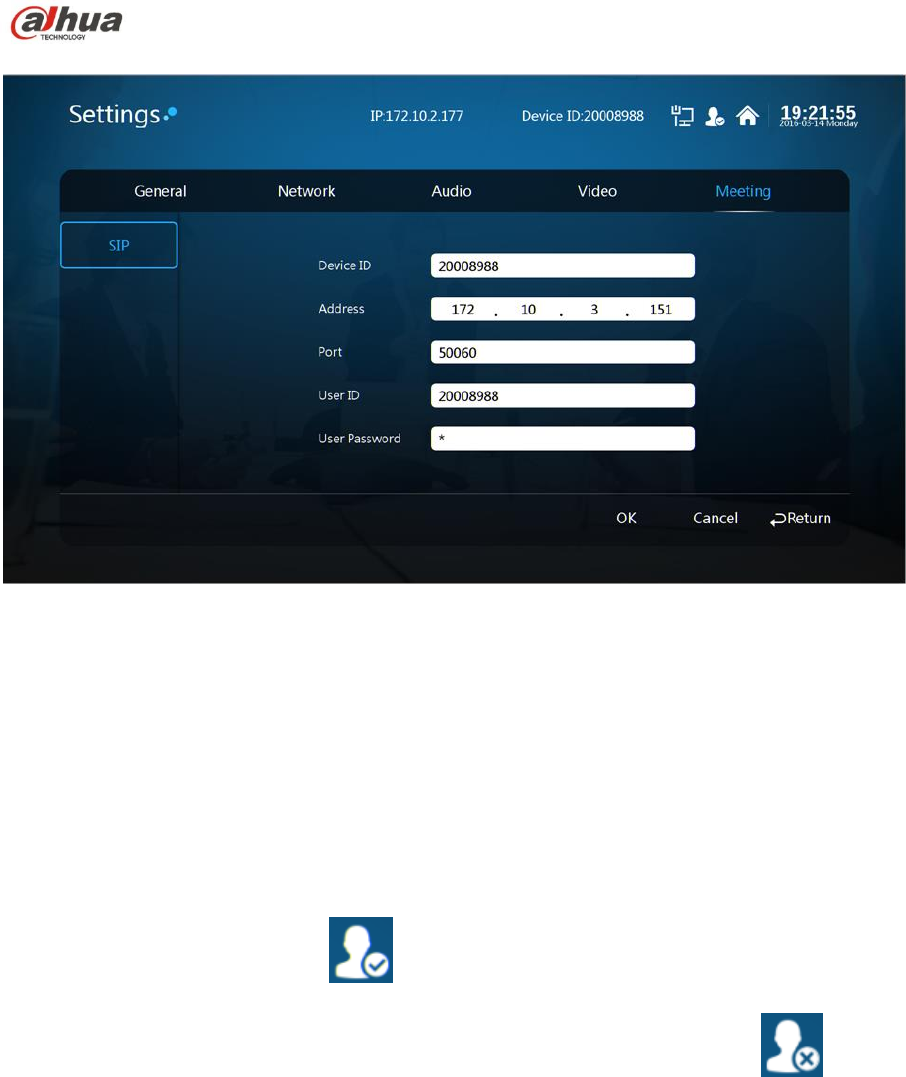
5.5 Meeting
Step 1
Select “Settings > Meeting”. The system displays “Meeting” interface, which is shown in Figure 5-
7.
Dahua Video Conference Terminal User’s Manual
18
Figure 5-7
Step 2
It is to set device ID, SIP server, SIP service port, user ID, user password and etc.
Note:
Make sure the parameter on this interface has to be in accordance with the practical config of the
MCU server; otherwise, the system registration fails.
Step 3
Select “OK” to complete meeting setting.
Note:
Please check if system registration is successfully connected after completing all the
configurations. The meeting can’t be held normally if registration fails and displays .
Dahua Video Conference Terminal User’s Manual
19
6 System Operation
6.1 Local Preview
6.1.1 Adjust Local Preview Image
It is used to adjust local camera image before the meeting.
Step 1
Select “Local Preview Image”.
Step 2
Press button to confirm. The system displays “Local Preview” image, which is shown in
Figure 6-1.
Figure 6-1
Step 3
Press button to adjust camera angle.
Step 4
Press button to realize image zoom in/out setting.
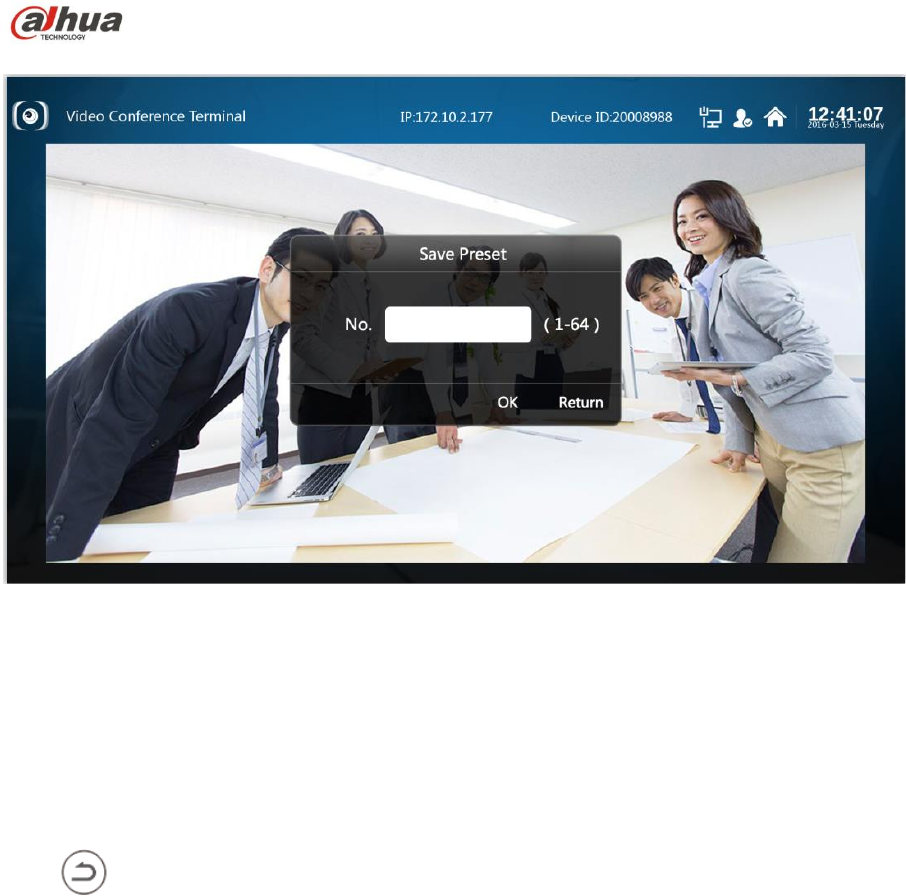
6.1.2 Camera Preset Memory
Step 1
Press button after completing local preview image adjustment and save camera preset.
The system displays “Save Preset” interface, which is shown in Figure 6-2.
Dahua Video Conference Terminal User’s Manual
20
Figure 6-2
Step 2
Press “Number button” and input value with range 1~64.
Note:
Save the camera preset, you can press “Number button” to input corresponding preset value and
quickly adjust camera lens.
Step 3
Press button to return to main menu interface.
6.2 Contacts
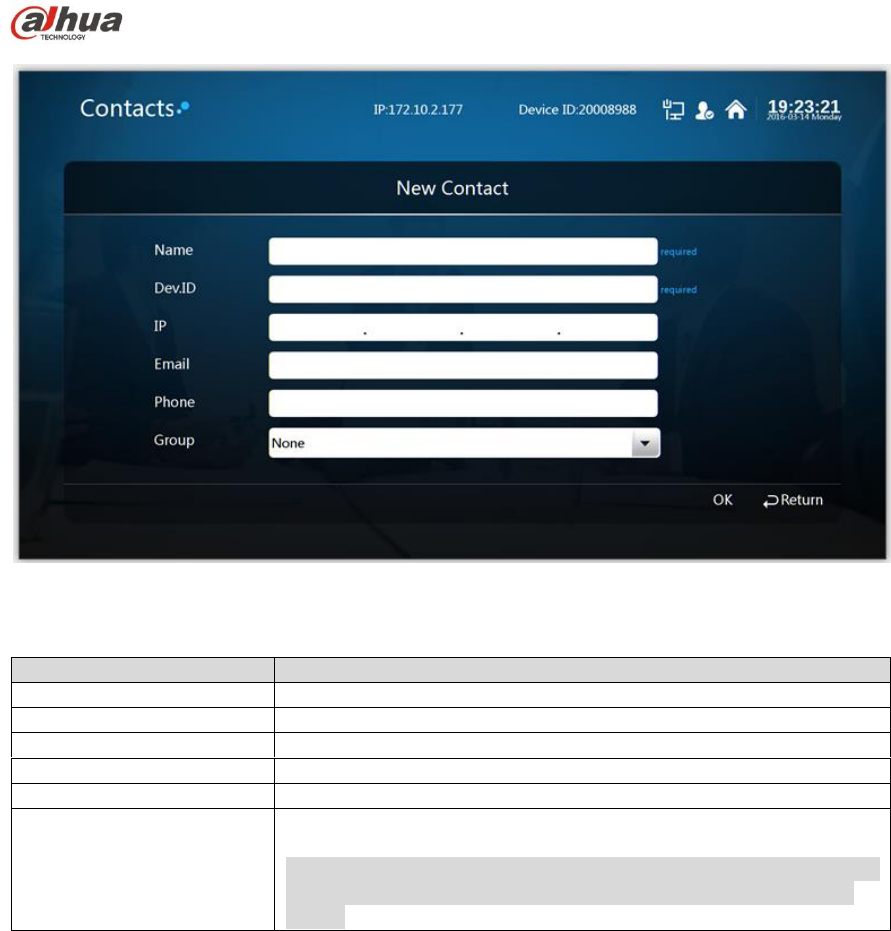
6.2.1 Create New Contact
Step 1
Select “Contacts > Contact person > New Contact”, it will display “New Contact” interface which
is shown in Figure 6-3.
Dahua Video Conference Terminal User’s Manual
21
Figure 6-3
Step 2
It is to set interface parameter, please refer to sheet 6-1 for more details about parameter.
Name
Parameter description
Name
It is to add member name.
ID
It is to add member device ID.
IP
It is to add member IP address.
Email
It is to add member email.
Phone
It is to add member phone number.
Group
The group to which the member belongs.
Note:
It needs to establish group first, otherwise, it fails to select in the
box. Please refer to 6.2.3 for more details about creating new
group.
Sheet 6-1
Step 3
Select “OK” to finish adding contact person.
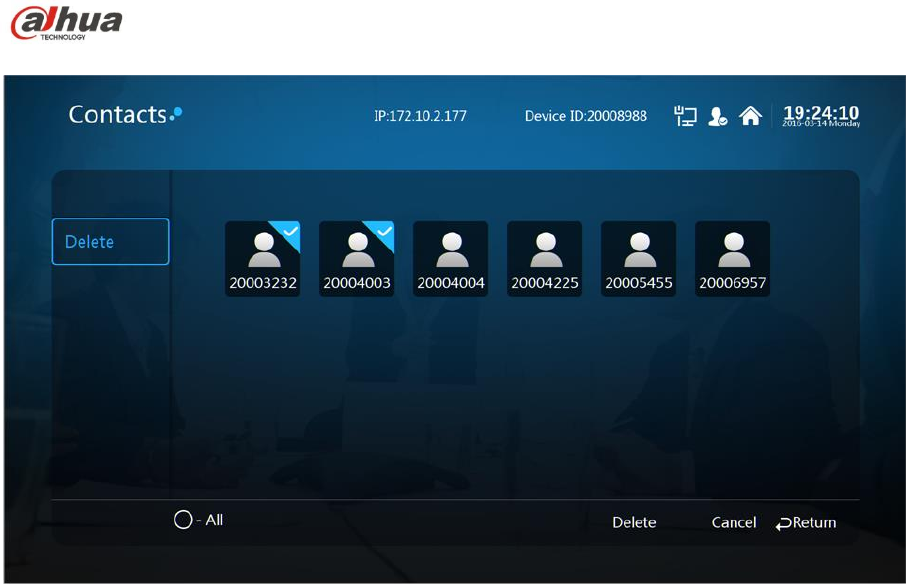
6.2.2 Delete Contact
Step 1
Select “Contacts > Contact Person > Delete”. The system displays “Delete” interface, which is
shown in Figure 6-4.
Dahua Video Conference Terminal User’s Manual
22
Figure 6-4
Step 2
Check the members who need to be deleted.
Note:
Select “All” and it will check all the contacts.
Step 3
Select “OK” to delete.
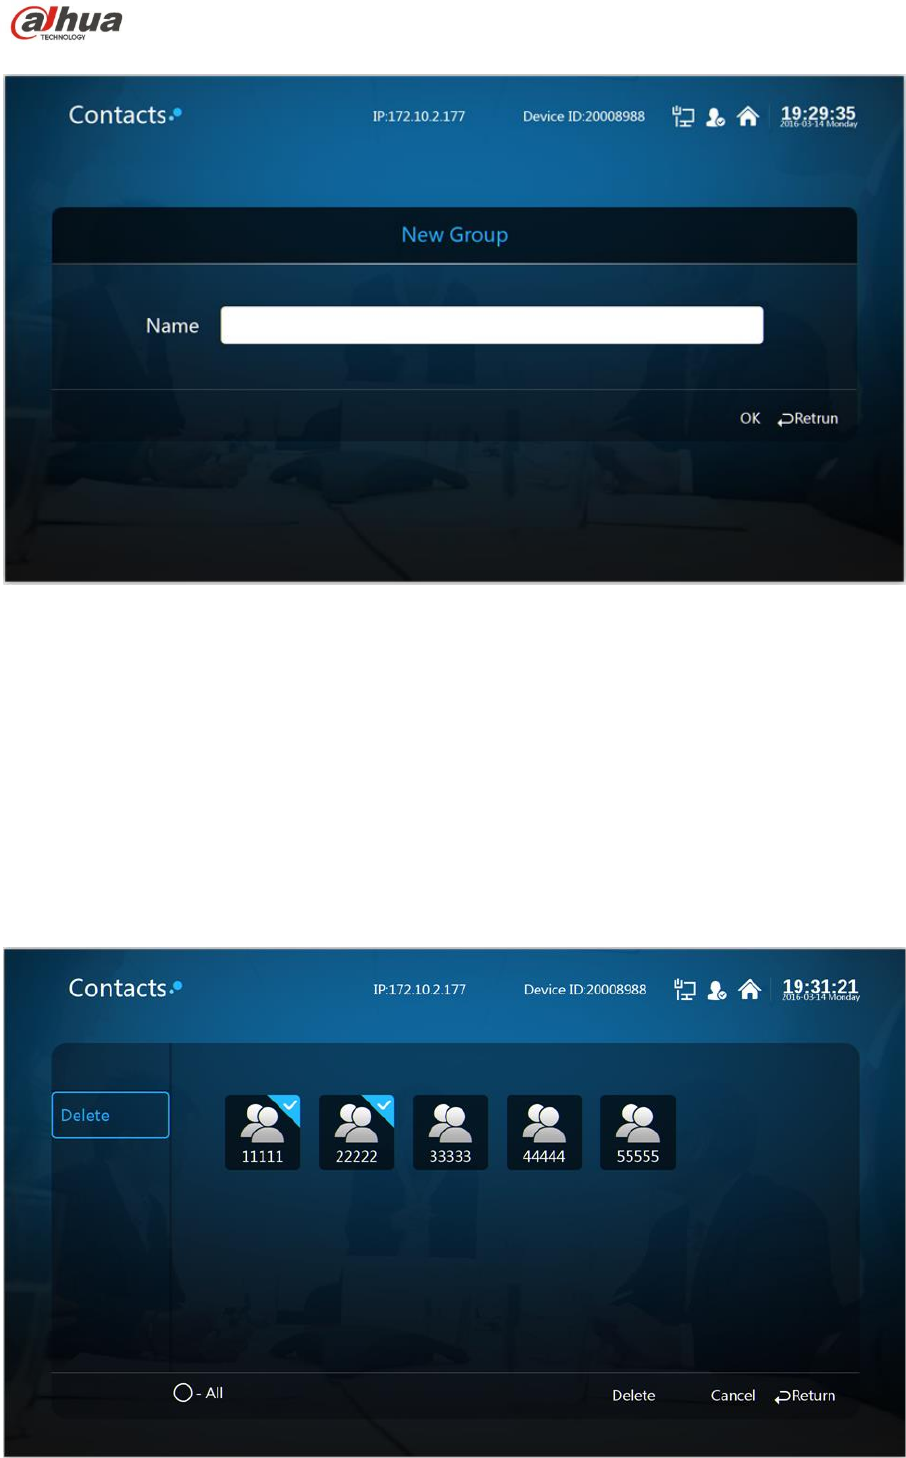
6.2.3 Create New Group
Step 1
Select “Contacts > Group > New Group”. The system displays “New Group” interface, which is
shown in Figure 6-5.
Dahua Video Conference Terminal User’s Manual
23
Figure 6-5
Step 2
It is to set group name.
Step 3
Select “OK” to complete adding group.
6.2.4 Delete Group
Step 1
Select “Contacts > Group > Delete” and the system displays “Delete” interface, which is shown in
Figure 6-6.
Figure 6-6
Dahua Video Conference Terminal User’s Manual
24
Step 2
Check the group which needs to be deleted.
Step 3
Select “OK” to delete.
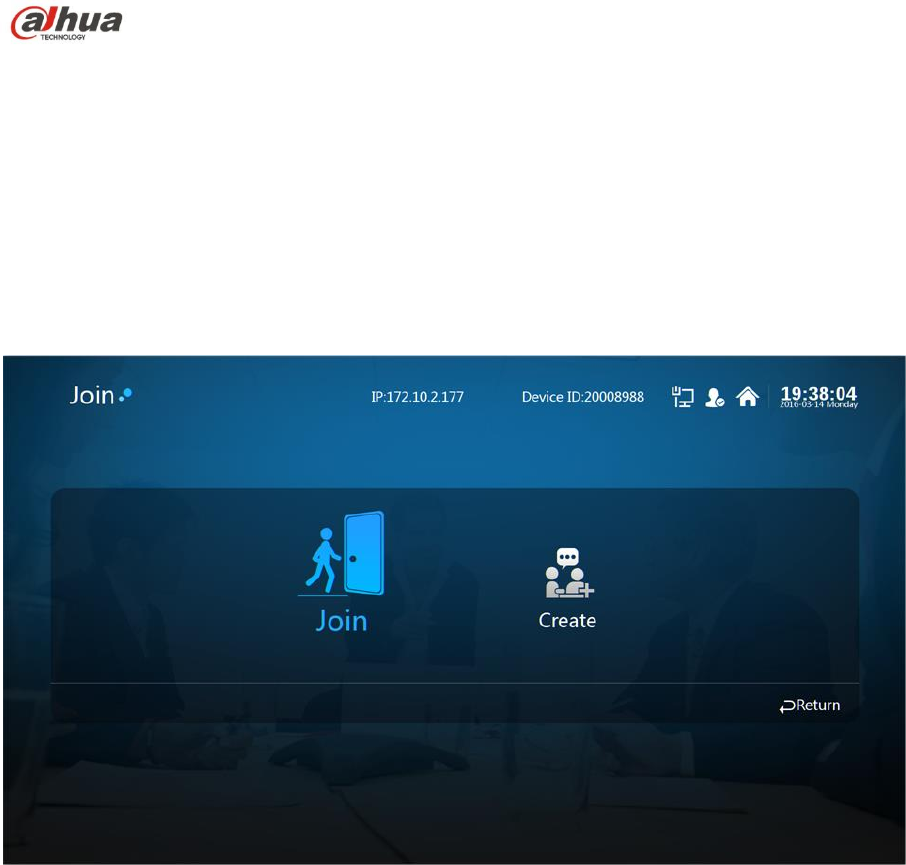
6.3 Join Meeting
It consists of “Join Meeting” and “Create Meeting”, which is shown in Figure 6-7.
Figure 6-7
6.3.1 Create Meeting
You can create immediate meeting and reserve meeting.
Immediate meeting: It is to set meeting theme, duration, add members and etc, the meeting
is enabled immediately.
Reserve meeting: You can customize meeting time, and creating meeting.
Note:
The meeting duration shall be at least 30 minutes.
The earliest time to reserve meeting is one minute after the current time.
Take “Create Immediate Meeting” as an example, the exact operation steps are shown as
follows:
Step 1
Select “Join > Create”, the system “Create” interface, which is shown in Figure 6-8.
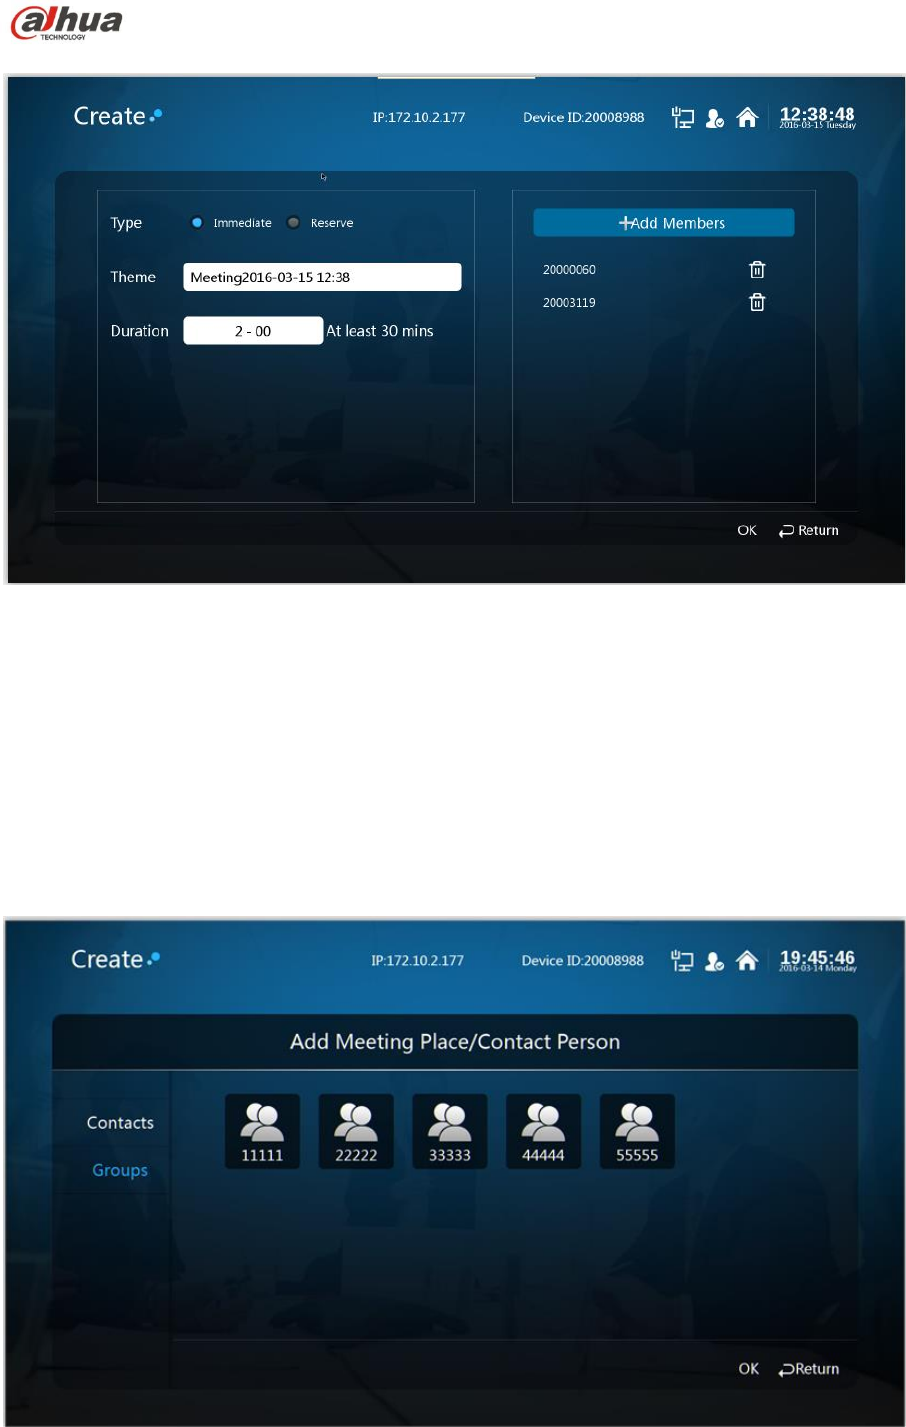
Dahua Video Conference Terminal User’s Manual
25
Figure 6-8
Step 2
As for meeting type, select “Immediate”.
Step 3
Set “Meeting Theme”, “Duration” and other information.
Step 4
Select “Add Members”. The system will display “Add Meeting Place/Contact Person” interface,
which is shown in Figure 6-9.
Figure 6-9
Dahua Video Conference Terminal User’s Manual
26
Parameter
Note
Contacts
It is to display the members added by contacts.
Groups
It is to display groups.
Note:
In the form of group, add all the members of the group to join
meeting.
Sheet 6-2
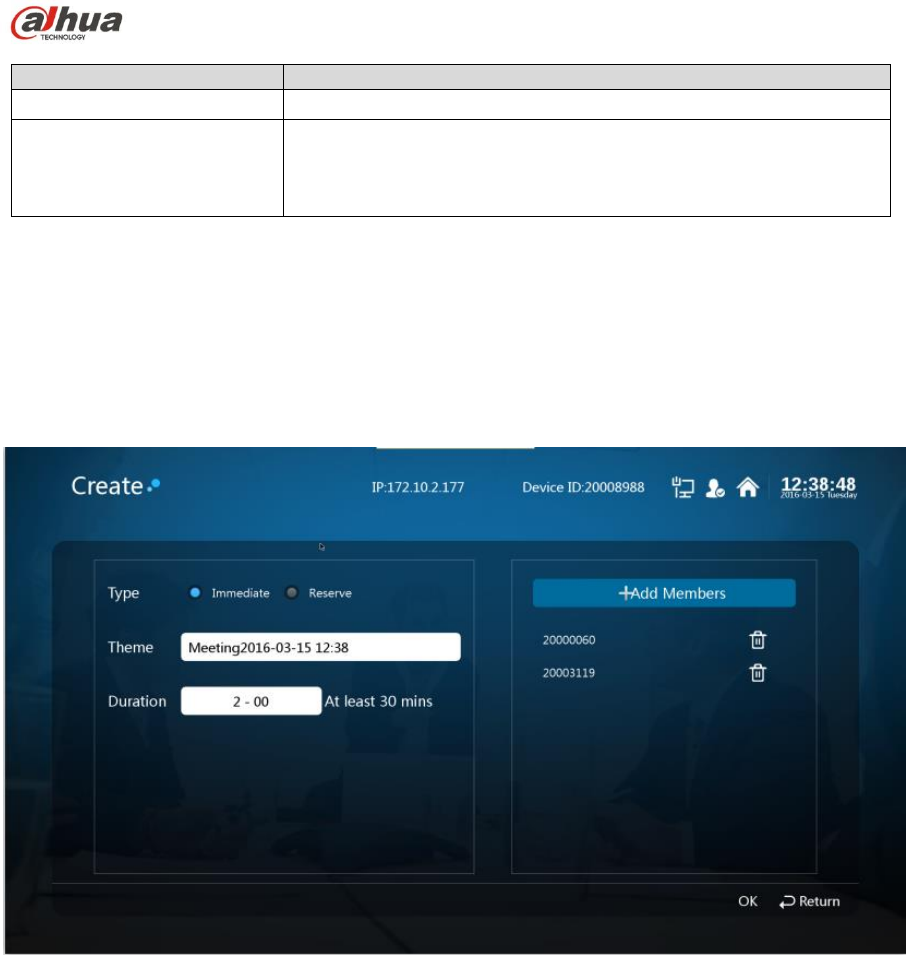
Step 5
Check the needed meeting member to add.
Step 6
Select “OK” to complete adding meeting member. The system displays “Create Meeting”
interface, which is shown in Figure 6-10.
Figure 6-10
Step 7
Select “OK” to finish creating meeting.
So far you have finished creating meeting, enter meeting interface, which is shown in Figure 6-11.
Dahua Video Conference Terminal User’s Manual
27
Figure 6-11
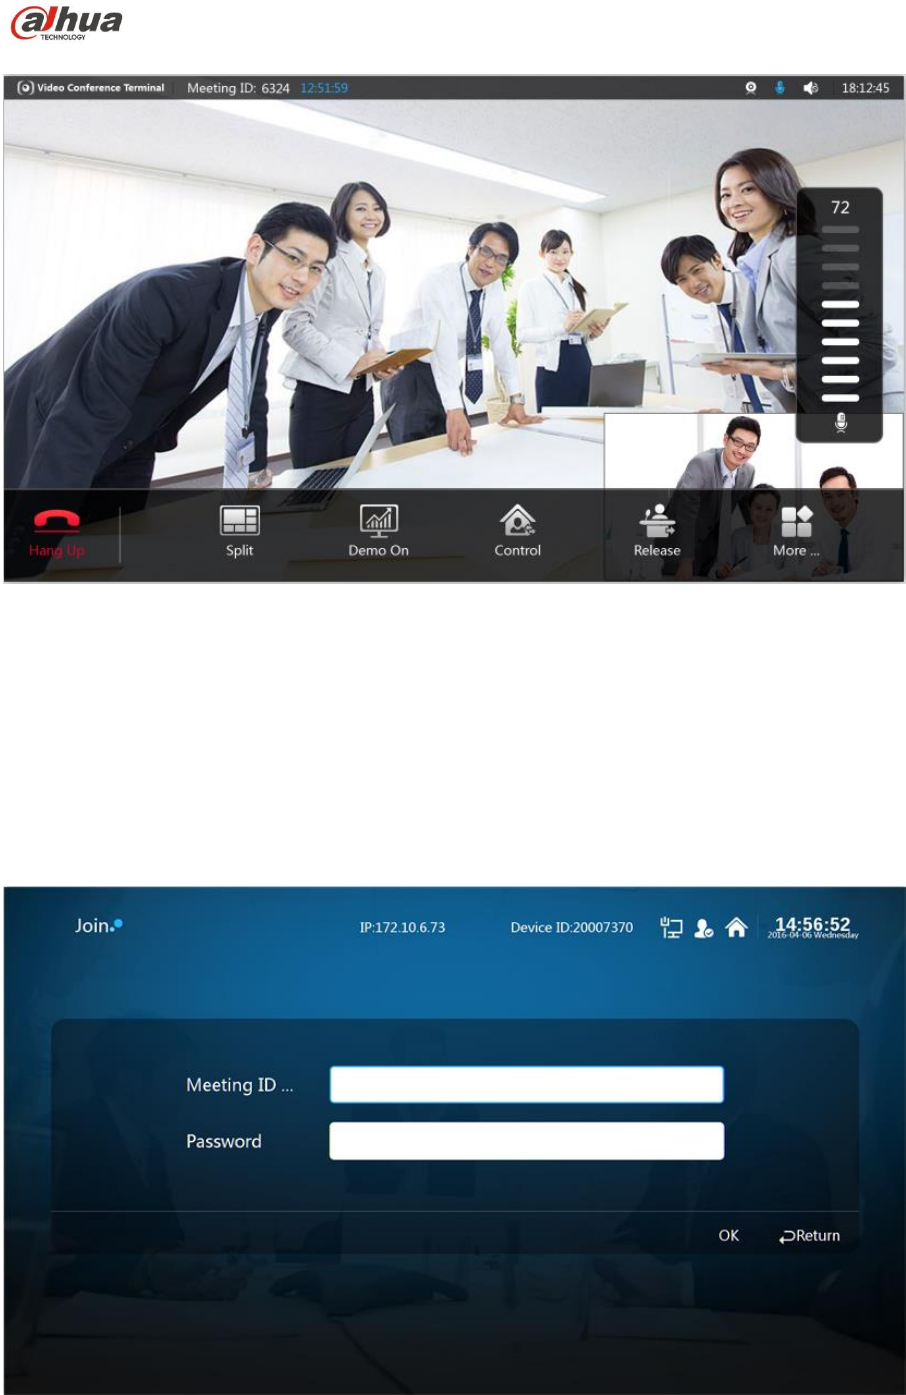
6.3.2 Join Meeting
Attention:
When a user wants to join the on-going meeting, he or she has to be the member of it.
Some meeting is in process, and you failed to join in time, then you can join directly via entering
“Meeting ID”.
Step 1
Select “Join meeting> Join”, and see Figure 6-12.
Figure 6-12
Dahua Video Conference Terminal User’s Manual
28
Step 2
Enter “Meeting ID”.
Step 3
Select “OK” to join meeting. Enter the meeting interface, which is shown in Figure 6-13.
Figure 6-13
6.4 Control Meeting
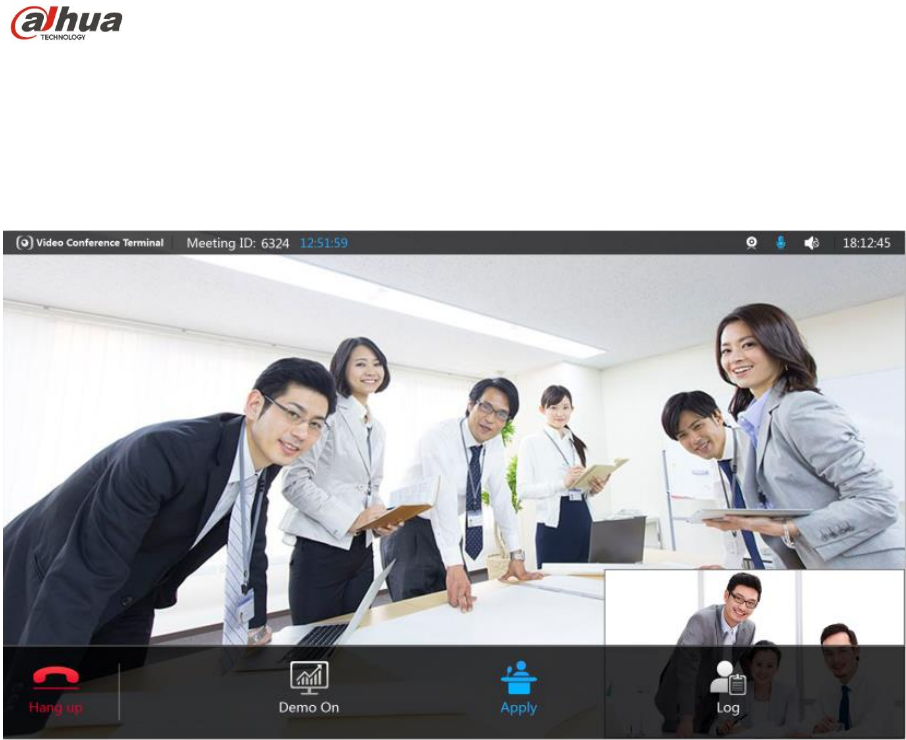
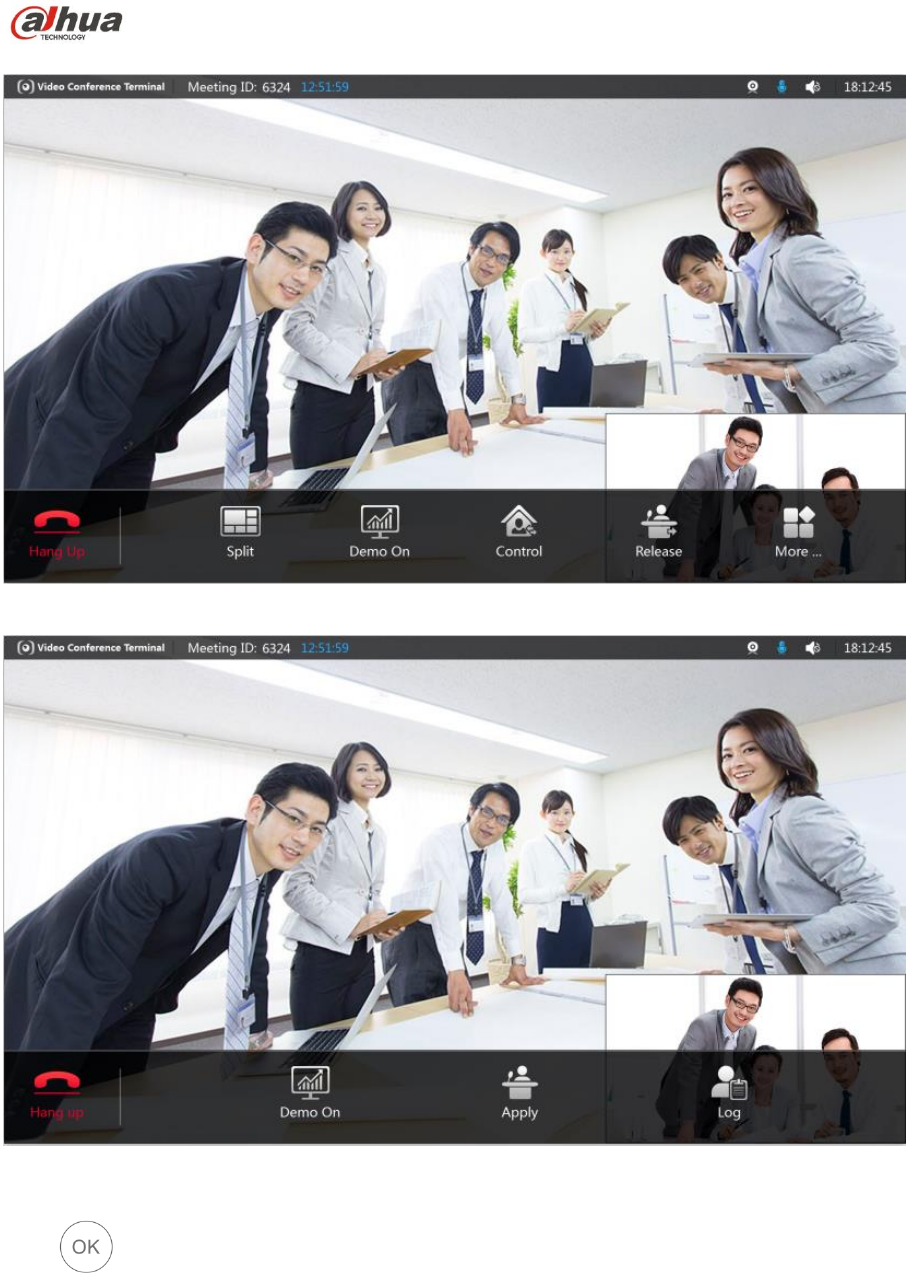
The meeting control is divided into “Host Meeting Place” and “Non-host Meeting Place’.
Host meeting place: The host meeting place has the right to control the rights of all the
meeting places, the meeting creator is the meeting host by default, which is shown in Figure
6-14.
Non-host meeting place: The person who joins the meeting is considered as non meeting
place host default, which is shown in Figure 6-15.
Dahua Video Conference Terminal User’s Manual
29
Figure 6-14
Figure 6-15
Note:
Press button to display meeting menu interface.
6.4.1 Host Meeting Place
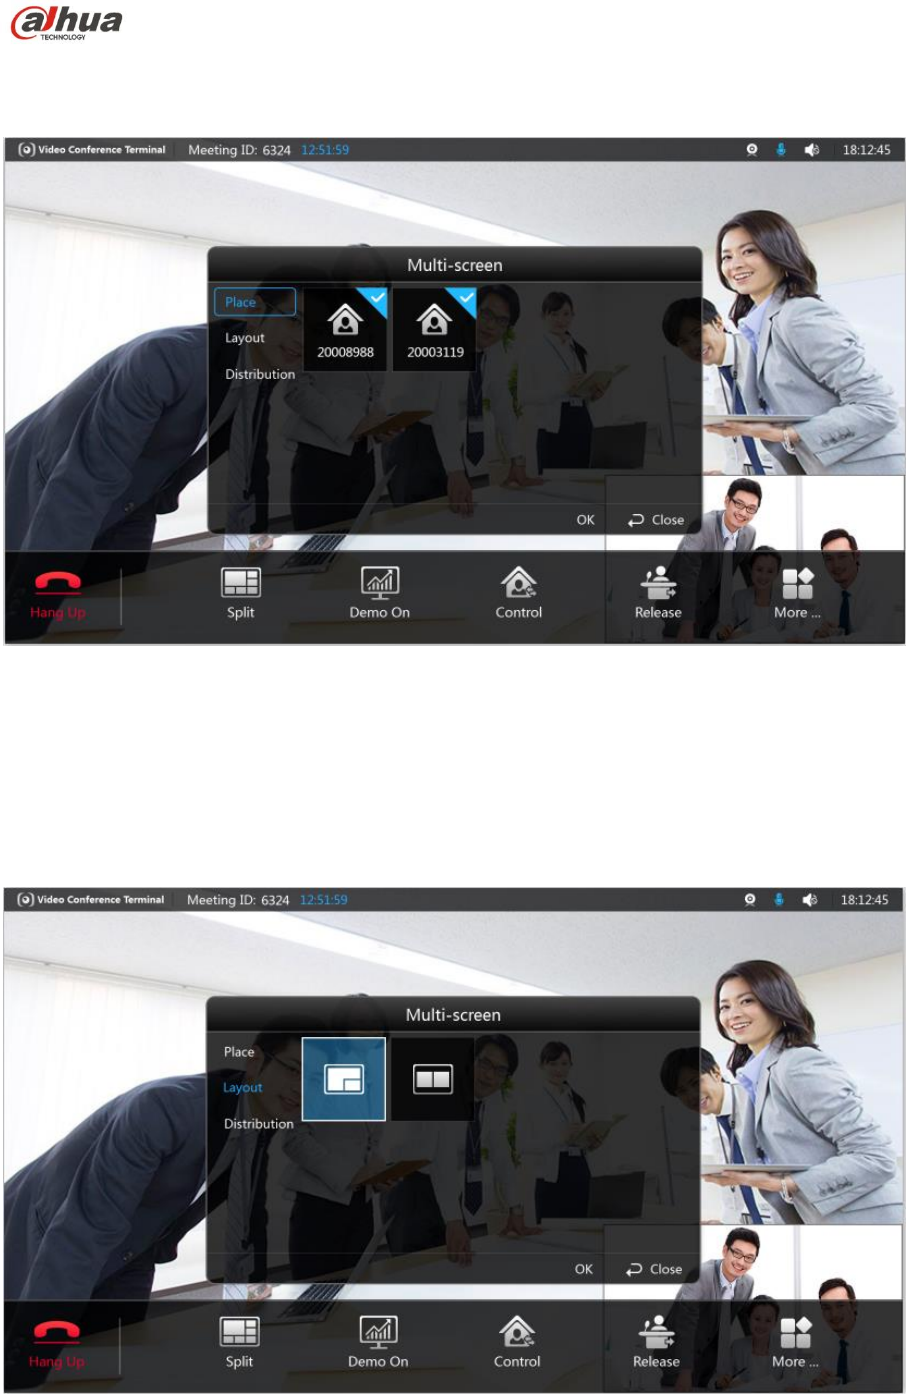
6.4.1.1 Split
It will auto display the meeting picture according to the number of meeting places, it can also set
meeting picture layout according to the user requirement, which is to satisfy multi-view watching.
Step 1
Dahua Video Conference Terminal User’s Manual
30
Select “Split > Select Meeting Place”, then the system displays the interface of “Select Meeting
Place”, which is shown in Figure 6-16.
Figure 6-16
Step 2
Check the meeting member whose meeting picture is needed to be displayed.
Step 3
Select “Layout” and adjust the meeting picture layout of meeting member which has been
checked. The system displays the interface of “Layout”, which is shown in Figure 6-17.
Figure 6-17
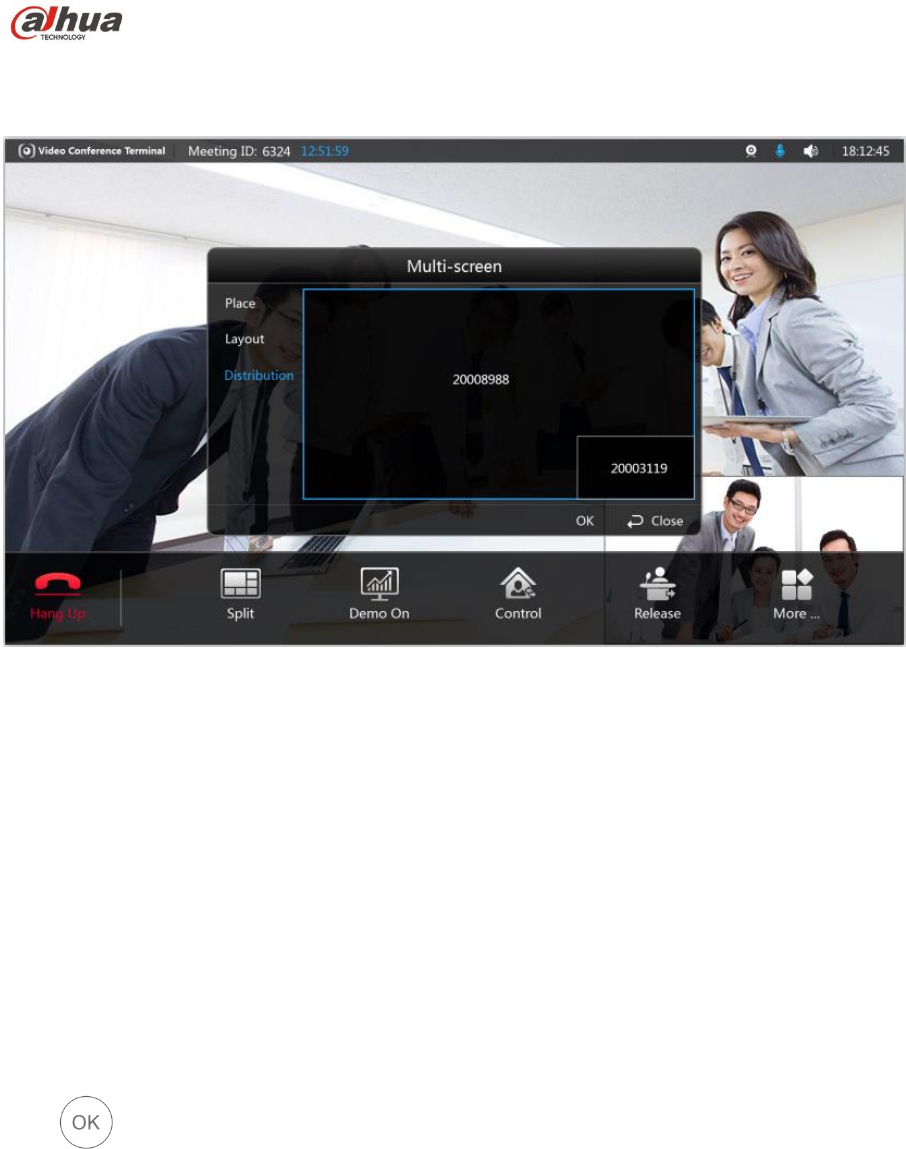
Step 4
Dahua Video Conference Terminal User’s Manual
31
Select “Distribution” and adjust the meeting picture location of the meeting members. The system
displays the interface of “Distribution”, which is shown in Figure 6-18.
Figure 6-18
Step 5
Select “OK” to complete setting.
6.4.1.2 Demo On
Full HD data sharing is realized between external computer and meeting place.
Note:
It can connect computer to video conference terminal via VGA cable.
Step 1
Select “Demo On”
Step 2
Press button to confirm. The system displays “Demo On” interface, which is shown in
Figure 6-19.
Dahua Video Conference Terminal User’s Manual
32
Figure 6-19
Step 3
Press the of remote control to send/close demo (optional).
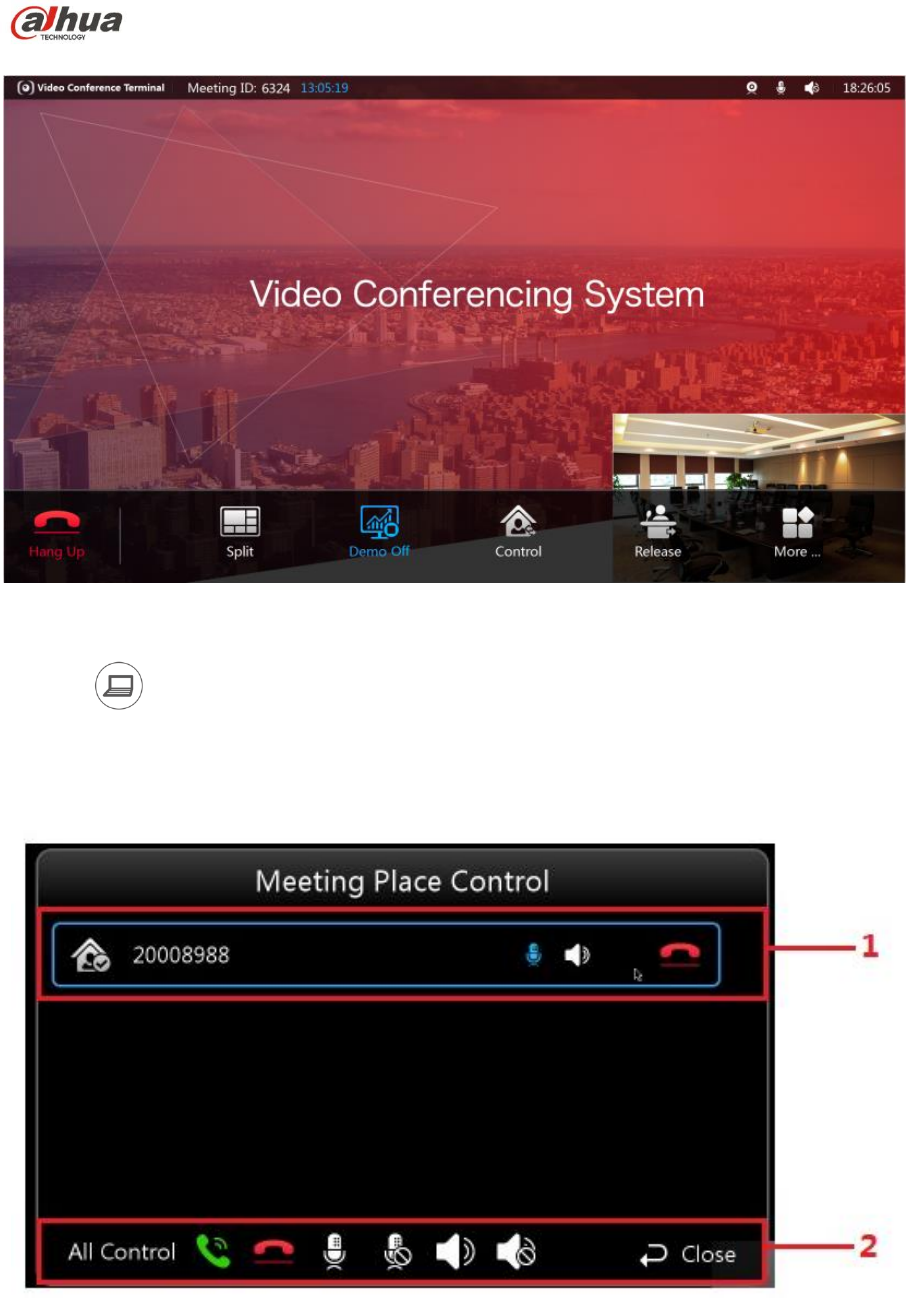
6.4.1.3 Control
It can control some meeting member or all meeting members, which is shown in Figure 6-20.
Figure 6-20
Dahua Video Conference Terminal User’s Manual
33
SN
Parameter
Note
1
It is to display member device ID.
Enable/disable the member Mic.
Enable/disable the member speaker.
Hang up the member during meeting.
2
Call all meeting members again.
Hang up all meeting members.
Enable/disable Mic of all meeting members.
Disable the Mic of all meeting members.
Enable the speaker of all meeting members.
Disable the speaker of all meeting members.
Sheet 6-3
Step 4
Press button to select the control button you need.
Step 5
Press button to confirm control operation.
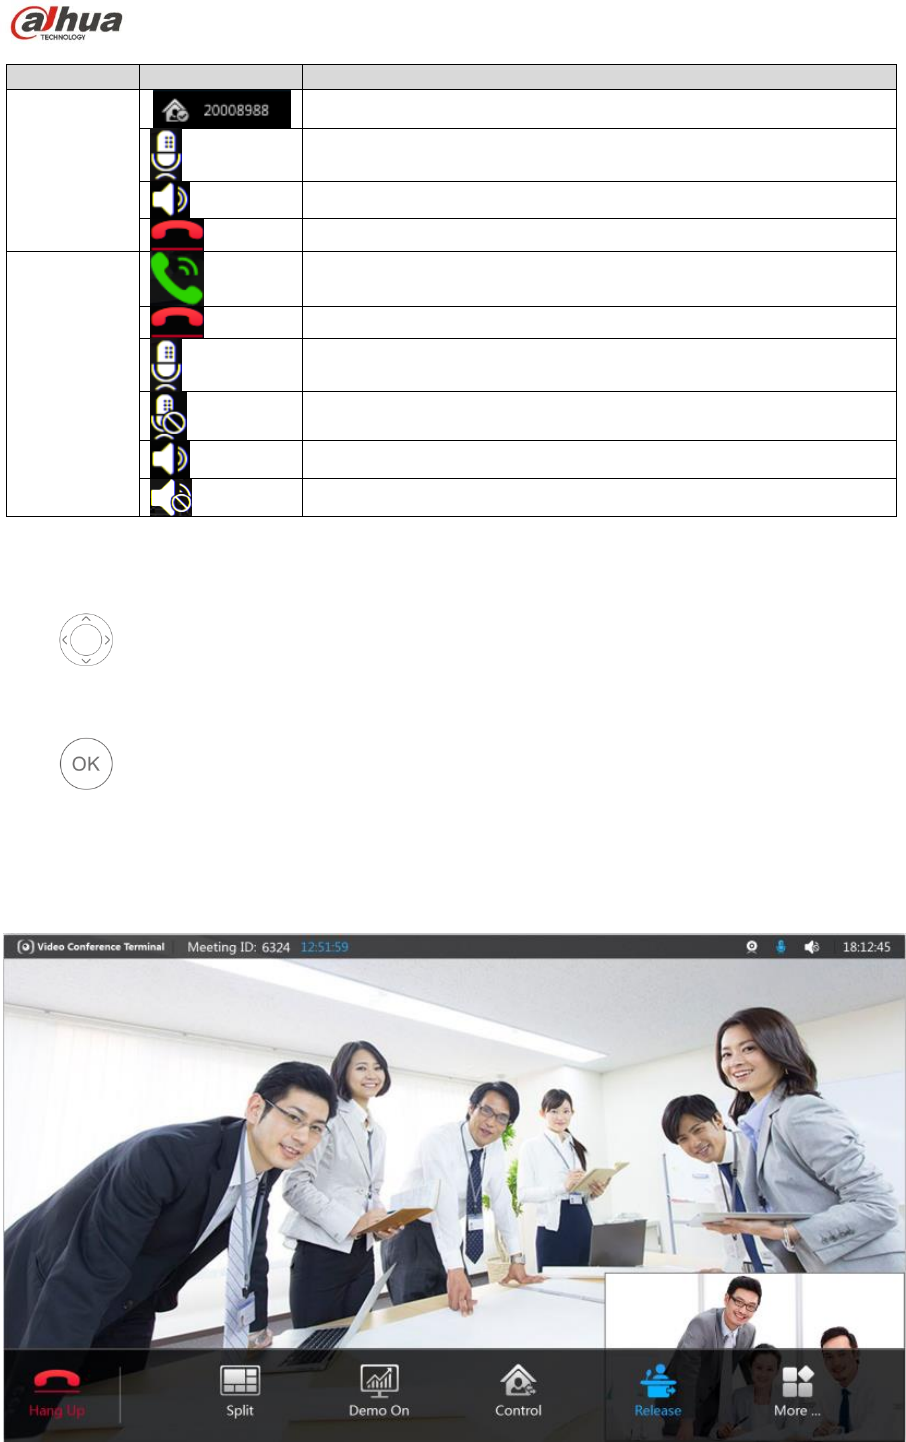
6.4.1.4 Release
Step 1
Select “Release” and the system displays the interface which is shown in Figure 6-21.
Figure 6-21
Dahua Video Conference Terminal User’s Manual
34
Step 2
Press to confirm and exit host control right of the meeting place.
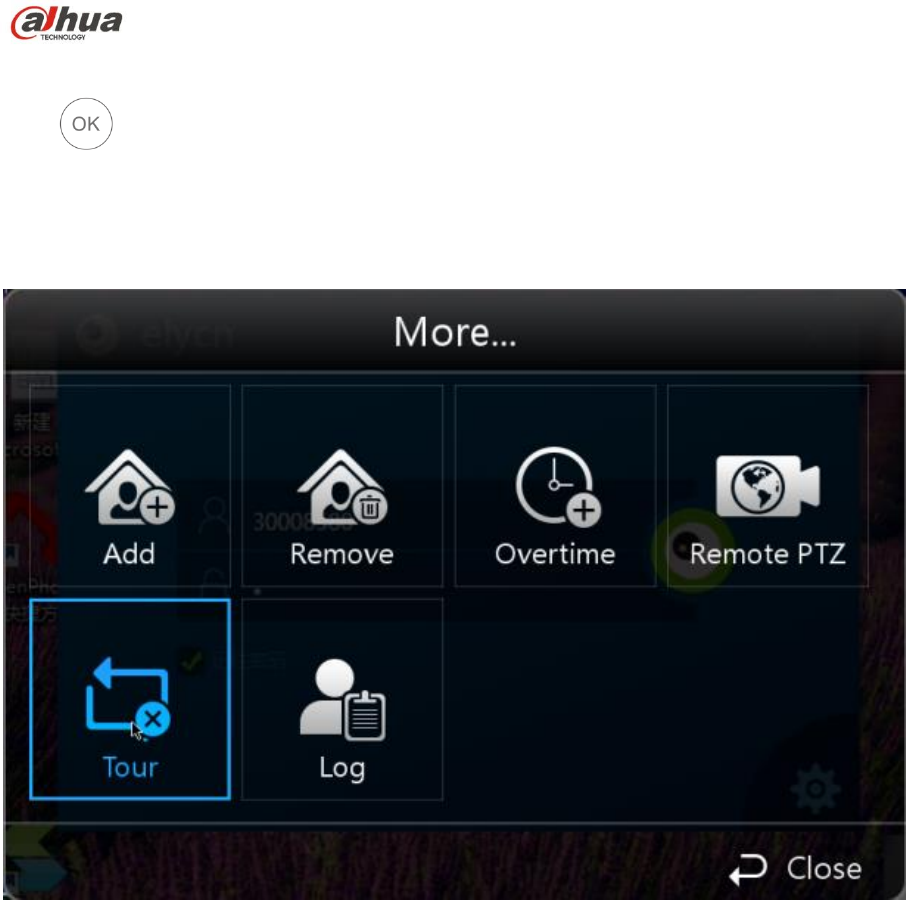
6.4.1.5 More
The button includes several functions, such as add, remove, overtime, tour and etc, which is
shown in Figure 6-22.
Figure 6-22
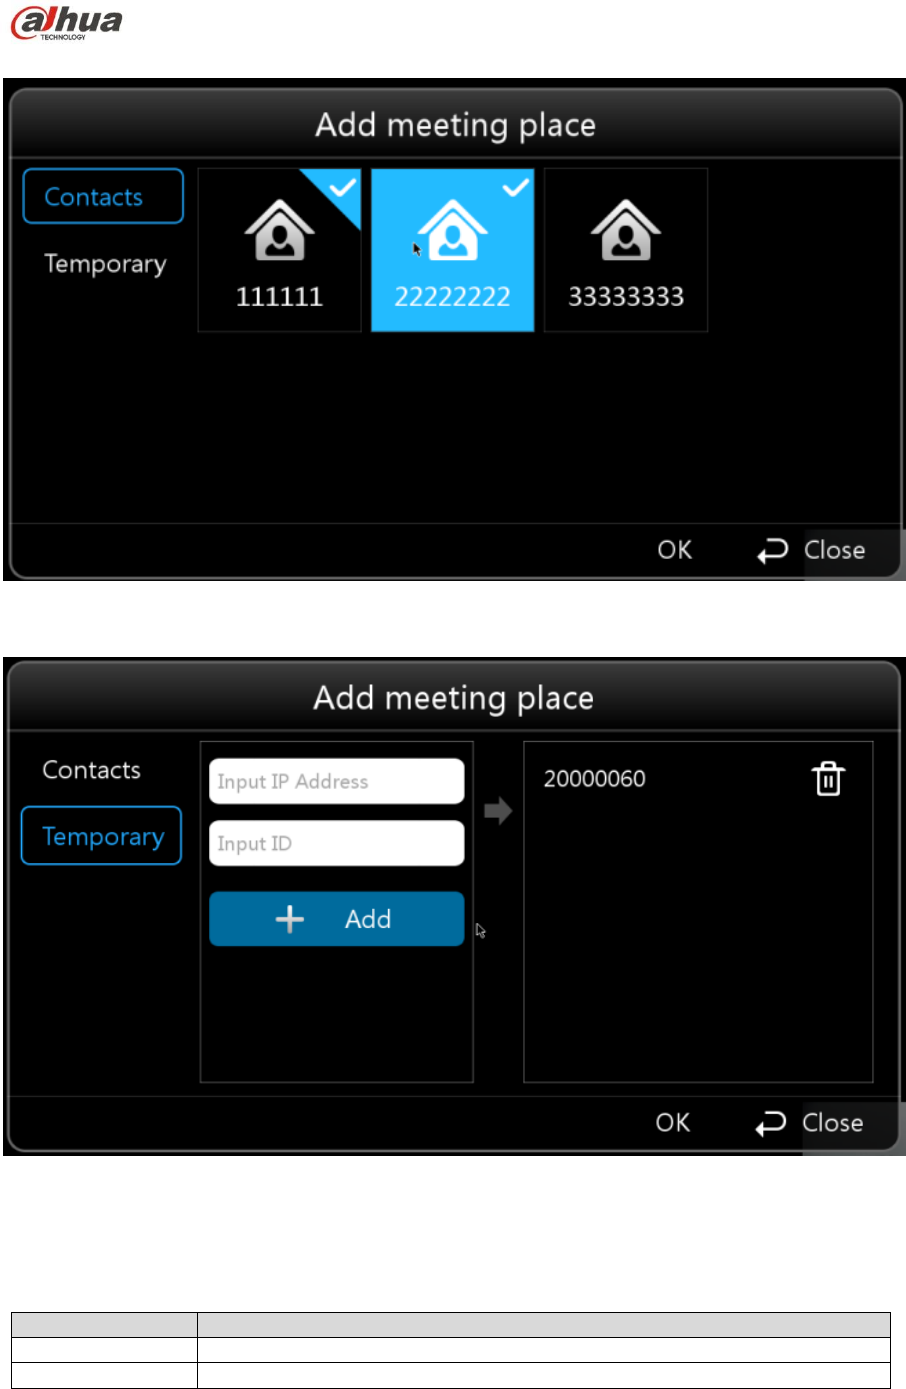
6.4.1.5.1 Add
Step 1
Select “More > Add” and the system will display the “Add” interface, which is shown in Figure 6-
23 and Figure 6-24.
Dahua Video Conference Terminal User’s Manual
35
Figure 6-23
Figure 6-24
Step 2
It is to configure interface parameter, please refer to sheet 6-4 for more details about the
parameter description.
Parameter
Note
Contacts
Select to add the members in the contacts.
Temporary
Enter member “IP address” and “ID No.” to add.
Sheet 6-4
Step 3
Select “OK’ to finish adding.
Dahua Video Conference Terminal User’s Manual
36
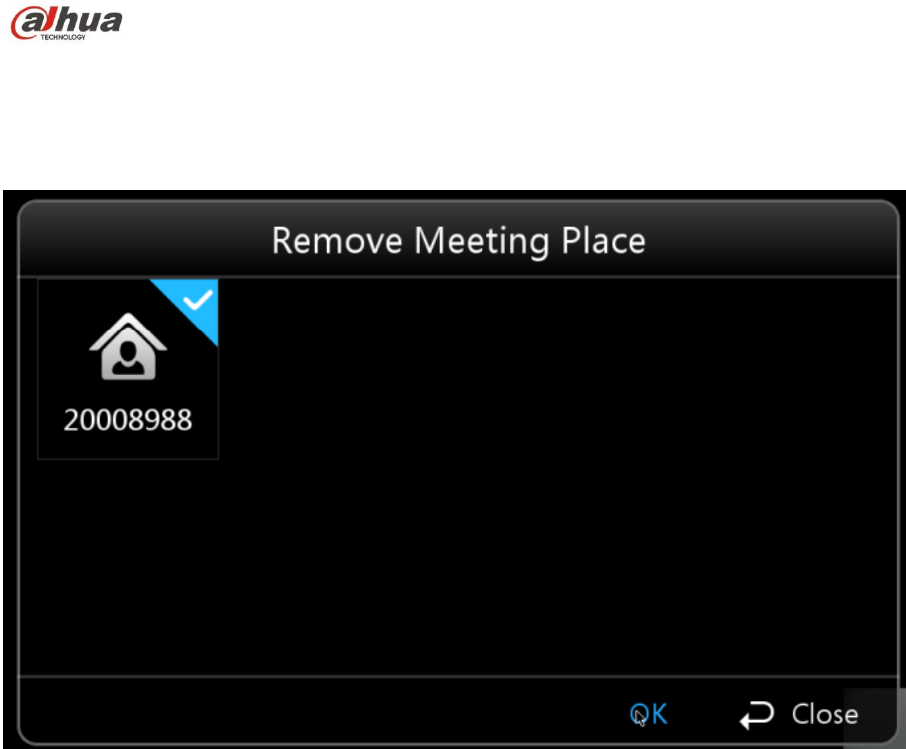
6.4.1.5.2 Remove
Step 1
Select “More > Remove” and the system will display the interface of “Remove”, which is shown in
Figure 6-25.
Figure 6-25
Step 2
Check the meeting place you need to remove.
Step 3
Select “OK” to confirm.
6.4.1.5.3 Overtime
Step 1
Select “More > Overtime” and the system will display the interface of “Overtime”, which is shown
in Figure 6-26.

Dahua Video Conference Terminal User’s Manual
37
Figure 6-26
Step 2
Enter delay time.
Note:
The range of delay time is between 1 minute and 999 minutes.
Step 3
Select “OK” to confirm.
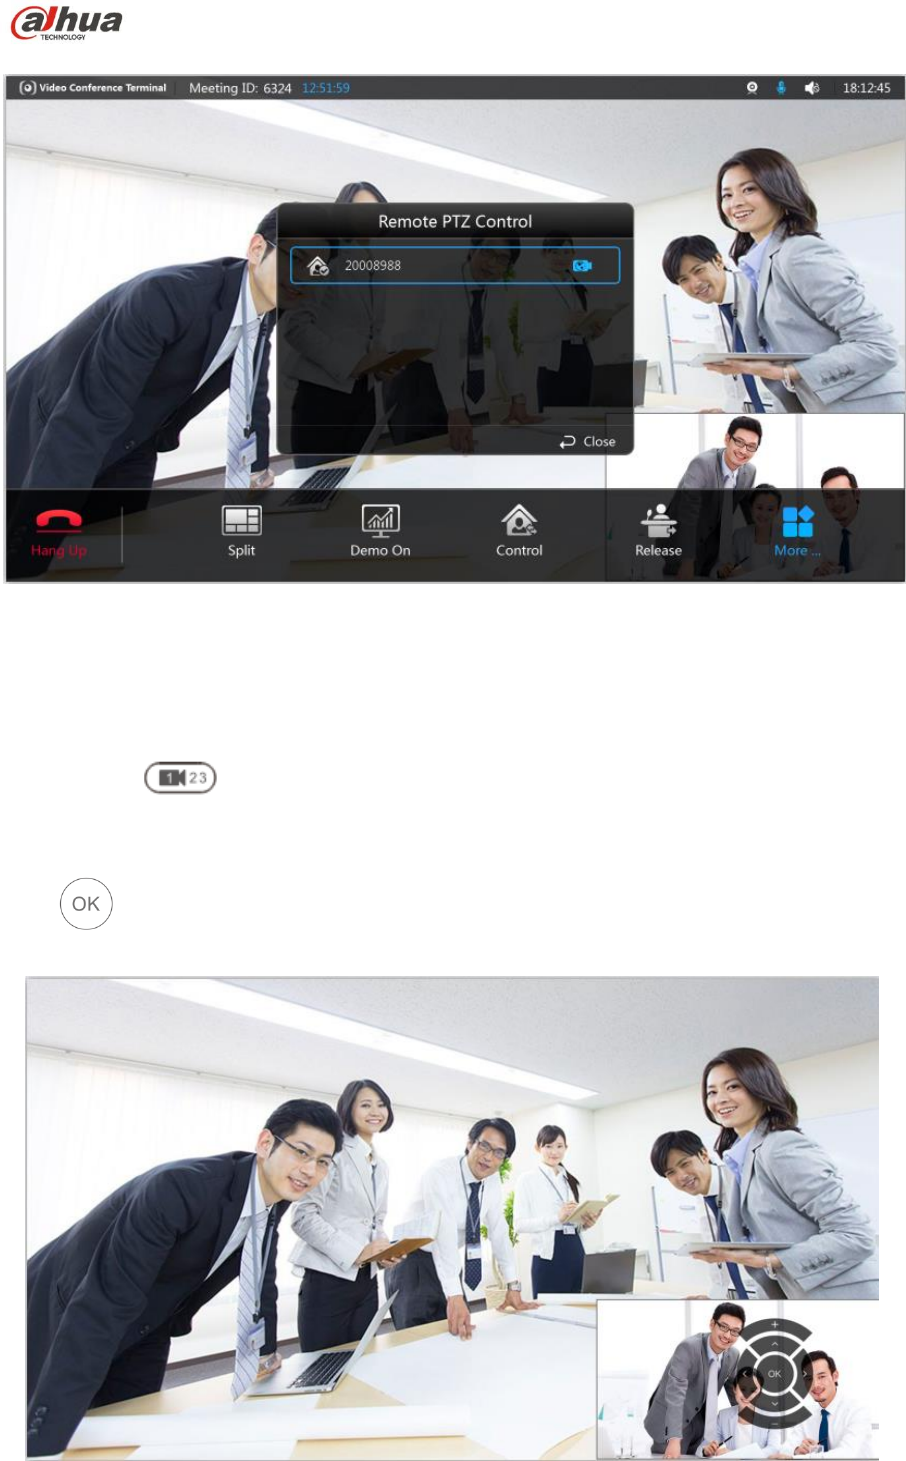
6.4.1.5.4 Remote PTZ
Step 1
Select “More > Remote PTZ” and the system will display the interface of “Remote PTZ Control”,
which is shown in Figure 6-27 and Figure 6-28.
Step 2
It can press to realize shortcut operation.
Dahua Video Conference Terminal User’s Manual
38
Figure 6-27
Step 3
Select the member you need to control.
Step 4
You can press to realize shortcut operation.
Step 5
Press button and confirm. The system will display the interface which is shown in Figure 6-
28.
Figure 6-28

Dahua Video Conference Terminal User’s Manual
39
Step 6
Press button to adjust the preview image of the member.
Step 7
Adjustment completed, press button to confirm.
6.4.1.5.5 Tour
The host tours to observe each meeting place.
Step 1
Select “More > Tour”.
Step 2
Press button to confirm.
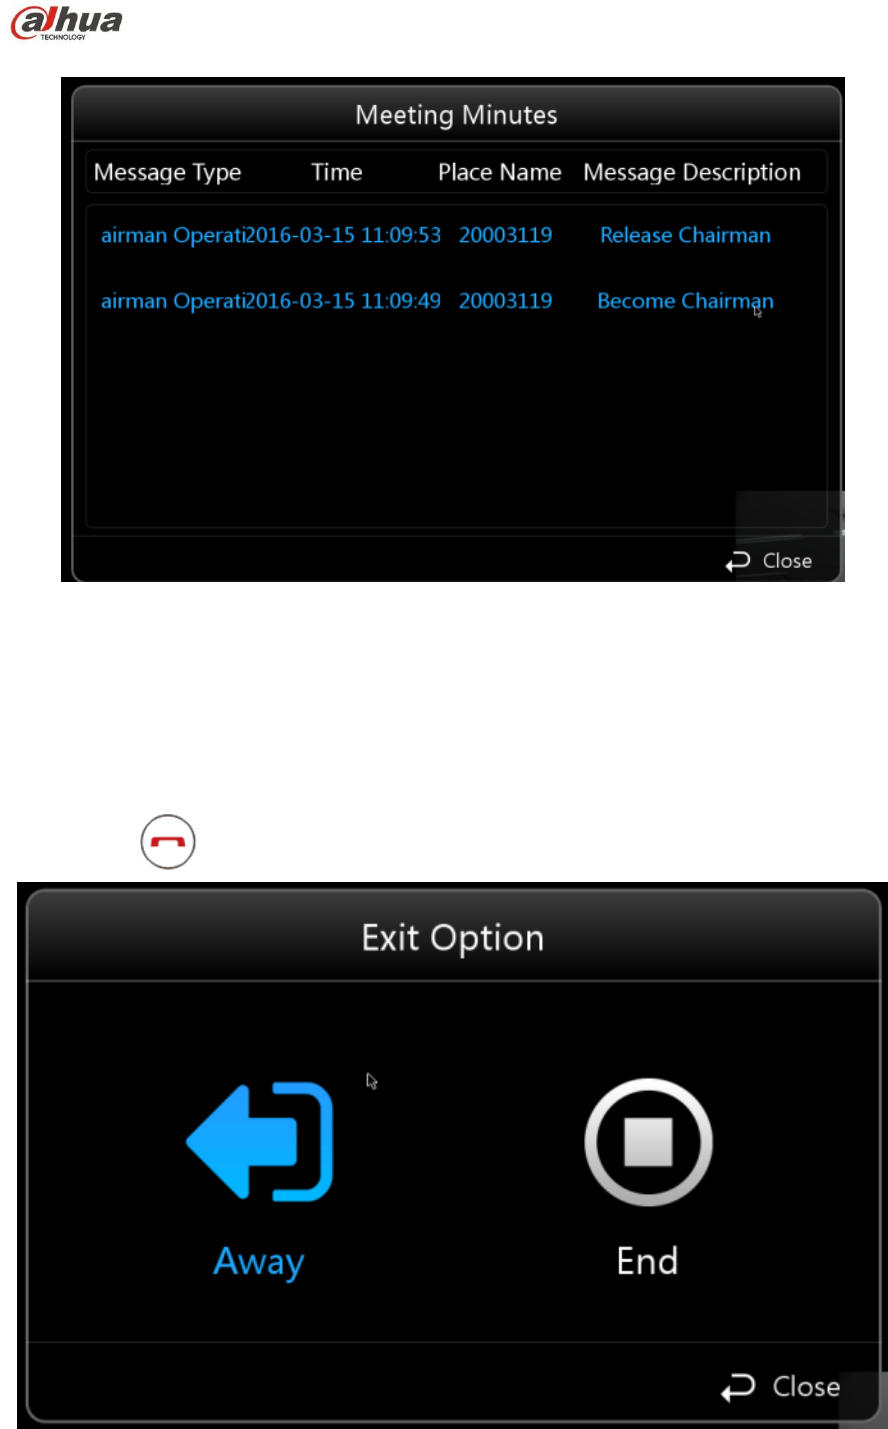
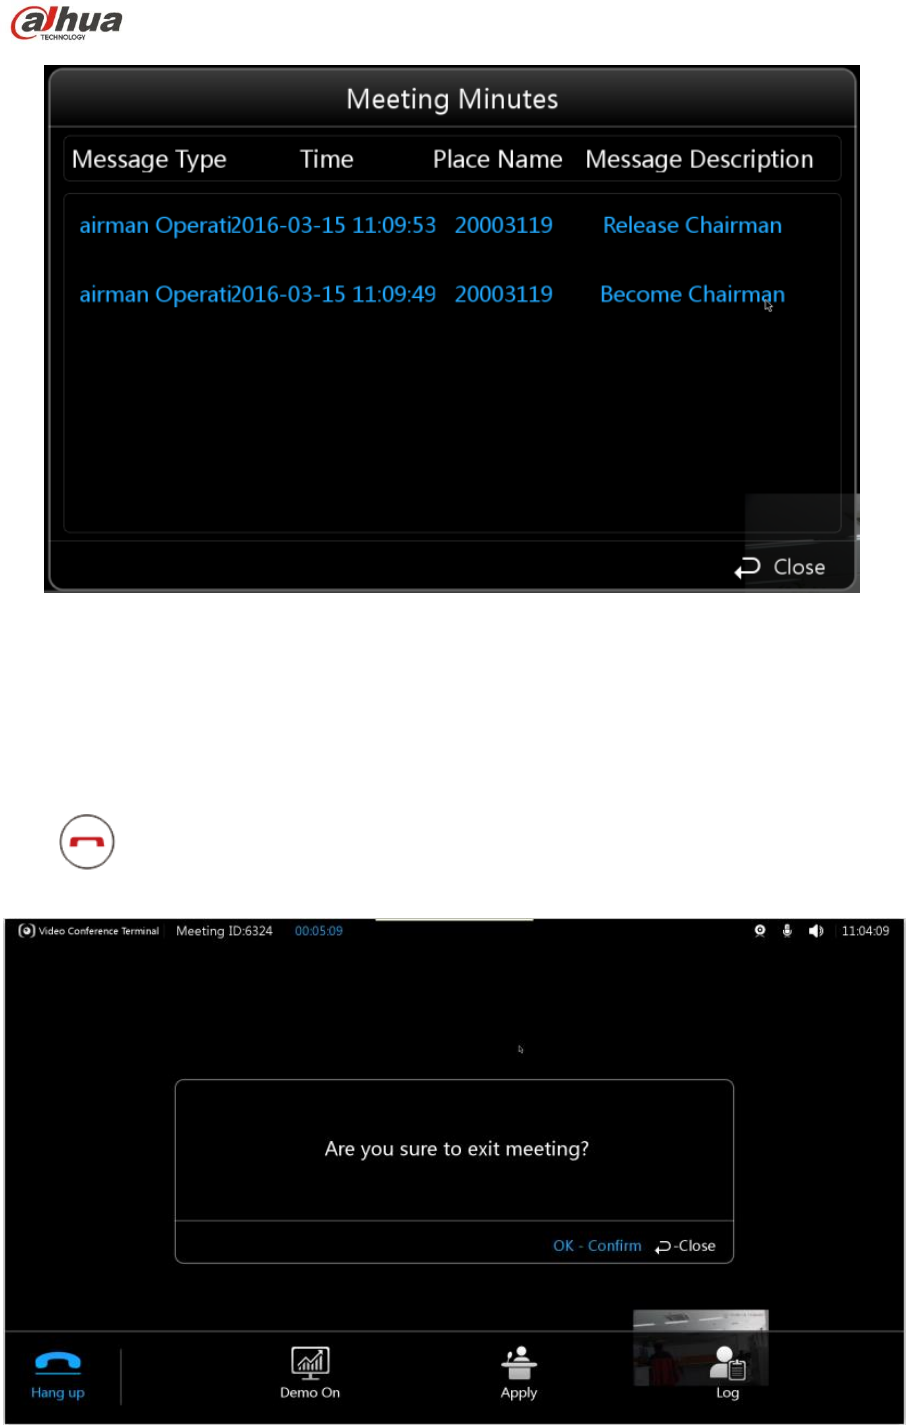
6.4.1.5.6 Log
It is to check relevant event information happened in each time point during the meeting.
Step 1
Select “More > Log”
Step 2
Press button to confirm. The system displays the interface of “Log”, which is shown in
Figure 6-29.
Dahua Video Conference Terminal User’s Manual
40
Figure 6-29
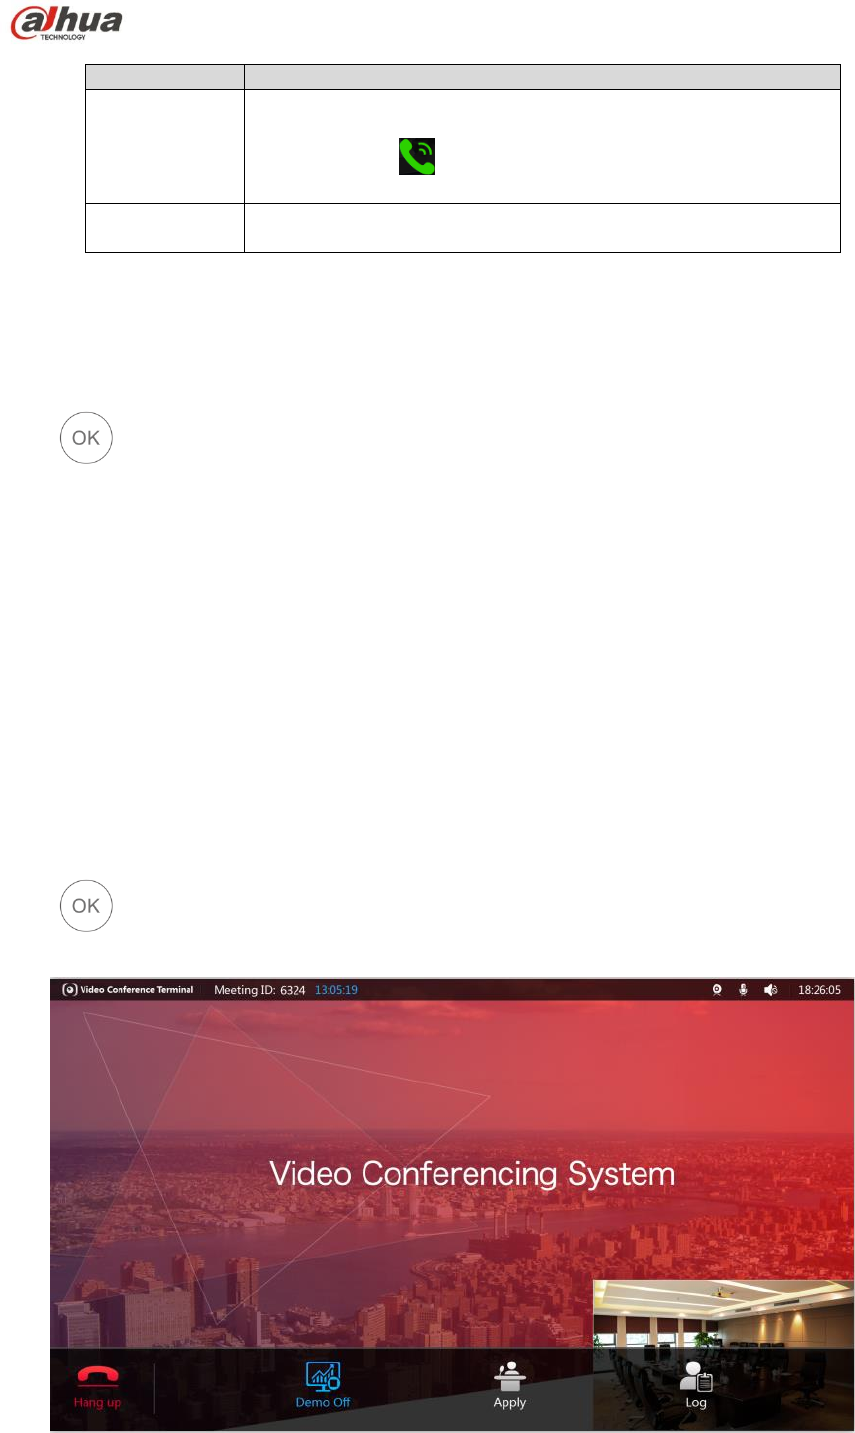
6.4.1.6 Hang up
Step 1
Select “Hang up” to exit or end meeting. The interface is shown in Figure 6-30.
Step 2
You can press button to realize shortcut operation.
Figure 6-30
Dahua Video Conference Terminal User’s Manual
41
Parameter
Note
Away
Exit the meeting interface temporarily.
Note:
You can select in the “Meeting Agenda” to call and return
to the meeting again.
End
The whole meeting is over; the meeting members have to exit
the meeting.
Sheet 6-5
Step 3
Select “Away” / “End”.
Step 4
Press button to confirm.
6.4.2 Non-host Meeting Place
6.4.2.1 Demo On
Full HD data sharing can be realized between external computer and meeting place.
Note:
It is to connect computer to video conference terminal via VGA cable.
Step 1
Select “Demo On”.
Step 2
Press button to confirm. The system displays the interface of ‘Demo On”, which is shown
in Figure 6-31.
Figure 6-31

Dahua Video Conference Terminal User’s Manual
42
Step 3
Press the button of the remote control to send /close demo (optional).
6.4.2.2 Apply
The host meeting place has more control rights than the non-host meeting place.
Meeting place without host: You can apply to be host directly if there is no host in the meeting
place.
Meeting place with host: If there is host in the meeting place, then it needs to be agreed by the
current host when you apply for host.
Step 1
Select “Apply”.
Step 2
Press button to confirm.
6.4.2.3 Log
It is to check the relevant event information at each time point during the meeting.
Step 1
Select “More > Log”.
Step 2
Press button to confirm. The system displays the interface of “Log”, which is shown in
Figure 6-32.
Dahua Video Conference Terminal User’s Manual
43
Figure 6-32
6.4.2.4 Hang up
Step 1
Select “Hang up” to exit meeting, which is shown in Figure 6-33.
Step 2
Press to realize shortcut operation (optional).
Figure 6-33
Dahua Video Conference Terminal User’s Manual
44
Step 3
Press button to confirm.
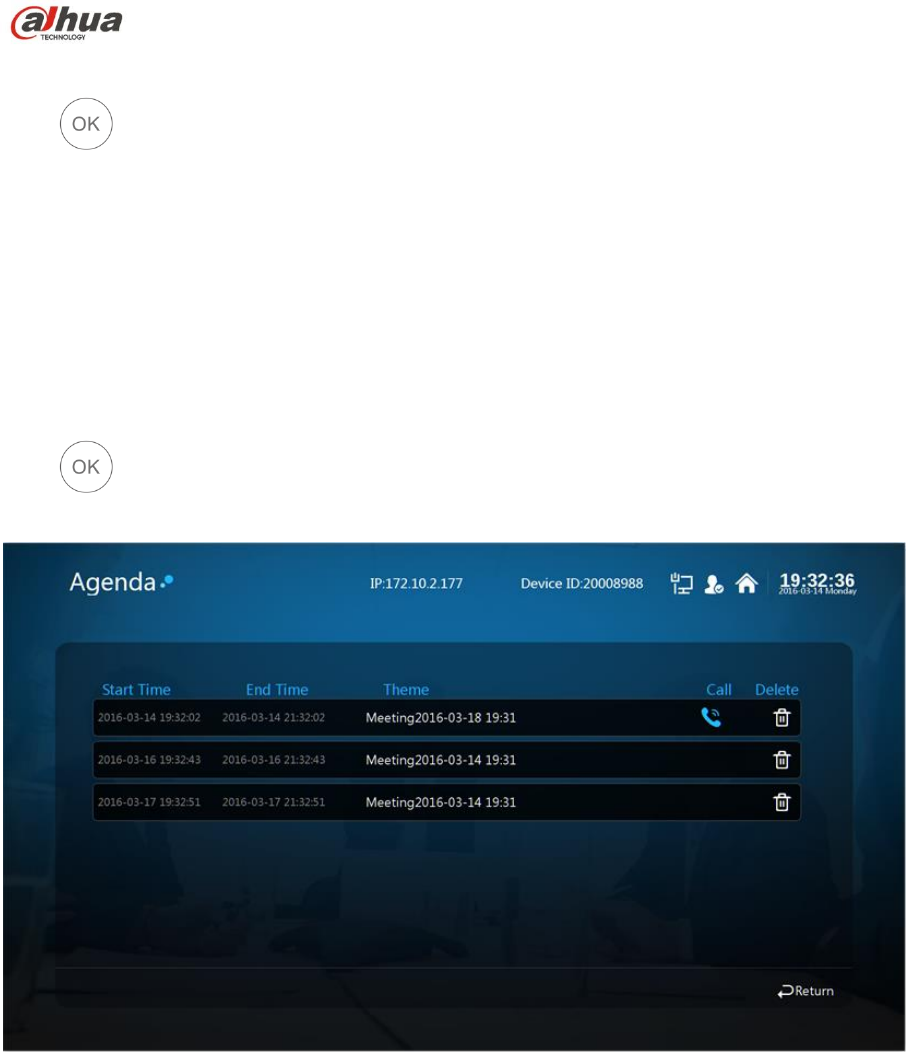
6.5 Agenda
It is to display the ongoing meeting and all the reserved meetings.
Step 1
Select “Agenda”.
Step 2
Press button to confirm. The system displays the interface of “Agenda”, which is shown in
Figure 6-34.
Figure 6-34
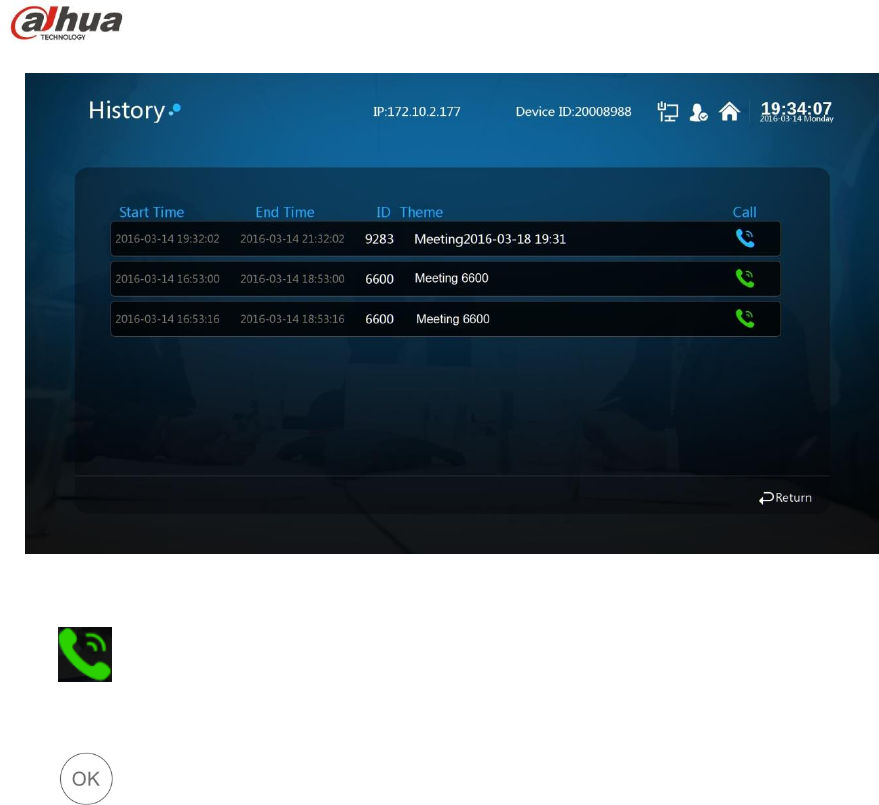
6.6 History
It is to check relevant information record of the history meetings.
Step 1
Select “History”. The system displays the interface of “History”, which is shown in Figure 6-35.
Dahua Video Conference Terminal User’s Manual
45
Figure 6-35
Step 2
Select .
Step 3
Press to confirm to call the meeting again.
Dahua Video Conference Terminal User’s Manual
46
7 Appendix Ⅰ Technical Parameters
Parameter
Note
Device Dimension
245mm×166mm×156mm
Package size
425mm×305mm×220mm(reference size, ±5mm)
Device net weight
2.5kg
Device gross weight
5kg
Working voltage
AC 100V~AC 240V
DC 12V
Working frequency
50Hz~60Hz
Max power consumption
36W
Temperature
0℃~+45℃ (working state)
-40℃~+70℃ (non working state)
RH
10%~80% (working state)
0%~95% (non working state)
ambient noise
<46dBA SPL
Min illuminance
7Lux
Recommended illuminance
<300Lux
Note:
This quick start guide is for reference only. Slight difference may be found in user
interface.
All the designs and software here are subject to change without prior written notice.
If there is any uncertainty or controversy, please refer to the final explanation of us.
Please visit our website or contact your local service engineer for more information.
Dahua Technology Co., Ltd
Address:No.1199 Bin’an Road, Binjiang District, Hangzhou, PRC.
Postcode: 310053
Tel: +86-571-87688883
Fax: +86-571-87688815
Email:overseas@dahuatech.com
Website: www.dahuasecurity.com

Compliance Information
FCC 15.105
For a Class B digital device or peripheral, the instructions furnished the user shall
include the following or similar statement, placed in a prominent location in the text of
the manual:
NOTE: This equipment has been tested and found to comply with the limits for a
Class B digital device, pursuant to part 15 of the FCC Rules. These limits are
designed to provide reasonable protection against harmful interference in a residential
installation. This equipment generates, uses and can radiate radio frequency energy
and, if not installed and used in accordance with the instructions, may cause harmful
interference to radio communications. However, there is no guarantee that
interference will not occur in a particular installation. If this equipment does cause
harmful interference to radio or television reception, which can be determined by
turning the equipment off and on, the user is encouraged to try to correct the
interference by one or more of the following measures:
—Reorient or relocate the receiving antenna.
—Increase the separation between the equipment and receiver.
—Connect the equipment into an outlet on a circuit different from that to which the
receiver is connected.
—Consult the dealer or an experienced radio/TV technician for help.
FCC 15.19
This device complies with Part 15 of the FCC Rules. Operation is subject to the
following two conditions:
(1) This device may not cause harmful interference, and
(2) this device must accept any interference received, including interference that may
cause undesired operation.
FCC 15.21
Any changes or modifications not expressly approved by the party responsible for
compliance could void the user’s authority to operate the equipment.
FCC 15.203
This equipment complies with FCC RF radiation exposure limits set forth for an
uncontrolled environment. This device and its antenna must not be co-located or
operating in conjunction with any other antenna or transmitter.
RF exposure warning
The antennas used for this transmitter must be installed to provide a separation
distance of at least 20 cm from all persons and must not be co-located or operating in
conjunction with any other antenna or transmitter.
Dahua Video Conference Terminal User’s Manual
47