Zhejiang Flashforge 3D Technology HUNTER 3D Printer User Manual
Zhejiang Flashforge 3D Technology CO., Ltd. 3D Printer
UserManual.wiki
>
Zhejiang Flashforge 3D Technology
>
HUNTER User Manual
User Manual
Navigation menu
Upload a User Manual
Namespaces
Wiki Guide
HTML
PDF
Info
Views
User Manual
Discussion / Help
Navigation
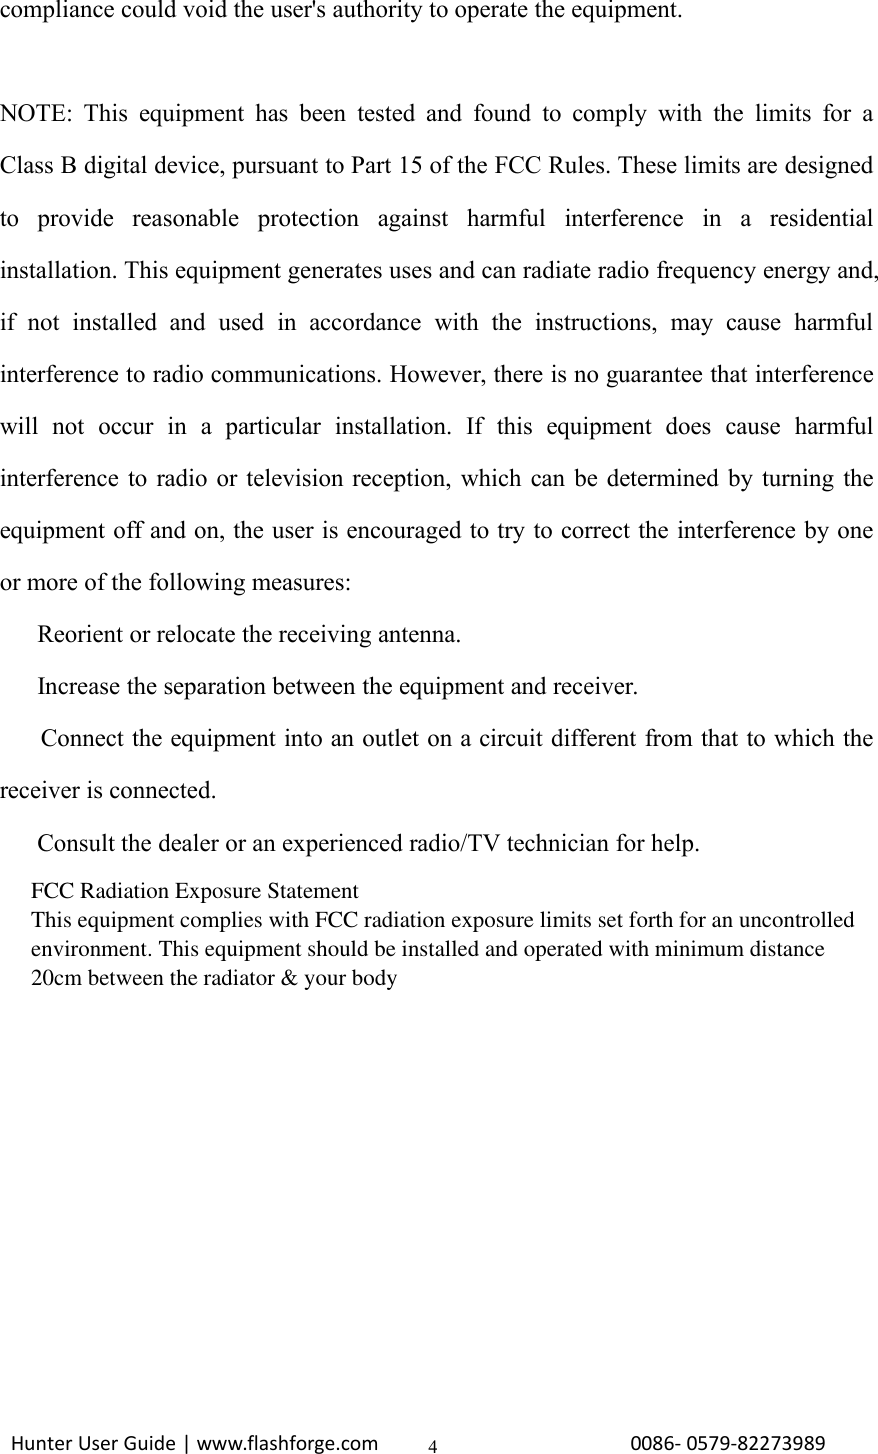


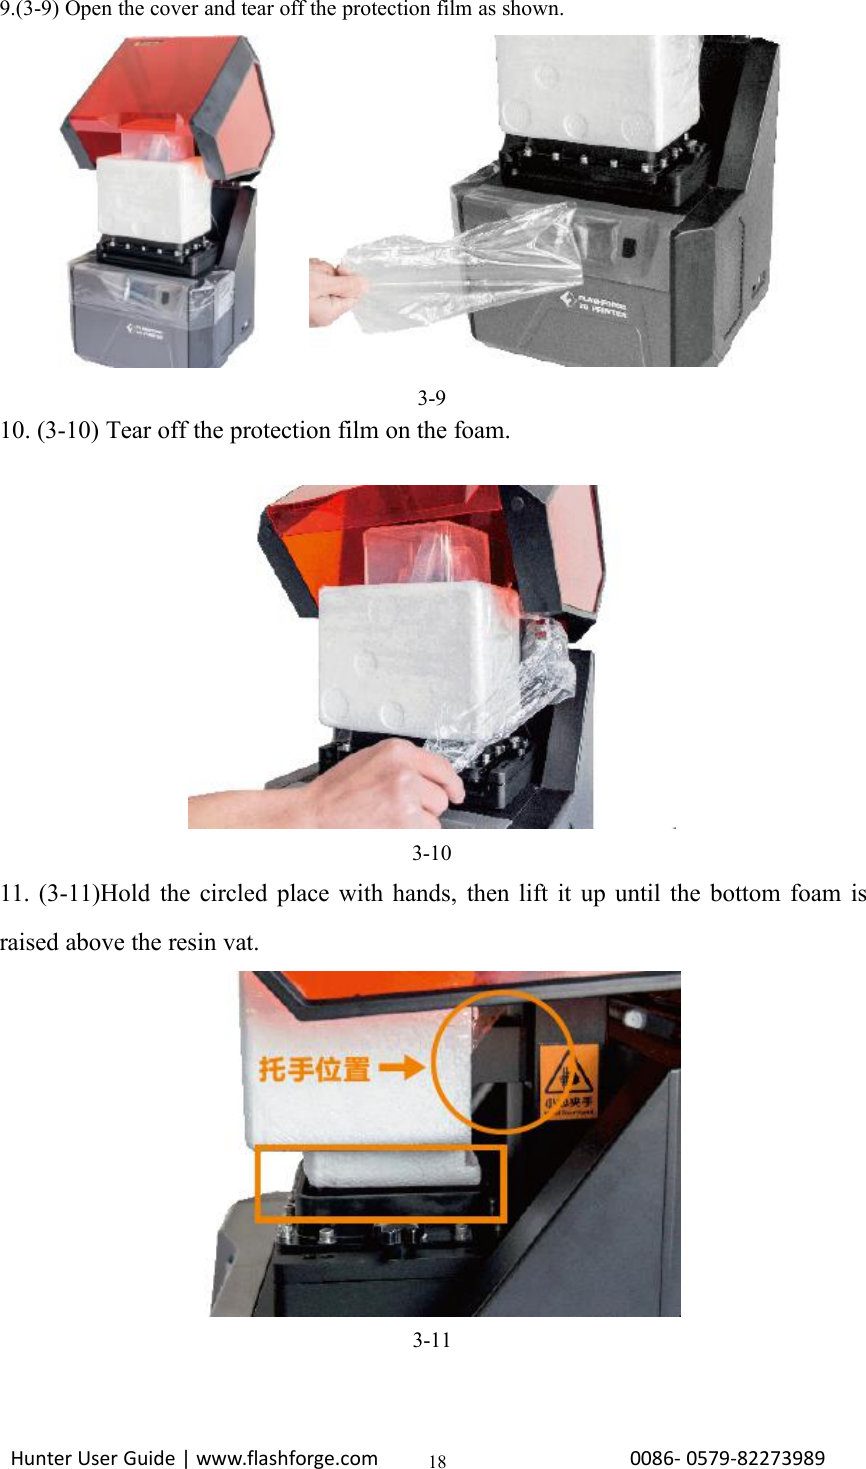
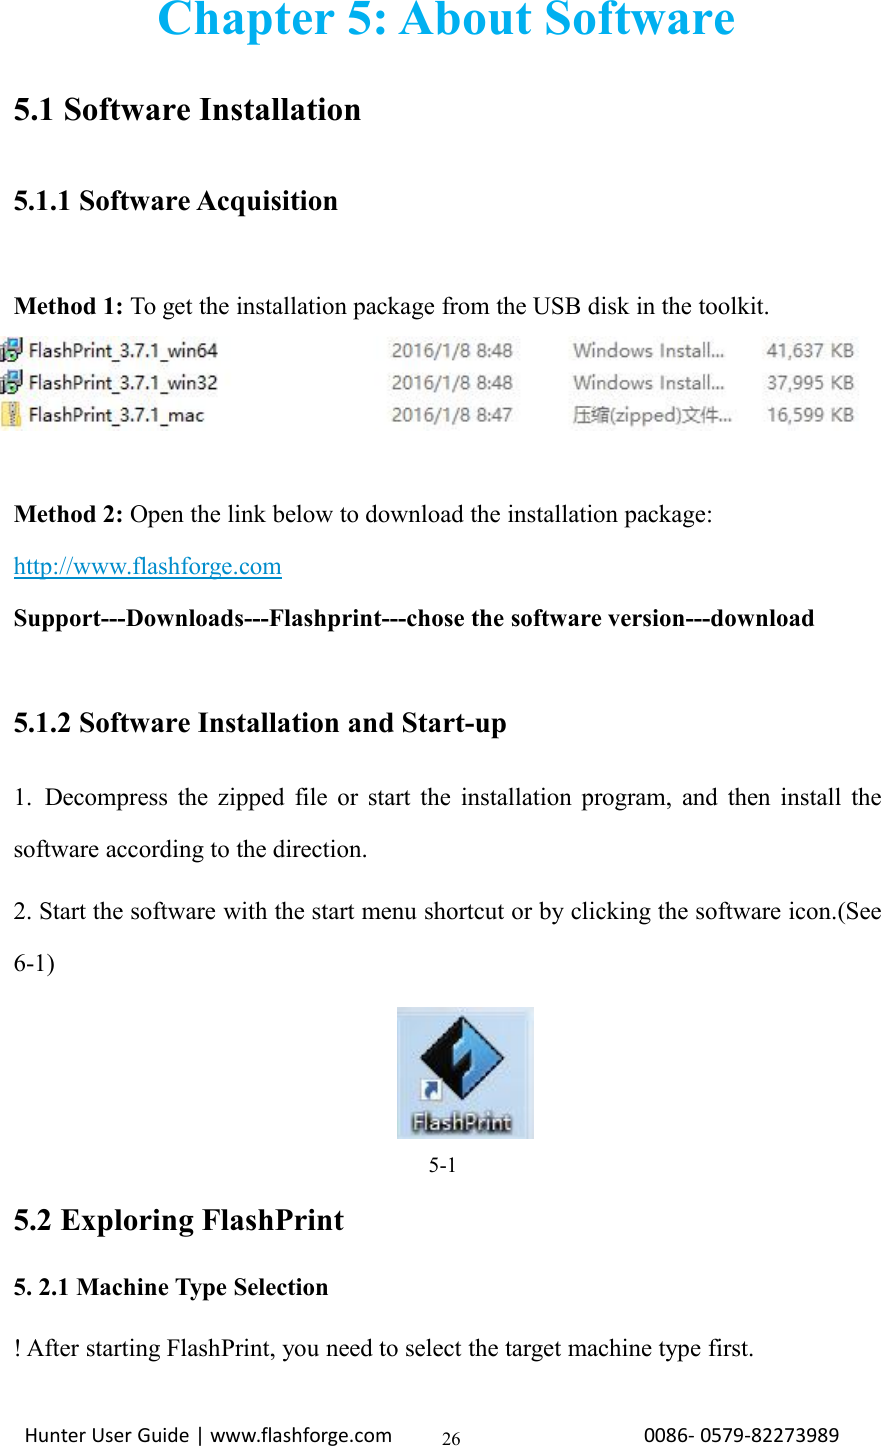
![Hunter User Guide | www.flashforge.com 0086- 0579-8227398927When you start FlashPrint, a dialog box will pop up. Just need to select FlashforgeHunter in the machine type list and click [OK]. You can also change the machine typevia clicking [Print]--[Machine type]. Please see graphic 5-2:5-25.2.2 Flashprint Menus5-3](https://usermanual.wiki/Zhejiang-Flashforge-3D-Technology/HUNTER/User-Guide-3439037-Page-27.png)
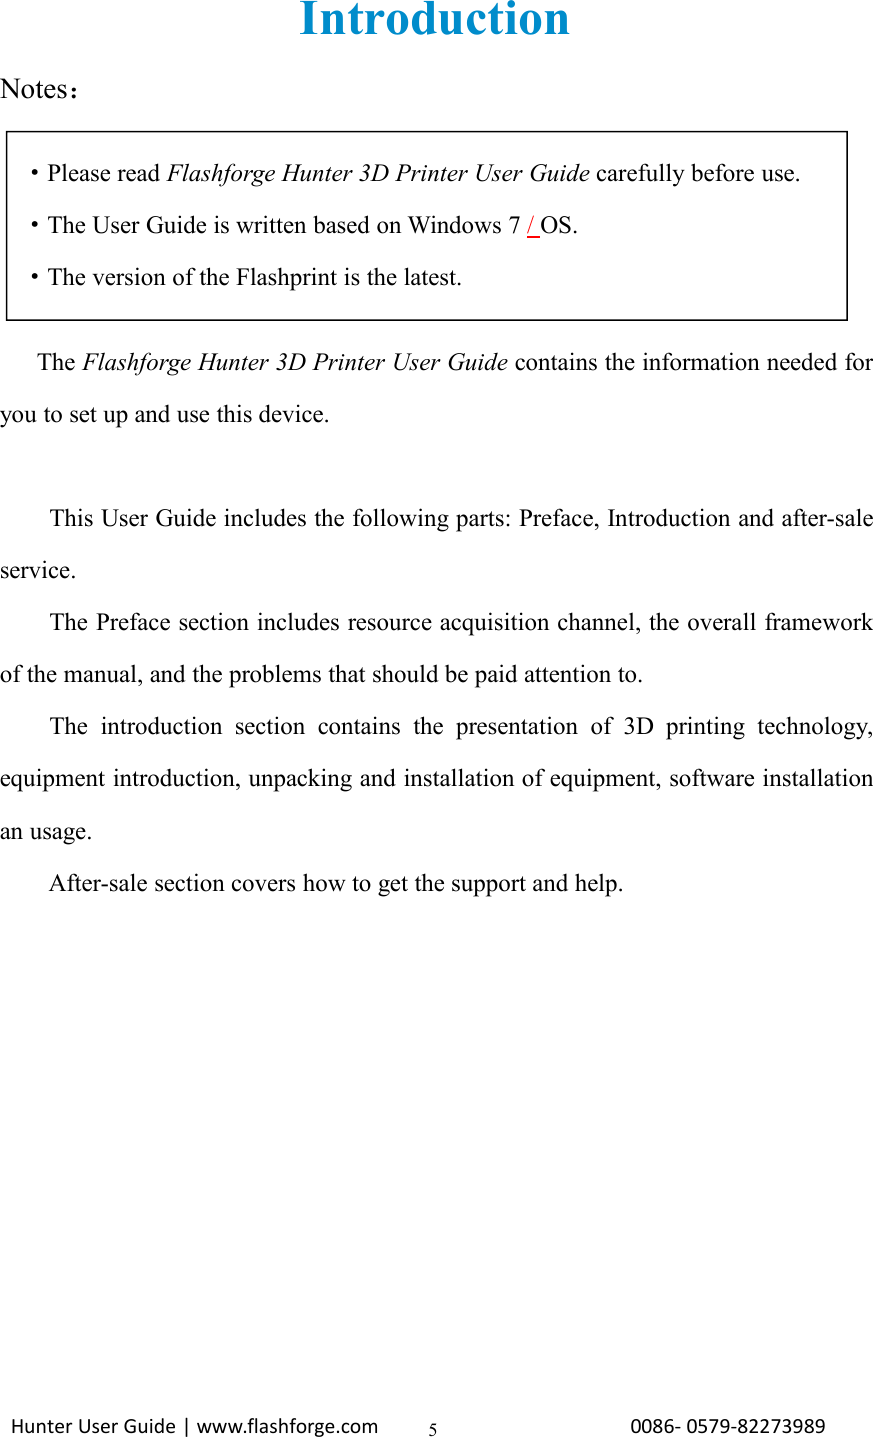
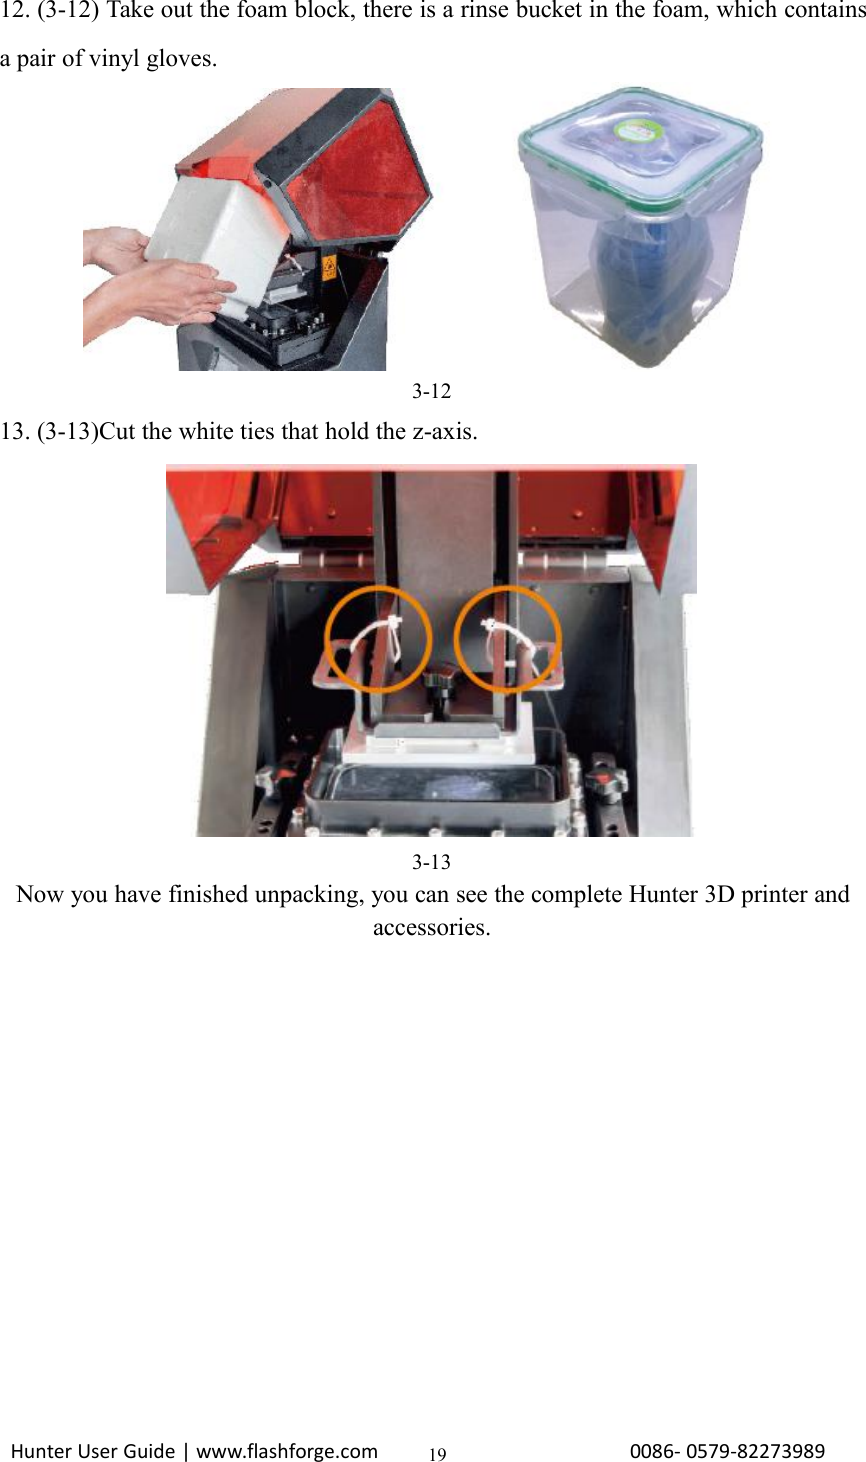
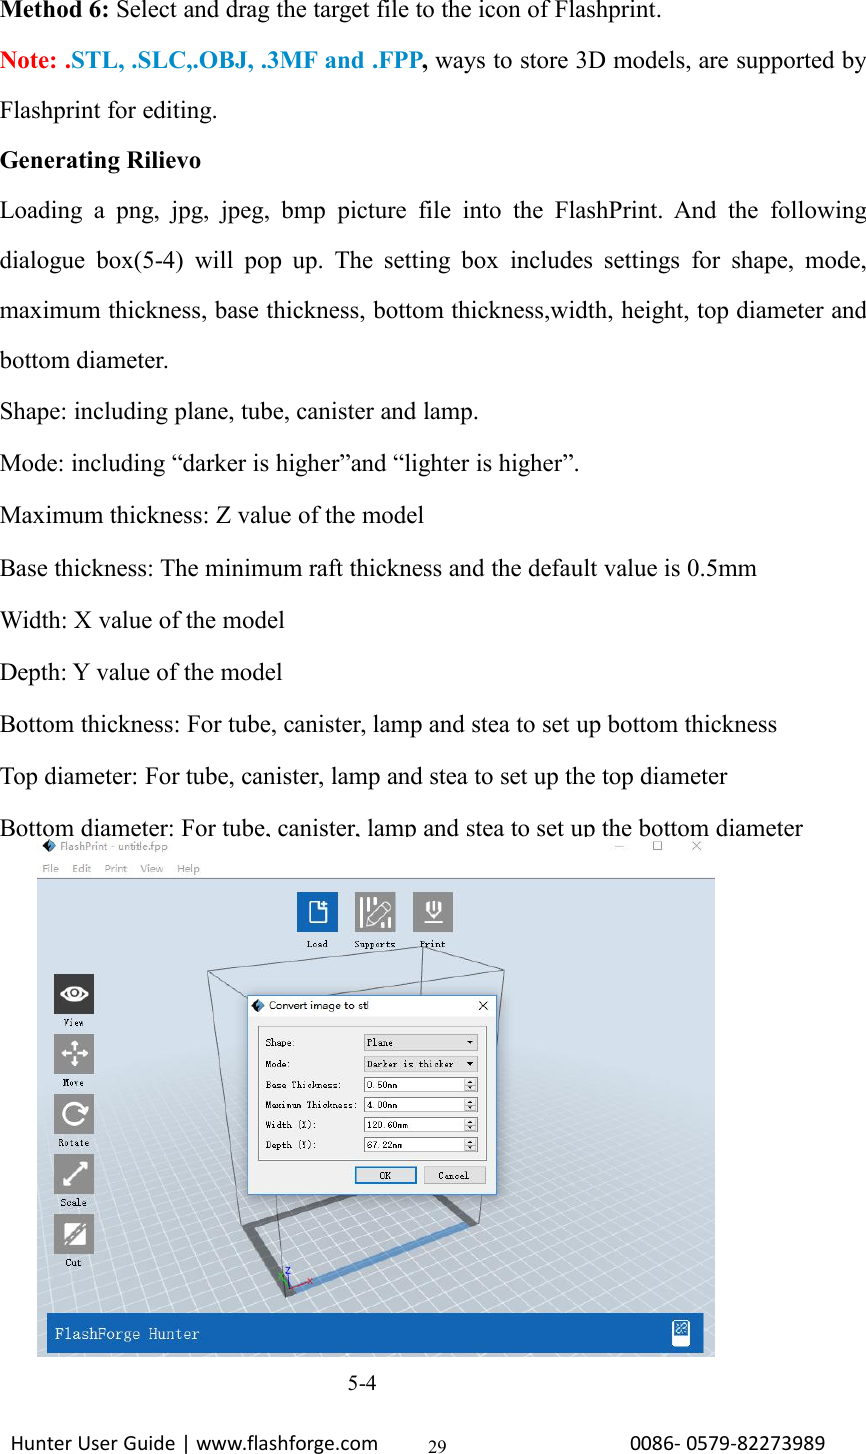
![Hunter User Guide | www.flashforge.com 0086- 0579-82273989285.2.3 LoadingYou can load a model file or Gcode file into your Flashprint by the following sixmethods:Method 1: Click the Load icon on the main interface. Then select the object file.Method 2: Select the file for loading and drag the file to the main interface of thesoftware.Method 3: Click [File]--[Load File]. Then select the object file for loading.Method 4: Click [File]--[Examples]to load the example filesMethod 5: Click [File]--[Recent Files]to load the files opened recently.Load one or multiple files.Enter the support edit modeView FlashPrint home screen from one of six viewing angles.Move model around on xy-axis; shift+click to move along z axisTurn and rotate your modelScaling the size of your objectCut the model into several partsPrint it directly with your Hunter or export to your USB stick.](https://usermanual.wiki/Zhejiang-Flashforge-3D-Technology/HUNTER/User-Guide-3439037-Page-28.png)
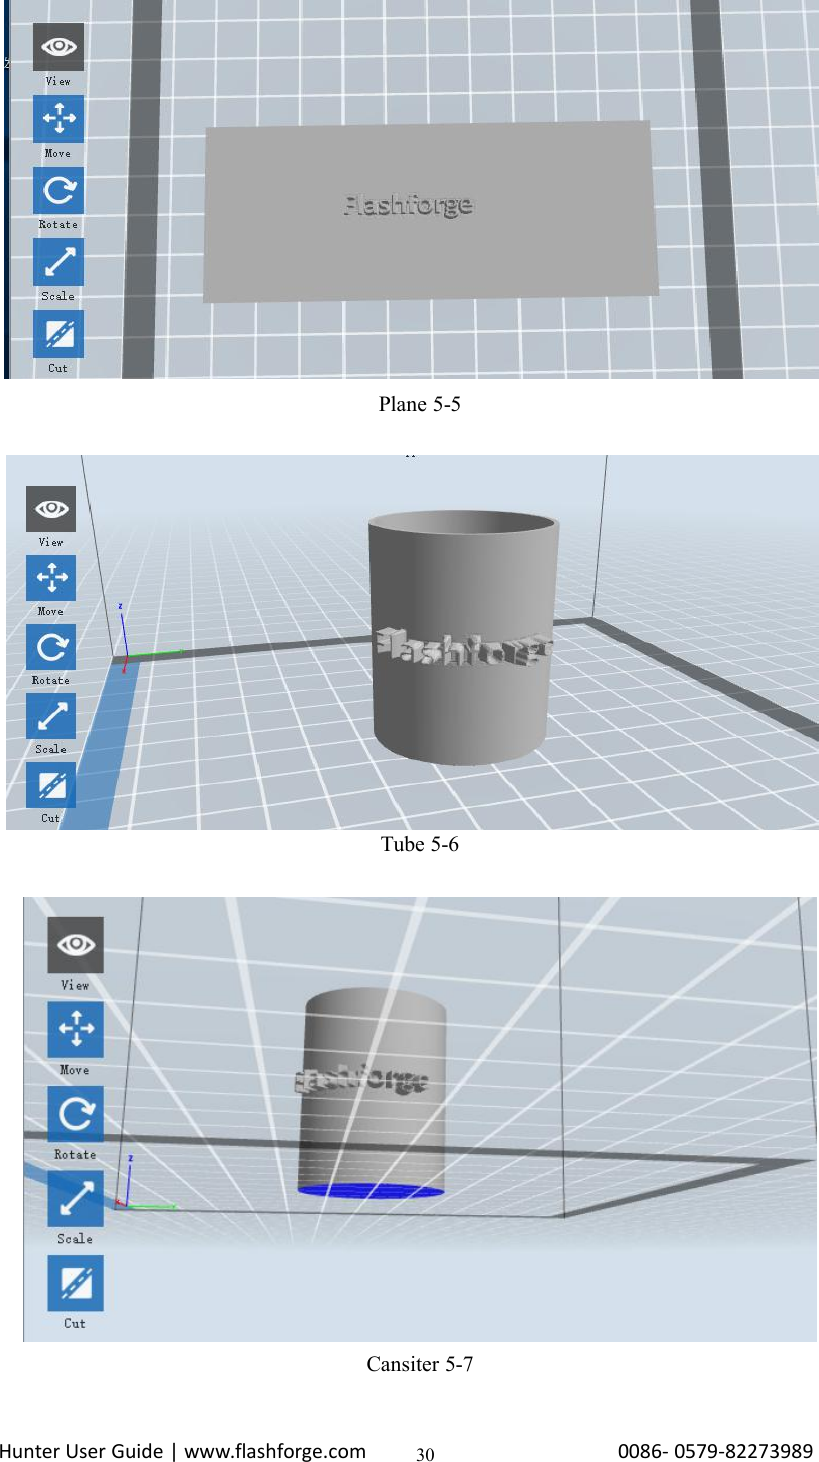
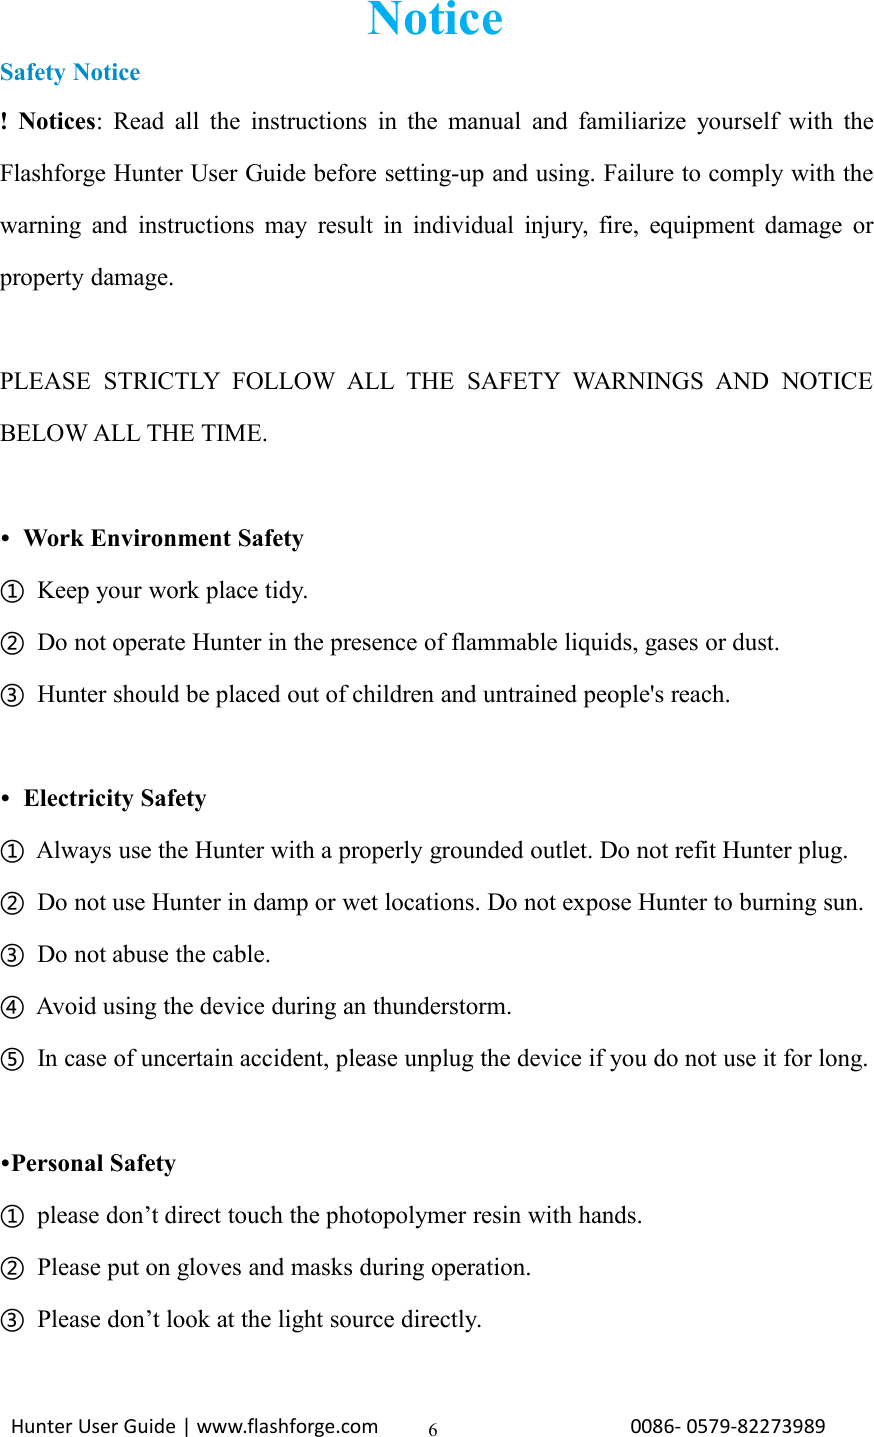
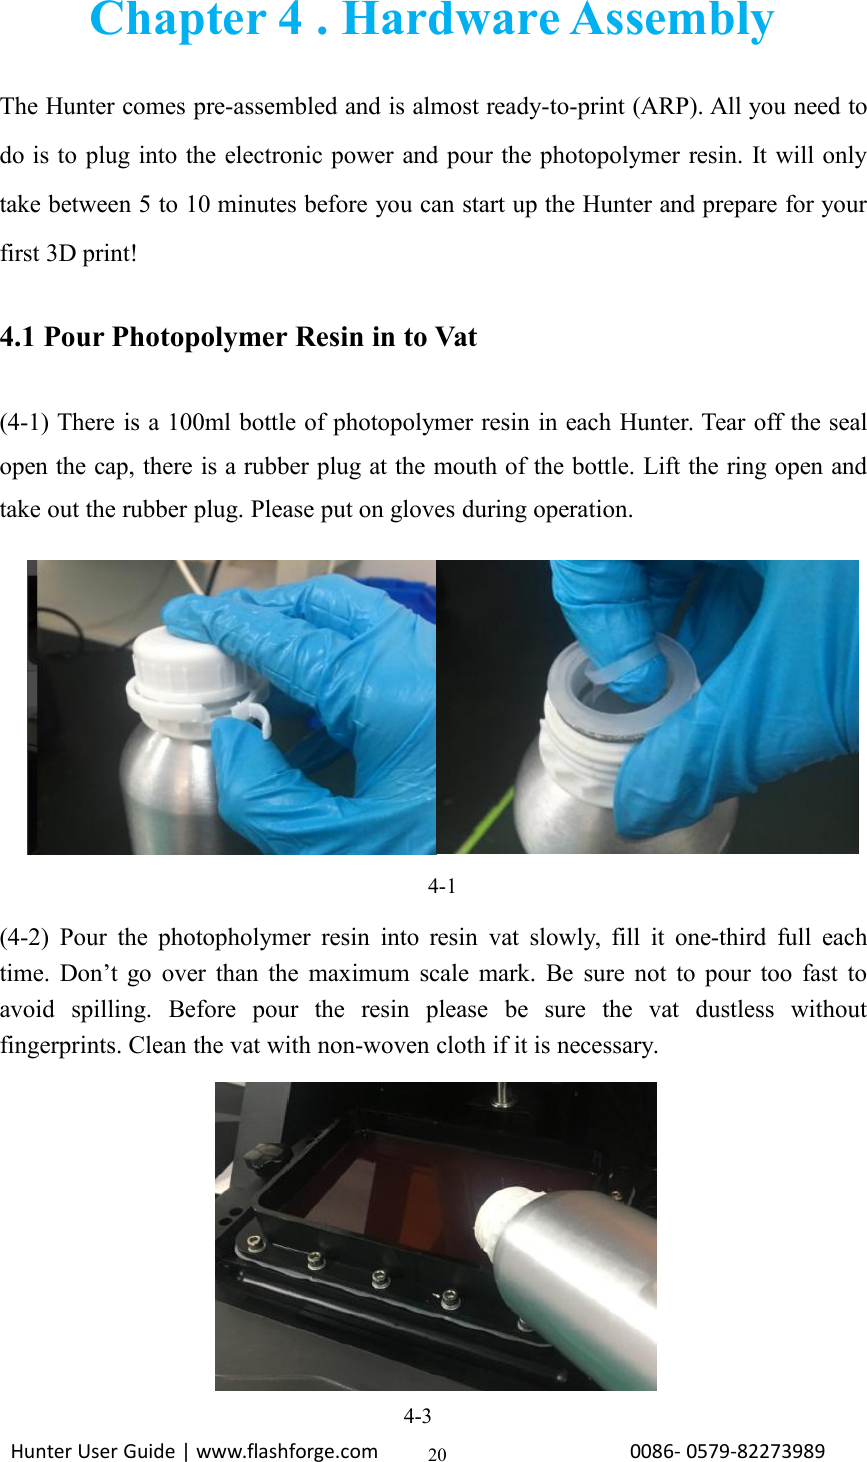
![Hunter User Guide | www.flashforge.com 0086- 0579-8227398931Lamp 5-8Seal 5-95.2.4 Views①Changing viewsChange model views by moving, rotating, scaling.●DragClick the [View] icon and then you can move the object by the following threemethods:](https://usermanual.wiki/Zhejiang-Flashforge-3D-Technology/HUNTER/User-Guide-3439037-Page-31.png)
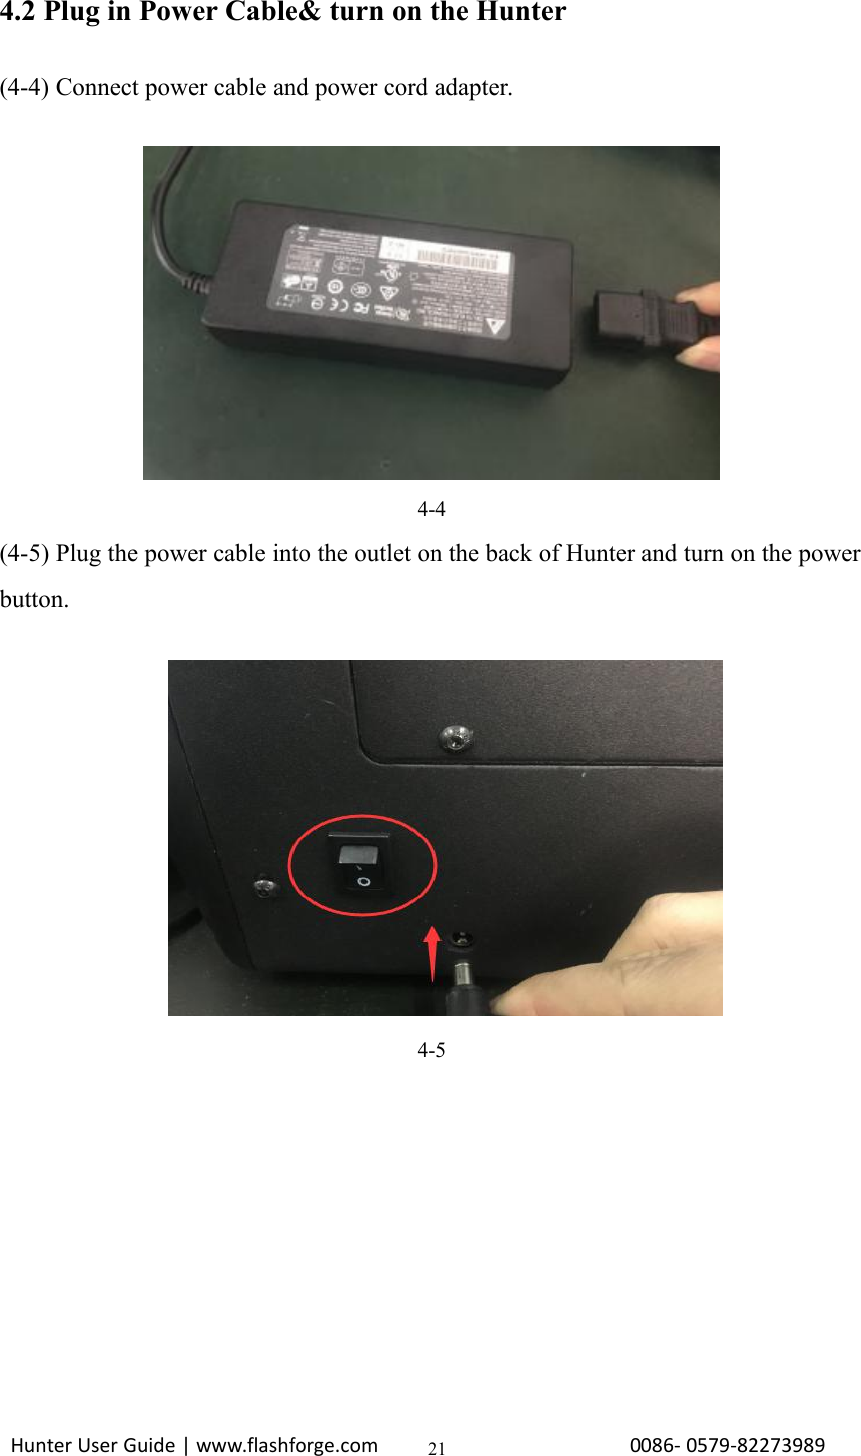
![Hunter User Guide | www.flashforge.com 0086- 0579-8227398932Method 1: Long press the left mouse button and drag.Method 2: Long press the middle mouse button and drag.Method 3: Long press the Shift key, hold down the right mouse button and drag.●RotateClick the [View] icon and then you can rotate the object by the following twomethods:Method 1. Hold down the right mouse button and drag.Method 2. Hold down the Shift key, hold down the left mouse button and drag.●ScaleRotate the mouse wheel to enlarge or shrink the build plate.②Set ViewAllows users to view the object on the build plate. Six views are under the view menu,that is, home view, bottom view, top view, front view, back view, left view and rightview.Method 1: Click the the [View] button, there are six views in the drop- down listMethod 2: Click the the [Look] icon on the left, click it again and a submenu willappear with six views for selecting.③Reset ViewAllow users to reset views by the following two methods:Method 1: Click the [View] menu and select [Home View]Method 2: Click the [View]button on the left, click it again and you will see theviewing options, you can click [Reset].④Show Model OutlineClick [View]--[Show Model Outline], it will highlight the yellow border of theobject](https://usermanual.wiki/Zhejiang-Flashforge-3D-Technology/HUNTER/User-Guide-3439037-Page-32.png)
![Hunter User Guide | www.flashforge.com 0086- 0579-8227398933⑤Show Steep OverhangClick [View]--[Show Steep Overhang]. When the intersection angle between themodel surface and horizontal line is within the overhang threshold value, the surfacehas steep overhang and it becomes red in the software. Overhang threshold valuecould be set as needed. The default value is 45 degree.5.2.5 MoveSelect the object and move the object by the following two methods:Method 1: Click the [Move] icon on the left, Long press the left mouse button anddrag to adjust the location of the model in XY direction. Long press the Shift key andthe left mouse button, drag to adjust the location of the model in Z direction. Thedistance and the direction of the movement shall be displayed.Method 2: Click the [Move]button on the left and then enter the distance value.Click [Reset]to reset distance values.Note: Users shall click [Center] and [On Platform] after the location adjustment toensure the model(s) be within the build area and on the build platform. If a specifiedposition is needed, only to click [On Platform].5.2.6 RotateSelect the target object and rotate the object by the following two methods:Method 1: Click the [Rotate] icon on the left and three mutually perpendicular ringsappear around the object Click one ring and rotate on the present axis, you will see therotation angle and direction in the center of circle. In this way, you could make themodel rotate on X/Y/Z axis.Method 2: Click the [Rotate] icon on the left, and then enter into rotating angelvalues in X/Y/Z axes positioning. Click [Reset] to reset rotating angel values.](https://usermanual.wiki/Zhejiang-Flashforge-3D-Technology/HUNTER/User-Guide-3439037-Page-33.png)
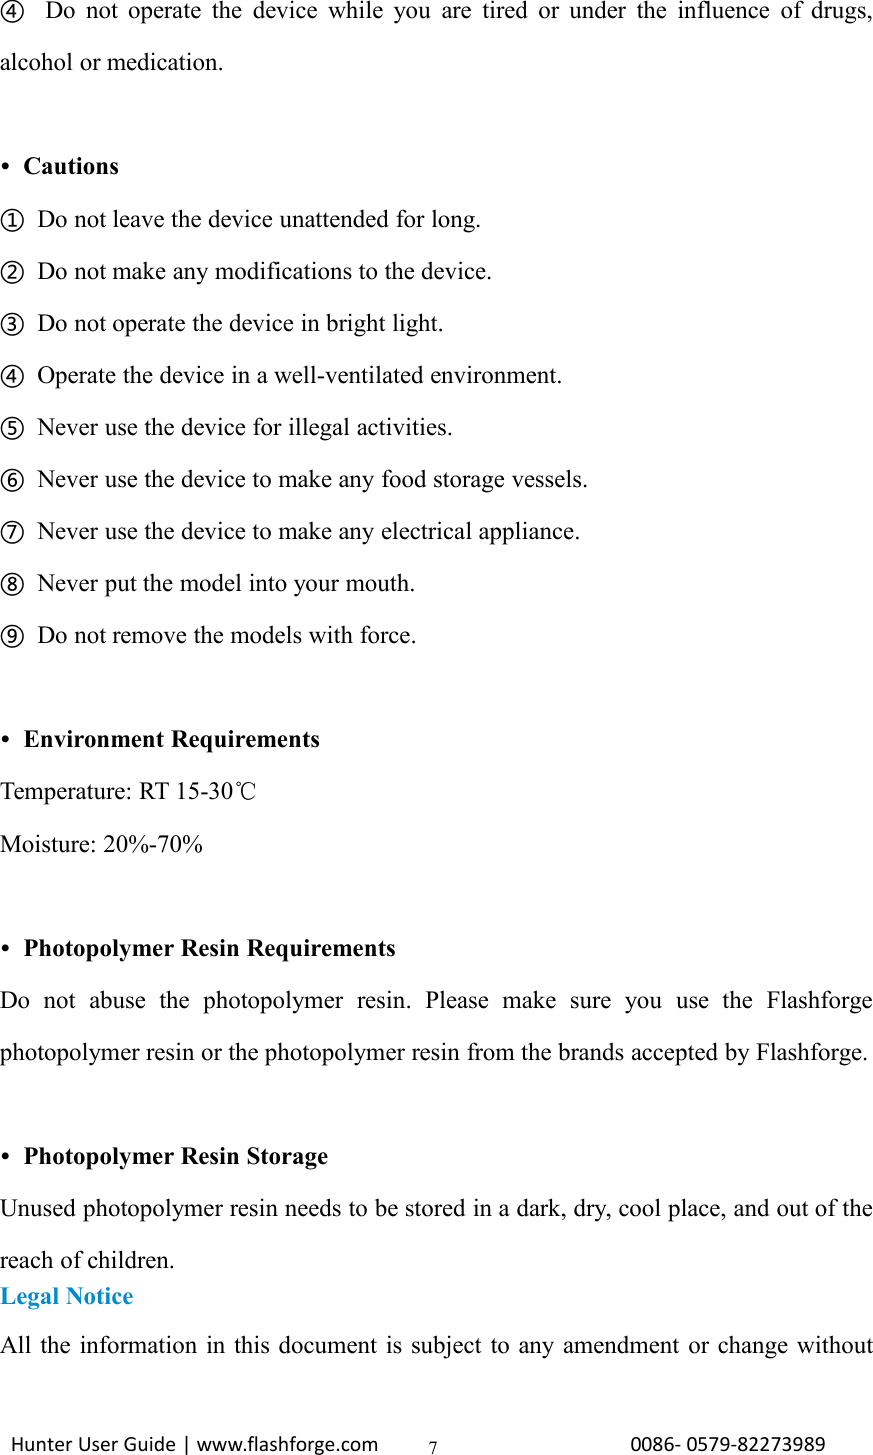
![Hunter User Guide | www.flashforge.com 0086- 0579-82273989345.2.7 ScaleSelect the target object and scale the object by the following two methods:Method 1: Click the [Scale] icon on the left, hold down the left mouse button andscale the model. The corresponding values will display near the object.Method 2: Click the [Scale] icon on the left and then enter into scale values in X/Y/Zaxes positioning. Click the [Maximum] button to get largest size possible for building.Click [Reset] to reset the size of model.Note: If the [Uniform Scaling] radio button is clicked, it will scale the model in equalproportion when changing value in any positioning of the model. Otherwise it willonly change the value of the corresponding positioning.5.2.8 CutLeft-click on the model to select it and double-click on the Cut icon to set the cutplane. The direction and position are available for setting.①Draw with Mouse②X Plane](https://usermanual.wiki/Zhejiang-Flashforge-3D-Technology/HUNTER/User-Guide-3439037-Page-34.png)
![Hunter User Guide | www.flashforge.com 0086- 0579-8227398935③Y Plane④Z Plane5.2.9 SupportsAfter loading the model, click [Edit]--[Supports]or click the Supports icon directly,then you will enter the support edit mode(5-10). Click [Back]to exit when you finishediting.5-10](https://usermanual.wiki/Zhejiang-Flashforge-3D-Technology/HUNTER/User-Guide-3439037-Page-35.png)
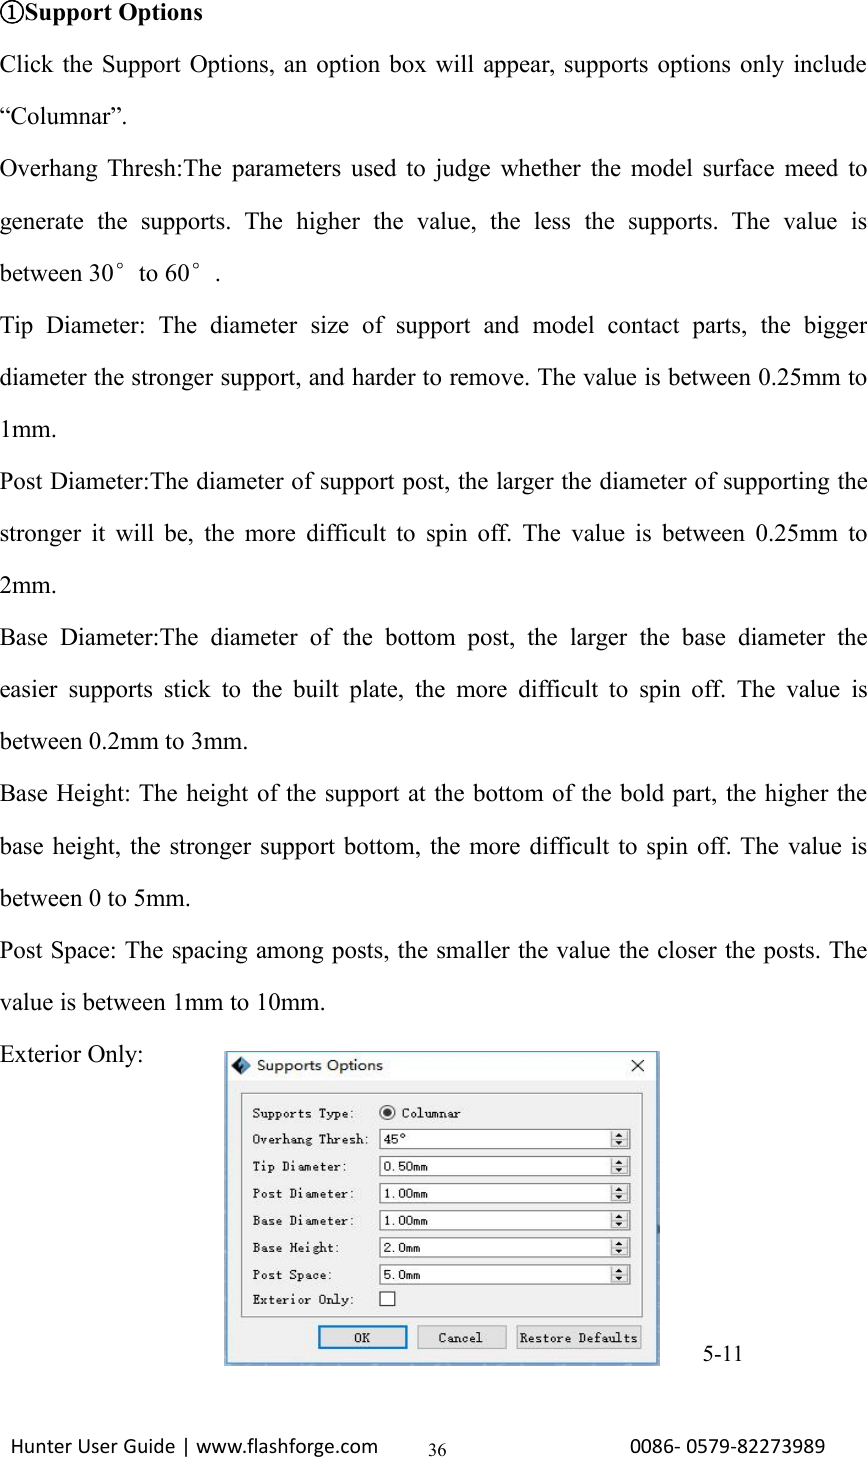
![Hunter User Guide | www.flashforge.com 0086- 0579-8227398937②Auto SupportsClick the [Auto Supports] button, the software will judge the position where supportsare needed and generate corresponding treelike or linear supports. If it is a model withsupports, the existing supports will be deleted and new supports will be generated.③Add SupportsSupports will be added once clicking the [Add]button. Move the cursor to theposition where supports needed, left-click to choose the starting point of supports,hold down the left mouse button and drag the mouse the supports preview will showup (if support surface doesn’t need support or the support column angle is too large,will highlight the support review ).Loosen the left mouse button, if support columndoesn’t meet with model, then support will be generated on origin and terminal point(the highlighted preview support won’t generate support structure )④Clear SupportsClick [Clear Supports], all supports will be deleted. The operation can be repealedvia clicking [Undo] or pressing the shortcut key Ctrl+Z.⑤Delete SupportsSupports will be deleted once clicking the [Delete]button. Move the cursor to thesupports needed deleting, current supports and its subnode support will be highlighted,click the left mouse button to delete these highlighted support.](https://usermanual.wiki/Zhejiang-Flashforge-3D-Technology/HUNTER/User-Guide-3439037-Page-37.png)

![Hunter User Guide | www.flashforge.com 0086- 0579-8227398939a. X adjust: According to the previous printing error to adjust the x-axis size.b. Y adjust: According to the previous printing error to adjust the x-axis size.Othersa. Light intensity:According to the sensitivity of light to adjust the lightintensity. Use Flashforge photopolymer resin need not any adjustment, default 100%.5.2.11 File Menus①New ProjectClick [File]--[New Project]can build a blank project. If there is an unsavedmodification on previous project, then it will inform you whether the modificationneeds to be saved or not. Click [Yes]will save the modification, click [No]willabandon it. If click [Cancel]or close tool tip, then it will cancel the new project.5-13②SavingAfter finishing the model edit and adjustment, there are two ways below to save allmodels in the scene.Method 1:Click [File]--[Save Project] in the menu bar to save the file as a project file with the“.fpp” suffix, all models in the scene (include support) are independent. Afterreloading the files, extruder configuration information and model position will be thesame as the configuration during saving.](https://usermanual.wiki/Zhejiang-Flashforge-3D-Technology/HUNTER/User-Guide-3439037-Page-39.png)
![Hunter User Guide | www.flashforge.com 0086- 0579-8227398940Method 2:Click on [File]--[Save as...] to save the model as project file .fpp or .stl and .obj.For .stl and .boj, models are integrated as one(include support part). If load it again,only the position of the model was saved, not included the printing parameters.③PreferencesClick [File]--[Preferences], you can choose language and if needs detecting updatewhen start5-14●Language: The software supports six languages, namely, Chinese(simplifiedChinese and traditional Chinese), English, French, Korean, Japanese and Russian.●Check for Update after start up: It is used to preset if it is necessary to activatethe online automatic update function, if choose yes, every time when you opensoftware, it can online detect if it is a new version software, once new version found,it will reminds users to download and install new version firmware.5.2.12 Edit Menus①UndoAllows users to undo the recent edits by the following two methods:Method 1: Click [Edit]--[Undo].Method 2: Press the shortcut Ctrl+Z.②RedoAllows users to redo the most recent edit you have undone to your model file by the](https://usermanual.wiki/Zhejiang-Flashforge-3D-Technology/HUNTER/User-Guide-3439037-Page-40.png)
![Hunter User Guide | www.flashforge.com 0086- 0579-8227398941following two methodsMethod 1: Click [Edit]--[Redo]Method 2: Press the shortcut Ctrl+Y.③Empty Undo-stackTo clean up the recorded operating steps so as to release the memory.④Select AllBy the following two methods, you could select all models in the scene.(Whenmodels are too small to be seen or out of viewing scope, please click [Center] and[Scale] buttons to adjust the model.)Method 1: Click [Edit]--[Select All].Method 2: Press the shortcut Ctrl+A.⑤DuplicateSelect the object and duplicate the object through the following two methods:Method 1: Click [Edit]--[Duplicate]Method 2: Press the shortcut Ctrl+D⑥DeleteSelect the object and delete the object through the following two methods:Method 1: Click [Edit]--[Delete]Method 2: Press the shortcut Delete⑦Surface to PlatformAfter selecting the model, you can make the model surface to platform via the followingoperation.Click [Edit]--[Surface to Platform]into surface to platform mode(5-15)](https://usermanual.wiki/Zhejiang-Flashforge-3D-Technology/HUNTER/User-Guide-3439037-Page-41.png)
![Hunter User Guide | www.flashforge.com 0086- 0579-8227398942(Surface to Platform 5-15)⑧Auto Layout AllClick [Edit]--[Auto Layout All]after loading one or more than one models, allmodels will be placed automatically as automatic placement rule.5.2.13 Print Menus①Connect MachineYou can connect the Hunter with your PC via a USB cable or WIFI.Note: The machine icon on the bottom right displays the connection status:ConnectedDisconnectedMethod 1:Connect Via USB Cablea. Connect your Hunter with your PC via an USB cable.b. Turn on your Hunter and start Flashprint.](https://usermanual.wiki/Zhejiang-Flashforge-3D-Technology/HUNTER/User-Guide-3439037-Page-42.png)
![Hunter User Guide | www.flashforge.com 0086- 0579-8227398943c.Click [Print]--[Connect Machine],then select USB in the [Connection Mode]option and select machine you want to connect in [Select Machine] option. If you cannot find your machine, click the [Rescan] button to scan your machine and select it.Finally click [Connect] button to connect to the printer. If you still can not find yourmachine after rescan, it means you haven’t installed the driver in the software.5-16Method 2:Connect Via WIFI1. Turn on Hunter.2.Turn on Wi-Fi on the Hunter. Press [ Tools ],[ Setting ],[ WIFI ], and [ WIFION].3. A connection connect the available networks.4. Click [Print]-[Connect Machine], it will top up box, then select Wi-Fi in theConnect mode. type in “192.168.0.102”and 8899 in IP address, click [Connect].5-17](https://usermanual.wiki/Zhejiang-Flashforge-3D-Technology/HUNTER/User-Guide-3439037-Page-43.png)
![Hunter User Guide | www.flashforge.com 0086- 0579-82273989445-18②Disconnect HunterClick [Print]--[Disconnect] to disconnect your PC and Hunter.5.2.14 Tool Menus①Update FirmwareEvery time when you start Flashprint, it will automatically detect and download theup-to-date firmware. If any update is available, a dialog box will pop up for remindingthe users to update.Step 1: Click [Tools]--[Update firmware]. It needs to cut off connection beforeupdating firmware. If software and printer are already in connection, it reminds youcutting off the connection, choose [Yes] and go on to the next step.Step 2: Choose corresponding printer type and firmware version and click [OK] inthe firmware updating box. After confirming the printer is in free state, the softwarewill automatically update the firmware.Step 3:Reboot you Hunter and wait for 4-5 seconds, then you can see the updateprocess bar. When the update finishes, it will go back to the main interface.Step 4:Tap[Tools]--[About] to check] to check whether the updated version is right.③On Board PreferencesWhen the computer and printer are in connection, click [Tools]--[On BoardPreferences], you can check the printer name.④Machine information](https://usermanual.wiki/Zhejiang-Flashforge-3D-Technology/HUNTER/User-Guide-3439037-Page-44.png)
![Hunter User Guide | www.flashforge.com 0086- 0579-8227398945When the computer and printer are in connection state, click [Tools]--[Machineinformation], you can check the machine type, machine name and firmware etc.5.2.15 Help Menus①Help Contents:Click [Help]--[Help Contents], you can read the help contents.②Check for Updates :Click [Help]--[Check for Update] to detect the availableupdates online.③About FlashPrint:Click [Help]--[About Flashprint], the software informationbox will pop up. The contents include the current software version and copyrightinformation.5-19](https://usermanual.wiki/Zhejiang-Flashforge-3D-Technology/HUNTER/User-Guide-3439037-Page-45.png)
![Hunter User Guide | www.flashforge.com 0086- 0579-8227398946Chapter 6: PrintingThis chapter will provide a step-by-step guide on turning a 3D model into a physicalreality.6.1 Generate Gcode FileDouble-click [flashprint] icon to open Flashprint software.6-1(6-2)Click[Print]-[Machine Type] and select Flashforge Hunter6-2(6-3) Click [load]icon, select .stl 3D files shown as follow:](https://usermanual.wiki/Zhejiang-Flashforge-3D-Technology/HUNTER/User-Guide-3439037-Page-46.png)
![Hunter User Guide | www.flashforge.com 0086- 0579-82273989476-3(6-4) Click [Edit]-[Surface to platform], select on surface to contact the model anddouble click. After finished click[ back] button, double click [Move] icon, then click[on platform]-[Center] icon.图6-46-4Note:If the model is in the right position, there is no need to do this step.(6-5) Click [print] icon to set the printing parameters, the default parameters asshown.](https://usermanual.wiki/Zhejiang-Flashforge-3D-Technology/HUNTER/User-Guide-3439037-Page-47.png)
![Hunter User Guide | www.flashforge.com 0086- 0579-82273989486-56.2 Methods of printingPrinting from USB1. Connect Hunter to the computer with the USB cable.2. Turn on the Hunter.3. Select [ Print ] from menu bar, then select [ Connect ].4. Click on [ Rescan ], then [ Connect ].5. Now the printer is connected with FlashPrint.6. Press [ Print ] icon, and a printing options screen will appear.7. Save the file at any location, and the object will start slicing.8. After slicing the object, it will automatically upload the gcode to the Hunter.Printing from USB disk1. Press [ Print ], and a printing options screen will show up.3. Click [ OK ], and save the gcode file in the USB disk.4. FlashPrint will begin slicing the 3D model.5.After slicing the object, take the USB disk from the computer. Insert it into the USBdisk slot on the Hunter.6. Press [ Print ] and then press the middle USB disk icon.](https://usermanual.wiki/Zhejiang-Flashforge-3D-Technology/HUNTER/User-Guide-3439037-Page-48.png)
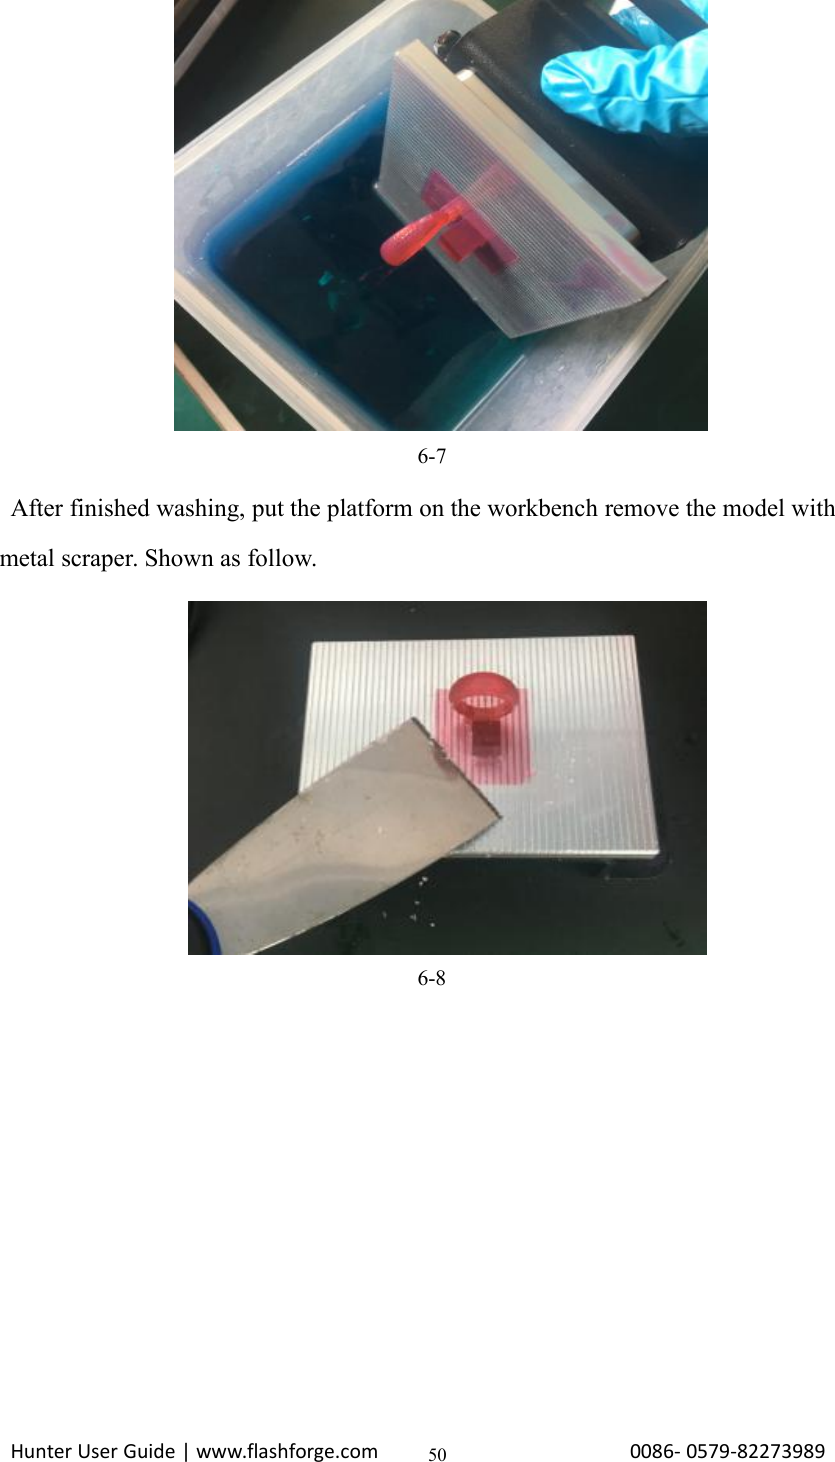
![Hunter User Guide | www.flashforge.com 0086- 0579-82273989497. A list of file(s) will show up, press the file that you would like to print, then press[ Yes ].8. The printer will now enter preheating phase and will start printing once it finishespreheatingPrinting via Wi-FiAfter the printer and computer have connected wifi (Please refer to 5.2.13 ), load theGecod file in Flashprint, then click [Print] icon to start printing.Notice: Please close the cover while printing.6.3 Model Processing(6-6)After finish printing, please put on vinyl gloves and open the light shield,hold the build plate and unscrew the platform screw, take out the build plate fromhorizontal direction carefully.Attention: Please put on vinyl gloves during operation,Pour the used photopolymer resin into a clean bottle, it can be recycled.Photopolymer resin need to be stored in a dark, dry and cool place.6-6(6-7) Pour the iso phthalic acid(IPA) in to rinse bucket halfway, immerse the buildplate and model into rinse bucket and rinse it with brush.](https://usermanual.wiki/Zhejiang-Flashforge-3D-Technology/HUNTER/User-Guide-3439037-Page-49.png)