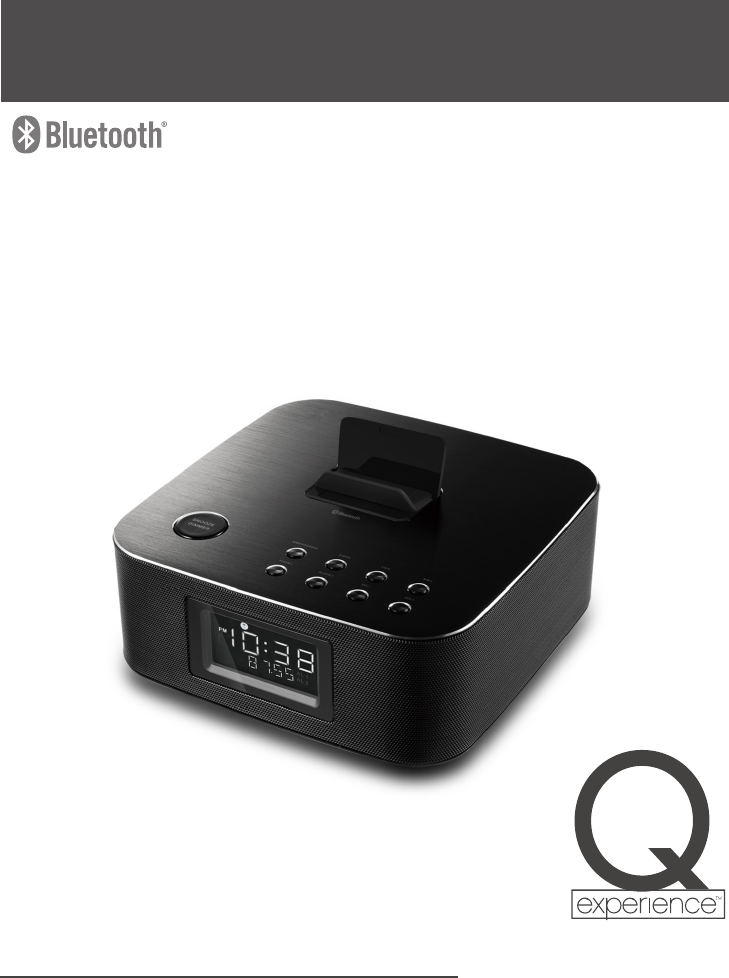
Zhongshan City Richsound Electronic BT406 Clock Radio User Manual Walmart US Q IFU V0
Zhongshan City Richsound Electronic Industrial Ltd. Clock Radio Walmart US Q IFU V0
User Manual
Instruction Manual
QAA14AV012
BW BT Metal Clck Radio

1
Contents
Important Safety Instructions ............................................................................................. 2
Safety ....................................................................................................................................................................................... 2
Warning .................................................................................................................................................................................. 2
Identifying the Parts ............................................................................................................4
Main Unit ............................................................................................................................................................................... 4
Remote Control ...................................................................................................................................................................4
Preparations..........................................................................................................................5
Prepare the Remote Control ........................................................................................................................................... 5
Precautions Concerning Batteries ................................................................................................................................ 5
Install Batteries .................................................................................................................................................................... 6
Connections ..........................................................................................................................6
Connecting the Power ...................................................................................................................................................... 6
Using USB Charge socket ................................................................................................................................................. 6
Using LINE IN socket .......................................................................................................................................................... 6
General Operation ................................................................................................................ 7
Power ON/OFF ..................................................................................................................................................................... 7
Select Modes ........................................................................................................................................................................ 7
Set the Time .......................................................................................................................................................................... 7
Set the Alarm Timer ........................................................................................................................................................... 7
Activate and Deactivate the Alarm Timer .................................................................................................................. 7
Repeat Alarm ........................................................................................................................................................................ 7
Stop Alarm Ring .................................................................................................................................................................. 7
View the Alarm Settings ................................................................................................................................................... 7
Set the Sleep Timer ............................................................................................................................................................ 7
Adjust Display Brightness ................................................................................................................................................ 8
Adjust the Volume .............................................................................................................................................................. 8
Select a Preset Sound Eect ........................................................................................................................................... 8
Play from an External Audio Device ....................................................................................8
Play With Bluetooth Device .................................................................................................8
Pair Bluetooth-enabled Devices Manually ................................................................................................................ 8
Listen to Music from Bluetooth Device .......................................................................................................................8
Listening to the FM Radio ....................................................................................................9
Auto Scan and Save Preset Station ...............................................................................................................................9
Tuning in a Station .............................................................................................................................................................9
Presetting Stations Manually .......................................................................................................................................... 9
Troubleshooting ................................................................................................................... 9
Specications ......................................................................................................................10
Standard Accessories .........................................................................................................10
2
WARNING
CAUTION: TO REDUCE THE RISK OF ELECTRIC SHOCK, DO NOT
REMOVE COVER (OR BACK). NO USER-SERVICEABLE PARTS
INSIDE. REFER SERVICING TO QUALIFIED SERVICE PERSONNEL.
RISK OF ELECTRIC SHOCK
DO NOT OPEN
The lightning ash with arrowhead symbol,
within an equilateral triangle, is intended to
alert the user to the presence of uninsulated
“dangerous voltage” within the product’s
enclosure that may be of sucient magnitude
to constitute a risk of electric shock to persons.
The exclamation point within an equilateral
triangle is intended to alert the user to
the presence of important operating and
maintenance (servicing) instructions in the
literature accompanying the appliance.
Safety
1 Read these instructions – All the safety and
operating instructions should be read before
this product is operated.
2 Keep these instructions – The safety and
operating instructions should be retained for
future reference.
3 Heed all warnings – All warnings on the
appliance and in the operating instructions
should be adhered to.
4 Follow all instructions – All operating and use
instructions should be followed.
5 Do not use this apparatus near water – The
appliance should not be used near water or
moisture – for example, in a wet basement or
near a swimming pool, and the like.
6 Clean only with dry cloth.
7 Do not block any ventilation openings.
Install in accordance with the manufacturer’s
instructions.
8 Do not install near any heat sources such
as radiators, heat registers, stoves, or other
apparatus (including ampliers) that produce
heat.
9 Do not defeat the safety purpose of the
polarized or grounding plug. A polarized
plug has two blades with one wider than the
other. A grounding plug has two blades and a
third grounding prong. The wide blade or the
third prong is provided for your safety. If the
provided plug does not t into your outlet,
consult an electrician for replacement of the
obsolete outlet.
10 Protect the power cord from being walked
on or pinched particularly at the plugs,
convenience receptacles, and at the point
where they exit from the apparatus.
11 Only use attachments/accessories specied
by the manufacturer.
12 Use only with the cart, stand, tripod,
bracket, or table specied by the
manufacturer, or sold with the
apparatus. When a cart or rack is used, use
caution when moving the cart/apparatus
combination to avoid injury from tip-over.
13 Unplug the apparatus during lightning
storms or when unused for long periods of
time.
14 Refer all servicing to qualied personnel.
Servicing is required when the apparatus
has been damaged in any way, such as the
power supply cord or plug is damaged, liquid
has been spilled or objects have fallen into
the apparatus, it has been exposed to rain or
moisture, it does not operate normally, or it
has been dropped.
15 This equipment is a Class II or double
insulated electrical appliance. It has been
designed in such a way that it does not
require a safety connection to electrical earth.
Caution:
- Use of controls or adjustments or
performance of procedures other than herein
may result in hazardous radiation exposure or
other unsafe operation.
Warning
The battery (battery or batteries or battery
pack) shall not be exposed to excessive heat
such as sunshine, re or the like.
Before operating this system, check the
voltage of this system to see if it is identical
with the voltage of your local power supply.
The ventilation should not be impeded by
covering the ventilation openings with items
such as newspaper, table-cloths, curtains etc.
Make sure there is at least 7.9’’ of space above
and at least 1.97’’ of space on each side of the
unit.
Do not place this unit close to strong
magnetic eld.
Do not place the unit on the amplier or
receiver.
Don’t place this unit close to the damper, or
the moisture will aect the life of the laser
head.
Important Safety Instructions

3
Should any solid object or liquid fall into
the system, unplug the system and have
it checked by qualied personnel before
operating it any further.
Do not attempt to clean the unit with
chemical solvents as this might damage the
nish. Use a clean, dry or slightly damp cloth.
When removing the power plug from the wall
outlet, always pull directly on the plug, never
yank on the cord.
Depending on the electromagnetic waves
used by a television broadcast, if a TV is
turned on near this unit while it is also on,
lines might appear on the TV screen. Neither
this unit nor the TV are malfunctioning. If you
see such lines, keep this unit well away from
the TV set.
No naked ame sources, such as lighted
candles, should be placed on the apparatus.
Changes or modications to this unit not
expressly approved by the party responsible
for compliance could void the user’s authority
to operate the equipment.
The marking label is pasted on the bottom of
the equipment.
FCC INFORMATION (for US customers)
This equipment has been tested and found
to comply with the limits for a Class B digital
device, pursuant to Part 15 of the FCC Rules.
These limits are designed to provide reasonable
protection against harmful interference in
a residential installation. This equipment
generates, uses and can radiate radio
frequency energy and, if not installed and
used in accordance with the instructions,
may cause harmful interference to radio
communications.
• However,thereisnoguaranteethatinterference
will not occur in a particular installation. If this
equipment does cause harmful interference
to radio or television reception, which can
be determined by turning the equipment
o and on, the user is encouraged to try to
correct the interference by one or more of the
following measures:
- Reorient or relocate the receiving antenna.
- Increase the separation between the
equipment and receiver.
- Connect the equipment into an outlet on
a circuit dierent from that to which the
receiver is connected.
- Consult the dealer or an experienced radio/
TV technician for help.
• ThisdevicecomplieswithPart15oftheFCC
Rules. Operation is subject to the following
two conditions:
(1) this device may not cause harmful
interference, and
(2) this device must accept any interference
received, including interference that may
cause undesired operation.
Warning: DO NOT INGEST BATTERY,CHEMI-
CAL BURN HAZARD
The remote control supplied with this
product contains a coin/button cell battery.
If the coin/button cell battery is swallowed,
it can cause severe internal burns in just 2
hours and lead to death. Keep new and used
batteries away from children. If the battery
compartment does not close securely, stop
using the product and keep it away from
children. If you think batteries might have
been swallowed or placed inside any part of
the body, seek immediate medical attention.
FCC RF Radiation Exposure Statement
Caution: This Transmitter must be installed to
provide a separation distance of at least 20cm
from all persons.
4
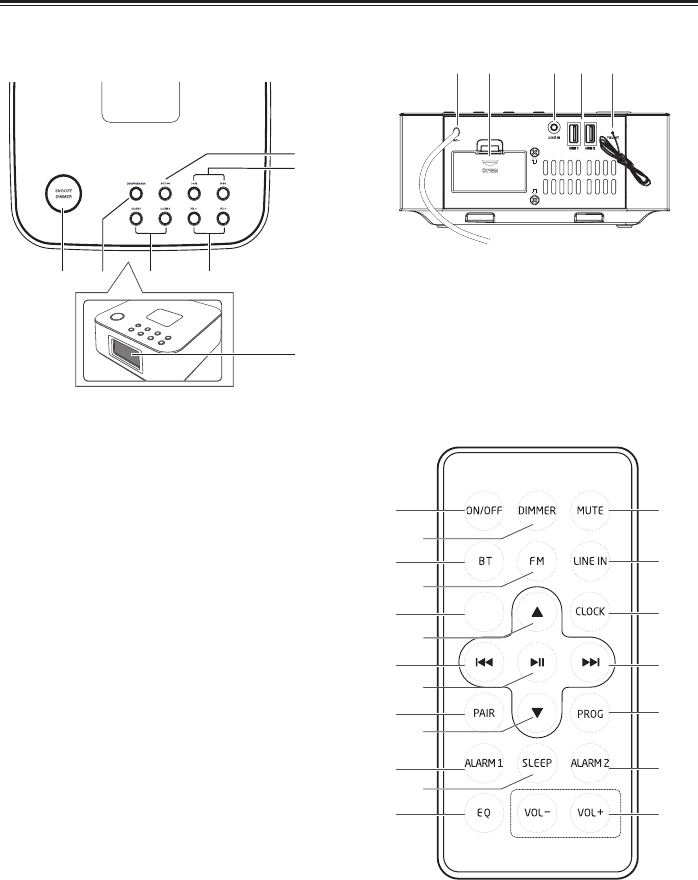
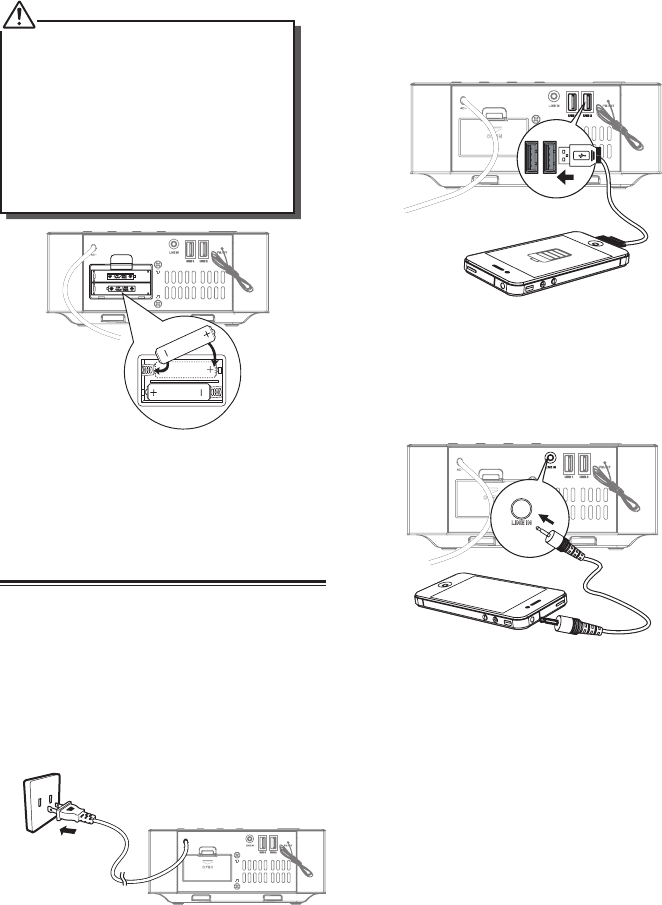
Identifying the Parts
Rear View
1 AC Connect to power.
2 Battery Compartment
3 LINE IN
Connect to an external audio device.
4 USB1/USB2
Use this socket to charge your smartphone
and tablet PC.
5 FM ANT
Remote Control
SNOOZE
1 ON/OFF
Turn on or turn o unit.
2 DIMMER
Adjust display brightness.
3 BT
- Select Bluetooth function.
Main Unit
Top View
1 SNOOZE/DIMMER
- Repeat the alarm.
- Adjust the display brightness.
- Press and hold this button in the standby
mode to set the clock.
2 ON/OFF/SOURCE
- Turn on or turn o the unit.
- Select the play function.
3 BF/PAIR
- In Bluetooth mode, start or pause play.
- Activate the pairing function in
BLUETOOTH mode and disconnect the
existing paired Bluetooth device.
4 H/G
- In Bluetooth mode, skip to previous/next
audio le.
- Search radio stations manually.
- Press and hold this button to search radio
stations automatically.
- Adjust time.
5 ALARM 1/ALARM 2
- Set the alarm timer.
- View alarm settings.
6 VOLUME +/-
- Increase or decrease the volume level.
7 Display Panel
- Show the current status.
5
4 FM
- Select FM function.
5 SNOOZE
- Repeat the alarm.
6
- Select a next preset station.
- Adjust the time.
7 H
- In Bluetooth mode, skip to previous audio
le.
- Search radio stations manually.
- Press and hold this button to search radio
stations automatically.
8 BF
- In Bluetooth mode, start or pause play.
9 PAIR
- Activate the pairing function in
BLUETOOTH mode and disconnect the
existing paired Bluetooth device.
10
- Select a previous preset station.
- Adjust the time.
11 ALARM 1
- Set the alarm 1 timer.
- View alarm 1 settings.
12 SLEEP
- Set the sleep timer.
13 EQ
- Select a preset sound eect:
POP, CLASSIC, ROCK, JAZZ, FLAT.
14 MUTE
- Mute or resume the sound.
15 LINE IN
- Select LINE function.
16 CLOCK
- Press and hold this button in the standby
mode to set the clock.
17 G
- In Bluetooth mode, skip to next audio le.
- Search radio stations manually.
- Press and hold this button to search radio
stations automatically.
18 PROG
- Preset stations for tuner.
19 ALARM 2
- Set the alarm 2 timer.
- View the alarm 2 settings.
20 VOL+ /VOL-
- Increase/decrease the volume level.
Preparations
Prepare the Remote Control
The provided Remote Control allows the unit to
be operated from a distance.
Even if the Remote Control is operated within
the eective range (19.7'), remote control
operation may be impossible if there are any
obstacles between the unit and the remote
control.
If the Remote Control is operated near other
products which generate infrared rays, or if
other remote control devices using infrared
rays are used near the unit, it may operate
incorrectly. Conversely, the other products
may operate incorrectly.
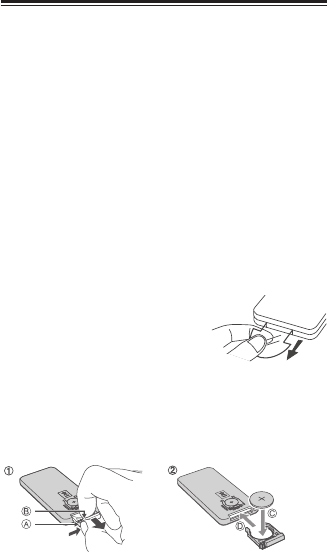
First-time use:
The unit has a pre-installed
lithium CR2025 battery. Remove the protective
tab to activate the remote control battery.
To Replace the Remote Control Battery:
1 Pull out the battery tray and remove the old
battery.
2 Place a new CR2025 battery into the battery
tray with correct polarity (+/-) as indicated.
3 Insert the battery tray back into the slot.
Precautions Concerning Batteries
When the Remote Control is not to be used
for a long time (more than a month), remove
the battery from the Remote Control to
prevent it from leaking.
If the batteries leak, wipe away the leakage
inside the battery compartment and replace
the batteries with new ones.
Do not use any batteries other than those
specied.
Do not heat or disassemble batteries. Never
throw them in re or water.
Do not carry or store batteries with other
metallic objects. Doing so could cause
batteries to short circuit, leak or explode.
Never recharge a battery unless it is
conrmed to be a rechargeable type.
6
Install Batteries
• YoucanonlyuseACpoweraspowersupply.
Batteries ( not supplied ) are for backup
purpose.
• Ifthesystemisunpluggedorifapower
failure occurs, all settings of the unit will
be erased unless there are batteries in the
unit and you do not change them while
disconnected from a power source. Once
settings have been erased, you will need to
reset all desired settings.
1 Open the batteries compartment.
2 Install two AAA batteries (not supplied) with
correct polarity.
3 Close the battery compartment.
Connections
Connecting the Power
Caution:
- Risk of product damage! Ensure that the
power supply voltage corresponds to the
voltage printed on the back or the underside
of the unit.
- Before connecting the AC power cord, ensure
you have completed all other connections.
Connect the AC power cord to the wall socket.
Using USB Charge socket
Connect a USB cable( not supplied) to the USB1
or USB2 socket to charge your smartphone or
tablet PC.
Using LINE IN socket
Connect the LINE cable to the LINE IN socket on
the rear of unit and to the headphone socket on
the audio player.
7
General Operation
Power ON/OFF
• Whenyourstconnecttheunittothemain
socket, the unit will be in STANDBY mode.
• PresstheON/OFF/SOURCE button on the
main unit or the ON/OFF button on the
remote control to switch the main unit ON.
• PressandholdtheON/OFF/SOURCE button
on the main unit or press the ON/OFF button
on the remote control to switch the main unit
back to Standby mode.
• Disconnectthemainplugfromthemain
socket if you want to switch the unit o
completely.
Select Modes
• PresstheON/OFF/SOURCE button on the
main unit repeatedly to switch between
BT(Bluetooth), LINE IN, and FM mode.
If there is no signal under the Bluetooth and
LINE IN mode, the unit will automatically
switch o within 15 minutes.
Set the Time
The built-in clock shows the correct time in the
display.
1 InSTANDBYmode,pressandholdthe
CLOCK button on the remote control or the
SNOOZE/DIMMER button on the main unit.
This will cause the seconds/hour indicator to
blink.
2 Set the hour with the / button on remote
control or the H/G button on main unit.
3 Press the CLOCK button on remote control or
SNOOZE button on main unit to conrm.
4 Repeat steps 2-3 to set the minutes, year,
month and day.
During Time Setup, press the BF button to
select 12/24 hour format.
Set the Alarm Timer
Youcansettwoalarmsthatgooatdierent
times.
1 Ensure that you have set the clock correctly.
2 In STANDBY mode, press and hold the
ALARM 1 or ALARM 2 buttons on remote
control or main unit for a few seconds. The
[AL1 ] or [AL2 ] will begin to blink.
3 Press the / buttons on the remote control
or the H/G buttons on main unit to select
an alarm sound source: FM tuner, or buzzer.
4 Press and hold the ALARM 1 or ALARM 2
buttons on remote control or main unit. The
hours digits will begin to blink.
5 Press the / buttons on remote control or
the H/G buttons on main unit repeatly to
set the hour.
6 Press and hold the ALARM 1 or ALARM 2
buttons on remote control or main unit. The
minutes digits will begin to blink.
7 Repeat steps 5-6 to set the minutes.
8 Repeat steps 5-6 to select whether to ring
alarm every day, only on week days, or only
on the weekend.
9 Repeat steps 5-6 to set the alarm volume.
Activate and Deactivate the Alarm Timer
Press the ALARM 1 or ALARM 2 buttons
repeatedly to activate or deactivate the timer.
- If the timer is activated, [AL1 ] or [AL2 ] is
displayed.
- If the timer is deactivated, [AL1 ] or [AL2 ]
is displayed, the will disappear from the
display on the front of the unit.
Repeat Alarm
Youcanpresstoadjusttheintervaltorepeat
alarm. When the alarm rings, press the SNOOZE/
DIMMER button on main unit or the SNOOZE
button on remote control. The alarm repeats
ringing 9 minutes later.
Stop Alarm Ring
When the alarm rings, press the corresponding
ALARM 1or ALARM 2 button. The alarm stops,
but the alarm settings remain.
View the Alarm Settings
Press the ALARM 1 or ALARM 2 buttons to view
the alarm settings.
Set the Sleep Timer
This unit can switch to standby automatically
after a set period of time.
1 Press SLEEP repeatedly to select a set period
of time (in minutes).
- When the sleep timer is activated, the

8
display will show “ ” and the volume will
gradually decrease before the unit powers
o.
2 Press SLEEP repeatedly until [OFF] is
displayed.
- When the sleep timer is deactivated,
disappears from the display.
Adjust Display Brightness
Press DIMMER repeatedly to select dierent
levels of display brightness.
Adjust the Volume
- During play, press the VOL+/- buttons to
increase/decrease the volume level.
- If you wish to turn the sound o, press MUTE
on the remote control. Press MUTE again or
press VOL +/– to resume normal listening.
Select a Preset Sound Eect
During play, press the EQ button repeatedly to
select: [POP], [CLASSIC], [ROCK], [JAZZ], [FLAT].
Play from an External Audio Device
Youcanlistentoanexternalaudiodevice
through this unit.
1 Ensure that the unit is connected to the TV or
audio device.
2 Press the ON/OFF/SOURCE button on the
main unit repeatedly or the LINE IN button
on the remote control to select the LINE
source.
3 Start to play on the audio player.
Play With Bluetooth Device
Youcanlistentomusicfromabluetooth-enabled
device via this player.
Pair Bluetooth-enabled Devices
Manually
The rst time you connect your bluetooth device
to this player, you need to pair your device to this
player.
Note:
- The operational range between this player
and a Bluetooth device is approximately
26.24' .
- Before you connect a Bluetooth device to this
unit, familiarize yourself with the Bluetooth
capabilities of the device.
- Compatibility with all Bluetooth devices is
not guaranteed.
- Any obstacle between this unit and a
Bluetooth device can reduce the operational
range.
- Keep this player away from any other
electronic device that may cause interference.
1. Press the ON/OFF/SOURCE button
repeatedly on the unit or press the BT
button on the remote control to select BluT
(Bluetooth) mode. “NO BT” will show on
the display if the unit is not paired to any
Bluetooth device, the system has entered
pairing mode, the display will show “PAIR”.
2 Activate your Bluetooth device and select the
search mode. “QAA14AV012” will appear on
your Bluetooth device.
3 Select “QAA14AV012” in the pairing list.
Display panel shows “BLUET” while the
pairing succeeds.
Tips:
- Enter "0000" for the password if necessary.
- If a connection exist, press and hold the"
BF/PAIR " button on the unit or press the
"PAIR" on remote control to re-activate
the pairing mode, the connection will be
interrupted.
- If no other Bluetooth device pairs with this
player in 2 minutes, the player will recover
the previous connection
- The player will also be disconnected when
your device is moved beyond the operational
range.
- If you want to reconnect your device to this
player, place it within the operational range.
- If the device is moved beyond the operational
range, when it is brought back, please check
if the device is still connected to the player.
- If they are connected, display panel shows
"BLUET".
- If the connection is lost, display panel shows
"NO BT". Follow the instructions above to
pair your device to the player again.
Listen to Music from Bluetooth Device
• IftheconnectedBluetoothdevicesupport
Advanced Audio Distribution Prole (A2DP),
you can listen to the music stored on the
device through the player.
• IfthedevicealsosupportsAudioVideo
Remote Control Prole (AVRCP) , you can use
9
the player's remote control to play music
stored on the device.
1. Pair your device with the player.
2. Start to play music via your device
(if it supports A2DP).
3. Use supplied remote control to control
play (if it supports AVRCP).
- To pause/resume play, press the BF button.
- To skip to a track, press the H/G buttons.
Listening to the FM Radio
Auto Scan and Save Preset Station
1 Tap the ON/OFF/SOURCE button repeatedly
on the unit or press the FM button on the
remote control to select FM mode.
2 Press and hold the PROG button for a few
seconds to activate automatic programming.
All available stations are programmed in the
order of waveband reception strength.
- The rst programmed radio station is played
automatically.
• TunetoaPresetRadioStation
- Press the or buttons to select a preset
number that you want.
Tuning in a Station
• Tuneinradiostationsautomatically
- Press and hold the H/G buttons, the
frequency changes down or up automatically
until a station is found.
The search may not stop at a station with a
very weak signal.
• Tuneinradiostationsmanually
- Press the H/G buttons repeatedly until
you nd the station you want.
If reception is still poor, try to adjust the
position of the aerial or try to move the radio
to another location.
Presetting Stations Manually
Youcanpresetupto20FMstations.
1 Tune in the desired station, then press the
PROG button.
2 Press the / buttons to select the preset
number.
3 Press the PROG button to store the station.
4 Repeat above steps 1 to 3 for each station
you want to store in memory with a preset
number.
Troubleshooting
To keep the warranty valid, never try to repair the
system yourself. If you encounter problems when
using this unit, check the following points before
requesting service.
No power.
- Ensure that the AC cord of the apparatus is
connected properly.
- Ensure that there is power at the AC outlet.
- Press ON/OFF button to turn the unit on.
Remote control does not work
- Before you press any function button, rst
select the correct source.
- Reduce the distance between the remote
control and the unit.
- Insert the battery with its polarities (+/-)
aligned as indicated.
- Replace the battery.
- Aim the remote control directly at the sensor
on the front of the unit.
No Response From the Unit
- Disconnect and reconnect the AC power
plug, then turn on the unit again.
Poor radio reception
- Increase the distance between the unit and
your TV or VCR.
- Fully extend the FM antenna.
Timer does not work
- Set the clock correctly.
- Switch on the timer.
Clock/timer setting erased
- Power has been interrupted or the power
cord has been disconnected.
- Reset the clock/timer.

10
Specications
General
Power Requirements ........................................................................................................................................AC120V~ 60Hz
Power Consumption ..............................................................................................................................................................25W
USB 2.0 Socket .............................................................................................................................................................. 5V ,2.1A
Output Power .......................................................................................................................................................................5W x 2
Total Harmonic Distortion ................................................................................................................................. 1%(1kHz, 1W)
Audio Input Sensitivity .................................................................................................................................................... 500mV
Frequency Response ............................................................................................................................................. 40Hz - 20kHz
Tuning Range ...........................................................................................................................................................87.5-108MHz
Unit Dimensions (W x H x D) ..........................................................................................................................7.8’’ x 3.5’’ x 7.8’’
Speaker Impedance ................................................................................................................................................................... 2Ω
Remote Control
Distance ......................................................................................................................................................................................19.7'
Angle ............................................................................................................................................................................................. 30O
Standard Accessories
Remote Control .......................................................................................................................................................................... x 1
Owner’s Manual .......................................................................................................................................................................... x 1
3.5mm to 3.5mm cable ............................................................................................................................................................ x 1