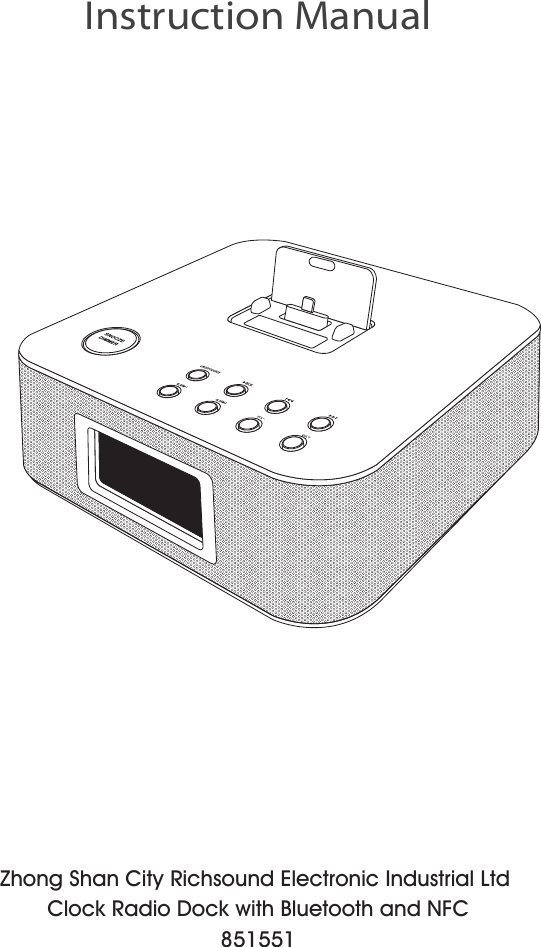
Zhongshan City Richsound Electronic DS406 Clock Radio Dock with BT and NFC User Manual DS406N Brookstone fM

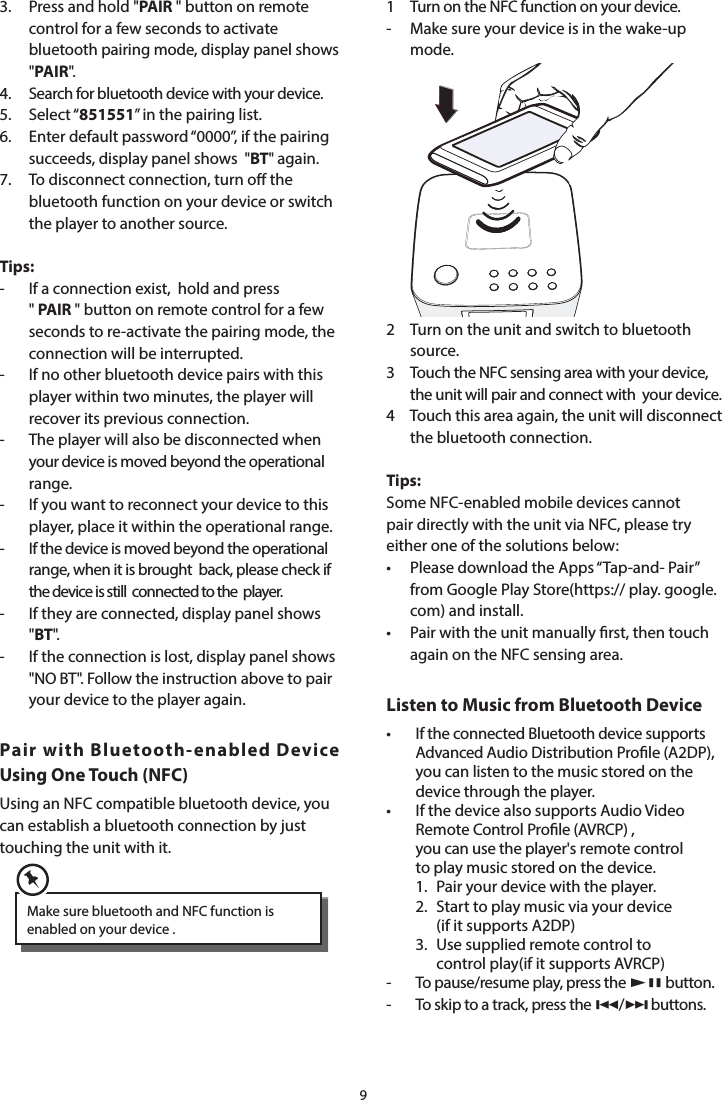
Zhongshan City Richsound Electronic Industrial Ltd. Clock Radio Dock with BT and NFC DS406N Brookstone fM

User Manual

Zhong Shan City Richsound Electronic Industrial Ltd Clock Radio Dock with Bluetooth and NFC851551Instruction Manual
1ContentsImportant Safety Instructions .............................................................................................2Safety ....................................................................................................................................................................................... 2Warning .................................................................................................................................................................................. 2Identifying the Parts ............................................................................................................ 4Main Unit ............................................................................................................................................................................... 4Remote Control ................................................................................................................................................................... 4Preparations..........................................................................................................................5Prepare the Remote Control ........................................................................................................................................... 5Precautions Concerning Batteries ................................................................................................................................5Install Batteries .................................................................................................................................................................... 6Connect Power .................................................................................................................................................................... 6General Operation ................................................................................................................6Power ...................................................................................................................................................................................... 6Set Time .................................................................................................................................................................................. 6Clock synchronization ....................................................................................................................................................... 7Set the Alarm Timer ........................................................................................................................................................... 7Repeat Alarm ........................................................................................................................................................................ 7Stop Alarm Ring ..................................................................................................................................................................7View the Alarm Settings ................................................................................................................................................... 7Set the sleep timer .............................................................................................................................................................7Adjust Display Brightness ................................................................................................................................................ 7Adjust Volume Level .......................................................................................................................................................... 7Select a Preset Sound Eect ...........................................................................................................................................7Mute Sound ..........................................................................................................................................................................7Play from iPod/iPhone/iPad .................................................................................................8iPod/iPhone/iPad Operation........................................................................................................................................... 8Play from an External Audio Device ....................................................................................8Play With Bluetooth Device ................................................................................................. 8Pair Bluetooth-enabled Devices Manually ................................................................................................................8Pair with Bluetooth-enabled Device Using One Touch (NFC) ............................................................................. 9Listen to Music from Bluetooth Device ....................................................................................................................... 9Listening to the FM Radio ..................................................................................................10Tuning in a Station ...........................................................................................................................................................10Presetting Stations ...........................................................................................................................................................10Tune to a Preset Radio Station .....................................................................................................................................10Troubleshooting .................................................................................................................10Specications ......................................................................................................................11Standard Accessories .........................................................................................................11Appendix .............................................................................................................................12
2WARNING&$87,2172 5('8&(7+( 5,6. 2) (/(&75,&6+2&.'21275(029(&29(525%$&.1286(56(59,&($%/(3$576,16,'(5()(56(59,&,1*7248$/,),('6(59,&(3(56211(/RISK OF ELECTRIC SHOCKDO NOT OPENThe lightning flash with arrowhead symbol, within an equilateral triangle, is intended to alert the user to the pres-ence of uninsulated “dangerous voltage” within the product’s enclosure that may be of sucient magnitude to constitute a risk of electric shock to persons. The exclamation point within an equilat-eral triangle is intended to alert the user to the presence of important operating and maintenance (servicing) instruc-tions in the literature accompanying the appliance. Safety1  Read these instructions – All the safety and    operating instructions should be read before    this product is operated. 2  Keep these instructions – The safety and    operating instructions should be retained for   future reference. 3  Heed all warnings – All warnings on the    appliance and in the operating instructions    should be adhered to. 4  Follow all instructions – All operating and use    instructions should be followed. 5  Do not use this apparatus near water – The    appliance should not be used near water or    moisture – for example, in a wet basement or    near a swimming pool, and the like.6  Clean only with dry cloth.7  Do not block any ventilation openings. Install    in accordance with the manufacture’s     instructions.8  Do not install near any heat sources such as    radiators, heat registers, stoves, or other    apparatus (including ampliers) that produce   heat. 9  Do not defeat the safety purpose of the     polarized or grounding plug. A polarized plug   has two blades with one wider than the    other. A grounding plug has two blades and    a third grounding prong. The wide blade or    the third prong is provided for your safety. If    the provided plug does not t into your    outlet, consult an electrician for replacement    of the obsolete outlet.10  Protect the power cord from being walked on  or pinched particularly at the plugs,      convenience receptacles, and at the point    where they exit from the apparatus.11  Only use attachments/accessories specied    by the manufacturer.12  Use only with the cart, stand, tripod, bracket, or table specied by the manufactur-er, or sold with the apparatus. When a cart or rack is used, use caution when   moving the cart/apparatus      combination to avoid injury from tip-over.13  Unplug the apparatus during lightning     storms or when unused for long periods of   time.14  Refer all servicing to qualied personnel.    Servicing is required when the apparatus has    been damaged in any way, such as power    supply cord or plug is damaged, liquid has    been spilled or objects have fallen into the    apparatus has been exposed to rain or      moisture, does not operate normally, or has   been dropped.15   This equipment is a Class II or double in   sulated electrical appliance. It has been     designed in such a way that it does not     require a safety connection to electrical earth.Caution:-  Use of controls or adjustments or      performance of procedures other than herein    may result in hazardous radiation exposure    or other unsafe operation.Warningz   The battery (battery or batteries or battery    pack) shall not be exposed to excessive heat    such as sunshine, re or the like.z  Before operating this system, check the volt   age of this system to see if it is identical with    the voltage of your local power supply.z  The ventilation should not be impeded by     covering the ventilation openings with items     such as newspaper, table-cloths, curtains etc.     Make sure there is at least 20 cm of space     above and at least 5cm of space on each side     of the unit.Important Safety Instructions
3z  Do not place this unit close to strong     magnetic eld.z  Do not place the unit on the amplier or   receiver. z  Don’t place this unit close to the damper, or    the moisture will aect the life of the laser   head.z  Should any solid object or liquid fall into the   system, unplug the system and have it      checked by qualied personnel before      operating it any further.z  Do not attempt to clean the unit with      chemical solvents as this might damage the    nish.  Use a clean, dry or slightly damp cloth. z  When removing the power plug from the wall   outlet, always pull directly on the plug, never    yank on the cord. z  Depending on the electromagnetic waves    used by a television broadcast, if a TV is     turned on near this unit while it is also on,    lines might appear on the TV screen. Neither    this unit nor the TV are malfunctioning. If    you see such lines, keep this unit well away    from the TV set. z  No naked ame sources, such as lighted    candles, should be placed on the apparatus.z  Changes or modications to this unit not    expressly approved by the party responsible    for compliance could void the user’s authority   to operate the equipment.NOTE:  t This equipment has been tested and found to    comply with the limits for a Class B digital    device, pursuant to Part 15 of the FCC Rules.     These limits are designed to provide reasonable    protection against harmful interference in a  residential installation. This equipment  generates, uses and can radiate radio      frequency energy and, if not installed and    used in accordance with the instructions, may   cause harmful interference to radio     communications.t )PXFWFSUIFSFJTOPHVBSBOUFFUIBUJOUFSGFSFODFwill not occur in a particular installation.  If this equipment does cause harmful interfer-ence to radio or television reception, which can be determined by turning the equipment o and on, the user is encouraged to try to correct the interference by one or more of the following measures:-  Reorient or relocate the receiving antenna.-  Increase the separation between the equip   ment and receiver.-  Connect the equipment into an outlet on a  circuit dierent from that to which the   receiver is connected.-  Consult the dealer or an experienced radio/   TV technician for help.t 5IJTEFWJDFDPNQMJFTXJUI1BSUPGUIF'$$  Rules.  Operation is subject to the following    two conditions:    (1) this device may not cause harmful      interference, and (2) this device must accept    any interference received,   including interference    that may cause undesired operation.t 4IJFMEFEDBCMFTNVTUCFVTFEXJUIUIJTVOJU  to ensure compliance with the Class B FCC   limits. Correct Disposal of this product. This marking indicates that this product should not be disposed with other    household wastes throughout the EU.      To prevent possible harm to the environment    or human health from uncontrolled waste    disposal, recycle it responsibly to promote    the sustainable reuse of material resources.    To return your used device, please use the    return and collection systems or contact the    retailer where the product was purchased.    They can take this product for environmental   safe recycling.z  The marking label is pasted on the bottom of   the equipment. iPod, iPhone and iPad are trademarks of Apple Inc., registered in the U.S. and other countries.“Made for iPod”, “Made for iPhone” and “Made for iPad” mean that an electronic accessory has been designed to connect specifically to iPod, iPhone or iPad respectively, and has been certied by the developer to meet Apple performance standards.Apple is not responsible for the operation of this device or its compliance with safety and regulatory standards. Please note that the use of this accessory with iPod, iPhone, or iPad may aect wireless performance.All trademarks are the property of their respective owners and all rights are acknowledged.
4Identifying the PartsRear View  1 AC  Connect to power.2 Battery Compartment3 LINE IN  Connect to an external audio device.4 FM ANTRemote Control 1 ON/OFF  Turn on or turn o unit.2 DIMMER  Adjust display brightness.3 DOCK  Select iPod/iPhone/iPad function.Main UnitTop View  1 SNOOZE/DIMMER  -  Repeat the alarm.  -  Adjust the display brightness.    2 ON/OFF/SOURCE  -  Turn on or turn o the unit.  -  Select the play function.3 BF/PAIR  -  Start or pause play.  -  Activate Bluetooth pairing mode.4 H/G  -  Skip to previous/next audio le.  -   Search radio stations manually.  -   Press and hold this button to search radio    stations automatically.5  ALARM 1/ALARM 2  -  Set the alarm timer.  -  View alarm settings.6 VOLUME +/-  Decrease or increase the volume level.7  DOCK for iPod/iPhone/iPad  Load an iPod/iPhone/iPad.8 Display Panel  Show the current status.9  NFC sensing area
54 FM/BT Select FM/Bluetooth function.5 MENU  Switch between the folder list and the le list   for iPod/iPhone.6 S  -  Navigate through iPod/iPhone menu.  -  Select a next preset station.  - Adjust time.7 H  -  Skip to previous audio le.  -   Search radio stations manually.  -   Press and hold this button to search radio    stations automatically.8 BF/PAIR  -  Start or pause play.  -  Pair the Bluetooth-enabled device.9 REPEAT  -  Select repeat play modes.10 T  -  Navigate through iPod/iPhone menu.  -  Select a previous preset station. - Adjust time.11 ALARM 1  -  Set the alarm 1 timer.  -  View alarm 1 settings.12 SLEEP  Set the sleep timer.13 EQ  Select a preset sound eect:   CLASSIC, ROCK, JAZZ, POP, FLAT.14 MUTE  Mute or resume the sound.15 LINE IN   Select LINE function.16 CLOCK  Press and hold this button in the standby    mode to set the clock.17 G  -  Skip to next audio le.  -   Search radio stations manually.  -   Press and hold this button to search radio    stations automatically.18 PROG  Preset stations for tuner.19 ALARM 2  -  Set the alarm 2 timer.  -  View alarm 2 settings.20 VOL+ /VOL-   -  Increase/Decrease the volume level.PreparationsPrepare the Remote ControlThe provided Remote Control allows the unit to be operated from a distance. z  Even if the Remote Control is operated within    the eective range (6m), remote control    operation may be impossible if there are any    obstacles between the unit and the remote   control. z  If the Remote Control is operated near other    products which generate infrared rays, or if    other remote control devices using infrared    rays are used near the unit, it may operate    incorrectly. Conversely, the other products    may operate incorrectly. For First-time use:The unit has a pre-installed lithium CR2025 bat-tery.Remove the protective tab to activate the remote control battery.To Replace the Remote Control Battery:1  Pull out the battery tray and remove the old   battery.  2  Place a new CR2025 battery into the battery    tray with correct polarity (+/-) as indicated. 3  Insert the battery tray back into the slot. Precautions Concerning Batteriesz  When the Remote Control is not to be used    for a long time (more than a month), remove    the battery from the Remote Control to     prevent it from leaking.z  If the batteries leak, wipe away the leakage    inside the battery compartment and replace    the batteries with new ones.z  Do not use any batteries other than those   specied.  z  Do not heat or disassemble batteries. Never    throw them in re or water.z  Do not carry or store batteries with other    metallic objects. Doing so could cause      batteries to short circuit, leak or explode.z  Never recharge a battery unless it is      conrmed to be a rechargeable type. 
6Install BatteriesNote:t :PVDBOPOMZVTF"$QPXFSBTQPXFSTVQQMZ  Batteries ( not supplied ) are for backup   purpose.t *GUIFTZTUFNJTVOQMVHHFEPSJGBQPXFS  failure occurs, all setups of the unit will be    erased unless there are batteries in the unit    and don’t change them at this time. Once    setups had be erased, please resetup all items   ( tuner stations; Source... ) which you desire. 1  Open the batteries compartment.2  Install two AAA batteries(not supplied) with    correct polarity and the install steps as     indicated.3 Close the battery compartment.Connect PowerCaution:-  Risk of product damage! Ensure that the    power supply voltage corresponds to the   voltage printed on the back or the underside    of the unit.-  Before connecting the AC power cord, ensure    you have completed all other connections. Connect the AC power cord to the wall socket.General OperationPower:PVDBOVTFBMMUIFGVODUJPOTPOUIFUPQPGUIFunit or the remote control after connecting to power supply (called Standby Mode).     Turn OnPress ON/OFF button to turn the system on from standby mode.Press ON/OFF/SOURCE to select dierent functions.    When turning the system on, the system will continue in the mode it was in when it was turned o last time.Turn OPress and hold ON/OFF button on the unit or press the button on the remote control again to turn the system o and go to standby mode.    Be sure to unplug the power cord from the outlet when the system is not in use for an extended period of time.Set TimeThe built-in clock shows the correct time in the display.1  In standby mode, press and hold the CLOCK    button for some seconds, hour indicator will         blink.2  Set the hour with the Sbutton or Tbutton.3 Press the CLOCK button to conrm, minute    indicator will blink.4  Repeat steps 2-3 to set the minutes, day,    month and year.    In standby mode, press and hold the CLOCK button for some seconds, then press the BF button to select 12/24 hour format.
7Clock Synchronization1.   In the standby mode, press and hold the   MENU button on the remote control for few    seconds, then the unit will enter the CLOCK   4:/$NPEF2.   There are three clock synchronization modes   for chose:tiPod  Only synchronize with the iPod/       iPhone/iPad. t 3%4  Only synchronize with the RDS radio      station. t0'' Turn o the clock synchronization        function, only adjust the clock        manually. 3.  Then press the ENTER button to conrm.Set the Alarm Timer:PVDBOTFUUXPBMBSNTXIJDIHPPòBUEJòFSFOUtime.1 Ensure that you have set the clock correctly.2  Press and hold ALARM1 or ALARM2, [AL1 ]   or [AL2 ] begin to blink.3 Press S/T on the remote control to select an        alarm sound source: iPod/iPhone/iPad,   FM tuner, or buzzer.4 Press ALARM 1 or ALARM 2. The hour digits    begin to blink.5 Press S/T repeatly to set the hour.6 Press ALARM 1 or ALARM 2. The minute    digits begin to blink.7  Repeat steps 5-6 to set the minute.8  Repeat steps 5-6 to select whether to ring    alarm the whole week, on weekdays, or at   weekend.9  Repeat steps 5-6 to set the alarm volume.Activate and Deactivate the Alarm TimerPress ALARM 1 or ALARM 2 repeatly to activate or deactivate the timer.-  If the timer is activated, [AL1 ] or [AL2 ]   is displayed.-  If the timer is deactivated, [AL1 ] or  [AL2 ] disappears. Repeat Alarm:PVDBOQSFTTUPBEKVTUUIFJOUFSWBMUPSFQFBUalarm. When the alarm rings, press SNOOZE/DIMMER. The alarm repeats ringing 9 minutes later. Stop Alarm RingWhen the alarm rings, press the corresponding ALARM 1or ALARM 2. The alarm stops but the alarm settings remain.View the Alarm SettingsPress ALARM 1or ALARM 2 to view the alarm settings.Set the sleep timerThis unit can switch to standby automatically after a set period of time.1 Press SLEEP repeatedly to select a set period    of time (in minutes).   -  When the sleep timer is activated, the    display show  , the volume will gradually         decrease before the unit power o.2 Press SLEEP repeatedly until [OFF] is     displayed.  -  When the sleep timer is deactivated,      disappears on the display.Adjust Display BrightnessPress DIMMER repeatedly to select different levels of display brightness. Adjust Volume LevelDuring play, press the VOL+/- buttons to increase/decrease the volume level.Select a Preset Sound EectDuring play, press the EQ button repeatedly to select: [FLAT], [POP], [CLASSIC], [ROCK], [JAZZ]Mute SoundDuring play, press the MUTE button to mute or restore sound. Press this button again to cancel the eect.
8Play from iPod/iPhone/iPadiPod/iPhone/iPad OperationUsing the iPod/iPhone/iPad dock, you can use the unit to play music les stored on your iPod/iPhone/iPad.Listen to the iPod/iPhone/iPad:PVDBOFOKPZBVEJPGSPNJ1PEJ1IPOFJ1BEthrough this unit.1.   Press down docking cover of the unit to ip    the docking cover up. 2.   Insert your iPod/iPhone/iPad into the iPod/ iPhone/iPad dock.3 Press the DOCK button on remote control or   SOURCE button on top panel to select the   iPod/iPhone/iPad source.   Start to play the connected iPod/iPhone/iPad.-  To pause/resume play, press the BFbutton.-  To skip to a track, press the H/G buttons. -  To search during play: press and hold H/  G buttons, then release to resume normal   play.-  To navigate the menu(only for iPod/iPhone,):   Press MENU button, then press S,T to select,   and press BF to conrm.-  To select repeat play options: press the    REPEAT button repeatedly to select a repeat    option play mode.     This apparatus does not support to apple 30-pin models.Charge the iPod/iPhone/iPadThe docked iPod/iPhone/iPad begins to charge as soon as the unit is connected to AC power.Play from an External Audio Device:PVDBOMJTUFOUPBOFYUFSOBMBVEJPEFWJDFthrough this unit. 1  Connect the audio player.  Connect the LINE cable to the LINE IN socket    on the Rear of unit and to the headphone    socket on the audio player.2 Press the LINE IN button to select the LINE   source.3  Start to play on the audio player.Play With Bluetooth Device:PVDBOMJTUFOUPNVTJDGSPNBCMVFUPPUIFOBCMFEdevice via this player. Pair Bluetooth-enabled Devices ManuallyThe rst time you connect your bluetooth device to this player, you need to pair your device to this player.Note:-  The operational range between this player    and a Bluetooth device is approximately 8   meters. -  Before you connect a Bluetooth device   to this unit, familiarize yourself with the    Bluetooth capabilities of the device. -  Compatibility with all Bluetooth devices    is not guaranteed.-  Any obstacle between this unit and a      Bluetooth device can reduce the     operational range.-  Keep this player away from any other electronic   device that may cause interference.1.   Turn on the Bluetooth function on your device.2.   Switch player's source to bluetooth,      Display panel shows "BT", then shows     "NO BT" (if no bluetooth device is    connected).
93.  Press and hold "PAIR " button on remote  control for a few seconds to activate      bluetooth pairing mode, display panel shows  "PAIR".4.  Search for bluetooth device with your device.5. Select “851551” in the pairing list.6.  Enter default password “0000”, if the pairing    succeeds, display panel shows  "BT" again.7.  To disconnect connection, turn o the     bluetooth function on your device or switch    the player to another source.Tips:-  If a connection exist,  hold and press     " PAIR " button on remote control for a few    seconds to re-activate the pairing mode, the    connection will be interrupted.-  If no other bluetooth device pairs with this    player within two minutes, the player will    recover its previous connection.-  The player will also be disconnected when    your device is moved beyond the operational   range.-  If you want to reconnect your device to this    player, place it within the operational range.-  If the device is moved beyond the operational    range, when it is brought  back, please check if    the device is still  connected to the  player.-  If they are connected, display panel shows   "BT".-  If the connection is lost, display panel shows   "NO BT". Follow the instruction above to pair   your device to the player again.Pair with Bluetooth-enabled Device Using One Touch (NFC)Using an NFC compatible bluetooth device, you can establish a bluetooth connection by just touching the unit with it.     Make sure bluetooth and NFC function is enabled on your device .1   Turn on the NFC function on your device.-   Make sure your device is in the wake-up   mode. 2   Turn on the unit and switch to bluetooth   source.3  Touch the NFC sensing area with your device,    the unit will pair and connect with  your device.4   Touch this area again, the unit will disconnect    the bluetooth connection.Tips:Some NFC-enabled mobile devices cannotpair directly with the unit via NFC, please try either one of the solutions below:t 1MFBTFEPXOMPBEUIF"QQTi5BQBOE1BJSw  from Google Play Store(https:// play. google.   com) and install.t 1BJSXJUIUIFVOJUNBOVBMMZöSTUUIFOUPVDI  again on the NFC sensing area.Listen to Music from Bluetooth Devicet *GUIFDPOOFDUFE#MVFUPPUIEFWJDFTVQQPSUT  Advanced Audio Distribution Prole (A2DP),    you can listen to the music stored on the    device through the player. t *GUIFEFWJDFBMTPTVQQPSUT"VEJP7JEFP Remote Control Prole (AVRCP) ,      you can use the player's remote control    to play music stored on the device.   1.  Pair your device with the player.  2.  Start to play music via your device        (if it supports A2DP)  3.  Use supplied remote control to     control play(if it supports AVRCP)-  To pause/resume play, press the BF button. -  To skip to a track, press the H/G buttons.
10Listening to the FM RadioTuning in a Station1 Press the FM button to select the FM source.2  Press and hold the H/G buttons, the    frequency changes down or up automatically     until a station is found. 3 Press H/G buttons repeatedly until you    nd the station you want.Presetting Stations:PVDBOQSFTFUVQUP'.TUBUJPOTz Program radio stations automaticallyPress and hold the PROG button for 2 seconds to activate automatic programming. All available stations are programmed in the order of waveband reception strength.-  The rst programed radio station is played   automatically.z Program radio stations manually1  Tune in the desired station, then press the   PROG button.2 Press the S/T buttons to select the preset   number.3 Press the PROG button to store the station. 4  Repeat above steps 1 to 3 for each station    you want to store in memory with a preset   number.    If the system is unplugged or if a power failure occurs, the preset stations will be erased unless there are batteries in unit and don't change batteries at this time.  Tune to a Preset Radio Stationz Press the SorT buttons to select a preset    number that you want.TroubleshootingTo keep the warranty valid, never try to repair the system yourself. If you encounter problems when using this unit, check the following points before requesting service.No power.-  Ensure that the AC cord of the apparatus is   connected properly.-  Ensure that there is power at the AC outlet.-  Press ON/OFF button to turn the unit on. Remote control does not work-  Before you press any function button, rst    select the correct source.-  Reduce the distance between the remote    control and the unit.-  Insert the battery with its polarities (+/-)    aligned as indicated.-  Replace the battery.-  Aim the remote control directly at the ensor    on the front of the unit.No Response From the Unit-  Disconnect and reconnect the AC power    plug, then turn on the unit again.Poor radio reception-  Increase the distance between the unit and   your TV or VCR.-  Fully extend the FM antenna.Timer does not work-  Set the clock correctly.-  Switch on the timer.Clock/timer setting erased-  Power has been interrupted or the power    cord has been disconnected.-  Reset the clock/timer.Using iPhone to play music-  While the iPhone is playing the music      throught the docking, there may be a      chance that the iPhone may not be under a    good receiption mode to get the incoming   call signal.
11SpecicationsGeneral Power Requirements ......................................................................................................................................AC 120V~   60HzPower Consumption ..............................................................................................................................................................25WOutput Power .......................................................................................................................................................................5W x 2 Total Harmonic Distortion ................................................................................................................................. 1%(1kHz, 1W)Audio Input Sensitivity/Impedance................................................................................................................ 500mV/47kΩFrequency Response .............................................................................................................................................40Hz - 20kHzTuning Range ...........................................................................................................................................................87.5-108MHzUnit Dimensions (W x H x D) ....................................................................................................................198 x 89 x 198mmSpeakerFront Impedance .................................................................................................................................................................................................................. 2ΩRate Power ................................................................................................................................................................................................................. 5WRemoteDistance .........................................................................................................................................................................................6mAngle .............................................................................................................................................................................................  30OStandard Accessories Remote Control  .......................................................................................................................................................................... x 1Owner’s Manual .......................................................................................................................................................................... x 1  z        Design and specications are subject to change without notice.
12Appendix

Navigation menu