Zhongshan City Richsound Electronic TB362 TV Soundbar, HOME THEATRE SYSTEM User Manual TB362 NAKAMICHI NK12 IFU V1 0 140925 203004457

Zhongshan City Richsound Electronic Industrial Ltd. TV Soundbar, HOME THEATRE SYSTEM TB362 NAKAMICHI NK12 IFU V1 0 140925 203004457
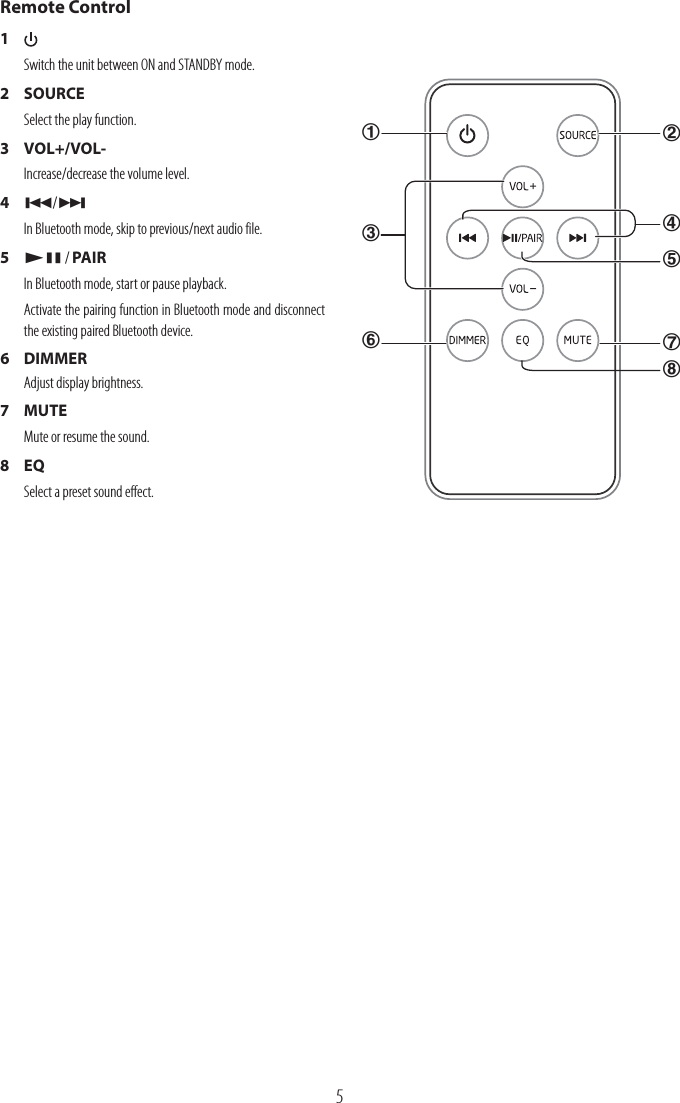
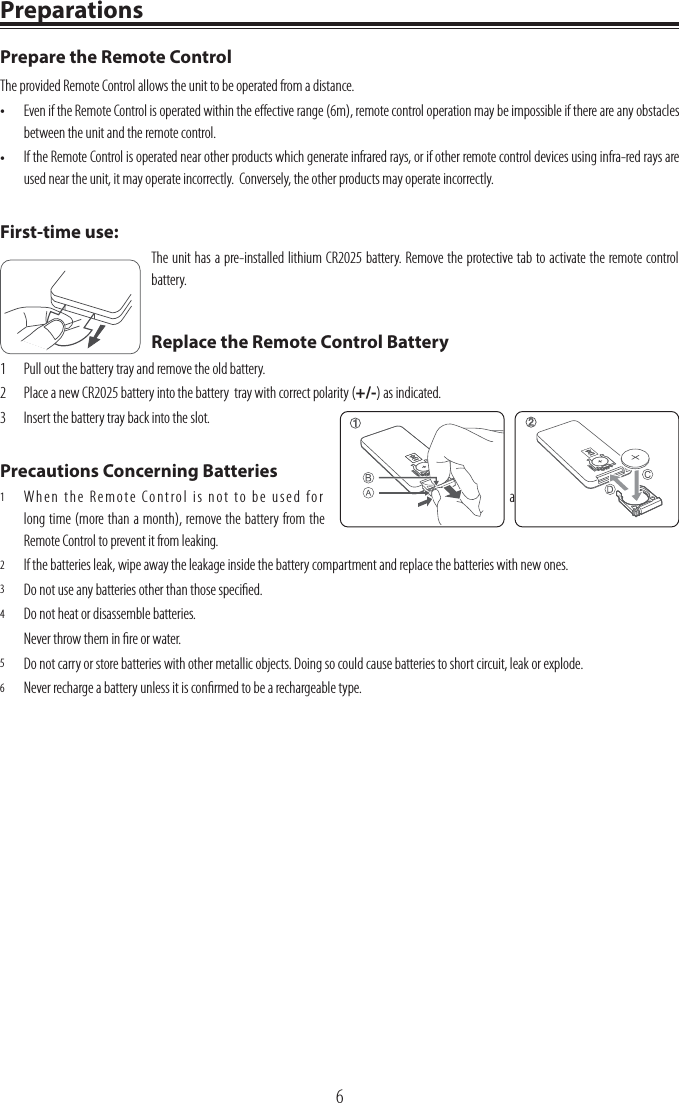
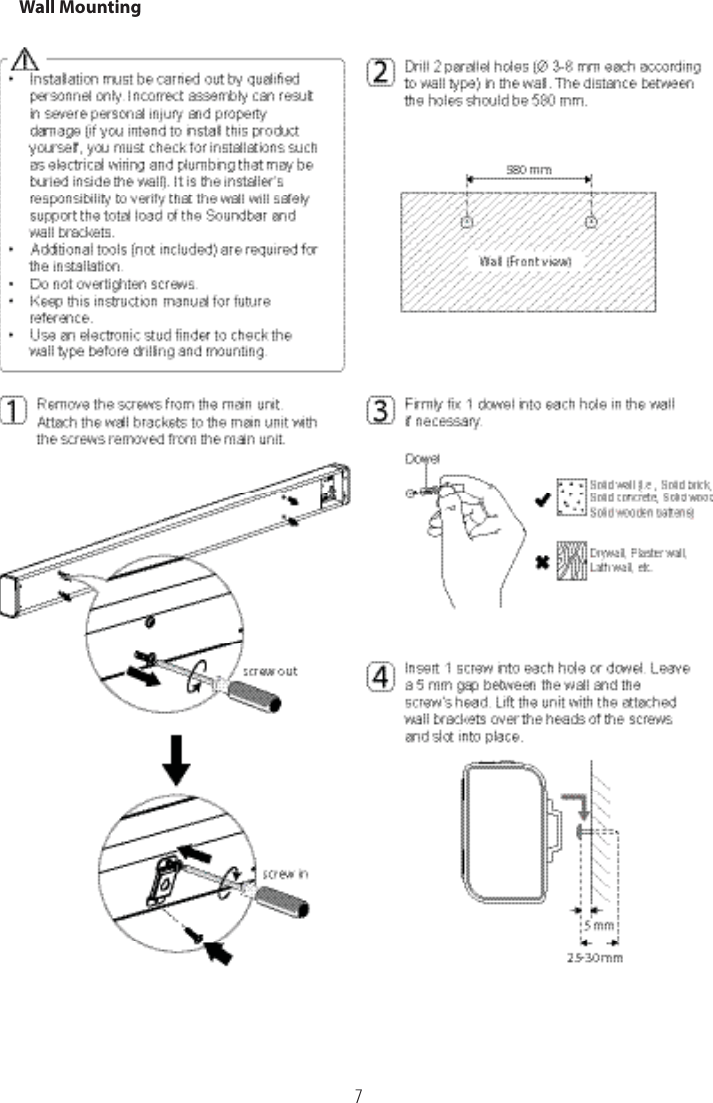
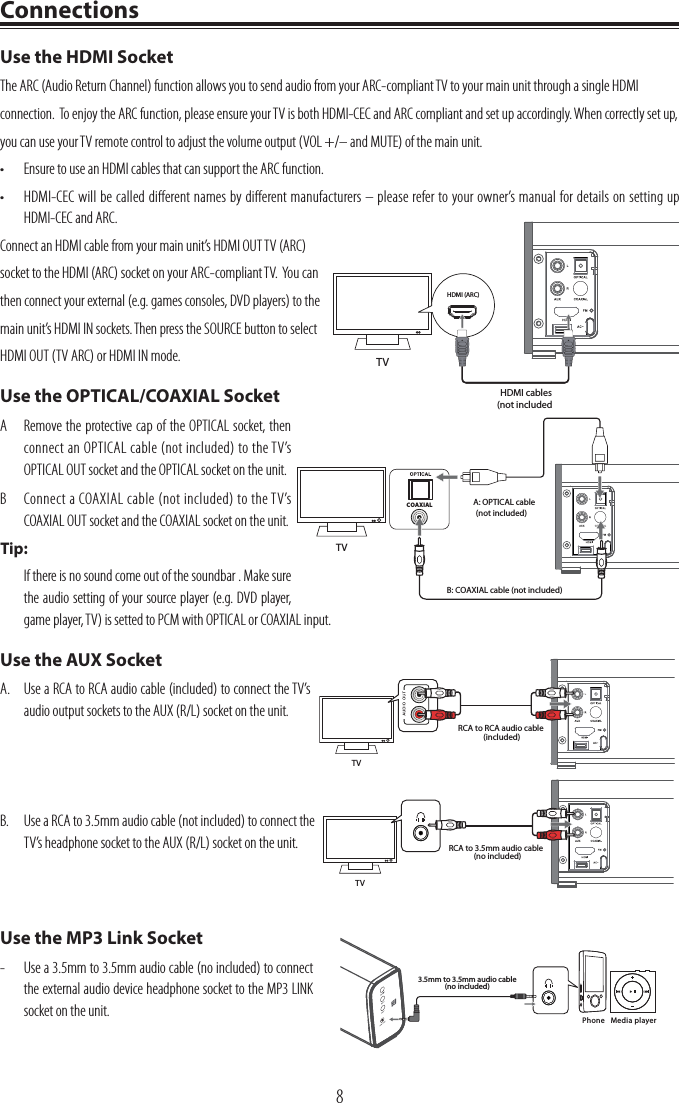
User Manual

211  Use only with the cart, stand, tripod, bracket, or table specified by the manufacturer, or sold with the apparatus. When a cart or rack is used, use caution when moving the cart/apparatus combination to avoid injury from tip-over.12  Unplug the apparatus during lightning storms or when unused for long periods of time.13  Refer all servicing to qualified personnel.   Servicing is required when the apparatus has been damaged in any way, such as power supply cord or plug is damaged, liquid has been spilled or objects have fallen into the apparatus, the unit has been exposed to rain or moisture, does not operate normally, or has been dropped.14   This equipment is a Class II or double insulated electrical appliance. It has been designed in such a way that it does not require a safety connection to electrical earth.Caution:-  Use of controls or adjustments or performance of procedures other than those described herein, may result in hazardous radiation exposure or other unsafe operation.-  To reduce the risk of fire or electric shock, do not expose this apparatus to rain or moisture. The apparatus must not be exposed to dripping or splashing and objects filled with liquids, such as vases, must not be placed on apparatus. -  The mains plug/appliance coupler is used as the disconnect device, the disconnect device must remain readily operable. Warning1  The battery (battery or batteries or battery pack) must not be exposed to excessive heat such as sunshine, fire or the like.2  Before operating this system, check the voltage of this system to see if it is identical to the voltage of your local power supply.3  The ventilation should not be impeded by covering the ventilation openings with items such as newspaper, table-cloths, curtains etc. Make sure there is at least 20 cm of space above and at least 5cm of space on each side of the unit.4  Do not place this unit close to strong magnetic fields.5  Do not place the unit on the amplifier or receiver. 6  Do not place this unit close to damp areas as the moisture will affect the life of the laser head.Important Safety InstructionsCAUTION: TO REDUCE THE RISK OF ELECTRIC SHOCK, DO NOT REMOVE COVER (OR BACK). NO USER-SERVICEABLE PARTS INSIDE. REFER SERVICING TO QUALIFIED SERVICE PERSONNEL.The lightning flash with arrowhead symbol, within an equilateral triangle, is intended to alert the user to the presence of uninsulated “dangerous voltage” within the product’s enclosure that may be of sufficient magnitude as  to constitute a risk of electric shock to persons. The exclamation point within an equilateral triangle is intended to alert the user to the presence of important operating and maintenance (servicing) instructions in the literature accompanying the appliance. Safety1  Read these instructions - All the safety and operating instructions should be read before this product is operated. 2  Keep these instructions-The safety and operating instructions should be retained for future reference. 3  Heed all warnings - All warnings on the appliance and in the operating instructions should be adhered to. 4  Follow all instructions - All operating and use instructions should be followed. 5  Do not use this apparatus near water - The appliance should not be used near water or moisture - for example, in a wet basement or near a swimming pool and the like.6  Clean only with a dry cloth.7  Do not block any ventilation openings. Install in accordance with the manufacturer’s instructions.8  Do not install near any heat sources such as radiators, heaters, stoves, or other apparatus (including amplifiers) that produce heat. 9  Do not defeat the safety purpose of the polarized or grounding-type plug. A polarized plug has two blades with one wider than the other. A grounding type plug has two blades and a third grounding prong. The wide blade or the third prong are provided for your safety. If the provided plug does not fit into your outlet, consult an electrician for replacement of the obsolete outlet.10  Only use attachments/accessories specified by the manufacturer.
37  Should any solid object or liquid fall into the system, unplug the system and have it checked by qualified personnel before operating it any further.8  Do not attempt to clean the unit with chemical solvents as this might damage the finish. Use a clean, dry or slightly damp cloth. 9  When removing the power plug from the wall outlet, always pull directly on the plug, never yank on the cord. 10  No naked flame sources, such as lighted candles, should be placed on the apparatus.11  Changes or modifications to this unit not expressly approved by the party responsible for compliance will void the user’s authority to operate the equipment.t  The marking label is pasted on the back or the underside of the equipment.t  This device complies with Part 15 of the FCC Rules.    Operation is subject to the following two conditions:   (1)   this device may not cause harmful interference, and  (2)   this device must accept any interference received,           including interference that may cause undesired operation. DO NOT INGEST BATTERY,CHEMICAL BURN HAZARD  The remote control supplied with this product contains a coin/button cell battery. If the coin/button cell battery is swallowed, it can cause sever internal burns in just 2 hours and lead to death. Keep new and used batteries away from children. If the battery compartment does not close securely, stop using the product and keep it away from children. If you think batteries might have been swallowed or placed inside any part of the body, seek immediate medical attention.
.PEFM5#5#Important Safety Instructions .....................................................................................2Safety .........................................................................................................................................................................................................................2Warning .....................................................................................................................................................................................................................2Identifying the Parts ....................................................................................................4Main Unit  ..................................................................................................................................................................................................................4Remote Control .........................................................................................................................................................................................................5Preparations..................................................................................................................6Prepare the Remote Control ......................................................................................................................................................................................6Replace the Remote Control Battery ........................................................................................................................................................................6Wall Mounting ..........................................................................................................................................................................................................7Connections ..................................................................................................................8Use the HDMI Socket.................................................................................................................................................................................................8Use the OPTICAL/COAXIAL Socket ............................................................................................................................................................................8Use the AUX Socket ...................................................................................................................................................................................................8Use the MP3 Link Socket ..........................................................................................................................................................................................8Connect Power ..........................................................................................................................................................................................................9Pairing the Wireless Subwoofer with the Main Unit ..................................................91. Automatic Pairing .................................................................................................................................................................................................92. Manual Pairing ......................................................................................................................................................................................................9Basic Operation ............................................................................................................9Standby/ON ...............................................................................................................................................................................................................9Select Modes ...........................................................................................................................................................................................................10Adjust the Volume ...................................................................................................................................................................................................10Select a Preset Sound Effect....................................................................................................................................................................................10Adjust Brightness ....................................................................................................................................................................................................10AUX/MP3 LINK/OPTICAL/COAXIAL/HDMI Operation ..............................................10Play with Bluetooth Device ........................................................................................10Pair Bluetooth-enabled Devices .............................................................................................................................................................................10NFC (Near Field Communication) Operation ..........................................................................................................................................................11Listen to Music from Bluetooth Device ...................................................................................................................................................................11Troubleshooting .........................................................................................................12Specications .............................................................................................................. 13Standard Accessories .................................................................................................13
211  Use only with the cart, stand, tripod, bracket, or table specified by the manufacturer, or sold with the apparatus. When a cart or rack is used, use caution when moving the cart/apparatus combination to avoid injury from tip-over.12  Unplug the apparatus during lightning storms or when unused for long periods of time.13  Refer all servicing to qualified personnel.   Servicing is required when the apparatus has been damaged in any way, such as power supply cord or plug is damaged, liquid has been spilled or objects have fallen into the apparatus, the unit has been exposed to rain or moisture, does not operate normally, or has been dropped.14   This equipment is a Class II or double insulated electrical appliance. It has been designed in such a way that it does not require a safety connection to electrical earth.Caution:-  Use of controls or adjustments or performance of procedures other than those described herein, may result in hazardous radiation exposure or other unsafe operation.-  To reduce the risk of fire or electric shock, do not expose this apparatus to rain or moisture. The apparatus must not be exposed to dripping or splashing and objects filled with liquids, such as vases, must not be placed on apparatus. -  The mains plug/appliance coupler is used as the disconnect device, the disconnect device must remain readily operable. Warning1  The battery (battery or batteries or battery pack) must not be exposed to excessive heat such as sunshine, fire or the like.2  Before operating this system, check the voltage of this system to see if it is identical to the voltage of your local power supply.3  The ventilation should not be impeded by covering the ventilation openings with items such as newspaper, table-cloths, curtains etc. Make sure there is at least 20 cm of space above and at least 5cm of space on each side of the unit.4  Do not place this unit close to strong magnetic fields.5  Do not place the unit on the amplifier or receiver. 6  Do not place this unit close to damp areas as the moisture will affect the life of the laser head.Important Safety InstructionsCAUTION: TO REDUCE THE RISK OF ELECTRIC SHOCK, DO NOT REMOVE COVER (OR BACK). NO USER-SERVICEABLE PARTS INSIDE. REFER SERVICING TO QUALIFIED SERVICE PERSONNEL.The lightning flash with arrowhead symbol, within an equilateral triangle, is intended to alert the user to the presence of uninsulated “dangerous voltage” within the product’s enclosure that may be of sufficient magnitude as  to constitute a risk of electric shock to persons. The exclamation point within an equilateral triangle is intended to alert the user to the presence of important operating and maintenance (servicing) instructions in the literature accompanying the appliance. Safety1  Read these instructions - All the safety and operating instructions should be read before this product is operated. 2  Keep these instructions-The safety and operating instructions should be retained for future reference. 3  Heed all warnings - All warnings on the appliance and in the operating instructions should be adhered to. 4  Follow all instructions - All operating and use instructions should be followed. 5  Do not use this apparatus near water - The appliance should not be used near water or moisture - for example, in a wet basement or near a swimming pool and the like.6  Clean only with a dry cloth.7  Do not block any ventilation openings. Install in accordance with the manufacturer’s instructions.8  Do not install near any heat sources such as radiators, heaters, stoves, or other apparatus (including amplifiers) that produce heat. 9  Do not defeat the safety purpose of the polarized or grounding-type plug. A polarized plug has two blades with one wider than the other. A grounding type plug has two blades and a third grounding prong. The wide blade or the third prong are provided for your safety. If the provided plug does not fit into your outlet, consult an electrician for replacement of the obsolete outlet.10  Only use attachments/accessories specified by the manufacturer.
37  Should any solid object or liquid fall into the system, unplug the system and have it checked by qualified personnel before operating it any further.8  Do not attempt to clean the unit with chemical solvents as this might damage the finish. Use a clean, dry or slightly damp cloth. 9  When removing the power plug from the wall outlet, always pull directly on the plug, never yank on the cord. 10  No naked flame sources, such as lighted candles, should be placed on the apparatus.11  Changes or modifications to this unit not expressly approved by the party responsible for compliance will void the user’s authority to operate the equipment.t  The marking label is pasted on the back or the underside of the equipment.t  This device complies with Part 15 of the FCC Rules.    Operation is subject to the following two conditions:   (1)   this device may not cause harmful interference, and  (2)   this device must accept any interference received,           including interference that may cause undesired operation. FCC ID: Z8M-TB362DO NOT INGEST BATTERY,CHEMICAL BURN HAZARD  The remote control supplied with this product contains a coin/button cell battery. If the coin/button cell battery is swallowed, it can cause sever internal burns in just 2 hours and lead to death. Keep new and used batteries away from children. If the battery compartment does not close securely, stop using the product and keep it away from children. If you think batteries might have been swallowed or placed inside any part of the body, seek immediate medical attention.
4Rear ViewSide View03241689:75-/Identifying the PartsMain Unit 1 Speakers2  Display Window / Remote Control Sensor  Show the current status.  Receive signal from the remote control.3  /  Press this button to switch the unit on or press and hold to switch to Standby mode.  Select the play function.4 VOL+/VOL-  Increase/decrease the volume level.5  MP3 LINK  Socket  Connect to an external audio device.6    NFC (Near Field Communication) sensor.7 USB Socket8 OPTICAL Socket  Connect to an external audio device.9  AUX (L/R)  Socket  Connect to an external audio device.10 HDMI (ARC)  Socket11 Power Cord12 FM ANTENNA13 COXIAL Socket  Connect to an external audio device.
5Remote Control1      Switch the unit between ON and STANDBY mode.2 SOURCE   Select the play function.3 VOL+/VOL-   Increase/decrease the volume level.4 H/G   In Bluetooth mode, skip to previous/next audio file.5 BF / PAIR  In Bluetooth mode, start or pause playback.  Activate the pairing function in Bluetooth mode and disconnect the existing paired Bluetooth device.6 DIMMER  Adjust display brightness.7 MUTE   Mute or resume the sound.8 EQ    Select a preset sound effect.-035/124
6PreparationsPrepare the Remote ControlThe provided Remote Control allows the unit to be operated from a distance. tEven if the Remote Control is operated within the effective range (6m), remote control operation may be impossible if there are any obstacles between the unit and the remote control. tIf the Remote Control is operated near other products which generate infrared rays, or if other remote control devices using infra-red rays are used near the unit, it may operate incorrectly.  Conversely, the other products may operate incorrectly. First-time use:The unit has a pre-installed lithium CR2025 battery. Remove the protective tab to activate the remote control battery.Replace the Remote Control Battery1  Pull out the battery tray and remove the old battery. 2  Place a new CR2025 battery into the battery  tray with correct polarity (+/-) as indicated. 3  Insert the battery tray back into the slot. Precautions Concerning Batteries1  When the Remote Control is not to be used for  a long time (more than a month), remove the battery from the Remote Control to prevent it from leaking.2  If the batteries leak, wipe away the leakage inside the battery compartment and replace the batteries with new ones.3  Do not use any batteries other than those specified.4  Do not heat or disassemble batteries.   Never throw them in fire or water.5  Do not carry or store batteries with other metallic objects. Doing so could cause batteries to short circuit, leak or explode.6  Never recharge a battery unless it is confirmed to be a rechargeable type.
7Wall Mounting
8ConnectionsUse the HDMI SocketThe ARC (Audio Return Channel) function allows you to send audio from your ARC-compliant TV to your main unit through a single HDMI connection.  To enjoy the ARC function, please ensure your TV is both HDMI-CEC and ARC compliant and set up accordingly. When correctly set up,you can use your TV remote control to adjust the volume output (VOL +/– and MUTE) of the main unit.t &OTVSFUPVTFBO)%.*DBCMFTUIBUDBOTVQQPSUUIF"3$GVODUJPOt )%.*$&$XJMMCFDBMMFEEJGGFSFOUOBNFTCZEJGGFSFOUNBOVGBDUVSFSToQMFBTFSFGFSUPZPVSPXOFSTNBOVBMGPSEFUBJMTPOTFUUJOHVQHDMI-CEC  and  ARC.                         Connect an HDMI cable from your main unit’s HDMI OUT TV (ARC)socket to the HDMI (ARC) socket on your ARC-compliant TV.  You canthen connect your external (e.g. games consoles, DVD players) to the main unit’s HDMI IN sockets. Then press the SOURCE button to selectHDMI OUT (TV ARC) or HDMI IN mode.  Use the OPTICAL/COAXIAL SocketA  Remove the protective cap of the OPTICAL socket, then connect an OPTICAL cable (not included) to the TV’s OPTICAL OUT socket and the OPTICAL socket on the unit.B  Connect a COAXIAL cable (not included) to the TV’s COAXIAL OUT socket and the COAXIAL socket on the unit.Tip:    If there is no sound come out of the soundbar . Make sure the audio setting of your source player (e.g. DVD player, game player, TV) is setted to PCM with OPTICAL or COAXIAL input.Use the AUX SocketA.  Use a RCA to RCA audio cable (included) to connect the TV’s audio output sockets to the AUX (R/L) socket on the unit. B.  Use a RCA to 3.5mm audio cable (not included) to connect the TV’s headphone socket to the AUX (R/L) socket on the unit. Use the MP3 Link Socket-  Use a 3.5mm to 3.5mm audio cable (no included) to connect the external audio device headphone socket to the MP3 LINK socket on the unit. TVHDMI (ARC)HDMI cables(not includedTVCOAXIAL A: OPTICAL cable(not included)B: COAXIAL cable (not included)(included)RCA to RCA audio cableTV(no included)RCA to 3.5mm audio cableTVMedia playerPhone(no included)3.5mm to 3.5mm audio cable
9Connect PowerRisk of product damage!-   Ensure that the power supply voltage corresponds to the voltage printed on the back or the underside of the unit.-   Before connecting the AC power cord, ensure you have completed all other connections.t $POOFDUUIFNBJOTQMVHPGUIFNBJOVOJUUPBNBJOTTPDLFUt $POOFDUUIFNBJOTQMVHPGTVCXPPGFSUPUIFXJSFMFTTTVCXPPGFSBOEUPBNBJOTTPDLFUPairing the Wireless Subwoofer with the Main Unit1. Automatic PairingPlug the main unit and the subwoofer into the mains sockets and then press STANDBY button on the unit or on the remote control to switch theunit to ON mode. Then the subwoofer and main unit will automatically pair within 30 seconds.t 8IFOUIFTVCXPPGFSJTQBJSJOHXJUIUIFNBJOVOJUUIF1BJS*OEJDBUPSXJMMnBTISBQJEMZt 8IFOUIFTVCXPPGFSJTQBJSFEXJUIUIFNBJOVOJUUIF1BJS*OEJDBUPSXJMMMJHIUVQt %VSJOH4UBOECZNPEFUIFTVCXPPGFS1BJSJOEJDBUPSXJMMPõBOEnBTITMPXMZ1SFTT45"/%#:CVUUPOUPTXJUDIUIFVOJU0/Note: Do not press Pair on the rear of the subwoofer, except for manual pairing.2. Manual PairingNote: It is very abnormal that the connection would fail, you should not attempt manual pairing in normal usage.If the automatic pairing fails and the word “CHECK SUBWOOFER“ showed on the display, ensure that all the cables are well connected, the main VOJUJTTXJUDIFEUP0/NPEFBOEUIF1BJSJOEJDBUPSJTnBTIJOH*GJUTUJMMEPFTOUXPSLQBJSUIFTVCXPPGFSXJUIUIFNBJOVOJUNBOVBMMZ1.   Unplug both units from the mains sockets again, then plug them in again after 3 minutes.2.   Press and hold the Pair button on the rear of the subwoofer for a few seconds, and then press STANDBY button on the main unit or on the    remote control to switch the unit ON.  The Pair indicator on the subwoofer will rapidly blink when pairing and will become solid when    successful.Note:t "GUFSDPOOFDUJOHUIFQPXFSZPVNVTUQSFTT1"*3POUIFTVCXPPGFSXJUIJOTFDPOETUPCFFõFDUJWFt 5IFTVCXPPGFSTIPVMECFXJUIJONPGUIFNBJOVOJUJOBOPQFOBSFBUIFDMPTFSUIFCFUUFSt 3FNPWFBOZPCKFDUTCFUXFFOUIFTVCXPPGFSBOEUIFNBJOVOJUt *GUIFXJSFMFTTDPOOFDUJPOGBJMTBHBJODIFDLJGUIFSFJTDPOnJDUPSTUSPOHJOUFSGFSFODFFHJOUFSGFSFODFGSPNBOFMFDUSPOJDEFWJDFBSPVOEUIF MPDBUJPO3FNPWFUIFTFDPOnJDUTPSTUSPOHJOUFSGFSFODFTBOESFQFBUUIFBCPWFQSPDFEVSFTBasic OperationStandby/ONWhen you first connect the main unit to the mains socket, the main unit will be in Standby mode.t 1SFTTUIF / button on the main unit or the   button on the remote control to switch the main unit on.t 1SFTTBOEIPMEUIF / button on the main unit or press the   button on the remote control to switch the main unit back to Standby mode. t %JTDPOOFDUUIFNBJOTQMVHGSPNUIFNBJOTTPDLFUJGZPVXBOUUPTXJUDIUIFVOJUPGGDPNQMFUFMZ-  When the unit volume is close to mute or is idle for approximately 15 minutes, it will automatically switch to Standby mode.OPTICAL
10Select ModesPress the  / button on the main unit or the SOURCE button on the remote control repeatedly to switch between AUX, MP3 LINK, OPTICAL and BLUETOOTH mode. The selected mode will show on the display.Adjust the Volumet 1SFTTUIFVOL +/– button to adjust the volume.t *GZPVXJTIUPUVSOUIFTPVOEPõQSFTTUIFMUTE button on the remote control. Press the MUTE button again or press the VOL +/- button to resume normal listening.Select a Preset Sound EectWhile playing, press the EQ button on the remote control to select between preset equalisers: FLAT, POP, ROCK.Adjust BrightnessPress the DIMMER button on the remote repeatedly to select brightness level.AUX/MP3 LINK/OPTICAL/COAXIAL/HDMI Operation1  Ensure that the unit is connected to the TV or audio device.2  While in ON mode, press the  / button repeatedly on the main unit or the SOURCE button on the remote contro to select AUX, MP3 LINK, COAXIAL, OPTICAL or HDMI mode.3  Operate your audio device directly for playback features.4 Press the VOL +/– button to adjust the volume to your desired level.Play with Bluetooth DeviceYou can listen to tracks from a media device if connected to the unit via Bluetooth.Pair Bluetooth-enabled DevicesThe first time you connect your bluetooth device to this player, you need to pair your device to this player.Note:-  The operational range between this player and a Bluetooth device is approximately 8 meters (without any object between the Bluetooth device and the unit).-  Before you connect a Bluetooth device to this unit, ensure you know the device’s capabilities.-  Compatibility with all Bluetooth devices is not guaranteed.-  Any obstacle between this unit and a Bluetooth device can reduce the operational range.-  If the signal strength is weak, your Bluetooth receiver may disconnect, but it will re-enter pairing mode automatically.1   During ON mode, press the  / button repeatedly on the unit or the SOURCE button on the remote control to select Bluetooth mode. “NO BT” will show on the display if the unit is not paired to any Bluetooth device.2   The system has entered pairing mode.-  Or press and hold the BF/PAIR button on the remote control to be searchable. 3   Activate your Bluetooth device and select the search mode. “TB362”  will appear on your Bluetooth device list.4   Select “TB362” in the pairing list. Display panel shows “BT” while the pairing succeeds.5   To disconnect the Bluetooth function, switch to another function on the unit or disable the function from your Bluetooth device.
11Tips:1  Enter 0000 for the password if necessary.2  If there is an existing connection, press and hold the BF/PAIR button on the remote control to re-activate the pairing mode, the connection will be interrupted.3  If no other Bluetooth device pairs with this player within two minutes, the player will recover its previous connection.4  The player will also be disconnected when your device is moved beyond the operational range.5  If you want to reconnect your device to this player, place it within the operational range.6  If the device is moved beyond the operational range, when it is brought back, please check if the device is still connected to the player.7  If the connection is lost, follow the instructions above to pair your device to the player again.NFC (Near Field Communication) OperationPair your NFC-enabled mobile device directly with this unit by just a single tap.1.    Activate NFC on your mobile device.2.    Tap the mobile device on the “    “ icon of the unit.3.    Operate your mobile device directly for playback features.4.    To disconnect, tap the mobile device on the “  “ icon of the unit to disconnect or disable NFC from your mobile device.Note: This NFC function only works with mobile devices that support NFC technology.Tips: Some NFC-enabled mobile devices cannot pair directly with the unit via NFC, please try either one of the solutions below:t 1MFBTFEPXOMPBEUIF"QQi5BQBOE1BJSwGSPN(PPHMF1MBZ4UPSFIUUQTQMBZ(PPHMFDPNand install.t 1BJSXJUIUIFVOJUNBOVBMMZGJSTUUIFOUPVDIBHBJOPOUIF/'$TFOTJOHBSFBListen to Music from Bluetooth Device-  If the connected Bluetooth device supports Advanced Audio Distribution Profile (A2DP), you can listen to the music stored on the device through the player. -  If the device also supports Audio Video Remote Control Profile (AVRCP), you can use the player's remote control to play music stored on the device. 1.  Pair your device with the player.2.  Play music via your device (if it supports A2DP).3.  Use supplied remote control to control play (if it supports AVRCP).  -  To pause/resume play, press the BF button.  -  To skip to a track, press the H,G buttons.
12TroubleshootingTo keep the warranty valid, never try to repair the system yourself. If you encounter problems when using this unit, check the following points before requesting service.No power  -  Ensure that the AC cord of the apparatus is properly connected .  -  Ensure that there is power at the AC outlet.  -  Press standby button to turn the unit on. Remote control does not work  -  Before you press any SOURCE button, first select the correct source.  -  Reduce the distance between the remote control and the unit.  -  Insert the battery with its polarities (+/-) aligned as indicated.  -  Replace the battery.  -  Aim the remote control directly at the sensor on the front of the unit.No response from the unit   -  Disconnect and reconnect the AC power plug, then turn  the unit on again.I can't nd the Bluetooth name of this unit on my Bluetooth device for Bluetooth pairing  -  Ensure the Bluetooth function is activated on your Bluetooth device.  -  Ensure you have paired the unit with your Bluetooth device.
13SpecicationsGeneral Power requirements................................................................................................................................................................................ AC 120V~  60HzPower consumption ....................................................................................................................................................................................................30WOutput power RMS ............................................................................................................................................................................................... 15W x 2  Total harmonic distortion .......................................................................................................................................................................... 1%(1kHz, 1W)Audio input sensitivity ............................................................................................................................................................................................700mVFrequency response ................................................................................................................................................................................... 200Hz - 20KHzMain unit(W x H x D) ......................................................................................................................................................................... 950 x 93.5 x 51 mmSpeakersTotal impedance .......................................................................................................................................................................................................4Ω x 2 Wireless SubwooferPower Supply   ........................................................................................................................................................................................ AC 120V~  60HzPower Consumption  ..................................................................................................................................................................................................30 WOutput Power  .............................................................................................................................................................................................................60 WFrequency Response  ....................................................................................................................................................................................40Hz - 200HzImpedance  ....................................................................................................................................................................................................................4 ΩDimension (W x H x D) .....................................................................................................................................................................240 x 315 x 240 mmRemote ControlDistance  .......................................................................................................................................................................................................................6mAngle    ...................................................................................................................................................................................................................... 30OStandard Accessories Remote Control  ............................................................................................................................................................................................................. x 1Instruction Manual ........................................................................................................................................................................................................ x 1RCA - RCA audio Cable .................................................................................................................................................................................................. x 1Wall Bracket  ..................................................................................................................................................................................................................x 2t  Design and specifications are subject to change without notice.
14 )&&:DUQLQJ&KDQJHVRUPRGLILFDWLRQVWRWKLVXQLWQRWH[SUHVVO\DSSURYHGE\WKHSDUW\UHVSRQVLEOHIRUFRPSOLDQFHFRXOGYRLGWKHXVHU¶VDXWKRULW\WRRSHUDWHWKHHTXLSPHQW)&&127(7KLVHTXLSPHQWKDVEHHQWHVWHGDQGIRXQGWRFRPSO\ZLWKWKHOLPLWVIRUD&ODVV% GLJLWDO GHYLFH SXUVXDQW WR 3DUWRIWKH)&&5XOHV7KHVHOLPLWVDUHGHVLJQHGWRSURYLGHUHDVRQDEOHSURWHFWLRQDJDLQVWKDUPIXOLQWHUIHUHQFHLQDUHVLGHQWLDOLQVWDOODWLRQ 7KLV HTXLSPHQW JHQHUDWHV XVHVDQGFDQUDGLDWHUDGLRIUHTXHQF\  HQHUJ\ DQGLIQRWLQVWDOOHGDQGXVHGLQDFFRUGDQFHZLWKWKHLQVWUXFWLRQVPD\FDXVHKDUPIXOLQWHUIHUHQFHWRUDGLRFRPPXQLFDWLRQV+RZHYHU WKHUHLVQRJXDUDQWHHWKDWLQWHUIHUHQFHZ LOO QRWRFFXULQ D SDUWLFXODULQVWDOODWLRQ ,IWKLVHTXLSPHQWGRHVFDXVHKDUPIXOLQWHUIHUHQFHWRUDGLR RU WHOHYLVLRQUHFHSWLRQ ZKLFK FDQEHGHWHUPLQHGE\  WXUQLQJWKH HTXLSPHQW RII DQG RQ WKH XVHU LVHQFRXUDJHGWRWU\WRFRUUHFWWKHLQWHUIHUHQFHE\RQHRUPRUHRIWKHIROORZLQJPHDVXUHV 5HRULHQWRUUHORFDWHWKHUHFHLYLQJDQWHQQD ,QFUHDVHWKHVHSDUDWLRQEHWZHHQWKHHTXLSPHQWDQGUHFHLYHU &RQQHFWWKHHTXLSPHQWLQWRDQRXWOHWRQDFLUFXLWGLIIHUHQWIURPWKDWWRZKLFKWKHUHFHLYHULVFRQQHFWHG &RQVXOWWKHGHDOHURUDQH[SHULHQFHGUDGLR79WHFKQLFLDQIRUKHOS

Navigation menu