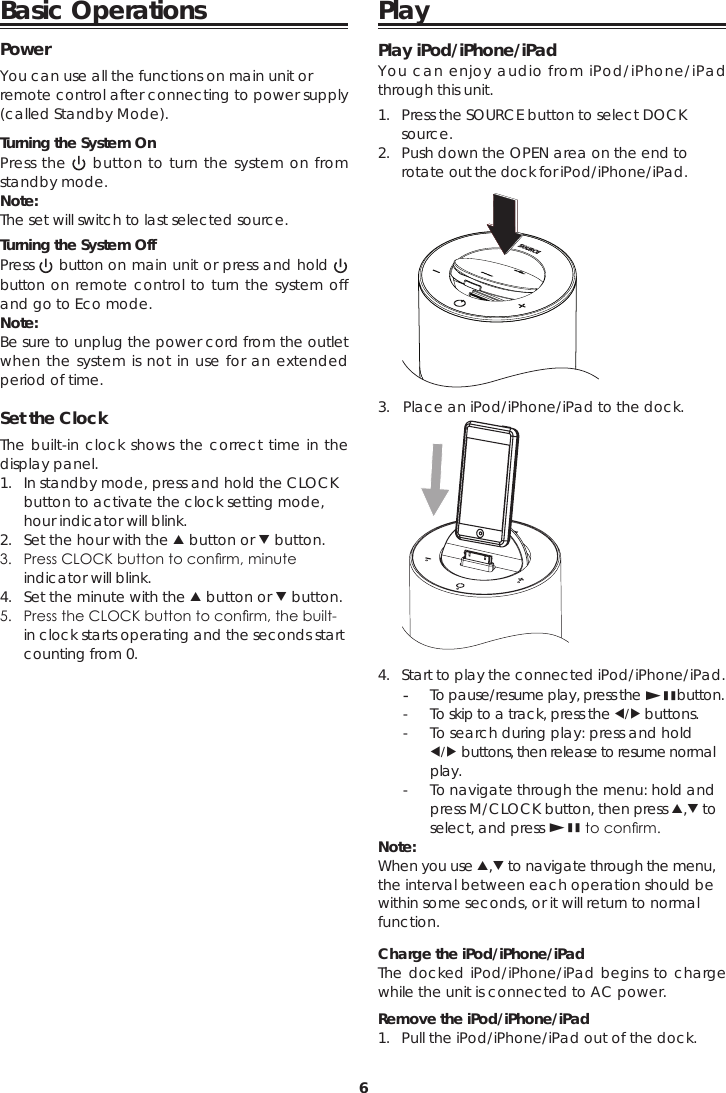
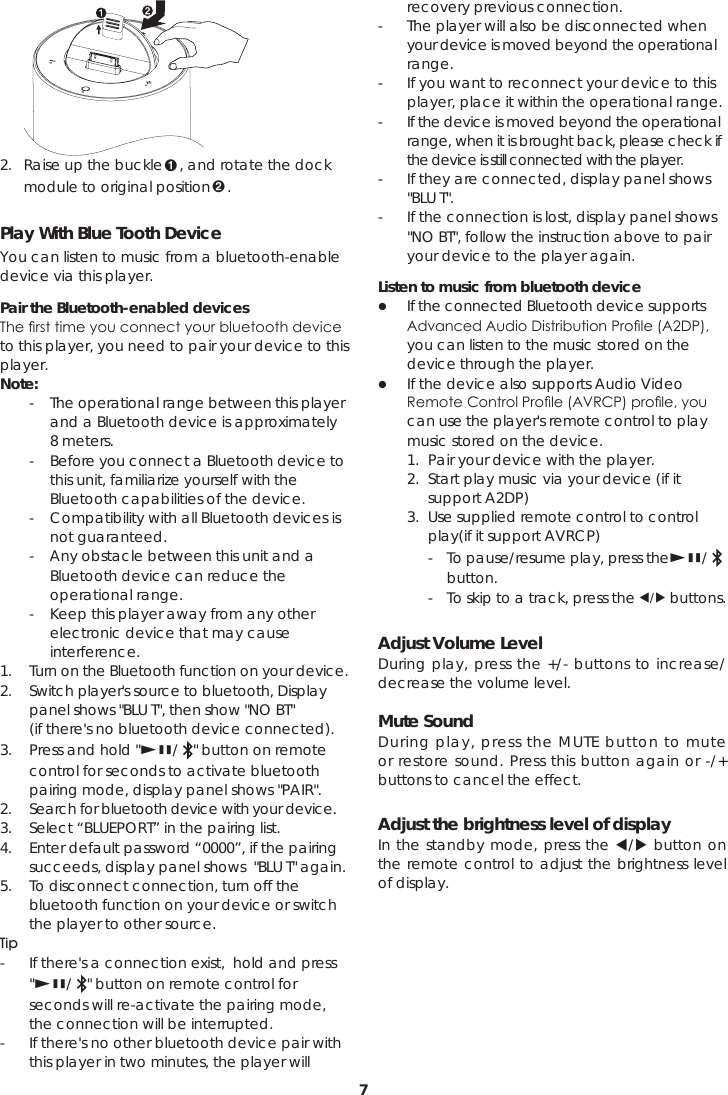
Zhongshan City Richsound Electronic TD530 Docking Stationfor iPod/iPhone/iPad User Manual Manual

Zhongshan City Richsound Electronic Industrial Ltd. Docking Stationfor iPod/iPhone/iPad Manual

Manual

1ContentsImportant Safety Instructions ....................................................................................2Safety ...................................................................................................................................2Identifying the Parts ...................................................................................................3Main Unit ..............................................................................................................................3Smart Remote Control .......................................................................................................4Connections ...............................................................................................................4Connect to FM Antenna ...................................................................................................4Connect to External Audio Device ..................................................................................5Connect Power ..................................................................................................................5Install remote control batteries .................................................................................5Prepare the Remote Control ............................................................................................5Replace the Remote Control Battery ..............................................................................5Precautions Concerning Batteries ....................................................................................5Basic Operations ........................................................................................................6Power ...................................................................................................................................6Set The Clock ......................................................................................................................6Play ..............................................................................................................................6Play iPod/iPhone/iPad .......................................................................................................6Play With Blue Tooth Device ..............................................................................................7Adjust Volume Level ...........................................................................................................7Mute Sound .........................................................................................................................7Listening to the FM Radio ..........................................................................................8Troubleshooting ..........................................................................................................8Specications .............................................................................................................9Standard Accessories ................................................................................................9
2Important Safety InstructionsWARNINGCAUTION: TO REDUCE THE  RISK  OF  ELECTRIC  SHOCK,  DO NOT REMOVE COVER (OR  BACK). NO USER-SERVICEABLE PARTS INSIDE. REFER SERVICING TO QUALIFIED SERVICE PERSONNEL.RISK OF ELECTRIC SHOCKDO NOT OPENThe lightning flash with arrowhead symbol, within an equilateral triangle, is intended to alert the user to the presence of uninsulated “dangerous voltage” within the product’s enclosure that may be of sufficient magnitude to constitute a risk of electric shock to persons. The  exclamation point within an equilateral triangle is intended to alert the user to the presence of important operating and maintenance (servicing) instructions in the literature accompanying the appliance.Safety1  Read these instructions.2  Keep these instructions.3  Heed all warnings.4  Follow all instructions.5  Do not use this apparatus near water.6  Clean only with dry cloth.7  Do not block any  ventilation openings. Install    in accordance with the manufacturer’s    instructions.8  Do not install near any heat sources such as    radiators, heat registers, stoves, or other   apparatus(includingampliers)thatproduce  heat.9  Do not override the safety purpose of the   polarized or grounding-type plug. A polarized  plug has two blades - one wider than the  other. A grounding plug has two blades and  a third grounding prong. The wide blade or   the third prong is provided for your safety. If theprovidedplugdoesnottintoyouroutlet,  consult electrician for replacement of the    obsolete outlet. 10  Protect the power cord from  being walked   on or pinched particularly at plugs,  convenience  receptacles, and the point    where it exit from the apparatus. 11 Onlyuseattachment/accessoriesspecied  by the manufacturer. 12  Use only with a cart, stand, tripod, bracket or tablespeciedbythemanufacturer,orsold  with the apparatus. When a cart is used, use    caution when moving the cart/ apparatus  combination to avoid injury from tip-over. 13  Unplug this apparatus during lightning storms    or when unused for long periods of time. 14 Referallservicingtoqualiedservicepersonnel.  Servicing is required when the apparatus has    been damaged in any way, such as power-   supply cord or plug is damaged, liquid has    been spilled or objects have fallen into the    apparatus, the apparatus has been exposed    to rain or moisture, does not operate normally,    or has been dropped. 15  Do not expose this equipment to dripping or   splashingandensurethatnoobjectslled  with liquids, such as vases, are placed on the    equipment.16   This is CLASS II apparatus with double    insulation, and no protective earth provided.17  Warning: to reduce the risk of electric shock,    do not expose this apparatus near moisture.18  Warning: the battery (battery or batteries or   battery pack) shall not be exposed to exceessive   heatsuchassunshine,reorthelick.19  The mains plug is used as the disconnect    device, the disconnect device shall remain   readily operable.
3Main Unit: Top View        1  SOURCE Press this button repeatedly to select a source.2  OPEN Open the Dock for iPod/iPhone/iPad.3    Press this button to turn on or switch to the Eco    Power standby mode.4  Dock for iPod/iPhone/iPad  Load an iPod/iPhone/iPad.5  + VOLUME -  Increase or decrease the volume level.                 6  Remote control sensor7  LED display  Show the current status.8  Power Light  Indicate mode of power.Identifying the PartsBottom View    1  FM Antenna Socket  Connect to a FM Antenna.2  AUX IN Terminals  Connect to TV or an external audio device.3  AC~  Power supply socket.
4Smart Remote Control     1  /SOUND   Select a preset sound effect:   Bass 1, Bass 2, Bass 3.2    -  skip to previous track.  -  Tune to a radio station by searching       backward.  -  Select previous radio station.  -  In Standby mode: Adjust brightness level.3  BF/  Start or pause playback.  Pair the bluetooth-enabled device.4   /MUTE  -  Turn on this product or switch to Eco Power      standby mode.  -  Press and hold to turn off the product and      switch to Eco Power standby mode.  -  Mute or resume sound of unit.5  /SOURCE  Select a source.6  VOL+/VOL-  Increase or decrease volume level.7    -  Skip to next track  -  Tune to a radio station by searching       forward.  -  Select next preset radio station.  -  In Standby mode: Adjust brightness level.8  M/CLOCK  -  Press and hold this button to set the clock.  -  Press and hold this button to search radio      stations automatically.  -  Preset station for tuner.Connect to FM AntennaConnect the supplied FM wire antenna to the FM Antenna socket on the unit.          If reception is poor, connect the outside antenna.Note: Before attaching a 75 ohm coaxial lead (the kind with a round wire going to an outside antenna), disconnect the supplied FM wire antenna.                Caution: To avoid noise, keep antennas away from the system, the connecting cord and the AC power cord.Connect to External Audio DeviceYou can also listen to an external audio device through this unit.                         Connections
5Install remote control batteriesPrepare the Remote ControlThe provided Remote Control allows the unit to be operated from a distance.  Even if the Remote Control is operated within    the effective range (6m), remote control    operation may be impossible if there are any    obstacles between the unit and the remote    control.  If the Remote Control is operated near other    products which generate infrared rays, or if    other remote control devices using infrared    rays are used near the unit, it may operate    incorrectly. Conversely, the other products    may operate incorrectly. Replace the Remote Control Battery                                      1  Use needle to push the battery forward    through the hole on rear of remote control. 2  Remove the old battery. Place a new CR2025    battery with correct polarity (+/-) as indicated.    Then install the battery into remote control.Precautions Concerning Batteries When the Remote Control is not to be used    for a long time (more than a month), remove    the battery from the Remote Control to    prevent it from leaking. If the batteries leak, wipe away the leakage    inside the battery compartment and replace    the batteries with new ones. Do not use any batteries other than those   specied.  Do not heat or disassemble batteries. Never   throwtheminreorwater. Do not carry or store batteries with other    metallic objects. Doing so could cause batteries    to short circuit, leak or explode. Neverrechargeabatteryunlessitisconrmed  to be a rechargeable type. Using AUX IN socketConnect audio cables to:-  The AUX IN sockets on this unit.-  The audio output sockets on external audio    device.Note:Press SOURCE button on main unit or remote  control to select AUX 1(AUX 2) for your connection.Connect PowerCaution:-  Risk of product damage! Ensure that the power    supply voltage corresponds to the voltage    printed on the back or the underside of the    unit.-  Before connecting the AC power cord, ensure    you have completed all other connections.     Connect the AC power cord to:-  the AC~ socket on this unit.-  the wall socket.
6Basic OperationsPowerYou can use all the functions on main unit or  remote control after connecting to power supply (called Standby Mode).Turning the System OnPress the   button to turn the system on from standby mode.Note:The set will switch to last selected source.Turning the System OffPress   button on main unit or press and hold   button on remote control to turn the system off and go to Eco mode.Note: Be sure to unplug the power cord from the outlet when the system is not in use for an extended period of time.Set the ClockThe built-in clock shows the correct time in the display panel.1.  In standby mode, press and hold the CLOCK    button to activate the clock setting mode,    hour indicator will blink.2.  Set the hour with the  button or  button.3. PressCLOCKbuttontoconrm,minute  indicator will blink.4.  Set the minute with the  button or  button.5. PresstheCLOCKbuttontoconrm,thebuilt-  in clock starts operating and the seconds start    counting from 0.PlayPlay iPod/iPhone/iPadYou can enjoy audio from iPod/iPhone/iPad through this unit. 1.  Press the SOURCE button to select DOCK    source.2.  Push down the OPEN area on the end to    rotate out the dock for iPod/iPhone/iPad.      3.  Place an iPod/iPhone/iPad to the dock.      4.  Start to play the connected iPod/iPhone/iPad.  -  To pause/resume play, press the BFbutton.  -  To skip to a track, press the / buttons.   -  To search during play: press and hold      / buttons, then release to resume normal      play.  -  To navigate through the menu: hold and      press M/CLOCK button, then press , to      select, and press BFtoconrm.Note:When you use , to navigate through the menu, the interval between each operation should be within some seconds, or it will return to normal function.Charge the iPod/iPhone/iPadThe docked iPod/iPhone/iPad begins to charge while the unit is connected to AC power.Remove the iPod/iPhone/iPad1.  Pull the iPod/iPhone/iPad out of the dock.
7      2.  Raise up the buckle1, and rotate the dock    module to original position2.Play With Blue Tooth DeviceYou can listen to music from a bluetooth-enable device via this player. Pair the Bluetooth-enabled devicesThersttimeyouconnectyourbluetoothdeviceto this player, you need to pair your device to this player.Note:  -  The operational range between this player      and a Bluetooth device is approximately      8 meters.   -  Before you connect a Bluetooth device to      this unit, familiarize yourself with the      Bluetooth capabilities of the device.   -  Compatibility with all Bluetooth devices is      not guaranteed.  -  Any obstacle between this unit and a      Bluetooth device can reduce the        operational range.  -  Keep this player away from any other      electronic device that may cause     interference.1.   Turn on the Bluetooth function on your device.2.   Switch player's source to bluetooth, Display    panel shows "BLU T", then show "NO BT"     (if there's no bluetooth device connected).3.  Press and hold "BF/  " button on remote    control for seconds to activate bluetooth    pairing mode, display panel shows "PAIR".2.  Search for bluetooth device with your device.3.  Select “BLUEPORT” in the pairing list.4.  Enter default password “0000”, if the pairing    succeeds, display panel shows  "BLU T" again.5.  To disconnect connection, turn off the    bluetooth function on your device or switch    the player to other source.Tip-  If there's a connection exist,  hold and press    "BF/  " button on remote control for    seconds will re-activate the pairing mode,    the connection will be interrupted.-  If there's no other bluetooth device pair with    this player in two minutes, the player will    recovery previous connection.-  The player will also be disconnected when    your device is moved beyond the operational    range.-  If you want to reconnect your device to this    player, place it within the operational range.-  If the device is moved beyond the operational    range, when it is brought back, please check if    the device is still connected with the player.-  If they are connected, display panel shows    "BLU T".-  If the connection is lost, display panel shows    "NO BT", follow the instruction above to pair    your device to the player again.Listen to music from bluetooth device  If the connected Bluetooth device supports   AdvancedAudioDistributionProle(A2DP),  you can listen to the music stored on the    device through the player.  If the device also supports Audio Video   RemoteControlProle(AVRCP)prole,you  can use the player's remote control to play    music stored on the device.   1.  Pair your device with the player.  2.  Start play music via your device (if it      support A2DP)  3.  Use supplied remote control to control      play(if it support AVRCP)    -  To pause/resume play, press theBF/          button.        -  To skip to a track, press the / buttons.Adjust Volume LevelDuring play, press the +/- buttons to increase/decrease the volume level. Mute SoundDuring play, press the MUTE button to mute or restore sound. Press this button again or -/+ buttons to cancel the effect. Adjust the brightness level of displayIn the standby mode, press the / button on the remote control to adjust the brightness level of display.
8Listening to the FM RadioTuning in a Station1  Ensure that you have connected and fully    extended the FM antenna.2  Press the SOURCE button to select the TUNER    source.3  Press and hold the / buttons(till the digital    moved), then release the button, the frequency    changes down or up automatically until a    station is found.4  Repeat steps 2-3 to tune to more stations. Note: -  The unit will automatically switch the Stereo or    MONO channel to receive the FM radio mode,    it can get the best effect.Presetting StationsYou can preset up to 20 FM stations. Program radio stations automatically  Press and hold the M/Clock button for some   seconds to activate automatic programming.    All available stations are programmed in the    order of waveband reception strength. - Therstprogramedradiostationisplayed    automatically.Note: -  If the system is unplugged or if a power failure    occurs, the preset stations will not be erased.Tune to a preset radio stationPress the / buttons to skip to previous/next preset radio station.TroubleshootingTo keep the warranty valid, never try to repair the system yourself. If you encounter problems when using this unit, check the following points before requesting service.No power-  Ensure that the AC cord of the apparatus is    connected properly.-  Ensure that there is power at the AC outlet.-  Press standby button to turn the unit on. Remote control does not work- Beforeyoupressanyfunctionbutton,rst  select the correct source.-  Reduce the distance between the remote    control and the unit.-  Insert the battery with its polarities (+/-) aligned    as indicated.-  Replace the battery.-  Aim the remote control directly at the ensor    on the front of the unit.Poor radio reception-  Increase the distance between the unit and    your TV or VCR.-  Fully extend the FM antenna.-  Connect an outdoor FM antenna instead.Clock setting erased-  Power has been interrupted or the power cord    has been disconnected.-  Reset the clock.Using iPhone to play music-  While the iPhone is playing the music throught    the docking, there may be a chance that the    iPhone may not be under a good receiption    mode to get the incoming call signal.No Response From the Unit-  Disconnect and reconnect the AC power plug,    then turn on the unit again.
9SpecicationsGeneral Power Requirements ......................AC 120V ~ 60HzPower Consumption ........................................100WOutput Power ................................... 25W x 2 + 50WTotal Harmonic Distortion .................. 1%(1kHz, 1W)Audio Input Sensitivity/Impedance ........................ ...............................................................500mV/47kΩFrequency Response ................40Hz - 20kHz(±3dB)Unit Dimensions (W x H x D) ................................................................................................Φ288x1192mmSpeakerFront Impedance ........................................................... 3ΩRate Power .........................................................25WWooferImpedance ...........................................................6ΩRate Power ........................................................50WRemoteDistance ...............................................................6mAngle ....................................................................30OStandard Accessories                                   FM antenna ...........................................................x 1AC Power cord ......................................................x 1Remote Control  ....................................................x 1Owner’s manual ....................................................x 1 Designandspecicationsaresubjectto  change without notice.FCC STATEMENT1  This device complies with Part 15 of the FCC    Rules. Operation is subject to the following    two conditions:  (1)  This device may not cause harmful       interference.  (2) This device must accept any interference      received, including interference that may      cause undesired operation.2 Changesormodicationsnotexpressly  approved by the party responsible for     compliance could void the user’s authority to    operate the equipment.NOTE: This equipment has been tested and found to comply with the limits for a Class B digital device, pursuant to Part 15 of the FCC Rules. These limits are designed to provide reasonable protection against harmful interference in a residential installation.This equipment generates uses and can radiate radio frequency energy and, if not installed and used in accordance with the instructions, may cause harmful interference to radio communications. However, there is no guarantee that interference will not occur in a particular installation. If this equipment does cause harmful interference to radio or television reception, which can be determined by turning the equipment off and on, the user is encouraged to try to correct the interference by one or more of the following measures:-  Reorient or relocate the receiving antenna.-  Increase the separation between the      equipment and receiver.-  Connect the equipment into an outlet on a    circuit different from that to which the     receiver is connected.-  Consult the dealer or an experienced radio/   TV technician for help.CAUTION:

Navigation menu