Zhongshan City Richsound Electronic VCM632 Is Vertical CD BT Dock Micro System User Manual
Zhongshan City Richsound Electronic Industrial Ltd. Is Vertical CD BT Dock Micro System
UserManual.wiki
>
Zhongshan City Richsound Electronic
>
VCM632 User Manual
User Manual
Navigation menu
Upload a User Manual
Namespaces
Wiki Guide
HTML
PDF
Info
Views
User Manual
Discussion / Help
Navigation
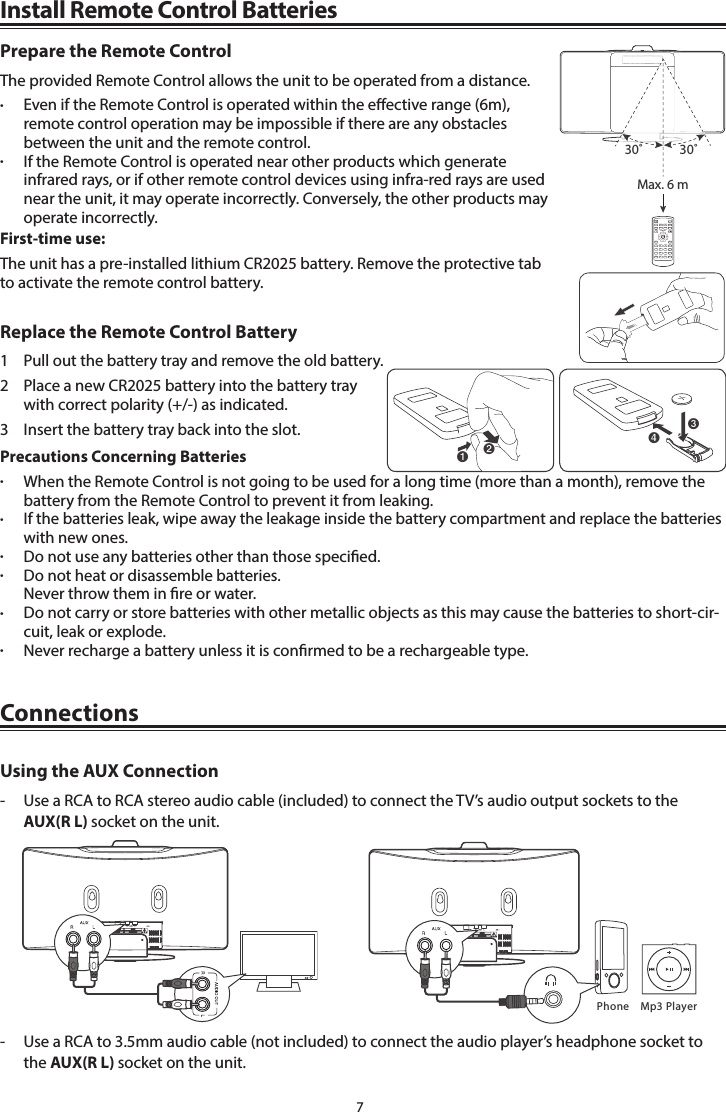
![9 Select the EqualiserPress the EQ button on the remote control repeatedly to select: [POP] - [CLASSIC] - [JAZZ] - [ROCK] .The default EQ setting is POP.Adjust the BrightnessPress the DIMMER button on the remote control to select brightness level.Set the Clock- Manual Setting the clock can only be done in STANDBY mode.1 In STANDBY mode, press and hold the CLOCK button on the remote control until the hour digits are ashing.2 Press the , buttons on the remote control to adjust the hour digits while ashing, then press CLOCK button on the remote control to conrm, then the minute digits will ash.3 Press the , buttons on the remote control to adjust the minute digits while ashing, then press the CLOCK button on the remote control to conrm.- Each activated state will be cleared if any buttons are not pressed within 15 seconds.- During Time Setup press the BF button to select 12/24 hour format.• Time Display- Press the CLOCK button to show the current time on the display for a few seconds.Set the alarm Timer- The clock must be correctly set for the timer to operate correctly.1 In STANDBY mode, press and hold the TIMER/SLEEP button on the remote control until the hour digits ash on the display.2 Press the , buttons on the remote control to adjust the hour digits, and then press the TIMER/SLEEP button on the remote control to conrm, the minute digits will ash on the display. 3 Press the , buttons on the remote control to adjust the minute digits, and then press the TIMER/SLEEP button on the remote control to conrm, the tuner timer will ash on the display4 Press the , buttons on the remote control to select BUZZER, FM, IPOD, DISC mode, and then press the TIMER/SLEEP button on the remote control to conrm, the display will show the volume level. 5 Press the , buttons on the remote control to adjust the volume, and then press the TIMER/SLEEP button on the remote control to conrm, the display will show the selected timer and “ ” will ash on the display. Activate and Deactivate the Alarm Timer• PresstheTIMER/SLEEP button on the remote control to view the alarm settings or activate the alarm.- The alarms are active when “ ” both are shown in the display on the front of the unit.- To deactivate the alarms, press the TIMER/SLEEP. The “ ” will disappear from the display on the front of the unit.](https://usermanual.wiki/Zhongshan-City-Richsound-Electronic/VCM632/User-Guide-2301315-Page-9.png)