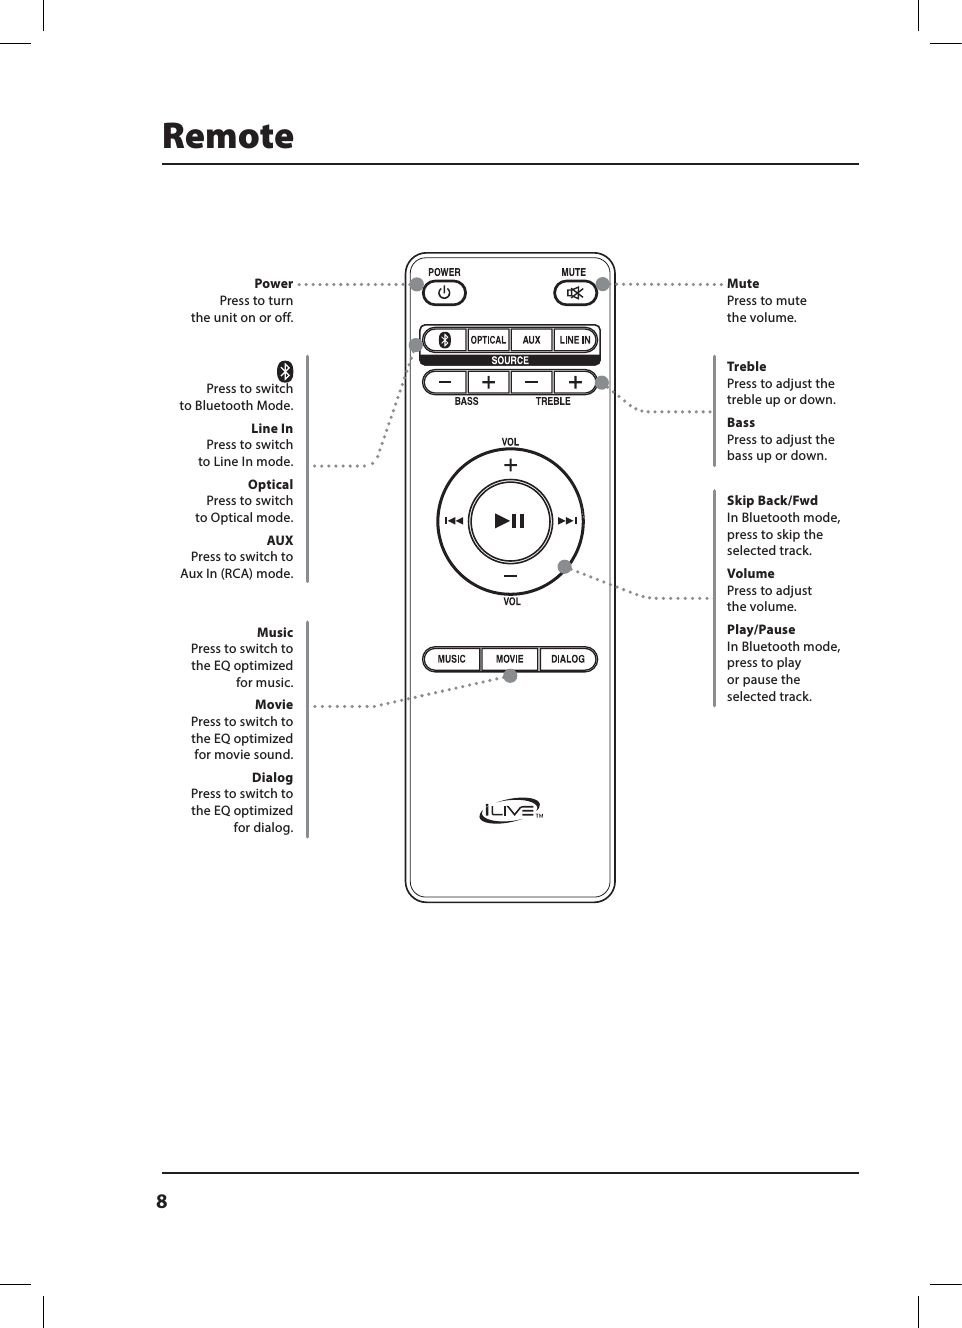
Zhongshan Senjia Electrical Appliances 397 37 inch HD Sound Bar + Wireless Subwoofer User Manual 15 ITBSW397B UserMan

Zhongshan Senjia Electrical Appliances Co., Ltd. 37 inch HD Sound Bar + Wireless Subwoofer 15 ITBSW397B UserMan

15_ITBSW397B UserMan

37" HD Soundbar  + Wireless Subwoofer
2Safety Instructions & WarningsWarning: To reduce the risk of electric shock, do not remove cover (or back). No user-serviceable parts inside. Refer servicing to qualied service personnel.ATTENTIONRISQUE D' ÉLECTROCUTIONNE PAS OUVRIRCAUTIONRISK OF ELECTRIC SHOCKDO NOT OPENThe exclamation point within an equilateral triangle is intended to alert the user to the presence of important operating and maintenance (servicing) instructions in the literature accompanying the appliance.This symbol indicates that this product incorporates double insulation between hazardous mains voltage and user accessible parts.The lightning ash with arrowhead symbol, within an equilateral triangle, is intended to alert the user to the presence of un-insulated “dangerous voltage” within the product’s enclosure that may be of sufcient magnitude to constitute a risk of electric shock to persons.
3Additional Warnings and Precautions•  CAUTION: TO PREVENT ELECTRIC SHOCK, MATCH WIDE BLADE OF PLUG TO WIDE SLOT, FULLY INSERT.• Mains plug is used as disconnect device and it should remain readily operable during intended use. In order to disconnect the apparatus from the mains completely, the mains plug should be disconnected from the mains socket outlet completely. • CAUTION: Use of controls or adjustments or performance of procedures other than those specied may result in hazardous radiation exposure.•  WARNING: Changes or modications to this unit not expressly approved by the party responsible for compliance could void the user’s authority to operate the equipment.• WARNING: Do not place this unit directly onto furniture surfaces with any type of soft, porous, or sensitive nish. As with any rubber compound made with oils, the feet could cause marks or staining where the feet reside.  We recommend using a protective barrier such as a cloth or a piece of glass between the unit and the surface to reduce the risk of damage and/or staining.•  WARNING: Use of this unit near uorescent lighting may cause interference regarding use of the remote. If the unit is displaying erratic behavior move away from any uorescent lighting, as it may be the cause.• WARNING: Shock hazard - Do Not Open.• Caution and marking information is located at the rear or bottom of the apparatus.•  WARNING: To reduce the risk of re or electric shock, do not expose this apparatus to rain, moisture, dripping, or splashing.•  Objects lled with liquids, such as vases, shall not be placed on the apparatus.• CAUTION: Danger of explosion if battery is incorrectly replaced. Replace only with the same or equivalent type.• WARNING: There is a danger of explosion if you attempt to charge standard Alkaline batteries in the unit. Only use rechargeable NiMH batteries.• Battery shall not be exposed to excessive heat such as sunshine, re or the like.• Keep new and used batteries away from children. If the battery compartment does not close securely, stop using the product and keep it away from children.• If you think batteries might have been swallowed or placed inside any part of the body, seek immediate medical attention.• Do not mix old and new batteries. • Completely replace all old batteries with new ones.•  Do not mix alkaline, standard (carbon-zinc), or rechargeable (ni-cad, ni-mh, etc) batteries.• Batteries should be recycled or disposed of as per state and local guidelines.• WARNING: This product may contain chemicals known to the State of California to cause birth defects, or other reproductive harm (California Prop 65). Wash hands after handling.• This product meets and complies with all Federal regulations.Important Safety Instructions•  Read these Instructions.•  Keep these Instructions.• Heed all Warnings.• Follow all instructions.• Do not use this apparatus near water.• Clean only with a dry cloth.•  Do not block any ventilation openings. Install in accordance with the manufacturer’s instructions.• Do not install near any heat sources such as radiators, heat registers, stoves, or other apparatus (including ampliers) that produce heat.• Do not defeat the safety purpose of the polarized or grounding - type plug. A polarized plug has two blades with one wider than the other. A grounding type plug has two blades and a third grounding prong. The wide blade or the third prong are provided for your safety. When the provided plug does not t into your outlet, consult an electrician for replacement of the obsolete outlet.• Protect the power cord from being walked on or pinched particularly at plugs, convenience receptacles, and the point where they exit from the apparatus.•  Only use attachments/accessories specied by the manufacturer. • Unplug this apparatus during lightning storms or when unused for long periods of time.•  Refer all servicing to qualied service personnel. Servicing is required when the apparatus has been damaged in any way, such as power-supply cord or plug is damaged, liquid has been spilled or objects have fallen into the apparatus, the apparatus has been exposed to rain or moisture, does not operate normally, or has been dropped.• Use only with a cart, stand, tripod, bracket, or table specied by the manufacturer, or sold with the apparatus. When a cart is used, use caution when moving the cart/apparatus combination to avoid injury from tip-over.FCC Warnings Warning: Changes or modications to this unit not expressly approved by the party responsible for compliance could void the user’s authority to operate the equipment.NOTE: This equipment has been tested and found to comply with the limits for a Class B digital device, pursuant to Part 15 of the FCC Rules. These limits are designed to provide reasonable protection against harmful interference in a residential installation. This equipment generates, uses, and can radiate radio frequency energy and, if not installed and used in accordance with the instructions, may cause harmful interference to radio communications. However, there is no guarantee that interference will not occur in a particular installation. If this equipment does cause harmful interference to radio or television reception, which can be determined by turning the equipment off and on, the user is encouraged to try to correct the interference by one or more of the following measures:• Reorientorrelocatethereceivingantenna.• Increasetheseparationbetweentheequipmentandreceiver.• Connecttheequipmentintoanoutletonacircuitdierentfromthattowhichthereceiverisconnected.• Consultthedealeroranexperiencedradio/TVtechnicianforhelp.This equipment complied with FCC radiation exposure limits set forth for an uncontrolled environment. This equipment should beinstalled and operated with minimum distance     cm between the radiator & your body.•20
4Table of ContentsSetup . . . . . . . . . . . . . . . . . . . . . . . . . . . . . . . . . . . . . . . . . . . . . . . . . . . . . . . . . . . . . . . . . . . . . . . . . . . . . . . . . . . . . . . . . . . . . . .  5Features & SpecicationsIncludes PowerRemote BatteriesOrientation  . . . . . . . . . . . . . . . . . . . . . . . . . . . . . . . . . . . . . . . . . . . . . . . . . . . . . . . . . . . . . . . . . . . . . . . . . . . . . . . . . . . . . . . . .  6Rear ViewSpeaker Inputs DetailFront ViewSpeaker Controls (Right Side)Function & Media Source IndicatorsRemote . . . . . . . . . . . . . . . . . . . . . . . . . . . . . . . . . . . . . . . . . . . . . . . . . . . . . . . . . . . . . . . . . . . . . . . . . . . . . . . . . . . . . . . . . . . . .  8Bluetooth Wireless  . . . . . . . . . . . . . . . . . . . . . . . . . . . . . . . . . . . . . . . . . . . . . . . . . . . . . . . . . . . . . . . . . . . . . . . . . . . . . . . . . .  9Pairing to a Bluetooth Device and Playing Audio Wirelessly Audio Inputs . . . . . . . . . . . . . . . . . . . . . . . . . . . . . . . . . . . . . . . . . . . . . . . . . . . . . . . . . . . . . . . . . . . . . . . . . . . . . . . . . . . . . . .  10Aux In (Stereo RCA Inputs) Optical Input Line In Subwoofer . . . . . . . . . . . . . . . . . . . . . . . . . . . . . . . . . . . . . . . . . . . . . . . . . . . . . . . . . . . . . . . . . . . . . . . . . . . . . . . . . . . . . . . . .  12Connecting the Wireless SubwooferConnecting to a Wired SubwooferLearn Feature  . . . . . . . . . . . . . . . . . . . . . . . . . . . . . . . . . . . . . . . . . . . . . . . . . . . . . . . . . . . . . . . . . . . . . . . . . . . . . . . . . . . . . .  13What is the Learn Feature? Using the Learn Feature Company Information  . . . . . . . . . . . . . . . . . . . . . . . . . . . . . . . . . . . . . . . . . . . . . . . . . . . . . . . . . . . . . . . . . . . . . . . . . . . . . .  14Contact Information International Support Warranty
5Features & Specifications• 37" length• Wireless subwoofer • Supports Bluetooth• Wireless range: 60 ft.• 2.1 channel stereo sound • Full-function remote with learning capability• Optical digital audio input• Line In (3.5mm audio input)• Aux In (RCA stereo audio inputs)• Subwoofer outputOPTICAL IN SUB OUT RLAUX INLINE IN DC INOPTICAL IN SUB OUT RLAUX INLINE IN DC INDC INCONNECTONOFFDC INCONNECTONOFFOPEN2x AAA 1.5VOn both the soundbar and the subwoofer, plug the power cord (included) into the DC Input on the back of the unit and a standard wall outlet.NOTE: The power adapters for the soundbar and the subwoofer are NOT interchangeable. Be sure you have the correct adapter before using.SetupIncludes • Remote control: requires 2 AAA batteries (included)• Optical audio cable• 2 AC/DC power adapters: 1 soundbar, 1 subwoofer• Wall-mount hardware and instructionsPowerRemote BatteriesOPTICAL IN SUB OUT RLAUX INLINE IN DC IN
6OPTICAL IN SUB OUT RLAUX INLINE IN DC INSpeaker Inputs DetailRear ViewOrientationStereo RCA Audio Inputs (AUX IN)Subwoofer OutputSpeaker InputsWall Mount PegsOptical InputDC Power InputLine In ( 3.5mm audio input)OPTICAL IN SUB OUT RLAUX INLINE IN DC IN
7Speaker Controls (Right Side)Front ViewRemote IR Receiver & Function Indicator LightsPowerPress to power the unit ON or OFF.Source/ConnectPress to switch between Optical,  Line In, Aux In, and Bluetooth modes.Press and hold to wirelessly connect to the subwoofer (see pg.12).Volume +/-Press to adjust the volume up or down. Pair/LearnPress and hold to begin pairing to a Bluetooth device.With the soundbar OFF, press to begin using the Learn Feature (see pg.13).Function & Media Source IndicatorsSoundbar Status Indicator LightPower OFF Red LightLine In Mode Green LightOptical Mode Orange LightAux In Mode White LightBluetooth Pairing Flashing Blue LightBluetooth Connected Blue LightMute Volume Flashing Source Light (ex. Line In - flashing green)Adjusting Volume Source Light flashes with each adjustmentMax Volume Source Light remains solidVOLUME +PAIR/LEARNVOLUMEPOWERSOURCE/CONNECT
8RemotePower Press to turn  the unit on or off.Mute Press to mute  the volume.Press to switch  to Bluetooth Mode.Line In Press to switch  to Line In mode.Optical Press to switch  to Optical mode.AUX Press to switch to Aux In (RCA) mode.Music Press to switch to  the EQ optimized  for music.Movie Press to switch to  the EQ optimized  for movie sound.Dialog Press to switch to  the EQ optimized  for dialog.Treble Press to adjust the treble up or down. Bass Press to adjust the bass up or down.Skip Back/Fwd In Bluetooth mode, press to skip the selected track.Volume Press to adjust  the volume. Play/Pause In Bluetooth mode, press to play  or pause the  selected track.
9Pairing to a Bluetooth Device and Playing Audio Wirelessly 1.  With the unit powered ON, press the   button on the remote to switch to Bluetooth Mode, indicated by a slowly flashing blue light. You can also press the Source button on the side of the unit.2.  Press and hold the Pair button on the side of the soundbar until the pairing indicator begins quickly flashing blue. When pairing, remain within 3 feet of the unit.3.  Use the controls on your Bluetooth device to select ITBSW397 in your Bluetooth settings. If your device requests a password, enter the default password 0 0 0 0 . Consult the user’s manual for your specific device for more detailed instructions on pairing Bluetooth devices.4.  When successfully paired, a chime will sound and the pairing indicator will change to a solid blue. Audio should now be heard through the speakers. Use the controls on the connected Bluetooth Device to select and begin playing audio.5.  Play, pause or skip audio using the controls on the connected Bluetooth Device or the soundbar's remote.After initial pairing, the unit will stay paired unless unpaired manually by the user or erased due to a reset of the device. If your device should become unpaired or you find it is unable to connect, repeat these steps.Bluetooth Wireless
10Audio InputsOptical Input You will need an audio source with an Optical Audio Output and a Digital Optical Audio Cable (included).1.  Connect the Digital Optical Audio Cable to the optical output on the audio source and to the Optical Input  on the soundbar.2.  Power ON the soundbar and press the Source button to select Optical Mode, indicated by an orange light.3.  Using the native controls on your connected device, make sure the audio settings are set to PCM or Optical Audio and are turned ON.4.  Audio from the connected audio source should now be played through the speakers.Important tips for optical audio: Use the correct toslink cable and make sure that it is firmly seated in both source and sound bar sockets.Optical output is activated on the source (they should see a red light emitting from the toslink socket).  It may be labeled SPDIF in the setting menu of the source. The optical output is set to output PCM and not Dolby Digital.Aux In (Stereo RCA Inputs) Requires RCA stereo audio cable (not included). When connecting an RCA stereo audio cable (Red/White), match the colored ports to their corresponding plugs. 1.  Connect the RCA stereo audio cable (not included) to the RCA Stereo Inputs on the soundbar and the audio outputs on a television or other audio source.2.  Power ON the soundbar and press the Source button to select Aux In Mode, indicated by a white light.3.  Audio played through the television should now be heard through the speakers.Line In Requires a 3.5 mm audio cable (not included).1.  Using a 3.5 mm audio cable, plug into the Line In on the soundbar and the audio output/headphone jack on an MP3 Player or other audio source.2.  Power ON the soundbar and press the Source button to select Line In Mode, indicated by a green light.3.  Audio played through the connected device should now be heard through the speakers. Use the controls on the connected device to play, pause, or skip selected tracks.
11Aux In (Stereo RCA Inputs) - DetailOptical Input - DetailLine In - DetailOPTICAL IN SUB OUT RLAUX INLINE IN DC INOPTICAL IN SUB OUT RLAUX INLINE IN DC INOPTICAL IN SUB OUT RLAUX INLINE IN DC INOPTICAL IN SUB OUT RLAUX INLINE INDC IN
12SubwooferDC INCONNECTONOFFDC INSUB INOPTICAL IN SUB OUT RLAUX INLINE IN DC INDC INSUB INOPTICAL IN SUB OUT RLAUX INLINE IN DC INDC INSUB INOPTICAL IN SUB OUT RLAUX INLINE IN DC INConnecting the Wireless Subwoofer1.  With the soundbar and subwoofer powered ON, press and hold the Source/Connect button on the soundbar until the Power LED begins flashing red.2.  Press the Connect button on the subwoofer until the Connect LED on the subwoofer begins flashing.3.  The units are connected when both LEDs turn solid. When audio is played through any source, the speaker will automatically use the connected subwoofer.Connecting to a Wired SubwooferThe soundbar can also be used with conventional wired subwoofers. Use an RCA audio cable (not included) to connect the soundbar's subwoofer output to a wired subwoofer's audio input. When audio is played through any source, the speaker will automatically use the connected subwoofer.Connect button & LED IndicatorWired Subwoofer (example only)ITBSW397 SoundbarPower SwitchNOTE: To reduce unwanted vibration, try placing the subwoofer on a solid or padded surface, such as the floor or carpet.
13Learn FeatureWhat is the Learn Feature? This will teach the soundbar to function with a separate remote control, such as the remote for your television or a universal remote. Teaching the bar speaker remote commands will reduce the number of remotes needed and generally improve the ease of operation. Power, volume and mute are a examples of commands that the soundbar  can learn. Note: While the soundbar is able to learn most commands and IR protocols, not all can be programmed. For example, bass and treble may be commands that cannot be duplicated by another remote. Use the soundbar remote for these functions.Using the Learn Feature 1.  With the power OFF, press the Learn button on the soundbar. An indicator light will begin flashing red.2.  Press the button on the soundbar remote that you want the soundbar to learn. For example: Volume + 3.  The red light will continue to flash while another indicator displays a blue light.4.  Press the corresponding button on the other remote.5.  The red light will continue to flash and another indicator will display a green light when the signal is received.6.  Press the Learn button on the soundbar to complete the set up. The programmed button on your remote will now be able to control your sound bar. Note: It is necessary to program each button on your remote separately. 7.  If the soundbar has failed to learn a command, the indicator will not display the green light. Try another button.
14International Support To download this User’s Guide in English, Spanish, and French, or to get answers to frequently asked questions, visit the support section at: www.iLiveElectronics.comPara descargar este Manual del Usuario en inglés, español y francés, o para obtener respuestas a preguntas frecuentes, visite la sección de apoyo en: www.iLiveElectronics.comPour télécharger ce guide de l’utilisateur en anglais, espagnol ou français, ou pour obtenir des réponses à des questions fréquemment posées, consultez la rubrique d’assistance sur: www.iLiveElectronics.comContact Information Website: www.iLiveElectronics.comEmail Support: prodinfo@dpiinc.comEmail Parts: partsinfo@dpiinc.comPhone Support: 1-888-999-4215Warranty For Warranty Information and the most up-to-date version of this User’s Guide, go to:  www.iLiveElectronics.comCompany InformationCopyright © 2017 Digital Products International (DPI, Inc.) All other trademarks appearing herein are the property of their respective owners. Specifications are subject to change without notice.Protect for Today Sustain for TomorrowMade   Green

Navigation menu