Zhongshan Senjia Electrical Appliances HDSB Bluetooth 37 inch HD Sound Bar User Manual
Zhongshan Senjia Electrical Appliances Co., Ltd. Bluetooth 37 inch HD Sound Bar
UserManual.wiki
>
Zhongshan Senjia Electrical Appliances
>
HDSB User Manual
User Manual
Navigation menu
Upload a User Manual
Namespaces
Wiki Guide
HTML
PDF
Info
Views
User Manual
Discussion / Help
Navigation

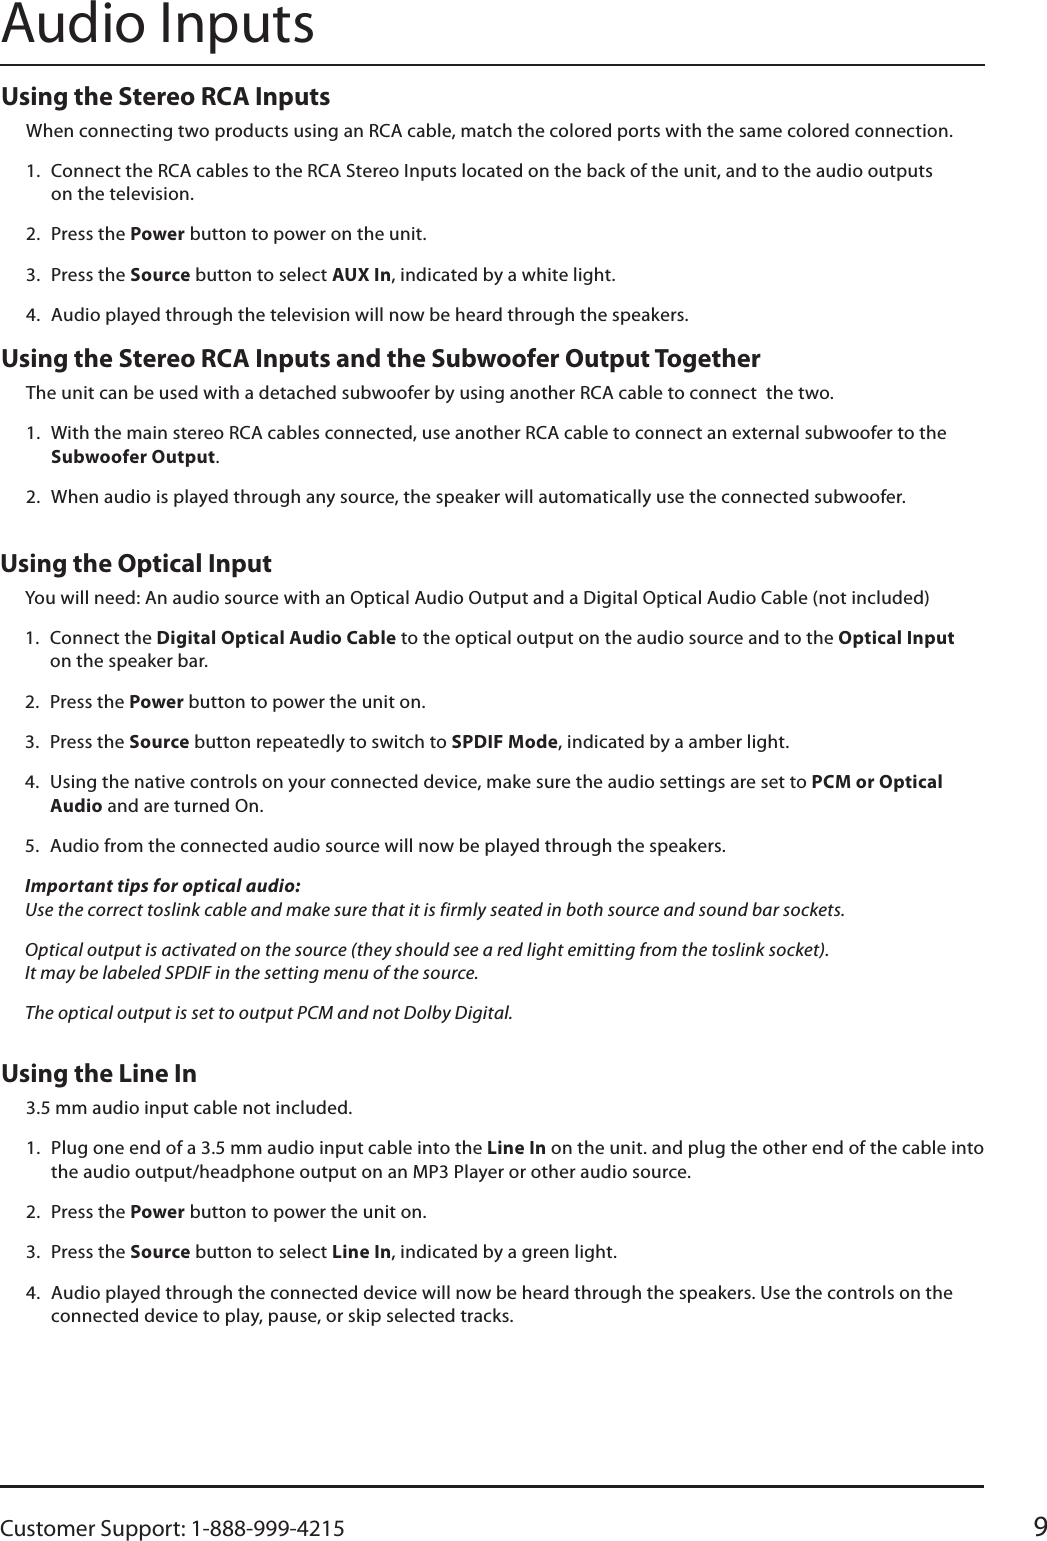
![2Safety Instructions & WarningsImportant Safety Instructionst 3FBEUIFTF*OTUSVDUJPOTt ,FFQUIFTF*OTUSVDUJPOTt )FFEBMM8BSOJOHTt 'PMMPXBMMJOTUSVDUJPOTt %POPUVTFUIJTBQQBSBUVTOFBSXBUFSt $MFBOPOMZXJUIBESZDMPUIt %POPUCMPDLBOZWFOUJMBUJPOPQFOJOHT*OTUBMMJOBDDPSEBODFXJUIUIFNBOVGBDUVSFSTJOTUSVDUJPOTt %POPUJOTUBMMOFBSBOZIFBUTPVSDFTTVDIBTSBEJBUPSTIFBUSFHJTUFSTTUPWFTPSPUIFSBQQBSBUVTJODMVEJOHBNQMJĕFSTUIBUQSPEVDFIFBUt %POPUEFGFBUUIFTBGFUZQVSQPTFPGUIFQPMBSJ[FEPSHSPVOE-JOHUZQFQMVH"QPMBSJ[FEQMVHIBTUXPCMBEFTXJUIPOFXJEFSUIBOUIFPUIFS"HSPVOEJOHUZQFQMVHIBTUXPCMBEFTBOEBUIJSEHSPVOEJOHQSPOHćFXJEFCMBEFPSUIFUIJSEQSPOHBSFQSPWJEFEGPSZPVSTBGFUZ8IFOUIFQSPWJEFEQMVHEPFTOPUĕUJOUPZPVSPVUMFUDPOTVMUBOFMFDUSJDJBOGPSSFQMBDF-NFOUPGUIFPCTPMFUFPVUMFUt 1SPUFDUUIFQPXFSDPSEGSPNCFJOHXBMLFEPOPSQJODIFEQBSUJDVMBSMZBUQMVHTDPOWFOJFODFSFDFQUBDMFTBOEUIFQPJOUXIFSFUIFZFYJUGSPNUIFBQQBSBUVTt 0OMZVTFBUUBDINFOUTBDDFTTPSJFTTQFDJĕFECZUIFNBOV-GBDUVSFSt 6OQMVHUIJTBQQBSBUVTEVSJOHMJHIUOJOHTUPSNTPSXIFOVOVTFEGPSMPOHQFSJPETPGUJNFt 3FGFSBMMTFSWJDJOHUPRVBMJĕFETFSWJDFQFSTPOOFM4FSWJDJOHJTSFRVJSFEXIFOUIFBQQBSBUVTIBTCFFOEBNBHFEJOBOZXBZTVDIBTQPXFSTVQQMZDPSEPSQMVHJTEBNBHFEMJRVJEIBTCFFOTQJMMFEPSPCKFDUTIBWFGBMMFOJOUPUIFBQQBSBUVTUIFBQQBSBUVTIBTCFFOFYQPTFEUPSBJOPSNPJTUVSFEPFTOPUPQFSBUFOPSNBMMZPSIBTCFFOESPQQFEt 6TFPOMZXJUIBDBSUTUBOEUSJQPECSBDLFUPSUBCMFTQFDJĕFECZUIFNBOVGBDUVSFSPSTPMEXJUIUIFBQQBSBUVT8IFOBDBSUJTVTFEVTFDBVUJPOXIFONPWJOHUIFDBSUBQQBSBUVTDPNCJOBUJPOUPBWPJEJOKVSZGSPNUJQPWFSFCC Warnings :DUQLQJ&KDQJHVRUPRGL¿FDWLRQVWRWKLVXQLWQRWH[SUHVVO\DSSURYHGE\WKHSDUW\UHVSRQVLEOHIRUFRPSOLDQFHFRXOGYRLGWKHXVHU¶VDXWKRULW\WRRSHUDWHWKHHTXLSPHQW127(7KLVHTXLSPHQWKDVEHHQWHVWHGDQGIRXQGWRFRPSO\ZLWKWKHOLPLWVIRUD&ODVV%GLJLWDOGHYLFHSXUVXDQWWR3DUWRIWKH)&&5XOHV7KHVHOLPLWVDUHGHVLJQHGWRSURYLGHUHDVRQDEOHSURWHFWLRQDJDLQVWKDUPIXOLQWHUIHUHQFHLQDUHVLGHQWLDOLQVWDO-ODWLRQ7KLVHTXLSPHQWJHQHUDWHVXVHVDQGFDQUDGLDWHUDGLRIUHTXHQF\HQHUJ\DQGLIQRWLQVWDOOHGDQGXVHGLQDFFRUGDQFHZLWKWKHLQVWUXFWLRQVPD\FDXVHKDUPIXOLQWHUIHUHQFHWRUDGLRFRPPXQLFDWLRQV+RZHYHUWKHUHLVQRJXDUDQWHHWKDWLQWHUIHU-HQFHZLOOQRWRFFXULQDSDUWLFXODULQVWDOODWLRQ,IWKLVHTXLSPHQWGRHVFDXVHKDUPIXOLQWHUIHUHQFHWRUDGLRRUWHOHYLVLRQUHFHSWLRQZKLFKFDQEHGHWHUPLQHGE\WXUQLQJWKHHTXLSPHQWRIIDQGRQWKHXVHULVHQFRXUDJHGWRWU\WRFRUUHFWWKHLQWHUIHUHQFHE\RQHRUPRUHRIWKHIROORZLQJPHDVXUHVt 3FPSJFOUPSSFMPDBUFUIFSFDFJWJOHBOUFOOBt *ODSFBTFUIFTFQBSBUJPOCFUXFFOUIFFRVJQNFOUBOESFDFJWFSt $POOFDUUIFFRVJQNFOUJOUPBOPVUMFUPOBDJSDVJUEJČFSFOUGSPNUIBUUPXIJDIUIFSFDFJWFSJTDPOOFDUFEt $POTVMUUIFEFBMFSPSBOFYQFSJFODFESBEJP57UFDIOJDJBOGPSIFMQWARNING7RUHGXFHWKHULVNRIHOHFWULFVKRFNGRQRWUHPRYHFRYHURUEDFN1RXVHUVHUYLFHDEOHSDUWVLQVLGH5HIHUVHUYLFLQJWRTXDOL¿HGVHUYLFHSHUVRQQHO0CC4=C8>=A8B@D43q;42CA>2DC8>==4?0B>DEA8A20DC8>=A8B:>54;42CA82B7>2:3>=>C>?4=7KHH[FODPDWLRQSRLQWZLWKLQDQHTXLODWHUDOWULDQJOHLVLQWHQGHGWRDOHUWWKHXVHUWRWKHSUHVHQFHRILPSRUWDQWRSHUDWLQJDQGPDLQWH-QDQFHVHUYLFLQJLQVWUXFWLRQVLQWKHOLWHUDWXUHDFFRPSDQ\LQJWKHDSSOLDQFH7KLVV\PEROLQGLFDWHVWKDWWKLVSURGXFWLQFRU-SRUDWHVGRXEOHLQVXODWLRQEHWZHHQKD]DUGRXVPDLQVYROWDJHDQGXVHUDFFHVVLEOHSDUWV7KHOLJKWQLQJÀDVKZLWKDUURZKHDGV\PEROZLWKLQDQHTXLODWHUDOWULDQJOHLVLQWHQGHGWRDOHUWWKHXVHUWRWKHSUHVHQFHRIXQLQVXODWHG³GDQJHURXVYROWDJH´ZLWKLQWKHSURGXFW¶VHQ-FORVXUHWKDWPD\EHRIVXI¿FLHQWPDJQLWXGHWRFRQVWLWXWHDULVNRIHOHFWULFVKRFNWRSHUVRQVWARNING'2127,1*(67%$77(5<&+(0,&$/%851+$=$5'FCC Radiation Exposure StatementThis equipment complied with FCC radiation exposure limits set forth for an uncontrolled environment. This equipment should be installed and operated with minimum distance 20cm between the radiator & your body.](https://usermanual.wiki/Zhongshan-Senjia-Electrical-Appliances/HDSB/User-Guide-2548959-Page-2.png)
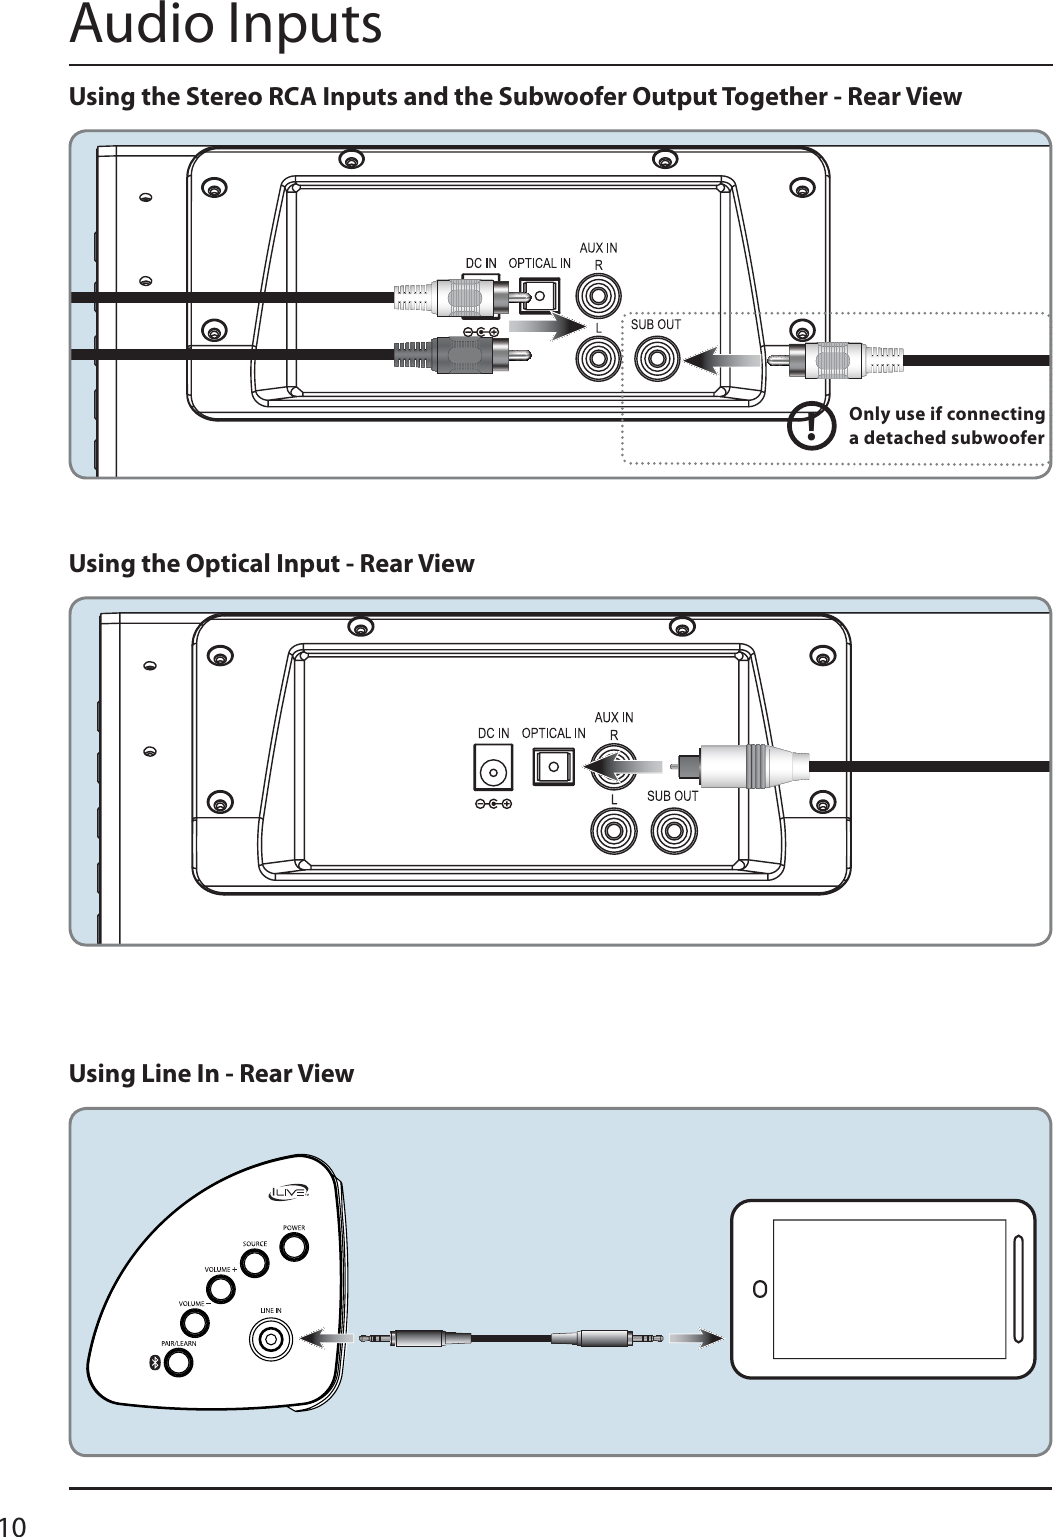
![Customer Support: 1-888-999-4215 3Safety Instructions & WarningsAdditional Warnings and Precautionst CAUTION5013&7&/5&-&$53*$4)0$,."5$)8*%&#-"%&0'1-6(508*%&4-05'6--:*/4&35AVIS: AFIN DE PRÉVENIR LES CHOCS ÉLÉCTRIQUES, FAITES CORRESPONDRE LA FICHE BLANCHE DE LA PRISE À LA FENTE LARGE, INSÉREZ TOTALEMENT.t 8"3/*/(5PSFEVDFUIFSJTLPGĕSFPSFMFDUSJDTIPDLEPOPUFYQPTFUIJTBQQBSBUVTUPSBJONPJTUVSFESJQQJOHPSTQMBTIJOHAVIS: Pour réduire le risque d'incendie ou de choc élec-trique, n'exposez pas cet appareil à la pluie ou l'humidité ou aux éclaboussures. CAUTION8VHRIFRQWUROVRUDGMXVWPHQWVRUSHUIRUPDQFHRISURFHGXUHVRWKHUWKDQWKRVHVSHFL¿HGPD\UHVXOWLQKD]DUG-RXVUDGLDWLRQH[SRVXUHAVIS: L’utilisation de commande ou l’exécution de procé-GXUHVDXWUHVTXHFHOOHVVSpFL¿pHVLFLSHXYHQWDERXWLUjXQHexposition à des radiations dangereuses.t WARNING:$IBOHFTPSNPEJĕDBUJPOTUPUIJTVOJUOPUFYQSFTTMZBQQSPWFECZUIFQBSUZSFTQPOTJCMFGPSDPNQMJBODFDPVMEWPJEUIFVTFSTBVUIPSJUZUPPQFSBUFUIFFRVJQNFOUAVIS'HVFKDQJHPHQWVRXGHVPRGL¿FDWLRQVVXUFHSURGXLWQRQH[SUHVVpPHQWDSSURXYpVSDUODSDUWLHUHVSRQVDEOHGHla conformité peut annuler le droit de l’utilisateur d’utiliser cet équipement.t WARNING:%POPUQMBDFUIJTVOJUEJSFDUMZPOUPGVSOJUVSFTVSGBDFTXJUIBOZUZQFPGTPęQPSPVTPSTFOTJUJWFĕOJTI"TXJUIBOZSVCCFSDPNQPVOENBEFXJUIPJMTUIFGFFUDPVMEDBVTFNBSLTPSTUBJOJOHXIFSFUIFGFFUSFTJEFڀ8FSFDPN-NFOEVTJOHBQSPUFDUJWFCBSSJFSTVDIBTBDMPUIPSBQJFDFPGHMBTTCFUXFFOUIFVOJUBOEUIFTVSGBDFUPSFEVDFUIFSJTLPGEBNBHFBOEPSTUBJOJOHAVIS: Ne placez pas cette unité directement sur des surfaces GHPHXEOHVGRQWOD¿QLWLRQVHUDLWGRXFHSRUHXVHRXVHQVLEOHCar, comme tout composé caoutchouc a base d’huiles, les pieds pourraient laisser des tracs ou des taches à l’endroit ou ils sont posés. Nous recommandons d’utiliser une protection FRPPHXQOLQJHRXXQPRUFHDXGHYHUUHHQWUHO¶XQLWpHWODsurface pour réduire le risque de dégât et/ou de tache.t WARNING:6TFPGUIJTVOJUOFBSĘVPSFTDFOUMJHIUJOHNBZDBVTFJOUFSGFSFODFSFHBSEJOHVTFPGUIFSFNPUF*GUIFVOJUJTEJTQMBZJOHFSSBUJDCFIBWJPSNPWFBXBZGSPNBOZĘVPSFTDFOUMJHIUJOHBTJUNBZCFUIFDBVTFAVIS/¶XWLOLVDWLRQGHFHWWHXQLWpHQSUpVHQFHGHOXPLqUHVÀX-orescentes peut causer des interférences lors de l’utilisation de la télécommande. En cas de dysfonctionnement, éteignez OHVVRXUFHVGHOXPLqUHÀXRUHVFHQWHVFDUFHOOHVFLSRXUUDLHQWen être la cause.t $"65*0/%BOHFSPGFYQMPTJPOJGCBUUFSZJTJODPSSFDUMZSFQMBDFE3FQMBDFPOMZXJUIUIFTBNFPSFRVJWBMFOUUZQFAVIS: Un danger d’explosion est présent lorsque les piles sont remplacées de manière incorrecte. Remplacez seulement OHVSLOHVSDUGHVSLOHVGHW\SHpTXLYDOHQWt WARNING:ćFSFJTBEBOHFSPGFYQMPTJPOJGZPVBUUFNQUUPDIBSHFTUBOEBSE"MLBMJOFCBUUFSJFTJOUIFVOJU0OMZVTFSFDIBSHFBCMF/J.)CBUUFSJFTAVIS: Charger des piles alcalines dans l’unité peut causer une explosion. Utilisez seulement des piles rechargeables NiMH.t WARNING:ćFSFNPUFDPOUSPMTCVUUPODFMMCBUUFSZDPOUBJOTNFSDVSZ%POPUQVUJOUIFUSBTIJOTUFBESFDZDMFPSEJTQPTFPGBTIB[BSEPVTXBTUFAVIS: Les piles boutons de la télécommande contiennent du mercure. Ne les jetez pas à la corbeille, recyclez-les ou disposez-les comme des déchets dangereux.t 8"3/*/(-JUIJVNCBUUFSJFTMJLFBMMSFDIBSHFBCMFCBUUFS-JFTBSFSFDZDMBCMFBOETIPVMECFSFDZDMFEPSEJTQPTFEPGJOOPSNBMIPVTFIPMEXBTUF$POUBDUZPVSMPDBMHPWFSONFOUGPSEJTQPTBMPSSFDZDMJOHQSBDUJDFTJOZPVSBSFBćFZTIPVMEOFWFSCFJODJOFSBUFETJODFUIFZNJHIUFYQMPEFAVIS: Les piles Lithium ion, comme toutes les autres piles UHFKDUJHDEOHVVRQWUHF\FODEOHVHWGRLYHQWrWUHHWpHVDYHFYRVGpFKHWVPpQDJHUV&RQWDFWH]YRWUHPXQLFLSDOLWpSRXUREWHQLUdes conseils sur les moyens de disposition et de recyclage GDQVYRWUHUpJLRQ1¶LQFLQpUH]SDVYRVSLOHVFDUFHOOHVFLSHXYHQWH[SORVHUt WARNING4IPDLIB[BSE%P/PU0QFOAVIS: Risque de choc électrique - ne pas ouvrir &DXWLRQDQGPDUNLQJLQIRUPDWLRQLVORFDWHGDWWKHUHDURUERWWRPRIWKHDSSDUDWXVAttention et de marquage des informations est situé sur le paneau arrière ou inférieur de l’unité. 2EMHFWV¿OOHGZLWKOLTXLGVVXFKDVYDVHVVKDOOQRWEHSODFHGRQWKHDSSDUDWXV2EMHWVUHPSOLVGHOLTXLGHVFRPPHGHVYDVHVQHGRLYHQWSDVêtre placés sur l’appareil. 0DLQVSOXJLVXVHGDVGLVFRQQHFWGHYLFHDQGLWVKRXOGUHPDLQUHDGLO\RSHUDEOHGXULQJLQWHQGHGXVH,QRUGHUWRGLVFRQ-QHFWWKHDSSDUDWXVIURPWKHPDLQVFRPSOHWHO\WKHPDLQVSOXJVKRXOGEHGLVFRQQHFWHGIRUPWKHPDLQVVRFNHWRXWOHWFRPSOHWHO\La prise du secteur est utilisé pour déconnecter le système. La prise du secteur ne doit pas être obstruée ou doit être facilement accessible pendant son utilisation. Pour être complètement déconnecté de l’alimentation d’entrée, la prise doit être débranchée du secteur. %DWWHU\VKDOOQRWEHH[SRVHGWRH[FHVVLYHKHDWVXFKDVVXQVKLQH¿UHRUWKHOLNH/HVSLOHVQHGRLYHQWSDVrWUHH[SRVpHVjGHIRUWHFKDOHXUtel qu’à la lumière du soleil, au feu ou autres choses de semblable. 7KLVSURGXFWLVVXSSOLHGZLWKDFRLQEXWWRQFHOOEDWWHU\,IWKHFRLQEXWWRQFHOOEDWWHU\LVVZDOORZHGLWFDQFDXVHVHYHUHLQWHUQDOEXUQVDQGFDQOHDGWRGHDWK&HSURGXLWHVWOLYUpDYHFXQHSLOHSLqFHWRXFKH6LODSLOHSLqFHERXWRQHVWDYDOpLOSHXWFDXVHUGHVEUOXUHVLQWHUQHVJUDYHVHWSHXWFRQGXLUHjODPRUW .HHSQHZDQGXVHGEDWWHULHVDZD\IURPFKLOGUHQ,IWKHEDWWHU\FRPSDUWPHQWGRHVQRWFORVHVHFXUHO\VWRSXVLQJWKHSURGXFWDQGNHHSLWDZD\IURPFKLOGUHQ*DUGH]OHVSLOHVQHXYHVHWG¶RFFDVLRQjSDUWLUGHVHQIDQWV6Lle compartiment de la batterie ne pas fermer correctement, cesser d’utiliser le produit et garder loin des enfants. ,I\RXWKLQNEDWWHULHVPLJKWKDYHEHHQVZDOORZHGRUSODFHGLQVLGHDQ\SDUWRIWKHERG\VHHNLPPHGLDWHPHGLFDODWWHQWLRQ6LYRXVSHQVH]TXHOHVEDWWHULHVSHXYHQWDYRLUpWpDYDOpRXplacé à l’intérieur d’une partie du corps, consulter immédi-atement un médecin. 'RQRWPL[ROGDQGQHZEDWWHULHV1HSDVPpODQJHUYLHLOOHVHWQRXYHOOHVEDWWHULHV &RPSOHWHO\UHSODFHDOOROGEDWWHULHVZLWKQHZRQHV5HPSODFHUFRPSOqWHPHQWWRXWHVOHVSLOHVSDUGHVQHXYHV 'RQRWPL[DONDOLQHVWDQGDUGFDUERQ]LQFRUUHFKDUJHDEOHQLFDGQLPKHWFEDWWHULHVNe mélangez pas des piles alcalines, standard (carbone-zinc) ou rechargeables (Ni-Cd, Ni-MH, etc) batteries. %DWWHULHVVKRXOGEHUHF\FOHGRUGLVSRVHGRIDVSHUVWDWHDQGORFDOJXLGHOLQHV3LOHVGRLYHQWrWUHUHF\FOpHVRXpOLPLQpHVVHORQOHVGLUHFWLYHVétatiques et locales.](https://usermanual.wiki/Zhongshan-Senjia-Electrical-Appliances/HDSB/User-Guide-2548959-Page-3.png)