Zhongshan Senjia Electrical Appliances ITBSB Bluetooth HD Sound Bar User Manual
Zhongshan Senjia Electrical Appliances Co., Ltd. Bluetooth HD Sound Bar
User Manual
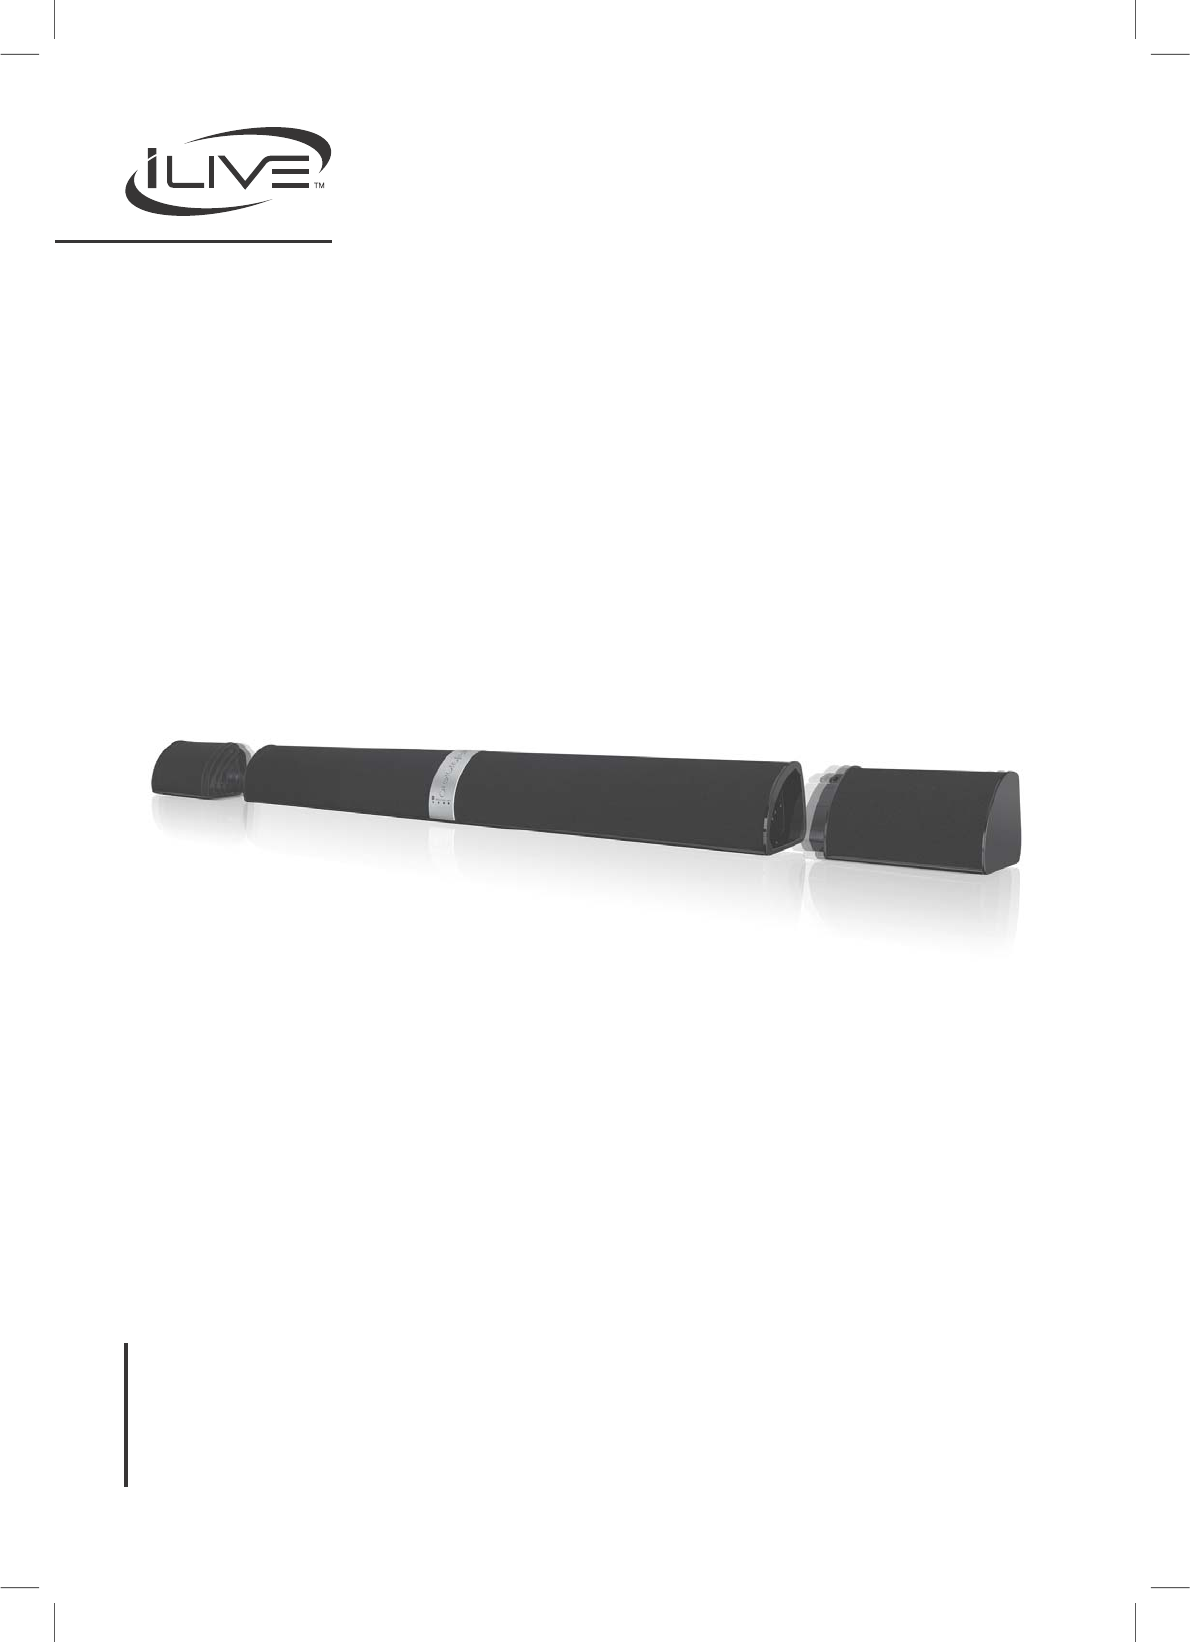
Bluetooth HD Soundbar
with Detachable Wireless Speakers
User’s Guide for Model ITB474B v1067-01
For the most of this User’s Guide, go to www.iLiveElectronics.com
ITB474B-1067-01-IB-EN.indd 1 4/30/2014 2:41:22 PM

2
Warnings and Precautions
FCC Warnings
:DUQLQJ&KDQJHVRUPRGL¿FDWLRQVWRWKLVXQLWQRWH[SUHVVO\
DSSURYHGE\WKHSDUW\UHVSRQVLEOHIRUFRPSOLDQFHFRXOGYRLGWKH
XVHU¶VDXWKRULW\WRRSHUDWHWKHHTXLSPHQW
127(7KLVHTXLSPHQWKDVEHHQWHVWHGDQGIRXQGWRFRPSO\
ZLWKWKHOLPLWVIRUD&ODVV%GLJLWDOGHYLFHSXUVXDQWWR3DUWRI
WKH)&&5XOHV7KHVHOLPLWVDUHGHVLJQHGWRSURYLGHUHDVRQDEOH
SURWHFWLRQDJDLQVWKDUPIXOLQWHUIHUHQFHLQDUHVLGHQWLDOLQVWDO-
ODWLRQ7KLVHTXLSPHQWJHQHUDWHVXVHVDQGFDQUDGLDWHUDGLR
IUHTXHQF\HQHUJ\DQGLIQRWLQVWDOOHGDQGXVHGLQDFFRUGDQFH
ZLWKWKHLQVWUXFWLRQVPD\FDXVHKDUPIXOLQWHUIHUHQFHWRUDGLR
FRPPXQLFDWLRQV+RZHYHUWKHUHLVQRJXDUDQWHHWKDWLQWHUIHU-
HQFHZLOOQRWRFFXULQDSDUWLFXODULQVWDOODWLRQ,IWKLVHTXLSPHQW
GRHVFDXVHKDUPIXOLQWHUIHUHQFHWRUDGLRRUWHOHYLVLRQUHFHSWLRQ
ZKLFKFDQEHGHWHUPLQHGE\WXUQLQJWKHHTXLSPHQWRIIDQGRQ
WKHXVHULVHQFRXUDJHGWRWU\WRFRUUHFWWKHLQWHUIHUHQFHE\RQH
RUPRUHRIWKHIROORZLQJPHDVXUHV
t 3FPSJFOUPSSFMPDBUFUIFSFDFJWJOHBOUFOOB
t *ODSFBTFUIFTFQBSBUJPOCFUXFFOUIFFRVJQNFOUBOESFDFJWFS
t $POOFDUUIFFRVJQNFOUJOUPBOPVUMFUPOBDJSDVJUEJČFSFOU
GSPNUIBUUPXIJDIUIFSFDFJWFSJTDPOOFDUFE
t $POTVMUUIFEFBMFSPSBOFYQFSJFODFESBEJP57UFDIOJDJBO
GPSIFMQ
Additional Warnings and Precautions
t CAUTION5013&7&/5&-&$53*$4)0$,."5$)
8*%&#-"%&0'1-6(508*%&4-05'6--:*/4&35
t 8"3/*/(5PSFEVDFUIFSJTLPGĕSFPSFMFDUSJDTIPDLEP
OPUFYQPTFUIJTBQQBSBUVTUPSBJONPJTUVSFESJQQJOHPS
TQMBTIJOH
AVIS: Pour réduire le risque d’incendie ou de choc élec-
trique, ne pas exposer cet appareil sous la pluie et l’humidité
CAUTION:6TFPGDPOUSPMTPSBEKVTUNFOUTPSQFSGPSNBODFPG
QSPDFEVSFTPUIFSUIBOUIPTFTQFDJĕFENBZSFTVMUJOIB[BSEPVT
SBEJBUJPOFYQPTVSF
t WARNING:$IBOHFTPSNPEJĕDBUJPOTUPUIJTVOJUOPU
FYQSFTTMZBQQSPWFECZUIFQBSUZSFTQPOTJCMFGPSDPNQMJBODF
DPVMEWPJEUIFVTFSTBVUIPSJUZUPPQFSBUFUIFFRVJQNFOU
t WARNING:%POPUQMBDFUIJTVOJUEJSFDUMZPOUPGVSOJUVSF
TVSGBDFTXJUIBOZUZQFPGTPęQPSPVTPSTFOTJUJWFĕOJTI"T
XJUIBOZSVCCFSDPNQPVOENBEFXJUIPJMTUIFGFFUDPVME
DBVTFNBSLTPSTUBJOJOHXIFSFUIFGFFUSFTJEFڀ8FSFDPN-
NFOEVTJOHBQSPUFDUJWFCBSSJFSTVDIBTBDMPUIPSBQJFDFPG
HMBTTCFUXFFOUIFVOJUBOEUIFTVSGBDFUPSFEVDFUIFSJTLPG
EBNBHFBOEPSTUBJOJOH
t WARNING:6TFPGUIJTVOJUOFBSĘVPSFTDFOUMJHIUJOHNBZ
DBVTFJOUFSGFSFODFSFHBSEJOHVTFPGUIFSFNPUF*GUIFVOJUJT
EJTQMBZJOHFSSBUJDCFIBWJPSNPWFBXBZGSPNBOZĘVPSFTDFOU
MJHIUJOHBTJUNBZCFUIFDBVTF
t $"65*0/%BOHFSPGFYQMPTJPOJGCBUUFSZJTJODPSSFDUMZ
SFQMBDFE3FQMBDFPOMZXJUIUIFTBNFPSFRVJWBMFOUUZQF
AVIS: Danger d’explosion si les piles sont remplacées de façon
incorrect. Remplacer les piles seulement par le même type de
pile ou l’équivalent.
t WARNING:ćFSFJTBEBOHFSPGFYQMPTJPOJGZPVBUUFNQU
UPDIBSHFTUBOEBSE"MLBMJOFCBUUFSJFTJOUIFVOJU0OMZVTF
SFDIBSHFBCMF/J.)CBUUFSJFT
t WARNING:ćFSFNPUFDPOUSPMTCVUUPODFMMCBUUFSZDPOUBJOT
NFSDVSZ%POPUQVUJOUIFUSBTIJOTUFBESFDZDMFPSEJTQPTFPG
BTIB[BSEPVTXBTUF
t 8"3/*/(-JUIJVNCBUUFSJFTMJLFBMMSFDIBSHFBCMFCBUUFS-
JFTBSFSFDZDMBCMFBOETIPVMECFSFDZDMFEPSEJTQPTFEPGJO
OPSNBMIPVTFIPMEXBTUF$POUBDUZPVSMPDBMHPWFSONFOUGPS
EJTQPTBMPSSFDZDMJOHQSBDUJDFTJOZPVSBSFBćFZTIPVMEOFWFS
CFJODJOFSBUFETJODFUIFZNJHIUFYQMPEF
t WARNING4IPDLIB[BSE%P/PU0QFO
AVIS: Risque de choc électrique - ne pas ouvrir
&DXWLRQDQGPDUNLQJLQIRUPDWLRQLVORFDWHGDWWKHUHDURU
ERWWRPRIWKHDSSDUDWXV
Attention et de marquage des informations est situé sur le
paneau arrière ou inférieur de l’unité.
2EMHFWV¿OOHGZLWKOLTXLGVVXFKDVYDVHVVKDOOQRWEHSODFHG
RQWKHDSSDUDWXV
Objets remplis de liquides, comme des vases, ne doivent pas
être placés sur l’appareil.
0DLQVSOXJLVXVHGDVGLVFRQQHFWGHYLFHDQGLWVKRXOGUHPDLQ
UHDGLO\RSHUDEOHGXULQJLQWHQGHGXVH,QRUGHUWRGLVFRQ-
QHFWWKHDSSDUDWXVIURPWKHPDLQVFRPSOHWHO\WKHPDLQV
SOXJVKRXOGEHGLVFRQQHFWHGIRUPWKHPDLQVVRFNHWRXWOHW
FRPSOHWHO\
La prise du secteur est utilisé pour déconnecter le système.
La prise du secteur ne doit pas être obstruée ou doit être
facilement accessible pendant son utilisation. Pour être
complètement déconnecté de l’alimentation d’entrée, la prise
doit être débranchée du secteur.
%DWWHU\VKDOOQRWEHH[SRVHGWRH[FHVVLYHKHDWVXFKDV
VXQVKLQH¿UHRUWKHOLNH
Les piles ne doivent pas être exposées à de forte chaleur,
tel qu’à la lumière du soleil, au feu ou autres choses de
semblable.
7KLVSURGXFWLVVXSSOLHGZLWKDFRLQEXWWRQFHOOEDWWHU\,I
WKHFRLQEXWWRQFHOOEDWWHU\LVVZDOORZHGLWFDQFDXVHVHYHUH
LQWHUQDOEXUQVDQGFDQOHDGWRGHDWK
Ce produit est livré avec une pile pièce / touche. Si la pile
pièce / bouton est avalé, il peut causer des brûlures internes
graves et peut conduire à la mort.
.HHSQHZDQGXVHGEDWWHULHVDZD\IURPFKLOGUHQ,IWKH
EDWWHU\FRPSDUWPHQWGRHVQRWFORVHVHFXUHO\VWRSXVLQJWKH
SURGXFWDQGNHHSLWDZD\IURPFKLOGUHQ
Gardez les piles neuves et d’occasion à partir des enfants. Si
le compartiment de la batterie ne pas fermer correctement,
cesser d’utiliser le produit et garder loin des enfants.
,I\RXWKLQNEDWWHULHVPLJKWKDYHEHHQVZDOORZHGRUSODFHG
LQVLGHDQ\SDUWRIWKHERG\VHHNLPPHGLDWHPHGLFDODWWHQWLRQ
Si vous pensez que les batteries peuvent avoir été avalé ou
placé à l’intérieur d’une partie du corps, consulter immédi-
atement un médecin.
'RQRWPL[ROGDQGQHZEDWWHULHV
Ne pas mélanger vieilles et nouvelles batteries.
&RPSOHWHO\UHSODFHDOOROGEDWWHULHVZLWKQHZRQHV
Remplacer complètement toutes les piles par des neuves.
'RQRWPL[DONDOLQHVWDQGDUGFDUERQ]LQFRUUHFKDUJHDEOH
QLFDGQLPKHWFEDWWHULHV
Ne mélangez pas des piles alcalines, standard (carbone-zinc)
ou rechargeables (Ni-Cd, Ni-MH, etc) batteries.
%DWWHULHVVKRXOGEHUHF\FOHGRUGLVSRVHGRIDVSHUVWDWHDQG
ORFDOJXLGHOLQHV
Piles doivent être recyclées ou éliminées selon les directives
étatiques et locales.
ITB474B-1067-01-IB-EN.indd 2 4/30/2014 2:41:23 PM

Customer Support: 1-888-999-4215 3
Table of Contents
Unboxing Your HD Soundbar . .............................................................................4
Features & Specications
Includes
Setup .....................................................................................................4
Power
Indicator Lights
Remote Battery
Orientation .............................................................................................5-6
Speaker Inputs (Rear)
Speaker Controls (Front)
Remote Layout
Audio Inputs ............................................................................................7-8
Using the Stereo RCA Inputs
Using the Stereo RCA Inputs and the Subwoofer Output Together
Using the Optical Input
Using the Line In
Using the Optical Input - Rear View
Using the Line In - Side View
Bluetooth.................................................................................................9
Pairing a Bluetooth Device for the First Time
Playing Audio Wirelessly
The Satellite Speakers . ...............................................................................10-11
The Satellite Speakers
Satellite Speaker Indicator Lights
Powering On the Satellite Speakers
Re-Connecting the Satellite Speakers
Charging the Satellite Speakers
Satellite Speakers (Left/Right)
Main Speaker Dock (Left)
Company Information . .................................................................................. 12
Contact Information
International Support
Green Initiative
Warranty
ITB474B-1067-01-IB-EN.indd 3 4/30/2014 2:41:23 PM
4
Includes
t Remote control with 2 AAA batteries
t RCA stereo audio cable
t Wall-mount hardware and instructions
t AC/DC power adapter
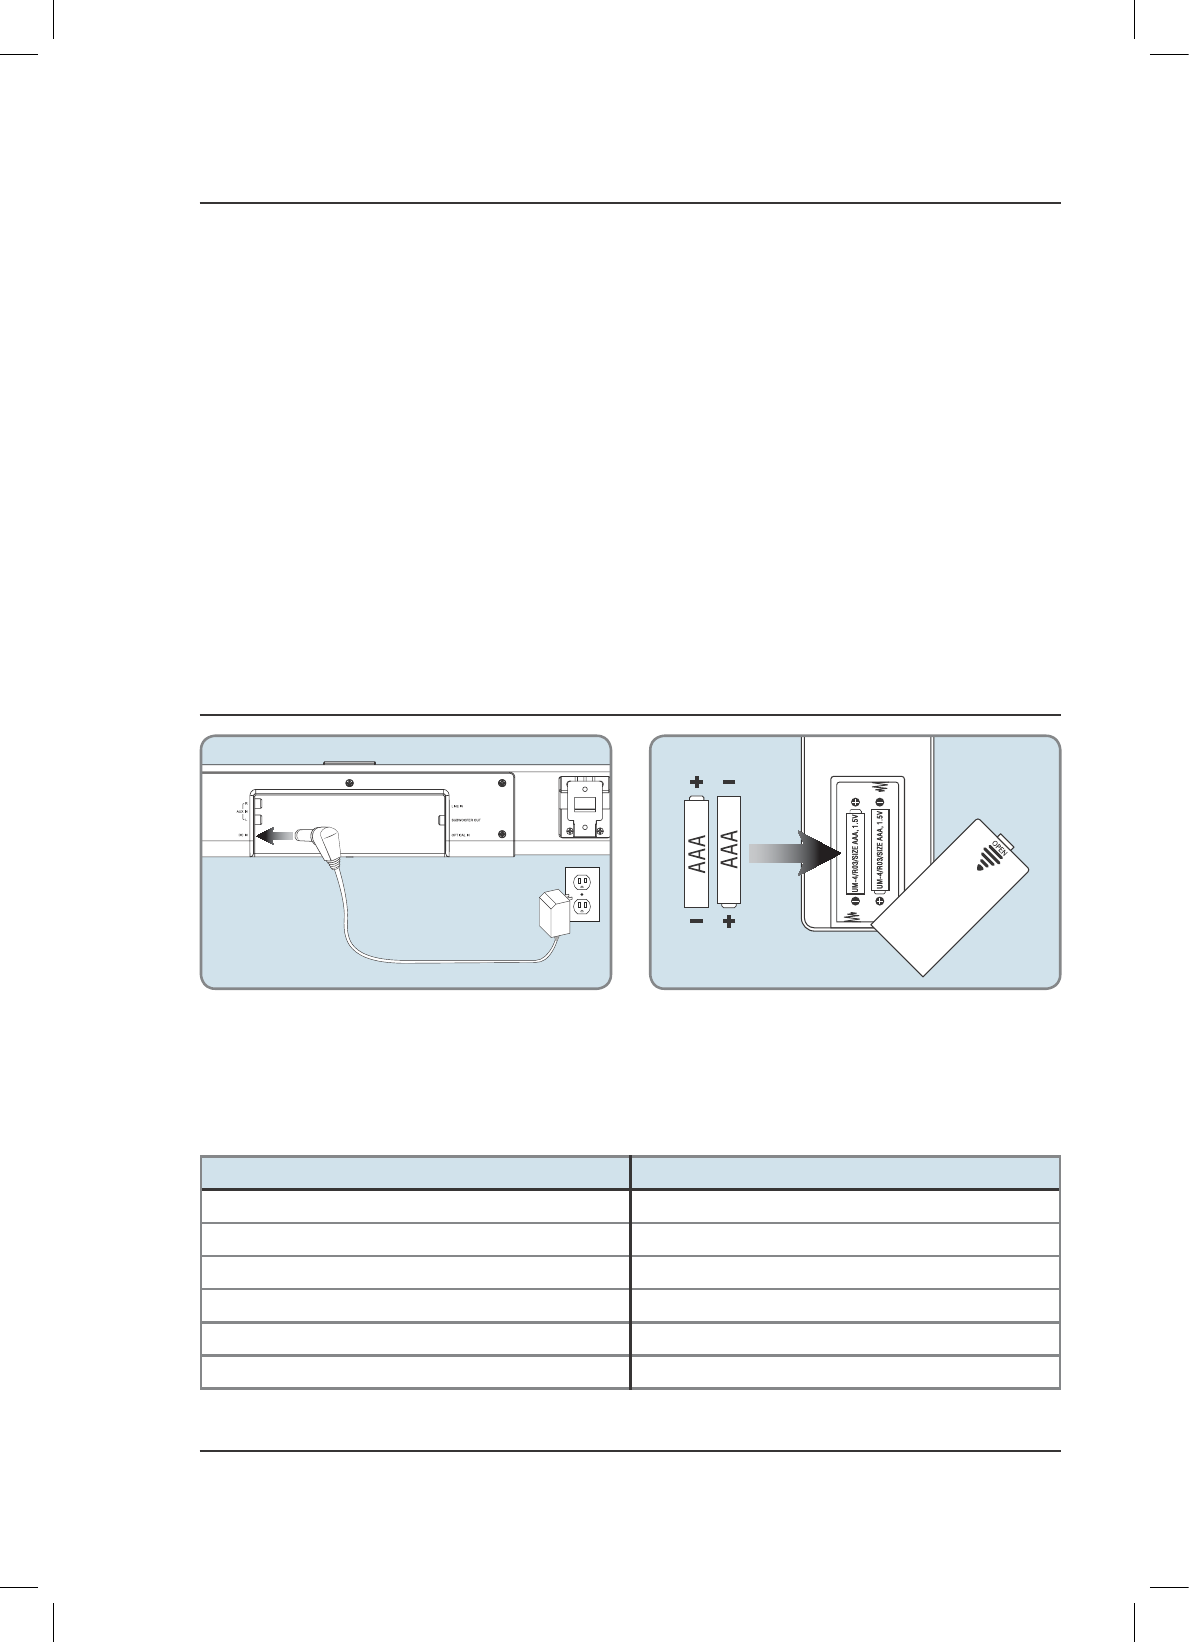
Remote Battery
Requires two AAA batteries (included).
Power
Plug the small end of the power cord into the
DC Input on the back of the speaker, and the
large plug into a standard wall outlet.
Indicator Lights
Unboxing Your HD Soundbar
Setup
Features & Specications
t 4 channel sound
t Supports Bluetooth
t Supports profile A2DP (Advanced Audio
Distribution Profile)
t 2.4GHz wireless speakers
t Detachable satellite speakers with built-in
lithium battery
t Digital volume control
t Remote
t Optical digital audio input
t 3.5mm audio input
t RCA stereo audio inputs
t LED pairing indicator
t LED source indicators
t Wall mountable
t Cloth speaker grill
STATUS INDICATOR
Power Off No Light
Line In Mode Green Light
Optical Mode Amber Light
Aux In Mode White Light
Bluetooth Pairing Flashing Blue Light
Bluetooth Connected Blue Light
ITB474B-1067-01-IB-EN.indd 4 4/30/2014 2:41:25 PM
Customer Support: 1-888-999-4215 5
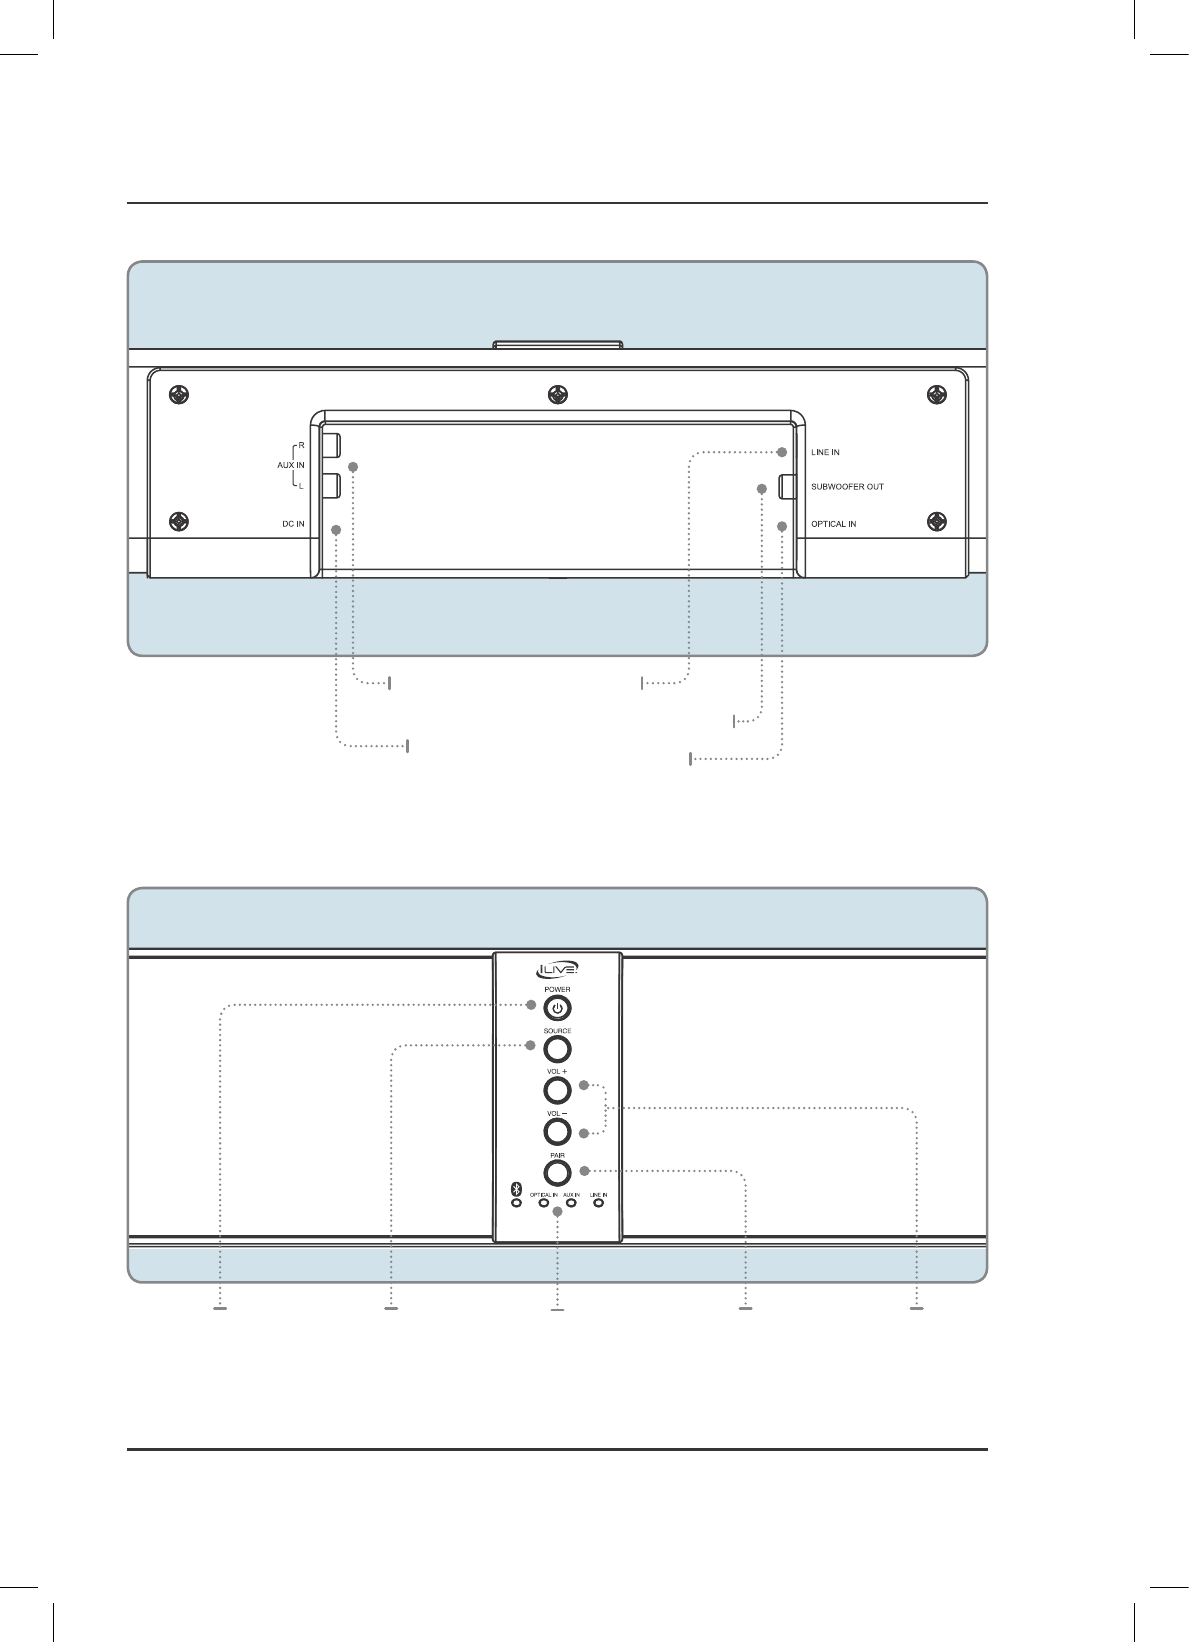
Speaker Controls (Front)
Speaker Inputs (Rear)
Orientation
Stereo RCA Audio
Inputs (AUX IN)
Optical Input
DC Power Input
Power
Press to power
the unit on or off.
Source
Press to switch
between Optical,
Line In, AUX, and
Bluetooth modes.
Source Indicator
Lights
Pairing
Press to begin
pairing to a
Bluetooth device.
Volume
Press to adjust
the volume up
or down.
Subwoofer Output
Line In
ITB474B-1067-01-IB-EN.indd 5 4/30/2014 2:41:26 PM
6
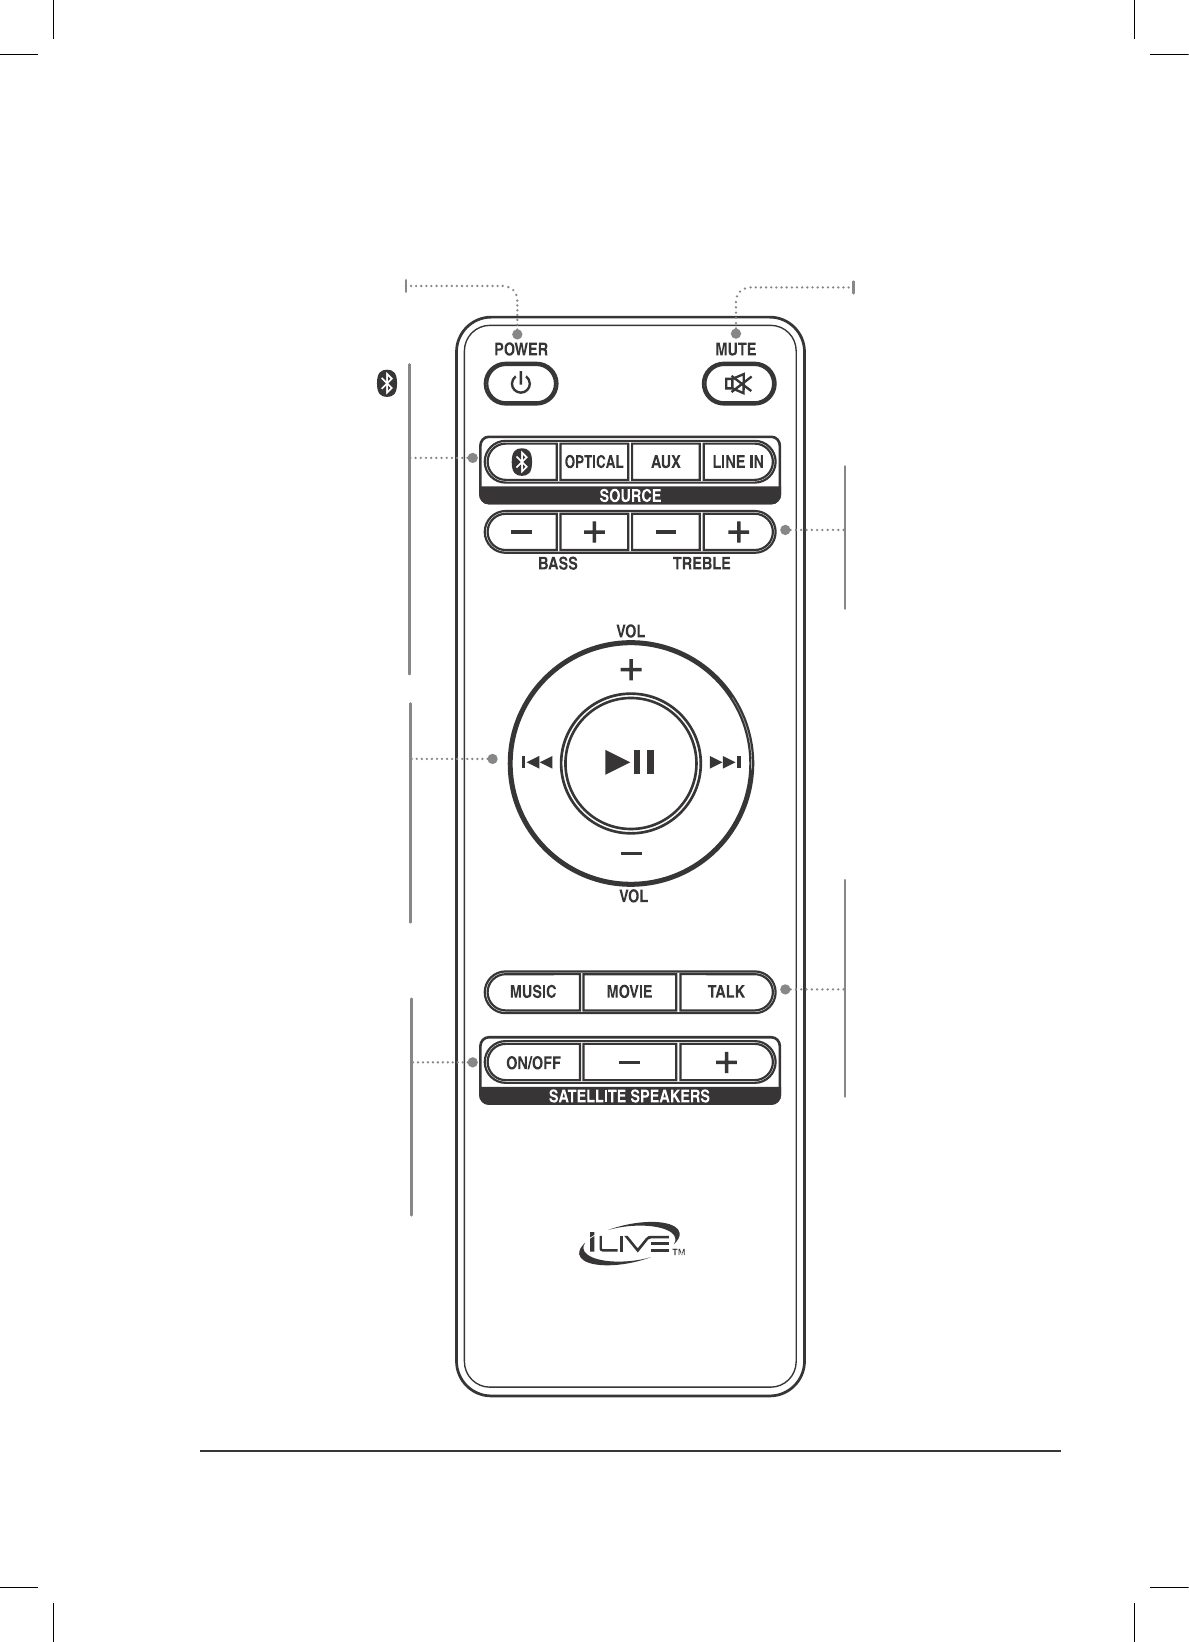
Remote Layout
Power
Press to turn
the unit on or off.
Mute
Press to mute the volume.
Press to switch
to Bluetooth Mode.
Line
Press to switch
to Line In mode.
Optical
Press to switch
to Optical mode.
AUX
Press to switch
to Aux In mode.
Music
Press to switch to the
EQ optimized for music.
Movie
Press to switch to the
EQ optimized for movies.
Talk
Press to switch to the
EQ optimized for dialogue.
Skip
Press to skip forward or
back one track.
Play/Pause
Press to play or pause
a track.
Volume +/-
Press to adjust
the volume.
Treble
Press to adjust the treble
up or down.
Bass
Press to adjust the bass
up or down.
Satellite Speakers:
ON/OFF
Press to power the
satellite speakers
on or off.
Volume -/+
Press to adjust the
volume of the satellite
speakers up or down.
ITB474B-1067-01-IB-EN.indd 6 4/30/2014 2:41:27 PM

Customer Support: 1-888-999-4215 7
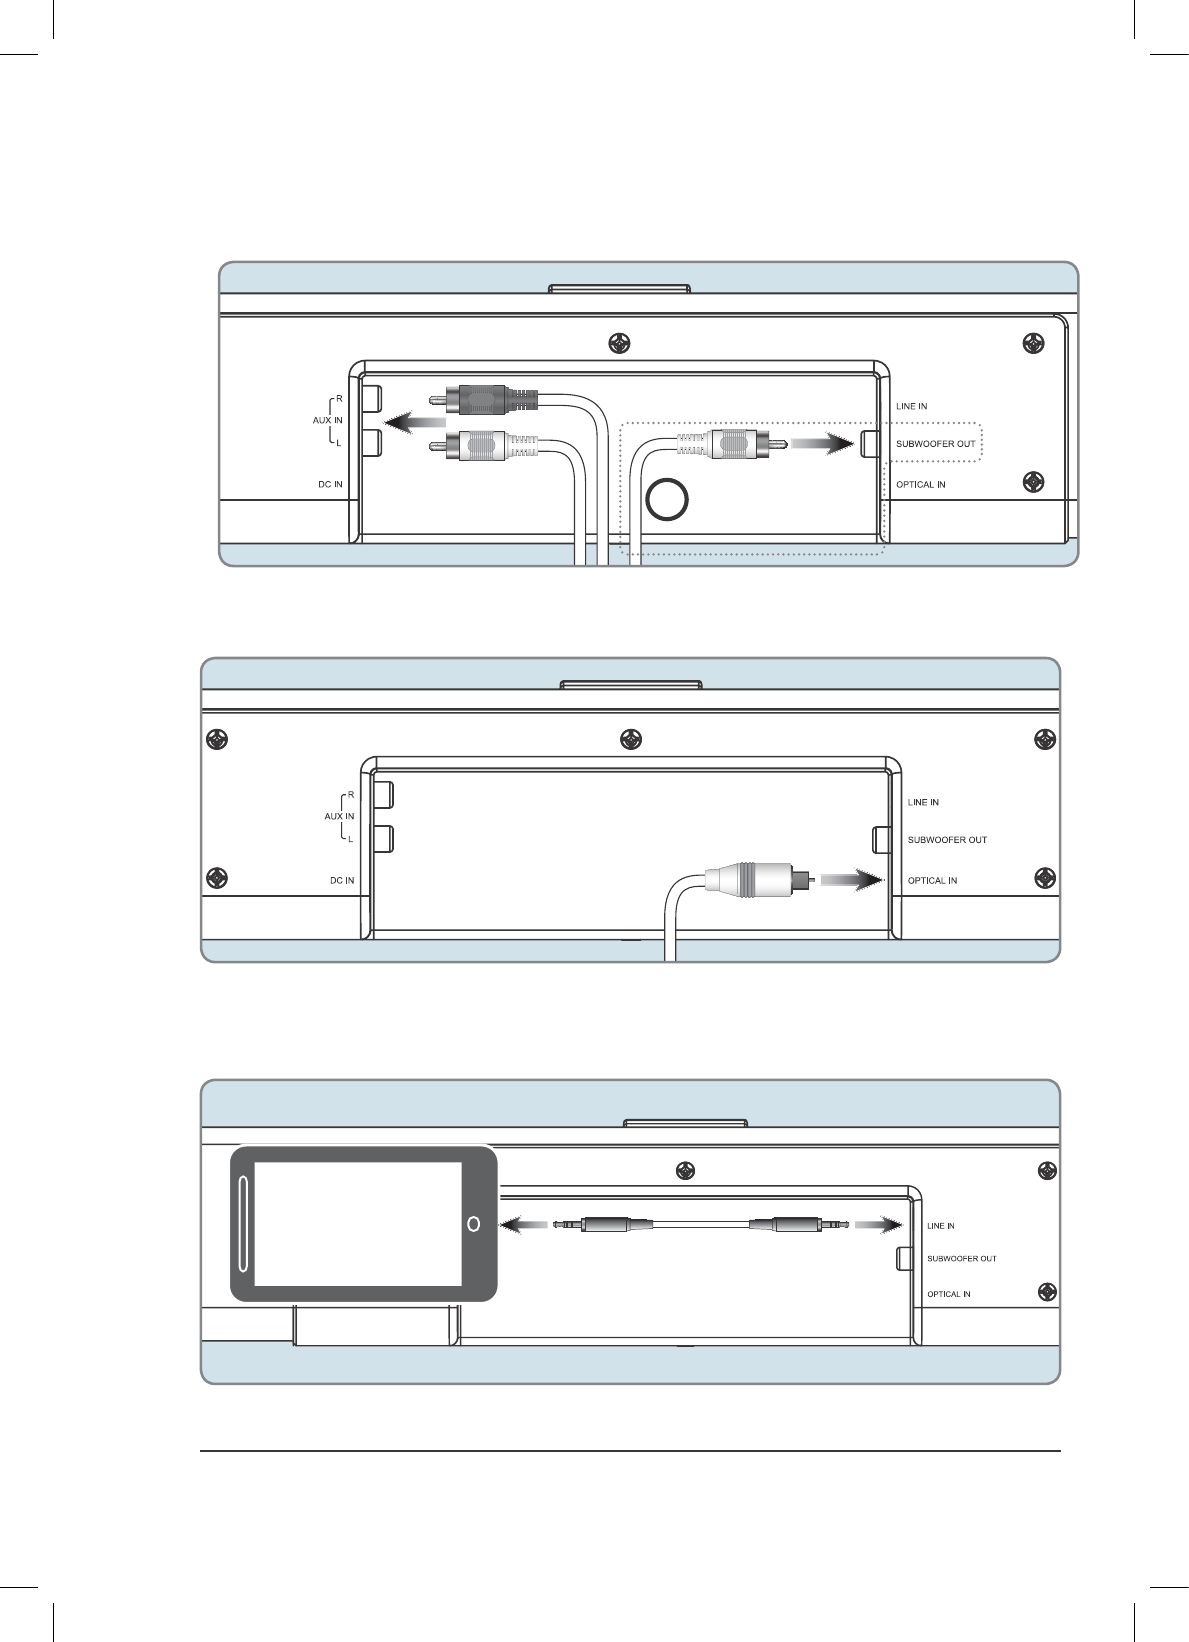
Audio Inputs
Using the Stereo RCA Inputs
When connecting two products using an RCA cable, match the colored ports with the same colored connection.
1. Connect the RCA cables to the RCA Stereo Inputs located on the back of the unit, and to the audio outputs
on the television.
2. Press the Power button to power on the unit.
3. Press the Source button to select AUX In, indicated by a white light.
4. Audio played through the television will now be heard through the speakers.
Using the Stereo RCA Inputs and the Subwoofer Output Together
The unit can be used with a detached subwoofer by using another RCA cable to connect the two.
1. With the main stereo RCA cables connected, use another RCA cable to connect an external subwoofer to the
Subwoofer Output.
2. When audio is played through any source, the speaker will automatically use the connected subwoofer.
Using the Optical Input
You will need: An audio source with an Optical Audio Output and a Digital Optical Audio Cable (not included)
1. Connect the Digital Optical Audio Cable to the optical output on the audio source and to the Optical Input
on the speaker bar.
2. Press the Power button to power the unit on.
3. Press the Source button to select Optical In, indicated by a amber light.
4. Using the native controls on your connected device, make sure the audio settings are set to PCM or Optical
Audio and are turned On.
5. Audio from the connected audio source will now be played through the speakers.
Using the Line In
3.5 mm audio input cable not included.
1. Plug one end of a 3.5 mm audio input cable into the Line In on the unit. and plug the other end of the cable
into the audio output/headphone output on an MP3 Player or other audio source.
2. Press the Power button to power the unit on.
3. Press the Source button to select Line In, indicated by a green light.
4. Audio played through the connected device will now be heard through the speakers.
IMPORTANT TIPS FOR OPTICAL AUDIO:
t Use the correct toslink cable and make sure that it is firmly seated in both source and sound bar sockets.
t Optical output is activated on the source (they should see a red light emitting from the toslink socket).
It may be labeled SPDIF in the setting menu of the source.
t The optical output is set to output PCM and not Dolby Digital.
ITB474B-1067-01-IB-EN.indd 7 4/30/2014 2:41:28 PM
8
Using the Stereo RCA Inputs - Rear View
Only use if connecting
a detached subwoofer
Using the Optical Input - Rear View
Using the Line In - Side View
!
ITB474B-1067-01-IB-EN.indd 8 4/30/2014 2:41:30 PM

Customer Support: 1-888-999-4215 9
Pairing a Bluetooth Device for the First Time
1. Power on the unit by pressing the Power button.
2. Press the button on the remote to switch to Bluetooth Mode, indicated by a slowly flashing blue light.
3. Press the Pair button on the unit.
The pairing indicator will flash blue quickly. When pairing, remain within 3 feet of the unit.
4. Using the native controls on your Bluetooth device, select the ITB474 in your Bluetooth settings to pair.
If your device requests a password, enter the default password 0 0 0 0 .
Refer to the user’s manual for your specific device for instructions on pairing and connecting Bluetooth devices.
5. When successfully paired and connected, a beep will issue from the unit and the Pairing Indicator will
display a solid blue light.
After initial pairing, the unit will stay paired unless unpaired manually by the user or erased due to a reset of the
device. If your device should become unpaired or you find it is unable to connect, repeat the above steps.
Playing Audio Wirelessly
1. After pairing to a bluetooth device, use the native controls on the connected Bluetooth Device to
select a track.
2. Play, pause or skip a selected track using the native controls on the connected Bluetooth Device or the
controls on the speaker's remote.
3. Audio played through the connected Bluetooth device will now be heard through the speakers.
Bluetooth
ITB474B-1067-01-IB-EN.indd 9 4/30/2014 2:41:31 PM
10
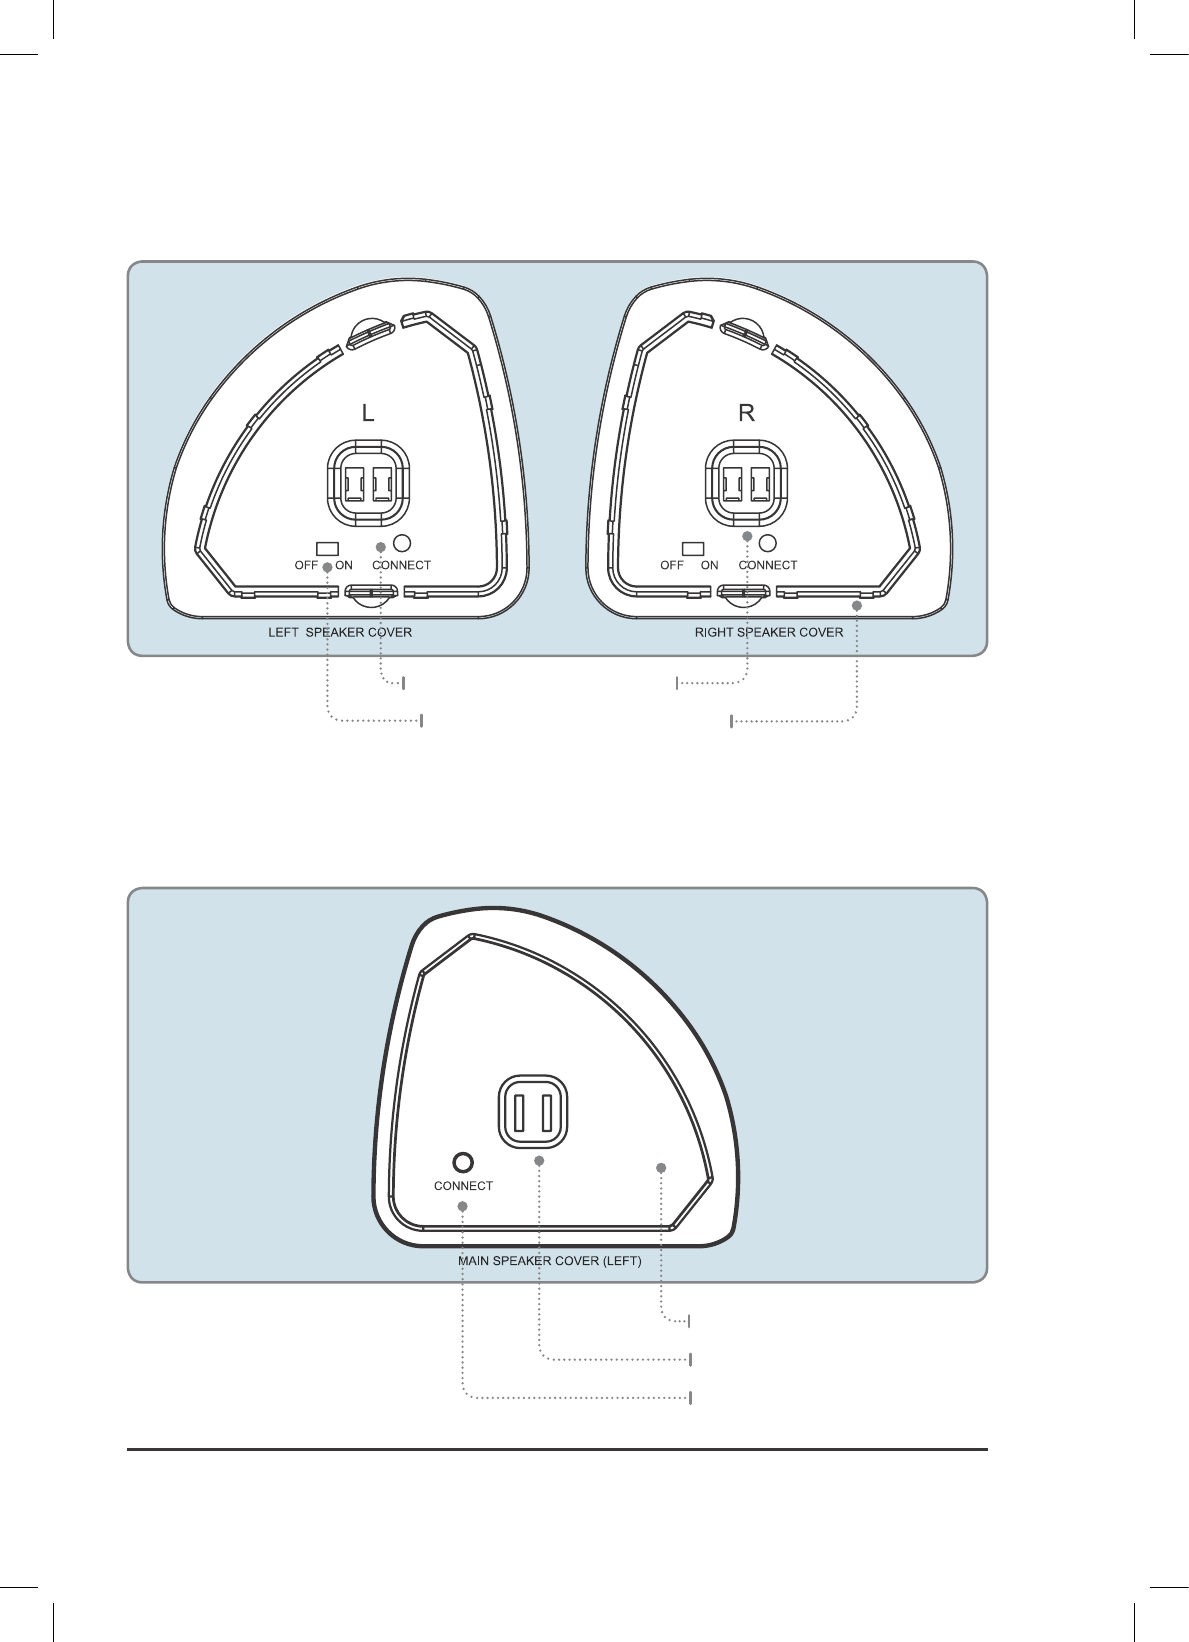
The Satellite Speakers
The Satellite Speakers
This unit is equipped with two detachable speakers that may be used to create a surround sound effect and lend an
extra dimension to your listening experience. From the remote control, the speakers can be powered on or off, and
change their volume independently of the main speaker. The satellite speakers can wirelessly play music or sound
anywhere in a 33 ft area of the main unit.
Re-Connecting the Satellite Speakers
If your satellite speakers lose their wireless connection to the main speaker unit for any reason, press and hold the
Connect button on the satellite speaker for one second and release, then perform the same operation on the main
speaker unit (see diagram on the next page). The green indicator light on the front of the satellite speaker will blink
quickly, then become solid as the connection is re-established.
Charging the Satellite Speakers
The satellite speakers are powered by internal lithium batteries and must be recharged after extended periods of
use. To charge the satellite speakers, simply dock them with the main speaker unit. A red light on the front of the
speakers will indicate the speaker is charging. The initial charge time for the speakers is 6 hours.
Powering On the Satellite Speakers
The satellite speakers must first be powered on manually by turning the Power Switch on the speakers to On (see
diagram on next page). They should already be wirelessly connected to the main speaker and will be ready to play
sound whenever you choose.
Satellite Speaker Indicator Lights
STATUS INDICATOR
Paired to Main Speaker Solid Green Light
Pairing to Main Speaker Quickly Flashing Green Light
Battery Low Flashing Red Light
Battery Charging Solid Red Light
Battery Charged No Light
ITB474B-1067-01-IB-EN.indd 10 4/30/2014 2:41:32 PM
Customer Support: 1-888-999-4215 11
Satellite Speakers (Left/Right)
Main Speaker Dock (Left)
Power Plug
Power Plug
Docking Coupling
Docking Housing
Power Switch
Connect Button
Connect Button
ITB474B-1067-01-IB-EN.indd 11 4/30/2014 2:41:32 PM

12
Green Initiative
Our Environmental Commitment to "Protect for Today and
Sustain for Tomorrow". On a continual basis DPI, Inc. is
making efforts to sustain the environment and improve the
recyclability of its products and packaging.
Focusing on “protecting for today and sustaining for
tomorrow” DPI, Inc. has committed to reducing packaging
size, increasing the usage of recyclable plastics, and ensuring
that packaging and manuals are made with up to 85%
recycled material. In addition to material consideration,
DPI, Inc. has also focused on the finer details that positively
impact the environment such as employing the usage of
soy-based inks.
DPI, Inc. also ensures that the factories that produce the company’s wide variety of consumer electronics adhere to
environmentally friendly air and water restrictions. This is yet another example that every step of the way DPI, Inc. is
making efforts to lessen any impact on the environment.
In 2011 DPI, Inc. also began conversations with Energy Star in order to ensure that the consumer electronics being
produced meet high standards of energy efficiency. The ultimate goal is keeping energy costs for consumers low
while providing quality, feature-rich products.
International Support
To download this User’s Guide in English, Spanish, and French, or to get answers to frequently asked questions, visit
the support section at: www.iLiveElectronics.com
Para descargar este Manual del Usuario en inglés, español y francés, o para obtener respuestas a preguntas frecuentes,
visite la sección de apoyo en: www.iLiveElectronics.com
Pour télécharger ce guide de l’utilisateur en anglais, espagnol ou français, ou pour obtenir des réponses à des
questions fréquemment posées, consultez la rubrique d’assistance sur: www.iLiveElectronics.com
Contact Information
Website: www.iLiveElectronics.com
Email Support: prodinfo@dpiinc.com
Email Parts: partsinfo@dpiinc.com
Phone Support: 1-888-999-4215
Warranty
For Warranty Information and the most
of this User’s Guide, go to:
www.iLiveElectronics.com
Company Information
Copyright © 2014 Digital Products International (DPI, Inc.) All other trademarks appearing herein are the property of their respec-
tive owners. Specications are subject to change without notice.
ITB474B-1067-01-IB-EN.indd 12 4/30/2014 2:41:33 PM