G4 Service & Installation Manual Zip Assist 803904 V1.00
G4 Service & Installation Manual Zip Assist 803904 V1.00 G4 Service & installation manual Zip Assist _803904_v1.00 G4 Service & installation manual Zip Assist _803904_v1.00 zipwater.commercial zipwater_instruction manuals zipwater.hydrotaps zipwater.uk.products zipwater.uk zip-website-media
2016-08-30
: Zip Water G4 Service & Installation Manual Zip Assist 803904 V1.00 G4 Service & installation manual Zip Assist _803904_v1.00 zipwater.residential zipwater_instruction manuals zipwater.hydrotaps zipwater.uk.products zipwater.uk
Open the PDF directly: View PDF ![]() .
.
Page Count: 16

ZIP ASSIST
WiFi Installation
and
Service Manual
Page 2 of 16 803904 - Zip Assist - May 2016 - v1.00
This Computer Maintenance and Managament System (CMMS)
is designed to provide online monitoring of installed HydroTaps
(via WiFi and through a cloud based server) by the product own-
er and/or facility manager and/or Zip service centre. The moni-
toring system allows settings to be changed, usage patterns to
be monitored and reported, system status notications and al-
lows planning of preventative maintenance and lter changes.
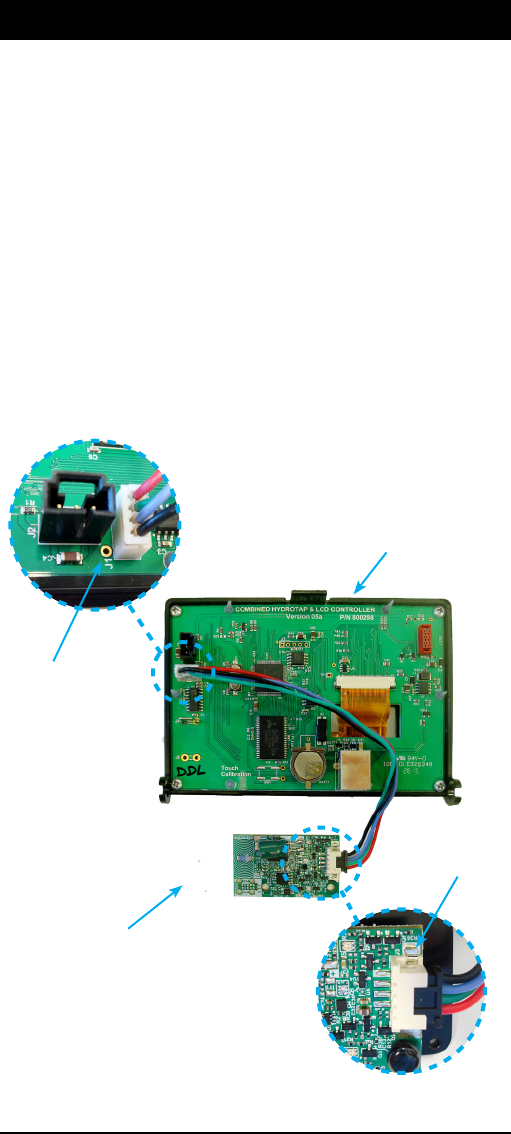
1. Turn the unit OFF
2. Remove the front cover
3. Connect the BLACK connector on the WiFi
cable to J3 on the WiFi PCB
4. Connect the WHITE connector on the WiFi
cable to J1 on the LCD PCB
Connector J1
Connector J3
WiFi PCB
LCD PCB
STEP 1 - Connect the WiFi cable
803904 - Zip Assist - May 2016 - v1.00 Page 3 of 16
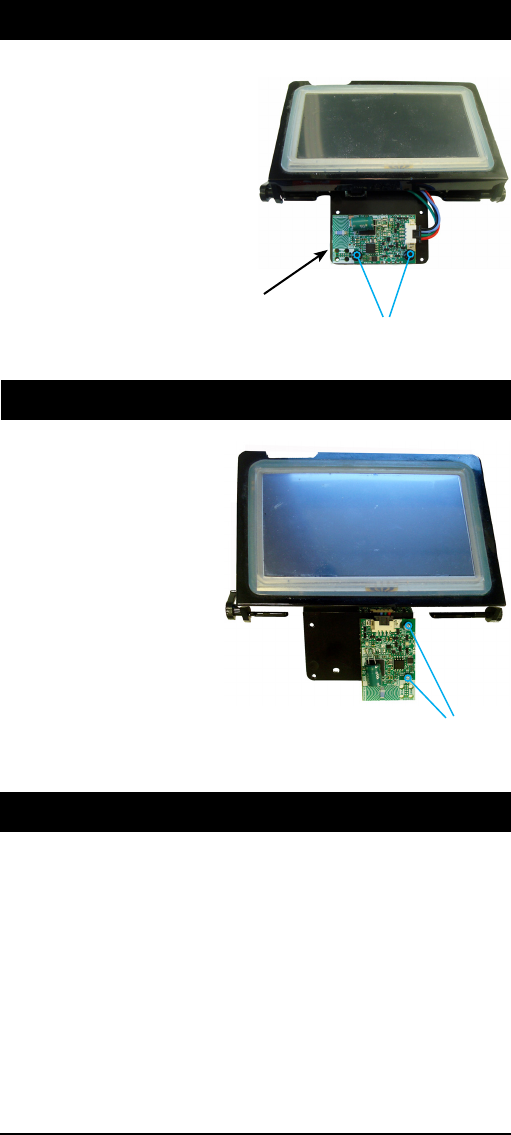
STEP 2 - WiFi Board placement ( HydroTap Built Post Feb 2016)
1. Mount the WiFi Board in the
horizontal position shown
2. Secure in place with the
two plastic pins supplied
WiFi Board placement (HydroTap Built Pre Feb 2016)
1. Mount the WiFi Board
in the vertical position
shown.
2. Secure in place with
the two pozi drive
screws supplied (M2.5
x 6mm)
Plastic pins
Pozi drive screws
1. Turn the power ON
2. If necessary, upgrade the G4 LCD PCB to B02.4 or later,
for compatibility with the new WiFi PCB and Zip Assist.
3. Turn the power OFF and then ON again after this is
performed.
4. Attach the front cover
STEP 3 - Upgrade the Firmware
WiFi PCB
Page 4 of 16 803904 - Zip Assist - May 2016 - v1.00
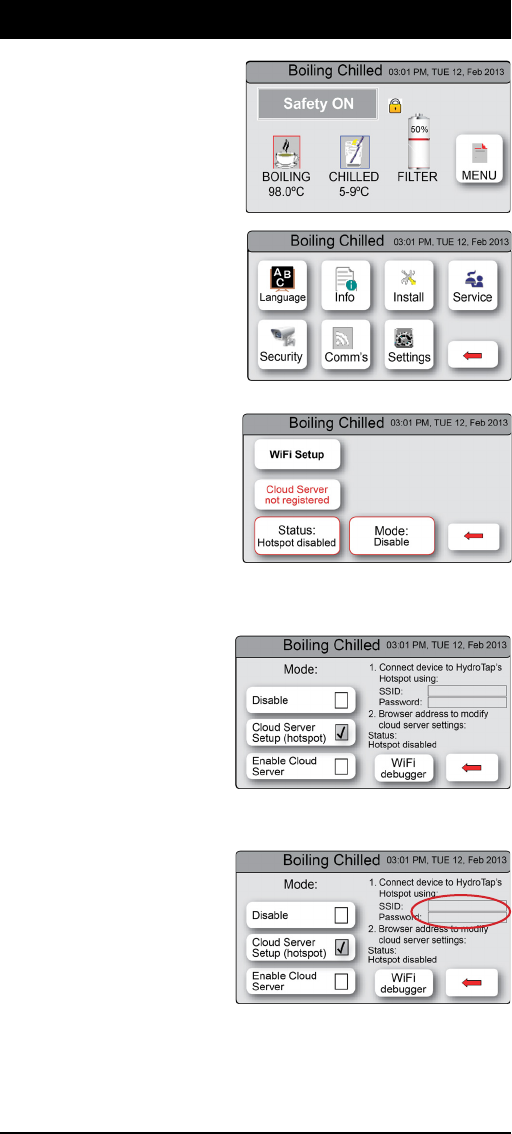
1. Home screen
2. Press [MENU] for main
menu.
3. Press [Comm’s] for
WiFi communications
NOTE: One of three Modes
will be displayed, depending
on the current Mode selected
in the WiFi setup proces.
4. Press [WiFi Setup]
5. Press [Cloud Server
Setup (hotspot)]
6. Wait for the the *SSID
name and password
to be shown on the
Hydrotap LCD screen
*SSID (Service Set IDenti-
er): The name assigned to a
WiFi (wireless) network.
STEP 4 - Get HydroTap to Create Its Own Hotspot
Note: At this point the Hydrotap has just created it’s own WiFi
access point. On a wireless device ( Eg.Smart phone / laptop),
the access point will be seen in the list of available networks,
just like any other access point.
ZIP-2011000000000
20238553
803904 - Zip Assist - May 2016 - v1.00 Page 5 of 16
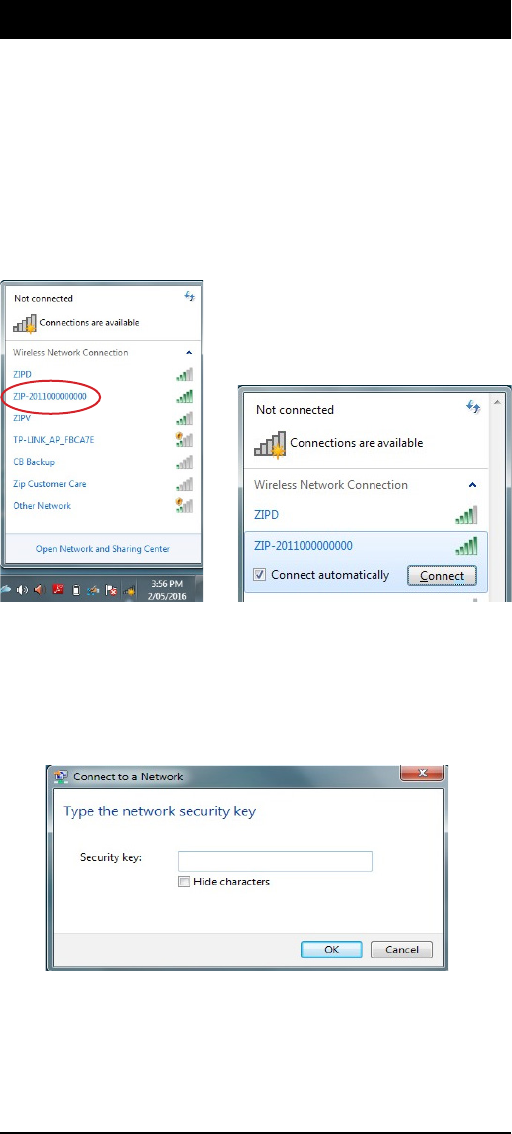
STEP 5 - WiFi Configurator Application
Option 1) Windows Application
Use a Windows device to connect to the WiFi hotspot created
by the HydroTap.
1. From the available list of WiFi networks select the SSID
which matches that shown on the HydroTap LCD screen (in
the WiFi Setup menu). Press [Connect].
2. When prompted enter the password shown on the Hydro-
Tap LCD screen (in the WiFi Setup menu). Press [OK].
Page 6 of 16 803904 - Zip Assist - May 2016 - v1.00
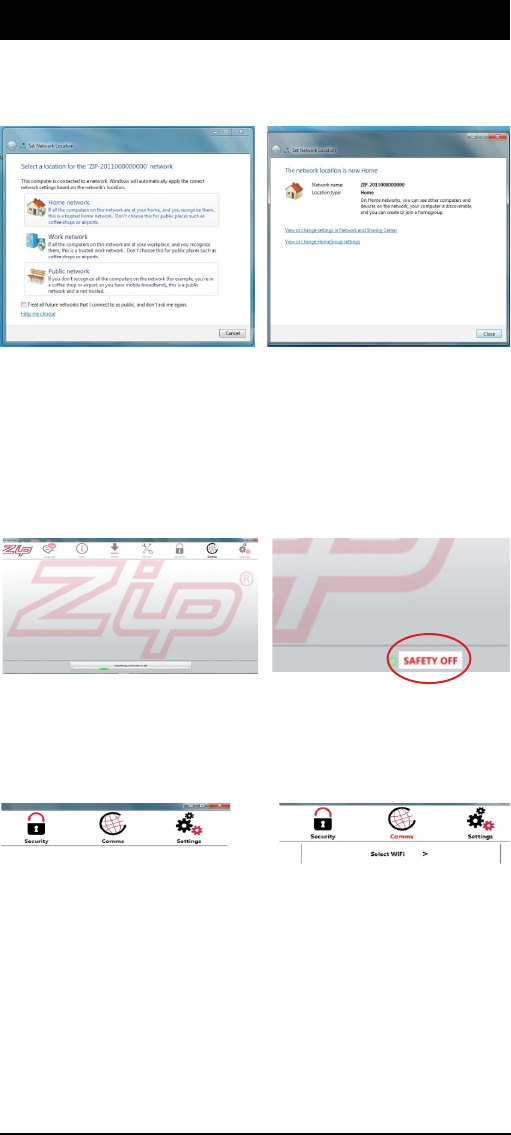
3. Select “Home network” if a network location is requested to
be entered
4. Open the Zip Wi-Fi Congurator application and wait until
the green connection status icon begins ashing. This
means that the windows application is communicating with
the HydroTap.
5. Navigate to [Comms] then [Select WiFi]
6. Scroll down through the available list of WiFi Domains and
select the customers SSID (network name) that the HydroTap
should connect to.
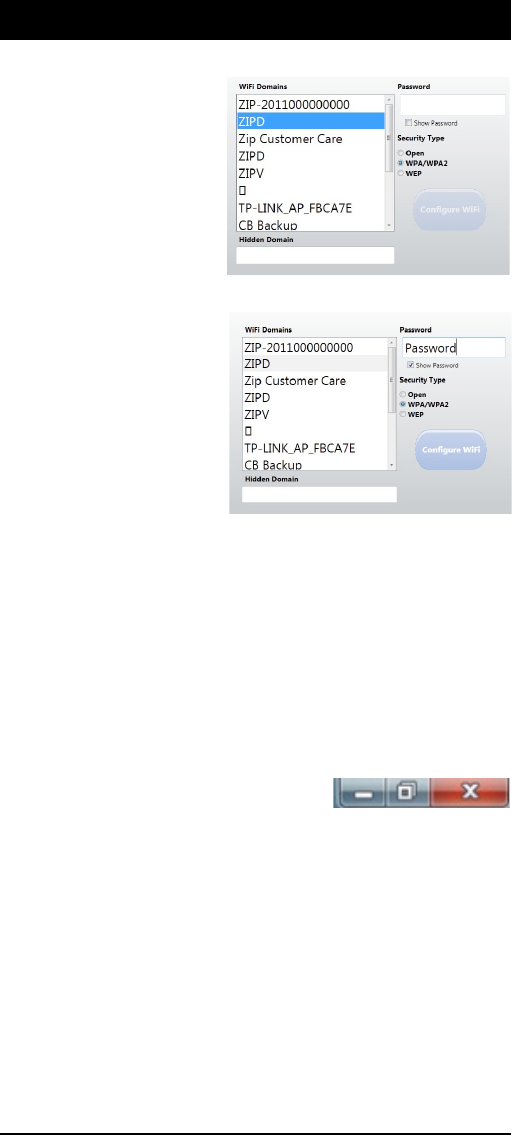
7. If the SSID has been hidden from being publically dis-
played, it can be manually entered in the “Hidden Domain” text
eld. Otherwise this eld should be left blank.
STEP 5 - WiFi Configurator Application
803904 - Zip Assist - May 2016 - v1.00 Page 7 of 16
8. The “Security Type”
should be automatically
selected. If not manually
select it.
9. Select the “Show
Password” tick box.
10. Enter the password
of the customers network
(or request the customer
to enter it and then untick
“Show Password” so it
remains hidden).
11. Press [Congure WiFi]. The green connection status icon
will stop ashing indicating that the application is saving the
settings to the HydroTap.
12. Wait until the green connection status icon starts ashing
again. This indicates that the application has successfully saved
the settings to the HydroTap.
13. Close the windows application. This
will ensure a quicker connection to the
customers network in the next step.
Troubleshooting: the close button may need to be pressed
twice.
STEP 5 - WiFi Configurator Application
Page 8 of 16 803904 - Zip Assist - May 2016 - v1.00
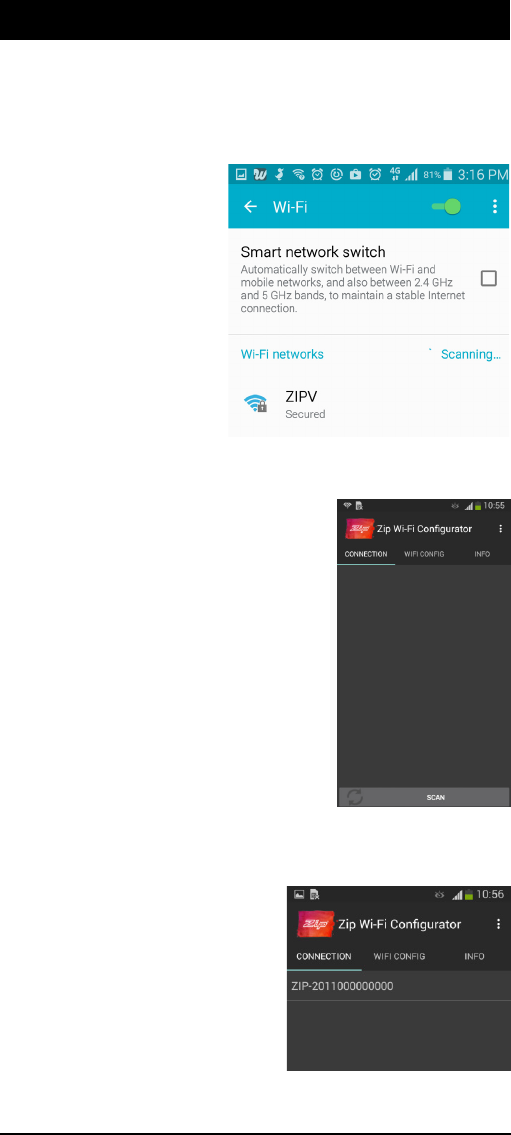
2. Open the Zip Wi-Fi Congurator
application.
3. Press scan. Application will
search for all SSIDs that start
with ‘ZIP-‘. Press the SSID which
matches that shown on the Hydro-
Tap LCD screen (in the WiFi Setup
menu).
STEP 5 - WiFi Configurator Application
Option 2) Android Application
1. If it exists under Wi-Fi settings, ensure the “Smart network
switch” setting is disabled.
803904 - Zip Assist - May 2016 - v1.00 Page 9 of 16
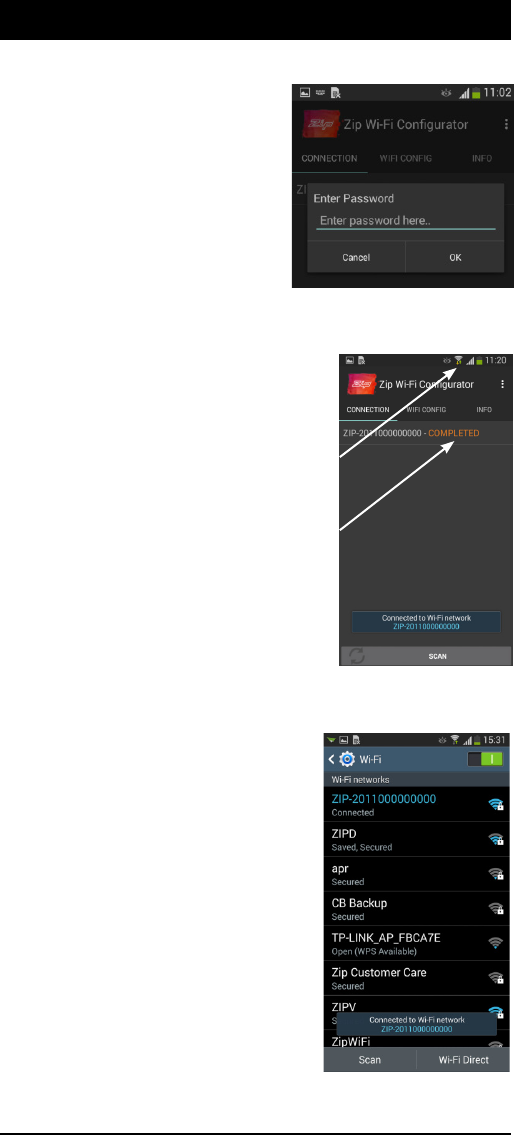
4. When prompted enter the
password shown on the HydroTap
LCD screen (in the WiFi Setup
menu).
5. Press OK. The application should
cause the android device to connect to
the HydroTap. This can be seen by:
a. The android phone should show
a connected WiFi symbol in the status bar
AND
b. The word “COMPLETED” shown
next to the SSID.
Troubleshooting:
• If the above is not shown, the an-
droid device can be manually connected
to the HydroTaps hotspot through the
standard method using its WiFi setting
menu.
STEP 5 - WiFi Configurator Application
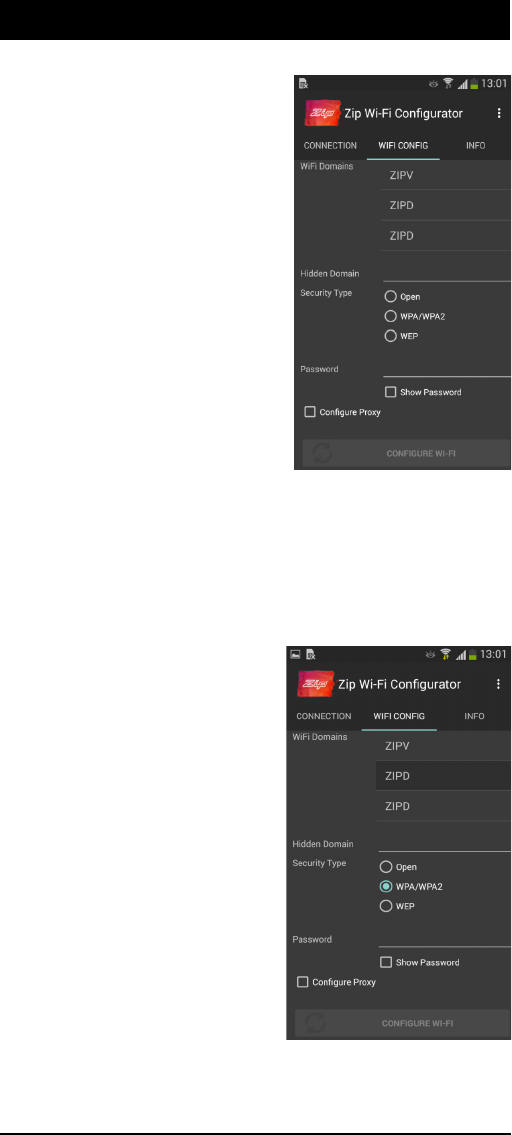
Page 10 of 16 803904 - Zip Assist - May 2016 - v1.00
6. After sucessful connection to
the HydroTap hotspot click on the
“WIFI CONFIG” tab.
7. Scroll down through the available list of WiFi Domains and
select the customers SSID (network name) that the HydroTap
should connect to.
8. If the SSID has been hidden
from being publically displayed,
it can be manually entered in the
“Hidden Domain” text eld. Other-
wise this eld should be left blank.
9. The “Security Type” should be
automatically selected. If not manu-
ally select it
STEP 5 - WiFi Configurator Application
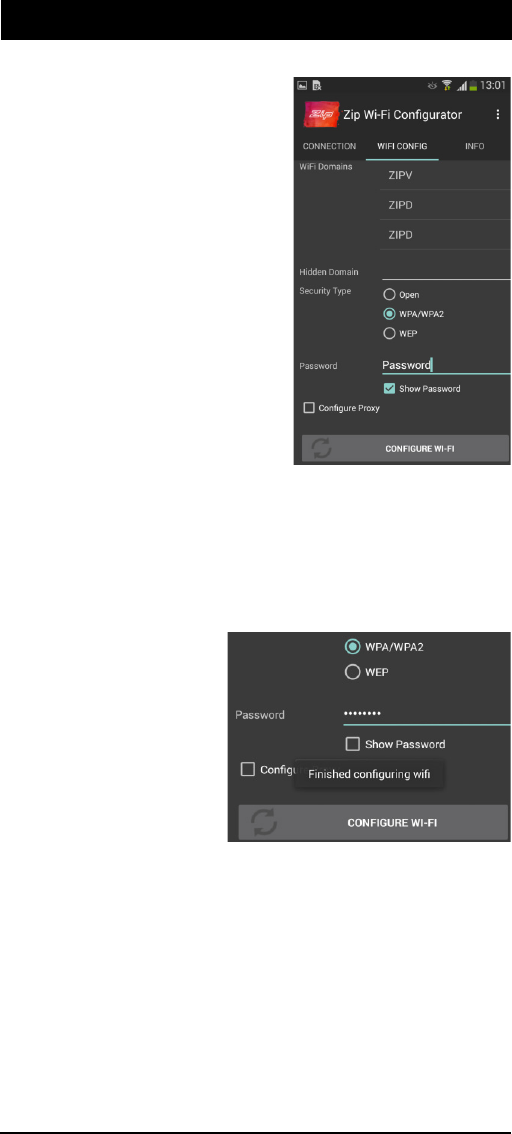
803904 - Zip Assist - May 2016 - v1.00 Page 11 of 16
10. Select the “Show Password”
tick box.
11. Enter the password of the
customers network (or request the
customer to enter it and then untick
“Show Password” so it remains
hidden).
STEP 5 - WiFi Configurator Application
12. Press “CONFIGURE WI-FI”. Wait until “Finished congur-
ing wi” is displayed.
Page 12 of 16 803904 - Zip Assist - May 2016 - v1.00
1. On the HydroTap LCD menu navigate to [Menu]-
>[Comms]->[WiFi Setup].
2. Press [Enable Cloud Server] and wait for the WiFi red
status icon to turn green.
Note: This step may take a few minutes
3. Initially the strength bar will show 99. Wait until this number
changes and verify that it is less than 80. If a number is being
shown greater than 80 then a request should be made to the
customer to either:
Step 6 - Connect to the clients WiFi
010.002.006.187
59
ZIP_GUEST
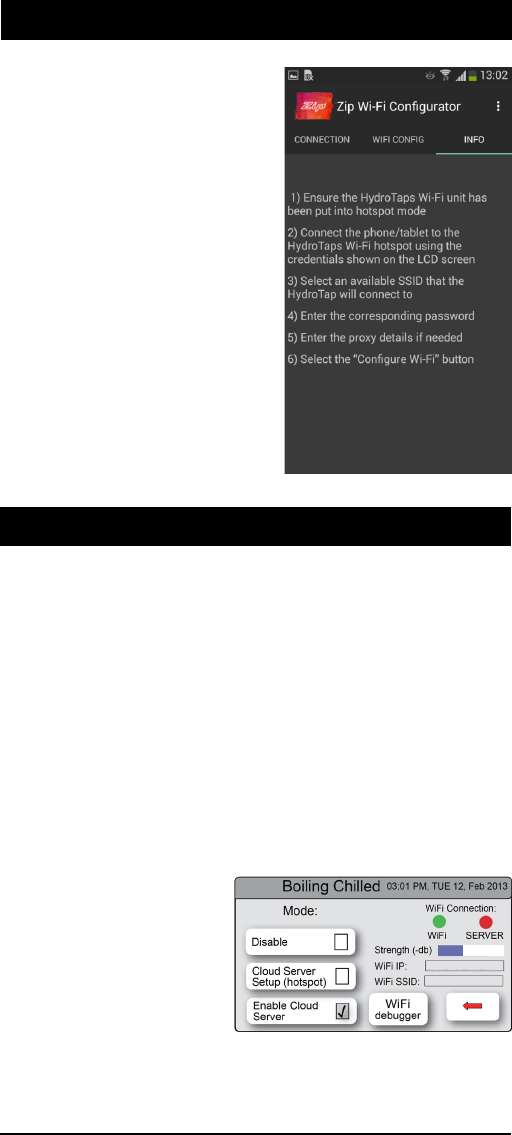
STEP 5 - WiFi Configurator Application
Note: A summary of the congu-
ration steps is shown under the
[Info] tab.
a. Increase the signal
strength of the network
at the location of the
HydroTap OR
b. Utilise an
alternative WiFi network
that has a stronger signal.
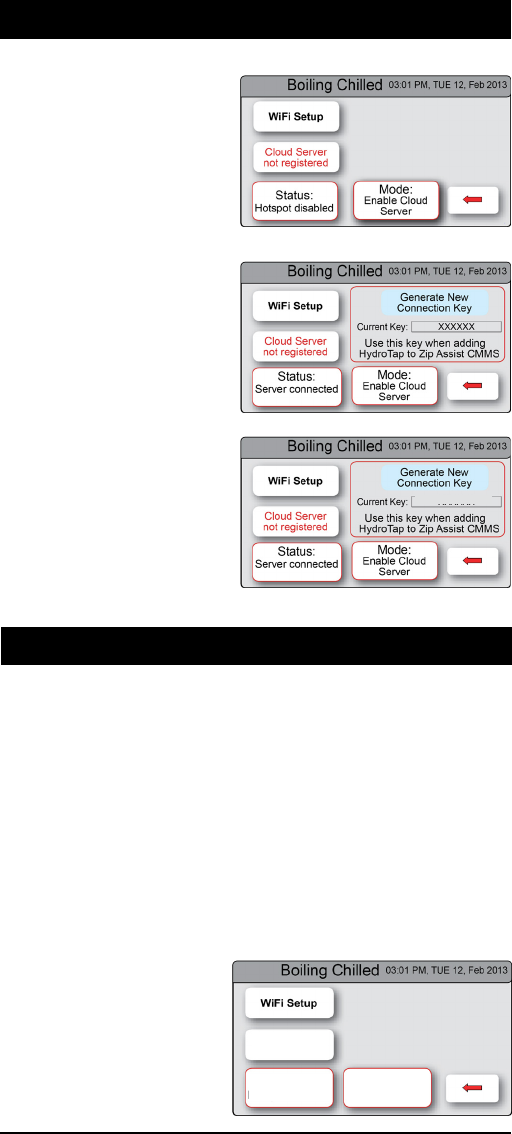
803904 - Zip Assist - May 2016 - v1.00 Page 13 of 16
1. Press [Cloud Server not
registered].
2. Press [Generate New
Connection Key].
XXXXXX will initially be
showing.
3. Wait until a 6 character
connection key is
displayed. This step
may take a few
minutes.
Step 7 - Obtain a connection key
c1ea3f
1. Using a web browser navigate to:
https://zipassist.zipindustries.com/
2. The client should have already created a ZipAssist owner
account. Login using these credentials
3. Click on the management tab and add a new HydroTap
4. Enter the connection key when prompted
Cloud Server
is registered
Status:
Server connected
Mode:
Enable Cloud
Server
5. Once connected the following changes will appear on the
HydroTap LCD in the Comms menu
a. Cloud server will
be shown as registered
b. Status will show
“Server Connected”
Step 8 - Connect to ZipAssist using the connection key
Page 14 of 16 803904 - Zip Assist - May 2016 - v1.00
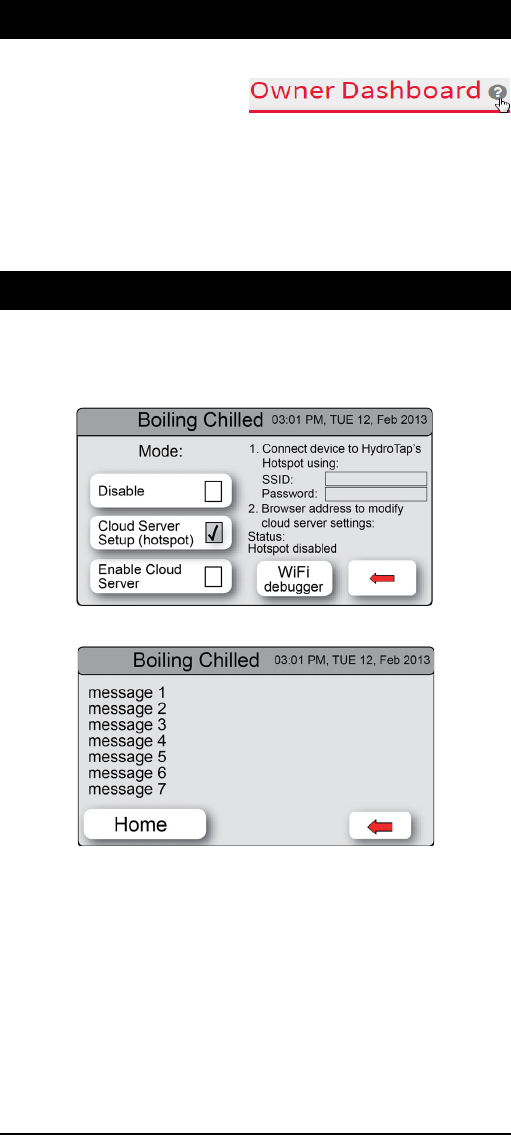
Press [WiFi Debugger] to view the message log.
Troubleshooting
Step 8 - Connect to ZipAssist using the connection key
For Further instructions on
using ZipAssist refer to:
The help “tooltip” icons shown throughout the ZipAssist website.

803904 - Zip Assist - May 2016 - v1.00 Page 15 of 16
Press [WiFi Debugger] to view the message log.
Notes

Page 16 of 16 803904 - Zip Assist - May 2016 - v1.00
Head Ofce
Zip Heaters (Aust) Pty. Ltd.
ABN: 46 000 578 727
67 Allingham Street
Condell Park NSW 2200
Postal: Locked Bag 80
Bankstown 1885 Australia
Website: www.zipwater.com
Facsimile: (02) 9796 3858
Telephone: (02) 9796 3100
Sales & Service.
Free Call: 1 800 63 86 33
Customer Care.
Free Call: 1 800 42 43 44
As Zip policy is one of continuous product
improvement, changes to specications
may be made without prior notice. Images
in this booklet have been modied and may
not be true representations of the nished
goods.
Contact Details
UK Office
Zip Heaters (UK) Ltd.
14 Bertie Ward Way
Dereham
Norfolk
NR19 1TE
Website: www.zipheaters.co.uk
Facsimile: 01362 692 448
Telephone: 0845 6 005 005
Mobile: 0345 6 005 005
Email: sales@zipheaters.co.uk
