Zipit Wireless ZWM2 Wireless Messenger 2 User Manual Jump Start
Zipit Wireless, Inc. Wireless Messenger 2 Jump Start
user manual

JUMP START
Getting online with your Zipit Wireless Messenger 2 is quick and easy!
All you need is an existing Instant Messaging account and wireless
Internet access. Then just…
1. Plug it in. Connect the included AC adapter to the back of your
Zipit device and to an AC power outlet.
2. Turn it on. Press the green Power button for one second.
3. Hook it up. Follow the prompts to configure your device to use
up to 3 existing IM accounts.
4. Lose the PC. Press the MyFriendz button to start chatting, or
access other options such as MyTunez or MyPhotoz through the
HOME button. Check out the 411! Explore more options at
Zipitwireless.com.
TABLE OF CONTENTS
JUMP START............................... i
CHECK IT OUT........................... 1
Getting Started...................... 2
Locating Controls................... 3
Charging the Battery.............. 4
Turning the Zipit On and Off.... 4
Using Standby and Sleep Modes5
GET CONNECTED ....................... 6
Connecting to Your Wireless Network 6
Defining Your Messaging Accounts 11
Registering Your Zipit............12
Using the Home Menu ...........13
SPEAK OUT ..............................14
Using the MyFriendz List ........14
Using the Chat Window..........15
Sending Emoticonz and Special Characters 16
Receiving an IMAlert and Using IMResponse 17
Using Other Messaging Options18
LISTEN UP ...............................19
MyTunez Player Controls........20
Playing MyMusic from an SD Card 21
Using MyNetwork Audio Streaming 23
Using MyStationz Internet Radio25
SHOW YOUR STYLE...................26
TAKE CONTROL ........................27
LOCK IT DOWN.........................28
GO BEYOND .............................29
TROUBLESHOOTING..................31
Understanding Setup Error Messages 31
Handling Network Setup Errors34
Recovering from Lost Connections and Chats 34
FCC DECLARATION OF COMFORMITY 35
CHECK IT OUT
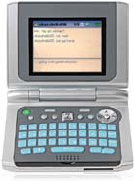
Congratulations on your new
Zipit® Wireless Messenger 2!
The Zipit® Wireless Messenger 2 is a
portable instant messaging device with a
built-in full-function audio player and a high resolution photo player.
With this personal media device, you can easily
Instant message (IM) your friends — up to 99 simultaneous chats —
using MyFriendz™ buddy lists for AIM, MSN, and Yahoo
Manage your IM accounts and MyFriendz profiles
Use IMAlert™ to track multiple chats
Customize your IM display and sounds
Listen to your MyTunez™ (MP3 and WMA files) from
– An SD sound card
– Streaming media servers on your network
– Streaming Internet Radio
View your MyPhotoz™
And, through the Zipitwireless.com web site, you can
Download cool color Themez™, fonts, Emoticonz™, and
MySoundz™
Upload a personal background and apply it to your Zipit device
Load your piggy bank and purchase premium Themez and Fontz
Refer a friend and earn piggy bank Creditz™
1
Getting Started
You can use some features of your Zipit Wireless Messenger 2 without
being connected to the Internet. To get started, though, or to use
instant messaging, you must have
wireless Internet (Wi-Fi® network) access
an existing instant messaging (IM) account
Wi-Fi Access
If you are using your Zipit device at home, you will need a wireless
access point or router that is connected to a broadband Internet
service (like a cable or DSL connection).
If you are in a public area or business, you will need wireless access
through a public Wi-Fi “hotspot.” A public Wi-Fi hotspot is an open
hotspot that does not require a browser or a fee for access.
Check this! Lots of businesses, hotels, and restaurants have public
hotspots that are free to their customers. Go to
Zipitwireless.com to see the available hotspots in your area.
The Zipit Wireless Messenger 2 contains an 802.11g radio and will
work with both 802.11b and 802.11g networks.
IM Account
If you don’t have an IM account, you can set one up for free on any
Internet-connected PC. Go to Zipitwireless.com for more
information. When you set up a new account, you will choose or be
provided with a screen name and a password.
2

Locating Controls
Power. Press and hold for 1 second to turn your device on or off.
MyFriendz. Open or close the MyFriendz List of buddies logged in to the IM
service(s) you are using.
Home. Press for Home Menu to access main functions.
Options. Context-sensitive menu of actions that match active function.
MyEmoticonz ( ☺ ) . Press to add an emoticon (smiley) to your IM.
* Cursor Arrows (Up, Down, Left, Right). Navigate. In chat, use ← to move
back through text without deleting.
* Select (centered between cursor arrows). Select (highlight) or execute
function.
* Alt: In text entry, press once to access alternate function; twice to set Alt
Lock.
Shift: In text entry, press once to capitalize next letter; twice to set Shift Lock.
Backspace (← BS): Delete typed characters.
Enter: Execute selected function.
Previous and Next. Context-sensitive; use to back up or go forward in the
active function:
in menu, one
level
in chat, one
open
conversation
in audio player,
one song
in photo player,
one slideshow
in setup, one
screen
in MyFriendz or
audio list, one
page
*: Different function for audio; see page “MyTunez Player Controls” on page
20. 3
Select
Power
SD card slot
AC adapter
Charging the Battery
Plug the AC adapter into the DC input jack on the back side of your
Zipit device and into an AC power outlet. You can start using your
device immediately. Charge the battery for at least 3 hours before
removing the power adapter.
An LED on your Zipit device shows the status of your battery. If the
battery is charging (on AC power), the battery LED will be solid amber.
The LED will turn solid green when the battery is completely charged.
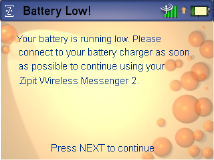
If the battery charge gets low, the LED will blink in amber, the battery
icon in the chat window header will flash, and you’ll see this message:
You’ll only
see this
message
once. If
you press
NEXT and
don’t
connect
your AC
adapter,
your Zipit
device will
turn itself off
in 5
minutes.
Turning the Zipit Device On and Off
To turn your Zipit device On or Off, press and hold the Power button
for at least one second.
4
Caution: Your Zipit Wireless Messenger 2 automatically checks for
software updates when you go online. If an update is available
and ready to install, do not power off until the installation is
complete.
Using Standby and Sleep Modes
Your Zipit device enters Sleep mode when you close the lid or after 5
minutes with no activity. In Sleep mode, the device turns off its
display but remains connected to network applications (IM and
streaming music) unless you move out of range of the network. Your
IM buddies will see your Away message, and you can continue to play
music. When you open the lid, your device will wake up and return to
your most recent application. Because Sleep mode saves your
battery power, it is a good idea to close the lid if you are taking a long
break from using your Zipit device.
Your Zipit device enters Suspend mode after 4 hours in Sleep mode.
When it enters Suspend mode, your device closes all applications but
does not shut down all the way. Your Zipit device will stay in
Suspend mode for up to 4 days with a fully charged battery. If the
battery power gets too low, your device will turn itself Off.
You can return to On mode from Sleep or Suspend very quickly, by
opening the lid, pressing any key, or pressing the power button. You
can customize the time limits for entering Sleep and Suspend modes
through the global settings.
5

GET CONNECTED
The first time you turn on your Zipit Wireless Messenger 2, the Setup
Wizard will help you
Search for and connect to your wireless network
Enter the screen names and passwords for your IM accounts (up to
one each for AIM, MSN, and Yahoo)
Register your Zipit device
You can update your setup information later if you need to.
Connecting to Your Wireless Network
Wireless networks can be set up in several ways, with different types
of security and connection requirements. Networks can be
encrypted or open. Encrypted networks require you to provide a
special access code called a “WEP key” or “WPA key” to get connected.
This means that only authorized people who know the key can use
them. Open networks are available to any user within range.
Some networks are hidden, which means you have to know their
names to be able to find and use them.
Some networks use dynamic DHCP addressing, which means that the
network automatically tells a device how to get to the Internet when it
joins the network. Other networks use static IP addressing and
require you to know the address for connecting to the Internet.
For more information about network connections, see the Support
page at Zipitwireless.com.
6
Your Zipit device is designed to make the wireless connection
process as automated and simple as possible.
Whether your network is open or encrypted, hidden, or uses dynamic
DHCP or static IP addressing, the Zipit Setup Wizard will guide you
through the connection process.
When you turn on your Zipit device, it will search for all available
wireless networks and try to connect to the strongest open networks
first, followed by the strongest encrypted networks. If your network
is open (most home and public hotspot networks are), you probably
will not need to provide any information. If it is hidden or encrypted,
or uses static IP addressing, the Setup Wizard will prompt you to enter
the information it needs.
If you know that your network is hidden and know how to set up
networks, you can interrupt the automatic connection and configure
the network yourself.
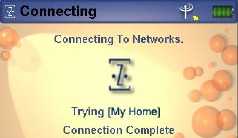
When you connect to a network, the Setup Wizard will show a
Connected screen and the network status LED will turn solid green.
7
Connecting Automatically
Follow these steps to get up and running:
1. Turn on your Zipit device. The Welcome screen appears.
2. Press NEXT. The Zipit logo spins, showing you that your device is
searching for a network. This can take several seconds.
3. The Scanning for Wireless Networks screen displays the number
of networks found. Press NEXT.
4. The next screens that you see depend upon what type and
number of networks your Zipit device found.
– If one open network was found, the Automatically Connecting
screen will appear, your device will connect automatically, and the
message “Connected to (your network’s name)” will appear.
– If one encrypted network was found, your device will ask you to
enter a special access code called a WEP key or WPA key. Type in
the code and press NEXT. If you make a mistake while typing,
use the backspace key or the ← cursor key to back up and correct
it. Your device will use the information to connect, or will prompt
you to confirm the information.
Your Zipit device will not find a hidden network until you tell it where to look; then it
can connect. If no networks were found, your device will assume that a hidden
network is available and will prompt you to enter the network’s name (SSID). Enter
your network’s name in the SSID field and press NEXT. (If you don’t know your
SSID, your access point or router’s documentation or a label on your access
point/router can tell you how to find it. If you still
8
– need help, check out the Support area at Zipitwireless.com.)
If you entered the name incorrectly or if the network is encrypted,
the Setup Wizard will show an “Unable to Connect” screen.
Double-check the way you entered the SSID and change it if you
need to. (Use the backspace or ← cursor key to back up and
correct it.) If you typed it correctly, your network is both hidden
and encrypted. Enter your network key code at the prompt and
press NEXT.
– If your Zipit device found several networks, which is common in
public areas, the Setup Wizard will automatically try to connect to
the open network with the strongest network signal, then weaker
open networks, and then encrypted networks.
If you want to choose which network to use, or want to specify a
hidden network, you’ll need to interrupt the Setup Wizard by
pressing NEXT. The Setup Wizard shows the networks it found.
Use the ↑ and ↓ cursor keys to select a network and then press
NEXT to connect to the network. If you choose to add a network,
the Setup Wizard will ask you to enter its SSID (network name).
Where to next?
If you’re connected to a network, see “Defining Your Messaging
Accounts” on page 11.
If you got an error message, skip to “Handling Network Setup
Errors” on page 31.
9
Connecting Manually
If you do not want to let the Setup Wizard set up your network
connection automatically, you can interrupt the connection process
and set up the connection manually. You should know how to set up
networks before trying this process.
To set up your network connection manually, follow these steps:
1. When the Setup Wizard tells how many networks it found, press
NEXT to interrupt it.
2. The Setup Wizard displays a manual configuration screen and
prompts you to enter the configuration information. Type in the
requested information and press NEXT.
3. The Setup Wizard connects using the information you provided.
Where to next?
If you’re connected to a network, see “Defining Your Messaging
Accounts” below.
If you got an error message, skip to “Handling Network Setup
Errors” on page 31.
10
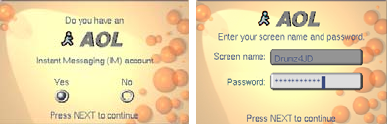
Defining Your Messaging Accounts
Once your Zipit device has connected to the Internet, you’ll enter your
instant messaging account information. You can save a username
and password for three different accounts — one on AOL, one on MSN,
and one on Yahoo. With the Zipit Wireless Messenger 2, you can log
into all of your accounts at once, seeing buddies from all three
services.
1. When the Setup Wizard prompts you to define your IM accounts,
press NEXT.
2. Your Zipit device will ask if you have an AOL account. Choose
“Yes” or “No” and press NEXT. (Change answers by pressing the
“Y” or “N” button, the space bar, or the →or ← cursor button.)
3. If you selected “Yes,” enter your account information when
prompted. If you make a mistake while typing, use the backspace
key to delete characters. Press NEXT.
4. Repeat Steps 2 and 3 to define your MSN and Yahoo accounts.
Note: If you have an MSN account, you must enter your complete
email address, not simply your screen name.
11

Registering Your Zipit Device
Now the Setup Wizard will help you register your Zipit Wireless
Messenger 2. Zipit will use the information you provide to send you
an email containing your personal access code to use on the
Zipitwireless.com website. We’ll also use it to invite you to opt in and
try new features.
1. When the Setup Wizard prompts you to register, enter the
requested information.
2. Press NEXT. Zipit will send you an email with a link you can click
to finish the registration and customize your Zipit device.
If any of your info changes, you can update it later through the
Zipitwireless.com website or the Tools menu.
Congratulations — your
setup is complete! Press the
MyFriendz button to start
chatting. Or press HOME to
check out all of your other
options.
Listen up! Did you
know you can play your
tunes while you chat?
Just start MyTunez.
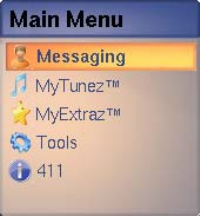
Using the Home Menu
The HOME key lets you access the main Zipit device functions.
1. To get to the Home Menu
at any time, press HOME.
2. Use the ↑ and ↓ cursor
keys to scroll through the list
and highlight a list entry.
3. Press the select botton,
ENTER, or the → cursor key
to select the highlighted
entry.
4. Press the ←cursor key to
back up one level in the open
menu.
Navigation Example
From the Main Menu with Messaging highlighted, press to see the
Messaging Menu. Press again to open the MyFriendz function.
Press to return to the Messaging Menu, or HOME to return to the
Home Menu.
Quick Tips
If 411 is the first entry in the Home Menu, Zipit has a new message
for you. After you read it, the 411 listing will drop to the bottom of
the menu.
If you are using MyTunez or MyPhotoz, Now Playing or Now
Showing appear in the Home Menu. Select these entries to return
to the audio or video players from another function.
13

SPEAK OUT
Speak out with the Messaging functions!
They let you chat, control your IM account,
and set IM options. Most of these functions
are accessed through the Messaging Menu.
Using the MyFriendz List
The MyFriendz list shows all of your friends who are logged into the IM
service(s) you are using, and shows you their status. Navigate to the
MyFriendz listing in the Messaging Menu and press → or ENTER, or
just click the MyFriendz button. Then use the cursor keys to scroll
through the list, and press ENTER to start chatting.
The top of your MyFriendz list shows the people you’re chatting with
now, listed alphabetically in bold type. Below that, the list shows
friends who are online but not chatting with you. They are listed in a
regular font if idle, or in italics if they are away from their computers.
Quick Tips
Select the name of someone already chatting with you to make that
chat window jump to the top.
Type a letter, or several letters, to jump to the first name in the list
that matches what you typed.
Press PREV or NEXT to navigate the list a page at a time.
Select a name and press the → cursor key to see a friend’s status
message.
14

Using the Chat Window
Each chat session uses a full window. If you are chatting with several
people, the windows are stacked in the order in which they were
started. You can page through them by using the PREV and NEXT
buttons or the → and ← cursor arrows.
The chat window has three parts:
Header bar:
Current buddy: Screen name and service provider.
Counter: Updates when you open or close chats.
This is the first of 2 open chats.
New message status: Pulses if you have any unread
411 or message. Press MyFriendz to see buddy
list, and look for animated logos to find new
messages.
Network status: Shows whether you are online and
signal strength.
Special key status: Shows whether Alt function is on
(A) or locked (A), or whether Shift function is on (↑)
or locked (↑). See Quick Tips below for details.
Battery status: If running on battery, shows 1 to 4
bars of remaining power. Blinks slowly if battery is
getting low – connect to AC power soon. Blinks
quickly when critically low and enters Standby as
soon as possible. If charging, shows .
Text entry window: Type your message here and press ENTER to
send. Use Backspace to erase or ← to back up and insert additional
text. Any letter you type while in the chat window will appear here.
Header bar: From left to right,
shows service logo and ID of
your current buddy, window
counter, new message status,
network status, special key
status, and battery status.
(See below for details.)
History window: Shows most
recent 12-15 lines of chat.
Lines you typed are labeled
“
Me.
”
Use
↑
and
↓
to reread.

Quick Tips
Press ALT once to enable any one of the blue keys on the keyboard,
including the numeric keys, special accent keys, and the Close
Window (X) key. Press ALT twice to lock this function and use more
than one blue key. Press ALT again to return to normal mode.
Press SHIFT once to type one uppercase character. Press SHIFT
twice to lock this function and type everything in uppercase. Press
SHIFT again to return to normal mode.
Press PREV or NEXT to move through your open chat windows, in
the order that they were connected.
Press the MyFriendz key and type a few letters of your friend’s name
to jump to a specific conversation.
Press ALT + ⌧ together to close the active chat.
Sending Emoticonz and Special Characters
To add Emoticonz (smileys) to your messages, press the
MyEmoticonz key ( ☺ ). A pop-up window of available characters will
appear. (Your choices will depend upon the IM service you are using.)
Scroll through the window, select a character, and press ENTER to add
it to your message. The pop-up will disappear after one use.
Register and download
special emoticon packs
from the
Zipitwireless.com
website. You can also
download new Fontz to
match your personality!
16
To add a special character, press the . . . on the key to the left of the
“Z” key. Select from the pop-up window as for a smiley.
Receiving an IMAlert and Using IMResponse
When you receive a
new message, unless
you are in the Setup
Menu or MyFriendz
list, an IMAlert will
pop up for 3 seconds
on top of any open
window. A
swooshing sound will
also play.
If you want to read the new message, press SHIFT + NEXT while the
IMAlert is showing to jump to that chat window. (If you receive
several IMAlerts, you can only jump to the first one.) You can also
press the MyFriendz key to see who has sent you messages—their IM
service logos will be flashing.
17

Using Other Messaging Options
You don’t need to use them all to chat, but
there are even more options in the
Messaging Menu. Check out the list below
for an overview of these functions:
MyFriendz: See your MyFriendz list, check status, and start chat
sessions.
Guest Login: Allow a friend to use your Zipit device temporarily
without resetting your accounts.
Add MyFriendz (AIM or MSN only): Add a friend’s screen name and
IM service to your MyFriendz list so you can chat with them from
your Zipit device or PC. Enter the info as requested. Press PREV
to cancel, or NEXT to save the addition and return to your previous
activity.
Delete MyFriendz (AIM or MSN only): Delete someone from your
friends list. Select the name and press CTRL + D. Press NEXT to
return to your previous activity. Careful ⎯ you can’t undo this! If
you delete a name, you’ll have to add it back before you can chat
with this person again.
Manage Accounts: Change the IM accounts you configured
through the Setup Wizard. Select which accounts are active, enter
a different screen name and password for the currently enabled IM
services, and reconnect to enabled accounts. Use this if you have
several screen names on one service. Enter the requested info and
press NEXT. Your device will close all open chat windows, login to
the enabled accounts, and return to the MyFriendz list. Changing
makes the new account the primary account until you change it
again.
IM Options: Customize your IMAway message, or change your
MyFontz and MySoundz.
18

LISTEN UP
Listen up! Your Zipit Wireless Messenger 2
isn’t just a full-function IM device. Use it to
listen to all of your favorite music. It plays
MP3 and WMA files from your SD memory
card, a network streaming audio server
(UPnP), and even Internet radio!
Start MyTunez, plug in your earphones,
and close the lid ⎯ your Zipit device will play your entire playlist.
(Your IM friendz will see your Away message.) Or relax and play
tunez while you chat or look at a slideshow.
While you are listening to MyTunez through any of these functions,
other device sounds will be disabled.
Quick Tips
If you are playing music in the background of another function, a
Now Playing entry shows at the top of the Home Menu. Click there
to jump straight back to your tunez.
The Now Playing screens vary slightly for the MyMusic, MyNetwork,
and MyStationz audio options.
If you press HOME while a song is playing, the Home Menu will
appear and your song will continue playing. Press HOME again to
return to the Now Playing screen.
Use the player controls to change your tunez without leaving the
open screen.
Use the OPTIONS menu while in MyTunez to add or change your
Shuffle and Repeat settings, add songs to your player queue, and
control your playlists.
19

MyTunez Player Controls
Once you’ve started MyTunez, use these controls to navigate through
songs or change the volume without changing what’s open on your
screen:
OPTIONS: For MyMusic and MyNetwork, press to
Add to
Queue
Add to
Playlis
t
Delete
Shuffle
Repeat
PREV: If in player, restart playing song. If in chat, press ALT + PREV. If
using MyMusic, hold down to rewind; let go to continue playing from there. If
in MyNetwork guide menu, press SHIFT + PREV to page up list.
NEXT: If in player, skip to next song. If in chat, press ALT + NEXT. If using
MyMusic, hold down to fast forward; let go to continue playing from there. If
in MyNetwork guide menu, press SHIFT + NEXT to page down list.
PLAY: If in player, play the highlighted item. If the song was stopped, resume
from where it was stopped and continue through playlist. If in chat, press
ALT + PLAY to play last selected song.
STOP: If in player, stop the currently playing song. If in chat, press ALT +
STOP.
VOLUME DOWN: Press once to decrease volume one step.
VOLUME UP: Press once to increase volume one step.
VOLUME DOWN + VOLUME UP: Press simultaneously to mute volume.
20
Play
Vol DOWN
Vol UP
Previous
Next
Options
Play Stop
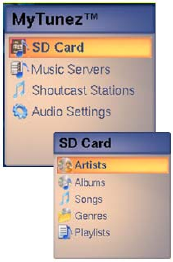
Playing MyMusic from an SD Card
If you have a library of tunez on your computer, you can play them
from your Zipit device as easily as from an MP3 player. And with the
Zipit Wireless Messenger 2, you can listen to your tunez while you
chat, view pictures, or use online tools.
First, copy your MP3 and WMA tunez from your computer to a
directory called Music on an SD memory card. Then follow these
steps:
1. Slide the SD card into the
bottom of your Zipit device.
2. Your device builds its music
library and displays “SD Card”
as a choice in the MyTunez
Menu.
3. From the MyTunez Menu,
select SD Card. Use the ↑and ↓
buttons to select the way you
want to view your library, and
the → button to see sublists.
Press ENTER or the select
button to play tunez.
Music plays from the point
where you press ENTER.
For example, (except in Shuffle mode) if you are in the Artist menu,
your Zipit device plays all songs by all artists, in order by artist and
then album. If you are in an Album menu, it plays all songs on that
album, beginning with the song number you selected.
21
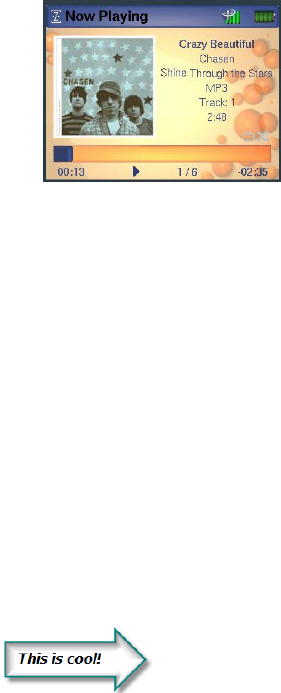
The Now Playing screen for MyMusic shows all of the info that was
found about the current song:
Beside cover
art (if any)
– Song title (in
bold)
– Artist
– Album
– File type
– Track
number
Song length
Bottom of
screen
– Elapsed
song time
– Song
number of
total on
album
Remaining
song time
Create a dynamic playlist – a
Zipit exclusive! Queue up the
songs you want to listen to; then
save them as a playlist. While in
the audio player, navigate to
another album, artist, or playlist.
Press OPTIONS and select Add to
Playlist. Save your special mix
as a custom playlist ⎯ it will be
available until the next time you
rebuild the music database by
changing the contents of the SD
card.
22
Using MyNetwork Audio Streaming
If your wireless network includes a music server, you can use it to
stream audio to your Zipit device. You’ll have access to all MP3 and
WMA songs on the server, with no restriction from the storage space
on your player.
Setting Up Music Servers
Your Zipit device will automatically detect UPnP (universal plug and
play) servers, including these verified servers:
Microsoft Windows Media Player 11
Microsoft Windows Media Connect *
Yahoo Music Engine
Visit Zipitwireless.com for the complete list of supported UPnP
servers.
NOTE: If your Zipit Wireless Messenger 2 detects a Windows Media
Connect music server, the Windows Media Connect server will have
to authorize the Zipit Wireless Messenger 2 before it provides
content to your device. If you connect to a Windows Media Connect
server and your Zipit device has not been registered, you’ll see a
screen that tells you how to configure the Windows Media Connect
server to recognize it.
For help connecting your Zipit Wireless Messenger 2 to a wireless
network music server, go to Zipitwireless.com.
23
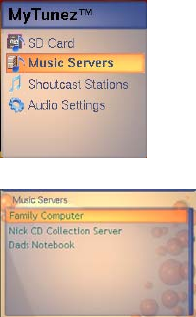
Using the MyNetwork Player
To use MyNetwork audio streaming,
1. Select MyTunez from the Home
Menu, then select Music Servers
from the MyTunez Menu.
2. Your device will display a list of
all available music servers.
Select one and press ENTER to
see the MyNetwork guide menu.
3. While navigating through the
guide menu, you can type any
character(s) to jump ahead in the
list. For example, if you type
“DA” in the Artist menu, the list
will scroll to the first Artist whose
name that starts with “DA.”
Use the ↑and ↓ buttons to select the way you want to view the music,
and the → button to see sublists. Press ENTER or the select button
to play tunez.
Music plays from the point where you press ENTER. For example,
(except in Shuffle mode) if you are in the Artist menu, your Zipit
device plays all songs by all artists, in order by artist and, for each
artist, by album.
24
The MyNetwork player screen displays the artist’s name, album name,
song title, and elapsed time. It indicates whether the music is
playing, muted, or stopped. It also shows the name of the next song
and displays an animated Zipit logo to show that the next-up song is
buffering.
If you pause the current track, the elapsed time will start blinking. If
you stop the track, then the track counter will be reset to 00. If you
press PLAY, the counter will restart.
Once the music is playing, if you navigate back to a song title, the
song is paused and you can then go back and navigate through the
content list. If you stop navigating through the guide menu, the
player screen will reappear and the song that was playing will restart
from where it was paused.
Using MyStationz Internet Radio
If you don’t have access to a music server or SD memory card, or just
want to listen to a wider range of tunez, select radio stations that
stream over the Internet. First, go to Zipitwireless.com and choose
the range of stations you’d like to use.
The audio guide and player screen look and function similarly to those
for MyMusic and MyNetwork tunez.
25

SHOW YOUR STYLE
There are lots of ways to customize your
Zipit Wireless Messenger 2! Change these
settings as often as you’d like to match your
style or your mood:
Change your fontz, Away message, and
sounds for chatting. Update these
through the IM Options selection in the
Messaging Menu.
Download special Emoticonz, Fontz, and MySoundz packages from
Zipitwireless.com.
Play your tunez and watch slideshows of the pictures you save to an
SD memory card.
Set your favorite types of music for the MyStations Internet radio
feature.
Choose from several standard Zipit background images. Change
your selection at Zipitwireless.com.
Upload your own personal image to your Zipit account; then
download it to your Zipit device. Your background image will not
be available to anyone else!
26

TAKE CONTROL
Use the Global Settings to control settings
that are applied across all functions of the
Zipit device. From the Home Menu, select
Global Settings and then Chat, Device, or
Music.
These feature menus will show all context-
sensitive settings for these operating modes.
Chat and Music functions will include those
discussed in the Speak Out and Listen Up topics in this guide. Device
functions include the following:
– LCD Backlight Timer
– Brightness
– Contrast
– Device Password
– MyFontz
– Owner
– Power Management
– Setup Wizard
– SysInfo
27

LOCK IT DOWN
Your Zipit Wireless Messenger 2 has built-in
security ⎯ it is immune to viruses, does not
allow pop-ups, and only allows connections by
buddies you know. You can enhance this
security by
Setting a password to prevent others
from accessing your IM accounts. From the Home Menu, select
Tools, then Global Settings, then Enable Password. Enter 4-6
characters (any mix of uppercase, lowercase, and digits).
If password protection is enabled, you must enter the password
before changing account setup or enabling or disabling an IM
account.
Filling in the Owner field in the Device Settings menu, then locking it
with a device password. Your Owner data will stay in your Zipit
device and cannot be accessed by anyone without your password.
Registering your device at Zipitwireless.com.
28
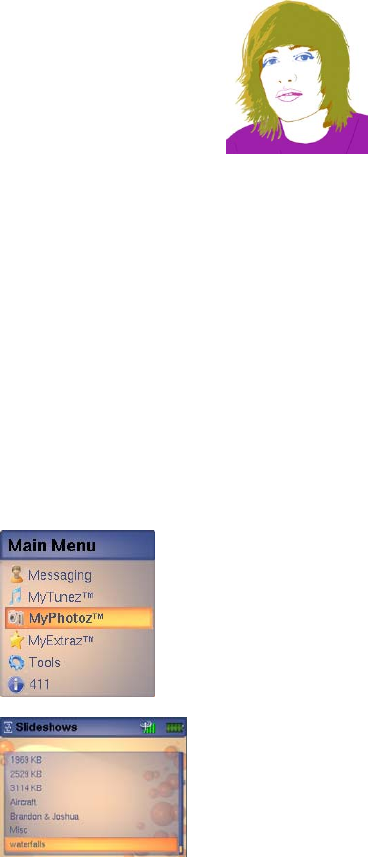
GO BEYOND
Your Zipit Wireless Messenger 2 has a
high-resolution display perfect for viewing
graphics and slideshows.
Just load your favorite graphics in a
directory called Pictures on your SD
memory card. If you organize your
graphics in subdirectories in the Pictures folder, your Zipit device will
treat each subdirectory as a separate slideshow.
Now follow these steps:
1. Insert the SD
card in your
device and
select MyPhotoz
from the Home
Menu.
2. Scroll through
the list of
slideshows and
select the one
you want to
view.
3. Use the PREV,
NEXT,
PLAY/PAUSE,
and STOP
buttons to
control your
slideshow.
29

The Now Showing player displays your slideshow. The bottom of the
player indicates whether the show is playing or paused, lists the
picture captions, and indicates the current and total number of
pictures in the show.
Ready to chill? Start
MyTunez and listen to
your favorite music
while you watch your
slides.
Got some great art? If you are registered at Zipitwireless.com, you
can install your personal art as the custom background on your Zipit
device.
30
TROUBLESHOOTING
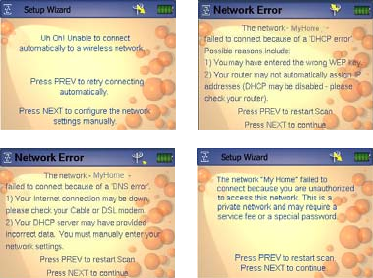
Understanding Setup Error Messages
There are 4 types of network error messages you might see while
trying to connect to a network:
Automatic connection failed: The Setup Wizard found at least one
network but could not connect to it.
DHCP error: There was a problem with your router’s IP address.
DNS error: Your Internet connection is down or there was a
problem with the DNS server.
Proprietary network: You are trying to connect to a private
network that requires a password and/or subscription.
31

If you see any of these error messages, you can press PREV to retry
the connection. You can also press NEXT to configure the network
yourself. Follow these steps:
1. The Setup Wizard
displays an error
message.
2. Press NEXT to enter the
configuration information
yourself and connect to
the network manually.
3. The Setup Wizard asks you to enter manual settings. (If you do
not know it, you can get this information from your network service
provider.) Enter the requested information and press NEXT.
4. The Setup Wizard retries the connection process. When you see
the Connected screen, continue to the section “Defining Your
Messaging Accounts” on page 11. If you still cannot connect, see
below for additional options.
Possible Error Message Causes and Solutions
Automatic connection failed
Your device is not in range of any wireless access points.
– Make sure that your access point is turned on and is functional.
Move closer to known wireless access points.
Available access points are not broadcasting their SSID.
Manually enter the SSID of the network (refer to the setup/configuration
page of the access point) in the space provided.
32

DHCP error
You entered an invalid SSID or an invalid WEP key.
The access point has been configured to disable DHCP.
The Internet connection is down.
The access point configuration is set incorrectly.
The DHCP server is providing incorrect network information.
The only networks available are “for fee” Hotspots.
From the “Uh Oh” screen, select the network that you want to access.
You will be given a brief list of the possible reasons for the failure and a
method to correct the failure condition.
Check your access point/router’s configuration screen to make sure that
the Authentication type is set to Open and that the Preamble is set to
Long.
DNS error
You entered an invalid SSID or invalid WEP key.
The access point has been configured to disable DHCP.
The DHCP server on your access point is providing incorrect network
information (this is very uncommon).
From the DHCP error screen, press NEXT to verify the SSID and WEP
information.
Verify that your access point/router has DHCP enabled. If not, enable it
and re-scan; or press NEXT after verifying the SSID and WEP to enter the
Static IP configuration screen. Confirm the required information from
your access point/router.
Proprietary network
The Internet connection is down.
Verify that you can access the Internet from a PC. If not, check the status
of your cable or DSL modem to see if it is receiving data from the Internet.
The DHCP server on your access point is providing incorrect network
information.
See “DNS Error” above.
33
Handling Network Setup Errors
During setup, your Zipit device might connect to a network but be
unable to connect to an instant messaging account. If this happens,
check the following:
Do you have an existing IM account with AIM, MSN, or Yahoo? You cannot
create an account through your Zipit device.
Go to http://www.aim.com, http://messenger.yahoo.com, or
http://messenger.msn.com to setup one or more accounts.
Restricted AOL accounts (such as KAOL) are not supported.
Did you enter your username and password correctly?
MSN accounts require the full account name, not just the screen name.
For example, if you have a Hotmail account, you must add
“@hotmail.com” to the login.
Are your router’s firewall settings preventing access to IM accounts?
Open the following ports to allow the IM traffic to pass through the firewall:
1863, 5190, 6891, 6901.
Recovering from Lost Connections and Chats
If you are logged into an IM service on your Zipit device and log in
again from another Zipit device, a phone, or a PC, your connection on
the first device will be “bumped” (logged off). You will have the
option to change IM accounts, reconnect, or stop chatting but
continue with other services.
If you are chatting and lose your network connection, the message “Network Lost”
will flash in the header bar of the chat window. Your chats will still be displayed,
but you will not be able to enter any new text. Once you have finished reading the
open chats, press the MyFriendz key. Your Zipit
34
device will scan for available networks and reconnect if possible.
FCC DECLARATION OF COMFORMITY
This device complies with Part 15 of the FCC Rules. Operation is subject to the
following two conditions:
1. This device may not cause harmful interference.
2. This device must accept any interference received, including interference
that may cause undesired operation.
Product: Zipit Wireless Messenger 2
Model: ZWM2
Responsible Party: Zipit Wireless, Inc.
200 N. Main Street, Suite 300
Greenville, SC 29601
Zipitwireless.com
Customer Support Toll Free: 1-866-92 ZIPIT
This equipment has been tested and found to comply with the limits for a Class
B digital device, pursuant to Part 15 of the FCC Rules. These limits are
designed to provide reasonable protection against harmful interference in a
residential installation. This equipment generates, uses and can radiate radio
frequency energy and, if not installed and used in accordance with the
instructions, may cause harmful interference to radio communications.
However, there is no guarantee that interference will not occur in a particular
installation. If this equipment does cause harmful interference to radio or
television reception, which can be determined by turning the equipment off and
on, the user is encouraged to try to correct the interference by one or more of
the following measures:
Reorient or relocate the receiving antenna.
Increase the separation between the equipment and receiver.
35
Connect the equipment into an outlet on a circuit different from that to which
the receiver is connected.
Consult the dealer or an experienced radio/TV technician for help
Radiation Exposure Statement:
This equipment complies with FCC radiation exposure limits set forth for an
uncontrolled environment. Maximum Specific Absorbtion Rate (SAR) (Body)
is 0.616 W/kg (1g).
This equipment must not be co-located or operating in conjunction with any
other antenna or transmitter.
36