Zonar Systems 2010HH Handheld RFID Tag Reader User Manual Manual
Zonar Systems Inc Handheld RFID Tag Reader Manual
Manual

REV: 9/04
FCC PART 15 COMPLIANCE
Compliance Statement (Part 15.19)
WARNING:
This device complies with Part 15 of the FCC Rules. Operation is subject to the following two
conditions:
(1) This device may not cause harmful interference and
(2) This device must accept any interference received, including interference that may cause undesired
operation.
Warning (Part 15.21)
Caution: Any change or modification not expressly approved by Zonar Systems could void the
user’s authority to operate the equipment.
19518 INTERNATIONAL BLVD.
SEATTLE, WA 98188.5493
877.THE.EVIR • FAX: 206.878.3082
www.zonarsystems.com
© 2004 Zonar Systems, LLC • is a registered trademark of Zonar Systems, LLC

1
TABLE OF CONTENTS
WHAT IT IS...............................................................................................................................3
HOW THE SYSTEM WORKS...................................................................................................3
WHY IT MATTERS ...................................................................................................................3
EQUIPMENT DESCRIPTION...................................................................................................4
KEYPAD & NAVIGATION .........................................................................................................5
SCHEMATIC OVERVIEW.........................................................................................................6
HOW TO USE......................................................................................................................7-10
INDEX OF FUNCTION ......................................................................................................11-12
LIMITED WARRANTY
Zonar does not represent or warrant that the hardware and software are free of bugs or errors and
shall not be liable for any losses (financial or non-financial) occurring as a result of such bugs or
errors. No other warranty express or implied, including any warranties of merchantability or particular
purpose, is provided for any hardware or software provided pursuant to this contract. Zonar shall
not be liable to customer, or any third-party for any general, special, punitive, incidental, indirect or
consequential damages, or any loss of profits or business, arising out of this agreement. In no event
shall Zonar’s liability exceed the value of one month’s subscription paid by customer to Zonar, not
to exceed one thousand dollars, under this agreement.
Zonar warrants that the hardware and software comprise a verified safety inspection system which,
when used according to Zonar's instructions, will allow the customer the ability to verify that safety
inspections have occurred. However, Zonar disclaims any liability arising as a result of operator
error (whether willful, negligent, or intentional) or misuse of the hardware or software. Customer
shall have no other liability and customer shall have no other remedy, except as specifically provided
in this paragraph; and in no event shall Zonar be liable for any consequential damages. The terms
and conditions of this agreement shall apply to any replacement hardware and software furnished.
2
WHAT IT IS
The Zonar 2010 Replaces Paper Forms For
Safety Inspections
The Zonar 2010 replaces all the paperwork that’s
required by Federal and State regulations for your
pre and post-trip inspections. It’s a handheld reader
for radio frequency identification (RFID) tags. The
RFID tags have been placed around the vehicle
you drive in critical inspection areas or zones. So
now as you go around the vehicle checking
components, instead of paper forms, you’ll use the
Zonar 2010.
HOW THE ZONAR SYSTEM WORKS
The Zonar 2010’s Part of An Electronic Safety
Inspection System
The Zonar System is a paperless, electronic safety
inspection system. In other words, the power of
computers and the Internet eliminate the hassles
of dealing with paperwork. Recording, reviewing,
storing, and managing vehicle inspections becomes
easier and faster. And most importantly, the Zonar
System helps make sure that you’re always driving
a safe vehicle.
Specially Programmed Radio Frequency
Identification (RFID) Tags
RFID tags have been put on the vehicle in critical
inspection areas or zones. The RFID tags, which
are weather-resistant—they can withstand mud,
grease, and even ice—contain information about
their location on the vehicle, fleet numbers, and
the components you need to inspect.
The Zonar 2010 reads the tags and then prompts
you to indicate whether the components in a
particular zone are OK or BAD. When you find
problems with components, you’ll select descriptions
of their defective conditions from a list. Then, you’ll
decide whether or not it’s safe to operate the vehicle
with the defective conditions.
If you’re driving and stopped by a state trooper or
police officer, you’ll use the Zonar 2010 to provide
on-road inspection verification.
Safety Inspection Information Stored In A
Computer Instead of Boxes
The information about safety inspections that you
record in the Zonar 2010 gets transmitted to
computers at Zonar Systems via the Internet. How?
You’ll place the Zonar 2010 into a Reader
Downloading Station (RDS) that’s been installed
where you work.
Management, safety, and maintenance personnel
access the pre and post trip inspection reports from
their computers. No more passing of paper,
complaints about lost reports and illegible handwriting,
and unnecessary delays in getting repairs made.
WHY IT MATTERS
The Zonar 2010 reads the tags and then prompts
you to indicate whether the components in a particular
zone are OK or BAD. When you find problems with
components, you’ll select descriptions of their
defective conditions from a list. Then, you’ll decide
whether or not it’s safe to operate the vehicle with
the defective conditions. If you’re driving and stopped
by a state trooper or police officer, you’ll use the
Zonar 2010 to provide on-road inspection verification.
Safety Inspection Information Stored In A
Computer Instead of Boxes
The information about safety inspections that you
record in the Zonar 2010 gets transmitted to
computers at Zonar Systems via the Internet. How?
You’ll place the Zonar 2010 into a Reader
Downloading Station (RDS) that’s been installed
where you work.
Management, safety, and maintenance personnel
access the pre and post trip inspection reports from
their computers. No more passing of paper,
complaints about lost reports and illegible handwriting,
and unnecessary delays in getting repairs made.
3
06/15/02 08:30
REPORT HISTORY
CURRENT REPORT >
MANUAL INSP
SET CONTRAST
VERSION
STORE CURR RPT
SELECT ITEM
4
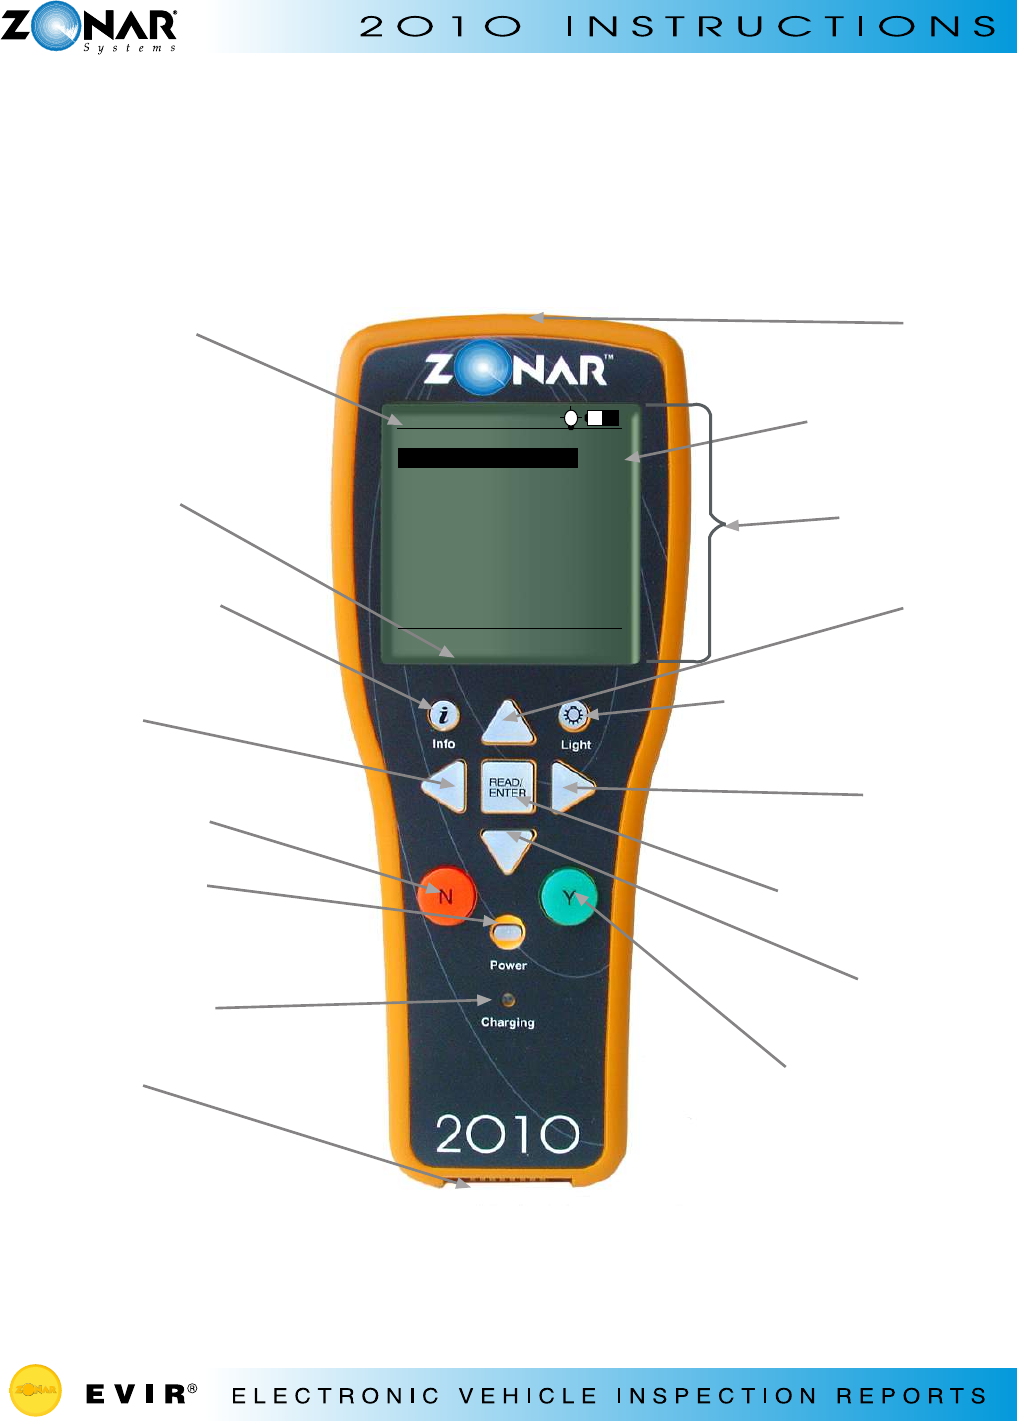
EQUIPMENT DESCRIPTION
Date/Time;
Spotlight Indicator;
Battery Level;
(Title Line)
Instruction Line
Info button for main
menu
LEFT arrow
Red N (no) button
Power button for
turning Zonar 2010
ON/OFF
Charging indicator
Light
Power/Data
Connector
Spotlights
> Cursor character
Display Window
UP arrow
Light (for spotlights) button
RIGHT arrow
READ/ENTER button
DOWN arrow
Green Y (yes) button
5
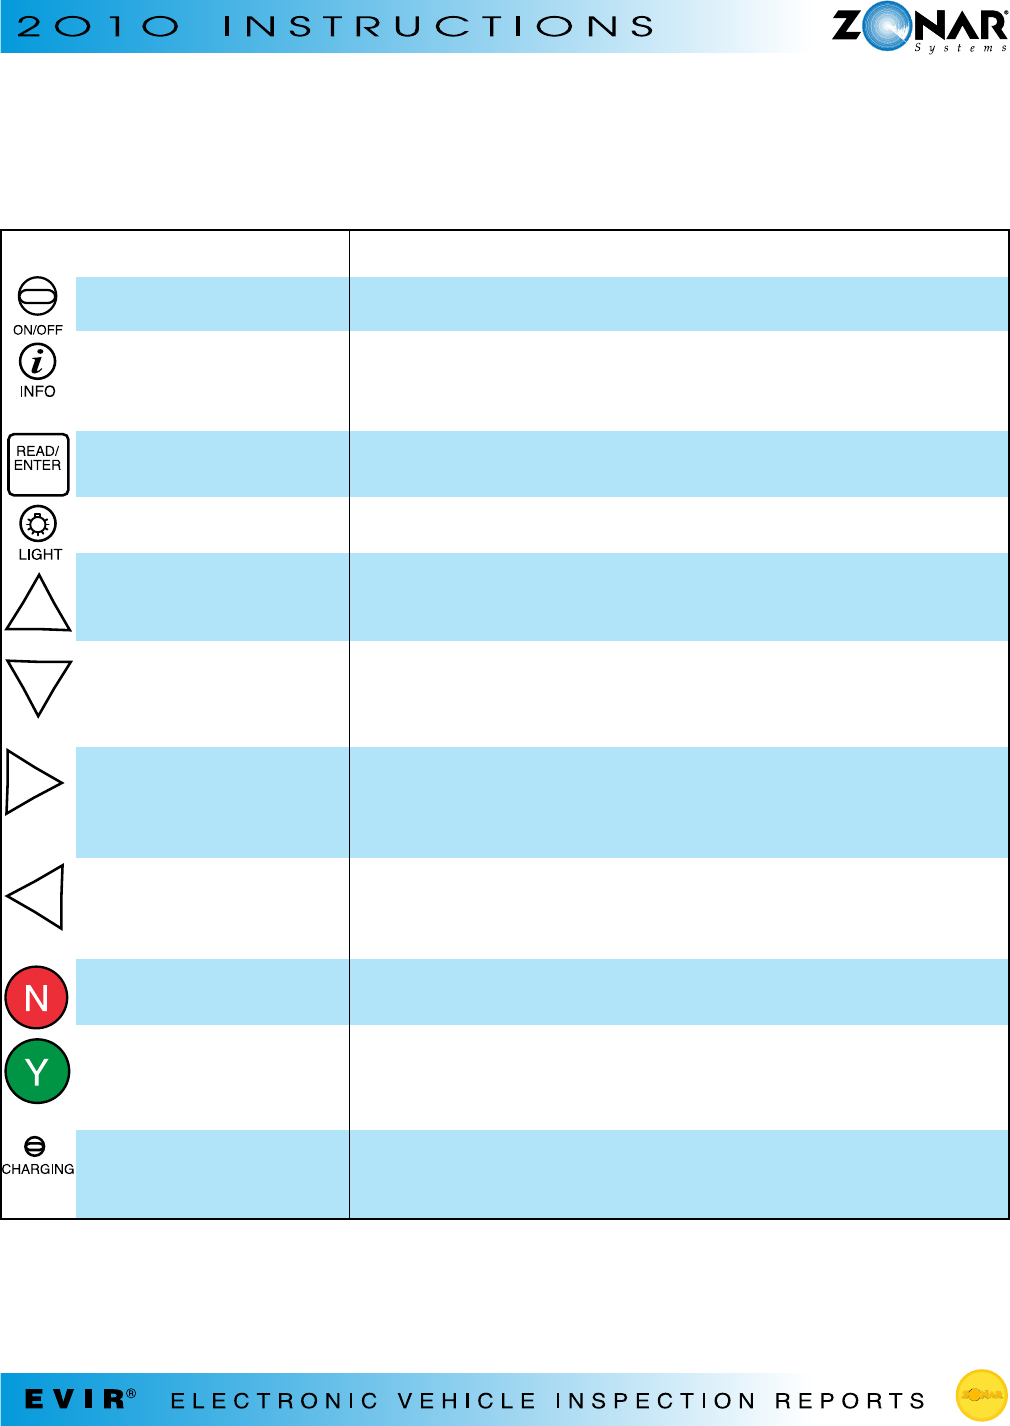
KEYPAD & NAVIGATION
USE: TO:
Power button • Turn the Zonar 2010 on/off
Info button • Return to the main menu at any time (except
when you’re being prompted to enter a value or answer a
question)
READ/ENTER button • Read a card or tag
• Enter mileage/hours
Light button • Turn the spotlights on/off
UP arrow • Scroll up
• Add by increments of 1 (e.g. for mileage or screen contrast)
• Accelerate adding increments up to 10,000: hold after pressing
DOWN arrow • Scroll down
• Decrease by increments of 1
• Accelerate decreasing increments: hold after pressing
RIGHT arrow • View the next screen for an item that has the cursor character
> displayed
• Add by increments of 10
• Accelerate adding increments up to 10,000: hold after pressing
LEFT arrow • Go back to previous screen
• Decrease by increments of 10
• Accelerate decreasing increments: hold after pressing
Red N (no button) • Answer “No” to questions
• Enter a “Red” condition (for components that are BAD)
Green Y (yes button) • Answer “Yes” to questions
• Enter a “Green” condition (for components that
are OK)
Charging indicator light • Check for a steady green light when the battery is charging
• Check for a flashing green light when the batteries are fully
charged

6
7
HOW TO USE THE ZONAR 2010 FOR SAFETY INSPECTIONS
Complete Pre/Post-trip Inspections
• Turn on the Zonar 2010
- Remove the Zonar 2010 from its vehicle mount
- Press Power button
• Log in
- Press READ/ENTER button
- Place your Zonar ID Card within 2 inches of the Zonar 2010’s spotlights
- Press any button after reviewing System Info screen
- Select inspection configuration using the Right button on the desired inspection. (Multi
configuration only)
- Wait for Report History screen to appear
• Review previous inspection report (located at top of the list on Report History screen)
• Read the Asset tag
- Position the Zonar 2010’s spotlights within 2 inches of Asset tag; press READ/ENTER button
- Verify that vehicle number appears on screen
- Enter vehicle’s mileage
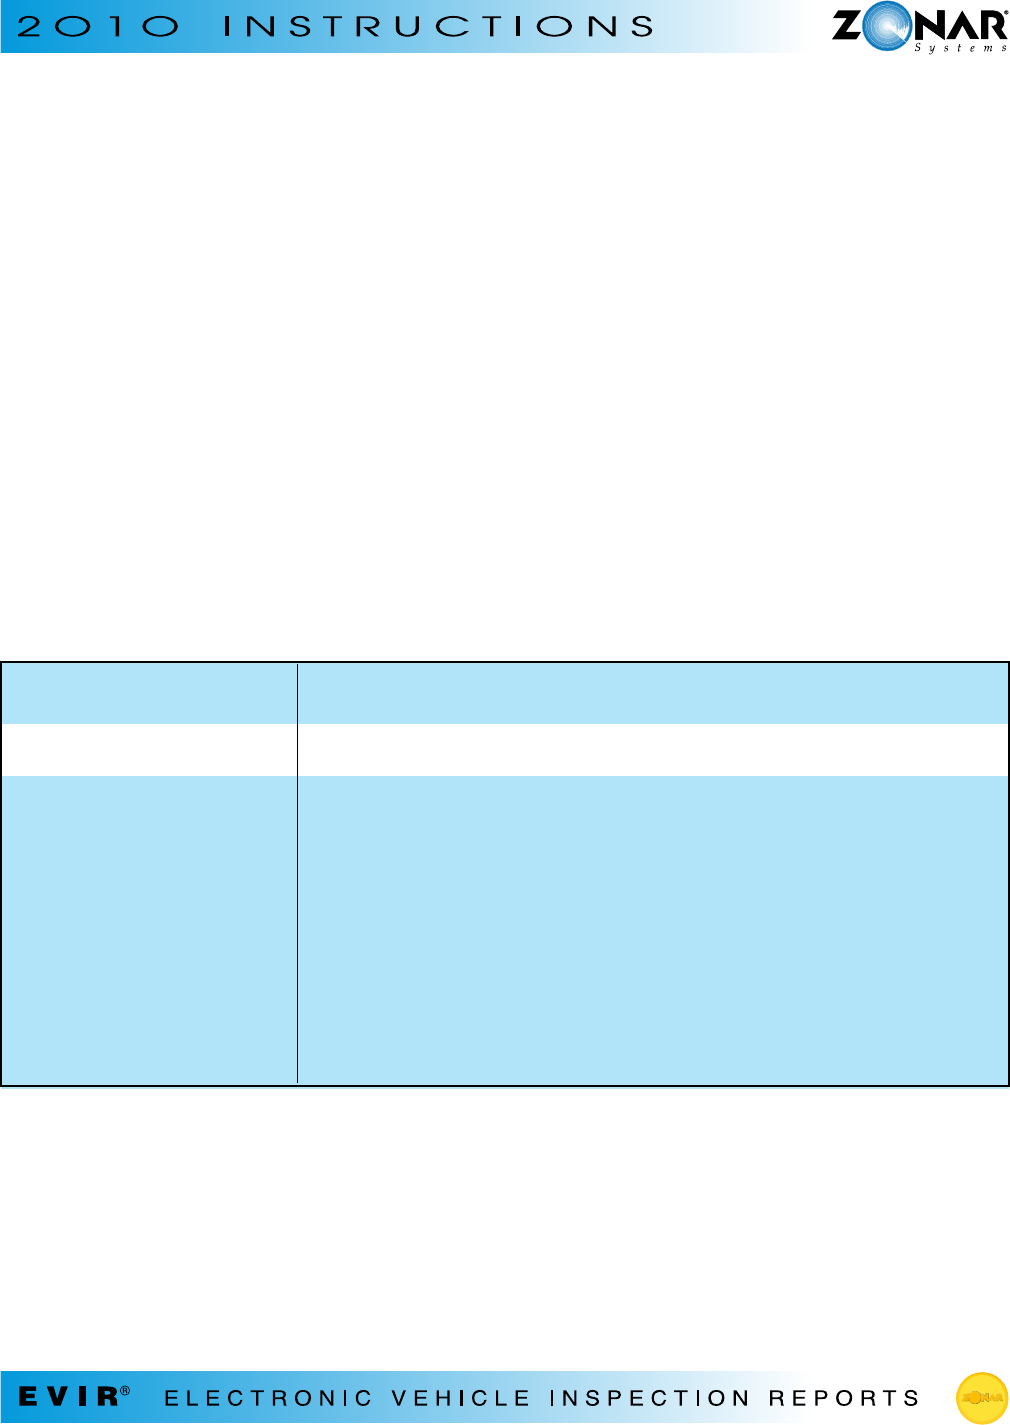
IF THE PREVIOUS THEN:
REPORT IS:
OK Press Info to go to main menu
BAD • Press RIGHT arrow to go to BAD report screen
• Press RIGHT arrow to go to ZONES screen to view which zones
have defective components
• Use the UP/DOWN arrows to go to a defective zone (R or Y)
Note: Green = OK; Yellow = defective condition but safe to operate;
Red = defective condition—not safe to operate
• Press RIGHT arrow to view display that lists defective components’
conditions
• Press Info to go to main menu

8
TO: THEN:
Add increments of 1 Press the UP arrow
Decrease increments of 1 Press the DOWN arrow
Add increments of 10 Press the RIGHT arrow
Decrease increments of 10 Press the DOWN arrow
Record the mileage in the report Press READ/ENTER
Note: Holding the arrow buttons accelerates adding or decreasing increments.
• Inspect all the components in a zone
- Go to a zone (following the order you’ve been given)
- Position the Zonar 2010’s spotlights within 2 inches of RFID tag
- Press READ/ENTER
- Inspect each component listed
- Determine if each component is OK—no defects
IF THE CONDITION OF: THEN:
All the components are OK • Press the green Y (yes) button
• Verify that there’s a G for a green condition
(OK) by the zone
• Inspect the next zone
One or more of the components aren’t OK Press the red N (no) button
- Identify the defective condition(s) for each component that isn’t OK
TO: THEN:
View a list of defective conditions for a Highlight the component with the defective
component condition (by scrolling with the UP and DOWN
arrows); press the RIGHT arrow
Select a defective condition from the list of Highlight the defective condition from the list
defective conditions for a component (by scrolling with the UP and DOWN arrows);
press the RIGHT arrow
9
- Decide whether the vehicle is safe to operate with the defective condition(s)
IF: THEN:
The vehicle is safe to operate with the Press the green Y (yes) button to flag the defect
defective condition as Yellow
The vehicle isn’t safe to operate with the Press the red N (no) button to flag the defect
defective condition as Red
Note: If you need to enter a component that’s not listed:
1) Scroll to OTHER
2) Press the RIGHT arrow to go to the next screen
3) Use the UP, DOWN, RIGHT, LEFT arrows to select the character you want
4) Press READ/ENTER to highlight the character (the maximum number of characters you can
enter is 18)
5) Erase text or add a space using “<” or “>” characters
6) Press the Info button when you’ve completed entering text for the “OTHER” component. (A
screen titled “OTHER” will be displayed with a list of defective conditions.)
7) Highlight the defective condition for this “OTHER” component (by scrolling with the UP and
DOWN arrows); press the RIGHT arrow
8) Decide if the vehicle is safe to operate with this defective condition; press the red N (no)
button if it isn’t OR press the green Y (yes) button if the vehicle is safe to operate with this
defective condition.
Note: If you need to enter a description of a condition that’s not listed:
1) Scroll to OTHER
2) Press the RIGHT arrow to go to the next screen
3) Use the UP, DOWN, RIGHT, LEFT arrows to select the character you want
4) Press READ/ENTER to highlight the character (the maximum number of characters you can
enter is 18)
5) Erase text or add a space using “<” or “>” characters
6) Press the Info button when you’ve completed entering text for the “OTHER” condition
7) Decide if the vehicle is safe to operate with this defective condition; press the red N (no)
button if it isn’t OR press the green Y (yes) button if the vehicle is safe to operate with this
defective condition
- Continue inspecting the zones until the question mark in front of each zone on the ZONES
screen has been replaced with a G, Y, or R
WHEN: THEN:
You’re ready to inspect the next zone • Go to the next zone
• Position the Zonar 2010 within 2 inches of
RFID tag; press READ/ENTER
• Follow the directions above for inspecting a
zone
10
• Turn off the Zonar 2010’s power
- Press Power button
• Return the Zonar 2010 to its vehicle mount between trip inspections
- Transmit Completed Pre/Post-trip Inspections To Zonar Systems
• Place Zonar 2010 into Reader Downloading Station (RDS)
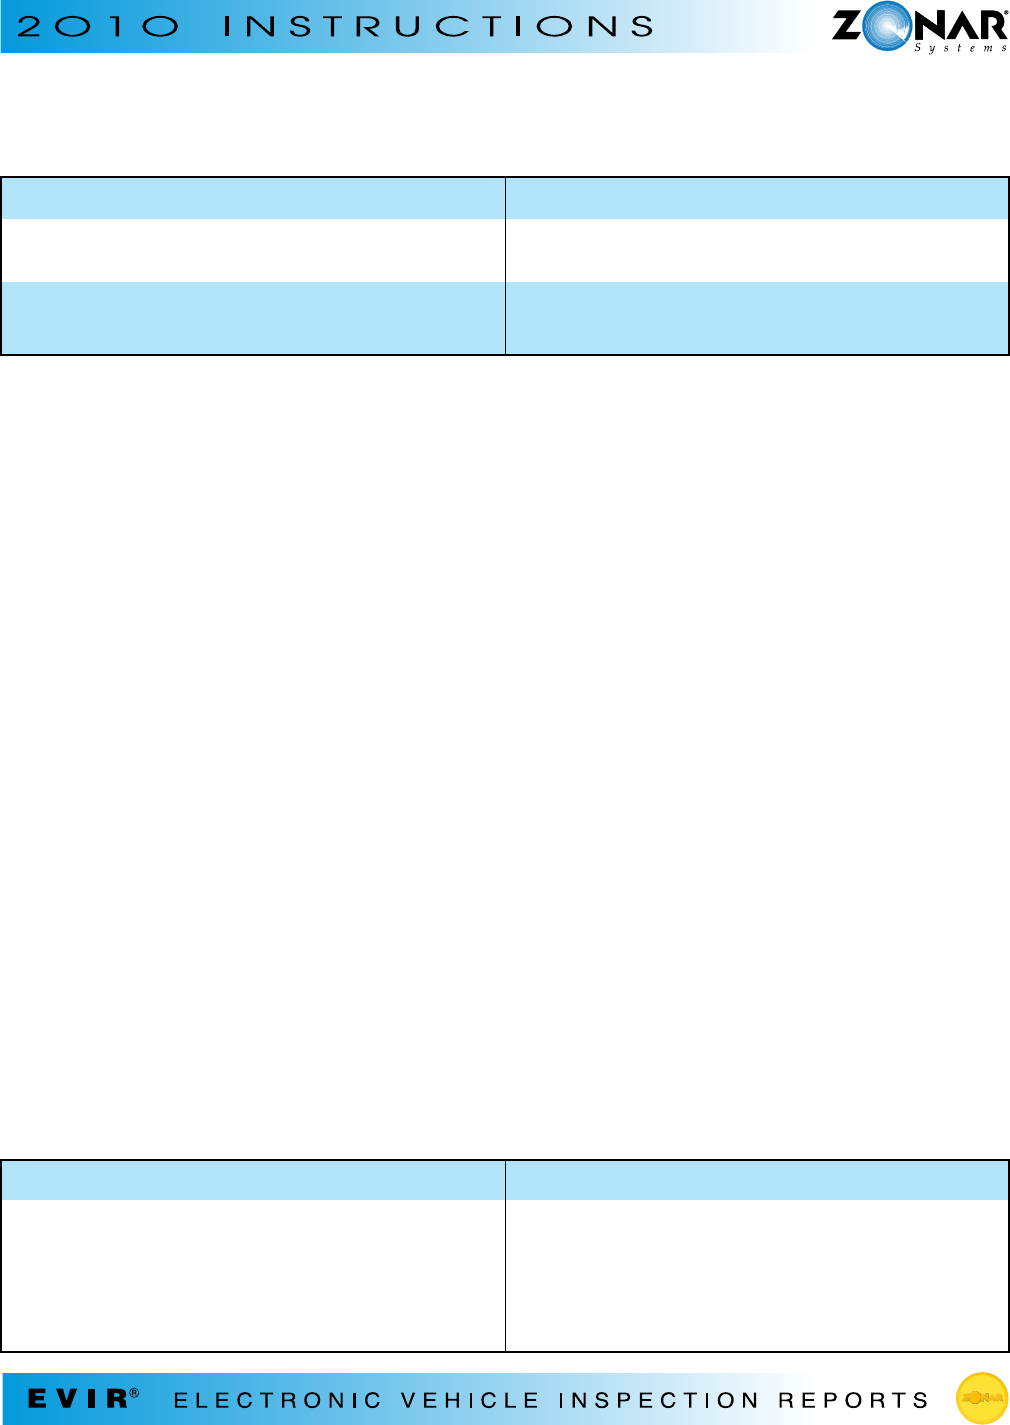
WHEN: THEN:
The inspections reports are being transmitted • The light on the cradle changes from
green to red
• The screen shows: ‘Downloading…’
The light on the cradle is red Don’t remove the Zonar 2010 from the cradle
The light on the cradle changes from red to green The transmission is complete and you can
remove the Zonar 2010 from the cradle
Charge The Zonar 2010’s Batteries
Place the Zonar 2010 into its vehicle mount (connected to the 12V power using a cigarette
ighter adapter or wired directly to the electrical system)
Note: While the Zonar 2010 is in its vehicle mount or RDS, the CHARGING indicator light will be
a steady green. When the batteries are fully charged, the CHARGING light flashes green. While
the time to fully charge the batteries varies depending upon the beginning battery level, it typically
takes four hours to fully charge the batteries.
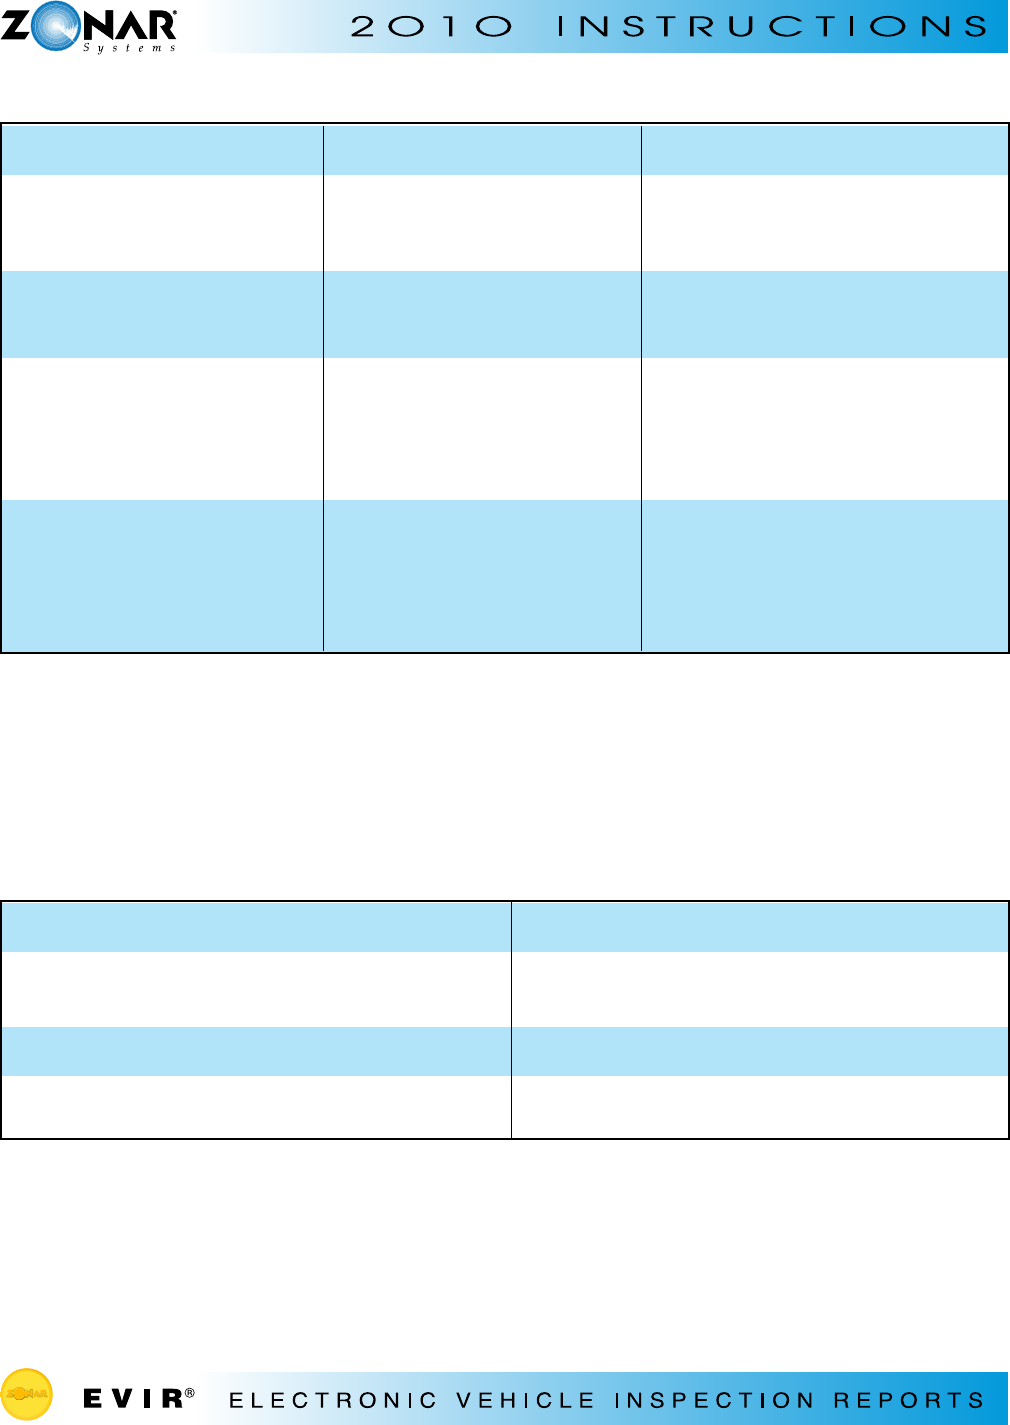
The Store Report screen
appears after you’ve inspected
all the zones
The Store Report screen
appears after you’ve inspected
all the zones
The Incomplete Report screen
appears after selecting Store
Curr Report from the Main Menu
The Incomplete Report screen
appears after selecting Store
Curr Report from the Main Menu
Press the green Y (yes) button
Press the red N (no) button
Note: You’ll return to the Zones
screen and can make changes
• Press the red N (no) button
• Go back and inspect the missing
components
• Follow directions for storing the
current report
Press the green Y (yes) button to
make a permanent record of the
incomplete report
Note: An incomplete report is
recorded as BAD on the Report
History screen
You’re ready to make a
permanent record of the
inspection report
You’re not ready to make a
permanent record of the
inspection report
You want to go back and
complete inspecting the missing
listed zone(s)
You don’t want to go back and
complete inspecting the missing
listed zone(s)
• Store the current report
IF: AND: THEN:
INDEX of FUNCTIONS
TO: THEN:
Activate the RFID tags so they can be read Position the Zonar 2010’s spotlights within 2
inches of tag; press READ/ENTER
Add incremental values of 1 Press the UP arrow
Add incremental values of 10 Press the RIGHT arrow
Accelerate adding/decreasing values Hold the (UP/RIGHT/DOWN/LEFT) arrow
after pressing
Answer “No” to questions Press the red N (no) button
Answer “Yes” to questions Press the green Y (yes) button
Charge the batteries Place the Zonar 2010 into its vehicle mount,
10x charger or RDS
Darken the text on screens • Highlight SET CONTRAST from main menu
by scrolling the cursor with the DOWN arrow;
press the RIGHT arrow
• Press the UP arrow to increase the percentage
• Press READ/ENTER to set contrast
Decrease incremental values by 1 Press the DOWN arrow
Decrease incremental values by 10 Press the LEFT arrow
Delete text Use the “<” character
Determine the battery level of the main menu Locate the drawing of a battery on the title line
Note: Completely black = fully charged
Determine operator who stored previous report • Press the RIGHT arrow after REPORT
HISTORY on the main menu
• Press the RIGHT arrow after the first report in
the list on the REPORT HISTORY screen (to
go to the next screen)
• Highlight OPERATOR
Enter a “Green” condition
(for components that are OK) Press the green Y (yes) button
Enter mileage • Position the Zonar 2010’s spotlights within 2
inches of Asset tag; press READ/ENTER button
• Use the UP/RIGHT arrows to add increments;
hold to accelerate adding increments • Press READ/ENTER
11
12
INDEX of FUNCTIONS
TO: THEN:
Enter text for an “OTHER” component or
condition that’s not listed • Use the UP, DOWN, RIGHT, LEFT arrows to
select the character you want (use the “>”
character for a space; to erase text use the
“<” character)
• Press READ/ENTER
• Press the Info button when you’ve
completed entering text
Note: The maximum number of characters you
can select is 18.
Enter a “Red” condition (for components
that are BAD) Press the red R (no) button
Highlight your selection from a list Scroll the UP/DOWN arrows to make your
selection
Lighten the text on screens • Highlight SET CONTRAST from main menu
by scrolling the cursor with the DOWN arrow
• Press the RIGHT arrow
• Press the DOWN arrow to decrease the
percentage
• Press READ/ENTER to set contrast
Log in • Press READ/ENTER button
• Place your Zonar ID Card within 2 inches of
the Zonar 2010’s spotlights
Read a RFID tag • Position the Zonar 2010’s spotlights within
2 inches of tag
• Press READ/ENTER
Review most recent inspection report • Press the RIGHT arrow after REPORT
HISTORY on the main menu
• Press the RIGHT arrow after the first report
in the list on the REPORT HISTORY screen
Store the current report Press the green Y (yes) button when the Store
Report screen appears
Transmit completed pre and post inspection Place Zonar 2010 into Reader Downloading
reports to Zonar Systems Station (RDS)
Turn the Zonar 2010 on/off • Press the Power button once to turn the
Zonar 2010 on or off
Turn the spotlights on/off Press the Light button
View the next screen for an item that has the
character > displayed Press the RIGHT arrow