Zoom Telephonics 0243WL Power switch with sensors User Manual zoomguardP1instruxOct1713

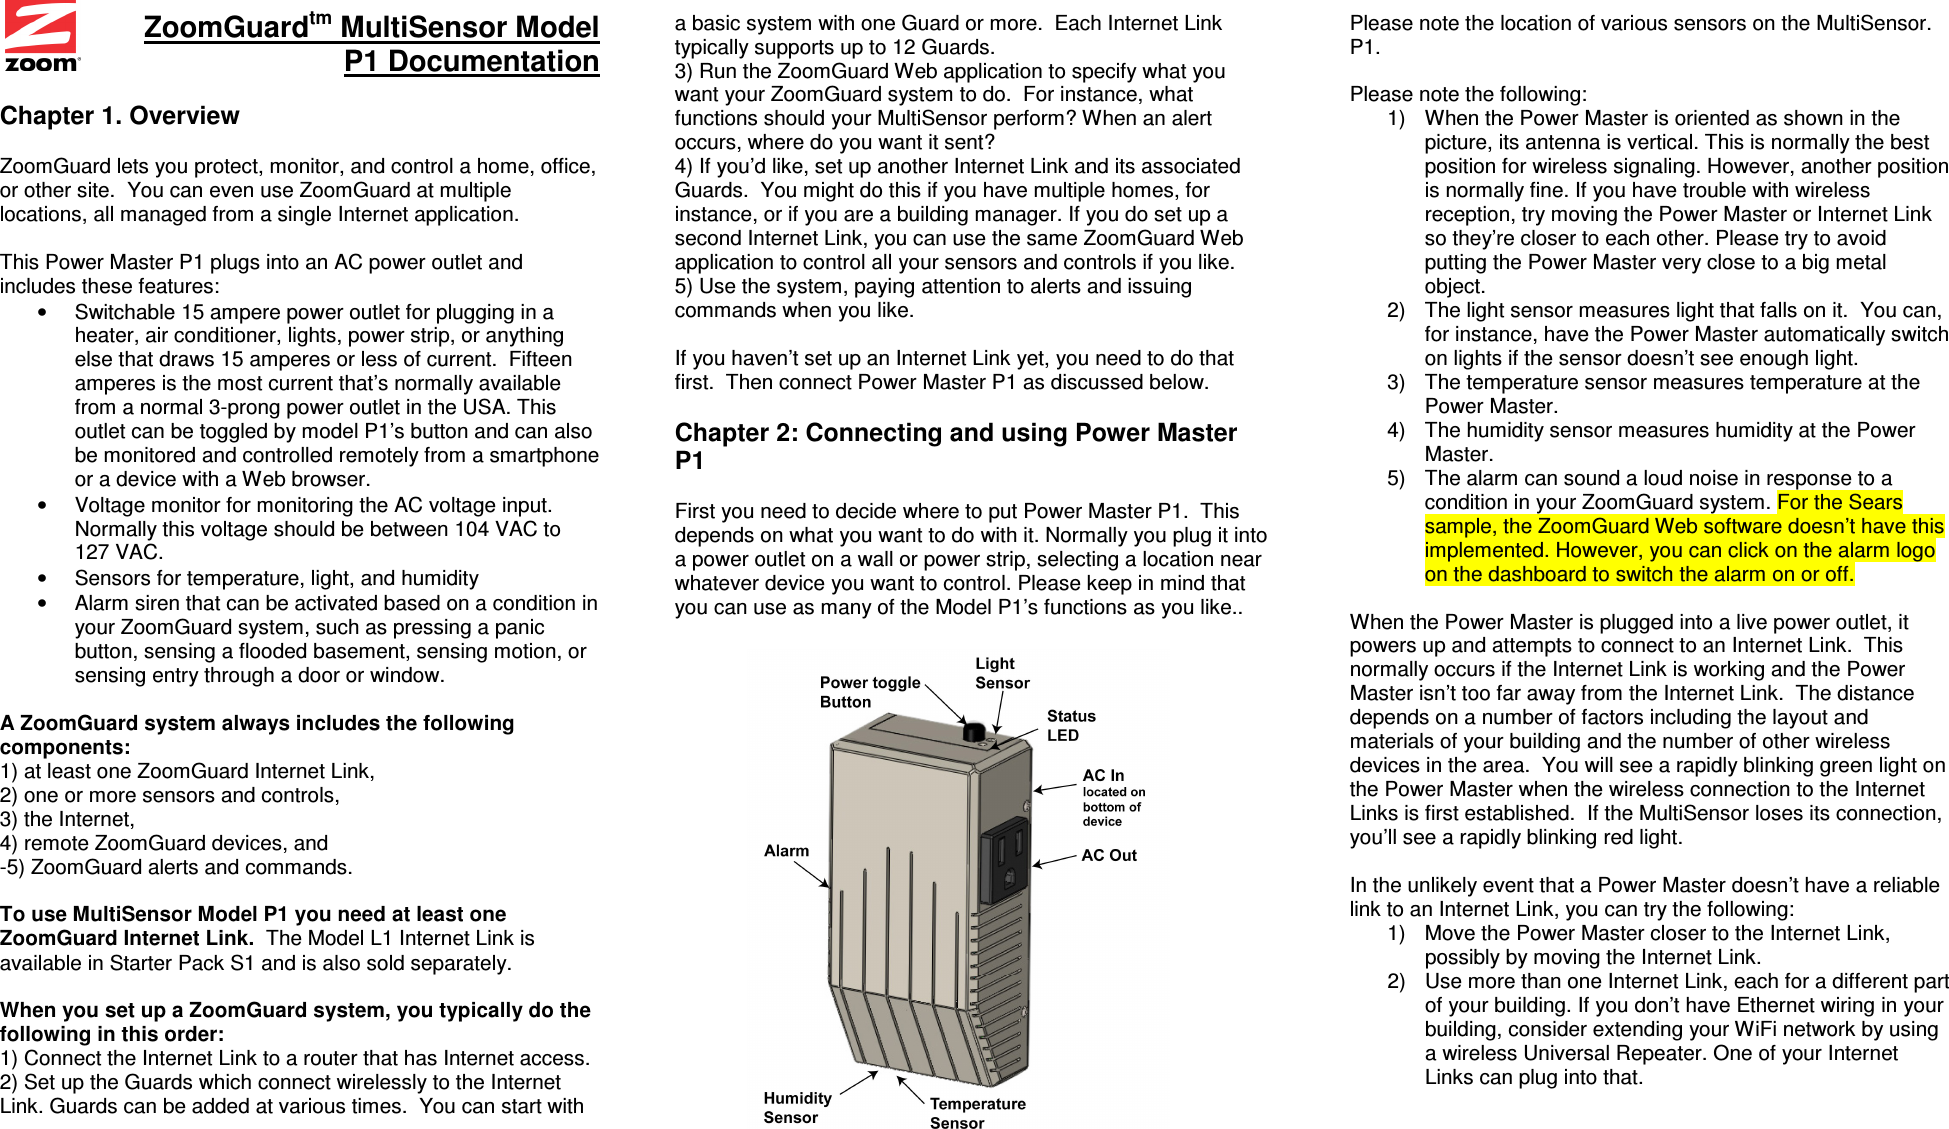
Zoom Telephonics Inc Power switch with sensors zoomguardP1instruxOct1713

Manual.pdf

ZoomGuardtm MultiSensor Model  P1 Documentation  Chapter 1. Overview  ZoomGuard lets you protect, monitor, and control a home, office, or other site.  You can even use ZoomGuard at multiple locations, all managed from a single Internet application.  This Power Master P1 plugs into an AC power outlet and includes these features: •  Switchable 15 ampere power outlet for plugging in a heater, air conditioner, lights, power strip, or anything else that draws 15 amperes or less of current.  Fifteen amperes is the most current that’s normally available from a normal 3-prong power outlet in the USA. This outlet can be toggled by model P1’s button and can also be monitored and controlled remotely from a smartphone or a device with a Web browser. •  Voltage monitor for monitoring the AC voltage input.  Normally this voltage should be between 104 VAC to 127 VAC.   •  Sensors for temperature, light, and humidity •  Alarm siren that can be activated based on a condition in your ZoomGuard system, such as pressing a panic button, sensing a flooded basement, sensing motion, or sensing entry through a door or window.  A ZoomGuard system always includes the following components: 1) at least one ZoomGuard Internet Link, 2) one or more sensors and controls,  3) the Internet, 4) remote ZoomGuard devices, and -5) ZoomGuard alerts and commands.   To use MultiSensor Model P1 you need at least one ZoomGuard Internet Link.  The Model L1 Internet Link is available in Starter Pack S1 and is also sold separately.   When you set up a ZoomGuard system, you typically do the following in this order: 1) Connect the Internet Link to a router that has Internet access. 2) Set up the Guards which connect wirelessly to the Internet Link. Guards can be added at various times.  You can start with a basic system with one Guard or more.  Each Internet Link typically supports up to 12 Guards. 3) Run the ZoomGuard Web application to specify what you want your ZoomGuard system to do.  For instance, what functions should your MultiSensor perform? When an alert occurs, where do you want it sent?  4) If you’d like, set up another Internet Link and its associated Guards.  You might do this if you have multiple homes, for instance, or if you are a building manager. If you do set up a second Internet Link, you can use the same ZoomGuard Web application to control all your sensors and controls if you like. 5) Use the system, paying attention to alerts and issuing commands when you like.  If you haven’t set up an Internet Link yet, you need to do that first.  Then connect Power Master P1 as discussed below.  Chapter 2: Connecting and using Power Master P1   First you need to decide where to put Power Master P1.  This depends on what you want to do with it. Normally you plug it into a power outlet on a wall or power strip, selecting a location near whatever device you want to control. Please keep in mind that you can use as many of the Model P1’s functions as you like..                       Please note the location of various sensors on the MultiSensor. P1.  Please note the following: 1)  When the Power Master is oriented as shown in the picture, its antenna is vertical. This is normally the best position for wireless signaling. However, another position is normally fine. If you have trouble with wireless reception, try moving the Power Master or Internet Link so they’re closer to each other. Please try to avoid putting the Power Master very close to a big metal object. 2)  The light sensor measures light that falls on it.  You can, for instance, have the Power Master automatically switch on lights if the sensor doesn’t see enough light. 3)  The temperature sensor measures temperature at the Power Master. 4)  The humidity sensor measures humidity at the Power Master. 5)  The alarm can sound a loud noise in response to a condition in your ZoomGuard system. For the Sears sample, the ZoomGuard Web software doesn’t have this implemented. However, you can click on the alarm logo on the dashboard to switch the alarm on or off.  When the Power Master is plugged into a live power outlet, it powers up and attempts to connect to an Internet Link.  This normally occurs if the Internet Link is working and the Power Master isn’t too far away from the Internet Link.  The distance depends on a number of factors including the layout and materials of your building and the number of other wireless devices in the area.  You will see a rapidly blinking green light on the Power Master when the wireless connection to the Internet Links is first established.  If the MultiSensor loses its connection, you’ll see a rapidly blinking red light.  In the unlikely event that a Power Master doesn’t have a reliable link to an Internet Link, you can try the following: 1)  Move the Power Master closer to the Internet Link, possibly by moving the Internet Link. 2)  Use more than one Internet Link, each for a different part of your building. If you don’t have Ethernet wiring in your building, consider extending your WiFi network by using a wireless Universal Repeater. One of your Internet Links can plug into that.
Chapter 3: Using the ZoomGuard Web Application  ZoomGuard Web software is easy and self-documented. We recommend doing setup using a computer or tablet, since they have larger screens than a phone.  However, you can use a smartphone or anything else that has a Web browser.  To use ZoomGuard Web software with your sample(s), go to  www.zoom-guard.com/sample        (Note the dash between zoom and guard.) There you enter your e-mail address, a password, and information for the Guards you set up.  The Guard Device ID is the 5-digit Device ID that’s on the Guard’s label.  The Name typically reminds you where you put the Guard.  After you sign in, you can activate some or all of your Guard’s sensors. You can set up alerts in the event that something happens – for instance, ZoomGuard Power Master sees that an area is too hot, too dark, or too humid  After your Guard is set up, you can use the Dashboard to monitor your Guard.  If you ever want to modify settings or see the Dashboard, you can log into www.zoom-guard.com and then enter your e-mail and password, the same ones you used above. You can use any Web browser including a smartphone’s browser.  There will also be apps for Android phones and tablets, and for the iPhone and iPad.  If you have more than one Guard, you can use the same ZoomGuard Web software to add additional Guards, determine how they’re configured, and monitor them.  Enjoy!  If you need help, using the ZoomGuard application, use the Help button at the top of the page.  You can also call 617-753-0500.  Chapter 4: Using the ZoomGuard iPhone Ap (We still need to write this chapter.) Chapter 6: Using the ZoomGuard Android Ap (We still need to write this chapter.)  Appendix A:  Compliance Information  This equipment has been tested and found to comply with the limits for a Class B digital device, pursuant to Part 15 of the FCC Rules. These limits are designed to provide reasonable protection against harmful interference in a residential installation. This equipment generates uses and can radiate radio frequency energy and, if not installed and used in accordance with the instructions, may cause harmful interference to radio communications. However, there is no guarantee that interference will not occur in a particular installation. If this equipment does cause harmful interference to radio or television reception, which can be determined by turning the equipment off and on, the user is encouraged to try to correct the interference by one of the following measures:  - Reorient or relocate the receiving antenna. - Increase the separation between the equipment and receiver. - Connect the equipment into an outlet on a circuit different from that to which the receiver is connected. - Consult the dealer or an experienced radio/TV technician for help.  This device complies with Part 15 of the FCC Rules. Operation is subject to the following two conditions: (1) This device may not cause harmful interference, and (2) this device must accept any interference received, including interference that may cause undesired operation.  FCC Caution: Any changes or modifications not expressly approved by the party responsible for compliance could void the user's authority to operate this equipment.  To comply with FCC’s and Industry Canada’s RF radiation exposure limits for general population/uncontrolled exposure, the antenna(s) used for this transmitter must be installed to provide a separation distance of at least 20 cm from all persons and must not be collocated or operating in conjunction with any other antenna or transmitter.  This device complies with Industry Canada licence-exempt RSS standard(s). Operation is subject to the following two conditions: (1) this device may not cause interference, and (2) this device must accept any interference, including interference that may cause undesired operation of the device.  Le présent appareil est conforme aux CNR d'Industrie Canada applicables aux appareils radio exempts de licence. L'exploitation est autorisée aux deux conditions suivantes : (1) l'appareil ne doit pas produire de brouillage, et (2) l'utilisateur de l'appareil doit accepter tout brouillage radioélectrique subi, même si le brouillage est susceptible d'en compromettre le fonctionnement.  Under Industry Canada regulations, this radio transmitter may only operate using an antenna of a type and maximum (or lesser) gain approved for the transmitter by Industry Canada. To reduce potential radio interference to other users, the antenna type and its gain should be so chosen that the equivalent isotropically radiated power (e.i.r.p.) is not more than that necessary for successful communication.  Conformément à la réglementation d'Industrie Canada, le présent émetteur radio peut fonctionner avec une antenne d'un type et d'un gain maximal (ou inférieur) approuvé pour l'émetteur par Industrie Canada. Dans le but de réduire les risques de brouillage radioélectrique à l'intention des autres utilisateurs, il faut choisir le type d'antenne et son gain de sorte que la puissance isotrope rayonnée équivalente (p.i.r.e.) ne dépasse pas l'intensité nécessaire à l'établissement d'une communication satisfaisante.

Navigation menu