Zoom Telephonics 1059 Bluetooth Docking Transmitter for iPod User Manual Manual
Zoom Telephonics Inc Bluetooth Docking Transmitter for iPod Manual
Manual
1
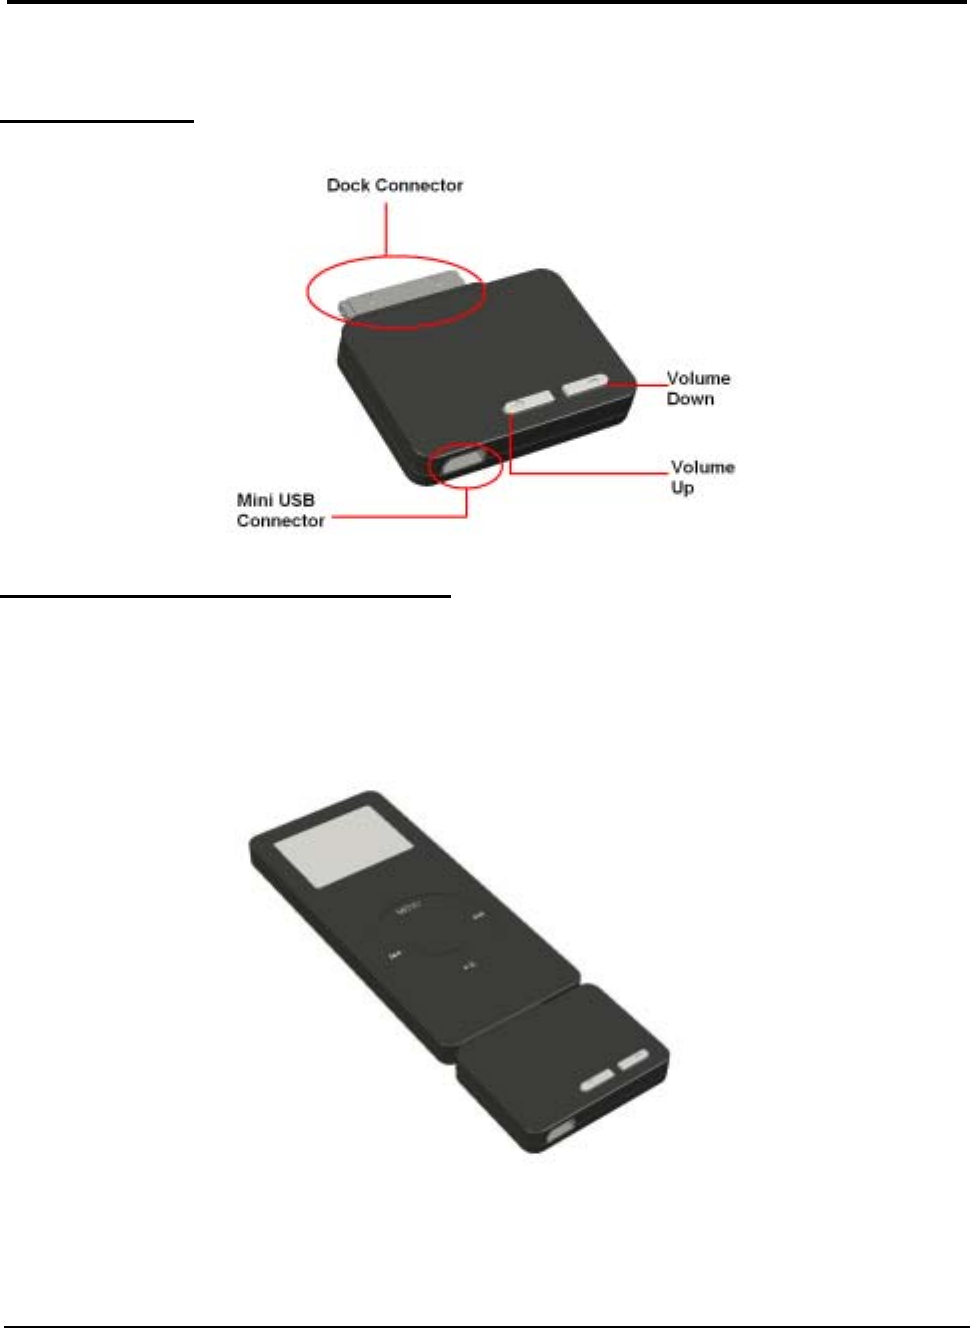
Product shape
Connecting my Audio Transmitter
1. Insert the connector on the bottom of i-pod (Dock Connector).
2. Press the unit until it is firmly attached..
A
udio Transmitte
r
for i-pod
Quick Guide

2
Audio Transmitter LED Indicator
Mode
Searching for last
connected device Pairing in process Connecting in
process
LED Indicator Red and blue flashing
alternatively Red/Blue alternate flash Slow Blue flash
Pairing with Bluetooth headset device
Before using your Audio Transmitter for the first time, you must pair it with a Bluetooth
enabled headset prior to usage. The “Pairing” process creates a unique wireless link
between two devices. Once paired the communications between the paired devices does
not need any further authentication or authorization.
Please follow the instruction below to pair the Audio Transmitter with a Bluetooth enabled
headset:
1. Follow the operating instructions that came with your Bluetooth headset to initiate the
pairing process.
2. After powering on the Audio Transmitter, it enters the pairing mode automatically with the
“Pairing LED indicator” flashing red and blue and waiting to be paired with another
Bluetooth headset for 3 minutes.
3. Once pairing is successful between the Audio Transmitter and the Bluetooth headset, the
Audio Transmitter will exit the pairing mode with the “Pairing LED indicator” blinking blue
every 5 seconds and will be ready to use.
*Note: The transmitter will power-on after it connect with i-pod, to turn it off, please hold
the “Volume Up” button for 5 sec, then the transmitter will power-off (just the transmitter
power off).
*Note: Audio transmitter will remember the last paired device its memory. Upon re-startup,
it will search for the last paired device (red and blue LED illuminating).
*Note: To re-pair the Audio Transmitter with another device, please remove the transmitter
from i-pod and connect with i-pod once more.
Remote Control by Bluetooth (AVRCP)
That audio transmitter support 2 profiles on Bluetooth, one is A2DP(Advance Audio
Distribution Profile), another is AVRCP (AV Remote Control Profile), the AVRCP profile can
provide user for Play / Pause / Stop / Forward / Backward functions, while your stereo
headset must support AVRCP, you can enjoy the music with remote control.
To get more information, please see the manual of the stereo headset.

3
Adjusting the Volume
User can adjust the volume up / down by 2 ways:
1. Adjust the volume up / down by the button on the transmitter.
2. Adjust the volume by the buttons on the headset
Charging your i-pod and exchange data with PC
You may charge the Li-ion battery of the i-pod by using the mini USB cable. at the same
time, you can also exchange data if you connect it with a USB port on PC.
Note:
1. To exchange the data with PC, the PC must installed i-tune on it.
2. If you install i-tune on your PC, it will lock i-pod for exchange data while connection
between PC and i-pod created. On this time, i-pod will not play music.
3. If your PC didn’t install the i-tune, your i-pod could play the music and charge at
the same time.
FCC statement in User's Manual (for class B)
"Federal Communications Commission (FCC) Statement
This Equipment has been tested and found to comply with the limits for a class B digital
device, pursuant to Part 15 of the FCC rules. These limits are designed to provide reasonable
protection against harmful interference in a residential installation. This equipment generates,
uses and can radiate radio frequency energy and, if not installed and used in accordance with
the instructions, may cause harmful interference to radio communications. However, there is
no guarantee that interference will not occur in a particular installation. If this equipment
does cause harmful interference to radio or television reception, which can be determined by
turning the equipment off and on, the user is encouraged to try to correct the interference by
one or more of the following measures:
- Reorient or relocate the receiving antenna.
- Increase the separation between the equipment and receiver.
- Connect the equipment into an outlet on a circuit different from that to which the receiver is
connected.
- Consult the dealer or an experienced radio/TV technician for help.
FCC Caution:
1.The device complies with Part 15 of the FCC rules. Operation is subject to the following
two conditions:
(1) This device may not cause harmful interference, and
(2) this device must accept any interference received, including interference that may
cause undesired operation.
2.This device and its antenna(s) must not be co-located or operating in conjunction with
any other antenna or transmitter.
3. Changes or modifications to this unit not expressly approved by the party responsible
for compliance could void the user authority to operate the equipment.
In addition to the requirements of Section 7.1.5 in RSS-Gen, the device's shall also
contain the following or equivalent statement: “Privacy of communications may not
be ensured when using this telephone”.
If privacy is provided as a standard feature, the privacy notice may be omitted
provided that full justification accompanies the equipment certification application for
evaluation by Industry Canada.