Zoom Telephonics BT4163 Bluetooth PC Card User Manual 354151
Zoom Telephonics Inc Bluetooth PC Card 354151
Contents
- 1. User Manual Part 1
- 2. User Manual Part 2
- 3. User Manual Part 3
User Manual Part 1

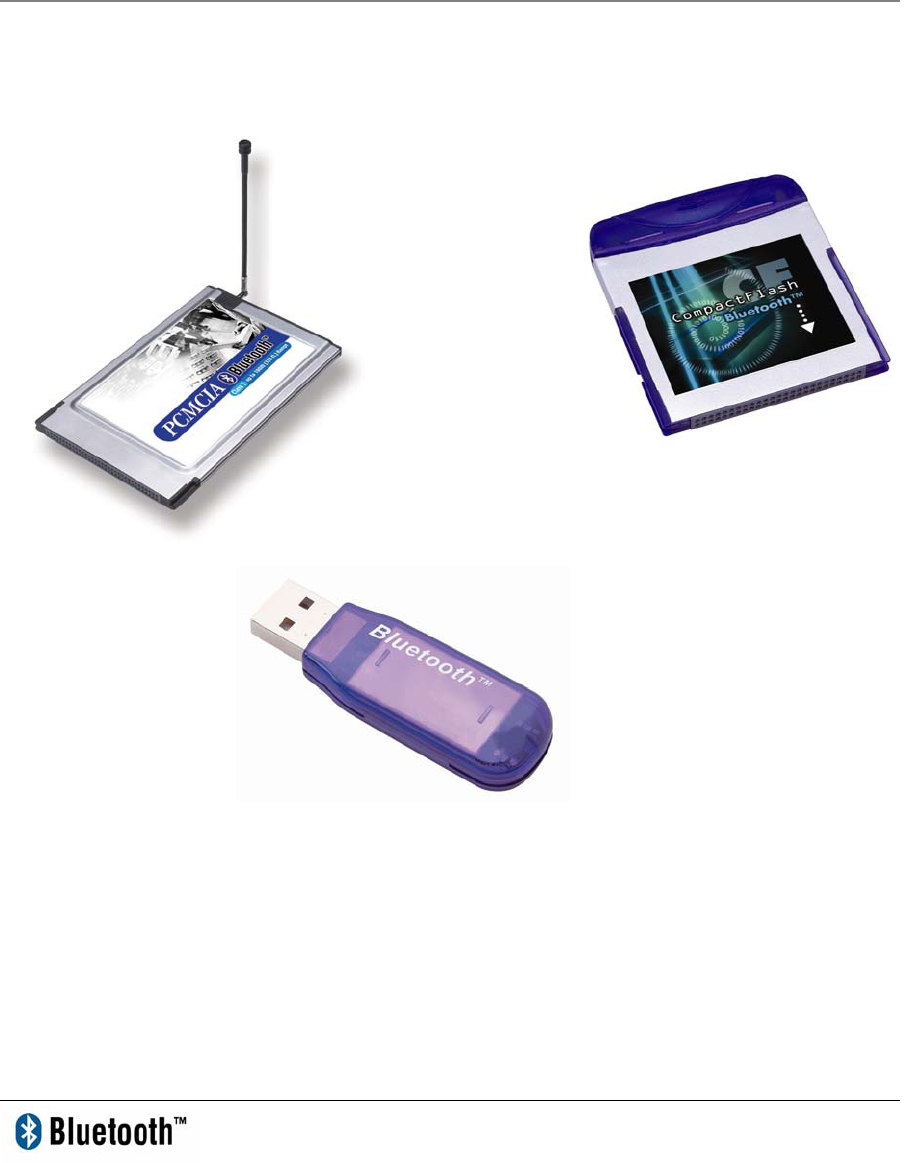
USB /PCMCIA /CF Adapter
Manual and
Application note
1.4
Manual and Application note

Index
INTRODUCTION i
CHAPTER1
Package 1
Features 1
Specifications 2
Mechanics 3
Certification 4
Environmental Operating Ranges 3
Power Consumption 3
LED Indication 4
Drivers support 4
CHAPTER2
Setup for Windows 98/2000/ME/XP 6
Setup for Mac 14
CHAPTER3
Application note for Windows
98SE/ME/2000/XP 14
Icons used for Bluetooth devices and
services 14
Network sharing setting for Windows 17
File transfer setting for Windows 25
Dial-up networking setting for Windows 27
FAX setting 30
PIM Item Transfer setting 31
PIM Synchronization setting 33
Serial Port setting 35
ActiveSync setting 36
Audio Gateway setting for windows 38
Personal area network setting for
Windows 40
CHAPTER4
Setup for PocketPC2000 & PocketPC2002
45
Configuring BTW-CE 50
Network sharing setting for WinCE 58
File transfer setting for WinCE 64
Dial-up networking setting for WinCE 68
Serial Port setting for WinCE 77
ActiveSync setting for WinCE 78
Hosting a Personal area network 82
CHAPTER5
How to pair with my mobile phone 83
How to pair with 6310 85
How to pair with 8910 86
How to pair with Ericsson T39m 87
How to pair with Ericsson T68 88
How to sync with Ericsson T68 via
XTNDConnectPC 89
How to sync with Nokia 7650 via Nokia PC
Suite for 7650 98
How to establish Bluetooth connection
with Nokia 3650 103
How to connect to Ericsson P800 via serial
port 113
How to setup Hyper Terminal for Bluetooth
transfer 140
How to HotSync with Palm Bluetooth SDIO
and Tungsten T 146
How to dial-up from Palm Tungsten T to my
PC’s modem to surf the internet 149
Sending FAX VIA mobile phone with
WinFAXPro 150
Bluetooth Printing to HP DeskJet 995c 154
CHAPTER6
Application note for Mac O.S. 159
TROUBLESHOOTING
Troubleshooting 168

1
Introduction
Bluetooth is an open specification for a cutting-edge technology that enables short-range
wireless connections between desktop and laptop computers, personal digital assistants,
cellular phones, printers, scanners, digital cameras and even home appliances — on a
globally available band (2.4GHz) for worldwide compatibility. In a nutshell, Bluetooth
unplugs your digital peripherals and makes cable clutter a thing of the past. Now you can
connect your PDA or PC to Bluetooth™ enabled mobile phone with this Bluetooth™
adapter.
You can access e-mail & Internet no matter where you are with just a little help from your
Bluetooth™ mobile phone.
Plus, when you are back in the office, you can hook yourself up to your office network as
well as communicate with other Bluetooth™-enabled devices.
i

2
Chapter1
Package
z One Bluetooth adapter
z One driver and software disk
z This user manual
Features
z Bluetooth v1.1 compliant
z USB Bluetooth adapter support full speed USB v1.1 Interface.
z CF Bluetooth adapter complies with CompactFlash type I Interface.
z PCMCIA Bluetooth adapter complies with PC Card Standard, including PCMCIA
release 2.1 and JEIDA 4.x standards.
z Wireless communication within a radius of 32 Feet (10 Meters) for Class 2 Bluetooth
devices.
z Wireless communication within a radius of 328 Feet (100 Meters) for Class 1
Bluetooth devices.
z Connect up to 7 different Bluetooth enabled devices
z Encryption and authentication to ensure safe, secure communications
z Low power consumption
Specifications
Main chip: CSR BlueCore 02
Protocol: Bluetooth 2.4 GHz ISM band frequency hopping
Data Rate: 721 Kbps
Connect up to 7 devices in a Piconet
Antenna: Integrated inside the adapter
0dBm(Class 2) Bluetooth radio:
Connection within a range of up to 32 feet (10 meters)
1

3
Class1 Bluetooth radio:
Connection within a range of up to 328 feet (100 meters)
Sensitivity: -80dbm at 0.1% Bit Error Rate (BER)
Security: encrypted link, authentication
Bluetooth profile support includes:
Generic Access Profile (GAP),
Serial Port Profile (SPP),
Service Discovery Application Profile (SDAP),
Generic Object Exchange Profile (GOEP),
Object Push Profile (OPP),
File Transfer Profile (FTP),
Dial-up Network Profile (DUN),
LAN Access Profile (LAP),
Fax Profile (FAX),
Synchronization Profile,
Headset Profile,
Personal Area Network (PAN)
Human Interface Device (HID)
Hardcopy Cable Replacement Profile (HCRP)
Mechanics
USB Bluetooth Dimension:
58.6 x 19.8 x 8.1 mm (L x W x H) (for Class 2)
72.2 x 29.8 x 8.5 mm (L x W x H) (for Class 1 width including external antenna)

4
CF Bluetooth Dimension:
47.3 x 42.9 x 4.58 mm (L x W x H)
PCMCIA Bluetooth Dimension:
86 x 54 x 5 mm (L x W x H)
Certification
FCC, CE, BQB
Environmental Operating Ranges
·Temperature: 0 ~ 50%
·Humidity: 10 ~ 90%
Power Consumption
USB Bluetooth:
Typical: 40mA/5V
Maximum: 90mA/5V
CF Bluetooth:
Typical: 40mA/3.3V
Maximum: 90mA/3.3V
PCMCIA Bluetooth:
Typical: 70mA/5V
Maximum: 210mA/5V
Idle: 25mA/5V
LED Indication
CF adapter LED: Power on, Activity
PCMCIA adapter LED: Activity
Drivers support
USB Bluetooth:

5
Windows 98SE, Me, 2000, XP, MAC O.S. 10.2.x
CF Bluetooth:
Windows 98SE, Me, 2000, XP, PPC2000, PPC2002
PCMCIA Bluetooth:
Windows 98SE, Me, 2000, XP,
6
Chapter2
Setup for Windows 98SE/2000/ME/XP
For PCMCIA or CF Bluetooth card, please install the driver before
installing Bluetooth software, the driver can be located in BTCF (for CF
Bluetooth adapter) or BTPCMCIA (for PCMCIA Bluetooth adapter) of the
driver CD.
For USB Bluetooth adapter, please install Bluetooth software before
inserting the USB adapter.
Install CF (PCMCIA) Bluetooth card driver
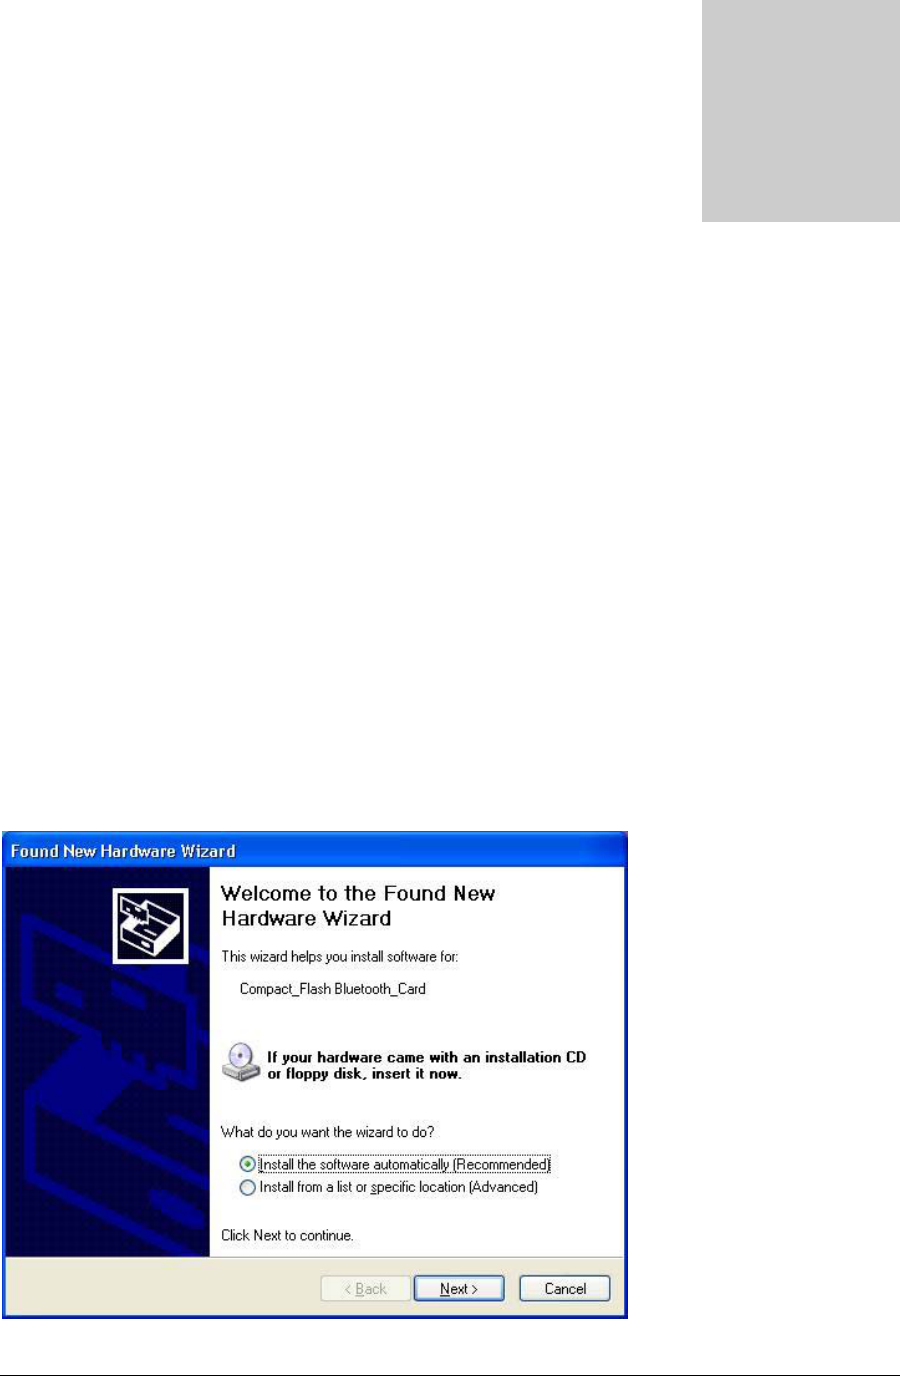
Please follow the steps below to install driver for CF Bluetooth card.
(1) Insert your CF Bluetooth card in a PCMCIA adapter.
(2) Plug the PCMCIA adapter in the PCMCIA slot of your notebook and place the
installation CD in the CD-ROM.
(3) System will automatically detect the card. Select "Install the software automatically
(Recommended)" and click "Next".
2
7
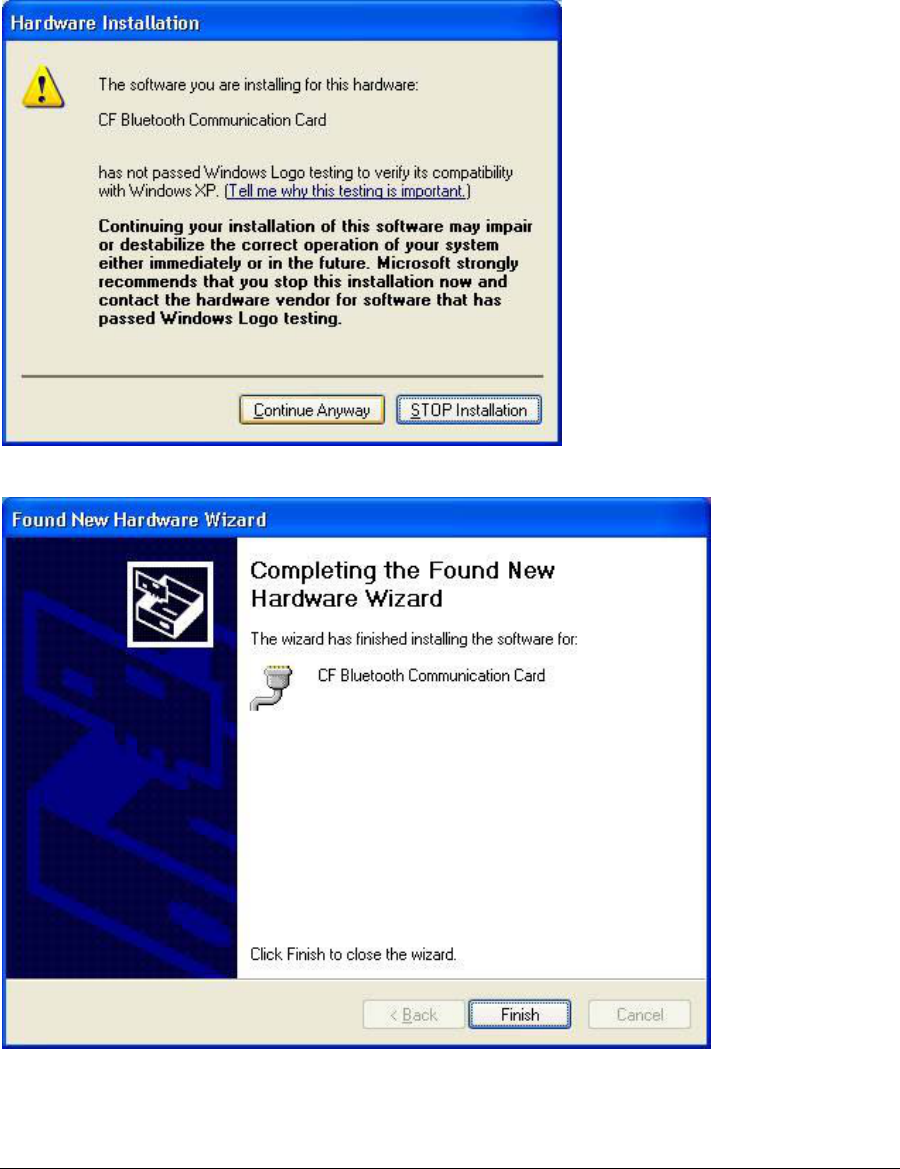
(4) If the driver was not found automatically, please click "Install from a list or specific
location (Advanced)" and direct the system to the BTCF directory on your CD-ROM for the
appropriate driver.
(5) When the driver is found, Windows 2000/XP will pop up a warning message as below.
Click "Continue Anyway" to continue.
(6) Click the "Finish" button to complete the driver installation process for CF Bluetooth
card.
(7) The driver installation process of PCMCIA Bluetooth card is similar to the CF Bluetooth
card, please refer to the section above.
8
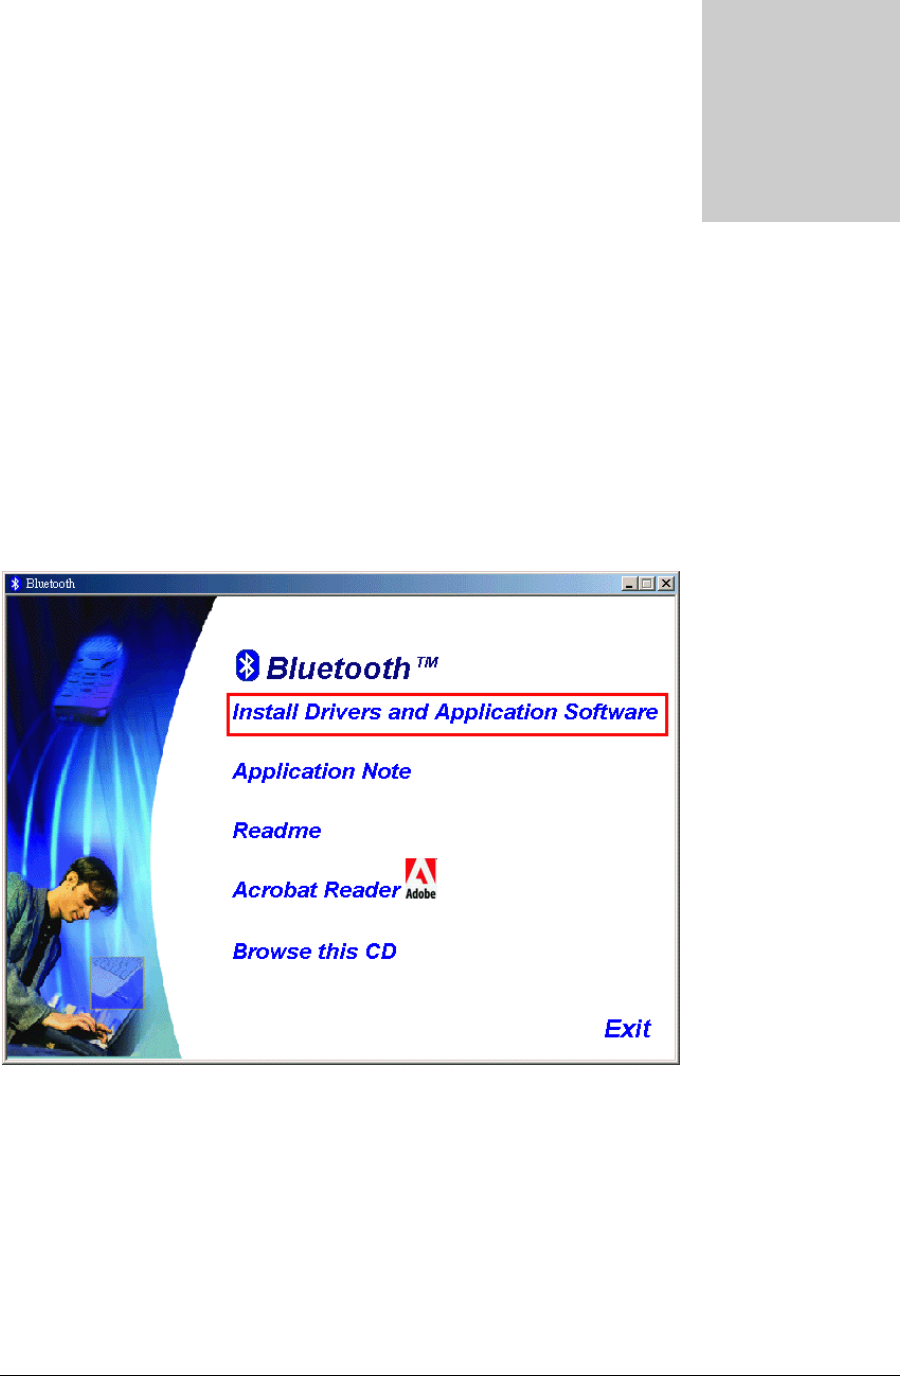
Installing Bluetooth software for Windows
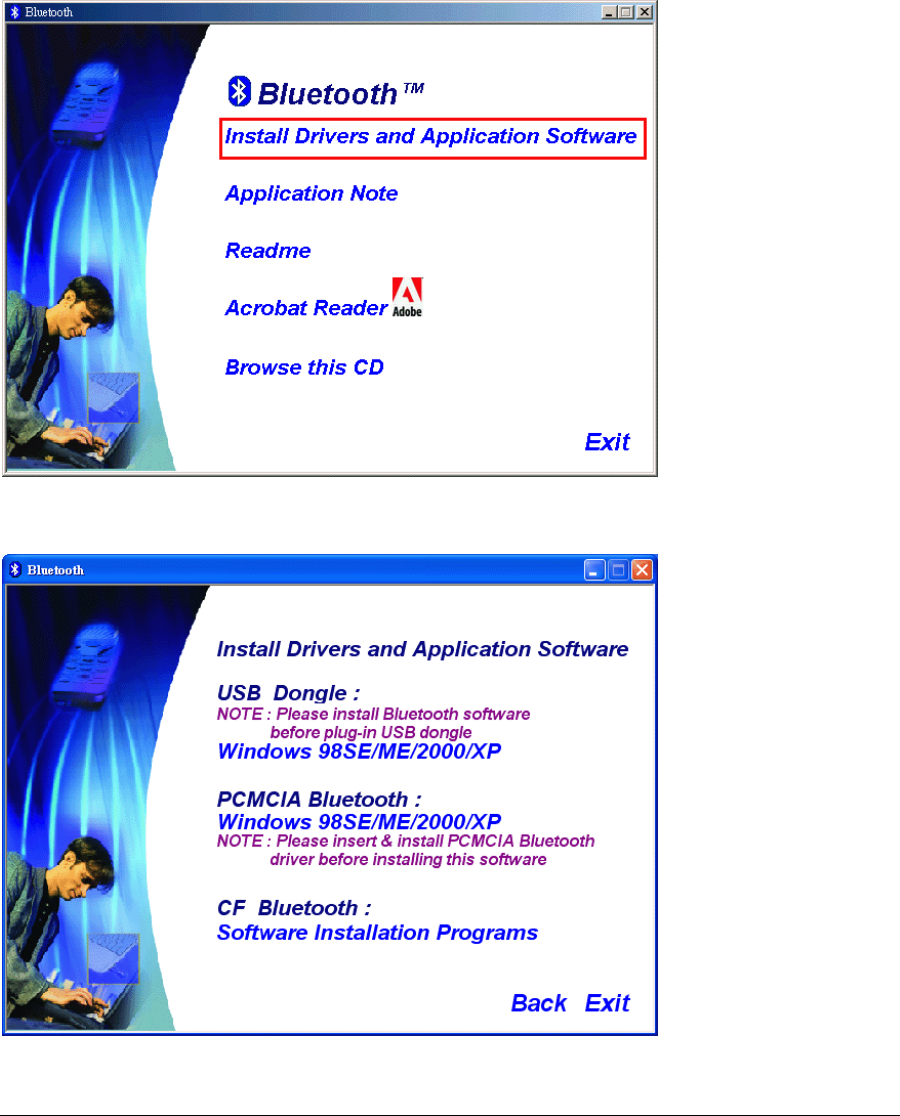
(1) Place installation CD into PC and the setup menu should launch automatically.
If the setup menu does not launch automatically, use Windows Explorer to navigate to the
appropriate CD-ROM drive and run "Bsetup".
(2) Please select your device and O.S.
9
(3) Complete the following steps to install Bluetooth software:
(a) Exit all applications.
(b) InstallShield Wizard setup dialog box will automatically be displayed.
(c) Follow the instructions on screen:
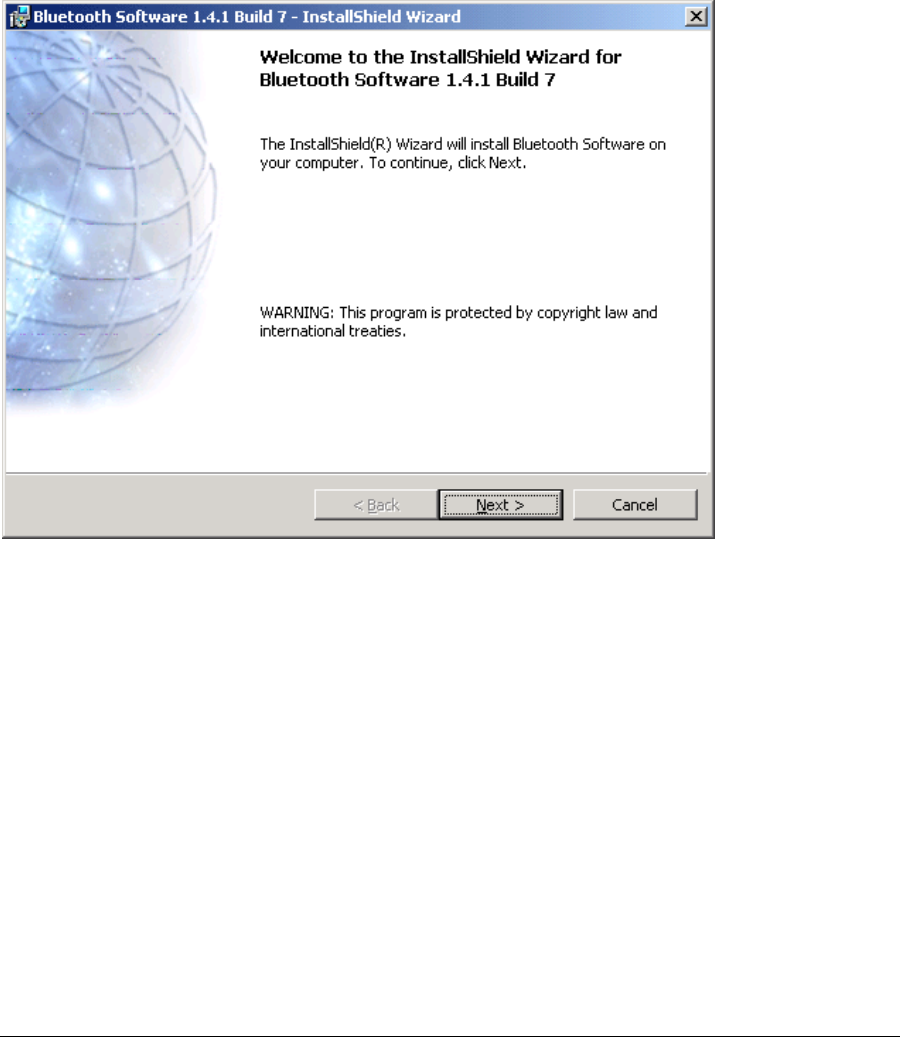
(d) On the Welcome screen, click the Next button.
(e) When the License Agreement screen is displayed, read the License Agreement, then
click the radio button to the left of "I accept the terms in the license agreement" and
click the Next button.

10
(f) You can choose the destination folder in your system, if you do not want to change the
destination folder please click “Next“. On the Destination Folder screen, click the Change
button to browse to a new destination folder for the Bluetooth software. Otherwise, click the
Next button to accept the default folder.
11
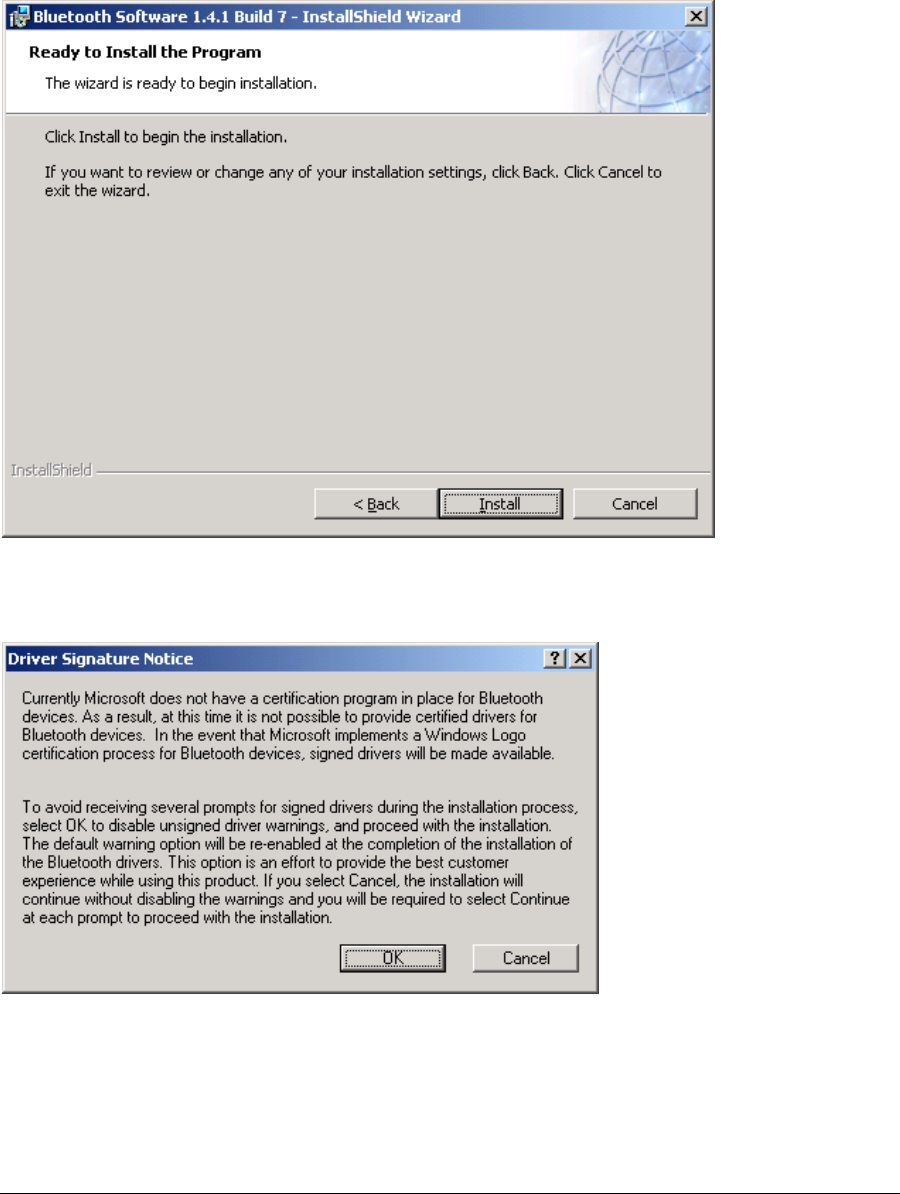
(g) The system is ready to install the Bluetooth software. If you need to review or change
any settings, click the "Back" button. Click the "Cancel" button to exit the Wizard.
Otherwise, click the "Install" button.
(h) For Windows 2000/XP users, system will popup a "Driver Signature Notice", please
click the "OK" button.
(i) During the installation of USB Bluetooth adapter, system will try to detect your Bluetooth
device, please make sure your Bluetooth device is plugged in properly. If the USB
Bluetooth adapter was not plugged in previously, a message box as below will pop up,
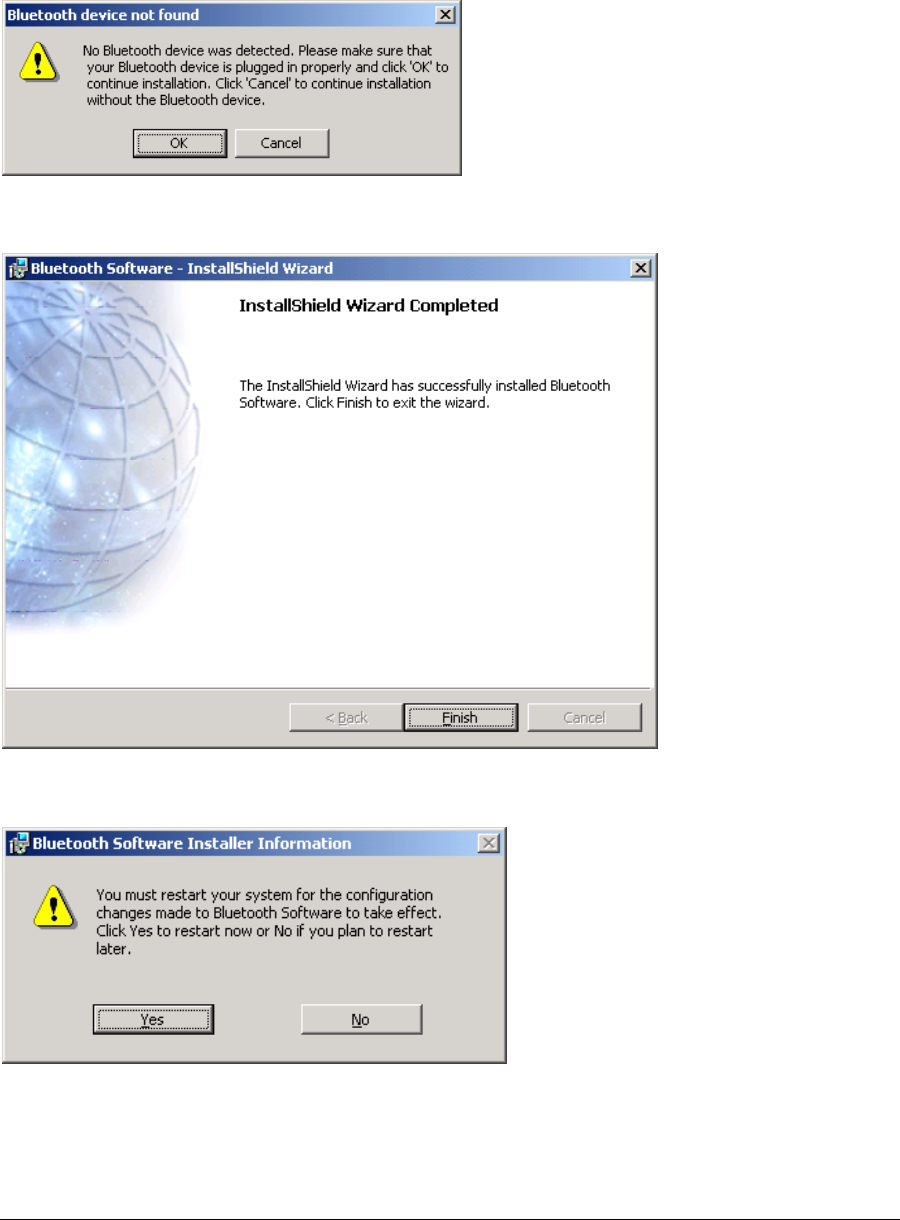
12
please plug it in now and click "OK" to continue, or you can click "Cancel" to continue the
installation without the Bluetooth device.
(j) When the installation is completed, please click the "Finish" button.
(k) Click "Yes" to restart your computer. If you plan to restart later, click "No".
For more information of Bluetooth software Configuration & User’s Guide,
please refer to Chapter 3 of this application note.

13
Setup for Mac
Mac O.S.X 10.2
Mac O.S. 10.2.x has build-in Bluetooth software for USB Bluetooth adapters, therefore no
additional Bluetooth software is required. Simply plug in the USB Bluetooth adapter and a
Bluetooth icon will appear in the System folder. Open the Bluetooth applet to configure the
Bluetooth functions on your Mac system.
Chapter3
Application note for Windows 98SE/ME/2000/XP
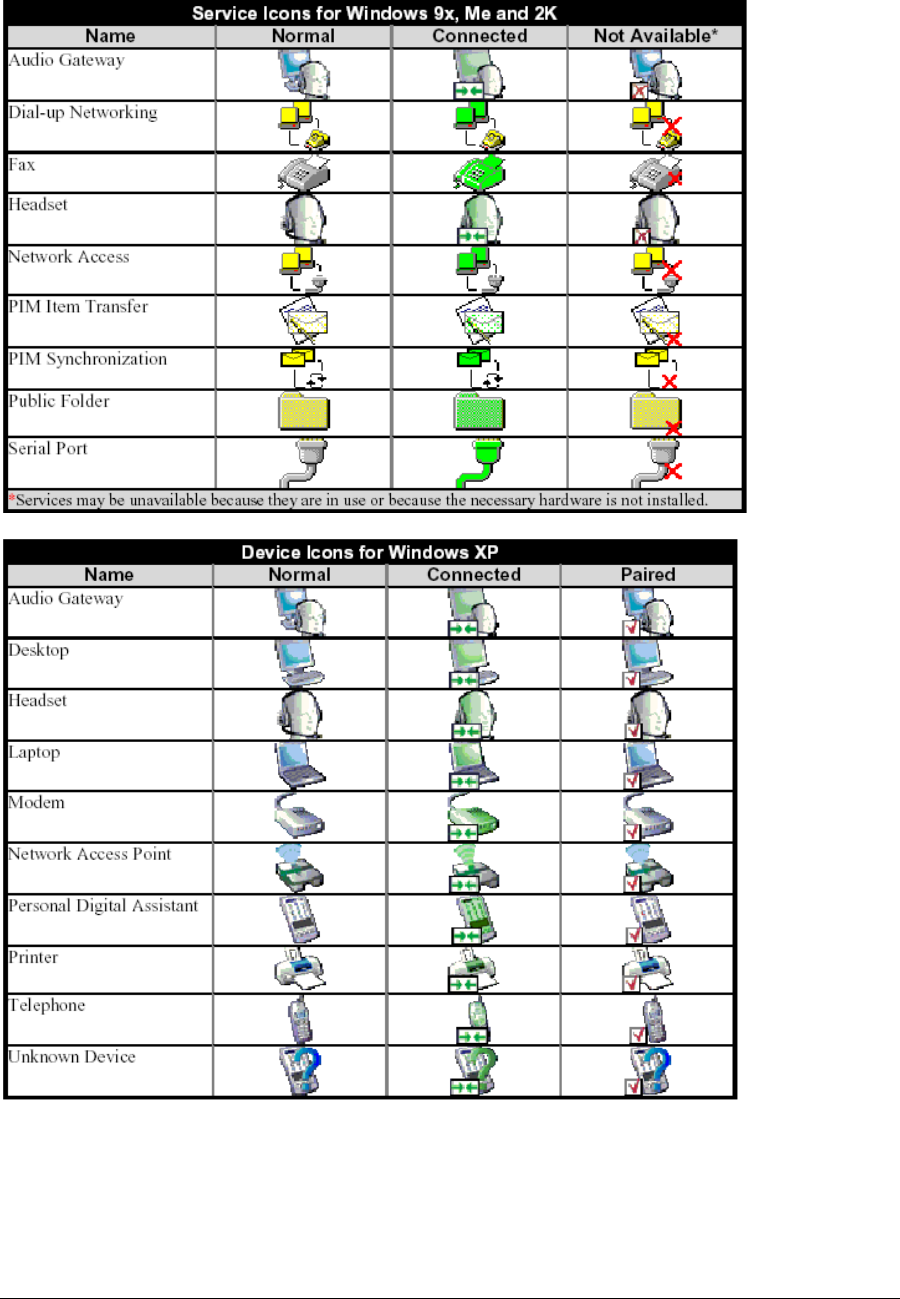
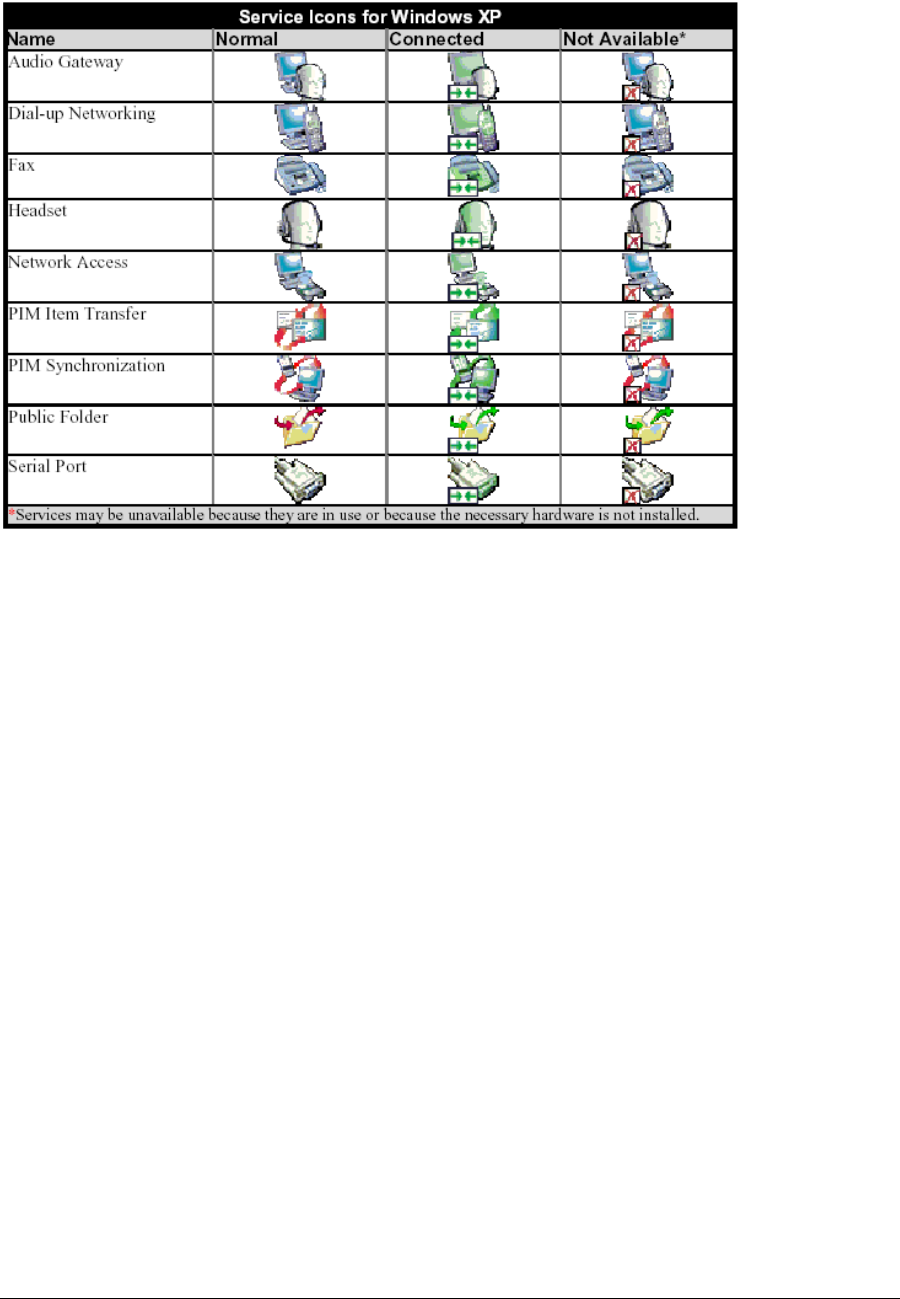
3.1 Icons used for Bluetooth devices and services
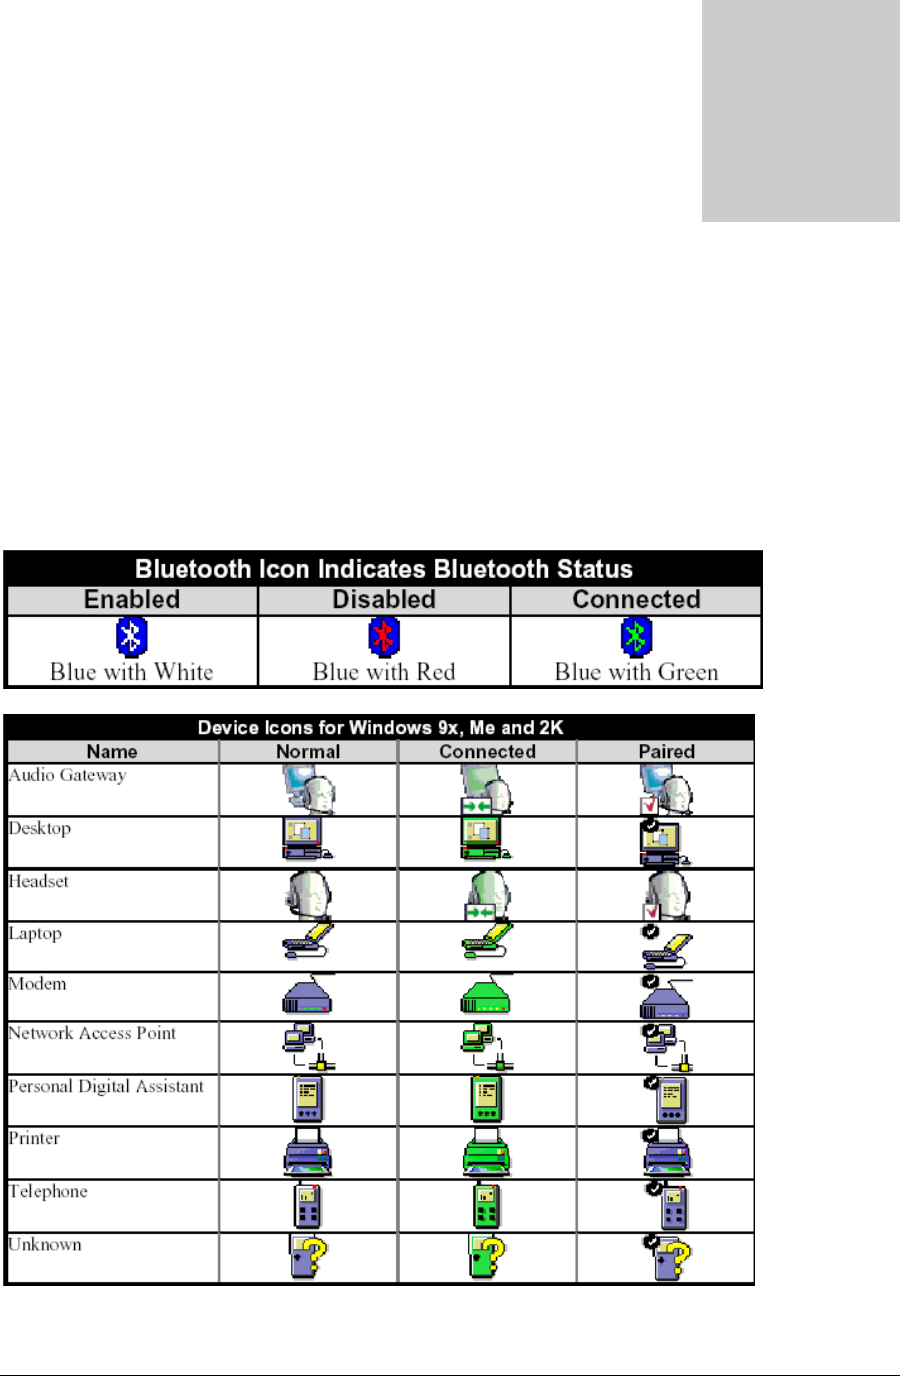
Bluetooth icons provide at-a-glance feedback about a device or service's status by
changing appearance.
The Bluetooth icon in the Windows system tray provides feedback about Bluetooth status.
Basic Bluetooth Icon
Device Icons for Windows 98SE, Me and 2K
Service Icons for Windows 98SE, Me and 2K
3
15
Device Icons for Windows XP
Service Icons for Windows XP
16
NOTE: Only available services are displayed in the menus

3.2. Network sharing setting for Windows
The Network Access service permits a Bluetooth enabled PC (client) to access the Internet
via another Bluetooth enabled PC (Server) that already has an Ethernet connection.
Windows network sharing setting
PC to PC (Windows 2000 or Windows XP)
1. To enable Internet Connection Sharing on the server PC
2. Click on Start menu-->Settings -->Network and Dial-up Connections and find your
Local Area Connection (LAN) that is connected to the Internet.
3. Right click the active LAN connection to open the "Properties" dialog box.
4. Click on "Advanced" tab and select the "Internet Connection Sharing" checkbox to
enable Internet sharing.
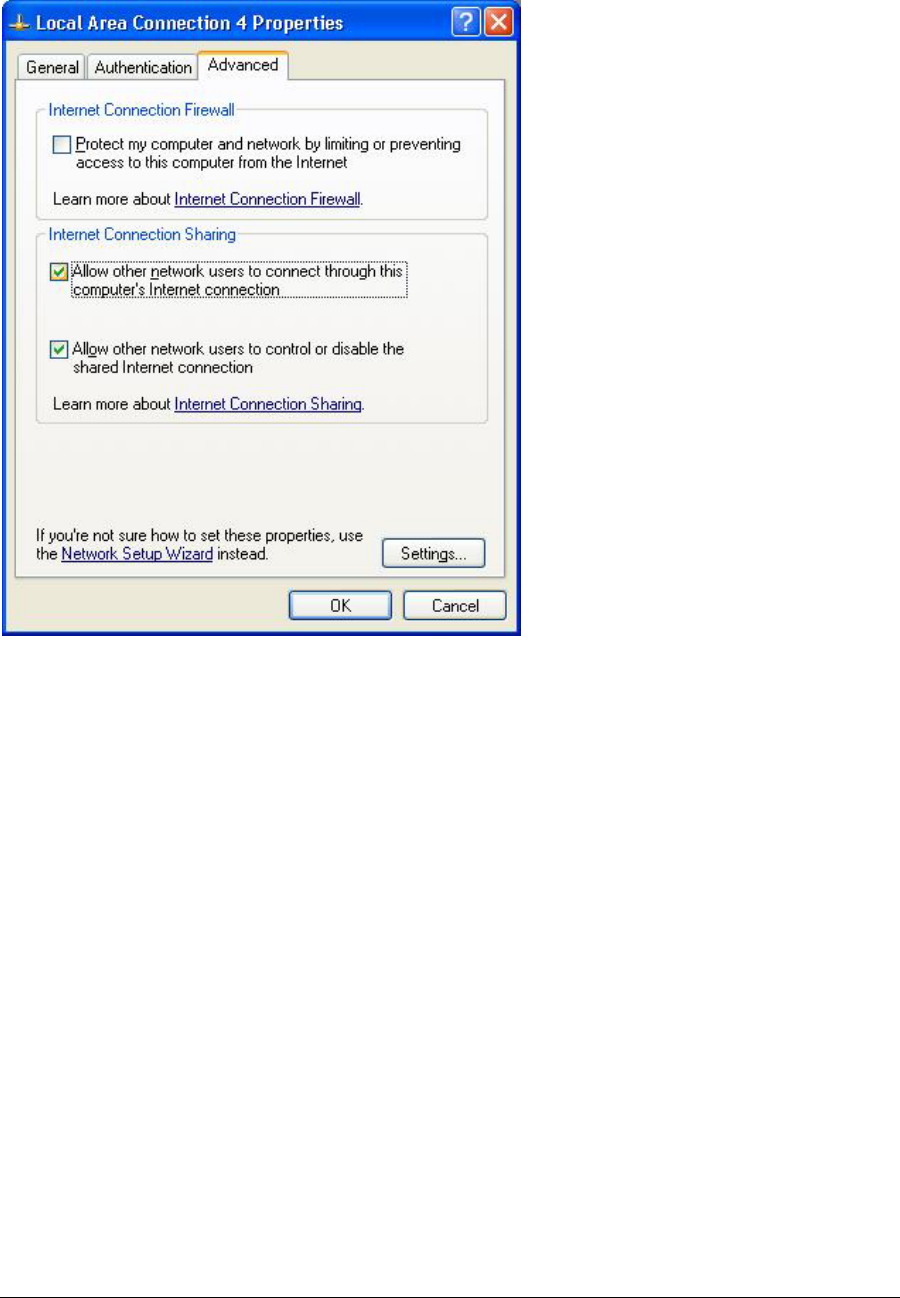
18
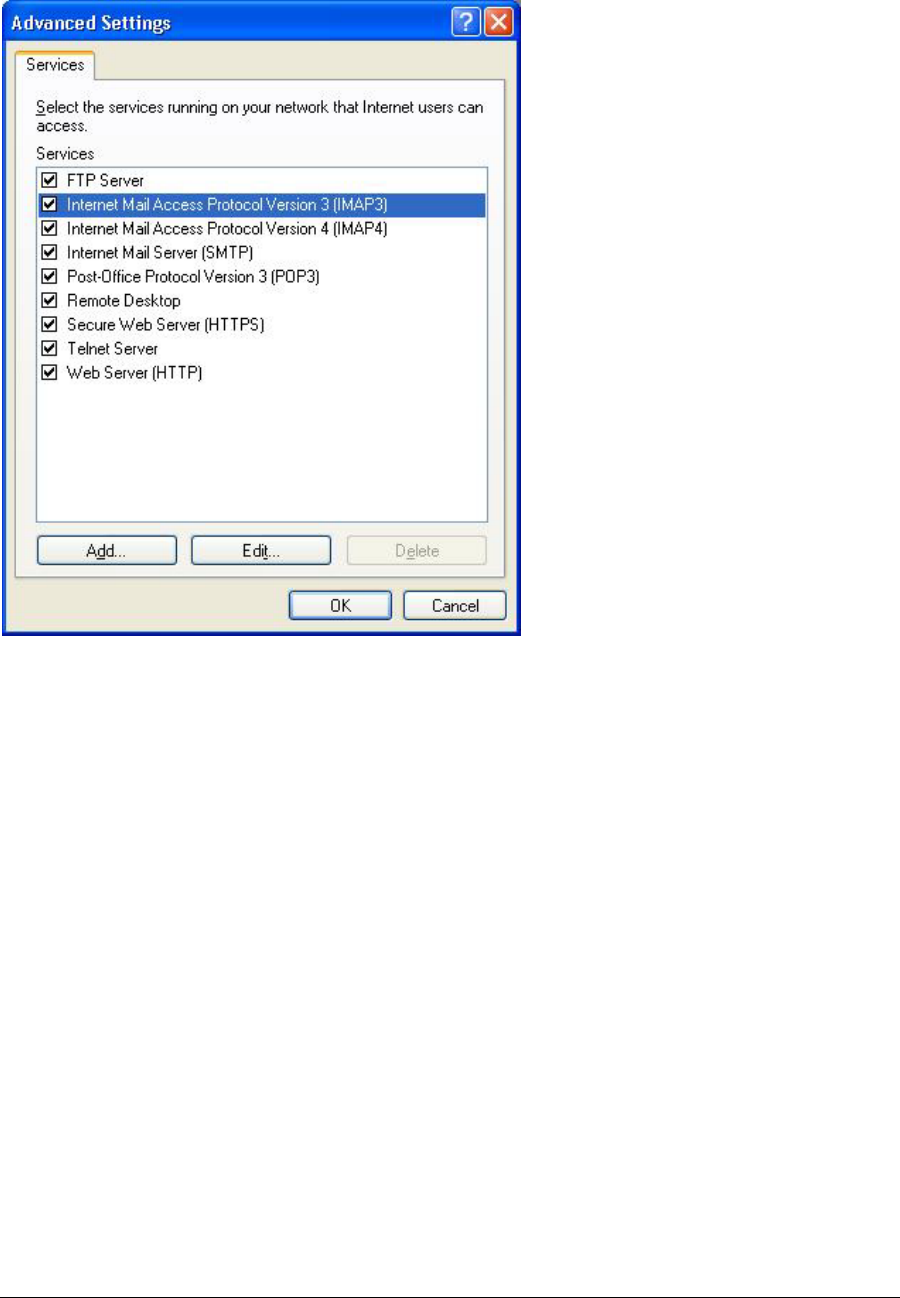
5. Click on "Settings..." button and select the services you wish to provide other Bluetooth
devices. Click "OK" to save the changes.
19
6. Go back to the "Network and Dial-up Connections" window, right click the "Bluetooth
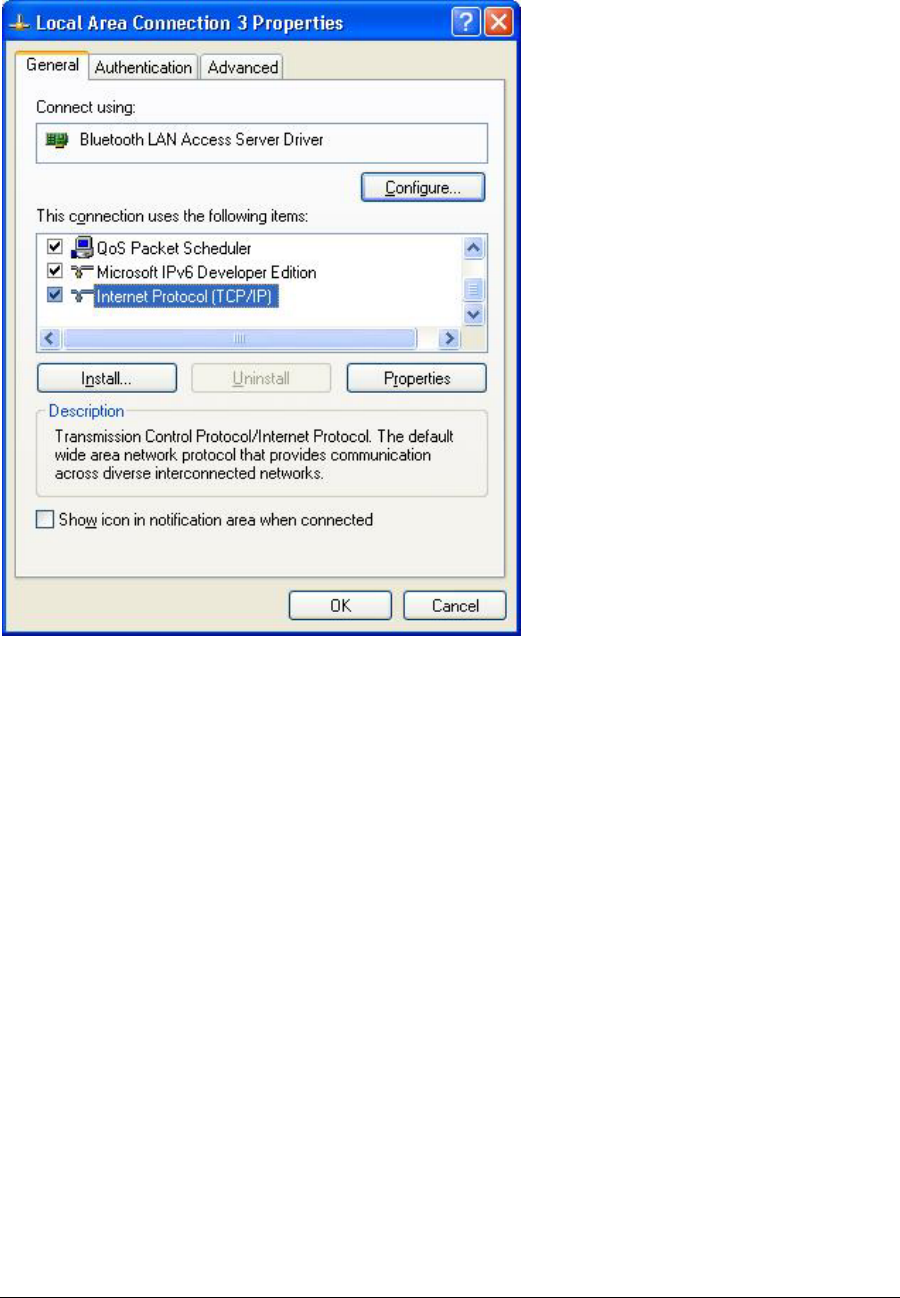
LAN Access Server Driver" and select "Properties".
7. Under "General" tab, click on "Internet Protocol (TCP/IP)" and "Properties".
20
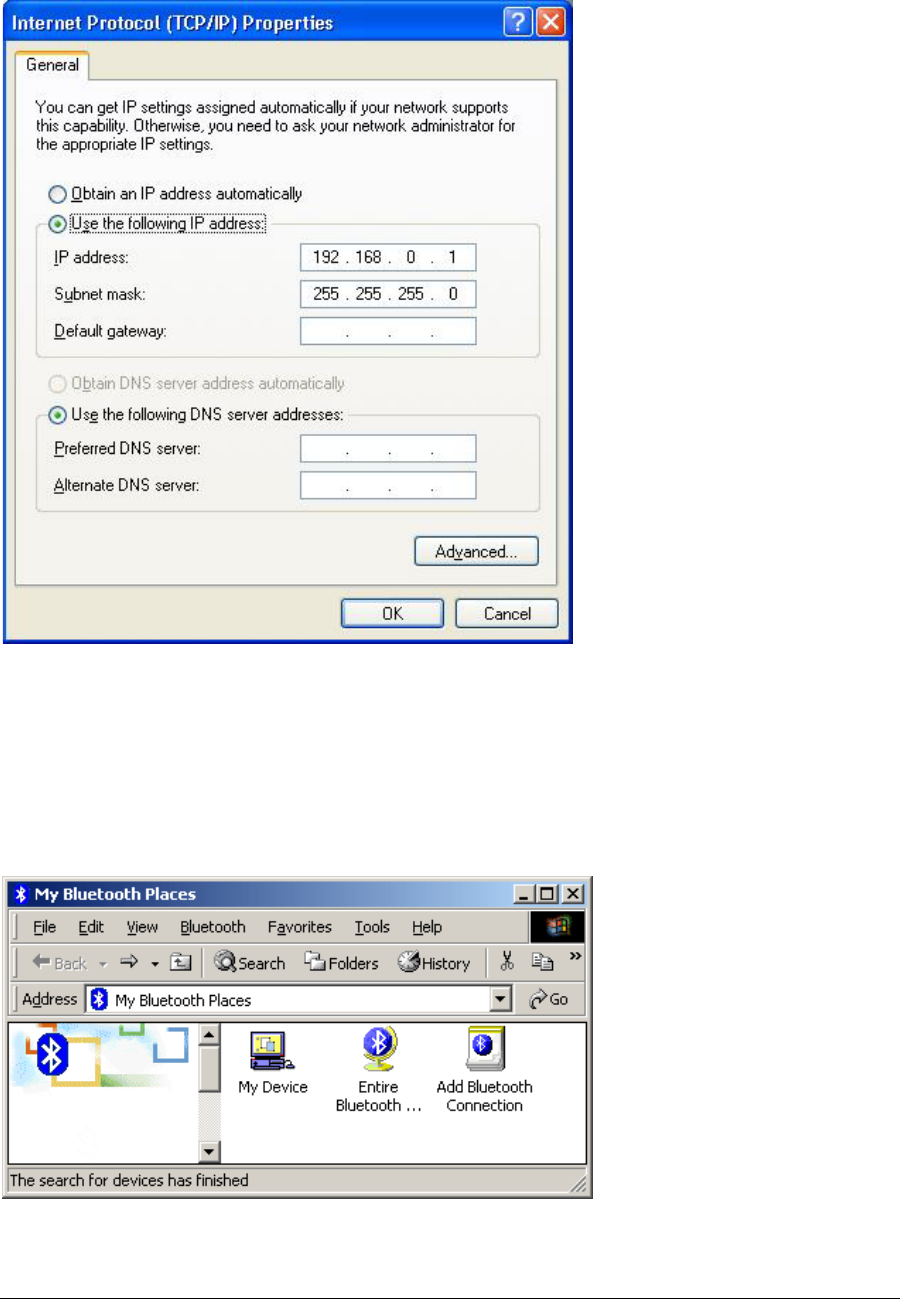
8. Under "General" tab, assign a virtual IP as shown in the picture below. Then click "OK"
to save the changes.
21
9. This allows the server PC to act as a DHCP server towards the client PCs.
NOTE: For Win98SE and WinMe, please download and install WinRoute (or similar
program) on the Server PC to allow DHCP service.
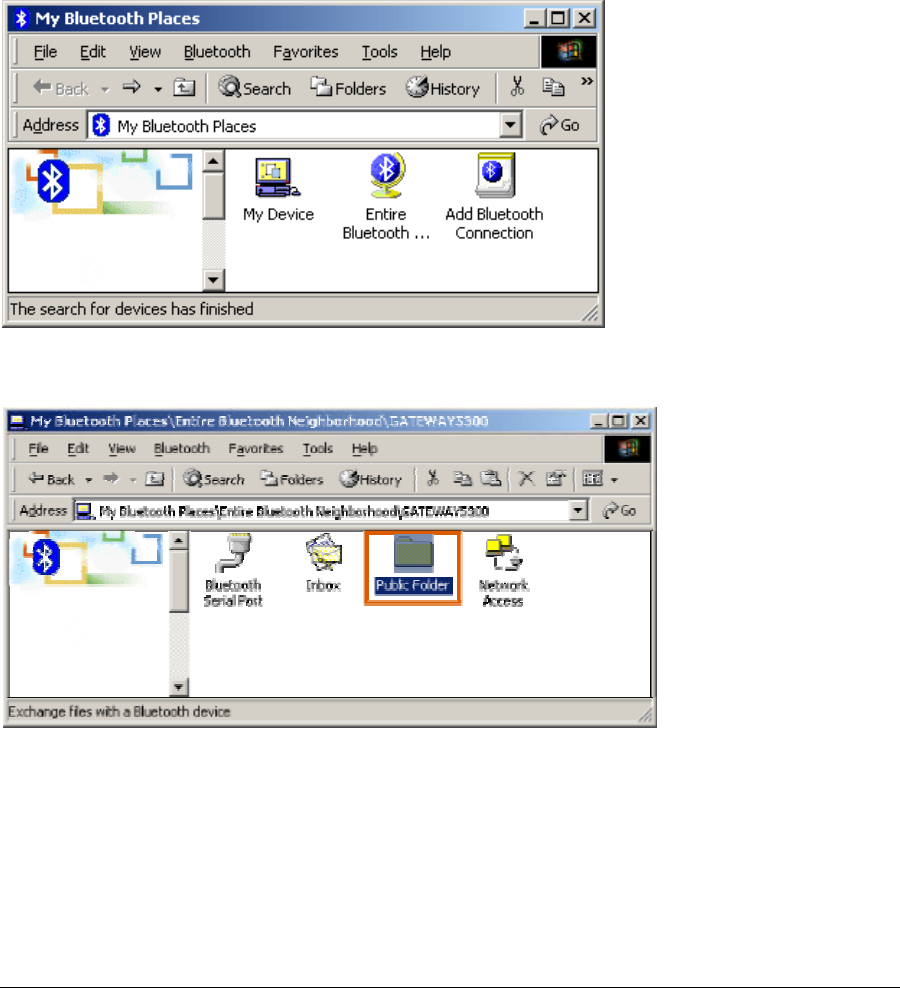
10. On the client PC, launch the Bluetooth software stack by clicking the "My Bluetooth
Places" icon located on the desktop.
11. Double click the "Entire Bluetooth Neighborhood" icon to search for other Bluetooth
devices nearby.
22
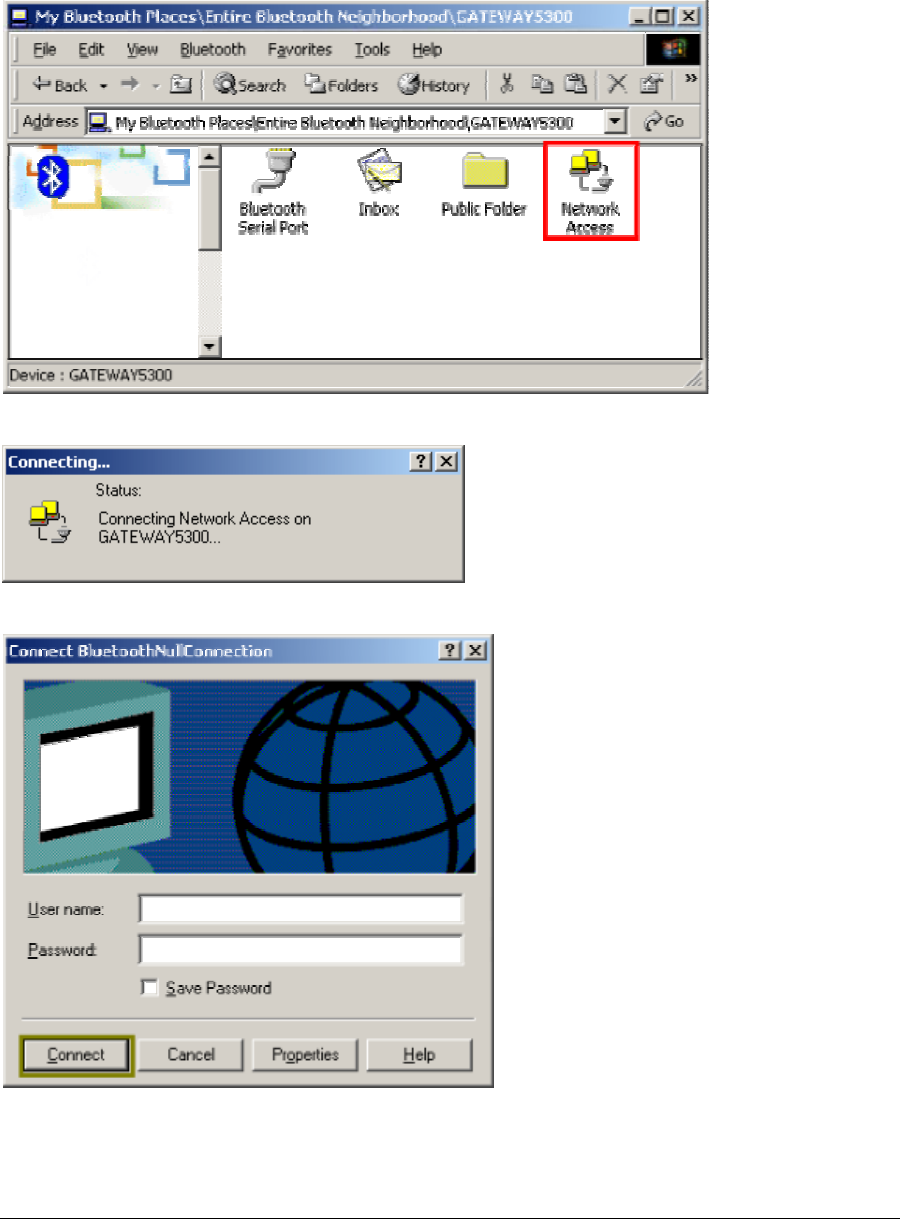
12. After searching is completed, locate the computer name of the server PC and double
click it to discover the Bluetooth services it has to offer. (i.e. Bluetooth Serial Port, Dial-up
Networking, File Transfer, Network Access, etc.).
13. Click on the "Network Access" icon to connect to the shared Internet connection on the
server PC.
14. Click OK without entering any username or password. If one is already present, click
OK anyway and it will still connect.
15. Now you can access the Internet via Bluetooth.

23
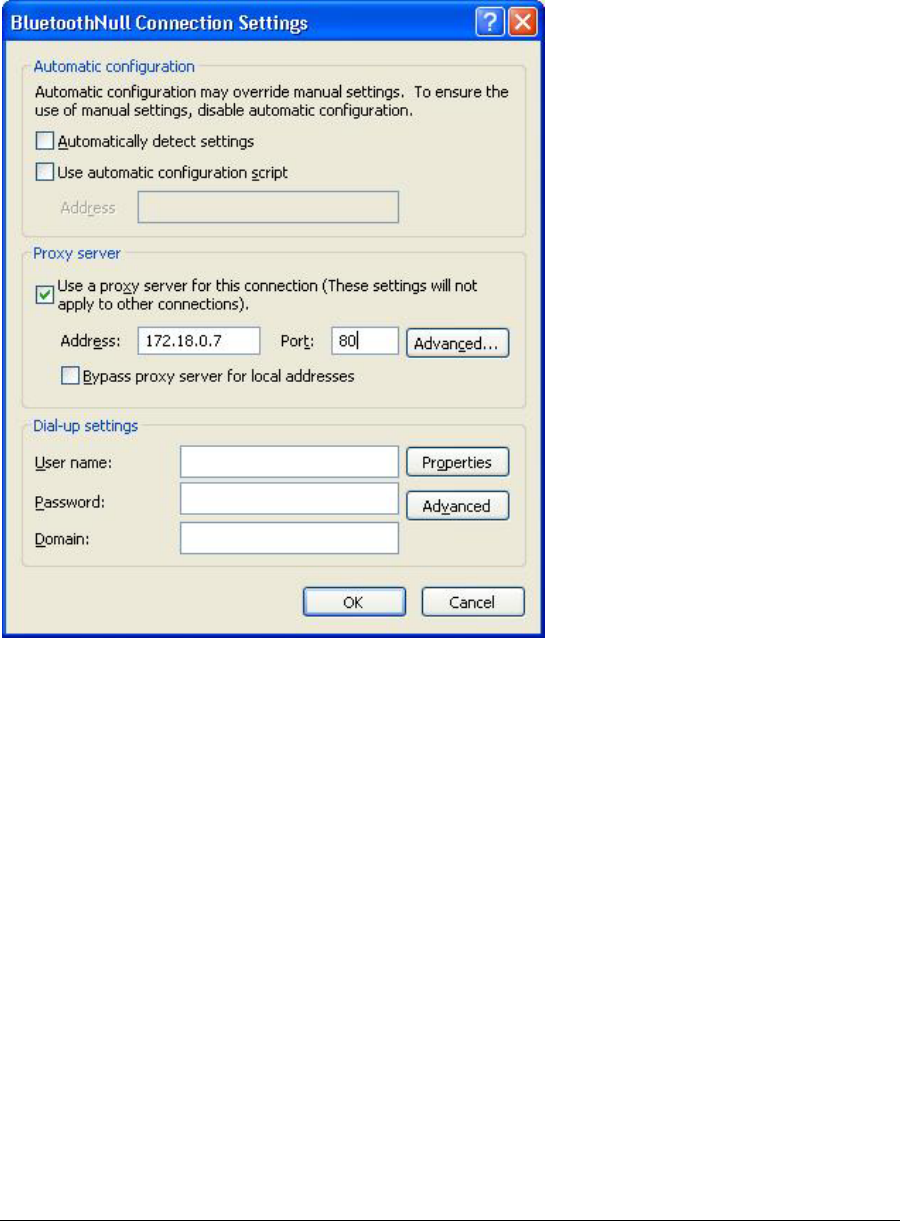
Note: If your PC accesses the Internet via a proxy server, remember to configure the proxy
setting of you browser program in the client PC. Consult your MIS personnel if you're not
sure what to set.
Proxy setup
1. To set up proxy, right click "Internet Explorer", select "Properties", select
"Connections" tab. Select "BluetoothNull Connection" and click on "Settings...".
24
2. Select the "Proxy server" checkbox and enter the proxy address of you company and
Port number. Then click “OK” to save the changes.
3.3. File transfer setting for Windows
The File Transfer service allows one Bluetooth device to perform file operations on the
default File Transfer directory (and the folders and files it contains) of another Bluetooth
device.
File transfer setting for Windows
PC to PC
1. After successful USB adapter setup on two PCs, launch the Bluetooth software stack on
both PCs by clicking the "My Bluetooth Places" icon located on the desktop.
2. On one PC only, double click on "Entire Bluetooth Neighborhood" icon to search for
other Bluetooth devices nearby.
3. After searching is completed, locate the name of PC that you wish to transfer the file to
and double click it to discover the Bluetooth services it has to offer (i.e. Bluetooth Serial
Port, Dial-up Networking, File Transfer, Network Access, etc.).
4. Double click the "Public Folder" icon to open the Bluetooth shared folder on the other
PC.
5. Locate the file you wish to transfer to that PC and drag it into the "Public Folder"
window.
6. At this time, a window will pop up to indicate that a file transfer connection is being
established, and then file transfer will begin.
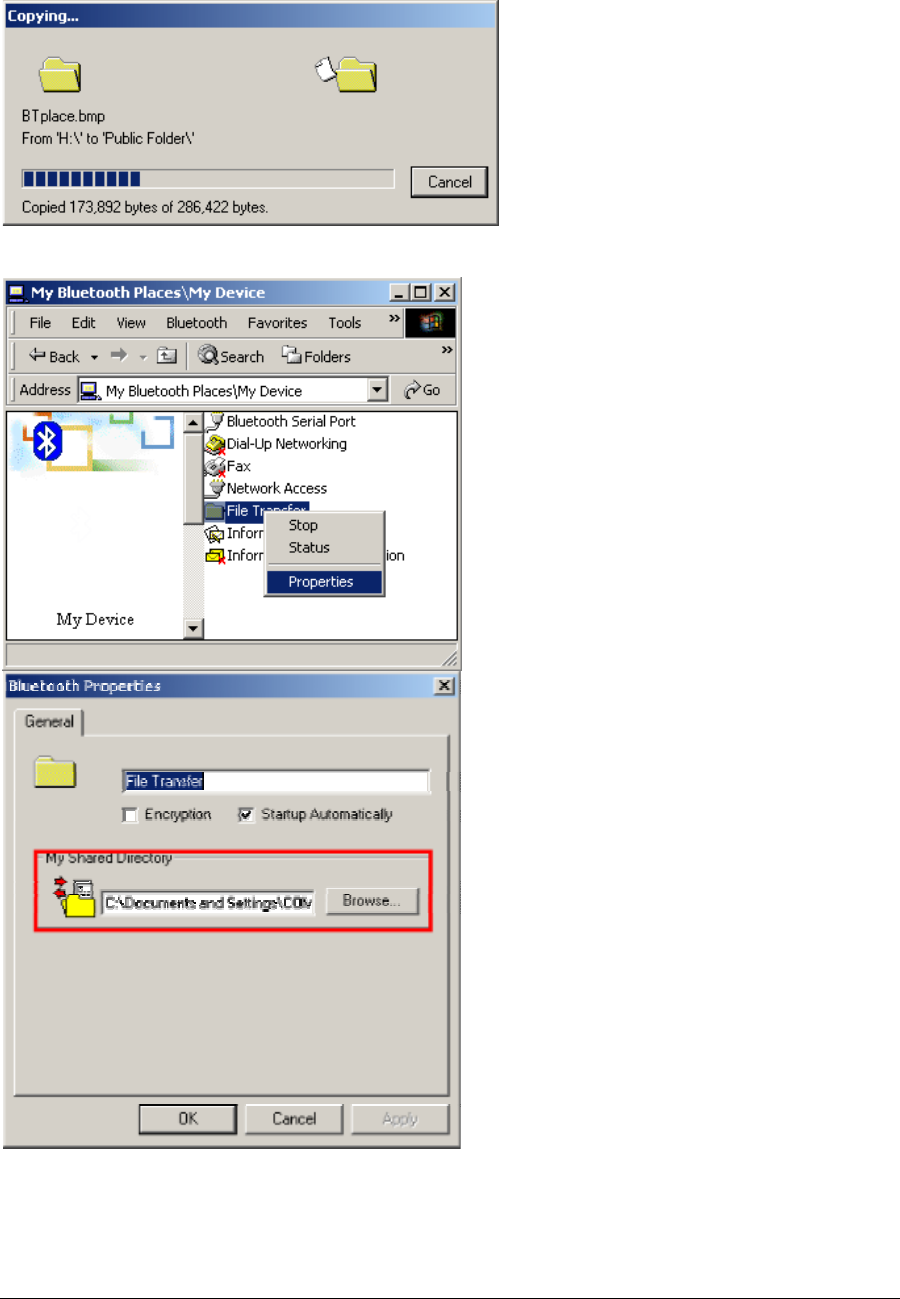
26
7. The file will be opened once the transfer is completed, if the "Start Automatically"
checkbox is selected.
3.4. Dial-up networking setting for Windows
The Dial-up Networking service permits a Bluetooth client to use a modem that is physically
connected to a different Bluetooth device (the server). After the Bluetooth wireless
connection is established the client can use the server's modem as if it were a local device
on the client.
To establish a Dial-up Networking session:
Dial-up networking setting for Windows
Connections are initiated from the client:
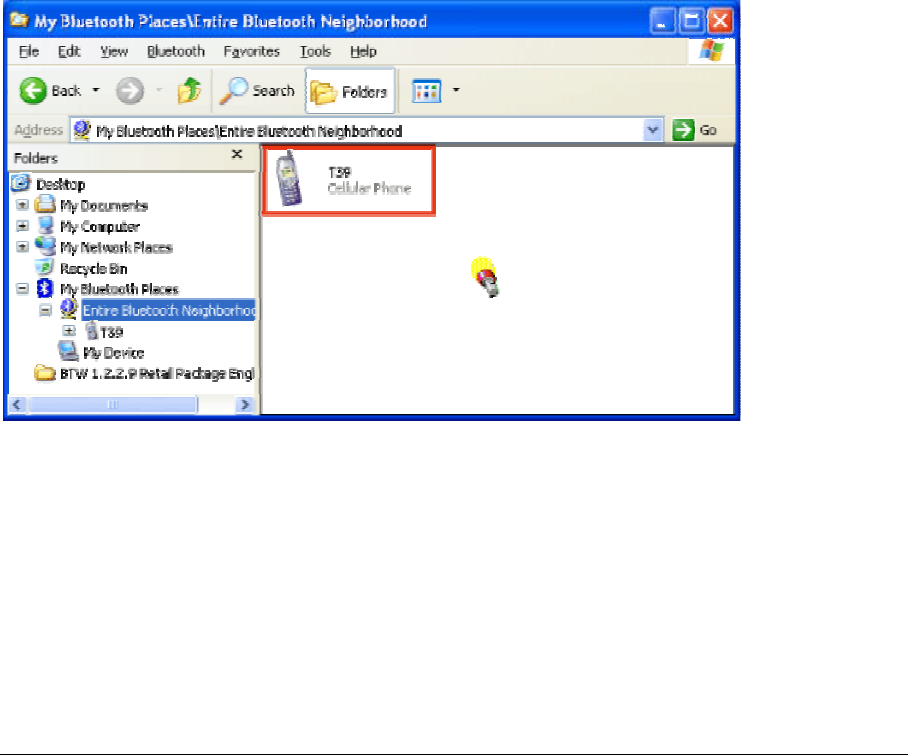
1. On the client, in the Folders pane of "My Bluetooth Places", select "Entire Bluetooth
Neighborhood".
2. In the right pane of "Entire Bluetooth Neighborhood", right-click anywhere except on a
device name and select “Refresh” from the pop-up menu.
3. In the Folders pane of "My Bluetooth Places", right-click the server that will provide the
Dial-up Networking Service and select Discover Available Services from the pop-up menu
to update the available services list. The available services will be displayed in the right
pane of "My Bluetooth Places".

28
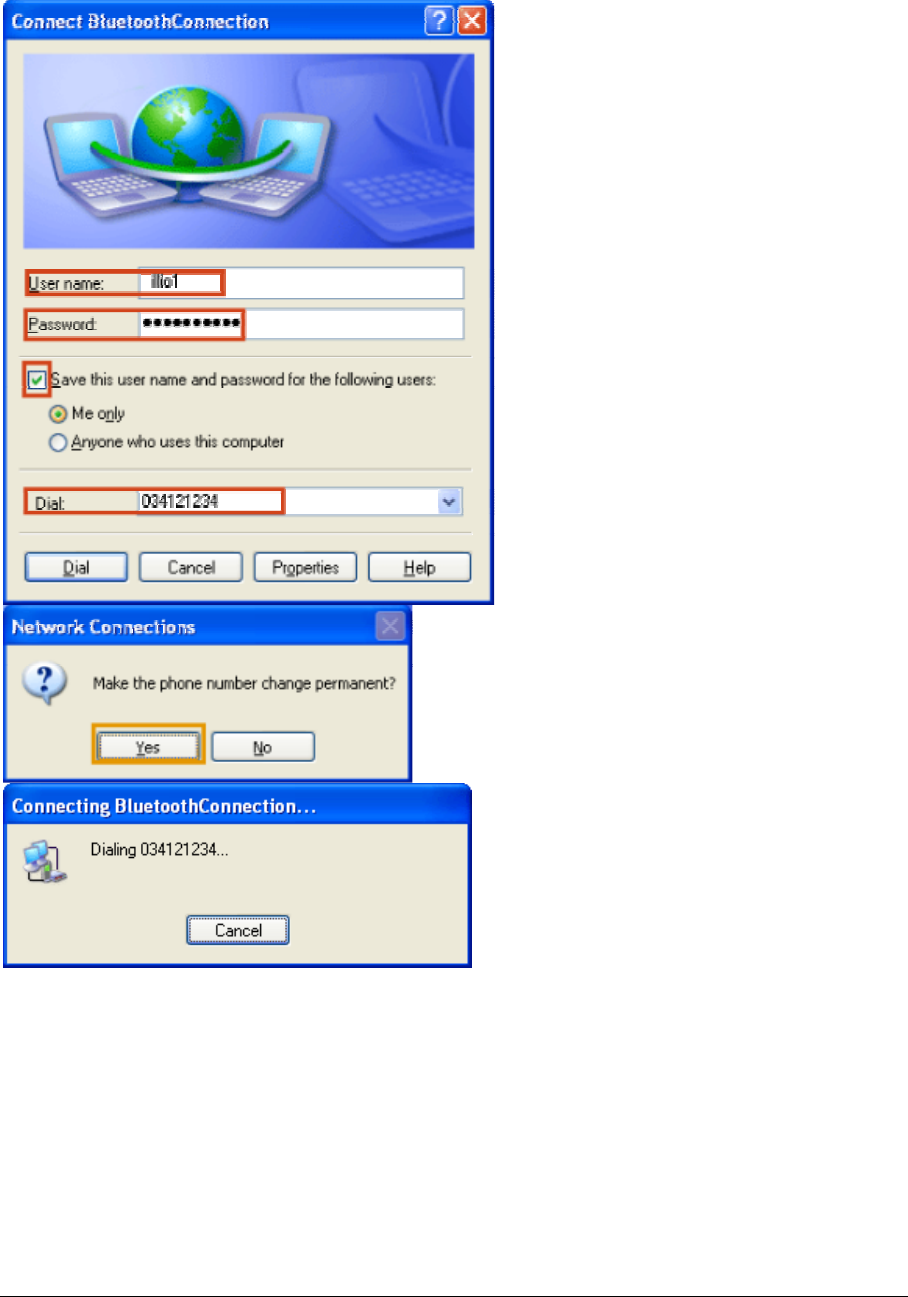
4. In the right pane of "My Bluetooth Places", double-click "Dial-up Networking".
5. In the “Connect To” dialog box, type in your user name, password, and the phone number
to be dialed, and then click the "Dial" button.
6. Select the "Save password" checkbox and the dialog box will not appear for subsequent
connections to the same phone number. You can now open a web browser and connect to
the Internet.
Note: When using the GPRS Dial up function, you do not have to type in the user name or
password.
29
To close a Dial-up Networking connection
1. On the client, in the Folders pane of "My Bluetooth Places", select (highlight) the device
that is providing the Dial-up Networking service.
2. In the right pane of "My Bluetooth Places", right-click "Dial-up Networking" and then
select "Disconnect Dial-up Networking" from the pop-up menu.

3.5. FAX setting
The Fax service allows a Bluetooth client to wirelessly send a fax using a device that is
physically attached to a Bluetooth server.
FAX setting for Windows
To send a Fax
Connections are initiated from the client:
1. On the client, in the Folders pane of "My Bluetooth Places", select "Entire Bluetooth
Neighborhood".
2. In the right pane of "Entire Bluetooth Neighborhood", right-click anywhere except on
a device name and select Refresh from the pop-up menu.
3. In the Folders pane of "My Bluetooth Places", right-click the server that will provide the
Fax service and select "Discover Available Services" from the pop-up menu to update
the available services list. The available services will be displayed in the right pane of "My
Bluetooth Places".
4. In the right pane of "My Bluetooth Places", double-click Fax. After the Fax connection
is established, open or create the document to be faxed and use the "Print" or "Send to
Fax Recipient" option available in most applications. The Fax connection closes
automatically when the transmission is completed.

3.6. PIM Item Transfer setting
Overview
The Bluetooth PIM Item Transfer application allows this computer to send and receive
Personal Information Manager items to-and-from a remote Bluetooth device. Item transfer
can be accomplished several ways:
To send, receive or exchange business cards:
1. From Windows Explorer, My Bluetooth Places, right-click the PIM Item Transfer service
on a remote device and select the appropriate option.
or In the Windows system tray, right-click the Bluetooth icon, select Quick Connect
Business Card Exchange, select a device from the list, select the appropriate option from
the shortcut menu, and then click OK.
2. From Windows Explorer, My Bluetooth Places, highlight the PIM Item Transfer service
on a remote device, and then, from the Bluetooth menu on the Windows menu bar, select
the appropriate action.
In addition to the business card options listed above, you can also send Notes (*.vnt),
Email (*.vmg) and Calendar (*.vcs) items from this menu.
3. From within a supported Personal Information Manager, select one or more items and
then, from the PIM's File menu, select Send to Bluetooth.
Whether sent items are accepted by the remote device is determined by how the remote
device's PIM Item Transfer service is configured.
Close a PIM Item Transfer Connection
This application closes the open connection automatically when its task is complete.
Configure PIM Item Transfer
The Bluetooth Configuration Panel > Client Applications > PIM Item Transfer > General tab
provides options to configure:
• Click the application name to change it, highlight the existing name and enter the
new name.
• Enable or disable secure connection. To enable secure connection, place a
checkmark in the box.
• How your business card is handled when it is requested by a remote device. The
Send My Business Card options are:
Choose a business card as needed-each time a remote device requests your business
card you must select a card from your PIM. If you ignore the request the remote device will
receive a timeout notice.
Always send the same business card-when this option is selected a dialog appears that
allows you to set a default business card, which will be sent automatically when requests
are received.
Where to store received business cards. The Received Business Cards options are:

32
Microsoft Outlook
Outlook Express
Lotus Notes
NOTE: The selected Received Business Cards option does not influence the
settings on other PIM-related property pages.
For example, even if the PIM Item Transfer service business card option on this
computer is configured to "Do Not Accept", the PIM Item Transfer application will
still accept business cards that the application has specifically requested via its
"Receive" or "Exchange" functions.
Email attachments. The only option is include or do not include attachments with email that
is sent or received on this computer using this service.

3.7. PIM Synchronization setting
Overview
The PIM Synchronization Application is used to synchronize the Personal Information
Manager (PIM) database of this computer with the PIM database of a remote Bluetooth
device.
The supported PIMs are:
• Microsoft Outlook
• Microsoft Outlook Express
• Lotus Notes.
The supported data types are:
• Business cards
• Calendar items
• Email (with or without attachments)
• Notes.
Configure PIM Synchronization
The Bluetooth Configuration Panel > Client Applications > PIM Synchronization > General
tab provides options to configure:
• The application name- to change it, highlight the existing name and enter the new
name.
• Enable or disable secure connection. To enable secure connection, place a
checkmark in the box.
• The PIM items to be synchronized and the PIM on this computer with which those
items should be synced.
NOTE: If synchronization is enabled for a specific item type, but is not enabled for that item
type on the remote device, synchronization WILL NOT take place for that item.
The data item types which can be synchronized are:
Business cards
Calendar items
Email (with or without attachments-see below)

34
Notes
Possible synchronization options for each of these data item types include:
Do Not Synchronize-this item type will not be synchronized
Synchronize Microsoft Outlook-this item type will be synced with its matching entry in
Microsoft Outlook, regardless of the PIM that contains this entry on the remote device. If a
matching Outlook entry does not exist, it will be created
Synchronize Outlook-Express-this item type will be synced with its matching entry in
Express, regardless of the PIM that contains this entry on the remote device. If a matching
Express entry does not exist, it will be created
Synchronize Lotus Notes-this item type will be synced with its matching entry in Lotus
Notes, regardless of the PIM that contains this entry on the remote device. If a matching
Notes entry does not exist, it will be created.
NOTE: All choices are not available for all items. For example, Notes items can only
be synchronized in Microsoft Outlook, therefore Lotus Notes and Outlook Express
do not appear as options in the "Notes" item shortcut menu.
Personal Information Managers that are not installed on this computer do not appear
as options in the shortcut menus.
Email attachments. The only option is include or do not include attachments with email that
is sent or received on this computer using this service.

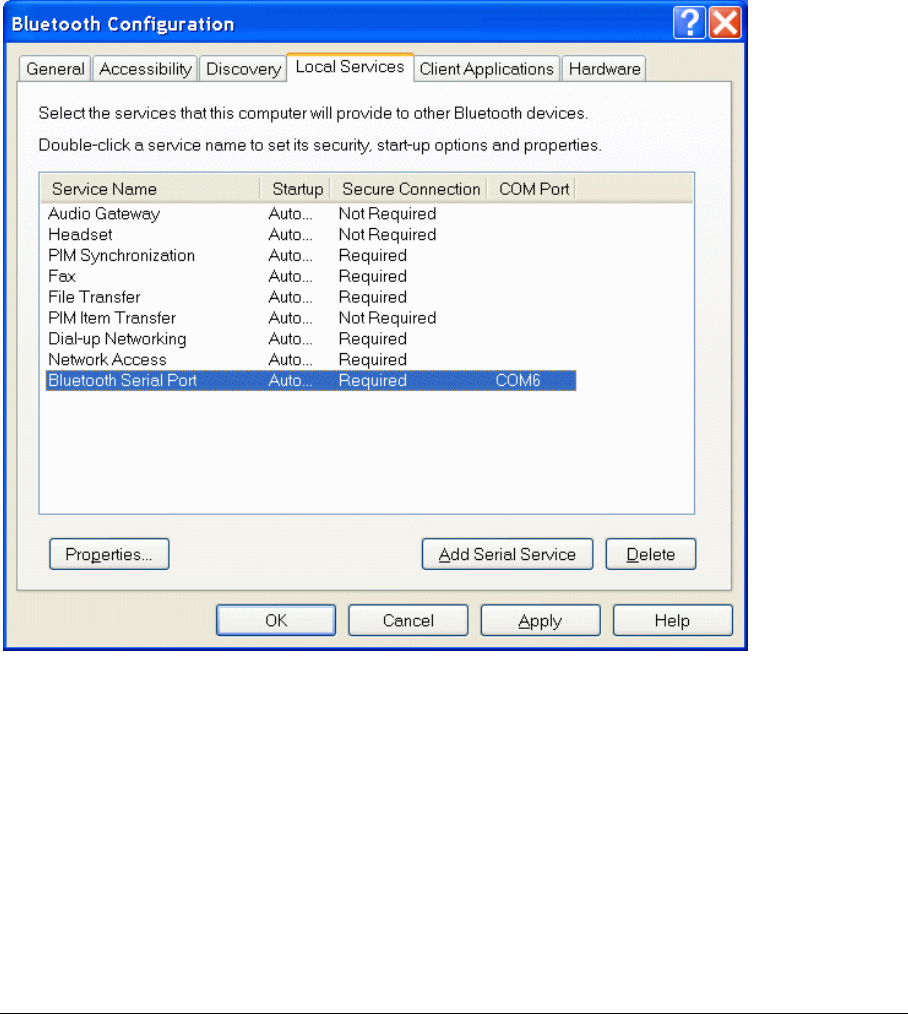
3.8. Serial port setting
The Bluetooth Serial Port service allows two Bluetooth devices to establish a wireless
connection through virtual communications ports and then use that connection as if it were
a hardwired serial cable between the devices.
To establish a Bluetooth serial port connection:
Connections are initiated from the client:
1. On the client, in the Folders pane of "My Bluetooth Places", select "Entire Bluetooth
Neighborhood".
2. In the right pane of "Entire Bluetooth Neighborhood", right-click anywhere except on a
device name and select "Refresh" from the pop-up menu.
3. In the Folders pane of "My Bluetooth Places", right-click the server you want to
establish a connection with and select "Discover Available Services" from the popup
menu to update the available services list. The available services will be displayed in the
right pane of "My Bluetooth Places".
4. In the right pane of "My Bluetooth Places", double-click "Bluetooth Serial Port". A
dialog box appears that contains the communications port number assigned to this
connection by the client. The application that will use this connection must be configured to
send data to this port.
Depending on the security configuration, the dialog box that provides communications port
information may not appear until after Authentication and Authorization have been
accomplished.
The application on the server must be configured to use the correct communications port.
To determine the communications port being used by the service:
* On the server, in the Folders pane of "My Bluetooth Places", right-click "My Device"
and select "Properties" from the pop-up menu
* In the "Bluetooth Configuration Panel", select the "Local Services" tab.
* Double-click the "Bluetooth Serial Port" service to display its "Service Properties"
dialog box. The "Service Properties" dialog box shows the communications port the
connection is using.
To close a Bluetooth serial port connection
Connections are normally closed from the client:
* On the client, in the Folders pane of "My Bluetooth Places", select (highlight) the device
that is providing the "Bluetooth Serial Port" service.
* In the right pane of "My Bluetooth Places", right-click "Bluetooth Serial Port" and then
select "Disconnect Bluetooth Serial Port" from the pop-up menu. Though not
recommended, connections can also be closed from the server:
* On the server, in the Folders pane of "My Bluetooth Places", select (highlight) "My
Device".
* In the right pane of "My Bluetooth Places", right-click "Bluetooth Serial Port" and then
select Stop to close the service. The service must be re-started before it will be available to
remote devices (right-click Bluetooth Serial Port and select Start from the pop-up menu).
36
3.9. ActiveSync setting
ActiveSync setting for Windows
1.Right-click on Bluetooth Configuration icon from the toolbar in the desktop window.
Select Setup and then open Configuration window.
2. Select Local Service tab from the Bluetooth Configuration window. In the Service
Properties window, please learn by heart the current COM port this computer uses, for
example: COM 6, in order to identify this value with the configuration of Microsoft
ActiveSync later.
3.In the Microsoft ActiveSync window, select Connection Settings... from drop-down list of
File menu.
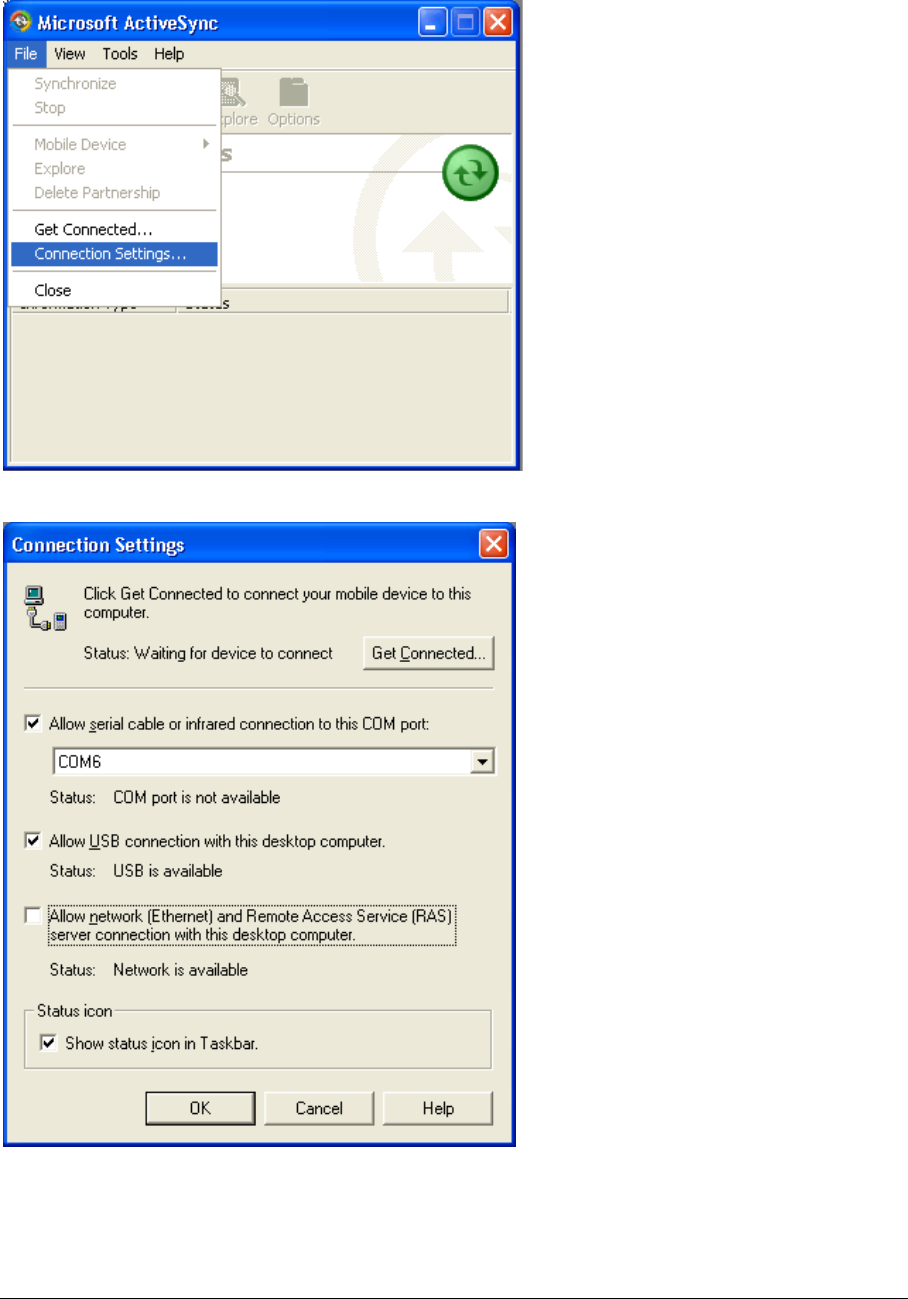
37
4. Choose the same COM port. (in this case, it is COM 6 that Bluetooth Serial port uses
shown in the Step 2.)
5. Please refer to the PDA ActiveSync Setting to complete the Bluetooth ActiveSync
Configuration Process
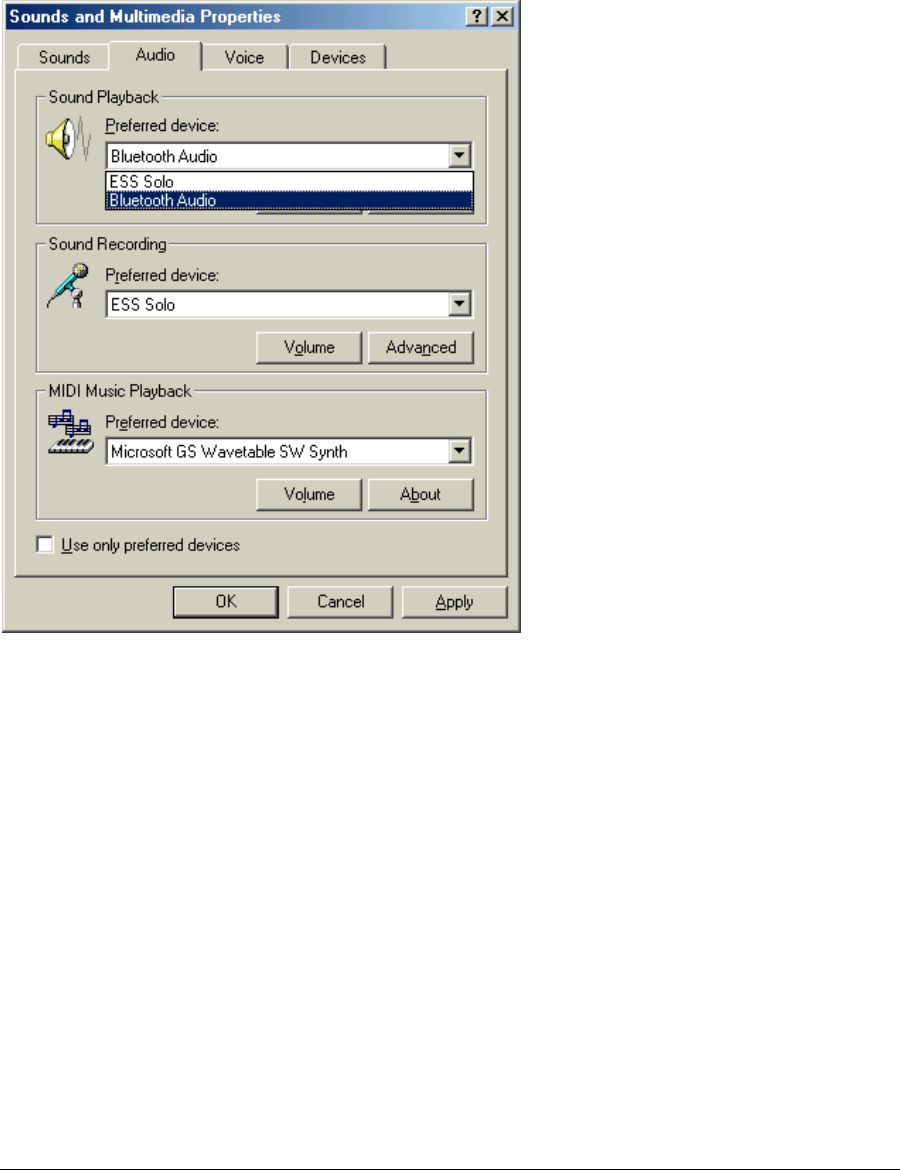
3.10. Audio Gateway setting for windows
The Audio Gateway Application allows a remote Bluetooth device to use this computer's
microphone and speakers as the remote device's audio input and output devices.
*Remember please switch your Audio device to "Bluetooth Audio" from control panel.
Open a connection to the Audio Gateway service that is provided by another Bluetooth
device using one of these techniques:
• Windows system tray, Bluetooth icon
• From Bluetooth Explorer
• Using the Bluetooth Setup Wizard
39
From Bluetooth Explorer to connection your headset device.
Key in headset pair key or PIN code. (Refer to the Headset's user's manual for reference)
Close an audio gateway connection:
If the connection was established via the Bluetooth icon in the Windows system tray; click
the Bluetooth icon, select Quick Connect, Audio Gateway and then select the device that is
providing the service (active connections have a checkmark in front of them). Or No matter
how the connection was created, In My Bluetooth Places, right-click the service name and
select Disconnect.Configure The Bluetooth Configuration Panel > Client Applications
> Audio Gateway > General tab provides options to configure:
• The application name-- to change it, highlight the existing name and enter the new
name.
• Enable or disable secure connection. To enable secure connection, place a
checkmark in the box.
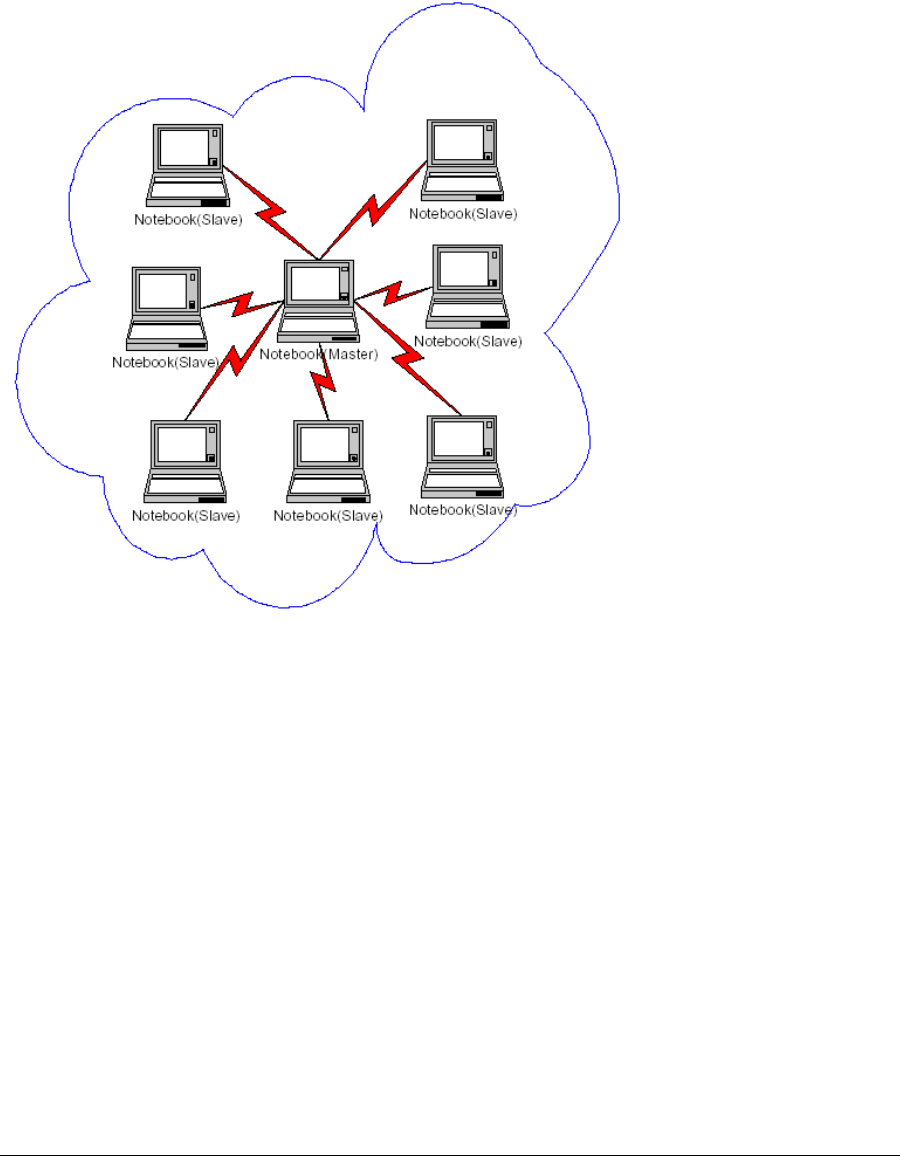
3.11.Personal area network setting for windows
The Personal Area Networking (PAN) chapter will show you how two or more Bluetooth
enabled devices can form an ad-hoc network and how the same mechanism can be used
to access a remote network through a network access point.
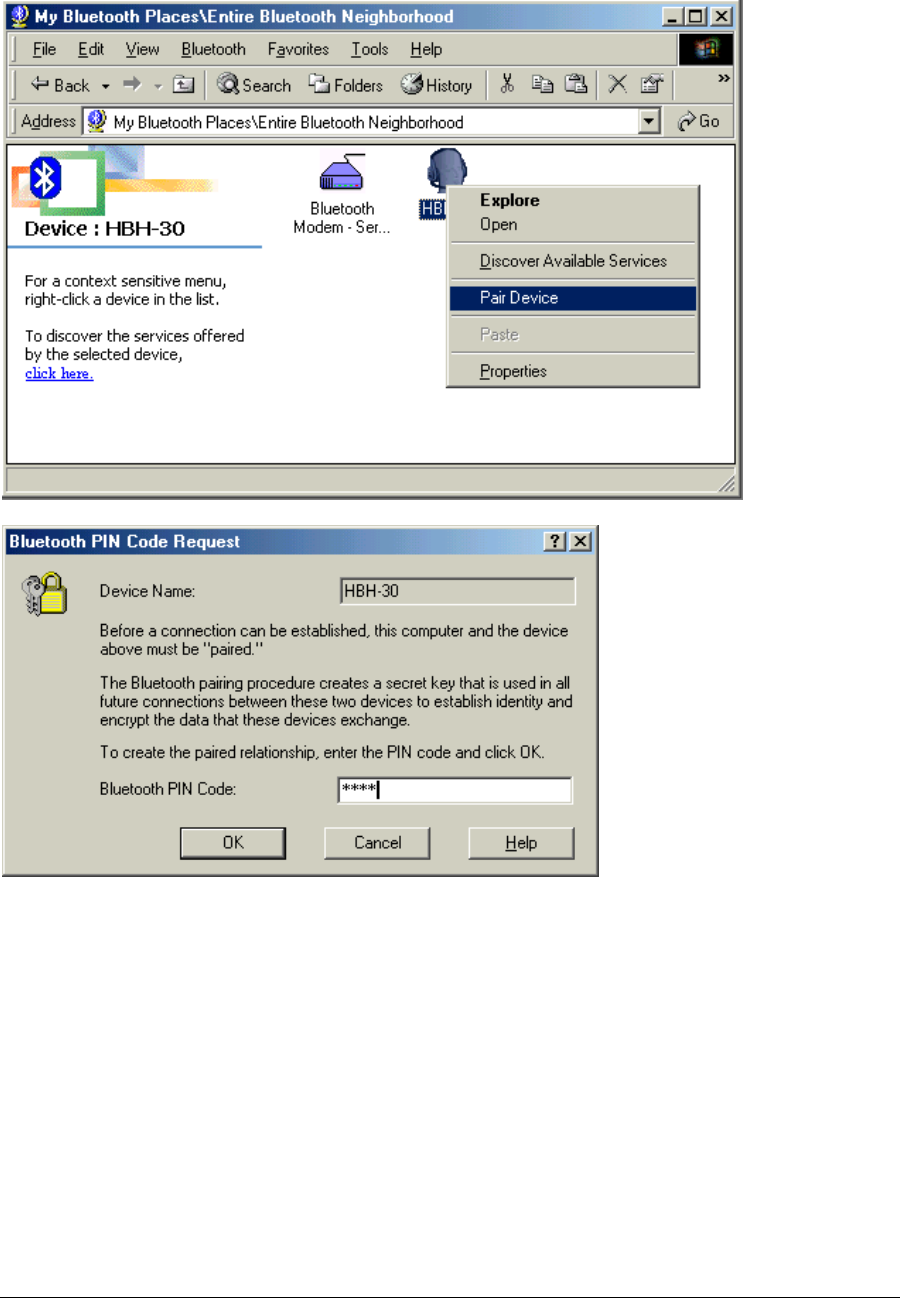
How to setup an Ad-hoc Network
1. On the client, in the Folders pane of "My Bluetooth Places", select "Entire Bluetooth
Neighborhood".
2. In the right pane of "Entire Bluetooth Neighborhood", right-click anywhere except on
a device name and select Refresh from the pop-up menu.
41
3. In the right pane of "My Bluetooth Places", right-click the server that will provide the
Networking Access Service and select Discover Available Services from the pop-up menu
to update the available services list. The available services will be displayed in the right
pane of "My Bluetooth Places".
Double click Network Access to establish a PAN network.
If the system pops up a "Bluetooth PIN Code Request" window please key in the same
passkey or PIN code between the two devices.
42
Once connected, you can check your Bluetooth PAN network neighborhood from the file
explorer or by the "Search Computers" function.
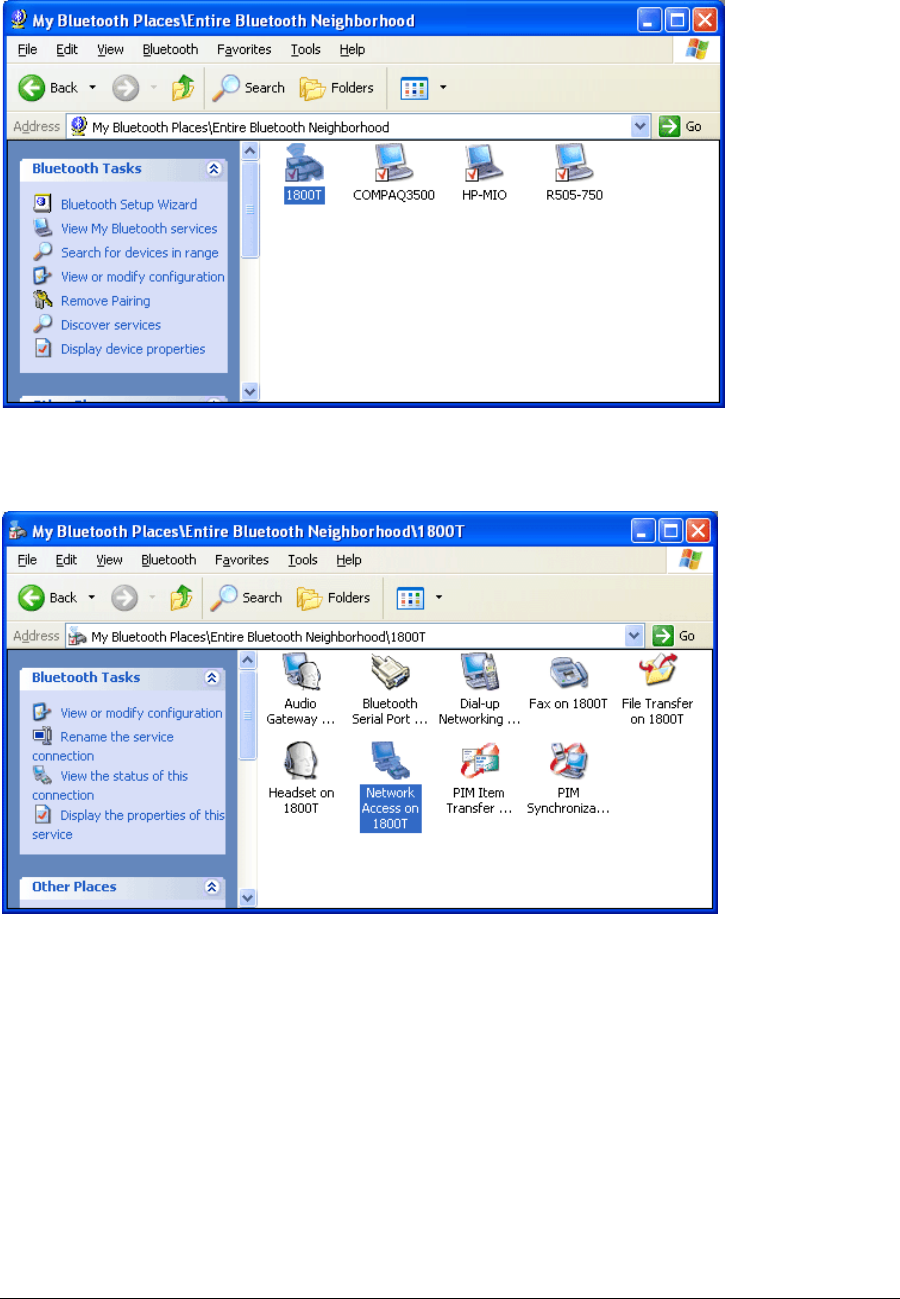
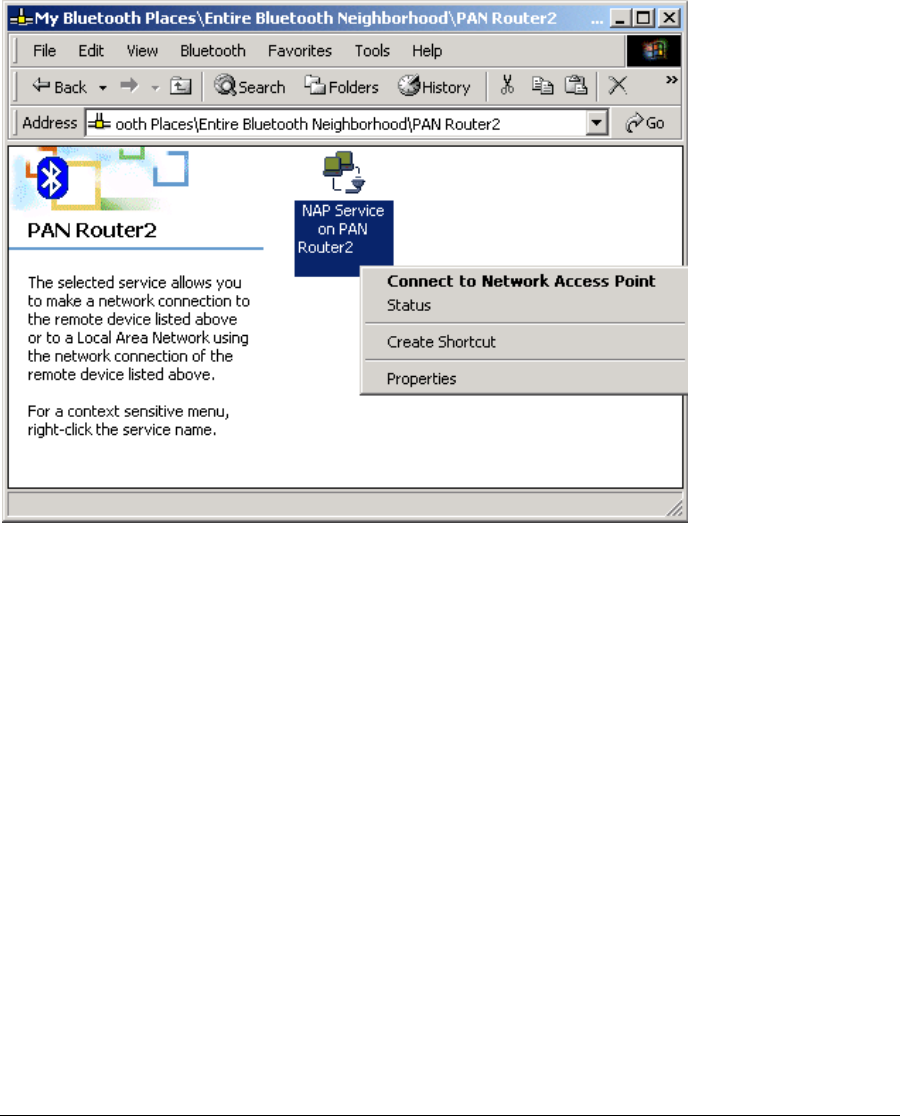
How to setup with Bluetooth Network Access Point
The Bluetooth Software makes it easy to join an existing personal network, hosted by
another Bluetooth device (PocketPC, desktop, etc.) From the My Bluetooth Places,
choose Entire Bluetooth Neighborhood, and select the Bluetooth device that you want to
establish a PAN connection and double click the device icon.

43
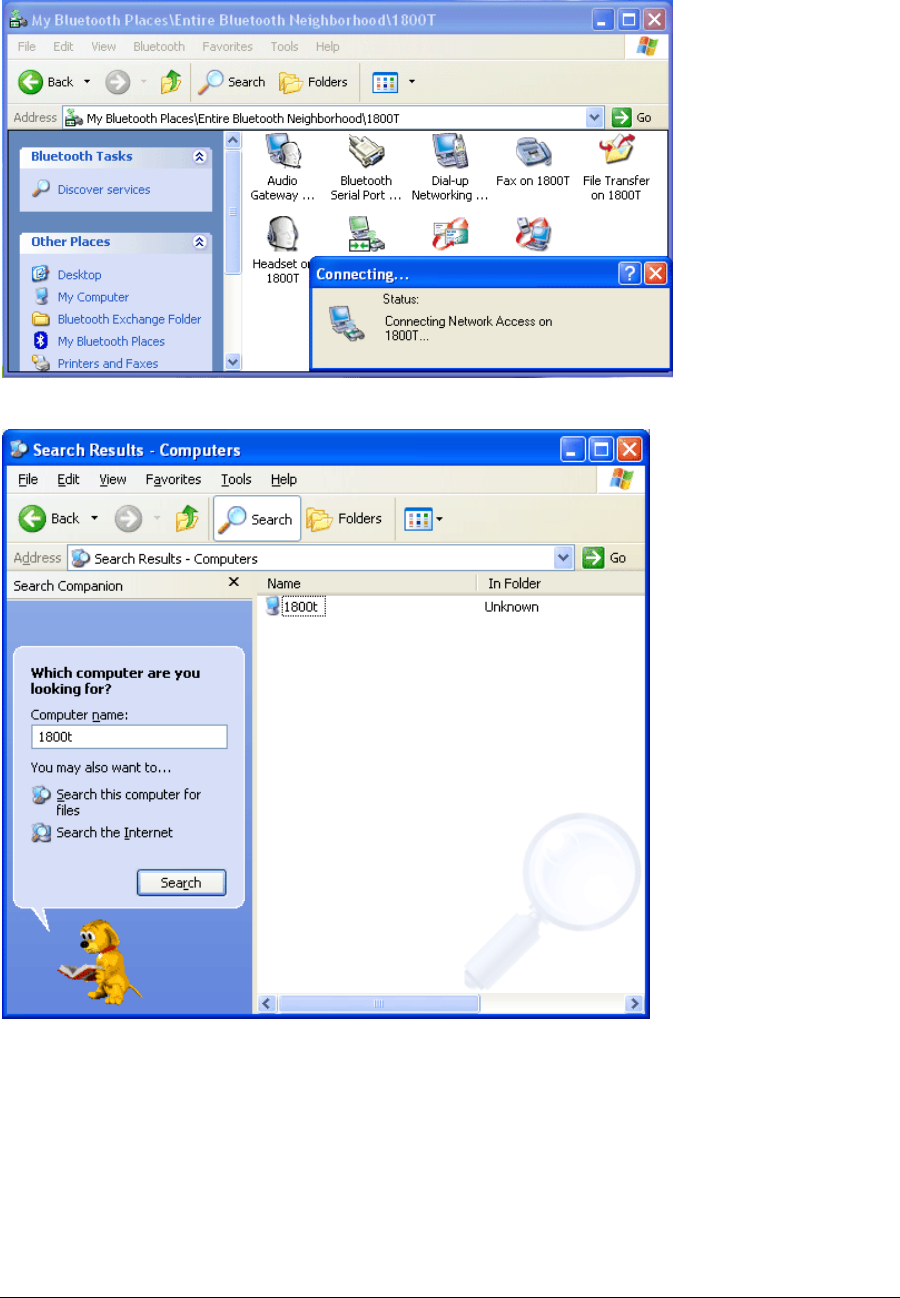
It will list out all the available services of this device, please select the NAP Service.
Right click the NAP Service and select "Connect to Network Access Point", your PC will
get an IP address from the Network Access Point.
44
At this moment, you might be prompted to enter the IP network settings; if this is the case,
choose "Obtain an IP address automatically" from your Bluetooth Network TCP/IP
setting.
After selecting the host, a connection will then be established between your PC and the
host over the personal network.
45
Chapter4
Setup for PocketPC2000 & PocketPC 2002
(1) Make sure your PDA is connected with your PC, CF Bluetooth card securely sits in the
PDA'S CF slot, and the installation disk in your PC's CD-ROM, the Setup program should
launch automatically.
If Setup does not launch automatically, use Windows Explorer to navigate to the
appropriate CD-ROM drive and double click on "bsetup".
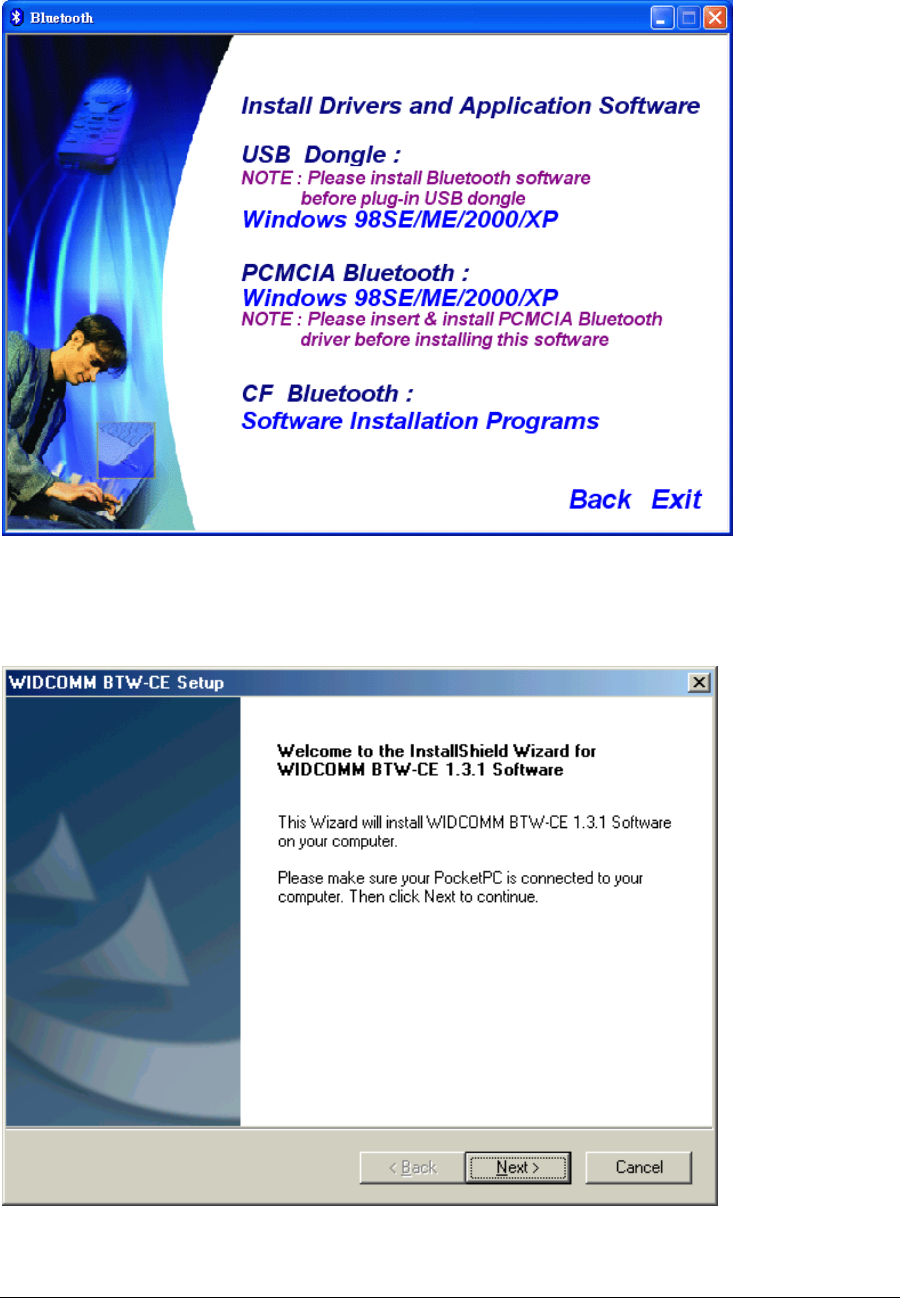
(2) Select CF Bluetooth “Software Installation Programs”-> "PocketPC2000 &
PocketPC2002 (WinCE)" at Setup dialog box.
4
46
(3). Follow the instructions on the screen:
a) On the Welcome screen, click the Next button.
47
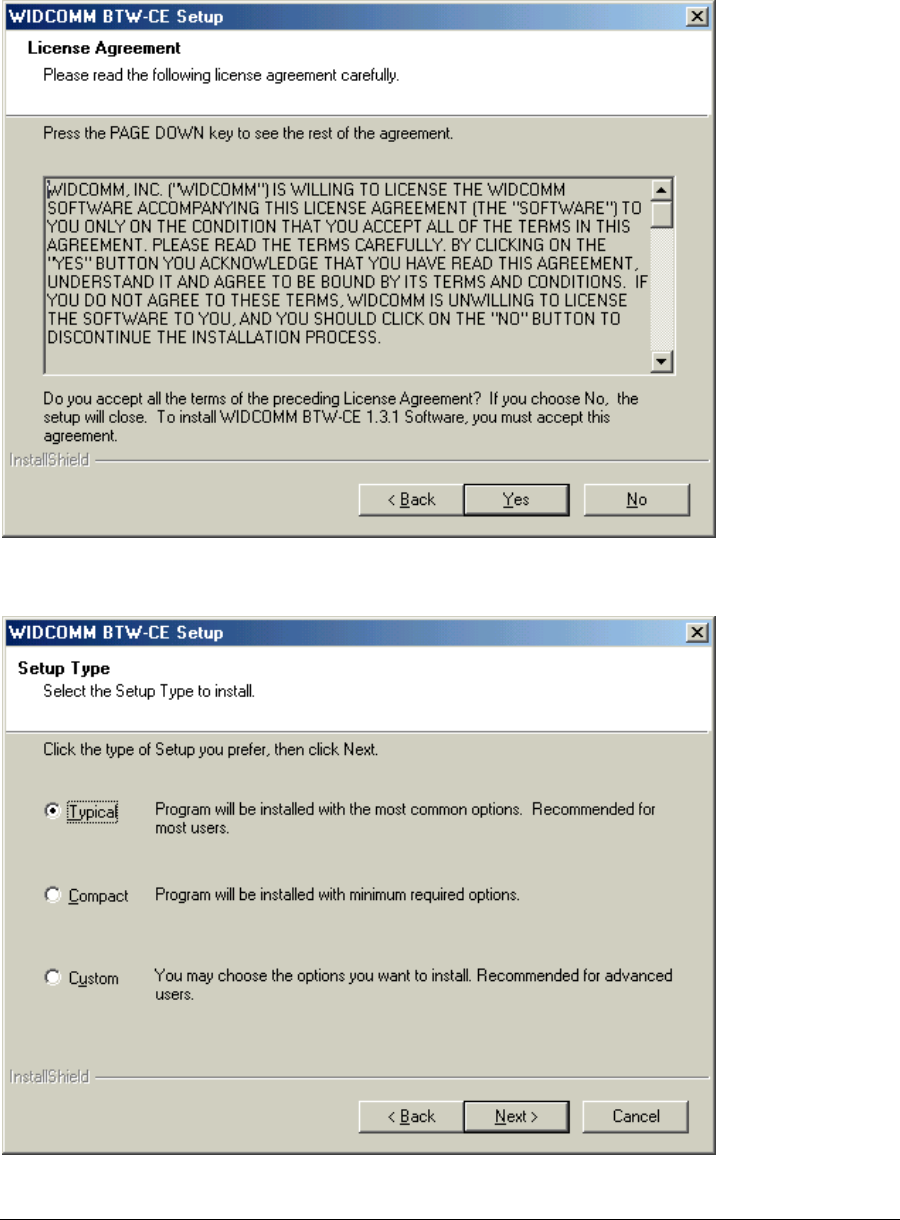
b) When the License Agreement screen is displayed, read the License Agreement, then
click "Yes" to go to the next step.
c) On the Setup Type screen, click "Typical" and click "Next" to accept the default setting.
48
d) The system will start installing all the necessary setup files.
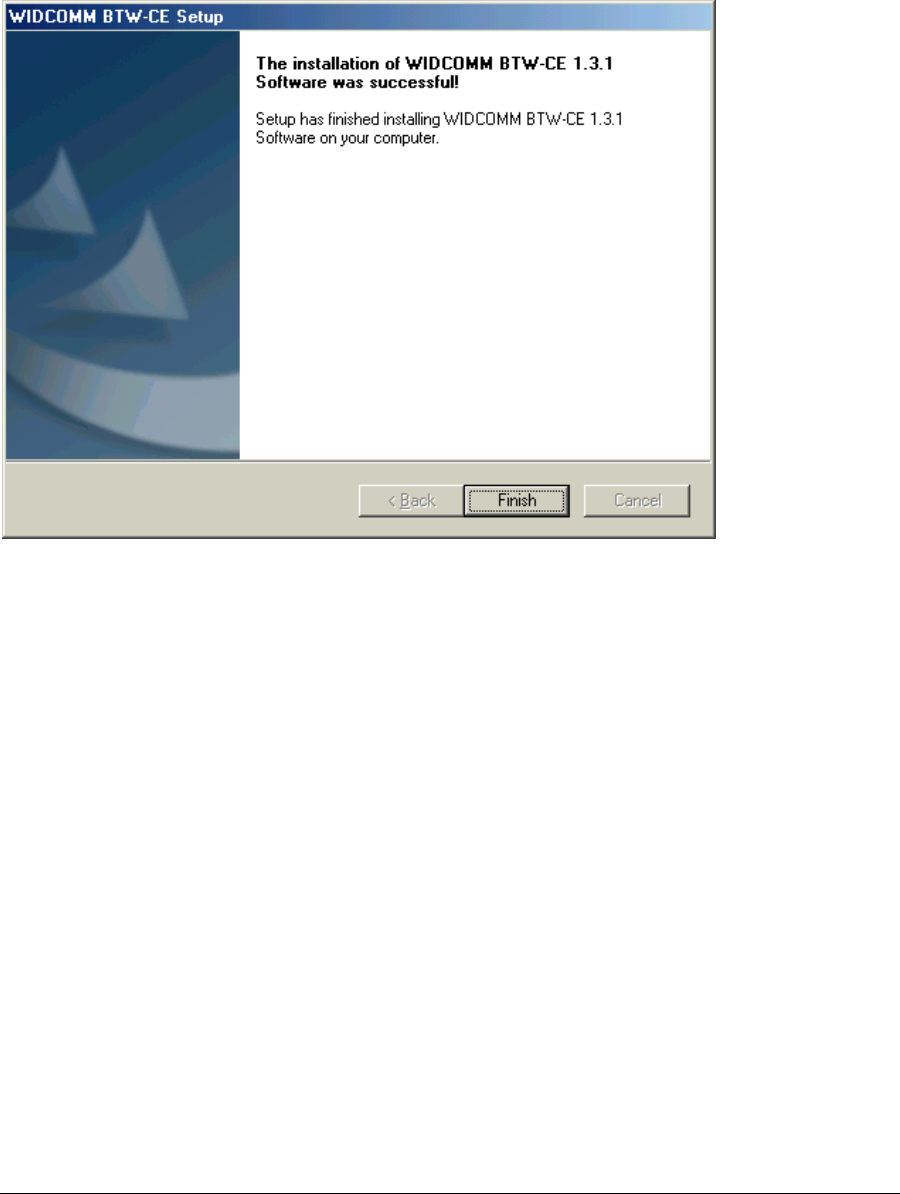
e) When the installation is completed, click the "Finish" button on the Completed screen.
f) On the handheld (PDA) device:
Tap "Yes" to accept the default directory and install the software.
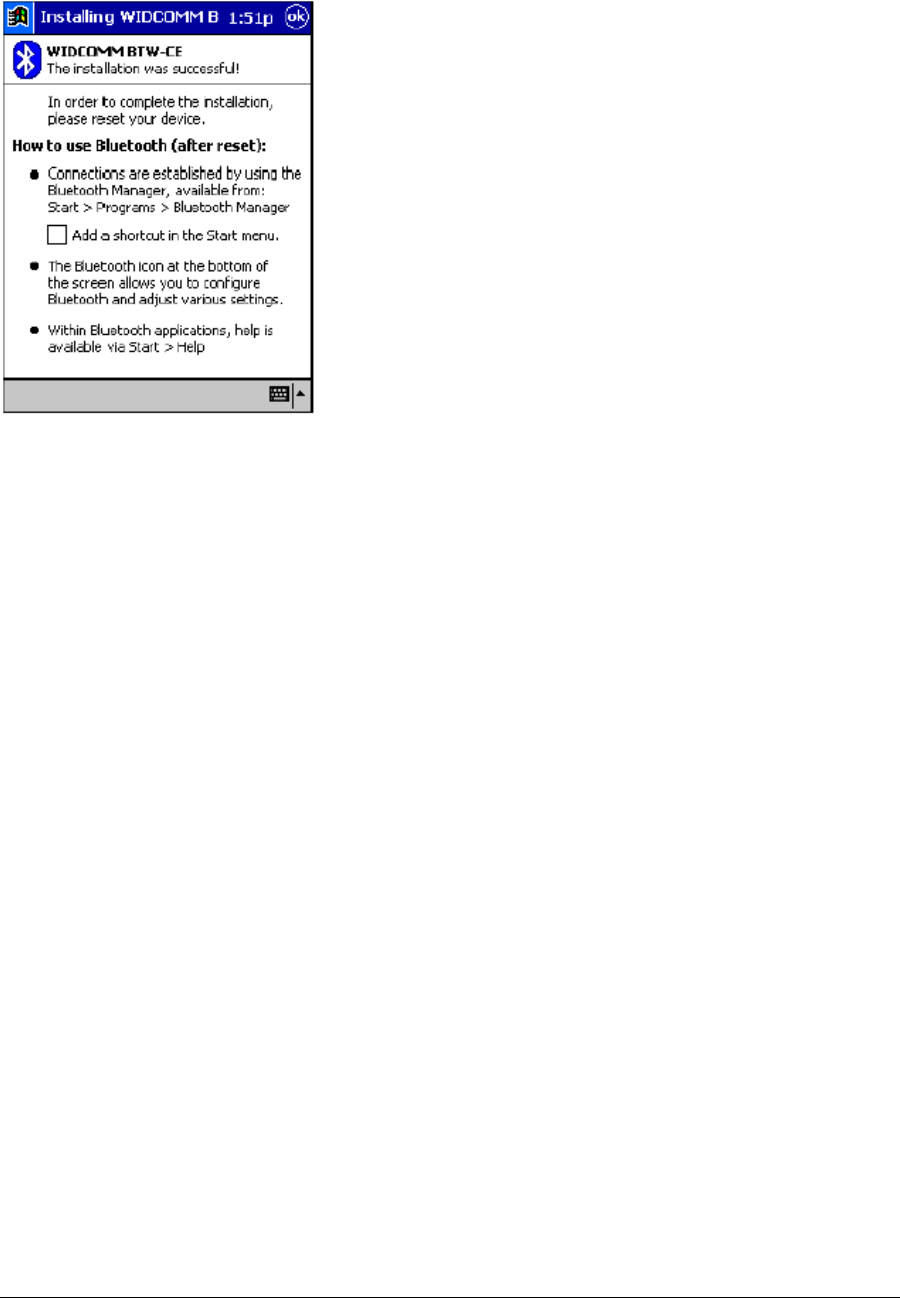
g) A Welcome screen will be shown with basic instructions to use BTW-CE.
h) Check off "Add a shortcut in the Start menu" in order to have access to the
"Bluetooth Manager" from the Start menu.
49
i) Perform a "soft" reset to the handheld computer. Refer to your device's documentation
for the exact procedure.
NOTE:
A soft reset leaves installed applications and stored data intact, and simply restarts
the device.
A hard reset deletes ALL downloaded applications on the handheld. See the
handheld computer's documentation for additional information.
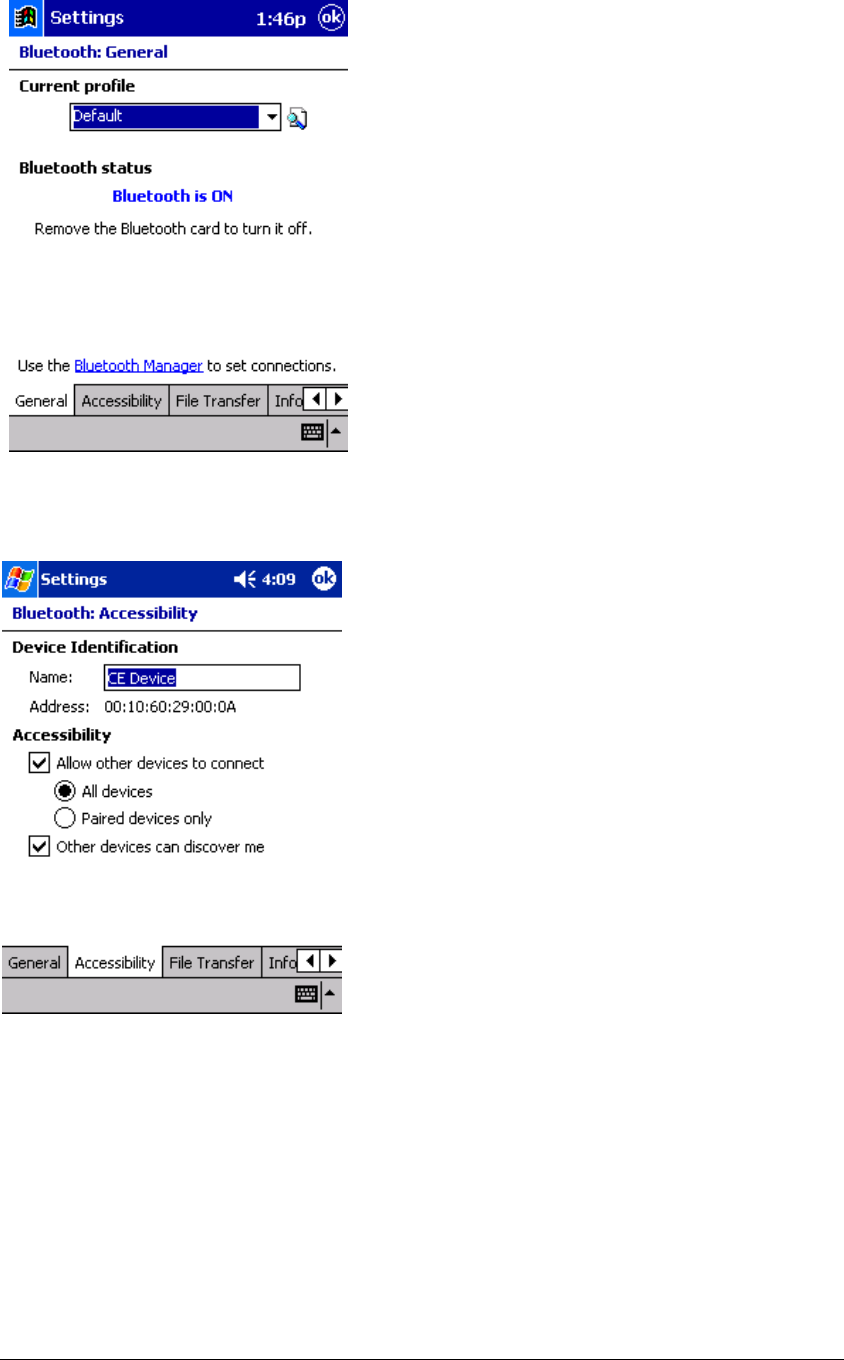
Bluetooth Control Panel:
Configuring BTW-CE
BTW-CE provides a Control Panel to adjust Bluetooth settings.
To access the Control Panel, tap the Bluetooth icon in the lower-right corner of the
Today screen.

50
BTW-CE can have multiple saved configurations. Individual configuration sets are
saved in profiles, which can be quickly loaded to meet the appropriate situation.
The Control Panel has seven tabs. All tabs are not visible on the screen at the same
time; use the arrows to the right of the tab names to scroll back-and-forth and expose
the different tabs.
There are server tabs in the control panel:
* General
User profile selection
Bluetooth status (ON/OFF) indicator
Hardware power control (ON/OFF)
Shortcut to the Bluetooth Manager.
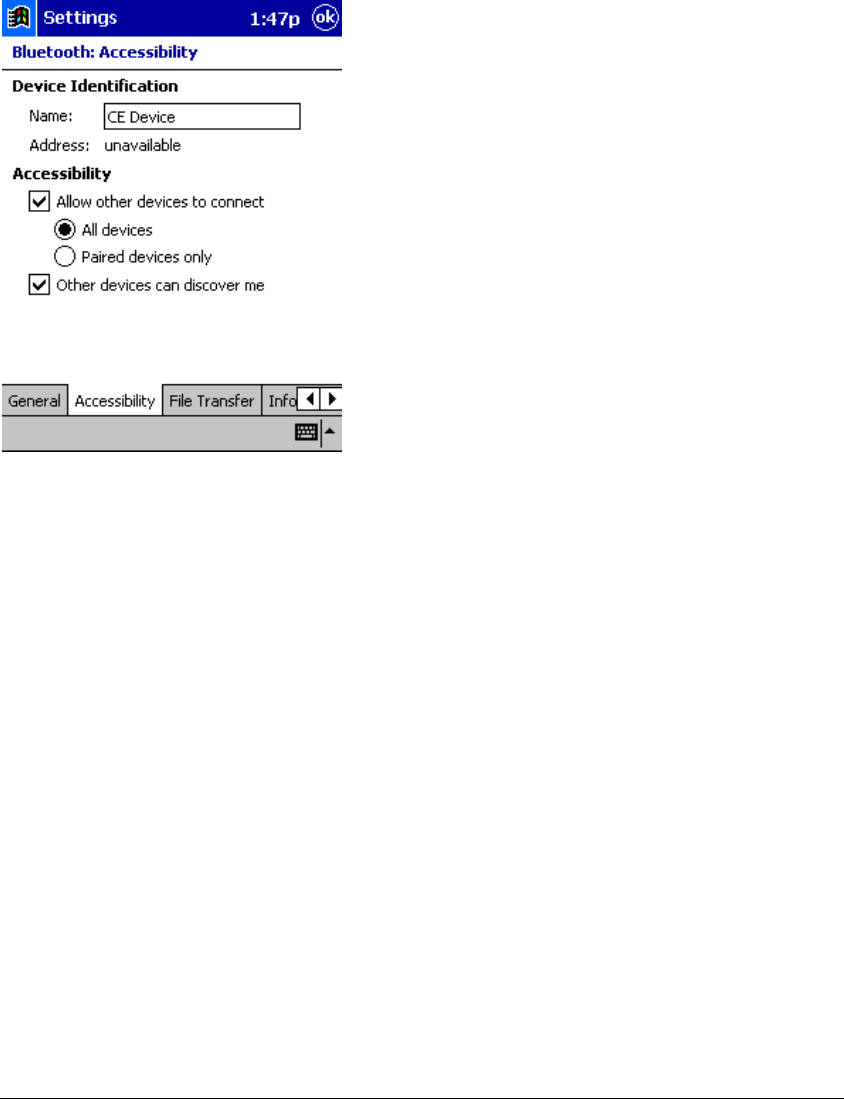
* Accessibility
Set the device name
The card's Bluetooth Device Address (Bd_Addr)
Determine which remote devices are allowed to connect
Determine whether this PocketPC can be seen by other remote devices.
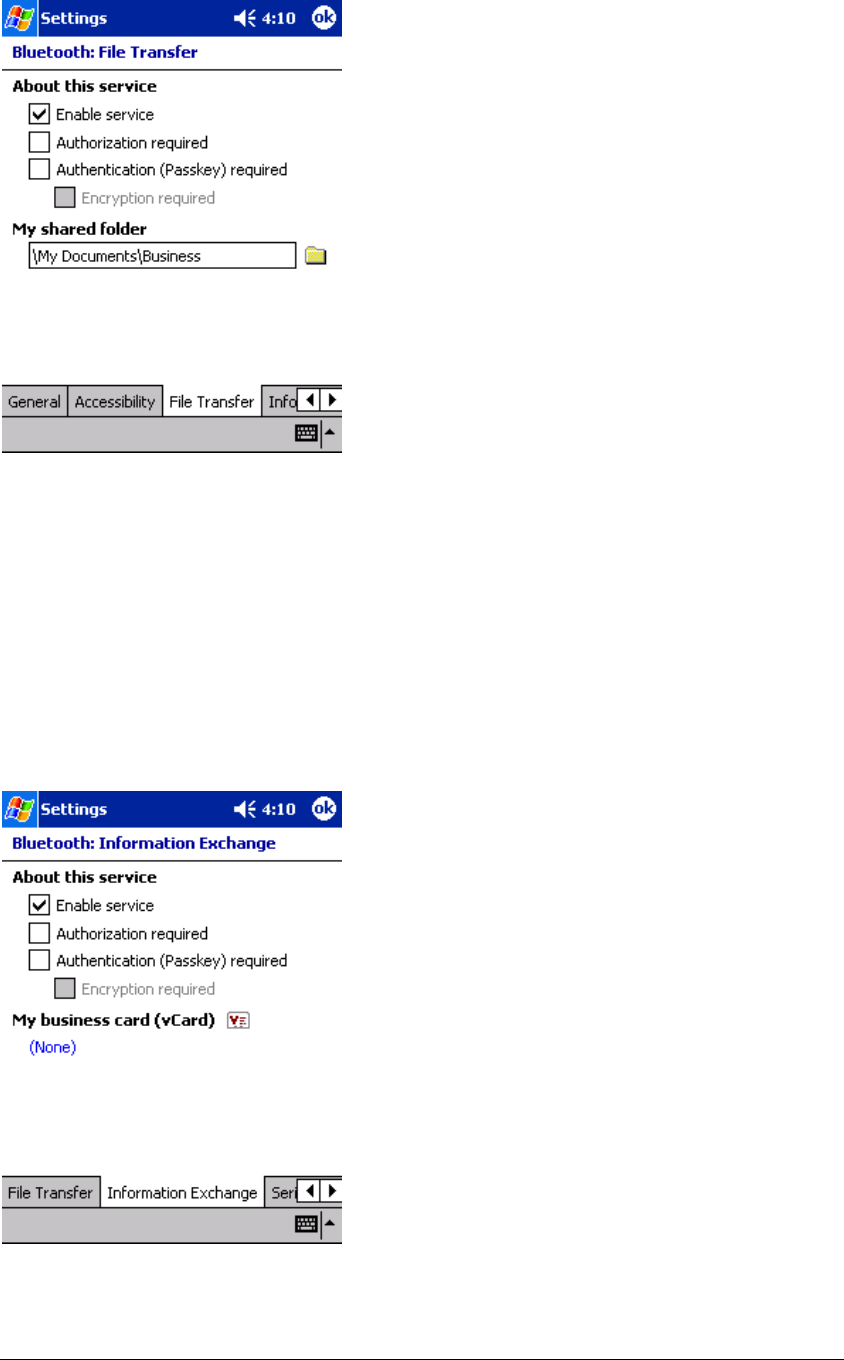
* Service tabs-BTW-CE can provide four services. They are:

51
File Transfer-Sets the highest-level of directory on this PocketPC that the remote
devices will have access to.
Information Exchange-Sets the default business card (Pocket Outlook contact entry)
Serial Port-Bluetooth serial port information
Dial-up Networking-configure the COM port, baud rate and flow control.
* About - there are no configurable options on this tab.
Software version information
Copyright information
Website and Technical Support links
There are three options on this screen:
* Current Profile: to change the active profile, tap the down-arrow in the "Current
profile:" field and select the new profile from the drop-down list. The current profile will
be saved, and the settings from the selected profile will be loaded. To add, delete, or
rename a profile, tap.
* Bluetooth Status:
Integrated Bluetooth hardware.
External Bluetooth hardware (Compact Flash or PC expansion card)
* Bluetooth Manager:
Tapping on this shortcut starts the Bluetooth Manager.
When Bluetooth is OFF, no connections, incoming or outgoing, are possible.
When Bluetooth is ON, Bluetooth is always "Up" and battery drain is significantly
greater than when Bluetooth is disabled. To conserve battery power, do not enable
Bluetooth when it is not being used.
52
Accessibility page displays device information. You can modify your device name in
here. This name will show on other Bluetooth devices.
All information on this tab is saved with the active profile, including the device name.
The options on the Accessibility tab are:
* Device Identification:
Name--the name of this device, as displayed to remote devices when the associated
profile is active. To change the device name associated with this profile, highlight the
name and enter the new name.
53
Address--the Bluetooth Device Address (Bd_Addr) of this device. This information is
permanently associated with the Bluetooth hardware during the manufacturing
process and cannot be changed.
* Accessibility:
Allow other devices to connect, when this option is enabled, other devices are
permitted to connect to this device. Two mutually exclusive sub-options provide
additional refinement. They are:
* All devices--select this option to allow all devices to connect.
* Paired devices only--select this option to allow only devices that have a paired
relationship.
Other devices can discover me, when this option is enabled, other Bluetooth devices
can see and report this device. Even though remote devices cannot discover this
device unless this option is checked, if a remote device has this device's Bluetooth
Device Address, that device may still be able to connect to this device.
54
Click “File Transfer” tab to display information about your CE device shared folder,
you can modify the shared folder here.
The options on this tab only affect incoming File Transfer connections.
There is one additional configurable item: "My shared folder" which allows you to
specify the default File Transfer directory, the highest level directory on this
PocketPC that remote devices have access to.
To change the default File Transfer directory, tap folder navigate to the desired
directory, and then tap the "OK" bottom.
55
Information Exchange page displays your business card. You can set your business
card in here.
The Common Options on this tab only affect incoming Information Exchange
connections.
There is one additional configurable item: "My business card (vCard)".
The "My business card" information comes from a selected record in the Contacts
list of Pocket Outlook. Information from the selected record is sent to remote devices
on request. It is also the contact information that is sent when you select "Send your
business card to one or more recipients" while using Business Card Exchange.
The default selection is "none" (no information).
To select a vCard, tap “Choose a contact” from the list, and then tap OK.
To discontinue sending contact information when it is requested, tap Choose
"(none)" from the list, and then tap OK.
If you reach the contacts list by mistake, tap OK to return to the previous screen.
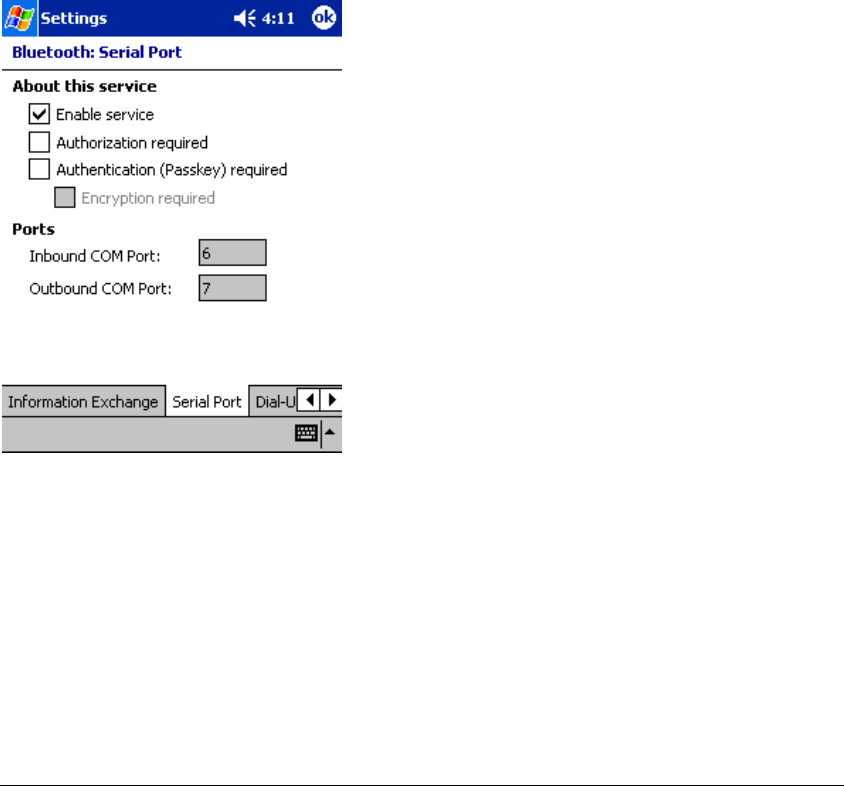
Serial Port page displays your Serial Port setting.
The configurable options on this tab only affect incoming Serial Port connections.
All of the Common Options (see Section 2.3.1) are available.
There are two additional, non-configurable items:
56
* Inbound COM Port: the local communications port that is used for inbound serial
connections.
* Outbound COM Port: the local communications port that is used for outbound serial
connections.
The Inbound and Outbound COM ports are permanently assigned and cannot be
changed.
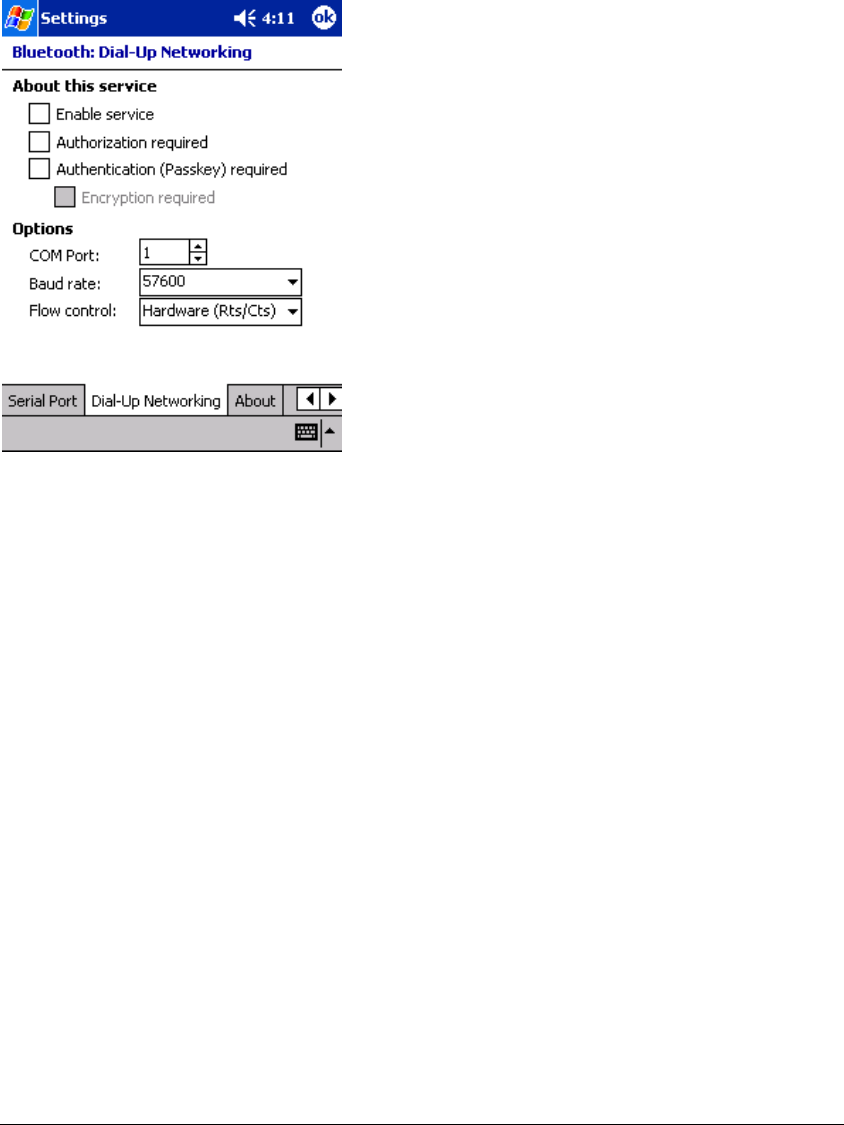
Dial-Up Networking page displays your Dial-Up Networking setting. You can change
your COM port, baud rate and Flow control here.
There are three additional items:
* COM Port: select the communications port to be used.
* Baud rate: tap the down-arrow and select a baud rate from the drop-down list. The
options range from 1,200 to 115,200 baud, in nine steps.
* Flow control: tap the down-arrow and select the type of flow control to be used from
the drop-down list.
The options are:
Off
Hardware (Rts/Cts).
57
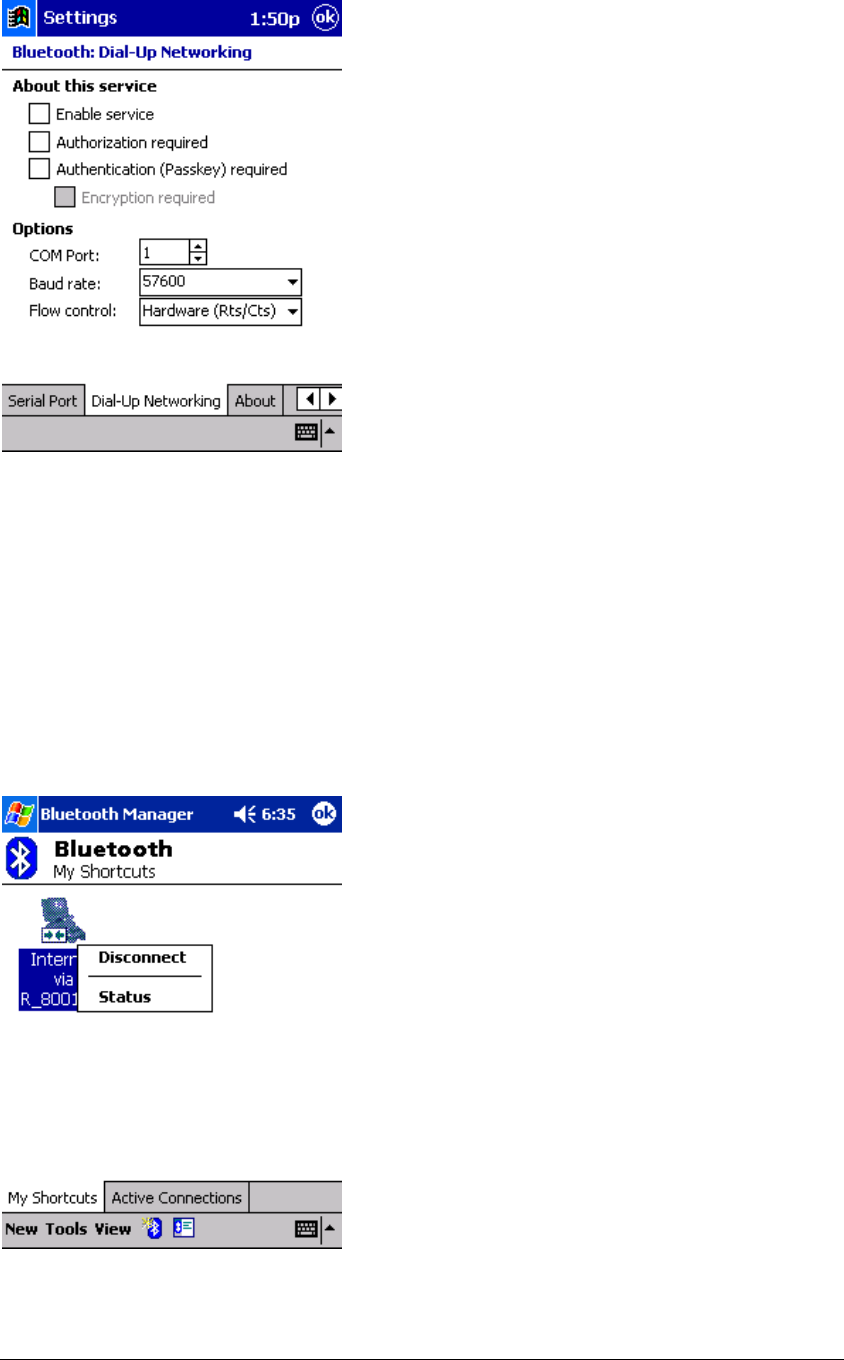
Connection Open-Context Sensitive Menu Options
From the My Connections screen, tap and hold a connection icon that is associated
with an OPEN connection to access the context sensitive menu.
The Menu options are:
* Disconnect-close the open connection
* Status-select this option to display the Connection Status screen (double-tap
default).