ZyXEL Communications WRE6505 Wireless AC750 Range Extender User Manual WRE6505
ZyXEL Communications Corporation Wireless AC750 Range Extender WRE6505
user manual
Quick Start Guide
www.zyxel.com
W RE6 5 0 5
Wireless AC750 Range Extender
Version 1.00
Edition 2, 7/ 2014
Copyright © 2014 ZyXEL Comm unications Corporation
User’s Guide
Default Login Details
LAN IP Address 192.168.1.2
User Name adm in
Password 1234
2.4G
2.4G
5G
5G

WRE6505 User’s Guide
2
IMPORTANT!
READ CAREFULLY BEFORE USE.
KEEP THIS GUIDE FOR FUTURE REFERENCE.
Related Documentation
• Quick Start Guide
The Quick Start Guide shows how to connect the WRE6505 and access the Web Configurator
wizards. ( See t he wizard real tim e help for information on configuring each screen.) I t also
contains a connection diagram and package contents list.
Note: I t is recom m ended you use the Web Configurator to configure the WRE6505.

Contents Overview
WRE6505 User’s Guide
3
Contents Overview
User’s Guide .........................................................................................................................................7
Introduction ...............................................................................................................................................9
WRE6505 Modes ....................................................................................................................................13
Universal Repeater Mode .......................................................................................................................15
Access Point Mode .................................................................................................................................21
The Web Configurator .............................................................................................................................27
Connection Wizard ..................................................................................................................................29
Status ......................................................................................................................................................37
Tutorials ..................................................................................................................................................43
Technical Reference ..........................................................................................................................51
Wireless LAN ..........................................................................................................................................53
LAN .........................................................................................................................................................63
System ....................................................................................................................................................65
Troubleshooting ......................................................................................................................................76

Table of Contents
WRE6505 User’s Guide
4
Table of Contents
Contents Overview ..............................................................................................................................3
Table of Contents .................................................................................................................................4
Part I: User’s Guide ........................................................................................... 7
Chapter 1
Introduction...........................................................................................................................................9
1.1 Overview .............................................................................................................................................9
1.2 Securing the WRE6505 .....................................................................................................................10
1.3 Front Panel ........................................................................................................................................10
1.4 WPS Button .......................................................................................................................................12
1.4.1 Wi-Fi Protected Setup .............................................................................................................12
Chapter 2
WRE6505 Modes .................................................................................................................................13
2.1 Overview ...........................................................................................................................................13
2.1.1 Device Modes ..........................................................................................................................13
Chapter 3
Universal Repeater Mode...................................................................................................................15
3.1 Overview ...........................................................................................................................................15
3.2 What You Can Do .............................................................................................................................15
3.3 What You Need to Know ...................................................................................................................16
3.3.1 Setting your WRE6505 to Universal Repeater Mode ..............................................................16
3.4 Universal Repeater Mode Status Screen ..........................................................................................17
3.5 WPS Screen ......................................................................................................................................19
Chapter 4
Access Point Mode.............................................................................................................................21
4.1 Overview ...........................................................................................................................................21
4.2 What You Can Do .............................................................................................................................21
4.3 What You Need to Know ...................................................................................................................22
4.3.1 Setting your WRE6505 to AP Mode ........................................................................................22
4.3.2 Configuring your WLAN, LAN and Maintenance Settings .......................................................22
4.4 AP Mode Status Screen ....................................................................................................................22
4.4.1 Navigation Panel .....................................................................................................................25

Table of Contents
WRE6505 User’s Guide
5
Chapter 5
The Web Configurator ........................................................................................................................27
5.1 Overview ...........................................................................................................................................27
5.2 Accessing the Web Configurator .......................................................................................................27
5.3 Resetting the WRE6505 ....................................................................................................................28
Chapter 6
Connection Wizard .............................................................................................................................29
6.1 Overview ...........................................................................................................................................29
6.2 Using the Web Configurator Wizard ..................................................................................................29
6.2.1 Extending the Network ............................................................................................................29
6.2.2 Configuring the WRE6505 for Connection to an AP ................................................................30
Chapter 7
Status ...................................................................................................................................................37
7.1 WRE6505 Status ...............................................................................................................................37
7.1.1 Summary: Packet Statistics ....................................................................................................39
7.1.2 Summary: WLAN Station Status ..............................................................................................40
7.2 Navigation Panel ...............................................................................................................................41
Chapter 8
Tutorials...............................................................................................................................................43
8.1 Overview ...........................................................................................................................................43
8.2 Connecting to the Internet from an Access Point ..............................................................................43
8.3 Connecting to a Wireless Network Using WPS .................................................................................43
8.3.1 Push Button Configuration (PBC) ............................................................................................44
8.3.2 PIN Configuration ....................................................................................................................45
8.4 Connecting the WRE6505 to an AP ..................................................................................................46
8.4.1 Selecting an AP from an Automatically Detected List .............................................................47
8.4.2 Selecting an AP by Manually Entering Security Information ...................................................49
Part II: Technical Reference............................................................................ 51
Chapter 9
Wireless LAN.......................................................................................................................................53
9.1 Overview ...........................................................................................................................................53
9.2 What You Can Do .............................................................................................................................53
9.3 What You Should Know ....................................................................................................................53
9.3.1 Wireless Security Overview .....................................................................................................53
9.4 General Wireless LAN Screen .........................................................................................................55
9.5 Security .............................................................................................................................................56

Table of Contents
WRE6505 User’s Guide
6
9.6 AP Select Screen ..............................................................................................................................56
9.7 MAC Filter .........................................................................................................................................57
9.8 Wireless LAN Advanced Screen .......................................................................................................59
9.9 WPS Screen ......................................................................................................................................59
9.10 WPS Station Screen ........................................................................................................................60
9.11 Scheduling Screen ..........................................................................................................................61
Chapter 10
LAN ......................................................................................................................................................63
10.1 Overview .........................................................................................................................................63
10.2 What You Need To Know ................................................................................................................63
10.3 LAN IP Screen ................................................................................................................................63
Chapter 11
System .................................................................................................................................................65
11.1 Overview .........................................................................................................................................65
11.2 What You Can Do ............................................................................................................................65
11.3 General ............................................................................................................................................65
11.4 System Password Screen ..............................................................................................................66
11.5 Firmware Upgrade Screen ..............................................................................................................66
11.6 Backup / Restore Screen ................................................................................................................68
11.6.1 Backup Configuration .............................................................................................................69
11.6.2 Restore Configuration ............................................................................................................69
11.6.3 Restore to Factory Defaults ...................................................................................................70
11.7 Language ........................................................................................................................................70
11.8 System Mode ..................................................................................................................................70
11.8.1 System WPS Behavior ...........................................................................................................71
Chapter 12
Troubleshooting..................................................................................................................................76
12.1 Power, Hardware Connections, and LEDs ......................................................................................76
12.2 WRE6505 Access and Login ..........................................................................................................77
12.3 Internet Access ...............................................................................................................................78
12.4 Resetting the WRE6505 to Its Factory Defaults ..............................................................................80
12.5 Wireless Problems ..........................................................................................................................80
Appendix A Setting Up Your Computer’s IP Address ........................................................................81
Appendix B Legal Information..........................................................................................................109
Index .................................................................................................................................................. 114

7
PART I
User’s Guide

8
WRE6505 User’s Guide
9
CHAPTER 1
Introduction
1.1 Overview
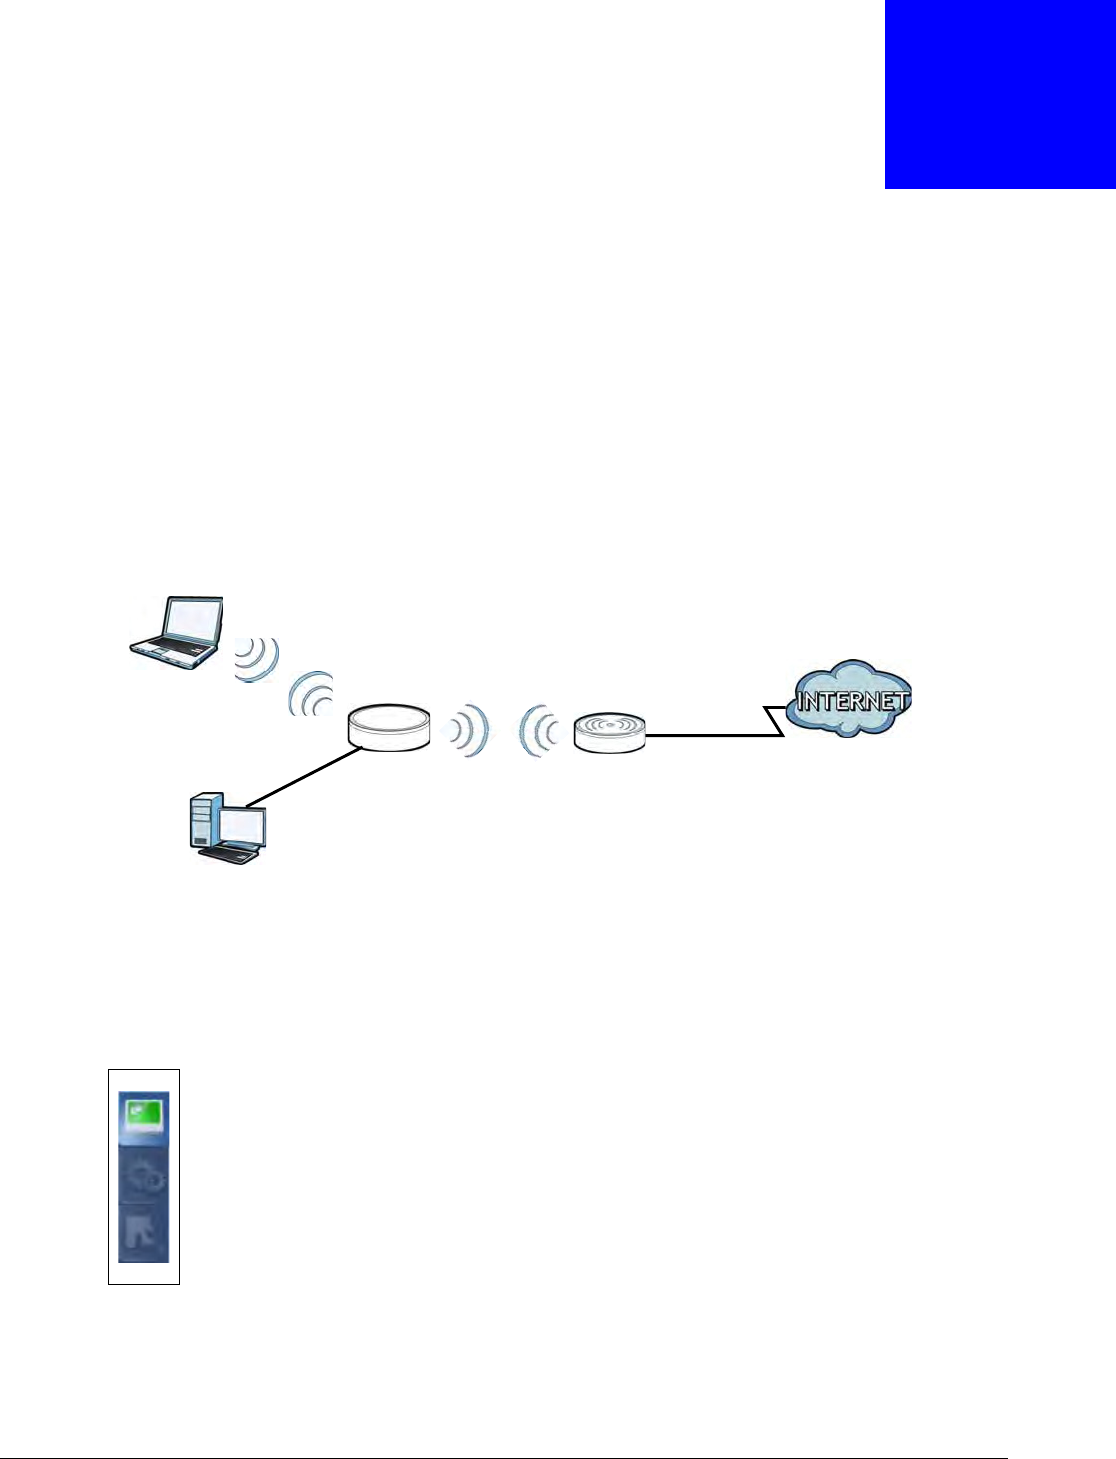
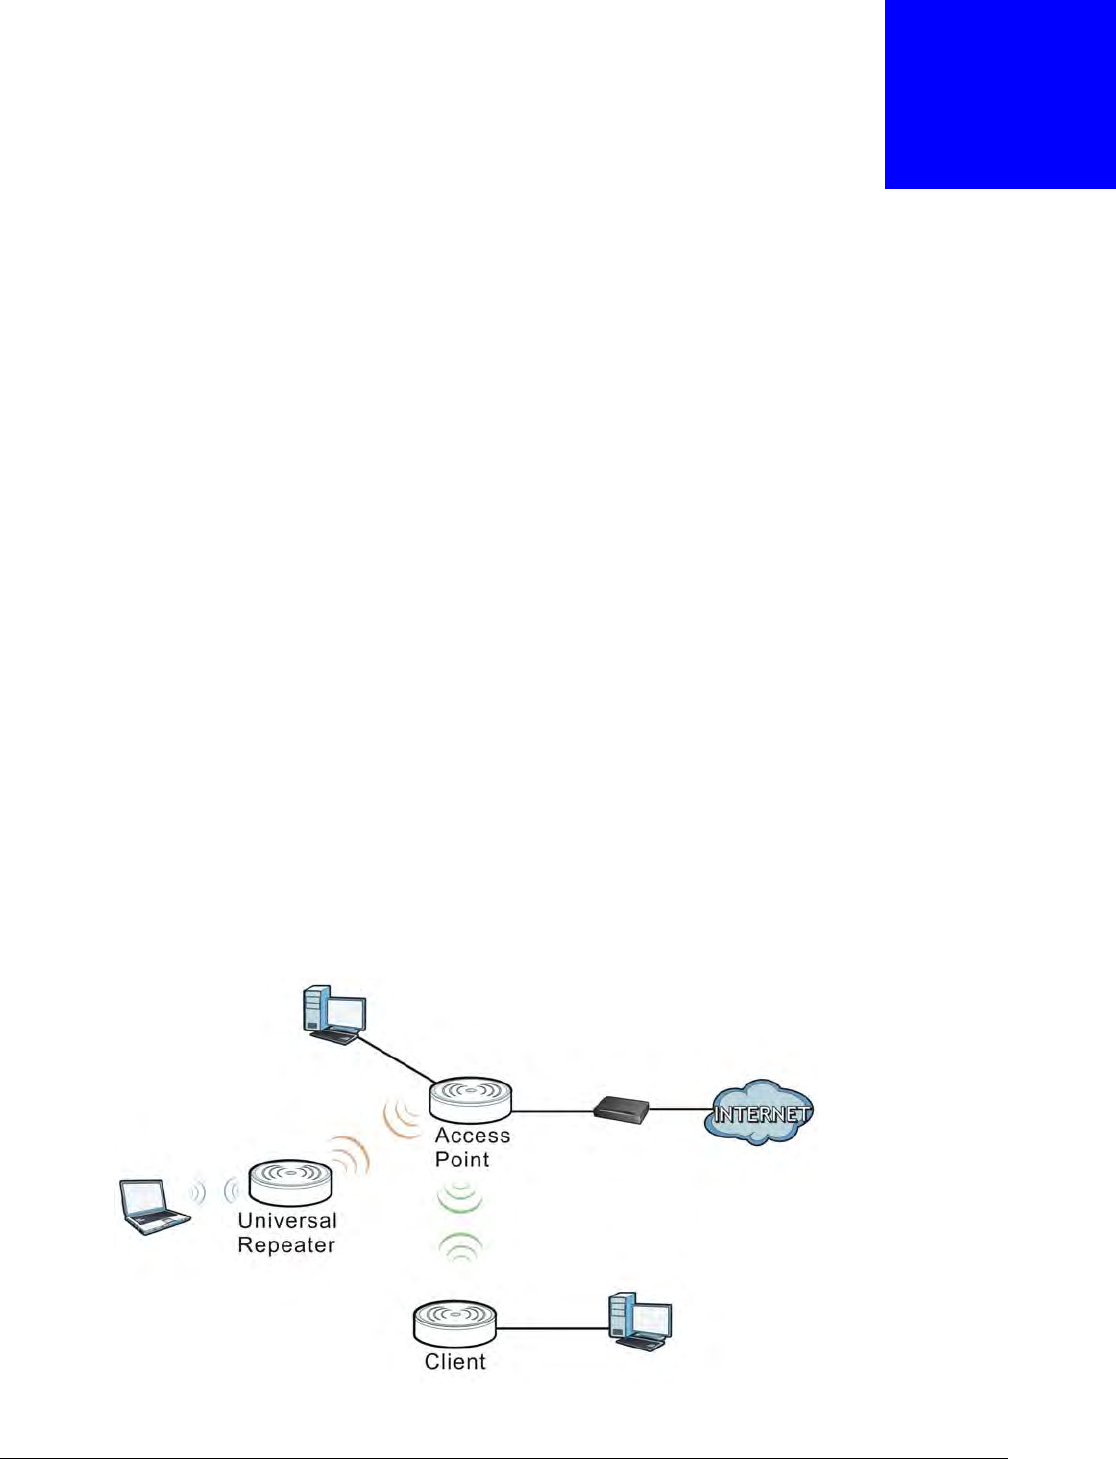
The ZyXEL WRE6505 Wireless AC750 Range Extender allows you to easily extend existing 802.11
b/ g/ n/ ac wireless networks fast and easy. WRE6505 directly into a power outlet and the LED signal
strength indicator allows you to determ ine the ideal installation location. The one-click Wi-Fi
Protected Setup ( WPS Button on page 12) provides frustration-free wireless client setup and
com pletes the instant network access setup.
Figure 1 Universal Repeater
Your can create the following connections using the WRE6505:
•LAN . You can connect network devices via the Ethernet port of the WRE6505 so that they can
com m unicate with each other and access the I nternet.
•W LAN . Wireless clients can connect to the WRE6505 to access network resources.
Use a (supported) web browser to m anage the WRE6505.
See Chapter 7 on page 37 for m ore inform ation.
LEW
N
AP
WLAN
Chapter 1 Introduction
WRE6505 User’s Guide
10
1.2 Securing the WRE6505
Do t he following things regularly to m ake the WRE6505 m ore secure and to m anage the WRE6505
more effectively.
• Change the password. Use a password that’s not easy to guess and that consists of different
types of characters, such as num bers and letters.
• Write down the password and put it in a safe place.
• Back up the configuration ( and m ake sure you know how to restore it). Restoring an earlier
working configuration may be useful if the device becomes unstable or even crashes. I f you
forget your password, you will have to reset the WRE6505 to its factory default settings. I f you
backed up an earlier configuration file, you would not have to totally re-configure the WRE6505.
You could simply restore your last configuration.
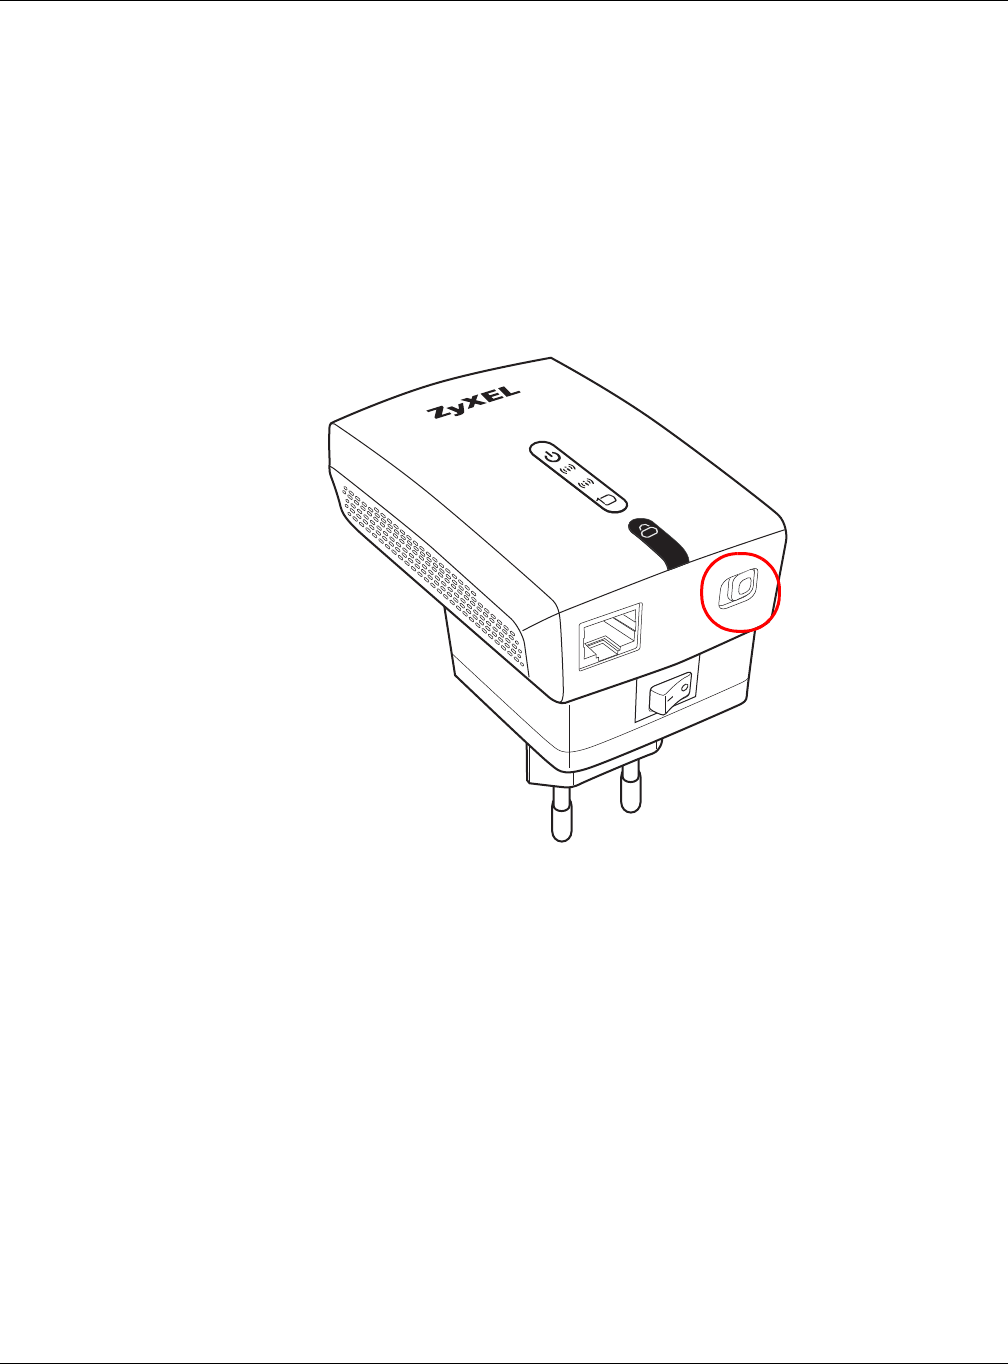
1.3 Front Panel
Figure 2 Front Panel
The following table describes the LEDs and the WPS button.
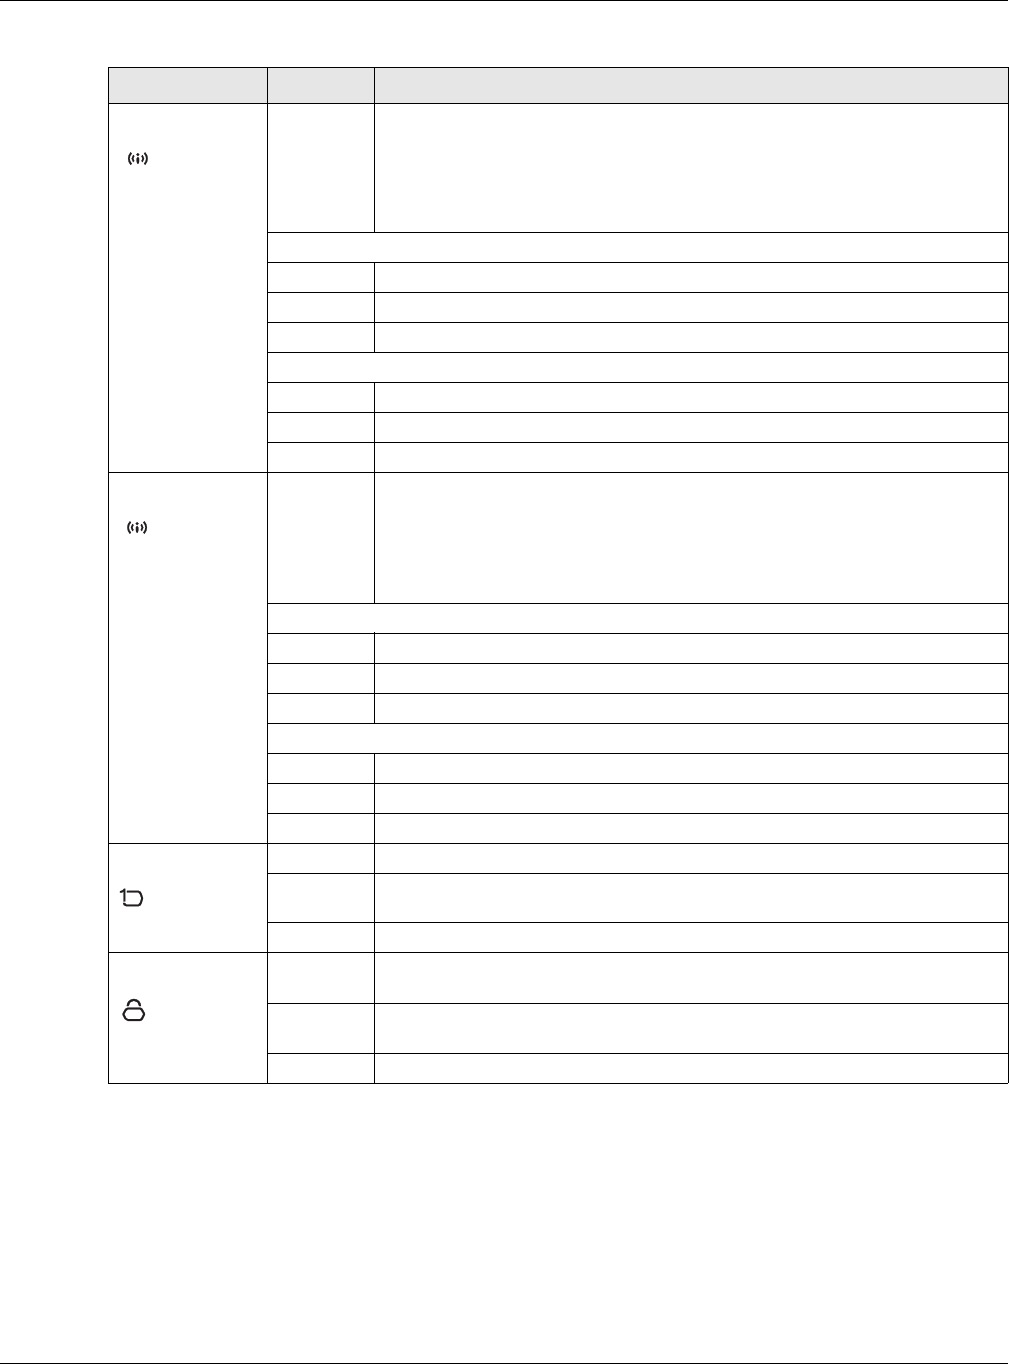
Table 1 Front Panel LEDs and WPS Button
LED STATUS DESCRIPTION
Power On (Green) The WRE6505 is receiving power and functioning properly.
Blinking
(Green)
The WRE6505 is booting or resetting to factory defaults.
Off The WRE6505 is not receiving power.
ETHERNET
ON/OFF
AP/Repeater
2.4G
5G
WPS Button
LEDs
Power Switch
Ethernet Port
AP / Repeater
Mode Switch
Chapter 1 Introduction
WRE6505 User’s Guide
11
Wi-Fi 2.4G The device uses two LEDs to generate the following t hree signal colors:
• Red: signifies a signal strength under 50%
• Orange: signifies a signal strength under 75%
• Green: signifies a signal strength over 75%
Repeater m ode
On WLAN signal detected.
Blinking The WRE6505 is sending/ receiving data through the wireless LAN.
Off The wireless LAN is not ready or fault detected.
AP m ode
On WLAN is powered on.
Blinking The WRE6505 is sending/ receiving data through the wireless LAN.
Off WLAN is off.
Wi-Fi 5G The device uses two LEDs to generate the following three signal colors:
• Red: signifies a signal strength under 50%
• Orange: signifies a signal strength under 75%
• Green: signifies a signal strength over 75%
Repeater m ode
On WLAN signal detected.
Blinking The WRE6505 is sending/ receiving data through the wireless LAN.
Off The wireless LAN is not ready or fault detected.
AP m ode
On WLAN is powered on.
Blinking The WRE6505 is sending/ receiving data through the wireless LAN.
Off WLAN is off.
LAN On (Green) The WRE6505 has a successful 10/ 100MB LAN connection.
Blinking
(Green)
The WRE6505 is transmit ting data.
Off Link is off.
WPS On (Blue) This remains on for 5 minutes after a successful WPS connection has been
established.
Blinking
(Blue)
The WRE6505 is waiting for another WPS device to connect.
Off There is no WPS connection established.
Table 1 Front Panel LEDs and WPS Button ( continued)
LED STATUS DESCRIPTION
2.4G
2.4G
5G5G

Chapter 1 Introduction
WRE6505 User’s Guide
12
1.4 WPS Button
The WPS button can be used to begin Wi-Fi Protected Setup (WPS), reboot the WRE6505 while
keeping it’s configuration or reboot the WRE6505 to factory default configuration.
1.4.1 Wi-Fi Protected Setup
Your WRE6505 supports Wi-Fi Protected Setup (WPS), which is an easy way to set up a secure
wireless network. WPS is an industry standard specification, defined by the Wi-Fi Alliance.
WPS allows you to quickly set up a wireless network with strong security, without having to
configure security settings m anually. Each WPS connection works between two devices. Both
devices must support WPS (check each device’s docum entation to m ake sure).
Depending on the devices you have, you can either press a button (recom m ended) on the device
itself, or in its configuration utility or enter a PIN (a unique Personal I dentification Num ber that
allows one device to authenticate the other) in each of the two devices. When WPS is activated on
a device, it has two m inutes to find another device that also has WPS activated. Then, the two
devices connect and set up a secure network by themselves.
For m ore information on using WPS, see Section 3.5 on page 19.
Table 2 WPS Button Functions
ACTION RESULT
Push once or hold for
less than 5 seconds
AP Mode:
Press (less than five seconds) to connect to a client. See Section
1.4 on page 12.
Repeat e r m ode :
Press (less than five seconds) to enable WPS. Press twice to
connect to a client. See Section 1.4 on page 12.
AP Mode
Hold for 5 to 10
seconds
The WRE6505 resets its configuration to factory defaults and
reboots. See Section 5.3 on page 28.
Hold for m ore than 10
seconds
The WRE6505 keeps its configuration and reboots.
Repeat er Mode
Push twice The WRE6505 begins connecting to a wireless client via WPS. See
Section 1.4 on page 12.
Hold for 5 to 10
seconds
The WRE6505 resets its configuration to factory defaults and
reboots. See Section 5.3 on page 28.
Hold for m ore than 10
seconds
The WRE6505 keeps its configuration and reboots.
WRE6505 User’s Guide
13
CHAPTER 2
WRE6505 Modes
2.1 Overview
This chapter introduces the different m odes available on your WRE6505.
•Sys OP m ode. This is the operating m ode of your WRE6505, or simply how the WRE6505 is
being used in the network.
2.1.1 Device Modes
This refers to the operating m ode of the WRE6505, which can act as a:
•Unive rsa l Repe ater : I n this m ode, the WRE6505 can be an access point and a wireless client at
the sam e tim e. Go to Section 3.4 on page 17 to view the St a t u s screen in this m ode. Use this
mode if there is an existing wireless router or access point in your network and you also want to
allow clients to connect to the WRE6505 wirelessly.
•Acce ss Point: Use this m ode if you want to extend your network by allowing network devices to
connect to the WRE6505 wirelessly. Go to Section 4.4 on page 22 to view the St a t u s screen in
this m ode.
In this m ode, you can also set the WRE6505 to work as an AP only, a wireless bridge to establish
wireless links with other APs (WDS bridge), or an AP and bridge simultaneously (WDS repeater).
See Section 4.2 on page 21 for m ore information.
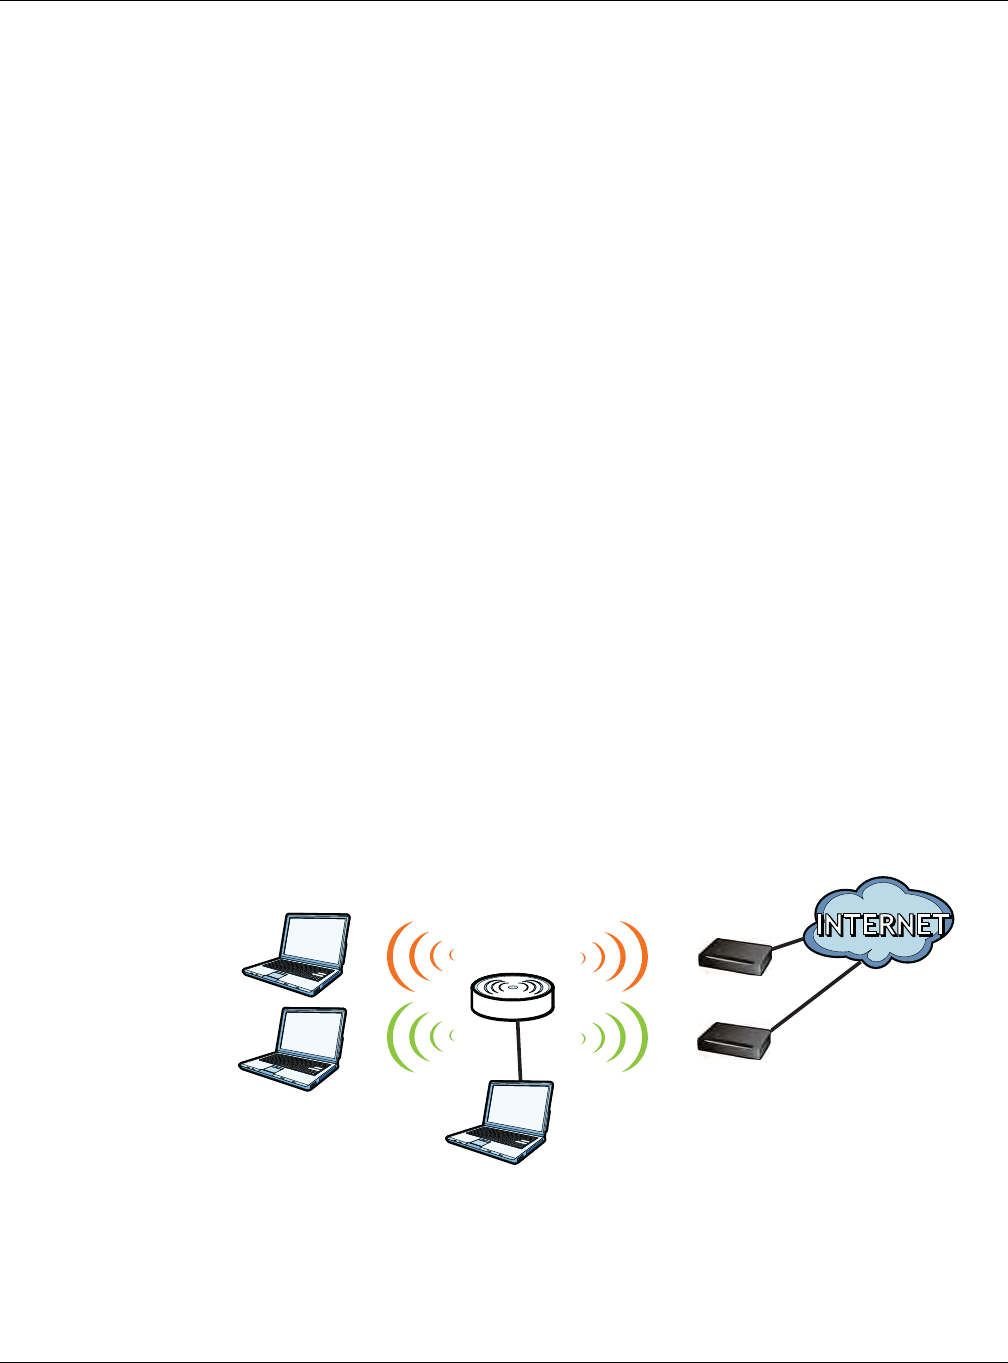
The following figure is an illustration of the device configuration m odes of the WRE6505.
Figure 3 Device Mode Exam ple
Note: Choose your device m ode carefully to avoid having to change it later.
Chapter 2 WRE6505 Modes
WRE6505 User’s Guide
14
Under Repeater m ode, the WRE6505 supports three WPS behaviors: Normal m ode, Range boost
mode, and Speed boost m ode. These behaviors are only available in Repeater m ode through the
Maintenance screen.
2.1.1.1 Changing Operating Mode
Push the AP / Re pea t er m ode switch on the WRE6505’s bottom panel to the AP position to have
the WRE6505 act as an access point. Push the switch to the Re pe at e r position to have the
WRE6505 work as a universal repeater.
The WRE6505 restarts automatically after you change operating m odes.
Figure 4 Bottom Panel
ETHERNET
ON/OFF
AP/Repeater
2.4G
5G
WRE6505 User’s Guide
15
CHAPTER 3
Universal Repeater Mode
3.1 Overview
In universal repeater m ode, your WRE6505 can act as an access point and wireless client at the
sam e tim e. The WRE6505 can connect to an existing network through another access point and
also lets wireless clients connect to the network through it. This helps you expand wireless
coverage when you have an access point or wireless router already in your network.
In the example below, the WRE6505 (A) is configured as a universal repeater. I t has three clients
that want to connect to the I nternet. The WRE6505 wirelessly connects to the available access point
(B).
Figure 5 Universal Repeater Mode
After the WRE6505 and the access point connect, the WRE6505 acquires its I P address from the
access point. The clients of the WRE6505 can now surf the I nternet.
3.2 What You Can Do
• Use the St a t u s screen (Section 7.1 on page 37) to view read-only inform ation about your
WRE6505.
• Use the LAN screen (Chapter 10 on page 63) to set the I P address for your WRE6505.
• Use the W ire le ss LAN > W PS screen (Section 3.5 on page 19) to configure WPS on the
WRE6505 to associate to another access point.
• Use the N e t w or k > W ireless LAN ( 2 .4 G/ 5 G) > Se curit y screen (Section 9.5 on page 56) to
configure the wireless security between the WRE6505 and another access point.
• Use other W ir eless LAN screens (Section 9.4 on page 55) to configure the wireless settings and
wireless security between the wireless clients and the WRE6505.
AB
Chapter 3 Universal Repeater Mode
WRE6505 User’s Guide
16
3.3 What You Need to Know
With the exception of the Syst em M ode other configuration screens in Universal Repeater m ode
are similar to the ones in Access Point Mode. See Chapter 2 on page 13 of this User’s Guide.
3.3.1 Setting your WRE6505 to Universal Repeater Mode
1To use your WRE6505 as a universal repeater, see Section 2.1.1.1 on page 14.
2Connect your computer to the LAN port of the WRE6505.
3The default I P address of the WRE6505 is “192.168.1.2”. I n this case, your computer m ust have an
IP address in the range between “ 192.168.1.3” and “ 192.168.1.254”.
4After you’ve set your computer’s I P address, open a web browser such as I nternet Explorer and
type “http: / / 192.168.1.2” or http: / / zyxelsetup as the web address in your web browser.
5Enter “1234” (default) as the password and click Login.
6Type a new password and retype it to confirm, then click Apply. Otherwise, click I gn ore.
Note: You have to log in to the Web Configurator again when you change modes. As soon
as you do, your WRE6505 is already in Universal Repeater m ode.
Note: The universal repeater m ode I P address is always the same as the access point
mode IP address. If you change the I P address of your WRE6505 while in access
point m ode, use this I P address in universal repeater m ode.
Note: I f a client is connected to the WRE6505 through the Ethernet connection, the client
can only access the 2.4 GHz Wi-Fi. I n the following figure, the LAN Client is only
able to access the 2.4 GHz Wi-Fi.
Figure 6 Repeater Mode Overview
WRE
LAN Client
5 GHz
5 GHz AP
5 GHz
5 GHz
2.4 GHz AP
2.4 GHz2.4 GHz
2.4 GHz
Chapter 3 Universal Repeater Mode
WRE6505 User’s Guide
17
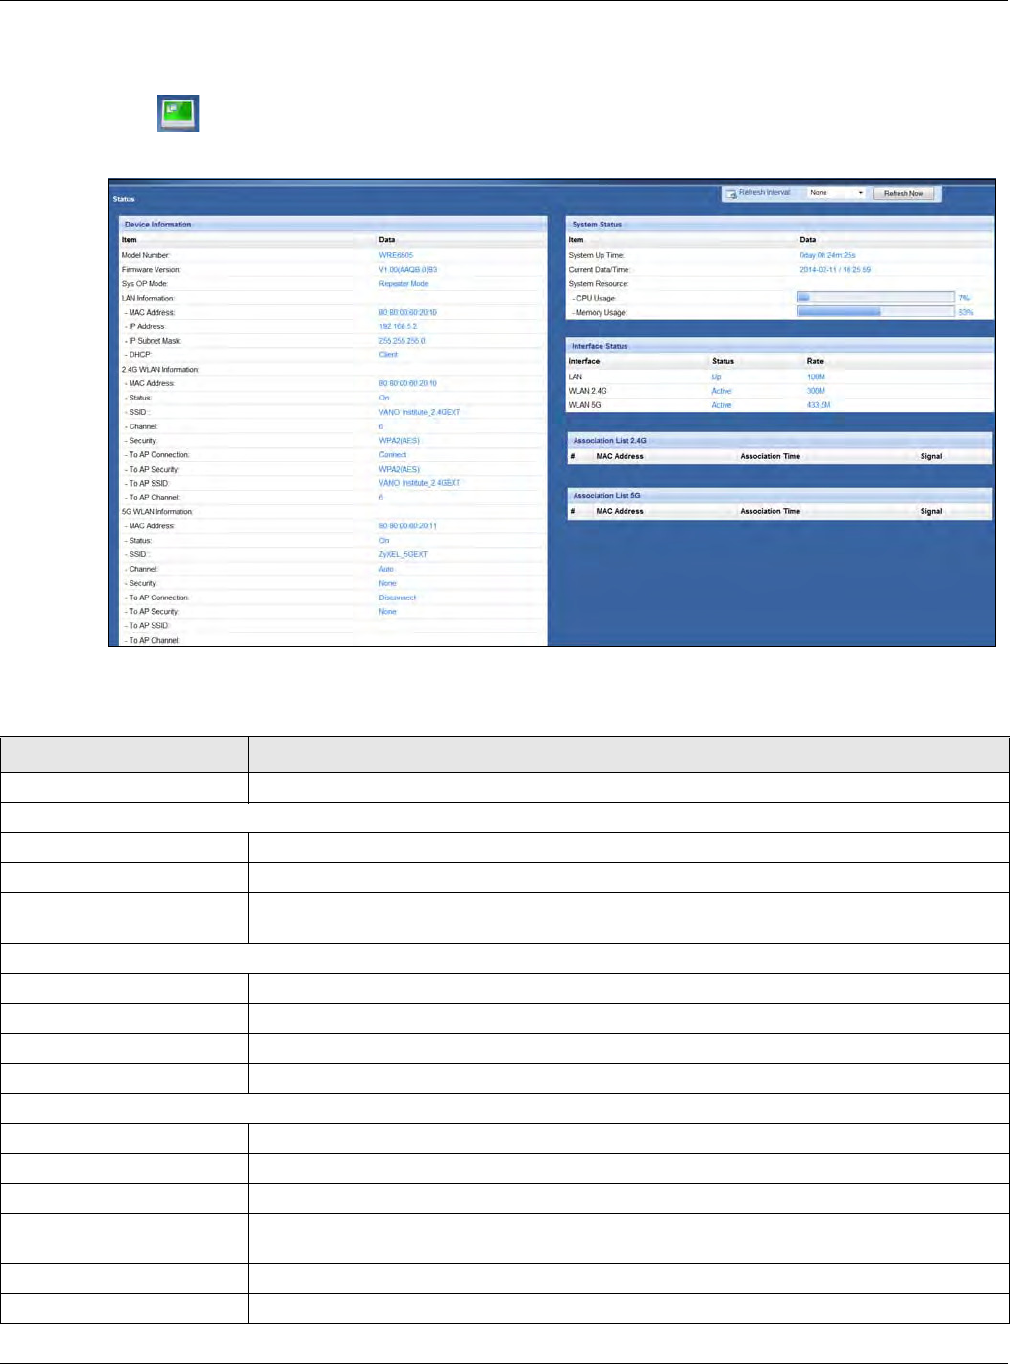
3.4 Universal Repeater Mode Status Screen
Click to open the St a t u s screen.
Figure 7 Status: Universal Repeater Mode
The following table describes the labels shown in the St a t us screen.
Table 3 Status Screen: Universal Repeater Mode
LABEL DESCRIPTION
Logout Click this at any time to exit the Web Configurator.
Device I nformation
Model Num ber This is the WRE6505’s model name.
Firm ware Version This is the firm ware version and the date created.
Sys OP Mode This is the device m ode (Section 2.1.1 on page 13) to which the WRE6505 is set - Unive rsal
Repe at er Mode .
LAN I nform ation
MAC Address This shows the LAN Ethernet adapter MAC Address of your device.
I P Address This shows the LAN port’s I P address.
I P Subnet Mask This shows the LAN port’s subnet m ask.
DHCP This shows the LAN port ’s DHCP role - Clie n t or N o ne .
2.4G WLAN I nform ation
MAC Address This shows the wireless adapt er MAC Address of your WRE6505.
Status This shows the current status of the Wireless LAN - ON .
SSID This shows a descriptive nam e used to ident ify the WRE6505 in the wireless LAN.
Channel This shows the channel num ber which you select manually or the WRE6505 autom atically
scans and selects.
Security This shows the level of wireless security the WRE6505 is using.
To AP Connection This displays whether the WRE6505 is connected to an AP or not.

Chapter 3 Universal Repeater Mode
WRE6505 User’s Guide
18
To AP Security This displays the type of established security protocol with the AP.
To AP SSI D This displays the SSID of t he connected AP.
To AP Channel This displays the current channel in use with the connected AP.
5G WLAN Information
MAC Address This shows the wireless adapt er MAC Address of your WRE6505.
Status This shows the current status of the Wireless LAN - ON .
SSID This shows a descriptive nam e used to ident ify the WRE6505 in the wireless LAN.
Channel This shows the channel num ber which you select manually or the WRE6505 autom atically
scans and selects.
Security This shows the level of wireless security the WRE6505 is using.
To AP Connection This displays whether the WRE6505 is connected to an AP or not.
To AP Security This displays the type of established security protocol with t he WRE6505.
To AP SSI D This displays the SSID of t he connected AP.
To AP Channel This displays the current channel in use with the connected AP.
System Status
Item This colum n shows the type of data the WRE6505 is recording.
Data This colum n shows the actual data recorded by the WRE6505.
System Up Time This is the total time the WRE6505 has been on.
Current Date/ Tim e This field displays your WRE6505’s present date and time.
System Resource
CPU Usage This displays what percentage of the WRE6505’s processing ability is currently used. When
this percentage is close to 100% , the WRE6505 is running at full load, and the throughput is
not going to improve anym ore. I f you want some applications to have m ore t hroughput, you
should turn off other applications (for exam ple, using bandwidt h m anagem ent .
Memory Usage This shows what percentage of the heap m emory the WRE6505 is using.
I nt erface Status
Interface This displays the WRE6505 port types. The port types are: LAN and W LAN .
Status For t he LAN port, this field displays D ow n (line is down) or Up (line is up or connected).
For the WLAN, it displays Up when the WLAN is enabled or D ow n when the WLAN is
disabled.
Rate For the LAN ports, this displays the port speed and duplex setting or N A when the line is
disconnected.
For the WLAN, it displays the m aximum transmission rate when the WLAN is enabled and N A
when the WLAN is disabled or Aut o.
Association List 2.4G
# This is the index num ber of an associated wireless station.
MAC Address This field displays the MAC address of an associated wireless station.
Association Tim e This field displays the time a wireless station first associated with the WRE6505’s WLAN
network.
Signal This is the signal strengt h num ber of the associated client.
Association List 5G
# This is the index num ber of an associated wireless station.
MAC Address This field displays the MAC address of an associated wireless station.
Table 3 Status Screen: Universal Repeater Mode
LABEL DESCRIPTION
Chapter 3 Universal Repeater Mode
WRE6505 User’s Guide
19
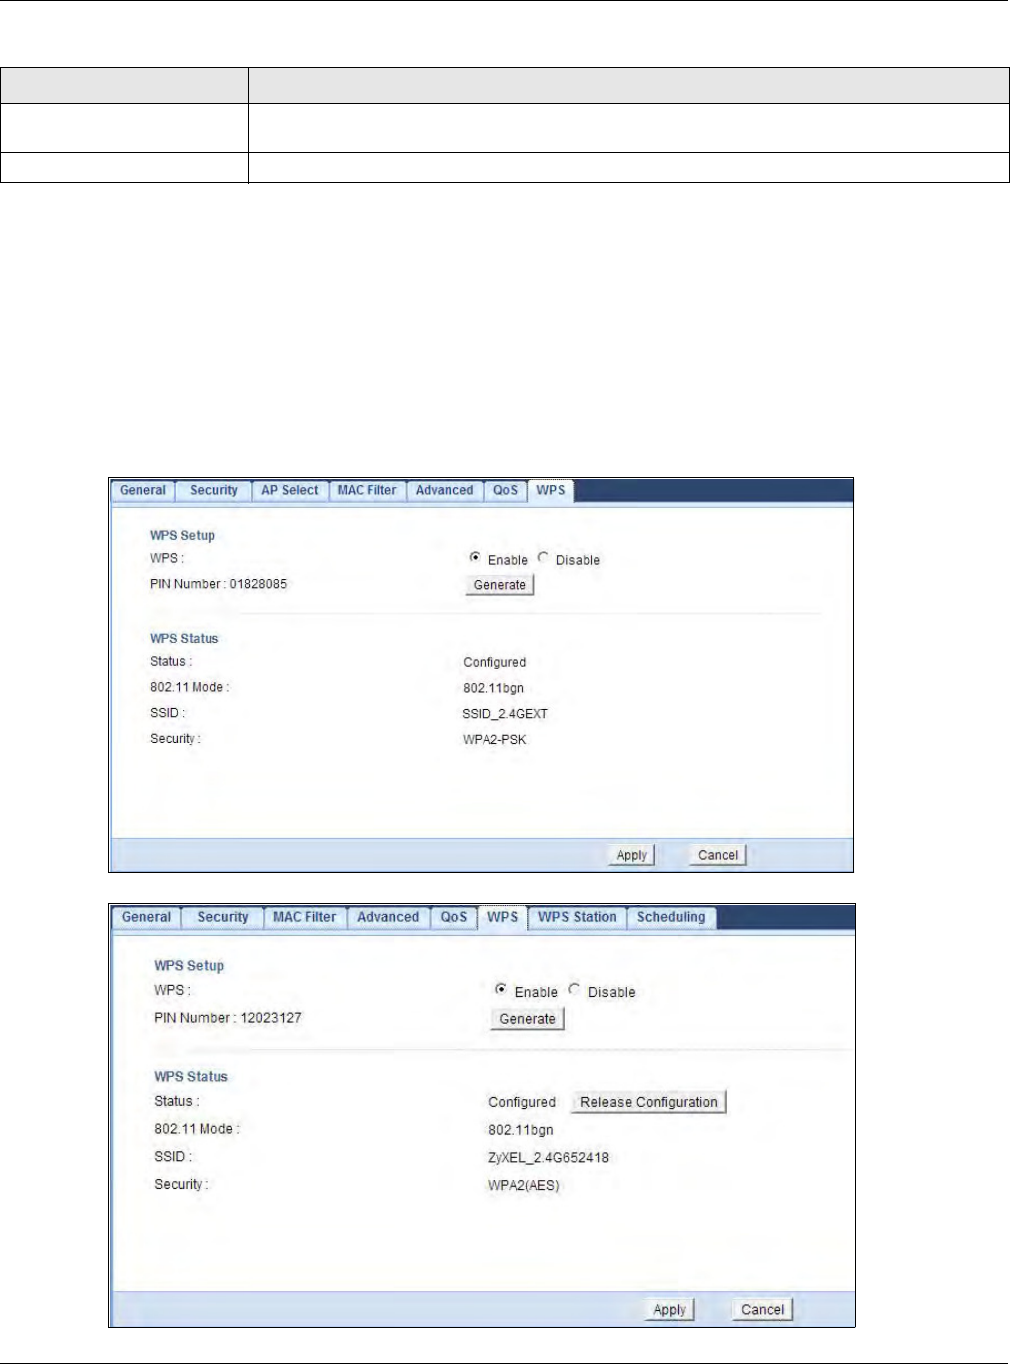
3.5 WPS Screen
Use this screen to connect to another AP. Go to Configu ra t ion > W ir eless LAN ( 2 .4 G/ 5 G) >
W PS to open the following screen.
Note: Wireless clients cannot use WPS to set up a wireless network with the WRE6505 in
universal repeater m ode.
Figure 8 Universal Repeater: Configuration > Wireless LAN (2.4G/ 5G) > WPS
Figure 9 AP: Configuration > Wireless LAN (2.4G/ 5G) > WPS
Association Tim e This field displays the time a wireless station first associated with the WRE6505’s WLAN
network.
Signal This is the signal strengt h num ber of the associated client.
Table 3 Status Screen: Universal Repeater Mode
LABEL DESCRIPTION

Chapter 3 Universal Repeater Mode
WRE6505 User’s Guide
20
The following table describes the labels in this screen.
Table 4 Universal Repeater: Configuration> Wireless LAN (2.4G / 5G) > WPS
LABEL DESCRIPTION
WPS Setup
WPS Select this to enable the WPS feature.
PI N Num ber This displays a PIN num ber last t im e system generated. Click Ge ne r at e t o generate a new
PI N num ber.
Generate Click Ge ne r a t e to have the WRE6505 generate a PI N num ber.
WPS Status
Status This displays Configur ed when the WRE6505 has connected to a wireless network using
WPS or when En able W PS is selected and wireless or wireless securit y settings have been
changed. The current wireless and wireless security settings also appear in the screen.
This displays Unconfig ur ed if WPS is disabled and there are no wireless or wireless
security changes on the WRE6505 or you click Relea se Con figu ra tion t o remove the
configured wireless and wireless security settings.
Release
Configuration
(AP Mode Only)
This button is only available in AP m ode when the WPS status displays Configu red .
Click this button to remove all configured wireless and wireless security settings for WPS
connections on the WRE6505.
802.11 Mode Displays the wireless protocol configured for t he WPS connect ion.
SSI D Displays the network name for t he WPS connection.
Security Displays the security protocol selected for the WPS connect ion.
Apply Click Apply to save your changes back to the WRE6505.
Cancel Click Can ce l to return to the previous menu without saving.
WRE6505 User’s Guide
21
CHAPTER 4
Access Point Mode
4.1 Overview
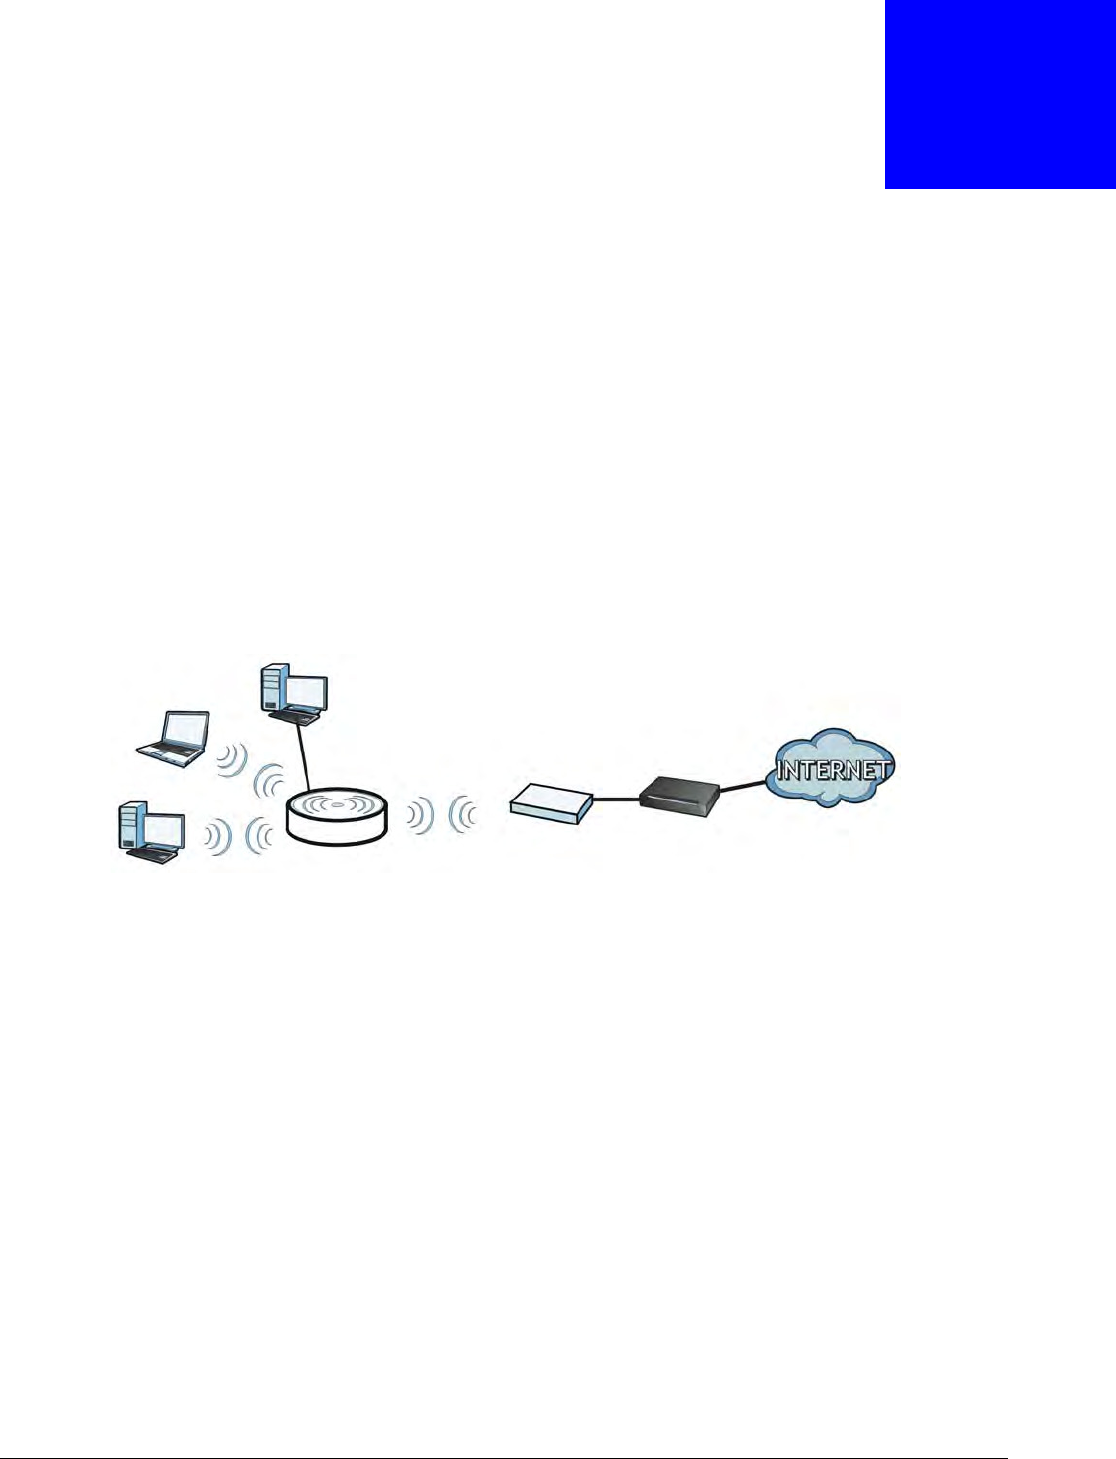
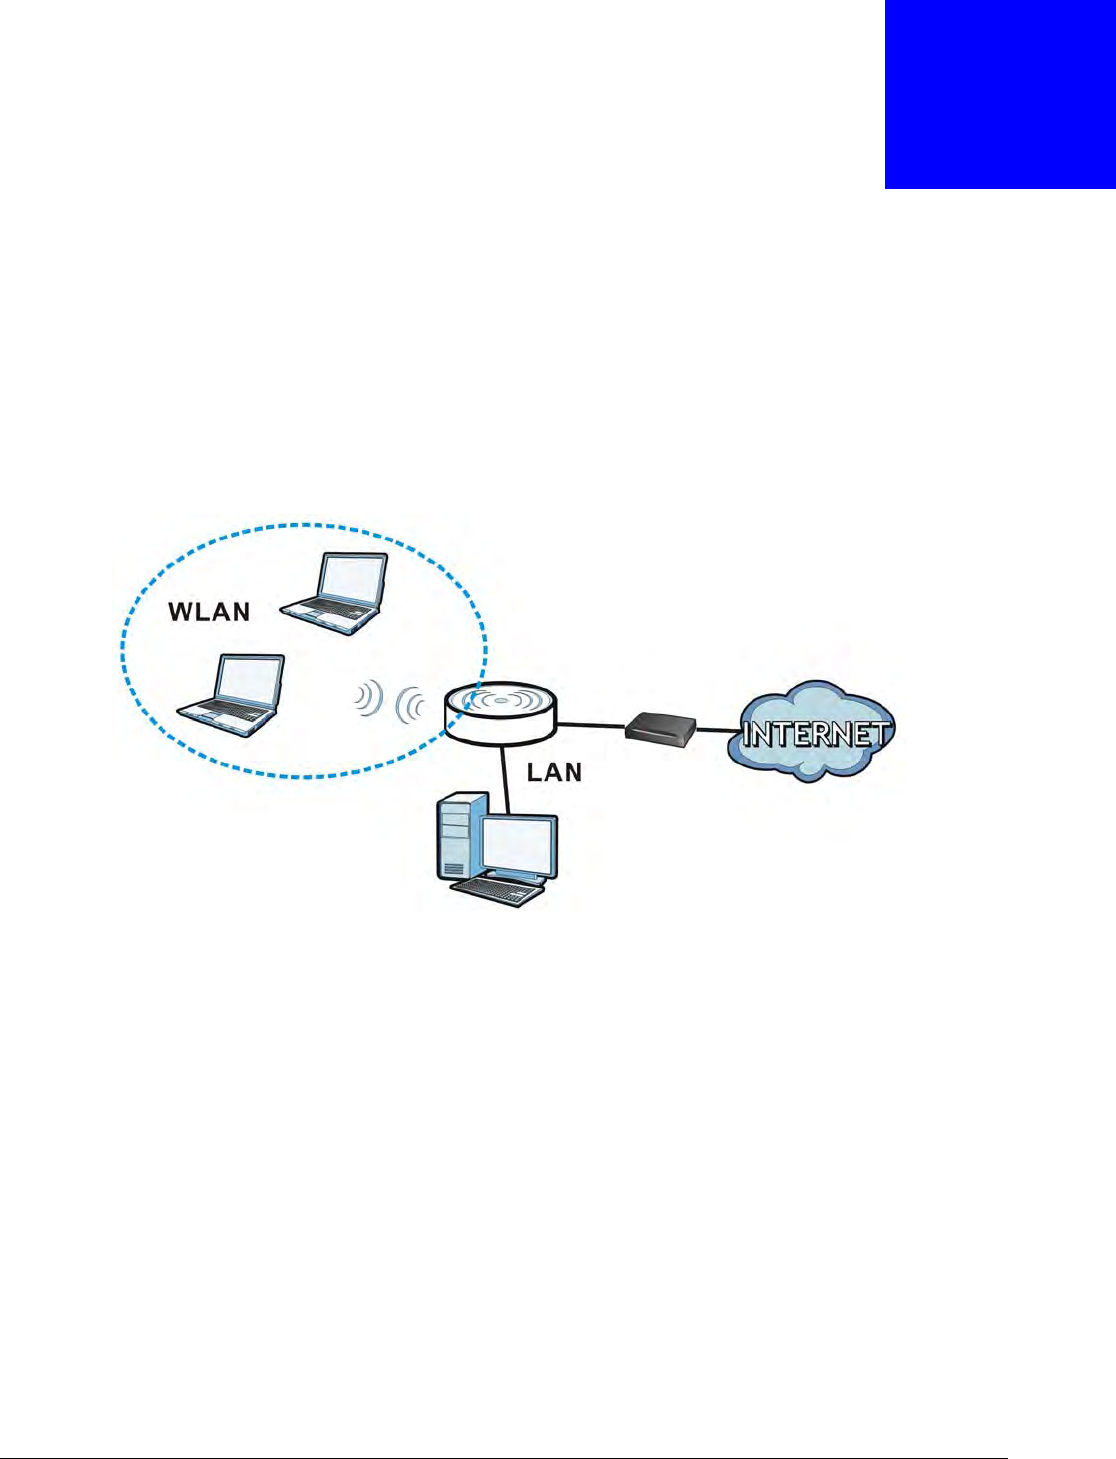
In Access Point ( AP) m ode your WRE6505 bridges a wired network (LAN) and wireless LAN ( WLAN)
in the sam e subnet. See the figure below for an exam ple.
Figure 10 Wireless Internet Access in Access Point Mode
Note: See Chapter 8 on page 43 for an example of setting up a wireless network in
Access Point m ode.
4.2 What You Can Do
• Use the St a t u s screen (Section 4.4 on page 22) to view read-only inform ation about your
WRE6505.
• Use the LAN screen (Chapter 10 on page 63) to set the I P address for your WRE6505 acting as
an access point.
• Use the W ire le ss LAN > W PS screen (Section 9.9 on page 59) to configure WPS on the
WRE6505 to associate to another access point.

Chapter 4 Access Point Mode
WRE6505 User’s Guide
22
4.3 What You Need to Know
With the exception of the Syst em M ode other configuration screens in Access Point m ode are
sim ilar to the ones in Universal Repeater m ode. See Chapter 2 on page 13 of this User’s Guide.
4.3.1 Setting your WRE6505 to AP Mode
By default, AP m ode in the WRE6505 is not configured with a static I P address. To setup your
WRE6505 in AP m ode for the first tim e, the directly- connected router m ust have the DHCP server
function enabled.
1To use your WRE6505 as an access point, set the m ode switch to AP m ode. See Section 2.1.1.1 on
page 14.
2Connect one end of an Ethernet cable to the Ethernet port on the WRE6505 and the other end to
your router.
3Connect your computer to your network, m ake sure both the WRE6505 and com puter are under the
sam e subnet.
4Open a web browser window and type “http: / / zyxelsetup” in the web address.
The login screen displays.
5Enter “1234” (default) as the password and click Login.
6Type a new password and retype it to confirm, then click Apply. Otherwise, click I gn ore.
The WRE6505 Web Configurator displays, which allows you to configure the AP m ode.
4.3.2 Configuring your WLAN, LAN and Maintenance Settings
• See
Chapter 9 on page 53 and Chapter 10 on page 63 for inform ation on the configuring your
wireless network and LAN settings.
• See Chapter 11 on page 65 for inform ation on configuring your Maintenance settings.
4.4 AP Mode Status Screen
Click to open the St a t u s screen.
Chapter 4 Access Point Mode
WRE6505 User’s Guide
23
Figure 11 Status Screen: Access Point Mode
The following table describes the icons shown in the St a t u s screen.
The following table describes the labels shown in the St a t us screen.
Table 5 Status Screen Icon Key: Access Point Mode
ICON DESCRIPTION
Click this icon to view copyright and a link for related product inform ation.
Click t his icon to open the wizard. See Chapter 6 on page 29.
Select a number of seconds or N o ne from the drop-down list box to refresh all screen statistics
autom atically at the end of every tim e interval or to not refresh the screen st atistics.
Click this button to refresh the status screen statistics.
Click t his icon to see the St a t us page. The inform ation in this screen depends on the device
m ode you select.
Click t his icon to see the Con fi gu ra t ion navigation m enu.
Click t his icon to see the Ma int ena nce navigation menu.
Table 6 Status Screen: Access Point Mode
LABEL DESCRIPTION
Logout Click this at any time to exit the Web Configurator.
Device I nformation
Model Num ber This is the WRE6505’s model name.
Firm ware Version This is the firm ware version and the date created.
Sys OP Mode This is the device m ode (Section 2.1.1 on page 13) to which the WRE6505 is set - Acce ss
Point M ode .
LAN I nform ation
MAC Address This shows the LAN Ethernet adapter MAC Address of your device.
I P Address This shows the LAN port’s I P address.

Chapter 4 Access Point Mode
WRE6505 User’s Guide
24
I P Subnet Mask This shows the LAN port’s subnet m ask.
DHCP This shows the LAN port ’s DHCP role - Client or N one .
2.4G WLAN I nform ation
MAC Address This shows the wireless adapter MAC Address of your device.
Status This shows the current status of the Wireless LAN - ON .
SSID This shows a descriptive nam e used to ident ify the WRE6505 in the wireless LAN.
Channel This shows the channel num ber which you select manually or the WRE6505 autom atically
scans and selects.
Security This shows the level of wireless security the WRE6505 is using.
5G WLAN Information
MAC Address This shows the wireless adapter MAC Address of your device.
Status This shows the current status of the Wireless LAN - ON .
SSID This shows a descriptive nam e used to ident ify the WRE6505 in the wireless LAN.
Channel This shows the channel num ber which you select manually or the WRE6505 autom atically
scans and selects.
Security This shows the level of wireless security the WRE6505 is using.
System Status
Item This colum n shows the type of data the WRE6505 is recording.
Data This colum n shows the actual data recorded by the WRE6505.
System Up Time This is the total time the WRE6505 has been on.
Current Date/ Tim e This field displays your WRE6505’s present date and time.
System Resource
CPU Usage This displays what percentage of the WRE6505’s processing ability is currently used. When
this percentage is close to 100% , the WRE6505 is running at full load, and the throughput is
not going to improve anym ore. I f you want some applications to have m ore t hroughput, you
should turn off other applications (for exam ple, using bandwidt h m anagem ent .
Memory Usage This shows what percentage of the heap m emory the WRE6505 is using.
I nt erface Status
Interface This displays the WRE6505 port types. The port types are: LAN and W LAN .
Status For t he LAN port, this field displays D ow n (line is down) or Up (line is up or connected).
For the WLAN, it displays Up when the WLAN is enabled or Dow n when the WLAN is
disabled.
Rate For the LAN ports, this displays the port speed and duplex setting or N A when the line is
disconnected.
For the WLAN, it displays the m aximum transmission rate when the WLAN is enabled and N A
when the WLAN is disabled or Aut o.
Association List 2.4G
# This is the index num ber of an associated wireless client .
MAC Address This field displays the MAC address of an associated wireless client.
Association Tim e This field displays the time a wireless station first associated with the WRE6505’s WLAN
network.
Signal This is the signal strengt h num ber of the associated client.
Table 6 Status Screen: Access Point Mode (continued)
LABEL DESCRIPTION
Chapter 4 Access Point Mode
WRE6505 User’s Guide
25
4.4.1 Navigation Panel
Use the m enu in the navigation panel to configure WRE6505 features in Access Point m ode.
The following screen and table show the features you can configure in Access Point m ode.
Figure 12 Menu: Access Point Mode
The following table describes the sub-menus.
Association List 5G
# This is the index num ber of an associated wireless client .
MAC Address This field displays the MAC address of an associated wireless client.
Association Tim e This field displays the time a wireless station first associated with the WRE6505’s WLAN
network.
Signal This is the signal strengt h num ber of the associated client.
Table 6 Status Screen: Access Point Mode (continued)
LABEL DESCRIPTION
Table 7 Navigation Panel: Access Point Mode
LINK TAB FUNCTION
Status This screen shows the WRE6505’s general device, syst em and interface
status information. Use this screen t o access the wizard, and summary
statistics tables.
CON FI GURATI ON
Network
Wireless LAN
2.4G General Use this screen to configure general wireless LAN settings.
Security Use this screen to configure wireless security settings.
MAC Filter Use the MAC filter screen to configure the WRE6505 to block access to
devices or block the devices from accessing the WRE6505.
Advanced This screen allows you to configure advanced wireless settings.
WPS Use t his screen to configure WPS.
WPS Station Use this screen to add a wireless station using WPS. Only available in AP
mode.
Scheduling Use this screen to schedule the tim es the Wireless LAN is enabled.

Chapter 4 Access Point Mode
WRE6505 User’s Guide
26
Wireless LAN
5G General Use this screen t o configure general wireless LAN sett ings.
Security Use this screen to configure wireless security settings.
MAC Filter Use the MAC filter screen to configure the WRE6505 to block access to
devices or block the devices from accessing the WRE6505.
Advanced This screen allows you to configure advanced wireless settings.
WPS Use t his screen to configure WPS.
WPS Station Use this screen to add a wireless station using WPS. Only available in AP
mode.
Scheduling Use this screen to schedule the tim es the Wireless LAN is enabled.
LAN I P Use this screen t o configure LAN I P address and subnet m ask.
M AI N TEN AN CE
General Use this screen to view and change adm inistrative settings such as system
and dom ain nam es.
Password Password
Setup
Use this screen to change the password of your WRE6505.
Time Time Setting Use this screen to change your WRE6505’s tim e and date.
Firmware
Upgrade Use this screen to upload firm ware to your WRE6505.
Backup/
Restore Use this screen to backup and restore the configuration or reset your
WRE6505 to the factory defaults.
Language Use this screen to select t he language to display in the interface.
Table 7 Navigation Panel: Access Point Mode
LINK TAB FUNCTION

WRE6505 User’s Guide
27
CHAPTER 5
The Web Configurator
5.1 Overview
This chapter describes how to access the WRE6505 Web Configurator and provides an overview of
its screens.
The Web Configurator is an HTML-based m anagem ent interface that allows easy setup and
managem ent of the WRE6505 via I nternet browser. Use I nternet Explorer 6.0 and later versions,
Mozilla Firefox 3 and later versions, or Safari 2.0 and later versions. The recomm ended screen
resolution is 1024 by 768 pixels.
In order to use the Web Configurator you need to allow:
• Web browser pop-up windows from your device. Web pop-up blocking is enabled by default in
Windows XP SP (Service Pack) 2.
• JavaScript (enabled by default).
• Java perm issions (enabled by default).
Refer to Chapter 12 Troubleshooting to see how to m ake sure these functions are allowed in
Internet Explorer.
5.2 Accessing the Web Configurator
1Make sure your WRE6505 hardware is properly connected and prepare your computer or computer
network to connect to the WRE6505 (refer to the Quick Start Guide).
Note: I f your com put er is assigned a static I P address, it m ust be on the sam e subnet as
the WRE6505.
The WRE6505’s DHCP server is enabled before the WRE6505 is associated with
your AP or wireless router and disabled after association. I f this is the first time you
are accessing your WRE6505, you can configure your com puter as a DHCP client
(computer factory default) so it will get an I P address autom atically from the
WRE6505. After the WRE6505 is associated with your wireless router, your
computer will get its I P address from the wireless router.
2Launch your web browser.
3If this is the first tim e you are accessing your WRE6505, type "http: / / 192.168.1.2" as the website
address in your web browser. This is the default LAN I P address. Alternatively, aft er the WRE6505
has successfully associated with your wireless router, type "http: / / zyxelsetup" instead of the default
IP address.
Chapter 5 The Web Configurator
WRE6505 User’s Guide
28
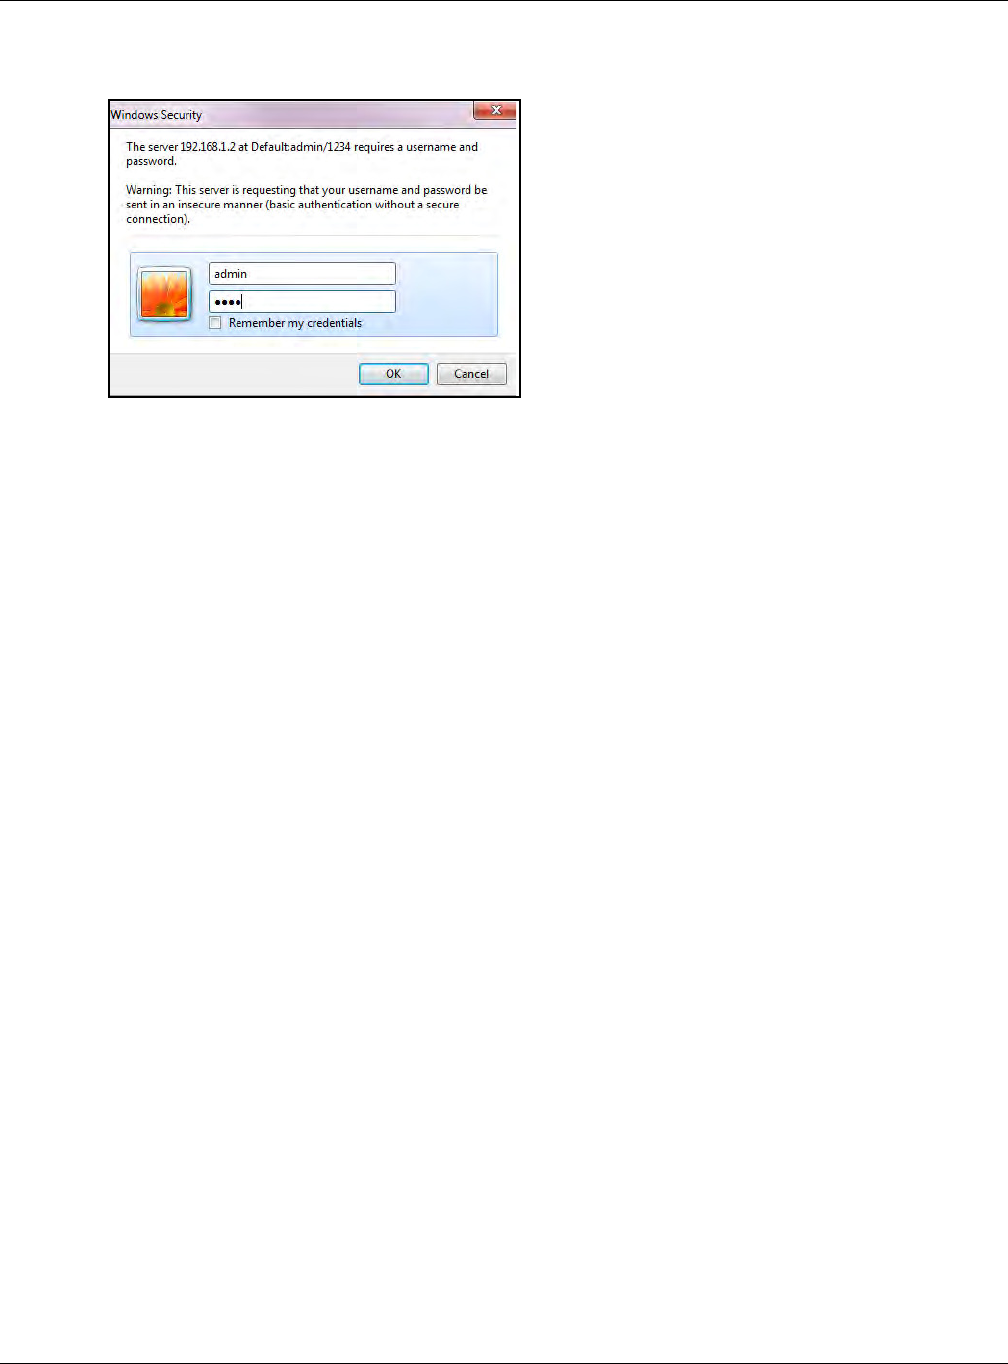
4Ty p e adm in (default) as the user nam e and 1 2 3 4 (default) as the password and click OK.
Figure 13 Login Screen
5.3 Resetting the WRE6505
If you forget your password or I P address, or you cannot access the Web Configurator, press the
W PS button for m ore than 5 seconds (no longer than 10 seconds) to reload the factory-default
configuration file. This means that you will lose all configurations that you had previously saved, the
username will be reset to a dm in and password will be reset to 1 2 3 4 . The I P address will be reset
to “192.168.1.2”.
1Make sure the power LED is on.
2Press and hold the W PS button. After 5 (no longer than 10) seconds, the power LED begins
flashing.
3Release the W PS button. The WRE6505 reloads factory defaults and begins to reboot.
WRE6505 User’s Guide
29
CHAPTER 6
Connection Wizard
6.1 Overview
This chapter provides inform ation on the wizard setup screens in the Web Configurator.
The Web Configurator’s wizard setup helps you configure your device.
After you access the WRE6505 Web Configurator, click to start wizard setup.
6.2 Using the Web Configurator Wizard
The Web Configurator for the WRE6505 is available in Repeater and AP mode. The following section
reflects the web configuration process while in Repeater Mode.
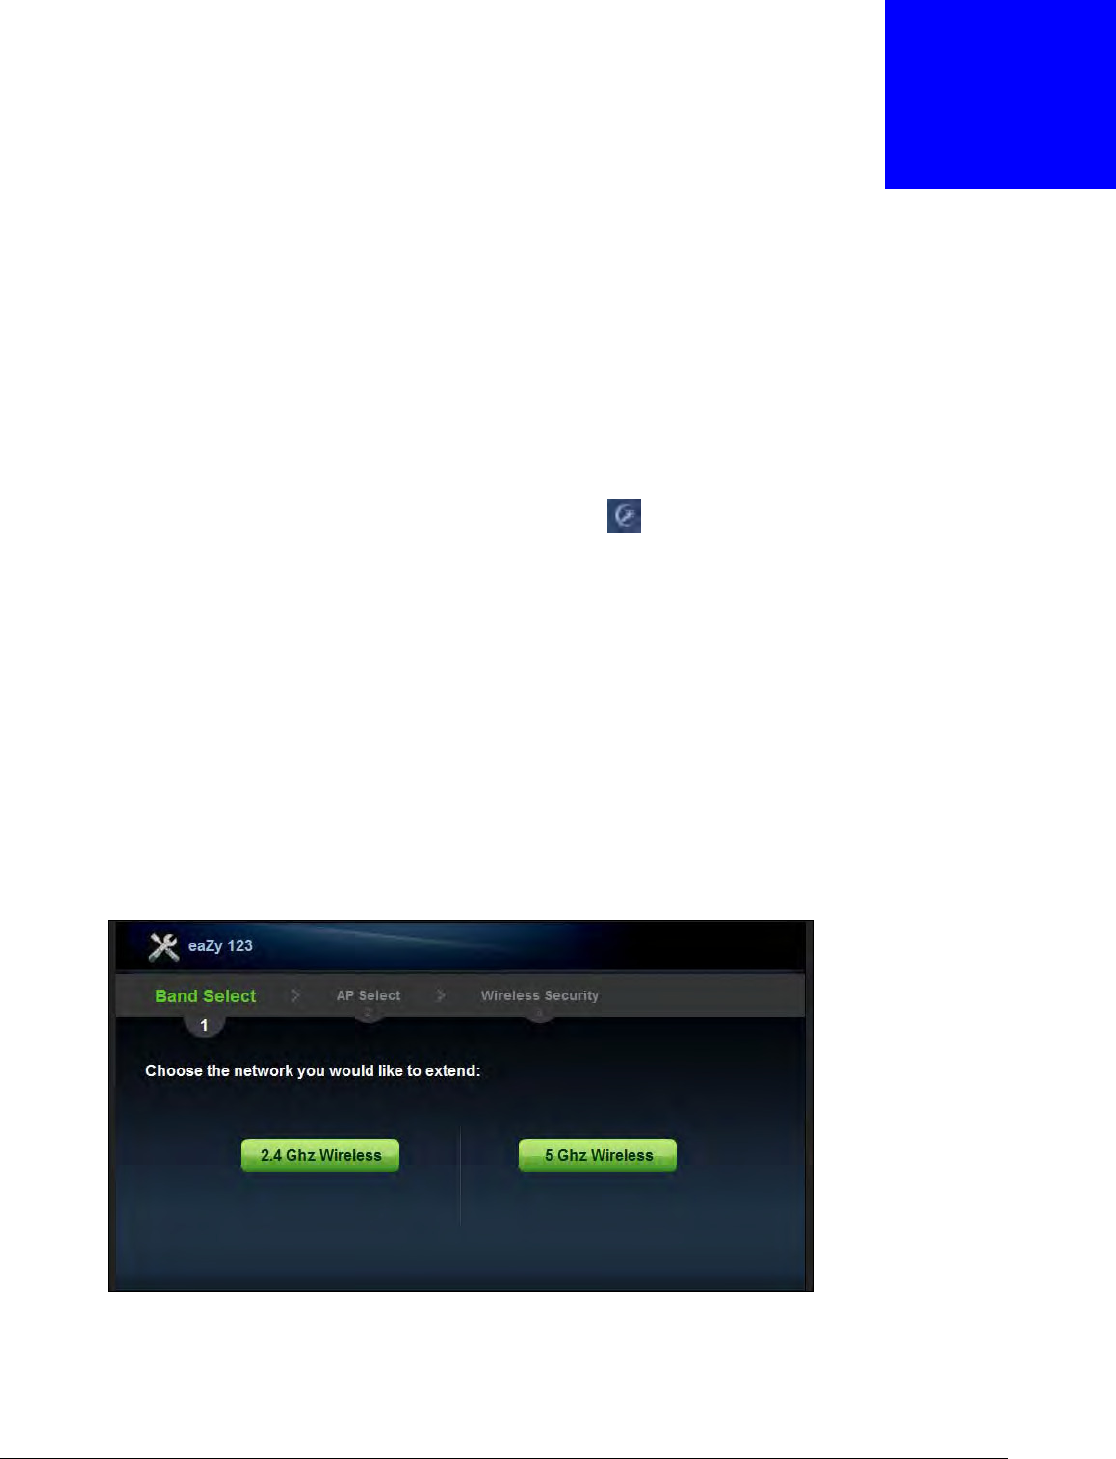
6.2.1 Extending the Network
The first step in setting up your network is to select the type of network to extend.
Click the 2.4 Ghz or 5 Ghz Wireless button to continue.
Figure 14 Wizard Step 1: Selecting Network
The wizard scans for available networks and displays the AP Select m enu.
Chapter 6 Connection Wizard
WRE6505 User’s Guide
30
6.2.2 Configuring the WRE6505 for Connection to an AP
In this step of the configuration wizard, you m ust configure the WRE6505 with the security
parameters of the AP you want to connect to. These param eters can be configured by selecting
those automatically detected by the WRE6505, or by configuring them m anually. Manual
configuration is useful when the AP is hidden.
6.2.2.1 Selecting Automatically Detected AP Parameters
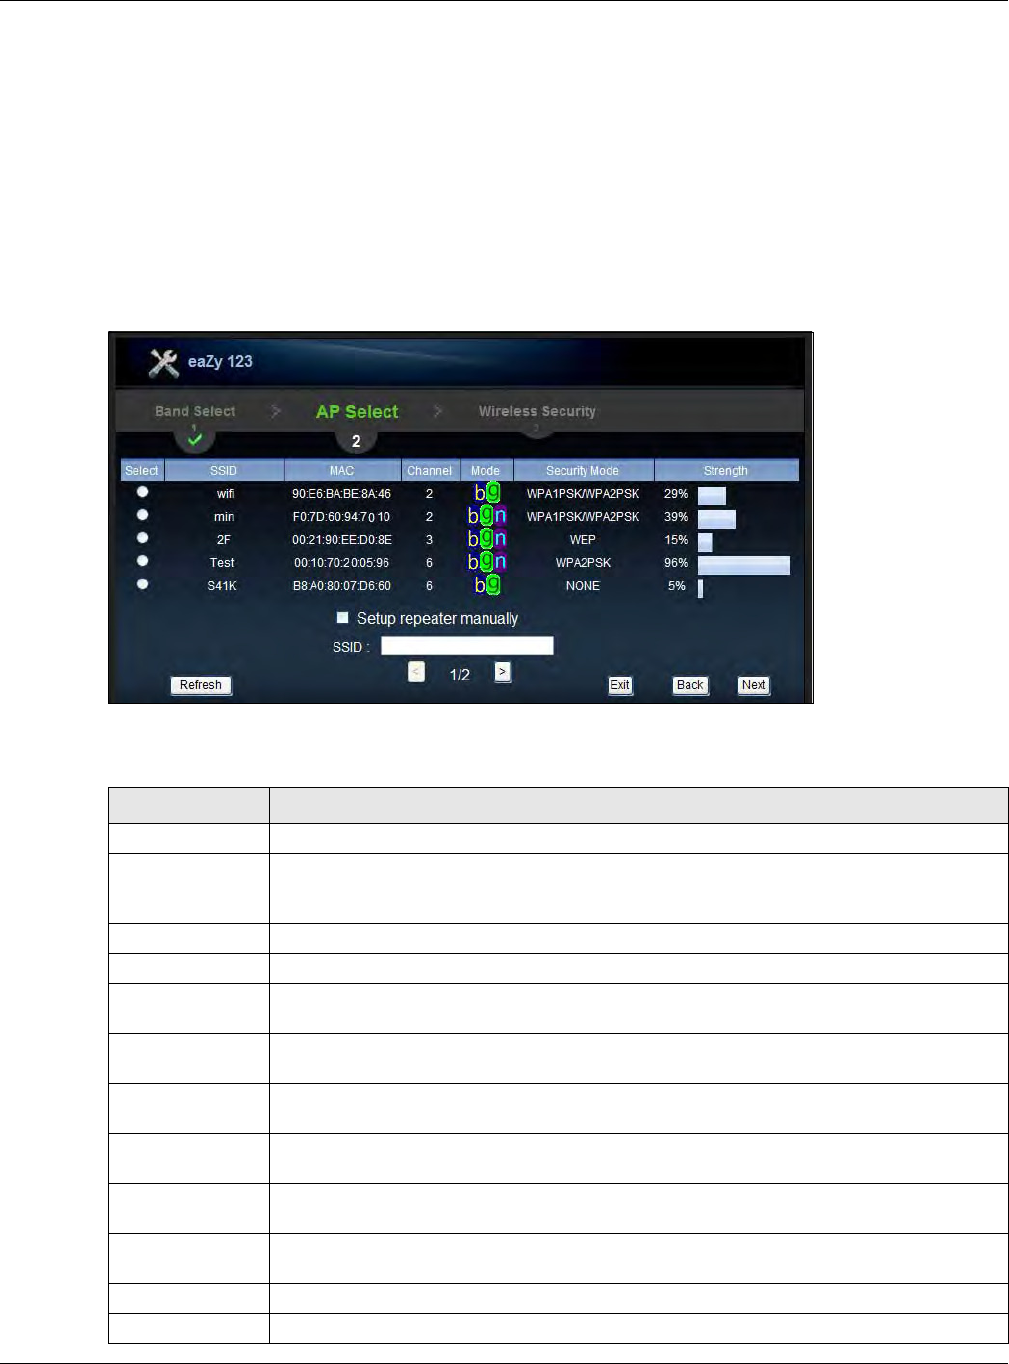
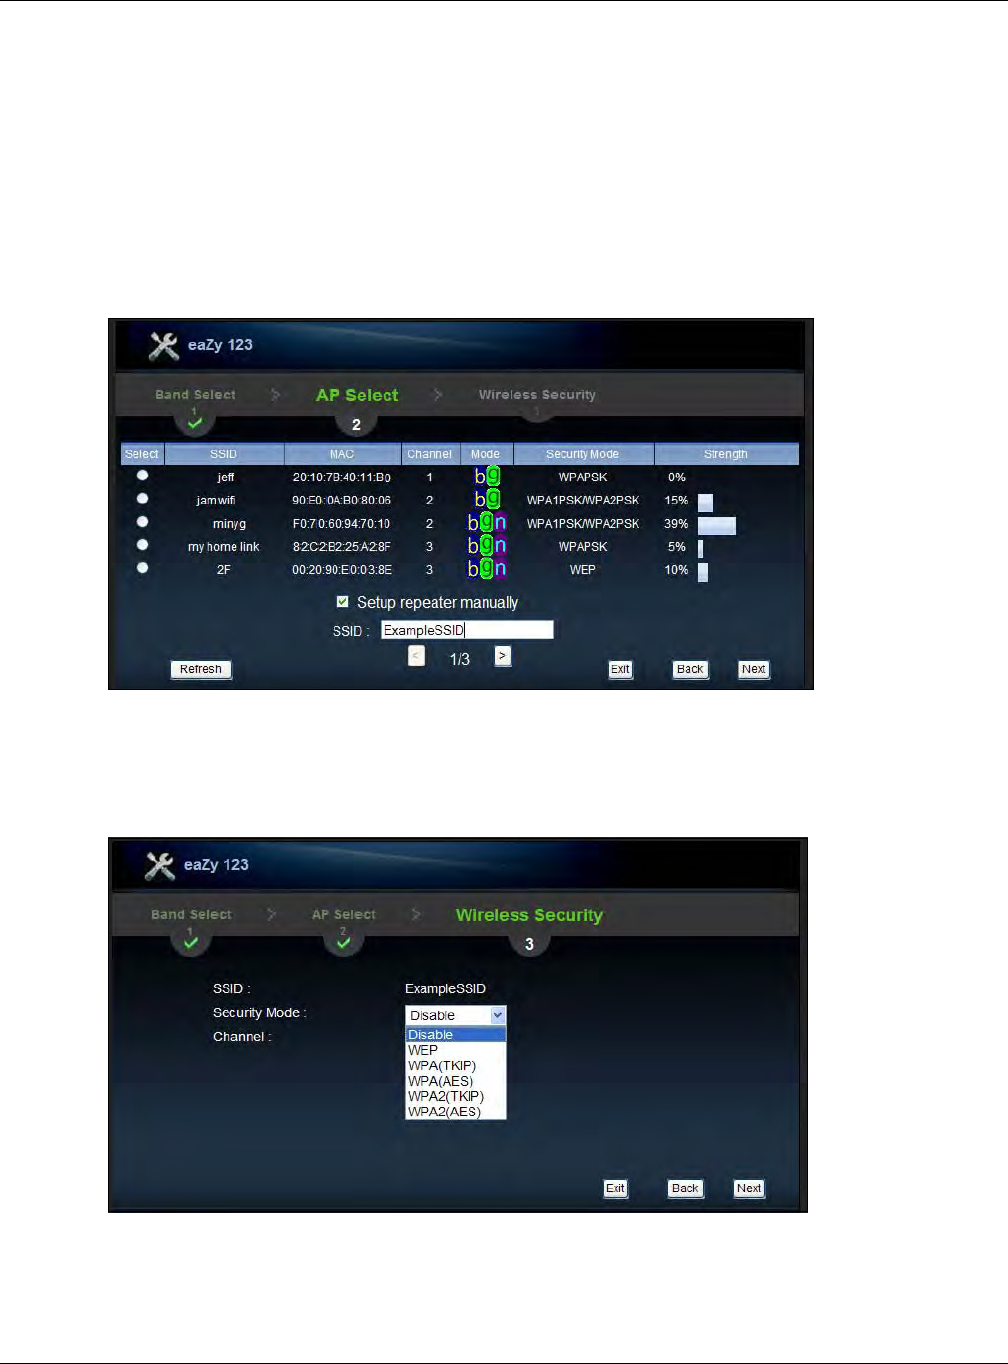
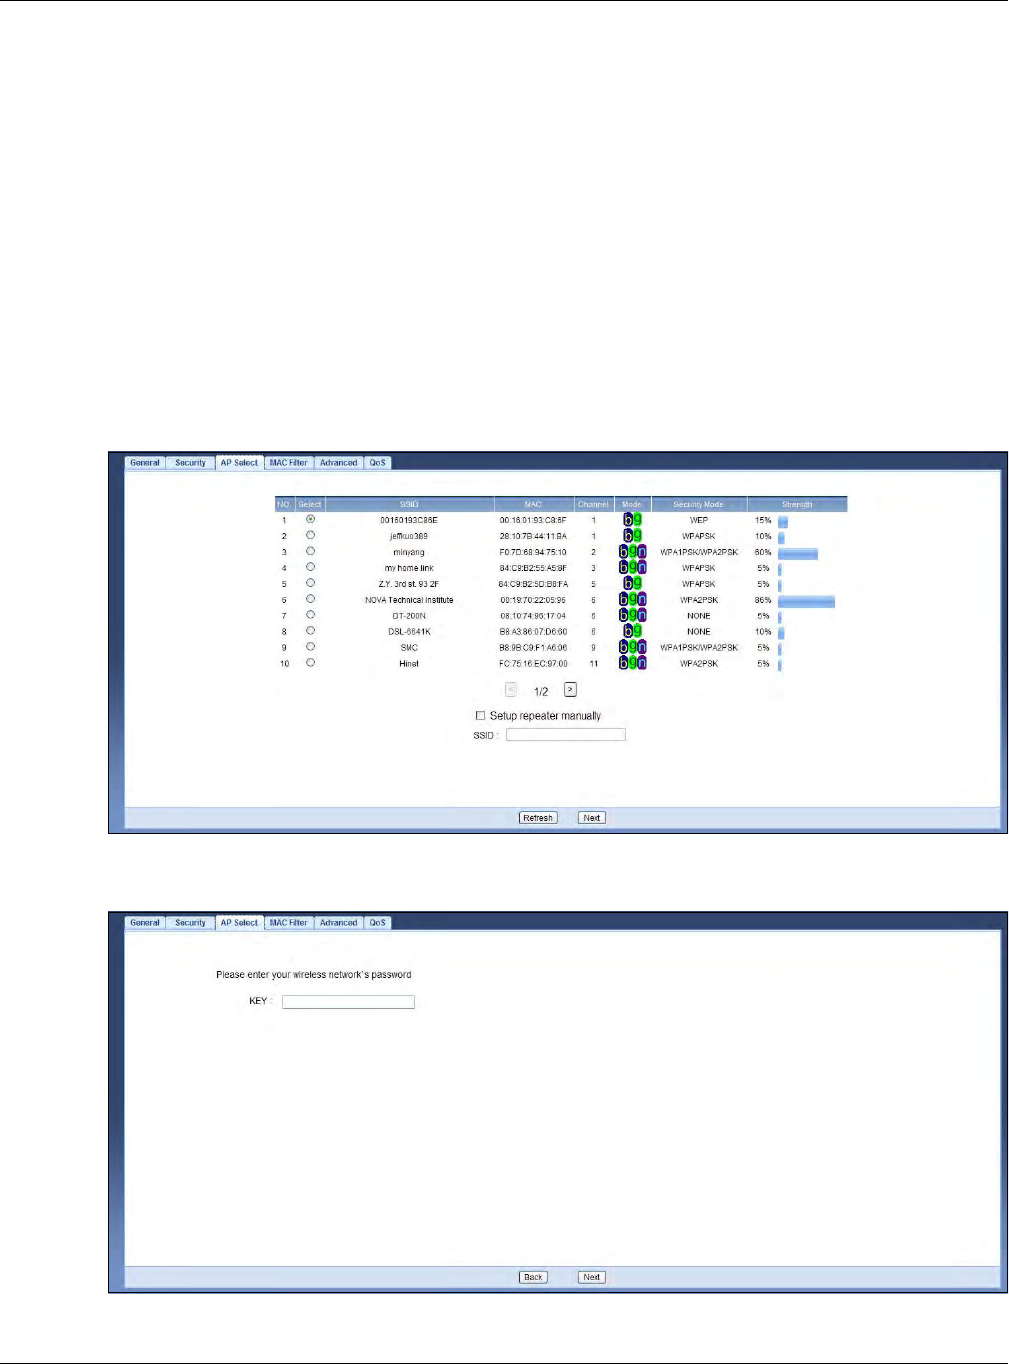
1Select an available AP, see the following screen.
Figure 15 Wizard Step 2: Selecting an AP
The following table describes the labels in this screen.
Table 8 Network > Wireless LAN > AP Select
LABEL DESCRIPTION
Select Use the radio but ton to select the wireless device to which you want to connect.
SSI D This displays the Service Set I Dentity of the wireless device. The SSI D is a unique name
that identifies a wireless network. All devices in a wireless network must use the sam e
SSI D.
MAC This displays the MAC address of t he wireless device.
Channel This displays the channel num ber used by this wireless device.
Mode This displays which I EEE 802.11b/ g/ n wireless networking standards the wireless device
support s.
Security Mode This displays t he type of security configured on the wireless device. When no is shown, no
security is configured and you can connect to it without a password.
Strength This displays the strength of t he wireless signal. The signal strength mainly depends on
the antenna output power and the distance between your WRE6505 and this device.
Setup repeater
manually
Select this to setup the AP m anually. You will need to know the wireless router’s SSID.
This is the only option that allows you to manually set the channel.
SSI D If Set up r epea te r m a nua lly is selected, use t his field t o type the SSID of t he AP. This is
useful when the AP’s SSID is hidden.
Refresh Click this to search for available wireless devices within transmission range and update
this table.
Back Click this to go back to the previous st ep in the wizard.
Next Click this to start t he next step in the AP set up process.
Chapter 6 Connection Wizard
WRE6505 User’s Guide
31
Note: The wireless stations and WRE6505 m ust use the same SSID, channel I D, WPA-PSK
(if WPA-PSK is enabled) or WPA2-PSK (if WPA2-PSK is enabled) for wireless
communication.
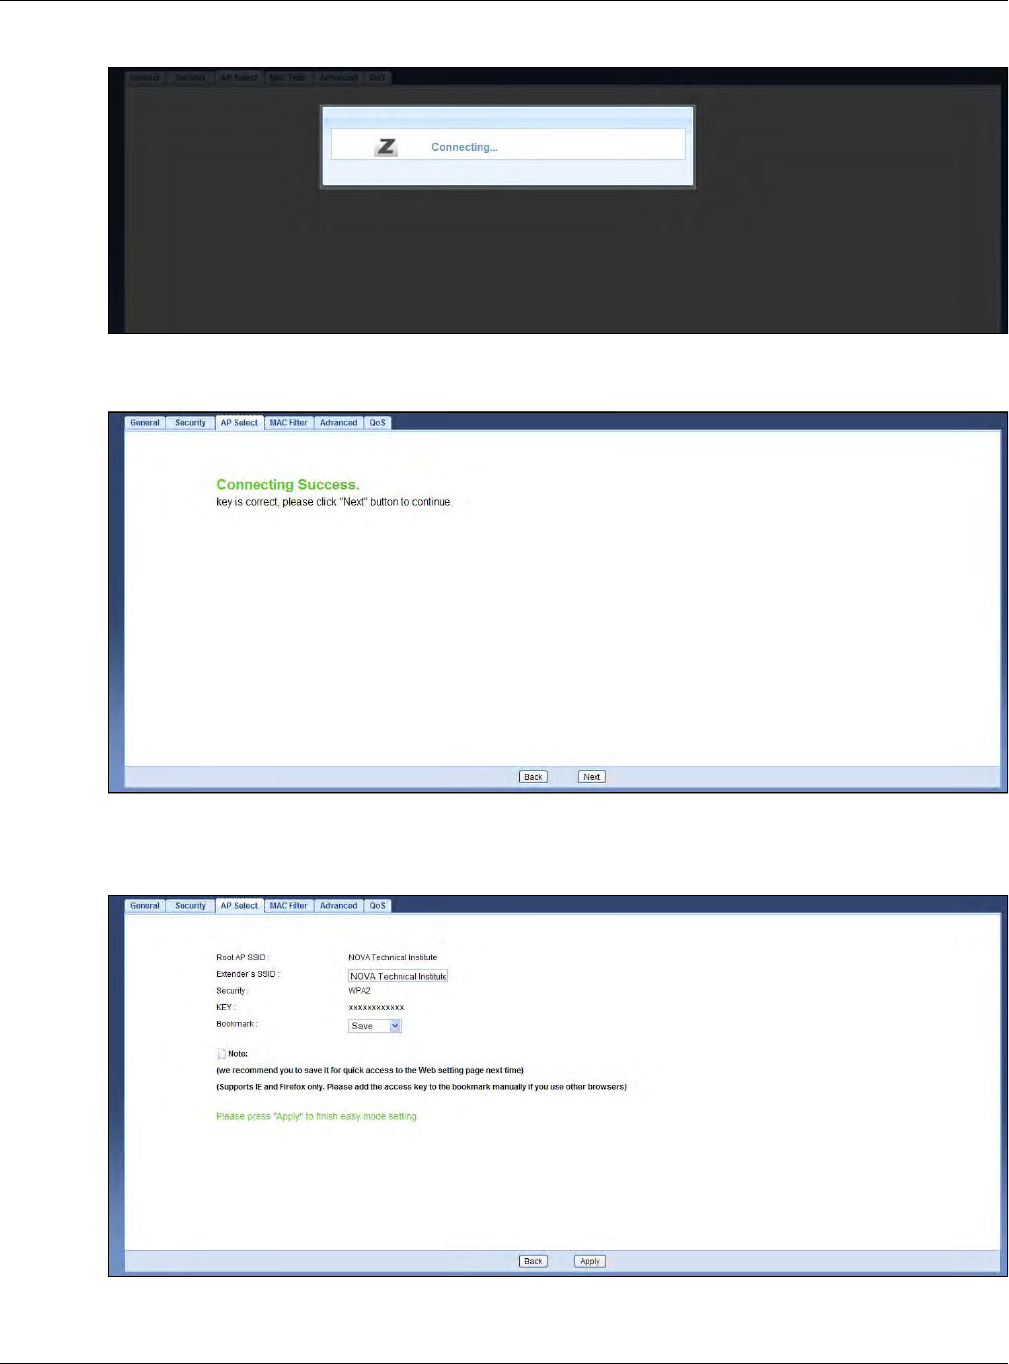
2Click N e x t to continue.
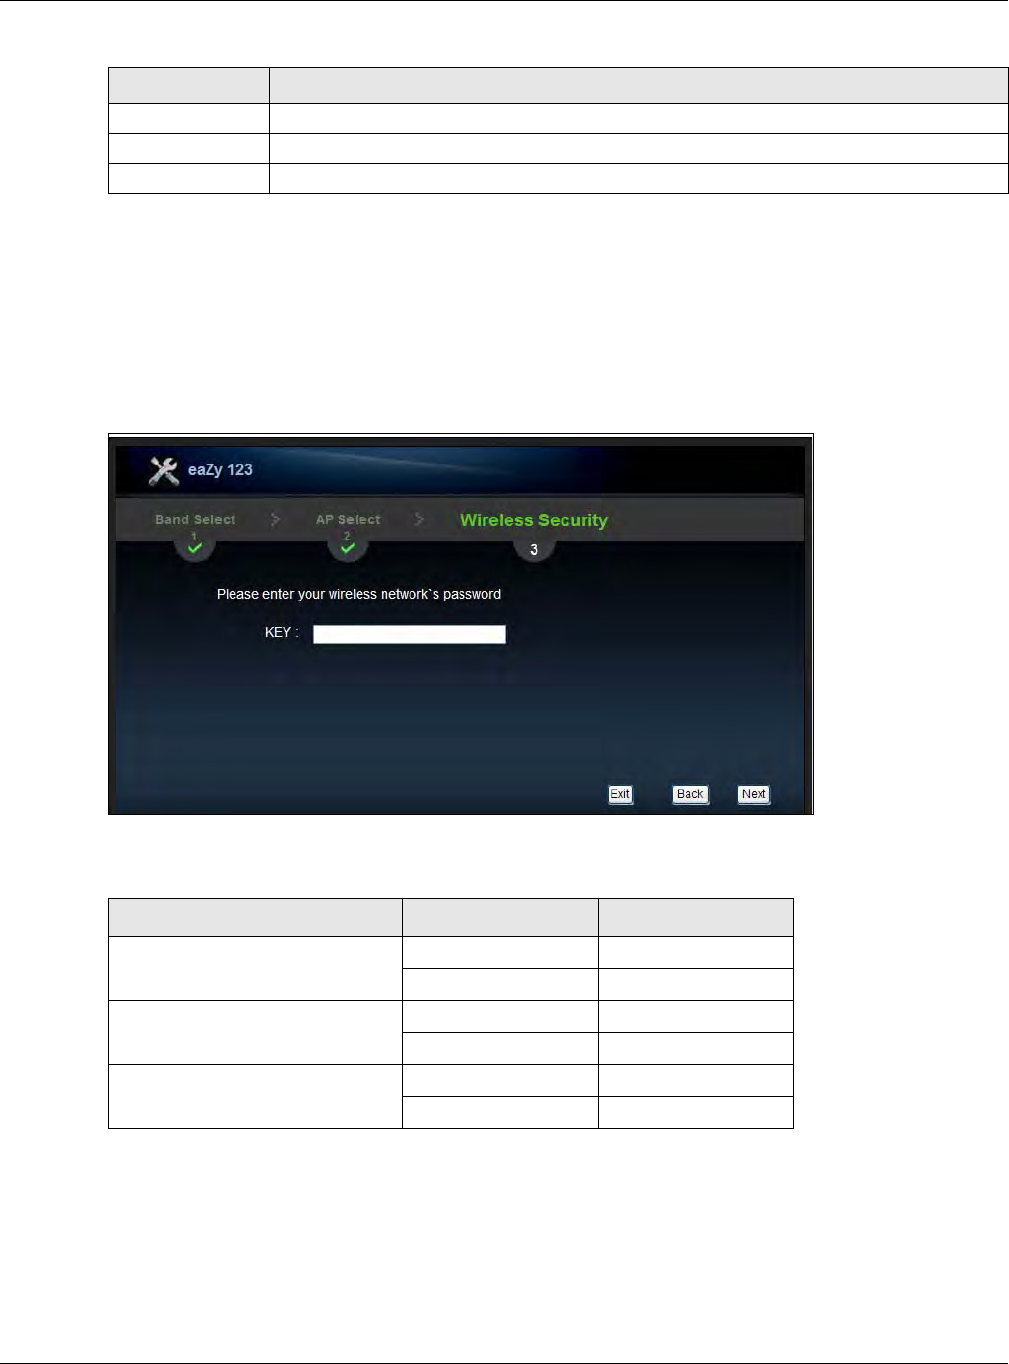
3Type the selected network’s wireless password (key). The num ber of characters accepted by the
KEY field is shown in the following table.
Figure 16 Wizard Step 3: Enter Wireless Network Password
The following table describes the labels in this screen.
4Click N e x t to continue and verify the password.
6.2.2.2 Completing the Connection Wizard
Com plete the installation process by reviewing the wireless network settings and applying the
configuration.
After entering the wireless network’s password, the verification screen displays as follows.
Exit Click this to exit the wizard.
Previous Click this to see the previous page of APs.
Next Click this to see the next page of APs.
Table 8 Network > Wireless LAN > AP Select (continued)
LABEL DESCRIPTION
Table 9 Maxim um Key Lengths
ENCRYPTION KEY FORMAT KEY LENGTH
64-bit WEP ASCII 5 characters
Hex 10 characters
128-bit WEP ASCII 13 characters
Hex 26 characters
WPA pre-shared key Passphrase 8-63 characters
Hex 64 characters
Chapter 6 Connection Wizard
WRE6505 User’s Guide
32
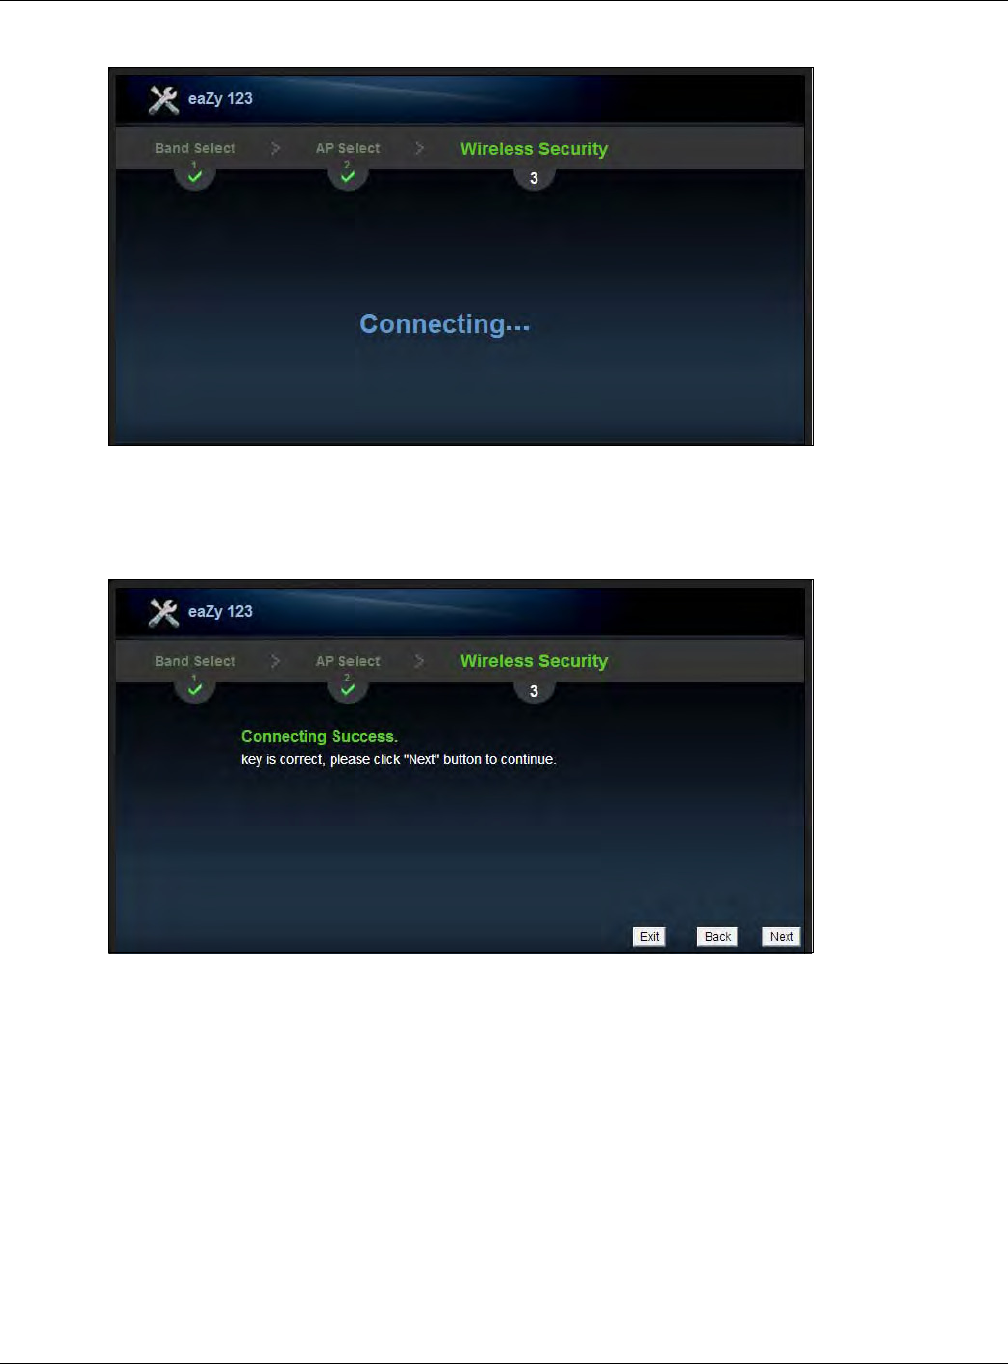
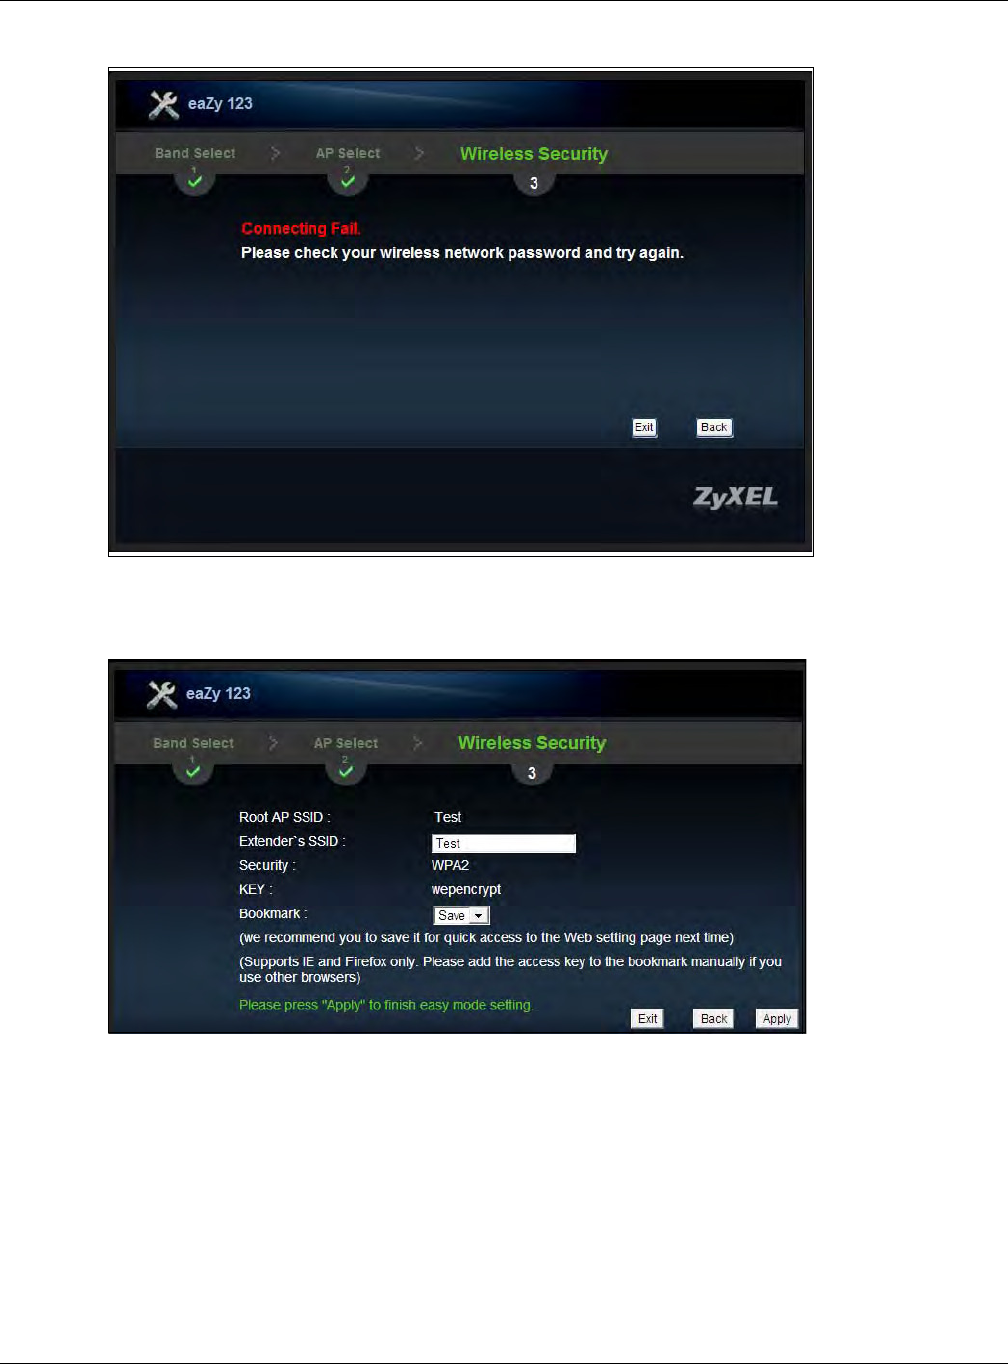
Figure 17 Wizard Step 3: Verifying the Password
The following screen appears if the key verifies successfully.
1Click N e x t to continue. The Wireless Security overview page displays.
Figure 18 Wizard Step 4: Enter Wireless Network Password (Continued)
If the network password is invalid a pop-up and displays a connection failure. Click OK to return to
the network password page.
Chapter 6 Connection Wizard
WRE6505 User’s Guide
33
Figure 19 Wizard Step 3: Key Verification Failed
2Click Apply to complete the easy m ode setting process, or click Ba ck to return to the initial setup
screen. You can also click Ex it to return to the m ain m enu and exit the setup process.
Figure 20 Wizard Step 5: Verify Network Settings
3Verify the selected wireless network settings. Click the Bookm ark drop-down m enu and select
Sav e to save the settings to your web browser’s cache. Select N o to continue without saving. The
Bookmark function creates a bookm ark in your browser and allows for quick access to web settings
the next tim e you log in.
Note: The Bookm ark function is only supported by the following browsers: Microsoft
Internet Explorer and Mozilla Firefox.
A secondary 5 GHz setup screen displays. Click Ye s to setup a 5 GHz network. Click N o to restart
the device.
The eaZy 123 setup wizard is com plete.
Chapter 6 Connection Wizard
WRE6505 User’s Guide
34
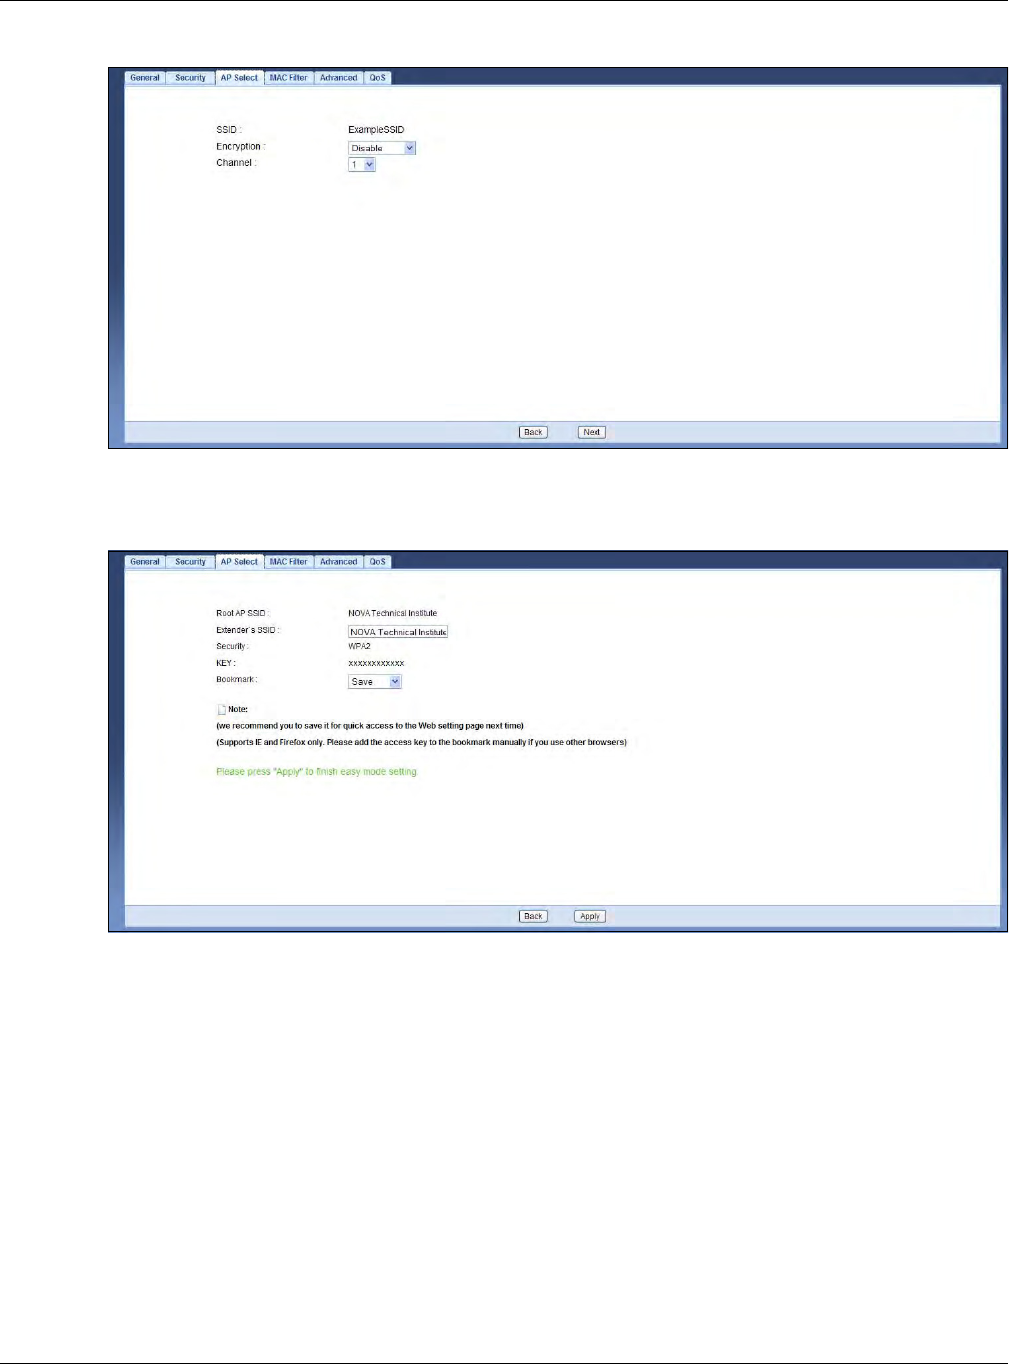
6.2.2.3 Manually Configuring AP Parameters
If the AP you want to connect to is not listed, then follow these steps to configure the security
settings of the AP m anually.
1Select Setup repe a ter m anually.
2Type the SSID of the wireless router into the SSI D field.
3Click N e x t to continue.
Figure 21 Wizard Step 1: Entering the SSID
4Select the security m ode used by the wireless router from the drop-down menu.
5Configure the security settings. The num ber of characters accepted by the KEY field is shown in the
following table.
Figure 22 Wizard Step 2: Configuring Security Settings
Chapter 6 Connection Wizard
WRE6505 User’s Guide
35
The following table describes the labels in this screen.
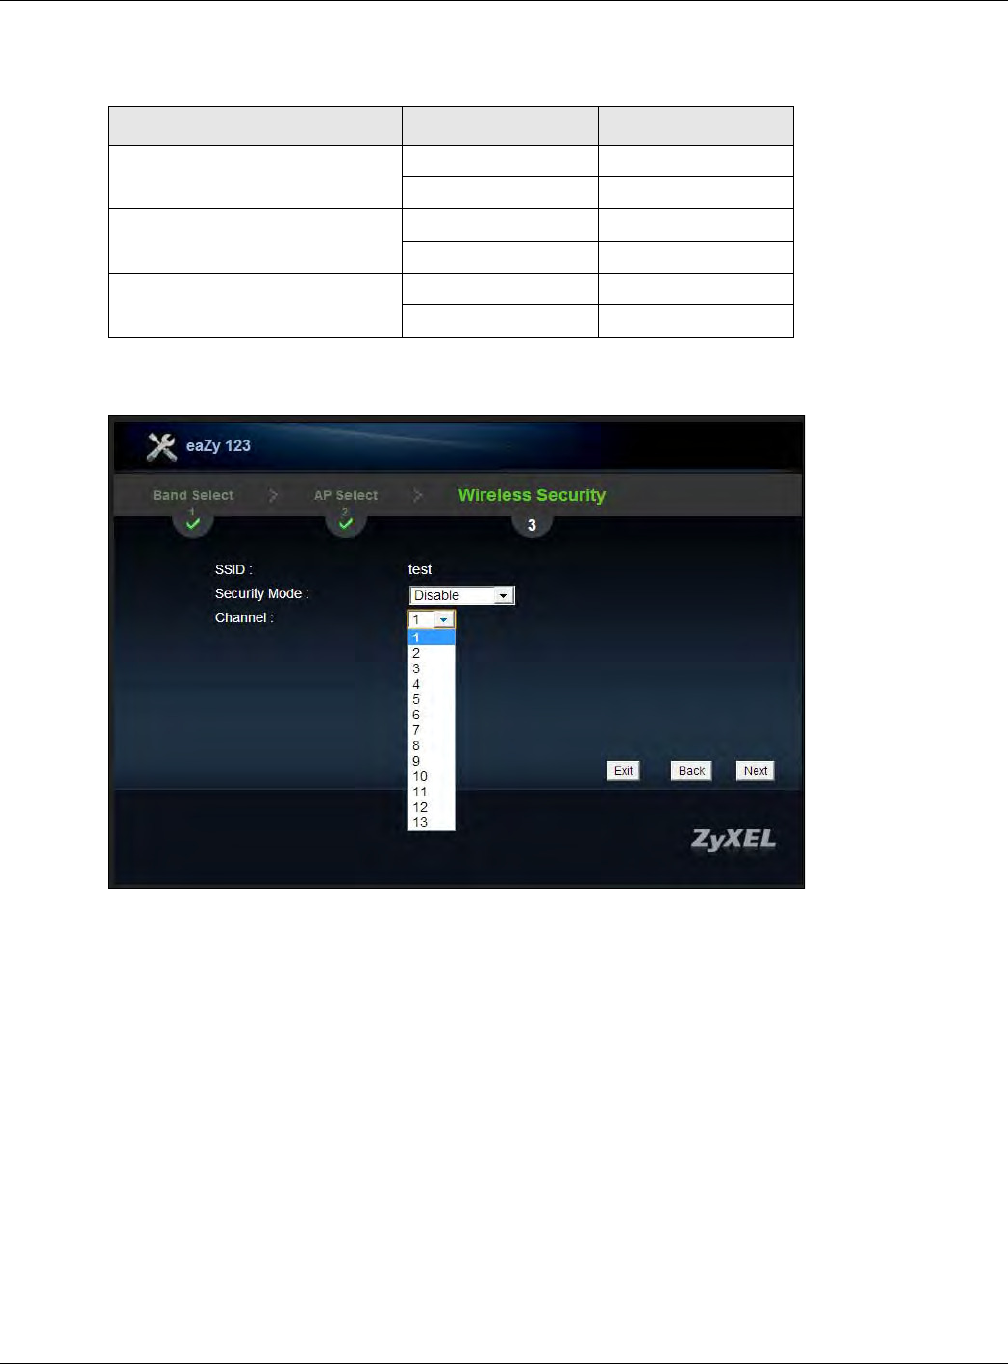
6Select the channel from the drop-down m enu.
Figure 23 Wizard Step 2: Configuring Security Settings
7Click N e x t to continue.
8Click Apply to complete the easy m ode setting process, or click Ba ck to return to the initial setup
screen. You can also click Ex it to return to the m ain m enu and exit the setup process.
Table 10 Maxim um Key Lengths
ENCRYPTION KEY FORMAT KEY LENGTH
64-bit WEP ASCII 5 characters
Hex 10 characters
128-bit WEP ASCII 13 characters
Hex 26 characters
WPA pre-shared key Passphrase 8-63 characters
Hex 64 characters
Chapter 6 Connection Wizard
WRE6505 User’s Guide
36
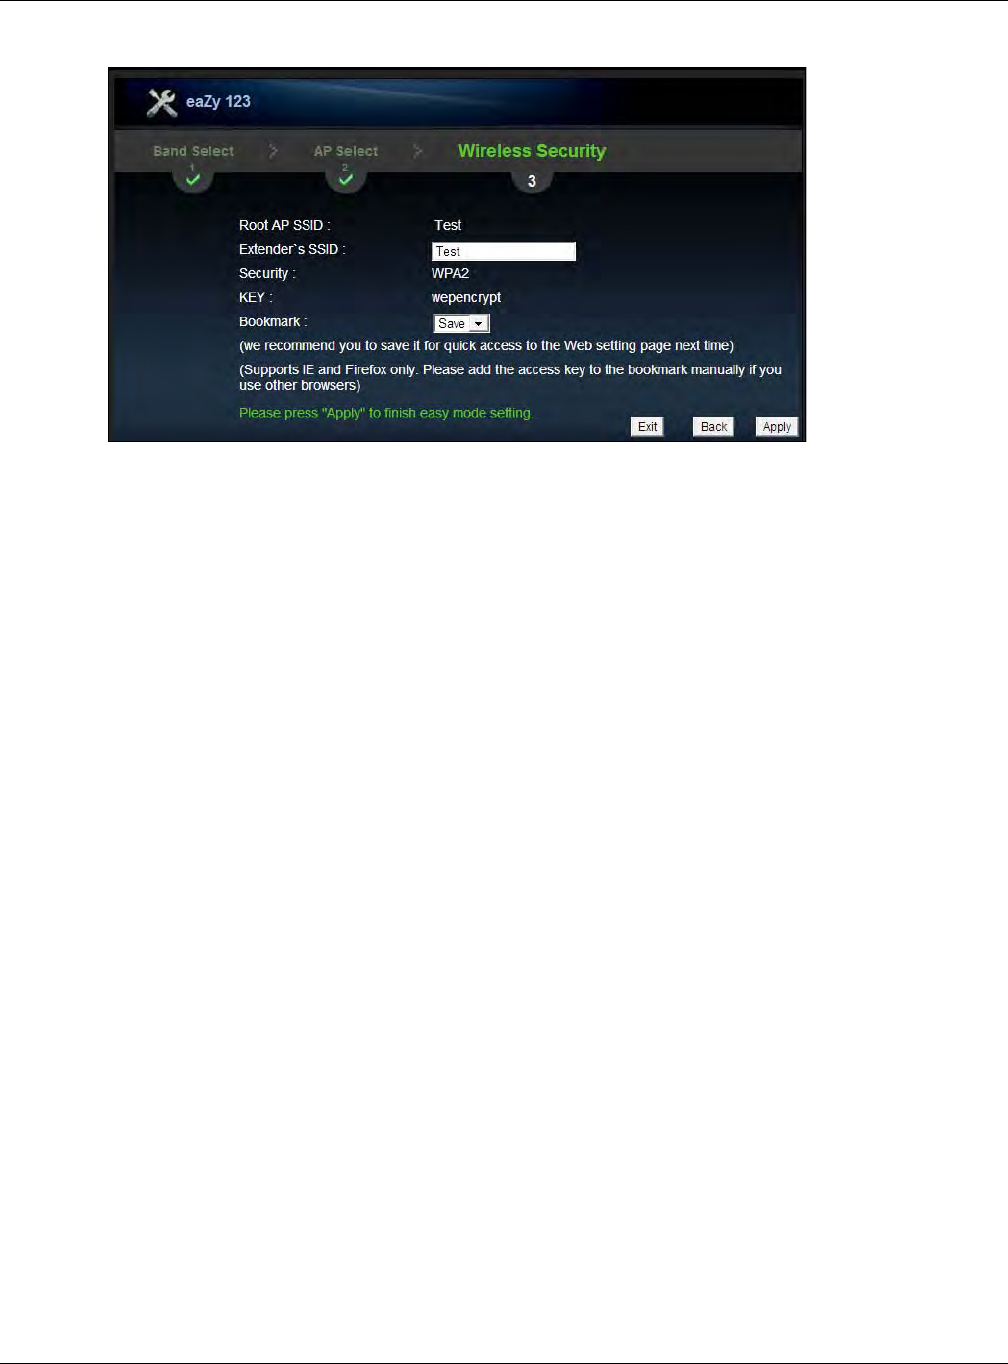
Figure 24 Wizard Step 5: Verify Network Settings
9Verify the selected wireless network settings. Click the Bookm ark drop-down m enu and select
Sav e to save the settings to your web browser’s cache. Select N o to continue without saving. The
Bookmark function creates a bookm ark in your browser and allows for quick access to web settings
the next tim e you log in.
Note: The Bookm ark function is only supported by the following browsers: Microsoft
Internet Explorer and Mozilla Firefox (prior to version 23).
WRE6505 User’s Guide
37
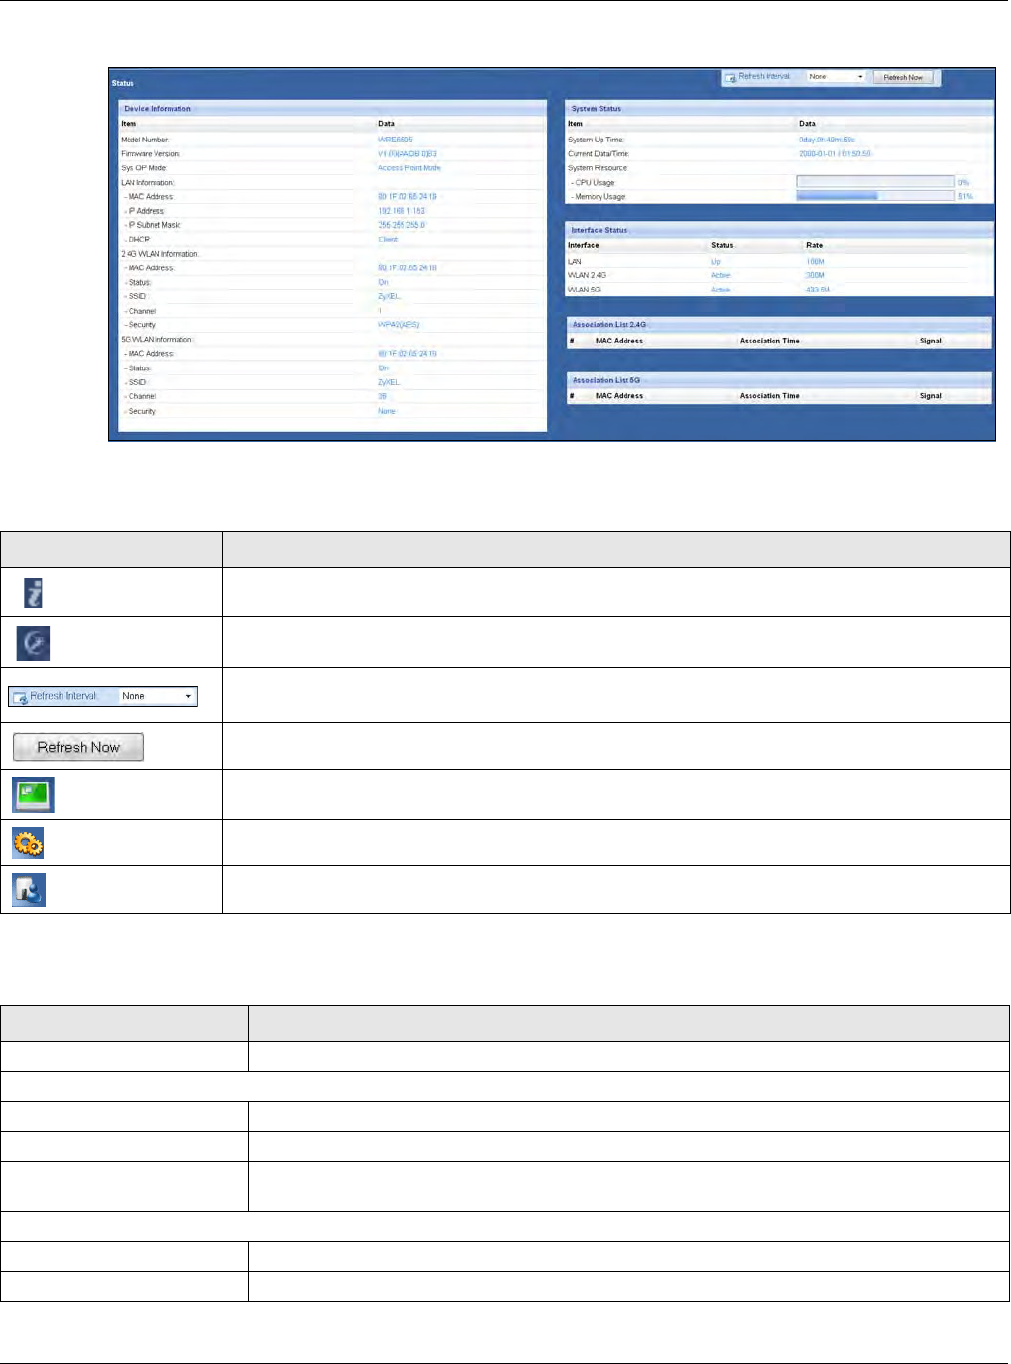
CHAPTER 7
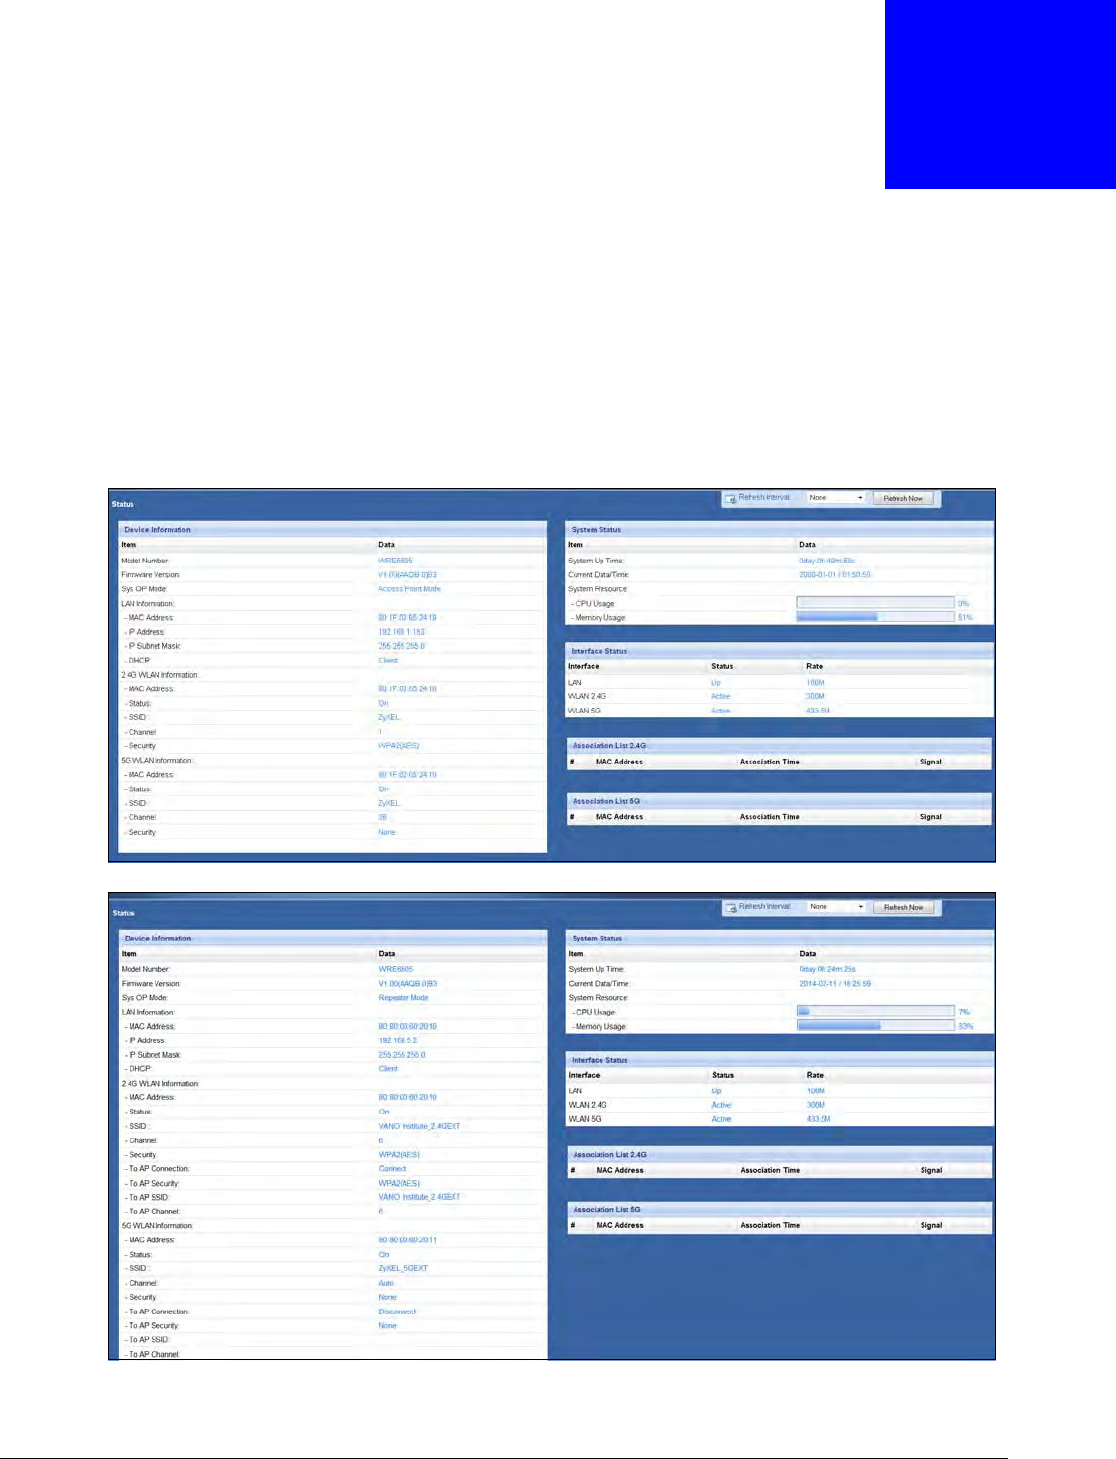
Status
7.1 WRE6505 Status
The screen below shows the status screen.
Figure 25 AP Mode > Status Screen
Figure 26 Repeat Mode > Status Screen

Chapter 7 Status
WRE6505 User’s Guide
38
The following table describes the icons shown in the St a t u s screen.
The following table describes the labels shown in the St a t us screen.
Table 11 Status Screen I con Key
ICON DESCRIPTION
Click this icon to open t he setup wizard.
Click this icon to view copyright and a link for relat ed product inform ation.
Select a num ber of seconds or N on e from the drop-down list box to refresh all
screen statistics autom atically at the end of every time interval or to not refresh
the screen statistics.
Click this button to refresh the status screen statistics.
Table 12 Web Configurator Status Screen
LABEL DESCRIPTION
Device I nformation
Model Num ber This is the Model Num ber.
Firmware Version This is the current firm ware version of the WRE6505.
Sys OP Mode This is the system’s current operating m ode: AP or Repeater mode
LAN I nform ation
- MAC Address This shows the LAN Ethernet adapter MAC Address of your device.
- I P Address This shows the LAN port’s I P address.
- I P Subnet Mask This shows the LAN port’s subnet m ask.
- DHCP This shows the LAN port ’s DHCP role.
2.4G WLAN I nform ation
- MAC Address This shows the wireless adapter MAC Address of your device.
- Status This shows the current status of the Wireless LAN - On or Off.
- SSID This shows a descriptive nam e used to identify the WRE6505 in the wireless
LAN.
- Channel This shows the channel num ber which the WRE6505 is currently using over the
wireless LAN.
- Security This shows the level of wireless security the WRE6505 is using.
- To AP Connection This displays whether the WRE6505 is connected to an AP or not.
- To AP Security This displays the type of est ablished security protocol with the device.
- To AP SSID This displays the SSID of the connected network router.
- To AP Channel This displays the current channel in use with the connected network router.
5G WLAN I nformation
- MAC Address This shows the wireless adapter MAC Address of your device.
- Status This shows the current status of the Wireless LAN - On or Off.
- SSID This shows a descriptive nam e used to identify the WRE6505 in the wireless
LAN.
- Channel This shows the channel num ber which the WRE6505 is currently using over the
wireless LAN.
- Security This shows the level of wireless security the WRE6505 is using.
- To AP Connection This displays whether the WRE6505 is connected to an AP or not.

Chapter 7 Status
WRE6505 User’s Guide
39
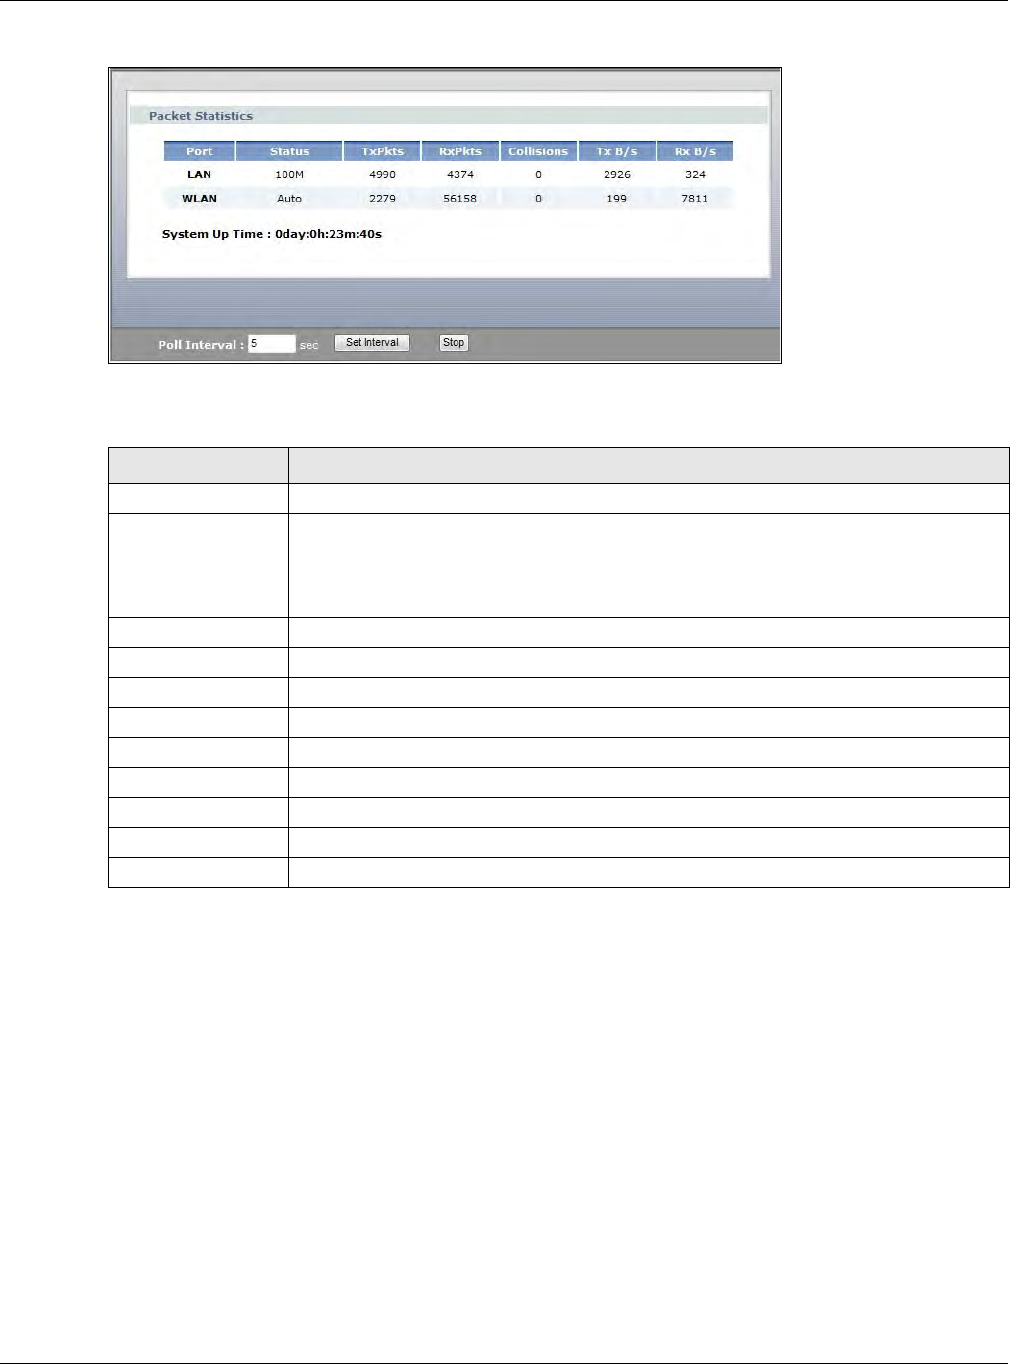
7.1.1 Summary: Packet Statistics
Click the Pack e t St a tist ics ( D etails...) hyperlink in the St atus screen. Read-only inform ation
here includes port status, packet specific statistics and the "system up tim e". The Poll I nt e rval( s)
field is configurable and is used for refreshing the screen.
- To AP Security This displays the type of est ablished security protocol with the device.
- To AP SSID This displays the SSID of the connected network router.
- To AP Channel This displays the current channel in use with the connected network router.
System Status
Syst em Up Time This is the total tim e the WRE6505 has been on.
Current Date/ Tim e This field displays your WRE6505’s present date and time.
System Resource
- CPU Usage This displays what percentage of the WRE6505’s processing ability is currently
used. When this percentage is close to 100% , the WRE6505 is running at full
load, and the throughput is not going to im prove anym ore. I f you want some
applications to have m ore throughput, you should turn off other applicat ions.
- Memory Usage This shows what percentage of the heap m emory the WRE6505 is using.
I nt erface Status
Interface This displays the WRE6505 port types. The port types are: LAN and W LAN .
Status For the LAN port, this field displays Dow n (line is down) or Up (line is up or
connected).
For the WLAN, it displays Up when the WLAN is enabled or D ow n when the
WLAN is disabled.
Rate For t he LAN ports, this displays the port speed and duplex setting or N A when
the line is disconnect ed.
For the WLAN, it displays the maxim um transmission rate when the WLAN is
enabled and N A when the WLAN is disabled or Au t o.
Association List 2.4G
# This is the index num ber of an associated wireless client.
MAC Address This field displays the MAC address of an associated wireless client.
Association Tim e This field displays the time a wireless client is first associated with the
WRE6505’s WLAN network.
Signal This is the signal strengt h num ber of the associated client.
Association List 5G This table displays all the associated wireless clients and respective signal
strength.
# This is the index num ber of an associated wireless client.
MAC Address This field displays the MAC address of an associated wireless client.
Association Tim e This field displays the time a wireless client is first associated with the
WRE6505’s WLAN network.
Signal This is the signal strengt h num ber of the associated client.
Table 12 Web Configurator Status Screen (continued)
LABEL DESCRIPTION
Chapter 7 Status
WRE6505 User’s Guide
40
Figure 27 Sum m ary: Packet Statistics
The following table describes the labels in this screen.
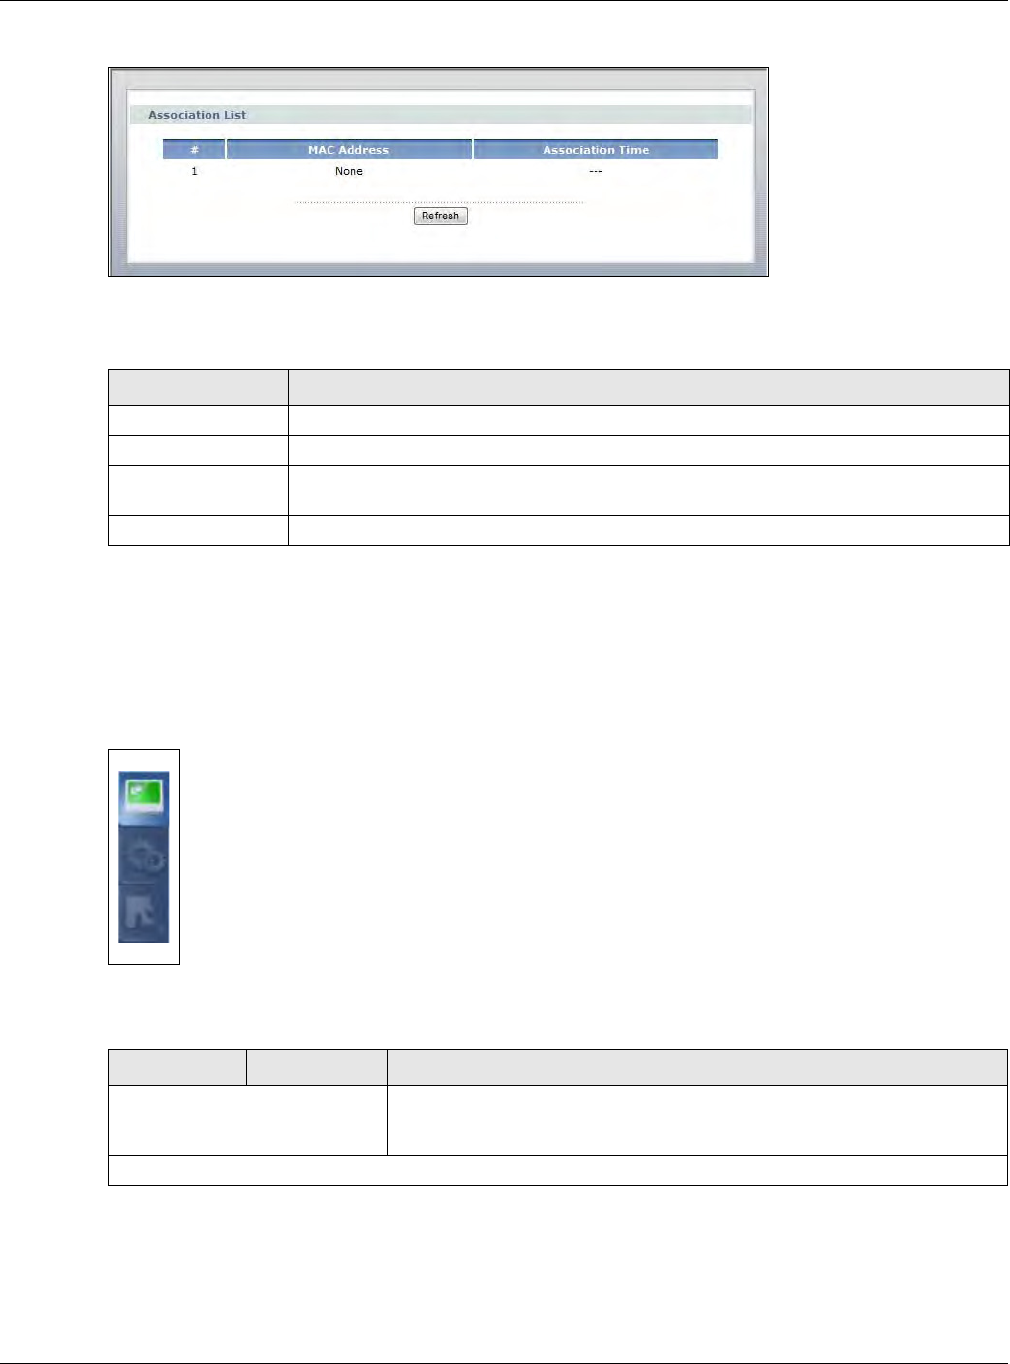
7.1.2 Summary: WLAN Station Status
Click the W LAN St at ion Stat us ( Det a ils...) hyperlink in the St a t u s screen. View the wireless
stations that are currently associated to the WRE6505 in the Associa t ion List. Association m eans
that a wireless client (for exam ple, your network or com puter with a wireless network card) has
connected successfully to the AP ( or wireless router) using the same SSI D, channel and security
settings.
Table 13 Summ ary: Packet Statistics
LABEL DESCRIPTION
Port This is the WRE6505’s port type.
Status For the LAN ports, this displays the port speed and duplex setting or Dow n when the
line is disconnected.
For the WLAN, it displays Up when the WLAN is enabled or D ow n when the WLAN is
disabled or Au t o.
TxPkts This is t he num ber of transmitted packets on this port.
RxPkts This is the num ber of received packets on this port.
Collisions This is the num ber of collisions on t his port.
Tx B/s This displays the transmission speed in bytes per second on this port.
Rx B/ s This displays the reception speed in bytes per second on this port.
System Up Time This is the total tim e the WRE6505 has been on.
Poll I nterval Enter the time interval for refreshing statistics in this field.
Set I nterval Click this but ton to apply the new poll interval you entered in the Poll I nt er va l field.
Stop Click St op to stop refreshing statistics.
Chapter 7 Status
WRE6505 User’s Guide
41
Figure 28 Sum m ary: WLAN Station Status
The following table describes the labels in this screen.
7.2 Navigation Panel
Use the m enu in the navigation panel m enus to configure WRE6505 features.
Figure 29 Menus
The following table describes the sub-menus.
Table 14 Summ ary: WLAN Station Status
LABEL DESCRIPTION
# This is t he index num ber of an associated wireless st ation.
MAC Address This field displays the MAC address of an associated wireless station.
Association Tim e This field displays the time a wireless station first associated with the WRE6505’s WLAN
network.
Refresh Click Refre sh to reload the list.
Table 15 Menus
LINK TAB FUNCTION
Status This screen shows the WRE6505’s general device, system and interface
status information. Use this screen to access the wizard, and summary
statistics tables.
Configuration

Chapter 7 Status
WRE6505 User’s Guide
42
Wireless
LAN 2.4G General Use this screen to configure wireless LAN.
Security Use this screen to select the available security m odes as defined by the
paired AP or wireless router.
AP Select Use this screen to connect to an access point.
MAC Filter Use the MAC Address List screen to allow devices to access the WRE6505.
Advanced This screen allows you to configure advanced wireless settings.
WPS Use this screen t o configure WPS.
WPS Station Use this screen to connect the WRE6505 to a wireless station or access
point using WPS.
Wireless
LAN 5G General Use this screen to configure wireless LAN.
Security Use this screen to select the available security m odes as defined by the
paired AP or wireless router.
AP Select Use this screen to connect to an access point.
MAC Filter Use the MAC Address List screen to allow devices to access the WRE6505.
Advanced This screen allows you to configure advanced wireless settings.
WPS Use this screen t o configure WPS.
WPS Station Use this screen to connect the WRE6505 to a wireless station or access
point using WPS.
LAN I P Use this screen t o configure LAN IP address, subnet m ask and gateway.
Maintenance
General This screen displays the system and dom ain names.
Password Use this screen to change the password.
Firmware
Upgrade
Use this screen to upload firm ware to your WRE6505.
Backup/
Restore
Use this screen to backup and restore the configuration or reset the factory
defaults to your WRE6505.
Language Use this screen t o select the language set ting for the user interface.
Syst em Mode Use this screen to select the WPS mode behavior.
Table 15 Menus (continued)
LINK TAB FUNCTION
WRE6505 User’s Guide
43
CHAPTER 8
Tutorials
8.1 Overview
This chapter provides tutorials for your WRE6505 as follows ( in access point or universal repeater
mode) as follows:
•Connecting to the I nternet from an Access Point
•Connecting to a Wireless Network Using WPS
•Connecting the WRE6505 to an AP
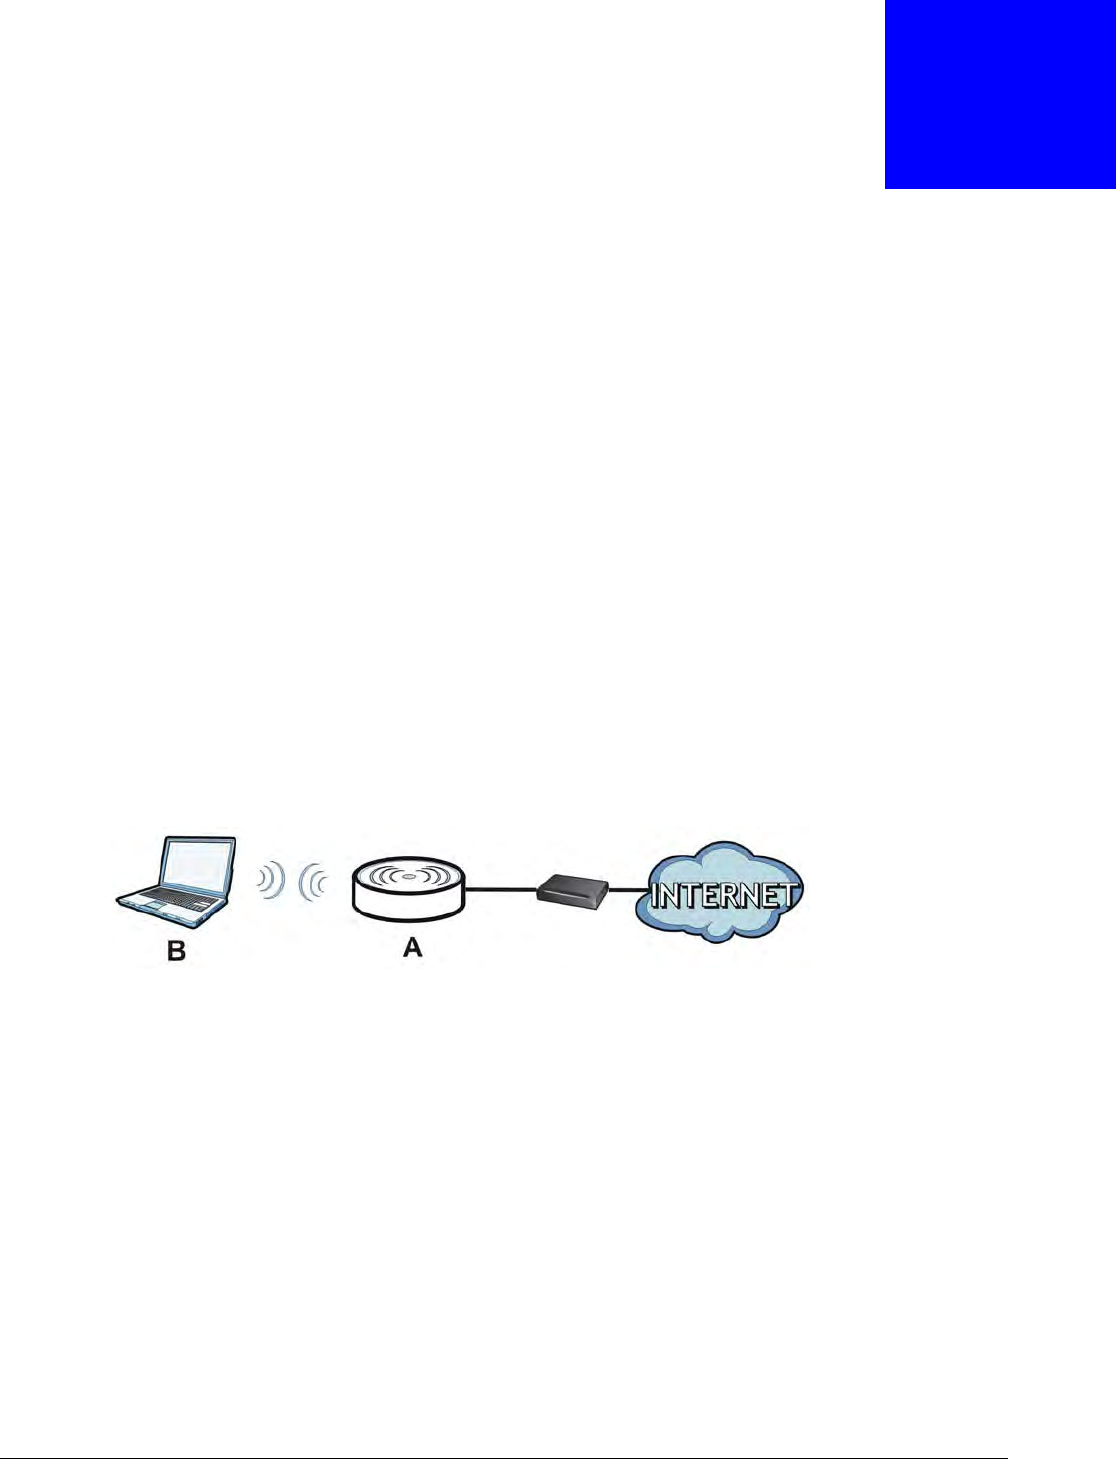
8.2 Connecting to the Internet from an Access Point
This section gives you an example of how to set up an access point (AP) and wireless client (a
notebook (B), in this exam ple) for wireless communication. B can access the I nternet through the
access point (A) wirelessly.
Figure 30 Wireless Access Point Connection to the I nternet
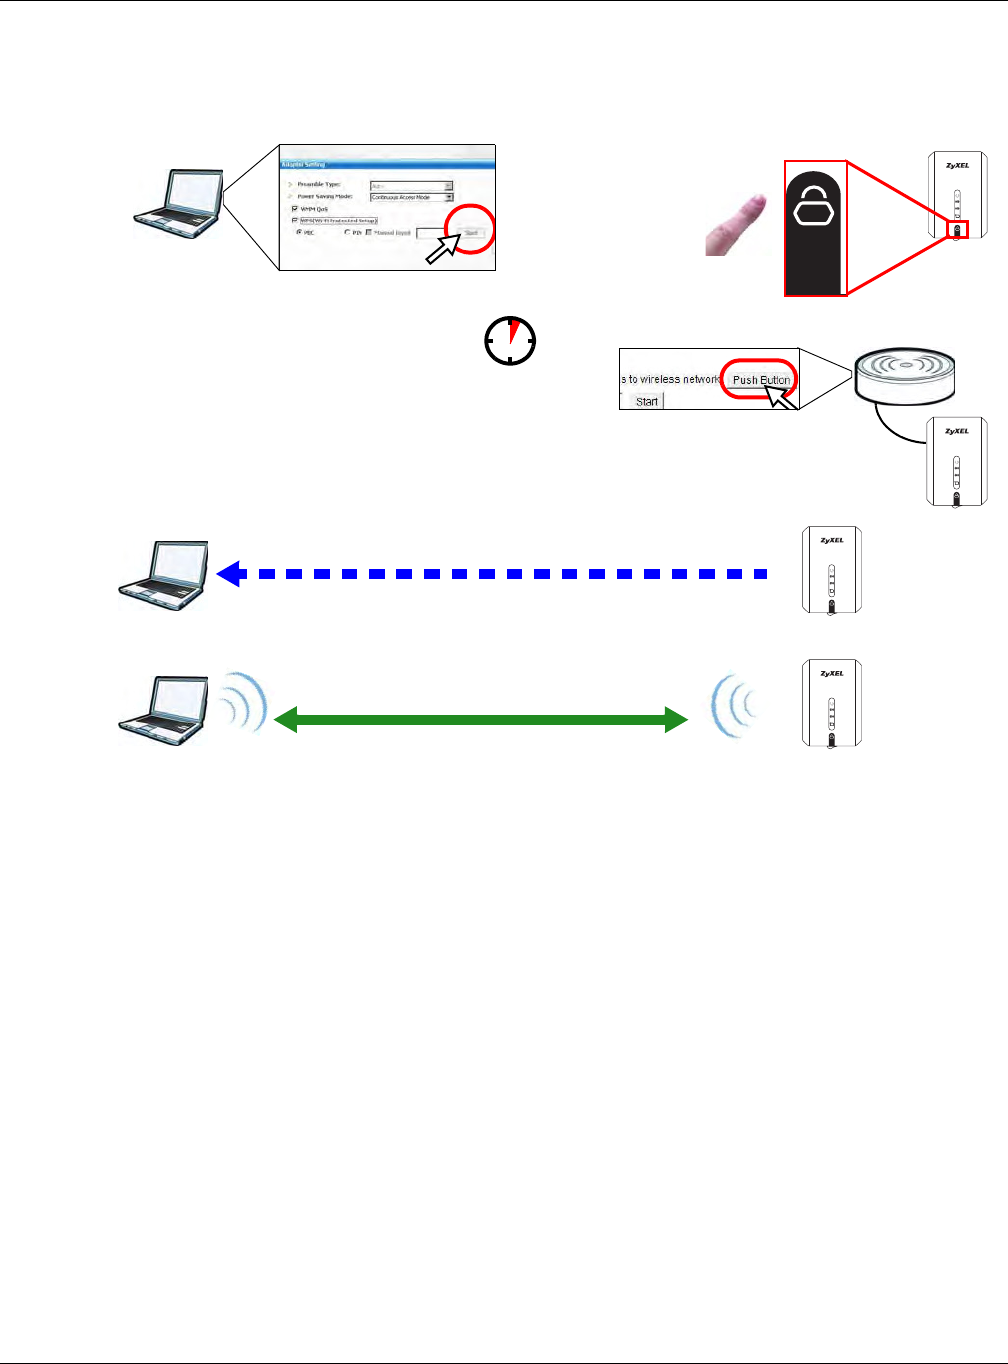
8.3 Connecting to a Wireless Network Using WPS
This section gives you an example of how to set up wireless network using WPS. The following
example uses the WRE6505 as the AP and NWD-211AN as the wireless client which connects to a
notebook.
Note: The wireless client m ust be a WPS-aware device (for example, a WPS USB adapter
or PCI card).
The following WPS m ethods for creating a secure connection are described in the tutorial.
•Push But t on Configura t ion ( PBC) - create a secure wireless network simply by pressing a
button. See Section 8.3.1 on page 44.This is the easier m ethod.

Chapter 8 Tutorials
WRE6505 User’s Guide
44
•PI N Configura t ion - create a secure wireless network simply by entering a wireless client's PIN
(Personal I dentification Num ber) in the WRE6505’s interface. See Section 8.3.2 on page 45. This
is the m ore secure method, since one device can authenticate the other.
8.3.1 Push Button Configuration (PBC)
The push button configuration function found in the interface is only available in AP m ode. The WPS
button, see Section 1.3 on page 10, can also be used for PBC configurations in either AP or
Repeater m ode.
1Make sure that your WRE6505 is turned on and set to work in AP m ode and that it is connected to
your net work.
2Launch your wireless client’s configuration utility.
3In the wireless client utility, find the WPS settings. Enable WPS and press the WPS button (St a r t or
W PS button).
4Log into WRE6505’s Web Configurator. Make sure WPS is enabled in the N e t w or k > W ir eless LAN
> W PS screen.
5Navigate to N e t w or k > W ir eless LAN > W PS Station and press the Push But t on.
Note: Your WRE6505 has a WPS button located on its panel, as well as a WPS button in
its configuration utility (AP m ode only). Both buttons have exactly the same
function; you can use one or the other.
Note: I t doesn’t m atter which button is pressed first. You m ust press the second button
within two m inutes of pressing the first one.
The WRE6505 sends the proper configuration settings to the wireless client. This m ay take up to
two minutes. Then the wireless client is able to communicate with the WRE6505 securely.
The following figure shows you how to set up wireless network and security by pressing a button on
both WRE6505 and wireless client (the NWD- 211AN in this exam ple).
Chapter 8 Tutorials
WRE6505 User’s Guide
45
Figure 31 Example WPS Process: PBC Method
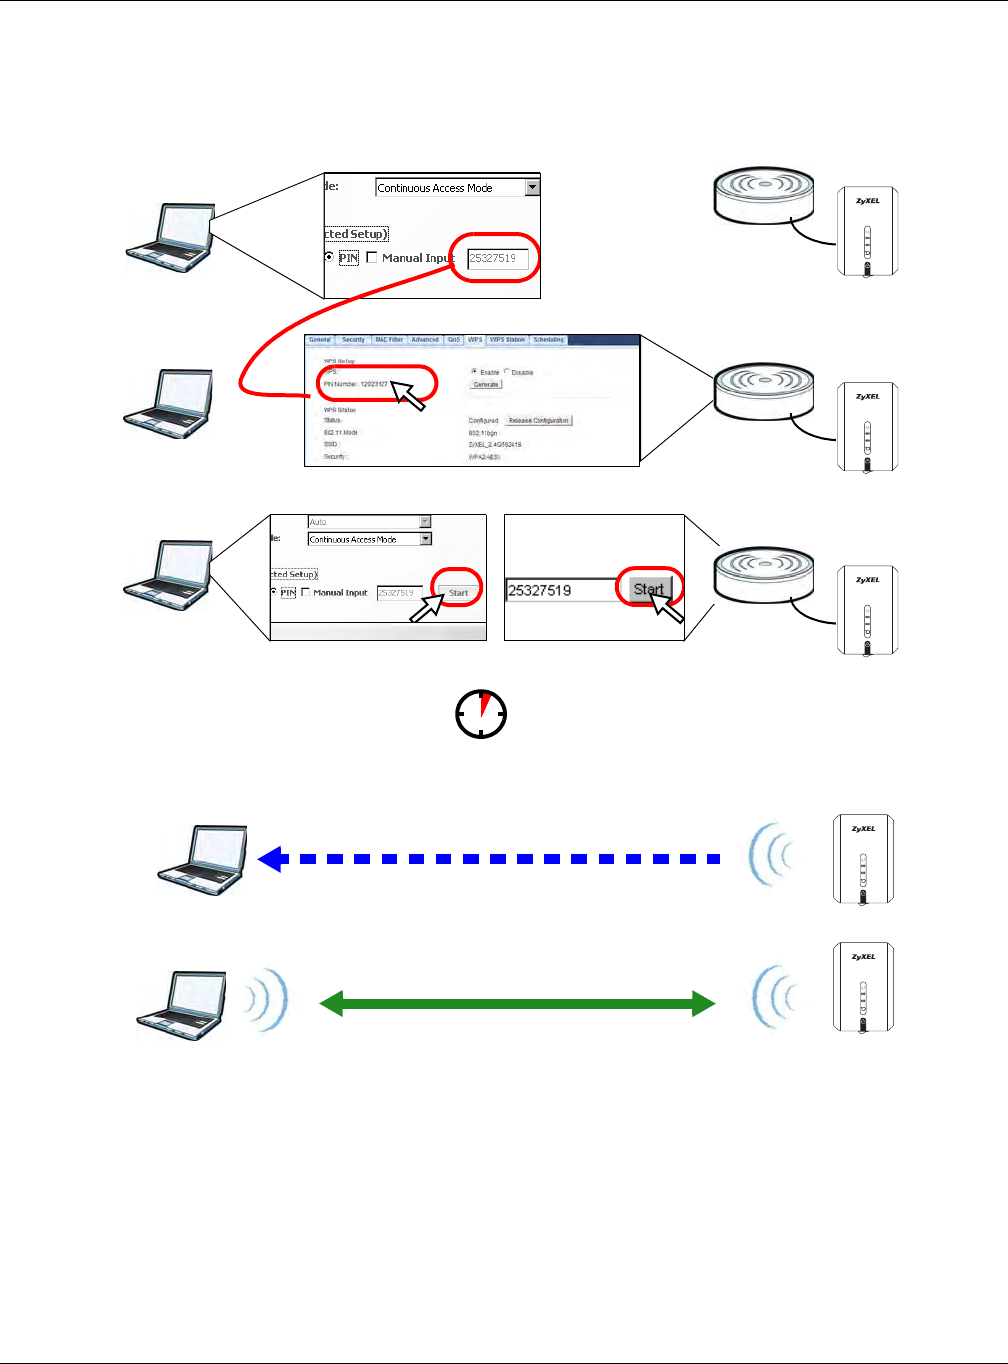
8.3.2 PIN Configuration
When you use the PIN configuration m ethod, you need to use both WRE6505’s configuration
interface and the client’s utilities.
The push button configuration function is only available in AP m ode.
1Launch your wireless client ’s configuration utility. Go to the WPS Station settings and select the PI N
method to get a PIN num ber.
2On the WRE6505, navigate to the N e t w or k > W ir eless LAN ( 2 .4 G/ 5 G) > W PS screen.
3Obtain the PI N num ber for the WRE6505 or press the Ge ne r at e button to create a new PI N
num ber. See Section 9.9 on page 59
4Enter the WRE6505 PI N num ber in the wireless station’s utility screen.
The WRE6505 authenticates the wireless client and sends the proper configuration settings to the
wireless client. This m ay take up to two m inutes. Then the wireless client is able to comm unicate
with the WRE6505 securely.
2.4G2.4G
5G5G
Wireless Client
SECURITY INFO
COMMUNICATION
WITHIN 2 MINUTES
AP
2.4G2.4G
5G5G
2.4G2.4G
5G5G
2.4G2.4G
5G5G
Chapter 8 Tutorials
WRE6505 User’s Guide
46
The following figure shows an exam ple of how to set up wireless network and security on WRE6505
and wireless client ( ex. NWD210N in this exam ple) by using PIN m ethod.
Figure 32 Example WPS Process: PI N Method
8.4 Connecting the WRE6505 to an AP
Repeater m ode allows you to extend the original AP coverage.
•Select ing a n AP from a n Autom atically Det ect e d List - create a secure wireless network
sim ply by selecting an AP from a list of detected APs. See Section 8.4.1 on page 47.This is the
easier m ethod.
Authentication by PIN
SECURITY INFO
WITHIN 2 MINUTES
Wireless Client
COMMUNICATION
2.4G
2.4G
5G
5G
2.4G
2.4G
5G
5G
2.4G
2.4G
5G
5G
2.4G
2.4G
5G
5G
2.4G
2.4G
5G
5G
Chapter 8 Tutorials
WRE6505 User’s Guide
47
•Select ing a n AP by M a nually En t e ring Secu rit y I nform ation - create a secure wireless
network by m anually entering the AP’s wireless security settings in the WRE6505’s interface. See
Section 8.4.2 on page 49. This is useful when the AP is hidden.
8.4.1 Selecting an AP from an Automatically Detected List
Follow the steps below to create a secure wireless network by selecting an AP from a list of detected
APs.
The AP select function is only available in repeater m ode. See Section 2.1.1 on page 13.
The instructions require that your hardware is connected (see the Quick Start Guide) and you are
logged into the Web Configurator through your LAN connection (see Section 5.2 on page 27).
1Select an AP form the Se lect colum n and click N ex t .
Figure 33 Tutorial: Selecting an automatically detected AP
2Type a key into the KEY field and click N e x t .
Figure 34 Tutorial: The KEY field
3Wait for the WRE6505 to verify the key with the AP.
Chapter 8 Tutorials
WRE6505 User’s Guide
48
Figure 35 Tutorial: Verifying the key
4When the key is verified, click N e x t .
Figure 36 Tutorial: Successful key verification
5Click APPLY to save settings and restart the WRE6505. Click CON TI N U E to go to the Status
screen without saving the settings and restarting the WRE6505.
Figure 37 Tutorial: Saving settings

Chapter 8 Tutorials
WRE6505 User’s Guide
49
8.4.2 Selecting an AP by Manually Entering Security Information
This exam ple shows you how to configure wireless security settings with the following parameters
on your WRE6505.
Follow the steps below to create a secure wireless network by m anually entering the AP’s wireless
security settings in the WRE6505’s interface.
The instructions require that your hardware is connected (see the Quick Start Guide) and you are
logged into the Web Configurator through your LAN connection (see Section 5.2 on page 27).
1Select Setup repe a ter m anually.
2Type the SSID of the AP into the SSI D field and click N e x t .
Figure 38 Tutorial: Typing an SSI D
3Select the security settings and click N e x t .
SSI D ExampleSSID
Cha nn el 7
Securit y WPA2 PSK
Chapter 8 Tutorials
WRE6505 User’s Guide
50
Figure 39 Tutorial: Security Settings
4Click Apply to save settings and restart the WRE6505. Click CON TI N UE to go to the Status screen
without saving the settings and restarting the WRE6505.
Figure 40 Tutorial: Saving settings

51
PART II
Technical Reference

52

WRE6505 User’s Guide
53
CHAPTER 9
Wireless LAN
9.1 Overview
This chapter discusses how to configure the wireless network settings in your WRE6505. See
Section 1.1 on page 9 for an overview of wireless networks.
9.2 What You Can Do
• Use the Gen er al screen to enable the Wireless LAN (2.4G/ 5G), enter the SSID and select the
wireless security m ode (Section 9.4 on page 55).
• Use the Secu rit y screen to (Section 9.5 on page 56).
• Use the M AC Filt e r screen to allow or deny wireless stations based on their MAC addresses from
connecting to the WRE6505 (Section 9.7 on page 57).
• Use the Adva nced screen to allow intra-BSS networking and set the RTS/ CTS Threshold ( Section
9.8 on page 59).
• Use the W PS screen to quickly set up a wireless network with strong security, without having to
configure security settings m anually (Section 9.9 on page 59) .
• Use the AP Select screen to choose an access point that you want the WRE6505 to connect to.
You should know the security settings of the target AP (Section 9.6 on page 56).
9.3 What You Should Know
Every wireless network m ust follow these basic guidelines.
• Every wireless client in the same wireless network m ust use the same SSID.
The SSID is the name of the wireless network. I t stands for Service Set I Dentity.
• If two wireless networks overlap, they should use different channels.
Like radio stations or television channels, each wireless network uses a specific channel, or
frequency, to send and receive inform ation.
• Every wireless client in the same wireless network m ust use security compatible with the AP.
Security stops unauthorized devices from using the wireless network. I t can also protect the
information that is sent in the wireless network.
9.3.1 Wireless Security Overview
The following sections introduce different types of wireless security you can set up in the wireless
network.

Chapter 9 Wireless LAN
WRE6505 User’s Guide
54
9.3.1.1 MAC Address List
Every wireless client has a unique identification number, called a MAC address.1 A MAC address is
usually written using twelve hexadecim al characters2; for exam ple, 00A0C5000002 or
00: A0: C5: 00: 00: 02. To get the MAC address for each wireless client, see the appropriate User’s
Guide or other docum entation.
You can use the MAC Address List to tell the AP which wireless clients are allowed to use the
wireless network. I f a wireless client is allowed to use the wireless network, it still has to have the
correct settings (SSID, channel, and security). If a wireless client is not allowed to use the wireless
network, it does not m atter if it has the correct settings.
This type of security does not protect the inform ation that is sent in the wireless network.
Furtherm ore, there are ways for unauthorized devices to get the MAC address of an authorized
wireless client. Then, they can use that MAC address to use the wireless network.
9.3.1.2 Encryption
Wireless networks can use encryption to protect the information that is sent in the wireless
network. Encryption is like a secret code. I f you do not know the secret code, you cannot
understand the m essage.
For exam ple, if users do not log in to the wireless network, you can choose no authentication, if
users do log on to the wireless network, you can choose No Security, Static W EP, W PA- PSK, or
W PA2 - PSK.
Usually, you should set up the strongest encryption that every wireless client in the wireless
network supports. Suppose the wireless network has two wireless clients. Device A only supports
WEP, and device B supports WEP and WPA-PSK. Therefore, you should set up St atic W EP in the
wireless network.
Note: I t is recom m ended that wireless networks use WPA-PSK, or stronger encryption.
IEEE 802.1x and WEP encryption are better than none at all, but it is still possible
for unauthorized devices to figure out the original inform ation pretty quickly.
Many types of encryption use a key to protect the inform ation in the wireless network. The longer
the key, the stronger the encryption. Every wireless client in the wireless network m ust have the
sam e key.
1. Some wireless devices, such as scanners, can detect wireless networks but cannot use wireless networks. These kinds
of wireless devices might not have MAC addresses.
2. Hexadecimal characters are 0, 1, 2, 3, 4, 5, 6, 7, 8, 9, A, B, C, D, E, and F.
Table 16 Types of Encryption for Each Type of Authentication
NO AUTHENTICATION
W eak est No Security
Static WEP
WPA-PSK
St r on ge st WPA2- PSK
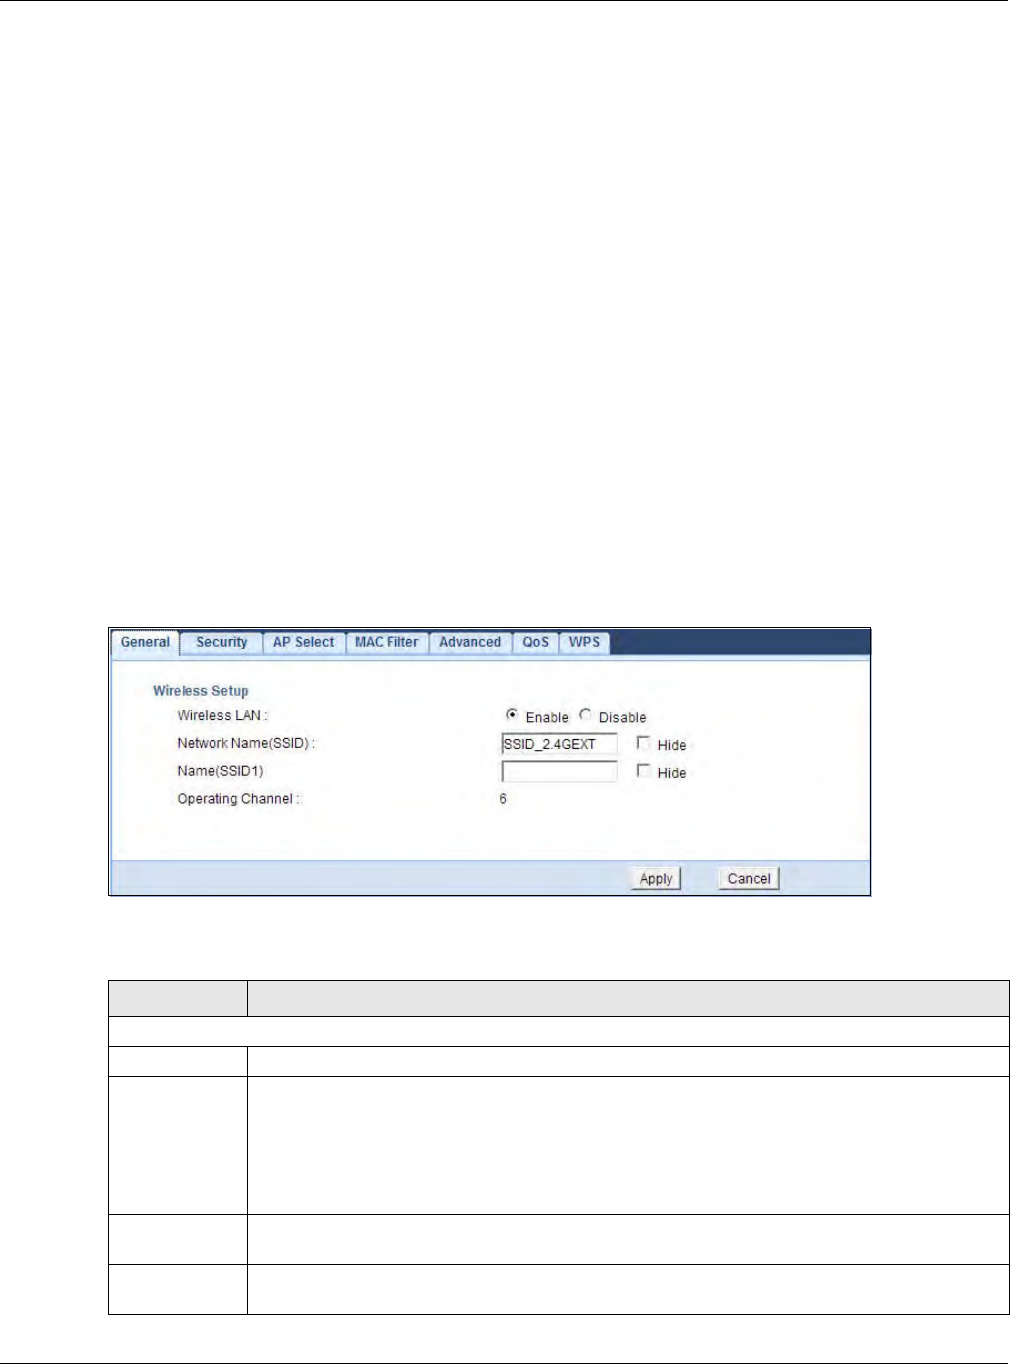
Chapter 9 Wireless LAN
WRE6505 User’s Guide
55
9.3.1.3 WPS
Wi-Fi Protected Setup (WPS) is an industry standard specification, defined by the Wi-Fi Alliance.
WPS allows you to quickly set up a wireless network with strong security, without having to
configure security settings m anually. Depending on the devices in your network, you can either
press a button ( on the device itself, or in its configuration utility) or enter a PI N (Personal
Identification Num ber) in the devices. Then, they connect and set up a secure network by
them selves. See how to set up a secure wireless network using WPS in the Section 8.3 on page 43.
9.4 General Wireless LAN Screen
Use this screen to enable the Wireless LAN, enter the SSID and select the wireless security m ode.
Note: I f you are configuring the WRE6505 from a computer connected to the wireless
LAN and you change the WRE6505’s SSID, channel or security settings, you will
lose your wireless connection when you press Apply to confirm. You m ust then
change the wireless settings of your computer to m atch the WRE6505’s new
settings.
Click N e t w or k > W ir ele ss LAN ( 2 .4 G/ 5 G) to open the Genera l screen.
Figure 41 Network > Wireless LAN (2.4G/ 5G) > General
The following table describes the general wireless LAN labels in this screen.
Table 17 Network > Wireless LAN (2.4G/ 5G) > General
LABEL DESCRIPTION
Wireless Setup
Wireless LAN This is turned on by default. Click D isable to turn off the wireless LAN function.
Network Nam e
(SSID)
or
Nam e
(SSID1~ 3)
The SSI D (Service Set I Dentity) identifies the Service Set with which a wireless client is
associated. Enter a descriptive nam e (up to 32 printable charact ers found on a typical
English language keyboard) for the wireless LAN.
You can configure up to two SSI Ds to enable two BSSs ( Basic Service Sets) on the WRE6505.
Wireless clients can use different SSI Ds to associate with the sam e access point.
Hide Select this check box to hide the SSID in the outgoing beacon fram e so a wireless client
cannot obtain the SSI D through scanning using a site survey tool.
Operating
Channel
This displays the channel the WRE6505 is currently using.
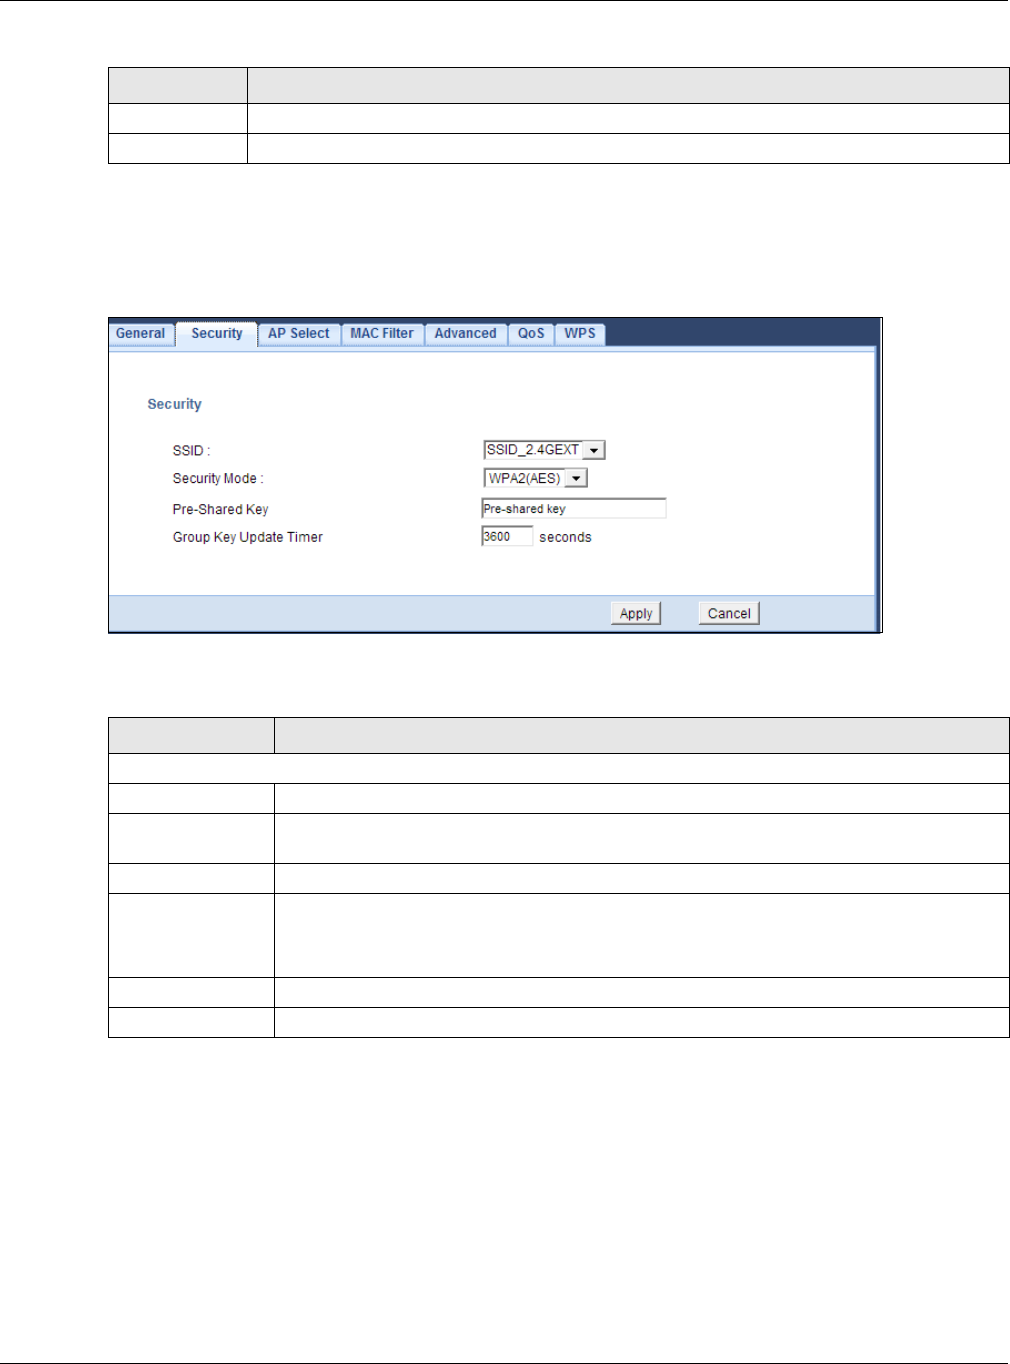
Chapter 9 Wireless LAN
WRE6505 User’s Guide
56
9.5 Security
Figure 42 Universal Repeater Mode: Wireless LAN (2.4G/ 5G) > Security
The following table describes the labels in this screen.
9.6 AP Select Screen
Use this screen ( available in repeater m ode only) to choose an access point that you want the
WRE6505 to connect to. You should know the security settings of the target AP.
To open this screen, click N e t w or k > W ireless LAN ( 2 .4 G/ 5 G) > AP Select tab.
Apply Click Apply to save your changes back to the WRE6505.
Cancel Click Can ce l to return to the previous m enu without saving.
Table 17 Network > Wireless LAN (2.4G/ 5G) > General (continued)
LABEL DESCRIPTION
Table 18 Universal Repeater Mode: Wireless LAN (2.4G/ 5G) > Security
LABEL DESCRIPTION
Security
SSI D Enter the nam e of the access point to which you are connecting.
Security Mode Select N o Securit y or the available m odes to m atch as provided by the source AP or
wireless router.
Pre-Shared Key Enter the security pre-shared key as provided by the source AP or wireless router.
Group Key Update
Timer
The Group Key Update Tim er is the rate at which the AP sends a new group key out to all
clients.
The default is 3600 seconds (60 m inutes).
Apply Click Apply to save your changes back to the WRE6505.
Cancel Click Can ce l to reload the previous configuration for this screen.
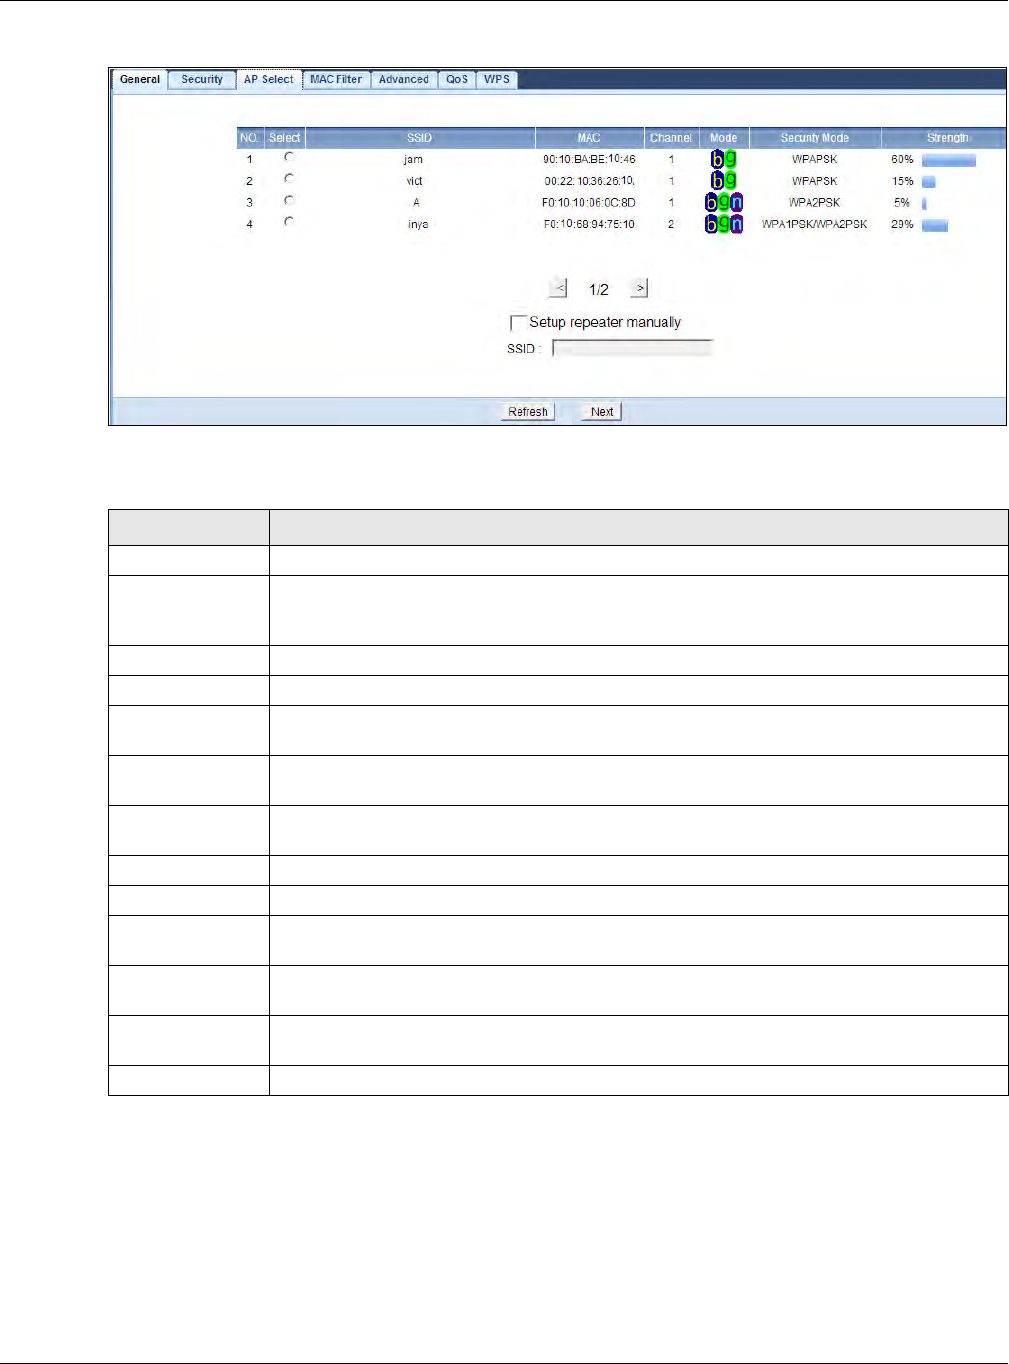
Chapter 9 Wireless LAN
WRE6505 User’s Guide
57
Figure 43 Network > Wireless LAN (2.4G/ 5G) > AP Select (Repeater Mode)
The following table describes the labels in this screen.
9.7 MAC Filter
The MAC Filter screen allows you to specify which devices are allowed to access the WRE6505,
while denying access to all unspecified devices. Every Ethernet device has a unique MAC (Media
Access Control) address. The MAC address is assigned at the factory and consists of six pairs of
Table 19 Network > Wireless LAN (2.4G/ 5G) > AP Select (Repeater Mode)
LABEL DESCRIPTION
Select Use the radio but ton to select the wireless device to which you want to connect.
SSI D This displays the Service Set I Dentity of the wireless device. The SSI D is a unique name
that identifies a wireless network. All devices in a wireless network must use the sam e
SSI D.
MAC This displays the MAC address of t he wireless device.
Channel This displays the channel num ber used by this wireless device.
Mode This displays which I EEE 802.11b/ g/ n wireless networking standards the wireless device
support s.
Security Mode This displays t he type of security configured on the wireless device. When no is shown, no
security is configured and you can connect to it without a password.
Strength This displays the strength of t he wireless signal. The signal strength mainly depends on
the antenna output power and the distance between your WRE6505 and this device.
<Click < to see the previous page of APs.
>Click > to see the next page of APs.
Setup repeater
manually
Select this to setup the AP m anually.
SSI D If Set up r epea te r m a nua lly is selected, use t his field t o type the SSID of t he AP. This is
useful when the AP’s SSID is hidden.
Refresh Click Re fr esh to search for available wireless devices within transmission range and
update this table.
Next Click N e x t to start the next step in the AP setup process.
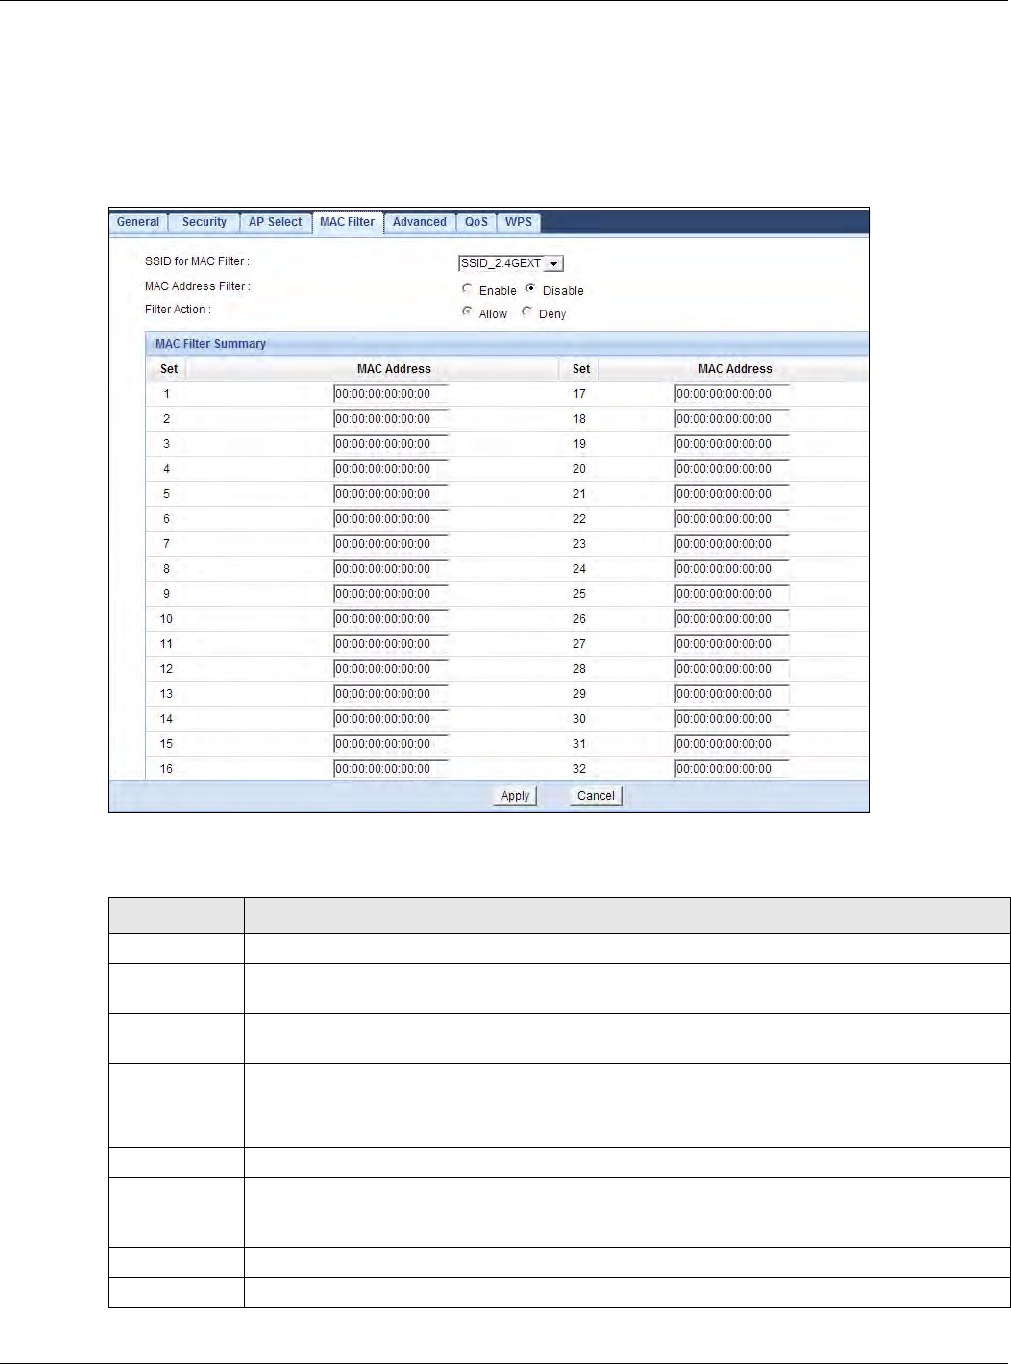
Chapter 9 Wireless LAN
WRE6505 User’s Guide
58
hexadecim al characters, for exam ple, 00: A0: C5: 00: 00: 02. You need to know the MAC address of
the devices to configure this screen.
To change your WRE6505’s MAC Address List settings, click N e t w or k > W ir eless LAN ( 2 .4 G/ 5 G)
> M AC Filt e r. The screen appears as shown.
Figure 44 Network > Wireless LAN (2.4G/ 5G) > MAC Filter
The following table describes the labels in this m enu.
Table 20 Network > Wireless LAN (2.4G/ 5G) > MAC Address List
LABEL DESCRIPTION
Act ive Select this to enable MAC address filtering.
SSI D for MAC
Filter
Select the SSID for which you want to configure MAC filtering.
MAC Address
Filter
Select En able to allow MAC address filtering (default: Disable).
Filter Action Select Disable to deactivate t he MAC filtering rule.
Select Allow to perm it access to the WRE6505, MAC addresses not listed will be denied
access to the WRE6505.
Set This is the index number of the MAC address.
MAC Address Enter the MAC addresses of the wireless st ation to include in the rule. Enter the MAC
addresses in a valid MAC address form at, that is, six hexadecimal character pairs, for
exam ple, 12: 34: 56: 78: 9a: bc.
Apply Click Apply to save your changes back to the WRE6505.
Cancel Click Ca ncel to return to the previous m enu without saving.
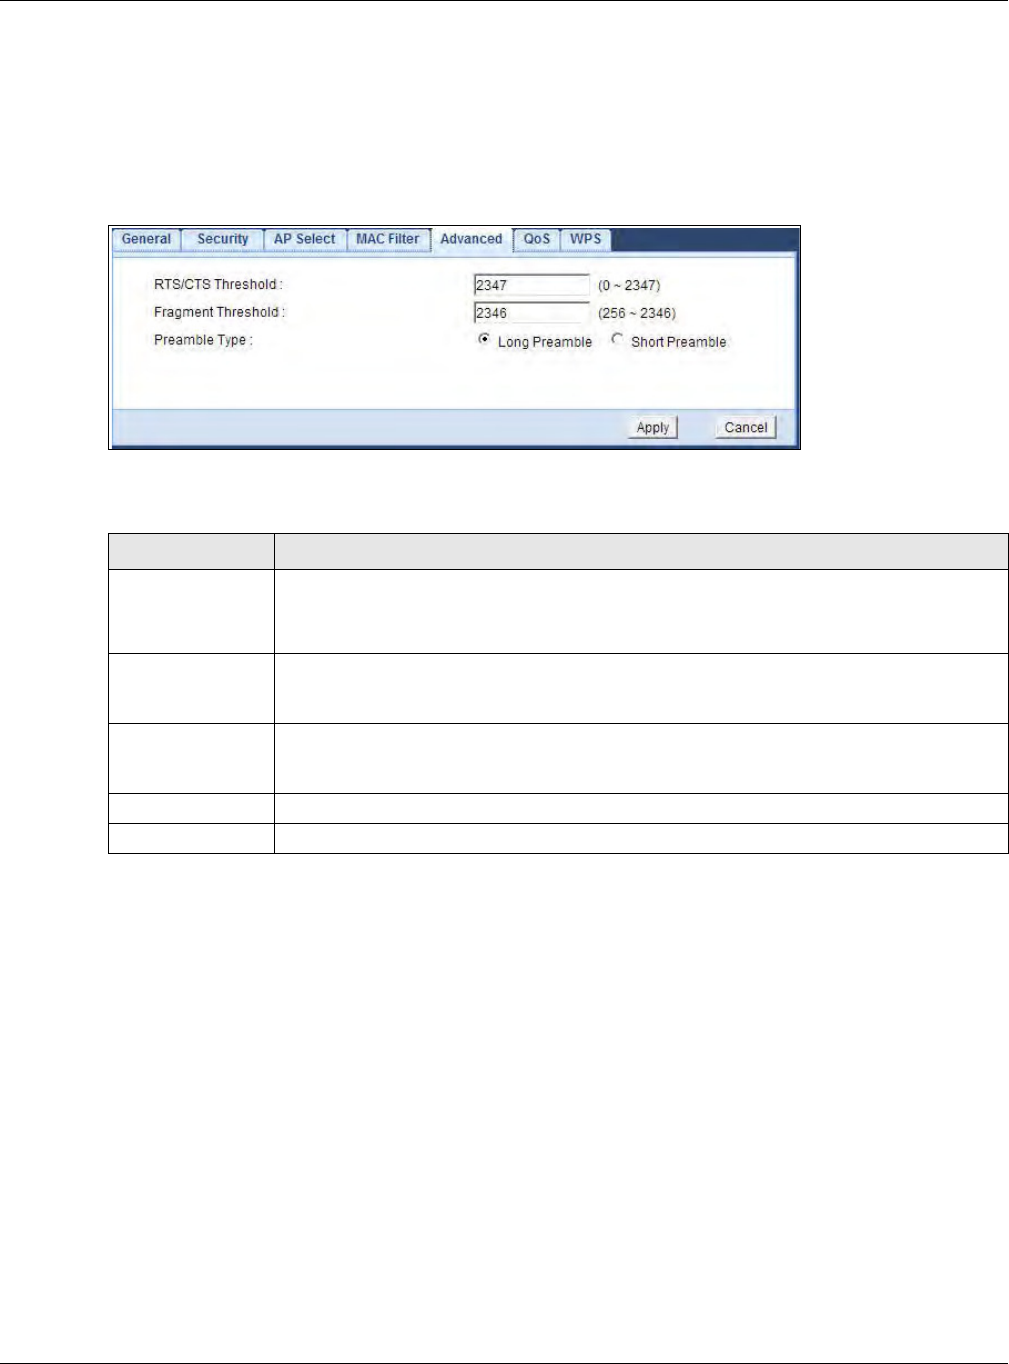
Chapter 9 Wireless LAN
WRE6505 User’s Guide
59
9.8 Wireless LAN Advanced Screen
Use this screen to configure advanced wireless LAN param eters.
Click N e t w or k > W ir eless LAN ( 2 .4 G/ 5 G) > Adva nce d. The screen appears as shown.
Figure 45 Network > Wireless LAN (2.4G/ 5G) > Advanced
The following table describes the labels in this screen.
9.9 WPS Screen
Use this screen to enable/ disable WPS, view or generate a new PI N and check current WPS status.
To open this screen, click N e t w ork > W ir eless LAN ( 2 .4 G/ 5 G) > W PS tab.
Table 21 Network > Wireless LAN (2.4G/ 5G) > Advanced
LABEL DESCRIPTION
RTS/ CTS
Threshold
Data with its frame size larger than this value will perform the RTS (Request To Send)/
CTS (Clear To Send) handshake.
Enter a value between 0 and 2 3 4 7 .
Fragm entation
Threshold
The t hreshold ( num ber of bytes) for the fragm entation boundary for directed m essages.
It is the m aximum data fragm ent size that can be sent . Enter an even num ber between
2 5 6 and 2 3 4 6 .
Preamble Type A preamble affects the tim ing in your wireless network. There are two preamble m odes:
long and short. I f a device uses a different preamble mode than the WRE6505 does, it
cannot com m unicate with the WRE6505.
Apply Click Apply to save your changes to the WRE6505.
Cancel Click Can ce l to return t o the previous menu without saving.
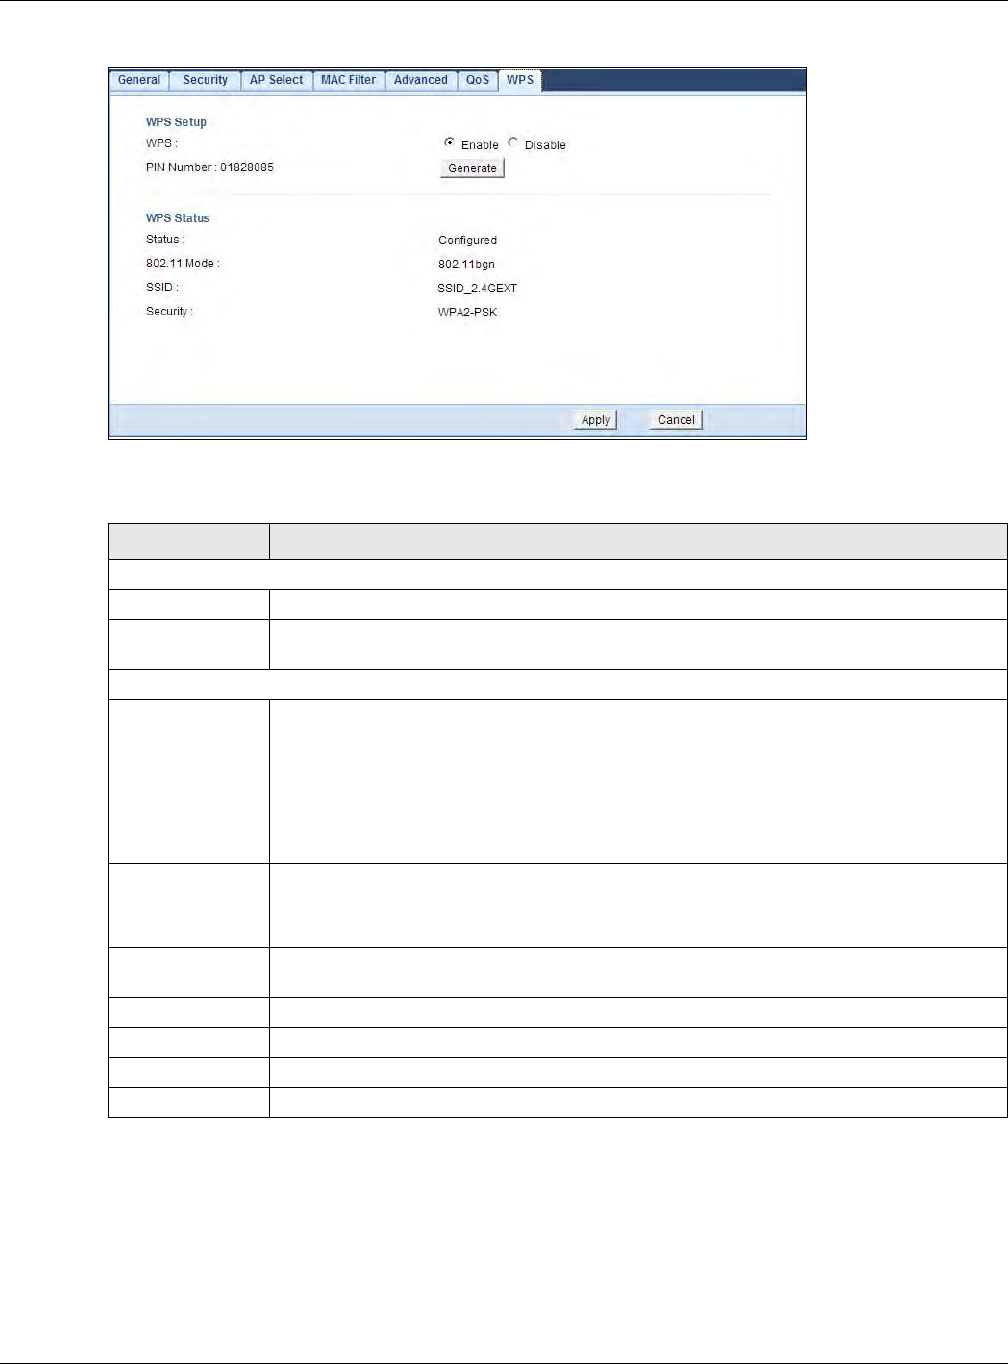
Chapter 9 Wireless LAN
WRE6505 User’s Guide
60
Figure 46 Network > Wireless LAN (2.4G/ 5G) > WPS
The following table describes the labels in this screen.
9.10 WPS Station Screen
Use this screen (available in AP mode only) when you want to add a wireless station using WPS. To
open this screen, click N e t w o rk > W ir eless LAN ( 2 .4 / 5 G) > W PS Station tab.
Table 22 Network > Wireless LAN (2.4G/ 5G) > WPS
LABEL DESCRIPTION
WPS Setup
WPS Select this to enable the WPS feature.
PI N Num ber This displays a PIN num ber last time system generated. Click Ge ne r at e to generate a
new PIN num ber.
WPS Status
Status This displays Configur ed when t he WRE6505 has connected to a wireless network using
WPS or when En a ble W PS is selected and wireless or wireless security settings have
been changed. The current wireless and wireless security settings also appear in the
screen.
This displays Unconfigu red if WPS is disabled and there are no wireless or wireless
security changes on t he WRE6505 or click Relea se Conf igur at ion (AP m ode only) to
remove the configured wireless and wireless security settings.
Release
Configuration
(AP mode only)
This button is only available when the WPS st atus displays Configur ed.
Click this butt on to remove all configured wireless and wireless security settings for WPS
connections on the WRE6505.
802.11 Mode This is the 802.11 mode used. Only compliant WLAN devices can associate with the
WRE6505.
SSI D This is the name of the wireless network (the WAP3205 v2’s first SSID).
Security This is the type of wireless security employed by the network.
Apply Click Apply to save your changes back to the WRE6505.
Cancel Click Can ce l to return to the previous m enu without saving.
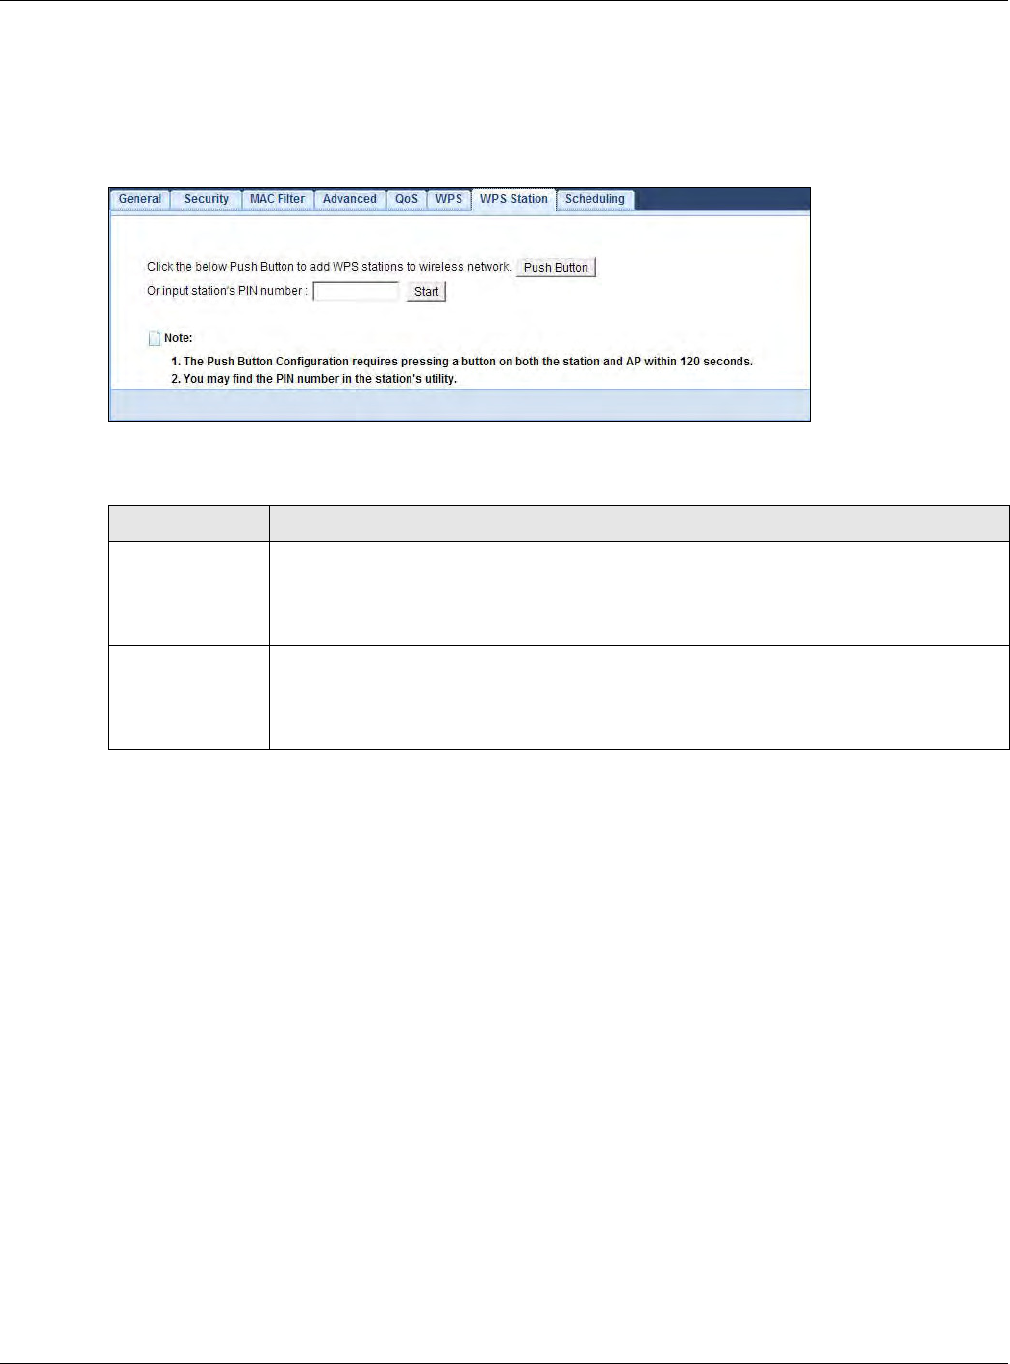
Chapter 9 Wireless LAN
WRE6505 User’s Guide
61
Note: After you click Push Butt on on this screen, you have to press a similar button in
the wireless station utility within 2 m inutes. To add the second wireless station, you
have to press these buttons on both device and the wireless station again after the
first 2 minutes.
Figure 47 Network > Wireless LAN (2.4/ 5G) > WPS Station
The following table describes the labels in this screen.
9.11 Scheduling Screen
Use this screen (available in AP m ode only) to set the times your wireless LAN is turned on and off.
Wireless LAN scheduling is disabled by default. The wireless LAN can be scheduled to turn on or off
on certain days and at certain times. To open this screen, click N e t w or k > W ir eless LAN ( 2 .4 /
5 G) > Sche du ling tab.
Table 23 Network > Wireless LAN (2.4/ 5G) > WPS Station
LABEL DESCRIPTION
Push Button Use this butt on when you use the PBC (Push Button Configuration) m ethod t o configure
wireless stations’s wireless settings. See Section 8.3.1 on page 44.
Click this to st art WPS-aware wireless station scanning and the wireless security
inform ation synchronization.
Or input station’s
PI N num ber
Use this button when you use the PIN Configuration m ethod to configure wireless station’s
wireless settings. See Section 8.3.2 on page 45.
Type the same PI N num ber generated in the wireless station’s utility. Then click St a rt to
associate to each other and perform the wireless security information synchronization.
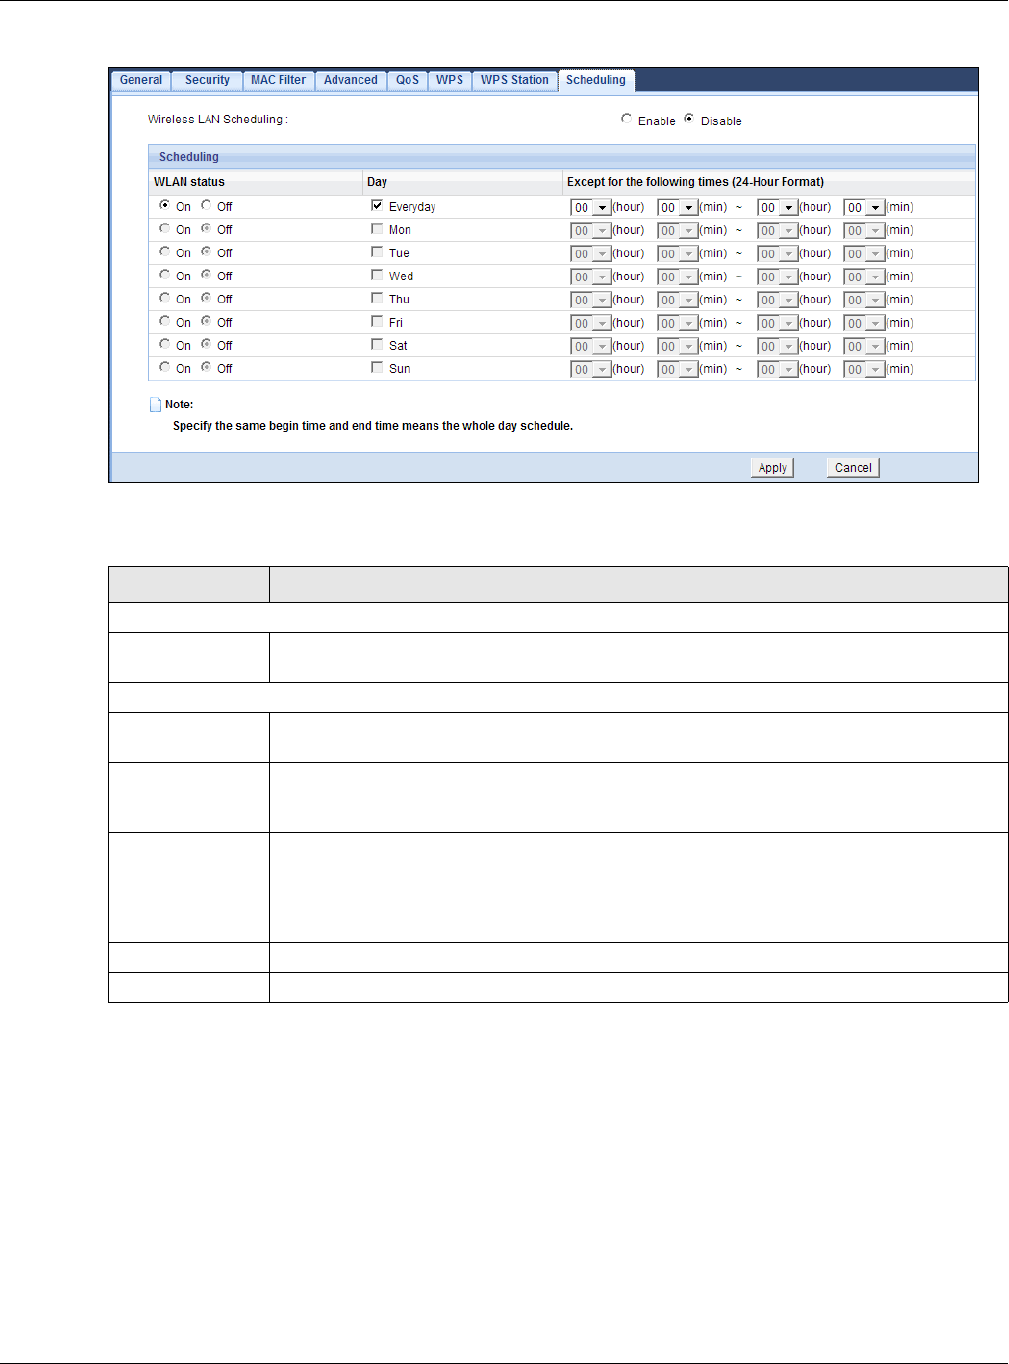
Chapter 9 Wireless LAN
WRE6505 User’s Guide
62
Figure 48 Network > Wireless LAN (2.4/ 5G) > Scheduling
The following table describes the labels in this screen.
Table 24 Network > Wireless LAN (2.4/ 5G) > Scheduling
LABEL DESCRIPTION
Wireless LAN Scheduling
Enable Wireless
LAN Scheduling
Select this to enable Wireless LAN scheduling.
Scheduling
WLAN Status Select On or Off to specify whether the Wireless LAN is t urned on or off. This field works
in conjunct ion with t he Da y and For t he follow ing t im es fields.
Day Select Eve ryda y or the specific days to turn the Wireless LAN on or off. I f you select
Eve ryda y you can not select any specific days. This field works in conjunction with the
For t he follow ing t im es field.
For the following
tim es (24-Hour
For m at )
Select a begin time using t he first set of hour and m inute (m in) drop down boxes and
select an end time using the second set of h our and m inute (m in) drop down boxes. I f
you have chosen On earlier for the WLAN Status the Wireless LAN will turn on between
the two tim es you enter in these fields. I f you have chosen Off earlier for the WLAN
Status the Wireless LAN will turn off between the two times you enter in these fields.
Apply Click Apply to save your changes back to the WRE6505.
Cancel Click Can ce l to reload the previous configuration for this screen.
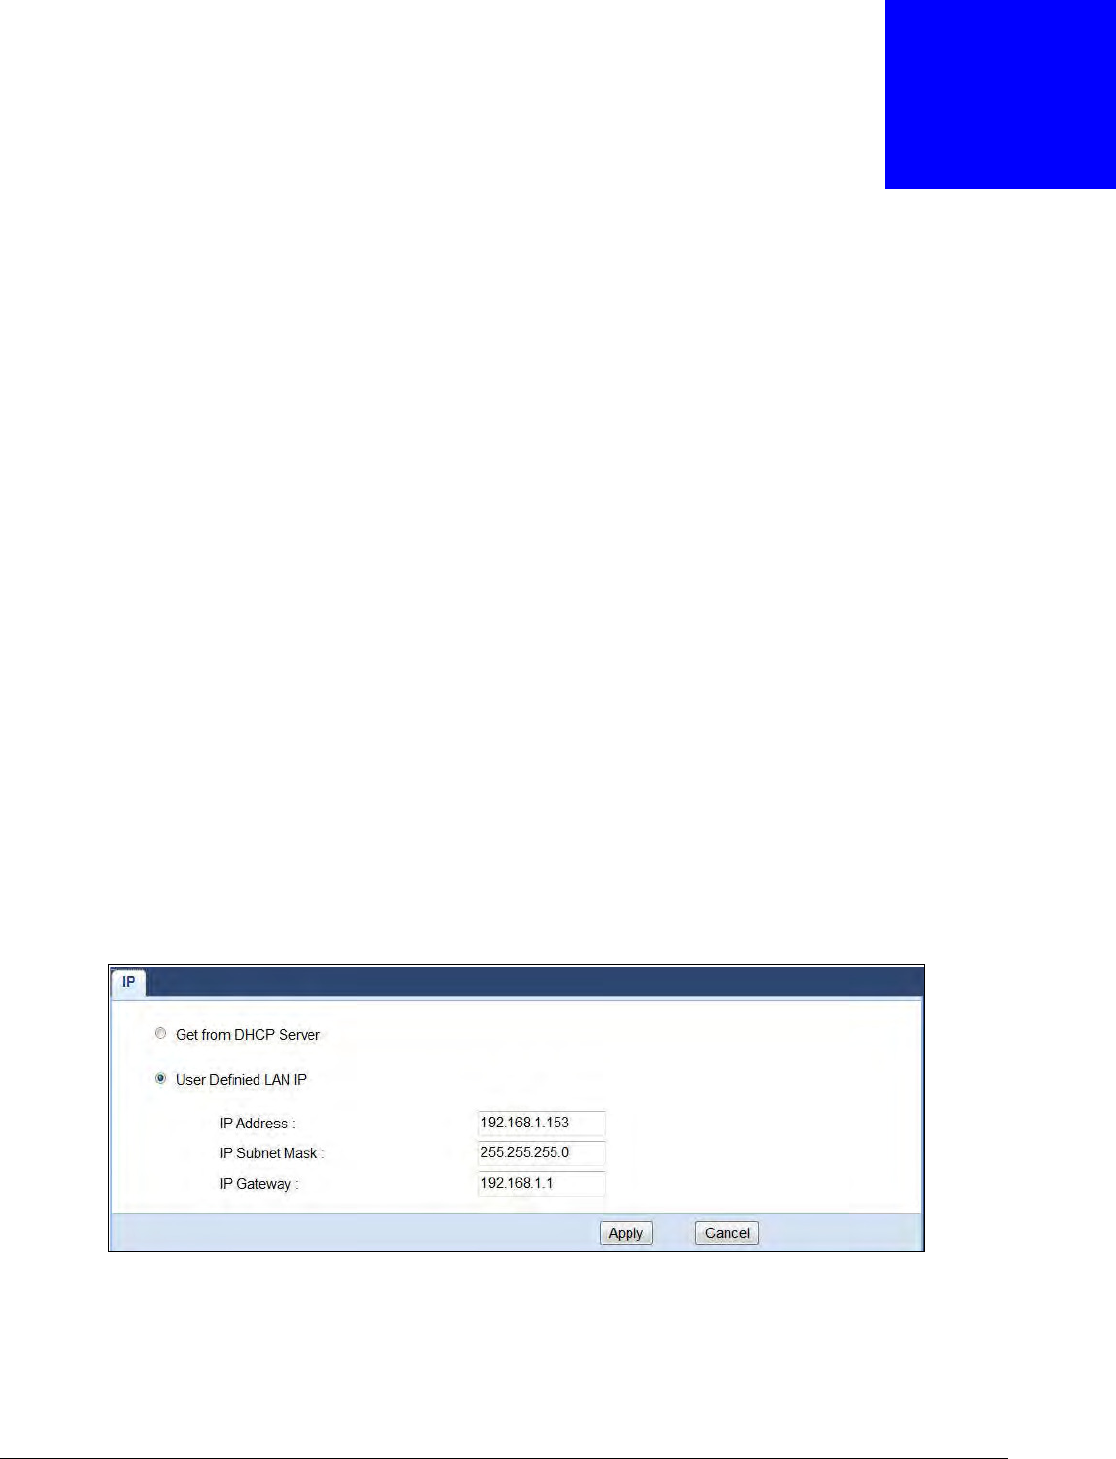
WRE6505 User’s Guide
63
CHAPTER 10
LAN
10.1 Overview
This screen allows you to assign the WRE6505 a fixed or dynam ic I P address. The default I P
address is 192.168.1.2. I n initial configuration, the WRE6505 acts as a DHCP server, so it can
assign your computer an IP address in the same network range as the default I P. After the
WRE6505 connects to an AP, the DHCP server function is disabled and your computer gets its I P
from the AP. I f the AP connection is dropped, connect to the WRE6505 again using the default
dom ain nam e, http: / / zyxelsetup. The MAC address can be found on a label on the product.
10.2 What You Need To Know
The LAN param eters of the WRE6505 are preset in the factory with the following values:
• I P address of 192.168.1.2 with subnet m ask of 255.255.255.0 (24 bits)
10.3 LAN IP Screen
Use this screen to change your basic LAN settings. Click N e t w or k > LAN .
Figure 49 Network > LAN > IP

Chapter 10 LAN
WRE6505 User’s Guide
64
The following table describes the labels in this screen.
Table 25 Network > LAN > I P
LABEL DESCRIPTION
Get from DHCP
Server
Select this to have the WRE6505 get a dynamic I P address from a DHCP server.
User Defined LAN
IP
Click this to enable the m anual I P configuration.
I P Address Enter the I P address of your WRE6505 in dotted decim al notation 192.168.1.2 (factory
default).
IP Subnet Mask Enter the subnet m ask of your WRE6505 in dotted decim al notation.
IP Gat eway Enter the gateway of your WRE6505 in dotted decimal notation.
Apply Click Apply to save your changes back to the WRE6505.
Cancel Click Can ce l to reload the previous configuration for this screen.

WRE6505 User’s Guide
65
CHAPTER 11
System
11.1 Overview
This chapter provides inform ation on the System screen.
11.2 What You Can Do
Use the Pa ssw or d screen to set the password (Section 11.4 on page 66).
Use the Fir m w are Upgra de screen to update firm ware (Section 11.5 on page 66).
Use the Backup/ Rest or e screen to backup and restore device configurations (Section 11.6 on
page 68).
Use the Langu age screen to select the interface display language (Section 11.7 on page 70).
Use the System M ode screen to select the WPS behavior (Section 11.8 on page 70).
11.3 General
Use this screen to set the system and dom ain nam es. Click M a in t en a nce > Gen era l. The following
screen displays.
Figure 50 Maintenance > General
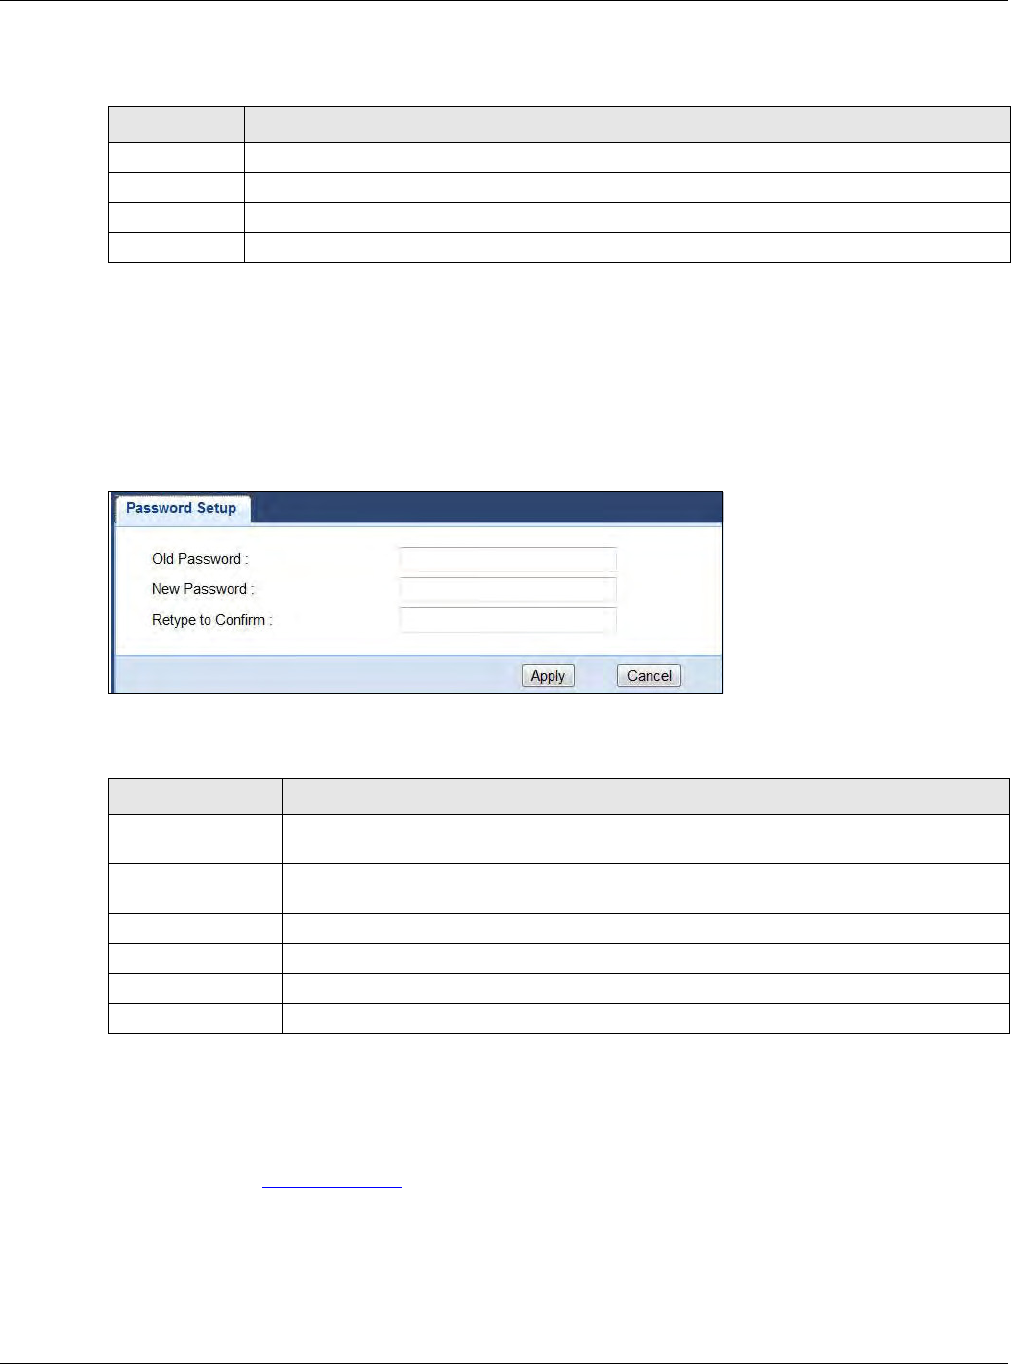
Chapter 11 System
WRE6505 User’s Guide
66
The following table describes the labels in this m enu.
11.4 System Password Screen
Use this screen to set the web configurator password. Click M a int e na nce > Sy st e m . The following
screen displays.
Figure 51 Maintenance > Password
The following table describes the labels in this screen.
11.5 Firmware Upgrade Screen
Find firm ware at www.zyxel.com in a file that (usually) uses the system m odel name with a “* .bin”
extension, e.g., “WRE6505.bin”. The upload process uses HTTP (Hypertext Transfer Protocol) and
may take up to two m inutes. After a successful upload, the system will reboot.
Click M a inten ance > Firm w a r e Upgr a de . Follow the instructions in this screen to upload
firmware to your WRE6505.
Table 26 Maintenance > General
LABEL DESCRIPTION
System Name Type the name used to designate the system.
Dom ain Nam e Type the dom ain nam e used to designate the system.
Apply
Cancel
Table 27 Maintenance > System > Password
LABEL DESCRIPTION
Old Password Type the default password or the existing password you use to access the system in this
field.
New Password Type your new system password ( up to 30 characters). Note that as you type a
password, the screen displays an asterisk (* ) for each character you type.
Retype to Confirm Type the new password again in this field.
Apply Click Apply to save your changes back to the WRE6505.
Reset Click Re se t to begin configuring this screen afresh.
Cancel
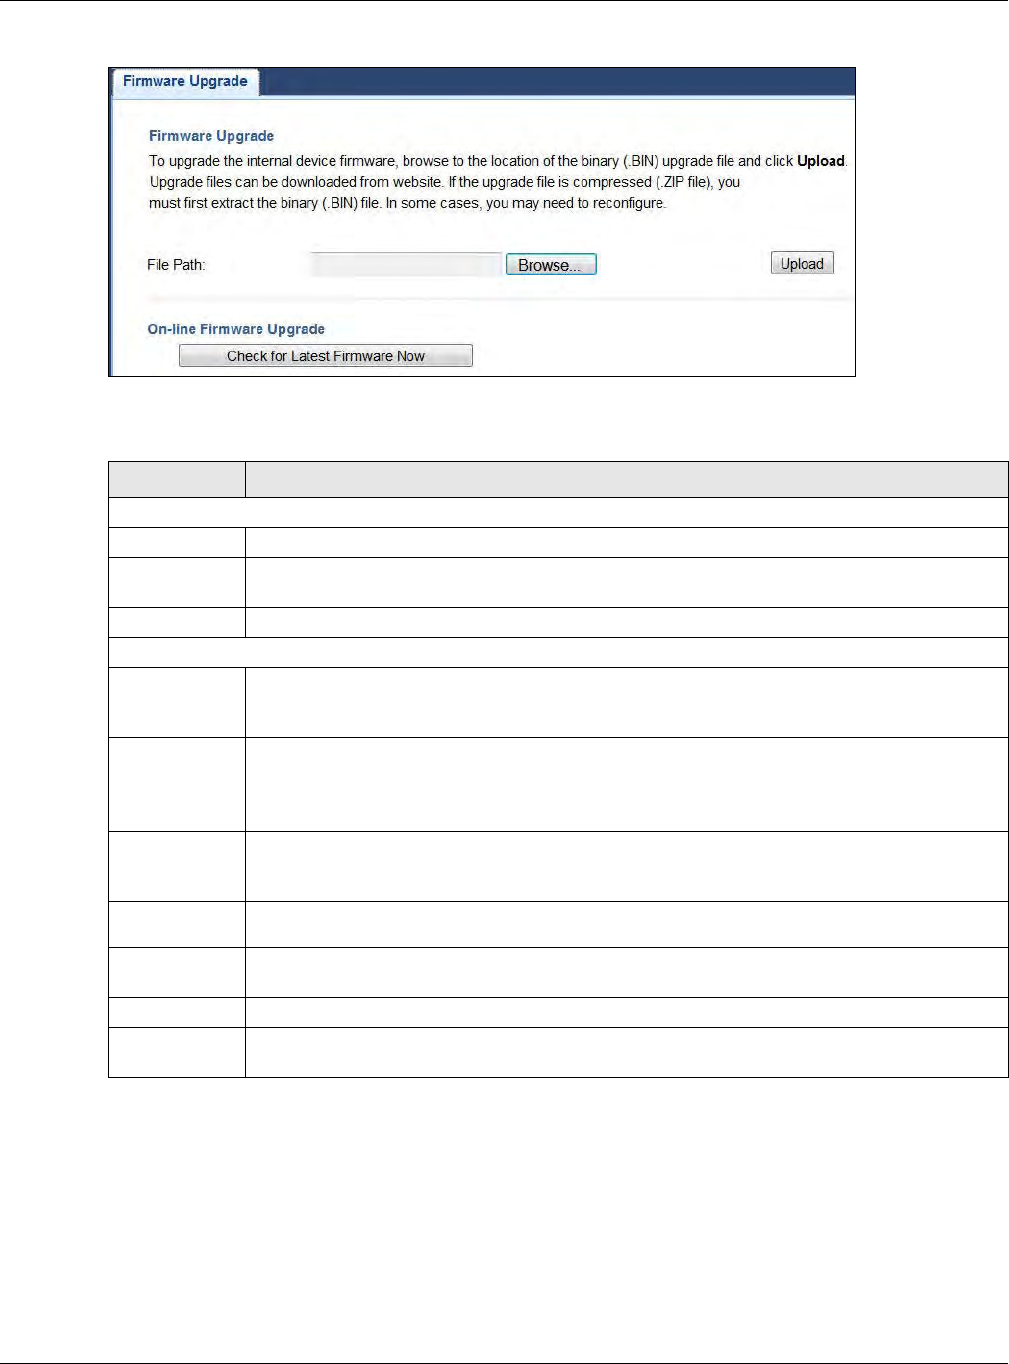
Chapter 11 System
WRE6505 User’s Guide
67
Figure 52 Maintenance > Firm ware Upgrade
The following table describes the labels in this screen.
Note: Do not turn off the WRE6505 while firmware upload is in progress!
After you see the Fir m w are Upgrading screen, wait until the upgrade process is complete.
Table 28 Maintenance > Firmware Upgrade
LABEL DESCRIPTION
Firm ware Upgrade
File Path Type in the location of the file you want to upload in this field or click Brow se... to find it.
Browse... Click Brow se... to find the .bin file you want to upload. Rem em ber that you m ust
decom press compressed (.zip) files before you can upload t hem.
Upload Click Upload to begin the upload process. This process m ay t ake up to two m inut es.
On- line Firm ware Upgrade
Check for
Latest
Firm ware Now
The following fields display when you click t his button.
You ar e
currently
using
firm ware
version:
The firm ware version consists of the trunk version num ber, model code, and release num ber.
For exam ple, V1.00(AAAG.5) m eans V1.00 is t he trunk num ber, AAAG represents WRE6505,
and 5 m eans the fifth release.
The Lat est
Firmware
Ver sion
Com pare the release num ber in the previous field with the release num ber in this one to see
if you have the latest firm ware. I n this exam ple, V1.00(AAAG.5), the num bers are the sam e
(5), so t he WRE6505 already has the latest firmware.
Release
Date The date the firm ware was issued is shown in year-month-date form at.
Release
Not e The release note shows what has changed (new features, bug fixes, known issues) in t his
firm ware version. Check the Release Not e before deciding to use new firm ware.
Size This is the size of the firm ware in bytes. 15073234 is about 15 MB.
Do_Firm ware_
Upgrade
Click this button to download and upgrade the new firm ware to the WRE6505.
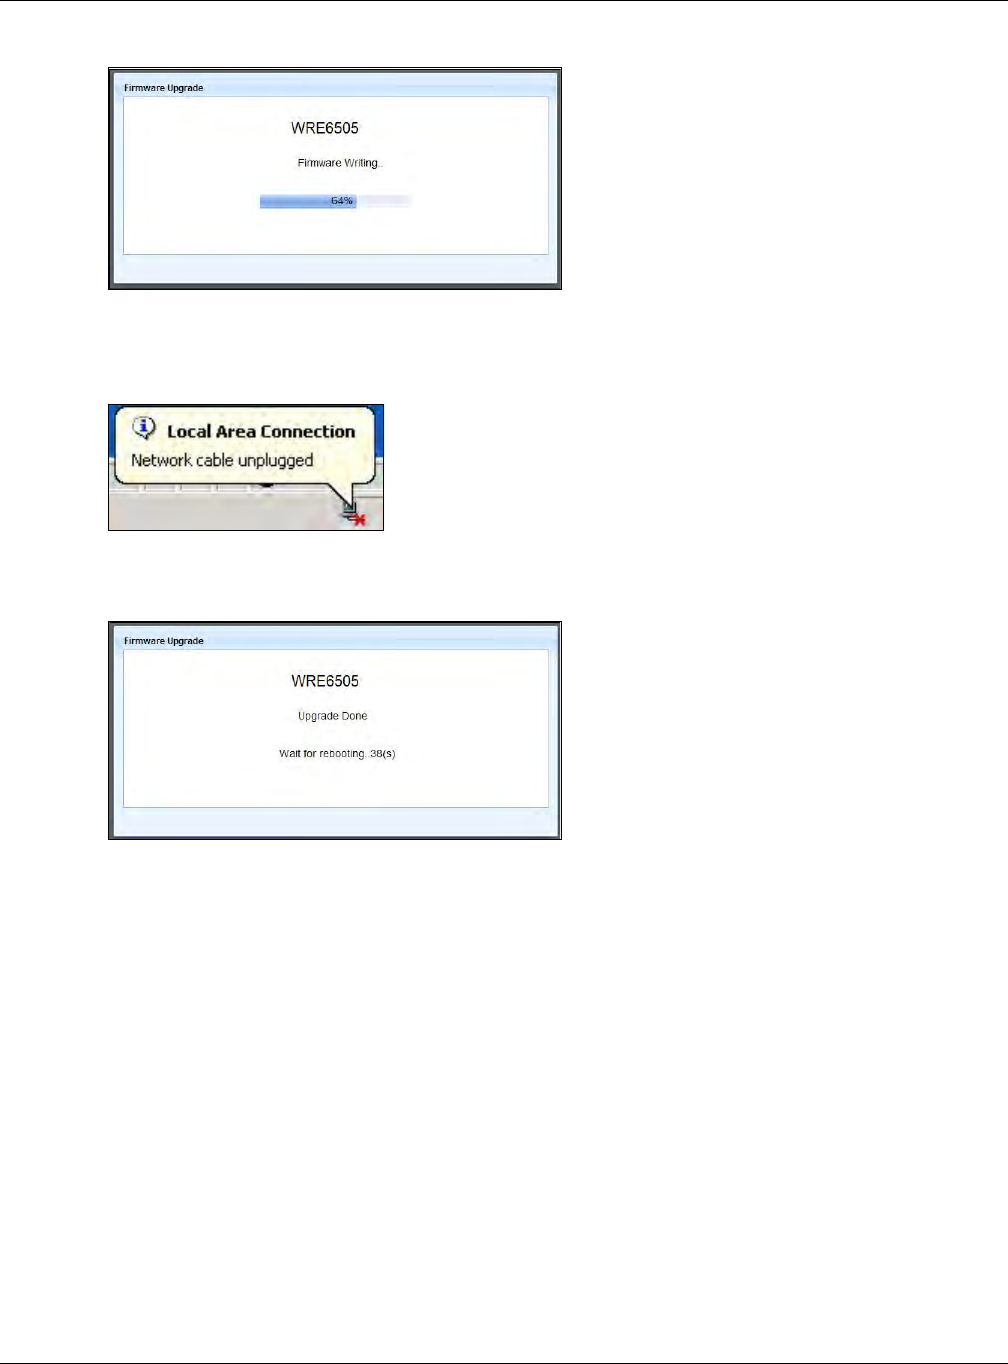
Chapter 11 System
WRE6505 User’s Guide
68
Figure 53 Firm ware Upgrading
The WRE6505 automatically restarts in this tim e causing a temporary network disconnect. I n some
operating systems, you m ay see the following icon on your desktop.
Figure 54 Network Temporarily Disconnected
After the WRE6505 restarts, the Upgra de Accom plishe d screen appears.
Figure 55 Upgrade Accomplished
Refresh the web page and log in again and check your new firm ware version in the St a t us screen.
11.6 Backup / Restore Screen
Click M a inten ance > Ba cku p/ Rest ore. I nform ation related to factory defaults, backup
configuration, and restoring configuration appears as shown next.
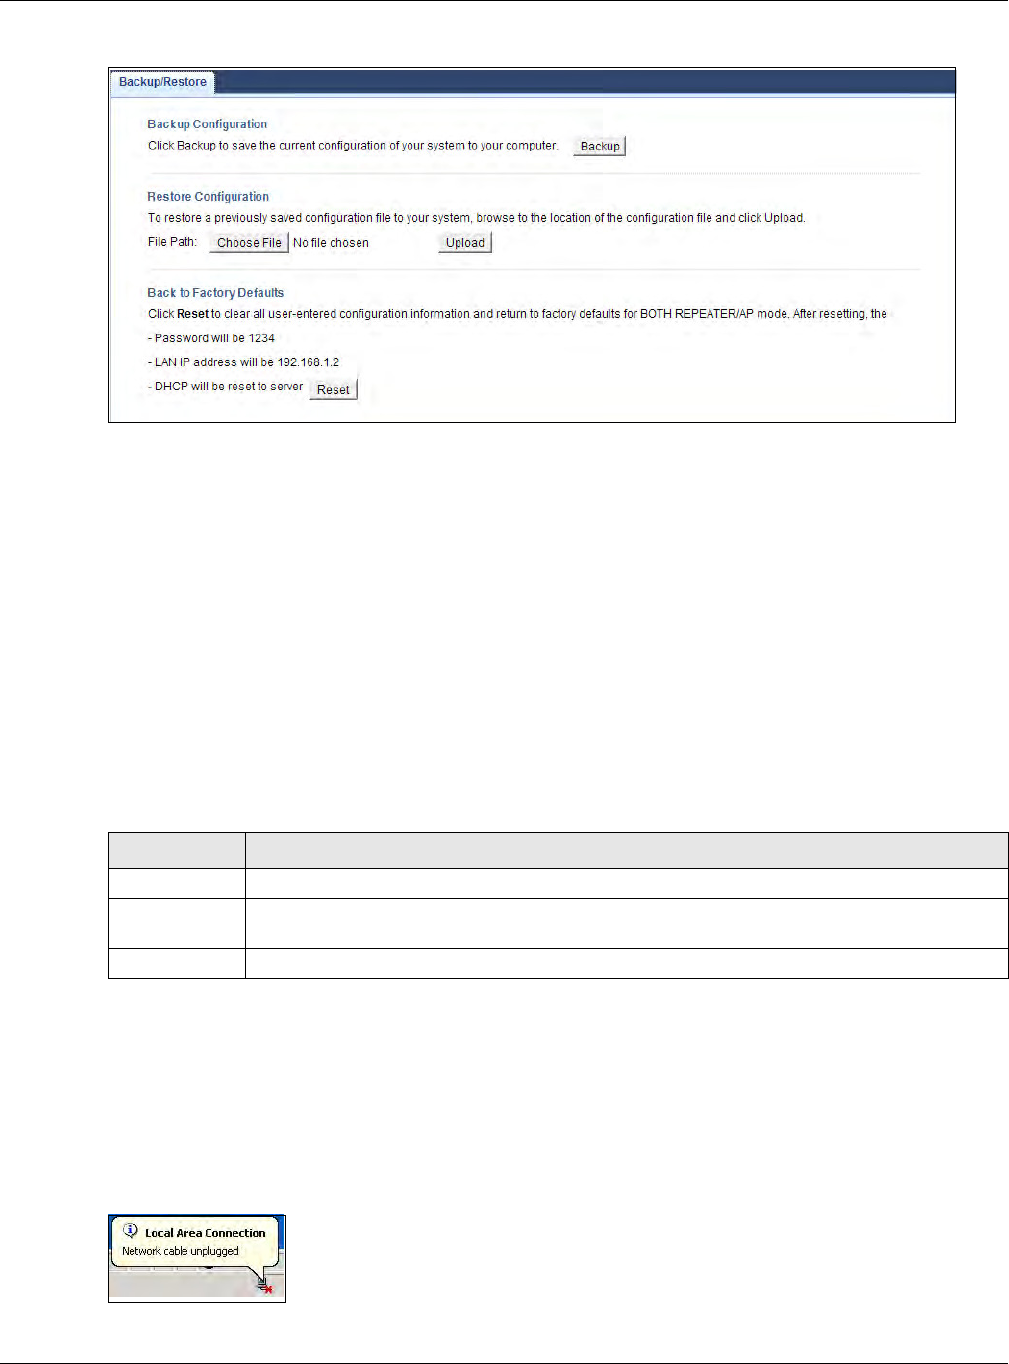
Chapter 11 System
WRE6505 User’s Guide
69
Figure 56 Maintenance > Backup/ Restore
11.6.1 Backup Configuration
Backup configuration allows you to back up (save) the WRE6505’s current configuration to a file on
your computer. Once your WRE6505 is configured and functioning properly, it is highly
recom m ended that you back up your configuration file before m aking configuration changes. The
backup configuration file will be useful in case you need to return to your previous settings.
Click Ba ckup to save the WRE6505’s current configuration to your computer.
11.6.2 Restore Configuration
Restore configuration allows you to upload a new or previously saved configuration file from your
com puter to your WRE6505.
Note: Do not turn off the WRE6505 while configuration file upload is in progress.
After you see a “configuration upload successful” screen, you m ust then wait one m inute before
logging into the WRE6505 again.
The WRE6505 automatically restarts in this tim e causing a temporary network disconnect. I n some
operating systems, you m ay see the following icon on your desktop.
Figure 57 Temporarily Disconnected
Table 29 Maintenance Restore Configuration
LABEL DESCRIPTION
File Path Type in the location of the file you want to upload in this field or click Brow se... to find it.
Browse... Click Brow se... to find the file you want to upload. Rem ember t hat you m ust decom press
com pressed (.ZI P) files before you can upload them.
Upload Click Upload to begin the upload process.
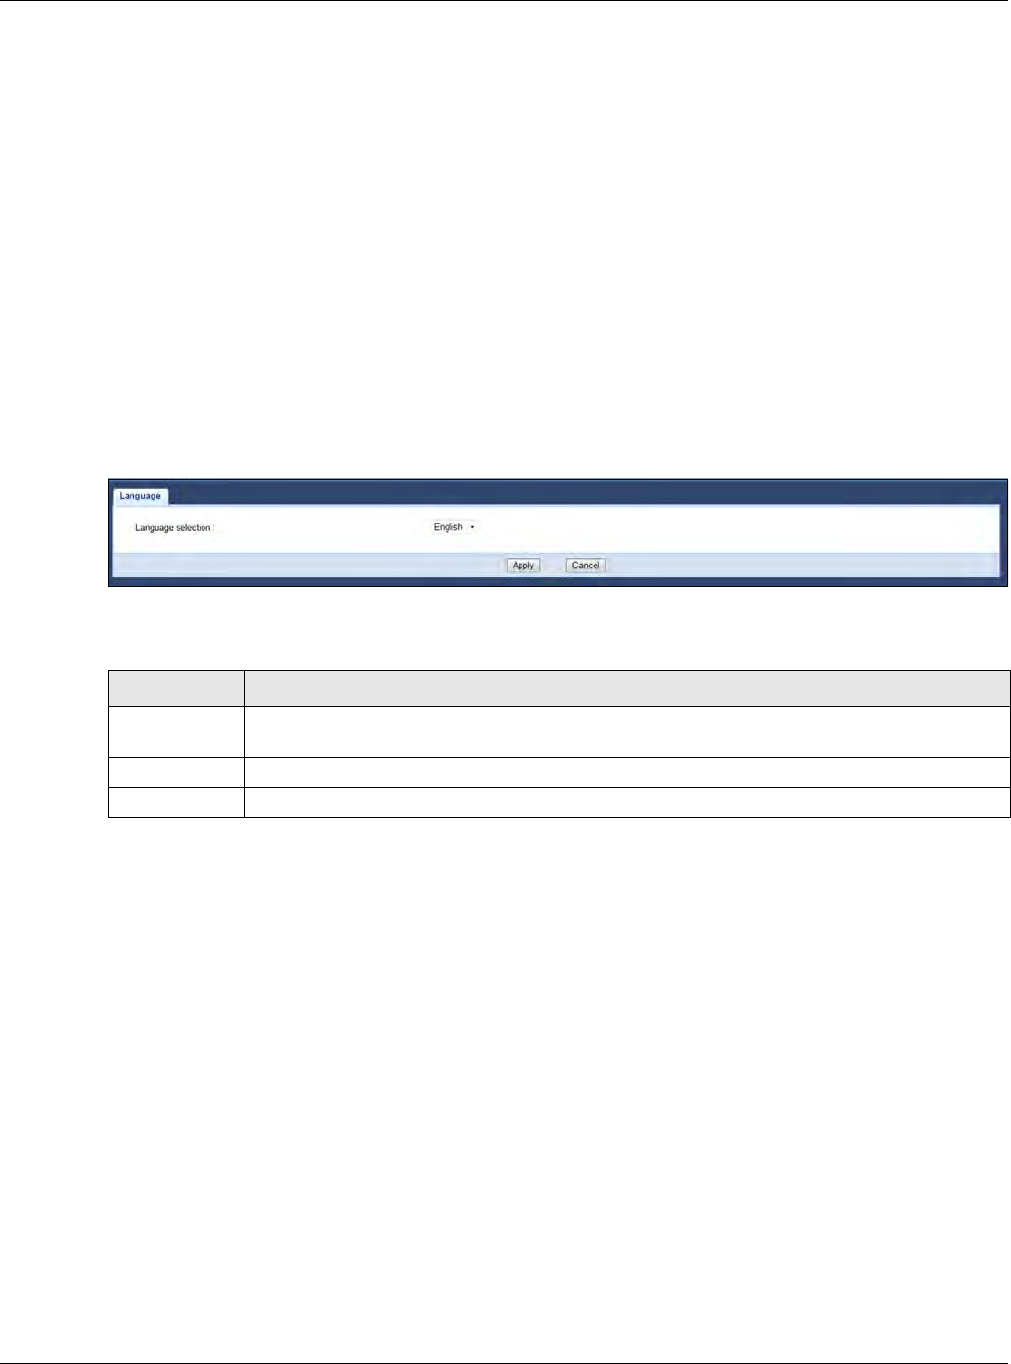
Chapter 11 System
WRE6505 User’s Guide
70
If you uploaded the default configuration file you may need to change the I P address of your
com puter to be in the same subnet as that of the default WRE6505 I P address ( 192.168.1.2). Refer
to your operating system’s help files for details on how to set up your computer’s IP address.
11.6.3 Restore to Factory Defaults
Pressing the W PS button ( see Section 1.4 on page 12) on the front panel for m ore than 10 seconds
resets the factory defaults of your WRE6505. Refer to Section 1.4 on page 12 for m ore inform ation
on the resetting the WRE6505.
11.7 Language
Click Maintenance > Language to select the language for use in the user interface.
Figure 58 Maintenance > Language
The following table describes the labels in this m enu.
11.8 System Mode
For further inform ation on System Mode see Section 2.1.1 on page 13.
Table 30 Maintenance > Language
LABEL DESCRIPTION
Language
selection
Click the drop-down menu to select the display language.
Apply Click Apply to save your changes back to the WRE6505.
Cancel Click Ca ncel to reload the previous configuration for this screen.
Chapter 11 System
WRE6505 User’s Guide
71
Figure 59 Maintenance > System Mode
The following table describes the labels in this m enu.
11.8.1 System WPS Behavior
In Universal Repeater m ode (see Chapter 2 on page 14), you can select the type of WPS behavior:
Normal Mode, Range Boost, or Speed Boost m ode.
The device enables you to extend the range of your dual-band router to eliminate "dead spots" in
your wireless network. You can choose from normal m ode, range boost, or speed boost m odes for
both your 2.4GHz and 5GHz networks.
The following terms are used to describe the WPS behavior:
• Up: The connection from the WRE6505 to the Router
• Down: The connection from the WRE6505 to a client
Table 31 Maintenance > System Mode
LABEL DESCRIPTION
Norm al m ode The default WPS behavior, both 2.4 GHz and 5 GHz bands are supported in up and down
broadcasting.
Range boost
mode
Select to set t he device to Range Boost m ode- - the 2.4 GHz band is supported on the Down
behavior, while the 5 GHz band is support ed on the Up behavior.
Speed boost
mode
Select to set the device to Range Boost m ode- - the 5 GHz band is supported on the Down
behavior, while the 2.4 GHz band is supported on the Up behavior.
Apply Click Apply to save your changes back to the WRE6505.
Cancel Click Ca ncel to reload the previous configuration for this screen.
Chapter 11 System
WRE6505 User’s Guide
72
Figure 60 Normal Mode with Up and Down Broadcasting
• Home wireless network: 2.4G SSID = Home2.4G_2.4GEXT; 5G SSI D = Home5G_5GEXT.
• Work wireless network: 2.4G SSID = Work2.4G_2.4GEXT; 5G SSI D = Work5G_5GEXT.
• No profile: There is no currently defined profile.
The following section describes the Norm al, Range Boost, and Speed Boost m ode (WPS) behaviors
in a hom e and work network connection.
As connection profiles are established, the WRE6505 maintains a record of the varying profiles and
autom atically joins the network when in range.
Note: The hom e wireless network is the initial setup environm ent. The WRE6505 does not
have any established network profiles at the time of initial setup.
11.8.1.1 Normal Mode
In norm al m ode, both Down and Up WPS behaviors are supported for both 2.4 GHz and 5 GHz
bands.
Figure 61 Maintenance > System Mode> Norm al m ode
Universal
Repeater
Client
Up
Router
Down
Universal
Repeater
Client
2.4 GHz / 5 GHz
Up
2.4 GHz / 5 GHz
Down
Chapter 11 System
WRE6505 User’s Guide
73
The following table describes the labels in the previous screen.
11.8.1.2 Range Boost Mode
In range boost m ode, the 2.4 GHz band is supported on the Down behavior, while the 5 GHz band is
supported on the Up behavior.
Figure 62 WPS Behavior: Range Boost Mode
Table 32 WPS Behavior: Normal Mode
HOME WIRELESS NETWORK WORK WIRELESS NETWORK
WPS BAND UP DOWN UP DOWN
2.4 GHz No profile
(I nitial Setup)
No profile
(I nitial Setup)
Work1 Work1_2.4GEXT
No profile No profile No profile Work2_2.4GEXT
Hom e1 Hom e1_2.4GEXT Work3 Work3_2.4GEXT
no profile no profile No profile Work4_2.4GEXT
Hom e1 Hom e1_2.4GEXT Work3 Work3_2.4GEXT
Hom e1 Hom e1_2.4GEXT Work1 Work1_2.4GEXT
5 GHz No profile
(I nitial Setup)
No profile
(I nitial Setup)
No profile Work1_5GEXT
No profile No profile Work2_5GEXT Work2_5GEXT
No profile No profile No profile Work3_5GEXT
Hom e2 Home2_5GEXT Work4 Work4_5GEXT
Hom e2 Home2_5GEXT Work2_5GEXT Work2_5GEXT
Hom e2 Home2_5GEXT Work4 Work4_5GEXT
Universal
Repeater
Client
2.4 GHz
Up
5 GHz
Down
Chapter 11 System
WRE6505 User’s Guide
74
The following table describes the labels in the previous screen.
11.8.1.3 Speed Boost Mode
In speed boost mode, the 5 GHz band is supported on the Down behavior, while the 2.4 GHz band
is supported on the Up behavior.
Figure 63 WPS Mode: Speed Boost Mode
The following table describes the labels in the previous screen.
Table 33 WPS Behavior: Range Boost Mode
HOME WIRELESS NETWORK WORK WIRELESS NETWORK
WPS BAND UP DOWN UP DOWN
2.4 GHz No profile
(Initial Setup)
No profile
(Initial Setup)
Work1 Off
Hom e1 Hom e1_2.4GEXT Work3 Off
No profile Home2_2.4GEXT Work3 Off
Hom e1 Hom e1_2.4GEXT Work3 Off
5 GHz No profile
(Initial Setup)
No profile
(Initial Setup)
No profile Work1_5GEXT
Hom e2 Hom e2_5GEXT Work2 Work3_5GEXT
Hom e2 Hom e2_5GEXT Work2 Work3_5GEXT
No profile No profile No profile Work3_5GEXT
Table 34 WPS Mode: Speed Boost Mode
HOT SPOT 1 (HOME) HOT SPOT 2 (WORK)
WPS BAND UP DOWN UP DOWN
2.4 GHz No profile
(Initial Setup)
No profile
(Initial Setup)
No profile Work2_2.4GEXT
Hom e1 Hom e1_2.4GEXT Work1 Work4_2.4GEXT
No profile Hom e2_2.4GEXT No profile Work4_2.4GEXT
Hom e1 Hom e1_2.4GEXT Work1 Work3_2.4GEXT
Universal
Repeater
Client
5 GHz
Up
2.4 GHz
Down

Chapter 11 System
WRE6505 User’s Guide
75
5 GHz No profile
(Initial Setup)
No profile
(Initial Setup)
Work2 Off
Hom e2 Hom e2_5GEXT Work4 Off
Hom e2 Hom e2_5GEXT Work4 Off
No profile No profile Work3 Off
Table 34 WPS Mode: Speed Boost Mode (continued)
HOT SPOT 1 (HOME) HOT SPOT 2 (WORK)
WPS BAND UP DOWN UP DOWN

WRE6505 User’s Guide
76
CHAPTER 12
Troubleshooting
This chapter offers some suggestions to solve problems you m ight encounter. The potential
problems are divided into the following categories.
•Power, Hardware Connections, and LEDs
•WRE6505 Access and Login
•Internet Access
•Resetting the WRE6505 to I ts Factory Defaults
•Wireless Problem s
12.1 Power, Hardware Connections, and LEDs
The WRE6505 does not turn on. None of the LEDs turn on.
1Make sure the WRE6505 is plugged in to an appropriate power source. Make sure the power source
is turned on.
2Disconnect and re- connect the power adaptor or cord to the WRE6505.
3If the problem continues, contact the vendor.
One of the LEDs does not behave as expected.
1Make sure you understand the normal behavior of the LED. See Section 1.3 on page 10.
2Make sure you understand how the LEDs are enabled or disabled. See Section 1.3 on page 10.
3Check the hardware connections. See the Quick Start Guide.
4Inspect your cables for damage. Contact the vendor to replace any dam aged cables.
5Disconnect and re- connect the power adaptor to the WRE6505.
6If the problem continues, contact the vendor.

Chapter 12 Troubleshooting
WRE6505 User’s Guide
77
12.2 WRE6505 Access and Login
I don’t know the I P address of my WRE6505.
1Click St a rt > Ru n, enter cm d, and then enter Ping zyx elsetup.
2The default I P address is 1 9 2 .1 6 8 .1 .2 .
Note: I n Repeater m ode, you can access the login screen by using the I P address
(192.168.1.2) or by typing “http: / / zyxelsetup” in your browser I P address bar.
While in AP m ode, connect the WRE6505 to your router (configured under same
subnet) and type “http: / / zyxelsetup” in your browser I P address bar.
3If you changed the I P address and have forgotten it, you m ight get the I P address of the WRE6505
by looking up the I P address of the default gateway for your computer. To do this in m ost Windows
com puters, click St art > Run, enter cm d, and then enter ipconfig. The I P address of the Defau lt
Gat e w a y m ight be the I P address of the WRE6505 (it depends on the network), so enter this I P
address in your I nternet browser. Login (see the Quick Start Guide for instructions) and go to the
Device I nfor m a t ion table in the St a t u s screen. Your WRE6505’s IP address is available in the
Device I nfor m a t ion table.
• If the DHCP setting under LAN infor m a t ion is N on e , your device has a fixed I P address.
• If the DHCP setting under LAN inform ation is Client , then your device receives an I P
address from a DHCP server on the network.
4If your WRE6505 is a DHCP client, you can find your I P address from the DHCP server. This
information is only available from the DHCP server which allocates I P addresses on your network.
Find this inform ation directly from the DHCP server or contact your system administrator for m ore
information.
5Reset your WRE6505 to change all settings back to their default. This m eans your current settings
are lost. See Section 12.4 on page 80 in the Tr ou ble sh oot ing for inform ation on resetting your
WRE6505.
I forgot the usernam e and password.
1The default usernam e is a dm in and default password is 1 2 3 4 .
2If this does not work, you have to reset the device to its factory defaults. See Section 11.6.3 on
page 70.
I cannot see or access the Login screen in the Web Configurator.
1Make sure you are using the correct I P address.

Chapter 12 Troubleshooting
WRE6505 User’s Guide
78
• The default I P address is 192.168.1.2.
• If you changed the I P address, use the new I P address.
• If you changed the IP address and have forgotten it, see the troubleshooting suggestions for I
don’t know the I P address of my WRE6505.
2Check the hardware connections, and m ake sure the LEDs are behaving as expected. See the Quick
Start Guide.
3Make sure your I nternet browser does not block pop-up windows and has JavaScript and Java
enabled.
4Make sure your computer is in the same subnet as the WRE6505. (I f you know that there are
routers between your computer and the WRE6505, skip this step.)
• If there is a DHCP server on your network, make sure your computer is using a dynamic I P
address.
• If there is no DHCP server on your network, m ake sure your computer’s I P address is in the
sam e subnet as the WRE6505.
5Reset the device to its factory defaults, and try to access the WRE6505 with the default I P address.
6If the problem continues, contact the network adm inistrator or vendor, or try one of the advanced
suggestions.
Adva nce d Sugge st ions
• I f your computer is connected wirelessly, use a computer that is connect ed to a LAN /ETHERN ET
port.
I can see the Login screen, but I cannot log in to the WRE6505.
1Make sure you have entered the password correctly. The default usernam e is adm in and default
password is 1 2 3 4 . This field is case-sensitive, so m ake sure [ Caps Lock] is not on.
2This can happen when you fail to log out properly from your last session. Try logging in again after
5 m inutes.
3Disconnect and re- connect the power adaptor or cord to the WRE6505.
4If this does not work, you have to reset the device to its factory defaults. See Section 12.4 on page
80.
12.3 Internet Access
I cannot access the I nternet.

Chapter 12 Troubleshooting
WRE6505 User’s Guide
79
1Check the hardware connections, and m ake sure the LEDs are behaving as expected. See the Quick
Start Guide.
2Try to connect directly to the AP. I f you can access the I nternet, check that the WRE6505 has
associated with the AP by checking the W LAN STA I nfor m a t ion SSID field shows the SSID of the
AP. See Section 9.4 on page 55.
3If you are trying to access the I nternet wirelessly, m ake sure the wireless settings in the wireless
client are the same as the settings in the AP.
4Disconnect all the cables from your device, and follow the directions in the Quick Start Guide again.
5If the problem continues, contact your I SP.
I cannot access the I nternet anymore. I had access to the Internet ( with the WRE6505), but
my Internet connection is not available anymore.
1Check the hardware connections, and m ake sure the LEDs are behaving as expected. See the Quick
Start Guide and Section 1.3 on page 10.
2Reboot the WRE6505.
3Try to connect directly to the AP. I f you can access the I nternet, check that the WRE6505 has
associated with the AP by checking the W LAN STA I nfor m a t ion SSID field shows the SSID of the
AP. See Section 9.4 on page 55.
4If the problem continues, contact your I SP.
The I nternet connection is slow or intermittent.
1There m ight be a lot of traffic on the network. Look at the LEDs, and check Section 1.3 on page 10.
If the WRE6505 is sending or receiving a lot of inform ation, try closing some programs that use the
Internet, especially peer-to-peer applications.
2Check the signal strength. If the signal strength is low, try m oving the WRE6505 closer to the AP if
possible, and look around to see if there are any devices that might be interfering with the wireless
network ( for exam ple, m icrowaves, other wireless networks, and so on).
3Reboot the WRE6505.
4If the problem continues, contact the network adm inistrator or vendor, or try one of the advanced
suggestions.
Adva nce d Sugge st ion
• Check the settings for QoS. I f it is disabled, you m ight consider activating it.

Chapter 12 Troubleshooting
WRE6505 User’s Guide
80
12.4 Resetting the WRE6505 to Its Factory Defaults
If you reset the WRE6505, you lose all of the changes you have made. The WRE6505 re-loads its
default set tings, and the usernam e/ password resets to a dm in/1 2 3 4 . You have to m ake all of your
changes again.
You will lose all of your changes when you reset the WRE6505 to its factory defaults.
To reset the WRE6505,
1Make sure the power LED is on.
2Press the W PS button for longer than 10 seconds, the Power LED begins to blink, to set the
WRE6505 back to its factory-default configuration.
OR
3Click M a inten ance > Ba cku p/ Rest ore > Re st or e and then click Re set .
If the WRE6505 restarts automatically, wait for the WRE6505 to finish restarting, and log in to the
Web Configurator. The username is adm in and password is 1 2 3 4 .
If the WRE6505 does not restart automatically, disconnect and reconnect the WRE6505’s power.
Then, follow the directions above again.
12.5 Wireless Problems
I cannot access the WRE6505 or ping any computer from the WLAN.
1Make sure the wireless LAN is enabled on the WRE6505.
2Make sure the wireless adapter on the wireless station is working properly.
3Make sure the wireless adapter installed on your computer is I EEE 802.11 compatible and supports
the sam e wireless standard as the WRE6505.
4Make sure your computer (wit h a wireless adapter installed) is within the transmission range of the
WRE6505.
5Check that both the WRE6505 and your wireless station are using the sam e wireless and wireless
security settings, and that both the WRE6505 and the AP are using the sam e wireless and wireless
security settings.
6Make sure traffic between the WLAN and the LAN is not blocked by the MAC Address List of the
WRE6505. See Section 9.7 on page 57.

WRE6505 User’s Guide
81
APPENDIX A
Setting Up Your Computer’s IP Address
Note: Your specific WRE6505 m ay not support all of the operating system s described in
this appendix. See the product specifications for m ore inform ation about which
operating system s are supported.
This appendix shows you how to configure the I P settings on your computer in order for it to be
able to communicate with the other devices on your network. Windows Vista/ XP/ 2000, Mac OS 9/
OS X, and all versions of UNI X/ LI NUX include the software components you need to use TCP/ I P on
your com put er.
If you manually assign I P information instead of using a dynam ic I P, m ake sure that your network’s
com puters have I P addresses that place them in the same subnet.
In this appendix, you can set up an IP address for:
•Windows XP/ NT/ 2000 on page 81
•Windows Vista on page 85
•Windows 7 on page 89
•Mac OS X: 10.3 and 10.4 on page 93
•Mac OS X: 10.5 and 10.6 on page 96
•Linux: Ubuntu 8 (GNOME) on page 99
•Linux: openSUSE 10.3 (KDE) on page 103
Windows XP/NT/2000
The following example uses the default Windows XP display them e but can also apply to Windows
2000 and Windows NT.
1Click St a rt > Cont r ol Pa nel.
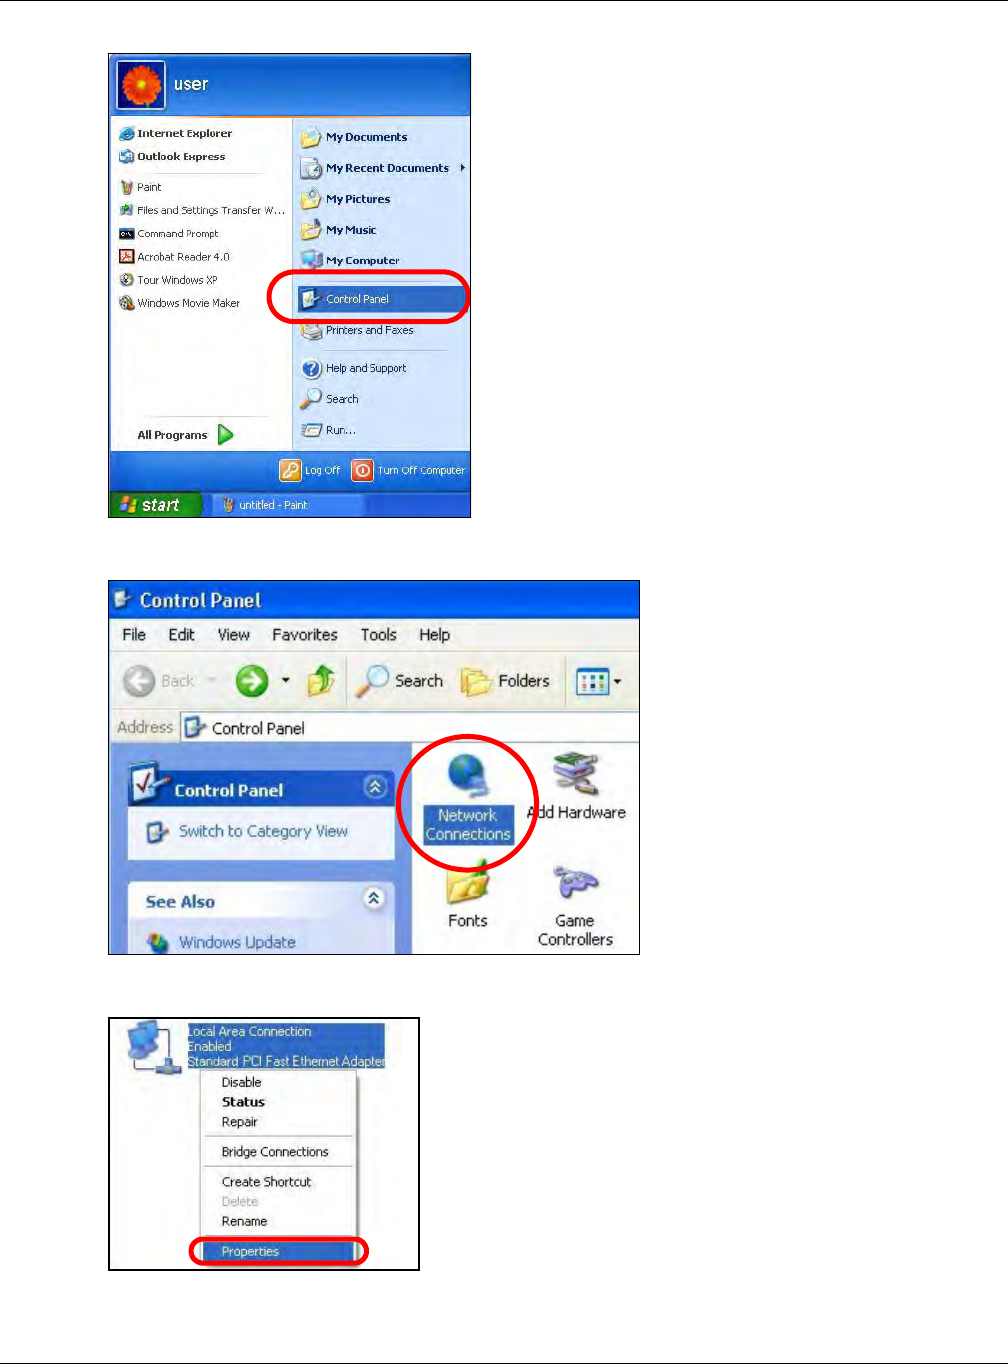
Appendix A Setting Up Your Computer’s IP Address
WRE6505 User’s Guide
82
2In the Control Panel, click the N etw ork Conn ect ions icon.
3Right- click Local Ar ea Conn ect ion and then select Pr ope r t ie s.
4On the Gen er al tab, select I nter ne t Prot ocol ( TCP/ I P) and then click Pr ope r t ie s.
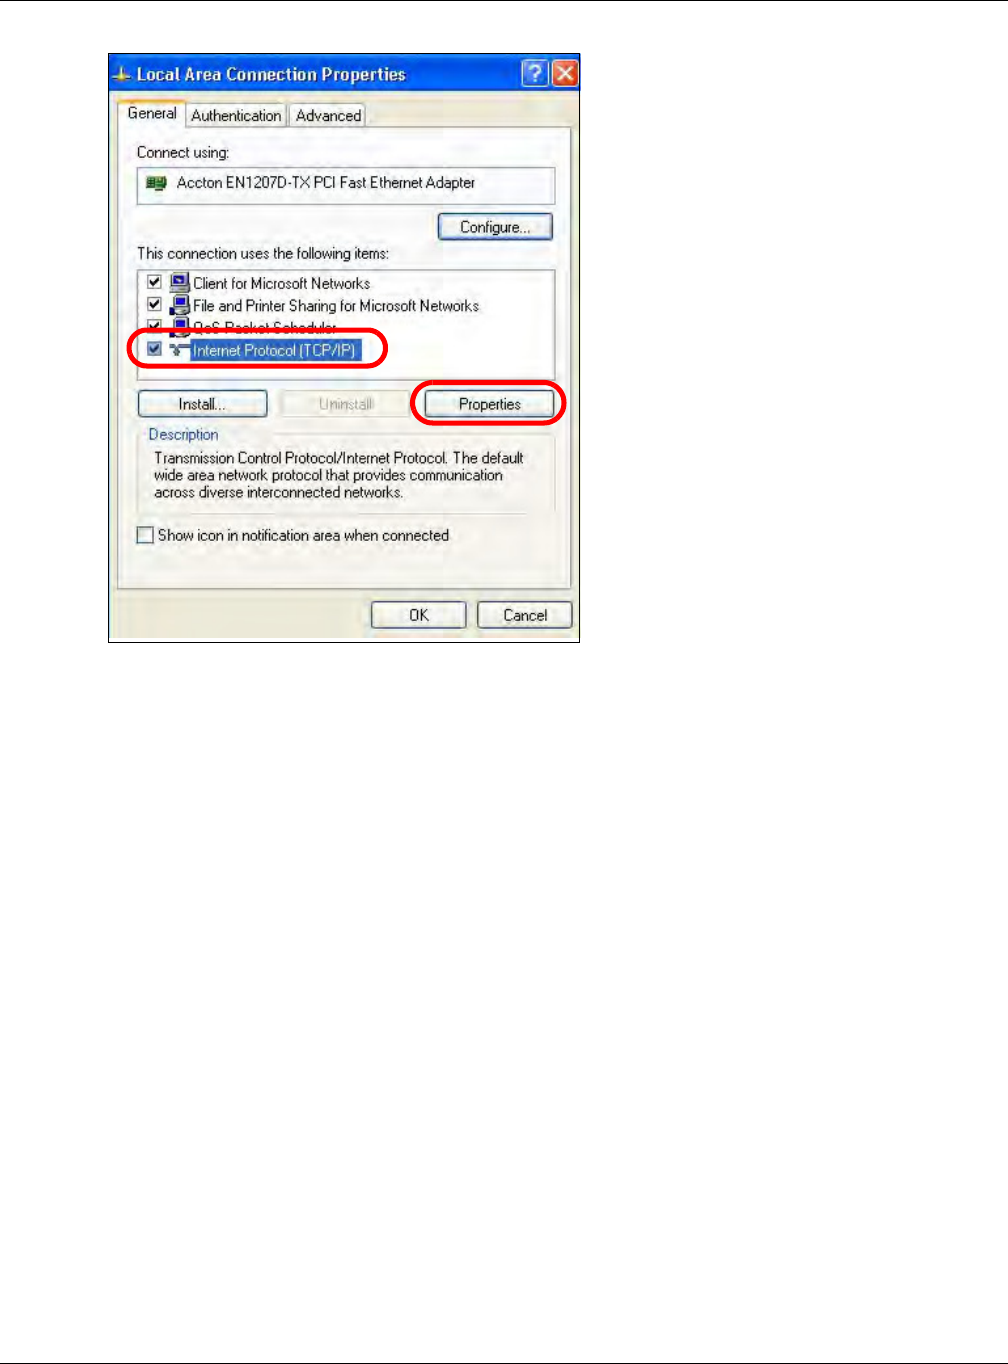
Appendix A Setting Up Your Computer’s IP Address
WRE6505 User’s Guide
83
5The I nt e rnet Pr ot ocol TCP/ I P Prope rties window opens.
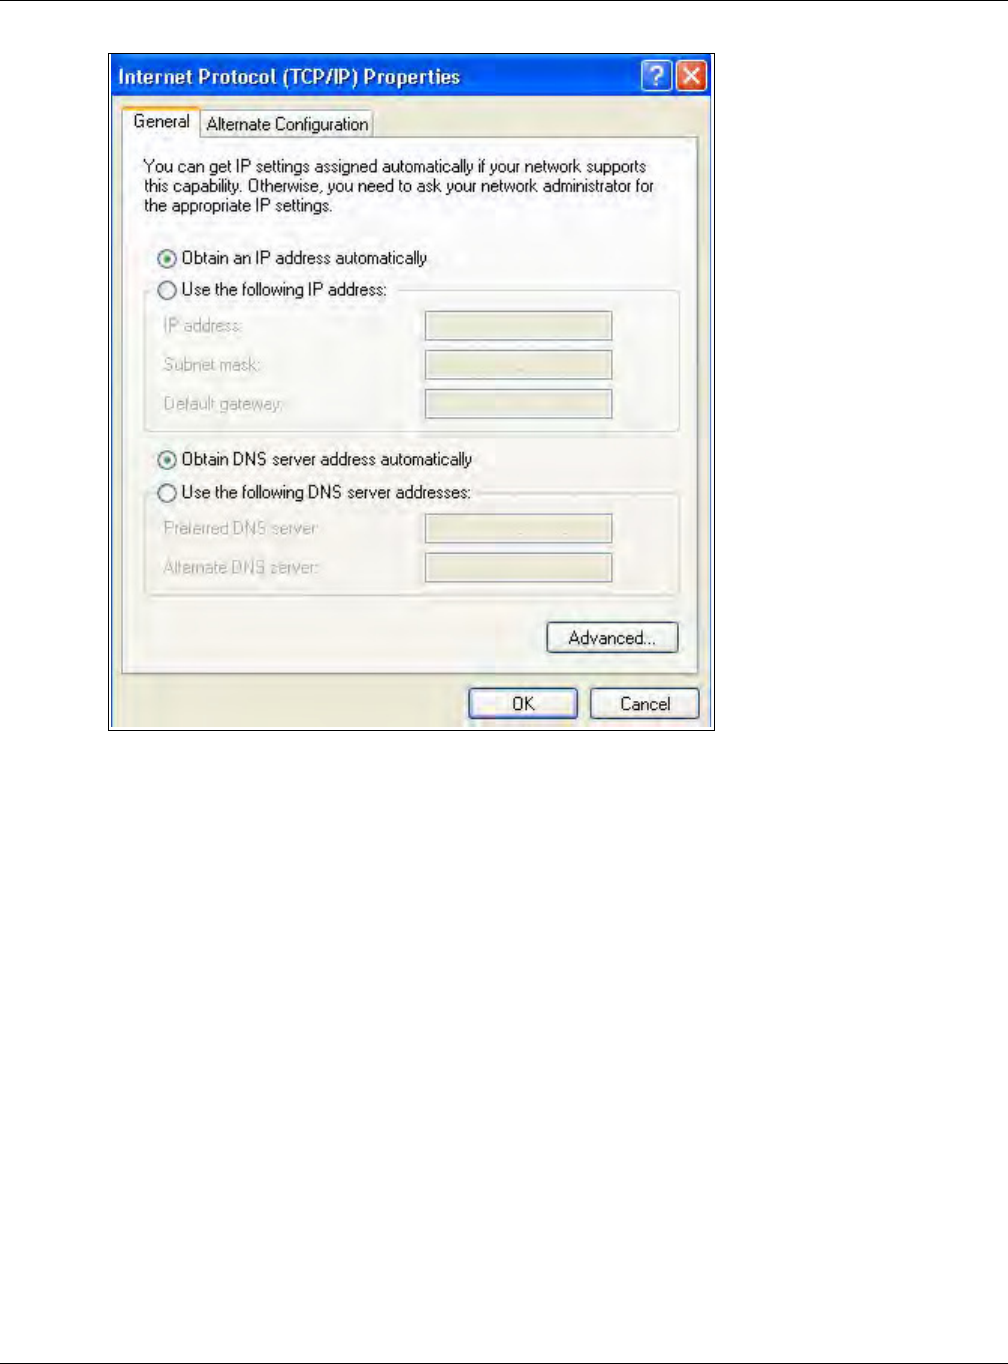
Appendix A Setting Up Your Computer’s IP Address
WRE6505 User’s Guide
84
6Select Obt a in a n I P a ddr ess a ut om atically if your network adm inistrator or I SP assigns your I P
address dynam ically.
Select Use t he follow ing I P Addr ess and fill in the I P a ddr e ss, Subnet m ask , and D efault
ga t e w a y fields if you have a static I P address that was assigned to you by your network
adm inistrator or I SP. You m ay also have to enter a Pre fe r red DNS ser ve r and an Alt e r n at e DNS
ser ve r, if that information was provided.
7Click OK to close the I nt e rnet Pr ot ocol ( TCP/ I P) Pr oper t ies window.
8Click OK to close the Local Ar ea Conn ect ion Pr opert ies window.
Verifying Settings
1Click St a r t > All Progr am s > Acce ssories > Com m and Pr om pt .
2In the Com m a nd Pr om pt window, type "ipconfig" and then press [ ENTER] .
You can also go to St a rt > Cont r ol Pa ne l > N etw ork Conn ect ions, right-click a network
connection, click St a t u s and then click the Suppor t tab to view your I P address and connection
information.
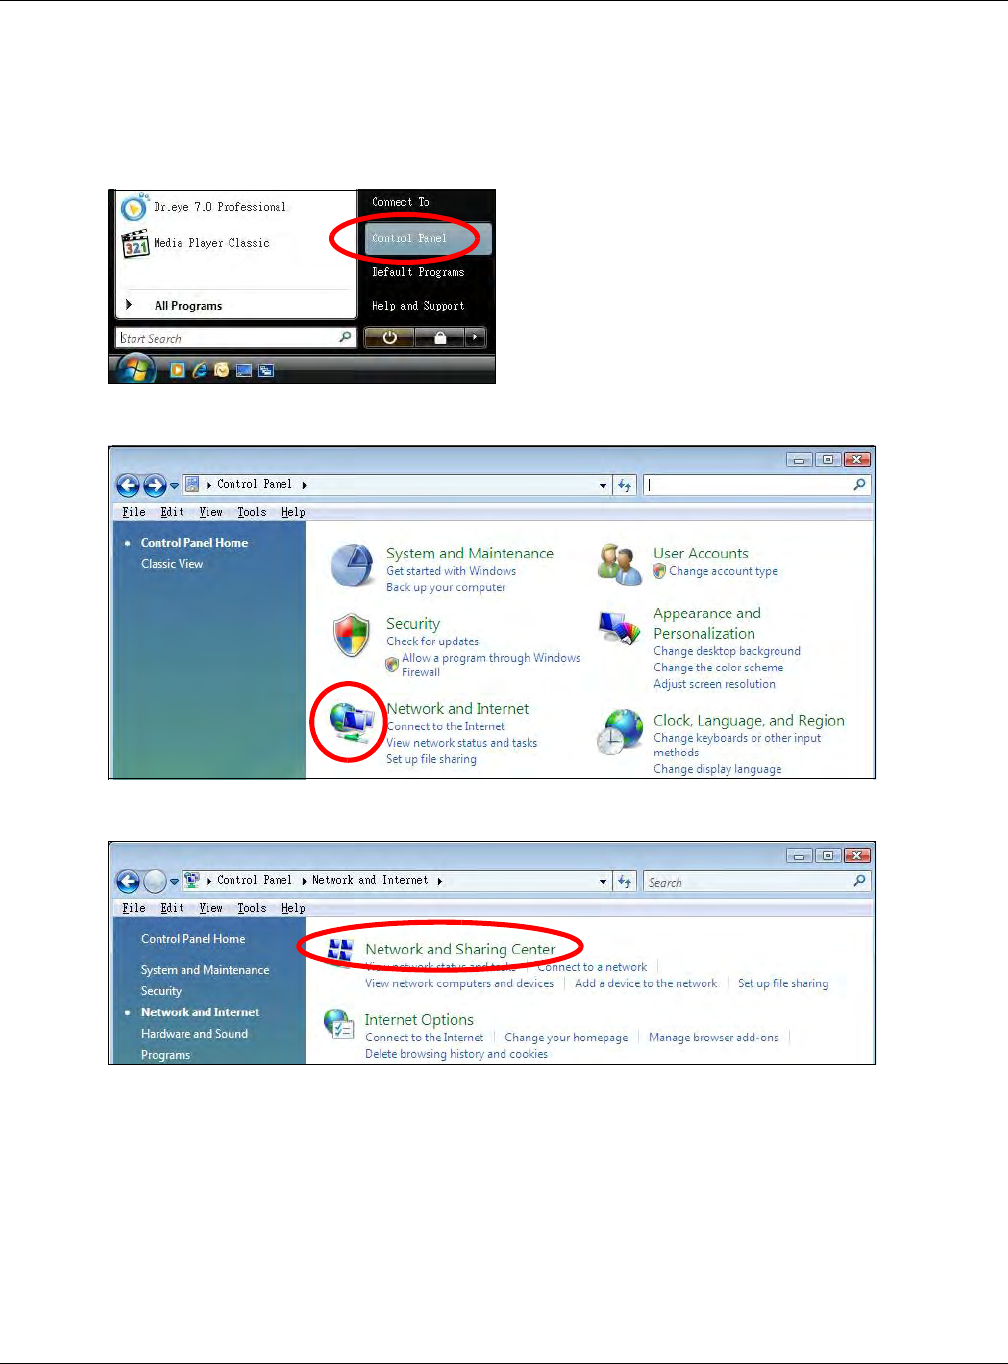
Appendix A Setting Up Your Computer’s IP Address
WRE6505 User’s Guide
85
Windows Vista
This section shows screens from Windows Vista Professional.
1Click St a r t > Control Pa nel.
2In the Control Panel, click the N etw ork and I nt e rnet icon.
3Click the N e t w or k and Sha ring Cent e r icon.
4Click M a na ge net w or k conne ctions.
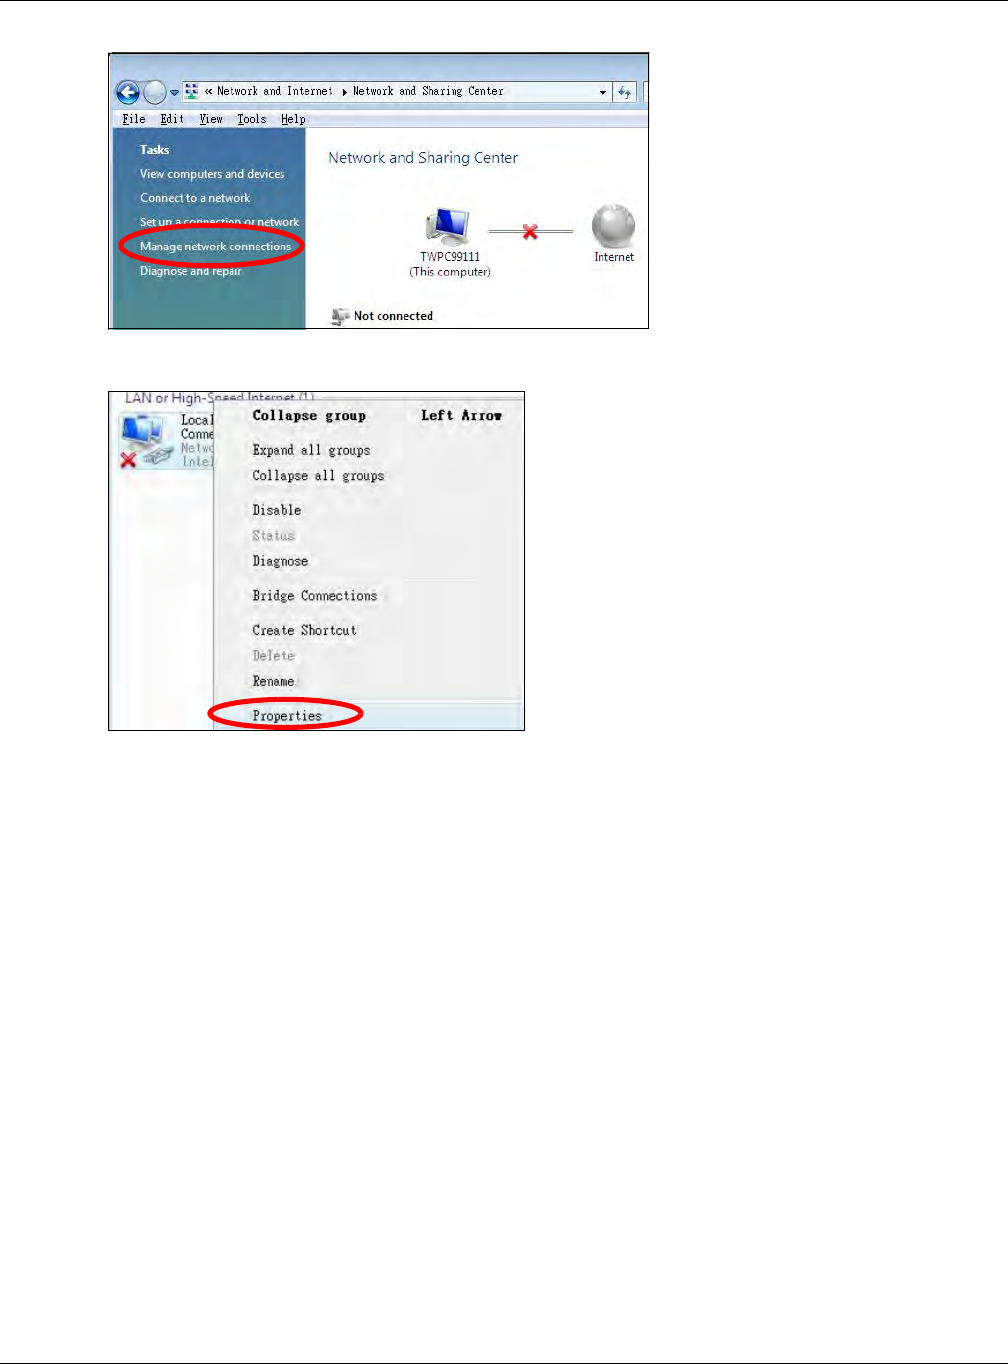
Appendix A Setting Up Your Computer’s IP Address
WRE6505 User’s Guide
86
5Right- click Local Ar ea Conn ect ion and then select Pr ope r t ie s.
Note: During this procedure, click Cont inue whenever Windows displays a screen saying
that it needs your perm ission to continue.
6Select I nt e rne t Prot ocol Ver sion 4 ( TCP/ I Pv4 ) and then select Pr op e rt ie s.
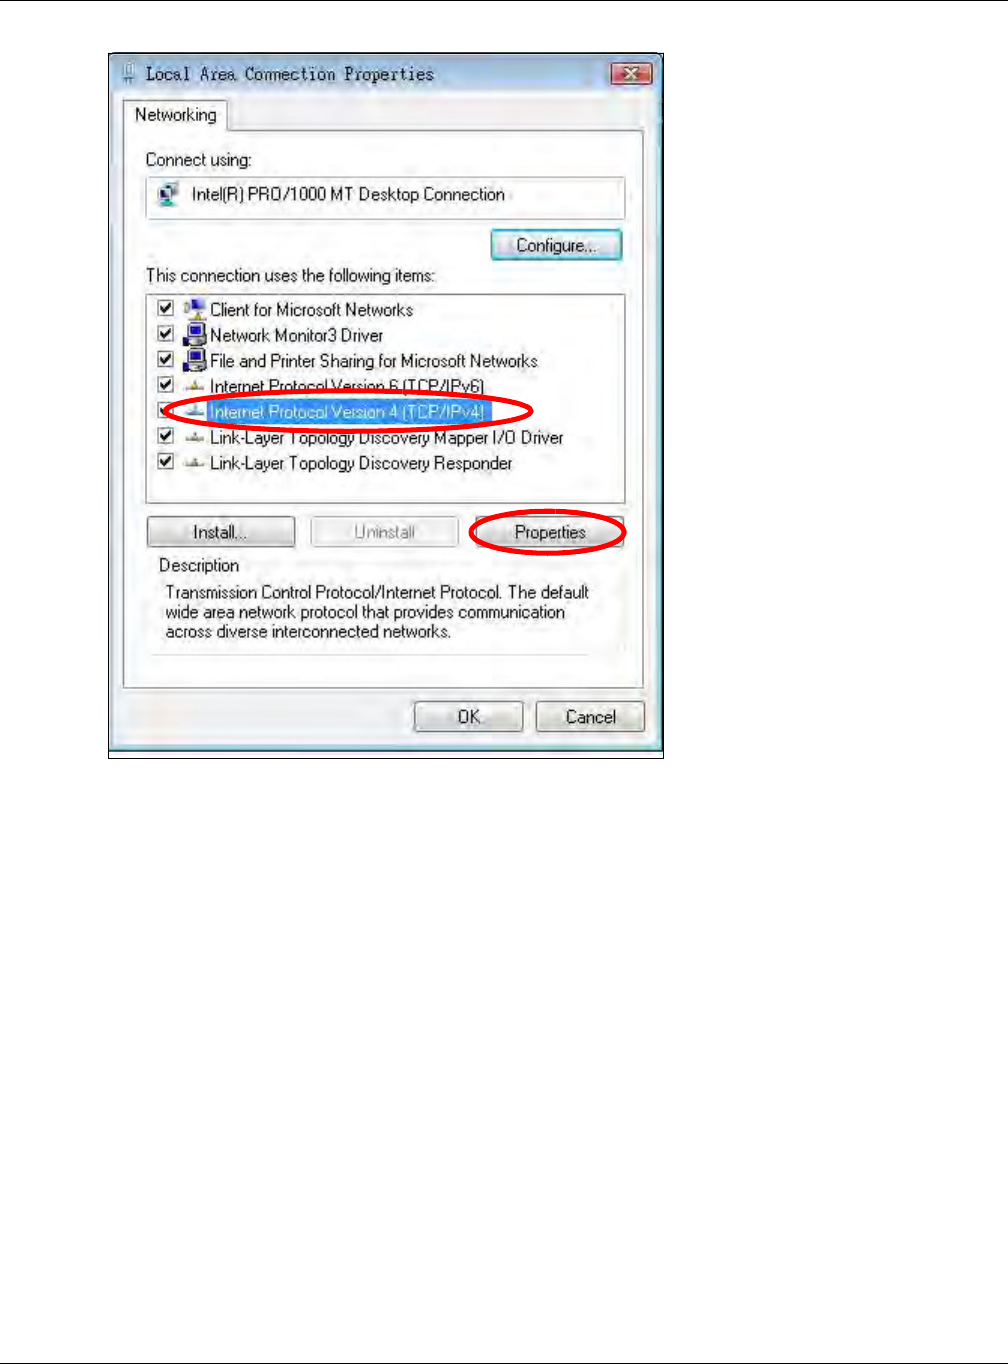
Appendix A Setting Up Your Computer’s IP Address
WRE6505 User’s Guide
87
7The I nt e rnet Pr ot ocol Ve rsion 4 ( TCP/ I Pv4 ) Pr oper t ie s window opens.
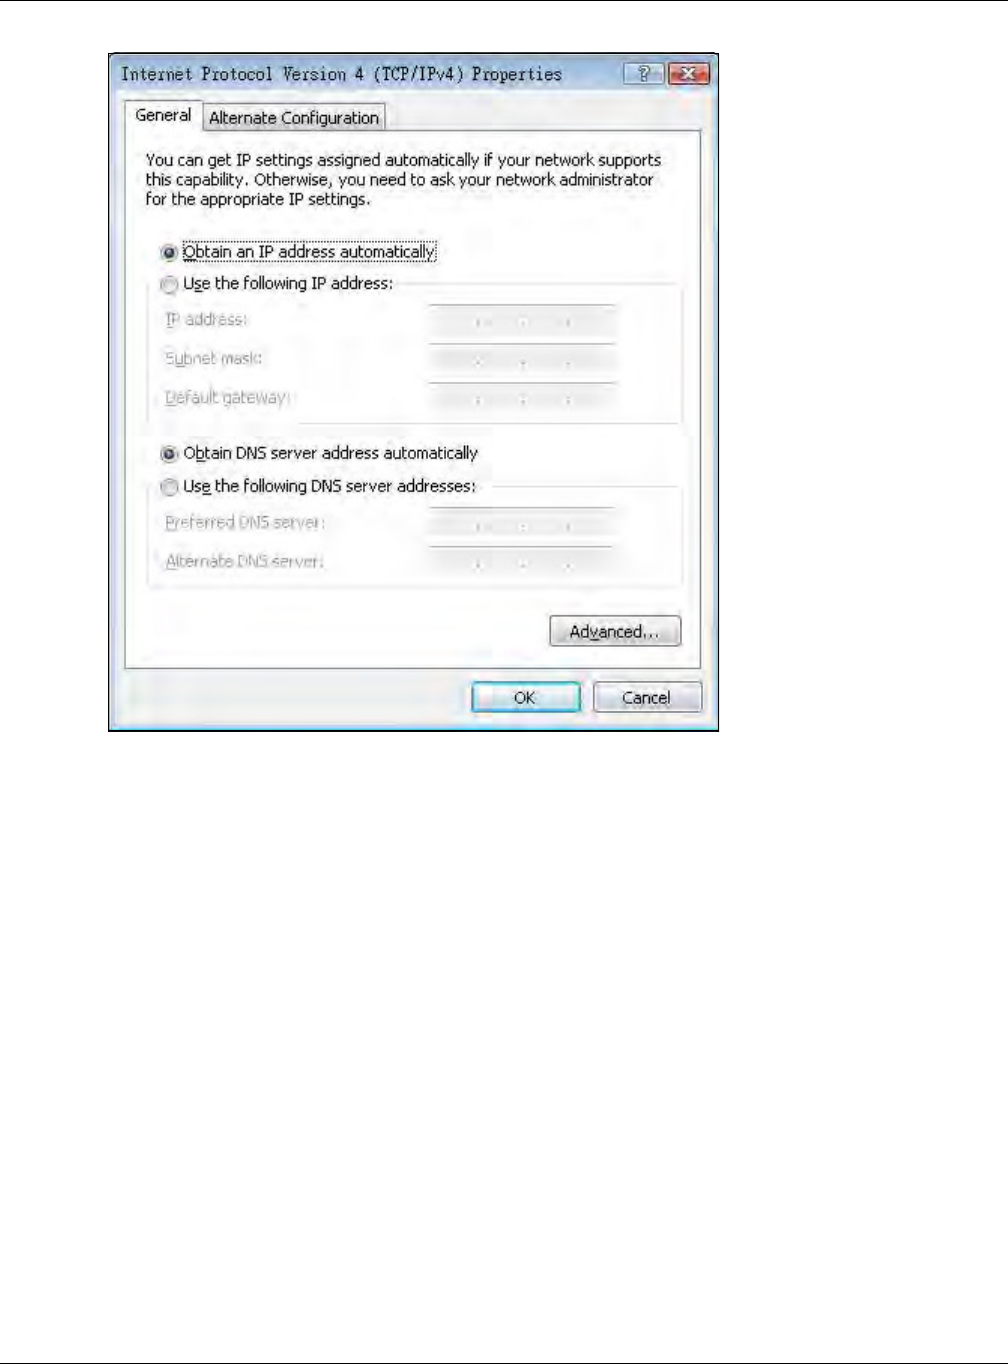
Appendix A Setting Up Your Computer’s IP Address
WRE6505 User’s Guide
88
8Select Obt a in a n I P a ddr ess a ut om atically if your network adm inistrator or I SP assigns your I P
address dynam ically.
Select Use t he follow ing I P Addr ess and fill in the I P a ddr e ss, Subnet m ask , and D efault
ga t e w a y fields if you have a static I P address that was assigned to you by your network
adm inistrator or I SP. You m ay also have to enter a Pre fe r red DNS ser ve r and an Alt e r n at e DNS
ser ve r, if that information was provided.Click Advan ced.
9Click OK to close the I nt e rnet Pr ot ocol ( TCP/ I P) Pr oper t ies window.
10 Click OK to close the Local Ar ea Conn ect ion Pr opert ies window.
Verifying Settings
1Click St a r t > All Progr am s > Acce ssories > Com m and Pr om pt .
2In the Com m a nd Pr om pt window, type "ipconfig" and then press [ ENTER] .
You can also go to St a rt > Cont r ol Pa ne l > N etw ork Conn ect ions, right-click a network
connection, click St a t u s and then click the Suppor t tab to view your I P address and connection
information.
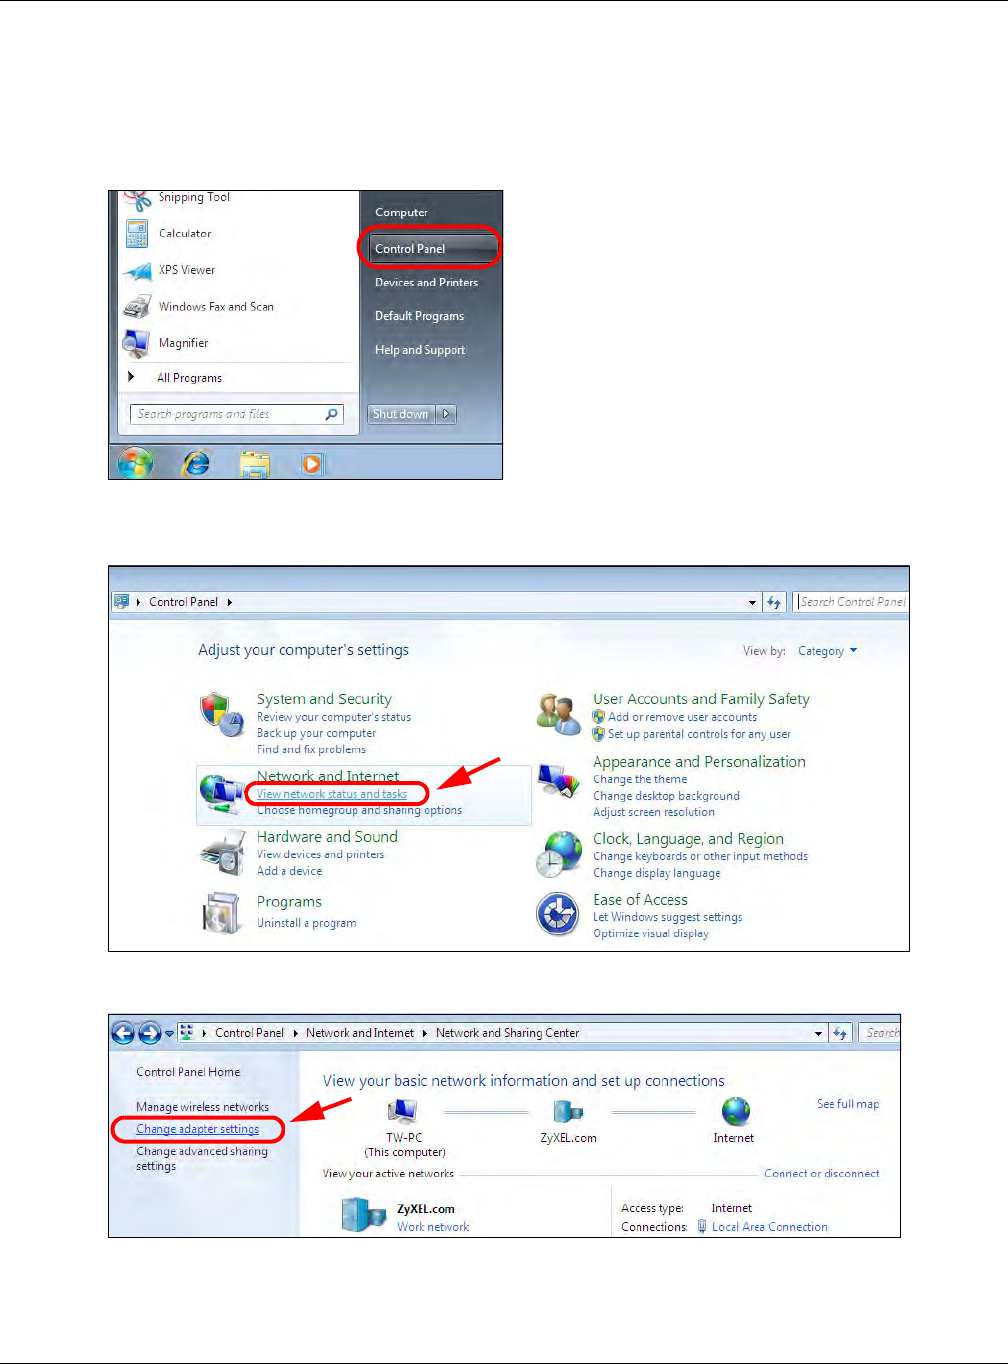
Appendix A Setting Up Your Computer’s IP Address
WRE6505 User’s Guide
89
Windows 7
This section shows screens from Windows 7 Enterprise.
1Click St a r t > Control Pa nel.
2In the Control Panel, click View n et w or k st atus a nd t ask s under the N etw ork and I nter net
category.
3Click Ch ange a da pt er set t ings.
4Double click Local Area Connect ion and then select Pr op er t ie s.

Appendix A Setting Up Your Computer’s IP Address
WRE6505 User’s Guide
90
Note: During this procedure, click Cont inue whenever Windows displays a screen saying
that it needs your perm ission to continue.
5Select I nt e rne t Prot ocol Ver sion 4 ( TCP/ I Pv4 ) and then select Pr op e rt ie s.
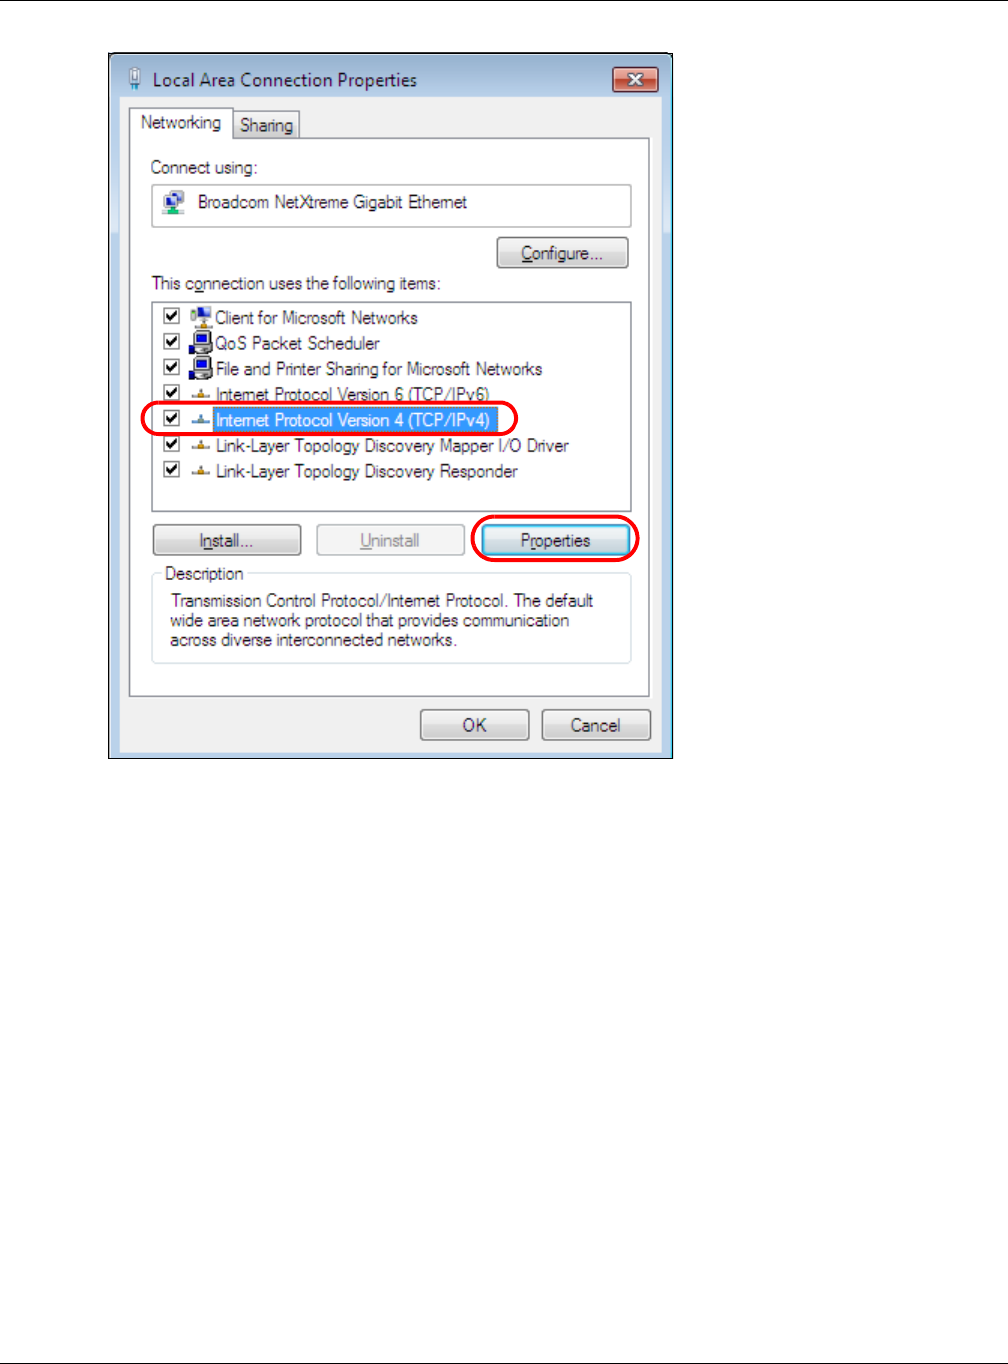
Appendix A Setting Up Your Computer’s IP Address
WRE6505 User’s Guide
91
6The I nt e rnet Pr ot ocol Ve rsion 4 ( TCP/ I Pv4 ) Pr oper t ie s window opens.
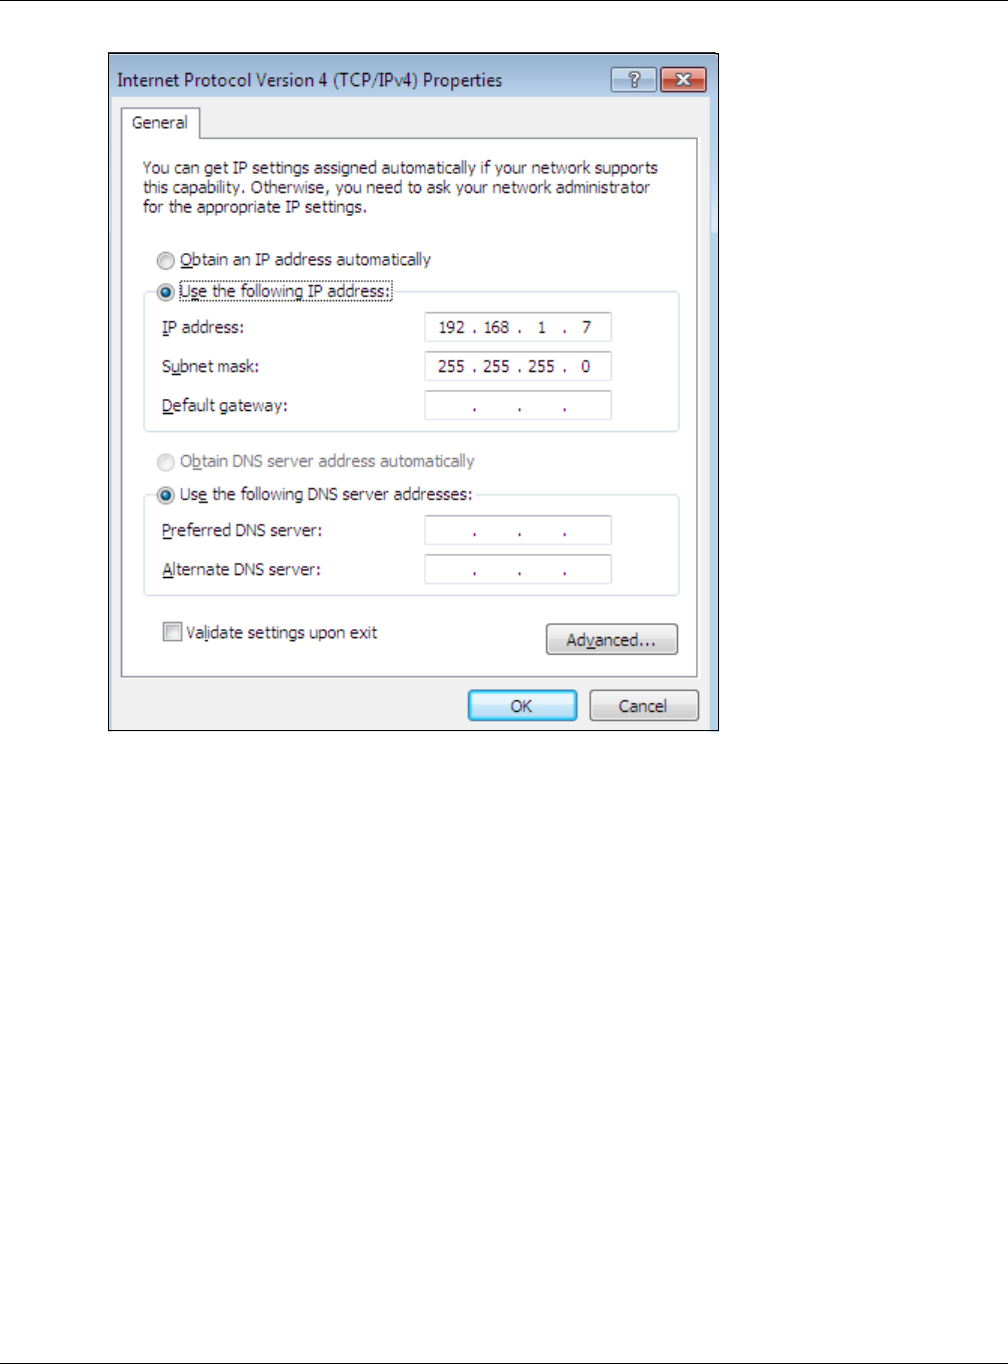
Appendix A Setting Up Your Computer’s IP Address
WRE6505 User’s Guide
92
7Select Obt a in a n I P a ddr ess a ut om atically if your network adm inistrator or I SP assigns your I P
address dynam ically.
Select Use t he follow ing I P Addr ess and fill in the I P a ddr e ss, Subnet m ask , and D efault
ga t e w a y fields if you have a static I P address that was assigned to you by your network
adm inistrator or I SP. You m ay also have to enter a Pre fe r red DNS ser ve r and an Alt e r n at e DNS
ser ve r, if that information was provided. Click Advan ced if you want to configure advanced
settings for I P, DNS and WI NS.
8Click OK to close the I nt e rnet Pr ot ocol ( TCP/ I P) Pr oper t ies window.
9Click OK to close the Local Ar ea Conn ect ion Pr opert ies window.
Verifying Settings
1Click St a r t > All Progr am s > Acce ssories > Com m and Pr om pt .
2In the Com m a nd Pr om pt window, type "ipconfig" and then press [ ENTER] .
3The I P settings are displayed as follows.
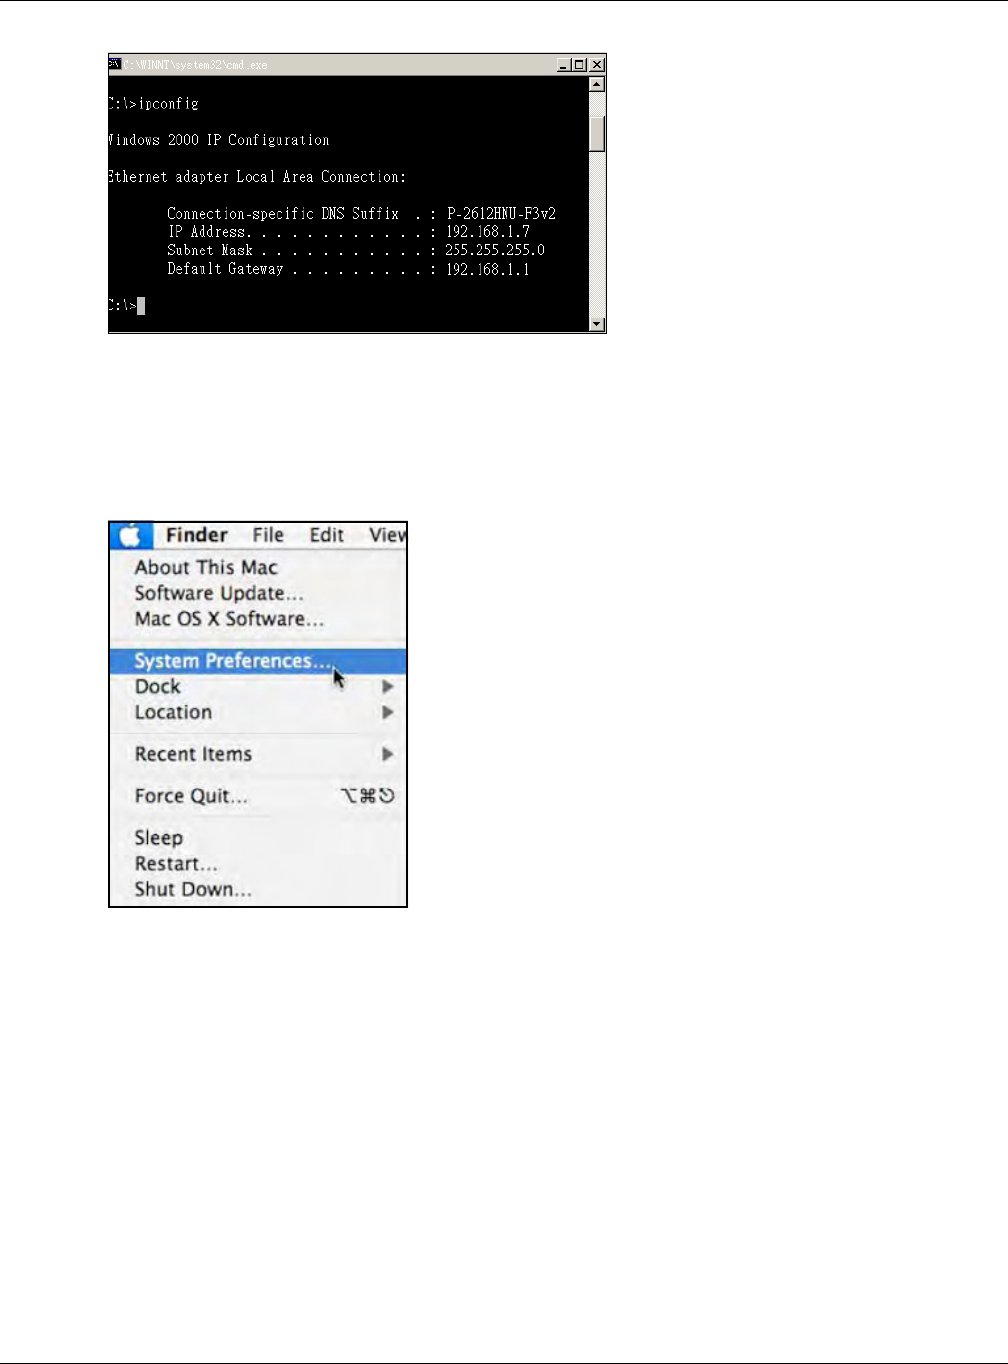
Appendix A Setting Up Your Computer’s IP Address
WRE6505 User’s Guide
93
Mac OS X: 10.3 and 10.4
The screens in this section are from Mac OS X 10.4 but can also apply to 10.3.
1Click Apple > Syst em Prefe re nces.
2In the Syst em Prefe re nces window, click the N etw ork icon.
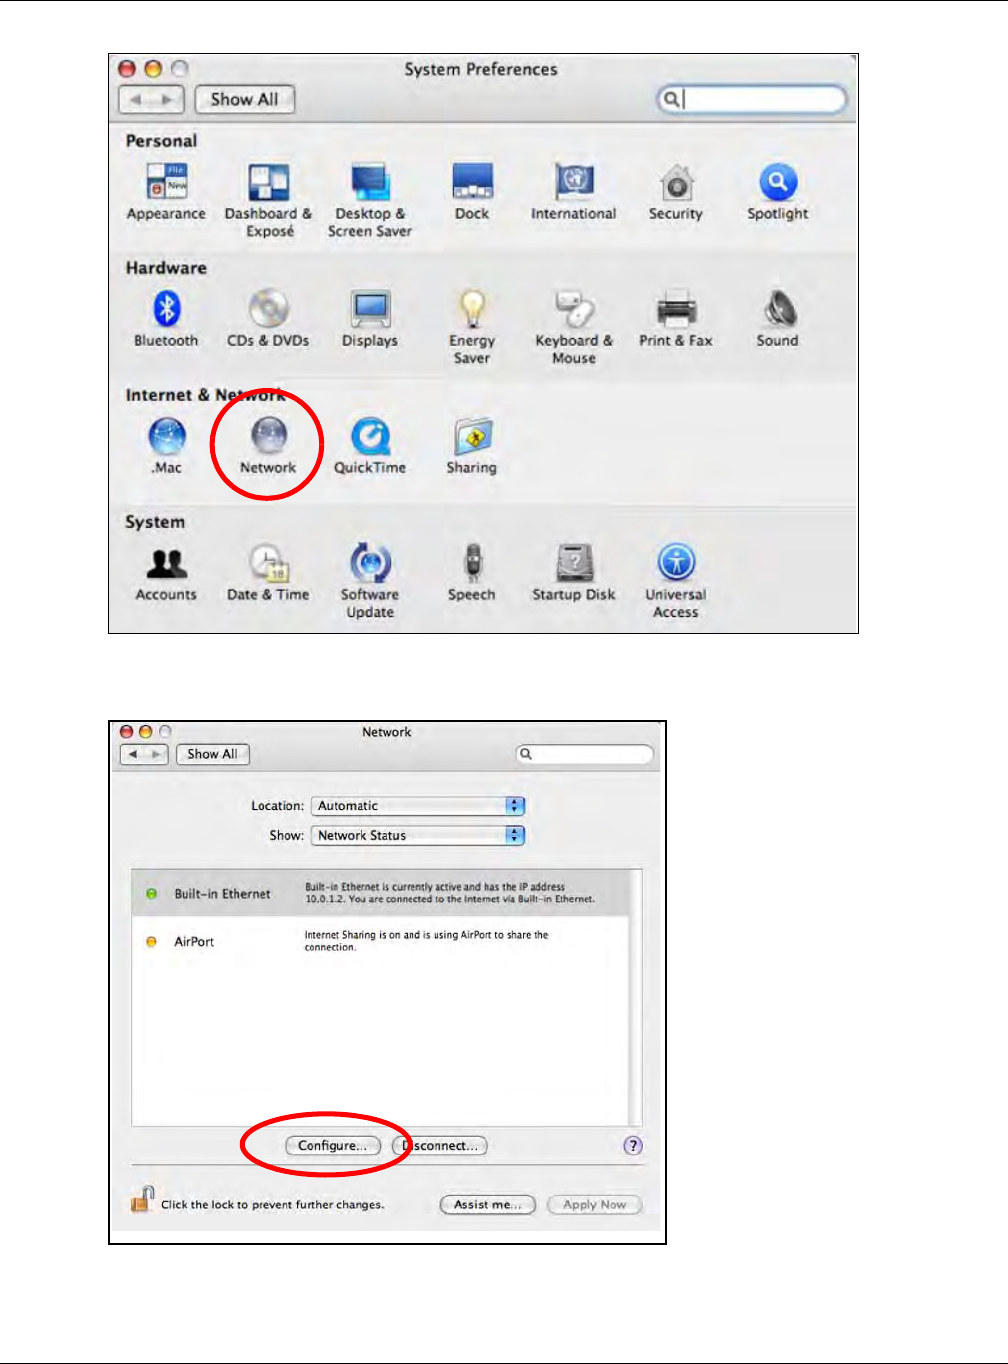
Appendix A Setting Up Your Computer’s IP Address
WRE6505 User’s Guide
94
3When the N e t w or k preferences pane opens, select Built - in Et he rnet from the network
connection type list, and then click Configur e.
4For dynam ically assigned settings, select Using D H CP from the Configur e I Pv4 list in the TCP/ I P
tab.
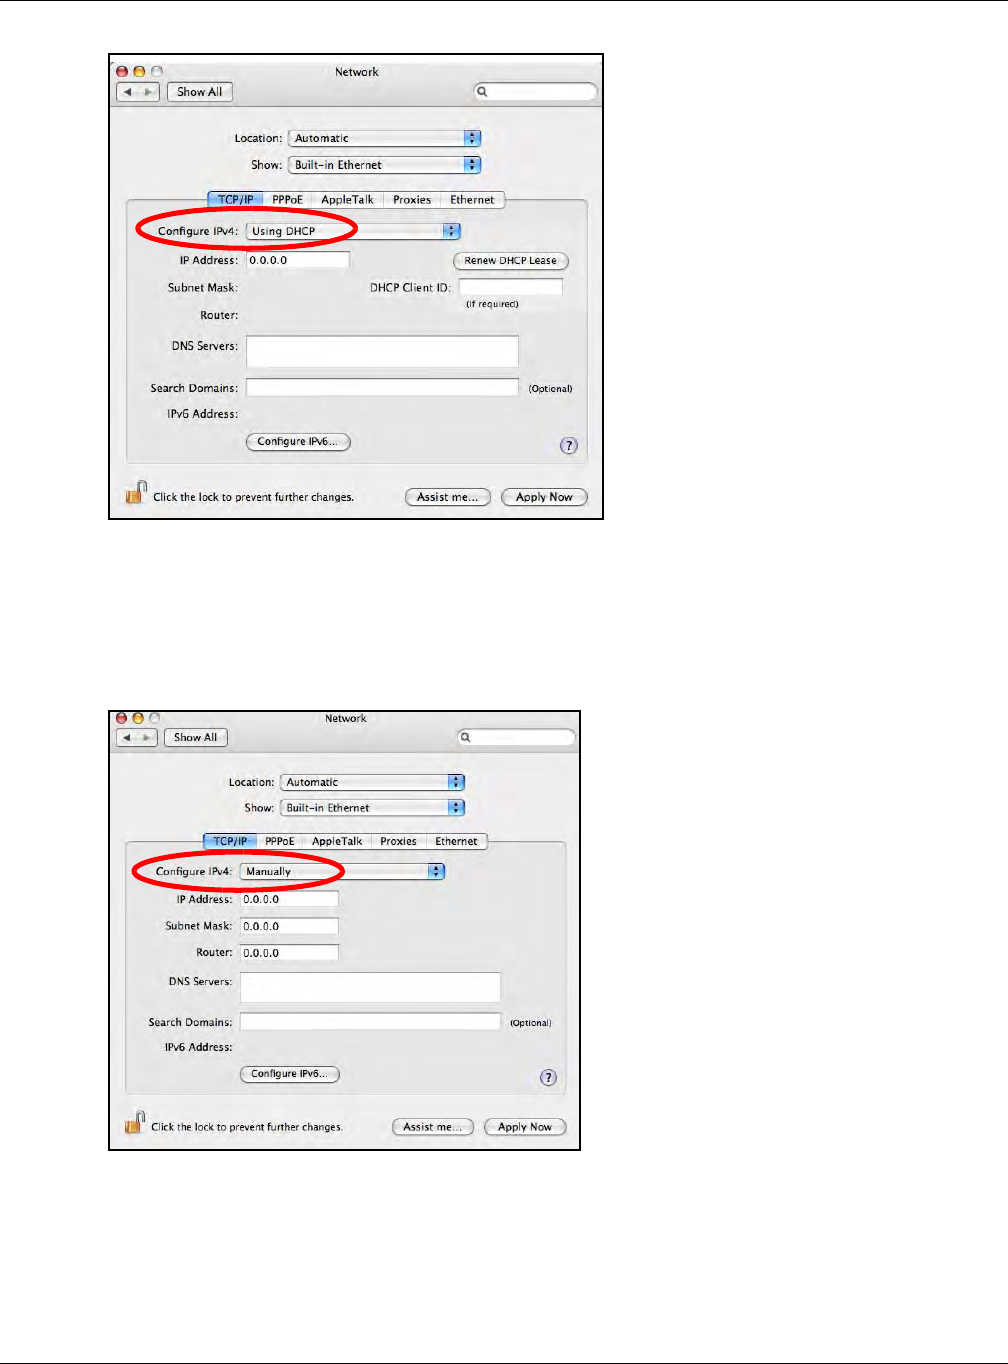
Appendix A Setting Up Your Computer’s IP Address
WRE6505 User’s Guide
95
5For statically assigned settings, do the following:
• From the Configure I Pv4 list, select Man ua lly.
• In the I P Addr ess field, type your I P address.
• In the Subnet M ask field, type your subnet m ask.
• In the Ro ut e r field, type the I P address of your device.
6Click Apply Now and close the window.
Verifying Settings
Check your TCP/ I P properties by clicking Applications > Ut ilit ies > N etw ork Ut ilit ie s, and then
selecting the appropriate N et w ork I nt e rface from the I n fo tab.
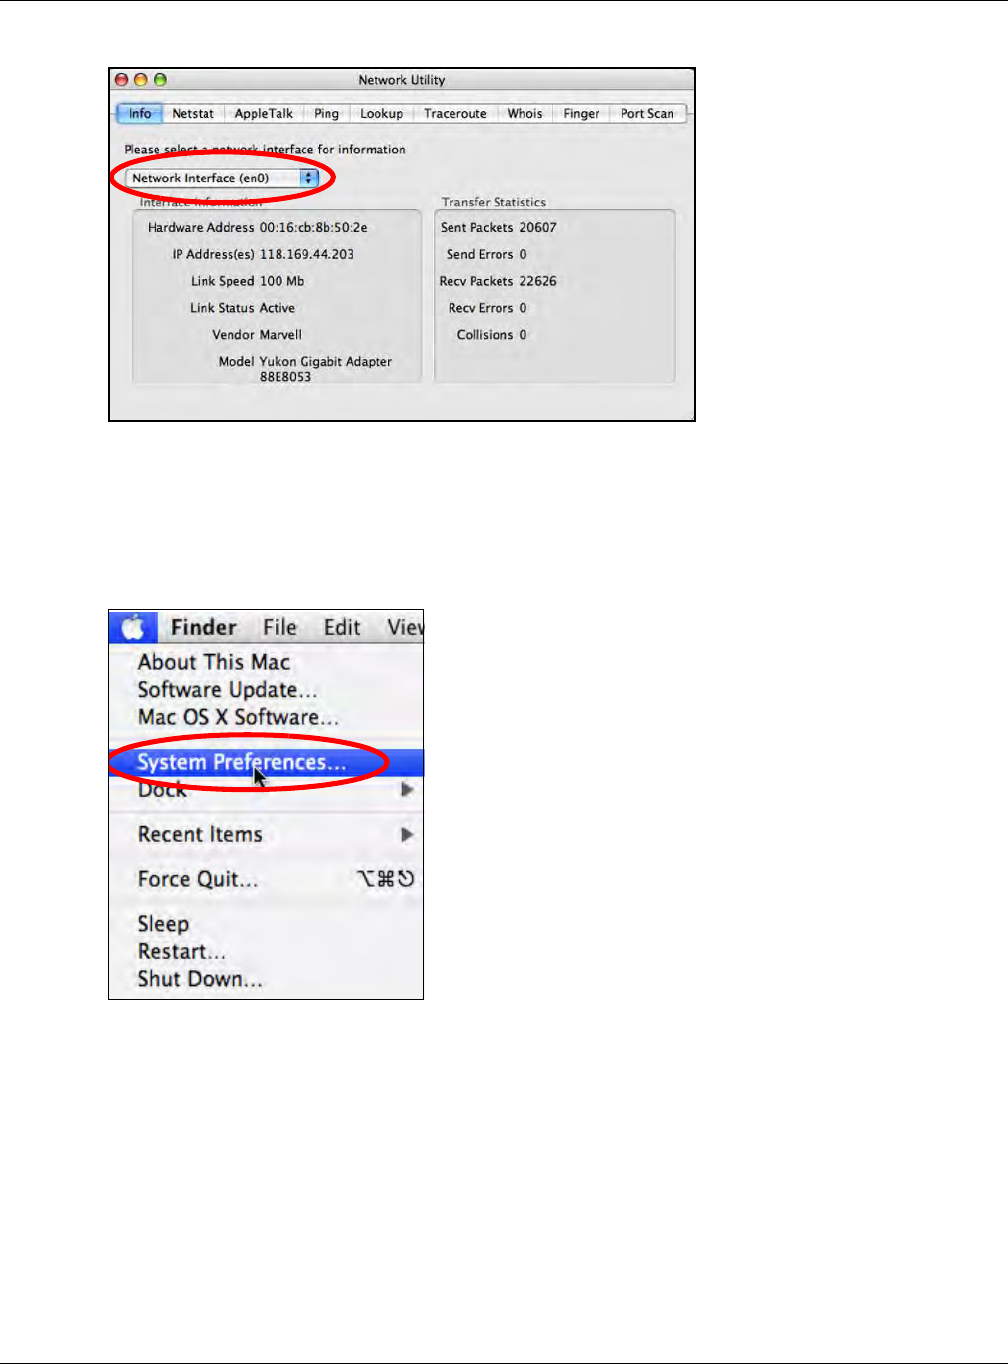
Appendix A Setting Up Your Computer’s IP Address
WRE6505 User’s Guide
96
Figure 64 Mac OS X 10.4: Network Utility
Mac OS X: 10.5 and 10.6
The screens in this section are from Mac OS X 10.5 but can also apply to 10.6.
1Click Apple > Syst em Prefe re nces.
2In Syst em Pr efere nce s, click the N e t w or k icon.
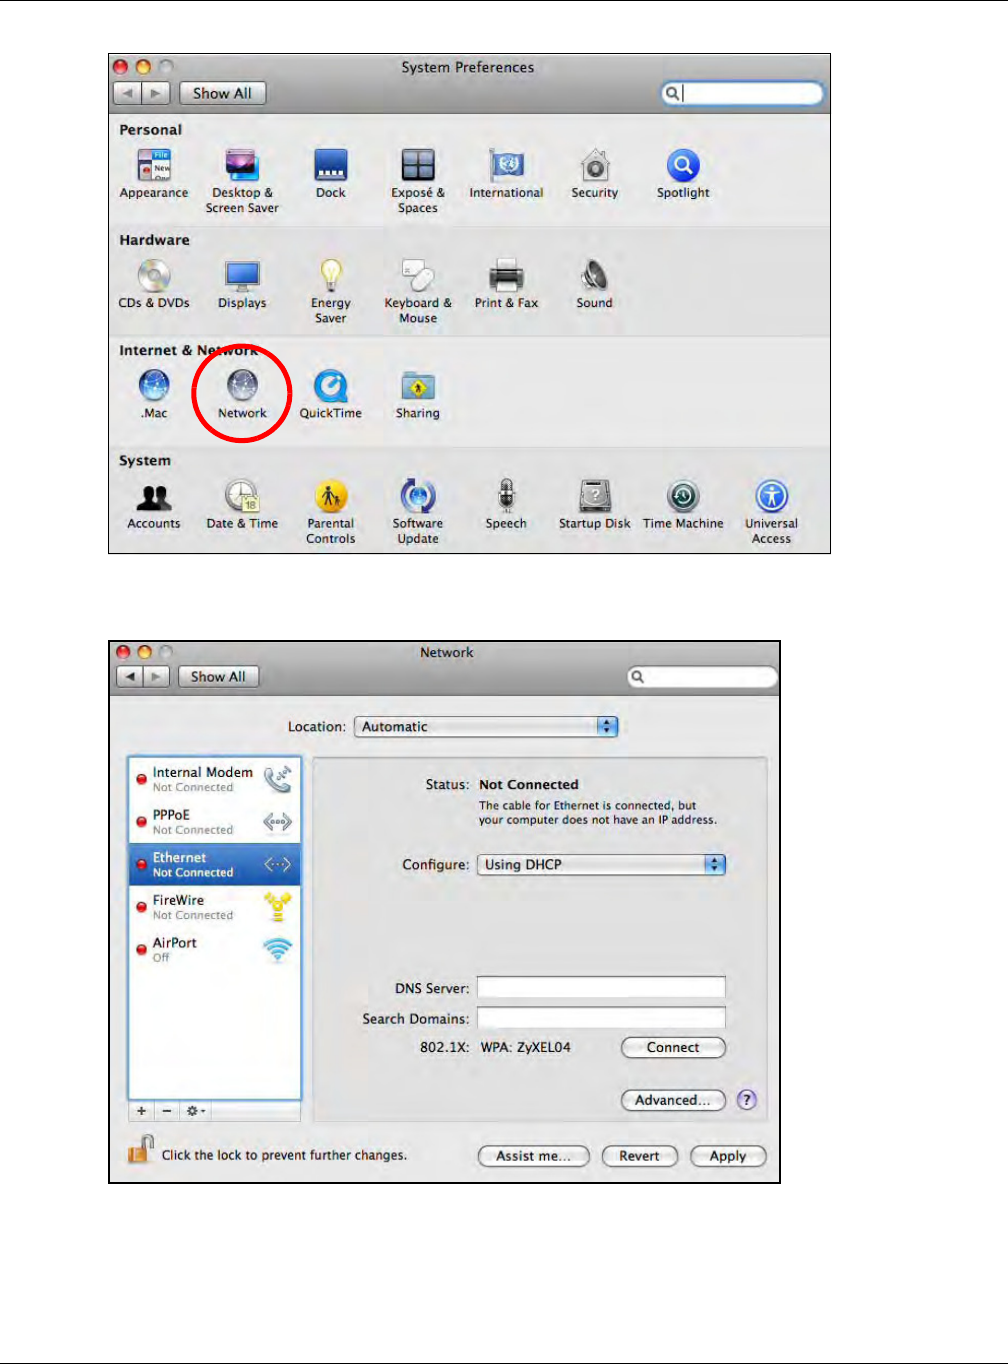
Appendix A Setting Up Your Computer’s IP Address
WRE6505 User’s Guide
97
3When the N etw ork preferences pane opens, select Et h e rn e t from the list of available connection
types.
4From the Configure list, select Using DHCP for dynam ically assigned settings.
5For statically assigned settings, do the following:
• From the Configure list, select M anually.
• In the I P Addr ess field, enter your I P address.
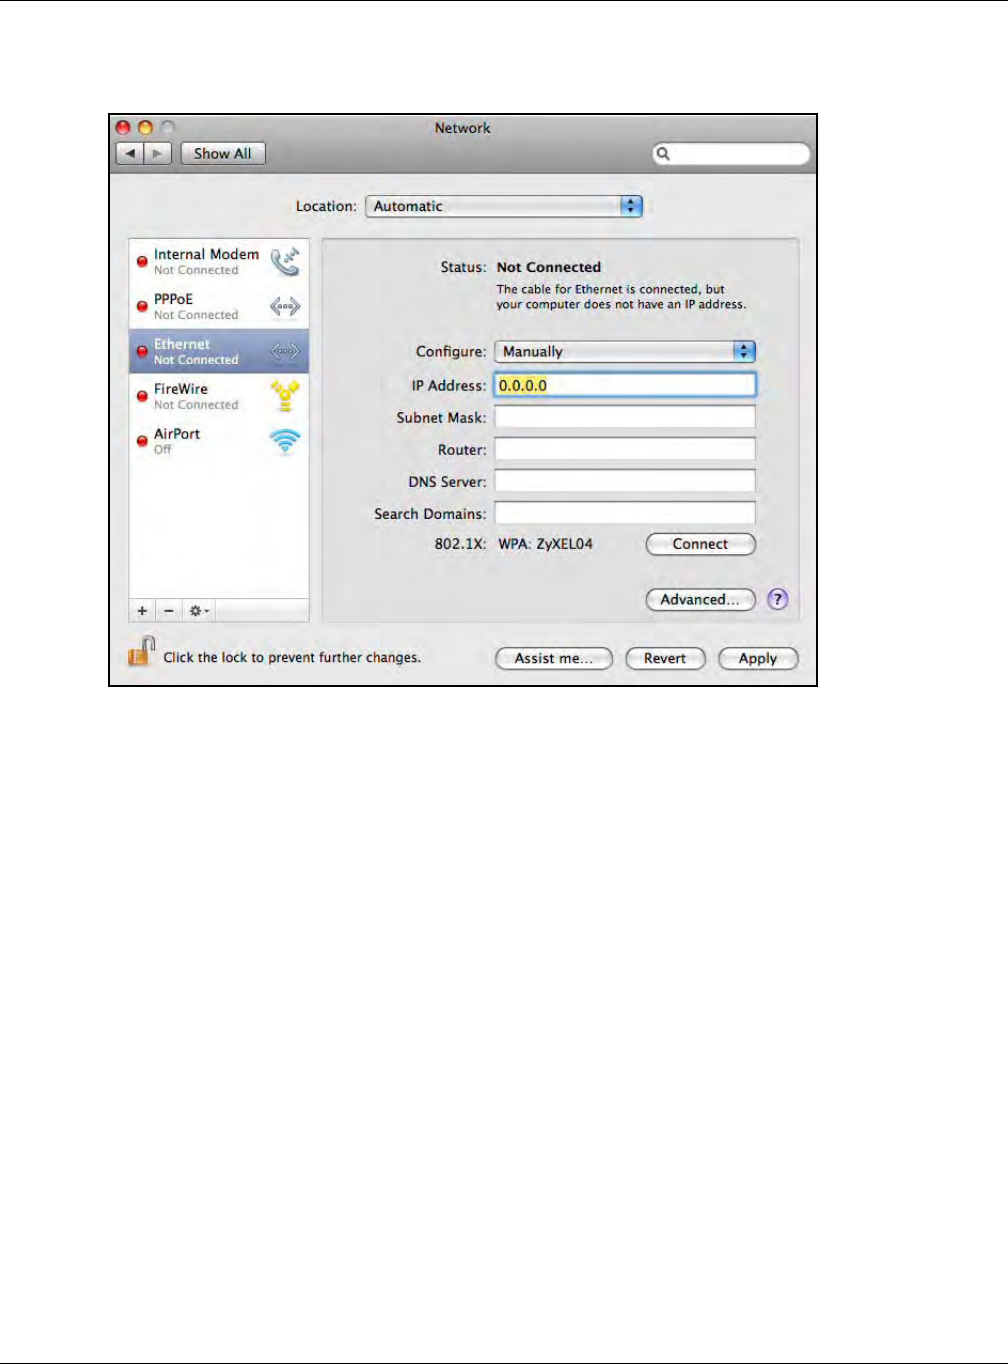
Appendix A Setting Up Your Computer’s IP Address
WRE6505 User’s Guide
98
• In the Subnet M ask field, enter your subnet mask.
• In the Ro ut e r field, enter the I P address of your WRE6505.
6Click Apply and close the window.
Verifying Settings
Check your TCP/ I P properties by clicking Applications > Ut ilit ies > N etw ork Ut ilit ie s, and then
selecting the appropriate N et w ork in t erfa ce from the I nfo tab.
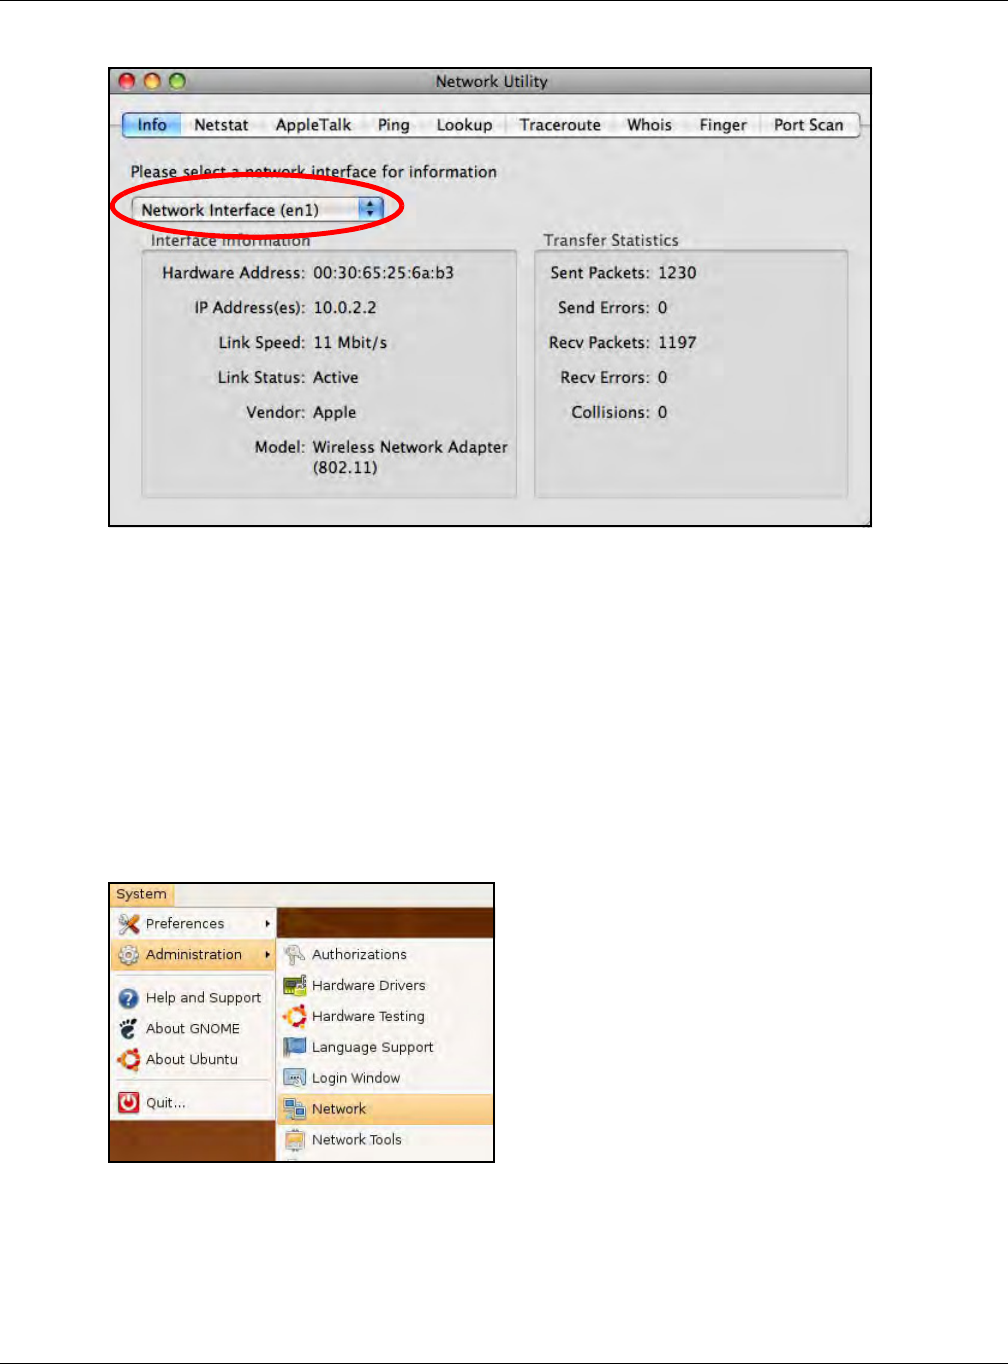
Appendix A Setting Up Your Computer’s IP Address
WRE6505 User’s Guide
99
Figure 65 Mac OS X 10.5: Network Utility
Linux: Ubuntu 8 (GNOME)
This section shows you how to configure your computer’s TCP/ I P settings in the GNU Object Model
Environm ent (GNOME) using the Ubuntu 8 Linux distribution. The procedure, screens and file
locations m ay vary depending on your specific distribution, release version, and individual
configuration. The following screens use the default Ubuntu 8 installation.
Note: Make sure you are logged in as the root adm inistrator.
Follow the steps below to configure your computer I P address in GNOME:
1Click Syst e m > Adm inistra t ion > N et w or k.
2When the N etw ork Settings window opens, click U n lock to open the Au t he nt ica t e window. (By
default, the Unlock button is greyed out until clicked.) You cannot m ake changes to your
configuration unless you first enter your adm in password.
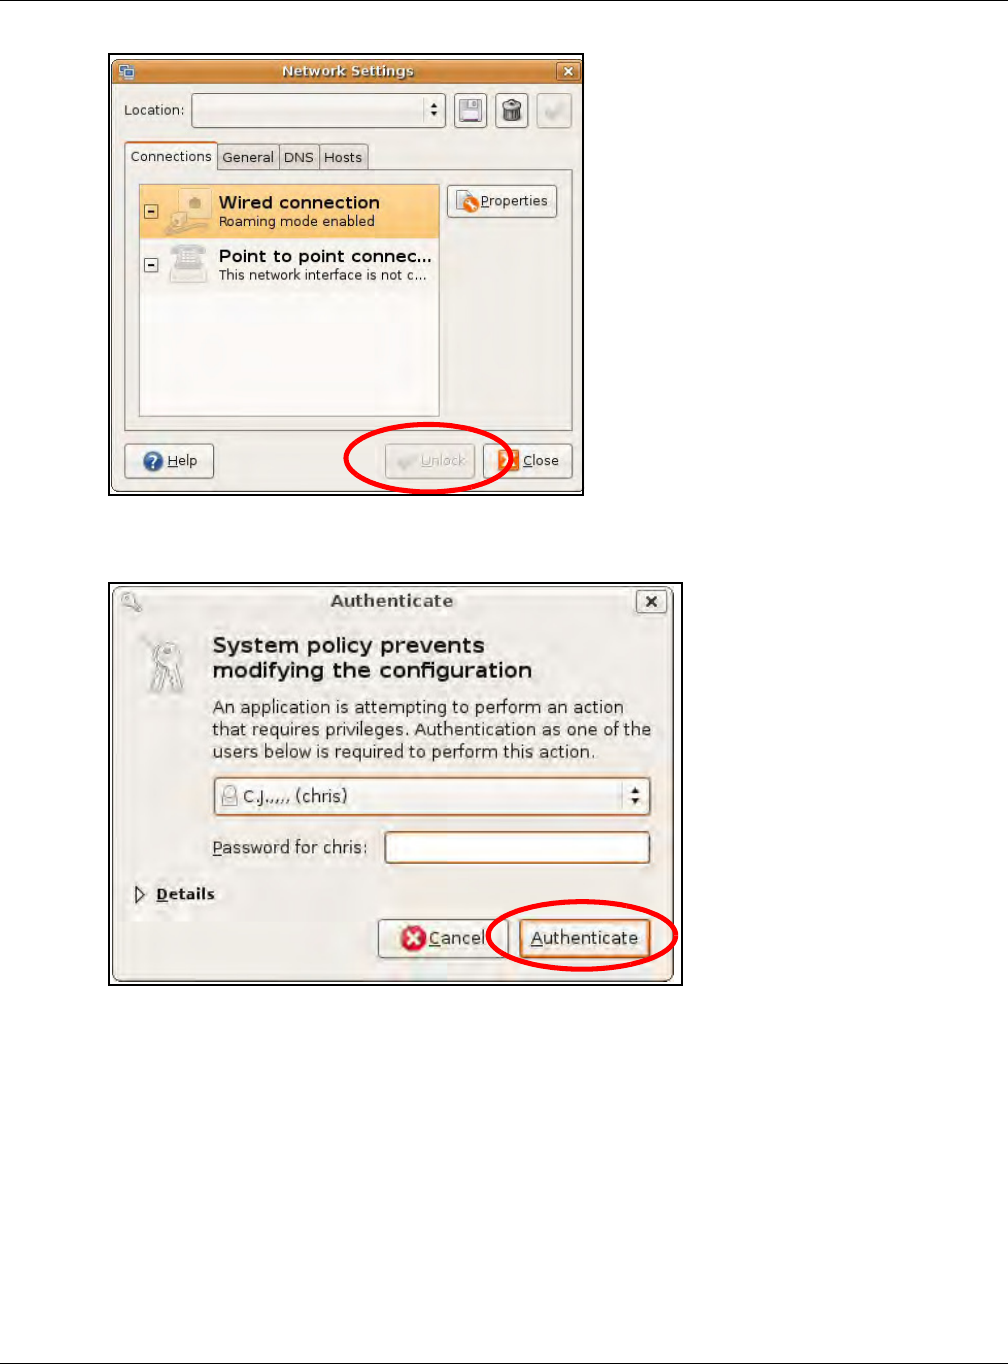
Appendix A Setting Up Your Computer’s IP Address
WRE6505 User’s Guide
100
3In the Au t he n t ica t e window, enter your admin account name and password then click the
Au t he nt ica t e button.
4In the N e t w or k Settings window, select the connection that you want to configure, then click
Pr op e rt ie s.
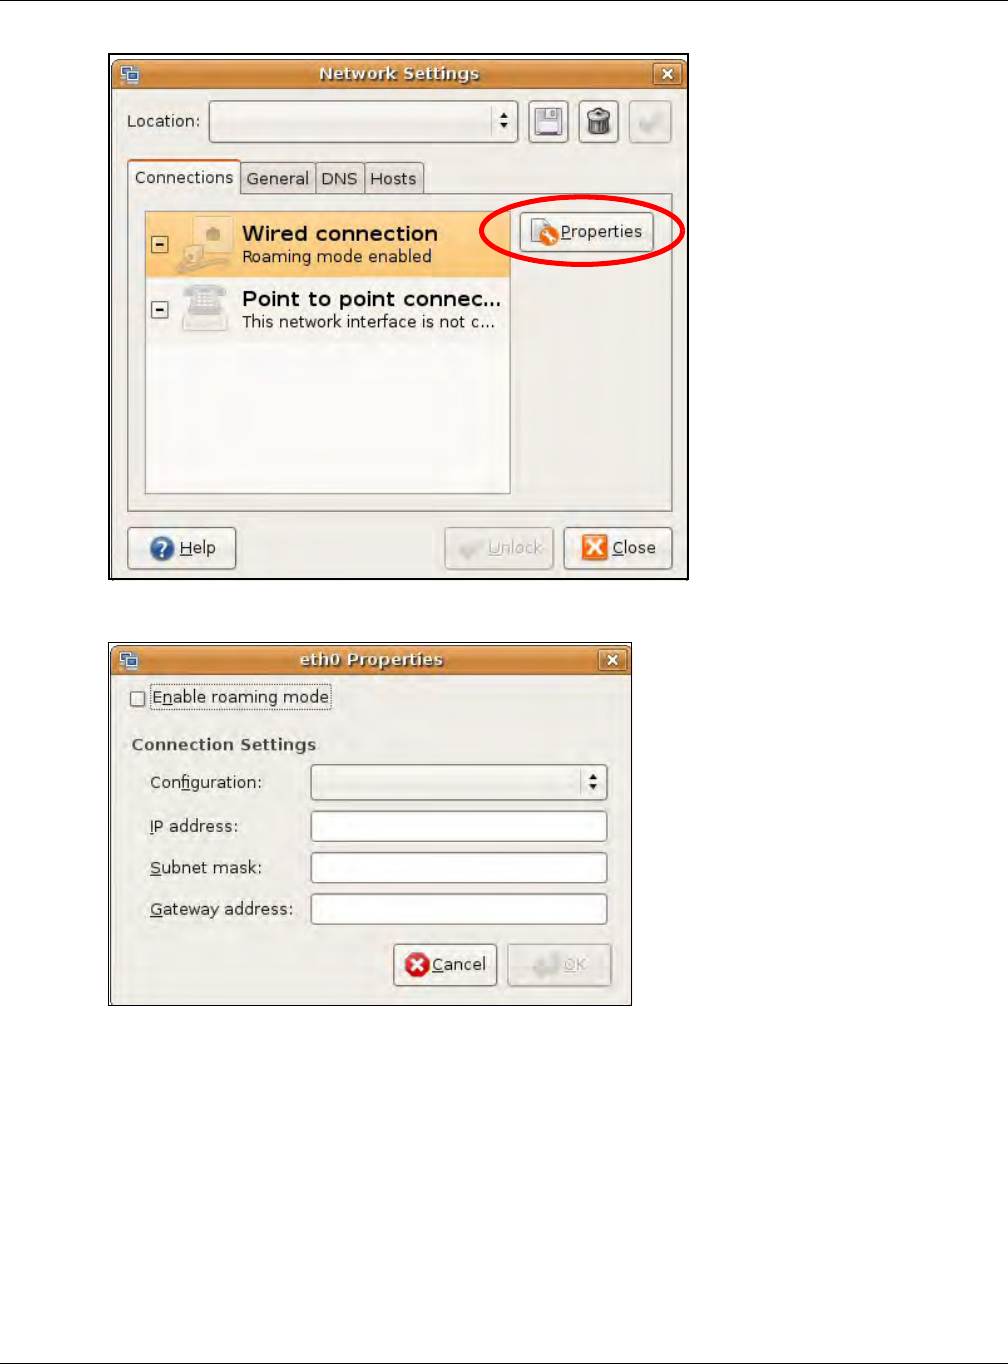
Appendix A Setting Up Your Computer’s IP Address
WRE6505 User’s Guide
101
5The Pr op er t ie s dialog box opens.
• In the Con figu ra t ion list, select Aut om at ic Configura t ion ( DH CP) if you have a dynamic I P
address.
• In the Configu rat ion list, select St a t ic I P a ddr ess if you have a static I P address. Fill in the
I P a ddress, Su bne t m a sk, and Gat e w a y a ddr e ss fields.
6Click OK to save the changes and close the Pr op er t ie s dialog box and return to the N e t w ork
Se t t ing s screen.
7If you know your DNS server I P address(es), click the D N S tab in the N etw or k Settings window
and then enter the DNS server information in the fields provided.
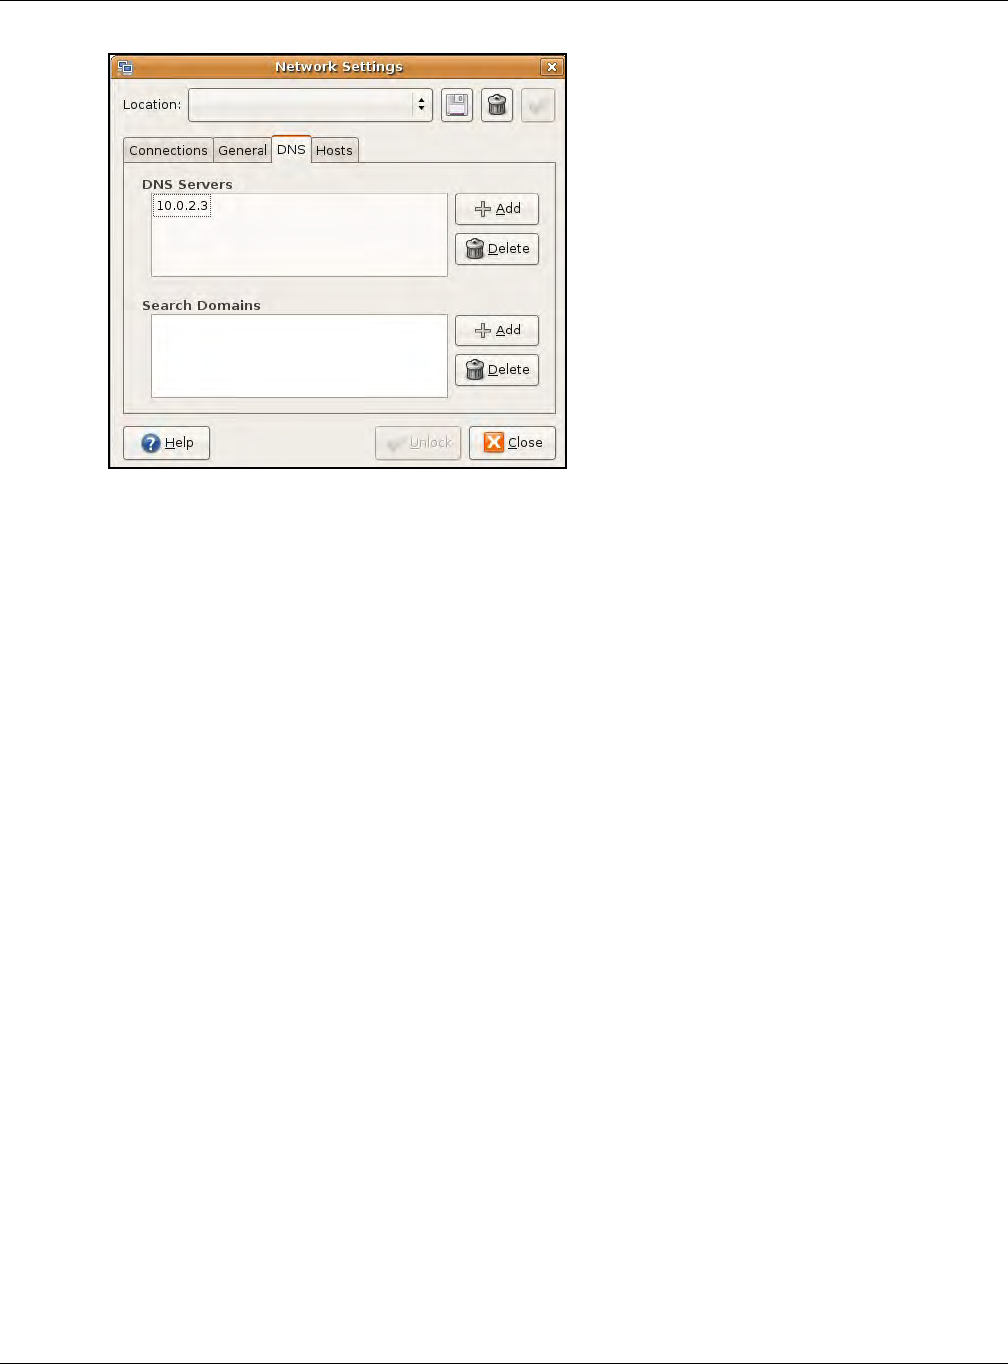
Appendix A Setting Up Your Computer’s IP Address
WRE6505 User’s Guide
102
8Click the Close button to apply the changes.
Verifying Settings
Check your TCP/ I P properties by clicking Syst e m > Adm inistra t ion > N e t w or k Tools, and then
selecting the appropriate N et w or k de vice from the D evices tab. The I nt erface Stat ist ics
colum n shows data if your connection is working properly.
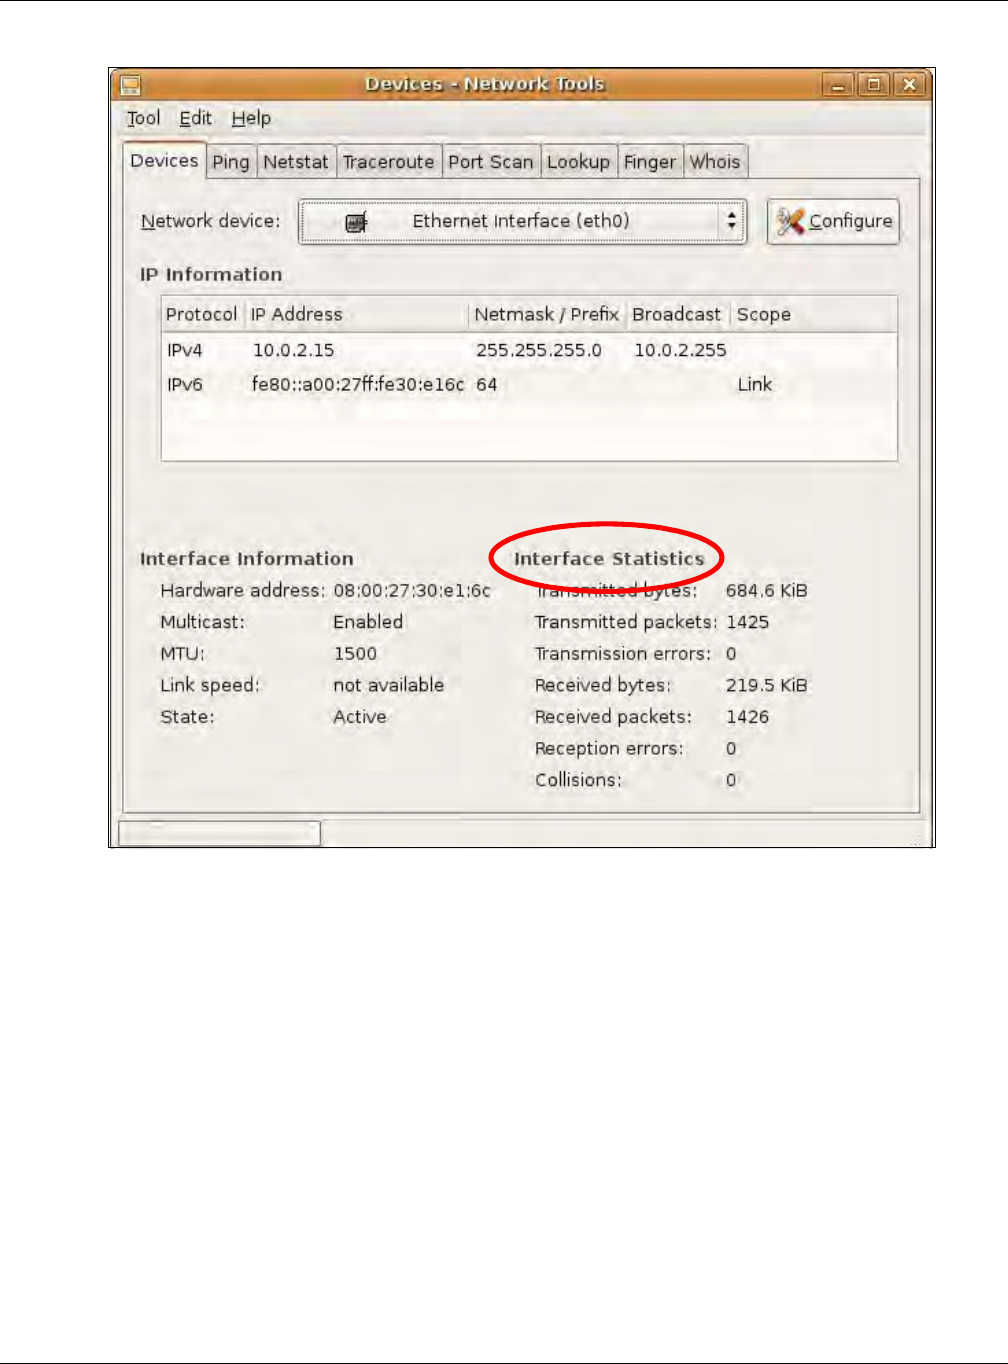
Appendix A Setting Up Your Computer’s IP Address
WRE6505 User’s Guide
103
Figure 66 Ubuntu 8: Network Tools
Linux: openSUSE 10.3 (KDE)
This section shows you how to configure your computer’s TCP/ IP settings in the K Desktop
Environm ent (KDE) using the openSUSE 10.3 Linux distribution. The procedure, screens and file
locations m ay vary depending on your specific distribution, release version, and individual
configuration. The following screens use the default openSUSE 10.3 installation.
Note: Make sure you are logged in as the root adm inistrator.
Follow the steps below to configure your computer I P address in the KDE:
1Click K Men u > Com pu t er > Adm inistra t or Settings ( Ya ST) .
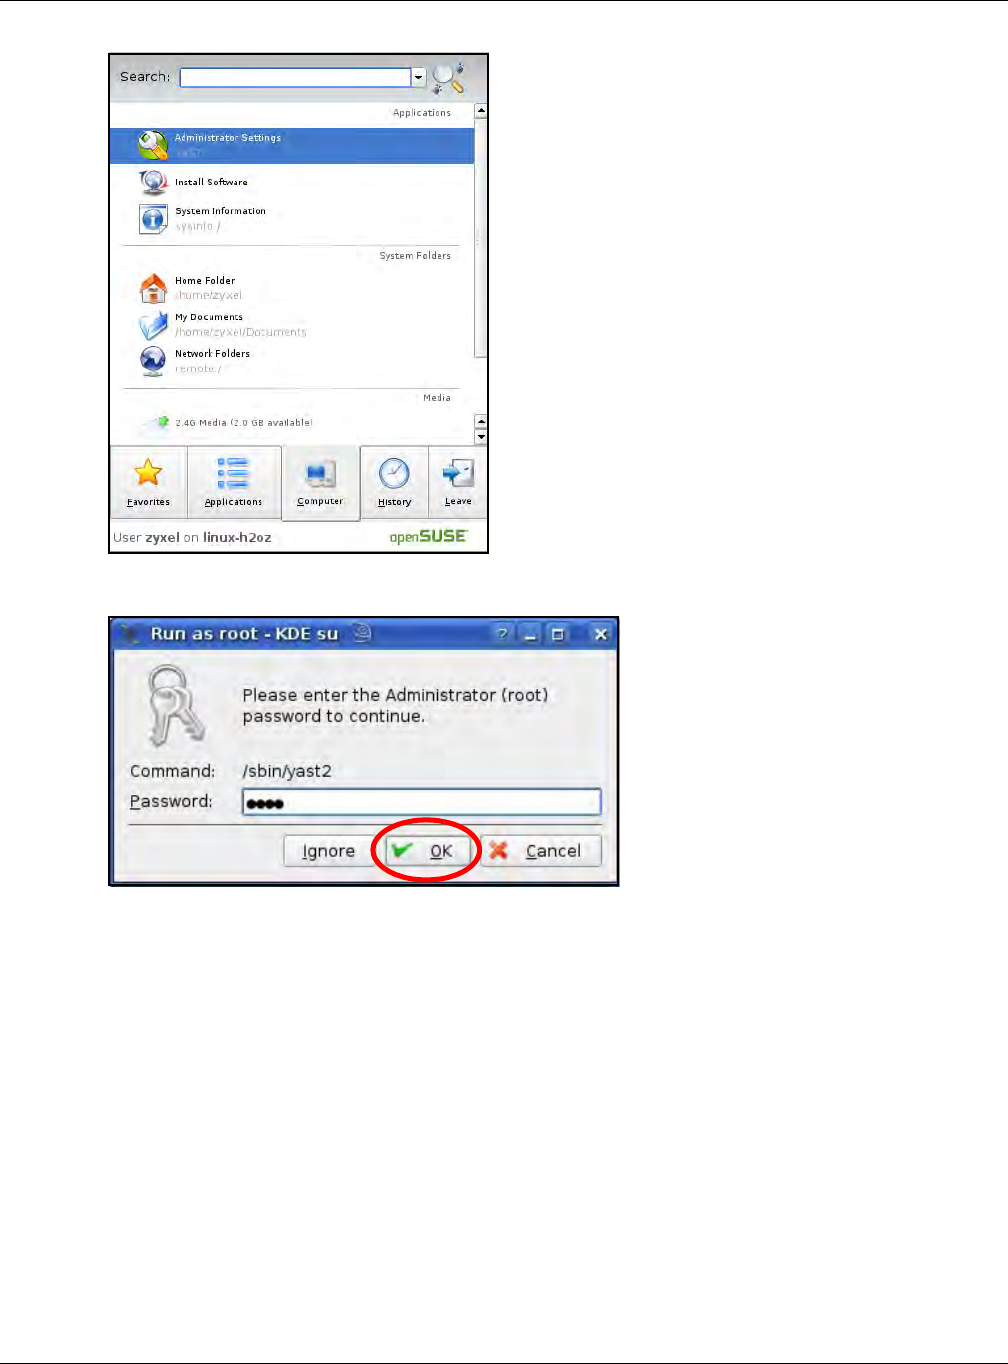
Appendix A Setting Up Your Computer’s IP Address
WRE6505 User’s Guide
104
2When the Run a s Root - KDE su dialog opens, enter the adm in password and click OK.
3When the YaST Con t rol Ce nt er window opens, select N e t w or k Devices and then click the
N etw or k Ca rd icon.
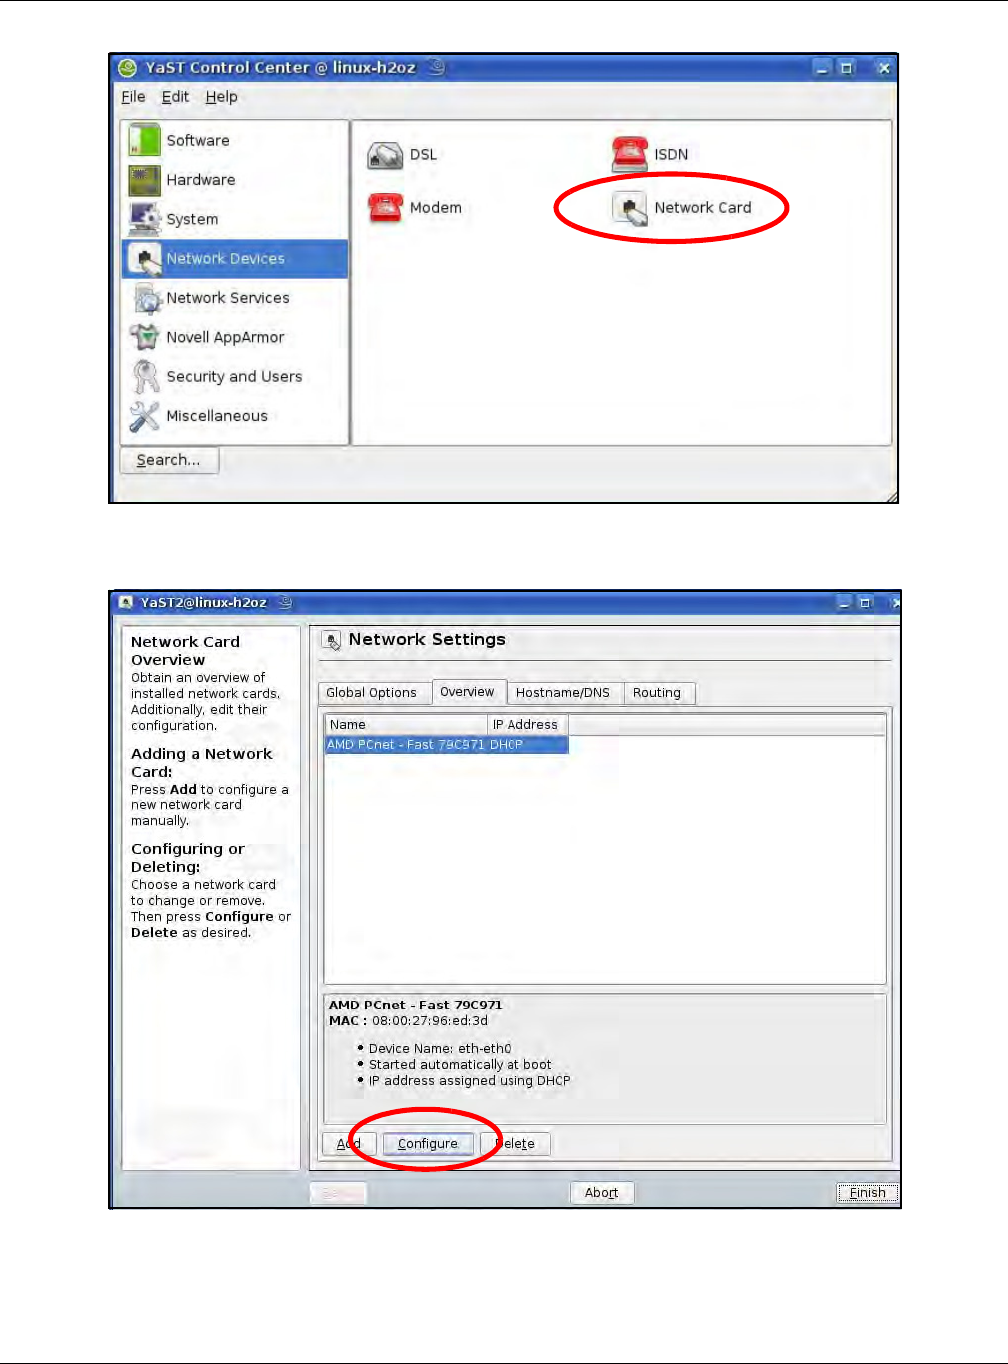
Appendix A Setting Up Your Computer’s IP Address
WRE6505 User’s Guide
105
4When the N etw ork Settings window opens, click the Over view tab, select the appropriate
connection N a m e from the list, and then click the Configur e button.
5When the N etw ork Ca rd Setup window opens, click the Addre ss tab
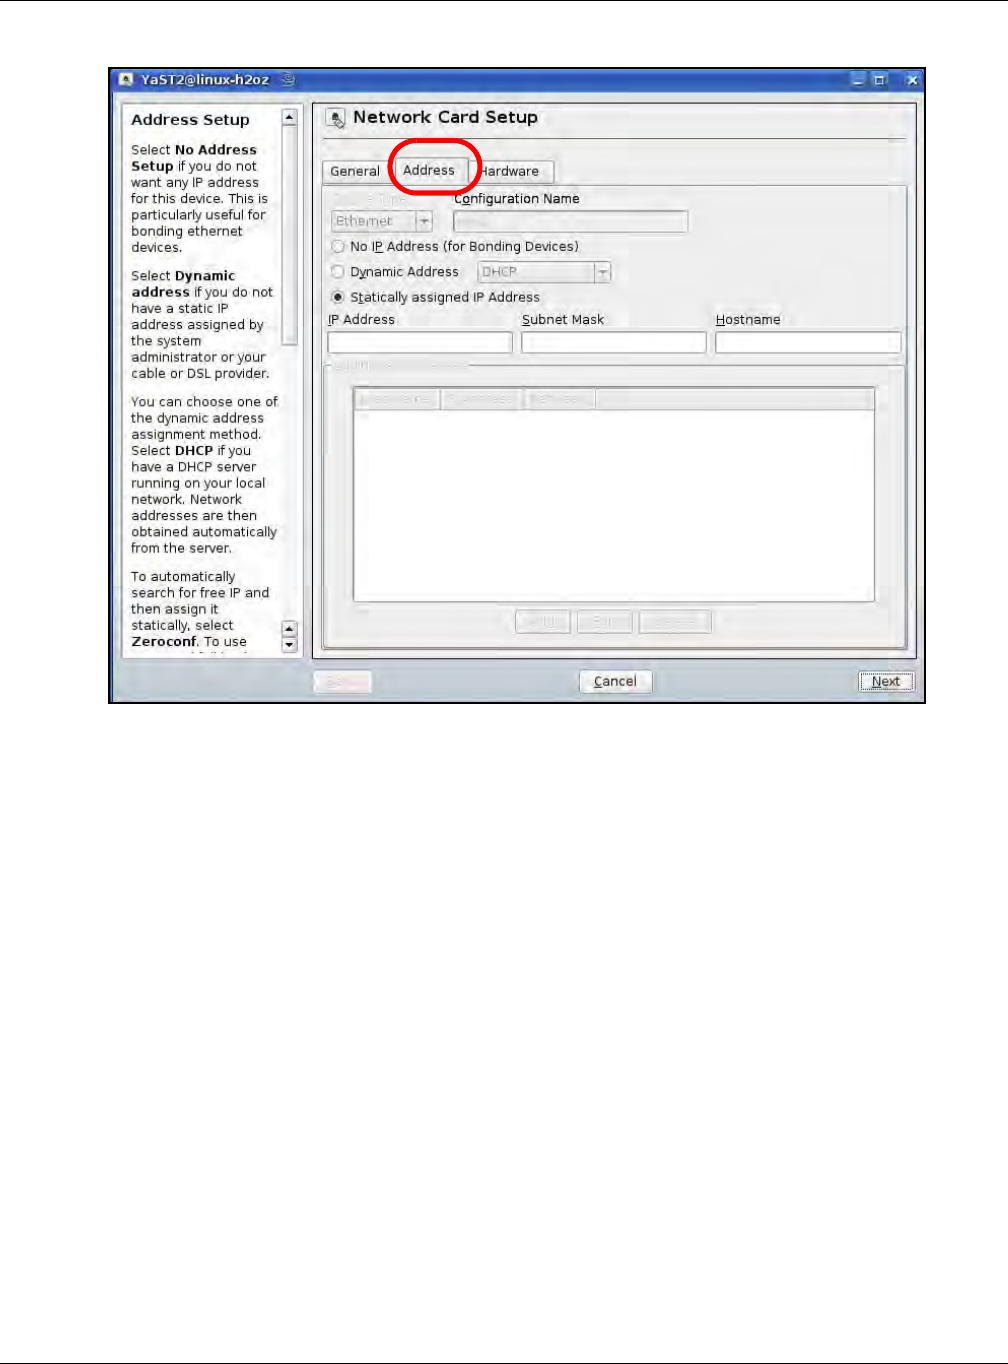
Appendix A Setting Up Your Computer’s IP Address
WRE6505 User’s Guide
106
Figure 67 openSUSE 10.3: Network Card Setup
6Select D ynam ic Addre ss ( DH CP) if you have a dynam ic I P address.
Select St a t ically a ssigned I P Addr e ss if you have a static I P address. Fill in the I P a ddr ess,
Subn et m a sk, and H ost nam e fields.
7Click N e x t to save the changes and close the N et w or k Card Setup window.
8If you know your DNS server I P address(es), click the H ost na m e / D N S tab in N etw ork Sett ings
and then enter the DNS server information in the fields provided.
Appendix A Setting Up Your Computer’s IP Address
WRE6505 User’s Guide
107
9Click Finish to save your settings and close the window.
Verifying Settings
Click the KN e t w or k M ana ge r icon on the Ta sk bar to check your TCP/ I P properties. From the
Op t ion s sub-m enu, select Show Conn ection I nform ation.
Figure 68 openSUSE 10.3: KNetwork Manager
When the Conn ect ion St a t us - KN et w ork Man age r window opens, click the St a t ist ics t ab to
see if your connection is working properly.
Appendix A Setting Up Your Computer’s IP Address
WRE6505 User’s Guide
108
Figure 69 openSUSE: Connection Status - KNetwork Manager

WRE6505 User’s Guide
109
APPENDIX B
Legal Information
Copyright
Copyright © 2014 by ZyXEL Com munications Corporation.
The cont ent s of t his publication m ay not be r eproduced in any part or as a w hole, t ranscribed, stored in a r et rieval syst em, translated into
any language, or transm itt ed in any form or by any m eans, electronic, m echanical, magnetic, optical, chemical, phot ocopying, m anual, or
otherwise, without the prior written permission of ZyXEL Communications Corporation.
Published by ZyXEL Com m unications Corporat ion. All rights reserved.
Disclaimer
ZyXEL does not assume any liability arising out of the application or use of any products, or software described herein. Neither does it
convey any license under its patent rights nor the pat ent rights of others. ZyXEL further reserves t he right to m ake changes in any
products described herein without notice. This publication is subject t o change without notice.
Certifications
Federal Communications Commission (FCC) Interference Statement
The device complies with Part 15 of FCC rules. Operation is subject to the following two conditions:
• This device may not cause harmful interference.
• This device must accept any interference received, including int erference that may cause undesired operat ions.
This device has been tested and found to com ply with t he lim its for a Class B digit al device pursuant to Part 15 of the FCC Rules. These
lim its are designed to provide reasonable protect ion against harmful interference in a residential inst allation. This device generates, uses,
and can radiate radio frequency energy, and if not installed and used in accordance with the instructions, m ay cause harm ful interference
to radio communications. However, there is no guarant ee that interference will not occur in a particular installation.
If t his device does cause harm ful interference to radio/ television reception, which can be determ ined by turning the device off and on, the
user is encouraged to try to correct the interference by one or m ore of the following m easures:
1Reorient or relocate the receiving ant enna.
2Increase the separation between the equipment and the receiver.
3Connect t he equipm ent into an outlet on a circuit different from that to which the receiver is connect ed.
4Consult t he dealer or an experienced radio/ TV t echnician for help.
FCC Radiation Exposure Statement
• This transm itt er must not be co-located or operating in conj unct ion with any other antenna or transm itter.
• IEEE 802.11b, 802.11g or 802.11n (20MHz) operation of this product in the U.S.A. is firm ware-limited to channels 1 through 11. I EEE
802.11n ( 40MHz) operation of this product in the U.S.A. is firmware- lim it ed to channels 3 through 9.
• To com ply with FCC RF exposure compliance requirem ents, a separation dist ance of at least 20 cm m ust be maintained bet ween the
antenna of this device and all persons.
注意 !
依據 低率電波輻射性電機管理辦法
第十二條 經型式認證合格之低率射頻電機,非經許可,公司商號或使用
者均不得擅自變更頻率大率或變更原設計之特性及能
第十四條 低率射頻電機之使用不得影響飛航安全及干擾合法通信;經發現
有干擾現象時,應立即停用,並改善至無干擾時方得繼續使用
前項合法通信,指依電信規定作業之無線電信低率射頻電機須忍
受合法通信或工業科學及醫療用電波輻射性電機設備之干擾
RF (RSS210 i8 & RSSGEN i3)
This device complies with I ndustry Canada licence-exem pt RSS standard(s) . Operation is subject to the following two conditions:
(1) t his device may not cause interference, and
(2) this device m ust accept any interference, including interference that m ay cause undesired operation of the device.

Appendix B Legal Information
WRE6505 User’s Guide
110
The device for the band 5150- 5250 MHz is only for indoor usage to reduce potential for harm ful interference to co-channel m obile satellite
sy stem s.
Le présent appareil est conform e aux CNR d'I ndust rie Canada applicables aux appareils radio exempts de licence. L'exploitation est
autorisée aux deux conditions suivantes :
(1) l'appareil ne doit pas produire de brouillage, et
(2) l'utilisateur de l'appareil doit accepter tout brouillage radioélectrique subi, m êm e si le brouillage est susceptible d'en compromettre le
fonctionnement.
Les dispositifs fonctionnant dans la bande 5150-5250 MHz sont réservés uniquement pour une utilisation à l’int érieur afin de réduire les
risques de brouillage préjudiciable aux syst èm es de satellites m obiles utilisant les m êmes canaux.
Notices
Changes or m odifications not expressly approved by t he party responsible for compliance could void the user's authority to operate the
equipment.
This device has been designed for the WLAN 2.4 GHz network throughout t he EC region and Switzerland, with restrictions in France.
This device and its antenna(s) must not be co-located or operating in conjunction with any other antenna or transm it ter.
Ce produit est conçu pour les bandes de fréquences 2,4 GHz conform ém ent à la législation Européenne. En France m étropolitaine, suivant
les décisions n° 03-908 et 03-909 de l'ARCEP, la puissance d'émission ne devra pas dépasser 10 mW (10 dB) dans le cadre d'une
installation Wi-Fi en extérieur pour les fréquences com prises entre 2454 MHz et 2483,5 MHz.
This Class B digital apparatus complies with Canadian ICES-003.
Cet appareil num érique de la classe B est conform e à la norm e NMB- 003 du Canada.
Viewing Certifications
Go to ht tp: / / www.zyxel.com to view this product ’s docum ent at ion and certifications.
ZyXEL Limited Warranty
ZyXEL warrants to the original end user (purchaser) that this product is free from any defects in material or workm anship for a specific
period (the Warranty Period) from the date of purchase. The Warranty Period varies by region. Check with your vendor and/ or the
authorized ZyXEL local distributor for det ails about t he Warranty Period of this product. During the warranty period, and upon proof of
purchase, should the product have indications of failure due to faulty workm anship and/ or materials, ZyXEL will, at its discretion, repair or
replace the defective products or com ponents without charge for eit her parts or labor, and to whatever ext ent it shall deem necessary t o
restore the product or com ponents to proper operating condition. Any replacem ent will consist of a new or re-m anufactured funct ionally
equivalent product of equal or higher value, and will be solely at the discret ion of ZyXEL. This warranty shall not apply if the product has
been m odified, m isused, tampered with, damaged by an act of God, or subjected to abnorm al working conditions.
Note
Repair or replacement, as provided under this warranty, is the exclusive remedy of the purchaser. This warranty is in lieu of all other
warranties, express or implied, including any im plied warranty of m erchantability or fitness for a particular use or purpose. ZyXEL shall in
no event be held liable for indirect or consequential damages of any kind t o the purchaser.
To obtain the services of this warranty, contact your vendor. You m ay also refer to the warranty policy for t he region in which you bought
the device at ht tp: / / www.zyxel.com / web/ support_warranty_info.php.
Registration
Register your product online to receive e-m ail notices of firmware upgrades and inform ation at www.zyxel.com for global products, or at
www.us.zyxel.com for North American products.
Open Source Licenses (all products)
This product cont ains in part som e free soft ware distribut ed under GPL license term s and/ or GPL like licenses. Open source licenses are
provided with t he firmware package. You can download the latest firm ware at www.zyxel.com . To obtain the source code covered under
those Licenses, please contact support@zyxel.com .tw to get it.
Regulatory Information
European Union
The following inform ation applies if you use the product within the European Union.
Declaration of Conformity with Regard to EU Directive 1999/5/EC (R&TTE Directive)
Com pliance Inform ation for 2.4GHz and 5GHz Wireless Products Relevant to the EU and Other Countries Following the EU Directive 1999/5/EC
(R&TTE Directive)
[ Czech] ZyXEL tím to prohlašuje, že tento zařízení je ve shodě se základními požadavky a dalšími příslušným i ustanoveními
sm ěrnice 1999/ 5/ EC.
[ Danish] Undertegnede ZyXEL erklærer herved, at følgende udstyr udstyr overholder de væsentlige krav og øvrige relevante
krav i direktiv 1999/ 5/ EF.
[ German] Hierm it erklärt ZyXEL, dass sich das Gerät Ausstattung in Übereinst im mung m it den grundlegenden Anforderungen
und den übrigen einschlägigen Bestimm ungen der Richtlinie 1999/ 5/ EU befindet.
[ Estonian] Käesolevaga kinnitab ZyXEL seadme seadm ed vastavust direktiivi 1999/ 5/ EÜ põhinõuetele ja nim et atud direktiivist
tulenevat ele t eistele asjakohastele sätetele.

Appendix B Legal Information
WRE6505 User’s Guide
111
National Restrictions
This product may be used in all EU countries (and other countries following the EU directive 1999/ 5/ EC) wit hout any limitation except for
the countries m entioned below:
Ce produit peut être utilisé dans tous les pays de l’UE (et dans t ous les pays ayant transposés la direct ive 1999/ 5/ CE) sans aucune
limitation, excepté pour les pays mentionnés ci-dessous:
Questo prodotto è utilizzabile in tutte i paesi EU (ed in tutt i gli altri paesi che seguono le diret t ive EU 1999/ 5/ EC) senza nessuna
limitazione, eccetto per i paesii menzionati di seguito:
Das Produkt kann in allen EU St aaten ohne Einschränkungen eingesetzt werden (sowie in anderen Staaten die der EU Direktive 1995/ 5/ CE
folgen) m it Außnahme der folgenden aufgeführt en St aaten:
In the m aj ority of the EU and other European count ries, the 2, 4- and 5- GHz bands have been m ade available for the use of wireless local
area networks (LANs) . Later in t his docum ent you will find an overview of countries inwhich additional restrictions or requirem ent s or both
are applicable.
The requirements for any country m ay evolve. ZyXEL recom mends that you check with the local authorities for the latest status of t heir
national regulations for both the 2,4- and 5-GHz wireless LANs.
The following count ries have restrictions and/ or requirem ent s in addition to those given in the table labeled “Over view of Regulat or y
Requirem ent s for Wireless LANs” : .
English Hereby, ZyXEL declares that this equipm ent is in compliance with the essential requirements and ot her relevant
provisions of Directive 1999/ 5/ EC.
[ Spanish] Por m edio de la presente ZyXEL declara que el equipo cum ple con los requisitos esenciales y cualesquiera ot ras
disposiciones aplicables o exigibles de la Directiva 1999/ 5/ CE.
[ Greek] Ε Η ΑΑ ZyXEL ∆ΗΩΕ επισός ΦΩΕΑ Ω∆Ε ΑΑΗΕ Α
Ε ΧΕΕ ∆ΑΑΕ Η ∆ΗΓΑ 1999/ 5/ ΕC.
[ French] Par la présente ZyXEL déclare que l'appareil équipements est conform e aux exigences essent ielles et aux autres
dispositions pertinentes de la directive 1999/ 5/ EC.
[ I t alian] Con la presente ZyXEL dichiara che quest o attrezzatura è conform e ai requisit i essenziali ed alle altre disposizioni
pertinent i stabilite dalla direttiva 1999/ 5/ CE.
[ Latvian] Ar šo ZyXEL deklarē, ka iekārtas atbilst Direktīvas 1999/ 5/ EK būtiskajām prasībām un cit iem ar to saist ītajiem
not eiku m iem .
[ Lithuanian] Šiuo ZyXEL deklaruoja, kad šis įranga atitinka esminius reikalavimus ir kitas 1999/ 5/ EB Direktyvos nuostatas.
[ Dutch] Hierbij verklaart ZyXEL dat het toestel uitrust ing in overeenstemm ing is m et de essentiële eisen en de andere
relevant e bepalingen van richtlij n 1999/ 5/ EC.
[ Maltese] Hawnhekk, ZyXEL, jiddikjara li dan tagħmir jikkonforma m al-ħtiġij iet essenzj ali u m a provvedim enti oħraj n relevanti li
hemm fid-Dirrettiva 1999/ 5/ EC.
[ Hungarian] Alulírott , ZyXEL nyilatkozom , hogy a berendezés m egfelel a vonatkozó alapvetõ követelm ényeknek és az 1999/ 5/ EK
irányelv egyéb elõírásainak.
[ Polish] Niniej szym ZyXEL oświadcza, że sprzęt jest zgodny z zasadniczym i wym ogam i oraz pozost ałym i stosownym i
postanowieniam i Dyrektywy 1999/ 5/ EC.
[ Portuguese] ZyXEL declara que este equipam ento está conforme com os requisit os essenciais e outras disposições da Directiva
1999/ 5/ EC.
[ Slovenian] ZyXEL izjavlja, da je ta oprema v skladu z bistvenim i zahtevam i in ostalimi relevantnimi določili direkt ive 1999/ 5/ EC.
[ Slovak] ZyXEL tým to vyhlasuje, že zariadenia spĺňa základné požiadavky a všetky príslušné ustanovenia Sm ernice 1999/ 5/
EC.
[ Finnish] ZyXEL vakuuttaa täten että laitteet tyyppinen laite on direktiivin 1999/ 5/ EY oleellisten vaatimusten ja sitä koskevien
direktiivin m uiden ehtojen m ukainen.
[ Swedish] Härmed intygar ZyXEL att denna ut rustning står I överensstämm else m ed de väsentliga egenskapskrav och övriga
relevanta bestäm melser som framgår av direktiv 1999/ 5/ EC.
[ Bulgarian] С я ZyXEL , ч я
1999/ 5/ C.
[ I celandic] Hér m eð lýsir, ZyXEL því yfir að þessi búnaður er í samræm i við grunnkröfur og önnur viðeigandi ákvæði t ilskipunar
1999/ 5/ EC.
[ Norwegian] Erklærer herved ZyXEL at dette utstyret er I samsvar m ed de grunnleggende kravene og andre relevante
bestemm elser I direktiv 1999/ 5/ EF.
[ Romanian] Prin prezenta, ZyXEL declară că acest echipament este în conform itate cu cerinţele esenţiale şi alt e prevederi
relevante ale Directivei 1999/ 5/ EC.
Overview of Regulatory Requirem ents for Wireless LANs
Frequency Band (MHz) Max Power Level
( EI RP) 1 (m W) I ndoor ONLY Indoor and Outdoor

Appendix B Legal Information
WRE6505 User’s Guide
112
Belgium
The Belgian Inst it ute for Postal Services and Telecom m unications ( BIPT) m ust be notified of any outdoor wireless link having a range
exceeding 300 m et ers. Please check htt p: / / www.bipt.be for m ore details.
Draadloze verbindingen voor buitengebruik en met een reikwijdte van meer dan 300 meter dienen aangemeld te worden bij het Belgisch
Instituut voor postdiensten en telecomm unicatie ( BIPT). Zie htt p: / / www.bipt.be voor m eer gegevens.
Les liaisons sans fil pour une utilisation en extérieur d’une distance supérieure à 300 mètres doivent être notifiées à l’I nstitut Belge des
services Post aux et des Télécom munications (I BPT). Visitez http: / / www.ibpt.be pour de plus amples détails.
Denm ark
In Denm ark, the band 5150 - 5350 MHz is also allowed for outdoor usage.
I Danm ark m å frekvensbåndet 5150 - 5350 også anvendes udendørs.
France
For 2.4 GHz, the output power is restricted to 10 m W EI RP when the product is used outdoors in the band 2454 - 2483.5 MHz. There are
no restrictions when used indoors or in other parts of the 2.4 GHz band. Check http: / / www.arcep.fr/ for m ore details.
Pour la bande 2.4 GHz, la puissance est limitée à 10 m W en p.i.r.e. pour les équipem ents ut ilisés en extérieur dans la bande 2454 -
2483.5 MHz. I l n'y a pas de restrictions pour des utilisat ions en intérieur ou dans d'autres parties de la bande 2.4 GHz. Consultez http: / /
www.arcep.fr/ pour de plus amples dét ails.
It aly
This product m eets the National Radio I nterface and the requirem ents specified in the National Frequency Allocation Table for It aly. Unless
this wireless LAN product is operat ing within t he boundaries of the owner's property, its use requires a “general authorization.” Pl ea se
check htt p: / / www.sviluppoeconomico.gov.it/ for m ore details.
Questo prodott o è conforme alla specifiche di Int erfaccia Radio Nazionali e rispet ta il Piano Nazionale di ripartizione delle frequenze in
Italia. Se non viene installato all 'interno del proprio fondo, l'utilizzo di prodotti Wireless LAN richiede una “Autorizzazione Generale”.
Consultare htt p: / / www.sviluppoeconomico.gov.it/ per m aggiori det tagli.
Latvia
The outdoor usage of the 2.4 GHz band requires an authorization from the Elect ronic Comm unications Office. Please check http: / /
www.esd.lv for m ore details.
2.4 GHz frekvenèu joslas izmantoðanai ârpus telpâm nepiecieðama atïauja no Elektronisko sakaru direkcijas. Vairâk informâcijas: http://www.esd.lv.
Notes:
1. Although Norway, Switzerland and Liechtenst ein are not EU member states, t he EU Directive 1999/ 5/ EC has also been im plem ented in
those countries.
2. The regulatory limits for m aximum output power are specified in EI RP. The EIRP level ( in dBm ) of a device can be calculated by adding
the gain of the antenna used(specified in dBi) to the output power available at the connector ( specified in dBm ).
2400- 2483.5 100 V
5150- 5350 200 V
5470- 5725 1000 V
R&TTE 1999/ 5/ EC
WLAN 2.4 – 2.4835 GHz
IEEE 802.11 b/ g/ n
Location Frequency Range(GHz) Power (EIRP)
Indoor (No restrictions) 2.4 – 2.4835 100m W (20dBm )
Outdoor 2.4 – 2.454 100m W (20dBm )
2.454 – 2.4835 10m W (10dBm)

Appendix B Legal Information
WRE6505 User’s Guide
113
List of national codes
Safety Warnings
• Do NOT use this product near water, for example, in a wet basement or near a swim ming pool.
• Do NOT expose your device to dampness, dust or corrosive liquids.
• Do NOT store things on the device.
• Do NOT install, use, or service this device during a thunderst orm . There is a remote risk of electric shock from lightning.
• Connect ONLY suitable accessories to the device.
• Do NOT open the device or unit. Opening or removing covers can expose you to dangerous high voltage points or other risks. ONLY
qualified service personnel should service or disassem ble t his device. Please contact your vendor for further inform at ion.
• Make sure to connect t he cables t o t he correct port s.
• Place connecting cables carefully so that no one will step on them or st um ble over them.
• Always disconnect all cables from this device before servicing or disassem bling.
• Use ONLY an appropriate power adaptor or cord for your device.
• Connect the power adaptor or cord to the right supply voltage (for example, 110V AC in North America or 230V AC in Europe) .
• Do NOT allow anything to rest on the power adaptor or cord and do NOT place the product where anyone can walk on the power
adaptor or cord.
• Do NOT use t he device if the power adapt or or cord is damaged as it might cause elect rocution.
• If the power adaptor or cord is damaged, remove it from t he power outlet.
• Do NOT attempt to repair the power adaptor or cord. Cont act your local vendor to order a new one.
• Do not use the device outside, and make sure all the connections are indoors. There is a rem ote risk of electric shock from lightning.
• Do NOT obstruct t he device ventilation slots, as insufficient airflow m ay harm your device.
• Antenna Warning! This device meets ETSI and FCC certification requirements when using the included antenna(s). Only use the
included antenna(s).
• I f you wall m ount your device, m ake sure that no electrical lines, gas or water pipes will be damaged.
Your product is m arked with this sym bol, which is known as t he WEEE mark. WEEE st ands for Waste Electronics and
Elect rical Equipm ent . I t m eans that used electrical and electronic products should not be mixed with general waste. Used
elect rical and electronic equipment should be treated separately.
COUNTRY ISO 3166 2 LETTER CODE COUNTRY ISO 3166 2 LETTER CODE
Austria AT Malt a MT
Belgium BE Netherlands NL
Cyprus CY Poland PL
Czech Republic CR Portugal PT
Denm ark DK Slovakia SK
Estonia EE Slovenia SI
Finland FI Spain ES
France FR Sweden SE
Germany DE United Kingdom GB
Greece GR Iceland IS
Hungary HU Liechtenstein LI
Ireland IE Norway NO
It aly IT Switzerland CH
Latvia LV Bulgaria BG
Lithuania LT Romania RO
Luxembourg LU Turkey TR

Index
WRE6505 User’s Guide
114
Index
A
AP
autom atic selection 47
configuring 47, 49
connection 46
manual selection 49
AP Mode
menu 25
status screen 17, 22
AP m ode
scheduling 61
setting up 22
B
backup configuration 69
C
certifications
notices 110
viewing 110
channel 17, 18, 24
configuration
backup 69
reset factory defaults 70
restore 69
connection
AP 46
copyright 109
CPU usage 18, 24, 39
D
disclaim er 109
docum entation
related 2
duplex setting 18, 24, 39
E
encryption 54
key 54
F
factory defaults
restore 70
FCC interference statement 109
firmware upgrade
screen 66
firmware upload 66
file extension
using HTTP
firmware version 17, 23, 38
G
general 65
general wireless LAN screen 55
guide
quick start 2
I
Internet
connection 46
IP Address 64

Index
WRE6505 User’s Guide
115
L
LAN 63
LAN I P
screen 63
LAN setup 63
language 70
link type 18, 24, 39
M
MAC 57
MAC address 54
MAC address filtering 57
MAC address list 54, 57
managing the device
good habits 10
media access control 57
mem ory usage 18, 24, 39
mode
access point 13
norm al 72
range boost 73
speed boost 74
universal repeater 13
N
navigation
panel 25, 41
navigation panel 25, 41
norm al m ode 72
O
operating
mode 14
operating mode
changing 14
norm al 72
range boost 73
speed boost 74
other docum entation 2
P
PI N
configuration 44, 45
port speed 18, 24, 39
product registration 110
push button
configuration 43, 44
Q
quick start guide 2
R
range boost m ode 73
registration
product 110
related docum entation 2
reset the device 28
resetting
factory default 28
restore configuration 69
RTS/ CTS t hreshold 59
S
safety warnings 113
scheduling 61
wireless LAN 61
security
PBC 43, 44
PI N 44, 45
WPS 43
service set identification 30, 57
service set identity. see SSID.
speed boost m ode 74
SSI D 17, 18, 24, 30, 38, 53, 57

Index
WRE6505 User’s Guide
116
subnet m ask 64
sum m ary
packet statistics 39
wireless station status 40
system 65
WPS behavior 71
system mode 70
norm al 72
range boost 73
speed boost 74
system password
screen 66
W
warranty 110
note 110
web configurator
accessing 27
overview 27
WEP Encryption 56
wireless association list 40
wireless channel 80
wireless LAN 80
wireless LAN wizard 30
wireless network 54
basic guidelines 53
encryption 54
security 53
SSI D 53
wireless security 53
overview 53
troubleshooting 80
type 53
wireless tutorial 43
wizard setup 29
wireless LAN 30
WPS 59
behavior 71
screen 59
WPS button 12, 28