Zyxel Adsl2 Access Router P 660R T1 V2 Users Manual TxC_QSG_v3 40_2006 1
P-660R-T1 v2 to the manual 373cfebb-9bb9-b6b4-8909-ef440a39d273
2015-01-23
: Zyxel Zyxel-Adsl2-Access-Router-P-660R-T1-V2-Users-Manual-309844 zyxel-adsl2-access-router-p-660r-t1-v2-users-manual-309844 zyxel pdf
Open the PDF directly: View PDF ![]() .
.
Page Count: 9

P-660R-TxC Series
ADSL2+ Access Router
Quick Start Guide
Version 3.40
Edition 1
2/2006
P-660R-TxC Series Quick Start Guide
2
Overview
The P-660R-TxC ADSL2+ access router is the ideal device for small networks connecting to the Internet via
ADSL. See your User’s Guide for background information on all features.
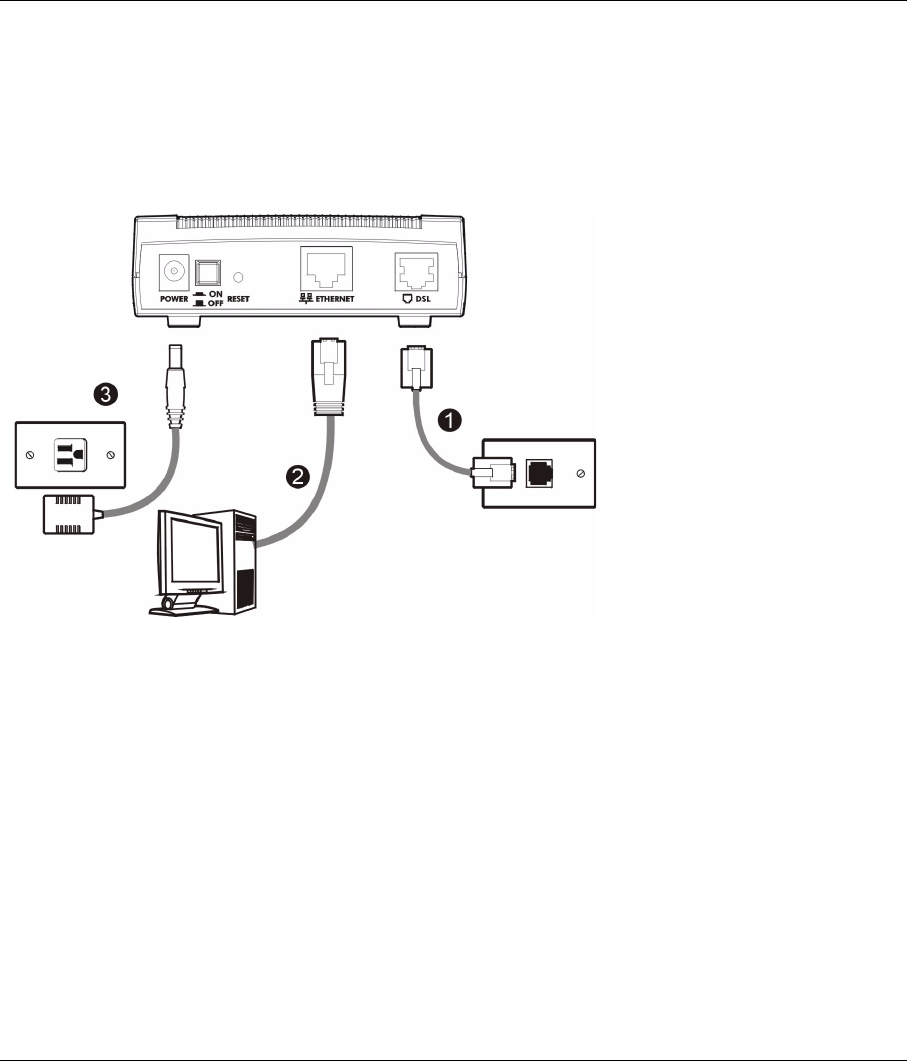
1 Hardware Connections
If you prefer to see a multi-media animation of how to make hardware connections, see the included CD.
1DSL: Use a telephone wire to connect your P-660R-TxC’s DSL port to a telephone jack (or to a splitter, if
one is already installed).
2ETHERNET: Use an Ethernet cable to connect a computer to the ETHERNET port for initial configuration
and/or Internet access.
3POWER: Use the included power adaptor to connect the POWER socket to an appropriate power source.
After you’ve made the connections, push in the power button to turn on the P-660R-TxC. Look at the lights on
the front panel. The POWER light blinks while performing system testing. The POWER light then turns steady
on if the testing is successful. The ETHERNET light turns on if the LAN port is properly connected.
2 Configuration for Internet Access
You may configure the P-660R-TxC for Internet access in any one of these ways:
• Configuration Genie
• Zero Configuration
•Web Configurator Internet Access Wizard
P-660R-TxC Series Quick Start Guide
3
Note: Configuration genie and Zero configuration are only able to configure the device automatically for
Internet access if you are using PPPoE, PPPoA or ENET ENCAP encapsulation with a
dynamically-assigned IP address from your ISP.
If you’re not using these Internet access settings, then use the Web Configurator Internet
Access Wizard to manually configure the device.
You will need your Internet access information such as user name and password if given by your ISP.
2.1 Configuration Genie
From the included CD, click “Multimedia Auto Provisioner” (the installation and configuration assistant) and
then click “Installation Tutorial”. After you’ve viewed the tutorial, click “Configuration Genie” at the end of the
installation tutorial or from “Multimedia Auto Provisioner” in the CD.
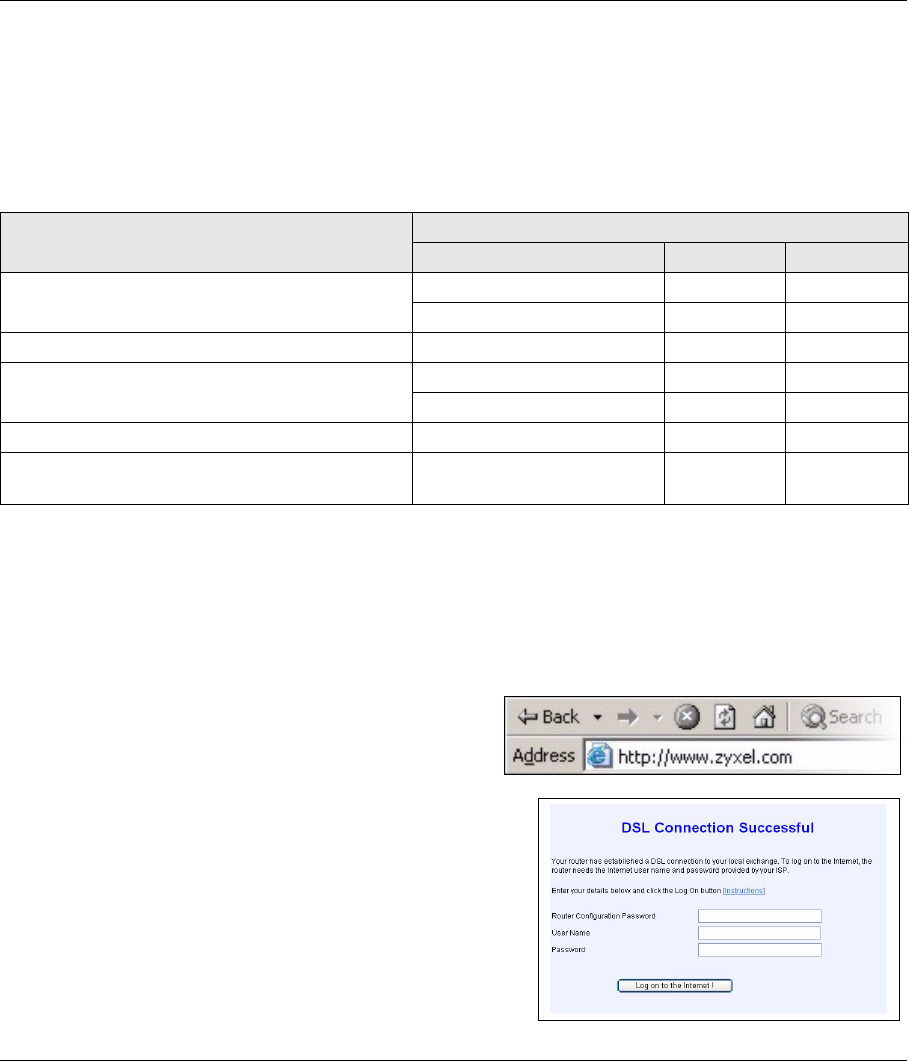
2.2 Zero Configuration
Launch your web browser and navigate to any web site (for
example, www.zyxel.com). The P-660R-TxC automatically
detects and configures your Internet connection. This may
take about two minutes.
If you have a PPPoE or PPPoA connection, a screen displays
prompting you to enter your Internet account information. Enter
the username, password and/or service name exactly as
provided. Click Log on to the Internet !.
INFORMATION FROM ISP YOU ARE USING
ENCAPSULATION METHOD MODE IP ADDRESS
None RFC1483 Bridge N/A
ENET ENCAP Routing Dynamic
An IP address only RFC1483 Routing Static
A user name and password PPPoA or PPPoE Routing Dynamic
PPPoA Bridge N/A
A user name, password and an IP address PPPoA or PPPoE Routing Static
An IP address, subnet mask and a gateway IP
address
ENET ENCAP Routing Static
P-660R-TxC Series Quick Start Guide
4
2.3 Web Configurator Internet Access Wizard
2.3.1 Accessing the Web Configurator
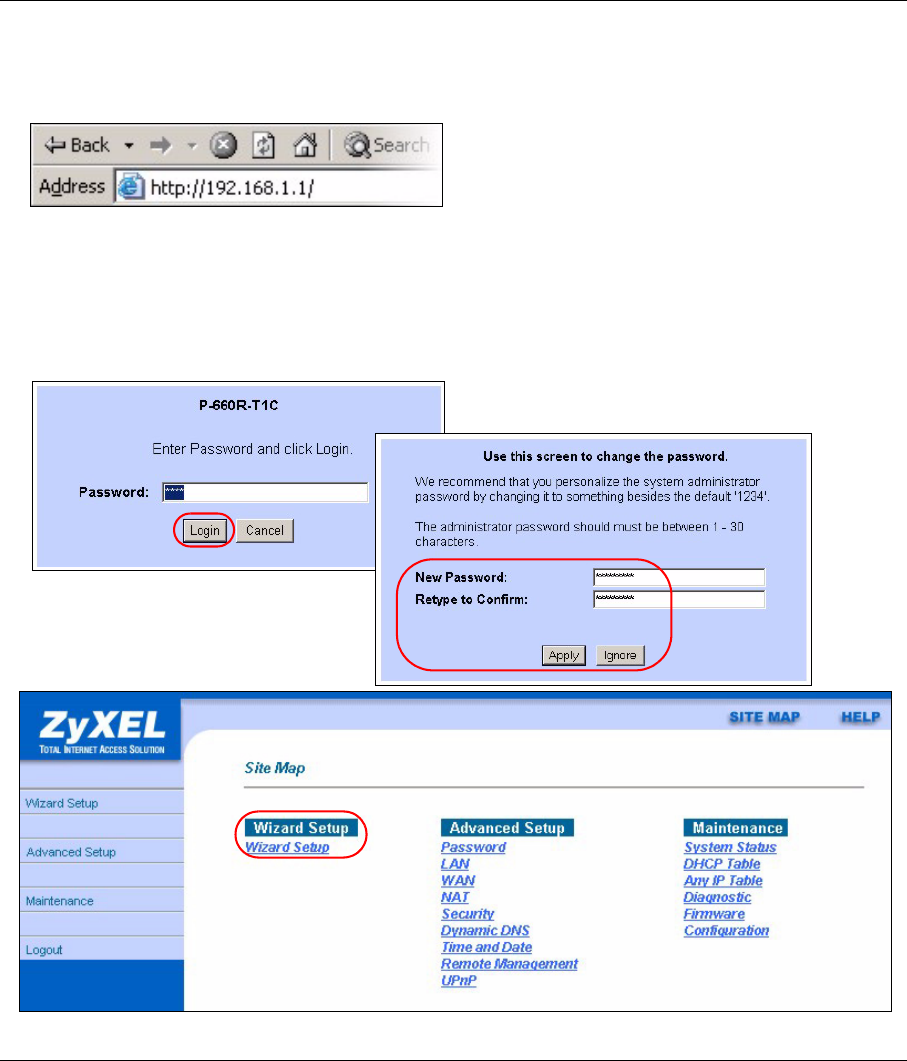
1Launch your web browser. Enter “192.168.1.1” as the web site address.
Note: If you do not see the next screens, then please read Section 4.1 on page 8.
2Click Login.
3Type a new password (retype it to confirm) and click Apply. Otherwise click Ignore. You then see the main
web configurator screen.
4In the Site Map screen, click Wizard Setup.
P-660R-TxC Series Quick Start Guide
5
2.3.2 Internet Access Setup
1Configure the Internet access settings in this step. The wizard screens vary depending on the Mode and
Encapsulation you chose in the first wizard screen.
Note: Enter the Internet access information given to you by your ISP exactly in each wizard screen. If
not given, leave the fields set to the default.
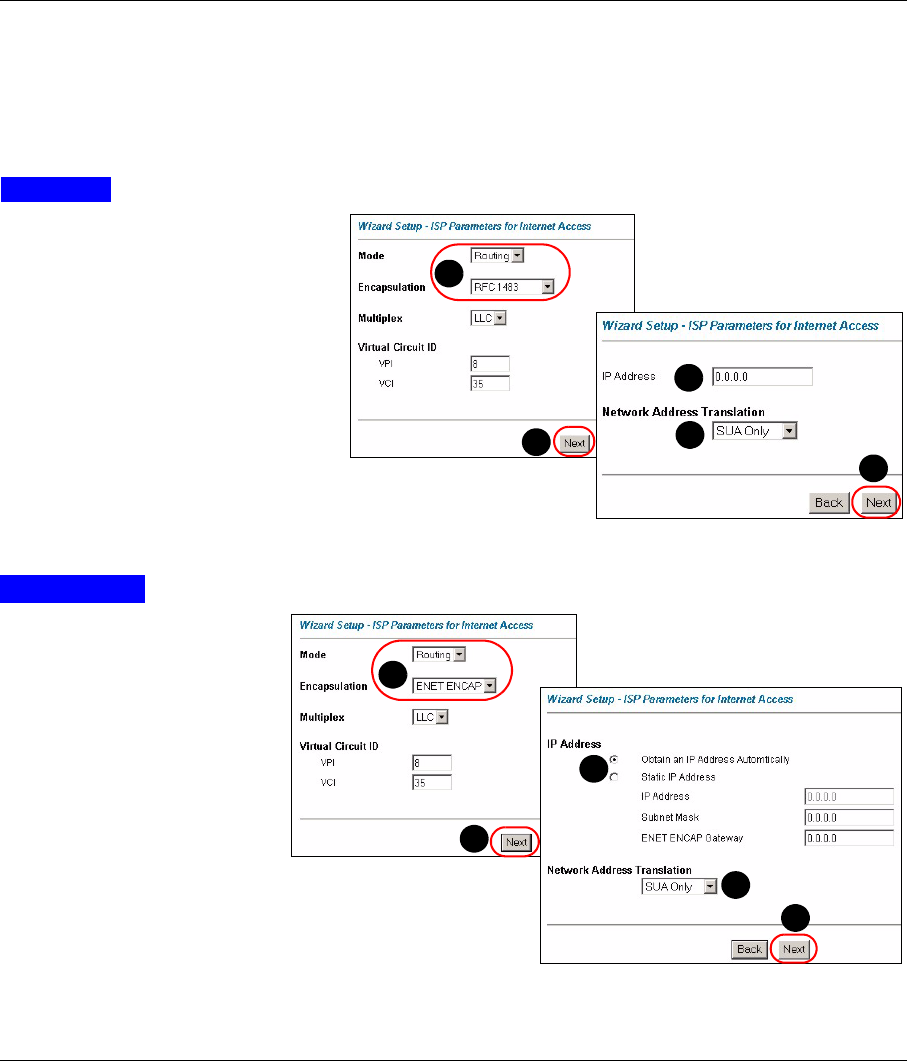
RFC 1483
A) Select Routing if your ISP gave
you an IP address and allows
multiple computers to share an
Internet account. Otherwise, select
Bridge. Then select RFC 1483.
B) Click Next.
C) If you selected Routing, enter the
IP address given by your ISP.
D) If you selected Routing, select
SUA Only when you have one
public IP address, Full Feature
when you have more than one
public IP address (for translation)
or None to disable NAT.
E) Click Next.
ENET ENCAP
A) Select Routing, then ENET
ENCAP.
B) Click Next.
C) If your ISP gave you an IP
address, subnet mask and
gateway address, select
Static IP Address and enter
them. Otherwise, select
Obtain an IP Address
Automatically.
D) Select SUA Only if you
have one public IP address,
Full Feature if you have
more than one public IP
address (for translation) or
None to disable NAT.
E) Click Next.
A
C
D
B
E
A
C
D
B
E
P-660R-TxC Series Quick Start Guide
6
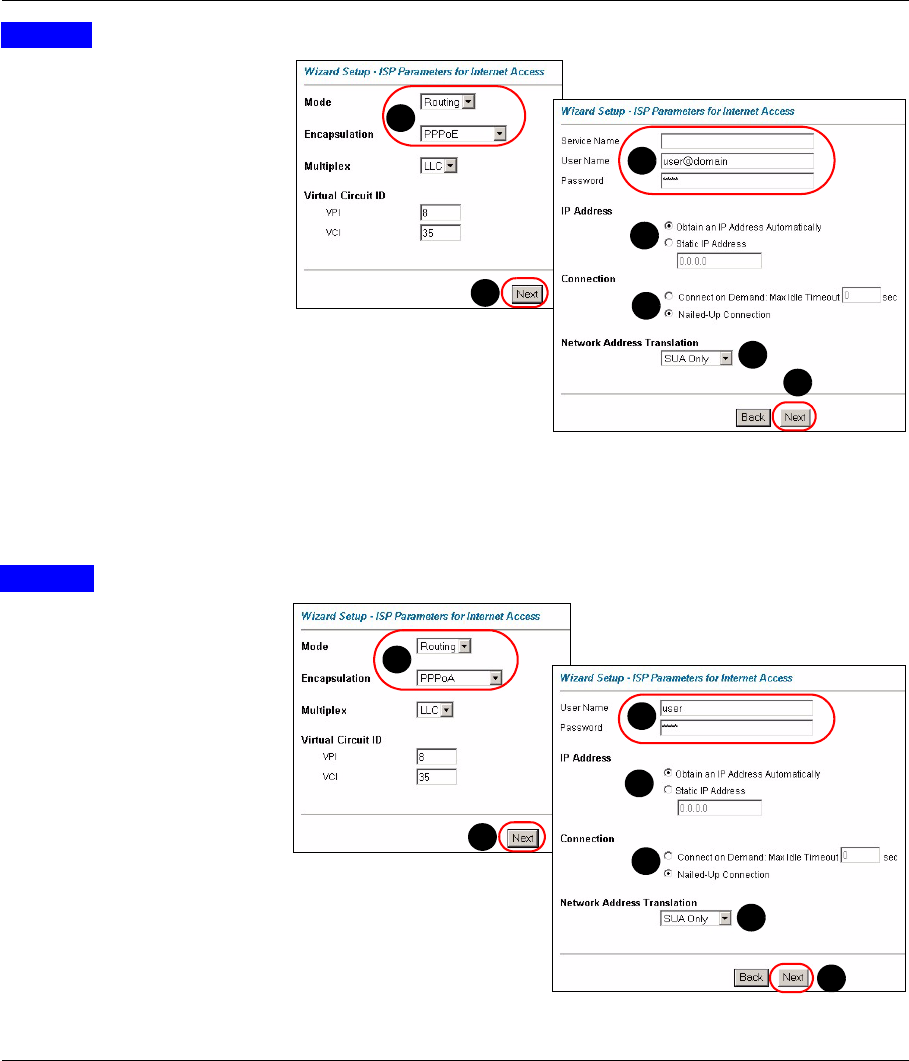
PPPoE
A) Select Routing, then
PPPoE.
B) Click Next.
C) Enter the service name,
username and password
given by your ISP.
D) If your ISP gave you an IP
address, select Static IP
Address and enter it.
Otherwise, select Obtain an
IP Address Automatically.
E) Select Nailed-Up
Connection to have your
connection up all the time.
Otherwise, select Connect
on Demand and specify an
idle time-out period (in
seconds) in the Max. Idle Timeout field.
F) Select SUA Only if you have one public IP address, Full Feature if you have more than one public IP
address (for translation) or None to disable NAT.
G) Click Next.
PPPoA
A) Select Routing if your ISP
allows multiple computers
to share an Internet
account. Otherwise, select
Bridge. Then select
PPPoA.
B) Click Next.
C) Enter the username and
password given by your
ISP.
D) If your ISP gave you an IP
address, select Static IP
Address and enter it.
Otherwise, select Obtain an
IP Address Automatically.
E) Select Nailed-Up
Connection to have your
connection up all the time.
A
C
D
B
F
G
E
A
C
D
B
F
G
E
P-660R-TxC Series Quick Start Guide
7
Otherwise, select Connect on Demand and specify an idle time-out period (in seconds) in the Max. Idle
Timeout field.
F) If you selected Routing, select SUA Only when you have one public IP address, Full Feature when you
have more than one public IP address (for translation) or None to disable NAT.
G) Click Next.
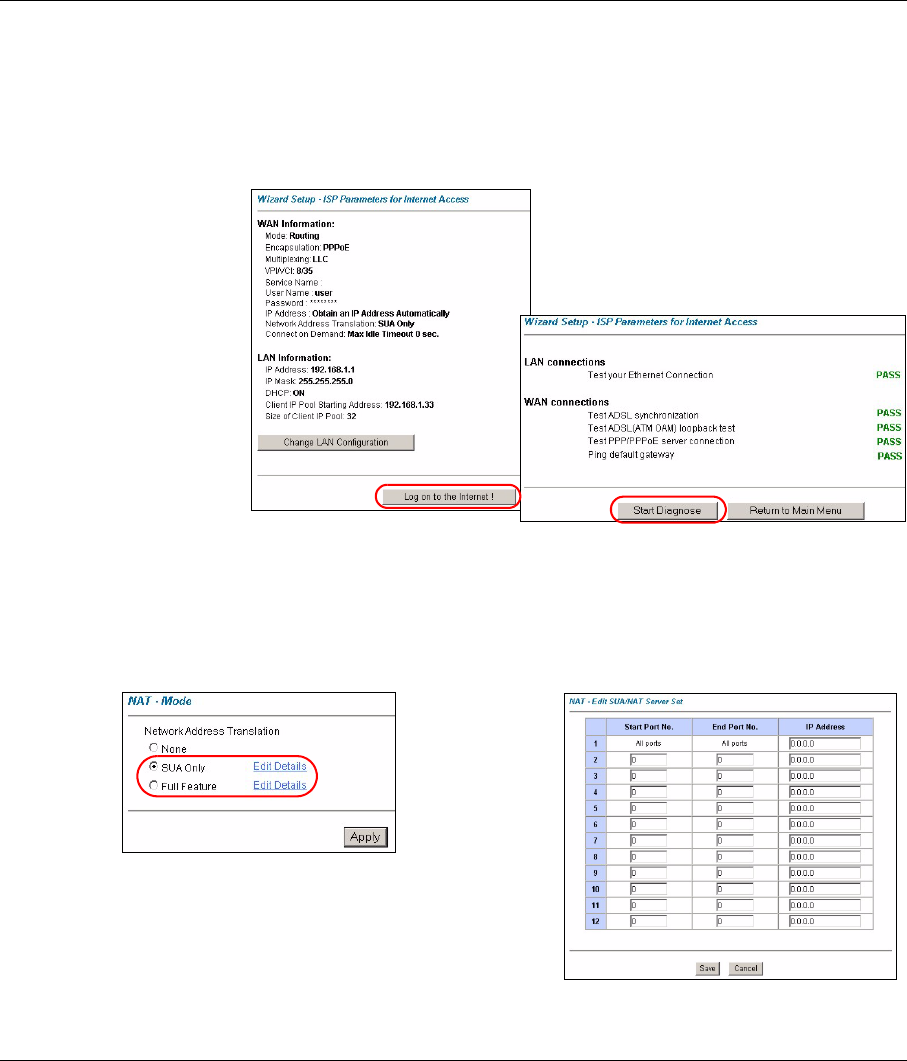
2Verify your LAN and
WAN settings and click
Log on to the Internet !.
3The P-660R-TxC
automatically tests the
connection to the
computer(s) connected
to the LAN port. To test
the connection from the
P-660R-TxC to the ISP,
click Start Diagnose.
Otherwise click Return
to Main Menu to go back
to the main screen.
3 NAT
NAT (Network Address Translation - NAT, RFC 1631) means the translation of an IP address in one network to
a different IP address in another. For example, you could translate one public IP address to multiple private IP
addresses on your LAN (SUA Only). You must select Routing mode to use routing features such as NAT.
Click
Advanced
Setup and
then NAT to
open the
NAT-Mode
screen.
Select SUA
Only if you
have one public IP address and Full Feature if
you have multiple public IP addresses (for
address translation).
If you have
servers on your
LAN, configure
an SUA server
set to have
them visible to
the outside.
From the NAT -
Mode screen
click Edit
Details and fill
in the fields as
shown.

P-660R-TxC Series Quick Start Guide
8
4 Troubleshooting
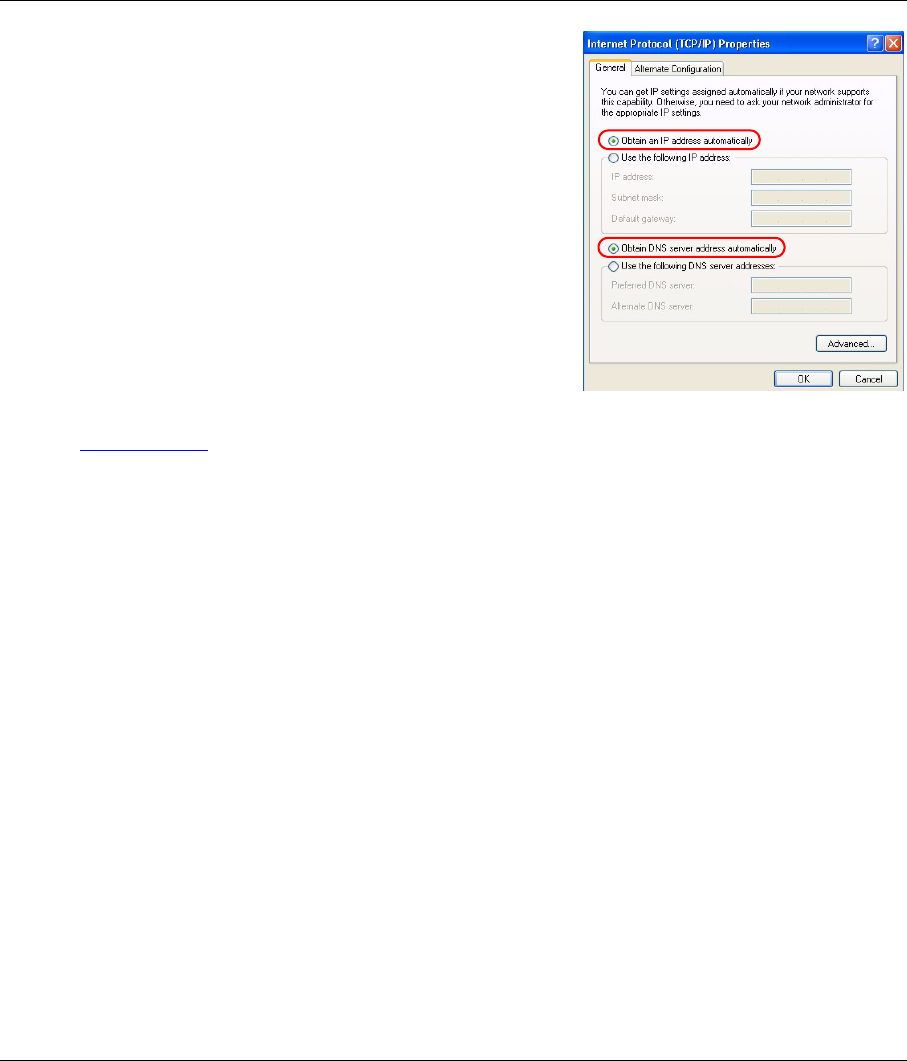
4.1 Set Up Your Computer’s IP Address
This section shows you how to set your Windows NT/2000/XP computer to automatically get an IP address.
This ensures that your computer can connect with your P-660R-TxC. Refer to your User’s Guide for detailed
IP address configuration for other Windows and Macintosh computer operating systems.
1In Windows XP, click start, Control Panel. In Windows 2000/NT, click Start, Settings, Control Panel.
2In Windows XP, click Network Connections. In Windows 2000/NT, click Network and Dial-up
Connections.
3Right-click Local Area Connection and then click Properties.
PROBLEM CORRECTIVE ACTION
None of the LEDs turn on
when you connect the P-
660R-TxC’s power.
Make sure that you have the correct power adaptor connected to the P-660R-TxC, it is
plugged into an appropriate power source and the P-660R-TxC is turned on.
Check all cable connections. If the LEDs still do not turn on, you may have a hardware
problem. In this case, you should contact your local vendor.
Cannot access the P-
660R-TxC from my
computer.
Check the cable connection from your computer to the P-660R-TxC.
Make sure your computer’s IP address is in the same subnet as the P-660R-TxC’s IP
address (see Section 4.1 on page 8).
Ping the P-660R-TxC from a computer on the LAN. Make sure your computer’s
Ethernet adapter is installed and functioning properly. In the computer, click Start, (All)
Programs, Accessories and then Command Prompt. In the Command Prompt
window, type "ping" followed by the P-660R-TxC’s LAN IP address (192.168.1.1 is the
default) and then press [ENTER]. The P-660R-TxC should reply; otherwise see
Section 4.1 on page 8.
If the P-660R-TxC’s IP address has changed, then enter the new one as the URL.
Use Internet Explorer 6.0 and later or Netscape Navigator 7.0 and later with
JavaScript enabled.
Make sure you enter the password correctly (the field is case sensitive).
If you’ve forgotten the P-660R-TxC’s password, use the RESET button. Press the
button in for about 10 seconds (or until the POWER light starts to blink), then release
it. It returns the P-660R-TxC to the factory defaults (password is 1234, LAN IP address
192.168.1.1 etc.; see your User’s Guide for details).
Cannot access the
Internet.
Verify the Internet connection settings in the wizard. Make sure you entered the
correct user name and password if you are using PPPoE or PPPoA.
The P-660R-TxC stores the Internet connection settings that it detects using zero
configuration. Reset the P-660R-TxC to the factory defaults or manually configure it
for Internet access if you connect it to another DSL line with a different VPI and VCI.
P-660R-TxC Series Quick Start Guide
9
4Select Internet Protocol (TCP/IP) (under the General tab in
Windows XP) and click Properties.
5The Internet Protocol TCP/IP Properties screen opens (the
General tab in Windows XP).
6Select the Obtain an IP address automatically and Obtain
DNS server address automatically options.
7Click OK to close the Internet Protocol (TCP/IP) Properties
window.
8Click Close (OK in Windows 2000/NT) to close the Local Area
Connection Properties window.
9Close the Network Connections screen.
Viewing Your Product’s Certifications
1Go to www.zyxel.com.
2Select your product from the drop-down list box on the ZyXEL home page to go to that product's page.
3Select the certification you wish to view from this page.
