Abbyy ABBYY® FineReader 14 Fine Reader 14.0 User's Guide UG English
User Manual: abbyy FineReader - 14.0 - User's Guide Free User Guide for ABBYY FineReader Software, Manual
Open the PDF directly: View PDF ![]() .
.
Page Count: 266 [warning: Documents this large are best viewed by clicking the View PDF Link!]
- Introducing ABBYY FineReader
- The New Task window
- PDF Editor
- OCR Editor
- Launching the OCR Editor
- OCR Editor interface
- Obtaining documents
- Recognizing documents
- Improving OCR results
- If your document image has defects and OCR accuracy is low
- If areas are detected incorrectly
- If the complex structure of a paper document is not reproduced
- If you are processing a large number of documents with identical layouts
- If tables and pictures are not detected
- If a barcode is not detected
- If an incorrect font is used or some characters are replaced with "?" or "□"
- If your printed document contains non-standard fonts
- If your document contains many specialized terms
- If the program fails to recognize certain characters
- If vertical or inverted text was not recognized
- Checking and editing texts
- Copying content from documents
- Saving OCR results
- Integration with other applications
- Automating and scheduling OCR
- ABBYY Compare Documents
- Reference
- Types of PDF documents
- Scanning tips
- Taking photos of documents
- Options dialog box
- Format settings
- Supported OCR and document comparison languages
- Supported document formats
- Document features to consider prior to OCR
- Image processing options
- OCR options
- Working with complex-script languages
- Supported interface languages
- Current date and time on stamps and in Bates numbers
- Fonts required for the correct display of texts in supported languages
- Regular expressions
- Installing, activating and, registering ABBYY FineReader 14
- ABBYY Screenshot Reader
- Appendix
- Technical support
- Copyrights
ABBYY® FineReader 14
User’s Guide
© 2017 ABBYY Production LLC. All rights reserved.

2
ABBYY® FineReader 14 User’s Guide
Information in this document is subject to change w ithout notice and does not bear any commitment on the part of ABBYY.
The softw are described in this document is supplied under a license agreement. The softw are may only be used or copied in strict
accordance w ith the terms of the agreement. It is a breach of the "On legal protection of softw are and databases" law of the Russian
Federation and of international law to copy the softw are onto any medium unless specifically allowed in the license agreement or
nondisclosure agreements.
No part of this document may be reproduced or transmitted in any from or by any means, electronic or other, for any purpose, w ithout the
express w ritten permission of ABBYY.
Copyrights
262
3
ABBYY® FineReader 14 User’s Guide
Contents
Introducing ABBYY FineReader ..................................................................................... 8
About ABBYY FineReader ........................................................................................... 9
What's New in ABBYY FineReader .............................................................................. 11
The New Task window ................................................................................................ 13
Viewing and editing PDFs ........................................................................................... 15
Quick conversion ..................................................................................................... 17
Creating PDF documents .................................................................................... 20
Creating Microsoft Word documents ..................................................................... 22
Creating Microsoft Excel spreasheets .................................................................... 24
Other formats ................................................................................................. 26
Advanced conversion ............................................................................................... 26
Comparing documents ............................................................................................. 30
Scanning and saving documents ................................................................................. 33
Scanning to the OCR Editor ................................................................................. 36
Scanning to PDF ............................................................................................... 38
Scanning to Microsoft Word ................................................................................ 40
Scanning to Microsoft Excel ................................................................................ 42
Scanning to image files ...................................................................................... 44
Scanning to other formats .................................................................................. 46
PDF Editor ................................................................................................................. 47
Viewing PDF documents ............................................................................................ 48
Viewing modes ................................................................................................. 49
Navigating PDF documents ................................................................................. 52
Background recognition ...................................................................................... 54
Keyword search ............................................................................................... 55
Copying content from PDF documents .................................................................. 57
PDF security features ........................................................................................ 58
Reviewing PDF documents ........................................................................................ 59
Comments ...................................................................................................... 59
Marking up text ............................................................................................... 60
Drawing shapes ............................................................................................... 62
Adding text to a PDF document ........................................................................... 64
Collaborating on PDF documents .......................................................................... 65
Adding stamps ................................................................................................. 69
Working with PDF content ......................................................................................... 71
Editing text ..................................................................................................... 72
Inserting and editing pictures .............................................................................. 74
Recognizing text ............................................................................................... 75
Working with pages ........................................................................................... 76
4
ABBYY® FineReader 14 User’s Guide
Contents
Adding bookmarks ............................................................................................ 79
Adding Bates numbers ...................................................................................... 81
Adding file attachments ..................................................................................... 83
Viewing metadata ............................................................................................. 84
Enhancing page images ..................................................................................... 85
Filling out forms ...................................................................................................... 86
Signing PDF documents ............................................................................................ 87
Digital signature ................................................................................................ 88
Text signature ................................................................................................. 89
Picture signature .............................................................................................. 90
Protecting PDF documents with passwords .................................................................... 90
Passwords and permissions ................................................................................ 91
Deleting confidential information from PDF documents .............................................. 92
Creating PDF documents .......................................................................................... 93
Creating PDF documents from selected pages ........................................................ 93
Using a virtual printer to create PDF documents ...................................................... 93
Saving and exporting PDF documents .......................................................................... 94
Saving PDF documents ...................................................................................... 94
Saving in PDF/A ............................................................................................... 95
Saving in other formats ..................................................................................... 96
Reducing the size of your PDF documents ............................................................. 97
Sending PDF documents to the OCR Editor ............................................................ 98
E-mailing PDF documents ................................................................................... 98
Printing PDF documents ..................................................................................... 99
OCR Editor ............................................................................................................... 100
Launching the OCR Editor ........................................................................................ 100
OCR Editor interface ............................................................................................... 101
Obtaining documents .............................................................................................. 105
Opening images and PDFs ................................................................................ 105
Scanning paper documents ............................................................................... 106
Recognizing documents ........................................................................................... 107
OCR projects ................................................................................................. 108
Group work with OCR projects ........................................................................... 113
Improving OCR results ............................................................................................ 114
If your document image has defects and OCR accuracy is low ................................. 115
If areas are detected incorrectly ........................................................................ 118
Editing area properties ................................................................................. 121
If the complex structure of a paper document is not reproduced .............................. 122
If you are processing a large number of documents with identical layouts ................... 123
If tables and pictures are not detected ................................................................ 124
5
ABBYY® FineReader 14 User’s Guide
Contents
If a barcode is not detected .............................................................................. 127
If an incorrect font is used or some characters are replaced with "?" or "?" ................. 128
If your printed document contains non-standard fonts ............................................ 129
If your document contains many specialized terms ................................................ 132
If the program fails to recognize certain characters ................................................ 133
If vertical or inverted text was not recognized ....................................................... 135
Checking and editing texts ....................................................................................... 136
Checking recognized text .................................................................................. 137
Using styles ................................................................................................... 140
Editing hyperlinks ............................................................................................ 141
Editing tables ................................................................................................. 142
Removing confidential information ....................................................................... 142
Copying content from documents ............................................................................. 143
Saving OCR results ................................................................................................ 144
Saving in PDF ................................................................................................. 146
Saving editable documents ................................................................................ 147
Saving tables ................................................................................................. 149
Saving e-books ............................................................................................... 150
Saving in HTML .............................................................................................. 151
Saving images ................................................................................................ 152
Sending OCR results to the PDF Editor ................................................................. 153
E-mailing OCR results ....................................................................................... 154
Sending OCR results to Kindle ............................................................................ 155
Integration with other applications ........................................................................... 155
Integration with Windows Explorer ............................................................................. 156
Integration with Microsoft SharePoint ......................................................................... 159
Automating and scheduling OCR ................................................................................ 160
Automating document processing with ABBYY FineReader .............................................. 161
ABBYY Hot Folder ................................................................................................. 164
ABBYY Compare Documents ...................................................................................... 168
Launching ABBYY Compare Documents ..................................................................... 169
Comparing documents ............................................................................................ 170
The main window .................................................................................................. 172
Improving comparison results ................................................................................... 174
Viewing comparison results ...................................................................................... 176
Saving comparison results ....................................................................................... 178
Reference ................................................................................................................ 179
Types of PDF documents ........................................................................................ 180
6
ABBYY® FineReader 14 User’s Guide
Contents
Scanning tips ........................................................................................................ 182
Taking photos of documents .................................................................................... 185
Options dialog box ................................................................................................. 188
Format settings ..................................................................................................... 191
PDF settings .................................................................................................. 191
DOC(X)/RTF/ODT settings ............................................................................... 196
XLS(X) settings .............................................................................................. 198
PPTX settings ................................................................................................ 199
CSV settings .................................................................................................. 199
TXT settings ................................................................................................. 200
HTML settings ............................................................................................... 201
EPUB/FB2 settings .......................................................................................... 202
DjVu settings ................................................................................................. 203
Supported OCR and document comparison languages ................................................... 205
Supported document formats ................................................................................... 212
Document features to consider prior to OCR ................................................................ 214
Image processing options ........................................................................................ 217
OCR options ......................................................................................................... 220
Working with complex-script languages ....................................................................... 223
Supported interface languages .................................................................................. 227
Current date and time on stamps and in Bates numbers ................................................ 228
Fonts required for the correct display of texts in supported languages ............................... 231
Regular expressions ............................................................................................... 233
Installing, activating and, registering ABBYY FineReader 14 ..................................... 234
System requirements ............................................................................................. 235
Installing and starting ABBYY FineReader .................................................................... 236
Activating ABBYY FineReader ................................................................................... 237
Registering ABBYY FineReader ................................................................................. 238
Privacy policy ........................................................................................................ 239
ABBYY Screenshot Reader ........................................................................................ 240
Appendix ................................................................................................................. 243
Glossary .............................................................................................................. 244
Keyboard shortcuts ................................................................................................ 250
Customer Experience Improvement Program .............................................................. 260
Technical support ..................................................................................................... 261
Copyrights ............................................................................................................... 262
7
ABBYY® FineReader 14 User’s Guide
Contents


9
ABBYY® FineReader 14 User’s Guide
About ABBYY FineReader
ABBYY FineReader 14 is a one-stop solution for working with paper documents and all types of PDF
documents, combining powerful Optical Character Recognition (OCR) and PDF viewing and editing
functionality.
ABBYY FineReader 14 features
·Scan and convert documents Scan and convert paper and PDF documents into editable
formats (including Microsoft® Word, Microsoft Excel®, searchable PDF, and many more) for
further editing and re-use.
oThe OCR technology used in ABBYY FineReader quickly and accurately recognizes text
and retains the original formatting of any document. ABBYY FineReader retains the
structure of original documents, including their formatting, hyperlinks, e-mail addresses,
headers, footers, captions, page numbers, and footnotes.
oABBYY FineReader offers a built-in text editor, which allows you to compare recognized
texts against their original images and make any necessary changes to the content or
formatting. If you are not satisfied with the results of automatic processing, you can
manually specify image areas to capture and train the program to recognize less
common or unusual fonts.
oABBYY FineReader can recognize photos of text documents obtained with a digital
camera or a mobile phone. You can use additional image preprocessing settings to
improve the quality of your photos and get even more accurate OCR results.
·Work with any type of PDF documents, including document scans.
With ABBYY FineReader, you can:
oEdit text and pictures
oCarry out searches in the body text and in comments, bookmarks and metadata
oRearrange pages in PDF documents
oCopy text, tables, and pictures from scans or photos
oAdd comments and annotations to documents
oSign documents with a digital signature
oProtect PDF documents with passwords
oRemove sensitive information from documents
oCreate PDF documents specifically adapted for long-term storage (e.g. in digital
archives)
oFill out PDF forms
·Compare texts to identify differences between two versions of the same document.*
13
72 74
55
76
57
59
88
91
92
95
86
168 10

10
ABBYY® FineReader 14 User’s Guide
ABBYY FineReader 14 can compare two versions of the same document even if they are available
to you in two different formats. For example, you can compare a document scan and its Word
version.
·Convert documents automatically with ABBYY Hot Folder .*
ABBYY Hot Folder is a scheduling application provided with ABBYY FineReader 14 that
automatically processes documents in user-defined folders.
·Take a snapshot of any part of the screen with ABBYY Screenshot Reader . If a screenshot
contains text, it can be extracted and saved to an editable format.**
* This feature is not available in some versions of ABBYY FineReader 14. Please visit
http://www.ABBYY.com/FineReader for more information.
** To use ABBYY Screenshot Reader, you must register your copy of ABBYY FineReader 14.
164 10
240
10
11
ABBYY® FineReader 14 User’s Guide
What's New in ABBYY FineReader
Improved OCR speed and quality
·The documents are now processed faster and text is recognized even more accurately.
·More of the original formatting is retained as the program now detects graphs and diagrams with
greater precision.
·New OCR languages added: mathematical symbols (used for recognizing simple one-line
formulas) and English transcription symbols.
Creating and converting PDF documents
·Improved conversion of PDF documents with a text layer: the program will use the original text
layer if available.
·ABBYY FineReader can now create PDF documents from office documents such as *.docx,
*.xlsx, *.rtf, etc., and combine multiple files into one PDF.
Working with PDF documents
The program now includes a powerful tool for working with PDF documents, which allows you to:
·Edit different types of PDF documents (including those that only contain scans) without the need to
recognize or convert the entire document.
·View PDF documents, search inside PDF documents, and highlight text fragments.
·Add comments and notes to PDF documents and reply to other peoples' comments.
·Fill out and save PDF forms.
·View and edit metadata.
·Find and remove sensitive information both in the body text and in the comments, bookmarks, and
metadata of a document.
·Add Bates numbers to your documents.
·Sign your documents with a digital signature.
Comparing documents
·You can now compare two versions of the same document, which need not be in the same format.
For example, you can compare a text version and an image, a PDF document and a scan, etc.
Batch processing of PDF documents
·Create PDF documents from files in various formats.
·Batch-process PDF documents: create PDF/A compliant PDF documents, reduce the size of your
documents, improve the quality of document images, protect PDF documents with passwords,
and permanently delete sensitive information.
12
ABBYY® FineReader 14 User’s Guide
We wish to extend our sincere thanks to all users who have contributed their feedback and helped us
improve the program. We hope the new combination of powerful OCR and PDF functionality will make
ABBYY FineReader even more useful to you.
13
ABBYY® FineReader 14 User’s Guide
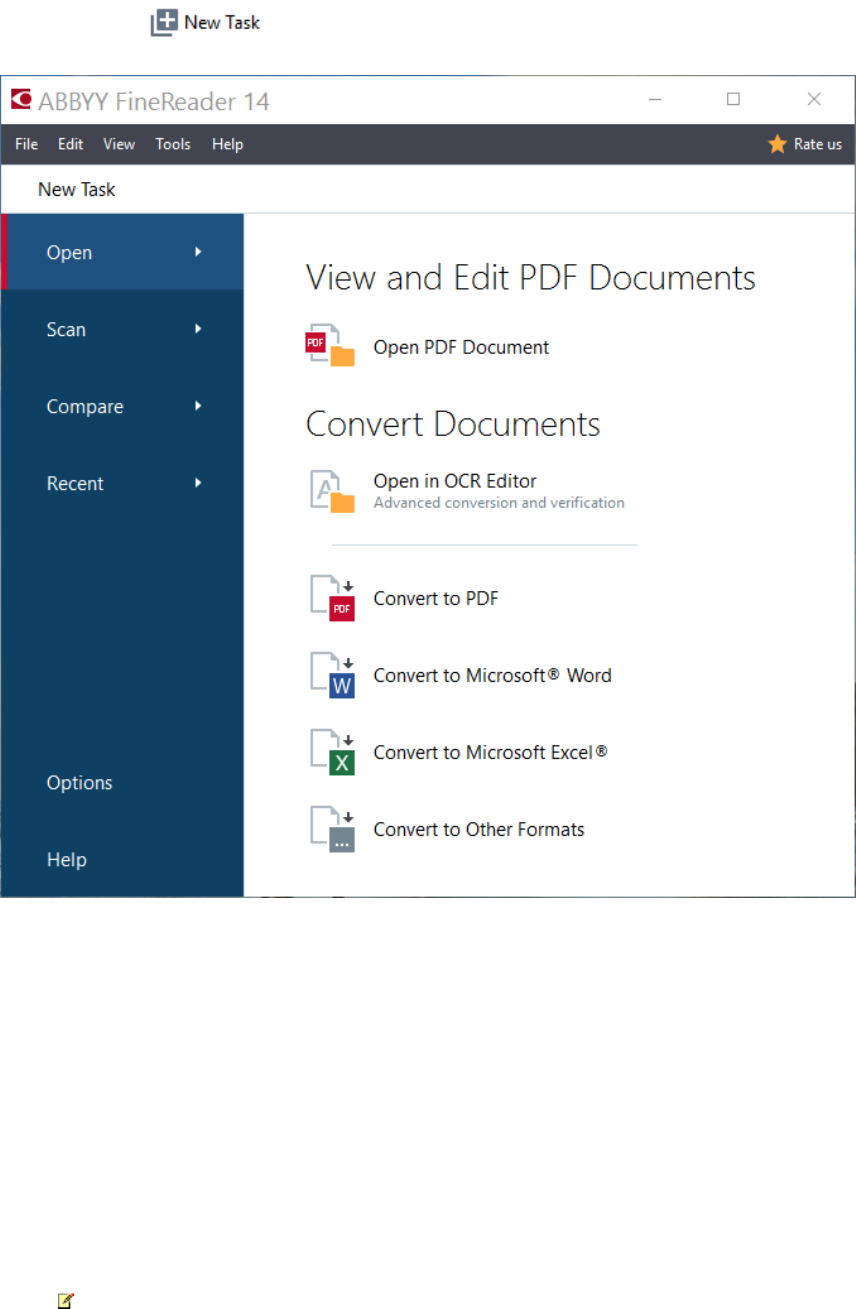
The New Task window
When you launch ABBYY FineReader, a New Task window opens, where you can easily open, scan,
create, or compare documents. If you don’t see the New Task window (e.g. if you closed it or if you
initiated an ABBYY FineReader task by right-clicking a file in Windows Explorer), you can always open it
by clicking the button on the main toolbar.
To start processing a document, select a task:
1. In the left-hand pane:
·Click Open if you already have documents that you need to process.
·Click Scan if you need to scan paper documents first.
·Click Compare if you want to compare two versions of the same document.
·Click Recent to resume work on a previously saved PDF document or OCR project.
2. In the right-hand pane, select the appropriate task.
For your convenience, when you hover the mouse cursor over a task, a pop-up window appears
listing the most common scenarios covered by that task.
14
ABBYY® FineReader 14 User’s Guide
The settings for all ABBYY FineReader tasks are specified in the Options dialog box. To open this
dialog box, click Options at the bottom of the left-hand pane.
Chapter contents
·Viewing and editing PDF documents
·Quick conversion
·Advanced conversion
·Comparing documents
·Scanning and saving documents
188
15
17
26
30
33

15
ABBYY® FineReader 14 User’s Guide
Viewing and editing PDFs
With ABBYY FineReader, you can easily view, edit, comment, and search inside any type of PDF
documents, even those that were obtained by simply scanning a paper document and so do not contain
any searchable or editable text.
Viewing PDF documents and adding your comments
On the New Task screen, click the Open tab and then click Open PDF Document. The selected
document will be opened in the PDF Editor for viewing and commenting .
Use the Pages , Bookmarks , Search , and Comments buttons to navigate around the
document.
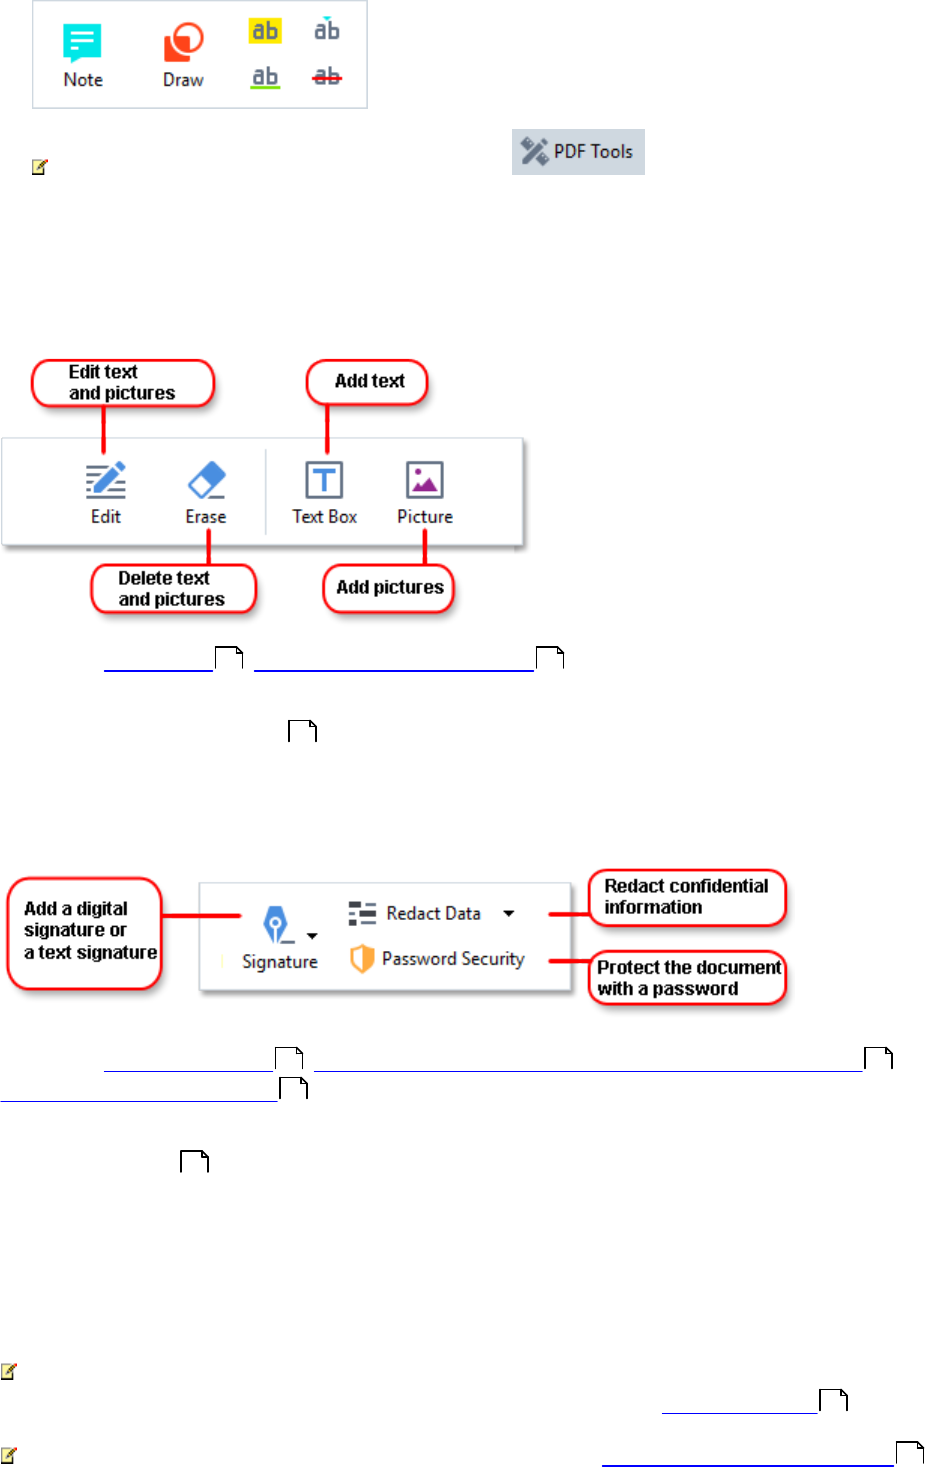
ABBYY FineReader offers the following commenting tools:
·Add Note
·Highlight , Underline, Strikethrough, and Insert Text
·Draw Shape, Line, or Arrow
48 59
52 79 55 65
59
60
62
16
ABBYY® FineReader 14 User’s Guide
If you don't see the commenting tools, click the button.
Editing PDF documents
ABBYY FineReader offers the following editing tools:
See also: Editing text , Inserting and editing pictures .
Protecting PDF documents
With ABBYY FineReader, you can:
See also: Digital signatures , Removing confidential information from PDF documents ,
Passwords and permissions .
Filling out forms
ABBYY FineReader allows you to fill out, save, and print interactive forms.
When you open a PDF that contains an interactive form, the form fields are highlighted, inviting you to
select a value from the drop-down list or type in some information.
If you encounter a form that cannot be filled out by simply typing text in the empty fields, use the Text
Box tool to type the necessary information over the form. See also: Filling out forms .
For more information on working with PDF documents, see Working with PDF documents .
72 74
90
88 92
91
86
86
47
17
ABBYY® FineReader 14 User’s Guide
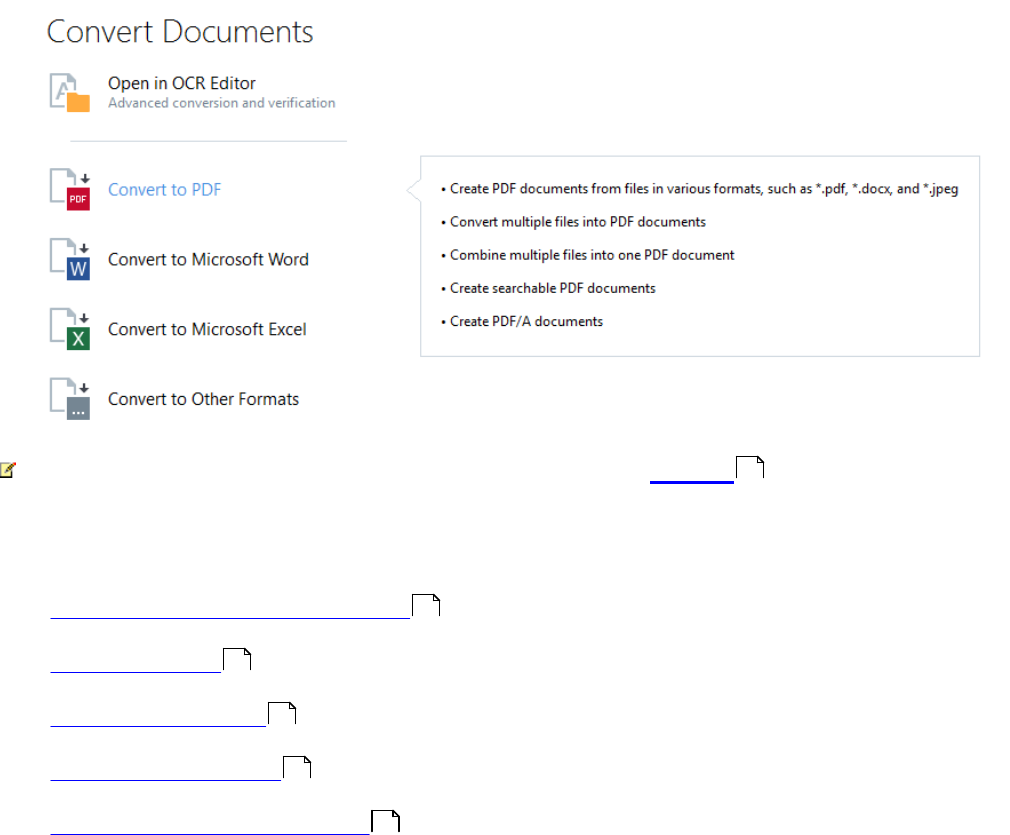
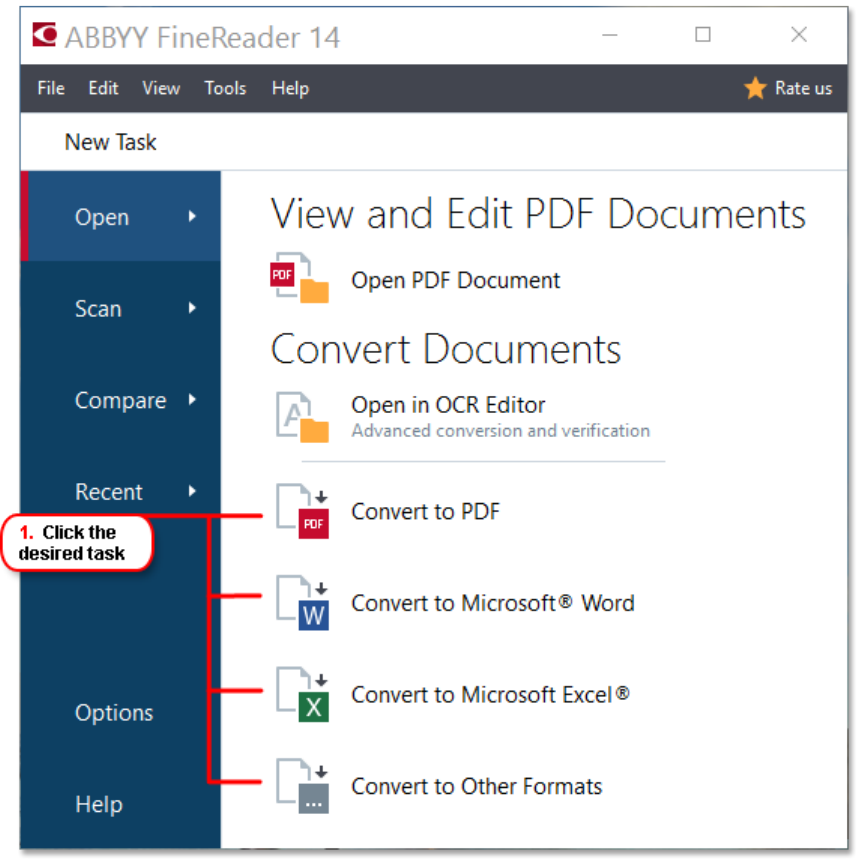
Quick conversion
You can use the built-in tasks on the Open tab of the New Task screen to convert PDF documents or
images or create a new PDF from files in various formats.
Converting one or more files
1. Click the Open tab and then click a desired task:
·Convert to PDF creates PDF documents from *.docx, *.html, *.jpeg, and other files. You
can also use this task to combine multiple files into one PDF document.
·Convert to Microsoft® Word creates Word documents from PDF and image files. You
can also use this task to combine multiple files into one Microsoft Word document.
·Convert to Microsoft Excel® creates Excel spreadsheets from PDF and image files.
You can also use this task to combine multiple files into one Excel document.
·Convert to Other Formats converts PDF and image files into popular formats, including
*.odt, *.pptx, *.epub, *.html, and many more.
18
ABBYY® FineReader 14 User’s Guide
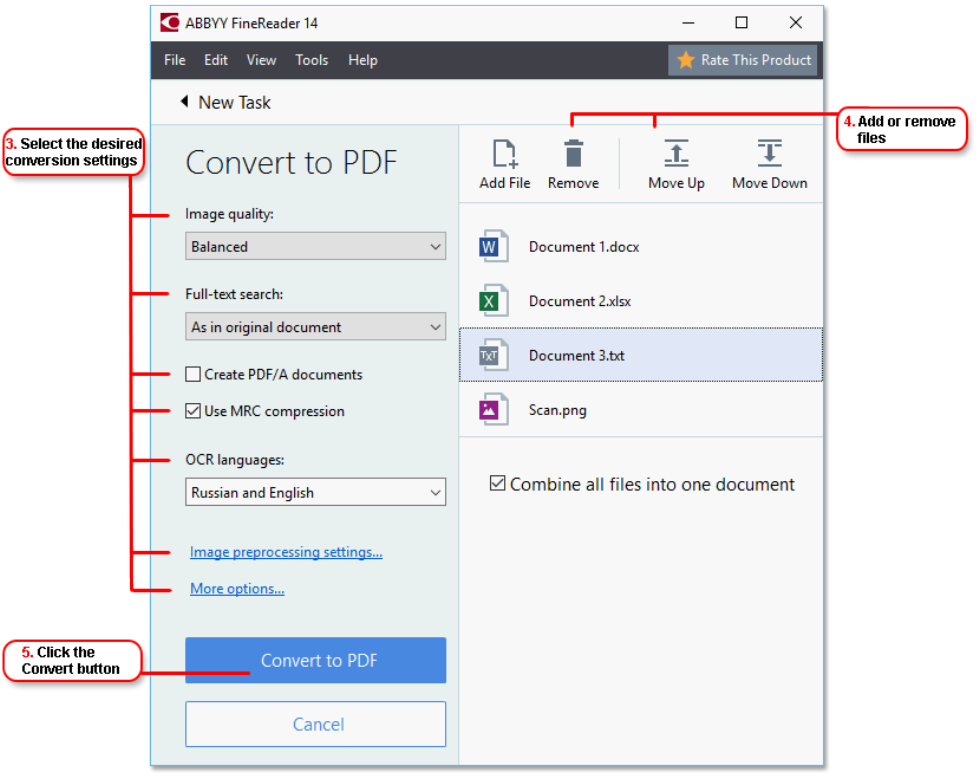
2. In the dialog box that opens, select one or more files to convert.
3. Specify conversion settings.
These settings determine the appearance and properties of the output document.
4. Add or remove files if necessary.
5. Click the Convert to <format> button.
6. Specify a destination folder for the output file.
When the task is completed, the resulting file will be placed into the folder that you specified.
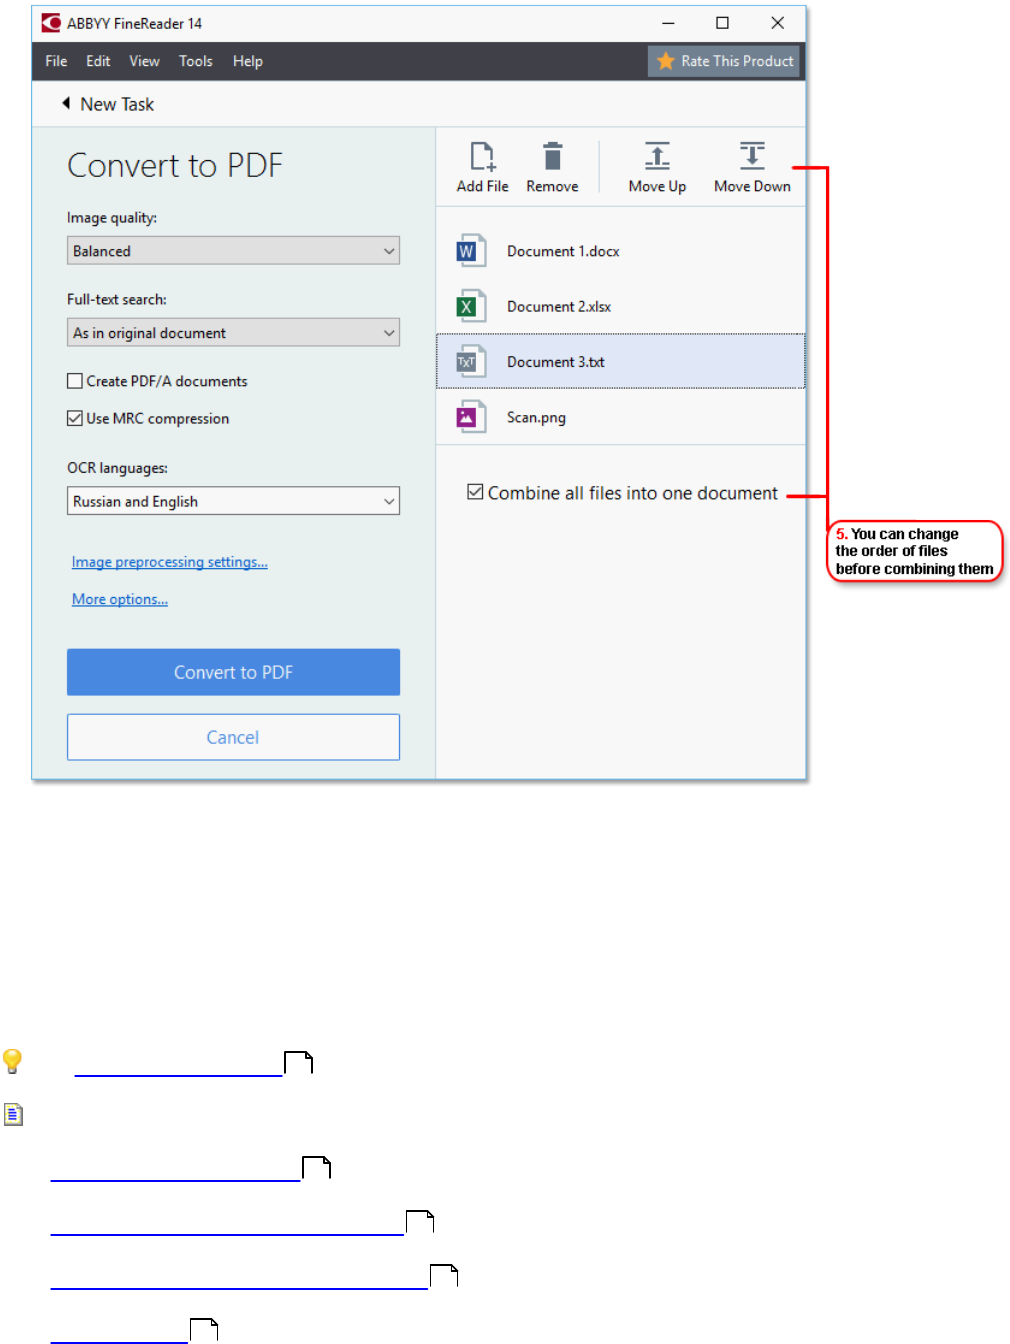
Combining files
1. Click the Open tab and then click a desired task.
2. In the dialog box that opens, select the files that you want to convert.
3. Specify conversion settings.
4. Add or remove files if necessary.
19
ABBYY® FineReader 14 User’s Guide
5. Arrange the files in the desired order and select the Combine all files into one document
option.
6. Click the Convert to <format> button.
7. Specify a name and a destination folder for the output file.
When the task is completed, the resulting file will be placed into the folder that you specified.
Use advanced conversion for large documents with complicated layouts.
See also: :
·Creating PDF documents
·Creating Microsoft Word documents
·Creating Microsoft Excel spreadsheets
·Other formats
26
20
22
24
26
20
ABBYY® FineReader 14 User’s Guide
Creating PDF documents
In the New Task window, you can:
·Create PDF documents from files in various formats.
·Convert multiple files to PDF.
·Combine multiple files into one PDF.
·Create searchable PDF documents.
·Create PDF/A-compliant documents.
Converting one or more files
1. Click the Open tab and then click Convert to PDF.
2. In the dialog box that opens, select one or more files to convert.
3. Specify conversion settings. These settings determine the appearance and properties of the
output document.
3.1.Image quality The quality of the pictures and the size of the resulting file can be tweaked
using the options in the Image quality drop-down menu:
·Best quality
Select this option to retain the quality of the pictures and the page image. The original
resolution will be preserved.
·Balanced
Select this option to reduce the size of the output PDF file without too much loss in picture
quality.
·Compact size
Select this option to obtain a small-sized PDF file at the expense of picture quality.
·Custom...
Select this option to customize picture saving. In the Custom Settings dialog box, specify
desired values and click OK.
3.2.Full-text search Use this drop-down menu to enable or disable full-text searches in the
output document:
·As in original document The text on the images will not be recognized. Users will be able to
search inside the output document only if the original document has a text layer.
·Search inside text and images The text on the images will be recognized. Users will be
able to search inside the output document.
·Disable full-text search The document will be converted to image-only PDF. Users will not
be able to search inside the output document.

21
ABBYY® FineReader 14 User’s Guide
3.3.Create PDF/A documents Select this option to create a PDF/A-compliant document. A
PDF/A-2b document will be created by default. Click More options... to select another version
of PDF/A.
3.4.Use MRC compression Select this option to apply Mixed Raster Content (MRC)
compression to reduce file size without noticeable loss in image quality.
3.5.OCR languages Select the language(s) of your document. See also: OCR languages .
3.6.Image preprocessing settings... Here you can specify some additional manipulations to be
preformed on your scans and image files to improve their appearance and the quality of
conversion. See also: Image processing options .
3.7.More options... Open the PDF tab of the Format Settings dialog box.
4. Add or remove files if necessary.
5. Click the Convert to PDF button.
6. Specify a destination folder for the output file.
When the task is completed, the resulting PDF document will be placed into the folder that you
specified.
Combining files
1. Click the Open tab and then click Convert to PDF.
2. In the dialog box that opens, select the files that you want to convert.
3. Specify conversion settings .
4. Add or remove files if necessary.
5. Arrange the files in the desired order and select the Combine all files into one document
option.
6. Click the Convert to PDF button.
7. Specify a name and a destination folder for the output file.
When the task is completed, the resulting PDF document will be placed into the folder that you
specified.
214
218
191 191
20

22
ABBYY® FineReader 14 User’s Guide
Creating Microsoft Word documents
In the New Task window, you can create Microsoft Word documents from PDF documents and images
and from files in any of the supported formats . You can also convert and combine multiple files into
one Microsoft Word document.
Converting one or more files
1. Click the Open tab and then click Convert toMicrosoft Word.
2. In the dialog box that opens, select one or more files to convert.
3. Specify conversion settings. These settings determine the appearance and properties of the
output document.
3.1.Keep formatting.
Select the appropriate setting depending on how you plan to use the output document:
·Exact copy
The output document will look almost exactly like the original, but will offer limited editing
options.
·Editable copy
The appearance of the output document may slightly differ from the original, but the
document can be easily edited.
·Formatted text
The font types, font sizes, and paragraph formatting will be retained. The output text will be
placed in one column.
·Plain text
Only the paragraph formatting will be retained. The output text will be placed in one column
and a single font will be used throughout.
3.2.OCR languages Select the language(s) of your document. See also: OCR languages .
3.3.Keep pictures Select this option if you want to preserve the pictures in the output document.
3.4.Keep headers, footers, and page numbers Select this option to preserve the headers,
footers, and page numbers.
3.5.More options... Opens the DOC(X)/RTF/ODT tab of the Format Settings dialog box.
4. Add or remove files if necessary.
5. Click the Convert to Word button.
6. Specify a destination folder for the output file.
When the task is completed, the resulting Microsoft Word document will be placed into the folder
that you specified.
212
214
196 191

23
ABBYY® FineReader 14 User’s Guide
Combining files
1. Click the Open tab and then click Convert toMicrosoft Word.
2. In the dialog box that opens, select the files that you want to convert.
3. Specify conversion settings .
4. Add or remove files if necessary.
5. Arrange the files in the desired order and select the Combine all files into one document
option.
6. Click the Convert to Word button.
7. Specify a name and a destination folder for the output file.
When the task is completed, the resulting Microsoft Word document will be placed into the folder
that you specified.
22

24
ABBYY® FineReader 14 User’s Guide
Creating Microsoft Excel spreasheets
In the New Task window, you can create Microsoft Excel documents from PDF documents and images
and from files in any of the supported formats . You can also convert and combine multiple files into
one Excel document.
Converting one or more files
1. Click the Open tab and then click Convert toMicrosoft Excel.
2. In the dialog box that opens, select one or more files to convert.
3. Specify conversion settings. These settings determine the appearance and properties of the
output document.
3.1. Keep formatting.
Select the appropriate setting depending on how you plan to use the output document.
·Formatted text
The font types, font sizes, and paragraph formatting will be retained.
·Plain text
Only the paragraphs will be retained. A single font will be used throughout.
3.2. OCR languages Select the language(s) of your document. See also: OCR languages .
3.3. Keep pictures (XLSX only) Select this option if you want to preserve the pictures in the output
document.
3.4. Create a separate sheet for each page (XLSX only) Select this option if you want to create a
separate Microsoft Excel spreadsheet from each page of the original document(s).
3.5. More options... Opens the XLS(X) tab of the Format Settings dialog box.
4. Add or remove files if necessary.
5. Click the Convert to Excel button.
6. Specify a destination folder for the output file.
When the task is completed, the resulting Microsoft Excel file will be placed into the folder that you
specified.
Combining files
1. Click the Open and then click Convert toMicrosoft Excel.
2. In the dialog box that opens, select the files that you want to convert.
3. Specify conversion settings .
4. Add or remove files if necessary.
212
214
198 191
24
25
ABBYY® FineReader 14 User’s Guide
5. Arrange the files in the desired order and select the Combine all files into one document
option.
6. Click the Convert to Excel button.
7. Specify a name and a destination folder for the output file.
When the task is completed, the resulting Microsoft Excel document will be placed into the folder
that you specified.

26
ABBYY® FineReader 14 User’s Guide
Other formats
In the New Task window, you can convert PDF documents and images into popular formats (*.pptx,
*.odt, *.html, *.epub, *.fb2, *.rtf, *.txt, *.csv, *.djvu) and combine multiple files into one document.
Converting one or more files
1. Click the Open tab and then click Convert toother formats.
2. In the dialog box that opens, select one or more files to convert.
3. Specify conversion settings. These settings determine the appearance and properties of the
output document.
3.1.Select output format Select a format into which to convert your file.
3.2.OCR languages Select the language(s) of your document. See also: OCR languages .
3.3.More options... Opens the corresponding tab of the Format Settings dialog box.
4. Add or remove files if necessary.
5. Click the Convert to <format> button.
6. Specify a destination folder for the output file.
When the task is completed, the resulting file will be placed into the folder that you specified.
Combining files
1. Click the Open tab and then click Convert toother formats.
2. In the dialog box that opens, select the files that you want to convert.
3. Specify conversion settings .
4. Add or remove files if necessary.
5. Arrange the files in the desired order and select the Combine all files into one document
option.
6. Click the Convert to <format> button.
7. Specify a name and a destination folder for the output file.
When the task is completed, the resulting document will be placed into the folder that you
specified.
Advanced conversion
ABBYY FineReader includes an OCR Editor , which provides advanced OCR and conversion
features. The OCR Editor allows you to check recognition areas and verify recognized text, preprocess
214
191
26
100
27
ABBYY® FineReader 14 User’s Guide
images in order to improve OCR accuracy, and much more.
28
ABBYY® FineReader 14 User’s Guide
The OCR Editor also offer powerful features for fine-tuning OCR and conversion to get the best possible
results. For example, you can edit recognition areas , check recognized text , and train ABBYY
FineReader to recognize non-standard characters and fonts.
1. There are several ways to open the OCR Editor:
·Open the New Task window by clicking File > New Task, click the Open tab, and then
click the Open in OCR Editor task.
·Open the New Task window and click Tools > OCR Editor.
·Open the New Task window, and click File > Open in OCR Editor....
2. In the Open Image dialog box, select the files you want to open.
If you are using the default settings, ABBYY FineReader will automatically analyze and recognize the
files you opened. You can change these settings on the Image Processing tab of the Options
dialog box (click Tools > Options... to open this dialog box).
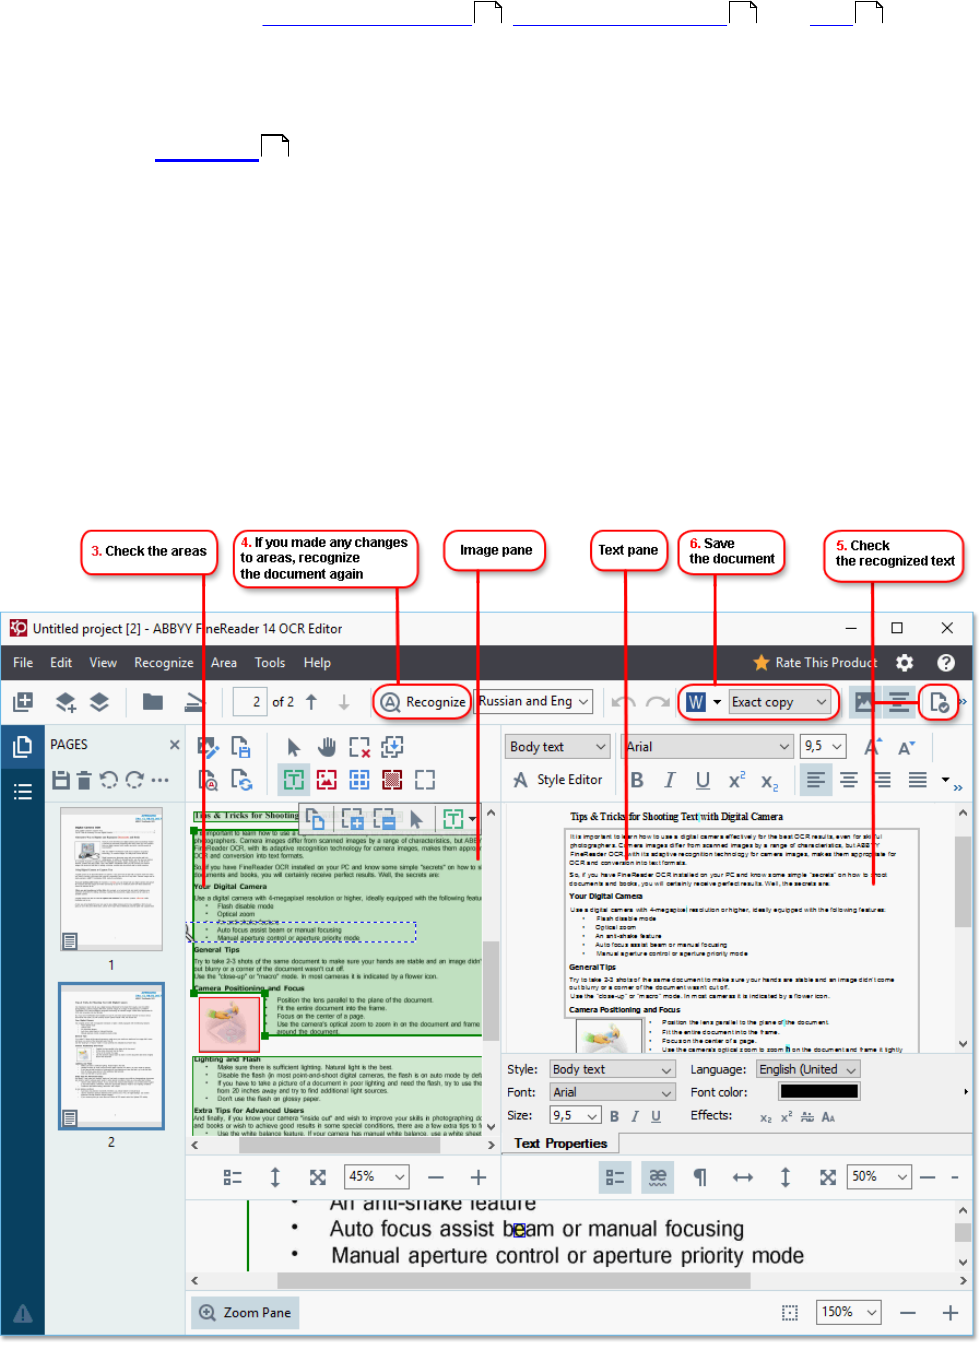
3. After you open a document, its image will be displayed in the Image pane, and text, picture, table
and barcode areas will be marked on the image. Check that the areas have been detected
correctly and edit them if necessary.
118 137 129
13

29
ABBYY® FineReader 14 User’s Guide
ABBYY FineReader analyzes documents to detect areas that contain text, pictures, tables, and
barcodes.
Sometimes, areas in complex documents may be detected incorrectly. In most cases it is easier
to correct automatically detected areas than to draw all areas manually.
You can find tools for drawing and editing areas on the toolbar above the Image pane and on the
toolbars that appear above text, picture, background picture, and table areas when you select
them.
You can use these tools to:
·Add and delete areas
·Change the type of an area
·Adjust area borders and move entire areas
·Add rectangular parts to areas or delete them
·Change the order of areas
4. If you made any changes to areas, click the Recognize button on the main toolbar to recognize
the document again.
5. Check the recognized text in the Text pane and correct it if necessary.
6. Save the recognized document . You can select the format in which to save your document
from the drop-down list of the Save/Send button on the main toolbar (click the arrow next to the
button to open the drop-down list).
For more information about the OCR Editor and its features, see Working with the OCR Editor .
144
100
30
ABBYY® FineReader 14 User’s Guide
Comparing documents
(This functionality is not available in some versions of ABBYY FineReader 14. See also:
http://www.ABBYY.com/FineReader.
ABBYY FineReader includes ABBYY Compare Documents, an application that lets you compare two
versions of a document, even if these versions are in different formats. ABBYY Compare Documents
automatically detects differences in the two versions, enabling you to quickly get a clear picture of the
changes that were made to the original. This can be useful in a variety of situations, for example when
you want to review a document before signing or publishing it.
There are several ways to start ABBYY Compare Documents:
·Open the New Task window, click the Compare tab, and then click Open ABBYY Compare
Documents.
·Click the Start button in Windows and click ABBYY FineReader 14 > ABBYY Compare
Documents (in Windows 10, click the Start button, click the All Programs item on the start
menu, and then click ABBYY FineReader 14 > ABBYY Compare Documents)
·Click Compare Documents on the Tools menu.
·Right-click a file in Windows Explorer and click Compare documents... on the shortcut menu.
Follow the instructions below to compare two documents.
13
156
31
ABBYY® FineReader 14 User’s Guide
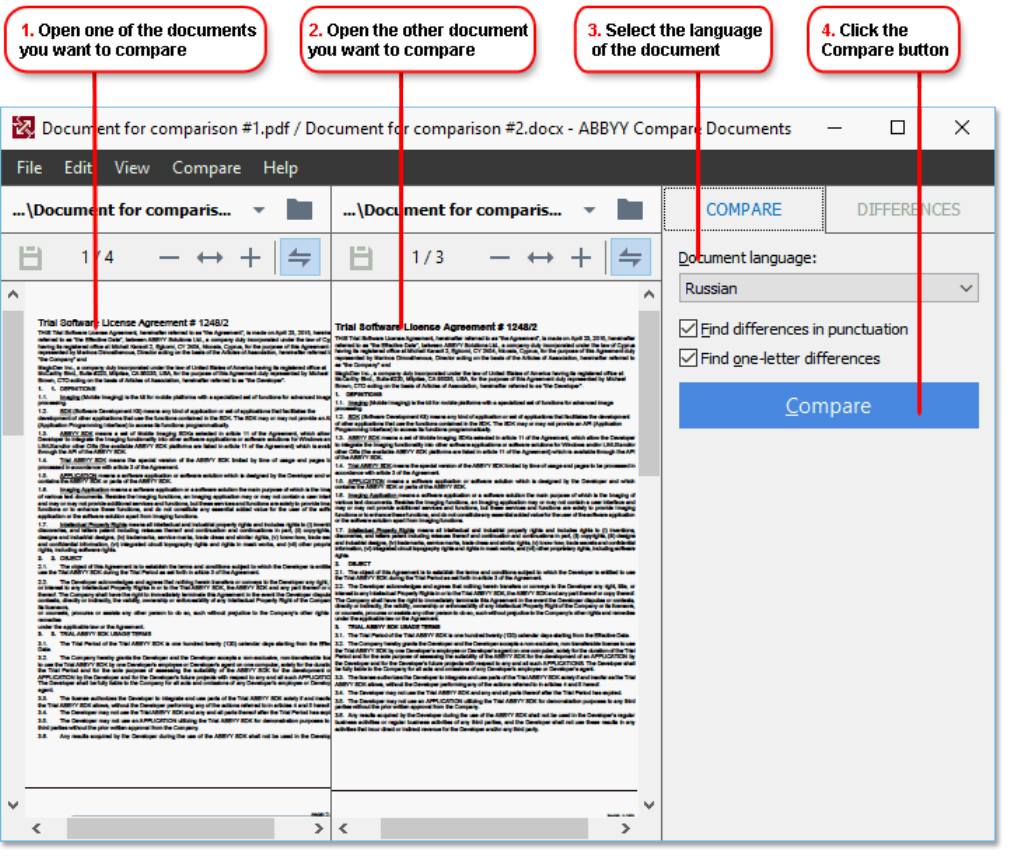
1. Open ABBYY Compare Documents, open one of the versions that you want to compare in the
left-hand pane and the other one in the right-hand pane.
2. In the COMPARE pane, select the languages of the document from the drop-down list.
3. Click the Compare button to compare the documents.
32
ABBYY® FineReader 14 User’s Guide
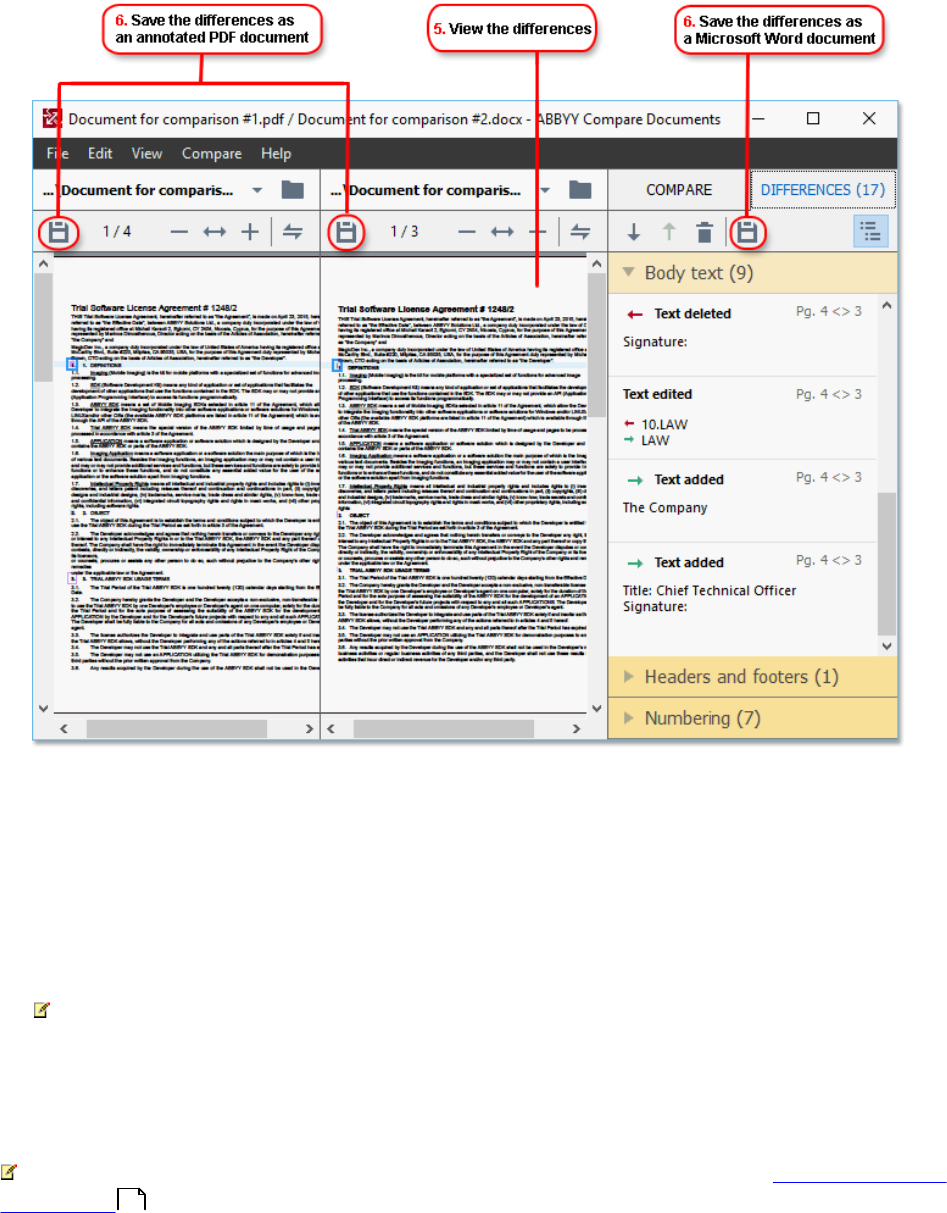
4. Review the differences detected by ABBYY Compare Documents.
The differences between the two versions will be highlighted in each version and listed in the right-
hand pane, providing you with a clear picture of the changes made to the document. This makes it
easy to see which text was added, removed or edited in each version. Both pages are scrolled
simultaneously and the identical fragments are always displayed side by side. Differences can be
removed from the list or copied to the Clipboard.
Differences that were removed from the list will not be saved to the difference report.
5. Save a difference report. There are two ways to do this. You can save one of the versions as a
PDF document where all the differences will be indicated by comments, or you can save the
differences to a Microsoft Word document.
For more information on comparing two versions of the same document, see ABBYY Compare
Documents .
168
33
ABBYY® FineReader 14 User’s Guide
Scanning and saving documents
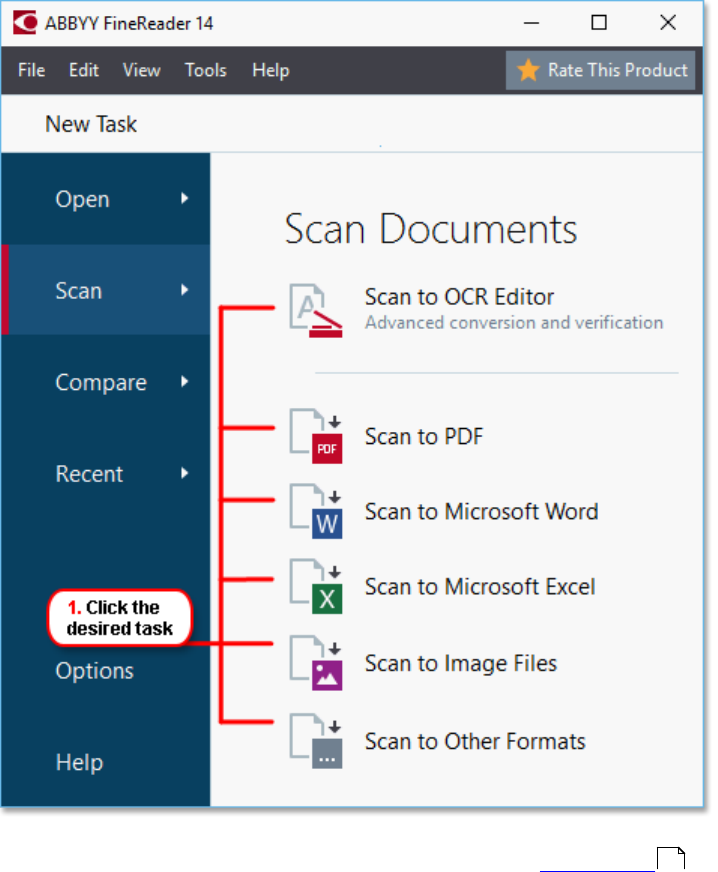
You can use the tasks on the Scan tab of the New Task window to create digital documents in various
formats. You will need a scanner or a digital camera to obtain document images.
1. Click the Scan tab and then click a task:
·Scan to OCR Editor opens scans in the OCR Editor .
·Scan to PDF creates PDF documents from images obtained from a scanner or digital
camera.
·Scan to Microsoft Word creates Microsoft Word documents from images obtained
from a scanner or digital camera.
·Scan to Microsoft Excel creates Microsoft Excel documents from images obtained
from a scanner or digital camera.
·Scan to Image Files creates image-only documents from images obtained from a
scanner or digital camera.
·Scan to Other Formats creates documents in popular formats, such as *.odt, *.pptx,
*.epub, and *.html, from images obtained from a scanner or digital camera.
100
34
ABBYY® FineReader 14 User’s Guide
2. Select a device and specify scanning settings .
3. Click the Preview button or click anywhere inside the image.
4. Review the image. If you are not satisfied with the quality of the image, change the scanning
settings and click the Preview button again.
5. Specify the settings specific to the selected format.
These settings determine the appearance and properties of the output document.
6. Click the Scan to <format> button.
7. When scanning starts, a dialog box with a progress bar and tips will be displayed.
8. After a page has been scanned, a dialog box prompting you to decide what to do next will be
displayed.
Click Scan Again to scan more pages using the current settings or click Finish Scanning to close
the dialog box.
9. Depending on the task you selected in step 1, the scanned images will be:
·Processed and added to an OCR project in the OCR Editor .
·Processed and converted to PDF. Specify the folder where you want to save the
resulting document. The document will remain open in the OCR Editor.
182
100
35
ABBYY® FineReader 14 User’s Guide
·Processed and converted to the selected format. Specify the folder where you want to
save the resulting document. The document will remain open in the OCR Editor.
See also: :
·Scanning to the OCR Editor
·Scanning to PDF
·Scanning to Microsoft Word
·Scanning to Microsoft Excel
·Scanning to image files
·Scanning to other formats
36
38
40
42
44
46

36
ABBYY® FineReader 14 User’s Guide
Scanning to the OCR Editor
You can open images from a scanner or camera in the OCR Editor, where you will be able to:
·Draw and edit recognition areas manually
·Check recognized text
·Train ABBYY FineReader to recognize non-standard characters and fonts
·Use other advanced tools to ensure the best possible OCR result.
1. Open the New Task window, click the Scan tab, and then click the Scan to OCR Editor task.
2. Select a device and specify scanning settings .
3. Click the Preview button or click anywhere inside the image.
4. Review the image. If you are not satisified with the quality of the image, change the scanning
settings and click the Preview button again.
5. Specify preprocessing and automation settings.
5.1.Automatically process page images as they are added
This option enables or disables automatic processing of newly added pages. If automatic
processing is enabled, you can select general document processing options and image
preprocessing settings to be used when scanning and opening images:
·Recognize page images
Enable this option if you want FineReader to automatically preprocess newly added images
using the settings specified in the Preprocessing Settings dialog box (click the Image
preprocessing settings link below to open this dialog box). Analysis and OCR will also be
performed automatically.
·Analyze page images
Performs image preprocessing and document analysis automatically, but OCR has to be
started manually.
·Preprocess page images
Preprocesses images automatically. Analysis and OCR have to be started manually.
5.2.OCR languages
Use this option to specify the languages of the document. See also: OCR languages .
5.3.Image preprocessing settings...
Opens the Preprocessing Settings dialog box where you can specify image preprocessing
settings such as detection of page orientation and automatic preprocessing settings. These
settings can significantly improve source images, resulting in greater OCR accuracy. See
also: Image processing options .
5.4.More options...
Opens the Image Processing tab of the Options dialog box. You can also open this dialog
box by clicking Options... on the Tools menu).
182
214
218
188

37
ABBYY® FineReader 14 User’s Guide
6. Click Scan.
7. A progress dialog box will be displayed, showing a progress bar and tips.
8. After the page has been scanned, a dialog box prompting you to decide what to do next will
appear.
Click Scan Again to scan subsequent pages using the current settings or Finish Scanning to
close the dialog box.
9. After the scanning process is completed, the scanned images will be added to an OCR project in
the OCR Editor and processed using the preprocessing and automation settings you specified
earlier.
For more information about the OCR Editor and its features, see Working with the OCR Editor .
100

38
ABBYY® FineReader 14 User’s Guide
Scanning to PDF
The Scan to PDF task in the New Task window lets you create PDF documents from images obtained
from a scanner or a digital camera.
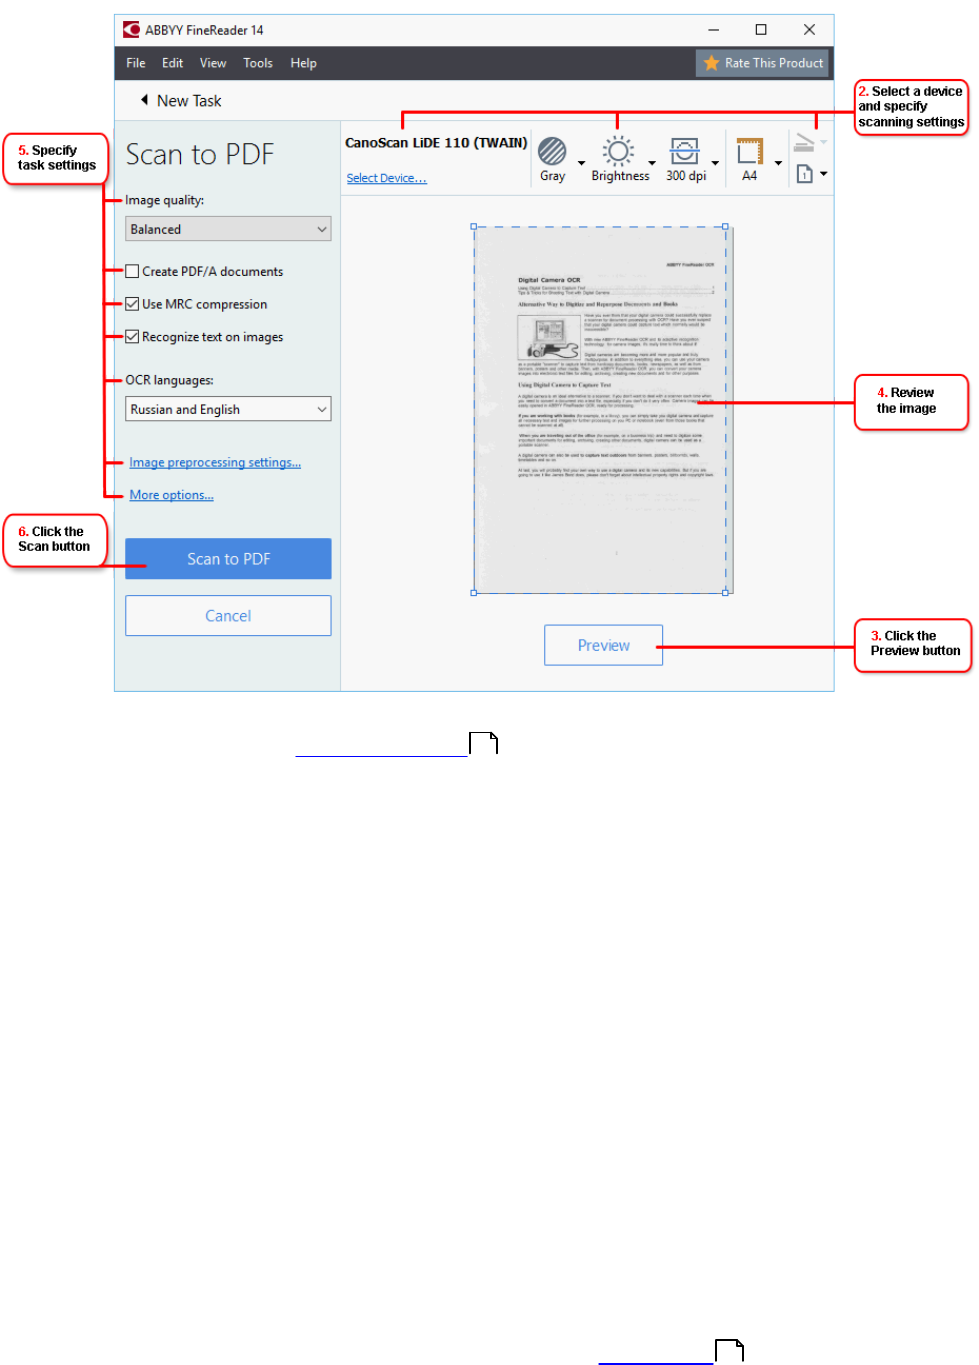
1. Open the New Task window, click the Scan tab, and then click Scan to PDF.
2. Select a device and specify scanning settings .
3. Click the Preview button or click anywhere inside the image.
4. Review the image. If you are not satisfied with the quality of the image, change the scanning
settings and click the Preview button again.
5. Specify conversion settings. These settings determine the appearance and properties of the
output document.
5.1.Image quality This option determines the quality of images and pictures, which affects the
size of the resulting output file. The following quality settings are available:
·Best quality
Select this option to retain the quality of the pictures and the page image. The original
resolution will be preserved.
·Balanced
Select this option to reduce the size of the output PDF file without too much loss in picture
quality.
·Compact size
Select this option to obtain a small-sized PDF file at the expense of picture quality.
·Custom...
Select this option to customize picture saving. In the Custom Settings dialog box, specify
the desired values and click OK.
5.2.Create PDF/A documents
Select this option to create a PDF/A-compliant document.
5.3.Use MRC compression
Select this option to apply Mixed Raster Content (MRC) compression to reduce file size
without noticeable loss in image quality..
5.4.Recognize text on images
Select this option if you want OCR to start automatically.
5.5.OCR languages
Use this option to specify the languages of the document. See also: OCR languages .
5.6.Image preprocessing settings...
Use this option to specify image preprocessing settings, such as detection of page orientation
and automatic preprocessing settings. These settings can significantly improve source
images, resulting in greater OCR accuracy. See also: Image processing options .
182
214
218

39
ABBYY® FineReader 14 User’s Guide
5.7.More options...
Opens the PDF section of the Format Settings of the Options dialog box, where you
can specify additional settings (you can also open this dialog box by clicking Options... on the
Tools menu).
6. Click Scan to PDF.
7. A dialog box will be displayed, showing a progress bar and tips.
8. After the page has been scanned, a dialog box prompting you to decide what to do next will
appear.
Click Scan Again to scan more pages using the current settings or click Finish Scanning to
close the dialog box.
9. After the scanning is completed, the scanned images will be processed using the settings you
specified, converted to PDF, and opened in the OCR Editor.
10. Specify the folder where you want to save the resulting PDF.
191 191

40
ABBYY® FineReader 14 User’s Guide
Scanning to Microsoft Word
The Scan to Microsoft Word task in the New Task window lets you create Microsoft Word documents
from images obtained from a scanner or a digital camera.
1. Open the New Task window, click the Scan tab, and then click the Scan to Microsoft Word
task.
2. Select a device and specify scanning settings .
3. Click the Preview button or click anywhere inside the image.
4. Review the image. If you are not satisfied with the quality of the image, change the scanning
settings and click the Preview button again.
5. Specify conversion settings. These settings determine the appearance and properties of the
output document.
5.1.Preserve formatting
Select the appropriate setting depending on how you plan to use the output document.
·Exact copy
The output document will look almost exactly like the original, but will offer limited editing
options..
·Editable copy
The appearance of the output document may slightly differ from the original, but the
document can be easily edited.
·Formatted text
The font types, font sizes, and paragraph formatting will be retained. The output text will be
placed in one column.
·Plain text
Only the paragraph formatting will be retained. The output text will be placed in one column
and a single font will be used throughout.
5.2.OCR languages
Select the language(s) of your document. See also: OCR languages .
5.3.Keep pictures
Select this option if you want to preserve the pictures in the output document.
5.4.Keep headers, footers, and page numbers
Select this option to preserve the headers, footers, and page numbers.
5.5.Image preprocessing settings...
Specify image preprocessing settings, such as detection of page orientation and automatic
preprocessing settings. These settings can significantly improve source images, resulting in
greater OCR accuracy. See also: Image processing options .
182
214
218

41
ABBYY® FineReader 14 User’s Guide
5.6.More options...
Opens the DOC(X)/RTF/ODT section of the Format Settings tab of the Options dialog
box, where you can specify additional settings (you can also open this dialog box by clicking
Options... on the Tools menu).
6. Click Scan to Word.
7. A dialog box will be displayed, showing a progress bar and tips.
8. After the page has been scanned, a dialog box prompting you to decide what to do next will
appear.
Click Scan Again to scan more pages using the current settings or click Finish Scanning to
close the dialog box.
9. Specify the folder where you want to save your Microsoft Word document.
When the task is completed, a Microsoft Word document will be created in the folder that you specified.
All of the document's pages will also be opened in the OCR Editor.
196 191

42
ABBYY® FineReader 14 User’s Guide
Scanning to Microsoft Excel
The Scan to Microsoft Excel task in the New Task window lets you create Microsoft Excel documents
from images obtained from a scanner or a digital camera.
1. Open the New Task window, click the Scan tab, and then click the Scan to Microsoft Excel
task.
2. Select a device and specify scanning settings .
3. Click the Preview button or click anywhere inside the image.
4. Review the image. If you are not satisfied with the quality of the image, change the scanning
settings and click the Preview button again.
5. Specify conversion settings. These settings determine the appearance and properties of the
output document.
5.1.Preserve formatting.
Select the appropriate setting depending on how you plan to use the output document.
·Formatted text
The font types, font sizes, and paragraph formatting will be retained.
·Plain text
Only the paragraphs will be retained. A single font will be used throughout.
5.2.OCR languages
Select the language(s) of your document. See also: OCR languages .
5.3.XLSX settings:
·Keep pictures
Select this option if you want to preserve the pictures in the output document.
·Create a separate sheet for each page
Select this option if you want to create a separate Microsoft Excel spreadsheet from each
page of the original document(s).
5.4.Image preprocessing settings...
Use this option to specify image preprocessing settings, such as detection of page orientation
and automatic preprocessing settings. These settings can significantly improve source
images, resulting in greater OCR accuracy. See also: Image processing options .
5.5.More options...
Opens the XLS(X) section of the Format Settings tab of the Options dialog box, where
you can specify additional settings (you can also open this dialog box by clicking Options... on
the Tools menu).
6. Click Scan to Excel.
7. A dialog box will be displayed, showing a progress bar and tips.
182
214
218
198 191
43
ABBYY® FineReader 14 User’s Guide
8. After the page has been scanned, a dialog box prompting you to decide what to do next will
appear.
Click Scan Again to scan more pages using the current settings or click Finish Scanning to
close the dialog box.
9. Specify the folder where you want to save your Microsoft Excel document.
When the task is completed, a Microsoft Excel document will be created in the folder that you specified.
All of the document's pages will also be opened in the OCR Editor.

44
ABBYY® FineReader 14 User’s Guide
Scanning to image files
The Scan to Image Files task in the New Task window lets you create image-only documents from
images obtained from a scanner or a digital camera.
1. Click the Scan tab and then click the Scan to Image Files task.
2. Select a device and specify scanning settings .
3. Click the Preview button or click anywhere inside the image.
4. Review the image. If you are not satisfied with the quality of the image, change the scanning
settings and click the Preview button again.
5. Specify conversion settings. These settings determine the appearance and properties of the
output document.
5.1.Select image format
Use this setting to select the desired image file format.
5.2.Compression
If you selected the TIFF format, you will be able to compress scanned images. Image
compression reduces file size.
Using different compression methods results in different data compression rates and may result
in data loss (loss of image quality). There are two factors you should consider when choosing a
compression method: the quality of images in the output file and its size.
ABBYY FineReader lets you use the following compression methods:
·PACKBITS
Does not cause data loss and is well suited for compressing black-and-white scans.
·JPEG (JFIF format)
This method is used to compress grayscale and color images such as photographs. It
compresses images significantly, but at the cost of some data loss. This leads to reduced
image quality (blurriness and loss of color saturation).
·ZIP
Does not cause data loss and works best on images that contain large single-color areas
such as screenshots and black-and-white images.
·LZW
Does not cause data loss and works best on images with vector graphics and grayscale
images.
5.3.Image preprocessing settings...
Specify image preprocessing settings, such as detection of page orientation and automatic
preprocessing settings. These settings can significantly improve source images, resulting in
greater OCR accuracy. See also: Image processing options .
6. Click Scan to <format>.
7. A dialog box will be displayed, showing a progress bar and tips.
182
218
45
ABBYY® FineReader 14 User’s Guide
8. After the page has been scanned, a dialog box prompting you to decide what to do next will
appear.
Click Scan Againto scan more pages using the current settings or click Finish Scanning to close
the dialog box.
9. Specify the folder where you want to save your output file.
When the task is completed, output files in the specified format will be created in the folder that you
specified. All of the document's pages will also be opened in the OCR Editor.

46
ABBYY® FineReader 14 User’s Guide
Scanning to other formats
The Scan to Other Formats task in the New Task window lets you create documents in popular
formats (*.pptx, *.odt, *.html, *.epub, *.fb2, *.rtf, *.txt, *.csv, and *.djvu) from images obtained from a
scanner or a digital camera.
1. Open the New Task window, click the Scan tab, and then click the Scan to Other Formats task.
2. Select a device and specify scanning settings .
3. Click the Preview button or click anywhere inside the image.
4. Review the image. If you are not satisfied with the quality of the image, change the scanning
settings and click the Preview button again.
5. Specify conversion settings. These settings determine the appearance and properties of the
output document.
5.1.Select output format
Use this option to select the desired format for the output file.
5.2.OCR languages
Select the language(s) of your document. See also: OCR languages .
5.3.Image preprocessing settings...
Specify image preprocessing settings, such as detection of page orientation and automatic
preprocessing settings. These settings can significantly improve source images, resulting in
greater OCR accuracy. See also: Image processing options .
5.4.More options...
Opens the section with the settings of the selected format on the Format Settings tab of
the Options dialog box, where you can specify additional settings (you can also open this
dialog box by clicking Options... on the Tools menu).
6. Click Scan to <format>.
7. A dialog box will be displayed, showing a progress bar and tips.
8. After the page has been scanned, a dialog box prompting you to decide what to do next will
appear.
Click Scan Again to scan more pages using the current settings or click Finish Scanning to
close the dialog box.
9. Specify the folder where you want to save your output file.
When the task is completed, output files in the specified format will be created in the folder that you
specified. All of the document's images will also be opened in the OCR Editor.
182
214
218
191
47
ABBYY® FineReader 14 User’s Guide
PDF Editor
The PDF Editor is an easy-to-use tool that lets you view and search PDF documents, rearrange, add or
delete pages, copy text and pictures, edit text, and add comments to documents. You don't need to
convert your PDF to an editable format, even if it only contains scans without a text layer.
Chapter contents
·Viewing PDF documents
·Reviewing PDF documents
·Working with PDF content
·Filling out forms
·Signing PDF documents with a digital signature
·Protecting PDF documents with passwords
·Creating PDF documents
·Saving and exporting PDF documents
48
59
71
86
87
90
93
94
48
ABBYY® FineReader 14 User’s Guide
Viewing PDF documents
The PDF Editor allows you to view and search PDF documents and copy text, pictures, and tables
inside them.
To open a PDF document in the PDF Editor:
·Open the New Task window, click the Open tab and then click the Open PDF Document task.
·Open the New Task window and click File > Open PDF Document....
The document will be displayed in the PDF Editor.
To customize the way the document is displayed, use the following settings.
·The viewing modes change the way pages are displayed and scrolled.
See also: Viewing modes .
·The zoom feature lets you zoom in to and out of the document.
13
49

49
ABBYY® FineReader 14 User’s Guide
·Actual Size displays the page at a scale of 100%.
·Fit to Width changes the scale at which the document is displayed so that the width of the
document fits to the width of the screen.
·Best Fit changes the scale at which the document is displayed so that the height of the document
fits to the height of the screen.
·Zoom Out/Zoom In lets you adjust the scale manually.
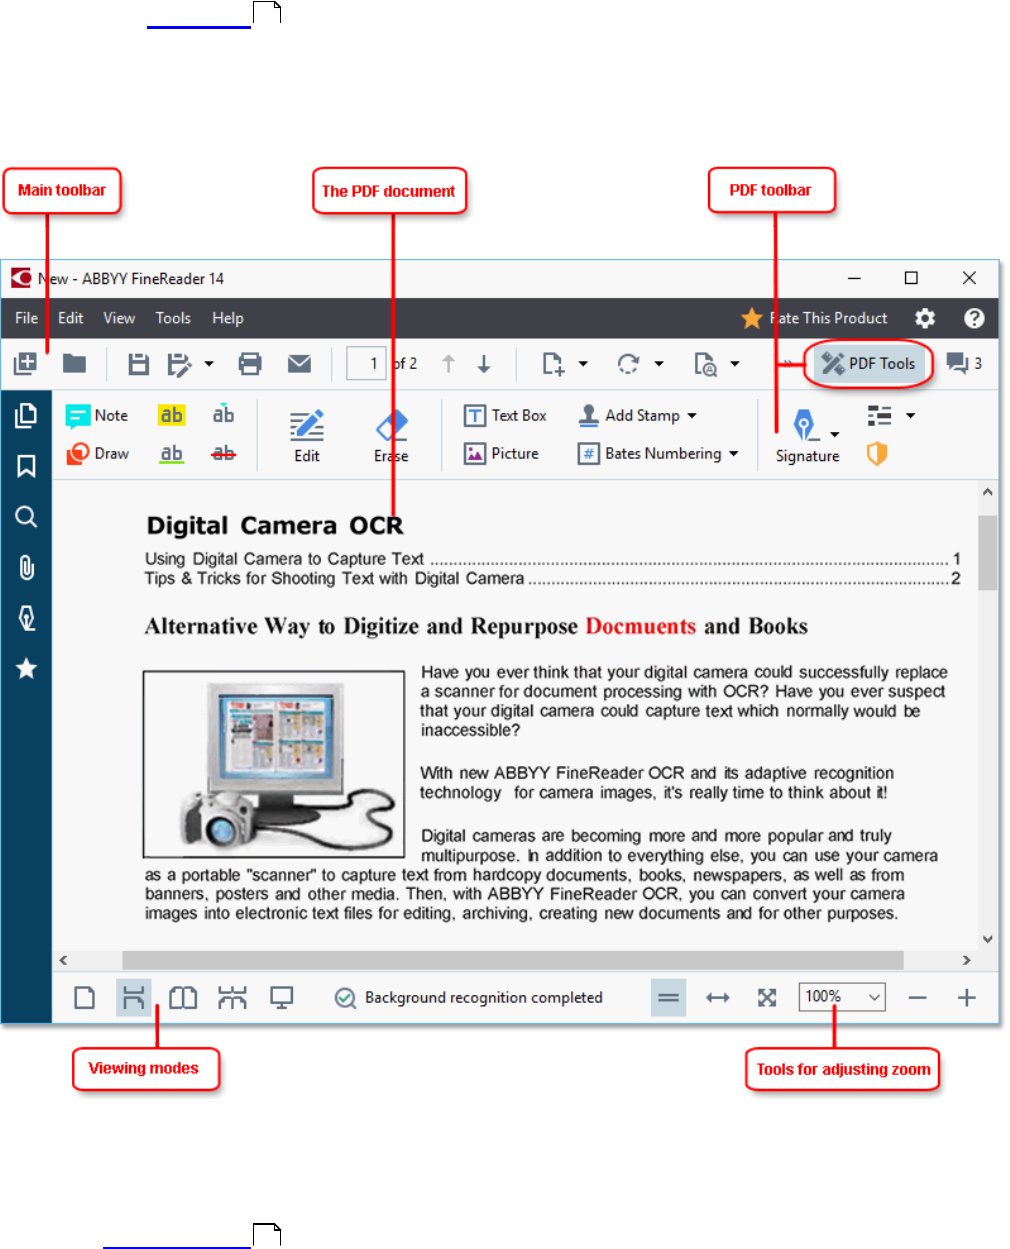
To show/hide the toolbar with PDF tools, click the PDF Tools button on the main toolbar.
Chapter contents
·Viewing modes
·Navigating PDF documents
·Background recognition
·Keyword search
·Copying content from PDF documents
·PDF security features
Viewing modes
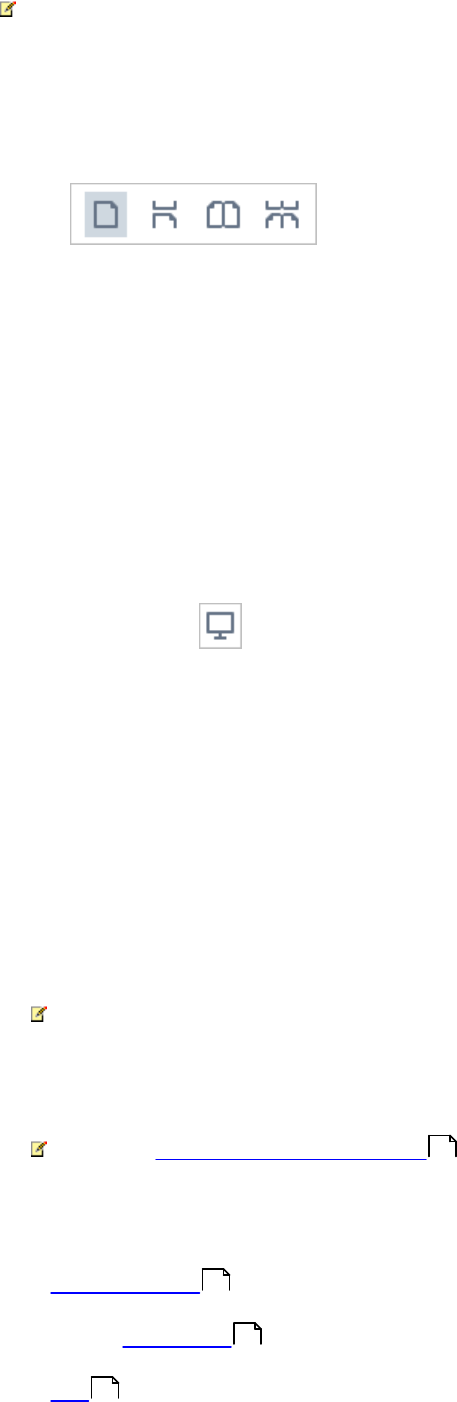
The PDF Editor has four viewing modes that determine how document pages are displayed and
scrolled:
One-Page View displays one page and hides all the other pages.
One-Page Scrolling displays pages one after the other, so that when you get to the bottom of one page,
the top of the next page is visible.
Two-Page View displays pages side-by-side, with odd-numbered pages on the left and even-numbered
pages on the right.
Two-Page Scrolling displays two pages side-by-side with subsequent pages appearing as you scroll
down.
49
52
54
55
57
58
50
ABBYY® FineReader 14 User’s Guide
If you want to display even pages on the left and odd pages on the right in one of the two-page viewing
modes, click View > View mode > Odd Pages on the Right.
There are several ways to change the viewing mode:
·Click one of the buttons on the toolbar at the bottom of the screen:
·Click View > View mode and select one of the viewing modes.
·Use the following keyboard shortcuts: Ctrl+1, Ctrl+2, Ctrl+3, and Ctrl+4.
Full-screen mode
The PDF Editor has a full-screen viewing mode, in which the document takes up the entire screen
space and no panels or toolbars are visible.
To enter full-screen mode, do one of the following:
·Click the button on the toolbar at the bottom of the screen.
·Click View > Full Screen.
·Press F11.
In the full-screen mode, you can:
·Scroll the document.
·View comments (place the mouse pointer over a commented area to display the comment).
·Change viewing modes and scaling.
To display the bottom toolbar with viewing options, move the mouse pointer to the bottom edge of
the screen.
·Go to specific pages in the document.
See also: Navigating PDF documents .
You can also right-click the document in full-screen view and use the commands on the shortcut menu
to:
·Add comments and text insertion points
·Create bookmarks
·Edit text and pictures
To exit the full-screen mode, press F11 or Esc.
53
59
79
72
51
ABBYY® FineReader 14 User’s Guide
Hiding toolbars and panes when reading PDF documents
When reading a document in the PDF Editor, you may want to hide some or all of the toolbars and
panes in order to leave as much screen space for the document as possible. The menu bar, the main
toolbar, and the toolbar at the bottom of the screen can't be hidden separately, but you can use the full-
screen mode if you want to hide all toolbars and panes.
You can hide the following toolbars and panes:
·To hide the navigation pane, press F5 or click View and disable the Show Navigation Pane
option.
·To hide the PDF toolbar, press F6 or click View and disable the Show PDF Tools option.
·To hide the Comments pane, press F7 or click View and disable the Show Comments
Pane option.
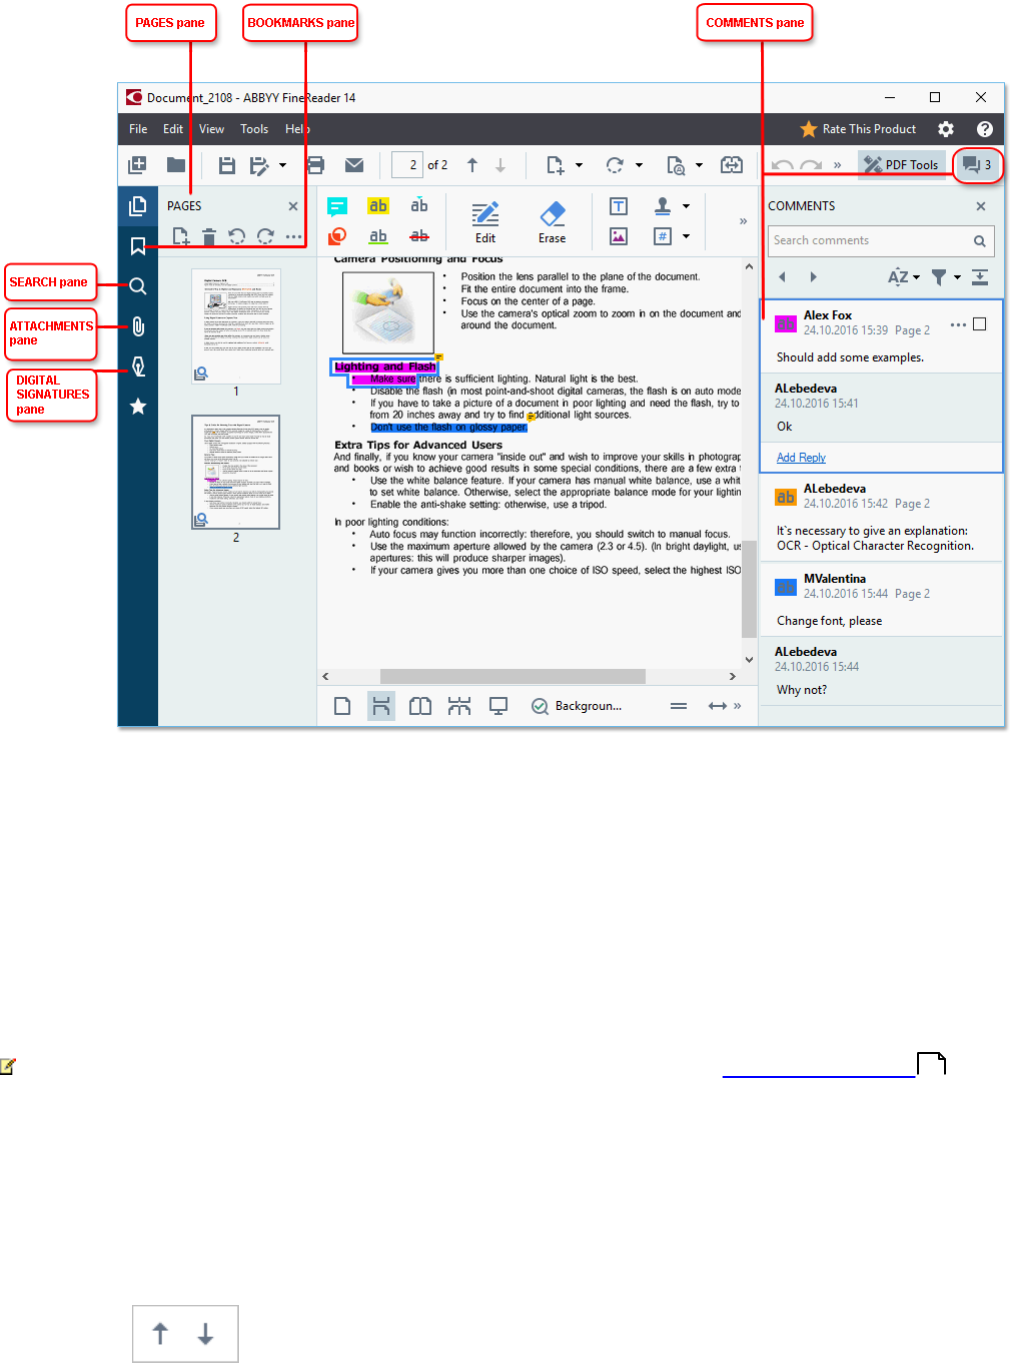
The PDF Editor with the navigation pane, PDF toolbar, and comment pane hidden:
52
ABBYY® FineReader 14 User’s Guide
Navigating PDF documents
The PDF Editor offers a number of tools for navigating PDF documents.
·The Pages pane lets you navigate pages quickly, change the order of pages, add pages to the
document, or delete them.
·The Bookmarks pane contains tools for creating, editing, and navigating bookmarks.
·The Search pane lets you search and highlight text.
·The Attachments pane lets you view and edit attachments.
·The Digital Signatures pane lets you view and delete digital signatures.
The keyboard shortcuts for showing and hiding these panes are listed in Keyboard shortcuts .
Viewing a specific page
The PDF Editor provides several tools that make it easier to navigate long documents.
To navigate between pages:
·Use the buttons on the main toolbar.
257
53
ABBYY® FineReader 14 User’s Guide
·Click View > Go to Page and then click Next Page, Previous Page, First Page or Last Page.
To quickly open a specific page:
·Type the number of the desired page in the box on the main toolbar and press Enter.
·Click View > Go to Page > Page Number..., type the number of the desired page, and click OK.
Navigating pages in the full-screen view
To open a specific page in full-screen view, do the following:
1. Move the mouse pointer to the bottom edge of the screen to bring up the toolbar.
2. Type the number of the desired page in the box on the toolbar at the bottom of the
screen.
3. Press Enter.

54
ABBYY® FineReader 14 User’s Guide
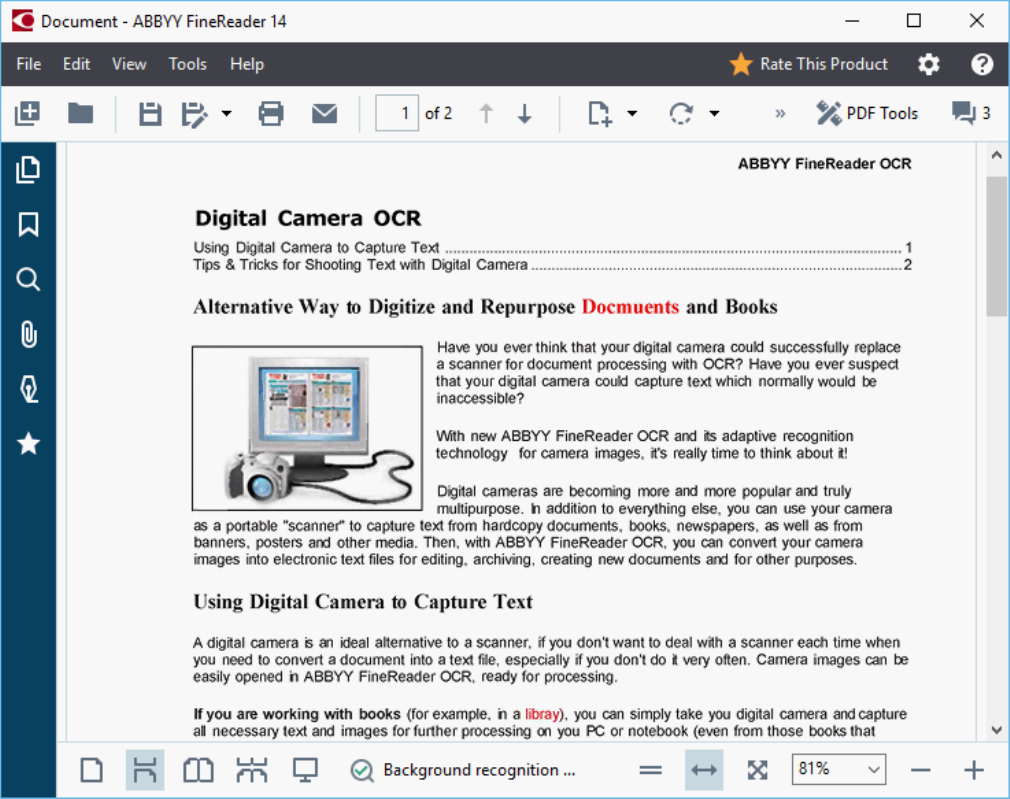
Background recognition
The PDF Editor allows you to search and copy text and pictures in PDF documents without a text layer,
such as scanned documents and documents created from image files. This is possible thanks to an
OCR process that runs in the background.
Background recognition is enabled by default and starts automatically when you open a PDF document.
The background recognition process does not change the contents of the PDF file. Instead, it adds a
temporary text layer that will not be available when you open the document in other applications.
If you want to make the document searchable in other applications, you will need to save the text
layer created by the background recognition process. To do this, click File > Recognize Document >
Recognize Document...See also: Recognizing text .
Important! If the search or copy functions don't work properly, check that the right OCR languages
are selected for the document. See also: Document features to consider prior to OCR .
To disable background recognition, clear the Enable background recognition in the PDF Editor
option in the Options dialog box.
The background recognition process cannot run on computers with a single-core processor.
75
214
188
55
ABBYY® FineReader 14 User’s Guide
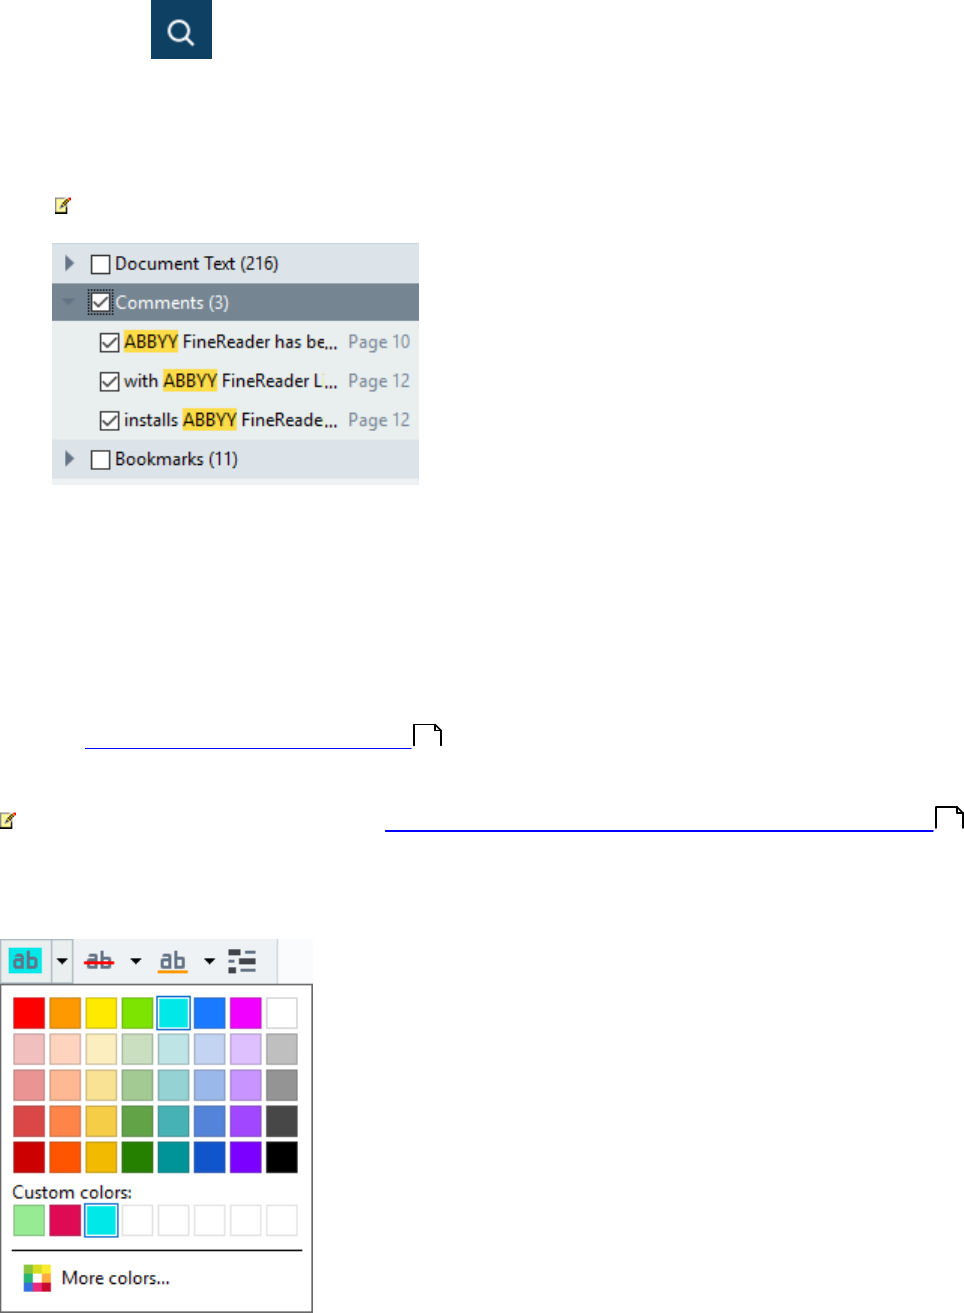
Keyword search
The PDF Editor allows you to find and highlight information in PDF files. Comments, metadata, and
bookmarks will be searched along with the text in the document itself, and the results will be displayed in
a separate panel. Search results will also be highlighted in the document, and you will be able to apply
various effects to these results.
1. Click the tab in the pane on the left or click View > Search to open the Search pane.
2. Type the word or phrase you want to find.
Words or phrases that match your query will be highlighted in the document.
The search results will be arranged into groups and you will be able to highlight entire groups.
3. You can change search options by clicking on the arrow in the search box and selecting any of
the following:
·Exact Match will find only words that are an exact match of the words you typed in the search
box.
·Match Case will find only words that match the capitalization in your query.
You can highlight, cross out, and underline search hits in the text. To do this, in the Search pane,
select the words you want to highlight, cross out or underline and then click the respective tool.
You can also redact search hits. See Removing confidential information from PDF documents .
To change the color used for text markup, click the arrow next to the respective tool and select the
desired color on the color palette that appears.
60
92

56
ABBYY® FineReader 14 User’s Guide
By default, the markup tools in the Search pane use the same colors as the markup tools on the PDF
Tools toolbar.
To navigate to the next/previous search hit, use the buttons. You can also select the next
search result by pressing F3.
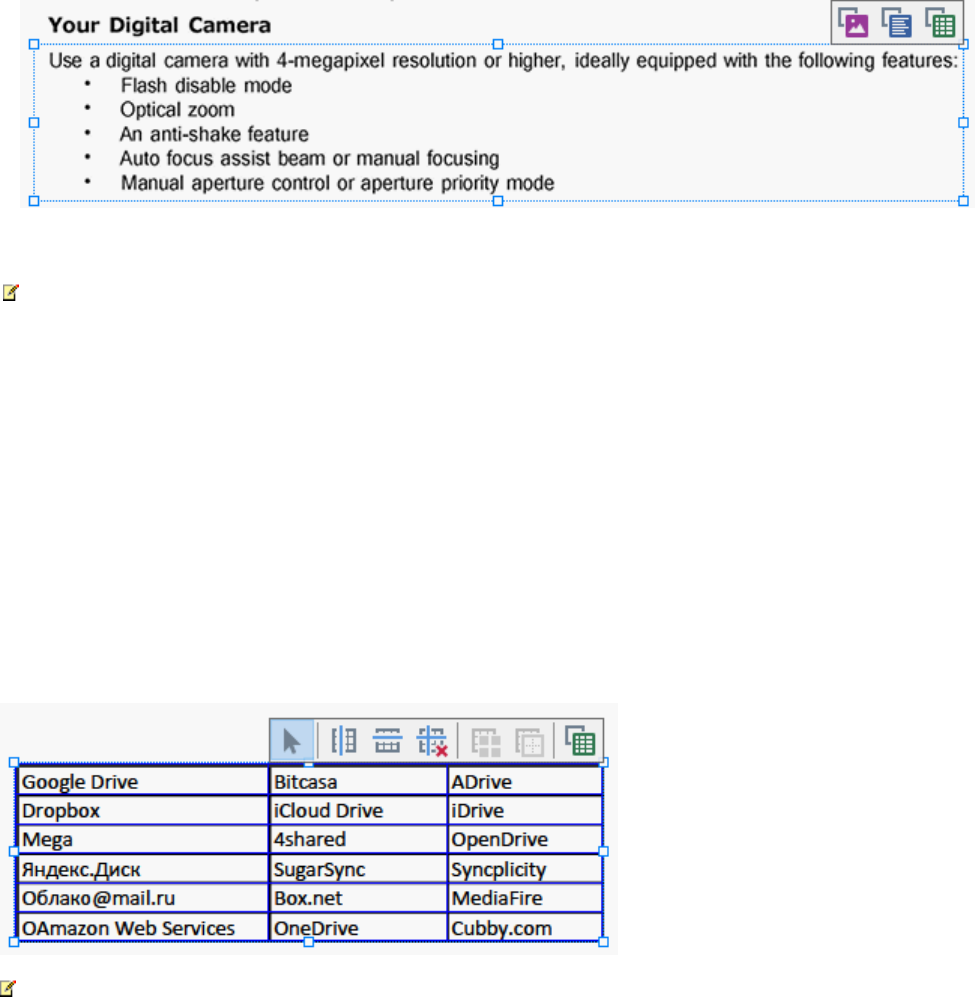
57
ABBYY® FineReader 14 User’s Guide
Copying content from PDF documents
The PDF Editor allows you to copy text, pictures, and tables from PDF documents to other applications.
These features can be used in PDF documents of any type, even those that contain only scans.
Complete the following steps to copy text:
1. Select the text that you want to copy.
2. Right-click the selected text and click Copy Text on the shortcut menu or click one of the icons
on the pop-up toolbar that appears above the text.
3. Paste the text into the desired application.
To copy text from a page that already has a text layer (whether original or created by the
background recognition process), select the text, right-click it, and click Copy Text on the shortcut
menu.
Complete the following steps to copy a table:
1. Select the table that you want to copy.
2. Right-click the selected table and click Copy Table on the shortcut menu or click one of the icons
on the pop-up toolbar that appears above the table.
You can use the pop-up toolbar above the table to edit the table before copying it. You can add
vertical and horizontal separators to the table, remove separators, and split or combine table cells.
No changes will be made to the table in the original file.
After editing the table, click Copy Table again.
3. Paste the table into the desired application.

58
ABBYY® FineReader 14 User’s Guide
If the copied content is significantly different from the original document:
·If the document does not have a text layer, check that the right OCR languages are selected.
·If the page with the content you want to copy has a poor quality text layer, replace the text layer with
a new one.
Now try copying the content again.
Complete the following steps to copy a page fragment as an image:
1. Select the area you wish to copy.
2. Right-click the selected area and click Copy Image on the shortcut menu or click one of the icons
on the pop-up toolbar that appears above the area. If the selected area contains text, this text will
not be recognized and will be copied as part of the image.
3. Paste the image into the desired application.
PDF security features
Some PDF documents can harm your computer.
ABBYY FineReader has a number of features that make working with PDF documents safer. The
program will ask for your confirmation when you perform the following potentially dangerous actions:
·Opening attachments
·Opening links
·Submitting form data.
If you trust the creator of the document, click Allow; otherwise, click Cancel.
You can also protect your computer from malicious JavaScript code by disabling JavaScript in PDF
documents. To disable JavaScript, open the Options dialog box, click the Other tab, and clear the
Enable JavaScript in PDF documents opened in the PDF editor option. No when you open a PDF
document with JavaScript the following notification will appear at the top of the window:
Click the image to enlarge it
If you trust the person or entity who sent you the PDF document, you can enable JavaScript by selecting
one of the following options from the JavaScript Settings drop-down list:
·Enable JavaScript for This Document Only to enable JavaScript while the current document is
open.
·Enable JavaScript for All Documents to open the Options dialog box, where you can enable
JavaScript for all documents.
214
86
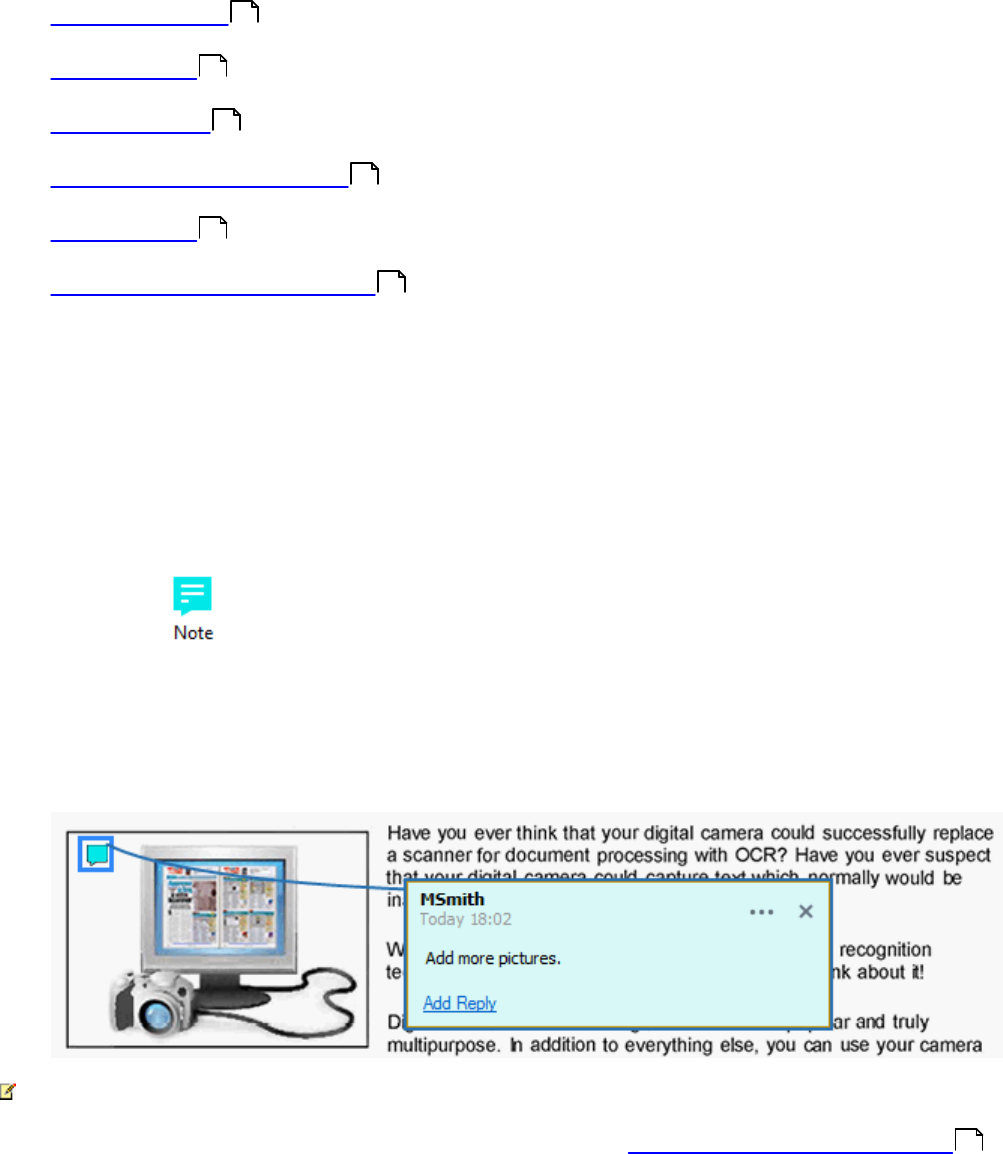
59
ABBYY® FineReader 14 User’s Guide
Reviewing PDF documents
The PDF Editor includes a number of features for reviewing PDF documents. While reading a
document, you can add comments, highlight important fragments, make notes, draw shapes to highlight
specific areas, and place stamps on pages.
Chapter contents
·Adding comments
·Marking up text
·Drawing shapes
·Adding text to PDF documents
·Adding stamps
·Collaborating on PDF documents
Comments
The PDF Editor offers tools for adding notes to any part of a PDF document, making discussing and
reviewing PDF documents much simpler.
1. If the PDF Tools toolbar is hidden, open it by clicking the PDF Tools button on the main toolbar.
2. Click the tool on the PDF Tools toolbar.
3. If you don't like the default note color, select another one on the toolbar that appears above the
document.
4. Click where you want the note to appear on the page and type the note.
You can change the color of an existing note using its shortcut menu.
To find out how to open notes, reply to notes or delete them, see Collaborating on PDF documents .
59
60
62
64
69
65
65
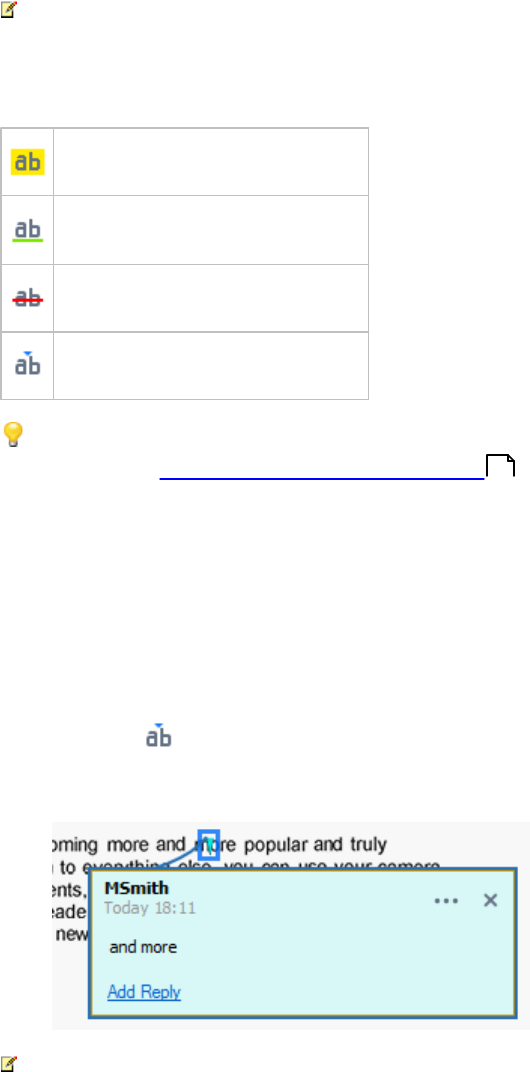
60
ABBYY® FineReader 14 User’s Guide
Marking up text
The PDF Editor allows you to indicate what changes should be made to a document. Any editing marks
that you add will not alter the text itself but merely indicate what changes must be made and where.
Annotations related to editing text are only available in documents with a text layer or documents that
have been recognized by the background recognition process.
ABBYY FineReader includes the following markup tools:
Highlight
Underline
Strikethrough
Add Note to Insert Text
You can add a comment to any type of annotation by double-clicking the annotation. For more on
comments, see Collaborating on PDF documents .
To highlight, underline, or cross out a text fragment:
·Select a markup tool on the main toolbar and then select the desired text fragment, or
·Select the desired text fragment and then select a markup tool on the main toolbar.
To indicate an insertion point:
·Click the tool on the PDF Tools toolbar and click the place where you think text needs to be
inserted.
To change the color of an annotation:
·Right-click the annotation and select the desired color on the shortcut menu or
·Click a markup tool on the main toolbar and then click one of the color boxes on the toolbar that
appears above the document.
You can use the search feature to mark up specific text fragments without reading through the entire
document to find them.
1. Open the Search pane.
65
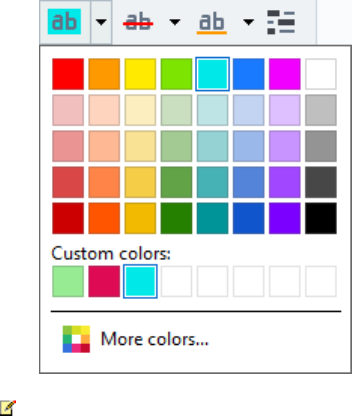
61
ABBYY® FineReader 14 User’s Guide
2. Type the word or phrase you want to find.
3. In the Search pane, select the search hits you want to mark up and click the desired markup tool.
If you want to choose a different color, click the arrow next to the markup tool instead of clicking
the tool itself and then click the desired color on the color palette that appears.
By default, the markup tools in the Search pane use the same colors as the markup tools on the
PDF Tools toolbar.
62
ABBYY® FineReader 14 User’s Guide
Drawing shapes
The PDF Editor allows you to comment on objects that have various shapes and sizes, such as
blueprints or irregularly shaped fragments of text. Before adding your comment, you can draw a shape
around the object that you want to comment on.
1. On the PDF Tools toolbar, click .
2. Select a desired drawing tool on the toolbar that is shown below.
·Ink
Draws a line when you hold down the left mouse button, letting you draw any shape.
·Line
Draws a straight line. If you want to draw a vertical, horizontal or diagonal (sloped at an angle of
45°) line, hold down the Shift key.
·Arrow
Draws an arrow. If you want to draw a vertical, horizontal or diagonal (sloped at an angle of
45°) line, hold down the Shift key.
·Rectangle
Draws a rectangle. If you want to draw a square, hold down the Shift key.
·Oval
Draws an oval. If you want to draw a circle, hold down the Shift key.
·Polygon
Draws a polygon. Click where you want to place the initial vertex of the polygon. To complete
the polygon, click the initial vertex.
·Cloud
Draws a cloud. Click where you want to place the initial vertex of the cloud. To complete the
cloud, click the initial vertex.
63
ABBYY® FineReader 14 User’s Guide
·Polyline
Draws a jagged line. Click the page to start drawing, click again when you want to draw the
next segment, and double-click where you want the jagged line to end.
3. Once you have finished drawing the shape, double-click it if you want to type a comment.
If you are using the Ink tool, you will need to disable the drawing tools before you can type a
comment.
To draw a set of shapes using the Ink tool and add a comment to the entire set:
·Hold down the Shift key and draw the figure. You can release the mouse button, but only
release the Shift key when you are finished drawing.
·Disable the drawing tools, double click one of the shapes in the set, and type your comment.
4. Drawing tools have several settings you can change.
To change these options:
·Right-click a shape you drew on the page and use the commands on its shortcut menu.
·Selecting the desired settings on the PDF Tools toolbar before drawing a shape.
For more on using and editing comments, see Collaborating on PDF documents .
65
64
ABBYY® FineReader 14 User’s Guide
Adding text to a PDF document
The PDF Editor allows you to add a block of text to any type of PDF without converting it to an editable
format.
1. On the PDF Tools toolbar, click .
A toolbar with text editing tools will appear beneath the PDF Tools toolbar.
2. Click where you want to add text. You can drag the mouse pointer without releasing the mouse
button to change the size of the text block.
3. Type your text. You can choose a font type, font size, and font color.
4. Change the size of the text block if necessary.
5. To draw a border around the text block, select the color and thickness of the border.
6. You can also change the background color of the text block or use the Detect background color
option to use the background color of the page.
By default, transparent background is used.
You can use the PDF Editor to fill out forms that do not have interactive fields. To do this, simply type
text over the form using the Text Box tool.
When you add a text block, a new comment containing text from the block will appear in the
Comments pane. You can change the status of the comment in the same way you can change the
status of an annotation. See also: Collaborating on PDF documents .
65
65
ABBYY® FineReader 14 User’s Guide
Collaborating on PDF documents
The PDF Editor allows you to see and reply to comments made by other reviewers, even if they were
created in applications other than ABBYY FineReader. You can also change the status of a comment to
inform a reviewer that you have accepted or rejected their suggestion.
To view a list of all comments in the document, open the Comments pane by clicking the button
on the main toolbar.
There are other ways to open the Comments pane:
·Right-click an annotation, stamp or comment and click Show Comments Pane on the shortcut
menu.
·Click View and select Show Comments Pane.
·Press F7.
Adding a comment to an annotation

66
ABBYY® FineReader 14 User’s Guide
·Double-click the annotation to which you want to add a comment, or
·Right-click the annotation and select the Add Comment command on the shortcut menu.
If the Comments pane is hidden, a comment box where you can type the comment will appear. If the
Comments pane is visible, the comment box associated with the annotation will be highlighted.
Opening a comment
·Select the annotation that contains the comment you want to see.
If the Comments pane is hidden, a comment box where you can type the comment will appear. If the
Comments pane is visible, the comment box associated with the annotation will be highlighted.
If you want a comment to always be visible, double-click its annotation. To hide a comment, click the
button in the upper-right corner of the comment box.
Replying to a comment
1. Select the annotation that contains the comment to which you want to reply.
2. Click Reply in the comment's box or press Ctrl+Enter and type your reply.
Deleting an annotation or its associated comment or reply
To delete an annotation:
·Select the annotation you want to delete and press Del or right-click the annotation and click
Delete on the shortcut menu.
The comment associated with the annotation will also be deleted.
·Select a comment box in the Comments pane and press Del or right-click the comment box and
click Delete.
The annotation associated with the comment will also be deleted.
To delete a comment in the Comments pane:
·Right-click anywhere inside the comment box and select Delete on the shortcut menu.
All replies associated with the comment will also be deleted.
To delete all comments and annotations:
·Click Edit > Delete Comments and Markup...
To delete a reply:
·Right-click the reply and select Delete Reply on the shortcut menu.
In the same manner, you can delete a reply on the Comments pane.
Flagging a comment or changing its status

67
ABBYY® FineReader 14 User’s Guide
You can assign statuses to comments you have read or flag those comments which you want to revisit
later.
To flag a comment:
·Click the box next to the comment in the Comments pane or right-click the comment and click
Flag on the shortcut menu.
To change the status of a comment:
·Right-click a comment or its annotation, click Status on its shortcut menu, and select the desired
status.
·Click the button in the comments box and select the desired status.
Properties of annotations and comments
In the Properties... dialog box of an annotation or comment, you can change the author or the subject
and see how the status of the annotation or comment changed over time. If you have changed the
name of the author, you can click the Set Default button to use the new name for any annotations and
comments you make in the future.
To open the Properties dialog box of an annotation or comment:
·Right-click the annotation, stamp or comment and click Properties... on the shortcut menu.
The Comments pane

68
ABBYY® FineReader 14 User’s Guide
The Comments pane displays all annotations added to the document, with or without comments, and
all text blocks, stamps, and editorial marks.
·To navigate the comments, use the buttons.
·You can search for a specific comment, reply or author using the search box at the top of the
Comments pane.
To sort the comments:
·On the Comments pane, click and then select the desired sorting option from the menu.
You can filter the comments by type, author, flag status, or comment status.
To filter the comments:
·On the Comments pane, click to open the filter menu and then click Show All Comments,
Hide Current Comments, or select the criteria you want to use to filter the comments.
You can filter the comments by:
1. Type
2. Author
3. Page
4. Date
5. Flag Status
6. Status
To reset the filter, click Reset.
If you just want to see the authors and dates of the comments, click to hide the text of the
comments. To display the text again, click .

69
ABBYY® FineReader 14 User’s Guide
Adding stamps
The PDF Editor allows you to stamp PDF documents in the same manner as you stamp paper
documents. You can select a stamp from the list of available stamps or create your own, adding any
desired text, the date and time of stamping, or an image.
To stamp a page:
1. On the PDF Tools toolbar, click and select the desired stamp.
If the stamp you want to use is not available in the menu, click Other stamp.
2. Stamp the page.
3. Move the stamp to the desired location if necessary.
You can add comments to stamps and change their statuses in the same manner as you add
comments to annotations. See also: Collaborating on PDF documents .
How to create a stamp
65
70
ABBYY® FineReader 14 User’s Guide
The PDF Editor allows you to create textual stamps and stamps from images.
To create a stamp from an image:
1. On the PDF Tools toolbar, click > Create Stamp from Image....
2. In the dialog box that opens, type a name for your stamp in the Name field.
3. Click Open Image to open an image from your hard disk or click Paste Image from Clipboard if
you have previously copied an image to the Clipboard.
4. Use the Stamp size slider if you need to adjust the size of the image.
5. Click Save.
To create a text stamp:
1. On the PDF Tools toolbar, click > Create Text Stamp....
2. In the dialog box that opens, type a name for your stamp in the Name field.
3. In the Stamp text field, type the text that you want to appear on the stamp.
4. From the Add Date/Time drop-down list, select the date and time format that you want to use.
When you stamp a page, the stamp will contain the date and time of the stamping in the format
you specified.
All text elements will be added to the stamp at the position of the cursor in the Stamp text field.
You can change the order of the stamp elements in this field, add explanatory text, and set up the
date and time formats. For more on dates and times, see Текущие дата и время в штампах и
нумерации Бейтса .
5. In the Font and border group of options, select a font type, font size, and font effects for the
text in the stamp and a color for the stamp.
6. Enable the Add border option if you want the stamp to have a border.
7. The View box contains a preview of the stamp, so you can see the effects of the changes you
make.
8. Click Save.
How to edit stamps
1. On the PDF Tools toolbar, click > Manage Stamps....
2. In the dialog box that opens, select a stamp and click Edit....
3. Specify the desired settings and click Use.
228
244

71
ABBYY® FineReader 14 User’s Guide
How to delete a stamp
To remove a stamp from your document, do one of the following:
·Select the stamp in the document and press Del.
·Right-click the stamp in the document and select Delete on the shortcut menu.
·Select the comment for the stamp in the Comments pane and press Del.
To remove a stamp from the list:
1. On the PDF Tools toolbar, click > Manage Stamps....
2. In the dialog box that opens, select the stamp and click Delete.
Working with PDF content
The PDF Editor allows you to modify the contents of PDF documents without the need to convert PDF
documents to editable formats.
Chapter contents
·Editing text
·Inserting and editing pictures
·Recognizing text
·Working with pages
·Adding bookmarks
·Adding Bates numbers
·Working with file attachments
·Viewing metadata
·Enhancing page images
72
74
75
76
79
81
83
84
85

72
ABBYY® FineReader 14 User’s Guide
Editing text
The PDF Editor allows you to edit text in any type of PDF documents, including those that contain only
scans. The PDF Editor lets you correct typos, add new text, and edit the formatting of separate lines of
text.
·Editing text in PDF documents that were created in other applications
·Editing scanned documents
·Editing searchable PDF documents
Editing text in PDF documents that were created in other applications
To edit text in a PDF document:
1. Click the button on the PDF Tools toolbar and wait for several seconds while the
program prepares the document for editing.
The Text toolbar will appear above the document.
2. Place the cursor in the text that you want to edit and make the desired changes using the tools on
the Text toolbar.
The program will automatically select a font that is as close to the font used in the original
document as possible.
3. To finish editing the line of text, click anywhere outside the line.
4. To exit the text editing mode, click the button again.
5. Save the document.
Editing scanned documents
Some PDF documents are image-only, i.e. they do not contain a text layer. See also: Types of PDF
documents .
ABBYY FineReader allows you to edit text in PDF documents even if they do not contain a text layer.
When you open such documents, the program creates a temporary text layer so that the document
become editable. Any edits you make (e.g. corrected typos) are then transferred onto the document
image.
72
72
73
180
73
ABBYY® FineReader 14 User’s Guide
1. Click the button on the PDF Tools toolbar and wait several seconds while the program
prepares the document for editing. A Text toolbar will appear above the document.
2. Check that the right OCR languages are selected. See also: Document features to consider prior
to OCR .
3. If a page has distorted text lines or other defects, the program will ask you if you want to improve
the quality of the image. To enhance the image prior to OCR, use the commands in the Correct
Skew and Page Orientation drop-down list on the Text pan.
4. Editable text will be enclosed in frames. Click the line of text you want to edit and add, delete or
change the text or change its font, font size and font style using the tools on the Text toolbar.
When you click a line of text, the program will automatically select a font that is as close to the
font used in the text line as possible.
5. To finish editing a line of text, click outside of it.
6. Click the button to exit the text editing mode.
7. Save the document.
Editing searchable PDF documents
Some PDF documents contain a text layer underneath the document image. See also: Types of PDF
documents .
When you edit documents of this type, the program will apply your changes to the text layer and to the
document image.
1. Click the button on the PDF Tools toolbar and wait several seconds while the program
prepares the document for editing. A Text toolbar will appear above the document.
2. Check that the correct OCR languages are selected. See also: Document features to consider
prior to OCR .
3. When you try to edit a document that already contains a text layer, the program will prompt you to
recognize the document and replace the existing text layer. You can do this using the command in
the Text Layer drop-down list on the Text toolbar.
214
180
214
74
ABBYY® FineReader 14 User’s Guide
In the dialog box that opens, select the OCR language(s). You can also image preprocessing to
correct the orientation of pages, deskew the image, straighten distorted text lines, and remove
other defects.
Once the document has been recognized, you can begin editing it.
4. Editable lines of text will be enclosed in frames. Click the line of text you want to edit and add,
delete or change the text or change its font, font size and font style using the tools on the Text
toolbar.
When you click a line of text, the program will automatically select a font that is as close to the
font used in the original text line as possible.
5. To finish editing a line of text, click anywhere outside the line.
6. Click the button to exit the text editing mode.
7. Save the document.
Inserting and editing pictures
The PDF Editor allows you to insert pictures into any type of PDF document.
1. Click the button on the PDF Tools toolbar.
2. In the dialog box that opens, select a picture and click Open.
3. Move the picture to the desired location on the page.
You can move, rotate, delete, and resize pictures. When you move a picture, it may overlap with
other objects on the page. To bring an overlapping picture to the foreground, right-click it and
select Bring Picture to Front.
To delete a picture:
·To delete a picture in a PDF document created in another application, right-click the picture and
click Delete on the shortcut menu.
·You can delete a part of the document image and anything that it may contain, including pictures.
To do this, click the tool on the PDF Tools toolbar and select the area you want to erase.
The Erase tool deletes pictures and text, automatically selecting the appropriate background
color to fill the empty space.
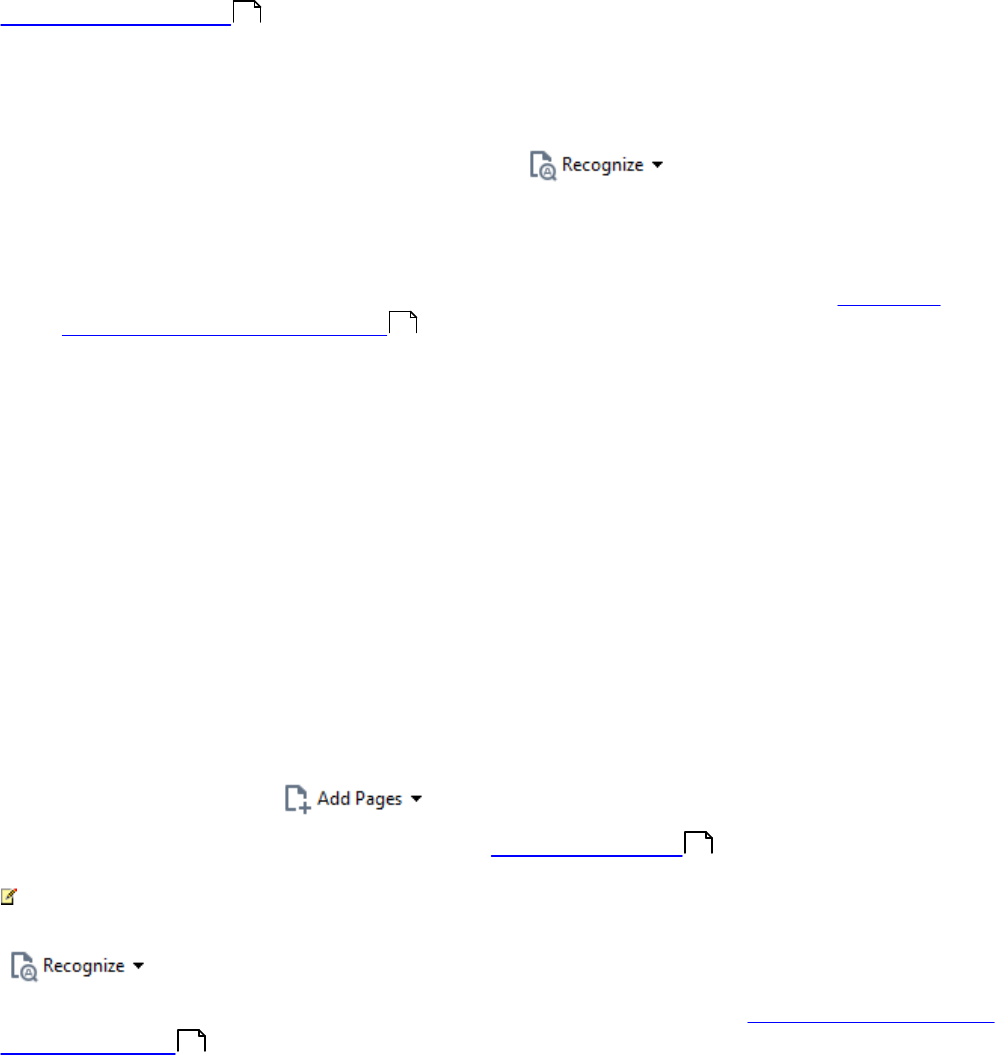
75
ABBYY® FineReader 14 User’s Guide
Recognizing text
Background recognition is a process that adds a temporary text layer to a document, enabling you to
mark up, copy, and search its text. You can make these capabilities available to other users by adding a
permanent text layer to PDF documents. Documents with text layers are practically indistinguishable
from their originals. You can also replace an existing text layer in a searchable PDF document.
1. On the main toolbar, click the arrow next to the button and select Recognize
Document... from the drop-down list. Alternatively, click File > Recognize Document >
Recognize Document... or press Ctrl+Shift+R.
2. In the dialog box that opens, specify the appropriate OCR languages. See also: Document
features to consider prior to OCR .
3. To improve the quality of OCR, enable image processing. Image processing may change the
appearance of your document.
·Correct page orientation - The program will detect text orientation and correct if necessary.
·Deskew images and correct image resolution - The program will detect and correct any
skew, select the appropriate image resolution, and make some other changes to improve the
images.
4. Click the Recognize button.
5. As a result, the output document will contain a searchable text layer.
You can also add a text layer when adding pages to a PDF document from a file or when scanning
paper documents. To do this, select the Recognize text on images option in the Image Processing
Settings dialog box (click > > Image Processing Settings to open this dialog box) and
specify the languages of the document. See also: Working with pages .
If you want to check recognized text, train the program to recognize non-standard fonts and
characters, or use some other advanced features of ABBYY FineReader, click the arrow next to the
button and then click Recognize and Verify in OCR Editor. Alternatively, click File >
Recognize Document > Recognize and Verify in OCR Editor. See also: Sending PDF documents
to the OCR Editor .
54
214
77
98
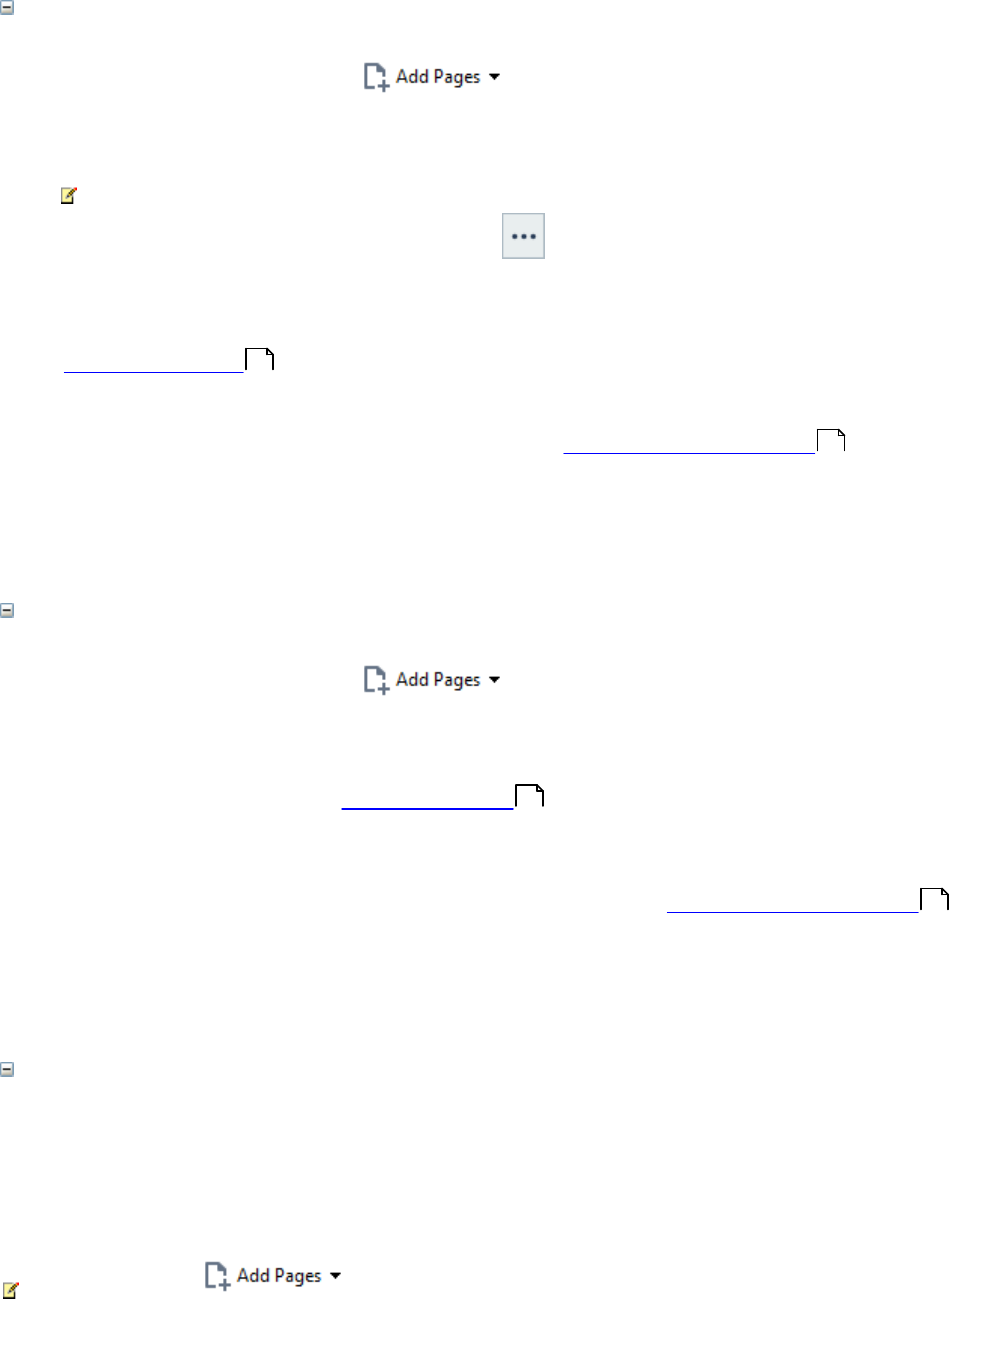
76
ABBYY® FineReader 14 User’s Guide
Working with pages
The PDF Editor allows you to delete or add pages to a PDF document, change their order, and insert
blank pages.
Adding pages from a file...
1. On the main toolbar, click the button.
2. Click Add from File....
Alternatively, click Add Pages from File... in the shortcut menu of the Pages pane or from the
drop-down menu that appears if you click the button.
3. In the dialog box that opens, select the file or files that you want to add to the PDF document and
specify the numbers of the pages that you want to add. The files you select must be in any of the
supported formats . You can also specify where you want the new pages to be added (e.g.
before the first page, before the current page, etc.).
4. Click the Settings... button and specify the desired image processing options .
5. Click the Open button
The selected files will be converted into PDF and inserted into the current PDF document.
Adding scanned pages...
1. On the main toolbar, click the button.
2. Click Add from Scanner....
3. Select a device and specify scanning settings .
4. Click the View button or click anywhere in the scanning area to view the image.
5. If required, click the Settings... button and specify the desired image processing options .
6. Click the Scan button.
The scanned pages will be inserted into the current PDF document.
Inserting blank pages...
1. In the Pages pane, select the page before or after which you want to insert a blank page.
2. Right-click the page, click Add Blank Page on the shortcut menu, and then click Before
Current Page or After Current Page.
Alternatively, click > Add Blank Page. A blank page will be added after the currently
selected page.
212
77
182
77

77
ABBYY® FineReader 14 User’s Guide
Changing the order of pages...
·In the Pages pane, select one or more pages and drag them to the desired place in the document.
Rotating pages...
·In the Pages pane, select one or more pages, right-click them, click Rotate Pages on the
shortcut menu, and then click Rotate Right or Rotate Left. Alternatively, click the the button
at the top of the pane and then click Rotate Pages >Rotate Right (or Rotate Left).
Deleting pages...
·In the Pages pane, select one or more pages, right-click them, and click Delete Pages... on the
shortcut menu or press the Del key.
Creating a PDF document from selected pages...
·In the Pages pane, select the desired pages, right-click them, and then clickCreate PDF from
Selected Pages on the shortcut menu.
The created document will be opened in a new window.
Image processing options
The PDF Editor offers multiple image processing options to improve the quality of images and OCR.
You can specify image processing options when scanning paper documents or when creating PDF
documents from image files.
·Image quality The quality of the pictures and the size of the file are determined by the value you
select from the drop-down list in the Image quality group of options:
·Best quality
Select this item to preserve the quality of the page images and pictures. The original
resolution of the source images will be preserved.
·Balanced
Select this option to reduce the size of the PDF file while keeping the quality of the page
images and pictures at a reasonably high level.
·Compact size
Select this option to obtain a small-sized PDF file. This may adversely affect the quality of the
page images and pictures.
·Custom...
Select this option if you want to specify custom options for saving page images and pictures.
In the dialog box that opens, specify desired saving options and click OK.

78
ABBYY® FineReader 14 User’s Guide
·Улучшать изображения страниц Select this option if you want the program to rectify defects
that commonly occur in scans and digital photos. Click the Preprocessing settings... button and
specify image preprocessing settings .
·Recognize text on images Select this option if you want to add a text layer to the document.
You will get a searchable PDF document that looks almost exactly like the original.
·Use MRC compression (specify OCR languages below) Select this option if you want to apply
the MRC compression algorithm to recognized pages. MRC compression reduces the size of the
output file while preserving the visual quality of the page images.
·Apply ABBYY PreciseScan to smooth characters on image Select this option if you want to
apply ABBYY PreciseScan technology. ABBYY PreciseScan smoothes characters on a document
so that they do not become pixilated when you zoom in.
·OCR languages Be sure to select the right OCR languages. See also: Document features to
consider prior to OCR .
218
214

79
ABBYY® FineReader 14 User’s Guide
Adding bookmarks
The PDF Editor allows you to add bookmarks to PDF documents.
To create a bookmark in the Bookmarks pane or using a shortcut menu.
1. To create a bookmark in the Bookmarks pane:
a. Click the button on the vertical bar to the left or click View > Bookmarks. The
Bookmarks pane will open.
b. Click and type a name for your bookmark.
c. By default, the newly created bookmark will point to the start of the current page.
2. To create a bookmark using a shortcut menu:
a. Select a text fragment, a picture, or any other place in the document that you want to
bookmark.
b. Right-click the selection and click Add Bookmark on the shortcut menu.
c. Type a name for your bookmark in the Bookmarks pane.
If you bookmark a text fragment, the selected text will be used as the name of the bookmark.
d. The newly created bookmark will point to the text fragment, picture or other place in the
document that you selected.
To select a different destination for your bookmark, click Set Destination on the shortcut menu of
the bookmark and then click where you want the bookmark to be inserted in your document.
Bookmarks can be nested. A new bookmark will have the same nesting level as the previously
selected bookmark. If a new bookmark is the first bookmark in the document, it is placed at the root
level.
Alternatively, you can create a bookmark by clicking Edit > Add Bookmark....
Rearranging bookmarks…
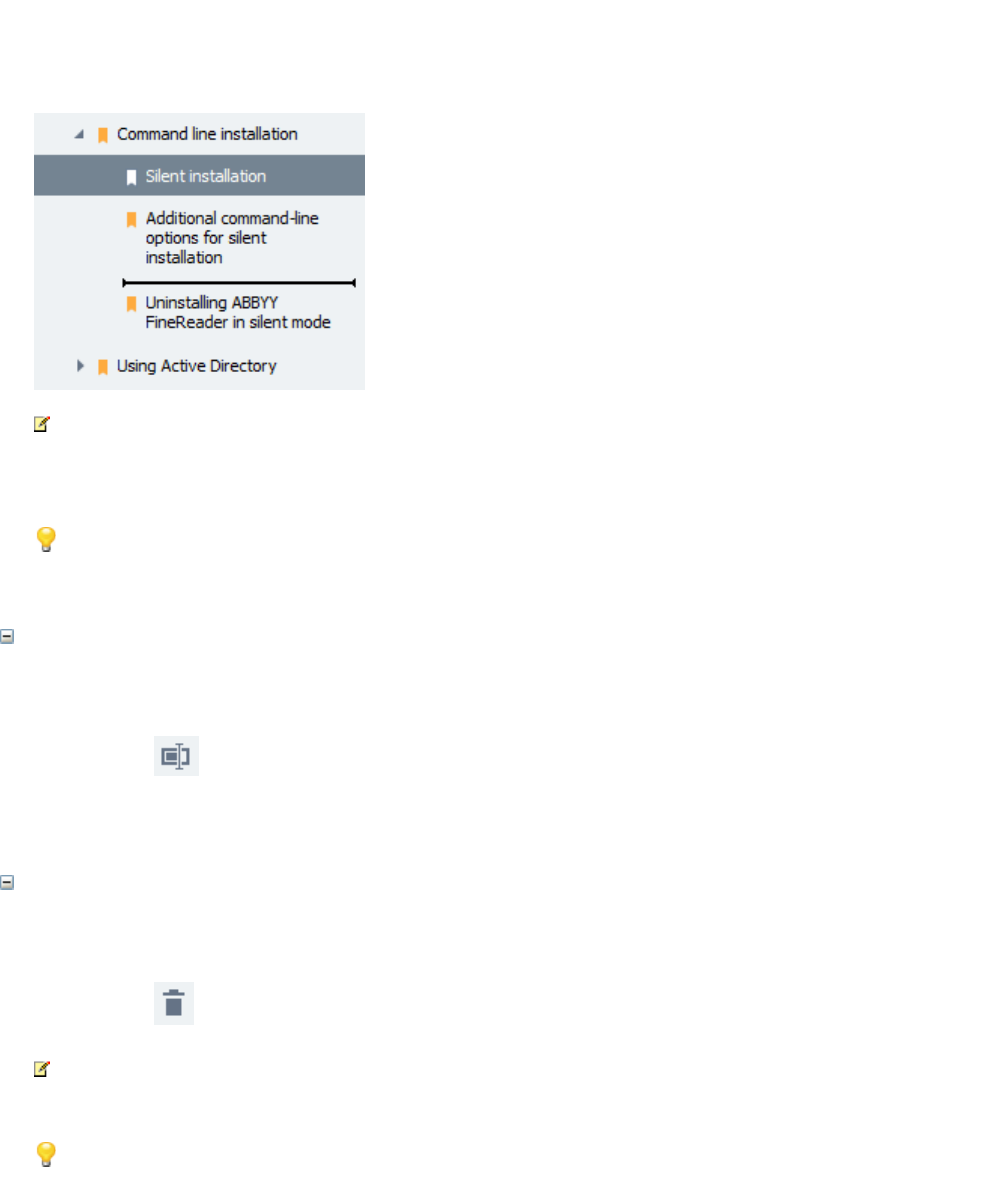
80
ABBYY® FineReader 14 User’s Guide
1. Select a bookmark in the Bookmarks pane.
2. Hold down the left mouse button and drag the bookmark to a desired location.
To create a nested bookmark, drag it onto an existing parent bookmark, wait for the icon of the
parent bookmark to change, and release the left mouse button. Alternatively, right-click a bookmark
and use the Move one level left and Move one level right commands on the shortcut menu.
Rearranging bookmarks or changing their nesting levels will not affect the appearance of the
document.
Renaming bookmarks…
1. Select a bookmark in the Bookmarks pane.
2. Click the button or click Rename on the shortcut menu of the bookmark.
3. Type in a new name.
Deleting bookmarks…
1. Select a bookmark in the Bookmarks pane.
2. Click the button or click Delete on the shortcut menu of the bookmark.
You can delete several bookmarks at a time if they are positioned at the same nesting level.
Holding down the Ctrl key, select the bookmarks you want to delete and click Delete.
When you delete a parent bookmark, all of its child bookmarks are also deleted.

81
ABBYY® FineReader 14 User’s Guide
Adding Bates numbers
The PDF Editor allows you to add Bates numbers to PDF documents. You can use Bates numbering to
index your documents. Bates numbers facilitate document search and retrieval and are useful for
electronic archiving.
To add Bates numbers:
1. Click .
2. On the menu that opens, click one of the available numbering styles.
Creating a Bates numbering template...
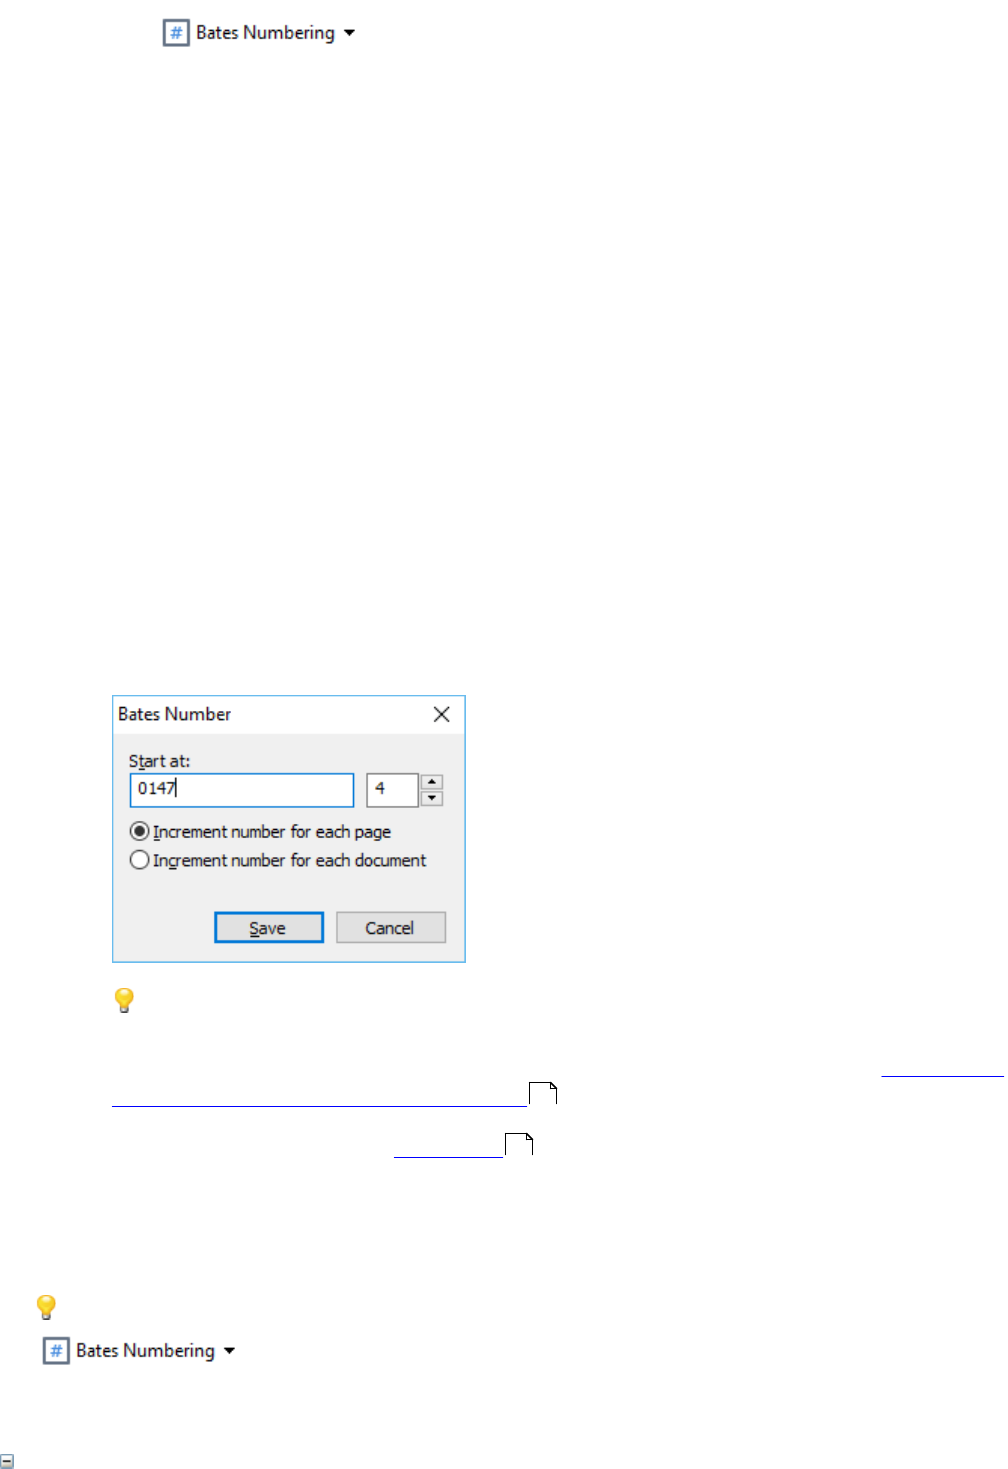
82
ABBYY® FineReader 14 User’s Guide
1. Click the button and then click Create....
2. In the dialog box that opens, enter a name for your numbering style in the Name field.
3. Select one of the eight possible locations on the page.
4. In the Bates number text field, type your text.
5. Specify Bates numbering settings:
a. From the Add Date/Time drop-down list, select a date and/or time format.
b. Click Add Page Number.
This will add the number of the current page to each Bates number.
c. Click Add Unique Number.
If multiple documents are processed, they will all be numbered throughout. Depending on
your settings, this number will increment either with each new page or with each new
document.
By default, numbering starts from 1 and increments with each page. To change the default
settings, click More...
The parameters that you specify will be added to the Bates number text field after the
cursor. You can change the order of the parameters in this field, add explanatory text, and
set up the date and time formats. For more about setting up date and time, see Current date
and time on stamps and in Bates numbers .
6. Under Font and border, select a font effects and color for Bates numbers.
7. Select the Add border option if you want the text to be enclosed in a frame.
8. Click Save.
You can create a Bates numbering style from an existing one. To do this, click
> Manage Bates Numbers.... In the dialog box that opens, select a Bates
numbering style and click Copy....
Changing Bates numbering parameters...
228
244
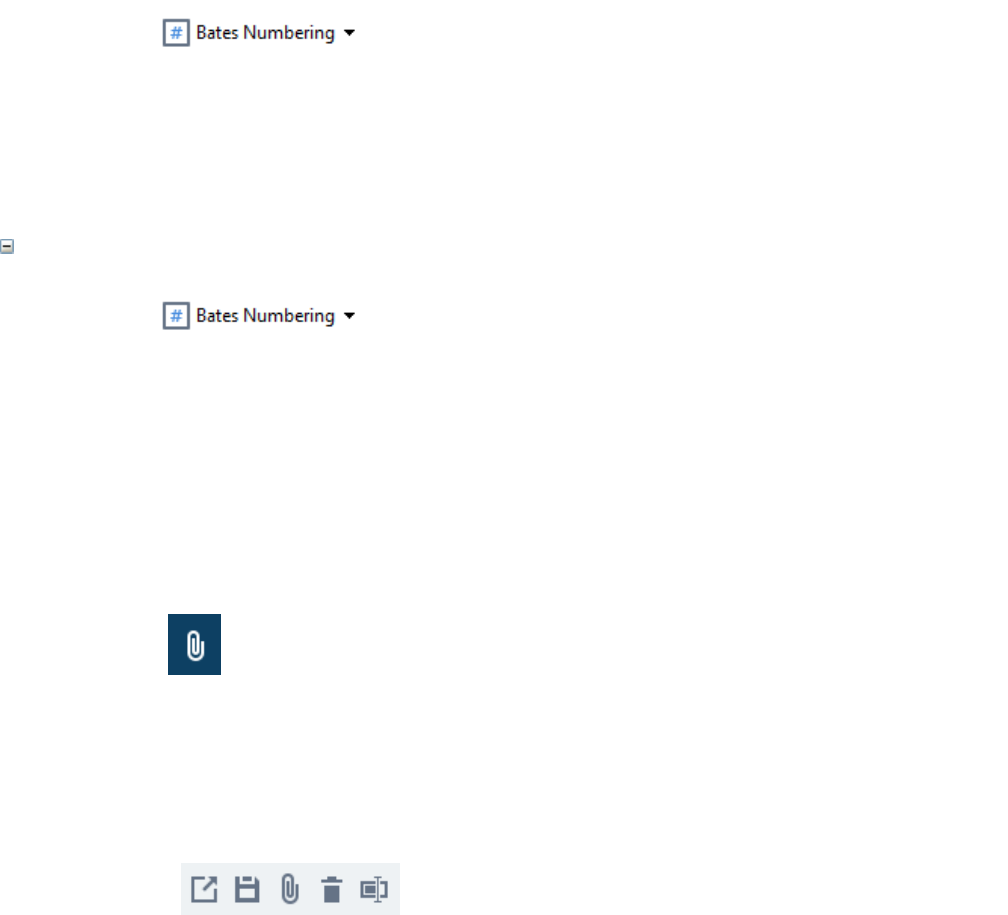
83
ABBYY® FineReader 14 User’s Guide
1. Click the button and then click Manage Bates Numbers....
2. In the dialog box that opens, select the Bates numbering style that you want to modify and click
Edit....
3. Specify the desired settings and click Save.
Removing a Bates numbering style from the list...
1. Click the button and then click Manage Bates Numbers....
2. In the dialog box that opens, select the Bates numbering style that you want to delete and click
Delete.
Adding file attachments
Files of any format can be attached to a PDF document.
To view attached files:
·Click the button in the pane to the left, or click View > Attachments.
You can open, save, rename or delete attached files.
In the Attachments pane:
·Select a file.
·On the toolbar, click the tool that corresponds to the action you want
to perform. Alternatively, click the corresponding command on the shortcut menu

84
ABBYY® FineReader 14 User’s Guide
Viewing metadata
The PDF Editor allows you to view the title and author of a PDF document and some other information.
This information is called metadata. Some of the metadata are specified by the author and some are
generated automatically. You can also search documents by metadata.
To view metadata, click File > Document Properties... to open the Document Properties dialog box.
You can change or save any metadata created by the author, provided that the PDF document is not
password-protected:
·Title contains the title of the document.
·Author contains the author of the document.
·Subject contains the subject of the document.
·Keywords contains keywords that you can use when searching documents.
The original metadata are preserved when you convert files in various formats to PDF, provided that
you have not chosen to delete the metadata and have not specified new export options that will override
the existing options.
The metadata of a document also contain the following information about the document and the file:
·File name contains the name of the file.
·Location contains the path to the folder where the document is stored.
·File size contains the size of the file.
·Page size contains the size of the current page.
·Pages contains the number of pages in the document.
·PDF producer contains the name of the application where the document was created
·Application contains the name of the application where the document content was created.
·PDF version contains the version of PDF.
·Tagged PDF contains information about document tags.
·Fast Web View specifies if the document supports Fast Web View technology, which speeds up
loading documents online.
·Created contains the date and time when the document was created.
·Modified contains the date and time when the document was last changed.
ABBYY FineReader allows you to view, edit, find , and delete metadata.
55 92

85
ABBYY® FineReader 14 User’s Guide
Enhancing page images
The PDF Editor can enhance the quality of PDF documents created from image files. Depending on the
type of an input image, the program will select the appropriate image enhancement algorithms. Besides
automatic image enhancement, the PDF Editor can correct page orientation, skew, distorted text lines
and other defects, and make characters look smoother with ABBYY PreciseScan technology.
You can specify enhancement options in the Image Enhancement dialog box (clickEdit > Enhance
Page Images... to open this dialog box).
·Correct page orientation Select this option if you want the program to detect and correct page
orientation automatically.
For best recognition results, a page should have the standard orientation, i.e. with horizontal text
lines and top-to-bottom reading order. Otherwise, the document may be recognized incorrectly.
·Deskew images and correct image resolution Select this option if you want the program to run
a number of image processing routines on your images.
Depending on the type of an input image, the program will select the image corrections to apply,
such as skew correction, correction of trapezoid distortions, or adjustment of image resolution.
This operation may take some time to complete.
·Apply ABBYY PreciseScan to smooth characters on images Select this option if you want to
apply ABBYY PreciseScan technology, making the characters less pixelated when you zoom in.
Be sure to select the right OCR languages. See also: Document features to consider prior to
OCR .
214
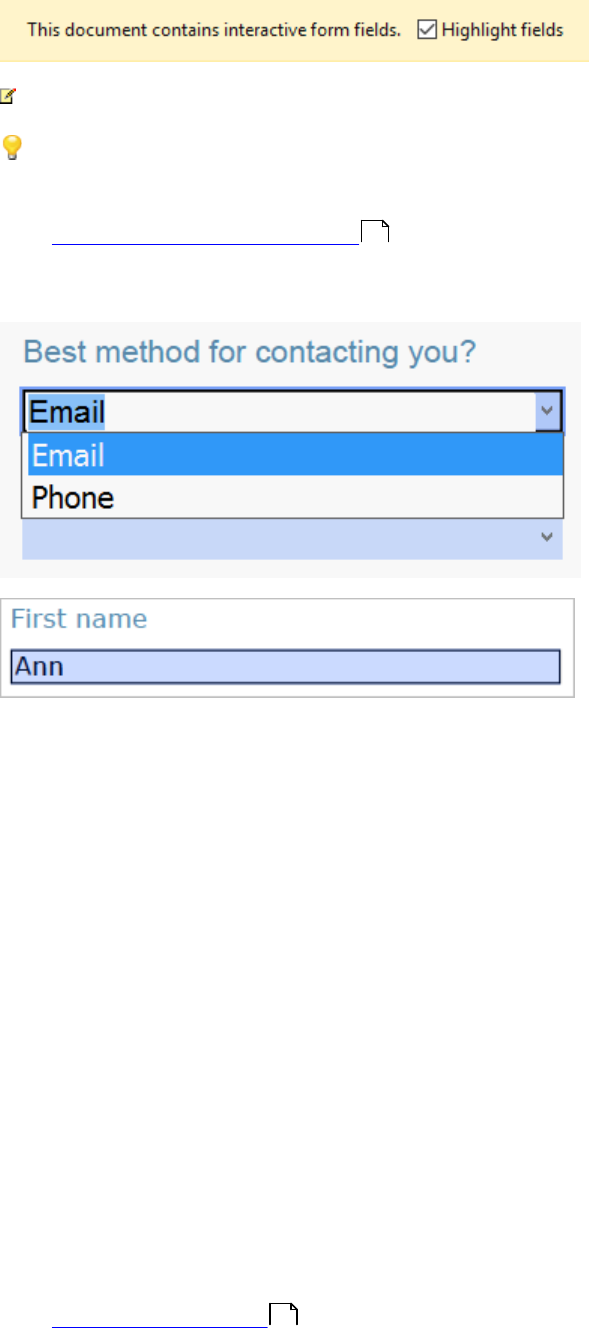
86
ABBYY® FineReader 14 User’s Guide
Filling out forms
The PDF Editor allows you to view, fill out, save, and print interactive forms.
1. If a document contains a form, the following message is displayed:
You can disable field highlighting by clearing the Highlight fields check box in this message.
If no fields are highlighted on a PDF form, you can still fill out such a form using the Text Box
tool.
See also: Adding text to a PDF document .
2. To fill out a form, select values form drop-down lists or type in text from the keyboard.
With ABBYY FineReader you can also:
·Load data into a form
Click Edit > Form Data > Load Form Data from File.... In the dialog box that opens, select the
*.fdf file that contains the data and click Open. The form will be populated with the data from the
*.fdf file.
·Save form data
Click Edit > Form Data > Save Form Data to File.... In the dialog box that opens, provide a name
for your *.fdf file and click Save. The data from the form will be saved to the *.fdf file you created.
·Clear form fields
Click Edit > Form Data > Reset Form. All of the form fields will be cleared.
If JavaScript is disabled in the program settings, some of the elements in PDF forms may be
unavailable. For example, data format checks may be unavailable. You can enable JavaScript by clicking
Options > Other > Enable JavaScript in PDF documents opened in the PDF editor.
See also: PDF security features .
64
58


88
ABBYY® FineReader 14 User’s Guide
Digital signature
The PDF Editor allows you to sign documents digitally and to validate any digital signature in a
document. A digital signature is used to establish the identity of the person that signed the document.
Additionally, a digital signature can be used to make sure that a signed document has not been altered.
To sign a document:
1. On the main toolbar, click > Add Digital Signature....
2. Select the certificate to be used from the Sign as drop-down list. To view the properties of a
certificate, select it and click Show Certificate....
If the certificate you want to use is not in the list, you will have to install it. To install a certificate,
right-click it in Windows Explorer, click Install Certificate on the shortcut menu, and follow the
instructions in the Certificate Import Wizard.
3. Select your reason for signing the document from the Reason drop-down list or type a new
reason.
4. If required, in the Location and Contact fields, specify the place of signing and your contact
details.
5. Select Add custom image to digital signature if you want your signature to include an image.
Then click the Select Image... button to browse to an image file. The image will appear to the left
of the signature.
6. Click Sign.
7. Select the area where you want to place the signature or simply click the desired location.
8. Save the document.
A signature contains information about the version of the document at the time of signing. If you add a
new signature to an already signed document, the previously added signatures will remain valid.
To view the properties of a signature in a document:
·Right-click the signature and click Show Signature Properties... on the shortcut menu, or
· Double-click the signature in the Digital Signatures pane.
When you open a PDF document, ABBYY FineReader automatically validates the digital signatures in
the document, if any. Validation results will be displayed in the Digital Signatures pane, which also
contains detailed information about the signatures used in the document.
To delete a signature:
·Right-click the signature and click Remove Signature on the shortcut menu..
You can only delete a signature from a document if you have the corresponding digital certificate.
You can add more than one digital signature to a document.
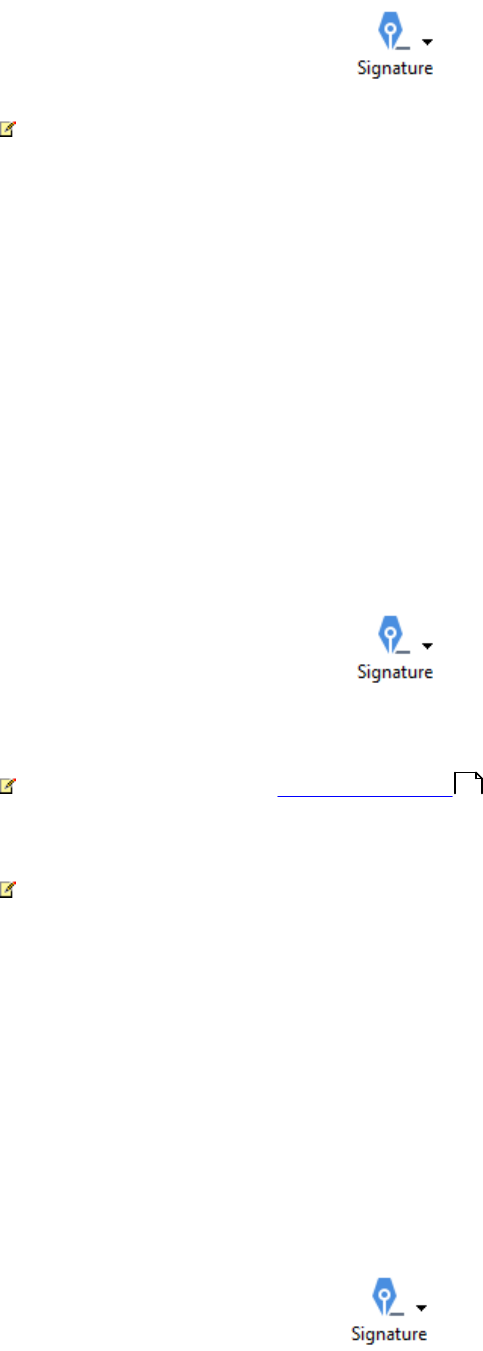
89
ABBYY® FineReader 14 User’s Guide
Text signature
The PDF Editor allows you to add text signatures to your PDF documents.
1. On the PDF Tools toolbar, click > Create Text Signature....
If you have already created some text signatures, select a signature from the list of available
signatures. Alternatively, click Other Signature > Create Text Signature....
2. In the Create Text Signature dialog box that opens, enter some text for the signature.
3. Change the style of the signature, if required.
4. Click Save.
5. Place the signature where you want it to appear on the page.
6. You can change the size of the signature, rotate it, or move it to another location in the document.
As a result, your text signature will appear in the document.
Editing signatures
1. On the PDF Tools toolbar, click > Other Signature > Manage Signatures....
2. In the dialog box that opens, select a signature and click Edit....
You can edit both text and picture signatures .
3. In the dialog box that opens, change the parameters of your signature and click Save.
If you want to add the edited signature to the document, click Use and place the signature where
you want it to appear on the page.
Deleting signatures
To delete a signature:
·Select the signature on the document and press the Del key or
·Right-click the signature on the document and click Delete on the shortcut menu.
To delete a signature from the list of available signatures:
1. On the PDF Tools toolbar, click > Other Signature>Manage Signatures....
2. In the dialog box that opens, select the signature you want to delete and click Delete.
90

90
ABBYY® FineReader 14 User’s Guide
You can delete both text and picture signatures .
You can add more than one signature to a document.
Picture signature
ABBYY FineReader allows you to add picture signatures to your PDF documents.
1. On the PDF Tools toolbar, click > Create Signature from Image....
If you have already created some signatures, select a signature from the list of available
signatures. Alternatively, click Other Signature>Create Signature from Image...
2. In the Create Signature from Image dialog box, click Open Image to select an image file or
click Paste Image from Clipboard to paste the signature currently stored on the Clipboard.
3. You can change the size of your signature and make the background transparent.
4. Click Save.
5. Place the signature where you want it to appear on the page.
6. You can change the size of the signature, rotate it, or move it to another location in the document.
As a result, your picture signature will appear in the document.
You can add any number of signatures to a document.
You can edit or delete a picture signature. See also: Text signature .
Protecting PDF documents with passwords
When you create a PDF document, you can set passwords to protect it from unauthorized access,
editing, and printing.
Chapter contents
·Passwords and permissions
·Deleting confidential information from PDF documents
90
89
91
92

91
ABBYY® FineReader 14 User’s Guide
Passwords and permissions
When you create a PDF document , you can set passwords to protect it from unauthorized access,
editing, and printing. A PDF document can be protected with a Document Open password and/or
Permissions Password.
If a PDF document is protected from unauthorized access, it can only be opened after entering the
Document Open Password that was specified by the document's author. If the document is protected
from unauthorized editing and printing, these actions will only be possible after entering the Permissions
Password specified by the author. The Permissions Password can also be used to open a protected
PDF document.
Follow the instructions below to protect a document with a password.
1. Click the button on the PDF Tools toolbar or clickTools >Security
Settings.
The Security Settings dialog box will open.
2. If you want to protect your document from unauthorized opening, select the Restrict access with
a Document Open password option.
3. Type a Document Open password and confirm it.
You can disable the Hide characters option. In this case, the characters you enter will be
displayed on the screen and you won't have to retype your password.
4. If you want to prevent unauthorized printing, editing or copying of your document, select the
Restrict printing and editing with a Permissions password option.
5. Type a Permissions Password and confirm it.
The Document Open Password and the Permissions Password must be different.
6. From the Printing drop-down list, select a printing resolution for your document.
7. From the Editing drop-down list, select allowed editing operations.
8. If you want to allow other users to copy and edit the content of your document, select the
corresponding options.
9. Select an encryption level and components to encrypt.
10. Click Save.
You will be prompted to confirm the passwords again. You can save the changes to the open document
or create a new document.
93
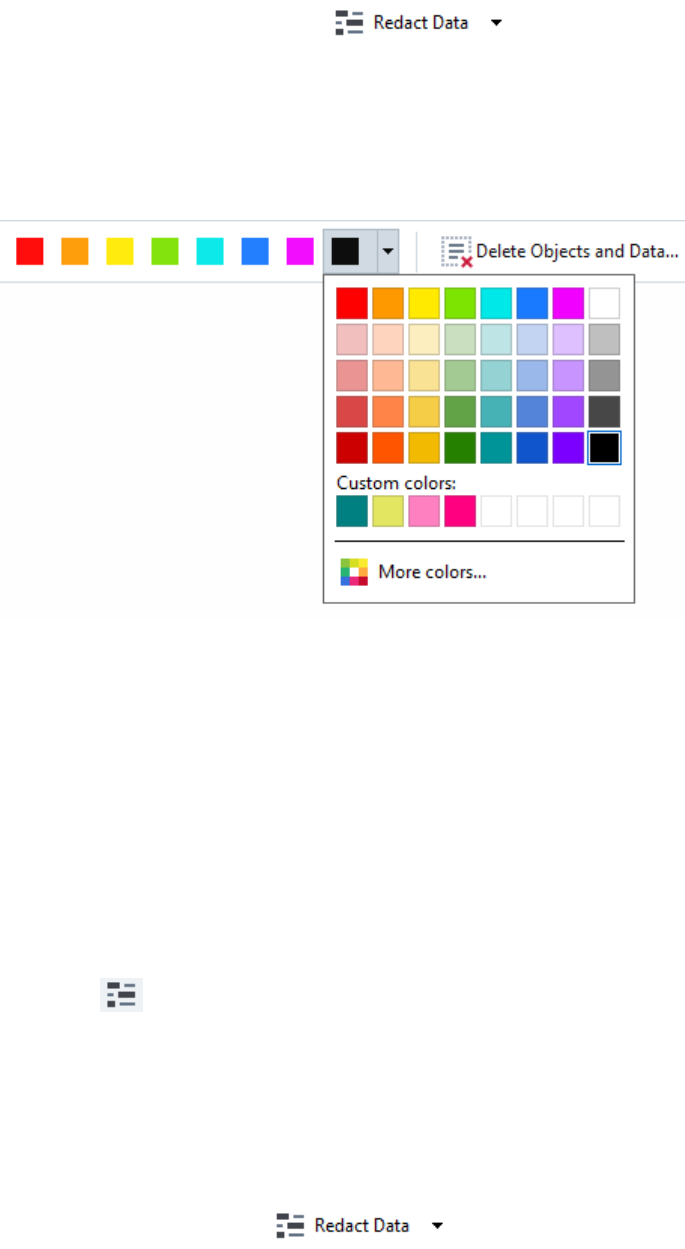
92
ABBYY® FineReader 14 User’s Guide
Deleting confidential information from PDF documents
You can use the PDF Editor to remove confidential information from PDF documents before publishing
them. Both text and images can be redacted.
1. On the PDF Tools toolbar, click or click the arrow next to this tool and select
Redaction Mode.
2. If you want to change the color of rectangles that will be painted over redacted text, click one of
the seven color boxes on the toolbar or click the arrow and select any other desired color from the
palette. For even more colors, click More colors....
3. Select the text and/or images you want to remove.
As a result, the selected content will be removed from the document and their respective
occurrences painted over with the color of your choice.
ABBYY FineReader also allows you to use the Search feature to remove sensitive data.
1. Open the Search pane.
2. Type in text to find.
3. Select the occurrences you want to redact.
4. Click the button.
The selected text will be painted over in the document and replaced with asterisks in objects that do not
appear in the body text of the document (i.e. in comments, bookmarks, and metadata).
You can delete objects and data that do not occur in the body text of your document (e.g. comments,
annotations, bookmarks, attachments, metadata, etc.):
1. Click the arrow next to the button and select Delete Objects and Data....
2. In the dialog box that opens, select the objects and data to delete and click Apply.

93
ABBYY® FineReader 14 User’s Guide
Creating PDF documents
Chapter contents
·Creating PDF documents from selected pages
·Using a virtual printer to create PDF documents
For detailed instructions on creating PDF documents from files, scans, or digital photos, see: Creating
PDF documents and Scanning to PDF .
Creating PDF documents from selected pages
The PDF Editor allows you to create PDF documents from selected pages.
1. In the Pages pane, select the pages from which you want to create a PDF.
2. Right-click the pages and click Create PDF from Selected Pages on the shortcut menu.
3. The created document will be opened in a new PDF Editor window.
Using a virtual printer to create PDF documents
You can create PDF documents from any applications that allow you to select a printer. PDF-XChange
5.0 for ABBYY FineReader 14 will be used.
1. Open a document from which you want to create a PDF.
2. Open the printing options dialog box.
3. In the list of available printers, select PDF-XChange 5.0 for ABBYY FineReader 14.
4. If required, click Properties... and adjust the PDF creation settings.
5. Click Print to start creating a PDF document.
6. In the dialog box that opens, you can change the name and location of your file, open the
document for viewing after it is saved, or e-mail the document. You can also choose to add the
PDF document that is being created to an existing PDF document by selecting Add Files to PDF.
93
93
20 38
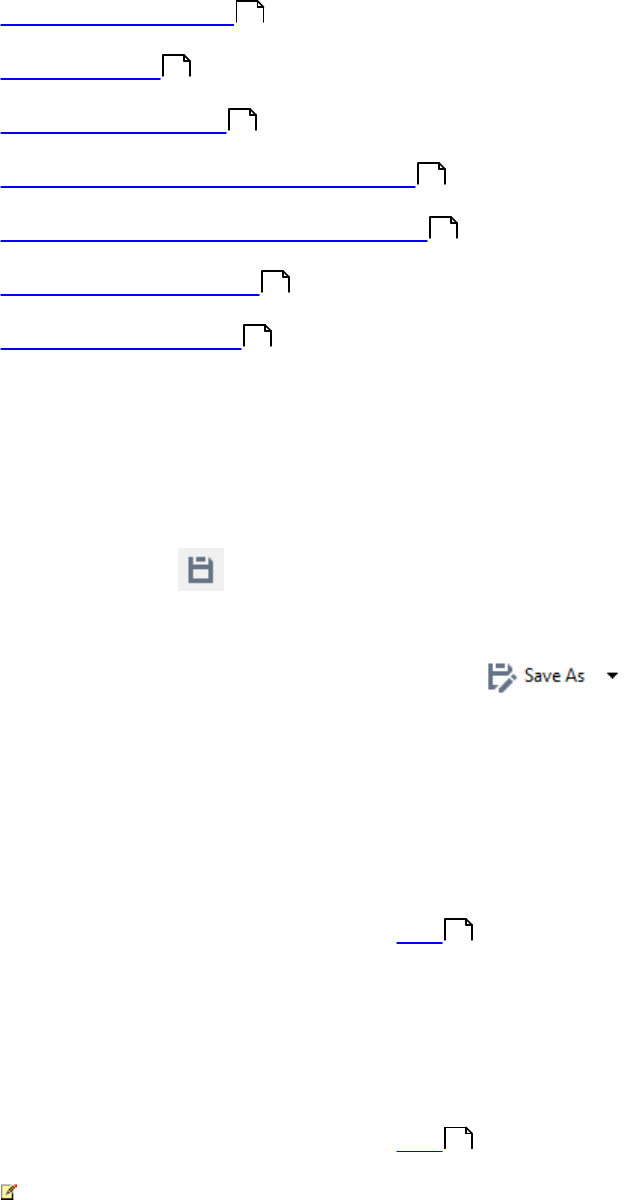
94
ABBYY® FineReader 14 User’s Guide
Saving and exporting PDF documents
The PDF Editor allows you to save, print, and e-mail PDF documents or send them to the OCR Editor
for further processing.
Chapter contents
·Saving PDF documents
·Saving in PDF/Α
·Saving in other formats
·Reducing the size of your PDF documents
·Sending PDF documents to the OCR Editor
·E-mailing PDF documents
·Printing PDF documents
Saving PDF documents
The PDF Editor allows you to save entire PDF documents or only selected pages. Various saving
options are available.
·To save the changes you have made to your current PDF document, click File > Save.
Alternatively, click on the main toolbar.
·To save your current PDF document under a different name or to a different folder, click File >
Save As > PDF Document.... Alternatively, click on the main toolbar and then click
PDF Document....
·To save your document as a PDF document where users will be able to select, copy, and edit
content, click File > Save As > Searchable PDF Document. Alternatively, click Save As on the
main toolbar and then click Searchable PDF Document.
As a result, your PDF document will be converted to searchable PDF using the currently selected
saving options. To change the saving options, click the Options... button in the saving dialog box
and select desired saving options on the PDF tab.
·To save a PDF document without a text layer (such PDF documents cannot be searched and their
content cannot be selected, copied or edited) click File > Save As > Image-Only PDF Document.
Alternatively, click Save As on the main toolbar and then click Image-Only PDF Document.
As a result, your PDF document will be converted to image-only PDF using the currently selected
saving options. To change the saving options, click the Options... button in the saving dialog box
and select desired saving options on the PDF tab.
To convert only some pages of a document, in the Pages pane, select the pages that you want
to save and click Save As on the shortcut menu.
94
95
96
97
98
98
99
191
191
95
ABBYY® FineReader 14 User’s Guide
Saving in PDF/A
The PDF Editor allows you to save documents in PDF/A, a format intended for long-term storage.
PDF/A documents contain all the information required for their correct display:
·All fonts are embedded into the document (except for non-visible text).
·Only embeddable fonts are used.
·Colors are displayed correctly irrespective of the device.
·The metadata used in the document comply with the applicable standards.
The following are not supported:
·audio, video, and 3D objects
·scripts
·encryption
·links to external content
·copyrighted content (e.g. LZW).
To save a PDF document in PDF/A:
1. Click File > Save As > PDF Document.... Alternatively, click the button on the
main toolbar and then click PDF Document....
2. In the dialog box that opens, specify a name and location for your document.
3. Select Create PDF/A and then select a PDF/A version from the drop-down list.
4. Click Save.
You can create PDF/A-compliant documents from various formats. See also: Creating PDF
documents .
PDF/A versions
PDF/A-1
PDF/A-2
PDF/A-3
B, A
B, A, U
B, A, U
·2005: PDF/A-1 is based on PDF 1.4 and supports the following features:
95
20

96
ABBYY® FineReader 14 User’s Guide
·A – accessible – additional document requirements (tags)
·B – basic – basic compliance level
ISO 19005-1:2005 (Cor 1: 2007, Cor 2: 2011).
·2011: PDF/A-2 is based on PDF 1.7 and supports additional features:
·U - Unicode
· JPEG2000 compression
·transparency
·PDF/A attachments
·digital signatures
ISO 19005-2:2011.
·2012: PDF/A-3 supports additional features:
·file attachments in any format
ISO 19005-3:2012.
Saving in other formats
The PDF Editor allows you to save entire PDF documents or individual pages in various formats:
Microsoft Word, Microsoft Excel, Microsoft PowerPoint, HTML, images formats, and many more.
1. Click File > Save As and then click a desired format. Alternatively, click and then
click a desired format.
2. In the dialog box that opens, specify a name and location for your document.
3. Open the drop-down list next to File options and specify whether you want to create one file for
all pages or a separate file for each page.
4. Click Save.
5. As a result, your PDF- document will be converted into the format of your choice using the
currently selected saving options.
To change the saving options, click the Options... button in the saving dialog box and select desired
saving options. Alternatively, click Tools > Options... > Format Settings . The options dialog box
will open, displaying the tab of the format that you selected.
To convert only some of the pages in the document, in the Pages pane, select the pages that you
want to convert, right-click them, click Save As on the shortcut menu, and then click an output
format.
You can convert PDF and image files into documents in various formats. See also: Creating
Microsoft Word documents , Creating Microsoft Excel documents , and Other formats .
191
22 24 26
97
ABBYY® FineReader 14 User’s Guide
Reducing the size of your PDF documents
PDF documents that contain page images or a lot of pictures can be very large. The PDF Editor allows
you to reduce the size of such documents.
1. Click File > Reduce File Size....
2. In the dialog box that opens, the following options are available:
·Image quality - Select this option if you want to reduce the size of the file by lowering the
quality of the pictures inside the document.
·Use MRC compression (specify OCR languages below) - Select this option if you want to
apply the MRC compression algorithm to recognized pages, which considerably reduces file
size while preserving the visual quality the page images.
·OCR languages - Be sure to select the right OCR language(s).
3. Click Apply.
The compressed PDF document will be opened in a new window.
98
ABBYY® FineReader 14 User’s Guide
Sending PDF documents to the OCR Editor
The PDF Editor allows you to send PDF documents to the OCR Editor , where you can draw
recognition areas, check recognized text, train the program to recognize non-standard fonts and
characters, and use other advanced features offered by ABBYY FineReader.
·To send a PDF document to the OCR Editor, click the arrow next to the button and
then click Recognize and Verify in OCR Editor.
·To send only some of the pages of the document to the OCR Editor, in the Pages pane, select the
pages that you want to send, right-click them and click Send Selected Pages to OCR Editor on
the shortcut menu.
When sending the document to the OCR Editor, some of these document objects will be lost:
·attachments
·bookmarks
·comments
·annotations
Once you are done working with the document in the OCR Editor, you can send it back to the PDF
Editor. To do this, click the arrow next to the button and then click Send to PDF
Editor. Alternatively, click File > Send To > PDF Editor....
E-mailing PDF documents
The PDF Editor allows you to send PDF documents by e-mail.
1. Click the button on the main toolbar or click File > E-mail....
2. In the dialog box that opens, change the name of the document if required.
3. Select the pages that you want to e-mail.
4. Click Create E-mail Message.
An e-mail message will be created and the PDF document will be attached to this message. Type in the
recipient's address and send the message.
100

99
ABBYY® FineReader 14 User’s Guide
Printing PDF documents
The PDF Editor allows you to print PDF documents. Before printing, please make sure your computer
has a local or network printer connected to it and that the drivers for the printer are installed.
1. Click the button on the main toolbar or clickFile >Print....
2. In the dialog box that opens, specify desired printing settings:
·Printer - Select one of the available printing devices.
·Copies - Specify the number of copies to be printed.
·Pages to print - Specify the pages to be printed (you can choose to print all of the pages,
selected pages or a range of pages).
·Page setup - Specify paper size and orientation.
·Scaling and position - Specify the number of document pages to place on one printed page
and other printing settings, such as image scaling and duplex printing.
·Black and white - Select this option if you want to print your document in black and white.
·Print to file - Select this option if you want to save all of the document pages to a file.
·Print annotations and markup - Select this option if you want to print the comments.
3. Click Print.
100
ABBYY® FineReader 14 User’s Guide
OCR Editor
The OCR Editor uses Optical Character Recognition technology for advanced conversion of document
scans, PDF documents, and image files (including digital photos) into editable formats.
In the OCR Editor, you can draw recognition areas, check recognized text, train the program to
recognize non-standard characters and fonts, and use some other advanced features to achieve
maximum OCR quality.
Chapter contents
·Launching the OCR Editor
·OCR Editor interface
·Obtaining documents
·Recognizing documents
·Improving OCR results
·Checking and editing texts
·Copying text, tables and pictures from PDF documents
·Saving OCR results
Launching the OCR Editor
There are several ways to launch the OCR Editor:
·In the New Task window, click:
oNew Task > Open > Open in OCR Editor
oor New Task > Tools > OCR Editor
oor New Task > File > Open in OCR Editor...
·In the PDF Editor, click:
oPDF Editor > Tools > OCR Editor.
·Open the Windows Start menu and click ABBYY FineReader 14 > ABBYY FineReader 14 OCR
Editor (or clickStart > All Programs > ABBYY FineReader 14 > ABBYY FineReader 14
OCR Editor in Windows 10).
Tip. You can set up the OCR Editor to either open the last used project or create a new project when it
is launched. To do this, click New Task > Options > General and select either Open a new OCR
project or Open the last used OCR project.
236
101
105
107
114
136
57
144
13
48
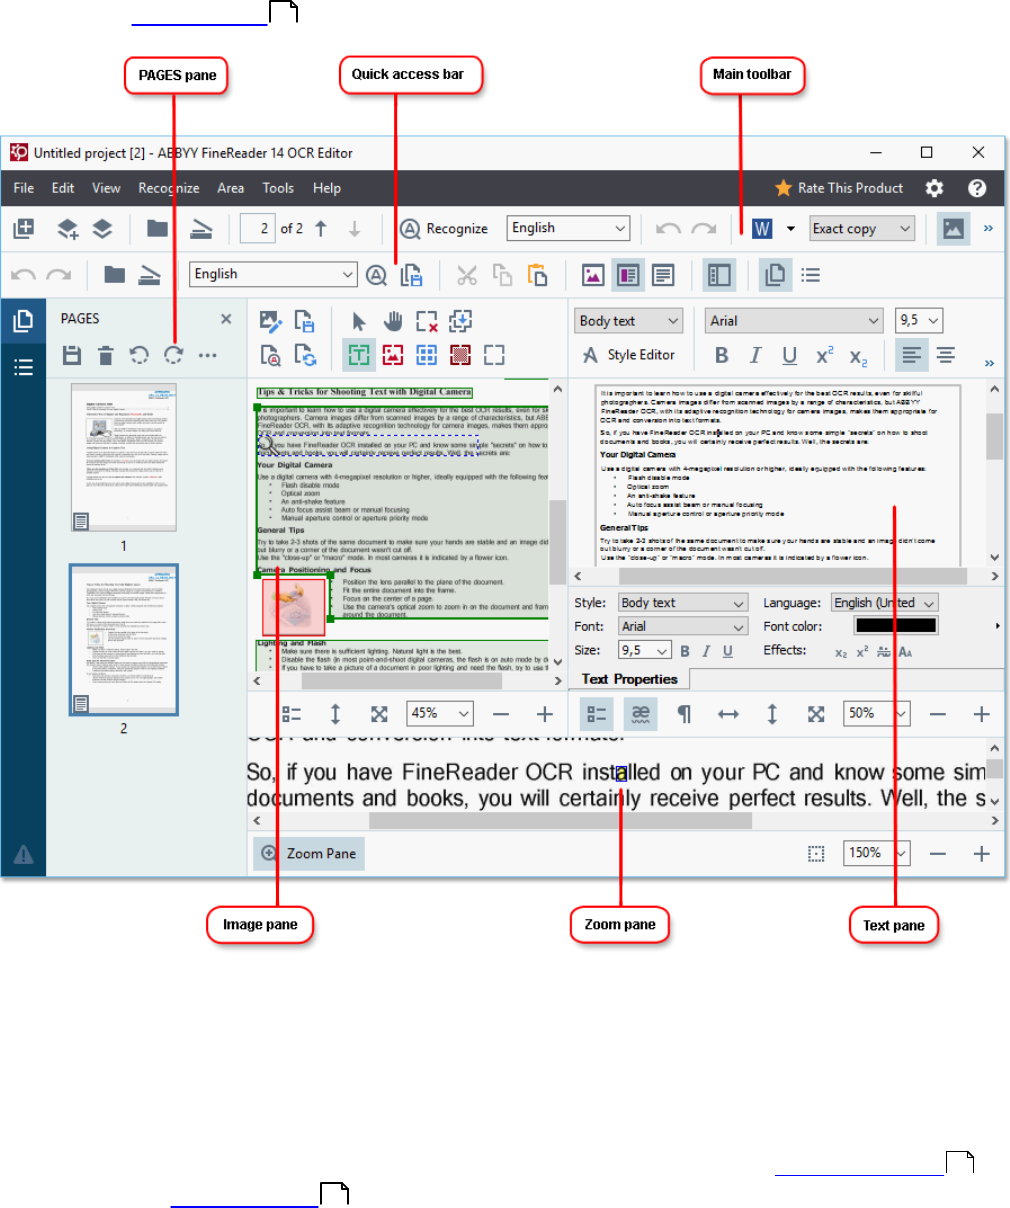
101
ABBYY® FineReader 14 User’s Guide
OCR Editor interface
The OCR Editor window displays your current OCR project. For more information on working with OCR
projects, see OCR projects .
·The Pages pane shows the pages contained in the OCR project. Two page views modes are
available: thumbnails (shown above) and details, which shows a list of document pages and their
properties. To switch between the views, right-click anywhere in the Pages pane and select
Navigation Pane>Thumbnails or Navigation Pane>Details. Alternatively, use theView menu at
the top of the OCR Editor window.
·The Image pane displays the image of the current page. Here you can edit recognition areas
and change area properties .
·The Text pane displays the recognized text. Here you can check the spelling and edit the
recognized text.
108
118
121
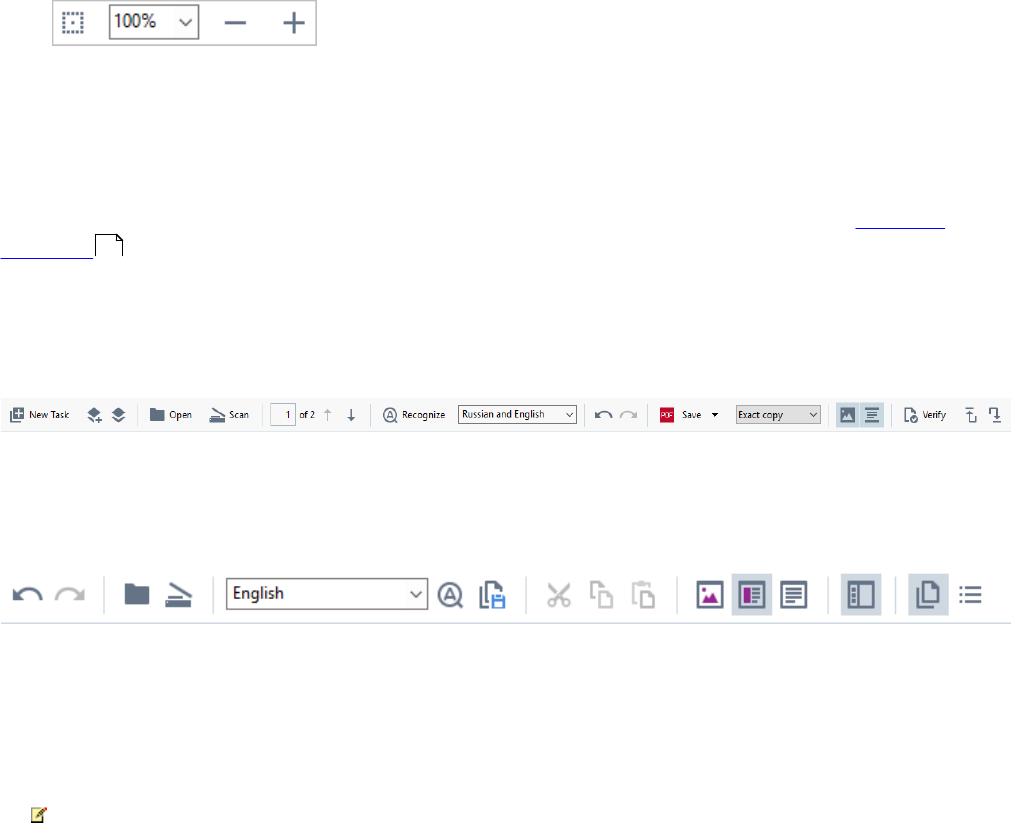
102
ABBYY® FineReader 14 User’s Guide
·The Zoom pane displays an enlarged image of the current line of text or any other image area you
are currently working on. In the Image pane you see the entire page, whereas in the Zoom pane
you can examine certain image fragments in greater detail, e.g. compare the image of a character
with its recognized counterpart in the Text window. To scale the image up or down, use the
controls at the bottom of the pane.
Toolbars
There are several toolbars in the OCR Editor. The toolbar buttons provide easy access to program
commands. The same commands can also be invoked by pressing their corresponding keyboard
shortcuts .
The Main Toolbar features a set of buttons for the most commonly used operations. Using these
buttons, you can open a document, scan a page, open an image, recognize pages, and save the
results. The main toolbar cannot be customized.
The Quick Access Bar is fully customizable and contains the buttons that you use the most. This
toolbar is hidden by default. To make it visible, click View > Toolbars and select Quick Access Bar.
Alternatively, right-click anywhere on the main toolbar and select Quick Access Bar.
To customize the Quick Access Bar:
1. Click View > Customize... to open the Customize Toolbars and Shortcuts dialog box.
2. On the Toolbars tab, select a category from the Categories drop-down list.
The set of commands available in the Commands list will change accordingly. The commands are
grouped in the same manner as in the main menu.
3. From the Commands list, select a command and click >> to add it onto the Quick Access Bar or
click << to remove it.
4. Click OK to save the changes.
5. If you want to reset the Quick Access Bar to its default state, click the Reset All button.
The toolbars in the Pages, Image, and Text panes contain buttons for commands applicable to objects
that can be displayed in the respective pane:
250
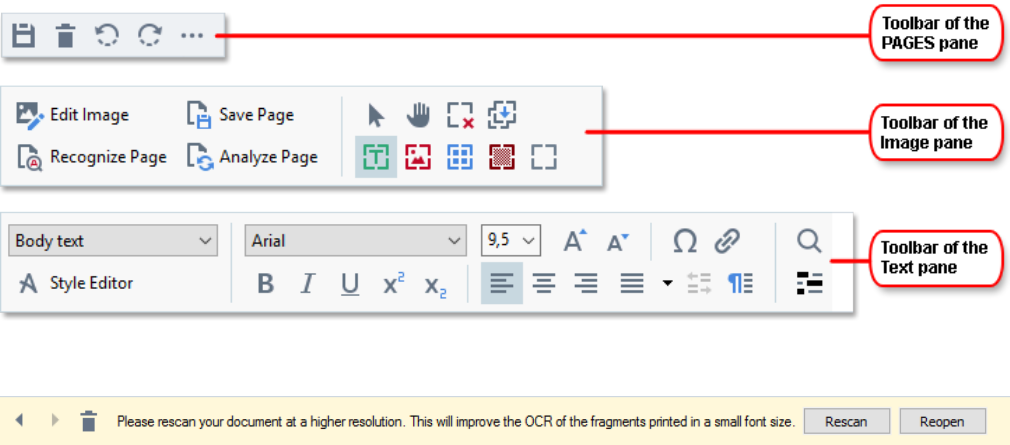
103
ABBYY® FineReader 14 User’s Guide
The Warnings pane displays warnings and error messages.
To show the Warnings pane, click View >
Show Warnings
104
ABBYY® FineReader 14 User’s Guide
or click the button in the lower left-hand corner of the OCR Editor window.
Warnings and errors are displayed for the page that is currently selected in the Pages pane. To scroll
through the warnings and errors and delete unwanted messages, use the buttons.
Customizing the OCR Editor workspace
·You can temporarily hide the panes that you do not need. To show/hide panes, use the View menu
or the following keyboard shortcuts:
·F5 — shows or hides the Pages pane.
·F6 — shows or hides the Image pane.
·F7 — shows or hides the Image and Text panes.
·F8 — shows or hides the Text pane.
·Ctrl+F5 — shows or hides the Zoom pane.
·To change the size of a pane, hover the mouse cursor on one of its borders until a double-headed
arrow appears and drag the border in the desired direction.
·To change the position of the Pages or Zoom pane, use the View menu or the shortcut menu of
the pane. To show or hide the Warnings pane, click View and select or clear theShow Warnings
item.
·To show or hide the Properties bar at the bottom of the Image or Text pane, select or clear the
Properties item in the context menu of the pane or click the button.
·Some of the pane properties can be customized on the Areas and Text tab of the Options
dialog box.
All of the pages of your current OCR project are displayed in the Pages pane. Two page views are
available.
To change the way the pages are displayed in the Pages pane:
·Use the and buttons in the Pages pane.
·Click View > Navigation Pane.
·Right-click anywhere in the Pages pane, click Navigation Pane in the context menu, and then
select the desired item.
To open a page, double-click its thumbnail in the Pages pane (in Thumbnails view) or double-click its
number (in Details view). The image of the selected page will be shown in the Image pane. If OCR has
already been performed on this page, the recognized text will appear in the Text pane.
190
105
ABBYY® FineReader 14 User’s Guide
Obtaining documents
After you launch the OCR Editor, you need to open an image file or PDF. This chapter provides
instructions on how you can obtain images and PDF documents for subsequent processing in the OCR
Editor.
Chapter contents
·Opening images and PDF documents
·Scanning paper documents
The quality of OCR depends on the quality of images and PDF documents that you open with ABBYY
FineReader. For information on scanning and taking photos of documents and on how to remove
common defects from scans and photographs, see Image processing options and Editing images
manually .
Opening images and PDFs
ABBYY FineReader allows you to open PDF and image files in any of the supported formats .
Complete the following steps to open an image or PDF file:
1. In the OCR Editor, click on the main toolbar or click File > Open Image....
2. In the dialog box that opens, select one or more image or PDF files.
3. If you select a file that contains multiple pages, you can specify a range of pages to open.
4. Select Automatically process page images as they are added if you want the image to be
processed automatically.
Tip. You can specify which manipulations the program should perform on the image, e.g. what image
defects should be rectified or whether the document should be analyzed and recognized automatically.
To specify image processing options, click the Options... button. See Image processing options for
details.
If an OCR project is already open when you open new pages, the selected pages will be appended to
the end of this project. If no OCR project is currently open, a new one will be created from the selected
pages.
For more information on working with pages and OCR projects, see OCR projects .
Access to some PDF files may be restricted by their authors. Such restrictions include password
protection and restrictions on opening the document or copying its content. When opening such files,
ABBYY FineReader will request a password.
105
182
217
115
212
217
108
106
ABBYY® FineReader 14 User’s Guide
Scanning paper documents
To scan a document:
1. In the OCR Editor, click on the main toolbar or click File >Scan Pages....
2. Select a scanning device and specify scanning settings .
3. Click the Preview button or click anywhere inside the image.
4. Review the image. If it is not satisfactory, change the scanning settings and click the Preview
button again.
5. Click Settings... and specify image processing options .
These options determine the appearance and properties of the output document.
6. Click Scan.
7. Once the scanning is completed, a dialog box will appear, offering the following two choices:
·Click Scan more if you want to scan more pages using the current scanning settings.
·Click Preview if you want to see the scanned page.
·Click to close the dialog box.
8. If an OCR project is already open when you scan new pages, the scanned pages will be
appended to the end of this project. If no OCR project is currently open, a new one will be created
from the scanned pages
See Scanning tips for some tips on selecting the optimal scanning settings.
182
188
182
107
ABBYY® FineReader 14 User’s Guide
Recognizing documents
ABBYY FineReader uses Optical Character Recognition (OCR) technology to convert document
images into editable text. Prior to OCR, the program analyzes the structure of the entire document and
detects the areas that contain text, barcodes, pictures, and tables. For best OCR results, be sure to
select the right OCR language , recognition mode , and print type .
By default, images contained in an OCR project are recognized automatically using the settings
currently selected in the program.
Tip. You can disable automatic analysis and OCR for newly added images on the Image
Processing tab of the Options dialog box (click Tools > Options... to open this dialog box).
In some cases, the OCR process must be started manually. This may be necessary, for example, if you
disable automatic OCR, manually draw areas on an image, or change any of the following parameters in
the Options dialog box:
·the OCR language on the Languages tab
·the OCR options on the OCR tab
·the fonts to be used on the OCR tab
To launch the OCR process manually:
·Click the button on the main toolbar, or
·Click Recognize > Recognize All Pages.
Tip. To recognize a selected area or page, use the Area or Recognize menu or right-click the area or
page to call up the context menu.
See also: :
·OCR options
·Document features to consider prior to performing OCR
·Editing areas
·Improving OCR results
214 220 215
188
188
220
214
118
114
108
ABBYY® FineReader 14 User’s Guide
OCR projects
While working with the program, you can save your interim results in an OCR project so that you can
resume your work where you left off. An OCR project contains the source images, the text that has been
recognized on the images, your program settings, and any user patterns , languages or language
groups that you have created.
This section covers the following topics:
·Opening a previously saved OCR project
·Using settings from earlier versions of ABBYY FineReader
·Adding images to an OCR project
·Removing pages from an OCR project
·Saving an OCR project
·Closing an OCR project
·Splitting an OCR project into several projects
·Reordering pages in an OCR project
·Working with document metadata
·Working with patterns and languages
Opening an OCR project
When you launch the OCR Editor, a new OCR project is created by default. You can either work this
new OCR project or open an existing one.
To open an existing OCR project:
1. Click File > Open OCR Project....
2. In the dialog box that opens, select the OCR project that you want to open.
If you open an OCR project that was created in an earlier version of the program, ABBYY FineReader
will try to convert it into the new format used by the current version. This conversion cannot be undone,
so you will be prompted to save your OCR project under a different name. The recognized text from the
old project will not be carried over into the new project. To recognize the pages in the OCR project, click
the button.
Tip. If you want the last used OCR project to open when you launch the OCR Editor, select Open the
last used OCR project on the General tab of the Options dialog box (click Tools > Options... top
open this dialog box).
You can also right-click an OCR project in Windows Explorer and select Open in ABBYY FineReader
14. OCR projects are marked with the icon.
244
244
108
109
109
109
109
110
110
110
111
111

109
ABBYY® FineReader 14 User’s Guide
Using settings from earlier versions of ABBYY FineReader
ABBYY FineReader lets you import user dictionaries and program settings from files created in earlier
versions of the program.
To use dictionaries created in ABBYY FineReader 10, 11 or 12:
1. Click Tools > View Dictionaries....
2. In the User Dictionaries dialog box, select the language of the dictionary and click View....
3. In the Dictionary for... dialog box, click Import... and specify the path to the dictionary.
4. Select the dictionary file and click Open.
Adding images to an OCR project
1. Click File > Open Image....
2. In the dialog box that opens, select one or more images and click Open. The images will be
appended to the end of the open OCR project, and their copies will be saved in the OCR project
folder.
You can also right-click images in Windows Explorer and select Convert with ABBYY FineReader 14
> Open in OCR Editor ABBYY FineReader 14 on the shortcut menu. The selected files will be added
to a new OCR project.
You can also add document scans. See also: Scanning paper documents .
Removing pages from an OCR project
·In the Pages pane, select a page and click Delete, or
·Click Edit > Delete Pages..., or
·Right-click a page in the Pages pane and select Delete... on the shortcut menu
You can select and delete more than one page in the Pages pane.
Saving an OCR project
1. Click File > Save OCR Project....
2. In the dialog box that opens, enter a name for your OCR project and specify a folder where it
should be stored.
When you save an OCR project, not only the page images and recognized text are saved, but also
any patterns and languages you created while working on the project.
106
110
ABBYY® FineReader 14 User’s Guide
Closing an OCR project
·To close an OCR project, click File > Close.
Splitting an OCR project into several projects
When processing large numbers of multi-page documents, it is often more practical to scan all the
documents first and only then analyze and recognize them. However, to preserve the original formatting
of each paper document correctly, ABBYY FineReader must process each of them as a separate OCR
project. ABBYY FineReader includes tools for grouping scanned pages into separate OCR projects.
To split an OCR project:
1. Right-click anywhere in the Pages pane and select Move Pages to New OCR Project... on the
shortcut menu.
2. In the dialog box that opens, create the necessary number of OCR projects by clicking the Add
OCR Project button.
3. Move pages from the Pages pane to another OCR project using one of the following methods:
·Select the pages and drag them with the mouse.
You can also use drag-and-drop to move pages between OCR projects.
·Use the Move and Return buttons. The Move button will move the pages to the current
project.
·Press Ctrl+Right Arrow to move the selected pages from the Pages pane to the current
OCR project or press Ctrl+Left Arrow or Delete to move them back to their original project.
4. When you are done, click Create to create a new OCR project or Create All to create all projects
in one go.
Tip. You can also drag-and-drop selected pages from the Pages pane into another instance of the
OCR Editor. The selected pages will be appended to the end of the OCR project.
Reordering pages in an OCR project
1. In the Pages pane, select one or more pages.
2. Right-click anywhere in the Pages pane and select Reorder Pages... on the shortcut menu.
3. In the Reorder Pages dialog box, choose one of the following:
·Reorder pages (cannot be undone)
This changes all page numbers successively, starting with the selected page.

111
ABBYY® FineReader 14 User’s Guide
·Restore original page order after duplex scanning
This option restores the original page numbering of a document with double-sided pages. This
option is useful if you use a scanner with an automatic feeder to first scan all the odd-
numbered pages and then all the even-numbered pages. You can choose between the normal
and the reverse order for the even-numbered pages.
This option will only work if three or more consecutively numbered pages are selected.
·Swap book pages
This option is useful if you scan a book written in a left-to-right script and then split the facing
pages without specifying the correct language.
This option will only work if two or more consecutively numbered pages are selected and if
at least two of them are facing pages.
To cancel this operation, select Undo last operation.
4. Click OK.
The pages in the Pages pane will be rearranged in accordance with their new numbers.
In Thumbnails view, you can change page numbering simply by dragging selected pages to the
desired place in the OCR project.
Metadata
Document metadata contain detailed information about the document such as its author, subject, and
keywords. Document metadata can be used to sort files and to review document properties.
Documents can also be searched by their metadata.
When recognizing PDF documents and certain types of image files, ABBYY FineReader will export the
metadata of the source document. You can edit these metadata if necessary.
To add or modify document metadata:
1. Open the Format Settings tab of the Options dialog box (click Tools > Options... to open
this dialog box).
2. Click the Edit Metadata... button and in the dialog box that opens, enter the name, author,
subject, and keywords for the document.
3. Click OK.
Working with patterns and languages
You can save and load user patterns and languages.
For more about patterns, see If your document contains non-standard fonts . For more about user
languages, see If the program failed to recognize some of the characters .
To save patterns and languages to a file:
191
129
133
112
ABBYY® FineReader 14 User’s Guide
1. Open the OCR tab of the Options dialog box (click Tools > Options... to open this dialog box).
2. Click the Save Patterns and Languages...
3. In the dialog box that opens, type a name for your file and click Save.
This file will contain the path to the folder where your user languages, language groups, dictionaries, and
patterns are stored.
To load patterns and languages:
1. Open the OCR tab of the Options dialog box (click Tools > Options... to open this dialog box).
2. Click the Load Patterns and Languages...
3. In the Load Options dialog box, select the required *.fbt file and click Open.

113
ABBYY® FineReader 14 User’s Guide
Group work with OCR projects
ABBYY FineReader provides tools for working on documents together with other users over a network.
Multiple users can share the same user languages and dictionaries created for these languages.
To make user dictionaries and languages available to multiple users:
1. Create/open an OCR project and select desired scanning and OCR options for the project.
2. Specify a folder where user dictionaries will be stored. This folder should be accessible to all
users.
By default, user dictionaries are stored in %Userprofile%
\AppData\Roaming\ABBYY\FineReader\14.00\UserDictionaries.
To specify a different folder for user dictionaries:
1. On the Areas and Text tab of the Options dialog box (click Tools > Options...to
open this dialog box), click the User Dictionaries... button.
2. In the dialog box that opens, click the Browse... button and specify the path to your
folder.
3. Save the user patterns and languages to a file (*.fbt):
1. Click the OCR tab in the Options dialog box (click Tools > Options... to open this
dialog box).
2. Click Save Patterns and Languages....
3. In the Save Options dialog box, specify a folder where the file will be stored. This
folder should be accessible to all users.
4. Now other users can access the user languages and dictionaries. To do so, they need to load the
*.fbt file you created in step 3 and specify the path to the folder with the user dictionaries you
created in step 2.
To be able to access the user dictionaries, patterns, and languages, users must have
read/write permissions for the folders where they are stored.
To see the list of available user languages and their parameters, click the OCR tab in the Options
dialog box (click Tools > Options... to open this dialog box).
When a user language is being used by several users, users can add words or delete words from the
corresponding dictionary, but they cannot change the properties of this language.
When a user dictionary is being edited by a user, other users can use this dictionary to perform OCR
and check spelling, but they cannot add or remove words.
Any changes a user makes to a user dictionary will become available to all users who have selected the
folder where this dictionary is stored. For the changes to come into effect, users will need to restart
ABBYY FineReader.
111

114
ABBYY® FineReader 14 User’s Guide
Improving OCR results
Contents:
·If your document image has defects and OCR accuracy is low
·If areas are not detected properly
·If the complex structure of a paper document is not reproduced
·If you are processing a large number of documents with identical layouts
·If tables and pictures are not detected
·If a barcode is not detected
·If an incorrect font is used or some characters are replaced with "?" or "?"
·If your printed document contains non-standard fonts
·If your document contains many specialized terms
·If the program fails to recognize certain characters
·If vertical or inverted text was not recognized
115
118
122
123
124
127
128
129
132
133
135
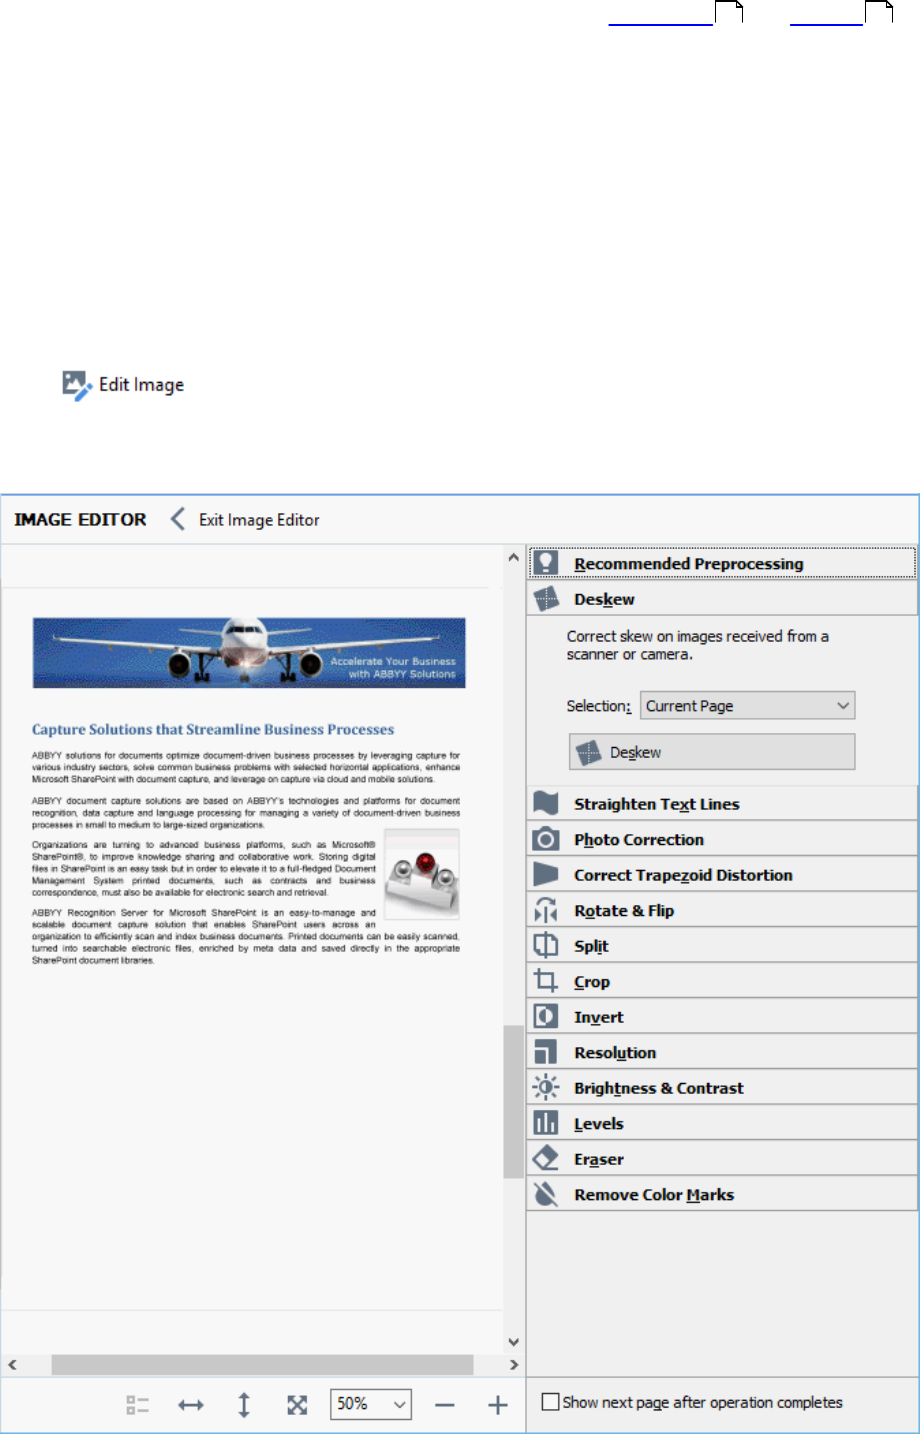
115
ABBYY® FineReader 14 User’s Guide
If your document image has defects and OCR accuracy is low
Distorted text lines, skew, noise, and other defects commonly found in scanned images and digital
photos can lower OCR quality. ABBYY FineReader provides a variety of automated and manual
tools for removing these defects.
How to edit images manually
If you disabled automatic preprocessing features or want to preprocess specific pages, you can use the
Image Editor to manually edit page images.
Follow the instructions below to edit an image manually:
1. Open the OCR Editor and then open the Image Editor:
·Click on the toolbar of the Image pane, or
·Click Edit > Edit Page Images....
217 115
116
ABBYY® FineReader 14 User’s Guide
The IMAGE EDITOR will open and display the currently selected page. The rightmost panel of
the Image Editor contains tools for editing images.
2. Click the tool you want to use and apply it to the image. The resulting changes will be displayed in
the Image pane. Most of the tools can be applied both to specific pages and to all of the pages in
the document. You can specify which pages you want to edit using the Selection drop-down list
of the tool, where you can select all odd/even pages, the current page or the selected pages if
multiple pages are selected in the Pages pane.
3. After you finish editing images, click the Exit Image Editor button at the top of the Image Editor.
The image editor contains the following tools:
·Recommended Preprocessing
Depending on the type of your image, the program will automatically determine and apply the
necessary corrections. Corrections that may be applied include noise and blur removal, color
inversion to make the background color lighter than the text, skew correction, straightening of text
lines, correction of trapezoid distortions, and cropping of image borders.
·Deskew
Corrects image skew.
·Straighten Text Lines
Straightens any curved text lines on the image.
·Photo Correction
Tools in this group let you straighten text lines, remove noise and blur, and change the document's
background color to white.
·Correct Trapezoid Distortion
Corrects trapezoid distortions and removes image edges that don't contain any useful data.
When this tool is selected, a blue grid appears on the image. Drag the grid's corners to the corners
of the image so that the grid's horizontal lines become parallel to the text lines. Click the Correct
button to apply the changes.
·Rotate & Flip
Tools in this group let you rotate images and flip them vertically or horizontally to get the text on the
image facing in the right direction.
·Split
Tools in this group let you split the image into parts. This can be useful if you are scanning a book
and need to split facing pages.
·Crop
Removes image edges that don't contain any useful information.
·Invert
Inverts image colors. This can be useful if you're dealing with non-standard text coloring (light text
on a dark background).
·Resolution
Changes the resolution of the image.
117
ABBYY® FineReader 14 User’s Guide
·Brightness & Contrast
Changes the brightness and contrast of the image.
·Levels
This tool lets you adjust the color levels of the images by changing the intensity of shadows, light,
and halftones.
To increase the contrast of an image, move the left and right sliders on the Input levels
histogram. The range of colors between lightest and darkest is divided into 255 increments. The
left slider sets the color that will be considered to be the blackest part of the image, and the right
slider sets the color that will be considered to be the whitest part of the image. Moving the middle
slider to the right will darken the image, and moving it to the left will lighten the image.
Adjust the output level slider to decrease the contrast of the image.
·Eraser
Erases a part of the image.
·Remove Color Marks
Removes any color stamps and marks made in pen to facilitate the OCR of the text obscured by
such marks. This tool is intended for scanned documents with a white background, and should not
be used on digital photos and documents with color backgrounds.
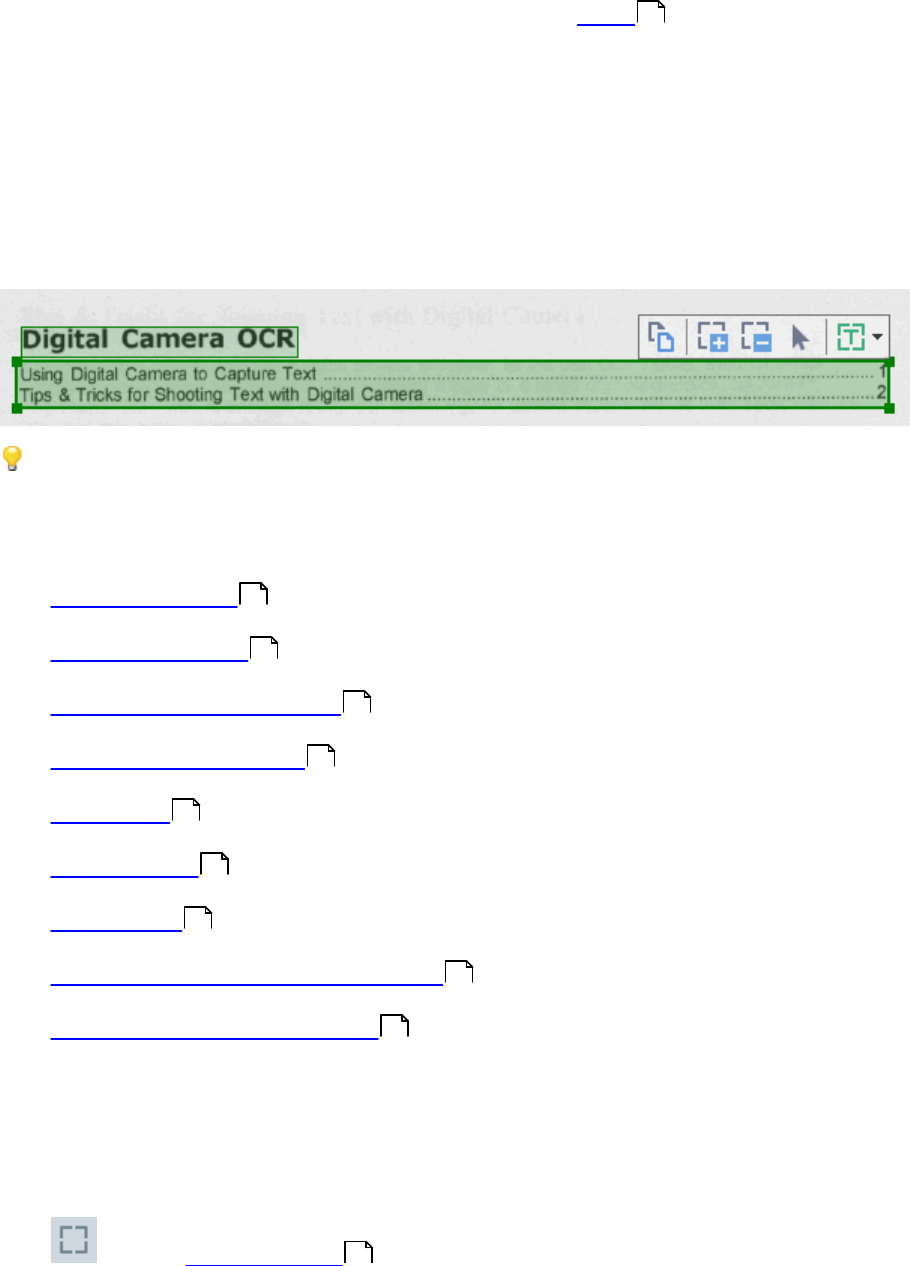
118
ABBYY® FineReader 14 User’s Guide
If areas are detected incorrectly
ABBYY FineReader analyzes page images prior to OCR and detects different types of areas on these
images, specifically text, picture, background picture, table, and barcode areas. This analysis
determines which areas will be recognized and in what order. In the user interface, different area types
are distinguished by the colors of their borders.
If you click on an area, it will be highlighted and will become active . You can also navigate areas by
pressing the Tab key. The areas' numbers determine the order in which they are selected when the Tab
key is pressed. By default, these area numbers are not visible in the Image pane, but you can view them
in the Area Properties pane of each area. Area numbers will appear on areas when the Order Areas
tool is selected.
The tools for drawing and editing areas manually can be found on the toolbar at the top of the Image
pane and on the pop-up toolbars of the text, picture, background picture, and table areas (select an area
to view its pop-up toolbar).
Once you have adjusted the position or changed the type of an area, be sure to recognize the image
again.
You can use area editing tools to:
·Create a new area
·Adjust area borders
·Add or remove parts of areas
·Select one or more areas
·Move areas
·Reorder areas
·Delete areas
·Change the orientation of text in an area
·Change the color of area borders
Creating a new area
1. Select one of the tools on the toolbar at the top of the Image pane:
draws a recognition area .
244
118
119
119
120
120
120
120
120
121
244

119
ABBYY® FineReader 14 User’s Guide
draws a text area .
draws a picture area .
draws a background picture area .
draws a table area .
2. Hold down the left mouse button and move the mouse pointer to draw an area.
Tip. New areas can be drawn without selecting a tool from the Image pane toolbar. You can draw an
area on the image using one of the following key combinations:
·Ctrl+Shift draws a text area.
·Alt+Shift draws a picture area.
·Ctrl+Alt draws a table area.
·Ctrl+Shift+Alt draws a background picture area.
You can change the type of an area. Right-click the area whose type you want to change, click Change
Area Type To on the shortcut menu, and select the desired area type.
Adjusting area borders
1. Place the mouse pointer on an area border.
2. Hold down the left mouse button drag the border in the desired direction.
You can simultaneously adjust the vertical and horizontal borders of an area by placing the mouse
pointer on a corner of the area.
Adding/removing area parts
1. Select the or tool on the toolbar of a text, picture or background picture area.
2. Place the mouse pointer inside an area and select a part of the image. This segment will be
added to or deleted from the area.
3. Adjust the area border if necessary.
Note:
1. These tools are only available for text, picture, and background picture areas. Area segments
cannot be added to or deleted from table or barcode areas.
244
244
244
244
120
ABBYY® FineReader 14 User’s Guide
2. Area borders can also be adjusted by using sizing handles. The resulting segments can be
dragged in any direction using the mouse. To add a new sizing handle, place the mouse pointer
on the desired point on the border while holding down Ctrl+Shift (this switches the pointer to
crosshairs) and click the border. A new sizing handle will appear on the area border.
Selecting one or more areas
·Select the , , , , , or tool on the toolbar at the top of the Image
pane and click the areas you want to select while holding the Ctrl key. To remove an area from the
selection, click it again.
Moving an area
·Select an area and drag it while holding the Ctrl key.
Reordering areas
1. Select the tool on the toolbar at the top of the Image pane or click Area > Reorder Areas.
2. Select the areas in the order in which their content should appear in the output document.
The areas are automatically numbered from left to right during page analysis, regardless of the
direction of the text on the image.
Deleting an area
·Select the areas you want to delete and press the Delete key.
·Select the areas you want to delete, right-click one of them, and click Delete on the shortcut
menu.
·Select the tool and click the areas you want to delete.
To delete all areas:
·Right-click anywhere inside the Image pane and click Delete Areas and Text on the shortcut
menu.
Deleting an area from an image that has already been recognized will also delete all text from that
area in the Text pane.
Changing text orientation

121
ABBYY® FineReader 14 User’s Guide
·Right-click an area and click Properties on the shortcut menu to display its properties in the Area
Properties pane. In this dialog box, select the desired text orientation from the Orientation drop-
down list.
Fore more information about editing text properties in text areas, see Editing area properties .
To change the colors of area borders:
1. Click Tools > Options... to open the Options dialog box and click the Areas and Text tab.
2. Select an area whose color you want to change and then select the desired color.
Editing area properties
When performing automatic document analysis, ABBYY FineReader detects different area types on
document pages, such as table, picture, text, and barcode areas. The program also analyzes the
document structure and identifies headings and other layout elements, such as headers, footers, and
captions.
You can manually change incorrectly defined properties in some text and table areas.
1. Select an area in the Image or Zoom pane to display its properties in the Area Properties pane.
This pane displays the following editable properties:
·Language
See OCR languages .
·Function
Displays the function of the text, i.e. whether it is a header or a footer, a footnote, etc. (applies
only to text areas).
·Orientation
See If vertical or inverted text was not recognized .
·Print type
See Document features to consider prior to OCR .
·Inversion
See If vertical or inverted text was not recognized .
·Direction of CJK text
See Working with complex-script languages .
Note:
a. Use the / buttons to navigate the properties dialog box if the Image pane is not wide
enough to fit the entire dialog box.
b. Some properties of text in text areas can be changed using the shortcut menu of these areas.
2. After you have made the desired changes, be sure to recognize the document again so that the
changes you made to the areas are reflected in the recognized text.
For more information about areas, see Editing areas .
121
214
135
215
135
226
118

122
ABBYY® FineReader 14 User’s Guide
If the complex structure of a paper document is not reproduced
Before running the OCR process, ABBYY FineReader 14 analyzes of the logical structure of the
document and detects areas containing text, pictures, tables, and barcodes. The program then relies on
this analysis to identify which parts of the image need to be recognized and the order in which they
should be recognized. This information helps recreate the formatting of the original document.
By default, ABBYY FineReader 14 will analyze documents automatically. In the case of very complex
layouts, the program may occasionally make mistakes when determining the type of an area type or
locating it's borders. It is often easier to correct faulty areas manually rather than drawing all areas
anew.
Use the following tools and commands to correct areas:
·The manual area adjustment tools on the toolbar at the top of the Image pane.
·The shortcut menu commands available by right-clicking the selected area in the Image pane or
the Zoom pane.
·Commands on the Area menu.
Make sure you recognize the document again after making the desired adjustments, so that the
changes you have made to the areas are reflected in the recognized text.
For more information about areas, see Editing areas .
OCR settings, area properties, and selected saving options also have an effect on how well the layout of
the original document is retrained. See also: OCR options , Editing area properties , Saving OCR
results .
118
220 121
144

123
ABBYY® FineReader 14 User’s Guide
If you are processing a large number of documents with
identical layouts
If you are processing a large number of documents with identical layouts (e.g. forms or questionnaires),
analyzing the layout of every page will be very time consuming. To save time, you can analyze only one
document in a set of similar documents and save the detected areas as a template. Then you can use
this template for the other documents in the set.
To create an area template:
1. Open an image in the OCR Editor and either let the program analyze the layout automatically or
draw the areas manually.
2. Click Area > Save Area Template.... In the dialog box that opens, specify a name for the area
template and click Save.
To be able to use an area template, you must scan all the documents in the set using the same
resolution value.
To apply an area template:
1. In the Pages pane, select the pages to which you want to apply the template.
2. Click Area > Load Area Template....
3. In the Open Area Template dialog box, select the desired template file (*.blk).
4. In the same dialog box, next to Apply to, select Selected pages to apply the template to the
selected pages.
Tip. If you want to apply the template to all pages in the document, select All pages.
5. Click Open.

124
ABBYY® FineReader 14 User’s Guide
If tables and pictures are not detected
If a table is not detected
Table areas contain tables and text that is arranged in a table-like manner. If the program fails to
correctly draw a table area around a table, use the Table tool to draw the area manually.
1. Click on the toolbar at the top of the Image pane and use the mouse pointer to draw a table
area around the table.
2. Right-click the table and click Analyze Table Structure on the shortcut menu, or click on the
pop-up toolbar of the table area.
3. Use the pop-up toolbar, the shortcut menu of the table area, or the commands on the Area menu
to edit the results.
4. Run the OCR process again.
You can also assign the Table type to an area of a different type. To do this, right-click the area and
click Change Area Type To > Table on the shortcut menu.
If ABBYY FineReader failed to correctly detect the rows and columns in a table automatically, you can
adjust the layout manually and run the OCR process again.
244
125
ABBYY® FineReader 14 User’s Guide
·You can use commands on the Area menu and the shortcut menu of a table area to:
—Analyze Table Structure (automatically analyzes the structure of a table and saves you the
trouble of drawing vertical and horizontal separators manually).
—Split Cells, Merge Cells, Merge Rows (allow you to correct any wrongly identified rows or
columns).
·Use the pop-up toolbar of the selected table area to add a horizontal or vertical separator, delete
table separators, analyze table structure, split table cells, or merge table cells or rows. To do this,
click the table area and then click the appropriate tool on the pop-up toolbar:
.
Tip. Click the tool on the pop-up toolbar to select objects.
Note:
1. The cell splitting command can only be applied to table cells that were previously merged.
2. To merge or split table cells or rows, select them on the image and then click the appropriate tool
or menu command.
3. If the table contains vertical text cells, you may need to change the text properties first.
4. If a table cell only contains an image, select the Treat selected cells as picture option on the
Area Properties pane (to open this pane, right-click an area and click Properties on the shortcut
menu).
If a cell contains a combination of images and text, select the image to turn it into a dedicated area
inside the cell.
See also: :
·If vertical or inverted text was not recognized
·Editing areas
·Editing area properties
If a picture is not detected
Picture areas contain pictures. You can also use picture areas for text fragments that you don't want
to be recognized. If the program fails to correctly draw a picture area around a picture, use the Picture
tool to draw the area manually.
1. Select the tool on the toolbar at the top of the Image pane and use the mouse pointer to
draw a picture area around the picture.
2. Run the OCR process again.
135
118
121
244

126
ABBYY® FineReader 14 User’s Guide
If there is text printed over a picture in your document, draw a background picture area around the
picture.
1. Select the tool on the toolbar at the top of the Image pane and use the mouse pointer to
draw a background picture area around the background picture.
2. Run the OCR process again.
You can also assign the Picture or Background Picture type to an area of a different type that was
detected automatically. To do this, right-click the area whose type you want to change and click Change
Area Type To > Picture (or Background Picture) on the shortcut menu.
For more on areas, area types, and how to edit them, see Editing areas .
244
118

127
ABBYY® FineReader 14 User’s Guide
If a barcode is not detected
Barcode areas contain barcodes. If your document contains a barcode that you would like to render
as a sequence of letters and digits rather than as an image, select the barcode and change the area
type to Barcode.
Barcode recognition is disabled by default. To enable it, click Tools > Options... to open the Options
dialog box, click the OCR tab, and select the Convert barcodes into strings option.
To draw a barcode area and recognize it:
1. Draw an area around a barcode in the Image or Zoom pane.
2. Right-click the area and click Change Area Type To > Barcode on the shortcut menu.
3. Run the OCR process.
ABBYY FineReader 14 can read the following types of barcode:
·Code 3 of 9
·Check Code 3 of 9
·Code 3 of 9 without asterisk
·Codabar
·Code 93
·Code 128
·EAN 8
·EAN 13
·IATA 2 of 5
·Interleaved 2 of 5
·Check Interleaved 2 of 5
·Matrix 2 of 5
·Postnet
·Industrial 2 of 5
·UCC-128
·UPC-A
·UPC-E
·PDF417
·Aztec Code
244

128
ABBYY® FineReader 14 User’s Guide
·Data Matrix
·QR code
·Patch code
The default barcode type is Autodetect, which means that barcode types are to be detected
automatically. However, not all barcode types can be detected automatically, and sometimes you may
need to select the appropriate type manually on the Свойства области pane.
ABBYY FineReader can automatically detect the following types of barcode: Code 3 of 9, Code 93, Code
128, EAN 8, EAN 13, Postnet, UCC-128, UPC-E, PDF417, UPC-A, QR code.
If an incorrect font is used or some characters are replaced with
"?" or "?"
If you see "?" or "?" instead of letters in the Text pane, check to see if the fonts selected to display the
recognized text contain all the characters used in your text.
See also: Required fonts .
You can change the font of a recognized text without running the OCR process again.
To change the font in a short document:
1. Select a text fragment where some characters have the wrong font.
2. Right-click the selection and click Properties on the shortcut menu.
3. Select the desired font from the Font drop-down list in the Text Properties pane. The font in the
selected text fragment will change accordingly.
To change the font in a long document where styles are used :
1. Click Tools > Style Editor....
2. In the Style Editor dialog box, select the style you want to edit and change its font.
3. Click OK. The font in all of the text fragments using this style will change accordingly.
If an OCR project was recognized or edited on another computer, the text in the document may
be displayed incorrectly on your computer. If this is the case, make sure that all the fonts used in this
OCR project are installed on your computer.
104
231
140

129
ABBYY® FineReader 14 User’s Guide
If your printed document contains non-standard fonts
If a document you want to recognize contains decorative fonts or special characters (e.g. mathematical
symbols), we recommend using the training mode to improve OCR accuracy.
It is not advisable to use the training mode in other cases, as the gains in OCR quality will be
insignificant compared to the time and effort you will spend on training.
In training mode, a user pattern is created, which can be used when performing OCR on the entire
text.
·Using user patterns
·Creating and training a user pattern
·Selecting a user pattern
·Editing a user pattern
Using user patterns
To use a user pattern to recognize a document:
1. Click Tools > Options... to open the Options dialog box and click the OCR tab.
2. Select the Use user patterns option.
If the Also use built-in patterns option underneath the Use user patterns option is selected,
ABBYY FineReader will use its built-in patterns in addition to any user patterns you create.
3. Click the Pattern Editor... button.
4. In the Pattern Editor dialog box, select a pattern and click OK.
5. Click the button on the main toolbar at the top of the OCR Editor window.
Creating and training a user pattern
To train a user pattern to recognize new characters and ligatures:
1. Click Tools > Options... to open the Options dialog box and click the OCR tab.
2. Select the Use training to recognize new characters and ligatures option.
If the Also use built-in patterns option underneath the Use training to recognize new
characters and ligatures option is selected, ABBYY FineReader will use its built-in patterns in
addition to any user patterns you create.
3. Click the Pattern Editor... button.
Pattern training is not supported for Asian languages.
244
129
129
131
131
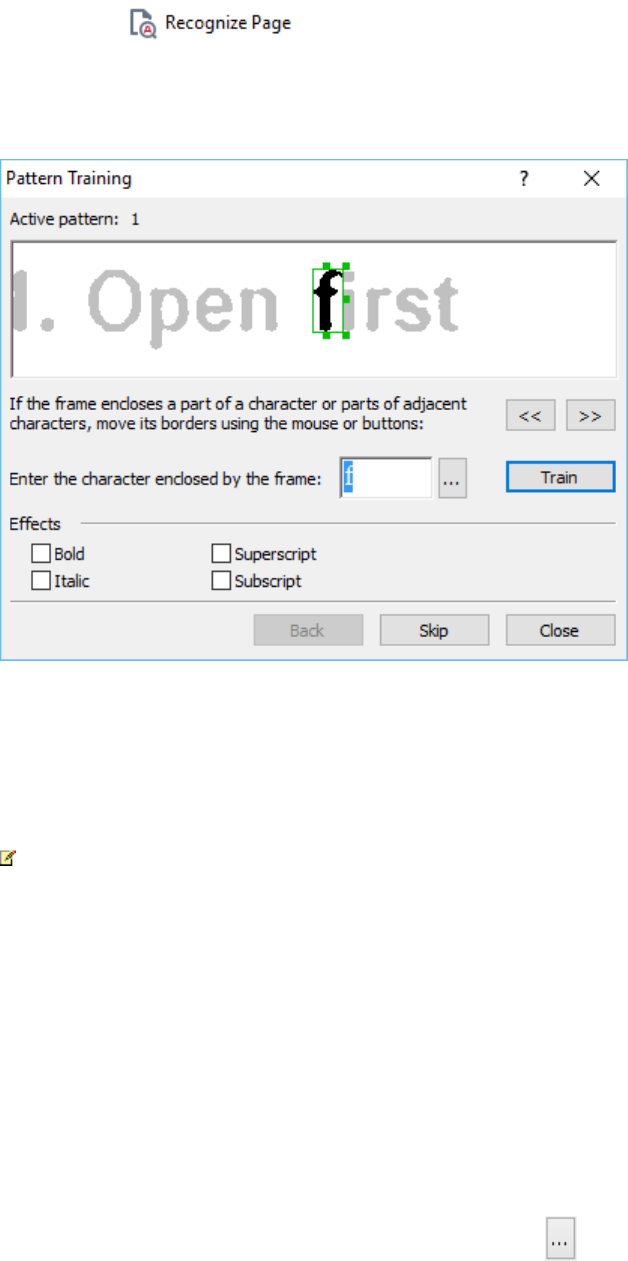
130
ABBYY® FineReader 14 User’s Guide
4. In the Pattern Editor dialog box, click the New... button.
5. In the Create Pattern dialog box, specify a name for the new pattern and click OK.
6. Click OK in the Pattern Editor dialog box and then click OK in the Options dialog box.
7. Click the button in the toolbar at the top of the Image pane.
If the program encounters a character it does not recognize, the Pattern Training dialog will open
and display this character.
8. Teach the program to read new characters and ligatures.
A ligature is a combination of two or three characters that are "glued together" (for example, fi, fl, ffi,
etc.) and are difficult for the program to separate. In fact, better results can be obtained by treating
them as single compound characters.
Words printed in bold or italic type or words in superscript/subscript may be retained in the
recognized text by selecting the corresponding options under Effects.
To go back to a previously trained character, click the Back button. The frame will jump to its
previous location and the latest trained "character image - keyboard character" pairing will be
removed from the pattern. The Back button navigates between the characters of one word and will
not navigate between words.
Important!
·You can only train ABBYY FineReader 14 to read the characters included in the alphabet of the
OCR language. To train the program to read characters that cannot be entered from the keyboard,
use a combination of two characters to denote these non-existent characters or copy the desired
character from the Insert Character dialog box (click to open this dialog box).

131
ABBYY® FineReader 14 User’s Guide
·Each pattern may contain up to 1,000 new characters. However, avoid creating too many ligatures,
as this may adversely affect OCR quality.
Selecting a user pattern
ABBYY FineReader lets you use patterns to improve OCR quality.
1. Click Tools > Pattern Editor....
2. In the Pattern Editor dialog box, select one of the patterns in the list and click the Set Active
button.
Some important points to remember:
1. Sometimes the program will not differentiate between very similar yet different characters and
recognize them as one and the same character. For example, the straight ('), left (‘), and right (’)
quotes will be stored in a pattern as a single character (straight quote). This means that left and
right quotes will never be used in the recognized text, even if you try to train them.
2. For some character images, ABBYY FineReader 14 will select the corresponding keyboard
character based on the surrounding context. For example, an image of a small circle will be
recognized as the letter O if there are letters immediately next to it, and as the number 0 if there
are digits next to it.
3. A pattern can only be used for documents that have the same font, font size, and resolution as the
document used to create the pattern.
4. You can save your pattern to a file and use it in other OCR projects. See also: OCR projects .
5. To recognize texts set in a different font, be sure to disable the user pattern. To do this,
clickTools > Options... to open the Options dialog box, click the OCR tab, and select the Use
built-in patterns option.
Editing a user pattern
You may wish to edit your newly created pattern before launching the OCR process. An incorrectly
trained pattern may adversely affect OCR quality. A pattern should contain only entire characters or
ligatures . Characters with cut edges and characters with incorrect letter pairings should be removed
from the pattern.
1. Click Tools > Pattern Editor....
2. In the Pattern Editor dialog box, select the pattern you want to edit and click the Edit... button.
3. In the User Pattern dialog box, select a character and click the Properties... button.
In the dialog box that opens:
·In the Character field, enter the letter that corresponds to the character .
·In the Effect field, specify the desired font effect (bold, italic, superscript or subscript).
244
108
244
244
132
ABBYY® FineReader 14 User’s Guide
To delete a character that has been trained incorrectly, click the Delete button in the User Pattern
dialog box.
If your document contains many specialized terms
ABBYY FineReader 14 checks recognized words against its internal dictionary. If your text contains too
many specialized terms, abbreviations or proper names, you can improve OCR quality by adding them
to a user dictionary.
1. Click Tools > View Dictionaries....
2. In the User Dictionaries dialog box, select the appropriate language and click View....
3. In the dialog box that opens, type the word you want to add and click the Add word button (or
select a word you want to delete and click the Delete button).
If the dictionary already contains the word you are trying to add, a warning message will be displayed.
You can import user dictionaries created in ABBYY FineReader 9.0, 10, 11 and 12):
1. Click Tools > View Dictionaries... button
2. In the User Dictionaries dialog box, select the appropriate language and click the View....
3. In the dialog box that opens, click the Import... button and select the user dictionary you want to
import (it will have the *.pmd, *.txt or *.dic extension).

133
ABBYY® FineReader 14 User’s Guide
If the program fails to recognize certain characters
ABBYY FineReader 14 uses data about the document language when recognizing text. The program
may fail to recognize some characters in documents with uncommon elements (e.g. code numbers)
because the document language might not contain these characters. To recognize such documents,
you can create a custom language that has all of the necessary characters. You can also create groups
of several OCR languages and use these groups when recognizing documents.
How to create a user language
1. Open the Options dialog box (clickTools > Options... to open this dialog box), click the
Languages tab.
2. Click the New... button.
3. In the dialog box that opens, select the Create a new language based on an existing one
option, select the language which you want to use as a base for the new language, and click OK.
4. The Language Properties dialog box will open. In this dialog box:
a. Type a name for your new language.
b. The language you selected in the New Language or Group dialog box is displayed in the
Source language drop-down list. You can select a different language from this drop-down
list.
c. The Alphabet contains the alphabet of the base language. If you want to edit the alphabet,
click the button.
d. The Dictionary option group contains several options for the dictionary that will be used by
the program when recognizing text and checking the result:
·None
The language will not have a dictionary.
·Built-in dictionary
The program's built-in dictionary will be used.
·User dictionary
Click the Edit... button to specify dictionary terms or import an existing custom dictionary
or a text file with Windows-1252 encoding (terms must be separated by spaces or other
characters that are not in the alphabet).
Words from the user dictionary will not be marked as misspelled when the spelling in the
recognized text is checked. They may be written in all lower-case or all upper-case letters, or
may begin with an upper-case letter.
Word in the dictionary
Words that will not be considered misspelled during
a spelling check
abc
abc, Abc, ABC
214
134
134
ABBYY® FineReader 14 User’s Guide
Abc
abc, Abc, ABC
ABC
abc, Abc, ABC
Abc
aBc, abc, Abc, ABC
·The Regular expression allows you to create a user dictionary using regular
expressions.
See also: Regular expressions .
e. Languages can have several additional properties. To change these properties, click the
Advanced... button to open the Advanced Language Properties dialog box, where you can
specify:
·Characters that can begin or end a word
·Non-letter characters that appear separately from words
·Characters that may appear inside words but should be ignored
·Characters that cannot appear in texts that are recognized using this language
(prohibited characters)
·The Text may contain Arabic numerals, Roman numerals, and abbreviations option
5. You can now select the newly created language when choosing OCR languages.
For more on OCR languages, see OCR languages .
By default, the user language is saved in the folder of the OCR project. You can also save all user
patterns and languages as a single file. To do this, open the Options dialog box (clickTools >
Options... to open this dialog box), click the OCR tab, and then click the Save Patterns and
Languages... button.
Creating a language group
If you are going to use a particular language combination regularly, you may wish to group the languages
together for convenience.
1. Open the Options dialog box (click Tools > Options... to open this dialog box) and click the
Languages tab.
2. Click the Новый... button.
3. In the New Language or Group dialog box, select the Create a new group of languages
option, and click OK.
4. The Language Group Properties dialog box will open. In this dialog box, specify a name for the
language group and select the languages you want to include in the group.
233
214

135
ABBYY® FineReader 14 User’s Guide
If you know that your text will not contain certain characters, you may wish to explicitly specify
these so-called prohibited characters. Doing this can increase the speed and accuracy of OCR.
To specify these characters, click the Advanced... button in the Language Group Properties
dialog box and enter the prohibited characters in the Prohibited characters field.
5. Click OK.
The new group will appear in the drop-down list of languages on the main toolbar .
By default, user language groups are saved in the folder of the OCR project . You can also save all
user patterns and languages as a single file. To do this, open the Options dialog box (click Tools >
Options... to open this dialog box), click the OCR tab, and then click the Save Patterns and
Languages... button.
Tip. You can use the drop-down list of languages on the main toolbar to select a language group.
1. Select More languages... from the drop-down list of languages on the main toolbar.
2. In the Language Editor dialog box, select the Specify OCR languages manually option.
3. Select the desired languages and click OK.
If vertical or inverted text was not recognized
A fragment of recognized text may contain a large number of errors if the orientation of the fragment was
detected incorrectly or if the text in the fragment is inverted (i.e. light text is printed on a dark
background).
To solve this problem:
1. In the Image pane, select the area or the table cell that contains vertical or inverted text.
2. Right-click the area and click Properties on the shortcut menu to open the Area Properties
pane. Next:
·Select the direction of the text from the Direction of CJK text drop-down list,
or
·Select Inverted from the Inversion drop-down list.
3. Run the OCR process again.
For more information about areas, see Editing areas .
102
108
244
118
136
ABBYY® FineReader 14 User’s Guide
Checking and editing texts
Once the OCR process is completed, the recognized text appears in the Text pane. The characters
recognized with low confidence are highlighted, so that you can easily spot any OCR errors and correct
them.
You can edit recognized text either directly in the Text pane or in the Verification dialog box (click
Recognize > Verify Text... to open this dialog box). In the Verification dialog box, you can review low-
confidence words, correct spelling errors, and add new words to the user dictionary.
ABBYY FineReader also allows you to change the formatting of output documents.
To change the formatting of recognized texts, use the buttons on the main toolbar of the Text pane and
the buttons in the Text Properties pane (right-click anywhere in the Text pane and then click
Properties on the shortcut menu to display this pane).
When recognizing a text, ABBYY FineReader identifies the styles used in the text. All the identified
styles are displayed in the Text Properties pane. You can edit the styles to change the formatting of the
entire text. When saving recognized texts in DOCX, ODT or RTF, all the existing styles can be
preserved.
See also: :
·Checking recognized text
·Using styles
·Editing hyperlinks
·Editing tables
·Removing confidential information
·Saving editable documents
137
140
141
142
142
147
137
ABBYY® FineReader 14 User’s Guide
Checking recognized text
You can edit recognized text either directly in the Text pane or in the Verification dialog box
(clickRecognize > Verify Text... to open this dialog box). In the Verification dialog box, you can review
low-confidence words, correct spelling errors, and add new words to the user dictionary.
Checking texts in the Text pane
You can check, edit, and format OCR results in the Text pane.
The toolbar of the Text pane contains buttons that let you check the spelling in recognized texts. Use
the / buttons to go to the next/previous low-confidence word or character. If the low-confidence
characters are not highlighted, click the button on the toolbar at the top of the Text window.
To verify a low-confidence word in the Text pane:
1. Click the word in the Text pane. The image area with this word will be highlighted in the Image
pane. At the same time, the Zoom pane will display a magnified image of the word.
2. Correct the word in the Text window, if necessary.
Tip. You can insert symbols that are not on available on your keyboard by clicking the button.
Alternatively, use the Verification dialog box.
This method is convenient when you need to compare the source and output documents.
The text formatting tools can be found:
·on the toolbar at the top of the Text pane
·in the Text Properties pane (right-click anywhere in the Text pane and then click Properties on
the shortcut menu to display this pane)
Use the / buttons to move around the Text Properties pane if the Text window is too narrow
and you cannot see the entire pane.
To learn how you can change the appearance of the main window and the tools available on its
toolbars, see OCR Editor Window and Toolbars .
Checking the recognized text in the Verification dialog box
137 137
101 102
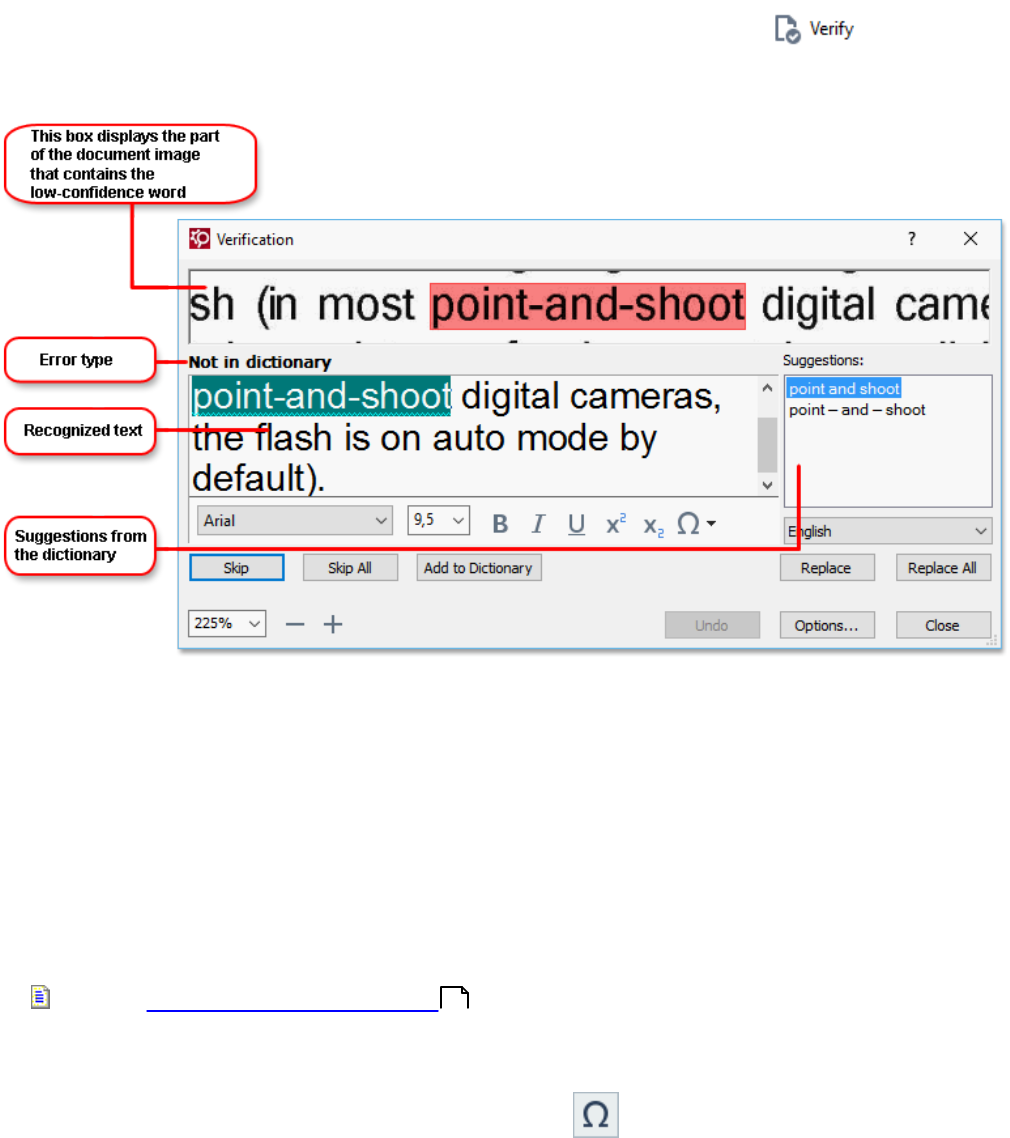
138
ABBYY® FineReader 14 User’s Guide
ABBYY FineReader offers a Verification dialog box, where you can check and correct words that
contain low-confidence characters. To open the Verification dialog box, click on the main
toolbar or click Recognize > Verify Text....
In the Verification dialog box, you can:
·Skip a highlighted word without making any changes. When you click Skip, the highlighting is
removed.
Replace the highlighted word with one of the suggested variants.
·Simply select the correct suggestion in the box to the right and click Replace.
·Add the highlighted word to the dictionary by clicking the Add to Dictionary button.
Next time the program encounters this word, it will no longer treat it as an error.
See also: Working with user dictionaries .
·Change the font and apply font effects.
·Insert non-keyboard characters into the text. Click the and select More Symbols.... In the
dialog box that opens, from the Subset drop-down list, select the subset that contains the symbol
that you need (e.g. Basic Greek or Currency Symbols). Next, double-click the character that you
wish to insert. Alternatively, you can specify the Unicode code point of the character in the
Character code field.
Tip. To change the checking options, click Options....
When checking texts written in Chinese, Japanese or Korean, the program will suggest similar-looking
characters for characters recognized with low confidence.
139
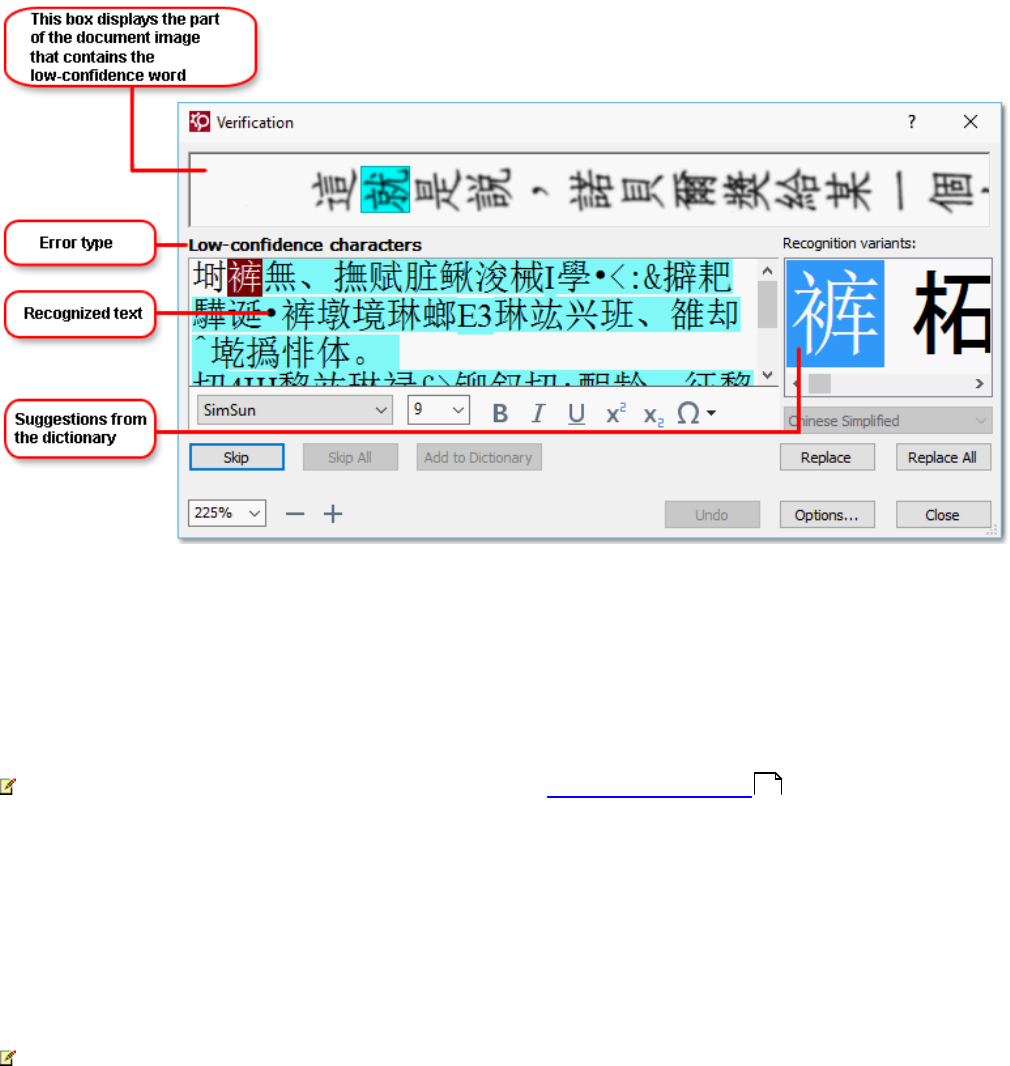
139
ABBYY® FineReader 14 User’s Guide
Working with user dictionaries
When recognizing a text, ABBYY FineReader checks recognized words against its dictionaries. If your
text contains too many specialized terms, abbreviations or proper names, you can improve OCR quality
by adding them to a user dictionary.
User dictionaries may not be available for some of the supported languages .
To add a word to the user dictionary, do one of the following:
·In the Verification dialog box (click Recognize > Verify Text... to open this dialog box), click the
Add to Dictionary button, or
·In the Text window, right-click the word you wish to add and then click Add to Dictionary on the
shortcut menu
When adding a word to a user dictionary, make sure that the right language is selected.
205

140
ABBYY® FineReader 14 User’s Guide
Using styles
When recognizing a text, ABBYY FineReader detects the styles and formatting used in the original
document. These styles and formatting are reproduced in the output document. You can review and edit
the document styles and create new styles in the Text pane.
To apply a style to a text fragment:
1. Select the desired text fragment in the Text pane.
2. Right-click the selected fragment and click Properties on the shortcut menu.
3. Select the desired style in the Text Properties pane.
When saving recognized texts in DOCX, ODT or RTF, all the existing styles can be preserved. See
also: DOC(X)/RTF/ODT format .
To create, change, and merge styles:
1. Click Tools > Style Editor....
2. In the Style Editor dialog box, select the desired style and modify its name, font, font size,
character spacing, and scale.
3. To create a new style, click the Newbutton. The newly created style will be added to the list of
existing styles, where you can modify it.
4. To merge multiple styles into one, select the styles to merge and click the Merge... button. In the
Merge Styles dialog box, specify the style into which to merge the selected styles.
5. Click OK to save the changes.
You can navigate between text fragments printed in identical styles. To do this, in the Style Editor dialog
box, select the desired style and click Previous Fragment or Next Fragment.
196

141
ABBYY® FineReader 14 User’s Guide
Editing hyperlinks
ABBYY FineReader detects hyperlinks and recreates their destination addresses in the output
document. Detected hyperlinks are underlined and displayed in blue.
When viewing the recognized document in the Text pane, rest the mouse pointer on a hyperlink to view
its address. To follow a hyperlink, right-click it and click the Open Hyperlink command on its shortcut
menu, or click the hyperlink while holding down the Ctrl key.
To add, delete or change the text or address of a hyperlink:
1. In the Text pane, select the text of the desired hyperlink.
2. To delete a hyperlink, right-click it and then click Remove Hyperlink on the shortcut menu.
3. To add a hyperlink or change the text of a hyperlink, right-click it and click the Hyperlink...
command on its shortcut menu, or click on the main toolbar at the top of the Text pane. In
the Edit Hyperlink dialog box, you can:
a. Edit the text of the link in the Text to display field.
b. Select or change the hyperlink type in the Link to group:
·Select Web page to link to an Internet page.
In the Address field, specify the protocol and the URL of the page (e.g.
http://www.abbyy.com).
·Select Local file to link to a file.
Click Browse... to browse for the file that the hyperlink will point to (e.g.
file://D:/MyDocuments/ABBYY FineReaderGuide.pdf).
·Select E-mail address if you want users to be able to send an e-mail message to the
address contained in the hyperlink by simply clicking it.
In the Address field, specify the protocol and the e-mail address (e.g.
mailto:office@abbyy.com).
142
ABBYY® FineReader 14 User’s Guide
Editing tables
You can edit recognized tables in the Text pane. The following commands are available:
·Merge table cells
Use the mouse to select the table cells to be merged and click Area >Merge Table Cells.
·Split table cells
Click a table cell to split and click Area > Split Table Cells.
This command can only be applied to table cells that have been previously merged.
·Merge table rows
Use the mouse to select the table cells to be merged and click Area > Merge Table Rows.
·Delete cell contents
Select the cell or cells whose contents you want to delete and press the Delete key.
By default, the table editing tools are not displayed on the toolbar. You can add the table editing tools to
the toolbar in the Customize Toolbars and Shortcuts dialog box (click View > Toolbars >
Customize... to open this dialog box).
For detailed instructions on how to add buttons to the toolbars, see Toolbars .
Removing confidential information
With ABBYY FineReader 14, you can remove confidential information from recognized texts.
1. Click Tools > Redaction Mode or click the button on the main toolbar at the top of the Text
pane.
2. In the Text pane, use the marker to black out the text you wish to obliterate.
Tip. If you black out some characters by mistake, you can undo the last redaction by pressing Ctrl+Z or
by clicking the Undo button on the main toolbar.
3. Save your document.
The redacted text will appear as dots in the output document. If the saving format you selected supports
text and background colors, the redacted text fragments will appear as black rectangles.
To switch off the redaction mode, either
·Click the Tools > Redaction Mode once again, or
·Click the button on the main toolbar once again.
102

143
ABBYY® FineReader 14 User’s Guide
Copying content from documents
ABBYY FineReader allows you to copy text, pictures, and tables from documents and paste them to
other applications. You can copy content from scanned pages and images without recognizing the entire
document or converting it to an editable format. The selected content will be copied to the Clipboard.
You can then paste it into any application that supports pasting from the Clipboard.
To copy content:
1. Use the , , or tool in the Image pane to select the fragment of the document
you want to copy.
2. Right-click the fragment and click Recognize and Copy Text on the shortcut menu or click
button on the pop-up toolbar.
3. Paste the content into another application.
To save several pages:
1. Select the pages in the Pages pane.
2. Right-click the selected pages, click Save As, and select a desired format, or select Send To
and select the application into which you want to insert the recognized pages.
144
ABBYY® FineReader 14 User’s Guide
Saving OCR results
OCR results can be saved to a file, sent to another application or to the PDF Editor, copied to the
Clipboard, or e-mailed. You can also send OCR results to Kindle.com, where they will be converted to
the Kindle format and become available for download onto your Kindle device. You can save either the
entire document, or selected pages only.
Be sure to select the appropriate saving options before clicking Save.
To save recognized text:
1. On the main toolbar, click the arrow next to the Save button and select a document saving mode
and page objects to preserve.
Available file formats are listed beneath each mode.
There are five format saving modes:
a. Exact copy produces a document whose formatting corresponds to that of the original.
Recommended for documents with complex formatting, such as promotion booklets.
Note, however, that this option limits your ability to change the text and format of the
output document.
b. Editable copy produces a document whose formatting may differ slightly from that of
the original. Documents produced in this mode are easy to edit.
c. Formatted text retains the fonts, font sizes, and paragraphs, but does not retain the
exact spacing or locations of the objects on the page. The text produced will be left-
aligned (texts in right-to-left scripts will be right-aligned).
Vertical texts will be changed to horizontal in this mode.
d. Plain text does not retain text formatting.
e. Flexible layout produces an HTML document with the positions of the objects as close
to the original as is technically possible.
2. On the Format Settings tab of the Options dialog box, select the desired saving options and
click OK.
3. On the main toolbar , click the arrow to the right of the Save button and select the appropriate
option, or use the commands on File menu.
ABBYY FineReader allows you to save pages as images. See also: Saving images .
Supported applications:
·Microsoft Word 2016 (16.0), 2013 (15.0), 2010 (14.0), 2007 (12.0)
·Microsoft Excel 2016 (16.0), 2013 (15.0), 2010 (14.0), 2007 (12.0)
·Microsoft PowerPoint 2016 (16.0), 2013 (15.0), 2010 (14.0), 2007 (12.0)
191
102
152

145
ABBYY® FineReader 14 User’s Guide
·Apache OpenOffice Writer 4.1
·LibreOffice Writer 5.1
·Corel WordPerfect X5, X6
·Adobe Acrobat/Reader (8.0 and later)
To ensure the best compatibility between ABBYY FineReader and the applications listed above, make
sure you install the latest available updates for these applications.
See also: :
·Saving in PDF
·Saving editable documents
·Saving tables
·Saving e-books
·Saving in HTML
·Saving an image of a page
·Sending OCR results to the PDF Editor
·E-mailing OCR results
·Sending OCR results to Kindle
146
147
149
150
151
152
146
154
155

146
ABBYY® FineReader 14 User’s Guide
Saving in PDF
ABBYY FineReader allows you to save entire PDF documents or selected pages. Various saving
options are available.
·To save a PDF document that will allow users to select, copy, and edit its content, click the arrow
next to the Save As button on the main toolbar and select Searchable PDF Document.
Alternatively, clickFile > Save As > Save as Searchable PDF Document....
The document will be saved as a searchable PDF. To change the saving options, click the
Options... button in the saving dialog box and select desired saving options on the PDF tab.
·To save a PDF document that will not allow users to select, copy, and edit its content, click the
arrow next to the Save As button on the main toolbar and select Image-Only PDF Document.
Alternatively, clickFile > Save As Save as Image-Only PDF Document.
The document will be saved as an image-only PDF. To change the saving options, click the
Options... button in the saving dialog box and select desired saving options on the PDF tab.
To save only some pages of the document, on the Pages pane, select the pages that you want
to save and on the shortcut menu, click Save As > Searchable PDF Document (or Image-Only
PDF Document).
You can select additional saving options on the Format Settings > PDF tab of the Options dialog
box (click Tools > Options... to open this dialog box).
102
191
102
191
191

147
ABBYY® FineReader 14 User’s Guide
Saving editable documents
ABBYY FineReader allows you to save OCR results in editable formats. When choosing a format,
consider how you intend to use the document.
·Saving documents in DOC(X)/RTF/ODT
·Saving documents in PPTX
·Saving plain text (TXT)
DOC(X)/RTF/ODT
To save your text in DOCX/RTF/ODT:
·Click the arrow next to the Save As button on the main toolbar and select Microsoft Word
Document, RTF Document or ODT Document. If the format that you need is not displayed in the
list, select Save in Other Formats... and in the dialog that opens, select the required format.
Alternatively, click File > Save As and select the desired saving format.
The document will be saved in the format that you specified. To change the saving options, click
the Options... button in the saving dialog box and select desired saving options on the
DOC(X)/RTF/ODT tab.
To save only some pages of the document, on the Pages pane, select the pages that you want
to save and on the shortcut menu, click Save As > Microsoft Word Document.RTF
DocumentODT Document
You can select additional saving options on the Format Settings > DOC(X) / RTF / ODT tab of
the Options dialog box (click Tools > Options... to open this dialog box).
PPTX
To save your text in PPTX:
·Click the arrow next to the Save As button on the main toolbar and select Microsoft
PowerPoint Presentation. If the format that you need is not displayed in the list, select Save in
Other Formats... and in the dialog that opens, select the required format. Alternatively, click File >
Save As > Microsoft PowerPoint® Presentation.
The document will be saved in the PPTX format. To change the saving options, click the Options...
button in the saving dialog box and select desired saving options on the PPTX tab.
To save only some pages of the document, on the Pages pane, select the pages that you want
to save and on the shortcut menu, click Save As > Microsoft PowerPoint Presentation.
You can select additional saving options on the Format Settings > PPTX tab of the Options
dialog box (click Tools > Options... to open this dialog box).
147
147
148
102
196
191
102
199
191

148
ABBYY® FineReader 14 User’s Guide
TXT
To save your text in TXT:
·Click the arrow next to the Save As button on the main toolbar and select TXT Document. If
the format that you need is not displayed in the list, select Save in Other Formats... and in the
dialog that opens, select the required format. Alternatively, click File > Save As > TXT Document.
The document will be saved in the TXT format. To change the saving options, click the Options...
button in the saving dialog box and select desired saving options on the TXT tab.
To save only some pages of the document, on the Pages pane, select the pages that you want
to save and on the shortcut menu, click Save As > Text Document.
You can select additional saving options on the Format Settings > TXT tab of the Options dialog
box (click Tools > Options... to open this dialog box).
102
200
191

149
ABBYY® FineReader 14 User’s Guide
Saving tables
ABBYY FineReader allows you to save tables in the XLS, XLSX, and CSV formats.
XLS and XLSX
To save your text in XLS or XLSX:
·Click the arrow next to the Save As button on the main toolbar and select Microsoft Excel
Workbook. If the format that you need is not displayed in the list, select Save in Other Formats...
and in the dialog that opens, select the required format. Alternatively, click File > Save As >
Microsoft Excel Workbook.
The document will be saved in the format that you specified. To change the saving options, click
the Options... button in the saving dialog box and select desired saving options on the XLS(X)
tab.
To save only some pages of the document, on the Pages pane, select the pages that you want
to save and on the shortcut menu, click Save As > Microsoft Excel Workbook.
You can select additional saving options on the Format Settings > XLS(X) tab of the Options
dialog box (click Tools > Options... to open this dialog box).
CSV
To save your text in CSV:
·Click the arrow next to the Save As button on the main toolbar and select CSV Document. If
the format that you need is not displayed in the list, select Save in Other Formats... and in the
dialog that opens, select the required format. Alternatively, click File > Save As > CSV Document.
The document will be saved in the CSV format. To change the saving options, click the Options...
button in the saving dialog box and select desired saving options on the CSV tab.
To save only some pages of the document, on the Pages pane, select the pages that you want
to save and on the shortcut menu, click Save As > CSV Document.
You can select additional saving options on the Format Settings > CSV tab of the Options dialog
box (click Tools > Options... to open this dialog box).
102
198
191
102
199
191

150
ABBYY® FineReader 14 User’s Guide
Saving e-books
ABBYY FineReader 14 allows you to scan paper books and convert them into the EPUB, FB2, and DjVu
formats. You will be able to read the resulting e-books on tablets (including iPads), and on other mobile
devices and upload them to your Kindle.com account.
You can also save an e-book in the HTML format. For details, see Saving in HTML .
Saving in FB2 or EPUB
To save your text in FB2 or EPUB:
·Click the arrow next to the Save As button on the main toolbar and select FB2 Document or
EPUB Document. If the format that you need is not displayed in the list, click Save in Other
Formats... and select the required format. Alternatively, click File > Save As > FB2 Document (or
EPUB® Document).
The document will be saved in the format that you specified. To change the saving options, click
the Options... button in the saving dialog box and select desired saving options on the
EPUB/FB2 tab.
To save only some pages of the document, on the Pages pane, select the pages that you want
to save and on the shortcut menu, click Save As > Electronic Publication (EPUB)
(orFictionBook (FB2)).
You can select additional saving options on the Format Settings > EPUB / FB2 tab of the
Options dialog box (click Tools > Options... to open this dialog box).
Saving in DjVu
To save your text in DjVu:
·Click the arrow next to the Save As button on the main toolbar and select DjVu Document. If
the format that you need is not displayed in the list, select Save in Other Formats... and in the
dialog that opens, select the required format. Alternatively, click File > Save As >DjVu Document.
The document will be saved in the format that you specified. To change the saving options, click
the Options... button in the saving dialog box and select desired saving options on the DjVu
tab.
To save only some pages of the document, on the Pages pane, select the pages that you want
to save and on the shortcut menu, click Save As > DjVu Document.
You can select additional saving options on the Format Settings > DjVu tab of the Options dialog
box (click Tools > Options... to open this dialog box).
155
151
202
191
102
203
191

151
ABBYY® FineReader 14 User’s Guide
Saving in HTML
To save your text in HTML:
·Click the arrow next to the Save As button on the main toolbar and select HTML Document. If
the format that you need is not displayed in the list, select Save in Other Formats... and in the
dialog that opens, select the required format. Alternatively, click File > Save As > HTML
Document.
The document will be saved in the format that you specified. To change the saving options, click
the Options... button in the saving dialog box and select desired saving options on the HTML
tab.
To save only some pages of the document, on the Pages pane, select the pages that you want
to save and on the shortcut menu, click Save As > HTML Document.
You can select additional saving options on the Format Settings > HTML tab of the Options
dialog box (click Tools > Options... to open this dialog box).
102
201
191

152
ABBYY® FineReader 14 User’s Guide
Saving images
ABBYY FineReader allows you to save both recognized text and page images, including scans.
To save one or more images:
1. In the Pages pane, select the pages you want to save.
2. Click File > Save As > Page Images...
3. In the dialog box that opens, select the disk and folder to save the file to.
4. Select an image format you want to save the image in.
If you want to save multiple pages to one file, choose the TIFF format and select Create a
single file for all pages.
For details, see Supported document formats .
5. Specify a file name and click Save.
Tip. When saving in TIFF, you can select the image format and compression method. Image
compression lets you decrease file size. Methods used for image compression differ by compression
rate and data loss. Two factors define the choice of compression method: the resulting image quality
and file size.
ABBYY FineReader offers the following compression methods:
·ZIP No data loss occurs. This compression algorithm is used for images containing large sections
in one color. For example, this compression algorithm is suitable for screenshots and black-and-
white images.
·JPEG This compression algorithm is used for gray and color images such as photos. This method
provides high-density compression but causes data loss and results in poorer image quality
(blurred outlines and poor color palette).
·CCITT Group 4 No data loss occurs. This compression algorithm is commonly used for black-
and-white images created in graphical programs or for scanned images. CCITT Group 4 is a
commonly used compression method that is suitable for virtually all images.
·Packbits No data loss occurs. This compression algorithm is used for black-and-white scans.
·LZW No data loss occurs. This compression algorithm is used for graphic design and grayscale
images.
When saving to image-only PDF, the program uses the parameters you specified on the Format
Settings > PDF tab of the Настройки dialog box (click Tools > Options... to open this dialog box).
212
191
153
ABBYY® FineReader 14 User’s Guide
Sending OCR results to the PDF Editor
ABBYY FineReader allows you to send OCR results from the OCR Editor to the PDF Editor , where
you can add notes and comments to the document and use other features offered by ABBYY
FineReader for working with PDF documents.
To send OCR results to the PDF Editor:
·On the toolbar, click the arrow next to the button and select Send to PDF Editor
· Click File > Send To > PDF Editor...
Once you are done working with the document in the PDF Editor, you can send it back to the OCR
Editor. To do this, on the toolbar at the top of the OCR Editor window, click the arrow next to the
button and from the drop-down list, select Recognize and Verify in OCR Editor. To
send only some pages of the document, on the Pages pane, select the pages that you want to send,
right-click them and click Send Selected Pages to OCR Editor on the shortcut menu.
When sending the document back to the OCR Editor, the following document objects will be lost:
·attachments
·bookmarks
·comments
·annotations
47

154
ABBYY® FineReader 14 User’s Guide
E-mailing OCR results
ABBYY FineReader allows you to e-mail OCR results in any of the supported formats with the
exception of HTML.
To e-mail a document:
1. Click File > E-mail > Document....
2. In the dialog box that opens, select:
·A saving format
·One of the three saving options: save all pages to one file, save each page to a separate file, or
split the document into files based on blank pages
3. Click OK. An e-mail message with an attachment will be created. Specify the recipient and send
the message.
You can also e-mail the images of document pages.
To e-mail page images:
1. Click File > E-mail > Images....
2. In the dialog box that opens, select:
·A saving format
·Send as multi-page image file if you want to send the images as a multi-page image file.
3. Click OK. An e-mail message with an attachment (or attachments) will be created. Specify the
recipient and send the message.
212

155
ABBYY® FineReader 14 User’s Guide
Sending OCR results to Kindle
ABBYY FineReader allows you to send OCR results to the Kindle.com server, where they will be
converted into the Kindle format and made available for download onto your Kindle device.
To use this feature, you need a Kindle account on Kindle.com.
1. Click the arrow next to the Save As button on the main toolbar and then click Send to Amazon
Kindle...
2. In the dialog box that open, specify:
·The address of your Kindle account
·One of the three saving options: save all pages to one file, save each page to a separate file, or
split the document into files based on blank pages
·A name for the file
3. Click OK.
An e-mail message with an attachment (or attachments) will be created. Send this e-mail
message to Kindle.com and the converted file will soon be available for download onto your Kindle
device.
Integration with other applications
ABBYY FineReader integrates with Windows Explorer, allowing you to initiate the processing of PDF
documents, office documents, and image files by simply right-clicking them.
You can also make and save changes to PDF documents stored on a Microsoft SharePoint server.
Chapter contents
·Integration with Windows Explorer
·Integration with Microsoft SharePoint
102
156
159

156
ABBYY® FineReader 14 User’s Guide
Integration with Windows Explorer
ABBYY FineReader integrates with Windows Explorer. As a result, ABBYY FineReader commands will
appear when you right-click a file in any of the supported formats , enabling you to open and edit PDF
documents, perform OCR on image files, convert files, combine multiple files into one PDF, and
compare files.
To open and process a PDF directly from Windows Explorer:
1. In Windows Explorer, select one or more PDF files.
2. Right-click the files(s) and select one of the following commands:
·Edit with ABBYY FineReader 14 opens PDF files in the PDF Editor
For more information on working with PDF documents in the PDF Editor, see Working with
PDF documents .
·Convert with ABBYY FineReader 14 - converts PDF files into various formats:
·Convert to searchable PDF document
·Convert to image-only PDF document
·Convert to Microsoft Word document
·Convert to Microsoft Excel document
·Convert to another format
·Open in OCR Editor ABBYY FineReader 14 opens PDF files in the OCR Editor.
For more information on working with the OCR Editor, see Working with the OCR
Editor .
If you select multiple files in Windows Explorer, clicking Convert with ABBYY FineReader 14
on the shortcut menu will open the New Task window. For more information on the available
conversion settings, see Creating PDF documents , Creating Microsoft Word documents ,
Creating Microsoft Excel documents , and Other formats .
·Compare with... opens PDF files in the ABBYY Compare Documents application.
For more information about comparing documents, see ABBYY Compare Documents .
·Combine into one PDF... combines multiple files into one PDF.
·Compare documents... compares two versions of the same document.
To process files in editable formats directly from Windows Explorer:
1. In Windows Explorer, select one or more files in editable formats.
2. Right-click the files(s) and select one of the following commands:
·Convert to PDF... converts files to PDF.
212
47
100
20 22
24 26
168

157
ABBYY® FineReader 14 User’s Guide
When creating PDF documents from Microsoft Word, Microsoft Excel, and Microsoft
PowerPoint files, ABBYY FineReader will preserve the structure of the original document, and
any bookmarks and hyperlinks.
·Convert to PDF and send... converts files to PDF and attaches them to an e-mail message.
·Compare with... opens files in the ABBYY Compare Documents application.
·Combine into one PDF... combines multiple files into one PDF.
·Compare documents... compares two versions of the same document.
To process image files directly from Windows Explorer:
1. In Windows Explorer, select one or more image files.
2. Right-click the files(s) and select one of the following commands:
·Convert with ABBYY FineReader 14 converts image files into various formats
·Convert to searchable PDF document
·Convert to image-only PDF document
·Convert to Microsoft Word document
·Convert to Microsoft Excel document
·Convert to another format
·Open in OCR Editor ABBYY FineReader 14 opens image files in the OCR Editor.
·Combine into one PDF... combines multiple files into one PDF.
·Compare with... opens image files in the ABBYY Compare Documents application.
The commands actually available to you on the Windows Explorer shortcut menu depend on the
number and format of the selected files.
If you don't see the ABBYY FineReader commands on the Windows Explorer shortcut menu...

158
ABBYY® FineReader 14 User’s Guide
If you can't see the ABBYY FineReader commands on the Windows Explorer shortcut menu, this
means that you chose not to integrate ABBYY FineReader with Windows Explorer when installing the
program.
To integrate ABBYY FineReader with Windows Explorer:
1. Click Start > Settings > Control Panel (or click Start > Settings > System > Apps &
features in Windows 10) and then click Programs and Features.
2. In the list of installed applications, select ABBYY FineReader and click Change/Remove.
3. Follow the instructions of the setup program.

159
ABBYY® FineReader 14 User’s Guide
Integration with Microsoft SharePoint
ABBYY FineReader allows you to open, edit, and save files stored in Microsoft SharePoint document
libraries.
To process a PDF document stored on a Microsoft SharePoint server:
1. Open the PDF document in the ABBYY FineReader PDF Editor.
2. Check out the document to prevent other users from changing it. To do this, click File >
SharePoint® > Check Out.
If the document has already been checked out by another user, save a copy of the document on
your computer.
3. Edit the PDF document.
For more information on working with PDF documents in the PDF Editor, see Working with PDF
documents .
4. Check in the document, so that other users can see your changes. To do this, click File >
SharePoint® > Check In...
If you don't want to save the changes to the server, click Discard Check Out....
5. In the dialog box that opens, select Version type of the document if version control is enabled on
the server and enter your comment.
Select the Keep the document checked out after checking in the current version option if
you want to upload all of your changes to the server without checking in the document.
6. Click Check In.
To integrate ABBYY FineReader with SharePoint installed on Microsoft Windows Server® 2012/2008,
you need to install the Desktop Experience component:
1. Click Start > Administrative Tools > Server Manager.
2. In the Server Manager window, click Manage > Add Roles and Features.
3. The Add Roles and Features Wizard will open.
4. In the Features section, select the Desktop Experience item from the User Interfaces and
Infrastructure drop-down list .
5. In the dialog box that opens, click Add Features.
6. In the Add Roles and Features Wizard window, click Next > Install.
7. After the component is installed, click Close.
47

160
ABBYY® FineReader 14 User’s Guide
Automating and scheduling OCR
·Automating document processing with ABBYY FineReader
Processing multiple documents often involves repeating the same actions multiple times. ABBYY
FineReader includes built-in automated tasks . If you need more flexibility, you can create
custom automated tasks from a wide range of available processing steps.
·Scheduled processing
ABBYY FineReader includes ABBYY Hot Folder, a scheduling agent that lets you process
documents when your computer is not in use, e.g. overnight. Scheduled tasks can be created for
specific folders. You can specify all the necessary image opening, OCR, and saving options for a
task.
161
13
164
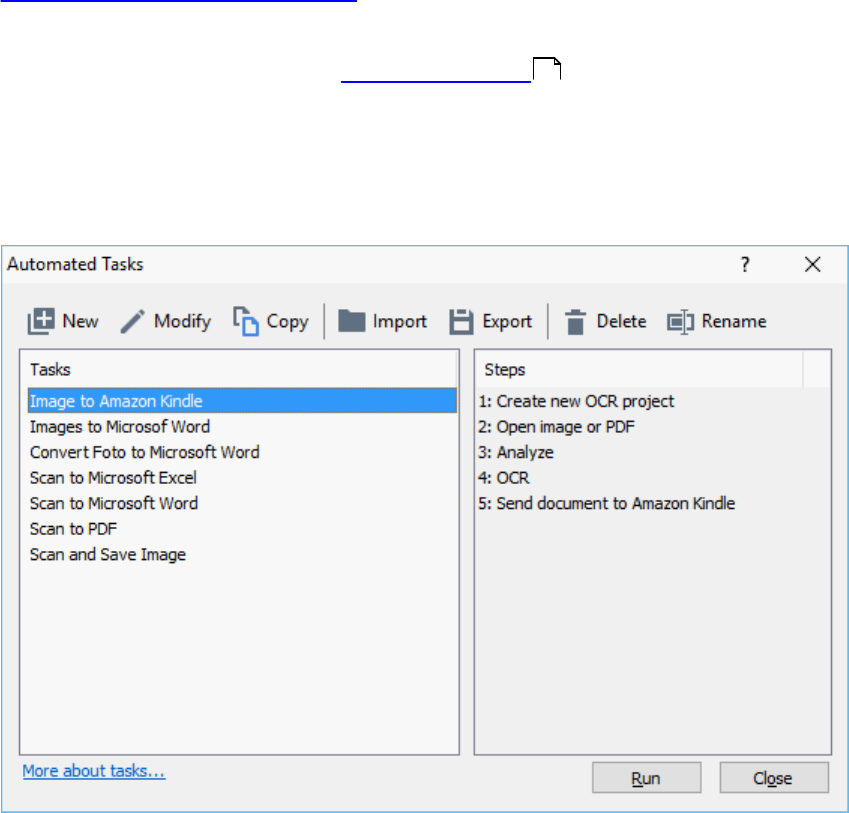
161
ABBYY® FineReader 14 User’s Guide
Automating document processing with ABBYY FineReader
(Not available in some versions of ABBYY FineReader 14. See also:
http://www.ABBYY.com/FineReader
In ABBYY FineReader, you can use built-in and custom automated tasks to process your documents.
You can organize your tasks in the Automated Tasks... dialog box.
·To open the Automated Tasks dialog box, click Tools > Automated Tasks.
The toolbar at the top of the Automated Tasks dialog box contains buttons for creating, modifying,
copying, deleting, importing, and exporting tasks.
To process a document using an automated task, start the task in Tasks window.
Creating Custom Automated Tasks
You can create your own automated tasks if you need to include processing steps that are not available
in the built-in automated tasks. The order of steps in an automated task must correspond to the order of
processing operations in the OCR Editor.
1. On the toolbar, click New.
2. In the left-hand pane, choose an OCR project to be used:
·Create new OCR project
If you choose this option, a new OCR project will be created when you start the task. You will
also need to specify which document options to use when processing your documents: the
global options specified in the program or the options specified in this particular task.
·Select existing OCR project
Select this option if you want the task to process images from an existing OCR project.
244

162
ABBYY® FineReader 14 User’s Guide
·Use current OCR project
Select this option if you want the task to process images from the current OCR project.
3. Choose how you will obtain images:
·Open image or PDF
Select this option if you want the task to process images or PDF documents from a particular
folder (you will need to specify the folder in this case).
·Scan
Select this option if you are going to scan some pages (the current scanning settings will be
used).
Note:
a. This step is optional if earlier you chose the Select existing OCR project or Use
current OCR project command.
b. If images are added to an OCR project that already contains images, only the newly
added images will be processed.
c. If an OCR project to be processed contains some pages that have already been
recognized and some pages that have already been analyzed, the recognized pages will
not be processed again and the analyzed pages will be recognized.
4. Add the Analyze step to detect areas on the images and configure this step:
·Analyze the layout automatically
ABBYY FineReader will analyze the images and identify the areas based on their content.
·Draw areas manually
ABBYY FineReader will ask you to draw the appropriate areas manually.
·Use an area template
Select this option if you want an existing area template , to be used when the program
analyzes the document. You will need to either specify a template or choose to have the
program prompt you to select one every time the task starts. For details, see If you are
processing a large number of documents with identical layouts .
5. Add an OCR step if you need the images to be recognized. The program will use the OCR
options you selected in the OCR project step.
When you add an OCR, step the Analyze step is added automatically.
6. Add an OCR step to save the recognized text in a format of your choice, e-mail the text or
images, or create a copy of the OCR project. A task may include multiple saving steps:
·Save document
Here you can specify the name of the file, its format, file options and the folder where the file
should be saved.
To avoid specifying a new folder each time the task is started, select Create a time-
stamped subfolder.
244
123

163
ABBYY® FineReader 14 User’s Guide
·Send document
Here you can select the application in which to open the resulting document.
·E-mail document
Here you can specify the name of the file, its format, file options, and the e-mail address to
which the file should be sent.
·Save images
Here you can specify the name of the file, its format, file options, and the folder where the
image file should be saved.
To save all images to one file, select Save as one multi-page image file (applicable only to
images in TIFF, PDF, JB2, JBIG2, and DCX).
·E-mail images
Here you can specify the name of the file, its format, file options, and the e-mail address to
which the image file should be sent.
·Save OCR project
Here you can specify the folder to which the OCR project should be saved.
Specify which options the program should use to save the results. You can choose between the
global options specified in the program at the time of saving or the options which you specified
for this particular task.
7. Remove any unnecessary steps from the task by clicking the button.
Sometimes, removing one step will also cause another step to be removed. For instance, if you
remove the Analyze step, the OCR step will also be removed, as OCR cannot be carried out
without analyzing an image.
8. Once you have configured all the required steps, click Finish.
The newly created task will appear in the Tasks window.
To save an automated task, click Export on the toolbar at the top of the Automated Tasks dialog box
and specify a name and folder for the task.
To load a previously created automated task, click Import on the toolbar at the top of the Automated
Tasks and select the file of the task that you want to import.
164
ABBYY® FineReader 14 User’s Guide
ABBYY Hot Folder
(Not available in some versions of ABBYY FineReader 14. See also:
http://www.ABBYY.com/FineReader
ABBYY FineReader includes ABBYY Hot Folder, a scheduling agent that allows you to select a folder
with images that ABBYY FineReader should process automatically. You can schedule ABBYY
FineReader to process documents when you don’t use your computer, e.g. overnight,
To process images in a folder automatically, create a processing task for that folder and specify the
image opening, OCR, and saving options. You must also specify how often ABBYY FineReader should
check the folder for new images (at regular intervals or only once) and set the start time for the task.
For tasks to start, your computer must be turned on and you must be logged on.
Installing and starting ABBYY Hot Folder
By default, ABBYY Hot Folder is installed on your computer together with ABBYY FineReader 14. If,
during custom installation of ABBYY FineReader 14, you chose not to install the ABBYY Hot Folder
component, you can install the it later by following the instructions below.
To install ABBYY Hot Folder:
1. Click the Start button on Control Panel and then click Control Panel.
2. Click Programs and Features.
If you use Windows XP, click Add or Remove Programs.
If you use Windows 10, click Start > Settings > System > Apps & features.
3. Select ABBYY FineReader 14 from the list of installed programs and click Change.
4. In the Custom Setup dialog box, select the ABBYY Hot Folder item.
5. Follow the instruction in the installation wizard.
Launching ABBYY Hot Folder
To launch ABBYY Hot Folder:
·Click Программы > ABBYY FineReader 14 and then click ABBYY Hot Folder (Start >
All Programs > ABBYY FineReader 14 > ABBYY Hot Folder , if you use Windows 10), or
·click inABBYY FineReader 14and then click Hot Folder, or
·click the icon on the Windows taskbar (this icon will appear after you have set up at least one
task).
When you launch ABBYY Hot Folder, its main window opens.
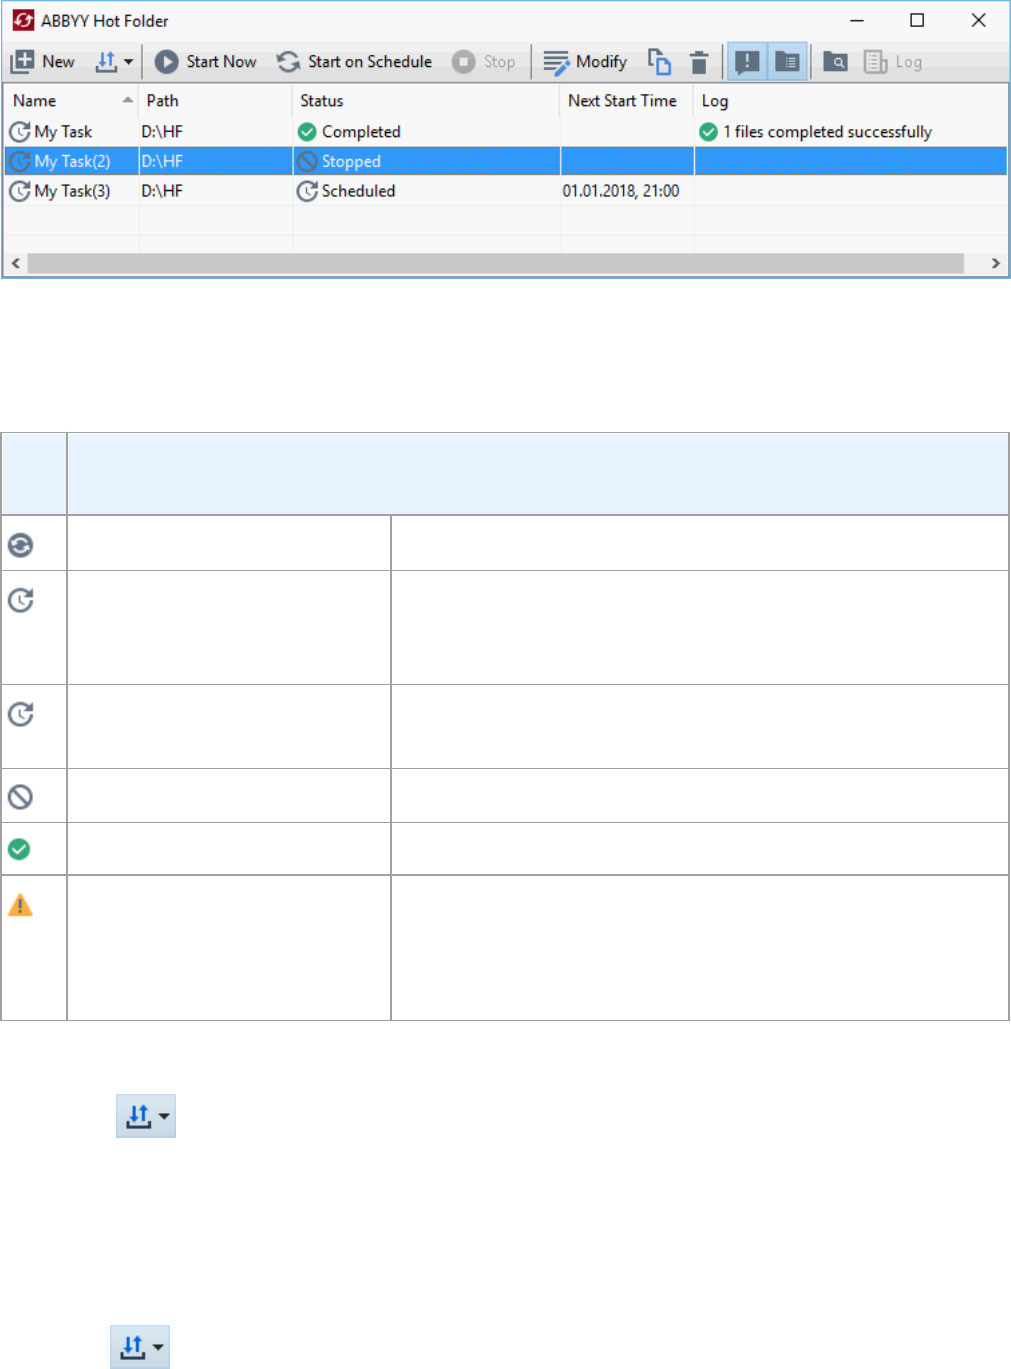
165
ABBYY® FineReader 14 User’s Guide
Use the toolbar buttons at the top of the window to set up, copy, and delete tasks, to initiate processing,
and to view reports.
The set-up tasks are displayed in the ABBYY Hot Folder main window. For each task, the complete
path to its folder, its status, and the time of the next processing session are displayed.
A task may have one of the following statuses:
Statu
s
Description
Running...
The images in the folder are being processed.
Scheduled
You chose to check the hot folder for images only once at start
time. The start time is indicated in the Next Start Time
column.
Watching...
You chose to check the hot folder for images repeatedly. The
start time is indicated in the Next Start Time column.
Stopped
The processing has been paused by the user.
Completed
The processing is completed.
Error (see log)
An error occurred when processing images in this folder. The
full text of the error can be found in the task log. To find out the
cause of the error, select the failed folder and click the View
Log button on the toolbar.
You can save any task for future use:
1. Click > Export...
2. In the dialog box that opens, specify the name of the task and the folder where it should be stored.
3. Click Save.
To load a previously saved task:
1. Click > Import...

166
ABBYY® FineReader 14 User’s Guide
2. In the dialog box that opens, select a task and click Open.
To create a new task:
1. On the ABBYY Hot Folder toolbar, click the New button.
2. In the Task name field, type a name for the task.
3. Specify a schedule for the task:
·Run once(the task will be run once at the time you specify)
·Recurring (the task will be run every minute, once a day, once week or once a month at the
specified time.
4. Specify the folder or OCR project that contains the images to be processed.
·File from folder allows you to process images in local and network folders.
·File from FTP allows you to process images in folders on an FTP server.
If login and password are required in order to access the FTP folder, enter them in the User
name and Password fields respectively. If no login and password are required, select the
Anonymous user option.
·File from Outlook allows you to process images in your mail box.
·OCR project opens images stored in an OCR project.
For more about document colors, see Document features to consider prior to OCR .
Under Original files specify whether original files should be kept, deleted or moved.
5. In the Analyze and recognize images step, configure the document analysis and OCR options.
a. From the Document language drop-down list, select the language of the texts to be
recognized.
You can select more than one OCR language.
b. Under Document processing settings, specify whether a document should be
recognized or analyzed or whether its page images should be preprocessed. If required,
specify additional OCR and image preprocessing options by clicking Recognition
Options... or Preprocessing Options... respectively.
c. Specify whether the program should detect areas automatically or use an area template
for the purpose.
6. From the Save results drop-down list, select how documents should be saved.
a. From the Save as drop-down list, select a destination format.
Tip. Click Options... if you want to specify additional saving options.
214

167
ABBYY® FineReader 14 User’s Guide
When saving to PDF, specify whether the text on the images should be recognized or
whether the images should be converted to image-only PDF documents.
b. In the Folder field, specify a folder where documents should be saved after processing.
c. From the Output drop-down list, select a saving method:
·Create a separate document for each file (retains folder hierarchy) creates a
separate document for each file.
·Create a separate document for each folder (retains folder hierarchy) creates
one document for all files stored in a particular folder.
·Create one document for all files creates one document for all files.
d. In the File name field, enter a name to be assigned to documents after processing.
Tip. You can specify several saving steps for a folder in order to save processing results in multiple
formats.
7. Click Create Task.
The configured task will be displayed in the ABBYY Hot Folder main window.
Task files are stored in %Userprofile%\AppData\Local\ABBYY\HotFolder\14.00.
For tasks to start, your computer must be turned on and you must be logged on.
To see a notification message each time a task has been completed, click .
A notification message will be displayed in a pop-up window above the Windows taskbar.
Changing task properties
You can change the properties of an existing task.
1. Stop the task whose properties you wish to change.
2. Click Modify on the toolbar at the top of the ABBYY Hot Folder window.
3. Make the necessary changes and click Create Task.
Processing log
Images in a hot folder are processed according to your defined settings. ABBYY Hot Folder keeps a
detailed log of all the operations.
The log file contains the following information:
·The name of the task and its settings
·Errors and warnings (if any)

168
ABBYY® FineReader 14 User’s Guide
·Statistics (number of processed pages, number of errors and warnings, number of uncertain
characters)
To enable logging, click on the toolbar.
The log will be saved as a TXT file in the same folder that contains the files with recognized text.
To view a log:
1. In the ABBYY Hot Folder main window, select the task you wish to inspect.
2. Click the Log button on the toolbar at the top of the ABBYY Hot Folder window.
ABBYY Compare Documents
ABBYY Compare Documents allows you to compare two versions of the same document, which need
not be in the same format.
ABBYY Compare Documents will help you quickly identify unwanted modifications to prevent you from
signing or publishing the wrong version.
Main features
·Compare documents regardless of whether they are in the same format or in different formats.
You can compare a Microsoft Word document with its PDF version, a scan with its ODT version,
and any other combination of formats that are supported by ABBYY FineReader 14.
·Examine the differences in a handy side-by-side view. Clicking a difference in the results pane will
immediately highlight the corresponding fragment in both versions.
·View only substantial changes such as deleted, added or edited text. Minor differences in
formatting, fonts, spaces, and tabs will be ignored.
·Save comparison results as a difference report or as an annotated PDF document, with each
difference highlighted and supplied with a comment.
Chapter contents
·Launching ABBYY Compare Documents
·Comparing documents
·The main window
·Improving comparison results
·Viewing comparison results
·Saving comparison results
169
170
172
174
176
178
169
ABBYY® FineReader 14 User’s Guide
Launching ABBYY Compare Documents
There are many ways to launch ABBYY Compare Documents:
·Open the New Task window, click the Compare tab and then click the Open ABBYY
Compare Documents task.
·In the New Task window, click Tools > Compare Documents.
·Click Start > ABBYY FineReader 14 > ABBYY Compare Documents. (In Windows 10, click
Start and then click All Programs > ABBYY FineReader 14 > ABBYY Compare
Documents.)
·Open the PDF Editor and click Tools > Compare Documents.
·Open the OCR Editor , and click Tools > Compare Documents.
There are several other ways to open a document in ABBYY Compare Documents:
·In the PDF Editor, click the button on the main toolbar.
·In the PDF Editor, click File > Compare Document....
The document that is open in the PDF Editor will be opened in ABBYY Compare Documents. You will
then need to open another version of this document to compare the two.
·In Windows Explorer , right-click a file and click Compare with... on the shortcut menu.
·In Windows Explorer, select two files, right-click one of them, and click Compare documents... on
the shortcut menu.
ABBYY Compare Documents is not available in some versions of ABBYY FineReader 14. See also:
http://www.ABBYY.com/FineReader
13
48
101
156
170
ABBYY® FineReader 14 User’s Guide
Comparing documents
To compare two versions of a document, complete these steps:
1. Launch ABBYY Compare Documents.
See also: Launching ABBYY Compare Documents .
2. Open the documents in ABBYY Compare Documents. The documents have to be in one of the
supported formats .
To open a document, do one of the following:
·Drag and drop a document onto one of the two of the display areas.
·Click anywhere on a display area and browse to the file location.
·Click the button on the toolbar of a display area and browse to the desired document.
·Click one of the display areas and then click on the File > Open Document....
You can switch between the display areas by pressing Ctrl+Tab or Alt+1/Alt+2.
ABBYY Compare Documents remembers recently compared pairs of documents.
·To open one of the recently compared documents, select it from the drop-down list at the top
of a display area.
·To open a recently compared pair of documents, click File > Recent Comparisons and
select a pair of documents from the list.
You can also open a pair of recently compared documents from the New Task window: click
the Compare tab and then select a pair of documents under Recent Comparisons.
3. Select the language of the documents from the list on the COMPARE tab.
4. Click the Compare button on the COMPARE tab of the rightmost pane or click the Compare
Documents command on the Compare menu.
A window will be displayed, showing a progress bar, comparison tips, and warnings.
5. Review the detected differences . You can:
169
212
205
176

171
ABBYY® FineReader 14 User’s Guide
·View a list of differences on the DIFFERENCES tab of the rightmost pane, or
·View the differences highlighted in the documents.
6. Save the comparison result. There are two ways to do this:
·Save an annotated PDF file with differences in the comments. To do this, click the button
in the area of the document you want to save. The document will be saved as a PDF file with
all differences relative to the other document highlighted and commented.
·Save a Microsoft Word document containing a list of all differences between the documents.
To do this, click the button on the DIFFERENCES tab of the rightmost pane.
See also: Viewing comparison results , Saving comparison results .
176 178
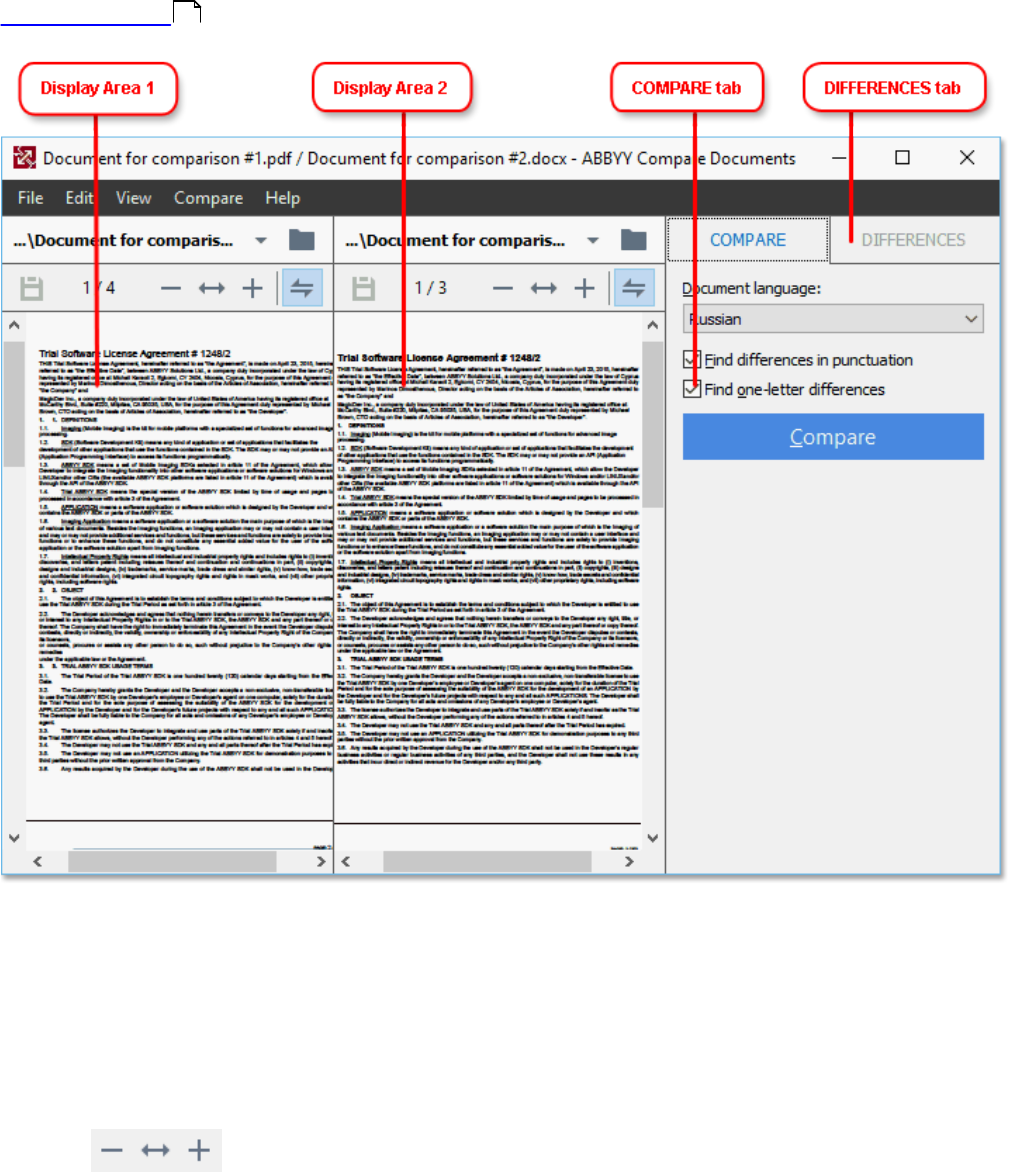
172
ABBYY® FineReader 14 User’s Guide
The main window
When you launch ABBYY Compare Documents, its main window opens.
·Display Area 1 shows the first document.
·Display Area 2 shows the second document.
Tip. You can change the way the documents are displayed:
·Zoom in by pressing Ctrl+=, zoom out by pressing Ctrl+-, or press Ctrl+0 to reset the zoom
level. You can also do this using the commands on the shortcut menu of the document and the
buttons above the document.
·Change the way the display areas are shown by clicking View > Split Document Pane
Horizontally. This will split the display pane horizontally, i.e. one document will be displayed
above the other.
·The COMPARE tab of the rightmost pane contains comparison settings.
·The DIFFERENCES tab of the rightmost pane contains a list of differences between the
documents (the list only appears after you compare the documents).
169


174
ABBYY® FineReader 14 User’s Guide
Improving comparison results
ABBYY Compare Documents offers a number of additional options to achieve more accurate document
comparison. To configure these options, do one of the following:
·Click the СРАВНЕНИЕ tab in the rightmost pane.
·Click Compare > Advanced.
СРАВНЕНИЕ tab
This tab contains the following settings:
·Find differences in punctuation
Select this option to detect differences in punctuation and hyphenation.
·Find one-letter differences
Select this option to detect differences in spelling.
Advanced options
The following advanced options are available:
·PDF recognition mode
Selecting the right recognition mode is crucial for accurate comparison of PDF documents.
ABBYY Compare Documents offers three PDF recognition modes:
·Use Only Text from PDF
This is the default mode for PDF documents with a text layer. ABBYY Compare Documents
will use the text layer for comparison.
·Automatically Choose between OCR and Text from PDF
When this mode is selected, ABBYY Compare Documents will check the quality of the original
text layer. If the program determines the original text layer is good enough, it will use the original
text layer. Otherwise, it will recognize the document and use the resulting text layer instead.
·Use OCR
In this mode, the program uses optical character recognition to extract text from documents.
The documents will take longer to compare in this mode, but the comparison results will be
more reliable.
These options are intended for PDF documents that contain a text layer and pictures. Such
PDF documents are typically created by converting editable document files to PDF. Other
kinds of PDF documents, such as searchable or image-only PDF documents, do not require
any additional OCR options and are always processed in the Use OCR mode.
·Find Headers and Footers Automatically
Disable this option if the document has no headers or footers.
175
ABBYY® FineReader 14 User’s Guide
·Reset Advanced Options
Select this command to revert to the default settings.
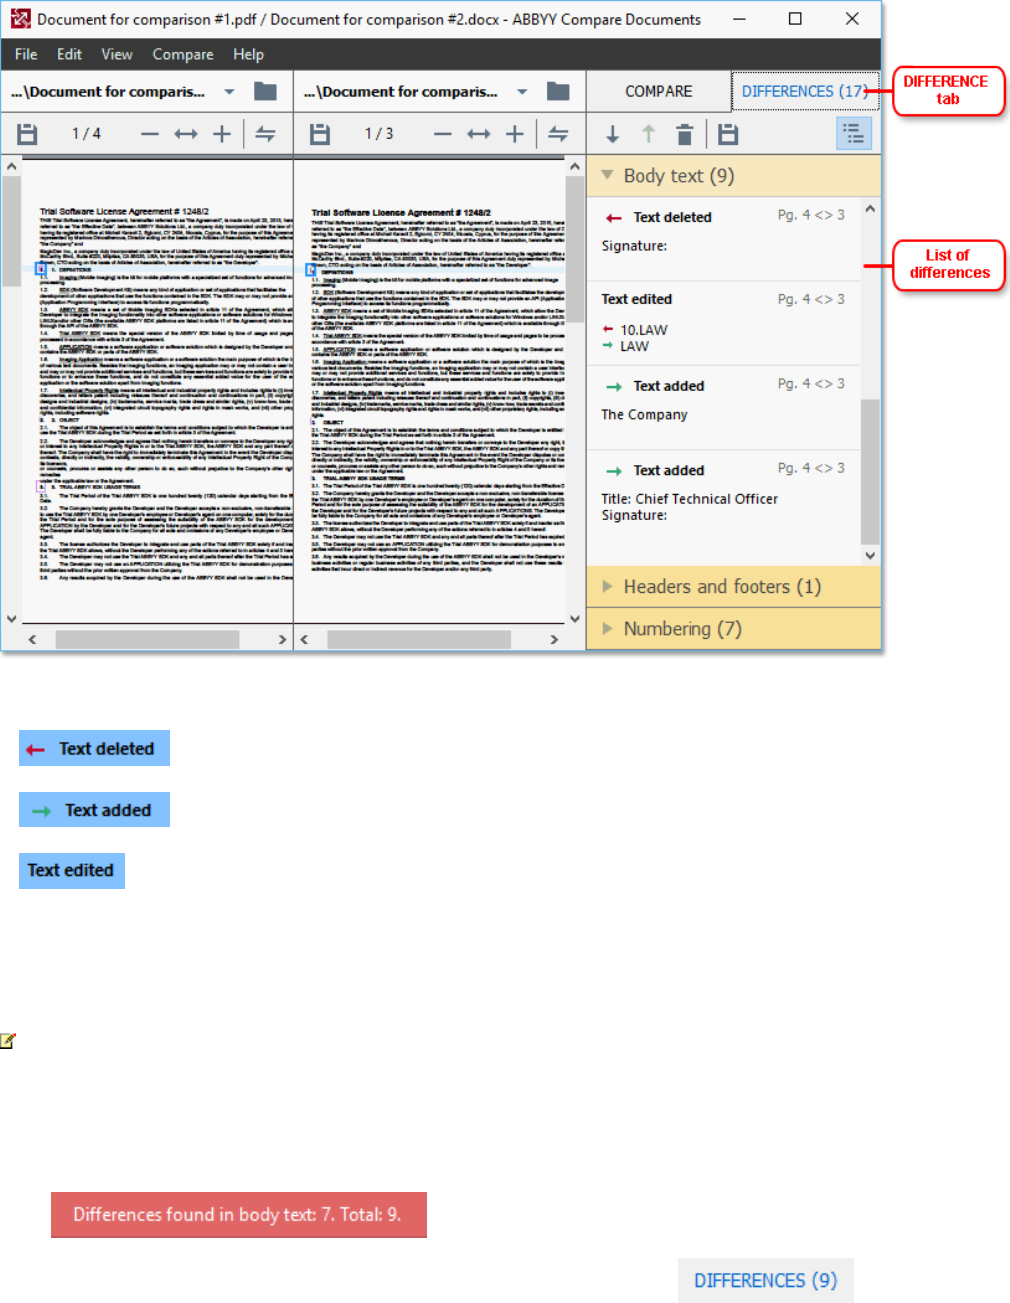
176
ABBYY® FineReader 14 User’s Guide
Viewing comparison results
The differences that the program has detected are highlighted in the two texts and are also listed
separately in the pane on the right.
ABBYY Compare Documents can find the following types of differences:
·
·
·
Each item in the list of differences contains a deleted, inserted or edited text fragment and the numbers
of the pages where this text occurs in each document. To copy a difference to the Clipboard, right-click
it and click Copy Difference on the shortcut menu or select it and click Edit > Copy Difference.
If a text fragment has been edited, both the old and the new versions of the fragment will be listed in
the rightmost pane.
The number of detected differences is displayed in two locations:
·On the red bar that appears at the top of the display area after you compare the documents:
·Next to the title of the DIFFERENCES tab of the rightmost pane: .
177
ABBYY® FineReader 14 User’s Guide
When you select a difference on the DIFFERENCES tab, the differing text will be displayed in both
documents side-by-side.
To navigate the differences, do one of the following:
·Click a difference in one of the two documents.
·Use keyboard shortcuts : Ctrl+Right Arrow/Ctrl+Left Arrow.
·Use the and buttons on the DIFFERENCES tab.
·Click Compare and then click Next Difference or Previous Difference.
You can also scroll the two versions simultaneously to see the changes in a side-by-side view.
Simultaneous scrolling is enabled by default. To disable it, click Fit to Width on the View and clear the
Synchronize Scrolling item, or right-click a document and disable the Synchronize Scrolling option
on the shortcut menu, or click the button above one of the documents.
Grouping differences
ABBYY Compare Documents groups detected differences so that you can ignore minor changes and
focus on substantial discrepancies.
Detected differences may be placed in one of three groups:
·Body text
This group contains the substantial differences found in the body text of the two documents.
·Headers and footers
This group contains the differences in the headers and footers of the two documents (e.g.
differences in page numbers).
·Numbering
This group contains the differences in the numbers contained in the two documents, e.g.
differences in the numbering of lists.
To disable the grouping of differences, click the button on the DIFFERENCES tab of the rightmost
pane.
To remove a difference from the list, do one of the following:
·Click the button on the DIFFERENCES tab.
·Right-click the difference and click Ignore Difference on the shortcut menu.
To remove several differences at a time, select them while holding down the Ctrl key.
Any differences that you have removed from the list will not be shown in the comparison report.
250

178
ABBYY® FineReader 14 User’s Guide
Saving comparison results
There are two ways to save differences in ABBYY Compare Documents:
1. To save the comparison results as comments in an annotated PDF document, do one of the
following:
·Click the document you want to save and then click File > Save Document with Differences
as PDF....
·Click the button on the toolbar above the document you want to save.
2. To save the comparison results to a table in Microsoft Word, do one of the following
·Click File > Save Differences to File....
·Click the button on the DIFFERENCES tab.

179
ABBYY® FineReader 14 User’s Guide
Reference
This chapter provides answers to some frequently asked questions.
Chapter contents
·Types of PDF documents
·Scanning tips
·Taking photos of documents
·Options dialog box
·Format settings
·Supported OCR and document comparison languages
·Supported document formats
·Document features to consider prior to OCR
·Image processing options
·OCR options
·Working with complex-script languages
·Supported interface languages
·Current date and time on stamps and in Bates numbers
·Fonts required for the correct display of texts in supported languages
·Regular expressions
180
182
185
188
191
205
212
214
217
220
223
227
228
231
233

180
ABBYY® FineReader 14 User’s Guide
Types of PDF documents
The features of a PDF document depend on the program in which it was created. Some PDF
documents are searchable and have text you can copy, while in other documents this only becomes
possible when you open them in special applications like ABBYY FineReader. There are three types of
PDF documents.
Image-only PDF documents
Image-only PDF documents are created from scans of hard-copy documents. They only contain the
images of pages and don't have a text layer. Image-only PDFs are not searchable, and the text they
contain cannot be modified or marked up in PDF viewing applications.
ABBYY FineReader 14 uses a special background OCR process that creates a temporary text layer
in image-only documents, making it possible to search and copy their text and even edit page images
. Moreover, ABBYY FineReader 14 lets you save this text layer in the document so that the text in the
document can be searched and copied into other applications. See also: PDF settings .
Searchable PDF documents
Searchable PDF documents consist of the images of pages with an invisible text layer placed
underneath. Documents of this type are usually created by scanning a paper document, recognizing it,
and saving the recognized text into a text layer.
When you open a PDF document in ABBYY FineReader, it will analyze the document to determine if it
contains a usable text layer. See also: OCR options . If a text layer is present, the text in the
document can be searched and copied in any PDF application. Unlike many other PDF applications,
ABBYY FineReader also lets you edit the text in searchable PDF documents.
In ABBYY FineReader, searchable PDF documents can be created by:
1. Adding a text layer to an image-only PDF document.
2. Converting PDF documents and image files to the searchable PDF format. To do this, enable the
Text under the page image option in the Searchable PDF settings group of options in the PDF
format settings. See also: PDF settings .
54
72
75
195
220
75
195
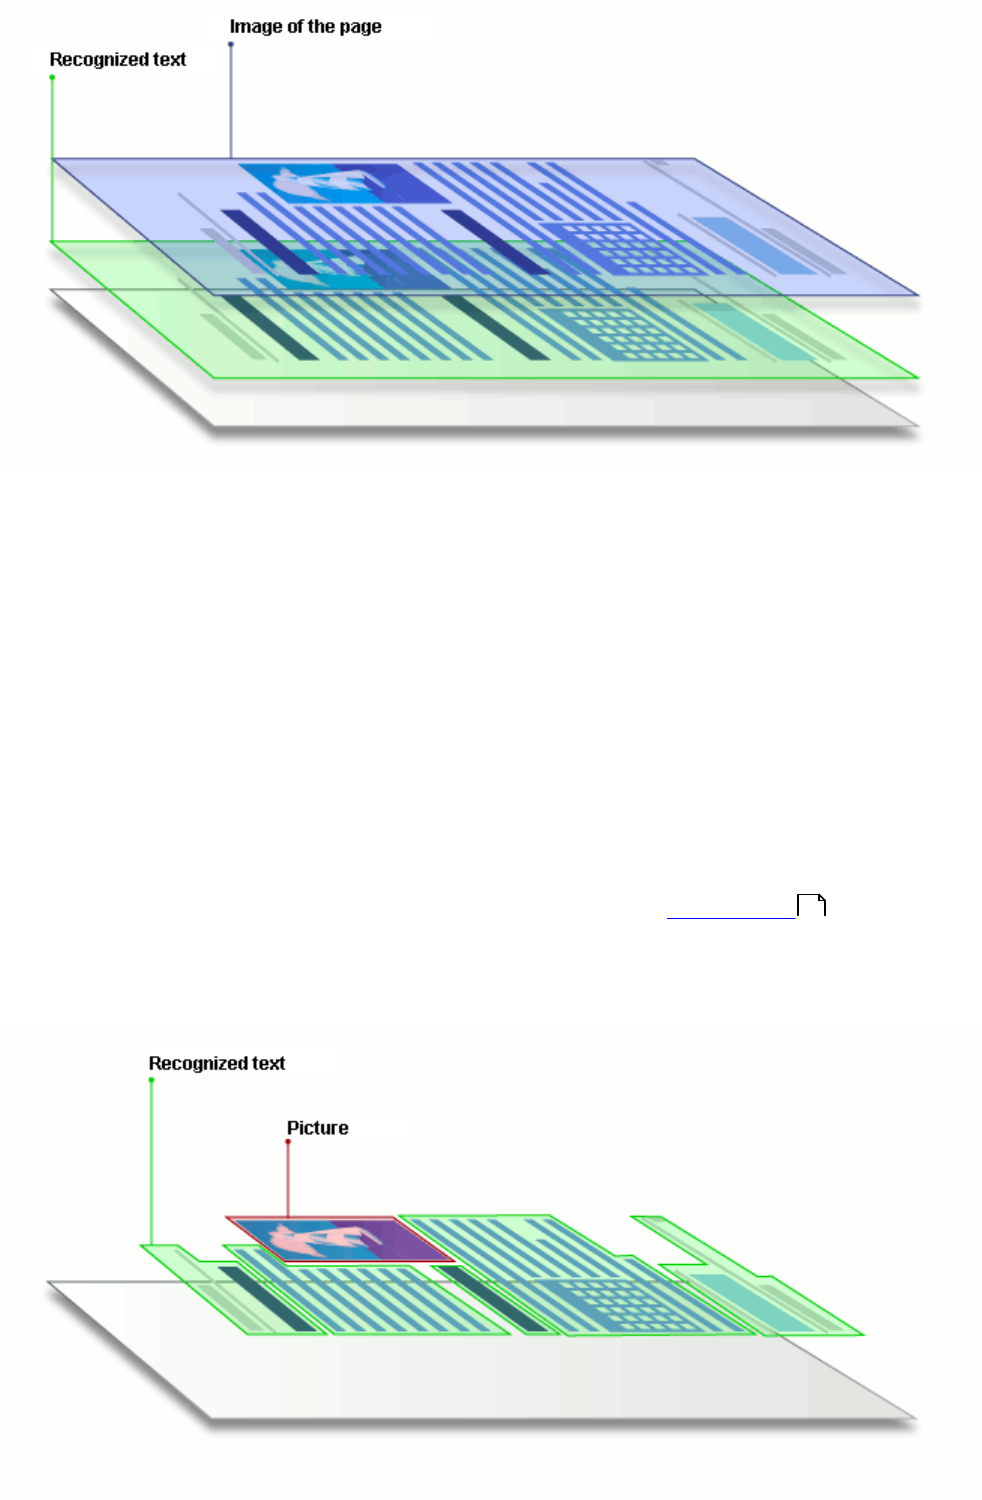
181
ABBYY® FineReader 14 User’s Guide
PDF documents that were created in other applications
Searchable PDF documents can be created from documents in various editable formats (such as
DOCX). Documents of this type contain a text layer and pictures, but do not contain page images.
These documents are searchable and their text and pictures can be copied and edited, provided that
such actions do not require entering a password or that the user knows the password.
PDF documents if this type can be created by:
1. Opening an editable document in the program where it was created and saving it in PDF.
2. Converting another type of PDF document or a document in another format into this type of PDF
using ABBYY FineReader (in the PDF format settings, enable the Text and pictures only option
in the Searchable PDF settings group of options). See also: PDF settings .
The resulting document will be easier to edit than other types of PDF documents but may be visually
different from the original.
195
182
ABBYY® FineReader 14 User’s Guide
Scanning tips
You can set the scanning settings in the ABBYY FineReader scanning dialog box.
·Make sure that the scanner is properly connected to your computer and turn it on.
Consult your scanner documentation to ensure it is set up correctly. Be sure to install the software
provided with your scanner. Some scanners have to be turned on before turning on the computer
they are connected to.
·Try to make sure that the pages in the scanner are positioned as straight as possible. Place your
documents face down on the scanner, making sure they are properly adjusted. Skewed images
may be converted incorrectly.
·If you need to scan documents that were printed with a regular printer, use the grayscale mode and
a resolution of 300 dpi for best results.
Recognition quality depends on the quality of the hard-copy document and on the settings used for
scanning the document. Poor image quality may have an adverse effect on the quality of
conversion. Be sure to select the scanning parameters appropriate for your document .
There are several ways to open the scanning interface:
·Open the New Task screen, click the Scan tab, and then click Scan to OCR Editor or
another task on this tab.
·In the OCR Editor, click the Scan button on the main toolbar.
·In the PDF Editor, click the button on the main toolbar and then click Add
from Scanner... on the menu shown below.
You can specify the following scanning settings:
Color mode
Lets you select the scanning mode: color, grayscale (the best mode for OCR) or black-and-white.
Brightness
Changes the scanning brightness.
ABBYY FineReader will display a warning message during scanning if the brightness setting is too
low or too high. You may also need to adjust the brightness setting when scanning in black-and-white
mode.
The 50% setting works well in most cases.
If the resulting image contains too many "sketchy" or "thick" letters, troubleshoot using the table below.
Image defect
Recommendations
This image is suitable for text recognition.
214
244

183
ABBYY® FineReader 14 User’s Guide
Characters are very thin and sketchy
·Lower the brightness to make the image darker.
·Use the grayscale scanning mode (brightness is
adjusted automatically in this mode).
Characters are very thick and are stuck
together
·Increase the brightness to make the image lighter.
·Use the grayscale scanning mode (brightness is
adjusted automatically in this mode).
Scanning resolution
Changes the scanning resolution.
Recognition quality depends on the resolution of the document image. Poor image quality may have an
adverse effect on the quality of conversion.
We recommend scanning documents at 300 dpi .
For best recognition results, vertical and horizontal resolutions must be the same.
Setting the resolution too high (over 600 dpi) slows down OCR. Increasing the resolution beyond this
point does not yield substantially improved OCR results.
Setting an extremely low resolution (less than 150 dpi) adversely affects OCR quality.
You may need to adjust the resolution of your images if:
·The resolution of your image is less than 250 dpi or higher than 600 dpi.
·If the image has a non-standard resolution.
Some faxes, for example, have a resolution of 204 by 96 dpi.
Crop Image
Lets you select a preset scanning area size or specify the scanning area manually.
244
184
ABBYY® FineReader 14 User’s Guide
Multi-page document scanning options:
Specify settings for scanning multi-page documents if your scanner supports the following features:
duplex scanning, automatic document feeding (ADF), delays between automatic scans, etc.
Scanning facing pages
When you scan a book, a scanned image will typically contain two facing pages.
To improve OCR quality, images with facing pages need to be split into two separate images. ABBYY
FineReader 14 features a special mode that automatically splits such images into separate pages within
the OCR project.
Follow the instructions below to scan facing pages from a book or to scan dual pages.
1. Click Tools > Options... to open the Options dialog box and then click the Image Processing
tab.
2. Select the Split facing pages option in the Image preprocessing settings group of options.
Make sure your scans have the correct orientation or enable the Correct page orientation
option. If a scan with facing pages does not have the correct orientation (e.g. it is upside-down),
facing pages will not be split.
3. Scan the facing pages.
There are other image processing options you can specify. See also: Image processing options .
You can also split facing pages manually:
1. Open the Image Editor by clicking the button on the toolbar of the Image pane.
2. Use the tools in the Split section of the leftmost pane to split the page.
See also:
·Image processing options
·Document features to consider prior to OCR
·If your document image has defects and OCR accuracy is low
218
217
214
115

185
ABBYY® FineReader 14 User’s Guide
Taking photos of documents
Scanning isn't the only way to acquire images of your documents. You can photograph documents with
a camera or a mobile phone and then open the photographs in ABBYY FineReader 14 and recognize
them.
When taking pictures of documents, a number of factors should be kept in mind to make the photo
better suited for OCR. These factors are described in detail in the sections that follow:
·Camera requirements
·Lighting
·Taking photos
·How to improve an image
Camera requirements
Your camera should meet the following requirements in order to obtain document images that can be
reliably recognized.
Recommended camera characteristics
·Image sensor: 5 million pixels for A4 pages. Smaller sensors may be sufficient for taking pictures
of smaller documents such as business cards.
·Flash disable feature
·Manual aperture control, i.e. availability of Av or full manual mode
·Manual focusing
· An anti-shake (image stabilization) feature or ability to use a tripod
·Optical zoom
Minimum requirements
·Image sensor: 2 million pixels for A4 pages
·Variable focal distance
For detailed information about your camera, please refer to the documentation supplied with your
device.
Lighting
Lighting greatly affects the quality of the resulting photo.
Best results can be achieved with bright and evenly distributed light, preferably daylight. On a bright
sunny day, you can increase the aperture number to get a sharper picture.
105
185
185
186
187
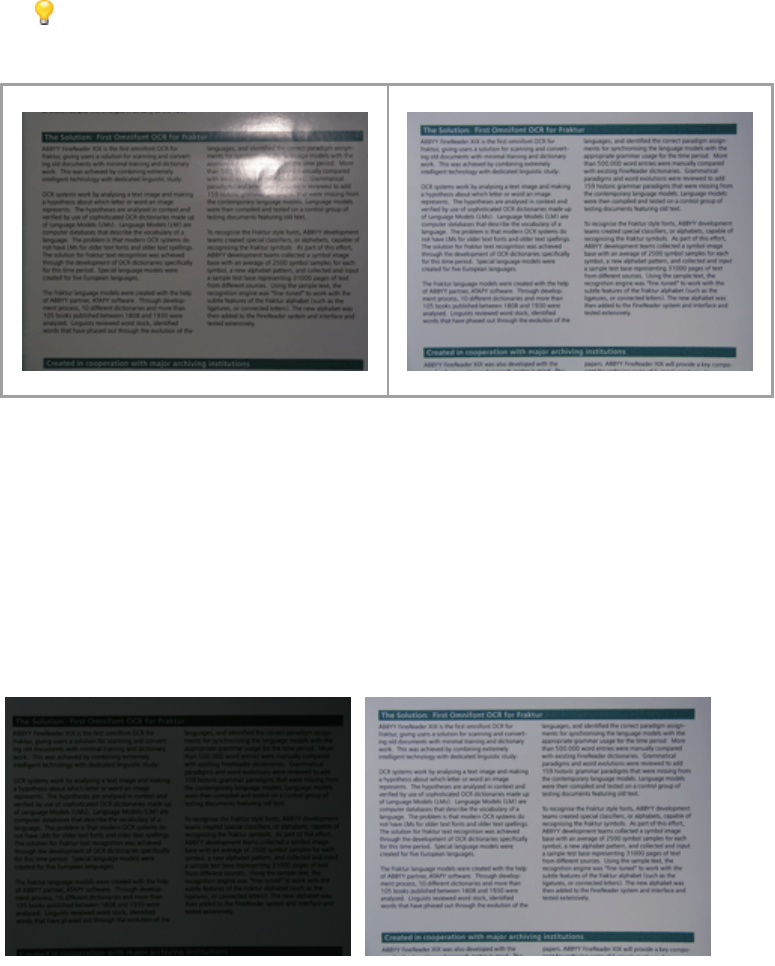
186
ABBYY® FineReader 14 User’s Guide
Using a flash and additional lighting sources
·When using artificial lighting, use two light sources positioned so as to avoid shadows or glare.
·If there is enough light, turn the flash off to prevent sharp highlights and shadows. When using the
flash in poor lighting conditions, be sure to take photos from a distance of approximately 50 cm.
We advise against using the flash when taking pictures of documents printed on glossy paper.
Compare an image with glare and a good quality image:
If the image is too dark
·Set a lower aperture value to open up the aperture.
·Set a higher ISO value.
·Use manual focus, as automatic focus may fail in poor lighting conditions.
Compare an image that is too dark with a good quality image:
Taking photos
To obtain good quality photos of documents, be sure to position the camera correctly and follow these
simple recommendations.
·Use a tripod whenever possible.
·The lens should be positioned parallel to the page. The distance between the camera and the
document should be selected so that the entire page fits within the frame when you zoom in. In
most cases, this distance will be between 50 and 60 cm.

187
ABBYY® FineReader 14 User’s Guide
·Even out the paper document or book pages (especially in the case of thick books). The text lines
should not be skewed by more than 20 degrees, otherwise the text may not be converted properly.
·To get sharper images, focus on the center of the image.
·Enable the anti-shake feature, as longer exposures in poor lighting conditions may cause blur.
·Use the automatic shutter release feature. This will prevent the camera from moving when you
press the shutter release button. The use of automatic shutter release is recommended even if you
use a tripod.
How to improve an image if:
·The image is too dark or its contrast is too low.
Solution: Try using brighter lighting. If that is not an option, try setting a lower aperture value.
·The image is not sharp enough.
Solution: Autofocus may not work properly in poor lighting or when taking pictures from a close
distance. Try using brighter lighting. Use a tripod and self-timer to avoid moving the camera when
taking the picture.
If an image is only slightly blurry, the Photo Correction tool in the Image Editor of the OCR Editor
may help get better results. See also: If your document image has defects and OCR accuracy is
low .
·A part of the image is not sharp enough.
Solution: Try setting a higher aperture value. Take pictures from a greater distance at maximum
optical zoom. Focus on a point between the center and the edge of the image.
·The flash causes glare.
Solution: Disable the flash or try using other light sources and increasing the distance between
the camera and the document.
115

188
ABBYY® FineReader 14 User’s Guide
Options dialog box
The Options dialog box contains a variety of options that let you decide how documents will be
scanned, opened, recognized, and saved into various formats, as well as change OCR languages, the
language of the interface, the print type of input documents, and some other options.
There are several ways to open the Options dialog box:
·In the New Task screen, click the Options button in the lower-left corner.
·In the New Task screen, click Tools > Options....
·In the PDF Editor, click Tools > Options....
·In the OCR Editor, click Tools > Options....
Buttons, links or commands that open the Options dialog box will also be available when you convert or
scan files in the New Task screen, on toolbars and on shortcut menus of toolbars in the PDF Editor and
the OCR Editor, and in the dialog boxes that appear when you save documents.
The Options dialog box has seven tabs, each of which contains settings specific to certain ABBYY
FineReader functionality.
General
On this tab, you can:
·Choose which part of the program will open when you start ABBYY FineReader 14: the New Task
screen, the OCR Editor with a new OCR project, or the OCR Editor with the most recently used
OCR project.
·Specify which device you want to use to get images, and choose a scanning interface.
ABBYY FineReader uses a built-in dialog box to display the scanning settings . If the scanning
interface of ABBYY FineReader 14 is incompatible with your scanner, you can use your scanner's
native interface. The scanner's documentation should contain a description of this dialog box and
its elements.
·Make FineReader the default program for opening PDF documents.
See also: OCR projects .
Image Processing
This tab contains three groups of options:
·Enable background recognition in the PDF Editor
When this option is enabled, all pages that are opened in the PDF Editor will be recognized
automatically. This process runs in the background and adds a temporary text layer to PDF
documents, making it possible to search them and copy their text.
Use the link at the bottom of this group to specify the language(s) of your document.
182
108

189
ABBYY® FineReader 14 User’s Guide
·Automatically process page images as they are added to the OCR Editor
This option enables or disables automatic processing of newly added pages. If automatic
processing is enabled, you can select general document processing options and image
preprocessing settings to be used when scanning and opening images:
·Recognize page images (includes preprocessing and analysis)
Newly added images in the OCR Editor will be preprocessed using the settings specified in the
Image preprocessing settings group of options. Analysis and recognition will also be
performed automatically.
·Analyze page images (includes preprocessing)
Image preprocessing and document analysis are performed automatically, but OCR has to be
started manually.
·Preprocess page images
Only preprocessing is carried out automatically. Analysis and OCR have to be started
manually.
·Image preprocessing settings
ABBYY FineReader 14 lets you automatically remove common defects from scans and digital
photos.
See also: Background recognition , Image processing options , and Working with complex-script
languages .
Languages
This tab contains OCR language options. See also: Document features to consider prior to OCR .
OCR
On this tab, you can select recognition options:
·The PDF recognition mode
·Whether to use thorough or fast recognition
·The type of the document
·Whether the program should detect structural elements (lets you choose which elements to
preserve when exporting results to Microsoft Word)
·Whether the program should recognize barcodes
·Training (lets you use user patterns when recognizing texts)
·Fonts (lets you choose the fonts to be used in recognized texts)
See also: OCR options , If the printed document contains non-standard fonts .
54 217
223
214
220
215
220 129

190
ABBYY® FineReader 14 User’s Guide
Format Settings
On this tab, you can adjust the settings of output file formats. See also: Format settings .
Other
On this tab, you can:
·Specify the interface language of ABBYY FineReader 14.
·Specify how many processor cores FineReader may use for OCR.
·Choose whether or not ABBYY FineReader 14 should automatically check for and install updates.
·Choose whether or not you want to participate in ABBYY's software improvement program.
·Choose whether to show special offers and tips on using ABBYY FineReader 14.
·Enable or disable JavaScript in PDF documents.
Click Reset... at the bottom of the dialog box if you want to revert to the default settings.
Areas and Text*
On this tab you can:
·Specify verification settings for low-confidence characters.
·Specify verification settings for non-dictionary words:
·Ignore words with digits and special characters.
·Check non-dictionary compounds.
A compound word is a word made up of two or more words.
·Specify whether you want to correcting spaces before and after punctuation marks.
·View and edit user dictionaries.
·Choose a font for displaying plain text.
·Choose the color and thickness of frames of different area types in the Image window, the highlight
color for low-confidence characters, and other display options.
See also: Checking recognized text , If the program fails to recognize certain characters , Editing
area properties .
* This tab is only available in the OCR Editor.
191
227
58
190
137 133
121
191
ABBYY® FineReader 14 User’s Guide
Format settings
ABBYY FineReader offers flexible format settings which determine the look and feel of output
documents.
·PDF settings
·DOC(X)/RTF/ODT settings
·XLS(X) settings
·PPTX settings
·CSV settings
·TXT settings
·HTML Settings
·EPUB/FB2 settings
·DjVu settings
PDF settings
The following settings are available:
Image quality
191
196
198
199
199
200
201
202
203
192
ABBYY® FineReader 14 User’s Guide
If your text contains a lot of pictures or if you choose to save the page image together with the
recognized text, the resulting PDF file may be quite large. The quality of the pictures and the size of the
resulting file can be tweaked using the options in the Image quality drop-down list:
·Best quality
Select this option to retain the quality of the pictures or the page image. The original resolution of
the source image will be preserved.
·Balanced
Select this option to reduce the size of the PDF file while keeping the quality of the pictures or page
image at a reasonably high level.
·Compact size
Select this option to greatly reduce the size of the output PDF file. The resolution of the pictures
and page image will be reduced to 300 dpi, affecting their quality.
·Custom...
Select this option if you want to specify custom image quality settings. In the Custom Settings
dialog box, select the desired settings and click OK.
Create PDF/A documents
Enable this option if you want to create a PDF/A document and select the PDF/A version that you want to
use.
Protect documents with passwords
193
ABBYY® FineReader 14 User’s Guide
This option allows you to protect your PDF document with a password to prevent unauthorized opening,
printing, or editing. Click the Settings... button and specify protection settings in the dialog box that
opens:
·Document Open password
If your document has a Document Open password, users will be able to open it only after entering
the password you specify. To set a password for your document:
1. Enable the Restrict access with a Document Open password option.
2. Type the password and confirm it.
Disable the Hide characters option if you want the characters of your password to be visible in the
Document Open password field.
·Permissions password
This password protects the PDF document from unauthorized editing and printing and prevents
users who do not know the password from copying its content into another application. Users will
be able to perform all of these actions only after entering the password you specify. To set this
password:
1. Enable the Restrict printing and editing with a Permissions password option.
2. Type the password and confirm it.
Disable the Hide characters option if you want the characters of your password to be visible in the
Permissions password field.
Next, select the actions you want to allow users to perform.
·The Printing drop-down list contains options that allow or restrict printing the document.
·The Editing drop-down list contains options that allow or restrict editing the document.
·The Allow copying text, images, and other content option allows users to copy content
(text, pictures, etc.) from your document. If you want to prohibit such actions, make sure this
option is not selected.
·The Allow screen readers to read text option allows screen reader software to read text
from the document when it is open. If you want to prohibit such actions, make sure this option
is not selected.
·Encryption level
The Encrypt drop-down list contains options that encrypt password-protected documents.
·128-bit AES is a fairly strong encryption algorithm based on the AES standard.
·256-bit AES is a strong encryption algorithm based on the AES standard.

194
ABBYY® FineReader 14 User’s Guide
Select one of the options from the Encrypt drop-down list. All document contents encrypts the
entire document, while All document contents except metadata leaves the document's data
unencrypted and readable.
Delete objects and data
Enable this option if you don't want to preserve various objects contained in the PDF document, then
click the Select... button to select which objects you don't want to keep:
·Comments and annotations
Notes, annotations, shapes, and text blocks will not be saved.
·Links, media, actions, scripts, and form data
Interactive elements will not be saved.
·Bookmarks
Bookmarks will not be saved.
·Attachments
Attached files will not be saved.
Use one paper size for all page images
If this option is disabled, the original paper size of the page images will be retained. Enable this option if
you want to use a specific paper size in your PDF document.
Use MRC compression (requires OCR)
Selecting this option will apply the MRC compression algorithm, which greatly reduces file size and
preserves the visual quality the image.
The Use MRC compression (requires OCR) option is available for searchable PDF documents
when the Text under the page image option is enabled.
Apply ABBYY PreciseScan to smooth characters on page images

195
ABBYY® FineReader 14 User’s Guide
Enable this option if you want to use the ABBYY PreciseScan technology to smooth out the characters
in the document. As a result, characters will not look pixelated even when you zoom in on the page.
Searchable PDF settings
This group of options lets you decide what elements of your PDF document you want to save.
Depending on how you are planning to use your document, select one of the following options:
·Text and pictures only
This option saves only the recognized text and the associated pictures. The page will be fully
searchable and the size of the PDF file will be small. The appearance of the resulting document
may slightly differ from the original
·Text over the page image
This option saves the background and pictures of the original document and places the recognized
text over them. Usually, this PDF type requires more disk space than Text and pictures only. The
resulting PDF document will be fully searchable. In some cases, the appearance of the resulting
document may slightly differ from the original.
·Text under the page image
This option saves the entire page as an image and places the recognized text underneath. The text
layer makes it possible to search the document and copy text, while the page images insure that
the document looks virtually the same as the original.
Create bookmarks from headings
Select this option if you wish to create a table of contents from the document headings.
Create PDF tags
Select this option to add PDF tags to the output PDF document.
Apart from text and pictures, PDF files can contain information about the document structure, such as
logical parts, pictures, and tables. This information is stored in PDF tags. A PDF file equipped with PDF
tags may be reflowed to fit different screen sizes and will display well on handheld devices.
Fonts
When saving texts in PDF, you can use either Adobe fonts or the Windows fonts installed on your
computer. To specify the font set to be used, select one of the following items from the drop-down list:
·Use predefined fonts
The PDF file will use Adobe fonts, for example: Times New Roman, Arial, Courier New.
·Use Windows fonts
The file will use the Windows fonts installed on your computer.
To embed fonts in the PDF document, select the Embed fonts option. This will make the document file
larger, but the document will look the same on all computers.
The Embed fonts is only available for Text and pictures only and Text over the page image PDF
documents.
Preserve document metadata, such as authors and keywords

196
ABBYY® FineReader 14 User’s Guide
Preserves the metadata of the document when it is saved in the PDF format. This option is enabled
by default.
If you want to make changes to the document's metadata, click the Edit Metadata... button, make the
desired changes, and click OK.
DOC(X)/RTF/ODT settings
The following settings are available:
Document layout
Select the appropriate setting depending on how you plan to use the output document.
a. Exact copy
Preserves the formatting of the original document. This setting is recommended for documents with
complex layouts, such as promotion booklets. Note, however, that it limits your ability to change the
text and formatting in the output document.
b. Editable copy
Produces a document in which the formatting may differ slightly from that of the original. Documents
produced in this mode are easy to edit.
c. Formatted text
Retains paragraphs but does not retain the exact positions of objects on the page and line spacing.
The text produced will be left-aligned. Texts in right-to-left scripts will be right-aligned.
Vertical texts will become horizontal.
d. Plain text
Discards most formatting. Preserves only the font styles if the Keep bold, italic, and underlined
text styles in plain text option is enabled.
Default paper size
84

197
ABBYY® FineReader 14 User’s Guide
You can select the paper size to be used for saving in RTF, DOC, DOCX, or ODT format from the
Default paper size drop-down list.
Picture settings
Documents containing a large number of pictures can be very large. The quality of the pictures and the
size of the resulting file can be tweaked using the options in the Keep pictures drop-down list.
Tip. To change the picture saving settings, click Custom..., specify the desired settings in the Custom
Settings dialog box, and click OK.
Text settings
·Keep headers, footers, and page numbers
Retains the headers, footers, and page numbers in the output text.
·Keep line breaks and hyphens
Retains the original arrangement of text lines in the output text.
·Keep page breaks
Retains the original page arrangement.
·Keep line numbers
Retains the original line numbering (if any). The line numbers will be saved in a separate field that
remains unchanged when you edit the text.
This feature is available only if the Editable copy option is selected in the Document layout
drop-down list.
·Keep text and background colors
Select this option to retain the font color and background color.
·Keep bold, italic, and underlined text styles in plain text
Retains font styles when the Plain text option is selected in the Document layout drop-down list.
If you disable the detection of headers, footers, the table of contents, numbered lists, and footnotes on
the Распознать tab of the Настройки dialog box (click Tools . Options... to open this dialog box),
these elements will be saved as body text.
Low-confidence characters
Enable the Highlight low-confidence characters option if you plan to edit the document in Microsoft
Word and not in the Text pane of the OCR Editor. When this option is selected, all low-confidence
characters will be highlighted in the Microsoft Word document.
Tip. You can change the color use for low-confidence characters on the Areas and Text tab of the
Настройки dialog box (click Tools>Options...to open this dialog box).
Preserve document metadata, such as authors and keywords

198
ABBYY® FineReader 14 User’s Guide
Preserves the metadata when you save the document. This option is enabled by default.
If you want to make changes to the document's metadata, click the Edit Metadata... button, make the
desired changes, and click OK.
XLS(X) settings
The following settings are available:
Document layout
Select the appropriate setting depending on how you plan to use the output document.
a. Formatted text
Retains the fonts, font sizes, and paragraphs, but does not retain the exact line spacing or locations
of the objects on the page. The text produced will be left-aligned. Texts in right-to-left scripts will be
right-aligned.
Vertical texts will become horizontal.
b. Plain text
Does not retain the formatting.
Picture settings
You can save pictures in XLSX documents. Documents containing a large number of pictures can be
very large. The quality of the pictures and the size of the resulting file can be tweaked using the options
in the Keep pictures (XLSX only) drop-down list.
Tip. To change the picture saving settings, click Custom..., select the desired settings in the Custom
Settings dialog box, and click OK.
Text settings
·Keep headers and footers
Enable this option if you want to keep the headers and footers. If this option is disabled, the
headers and footers will not be preserved.
·Ignore text outside tables
Saves only the tables and ignores the rest.
·Convert numeric values to numbers
Converts numbers into the "Numbers" format in the XLSX document. Microsoft Excel can perform
arithmetic operations on such cells.
·Create separate sheet for each page (XLSX only)
Select this option to save pages from the source document as separate worksheets.
Preserve document metadata, such as authors and keywords
199
ABBYY® FineReader 14 User’s Guide
Preserves the metadata when you save the document. This option is enabled by default.
If you want to make changes to the document's metadata, click the Edit Metadata... button, make the
desired changes, and click OK.
PPTX settings
The following settings are available:
Picture settings
Documents containing a large number of pictures can be very large. The quality of the pictures and the
size of the resulting file can be tweaked using the options in the Keep pictures drop-down list.
Tip. To change the picture saving settings, click Custom.... In the Custom Settings dialog box, select
the desired settings and click OK.
Text settings
·Keep headers and footers
Preserves the headers and footers in the output document.
·Keep line breaks
Retains the original arrangement of text lines. If this option is not selected, the output document will
have a single line containing all of the text.
·Shrink text on overflow
Decreases the font size of text if the text does not fit into a text block.
Preserve document metadata, such as authors and keywords
Preserves the metadata when you save the document. This option is enabled by default.
If you want to make changes to the document's metadata, click the Edit Metadata... button, make the
desired changes, and click OK.
CSV settings
The following settings are available:
Text settings
·Ignore text outside tables
Saves only the tables and ignores the rest.
·Insert page break character (#12) as page separator
Saves the original page arrangement.
Delimiter
Specifies the character that will be used to separate the data columns in the output CSV document.
Encoding

200
ABBYY® FineReader 14 User’s Guide
ABBYY FineReader detects the code page automatically. To change the code page, select the
desired code page from the Encoding drop-down list.
Preserve document metadata, such as authors and keywords
Preserves the metadata when you save the document. This option is enabled by default.
If you want to make changes to the document's metadata, click the Edit Metadata... button, make the
desired changes, and click OK.
TXT settings
The following settings are available:
Document layout
Select the appropriate setting depending on how you plan to use the output document.
a. Formatted text
Retains the paragraphs but does not retain the exact positions of the objects and line spacing.
Additionally, white spaces are used to reproduce paragraph indentations and tables. The text
produced will be left-aligned. Texts in right-to-left scripts will be right-aligned.
Vertical texts will become horizontal.
b. Plain text
Does not retain the formatting.
Text settings
·Keep line breaks
Retains the original arrangement of text lines. If this option is not selected, each paragraph will be
saved as a single line of text.
·Insert page break character (#12) as page break
Saves the original page arrangement.
·Use blank line as paragraph separator
Separates the paragraphs with blank lines.
·Keep headers and footers
Preserves the headers and footers in the output document.
Encoding
ABBYY FineReader detects the code page automatically. To change the code page, select the
desired code page from the Encoding drop-down list.
Preserve document metadata, such as authors and keywords
244
244

201
ABBYY® FineReader 14 User’s Guide
Preserves the metadata when you save the document. This option is enabled by default.
If you want to make changes to the document's metadata, click the Edit Metadata... button, make the
desired changes, and click OK.
HTML settings
The following settings are available:
Document layout
Select the appropriate setting depending on how you plan to use the output document.
·Flexible layout
Preserves the formatting of the original. The output HTML document can be easily edited.
·Formatted text
Retains the fonts, font sizes, font styles, and paragraphs, but does not retain the exact line spacing
or locations of the objects on the page. The text produced will be left-aligned. Texts in right-to-left
scripts will be right-aligned.
Vertical texts will become horizontal.
·Plain text
Does not retain the formatting.
Picture settings
Documents containing a large number of pictures can be very large. The quality of the pictures and the
size of the resulting file can be tweaked using the options in the Keep pictures drop-down list.
Tip. To change the picture saving settings, click Custom.... In the Custom Settings dialog box, select
the desired settings and click OK.
Text settings
·Keep line breaks
Retains the original arrangement of text lines. If this option is disabled, the output document will
have a single line containing all of the text.
·Keep text and background colors
Select this option to retain the font color and background color.
·Keep headers and footers
Preserves the headers and footers in the output document.
Encoding

202
ABBYY® FineReader 14 User’s Guide
ABBYY FineReader detects the code page automatically. To change the code page, select the
desired code page from the Encoding drop-down list.
Book settings
If you are converting a hard-copy book to HTML, enable the Generate a table of contents and use it
to divide the book into files option. The book can be split into chapters in one of the following ways:
·Automatically create files based on headings
ABBYY FineReader 14 will automatically split the document into parts of roughly equal size, save
them as separate HTML files, and create links to them in the table of contents.
·Create files based on level 1 headings
ABBYY FineReader 14 will automatically split the document into separate HTML files using the
highest-level headings.
·Create files based on level 2 headings
ABBYY FineReader 14 will automatically split the document into separate HTML files using the
highest-level headings and the headings of the next level.
Preserve document metadata, such as authors and keywords
Preserves the metadata when you save the document. This option is enabled by default.
If you want to make changes to the document's metadata, click the Edit Metadata... button, make the
desired changes, and click OK.
EPUB/FB2 settings
The following settings are available:
Document layout
Select the appropriate setting depending on how you plan to use the output document.
·Formatted text
Retains the paragraphs but does not retain the exact positions of the objects and line spacing. The
text produced will be left-aligned. Texts in right-to-left scripts will be right-aligned.
Vertical texts will become horizontal.
Font styles will be retained only in the EPUB format.
·Plain text
Does not retain the formatting.
If you are saving to the EPUB format, you can preserve fonts by selecting the Formatted text option
from the Document layout drop-down list and enabling the Retain fonts and font sizes (EPUB only)
option below. Select the Embed fonts option to embed the document's fonts in the resulting e-book.
Some devices and software cannot display embedded fonts.
Create cover
244
203
ABBYY® FineReader 14 User’s Guide
Enable the Use the first page as the e-book cover option if you want to use the first page in the
document as its cover.
Picture settings
Documents containing a large number of pictures can be very large. The quality of the pictures and the
size of the resulting file can be tweaked using the options in the Keep pictures drop-down list.
Tip. To change the picture saving settings, click Custom.... In the Custom Settings dialog box, select
the desired settings and click OK.
EPUB Settings
You can choose which version of the EPUB format you want to use.
Preserve document metadata, such as authors and keywords
Preserves the metadata when you save the document. This option is enabled by default.
If you want to make changes to the document's metadata, click the Edit Metadata... button, make the
desired changes, and click OK.
DjVu settings
The following settings are available:
Save mode
Select the appropriate setting depending on how you plan to use the output document.
·Text under the page image
This option saves the entire page as an image and places the recognized text underneath. As a
result, you get a searchable DjVu document that looks almost exactly like the original.
·Page image only
This option saves the exact image of the page. The output document will look almost exactly like
the original, but the text in the document will not be searchable.
Picture settings
Documents containing a large number of pictures can be very large. The quality of the pictures and the
size of the resulting file can be tweaked using the options in the Image quality drop-down list.
Tip. To change the picture saving settings, click Custom.... In the Custom Settings dialog box, select
the desired settings and click OK.
Multiple layers
The DjVu format uses a special compression technique which separates a page image into layers and
applies different compression methods to each of them. By default, ABBYY FineReader will
automatically determine whether multi-layer compression must be used on a page (i.e. the Multiple
layers option is set to Automatic). Set the Multiple layers option to Always on if you want to use multi-
layer compression on all pages or to Always off if you do not want to use multi-layer compression.
Preserve document metadata, such as authors and keywords
204
ABBYY® FineReader 14 User’s Guide
Preserves the metadata when you save the document. This option is enabled by default.
If you want to make changes to the document's metadata, click the Edit Metadata... button, make the
desired changes, and click OK.

205
ABBYY® FineReader 14 User’s Guide
Supported OCR and document comparison languages
ABBYY FineReader 14 supports 195 OCR languages:
·Natural languages
·Artificial languages
·Formal languages
Supported languages may vary in different versions of the product.
Natural languages
·Abkhaz
·Avar
·Agul
·Adyghe
·Azeri (Cyrillic), Azeri (Latin)**
·Aymara
·Albanian
·Altai
·English phonetic transcriptions
·English*, **
·Arabic (Saudi Arabia)
·Armenian (Eastern, Western, Grabar)*
·Afrikaans
·Nahuatl
·Basque
·Bashkir*, **
·Belarusian
·Bemba
·Blackfoot
·Bulgarian*, **
205
211
211
211
211 211
211
211 211
211 211

206
ABBYY® FineReader 14 User’s Guide
·Breton
·Bugotu
·Buryat
·Welsh
·Hungarian*, **
·Wolof
·Vietnamese*, **
·Hawaiian
·Gagauz
·Galician
·Ganda
·Greek*
·Guarani
·Kawa
·Scottish Gaelic
·Dakota
·Dargwa
·Danish*, **
·Tun
·Dungan
·Zulu
·Hebrew*
·Yiddish
·Ingush
·Indonesian*, **
·Irish
·Icelandic
·Spanish*, **
211 211
211 211
211
211 211
211
211 211
211 211

207
ABBYY® FineReader 14 User’s Guide
·Italian*, **
·Kabardian
·Kazakh
·Kalmyk
·Karakalpak
·Karachay-balkar
·Catalan*,**
·Kashubian
·Quechua (Bolivia)
·Kikuyu
·Kirghiz
·Chinese Simplified, Chinese Traditional
·Kongo
·Korean, Korean (Hangul)
·Corsican
·Koryak
·Xhosa
·Kpelle
·Crow
·Crimean Tatar
·Kumyk
·Kurdish
·Lak
·Latin*
·Latvian*, **
·Lezgi
·Lithuanian*, **
·Luba
211 211
211 211
211
211 211
211 211

208
ABBYY® FineReader 14 User’s Guide
·Sorbian
·Maya
·Macedonian
·Malagasy
·Malay (Malaysian)
·Malinke
·Maltese
·Mansi
·Maori
·Mari
·Minangkabau
·Mohawk
·Romanian (Moldova)
·Mongol
·Mordvin
·Miao
·German (Luxembourg)
·German** , German (New Spelling)*,**
·Nenets
·Nivkh
·Dutch** , Dutch (Belgian)*, **
·Nogay
·Norwegian (Nynorsk)** , Norwegian (Bokmal)*, **
·Nyanja
·Ojibway
·Ossetian
·Papiamento
·Polish*, **
211 211 211
211 211 211
211 211 211
211 211

209
ABBYY® FineReader 14 User’s Guide
·Portuguese** , Portuguese (Brazilian)*, **
·Occitan
·Rhaeto-Romanic
·Rwanda
·Romanian*, **
·Rundi
·Russian*, **
·Russian (Old Spelling)
·Russian with accent
·Sami (Lappish)
·Samoan
·Zapotec
·Swazi
·Cebuano
·Selkup
·Serbian (Cyrillic), Serbian (Latin)
·Slovak*, **
·Slovenian*, **
·Somali
·Swahili
·Sunda
·Tabasaran
·Tagalog
·Tajik
·Tahitian
·Thai*
·Tatar*, **
·Tok Pisin
211 211 211
211 211
211 211
211 211
211 211
211
211 211

210
ABBYY® FineReader 14 User’s Guide
·Tongan
·Tswana
·Tuvinian
·Turkish*, **
·Turkmen (Cyrillic), Turkmen (Latin)
·Udmurt
·Uighur (Cyrillic), Uighur (Latin)
·Uzbek (Cyrillic), Uzbek (Latin)
·Ukrainian*, **
·Faroese
·Fijian
·Finnish*, **
·French*, **
·Frisian
·Friulian
·Khakass
·Hani
·Khanty
·Hausa
·Croatian*, **
·Jingpo
·Romany
·Chamorro
·Chechen
·Czech*, **
·Chuvash
·Chukchee
·Swedish*, **
211 211
211 211
211 211
211 211
211 211
211 211
211 211

211
ABBYY® FineReader 14 User’s Guide
·Shona
·Evenki
·Even
·Eskimo (Cyrillic), Eskimo (Latin)
·Estonian*, **
·Sotho
·Yakut
·Japanese
Artificial languages
·Ido
·Interlingua
·Occidental
·Esperanto
Formal languages
·Basic
·C/C++
·COBOL
·Fortran
·Java
·Pascal
·Simple math formulas
·Digits
To find out which fonts are required to display the characters of a specific language, see Fonts
required for the correct display of texts in supported languages .
*Dictionaries are available for this language, enabling ABBYY FineReader to identify unreliably
recognized characters and detect spelling errors in texts written in this language.
**Document comparison language. ABBYY FineReader can compare documents written in 35
languages.See also: ABBYY Compare Documents .
211 211
231
168

212
ABBYY® FineReader 14 User’s Guide
Supported document formats
The table below lists the formats supported by ABBYY FineReader 14.
Format
File extension
Input formats
for the OCR
Editor
Input formats
for the PDF Editor
and for ABBYY
Compare
Documents
Saving formats
PDF document
*.pdf, *.pdf/a
+
+
+
Editable text formats
Microsoft Word
Document
*.doc, *.docx
-
+
+
Microsoft Excel 97-
2003 Workbook
*.xls, *.xlsx
-
+
+
Microsoft
PowerPoint
Presentation
*.pptx
-
+
+
*.ppt
-
+
-
Microsoft Visio
Drawing
*.vsd, *.vsdx
-
+
-
HTML Document
*.htm, *.html
-
+
+
Rich Text Format
*.rtf
-
+
+
Text Document
*.txt
-
+
+
Microsoft Office
Excel Comma-
Separated Values
File
*.csv
-
-
+
OpenDocument
Text
*.odt
-
+
+
*.ods
-
+
-
*.odp
-
+
-
FB2 Document
*.fb2
-
-
+
EPUB Document
*.epub
-
-
+
Non-editable formats
213
ABBYY® FineReader 14 User’s Guide
XPS (requires
Microsoft .NET
Framework 4)
*.xps
+
+
-
DjVu Document
*.djvu, *.djv
+
+
+
Images
JPEG
*.jpg, *.jpeg
+
+
+
JPEG 2000
*.jp2, *.j2k, *.jpf,
*.jpx, *.jpc
+
+
+
PNG
*.png
+
+
+
TIFF
*.tiff, *.tif
+
+
+
BMP
*.bmp, *.dib, *.rle
+
+
+
GIF
*.gif
+
+
-
JBIG2
*.jbig2, *.jb2
+
+
+
PCX
*.dcx, *.pcx
+
+
+
To be able to edit texts in a particular format, you must have the appropriate version Microsoft Office
or Apache OpenOffice installed on your computer.
ABBYY Compare Documents can save comparison results in the following formats:
·PDF document (*.pdf)
To view PDF files, you must have a PDF viewing application installed on your computer. To see
the list of differences, open the Comments pane.
·Microsoft Word Document (*.docx)

214
ABBYY® FineReader 14 User’s Guide
Document features to consider prior to OCR
The quality of images has a significant impact on OCR quality. This section explains what factors you
should take into account before recognizing images.
·OCR languages
·Print type
·Print quality
·Color mode
OCR languages
ABBYY FineReader can recognize both single- and multi-language documents (e.g. written in two or
more languages). For multi-language documents, you need to select several OCR languages.
To select OCR languages, click Options > Languages and select one of the following options:
·Automatically select OCR languages from the following list
ABBYY FineReader will automatically select the appropriate languages from the user-defined list of
languages. To edit the list of languages:
1. Make sure the Automatically select OCR languages from the following list option is
selected.
2. Click the Specify... button.
3. In the Languages dialog box, select the desired languages and click OK.
4. In the Options dialog box, click OK.
·Specify OCR languages manually
Select this option if the language you need is not in the list.
In the dialog box below, specify one or more languages. If you often use a particular language
combination, you can create a new group for these languages.
If a language is not in the list, it is either:
1. Not supported by ABBYY FineReader, or
For a complete list of supported languages, see Supported OCR languages .
2. Not supported by your version of the product.
The complete list of languages available in your version of the product can be found in the
Licenses dialog box (click Help > About > License Info to open this dialog box).
In addition to using built-in languages and language groups, you can create your own languages and
groups.See also: If the program fails to recognize certain characters .
214
215
215
216
188
134
205
133
215
ABBYY® FineReader 14 User’s Guide
Print type
Documents may be printed using various devices such as typewriters and fax machines. OCR quality
may vary depending on how a document was printed. You can improve OCR quality by selecting the
correct print type in the Options dialog box.
For most documents, the program will detect their print type automatically. For automatic print type
detection, the Auto option must be selected in theDocument type group of options in the Options
dialog box (clickTools > Options...>OCR to access these options). You can process documents in full-
color or black-and-white mode.
You may also choose to manually select the print type as needed.
An example of typewritten text. All letters are of equal width (compare, for example, "w"
and "t"). For texts of this type, select Typewriter.
An example of a text produced by a fax machine. As you can see from the example, the
letters are not clear in some places. There is also some noise and distortion. For texts of
this type, select Fax.
After recognizing typewritten texts or faxes, be sure to select Auto before processing regular printed
documents.
Print quality
Poor-quality documents with "noise" (i.e. random black dots or speckles), blurred and uneven letters, or
skewed lines and shifted table borders may require specific scanning settings.
Fax
Newspaper
Poor-quality documents are best scanned in grayscale . When scanning in grayscale, the program
will select the optimal brightness value automatically.
188
182
244

216
ABBYY® FineReader 14 User’s Guide
The grayscale scanning mode retains more information about the letters in the scanned text to achieve
better OCR results when recognizing documents of medium to poor quality. You can also correct some
of the defects manually using the image editing tools available in the Image Editor. See also: If your
document image has defects and OCR accuracy is low .
Color mode
If you do not need to preserve the original colors of a full-color document, you can process the
document in black-and-white mode. This will greatly reduce the size of the resulting OCR project and
speed up the OCR process. However, processing low-contrast images in black-and-white may result in
poor OCR quality. We also do not recommend black-and-white processing for photos, magazine pages,
and texts in Chinese, Japanese, and Korean.
Tip. You can also speed up the OCR of color and black-and-white documents by selecting Fast
recognition on the OCR tab of the Options dialog box. For more about the recognition modes, see
OCR Options .
For some additional recommendations on selecting the right color mode, see Scanning tips .
Once the document is converted to black-and-white, you will not be able to restore the colors. To get
a color document, open a file with color images or scan the paper document in color mode.
115
220
182

217
ABBYY® FineReader 14 User’s Guide
Image processing options
To customize the scanning and opening of pages in ABBYY FineReader, you can:
·enable/disable background recognition in the PDF Editor
·enable/disable automatic analysis and recognition of pages when they are added into the OCR
Editor
·specify image preprocessing settings
You can select desired options either when opening a PDF document, images or scans in the New Task
Window or on the Image Processing tab of the Options dialog box (click Tools > Options... to open
this dialog box).
Any changes you make in the Options dialog box will only be applied to newly scanned/opened
images.
The Image Processing tab of the Options dialog box contains the following options:
Enable background recognition in the PDF Editor
background recognition will be used for all pages you open in the PDF Editor. Background recognition
allows you to search and copy text even in documents that do not have a text layer (e.g. documents that
contain only scans or that were created from images). No permanent changes are made to the
document itself.
On this tab, you can also specify the OCR languages .
If you want to enable other users to carry out text searches in this document, click File > Recognize
Document > Recognize Document...
Automatic analysis and recognition of images added into the OCR Editor
By default, pages are analyzed and recognized automatically, but you can change this behavior. The
following modes are available:
·Recognize page images (includes preprocessing and analysis)
When images are opened in the OCR Editor, they will be automatically preprocessed using the
settings selected in the Image preprocessing settings group of settings. Analysis and OCR are
also performed automatically.
·Analyze page images (includes preprocessing)
Image preprocessing and document analysis are performed automatically, but OCR has to be
started manually.
·Preprocess page images
Only preprocessing is carried out automatically. Analysis and OCR have to be started manually.
This mode is commonly used for documents with complex structures.
217
217
218
214

218
ABBYY® FineReader 14 User’s Guide
If you do not want the images you add to be automatically processed, clear the Automatically
process page images as they are added to the OCR Editor option.
This lets you quickly open large documents, recognize only select pages in a document, and save
documents as images .
Image preprocessing settings
ABBYY FineReader lets you automatically correct common defects on scan and digital photos.
By default, this dialog box displays three recommended options:
·Split facing pages
Split facing pages The program will automatically split images that contain facing pages into two
images containing one page each.
·Correct page orientation
The orientation of pages that are added to an OCR project will be automatically detected and
corrected if necessary.
·Use recommended settings for better OCR
The program will automatically choose and apply the required preprocessing settings.
To display all the settings, click Show Advanced Settings:
·Deskew images
The program will automatically detect skewed pages and correct skew if necessary.
·Straighten text lines
The program will automatically detect uneven text lines on images and straighten them without
correcting trapezoid distortions.
·Correct image resolution
The program will automatically detect will automatically determine the best resolution for images
and will change the resolution of images when necessary.
·Detect page edges *
The program will automatically detect and crop image edges.
·Whiten background *
The program will automatically whiten backgrounds and select the best brightness setting.
·Reduce ISO noise *
The program will automatically remove noise from photographs.
·Remove motion blur *
The sharpness of blurry digital photos will be increased.
·Correct trapezoid distortions *
The program will automatically detect trapezoid distortions and uneven text lines on digital
photographs and scans of books.
152

219
ABBYY® FineReader 14 User’s Guide
·Fix inverted colors on image
When appropriate, the program will invert the colors of an image so that dark text is printed on a
light background.
·Convert to black and white
The program will convert color images to black-and white This will greatly reduce the size of the
resulting OCR project and speed up OCR. We do not recommend black-and-white conversion for
photos, magazine pages, and texts in Chinese, Japanese, and Korean.
·Remove color marks
The program will detect and remove any color stamps and marks made in pen to facilitate the
recognition of the text obscured by such marks. This option is designed for scanned documents
with dark text printed on a white background. Do not select this option for digital photos and
documents with color backgrounds.
* For digital photos only.
To display only the recommended settings, click Hide Advanced Settings.
You can disable all of these options when scanning or opening document pages and still apply any
desired preprocessing in the Image Editor of the OCR Editor. See also: If your document image has
defects and OCR accuracy is low .
115

220
ABBYY® FineReader 14 User’s Guide
OCR options
Selecting the right OCR options is important if you want fast and accurate results. When deciding which
options you want to use, you should consider not only the type and complexity of your document, but
also how you intend to use the results. The following groups of options are available:
·PDF recognition modes
·Balance between OCR speed and accuracy
·Document type
·Detection of structural elements
·Barcodes
·Patterns and languages
·Fonts to be used in recognized text
You can find the OCR options on the OCR tab of the Options dialog box (click Tools > Options... to
open this dialog box).
ABBYY FineReader automatically recognizes any pages you add to an OCR project. The currently
selected options will be used for OCR. You can turn off automatic analysis and OCR of newly added
images on theImage Processing tab of the Options dialog box (click Tools>Options... to open this
dialog box).
If you change the OCR options after a document has been recognized, run the OCR process again to
recognize the document with the new options.
PDF recognition modes
These settings are intended for PDF documents with text layers and pictures. Such PDF documents
are usually created from documents in editable formats. Other types of PDF documents, such as
searchable PDFs and image-only PDFs, are always processed in Use OCR mode, which is the default
mode for these types of PDF. No additional settings are required to process such PDFs.
Three recognition modes are available:
·Automatically Choose between OCR and Text from PDF
The program will examine the text layer and use the existing text layer if it contains good-quality
text. Otherwise, OCR will be used to create a new text layer.
·Use OCR
OCR will be used to create a new text layer. This mode takes more time but is more suitable for
documents with poor-quality text layers.
·Use Only Text from PDF
This is the default mode for PDF documents with text layers. The program will use the original
text layer without running OCR.
220
221
222
222
222
222
222
221
ABBYY® FineReader 14 User’s Guide
balance between OCR speed and accuracy
ABBYY FineReader 14 allows you to perform:
·Thorough recognition
In this mode, ABBYY FineReader analyzes and recognizes both simple documents and
documents with complex layouts, even those with text printed on a colored background and
documents with complex tables (including tables with white grid lines and tables with color cells).
Thorough recognition requires more time but delivers better quality.

222
ABBYY® FineReader 14 User’s Guide
·Fast recognition
This mode is recommended for processing large documents with simple layouts and good quality
images.
Print type
Specifies the type of device that was used for printing the document. See also: Document features to
consider prior to OCR .
Detect structural elements
Select the structural elements you want the program to detect: headers and footers, footnotes, tables of
contents, and lists. The selected elements will be clickable when the document is saved.
Barcodes
If your document contains barcodes and you wish them to be converted into strings of letters and digits
rather than saved as pictures, select Convert barcodes into strings. This feature is disabled by
default.
Patterns and languages
Recognition with training is used to recognize the following types of text:
·Texts with special symbols (e.g. mathematical symbols)
·Text with decorative elements
·Large volumes of text from low-quality images (over 100 pages)
Training is disabled by default. Enable Use training to recognize new characters and ligatures to
train ABBYY FineReader while performing OCR.
You can use either built-in or your own patterns for recognition.
You can save and load settings for user patterns and languages. See also: OCR project .
Fonts
Here you can select the fonts to be used when saving recognized text.
To select fonts:
1. Click the Select Fonts... button.
2. Select the desired fonts and click OK.
215
129
108

223
ABBYY® FineReader 14 User’s Guide
Working with complex-script languages
With ABBYY FineReader, you can recognize documents in Arabic, Hebrew, Yiddish, Thai, Chinese,
Japanese, and Korean. Some additional factors must be taken into account when working with
documents in Chinese, Japanese or Korean and with documents in which a combination of CJK and
European languages is used.
·Installing language support files
·Recommended fonts
·Disabling automatic image processing
·Recognizing documents written in more than one language
·If non-European characters are not displayed in the Text window
·Changing the direction of recognized text
Installing language support
To be able to recognize texts written in Arabic, Hebrew, Yiddish, Thai, Chinese, Japanese, and Korean,
you may need to install these languages.
Windows 10, Windows 8, Windows 7, and Windows Vista support these languages by default.
To install new languages in Microsoft Windows XP:
1. Click Start on Control Panel.
2. Click Control Panel > Region and Language.
3. Click the Languages tab and select the following options:
·Install files for complex-script and right-to-left languages
to enable support for Hebrew, Yiddish, Arabic, and Thai
·Install files for East Asian languages
to enable support for Japanese, Chinese, and Korean
4. Click OK.
Recommended fonts
Recognition of text in Arabic, Hebrew, Yiddish, Thai, Chinese, Japanese, and Korean may require
additional fonts to be installed. The table below lists the recommended fonts for texts in these
languages.
OCR languages
Recommended font
Arabic
Arial™ Unicode™ MS*
223
223
224
225
225
226
224

224
ABBYY® FineReader 14 User’s Guide
Hebrew
Arial™ Unicode™ MS*
Yiddish
Arial™ Unicode™ MS*
Thai
Arial™ Unicode™ MS*
Aharoni
David
Levenim mt
Miriam
Narkisim
Rod
Chinese (Simplified)
Chinese (Traditional)
Japanese, Korean
Korean (Hangul)
Arial™ Unicode™ MS*
SimSun fonts such as:
Example SimSun (Founder Extended),
SimSun-18030, NSimSun.
Simhei
YouYuan
PMingLiU
MingLiU
Ming(for-ISO10646)
STSong
* This font is installed together with Microsoft Windows XP and Microsoft Office 2000 or later.
The sections below contain advice on improving recognition accuracy.
Disabling automatic image processing
By default, any pages you add to an OCR project are automatically recognized.
However, if your document contains text in a CJK language combined with a European language, we
recommend disabling automatic detection of page orientation and using the dual page splitting option
only if all of the page images have the correct orientation (e.g. they were not scanned upside down).
You can enable/disable the Correct page orientation and Split facing pages options on the Image
Processing tab of the Options dialog box (click Tools > Options... to open this dialog box).
224
224
224
224
108

225
ABBYY® FineReader 14 User’s Guide
To split facing pages in Arabic, Hebrew, or Yiddish, be sure to select the corresponding OCR
language first and only then select the Split facing pages option. You can also restore the original page
numbering by selecting the Swap book pages option. See also: OCR projects .
If your document has a complex structure, we recommend disabling automatic analysis and OCR for
images and performing these operations manually.
You can turn off automatic analysis and OCR of newly added images on the Image Processing tab of
the Options dialog box (click Tools > Options... to open this dialog box).
1. Click Tools > Options... to open the Options dialog box.
2. On the Image Processing tab, clear the Automatically process page images as they are
added to the OCR Editor option.
3. Click OK.
Recognizing documents written in more than one language
The instructions below are provided as an example and explain how to recognize a document that
contains both English and Chinese text. Documents that contain other languages can be recognized in
a similar manner.
1. On the main toolbar, select More languages... from the list of languages. In the Language
Editor dialog box, select Specify OCR languages manually and select Chinese and English
from the list of languages.
2. Scan your pages or open your images.
3. If the program fails to detect all of the areas on an image:
·Specify areas manually using the area editing tools
·Specify any areas that only contain one language and on the Area Properties select English
or Chinese as appropriate.
A language can only be specified for areas of the same type. If you selected areas of
different types, such as Text and Table, you will not be able to specify a language.
·If necessary, select the text direction from the Orientation drop-down list (for details, see If
vertical or inverted text was not recognized )
·For texts in CJK languages, the program provides a selection of the text directions in the
Direction of CJK text drop-down list (for details, see Editing area properties) .
If non-European characters are not displayed in the Text pane
If text in a CJK language is displayed incorrectly in the Text pane, you may have selected the Plain text
mode.
To change the font used in Plain text mode:
108
188
118
135
121

226
ABBYY® FineReader 14 User’s Guide
1. Click Tools > Options... to open the Options dialog box.
2. Click the Areas and Text tab.
3. Select Arial Unicode MS from the Font used to display plain text drop-down list.
4. Click OK.
If this did not help and text in the Text window is still displayed incorrectly, see Incorrect font is used or
some characters are replaced with "?" or "?" .
Changing the direction of recognized text
ABBYY FineReader detects text direction automatically, but you can also specify text direction manually.
1. Activate the Text pane.
2. Select one or more paragraphs.
3. Click the button on the toolbar in the Text pane.
You can use the Direction of CJK text drop-down list in the Image pane to specify the direction of
text prior to OCR. See also: Editing area properties .
188
128
121
227
ABBYY® FineReader 14 User’s Guide
Supported interface languages
The interface language is selected when ABBYY FineReader is installed. This language will be used for
all the messages, dialog boxes, buttons, and menu items. To change the interface language, follow the
instructions below:
1. Click Options... on the Tools menu to open the Options dialog box and then select the Other
tab.
2. Select the desired language from the Interface language drop-down menu.
3. Click OK.
4. Restart ABBYY FineReader.
ABBYY FineReader 14supports 24 GUI languages:
·English
·Bulgarian
·Hungarian
·Vietnamese
·Dutch
·Greek
·Danish
·Spanish
·Italian
·Chinese Traditional
·Chinese Simplified
·Korean
·German
·Polish
·Portuguese (Brazilian)
·Russian
·Slovak
·Turkish
·Ukrainian

228
ABBYY® FineReader 14 User’s Guide
·French
·Czech
·Swedish
·Estonian
·Japanese
Current date and time on stamps and in Bates numbers
You can create stamps and Bates numbers that display the current date. Use the following tags in the
stamp manager or Bates number manager.
Tag
Example
<d/>
Date in short format
07.02.2013
<date/>
Date in long format
7 February 2013
<t12/>
Time in 12-hour format
9:22 PM
<t24/>
Time in 24-hour format
21:22
<time/>
Time in HH:MM:SS format
21:22:51
By default, the regional settings of your computer will determine the date and time formats. You can
specify a different format. For example, <d=RUS/>, <date=USA/>, or <time=ENG/>. The result will be
immediately displayed in the preview pane.
Click here to see some examples
<d=USA/>
2/7/2013
<d=ENG/>
07/02/2013
<d=RUS/>
07.02.2013
<d=DEU/>
07.02.2013
<d=FRA/>
07/02/2013
<d=ITA/>
07/02/2013
<d=ESP/>
07/02/2013
<d=NLD/>
3-2-2013
<d=PO/>
2013-02-07
<d=HUN/>
2013.02.07

229
ABBYY® FineReader 14 User’s Guide
<d=CZ/>
7.2.2013
<d=SL/>
7. 2. 2013
You can specify custom date and time formats.
Click here to see some examples
<date=USA %A/>
Friday
<date=DEU %B, %Y/>
February, 2013
<time %Hh %Mm/>
09h 22m
You can specify date and time formats using the <date/> and <time/> tags.
<date/> parameters
Example
Year
%y
The year as a number from 01 to 99 (with leading zeros)
01
%#y
The year as a number from 1 to 99 (no leading zeros)
1
%Y
The year as a number from 0001 to 9999 (with leading zeros)
2013
%#Y
The year as a number from 1 to 9999 (no leading zeros)
2013
Month
%b
Abbreviated names of the months
Feb
%B
Full names of the months
February
%m
The month as a number from 01 to 12 (with leading zeros)
02
%#m
The month as a number from 1 to 12 (no leading zeros)
2
Day of month
%d
The day as a number from 01 to 31 (with leading zeros)
07
%#d
The day as a number from 1 to 31 (no leading zeros)
7
Day of week
%a
Abbreviated names of the days
Tu
%A
Full names of the months
Tuesday
230
ABBYY® FineReader 14 User’s Guide
<time/> parameters
Example
Hours
%H
Hours in 24-hour format (from 00 to 23, with leading zeros)
07
%#H
Hours in 24-hour format (from 0 to 23, no leading zeros)
7
%I
Hours in 12-hour format (from 01 to 12, with leading zeros)
05
%#I
Hours in 12-hour format (from 1 to 12, no leading zeros)
5
%p
A.M./P.M. indication for 12-hour format*
AM
Minutes and seconds
%M
Minutes as a number from 00 to 59 (with leading zeros)
04
%#M
Minutes as a number from 0 to 59 (no leading zeros)
4
%S
Seconds as a number from 00 to 59 (with leading zeros)
04
%#S
Seconds as a number from 0 to 59 (no leading zeros)
4
Additional parameter
%%
Percentage symbol
Changing your regional settings
1. Click Start > Control Panel) > Regional and Language Options
2. On the Formats tab, select a format to be used for date and time, or click Options to create
your own date and time format.
In Windows 10, click Start > PC Settings > Time and Language > Region and
language.
______________________
* Available only for the USA, ENG, HUN, and CZ regions.
230
231
ABBYY® FineReader 14 User’s Guide
Fonts required for the correct display of texts in supported
languages
OCR languages
Font
Abkhaz
Arial Unicode MS(*)
Avar
Arial Unicode MS(*) , Lucida Sans Unicode
Agul
Arial Unicode MS(*) , Lucida Sans Unicode
Adyghe
Arial Unicode MS(*) , Lucida Sans Unicode
Altaic
Arial Unicode MS(*) , Lucida Sans Unicode
Arabic
Arial Unicode MS(*)
Armenian (Eastern, Western, Grabar)*
Arial Unicode MS(*)
Bashkir*
Arial Unicode MS(*) , Palatino Linotype
Vietnamese
Arial Unicode MS(*)
Gagauz
Arial Unicode MS(*)
Dargwa
Arial Unicode MS(*) , Lucida Sans Unicode
Zulu
Arial Unicode MS,(*) , Lucida Sans Unicode
Hebrew
Arial Unicode MS(*)
Yiddish
Arial Unicode MS(*)
Ingush
Arial Unicode MS(*) , Lucida Sans Unicode
Kabardian
Arial Unicode MS(*) , Lucida Sans Unicode
Chinese (Simplified), Chinese (Traditional)
Arial Unicode MS(*) , SimSun fonts
Example SimSun (Founder Extended), SimSun-18030,
NSimSun.
Simhei, YouYuan, PMingLiU, MingLiU, Ming(for-ISO10646),
STSong
Korean, Korean (Hangul)
Arial Unicode MS(*) , SimSun fonts
Example SimSun (Founder Extended), SimSun-18030,
NSimSun.
Simhei, YouYuan, PMingLiU, MingLiU, Ming(for-ISO10646),
STSong
Koryak
Arial Unicode MS(*) , Lucida Sans Unicode
232
232
232
232
232
232
232
232
232
232
232
232
232
232
232
232
232
232
232

232
ABBYY® FineReader 14 User’s Guide
Lak
Arial Unicode MS(*) , Lucida Sans Unicode
Lezgi
Arial Unicode MS(*) , Lucida Sans Unicode
Mansi
Arial Unicode MS(*) , Lucida Sans Unicode
Mari
Arial Unicode MS(*)
Ossetian
Arial Unicode MS(*)
Russian (old spelling)
Arial Unicode MS(*) , Palatino Linotype
Tabasaran
Arial Unicode MS(*) , Lucida Sans Unicode
Tajik
Arial Unicode MS(*) , Palatino Linotype
Thai
Arial Unicode MS(*) , Aharoni, David, Levenim mt,
Miriam, Narkisim, Rod
Udmurt
Arial Unicode MS(*)
Khakass
Arial Unicode MS(*)
Khanty
Arial Unicode MS(*)
Hausa
Arial Unicode MS(*) , Lucida Sans Unicode
Chechen
Arial Unicode MS(*) , Lucida Sans Unicode
Chuvash
Arial Unicode MS(*)
Chukchee
Arial Unicode MS(*) , Lucida Sans Unicode
Yakut
Arial Unicode MS(*)
Japanese
Arial Unicode MS(*) , SimSun fonts
Example SimSun (Founder Extended), SimSun-18030,
NSimSun.
Simhei, YouYuan, PMingLiU, MingLiU, Ming(for-ISO10646),
STSong
Where to find/supplied with
(*) Microsoft Office 2000 or later
232
232
232
232
232
232
232
232
232
232
232
232
232
232
232
232
232
232
233
ABBYY® FineReader 14 User’s Guide
Regular expressions
The table below lists the regular expressions that can be used to create a dictionary for a custom
language .
Item name
Conventiona
l regular
expression
symbol
Usage examples and explanations
Any character
.
c.t— denotes "cat," "cot," etc.
Character from
group
[]
[b-d]ell— denotes "bell," "cell," "dell," etc.; [ty]ell— denotes "tell"
and "yell"
Character not from
group
[^]
[^y]ell— denotes "dell," "cell," "tell," but forbids "yell”; [^n-s]ell—
denotes "bell," "cell," but forbids "nell," "oell," "pell," "qell," "rell," and
"sell"
Or
|
c(a|u)t— denotes "cat" and "cut"
0 or more matches
*
10*— denotes numbers 1, 10, 100, 1000, etc.
1 or more matches
+
10+— allows numbers 10, 100, 1000, etc.
Letter or digit
[0-9a-zA-Zа-
яА-Я]
[0-9a-zA-Zа-яА-Я]— allows any single character; [0-9a-zA-Zа-яА-
Я]+— allows any word
Capital Latin letter
[A-Z]
Small Latin letter
[a-z]
Capital Cyrillic letter
[А-Я]
Small Cyrillic letter
[а-я]
Digit
[0-9]
@
Reserved.
Note:
1. To use a regular expression symbol as a normal character, precede it with a back slash. For
example,[t-v]x+ stands for tx, txx, etc., ux, uxx, etc., and vx, vxx, etc., but \[t-v\]x+ stands for [t-v]x,
[t-v]xx, [t-v]xxx, etc.
2. To group regular expression elements, use brackets. For example, (a|b)+|c stands for c or any
combinations like abbbaaabbb, ababab, etc. (a word of any non-zero length in which there may be
any number of a's and b's in any order), while a|b+|c stands for a, c, b, bb, bbb, etc.
Examples
133
234
ABBYY® FineReader 14 User’s Guide
Suppose you are recognizing a table with three columns: birth dates, names, and e-mail addresses. In
this case, you can create two new languages, Data and Address, and specify the following regular
expressions for them. In this case, you can create two new languages, Data and Address, and specify
the following regular expressions for them.
Regular expression for dates:
The number denoting a day may consist of one digit (1, 2, etc.) or two digits (02, 12), but it cannot be
zero (00 or 0). The regular expression for the day should then look like this: ((|0)[1-9])|([1|2][0-9])|(30)|
(31).
The regular expression for the month should look like this: ((|0)[1-9])|(10)|(11)|(12).
The regular expression for the year should look like this: ([19][0-9][0-9])|([0-9][0-9]).
Now all we need to do is combine all this together and separate the numbers by period. The period is a
regular expression symbol, so you must put a back slash (\) before it.
The regular expression for the full date should then look like this:
((|0)[1-9])|([1|2][0-9])|(30)|(31)\. ((|0)[1-9])|(10)|(11)|(12)\.((19)[0-9][0-9])|([0-9][0-9])
Regular expression for e-mail addresses:
[a-zA-Z0-9_\-\.]+\@[a-z0-9\.\-]+
Installing, activating and, registering ABBYY
FineReader 14
Software piracy hurts software manufacturers and end users alike - using an illegal product is never
safe. Legal software ensures that a third party cannot introduce detrimental code changes. ABBYY
makes every effort to protect its intellectual property rights and the security of its customers.
ABBYY software products include special protection technology which prevents unauthorized use by
those who have not entered into a license agreement with ABBYY. To be able to run ABBYY FineReader
without any limitations, you need to activate it.
Registration is optional and registered users enjoy certain benefits.
Chapter contents
·System requirements
·Installing and starting ABBYY FineReader
·Activating ABBYY FineReader
·Registering ABBYY FineReader
·Privacy Policy
235
236
237
238
239

235
ABBYY® FineReader 14 User’s Guide
System requirements
1. Operating system:
·Microsoft® Windows® 10 / 8.1 / 8 / 7
·Microsoft Windows Server® 2016 / 2012 / 2012 R2 / 2008 R2
The operating system must support the language you select for the user interface.
2. 1 GHz or faster 32-bit (x86) or 64-bit (x64) processor with the SSE2 instruction set.
3. 1 GB RAM (4 GB recommended)
An additional 512 MB of RAM is required for each additional processor in a multi-processor
system.
4. 1.2 GB of free disk space for installation and an additional 1.2 GB for program operation
5. Video card and monitor supporting a resolution of at least 1024×768
6. An Internet connection for activating your serial number
7. Keyboard and mouse or other pointing device
Terminal server support
ABBYY FineReader 14 has been tested with the following terminal servers:
·Microsoft® Windows Server® 2012 R2, 2008 R2 (Remote Desktop, RemoteApp and Remote
Desktop Web Access)
·Citrix XenApp 7.9 (using the Installed application accessed from a server scenario)
Scanners and MFPs
ABBYY FineReader 14 supports TWAIN and WIA-compatible scanners and multi-function printers
(MFPs).
For a list of file formats supported by ABBYY FineReader 14, see Supported document formats .
212

236
ABBYY® FineReader 14 User’s Guide
Installing and starting ABBYY FineReader
Installing ABBYY FineReader on one computer
1. Double-click the Setup.exe file on the installation disk or other distribution media.
2. Follow the on-screen instructions in the Installation Wizard.
Deploying ABBYY FineReader 14 in a LAN
ABBYY FineReader can be installed and used on a local area network*. The automated installation
methods give you speed and flexibility when installing ABBYY FineReader on a local area network, as
you do not have to install the program manually on each individual workstation.
The installation consists of two stages. First, the program is installed on the server. From the server, the
program can be installed on workstations using one of the following four methods:
·Using Active Directory
·Using Microsoft System Center Configuration Manager (SCCM)
·From the command line
·Manually in interactive mode
For more information about installing ABBYY FineReader on workstations, using the License Manager,
and working with the program in a local area network, please refer to the System Administrator's Guide.
Download the System Administrator's Guide
Starting ABBYY FineReader
To start ABBYY FineReader 14:
·Click the Start button in Windows and then click All Programs > ABBYY FineReader 14 (in
Windows 10, click the Start > All Programs and then click ABBYY FineReader 14).
·Alternatively, right-click a document file in Windows Explorer (it has to be in one of the supported
formats ) and then click Edit with ABBYY FineReader 14 or Convert with ABBYY
FineReader 14 and select one of the conversion commands.
* This feature is not available in some editions of ABBYY FineReader 14. See also: FineReader page of
the ABBYY website (http://www.ABBYY.com/FineReader/ ) for a list of editions and their features.
236
212
236

237
ABBYY® FineReader 14 User’s Guide
Activating ABBYY FineReader
After you install ABBYY FineReader 14, you will need to activate the program to be able to run it in full
mode. Unless you activate ABBYY FineReader 14, the program will run in trial mode, which lets you try
out the program but limits the number of pages you can save and stops working after a certain period of
time.
To activate ABBYY FineReader 14:
1. In the New Task window, click Help > Activate....
2. Enter your serial number or load a license file if you have one.
Select one of the four activation options displayed in the Activation Wizard:
·Activation over the Internet
Activation is carried out automatically and takes only seconds to complete. An active Internet
connection is required for this method.
·Activation via the ABBYY website
1. Click the link in the Activation Wizard to open the activation page.
2. Copy the Product ID in the Activation Wizard and paste it to the corresponding field on the
page.
3. Copy the serial number in the Activation Wizard and paste it to the corresponding field on the
page.
4. Save the license file to your hard disk.
5. Click Next in the Activation Wizard and specify the path to the license file.
6. Click Next.
ABBYY FineReader 14 will be activated and will run in full mode from now on.
·Activation by e-mail
1. The program will generate an e-mail message with all of the information required for
activation.
2. Send the e-mail message without changing its body text and subject. You will receive a reply
message containing a license file.
3. Save the license file to your hard disk.
4. Specify the path to the license file in the Activation Wizard.
ABBYY FineReader 14 will be activated and will run in full mode from now on.
·Activation by e-mail from another computer
Select this activation method if you can't activate ABBYY FineReader 14 on the computer on
which it is installed (e.g. if it does not have an Internet connection or cannot send e-mail
messages).
244
244

238
ABBYY® FineReader 14 User’s Guide
1. Save the licensing information to a text file.
2. Create a new e-mail message on a computer that can send e-mail messages. Specify
Activation request in the Subject field and FineReader-activation@abbyy.com in the To
field.
3. Copy the contents of the text file to the e-mail message. Do not make any changes to ensure
that your message will be processed automatically and you will receive a prompt reply.
4. Send the message. You will receive a reply message with a license file.
5. Save the license file to your hard disk.
6. Specify the path to the license file in the Activation Wizard.
ABBYY FineReader 14 will be activated and will run in full mode from now on.
After you activate ABBYY FineReader once, you will be able to install it on the same computer any
number of times without having to activate it again. However, if significant changes are made to the
computer's hardware configuration, its hard disk is formatted or its operating system is reinstalled, you
may need to get a license file and activate ABBYY FineReader again.
Registering ABBYY FineReader
We invite you to register your copy of ABBYY FineReader 14 and receive special benefits available to
registered users. Registration is optional.
You can register your copy of ABBYY FineReader:
·By providing your contact information when activating your copy of the product.
If you choose not activate ABBYY FineReader during the activation process, you will be able to
register it later at any convenient time.
·By clicking Help > Register... and providing your contact information in the registration dialog box
·By completing the registration process on the ABBYY website (https://www.abbyy.com/).
Registered users will receive the following benefits:
1. Free technical support .*
2. ABBYY Screenshot Reader , an easy-to-use application for capturing screenshots and
recognizing on-screen text.
3. A way to recover your serial number if you lose it (e.g. when reinstalling your operating system).
We will also send you notifications about updates and new versions of products if you indicate your
consent to receive these notifications during the registration process.
* See also: the technical support page of the ABBYY website (https://www.abbyy.com/en-us/support/).
237
261 238
240

239
ABBYY® FineReader 14 User’s Guide
Privacy policy
You agree to transfer your personal data to ABBYY when you activate, register, and use your copy of
ABBYY FineReader. You also agree that ABBYY may collect, process, and use the data received from
you under the condition of confidentiality and in accordance with applicable law as set forth in the
End-User License Agreement. Any personal information provided by you will be used only within the
ABBYY group of companies and will not be disclosed to any third party unless ABBYY is required to do
so under applicable law or by the End-User License Agreement.
ABBYY may send you e-mail messages containing product news, pricing information, special offers,
and other company and product information only if you agree to receive such information from
ABBYY by selecting the corresponding option in the product registration dialog box. You can ask ABBYY
to delete your e-mail address from the mailing list at any time.

240
ABBYY® FineReader 14 User’s Guide
ABBYY Screenshot Reader
ABBYY Screenshot Reader is an easy-to-use application for creating screenshots and capturing text
from the screen.
ABBYY Screenshot Reader features:
·Create screenshots
·Turn screenshots into editable text
·All the benefits of ABBYY OCR technology
ABBYY Screenshot Reader has a straightforward and intuitive interface, which means that you do not
need any specialist knowledge to be able to make screenshots and recognize text in them. Simply open
any window of any application and select the section of the computer screen which you wish to
"photograph." You can then recognize the screenshot and save the image and the recognized text.
ABBYY Screenshot Reader is available to registered users of certain ABBYY products. For details on
how to register your copy of ABBYY FineReader 14, see Registering ABBYY FineReader .
·Installing and starting ABBYY Screenshot Reader
·Making screenshots and recognizing text
·Additional options
·Tips
Installing and starting ABBYY Screenshot Reader
By default, ABBYY Screenshot Reader is installed on your computer together with ABBYY FineReader
14.
To start ABBYY Screenshot Reader, click the ABBYY Screenshot Reader icon on the taskbar.
There are several other ways to start ABBYY Screenshot Reader:
·Open the New Task window of ABBYY FineReader 14 and click Screenshot Reader on the
Tools menu.
·Open the PDF Editor and click Screenshot Reader on the Tools menu.
·Open the OCR Editor and click Screenshot Reader on the Tools menu.
·In Microsoft Windows, click the Start button and then click ABBYY FineReader 14 > ABBYY
Screenshot Reader on the Start menu. If you are using Windows 10, click the button and
then clickAll Programs > ABBYY FineReader 14 > ABBYY Screenshot Reader on the Start
menu.
238
240
241
242
243
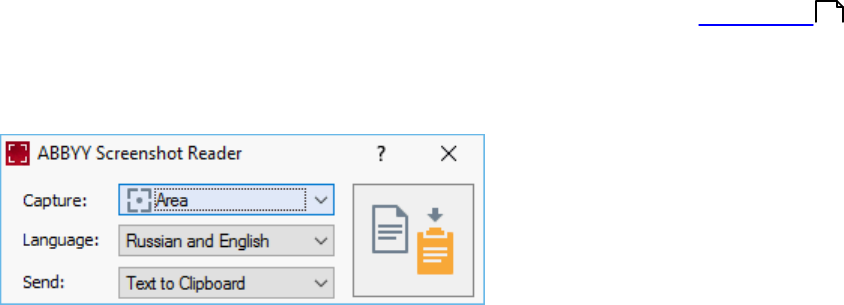
241
ABBYY® FineReader 14 User’s Guide
Making screenshots and recognizing text
ABBYY Screenshot Reader can create screenshots of selected areas on the screen of your computer
and save them to a file, copy them to the Clipboard, or send them to the OCR Editor .
When you launch ABBYY Screenshot Reader, the ABBYY Screenshot Reader window appears on
the screen of your computer.
The ABBYY Screenshot Reader window contains tools for recognizing text and tables on the screen
of your computer, for creating screenshots of selected screen areas, and for setting up the application.
To make a screenshot or to recognize a text fragment:
1. Select a screen capture method from the Capture drop-down list.
·Area
Lets you select an area to capture.
·Window
Captures a specific part of the screen (e.g. a window, a part of a window, or a toolbar).
·Screen
Captures the entire screen.
·Timed Screen
Captures the entire screen after a 5-second delay.
2. Select the language of the text you want to recognize from the Language drop-down list.
3. In the Send drop-down list, select the application to which you want to send the image or
recognized text.
The text and screenshots will be:
- Copied to the clipboard (when you select Text to Clipboard, Table to Clipboard, or Image to
Clipboard from the Send drop-down list).
- Placed in a new document (when you select Text to Microsoft Word[1] or Table to Microsoft
Excel[2] from the Send drop-down list).
- Saved as a file (when you select Text to File, Table to File or Image to File from the Send
drop-down list). The Save As dialog box will open and you will need to specify the name and
format of the file.
- Opened in the OCR Editor of ABBYY FineReader 14 (when you select Image to OCR Editor[3]
from the Send drop-down list). Select this item if the screen area contains both text and pictures.
100

242
ABBYY® FineReader 14 User’s Guide
- Attached to a newly created e-mail message as a *.bmp file (when you select Image to E-mail
from the Send drop-down list).
This item requires:
[1] Microsoft Word
[2] Microsoft Excel
[3] ABBYY FineReader 14
4. Click the button.
Depending on the item you select in the Screenshot list, the screenshot will be created
automatically or a capture tool will appear enabling you to select the desired area:
·If you selected Area from the Capture drop-down list, an area of the screen will be selected.
To adjust the borders of an area, place the mouse pointer on a border and drag it while holding
down the left mouse button. To move an area, select the area and move it while holding down
the left mouse button. When you have selected the desired area, click the Capture button.
·If you selected Window from the Capture drop-down list, place the mouse pointer over the
desired area and when a color frame appears, press the left mouse button.
·If you selected Screen or Timed Screen from the Capture drop-down list, the screenshot will
be created without any further input.
Notes.
1. To cancel screen capture, press the Esc key or click the right mouse button.
2. To cancel recognition, click the Stop button or press the Esc key.
Additional options
To select additional options, right-click on the ABBYY Screenshot Reader icon on the taskbar and
then click Options. The following options are available:
·Always on Top
Keeps the ABBYY Screenshot Reader toolbar on top of all the other windows when switching
between applications.
·Run at Startup
Launches ABBYY Screenshot Reader each time you start your computer.
·Enable Sounds
Plays a sound notification when ABBYY Screenshot Reader copies a screen area to the
Clipboard.

243
ABBYY® FineReader 14 User’s Guide
Tips
1. Working with texts written in several languages
Select a text fragment written entirely in one language. Before starting the recognition process,
make sure that the language you selected from the Language drop-down list is the same as the
language of the text fragment. Select the correct language if it isn't.
2. If the required language is not in the list, select More languages... from the Language drop-
down list and select the desired language in the dialog box that opens.
If you cannot find the required language in the list of available languages:
a. ABBYY Screenshot Reader does not support this language. For a full list of supported
languages, please see http://www.abbyy.com. The list of supported languages may vary in
different editions of the application.
b. This language may have been disabled during custom installation. To install OCR
languages:
1. Open the Control Panel by clicking the Start > Control Panel.
2. In the Control Panel window, click the Add or Remove Programs item.
If you are using Windows 10, click the button and then click Settings >
System > Apps & features.
3. Select ABBYY FineReader 14 from the list of installed software and click the
Change button.
4. Select desired languages in the Custom Setup dialog box.
5. Follow the on-screen instructions in the setup program.
3. If the selected area contains both text and pictures:
In the Send drop-down list, click Image to OCR Editor. The screenshot will be added to an OCR
project in the OCR Editor of FineReader 14, where you can process and recognize it. If the OCR
Editor is already open, the image will be added to the current OCR project. Otherwise, a new OCR
project will be created and the image will be added to this new project.
Appendix
Chapter contents
·Glossary
·Keyboard shortcuts
·Customer Experience Improvement Program
244
250
260
244
ABBYY® FineReader 14 User’s Guide
Glossary
А
Abbreviation A shortened form of a word or phrase (e.g. MS-DOS for Microsoft Disk Operating
System, UN for United Nations, etc.).
ABBYY FineReader task A set of consecutive steps the program needs to perform in order to process
a document. ABBYY FineReader 14 includes a number of built-in tasks for the most common
document processing needs. Users can also create their custom tasks. Tasks are launched in the New
Task window.
ABBYY Hot Folder A scheduling agent that allows users to select a folder with images and specify the
time for processing the images in this folder. ABBYY FineReader will automatically process the images
from the selected folder.
ABBYY Screenshot Reader An application that enables users to create screenshots and recognize
texts on them.
activation The process of obtaining a special code from ABBYY allowing the user to use his/her copy of
the product in full mode on a given computer.
active area The currently selected area on an image. An active area can be deleted, moved or
modified. To make an area active, click it. The frame enclosing an active area is bold and has sizing
handles that can be dragged to change its size.
ADF (Automatic Document Feeder) A device that automatically feeds documents to a scanner. A
scanner with an ADF can scan multiple pages without manual intervention. ABBYY FineReader can
work with multi-page documents.
ADRT® (Adaptive Document Recognition Technology) A technology that increases the quality of
conversion of multi-page documents. For example, it can recognize such elements as headings,
headers and footers, footnotes, page numbering, and signatures.
area A section of an image enclosed by a frame and containing a certain type of data. Before performing
OCR, ABBYY FineReader detects text, picture, table, and barcode areas in order to determine which
sections of the image should be recognized and in what order.
area template A template that contains information about the size and locations of the areas in similar-
looking documents.
automated task A set of document processing steps. ABBYY FineReader 14 includes a number of
preconfigured automated tasks, which are accessible from the New Task window. Users can also
create their own automated tasks.
B
background picture area An image area that contains a picture with text printed over it.
barcode area An image area that contains a barcode.

245
ABBYY® FineReader 14 User’s Guide
base form The form of a word to which endings, prefixes or suffixes are added.
brightness An image parameter that reflects the amount of white in an image. Increasing brightness
makes the image "whiter". Specifying a suitable brightness value increases recognition quality. See also:
Scanning tips .
Back to top
C
code page A table of correspondences between characters and their codes. Users can select the
characters they need from those available in a code page.
color mode A mode that determines whether document colors are to be retained. Black-and-white
images produce smaller OCR projects and are faster to process.
compound word A word made up of two or more existing words. In ABBYY FineReader, a compound
word is a word that the program cannot find in its dictionary but which it can create from two or more
dictionary words.
D
document analysis The process of identifying the logical structure of a document and areas that
contain various types of data. Document analysis can be carried out automatically or manually.
Document Open password A password that prevents users from opening a PDF document unless
they type the password specified by the author.
dpi (dots per inch) A measure of image resolution.
document type A parameter that tells the program how the original text was printed (e.g. on a laser
printer, on a typewriter, etc.). For laser-printed texts, select Auto, for typewritten texts, select
Typewriter, for faxes, select Fax.
driver A software program that controls a computer peripheral (e.g., a scanner, a monitor, etc.).
F
font effects The appearance of a font (e.g. bold, italic, underlined, strikethrough, subscript, superscript,
small caps).
H
headers and footers Images or text in the top or bottom margin of a page. Headers are located at the
top of the page and footers are located at the bottom.
182
244

246
ABBYY® FineReader 14 User’s Guide
I
ignored characters Any non-letter characters found in words (e.g. syllable characters or stress
marks). These characters are ignored during the spell check.
inverted image An image with white characters printed against a dark background.
Back to top
K
keyboard shortcuts Keys or combinations of keys that trigger a specific action when pressed. Using
keyboard shortcuts can significantly increase your productivity.
244

247
ABBYY® FineReader 14 User’s Guide
L
License Manager A utility used for managing ABBYY FineReader licenses and activating ABBYY
FineReader 14 Corporate.
ligature A combination of two or more characters that are "stuck" together (e.g. fi, fl, ffi). Such
characters are difficult for ABBYY FineReader to separate. Treating them as one character improves
OCR accuracy.
low-confidence characters Characters that may have been recognized by the program incorrectly.
low-confidence words Words that contain one or more low-confidence characters.
M
monospaced font A font (such as Courier New) in which all characters are equally spaced. For better
OCR results on monospaced fonts, on the OCR tab of the Options dialog box, select Typewriter in the
Document type group of options.
Back to top
О
OCR (Optical Character Recognition) A technology that enables computers to read text, detect pictures,
tables, and other formatting elements.
OCR project A project created by ABBYY FineReader to process a document. It contains the images of
the document pages, their recognized text (if any), and the program settings.
OCR project options The set of options that can be selected in the Options dialog box (click
Tools>Options... to open this dialog box). These options also include user languages and patterns.
OCR project options can be saved and then used in other OCR projects.
omnifont system A recognition system that recognizes characters set in any font without prior training.
optional hyphen An optional hyphen (¬) indicates exactly where a word or word combination should be
split if it occurs at the end of a line (e.g. "autoformat" should be split into "auto" and "format"). ABBYY
FineReader replaces all hyphens found in dictionary words with optional hyphens.
P
page layout The arrangement of text, tables, pictures, paragraphs, and columns on a page. The fonts,
font sizes, font colors, text background, and text orientation are also part of the page layout.
paradigm All grammatical forms of a word.
pattern A set of associations between averaged character images and their respective names.
Patterns are created when you train ABBYY FineReader on a specific text.
244

248
ABBYY® FineReader 14 User’s Guide
PDF (Portable Document Format) A commonly used document format. A PDF file looks the same no
matter what computer it is displayed on thanks to the detailed descriptions of text, fonts, and graphics it
contains.
PDF document created in another application A PDF document that contains a text layer and
illustrations. This type of PDF document is usually created by converting an editable document file to
PDF. PDF files that were created in other applications are relatively small and fully searchable. Text in
these documents can be selected, edited and deleted, just like text in other editable formats, such as
Microsoft Word documents.
PDF security settings Restrictions that prevent a PDF document from being opened, edited, copied or
printed. These settings include document open passwords, permissions passwords, and encryption
levels.
Permissions password A password that prevents other users from printing and editing a PDF
document unless they type the password specified by the author. If some security settings are selected
for the document, other users will not be able to change these settings until they type the password.
picture area An image area that contains a picture. This type of area may enclose an actual picture or
any other object (e.g. a text fragment) that should be displayed as a picture.
product ID A product identifier that is automatically generated on the basis of the hardware
configuration when activating ABBYY FineReader on a given computer. It does not contain any personal
information or information about the software or data stored on your computer.
prohibited characters Characters that you think will never occur in a text to be recognized. Specifying
prohibited characters increases the speed and quality of OCR.
Back to top
R
recognition area An image area that ABBYY FineReader should analyze automatically.
resolution A scanning parameter measured in dots per inch (dpi). Resolution of 300 dpi should be used
for texts set in 10 pt fonts and larger, 400 to 600 dpi is preferable for texts of smaller font sizes (9 pt and
less).
S
scanner A device for inputting images into a computer.
scanning mode A scanning parameter that determines whether an image must be scanned in black
and white, grayscale, or color.
separators Symbols that can separate words (e.g. /, \, dash) and that are separated by spaces from
the words themselves.
serial number A unique number you receive when you purchase the program. It is used during
activation.
shortcut menu The menu that appears when you right-click something, such as an area or another part
of a document.
244

249
ABBYY® FineReader 14 User’s Guide
support ID The unique identifier of a serial number that contains information about the license and the
computer on which it is used. A Support ID provides additional protection and is checked by the
technical support staff before providing technical support.
Т
table area An image area that contains data in tabular form. When the program reads this type of area,
it draws vertical and horizontal separators inside the area to form a table. This area is then rendered as
a table in the output text.
tagged PDF A PDF document that contains information about the document structure, such as its
logical parts, pictures, and tables. The structure of a document is encoded in PDF tags. A PDF file with
such tags may be reflowed to fit different screen sizes, and will display well on handheld devices.
text area An image area that contains text. Text areas should only contain single-column text.
training The process of establishing a correspondence between a character image and the character
itself. See also: If your printed document contains non-standard fonts .
U
Unicode An international text encoding standard developed by the Unicode Consortium (Unicode, Inc.).
The Unicode standard provides an easily extendible 16-bit system for encoding symbols from almost all
contemporary languages. It specifies how symbols should be encoded and determines which
algorithms and character properties should be used during the encoding process.
Back to top
129
244
250
ABBYY® FineReader 14 User’s Guide
Keyboard shortcuts
ABBYY FineReader offers the following keyboard shortcuts for the most commonly used commands.
·New Task window
·OCR Editor
·PDF Editor
·ABBYY Compare Documents
New Task window
·File menu
·Edit menu
·Tools menu
·Help menu
File menu
Command
Shortcut
New PDF Document
Ctrl+N
Open PDF Document...
Ctrl+O
Open in OCR Editor...
Ctrl+R
Scan to OCR Editor
Ctrl+S
New OCR Project
Ctrl+Shift+N
Open OCR Project...
Ctrl+Shift+O
Exit
Ctrl+Q
***Back to Top
Edit menu
Command
Shortcut
Move Up
Move Down
Remove
Del
250
251
255
258
250 250
250 250
251 251
251 251
250
251
ABBYY® FineReader 14 User’s Guide
Select All
Ctrl+A
Find Recent Documents
Ctrl+F
Tools menu
Command
Shortcut
Options...
Ctrl+>
Help menu
Command
Shortcut
Help
F1
***Back to Top
OCR Editor
·File menu
·Edit menu
·View menu
·Recognize menu
·Area menu
·Tools menu
·Help menu
·General
File menu
Command
Shortcut
New Task...
Ctrl+N
Open Image...
Ctrl+O
Scan Pages...
Ctrl+K
Save Page Images As...
Ctrl+Alt+S
Close
Ctrl+W
250
251 251
252 252
253 253
253 253
254 254
254 254
254 254
254
252
ABBYY® FineReader 14 User’s Guide
New OCR Project
Ctrl+Shift+N
Open OCR Project...
Ctrl+Shift+O
Save OCR Project...
Ctrl+Shift+S
E-mail document
Ctrl+M
E-mail images
Ctrl+Alt+M
Print text
Ctrl+P
Print image
Ctrl+P
Exit
Ctrl+Q
***Back to Top
Edit menu
Command
Shortcut
Undo
Ctrl+Z
Redo
Ctrl+Y
Cut
Ctrl+X
Recognize and Copy Text
Ctrl+C
Copy Area as Image
Ctrl+Shift+C
Paste
Ctrl+V
Delete
Del
Select All
Del+A
Cancel Selection
Ctrl+Shift+A
Delete Pages...
Ctrl+Backspace
Delete Areas and Text
Ctrl+Del
Delete Text
Ctrl+Shift+Del
Rotate Pages Right
Ctrl+Shift+>
Rotate Pages Left
Ctrl+Shift+<
Edit Page Images...
Ctrl+I
Find...
Ctrl+F
Find Next
F3
250
253
ABBYY® FineReader 14 User’s Guide
Replace...
Ctrl+H
***Back to Top
View menu
Command
Shortcut
Show Navigation Pane
F5
Show Zoom Pane
Ctrl+F5
Image Pane Only
F6
Image and Text Panes
F7
Text Pane Only
F8
Next Pane
Ctrl+Tab
Previous Pane
Ctrl+Shift+Tab
Zoom In
Ctrl++
Zoom Out
Ctrl+-
Best Fit
Ctrl+0
Go to Page Number...
Ctrl+G
Go to Next Page
Go to Previous Page
Go to First Page
Ctrl+Home
Go to Last Page
Ctrl+End
Close Page
Ctrl+F4
***Back to Top
Recognize menu
Command
Shortcut
Recognize All Pages
Ctrl+Shift+R
Recognize Page
Ctrl+R
Analyze All Pages
Ctrl+Shift+E
Analyze Page
Ctrl+E
250
250
254
ABBYY® FineReader 14 User’s Guide
Verify Text...
Ctrl+F7
Next Error
Previous Error
Mark Text as Verified
Ctrl+T
Area menu
Command
Shortcut
Recognize Area
Ctrl+Shift+B
Change Area Type to Text
Ctrl+2
Change Area Type to Table
Ctrl+3
Change Area Type to Picture
Ctrl+4
Change Area Type to Background Picture
Ctrl+6
Change Area Type to Barcode
Ctrl+5
Change Area Type to Recognition Area
Ctrl+1
***Back to Top
Tools menu
Command
Shortcut
View Dictionaries...
Ctrl+Alt+D
Redaction Mode
Ctrl+Shift+H
Hot Folder
Ctrl+Shift+F
Options...
Ctrl+>
Help menu
Command
Shortcut
Help
F1
***Back to Top
General
250
250

255
ABBYY® FineReader 14 User’s Guide
Command
Shortcut
Make the selected text fragment bold
Ctrl+B
Make the selected text fragment italic
Ctrl+I
Underline the selected text fragment
Ctrl+U
Go to table cell
Arrow keys
Switch to Pages pane
Alt+1
Switch to Image pane
Alt+2
Switch to Text pane
Alt+3
Switch to Zoom pane
Alt+4
You can also create your own keyboard shortcuts in the OCR Editor .
To create a shortcut in the OCR Editor:
1. Open the Customize Toolbars and Shortcuts dialog box by clicking Вид > Панели
инструментов>Customize....
2. On the Keyboard Shortcuts tab, select a category in the Categories field.
3. In the Commands field, select the command for which you want to specify a keyboard shortcut.
4. Place the cursor in the Press new shortcut key field and press the keys to be used for this
command.
5. Click Assign. The selected key combination will be added into the Current shortcut field.
6. Click OK to save the changes.
7. To return shortcuts to their default values, click Reset (for a selected command category) or
Reset All (for all shortcut keys).
PDF Editor
·File menu
·Edit menu
·View menu
·Tools menu
·Help menu
100
256 256
256 256
257 257
258 258
258 258
256
ABBYY® FineReader 14 User’s Guide
File menu
Command
Shortcut
New Task...
Ctrl+N
Open...
Ctrl+O
Save
Ctrl+S
Save as PDF Document...
Ctrl+Shift+S
Close Document
Ctrl+W
Recognize Document
Ctrl+Shift+R
Print...
Ctrl+P
Exit
Ctrl+Q
***Back to Top
Edit menu
Command
Shortcut
Undo
Ctrl+Z
Redo
Ctrl+Y
Cut
Ctrl+X
Copy
Ctrl+C
Copy Area as Image
Ctrl+C
Copy Area as Text
Ctrl+Shift+C
Copy Area as Table
Ctrl+Alt+C
Paste
Ctrl+V
Delete
Del
Select All
Ctrl+A
Add Pages from File...
Ctrl+Shift+O
Add Pages from Scanner...
Ctrl+Shift+A
Rotate Pages Right
Ctrl+Shift+>
Rotate Pages Left
Ctrl+Shift+<
250
257
ABBYY® FineReader 14 User’s Guide
Delete Pages...
Ctrl+Backspace
Add Bookmark...
Ctrl+D
Find
Ctrl+F
Find Next
F3
***Back to Top
View menu
Command
Shortcut
Show Navigation Pane
F5
Search
F9
Digital Signatures
F8
Show PDF Tools
F6
Show Comments Pane
F7
Zoom In
Ctrl++
Zoom Out
Ctrl+-
Best Fit
Ctrl+0
Actual Size
Ctrl+8
Fit to Width
Ctrl+9
Go to Page Number...
Ctrl+G
Next Page
Previous Page
First Page
Home
Last Page
End
Back
Forward
One-Page View
Ctrl+1
One-Page Scrolling
Ctrl+2
Two-Page View
Ctrl+3
Two-Page Scrolling
Ctrl+4
250
258
ABBYY® FineReader 14 User’s Guide
Full Screen
F11
***Back to Top
Tools menu
Command
Shortcut
Edit Text and Pictures
Ctrl+E
Text Box
Ctrl+T
Add Note
Ctrl+M
Highlight
Ctrl+H
Underline
Ctrl+U
Strikethrough
Ctrl+K
Insert Text
Ctrl+J
Search and Mark Up
F9
Redaction Mode
Ctrl+R
Options...
Ctrl+>
***Back to Top
Help menu
Command
Shortcut
Help
F1
ABBYY Compare Documents
·File menu
·Edit menu
·View menu
·Compare menu
·Help menu
File menu
250
250
258 258
259 259
259 259
259 259
260 260
259
ABBYY® FineReader 14 User’s Guide
Command
Shortcut
New Comparison
Ctrl+N
Open Document...
Ctrl+O
Close Document
Ctrl+W
Save Document with Differences as PDF...
Ctrl+S
Exit
Ctrl+Q
***Back to Top
Edit menu
Command
Shortcut
Undo
Ctrl+Z
Redo
Ctrl+Y
Select All Differences
Ctrl+A
***Back to Top
View menu
Command
Shortcut
Zoom In
Ctrl++
Zoom Out
Ctrl+-
Fit to Width
Ctrl+0
Next Page
Previous Page
Compare menu
Command
Shortcut
Compare Documents
Ctrl+R
Next Difference
Previous Difference
Ignore Difference
Del
250
250

260
ABBYY® FineReader 14 User’s Guide
Help menu
Command
Shortcut
Help
F1
***Back to Top
Customer Experience Improvement Program
At ABBYY, we are constantly seeking to improve the effectiveness and usability of our products. In order
to accomplish this, we need to know how users interact with out products and which functions they use.
Since contacting every user directly and asking for feedback isn't possible, the Customer Experience
Improvement Program was created. This program is completely anonymous and participation is strictly
voluntary. If you choose to participate, information about your system and the settings you use in your
ABBYY product (build number, part number, license type, name of your operating system and your
region) will be sent from your computer to ABBYY from time to time, without any effort on your part. No
personal data will ever be sent to ABBYY during this process.
An internet connection is required to send this information.
To participate in the Customer Experience Improvement Program:
·Select the Anonymously share ABBYY FineReader 14 settings in order to improve this
software option on the Other tab of the Options dialog box (click Tools>Options... to open this
dialog box).
You can opt out of the Customer Experience Improvement Program at any time by clearing the
Anonymously share ABBYY FineReader 14 settings in order to improve this software option
in the Options dialog box.
For more information about the Customer Experience Improvement Program, please visit
http://www.abbyy.com.
250

261
ABBYY® FineReader 14 User’s Guide
Technical support
If you have any questions regarding the use of ABBYY FineReader, please consult all the documentation
you have (the User's Guide and Help) before contacting our technical support service. You may also
wish to review the answers to frequently asked questions in the ABBYY knowledge base.
If you can't find the answer to your question in the product documentation or in the knowledge base,
please contact the ABBYY technical support service. You can create a new support ticket using an
online form at http://onlinesupport.abbyy.com.
In the case of a technical issue, please attach a system report file to your support ticket. To generate a
system report, click Help > About > System Info... > Save....
If you cannot generate a system report, please provide the following information in your support ticket:
·The serial number of your copy or Support ID (click Help > About > License Info to find out
the serial number of your copy of the product).
·The build number of your copy (click Help > About to find out the build number of your copy of the
product).
·The version of your Windows.
·Any other information that you think is relevant.
Technical support is provided only to registered users subject to the Product Life Cycle and Technical
Support Policy. To register your copy of the product, please visit this page of the ABBYY website or click
Help>Register... in the product.
244
262
ABBYY® FineReader 14 User’s Guide
Copyrights
© 2017 ABBYY Production LLC. ABBYY, ABBYY FineReader, FineReader, ADRT, and Adaptive Document Recognition Technology are
either registered trademarks or trademarks of ABBYY Softw are Ltd.
© 2000-2012 Datalogics, Inc.
Datalogics®, The DL Logo®, PDF2IMG™ and DLE™ are trademarks of Datalogics, Inc.
© 1984-2012 Adobe Systems Incorporated and its licensors. All rights reserved.
Adobe®, Acrobat®, The Adobe Logo®, the Adobe PDF logo®, Adobe® PDF Library™, Pow ered by Adobe PDF Library logo, Reader® are
either registered trademarks or trademarks of Adobe Systems Incorporated in the United States and/or other countries.
Portions of this computer program are copyright © 2008 Celartem, Inc. All rights reserved.
Portions of this computer program are copyright © 2011 Caminova, Inc. All rights reserved.
Portions of this computer program are copyright © 2013 Cuminas, Inc. All rights reserved.
DjVu is protected by U.S. Patent No. 6,058,214. Foreign Patents Pending.
Pow ered by AT&T Labs Technology.
© 2002-2008 Intel Corporation. Intel is a trademark of Intel Corporation in the U.S. and/or other countries.
Copyright © 1991-2016 Unicode, Inc. All rights reserved.
Distributed under the Terms of Use in http://w w w .unicode.org/copyright.html.
Permission is hereby granted, free of charge, to any person obtaining a copy of the Unicode data files and any associated documentation
(the "Data Files") or Unicode softw are and any associated documentation (the "Softw are") to deal in the Data Files or Softw are w ithout
restriction, including without limitation the rights to use, copy, modify, merge, publish, distribute, and/or sell copies of the Data Files or
Softw are, and to permit persons to w hom the Data Files or Softw are are furnished to do so, provided that (a) this copyright and permission
notice appear w ith all copies of the Data Files or Softw are, (b) this copyright and permission notice appear in associated documentation,
and (c) there is clear notice in each modified Data File or in the Softw are as w ell as in the documentation associated w ith the Data File(s) or
Softw are that the data or softw are has been modified.
THE DATA FILES AND SOFTWARE ARE PROVIDED "AS IS", WITHOUT WARRANTY OF ANY KIND, EXPRESS OR IMPLIED, INCLUDING BUT
NOT LIMITED TO THE WARRANTIES OF MERCHANTABILITY, FITNESS FOR A PARTICULAR PURPOSE AND NONINFRINGEMENT OF THIRD
PARTY RIGHTS. IN NO EVENT SHALL THE COPYRIGHT HOLDER OR HOLDERS INCLUDED IN THIS NOTICE BE LIABLE FOR ANY CLAIM, OR
ANY SPECIAL INDIRECT OR CONSEQUENTIAL DAMAGES, OR ANY DAMAGES WHATSOEVER RESULTING FROM LOSS OF USE, DATA OR
PROFITS, WHETHER IN AN ACTION OF CONTRACT, NEGLIGENCE OR OTHER TORTIOUS ACTION, ARISING OUT OF OR IN CONNECTION
WITH THE USE OR PERFORMANCE OF THE DATA FILES OR SOFTWARE.
Except as contained in this notice, the name of a copyright holder shall not be used in advertising or otherw ise to promote the sale, use or
other dealings in these Data Files or Softw are w ithout prior w ritten authorization of the copyright holder.
Unicode is a registered trademark of Unicode, Inc. in the United States and other countries.
JasPer License Version 2.0:
Copyright © 2001-2006 Michael David Adams
Copyright © 1999-2000 Image Pow er, Inc.
Copyright © 1999-2000 The University of British Columbia
All rights reserved.
Portions of this softw are are copyright © 2009 The FreeType Project (w w w .freetype.org). All rights reserved.
This softw are is based in part on the w ork of the Independent JPEG Group.
PDF-XChange Standard © 2001-2013 by Tracker Softw are Products Ltd.

263
ABBYY® FineReader 14 User’s Guide
© Microsoft Corporation. All rights reserved. Microsoft, Active Directory, Excel, Office 365, OneDrive, Outlook, Pow erPoint, SharePoint,
Visio, Windows, Windows Server, and Window s Design 2012 are either registered trademarks or trademarks of Microsoft Corporation in
the United States and/or other countries.
Apache, OpenOffice and the gull logo are trademarks of The Apache Softw are Foundation registered in the US and/or other countries. No
endorsement by The Apache Softw are Foundation is implied by the use of these marks.
Copyright (c) 1997,1998,2002,2007 Adobe Systems Incorporated
Permission is hereby granted, free of charge, to any person obtaining a copy of this documentation file to use, copy, publish, distribute,
sublicense, and/or sell copies of the documentation, and to permit others to do the same, provided that:
- No modification, editing or other alteration of this document is allow ed; and
- The above copyright notice and this permission notice shall be included in all copies of the documentation.
Permission is hereby granted, free of charge, to any person obtaining a copy of this documentation file, to create their ow n derivative
w orks from the content of this document to use, copy, publish, distribute, sublicense, and/or sell the derivative w orks, and to permit others
to do the same, provided that the derived w ork is not represented as being a copy or version of this document.
Adobe shall not be liable to any party for any loss of revenue or profit or for indirect, incidental, special, consequential, or other similar
damages, w hether based on tort (including w ithout limitation negligence or strict liability), contract or other legal or equitable grounds even if
Adobe has been advised or had reason to know of the possibility of such damages. The Adobe materials are provided on an "AS IS" basis.
Adobe specifically disclaims all express, statutory, or implied warranties relating to the Adobe materials, including but not limited to those
concerning merchantability or fitness for a particular purpose or non-infringement of any third party rights regarding the Adobe materials.
Copyright © 2010-2013 Marti Maria Saguer. All rights reserved.
Copyright (c) 2003 Calyptix Security Corporation
All rights reserved.
This code is derived from softw are contributed to Calyptix Security Corporation by Yuliang Zheng. Redistribution and use in source and
binary forms, w ith or w ithout modification, are permitted provided that the follow ing conditions are met: 1. Redistributions of source code
must retain the above copyright notice, this list of conditions and the follow ing disclaimer. 2. Redistributions in binary form must reproduce
the above copyright notice, this list of conditions and the follow ing disclaimer in the documentation and/or other materials provided w ith the
distribution. 3. Neither the name of Calyptix Security Corporation nor the names of its contributors may be used to endorse or promote
products derived from this softw are w ithout specific prior w ritten permission. THIS SOFTWARE IS PROVIDED BY THE COPYRIGHT
HOLDERS AND CONTRIBUTORS "AS IS" AND ANY EXPRESS OR IMPLIED WARRANTIES, INCLUDING, BUT NOT LIMITED TO, THE IMPLIED
WARRANTIES OF MERCHANTABILITY AND FITNESS FOR A PARTICULAR PURPOSE ARE DISCLAIMED. IN NO EVENT SHALL THE
COPYRIGHT OWNER OR CONTRIBUTORS BE LIABLE FOR ANY DIRECT, INDIRECT, INCIDENTAL, SPECIAL, EXEMPLARY, OR
CONSEQUENTIAL DAMAGES (INCLUDING, BUT NOT LIMITED TO, PROCUREMENT OF SUBSTITUTE GOODS OR SERVICES; LOSS OF USE,
DATA, OR PROFITS; OR BUSINESS INTERRUPTION) HOWEVER CAUSED AND ON ANY THEORY OF LIABILITY, WHETHER IN CONTRACT,
STRICT LIABILITY, OR TORT (INCLUDING NEGLIGENCE OR OTHERWISE) ARISING IN ANY WAY OUT OF THE USE OF THIS SOFTWARE,
EVEN IF ADVISED OF THE POSSIBILITY OF SUCH DAMAGE.
Miama Nueva Copyright (c) 2014, Linus Romer, w ith Reserved Font Name Miama Nueva.
Pecita Copyright (c) 2009-2015, Philippe Cochy, (http://pecita.eu ), w ith Reserved Font Name Pecita.
Bad Script Regular Copyright (c) 2011, Cyreal (w w w .cyreal.org ) w ith Reserved Font Name "Bad Script".
This Font Softw are is licensed under the SIL Open Font License, Version 1.1.
This license is copied in End-User License Agreement, and is also available w ith a FAQ at: http://scripts.sil.org/OFL
MD5C.C - RSA Data Security, Inc., MD5 message-digest algorithm
Copyright (C) 1991-2, RSA Data Security, Inc. Created 1991. All rights reserved.
This softw are is derived from the RSA Data Security, Inc. MD5 Message-Digest Algorithm.
262
262

264
ABBYY® FineReader 14 User’s Guide
Copyright (c) 1998-2011 The OpenSSL Project. All rights reserved.
This product includes softw are developed by the OpenSSL Project for use in the OpenSSL Toolkit (http://w w w .openssl.org/ ).
Copyright (C) 1995-1998 Eric Young (eay@cryptsoft.com) All rights reserved.
This product includes cryptographic softw are w ritten by Eric Young (eay@cryptsoft.com)
Eric Young is the author of the parts of the library used.
This product includes softw are w ritten by Tim Hudson (tjh@cryptsoft.com) .
OpenSSL License Copyright (c) 1998-2011 The OpenSSL Project. All rights reserved. Redistribution and use in source and binary forms,
w ith or w ithout modification, are permitted provided that the follow ing conditions are met: 1. Redistributions of source code must retain the
above copyright notice, this list of conditions and the follow ing disclaimer. 2. Redistributions in binary form must reproduce the above
copyright notice, this list of conditions and the follow ing disclaimer in the documentation and/or other materials provided with the distribution.
3. All advertising materials mentioning features or use of this softw are must display the follow ing acknow ledgment: "This product includes
softw are developed by the OpenSSL Project for use in the OpenSSL Toolkit. (http://w w w .openssl.org/ )" 4. The names "OpenSSL
Toolkit" and "OpenSSL Project" must not be used to endorse or promote products derived from this softw are w ithout prior w ritten
permission. For w ritten permission, please contact openssl-core@openssl.org . 5. Products derived from this softw are may not be
called "OpenSSL" nor may "OpenSSL" appear in their names w ithout prior w ritten permission of the OpenSSL Project. 6. Redistributions of
any form whatsoever must retain the following acknowledgment: "This product includes softw are developed by the OpenSSL Project for
use in the OpenSSL Toolkit (http://w w w .openssl.org/ )" THIS SOFTWARE IS PROVIDED BY THE OpenSSL PROJECT ``AS IS'' AND ANY
EXPRESSED OR IMPLIED WARRANTIES, INCLUDING, BUT NOT LIMITED TO, THE IMPLIED WARRANTIES OF MERCHANTABILITY AND
FITNESS FOR A PARTICULAR PURPOSE ARE DISCLAIMED. IN NO EVENT SHALL THE OpenSSL PROJECT OR ITS CONTRIBUTORS BE
LIABLE FOR ANY DIRECT, INDIRECT, INCIDENTAL, SPECIAL, EXEMPLARY, OR CONSEQUENTIAL DAMAGES (INCLUDING, BUT NOT LIMITED
TO, PROCUREMENT OF SUBSTITUTE GOODS OR SERVICES; LOSS OF USE, DATA, OR PROFITS; OR BUSINESS INTERRUPTION) HOWEVER
CAUSED AND ON ANY THEORY OF LIABILITY, WHETHER IN CONTRACT, STRICT LIABILITY, OR TORT (INCLUDING NEGLIGENCE OR
OTHERWISE) ARISING IN ANY WAY OUT OF THE USE OF THIS SOFTWARE, EVEN IF ADVISED OF THE POSSIBILITY OF SUCH DAMAGE.
This product includes cryptographic softw are w ritten by Eric Young (eay@cryptsoft.com) . This product includes softw are w ritten by
Tim Hudson (tjh@cryptsoft.com) .
Original SSLeay License
Copyright (C) 1995-1998 Eric Young (eay@cryptsoft.com) All rights reserved. This package is an SSL implementation w ritten by Eric
Young (eay@cryptsoft.com) . The implementation was w ritten so as to conform w ith Netscape`s SSL. This library is free for
commercial and non-commercial use as long as the follow ing conditions are adhered to. The follow ing conditions apply to all code found in
this distribution, be it the RC4, RSA, lhash, DES, etc., code; not just the SSL code. The SSL documentation included w ith this distribution is
covered by the same copyright terms except that the holder is Tim Hudson (tjh@cryptsoft.com) . Copyright remains Eric Young's, and
as such any Copyright notices in the code are not to be removed. If this package is used in a product, Eric Young should be given
attribution as the author of the parts of the library used. This can be in the form of a textual message at program startup or in documentation
(online or textual) provided with the package. Redistribution and use in source and binary forms, w ith or w ithout modification, are permitted
provided that the following conditions are met: 1. Redistributions of source code must retain the copyright notice, this list of conditions and
the follow ing disclaimer. 2. Redistributions in binary form must reproduce the above copyright notice, this list of conditions and the follow ing
disclaimer in the documentation and/or other materials provided with the distribution. 3. All advertising materials mentioning features or use
of this softw are must display the follow ing acknowledgement: "This product includes cryptographic softw are w ritten by Eric Young
(eay@cryptsoft.com) " The w ord 'cryptographic' can be left out if the routines from the library being used are not cryptographic related
:-). 4. If you include any Window s specific code (or a derivative thereof) from the apps directory (application code) you must include an
acknow ledgement: "This product includes softw are w ritten by Tim Hudson (tjh@cryptsoft.com) " THIS SOFTWARE IS PROVIDED BY
ERIC YOUNG ``AS IS'' AND ANY EXPRESS OR IMPLIED WARRANTIES, INCLUDING, BUT NOT LIMITED TO, THE IMPLIED WARRANTIES OF
MERCHANTABILITY AND FITNESS FOR A PARTICULAR PURPOSE ARE DISCLAIMED. IN NO EVENT SHALL THE AUTHOR OR
CONTRIBUTORS BE LIABLE OR ANY DIRECT, INDIRECT, INCIDENTAL, SPECIAL, EXEMPLARY, OR CONSEQUENTIAL DAMAGES (INCLUDING,
BUT NOT LIMITED TO, PROCUREMENT OF SUBSTITUTE GOODS OR SERVICES; LOSS OF USE, DATA, OR PROFITS; OR BUSINESS
INTERRUPTION) HOWEVER CAUSED AND ON ANY THEORY OF LIABILITY, WHETHER IN CONTRACT, STRICT LIABILITY, OR TORT
(INCLUDING NEGLIGENCE OR OTHERWISE) ARISING IN ANY WAY OUT OF THE USE OF THIS SOFTWARE, EVEN IF ADVISED OF THE
POSSIBILITY OF SUCH DAMAGE. The license and distribution terms for any publically available version or derivative of this code cannot be
changed. i.e. this code cannot simply be copied and put under another distribution license [including the GNU Public License.]
Chrome V8
Copyright 2006-2011, the V8 project authors. All rights reserved.
Copyright 2014, the V8 project authors. All rights reserved.
Redistribution and use in source and binary forms, w ith or w ithout modification, are permitted provided that the follow ing conditions are met:
* Redistributions of source code must retain the above copyright notice, this list of conditions and the follow ing disclaimer.
262
262
262
262
262
262
262
262
262
262
262
262
262
262
265
ABBYY® FineReader 14 User’s Guide
* Redistributions in binary form must reproduce the above copyright notice, this list of conditions and the follow ing disclaimer in the
documentation and/or other materials provided with the distribution.
* Neither the name of Google Inc. nor the names of its contributors may be used to endorse or promote products derived from this softw are
w ithout specific prior w ritten permission.
THIS SOFTWARE IS PROVIDED BY THE COPYRIGHT HOLDERS AND CONTRIBUTORS "AS IS" AND ANY EXPRESS OR IMPLIED
WARRANTIES, INCLUDING, BUT NOT LIMITED TO, THE IMPLIED WARRANTIES OF MERCHANTABILITY AND FITNESS FOR A PARTICULAR
PURPOSE ARE DISCLAIMED. IN NO EVENT SHALL THE COPYRIGHT OWNER OR CONTRIBUTORS BE LIABLE FOR ANY DIRECT, INDIRECT,
INCIDENTAL, SPECIAL, EXEMPLARY, OR CONSEQUENTIAL DAMAGES (INCLUDING, BUT NOT LIMITED TO, PROCUREMENT OF SUBSTITUTE
GOODS OR SERVICES; LOSS OF USE, DATA, OR PROFITS; OR BUSINESS INTERRUPTION) HOWEVER CAUSED AND ON ANY THEORY OF
LIABILITY, WHETHER IN CONTRACT, STRICT LIABILITY, OR TORT (INCLUDING NEGLIGENCE OR OTHERWISE) ARISING IN ANY WAY OUT
OF THE USE OF THIS SOFTWARE, EVEN IF ADVISED OF THE POSSIBILITY OF SUCH DAMAGE.
Chrome V8 / Strongtalk
Copyright (c) 1994-2006 Sun Microsystems Inc.
All Rights Reserved.
Redistribution and use in source and binary forms, w ith or w ithout modification, are permitted provided that the follow ing conditions are met:
* Redistributions of source code must retain the above copyright notice, this list of conditions and the follow ing disclaimer.
* Redistribution in binary form must reproduce the above copyright notice, this list of conditions and the follow ing disclaimer in the
documentation and/or other materials provided with the distribution.
* Neither the name of Sun Microsystems or the names of contributors may be used to endorse or promote products derived from this
softw are w ithout specific prior w ritten permission.
THIS SOFTWARE IS PROVIDED BY THE COPYRIGHT HOLDERS AND CONTRIBUTORS "AS IS" AND ANY EXPRESS OR IMPLIED
WARRANTIES, INCLUDING, BUT NOT LIMITED TO, THE IMPLIED WARRANTIES OF MERCHANTABILITY AND FITNESS FOR A PARTICULAR
PURPOSE ARE DISCLAIMED. IN NO EVENT SHALL THE COPYRIGHT OWNER OR CONTRIBUTORS BE LIABLE FOR ANY DIRECT, INDIRECT,
INCIDENTAL, SPECIAL, EXEMPLARY, OR CONSEQUENTIAL DAMAGES (INCLUDING, BUT NOT LIMITED TO, PROCUREMENT OF SUBSTITUTE
GOODS OR SERVICES; LOSS OF USE, DATA, OR PROFITS; OR BUSINESS INTERRUPTION) HOWEVER CAUSED AND ON ANY THEORY OF
LIABILITY, WHETHER IN CONTRACT, STRICT LIABILITY, OR TORT (INCLUDING NEGLIGENCE OR OTHERWISE) ARISING IN ANY WAY OUT
OF THE USE OF THIS SOFTWARE, EVEN IF ADVISED OF THE POSSIBILITY OF SUCH DAMAGE.
The TWAIN Toolkit is distributed as is. The developer and distributors of the TWAIN Toolkit expressly disclaim all implied, express or
statutory w arranties including, w ithout limitation, the implied warranties of merchantability, non-infringement of third party rights and fitness
for a particular purpose. Neither the developers nor the distributors w ill be liable for damages, w hether direct, indirect, special, incidental, or
consequential, as a result of the reproduction, modification, distribution or other use of the TWAIN Toolkit.
EPUB and EPUB logo are registered trademarks of the IDPF (International Digital Publishing Forum).
JavaScript is a registered trademark of Oracle and/or its affiliates.
Amazon, Kindle and the related logo are trademarks of Amazon.com, Inc. or its affiliates.
Arial is a trademark of The Monotype Corporation and may be registered in certain jurisdictions.
Palatino is a trademark of Monotype Imaging Inc. and may be registered in certain other jurisdictions.
Lucida is a trademark of Bigelow & Holmes Inc. registered in the U.S. Patent and Trademark Office and in the European Union, and may be
registered in other jurisdictions.
Corel and WordPerfect are trademarks or registered trademarks of Corel Corporation and/or its subsidiaries in Canada, the United States
and/or other countries.
266
ABBYY® FineReader 14 User’s Guide
Citrix, Citrix XenApp, and Citrix logo are trademarks of Citrix Systems, Inc. and/or one or more of its subsidiaries, and may be registered in
the United States Patent and Trademark Office and in other countries. The statements made and opinions expressed herein belong
exclusively to ABC EDUCATION SERVICES and are not shared by or represent the viewpoint of Citrix Systems, Inc. This presentation does
not constitute an endorsement of any product, service or point of view . Citrix makes no representations, w arranties or assurances of any
kind, express or implied, as to the completeness, accuracy, reliability, suitability, availability or currency of the content contained in this
presentation or any material related to this presentation. In no event shall Citrix, its agents, officers, employees, licensees or affiliates be
liable for any damages w hatsoever (including, w ithout limitation, damages for loss of profits, business information, loss of information)
arising out of the information or statements contained in the presentation. Any reliance you place on such content is strictly at your ow n
risk.
All other trademarks are the sole property of their respective ow ners.
