Adobe After Effects 6.5 Scripting Guide Instruction Manual 65
User Manual: adobe After Effects - 6.5 - Instruction Manual Free User Guide for Adobe After Effects Software, Manual
Open the PDF directly: View PDF ![]() .
.
Page Count: 253 [warning: Documents this large are best viewed by clicking the View PDF Link!]
- About Help
- Navigating in Help
- Printing Help
- Overview
- Writing Scripts
- JavaScript Debugging
- Reference
- Objects, methods, attributes, and globals
- Global functions
- Application object
- Application beginSuppressDialogs() method
- Application beginUndoGroup() method
- Application buildName attribute
- Application buildNumber attribute
- Application endSuppressDialogs() method
- Application endUndoGroup() method
- Application endWatchFolder() method
- Application exitAfterLaunchAndEval attribute
- Application exitCode attribute
- Application isProfessionalVersion attribute
- Application isRenderEngine attribute
- Application isWatchFolder attribute
- Application language attribute
- Application newProject() method
- Application onError attribute
- Application open() method
- Application pauseWatchFolder() method
- Application project attribute
- Application purge() method
- Application quit() method
- Application registeredCompany attribute
- Application registeredName attribute
- Application setMemoryUsageLimits() method
- Application setSavePreferencesOnQuit() method
- Application settings attribute
- Application version attribute
- Application watchFolder() method
- AVItem object
- AVItem duration attribute
- AVItem footageMissing attribute
- AVItem frameDuration attribute
- AVItem frameRate attribute
- AVItem hasAudio attribute
- AVItem hasVideo attribute
- AVItem height attribute
- AVItem name attribute
- AVItem pixelAspect attribute
- AVItem proxySource attribute
- AVItem setProxy() method
- AVItem setProxyToNone() method
- AVItem setProxyWithPlaceholder() method
- AVItem setProxyWithSequence() method
- AVItem setProxyWithSolid() method
- AVItem time attribute
- AVItem usedIn attribute
- AVItem useProxy attribute
- AVItem width attribute
- AVLayer object
- AVLayer adjustmentLayer attribute
- AVLayer audioActive attribute
- AVLayer audioActiveAtTime() method
- AVLayer audioEnabled attribute
- AVLayer blendingMode attribute
- AVLayer canSetCollapseTransformation attribute
- AVLayer canSetTimeRemapEnabled attribute
- AVLayer collapseTransformation attribute
- AVLayer effectsActive attribute
- AVLayer frameBlending attribute
- AVLayer guideLayer attribute
- AVLayer hasAudio attribute
- AVLayer hasTrackMatte attribute
- AVLayer height attribute
- AVLayer isNameFromSource attribute
- AVLayer isTrackMatte attribute
- AVLayer motionBlur attribute
- AVLayer preserveTransparency attribute
- AVLayer quality attribute
- AVLayer source attribute
- AVLayer threeDLayer attribute
- AVLayer timeRemapEnabled attribute
- AVLayer trackMatteType attribute
- AVLayer width attribute
- Collection object
- CompItem object
- CompItem activeCamera attribute
- CompItem bgColor attribute
- CompItem displayStartTime attribute
- CompItem draft3d attribute
- CompItem duplicate() method
- CompItem frameBlending attribute
- CompItem frameDuration attribute
- CompItem hideShyLayers attribute
- CompItem layer() method
- CompItem layers attribute
- CompItem motionBlur attribute
- CompItem numLayers attribute
- CompItem preserveNestedFrameRate attribute
- CompItem preserveNestedResolution attribute
- CompItem resolutionFactor attribute
- CompItem selectedLayers attribute
- CompItem selectedProperties attribute
- CompItem shutterAngle attribute
- CompItem shutterPhase attribute
- CompItem workAreaDuration attribute
- CompItem workAreaStart attribute
- File Class
- File object
- File close() method
- File copy() method
- File creator attribute
- File encoding attribute
- File eof attribute
- File hidden attribute
- File length attribute
- File lineFeed attribute
- File open() method
- File openDialog() Class method
- File read() method
- File readch() method
- File readln() method
- File readonly attribute
- File saveDialog() Class method
- File seek() method
- File tell() method
- File type attribute
- File write() method
- File writeln() method
- FileSource object
- FileSystem Class
- FileSystem object
- FileSystem absoluteURI attribute
- FileSystem alias attribute
- FileSystem created attribute
- FileSystem error attribute
- FileSystem exists attribute
- FileSystem fsName attribute
- FileSystem getRelativeURI() method
- FileSystem modified attribute
- FileSystem name attribute
- FileSystem parent attribute
- FileSystem path attribute
- FileSystem relativeURI attribute
- FileSystem remove() method
- FileSystem rename() method
- FileSystem resolve() method
- Folder class
- Folder object
- FolderItem object
- FootageItem object
- FootageSource object
- FootageSource alphaMode attribute
- FootageSource conformFrameRate attribute
- FootageSource displayFrameRate attribute
- FootageSource fieldSeparationType attribute
- FootageSource guessAlphaMode() method
- FootageSource guessPulldown() method
- FootageSource hasAlpha attribute
- FootageSource highQualityFieldSeparation attribute
- FootageSource invertAlpha attribute
- FootageSource isStill attribute
- FootageSource loop attribute
- FootageSource nativeFrameRate attribute
- FootageSource premulColor attribute
- FootageSource removePulldown attribute
- ImportOptions object
- Item object
- ItemCollection
- KeyframeEase object
- Layer object
- Layer active attribute
- Layer activeAtTime() method
- Layer copyToComp() method
- Layer duplicate() method
- Layer enabled attribute
- Layer hasVideo attribute
- Layer index attribute
- Layer inPoint attribute
- Layer locked attribute
- Layer moveAfter() method
- Layer moveBefore() method
- Layer moveToBeginning() method
- Layer moveToEnd() method
- Layer name attribute
- Layer nullLayer attribute
- Layer outPoint attribute
- Layer parent attribute
- Layer remove() method
- Layer selectedProperties attribute
- Layer setParentWithJump() method
- Layer shy attribute
- Layer solo attribute
- Layer startTime attribute
- Layer stretch attribute
- Layer time attribute
- LayerCollection
- MarkerValue object
- MaskPropertyGroup object
- OutputModule object
- OMCollection
- OutputModule applyTemplate() method
- PlaceholderSource object
- Project object
- Project activeItem attribute
- Project bitsPerChannel attribute
- Project close() method
- Project consolidateFootage() method
- Project file attribute
- Project importFile() method
- Project importPlaceholder() method
- Project importFileWithDialog() method
- Project item() method
- Project items attribute
- Project numItems attribute
- Project reduceProject() method
- Project removeUnusedFootage() method
- Project renderQueue attribute
- Project rootFolder attribute
- Project save() method
- Project saveWithDialog() method
- Project selection attribute
- Project showWindow() method
- Project timecodeBaseType attribute
- Project timecodeDisplayType attribute
- Project timecodeFilmType attribute
- Project timecodeNTSCDropFrame attribute
- Project transparencyGridThumbnails attribute
- Property object
- Property addKey() method
- Property canVaryOverTime attribute
- Property expression attribute
- Property expressionEnabled attribute
- Property expressionError attribute
- Property hasMax attribute
- Property hasMin attribute
- Property isInterpolationTypeValid() method
- Property isSpatial attribute
- Property isTimeVarying attribute
- Property KeyframeInterpolationType attribute
- Property keyInInterpolationType() method
- Property keyInSpatialTangent() method
- Property keyInTemporalEase() method
- Property keyOutInterpolationType() method
- Property keyOutSpatialTangent() method
- Property keyOutTemporalEase() method
- Property keyRoving() method
- Property keySelected() method
- Property keySpatialAutoBezier() method
- Property keySpatialContinuous() method
- Property keyTemporalAutoBezier() method
- Property keyTemporalContinuous() method
- Property keyTime() method
- Property keyValue() method
- Property maxValue attribute
- Property minValue attribute
- Property nearestKeyIndex() method
- Property numKeys attribute
- Property propertyValueType attribute
- Property removeKey() method
- Property selectedKeys attribute
- Property setInterpolationTypeAtKey() method
- Property setRovingAtKey() method
- Property setSelectedAtKey() method
- Property setSpatialAutoBezierAtKey() method
- Property setSpatialContinuousAtKey() method
- Property setSpatialTangentsAtKey() method
- Property setTemporalAutoBezierAtKey() method
- Property setTemporalContinuousAtKey() method
- Property setTemporalEaseAtKey() method
- Property setValue() method
- Property setValueAtKey() method
- Property setValueAtTime() method
- Property setValuesAtTimes() method
- Property unitsText attribute
- Property value attribute
- Property valueAtTime() method
- PropertyBase object
- PropertyBase active attribute
- PropertyBase canSetEnabled attribute
- PropertyBase duplicate() method
- PropertyBase elided attribute
- PropertyBase enabled attribute
- PropertyBase isEffect attribute
- PropertyBase isMask attribute
- PropertyBase isModified attribute
- PropertyBase matchName attribute
- PropertyBase moveTo() method
- PropertyBase name attribute
- PropertyBase parentProperty attribute
- PropertyBase propertyDepth attribute
- PropertyBase propertyGroup() method
- PropertyBase propertyIndex attribute
- PropertyBase propertyType attribute
- PropertyBase remove() method
- PropertyBase selected attribute
- PropertyGroup object
- RenderQueue object
- RQItemCollection
- RenderQueueItem object
- RenderQueueItem applyTemplate() method
- RenderQueueItem comp attribute
- RenderQueueItem elapsedSeconds attribute
- RenderQueueItem logType attribute
- RenderQueueItem numOutputModules attribute
- RenderQueueItem onStatusChanged attribute
- RenderQueueItem outputModules attribute
- RenderQueueItem outputModule() method
- RenderQueueItem remove() method
- RenderQueueItem render attribute
- RenderQueueItem saveAsTemplate() method
- RenderQueueItem skipFrames attribute
- RenderQueueItem startTime attribute
- RenderQueueItem status attribute
- RenderQueueItem templates attribute
- RenderQueueItem timeSpanDuration attribute
- RenderQueueItem timeSpanStart attribute
- Settings object
- Shape object
- SolidSource object
- System object
- TextDocument object
- Examples
- Creating User Interface Elements
- The Socket Object
- Encoding Names
- Object Properties
Using Help Back 1
Help Using Help
Using Help Back 1
Using Help
About Help
Adobe Systems Incorporated provides complete documentation in an Adobe PDF-based
help system. This help system includes information on all tools, commands, and features
of an application. It is designed for easy on-screen navigation and can also be printed and
used as a desktop reference. Additionally, it supports third-party screen-reader applica-
tions that run in a Windows environment.
Navigating in Help
Help opens in an Adobe Acrobat window with the Bookmarks pane open. (If the
Bookmarks pane is not open, click the Bookmarks tab at the left edge of the window.) At
the top and bottom of each page is a navigation bar containing links to this page (Using
Help), the table of contents (Contents), and the index (Index).
To move through pages sequentially, you can click the Next Page and the Previous
Page arrows; click the navigation arrows at the bottom of the page; or click Back to
return to the last page you viewed.
You can navigate Help topics by using bookmarks, the table of contents, the index, or the
Search (Acrobat 6) or Find (Acrobat 5) command.
To find a topic using bookmarks:
1
I
n the Bookmarks pane, click the plus sign (+) (Windows) or the right-facing arrow (Mac
OS) next to a bookmark topic to view its subtopics.
2
C
lick the bookmark to go to that topic.
To find a topic using the table of contents:
1
C
lick Contents in the navigation bar.
2
On the Contents page, click a topic to go to that topic.
3
To view a list of subtopics, click the plus sign (+) (Windows) or the right-facing arrow
(Mac OS) next to the topic name in the Bookmarks pane.
To find a topic using the index:
1
D
o one of the following:
•
Click Index in the navigation bar, and then click a letter at the top of the page.
•
Ι
n the Bookmarks pane, expand the Index bookmark to view the letter subtopics; then
click a letter.
2
Locate the entry you want to view, and click the page number to go to that topic.
3
To view other entries for the same topic, click Back to return to the same place in the
index, and then click another page number.

Using Help Back 2
Help Using Help
Using Help Back 2
To find a topic using the Search command (Acrobat 6):
1
Choose Edit > Search.
2
Type a word or phrase in the text box and click Search. Acrobat searches the document
and displays every occurrence of the word or phrase in the Results area of the Search PDF
pane.
To find a topic using the Find command (Acrobat 5):
1
Choose Edit > Find.
2
Type a word or phrase in the text box and click Find. Acrobat searches the document,
starting from the current page, and displays the first occurrence.
3
To find the next occurrence, choose Edit > Find Again.
Printing Help
Although Help is optimized for on-screen viewing, you can print selected pages or the
entire file.
To print Help:
Choose File > Print, or click the Print icon in the Acrobat toolbar.

Using Help Back 3
Help Overview
Using Help Back 3
Overview
The
Adobe After Effects 6.5 Render Automation & Scripting Guide
demonstrates how to take procedural control
of your After Effects projects via scripting. This feature set is available only in Adobe After Effects 6.5 Profes-
sional Edition.
With the use of system-level scripting, you can streamline your render pipeline and avoid a lot of repetitive
pointing and clicking. If you have used expressions or other JavaScript-like techniques for animating, or
worked with system scripting in AppleScript or Visual Basic, you will recognize the power of application
scripting in After Effects. With some practice, and with sufficient experience using the JavaScript language,
you can take control of your graphics pipeline.
If you know nothing about scripting
After Effects 6.5 is a visual tool with a graphical user interface; you are used to interacting with it via interface
elements such as menus, palettes and icons. For the most part, this is the most accessible way to work.
Scripting is designed for situations in which this methodology involves tedious repetition or painstaking
searching and sorting that could be automated. It is also useful for leveraging the power of networked
rendering in situations where Watch Folder is less powerful (and less convenient to set up).
Scripting is designed to help users of After Effects get past these types of obstacles, and it is available even to
users who have no inclination to learn the JavaScript language. If you are this type of user, you can still harness
the power of scripting via third party solutions such as Rush Render Queue, a graphical user interface to set
up distributed renders from any computer on the network without having to set up on individual machines.
You can also leverage the contributions of scripting users who share scripts with other users. Larger studios
may have such users in-house, while other users can visit forums such as those found at www.adobe-
forums.com.
After Effects objects
You may not think of After Effects as a collection of hierarchical objects, but when you make use of render
queue items, compositions, and projects, that is how they appear in scripting. Just as the expressions features
in After Effects give you access to virtually any property of any layer inside any composition of your project
(each of which we refer to as an object), scripting gives you access to the hierarchy of objects within After
Effects and allows you to make changes to these objects.
After Effects scripting is based on ECMAScript (or more specifically, the 3rd Edition of the ECMA-262
Standard). Further documentation on this standard can be found at www.ecma-international.org.
Expressions and motion math
Because scripting can access individual layer properties, and because it utilizes JavaScript, one might assume
that expressions and scripting are one and the same. However, they are two entirely distinct entities. Expres-
sions have no ability to access information from scripts (such as variables and functions), although a script
can be written to create or edit an expression.
The similarity between expressions and scripting is, however, apparent in that they are both drawn from the
same language, ECMA standard JavaScript. Thus, knowing how to utilize one is helpful in understanding the
other.

Using Help Back 4
Help Overview
Using Help Back 4
Motion math is no longer included in After Effects; its functionality has been superseded by scripting and
expressions. All mathematical and logical operators common to ECMAScript are available in scripting.
For example, with expressions it is possible to simulate the physics of a a bouncing ball by applying mathe-
matical rules to a “ball” layer. But using scripting, you can create a whole user interface that allows a bouncing
ball and shadow layer to be animated using criteria entered by the user.
About this guide
This guide is for users who manage a graphics pipeline (which may include other scriptable applications as
well) and who want to write scripts to add custom capabilities to After Effects.
This functionality is also offered via third-party network rendering management solutions. These products
feature software designed to help manage this process, so it is possible to take advantage of this functionality
without having to perform manual editing of scripts.
Although this guide is intended to provide an understanding of the extensions that have been added to the
ECMAScript/JavaScript language for scripting of After Effects projects, to take full advantage of what is
possible with scripting you will also need an understanding of writing scripts at the system level (for
integration with AppleScript on the Mac and DOS shell scripts on Windows systems) and a background in
how to work with JavaScript.
Much of what scripting can accomplish replicates what can be done via the After Effects user interface, so a
thorough knowledge of the application itself is also essential to understanding how to use this functionality.
Note that JavaScript objects normally referred to as “properties” are consistently called “attributes” in this
guide, to avoid confusion with After Effects’ own definition of a Property (an animatable value of an effect or
transform within an individual layer).
Activating full scripting features
For security reasons, the scripting features that operate outside the After Effects application (such as adding
and deleting files and folders on volumes, or accessing the network) are disabled by default.
To enable these features, choose Preferences > General, and select Allow Scripts to Write Files and Access
Network.
By selecting this box, you enable the following:
•
Writing files
•
Creating folders
•
Setting the current folder
•
Creating a socket
•
Opening a socket
•
Listening to a socket
The JavaScript Debugger is disabled by default so that casual users do not encounter it. When editing or
writing scripts, the JavaScript Debugger can help you diagnose script problems more quickly.
To activate the JavaScript Debugger on the local machine when a script error is encountered, choose Prefer-
ences > General, and select Enable JavaScript Debugger.
Note that the JavaScript Debugger operates only when executing a script, not with expressions, even though
expressions also make use of JavaScript.

Using Help Back 5
Help Overview
Using Help Back 5
For detailed information on the JavaScript Debugger, see “JavaScript Debugging” on page 15.
Accessing and writing scripts
To create and edit scripts for After Effects, use an external text-editing application that creates files with
Unicode UTF-8 text encoding. Beware of applications such as Microsoft Word that by default add header
information to files (these create line 0 errors in scripts, causing them to fail). A script can reside anywhere,
although to appear in the Scripts menu it must be saved in the Scripts folder within the After Effects appli-
cation folder. For details on writing and editing scripts, see “Writing Scripts” on page 6.
There is no built-in method for recording a series of actions in After Effects into a script, as you can with
Photoshop actions. Scripts are created outside After Effects and then executed within it, or externally via a
command-line or third-party render management software.
Uses of After Effects scripting
One primary use for scripting in After Effects 6.5 is render automation. Anyone charged with managing a
complex rendering pipeline will be interested in this. Render automation can be accomplished either by hand-
coding scripts or via a third-party network rendering solution that supports automated management of
network rendering pipelines.
There are other uses for scripting; it can be a shortcut around tedious tasks that would otherwise involve
repetitious pointing and clicking.
See “Examples” on page 179 for examples of what scripts can do.

Using Help Back 6
Help Writing Scripts
Using Help Back 6
Writing Scripts
When you use Adobe After Effects, you create projects, compositions, and Render Queue items along with all
of the elements that they contain: footage, images, solids, layers, masks, effects, and properties. Each of these
items, in scripting terms, is an object.
The heart of a scriptable application is the object model. In After Effects, the object model is composed of
projects, items, compositions, layers, and Render Queue items. Each object has its own special attributes, and
every object in an After Effects project has its own identity (although not all are accessible to scripting).
You should be familiar with the After Effects object model in order to create scripts. For more resources for
learning scripting, see “More resources to learn scripting” on page 8.
Editing scripts
After Effects 6.5 does not include a script editor. You can use any text editor to create, edit, and save scripts,
but it is recommended that you choose an application that does not automatically add header information
when saving files and that saves with Unicode (UTF-8) encoding.
Windows applications that are useful for editing scripts include EM Editor or the built-in Notepad (be sure to
set Encoding within save options to UTF-8).
Mac OS applications that are useful for editing scripts include BBEdit or the built-in OS X Textedit (be sure
to set the Save type in Preferences to Unicode [UTF-8]).
The .jsx format
After Effects scripts must include the .jsx file extension in order to be properly recognized by the application.
This extension is a variation on the standard “.js” extension used with normal JavaScript files; any UTF-8
encoded text file with this extension will be recognized.
The Scripts menu and Scripts folder
After Effects scripts reside in the Scripts folder, within the same folder as your After Effects 6.5 application file.
Only scripts contained in this Scripts folder are automatically listed in the Scripts menu, although a script file
can reside anywhere.
To run a script that does not appear in the Scripts menu, choose File > Run Script > Choose File, and choose
the script in the Open dialog box. Alternatively, you can send After Effects a script from a command line (on
Windows) or from AppleScript (on Mac OS).
To appear in the Open dialog box, your script must include the proper .jsx file extension.
Shutdown and Startup folders
Within the Scripts folder are two folders called Startup and Shutdown. After Effects runs scripts in these
folders automatically on starting and quitting, respectively.
In the Startup folder you can place scripts that you wish to execute at startup of the application. They are
executed after the application is initialized and all plug-ins are loaded.

Using Help Back 7
Help Writing Scripts
Using Help Back 7
Scripting shares a global environment, so any script executed at startup can define variables and functions that
are available to all scripts. In all cases, variables and functions, once defined by running a script that contains
them, persist in succeeding scripts during a given After Effects session. Once the application is quit, all such
globally defined variables and functions are cleared.
Please note that this persistence of global settings also means that if you are not careful about giving variables
in scripts unique names, you can inadvertently reassign global variables intended to persist throughout a
session.
Properties can also be embedded in existing objects such as the Application object (see “Application object”
on page 26) to extend the application for other scripts.
The Shutdown folder scripts are executed as the application quits. This occurs after the project is closed but
before any other application shutdown occurs.
Sending a script to After Effects from the system
If you are familiar with how to run a script from the command line in Windows or via AppleScript, you can
send a script directly to the open After Effects application, which then runs automatically.
How to include After Effects scripting in a command line (Windows)
Following are examples of DOS shell scripts that will send an After Effects script to the application without
using the After Effects user interface to execute the script.
In the first example, you would copy and paste your After Effects script directly into the command line script
and then run it, as follows (your script text would appear in quotation marks following the afterfx.exe -s
command):
afterfx.exe –s “alert (“You just sent an alert to After Effects”)”
Alternatively, you could specify the location of the .jsx file to be executed, as follows:
afterfx.exe –r c:\myDocuments\Scripts\yourAEScriptHere.jsx
How to include After Effects scripting in an AppleScript (Mac OS)
Following are three examples of AppleScripts that will send an existing .jsx file containing an After Effects
script to the application without using the After Effects user interface to execute the script.
In the first example, you copy your After Effects script directly into the AppleScript and then run it, as follows
(your script text would appear in quotation marks following the DoScript command):
tell application “Adobe After Effects 6.5”
DoScript “alert (\”You just sent an alert to After Effects\”)”
end tell
Alternatively, you could display a dialog box asking for the location of the .jsx file to be executed, as follows:
set thefile to choose file
tell application “Adobe After Effects 6.5”
DoScript thefile
end tell

Using Help Back 8
Help Writing Scripts
Using Help Back 8
Finally, this script is perhaps most useful when you are working directly on editing a .jsx script and want to
send it to After Effects for testing or to run. To use it effectively you must enter the application that contains
the open .jsx file (in this example it is TextEdit); if you do not know the proper name of the application, type
in your best guess to replace “TextEdit” and AppleScript prompts you to locate it.
Simply highlight the script text that you want to run, and then activate this AppleScript:
(*
This script sends the current selection to After Effects as a script.
*)
tell application “TextEdit”
set the_script to selection as text
end tell
tell application "Adobe After Effects 6.5"
activate
DoScript the_script
end tell
For more information on using AppleScript, check out Matt Neuberg’s
AppleScript: the Definitive Guide
(O’Reilly & Associates) or Sal Soghoian’s
AppleScript 1-2-3
(Peachpit Press).
Testing and troubleshooting
Any After Effects script that contains an error preventing it from being completed generates an error message
from the application. This error message includes information about the nature of the error and the line of
the script on which it occurred.
Additionally, After Effects includes a JavaScript debugger. For more information on activating and using the
debugger, see “JavaScript Debugging” on page 15.
More resources to learn scripting
Many resources exist for learning more about scripting that uses the ECMA standard.
The After Effects scripting engine supports the 3rd Edition of the ECMA-262 Standard, including its
notational and lexical conventions, types, objects, expressions and statements.
For a complete listing of the keywords and operators included with ECMAScript, please refer to Ecma-
262.pdf, available at www.ecma-international.org/publications/standards/ECMA-262.HTM.
Books that deal with JavaScript 1.2 are also useful for understanding how scripting works in After Effects. One
book that is something of a standard for JavaScript users is
JavaScript, The Definitive Guide
(O’Reilly) by David
Flanagan. Another very readable source is
JavaScript: A Beginner’s Guide
(Osborne) by John Pollock. Both of
these texts contain information that pertains only to extensions of JavaScript for Internet browsers; however,
they also contain thorough descriptions of scripting fundamentals.
There are also books for using AppleScript and creating Windows command line scripts, each of which can be
used to send scripts to After Effects.
Using Help Back 9
Help Writing Scripts
Using Help Back 9
Keywords and statement syntax
Although it is not possible to provide an exhaustive resource describing usage of JavaScript, the following
tables provide an overview of keywords, statements, operators, precedence and associativity.
The following table lists and describes all keywords and statements recognized by the After Effects scripting
engine.
Table 1 Keywords and Statement Syntax
Operators
The following tables list and describe all operators recognized by the After Effects scripting engine and show
the precedence and associativity for all operators.
Table 2 Description of Operators
Keyword/Statement Description
break
Standard JavaScript; exit the currently executing loop.
continue
Standard JavaScript; cease execution of the current loop iteration.
case
label used in a switch statement
default
label used in a switch statement when a case label is not found
do - while
Standard JavaScript construct. Similar to the
while
loop, except loop condition evaluation occurs
at the end of the loop.
false
Literal representing boolean false.
for
Standard JavaScript loop construct.
for - in
Standard JavaScript construct. Provides a way to easily loop through the properties of an object.
function
Used to define a function.
if/if - else
Standard JavaScript conditional constructs.
new
Standard JavaScript constructor statement.
null
Assigned to a variable, array element, or object property to indicate that it does not contain a legal
value.
return
Standard JavaScript way of returning a value from a function or exiting a function.
switch
Standard JavaScript way of evaluating an expression and attempting to match the expression's
value to a
case
label.
this
Standard JavaScript method of indicating the current object.
true
Literal representing boolean true.
undefined
Indicates that the variable, array element, or object property has not yet been assigned a value.
var
Standard JavaScript syntax used to declare a local variable.
while
Standard JavaScript construct. Similar to the
do - while
loop, except loop condition evaluation
occurs at the beginning of the loop.
with
Standard JavaScript construct used to specify an object to use in ensuing statements.
Operators Description
new
Allocate object.
Using Help Back 10
Help Writing Scripts
Using Help Back 10
delete
Deallocate object.
typeof
Returns data type.
void
Returns undefined value.
.
Structure member.
[]
Array element.
()
Function call.
++
Pre- or post-increment.
--
Pre- or post-decrement.
-
Unary negation or subtraction.
~
Bitwise NOT.
!
Logical NOT.
*
Multiply.
/
Divide.
%
Modulo division.
+
Add.
<<
Bitwise left shift.
>>
Bitwise right shift.
>>>
Unsigned bitwise right shift.
<
Less than.
<=
Less than or equal.
>
Greater than.
>=
Greater than or equal.
==
Equal.
!=
Not equal.
&
Bitwise AND.
^
Bitwise XOR.
|
Bitwise OR.
&&
Logical AND.
||
Logical OR.
?:
Conditional (ternary).
=
Assignment.
+=
Assignment with add operation.
-=
Assignment with subtract operation.
*=
Assignment with multiply operation.
Operators Description
Using Help Back 11
Help Writing Scripts
Using Help Back 11
Table 3 Operator Precedence
Render automation with aerender
One primary use for scripting in After Effects 6.5 is render automation. Anyone charged with managing a
complex rendering pipeline will be interested in this. Render automation can be accomplished either by hand-
coding scripts or via a third-party network rendering solution that supports automated management of
network rendering pipelines.
Note:
There are other uses for scripting; it can be a shortcut around tedious tasks that would otherwise involve
repetitious pointing and clicking. See “Examples” on page 179 for examples of what scripts can do.
/=
Assignment with divide operation.
%=
Assignment with modulo operation.
<<=
Assignment with bitwise left shift operation.
>>=
Assignment with bitwise right shift operation.
>>>=
Assignment with bitwise right shift unsigned operation.
&=
Assignment with bitwise AND operation.
^=
Assignment with bitwise XOR operation.
|=
Assignment with bitwise OR operation.
,
Multiple evaluation.
Operators (Listed from highest precedence —top row—to lowest) Associativity
[], (), .
left to right
new, delete, -(unary negation), ~, !, typeof, void,++, -- right to left
*, /, % left to right
+, -(subtraction) left to right
<<, >>, >>> left to right
<, <=, >, >= left to right
==, != left to right
&left to right
^left to right
|left to right
&& left to right
|| left to right
?: right to left
=, /=, %=, <<=, >>=, >>>=, &=, ^=, |=, +=, -=, *= right to left
,left to right
Operators Description
Using Help Back 12
Help Writing Scripts
Using Help Back 12
Usage
The command-line application aerender renders After Effects compositions. The render may be performed
either by an already running instance of After Effects or by a newly invoked instance. By default, aerender will
invoke a new instance of After Effects, even if one is already running. To change this, see the "-reuse" flag in
the following “Arguments” below.
Arguments
From the command line aerender takes a series of optional arguments that are added following the executable
command (i.e. aerender.exe). Some are single flags, like "-reuse". Some come in flag-argument pairs, like "-
project project_path". And one comes in a triplet, -mem_usage image_cache_percent max_mem_percent.
With 0 arguments, or with any argument equaling "-help", aerender prints a usage message with the infor-
mation contained in this section.
Argument Usage
-help print usage message
-reuse Use this flag if you want to try and reuse an already running instance
of After Effects to perform the render. By default, aerender launches
a new instance of After Effects, even if one is already running. But,
if After Effects is already running, and the -reuse flag is provided,
aerender asks the already running instance of After Effects to
perform the render. Whenever aerender launches a new instance of
After Effects, it tells After Effects to quit when rendering is
completed; otherwise, it doesn’t quit After Effects. Also, the prefer-
ences are written to file upon quitting when the -reuse flag is
specified; otherwise it isn’t written.
-project project_path where project_path is a file path or URI specifying a project file to
open. If none is provided, aerender will work with the currently
open project. If no project is open and no project is provided, an
error will result.
-comp comp_name where comp_name specifies a comp to be rendered.
If the comp is in the render queue already, and in a queueable state,
then (only) the first queueable instance of that comp on the render-
queue is rendered.
If the comp is in the project but not in the render queue, then it is
added to the render queue and rendered.
If no -comp argument is provided, aerender renders the entire
render queue as is. In this case (no -comp), the only other
arguments used are -project, -log, -v, -mem_usage, and -close;
the -RStemplate, -OMtemplate, -output, -s, -e, and arguments
are ignored.
Using Help Back 13
Help Writing Scripts
Using Help Back 13
-RStemplate
render_settings_template
where render_settings_template is the name of a template to apply
to the render queue item.
If the template does not exist, it is an error. Default is to use the
render template already defined for the item.
-OMtemplate
output_module_template
where output_module_template is the name of a template to apply
to the output module. If the template does not exist, it is an error.
Default is to use the template already defined for the output
module.
-output output_path where output_path is a file path or URI specifying the destination
render file. Default is the path already in the project file.
-log logfile_path where logfile_path is a file path or URI specifying the location of
the log file. Default is stdout.
-s start_frame where start_frame is the first frame to render. Default is the start
frame in the file.
-e end_frame where end_frame is the last frame to render. Note, this is "inclusive;"
the final frame is rendered. Default is the end frame in the file.
-i increment where increment is the number of frames to advance before
rendering a new frame. A value of 1 (the default) results in a normal
rendering of all frames. Higher increments will repeat the same
(frame increment-1) times and then render a new one, starting the
cycle again. Higher values result in faster renders but choppier
motion. Default is 1.
-mem_usage
image_cache_percent
max_mem_percent
where image_cache_percent specifies the maximum percent of
memory used to cache already rendered images/footage, and
max_mem_percent specifies the total percent of memory that can
be used by After Effects.
-v verbose_flag where verbose_flag specifies the type of messages reported.
Possible values are ERRORS (prints only fatal and problem errors)
or ERRORS_AND_PROGRESS (prints progress of rendering as
well). Default value is ERRORS_AND_PROGRESS.
-close close_flag where close_flag specifies whether or not toclose the project when
done rendering, and whether or not to save changes.
If close_flag is DO_NOT_SAVE_CHANGES, the project is closed
without saving changes.
If close_flag is SAVE_CHANGES, project is closed and changes are
saved. If close_flag is DO_NOT_CLOSE the project is left open; but
the project is left open only if using an already-running instance of
After Effects, since new invocations of After Effects must always
close and quit when done. Default value is
DO_NOT_SAVE_CHANGES.
Argument Usage
Using Help Back 14
Help Writing Scripts
Using Help Back 14
Examples
To render just Comp 1 to a specified file, enter:
aerender -project c:\projects\proj1.aep -comp "Comp 1" -output c:\output\proj1\proj1.avi
To render everything in the render queue as is in the project file, enter:
aerender -project c:\projects\proj1.aep
To render frames 1-10 using multi-machine render, enter:
aerender -project c:\projects\proj1.aep -comp "Comp 1" -s 1 -e 10
-RStemplate "Multi-Machine Settings"
-OMtemplate "Multi-Machine Sequence"
-output c:\output\proj1\frames[####].psd
-sound sound_flag where sound_flag specifies whether or not to play a sound when
rendering is complete. Possible values are ON or OFF. Default value
is OFF.
-version Displays the version number of aerender to the console. Does not
render.
Argument Usage
Using Help Back 15
Help JavaScript Debugging
Using Help Back 15
JavaScript Debugging
This section describes the JavaScript Debugger, which appears when the Enable JavaScript Debugger
preference is selected in General Preferences (it is deselected by default) and there is an error when executing
a script.
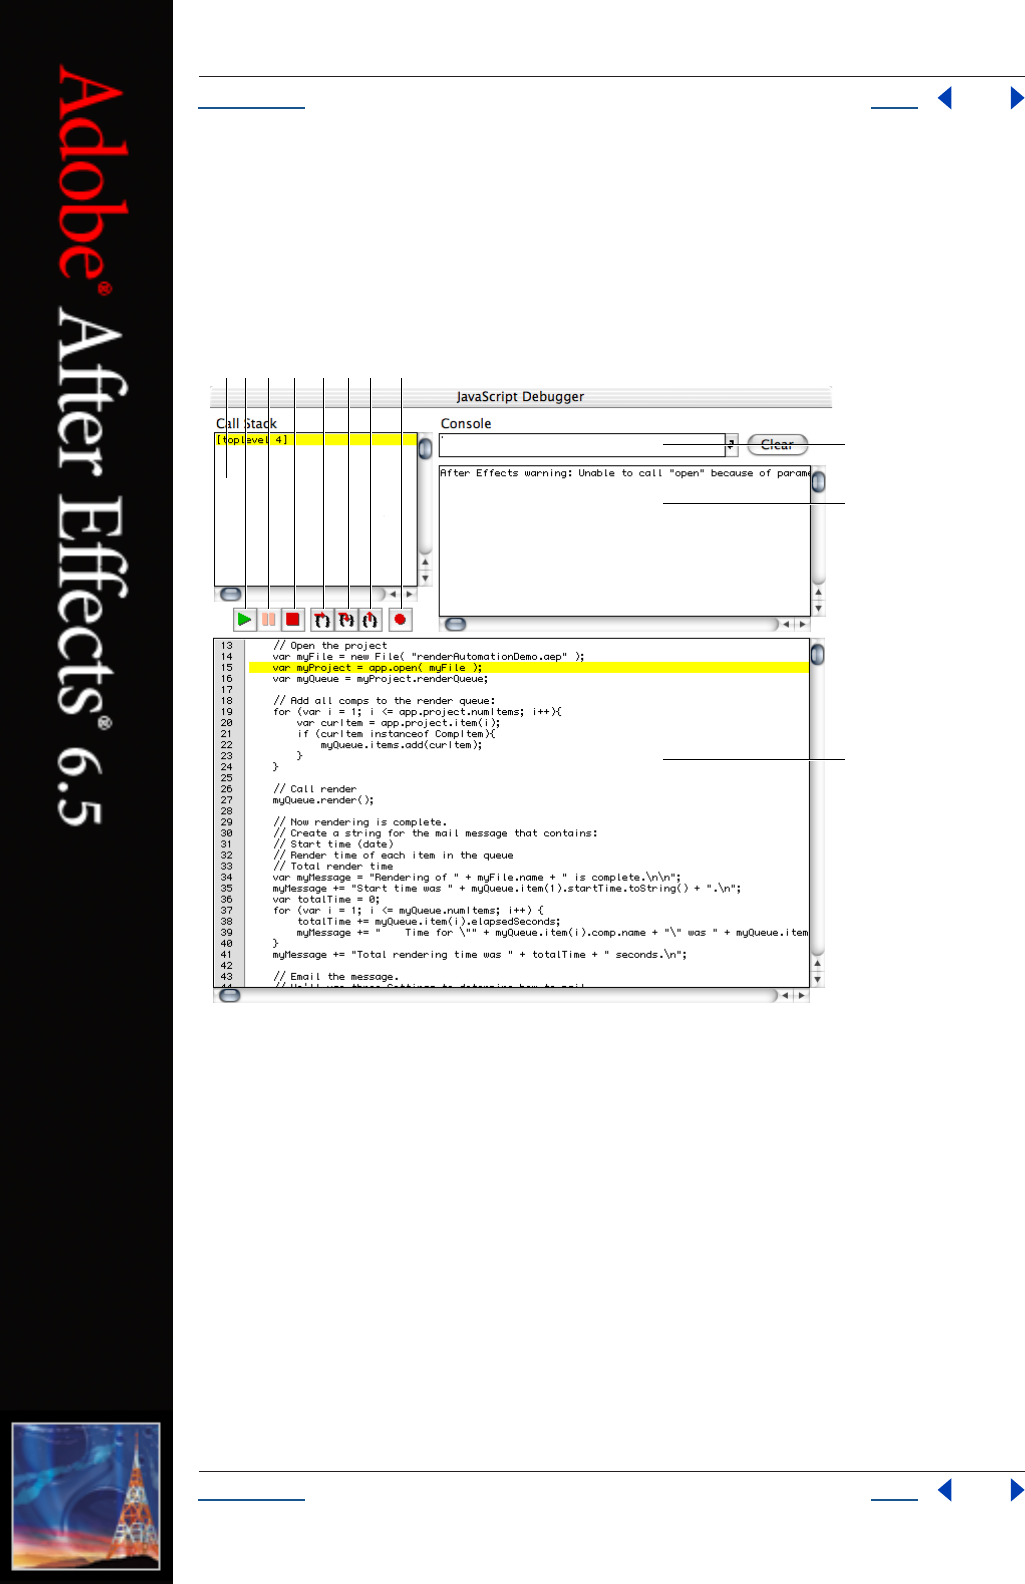
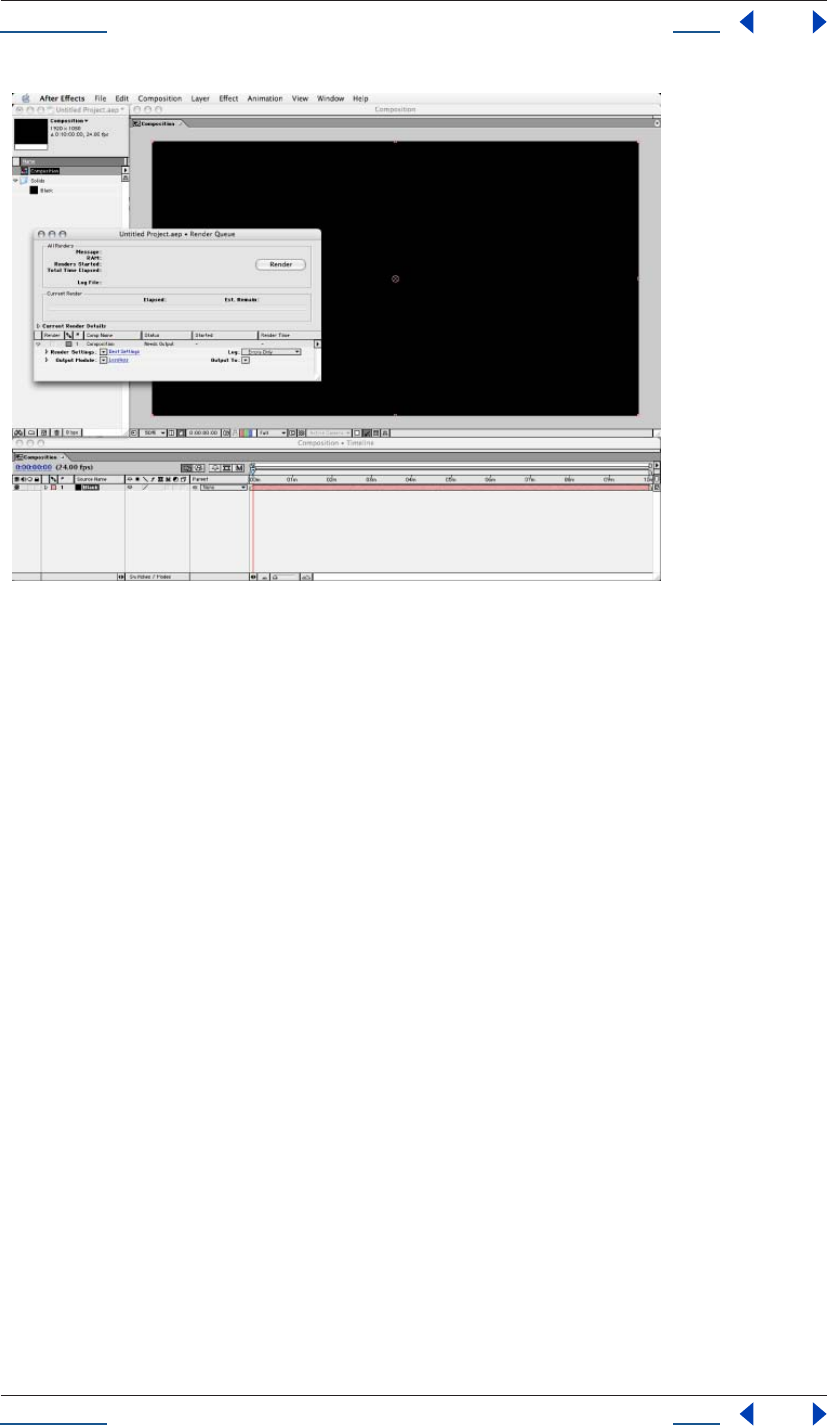
JavaScript Debugger window
A. Stack trace view B. Resume C. Pause D. Stop E. Step over F. Step into
G. Step out H. Breakpoints display I. Command line J. Debug output view
K. JavaScript source view
The current stack trace appears in the upper-left pane of the JavaScript Debugger window. This Stack Trace
view displays the calling hierarchy at the time of the breakpoint. Double-clicking a line in this view changes
the current scope, enabling you to inspect and modify scope-specific data.
All debugging output appears in the upper-right pane of the JavaScript Debugger window. Specifically, output
from the print method of the $ object appears in this Debug Output view.
The currently executing JavaScript source appears in the lower pane of the JavaScript Debugger window.
Double-clicking a line in this JavaScript Source view sets or clears an unconditional breakpoint on that line.
That is, if a breakpoint is in effect for that line, double-clicking it clears the breakpoint, and vice-versa. The
line number display on the left part displays a red dot for all lines with a breakpoint.
I
J
K
BACDEFGH
Using Help Back 16
Help JavaScript Debugging
Using Help Back 16
If Enable JavaScript Debugger is deselected in General Preferences, you see an error message but not the
JavaScript Debugger itself. This is the typical setup used in situations in which professional roles are divided
between those writing and administering scripts (technical directors, system administrators, and so on) and
those using them (the artist or animators). If you are writing and debugging your own scripts, you will want
to enable the JavaScript Debugger.
Controlling code execution in the JavaScript Debugger
This section describes the buttons that control the execution of code when the JavaScript Debugger window
is active. Most of these buttons also provide a keyboard shortcut.
Resume
Ctrl+R (Windows)
Command+R (Mac OS)
Resume execution of the script with the JavaScript Debugger window open. When the script terminates, the application closes the Jav-
aScript Debugger window automatically. Closing the window manually also causes script execution to resume. This button is enabled
when script execution is paused or stopped.
Pause
Ctrl+P (Windows)
Command+P (Mac OS)
Halt the currently executing script temporarily and reactivate the JavaScript Debugger. This button is enabled when a script is running.
,,Ray, funnyy wrapping on this line . . . -cj>>
Stop
Ctrl+K (Windows)
Command+K (Mac OS)
Stop execution of the script and generate a runtime error. This button is enabled when a script is running.
Step Over
Ctrl+S (Windows)
Command+S (Mac OS)
Halt after executing a single JavaScript statement in the script; if the statement calls a JavaScript function, execute the function in its
entirety before stopping.
Step Into
Ctrl+T (Windows)
Command+T (Mac OS)
Halt after executing a single JavaScript statement in the script or after executing a single statement in any JavaScript function that the
script calls.
Using Help Back 17
Help JavaScript Debugging
Using Help Back 17
Step Out
Ctrl+U (Windows)
Command+U (Mac OS)
When the JavaScript Debugger is paused within the body of a JavaScript function, resume script execution until the function returns.
When the JavaScript Debugger is paused outside the body of a function, resume script execution until the script terminates.
Script Breakpoints Display
Display the Script Breakpoints window.
Using the JavaScript command line entry field
You can use the JavaScript Debugger’s command line entry field to enter and execute JavaScript code interac-
tively within a specified stack scope. Commands entered in this field execute with a time-out of one second. If
a command takes longer than one second to execute, the script terminates and generates a time-out error.
Command line entry field
Enter in this field a JavaScript statement to execute within the stack scope of the line highlighted in the Stack
Trace view. When you’ve finished entering the JavaScript expression, you can execute it by clicking the
Command Line Entry button or pressing the Enter key. Click the button next to the field, or press Enter to
execute the JavaScript code in the command line entry field. The application executes the contents of the
command line entry field within the stack scope of the line highlighted in the Stack Trace view.
The command line entry field accepts any JavaScript code, making it very convenient to use for inspecting or
changing the contents of variables.
Note: To list the contents of an object as if it were JavaScript source code, enter the object.toSource() command.
Setting breakpoints
You can set breakpoints in the JavaScript Debugger itself, by calling methods of the $ object, or by defining
them in your JavaScript code.
Setting breakpoints in the JavaScript Debugger
When the JavaScript Debugger window is active, you can double-click a line in the JavaScript Source view to
set or clear a breakpoint at that line. Alternatively, you can click the Script Breakpoints Display button to
display the Script Breakpoints window and set or clear breakpoints in this window as described in “Script
Breakpoints window” on page 18.
Setting breakpoints in JavaScript code
Adding the debugger statement to a script sets an unconditional breakpoint. For example, the following code
causes the script to halt and display the JavaScript Debugger as soon as it enters the setupBox function.
function setupBox(box) {
// break unconditionally at the next line
debugger;
Using Help Back 18
Help JavaScript Debugging
Using Help Back 18
box.width = 48;
box.height = 48;
box.url = "none";
}
To execute a breakpoint in runtime code, call the $.bp() method, as shown in the following example:
function setupBox(box) {
box.width = (box.width == undefined) ? $.bp() : 48;
box.height = (box.height == undefined) ? $.bp() : 48;
box.url = (box.url == undefined) ? $.bp() : "none";
}
This example breaks into the JavaScript Debugger if any of the width, height, or url attributes of the custom
element are undefined. Of course, you wouldn’t put bp method calls into production code—it’s more appro-
priate for shipping code to set default values for undefined properties, as the previous example does.
Script Breakpoints window
Display of the Script Breakpoints window is controlled by the Script Breakpoints button in the JavaScript
Debugger. This window displays all defined breakpoints. This window does not display temporary break-
points or breakpoints defined by the debugger statement in JavaScript code.
The Script Breakpoints window provides the following controls:
•The Line field contains the line number of the breakpoint.
•The Condition field may contain a JavaScript expression to evaluate when the breakpoint is reached. If the
expression evaluates to false, the breakpoint is not executed.
•Breakpoints set in this window persist across multiple executions of a script. When the application quits or
a script is reloaded, it removes all breakpoints.
To set a breakpoint in the Script Breakpoints window:
1Click New to create a new breakpoint, or click the breakpoint that you wish to edit.
2Enter a line number in the Line Number field, or change the existing line number.
3Optionally, enter a condition such as (i>5) in the Condition field. This can be any valid JavaScript
expression. If the result of evaluating the expression is true, the breakpoint activates.
The $ object
The $ object (Debugger Object) provides properties and methods you can use to debug your JavaScript code.
For example, you can call its methods to set or clear breakpoints programmatically, or to change the language
flavor of the script currently executing. It also provides properties that hold information about the version of
the host platform’s operating system.
Note: The $ object is not a standard JavaScript object.
Properties
Name Type Description
error Error Retrieve the last runtime error. Reading this property returns an Error
object containing information about the last runtime error.
Using Help Back 19
Help JavaScript Debugging
Using Help Back 19
Debug output method
write (text, …);
writeln (text, …);
Write the given string to the Debug Output window. The writeln method appends a New Line character to its
arguments.
Parameters
Returns
None.
Clear breakpoint method
clearbp (scriptletName, line);
Clear a breakpoint. The breakpoint is defined by the name of the scriptlet or function and the line number. If
the scriptlet name is the empty string or is missing, the name of the currently executing scriptlet is used. If the
line number is zero or not supplied, the current line number is used. Thus, the call $.clearbp() without param-
eters clears a breakpoint at the current position.
The special string "NEXTCALL" as the scriptlet name causes the engine to clear a breakpoint at the next
function call.
Parameters
Returns
None.
Execute breakpoint method
bp([condition]);
Execute a breakpoint at the current position. Optionally, a condition may be supplied. The condition is a
JavaScript expression string that is evaluated before the breakpoint is executed. The breakpoint is executed
only if the expression returns true. If no condition is given, the use of the debugger statement is recommended
instead as it is a more widely supported JavaScript standard statement.
version String Returns the version number of the JavaScript engine as a three-part num-
ber like e.g. "3.1.11". Read only.
os String Outputs the current operating system version. Read only.
text String All parameters are concatenated to a single string.
scriptletName String The name of the scriptlet where the breakpoint is to be cleared.
line Number The line number where the breakpoint is to be cleared.
Using Help Back 20
Help JavaScript Debugging
Using Help Back 20
Parameters
Returns
None.
Garbage collection method
gc ()
Initiate a garbage collection. Garbage collection is the process by which the JavaScript interpreter cleans up
memory it is no longer using. This is done automatically. Occasionally when you’re debugging a script, it may
be useful to call this process.
Returns
None.
condition String An optional JavaScript expression string that is evaluated before the
breakpoint is executed. The expression needs to evaluate to the equivalent
of true in order to activate the breakpoint.
Using Help Back 21
Help Reference
Using Help Back 21
Reference
This chapter lists and describes syntax (keywords, statements, operators,classes, objects, methods, attributes,
and global functions) particular to the After Effects scripting engine.
The After Effects Scripting engine supports the 3rd Edition of the ECMA-262 Standard, including its
notational and lexical conventions, types, objects, expressions and statements. For a complete listing of the
keywords and operators included with ECMAScript, please refer to Ecma-262.pdf, available at www.ecma-
international.org/publications/standards/ECMA-262.HTM
For an overview of the most common keywords and statements available from ECMA-262, see “Keywords and
statement syntax” on page 9.
Objects, methods, attributes, and globals
As you look through this reference section, which is organized alphabetically according to object groupings,
you can refer to the following diagrams for an overview of where the various objects fall within the hierarchy,
and their correspondence to the user interface.
Hierarchy diagram of the main After Effects scripting objects
application
project
settings
renderQueue item(s)
item(s) may be any of the following 3 types of item:
ITEM(S)
renderQueueItem(s)
outputModule(s)
socketfile foldersystem
folderItemfootageItem
proxySource proxySourcemainSource
solidSource
color
fileSource
file
placeholderSource
layer(s)
properties
compItem
OR
OR
OR
OR
mainSource & proxySource
may be any of the following 3 types of item:
Using Help Back 22
Help Reference
Using Help Back 22
The hierarchy of objects in scripting corresponds to the hierarchy in the user interface. The Application contains a Project window that
contains a Composition with a Layer. The source for the Layer can be a footage file, placeholder, or solid, and it is also listed in the Project
window. The Layer in turn contains settings known as Properties, and these can hold individual keyframes. The Render Queue contains
Render Queue Items as well as Render Settings and Output Modules. All of these rules are directly analogous to scripting.
Attributes and properties
Note that in ECMAScript and JavaScript, a named piece of data of a certain type is commonly referred to as a
property. However, After Effects already has a separate definition of a “property”: It is a specific editable value
within a layer. Therefore in this section the synonymous term “attribute” refers to these same pieces of data.
Global functions
This section describes globally available functions that are specific to After Effects. Any JavaScript object or
function can call the functions in this section.
Using Help Back 23
Help Reference
Using Help Back 23
Functions
alert() global function
alert(text)
Description
The Alert global function opens an alert dialog that can contain a text alert. The user then has the option of
clicking OK to close the window.
Parameters
Example
alert ( "CoSA Lives!");
clearOutput() global function
clearOutput()
Description
The clearOutput global function clears the output in the info palette.
Parameters
None.
Function Reference Description
alert() see “alert() global function” on page 23 displays an alert dialog displaying a specified
text string
prompt() see “prompt() global function” on
page 25
opens a dialog box with a text field into which
the user can enter a text string
write() see “write() global function” on page 26 writes output to the Info palette, with no line
break added
writeLn() see “writeLn() global function” on
page 26
writes output to the info palette, adding a line
break at the end
clearOutput() see “clearOutput() global function” on
page 23
clears the Info palette
confirm() see “confirm() global function” on
page 24
prompts the user with a modal dialog and yes/
no buttons which clear the dialog and return a
boolean
fileGetDialog() see “fileGetDialog() global function” on
page 24
presents the platform’s standard Open dialog
box
filePutDialog() see “filePutDialog() global function” on
page 24
presents the platform’s standard Save dialog
box
folderGetDialog() see “folderGetDialog() global function”
on page 25
displays a dialog in which the user can select a
folder
text text string that is displayed in the dialog, which can display up to 240 characters
Using Help Back 24
Help Reference
Using Help Back 24
confirm() global function
confirm(text)
Description
The Confirm global function prompts the user with a modal dialog and yes/no buttons that clear the dialog.
These return a boolean; true if yes, false if no.
Parameters
Returns
Boolean.
Example
var shouldAdd = confirm("Add to Render Queue?");
if (shouldAdd == "true"){
proj.renderQueue.items.add(myCompItem);
}
fileGetDialog() global function
fileGetDialog(prompt,typeList)
Description
The fileGetDialog global function presents the Open dialog box that is standard for the platform on which
After Effects is running.
The typeList is a semicolon-separated list of four-character Mac OS file types followed by Windows file exten-
sions. For example, a value of "EggP aep" for this argument specifies that the Open dialog box is to display
After Effects project items only; other file types will be grayed out.
Parameters
Returns
File object, or null if the user cancels the dialog.
filePutDialog() global function
filePutDialog(prompt,default,type)
Description
The filePutDialog global function presents the Save dialog box that is standard for the platform on which After
Effects is running.
text text string; Mac OS user interface can display 256 characters, Windows, 30 characters
prompt message that displays on the title bar of the dialog; truncated if too long
typeList a platform-specific value indicating a list of file types to display
Using Help Back 25
Help Reference
Using Help Back 25
Parameters
Returns
File object, or null if the user cancels the dialog.
folderGetDialog() global function
folderGetDialog(prompt)
Description
The folderGetDialog global function displays a dialog in which the user can select a folder.
Parameters
Returns
Folder object, or null if the user cancels the dialog.
prompt() global function
prompt(prompt, default)
Description
The prompt global function opens a dialog box with a text field into which the user can enter a text string. The
text string is returned as a value, or is null if the dialog is cancelled.
Parameters
Returns
String, or null if dialog is cancelled. Read-only.
Example
// presuming a project loaded with at least one comp is open:
var myCompItem = app.project.item(1);
var newName = prompt( "What would you like to name the comp?");
// rename it
if (newName) { //if the user cancels, newName is null
myCompItem.name = newName; // newName now holds a string
}
prompt message that appears on the title bar of the dialog; truncated if too long
default default file name to display in the file-saving dialog; this value must observe the file-naming
conventions of the platform on which After Effects is running
type specified file type
prompt message that appears on the title bar of the dialog; truncated if too long
prompt text string that appears in the prompt dialog
default text string that appears by default in the text field

Using Help Back 26
Help Reference
Using Help Back 26
write() global function
write(text)
Description
The write global function writes output to the Info palette, with no line break added.
Parameters
Example
write(“This text appears in Info palette.”);
See also
“writeLn() global function” on page 26
writeLn() global function
writeLn(text)
Description
The write global function writes output to the info palette and adds a line break at the end.
Parameters
Example
writeLn(“This line of text appears in the console window with a line break at the end.”);
See also
“TextDocument.” on page 178
Application object
app.
Description
The application (app) global object enables access to data and functionality within the After Effects appli-
cation. Attributes of the Application object provide access to specific objects within After Effects. Methods of
the Application object can create documents, open existing documents, control Watch Folder mode, purge
memory, and quit the After Effects application. When the After Effects application quits, it closes the open
project, prompting the user to save or discard changes as necessary, and creates a project file as necessary.
text text string; truncated if too long for the info palette
text text string
Using Help Back 27
Help Reference
Using Help Back 27
Attributes
Methods
Attribute Reference Description
project see “Application project attribute” on
page 34 and “Project object” on
page 121
instance of the current After Effects Project
and all of its associated methods & attributes
language see “Application language attribute” on
page 32
identifies the language in which the applica-
tion is running
version see “Application version attribute” on
page 36
identifies the version number of the After
Effects application
serialNumber see “Application serialNumber
Attribute” on page 35
identifies the serial number of the After Effects
installation
registeredName see“Application registeredName
attribute” on page 35
identifies the name to which the After Effects
installation is registered
registeredCompany see “Application registeredCompany
attribute” on page 35
identifies the company to which the After
Effects installation is registered
buildName see “Application buildName attribute”
on page 29
identifies the name of this build of the applica-
tion
buildNumber see “Application buildNumber
attribute” on page 29
identifies the number of this build of the appli-
cation
isProfessionalVersion see “Application isProfessionalVersion
attribute” on page 31
identifies if the After Effects version is the Pro-
fessional Version
isWatchFolder see “Application isWatchFolder
attribute” on page 31
boolean that returns true when the local appli-
cation is running in Watch Folder mode
isRenderEngine see “Application isRenderEngine
attribute” on page 31
identifies whether the local After Effects appli-
cation is installed as a render engine
settings see “Application settings attribute” on
page 36 and “Settings object” on
page 170
calls settings within After Effects that can be
set via scripting
onError see “Application onError attribute” on
page 33
a callback that is called when an error occurs in
the application
exitCode see “Application exitCode attribute” on
page 31
Used only when executing script externally
(i.e., from a command line or AppleScript). Set
to zero, indicates no error occurred; set to a
positive number, indicates an error occurred
while running the script.
exitAfterLaunchAndEval see “Application exitAfterLaunchAndE-
val attribute” on page 30
specifies whether the application remains
open after running a script from the command
line on Windows
Method Reference Description
newProject() see “Application newProject() method”
on page 32
opens a new project in After Effects
open() see “Application open() method” on
page 33
opens a project or an Open Project dialog
Using Help Back 28
Help Reference
Using Help Back 28
Application beginSuppressDialogs() method
app.beginSuppressDialogs()
Description
This method begins suppression of dialogs in the user interface.
Parameters
None.
Returns
None.
Application beginUndoGroup() method
app.beginUndoGroup(undoString)
Description
An undo group allows a script to logically group all of its actions as a single undoable action (for use with the
Edit Undo/Redo menu items). Should be used in conjunction with the application.endUndoGroup() method.
Please note that beginUndoGroup() and endUndoGroup() pairs can be nested. Groups within groups become
part of the larger group, and will undo correctly. In such cases, the names of inner groups are ignored.
quit() see “Application quit() method” on
page 34
quits the application
watchFolder() see “Application watchFolder() method”
on page 37
starts watch-folder mode; does not return until
watch-folder mode is turned off
pauseWatchFolder() see “Application pauseWatchFolder()
method” on page 34
pauses a current watch-folder process
endWatchFolder() see “Application endWatchFolder()
method” on page 30
ends a current watch-folder process
purge() see “Application purge() method” on
page 34
purges a targeted type of cached information
(replicates Purge options in the Edit menu)
beginUndoGroup() see “Application beginUndoGroup()
method” on page 28
groups the actions that follow it into a single
undoable step
endUndoGroup() see “Application endUndoGroup()
method” on page 29
ends an undo group; needed only when one
script contains more than one undo group
beginSuppressDialogs() see “Application beginSuppressDia-
logs() method” on page 28
begins suppression of dialogs in the user inter-
face
endSuppressDialogs() see “Application endSuppressDialogs()
method” on page 29
ends suppression of dialogs in the user inter-
face
setMemoryUsageLimits() see “Application setMemoryUsageLim-
its() method” on page 36
sets memory usage limits as in the Cache pref-
erences tab
setSavePreferencesOnQuit() see “Application setSavePreferencesOn-
Quit() method” on page 36
sets whether Preferences are saved when the
application is quit
Method Reference Description
Using Help Back 29
Help Reference
Using Help Back 29
Parameters
See also
“Application endUndoGroup() method” on page 29
Application buildName attribute
app.buildName
Description
The buildName attribute identfies the name of the build of After Effects being run. This attribute is used
primarily by Adobe for testing and troubleshooting purposes.
Type
String; read-only.
Application buildNumber attribute
app.buildNumber
Description
The buildNumber attribute identfies the number of the build of After Effects being run. This attribute is used
primarily by Adobe for testing and troubleshooting purposes.
Type
Integer; read-only.
Application endSuppressDialogs() method
app.endSuppressDialogs(alert)
Description
This method ends the suppression of dialogs in the user interface. It should be called only if beginSuppress-
Dialogs() has previously been called.
If the input argument 'alert' is true, and any errors occurred between the calls to beginSuppressDialogs() and
endSuppressDialogs(), then a dialog will be presented to the user displaying that error message.
Parameters
See also
“Application beginSuppressDialogs() method” on page 28
Application endUndoGroup() method
app.endUndoGroup()
undoString (mandatory) the text that will appear for the Undo command in the Edit menu (i.e., “Undo undoString”)
alert boolean; specifies whether errors that have occurred following beginSuppressDialogs() should be dis-
played

Using Help Back 30
Help Reference
Using Help Back 30
Description
This ends the undo group begun with the app.beginUndoGroup() method. You can use this method to place
an end to an undo group in the middle of a script, should you wish to use more than one undo group for a
single script.
If you are using only a single undo group for a given script, you do not need to use this method; in its absence
at the end of a script, the system will close the undo group automatically.
Calling this method without having set a beginUndoGroup() method yields an error.
Parameters
None.
Returns
None.
See also
“Application beginUndoGroup() method” on page 28
Application endWatchFolder() method
app.endWatchFolder()
Description
The endWatchFolder() method ends watch folder mode.
Parameters
None
See also
“Application version attribute” on page 36
“Application pauseWatchFolder() method” on page 34
Application exitAfterLaunchAndEval attribute
app.exitAfterLaunchAndEval
Description
This attribute is used only when executing a script from a command line on Windows. When the application
is launched from the command line, the -r or -s command line flag will cause the application to run a script
(from a file and from a string, respectively).
If this attribute is set to true, After Effects will exit after the script is run; if it is false, the application will remain
open.
Note that this attribute only has an effect when After Effects is run, and it has no effect on Mac OS.
Type
Boolean; read/write.

Using Help Back 31
Help Reference
Using Help Back 31
Application exitCode attribute
app.exitCode
Description
The exitCode attribute is used only when executing a script from outside After Effects (i.e., from a command
line or AppleScript).
On Mac OS and Windows, the exitCode is set to 0 (EXIT_SUCCESS) at the beginning of each script evalu-
ation. In the event of an error while the script is running, it will be set to a positive integer.
Type
Integer; read/write.
Example
app.exitCode = 2; //on quit, if value is 2, no error has occurred
Application isProfessionalVersion attribute
app.isProfessionalVersion
Description
The isProfessionalVersion attribute is a boolean used to determine if the locally installed After Effects appli-
cation is the Standard or Professional version.
Type
Boolean; read-only.
Example
var PB = app.isProductionBundle;
alert("It is " + PB + " that you are running the Production Bundle.");
Application isRenderEngine attribute
app.isRenderEngine
Description
The isRenderEngine attribute is a boolean used to determine if an installation of After Effects is a Render
Engine only installation.
Type
Boolean; read-only.
Application isWatchFolder attribute
app.isWatchFolder
Description
The isWatchFolder attribute is a boolean used to determine if the Watch Folder dialog is currently displayed
(and the application is currently watching a folder for rendering). This returns true when the Watch Folder
dialog is open.

Using Help Back 32
Help Reference
Using Help Back 32
Type
Boolean; read-only.
Application language attribute
app.language
Description
The language attribute indicates in which language After Effects is running. The codes for the language
attribute are as follows:
•Language.ENGLISH
•Language.FRENCH
•Language.GERMAN
•Language.JAPANESE
Type
Language enumerated type (listed above).
Example
var lang = app.language;
if (lang == Language.JAPANESE){
alert("After Effects is running in Japanese.")};
else if (lang == Language.ENGLISH){
alert("After Effects is running in English.")};
else if (lang == Language.FRENCH){
alert("After Effects is running in French.")};
else{
alert("After Effects is running in German.")
};
Application newProject() method
app.newProject()
Description
The newProject method opens a new project in After Effects, replicating the File > New > New Project menu
command. If a project is already open and has been edited, the user will be prompted to save.
Use app.project.close(CloseOptions.DO_NOT_SAVE_CHANGES) to close an open project before opening
a new one.
Parameters
None.
Returns
Project object; null if the user cancels a Save dialog in response to having an open project that has been edited
since the last save.

Using Help Back 33
Help Reference
Using Help Back 33
Example
app.project.close(CloseOptions.DO_NOT_SAVE_CHANGES);
app.newProject();
See also
“Project close() method” on page 123
Application onError attribute
app.onError
Description
The onError attribute takes a function to perform an action when an error occurs. By creating a function and
assigning it to onError, you can respond to the error systematically, e.g., close and restart the application,
noting the error in a log file if it occurred during rendering.
Type
Function that takes a string, or null if no function is assigned.
Example
function err(errString) (
alert(errString);
)
app.onError = err
Application open() method
app.open()
app.open(file)
Description
The open() method opens a project. If the file parameter is null (i.e., if no argument is used) the user will be
presented with a dialog to select and open a file.
Parameters
Returns
Project object (the file specified as a parameter), or null if the user cancels the Open dialog.
Example
var my_file = new File("../my_folder/my_test.aep");
if (my_file.exist){
new_project = app.open(my_file);
if (new_project){
alert(new_project.file.name);
}
}
file (Optional) File object being opened
Using Help Back 34
Help Reference
Using Help Back 34
Application pauseWatchFolder() method
app.pauseWatchFolder(pause)
Description
The pauseWatchFolder() method pauses searching the target folder for render items.
Parameters
See also
“Application version attribute” on page 36
“Application endWatchFolder() method” on page 30
Application project attribute
app.project
Description
This attribute is the project that is currently loaded.
For more information about what is contained in the Project object, see “Project object” on page 121.
Type
Project; read-only.
Application purge() method
app.purge(target)
Description
The purge method replicates the functionality and target options of the Purge options within the Edit menu.
The target parameter contains the area of memory to be purged; the options for target are listed as enumerated
variables below.
Parameters
Enumerated Types
Application quit() method
app.quit()
pause boolean (paused - true or false)
target the type of elements to purge from memory; use one of Enumerated Types below
PurgeTarget.ALL_CACHES purges all data that After Effects has cached to physical memory
PurgeTarget.UNDO_CACHES purges all data saved in the undo cache
PurgeTarget.SNAPSHOT_CACHES purges all data cached as comp/layer snapshots
PurgeTarget.IMAGE_CACHES purges all saved image data

Using Help Back 35
Help Reference
Using Help Back 35
Description
The quit method quits the application.
Parameters
None.
Returns
None.
Application registeredCompany attribute
app.registeredCompany
Description
Text string; name (if any) that the user of the application entered as the registered company at the time of
installation.
Type
Text string; read-only.
Example
var company = app.registeredCompany;
alert(“Your company name is “ + company + “.”);
Application registeredName attribute
app.registeredName
Description
The registeredName attribute contains the text string that the user of the application entered for the registered
name at the time of installation.
Type
Text string; read-only.
Example
var userName = app.registeredName;
confirm(“Are you “ + userName + “?”);
Application serialNumber Attribute
app.serialNumber
Description
The serialNumber attribute contains an alphanumeric string that is the serial number of the installed version
of After Effects.
Type
String; read-only.
Using Help Back 36
Help Reference
Using Help Back 36
Example
var serial = app.serialNumber;
alert("This copy is serial number " + serial);
Application setMemoryUsageLimits() method
app.setMemoryUsageLimits(imageCachePercentage, maximumMemoryPercentage)
Description
This method sets memory usage limits as in the Cache preferences tab.
Parameters
Returns
None.
Application setSavePreferencesOnQuit() method
app.setSavePreferencesOnQuit(doSave)
Description
This method sets the toggle that determines whether preferences are saved when the application is closed
(quit).
Parameters
Returns
None.
Application settings attribute
app.settings
Description
This attribute holds the currently loaded settings.
For more information about what is contained in the Settings object, see “Settings object” on page 170.
Type
Settings; read-only.
Application version attribute
app.version
imageCachePercentage floating-point value; percentage of memory assigned to image cache
maximumMemoryPercentage floating-point value; maximum usable percentage of memory
doSave boolean; if true, preferences are set to save on quit
Using Help Back 37
Help Reference
Using Help Back 37
Description
The version attribute returns an alphanumerical string indicating which version of After Effects is running.
Type
String; read-only.
Example
var ver = app.version;
alert("This machine is running version " + ver + " of After Effects.");
Application watchFolder() method
app.watchFolder(folder_object_to_watch)
Description
The watchFolder() method starts a watch folder (network rendering) process pointed at a specified folder.
Parameters
Example
var theFolder = new Folder(“c:\\tool”);
app.watchFolder(theFolder);
See also
“Application endWatchFolder() method” on page 30
“Application pauseWatchFolder() method” on page 34
AVItem object
app.project.item(index)
Description
The AVitem object provides access to attributes and methods of audio/visual files imported into After Effects.
AVItem is the base class for both CompItem and FootageItem, so AVItem attributes and methods are also
available when working in CompItem and FootageItem.
Attributes
folder_object_to_watch the Folder object to be watched
Attribute Reference Description
name see “AVItem name attribute” on page 41 name of the object as shown in the Project
window
width see “AVItem width attribute” on page 44 integer [1 ..30,000] describing the width, in pix-
els of the item
height see “AVItem height attribute” on
page 41
integer [1 .. 30,000] describing the height, in
pixels of the item
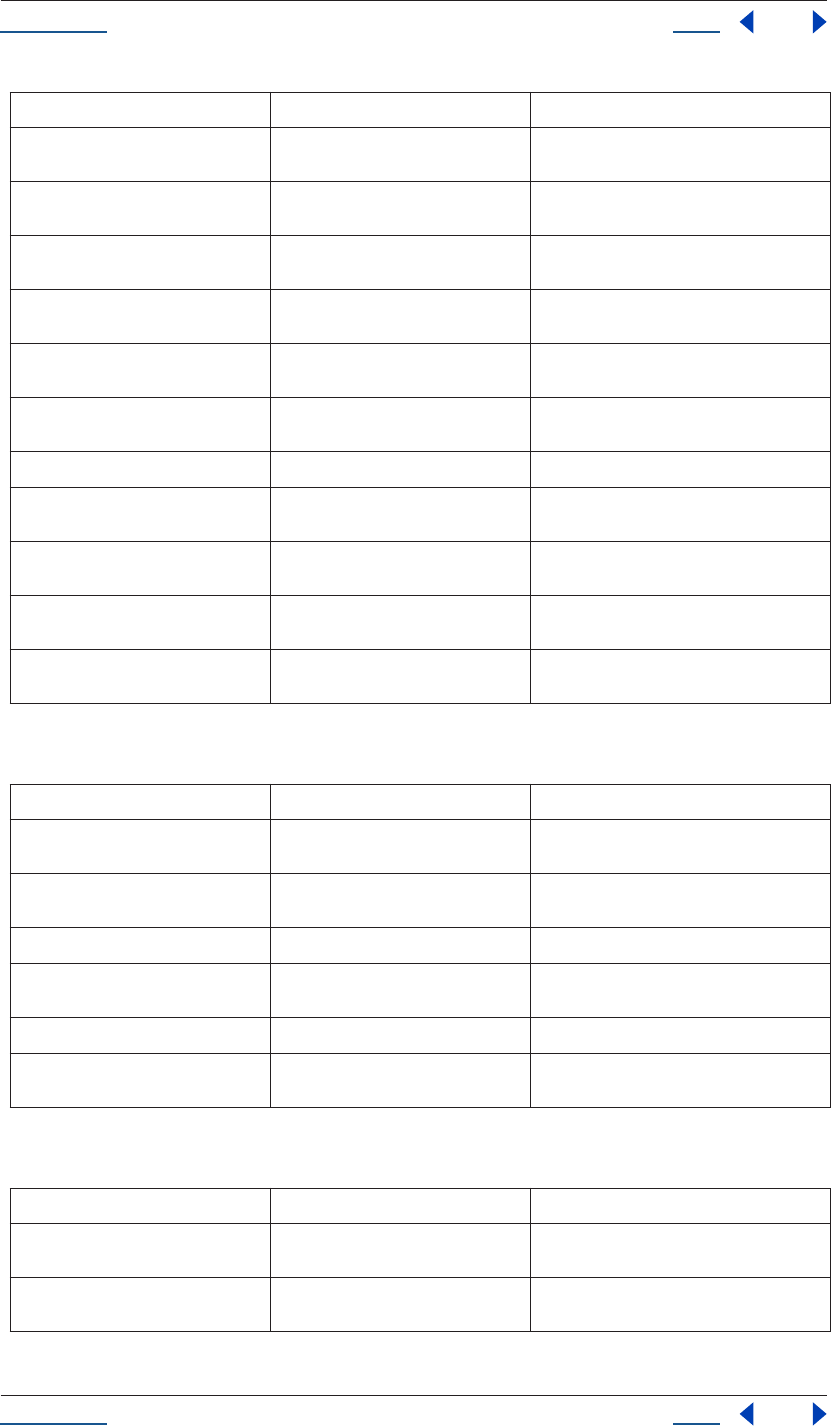
Using Help Back 38
Help Reference
Using Help Back 38
Attributes from Item object (See “Item object” on page 97)
Methods
pixelAspect see “AVItem pixelAspect attribute” on
page 41
pixel aspect ratio; floating-point value [0.01
..100]
frameRate see “AVItem frameRate attribute” on
page 40
frame rate of the AVItem [1..99]
frameDuration see “AVItem frameDuration attribute”
on page 39
frame rate for the AVItem [1/99 .. 1 ]
duration see “AVItem duration attribute” on
page 39
duration of the AVItem, in seconds [0 .. 10,800]
useProxy see “AVItem useProxy attribute” on
page 44
boolean describing whether a proxySource
should be used for this item
proxySource see “AVItem proxySource attribute” on
page 42
FootageItem used as proxy of the AVItem;
read-only
time see “AVItem time attribute” on page 44 current time of the AVItem in seconds
usedIn see “AVItem usedIn attribute” on
page 44
array containing all the CompItems that use
this AVItem
hasVideo see “AVItem hasVideo attribute” on
page 40
true if the AVItem has an audio component
hasAudio see “AVItem hasAudio attribute” on
page 40
true if the AVItem has a video component
footageMissing see “AVItem footageMissing attribute”
on page 39
true if the AVItem cannot be found or if it is a
placeholder
Attribute Reference Description
name see “Item name attribute” on page 98 name of the object as shown in the Project
window
comment see “Item comment attribute” on
page 98
string that holds a comment
id see “Item id attribute” on page 98 unique integer ID for this item
parentFolder see “Item parentFolder attribute” on
page 98
parent folder of this item
selected see “Item selected attribute” on page 99 true if this item is currently selected
typeName see “Item typeName attribute” on
page 99
string corresponding to the type of item
Method Reference Description
setProxy() see “AVItem setProxy() method” on
page 42
sets a proxy for the AVItem
setProxyWithSequence() see “AVItem setProxyWithSequence()
method” on page 43
sets a sequence as a proxy for the AVItem
Attribute Reference Description
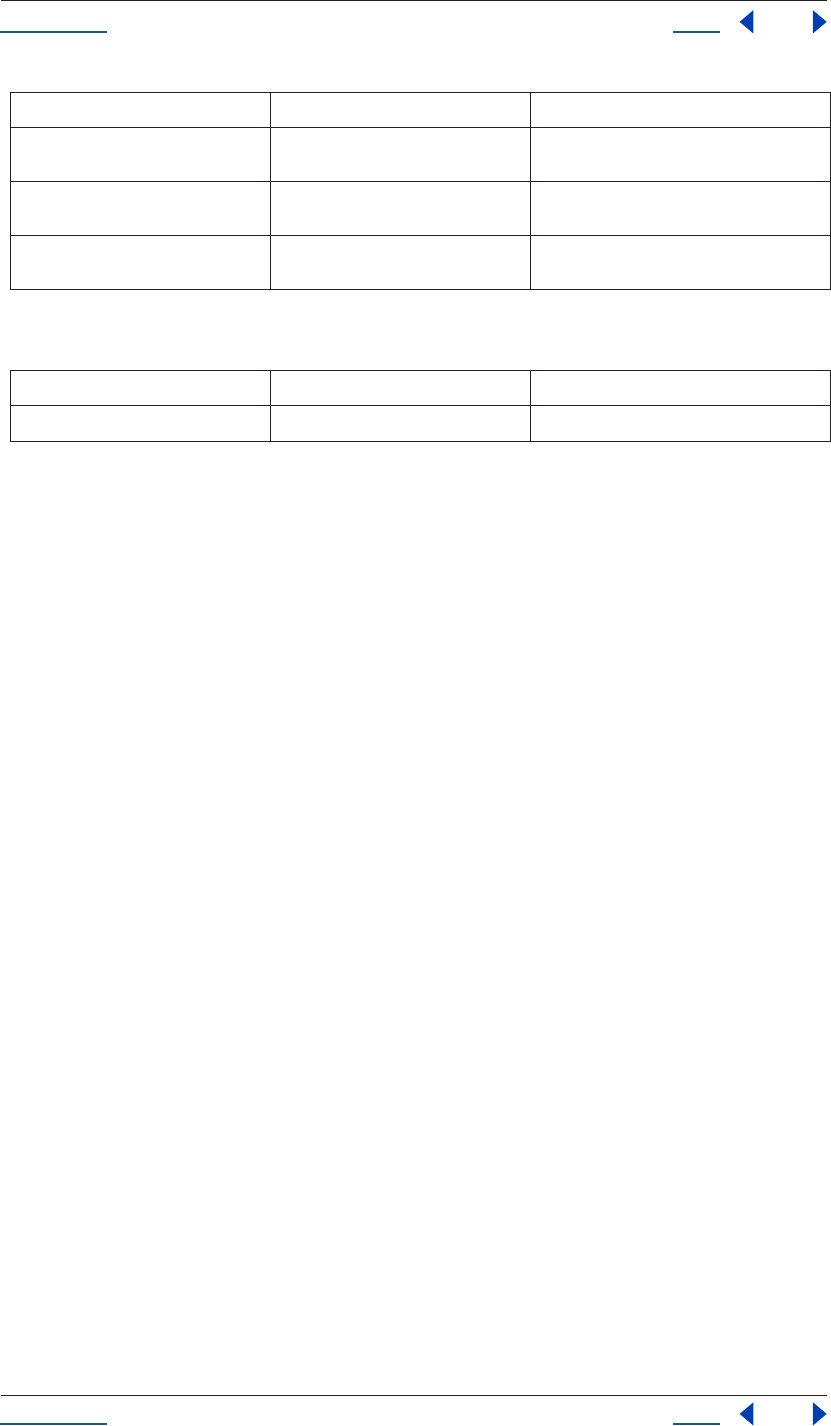
Using Help Back 39
Help Reference
Using Help Back 39
Method from Item object (See“Item object” on page 97)
AVItem duration attribute
app.project.item(index).duration
Description
The duration attribute returns the duration, in seconds, of the item. This attribute is read-only unless it is a
CompItem.
Permissible range of values is [0..10,800]. In a FootageItem, duration is linked to the duration of the
mainSource; in a CompItem, it is linked to the duration of the composition. This value may be written only
in a CompItem. It is an error to change this value if the item is a FootageItem.
Note: Still footage items have a duration of 0.
Type
Floating-point value; seconds. Read/write when item is a CompItem; otherwise, read-only.
AVItem footageMissing attribute
app.project.item(index).footageMissing
Description
The footageMissing attribute is true if the AVItem cannot be found or if it is a placeholder.
Type
Boolean; read-only.
AVItem frameDuration attribute
app.project.item(index).frameDuration
Description
The frameDuration attribute returns the length, in seconds, of a frame for this AVItem.
Permitted range is [1/99 .. 1 ]. This is the reciprocal of frameRate. When you set the frameDuration, you are
really storing the reciprocal as a new frameRate.
setProxyWithSolid() see “AVItem setProxyWithSolid()
method” on page 43
sets a solid as a proxy (feature available only via
scripting)
setProxyWithPlaceholder() see “AVItem setProxyWithPlaceholder()
method” on page 42
sets a placeholder as a proxy
setProxyToNone() see “AVItem setProxyToNone() method”
on page 42
removes the proxy
Method Reference Description
remove() see “Item remove() method” on page 99 deletes the item from the project
Method Reference Description

Using Help Back 40
Help Reference
Using Help Back 40
When you read the value back, you are retrieving the reciprocal of the frameRate. Hence, if you set and then
get the value to be a frameDuration that does not evenly divide into 1.0 (for example, 0.3), the value you get
back will be close, but not exactly equal; due to numerical limitations, (1 / ( 1 / 0.3) ) != 0.3, but rather
something close to 0.3.
If the AVItem is a FootageItem, then this attribute is readOnly.
In the case of a FootageItem, you must write to the conformFrameRate of the mainSource in order to change
the frameRate, and hence the frameDuration.
Type
Floating-point value; seconds. Read/write or read-only if AVItem is a FootageItem.
AVItem frameRate attribute
app.project.item(index).frameRate
Description
The frameRate attribute returns frame rate of the AVItem.
Permitted range is [1..99]. If the AVItem is a CompItem, then this corresponds to the frameRate of the comp.
If the AVItem is a FootageItem, then this corresponds to the displayFrameRate of the mainSource, and is
readOnly.
In the case of a FootageItem, you must write to the conformFrameRate of the mainSource in order to change
the frame rate.
Type
Floating-point value; frames per second. Read/write or read-only if AVItem is a FootageItem.
AVItem hasAudio attribute
app.project.item(index).hasAudio
Description
The hasAudio attribute is true if the AVItem has an audio component.
In the case of a CompItem, the value reflects the value for the comp. In the case of a FootageItem, the value
reflects the value for the mainSource.
Type
Boolean; read-only.
AVItem hasVideo attribute
app.project.item(index).hasVideo
Description
The hasVideo attribute is true if the AVItem has a video component.
In the case of a CompItem, the value reflects the value for the comp. In the case of a FootageItem, the value
reflects the value for the mainSource.

Using Help Back 41
Help Reference
Using Help Back 41
Type
Boolean; read-only.
AVItem height attribute
app.project.item(index).height
Description
The height attribute is the height, in pixels, of the item.
Permitted range is [1 ..30,000]. In a FootageItem, height is linked to the height of the mainSource; in a
CompItem, it is linked to the height of a composition. It is legal to change the height of a CompItem or a
FootageItem whose mainSource is a SolidSource. It is an error to change the height if the item is a FootageItem
whose mainSource is not a SolidSource.
Type
Integer; read-only unless a CompItem.
AVItem name attribute
app.project.item(index).name
Description
The name attribute is the name of the object as shown in the Project window.
In a FootageItem, the name is linked to the mainSource.
It is an error to attempt to change the name if the mainSource is a FileSource; in that case, the name is tied to
the name of the file(s) and may not be changed.
Type
String; read/write.
AVItem pixelAspect attribute
app.project.item(index).pixelAspect
Description
The pixelAspect attribute determines the pixel aspect ratio of a given item.
Permitted range is [0.01 .. 100]. In a FootageItem, pixelAspect is linked to the pixelAspect of the mainSource;
in a CompItem, it is linked to the pixelAspect of a composition.
Certain pixelAspect values are specially known to After Effects, and will be stored/retrieved with perfect
accuracy. These are the set { 1, 0.9, 1.2, 1.07, 1.42, 2, 0.95, 1.9 }. Other values may experience slight rounding
errors when you set them and get them. Thus, the value you retrieve after setting may be slightly different from
the value you supplied.
Type
Floating-point value; read-only unless a CompItem.

Using Help Back 42
Help Reference
Using Help Back 42
AVItem proxySource attribute
app.project.item(index).proxySource
Description
The proxySource attribute is the FootageSource being used as a proxy.
The attribute is read-only, but it can be changed by calling any of the AVItem methods that change the proxy
source: setProxy(), setProxyWithSequence(), setProxyWithSolid(), and setProxyWithPlaceholder().
Type
FootageSource; read-only.
AVItem setProxy() method
app.project.item(index).setProxy(File file)
Description
The setProxy method sets a file as the proxy of an AVItem.
It loads the given file into a FileSource and establishes this as the new proxySource. It does not preserve the
interpretation parameters, instead using the user preference.
This is different than what happens with a FootageItem's main source, but both are the same behavior as the
user interface. If the file has an unlabeled alpha channel, and the user preference says to ask the user what to
do via a dialog, scripting will guess the alpha interpretation instead of asking the user. After changing the
proxySource, this method will set the value of useProxy to true.
Parameters
Returns
None.
AVItem setProxyToNone() method
app.project.item(index).setProxyToNone()
Description
The setProxyToNone method removes the proxy from this AVItem. Following this, the value of proxySource
is null.
Returns
None.
AVItem setProxyWithPlaceholder() method
app.project.item(index).setProxyWithPlaceholder(name, width, height, frameRate, duration)
File file to be used as a proxy
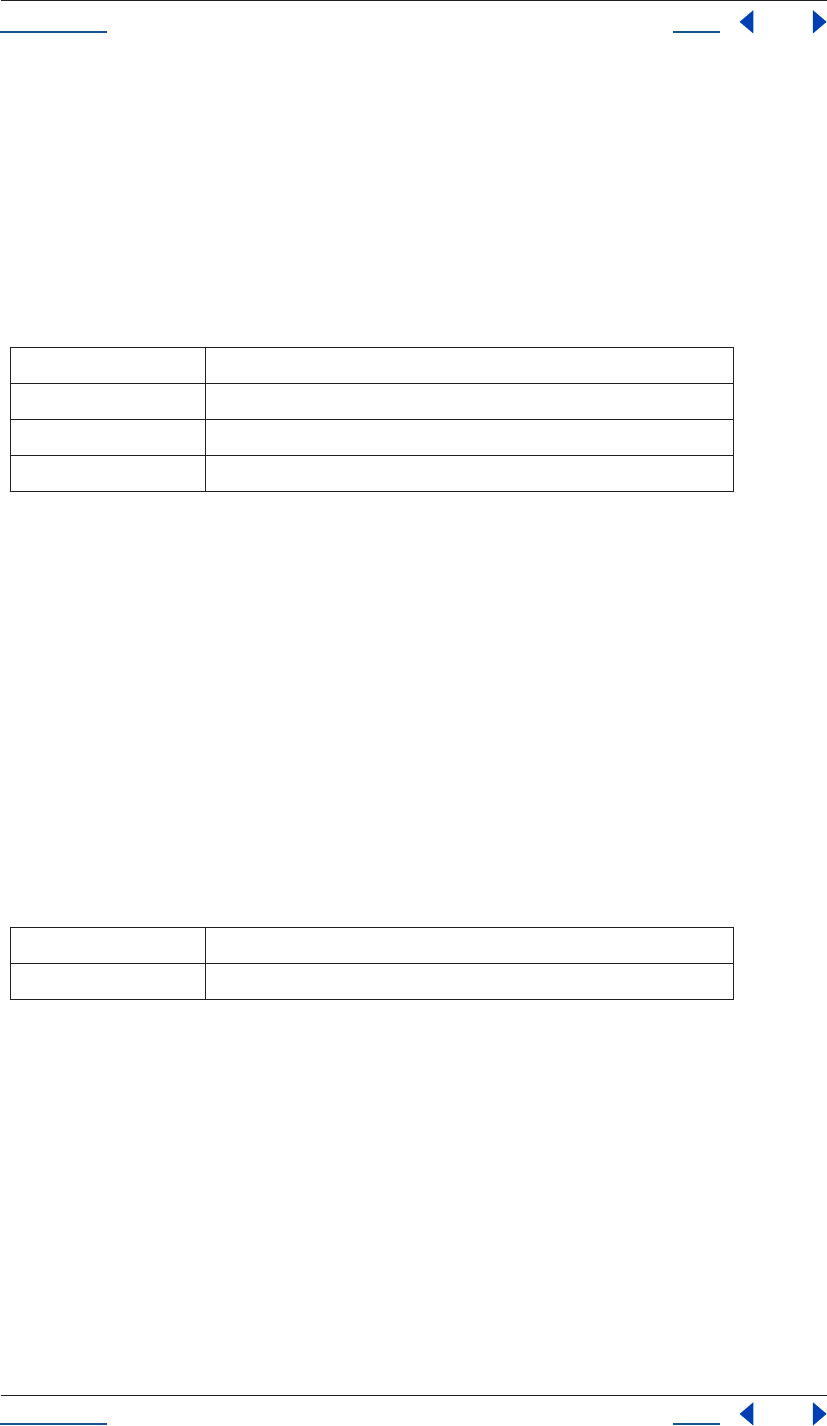
Using Help Back 43
Help Reference
Using Help Back 43
Description
The setProxyWithPlaceholder method creates a PlaceholderSource with specifications according to the input
arguments and establishes this as the new proxySource.
Note that there is no direct way to set a placeholder as a proxy in the user interface; this behavior occurs when
a proxy has been set and then moved or deleted.
This method does not preserve the interpretation parameters. After changing the proxySource, the value of
useProxy is set to true.
Parameters
Returns
None.
AVItem setProxyWithSequence() method
app.project.item(index).setProxyWithSequence(file, forceAlphabetical)
Description
The setProxy method loads the given sequence into a FileSource and establishes this as the new proxySource.
It loads the given sequence into a FileSource and establishes this as the new proxySource. It does not preserve
the interpretation parameters, instead using the user preference.
If the file has an unlabeled alpha channel, and the user preference says to ask the user what to do via a dialog,
scripting will guess the alpha interpretation instead of asking the user.
Parameters
Returns
None.
AVItem setProxyWithSolid() method
app.project.item(index).setProxyWithSolid(color, name, width, height, pixelAspect)
Description
The setProxyWithSolid method creates a SolidSource with specifications according to the input arguments
and establishes this SolidSource as the new proxySource.
Note that there is no way, using the user interface, to set a solid as a proxy; this feature is available only via
scripting.
name text string
width, height pixel dimensions of solid[4..30,000]
frameRate frames per second [1..99]
duration length in seconds [0..10,800] (up to 3 hours)
File file to be used as a proxy.
forceAlphabetical boolean determining whether to use the “force alphabetical order” option
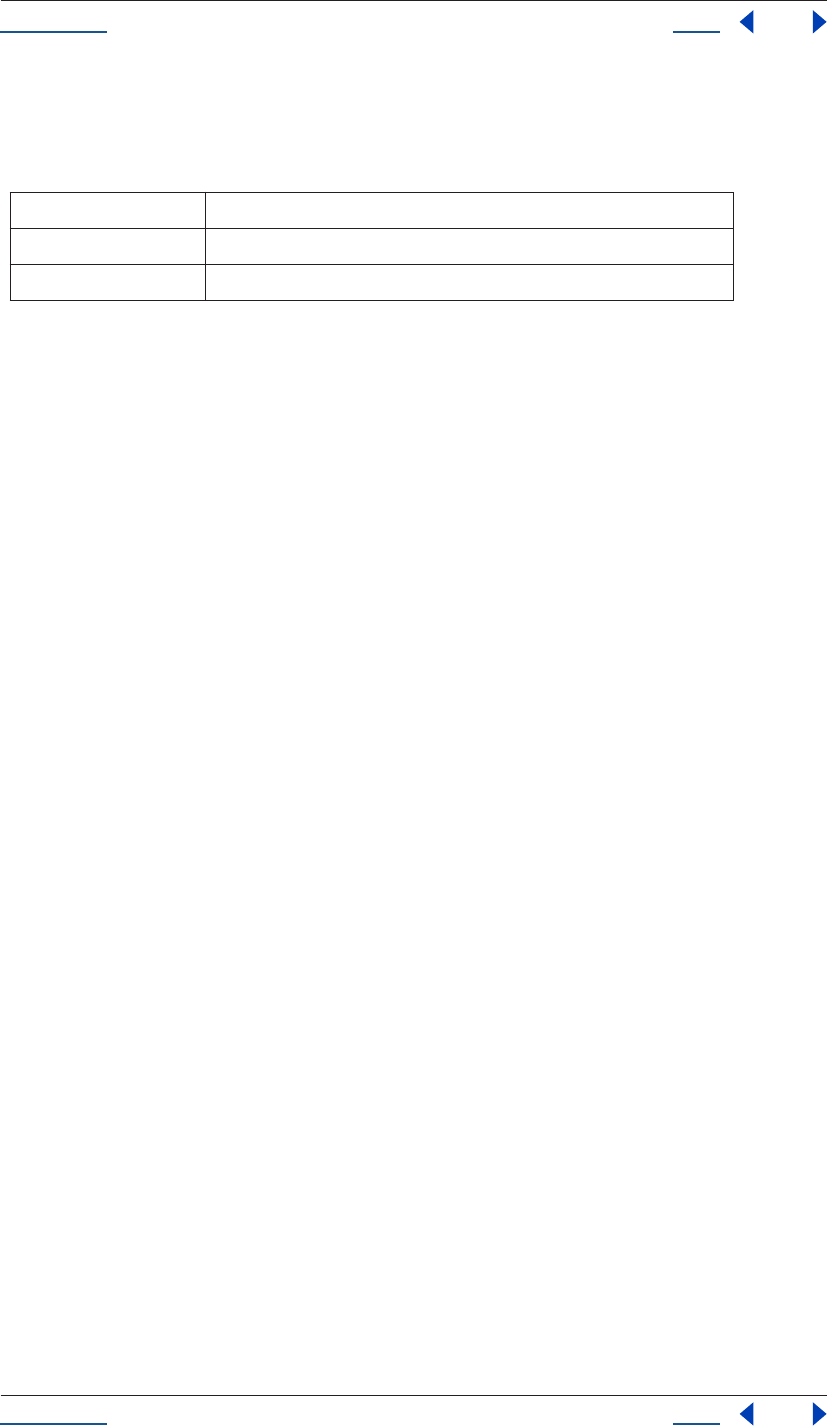
Using Help Back 44
Help Reference
Using Help Back 44
This method does not preserve the interpretation parameters. After changing the proxySource, the value of
useProxy is set to true.
Parameters
Returns
None.
AVItem time attribute
app.project.item(index).time
Description
The time attribute is the current time of the item when it is being previewed directly from the Project window.
It is an error to set this on a FootageItem whose mainSource is a still (i.e., if mainSource.isStill is true).
Type
Floating-point value; read/write.
AVItem usedIn attribute
app.project.item(index).usedIn
Description
The usedIn attribute is an array containing all the CompItems that use this AVItem.
Note: The returned value will not automatically update in response to changes that occur after you retrieve it. So
if you retrieve usedIn and then add this item into another comp, you need to retrieve usedIn again in order to get
an array that includes the new comp.
Type
Array of CompItem; read-only.
AVItem useProxy attribute
app.project.item(index).useProxy
Description
The useProxy attribute determines whether a proxy should be used for the item.
Type
Boolean; read/write.
AVItem width attribute
app.project.item(index).width
color array of 3 floats in the range [0..1] (red, green, and blue values)
width, height pixel dimension of solid[1..30,000]
pixelAspect pixel aspect of solid [0.01 .. 100]
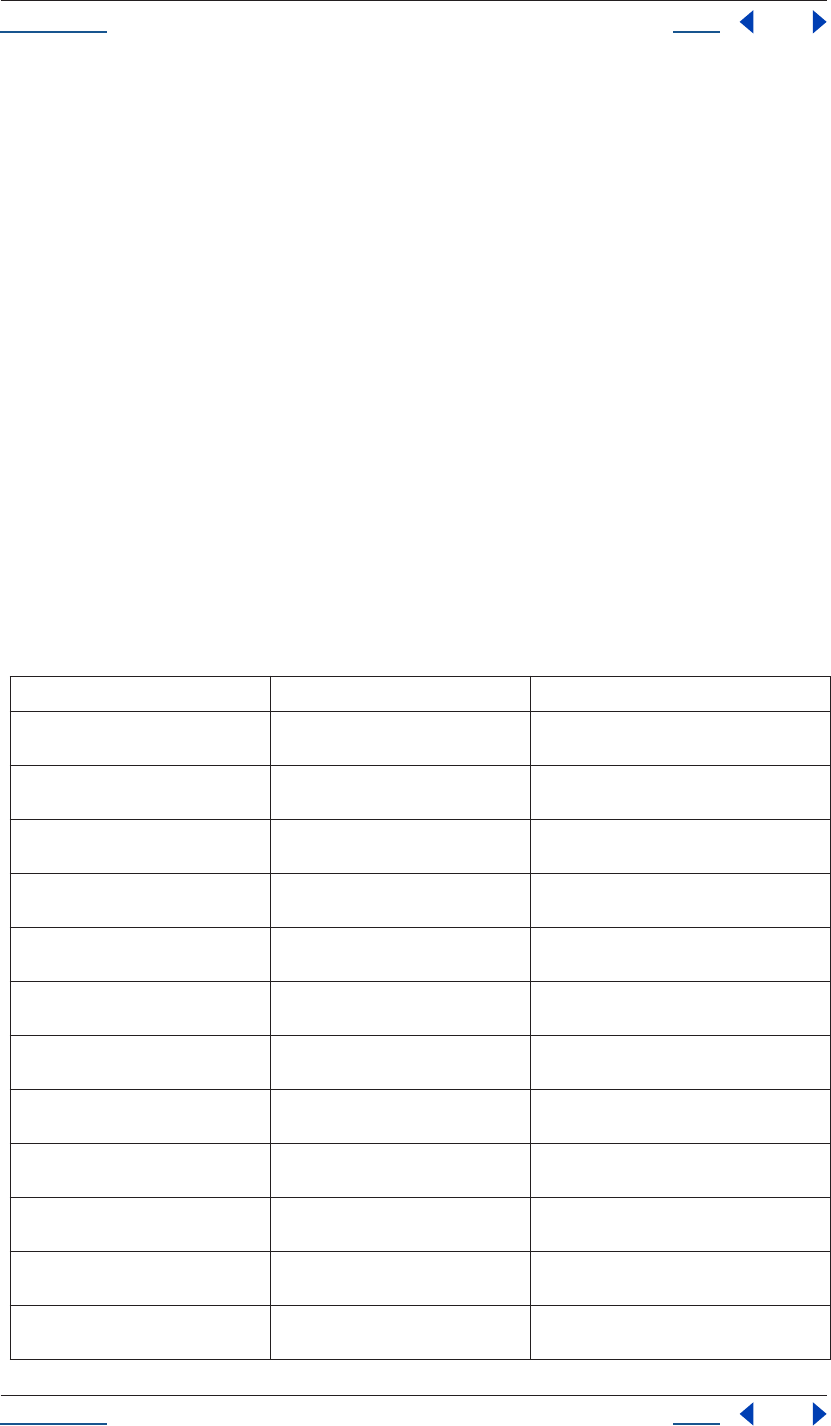
Using Help Back 45
Help Reference
Using Help Back 45
Description
The width attribute specifies the width, in pixels, of the item. Permitted range is [1 ..30,000].
In a FootageItem, width is linked to the mainSource's width; in a CompItem, it is linked to the comp's width.
It is legal to change the width of a CompItem or a FootageItem whose mainSource is a SolidSource. It is an
error to change the width if the item is a FootageItem whose mainSource is not a SolidSource.
Type
Integer; read-only unless a CompItem.
AVLayer object
app.project.layer(index)
Description
The AVLayer object provides an interface to those layers that contain AVItems (Comp layers, footage layers,
solid layers, text layers, and sound layers).
Since AVLayer is a subclass of Layer, all methods and attributes of Layer, in addition to those listed below, are
available when working with AVLayer.
Attributes
Attribute Reference Description
source see “AVLayer source attribute” on
page 51
source item for this layer
isNameFromSource see “AVLayer isNameFromSource
attribute” on page 50
true if the layer has no expressly set name, but
contains a named source
height see “AVLayer height attribute” on
page 50
height of the layer in pixels
width see “AVLayer width attribute” on
page 52
width of the layer in pixels
audioEnabled see “AVLayer audioEnabled attribute” on
page 47
true if the layer's audio is enabled
motionBlur see “AVLayer motionBlur attribute” on
page 51
true if layer's motionBlur is enabled
effectsActive see “AVLayer effectsActive attribute” on
page 49
true if the layer's effects are active
adjustmentLayer see “AVLayer adjustmentLayer attribute”
on page 46
true if this is an adjustment layer
guideLayer see “AVLayer guideLayer attribute” on
page 50
specifies whether this AVLayer is a guide layer
threeDLayer see “AVLayer threeDLayer attribute” on
page 52
true if this is a 3D layer
canSetCollapseTransformation see “AVLayer canSetCollapseTransfor-
mation attribute” on page 48
true if it is legal to change the value of collapse-
Transformation on this layer
collapseTransformation see “AVLayer collapseTransformation
attribute” on page 49
true if collapse transformation is on
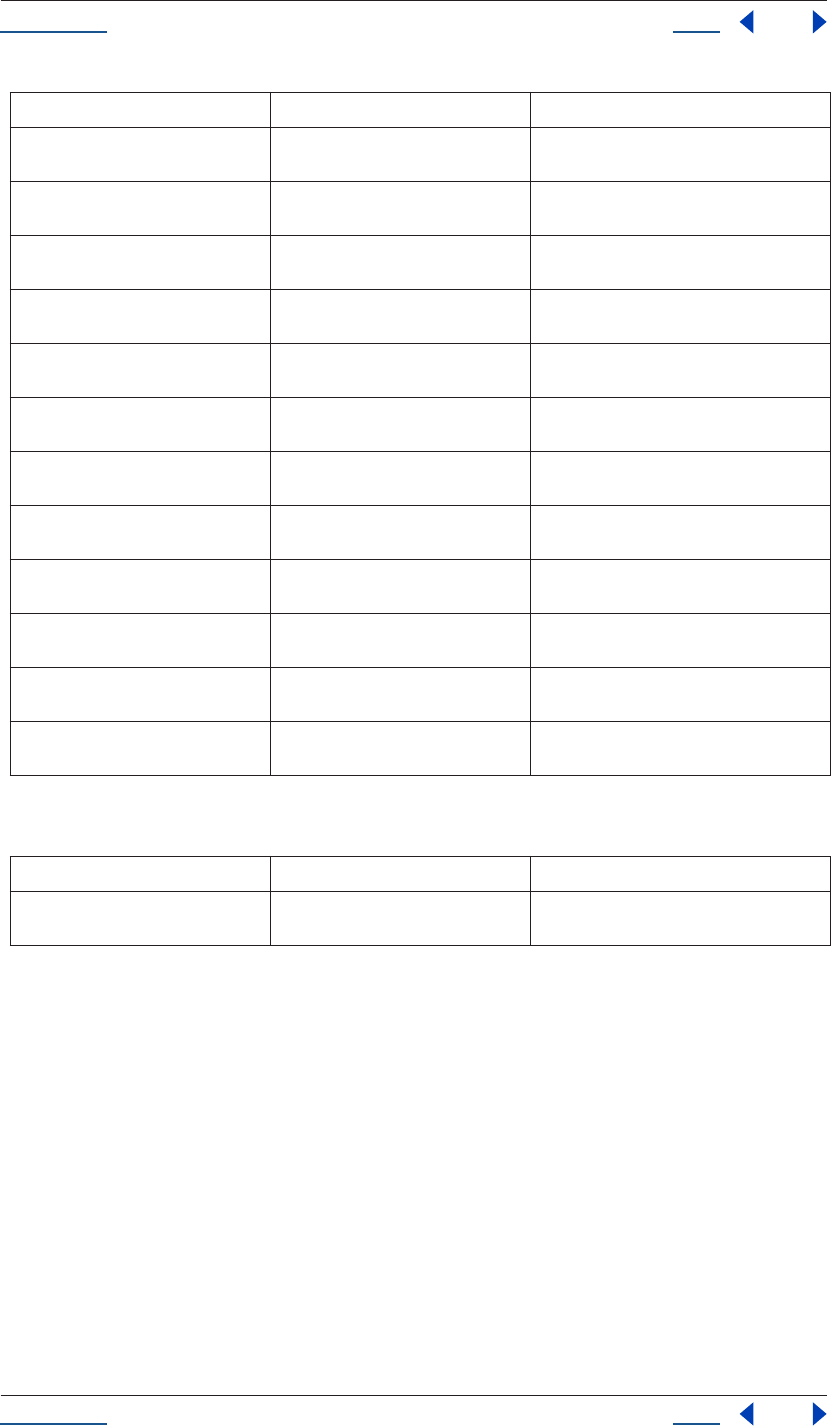
Using Help Back 46
Help Reference
Using Help Back 46
Method
Example
If the first item in the project is a CompItem, and the first layer of that CompItem is an AVLayer, the following
would set the layer quality, startTime, and inPoint.
var firstLayer = app.project.item(1).layer(1);
firstLayer.quality = LayerQuality.BEST;
firstLayer.startTime = 1;
firstLayer.inPoint = 2;
AVLayer adjustmentLayer attribute
app.project.item(index).adjustmentLayer
Description
The adjustmentLayer attribute returns a value of true if the layer is an adjustment layer.
frameBlending see “AVLayer frameBlending attribute”
on page 49
true if frame blending is enabled
canSetTimeRemapEnabled see “AVLayer canSetTimeRemapEn-
abled attribute” on page 49
true if it is legal to change the value of timeR-
emap
timeRemapEnabled see “AVLayer timeRemapEnabled
attribute” on page 52
true if time remapping is enabled on this layer
hasAudio see “AVLayer hasAudio attribute” on
page 50
true if the layer contains an audio component
audioActive see “AVLayer audioActive attribute” on
page 47
true if the layer's audio is active at the current
time
blendingMode see “AVLayer blendingMode attribute”
on page 47
blending mode of the layer
preserveTransparency see “AVLayer preserveTransparency
attribute” on page 51
true if preserve transparency is enabled
trackMatteType see “AVLayer trackMatteType attribute”
on page 52
if layer has a track matte, specifies the way it
will be applied
isTrackMatte see “AVLayer isTrackMatte attribute” on
page 51
true if this layer is being used as a matte track
for the layer below it
hasTrackMatte see “AVLayer hasTrackMatte attribute”
on page 50
true if the layer above is being used as a track
matte on this layer
quality see “AVLayer quality attribute” on
page 51
layer quality setting
guideLayer see “AVLayer guideLayer attribute” on
page 50
true if the layer is a guide layer
Method Reference Description
audioActiveAtTime() see “AVLayer audioActiveAtTime()
method” on page 47
given a time, returns whether this layer's audio
is active at that time
Attribute Reference Description
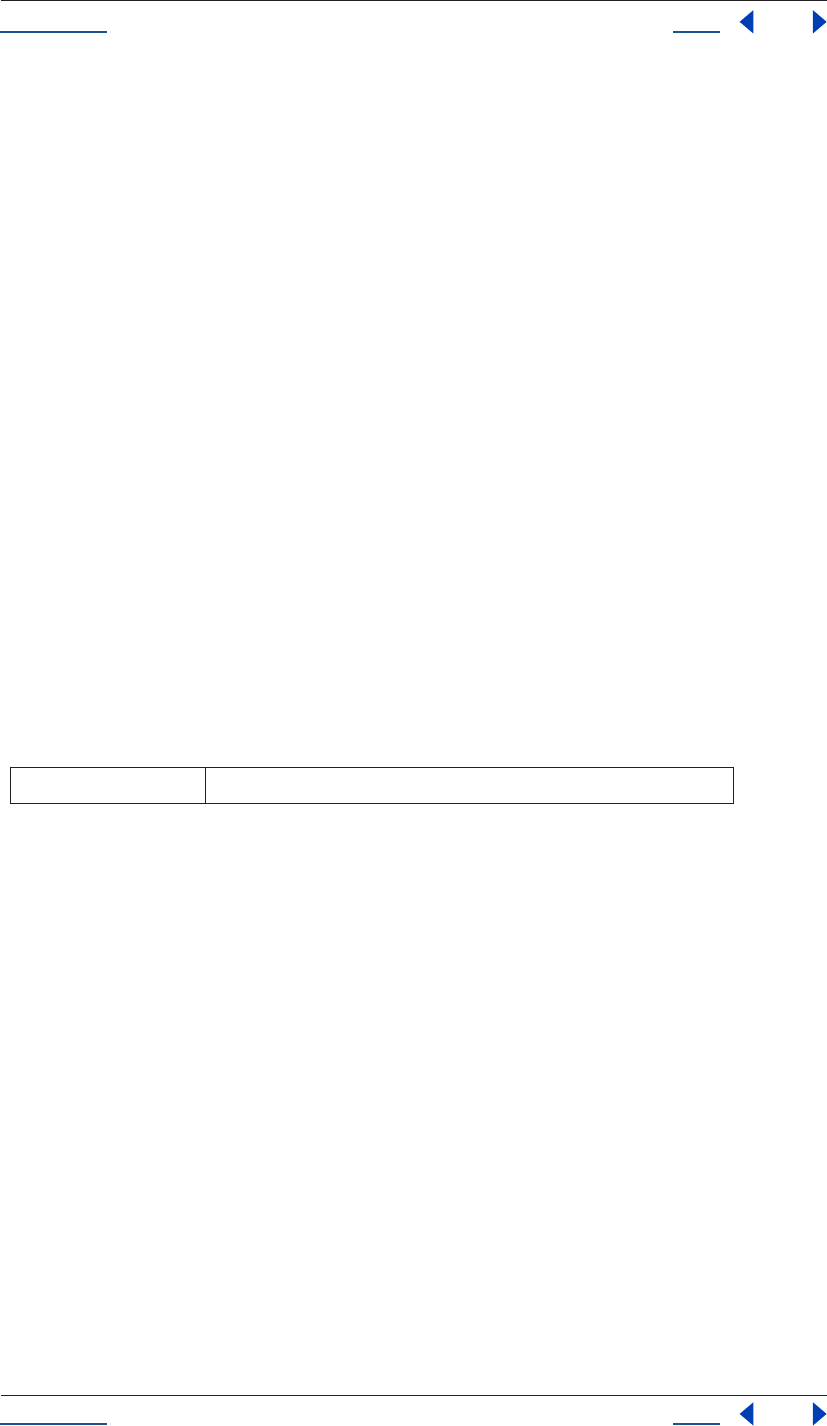
Using Help Back 47
Help Reference
Using Help Back 47
Type
Boolean; read/write.
AVLayer audioActive attribute
app.project.item(index).audioActive
Description
The audioActive attribute returns a value of true if the layer's audio is active at the current time.
To be true, audioEnabled must be true, no other layer with audio may be soloing unless this layer is soloed
too, and the time must be in between the inPoint and outPoint of this layer.
Type
Boolean; read-only.
AVLayer audioActiveAtTime() method
app.project.item(index).audioActiveAtTime(time)
Description
Given a time, the audioActiveAtTime method returns whether this layer's audio will be active at that
time.
To be true the layer’s audioEnabled attribute must be true, no other layer containing audio may be soloing
unless this layer is soloed too, and the given time must be between this layer's inPoint and outPoint.
Parameters
Returns
Boolean.
AVLayer audioEnabled attribute
app.project.item(index).audioEnabled
Description
The audioEnabled attribute is true if the layer's audio is enabled. This attribute corresponds to the speaker
button in the user interface.
Type
Boolean; read/write.
AVLayer blendingMode attribute
app.project.item(index).blendingMode.
Description
The blendingMode is the blending mode of the layer.
time time, in seconds (floating-point value)

Using Help Back 48
Help Reference
Using Help Back 48
Type
Enumerated type (read/write); one of the following:
BlendingMode.ADD
BlendingMode.ALPHA_ADD
BlendingMode.CLASSIC_COLOR_BURN
BlendingMode.CLASSIC_COLOR_DODGE
BlendingMode.CLASSIC_DIFFERENCE
BlendingMode.COLOR
BlendingMode.COLOR_BURN
BlendingMode.COLOR_DODGE
BlendingMode.DANCING_DISSOLVE
BlendingMode.DARKEN
BlendingMode.DIFFERENCE
BlendingMode.DISSOLVE
BlendingMode.EXCLUSION
BlendingMode.HARD_LIGHT
BlendingMode.HARD_MIX
BlendingMode.HUE
BlendingMode.LIGHTEN
BlendingMode.LINEAR_BURN
BlendingMode.LINEAR_DODGE
BlendingMode.LINEAR_LIGHT
BlendingMode.LUMINESCENT_PREMUL
BlendingMode.LUMINOSITY
BlendingMode.MULTIPLY
BlendingMode.NORMAL
BlendingMode.OVERLAY
BlendingMode.PIN_LIGHT
BlendingMode.SATURATION
BlendingMode.SCREEN
BlendingMode.SILHOUETE_ALPHA
BlendingMode.SILHOUETTE_LUMA
BlendingMode.SOFT_LIGHT
BlendingMode.STENCIL_ALPHA
BlendingMode.STENCIL_LUMA
BlendingMode.VIVID_LIGHT
AVLayer canSetCollapseTransformation attribute
app.project.item(index).canSetCollapseTransformation

Using Help Back 49
Help Reference
Using Help Back 49
Description
The canSetCollapseTransformation attribute returns a value of true if it is legal to change the value of the
collapseTransformation attribute on this layer.
Type
Boolean; read-only.
AVLayer canSetTimeRemapEnabled attribute
app.project.item(index).canSetTimeRemapEnabled
Description
The canSetTimeRemapEnabled attribute returns a value of true if it is legal to change the value of the timeR-
emapEnabled attribute on this layer.
Type
Boolean; read-only.
AVLayer collapseTransformation attribute
app.project.item(index).collapseTransformation
Description
The collapseTransformation attribute returns a value of true if collapse transformation is on for this layer.
Type
Boolean; read/write.
AVLayer effectsActive attribute
app.project.item(index).effectsActive
Description
The effectsActive attribute returns a value of true if the layer's effects are active.
Type
Boolean; read/write.
AVLayer frameBlending attribute
app.project.item(index).frameBlending
Description
The frameBlending attribute returns a value of true if frame blending is enabled.
Type
Boolean; read/write.

Using Help Back 50
Help Reference
Using Help Back 50
AVLayer guideLayer attribute
app.project.item(index).guideLayer
Description
This attribute returns a value of true if the layer is a guide layer.
Type
Boolean; read-only.
AVLayer hasAudio attribute
app.project.item(index).hasAudio
Description
The hasAudio attribute holds a value of true if the layer contains an audio component, regardless of whether
it is audioEnabled or soloed.
Type
Boolean; read-only.
AVLayer hasTrackMatte attribute
app.project.item(index).hasTrackMatte
Description
The hasTrackMatte attribute returns a value of true if the layer in front of this layer is being used as a track
matte on this layer. If true, then this layer's trackMatteType controls how the matte is applied.
Type
Boolean; read-only.
AVLayer height attribute
app.project.item(index).height
Description
The height attribute is the height of the layer, in pixels.
Type
Floating-point value; read-only.
AVLayer isNameFromSource attribute
app.project.item(index).isNameFromSource
Description
The isNameFromSource attribute returns a value of true if the layer has no expressly set name, but the layer
contains a named source. In this case, layer.name will be the same as layer.source.name. It returns false if the
layer has an expressly set name, or if neither the layer nor the layer's source has a name.

Using Help Back 51
Help Reference
Using Help Back 51
Type
Boolean; read-only.
AVLayer isTrackMatte attribute
app.project.item(index).isTrackMatte
Description
The isTrackMatte attribute returns a value of true if this layer is being used as a matte track for the layer behind
it.
Type
Boolean; read-only.
AVLayer motionBlur attribute
app.project.item(index).motionBlur
Description
The motionBlur attribute returns a value of true if the layer's motionBlur is enabled.
Type
Boolean; read/write.
AVLayer preserveTransparency attribute
app.project.item(index).preserveTransparency
Description
The preserveTransparency attribute returns a value of true if preserve transparency is enabled for the layer.
Type
Boolean; read/write.
AVLayer quality attribute
app.project.item(index).quality.
Description
The quality is the layer quality specifying how this layer is to be displayed.
Type
Enumerated type (read/write); one of the following:
LayerQuality.BEST
LayerQuality.DRAFT
LayerQuality.WIREFRAME
AVLayer source attribute
app.project.item(index).source

Using Help Back 52
Help Reference
Using Help Back 52
Description
The source attribute is the source AVItem for this layer.
The value of the source will be null in a Text layer.
Type
AVItem; read-only.
AVLayer threeDLayer attribute
app.project.item(index).threeDLayer
Description
The threeDLayer attribute is true if this is a 3D layer.
Type
Boolean; read/write.
AVLayer timeRemapEnabled attribute
app.project.item(index).timeRemapEnabled
Description
The timeRemapEnabled attribute is true if time remapping is enabled on this layer.
Type
Boolean; read/write.
AVLayer trackMatteType attribute
app.project.item(index).trackMatteType
Description
If this layer has a track matte, the trackMatteType specifies the way the track matte will be applied.
Type
Enumerated type (read/write); one of the following:
TrackMatteType.ALPHA
TrackMatteType.ALPHA_INVERTED
TrackMatteType.LUMA
TrackMatteType.LUMA_INVERTED
TrackMatteType.NO_TRACK_MATTE
AVLayer width attribute
app.project.item(index).width
Description
The width attribute is the width of the layer, in pixels.
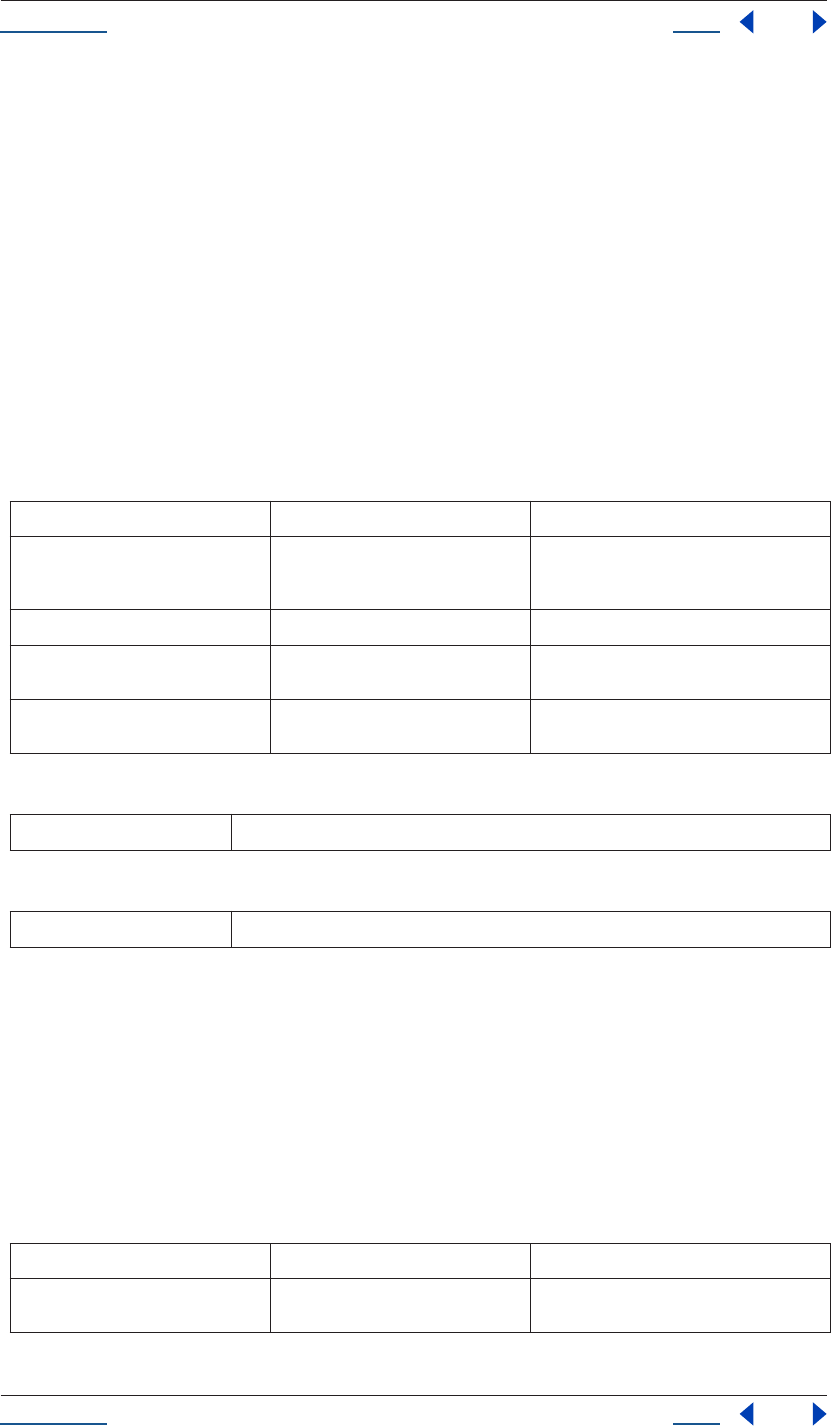
Using Help Back 53
Help Reference
Using Help Back 53
Type
Floating-point value; read-only.
Collection object
Description
A Collection object acts like an array that provides access to its elements by index. Like an array, a collection
associates a set of objects or values as a logical group and provides random access to them. However, most
collection objects are read-only. You do not assign objects to them yourself—their contents update automat-
ically as objects are created or deleted.
The index numbering of a collection starts with 1, not 0.
Objects
Attributes
Methods
CompItem object
app.project.item(index)
Description
The CompItem object provides access to attributes and methods of Compositions. These are accessed via their
index number.
Attributes
Object Reference Description
ItemCollection see “ItemCollection” on page 99 a collection of all of the items (imported files,
folders, solids, etc.) found in the Project win-
dow
LayerCollection see “LayerCollection” on page 110 contains all of the layers in a composition
OMCollection see “OMCollection” on page 119 contains all of the OutputModule items in the
project
RQItemCollection see “RQItemCollection” on page 164 contains all of the RenderQueue items in the
project
length the number of objects in the collection (applies to all collections)
[] retrieves an object or objects in the collection via its index number
Attribute Reference Description
frameDuration see “CompItem frameDuration
attribute” on page 58
The duration of a single frame in seconds. This
is the inverse of the framerate.
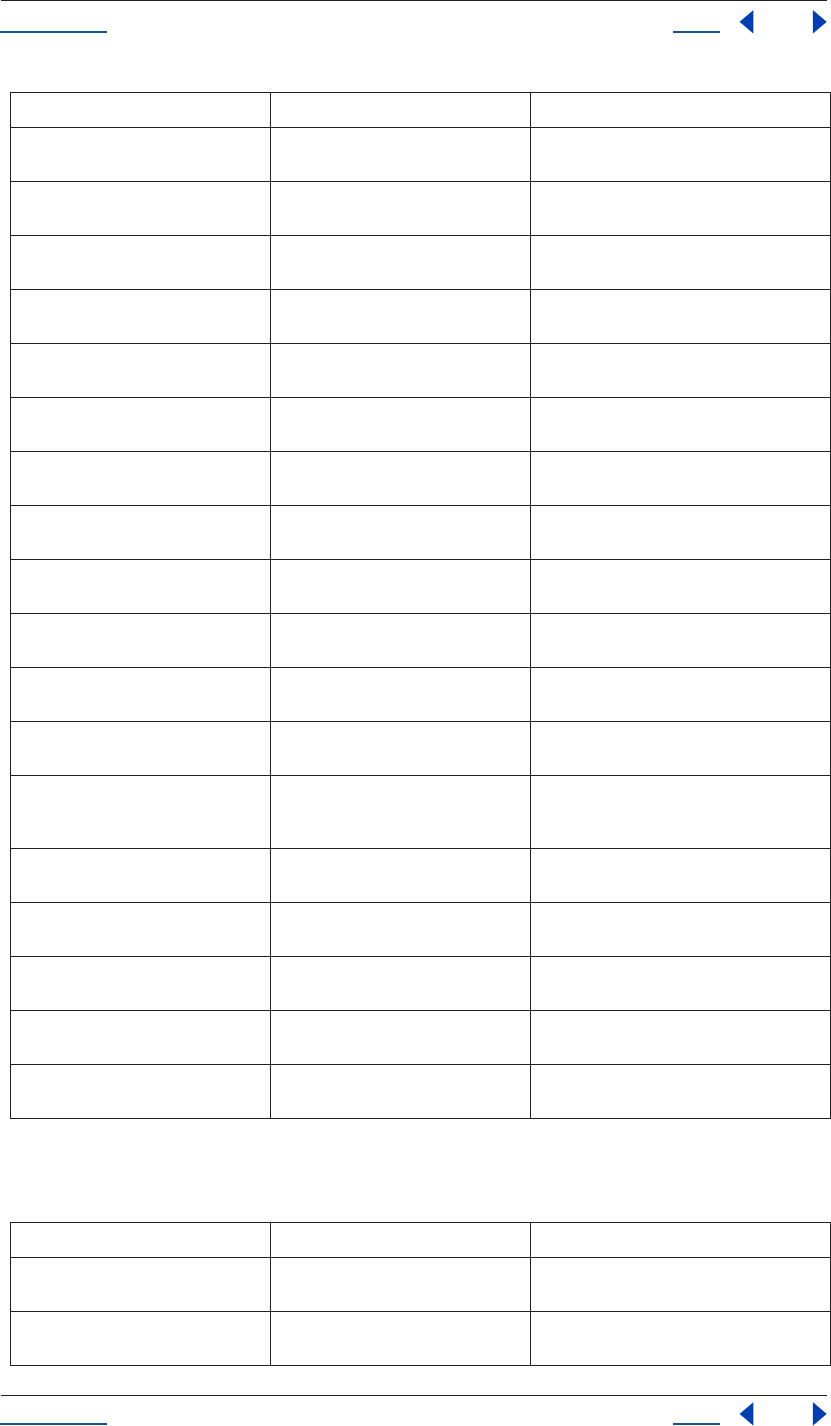
Using Help Back 54
Help Reference
Using Help Back 54
Attributes inherited from Item object and AVItem object (see “Item object” on page 97 and “AVItem object” on
page 37)
workAreaStart see “CompItem workAreaStart
attribute” on page 61
the work area start time (in seconds)
workAreaDuration see “CompItem workAreaDuration
attribute” on page 61
the work area duration (in seconds)
numLayers see “CompItem numLayers attribute” on
page 59
number of layers in the CompItem
hideShyLayers see “CompItem hideShyLayers
attribute” on page 58
corresponds to the value of the Hide All Shy
Layers button in the Composition window
motionBlur see “CompItem motionBlur attribute”
on page 59
if true, motion blur is enabled for this comp
draft3d see “CompItem draft3d attribute” on
page 57
sets the 3d display mode to Draft quality
frameBlending see “CompItem frameBlending
attribute” on page 57
if true, time filtering is enabled for this comp
preserveNestedFrameRate see “CompItem preserveNestedFrameR-
ate attribute” on page 59
boolean determining whether the frame rate
of nested compositions should be preserved
preserveNestedResolution see “CompItem preserveNestedResolu-
tion attribute” on page 60
boolean determining whether the resolution
of nested compositions should be preserved
bgColor see “CompItem bgColor attribute” on
page 56
background color of the composition
activeCamera see “CompItem activeCamera attribute”
on page 56
current active Camera Layer
displayStartTime see “CompItem displayStartTime
attribute” on page 57
changes the display of the start time in the
Timeline window
resolutionFactor see “CompItem resolutionFactor
attribute” on page 60
integer array determining the factor by which
the x and y resolution of the Composition win-
dow is downsampled
shutterAngle see “CompItem shutterAngle attribute”
on page 61
integer value (0 - 720) determining the camera
shutter angle
shutterPhase see “CompItem shutterPhase attribute”
on page 61
integer value (0 - 360) determining the camera
shutter phase
layers see “LayerCollection” on page 110 LayerCollection containing the layers of the
compItem
selectedLayers see “CompItem selectedLayers
attribute” on page 60
array containing all selected Layers
selectedProperties see “CompItem selectedProperties
attribute” on page 60
array containing all selected Properties
Attribute Reference Description
name see “Item name attribute” on page 98 name of the object as shown in the Project
window
comment see “Item comment attribute” on
page 98
string that holds a comment
Attribute Reference Description
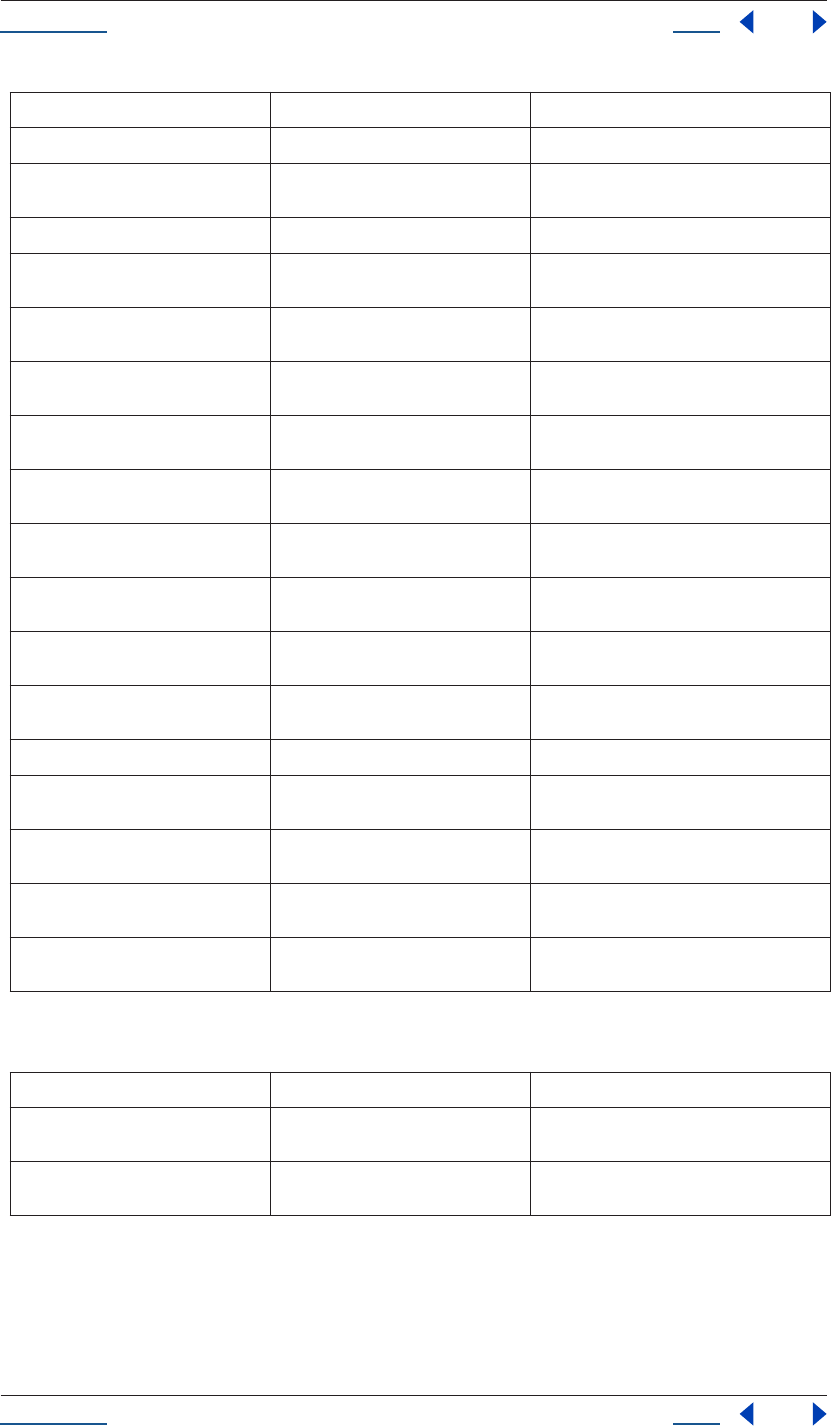
Using Help Back 55
Help Reference
Using Help Back 55
Methods
id see “Item id attribute” on page 98 unique integer ID for this item
parentFolder see “Item parentFolder attribute” on
page 98
parent folder of this item
selected see “Item selected attribute” on page 99 true if this item is currently selected
typeName see “Item typeName attribute” on
page 99
string corresponding to the type of item
width see “AVItem width attribute” on page 44 integer [1 ..30,000] describing the width, in pix-
els, of the item
height see “AVItem height attribute” on
page 41
integer [1 .. 30,000] describing the height, in
pixels, of the item
pixelAspect see “AVItem pixelAspect attribute” on
page 41
pixel aspect ratio; floating-point value [0.01
..100]
frameRate see “AVItem frameRate attribute” on
page 40
frame rate of the AVItem [1..99].
frameDuration see “AVItem frameDuration attribute”
on page 39
frame rate for the AVItem [1/99 .. 1 ].
duration see “AVItem duration attribute” on
page 39
duration of the AVItem, in seconds [0 .. 10,800]
useProxy see “AVItem useProxy attribute” on
page 44
boolean describing whether a proxySource
should be used for this item
proxySource see “AVItem proxySource attribute” on
page 42
FootageItem used as proxy of the AVItem;
read-only
time see “AVItem time attribute” on page 44 current time of the AVItem in seconds
usedIn see “AVItem usedIn attribute” on
page 44
array containing all the CompItems that use
this AVItem
hasVideo see “AVItem hasVideo attribute” on
page 40
true if the AVItem has an audio component
hasAudio see “AVItem hasAudio attribute” on
page 40
true if the AVItem has a video component
footageMissing see “AVItem footageMissing attribute”
on page 39
true if the AVItem cannot be found or if it is a
placeholder
Method Reference Description
duplicate() see “CompItem duplicate() method” on
page 57
creates and returns a duplicate of this comp
item
layer() see “CompItem layer() method” on
page 58
returns the layer using index, relative index or
name
Attribute Reference Description
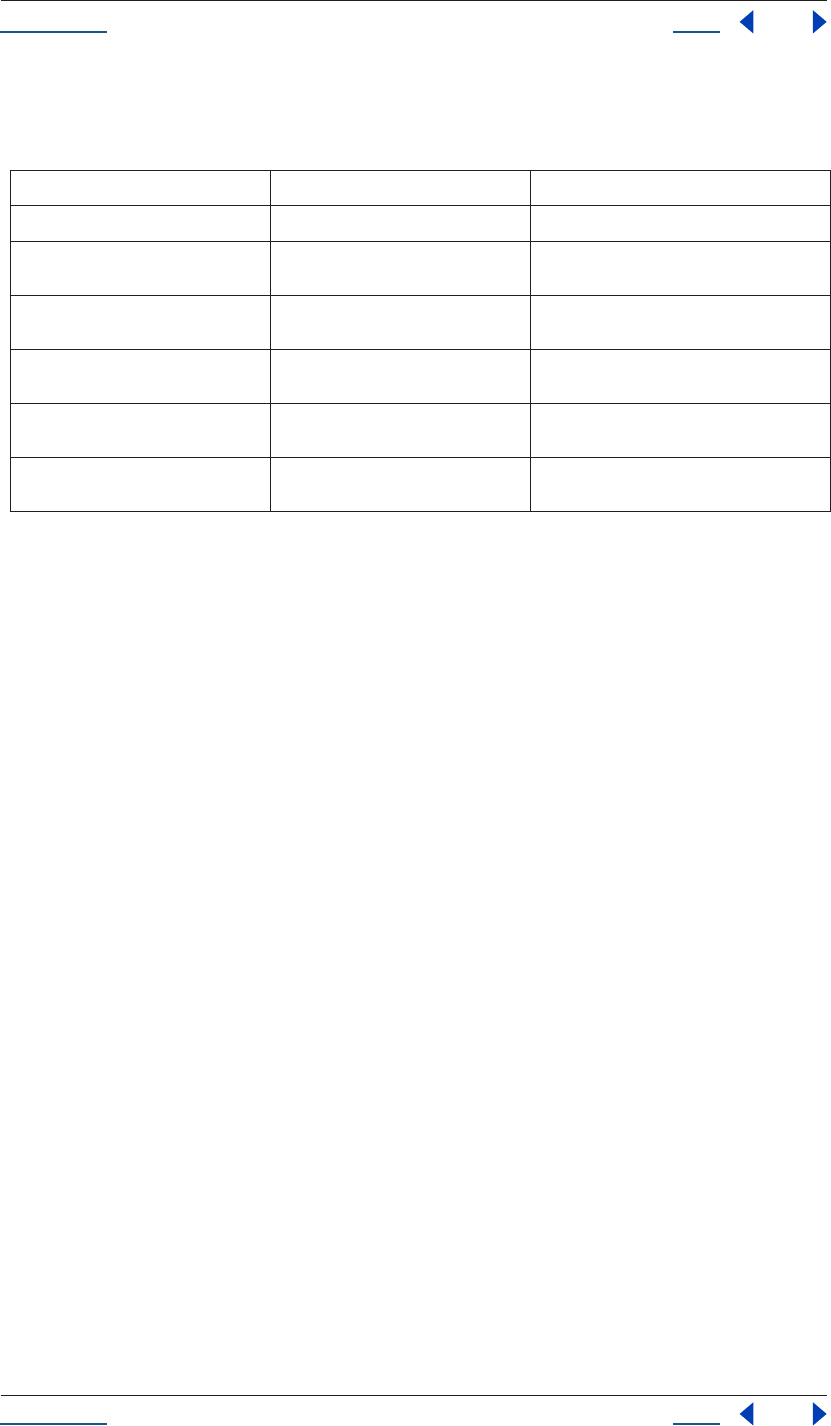
Using Help Back 56
Help Reference
Using Help Back 56
Methods inherited from Item object and AVItem object (see “Item object” on page 97 and “AVItem object” on
page 37)
Example
Given that the first item in the project is a CompItem, the following code would result in two alerts. The first
would display the number of layers in the CompItem, and the second would display the name of the last Layer
in the CompItem.
var firstComp = app.project.item(1);
alert( "number of layers is " + firstComp.numLayers );
alert( "name of last layer is " + firstComp.layer(firstComp.numLayers).name );
CompItem activeCamera attribute
app.project.item(index).activeCamera
Description
The active camera is the front-most camera layer that is enabled. The value is null if the comp contains no
enabled camera layers.
Type
Layer; read-only.
CompItem bgColor attribute
app.project.item(index).bgColor
Description
The bgColor attribute specifies the background color of the comp. The value should be an array containing
three floats in the range [0..1] for red, green, and blue.
Type
Array of three floating-point values from 0 to 1: [R, G, B); read/write.
Method Reference Description
remove() see “Item remove() method” on page 99 deletes the item from the project
setProxy() see “AVItem setProxy() method” on
page 42
sets a proxy for the AVItem
setProxyWithSequence() see “AVItem setProxyWithSequence()
method” on page 43
sets a sequence as a proxy for the AVItem
setProxyWithSolid() see “AVItem setProxyWithSolid()
method” on page 43
sets a solid as a proxy (feature available only via
scripting)
setProxyWithPlaceholder() see “AVItem setProxyWithPlaceholder()
method” on page 42
sets a placeholder as a proxy
setProxyToNone() see “AVItem setProxyToNone() method”
on page 42
removes the proxy

Using Help Back 57
Help Reference
Using Help Back 57
CompItem displayStartTime attribute
app.project.item(index).displayStartTime
Description
The displayStartTime attribute corresponds the time, in seconds, set as the begining of the composition. This
is the equivalent of the Start Timecode or Start Frame setting in the Composition Settings window, expressed
in seconds.
The permissible range is [0...86339] (86339 is 1 second less than 25 hours).
Type
Floating-point value; time, in seconds. Read/write.
CompItem draft3d attribute
app.project.item(index).draft3d
Description
The draft3d attribute determines whether Draft 3D mode is enabled for the Composition window. This corre-
sponds to the value of the draft3d button in the Composition window.
Type
Boolean; if true, enables Draft 3D. Read/write.
CompItem duplicate() method
app.project.item(index).duplicate()
Description
The duplicate() method creates and returns a duplicate of this comp item. The duplicate will contain the same
layers as the original.
Parameters
None.
Returns
CompItem.
CompItem frameBlending attribute
app.project.item(index).frameBlending
Description
The frameBlending attribute determines whether frame blending is enabled for this Composition. Corre-
sponds to the value of the frame blending button in the Composition window.
Type
Boolean; if true, frame blending is enabled; read/write.
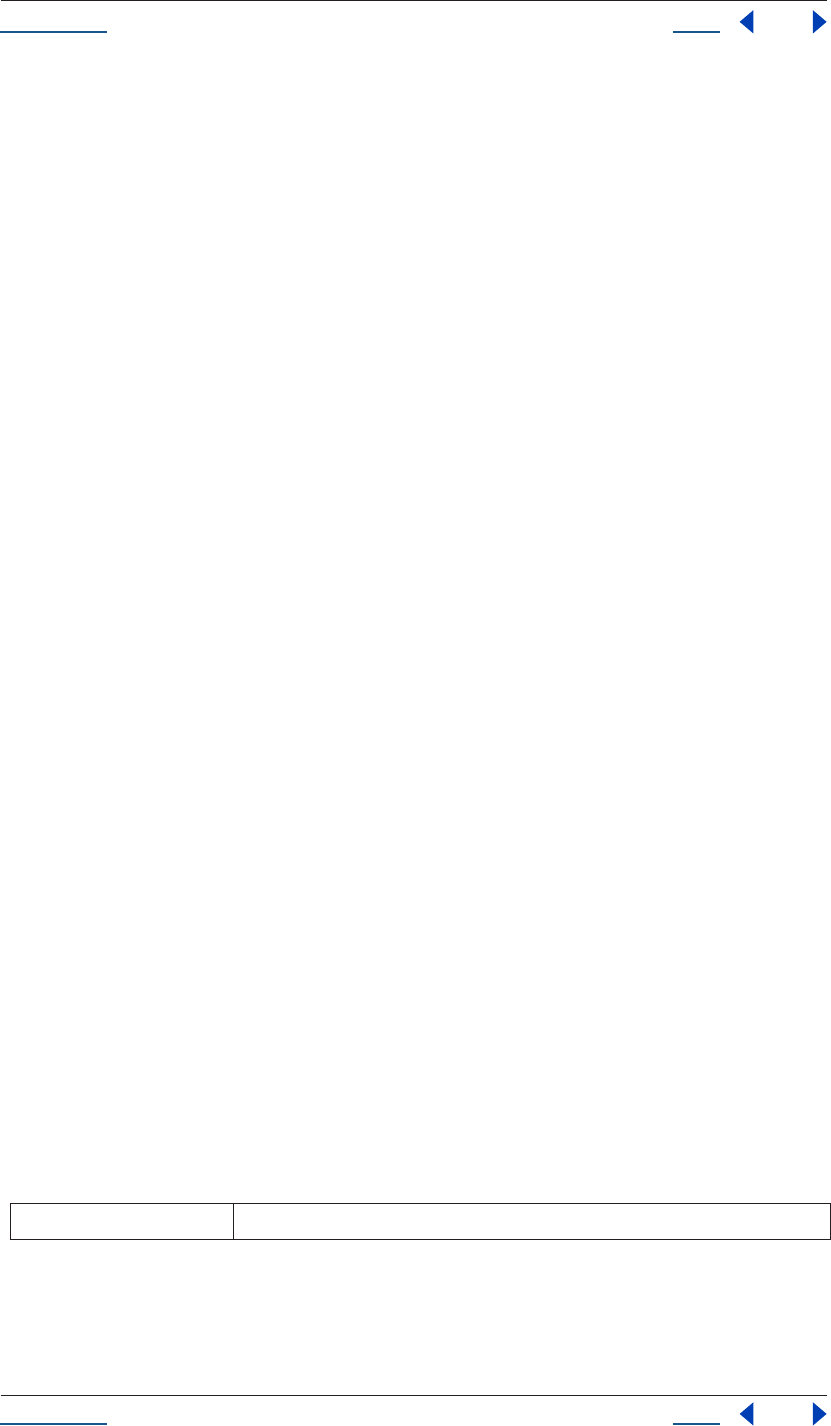
Using Help Back 58
Help Reference
Using Help Back 58
CompItem frameDuration attribute
app.project.item(index).frameDuration
Description
The frameDuration attribute returns the duration of a frame, in seconds. This is the inverse of the framerate
(or frames per second). This attribute is read-only.
Type
Floating-point value; read-only.
CompItem hideShyLayers attribute
app.project.item(index).hideShyLayers
Description
The hideShyLayers attribute determines whether shy layers should be visible in the Timeline window. It corre-
sponds to the value of the Hide All Shy Layers button in the Composition window.
If false, then only layers with "shy" set to false will be shown. If true, then all layers will be shown regardless of
the value of their "shy" attributes.
Type
Boolean; if true, shy layers are visible. Read/write.
CompItem layer() method
app.project.item(index).layer(index)
app.project.item(index).layer(otherLayer, relIndex)
app.project.item(index).layer(name)
Description
The layer() method returns a specified layer object.
Using the syntax layer(int index) this method returns the layer with the given index. The given
index must be in the range [1,numLayers], where numLayers is the number of layers in the Composition.
Using the syntax layer(Layer otherLayer, int relIndex) this method returns the layer whose index is that of
the given otherlayer added to the given relindex. Relindex must be in the range [(1-otherlayer.index),
(numlayers-otherlayer.index)].
Using the syntax layer(String name) this method returns the layer within the CompItem whose name
matches the given name.
Parameters
Note that there are three separate types of usage possible with layer, with unique syntax for each:
index index number of the specified layer; an integer

Using Help Back 59
Help Reference
Using Help Back 59
or
or
Returns
Layer object.
CompItem layers attribute
app.project.item(index).layers
Description
The layers attribute contains the LayerCollection for this composition.
Type
LayerCollection. Read-only.
CompItem motionBlur attribute
app.project.item(index).motionBlur
Description
The motionBlur attribute determines whether motion blur is enabled for the Composition. Corresponds to
the value of the motion blur button in the Composition window.
Type
Boolean; if true, motion blur is enabled. Read/write.
CompItem numLayers attribute
app.project.item(index).numLayers
Description
The numLayers attribute is the number of layers in the CompItem. This always equals length of the LayerCol-
lection.
Type
Integer. Read-only.
CompItem preserveNestedFrameRate attribute
app.project.item(index).preserveNestedFrameRate
otherLayer index number of the layer to which an offset will be applied
relIndex relative position of the layer; the difference between the two index numbers expressed as an
integer
name name of the specified number; a text string

Using Help Back 60
Help Reference
Using Help Back 60
Description
The preserveNestedFrameRate attribute determines whether the frame rate of nested compositions is
preserved in the current composition. This corresponds to the value of the Preserve Frame Rate When Nested
or in Render Queue option in the Advanced tab of the Composition Settings dialog box.
Type
Boolean; if true, nested frame rate is preserved. Read/write.
CompItem preserveNestedResolution attribute
app.project.item(index).preserveNestedResolution
Description
The preserveNestedResolution attribute determines whether the resolution of nested compositions is
preserved in the current composition. This corresponds to the value of the Preserve Resolution When Nested
option in the Advanced tab of the Composition Settings dialog box.
Type
Boolean; if true, nested frame rate is preserved. Read/write.
CompItem resolutionFactor attribute
app.project.item(index).resolutionFactor
Description
The resolutionFactor attribute specifies the sampling resolution of the comp when rendering.
Each of the two values in the array specifies how many pixels to skip when sampling in one of the two direc-
tions. The first number controls horizontal sampling; the second controls vertical sampling. Each of the two
integers must lie in the range [1..99]. Full resolution is [1,1], half resolution is [2,2], and quarter resolution is
[4,4]. The default is [1,1].
Type
Array of two integers, describing the x and y downsample resolution factor; read/write.
CompItem selectedLayers attribute
app.project.item(index).selectedLayers
Description
This attribute yields an array containing all of the selected Layers in this CompItem.
Type
Array of Layer objects; read-only.
CompItem selectedProperties attribute
app.project.item(index).selectedProperties

Using Help Back 61
Help Reference
Using Help Back 61
Description
This attribute yields an array containing all of the selected Property and PropertyGroup objects in this
CompItem.
Type
Array of Property and PropertyGroup objects; read-only.
CompItem shutterAngle attribute
app.project.item(index).shutterAngle
Description
The shutterAngle attribute determines the shutter angle setting for the composition. This setting corresponds
to the Shutter Angle setting found under the Advanced tab of the Composition Settings dialog box. Acceptable
integer settings are within the range of 0 - 720.
Type
Integer value (0 - 720 range only). Read/write.
CompItem shutterPhase attribute
app.project.item(index).shutterPhase
Description
The shutterPhase attribute determines the shutter phase setting for the composition. This setting is the equiv-
alent of the Shutter Phase setting found under the Advanced tab of the Composition Settings dialog box.
Acceptable integer settings are within the range of 0 - 360.
Type
Integer value (-360 - 360 range only). Read/write.
CompItem workAreaDuration attribute
app.project.item(index).workAreaDuration
Description
The workAreaDuration attribute determines the duration, in seconds, of the work area. This value is the
difference of the start point time of the Composition work area and the end point.
Type
Floating-point value; time, in seconds. Read/write.
CompItem workAreaStart attribute
app.project.item(index).workAreaStart
Description
The workAreaStart attribute determines the time, in seconds, where the Composition work area begins.
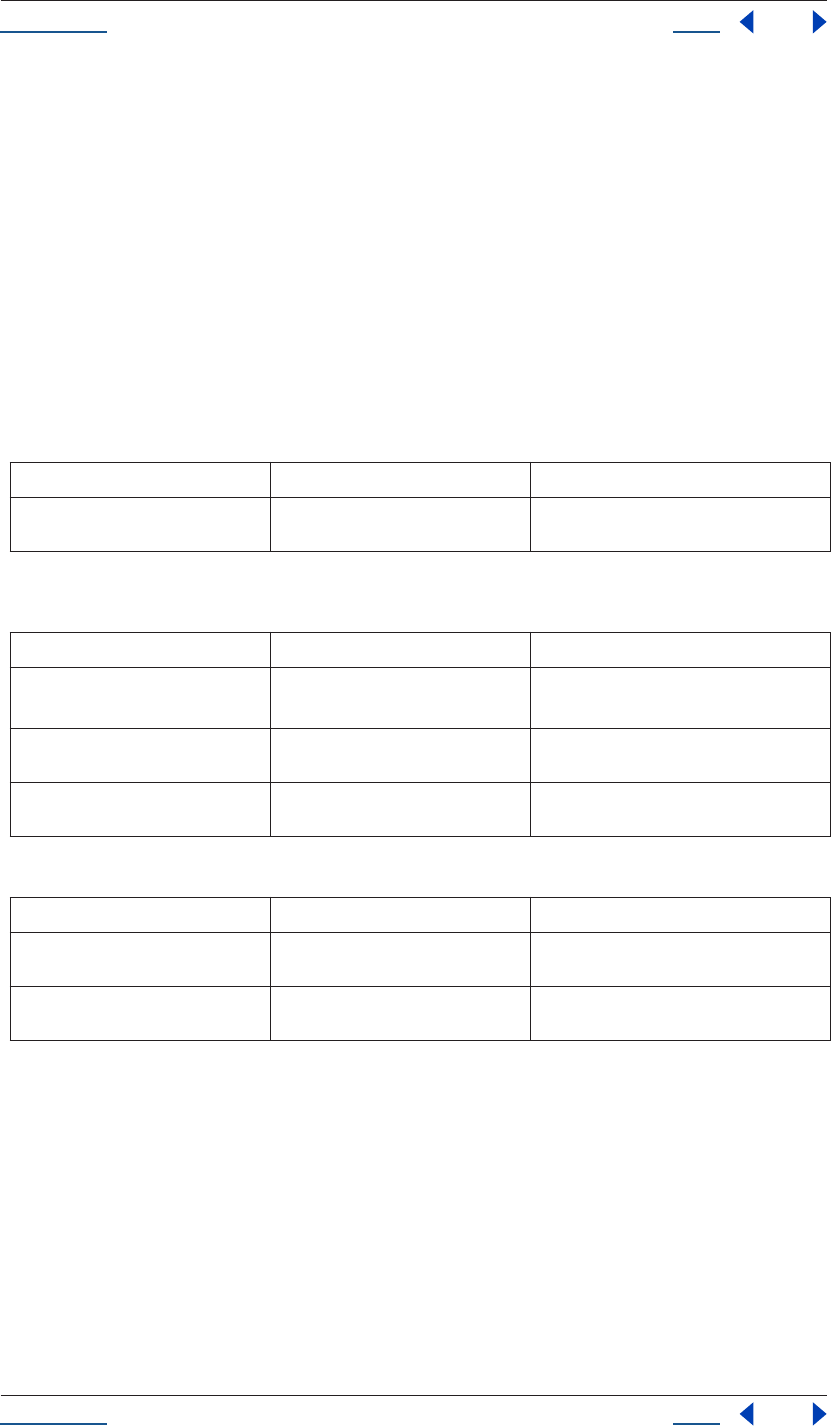
Using Help Back 62
Help Reference
Using Help Back 62
Type
Floating-point value; time, in seconds. Read/write.
File Class
The File Class contains methods and attributes common to File objects. A File object corresponds to a disk file.
Also included in this class are all attributes and methods within the FileSystem class, as those apply to Files as
well as Folders.
Note that the difference between the File Class and File object is that the class attributes and methods require
no specific instance of a File, whereas class methods and attributes do.
Class attributes inherited from FileSource object (see “FileSource object” on page 71)
Methods
Class methods inherited from FileSource object (see “FileSource object” on page 71)
File() Class method
File(path)
new File(path)
Description
This function constructs a new File object. If the given path name refers to an already existing folder, a Folder
object is returned instead.
The CRLF sequence is preset to the system default, and the encoding is preset to the default system encoding.
Class attribute Reference Description
fs see “FileSystem fs class attribute” on
page 74
name of the file system; read-only
Method Reference Description
File()
new File()
see “File() Class method” on page 62 constructs a new File object
openDialog() see “File openDialog() Class method” on
page 67
opens the built-in operating-system dialog to
select an existing file to open
saveDialog() see “File saveDialog() Class method” on
page 69
opens the built-in operating-system dialog to
select a file name to save a file into
Class method Reference Description
decode() see “FileSystem decode() class method”
on page 73
decodes the input string from UTF-8
encode() see “FileSystem encode() class method”
on page 73
encodes the input string in UTF-8
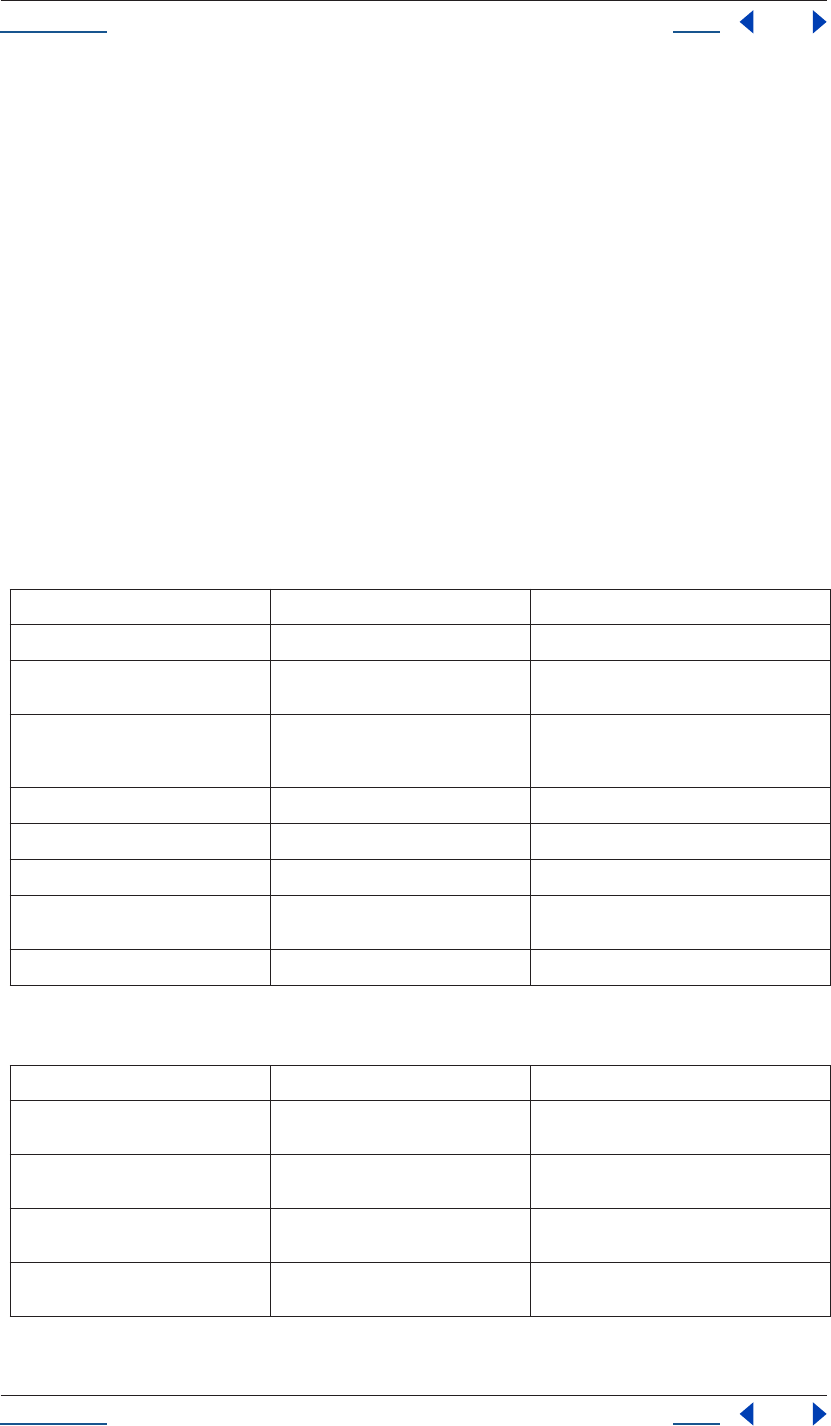
Using Help Back 63
Help Reference
Using Help Back 63
Parameters
Path, expressed as a string. If missing, a temporary name is generated.
Returns
File (or Folder if path refers to an existing folder).
File object
File(“path”)
Description
The File object contains methods and attributes common to File objects. A Folder object corresponds to a
folder.
Also included in this object are all attributes and methods within the FileSystem object, as those apply to Files
as well as Folders.
Attributes
Attributes inherited from FileSystem object (see “FileSystem object” on page 74)
Attribute Reference Description
creator see “File creator attribute” on page 65 Macintosh file creator as a four-character string
encoding see “File encoding attribute” on page 65 gets or sets the encoding for subsequent read/
write operations
eof see “File eof attribute” on page 66 has the value true if a read attempt caused the
current position to be behind the end of the
file
hidden see “File hidden attribute” on page 66 set to true if the file is invisible
length see “File length attribute” on page 66 size of the file in bytes
lineFeed see “File lineFeed attribute” on page 66 way line feed characters are written
readonly see “File readonly attribute” on page 69 when set, prevents the file from being altered
or deleted
type see “File type attribute” on page 70 Macintosh file type as a four-character string
Attribute Reference Description
absoluteURI see “FileSystem absoluteURI attribute”
on page 75
full path name for the object in URI notation
alias see “FileSystem alias attribute” on
page 76
returns true if the object refers to a file system
alias
created see “FileSystem created attribute” on
page 76
creation date of the object
error see “FileSystem error attribute” on
page 76
contains a message describing the last file sys-
tem error
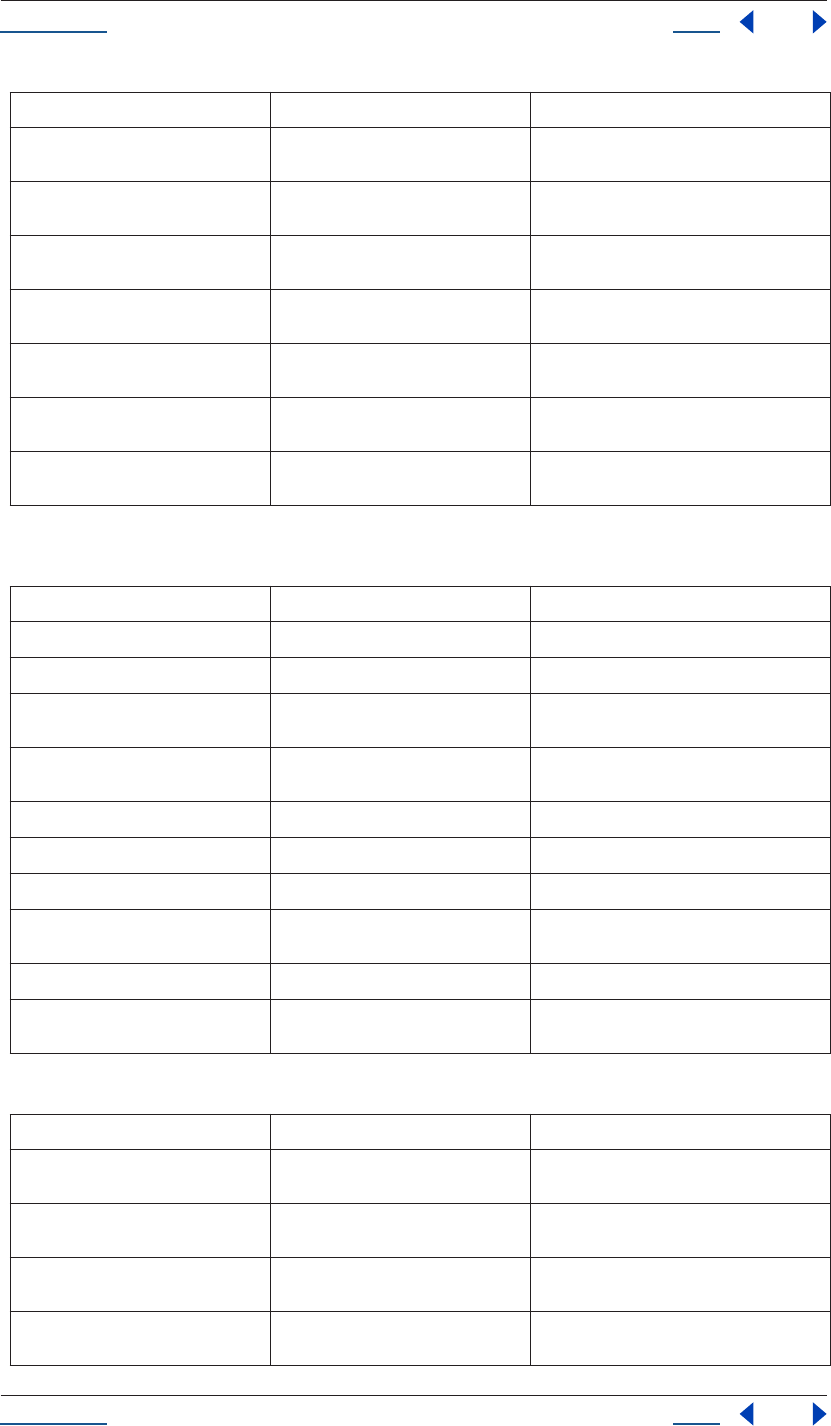
Using Help Back 64
Help Reference
Using Help Back 64
Methods
Methods inherited from FileSystem object (see “FileSystem object” on page 74)
exists see “FileSystem exists attribute” on
page 76
returns true if the path name of this object
refers to an actually existing file or folder
fsName see “FileSystem fsName attribute” on
page 77
file-system specific name of the object as a full
path name
modified see “FileSystem modified attribute” on
page 77
date of the object's last modification
name see “FileSystem name attribute” on
page 77
name of the object without the path specifica-
tion
parent see “FileSystem parent attribute” on
page 78
folder object containing this object
path see “FileSystem path attribute” on
page 78
path portion of the absolute URI
relativeURI see “FileSystem relativeURI attribute” on
page 78
path name for the object in URI notation, rela-
tive to the current folder
Method Reference Description
close() see “File close() method” on page 65 closes the open file
copy() see “File copy() method” on page 65 copies the file to the given location
open() see “File open() method” on page 67 opens the file for subsequent read/write oper-
ations
read() see “File read() method” on page 68 reads the contents of the file from the current
position on
readch() see “File readch() method” on page 68 reads one single text character
readln() see “File readln() method” on page 69 reads one line of text
seek() see “File seek() method” on page 70 seeks to a certain position in the file
tell() see “File tell() method” on page 70 returns the current position in the file as an off-
set in bytes
write() see “File write() method” on page 71 writes the given string to the file
writeln() see “File writeln() method” on page 71 writes the given string to the file and append a
line feed sequence
Method Reference Description
getRelativeURI() see “FileSystem getRelativeURI()
method” on page 77
calculates and returns the relative URI, given a
base path, in URI notation
remove() see “FileSystem remove() method” on
page 78
deletes the file or folder that this object repre-
sents
rename() see “FileSystem rename() method” on
page 79
renames the object to the new name
resolve() see “FileSystem resolve() method” on
page 79
attempts to resolve the file system alias that
this object points to
Attribute Reference Description

Using Help Back 65
Help Reference
Using Help Back 65
File close() method
File(path).close()
Description
The close() method closes the open file. The return value is true if the file was closed, false on I/O errors.
Parameters
None.
Returns
Boolean.
File copy() method
File(path).copy(target)
Description
The close() method copies the file to the given location.
You can supply a URI path name as well as another File object. If there is a file at the target location, it is
overwritten.
The method returns true if the copy was successful, false otherwise. The method resolves any aliases to find
the source file.
Parameters
Returns
Boolean.
File creator attribute
File(path).creator
Description
The creator attribute is the Macintosh file creator as a four-character string. On Windows, the return value is
always "????".
Type
String; read-only.
File encoding attribute
File(path).encoding
Description
The encoding attribute gets or sets the encoding for subsequent read/write operations.
target File object or String specifying the target location

Using Help Back 66
Help Reference
Using Help Back 66
The encoding is one of several predefined constants that follow the common Internet encoding names. Valid
names are UCS-2, X-SJIS, ISO-8851-9, ASCII or the like.
A special encoder, BINARY, is used to read binary files. This encoder stores each byte of the file as one Unicode
character regardless of any encoding. When writing, the lower byte of each Unicode character is treated as a
single byte to write. See “Encoding Names” on page 228 for a list of encodings. If an unrecognized encoding
is used, the encoding reverts to the system default encoding.
Type
String; read/write.
File eof attribute
File(path).eof
Description
The File eof attribute has the value true if a read attempt caused the current position to be past the end of the
file.
If the file is not open, the value is true.
Type
Boolean; read-only.
File hidden attribute
File(path).hidden
Description
The File hidden attribute has the value true if the file is invisible. Assigning a Boolean value sets or clears this
attribute.
Type
Boolean; read/write.
File length attribute
File(path).length
Description
The File length attribute is size of the file in bytes. When setting the file size, the file must not be open.
Type
Number; read-only.
File lineFeed attribute
File(path).lineFeed
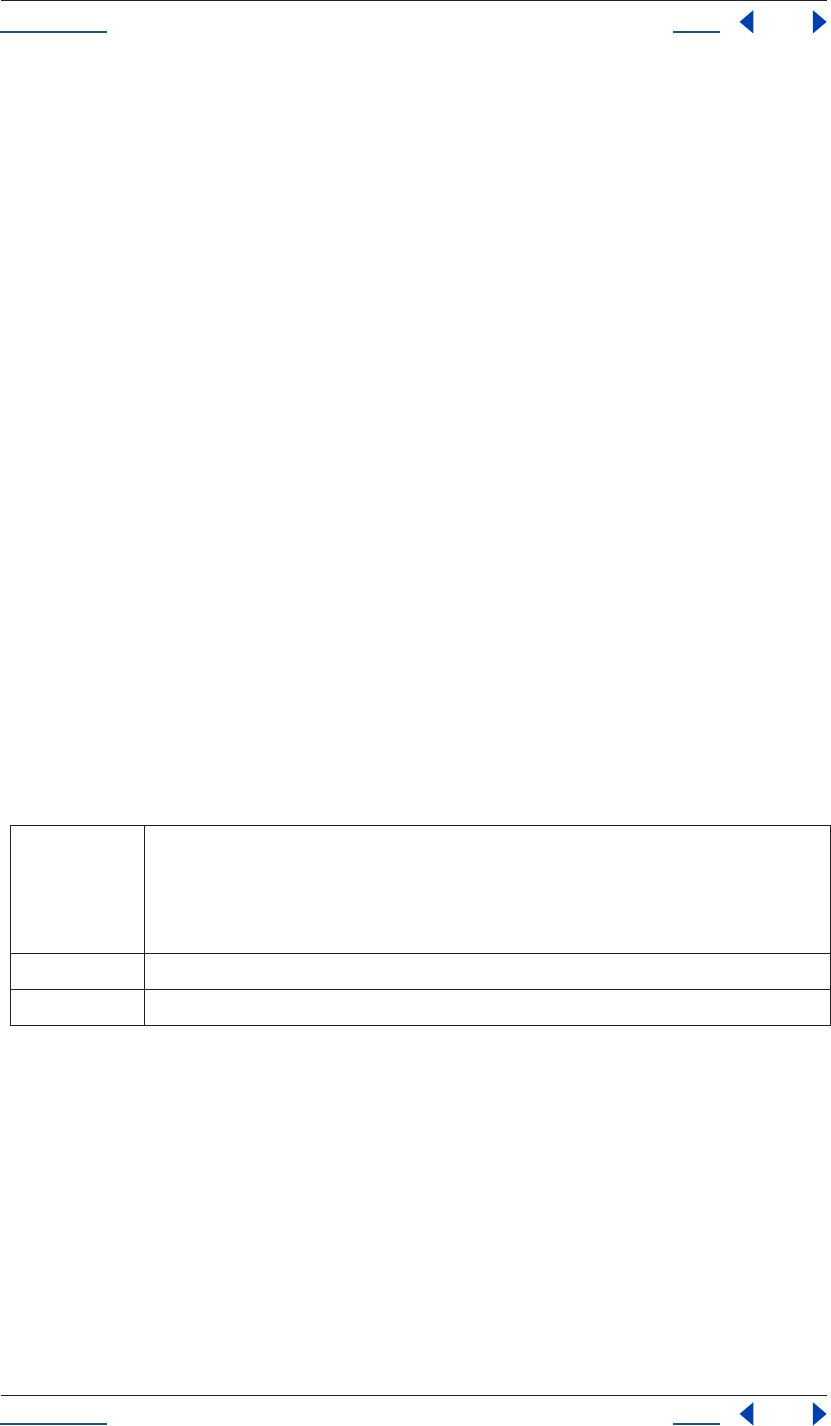
Using Help Back 67
Help Reference
Using Help Back 67
Description
The File lineFeed attribute determines the way line feed characters are written. This can be one of the three
values: macintosh, unix or windows (actually, only the first character is interpreted).
Type
String (one of: macintosh, unix, windows); read/write.
File open() method
File(path).open(mode, type, creator)
Description
The File open() method opens the file for subsequent read/write operations. The type and creator arguments
are optional and Macintosh specific; they specify the file type and creator as two four-character strings. They
are used if the file is newly created. On other platforms, they are ignored.
When open() is used to open a file for read access, the method attempts to detect the encoding of the open
file. It reads a few bytes at the current location and tries to detect the Byte Order Mark character 0xFFFE. If
found, the current position is advanced behind the detected character and the encoding property is set to one
of the strings UCS-2BE, UCS-2LE, UCS4-BE, UCS-4LE or UTF-8. If the marker character cannot be found,
it checks for zero bytes at the current location and makes an assumption about one of the above formats
(except for UTF-8). If everything fails, the encoding property is set to the system encoding. The method
resolves any aliases to find the file.
You should be careful if you try to open a file more than once. The operating system usually permits you to do
so, but if you start writing to the file using two different File objects, you may destroy your data.
The return value is true if the file has been opened successfully, false otherwise.
Parameters
Returns
Boolean.
File openDialog() Class method
File.openDialog(prompt, select)
Description
The File.openDialog class method presents the Open dialog box that is standard for the platform on which
After Effects is running. This method overlaps somewhat with the easier to use fileGetDialog() global
function.
mode one of r, w or e:
r (read) Opens for reading. If the file does not exist or cannot be found, the call fails.
w (write) Opens an empty file for writing. If the file exists, its contents are destroyed.
e (edit) Opens an existing file for reading and writing.
type The Macintosh file type; a four-byte character string; ignored on non-Macintosh operating systems.
creator The Macintosh file creator; a four-byte character string; ignored on non-Macintosh operating systems.
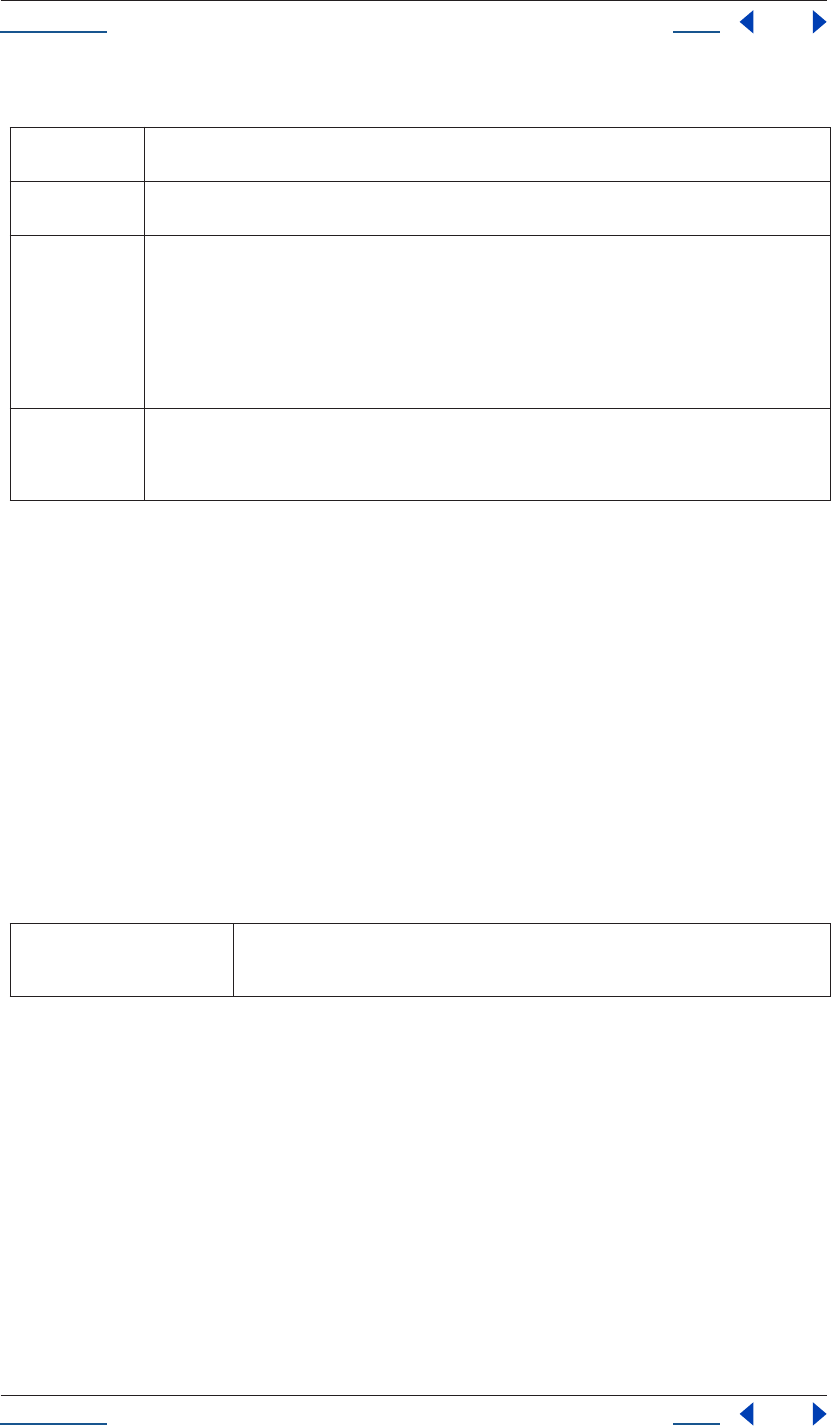
Using Help Back 68
Help Reference
Using Help Back 68
Parameters
Returns
File object, or null if the user cancels the dialog.
See also
“FileSource object” on page 71.
File read() method
File(path).read(chars)
Description
The File read() method reads the contents of the file from the current position on. Returns a string that
contains up to the number of characters that were supposed to be read.
Parameters
Returns
String.
File readch() method
File(path).readch()
Description
The File readch() method reads one single text character. Line feeds are recognized as CR, LF, CRLF or LFCR
pairs. If the file is encoded, multiple bytes may be read to create single Unicode characters.
Parameters
None.
prompt An optional prompt (expressed as a string) that is displayed as part of the dialog if the dialog permits the
display of an additional message.
select This argument allows the pre-selection of the files that the dialog displays. Unfortunately, this argument is
different on Mac OS and on Windows.
select (Win) Windows selection string is actually a list of file types with explanative text. This list appears in the bottom
of the dialog box as a drop-down list box so the user can select which types of files to display. The elements
of this list are separated by commas. Each element starts with the descriptive text, followed by a colon and
the file search masks for this text. Again, each search mask is separated by a semicolon. A Selection list that
allowed the selection of all text files (*.TXT and *.DOC) or all files would look like this:
Text Files:*.TXT;*.DOC,All files:*
A single asterisk character is a placeholder for all files.
select (Mac
OS)
On Mac OS, the optional second argument is a callback function. This function takes one argument, which
is a File object. When the dialog is set up, it calls this callback function for each file that is about to be dis-
played. If the function returns anything else than true, the file is not displayed. This is true only for the open-
Dialog() method; the saveDialog() method ignores this callback method.
chars The number of characters to read, expressed as an integer. If the number of characters to read
is not supplied, the entire file is read in one big chunk, starting at the current position. If the
file is encoded, multiple bytes may be read to create single Unicode characters.
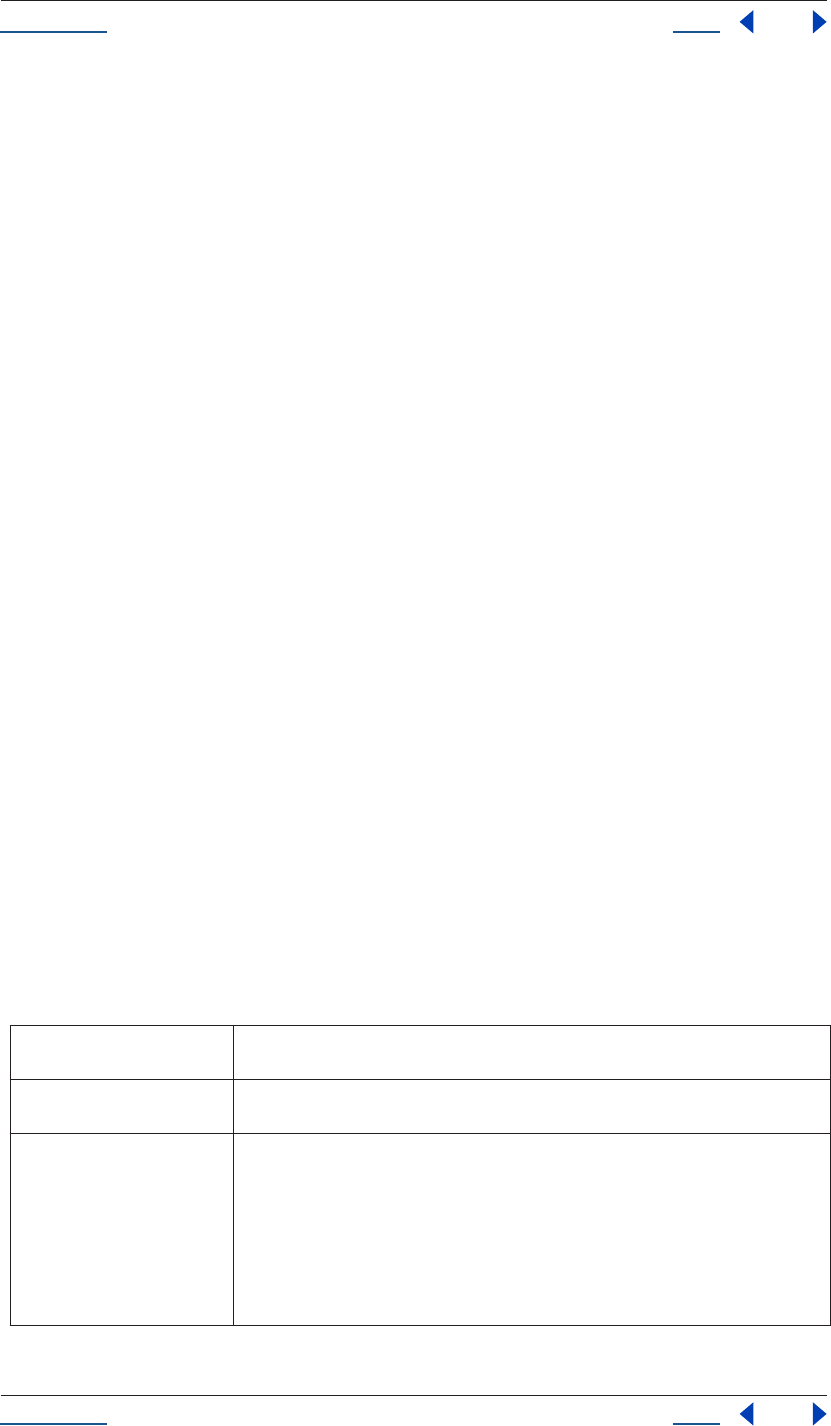
Using Help Back 69
Help Reference
Using Help Back 69
Returns
String.
File readln() method
File(path).readln()
Description
The File readch() method reads one line of text. Line feeds are recognized as CR, LF, CRLF or LFCR pairs. If
the file is encoded, multiple bytes may be read to create single Unicode characters.
Parameters
None.
Returns
String.
File readonly attribute
File(path).readonly
Description
The File readonly attribute, when set, prevents the file from being altered or deleted.
Type
Boolean; read/write.
File saveDialog() Class method
File.saveDialog(prompt, select)
Description
The File.saveDialog class method presents the Save dialog box that is standard for the platform on which After
Effects is running. This method overlaps somewhat with the easier-to-use filePutDialog() global function.
Parameters
prompt An optional prompt (expressed as a string) that is displayed as part of the dialog if the dialog
permits the display of an additional message.
select This argument allows the pre-selection of the files that the dialog displays. Unfortunately, this
argument is different on Mac OS and on Windows.
select (Win) Windows selection string is actually a list of file types with explanative text. This list is dis-
played in the bottom of the dialog as a drop-down list box so the user can select which types
of files to display. The elements of this list are separated by commas. Each element starts with
the descriptive text, followed by a colon and the file search masks for this text. Again, each
search mask is separated by a semicolon. A Selection list that allowed the selection of all text
files (*.TXT and *.DOC) or all files would look like this:
Text Files:*.TXT;*.DOC,All files:*
A single asterisk character is a placeholder for all files.
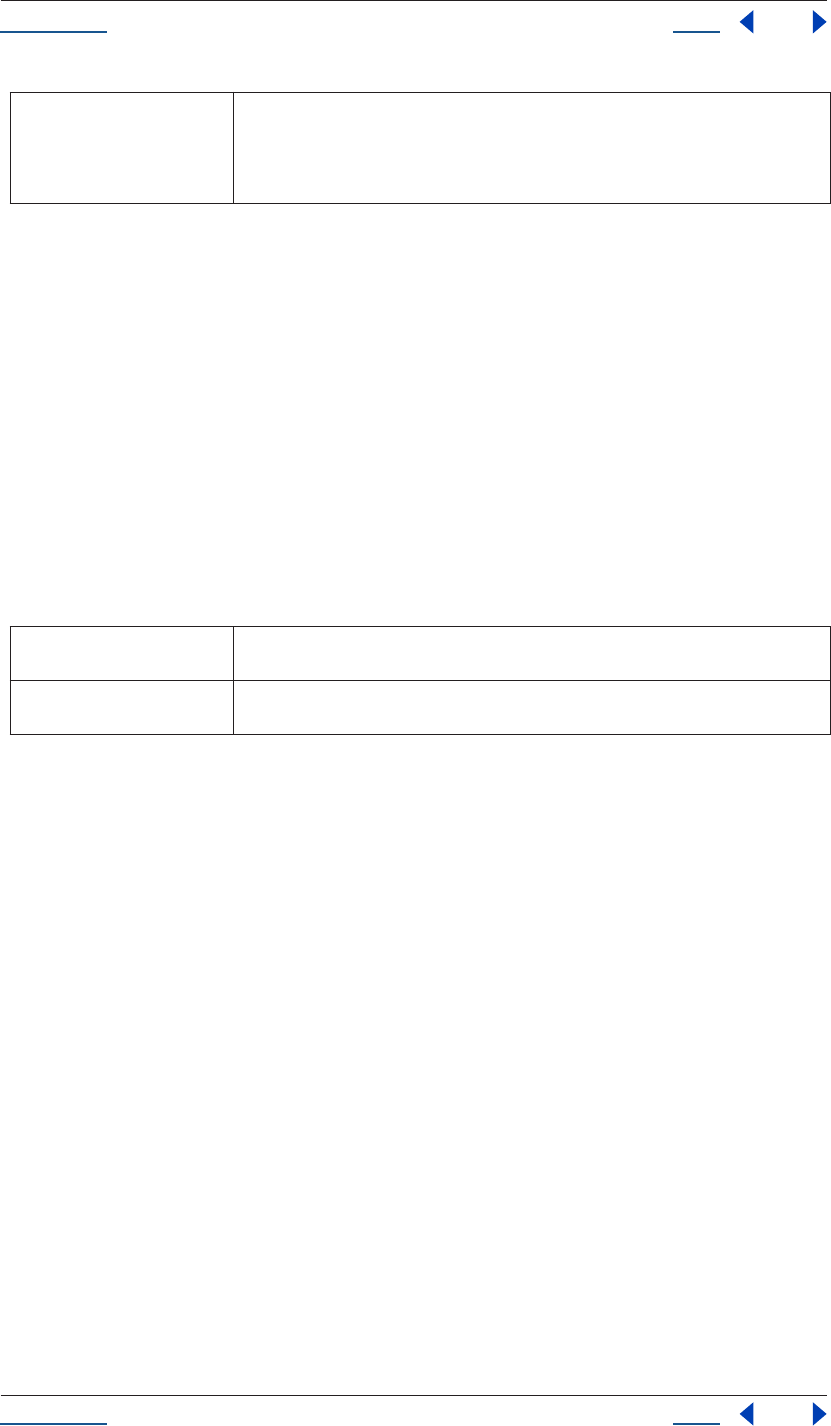
Using Help Back 70
Help Reference
Using Help Back 70
Returns
File object, or null if the user cancels the dialog.
See also
“filePutDialog() global function” on page 24
File seek() method
File(path).seek(pos, mode)
Description
The File seek() method seeks to a certain position in the file. This method does not permit seeking to positions
less than 0 or greater than the current file size.
Parameters
Returns
Boolean; true if the position was changed.
File tell() method
File(path).tell()
Description
The File tell() method returns the current position in the file as an offset in bytes.
Parameters
None.
Returns
Integer.
File type attribute
File(path).type
Description
The File type attribute holds the Macintosh file type as a four-character string.
select (Mac OS) On Mac OS, the optional second argument is a callback function. This function takes one
argument, which is a File object. When the dialog is set up, it calls this callback function for
each file that is about to be displayed. If the function returns anything else than true, the file
is not displayed. This is true only for the openDialog() method; the saveDialog() method
ignores this callback method.
pos the new current position inside the file as an offset in bytes (an integer), dependent on the
seek mode
mode the seek mode (0 = seek to absolute position, 1 = seek relative to the current position, 2 = seek
backwards from the end of the file)
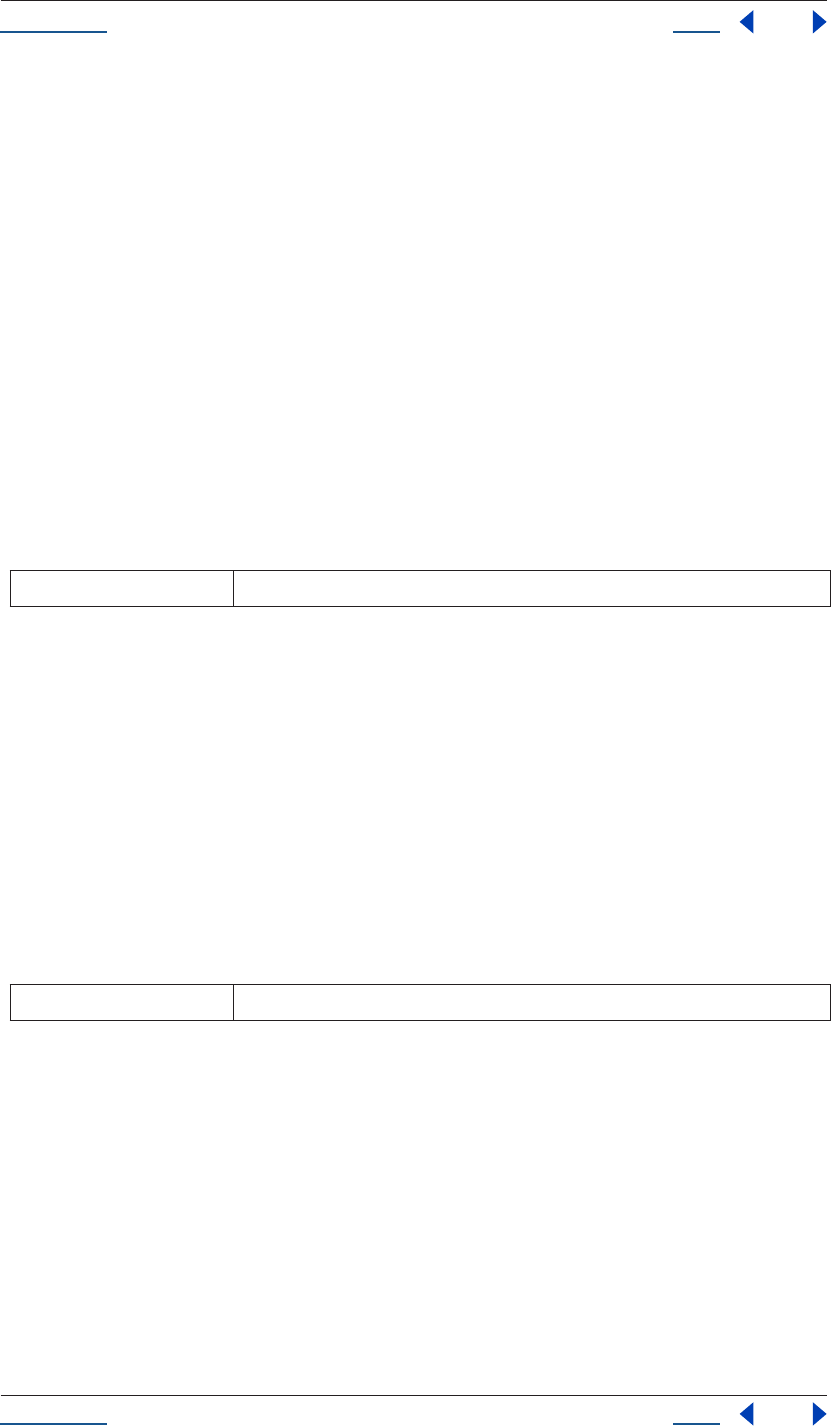
Using Help Back 71
Help Reference
Using Help Back 71
On Mac OS, the file type is returned. On Windows, "appl" is returned for .EXE files, "shlb" for .DLLs and
"TEXT" for any other file. If the file does not exist, the file type is "????".
Type
Boolean; read-only.
File write() method
File(path).write(text, ...)
Description
The File write() method writes a given string to the file. The parameters of this function are concatenated to
a single string. Returns true on success.
For encoded files, writing a single Unicode character may result in multiple bytes being written. Take care not
to write to a file that is open in another application or object. This may cause loss of data, since a second write
issued from another File object may overwrite existing data.
Parameters
Returns
Boolean.
File writeln() method
File(path).writeln(text, ...)
Description
The File writeln() method writes a given string to the file. The parameters of this function are concatenated
to a single string, and a Line Feed sequence is appended. Returns true on success.
If the file is encoded, multiple bytes may be read to create single Unicode characters.
Parameters
Returns
Boolean.
FileSource object
app.project.item(index).mainSource
app.project.item(index).proxySource
Description
The FileSource describes footage that comes from a file. FileSource is a subclass of FootageSource and so it
inherits all attributes and methods of FootageSource.
text A string or set of strings. All arguments are concatenated to form the string to be written.
text A string or set of strings. All arguments are concatenated to form the string to be written.
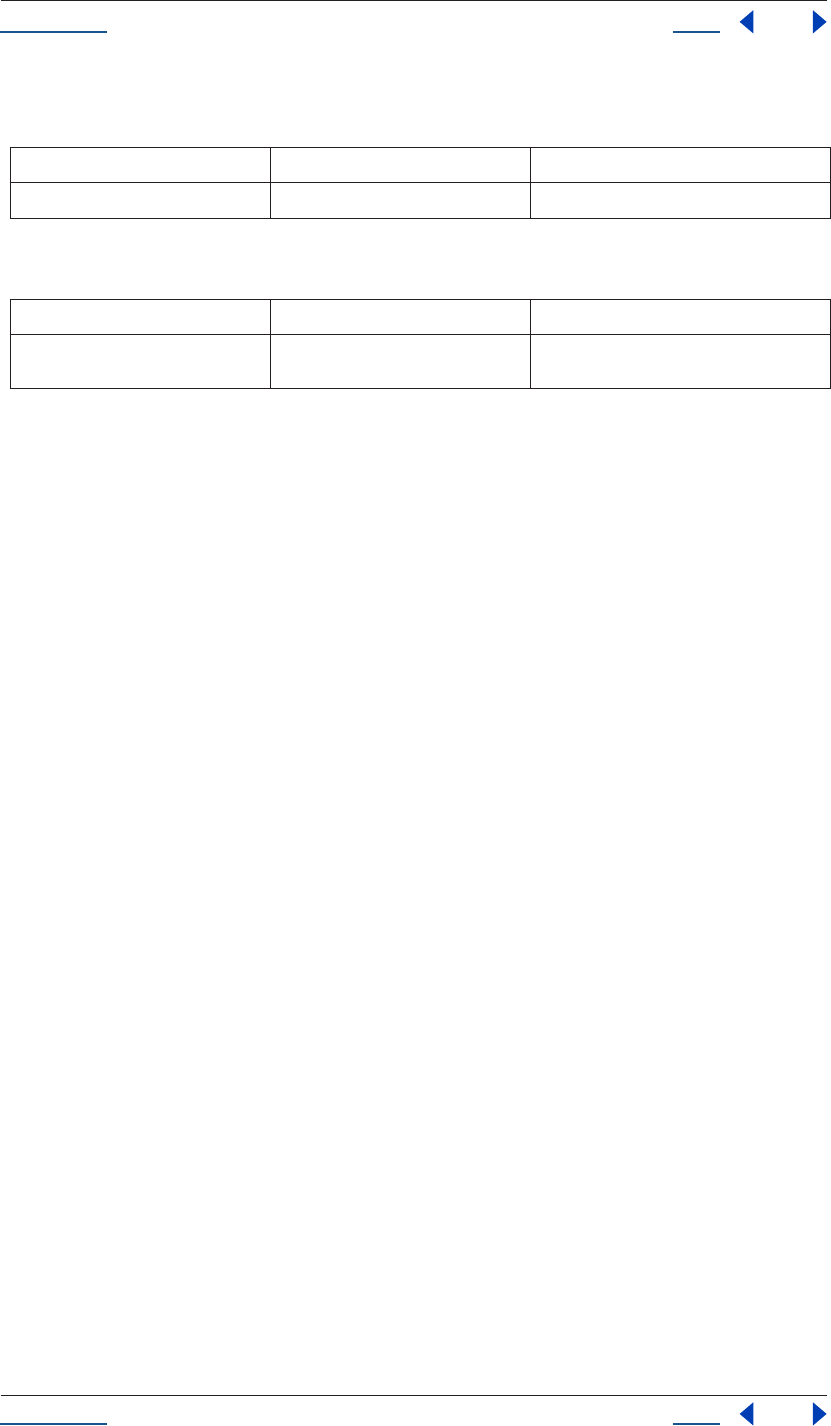
Using Help Back 72
Help Reference
Using Help Back 72
Attributes
Methods
FileSource file attribute
app.project.file
Description
The FileSource file attribute specifies the file that defines this FileSource. The attribute is readOnly.
Note that there are other ways to change the file. If this FootageSource is a proxySource of an AVItem, you can
call setProxy() or setProxyWithSequence() to change files. If this FootageSource is a mainSource of a
FootageItem, you can call replace() or replaceWithSequence() to change files.
Type
File; read-only.
FileSource reload() method
app.project.mainSource.reload()
Description
The FileSource reload() method reloads the asset from the file. This method can be called only on a
mainSource, not a proxySource.
Parameters
None.
Returns
None.
FileSystem Class
File.
Folder.
Description
The FileSystem class contains methods and attributes common to both File and Folder objects. A File object
corresponds to a disk file, while a Folder object matches a folder.
Attribute Reference Description
file see “FileSource file attribute” on page 72 specifies the file that defines this FileSource
Method Reference Description
reload() see “FileSource reload() method” on
page 72
reloads the asset from the file
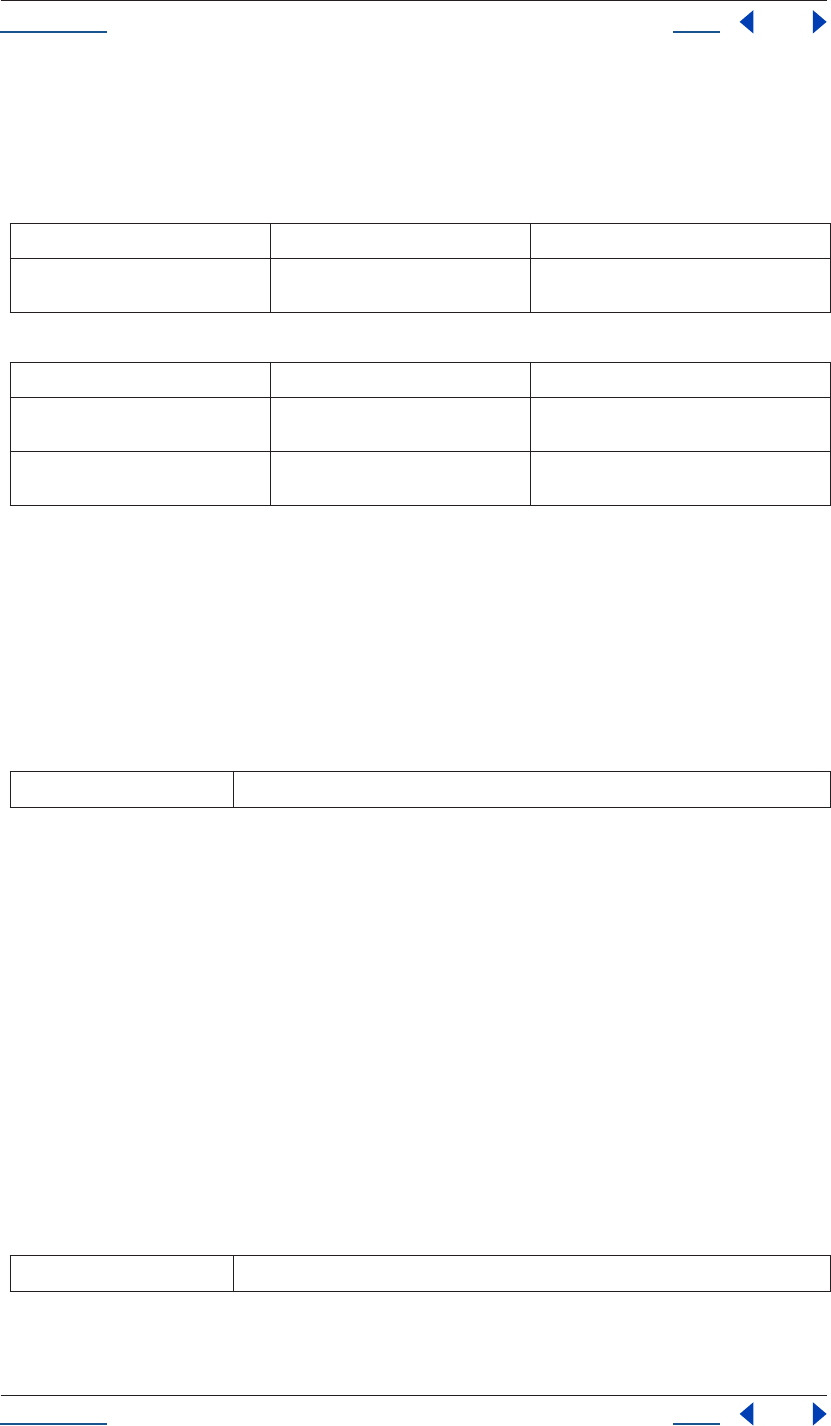
Using Help Back 73
Help Reference
Using Help Back 73
This attribute and methods differ from those found under the FileSystemObject in that they can be applied
without referring to a particular instance of a file or folder.
Class attributes
Class methods
FileSystem decode() class method
File.decode(string)
Folder.decode(string)
Description
The decode() class method of File or Folder decodes escaped characters and then interprets them as UTF-8.
Parameters
Returns
String.
See also
“FileSystem encode() class method” on page 73
FileSystem encode() class method
File.encode(string)
Folder.encode(string)
Description
The encode() class method of File or Folder converts the input string to UTF-8 and then encodes it such that
all characters are usable in a URI (or URL).
Parameters
Returns
String.
Class attribute Reference Description
fs see “FileSystem fs class attribute” on
page 74
name of the files system; read-only
Class method Reference Description
decode() see “FileSystem decode() class method”
on page 73
decodes the input string from UTF-8
encode() see “FileSystem encode() class method”
on page 73
encodes the input string in UTF-8
string string to be decoded
string string to be encoded
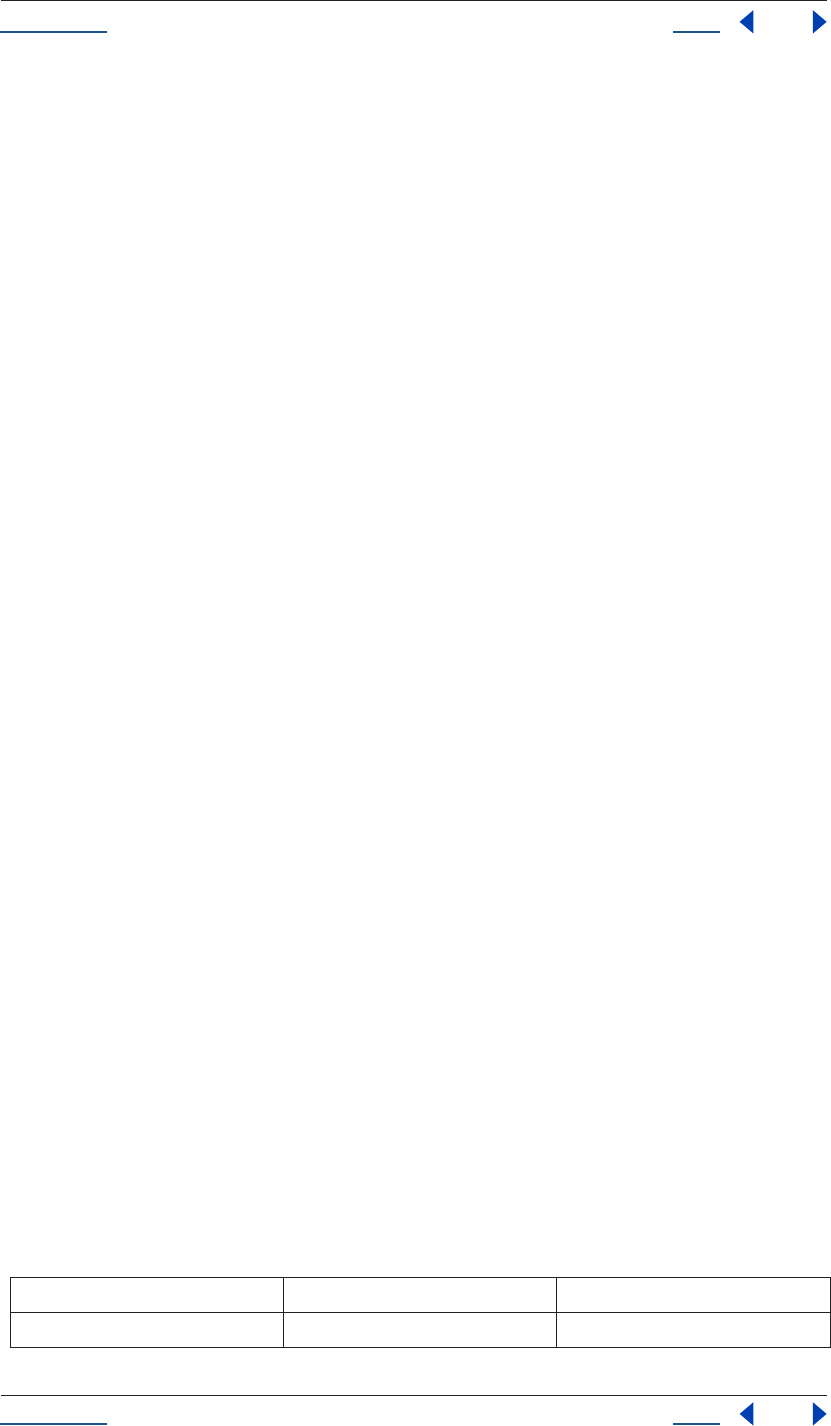
Using Help Back 74
Help Reference
Using Help Back 74
See also
“FileSystem alias attribute” on page 76
FileSystem fs class attribute
File.fs
Folder.fs
Description
The fs class attribute of File or Folder holds the name of the file system (operating system). Possible values are
“Windows” or “Macintosh”.
Type
String; read-only.
Example
write("The local file system is " + File.fs);
FileSystem object
File(“path”).
Folder(“path”).
Description
The FileSystem object contains methods and attributes common to both File and Folder objects. A File object
corresponds to a disk file, while a Folder object matches a folder. “FileSystem” is a name used to refer to both
Folders and Files.
These attributes and methods differ from those found under the FileSystem Class in that they cannot be
applied without referring to a particular instance of a file or folder, expressed as a path to that file or folder.
You can use absolute path names and relative path names. Absolute path names start with one or two slash
characters. These path names describe the full path from a root folder down to a file or folder. Relative path
names start from a known location, the current folder. A relative path name starts either with a folder name
or with one of the special names “.” and “..”. The name “.” refers to the current folder, and the name “..” refers
to the parent folder. The slash character is used to separate path elements. Special characters are encoded in
UTF-8 notation.
The FileSystem objects support a common convention. A volume name may be the first part of an absolute
path. The objects know where to look for the volume names on Mac OS and Windows and they translate the
volume names accordingly.
A path name can also start with the tilde “~” character. This character stands for the user’s home directory (on
Mac OS). On Windows, a directory with the environment variable HOME or, failing that, the desktop is used
as a home directory.
The following table illustrates how the root element of a full path name is used on different file systems. In
these examples, the current drive is C: on Windows and “Macintosh HD” on Mac OS.
URI Windows name Mac OS name
/d/dir/name.ext D:\dir\name.ext Macintosh HD:d:dir:name.ext
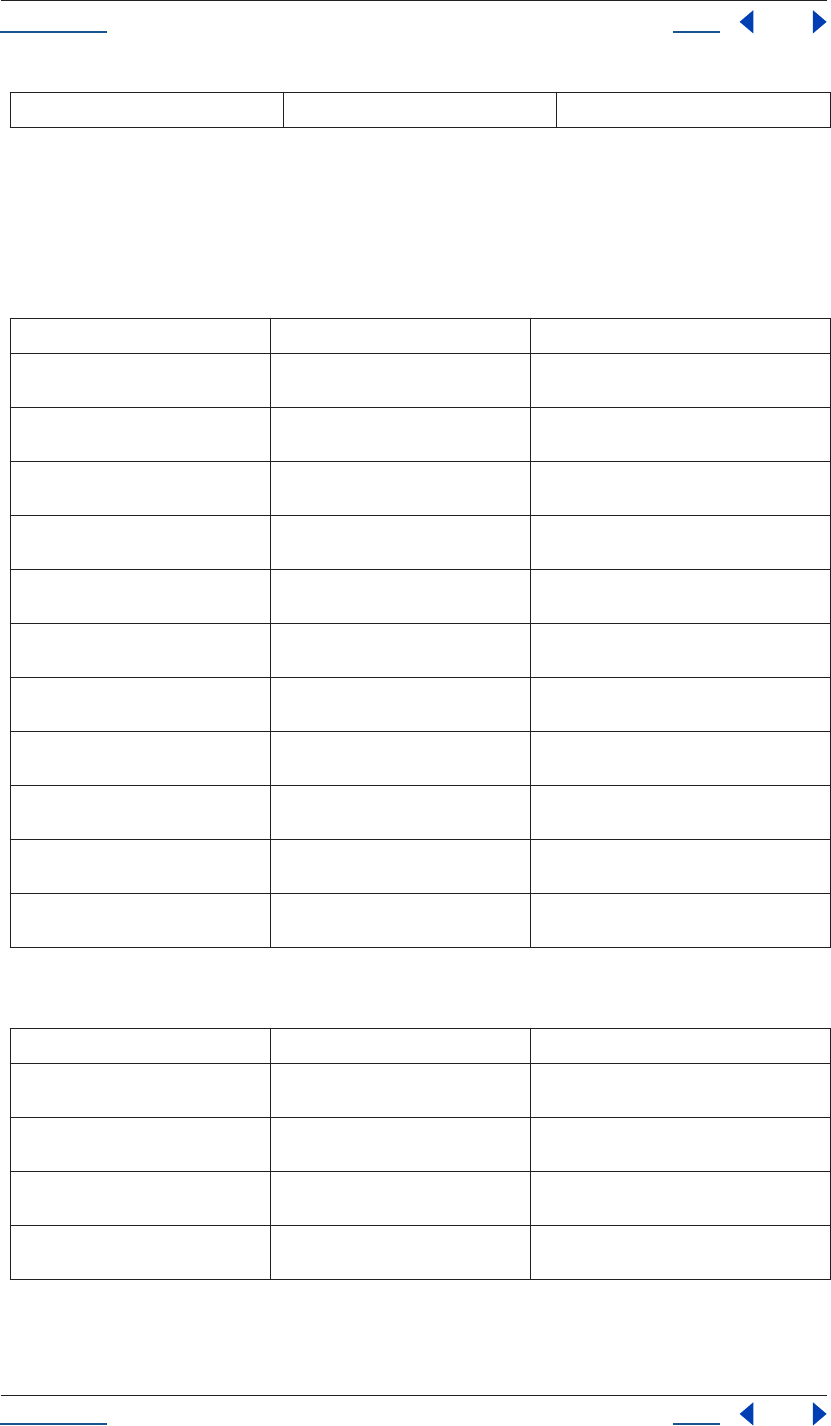
Using Help Back 75
Help Reference
Using Help Back 75
Thus if you have to use a script with URI notation on both Mac OS and Windows, try to use relative path
names, or try to originate your path names from the home directory. If that is not possible, it is recommended
that you work with Mac OS X aliases and UNC names on Windows, and store files on a machine that is remote
to the Windows machine on which the script is running.
Attributes
Methods
FileSystem absoluteURI attribute
File(path).absoluteURI
/Macintosh HD/dir/name.ext C:\Macintosh HD\dir\name.ext Macintosh HD:dir:name.ext
Attribute Reference Description
absoluteURI see “FileSystem absoluteURI attribute”
on page 75
full path name for the object in URI notation
alias see “FileSystem alias attribute” on
page 76
returns true if the object refers to a file system
alias
created see “FileSystem created attribute” on
page 76
creation date of the object
error see “FileSystem error attribute” on
page 76
contains a message describing the last file sys-
tem error
exists see “FileSystem exists attribute” on
page 76
returns true if the path name of this object
refers to an actually existing file or folder
fsName see “FileSystem fsName attribute” on
page 77
file-system specific name of the object as a full
path name
modified see “FileSystem modified attribute” on
page 77
date of the object's last modification
name see “FileSystem name attribute” on
page 77
name of the object without the path specifica-
tion
parent see “FileSystem parent attribute” on
page 78
folder object containing this object
path see “FileSystem path attribute” on
page 78
path portion of the absolute URI
relativeURI see “FileSystem relativeURI attribute” on
page 78
path name for the object in URI notation, rela-
tive to the current folder
Method Reference Description
getRelativeURI() see “FileSystem getRelativeURI()
method” on page 77
calculate and return the relative URI, given a
base path, in URI notation
remove() see “FileSystem remove() method” on
page 78
delete the file or folder that this object repre-
sents
rename() see “FileSystem rename() method” on
page 79
rename the object to the new name
resolve() see “FileSystem resolve() method” on
page 79
attempt to resolve the file system alias that this
object points to

Using Help Back 76
Help Reference
Using Help Back 76
Folder(path).absoluteURI
Description
The absoluteURI attribute of File or Folder is the full path name for the object in URI notation.
Type
String; read-only.
FileSystem alias attribute
File(path).alias
Folder(path).alias
Description
The alias attribute of File or Folder returns true if the object refers to a file system alias.
Type
Boolean; read-only.
FileSystem created attribute
File(path).created
Folder(path).created
Description
The created attribute of File or Folder is the creation date of the object. If the object does not refer to a folder
or file on the disk, the value is null.
Type
Date, or null if the object does not refer to a file or folder on disk; read-only.
FileSystem error attribute
File(path).error
Folder(path).error
Description
The error attribute of File or Folder contains a message describing the last file system error. Setting this value
clears any error message and resets the error bit for opened files.
Type
Boolean; read/write (writing resets the error bit).
FileSystem exists attribute
File(path).exists
Folder(path).exists
Using Help Back 77
Help Reference
Using Help Back 77
Description
The exists attribute of File or Folder returns true if the path name of this object refers to an already existing
file or folder.
Type
Boolean; read-only.
FileSystem fsName attribute
File(path).fsName
Folder(path).fsName
Description
The fsName attribute of File or Folder is the file-system specific name of that object as a full path name.
Type
String; read-only.
FileSystem getRelativeURI() method
File(path).getRelativeURI(string)
Folder(path).getRelativeURI(string)
Description
The getRelativeURI() method of File or Folder calculates and returns the relative URI, given a base path, in
URI notation. If the base path is omitted, the path of the current folder is assumed.
Parameters
Returns
String.
FileSystem modified attribute
File(path).modified
Folder(path).modified
Description
The modified attribute of File or Folder is the date of the object's last modification. If the object does not refer
to a folder or file on disk, the value is null.
Type
Date, or null if no valid FileSystem object is referenced; read-only.
FileSystem name attribute
File(path).name
Folder(path).name
string base path, in URI notation

Using Help Back 78
Help Reference
Using Help Back 78
Description
The name attribute of File or Folder is the name of the object without the path specification.
Type
String; read-only.
FileSystem parent attribute
File(path).parent
Folder(path).parent
Description
The parent attribute of File or Folder is the folder object containing this object. If this object already is the root
folder of a volume, the property value is null.
Type
Folder, or null if the object has no parent; read-only.
FileSystem path attribute
File(path).path
Folder(path).path
Description
The path attribute of File or Folder is the path portion of the absolute URI. If the name does not have a path,
this property contains the empty string.
Type
String, empty if name has no path; read-only.
FileSystem relativeURI attribute
File(path).relativeURI
Folder(path).relativeURI
Description
The relativeURI attribute of File or Folder is the path name for the object in URI notation, relative to the
current folder.
Type
String; read-only.
FileSystem remove() method
File(path).remove()
Folder(path).remove()
Description
The remove() method of File or Folder deletes the file or folder that this object represents. Folders must be
empty before they can be deleted. The return value is true if the file or folder has been deleted.
Using Help Back 79
Help Reference
Using Help Back 79
IMPORTANT: The remove() method deletes the referenced file or folder immediately. It does not move the refer-
enced file or folder to the system trash. The effects of the remove method cannot be undone. It is recommended that
you prompt the user for permission to delete a file or folder before deleting it. The method does not resolve aliases;
it rather deletes the file alias itself.
Parameters
None.
Returns
Boolean.
FileSystem rename() method
File(path).rename(string)
Folder(path).rename(string)
Description
The rename() method of File or Folder renames the object to a new name. The new name must not have a
path. This method returns true if the object was renamed. The method does not resolve aliases, but rather
renames the alias file.
Parameters
Returns
Boolean.
FileSystem resolve() method
File(path).resolve()
Folder(path).resolve()
Description
The resolve() method of File or Folder attempts to resolve the file system alias that this object points to. If
successful, a new File or Folder object is returned that points to the resolved file system element. If the object
is not an alias, or if the alias could not be resolved, the return value is null.
Parameters
None.
Returns
FileSystem object (File or Folder) or null if no alias.
Folder class
Folder.
string the new name for the object
Using Help Back 80
Help Reference
Using Help Back 80
Description
The Folder class contains methods and attributes common to Folder objects. A Folder object corresponds to
a folder.
Also included in this class are all attributes and methods within the FileSystem class, as those apply to Folders
as well as Files.
Note that the difference between the Folder Class and Folder object is that the class attributes and methods
require no specific instance of a Folder, whereas class methods and attributes do.
Attributes
Class attributes from FileSystem object (see “FileSystem object” on page 74)
Methods
Class methods from FileSystem object (see “FileSystem object” on page 74)
Attribute Reference Description
current see “Folder current Class attribute” on
page 81
current folder is returned as a Folder object
startup see “Folder startup Class attribute” on
page 81
folder containing the executable image of the
running application
system see “Folder system Class attribute” on
page 82
folder containing the operating system files
temp see “Folder temp Class attribute” on
page 82
default folder for temporary files
trash see “Folder trash Class attribute” on
page 82
folder containing deleted items
Class attribute Reference Description
fs see “FileSystem fs class attribute” on
page 74
name of the files system; read-only
Method Reference Description
Folder()
new Folder()
see “Folder create() method” on page 84 constructs a new Folder object
selectDialog() see “Folder selectDialog() Class method”
on page 81
opens a dialog box that permits you to select a
folder using the OS specific folder select dialog
Class method Reference Description
decode() see “FileSystem decode() class method”
on page 73
decodes the input string from UTF-8
encode() see “FileSystem encode() class method”
on page 73
encodes the input string in UTF-8
Using Help Back 81
Help Reference
Using Help Back 81
Folder() Class method
Folder(path)
new Folder(path)
Description
This function constructs a new Folder object. If the given path name refers to an already existing disk file, a
File object is returned instead.
The folder that the path name refers to does not need to exist. If the argument is omitted, a temporary name
is generated.
Parameters
Returns
Folder (or File if path refers to an existing file).
Folder current Class attribute
Folder.current
Description
The current attribute of Folder is the current folder. It is returned as a Folder object. Assigning either a Folder
object or a string containing the new path name sets the current folder.
Type
Folder; read/write.
Folder selectDialog() Class method
Folder.selectDialog(prompt, preset)
Description
The Folder SelectDialog() method opens a dialog box that permits you to select a folder using the platform-
specific selection dialog box. Both arguments are optional.
Parameters
Returns
Folder object pointing to the selected folder, or null if the user cancels the dialog.
Folder startup Class attribute
Folder.startup
path path for the folder created, expressed as a string
prompt String displays a prompt text if the dialog allows the display
of such a message; optional
preset Folder a folder that is pre-selected when the dialog opens

Using Help Back 82
Help Reference
Using Help Back 82
Description
The startup attribute of Folder is the folder containing the executable image of the running application.
Type
Folder; read-only.
Folder system Class attribute
Folder.system
Description
The system attribute of Folder is the folder containing the operating system files.
Type
Folder; read-only.
Folder temp Class attribute
Folder.temp
Description
The temp attribute of Folder is the default folder for temporary files.
Type
Folder; read-only.
Folder trash Class attribute
Folder.trash
Description
The trash attribute of Folder is the folder containing deleted items.
Type
Folder; read-only.
Folder object
Folder(“path”).
Description
The Folder object contains methods and attributes common to Folder objects. A Folder object corresponds to
a folder.
Also included in this object are all attributes and methods within the FileSystem object, as those apply to
Folders as well as Files.
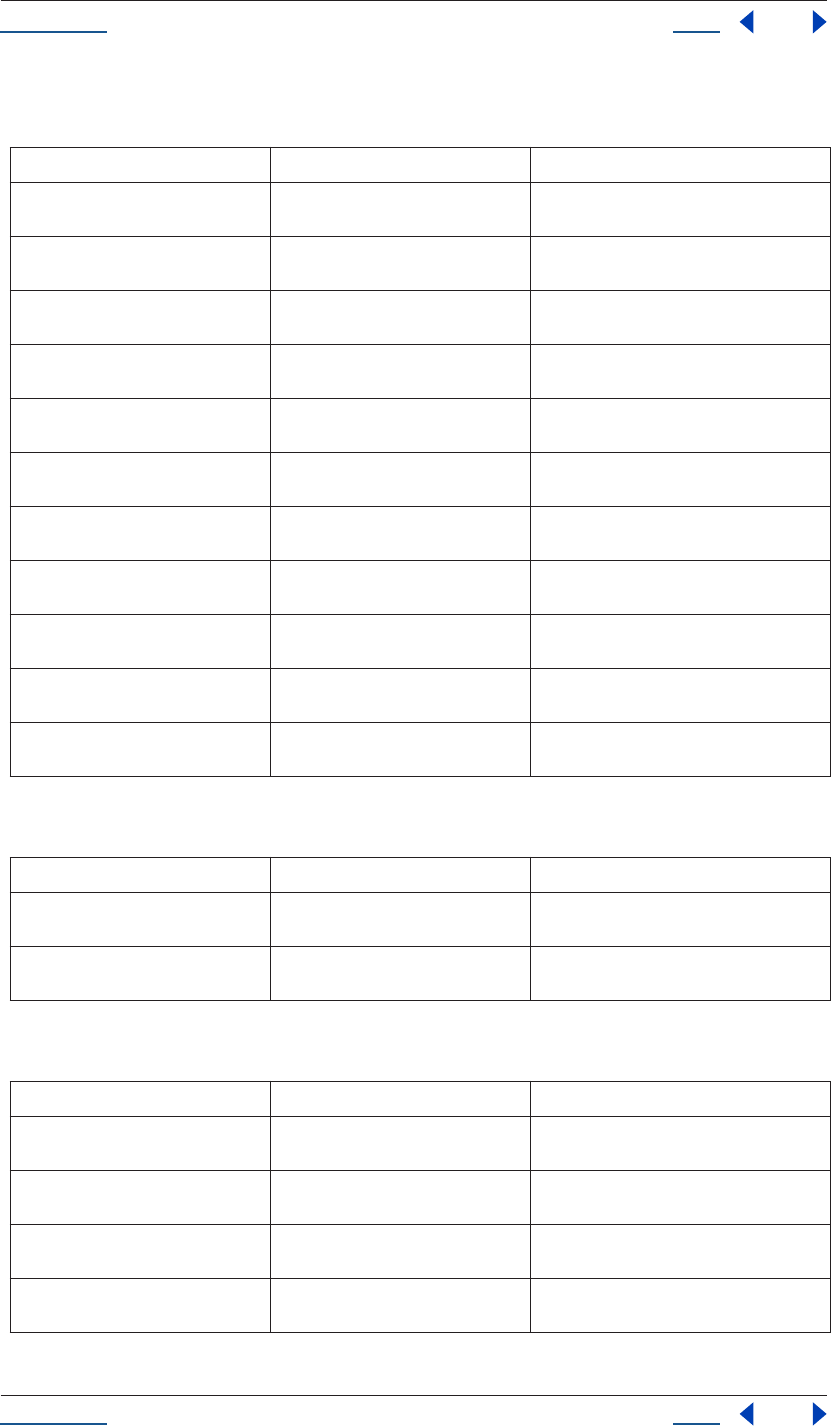
Using Help Back 83
Help Reference
Using Help Back 83
Attributes inherited from the FileSystem object (see “FileSystem object” on page 74)
Methods
Methods inherited from FileSystem object (see “FileSystem object” on page 74)
Attribute Reference Description
absoluteURI see “FileSystem absoluteURI attribute”
on page 75
full path name for the object in URI notation
alias see “FileSystem alias attribute” on
page 76
returns true if the object refers to a file system
alias
created see “FileSystem created attribute” on
page 76
creation date of the object
error see “FileSystem error attribute” on
page 76
contains a message describing the last file sys-
tem error
exists see “FileSystem exists attribute” on
page 76
returns true if the path name of this object
refers to an actually existing file or folder
fsName see “FileSystem fsName attribute” on
page 77
file-system specific name of the object as a full
path name
modified see “FileSystem modified attribute” on
page 77
date of the object's last modification
name see “FileSystem name attribute” on
page 77
name of the object without the path specifica-
tion
parent see “FileSystem parent attribute” on
page 78
folder object containing this object
path see “FileSystem path attribute” on
page 78
path portion of the absolute URI
relativeURI see “FileSystem relativeURI attribute” on
page 78
path name for the object in URI notation, rela-
tive to the current folder
Method Reference Description
create() see “Folder create() method” on page 84 attempts to create a folder at the location the
path name points to
getFiles() see “Folder getFiles() method” on
page 84
gets a list of File and Folder objects contained
in the folder object
Method Reference Description
getRelativeURI() see “FileSystem getRelativeURI()
method” on page 77
calculates and returns the relative URI, given a
base path, in URI notation
remove() see “FileSystem remove() method” on
page 78
deletes the file or folder that this object repre-
sents
rename() see “FileSystem rename() method” on
page 79
renames the object to the new name
resolve() see “FileSystem resolve() method” on
page 79
attempts to resolve the file system alias that
this object points to
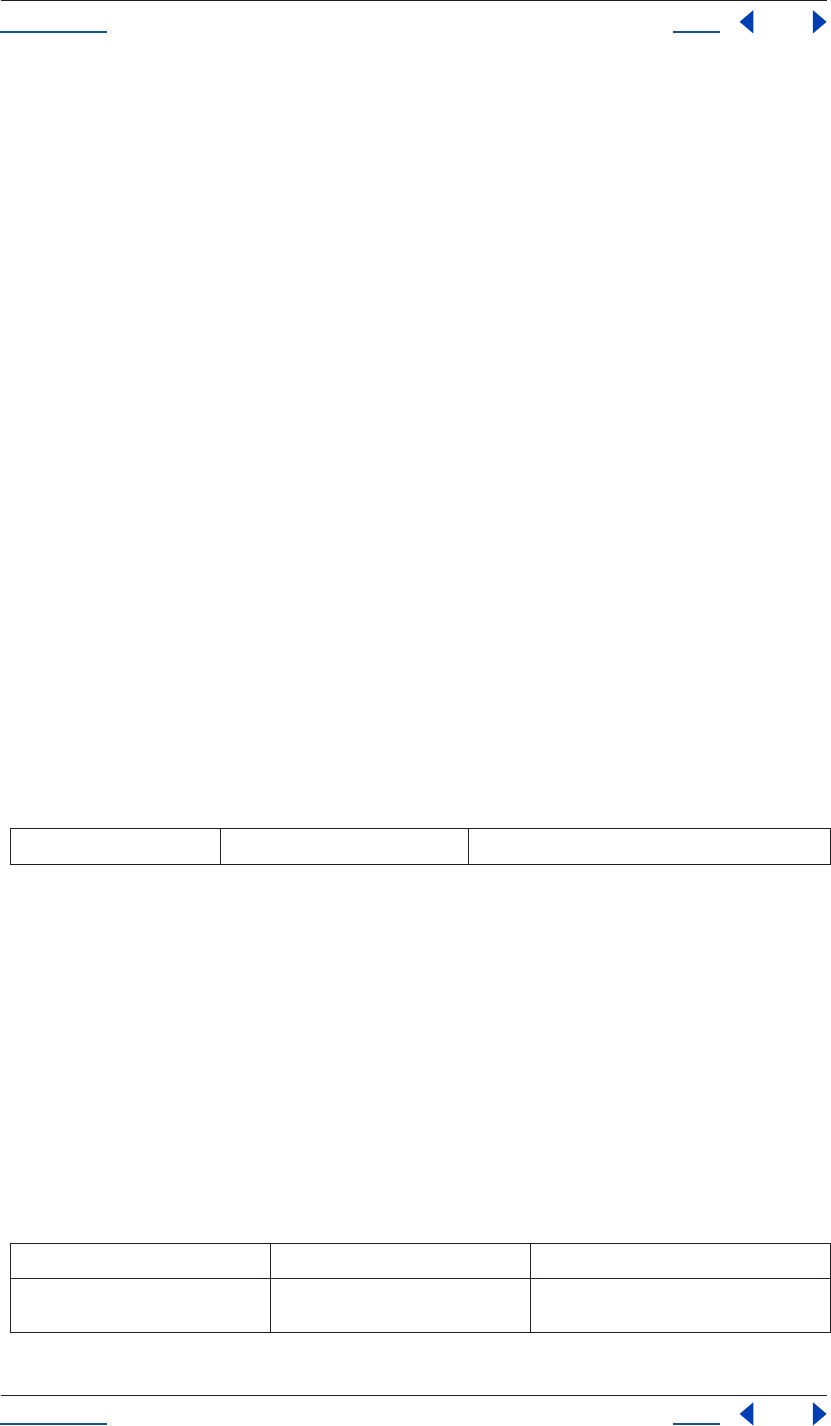
Using Help Back 84
Help Reference
Using Help Back 84
Folder create() method
Folder(path).create()
Description
The create() method attempts to create a folder at the location the path name points to.
Parameters
None.
Returns
Boolean; true if the folder was created.
Folder getFiles() method
Folder.getFiles(mask)
Description
The Folder getFiles() method returns a list of File and Folder objects contained in the folder object. The mask
parameter is the search mask for the file names, expressed as a string. It may contain question marks and
asterisks and is preset to * to find all files.
Alternatively, a function may be supplied. This function is called with a File or Folder object for every file or
folder in the directory search. If the function returns true, the object is added to the array.
On Windows, all aliases end with the extension ".lnk". This extension is stripped from the file name when
found to preserve compatibility with other operating systems. You can, however, search for all aliases by
supplying the search mask "*.lnk". This is not recommended, however, because it is not portable.
Parameters
Returns
Array of File & Folder objects or null if the folder does not exist.
FolderItem object
app.project.FolderItem
Description
The FolderItem object corresponds to any folder in your Project window. It can contain various types of items
(footage, compositions, solids) as well as other folders.
Attributes
mask String search mask for the files names (see above)
Attribute Reference Description
items see “FolderItem items attribute” on
page 85
ItemCollection that represents the contents of
this FolderItem
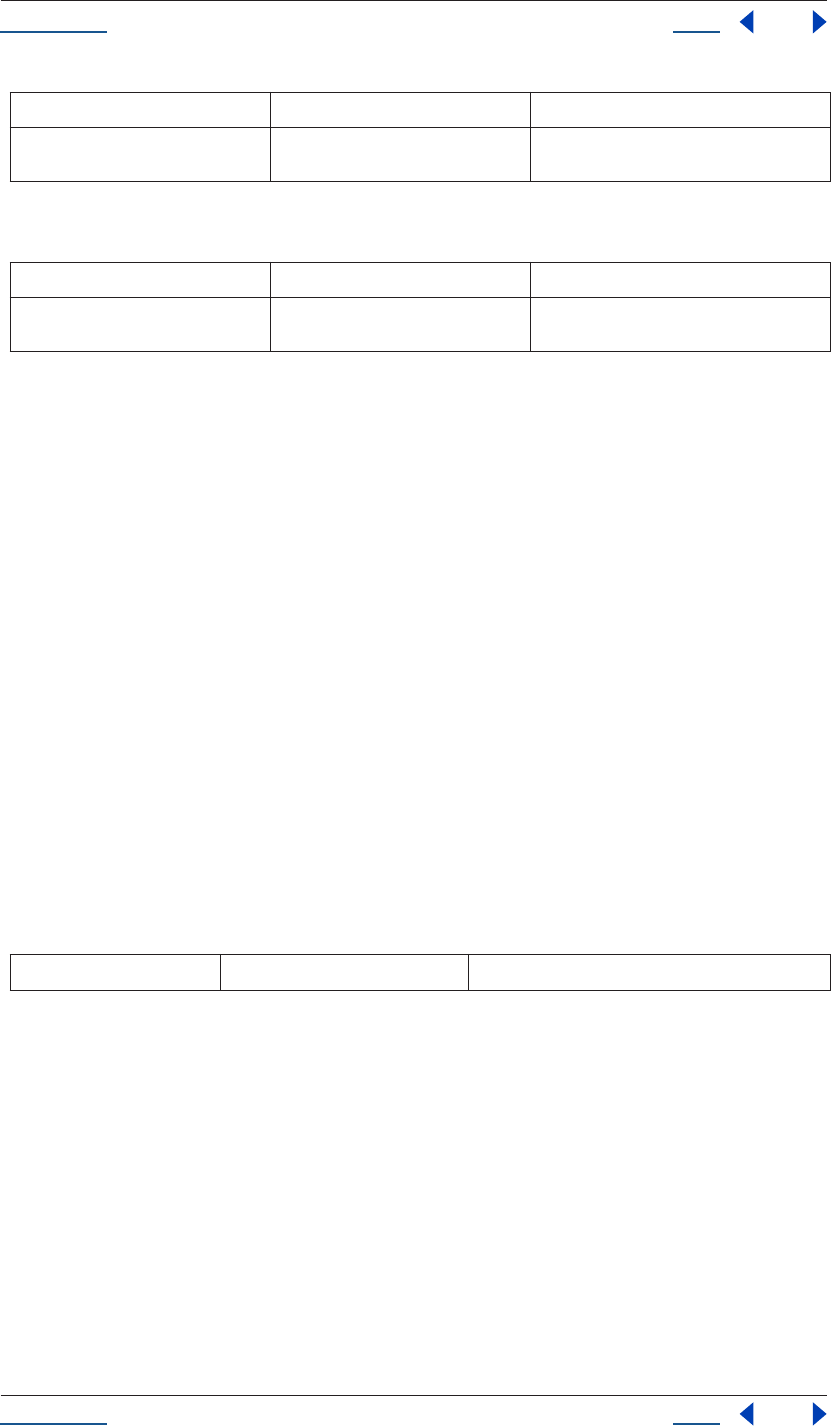
Using Help Back 85
Help Reference
Using Help Back 85
Methods
Example
Given that the second item in the project is a FolderItem, the following code puts up one alert for each top-
level item in the folder. The alerts display the name of each top-level item.
var secondItem = app.project.item(2);
if ( !(secondItem instanceof FolderItem) ) {
alert( "problem: second item is not a folder");
} else {
for (i = 1; i <= secondItem.numItems; i++ ) {
alert( "item number " + i + " within the folder is named "
+ secondItem.item(i).name);
}
}
FolderItem item() method
app.project.folderItem.item(index)
Description
The FolderItem item() method returns the top-level item in this FolderItem with the given index. Note that
“top-level” here means top-level within the folder, not necessarily within the project.
Parameters
Returns
Item.
FolderItem items attribute
app.project.folderItem.items
Description
The items attribute is the ItemCollection that represents the contents of this FolderItem.
Unlike the ItemCollection that is owned by the Project object, a FolderItem’s ItemCollection contains only the
top-level Items in the FolderItem.
Note that “top-level” indicates top-level within the folder, not necessarily within the project. Only in the case
of the rootFolder are the top-level items in the FolderItem also top-level items in the Project.
numItems see “FolderItem numItems attribute” on
page 86
number of items contained in the FolderItem
Method Reference Description
item() see “FolderItem item() method” on
page 85
returns an Item
index Integer index number of the FolderItem
Attribute Reference Description
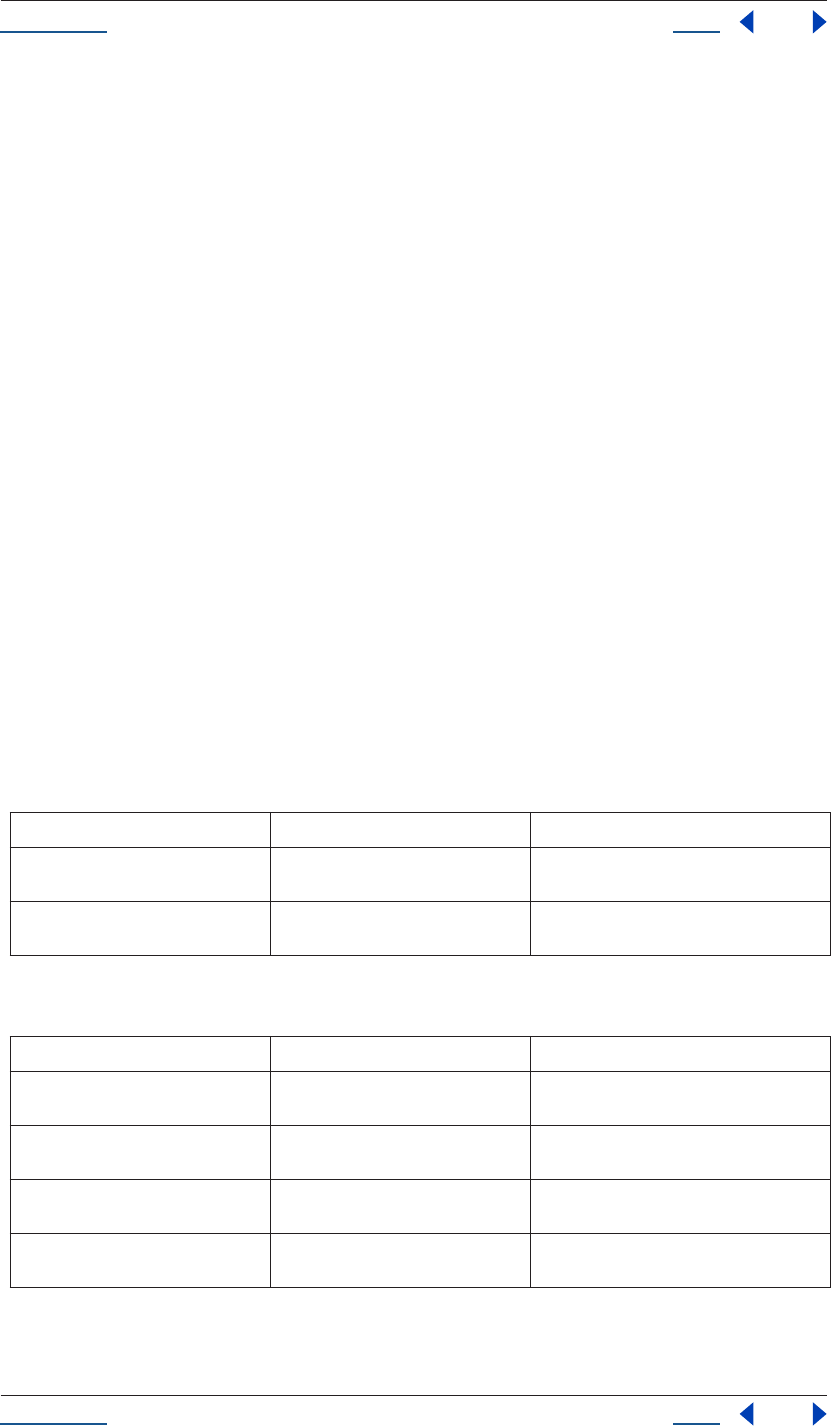
Using Help Back 86
Help Reference
Using Help Back 86
Type
ItemCollection; read only.
FolderItem numItems attribute
app.project.folderItem.numItems
Description
The numItems attribute is the number of items contained in the FolderItem.
This number is the number of top-level Items within the folder. In other words, if this FolderItem contains
another FolderItem, then the contained FolderItem counts as one item, even if there are further sub-items
inside the contained folder.
Type
Integer; read only.
FootageItem object
app.project.item(index)
app.project.items[index]
Description
The FootageItem object represents a footage item imported into the project, which appears in the Project
window.
Attributes
Methods
Attribute Reference Description
file see “FootageItem file attribute” on
page 87
footage source file
mainSource see “FootageItem mainSource attribute”
on page 87
contains all settings related to the footage
item
Method Reference Description
replace() see “FootageItem replace() method” on
page 87
replaces a footage file with another footage
file
replaceWithPlaceholder() see “FootageItem replaceWithPlace-
holder() method” on page 87
replaces a footage file with a placeholder
object
replaceWithSequence() see “FootageItem replaceWithSe-
quence() method” on page 88
replaces a footage file with an image sequence
replaceWithSolid() see “FootageItem replaceWithSolid()
method” on page 88
replaces a footage file with a solid
Using Help Back 87
Help Reference
Using Help Back 87
FootageItem file attribute
app.project.item(index).file
Description
The file attribute is the File object of the footage's source file.
If the FootageItem's mainSource is a FileSource, this is the same thing as mainSource.file Otherwise it is
NULL.
Type
File object (or null if mainSoure is not a FileSource); read only.
FootageItem mainSource attribute
app.project.item(index).mainSource.
Description
The footage item mainSource attribute contains all of the settings related to that footage item, including those
that are normally accessed via the Interpret Footage dialog box. See also FootageSource (and its three types:
SolidSource, FileSource, and PlaceholderSource).
The attribute is read-only, but it can be changed by calling any of the FootageItem methods that change the
footage source: replace(), replaceWithSequence(), replaceWithSolid(), and replaceWithPlaceholder().
Type
FootageSource. Read-only.
FootageItem replace() method
app.project.item(index).replace(file)
Description
The FootageItem replace() method replaces the FootageItem with the file given as a parameter.
In After Effects 6.5, in addition to loading the given file, this method does the following:
• Sets the mainSource to a new value reflecting the contents of the new file.
• Sets the name, width, height, frameDuration, and duration attributes, defined in the base AVItem class,
based on the contents of the file.
• Preserves interpretation parameters from the previous mainSource.
• Guesses the alpha if replace() is called with a file that has an unlabeled alpha channeI.
Parameters
FootageItem replaceWithPlaceholder() method
app.project.item(index).replaceWithPlaceholder(name, width, height, frameRate, duration)
file File object
Using Help Back 88
Help Reference
Using Help Back 88
Description
The FootageItem replaceWithSequence() method replaces the FootageItem with the image sequence given as
a parameter.
In After Effects 6.5, in addition to loading the given file, this method does the following:
• Sets the mainSource to a new value reflecting the contents of the new file.
• Sets the name, width, height, frameDuration, and duration attributes, defined in the base AVItem class,
based on the contents of the file.
• Preserves interpretation parameters from the previous mainSource.
• Guesses the alpha if replace() is called with a file that has an unlabeled alpha channeI.
Parameters
FootageItem replaceWithSequence() method
app.project.item(index).replaceWithSequence(file, forceAlphabetical)
Description
The FootageItem replaceWithSequence() method replaces the FootageItem with the image sequence given as
a parameter.
In After Effects 6.5, in addition to loading the given file, this method does the following:
• Sets the mainSource to a new value reflecting the contents of the new file.
• Sets the name, width, height, frameDuration, and duration attributes, defined in the base AVItem class,
based on the contents of the file.
• Preserves interpretation parameters from the previous mainSource.
• Guesses the alpha if replace() is called with a file that has an unlabeled alpha channel.
Parameters
FootageItem replaceWithSolid() method
app.project.item(index).replaceWithSolid(color, name, width, height, pixelAspect)
name string name of the placeholder
width integer width of the placeholder [4..30,000]
height integer height of the placeholder [4..30,000]
frameRate Floating-point value frame rate of the Placeholder [1..99]
duration Floating-point value duration of the Placeholder [0..10,800]
file File object replacement file
forceAlphabetical boolean value of true is equivalent to activating the Force
Alphabetical Order option in the File > Replace >
Footage > File dialog box.
Using Help Back 89
Help Reference
Using Help Back 89
Description
The FootageItem replaceWithSequence() method replaces the FootageItem with the image sequence given as
a parameter.
In After Effects 6.5, in addition to loading the given file, this method does the following:
• Sets the mainSource to a new value reflecting the contents of the new file.
• Sets the name, width, height, frameDuration, and duration attributes, defined in the base AVItem class,
based on the contents of the file.
• Preserves interpretation parameters from the previous mainSource.
• Guesses the alpha if replace() is called with a file that has an unlabeled alpha channeI.
Parameters
FootageSource object
app.project.item(index).mainSource.
app.project.item(index).proxySource.
Description
The FootageSource object holds information describing the source of some footage. It is used to hold the
mainSource of a FootageItem, or the proxySource of an AVItem. AVItem is the base class of FootageItem and
CompItem; thus proxySource appears in both these types of Item.
Attributes
color Floating-point array color of the solid (an array of four floating-point values from 0 to
1: [R, G, B, A])
name string name of the solid
width integer width of the solid [4..30,000]
height integer height of the solid [4..30,000]
pixelAspect Floating-point value pixel aspect ratio of the Solid [0.01..100]
Attribute Reference Description
hasAlpha see “FootageSource hasAlpha attribute”
on page 92
specifies if a footage clip or proxy includes an
alpha channel
alphaMode see “FootageSource alphaMode
attribute” on page 90
specifies the mode of an alpha channel
premulColor see “FootageSource premulColor
attribute” on page 94
specifies the color to be premultiplied
invertAlpha see “FootageSource invertAlpha
attribute” on page 93
specifies if an alpha channel in a footage clip or
proxy should be inverted
isStill see “FootageSource isStill attribute” on
page 93
specifies if footage is a still image
fieldSeparationType see “FootageSource fieldSepara-
tionType attribute” on page 91
specifies the field separation type
Using Help Back 90
Help Reference
Using Help Back 90
Methods
FootageSource alphaMode attribute
app.project.item(index).mainSource.alphaMode
app.project.item(index).proxySource.alphaMode
Description
The alphaMode attribute of footageSource defines how the alpha information in the footage is to be inter-
preted. If hasAlpha is false, this attribute has no relevant meaning.
Type
AlphaMode; one of the following (read/write):
AlphaMode.IGNORE
AlphaMode.STRAIGHT
AlphaMode.PREMULTIPLIED
FootageSource conformFrameRate attribute
app.project.item(index).mainSource.conformFrameRate
app.project.item(index).proxySource.conformFrameRate
Description
The conformFrameRate attribute of FootageSource determines a frame rate to use instead of the nativeFram-
eRate. If set to 0, the nativeFrameRate will be used instead. Permissible range is [0 .. 99.0].
It is an error to set this value if FootageSource.isStill is true. It is an error to set this value to 0 if remove-
Pulldown is not set to PulldownPhase.OFF. If this is 0 when you set removePulldown to a value other than
PulldownPhase.OFF, then this will be set to be equal to nativeFrameRate by default.
highQualityFieldSeparation see “FootageSource highQualityField-
Separation attribute” on page 92
specifies how the fields are to be separated in
a non-still footage.
removePulldown see “FootageSource removePulldown
attribute” on page 94
specifies the Pulldown Type for the footage
loop see “FootageSource loop attribute” on
page 93
specifies how many times an image sequence
is set to loop
nativeFrameRate see “FootageSource nativeFrameRate
attribute” on page 93
the native frame rate of the footage
displayFrameRate see “FootageSource displayFrameRate
attribute” on page 91
the effective frame rate as displayed and ren-
dered in compositions by After Effects
conformFrameRate see “FootageSource conformFrameRate
attribute” on page 90
specifies the rate to which footage should con-
form
Method Reference Description
guessAlphaMode() see “FootageSource guessAlphaMode()
method” on page 91
guesses the alphaMode setting
guessPulldown() see “FootageSource guessPulldown()
method” on page 92
guesses the pulldownType setting
Attribute Reference Description

Using Help Back 91
Help Reference
Using Help Back 91
Type
Floating-point value; read/write.
FootageSource displayFrameRate attribute
app.project.item(index).mainSource.displayFrameRate
app.project.item(index).proxySource.displayFrameRate
Description
The displayFrameRate attribute of FootageSource corresponds to the effective frame rate as displayed and
rendered in compositions by After Effects.
If removePulldown is PulldownPhase.OFF, then this will be the conformFrameRate (if non-zero) or the
nativeFrameRate (if conformFrameRate is 0). If removePulldown is not PulldownPhase.OFF, then this will be
(0.8 * conformFrameRate), the effective frame rate after removing 1 of every 5 frames.
Type
Floating-point value; read-only.
FootageSource fieldSeparationType attribute
app.project.item(index).mainSource.fieldSeparationType
app.project.item(index).proxySource.fieldSeparationType
Description
The fieldSeparationType attribute of FootageSource specifies how the fields are to be separated in a non-still
footage.
It is an error to attempt to write to this attribute if isStill is true. It is an error to set this value to FieldSepara-
tionType.OFF if removePulldown is not PulldownPhase.OFF. You must instead change removePulldown to
PulldownPhase.OFF, and then set the fieldSeparationType to FieldSeparationType.OFF.
Enumerated Types
FieldSeparationType (read/write); one of:
NONE
UPPER_FIELD_FIRST
LOWER_FIELD_FIRST
FootageSource guessAlphaMode() method
app.project.item(index).mainSource.guessAlphaMode()
app.project.item(index).proxySource.guessAlphaMode()
Description
The guessAlphaMode() method sets alphaMode, premulColor, and invertAlpha to the best guesses for this
footage source. If hasAlpha is false, no change will occur.
Parameters
None.
Using Help Back 92
Help Reference
Using Help Back 92
Returns
None.
FootageSource guessPulldown() method
app.project.item(index).mainSource.guessPulldown(method)
app.project.item(index).proxySource.guessPulldown(method)
Description
The guessPulldown() method sets the fieldSeparationType and removePulldown to the best guesses for this
footage source. If isStill is true, no change will occur.
Parameters
Enumerated Types
Returns
None.
FootageSource hasAlpha attribute
app.project.item(index).mainSource.hasAlpha
app.project.item(index).proxySource.hasAlpha
Description
The hasAlpha attribute of FootageSource is true if the footage has an alpha component.
If true, then the attributes alphaMode, invertAlpha, and premulColor will have relevance. If false, then those
three fields have no relevant meaning for the footage.
Type
Boolean; true if alpha exists. Read-only.
FootageSource highQualityFieldSeparation attribute
app.project.item(index).mainSource.highQualityFieldSeparation
app.project.item(index).proxySource.highQualityFieldSeparation
Description
The highQualityFieldSeparation attribute of FootageSource specifies whether After Effects will use special
algorithms to determine how to perform field separation.
It is an error to attempt to write to this attribute if isStill is true. It is an error to attempt to write to this
attribute if fieldSeparationType is FieldSeparationType.OFF.
Pulldown-
Method
used as an input argument to the guessPulldown()method of a FootageSource; use one of Enumerated
Types below
PULLDOWN_3_2 uses 3:2 pulldown method
ADVANCE_24P uses Advance 24p method

Using Help Back 93
Help Reference
Using Help Back 93
Type
Boolean; true if high quality is activated. Read/write.
FootageSource invertAlpha attribute
app.project.item(index).mainSource.invertAlpha
app.project.item(index).proxySource.invertAlpha
Description
The invertAlpha attribute of footageSource determines if an alpha channel in a footage clip or proxy should
be inverted.
This attribute is valid only if an alpha is present. If hasAlpha is false, or if alphaMode is AlphaMode.IGNORE,
then this attribute has no relevant meaning.
Type
Boolean; true if alpha is inverted. Read/write.
FootageSource isStill attribute
app.project.item(index).mainSource.isStill
app.project.item(index).proxySource.isStill
Description
The isStill attribute of footageSource specifies whether the footage is still or has a time-based component.
Examples of still footage are JPEG files, solids, and placeholders with duration of 0. Examples of non-still
footage are movie files, sound files, sequences, and placeholders of non-zero duration.
Type
Boolean; true if a still frame. Read-only.
FootageSource loop attribute
app.project.item(index).mainSource.loop
app.project.item(index).proxySource.loop
Description
The loop attribute of footageSource specifies the number of times that the footage is to be played consecutively
when used in a comp.
Legal range for values is [1 .. 9999] with a default value of 1. It is an error to attempt to write this attribute if
isStill is true.
Type
Integer; number of times the sequence will loop. Read/write.
FootageSource nativeFrameRate attribute
app.project.item(index).mainSource.nativeFrameRate
app.project.item(index).proxySource.nativeFrameRate

Using Help Back 94
Help Reference
Using Help Back 94
Description
The nativeFrameRate attribute of footageSource corresponds to the native frame rate of the footage.
Type
Floating-point value. Read/write.
FootageSource premulColor attribute
app.project.item(index).mainSource.premulColor
app.project.item(index).proxySource.premulColor
Description
The premulColor attribute of footageSource determines the color to be premultiplied. This attribute is valid
only if the alphaType is set to PREMULTIPLIED.
Type
Color (an array of four floating-point values from 0 to 1: [R, G, B, A]); read/write.
FootageSource removePulldown attribute
app.project.item(index).mainSource.removePulldown
app.project.item(index).proxySource.removePulldown
Description
The removePulldown attribute of Footage File Info specifies how the pulldowns are to be removed when field
separation is used.
It is an error to attempt to write to this attribute if isStill is true. It is an error to attempt to set this to a value
other than PulldownPhase.OFF in the case where fieldSeparationType is FieldSeparationType.OFF. The field-
SeparationType must be changed first.
Enumerated Type
PulldownPhase (read/write); one of:
RemovePulldown.OFF
RemovePulldown.WSSWW
RemovePulldown.SSWWW
RemovePulldown.SWWWS
RemovePulldown.WWWSS
RemovePulldown.WWSSW
RemovePulldown.WSSWW_24P_ADVANCE
RemovePulldown.SSWWW_24P_ADVANCE
RemovePulldown.SWWWS_24P_ADVANCE
RemovePulldown.WWWSS_24P_ADVANCE
RemovePulldown.WWSSW_24P_ADVANCE
ImportOptions object
new ImportOptions();
new ImportOptions(File);
Using Help Back 95
Help Reference
Using Help Back 95
Description
The ImportOptions object provides the ability to create, change, and access options for the importFile()
method. You can create ImportOptions using one of two constructors, one of which takes arguments, the
other which does not.
Constructors
If importFile() is set without arguments, it has a “file” that does not exist unless it is set in another statement:
new ImportOptions().file = new File("myfile.psd");
Otherwise importFile can be set with a single argument, which is a File object:
var my_io = new ImportOptions( new File( "myfile.psd" ) );
Attributes
Methods
ImportOptions canImportAs() method
importOptions.canImportAs(ImportAsType)
Description
The canImportAs() method is used to determine whether a given file can be imported as a given Impor-
tAsType, passed in as an argument.
Parameters
ImportAsType; one of:
ImportAsType.COMP
ImportAsType.FOOTAGE
ImportAsType.COMP_CROPPED_LAYERS
ImportAsType.PROJECT
Returns
Boolean.
Attributes Reference Description
importAs see “ImportOptions importAs attribute”
on page 96
contains the ImportAsType
sequence see “ImportOptions sequence attribute”
on page 96
boolean to determine whether a sequence or
an individual file is imported
forceAlphabetical see “ImportOptions forceAlphabetical
attribute” on page 96
boolean to determine whether the Force
Alphabetical Order option is set
file see “ImportOptions file attribute” on
page 96
the file to import
Method Reference Description
canImportAs() see “ImportOptions canImportAs()
method” on page 95
sets the ImportAsType, allowing the input to
be restricted to a particular type

Using Help Back 96
Help Reference
Using Help Back 96
Example
var io = new ImportOptions( File(“c:\\foo.psd”));
io.canImportAs( ImportAsType.COMP )
ImportOptions file attribute
importOptions.file
Description
The file attribute specifies the file to be imported. This is used to get or change the file that is set in the
constructor.
Type
File; read/write.
ImportOptions forceAlphabetical attribute
importOptions.forceAlphabetical
Description
The forceAlphabetical attribute is a boolean. A value of true is equivalent to activating the Force Alphabetical
Order option in the File > Import > File dialog box.
Type
Boolean; read/write.
ImportOptions importAs attribute
importOptions.importAs
Description
The importAs attribute holds the importAsType for the file to be imported. You can set it by setting a file of
the type you want to import as an argument.
Enumerated Type
ImportAsType; read/write. One of:
ImportAsType.COMP_CROPPED_LAYERS
ImportAsType.FOOTAGE
ImportAsType.COMP
ImportAsType.PROJECT
ImportOptions sequence attribute
importOptions.sequence
Description
The sequence attribute is a boolean; it determines whether a sequence or an individual file is imported.
Using Help Back 97
Help Reference
Using Help Back 97
Type
Boolean; read/write.
Item object
app.project.item(index)
app.project.items[index]
Description
The Item object represents an item that can appear in the Project window. FootageItem, CompItem, and
FolderItem are all types of Item.
Note that numbering of the index for item starts at 1, not 0.
Attributes
Methods
Example
The following example will get the second item from the project and check that the typeName of that item is
"Folder". Then it will remove from that folder any top-level item that is a Solid, but only if it is not currently
selected. The example will also check to make sure that, for each item in the folder, the parentFolder is properly
set to be the correct folder.
var myFolder = app.project.item(2);
if (myFolder.typeName != "Folder" ) {
alert("error: second item is not a folder");
}
else {
var numInFolder = myFolder.numItems;
// Always run loops backwards when deleting things:
for(i = numInFolder; i >= 1; i--) {
var curItem = myFolder.item(i);
if ( curItem.parentFolder != myFolder) {
Attributes Reference Description
name see “Item name attribute” on page 98 name of the object as shown in the Project
window
comment see “Item comment attribute” on
page 98
string that holds a comment
id see “Item id attribute” on page 98 unique integer ID for this item
parentFolder see “Item parentFolder attribute” on
page 98
parent folder of this item
selected see “Item selected attribute” on page 99 true if this item is currently selected
typeName see “Item typeName attribute” on
page 99
string corresponding to the type of item
Method Reference Description
remove() see “Item remove() method” on page 99 deletes the item from the project

Using Help Back 98
Help Reference
Using Help Back 98
alert("errorwithin AE: the parentFolder is not set correctly");
}
else {
if ( !curItem.selected && curItem.typeName == "Footage") {
// Aha! an unselected solid.
curItem.remove();
}
}
}
}
Item comment attribute
app.project.item(index).comment
Description
The item comment attribute is a string that holds a comment, up to 15,999 bytes in length after any encoding
conversion. The comment is for the user's purpose only; it has no effect on the Item's appearance or behavior.
Type
String; read/write.
Item id attribute
app.project.item(index).id
Description
The item ID attribute is a unique and persistent identification number used to identify an item between
sessions. The value of the ID will not change even after the project is saved to file and read in at a later time.
An ID is thus effectively permanent except when importing a project into another project, in which case new
IDs are assigned to the newly imported items.
Type
Integer; read-only.
Item name attribute
app.project.item(index).name
Description
The item name attribute is the name of the item as displayed in the Project window.
Type
String; read/write.
Item parentFolder attribute
app.project.item(index).parentFolder

Using Help Back 99
Help Reference
Using Help Back 99
Description
The Parent Folder attribute yields the Folder Item that contains the selected item. If this Item is at the top level
of the project, then the parentFolder will be the project's root folder, (app.project.rootFolder).
Type
FolderItem; read-only.
Item remove() method
app.project.item(index).remove()
Description
The Item remove() method removes (deletes) this item from the project window. If the item is a FolderItem,
all the items contained in the folder will also be removed.
Parameters
None.
Returns
None.
Item selected attribute
app.project.item(index).selected
Description
The selected attribute defines whether an item is selected or not. Multiple Items can be selected simultaneously
at any given time.
The selected attribute is true if this Item is currently selected. Setting this attribute to true will select the item.
Type
Boolean; read/write.
Item typeName attribute
app.project.item(index).typeName
Description
The typeName attribute is a string representing a user-readable name of the type. Examples are Folder,
Footage and Composition.
Type
String; read-only.
ItemCollection
app.project.items
Using Help Back 100
Help Reference
Using Help Back 100
Description
The ItemCollection object represents a collection of Items. The ItemCollection belonging to a Project object
represents all the Items in the project. The ItemCollection belonging to a FolderItem object represents all the
Items in that folder.
Attributes
Methods
ItemCollection addComp() method
app.project.ItemCollection.addComp(name, width, height, pixelAspect, duration, frameRate)
Description
The itemCollection addcomp() method creates a new CompItem and adds it to the ItemCollection.
If the ItemCollection belongs to the project or the root folder, then the new comp's parentFolder will be the
root folder. Otherwise, the new comp's parentFolder will be the FolderItem that owns the ItemCollection.
Parameters
Returns
CompItem.
KeyframeEase object
The KeyframeEase object specifies the KeyframeEase setting of a keyframe, which is determined by its speed
and influence settings.
Attributes
length the number of objects in the collection (applies to all collections)
[] retrieves an object or objects in the collection via its index number
addComp() creates a new CompItem and adds it to the ItemCollection
name string name of the new CompItem
width integer width of the new CompItem [4.. 30,000]
height integer height of the new CompItem [4.. 30,000]
pixelAspect floating-point value pixel aspect ratio of the Solid [0.01..100]
duration floating-point value duration of the new CompItem [0 .. 10800 ]
frameRate floating-point value frame rate of the new CompItem [1 .. 99]
Attribute Reference Description
speed see “KeyframeEase speed attribute” on
page 101
corresponds to the speed setting for a key-
frame
Using Help Back 101
Help Reference
Using Help Back 101
Method
KeyframeEase keyframeEase() method
myKey.keyframeEase(speed, influence)
Description
This constructor creates a KeyframeEase value. Both paramters are required. Note that for non-spatial 2D and
3D properties you must set an easeIn and and easeOut for each dimension (see example below). Note also that
there are two types of ease: temporal and spatial.
Parameters
Returns
None.
Example
var easeIn = new KeyframeEase(0.5, 50);
var easeOut = new KeyfreameEase(0.75, 85);
myPositionProperty.setTemporalEaseAtKey(2, [easeIn], [easeOut]);
KeyframeEase influence attribute
myKey,KeyframeEase.influence
Description
This attribute specifies the influence value of the keyframe. The valid range is 0.1 to 100.0.
Type
Floating-point value; read/write.
KeyframeEase speed attribute
myKey,KeyframeEase.speed
Description
This attribute specifies the speed value of the keyframe.
influence see “KeyframeEase influence attribute”
on page 101
corresponds to the influence setting for a key-
frame in range [0.1..100.0]
Method Reference Description
keyframeEase() see “KeyframeEase keyframeEase()
method” on page 101
returns a KeyframeEase
speed Floating-point value; the keyframe speed
influence Floating-point value in range [0.1..100.0]; the keyframe influence
Attribute Reference Description
Using Help Back 102
Help Reference
Using Help Back 102
Type
Floating-point value; read/write.
Layer object
app.project.item(index).layer(index)
Description
The Layer object provides access to a layer within Compositions. It can be accessed either by index number or
by a name string.
Those layers that are AV layers (Comp layers, footage layers, etc.) will be represented as AVLayer objects.
AVLayer is a subclass of Layer and contains additional methods and attributes. (See “AVLayer object” on
page 45 for more information.)
The Layer object is derived from PropertyGroup. All attributes of the PropertyBase and PropertyGroup
objects are available on Layers, as well.
Attributes
Attribute Reference Description
index see “Layer index attribute” on page 105 index of the layer, in the range [1,numLayers]
name see “Layer name attribute” on page 107 name of the layer
parent see “Layer parent attribute” on page 107 parent of this layer
time see “Layer time attribute” on page 109 current time of the layer
startTime see “Layer startTime attribute” on
page 109
startTime of the layer, expressed in comp time
stretch see “Layer stretch attribute” on
page 109
time stretch, expressed as a percentage
inPoint see “Layer inPoint attribute” on
page 105
inPoint of the layer, expressed in comp time
outPoint see “Layer outPoint attribute” on
page 107
outPoint of the layer, expressed in comp time
enabled see “Layer enabled attribute” on
page 104
true if the layer is enabled
solo see “Layer solo attribute” on page 109 true if the layer is soloed
shy see “Layer shy attribute” on page 108 true if the layer is shy
locked see “Layer locked attribute” on page 105 true if the layer is locked
hasVideo see “Layer hasVideo attribute” on
page 105
true if the layer contains a video component
active see “Layer active attribute” on page 103 true if the layer is active at the current time
nullLayer see “Layer nullLayer attribute” on
page 107
true if this is a null layer
selectedProperties see “Layer selectedProperties attribute”
on page 108
array containing all selected Property and
PropertyGroup objects in Layer
Using Help Back 103
Help Reference
Using Help Back 103
Methods
Example
If the first item in the project is a CompItem, the following example would disable the first layer in that
composition (i.e., turn the eyeball icon off) and rename it to "Lord High Imperial Layer."
var firstLayer = app.project.item(1).layer(1);
firstLayer.enabled = false;
firstLayer.name = "Lord High Imperial Layer";
Layer active attribute
app.project.item(index).layer(index).active
Description
The Layer active attribute is true if the layer's video is active at the current time.
To be true, the layer must be enabled; no other layer may be soloing unless this layer is soloed too, and the time
must be in between the inPoint and outPoint of this layer.
Note that an audio layer will not have active as true; there is a separate audioActive attribute in the AVLayer
object.
Type
Boolean; read-only.
Layer activeAtTime() method
app.project.item(index).layer(index).activeAtTime(time)
Method Reference Description
remove() see “Layer remove() method” on
page 108
deletes the layer from the composition
moveToBeginning() see “Layer moveToBeginning() method”
on page 106
moves the layer to the top of the composition
(the first layer)
moveToEnd() see “Layer moveToEnd() method” on
page 106
moves the layer to the bottom of the composi-
tion (the last layer)
moveAfter() see “Layer moveAfter() method” on
page 105
moves the layer below another, specified layer
moveBefore() see “Layer moveBefore() method” on
page 106
moves the layer above another, specified layer
duplicate() see “Layer duplicate() method” on
page 104
duplicates the layer
copyToComp() see “Layer copyToComp() method” on
page 104
copies the layer to the top and beginning of
another composition
activeAtTime() see “Layer activeAtTime() method” on
page 103
given a time, returns whether this layer will be
active at that time
setParentWithJump() see “Layer setParentWithJump()
method” on page 108
establishes newParent as the parent of this
layer
Using Help Back 104
Help Reference
Using Help Back 104
Description
The layer activeAtTime method returns whether this layer will be active at a given time. To be true, the layer’s
enabled attribute must be true, no other layer may be soloing unless this layer is soloed too, and the given time
must be between this layer's inPoint and outPoint.
Parameters
Returns
Boolean.
Layer copyToComp() method
app.project.item(index).layer(index).copyToComp(intoComp)
Description
The layer copyToComp() method copies the layer into the comp specified by intoComp. The original layer
will remain unchanged.
Parameters
Returns
None.
Layer duplicate() method
app.project.item(index).layer(index).duplicate()
Description
The layer duplicate method duplicates the layer. This has the same effect as selecting a layer in the user
interface and choosing Edit > Duplicate, except the selection in the user interface does not change when you
call this method.
Parameters
None.
Returns
Layer.
Layer enabled attribute
app.project.item(index).layer(index).enabled
Description
The Layer enabled attribute is true if the layer is enabled, false otherwise. This corresponds to the toggle
control in the Layer window.
time floating-point value time (in seconds) to evaluate
comp target composition where the layer will be moved

Using Help Back 105
Help Reference
Using Help Back 105
Type
Boolean; read/write.
Layer hasVideo attribute
app.project.item(index).layer(index).hasVideo
Description
The Layer hasVideo attribute is true if the layer is enabled, false otherwise. This corresponds to the toggle
control in the Layer window.
Type
Boolean; read-only.
Layer index attribute
app.project.item(index).layer(index).index
Description
The Layer index attribute is the index of the layer, in the range [1,numLayers].
Type
Integer; read-only.
Layer inPoint attribute
app.project.item(index).layer(index).inPoint
Description
The Layer inPoint attribute is the in-point of the layer, expressed in comp time. Values may be in the range [-
10800, 10800].
Type
Floating-point value; read/write.
Layer locked attribute
app.project.item(index).layer(index).locked
Description
The Layer locked attribute is true if the layer is locked, false otherwise. This correponds to the lock toggle in
the Layer window.
Type
Boolean; read/write.
Layer moveAfter() method
app.project.item(index).layer(index).moveAfter(layer)
Using Help Back 106
Help Reference
Using Help Back 106
Description
The Layer moveAfter method moves the layer below another, specified layer
Parameters
Returns
None.
Layer moveBefore() method
app.project.item(index).layer(index).moveBefore(layer)
Description
The Layer moveAfter method moves the layer above another, specified layer.
Parameters
Returns
None.
Layer moveToBeginning() method
app.project.item(index).layer(index).moveToBeginning()
Description
The Layer moveToBeginning method moves the layer to the top of the layer stack (the first layer).
Parameters
None.
Returns
None.
Layer moveToEnd() method
app.project.item(index).layer(index).moveToEnd()
Description
The Layer moveToEndmethod moves the layer to the bottom of the layer stack (the last layer).
Parameters
None.
Returns
None.
layer target layer that this layer will follow
layer target layer that this layer will precede

Using Help Back 107
Help Reference
Using Help Back 107
Layer name attribute
app.project.item(index).layer(index).name
Description
The Layer name attribute is the name of the layer. This can be unique from the Source name (which cannot
be changed in the Layer window), although by default they are identical until edited.
Type
String; read/write.
Layer nullLayer attribute
app.project.item(index).layer(index).nullLayer
Description
The Layer nullLayer attribute is true if the layer was created as a null object, false otherwise.
Type
Boolean; read/write.
Layer outPoint attribute
app.project.item(index).layer(index).outPoint
Description
The Layer outPoint attribute is the out-point of the layer, expressed in comp time (seconds). Values may be in
the range [-10800, 10800].
Type
Floating-point value; read/write.
Layer parent attribute
app.project.item(index).layer(index).parent
Description
The Layer parent attribute is the parent of this layer. The value may be null and may be set to null.
Note that, as in the regular application, if you set the parent, there will be no apparent jump in the layer's
transform. This is because offset values will be calculated to counterbalance any transforms above it in the
hierarchy. For example, if the new parent has a rotation of 30 degrees, then the child layer would be given a
rotation of -30 degrees.
If you want to set the parent while keeping the child layer's transform values from changing, use the “Layer
setParentWithJump() method” on page 108.
Type
Layer; read/write.
Using Help Back 108
Help Reference
Using Help Back 108
Layer remove() method
app.project.item(index).layer(index).remove()
Description
This method deletes the specified layer from the composition.
Parameters
None.
Layer selectedProperties attribute
app.project.item(index).layer(index).selectedProperties
Description
This attribute yields an array containing all of the selected Property and PropertyGroup objects in the layer.
Type
Array of PropertyBase; read-only.
Layer setParentWithJump() method
app.project.item(index).layer(index).setParentWithJump(newParent)
Description
The Layer setParentWithJump() method establishes newParent as the parent of this layer.
This method does not change the transform values of the child layer, and as a result, there may be an apparent
jump in the rotation, translation, or scale of the child layer.
If you do not want the child layer to jump, set the parent attribute directly (as in "childLayer.parent =
newParent;"). When you set the parent attribute directly, an offset will be calculated and set in the child layer's
transform fields, which will prevent the jump from occurring.
Parameters
Returns
None.
Layer shy attribute
app.project.item(index).layer(index).shy
Description
The Layer shy attribute is true if the layer is shy, and therefore will be hidden in the Layer window if the compo-
sition’s hide all shy layers is toggled on.
Type
Boolean; read/write.
newParent replacement parent layer

Using Help Back 109
Help Reference
Using Help Back 109
Layer solo attribute
app.project.item(index).layer(index).solo
Description
The Layer solo attribute is true if a layer is soloed, false otherwise.
Type
Boolean; read/write.
Layer startTime attribute
app.project.item(index).layer(index).startTime
Description
The Layer startTime attribute is the startTime of the layer, expressed in comp time. Permitted values are in the
range [-10800, 10800] seconds, corresponding to +/- 3 hours.
Type
Floating-point value; read/write.
Layer stretch attribute
app.project.item(index).layer(index).stretch
Description
The Layer stretch attribute is the layer’s time stretch, expressed as a percentage. A value of 100 means no
stretch.
Range can be [-9900, 9900]. Values between [-1, 1] will be clipped to minimum acceptable values. Those
between [0, 1] will be clipped to 1, and those between [-1, 0] (not including 0) will be set to -1.
Type
Floating-point value; read/write.
Layer time attribute
app.project.item(index).layer(index).time
Description
The Layer time attribute is the current time of the layer, expressed in comp time (seconds).
Type
Floating-point value; read-only.
Returns
None.
Using Help Back 110
Help Reference
Using Help Back 110
LayerCollection
app.project.item(index).lcoll
Description
The Layer Collection represents a collection of layers. Each CompItem object contains one LayerCollection.
The LayerCollection attributes and methods provide access to and the ability to add new layers.
Attributes
Methods
Example
Given that the first item in the project is a CompItem and the second item in the project is an AVItem, the
following code shows how to display the number of layers in the CompItem's layer collection, add a new layer
based on an AVItem in the project, and then display the new number of layers in the layer collection.
var firstComp = app.project.item(1);
var layerCollection = firstComp.layers;
alert( "number of layers before is " + layerCollection.length);
var anAVItem = app.project.item(2);
layerCollection.add(anAVItem);
alert( "number of layers after is " + layerCollection.length);
LayerCollection add() method
app.project.item(index).lcoll.add(item, duration)
length the number of objects in the collection (applies to all collections)
Method Reference Description
[] (no cross-reference) retrieves an object or objects in the collection
via its index number
add() see “LayerCollection add() method” on
page 110
creates a new AVLayer containing the given
AVItem and adds it to the CompItem
addNull() see “LayerCollection addNull() method”
on page 112
layer returned is a newly created layer in the
Comp that owns the LayerCollection
addSolid() see “LayerCollection addSolid()
method” on page 112
creates a new FootageItem that has a Solid-
Source according to the specified parameters,
and adds it to the project
addText() see “LayerCollection addText() method”
on page 113
creates a new Text layer with the specified
source text
addCamera() see “LayerCollection addCamera()
method” on page 111
creates a new Camera layer with the specified
name and center point
addLight() see “LayerCollection addLight()
method” on page 111
creates a new Light layer with the specified
name and center point
byName() see “LayerCollection byName() method”
on page 113
returns the first layer found with the given
name
precompose() see “LayerCollection precompose()
method” on page 113
collects the layers referred to by the indices
given in layerIndices, and puts them into a new
CompItem with the given name
Using Help Back 111
Help Reference
Using Help Back 111
Description
The LayerCollection add() method creates a new AVLayer containing the given AVItem, and adds the new
AVLayer to the containing CompItem.
This method generates an exception if the item cannot be added as a layer to this CompItem.
The duration parameter, if provided, will affect the method only if the given AVItem contains a piece of still
footage; it has no effect on movies, sequences or audio. If duration is provided, then the duration of the newly
created layer will be the passed value. If duration is not provided, then the duration will be determined by the
user preferences.
Note that by default, user preferences proscribe that the duration be set equal to that of the CompItem into
which the layer is being added. The preference can be changed to a specific duration. Choose Edit > Prefer-
ences > Import (Windows) or After Effects > Preferences > Import, and specify options under Still Footage.
Parameters
Returns
AVLayer.
LayerCollection addCamera() method
app.project.item(index).lcoll.addCamera(name, centerPoint)
Description
This method creates a new camera layer within the LayerCollection.
Parameters
Returns
Camera layer.
LayerCollection addLight() method
app.project.item(index).lcoll.addLight(name, centerPoint)
Description
This method creates a new light layer within the LayerCollection.
item AVItem to be added
duration optional floating-point value specifying the length of a still layer
name string; name of the new layer
centerPoint floating-point array; center of the new camera

Using Help Back 112
Help Reference
Using Help Back 112
Parameters
Returns
Light layer.
LayerCollection addNull() method
app.project.item(index).lcoll.addNull(duration)
Description
The LayerCollection addNull() method returns a newly created layer in the Comp that owns the LayerCol-
lection. The method has the same effect as choosing Layer > New > Null Object.
If duration is provided, then the duration of the newly created layer will be the passed value. If duration is not
provided, then the duration will be determined by user preferences.
Note that by default, user preferences specify that the duration be set equal to that of the CompItem into which
the layer is being added. The preference can be changed to a specific duration in the Preferences dialog box.
Choose Edit > Preferences > Import (Windows) or After Effects > Preferences > Import, and specify options
under Still Footage.
Parameters
Returns
AVLayer.
LayerCollection addSolid() method
app.project.item(index).lcoll.addSolid(color, name, width, height, pixelAspect, duration)
Description
The layerCollection addSolid() method creates a new FootageItem whose mainSource is a SolidSource
according to the specified parameters, and adds it to the project. This method also creates a new AVLayer that
has that new FootageItem as its source, and adds that layer to the containing CompItem.
Note that by default, user preferences proscribe that the duration be set equal to that of the CompItem into
which the layer is being added. The preference can be changed to a specific durationin the Preferences dialog
box. Choose Edit > Preferences > Import (Windows) or After Effects > Preferences > Import, and specify
options under Still Footage.
name string; name of the new layer
centerPoint floating-point array containing 2 values; center of the new light
duration optional floating-point value specifying the duration of the new layer
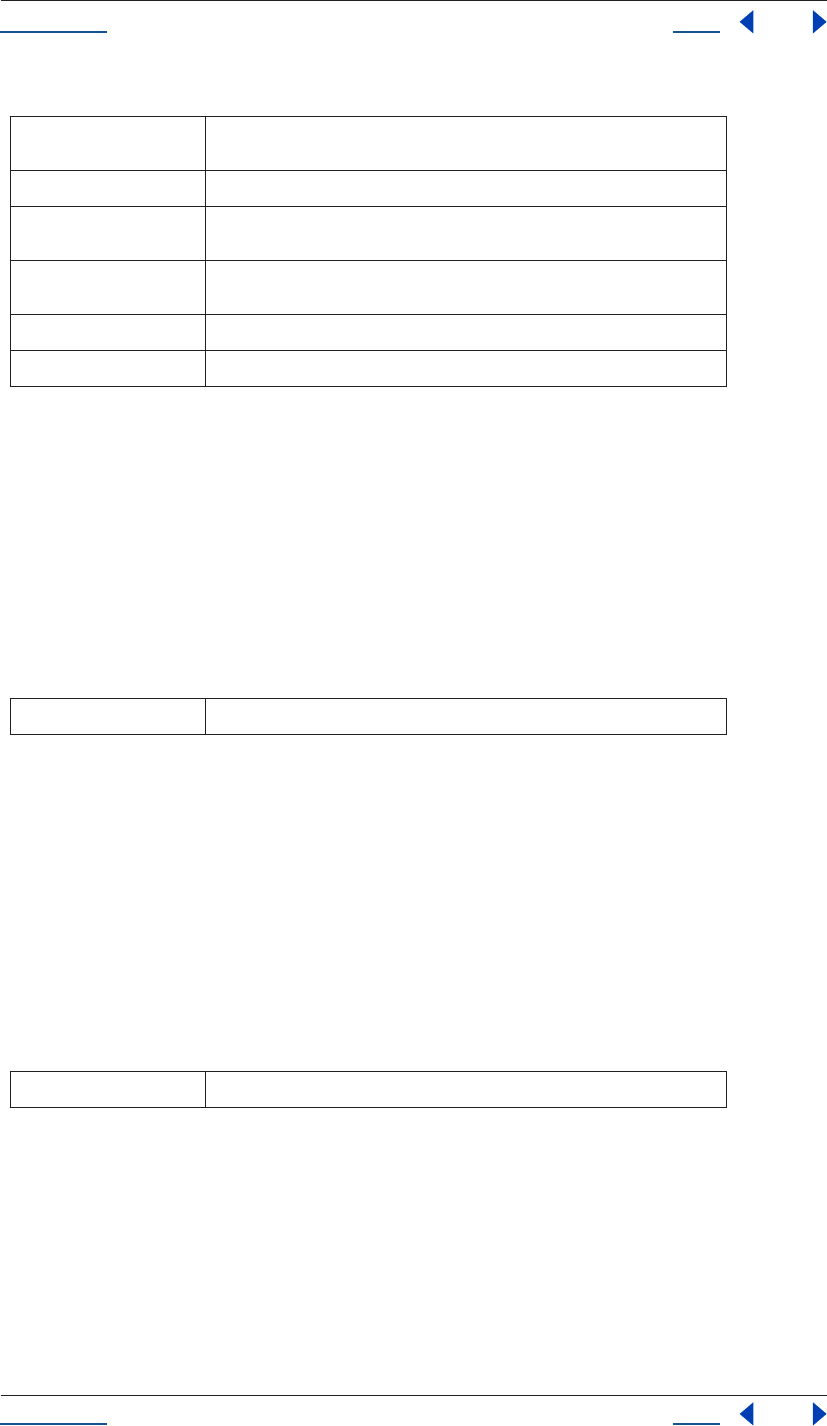
Using Help Back 113
Help Reference
Using Help Back 113
Parameters
Returns
AVLayer.
LayerCollection addText() method
app.project.item(index).lcoll.addText(sourceText)
Description
This method creates a new text layer within the LayerCollection.
Parameters
Returns
Text layer.
LayerCollection byName() method
app.project.item(index).lcoll.byName(name)
Description
The LayerCollection byName() method returns the first layer found with the given name. This method returns
null if no layer with the given name is found.
Parameters
Returns
Layer; null if name is not found.
LayerCollection precompose() method
app.project.item(index).lcoll.precompose(layerIndicies, name, moveAllAttributes)
color Establishes the color of the new FootageItem (a solid) contained in the layer. The
color argument must be an array of 3 floats lying in the range [0..1].
name Establishes the name of the new layer and the new FootageItem.
width Specifies the width, in pixels, of the new layer and the new FootageItem. Permit-
ted values are in the range [1 .. 30,000].
height Specifies the height, in pixels, of the new layer and the new FootageItem. Permit-
ted values are in the range [1 .. 30,000].
pixelAspect Specifies the pixel aspect ratio for the new FootageItem.
duration Optional floating-point value specifying the length of a still layer.
sourceText string; optional, serves as the source text of the new layer
name string - the name of the layer being sought
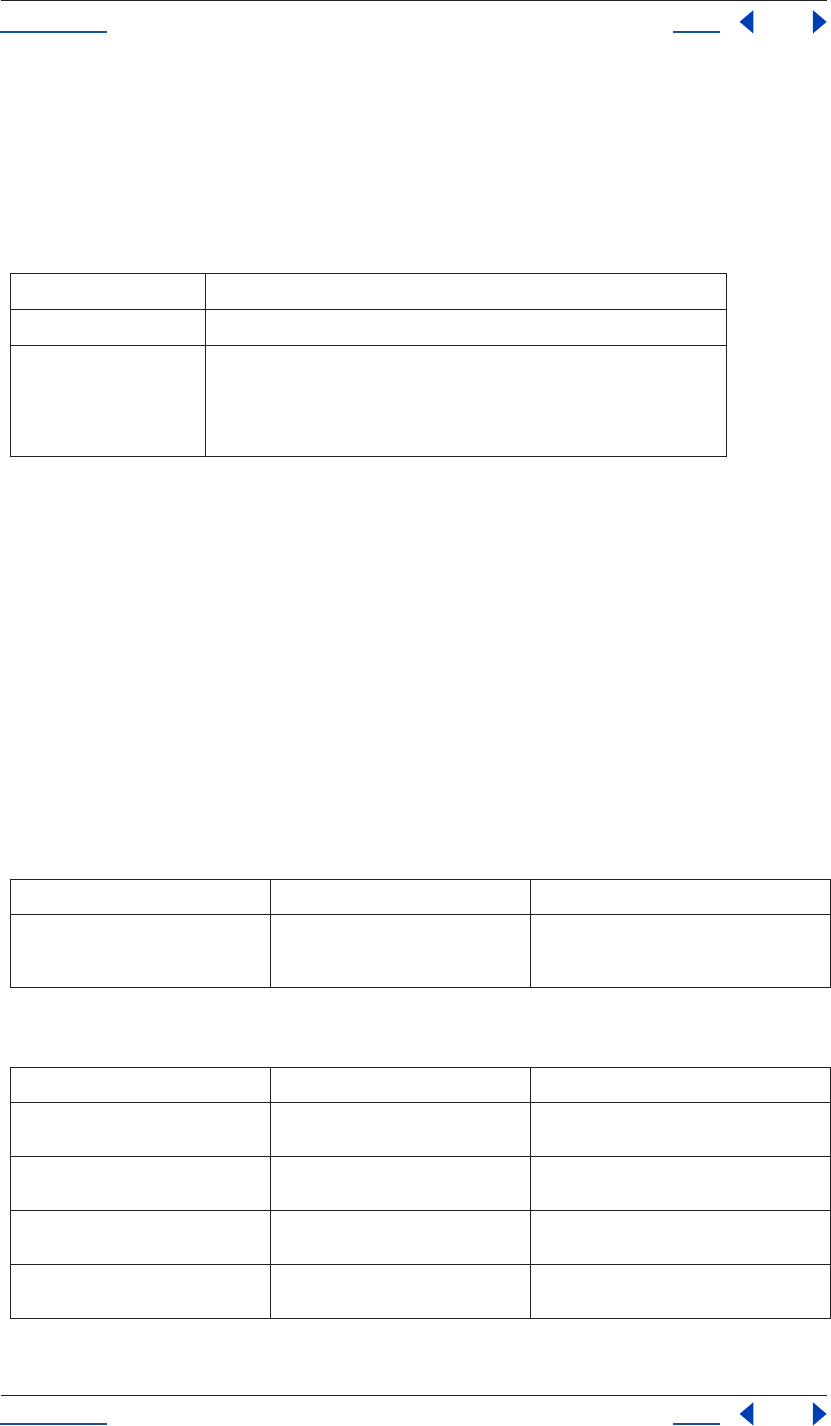
Using Help Back 114
Help Reference
Using Help Back 114
Description
The LayerCollection precompose() method collects the layers referred to by the given indices (first parameter)
and puts them into a new CompItem that has the given name (second parameter). The given layers are
removed from the LayerCollection. The new CompItem is added into the LayerCollection and is also returned
by the precompose() method.
Parameters
Returns
CompItem.
MarkerValue object
app.project.item(index).layer(index).MarkerValue
Description
The MarkerValue object holds the representation of a layer marker. It contains four string attributes:
comment, chapter, url, and frameTarget.
For more on the usage of markers see “Using markers” in After Effects Help.
Methods
Attributes
layerIndices indices of layers to be collected
name establishes the name of the new compItem
moveAllAttributes Optional boolean, defaults to true; may be set to false only if there is only 1 index
in the layerIndices array. Setting this to true corresponds to selecting the Move
All Attributes into the New Composition option in the Pre-Compose dialog box.
Setting it to false corresponds to selecting the Leave All Attributes In option in
the Pre-Compose dialog box.
Method Reference Description
MarkerValue() see “MarkerValue method” on page 115 Returns a MarkerValue. Sets the comment and,
optionally, the chapter, url and frameTarget
attributes.
Attribute Reference Description
comment see “MarkerValue Comment attribute”
on page 116
string comment included with the marker
chapter see “MarkerValue Chapter attribute” on
page 115
string Chapter Link reference point included
with the marker
url see “MarkerValue URL attribute” on
page 116
string Uniform Resource Locator included with
the marker
frameTarget see “MarkerValue FrameTarget
attribute” on page 116
string target (specifying a Web site frame)
included with the marker
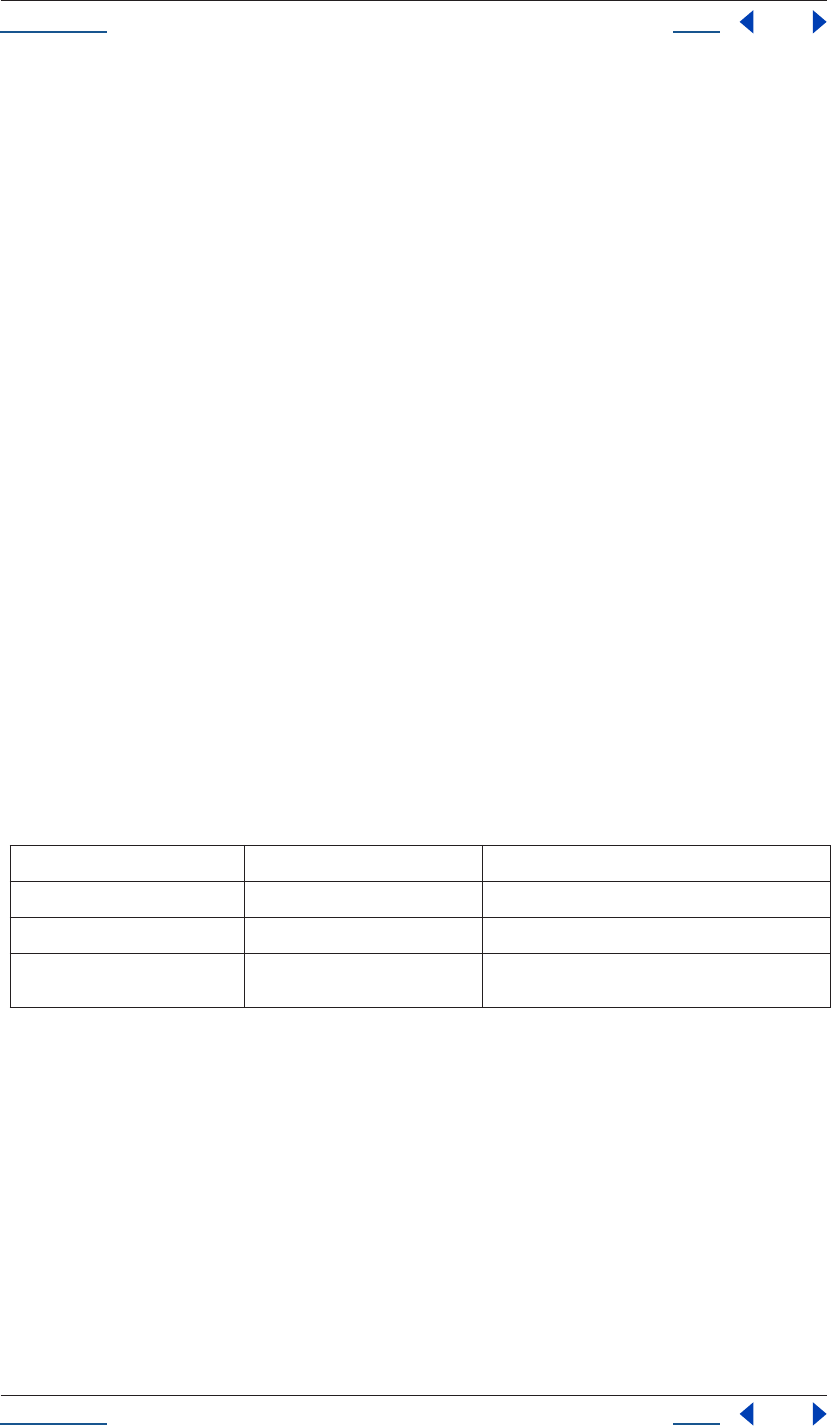
Using Help Back 115
Help Reference
Using Help Back 115
Examples
To set a marker that says “Fade Up” at the 2 second mark:
var myMarker = new Marker("Fade Up");
myLayer.property("Marker").setValueAtTime(2, myMarker);
To get a comment value from a particular marker:
var commentOfFirstMarker = app.project.item(1).layer(1).property("Marker").keyValue(0).comment;
var commentOfMarkerAtTime4 = app.project.item(1).layer(1).property("Marker").value-
AtTime(4.0,TRUE) .comment
var markerProperty = app.project.item(1).layer(1).property("Marker");
var markerValueAtTimeClosestToTime4 = markerProperty
.keyValue(markerProperty.nearestKeyIndex(4.0));
var commentOfMarkerClosestToTime4 = markerValueAtTimeClosestToTime4.comment;
MarkerValue method
app.project.item(index).layer(index).MarkerValue(comment)
app.project.item(index).layer(index).MarkerValue(comment, chapter)
app.project.item(index).layer(index).MarkerValue(comment, chapter, url)
app.project.item(index).layer(index).MarkerValue(comment, chapter, url, frameTarget)
Description
The markerValue method sets between one and four specific attributes of the marker and returns a Marker-
Value.
Parameters
Returns
MarkerValue (a marker keyframe containing the above four string values).
MarkerValue Chapter attribute
app.project.item(index).layer(index).MarkerValue.chapter
Description
The MarkerValue chapter attribute is a text chapter link attached to a given layer marker. Chapter links initiate
a jump to a chapter in a QuickTime movie or in other formats that support chapter marks (for more on
markers see “Using markers” in After Effects Help).
comment string see “MarkerValue Comment attribute” on page 116
chapter string see “MarkerValue Chapter attribute” on page 115
url string see “MarkerValue URL attribute” on page 116
frameTarget string see “MarkerValue FrameTarget attribute” on
page 116

Using Help Back 116
Help Reference
Using Help Back 116
Type
String; read/write.
MarkerValue Comment attribute
app.project.item(index).layer(index).MarkerValue.comment
Description
The MarkerValue comment attribute is a text comment attached to a given layer marker. This comment
appears in the Timeline window next to the layer marker (for more on markers see “Using markers” in After
Effects Help).
Type
String; read/write.
MarkerValue FrameTarget attribute
app.project.item(index).layer(index).MarkerValue.frameTarget
Description
The MarkerValue frameTarget attribute is a text frame marker attached to a given layer marker. Used with a
URL, this can target a specific frame within a Web site (for more on markers see “Using markers” in After
Effects Help).
Type
String; read/write.
MarkerValue URL attribute
app.project.item(index).layer(index).MarkerValue.url
Description
The MarkerValue URL attribute is a text Uniform Resource Locator attached to a given layer marker. This URL
is an automatic link to a site (for more on markers see “Using markers” in After Effects Help).
Type
String; read/write.
MaskPropertyGroup object
app.project.item(index).layer(index).mask
Description
The MaskPropertyGroup object is derived from PropertyGroup and inherits all the attributes and methods of
PropertyBase and PropertyGroup, along with its own attributes and methods as follows.

Using Help Back 117
Help Reference
Using Help Back 117
Attributes
MaskPropertyGroup color attribute
app.project.item(index).layer(index).mask(index).color
Description
This attribute is the color used to draw the mask outline as it appears in the user interface (Composition
window, Layer window, and Timeline window).
Type
Array of three floating-point values from 0 to 1: [R, G, B); read/write.
MaskPropertyGroup inverted attribute
app.project.item(index).layer(index).mask(index).inverted
Description
This attribute is a boolean specifying whether the mask is inverted.
Type
Boolean; read/write.
MaskPropertyGroup locked attribute
app.project.item(index).layer(index).mask(index).locked
Description
This attribute is a boolean specifying whether the mask is locked and cannot be edited in the user interface.
Type
Boolean; read/write.
MaskPropertyGroup maskMode attribute
app.project.item(index).layer(index).mask(index).maskMode
Attribute Reference Description
maskMode see “MaskPropertyGroup maskMode
attribute” on page 117
specifies the MaskMode for this mask
inverted see “MaskPropertyGroup inverted
attribute” on page 117
specifies whether the mask is inverted
rotoBezier see “MaskPropertyGroup rotoBezier
attribute” on page 118
specifies whether the shape of the mask is
Rotobezier
maskMotionBlur see “MaskPropertyGroup maskMotion-
Blur attribute” on page 118
specifies how motion blur is applied to this
mask
locked see “MaskPropertyGroup locked
attribute” on page 117
true if the mask is locked
color see “MaskPropertyGroup color
attribute” on page 117
color used to draw the mask outline in the user
interface
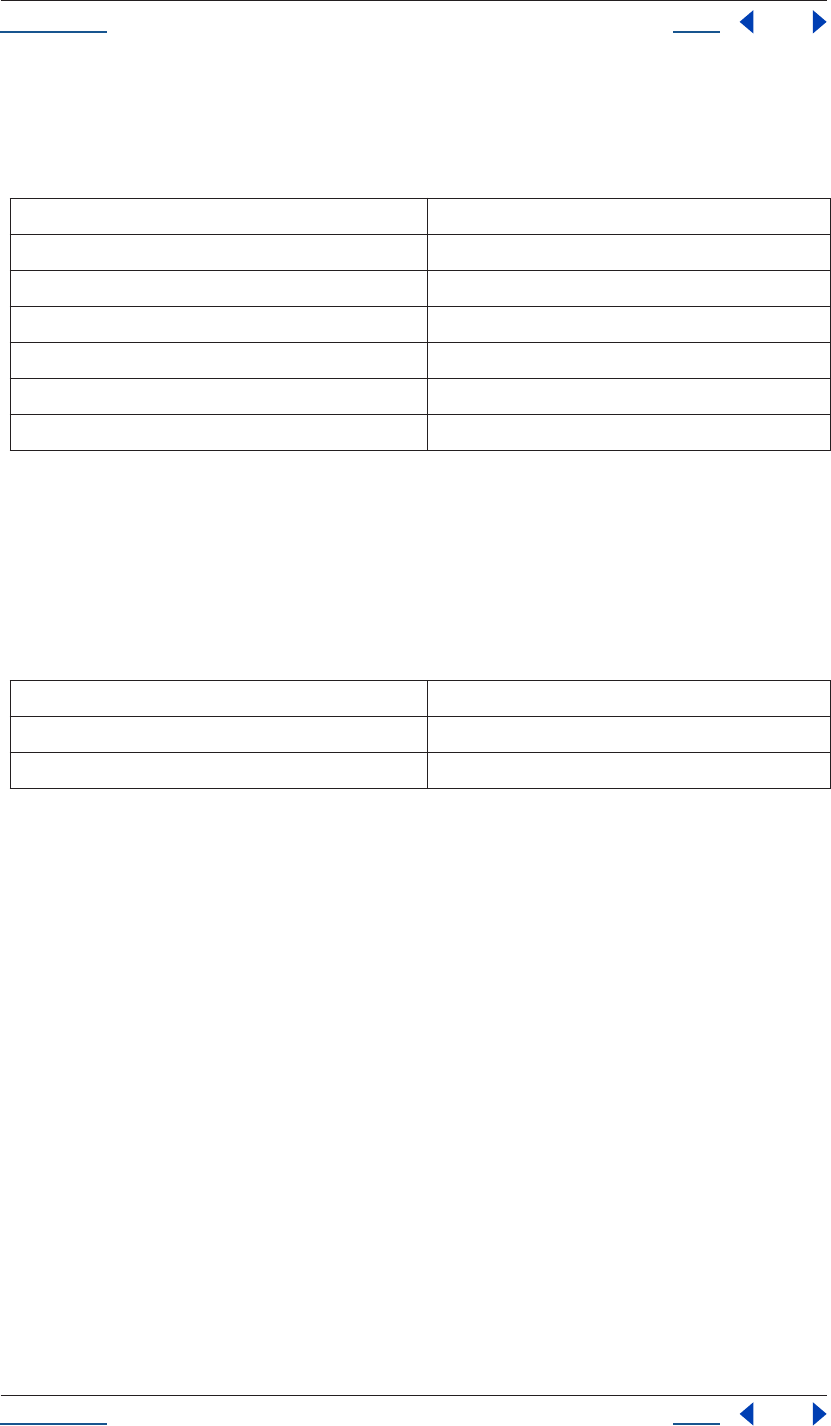
Using Help Back 118
Help Reference
Using Help Back 118
Description
This attribute is an enumerated type specifying the MaskMode for this mask.
Enumerated Types
MaskPropertyGroup maskMotionBlur attribute
app.project.item(index).layer(index).mask(index).maskMotionBlur
Description
This attribute is an enumerated type specifying how motion blur is applied to this mask.
Enumerated Type
MaskPropertyGroup rotoBezier attribute
app.project.item(index).layer(index).mask(index).rotoBezier
Description
This attribute is a boolean specifying whether the mask is in RotoBezier mode.
Type
Boolean; read/write.
OutputModule object
app.project.renderQueue.item(index).outputModule(index)
Description
The outputModule object of renderQueueItem generates a single file or sequence via a render, and contains
attributes and methods relating to that file to be rendered. It returns an Output Module with the given index
number. The indexed items are numbered beginning with 1.
MaskMode.NONE None
MaskMode.ADD Add
MaskMode.SUBTRACT Subtract
MaskMode.INTERSECT Intersect
MaskMode.LIGHTEN Lighten
MaskMode.DARKEN Darken
MaskMode.DIFFERENCE Difference
MaskMotionBlur.SAME_AS_LAYER Same as Layer
MaskMotionBlur.ON On
MaskMotionBlur.OFF Off
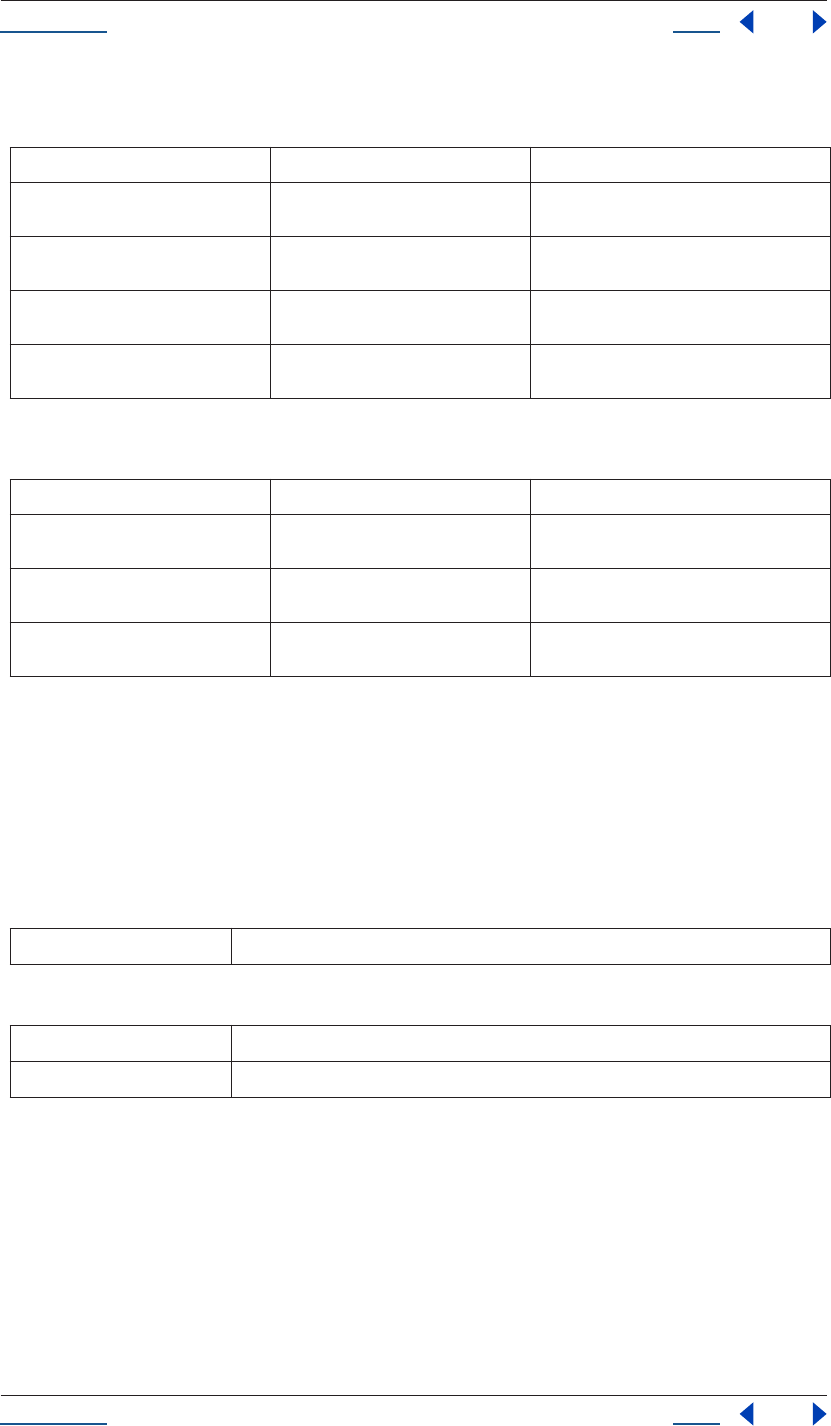
Using Help Back 119
Help Reference
Using Help Back 119
Attributes
Methods
OMCollection
app.project.renderQueue.items.outputModules
Description
The OMCollection contains all of the Output Modules in the project.
Attributes
Methods
See also
“Collection object” on page 53
OutputModule applyTemplate() method
app.project.renderQueue.item(index).outputModules[i].applyTemplate(templateName)
Description
Applies an existing Output Module template, identified by name.
Attribute Reference Description
file see “OutputModule file attribute” on
page 120
path and name of the file to be rendered
postRenderAction see “OutputModule postRenderAction
attribute” on page 120
one of the postRenderAction types
name see “OutputModule name attribute” on
page 120
name of the Output Module as presented to
the user
templates see “OutputModule templates
attribute” on page 121
array of all Output Module templates
Method Reference Description
remove() see “OutputModule remove() method”
on page 120
removes the Output Module
saveAsTemplate() see “OutputModule saveAsTemplate()
method” on page 121
saves a new Output ModuleTemplate with the
given name
applyTemplate() see “OutputModule applyTemplate()
method” on page 119
applies a pre-set Output Module Template
length number of objects in the collection (applies to all collections)
[] retrieves an object or objects in the collection via its index number
add() adds an Output Module with a specified template
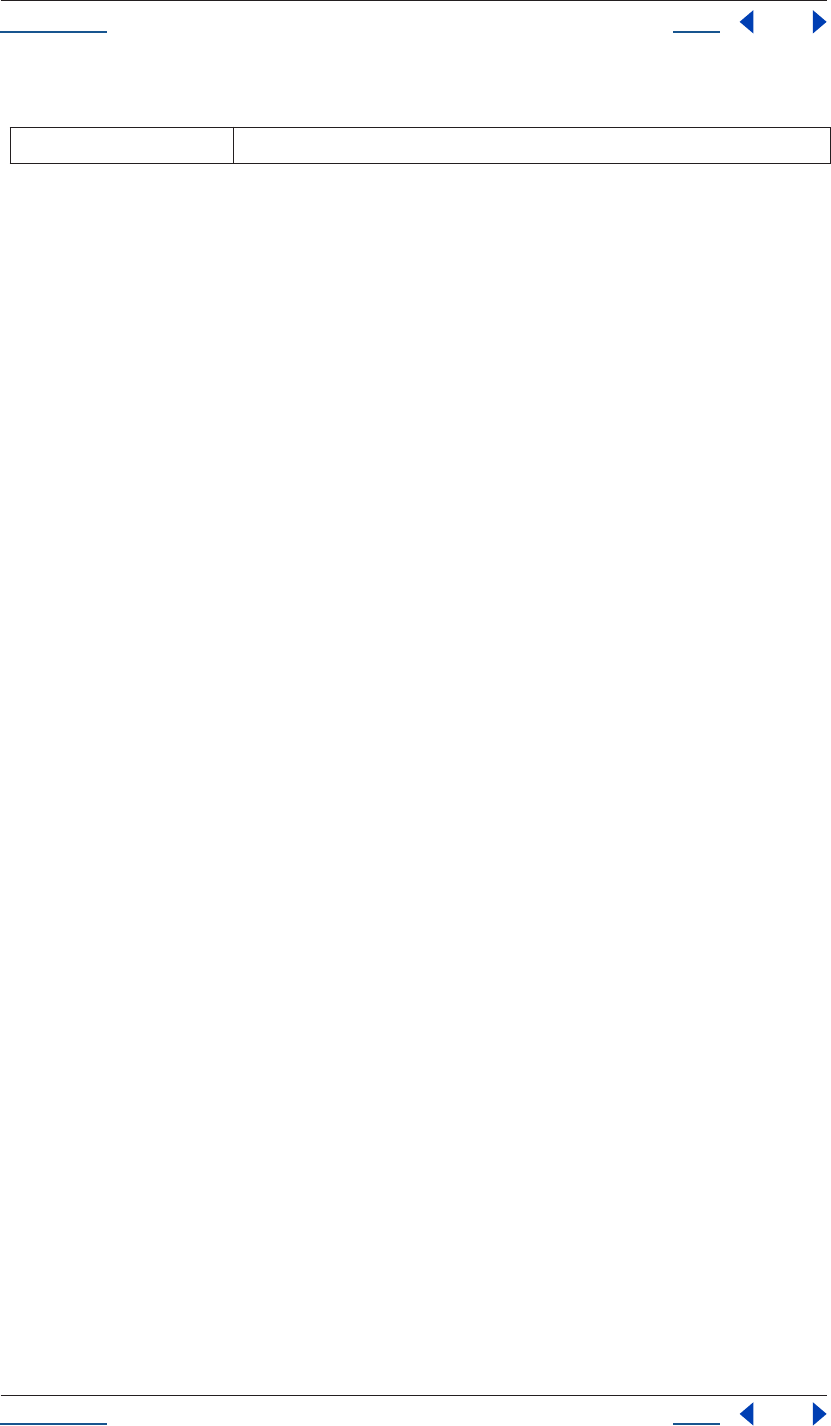
Using Help Back 120
Help Reference
Using Help Back 120
Parameters
Returns
None.
OutputModule file attribute
app.project.renderQueue.item(index).outputModules[i].file
Description
The file attribute is the File object to which the output module is set to render.
Type
File object; read-write.
OutputModule name attribute
app.project.renderQueue.item(index).outputModules[i].name
Description
The name attribute is the output module name as it is presented to the user, expressed as a string.
Type
String; read-only.
OutputModule postRenderAction attribute
app.project.renderQueue.item(index).outputModules[i].postRenderAction
Description
The postRenderAction attribute returns the Post Render Action (listed below).
Type
PostRenderAction (read/write); one of the following:
postRenderAction.NONE
postRenderAction.IMPORT
postRenderAction.IMPORT_AND_REPLACE_USAGE
postRenderAction.SET_PROXY
OutputModule remove() method
app.project.renderQueue.item(index).outputModules[i].remove()
Description
Deletes an Output Module.
templateName name of the template to be applied
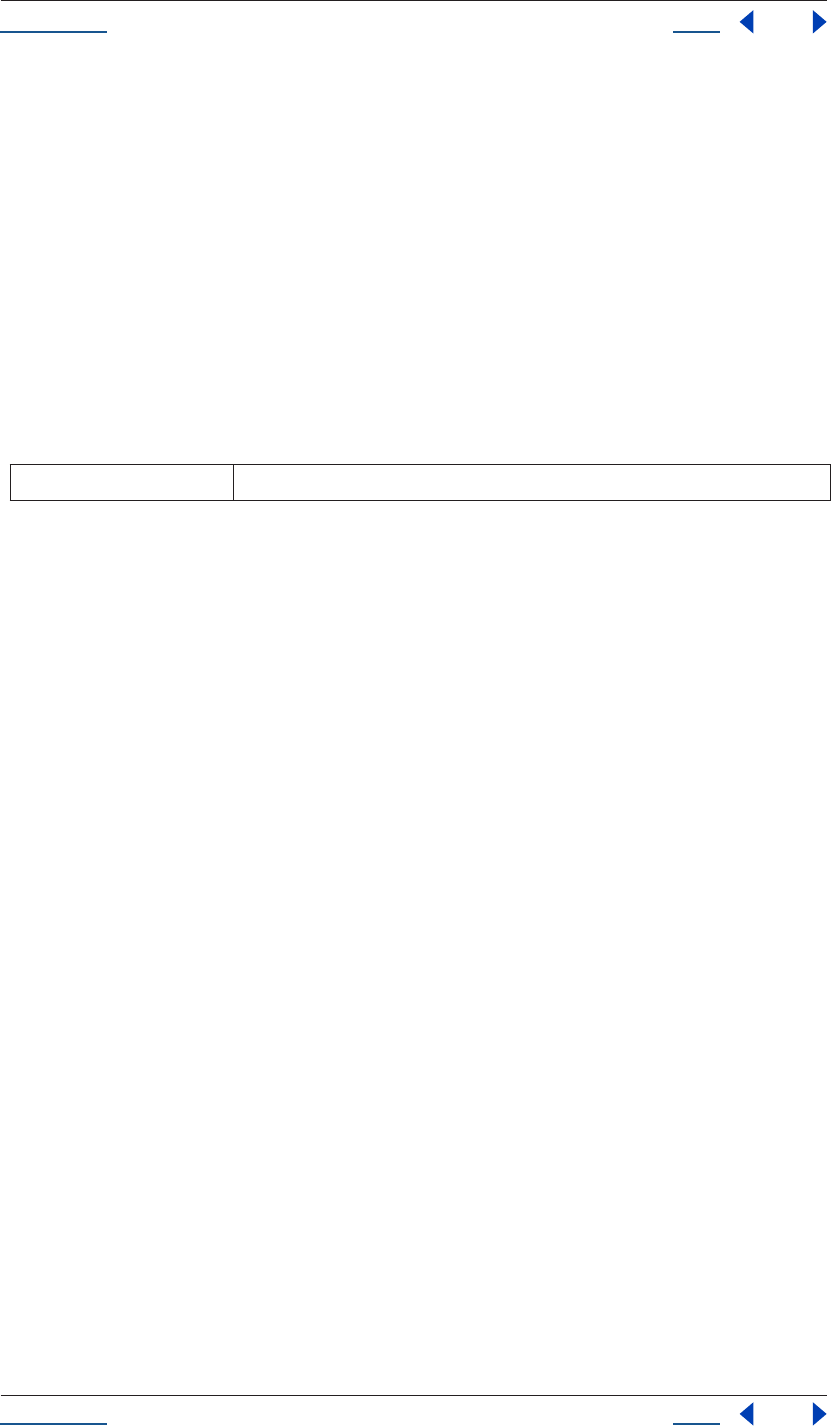
Using Help Back 121
Help Reference
Using Help Back 121
Parameters
None.
Returns
None.
OutputModule saveAsTemplate() method
app.project.renderQueue.item(index).outputModules[i].saveAsTemplate(name)
Description
Saves an Output Module with the name given as a parameter.
Parameters
Returns
None.
OutputModule templates attribute
app.project.renderQueue.item(index).outputModules[i].templates
Description
The templates attribute is an array of strings; these are the names of the templates in the local installation of
After Effects.
Type
Array; read-only.
PlaceholderSource object
app.project.item(index).mainSource
app.project.item(index).proxySource
Description
The PlaceholderSource object holds information describing the footage source of a placeholder. It is a subclass
of FootageSource and so it inherits all attributes and methods of the FootageSource object. (See “Footage-
Source object” on page 89.)
There are no attributes or methods in PlaceholderSource other than those inherited from the FootageSource
object.
Project object
app.project
name name of the new template
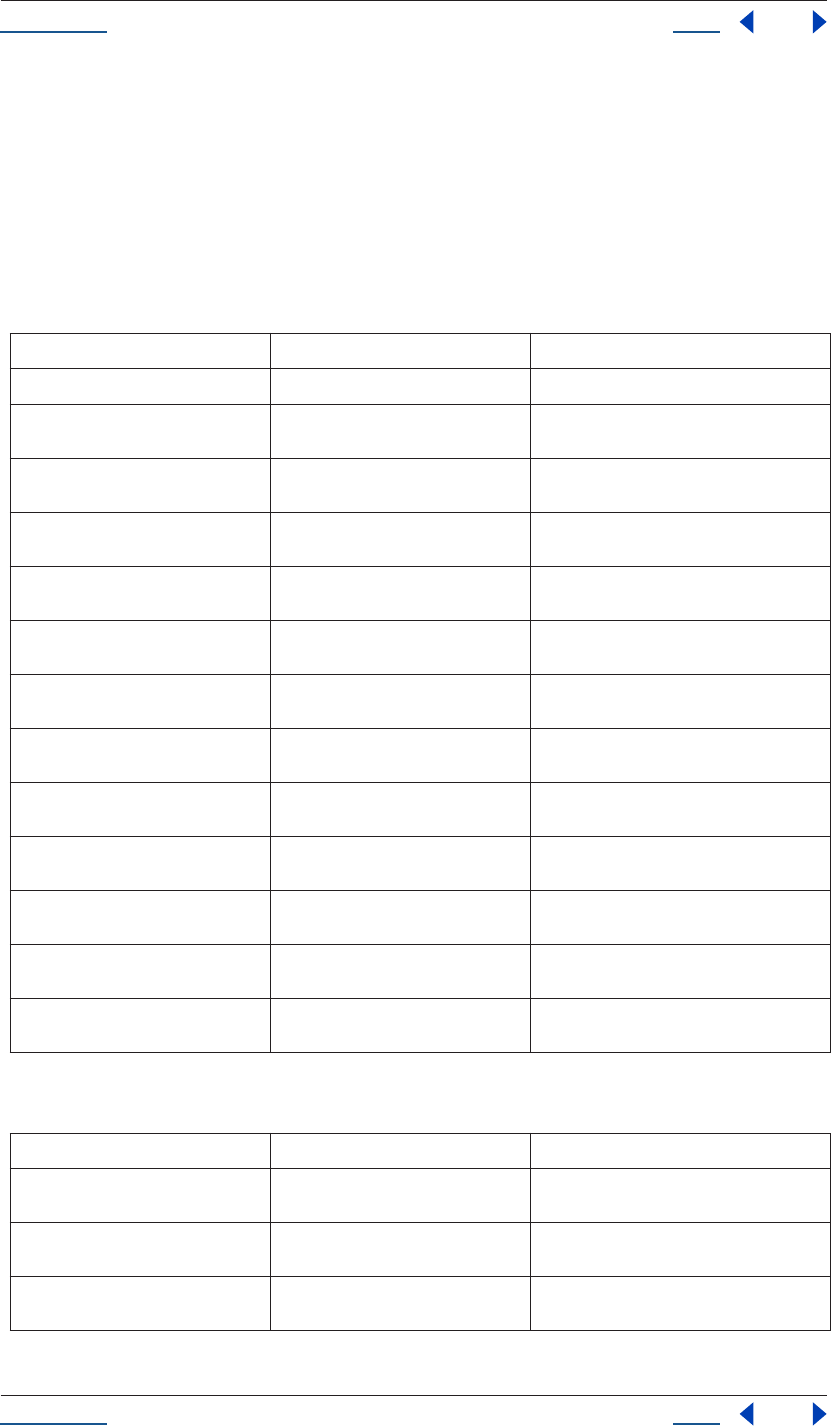
Using Help Back 122
Help Reference
Using Help Back 122
Description
The project object enables access to data and functionality within a particularAfter Effects project.
Attributes of the Project object provide access to specific objects within an After Effects project, such as
imported files and footage, comps, as well as project settings such as the timecode base.
Methods of the Project object can import footage, can create solids, compositions and folders, and can save
changes.
Attributes
Methods
Attribute Reference Description
file see “Project file attribute” on page 124 file object of the currently open project
rootFolder see “Project rootFolder attribute” on
page 127
folderItem containing all the contents of the
project; the equivalent of the Project window
items see “Project items attribute” on
page 126
itemCollection representing all items in the
project
activeItem see “Project activeItem attribute” on
page 123
currently active item, or null if none is active or
multiple items are active
bitsPerChannel see “Project bitsPerChannel attribute”
on page 123
color depth of the current project
transparencyGridThumbnails see “Project transparencyGridThumb-
nails attribute” on page 130
determines if thumbnail views should use the
transparency checkerboard pattern
timecodeDisplayType see “Project timecodeDisplayType
attribute” on page 129
method with which timecode is set to display
timecodeBaseType see “Project timecodeBaseType
attribute” on page 128
timecode base as set in the File > Project Set-
tings dialog box
timecodeNTSCDropFrame see “Project timecodeNTSCDropFrame
attribute” on page 129
equivalent to Drop Frame or Non-Drop Frame
in the File > Project Settings dialog box
timecodeFilmType see “Project timecodeFilmType
attribute” on page 129
method with which timecode is set to display
numItems see“Project numItems attribute” on
page 126
total number of items contained in the project
selection see “Project selection attribute” on
page 128
array of the items selected in the Project win-
dow
renderQueue see “Project renderQueue attribute” on
page 127
the project’s render queue
Method Reference Description
item() see “Project item() method” on
page 125
returns an item
consolidateFootage() see“Project consolidateFootage()
method” on page 124
replicates the functionality of File > Consoli-
date All Footage
removeUnusedFootage() see “Project removeUnusedFootage()
method” on page 127
replicates the functionality of File > Remove
Unused Footage
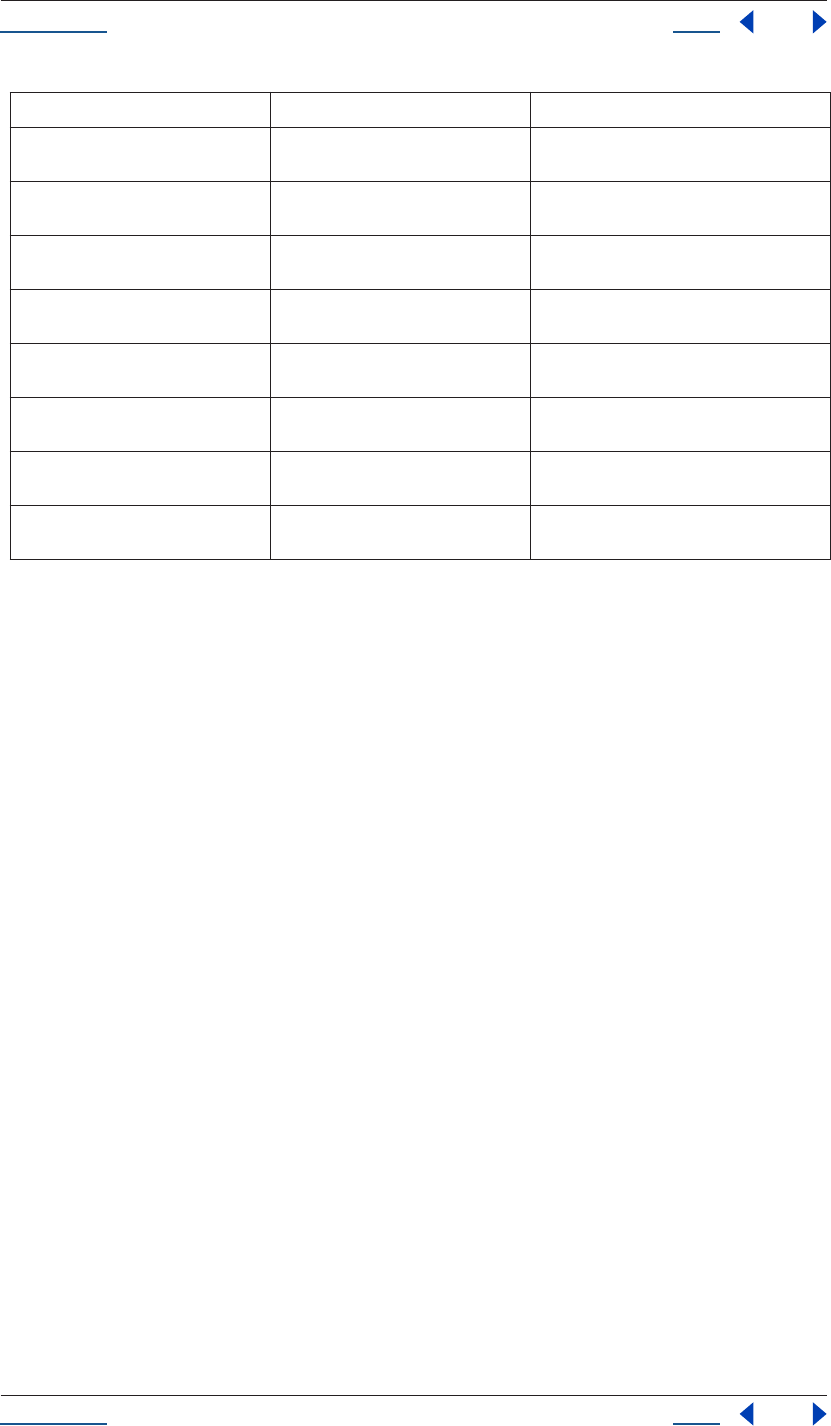
Using Help Back 123
Help Reference
Using Help Back 123
Project activeItem attribute
app.project.activeItem
Description
The project attribute activeItem returns the item that is currently active and is to be acted upon, or a null if no
item is currently selected or if multiple items are selected.
Type
The item that is currently active; read-only.
Project bitsPerChannel attribute
app.project.bitsPerChannel
Description
The bitsPerChannel attribute is an integer describing the color depth of the current project (either 8 or 16
bits).
Type
Integer (8 or 16 only); read/write.
Project close() method
app.project.close(CloseOptions)
Description
Closes the project with the option of saving changes automatically, prompting the user to save changes or
closing without saving changes.
reduceProject() see “Project reduceProject() method” on
page 126
replicates the functionality of File > Reduce
Project
close() see“Project close() method” on
page 123
closes the project with normal save options
save() see “Project save() method” on page 127 saves the project (or displays a Save dialog box
if project has never been saved)
saveWithDialog() see “Project saveWithDialog() method”
on page 128
displays a Save dialog box; returns true if file
was saved
importPlaceholder() see “Project importPlaceholder()
method” on page 125
replicates the functionality of File > Import >
Placeholder.
importFile() see “Project importFile() method” on
page 124
replicates the functionality of File > Import >
File.
importFileWithDialog() see “Project importFileWithDialog()
method” on page 125
displays an Import dialog box; returns an array
of all imported items
showWindow() see “Project showWindow() method” on
page 128
if true, shows the project window
Method Reference Description
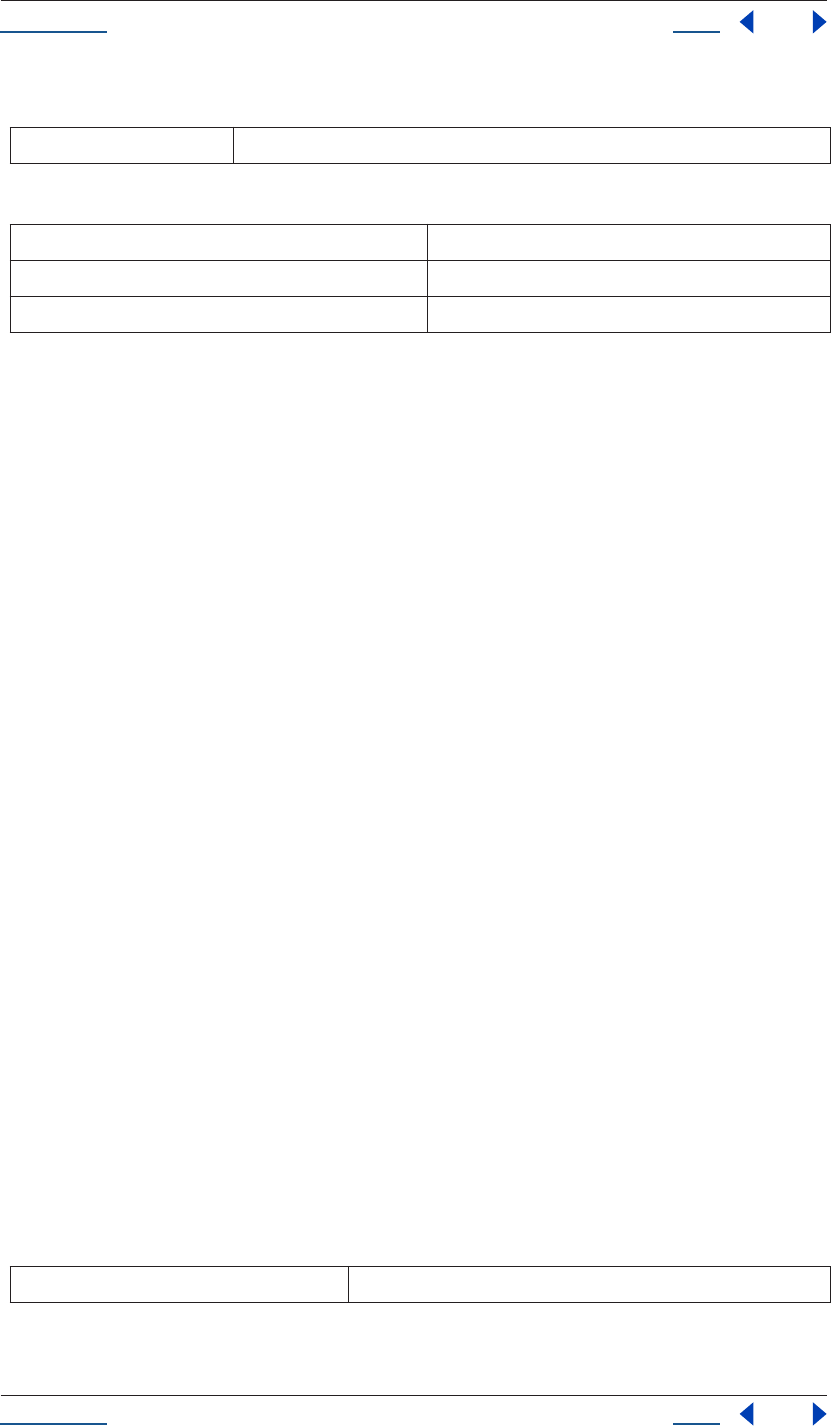
Using Help Back 124
Help Reference
Using Help Back 124
Parameters
Enumerated Types
Returns
Boolean. False only in one case: the file has not been previously saved; the user is presented with a Save dialog
box, and cancels the save.
Project consolidateFootage() method
app.project.consolidateFootage()
Description
Replicates the functionality of the Consolidate All Footage command.
Parameters
None.
Returns
Integer; the total number of footage items removed.
Project file attribute
app.project.file
Description
The file attribute is a File object representing the project that is currently open.
Type
File Object or null if project has not been saved; read-only.
Project importFile() method
app.project.importFile(ImportOptions)
Description
Replicates the functionality of the Import File dialog box.
Parameters
CloseOptions action to be performed on close (see Enumerated Types, below)
CloseOptions.DO_NOT_SAVE_CHANGES close without saving
CloseOptions.PROMPT_TO_SAVE_CHANGES send a prompt asking whether to save changes before close
CloseOptions.SAVE_CHANGES save automatically on close option
ImportOptions options as set in the ImportOptions object
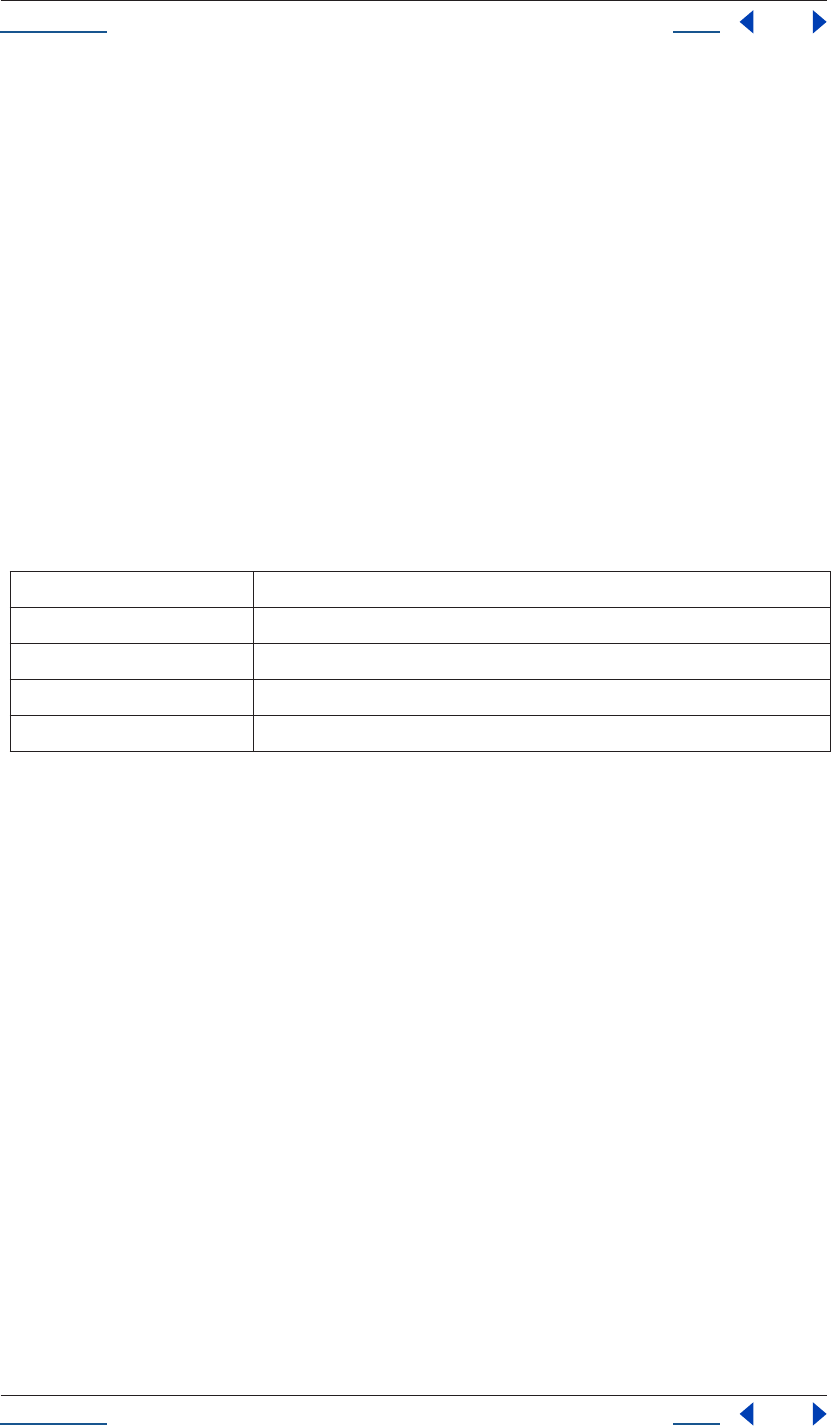
Using Help Back 125
Help Reference
Using Help Back 125
Returns
FootageItem
Example
app.project.importFile( ImportOptions( File( “sample.psd” ) )
See also
“ImportOptions object” on page 94
Project importPlaceholder() method
app.project.importPlaceholder(name, width, height, framerate, duration)
Description
Replicates the functionality of File > Import > Placeholder; adds a placeholder footage item of a specified
name, width, height, framerate, and duration to the project.
Parameters
Returns
FootageItem.
Project importFileWithDialog() method
app.project.importFileWithDialog()
Description
Replicates the functionality of File > Import > File and produces an Import dialog box for the user. Unlike
importFile(), importWithDialog() does not take arguments.
Returns
Array of Items created during import; or null if the user cancels the dialog.
Project item() method
app.project.item(index)
Description
This method returns an item with the given index number.
name name of the placeholder
width width in pixels of the placeholder footage
height height in pixels of the placeholder footage
framerate frame rate of the placeholder footage
duration duration of the placeholder footage, in seconds
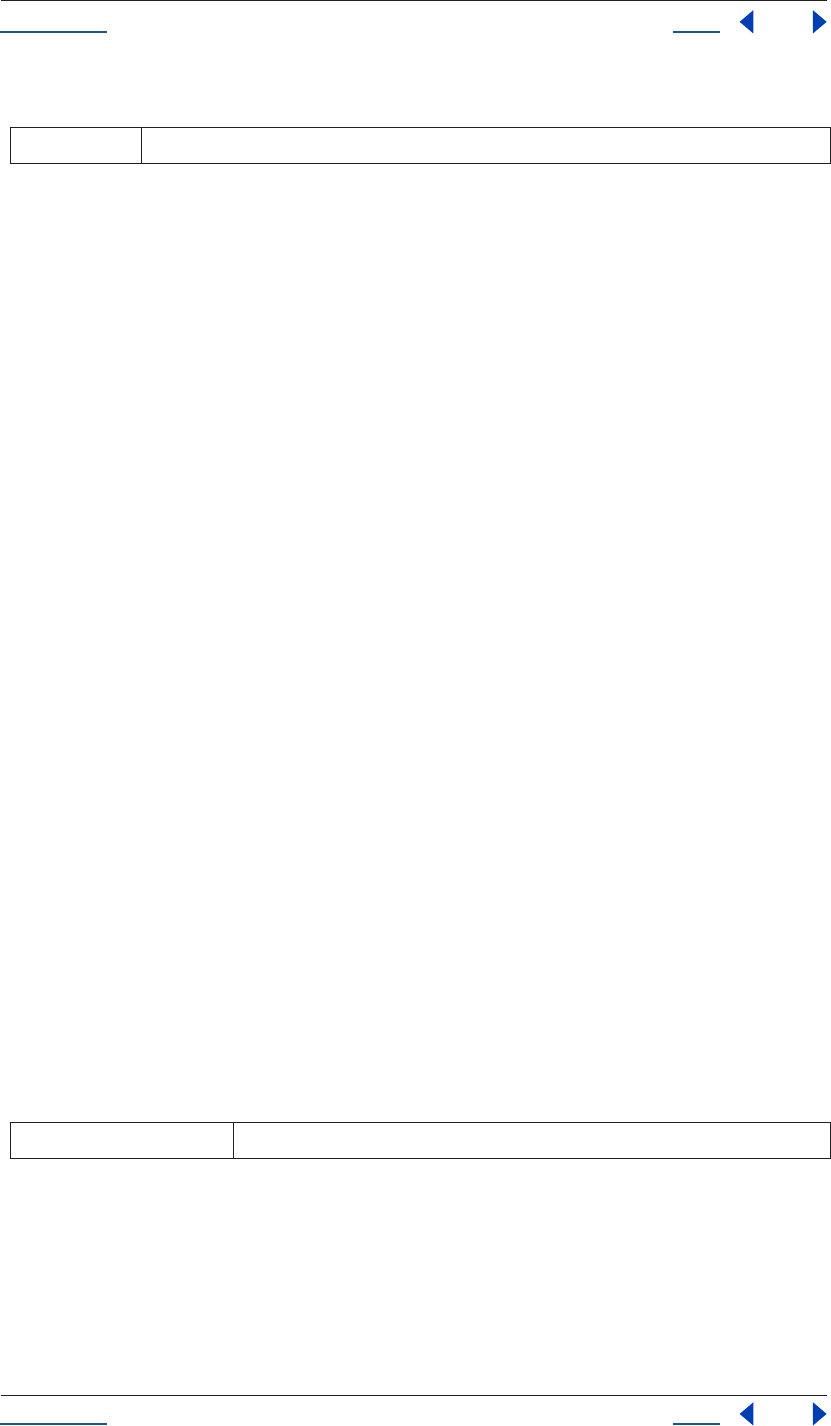
Using Help Back 126
Help Reference
Using Help Back 126
Parameters
Returns
Item.
Project items attribute
app.project.items
Description
This attribute represents all of the items in the project.
Type
ItemCollection; read-only.
Project numItems attribute
app.project.numItems
Description
The numItems attribute represents the total number of items contained in the project, including folders and
all types of footage.
Type
Integer; read-only.
Example
n = app.project.numItems;
alert("There are " + n + " items in this project.")
Project reduceProject() method
app.project.reduceProject(array_of_items)
Description
Replicates the functionality of File > Reduce Project.
Parameters
Returns
Integer; the total number of items removed.
Example
var theItems = new Array();
theItems[theItems.length] = app.project.item(1);
theItems[theItems.length] = app.project.item(3);
index integer; the index of the item
array_of_items items to which the project is to be reduced
Using Help Back 127
Help Reference
Using Help Back 127
app.project.reduceProject(theItems);
Project removeUnusedFootage() method
app.project.removeUnusedFootage()
Description
Replicates the functionality of File > Remove Unused Footage.
Parameters
None.
Returns
Integer; the total number of footage items removed.
Project renderQueue attribute
app.project.renderQueue
Description
This attribute represents the render queue of the project.
Type
RenderQueue; read-only.
Project rootFolder attribute
app.project.rootFolder
Description
The rootFolder attribute is the root folder containing the root contents of the project; this is a conceptual
folder that contains all items in the Project window, but not items contained inside other folders in the Project
window.
Type
FolderItem; read-only.
Project save() method
app.project.save()
app.project.save(File)
Description
Saves the project (or prompts the user if the file has never previously been saved). Passing in a File object is
equivalent to the Save As command and allows you to save a project to a new file.
Parameters
File File object to save
Using Help Back 128
Help Reference
Using Help Back 128
Returns
None.
Project saveWithDialog() method
app.project.saveWithDialog()
Description
This method presents the Save dialog box to a user. The user can either name a file with a location and save it,
or click Cancel and exit the dialog.
This method returns a boolean that is true if the file was saved, and false if not.
Parameters
None.
Returns
Boolean; true if file was saved.
Project selection attribute
app.project.selection
Description
The selection attribute contains an array of the items selected in the Project window.
Type
Array; read-only.
Project showWindow() method
app.project.showWindow(doShow)
Description
This method shows or hides the Project window, depending on how its argument is set.
Parameters
Returns
None.
Project timecodeBaseType attribute
app.project.timecodeBaseType
Description
The timecodeBaseType attribute reveals the Timecode Base as set in the Project Settings dialog box.
doShow boolean; if true, shows the Project window, if false, hides the Project window

Using Help Back 129
Help Reference
Using Help Back 129
Enumerated Type
One of the following (read/write):
TimecodeBaseType.FPS24
TimecodeBaseType.FPS25
TimecodeBaseType.FPS30
TimecodeBaseType.FPS48
TimecodeBaseType.FPS50
TimecodeBaseType.FPS60
TimecodeBaseType.FPS100
Project timecodeDisplayType attribute
app.project.timecodeDisplayType
Description
The timecodeDisplayType attribute describes the method with which timecode is set to display. The
enumerated values are found in a menu in the Project Settings dialog box.
Enumerated Type
One of the following (read/write):
TimecodeDisplayType.TIMECODE
TimecodeDisplayType.FRAMES
TimecodeDisplayType.FEET_AND_FRAMES
Project timecodeFilmType attribute
app.project.timecodeFilmType
Description
The timecodeFilmType attribute describes the film type that has been selected for the Feet + Frames option
in the Project Settings dialog box.
Enumerated Type
One of the following (read/write):
TimecodeFilmType.MM16
TimecodeFilmType.MM35
Project timecodeNTSCDropFrame attribute
app.project.timecodeNTSCDropFrame
Description
The timecodeNTSCDropFrame attribute describes how timecode for 29.97 fps footage is displayed. This
corresponds to the Drop Frame or Non-Drop Frame pulldown options under “NTSC” in the Project Settings
dialog box.
Type
Boolean (read/write); true if NTSC Drop Frame is set as the current project display style.
Using Help Back 130
Help Reference
Using Help Back 130
Project transparencyGridThumbnails attribute
app.project.transparencyGrid
Description
The transparencyGridThumbnails attribute determines if thumbnail views should use the transparency
checkerboard pattern (yes or no).
Type
Boolean (read/write).
Property object
app.project.item(index).layer(index).property
Description
The Property object contains value, keyframe, and/or expression information about a particular property of
the layer. Examples of a Property are position, zoom, and mask feather.
Note that in standard JavaScript descriptions a “property” and an “attribute” are synonymous. Because After
Effects contained this separate use of the term “property” before any scripting support was added, this
documentation refers only to “attributes” when speaking about accessible values within scripting. “Property”
meanwhile remains the term for values attached to layers, effects and masks both within this document and
throughout After Effects.
Attributes
Attribute Reference Description
propertyValueType see “Property propertyValueType
attribute” on page 142
type of value stored in this property
value see “Property value attribute” on
page 149
value of the property at the current time
hasMin see “Property hasMin attribute” on
page 135
true if there is a minimum permitted value
hasMax see “Property hasMax attribute” on
page 135
true if there is a maximum permitted value
minValue see “Property minValue attribute” on
page 142
minimum permitted value
maxValue see “Property maxValue attribute” on
page 141
maximum permitted value
isSpatial see “Property isSpatial attribute” on
page 136
true if property defines a spatial value
canVaryOverTime see “Property canVaryOverTime
attribute” on page 134
true if the property can be keyframed
isTimeVarying see “Property isTimeVarying attribute”
on page 136
true if the property has keyframes or an
expression enabled that vary its values
numKeys see “Property numKeys attribute” on
page 142
number of keyframes on this property
Using Help Back 131
Help Reference
Using Help Back 131
Methods
unitsText see “Property unitsText attribute” on
page 149
text description of the units in which the value
is expressed
expression see “Property expression attribute” on
page 134
the expression string for this property
expressionEnabled see “Property expressionEnabled
attribute” on page 135
if true, the expression is used to generate val-
ues for the property
expressionError see “Property expressionError attribute”
on page 135
contains error if the last expression evaluated
with an error
KeyframeInterpolationType see “Property KeyframeInterpolation-
Type attribute” on page 136
type of interpolation used at a keyframe
selectedKeys see “Property selectedKeys attribute” on
page 144
array containing the indices of all selected key-
frames of the Property
Method Reference Description
valueAtTime() see “Property valueAtTime() method”
on page 149
returns value of the property evaluated at
given time
setValue() see “Property setValue() method” on
page 147
sets the static value of the property
setValueAtTime() see “Property setValueAtTime()
method” on page 148
creates a keyframe at the given time (if none
exists) for the property
setValuesAtTimes() see “Property setValuesAtTimes()
method” on page 148
creates a keyframe that is an array at the given
time (if none exists) for the property
setValueAtKey() see “Property setValueAtKey() method”
on page 148
finds the keyframe with the given index and
sets the value of the property at that keyframe
nearestKeyIndex() see “Property nearestKeyIndex()
method” on page 142
returns the index of the keyframe nearest to
the given time
keyTime() see “Property keyTime() method” on
page 141
returns the time at which the condition given
by the arguments occurs
keyValue() see “Property keyValue() method” on
page 141
returns the value of the property at the time at
which the condition given by the arguments
occurs
addKey() see “Property addKey() method” on
page 134
adds a new keyframe at the given time
removeKey() see “Property removeKey() method” on
page 143
removes the keyframe with the given index
isInterolationTypeValid() see “Property isInterpolationTypeValid()
method” on page 136
true if this property can be interpolated
setInterpolationTypeAtKey() see “Property setInterpolationTypeAt-
Key() method” on page 144
sets the interpolation type for the key
keyInInterpolationType() see “Property keyInInterpolationType()
method” on page 137
returns the 'in' interpolationType for the given
key
keyOutInterpolationType() see “Property keyOutInterpolation-
Type() method” on page 138
returns the 'out' interpolationType for the
given key
Attribute Reference Description
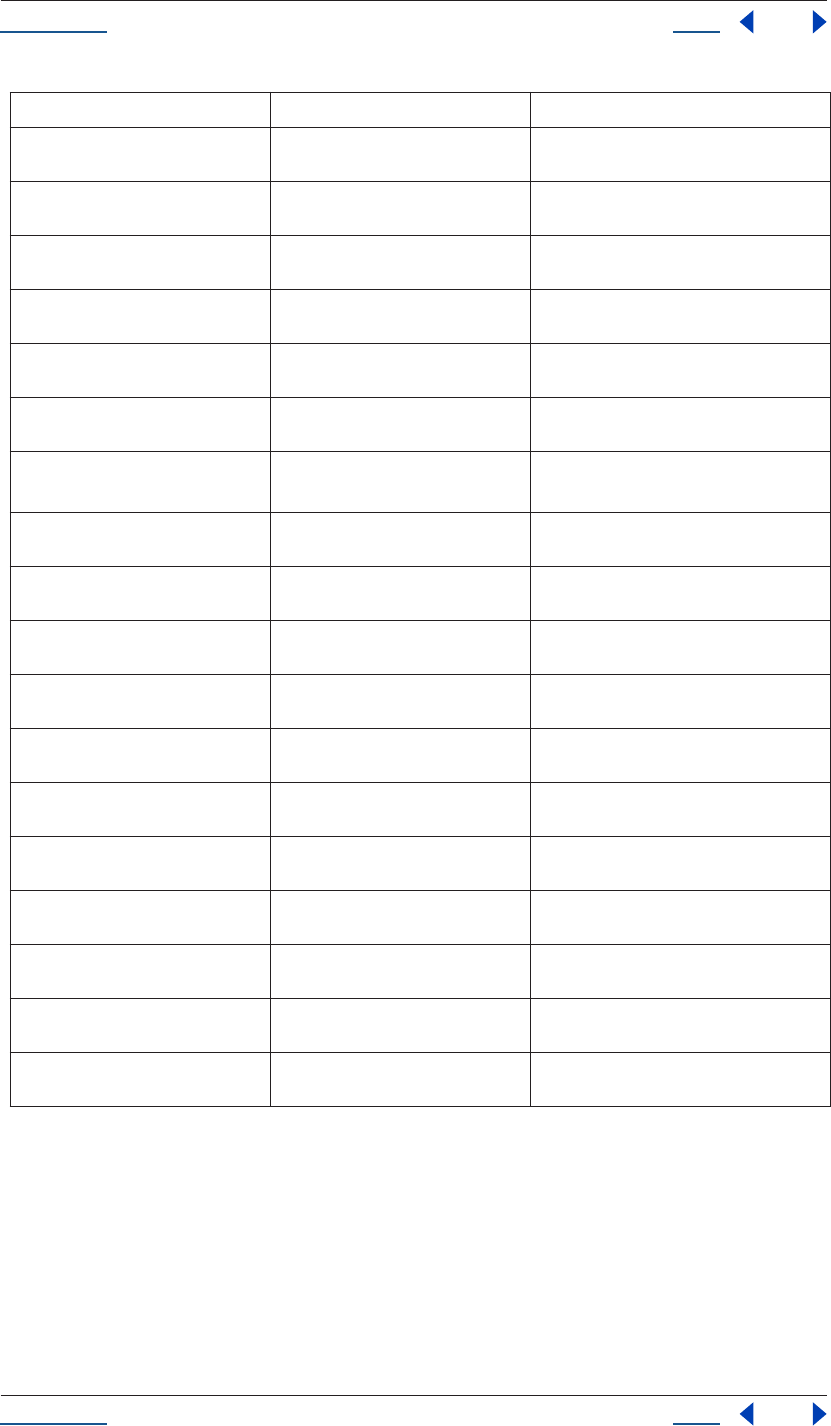
Using Help Back 132
Help Reference
Using Help Back 132
Examples
1Getting and setting the value of an opacity
opacity has propertyValueType of OneD, and is stored as a float.
var myProperty = myLayer.opacity;
myProperty.setValue(0.5);
// This new variable myOpacity will be a float value.
var myOpacity = myProperty.value;
setSpatialTangentsAtKey() see “Property setSpatialTangentsAt-
Key() method” on page 146
sets the in and out tangent vectors for the
given key
keyInSpatialTangent() see “Property keyInSpatialTangent()
method” on page 137
returns the 'in' spatial tangent for the given key
keyOutSpatialTangent() see “Property keyOutSpatialTangent()
method” on page 138
returns the 'out' spatial tangent for the given
key
setTemporalEaseAtKey() see “Property setTemporalEaseAtKey()
method” on page 147
sets the in and out temporal ease for the given
key
keyInTemporalEase() see “Property keyInTemporalEase()
method” on page 137
returns the 'in' temporal ease for the given key
keyOutTemporalEase() see “Property keyOutTemporalEase()
method” on page 138
returns the 'out' temporal ease for the given
key
setTemporalContinuou-
sAtKey()
see “Property setTemporalContinuou-
sAtKey() method” on page 146
specifies whether the keyframe has temporal
continuity
keyTemporalContinuous() see “Property keyTemporalContinuous()
method” on page 140
returns whether the keyframe has temporal
continuity
setTemporalAutoBezierAtKey() see “Property setTemporalAutoBezier-
AtKey() method” on page 146
specifies whether the keyframe has temporal
auto bezier
keyTemporalAutoBezier() see “Property keyTemporalAutoBezier()
method” on page 140
returns whether the keyframe has auto bezier
setSpatialContinuousAtKey() see “Property setSpatialContinuousAt-
Key() method” on page 145
specifies whether the keyframe has spatial
continuity
keySpatialContinuous() see “Property keySpatialContinuous()
method” on page 140
returns whether the keyframe has spatial con-
tinuity
setSpatialAutoBezierAtKey see “Property setSpatialAutoBezierAt-
Key() method” on page 145
specifies whether the keyframe has spatial
auto bezier
keySpatialAutoBezier() see “Property keySpatialAutoBezier()
method” on page 139
returns whether the keyframe has spatial auto
bezier
setRovingAtKey() see “Property setRovingAtKey()
method” on page 144
specifies whether the keyframe is roving
keyRoving() see “Property keyRoving() method” on
page 139
returns whether the keyframe is roving
setSelectedAtKey() see “Property setSelectedAtKey()
method” on page 145
sets whether the keyframe is selected
keySelected() see “Property keySelected() method” on
page 139
returns whether the keyframe is selected
Method Reference Description

Using Help Back 133
Help Reference
Using Help Back 133
2Getting and setting the value of a position
position has propertyValueType of ThreeD_SPATIAL and is stored as an array of three floats.
var myProperty = myLayer.position;
myProperty.setValue([10,30,0]);
// This new variable myPosition be an array of 3 floats:
var myPosition = myProperty.value;
3Changing the value of a mask shape to be open instead of closed
var myMask = mylayer.mask(1);
var myProperty = myMask.maskShape;
myShape = myProperty.value;
myShape.closed = false;
myProperty.setValue(myShape);
4Getting the value of a color at a particular time
A color is stored as an array of four floats (r,g,b,opacity). The following code sets the value of the red
component of a light's color at time 4 to be half of that at time 2:
var myProperty = myLight.color;
var colorValue = myProperty.valueAtTime(2,true);
colorValue[0] = 0.5 * colorValue[0];
myProperty.setValueAtTime(4,colorValue);
5How to check that a scale calculated by an expression at time 3.5 is the expected value of [10,50]
var myProperty = myLayer.scale;
// false value of preExpression means evaluate the expression
var scaleValue = myProperty.valueAtTime(3.5,false);
if (scaleValue[0] == 10 && scaleValue[1] == 50) {
alert("hurray");
else {
alert("oops");
}
6Keyframing a rotation from 0 to 90 and back again
The animation is 10 seconds, and the middle keyframe is at the 5 second mark. Rotation properties are stored
as a OneD value.
myProperty = myLayer.rotation;
myProperty.setValueAtTime(0, 0);
myProperty.setValueAtTime(5, 90);
myProperty.setValueAtTime(10, 0);
7Changing the keyframe values for the first three keyframes of some source text
myProperty = myTextLayer.sourceText;
if (myProperty.numKeys < 3) {
alert("error, I thought there were 3 keyframes");
}
myProperty.setValueAtKey(1, new TextDocument("key number 1");
myProperty.setValueAtKey(2, new TextDocument("key number 2");
Using Help Back 134
Help Reference
Using Help Back 134
myProperty.setValueAtKey(3, new TextDocument("key number 3");
8Setting values using the convenience syntax for position, scale, color, or source text
// These two are equivalent. The second fills in a default of 0.
myLayer.position.setValue([ 20, 30, 0]);
myLayer.position.setValue([ 20, 30 ]);
// These two are equivalent. The second fills in a default of 100.
myLayer.scale.setValue([ 50, 50, 100]);
myLayer.scale.setValue([ 50, 50 ]);
// These two are equivalent. The second fills in a default of 1.0
myLight.color.setValue([ .8, .3, .1, 1.0]);
myLight.color.setValue([ .8, .3, .1]);
// These two are equivalent. The second creates a TextDocument
myTextLayer.sourceText.setValue(new TextDocument("foo"));
myTextLayer.sourceText.setValue("foo");
Property addKey() method
app.project.item(index).layer(index).property(name).addKey(time)
Description
The property addKey method adds a new keyframe at the given time and returns the index of the new
keyframe.
Parameters
Returns
Integer; the index of the new keyframe.
Property canVaryOverTime attribute
app.project.item(index).layer(index).property(name).canVaryOverTime
Description
The Property canVaryOverTime attribute is true if this property can vary over time, in other words, if
keyframe values or expressions can be written to this property.
Type
Boolean; read-only.
Property expression attribute
app.project.item(index).layer(index).property(name).expression
Description
The Property expression attribute is the expression for this property, expressed as a string. This attribute forces
an evalution of the given expression string. The value always changes to the given expression string even if the
string is not a valid expression.
time floating-point value; the time at which the keyframe is added

Using Help Back 135
Help Reference
Using Help Back 135
If the given string is a valid expression, expressionEnabled becomes true. If the given string is not a valid
expression, an error is generated, and expressionEnabled is set to false. If you set a property’s expression to the
empty string, expressionEnabled will be set to false.
Type
String; read/write.
Property expressionEnabled attribute
app.project.item(index).layer(index).property(name).expressionEnabled
Description
The Property expressionEnabled attribute, if true, uses the expression to generate the value for the property.
If the attribute is false, then the expression is not used; keyframe information or the static value of the property
is used. This attribute can be set to true only if the expression contains a valid expression string.
Type
Boolean; read/write.
Property expressionError attribute
app.project.item(index).layer(index).property(name).expressionError
Description
The Property expressionError attribute contains the error if the last expression string given to the expression
attribute evaluated with an error.
If no expression string has been given to the expression, or if the last expression string given to expression
evaluated without error, it contains the empty string ("").
Type
String; read-only.
Property hasMax attribute
app.project.item(index).layer(index).property(name).hasMax
Description
The Property hasMax attribute is true if there is a maximum permitted value for this property.
Type
Boolean; read-only.
Property hasMin attribute
app.project.item(index).layer(index).property(name).hasMin
Description
The Property hasMin is true if there is a minimum permitted value for this property.

Using Help Back 136
Help Reference
Using Help Back 136
Type
Boolean; read-only.
Property isInterpolationTypeValid() method
app.project.item(index).layer(index).property(name).isInterpolationTypeValid(theType)
Description
This method returns true if this Property can be interpolated using the theType.
Parameters
Returns
Boolean.
Property isSpatial attribute
app.project.item(index).layer(index).property(name).isSpatial
Description
The Property isSpatial attribute is true if the property defines a spatial value. Examples are position and effect
point controls.
Type
Boolean; read-only.
Property isTimeVarying attribute
app.project.item(index).layer(index).property(name).isTimeVarying
Description
The Property isTimeVarying attribute is true if the property is time varying. A property is time varying if it
has keyframes or an enabled expression. If isTimeVarying is true, then canVaryOverTime must also be true.
Type
Boolean; read-only.
Property KeyframeInterpolationType attribute
app.project.item(index).layer(index).property(name).setInterpolationTypeAtKey
(1,KeyframeInterpolationType.LINEAR,KeyframeInterpolationType.BEZIER)
Description
This enumerated type specifies the type of interpolation used at a keyframe.
Enumerated Types
Possible values are:
theType KeyframeInterpolationType
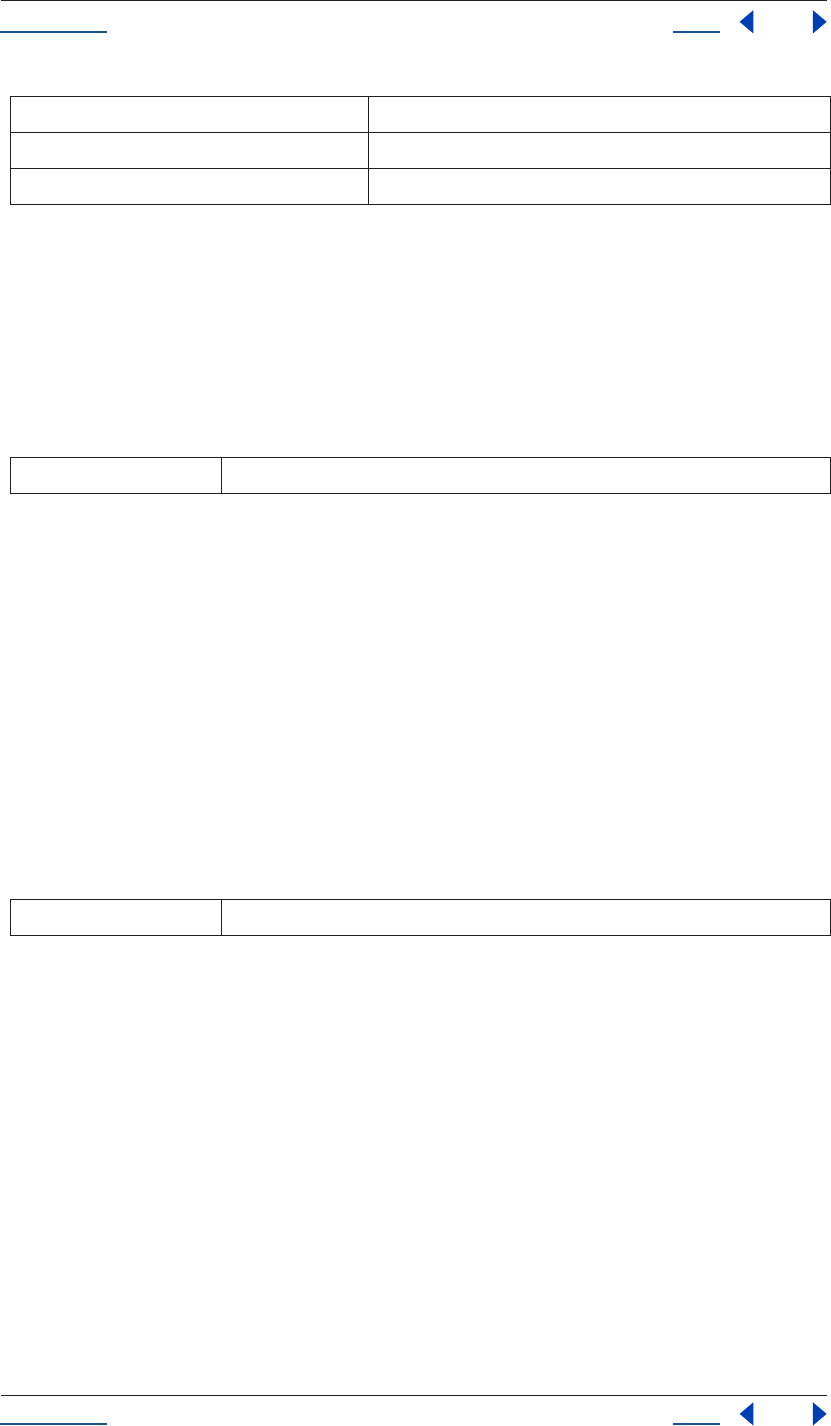
Using Help Back 137
Help Reference
Using Help Back 137
Property keyInInterpolationType() method
app.project.item(index).layer(index).property(name).keyInInterpolationType(keyIndex)
Description
This method returns the 'in' interpolationType for the given key.
Parameters
Returns
KeyframeInterpolationType.
Property keyInSpatialTangent() method
app.project.item(index).layer(index).property(name).keyInSpatialTangent(keyIndex)
Description
This method returns the 'in' spatial tangent for the given key.
If the PropertyValueType is TwoD_SPATIAL, the return value contains 2 floating-point values. If the Proper-
tyValueType is ThreeD_SPATIAL, the return value contains 3 floating-point values.
If the PropertyValueType is neither TwoD_SPATIAL nor ThreeD_SPATIAL, an exception is generated.
Parameters
Returns
Array of floating-point values.
Property keyInTemporalEase() method
app.project.item(index).layer(index).property(name).keyInTemporalEase(keyIndex)
Description
This method returns the 'in' temporal ease for the given key.
The return value is an array of KeyframeEase objects. The dimension of the array depends on the dimension
of the property's keyframeValueType. For ThreeD, the dimension of the array is 3. For TwoD, it is 2. For all
other keyframeValueTypes, it is 1.
KeyframeInterpolationType.LINEAR specifies a linear keyframe
KeyframeInterpolationType.BEZIER specifies a bezier keyframe.
KeyframeInterpolationType.HOLD specifies a hold keyframe
keyIndex Integer; the keyframe being evaluated
keyIndex Integer; the keyframe being evaluated
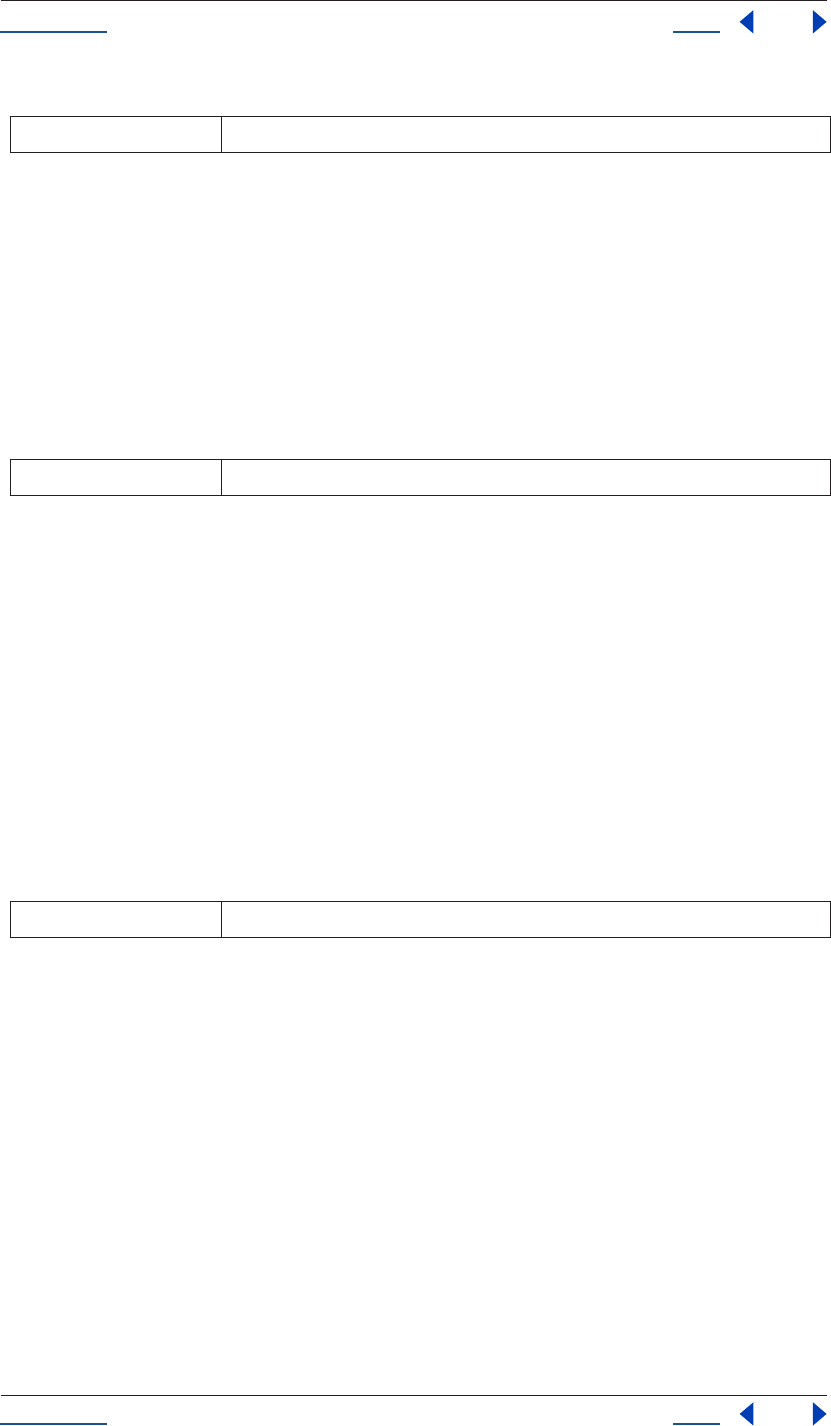
Using Help Back 138
Help Reference
Using Help Back 138
Parameters
Returns
KeyframeEase expressed as an array.
Property keyOutInterpolationType() method
app.project.item(index).layer(index).property(name).keyOutInterpolationType(keyIndex)
Description
This method returns the 'out' interpolationType for the given key.
Parameters
Returns
KeyframeInterpolationType.
Property keyOutSpatialTangent() method
app.project.item(index).layer(index).property(name).keyOutSpatialTangent(keyIndex)
Description
This method returns the 'out' spatial tangent for the given key.
If the PropertyValueType is TwoD_SPATIAL, the return value contains 2 floating-point values. If the Proper-
tyValueType is ThreeD_SPATIAL, the return value contains 3 floating-point values.
If the PropertyValueType is neither TwoD_SPATIAL nor ThreeD_SPATIAL, an exception is generated.
Parameters
Returns
Array of floating-point values.
Property keyOutTemporalEase() method
app.project.item(index).layer(index).property(name).keyOutTemporalEase(keyIndex)
Description
This method returns the 'out' temporal ease for the given key.
The return value is an array of KeyframeEase objects. The dimension of the array depends on the dimension
of the property's keyframeValueType. For ThreeD, the dimension of the array is 3. For TwoD, it is 2. For all
other keyframeValueTypes, it is 1.
keyIndex Integer; the keyframe being evaluated
keyIndex Integer; the keyframe to be evaluated
keyIndex Integer; the keyframe being set
Using Help Back 139
Help Reference
Using Help Back 139
Parameters
Returns
KeyframeEase expressed as an array.
Property keyRoving() method
app.project.item(index).layer(index).property(name).keyRoving(keyIndex)
Description
This method returns whether the keyframe is roving.
If the PropertyValueType is neither TwoD_SPATIAL nor ThreeD_SPATIAL, an exception is generated.
Parameters
Returns
Boolean.
Property keySelected() method
app.project.item(index).layer(index).property(name).keyRoving(keyIndex)
Description
This method returns whether the keyframe is selected.
Parameters
Returns
Boolean.
Property keySpatialAutoBezier() method
app.project.item(index).layer(index).property(name).keySpatialAutoBezier(keyIndex)
Description
This method returns whether the keyframe has spatial auto-bezier interpolation.
If the PropertyValueType is neither TwoD_SPATIAL nor ThreeD_SPATIAL, an exception is generated.
Note that spatial auto-bezier has an effect at this keyframe only if keySpatialContinuous(keyIndex) is true.
keyIndex Integer; the keyframe being set
keyIndex Integer; the keyframe being evaluated
keyIndex Integer; the keyframe being evaluated

Using Help Back 140
Help Reference
Using Help Back 140
Parameters
Returns
Boolean.
Property keySpatialContinuous() method
app.project.item(index).layer(index).property(name).keySpatialContinuous(keyIndex)
Description
This method returns whether the keyframe has spatial continuity.
If the PropertyValueType is neither TwoD_SPATIAL nor ThreeD_SPATIAL, an exception is generated.
Parameters
Returns
Boolean.
Property keyTemporalAutoBezier() method
app.project.item(index).layer(index).property(name).keyTemporalAutoBezier(keyIndex)
Description
This method returns whether the keyframe has auto-bezier interpolation.
Note that temporal auto-bezier has an effect at this keyframe only if the KeyframeInterpolationType is
BEZIER for both keyInInterpolation(keyIndex) and keyOutInterpolation(keyIndex).
Parameters
Returns
Boolean.
Property keyTemporalContinuous() method
app.project.item(index).layer(index).property(name).keyTemporalContinuous(keyIndex)
Description
This method returns whether the keyframe has temporal continuity.
Note that temporal continuity has an effect at this keyframe only if the KeyframeInterpolationType is BEZIER
for both keyInInterpolation(keyIndex) and keyOutInterpolation(keyIndex).
keyIndex Integer; the keyframe being evaluated
keyIndex Integer; the keyframe being evaluated
keyIndex Integer; the keyframe being evaluated
Using Help Back 141
Help Reference
Using Help Back 141
Parameters
Returns
Boolean.
Property keyTime() method
app.project.item(index).layer(index).property(name).keyTime(keyIndex)
app.project.item(index).layer(index).property(name).keyTime(markerComment)
Description
The property keyTime method finds the keyframe or marker specified in the arguments and returns the time
at which it occurs.
If no keyframe or marker can be found that matches the argument, this method generates an exception, and
an error is displayed.
Parameters
Returns
Floating-point value; the time at which the keyframe or marker occurs.
Property keyValue() method
app.project.item(index).layer(index).property(name).keyValue(keyIndex)
app.project.item(index).layer(index).property(name).keyValue(markerComment)
Description
The property keyValue method finds the keyframe or marker specified in the arguments and returns the time
at which it occurs.
If no keyframe or marker can be found that matches the argument, this method generates an exception, and
an error is displayed.
Parameters
Returns
Floating-point value; the time at which the keyframe or marker occurs.
Property maxValue attribute
app.project.item(index).layer(index).property(name).maxValue
keyIndex Integer; the keyframe being evaluated
keyIndex integer; the keyframe index number, (in range 0..numKeys)
markerComment string; the comment attached to a marker (see “MarkerValue Comment attribute” on page 116)
keyIndex integer; the keyframe index number, (in range 0..numKeys)
markerComment string; the comment attached to a marker (see “MarkerValue Comment attribute” on page 116)
Using Help Back 142
Help Reference
Using Help Back 142
Description
The Property maxValue attribute contains the maximum permitted value of the property. If the hasMax
attribute is false, an exception occurs, and an error is generated.
Type
Floating-point value; read-only.
Property minValue attribute
app.project.item(index).layer(index).property(name).minValue
Description
The Property maxValue attribute contains the minimum permitted value of the property. If the hasMax
attribute is false, an exception occurs, and an error is generated.
Type
Floating-point value; read-only.
Property nearestKeyIndex() method
app.project.item(index).layer(index).property(name).nearestKeyIndex(time)
Description
The property nearestKeyIndex method returns the index of the keyframe nearest to the given time.
Parameters
Returns
Integer; the index of the nearest keyframe.
Property numKeys attribute
app.project.item(index).layer(index).property(name).numKeys
Description
The Property numKeys attribute contains the number of keyframes in this property. If this attribute’s value is
0, then the property is not being keyframed.
Type
Integer; read-only.
Property propertyValueType attribute
app.project.item(index).layer(index).property(name).propertyValueType
Description
The Property numKeys attribute contains the type of value stored in this property.
time floating-point value; the time at which to search for the nearest key
Using Help Back 143
Help Reference
Using Help Back 143
The enumerated type associated with this attribute has one value for each type of data that can be stored in
and/or retrieved from a property. All property objects store data that falls into one of these categories.
Each type of data is stored and retrieved in a different kind of structure. For example, a 3D spatial property
(like a layer's position) is stored as an array of three floating point values. When setting a value for position,
you'd pass in such an array, as in:
mylayer.property("position").setValue([10,20,0]);
For another example, a shape property (such as a layer's mask shape) is stored as a Shape object. When setting
a value for a shape, pass in a shape object, as in:
var myShape = new Shape();
myShape.vertices = [[0,0],[0,100],[100,100],[100,0]];
var myMask = mylayer.property("ADBE Mask Parade").property(1);
myMask.property("ADBE Mask Shape").setValue(myShape);
Enumerated Types
Property removeKey() method
app.project.item(index).layer(index).property(name).removeKey(keyIndex)
Description
The property removeKey method removes a keyframe with the given keyIndex. If no keyframe with that
keyIndex exists, this method generates an exception and an error is displayed.
PropertyValueType.NO_VALUE stores no data
PropertyValueType.ThreeD_SPATIAL array of three floating point positional values, e.g., Anchor
Pont [10, 20.2, 0]
PropertyValueType.ThreeD array of three floating point quantitative values, e.g., Scale
[100, 20.2, 0]
PropertyValueType.TwoD_SPATIAL array of 2 floating point positional values, e.g., Anchor Pont
[5.1, 10]
PropertyValueType.TwoD array of 2 floating point quantitative values, e.g., Scale [5.1,
100]
PropertyValueType.OneD a floating point value
PropertyValueType.COLOR array of 4 floating point values in the range 0..1, e.g., [.8, .3, .1,
1.0]
PropertyValueType.CUSTOM_VALUE unimplemented type; you cannot get and set values for
properties with this type
PropertyValueType.MARKER MarkerValue object (see “MarkerValue object” on page 114)
PropertyValueType.LAYER_INDEX integer; a value of 0 means none (no layer)
PropertyValueType.MASK_INDEX integer; a value of 0 means none (no mask)
PropertyValueType.SHAPE shape object
PropertyValueType.TEXT_DOCUMENT TextDocument object (see “TextDocument object” on
page 177)
Using Help Back 144
Help Reference
Using Help Back 144
Parameters
Returns
None.
Property selectedKeys attribute
app.project.item(index).layer(index).property(name).selectedKeys
Description
The Property selectedKeys attribute yields an array of indices of all the selected keyframes in this Property. If
no keys are selected, or if the property has no keyframes, an empty array is returned.
Type
Array of integers; read-only.
Property setInterpolationTypeAtKey() method
app.project.item(index).layer(index).property(name).setInterpolationTypeAtKey(inType, outType)
Description
This method sets the in and out interpolation types for the given key.
If an outType is not provided, then outType will be set equal to the inType.
Parameters
Returns
None.
Property setRovingAtKey() method
app.project.item(index).layer(index).property(name).setRovingAtKey(keyIndex, newVal)
Description
This method specifies whether the keyframe is roving.
If the PropertyValueType is neither TwoD_SPATIAL nor ThreeD_SPATIAL, an exception is generated.
Note: The first and last key in any property never will rove. Setting to true will be ignored and the value will remain
false.
keyIndex integer; the index of the keyframe being removed
inType KeyframeInterpolationType; the incoming interpolation type
outType KeyframeInterpolationType (optional); the outgoing interpolation type
Using Help Back 145
Help Reference
Using Help Back 145
Parameters
Returns
None.
Property setSelectedAtKey() method
app.project.item(index).layer(index).property(name).setSelectedAtKey(keyIndex, onOff)
Description
This method specifies whether the keyframe is selected.
Parameters
Returns
None.
Property setSpatialAutoBezierAtKey() method
app.project.item(index).layer(index).property(name).setSpatialAutoBezierAtKey(keyIndex, newVal)
Description
This method specifies whether the keyframe has spatial continuity.
If the PropertyValueType is neither TwoD_SPATIAL nor ThreeD_SPATIAL, an exception is generated.
Parameters
Returns
None.
Property setSpatialContinuousAtKey() method
app.project.item(index).layer(index).property(name).setSpatialContinuousAtKey(keyIndex, newVal)
Description
This method specifies whether the keyframe has spatial continuity.
If the PropertyValueType is neither TwoD_SPATIAL nor ThreeD_SPATIAL, an exception is generated.
keyIndex Integer; the keyframe being set
newVal Boolean; if set to true, keyframe is set to be roving
keyIndex Integer; the keyframe being specified
onOff the new setting to use; if true, keyframe is selected, if false, deselected
keyIndex Integer; the keyframe being set
newVal Boolean; if set to true, keyframe is set to be auto-bezier
Using Help Back 146
Help Reference
Using Help Back 146
Parameters
Returns
None.
Property setSpatialTangentsAtKey() method
app.project.item(index).layer(index).property(name).setSpatialTangentsAtKey(keyIndex, inTangent,
outTangent)
Description
This method sets the in and out tangent vectors for the given key.
If no outTangent argument is provided, outTangent will be set equal to inTangent. If the PropertyValueType
is TwoD_SPATIAL, the inputs should be arrays containing 2 floating-point values. If the PropertyValueType
is ThreeD_SPATIAL, the inputs should be arrays containing 3 floating-point values.
If the PropertyValueType is neither TwoD_SPATIAL nor ThreeD_SPATIAL, an exception is generated.
Parameters
Returns
None.
Property setTemporalAutoBezierAtKey() method
app.project.item(index).layer(index).property(name).setTemporalAutoBezierAtKey(keyIndex, newVal)
Description
This method specifies whether the keyframe has temporal auto-bezier interpolation.
Note that spatial auto bezier has an effect at this keyframe only if keySpatialContinuous(keyIndex) is true.
Parameters
Returns
None.
Property setTemporalContinuousAtKey() method
app.project.item(index).layer(index).property(name).setTemporalContinuousAtKey(keyIndex, newVal)
keyIndex Integer; the keyframe being set
newVal Boolean; if set to true, keyframe is set to be continuous
keyIndex Integer; the keyframe being set
inTangent Floating-point value; the in tangent vector for this keyframe
outTangent Floating-point value (optional); the out tangent vector for this keyframe
keyIndex Integer; the keyframe being set
newVal Boolean; if set to true, keyframe is set to be continuous

Using Help Back 147
Help Reference
Using Help Back 147
Description
This method specifies whether the keyframe has temporal continuity.
Note that temporal continuity has an effect at this keyframe only if the KeyframeInterpolationType is BEZIER
for both keyInInterpolation(keyIndex) and keyOutInterpolation(keyIndex).
Parameters
Returns
None.
Property setTemporalEaseAtKey() method
app.project.item(index).layer(index).property(name).setTemporalEaseAtKey(keyIndex, inTemporalEase,
outTemporalEase)
Description
This method sets the in and out temporal ease for the given key.
If outTemporalEase is not provided, then outTemporalEase will be set equal to the inTemporalEase.
InTemporalEase and outTemporalEase are arrays of KeyframeEase objects. The dimension of the array
depends on the dimension of the property's keyframeValueType. For ThreeD, the dimension of the array is 3.
For TwoD, it is 2. For all other keyframeValueTypes, including TwoD_SPATIAL and ThreeD_SPATIAL types,
it is 1.
Parameters
Returns
None.
Property setValue() method
app.project.item(index).layer(index).property(name).setValue(newValue)
Description
The property setValue method sets the static value of the property.
If the property has keyframes, this method cannot be used; see “Property setValueAtTime() method” on
page 148 or “Property setValueAtKey() method” on page 148 instead. If used with a property that has
keyframes, this method generates an exception and an error is displayed.
The type of value to use as an argument depends on the propertyValueType.
keyIndex Integer; the keyframe being set
newVal Boolean; if set to true, keyframe is set to be continuous
keyIndex Integer; the keyframe being set
inTemporalEase KeyframeEase; the incoming temporal ease setting
outTemporalEase KeyframeEase; the outgoing temporal ease setting
Using Help Back 148
Help Reference
Using Help Back 148
Parameters
Returns
None.
Property setValueAtKey() method
app.project.item(index).layer(index).property(name).setValueAtKey(keyIndex, newValue)
Description
The property setValueAtKey method finds the keyframe with the given keyIndex and sets the value at that
keyframe.
If the property has no keyframes, or no keyframe with the given keyIndex, this method generates an exception
and an error is displayed.
The type of value to use as an argument depends on the propertyValueType.
Parameters
Returns
None.
Property setValueAtTime() method
app.project.item(index).layer(index).property(name).setValueAtTime(time, newValue)
Description
The property setValueAtTime method creates a keyframe at the given time (if none exists) and sets the value
at that keyframe.
If no keyframes yet exist, this method creates and sets the first keyframe at the given time. If no keyframe exists
at the given time, this method creates one. If a keyframe does exist at the given time, this method sets its value.
The type of value to use as an argument depends on the propertyValueType.
Parameters
Returns
None.
Property setValuesAtTimes() method
app.project.item(index).layer(index).property(name).setValuesAtTimes([times], [newValues])
newValue propertyValueType; a value appropriate for the type of property being set
keyIndex integer; the index of the keyframe to receive a value
newValue propertyValueType; a value appropriate for the type of property being set
time floating point value; the time at which to set a keyframe
newValue propertyValueType; a value appropriate for the type of property being set
Using Help Back 149
Help Reference
Using Help Back 149
Description
The property setValuesAtTimes method creates keyframes at a given series of times (for those times where no
keyframes exist) and sets values of those keyframes.
If no keyframes yet exist, this method creates a set of keyframes and sets the first keyframe at the given time.
If no keyframe exists at the given time, this method creates one. If a keyframe does exist at the given time, this
method sets its value.
Times and values are expressed as arrays. The type of value to use as arguments depends on the propertyVal-
ueType.
Parameters
Returns
None.
Property unitsText attribute
app.project.item(index).layer(index).property(name).unitsText
Description
The Property unitsText attribute is a text description of the units in which the value is expressed.
Type
String; read-only.
Property value attribute
app.project.item(index).layer(index).property(name).value
Description
The Property value attribute contains the value of the property at the current time. If expressionEnabled is
true, value returns the evaluated expression value; if there are keyframes, value returns the keyframed value at
the current time; in all other cases, value returns the static value for the property.
The type of value returned depends on the propertyValueType of the stream.
Type
Dependent on stream being evaluated; read-only.
Examples
See “Getting and setting the value of an opacity” on page 132, “Getting and setting the value of a position” on
page 133, and “Changing the value of a mask shape to be open instead of closed” on page 133 under Property
Object Examples.
Property valueAtTime() method
app.project.item(index).layer(index).property(name).valueAtTime(time, preExpression)
[times] floating point value; an array of times at which to set keyframes
[newValues] propertyValueType; an array of values appropriate for the type of property being set
Using Help Back 150
Help Reference
Using Help Back 150
Description
The property valueAtTime method returns the value of the property as evaluated at the given time. Time is in
seconds with the beginning of the composition represented as zero.
The preExpression option is relevant only if the property has an expression applied; otherwise it is ignored. It
controls whether any expression is used to calculate the value.
Note that the type of value returned is not made explicit; it will be of a different type, depending on the
property evaluated.
Parameters
Returns
Value (type depends on the propertyValueType).
PropertyBase object
app.project.item(index).layer(index).propertyBase
Description
PropertyBase is the base class for both PropertyGroup and Property, so PropertyBase attributes and methods
are also available to PropertyGroup and Property. Because PropertyGroup is the base class for Layer, its
attributes and methods are available for Layers as well.
Attributes
time floating point value; the time at which to set a keyframe
preExpression boolean; determines whether to evaluate the property before or after applying any active
expression
Attribute Reference Description
name see “PropertyBase name attribute” on
page 154
name of the property
matchName see “PropertyBase matchName
attribute” on page 153
special name for the property used to build
unique naming paths
propertyIndex see “PropertyBase propertyIndex
attribute” on page 155
index of a PropertyBase within its ParentGroup
propertyDepth see “PropertyBase propertyDepth
attribute” on page 154
indicates number of levels of parent Property-
Groups between the PropertyBase and the
layer
propertyType see “PropertyBase propertyType
attribute” on page 155
returns the PropertyType describing this Prop-
ertyBase
parentProperty see “PropertyBase parentProperty
attribute” on page 154
returns the PropertyGroup that is the parent of
this PropertyBase
isModified see “PropertyBase isModified attribute”
on page 153
returns true if the PropertyBase has been
changed since its creation
canSetEnabled see “PropertyBase canSetEnabled
attribute” on page 151
true if the user interface displays an eyeball
icon for this property
enabled see “PropertyBase enabled attribute” on
page 152
corresponds to the setting of the eyeball icon,
if there is one
Using Help Back 151
Help Reference
Using Help Back 151
Methods
PropertyBase active attribute
app.project.item(index).layer(index).property(name).active
Description
This attribute specifies whether the property is active. For a layer, this corresponds to the setting of the eyeball
icon. For an effect and all properties, it is the equivalent to the “enabled” attribute.
This attribute can be written only if canSetEnabled is true.
Type
Boolean; read/write (read-only if canSetEnabled is false).
PropertyBase canSetEnabled attribute
app.project.item(index).layer(index).property(name).canSetEnabled
Description
This attribute specifies whether you can write as well as read the enabled attribute. As a rule of thumb, this
attribute is set to true if the user interface displays an eyeball icon for this property (thus it is true for all layers).
Type
Boolean; read-only.
active see “PropertyBase active attribute” on
page 151
determines if PropertyBase is active
elided see “PropertyBase elided attribute” on
page 152
returns whether this property is elided (not
displayed) in the user interface
isEffect see “PropertyBase isEffect attribute” on
page 153
true if this property is an effect PropertyGroup
isMask see “PropertyBase isMask attribute” on
page 153
true if this property is a mask PropertyGroup
selected see “PropertyBase selected attribute” on
page 156
determines whether this PropertyBase is
selected
Method Reference Description
propertyGroup() see “PropertyBase propertyGroup()
method” on page 155
returns the parent PropertyGroup
remove() see “PropertyBase remove() method” on
page 156
removes the PropertyBase from the project
moveTo() see “PropertyBase moveTo() method”
on page 154
moves the PropertyBase to the specified
newIndex within its PropertyGroup
duplicate() see “PropertyBase duplicate() method”
on page 152
duplicates the PropertyBase and returns the
duplicate
Attribute Reference Description

Using Help Back 152
Help Reference
Using Help Back 152
PropertyBase duplicate() method
app.project.item(index).layer(index).property(name).duplicate()
Description
The PropertyBase duplicate method duplicates the PropertyBase and returns the duplicate.
This method is valid only for children of indexed groups; if not, an exception is generated and an error is
displayed.
Parameters
None.
Returns
PropertyBase; the duplicate.
PropertyBase elided attribute
app.project.item(index).layer(index).property(name).elided
Description
This attribute specifies whether this property is elided in the user interface. If elided, then this property is just
a group used to organize other properties. The property is not displayed in the user interface and its child
properties are not indented in the Timeline window.
Type
Boolean; read-only.
Example
Given a text layer with two animators and no properties twirled down, you would see:
•Text
•Path Options
•More Options
•Animator 1
•Animator 2
However, Animator 1 and Animator 2 are actually contained in a PropertyBase called “Text Animators”, which
is not displayed in the user interface, and so these two properties are not indented in the Timeline window.
PropertyBase enabled attribute
app.project.item(index).layer(index).property(name).enabled
Description
This attribute specifies whether this property is enabled. It corresponds to the setting of the eyeball icon, if
there is one.
If there is no eyeball icon, this attribute will default to true; you can write this attribute only if canSetEnabled
is true.

Using Help Back 153
Help Reference
Using Help Back 153
If you try to write this attribute and canSetEnabled is false, an exception will be generated.
Type
Boolean; read/write (read-only if canSetEnabled is false).
PropertyBase isEffect attribute
app.project.item(index).layer(index).property(name).isEffect
Description
This attribute specifies whether this property is an effect PropertyGroup (in which case it is set to true).
Type
Boolean; read-only.
PropertyBase isMask attribute
app.project.item(index).layer(index).property(name).isMask
Description
This attribute specifies whether this property is a mask PropertyGroup (in which case it is set to true).
Type
Boolean; read-only.
PropertyBase isModified attribute
app.project.item(index).layer(index).property(name).isModified
Description
The PropertyBase isModified attribute returns true if the PropertyBase has been changed since its creation.
Type
Boolean; read-only.
PropertyBase matchName attribute
app.project.item(index).layer(index).property(name).matchName
Description
The PropertyBase matchName attribute is a special name for the property used to build unique naming paths.
This name helps to identify that the property is part of a unique classification.
Every property has a unique matchName identifier. MatchNames are meant to be stable from version to
version regardless of its "name" in the user interface or any changes to the application. You can't see match-
Names directly through the user interface. But you can refer to them through scripting and sample them via
this attribute.
Note: Unlike names, matchNames do not change based on the language of the After Effects user interface (English/
French/German/Japanese).
Using Help Back 154
Help Reference
Using Help Back 154
Children of INDEXED_GROUP PropertyGroups (see “PropertyBase propertyType attribute” on page 155)
do not always have a “name,” defaulting instead to an empty string, but in all cases, they have a matchName.
Type
String; read-only.
PropertyBase moveTo() method
app.project.item(index).layer(index).property(name).moveTo(newIndex)
Description
The PropertyBase moveTo method moves the PropertyBase to the specified newIndex within its Property-
Group.
This method is valid only for children of indexed groups; if not, or if newIndex is not valid, an exception is
generated and an error is displayed.
Parameters
Returns
None.
PropertyBase name attribute
app.project.item(index).layer(index).property(name).name
Description
The PropertyBase name attribute is the name of the property.
It is an error to attempt to set the name if the property is not a child property of an INDEXED_GROUP.
Type
String; read/write.
PropertyBase parentProperty attribute
app.project.item(index).layer(index).property(name).parentProperty
Description
The PropertyBase parentProperty returns the PropertyGroup that is the parent of this PropertyBase, or null
if this PropertyBase is a layer.
Type
PropertyGroup; read-only.
PropertyBase propertyDepth attribute
app.project.item(index).layer(index).property(name).propertyDepth
newIndex integer; the index within the same PropertyGroup to which the PropertyBase is to be moved.
Using Help Back 155
Help Reference
Using Help Back 155
Description
The PropertyBase propertyDepth is 0 for a layer. Add 1 (one) for each level of parent PropertyGroup above
this PropertyBase until the layer has been reached.
Type
String; read-only.
PropertyBase propertyGroup() method
app.project.item(index).layer(index).property(name).propertyGroup()
app.project.item(index).layer(index).property(name).propertyGroup(countUp)
Description
The PropertyBase propertyGroup method returns the parent PropertyGroup, found by moving up the
hierarchy the number of levels proscribed by countUp.
The countUp is optional and defaults to 1 if not provided. Range of countUp must be within [1 ...property-
Depth]. Returns NULL if countUp takes you as far up as the parent of the layer containing this propertyBase.
Parameters
Returns
PropertyGroup. Null if countUp reaches the layer parent.
PropertyBase propertyIndex attribute
app.project.item(index).layer(index).property(name).propertyIndex
Description
The PropertyBase propertyIndex is the index of a PropertyBase within its ParentGroup.
Note that some properties, such as Layers or "position," will not have a propertyIndex. Others, such as
individual effects or masks, will have an index within their parent PropertyGroup.
Type
Integer; read-only.
PropertyBase propertyType attribute
app.project.item(index).layer(index).property(name).propertyType
Description
The PropertyBase propertyType returns the PropertyType describing this PropertyBase.
Enumerated Types
PropertyType is an enumerated type returned by propertyType (read-only). It specifies a particular type of
PropertyBase, as follows:
countUp integer (optional); defaults to 1; the number of levels to ascend within the range 1..property-
Depth.
Using Help Back 156
Help Reference
Using Help Back 156
PropertyBase remove() method
app.project.item(index).layer(index).property(name).remove()
Description
The PropertyBase remove method removes the PropertyBase from its parent group. If the PropertyBase is a
PropertyGroup, it removes the child properties as well.
This method is valid only for children of indexed groups; if not, an exception is generated and an error is
displayed.
This method may be called on a text animation property (any animator that has been set to a text layer).
Parameters
None.
Returns
None.
PropertyBase selected attribute
app.project.item(index).layer(index).property(name).selected
Description
This attribute specifies whether this PropertyBase is selected. Setting selected to true selects the property;
setting it to false deselects.
The value of this attribute can be read for any Property, PropertyGroup or Layer. The value can be written on
a PropertyGroup only if it is an effect or mask; attempting to set this attribute for any other kind of Property-
Group will generate an exception.
Note that sampling this attribute can slow down system performance if it is used repeatedly to sample a large
number of properties. To read the full set of selected Properties for a Comp or Layer, use the selectedProperties
attribute of Comp or Layer.
Type
Boolean; read/write.
PropertyGroup object
app.project.item(index).layer(index).propertyGroup
PROPERTY specifies a single property such as position or zoom
INDEXED_GROUP specifies a PropertyGroup whose members have an editable name and
an index, e.g., the “Masks” property of a layer, which refers to a variable
number of individual masks by index number.
NAMED_GROUP specifies a PropertyGroup whose members have an uneditable name
and an index, e.g., a layer
Using Help Back 157
Help Reference
Using Help Back 157
Description
The PropertyGroup object represents a group of PropertyBase objects, (i.e., Property objects and/or Proper-
tyGroup objects). PropertyGroups may be nested to provide a chain all the way from the Layer at the top down
to a single Property (such as the mask feather of the third mask).
Attributes
Methods
PropertyGroup addProperty() method
app.project.item(index).layer(index).propertyGroup(index).addProperty(name)
Description
This method adds a property with the given name to this group.
Properties may only be added to a PropertyGroup whose propertyType is PropertyType.INDEXED_GROUP.
The only exception to this rule is a text animator property, which is contained in a NAMED_GROUP.
This method generates an exception if a property cannot be created with the given name, so it is always a good
idea to call PropertyGroup canAdd Property() method first to check. (See “PropertyGroup canAddProperty()
method” on page 158.)
The following names are supported:
•Any matchName for a property that can be added normally using the user interface. For example, ADBE
Mask Atom, ADBE Paint Atom, ADBE Text Position, ADBE Text Anchor Point.
•When adding to an ADBE Mask Parade: ADBE Mask Atom, Mask.
•When adding to an ADBE Effects Parade, any effect by matchName, such as ADBE Bulge, ADBE Glo2, APC
Vegas.
•Any effect by display name, such as Bulge, Glow, Vegas.
•For text animators and selectors, Text Animator maps to ADBE Text Animator, Range Selector maps to
ADBE Text Selector, Wiggly Selector maps to ADBE Text Wiggly Selector, and Expression Selector maps to
ADBE Text Expressible Selector.
Attribute Reference Description
numProperties see “PropertyGroup numProperties
attribute” on page 158
number of indexed properties in the group
Method Reference Description
property() see “PropertyGroup property() method”
on page 158
returns the child PropertyGroup or Property
with the given propertyIndex or name
canAddProperty() see “PropertyGroup canAddProperty()
method” on page 158
true if a property with the given name can be
added to the PropertyGroup
addProperty() see “PropertyGroup addProperty()
method” on page 157
adds a property with the given name to the
PropertyGroup
Using Help Back 158
Help Reference
Using Help Back 158
Parameters
Returns
PropertyBase.
PropertyGroup canAddProperty() method
app.project.item(index).layer(index).propertyGroup(index).canAddProperty(name)
Description
This method returns true if a property with the given name can be added to this PropertyGroup.
Parameters
Returns
Boolean.
Example
The maskGroup can only add masks. The only legal input arguments are as follows:
•mask
•ADBE Mask Atom
Any other argument is illegal. Therefore:
•maskGroup.canAddProperty("mask") returns true
•maskGroup.canAddProperty("ADBE Mask Atom") returns true
Any other input for maskGroup argument is false. For example, maskGroup.canAddProperty("blend")
returns false
PropertyGroup numProperties attribute
app.project.item(index).layer(index).propertyGroup(index).numProperties
Description
This attribute represents the number of indexed properties in this group.
Note: For Layers only, this can appear misleading, as it returns a value of 3. These correspond to the mask, effect,
and motion tracker groups inside the Layer. However, Layers also have a host of other properties available only by
name; see the “PropertyGroup property() method” on page 158.
Type
Integer; read-only.
PropertyGroup property() method
app.project.item(index).layer(index).propertyGroup(index).property(index)
app.project.item(index).layer(index).propertyGroup(index).property(name)
name string; the name to be added to the PropertyGroup
name string; the name to be added to the PropertyGroup
Using Help Back 159
Help Reference
Using Help Back 159
Description
This method finds and returns the child PropertyBase, using either its propertyIndex or its name.
If using a string to provide the name argument, you may use any of the following:
•Any name used in expressions “parenthesis style” syntax, meaning the display name or the compact English
name
•Any match name
•Any expressions intercap sytax
See below for examples of these various types of names. Essentially, the method replicates syntax available with
expressions. In other words, the following are all allowed and are virtually interchangeable (where “mylayer”
is an already identified layer):
•mylayer.position
•mylayer("position")
•mylayer.property("position")
as well as the following, which are also interchangeable with one another:
•mylayer(1)
•mylayer.property(1)
•Note that some properties of a Layer, such as position and zoom, can be accessed only by name. When using
the name argument to find a property that is multiple levels down, you will need to make more than one
call of this method; for example,
myLayer.property("ADBE Masks").property(1)
will search two levels down, and return the first mask in the mask group.
If no Property or PropertyGroup can be found with the given name, this method returns a value of null.
Properties that can be accessed using this method with the name argument include:
Properties that can be accessed by name from any
Layer
• "ADBE Mask Parade", or “Masks”
• "ADBE Effect Parade", or “Effects”
• "ADBE MTrackers", or “Motion Trackers”
Properties that can be accessed by name from an
AVLayer
• "Anchor Point" or "anchorPoint"
• "Position" or "position"
• "Scale" or "scale"
• "Rotation" or "rotation"
• "Z Rotation" or "zRotation" or "Rotation Z" or "rotationZ"
• "Opacity" or "opacity"
• "Marker" or "marker"
Properties that can be accessed by name from a cam-
era layer
• "Zoom" or "zoom"
• "Depth of Field" or "depthOfField"
• "Focus Distance" or "focusDistance"
• "Aperture" or "aperture"
• "Blur Level" or "blurLevel"
Using Help Back 160
Help Reference
Using Help Back 160
Parameters
Returns
PropertyBase; or NULL if no property with the given string name can be found.
Examples
1If a layer (e.g., myLayer) has a Box Blur effect, you can retrieve the effect in any of the following ways:
myLayer.property(“Effects”).property(“Box Blur”);
myLayer.property(“Effects”).property(“boxBlur”);
Properties that can be accessed by name from a light
layer
• "Intensity" or "intensity"
• "Color" or "color"
• "Cone Angle" or "coneAngle"
• "Cone Feather" or "coneFeather"
• "Shadow Darkness" or "shadowDarkness"
• "Shadow Diffusion" or "shadowDiffusion"
• "Casts Shadows" or "castsShadows"
Properties that can be accessed by name from a 3D
layer
• "Accepts Shadows" or "acceptsShadows"
• "Accepts Lights" or "acceptsLights"
• "Ambient" or "ambient"
• "Diffuse" or "diffuse"
• "Specular" or "specular"
• "Shininess" or "shininess"
• "Casts Shadows" or "castsShadows"
• "Light Transmission" or "lightTransmission"
• "Metal" or "metal"
Properties that can be accessed by name from a cam-
era, light or 3D layer
• "X Rotation" or "xRotation" or "Rotation X" or "rotationX"
• "Y Rotation" or "yRotation" or "Rotation Y" or "rotationY"
• "Orientation" or "orientation"
Properties can be accessed by name from a text layer • "Source Text" or "sourceText" or "Text" or "text"
Properties that can be accessed from an AVLayer with
a non-still source
• "Time Remap" or "timeRemapEnabled"
Properties that can be accessed from an AVLayer with
an audio
• "Audio Levels" or "audioLevels"
Properties that can be accessed by name from a Prop-
ertyGroup "ADBE Mask Parade"
• "ADBE Mask Atom"
Properties that can be accessed by name from a Prop-
ertyGroup "ADBE Mask Atom"
• "ADBE Mask Shape", or “maskShape”
• "ADBE Mask Feather", or “maskFeather”
• "ADBE Mask Opacity", or “maskOpacity”
• "ADBE Mask Offset", or “maskOffset”
index integer; the propertyIndex of the target PropertyBase, in the range [1..numProperties]
name string; the name of the target PropertyBase, which is a child of the current one.
Using Help Back 161
Help Reference
Using Help Back 161
myLayer.property(“Effects”).property(“ADBE Box Blur”);
2If a layer (e.g., myLayer) has a mask named “Mask 1” you can retrieve it as follows:
myLayer.property(“Masks”).property(“Mask 1”);
3To get a Bulge Center value from a Bulge effect, you could use any of the following:
myLayer.property(“Effects”).property(“Bulge”).property(“Bulge Center”);
myLayer.property(“Effects”).property(“Bulge”).property(“bulgeCenter”);
RenderQueue object
app.project.renderQueue
Description
The RenderQueue object enables access to data and functionality within the Render Queue area of a particular
After Effects project. This object is pivotal to render automation.
Attributes of the RenderQueue object provide access to items in the Render Queue and their render status.
Methods of the RenderQueue object can start, pause, and stop the render process.
The RenderQueueItem object provides access to the specific settings for an item to be rendered.
Attributes
Methods
RenderQueue Item() method
app.project.renderQueue.item(index)
Attribute Reference Description
rendering see “RenderQueue rendering attribute”
on page 163
determines whether a render is in progress
numItems see “RenderQueue numItems attribute”
on page 162
total number of items in the Render Queue
items see “ItemCollection” on page 99 collected items in the Render Queue
Method Reference Description
showWindow() see “RenderQueue showWindow()
method” on page 163
boolean to show/hide the Render Queue win-
dow
render() see “RenderQueue render() method” on
page 162
starts the render; does not return until render
is complete
pauseRendering() see “RenderQueue pauseRendering()
method” on page 162
pauses the render
stopRendering() see “RenderQueue stopRendering()
method” on page 163
stops the render
item() see “RenderQueue Item() method” on
page 161
returns a RenderQueueItem
Using Help Back 162
Help Reference
Using Help Back 162
Description
This method returns a render queue item with the given index number.
Parameters
Returns
RenderQueueItem.
RenderQueue items attribute
app.project.renderQueue.items
Description
The items attribute of renderQueue provides a collection of all items in the Render Queue as a collection.
Type
RQItemCollection; read-only.
See also
“RQItemCollection” on page 164
RenderQueue numItems attribute
app.project.renderQueue.numItems
Description
The numItems attribute indicates the total number of render queue items in the Render Queue.
Type
Integer; read-only.
RenderQueue pauseRendering() method
app.project.renderQueue.pauseRendering(pause)
Description
Pauses the Render Queue; equivalent to use of the Pause button in the Render Queue window during a render.
Parameters
Returns
None.
RenderQueue render() method
app.project.renderQueue.render()
index integer; the index of the item
pause boolean; set to true, it pauses the render, set to false, it continues a paused render
Using Help Back 163
Help Reference
Using Help Back 163
Description
Starts the Render Queue; equivalent to use of the Render button in the Render Queue window. Does not
return until render is complete.
Set the app.onError if you wish to be notified of errors during the rendering process.
Set the RenderQueueItem.onStatusChanged attribute of a particular RenderQueueItem to get updates while
the render is progressing.
Parameters
None.
Returns
None.
See also
“Application open() method” on page 33
“RenderQueueItem onStatusChanged attribute” on page 167
RenderQueue rendering attribute
app.project.renderQueue.rendering
Description
The rendering attribute indicates whether rendering is in progress. This is a read-only attribute; use the
render() and stopRendering() methods to control it. If the render is paused, this is set to true.
Type
Boolean; read-only.
RenderQueue showWindow() method
app.project.renderQueue.showWindow(doShow)
Description
The showWindow method of RenderQueue is a boolean; if true, it makes the Render Queue window visible,
if false, it hides the window.
Parameters
Returns
None.
RenderQueue stopRendering() method
app.project.renderQueue.stopRendering()
doShow boolean; if true, shows the Render Queue window; if false, conceals it
Using Help Back 164
Help Reference
Using Help Back 164
Description
Stops the Render Queue; equivalent to use of the Stop button in the Render Queue window during a render.
Useful to call in the event of an onStatusChanged callback.
Parameters
None.
Returns
None.
See also
“RenderQueueItem onStatusChanged attribute” on page 167.
RQItemCollection
app.project.renderQueue.items
Description
The RQItemCollection contains all of the Render Queue items. This is the equivalent of all of the items found
in the Render Queue window of a given project.
Attributes
Methods
See also
“Collection object” on page 53
RenderQueueItem object
app.project.renderQueue.item(index)
Description
The RenderQueueItem object is an individual item in the Render Queue.
Attributes
length number of objects in the collection (applies to all collections)
[] retrieves an object or objects in the collection via its index number
add() adds a RenderQueueItem for a specified composition
Attribute Reference Description
numOutputModules see “RenderQueueItem numOutput-
Modules attribute” on page 166
total number of Output Modules assigned to a
given Render Queue item
render see “RenderQueueItem render
attribute” on page 168
boolean that shows true if this item will render
when the queue is started
Using Help Back 165
Help Reference
Using Help Back 165
Methods
RenderQueueItem applyTemplate() method
app.project.renderQueue.item.applyTemplate(templateName)
Description
The applyTemplate method of renderQueueItem applies a Render Settings template to the item.
Parameters
startTime see “RenderQueueItem startTime
attribute” on page 169
Date object representing time program began
rendering the item
elapsedSeconds see “RenderQueueItem elapsedSeconds
attribute” on page 166
time elapsed in the current render, in seconds
timeSpanStart see “RenderQueueItem timeSpanStart
attribute” on page 170
start time, in seconds, in the comp to be ren-
dered
timeSpanDuration see “RenderQueueItem timeSpanDura-
tion attribute” on page 169
duration of the comp to be rendered, in sec-
onds
skipFrames see “RenderQueueItem skipFrames
attribute” on page 168
number of frames to skip when rendering
comp see “RenderQueueItem comp attribute”
on page 166
composition being rendered by this RQ item
outputModules see “RenderQueueItem outputModules
attribute” on page 167
collection of the Output Modules
templates see “RenderQueueItem templates
attribute” on page 169
array of the Render Settings templates
status see “RenderQueueItem status attribute”
on page 169
current status of a Render Queue item
onStatusChanged see “RenderQueueItem onStatus-
Changed attribute” on page 167
condition in which the status of an item
changes (e.g., from RENDERING to DONE sta-
tus)
logType see “RenderQueueItem logType
attribute” on page 166
returns one of the log types
Method Reference Description
outputModule() see “RenderQueueItem outputModule()
method” on page 167
returns an Output Module for the item
remove() see “RenderQueueItem remove()
method” on page 167
deletes the item from the Render Queue
saveAsTemplate() see “RenderQueueItem saveAsTem-
plate() method” on page 168
saves a new Render Settings Template with the
given name
applyTemplate() see “RenderQueueItem applyTemplate()
method” on page 165
applies a pre-set Render Settings Template
templateName name of the template to apply
Attribute Reference Description

Using Help Back 166
Help Reference
Using Help Back 166
Returns
None.
RenderQueueItem comp attribute
app.project.renderQueue.item(index).comp
Description
The comp attribute returns the CompItem object that will be rendered by this Render Queue item. This is a
read-only attribute; to change the Composition, the Render Queue item must be deleted and re-created.
Type
CompItem; read-only.
RenderQueueItem elapsedSeconds attribute
app.project.renderQueue.item(index).elapsedSeconds
Description
The elapsedSeconds attribute shows the number of seconds spent rendering the item.
Type
Integer, or null if item has not been rendered; read-only.
RenderQueueItem logType attribute
app.project.renderQueue.item(index).outputModule.logType
Description
The logType attribute returns one of the log types (listed below).
Enumerated Type
LogType (read/write); one of the following:
LogType.ERRORS_ONLY
LogType.ERRORS_AND_SETTINGS
LogType.ERRORS_AND_PER_FRAME_INFO
RenderQueueItem numOutputModules attribute
app.project.renderQueue.item(index).numOutputModules
Description
The numOutputModules attribute represents the total number of Output Modules assigned to a given Render
Queue item.
Type
Integer; read-only.
Using Help Back 167
Help Reference
Using Help Back 167
RenderQueueItem onStatusChanged attribute
app.project.renderQueue.item(index).onStatusChanged
Description
The onStatusChanged attribute is invoked whenever the value of the RenderQueueItem.status attribute is
changed.
Note that changes cannot be made to render queue items (or to the application) while a render is in progress
(including when paused). This mirrors the regular application functionality.
Type
Function.
Example
function myStatusChanged() {
alert(app.project.renderQueue.item(1).status)
}
app.project.renderQueue.item(1).onStatusChanged = myStatusChanged();
app.project.renderQueue.item(1).render = false; //shows dialog
RenderQueueItem outputModules attribute
app.project.renderQueue.item(index).outputModules
Description
The outputModules attribute returns the collection of Output Modules for the item.
Type
OMCollection; read-only.
RenderQueueItem outputModule() method
app.project.renderQueue.item(index).outputModule(index)
Description
This method returns an output module with the given index.
Parameters
Returns
OutputModule.
RenderQueueItem remove() method
app.project.renderQueue.item(index).remove()
index integer; the index of the output module
Using Help Back 168
Help Reference
Using Help Back 168
Description
The remove method of renderQueueItem deletes the referenced item from the Render Queue.
Parameters
None.
Returns
None.
RenderQueueItem render attribute
app.project.renderQueue.item(index).render
Description
The render attribute determines whether an item will render when the Render Queue is started.
Type
Boolean; read/write.
RenderQueueItem saveAsTemplate() method
app.project.renderQueue.item(index).saveAsTemplate(name)
Description
The saveAsTemplate method of RenderQueueItem saves the item’s current render settings as a new template
with the name passed as a parameter.
Parameters
Returns
None.
RenderQueueItem skipFrames attribute
app.project.renderQueue.item(index).skipFrames
Description
The skipFrames attribute specifies the number of frames to skip when rendering. It is used to do quicker
rendering tests than a full render. The total length of time remains unchanged.
A value of 0 specifies no skipped frames and results in regular rendering of all frames. A value of 1 specifies
that every other frame is to be skipped. This is equivalent to "rendering on twos." Higher values will skip a
larger number of frames. For example, if skip has a value of 1, for sequence output you'd get half the number
of frames and for movie output each frame would be double the duration.
The permissible range of values for skipFrames is [0..99].
name name of the new template
Using Help Back 169
Help Reference
Using Help Back 169
Type
Integer. Read/write.
RenderQueueItem startTime attribute
app.project.renderQueue.item(index).startTime
Description
The startTime attribute returns a Date object showing the day and time that the item started rendering.
Type
Date; null if the item has not started rendering. Read-only.
RenderQueueItem status attribute
app.project.renderQueue.item(index).status
Description
The status attribute represents the current render status of the item.
Enumerated Type
RQItemStatus - one of the following attributes:
RenderQueueItem templates attribute
app.project.renderQueue.item(index).templates
Description
The templates attribute returns an array of the names of Render Settings templates available for the item. It is
a read-only attribute.
Type
Array; read-only.
RenderQueueItem timeSpanDuration attribute
app.project.renderQueue.item(index).timeSpanDuration
RQItemStatus.WILL_CONTINUE render has been paused
RQItemStatus.NEEDS_OUTPUT item lacks a valid output path
RQItemStatus.UNQUEUED render item is listed in the Render Queue window but is not ready to render
RQItemStatus.QUEUED composition is ready to render
RQItemStatus.RENDERING composition is rendering
RQItemStatus.USER_STOPPED rendering process was stopped by the user
RQItemStatus.ERR_STOPPED rendering process was stopped due to an error
RQItemStatus.DONE rendering process for the item is complete
Using Help Back 170
Help Reference
Using Help Back 170
Description
The timeSpanDuration attribute determines the duration, in seconds, of the comp to be rendered. This
achieves the same effect as setting a custom end time in the Render Settings dialog box, although the duration
is determined by subtracting the start time from the end time.
Type
Floating-point value; read/write.
RenderQueueItem timeSpanStart attribute
app.project.renderQueue.item(index).timeSpanStart
Description
The timeSpanStart attribute determines the time in the comp, in seconds, at which rendering will begin. This
is the equivalent of setting a custom start time in the Render Settings dialog box.
Type
Floating-point value; read/write.
Settings object
Description
The Settings object provides an easy way to manage settings for scripts. The settings are persistent between
application launches, saved in the After Effects Preferences file.
Methods
Settings getSetting() method
app.settings.getSetting(sectionName,keyName)
Description
The getSetting method retrieves a setting found in the Prefs file.
Parameters
Method Reference Description
saveSetting() see “Settings saveSetting() method” on
page 171
can save a default value for a preferences item
getSetting() see “Settings getSetting() method” on
page 170
retrieves a setting found in the Prefs file
haveSetting() see “Settings haveSetting() method” on
page 171
used to determine whether a given section
name and key name have a setting assigned
sectionName text string that holds the name of a section of settings; in the prefs file these are the names
enclosed in brackets and quotation marks
keyName text string that describes an individual setting name; these are listed in quotation marks below
the sectionName
Using Help Back 171
Help Reference
Using Help Back 171
Returns
String representing the value of the setting.
Example
var n = app.settings.getSetting("Eraser - Paint Settings", "Aligned Clone");
alert("The setting is " + n);
See also
“Settings haveSetting() method” on page 171
“Settings saveSetting() method” on page 171
Settings haveSetting() method
app.settings.haveSetting(sectionName,keyName)
Description
The haveSetting method is used to determine whether a given section name and key name have a setting
assigned.
Returns
Boolean.
See also
“Settings getSetting() method” on page 170
“Settings saveSetting() method” on page 171
Settings saveSetting() method
app.settings.saveSetting(sectionName,keyName,value)
Description
The saveSetting method can save a default value for a scripting preferences item.
Parameters
See also
“Settings getSetting() method” on page 170
“Settings haveSetting() method” on page 171
sectionName text string that holds the name of a section of settings; in the prefs file these are the names
enclosed in brackets and quotations
keyName text string that describes an individual setting name; these are listed in quotations below the
sectionName
value value assigned to the setting
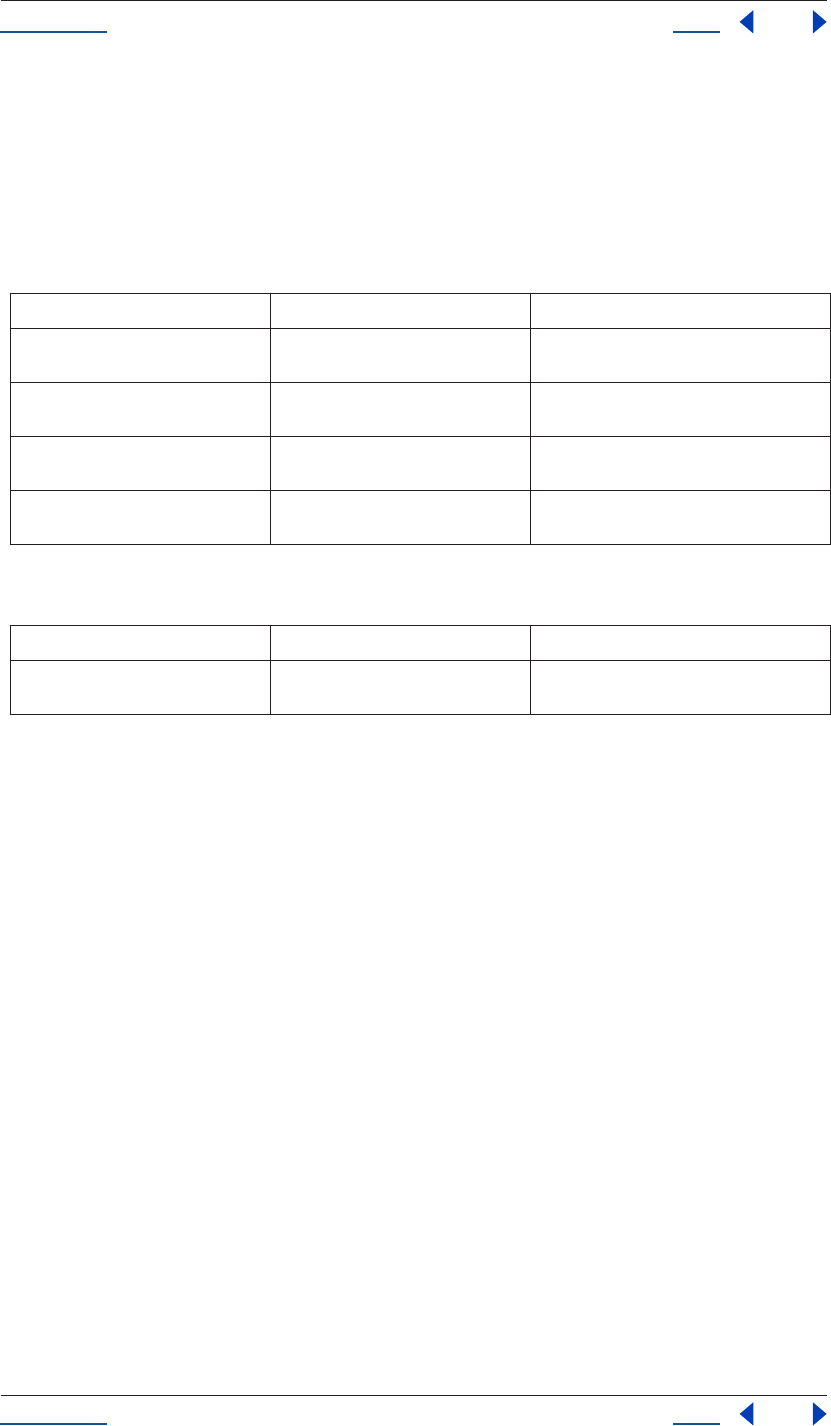
Using Help Back 172
Help Reference
Using Help Back 172
Shape object
app.project.item(index).layer(index).property(1).property(index).property("maskShape").value
Description
The Shape object holds information describing the outline shape of a Mask.
Attributes
Methods
Examples
1Creating a square mask
A square is a closed shape with 4 points. The inTangents and outTangents for connected straightline segments
are always 0, the default. Since the default values are the desired values, you do not need to set them here.
var myShape = new Shape();
myShape.vertices = [ [0,0], [0,1], [1,1], [1,0] ];
myShape.closed = true;
2Creating a “U” shaped mask
A "U" is an open shape with the same 4 points used in Example 1:
var myShape = new Shape();
myShape.vertices = [ [0,0], [0,1], [1,1], [1,0] ];
myShape.closed = false;
3Creating an oval
An oval is a closed shape with 4 points and inTangents and outTangents:
var myShape = new Shape();
myShape.vertices = [[300,50],[200,150],[300,250],[400,150]];
myShape.inTangents = [[55.23,0],[0,-55.23],[-55.23,0],[0,55.23]];
myShape.outTangents = [[-55.23,0],[0,55.23],[55.23,0],[0,-55.23]];
myShape.closed = true;
Attribute Reference Description
closed see “Shape closed attribute” on
page 173
specifies whether the shape is a closed curve
vertices see “Shape vertices attribute” on
page 174
array of floating-point pairs specifying the
anchor points of the shape
inTangents see “Shape inTangents attribute” on
page 173
array of floating-point pairs specifying the tan-
gent vectors coming into the shape vertices
outTangents see “Shape outTangents attribute” on
page 173
array of floating-point pairs specifying the tan-
gent vectors coming out of the shape vertices
Method Reference Description
shape() see “Shape Shape() method” on
page 174
constructor to create a new Shape

Using Help Back 173
Help Reference
Using Help Back 173
Shape closed attribute
app.project.item(index).layer(index).property(1).property(index).property("maskShape").value.closed
Description
This attribute specifies whether the shape is a closed curve. If true, the first and last vertices will be connected
to form a closed curve. If false, the closing segment will not be drawn.
Type
Boolean; read/write.
Shape inTangents attribute
app.project.item(index).layer(index).property(1).property(index).property("maskShape").value.inTan-
gents
Description
This attribute describes an array of float pairs specifying the tangent vectors (direction handles) associated
with the vertices of the shape.
Each float pair specifies one inTangent. There is one inTangent and one outTangent associated with each
vertex in the vertices array. However, when creating a shape to set as a keyframe value, you may leave inTangent
and/or outTangent null, or you may leave entries unfilled; they will be automatically padded with zeroes. This
will result in straight line segments in the non-RotoBezier case; in the RotoBezier case the zeros will be ignored
and the inTangents/outTangents will be automatically calculated.
Each vertex on the shape has two direction handles. The inTangent is the direction handle associated with the
line segment 'coming into' the vertex from the preceding vertex in the shape.
The inTangents are x,y coordinates specified relative to the associated vertex. For example, an inTangent of [-
1,-1] is located above and to the left of the vertex and has a 45 degree slope, regardless of the actual location
of the vertex. The longer a handle is, the greater an influence it has, so an incoming shape segment will hug
the tangent vector closer for an inTangent of [-2,-2] than it will for an inTangent of [-1,-1], even though both
of these come toward the vertex from the same direction.
If a shape is not closed, the inTangent for the first vertex and the outTangent for the final vertex will be ignored.
These two vectors would otherwise specify the dirction handles of the final connecting segment out of the final
vertex and back into the first vertex.
Note that if a shape is used in a mask with Rotobeziers, then the tangent values will be ignored on write (i.e.,
ignored when you set the new shape), because RotoBezier masks calculate their tangents automatically. This
means that, for RotoBezier masks, you can construct a shape by setting only the vertices attribute and setting
inTangents and outTangents both to null. If you set the shape without tangents, then follow this by getting the
shape once again; the new shape's tangent values will be filled with the automatically-calculated tangent
values.
Type
Array of floating-point pairs; read/write.
Shape outTangents attribute
app.project.item(index).layer(index).property(1).property(index).property("maskShape").value.outTan-
gents

Using Help Back 174
Help Reference
Using Help Back 174
Description
This attribute describes an array of float pairs specifying the tangent vectors (direction handles) associated
with the vertices of the shape.
Each float pair specifies one inTangent. There is one inTangent and one outTangent associated with each
vertex in the vertices array. However, when creating a shape to set as a keyframe value, you may leave inTangent
and/or outTangent null, or you may leave entries unfilled; they will be automatically padded with zeroes. This
will result in straight line segments in the non-RotoBezier case; in the RotoBezier case the zeros will be ignored
and the inTangents/outTangents will be automatically calculated.
Each vertex on the shape has two direction handles. The outTangent is the direction handle associated with
the line segment 'going out of' the vertex toward the next vertex in the shape.
The outsTangent are x,y coordinates specified relative to the associated vertex. For example, an inTangent of
[-1,-1] is located above and to the left of the vertex, and has a 45 degree slope, regardless of the actual location
of the vertex. The longer a handle is, the greater an influence it has, so an incoming shape segment will hug
the tangent vector closer for an inTangent of [-2,-2] than it will for an inTangent of [-1,-1], even though both
of these come toward the vertex from the same direction.
If a shape is not closed, the inTangent for the first vertex and the outTangent for the final vertex will be ignored.
These two vectors would otherwise specify the dirction handles of the final connecting segment out of the final
vertex and back into the first vertex.
Note that if a shape is used in a mask with Rotobeziers, then the tangent values will be ignored on write (i.e.,
ignored when you set the new shape), because RotoBezier masks calculate their tangents automatically. This
means that, for RotoBezier masks, you can construct a shape by setting only the vertices attribute and setting
inTangents and outTangents both to null. If you set the shape without tangents, then follow this by getting the
shape once again, the new shape's tangent values will be filled with the automatically-calculated tangent
values.
Type
Array of floating-point pairs; read/write.
Shape Shape() method
New Shape()
Description
This method is the constructor to create a new shape. After constructing a shape with this method, set the
various attributes individually to fill the shape with desired values.
Parameters
None.
Returns
Shape.
Shape vertices attribute
Description
This attribute describes an array of float pairs specifying the anchor points of the shape. Each float pair is an
array of two floats.
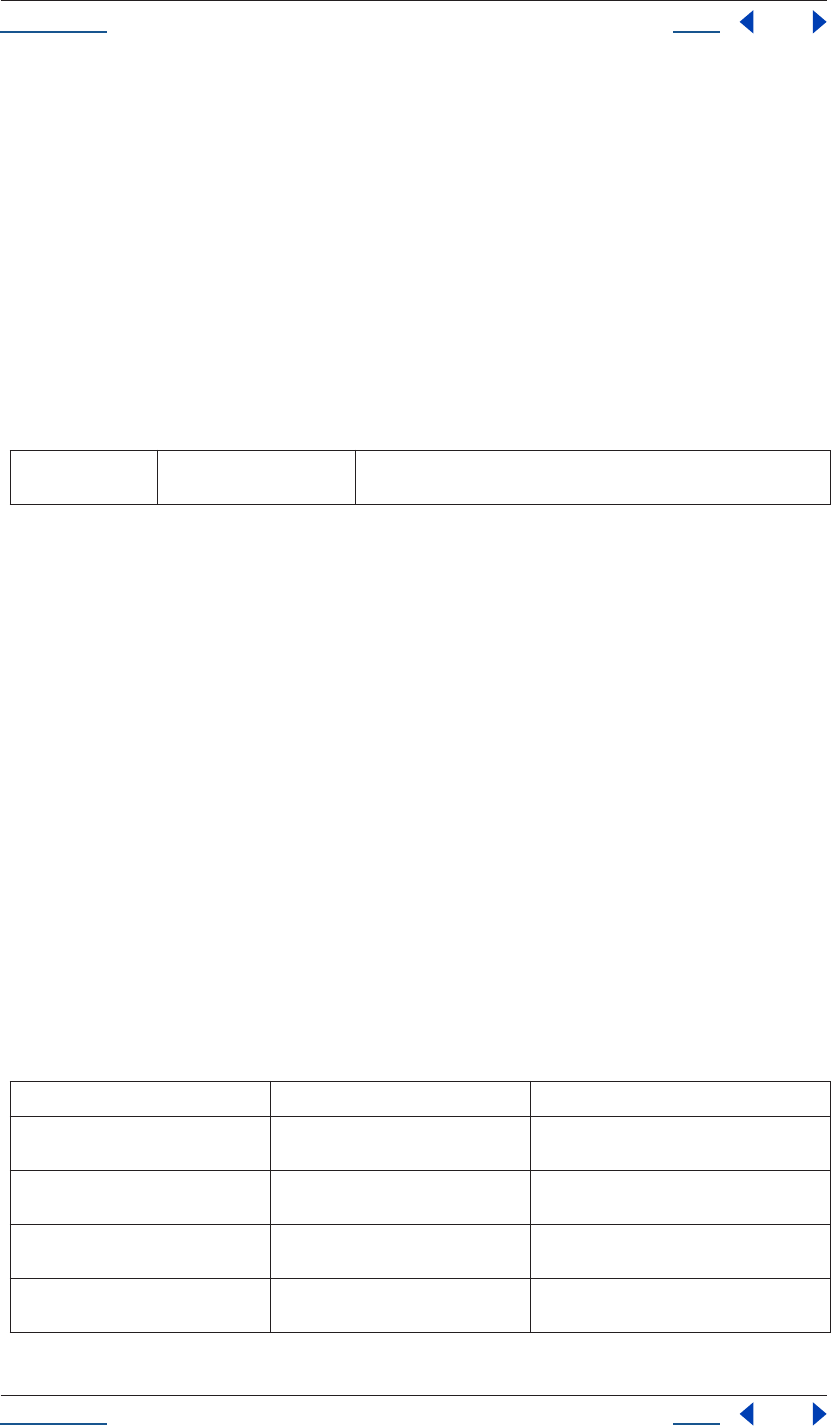
Using Help Back 175
Help Reference
Using Help Back 175
Type
Array of floating-point pairs; read/write.
SolidSource object
app.project.item(index).mainSource
app.project.item(index).proxySource
Description
The SolidSource object holds information describing a solid color footage source. It is a subclass of Footage-
Source and so it inherits all attributes and methods of the “FootageSource object” on page 89.
Attributes
SolidSource color attribute
app.project.item(index).solidSource.color
Description
The color attribute of SolidSource specifies the color of the solid. The value is an array of three floats for red,
green, and blue, where those floats are in the range [0..1].
Type
Array of three floating-point values from 0 to 1: [R, G, B]); read/write.
System object
system
Description
The System object provides access to attributes found on the user’s system, such as the user name or the name
and version of the operating system.
Attributes
color see “SolidSource color
attribute” on page 175
specifies the color of the solid
Attribute Reference Description
userName see “System userName attribute” on
page 176
user name logged in to the current session of
the operating system
machineName see “System machineName attribute”
on page 176
name of the host machine
osName see “System osName attribute” on
page 176
name of the operating system currently run-
ning
osVersion see “System osVersion attribute” on
page 176
version of the operating system currently run-
ning

Using Help Back 176
Help Reference
Using Help Back 176
System machineName attribute
system.machineName
Description
The machineName attribute specifies the name of the machine on which the program is running, and is
expressed as a text string.
Type
String; read-only.
Example
alert ( "Your machine is called " + system.machineName + ".");
System osName attribute
system.osName
Description
The osName attribute specifies the name of the operating system on which the program is running, and is
expressed as a text string.
Type
String; read-only.
Example
alert ( "Your OS is " + system.osname + ".");
System osVersion attribute
system.osVersion
Description
The osVersion attribute specifies the version of the current local operating system, and is expressed as a text
string.
Type
String; read-only.
Example
alert ( "Your OS is " + system.osname + " running version " + system.osversion);
System userName attribute
system.userName
Description
The userName attribute specifies the name of the user logged on to the system, and is expressed as a text string.
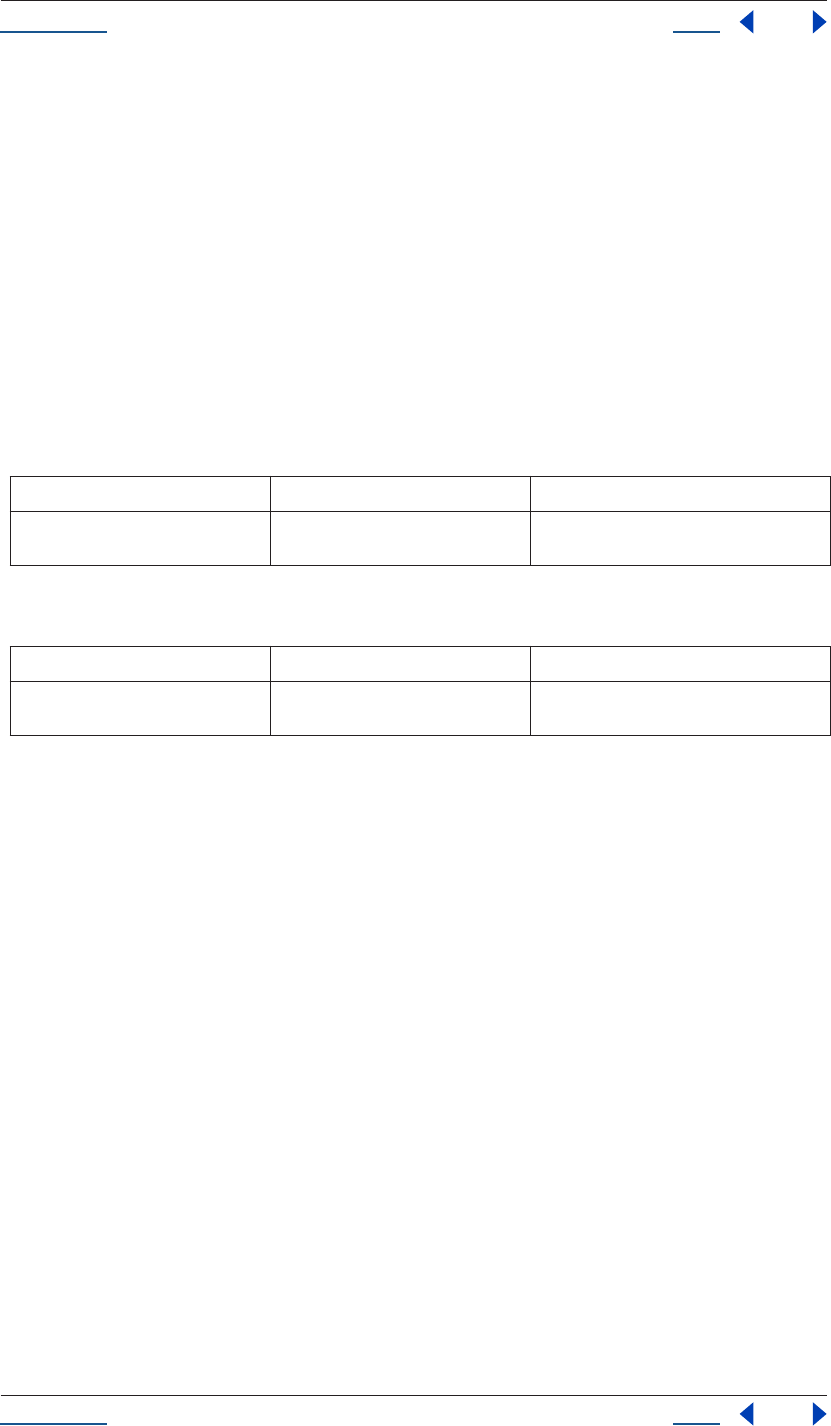
Using Help Back 177
Help Reference
Using Help Back 177
Type
String; read-only.
Example
confirm( "You are: " + system.userName + " running on " + system.machineName + ".");
TextDocument object
Description
The TextDocument object holds a string an attribute named "text." It is used to store values for a text layer's
Source Text property.
Attributes
Methods
Examples
1Set a value of some source text and then display an alert showing the new value:
var myTextDocument = new TextDocument("Happy Cake");
myTextLayer.property("Source Text").setValue(myTextDocument);
alert(myTextLayer.property("Source Text").getValue());
2Set keyframe values for text that will show different words over time:
var textProp = myTextLayer.property("Source Text");
textProp.setValueAtTime(0, new TextDocument("Happy"));
textProp.setValueAtTime(.33, new TextDocument("cake"));
textProp.setValueAtTime(.66, new TextDocument("is"));
textProp.setValueAtTime(1, new TextDocument("yummy!"));
TextDocument text attribute
TextDocument.text
Description
The actual text string stored in this TextDocument.
Type
String; read/write.
Attribute Reference Description
text see “TextDocument text attribute” on
page 177
text string stored in the TextDocument
Method Reference Description
TextDocument() see “TextDocument TextDocument()
method” on page 178
constructor to create a TextDocument
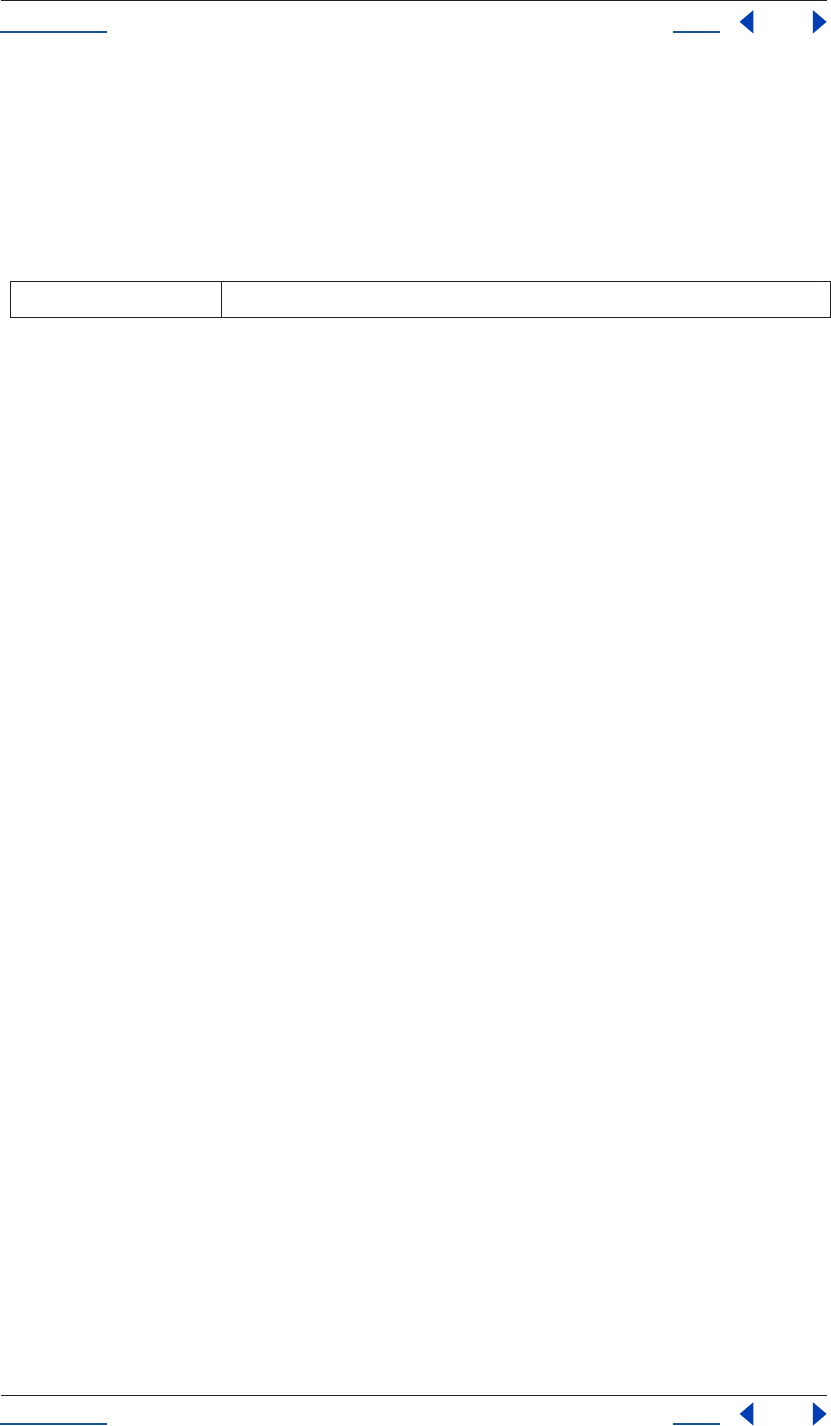

Using Help Back 179
Help Examples
Using Help Back 179
Examples
Following are sample scripts included on your CD with an overview of what they do and a step-by-step
breakdown of how they work. This set of examples is by no means exhaustive, but it does demonstrate some
of scripting’s more complex features in action. It also shows some typical programming constructions from
JavaScript that apply to scripting.
For examples specific to the use of the user interface, see “Creating User Interface Elements” on page 197. For
more examples from Adobe, as well as from other After Effects users, visit Adobe Studio Exchange at http://
share.studio.adobe.com, and choose Scripting under the Adobe After Effects section.
Apply effect
This example is a rather simple one; it first requires that the user select an AVLayer and, if that condition is
met, sets a 10-pixel Fast Blur to the selected layer (or layers), with Repeat Edge Pixels set to true.
The comments that appear on lines beginning with double forward slashes (//) describe what is occurring in
each section of the script. The script does the following, in order:
•checks that at least one selected layer can have effects applied to it
•adds Fast Blur to any selected layer that can
•sets Blurriness to 10 and turns on Repeat Edge Pixels
•returns a boolean stating whether the effect was added
•starts an undo group so that if the effect is being applied to more than one layer, the entire script operation
can be undone in one step rather than several
•sets an error with instructions to the user should the script fail to apply an effect to any layer
{
// This function applies the effect to one single layer
//
function applyFastBlurToLayer(the_layer)
{
var addedIt = false;
// Can only add an effect if there's an effects group in the layer.
// Some layers don't have one, like camera and light layers.
if (the_layer("Effects") != null) {
// Always best to check if it's safe before adding:
if (the_layer("Effects").canAddProperty("Fast Blur")) {
// add a new Fast Blur effect to the effects group of the layer
the_layer("Effects").addProperty("Fast Blur");
// set the parameter values
the_layer("Effects")("Fast Blur").blurriness.setValue(10);
the_layer("Effects")("Fast Blur").repeatEdgePixels.setValue(true);
addedIt = true;
}
Using Help Back 180
Help Examples
Using Help Back 180
}
// Return a boolean saying whether we added the effect
return addedIt;
}
// Start an undo group. By using this with an endUndoGroup(), you
// allow users to undo the whole script with one undo operation.
app.beginUndoGroup("Apply Fast Blur to Selections");
// If we don't find any selected layers, we'll put up an alert at the end.
var numLayersChanged = 0;
// Get the active comp
var activeItem = app.project.activeItem;
if (activeItem != null && (activeItem instanceof CompItem)){
var activeComp = activeItem;
// try to apply to every selected layer
var selectedLayers = activeComp.selectedLayers;
for (var i = 0; i < selectedLayers.length; i++) {
var curLayer = selectedLayers[i];
// The method returns true if it adds the effect, false otherwise.
if (applyFastBlurToLayer(curLayer) == true) {
numLayersChanged++;
}
}
}
// Print a message if no layers were affected
if (numLayersChanged == 0) {
alert("Please select an AV layer or layers and run script again");
}
app.endUndoGroup();
}
Replace text
This script performs an action much too specific to be useful as it is, but it shows the basics for a very useful
general operation, which is the automatic editing of text layers. Quite simply, the script looks for selected text
layers that contain the text string “blue” and changes this string to read “monday”--note that “blue” could
appear anywhere in the selected layer, even as part of another word, and still be changed. For example,
“bluejean” will read “mondayjean” after the effect is applied.
The comments that appear on lines beginning with double forward slashes (//) describe what is occurring in
each section of the script. The script does the following, in order:
Using Help Back 181
Help Examples
Using Help Back 181
•sets a function that replaces all instances of “blue” with “monday”
•sets a function that applies the first function to a single layer, looking for all Source Text keyframes where
“blue” might appear, evaluating each time whether any text was changed (and returning a boolean stating
whether it was changed)
•sets a single undo group for all changes made by the script
•pops up a warning if no layers were changed, instructing the user how to properly apply the script
{
// This script replaces text in all the selected text layers.
//
// It finds all instances of the word "blue" and changes them to "monday"
//
// This function takes theString and replaces firstWord with secondWord.
// It repeats, so it will replace all instances of firstWord in theString.
// Returns the changed string.
function replaceTextInString(theString, firstWord, secondWord)
{
var newString = theString;
while(newString.indexOf(firstWord) != -1) {
newString = newString.replace(firstWord,secondWord);
}
return newString;
}
// This function applies the change to one single layer
//
function replaceTextInLayer(theLayer, firstWord, secondWord)
{
var changedSomething = false;
// Get the sourceText property, if there is one.
var sourceText = theLayer.sourceText;
if (sourceText != null) {
if (sourceText.numKeys == 0) {
// textValue is a TextDocument. Retrieve the string inside
var oldString = sourceText.value.text;
if (oldString.indexOf(firstWord) != -1) {
var newString = replaceTextInString(oldString, firstWord, secondWord);
if (oldString != newString) {
sourceText.setValue(newString);
changedSomething = true;
}
}
} else {
// Do it for each keyframe:
for (var keyIndex = 1; keyIndex <= sourceText.numKeys; keyIndex++) {
// textValue is a TextDocument. Retrieve the string inside
var oldString = sourceText.keyValue(keyIndex).text;
Using Help Back 182
Help Examples
Using Help Back 182
if (oldString.indexOf(firstWord) != -1) {
var newString = replaceTextInString(oldString, firstWord, secondWord);
if (oldString != newString) {
sourceText.setValueAtKey(keyIndex,newString);
changedSomething = true;
}
}
}
}
}
// Return a boolean saying whether we replaced any text
return changedSomething;
}
// Start an undo group. By using this with an endUndoGroup(), you
// allow users to undo the whole script with one undo operation.
app.beginUndoGroup("Apply Text Change to Selections");
// If we don't make any changes, we'll put up an alert at the end.
var numLayersChanged = 0;
// Get the active comp
var activeItem = app.project.activeItem;
if (activeItem != null && (activeItem instanceof CompItem)){
var activeComp = activeItem;
// try to apply to every selected layer
var selectedLayers = activeComp.selectedLayers;
for (var i = 0; i < selectedLayers.length; i++) {
var curLayer = selectedLayers[i];
// The method returns true if it changes any text, false otherwise.
if (replaceTextInLayer(curLayer, "blue", "monday") == true) {
numLayersChanged++;
}
}
}
// Print a message if no layers were affected
if (numLayersChanged == 0) {
// Note: if you put quotes in the interior of the string,
// they must be preceded by a backslash, as in \"blue\" below.
alert("Please select a text layer or layers containing the word \"blue\" and run script again");
}
app.endUndoGroup();
}
Using Help Back 183
Help Examples
Using Help Back 183
Save and increment
Although much of the functionality of this script has been superseded by the incremental save feature that is
new to After Effects 6.5, it is still included here because it makes effective use of conditionals, functions, and
the File and FileSystem objects.
This script automatically saves a new copy of the open After Effects project and increments a three-digit
number in its name to distinguish it from preceding versions of the project. This script is saved as
save_and_increment.jsx on your install CD.
The first step is to determine whether the currently open project has ever been saved. This is accomplished
with an opening if/else statement. The first condition, “!app.project.file” is saying that if the project has not
been saved, an alert telling the user to save the project is popped up, and the script ends.
if (!app.project.file) {
alert ("This project must be saved before running this script.");
Next, if the project has been saved at least once before, we set some variables to point to the name of the file
and to the numbering and file extension that we plan to add to it. The lastIndexOf() JavaScript searches a
string backwards (from end to start) and in this case looks for the dot that separates the name from the
extension.
} else {
var currFile = app.project.file;
var currFileName = currFile.name;
var extPos = currFileName.lastIndexOf(".");
var ext = "";
Now we set the currFileName variable to the current name, before the dot.
if (extPos != -1) {
ext = currFileName.substring(extPos, currFileName.length);
currFileName = currFileName.substring(0, extPos);
}
Next we set a variable that will increment versions starting with 0, and we check to see if there is an underscore
character four characters from the end of currFileName. If there is, we assume that the incrementer has run
before, as its job is to assign a 3-digit suffix after an underscore incremented one higher than the last suffix. In
that case we set incrementer to the current numerical string and extract the name without this numerical
extension.
var incrementer = 0;
if (currFileName.charAt(currFileName.length -4) == "_") {
incrementer = currFileName.substring(currFileName.length - 3, currFileName.length);
currFileName = currFileName.substring(0, currFileName.length -4);
}
Now we add an incrementer loop and test for whether numbering has extended to two or three digits (e.g., if
the numbering has reached “_010” or above, or “_100” or above), assigning a zero for each if not.
incrementer++;
var istring = incrementer + "";
if (incrementer < 10) {
istring = "0" + istring;
}
Using Help Back 184
Help Examples
Using Help Back 184
if (incrementer < 100) {
istring = "0" + istring;
}
Finally we create a new file using our updated name and extension, display an alert letting the user know the
new file name being saved, and save the project with the new file name.
var newFile = File(currFile.path + "/" + currFileName + "_" + istring + ext);
alert(newFile.fsName);
app.project.save(newFile);
}
Render named items
This script allows you to find compositions in the open project with a particular text string in their names and
send all such compositions to the Render Queue.
To start, we check to see if a default string for rendering has already been set in the user preferences. If so, we
set this as a user prompt, handy if you’re always looking for the same string (for example, “FINAL” or
“CURRENT”). If not, we set a new sectionName and keyName for the preferences file along with a placeholder
value for the string that will be entered by the user.
var sectionName = "AE Example Scripts";
var keyName = "Render comps with this string";
var searchString = "";
if (app.settings.haveSetting(sectionName, keyName)) {
searchString = app.settings.getSetting(sectionName, keyName);
}
Now we display a prompt to the user asking for what text string we should use.
searchString = prompt("What string to render?", searchString);
We next go through the project looking for the text entered by the user, and seeing if the item that contains
that text is a composition, sending all compositions with that text string in their names to the Render Queue.
If the user cancels, the text is undefined. Otherwise, we save the new setting in preferences, convert it to all
lowercase letters for consistency’s sake (keeping in mind that the search will not be case sensitive).
if (searchString) {
app.settings.saveSetting(sectionName, keyName, searchString);
searchString = searchString.toLowerCase();
for (i = 1; i <= app.project.numItems; ++i) {
var curItem = app.project.item(i);
if (curItem instanceof CompItem) {
if (curItem.name.toLowerCase().indexOf(searchString) != -1) {
app.project.renderQueue.items.add(curItem);
}
}
}
Using Help Back 185
Help Examples
Using Help Back 185
Finally, we make the Render Queue window visible and bring it to the front, ready for the user to assign save
locations for the new render queue items.
app.project.renderQueue.showWindow(true);
}
New render locations
This script allows the user to select queued items in the Render Queue and assign a new render destination for
them.
First, we prompt the user for a new folder to use as a render destination.
var newLocation = folderGetDialog("Select a render destination...");
Next, we make certain that the user entered a new location (and didn’t cancel the dialog). Then we create a
loop for each selected render queue item. If this item is queued, we take the current render location, give it a
new name and location, and then display an alert stating the new file path.
if (newLocation) { //boolean to see if the user cancelled
for (i = 1; i <= app.project.renderQueue.numItems; ++i) {
var curItem = app.project.renderQueue.item(i);
if (curItem.status == RQItemStatus.QUEUED) {
for (j = 1; j <= curItem.numOutputModules; ++j) {
var curOM = curItem.outputModule(j);
var oldLocation = curOM.file;
curOM.file = new File(newLocation.toString() + "/" + oldLocation.name);
alert(curOM.file.fsName);
}
}
}
}
Smart import
This script allows the user to import the full, nested contents of a folder just by selecting it. It attempts to detect
whether each item is a still, moving footage, or an image sequence. The user still has to make other choices via
dialogs, such as which layer of a multi-layer image (e.g., a .psd file) to import.
First, we prompt the user for a folder whose contents are to be imported, and ascertain that the user chooses
a folder rather than cancelling the dialog. We then call a function that appears below to import all of the files,
one by one.
var targetFolder = folderGetDialog("Import Items from Folder...");
//returns a folder or null
if (targetFolder) {
function processFile (theFile) {
var importOptions = new ImportOptions (theFile);
//create a variable containing ImportOptions
importSafeWithError (importOptions);
}
Using Help Back 186
Help Examples
Using Help Back 186
Now we add a function to test whether a given file is part of a sequence. This uses Regular Expressions, which
are a special type of JavaScript designed to reduce the number of steps required to evaluate a string. The first
one tests for the presence of sequential numbers anywhere in the file name, followed by another making
certain that the sequential files aren’t of a type that can’t be imported as a sequence (moving image files).
We then check adjacent files to see if a sequence exists, stopping after we’ve evaluated ten files to save
processing time.
function testForSequence (files){
var searcher = new RegExp ("[0-9]+");
var movieFileSearcher = new RegExp ("(mov|avi|mpg)$", "i");
var parseResults = new Array;
for (x = 0; (x < files.length) & x < 10; x++) {
//test that we have a sequence, stop parsing after 10 files
var movieFileResult = movieFileSearcher.exec(files[x].name);
if (! movieFileResult) {
var currentResult = searcher.exec(files[x].name);
If no match is found using the Regular Expression looking for a number string, we get null and assume there
is no image sequence. Otherwise, we want an array consisting of the matched string and its location within
the file name.
if (currentResult) {
//we have a match - the string contains numbers
//the match of those numbers is stored in the array[1]
//take that number and save it into parseResults
parseResults[parseResults.length] = currentResult[0];
}
else {
parseResults[parseResults.length] = null;
}
}
else {
parseResults[parseResults.length] = null;
}
}
Now if all of the files just evaluated indicated that they are part of a numbered sequence, we assume that we
have a sequence and return the first file of that sequence. Otherwise, we end this function.
var result = null;
for (i = 0; i < parseResults.length; ++i) {
if (parseResults[i]) {
if (! result) {
result = files[i];
}
} else {
//case in which a file name did not contain a number
result = null;
break;
}
Using Help Back 187
Help Examples
Using Help Back 187
}
return result;
}
Next we add a function to pop up error dialogs if there is a problem with any file we are attempting to import.
function importSafeWithError (importOptions) {
try {
app.project.importFile (importOptions);
} catch (error) {
alert(error.toString() + importOptions.file.fsName);
}
}
Next comes a function to actually import any image sequence that we discover using testForSequence(),
above. Note that there is an option for forcing alphabetical order in sequences, which is commented out in the
script as written. If you want to force alphabetical order, un-comment the line “importOptions.forceAlpha-
betical = true” by removing the two slashes at the beginning of that line.
function processFolder(theFolder) {
var files = theFolder.getFiles();
//Get an array of files in the target folder
//test whether theFolder contains a sequence
var sequenceStartFile = testForSequence(files);
//if it does contain a sequence, import the sequence
if (sequenceStartFile) {
var importOptions = new ImportOptions (sequenceStartFile);
//create a variable containing ImportOptions
importOptions.sequence = true;
//importOptions.forceAlphabetical = true;
//un-comment this if you want to force alpha order by default
importSafeWithError (importOptions);
}
//otherwise, import the files and recurse
for (index in files) {
//Go through the array, set each element to singleFile, run this:
if (files[index] instanceof File) {
if (! sequenceStartFile) {
//if file is already part of a sequence, don't import it individually
processFile (files[index]);
//calls the processFile function above
}
}
if (files[index] instanceof Folder) {
processFolder (files[index]); // recursion
}
}
}
processFolder(targetFolder);
Using Help Back 188
Help Examples
Using Help Back 188
}
Render and email
This script renders all queued items in an open project and sends an email report to indicate when the render
has completed. It makes use of two other scripts that follow, email_methods.jsx (to send the email properly)
and email_setup.jsx (which establishes the sender, recipient, and email server).
We start by establishing conditions under which the script will run. An open project with at least one item
queued is required.
{
var safeToRunScript = true;
safeToRunScript = app.project != null;
if (! app.project) {
alert ("A project must be open to run this script.");
}
if (safeToRunScript) {
debugger;
//check the render queue and make certain at least one item is queued
safeToRunScript = false;
for (i = 1; i <= app.project.renderQueue.numItems; ++i) {
if (app.project.renderQueue.item(i).status ==
RQItemStatus.QUEUED) {
safeToRunScript = true;
break;
}
}
if (! safeToRunScript) {
alert ("You do not have any items set to render.");
}
}
Now we check whether we have email settings already saved in the Preferences. If so, we don’t need to prompt
the user. If not, we run the email_setup.jsx script, which prompts the user as to the mail gateway, sender and
recipient addresses. If there are saved settings that you need to change, you can always run email_setup.jsx to
make new settings that overwrite the existing ones.
if (safeToRunScript) {
var settings = app.settings;
if ( !settings.haveSetting("Email Settings", "Mail Server") ||
!settings.haveSetting("Email Settings", "Reply-to Address") ||
!settings.haveSetting("Email Settings", "Render Report
Recipient")){
// We don't have the settings yet, so run email_setup.jsx
// to prompt for them
var email_setupfile = new File("email_setup.jsx");
email_setupfile.open("r");
Using Help Back 189
Help Examples
Using Help Back 189
eval( email_setupfile.read() );
email_setupfile.close();
}
var myQueue = app.project.renderQueue //creates a shortcut for RQ
Now we’re ready to render. Once rendering is complete, the script creates a text string for the email message
that contains the start time of the render, the render time of each item in the queue, and the total render time.
myQueue.render();
var projectName = "Unsaved Project";
if (app.project.file) {
projectName = app.project.file.name;
}
var myMessage = "Rendering of " + projectName + " is complete.\n\n";
Now email the message, using the three settings from the email_methods.jsx script that has been automatically
run to prompt the user for the server, above.
if ( !settings.haveSetting("Email Settings", "Mail Server") ||
!settings.haveSetting("Email Settings", "Reply-to Address") ||
!settings.haveSetting("Email Settings", "Render Report
Recipient")){
alert("Can't send an email, I don't have all the settings I need.
Aborting.");
} else {
// Load code from a file with handy emailing methods:
var emailCodeFile = new File("email_methods.jsx");
emailCodeFile.open("r");
eval( emailCodeFile.read() );
emailCodeFile.close();
Finally, we send an error if for any reason we are unable to send the mail.
var serverSetting = settings.getSetting("Email Settings", "Mail
Server");
var fromSetting = settings.getSetting("Email Settings", "Reply-
to Address");
var toSetting = settings.getSetting("Email Settings", "Render
Report Recipient");
var myMail = new EmailSocket(serverSetting);
if (! myMail.send (fromSetting, toSetting, "AE Render Completed", myMessage) ) {
alert("Sending mail failed");
}
}
}
}
Using Help Back 190
Help Examples
Using Help Back 190
Email methods
This script creates an email object for use with the Render and Email script, described above. It uses code that
is specific to the socket object and therefore requires advanced understanding of networking to edit; the
comments below describe its operation.
// Create an email object. The function may be called both
// as a global function and as a constructor. It takes the
// name of the email server, and an optional Boolean that,
// if true, prints debugging messages.
// This object is not guaranteed to work for all SMTP servers,
// some of them may require a different set of commands.
// functions:
// send (fromAddress, toAddress, subject, text) - send an email
// auth (name, pass) - do an authorization via POP3
// both functions return false on errors
// sample:
// e = new EmailSocket ("mail.host.com");
// authorize via POP3 (not all servers require authorization)
// e.auth ("myname", "mypass");
// send the email
// e.send ("me@my.com", "you@you.com", "My Subject", "Hi there!")
// This script makes use of the Socket object, and creates a new class
// called EmailSocket that is derived from Socket. For more information on
// creating new classes in this way, consult chapter 7 of JavaScript, The
// Definitive Guide, by David Flanagan (O'Reilly).
//This is the constructor for the email socket. It takes as arguments:
//server - the address of the email server (is not checked for validity here)
//dbg - a boolean, if true, prints additional error information
function EmailSocket (server, dbg) {
var obj = new Socket;
obj._host = server;
obj._debug = (dbg == true);
obj.__proto__ = EmailSocket.prototype;
return obj;
}
// correct the protoype chain to point to the Socket prototype chain
// - this is what actually causes the derivation from Socket.
EmailSocket.prototype.__proto__ = Socket.prototype;
// This sets up the send() member function. send() takes as arguments:
// from - the email address of the sender. This is not validated.
// to - the email address of the recipient. If there is an error,
// and the from address is incorrect, you will not be notified.
// subject - the contents of the subject field.

Using Help Back 191
Help Examples
Using Help Back 191
// text - the body of the message.
//
// Returns:
// true if sending succeeded
// false otherwise (if there was an error)
//
// Note that this code uses a local function object to create
// the function that is assigned to send.
EmailSocket.prototype.send = function (from, to, subject, text) {
// open the socket on port 25 (SMTP)
if (!this.open (this._host + ":25"))
return false;
try {
// discard the greeting
var greeting = this.read();
if (this._debug)
write ("RECV: " + greeting);
// issue EHLO and other commands
this._SMTP ("EHLO " + from);
this._SMTP ("MAIL FROM: " + from);
this._SMTP ("RCPT TO: " + to);
this._SMTP ("DATA");
// send subject and time stamp
this.writeln ("From: " + from);
this.writeln ("To: " + to);
this.writeln ("Date: " + new Date().toString());
if (typeof subject != undefined)
this.writeln ("Subject: " + subject);
this.writeln();
// send the text
if (typeof text != undefined)
this.writeln (text);
// terminate with a single dot and wait for response
this._SMTP (".");
// terminate the session
this._SMTP ("QUIT");
this.close();
return true;
}
catch (e) {
this.close();
return false;
}
}
// Authorize via POP3. Supply name and password.
//
// Returns:
// true if sending succeeded
// false otherwise (if there was an error)

Using Help Back 192
Help Examples
Using Help Back 192
//
// Arguments:
// name - the userName of the account
// pass - the password
EmailSocket.prototype.auth = function (name, pass) {
// open the connection on port 110 (POP3)
if (!this.open (this._host + ":110"))
return false;
try {
// discard the greeting
var greeting = this.read();
if (this._debug)
write ("RECV: " + greeting);
// issue POP3 commands
this._POP3 ("USER " + name);
this._POP3 ("PASS " + pass);
this._POP3 ("QUIT");
this.close();
return true;
}
catch (e) {
this.close();
return false;
}
}
// Users of the EmailSocket do not need to be concerned with
// the following method. It is an implementation helper.
// local function to send a command & check a POP3 reply
// throws in case of error
EmailSocket.prototype._POP3 = function (cmd) {
if (this._debug)
writeln ("SEND: " + cmd);
if (!this.writeln (cmd))
throw "Error";
var reply = this.read();
if (this._debug)
write ("RECV: " + reply);
// the reply starts by either + or -
if (reply [0] == "+")
return;
throw "Error";
}
// Users of the EmailSocket do not need to be concerned with
// the following method. It is an implementation helper.
// local function to send a command & check a SMTP reply
// throws in case of error
Using Help Back 193
Help Examples
Using Help Back 193
EmailSocket.prototype._SMTP = function (cmd) {
if (this._debug)
writeln ("SEND: " + cmd);
if (!this.writeln (cmd))
throw "Error";
var reply = this.read();
if (this._debug)
write ("RECV: " + reply);
// the reply is a three-digit code followed by a space
var match = reply.match (/^(\d{3})\s/m);
if (match.length == 2) {
var n = Number (match [1]);
if (n >= 200 && n <= 399)
return;
}
throw "Error";
}
// nice to have: a toString()
// This function allows the email object to be printed.
EmailSocket.prototype.toString = function() {
return "[object Email]";
}
Email setup
A simple script that prompts the user for the server name, email sender, and email recipient that are saved as
Settings for the Render and Email script (above). You can run this script as standalone any time you want to
change the settings. The script will run email_setup.jsx whenever the settings don't exist; under normal
circumstances this would happen only the first time, or if the settings/preferences file is deleted.
This script is a good example of how a script can create settings that are saved in Preferences for the sole use
of scripting (as opposed to altering existing After Effects Preferences settings).
{
// This script sets up 3 email settings.
// It can be run all by itself, but it is also called
// within "3-Render and Mail.jsx" if the settings aren't yet set.
var serverValue = prompt("Enter name of mail server:");
var fromValue = prompt("Enter reply-to email address:");
var toValue = prompt("Enter recipient's email address");
if (serverValue != null && serverValue != "") {
app.settings.saveSetting("Email Settings", "Mail Server",
serverValue);
}
if (fromValue != null && fromValue != "") {
app.settings.saveSetting("Email Settings", "Reply-to Address",
fromValue);
}
if (toValue != null && toValue != "") {
Using Help Back 194
Help Examples
Using Help Back 194
app.settings.saveSetting("Email Settings", "Render Report
Recipient", toValue);
}
}
Dialogs and console
This script shows how to use the various dialogs (alert(), prompt(), confirm()) and how to write to the info
palette (write(), writeLn() and clearOutput()). Although this script serves no practical use, these dialogs and
info palette prompts are highly useful and should be familiar to all script creators.
// Use confirm() to let the user tell us whether he can see the "info" window.
// Depending how the user clicks, true or false is returned.
if (confirm("Can you see the \"info\" palette?")){
// Start by clearing the information area.
clearOutput();
// write and writeLn will write to the info tab with or without a
//'newline'
// at the end.
write("Roses are red,");
writeLn("violets are blue");
write("Sugar is sweet,");
writeLn("and so is Equal.");
var reply = prompt( "Did you like my poem?");
if (reply == "yes" || reply == "YES"){
alert("See the info window for a special secret fortune.");
// This gets rid of the old writing on the info tab.
clearOutput();
writeLn("You have a future as a literary critic.");
}
else {
alert("Hmm, I'll try once more...");
writeLn(".......");
writeLn("Roses are red, violets are blue,");
writeLn("I've got some gum, on the sole of my shoe.");
}
alert("Okay, all done with this test.");
}
else {
// alert() just displays a message in a dialog box.
alert("Please make it so you can see the info palette and run this script
again");
}

Using Help Back 195
Help Examples
Using Help Back 195
File fun
This script shows how to open files, open projects, collect names of the Comps in the scene, prompt a user for
where to write a file, write to a text file, and save the text file. It is useful only as an example of how the
individual methods and attributes operate; it doesn’t serve any useful production purpose.
// First, close any project that might be open.
if (app.project != null){
// 3 choices here, CloseOptions.DO_NOT_SAVE_CHANGES,
// CloseOptions.PROMPT_TO_SAVE_CHANGES, and CloseOptions.SAVE_CHANGES
app.project.close(CloseOptions.DO_NOT_SAVE_CHANGES);
}
// Prompt the user to pick a project file:
// First argument is a prompt, second is the file type.
var pfile = fileGetDialog("Select a project file to open", "EggP aep");
if (pfile == null){
alert("No project file selected. Aborting.");
} else {
// Open that file. It becomes the current project.
var my_project = app.open( pfile );
// Build a default text file name from the project's filename.
// Remove the ".aep" file extension (if present), then add
//_compnames.txt.
var default_text_filename;
var suffix_index = pfile.name.lastIndexOf(".aep");
if (suffix_index != -1){
default_text_filename = pfile.name.substring(0,suffix_index);
}else {
default_text_filename = pfile.name;
}
default_text_filename += "_compnames.txt";
// Create another file object for the file we'll write out.
// First argument is the prompt, second is a default file name, third is
//the file type.
var text_file = filePutDialog("Select a file to output your results",
default_text_filename, "TEXT txt");
if (text_file == null){
alert("No output file selected. Aborting.");
} else {
// opens file for writing. First argument is mode ("w" for writing),
// second argument is file type (for mac only),
// third argument is creator (mac only, "????" is no specific app).
text_file.open("w","TEXT","????");
// Write the heading of the file:
text_file.writeln("Here is a list of all the comps in " +
pfile.name);

Using Help Back 197
Adobe After Effects Help Creating User Interface Elements
Using Help Back 197
Creating User Interface Elements
A JavaScript framework for creating user interface (UI) elements is included in After Effects 6.5.
This framework allows developers to use JavaScript to create UI components such as windows, panels,
buttons, checkboxes, and so on. The framework--called the scripting user interface--is built as an abstraction
layer on top of the windowing framework provided by the host platform on which After Effects is running.
Both Windows and MAC OS X native windowing systems are supported.
The motivation behind the creation of this scripting user interface was twofold:
•To enable JavaScripts to create dialogs and interact with controls. This satisfies a fundamental need on the
part of developers to create parameterized scripts, whose actions can be controlled more directly by the end
user.
•To extend the JavaScript environment to allow scripts to create UI elements dynamically. In this way, devel-
opers can create specialized interactive access to an application’s functionality.
Types of interface elements
The following controls and UI elements are supported:
•Panels (frames) -- (classname Panel) a container to group and organize other control types
•Push buttons -- (classname Button) a button containing a text string
•Radio buttons-- (classname RadioButton) a dual-state control, usually grouped with other radio buttons,
only one of which is set
•Checkbox buttons -- (classname Checkbox) a dual-state control showing a checked box (if true) or an
empty box (if false)
•Edit text -- (classname EditText) an text field that the user can change.
•Static text -- (classname StaticText) a text field that the user cannot change
•Scrollbars -- (classname Scrollbar) a standard scrollbar with a moveable element and stepper buttons to
incrementally move the element.
•Sliders -- (classname Slider) a standard slider with a moveable position indicator
In addition, the given classnames described above can used in window resource specifications to define
controls within a window or panel. See “Creating a window using window resource specifications” on
page 203 for more information.
JavaScript UI interface
This section provides a description of the scripting user interface programming model.
UI objects
The scripting user interface defines Window objects that wrap native windows and various control elements
(Buttons, StaticText, etc.), which wrap simple native controls. These objects share common methods such as
“query the element type”, “move the elements around”, and “set the title, caption or content”. For a complete
list of properties and methods, see “Reference” on page 21.
Using Help Back 198
Adobe After Effects Help Creating User Interface Elements
Using Help Back 198
Creating a window
To create a new window, use the Window constructor function. The constructor takes the desired type of the
window (dialog) as a parameter. You can supply optional arguments to specify an initial window title and
bounds.
The code examples provided in the JavaScript Interface section consist of short segments from a complete
script that is included later in this document. The examples presented build upon each other.
The following example creates an empty dialog with the variable name dlg. This dialog is carried though to
subsequent examples:
// Create an empty dialog window near upper left of the screen var
var dlg = new Window('dialog', 'Alert Box Builder', [100,100,480,245]);
dlg.show();
.Newly created windows are initially invisible; the show() method makes them visible.
Roughly speaking, the numeric parameters to the constructor correspond to the top left and bottom right
coordinates of the window. The bounds supplied when creating the dialog specify the requested size of the
client area, which is the area of the dialog on which you can create controls. It does not include the title bar
and borders around the client area. The size and position of the dialog as a whole are automatically adjusted
to maintain the requested client area size.
For a more detailed description of window bounds, see “Element size and location” on page 198.
Container elements
All windows are containers, which is to say that they contain other elements such as panels, buttons, and check-
boxes within their boundaries.
Within a window, you can create other types of container elements and add interface components to them,
just as you add elements to a window. Elements added to a container are considered children of that container,
and certain operations performed on a container element also apply to its children. For instance, calling the
container’s hide() method makes the container invisible and makes all of its visible children invisible as well.
Along the same lines, calling the container’s show() method makes the container visible as well as any child
elements that were visible before the container was hidden. The following properties and methods of
containers also apply to all children of that container: visible, enabled, hide(), show().
Element size and location
To set the size and location of windows and controls, use the bounds property. As is typical when working with
window systems, the location of a window is defined as the point (pair of coordinates) where the top left
corner of the window is specified in the screen coordinate system.

Using Help Back 199
Adobe After Effects Help Creating User Interface Elements
Using Help Back 199
The location of an element within a window or other container element is defined as the point where the top
left corner of an element is specified in the window coordinate system, relative to the container the element
lies within. Size is specified by width and height in pixels. A complete bounds specification therefore consists
of 4 integer values that define the position of the upper left corner of the object and its dimensions.
The value of the bounds property can take several forms: a string with special contents, an inline JavaScript
“Bounds” object, or a four-element array. The following examples show equivalent ways of placing a 380-by-
390 pixel window near the upper left corner of the screen:
var dlg = new Window(‘dialog’, ‘Alert Box Builder’, [100,100,480,490]);
dlg.bounds = [100,100,480,490];
dlg.bounds = {left:100, top:100, right:480, bottom:490};
dlg.bounds = “left:100, top:100, right:480, bottom:490”;
Note that the window dimensions define the size of the “client area” of the window, which is the portion of
the window that an application can directly control. The actual window size will typically be larger, because
the host platform’s window system can add title bars and borders to windows.
When read, the bounds property returns a Bounds object--an array of four values representing the coordi-
nates of the upper left and lower right corners of the element: [left, top, right, bottom].
Adding elements
To add elements to a window or other container, use the container’s add() method. This method accepts the
type of the element to be created and some optional parameters, depending on the element type. The return
value is the UI object created or null on errors. The value of the element’s visible property defaults to “true”.
The element is initially visible, but it will remain invisible as long as its parent object is invisible.
A second (optional) parameter may be used to specify the initial bounds. The bounds is relative to the working
area of its parent container. For elements that display text, the text may be specified as the third (optional)
parameter--other types of elements have different semantics for a third argument.
For more information on the way in which each type of element interprets optional parameters, see “JavaS-
cript UI reference” on page 213. These optional parameters are positional, meaning that if you want to specify
some text for an element, but don’t care about its bounds, you must still provide an argument for the second
parameter in order to supply a value for the third (text) parameter. You can ‘skip over’ a positional parameter
by specifying the ‘undefined’ value as its argument value. In the example below, a Button element is created
with an initial text value, but no bounds value.
dlg.btnPnl = dlg.add(‘panel’, [15,330,365,375], ‘Build it’);
dlg.btnPnl.testBtn = dlg.btnPnl.add(‘button’, undefined, ‘Test’);
Dynamically creating a property such as btnPnl to reference the control object returned by add() is not
required, but can make it easier to later refer to the control. See “Accessing child elements” on page 200 for
more information.
Creation properties
Some element types have attributes that may only--in fact, can only--be specified when the element is created.
These are not normal properties of the element, in that they cannot be changed during the element’s lifetime,
and they are needed only once. For these element types, an optional creation properties argument may be
supplied to the add() method--this argument is an object with one or more properties that control things like
the element’s appearance, or special functions like ‘read-only’ for an edit text element.
Using Help Back 200
Adobe After Effects Help Creating User Interface Elements
Using Help Back 200
All UI elements have a creation property called name, which can be used to assign a name for identifying that
element. In the following example, the new Button element is assigned the name ‘ok’:
dlg.btnPnl.buildBtn = dlg.btnPnl.add(‘button’, [125,15,225,35], ‘Build’,
{name:’ok’});
Accessing child elements
A reference to each element added to a window is appended to the window’s children property.
The children collection is an array containing every defined element, indexed from 0 to the number of
elements minus 1. For controls or other elements that do not have children, the children collection is empty.
The number of child elements in a window is equal to the value of the length property of the children
collection. In the example below, since the ‘msgPnl’ panel was the first element created in dlg, the text for the
panel’s title can be set as follows:
var dlg = new Window('dialog', 'Alert Box Builder',[100,100,480,245]);
dlg.msgPnl = dlg.add('panel', [25,15,355,130]);
dlg.children[0].text = 'Messages';
dlg.show();
Using creation properties, a name can be assigned to a newly created element. If this is done, a child can be
referred to by its name. For instance, the Button in the example in the previous section was named ‘ok’, so the
Button could now be referred to like this:
dlg.btnPnl.children[‘ok’].text = “Build”;
An even simpler way to refer to a named child element is to use its name as a property of its parent element.
We can also refer to the Button from the previous example like this:
dlg.btnPnl.ok.text = “Build”;
The value of an element’s internal name property is used by the scripting user interface when a script accesses
a property of the element’s parent object that does not match any of the predefined properties.
In this case, the framework searches the names of the parent element’s children to see if a match exists, and if
so, returns a reference to the matching child object.
Types of UI elements
This section introduces the types of user interface elements you can create within a Window or other type of
container element.
The Panel element
The Panel element is the only type of non-window container that is currently defined. Panels are typically used
to visually organize related controls.
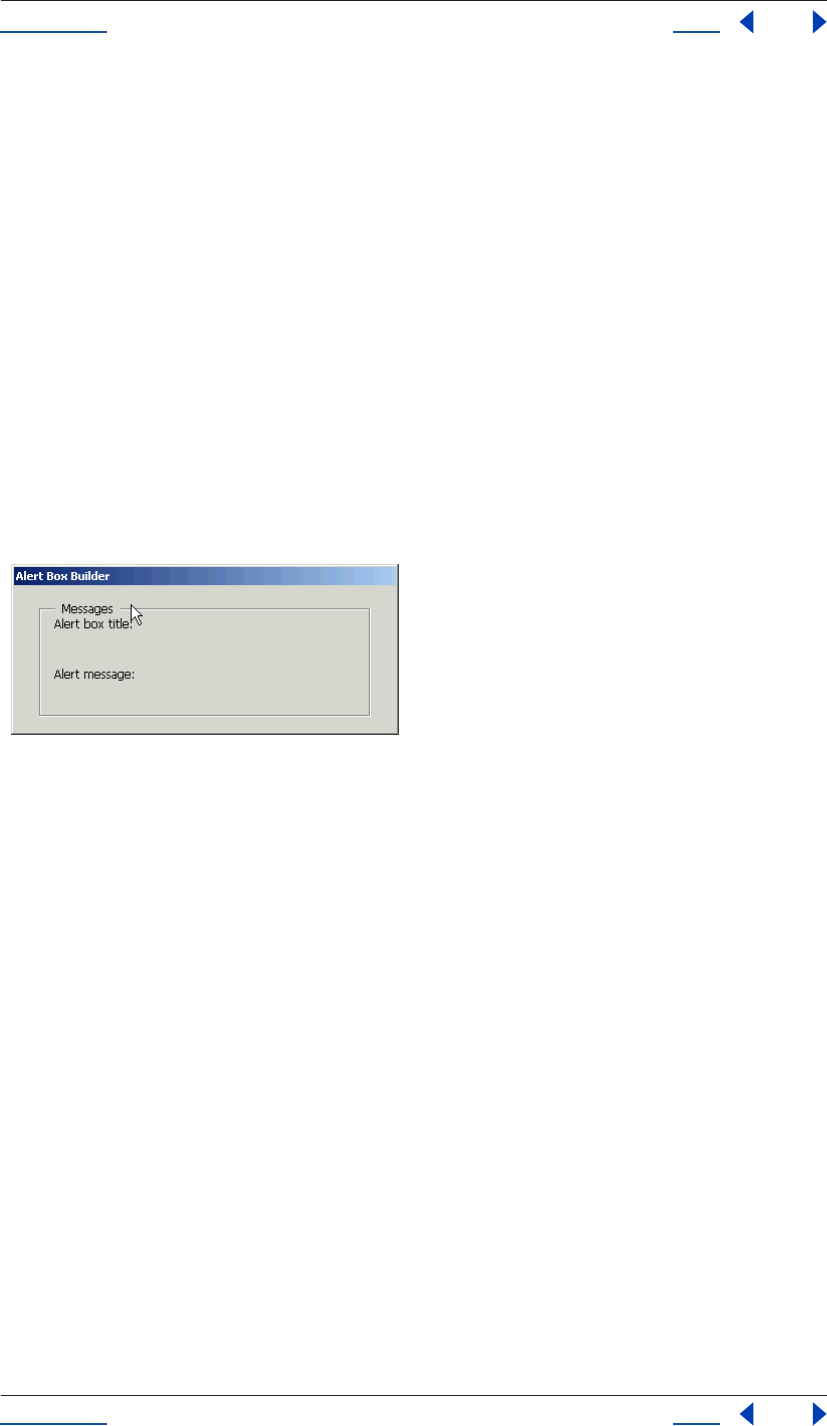
Using Help Back 201
Adobe After Effects Help Creating User Interface Elements
Using Help Back 201
You can also use panels as separators: panels with width = 0 appear as vertical lines and panels with height =
0 appear as horizontal lines. When you create a Panel, you can specify an optional borderStyle property (used
only at creation time) to control the appearance of the border drawn around the panel.
var dlg = new Window('dialog', 'Alert Box Builder',[100,100,480,245]);
dlg.msgPnl = dlg.add('panel', [25,15,355,130], 'Messages');
dlg.show();
The Static Text element
StaticText elements are typically used to display text strings that are not intended for direct manipulation by
a user, like informative messages or identifying information for other elements. In the following example, a
Panel is created, and several StaticText elements are added to it:
// sample code for section 2.6.2
var dlg = new Window('dialog', 'Alert Box Builder',[100,100,480,245]);
dlg.msgPnl = dlg.add('panel', [25,15,355,130], 'Messages');
dlg.msgPnl.titleSt = dlg.msgPnl.add('statictext', [15,15,105,35],
'Alert box title:');
dlg.msgPnl.msgSt = dlg.msgPnl.add('statictext', [15,65,105,85],
'Alert message:');
dlg.show();
The EditText element
EditText elements are typically used to provide a means for users to enter text to be supplied to the script when
the dialog is dismissed. Text in EditText elements can be selected by a user and copied from or pasted into. The
text property can be assigned to in order to display text in the element, and it can be read from to obtain the
current text value.
The textselection property can be assigned to in order to replace the current selection with new text, or to insert
text at the cursor (insertion point). It can be read from to obtain the current selection, if any.
Using the same panel pictured above, the example now adds some EditText elements, with initial values that
a user can accept or replace:
var dlg = new Window('dialog', 'Alert Box Builder',[100,100,480,245]);
dlg.msgPnl = dlg.add('panel', [25,15,355,130], 'Messages');
dlg.msgPnl.titleSt = dlg.msgPnl.add('statictext', [15,15,105,35],
'Alert box title:');
dlg.msgPnl.titleEt = dlg.msgPnl.add('edittext', [115,15,315,35], 'Sample Alert');
dlg.msgPnl.msgSt = dlg.msgPnl.add('statictext', [15,65,105,85], 'Alert message:');
dlg.msgPnl.msgEt = dlg.msgPnl.add('edittext', [115,45,315,105],
'<your message here>', {multiline:true});
dlg.show();
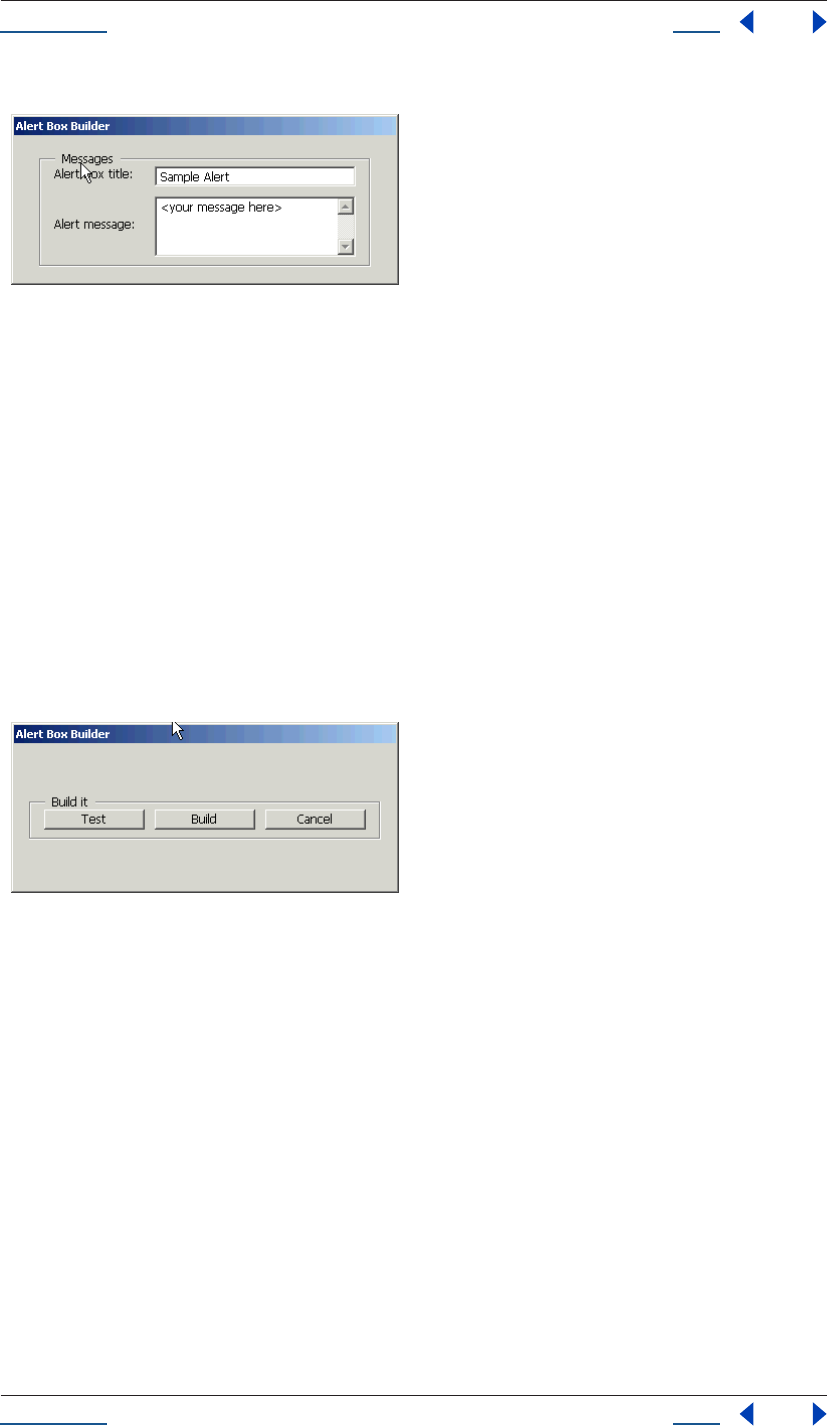
Using Help Back 202
Adobe After Effects Help Creating User Interface Elements
Using Help Back 202
Note the creation property on the second EditText field, where multiline:true is specified. multiline:true
indicates that the text in the item should wrap to the next page. In other words, it specifies a field in which a
long text string may be entered, and the text will wrap to appear as multiple lines.
The Button element
Button elements are typically used to initiate some action from a Window when a user clicks the mouse pointer
over the button; for example: accepting a dialog’s current settings, canceling a dialog, bringing up a new dialog
box, etc. The text property provides a label to identify a Button’s function:
var dlg = new Window('dialog', 'Alert Box Builder',[100,100,480,245]);
dlg.btnPnl = dlg.add('panel', [15,50,365,95], 'Build it');
dlg.btnPnl.testBtn = dlg.btnPnl.add('button', [15,15,115,35], 'Test');
dlg.btnPnl.buildBtn = dlg.btnPnl.add('button', [125,15,225,35],
'Build', {name:'ok'});
dlg.btnPnl.cancelBtn = dlg.btnPnl.add('button', [235,15,335,35],
'Cancel', {name:'cancel'});
dlg.show();
The Slider element
Slider elements are typically used to select within a range of values, allowing the user to hold the mouse pointer
down over a moveable position indicator on the slider and drag this indicator within the range of the slider.
If you click the mouse pointer on a point on the slider bar, the position indicator will jump to that location.
A Slider has a value property that reflects the position of the moveable indicator, and minvalue and maxvalue
properties to define the endpoints of the slider’s range of values.
To make a slider control appear like those used in After Effects, adjust the height of the control until the slider
bar appears as a single line.
The Scrollbar element
Scrollbar elements are similar to Slider elements, in that they are often used to select within a range of values,
and have a moveable position indicator. They have all the properties of sliders, and in addition, they have
‘stepper buttons’ at each end of the scrollbar for moving the position indicator in fixed-size steps.

Using Help Back 203
Adobe After Effects Help Creating User Interface Elements
Using Help Back 203
You can control the size of each ‘step’ by setting the stepdelta property. Clicking ahead of or behind the position
indicator makes the position indicator jump a fixed number of values toward the point where you clicked. You
can control the size of this jump by setting the jumpdelta property.
You can create scrollbars with horizontal or vertical orientation; if width is greater than height, the orientation
is horizontal, otherwise it is vertical. The following example creates a Scrollbar element with associated
StaticText and EditText elements within a panel:
dlg.sizePnl = dlg.add(‘panel’, [60,240,320,315], ‘Dimensions’);
dlg.sizePnl.widthSt = dlg.sizePnl.add(‘statictext’, [15,15,65,35],
‘Width:’;
dlg.sizePnl.widthScrl = dlg.sizePnl.add(‘scrollbar’,
[75,15,195,35],300, 300, 800);
dlg.sizePnl.widthEt = dlg.sizePnl.add(‘edittext’, [205,15,245,35]);
Note that the last 3 arguments to the add() method that creates the scrollbar define the values for the value,
minvalue and maxvalue properties. Scrollbars are often created with an associated EditText field to display the
current value of the scrollbar, and to allow setting the scrollbar’s position to a specific value.
Creating a window using window resource specifications
A specially formatted string provides a simple and compact means of creating a window and its component
elements as a resource specification. A resource specification allows you to define and configure multiple
window components in one easy-to-reference script.
The special string is passed as the type parameter to the Window constructor function, as follows:
// create a new dialog from a resource specification
var alertBuilderResource =
“dialog { text: ‘Alert Box Builder’, bounds:[100,100,480,490], \
msgPnl: Panel { text: ‘Messages’, bounds:[25,15,355,130], \
titleSt:StaticText { text:’Alert box title:’, \
bounds:[15,15,105,35] }, \
titleEt:EditText { text:’Sample Alert’, bounds:[115,15,315,35] }, \
msgSt: StaticText { text:’Alert message:’, \
bounds:[15,65,105,85] }, \
msgEt: EditText { text:’<your message here>’, \
bounds:[115,45,315,105], properties:{multiline:true} } \
}, \
hasBtnsCb: Checkbox { text:’Has alert buttons?’, alignment:’center’, \
bounds:[125,145,255,165] }, \
alertBtnsPnl: Panel { text:‘Button alignment’, bounds:[45,180,335,225], \
alignLeftRb:RadioButton { text:’Left’, bounds:[15,15,95,35] }, \
alignCenterRb:RadioButton { text:’Center’, \
bounds:[105,15,185,35] }, \
alignRightRb:RadioButton { text:’Right’, bounds:[195,15,275,35] } \
}, \
sizePnl: Panel { text: ‘Dimensions’, bounds:[60,240,320,315], \
widthSt:StaticText { text:’Width:’, bounds:[15,15,65,35] }, \
widthScrl:Scrollbar { minvalue:300, maxvalue:800, \
bounds:[75,15,195,35] }, \
widthEt:EditText { bounds:[205,15,245,35] }, \
heightSt:StaticText { text:’Height:’, bounds:[15,45,65,65] }, \
heightScrl:Scrollbar { minvalue:200, maxvalue:600, \
bounds:[75,45,195,65] }, \
heightEt:EditText { bounds:[205,45,245,65] } \
}, \
btnPnl: Panel { text: ‘Build it’, bounds:[15,330,365,375], \
testBtn:Button { text:’Test’, bounds:[15,15,115,35] }, \
buildBtn:Button { text:’Build’, bounds:[125,15,225,35], \
properties:{name:’ok’} }, \

Using Help Back 204
Adobe After Effects Help Creating User Interface Elements
Using Help Back 204
cancelBtn:Button { text:’Cancel’, bounds:[235,15,335,35], \
properties:{name:’cancel’} } \
} \
}”;
dlg = new Window (alertBuilderResource);
The general structure of a window resource specification is a Window type specification (i.e., “dialog”),
followed by a set of braces enclosing one or more property definitions. Controls are defined as properties
within windows and other containers by specifying the classname of the control in a property definition, with
properties of the control enclosed in braces {}, for example: testBtn: Button { text: ‘Test’ }.
Creation properties are specified in a properties property as named properties of an inline object (see example
above). The syntax of window resource specification strings is completely described below.
Window resource specification syntax
The window resource specification syntax is given in BNF (Backus-Naur Form) below:
resourceSpec = ‘”’ windowTypeName inlineObject ‘”’
windowTypeName = [a modal dialog]
inlineObject = “{“ propertiesList “}”
propertiesList = propertyDefn { “,” propertyDefn }
propertyDefn = propertyName “:” propertyValue
propertyName = [a JavaScript property name]
propertyValue = “null” | “true” | “false” | string | number
| inlineArray |objectDefn
string = [a JavaScript string literal]
number = [any JavaScript integer or real number literal]
inlineArray = “[“ propertyValue { “,” propertyValue } “]”
objectDefn = ( namedObject | inlineObject )
namedObject = [any object classname] inlineObject
Note: To create a UI element, the classname in the namedObject definition above can be any element classname
referred to in “Types of interface elements” on page 197. For example:
“dialog { \
text: ‘From Resource’, bounds: [10, 10, 210, 110], \
box: Panel { \
bounds: [10, 10, 190, 90], \
ok: Button { \
text: ‘OK’, bounds:[40, 30, 140, 50], \
} \
} \
}”;
Interacting with controls: events and event callbacks
When a script creates a window, it typically adds control elements to the window that a user can manipulate,
for instance, by clicking a button, entering text in a text box, moving a scrollbar, etc.
These user actions or manipulations generate events within the user interface system. The script that creates a
window needs a way to be notified of events from that window or from controls within the window. The
scripting user interface provides a number of event callback methods that a script can define as properties of
any UI element that the script needs to interact with.
Using Help Back 205
Adobe After Effects Help Creating User Interface Elements
Using Help Back 205
Each class of UI element has a set of callback methods defined for it. For windows, there are callbacks like
onClose(), onMove(), and onResize(). For controls, callbacks vary from type to type. A typical callback is
onClick() for button, radiobutton, and checkbox elements, and onChange() for edittext fields, scrollbars, and
sliders.
To handle a given event for some UI element, simply define a property of the same name as the event callback
in the element and assign a JavaScript function you have defined to it. The example below uses "in line"
functions, which employ a unique syntax and do not require a name. However, you can also define the
function elsewhere in the script. In that case, simply assign the name of the function to the event handler
property. The scripting user interface calls these functions on event notifications if defined.
Examples:
/*‘has buttons’ checkbox enables or disables the panel that
determines the justification of the ‘alert’ button group */
dlg.hasBtnsCb.onClick =
function () { this.parent.alertBtnsPnl.enabled = this.value; };
//The Build and Cancel buttons close this dialog
with (dlg.btnPnl) {
buildBtn.onClick =
function () { this.parent.parent.close(1); };
cancelBtn.onClick =
function () { this.parent.parent.close(2); };
};
Because event callback functions work as methods of the object in which they are defined, the functions have
access to the object via the “this” JavaScript keyword. In the examples above, “this” refers to the UI object a
given callback is defined in, so properties of the UI object can be accessed relative to the “this”. For example,
because each UI object has a parent property which is a reference to its container object, this.parent gets you a
reference to the object’s parent object.
To elaborate further on this point, a button( ) is contained within a panel, which is contained within a window,
all of which are ultimately closed. The progression is from smaller to larger UI moving from left to right.
Also be aware that you can simulate user actions by sending an event notification directly to a UI element, via
the element’s notify() method. In this manner, a script can generate events in the controls of a window, as if a
user was clicking buttons, entering text, moving a window, etc.
radiobutton and checkbox elements have a boolean value property; using notify() to simulate a click on these
elements also changes the value of this property, just like clicking the element would do. For instance, if the
value of a checkbox ‘hasBtnsCb’ in our example above is true, the following example changes the value to false:
if (dlg.hasBtnsCb.value == true)
dlg.hasBtnsCb.notify();
// dlg.hasBtnsCb.value is now false
For a complete description of the different event callback methods and notify(), see “Common methods and
event handlers” on page 217.
buildBtn.onClick = function () {this.parent.parent.close(1);};
button
panel
dialog

Using Help Back 206
Adobe After Effects Help Creating User Interface Elements
Using Help Back 206
Modal dialogs
A modal dialog is initially invisible. When calling its show() method, the dialog is displayed and starts
executing. The call to show() does not return until the dialog has been dismissed, typically by the user clicking
an OK or Cancel button.
When calling the hide() or close() methods during the execution of a modal dialog, the dialog is dismissed.
The close() method accepts an optional argument that the call to show() returns.
Warning: You cannot use the JavaScript Debugger to debug event callback functions for modal dialogs, because
once the dialog starts executing, it captures all mouse events. Setting a breakpoint in an event callback function for
a modal dialog will result in an apparent application hang if the breakpoint is ever reached.
To work around this restriction, an effective debugging technique is to create your dialog, but not call its show()
method to make it visible. Then use the debugger to call the notify() method on controls whose event callback
functions you wish to debug. It’s considered good design practice to keep the code in the event callback functions
simple, while deferring the primary script logic execution until after the dialog has been dismissed.
Default and Cancel elements
Modal dialogs can usually be dismissed by typing certain keyboard shortcuts. In addition to clicking the ‘OK’
or ‘Cancel’ buttons, typing the ‘Enter’ key normally produces the same results as clicking the ‘OK’ (or default)
button, and typing the ‘Esc’ key is equivalent to clicking the ‘Cancel’ button. In each case, the keyboard
shortcut is the same as if your script had called the notify() method for the associated Button. The dialog
designer has explicit control over which Button elements are notified by these keyboard shortcuts: a newly-
created dialog has defaultElement and cancelElement properties that are initially undefined. The dialog
designer can set these properties to the objects representing the buttons that should be notified when the
respective keyboard shortcut is typed.
The scripting user interface provides reasonable defaults if the defaultElement and cancelElement properties
are still undefined when the dialog is about to be shown for the first time.
Default values for the defaultElement property are determined by the following algorithm:
•The scripting user interface searches the dialog’s buttons for a button whose name property has the string
value “ok” (case is not important). If one is found, defaultElement is set to that object.
•If no matching named object is found, the scripting user interface searches the dialog’s buttons for a button
whose text property has the string value “ok” (case is not important). If one is found, defaultElement is set
to that object.
Default value for the cancelElement property are determined by the following algorithm:
•The scripting user interface searches the dialog’s buttons for a button whose name property has the string
value “cancel” (case is not important). If one is found, cancelElement is set to that object.
•If no matching named object is found, the scripting user interface searches the dialog’s buttons for a button
whose text property has the string value “cancel” (case is not important). If one is found, cancelElement is
set to that object.
These algorithms handle most dialog boxes without the designer having to explicitly set these properties.
When you add buttons to a dialog that will be used to dismiss the dialog, use creation properties to set the name
property of such buttons to ‘ok’ or ‘cancel’, depending on the desired semantics; this precaution makes the
above algorithm work properly even when the text of such buttons is localized. If the scripting user interface
cannot find a matching button for either case, the respective property is set to null, which means that keyboard
shortcuts for default or cancel will not notify any elements.

Using Help Back 207
Adobe After Effects Help Creating User Interface Elements
Using Help Back 207
Guidelines for creating and using modal dialogs
When your script creates a dialog, you typically create controls that the user must interact with in order to
enter values that your script will use. In general, you can minimize the number of event callback functions you
attach to various controls in your dialogs, unless interaction with those controls changes the operation of the
dialog itself. In most cases where you simply want to read the states of various controls when the dialog is
dismissed, you do not need to handle events for them. For instance, you often don’t need onClick() functions
for every checkbox and radiobutton in your dialog: when the dialog is dismissed, read their states using their
value properties.
Some exceptions to this guideline:
•onChange() functions are needed for edittext elements, if users enter values which must be validated (like a
number within a range). The event callback must perform any necessary validation, and interact with the
user on errors.
•Define onClick() for OK and Cancel buttons which close the dialog with a given value.
Note: Perform this function only if you have not defined the defaultElement and/or cancelElement properties or
named these buttons in such a way that they will automatically be identified as the OK and Cancel buttons.
Prompts and Alerts
Some JavaScript environments provide functions on the global window object to display message boxes or
alert boxes and a prompt box that displays one or two lines of text and then allows the user to enter one line
of text.
The scripting user interface defines functions alert(), confirm() and prompt() on the Window class that
provides this standard functionality. The host application controls the appearance of these simple dialog
boxes, so they are consistent with other alert and message boxes displayed by the application. See the “JavaS-
cript UI reference” on page 213 for details.
JavaScript UI example
Having explored the individual scripting components that make up the user interface, you are now ready to
see the parts assembled into real-world JavaScript code that produces a fully functional user interface.
The JavaScript UI code sample described below includes the following functions, which creates a simple user
interface builder window populated with various panels, checkboxes, buttons and controls. When you run the
builder, you can then cause it to create an Alert Box.
•createBuilderDialog() -- Creates an empty dialog window near the upper left of the screen and adds a title
panel, a checkbox, a control panel and a panel with buttons to test parameters and create the Alert Box
specification.
•initializeBuilder() --Sets up initial control states and attaches event callback functions to controls.
•runBuilder() -- Runs the builder dialog and returns the resulting Alert Box UI
•createResource() -- Creates and returns a string containing a dialog resource specification that creates the
Alert Box UI using the parameters entered
•stringProperty() -- Returns a formatted string
•arrayProperty() -- Returns a formatted array
•createTestDialog() -- Creates a new Test dialog
These functions are bundled together into a Main script, which assembles the final Alert Box dialog.

Using Help Back 208
Adobe After Effects Help Creating User Interface Elements
Using Help Back 208
createBuilderDialog
Most of the heavy-lifting for visual components of the JavaScript UI code sample occurs in the createBuilder-
Dialog() function, where the main components of the dialog are configured, as displayed below.
function createBuilderDialog()
{
//Create an empty dialog window near the upper left of the screen
var dlg = new Window('dialog', 'Alert Box Builder', [100,100,480,490]);
//Add a panel to hold title and 'message text' strings
dlg.msgPnl = dlg.add('panel', [25,15,355,130], 'Messages');
dlg.msgPnl.titleSt = dlg.msgPnl.add('statictext', [15,15,105,35], 'Alert box title:');
dlg.msgPnl.titleEt = dlg.msgPnl.add('edittext', [115,15,315,35], 'Sample Alert');
dlg.msgPnl.msgSt = dlg.msgPnl.add('statictext', [15,65,105,85], 'Alert message:');
dlg.msgPnl.msgEt = dlg.msgPnl.add('edittext', [115,45,315,105], '<your message here>',
{multiline:true});
//Add a checkbox to control the presence of buttons to dismiss the alert box
dlg.hasBtnsCb = dlg.add('checkbox', [125,145,255,165], 'Has alert buttons?');
//Add panel to determine alignment of buttons on the alert box
dlg.alertBtnsPnl = dlg.add('panel', [45,180,335,225], 'Button alignment');
dlg.alertBtnsPnl.alignLeftRb = dlg.alertBtnsPnl.add('radiobutton', [15,15,95,35], 'Left');
dlg.alertBtnsPnl.alignCenterRb = dlg.alertBtnsPnl.add('radiobutton', [105,15,185,35], 'Center');
dlg.alertBtnsPnl.alignRightRb = dlg.alertBtnsPnl.add('radiobutton', [195,15,275,35], 'Right');
//Add a panel with controls for the dimensions of the alert box
dlg.sizePnl = dlg.add('panel', [60,240,320,315], 'Dimensions');
dlg.sizePnl.widthSt = dlg.sizePnl.add('statictext', [15,15,65,35], 'Width:');
dlg.sizePnl.widthScrl = dlg.sizePnl.add('scrollbar', [75,15,195,35], 300, 300, 800);
dlg.sizePnl.widthEt = dlg.sizePnl.add('edittext', [205,15,245,35]);
dlg.sizePnl.heightSt = dlg.sizePnl.add('statictext', [15,45,65,65], 'Height:');
dlg.sizePnl.heightScrl = dlg.sizePnl.add('scrollbar', [75,45,195,65], 200, 200, 600);
dlg.sizePnl.heightEt = dlg.sizePnl.add('edittext', [205,45,245,65]);
//Add a panel with buttons to test parameters and create the alert box specification
dlg.btnPnl = dlg.add('panel', [15,330,365,375], 'Build it');
dlg.btnPnl.testBtn = dlg.btnPnl.add('button', [15,15,115,35], 'Test');
dlg.btnPnl.buildBtn = dlg.btnPnl.add('button', [125,15,225,35], 'Build', {name:'ok'});
dlg.btnPnl.cancelBtn = dlg.btnPnl.add('button', [235,15,335,35], 'Cancel', {name:'cancel'});
return dlg;
// createBuilderDialog
1
2
3
4
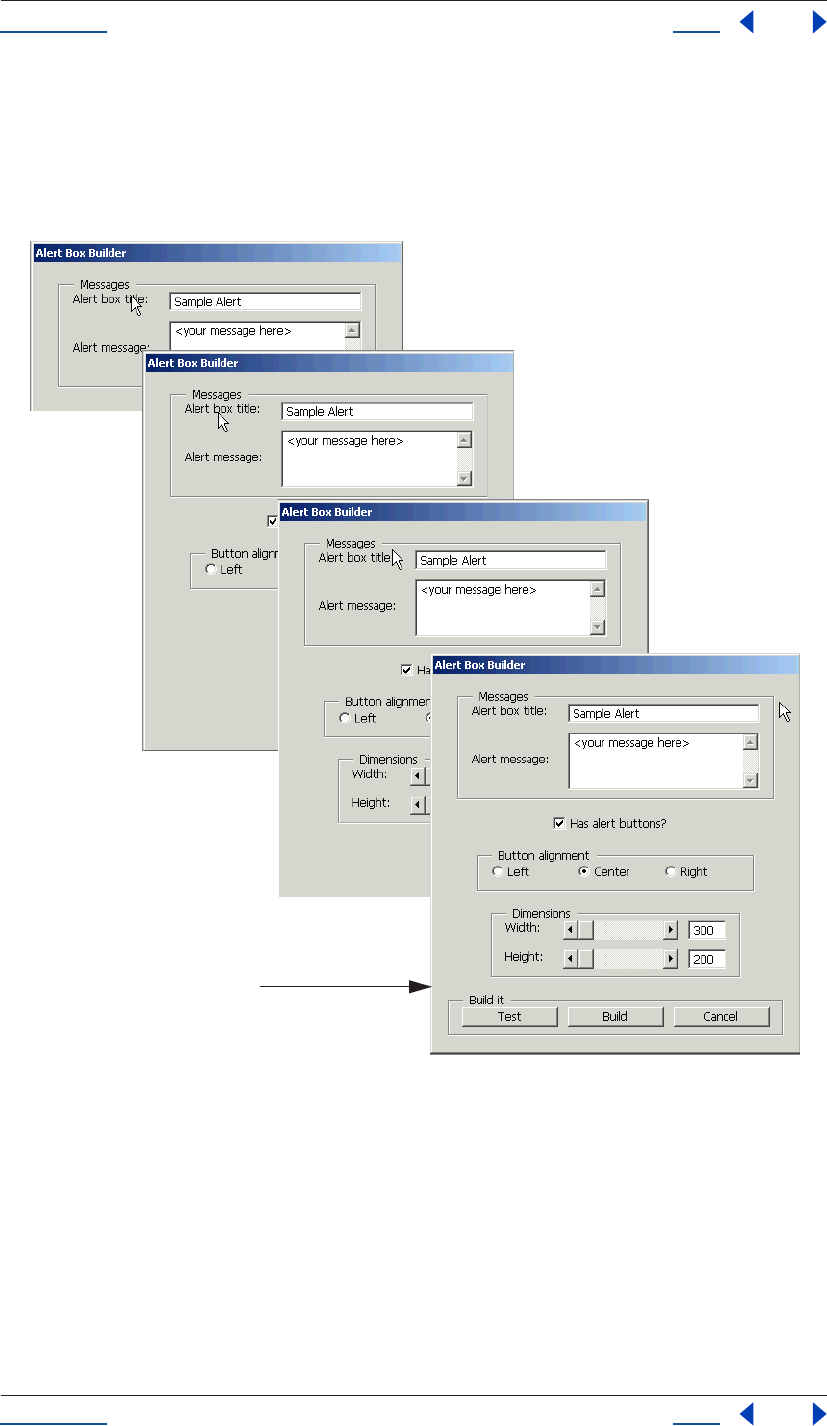
Using Help Back 209
Adobe After Effects Help Creating User Interface Elements
Using Help Back 209
This code snippet, when broken down into smaller segments--and run in the context of the entire UI sample
code that follows--produces the following succession of dialogs, which coalesce into one final Alert Box
window.
For the final dialog to actually display, supporting code to initialize and run the Alert Box Builder must be
included, as illustrated below.
function initializeBuilder(builder)
{
//Set up initial control states
with (builder) {
hasBtnsCb.value = true;
alertBtnsPnl.alignCenterRb.value = true;
with (sizePnl) {
widthEt.text = widthScrl.value;
heightEt.text = heightScrl.value;
}
1
2
3
4
Final Dialog
Created

Using Help Back 210
Adobe After Effects Help Creating User Interface Elements
Using Help Back 210
}
//Attach event callback functions to controls
/*'has buttons' checkbox enables or disables the panel that
determines the justification of the 'alert' button group */
builder.hasBtnsCb.onClick =
function () { this.parent.alertBtnsPnl.enabled = this.value; };
/*The edittext fields and scrollbars in sizePnl are connected */
with (builder.sizePnl) {
widthEt.onChange =
function () { this.parent.widthScrl.value = this.text; };
widthScrl.onChange =
function () { this.parent.widthEt.text = this.value; };
heightEt.onChange =
function () { this.parent.heightScrl.value = this.text; };
heightScrl.onChange =
function () { this.parent.heightEt.text = this.value; };
}
with (builder.btnPnl) {
//The Test button creates a trial Alert box from the current specifications
testBtn.onClick =
function () {
Window.alert('Type Enter or Esc to dismiss the test Alert box');
createTestDialog(createResource(this.parent.parent));
};
//The Build and Cancel buttons close this dialog
buildBtn.onClick =
function () { this.parent.parent.close(1); };
cancelBtn.onClick =
function () { this.parent.parent.close(2); };
};
} // initializeBuilder
function runBuilder(builder)
{
//Run the builder dialog, return its result
return builder.show();
}
/*This function creates and returns a string containing a dialog
resource specification that will create an Alert dialog using
the parameters the user entered. */
function createResource(builder)
{
//Define the initial part of the resource spec with dialog parameters
var dlgWidth = Number(builder.sizePnl.widthEt.text);
var dlgHeight = Number(builder.sizePnl.heightEt.text);
var res = "dialog { " +
stringProperty("text", builder.msgPnl.titleEt.text) +
arrayProperty("bounds", 0, 0, dlgWidth, dlgHeight) +
"\n";
//Define the alert message statictext element, sizing it to the alert box
var margin = 15; var l, t;
var msgWidth, msgHeight;
var hasButtons = builder.hasBtnsCb.value;
var btnsHeightUsed = hasButtons ? 20 + margin : 0;
msgHeight = 60;
msgWidth = dlgWidth - (margin * 2);
l = margin;
t = (dlgHeight - msgHeight - btnsHeightUsed) / 2;
res += " msg: StaticText { " +
stringProperty("text", builder.msgPnl.msgEt.text) +
arrayProperty("bounds", l, t, l + msgWidth, t + msgHeight) +
"justify:'center', properties:{multiline:true} }";
//Define buttons if desired
if (hasButtons) {
var btnWidth = 90;
//Align buttons as specified
with (builder.alertBtnsPnl) {
if (alignLeftRb.value)
Using Help Back 211
Adobe After Effects Help Creating User Interface Elements
Using Help Back 211
l = margin;
else if (alignCenterRb.value)
l = (dlgWidth - (btnWidth * 2 + 10)) / 2;
else
l = dlgWidth - ((btnWidth * 2 + 10) + margin);
}
t = dlgHeight - btnsHeightUsed;
res += ",\n" +
" okBtn: Button { " +
stringProperty("text", "OK") +
arrayProperty("bounds", l, t, l + btnWidth, t + 20) +
"},\n";
l += btnWidth + 10;
res += " cancelBtn: Button { " +
stringProperty("text", "Cancel") +
arrayProperty("bounds", l, t, l + btnWidth, t + 20) +
"}";
}
//All done!
res += "\n}";
return res;
}
function stringProperty(pname, pval)
{
return pname + ":'" + pval + "', ";
}
function arrayProperty(pname, l, t, r, b)
{
return pname + ":[" + l + "," + t + "," + r + "," + b + "], ";
}
function createTestDialog(resource)
{
var target = new Window (resource);
return target.show();
}
//------------- Main script -------------//
var builder = createBuilderDialog();
initializeBuilder(builder);
if (runBuilder(builder) == 1) {
//Create the Alert dialog resource specification string
var resSpec = createResource(builder);
//Write the resource specification string to a file, using the standard file open dialog
var fname = File.openDialog('Save resource specification');
var f = File(fname);
if (f.open('w')) {
var ok = f.write(resSpec);
if (ok)
ok = f.close();
if (! ok)
Window.alert("Error creating " + fname + ": " + f.error);
}
}
Sample code summary
This sample code is used to demonstrate some practical applications of the scripting interface. Here a few of
the major intentions of the script:
•To provide a simple real-world example of creating a user interface with multiple components and controls.
•To show how certain controls such as sliders and edit text boxes can interact.
•To show how radio buttons work and how to set radio buttons to true and initialize them.
•To show a multi-line text edit box as displayed in the messages panel of the dialog box.
•To show how you can associate static text fields with edit text fields and static text with other types of
controls.

Using Help Back 212
Adobe After Effects Help Creating User Interface Elements
Using Help Back 212
•To show how simple event callback functions work and how you can attach event handler functions to any
controls that can generate events.
•To show how to enable and disable sets of controls. For example, in the alert checkbox,
if you unclick the checkbox then everything in the button alignment field suddenly gets greyed out.
•To demonstrate how you typically dismiss a modal dialog by providing an OK and Cancel button.
•To show you can still read property values out of the dialog and its controls after the dialog has been
dismissed.
Resource-specification sample code
To run this JavaScript UI code using a resource specification, change the lines indicated below and include the
resource specification sample code. For more information on resource specifications, refer to “Creating a
window using window resource specifications” on page 203.
Note: This is a complete example of a resource specification string. The alertBuilderResource() code displayed
below is a way to create the same main dialog box created by the createBuilderDialog() function.

Using Help Back 213
Adobe After Effects Help Creating User Interface Elements
Using Help Back 213
//------------- Alternate dialog creation using resource specification -------------//
/*
To use this code, replace the line above that says
var builder = createBuilderDialog();
with
var builder = createBuilderDialogFromResource();
*/
var alertBuilderResource =
"dialog { text: 'Alert Box Builder', bounds:[100,100,480,490], \
msgPnl: Panel { text: 'Messages', bounds:[25,15,355,130], \
titleSt:StaticText { text:'Alert box title:', bounds:[15,15,105,35] }, \
titleEt:EditText { text:'Sample Alert', bounds:[115,15,315,35] }, \
msgSt: StaticText { text:'Alert message:', bounds:[15,65,105,85] }, \
msgEt: EditText { text:'<your message here>', bounds:[115,45,315,105],
properties:{multiline:true} } \
}, \
hasBtnsCb: Checkbox { text:'Has alert buttons?', alignment:'center',
bounds:[125,145,255,165] }, \
alertBtnsPnl: Panel { text:'Button alignment', bounds:[45,180,335,225], \
alignLeftRb:RadioButton { text:'Left', bounds:[15,15,95,35] }, \
alignCenterRb:RadioButton { text:'Center', bounds:[105,15,185,35] }, \
alignRightRb:RadioButton { text:'Right', bounds:[195,15,275,35] } \
}, \
sizePnl: Panel { text: 'Dimensions', bounds:[60,240,320,315], \
widthSt:StaticText { text:'Width:', bounds:[15,15,65,35] }, \
widthScrl:Scrollbar { minvalue:300, maxvalue:800, bounds:[75,15,195,35] }, \
widthEt:EditText { bounds:[205,15,245,35] }, \
heightSt:StaticText { text:'Height:', bounds:[15,45,65,65] }, \
heightScrl:Scrollbar { minvalue:200, maxvalue:600, bounds:[75,45,195,65] }, \
heightEt:EditText { bounds:[205,45,245,65] } \
}, \
btnPnl: Panel { text: 'Build it', bounds:[15,330,365,375], \
testBtn: Button { text:'Test', bounds:[15,15,115,35] }, \
buildBtn:Button { text:'Build', bounds:[125,15,225,35], properties:{name:'ok'} }, \
cancelBtn:Button { text:'Cancel', bounds:[235,15,335,35], properties:{name:'cancel'} } \
} \
}";
function createBuilderDialogFromResource()
{
//Create from resource
return new Window(alertBuilderResource);
} // createBuilderDialogFromResource
JavaScript UI reference
The JavaScript user interface defines the global elements of the Window object and properties and methods
of all the UI classes.
Global elements of the Window object
The following functions are class methods of the global Window class only; windows created via new Window()
do not have these functions defined.
To call class methods, use the following example syntax: Window.alert("Class method!");
alert (text)
Displays the specified string in a user alert box that provides an OK button. The alert dialog is not intended
for lengthy messages. When the string argument to the alert method is too long, the alert dialog truncates it.
confirm (text)
Displays the specified string in a self-sizing modal dialog box that provides Yes (default) and No buttons.
When this user clicks one of these buttons, this method hides the dialog and returns a value indicating the
button the user clicked to dismiss the dialog. A return value of true indicates that the user clicked the Yes
button to dismiss the confirm box. The confirmation dialog displays lengthier messages than the alert and
prompt dialogs do, but if this string is too long, the dialog truncates it.
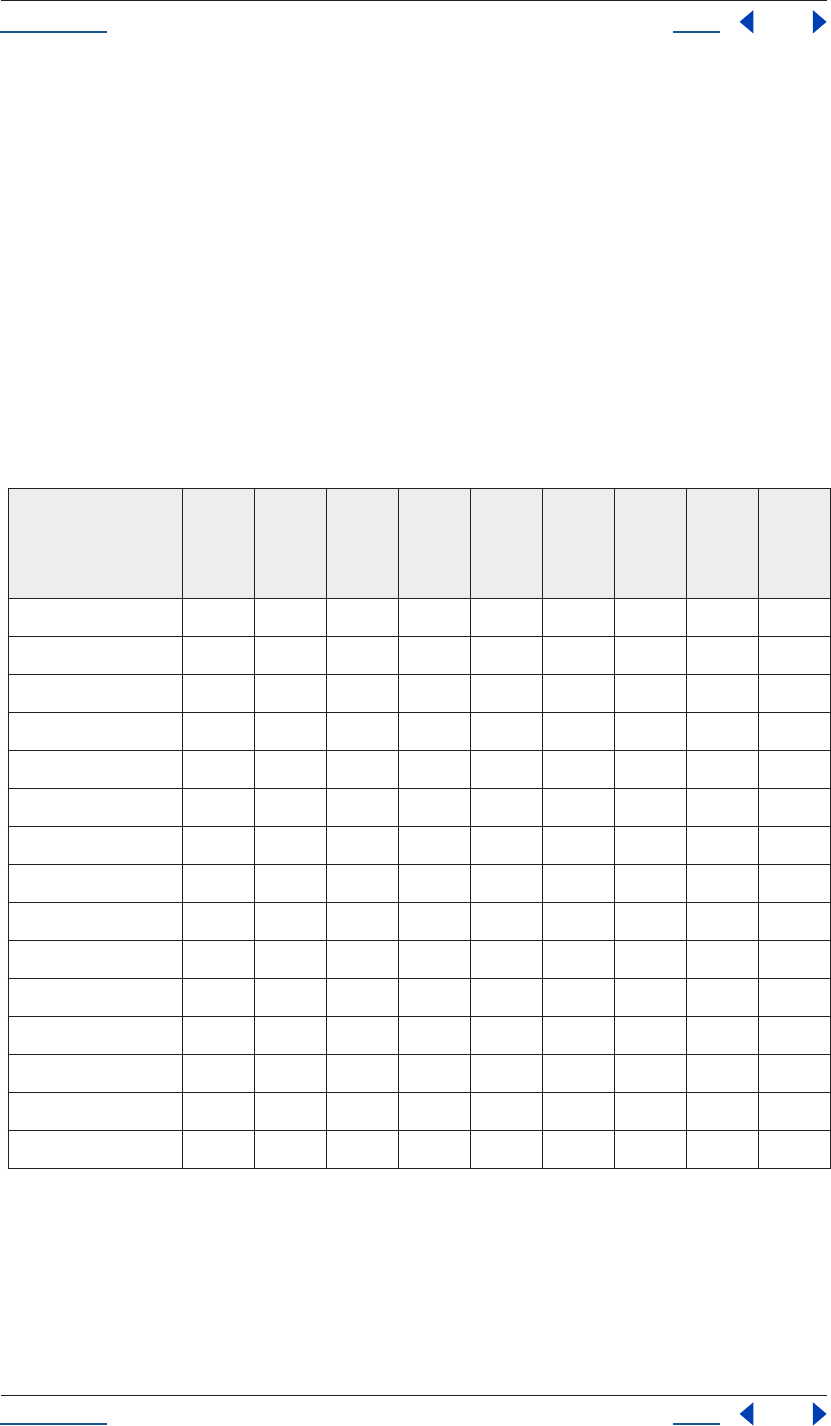
Using Help Back 214
Adobe After Effects Help Creating User Interface Elements
Using Help Back 214
find (type, title)
return value: Object
Finds an existing window already created by a script. title is the title of the window and type is modal dialog.
This value is a hint in case more than one window has the same title; if the type is unimportant, null or an
empty string can be passed. If the window was found, the corresponding JavaScript Window object is
generated and returned; if the window cannot be determined, the return value is null.
prompt (prompt [, default])
Displays a modal dialog that returns the user’s text input. When the dialog opens, it displays the given prompt
text and its text edit field is initialized with any specified default text. When the user clicks OK to dismiss the
dialog, it returns the text the user entered. If the user clicks the Cancel button in this dialog, this method’s
result is the value null.
Common object properties
The following table shows the common properties defined for each element type.
Window
Panel
StaticText
EditText
Button
Checkbox
RadioButton
Scrollbar
Slider
active x xxxxxx
bounds xxxxxxxxx
children xxxxxxxxx
enabled xxxxxxxxx
jumpdelta x
justify xxxxxxx
maxvalue xx
minvalue xx
parent xxxxxxxxx
stepdelta x
text xxxxxxx
textselection x
type xxxxxxxxx
value xxxx
visible xxxxxxxxx
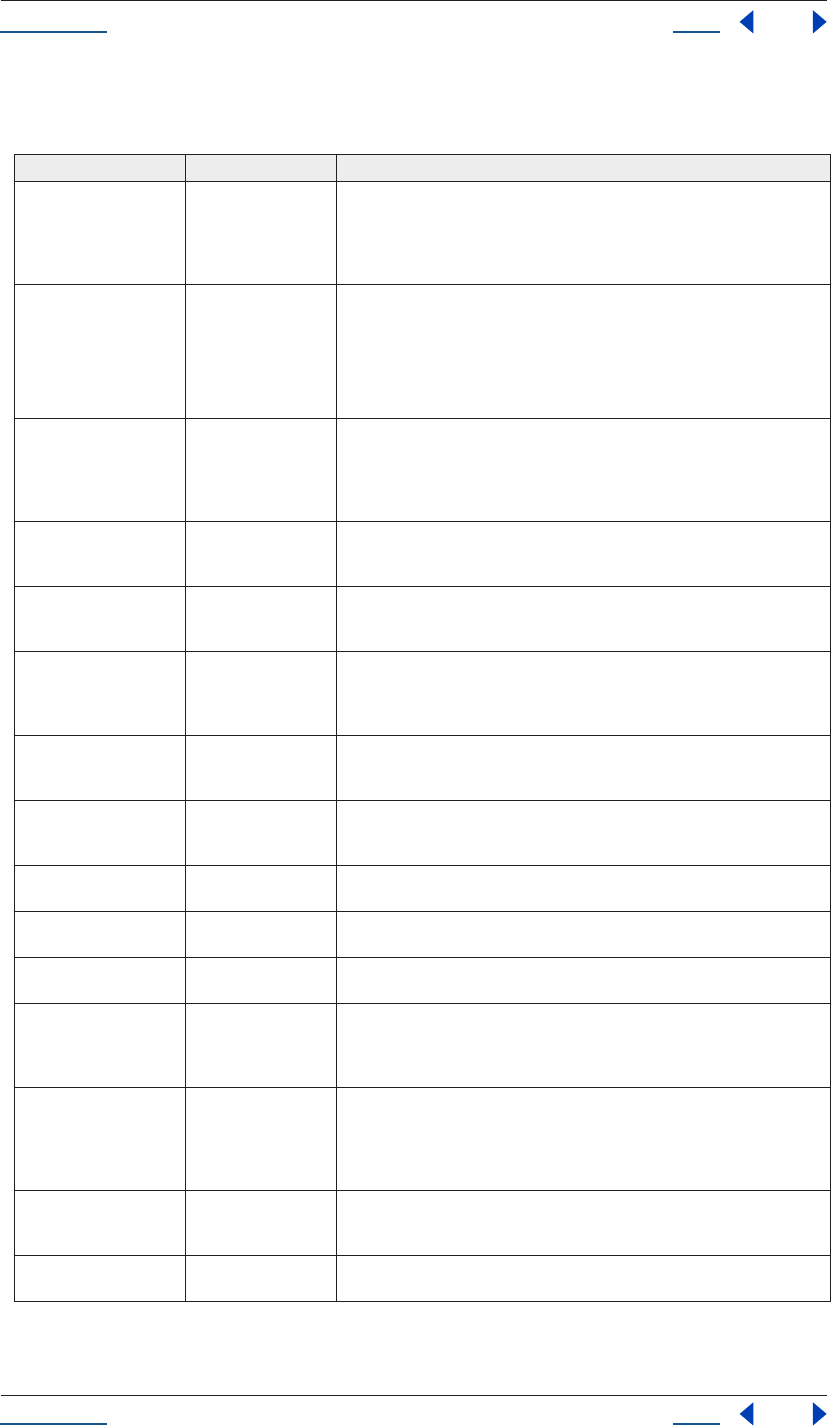
Using Help Back 215
Adobe After Effects Help Creating User Interface Elements
Using Help Back 215
Properties
Following are the properties defined for each element types listed above.
Property Type Description
active Boolean Contains true if the object is active, false otherwise. An active floating dialog
is the front-most dialog. A modal dialog that is visible is by definition the
active dialog. An active control is the one which will accept keystrokes, or in
the case of a Button, be activated (clicked) when the user types a return. Set
this true to make a given control or dialog active.
bounds Bounds Contains a Bounds object describing the location and size of the element as
array values representing the coordinates of the upper left and lower right
corners of the element: [left, top, right, bottom]. These are screen coordinates
for window elements, and window-relative coordinates for other elements.
See “Element Size and Location “
for a definition of the Bounds object.
children Object The collection of UI elements that the UI object contains. This is an array
indexed by number or by a string containing an element’s name. The length
property of this array is the number of child elements for container elements
and is zero for controls; future implementations may return additional ele-
ments for composite controls. Read only.
enabled Boolean Contains true if the object is enabled, false otherwise. If set to true, control
elements will accept input. If set to false, control elements will not accept
input, and all types of elements may change to a ‘grayed-out’ appearance.
jumpdelta Number Contains the value to increment or decrement a Scrollbar element’s position
by, when the user clicks ahead or behind the moveable element of the Scroll-
bar to make the scroll position ‘jump’.
justify String Controls justification of text in static text and edit text controls. The value is
either “left”, “center”, or “right” and the default value is left-justified. Some
implementations may not fully support this property, and it may be ignored
for some types of controls.
maxvalue Number Contains the maximum value that the value property can have. If maxvalue
is reset less than value, value will be reset to maxvalue. If maxvalue is reset less
than minvalue, minvalue will be reset to maxvalue.
minvalue Number Contains the minimum value that the value property can have. If minvalue is
reset greater than value, value will be reset to minvalue. If minvalue is reset
greater than maxvalue, maxvalue will be reset to minvalue.
parent Object The parent object of a UI object. This property returns null for window
objects. Read only.
placement Bounds An alternate name for the bounds property; bounds is the preferred name,
and use of placement is deprecated.
stepdelta Number Contains the value to increment or decrement a Scrollbar element’s position
by, when a stepper button at either end of the scrollbar is clicked.
text String The title, label or text. May be ignored for certain window types. For controls,
its usage depends on the control type. Many controls like buttons use the
text as a label, while other controls, such as edit fields, use the text to access
its content.
textselection String Replace the current text selection with the specified text string, modifying
the value of the text property. If there is no selection, the specified text is
inserted into the text property string at the current insertion point. Reading
the textselection property returns any selected text, or an empty string if
there is no selection.
type String Contains the type name of the element. For Window objects, this is the value
of the first argument to the Window constructor function. For controls, this is
the value of the first argument to the add() method. Read only.
value Boolean (for Checkbox and RadioButton) true if the control has been set (i.e., a check-
box shows a check mark), false if not set.
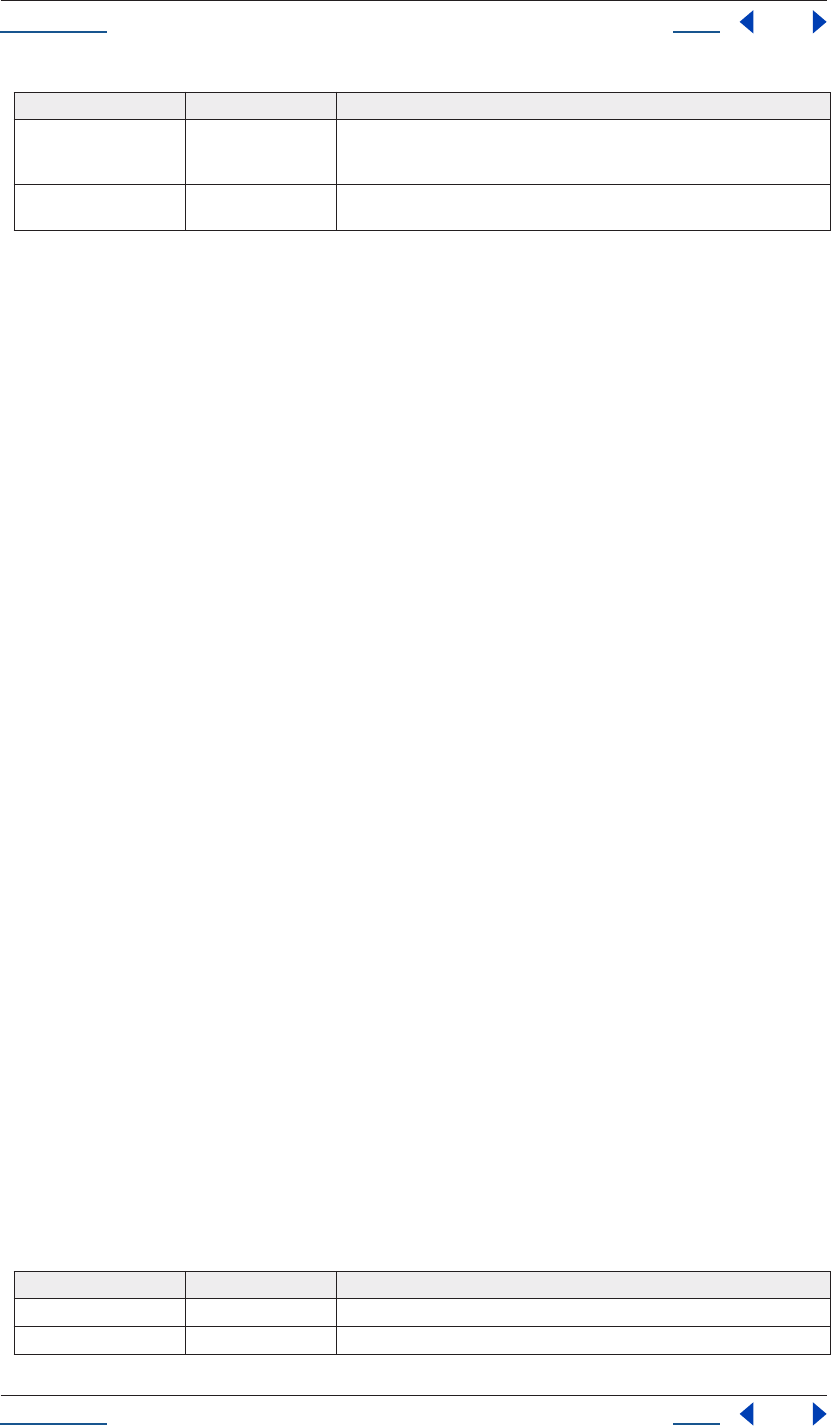
Using Help Back 216
Adobe After Effects Help Creating User Interface Elements
Using Help Back 216
Properties found only in Window elements
Window elements contain the following properties, in addition to those described in the previous section.
defaultElement -- Object
The element to notify when a user types the Enter key, with the intent to dismiss the dialog as if the “OK”
button had been clicked.
cancelElement -- Object
The element to notify when a user types the Esc key (or the <Cmd .> combination on a Mac), with the intent
to dismiss the dialog as if the “Cancel” button had been clicked.
Objects used as property values
The values of certain properties are represented by objects that the scripting interface defines. This section
describes those objects. It includes a description of their semantics, ways to create them, and descriptions of
their properties.
The Bounds Object
A Bounds object is used to define the boundaries of a Window or UI element within its
coordinate space. You cannot directly create a Bounds object; one is created when you set an
element’s bounds property. Reading the bounds property always yields a Bounds object. Bounds
contains an array describing the position and size of a UI element. The array values represent
the coordinates of the upper left and lower right corners of the element: [left, top, right,
bottom]. These are screen coordinates for window elements, and are relative to the coordinate
space of the parent (container) element for other element types.
You can set an element’s bounds property and indirectly create a Bounds object in any of
these ways:
e.bounds = Object
The object must contain properties named left, top, right, bottom, or x, y, width, height, where each property
has an integer coordinate value.
e.bounds = Array
The array must have integer coordinate values in the order [left, top, right, bottom].
e.bounds = String
The string must be an executable JavaScript inline object declaration, containing the same property names as
in the object case just described.
See “Element size and location” on page 198 for examples.
A Bounds object may be accessed as an array. In addition, it supports the following properties
value Number (for Scrollbar and Slider) the value of the control, for instance, the position of
the moveable part of a Scrollbar or Slider. If value is reset outside the
bounded range minvalue, maxvalue, value is set to the closest boundary.
visible Boolean Contains true if the object is physically visible, false otherwise. If set to false,
the UI object is hidden, and if set to true, the object is made visible.
Property Type Description
left Number The ‘x’ coordinate value of the left edge of the element.
top Number The ‘y’ coordinate value of the top edge of the element.
Property Type Description
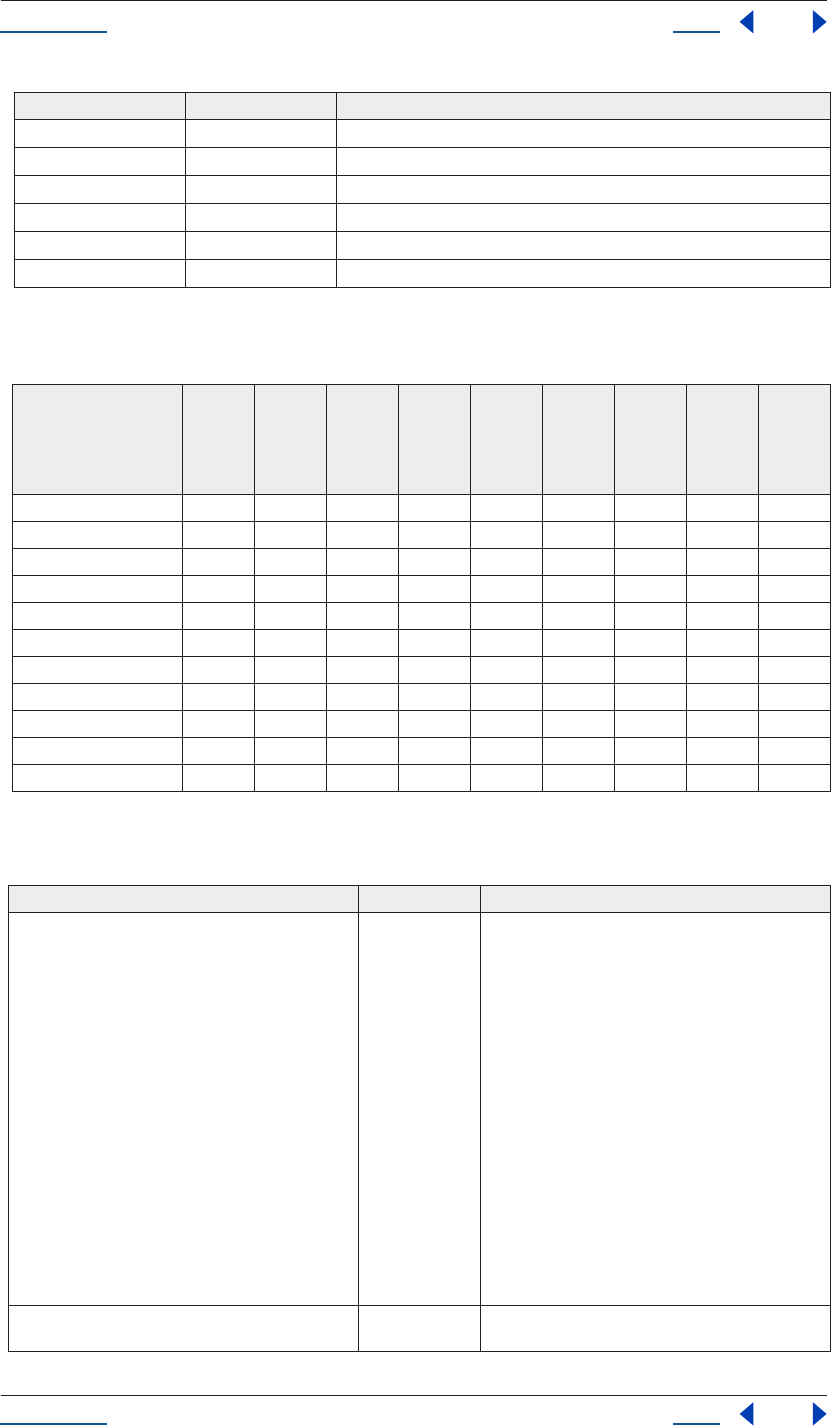
Using Help Back 217
Adobe After Effects Help Creating User Interface Elements
Using Help Back 217
Common methods and event handlers
Following are the common methods and event handlers defined for each element type.
Methods
Descriptions of the common methods and event handlers listed above follow:
right Number The ‘x’ coordinate value of the right edge of the element.
bottom Number The ‘y coordinate value of the bottom edge of the element.
xNumber Same as left.
yNumber Same as top.
width Number right - left.
height Number bottom - top.
Window
Panel
StaticText
EditText
Button
Checkbox
RadioButton
Scrollbar
Slider
add() x x
center() x
close() x
hide() xxxxxxxxx
notify() xxxxxx
show() xxxxxxxxx
onChange() x x x
onClick() x x x
onClose() x
onMove() x
onResize() x
Method Returns Description
add (type [, bounds, text, {
<creation
properties> } ]);
Object Creates a new UI element and add it to the children
array of its parent Window or Panel element. The
optional parameter bounds is a Bounds object
describing its position and size. This may also be a
four-element array. The optional parameter text is
assigned to the UI element as the initial text or title.
The UI element itself decides how to use this string; it
may be ignored.
In general, a Button uses the text as its label, while a
edit field uses it as its initial content. Internally, the
text is assigned to the text property of the element.
The optional parameter <creation properties> is an
object with properties that specify attributes of the
UI element that are used only when the element is
created. <creation properties> are specific to the type
of UI element, and are described below in the sec-
tions for each element type. The return value is the
newly created UI element or null on errors.
center([window]) no return value Centers a Window on screen, or optionally, within the
specified window object.
Property Type Description
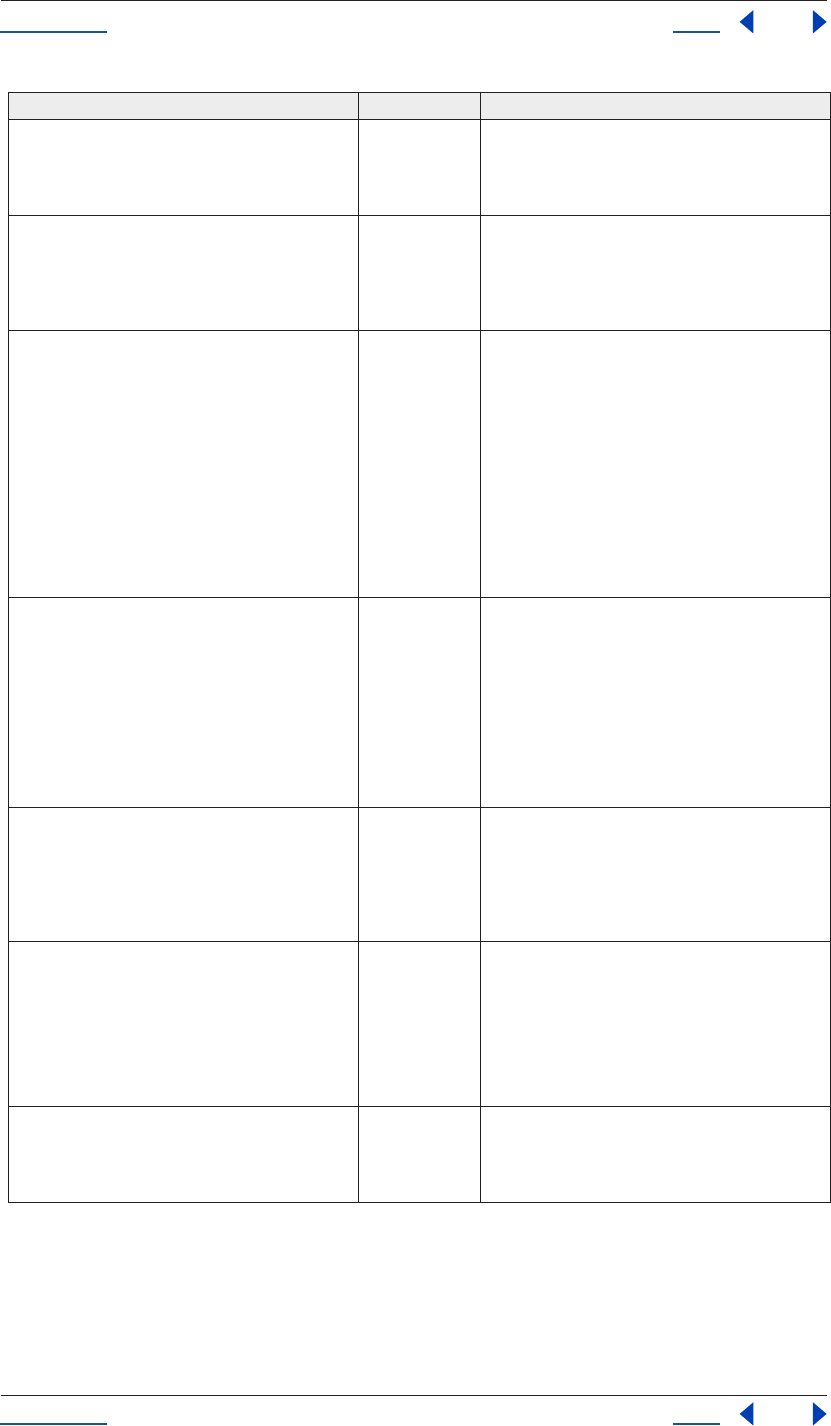
Using Help Back 218
Adobe After Effects Help Creating User Interface Elements
Using Help Back 218
close ([value]) no return value Closes a Window. For modal dialogs, the optional
value is returned as the result of the show() call that
caused the dialog to display and execute.
hide() no return value Hides the element. If hide() is called on a modal dia-
log, dismiss the dialog and set the dialog result to 0.
The application may choose to ignore this call for cer-
tain UI object types.
notify([event]) no return value Sends a notification message to whatever listens to
the UI object. notify() effectively lets you control a
dialog programmatically. Calling this method with
no argument on a control simulates the activation of
the control; a Button signals that it has been clicked
via its onClick() method, an EditText element tells its
listener that it contents have changed via its
onChange() method, and so on. You can supply an
optional argument to notify(), which is the name of
the event handler to call. For instance, to simulate a
dialog dlg being moved by a user, you can send a
notification message as follows: dlg.notify(“onMove”).
show() Number Displays the UI object. A Window may choose to
ignore the setting of the visibility state if it is not
applicable, like for inspectors whose visibility is con-
trolled by the application only. If show() is called for a
modal dialog, the dialog is displayed and executed.
The call to show() will not return until the dialog has
been dismissed. The result of show() is the dialog
result as supplied to close(). For all other elements,
the result is 0.
onClick() no return value This method is called when a control has been acti-
vated by clicking it. Not all types of controls imple-
ment this callback. If you are interested in processing
this event, define a function of this name in the con-
trol element.
onChange() no return value This method is called when the content of a control
has been changed. Not all types of controls imple-
ment this callback. If you are interested in processing
this event, define a function of this name in the con-
trol element.
onClose() no return value This method is called when a Window is closed. If you
are interested in processing this event, define a func-
tion of this name in the Window object.
Method Returns Description
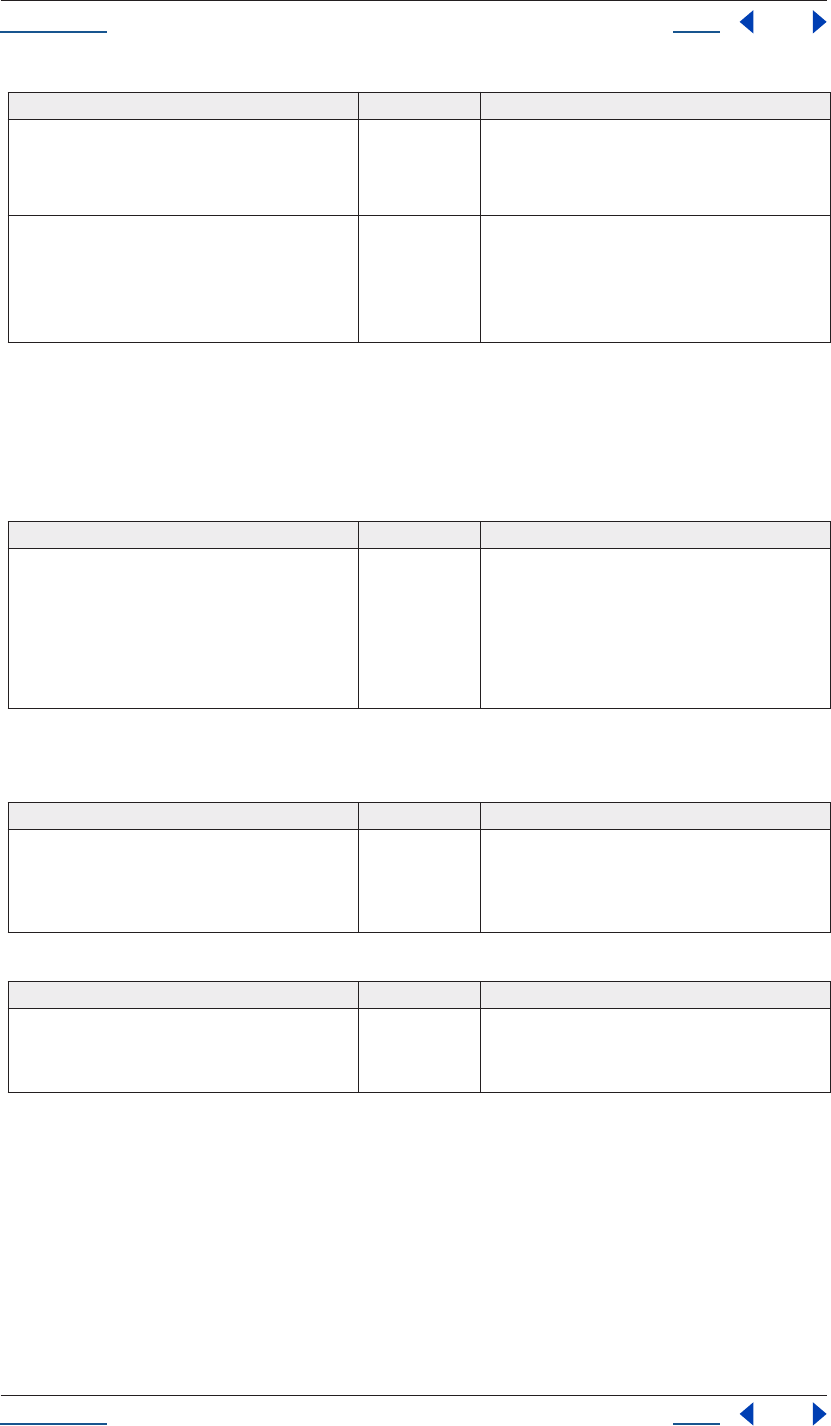
Using Help Back 219
Adobe After Effects Help Creating User Interface Elements
Using Help Back 219
UI object descriptions
This section describes UI objects such as windows, panels, buttons, checkboxes and so on.
Window object
To create a new Window object:
The panel element
To add a Panel element to a window w:
To add a border style around a panel.
If you specify a Panel whose width is 0, it will appear as a vertical line; a panel whose height is 0 will appear as
a horizontal line. Making a panel invisible will also hide all its children; making it visible again will also make
visible those children that were visible when the panel was made invisible.
onMove() no return value This method is called when a Window has been
moved. If you are interested in processing this event,
define a function of this name in the Window object.
onResize() no return value
This method is called when a Window has been
resized. If you are interested in processing this event,
define a function of this name in the Window object.
Method Returns Description
new Window (“dialog” [, title, bounds]); Object Creates a new Window. The required type argument
contains the requested element type for a modal dia-
log. The optional title argument is used to set the
window title, if specified. Optionally, a Bounds object
or array may be supplied that describes the bounds
of the window. If no bounds are given, a default
bounds is chosen. The return value is the newly cre-
ated window or null on errors.
Method Returns Description
w.add (“panel” [, bounds, text,
{<creation properties>} ]);
Object The optional parameter bounds defines the ele-
ment’s position and size. The optional parameter text
is the text displayed in the border of the panel. The
optional parameter <creation properties> is an object
that can contain any of the following properties:
Method Returns Description
borderStyle String Specifies the appearance of the border drawn
around the panel. It can be one of: none, etched,
raised, sunken, black. The default borderStyle is
etched.
Method Returns Description

Using Help Back 220
Adobe After Effects Help Creating User Interface Elements
Using Help Back 220
The statictext control
To add a StaticText element to a window:
The edittext control
To add an EditText element to a window:
The EditText control calls the onChange() event method if the editable text is changed or if its notify() method
is called. It also has a textselection property to access any text selection within the edit field.
The button control
To add a Button element to a window:
The Button control calls the onClick() event method if the control is clicked or if its notify() method is called.
Method Returns Description
w.add (“statictext” [, bounds, text,
{<creation properties>}]);
Object The optional parameter bounds defines the ele-
ment’s position and size. The optional parameter text
is the text displayed by the control. The optional
parameter <creation properties> is an object contain-
ing any of the following properties:
multiline Boolean If false (default) the control accepts a single line of
text. If true, the control accepts multiple lines, in
which case the text wraps within the width of the
control.
scrolling Boolean If false (default), the text displayed cannot be
scrolled. If true, scrolling buttons appear and the text
displayed can be vertically scrolled; this case implies
multiline.
Method Returns Description
w.add (“edittext” [, bounds, text,
{<creation properties>}]);
Object The optional parameter bounds defines the ele-
ment’s position and size. The optional parameter text
is the initial text displayed by the control. The
optional parameter <creation properties> is an object
containing any of the following properties:
multiline Boolean If false (default) the control accepts a single line of
text. If true, the control accepts multiple lines, in
which case the text wraps within the width of the
control.
readonly Boolean If false (default), the control accepts text input. If true,
the control will not accept input text, but simply dis-
plays the contents of its text property.
noecho Boolean If false (default), the control displays text that is typed
as input. If true, the control will not display input text
(useful for password fields).
Method Returns Description
w.add (“button” [, bounds, text]); Object The optional parameter bounds defines the ele-
ment’s position and size. The optional parameter text
is the text displayed inside the button control.
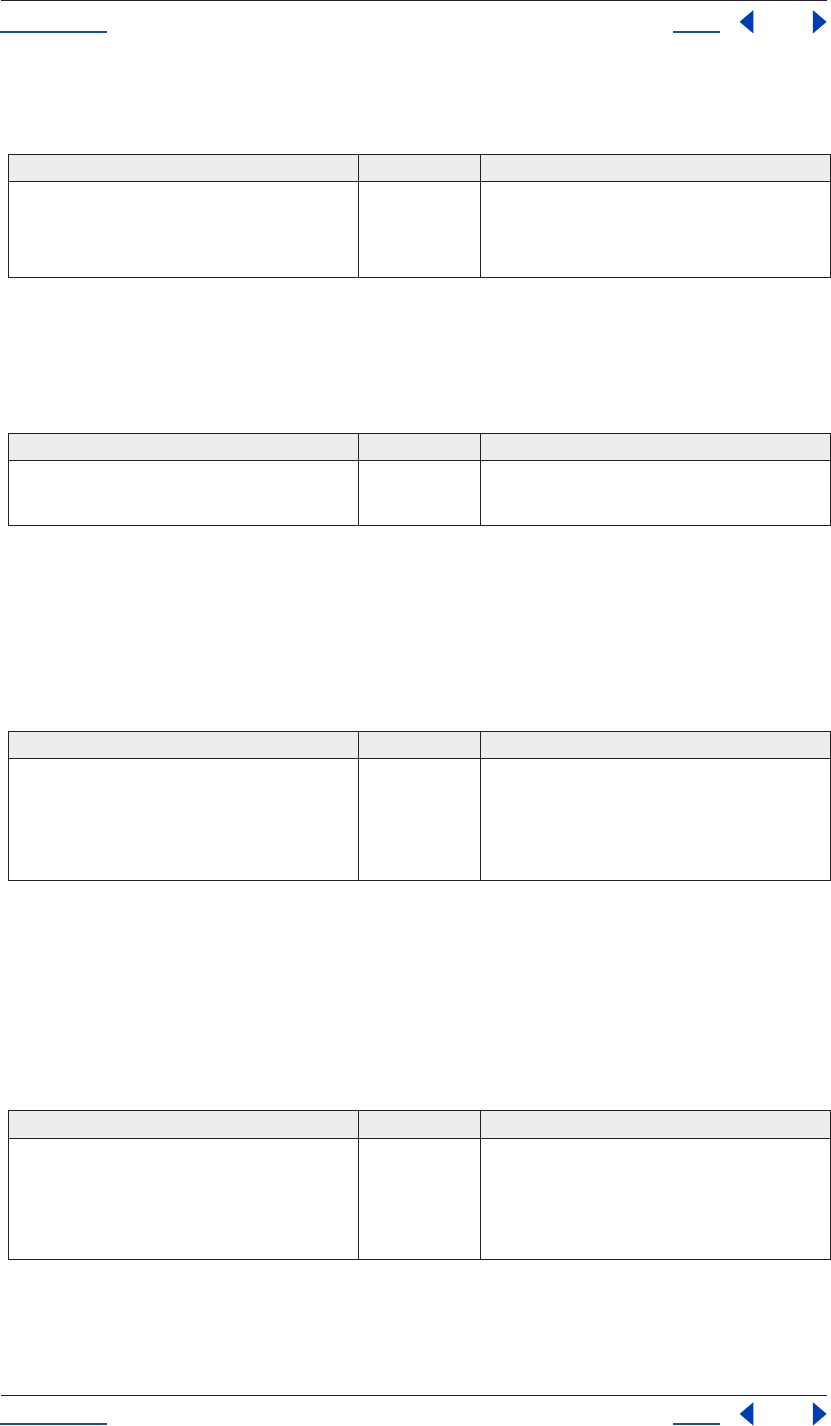
Using Help Back 221
Adobe After Effects Help Creating User Interface Elements
Using Help Back 221
The checkbox control
To add a Checkbox element to a window w:
The Checkbox control calls the onClick() event method if the control is clicked or if its notify() method is called.
It also has a value property which indicates whether the control is set or not.
The radiobutton control
To add a RadioButton element to a window w:
All RadioButtons in a group must be created sequentially, with no intervening creation of other element types.
Only one RadioButton in a group can be set at a time; setting a different RadioButton unsets the original one.
The RadioButton control calls the onClick() event method if the control is clicked or if its notify() method is
called. It also has a value property which indicates whether the control is set or not.
The scrollbar control
To add a Scrollbar element to a window w:
The Scrollbar control will have a horizontal orientation if the specified width is greater than its height at
creation time; its orientation will be vertical if its height is greater than its width. It calls the onChange() event
method if the position of the moveable element is changed by the user, or if its notify() method is called. The
value property contains the current position of the scrollbar’s moveable position indicator within the scrolling
area, within the range of minvalue and maxvalue.
The slider control
To add a Slider element to a window w:
All Slider controls have a horizontal orientation. The Slider control calls the onChange() event method if the
position of the slider is changed by the user, or if its notify() method is called. The value property contains the
current position of the slider’s moveable position indicator, within the range of minvalue and maxvalue.
Method Returns Description
w.add (“checkbox” [, bounds,
text]);
Object The optional parameter bounds defines the ele-
ment’s position and size. The optional parameter text
is the text displayed next to the checkbox control.
Method Returns Description
w.add (“radiobutton” [, bounds,
text]);
Object The optional parameter bounds defines the ele-
ment’s position and size. The optional parameter text
is the text displayed next to the radiobutton control.
Method Returns Description
w.add (“scrollbar” [, bounds,
value, minvalue, maxvalue]);
Object The optional parameter bounds defines the ele-
ment’s position and size. The optional parameter
value is the initial position of the moveable element.
The optional parameters minvalue and maxvalue
define the range of values that can be returned by
changing the position of the moveable element.
Method Returns Description
w.add (“slider” [, bounds,
value, minvalue, maxvalue]);
Object The optional parameter bounds defines the ele-
ment’s position and size. The optional parameter
value is the initial position of the moveable element.
The optional parameters minvalue and maxvalue
define the range of values that can be returned by
changing the position of the moveable element.

Using Help Back 222
Adobe After Effects Help The Socket Object
Using Help Back 222
Appendix A: The Socket Object
TCP connections are the basic transport layer of the Internet. Every time your Web browser connects to a
server and requests a new page, it opens a TCP connection to handle the request as well as the server's reply.
The JavaScript Socket object lets you connect to any server on the Internet and to exchange data with this
server.
The Socket object provides basic functionality to connect to a remote computer over a TCP/IP network or the
Internet. It provides calls like open() and close() to establish or to terminate a connection, or read() or write()
to transfer data. The object also contains a listen() method to establish a simple Internet server; the server uses
the method poll() to check for incoming connections.
Many of these connections are based on simple data exchange of ASCII data, while other protocols, like the
FTP protocol, are more complex and involve binary data. One of the simplest protocols is the HTTP protocol.
The following sample TCP/IP client connects to a WWW server (which listens on port 80); it then sends a very
simple HTTP GET request to obtain the home page of the WWW server, and then it reads the reply, which is
the home page together with a HTTP response header.
reply = "";
conn = new Socket;
// access Adobe's home page
if (conn.open ("www.adobe.com:80")) {
// send a HTTP GET request
conn.write ("GET /index.html HTTP/1.0\n\n");
// and read the server's reply
reply = conn.read();
conn.close();
}
After executing above code, the variable homepage contains the contents of the Adobe home page together
with a HTTP response header.
Establishing an Internet server is a bit more complicated. A typical server program sits and waits for incoming
connections, which it then processes. Usually, you would not want your application to run in an endless loop,
waiting for any incoming connection request. Therefore, you can ask a Socket object for an incoming
connection by calling the poll() method of a Socket object. This call would just check the incoming connec-
tions and then return immediately. If there is a connection request, the call to poll() would return another
Socket object containing the brand new connection. Use this connection object to talk to the calling client;
when finished, close the connection and discard the connection object.
Before a Socket object is able to check for an incoming connection, it must be told to listen on a specific port,
like port 80 for HTTP requests. Do this by calling the listen() method instead of the open() method.
The following example is a very simple Web server. It listens on port 80, waiting until it detects an incoming
request. The HTTP header is discarded, and a dummy HTML page is transmitted to the caller.
conn = new Socket;
// listen on port 80
if conn.listen (80)) {
// wait forever for a connection
var incoming;
do incoming = conn.poll();

Using Help Back 223
Adobe After Effects Help The Socket Object
Using Help Back 223
while (incoming == null);
// discard the request
read();
// Reply with a HTTP header
incoming.writeln ("HTTP/1.0 200 OK");
incoming.writeln ("Content-Type: text/html");
incoming.writeln();
// Transmit a dummy homepage
incoming.writeln ("<html><body><h1>Homepage</h1></body></html>");
// done!
incoming.close();
delete incoming;
}
Often, the remote endpoint terminates the connection after transmitting data. Therefore, there is a connected
property that contains true as long as the connection still exists. If the connected property returns false, the
connection is closed automatically.
On errors, the error property of the Socket object contains a short message describing the type of the error.
The Socket object lets you easily implement software that talks to each other via the Internet. You could, for
example, let two Adobe applications exchange documents and data simply by writing and executing JavaScript
programs.
JavaScript Reference
Properties
Methods
[new] Socket ();
Creates a new Socket object.
Returns
Object.
close();
connected Boolean Contains true if the connection is still active. Read only.
eof Boolean This property has the value true if the receive buffer is empty. Read only.
error String Contains a message describing the last error. Setting this value clears any error mes-
sage.
host String Contains the name of the remote computer when a connection is established. If the
connection is shut down or does not exist, the property contains the empty string.
Read only.
timeout Number The timeout in seconds to be applied to read or write operations. Defaults to 10 (ten
seconds).
Using Help Back 224
Adobe After Effects Help The Socket Object
Using Help Back 224
Terminates the open connection. The return value is true if the connection was closed, false on I/O errors.
Deleting the connection has the same effect. Remember, however, that JavaScript garbage collects the object
at some null time, so the connection may stay open longer than you want to if you do not close it explicitly.
Returns
Boolean
listen (Number port [, String encoding]);
Instructs the object to start listening for an incoming connection. The port argument is the TCP/IP port
number where the object should listen on; typical values are 80 for a Web server, 23 for a Telnet server and so
on. The encoding parameter is optional. The call to listen() is mutually exclusive to a call to open(). The result
is true if the connection object successfully started listening, false otherwise.
Parameters
Returns
Boolean
open (String computer [, String encoding]);
Open the connection for subsequent read/write operations. The computer name is the name or IP address,
followed by a colon and the port number to connect to. The port number is mandatory. Valid computer names
are, for example, "www.adobe.com:80" or "192.150.14.12:80". The encoding parameter is optional; currently,
it can be one of "ASCII", "binary" or "UTF-8". The call to open() is mutually exclusive to a call to listen().
Parameters
Returns
Boolean
poll();
Check a listening object for a new incoming connection. If a connection request was detected, the method
returns a new Socket object that wraps the new connection. Use this connection object to communicate with
the remote computer. After use, close the connection and delete the JavaScript object. If no new connection
request was detected, the method returns null.
Returns
a new Socket object or null.
read ([Number count]);
port Number The port number to listen on. Valid port numbers are 1 to 65535.
encoding String The encoding to be used for the connection. Typical values are "ASCII", "binary", or
"UTF-8". This parameter defaults to ASCII.
host String The name or IP address of the remote computer, followed by a colon and the port
number to connect to. The port number is mandatory. Valid computer names are e.g.
"www.adobe.com:80" or "192.150.14.12:80".
encoding String The encoding to be used for the connection. Typical values are "ASCII", "binary", or
"UTF-8". This parameter defaults to ASCII.
Using Help Back 225
Adobe After Effects Help The Socket Object
Using Help Back 225
Read up to the given number of characters from the connection. Returns a string that contains up to the
number of characters that were supposed to be read. If no count is supplied, the connection attempts to read
as many characters it can get until the remote server closes the connection or a timeout occurs.
Parameters
Returns
String
readln();
Read one line of text up to the next line feed. Line feeds are recognized as CR, LF, CRLF or LFCR pairs.
Returns
String
write (String text, …);
Write the given string to the connection. The parameters of this function are concatenated to a single string.
Returns true on success.
Parameters
Returns
Boolean
writeln (String text, …);
Write the given string to the connection and append a Line Feed character. The parameters of this function
are concatenated to a single string. Returns true on success.
Parameters
Returns
Boolean
Chat server sample
The following sample code implements a very simple chat server. A chat client may connect to the chat server,
who is listening on port number 1234. The server responds with a welcome message and waits for one line of
input from the client. The client types some text and transmits it to the server who displays the text and lets
the user at the server computer type a line of text, which the client computer again displays. This goes back
and forth until either the server or the client computer types the word "bye".
count Number The number of characters to read. If no count is supplied, the connection attempts to
read as many characters it can get until the remote server closes the connection or a
timeout occurs.
text String All arguments are concatenated to form the string to be written.
text String All arguments are concatenated to form the string to be written.

Using Help Back 226
Adobe After Effects Help The Socket Object
Using Help Back 226
function chatServer() {
var tcp = new Socket;
// listen on port 1234
writeln ("Chat server listening on port 1234");
if (tcp.listen (1234)) {
for (;;) {
// poll for a new connection
var connection = tcp.poll();
if (connection != null) {
writeln ("Connection from " + connection.host);
// we have a new connection, so welcome and chat
// until client terminates the session
connection.writeln ("Welcome to a little chat!");
chat (connection);
connection.writeln ("*** Goodbye ***");
connection.close();
delete connection;
writeln ("Connection closed");
}
}
}
}
function chatClient() {
var connection = new Socket;
// connect to sample server
if (connection.open ("remote-pc.corp.adobe.com:1234")) {
// then chat with server
chat (connection);
connection.close();
delete connection;
}
}
function chat (c) {
// select a long timeout
c.timeout=1000;
while (true) {
// get one line and echo it
writeln (c.read());
// stop if the connection is broken
if (!c.connected)
break;
// read a line of text
write ("chat: ");
var text = readln();
if (text == "bye")
// stop conversation if the user entered "bye"
break;
else
// otherwise transmit to server


Using Help Back 228
Help Encoding Names
Using Help Back 228
Appendix B: Encoding Names
Supported encoding names
The following list of names is a basic set of encoding names supported by the FileSystem object. Some of the
character encoders are built in, while the operating system is queried for most of the other encoders.
Depending on the language packs installed, some of the encodings may not be available. Names that refer to
the same encoding are listed in one line. Underlines are replaced with dashes before matching an encoding
name.
Note, however, that the FileSystem object cannot process extended Unicode character with values greater than
65535. These characters are left encoded as specified in the UTF-16 standard in as two characters in the range
from 0xD700-0xDFFF.
Built-in encodings are:
US-ASCII,ASCII,ISO646-US,ISO-646.IRV:1991,ISO-IR-6, ANSI-X3.4-
1968,CP367,IBM367,US,ISO646.1991-IRV
UCS-2,UCS2, ISO-10646-UCS-2
UCS2LE,UCS-2LE,ISO-10646-UCS-2LE
UCS2BE,UCS-2BE,ISO-10646-UCS-2BE
UCS-4,UCS4, ISO-10646-UCS-4
UCS4LE,UCS-4LE,ISO-10646-UCS-4LE
UCS4BE,UCS-4BE,ISO-10646-UCS-4BE
UTF-8,UTF8,UNICODE-1-1-UTF-8,UNICODE-2-0-UTF-8,X-UNICODE-2-0-UTF-8
UTF16,UTF-16,ISO-10646-UTF-16
UTF16LE,UTF-16LE,ISO-10646-UTF-16LE
UTF16BE,UTF-16BE,ISO-10646-UTF-16BE
CP1252,WINDOWS-1252,MS-ANSI
ISO-8859-1,ISO-8859-1,ISO-8859-1:1987,ISO-IR-100,LATIN1
MACINTOSH,X-MAC-ROMAN
BINARY
The ASCII encoder raises errors for characters greater than 127, and the BINARY encoder simply converts
between bytes and Unicode characters by using the lower 8 bits. This encoder is convenient for reading and
writing binary data.
Additional encodings
In Windows, all encodings use so-called code pages. These code pages are assigned numeric values. The usual
Western character set that Windows uses is, for example, the code page 1252. Windows code pages may be
selected by prepending the number of the code page with "CP" or "WINDOWS- like "CP1252" for the code
page 1252. The File object has a lot of other encoding names built-in that match predefined code page
numbers. If a code page is not present, the encoding cannot be selected.
On Mac OS, encoders may be selected by name rather than by code page number. The File object queries Mac
OS directly for an encoder. As far as Mac OS character sets are identical with Windows code pages, Mac OS
also knows the Windows code page numbers.

Using Help Back 229
Help Encoding Names
Using Help Back 229
Common encoding names
The following encoding names are implemented both on Windows and Mac OS:
UTF-7,UTF7,UNICODE-1-1-UTF-7,X-UNICODE-2-0-UTF-7
ISO-8859-2,ISO-8859-2,ISO-8859-2:1987,ISO-IR-101,LATIN2
ISO-8859-3,ISO-8859-3,ISO-8859-3:1988,ISO-IR-109,LATIN3
ISO-8859-4,ISO-8859-4,ISO-8859-4:1988,ISO-IR-110,LATIN4,BALTIC
ISO-8859-5,ISO-8859-5,ISO-8859-5:1988,ISO-IR-144,CYRILLIC
ISO-8859-6,ISO-8859-6,ISO-8859-6:1987,ISO-IR-127,ECMA-114,ASMO-708,ARABIC
ISO-8859-7,ISO-8859-7,ISO-8859-7:1987,ISO-IR-126,ECMA-118,ELOT-928,GREEK8,GREEK
ISO-8859-8,ISO-8859-8,ISO-8859-8:1988,ISO-IR-138,HEBREW
ISO-8859-9,ISO-8859-9,ISO-8859-9:1989,ISO-IR-148,LATIN5,TURKISH
ISO-8859-10,ISO-8859-10,ISO-8859-10:1992,ISO-IR-157,LATIN6
ISO-8859-13,ISO-8859-13,ISO-IR-179,LATIN7
ISO-8859-14,ISO-8859-14,ISO-8859-14,ISO-8859-14:1998,ISO-IR-199,LATIN8
ISO-8859-15,ISO-8859-15,ISO-8859-15:1998,ISO-IR-203
ISO-8859-16,ISO-885,ISO-885,MS-EE
CP850,WINDOWS-850,IBM850
CP866,WINDOWS-866,IBM866
CP932,WINDOWS-932,SJIS,SHIFT-JIS,X-SJIS,X-MS-SJIS,MS-SJIS,MS-KANJI
CP936,WINDOWS-936,GBK,WINDOWS-936,GB2312,GB-2312-80,ISO-IR-58,CHINESE
CP949,WINDOWS-949,UHC,KSC-5601,KS-C-5601-1987,KS-C-5601-1989,ISO-IR-149,KOREAN
CP950,WINDOWS-950,BIG5,BIG-5,BIG-FIVE,BIGFIVE,CN-BIG5,X-X-BIG5
CP1251,WINDOWS-1251,MS-CYRL
CP1252,WINDOWS-1252,MS-ANSI
CP1253,WINDOWS-1253,MS-GREEK
CP1254,WINDOWS-1254,MS-TURK
CP1255,WINDOWS-1255,MS-HEBR
CP1256,WINDOWS-1256,MS-ARAB
CP1257,WINDOWS-1257,WINBALTRIM
CP1258,WINDOWS-1258
CP1361,WINDOWS-1361,JOHAB
EUC-JP,EUCJP,X-EUC-JP
EUC-KR,EUCKR,X-EUC-KR
HZ,HZ-GB-2312
X-MAC-JAPANESE
X-MAC-GREEK
X-MAC-CYRILLIC
X-MAC-LATIN
X-MAC-ICELANDIC
X-MAC-TURKISH
Additional Windows encoding names
CP437,IBM850,WINDOWS-437
CP709,WINDOWS-709,ASMO-449,BCONV4
EBCDIC
KOI-8R
KOI-8U
ISO-2022-JP
ISO-2022-KR
Using Help Back 230
Help Encoding Names
Using Help Back 230
Additional Mac OS encoding names
These names are alias names for encodings that Mac OS might know.
TIS-620,TIS620,TIS620-0,TIS620.2529-1,TIS620.2533-0,TIS620.2533-1,ISO-IR-166
CP874,WINDOWS-874
JP,JIS-C6220-1969-RO,ISO646-JP,ISO-IR-14
JIS-X0201,JISX0201-1976,X0201
JIS-X0208,JIS-X0208-1983,JIS-X0208-1990,JIS0208,X0208,ISO-IR-87
JIS-X0212,JIS-X0212.1990-0,JIS-X0212-1990,X0212,ISO-IR-159
CN,GB-1988-80,ISO646-CN,ISO-IR-57
ISO-IR-16,CN-GB-ISOIR165
KSC-5601,KS-C-5601-1987,KS-C-5601-1989,ISO-IR-149
EUC-CN,EUCCN,GB2312,CN-GB
EUC-TW,EUCTW,X-EUC-TW

Using Help Back 231
Help
Using Help Back 231
Object Properties
(output of dump_objects.jsx from After Effects 6.5)
====================================================================
=======
AlphaMode enum
--------------------------------------------------------------------
-------
AlphaMode.IGNORE
AlphaMode.PREMULTIPLIED
AlphaMode.STRAIGHT
--------------------------------------------------------------------
-------
====================================================================
=======
Application object
--------------------------------------------------------------------
-------
beginSuppressDialogs() no return
beginUndoGroup(string undoName) no return
buildName : string : readOnly
buildNumber : integer : readOnly
endSuppressDialogs(boolean showAlert) no return
endUndoGroup() no return
endWatchFolder() no return
exitAfterLaunchAndEval : boolean : read/write
exitCode : integer : read/write
isProfessionalVersion : boolean : readOnly
isRenderEngine : boolean : readOnly
isUISuppressed : boolean : readOnly
isWatchFolder : boolean : readOnly
language : Language : readOnly
newProject() no return
open([File file]) returns Project
pauseWatchFolder(boolean doPause) no return
project : Project : readOnly
purge(PurgeTarget target) no return
quit() no return
registeredCompany : string : readOnly
registeredName : string : readOnly
serialNumber : string : readOnly
setMemoryUsageLimits(float imageCachePercent,
float maximumMemoryPercent) no return
setSavePreferencesOnQuit(boolean doSave) no return
settings : Settings : readOnly
version : string : readOnly
watchFolder(File file) no return
onError(string errorString,
string severity) no return
--------------------------------------------------------------------
-------

Using Help Back 232
Help
Using Help Back 232
====================================================================
=======
AVLayer object
--------------------------------------------------------------------
-------
(integer propertyIndex) returns
PropertyBase
(string propertyName) returns
PropertyBase
active : boolean : readOnly
activeAtTime(float atTime) returns boolean
addProperty(string propertyName) returns
PropertyBase
adjustmentLayer : boolean : read/write
audioActive : boolean : readOnly
audioActiveAtTime(float atTime) returns boolean
audioEnabled : boolean : read/write
blendingMode : BlendingMode : read/write
canAddProperty(string propertyName) returns boolean
canSetCollapseTransformation : boolean : readOnly
canSetEnabled : boolean : readOnly
canSetTimeRemapEnabled : boolean : readOnly
collapseTransformation : boolean : read/write
copyToComp(CompItem intoComp) no return
duplicate() returns AVLayer
effectsActive : boolean : read/write
elided : boolean : readOnly
enabled : boolean : read/write
frameBlending : boolean : read/write
guideLayer : boolean : read/write
hasAudio : boolean : readOnly
hasTrackMatte : boolean : readOnly
hasVideo : boolean : readOnly
height : float : readOnly
inPoint : float : read/write
index : integer : readOnly
isEffect : boolean : readOnly
isMask : boolean : readOnly
isModified : boolean : readOnly
isNameFromSource : boolean : readOnly
isTrackMatte : boolean : readOnly
locked : boolean : read/write
matchName : string : readOnly
motionBlur : boolean : read/write
moveAfter(Layer otherLayer) no return
moveBefore(Layer otherLayer) no return
moveTo(integer index) no return
moveToBeginning() no return
moveToEnd() no return
name : string : read/write
nullLayer : boolean : readOnly

Using Help Back 233
Help
Using Help Back 233
numProperties : integer : readOnly
outPoint : float : read/write
parent : Layer : read/write
parentProperty : PropertyGroup : readOnly
preserveTransparency : boolean : read/write
property(integer propertyIndex) returns
PropertyBase
property(string propertyName) returns
PropertyBase
propertyDepth : integer : readOnly
propertyGroup([integer countUp]) returns
PropertyGroup
propertyType : PropertyType : readOnly
quality : LayerQuality : read/write
remove() no return
selected : boolean : read/write
selectedProperties : Array of PropertyBase: readOnly
setParentWithJump(Layer newParent) no return
shy : boolean : read/write
solo : boolean : read/write
source : AVItem : readOnly
startTime : float : read/write
stretch : float : read/write
threeDLayer : boolean : read/write
time : float : readOnly
timeRemapEnabled : boolean : read/write
trackMatteType : TrackMatteType : read/write
width : float : readOnly
--------------------------------------------------------------------
-------
====================================================================
=======
BlendingMode enum
--------------------------------------------------------------------
-------
BlendingMode.ADD
BlendingMode.ALPHA_ADD
BlendingMode.CLASSIC_COLOR_BURN
BlendingMode.CLASSIC_COLOR_DODGE
BlendingMode.CLASSIC_DIFFERENCE
BlendingMode.COLOR
BlendingMode.COLOR_BURN
BlendingMode.COLOR_DODGE
BlendingMode.DANCING_DISSOLVE
BlendingMode.DARKEN
BlendingMode.DIFFERENCE
BlendingMode.DISSOLVE
BlendingMode.EXCLUSION
BlendingMode.HARD_LIGHT
BlendingMode.HARD_MIX
BlendingMode.HUE

Using Help Back 234
Help
Using Help Back 234
BlendingMode.LIGHTEN
BlendingMode.LINEAR_BURN
BlendingMode.LINEAR_DODGE
BlendingMode.LINEAR_LIGHT
BlendingMode.LUMINESCENT_PREMUL
BlendingMode.LUMINOSITY
BlendingMode.MULTIPLY
BlendingMode.NORMAL
BlendingMode.OVERLAY
BlendingMode.PIN_LIGHT
BlendingMode.SATURATION
BlendingMode.SCREEN
BlendingMode.SILHOUETE_ALPHA
BlendingMode.SILHOUETTE_LUMA
BlendingMode.SOFT_LIGHT
BlendingMode.STENCIL_ALPHA
BlendingMode.STENCIL_LUMA
BlendingMode.VIVID_LIGHT
--------------------------------------------------------------------
-------
====================================================================
=======
CloseOptions enum
--------------------------------------------------------------------
-------
CloseOptions.DO_NOT_SAVE_CHANGES
CloseOptions.PROMPT_TO_SAVE_CHANGES
CloseOptions.SAVE_CHANGES
--------------------------------------------------------------------
-------
====================================================================
=======
CompItem object
--------------------------------------------------------------------
-------
activeCamera : Layer : readOnly
bgColor : Array of float : read/write
comment : string : read/write
displayStartTime : float : read/write
draft3d : boolean : read/write
duplicate() returns
CompItem
duration : float : read/write
footageMissing : boolean : readOnly
frameBlending : boolean : read/write
frameDuration : float : read/write
frameRate : float : read/write
hasAudio : boolean : readOnly
hasVideo : boolean : readOnly

Using Help Back 235
Help
Using Help Back 235
height : integer : read/write
hideShyLayers : boolean : read/write
id : integer : readOnly
layer(integer layerIndex) returns Layer
layer(string layerName) returns Layer
layer(Layer otherLayer, integer relativeIndex) returns Layer
layers : LayerCollection: readOnly
motionBlur : boolean : read/write
name : string : read/write
numLayers : integer : readOnly
parentFolder : FolderItem : readOnly
pixelAspect : float : read/write
preserveNestedFrameRate : boolean : read/write
preserveNestedResolution : boolean : read/write
proxySource : FootageSource : readOnly
remove() no return
resolutionFactor : Array of integer : read/write
selected : boolean : read/write
selectedLayers : Array of Layer : readOnly
selectedProperties : Array of PropertyBase: readOnly
setProxy(File proxyFile) no return
setProxyToNone() no return
setProxyWithPlaceholder(string name,
integer width,
integer height,
float frameRate,
float duration) no return
setProxyWithSequence(File proxyFile,
boolean forceAlphabetical) no return
setProxyWithSolid(ArrayOfFloat color,
string name,
integer width,
integer height,
float pixelAspecRatio) no return
shutterAngle : integer : read/write
shutterPhase : integer : read/write
time : float : read/write
typeName : string : readOnly
useProxy : boolean : read/write
usedIn : Array of CompItem : readOnly
width : integer : read/write
workAreaDuration : float : readOnly
workAreaStart : float : readOnly
--------------------------------------------------------------------
-------
====================================================================
=======
FieldSeparationType enum
--------------------------------------------------------------------
-------
FieldSeparationType.LOWER_FIELD_FIRST

Using Help Back 236
Help
Using Help Back 236
FieldSeparationType.OFF
FieldSeparationType.UPPER_FIELD_FIRST
--------------------------------------------------------------------
-------
====================================================================
=======
FileSource object
--------------------------------------------------------------------
-------
alphaMode : AlphaMode : read/write
conformFrameRate : float : read/write
displayFrameRate : float : readOnly
fieldSeparationType : FieldSeparationType : readOnly
file : File : readOnly
guessAlphaMode() no return
guessPulldown(PulldownMethod pulldownMethod) no return
hasAlpha : boolean : readOnly
highQualityFieldSeparation : boolean : read/write
invertAlpha : boolean : read/write
isStill : boolean : readOnly
loop : integer : read/write
nativeFrameRate : float : readOnly
premulColor : Array of float : read/write
reload() no return
removePulldown : PulldownPhase : readOnly
--------------------------------------------------------------------
-------
====================================================================
=======
FolderItem object
--------------------------------------------------------------------
-------
comment : string : read/write
id : integer : readOnly
item(integer itemIndex) returns Item
items : ItemCollection : readOnly
name : string : read/write
numItems : integer : readOnly
parentFolder : FolderItem : readOnly
remove() no return
selected : boolean : read/write
typeName : string : readOnly
--------------------------------------------------------------------
-------
====================================================================
=======
FootageItem object

Using Help Back 237
Help
Using Help Back 237
--------------------------------------------------------------------
-------
comment : string : read/write
duration : float : readOnly
file : File : readOnly
footageMissing : boolean : readOnly
frameDuration : float : readOnly
frameRate : float : readOnly
hasAudio : boolean : readOnly
hasVideo : boolean : readOnly
height : integer : read/write
id : integer : readOnly
mainSource : FootageSource : readOnly
name : string : read/write
parentFolder : FolderItem : readOnly
pixelAspect : float : read/write
proxySource : FootageSource : readOnly
remove() no return
replace(File proxyFile) no return
replaceWithPlaceholder(string name,
integer width,
integer height,
float frameRate,
float duration) no return
replaceWithSequence(File proxyFile,
boolean forceAlphabetical) no return
replaceWithSolid(ArrayOfFloat color,
string name,
integer width,
integer height,
float pixelAspecRatio) no return
selected : boolean : read/write
setProxy(File proxyFile) no return
setProxyToNone() no return
setProxyWithPlaceholder(string name,
integer width,
integer height,
float frameRate,
float duration) no return
setProxyWithSequence(File proxyFile,
boolean forceAlphabetical) no return
setProxyWithSolid(ArrayOfFloat color,
string name,
integer width,
integer height,
float pixelAspecRatio) no return
time : float : readOnly
typeName : string : readOnly
useProxy : boolean : read/write
usedIn : Array of CompItem : readOnly
width : integer : read/write
--------------------------------------------------------------------
-------

Using Help Back 238
Help
Using Help Back 238
====================================================================
=======
ImportAsType enum
--------------------------------------------------------------------
-------
ImportAsType.COMP
ImportAsType.COMP_CROPPED_LAYERS
ImportAsType.FOOTAGE
ImportAsType.PROJECT
--------------------------------------------------------------------
-------
====================================================================
=======
ImportOptions object
--------------------------------------------------------------------
-------
new ImportOptions(File fileToImport) returns
ImportOptions
canImportAs(ImportAsType asType) returns boolean
file : File : read/write
forceAlphabetical : boolean : read/write
importAs : ImportAsType : read/write
sequence : boolean : read/write
--------------------------------------------------------------------
-------
====================================================================
=======
ItemCollection object
--------------------------------------------------------------------
-------
addComp(string name,
integer width,
integer height,
float pixelAspectRatio,
float duration,
float frameRate) returns
CompItem
--------------------------------------------------------------------
-------
====================================================================
=======
KeyframeEase object
--------------------------------------------------------------------
-------
new KeyframeEase(float speed,

Using Help Back 239
Help
Using Help Back 239
float influence) returns
KeyframeEase
influence : float : read/write
speed : float : read/write
--------------------------------------------------------------------
-------
====================================================================
=======
KeyframeInterpolationType enum
--------------------------------------------------------------------
-------
KeyframeInterpolationType.BEZIER
KeyframeInterpolationType.HOLD
KeyframeInterpolationType.LINEAR
--------------------------------------------------------------------
-------
====================================================================
=======
Language enum
--------------------------------------------------------------------
-------
Language.ENGLISH
Language.FRENCH
Language.GERMAN
Language.JAPANESE
--------------------------------------------------------------------
-------
====================================================================
=======
Layer object
--------------------------------------------------------------------
-------
(integer propertyIndex) returns
PropertyBase
(string propertyName) returns
PropertyBase
active : boolean : readOnly
activeAtTime(float atTime) returns boolean
addProperty(string propertyName) returns
PropertyBase
canAddProperty(string propertyName) returns boolean
canSetEnabled : boolean : readOnly
copyToComp(CompItem intoComp) no return
duplicate() returns Layer
elided : boolean : readOnly
enabled : boolean : read/write
hasVideo : boolean : readOnly

Using Help Back 240
Help
Using Help Back 240
inPoint : float : read/write
index : integer : readOnly
isEffect : boolean : readOnly
isMask : boolean : readOnly
isModified : boolean : readOnly
locked : boolean : read/write
matchName : string : readOnly
moveAfter(Layer otherLayer) no return
moveBefore(Layer otherLayer) no return
moveTo(integer index) no return
moveToBeginning() no return
moveToEnd() no return
name : string : read/write
nullLayer : boolean : readOnly
numProperties : integer : readOnly
outPoint : float : read/write
parent : Layer : read/write
parentProperty : PropertyGroup : readOnly
property(integer propertyIndex) returns
PropertyBase
property(string propertyName) returns
PropertyBase
propertyDepth : integer : readOnly
propertyGroup([integer countUp]) returns
PropertyGroup
propertyType : PropertyType : readOnly
remove() no return
selected : boolean : read/write
selectedProperties : Array of PropertyBase: readOnly
setParentWithJump(Layer newParent) no return
shy : boolean : read/write
solo : boolean : read/write
startTime : float : read/write
stretch : float : read/write
time : float : readOnly
--------------------------------------------------------------------
-------
====================================================================
=======
LayerCollection object
--------------------------------------------------------------------
-------
add(AVItem theItem,
[float duration]) returns AVLayer
addCamera(string name,
ArrayOfFloat centerPoint) returns Layer
addLight(string name,
ArrayOfFloat centerPoint) returns Layer
addNull([float duration]) returns AVLayer
addSolid(ArrayOfFloat color,
string name,

Using Help Back 241
Help
Using Help Back 241
integer width,
integer height,
float pixelAspectRatio,
[float duration]) returns AVLayer
addText([TextDocument textDoc]) returns AVLayer
addText(string text) returns AVLayer
byName(string name) returns Layer
precompose(ArrayOfInteger layerIndices,
string name,
[boolean moveAllAttributes]) returns
CompItem
--------------------------------------------------------------------
-------
====================================================================
=======
LayerQuality enum
--------------------------------------------------------------------
-------
LayerQuality.BEST
LayerQuality.DRAFT
LayerQuality.WIREFRAME
--------------------------------------------------------------------
-------
====================================================================
=======
LogType enum
--------------------------------------------------------------------
-------
LogType.ERRORS_AND_PER_FRAME_INFO
LogType.ERRORS_AND_SETTINGS
LogType.ERRORS_ONLY
--------------------------------------------------------------------
-------
====================================================================
=======
MarkerValue object
--------------------------------------------------------------------
-------
new MarkerValue(string comment,
[string chapter],
[string url],
[string frameTarget]) returns
MarkerValue
chapter : string : read/write
comment : string : read/write
frameTarget : string : read/write
url : string : read/write

Using Help Back 242
Help
Using Help Back 242
--------------------------------------------------------------------
-------
====================================================================
=======
MaskMode enum
--------------------------------------------------------------------
-------
MaskMode.ADD
MaskMode.DARKEN
MaskMode.DIFFERENCE
MaskMode.INTERSECT
MaskMode.LIGHTEN
MaskMode.NONE
MaskMode.SUBTRACT
--------------------------------------------------------------------
-------
====================================================================
=======
MaskMotionBlur enum
--------------------------------------------------------------------
-------
MaskMotionBlur.OFF
MaskMotionBlur.ON
MaskMotionBlur.SAME_AS_LAYER
--------------------------------------------------------------------
-------
====================================================================
=======
MaskPropertyGroup object
--------------------------------------------------------------------
-------
(integer propertyIndex) returns
PropertyBase
(string propertyName) returns
PropertyBase
active : boolean : readOnly
addProperty(string propertyName) returns
PropertyBase
canAddProperty(string propertyName) returns boolean
canSetEnabled : boolean : readOnly
color : Array of float : read/write
duplicate() returns
MaskPropertyGroup
elided : boolean : readOnly
enabled : boolean : readOnly
inverted : boolean : read/write
isEffect : boolean : readOnly

Using Help Back 243
Help
Using Help Back 243
isMask : boolean : readOnly
isModified : boolean : readOnly
locked : boolean : read/write
maskMode : MaskMode : read/write
maskMotionBlur : MaskMotionBlur : read/write
matchName : string : readOnly
moveTo(integer index) no return
name : string : read/write
numProperties : integer : readOnly
parentProperty : PropertyGroup : readOnly
property(integer propertyIndex) returns
PropertyBase
property(string propertyName) returns
PropertyBase
propertyDepth : integer : readOnly
propertyGroup([integer countUp]) returns
PropertyGroup
propertyIndex : integer : readOnly
propertyType : PropertyType : readOnly
remove() no return
rotoBezier : boolean : read/write
selected : boolean : read/write
--------------------------------------------------------------------
-------
====================================================================
=======
OMCollection object
--------------------------------------------------------------------
-------
add() returns
OutputModule
--------------------------------------------------------------------
-------
====================================================================
=======
OutputModule object
--------------------------------------------------------------------
-------
applyTemplate(string templateName) no return
file : File : read/write
name : string : readOnly
postRenderAction : PostRenderAction : read/write
remove() no return
saveAsTemplate(string templateName) no return
templates : Array of string: readOnly
--------------------------------------------------------------------
-------

Using Help Back 244
Help
Using Help Back 244
====================================================================
=======
PlaceholderSource object
--------------------------------------------------------------------
-------
alphaMode : AlphaMode : read/write
conformFrameRate : float : read/write
displayFrameRate : float : readOnly
fieldSeparationType : FieldSeparationType : read/write
guessAlphaMode() no return
guessPulldown(PulldownMethod pulldownMethod) no return
hasAlpha : boolean : readOnly
highQualityFieldSeparation : boolean : read/write
invertAlpha : boolean : read/write
isStill : boolean : readOnly
loop : integer : read/write
nativeFrameRate : float : readOnly
premulColor : Array of float : read/write
removePulldown : PulldownPhase : read/write
--------------------------------------------------------------------
-------
====================================================================
=======
PostRenderAction enum
--------------------------------------------------------------------
-------
PostRenderAction.IMPORT
PostRenderAction.IMPORT_AND_REPLACE_USAGE
PostRenderAction.NONE
PostRenderAction.SET_PROXY
--------------------------------------------------------------------
-------
====================================================================
=======
Project object
--------------------------------------------------------------------
-------
activeItem : Item : readOnly
bitsPerChannel : integer : read/write
close(CloseOptions closeOptions) returns boolean
consolidateFootage() returns integer
file : File : readOnly
importFile(ImportOptions importOptions) returns Item
importFileWithDialog() returns
ArrayOfItem
importPlaceholder(string itemName,
integer itemWidth,
integer itemHeight,
float frameRate,

Using Help Back 245
Help
Using Help Back 245
float duration) returns
FootageItem
item(integer itemIndex) returns Item
items : ItemCollection : readOnly
numItems : integer : readOnly
reduceProject(ArrayOfItem itemsToPreserve) returns integer
removeUnusedFootage() returns integer
renderQueue : RenderQueue : readOnly
rootFolder : FolderItem : readOnly
save(File toFile) returns boolean
saveWithDialog() returns boolean
selection : Array of Item : readOnly
showWindow(boolean doShow) no return
timecodeBaseType : TimecodeBaseType : read/write
timecodeDisplayType : TimecodeDisplayType : read/write
timecodeFilmType : TimecodeFilmType : read/write
timecodeNTSCDropFrame : boolean : read/write
transparencyGridThumbnails : boolean : read/write
--------------------------------------------------------------------
-------
====================================================================
=======
Property object
--------------------------------------------------------------------
-------
active : boolean : readOnly
addKey(float atTime) returns integer
canSetEnabled : boolean : readOnly
canVaryOverTime : boolean : readOnly
duplicate() returns
Property
elided : boolean : readOnly
enabled : boolean : readOnly
expression : string : read/write
expressionEnabled : boolean : read/write
expressionError : string : readOnly
hasMax : boolean : readOnly
hasMin : boolean : readOnly
isEffect : boolean : readOnly
isInterpolationTypeValid(
KeyframeInterpolationType type) returns boolean
isMask : boolean : readOnly
isModified : boolean : readOnly
isSpatial : boolean : readOnly
isTimeVarying : boolean : readOnly
keyInInterpolationType(integer keyIndex) returns
KeyframeInterpolationType
keyInSpatialTangent(integer keyIndex) returns
ArrayOfFloat
keyInTemporalEase(integer keyIndex) returns
ArrayOfKeyframeEase

Using Help Back 246
Help
Using Help Back 246
keyOutInterpolationType(integer keyIndex) returns
KeyframeInterpolationType
keyOutSpatialTangent(integer keyIndex) returns
ArrayOfFloat
keyOutTemporalEase(integer keyIndex) returns
ArrayOfKeyframeEase
keyRoving(integer keyIndex) returns boolean
keySelected(integer keyIndex) returns boolean
keySpatialAutoBezier(integer keyIndex) returns boolean
keySpatialContinuous(integer keyIndex) returns boolean
keyTemporalAutoBezier(integer keyIndex) returns boolean
keyTemporalContinuous(integer keyIndex) returns boolean
keyTime(integer keyIndex) returns float
keyTime(string markerName) returns float
keyValue(integer keyIndex) returns type-
stored-in-property
keyValue(string markerName) returns type-
stored-in-property
matchName : string : readOnly
moveTo(integer index) no return
name : string : readOnly
nearestKeyIndex(float atTime) returns integer
numKeys : integer : readOnly
parentProperty : PropertyGroup : readOnly
propertyDepth : integer : readOnly
propertyGroup([integer countUp]) returns
PropertyGroup
propertyType : PropertyType : readOnly
propertyValueType : PropertyValueType : readOnly
remove() no return
removeKey(integer keyIndex) no return
selected : boolean : read/write
selectedKeys : Array of integer : readOnly
setInterpolationTypeAtKey(integer keyIndex,
KeyframeInterpolationType inType,
[KeyframeInterpolationType outType]) no return
setRovingAtKey(integer keyIndex,
boolean isRoving) no return
setSelectedAtKey(integer keyIndex,
boolean isSelected) no return
setSpatialAutoBezierAtKey(integer keyIndex,
boolean isAutoBezier) no return
setSpatialContinuousAtKey(integer keyIndex,
boolean isContinuous) no return
setSpatialTangentsAtKey(integer keyIndex,
ArrayOfFloat inTangent,
[ArrayOfFloat outTangent]) no return
setTemporalAutoBezierAtKey(integer keyIndex,
boolean isAutoBezier) no return
setTemporalContinuousAtKey(integer keyIndex,
boolean isContinuous) no return
setTemporalEaseAtKey(integer keyIndex,
ArrayOfKeyframeEase inEase,

Using Help Back 247
Help
Using Help Back 247
[ArrayOfKeyframeEase outEase]) no return
setValue(type-stored-in-property newValue) no return
setValueAtKey(integer keyIndex,
type-stored-in-property newValue) no return
setValueAtTime(float atTime,
type-stored-in-property newValue) no return
setValuesAtTimes(ArrayOfFloat atTimes,
ArrayOf-type-stored-in-property newValues) no return
unitsText : string : readOnly
value : type-stored-in-property:
readOnly
valueAtTime(float atTime,
bool preExpression) returns type-
stored-in-property
--------------------------------------------------------------------
-------
====================================================================
=======
PropertyGroup object
--------------------------------------------------------------------
-------
(integer propertyIndex) returns
PropertyBase
(string propertyName) returns
PropertyBase
active : boolean : readOnly
addProperty(string propertyName) returns
PropertyBase
canAddProperty(string propertyName) returns boolean
canSetEnabled : boolean : readOnly
duplicate() returns
PropertyGroup
elided : boolean : readOnly
enabled : boolean : readOnly
isEffect : boolean : readOnly
isMask : boolean : readOnly
isModified : boolean : readOnly
matchName : string : readOnly
moveTo(integer index) no return
name : string : readOnly
numProperties : integer : readOnly
parentProperty : PropertyGroup : readOnly
property(integer propertyIndex) returns
PropertyBase
property(string propertyName) returns
PropertyBase
propertyDepth : integer : readOnly
propertyGroup([integer countUp]) returns
PropertyGroup
propertyIndex : integer : readOnly
propertyType : PropertyType : readOnly

Using Help Back 248
Help
Using Help Back 248
remove() no return
selected : boolean : readOnly
--------------------------------------------------------------------
-------
====================================================================
=======
PropertyType enum
--------------------------------------------------------------------
-------
PropertyType.INDEXED_GROUP
PropertyType.NAMED_GROUP
PropertyType.PROPERTY
--------------------------------------------------------------------
-------
====================================================================
=======
PropertyValueType enum
--------------------------------------------------------------------
-------
PropertyValueType.COLOR
PropertyValueType.CUSTOM_VALUE
PropertyValueType.LAYER_INDEX
PropertyValueType.MARKER
PropertyValueType.MASK_INDEX
PropertyValueType.NO_VALUE
PropertyValueType.OneD
PropertyValueType.SHAPE
PropertyValueType.TEXT_DOCUMENT
PropertyValueType.ThreeD
PropertyValueType.ThreeD_SPATIAL
PropertyValueType.TwoD
PropertyValueType.TwoD_SPATIAL
--------------------------------------------------------------------
-------
====================================================================
=======
PulldownPhase enum
--------------------------------------------------------------------
-------
PulldownPhase.OFF
PulldownPhase.SSWWW
PulldownPhase.SWWWS
PulldownPhase.SWWWW_24P_ADVANCE
PulldownPhase.WSSWW
PulldownPhase.WSWWW_24P_ADVANCE
PulldownPhase.WWSSW
PulldownPhase.WWSWW_24P_ADVANCE

Using Help Back 249
Help
Using Help Back 249
PulldownPhase.WWWSS
PulldownPhase.WWWSW_24P_ADVANCE
PulldownPhase.WWWWS_24P_ADVANCE
--------------------------------------------------------------------
-------
====================================================================
=======
PulldownMethod enum
--------------------------------------------------------------------
-------
PulldownMethod.ADVANCE_24P
PulldownMethod.PULLDOWN_3_2
--------------------------------------------------------------------
-------
====================================================================
=======
PurgeTarget enum
--------------------------------------------------------------------
-------
PurgeTarget.ALL_CACHES
PurgeTarget.IMAGE_CACHES
PurgeTarget.SNAPSHOT_CACHES
PurgeTarget.UNDO_CACHES
--------------------------------------------------------------------
-------
====================================================================
=======
RenderQueue object
--------------------------------------------------------------------
-------
item(integer itemIndex) returns
RenderQueueItem
items : RQItemCollection : readOnly
numItems : integer : readOnly
pauseRendering(boolean doPause) no return
render() no return
rendering : boolean : readOnly
showWindow(boolean doShow) no return
stopRendering() no return
--------------------------------------------------------------------
-------
====================================================================
=======
RenderQueueItem object

Using Help Back 250
Help
Using Help Back 250
--------------------------------------------------------------------
-------
applyTemplate(string templateName) no return
comp : CompItem : readOnly
elapsedSeconds : float : readOnly
logType : LogType : read/write
numOutputModules : integer : readOnly
outputModule(integer outputModuleIndex) returns
OutputModule
outputModules : OMCollection : readOnly
remove() no return
render : boolean : read/write
saveAsTemplate(string templateName) no return
skipFrames : integer : read/write
startTime : float : readOnly
status : RQItemStatus : readOnly
templates : Array of string: readOnly
timeSpanDuration : float : read/write
timeSpanStart : float : read/write
onStatusChanged() no return
--------------------------------------------------------------------
-------
====================================================================
=======
RQItemCollection object
--------------------------------------------------------------------
-------
add(CompItem compToAdd) returns
RenderQueueItem
--------------------------------------------------------------------
-------
====================================================================
=======
RQItemStatus enum
--------------------------------------------------------------------
-------
RQItemStatus.DONE
RQItemStatus.ERR_STOPPED
RQItemStatus.NEEDS_OUTPUT
RQItemStatus.QUEUED
RQItemStatus.RENDERING
RQItemStatus.UNQUEUED
RQItemStatus.USER_STOPPED
RQItemStatus.WILL_CONTINUE
--------------------------------------------------------------------
-------

Using Help Back 251
Help
Using Help Back 251
====================================================================
=======
Settings object
--------------------------------------------------------------------
-------
getSetting(string sectionName,
string sectionKey) returns string
haveSetting(string sectionName,
string sectionKey) returns boolean
saveSetting(string sectionName,
string sectionKey,
string newValue) no return
--------------------------------------------------------------------
-------
====================================================================
=======
Shape object
--------------------------------------------------------------------
-------
new Shape() returns Shape
closed : boolean : read/write
inTangents : Array of float[2] : read/write
outTangents : Array of float[2] : read/write
vertices : Array of float[2] : read/write
--------------------------------------------------------------------
-------
====================================================================
=======
SolidSource object
--------------------------------------------------------------------
-------
alphaMode : AlphaMode : read/write
color : Array of float : read/write
conformFrameRate : float : readOnly
displayFrameRate : float : readOnly
fieldSeparationType : FieldSeparationType : readOnly
guessAlphaMode() no return
guessPulldown(PulldownMethod pulldownMethod) no return
hasAlpha : boolean : readOnly
highQualityFieldSeparation : boolean : readOnly
invertAlpha : boolean : read/write
isStill : boolean : readOnly
loop : integer : readOnly
nativeFrameRate : float : readOnly
premulColor : Array of float : read/write
removePulldown : PulldownPhase : readOnly
--------------------------------------------------------------------
-------

Using Help Back 252
Help
Using Help Back 252
====================================================================
=======
System object
--------------------------------------------------------------------
-------
machineName : string : readOnly
osName : string : readOnly
osVersion : string : readOnly
userName : string : readOnly
--------------------------------------------------------------------
-------
====================================================================
=======
TextDocument object
--------------------------------------------------------------------
-------
new TextDocument(string text) returns
TextDocument
text : string : read/write
--------------------------------------------------------------------
-------
====================================================================
=======
TimecodeBaseType enum
--------------------------------------------------------------------
-------
TimecodeBaseType.FPS100
TimecodeBaseType.FPS24
TimecodeBaseType.FPS25
TimecodeBaseType.FPS30
TimecodeBaseType.FPS48
TimecodeBaseType.FPS50
TimecodeBaseType.FPS60
--------------------------------------------------------------------
-------
====================================================================
=======
TimecodeDisplayType enum
--------------------------------------------------------------------
-------
TimecodeDisplayType.FEET_AND_FRAMES
TimecodeDisplayType.FRAMES
TimecodeDisplayType.TIMECODE
--------------------------------------------------------------------
-------

Using Help Back 253
Help
Using Help Back 253
====================================================================
=======
TimecodeFilmType enum
--------------------------------------------------------------------
-------
TimecodeFilmType.MM16
TimecodeFilmType.MM35
--------------------------------------------------------------------
-------
====================================================================
=======
TrackMatteType enum
--------------------------------------------------------------------
-------
TrackMatteType.ALPHA
TrackMatteType.ALPHA_INVERTED
TrackMatteType.LUMA
TrackMatteType.LUMA_INVERTED
TrackMatteType.NO_TRACK_MATTE
--------------------------------------------------------------------
-------
