Adobe Copyright ©2012 Systems Incorporated. All Rights Reserved. Echo Sign For Salesforce V13 Installation And Customization Guide CG EN
User Manual: adobe Adobe EchoSign for Salesforce V13 - Installation and Customization Guide Free User Guide for Adobe EchoSign Software, Manual
Open the PDF directly: View PDF ![]() .
.
Page Count: 68
- Adobe EchoSign for Salesforce Overview
- Installing and Configuring EchoSign for Salesforce v13
- Basic Customization
- Sending an Agreement Using EchoSign for Salesforce
- Using EchoSign Forms
- Configure Salesforce to send large documents for Signature
- EchoSign Data Mappings – Push Signer Data and Files to Salesforce Records
- EchoSign Merge Mappings – Generate Documents with Salesforce Data
- Echosign Agreement Templates and ‘Send to EchoSign’ Button
- EchoSign Group Mappings – Move Users to Specific EchoSign Groups (New!)
- Updating Salesforce with Agreements Sent with the EchoSign API, widgets, or from echosign.com (Push AGreements)
- EchoSign for Salesforce Customization and Settings
- Advanced Signer Authentication Methods (NEW!)
- EchoSign for Chatter Features
- EchoSign Step by Step Guided Walk-Thrus – Get the Browser Add-In
- Automation and Background Actions
- Require Users to Sign-on to Salesforce to Access Echosign Account
- Granting Access to Additional profiles
- Updating Email Addresses or Passwords
- EchoSign for Salesforce Professional Edition - Additional Installation Steps
- EchoSign Integration with other Salesforce Apps
- APPENDIX

ADOBE ECHOSIGN FOR SALESFORCE V13
INSTALLATION AND CUSTOMIZATION GUIDE
Copyright ©2013 Adobe Systems Incorporated. All rights reserved.
Last Updated June 3, 2013

Adobe EchoSign for Salesforce v13 Installation and Customization Guide
©2013 Adobe Systems Incorporated. All rights reserved.
Adobe® EchoSign for Salesforce v13 Installation and Customization Guide
If this guide is distributed with software that includes an end user agreement, this guide, as well as the software described in it,
is furnished under license and may be used or copied only in accordance with the terms of such license. Except as permitted
by any such license, no part of this guide may be reproduced, stored in a retrieval system, or transmitted, in any form or by any
means, electronic, mechanical, recording, or otherwise, without the prior written permission of Adobe Systems Incorporated.
Please note that the content in this guide is protected under copyright law even if it is not distributed with software that
includes an end user license agreement. The content of this guide is furnished for informational use only, is subject to change
without notice, and should not be construed as a commitment by Adobe Systems Incorporated. Adobe Systems Incorporated
assumes no responsibility or liability for any errors or inaccuracies that may appear in the informational content contained in
this guide. Please remember that existing artwork or images that you may want to include in your project may be protected
under copyright law. The unauthorized incorporation of such material into your new work could be a violation of the rights of
the copyright owner. Please be sure to obtain any permission required from the copyright owner. Any references to company
names in sample templates are for demonstration purposes only and are not intended to refer to any actual organization.
Copyright ©2013 Adobe Systems Incorporated. All rights reserved. 2
Adobe EchoSign for Salesforce v13 Installation and Customization Guide
Table of Contents
ADOBE ECHOSIGN FOR SALESFORCE OVERVIEW 5
INSTALLING AND CONFIGURING ECHOSIGN FOR SALESFORCE V13 5
GET ECHOSIGN FROM THE APPEXCHANGE 5
UPGRADING FROM A PREVIOUS RELEASE 7
SANDBOX TESTING 9
ECHOSIGN SUPPORT 9
BASIC SETUP STEPS AFTER UPGRADE OR INSTALLATION 9
NEXT STEPS AFTER BASIC SETUP 13
BASIC CUSTOMIZATION 14
ADD THE ECHOSIGN AGREEMENTS LIST ON THE CONTACT, OPPORTUNITY, ACCOUNT, LEADS AND CONTRACTS
PAGE LAYOUTS 14
SENDING AN AGREEMENT USING ECHOSIGN FOR SALESFORCE 15
USING ECHOSIGN FORMS 16
CONFIGURE SALESFORCE TO SEND LARGE DOCUMENTS FOR SIGNATURE 16
ECHOSIGN DATA MAPPINGS - -- PUSH SIGNER DATA AND FILES TO SALESFORCE RECORDS 18
ABOUT ECHOSIGN FORM FIELD DATA MAPPINGS 18
CREATING AN ECHOSIGN FORM FIELD DATA MAPPING (IMPROVED!) 19
CREATING AN ECHOSIGN FILE MAPPING 22
USING DEFAULT AND MULTIPLE DATA MAPPINGS 23
TROUBLESHOOTING 23
ECHOSIGN MERGE MAPPINGS - -- GENERATE DOCUMENTS WITH SALESFORCE DATA 24
ABOUT ECHOSIGN MERGE MAPPINGS 24
CREATING AN ECHOSIGN MERGE MAPPING (IMPROVED!) 24
USING DEFAULT AND MULTIPLE MERGE MAPPINGS 26
TROUBLESHOOTING 26
ECHOSIGN AGREEMENT TEMPLATES AND ‘SEND TO ECHOSIGN’ BUTTON 27
ABOUT AGREEMENT TEMPLATES 27
CREATING AN AGREEMENT TEMPLATE (IMPROVED!) 27
‘SEND TO ECHOSIGN’ BUTTON (IMPROVED!) 33
ECHOSIGN GROUP MAPPINGS - -- MOVE USERS TO SPECIFIC ECHOSIGN GROUPS (NEW!) 36
Copyright ©2013 Adobe Systems Incorporated. All rights reserved. 3
Adobe EchoSign for Salesforce v13 Installation and Customization Guide
UPDATING SALESFORCE WITH AGREEMENTS SENT WITH THE ECHOSIGN API, WIDGETS, OR FROM
ECHOSIGN.COM (PUSH AGREEMENTS) 38
ECHOSIGN FOR SALESFORCE CUSTOMIZATION AND SETTINGS 40
DEFAULT ORGANIZATION LEVEL SETTINGS 40
SETTINGS FOR SPECIFIC USERS AND PROFILES 42
AVAILABLE ECHOSIGN SETTINGS 43
ADDING CUSTOM FIELDS AND RELATED OBJECTS TO THE AGREEMENT PAGE 47
ADD RELATED OBJECTS TO THE AGREEMENT PAGE 48
ADVANCED SIGNER AUTHENTICATION METHODS (NEW!) 50
KNOWLEDGE BASED AUTHENTICATION (KBA) 51
WEB IDENTITY VERIFICATION 52
ECHOSIGN FOR CHATTER FEATURES 53
ECHOSIGN STEP BY STEP GUIDED WALK-THRUS - -- GET THE BROWSER ADD-IN 54
AUTOMATION AND BACKGROUND ACTIONS 55
BACKGROUND ACTIONS 55
INSTRUCTIONS TO ENABLE ‘SEND ON BEHALF OF’ FUNCTIONALITY 55
ONLOADACTIONS (NEW!) 56
REQUIRE USERS TO SIGN-ON TO SALESFORCE TO ACCESS ECHOSIGN ACCOUNT 56
GRANTING ACCESS TO ADDITIONAL PROFILES 56
UPDATING EMAIL ADDRESSES OR PASSWORDS 57
ADMINISTRATOR SALESFORCE ACCOUNT PASSWORD CHANGES 57
USER EMAIL ADDRESS CHANGES 57
ECHOSIGN FOR SALESFORCE PROFESSIONAL EDITION - ADDITIONAL INSTALLATION STEPS 57
ECHOSIGN INTEGRATION WITH OTHER SALESFORCE APPS 59
ADVANCED DOCUMENT GENERATION 59
SUBSCRIPTIONS & BILLING 59
CONTRACT, PROPOSAL, AND QUOTE MANAGEMENT 59
APPENDIX 59
SELECT ECHOSIGN AGREEMENTS PAGE STYLE (ADVANCED OR BASIC) 59
CUSTOMIZING THE ‘ECHOSIGN AGREEMENT BASIC’ PAGE LAYOUT 63
SWITCHING BACK TO THE ‘ECHOSIGN AGREEMENT ADVANCED’ PAGE LAYOUT 66
Copyright ©2013 Adobe Systems Incorporated. All rights reserved. 4
Adobe EchoSign for Salesforce v13 Installation and Customization Guide
ADOBE ECHOSIGN FOR SALESFORCE OVERVIEW
Adobe EchoSign in Salesforce is available from the AppExchange and supports Salesforce Editions:
• Professional
• Enterprise
• Unlimited
• Developer
With Adobe EchoSign, reap immediate benefits for your document and signature workflows.
• Save time and money by eliminating snail mail, overnighting, and faxing.
• Save space with digital storage instead of filing cabinets.
• Send contracts for e-signature or approval directly from Salesforce, access real-time
contract history, and view saved contracts from any object
• Track deals in real-time across your organization and also get updates with Chatter when
agreements are viewed, signed, cancelled, or declined.
• eSign in over 20 languages and support fax-back service in 50+ locales worldwide
• Merge Salesforce data into documents before sending and map signer data back to
Salesforce objects - -- automatically
• Create reusable Agreement Templates for sending options and enable one-click 'Send to
EchoSign' buttons to send custom agreements from any Salesforce object
• Native integrations with Conga Composer, Apttus, Selectica, Drawloop, Zuora, Emptoris,
and more
Release notes for EchoSign for Salesforce v13 can be found here.
INSTALLING AND CONFIGURING ECHOSIGN FOR SALESFORCE V13
GET ECHOSIGN FROM THE APPEXCHANGE
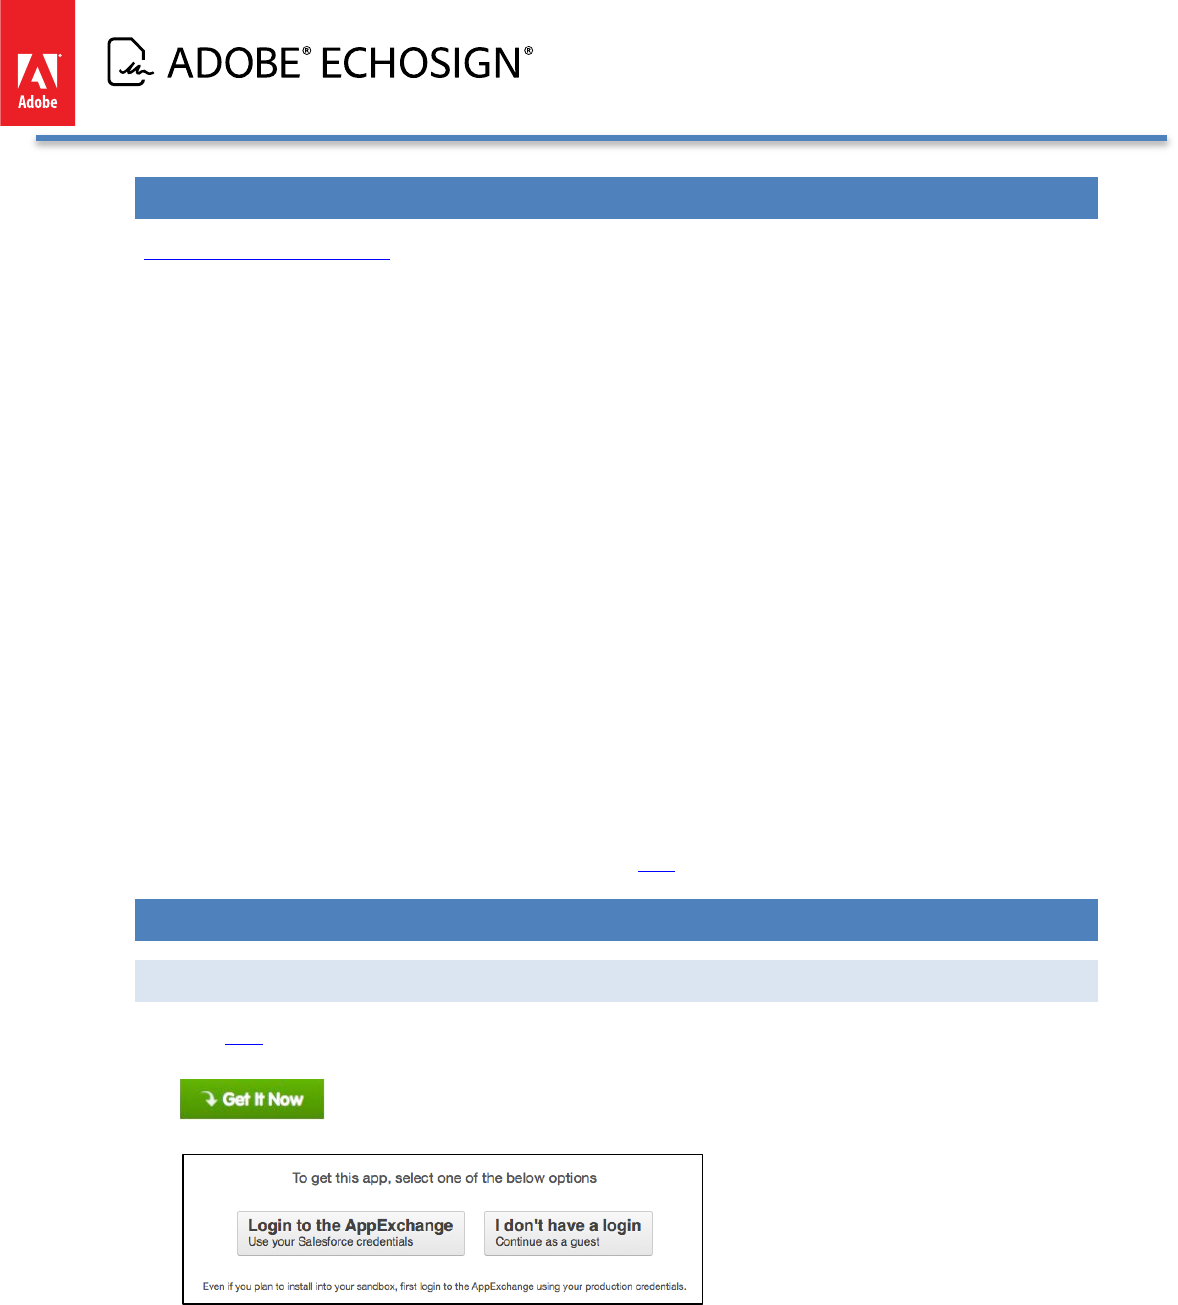
• Click here to view the Adobe EchoSign for Salesforce AppExchange listing
• Click the ‘Get It Now’ button
• Follow the instructions to determine where you would like to install EchoSign.
Copyright ©2013 Adobe Systems Incorporated. All rights reserved. 5
Adobe EchoSign for Salesforce v13 Installation and Customization Guide
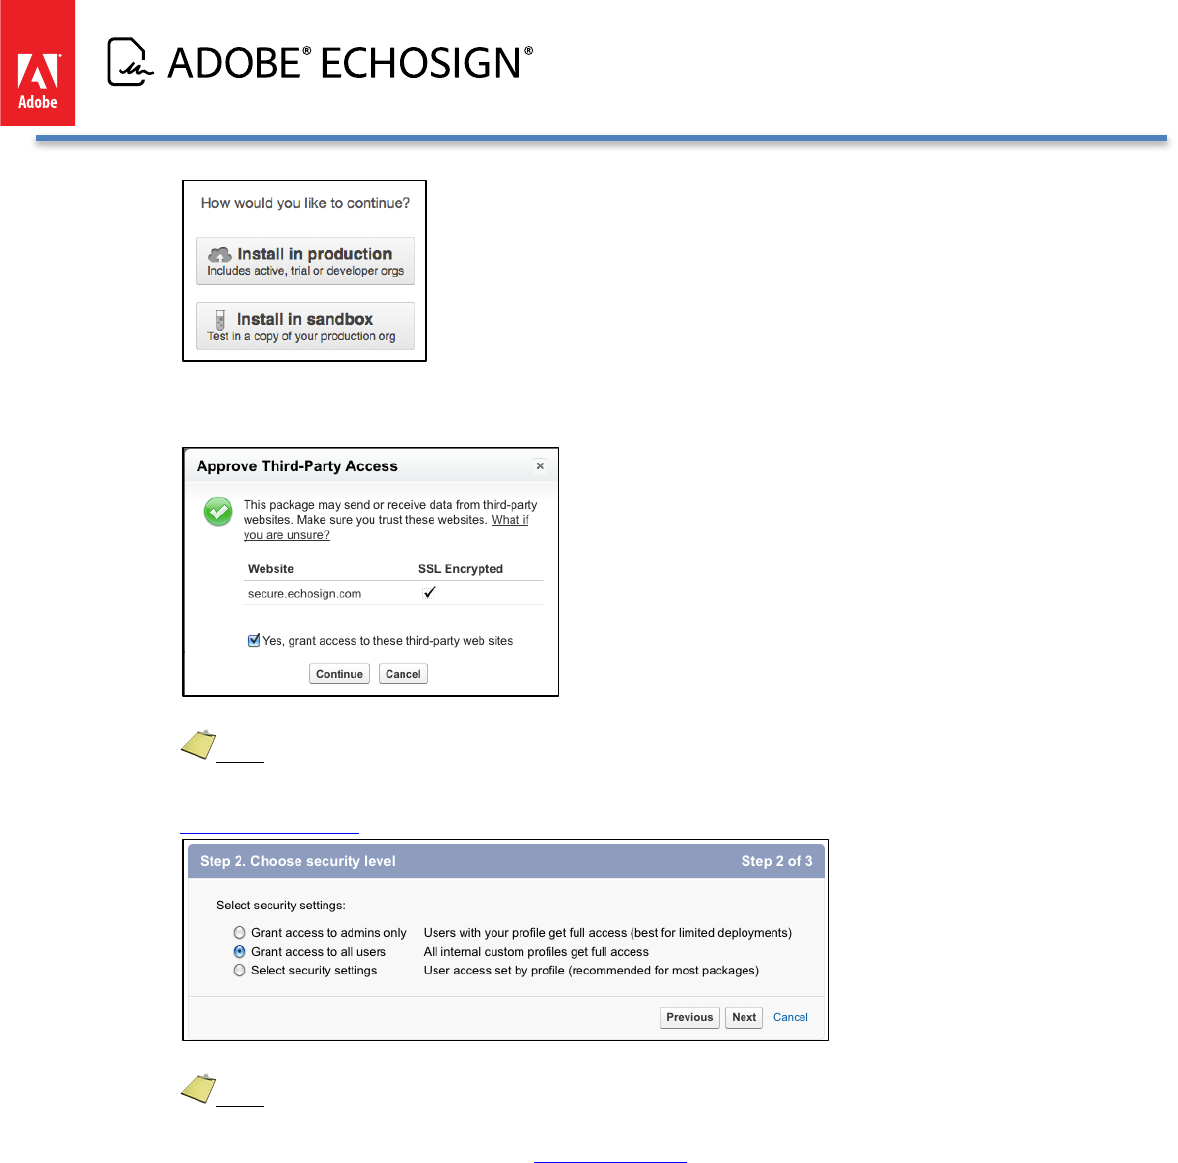
Follow the instructions to confirm and start the installation process.
• Grant access so that Salesforce can securely access EchoSign
• In ‘Step 2. Choose security level’, make sure to grant access to all users.
• Note: If you do not grant access to all users in your production account now, it will take additional
configurations to grant them full access later on so it is recommended that you grant access to all users. For
instructions on how to enable access for additional user profiles after installation, please refer to this
documentation guide about extending access.
• In ‘Step 3. Install package’, click the ‘Install’ button.
• Note: The installation process may take some time to complete. Salesforce.com will notify you by email
when it is done.
• When installation is completed, follow the simple setup steps to get started with Adobe EchoSign.
Copyright ©2013 Adobe Systems Incorporated. All rights reserved. 6

Adobe EchoSign for Salesforce v13 Installation and Customization Guide
UPGRADING FROM A PREVIOUS RELEASE
EXISTING CUSTOMERS UPGRADING TO VERSION 13: PLEASE READ THIS SECTION
Each version of Adobe EchoSign for Salesforce has new features and enhancements that could provide key
improvements in your document workflows. We strongly recommend you upgrade to the latest release, as
EchoSign will be discontinuing support of older releases at a later time.
EchoSign for Salesforce version 13 can only be automatically upgraded from version 6 or later. If you have earlier
versions of EchoSign for Salesforce installed or need assistance on upgrades, please contact the Client Success
Manager assigned to your account or reach out to EchoSign Support.
To find the version you currently have installed, go to Setup / Deploy / Installed Packages
Important Upgrade Notes:
1) Please DO NOT un-install your existing EchoSign for Salesforce package. Uninstalling your EchoSign package
will result in losing all your EchoSign data in Salesforce.
2) If you have users in your Salesfoce Org that belong to multiple EchoSign accounts, please reach out to your
EchoSign client success manager or to EchoSign Support before upgrading.
3) Before upgrading your production account, EchoSign recommends testing the upgrade process in your
Salesforce Sandbox environment. Also, make sure your email in the Sandbox environment is a real email
address that you have access to in case you need to ever change the email for your EchoSign account and
verify your email address.
4) Keep in mind hosted agreements that were sent from older versions of Salesforce and are still out for
signature during the time of upgrade, will not be able to get the status updates when they are signed after the
upgrade. Please make sure agreements initiated as hosted agreements are signed before you upgrade.
5) Hosted agreements no longer need Sites in Salesforce. Sites are only required if you need to send file
transactions larger than 2.8MB. Keep in mind Professional Edition will not support sending large files because
Sites are not supported. If you previously set up Sites for hosted agreements and do not need to send larger
transactions, you can deactivate the EchoSign Callback Site.
6) There are several new EchoSign settings that were added version 13. Make sure you review them and
determine what you want to set for your Org. Below are the new settings but for a full listing of all the
EchoSign custom settings, visit this section of the guide:
a. Auto-Sync Group Mappings- -- Check this box to automatically move the correct EchoSign groups
when their Salesforce user profiles are updated.
b. Disable Send Email Copies- -- Check this box to hide the ‘Send email copies to:’ field on the send
agreement page.
c. Disable Knowledge Based Authentication- -- Check this box to hide the Knowledge Based
Authentication (KBA) identity verification option for agreements. This is a signer identity verification
method that requires signers to provide and verify personal information to sign the document.
Copyright ©2013 Adobe Systems Incorporated. All rights reserved. 7
Adobe EchoSign for Salesforce v13 Installation and Customization Guide
Usage of this feature is limited and may incur added costs. Also, make sure your account send
settings on EchoSign.com have KBA enabled so you can use it in Salesforce.
d. Disable Web Identity Verification- -- Check this box to hide the web identity verification option for
agreements. Web identity verification requires signers to verify their identity by signing into one of
the following sites: Facebook, Google, LinkedIn, Twitter, Yahoo!, or Microsoft Live. Also, make sure
your account send settings on EchoSign.com have web identity enabled so you can use it in
Salesforce.
e. Enable Mapping Error Notification- -- Check this box to send email notifications to the data mapping
or merge mapping owner any time there are errors when the mappings are executed.
f. Enable Recipient Approver Role- -- Check this box to enable the option to mark any recipient as an
Approver. Approvers review and approve the document but they are not required to sign it.
g. Enable Separate Signer Identity Methods- -- Check this box to enable the option to select different
identity verification methods for recipients in your EchoSign account and those outside of your
EchoSign account. This applies to knowledge based authentication (KBA), web identity verification,
and password to sign. For example, you can require that a customer be verified with Knowledge
Based Identity before signing the document but require that your sales manager instead provide a
password to sign the document. If you don’t check this box, then all signers or approvers will verify
using the same method, as selected by the sender.
7) If you used Agreement Templates in v12 and want to take advantage of the new Agreement options
introduced in v13, please edit the Agreement Template layout and drag the fields to the layout. Go to Setup /
Create / Objects / Agreement Templates / Page Layout / (Edit) Agreement Template Layout. Add the
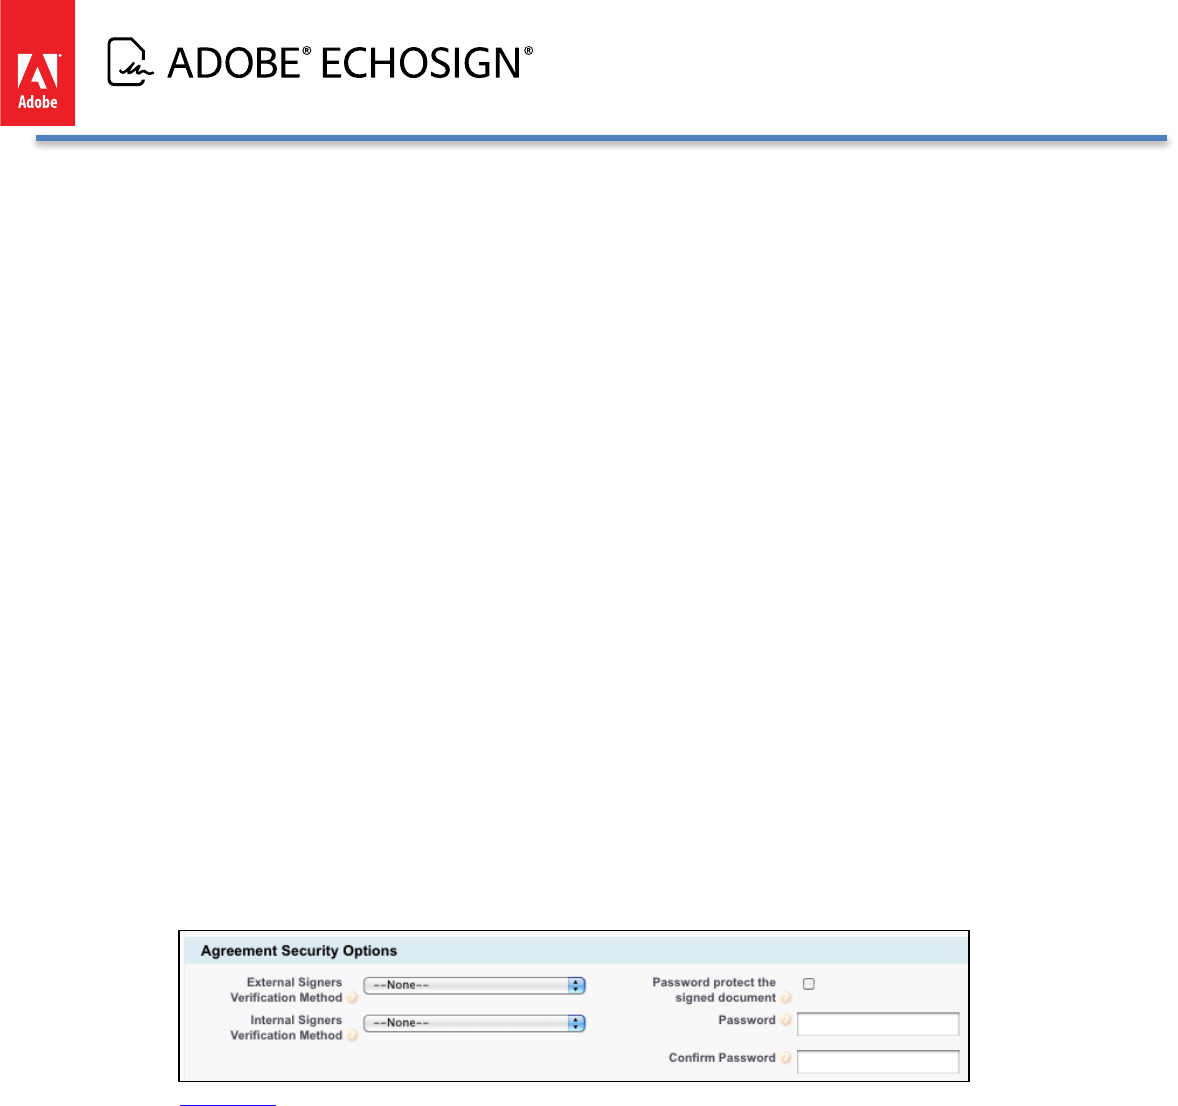
following new fields to the Agreement Security Options section:
a. External Signers Verification Method
b. Internal Signers Verification Method
Remove the ‘Password to Sign Agreement’ field used in v12 as the fields above replace it.
When done, the Agreement Template page ‘Agreement Security Options’ page should look like this:
Learn more about Agreement Templates.
8) The option to ‘Allow Signers to Suggest Revisions’ is no longer available in EchoSign.
9) For field values that were added to EchoSign for Salesforce version 13, Salesforce does not
enable them by default when upgrading from an older version to version 13. You will need to
add the following field values:
Object: Add File Attachment
Field: Attachment Type
Value to add: Quote Document from Master Quote
Object: Agreement Template
Field: Language
Values to add:
Chinese (Taiwan)
Copyright ©2013 Adobe Systems Incorporated. All rights reserved. 8
Adobe EchoSign for Salesforce v13 Installation and Customization Guide
English (United Kingdom)
Korean (South Korea)
Polish (Poland)
Object: EchoSign File Mapping
Field: Source Type
Values to add:
Signed Agreement - Merged PDF
Signed Agreement - Separate PDFs
Supporting Documents
Object: Agreement
Field: Agreement Status
Values to add:
Send in Progress
Approved
Waiting for Counter-Approval
Object: EchoSign Form Field Import
Field: Type
Value to add: Text Entry
SANDBOX TESTING
Important Sandbox Testing Notes:
When testing on a Salesforce Sandbox, you often are not using a real email address that you have access to. (e.g.
user@company.com.sandboxname) If so, we strongly recommend that you to change your Salesforce Sandbox
email to a real email address before you begin testing so that your EchoSign account tied to a real email address.
If not, it will be problematic if you want to change your email address later when you move to production because
your EchoSign account will be tied to an email address that does not exist and cannot be verified to make email
changes.
ECHOSIGN SUPPORT
For questions and additional assistance, please visit the Adobe EchoSign Support portal.
If you are running into issues configuring EchoSign for Salesforce or sending agreements, you can also contact
your designated Client Success Manager for assistance.
BASIC SETUP STEPS AFTER UPGRADE OR INSTALLATION
A few simple setup steps are required before you can start sending EchoSign agreements from Salesforce and this
is accomplished by launching the setup wizard. After upgrading or installing EchoSign for Salesforce v13, please
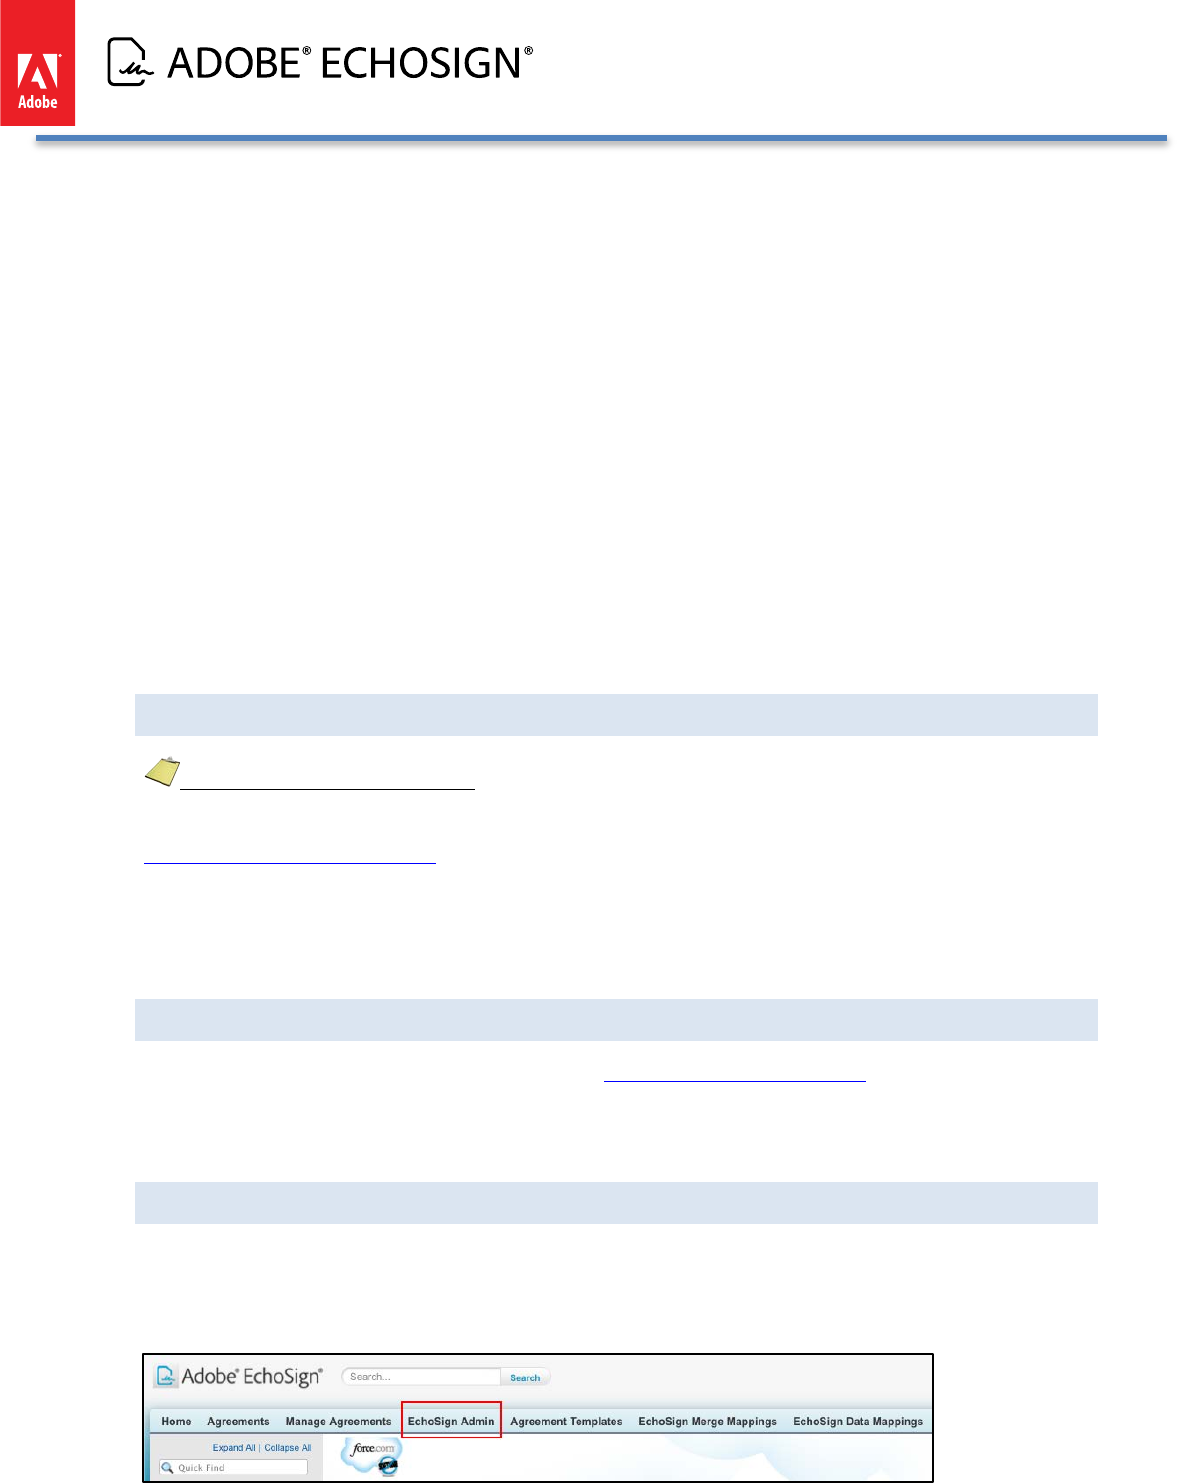
click on the EchoSign Admin tab.
Copyright ©2013 Adobe Systems Incorporated. All rights reserved. 9
Adobe EchoSign for Salesforce v13 Installation and Customization Guide
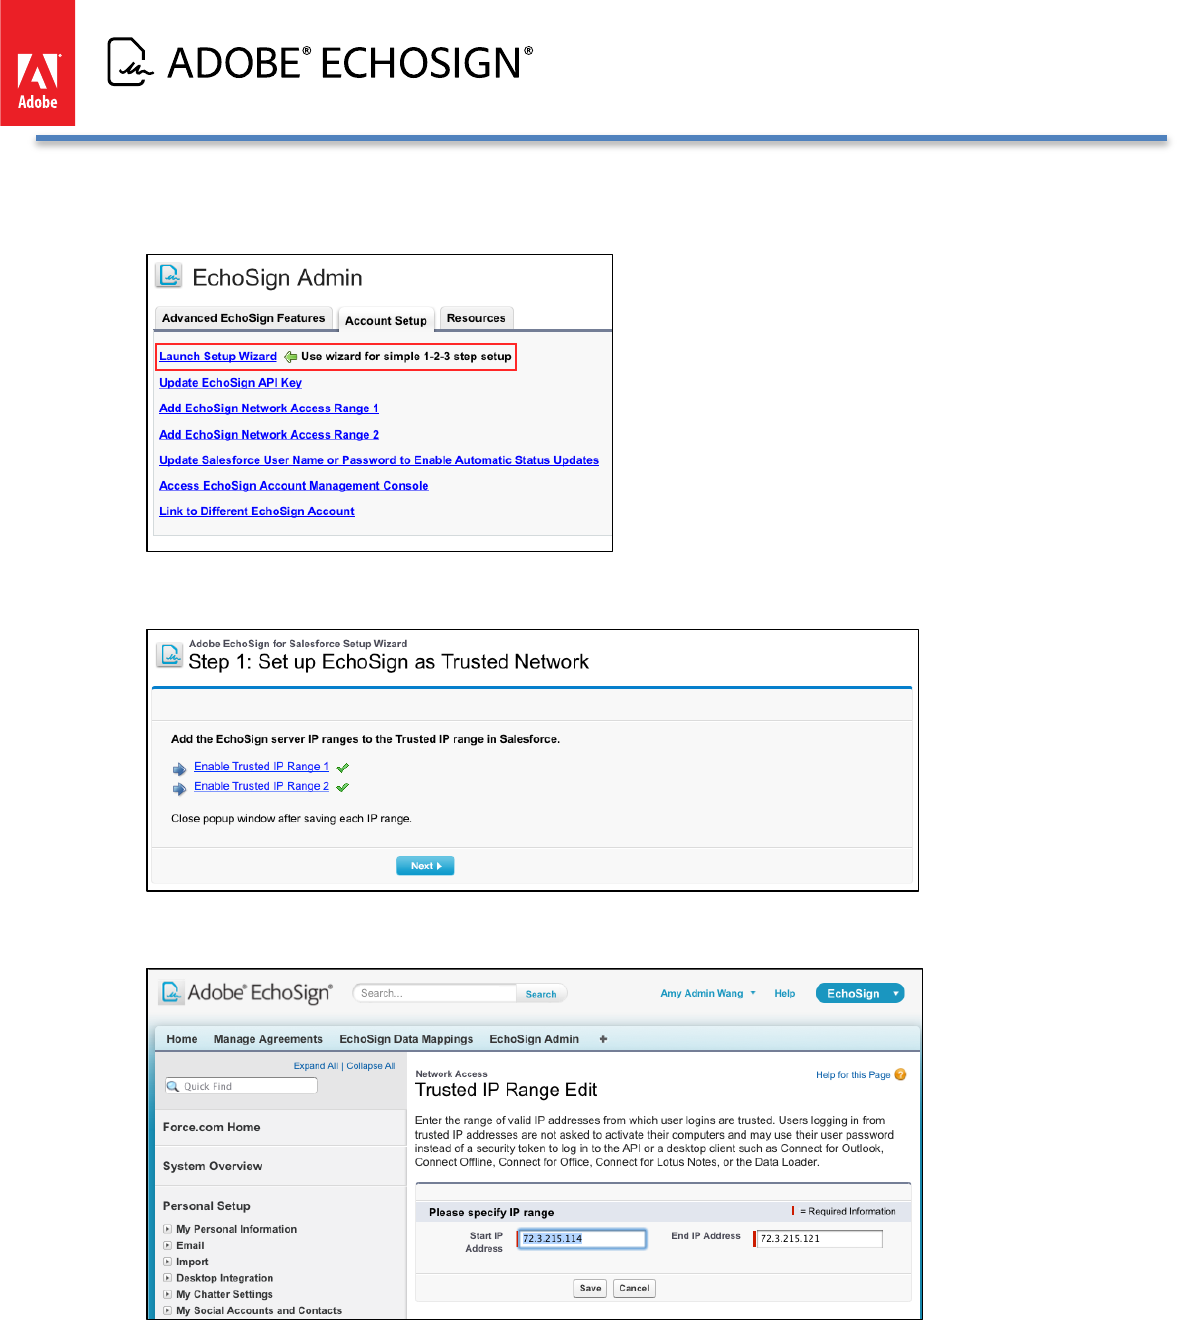
If the Setup Wizard doesn’t launch automatically, please go to the Account Setup tab and click the link ‘Launch
Setup Wizard’.
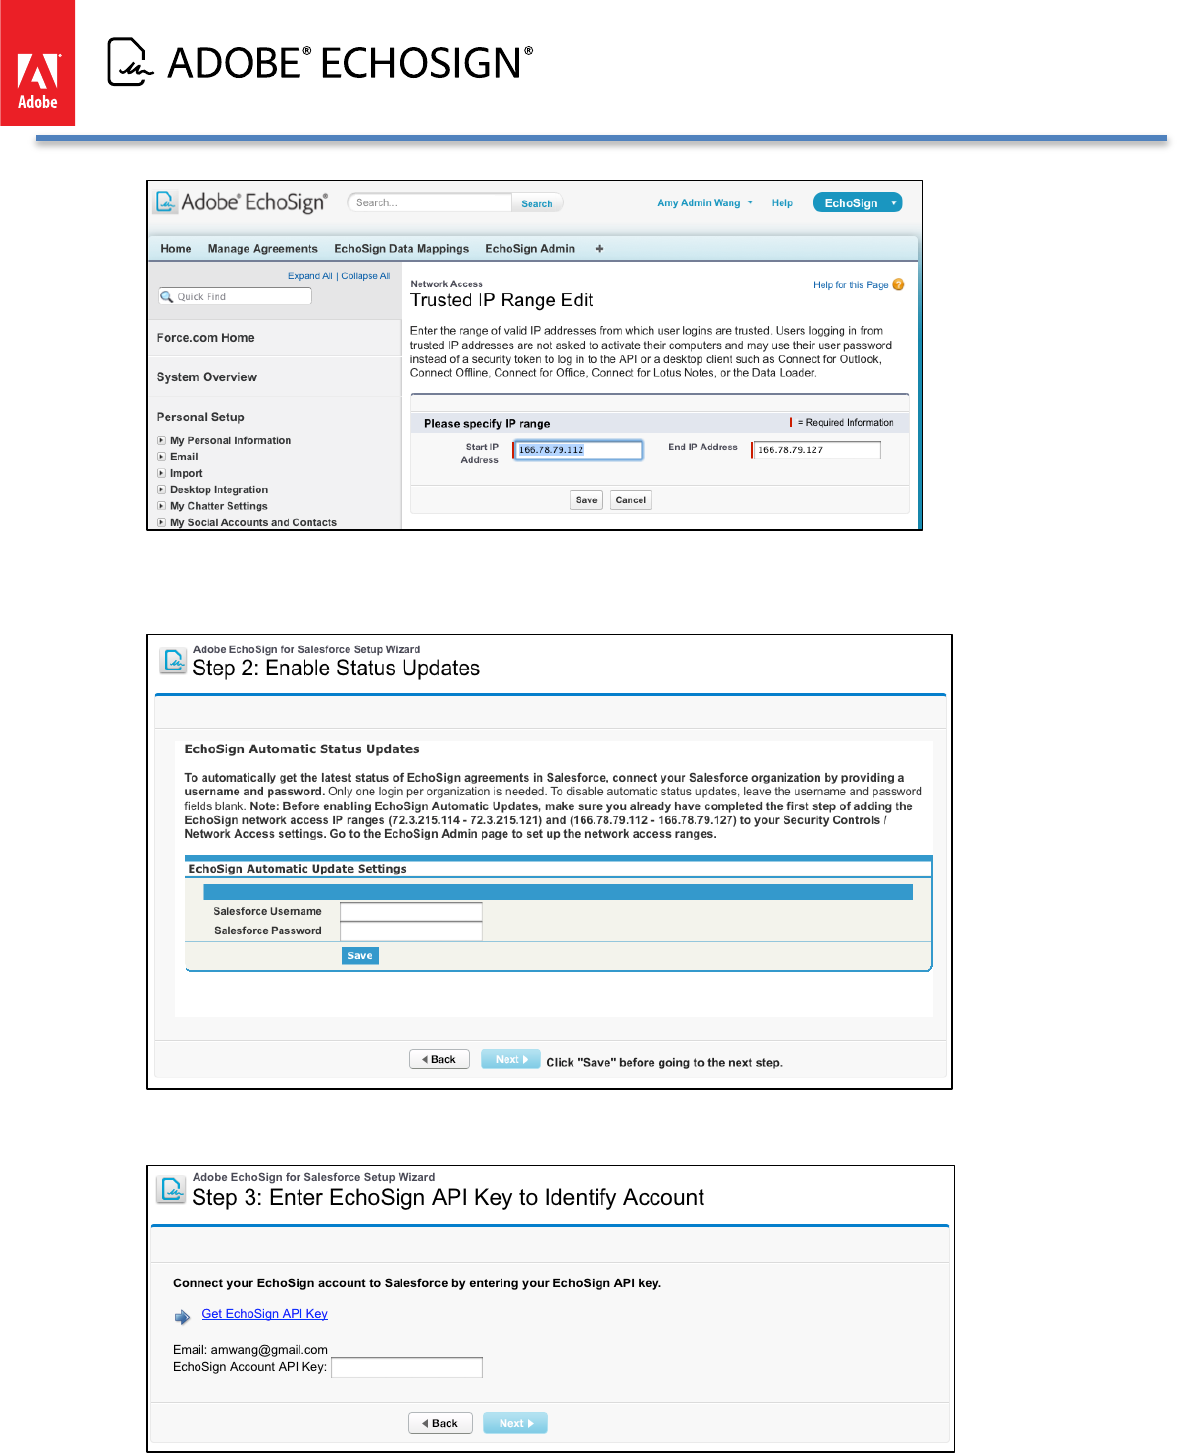
Step 1: Set up the 2 EchoSign IP Ranges as trusted ranges within Salesforce.
Close the popup window after saving each IP range.
Copyright ©2013 Adobe Systems Incorporated. All rights reserved. 10
Adobe EchoSign for Salesforce v13 Installation and Customization Guide
Step 2: Enable automatic status updates by entering and saving your Salesforce username and password.
Click the ‘Save’ button and when successfully saved, click the ‘Next’ button to continue.
Step 3: Copy the EchoSign API key from your EchoSign account and save it into Salesforce.
Copyright ©2013 Adobe Systems Incorporated. All rights reserved. 11
Adobe EchoSign for Salesforce v13 Installation and Customization Guide
Notes:
1) Make sure you do not check the option ‘Lock sessions to the IP address from which they
originated’ under Setup / Administration Setup / Security Controls / Session Settings.
2) If you run into issues sending agreements, you can contact EchoSign Support to ensure that
your EchoSign account is slotted in the right channel for the Salesforce integration, which is
the default for Salesforce users.
3) EchoSign for Salesforce requires that you have cookies enabled on your browser. Please
also check that third-party cookies are enabled as that is required in some browsers to fully
access the application pages.
4) If you are using Salesforce Professional Edition, you will need to complete installation by
following the additional steps in the section EchoSign for Salesforce Professional Edition -
Additional Installation Steps.
CONGRATULATIONS!
YOU HAVE SUCCESSFULLY INSTALLED AND SET UP ECHOSIGN FOR SALESFORCE.
TRY SENDING AN AGREEMENT AND EXPERIENCE ECHOSIGN FOR THE FIRST TIME.
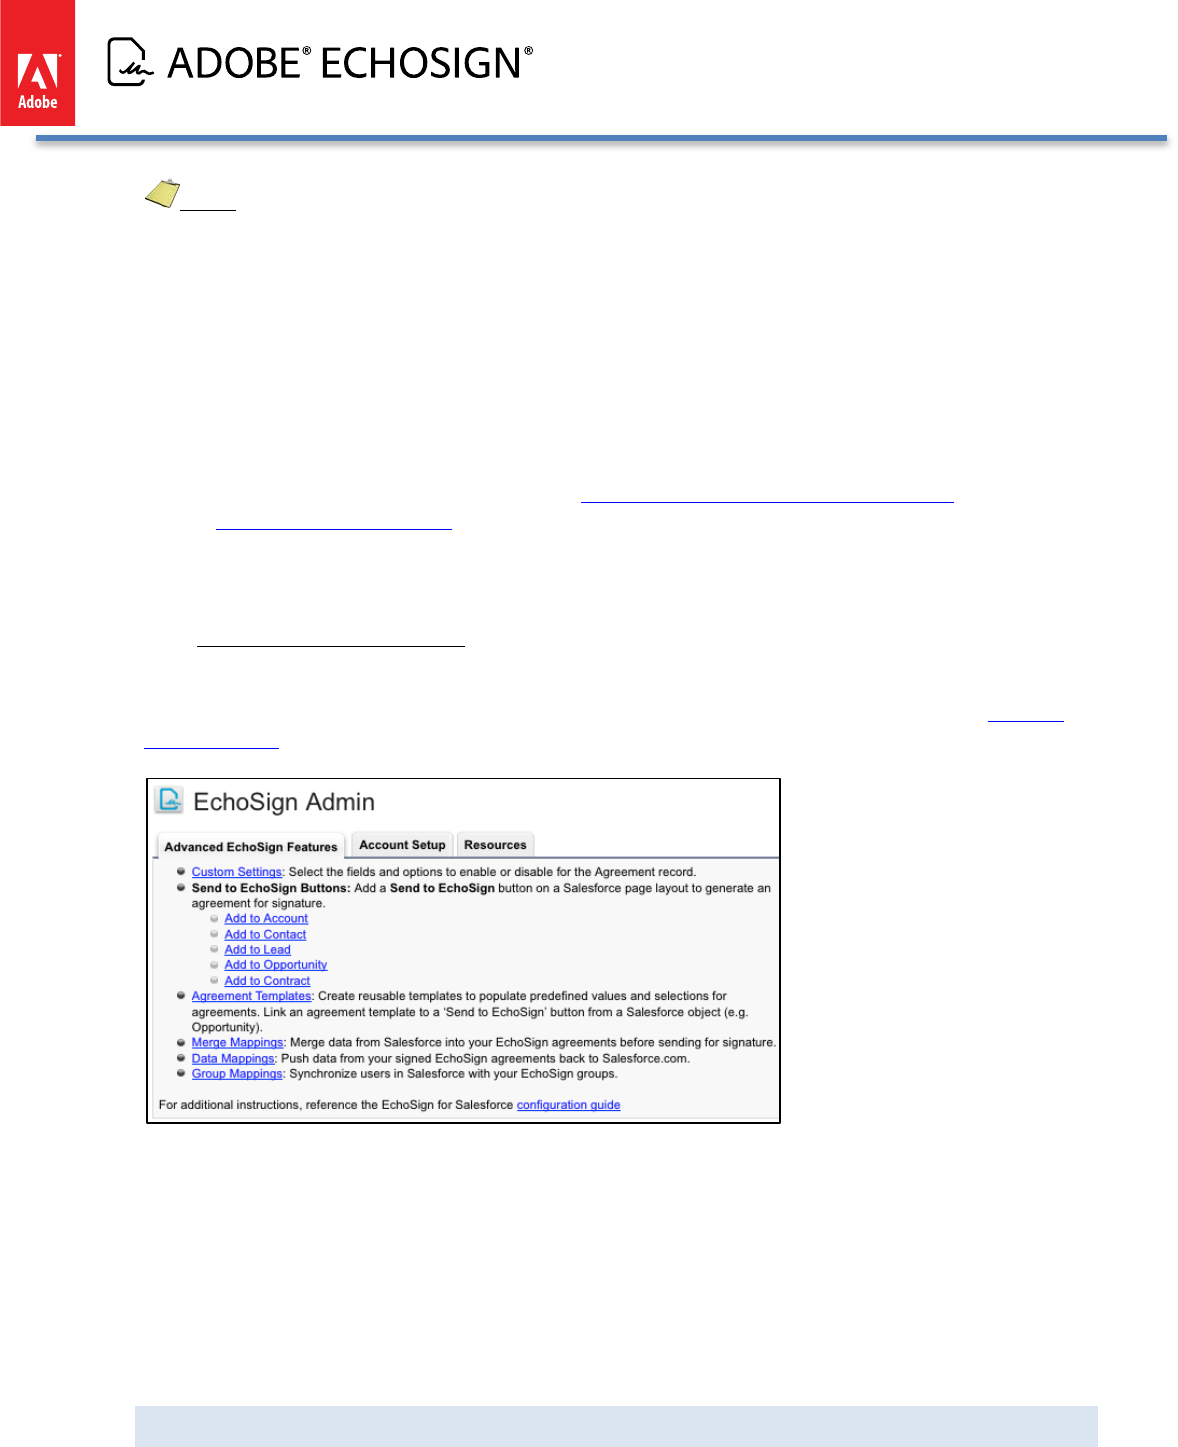
After the initial setup, the EchoSign Admin tab is a useful page you can come back to access links to EchoSign
features, setup configurations, and other resources. Administrators should also consider installing the EchoSign
Walk-Thrus App to get step-by-step guidance on some key features in the app.
Copyright ©2013 Adobe Systems Incorporated. All rights reserved. 12
Adobe EchoSign for Salesforce v13 Installation and Customization Guide
NEXT STEPS AFTER BASIC SETUP
EchoSign for Salesforce is now installed in your Salesforce organization. The following are some optional next
steps for further customizing and using EchoSign for Salesforce.
1. BASIC CUSTOMIZATION
Start sending agreements.
Add the EchoSign Agreement List to Contacts, Opportunities, Accounts, Leads and Contracts.
2. ADVANCED CUSTOMIZATION AND SETTINGS
Advanced Customization Options - -- Add the EchoSign Agreement List to other Salesforce objects,
customize agreement fields, and more.
EchoSign for Salesforce Custom Settings (Improved!) - -- Change EchoSign for Salesforce behavior and
available options.
3. ENABLE ADVANCED FEATURES
Configure Salesforce Sites if your users may be sending large transactions over 2.8MB
EchoSign Data Mappings - -- Map form field data entered by signers and push EchoSign files back into
Salesforce objects.
EchoSign Merge Mappings - -- Merge data from Salesforce objects into form fields in EchoSign agreements
before they are sent for signature.
Agreement Templates and Send to EchoSign Button - -- Set up default values and settings for your
agreements ahead of time. Also optionally link an agreement template to a ‘Send to EchoSign’ button on
a Salesforce object. (e.g. Opportunity)
EchoSign Group Mappings - Synchronize users in Salesforce profiles with your EchoSign groups.
Updating Salesforce with Agreements Sent Outside of Salesforce - -- Even if you send agreements or create
EchoSign Widgets directly through the EchoSign API or send agreements from EchoSign.com, you can
have those agreements pushed into Salesforce.
Automation and Background Actions - -- In conjunction with Salesforce workflow or triggers, set up
automatic agreement workflows through background actions, onLoad actions, or sending on behalf of
another user.
Require Sign On to Salesforce.com to Access Echosign Account - -- To control access, require that your
Salesforce.com users be signed on to Salesforce to access their EchoSign accounts.
Advanced Signer Authentication Methods - -- Add additional level of verification of signers’ identity
through Knowledge Based Authentication or Web Identity verification.
4. OTHER ECHOSIGN PRODUCTS
EchoSign Real-Time Quotes Integration - -- Send a Salesforce Quote for Signature.
EchoSign Chatter Integration - -- Install the EchoSign for Chatter Agreement status updates to your Chatter
feed.
EchoSign Walk-Thrus - -- Install the EchoSign Walk-Thrus App and get step by step instructions on how to
configure some key features in EchoSign for Salesforce
Copyright ©2013 Adobe Systems Incorporated. All rights reserved. 13
Adobe EchoSign for Salesforce v13 Installation and Customization Guide
BASIC CUSTOMIZATION
ADD THE ECHOSIGN AGREEMENTS LIST ON THE CONTACT, OPPORTUNITY, ACCOUNT,
LEADS AND CONTRACTS PAGE LAYOUTS
The instructions below describe how to associate Agreements with a Contact object, but they can be applied to
any other object referenced from the Agreement object - -- Opportunities, Accounts, Leads and Contracts.
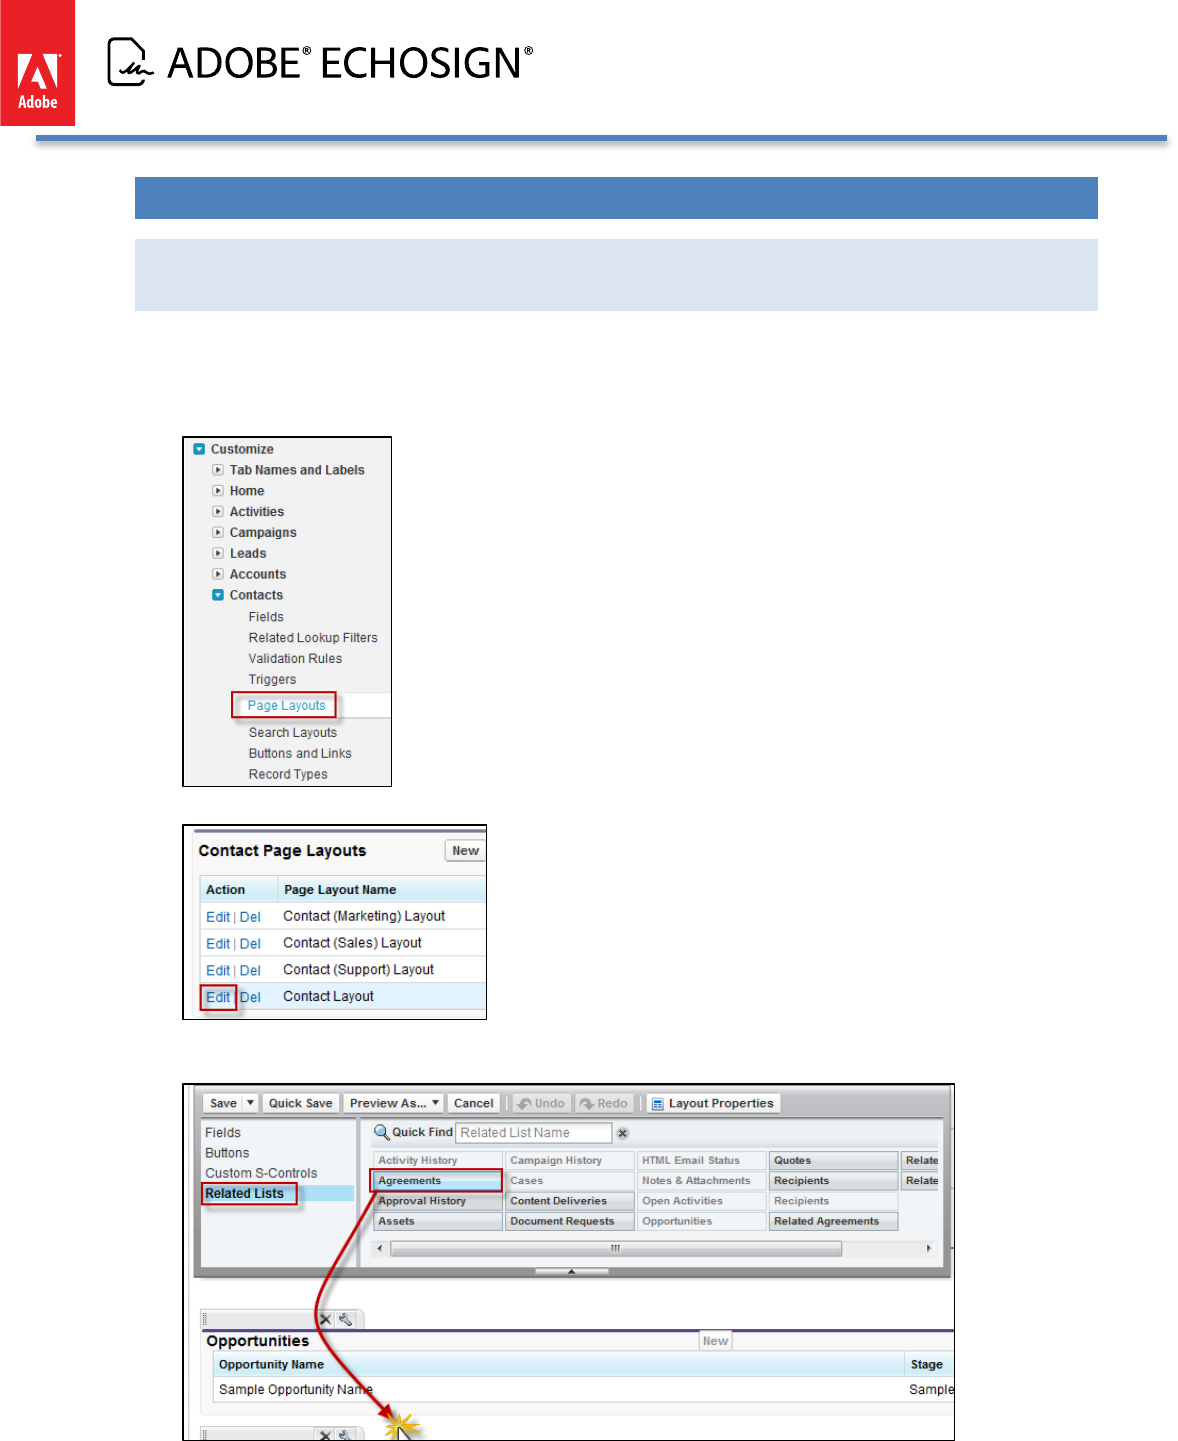
• Go to Setup / Customize / Contacts / Page Layouts
• Click ‘Edit’ next to Contacts Layout
• Click on ‘Related Lists’ then drag and drop the ‘Agreements’ list to the desired place on the
page layout
Copyright ©2013 Adobe Systems Incorporated. All rights reserved. 14
Adobe EchoSign for Salesforce v13 Installation and Customization Guide
• Click ‘Save’
SENDING AN AGREEMENT USING ECHOSIGN FOR SALESFORCE
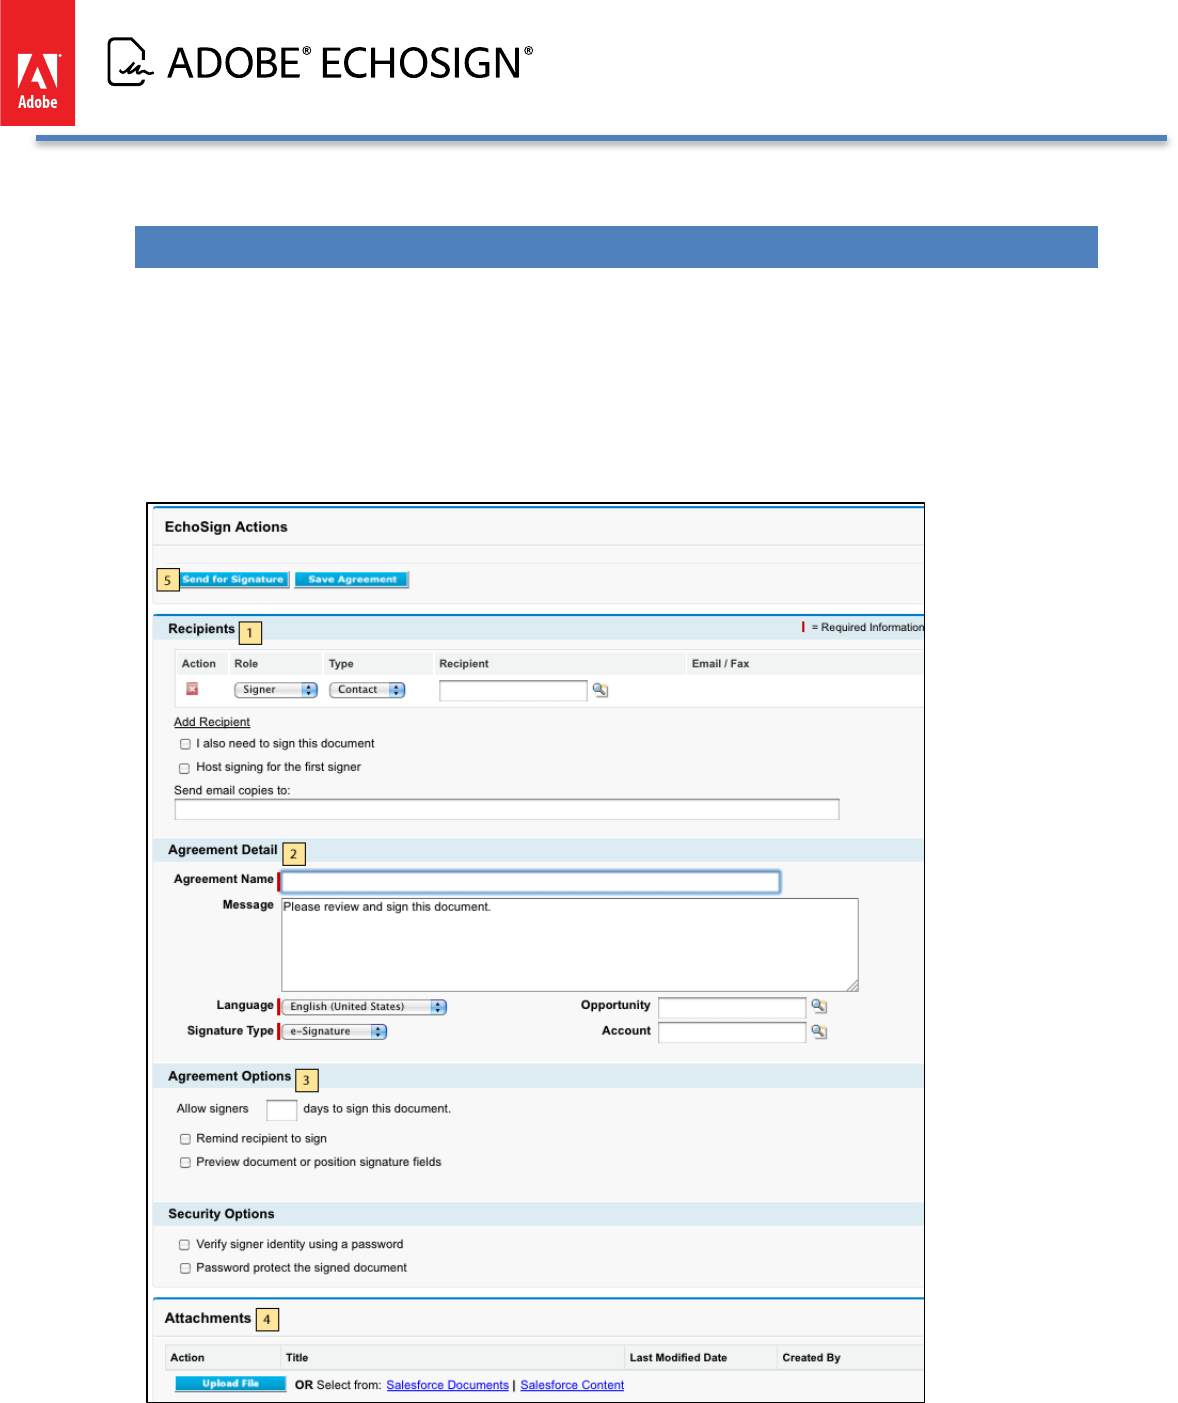
Create a new agreement by clicking ‘New’ on the Agreements tab or on the Agreements related list in one of the
related objects (Contact, Opportunity, Lead, etc.)
1. Specify the recipients
2. Name the agreement, type a message, select signature type and language
3. Select the relevant sending options and security options
4. Attach files from your computer or from the Salesforce Library or from Salesforce Content.
5. Click the ‘Send for Signature’ button
Copyright ©2013 Adobe Systems Incorporated. All rights reserved. 15
Adobe EchoSign for Salesforce v13 Installation and Customization Guide
USING ECHOSIGN FORMS
EchoSign gives you the ability to use interactive forms to collect data from your signers, position signature and
initial fields in your documents, collect two-party information from both sender and signer and more.
You can create your own EchoSign template library by storing EchoSign forms and templates in your Salesforce
Documents tab.
EchoSign Smart Forms and Text Tags provide the following benefits:
• Set specific locations for customers to sign and initial documents
• Collect data from signers that can later be pushed back into your Salesforce account.
• Merge data from Salesforce into document fields before sending for signature.
For detailed information on creating EchoSign Smart Forms using Adobe Acrobat, please refer to the Smart Forms
Tutorial.
You may also create EchoSign forms by adding special text tags in any document you send through EchoSign
(Word, PDF, Text, etc.). For more details read our Text Forms Tutorial.
CONFIGURE SALESFORCE TO SEND LARGE DOCUMENTS FOR SIGNATURE
If you choose not to expose this feature, skip this section.
Note: Sending file transactions over 2.8MB for signature is not supported in Salesforce Professional Edition.
If you are using Salesforce Professional Edition, skip this section. Then complete the installation by following the
steps in the section EchoSign for Salesforce Professional Edition - Additional Installation Steps.
To enable sending of large files over 2.8MB follow the instructions below. 2.8MB is the sum total of all files in
a single transaction.
CONFIGURE ECHOSIGN CALLBACK SITE AND CUSTOM SETTINGS TO SEND LARGE FILES
1. You first need to set up a Site for EchoSign Callback so that agreement updates can be pushed to Salesforce
in a timely manner.
2. Go to Setup / App Setup / Develop / Sites
3. Follow the Salesforce instructions if creating a Site for the first time. If you have not used Salesforce sites in
your Salesforce org, you will be required to register a Force.com domain name that will be used for all you
Salesforce sites in the account.
a. Note: Keep in mind that if you are registering a new domain name, it is recommended that you don’t
have a very long domain name or the secure web URL may exceed the 255 character limit that
EchoSign has for callback URLs.
4. Click the New button
5. Set the ‘Site Label’ value to: EchoSign Callback
6. Set the ‘Site Name’ value to: EchoSign_Callback
7. Set the ‘Site Contact’ value to a Salesforce user who will receive notifications about Sites. In most cases, this
would be the account admin.
8. Set the ‘Default Web Address’ value to EchoSignCallback.
Copyright ©2013 Adobe Systems Incorporated. All rights reserved. 16
Adobe EchoSign for Salesforce v13 Installation and Customization Guide
9. Set the ‘Active’ value to Checked.
10. Set the ‘Active Site Home Page’ value to EchoSignCallback
11. Click ‘Save’ to continue.
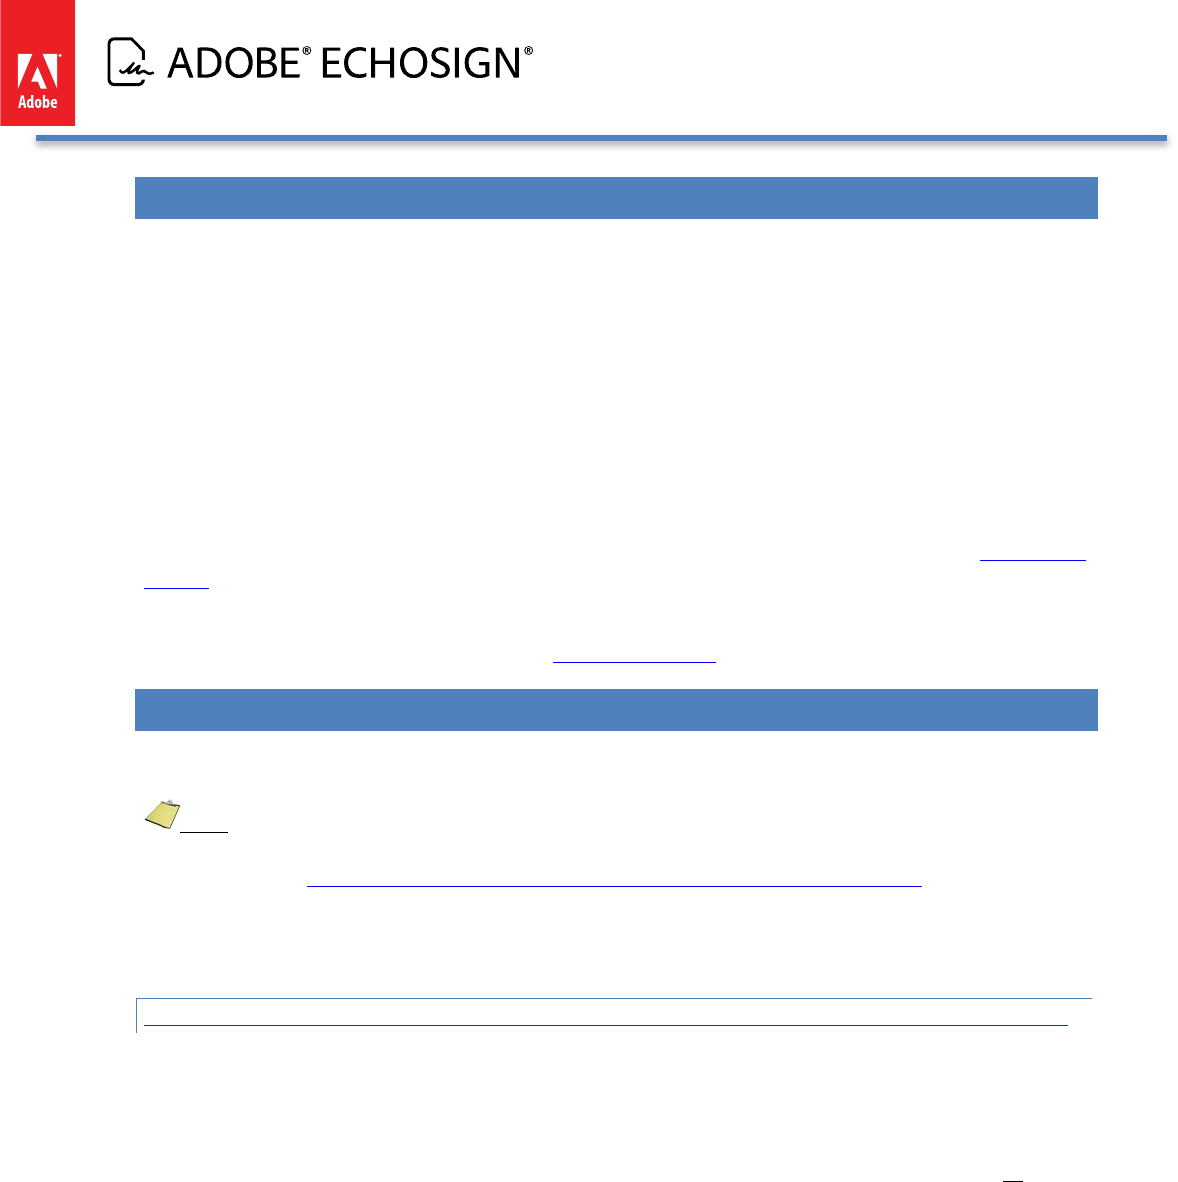
12. Copy the value of the ‘Secure Web Address’ field. You will need it for the configuration below. However, if
testing on Sandboxes, copy the http URL and not the https URL.
13. Now go to Setup / App Setup / Develop / Custom Settings
14. Click on the ‘EchoSign Settings’ link
15. Click on the ‘Manage’ Button
16. Click the New (above the ‘Default Organization Level Value’ label) to create default custom settings for all
Users.
17. Set the ‘Callback URL EchoSign to Salesforce Site’ value to the value of the ‘Secure Web Address’ you copied
from the site configuration above. Make sure the address prefix is ‘https’ and not ‘http’. Click ‘Save’ to save
the settings.
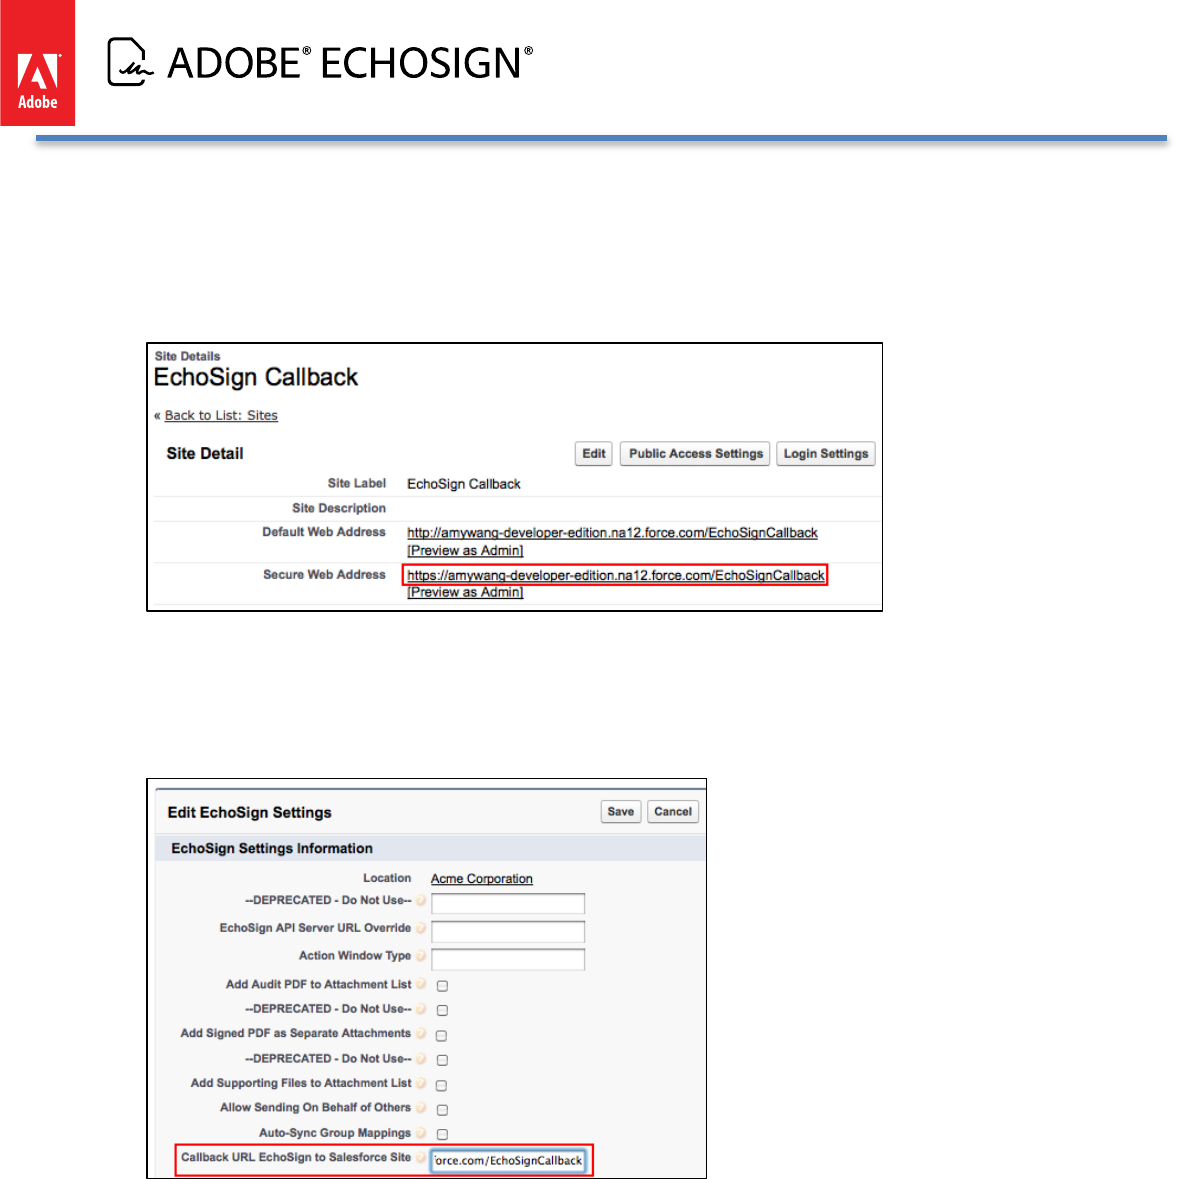
18. You also need to add the AgreementAttachmentService Apex class to the Site profile so it is visible. Go to
Develop / Sites / EchoSign Callback / Public Access Settings / Enable Apex Class Access. Find the Available
Apex Class called ‘echosign_dev1.AgreementAttachmentService’ and add it to the Enabled Apex Classes as
shown below.
Copyright ©2013 Adobe Systems Incorporated. All rights reserved. 17
Adobe EchoSign for Salesforce v13 Installation and Customization Guide
19. Also you need to add the IP ranges for public access settings in the Site so that it is restricted
properly to EchoSign IPs. If not, go to Develop / Sites / EchoSign Callback / Public Access
Settings / Login IP Ranges. Click the ‘New’ button and add both of these IP ranges:
a. 72.3.215.114 - 72.3.215.121
b. 166.78.79.112 - 166.78.79.127
When completed, the Login IP Ranges for the EchoSign Callback Site should be as follows:
ECHOSIGN DATA MAPPINGS - -- PUSH SIGNER DATA AND FILES TO SALESFORCE
RECORDS
EchoSign form field data mapping lets you define how EchoSign will update Salesforce.com objects with data it
captures from signers. For example, you can update a signer’s contact record in Salesforce.com with the address
and phone number they provided when completing and signing your document. Additionally, you can also push
back the EchoSign signed agreement, audit trail, and any uploaded supporting documents from recipients into
Salesforce objects by setting up file mappings.
If you choose not to use this feature, skip this section.
ABOUT ECHOSIGN FORM FIELD DATA MAPPINGS
EchoSign Data Mappings update Salesforce objects when an EchoSign agreement is signed. Each Data Mapping is
set up ahead of time and includes data mapping rules. Each data mapping rule defines the data source and the
target Salesforce field it needs to update.
A data source for a mapping can be an EchoSign form field, a specific constant value or a value from an EchoSign
Agreement Field. The target for each data mapping item may be any field in any Salesforce object that can be
referenced from the EchoSign Agreement.
Copyright ©2013 Adobe Systems Incorporated. All rights reserved. 18
Adobe EchoSign for Salesforce v13 Installation and Customization Guide
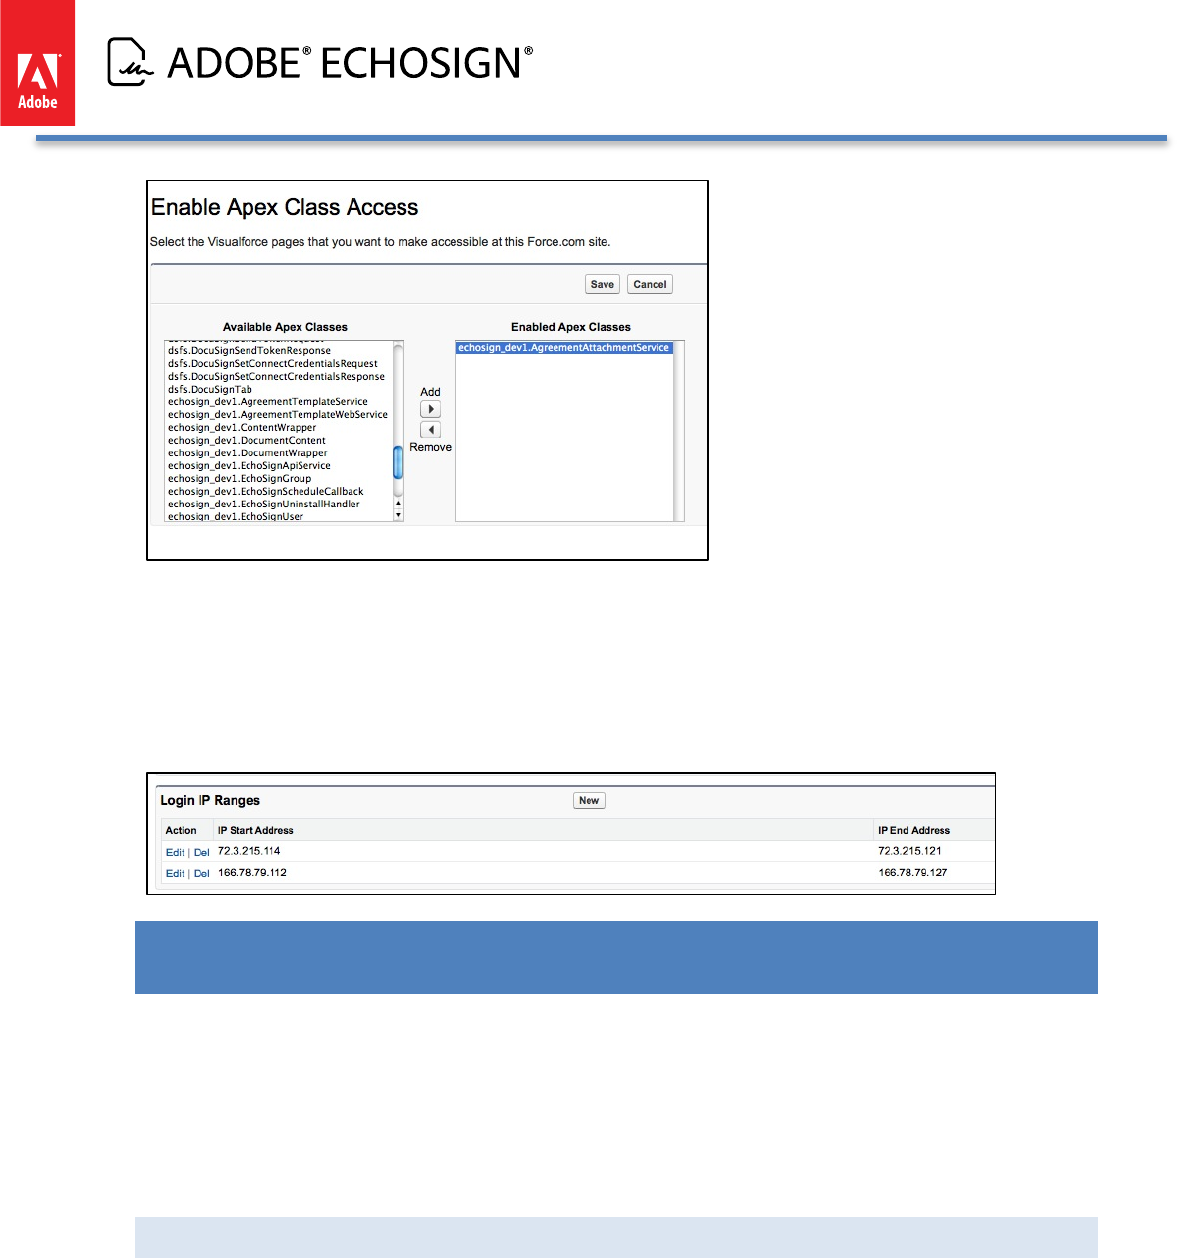
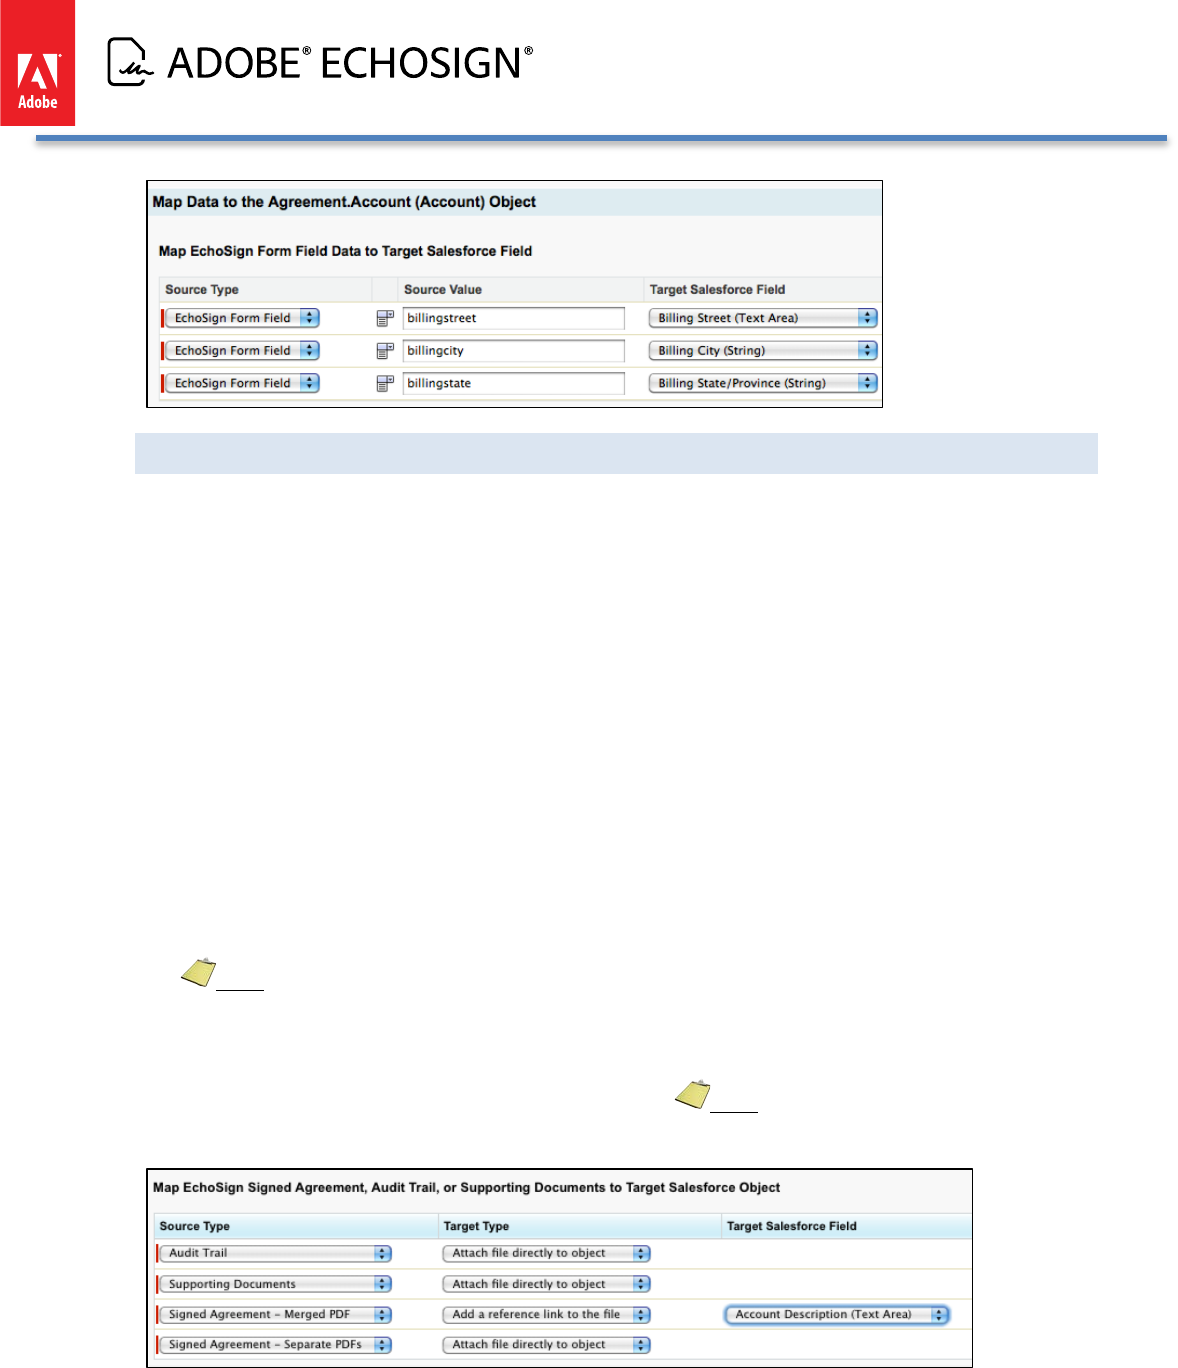
For example, the mapping below updates the signer’s first and last name (as entered by the signer) in the Contact
object. It also updates the opportunity close date with the Agreement’s signed date and the signed agreement
and audit trail.
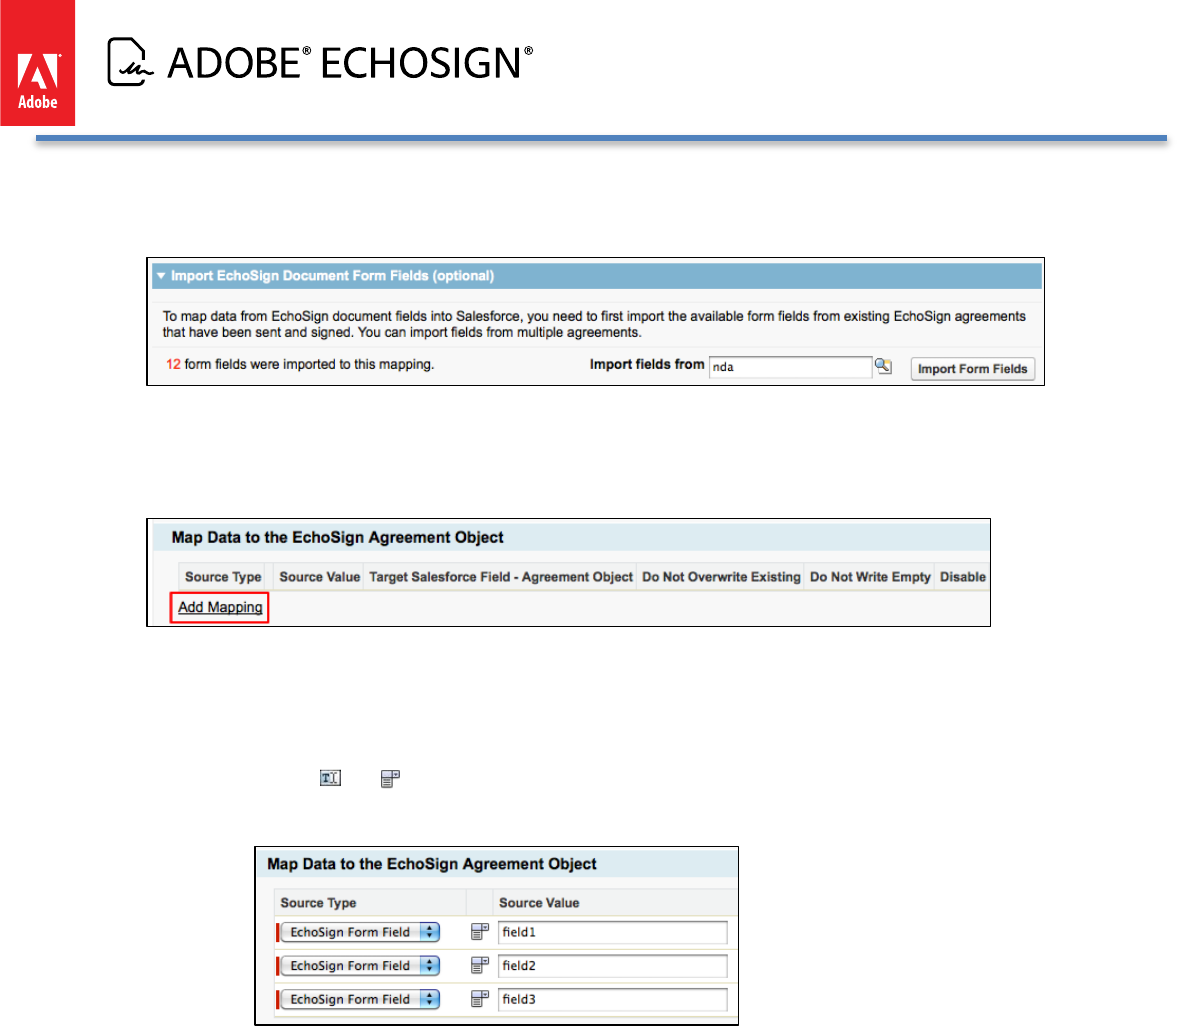
CREATING AN ECHOSIGN FORM FIELD DATA MAPPING (IMPROVED!)
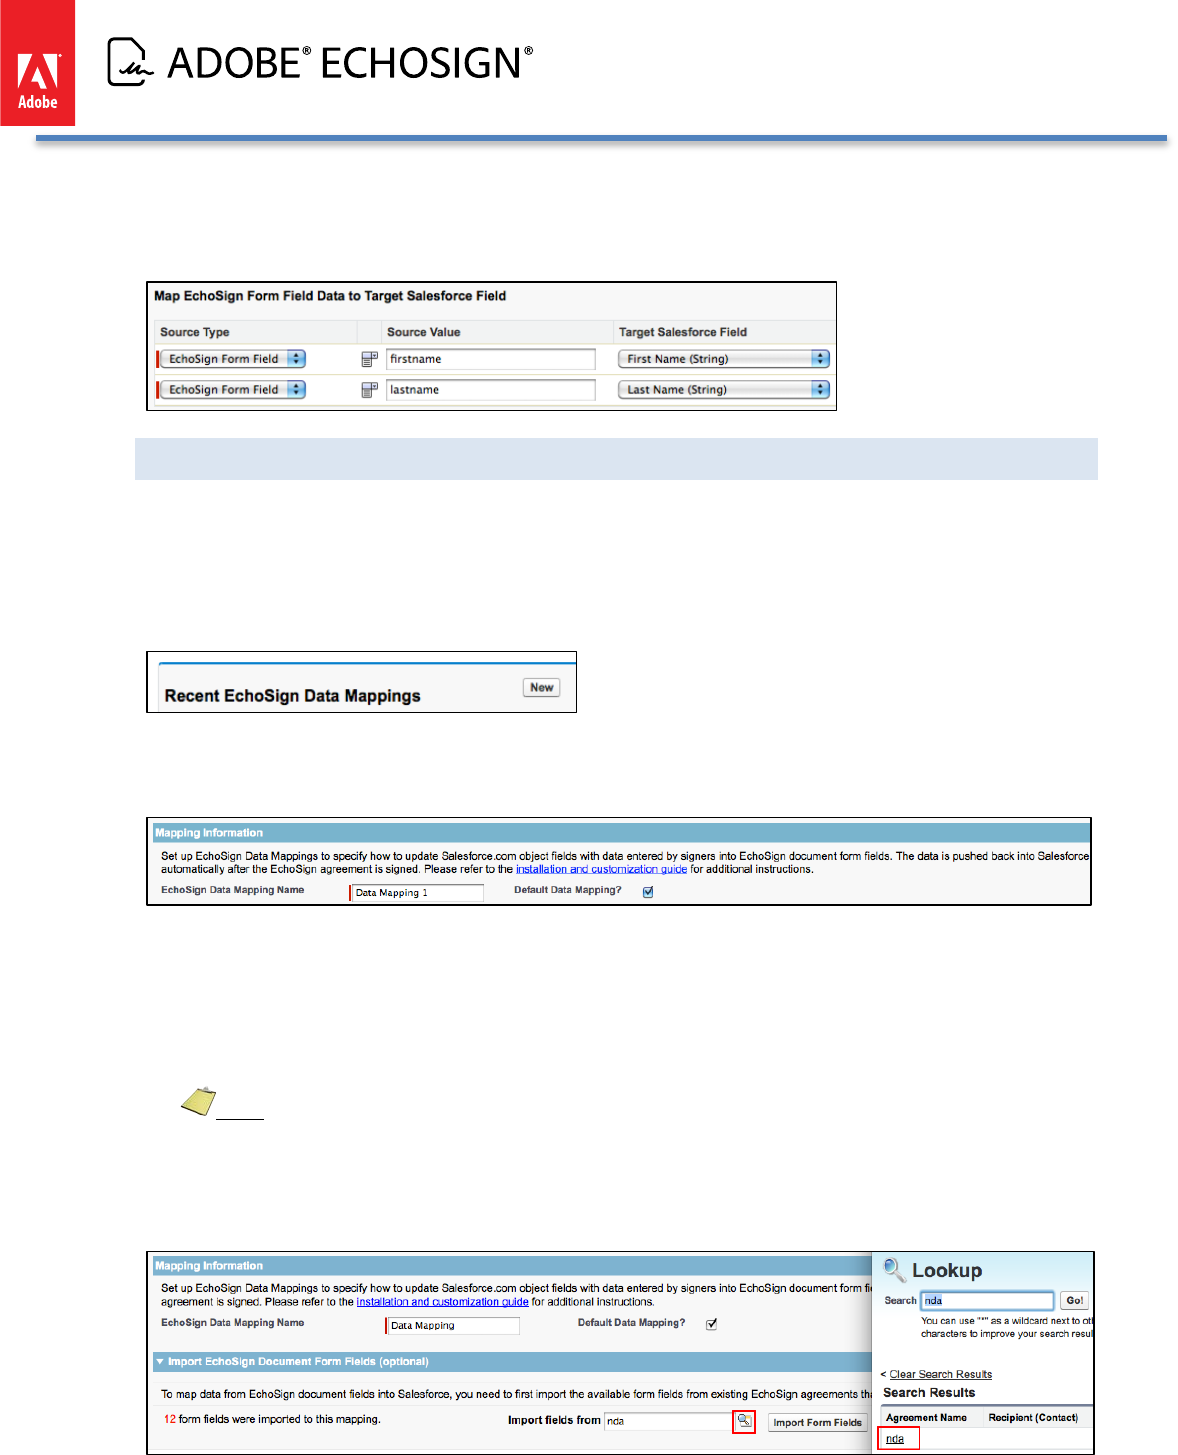
To create a new EchoSign Data Mapping, follow the steps below:
1. Select ‘EchoSign’ on the menu at the top right of the screen
2. Click the ‘EchoSign Data Mappings’ tab
3. Click ‘New’
4. Type a name for the mapping and decide whether you would like it to be the default mapping. If you check
‘Default Data Mapping?’, the mapping will execute by default after your agreements are signed.
5. There are a couple ways to specify the EchoSign agreement fields for the ‘Source Value’ either type in the
field name or import a list of selectable fields from an existing document.
If you want to import a list of EchoSign form field names to map data from by selecting an existing agreement
that was sent for signature and signed. You may import fields from multiple agreements to add additional
fields. Fields with duplicate names will not be imported twice.
Note: If you do not have any custom EchoSign fields in the document to import from, you will not be
able to import the standard default EchoSign fields that come with each signed agreement. (e.g. signed (date),
email, first, last, title, and company)
• Select the agreement you would like to import fields from.
Copyright ©2013 Adobe Systems Incorporated. All rights reserved. 19
Adobe EchoSign for Salesforce v13 Installation and Customization Guide
• Click ‘Import Form Fields’ button
• The number of fields imported will be displayed
6. You can add mapping rules to update fields in the EchoSign Agreement object. You can create a mapping to
any field (including custom fields).
7. Click ‘Add Mapping’
8. Define mapping rules through the following selections:
• Source Type - -- ‘EchoSign Form Field’, ‘Constant’, ‘Agreement Field’
• Source Value - -- Depending on the Source type, you will see the following:
• ‘EchoSign Form Field’ - -- Select an EchoSign Form Field or input in a specific field name. Click on
the and icons to switch between a text input field and a selectable dropdown displaying
the available and imported form field values.
• ‘Constant’ - -- Type a specific value
• ‘Agreement Field’ - -- Select an EchoSign Agreement Field
• Target Salesforce Field - -- Select a target Salesforce field where the Source Value will be copied to after
the agreement is signed
• Do Not Overwrite Existing - -- If checked, then if a value already exists in the target Salesforce field, do not
overwrite the value using this mapping rule.
• Do Not Write Empty - If checked, then if the source value from the EchoSign agreement is empty, do not
write the empty value into the target Salesforce field using this mapping rule.
• Disable - -- If checked, this row in the mapping will not execute.
9. You can add mapping rules to any Salesforce object that is associated to the EchoSign Agreement object
(through one or more lookup relationships).
10. To do this, click ‘Select a related object’
Copyright ©2013 Adobe Systems Incorporated. All rights reserved. 20
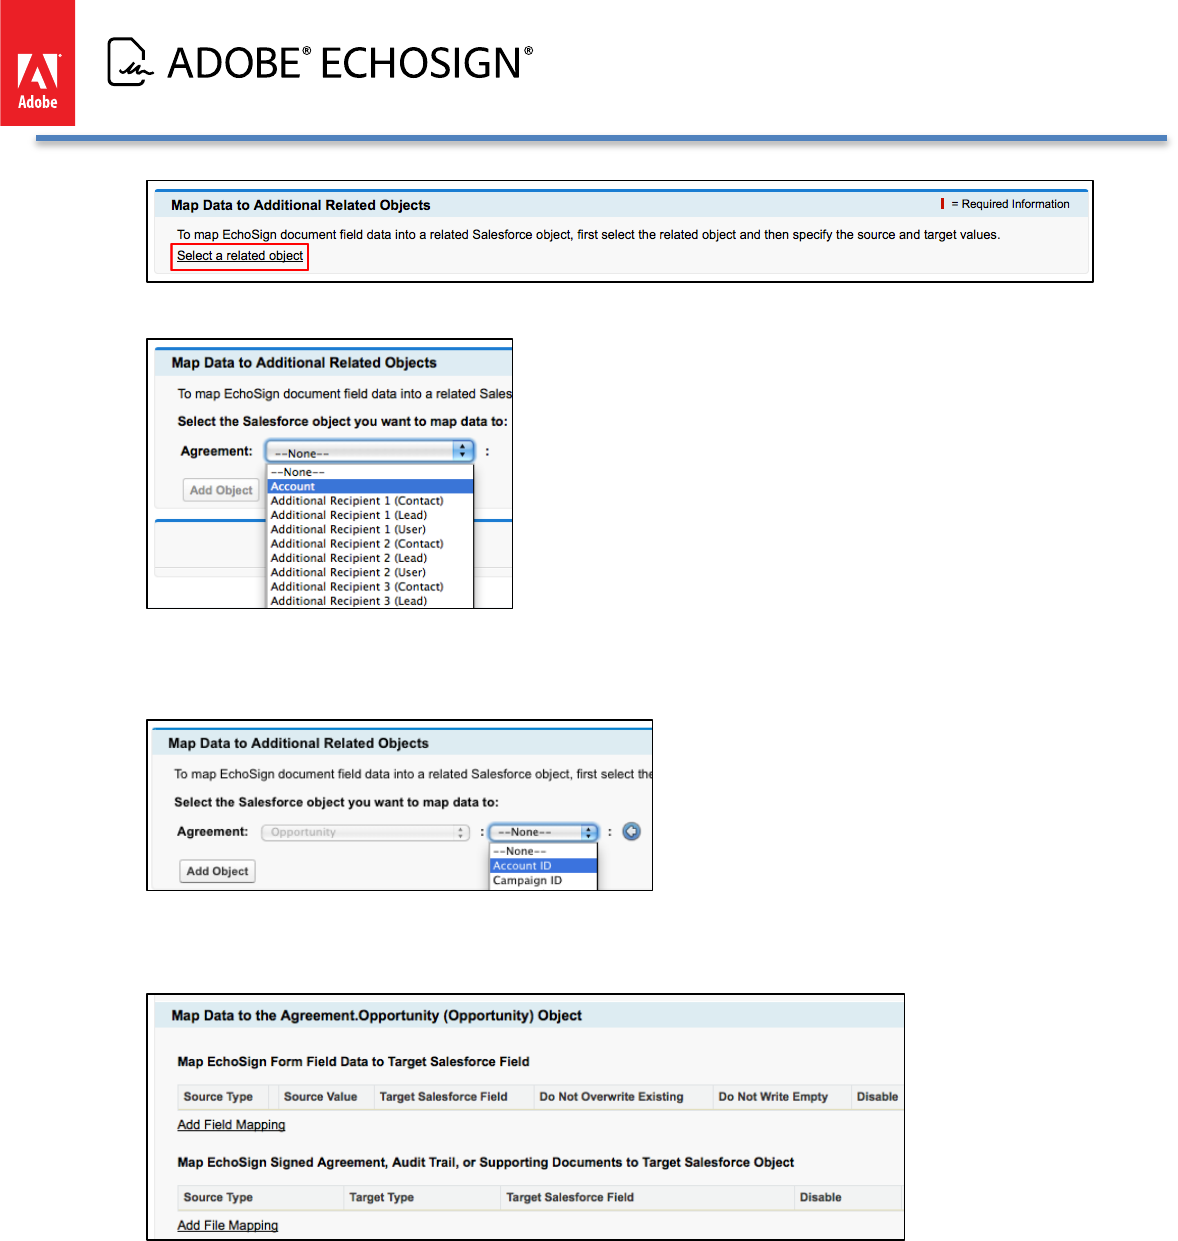
Adobe EchoSign for Salesforce v13 Installation and Customization Guide
11. Select any object referenced from the Agreement object
12. If this is the object you need, click the ‘Add Object’ button. If the object you need is referenced from the
current object, select it from the list of objects that appears in the next dropdown menu.
13. After you have selected the correct object, click the ‘Add Object’ button. A new group of mapping items will
appear, allowing you to create data mapping rules for the object you selected.
Copyright ©2013 Adobe Systems Incorporated. All rights reserved. 21
Adobe EchoSign for Salesforce v13 Installation and Customization Guide
CREATING AN ECHOSIGN FILE MAPPING
1. To map the EchoSign signed agreement or audit trial to the selected target Salesforce object, click ‘Add File
Mapping.’
2. Select from one of the following Source Types:
a. Signed Agreement - -- Merged PDF:
i. If you send multiple documents for signature in a single transaction, this option will
push the signed documents back to the Salesforce object record as a single merged
PDF.
b. Signed Agreement - -- Separate PDFs:
i. If you send multiple documents for signature in a single transaction, this option will
push the signed documents back to the Salesforce object record as separate PDFs.
c. Audit Trail
i. This pushes back the audit trail in PDF format back to the Salesforce object record.
d. Supporting Documents
i. This pushes back any supporting documents that are uploaded by the signers back to
the Salesforce object record.
3. If you select the Target Type ‘Add a reference link to the file’, that will provide the URL to get the signed
agreement PDF. You will need to select the target field where the URL will be copied.
Note: Adding a reference link for the audit trail or supporting documents is not supported. You can
attach the audit trail PDF or supporting documents to the Salesforce object record. Also, the reference link
can only be mapped into a text based field (e.g. string, picklist)
4. If you select ‘Attach file directly to object’, that will attach the PDF document directly to the object you are
mapping to if an attachment list is available for that object. Note: Not all objects (e.g. Users) support file
attachments so do not map files to those objects.
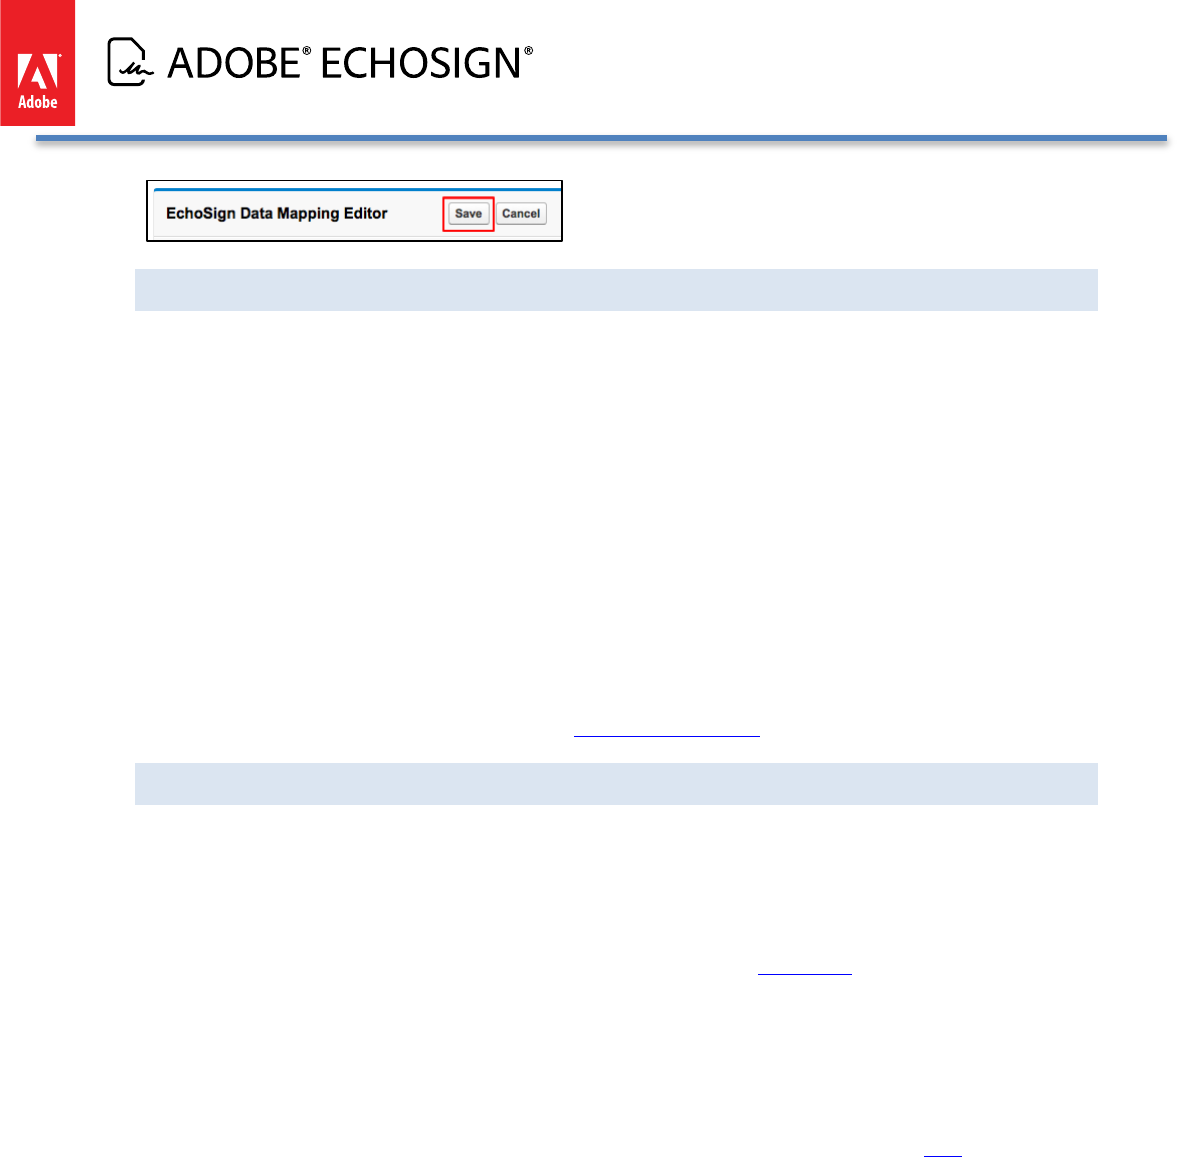
4. Click ‘Save’ to save the mapping
Copyright ©2013 Adobe Systems Incorporated. All rights reserved. 22
Adobe EchoSign for Salesforce v13 Installation and Customization Guide
USING DEFAULT AND MULTIPLE DATA MAPPINGS
You may create as many data mappings as necessary, one of which may be defined as the default mapping that
will be executed whenever an agreement’s status changes to ‘Signed’. Only one mapping can be a default
mapping.
You may also explicitly specify which mapping you’d like to use for an agreement by referencing it in the
Agreement’s ‘Data Mapping’ (echosign_dev1__Process_Template__c) field. You can use a Salesforce workflow or
trigger to run custom business logic to determine which template to use. Please note that you do not need to set
that field to point to the default mapping - -- the default mapping would be executed if this field were left empty.
You may also execute a mapping before or after the Agreement status changes to ‘Signed’ (e.g. execute the
mapping after the first signer signed it) by setting the ‘Trigger Data Mapping’
(echosign_dev1__Trigger_Process_Template__c) checkbox. You may use a Salesforce workflow or trigger to run
any custom business logic to determine when to execute a Data Mapping.
In addition, you can associate a data mapping to an agreement template, which can also let you set up other
default fields and options for your agreements. See Agreement Templates section for more information.
TROUBLESHOOTING
Salesforce fields have validation rules that may cause a mapping to fail. For example, if you map an EchoSign text
field to a Salesforce email field validation may fail if the content of the field is not a valid email address.
Please make sure to use EchoSign Form Field validation rules where possible to ensure data entered by signers
can be pushed into Salesforce. EchoSign standard PDF form fields validation rules from PDF documents and
allows you to create validation rules when using EchoSign Text Tags - See this tutorial for more information.
If a mapping fails for some reason, it logs the error message in the ‘Data Mapping Error’
(echosign_dev1__Data_Mapping_Error__c ) field on the EchoSign Agreement object. You may expose this field
on the agreement page layout or create a simple report in SalesForce to find agreements where mapping errors
had occurred. In additional data mapping errors will be sent to the owner of the data mapping by email. Go to
Setup / Develop / Custom Settings (EchoSign) to enable or disable the email notification using the setting called
‘Enable Mapping Error Notification’. To enable the ‘Data Mapping Error’ field, follow the steps here and drag the
field to the page layout.
Copyright ©2013 Adobe Systems Incorporated. All rights reserved. 23
Adobe EchoSign for Salesforce v13 Installation and Customization Guide
ECHOSIGN MERGE MAPPINGS - -- GENERATE DOCUMENTS WITH SALESFORCE DATA
EchoSign Merge Mappings give you the ability to merge field data from Salesforce into your documents fields
before sending them out for signature.
For example, you can populate a Lead’s address and phone number from a Salesforce record automatically into
the agreement before it is sent to the Lead for signature.
If you choose not to use this feature, skip this section.
ABOUT ECHOSIGN MERGE MAPPINGS
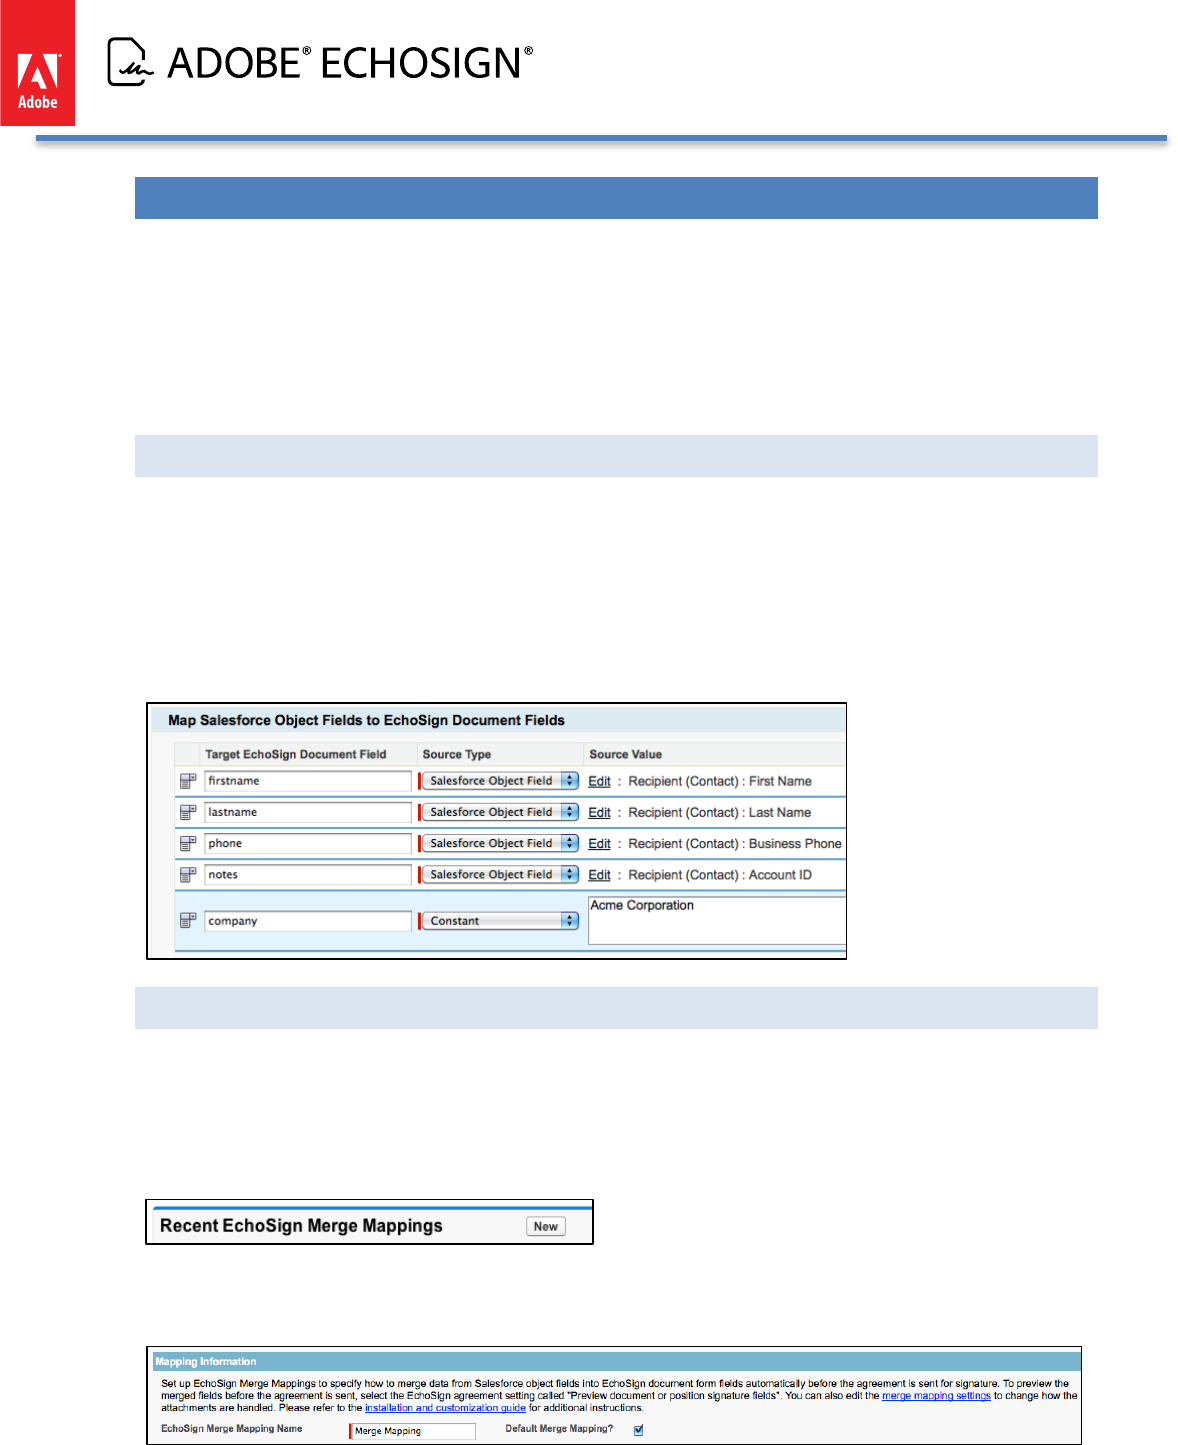
A data source type for a merge mapping can be a specific constant value or a value from a Salesforce object field
that can be referenced from the EchoSign Agreement. The target for each merge mapping item is a designated
field from an EchoSign agreement.
For example, the mapping below updates the EchoSign document fields for first name and last name with the
Salesforce Recipient (Lead) field data. It also fills in the company field in the document with the value ‘Acme
Corporation’.
CREATING AN ECHOSIGN MERGE MAPPING (IMPROVED!)
To create a new EchoSign Merge Mapping, follow the steps below:
1. Select ‘EchoSign’ on the menu at the top right of the screen
2. Click the ‘EchoSign Merge Mappings’ tab
3. Click ‘New’
4. Type a name for the mapping and decide whether you’d like it to be the default mapping. If you check
‘Default Merge Mapping?,’ the mapping will execute by default when sending an agreement for signature.
Copyright ©2013 Adobe Systems Incorporated. All rights reserved. 24
Adobe EchoSign for Salesforce v13 Installation and Customization Guide
5. To get a list of EchoSign form field names you can map data from, select an existing agreement that was sent
for signature and signed. You may import fields from additional agreements to add additional fields. Fields
with duplicate names will not be imported twice.
6. Select the agreement you would like to import fields from.
7. Click the ‘Import Form Fields’ button
8. The number of fields imported will be displayed
9. You can add mapping rules to merge data into EchoSign documents. You can create a mapping from fields
that can be referenced from the EchoSign Agreement object (including custom fields).
10. Click ‘Add Field Mapping’
11. Define mapping rules through the following selections:
o Target EchoSign Document Field - -- Select an EchoSign Form Field or input in a specific field name. Click
on the and icons to switch between a text input field and a selectable dropdown displaying the
available and imported form field values.
o Source Type - -- ‘Salesforce Object Field’ or ‘Constant’
o Source Value - -- Depending on the Source type, you will see the following:
o ‘Salesforce Object Field’ - -- When you then click on ‘Select Field’, this will open a window for you
to select the Salesforce source object field.
Copyright ©2013 Adobe Systems Incorporated. All rights reserved. 25
Adobe EchoSign for Salesforce v13 Installation and Customization Guide
o ‘Constant’ - -- Type a specific value
o Disable - -- If checked, this mapping row will not execute.
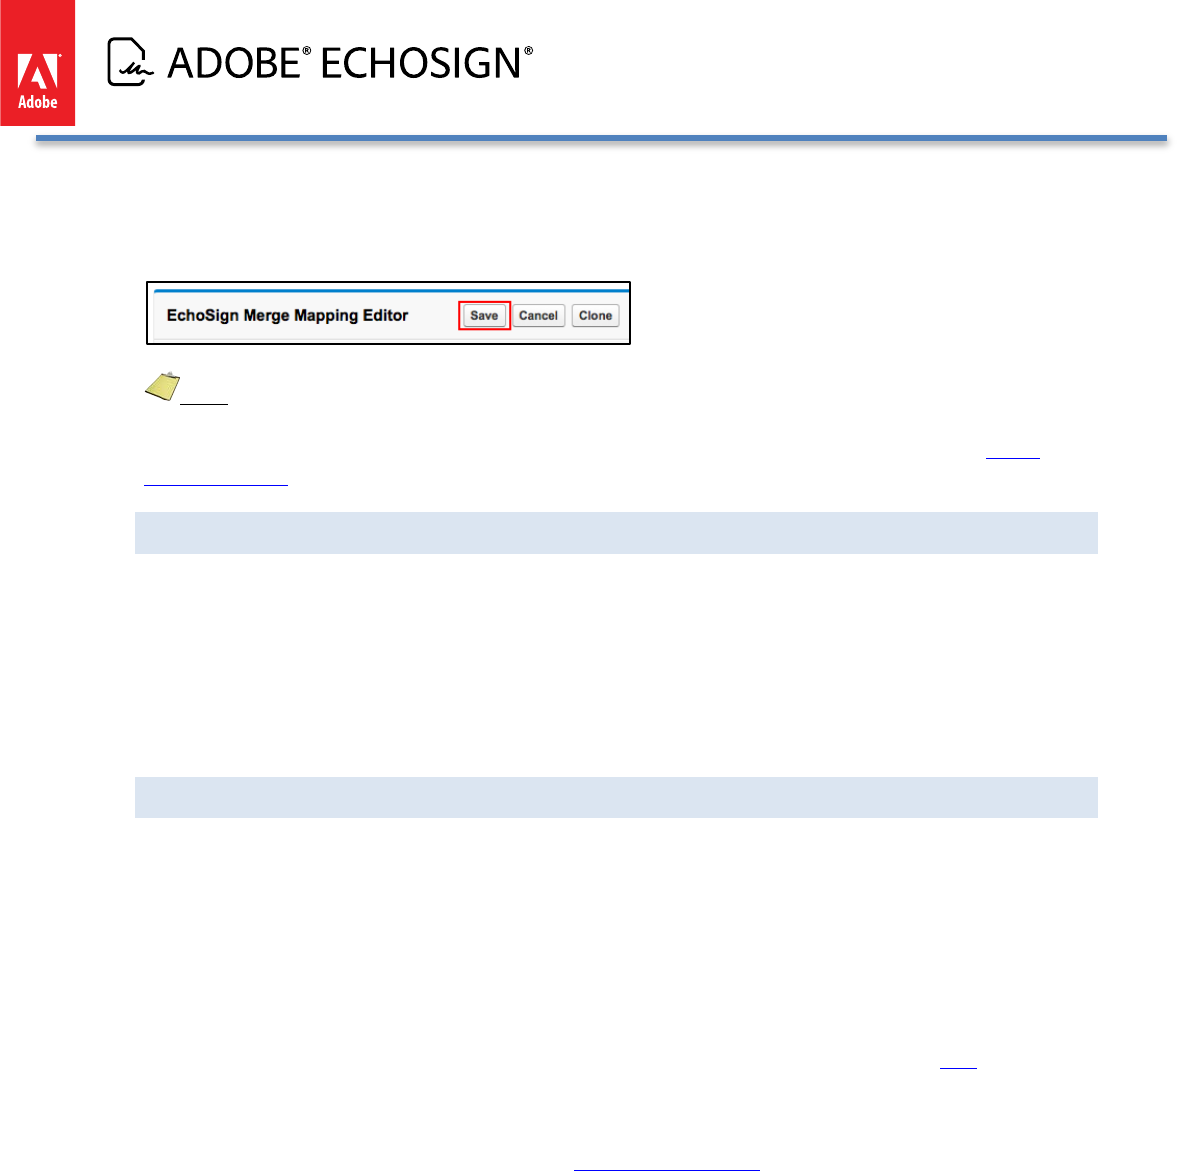
12. Click ‘Save’ to save the mapping.
Note: There are Merge Mapping settings that define how file attachments are handled. By default, the
original attached document (e.g. a NDA template) will be removed and the merged document will be attached to
the agreement record once the agreement is sent. If you want to change the default values, go to the Merge
Mapping Settings section of this document for more information.
USING DEFAULT AND MULTIPLE MERGE MAPPINGS
You may create as many Merge Mappings as necessary, one of which may be defined as the default mapping that
will be executed whenever an agreement is sent for signature. Only one mapping can be a default mapping.
You may also explicitly specify which merge mapping you’d like to use for an agreement by referencing it in the
Agreement’s ‘Merge Mapping’ (echosign_dev1__Merge_Mapping__c) field. You may use a Salesforce workflow
or trigger to run any custom business logic to determine which template to use. Please note that you do not need
to set that field to point to the default mapping - -- the default mapping would be executed if this field is left empty.
TROUBLESHOOTING
Salesforce fields have validation rules that may cause a mapping to fail. For example, if you map Salesforce email
field to an EchoSign text field it may fail if the content of the field is not a valid email address.
If a mapping fails for some reason, it logs the error message in the ‘Merge Mapping Error’
(echosign_dev1__Merge_Mapping_Error__c) field on the EchoSign Agreement object. You may expose this field
on the agreement page layout or create a simple report in SalesForce to find agreements where mapping errors
had occurred. In additional data mapping errors will be sent to the owner of the data mapping by email. Go to
Setup / Develop / Custom Settings (EchoSign) to enable or disable the email notification using the setting called
‘Enable Mapping Error Notification’. To enable the ‘Merge Mapping Error’ field, follow the steps here and drag the
field to the page layout.
In addition, you can associate a merge mapping to an agreement template, which can also let you set up other
default fields and options for your agreements. See Agreement Templates section for more information.
Copyright ©2013 Adobe Systems Incorporated. All rights reserved. 26
Adobe EchoSign for Salesforce v13 Installation and Customization Guide
ECHOSIGN AGREEMENT TEMPLATES AND ‘SEND TO ECHOSIGN’ BUTTON
EchoSign Agreement Templates offer an easy way to set up many default values and settings for your agreements
ahead of time. You can link an agreement template also to a ‘Send to EchoSign’ button.
If you choose not to use this feature, skip this section.
ABOUT AGREEMENT TEMPLATES
This includes pre-defining agreement fields including name, message, language, signature type, expiration dates,
and security options. Also, you can associate a particular data mapping, merge mapping, and object (Account,
Opportunity, or Contract) to the agreement template. Additionally, you can pre-set the recipient definitions, map
fields to agreement fields, and pre-define the file attachments.
In addition, you can also set up a ‘Send to EchoSign’ button that appears on a related object record (e.g.
Opportunity) so that it links to an agreement template by default. Clicking on the button would generate an
agreement using an agreement template.
CREATING AN AGREEMENT TEMPLATE (IMPROVED!)
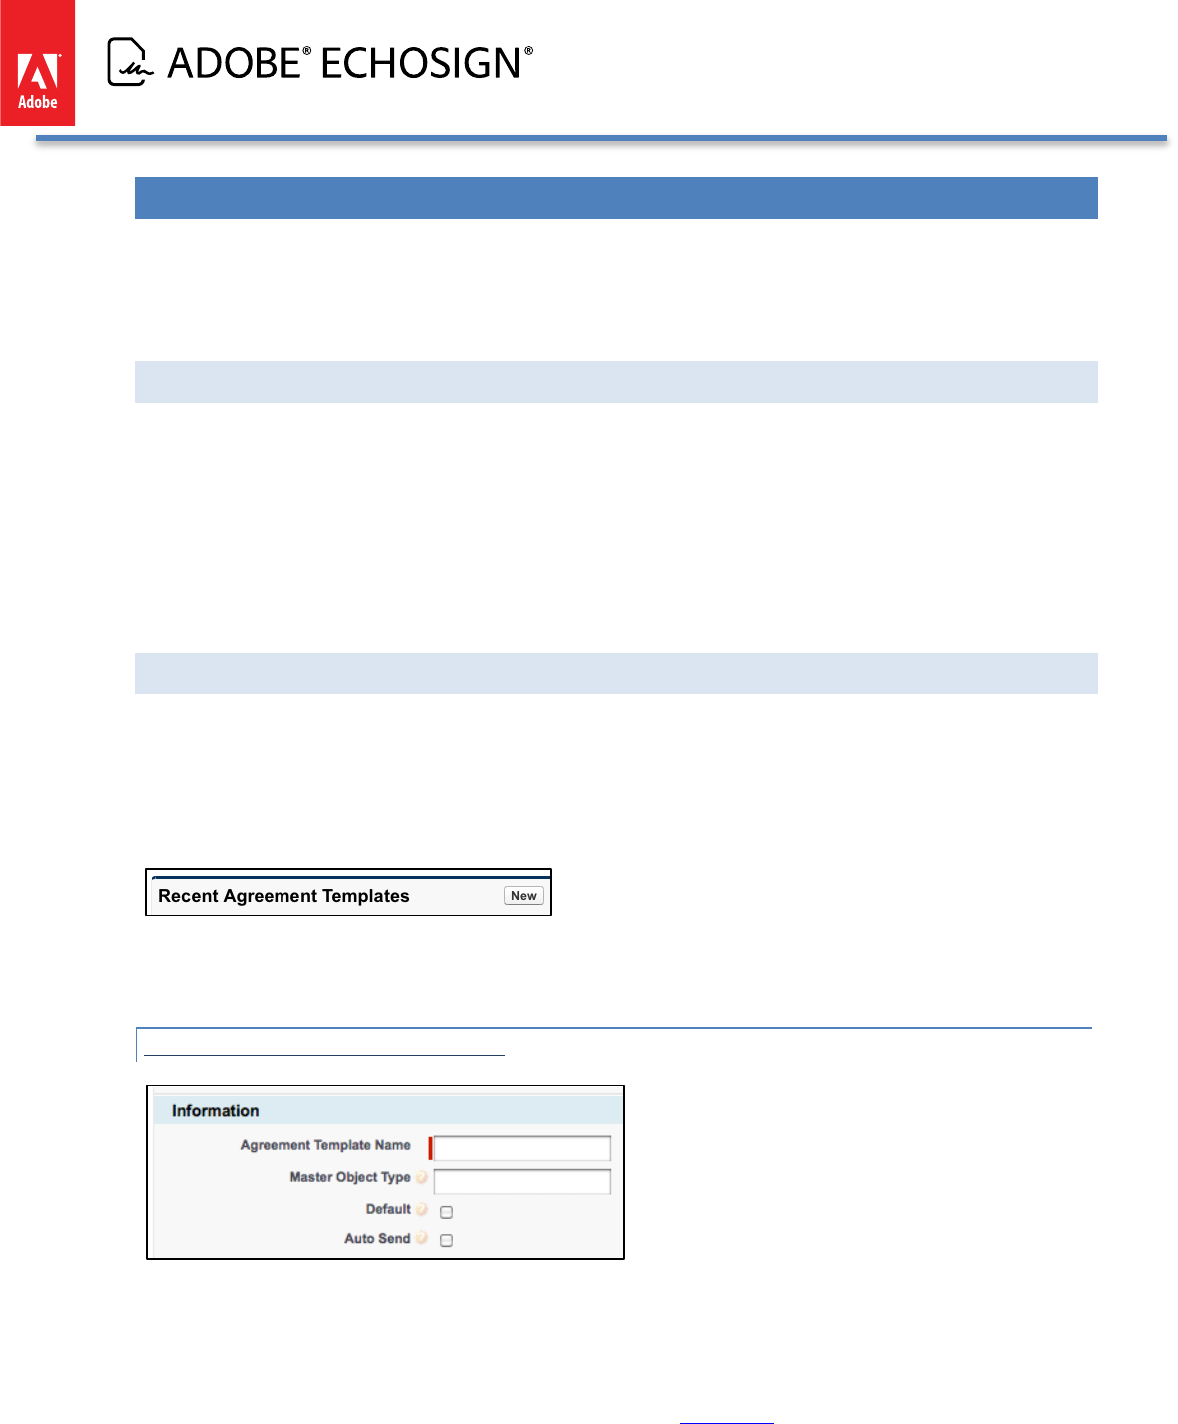
To create a new EchoSign Agreement Template, follow the steps below:
• Select ‘EchoSign’ on the menu at the top right of the screen
• Click the ‘Agreement Templates’ tab
• Click ‘New’
• Enter a name for the agreement template and then you can also define the fields and options you want to set
up for your template.
DEFINE TEMPLATE INFORMATION
• Master Object Type - The Master Object Type is the name of the Salesforce object that you want to use as a
master reference for some of the optional definitions in the agreement template. For example, you can
define Recipients, Field Mappings, or Attachments for the agreement that look up to fields and data in the
Master Object or data from lookup objects. Examples of a Master Object include ‘Opportunity’, ‘Lead’, and
‘Account’. If you have a Master Object defined in the Agreement Template, you should initiate the agreement
from a ‘Send to EchoSign’ button on the Master Object. See this section for more information about how to
enable a default button or create new ‘Send to EchoSign’ buttons.
Copyright ©2013 Adobe Systems Incorporated. All rights reserved. 27
Adobe EchoSign for Salesforce v13 Installation and Customization Guide
• Default - Decide if you want to set this as the Default agreement template for your new agreements. You can
also define a specific agreement template to associate with other agreements, which can override the default
agreement template. For example, you can create a custom ‘Send to EchoSign’ button for the Account object
that is associated with a specific agreement template. See this section for more information about how to
create custom buttons.
• Auto Send - If you have automated workflows that you want to use to trigger the sending of agreements or if
you would like to automatically send an agreement after a user hits a ‘Send to EchoSign’ button from a
Salesforce record, then you can check the ‘Auto Send’ box. For ‘Auto Send’ to work, you need to have at least
one recipient and one attachment defined in the agreement template.
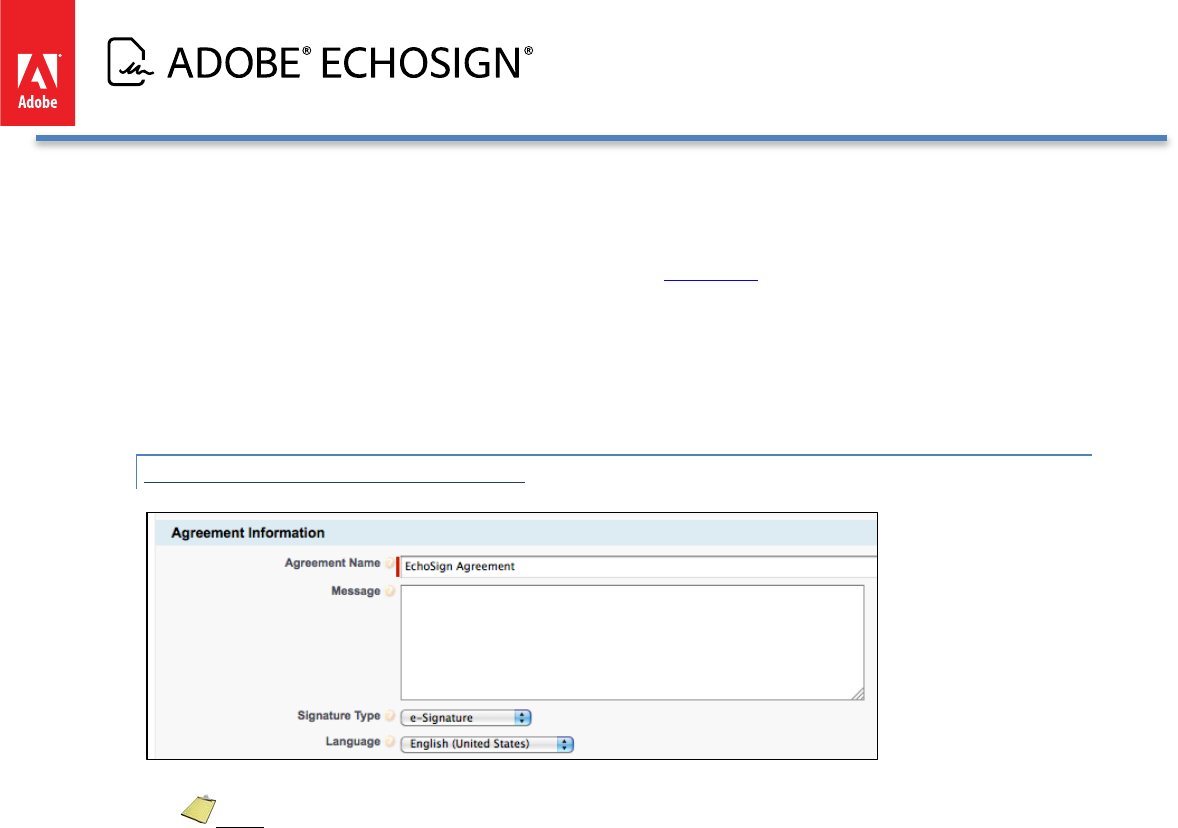
DEFINE AGREEMENT INFORMATION
• Enter an Agreement Name. Optionally, add a message and select a signature type and recipient language.
• Note: Keep in mind that for text fields in the agreement template (e.g. Agreement Name, Message, etc.),
you can optionally use Salesforce variables as part of the definition to dynamically generate this data for the
agreement. For example, this is beneficial if you want to customize the agreement name and message to
recipients each time the agreement is generated.
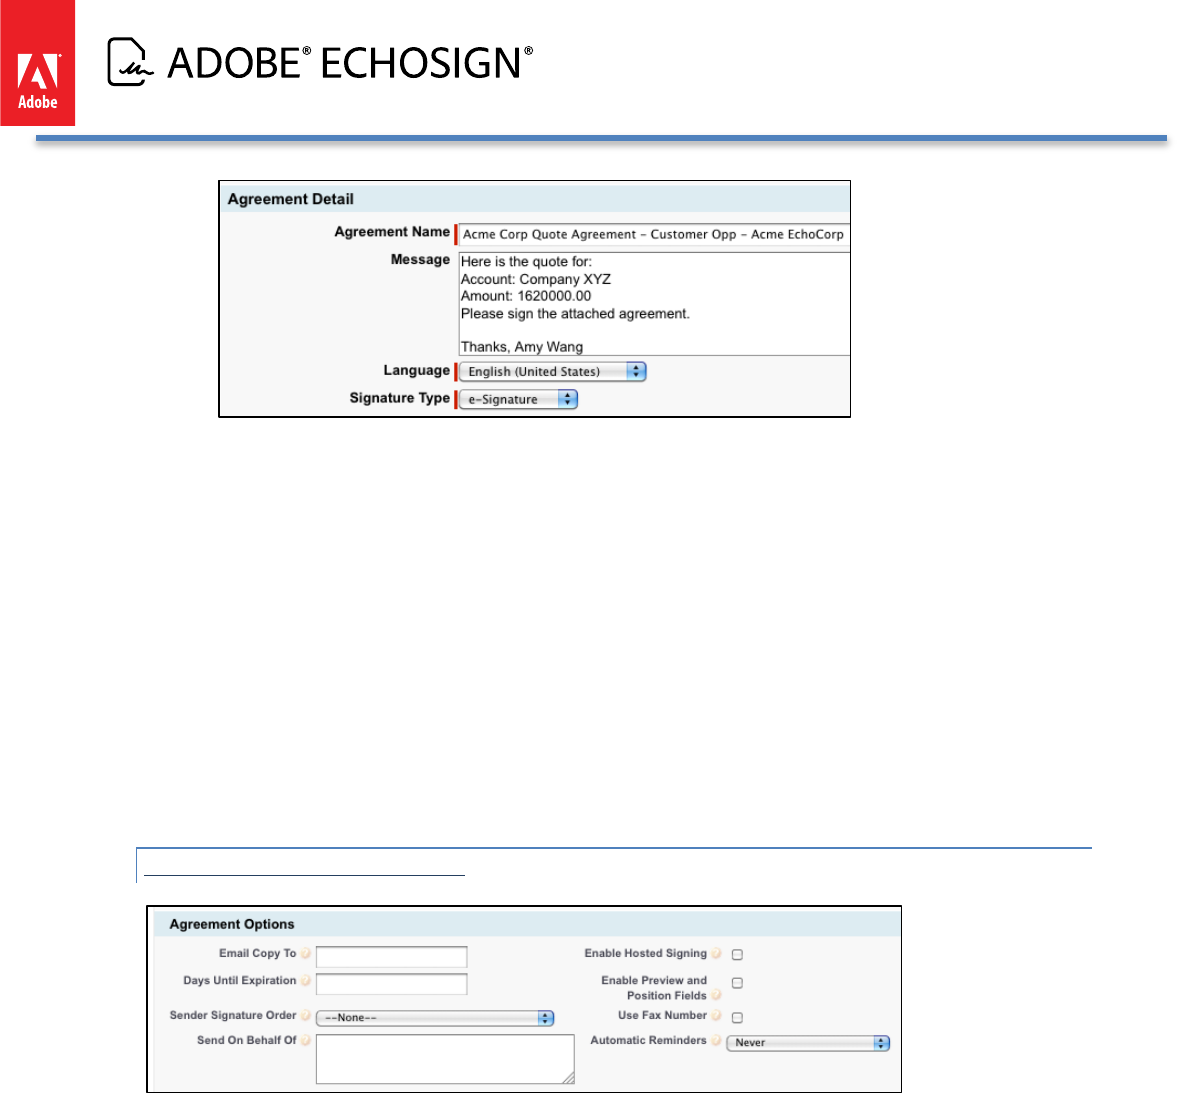
Example 1:
o Master Object: Opportunity
o Agreement Name: Acme Corp Agreement - {!Name}
o Message:
Here is the estimate for:
Account: {!Account.Name}
Amount: {!Amount}
Please sign the attached agreement.
Thanks, {!Owner.Name}
The following is the result when the Agreement gets generated from a specific Opportunity:
Copyright ©2013 Adobe Systems Incorporated. All rights reserved. 28
Adobe EchoSign for Salesforce v13 Installation and Customization Guide
Example 2: Custom Object as Master Object
Custom Lookup Field on the Opportunity: Student__c
Agreement Template Definition: AgreementTemplateProcess AgreementTemplateProcess
o Master Object: Student__c
o Agreement Name: Student Agreement - {!Name}
o Message:
Hello {!Student__r.Student_Name__c}
Please sign the attached application.
Thanks, {!Account.Owner.Name}
DEFINE AGREEMENT OPTIONS
• Select from a set of agreement options that are available including:
o Email Copy To
o Days Until Expiration
o Sender Signature Order
o Send On Behalf Of
o Enable Hosted Signing
o Enable Preview and Position Fields
o Use Fax Number
o Automatic Reminders
Note: For any text fields, you can optionally use Salesforce variables such as {!Id} or {!Account.Name} that
reference the Master Object defined in the Agreement template. For example, you can type in {!Owner.Email} for
the ‘Email Copy to’ or {!OwnerId} for the ‘Send On Behalf Of’ field. If the Master Object was ‘Opportunity’, then
Copyright ©2013 Adobe Systems Incorporated. All rights reserved. 29
Adobe EchoSign for Salesforce v13 Installation and Customization Guide
the variable {!OwnerId} would represent the owner of the Opportunity and the variable {!Owner.Email} would
represent the email of the owner of the Opportunity. If you are using the ‘Send on Behalf of’ functionality, make
sure to enable it first by following these instructions.
Note: The option ‘Allow Signers to Suggest Revisions’ is no longer available in EchoSign so you can remove the
deprecated field from the layout.
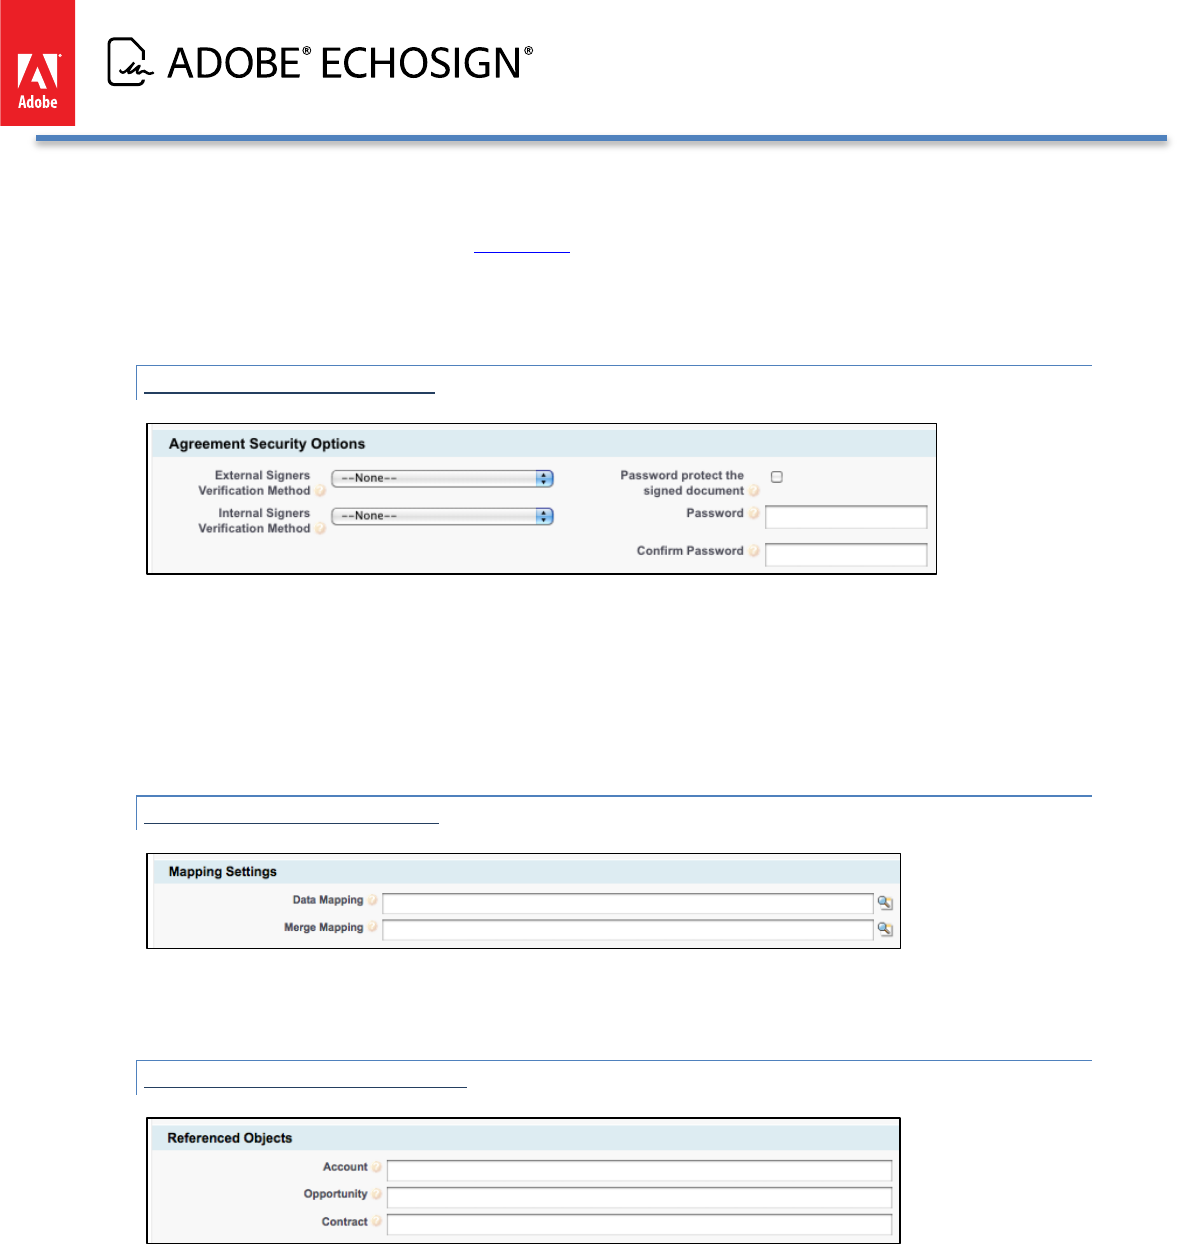
DEFINE SECURITY OPTIONS
• Optionally, choose the Signer Verification Method for signers in your EchoSign account and signers
outside of your EchoSign account:
o Password to sign agreement
o Knowledge based authentication
o Web identity authentication
• Optionally, assign a password to open the PDF of the signed agreement.
DEFINE MAPPING SETTINGS
• If you have a merge mapping or data mapping that you want to automatically run with agreements using
this agreement template, then specify the mappings in this section.
DEFINE REFERENCED OBJECTS
• Automatically associate an Account, Opportunity, or Contract to this agreement template by typing in the
specific ID or entering a Salesforce variable such as {!Id}. This will allow your Agreements list in the
referenced object to contain agreements sent with this agreement template.
Copyright ©2013 Adobe Systems Incorporated. All rights reserved. 30
Adobe EchoSign for Salesforce v13 Installation and Customization Guide
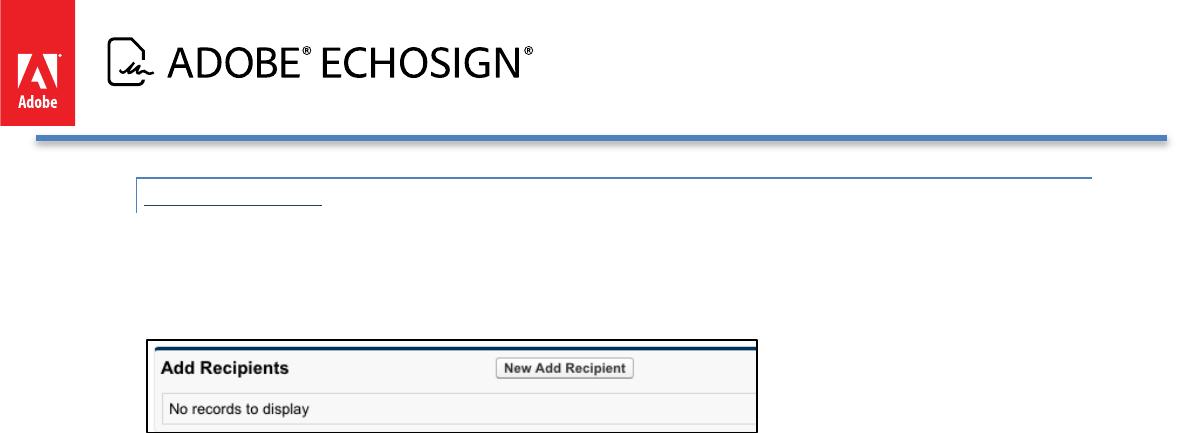
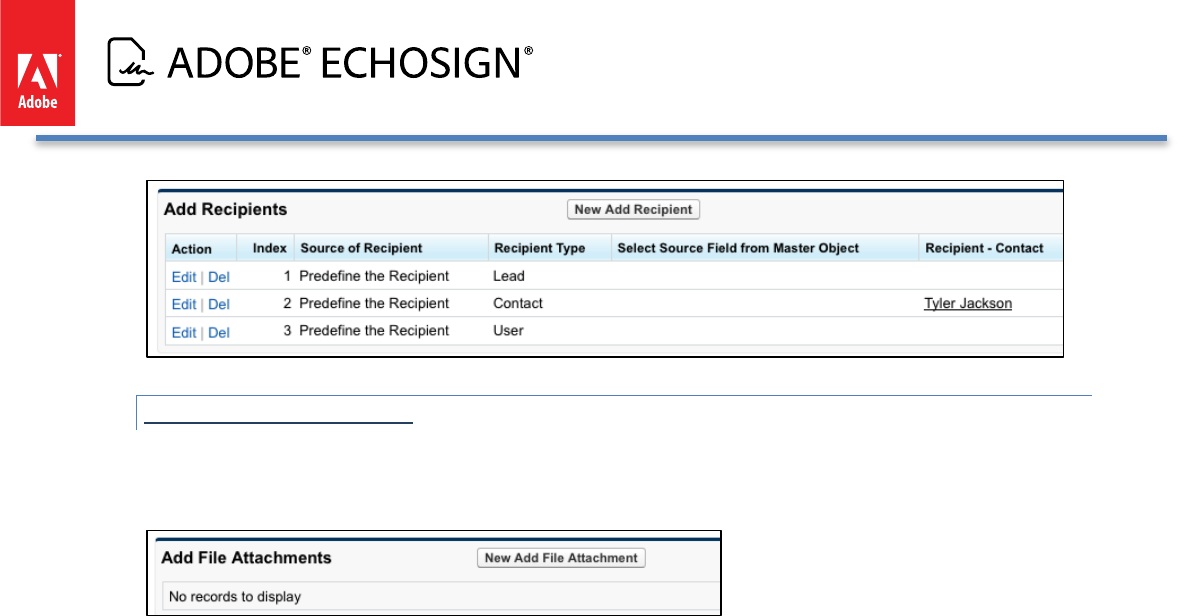
ADD RECIPIENTS
• Make sure to save your agreement template to view this section called ‘Add Recipients’. You can add up
to 6 recipients as signers.
• Click on ‘New Add Recipient’
• Select one of the following ways to specify your recipient:
o Predefine the Recipient
o Look Up Based on Master Object Field
o Opportunity Primary Contact Role
o Opportunity Contact Role
• Select the Recipient Type:
o Contact
o Lead
o User
o Email
• Select the Recipient Role:
o Signer
o Approver
• If you selected ‘Predefine the Recipient’, then simply select the recipient in the next screen.
• If you selected ‘Look Up Based on Master Object Field’, then the recipient will be looked up at the time
the agreement is generated based on the master object you set up in this agreement template. For
example, the master object may be ‘Opportunity’. In the next screen, select the source field from the
Master Object (e.g. Opportunity) that will be used to look up the recipient. For example, you can
populate the Recipient field with the User who created the Opportunity or who last updated the
Opportunity.
• (NEW!) If you selected ‘Opportunity Primary Contact Role’, then the recipient will be looked up at the
time the agreement is generated based on the master object you set up in this agreement template. In
this case, ‘Opportunity’ should be entered as the master object. If used, the primary contact in the
Opportunity will be used as a recipient in the agreement.
• (NEW!) If you selected ‘Opportunity Contact Role’, then the recipient will be looked up at the time the
agreement is generated based on the master object you set up in this agreement template. In this case,
‘Opportunity’ should be entered as the master object. In the next screen, select the Opportunity Contact
Role that will be used to select the contact as the recipient in the agreement. For example, you can
populate the Recipient field with the Contact who has the Decision Maker role for the Opportunity.
• You can also set up placeholder recipients that have a Recipient Type but are not specifically defined
until the sender defines the specific recipient when the agreement is generated. You do that by leaving
Step 2 blank.
Copyright ©2013 Adobe Systems Incorporated. All rights reserved. 31
Adobe EchoSign for Salesforce v13 Installation and Customization Guide
ADD FILE ATTACHMENTS
• Make sure to Save your agreement template to view this section called ‘Add File Attachments’.
• Click on ‘New Add File Attachment’
• Select one of the following ways to specify your file attachment:
o Document from Library
o Document from Content
o Document from Master Object
o Quote Document from Master Quote
• If you selected ‘Document from Library’, then simply select from the Salesforce documents in the next
step.
• If you selected ‘Document from Content’, then simply select from the Salesforce Content documents in
the next step.
• If you selected ‘Document from Master Object’, then the document will be looked up at the time the
agreement is generated based on the master object you set up in this agreement template. For example,
the master object may be ‘Opportunity’. In the next screen, select the criteria by which your file
attachment will be determined:
o File Selection from Master Object (e.g. Opportunity)
Latest Document
Oldest Document
All Documents
o Selection Determined By:
Last Modified Date
Created Date
• (NEW!) If you selected ‘Quote Document from Master Quote, then the document will be looked up at the
time the agreement is generated based on the master object you set up in this agreement template. In
this case ‘Quote’ is the master object that you need to enter for this agreement template. When you do
this the quote PDF(s) generated from the Opportunity will be used as the file attachment(s). In the next
screen, select the criteria by which your file attachment will be determined:
o File Selection from Master Object (e.g. Opportunity)
Latest Document
Oldest Document
All Documents
o Selection Determined By:
Copyright ©2013 Adobe Systems Incorporated. All rights reserved. 32
Adobe EchoSign for Salesforce v13 Installation and Customization Guide
Last Modified Date
Created Date
• When you have a master object such ‘Quote’, you will need to set up a custom ‘Send to EchoSign’ button
on the Quote object so that the agreement template documents you specified would be attached
accordingly.
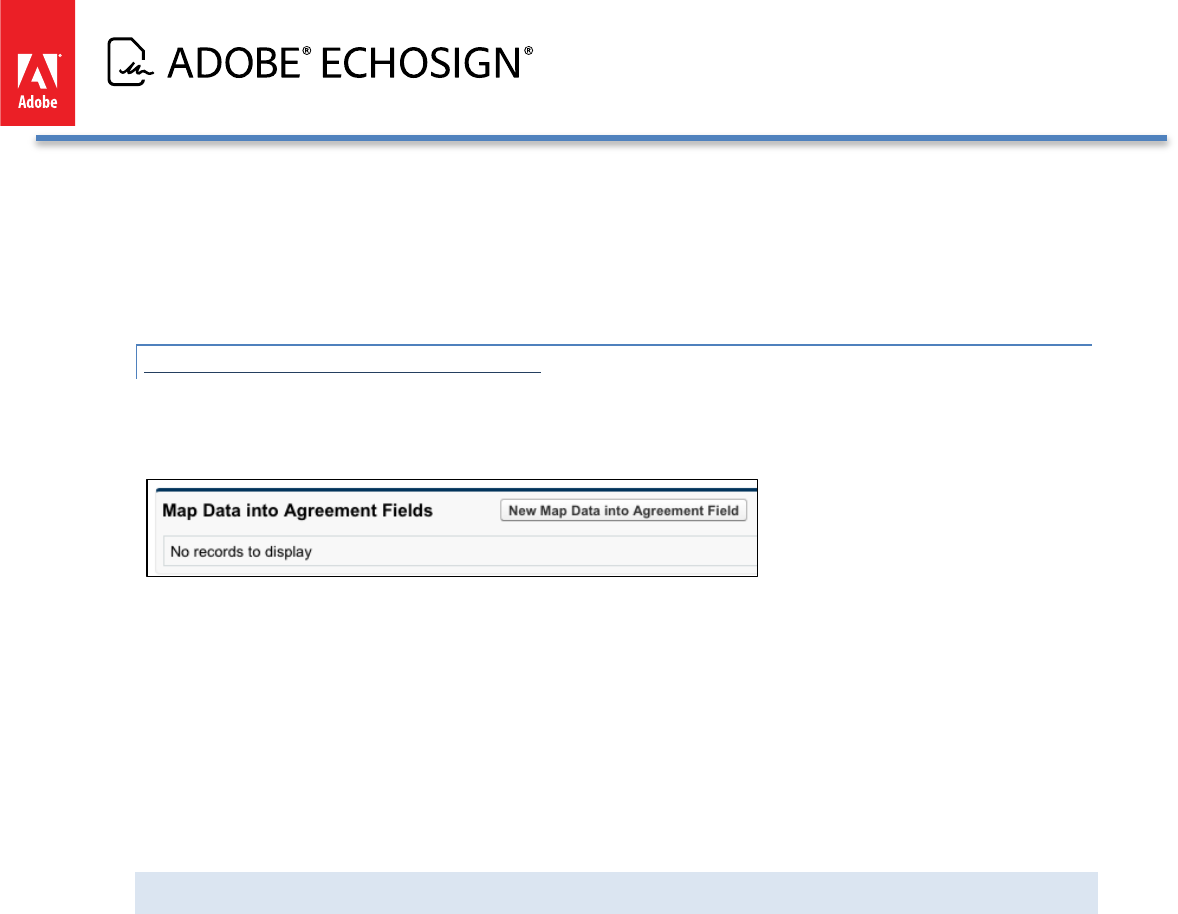
MAP DATA INTO AGREEMENT FIELDS
• Make sure to save your agreement template to view this section called ‘Map Data into Agreement Fields’.
• Click on ‘New Map Data into Agreement Field’
• Select one of the following mapping methods:
o Input Specific Value
o Select Master Object Field
• If you selected ‘Input Specific Value’, then input a target field value in the next screen. Also, select the
target Agreement object field where your inputted value will be mapped.
• If you selected ‘Select Master Object’, then the field value will be looked up at the time the agreement is
generated based on the master object you set up in this agreement template. For example, the master
object may be ‘Opportunity’. In the next screen, select the source field from your master object (e.g.
Opportunity) and also select the target Agreement object field where the data will be mapped.
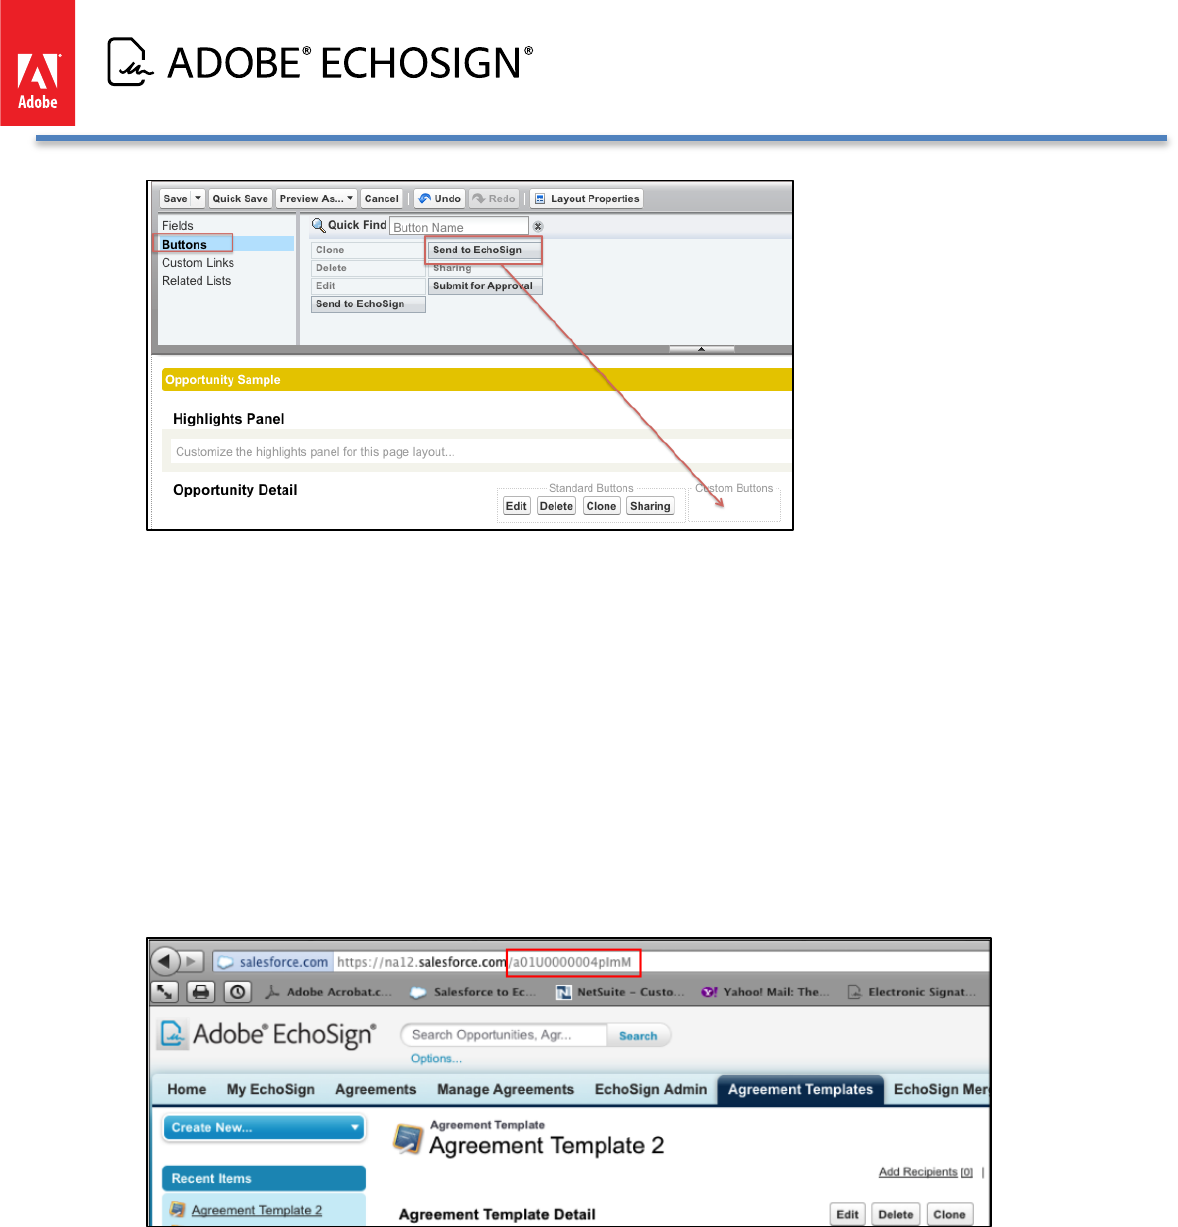
‘SEND TO ECHOSIGN’ BUTTON (IMPROVED!)
The ‘Send to EchoSign’ button is associated with the default agreement template or with any specific agreement
template that you configure. By default the EchoSign for Salesforce integration includes a ‘Send to EchoSign’
button that you can add to your Opportunity, Account, Contact, Lead, Opportunity, or Contract page layouts. You
can also create multiple custom ‘Send to EchoSign’ buttons that can be added to other objects and associated
with different agreement templates.
Here is an example for the Opportunity object:
• To enable the ‘Send to EchoSign’ button for the Opportunity object, go to Setup / Customize / Opportunities /
Page Layouts.
• Click on Edit ‘Opportunity Layout’
• Drag the Button ‘Send to EchoSign’ from the top section to the ‘Custom Buttons’ box in the Opportunity
Detail section.
Copyright ©2013 Adobe Systems Incorporated. All rights reserved. 33
Adobe EchoSign for Salesforce v13 Installation and Customization Guide
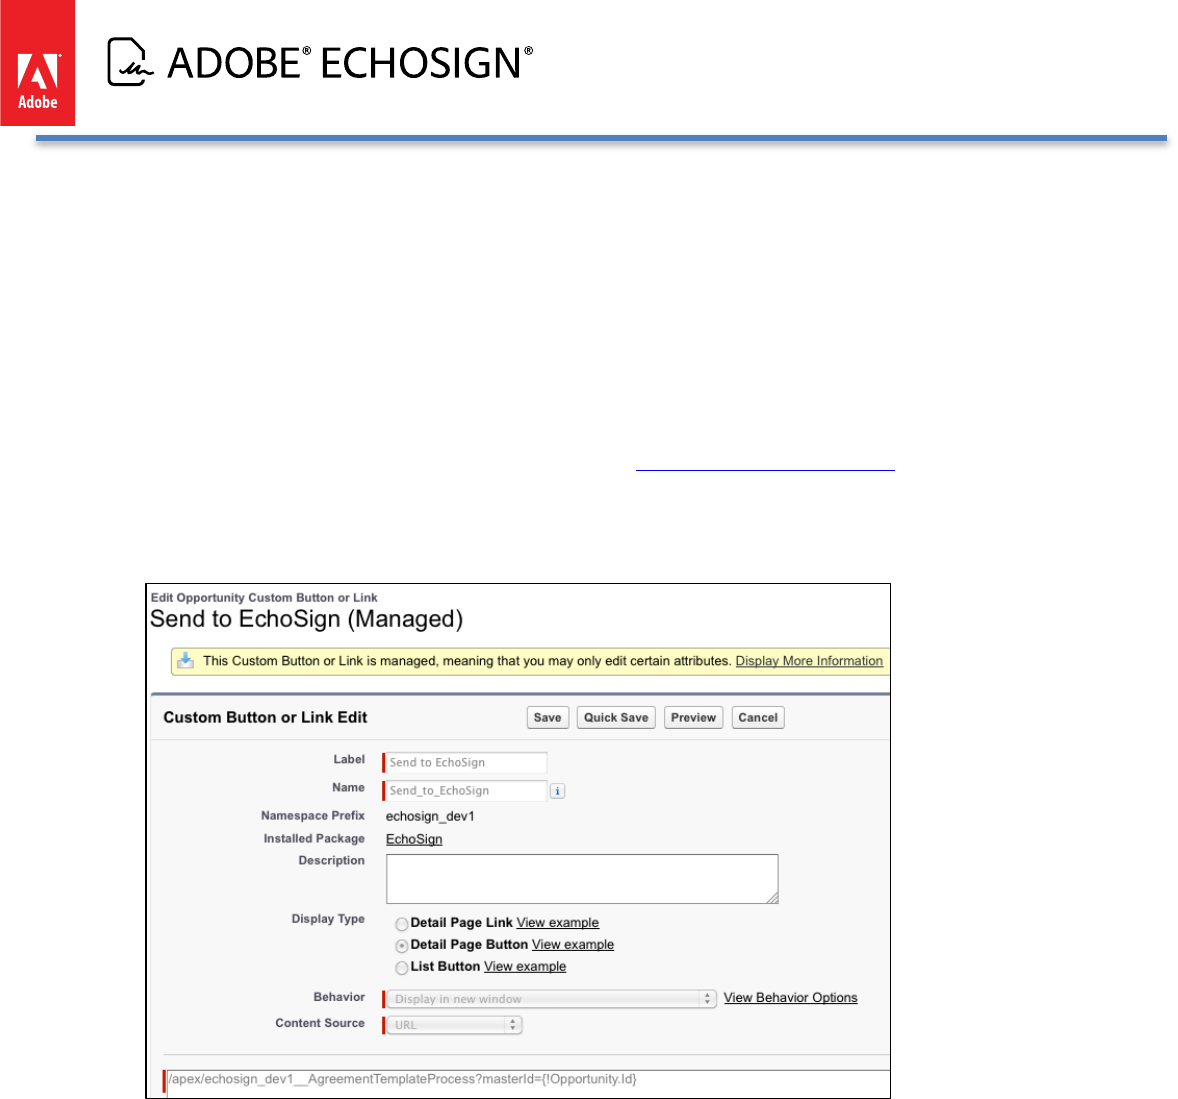
• To create additional custom ‘Send to EchoSign’ buttons for other objects, go to the Setup / Customize /
(Object) / Buttons and Links. You can label the button to meet your needs.
• Click ‘New’ under ‘Custom Buttons and Links’
• You can copy what was set up for the default Opportunity button (see screenshot below) but will need to
replace the Object ID variable at the end of the path with the Object ID variable that you want to add:
/apex/echosign_dev1__AgreementTemplateProcess?masterid={!Opportunity.Id}
• (Optional) Associate a specific Agreement Template to button:
o If you want to associate a specific Agreement Template for a specific ‘Send to EchoSign’ button, then
the button path should be:
/apex/echosign_dev1__AgreementTemplateProcess?masterid={!Object.Id}&templateId=a01U0000
004pImMwhere templateId should be set to the specific ID of the agreement template that is to be
used. If this value is not set, then the default agreement template will be used. You can get the
templateId from the URL of the agreement template page:
• (Optional) After button is clicked, send the user to a different page than the agreement page using retURL
parameter.
o Example: You can define a ‘Send to EchoSign’ button so that when clicked, it will bring
the user to a specified URL or back to the record instead of going to the Agreement
page. To define this button, use this string as an example:
/apex/echosign_dev1__AgreementTemplateProcess?masterid={!Opportunity
.Id}&retURL=/{!Opportunity.Id}
Copyright ©2013 Adobe Systems Incorporated. All rights reserved. 34
Adobe EchoSign for Salesforce v13 Installation and Customization Guide
• (Optional) After button is clicked, trigger an onLoadAction for ‘Send’
o Example: You can define a ‘Send to EchoSign’ button so that when clicked, it will bring
the user to the agreement page and after the page loads, the agreement will be ‘Sent’
without additional user intervention. To define this button, use this string as an
example:
/apex/echosign_dev1__AgreementTemplateProcess?masterid={!Opportunity
.Id}&onloadAction=Send
To learn more about onLoadActions, go to this section.
Alternatively, you can map the ‘Send’ value to the ‘On Load Action (Picklist)’
field on the Agreement record. You can define this mapping in the
Agreement Templates section called ‘Map Date to Agreement Fields’.
• Click ‘Save’.
• Then go to the Page Layout for that object and add the ‘Send to EchoSign’ button to the page similar to the
steps mentioned above for the Opportunity example.
Copyright ©2013 Adobe Systems Incorporated. All rights reserved. 35
Adobe EchoSign for Salesforce v13 Installation and Customization Guide
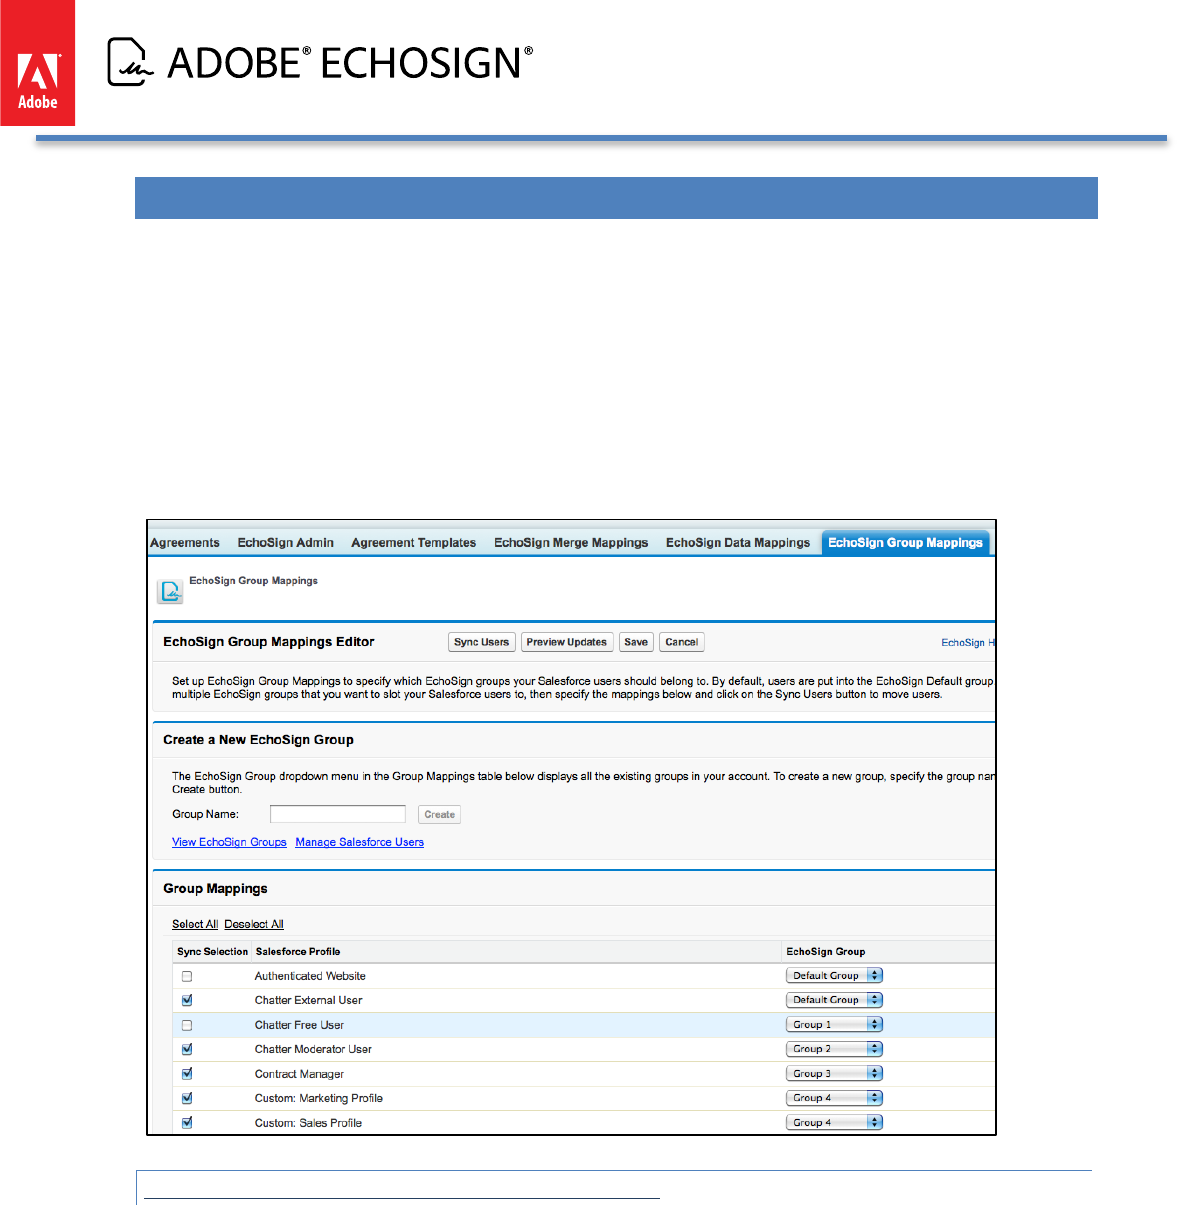
ECHOSIGN GROUP MAPPINGS - -- MOVE USERS TO SPECIFIC ECHOSIGN GROUPS (NEW!)
If you choose not to use this feature, skip this section.
EchoSign for Salesforce supports the ability to easily synchronize users in specific Salesforce profiles to EchoSign
groups. EchoSign groups are often used by companies to group users in the EchoSign account into different areas.
(e.g. Sales US, Sales Europe, Sales Asia Pacific) By having different groups, you can create different settings in
EchoSign or generate reports separately by group. If you don’t have multiple EchoSign groups, you can skip this
section since all of your users will belong to the Default group.
In Salesforce, you can set up mappings between Salesforce profiles and EchoSign groups by using the EchoSign
Group Mappings page. You can also create new EchoSign groups directly within Salesforce.
MOVE USERS TO DIFFERENT ECHOSIGN GROUPS
Follow these steps to set up Group Mappings and move users to their respective EchoSign groups:
1. Create the mappings between a Salesforce profile to a EchoSign group. You can map multiple
Salesforce profiles to a single EchoSign group.
2. Check the ‘Sync Selection’ box for any mapping row that you would like to Sync.
3. Click the ‘Save’ button to save the mappings or ‘Cancel’ to discard the changes.
4. To move any users to their respective EchoSign groups, click on the ‘Sync Users’ button on the
group mappings page. You will be first be shown a preview of users that will be moved before
you confirm the synchronization by clicking on ‘Sync Users’ in the preview window.
Copyright ©2013 Adobe Systems Incorporated. All rights reserved. 36
Adobe EchoSign for Salesforce v13 Installation and Customization Guide
5. After the sync, you will be shown a confirmation of which users were moved successfully.
6. Note that any Salesforce user in these profiles, who are not EchoSign users, will not be affected
by this synchronization. Also, any new user created when using EchoSign for Salesforce will be
created automatically into the correct group mapping based on the saved mappings that have
been checked for Sync Selection.
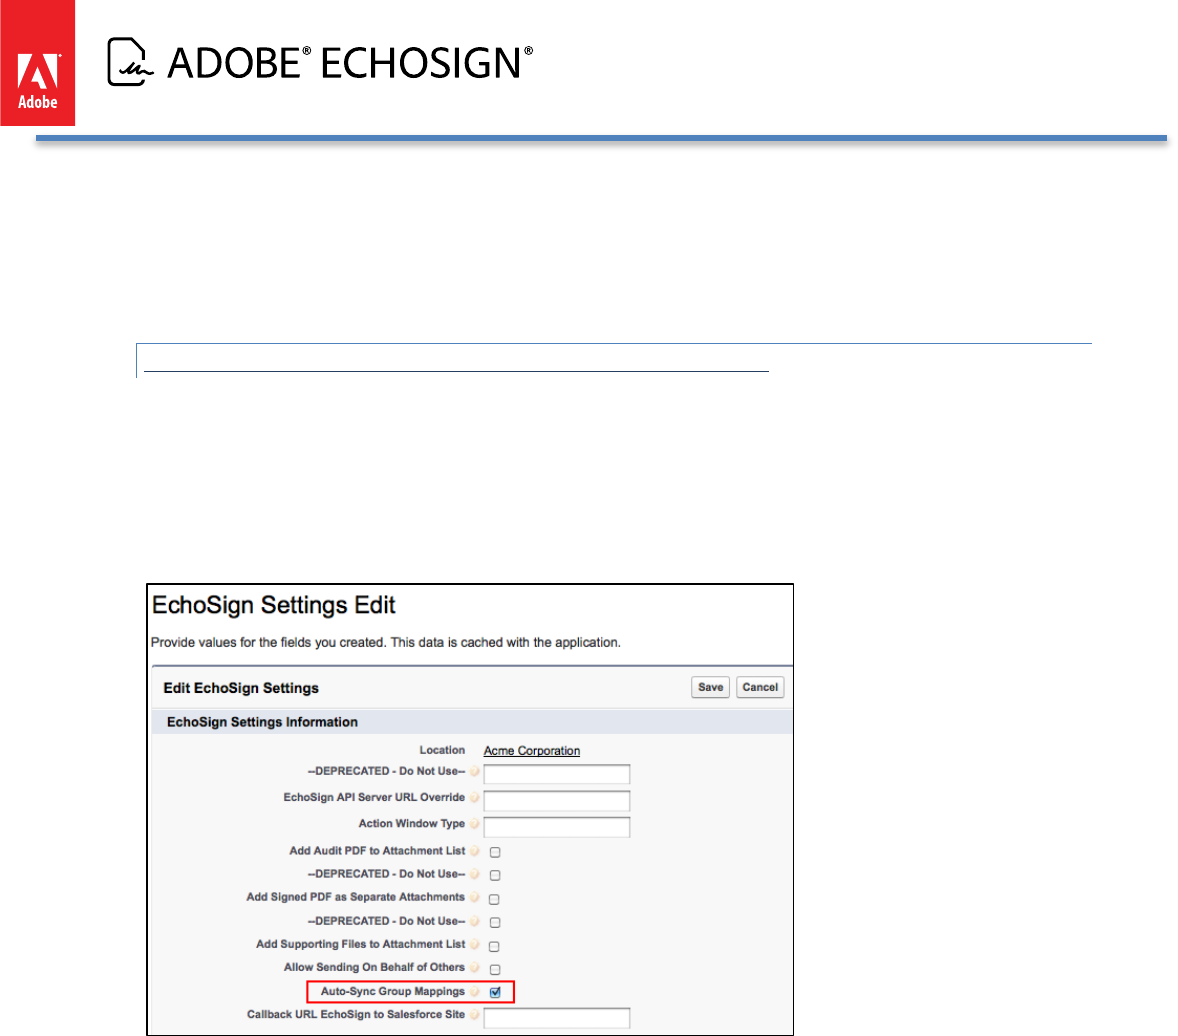
AUTO-SYNC USERS WHEN SALESFORCE PROFILE CHANGES
There is an optional setting you can turn on to automatically sync users when their Salesforce profile has changed
from one profile to another profile. Go to Setup / Develop / Custom Settings / (Manage) EchoSign Settings. Click
the ‘Edit’ button and check the box called ‘Auto-Sync Group Mappings’. This will enable the feature that will
move the users automatically when their profile changes. (e.g. from Marketing profile to Sales profile) The
synchronization will move the user to the correct EchoSign group based on the mappings saved and selected on
the Group Mappings page.
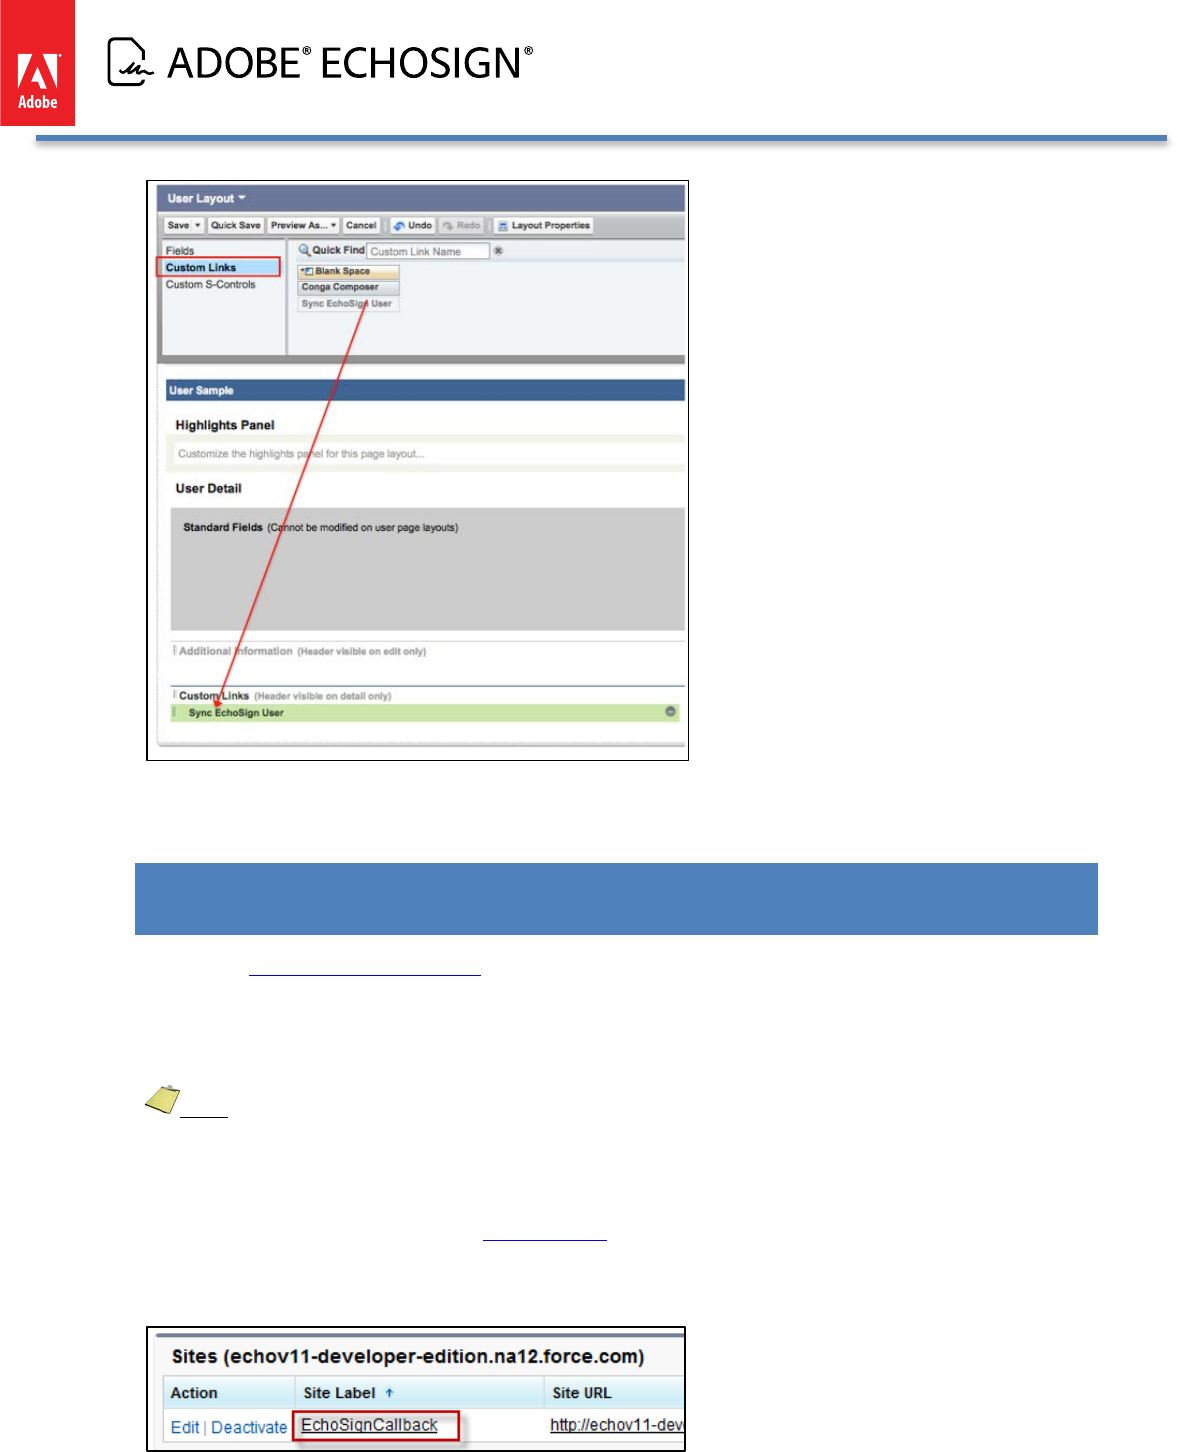
If you don’t have this auto-sync setting turned on and you would like to manually sync a user’s group from the
User record, you can add a link on the User page layout which allows you to manually force the synchronization
to move a single user to the correct EchoSign group based on the mappings saved and selected on the Group
Mappings page.
To add this sync link on the User page layout, follow these instructions:
• Go to Setup / Customize / Users / Page Layouts and click the ‘Edit’ button.
• Click on Custom Links and drag the ‘Sync EchoSign User’ link from the top of the page to
the ‘Custom Links’ section of the page. Click the ‘Save’ button.
Copyright ©2013 Adobe Systems Incorporated. All rights reserved. 37
Adobe EchoSign for Salesforce v13 Installation and Customization Guide
After adding this link, it will appear on every User detail page so that a manual sync of a single user can be done
when the link is clicked on. To move users in bulk, use the EchoSign Group Mappings page to sync users.
UPDATING SALESFORCE WITH AGREEMENTS SENT WITH THE ECHOSIGN API,
WIDGETS, OR FROM ECHOSIGN.COM (PUSH AGREEMENTS)
You can use EchoSign’s web services API to send agreements for signature or create Widgets and embed them on
your website and have all those agreements pushed and created in Salesforce.com just as if they were sent from
Salesforce.com. You can also send agreements via the EchoSign.com web application and have them all pushed
back to Salesforce.
Note: This feature is not supported in Salesforce Professional Edition.
To enable this scenario, follow the following steps:
• If you have not configured the EchoSign Callback Site earlier, you will need to create a Salesforce Site to use
this functionality (see instructions to Configure Sites).
• Next, add the ‘EchoSignAgreementPushCallback’ Visual Force page to the site. Go to Setup / Develop / Sites
• Click the Site name
Copyright ©2013 Adobe Systems Incorporated. All rights reserved. 38
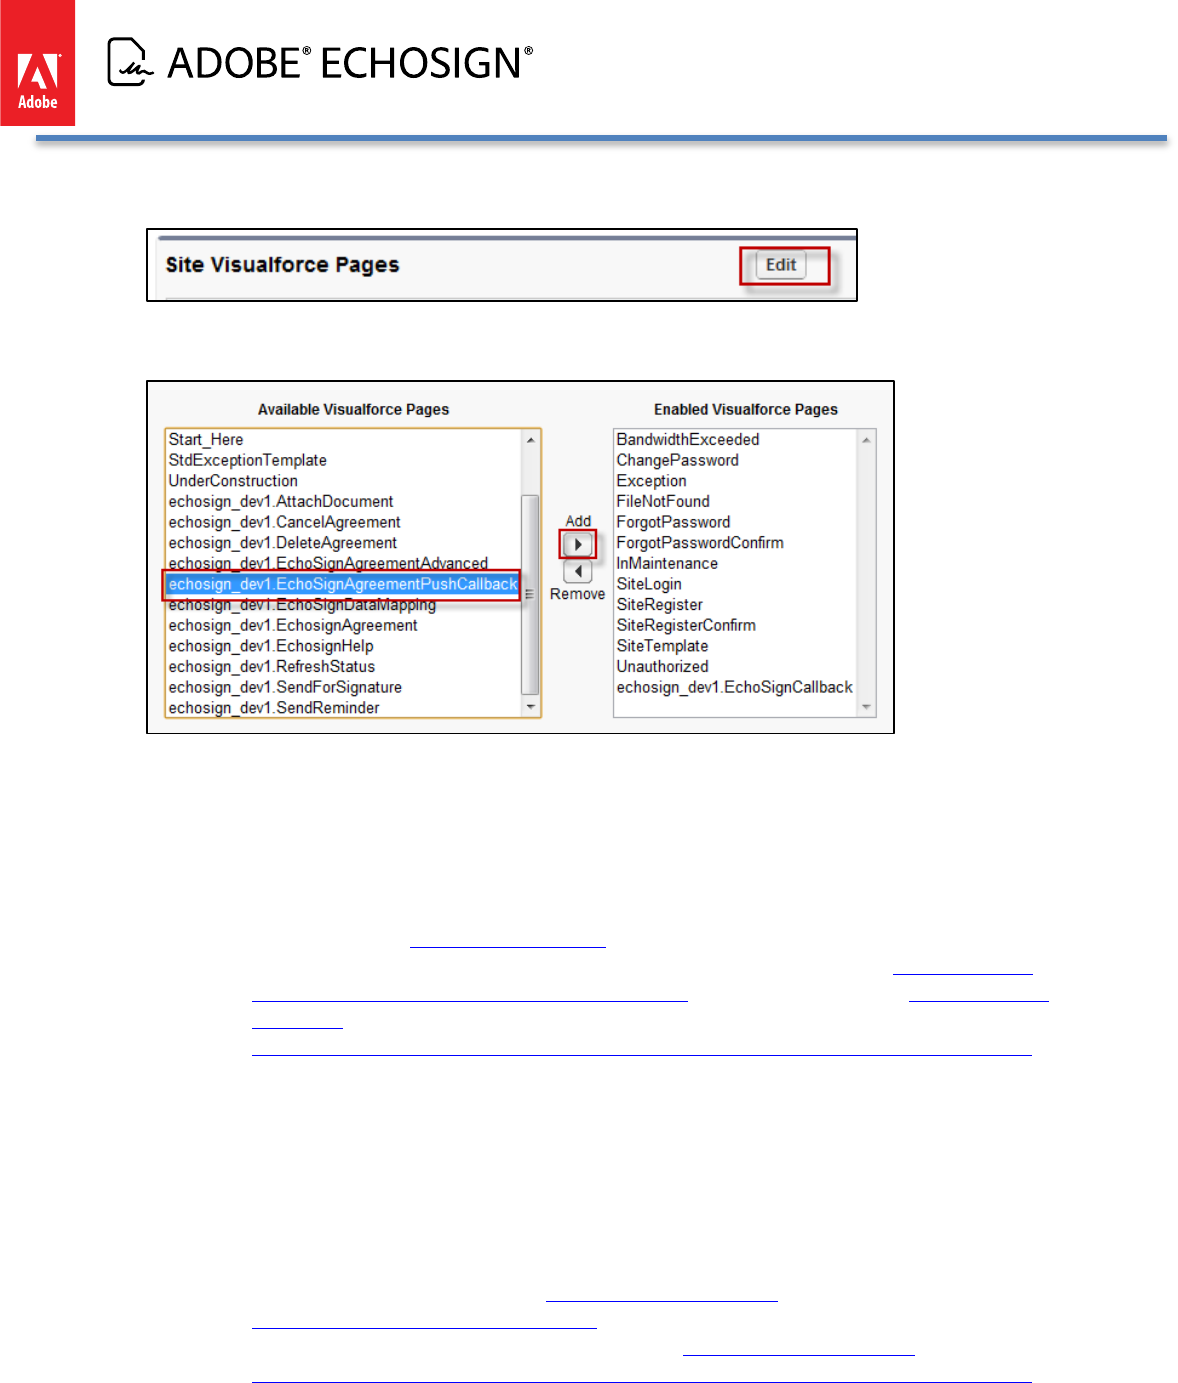
Adobe EchoSign for Salesforce v13 Installation and Customization Guide
• Under ‘Site Visual Force Pages’ click ‘Edit’
• Select ‘echosign_dev1.EchoSignAgreementPushCallback’ and click ‘Add’
• Click ‘Save’
• If you would like all of the agreements in your account that were sent outside of EchoSign to be created
and pushed into Salesforce, follow these instructions:
o Copy the secure URL address from the EchoSign Callback Site you created and append
‘/echosign_dev1__EchoSignAgreementPushCallback’ to compose the callback URL. Contact
EchoSign Support (echosign@support.com) and provide them with your callback URL to set as your
EchoSign account’s default callback URL. For example: If your site address is ‘https://echov11-
developer-edition.na12.force.com/EchoSignCallback’, the callback URL will be ‘https://echov11-
developer-
edition.na12.force.com/EchoSignCallback/echosign_dev1__EchoSignAgreementPushCallback‘
o EchoSign Support should also enter your EchoSign userID for the default callback URL API user
setting. All accounts using Salesforce should also have their accounts set to append the document
key to the callback URL.
• If you are sending agreements via the API, follow these instructions:
o Copy the secure URL address from the EchoSign Callback Site you created and append
‘/echosign_dev1__EchoSignAgreementPushCallback’ to create the callback URL to be used in the
EchoSign API.
o For example: If your site address is ‘https://echov11-developer-
edition.na12.force.com/EchoSignCallback’,
the URL you should use in the EchoSign API will be ‘https://echov11-developer-
edition.na12.force.com/EchoSignCallback/echosign_dev1__EchoSignAgreementPushCallback‘
Copyright ©2013 Adobe Systems Incorporated. All rights reserved. 39
Adobe EchoSign for Salesforce v13 Installation and Customization Guide
o When sending an agreement or creating a widget through the API you will need to provide a
callback URL (see https://secure.echosign.com/redirect/latestApiMethods and reference the API
parameter ‘CallbackInfo’.)
o Also make sure that your account settings are set to append the document key to the callback URL
that should be the default for Salesforce customers using EchoSign. For any issues, contact Adobe
EchoSign support at support@echosign.com.
• Additionally, go to Push Mappings settings to define preferences for how records are created when
agreements are pushed to Salesforce.
ECHOSIGN FOR SALESFORCE CUSTOMIZATION AND SETTINGS
Settings allow you to change the behavior of EchoSign for Salesforce and customize it to fit to your business
needs.
EchoSign for Salesforce supports various custom settings:
• EchoSign Settings control which features are exposed to your EchoSign users and also sets the application’s
behavior. This is the main set of core settings for the application.
• EchoSign Toolbar Settings control which buttons appear in the EchoSign Toolbar.
• EchoSign Merge Mapping Settings control how attachments are handled whenever there is a merge
mapping used.
• EchoSign Push Mapping Settings control how recipient records are created or updated when agreements
created outside of Salesforce are pushed into Salesforce.
• EchoSign Chatter Settings control which agreement events will result in Chatter posts and where the Chatter
posts will appear. These settings only appear if you have the EchoSign for Chatter app installed on your org.
Settings can be set for the entire Salesforce organization or for specific users and profiles
DEFAULT ORGANIZATION LEVEL SETTINGS
These settings affect all users and profiles in the organization, unless their settings override the default
organization level settings (see below)
1. Click on your Name on top corner of page
2. Click Setup / App Setup / Develop / Custom Settings
Click on the ‘EchoSign Settings’ or ‘EchoSign Toolbar Settings’ or ‘Merge Mapping Settings’ or ‘Push Mapping
Settings; link, as appropriate.
Copyright ©2013 Adobe Systems Incorporated. All rights reserved. 40
Adobe EchoSign for Salesforce v13 Installation and Customization Guide
The examples below show ‘EchoSign Settings’
3. Click on the Manage Button
4. Click the ‘New’ button (above the ‘Default Organization Level Value’ label) to create default custom settings
for all users.
Copyright ©2013 Adobe Systems Incorporated. All rights reserved. 41
Adobe EchoSign for Salesforce v13 Installation and Customization Guide
5. Set the appropriate settings. Click ‘Save’
6. For more details on each setting, see ‘Available Settings’ below
SETTINGS FOR SPECIFIC USERS AND PROFILES
Follow steps 1-4 above.
5. Click the ‘New’ button (above the ‘Setup Owner’ table) to create custom settings for specific Users or Profiles
that override the Default Organization Level (if defined).
6. Choose the user or profile you’d like to change these settings for and set values for the appropriate settings.
For more details on each setting, see the following ‘Available Settings’ section.
Copyright ©2013 Adobe Systems Incorporated. All rights reserved. 42
Adobe EchoSign for Salesforce v13 Installation and Customization Guide
AVAILABLE ECHOSIGN SETTINGS
CUSTOM ECHOSIGN SETTINGS
Each of the settings has a question mark icon that you can click on to see the description of the setting. These
settings give you the
• EchoSign API Server URL Override - -- Used for testing purposes only. Do not edit the value of this setting
without consulting EchoSign Support.
• Action Window Type - -- Determine how EchoSign windows open in users’ browsers. Enter ‘Window’ to
open in new windows, enter ‘Frame’ to open as a layer on top of the Agreement page, or leave the field
empty for the default behavior, which is to auto-detect based on the user’s browser capabilities.
• Add Audit PDF to Attachment List - -- Check this box to attach the PDF of the audit trail to the Agreement
record after the agreement is signed.
• Add Signed PDF as Separate Attachments - -- Check this box to attach the PDF of the signed agreements
as separate attachments when there are multiple documents sent in a single transaction. To stop
receiving the signed agreement as a merged PDF, please contact EchoSign Support for assistance.
• Add Supporting Files to Attachment List - Check this box to attach the PDFs of the supporting
documents to the Agreement record after the agreement is signed. Through the supporting document
fields in the agreement, the signers upload and attach the supporting documents to the agreement
transaction.
• Auto-Sync Group Mappings (NEW!) - -- Check this box to automatically move the correct EchoSign
groups when their Salesforce user profiles are updated.
• Allow Sending on Behalf of Others - -- Check this box to allow sending agreements on behalf of others.
• Callback URL EchoSign to Salesforce Site - -- Entering the Callback URL into this box is required when
sending large transactions over 2.8MB. This setting is the Secure Web Address that is copied from the
EchoSign Callback Site, which is set up to send large files. See this section in this document for additional
instructions.
• Disable Account Lookup - -- Check this box to hide the Account lookup option on the send agreement
page.
• Disable Add Recipient - -- Check this box to hide the option to add recipients on the send agreement
page.
• Disable Attach Agreement Attachments - -- Check this box to hide the option to add new attachments on
the send agreement page.
• Disable Send Email Copies (NEW!) - -- Check this box to hide the ‘Send email copies to:’ field on the send
agreement page.
• Disable Contact Recipient Type - -- Check this box to hide the option to select a Contact as a recipient on
the send agreement page.
• Disable Delete Agreement Attachments - -- Check this box to hide the option to delete agreement
attachments on the send agreement page.
• Disable Delete Recipient - -- Check this box to hide the option to delete recipients on the send agreement
page.
• Disable Edit Agreement Attachments - Check this box to hide the option to edit agreement
attachments on the send agreement page.
• Disable Email Recipient Type - -- Check this box to hide the option to type an Email address as a recipient
on the send agreement page.
Copyright ©2013 Adobe Systems Incorporated. All rights reserved. 43

Adobe EchoSign for Salesforce v13 Installation and Customization Guide
• Disable Knowledge Based Authentication (NEW!) - -- Check this box to hide the Knowledge Based
Authentication (KBA) identity verification option for agreements. This is a signer identity verification
method that requires signers to provide and verify personal information to sign the document. Usage of
this feature is limited and may incur added costs. Also, make sure your account send settings on
EchoSign.com have KBA enabled so you can use it in Salesforce.
• Disable Lead Recipient Type - -- Check this box to hide the option to select a Lead as a recipient on the
send agreement page.
• Disable Opportunity Lookup - -- Check this box to hide the Opportunity lookup option on the send
agreement page.
• Disable Preview or Position - Check this box to hide the option to preview the document or position
fields on the send agreement page.
• Disable Sender Signs - -- Check this box to hide the option for the sender to also sign the agreement.
• Disable Sign Expiration - -- Check this box to hide the option to set the number of days before the
agreement will expire on the send agreement page.
• Disable Signing Password - -- Check this box to hide the option to set a password to required to sign an
agreement.
• Disable Sign Reminder - -- Check this box to hide the option to set a reminder for signers on the send
agreement page.
• Disable Signature Type - -- Check this box to hide the option select a signature type (e-Signature or Fax
Signature) on the send agreement page.
• Disable Upload Agreement Attachments - Check this box to hide the option to upload agreement
attachments on the send agreement page.
• Disable User Recipient Type - -- Check this box to hide the option to select a User as a recipient on the
send agreement page.
• Disable View Agreement Attachments - -- Check this box to hide the option to disable viewing of
attachments on the send agreement page.
• Disable Password for Signed PDF - -- Check this box to hide the option to set a password to open the PDF
for the signed agreement.
• Disable Web Identity Verification (NEW!) - -- Check this box to hide the web identity verification option
for agreements. Web identity verification requires signers to verify their identity by signing into one of
the following sites: Facebook, Google, LinkedIn, Twitter, Yahoo!, or Microsoft Live. Also, make sure your
account send settings on EchoSign.com have web identity enabled so you can use it in Salesforce.
• Enable Hosted Signing Field - -- Check this box to show the ‘Host signing for the first signer’ field on the
agreement page to get in-person signatures.
• Enable Mapping Error Notification (NEW!) - -- Check this box to send email notifications to the data
mapping or merge mapping owner any time there are errors when the mappings are executed.
• Enable Recipient Approver Role (NEW!) - -- Check this box to enable the option to mark any recipient as
an Approver. Approvers review and approve the document but they are not required to sign it.
• Enable Send Written Signature To Fax - -- Check this box and EchoSign will attempt to use the recipient’s
fax number instead of the email address when sending an agreement for fax signature.
• Enable Separate Signer Identity Methods (NEW!) - -- Check this box to enable the option to select
different identity verification methods for recipients in your EchoSign account and those outside of your
EchoSign account. This applies to knowledge based authentication (KBA), web identity verification, and
password to sign. For example, you can require that a customer be verified with Knowledge Based
Identity before signing the document but require that your sales manager instead provide a password to
Copyright ©2013 Adobe Systems Incorporated. All rights reserved. 44
Adobe EchoSign for Salesforce v13 Installation and Customization Guide
sign the document. If you don’t check this box, then all signers or approvers will verify using the same
method, as selected by the sender.
• Override Recipient Field List - -- This field allows you to change the default set of agreement fields that
determine which Agreement fields are used when selecting the recipient for an agreement when sendig
for signature. When used, this setting should contain a list of comma-separated API field names from the
agreement record. The field names should be in order and represent the fields the recipients should be
read from. (e.g. SignerA_Email__c,SignerB_Email__c)
• EchoSign Server URL Override - Used for testing purposes only. Do not edit the value of this setting
without consulting EchoSign Support.
• Wipe Agreement Password - -- Check this box to not store in Salesforce the encrypted password field on
the agreement after it is sent. This applies to the password that is set to sign or view the agreement.
ECHOSIGN TOOLBAR SETTINGS
Toolbar settings allow you to control which EchoSign toolbar actions will be available in your account. You may
create different toolbar settings for different profiles or users.
• Cancel (Draft) - Available only when an agreement was not yet sent. Clicking this button would delete
the agreement in Salesforce. This button is hidden by default.
• Cancel Agreement - Cancels an agreement after it was sent for signature, but keeps the record in
Salesforce.
• Delete Agreement - Cancels an agreement after it was sent for signature and deletes the record from
Salesforce.
• Save Agreement - Saves the agreement.
• Send Agreement - Sends an agreement for signature.
• Send Reminder - Send a reminder to the current signer.
• Update Status - Queries EchoSign to update the status of the agreement in Salesforce.
• View Agreement - Opens the EchoSign ‘View Agreement’ page allowing the user to view it and perform
additional tasks.
ECHOSIGN MERGE MAPPING SETTINGS
Merge mapping settings allow you to control which how the attachments will be managed when merge
mappings are used for sending agreements. Reference merge mappings documentation for more information.
• Attach Merged Document - When a merge mapping is used for an agreement, selecting this option will
attach the document with the merged data into the agreement record after the agreement is sent.
• Remove Original document - When a merge mapping is used for an agreement, selecting this option
will remove the original template document from the agreement record after the agreement is sent.
ECHOSIGN PUSH MAPPING SETTINGS
Push mapping settings allow you to control how recipient records are created or updated when agreements
created outside of Salesforce are pushed into Salesforce. Reference the agreement push mapping documentation
for more information about how to set up Salesforce so that documents created elsewhere can also be created in
Salesforce automatically.
Copyright ©2013 Adobe Systems Incorporated. All rights reserved. 45
Adobe EchoSign for Salesforce v13 Installation and Customization Guide
• Copy Contact Account - -- Selecting this option will copy the first Contact recipient’s Account lookup to
the Agreement’s Account lookup.
• Copy Contact Opportunity - Selecting this option will copy the first Contact recipient’s Opportunity
lookup to the Agreement’s Opportunity lookup.
• Auto Create Recipient Object - -- This field is used to specify which recipient type to create (Contact or
Lead) when there is no existing contacts in Salesforce that match the original agreement’s recipient.
Type in ‘Contact’ or ‘Lead’ into this field based on the preference. The recipient lookup is also based on
the entry in the ‘Recipient Lookup Order’ field.
• Recipient Lookup Domain Ignore List - -- If a recipient’s email belongs to one of the domains that is
entered in this field, there will be no recipient matching performed and the recipient will be stored as an
email address in Salesforce.
• Recipient Lookup Order - -- This field determines the order by which recipients from the agreement are
searched for in Salesforce. For example, enter ‘Contact, Lead, User’ into this field if that is the order you
want to find recipients.
ECHOSIGN CHATTER SETTINGS
EchoSign Chatter Settings will appear if you have the EchoSign for Chatter app installed on your org. These
settings determine where to post Chatter updates and also which events will result in a Chatter post. You only
should define one set of Chatter settings for your Org and you can provide a Name to the settings. You can learn
more about EchoSign for Chatter here with instructions for installation and setup.
• Post on Account Record - Post Chatter updates for EchoSign agreements on the related
Account record.
• Post when Agreement Cancelled - Post Chatter update when agreement is cancelled.
• Post when Agreement Declined - Post Chatter update when agreement is declined.
• Post when Agreement Expires - Post Chatter update when agreement expires.
• Post on Agreement Record - Post Chatter updates for EchoSign agreements on the
Agreement record.
• Post when Reminders Sent - Post Chatter update when reminders are sent.
• Post when Agreement Sent - Post Chatter update when agreement is sent.
• Send Notifications to Sign Agreements - Post private Chatter message to signer when an
agreement needs the signer's signature.
Copyright ©2013 Adobe Systems Incorporated. All rights reserved. 46
Adobe EchoSign for Salesforce v13 Installation and Customization Guide
• Post when Agreement Signed or Approved - Post Chatter update when agreement is
signed and approved.
• Post when Agreement Viewed - Post Chatter update when agreement is viewed.
• Post on Contract Record - Post Chatter updates for EchoSign agreements on the related
Contract record.
• Enable EchoSign Chatter Updates - Enable this setting to turn on Chatter updates for
EchoSign agreements.
• Post on Opportunity Record - Post Chatter updates for EchoSign agreements on the
related Opportunity record.
• Post when Recipient Email Bounces - Post Chatter update when recipient email bounces
and is not delivered.
Note: There is another Chatter setting in the main EchoSign Settings. By default, the Agreement record will
be enabled for Chatter feeds but you can turn it off through the setting called ‘Disable Agreement Chatter Feed’.
ADDING CUSTOM FIELDS AND RELATED OBJECTS TO THE AGREEMENT PAGE
This section addresses customizing the default ‘EchoSign Agreement Advanced’ page. These customizations are
not available when using the ‘EchoSign Agreement Basic’ page. See Select EchoSign Agreements Page Style for
more information.
ADDING CUSTOM FIELDS
Using Field Sets, you can add fields you would like to view and edit when viewing the agreement page. You may
use the EchoSign built-in field set and then add one or more fields from the Agreement Object that will be
displayed on the agreement page.
EchoSign already has a built-in field set you can use. Follow the steps below to customize it:
• Go to Setup / Create / Objects
• Click on ‘Agreement’
Copyright ©2013 Adobe Systems Incorporated. All rights reserved. 47
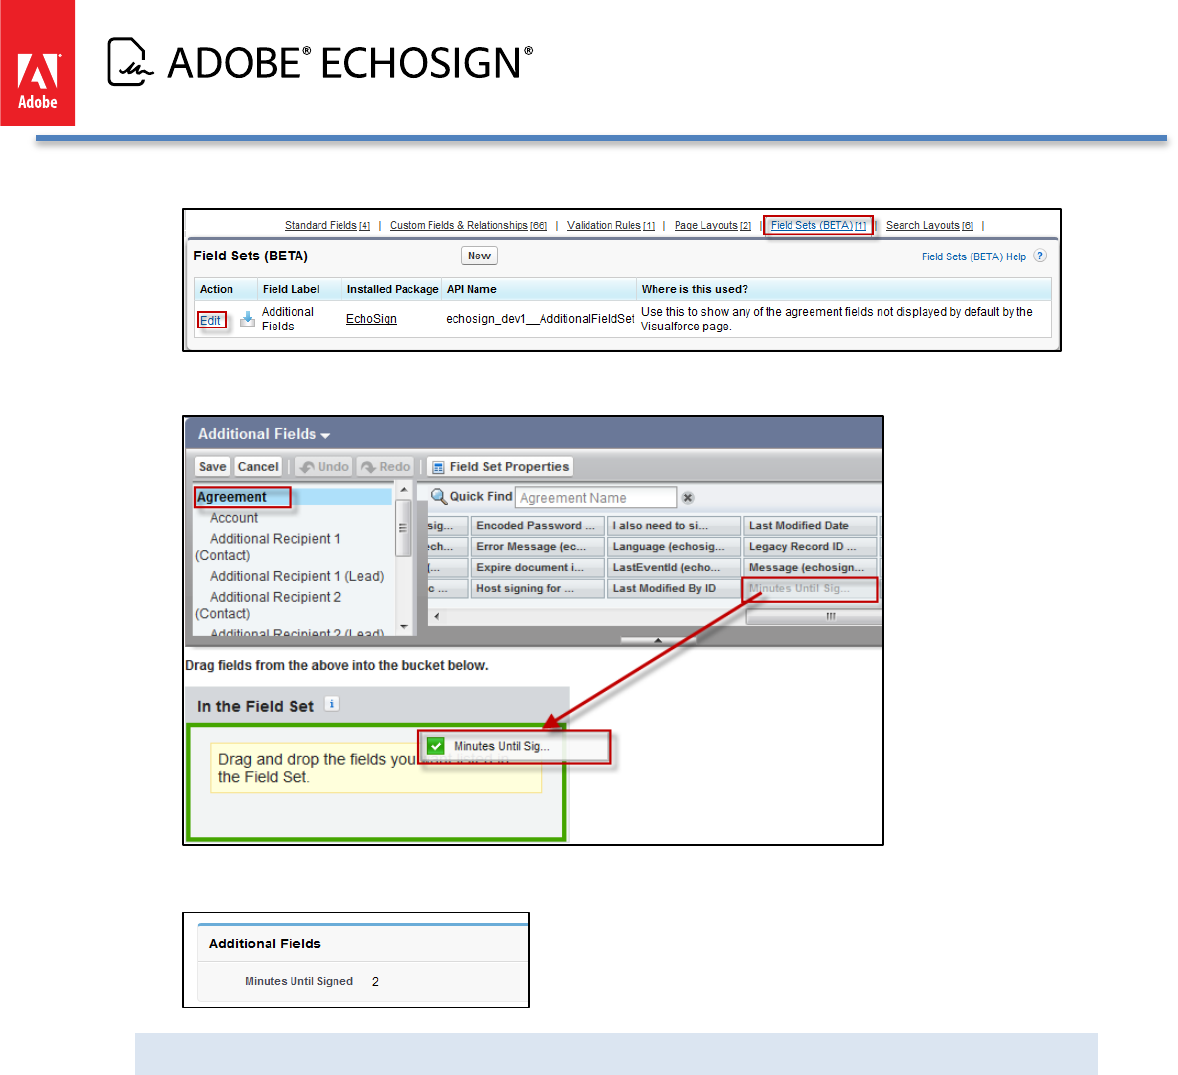
Adobe EchoSign for Salesforce v13 Installation and Customization Guide
• Mouse over ‘Field Sets (Beta)’ at the top and the click ‘Edit’
• Select the field you want to add and drag it into the ‘In the Field Set’ rectangle. Notice that EchoSign only
supports fields from the Agreement object and not from other objects.
• Click ‘Save’
• When you look at the agreement, a new section will appear with the fields you have selected:
ADD RELATED OBJECTS TO THE AGREEMENT PAGE
You may associate EchoSign Agreements with Salesforce objects of your choosing (standard or custom objects).
This enables you to create Agreements that are linked to those objects and that show all the Agreements that
relate to an object on that object’s page. By default, it is related to Opportunity and Account.
The instructions below describe how to associate Agreements with a Quote object, but they can be applied to any
other object in your Salesforce Organization.
Copyright ©2013 Adobe Systems Incorporated. All rights reserved. 48
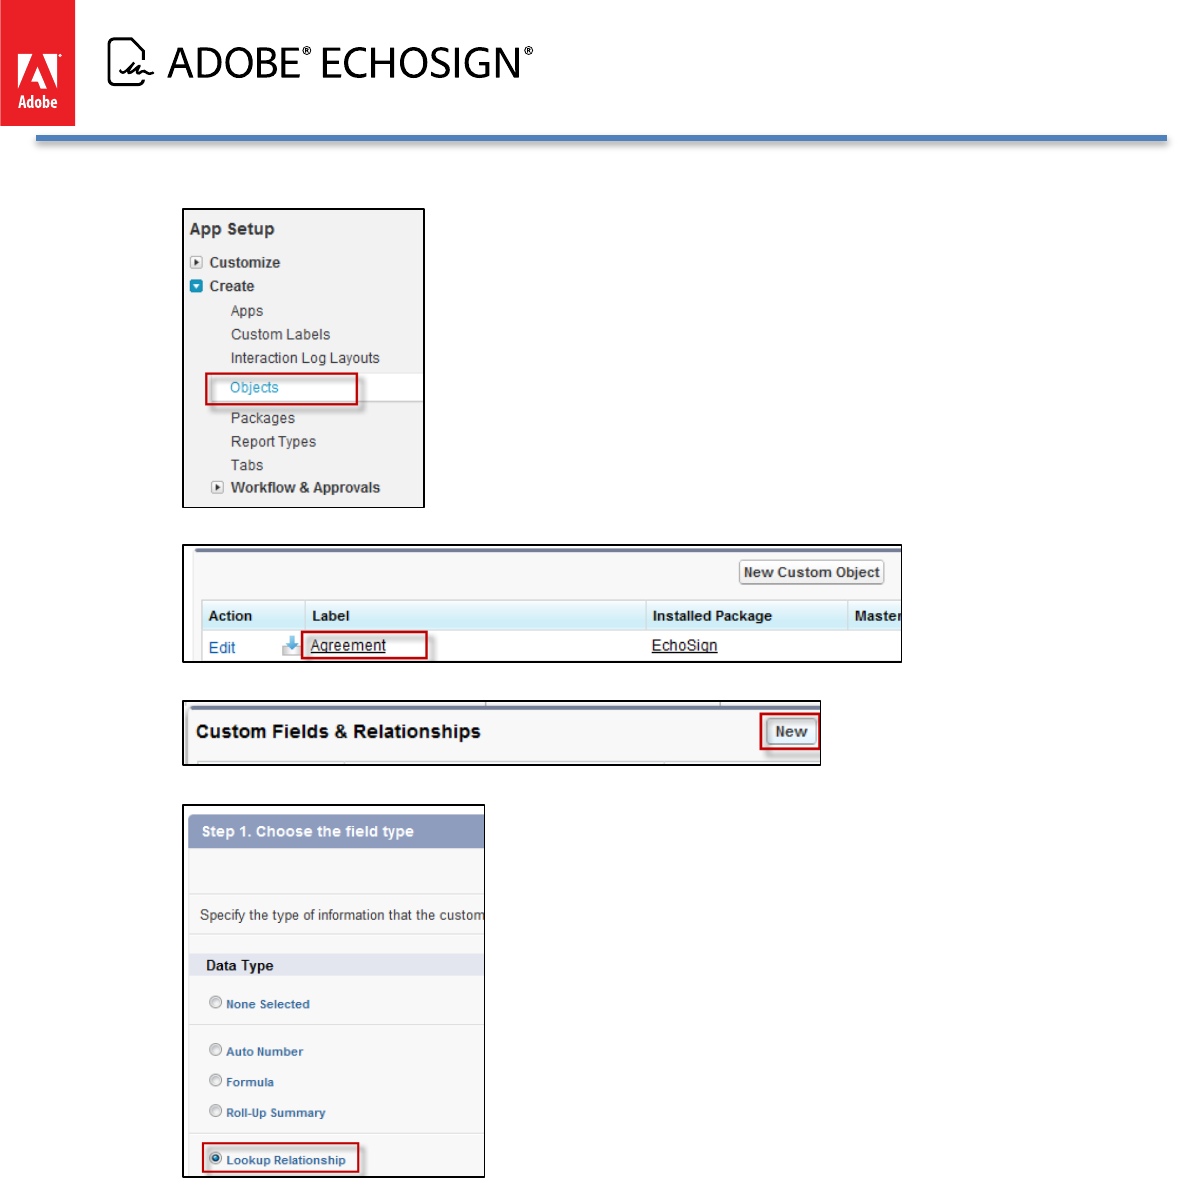
Adobe EchoSign for Salesforce v13 Installation and Customization Guide
• Go to Setup / Create / Objects
• Click on ‘Agreement’
• Click ‘New’ on ‘Custom Fields & Relationships’
• Select ‘Lookup’, Click ‘Next’
Copyright ©2013 Adobe Systems Incorporated. All rights reserved. 49
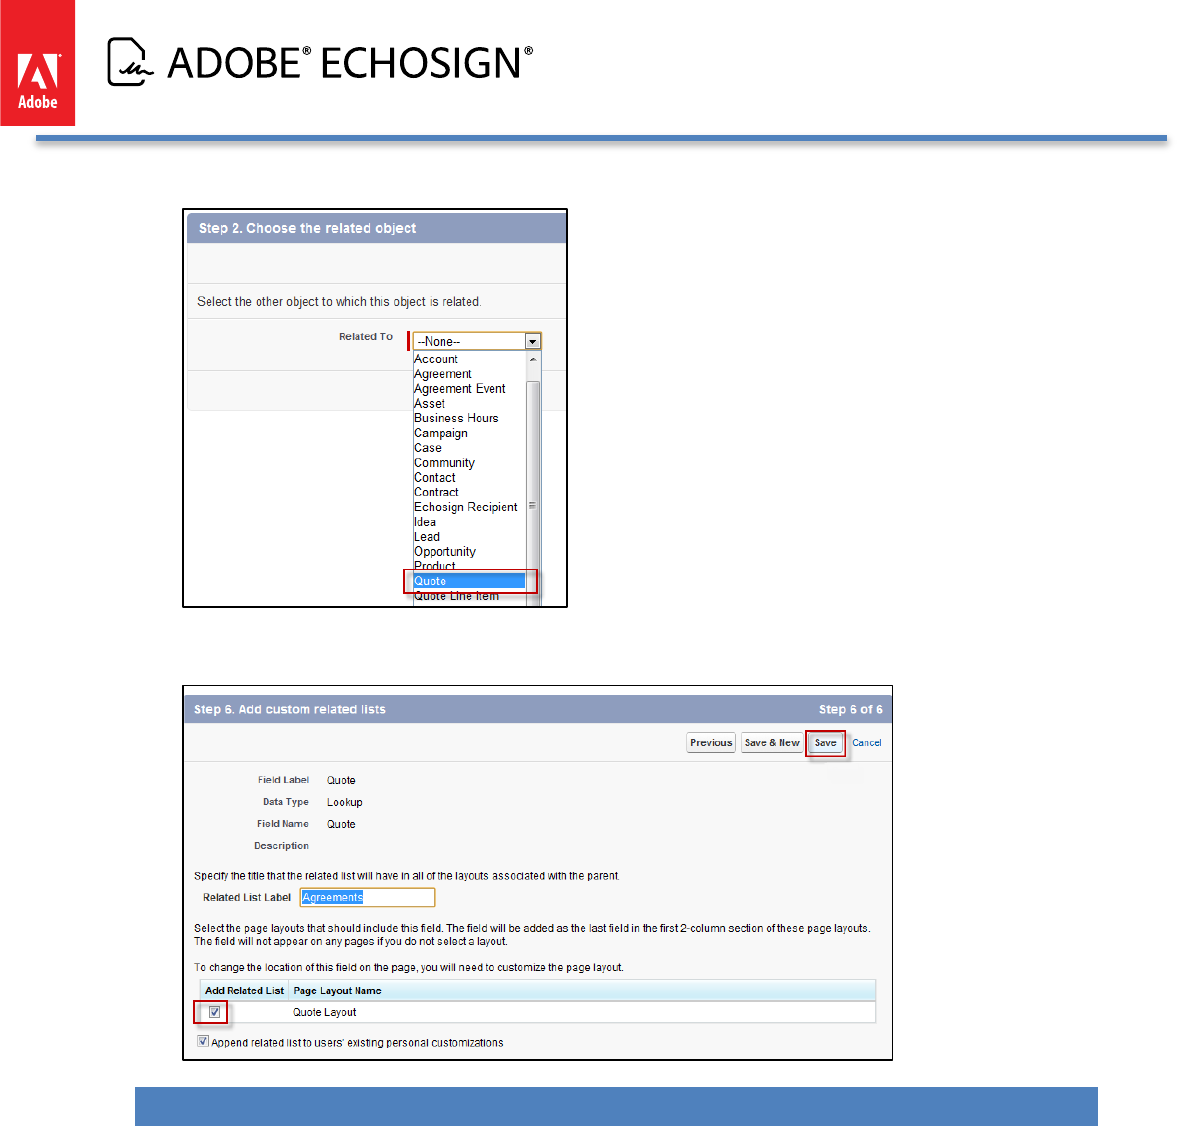
Adobe EchoSign for Salesforce v13 Installation and Customization Guide
• Choose ‘Quote’ from the drop-down list. Click ‘Next’
• Click ‘Next’ in steps 3, 4 and 5
• In Step 6, ensure that the ‘Add Related List’ check box is checked, then click ‘Save’.
ADVANCED SIGNER AUTHENTICATION METHODS (NEW!)
When signers receive documents to sign or approve, you can add an additional layer of authentication before
they can view the document. Often times, adding a password to sign the agreement is sufficient but in other
cases, more advanced verification methods may be desired.
EchoSign for Salesforce supports 3 signer verification methods:
• (New!) Knowledge Based Authentication - -- Answer questions to verify signer identity
• (New!) Web Identity Authentication- -- sign in with Facebook, LinkedIn, Google, etc. before
signing
• Password to sign agreement
You can apply these authentication methods for internal or external signers or all signers.
• E.g. External signers need verify their identity using Knowledge Based Authentication while internal
Copyright ©2013 Adobe Systems Incorporated. All rights reserved. 50
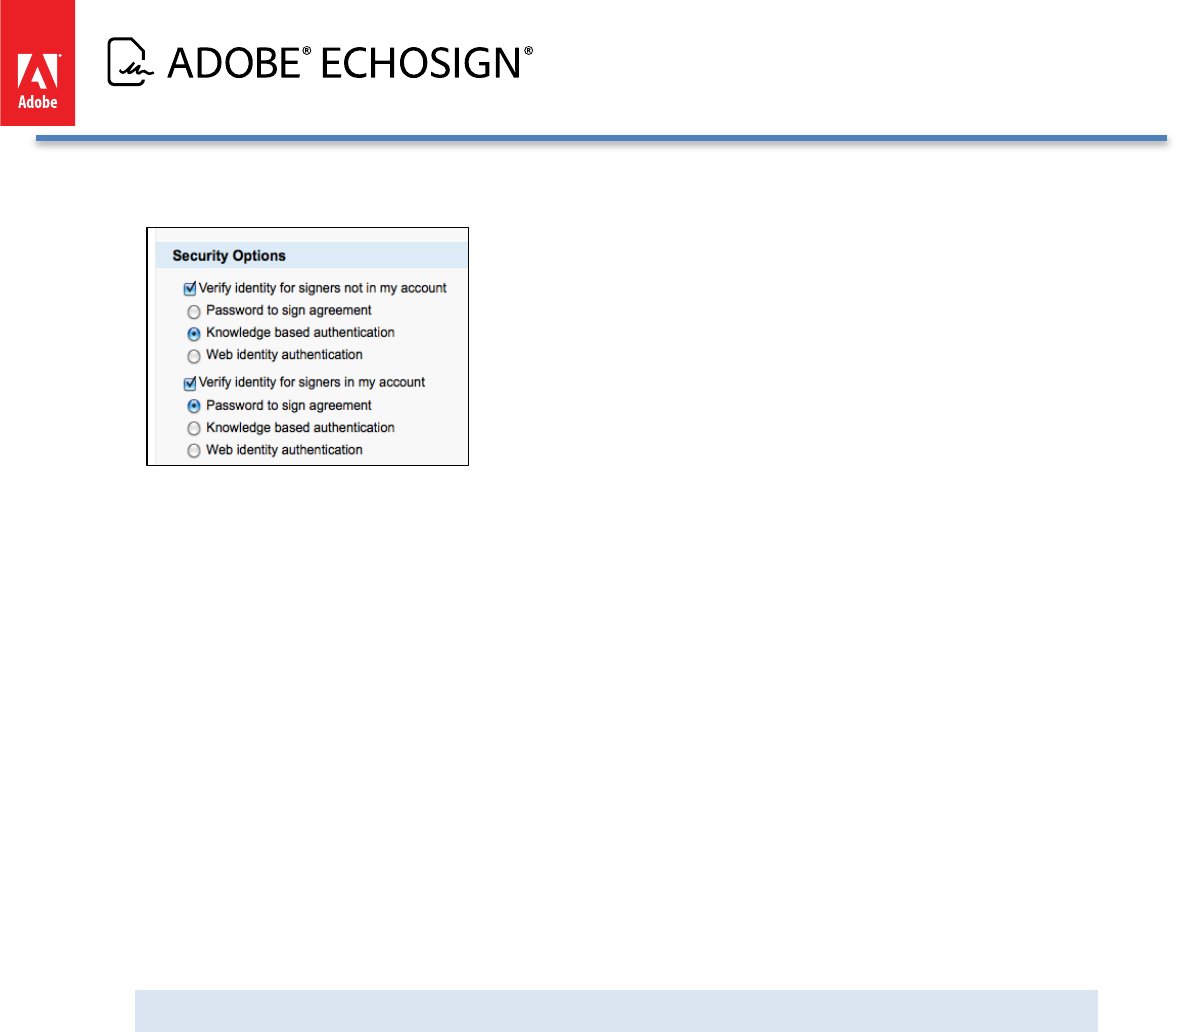
Adobe EchoSign for Salesforce v13 Installation and Customization Guide
signers need to verify using a password
To take advantage of this functionality, make sure you have the EchoSign Custom Settings set for knowledge
based authentication and web identity.
• Disable Knowledge Based Authentication- -- Check this box to hide the Knowledge Based Authentication
(KBA) identity verification option for agreements. This is a signer identity verification method that
requires signers to provide and verify personal information to sign the document. Usage of this feature is
limited and may incur added costs. Also, make sure your account send settings on EchoSign.com have
KBA enabled so you can use it in Salesforce.
• Disable Web Identity- -- Check this box to hide the web identity verification option for agreements. Web
identity verification requires signers to verify their identity by signing into one of the following sites:
Facebook, Google, LinkedIn, Twitter, Yahoo!, or Microsoft Live. Also, make sure your account send
settings on EchoSign.com have web identity enabled so you can use it in Salesforce.
• Enable Separate Signer Identity Methods - -- Check this box to enable the option to select different
identity verification methods for recipients in your EchoSign account and those outside of your EchoSign
account. For example, you can require that a customer be verified with Knowledge Based Identity before
signing the document but require that your sales manager instead provide a password to sign the
document. If you don’t check this box, then all signers or approvers will verify using the same method, as
selected by the sender.
KNOWLEDGE BASED AUTHENTICATION (KBA)
• Knowledge Based Authentication (KBA) requires signers and approvers to prove their identity by
answering questions taken from hundreds of public and commercial databases. This functionality is
powered by RSA and only available in the United States.
• When verified, the name associated with the signature is taken from the user’s authenticated name and
cannot be changed at the time of signing. The audit trail captures identity verification details.
Copyright ©2013 Adobe Systems Incorporated. All rights reserved. 51
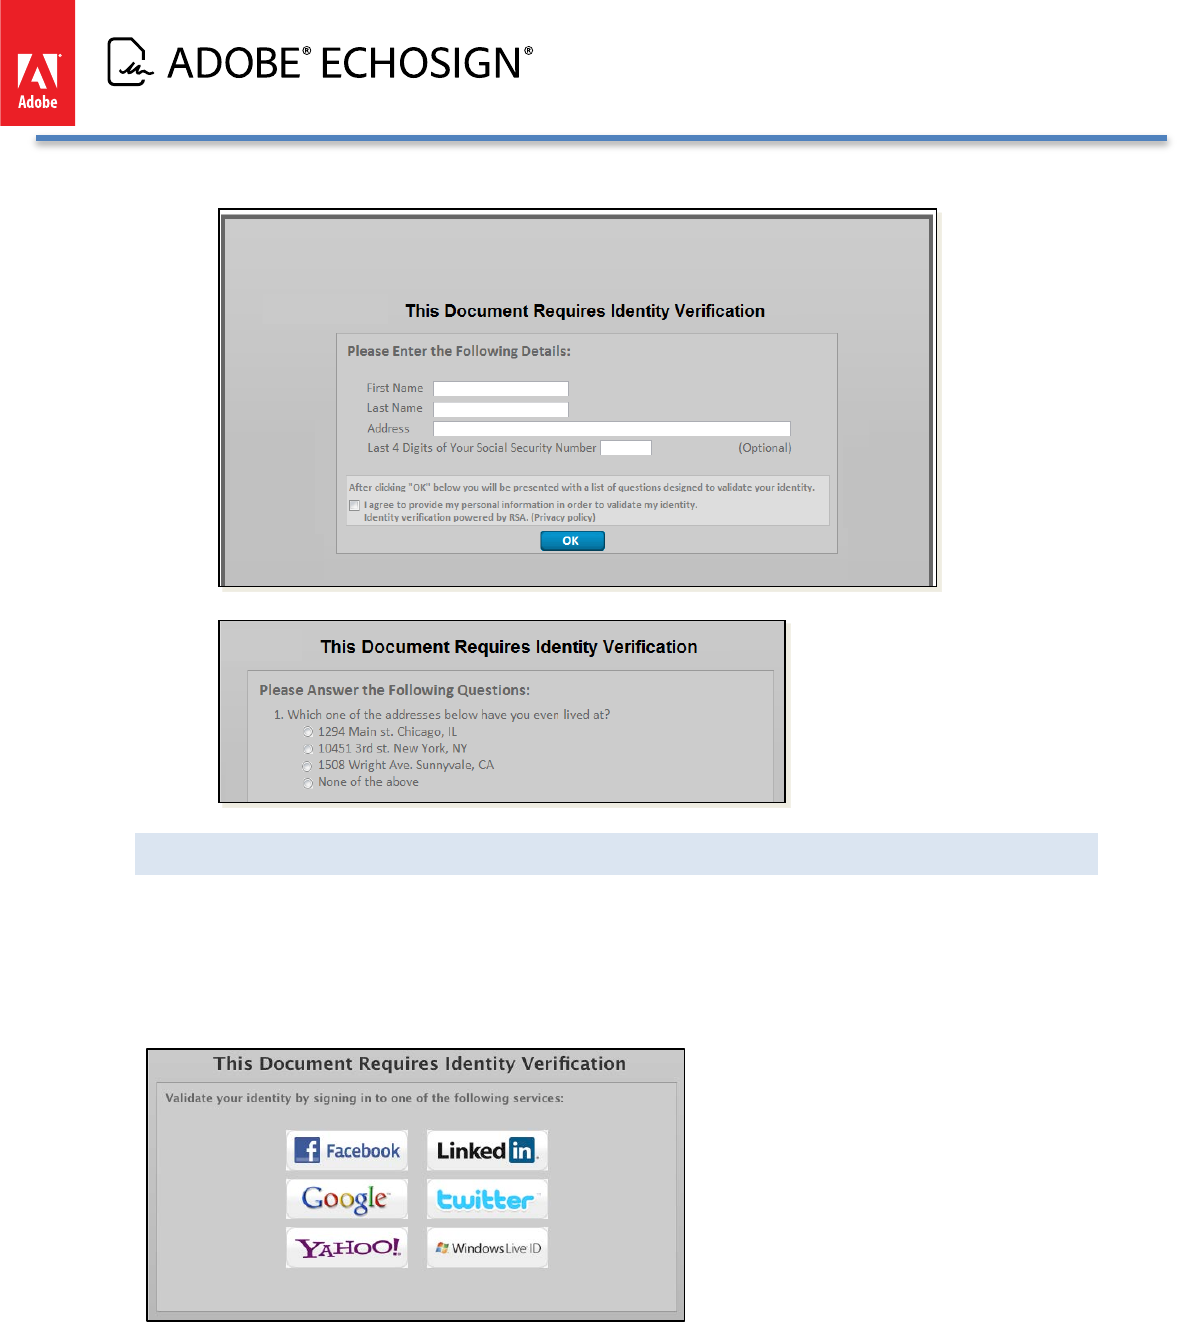
Adobe EchoSign for Salesforce v13 Installation and Customization Guide
• KBA usage is limited per account, per month. Contact Sales for more information.
WEB IDENTITY VERIFICATION
• Web identity verification requires signers and approvers to prove their identity by authenticating through
a 3rd party Web service: Google, LinkedIn, Facebook, Microsoft Live, Yahoo!, Twitter
• When verified, the name associated with the signature is taken from the user’s authenticated name and
cannot be changed at the time of signing. The audit trail captures identity verification details.
Copyright ©2013 Adobe Systems Incorporated. All rights reserved. 52
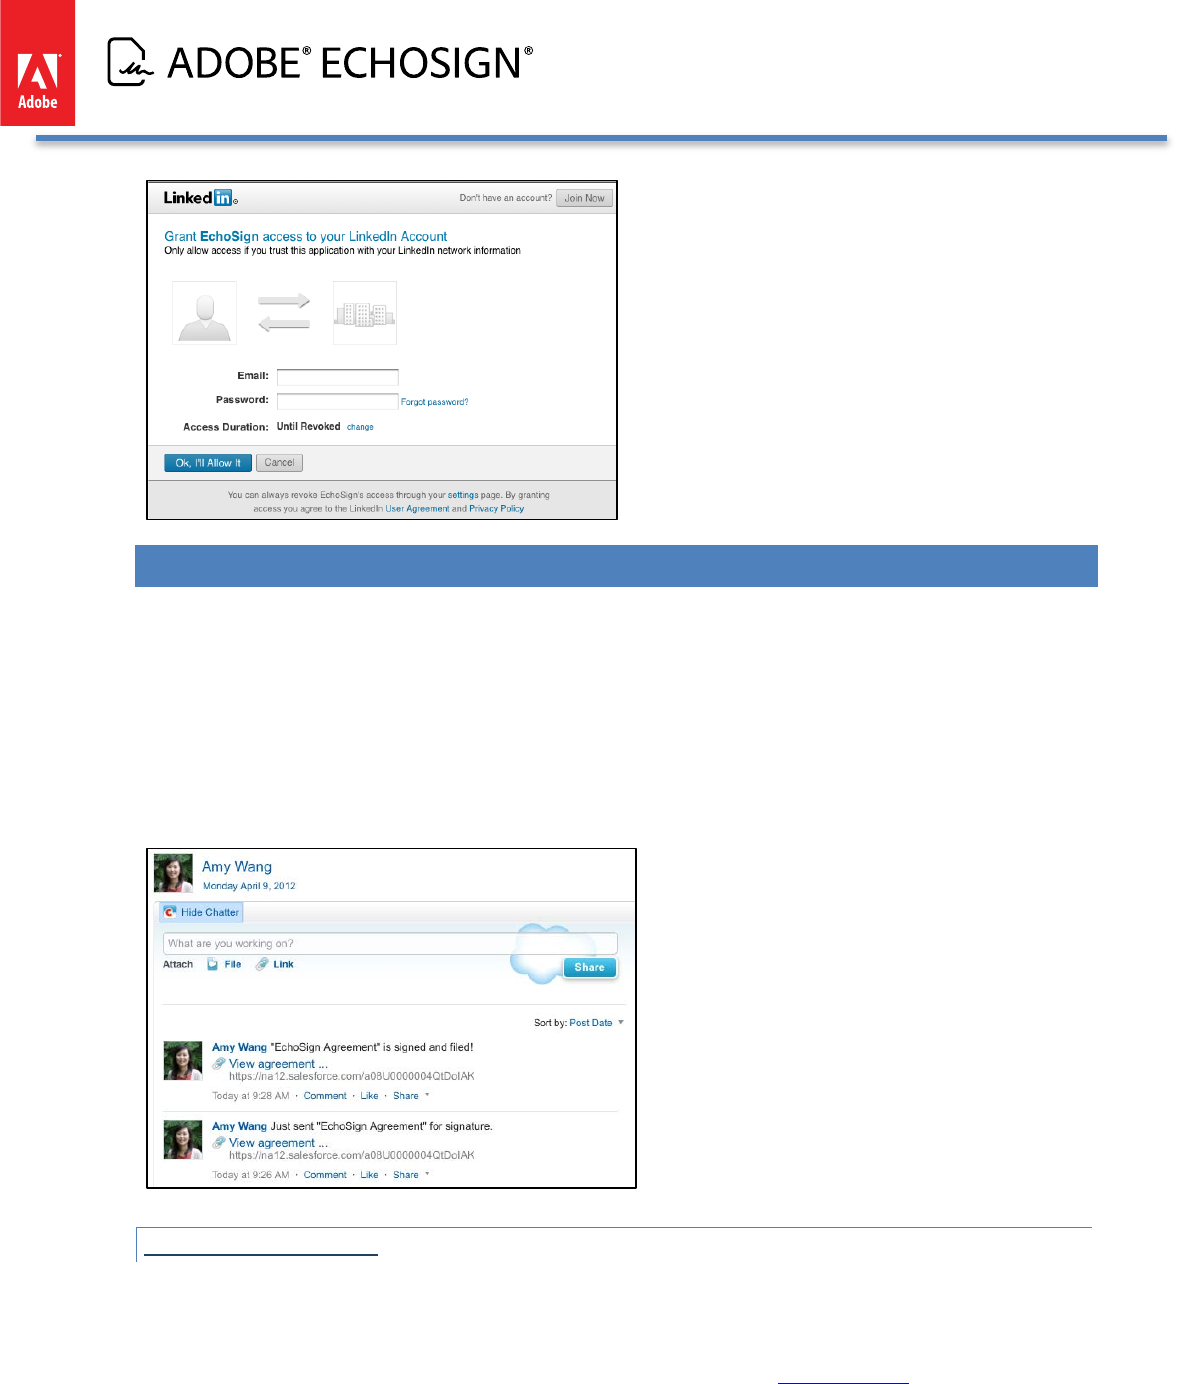
Adobe EchoSign for Salesforce v13 Installation and Customization Guide
ECHOSIGN FOR CHATTER FEATURES
Adobe EchoSign is Chatter Enabled! Get real-time Chatter updates when:
• agreements are sent, viewed, signed, declined, cancelled, not delivered
• agreements expire or reminders sent
• agreement you need to sign
Follow Chatter updates on Agreement, Account, Contract, and Opportunity. Collaborate across your organization
to close more deals.
SETUP INSTRUCTIONS
1) After installation the EchoSign for Salesforce app, you can configure which Chatter updates
you want your users to see. Go to Setup / Develop / Custom Settings / Chatter Settings.
You only should define one set of Chatter settings for your Org and you can provide a
Name to the settings. Click here to learn more about how to set up Chatter Settings.
Copyright ©2013 Adobe Systems Incorporated. All rights reserved. 53
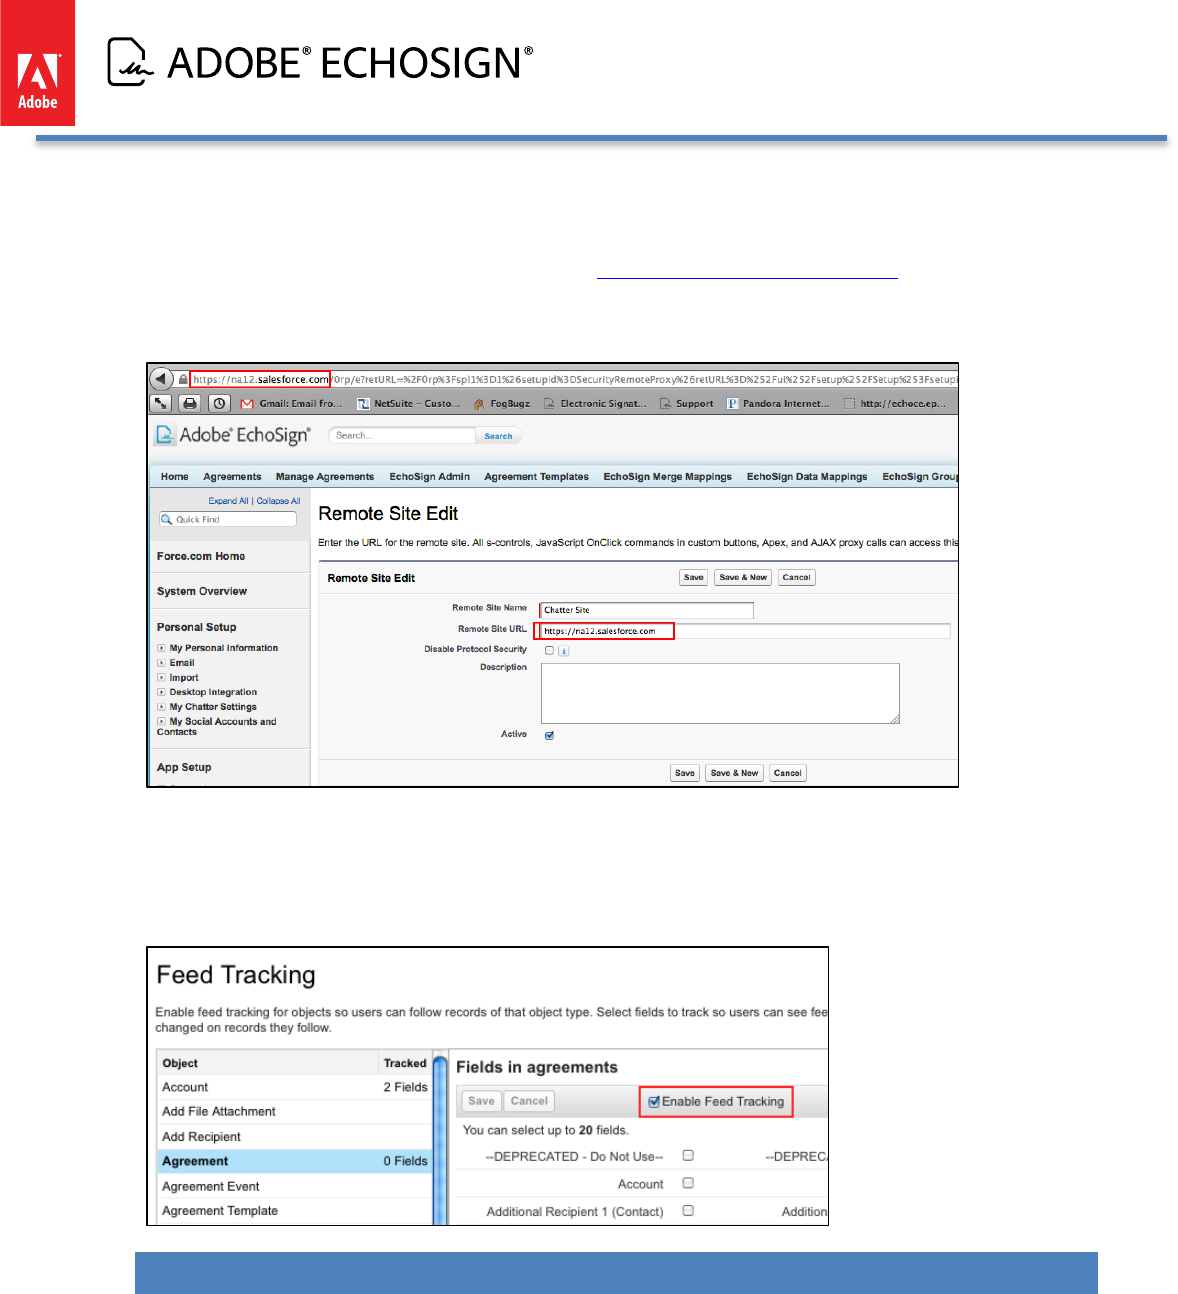
Adobe EchoSign for Salesforce v13 Installation and Customization Guide
2) Additionally, to enable Salesforce so that signers in your Org can get personal Chatter
messages when they have a document to sign, you need to go to Setup / Security Controls
/ Remote Site Settings to add a New Remote Site.
3) Copy the first part of your web page URL (e.g. https://abchostname.salesforce.com) with
the Salesforce Org domain and enter it to the Remote Site URL field. This URL may vary
across different Orgs so make sure to enter the one specific to your Org.
4) Click the ‘Save’ button.
5) Make sure also that Chatter feeds are enabled for the Agreement record. Go to Setup >
Customize > Chatter > Feed Tracking > Agreement
6) Check the box ‘Enable Feed Tracking’
ECHOSIGN STEP BY STEP GUIDED WALK-THRUS - -- GET THE BROWSER ADD-IN
Install the EchoSign Walk-Thrus browser add-in and get step-by-step guidance on how to use key features in
Adobe EchoSign for Salesforce. This is helpful for administrators who are configuring EchoSign document
workflows and setting up merge mappings, data mappings, agreement templates, and more. This browser add-in
is powered by Walkme.
Copyright ©2013 Adobe Systems Incorporated. All rights reserved. 54
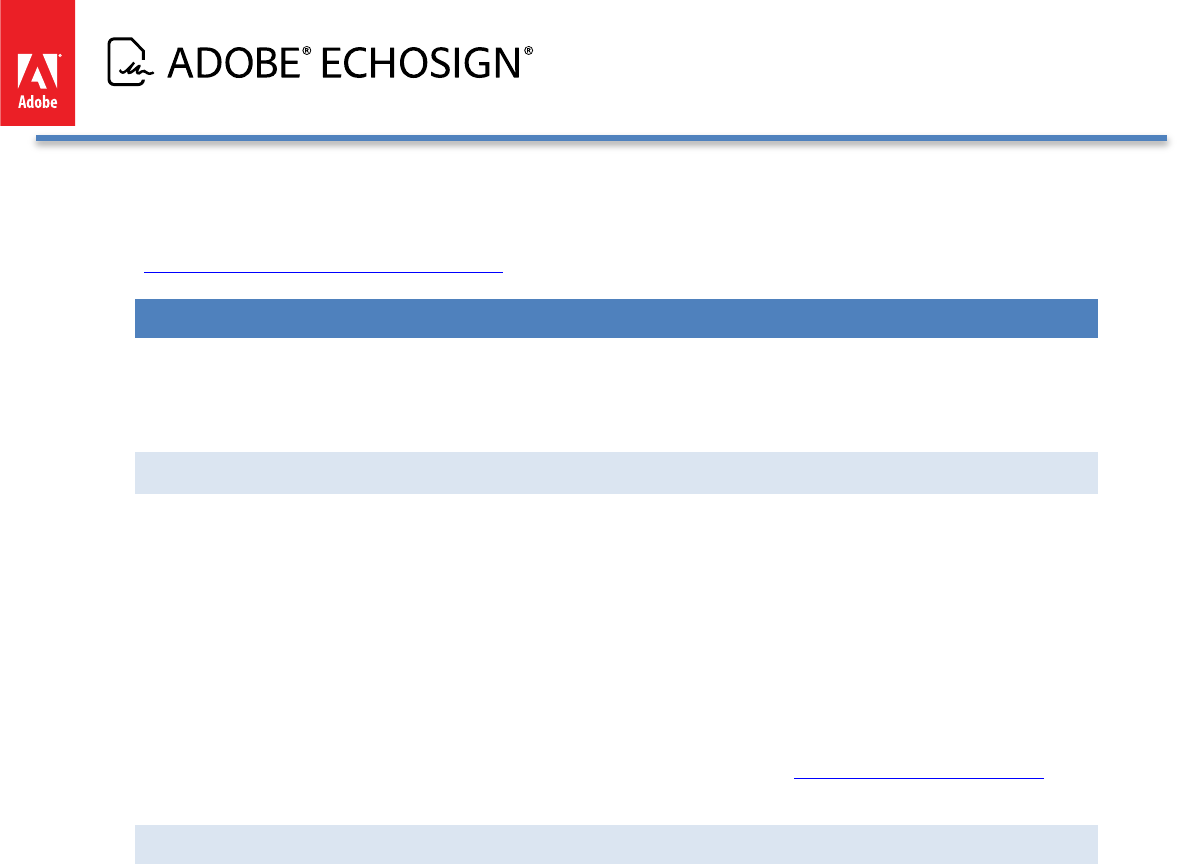
Adobe EchoSign for Salesforce v13 Installation and Customization Guide
EchoSign Walk-Thrus is free for EchoSign customers and can be downloaded and installed from your Chrome,
Firefox, Internet Explorer, or Safari browser by visiting this site:
http://www.walkme.com/download-adobe
AUTOMATION AND BACKGROUND ACTIONS
Adobe EchoSign for Salesforce has the ability to turn on background actions for agreements to automate
workflows. This includes: sending agreements, sending reminders, updating agreement status, deleting
agreements or canceling agreements.
BACKGROUND ACTIONS
• Through automatic workflows or triggers, Salesforce can automatically send a document for signature
without additional user intervention. You can also set up trigger or workflows to send reminders and to
delete, cancel, or update agreements automatically. To do so, you may need to allow users or workflows
to send on behalf of another user.
• Background actions are enabled via an Agreement picklist field called ‘Background Actions’. When the
field switches from one value to another, the action is triggered. Make sure to trigger actions that are
only allowed for the status of the Agreement. (E.g. you cannot send a reminder for an agreement that is
already in the cancelled status.) Make sure the EchoSign API key for your account is set in Salesforce via
the EchoSign Admin tab.
• Also, you can enable the ‘Send to EchoSign’ button to automatically send agreements using a predefined
Agreement Template without requiring user to view the agreement page first. This is achieved by
checking the box ‘Auto Send’ on the Agreement Template. Go to the Agreement Templates section of
this customization guide for more information.
INSTRUCTIONS TO ENABLE ‘SEND ON BEHALF OF’ FUNCTIONALITY
You may want to enable the ‘Send on Behalf of’ functionality if there are cases when someone in your
Salesforce org is required to send agreements on behalf of another person. Follow the steps below to ensure
that this is set up properly.
1. The ability to send on behalf of another user works only on EchoSign for Salesforce v11.7
or later.
2. This feature works for any agreement sending including background sending, which is
triggered through an update of the Agreement field 'Background Actions' or through the
‘Auto Send’ option in Agreement Templates. You can also set a lookup to a user in an
Agreement Template to ‘Send on Behalf of’ so that it is automatically populated when the
agreement is generated.
3. The EchoSign API key for the EchoSign account needs to be set in Salesforce on the
EchoSign Admin page. The user you are sending on behalf of must be a user under the
same account as the API key that was associated with your Salesforce instance.
4. In EchoSign Settings, make sure the ‘Allow Sending on Behalf of Others’ of checkbox is
checked. To set this up, go to Setup / Develop / Custom Settings / EchoSign Settings /
‘Edit’.
5. In the User record layout, add the field ‘EchoSign - -- Allow Sending as Other Users’ by
dragging it to the layout. Go to Setup / Customize / Users / Page Layouts / ‘Edit’.
6. For the specific user that you want to send on behalf of, you need to check the box on his
or her User record called ‘EchoSign - -- Allow Sending as Other Users’
7. In the Agreement page layout, add the field call ‘Send On Behalf Of’ by going to Setup /
Create / Objects / Agreement / Field Sets (BETA) / ‘Edit’. Drag the field into the Field Set.
8. When setting up the agreement to send, the field ‘Send on Behalf of’ needs to be
Copyright ©2013 Adobe Systems Incorporated. All rights reserved. 55
Adobe EchoSign for Salesforce v13 Installation and Customization Guide
populated with the user that has allowed other users to send on their behalf.
ONLOADACTIONS (NEW!)
Salesforce can automatically trigger actions via the onLoadAction URL parameter supported by EchoSign for the
Agreement button actions: Send, Remind, Delete, Cancel, Update, and View. The URL parameter will respect the
Toolbar Settings set by the administrator so that only those that are enabled will be available.
Example of URLs with onLoadAction:
• Send: Make sure you have an agreement with status Draft in your account.
o https://echosign-
dev1.ap1.visual.force.com/apex/EchoSignAgreementAdvanced?id=[agreementID]
&sfdc.override=1&onLoadAction=send
• Remind: Make sure you have an agreement with status Out for Signature in your account.
o https://echosign-
dev1.ap1.visual.force.com/apex/EchoSignAgreementAdvanced?id=[agreementID]
&sfdc.override=1&onLoadAction=remind
• Delete: Make sure you have an agreement with status Out for Signature in your account.
o https://echosign-
dev1.ap1.visual.force.com/apex/EchoSignAgreementAdvanced?id=[agreementID]
&sfdc.override=1&onLoadAction=delete
• Cancel: Make sure you have an agreement with status Out for Signature in your account.
o https://echosign-
dev1.ap1.visual.force.com/apex/EchoSignAgreementAdvanced?id=[agreementID]
&sfdc.override=1&onLoadAction=cancel
• Update: Make sure you have an agreement with status Out for Signature in your account.
o https://echosign-
dev1.ap1.visual.force.com/apex/EchoSignAgreementAdvanced?id=[agreementID]
&sfdc.override=1&onLoadAction=update
• View: Make sure you have an agreement with status Draft, Out for Signature, Signed, or
Cancelled in your account.
o https://echosign-
dev1.ap1.visual.force.com/apex/EchoSignAgreementAdvanced?id=[agreementID]
&sfdc.override=1&onLoadAction=view
REQUIRE USERS TO SIGN-ON TO SALESFORCE TO ACCESS ECHOSIGN ACCOUNT
Through SAML (Security Assertion Markup Language) settings, EchoSign can be integrated with Salesforce.com so
that your users are required to log in to Salesforce.com to gain access to their EchoSign accounts. This provides
benefits in security and access control. For example if a user is disabled from Salesforce, they will not have access
to their EchoSign account.
To do so, Salesforce will need to be configured as a SAML provider and EchoSign will need to be configured to
use SAML so that only valid Salesforce.com users can log in to an EchoSign account. The simple setup
instructions can be found in the EchoSign guide for setting up SAML.
GRANTING ACCESS TO ADDITIONAL PROFILES
During installation, you may have only granted Administrators access to EchoSign for Salesforce. If you need to
Copyright ©2013 Adobe Systems Incorporated. All rights reserved. 56
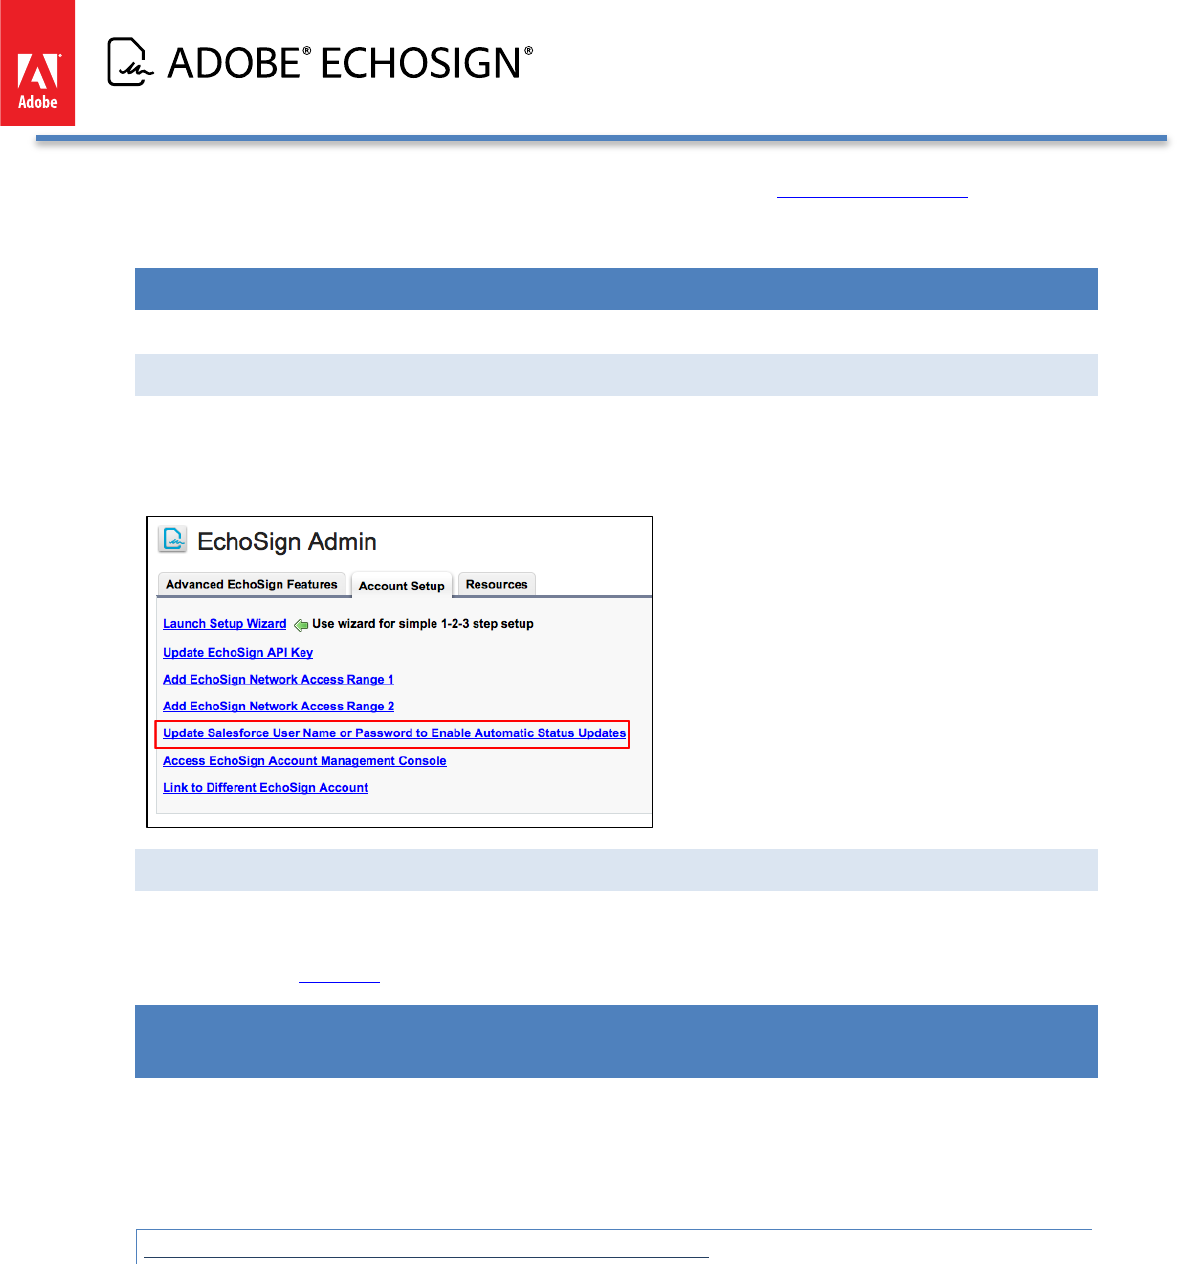
Adobe EchoSign for Salesforce v13 Installation and Customization Guide
extend access to additional user profiles, please refer the documentation for Granting Profile Access for EchoSign
for Salesforce.
UPDATING EMAIL ADDRESSES OR PASSWORDS
ADMINISTRATOR SALESFORCE ACCOUNT PASSWORD CHANGES
If the Salesforce password or username has changed for the account linked to EchoSign for your Salesforce Org,
remember to update it so that status updates continue to work properly for agreements in your Org. Go to the
EchoSign Admin page and click on the Account Setup tab. Then select the link: ‘Update Salesforce User Name or
Password to Enable Automatic Status Updates’.
USER EMAIL ADDRESS CHANGES
If any user in the Org has an email change in Salesforce, make sure to also change the user’s email address in
EchoSign. The only way to do that is for the admin or the user to log into EchoSign.com to update the password.
You can reference this guide for instructions on how to update your email address.
ECHOSIGN FOR SALESFORCE PROFESSIONAL EDITION - ADDITIONAL INSTALLATION
STEPS
If you are using Salesforce Professional Edition, please make sure to follow the instructions in the following
sections after completing the standard installation steps.
Note: Sending files over 2.8MB is not be supported in the Professional edition.
ADDING FIELDS TO THE AGREEMENTS PAGE LAYOUT
• Go to Setup / Create / Objects
Copyright ©2013 Adobe Systems Incorporated. All rights reserved. 57
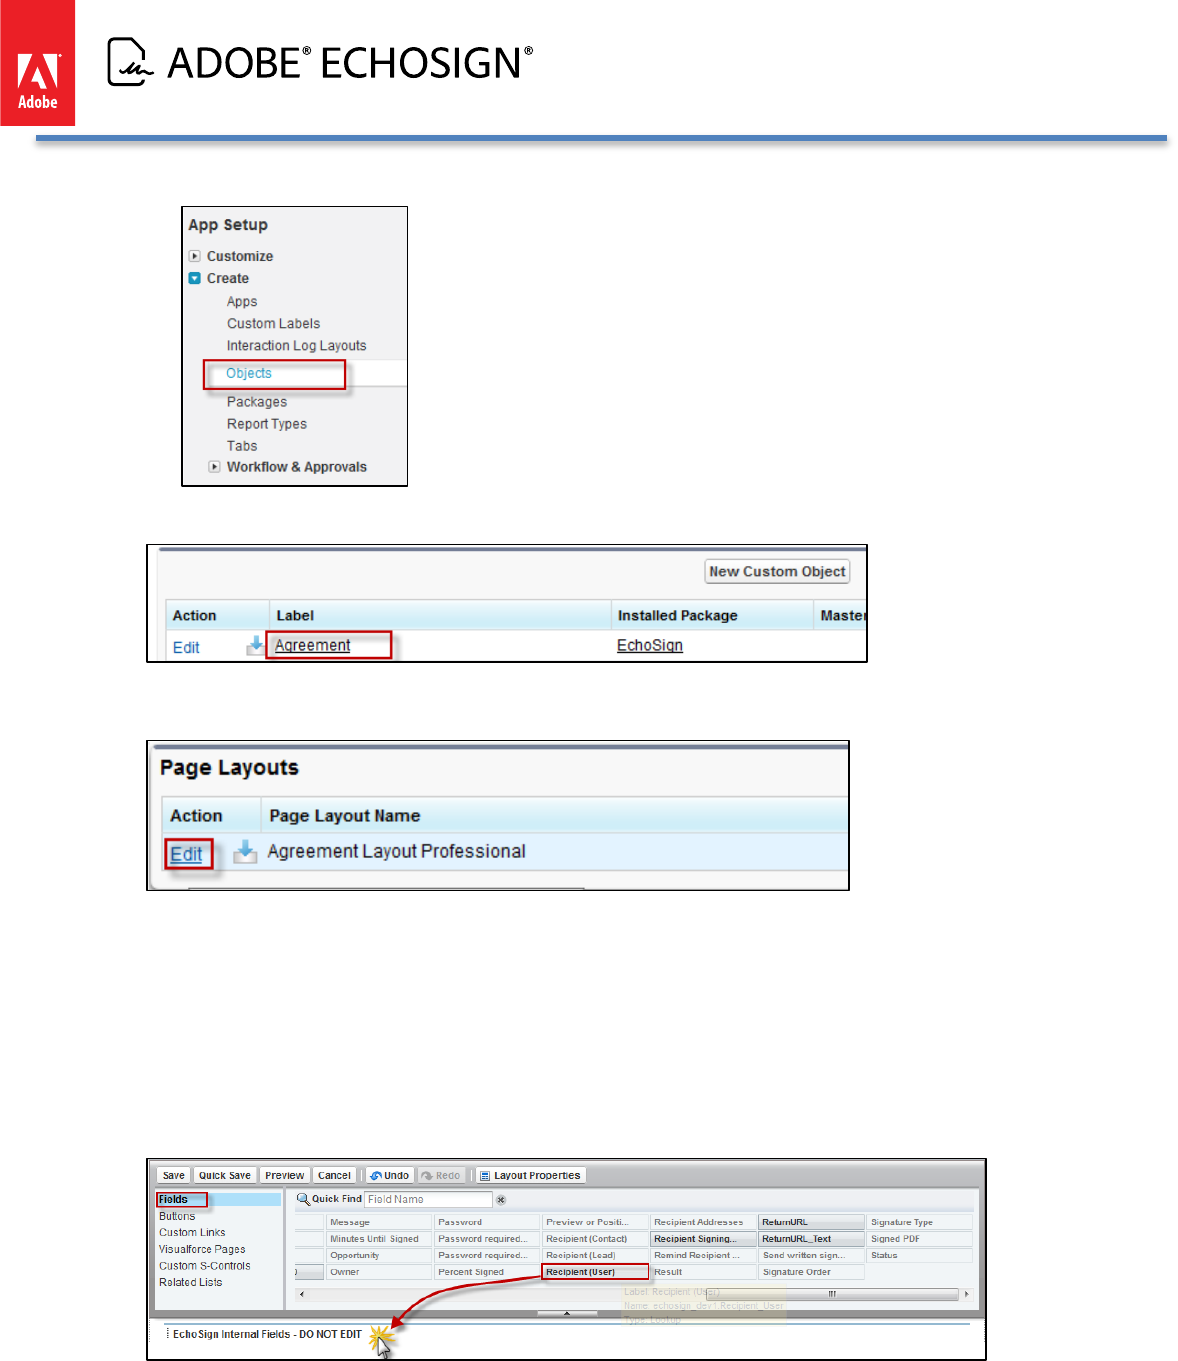
Adobe EchoSign for Salesforce v13 Installation and Customization Guide
• Click on ‘Agreement’
• In the Page Layouts section, click ‘Edit’ next to the Agreement Layout Professional
• Drag and drop the following fields into the page layout
o Recipient (User)
o Additional Recipient 1 (User)
o Additional Recipient 2 (User)
o Additional Recipient 3 (User)
o Enable Automatic Reminders
o Recipient Addresses
o Merge
• Click ‘Save’
Copyright ©2013 Adobe Systems Incorporated. All rights reserved. 58
Adobe EchoSign for Salesforce v13 Installation and Customization Guide
ADDING FIELDS TO THE ECHOSIGN RECIPIENT PAGE LAYOUT
• Go to Setup / Create / Objects
• Click on ‘EchoSign Recipient
• In the Page Layouts section, click ‘Edit’ next to the EchoSign Recipient Layout Professional
• Drag and drop the following fields into the page layout
o Agreement
o Contact
o Email Address
o Lead
o Order Number
o Person Account
o Recipient Type
o useEmailAddress
o User
o Merge
• Click ‘Save’
ECHOSIGN INTEGRATION WITH OTHER SALESFORCE APPS
EchoSign is integrated with several Salesforce apps that allow you to extend your Salesforce workflows even
further. Learn more about each of these apps and get them on the AppExchange.
ADVANCED DOCUMENT GENERATION
• Conga Composer
• Drawloop
SUBSCRIPTIONS & BILLING
• Zuora
CONTRACT, PROPOSAL, AND QUOTE MANAGEMENT
• Apttus
• BigMachines
• Selectica
APPENDIX
SELECT ECHOSIGN AGREEMENTS PAGE STYLE (ADVANCED OR BASIC)
EchoSign for Salesforce has two page styles to create, edit, and view agreements. The default is the Advanced
layout and is the recommended layout. Below is some information about the differences between the layout as
well as instructions for how to change to the Basic page layout.
Copyright ©2013 Adobe Systems Incorporated. All rights reserved. 59
Adobe EchoSign for Salesforce v13 Installation and Customization Guide
THE ‘ECHOSIGN AGREEMENT ADVANCED’ PAGE STYLE (DEFAULT)
This page which is set as the default style allows you to create an EchoSign Agreement on a single page - -- specify
recipients, names the agreement, select options, attach files and send. This page also gives you more flexibility in
specifying the number and type of recipients for each agreement.
THE ‘ECHOSIGN AGREEMENT BASIC’ PAGE STYLE
This page uses the standard Salesforce.com page layout to view and edit the agreement. Sending a new
agreement requires a few more clicks -- creating an agreement, saving it and then attaching files on a separate
screen. This page allows you to customize the page layout (adding and removing your own custom fields and
custom options) but does not provide the same flexibility in selecting the number and type of recipients as the
Advanced Agreement page does.
To use the EchoSign Agreement Basic page instead of the default Advanced page, follow the instructions in the
next sections:
1. Setting the ‘EchoSign Agreement Basic’ page layout
2. Setting up the Agreement buttons to work for your page layout
SETTING THE ‘ECHOSIGN AGREEMENT BASIC’ PAGE STYLE
If you choose to use the ‘EchoSign Agreement Basic’ page, follow the instructions below to ensure that your
Salesforce.com page layouts are properly configured
Note: This section only applies to customers with Salesforce.com Enterprise and Unlimited editions.
• Go to Setup / Create / Objects
• Click on ‘Agreement’
Copyright ©2013 Adobe Systems Incorporated. All rights reserved. 60
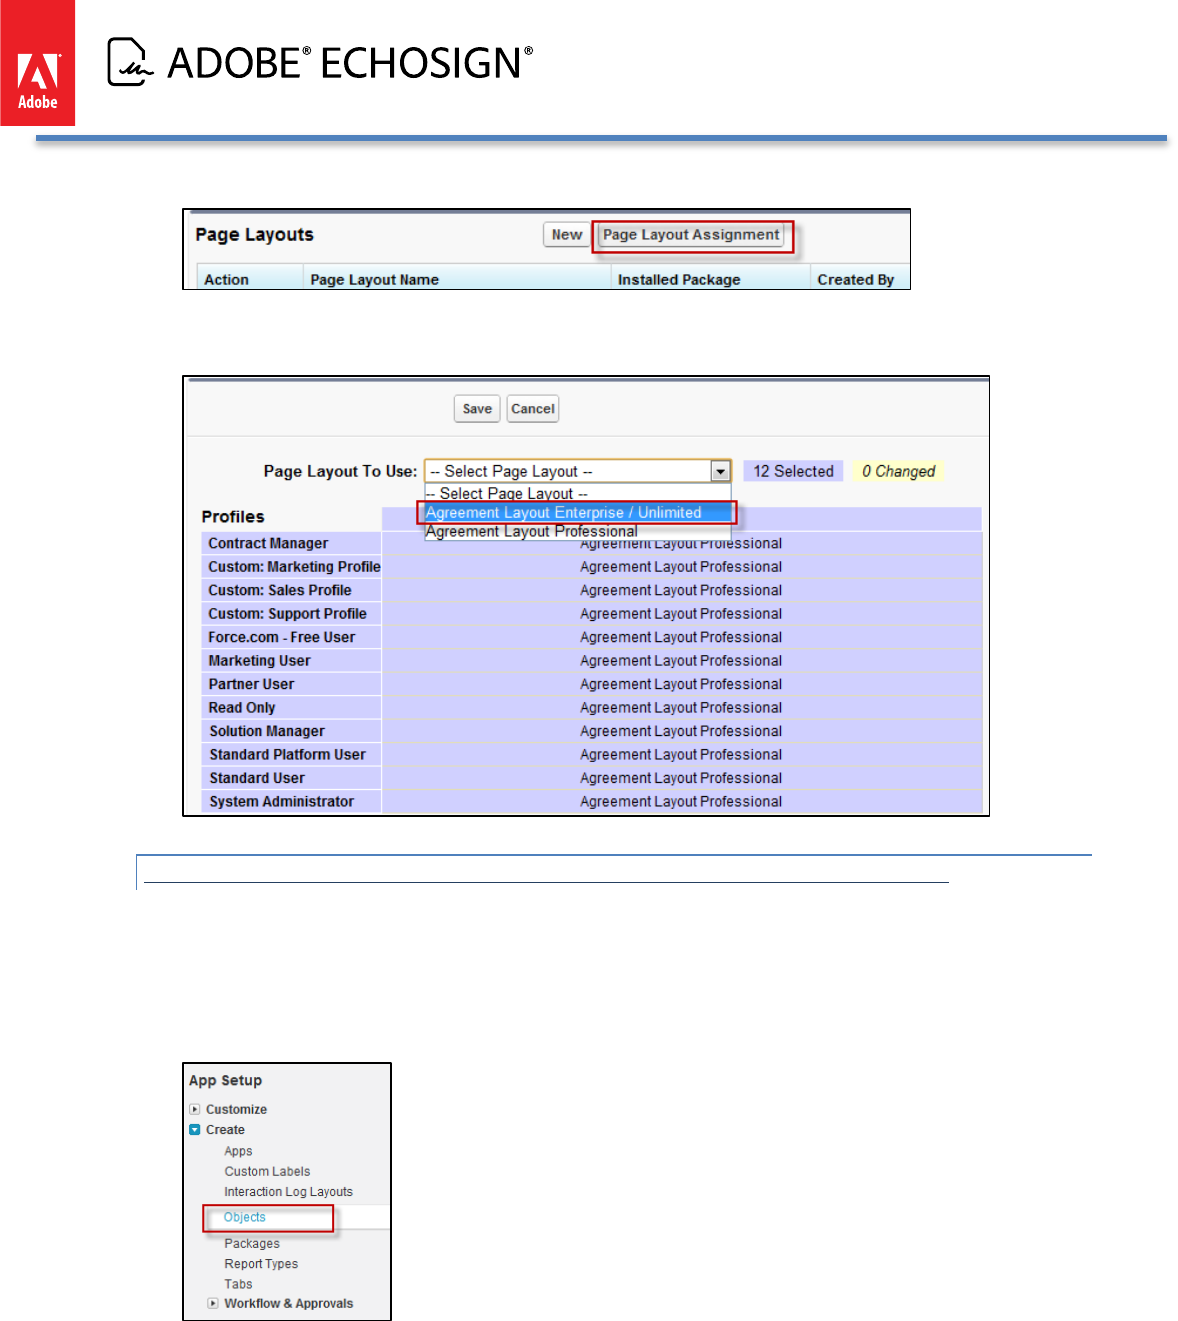
Adobe EchoSign for Salesforce v13 Installation and Customization Guide
• Click ‘Page Layouts’ and then ‘Page Layout Assignment’
• Click ‘Edit Assignment’, select all the profiles, select ‘Agreement Layout Enterprise / Unlimited’ from the drop
down list and click ‘Save'
SETTING UP THE AGREEMENTS BUTTONS TO WORK FOR YOUR PAGE STYLE
For the layout to take in effect, you also need to update the buttons on the layout.
Follow the instructions below to ensure your Salesforce.com pages are set up properly for the agreement related
buttons:
• Go to Setup / Create / Objects
Copyright ©2013 Adobe Systems Incorporated. All rights reserved. 61

Adobe EchoSign for Salesforce v13 Installation and Customization Guide
• Click on ‘Agreement’
• Click ‘Standard Buttons and Links’
SETTING UP THE AGREEMENT BUTTONS FOR ‘ECHOSIGN AGREEMENT BASIC’ PAGE STYLE
• Click ‘Edit’ next to the Button label ‘New’ and set it to ‘Standard Salesforce.com Page’
• Click ‘Edit’ next to the Button label ‘Edit’ and set it to ‘Standard Salesforce.com Page’
Copyright ©2013 Adobe Systems Incorporated. All rights reserved. 62
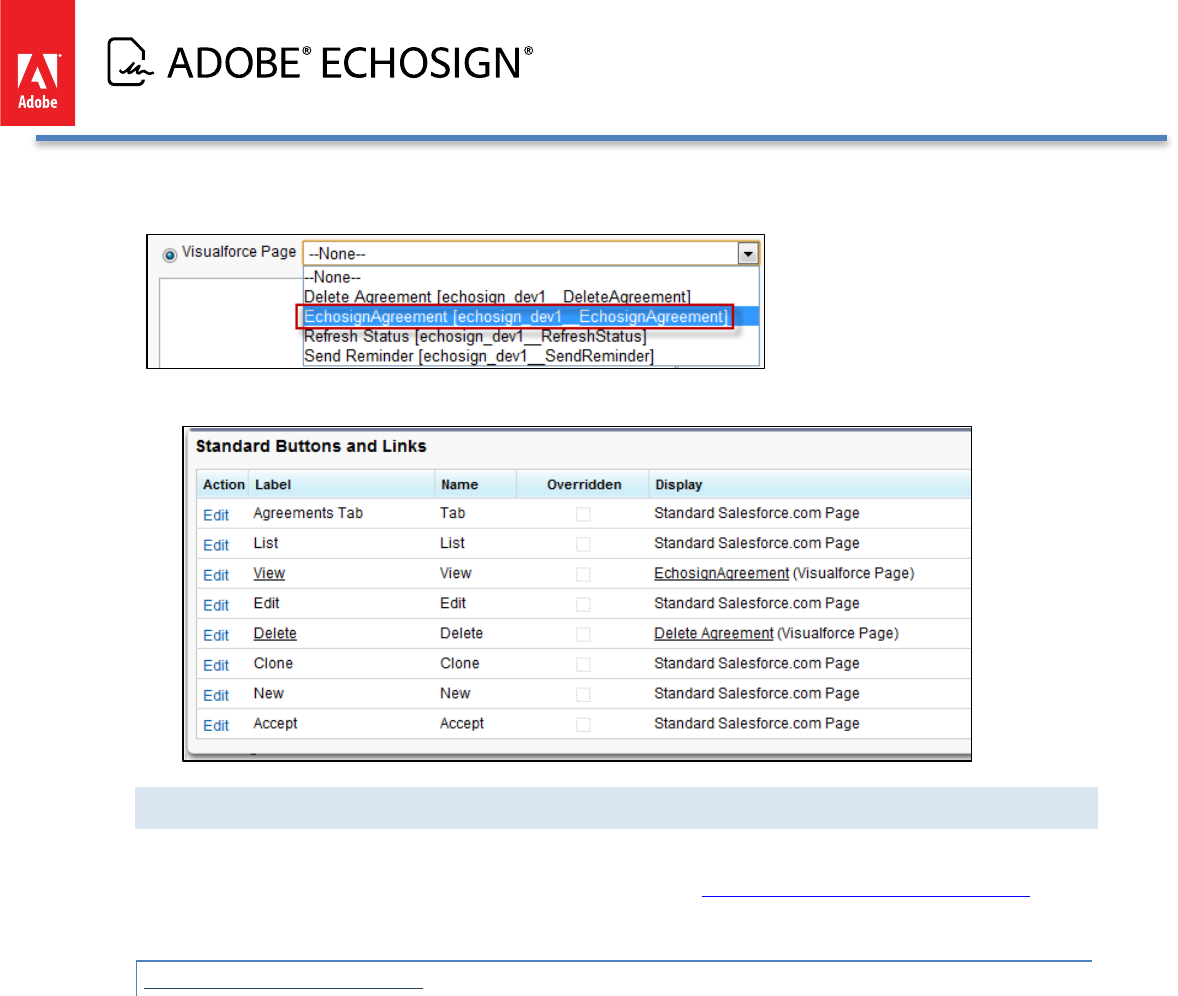
Adobe EchoSign for Salesforce v13 Installation and Customization Guide
Click ‘Edit’ next to the Button label ‘View’, select the ‘Visualforce Page’ and select ‘EchoSign Agreement’ from the
list.
• At the end of the process, you should have the following setup:
CUSTOMIZING THE ‘ECHOSIGN AGREEMENT BASIC’ PAGE LAYOUT
This section addresses customizing the ‘EchoSign Agreement Basic’ page. These customizations are not available
when using the default ‘EchoSign Agreement Advanced’ page. See Select EchoSign Agreements Page Style for
more.
CUSTOM ADDRESS FIELDS
Add fields like ‘Customer’, ‘Sales Operations’, ‘Accounting’, etc. to the EchoSign Agreement Object and use them
to specify signers instead of the standard ‘Recipient’ and ‘Additional Recipients’ fields.
Copyright ©2013 Adobe Systems Incorporated. All rights reserved. 63
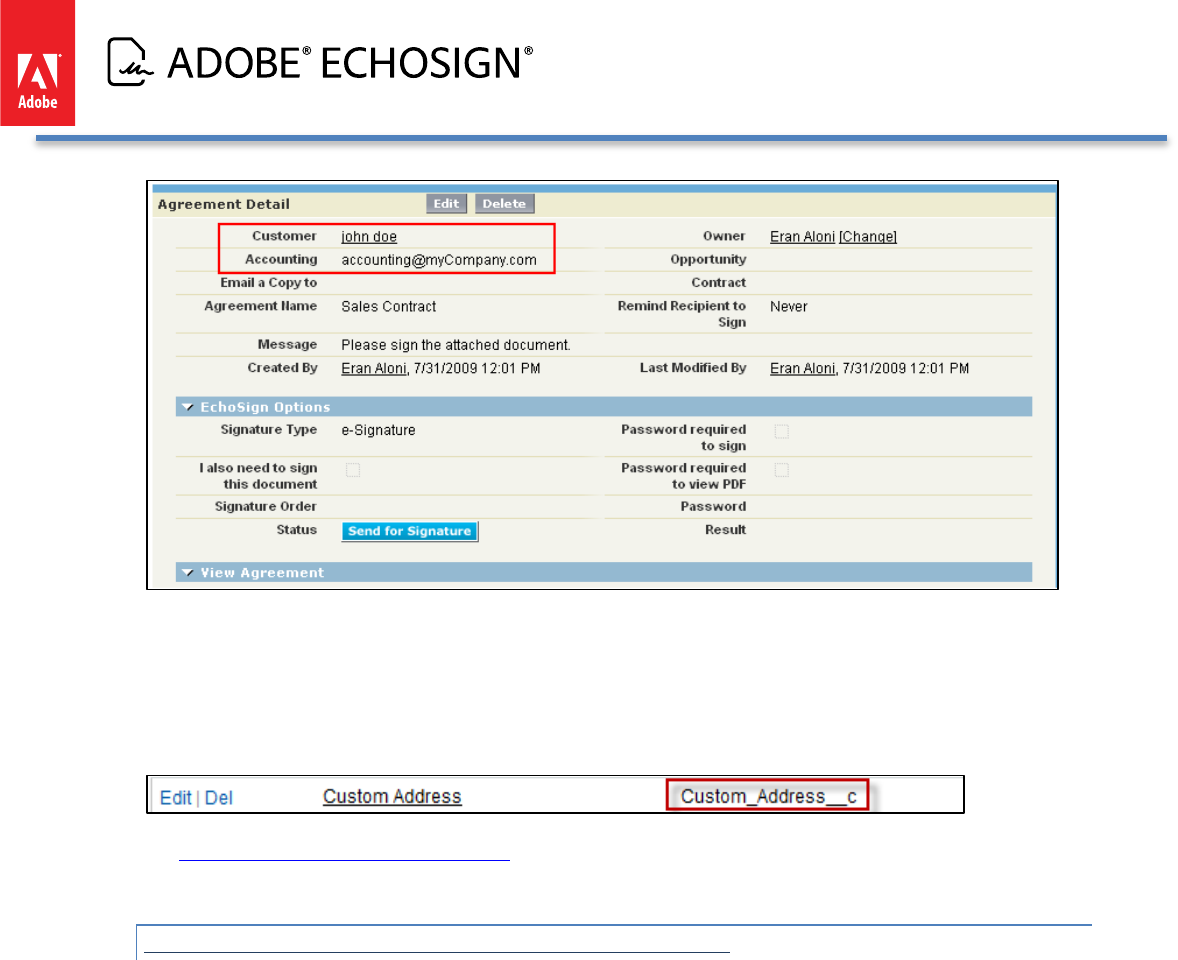
Adobe EchoSign for Salesforce v13 Installation and Customization Guide
Once you add the required custom fields to your EchoSign Agreement page layout, update the ‘Override
Recipient Field List’ Setting with the list of those fields’ API names.
To get a field’s API name, go to Setup / Create / Objects and click on the ‘Agreement’ object. Then find the field
you’d like to use in the ‘Custom Fields and Relationship’ list. The Field’s API name can be found in the ‘API Name’
column on the list.
See EchoSign for Salesforce Custom Settings for instructions on how to update the ‘Override Recipient Field List’
settings.
SEND USING THE ‘ECHOSIGN AGREEMENT BASIC’ PAGE
Create a new agreement by clicking ‘New’ on the Agreements tab or on the Agreements related list in one of the
relevant related objects (Contact, Opportunity, Lead, etc.)
1. Specify the recipients
2. Name the agreement, type a message
3. Select signature type, language and other relevant sending options
4. Click the ‘Save’ button
Copyright ©2013 Adobe Systems Incorporated. All rights reserved. 64
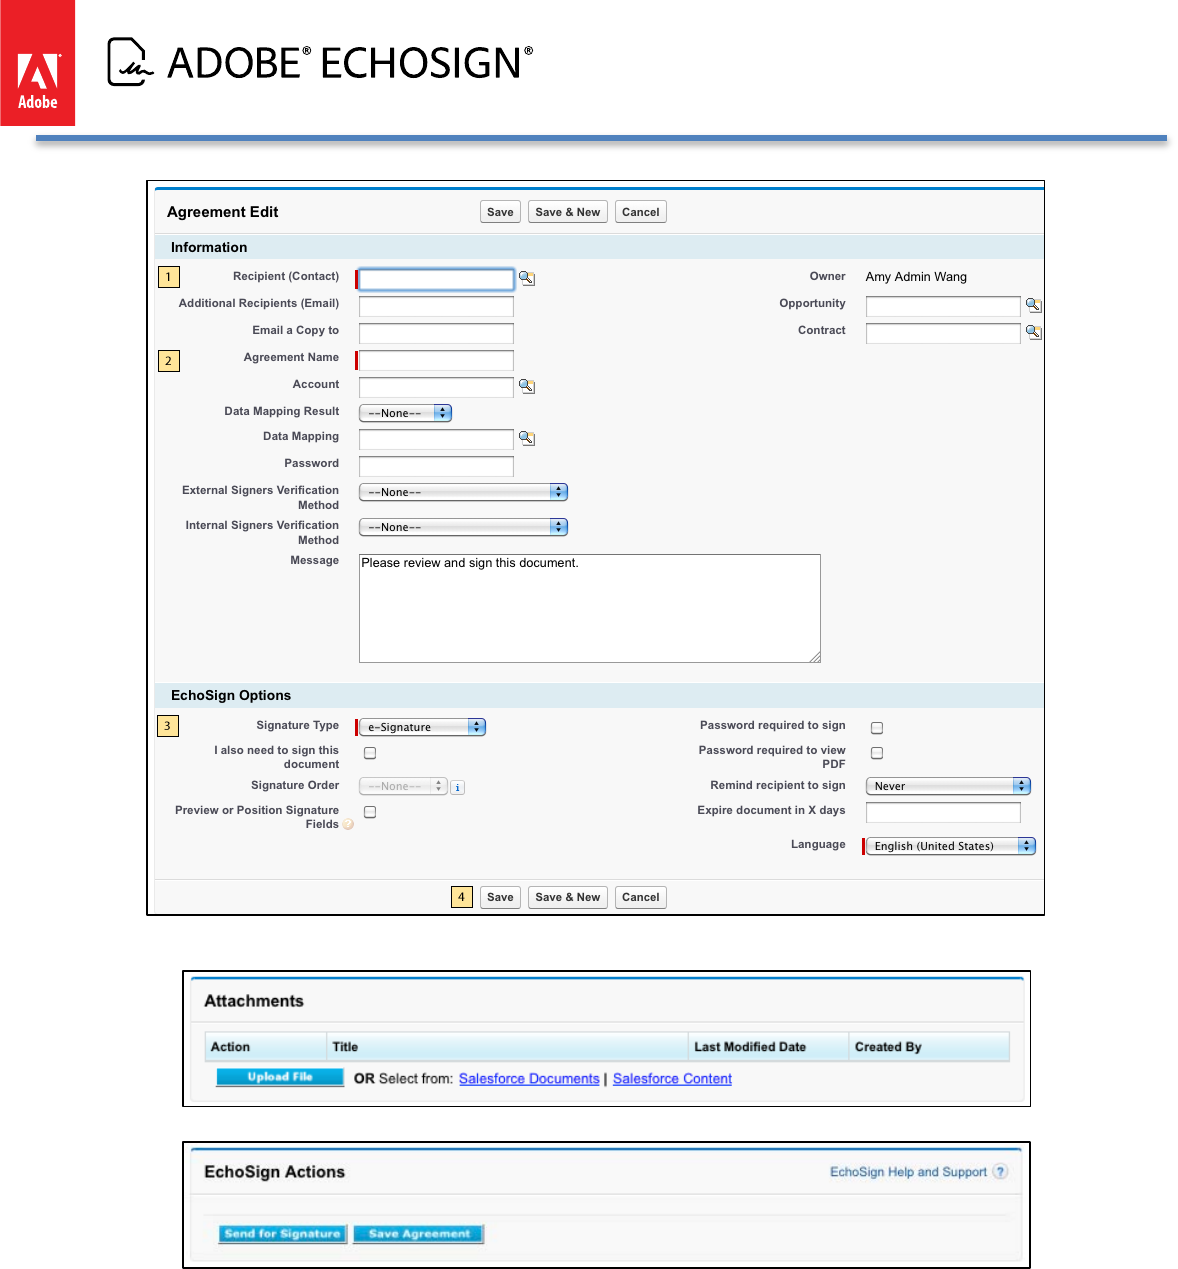
Adobe EchoSign for Salesforce v13 Installation and Customization Guide
5. On the next screen, attach files from your computer or from the Salesforce Library or Salesforce Content.
6. Click the ‘Send for Signature’ button
Copyright ©2013 Adobe Systems Incorporated. All rights reserved. 65
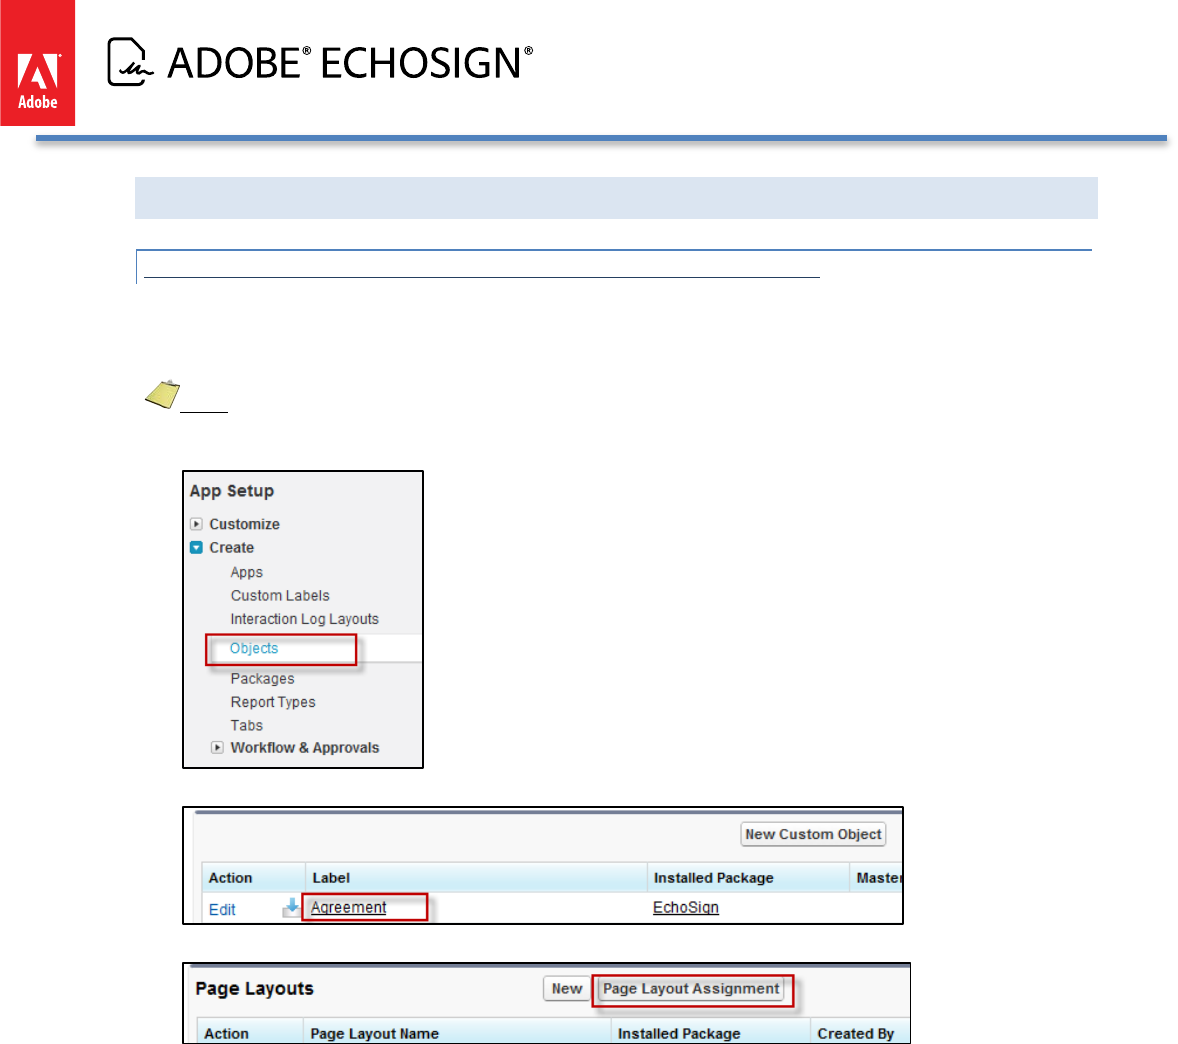
Adobe EchoSign for Salesforce v13 Installation and Customization Guide
SWITCHING BACK TO THE ‘ECHOSIGN AGREEMENT ADVANCED’ PAGE LAYOUT
SETTING THE ‘ECHOSIGN AGREEMENT ADVANCED’ PAGE STYLE
If you choose to switch to the default ‘EchoSign Agreement Advanced’ page, follow the instructions below to
ensure that your Salesforce.com page layouts are properly configured
Note: This section only applies to customers with Salesforce.com Enterprise and Unlimited editions.
• Go to Setup / Create / Objects
• Click on ‘Agreement’
• Click ‘Page Layouts’ and then ‘Page Layout Assignment’
• Click ‘Edit Assignment’, select all the profiles, select ‘Agreement Layout Professional’ from the drop down list
and click ‘Save'
Copyright ©2013 Adobe Systems Incorporated. All rights reserved. 66

Adobe EchoSign for Salesforce v13 Installation and Customization Guide
SETTING UP THE AGREEMENT BUTTONS FOR THE ‘ECHOSIGN AGREEMENT ADVANCED’
PAGE STYLE
If you are switching back to the Advanced page layout, then follow these instructions for setting up the
Agreement buttons:
For the layout to take in effect, you also need to update the buttons on the layout.
Follow the instructions below to ensure your Salesforce.com pages are set up properly for the agreement related
buttons:
• Go to Setup / Create / Objects
• Click on ‘Agreement’
• Click ‘Standard Buttons and Links’
• Click ‘Edit’ next to the Button label ‘New’ and set it to ‘No Override (use default)’
• Click ‘Edit’ next to the Button label ‘Edit’ and set it to ‘No Override (use default)’
Copyright ©2013 Adobe Systems Incorporated. All rights reserved. 67

Adobe EchoSign for Salesforce v13 Installation and Customization Guide
• Click ‘Edit’ next to the Button label ‘View’ and set it to ‘No Override (use default)’
• At the end of the process, you should have the following setup:
Copyright ©2013 Adobe Systems Incorporated. All rights reserved. 68
