Adobe Flex 3.0 Programming Action Script 3 Prog AS
User Manual: adobe Adobe Flex - 3.0 - Programming ActionScript Free User Guide for Adobe Flex Software, Manual
Open the PDF directly: View PDF ![]() .
.
Page Count: 581 [warning: Documents this large are best viewed by clicking the View PDF Link!]
- Chapter 1: About this manual
- Chapter 2: Introduction to ActionScript 3.0
- Chapter 3: Getting started with ActionScript
- Chapter 4: ActionScript language and syntax
- Chapter 5: Object-oriented programming in ActionScript
- Chapter 6: Working with dates and times
- Chapter 7: Working with strings
- Chapter 8: Working with arrays
- Chapter 9: Handling errors
- Basics of error handling
- Types of errors
- Error handling in ActionScript 3.0
- Working with the debugger versions of Flash Player and AIR
- Handling synchronous errors in an application
- Creating custom error classes
- Responding to error events and status
- Comparing the Error classes
- Example: CustomErrors application
- Chapter 10: Using regular expressions
- Chapter 11: Working with XML
- Chapter 12: Handling events
- Chapter 13: Display programming
- Chapter 14: Using the drawing API
- Chapter 15: Working with geometry
- Chapter 16: Filtering display objects
- Chapter 17: Working with movie clips
- Chapter 18: Working with text
- Chapter 19: Working with bitmaps
- Chapter 20: Working with video
- Basics of video
- Understanding the Flash Video (FLV) format
- Understanding the Video class
- Loading video files
- Controlling video playback
- Streaming video files
- Understanding cue points
- Writing callback methods for onCuePoint and onMetaData
- Using cue points
- Using video metadata
- Capturing camera input
- Advanced topics
- Example: Video Jukebox
- Chapter 21: Working with sound
- Basics of working with sound
- Understanding the sound architecture
- Loading external sound files
- Working with embedded sounds
- Working with streaming sound files
- Playing sounds
- Security considerations when loading and playing sounds
- Controlling sound volume and panning
- Working with sound metadata
- Accessing raw sound data
- Capturing sound input
- Example: Podcast Player
- Chapter 22: Capturing user input
- Chapter 23: Networking and communication
- Chapter 24: Client system environment
- Chapter 25: Printing
- Chapter 26: Using the external API
- Chapter 27: Flash Player security
- Flash Player security overview
- Overview of permission controls
- Security sandboxes
- Restricting networking APIs
- Full-screen mode security
- Loading content
- Cross-scripting
- Accessing loaded media as data
- Loading data
- Loading embedded content from SWF files imported into a security domain
- Working with legacy content
- Setting LocalConnection permissions
- Controlling access to scripts in a host web page
- Shared objects
- Camera, microphone, clipboard, mouse, and keyboard access
- Symbols
- != (inequality) operator 133
- !== (strict inequality) operator 133
- $ metacharacter 191
- $ replacement codes 137
- & (ampersand) 463
- ( ) (parentheses) metacharacters 191
- ( ) (parentheses) operators 61
- ( ) (XML filtering) operators 219
- * (asterisk) metacharacter 191
- * (asterisk) type annotation 47, 49, 54, 55
- * (wildcard) operator, XML 219
- + (addition) operator 134
- + (concatenation) operator, XMLList 217
- + (plus) metacharacter 191
- += (addition assignment) operator 134, 217
- , (comma) operator 45
- . (dot) metacharacter 191
- . (dot) operator 59, 76
- . (dot) operator, XML 211, 217
- .. (descendent accessor) operator, XML 217
- ... (rest) parameter 81
- / (forward slash) 190, 191
- : (colon) operator 49
- < operator 64
- == operator 133
- === operator 133
- > operator 64, 133
- >= operator 133
- ? (question mark) 191
- ?: (conditional) operator 69
- @ (attribute identifier) operator, XML 211, 219
- [ (left bracket) 191
- \ (backslash)
- ] (right bracket) 191
- ^ (caret) 191
- __proto__ 34
- __resolve 34
- | (pipe) 196
- Numerics
- A
- abstract classes 87
- accessor functions, get and set 94
- ActionScript
- about 33
- advantages of 5
- building applications with 21
- compatibility with previous versions 7
- description of 4
- development process 23
- documentation 2
- embedding in Flex MXML files 21
- history of OOP support 108
- new features in 5
- storing in ActionScript files 21
- tools for writing 22
- ways to include in applications 21
- writing with text editors 23
- ActionScript 1.0 109
- ActionScript 2.0, prototype chain 110
- ActionScript Virtual Machine (AVM1) 108
- ActionScript Virtual Machine 2 (AVM2) 108, 112
- activation object 83
- addCallback() method 551
- addEventListener() method 96, 231, 240
- addition (+) operator 134
- addition assignment (+=) operator 134
- additive operators 67
- addListener() method 231
- allowDomain() method
- allowFullScreen attribute 547
- allowInsecureDomain() method 471
- allowNetworking tag 545
- AllowScriptAccess parameter 558
- alpha channel masking 282
- alternation in regular expressions 196
- ampersand (&) 463
- animation 283
- anonymous functions 75, 80
- anti-aliasing text 367
- application/x-www-form- urlencoded 463
- ApplicationDomain class 287, 498, 549
- applications, development decisions 21
- apply() method 158
- arguments object 78, 79, 81
- arguments, passing by reference or value 78
- arguments.callee property 79
- arguments.caller property 81
- arguments.length property 79
- Array class
- arrays
- about 144
- array literals 60, 146
- associative 152
- cloning 156
- common tasks 145
- constructor 146
- creating 136, 146
- deep copy of 156
- delete operator 148
- examples 161
- indexed 145
- inserting elements 147
- iterating through 153
- key and value pairs 152
- length of 148
- maximum size 146
- multidimensional 155
- nested arrays and join() method 151
- object keys 153
- querying 151
- removing elements 147
- shallow copy 156
- sorting 148
- superconstructor 158
- terms 145
- typed arrays not supported 146
- using associative and indexed arrays 156
- as operator 51, 99
- -as3 compiler option 157
- AS3 namespace 114, 157
- ASCII characters 130
- assignment operators 69
- associativity, rules of 64
- asterisk (*) metacharacter 191
- asterisk (*) type annotation 47, 49, 54, 55
- asterisk (wildcard) operator, XML 219
- asynchronous errors 168
- asynchronous operation 241
- attribute identifier (@) operator, XML 211, 219
- audio playback, monitoring 447
- audio security 554
- avHardwareDisable property 538
- AVM1 (ActionScript Virtual Machine) 108
- AVM1Movie class 252
- AVM2 (ActionScript Virtual Machine 2) 108, 112
- B
- background color, making opaque 276
- backslash (\) character
- bar (|) character 196
- base classes 101
- basic concepts
- beginGradientFill() method 299
- big-endian byte order 472
- binary operators 64
- bitmap caching
- Bitmap class 251, 379
- bitmap data, copying 383
- bitmap printing 511
- BitmapData class 379
- BitmapData objects, applying filters 320
- bitmaps
- bitwise logical operators 68
- bitwise shift operators 67
- block-level scope 46
- Boolean class
- Boolean data type 53
- bound methods 83, 95
- brace operators ({ and }) in XML 216
- bracket ([ and ]) characters 191
- bracket ([ and ]) operators 76
- browse() method 556
- bubbles property 234
- bubbling phase 231
- build path 37
- built-in classes 34
- byte order 472
- ByteArray class 156
- bytes loaded 286
- C
- caching filters and bitmaps 321
- call() method (ExternalInterface class) 546, 558
- callback methods
- callee property 79
- caller property 81
- Camera class 411
- cameras
- cancelable property 233
- Capabilities class 497
- Capabilities.avHardwareDisable property 538
- Capabilities.localFileReadDisable property 538
- capture phase 231
- capturing camera input 411
- capturing user-selected text 360
- caret (^) character 191
- cascading style sheets. See CSS
- case replacement in strings 138
- case sensitivity 59
- casting 55, 56, 57
- catch blocks 171
- character classes (in regular expressions) 193
- character codes 452
- character ranges, specifying 194
- character-delimited string, combining arrays into 163
- characters
- charAt() method 133
- charCodeAt() method 133
- checkPolicyFile property 542
- childAllowsParent property 552, 553
- class definitions, multiple 498
- class inheritance 112
- class keyword 86
- class object 34, 111
- classes
- about 85
- about writing code for 25
- abstract not supported 87
- attributes 86
- base 101
- body 87
- built-in 34
- characteristics 12
- creating custom 24
- declaring static and instance properties 87
- default access control 89
- defining namespaces inside 87
- definitions of 86
- dynamic 52, 76, 89
- dynamic attribute 86
- inheriting instance properties 102
- internal attribute 89
- organizing 26
- private attribute 88
- private classes 35
- property attributes 88
- protected attribute 89
- public attribute 88
- public classes 38
- sealed 52
- static properties 106
- subclasses 101
- top-level statements 87
- classpath 37
- clearInterval() function 127
- clearTimeout() function 127
- client system environment
- Clipboard
- clock example 127
- clone() method (BitmapData class) 383
- clone() method (Event class) 235
- close bracket 191
- close parenthesis 191
- code, ways to include in applications 21
- ColdFusion 467
- collision detection at pixel level 382
- colon (:) operator 49
- colors
- ColorTransform class 314
- colorTransform property 314
- comma operator 45
- comments
- communication
- compatibility, Flash Player and FLV files 417
- compiler options 157
- compile-time type checking 49
- complex values 48
- compound literals 60
- computeSpectrum() method (SoundMixer class) 550, 553, 554
- concat() method
- concatenation
- concatenation (+) operator, XMLList 217
- conditional (?:) operator 69
- conditionals 69
- connect() method
- constants 62, 90, 233
- constructors
- content property (Loader class) 550
- content, loading dynamically 285
- contentLoaderInfo property 286, 557
- contentType property 463
- context menu, customizing 455
- cookies 475
- coordinate spaces
- Coordinated Universal Time (UTC) 123
- core Error classes in ActionScript 180
- core Error classes in ECMAScript 178
- createBox() method 313
- createGradientBox() method 299
- cross-domain policy files 555
- cross-scripting 550
- CSS
- cue points
- currentDomain property 557
- currentTarget property 235
- cursors, customizing 454
- custom classes 24
- custom data types, enumerations 96
- custom error classes 175
- custom LocalConnection client 468
- D
- data
- data property (URLRequest class) 463
- data structures 144
- data types
- dataFormat property 466
- date arithmetic 124
- Date class
- about 122
- constructor 123
- date property 123
- day property 124
- fullYear property 123
- getMonth() method 93, 124
- getMonthUTC() method 124
- getTime() method 124
- getTimezoneOffset() method 125
- hours property 124
- milliseconds property 124
- minutes property 124
- month property 123
- monthUTC property 124
- parse() method 93
- seconds property 124
- setTime() method 124
- Date objects
- date property 123
- Date() constructor 123
- dates and times
- day property 124
- debugger version, Flash Player 242
- debugging 170
- decode() method 463
- decrementing values 66
- default behavior
- default data type 34
- default parameter values 79
- default xml namespace directive 222
- Delegate class 238
- delete operator 77, 148
- delimiter character, splitting strings into array 136
- depth management, improved 253
- descendent accessor (..) operator, XML 217
- development
- device fonts 356
- Dictionary class
- dispatchEvent() method 241
- dispatching events 227
- display architecture 247, 294
- display content, loading dynamically 285
- display list
- display list object 230
- display object containers 248, 249, 255
- display objects
- about 248
- adding to display list 255
- adjusting colors 278
- animating 283
- assembling complicated objects 254
- bitmaps 377
- caching 273
- choosing a subclass 264
- clicking and dragging example 291
- common tasks 249
- creating 255
- depth management 253
- drawing API and 294
- events 263
- example 287, 304
- example of rearranging 292
- fading 280
- filtering 318, 319, 325
- grouping 255
- inheritance of core classes 251
- masking 281
- matrix transformation 314
- movie clips 346
- off-list 254
- positioning 265
- removing filters 320
- rotating 280, 313
- scaling 270, 271, 313
- security 552
- setting colors of 279
- size 270
- skewing 313
- subclassing 254
- terms 250
- translation 313
- types of 251
- user input and 450
- display programming, about 247
- displaying camera content on- screen 412
- DisplayObject class
- DisplayObjectContainer class 248, 252, 255
- displayState property 261, 547
- distance() method 309
- division by zero 54
- do..while loop 73
- Document Object Model (DOM) Level 3 Events specification 227, 230
- documentation
- dollar sign ($) metacharacter 191
- dollar sign ($) replacement codes 137
- DOM Events specification 227, 230
- domain property (LocalConnection class) 558
- domains, communicating between 471
- dot (.) metacharacter 191
- dot (.) operator 59, 76
- dot (.) operator, XML 211, 217
- dot syntax 59
- dotall flag in regular expressions 200
- dotall property of regular expressions 199
- double quotation mark in strings 132
- download() method 546, 556
- downloading files 483, 556
- drag-and-drop
- draw() method 287, 548, 550, 553, 555
- dynamic attribute 86
- dynamic classes 52, 76, 89
- dynamic text fields 356
- E
- E4X. See XML
- ECMAScript edition 4 draft 33
- ECMAScript for XML. See XML
- effects using blending modes 277
- embedded asset classes 98
- embedded fonts 366
- embedFonts property 366
- encoding ampersand (&) 463
- Endian.BIG_ENDIAN 472
- Endian.LITTLE_ENDIAN 472
- enterFrame event 232
- enumerations 96
- equality operators 68, 133
- Error classes
- error events 175, 241
- error handling
- ErrorEvent class 176, 242
- errors
- -es compiler option 157
- escape sequences in character classes 193
- Event class
- about 232
- bubbles property 234
- cancelable property 233
- clone() method 235
- constants 233
- currentTarget property 235
- eventPhase property 234
- isDefaultPrevented() method 235
- method categories 235
- preventDefault() method 230, 235
- stopImmediatePropogation() method 235
- stopPropogation() method 235
- subclasses 236
- target property 234
- toString() method 235
- type property 233
- event flow 227, 231, 234
- event handlers 229, 403
- event listeners
- event objects 227
- event target 227, 231
- Event.COMPLETE 463
- EventDispatcher class
- eventPhase property 234
- events
- exactSettings property (Security class) 557
- examples
- arrays 161
- building a Telnet client 486
- detecting system capabilities 504
- error handling 242
- filtering images 338
- GeometricShapes 115
- loading RSS data 224
- Matrix class 314
- multi-page printing 514
- rearranging display object layers 292
- regular expressions 203
- RunTimeAssetsExplorer 351
- SimpleClock 127
- sound application 443
- SpriteArranger class 289
- strings 138
- text formatting 369
- using external API with a web page container 524
- video jukebox 418
- Wiki parser 203
- WordSearch 456
- exceptions 167
- exec() method 202
- explicit type conversion 55
- extended flag in regular expressions 201
- extended property of regular expressions 199
- extends keyword 101
- external API
- external code, calling from ActionScript 521
- external containers, getting information about 520
- external data, loading 462
- external documents, loading data 464
- external SWF files, loading 350
- ExternalInterface class 519, 546, 558
- ExternalInterface.addCallback() method 551
- F
- facade class 444
- fading display objects 280
- fast-forwarding movie clips 348
- file size, smaller for shapes 253
- FileReference class 478, 546, 556
- FileReferenceList class 484, 556
- files
- filtering XML data 219
- filters
- final attribute 50, 94, 96, 105
- first sprite loaded 248, 286
- fixed property inheritance 112
- flags in regular expressions 199
- Flash authoring, when to use for ActionScript 22
- Flash cookie 475
- Flash Media Server 550
- flash package 36
- Flash Player
- Flash Video. See FLV
- flash.display package
- flash.geom package 307
- flash_proxy namespace 41
- Flex
- Flex, when to use for ActionScript 23
- flow control, basic concepts 20
- FLV
- focus, managing in interactions 455
- fonts
- for each..in statement 72, 153, 221
- for loops 71
- for loops, XML 211, 221
- for..in statement 72, 153, 221
- form feed character 132
- formatting text 362, 365
- forward slash 190, 191
- frameRate property 260
- frames, jumping to 349
- fromCharCode() method 133
- fscommand() function 467, 546, 558
- fullScreen event 261
- full-screen mode 261, 262, 547
- fullScreenSourceRect property 262
- fullYear property 123
- function closures 74, 78, 83
- function expressions 75
- function keyword 74, 91
- function objects 85
- function parameters 78
- function statements 74
- Function.apply() method 158
- functions
- G
- g flag (in regular expressions) 199
- garbage collection 76, 154
- generic objects 60, 152
- GeometricShapes example 115
- geometry
- getDefinition() method 557
- getImageReference() method 550
- getLocal() method 475, 546, 558, 559
- getMonth() method 93, 124
- getMonthUTC() method 124
- getRect() method 312
- getRemote() method 475, 546, 559
- getters and setters
- getTime() method 124
- getTimer() function 127
- getTimezoneOffset() method 125
- GIF graphics 285
- global flag in regular expressions 199
- global object 83
- global property of regular expressions 199
- global scope 83
- global variables 45
- gradients 299
- graphics, loading 285
- greater-than operator 64, 133
- greater-than-or-equal-to operator 133
- grouping display objects 255
- groups, in regular expressions 196
- H
- I
- i flag (in regular expressions) 199
- id3 property 554
- IDataInput and IDataOutput interfaces 472
- identifiers 38
- IEventDispatcher interface 98, 239, 240
- if statement 69
- if..else statement 69
- ignore flag in regular expressions 200
- ignoreCase property of regular expressions 199
- images
- IME
- IME conversion mode
- img tag in text fields, security 549
- implicit type conversion 55
- import statement 37
- importing SWF files 557
- incrementing values 66
- index positions in strings 133
- indexed arrays 145
- indexOf() method 135
- inequality (!=) operator 133
- infinity 54
- inheritance
- init event 232
- input text fields 356
- instance methods 93
- instance properties
- instance variables 91
- instanceof operator 51
- instances, creating 18
- int class, casting 56
- int data type 53
- InteractiveObject class 252
- interfaces
- internal attribute 37, 39, 89
- intersection() method 312
- intersects() method 312
- IPv6 462
- is operator 51, 99
- isDefaultPrevented() method 235
- isNaN() global function 47
- iterating though arrays 153
- J
- K
- L
- landscape printing 513
- lastIndexOf() method 135
- layering, rearranging 292
- left bracket 191
- left parenthesis 191
- left-associative operators 64
- length property
- less-than operator 64, 133
- less-than-or-equal operator 133
- level property 242
- lexical environment 83
- lineGradientStyle() method 299
- listeners. See event listeners
- literal values
- little-endian byte order 472
- load progress 286
- load() method (Loader class) 286, 542, 546
- load() method (Sound class) 542, 546, 549, 556
- load() method (URLLoader class) 463, 546
- load() method (URLStream class) 546, 556
- loadBytes() method 286, 542
- loaded media, accessing as data 553
- Loader class 285, 546, 554, 557
- LoaderContext class 286, 548, 554
- LoaderContext object 542
- LoaderInfo class
- loaderInfo property 286
- loading context 286
- loading graphics 285
- loadPolicyFile() method 546
- local storage 475
- local variables 45
- LocalConnection class
- LocalConnection.allowDomain() method 471, 558
- LocalConnection.allowInsecureDom ain() method 471
- LocalConnection.client property 468
- LocalConnection.connect() method 546
- localFileReadDisable property 538
- localToGlobal() method 309
- logical operators 68
- looping
- M
- m flag (in regular expressions) 199
- Macintosh, FLV files 418
- mantissa 53
- maps 152, 153
- masking display objects 281
- masking for alpha channel 282
- match() method 136
- Matrix class
- MAX_VALUE (Number class) 53
- memory management 154
- metacharacters, in regular expressions 191
- metadata, video 408, 410
- metasequences, in regular expressions 191, 192
- method property (URLRequest class) 463
- methods
- microphone
- Microphone class 234
- milliseconds property 124
- MIN_VALUE (Number class) 53
- minutes property 124
- MIP maps 387
- monitor, full-screen mode 261
- month property 123
- monthUTC property 124
- MorphShape class 252
- mouse cursors, customizing 454
- mouse security 560
- MouseEvent class 230, 236
- movie clips
- MovieClip class 252
- MovieClip objects, creating 350
- multiline flag in regular expressions 200
- multiline property of regular expressions 199
- multiple class definitions 498
- multiplicative operators 67
- mx.util.Delegate class 238
- N
- name conflicts, avoiding 36, 38
- named groups (in regular expressions) 198
- namespaces
- NaN value 54
- navigateToURL() function 546, 558
- negated character classes (in regular expressions) 194
- negative infinity 54
- nested functions 78, 83
- nested packages 36
- NetConnection class 546
- NetConnection.connect() method 546, 549
- NetStream class 542, 546, 549
- network byte order 472
- networking
- new operator 35
- newline character 132
- nodes in XML, accessing 218
- noncapturing groups in regular expressions 198
- null value 47, 53, 54, 154
- Number class
- Number data type 53
- O
- Object class
- object keys in arrays 153
- object literals 152
- object-oriented programming
- objects
- octal numbers 57
- off-list display objects 254
- on() event handlers 229
- onClipEvent() function 229
- onCuePoint event handlers 403
- opaque background 276
- open bracket ([) 191
- open parenthesis 191
- operators
- optional parameters 79
- overloaded operators 64
- override keyword 94, 95
- overriding getters and setters 106
- P
- package statement 86
- packages
- page properties 511
- parameters
- parentAllowsChild property 552, 553
- parentheses
- parse() method 93
- performance, improving for display objects 273
- period (.). See dot
- permissions
- pipe (|) character 196
- pixel snapping 380
- pixels, manipulating individual 381
- play() method (NetStream class) 546
- playback
- player. See Flash Player
- plus sign (+) 191
- PNG graphics 285
- podcast applications
- Point objects
- pointers (cursors), customizing 454
- points versus pixels 513
- polar() method 309
- polymorphism 101
- pop() method 147
- portrait printing 513
- ports, security 555
- positions
- positive infinity 54
- postfix operators 66
- prefix operators 66
- preventDefault() method 230, 235
- primary operators 65
- primitive types, implicit conversions 55
- primitive values 34, 48
- printArea parameter 511
- printing
- PrintJob statements, timing 512
- PrintJob() constructor 509
- priority parameter, addEventListener() method 240
- private attribute 88
- private classes 35
- private constructors not supported 92
- program flow 69
- programs, basic definition 9
- progress of audio playback 447
- ProgressEvent.PROGRESS 463
- properties
- property access operator 153
- protected attribute 89
- __proto__ 34
- prototype chain 34, 110
- prototype object 76, 110, 112
- prototype property 110, 112
- Proxy class 41
- public attribute 88
- public classes 38
- push() method 147, 158
- Q
- R
- Real-Tiime Messaging Protocol content security 550
- Rectangle objects
- recursive functions 80
- reference, passing by 78
- RegExp class
- regular expressions
- about 188
- alternation using pipe (|) metacharacter 196
- alternators and character groups 197
- capturing substring matches 197
- character classes 193
- characters in 191
- creating 190
- example 203
- flags 199
- forward slash delimiter 190
- groups 196
- metacharacters 191
- metasequences 191, 192
- methods for working with 202
- named groups 198
- parameters in String methods 202
- properties 199
- quantifiers 195
- searching 201
- relational operators 68
- replace() method 127, 137
- replacement codes 137
- replacing text in strings 136
- required parameters 79
- reserved words 62
- __resolve 34
- rest parameter 81
- return statement 77, 92
- reverse() method 148
- rewinding movie clips 348
- right bracket (]) 191
- right parenthesis 191
- right-associative operators 64
- right-click menu (context menu) 455
- rotate() method 313
- rotating display objects 280, 313
- rotating matrixes 313
- RSS data
- RTMP content security 550
- run time, determining user’s system 496
- S
- s flag (in regular expressions) 199
- sameDomain property 552
- scale() method 313
- scaling
- scenes, to demarcate timelines 349
- scope
- scope chain 83, 107
- script timeout limit 512
- scrolling text 358, 359
- sealed classes 52
- search() method 136
- search, in regular expressions 201
- searching strings 136
- seconds property 124
- security
- accessing loaded media as data 553
- allowNetworking tag 545
- bitmaps 553
- camera 557, 560
- Clipboard 560
- display list 552
- event-related 553
- files, uploading and downloading 556
- full-screen mode 547
- images 553
- img tag 549
- imported SWF files 557
- keyboard 560
- LocalConnection class 558
- microphone 557, 560
- mouse 560
- ports 555
- RTMP 550
- sending data 556
- shared objects 557, 559
- sockets 555
- sound 549, 554
- Stage 551
- URLLoader 555
- URLStream 555
- video 549, 555
- See also cross-domain policy files
- Security class 546
- Security.allowDomain() method
- Security.currentDomain property 557
- Security.exactSettings property 557
- SecurityDomain class 287, 549
- semicolons 61
- send() method (LocalConnection class) 468, 546
- sendToURL() function 546, 556
- Server, Flash Media 550
- server-side scripts 466
- setClipboard() method 560
- setInterval() function 127
- setters. See getters and setters
- setTime() method 124
- setTimeout() method 127
- shadow 108
- Shape class 252
- shared objects
- SharedObject class 475, 546
- SharedObject.getLocal() method 558, 559
- SharedObject.getRemote() method 559
- shift() method 147
- shortcut menu (context menu) 455
- significand 53
- SimpleButton class 252
- SimpleClock example 127
- single quotation mark in strings 132
- skewing display objects 313
- skewing matrixes 313, 314
- slash syntax 60
- slashes
- slice() method
- smoothing bitmaps 380
- Socket class 472, 546, 555
- socket connections 472
- socket server 473
- sorting arrays 148, 149
- sound
- Sound class 542, 546, 549
- SoundFacade class 444
- SoundLoaderContext class 542
- SoundMixer.computeSpectrum() method 550, 553, 554
- SoundMixer.stopAll() method 554
- source path 37
- speakers and microphones 441
- speed, improving for rendering 273
- splice() method 147
- split() method 136
- Sprite class 252
- sprite, first loaded 248, 286
- SpriteArranger class example 289
- Stage
- Stage class 231
- Stage owner 551
- StageDisplayState class 547
- standard mode 50, 76
- star (*). See asterisk
- static attribute 90
- static methods 92
- static properties
- static text
- static text fields 356
- static variables 90
- StaticText class 252
- status change events 177
- status-based error events 176
- stopAll() method (SoundMixer class) 554
- stopImmediatePropogation() method 235
- stopping movie clips 348
- stopPropogation() method 235
- storing data 475
- streaming video 402
- strict inequality (!==) operator 133
- strict mode
- String class
- charAt() method 133
- charCodeAt() method 133
- concat() method 134
- fromCharCode() method 133
- indexOf() method 135
- lastIndexOf() method 135
- match() method 136
- replace() method 137
- search() method 136
- slice() method 135
- split() method 136
- substr() and substring() methods 135
- toLowerCase() and toUpperCase() methods 138
- String data type 54
- string keys 152
- string representations of objects 134
- strings
- character position 135
- checking matches in regular expressions 202
- combining arrays into character- delimited string 163
- common tasks 130
- comparing 133
- concatenating 134
- converting case 138
- converting data type for XML attributes 223
- converting XML objects to 222
- declaring 131
- example 138, 139
- finding substrings 135
- index positions 133
- length 132
- matching substrings 197
- patterns, finding 135, 136
- replacing text 136
- substrings 135, 136
- terms 131
- style sheets. See CSS
- StyleSheet class 363
- subclasses 101
- substr() and substring() methods 135
- substrings
- super statement 92, 93, 105
- superclasses 101
- superconstructor for arrays 158
- SWF files
- switch statement 70
- symbols in regular expressions 191
- synchronous errors 167
- syntactic keywords 62
- syntax 59
- system, determining user’s 496
- System.setClipboard() method 560
- T
- tab character 132
- target node or phase 231
- target property 234
- Telnet client example 486
- terminating statements 61
- ternary operators 64
- test() method 202
- text
- about 355
- anti-aliasing 367
- assigning formats 362
- available types 357
- capturing input 360
- common tasks 356
- concepts and terms 356
- displaying 356
- formatting 362, 369
- formatting ranges of 365
- manipulating 359
- replacing 136
- restricting input 361
- saving to Clipboard 497
- scrolling 358, 359
- selecting 360
- sharpness 367
- static 252, 368
- thickness 367
- text editors 23
- text fields
- text line metrics 356, 374
- TextEvent class 230
- TextField class 230, 252
- TextFormat class 362
- TextLineMetrics class 374
- TextSnapshot class 368
- this keyword 93, 94, 95, 238
- throw statement 172
- time formats 123
- time intervals 125
- time unit values 123
- time zones 123, 125
- timeout limit 512
- Timer class
- timer events 125
- timers 125
- timing functions 126
- toLowerCase() method 138
- toString() method
- toUppercase() method 138
- traits object 112
- Transform class
- transform property 314
- transformation matrixes. See Matrix class
- translate() method 313
- translating matrixes 313
- try..catch..finally statements 171
- twips 513
- type annotations 45, 49
- type checking
- type conversion 55, 56, 222
- type mismatches 49
- type property (Event class) 233
- typed arrays 146
- types. See data types
- U
- UIEventDispatcher class 229
- uint class, casting 56
- uint data type 54
- unary operators 64, 66
- undefined 34, 54, 55, 146
- Unicode characters 130
- Uniform Resource Identifier (URI) 39
- union() method 312
- Universal Time (UTC) 123
- unordered arrays 152
- unshift() method 147
- untyped variables 34, 47
- upcasting 50
- upload() method 546, 556
- uploading files 480, 484, 556
- URIs 39
- URL encoding 463
- URLLoader class
- URLLoader constructor 463
- URLLoader.dataFormat property 466
- URLLoader.load() method 463
- URLLoaderDataFormat.VARIABLE S 466
- URLRequest instance 463
- URLRequest.contentType property 463
- URLRequest.data property 463
- URLRequest.method property 463
- URLRequestMethod.GET 464
- URLRequestMethod.POST 464
- URLs of loaded objects 286
- URLStream class 546, 555
- URLVariables class 462
- URLVariables.decode() method 463
- use namespace directive 41, 43, 114
- useCapture parameter, addEventListener() method 240
- user input
- user interactions, managing focus 455
- user’s system, determining at run time 496
- user-selected text, capturing 360
- useWeakReference parameter 154
- UTC (Coordinated Universal Time) 123
- V
- W
- X
- x flag (in regular expressions) 199
- XML
- accessing attributes 219
- ActionScript for 209
- basic concepts 207
- brace operators ({ and }) 216
- child nodes 218
- comments 211, 212
- common tasks 209
- concepts and terms 210
- documents 208
- E4X (ECMAScript for XML) 36, 207, 210
- filtering 219
- for each..in loops 72
- for loops 211, 221
- format for external API 522
- initializing variables 215
- loading data 215, 224
- methods 212
- namespaces 221
- parent nodes 218
- processing instructions 211
- properties 212
- socket server 473
- transforming 216
- traversing structures 217
- type conversion 222
- white space 212
- XML class 36
- XMLDocument class 36, 210
- XMLList objects
- XMLNode class 210
- XMLParser class 210
- XMLSocket class 216, 224, 472, 546, 555
- XMLSocket.connect() method 473, 546
- XMLTag class 210

PROGRAMMING ACTIONSCRIPT™ 3

ADOBE FLEX 3
Developer Guide
ii
© 2008 Adobe Systems Incorporated. All rights reserved.
Programming ActionScript™ 3.0
If this guide is distributed with software that includes an end-user agreement, this guide, as well as the software
described in it, is furnished under license and may be used or copied only in accordance with the terms of such
license. Except as permitted by any such license, no part of this guide may be reproduced, stored in a retrieval system,
or transmitted, in any form or by any means, electronic, mechanical, recording, or otherwise, without the prior
written permission of Adobe Systems Incorporated. Please note that the content in this guide is protected under
copyright law even if it is not distributed with software that includes an end-user license agreement.
The content of this guide is furnished for informational use only, is subject to change without notice, and should not
be construed as a commitment by Adobe Systems Incorporated. Adobe Systems Incorporated assumes no responsi-
bility or liability for any errors or inaccuracies that may appear in the informational content contained in this guide.
Please remember that existing artwork or images that you may want to include in your project may be protected
under copyright law. The unauthorized incorporation of such material into your new work could be a violation of
the rights of the copyright owner. Please be sure to obtain any permission required from the copyright owner.
Any references to company names in sample templates are for demonstration purposes only and are not intended to
refer to any actual organization.
Adobe, the Adobe logo, Flex, Flex Builder and Flash Player are either registered trademarks or trademarks of Adobe
Systems Incorporated in the United States and/or other countries.
ActiveX and Windows are either registered trademarks or trademarks of Microsoft Corporation in the United States
and other countries. Macintosh is a trademark of Apple Inc., registered in the United States and other countries. All
other trademarks are the property of their respective owners.
Speech compression and decompression technology licensed from Nellymoser, Inc. (www.nellymoser.com).
Sorenson™ Spark™ video compression and decompression technology licensed from
Sorenson Media, Inc.
Opera ® browser Copyright © 1995-2002 Opera Software ASA and its suppliers. All rights reserved.
Adobe Systems Incorporated, 345 Park Avenue, San Jose, California 95110, USA
Notice to U.S. government end users. The software and documentation are “Commercial Items,” as that term is
defined at 48 C.F.R. §2.101, consisting of “Commercial Computer Software” and “Commercial Computer Software
Documentation,” as such terms are used in 48 C.F.R. §12.212 or 48 C.F.R. §227.7202, as applicable. Consistent with
48 C.F.R. §12.212 or 48 C.F.R. §§227.7202-1 through 227.7202-4, as applicable, the Commercial Computer Software
and Commercial Computer Software Documentation are being licensed to U.S. Government end users (a) only as
Commercial items and (b) with only those rights as are granted to all other end users pursuant to the terms and
conditions herein. Unpublished-rights reserved under the copyright laws of the United States. Adobe Systems Incor-
porated, 345 Park Avenue, San Jose, CA 95110-2704, USA. For U.S. Government End Users, Adobe agrees to comply
with all applicable equal opportunity laws including, if appropriate, the provisions of Executive Order 11246, as
amended, Section 402 of the Vietnam Era Veterans Readjustment Assistance Act of 1974 (38 USC 4212), and Section
503 of the Rehabilitation Act of 1973, as amended, and the regulations at 41 CFR Parts 60-1 through 60-60, 60-250
,and 60-741. The affirmative action clause and regulations contained in the preceding sentence shall be incorporated
by reference.

iii
Contents
Chapter 1: About this manual
Using this manual . . . . . . . . . . . . . . . . . . . . . . . . . . . . . . . . . . . . . . . . . . . . . . . . . . . . . . . . . . . . . . . . . . . . . . . . . 1
Accessing ActionScript documentation . . . . . . . . . . . . . . . . . . . . . . . . . . . . . . . . . . . . . . . . . . . . . . . . . . . . 2
ActionScript learning resources . . . . . . . . . . . . . . . . . . . . . . . . . . . . . . . . . . . . . . . . . . . . . . . . . . . . . . . . . . . 3
Chapter 2: Introduction to ActionScript 3.0
About ActionScript . . . . . . . . . . . . . . . . . . . . . . . . . . . . . . . . . . . . . . . . . . . . . . . . . . . . . . . . . . . . . . . . . . . . . . . 4
Advantages of ActionScript 3.0 . . . . . . . . . . . . . . . . . . . . . . . . . . . . . . . . . . . . . . . . . . . . . . . . . . . . . . . . . . . . 5
What’s new in ActionScript 3.0 . . . . . . . . . . . . . . . . . . . . . . . . . . . . . . . . . . . . . . . . . . . . . . . . . . . . . . . . . . . . 5
Compatibility with previous versions . . . . . . . . . . . . . . . . . . . . . . . . . . . . . . . . . . . . . . . . . . . . . . . . . . . . . . 7
Chapter 3: Getting started with ActionScript
Programming fundamentals . . . . . . . . . . . . . . . . . . . . . . . . . . . . . . . . . . . . . . . . . . . . . . . . . . . . . . . . . . . . . . 9
Working with objects . . . . . . . . . . . . . . . . . . . . . . . . . . . . . . . . . . . . . . . . . . . . . . . . . . . . . . . . . . . . . . . . . . . . 11
Common program elements . . . . . . . . . . . . . . . . . . . . . . . . . . . . . . . . . . . . . . . . . . . . . . . . . . . . . . . . . . . . . 19
Building applications with ActionScript . . . . . . . . . . . . . . . . . . . . . . . . . . . . . . . . . . . . . . . . . . . . . . . . . . . 21
Creating your own classes . . . . . . . . . . . . . . . . . . . . . . . . . . . . . . . . . . . . . . . . . . . . . . . . . . . . . . . . . . . . . . . . 24
Example: Creating a basic application . . . . . . . . . . . . . . . . . . . . . . . . . . . . . . . . . . . . . . . . . . . . . . . . . . . . 27
Running subsequent examples . . . . . . . . . . . . . . . . . . . . . . . . . . . . . . . . . . . . . . . . . . . . . . . . . . . . . . . . . . . 32
Chapter 4: ActionScript language and syntax
Language overview . . . . . . . . . . . . . . . . . . . . . . . . . . . . . . . . . . . . . . . . . . . . . . . . . . . . . . . . . . . . . . . . . . . . . . 33
Objects and classes . . . . . . . . . . . . . . . . . . . . . . . . . . . . . . . . . . . . . . . . . . . . . . . . . . . . . . . . . . . . . . . . . . . . . . 34
Packages and namespaces . . . . . . . . . . . . . . . . . . . . . . . . . . . . . . . . . . . . . . . . . . . . . . . . . . . . . . . . . . . . . . . 35
Variables . . . . . . . . . . . . . . . . . . . . . . . . . . . . . . . . . . . . . . . . . . . . . . . . . . . . . . . . . . . . . . . . . . . . . . . . . . . . . . . . 44
Data types . . . . . . . . . . . . . . . . . . . . . . . . . . . . . . . . . . . . . . . . . . . . . . . . . . . . . . . . . . . . . . . . . . . . . . . . . . . . . . . 48
Syntax . . . . . . . . . . . . . . . . . . . . . . . . . . . . . . . . . . . . . . . . . . . . . . . . . . . . . . . . . . . . . . . . . . . . . . . . . . . . . . . . . . . 59
Operators . . . . . . . . . . . . . . . . . . . . . . . . . . . . . . . . . . . . . . . . . . . . . . . . . . . . . . . . . . . . . . . . . . . . . . . . . . . . . . . . 63
Conditionals . . . . . . . . . . . . . . . . . . . . . . . . . . . . . . . . . . . . . . . . . . . . . . . . . . . . . . . . . . . . . . . . . . . . . . . . . . . . . 69
Looping . . . . . . . . . . . . . . . . . . . . . . . . . . . . . . . . . . . . . . . . . . . . . . . . . . . . . . . . . . . . . . . . . . . . . . . . . . . . . . . . . 71
Functions . . . . . . . . . . . . . . . . . . . . . . . . . . . . . . . . . . . . . . . . . . . . . . . . . . . . . . . . . . . . . . . . . . . . . . . . . . . . . . . . 74
Chapter 5: Object-oriented programming in ActionScript
Basics of object-oriented programming . . . . . . . . . . . . . . . . . . . . . . . . . . . . . . . . . . . . . . . . . . . . . . . . . . 84
Classes . . . . . . . . . . . . . . . . . . . . . . . . . . . . . . . . . . . . . . . . . . . . . . . . . . . . . . . . . . . . . . . . . . . . . . . . . . . . . . . . . . 85
Interfaces . . . . . . . . . . . . . . . . . . . . . . . . . . . . . . . . . . . . . . . . . . . . . . . . . . . . . . . . . . . . . . . . . . . . . . . . . . . . . . . . 98
Inheritance . . . . . . . . . . . . . . . . . . . . . . . . . . . . . . . . . . . . . . . . . . . . . . . . . . . . . . . . . . . . . . . . . . . . . . . . . . . . . 101
Advanced topics . . . . . . . . . . . . . . . . . . . . . . . . . . . . . . . . . . . . . . . . . . . . . . . . . . . . . . . . . . . . . . . . . . . . . . . . 108
Example: GeometricShapes . . . . . . . . . . . . . . . . . . . . . . . . . . . . . . . . . . . . . . . . . . . . . . . . . . . . . . . . . . . . . 115
Chapter 6: Working with dates and times
Basics of dates and times . . . . . . . . . . . . . . . . . . . . . . . . . . . . . . . . . . . . . . . . . . . . . . . . . . . . . . . . . . . . . . . . 122
Managing calendar dates and times . . . . . . . . . . . . . . . . . . . . . . . . . . . . . . . . . . . . . . . . . . . . . . . . . . . . . 123

iv
Controlling time intervals . . . . . . . . . . . . . . . . . . . . . . . . . . . . . . . . . . . . . . . . . . . . . . . . . . . . . . . . . . . . . . . 125
Example: Simple analog clock . . . . . . . . . . . . . . . . . . . . . . . . . . . . . . . . . . . . . . . . . . . . . . . . . . . . . . . . . . . 127
Chapter 7: Working with strings
Basics of strings . . . . . . . . . . . . . . . . . . . . . . . . . . . . . . . . . . . . . . . . . . . . . . . . . . . . . . . . . . . . . . . . . . . . . . . . . 130
Creating strings . . . . . . . . . . . . . . . . . . . . . . . . . . . . . . . . . . . . . . . . . . . . . . . . . . . . . . . . . . . . . . . . . . . . . . . . . 131
The length property . . . . . . . . . . . . . . . . . . . . . . . . . . . . . . . . . . . . . . . . . . . . . . . . . . . . . . . . . . . . . . . . . . . . 132
Working with characters in strings . . . . . . . . . . . . . . . . . . . . . . . . . . . . . . . . . . . . . . . . . . . . . . . . . . . . . . . 133
Comparing strings . . . . . . . . . . . . . . . . . . . . . . . . . . . . . . . . . . . . . . . . . . . . . . . . . . . . . . . . . . . . . . . . . . . . . . 133
Obtaining string representations of other objects . . . . . . . . . . . . . . . . . . . . . . . . . . . . . . . . . . . . . . . .134
Concatenating strings . . . . . . . . . . . . . . . . . . . . . . . . . . . . . . . . . . . . . . . . . . . . . . . . . . . . . . . . . . . . . . . . . . . 134
Finding substrings and patterns in strings . . . . . . . . . . . . . . . . . . . . . . . . . . . . . . . . . . . . . . . . . . . . . . . 135
Converting strings between uppercase and lowercase . . . . . . . . . . . . . . . . . . . . . . . . . . . . . . . . . . . 138
Example: ASCII art . . . . . . . . . . . . . . . . . . . . . . . . . . . . . . . . . . . . . . . . . . . . . . . . . . . . . . . . . . . . . . . . . . . . . . 139
Chapter 8: Working with arrays
Basics of arrays . . . . . . . . . . . . . . . . . . . . . . . . . . . . . . . . . . . . . . . . . . . . . . . . . . . . . . . . . . . . . . . . . . . . . . . . . . 144
Indexed arrays . . . . . . . . . . . . . . . . . . . . . . . . . . . . . . . . . . . . . . . . . . . . . . . . . . . . . . . . . . . . . . . . . . . . . . . . . . 145
Associative arrays . . . . . . . . . . . . . . . . . . . . . . . . . . . . . . . . . . . . . . . . . . . . . . . . . . . . . . . . . . . . . . . . . . . . . . . 152
Multidimensional arrays . . . . . . . . . . . . . . . . . . . . . . . . . . . . . . . . . . . . . . . . . . . . . . . . . . . . . . . . . . . . . . . . . 155
Cloning arrays . . . . . . . . . . . . . . . . . . . . . . . . . . . . . . . . . . . . . . . . . . . . . . . . . . . . . . . . . . . . . . . . . . . . . . . . . . 156
Advanced topics . . . . . . . . . . . . . . . . . . . . . . . . . . . . . . . . . . . . . . . . . . . . . . . . . . . . . . . . . . . . . . . . . . . . . . . . 157
Example: PlayList . . . . . . . . . . . . . . . . . . . . . . . . . . . . . . . . . . . . . . . . . . . . . . . . . . . . . . . . . . . . . . . . . . . . . . . 161
Chapter 9: Handling errors
Basics of error handling . . . . . . . . . . . . . . . . . . . . . . . . . . . . . . . . . . . . . . . . . . . . . . . . . . . . . . . . . . . . . . . . . 165
Types of errors . . . . . . . . . . . . . . . . . . . . . . . . . . . . . . . . . . . . . . . . . . . . . . . . . . . . . . . . . . . . . . . . . . . . . . . . . . 167
Error handling in ActionScript 3.0 . . . . . . . . . . . . . . . . . . . . . . . . . . . . . . . . . . . . . . . . . . . . . . . . . . . . . . . . 169
Working with the debugger versions of Flash Player and AIR . . . . . . . . . . . . . . . . . . . . . . . . . . . . . 170
Handling synchronous errors in an application . . . . . . . . . . . . . . . . . . . . . . . . . . . . . . . . . . . . . . . . . . . 171
Creating custom error classes . . . . . . . . . . . . . . . . . . . . . . . . . . . . . . . . . . . . . . . . . . . . . . . . . . . . . . . . . . . 175
Responding to error events and status . . . . . . . . . . . . . . . . . . . . . . . . . . . . . . . . . . . . . . . . . . . . . . . . . . . 175
Comparing the Error classes . . . . . . . . . . . . . . . . . . . . . . . . . . . . . . . . . . . . . . . . . . . . . . . . . . . . . . . . . . . . . 178
Example: CustomErrors application . . . . . . . . . . . . . . . . . . . . . . . . . . . . . . . . . . . . . . . . . . . . . . . . . . . . . . 183
Chapter 10: Using regular expressions
Basics of regular expressions . . . . . . . . . . . . . . . . . . . . . . . . . . . . . . . . . . . . . . . . . . . . . . . . . . . . . . . . . . . . 188
Regular expression syntax . . . . . . . . . . . . . . . . . . . . . . . . . . . . . . . . . . . . . . . . . . . . . . . . . . . . . . . . . . . . . . . 189
Methods for using regular expressions with strings . . . . . . . . . . . . . . . . . . . . . . . . . . . . . . . . . . . . . . 202
Example: A Wiki parser . . . . . . . . . . . . . . . . . . . . . . . . . . . . . . . . . . . . . . . . . . . . . . . . . . . . . . . . . . . . . . . . . . 203
Chapter 11: Working with XML
Basics of XML . . . . . . . . . . . . . . . . . . . . . . . . . . . . . . . . . . . . . . . . . . . . . . . . . . . . . . . . . . . . . . . . . . . . . . . . . . . 207
The E4X approach to XML processing . . . . . . . . . . . . . . . . . . . . . . . . . . . . . . . . . . . . . . . . . . . . . . . . . . . . 210
XML objects . . . . . . . . . . . . . . . . . . . . . . . . . . . . . . . . . . . . . . . . . . . . . . . . . . . . . . . . . . . . . . . . . . . . . . . . . . . . 211
XMLList objects . . . . . . . . . . . . . . . . . . . . . . . . . . . . . . . . . . . . . . . . . . . . . . . . . . . . . . . . . . . . . . . . . . . . . . . . . 214
Initializing XML variables . . . . . . . . . . . . . . . . . . . . . . . . . . . . . . . . . . . . . . . . . . . . . . . . . . . . . . . . . . . . . . . . 215

v
Assembling and transforming XML objects . . . . . . . . . . . . . . . . . . . . . . . . . . . . . . . . . . . . . . . . . . . . . . 216
Traversing XML structures . . . . . . . . . . . . . . . . . . . . . . . . . . . . . . . . . . . . . . . . . . . . . . . . . . . . . . . . . . . . . . . 217
Using XML namespaces . . . . . . . . . . . . . . . . . . . . . . . . . . . . . . . . . . . . . . . . . . . . . . . . . . . . . . . . . . . . . . . . . 221
XML type conversion . . . . . . . . . . . . . . . . . . . . . . . . . . . . . . . . . . . . . . . . . . . . . . . . . . . . . . . . . . . . . . . . . . . . 222
Reading external XML documents . . . . . . . . . . . . . . . . . . . . . . . . . . . . . . . . . . . . . . . . . . . . . . . . . . . . . . . 224
Example: Loading RSS data from the Internet . . . . . . . . . . . . . . . . . . . . . . . . . . . . . . . . . . . . . . . . . . . . 224
Chapter 12: Handling events
Basics of handling events . . . . . . . . . . . . . . . . . . . . . . . . . . . . . . . . . . . . . . . . . . . . . . . . . . . . . . . . . . . . . . . 227
How ActionScript 3.0 event handling differs from earlier versions . . . . . . . . . . . . . . . . . . . . . . . . . 229
The event flow . . . . . . . . . . . . . . . . . . . . . . . . . . . . . . . . . . . . . . . . . . . . . . . . . . . . . . . . . . . . . . . . . . . . . . . . . . 231
Event objects . . . . . . . . . . . . . . . . . . . . . . . . . . . . . . . . . . . . . . . . . . . . . . . . . . . . . . . . . . . . . . . . . . . . . . . . . . . 232
Event listeners . . . . . . . . . . . . . . . . . . . . . . . . . . . . . . . . . . . . . . . . . . . . . . . . . . . . . . . . . . . . . . . . . . . . . . . . . . 236
Example: Alarm Clock . . . . . . . . . . . . . . . . . . . . . . . . . . . . . . . . . . . . . . . . . . . . . . . . . . . . . . . . . . . . . . . . . . . 242
Chapter 13: Display programming
Basics of display programming . . . . . . . . . . . . . . . . . . . . . . . . . . . . . . . . . . . . . . . . . . . . . . . . . . . . . . . . . . 247
Core display classes . . . . . . . . . . . . . . . . . . . . . . . . . . . . . . . . . . . . . . . . . . . . . . . . . . . . . . . . . . . . . . . . . . . . . 251
Advantages of the display list approach . . . . . . . . . . . . . . . . . . . . . . . . . . . . . . . . . . . . . . . . . . . . . . . . . 252
Working with display objects . . . . . . . . . . . . . . . . . . . . . . . . . . . . . . . . . . . . . . . . . . . . . . . . . . . . . . . . . . . . 255
Manipulating display objects . . . . . . . . . . . . . . . . . . . . . . . . . . . . . . . . . . . . . . . . . . . . . . . . . . . . . . . . . . . . 265
Animating objects . . . . . . . . . . . . . . . . . . . . . . . . . . . . . . . . . . . . . . . . . . . . . . . . . . . . . . . . . . . . . . . . . . . . . . 283
Loading display content dynamically . . . . . . . . . . . . . . . . . . . . . . . . . . . . . . . . . . . . . . . . . . . . . . . . . . . . 285
Example: SpriteArranger . . . . . . . . . . . . . . . . . . . . . . . . . . . . . . . . . . . . . . . . . . . . . . . . . . . . . . . . . . . . . . . . 287
Chapter 14: Using the drawing API
Basics of using the drawing API . . . . . . . . . . . . . . . . . . . . . . . . . . . . . . . . . . . . . . . . . . . . . . . . . . . . . . . . . . 294
Understanding the Graphics class . . . . . . . . . . . . . . . . . . . . . . . . . . . . . . . . . . . . . . . . . . . . . . . . . . . . . . . 295
Drawing lines and curves . . . . . . . . . . . . . . . . . . . . . . . . . . . . . . . . . . . . . . . . . . . . . . . . . . . . . . . . . . . . . . . . 296
Drawing shapes using built-in methods . . . . . . . . . . . . . . . . . . . . . . . . . . . . . . . . . . . . . . . . . . . . . . . . . 298
Creating gradient lines and fills . . . . . . . . . . . . . . . . . . . . . . . . . . . . . . . . . . . . . . . . . . . . . . . . . . . . . . . . . . 299
Using the Math class with drawing methods . . . . . . . . . . . . . . . . . . . . . . . . . . . . . . . . . . . . . . . . . . . . . 303
Animating with the drawing API . . . . . . . . . . . . . . . . . . . . . . . . . . . . . . . . . . . . . . . . . . . . . . . . . . . . . . . . . 303
Example: Algorithmic Visual Generator . . . . . . . . . . . . . . . . . . . . . . . . . . . . . . . . . . . . . . . . . . . . . . . . . . 304
Chapter 15: Working with geometry
Basics of geometry . . . . . . . . . . . . . . . . . . . . . . . . . . . . . . . . . . . . . . . . . . . . . . . . . . . . . . . . . . . . . . . . . . . . . . 307
Using Point objects . . . . . . . . . . . . . . . . . . . . . . . . . . . . . . . . . . . . . . . . . . . . . . . . . . . . . . . . . . . . . . . . . . . . . 308
Using Rectangle objects . . . . . . . . . . . . . . . . . . . . . . . . . . . . . . . . . . . . . . . . . . . . . . . . . . . . . . . . . . . . . . . . 310
Using Matrix objects . . . . . . . . . . . . . . . . . . . . . . . . . . . . . . . . . . . . . . . . . . . . . . . . . . . . . . . . . . . . . . . . . . . . 313
Example: Applying a matrix transformation to a display object . . . . . . . . . . . . . . . . . . . . . . . . . . . 314
Chapter 16: Filtering display objects
Basics of filtering display objects . . . . . . . . . . . . . . . . . . . . . . . . . . . . . . . . . . . . . . . . . . . . . . . . . . . . . . . . 318
Creating and applying filters . . . . . . . . . . . . . . . . . . . . . . . . . . . . . . . . . . . . . . . . . . . . . . . . . . . . . . . . . . . . 319
Available display filters . . . . . . . . . . . . . . . . . . . . . . . . . . . . . . . . . . . . . . . . . . . . . . . . . . . . . . . . . . . . . . . . . . 325
Example: Filter Workbench . . . . . . . . . . . . . . . . . . . . . . . . . . . . . . . . . . . . . . . . . . . . . . . . . . . . . . . . . . . . . . 338

vi
Chapter 17: Working with movie clips
Basics of movie clips . . . . . . . . . . . . . . . . . . . . . . . . . . . . . . . . . . . . . . . . . . . . . . . . . . . . . . . . . . . . . . . . . . . . 346
Working with MovieClip objects . . . . . . . . . . . . . . . . . . . . . . . . . . . . . . . . . . . . . . . . . . . . . . . . . . . . . . . . . 347
Controlling movie clip playback . . . . . . . . . . . . . . . . . . . . . . . . . . . . . . . . . . . . . . . . . . . . . . . . . . . . . . . . . 348
Creating MovieClip objects with ActionScript . . . . . . . . . . . . . . . . . . . . . . . . . . . . . . . . . . . . . . . . . . . . 350
Loading an external SWF file . . . . . . . . . . . . . . . . . . . . . . . . . . . . . . . . . . . . . . . . . . . . . . . . . . . . . . . . . . . . 350
Example: RuntimeAssetsExplorer . . . . . . . . . . . . . . . . . . . . . . . . . . . . . . . . . . . . . . . . . . . . . . . . . . . . . . . . 351
Chapter 18: Working with text
Basics of working with text . . . . . . . . . . . . . . . . . . . . . . . . . . . . . . . . . . . . . . . . . . . . . . . . . . . . . . . . . . . . . . 355
Displaying text . . . . . . . . . . . . . . . . . . . . . . . . . . . . . . . . . . . . . . . . . . . . . . . . . . . . . . . . . . . . . . . . . . . . . . . . . . 356
Selecting and manipulating text . . . . . . . . . . . . . . . . . . . . . . . . . . . . . . . . . . . . . . . . . . . . . . . . . . . . . . . . . 359
Capturing text input . . . . . . . . . . . . . . . . . . . . . . . . . . . . . . . . . . . . . . . . . . . . . . . . . . . . . . . . . . . . . . . . . . . . 360
Restricting text input . . . . . . . . . . . . . . . . . . . . . . . . . . . . . . . . . . . . . . . . . . . . . . . . . . . . . . . . . . . . . . . . . . . . 361
Formatting text . . . . . . . . . . . . . . . . . . . . . . . . . . . . . . . . . . . . . . . . . . . . . . . . . . . . . . . . . . . . . . . . . . . . . . . . . 362
Advanced text rendering . . . . . . . . . . . . . . . . . . . . . . . . . . . . . . . . . . . . . . . . . . . . . . . . . . . . . . . . . . . . . . . . 365
Working with static text . . . . . . . . . . . . . . . . . . . . . . . . . . . . . . . . . . . . . . . . . . . . . . . . . . . . . . . . . . . . . . . . . 367
Example: Newspaper-style text formatting . . . . . . . . . . . . . . . . . . . . . . . . . . . . . . . . . . . . . . . . . . . . . . . 369
Chapter 19: Working with bitmaps
Basics of working with bitmaps . . . . . . . . . . . . . . . . . . . . . . . . . . . . . . . . . . . . . . . . . . . . . . . . . . . . . . . . . . 377
The Bitmap and BitmapData classes . . . . . . . . . . . . . . . . . . . . . . . . . . . . . . . . . . . . . . . . . . . . . . . . . . . . . 379
Manipulating pixels . . . . . . . . . . . . . . . . . . . . . . . . . . . . . . . . . . . . . . . . . . . . . . . . . . . . . . . . . . . . . . . . . . . . . 380
Copying bitmap data . . . . . . . . . . . . . . . . . . . . . . . . . . . . . . . . . . . . . . . . . . . . . . . . . . . . . . . . . . . . . . . . . . . 383
Making textures with noise functions . . . . . . . . . . . . . . . . . . . . . . . . . . . . . . . . . . . . . . . . . . . . . . . . . . . . 384
Scrolling bitmaps . . . . . . . . . . . . . . . . . . . . . . . . . . . . . . . . . . . . . . . . . . . . . . . . . . . . . . . . . . . . . . . . . . . . . . . 386
Taking advantage of mipmapping . . . . . . . . . . . . . . . . . . . . . . . . . . . . . . . . . . . . . . . . . . . . . . . . . . . . . . . 386
Example: Animated spinning moon . . . . . . . . . . . . . . . . . . . . . . . . . . . . . . . . . . . . . . . . . . . . . . . . . . . . . 387
Chapter 20: Working with video
Basics of video . . . . . . . . . . . . . . . . . . . . . . . . . . . . . . . . . . . . . . . . . . . . . . . . . . . . . . . . . . . . . . . . . . . . . . . . . . 397
Understanding the Flash Video (FLV) format . . . . . . . . . . . . . . . . . . . . . . . . . . . . . . . . . . . . . . . . . . . . . 398
Understanding the Video class . . . . . . . . . . . . . . . . . . . . . . . . . . . . . . . . . . . . . . . . . . . . . . . . . . . . . . . . . . 399
Loading video files . . . . . . . . . . . . . . . . . . . . . . . . . . . . . . . . . . . . . . . . . . . . . . . . . . . . . . . . . . . . . . . . . . . . . . 400
Controlling video playback . . . . . . . . . . . . . . . . . . . . . . . . . . . . . . . . . . . . . . . . . . . . . . . . . . . . . . . . . . . . . . 400
Streaming video files . . . . . . . . . . . . . . . . . . . . . . . . . . . . . . . . . . . . . . . . . . . . . . . . . . . . . . . . . . . . . . . . . . . . 402
Understanding cue points . . . . . . . . . . . . . . . . . . . . . . . . . . . . . . . . . . . . . . . . . . . . . . . . . . . . . . . . . . . . . . . 402
Writing callback methods for onCuePoint and onMetaData . . . . . . . . . . . . . . . . . . . . . . . . . . . . . . 403
Using cue points . . . . . . . . . . . . . . . . . . . . . . . . . . . . . . . . . . . . . . . . . . . . . . . . . . . . . . . . . . . . . . . . . . . . . . . . 408
Using video metadata . . . . . . . . . . . . . . . . . . . . . . . . . . . . . . . . . . . . . . . . . . . . . . . . . . . . . . . . . . . . . . . . . . . 408
Capturing camera input . . . . . . . . . . . . . . . . . . . . . . . . . . . . . . . . . . . . . . . . . . . . . . . . . . . . . . . . . . . . . . . . . 411
Advanced topics . . . . . . . . . . . . . . . . . . . . . . . . . . . . . . . . . . . . . . . . . . . . . . . . . . . . . . . . . . . . . . . . . . . . . . . . 417
Example: Video Jukebox . . . . . . . . . . . . . . . . . . . . . . . . . . . . . . . . . . . . . . . . . . . . . . . . . . . . . . . . . . . . . . . . 418
Chapter 21: Working with sound
Basics of working with sound . . . . . . . . . . . . . . . . . . . . . . . . . . . . . . . . . . . . . . . . . . . . . . . . . . . . . . . . . . . . 424
Understanding the sound architecture . . . . . . . . . . . . . . . . . . . . . . . . . . . . . . . . . . . . . . . . . . . . . . . . . . 426

vii
Loading external sound files . . . . . . . . . . . . . . . . . . . . . . . . . . . . . . . . . . . . . . . . . . . . . . . . . . . . . . . . . . . . 427
Working with embedded sounds . . . . . . . . . . . . . . . . . . . . . . . . . . . . . . . . . . . . . . . . . . . . . . . . . . . . . . . . 429
Working with streaming sound files . . . . . . . . . . . . . . . . . . . . . . . . . . . . . . . . . . . . . . . . . . . . . . . . . . . . . 430
Playing sounds . . . . . . . . . . . . . . . . . . . . . . . . . . . . . . . . . . . . . . . . . . . . . . . . . . . . . . . . . . . . . . . . . . . . . . . . . 431
Security considerations when loading and playing sounds . . . . . . . . . . . . . . . . . . . . . . . . . . . . . . . 434
Controlling sound volume and panning . . . . . . . . . . . . . . . . . . . . . . . . . . . . . . . . . . . . . . . . . . . . . . . . . 435
Working with sound metadata . . . . . . . . . . . . . . . . . . . . . . . . . . . . . . . . . . . . . . . . . . . . . . . . . . . . . . . . . . 436
Accessing raw sound data . . . . . . . . . . . . . . . . . . . . . . . . . . . . . . . . . . . . . . . . . . . . . . . . . . . . . . . . . . . . . . . 437
Capturing sound input . . . . . . . . . . . . . . . . . . . . . . . . . . . . . . . . . . . . . . . . . . . . . . . . . . . . . . . . . . . . . . . . . . 440
Example: Podcast Player . . . . . . . . . . . . . . . . . . . . . . . . . . . . . . . . . . . . . . . . . . . . . . . . . . . . . . . . . . . . . . . . . 443
Chapter 22: Capturing user input
Basics of user input . . . . . . . . . . . . . . . . . . . . . . . . . . . . . . . . . . . . . . . . . . . . . . . . . . . . . . . . . . . . . . . . . . . . . 450
Capturing keyboard input . . . . . . . . . . . . . . . . . . . . . . . . . . . . . . . . . . . . . . . . . . . . . . . . . . . . . . . . . . . . . . . 451
Capturing mouse input . . . . . . . . . . . . . . . . . . . . . . . . . . . . . . . . . . . . . . . . . . . . . . . . . . . . . . . . . . . . . . . . . 453
Example: WordSearch . . . . . . . . . . . . . . . . . . . . . . . . . . . . . . . . . . . . . . . . . . . . . . . . . . . . . . . . . . . . . . . . . . . 456
Chapter 23: Networking and communication
Basics of networking and communication . . . . . . . . . . . . . . . . . . . . . . . . . . . . . . . . . . . . . . . . . . . . . . . 460
Working with external data . . . . . . . . . . . . . . . . . . . . . . . . . . . . . . . . . . . . . . . . . . . . . . . . . . . . . . . . . . . . . . 462
Connecting to other Flash Player and AIR instances . . . . . . . . . . . . . . . . . . . . . . . . . . . . . . . . . . . . . . 467
Socket connections . . . . . . . . . . . . . . . . . . . . . . . . . . . . . . . . . . . . . . . . . . . . . . . . . . . . . . . . . . . . . . . . . . . . . 472
Storing local data . . . . . . . . . . . . . . . . . . . . . . . . . . . . . . . . . . . . . . . . . . . . . . . . . . . . . . . . . . . . . . . . . . . . . . . 475
Working with file upload and download . . . . . . . . . . . . . . . . . . . . . . . . . . . . . . . . . . . . . . . . . . . . . . . . . 478
Example: Building a Telnet client . . . . . . . . . . . . . . . . . . . . . . . . . . . . . . . . . . . . . . . . . . . . . . . . . . . . . . . . 486
Example: Uploading and downloading files . . . . . . . . . . . . . . . . . . . . . . . . . . . . . . . . . . . . . . . . . . . . . . 488
Chapter 24: Client system environment
Basics of the client system environment . . . . . . . . . . . . . . . . . . . . . . . . . . . . . . . . . . . . . . . . . . . . . . . . . 495
Using the System class . . . . . . . . . . . . . . . . . . . . . . . . . . . . . . . . . . . . . . . . . . . . . . . . . . . . . . . . . . . . . . . . . . 496
Using the Capabilities class . . . . . . . . . . . . . . . . . . . . . . . . . . . . . . . . . . . . . . . . . . . . . . . . . . . . . . . . . . . . . . 497
Using the ApplicationDomain class . . . . . . . . . . . . . . . . . . . . . . . . . . . . . . . . . . . . . . . . . . . . . . . . . . . . . . 498
Using the IME class . . . . . . . . . . . . . . . . . . . . . . . . . . . . . . . . . . . . . . . . . . . . . . . . . . . . . . . . . . . . . . . . . . . . . . 500
Example: Detecting system capabilities . . . . . . . . . . . . . . . . . . . . . . . . . . . . . . . . . . . . . . . . . . . . . . . . . . 504
Chapter 25: Printing
Basics of printing . . . . . . . . . . . . . . . . . . . . . . . . . . . . . . . . . . . . . . . . . . . . . . . . . . . . . . . . . . . . . . . . . . . . . . . 508
Printing a page . . . . . . . . . . . . . . . . . . . . . . . . . . . . . . . . . . . . . . . . . . . . . . . . . . . . . . . . . . . . . . . . . . . . . . . . . 509
Flash Player and AIR tasks and system printing . . . . . . . . . . . . . . . . . . . . . . . . . . . . . . . . . . . . . . . . . . . 510
Setting size, scale, and orientation . . . . . . . . . . . . . . . . . . . . . . . . . . . . . . . . . . . . . . . . . . . . . . . . . . . . . . . 512
Example: Multiple-page printing . . . . . . . . . . . . . . . . . . . . . . . . . . . . . . . . . . . . . . . . . . . . . . . . . . . . . . . . 514
Example: Scaling, cropping, and responding . . . . . . . . . . . . . . . . . . . . . . . . . . . . . . . . . . . . . . . . . . . . . 516
Chapter 26: Using the external API
Basics of using the external API . . . . . . . . . . . . . . . . . . . . . . . . . . . . . . . . . . . . . . . . . . . . . . . . . . . . . . . . . . 518
External API requirements and advantages . . . . . . . . . . . . . . . . . . . . . . . . . . . . . . . . . . . . . . . . . . . . . . 519
Using the ExternalInterface class . . . . . . . . . . . . . . . . . . . . . . . . . . . . . . . . . . . . . . . . . . . . . . . . . . . . . . . . 520

viii
Example: Using the external API with a web page container . . . . . . . . . . . . . . . . . . . . . . . . . . . . . . 524
Example: Using the external API with an ActiveX container . . . . . . . . . . . . . . . . . . . . . . . . . . . . . . . 529
Chapter 27: Flash Player security
Flash Player security overview . . . . . . . . . . . . . . . . . . . . . . . . . . . . . . . . . . . . . . . . . . . . . . . . . . . . . . . . . . . 535
Overview of permission controls . . . . . . . . . . . . . . . . . . . . . . . . . . . . . . . . . . . . . . . . . . . . . . . . . . . . . . . . 537
Security sandboxes . . . . . . . . . . . . . . . . . . . . . . . . . . . . . . . . . . . . . . . . . . . . . . . . . . . . . . . . . . . . . . . . . . . . . 543
Restricting networking APIs . . . . . . . . . . . . . . . . . . . . . . . . . . . . . . . . . . . . . . . . . . . . . . . . . . . . . . . . . . . . . 545
Full-screen mode security . . . . . . . . . . . . . . . . . . . . . . . . . . . . . . . . . . . . . . . . . . . . . . . . . . . . . . . . . . . . . . . 547
Loading content . . . . . . . . . . . . . . . . . . . . . . . . . . . . . . . . . . . . . . . . . . . . . . . . . . . . . . . . . . . . . . . . . . . . . . . . 548
Cross-scripting . . . . . . . . . . . . . . . . . . . . . . . . . . . . . . . . . . . . . . . . . . . . . . . . . . . . . . . . . . . . . . . . . . . . . . . . . . 550
Accessing loaded media as data . . . . . . . . . . . . . . . . . . . . . . . . . . . . . . . . . . . . . . . . . . . . . . . . . . . . . . . . . 553
Loading data . . . . . . . . . . . . . . . . . . . . . . . . . . . . . . . . . . . . . . . . . . . . . . . . . . . . . . . . . . . . . . . . . . . . . . . . . . . 555
Loading embedded content from SWF files imported into a security domain . . . . . . . . . . . . . 557
Working with legacy content . . . . . . . . . . . . . . . . . . . . . . . . . . . . . . . . . . . . . . . . . . . . . . . . . . . . . . . . . . . . 557
Setting LocalConnection permissions . . . . . . . . . . . . . . . . . . . . . . . . . . . . . . . . . . . . . . . . . . . . . . . . . . . . 558
Controlling access to scripts in a host web page . . . . . . . . . . . . . . . . . . . . . . . . . . . . . . . . . . . . . . . . . . 558
Shared objects . . . . . . . . . . . . . . . . . . . . . . . . . . . . . . . . . . . . . . . . . . . . . . . . . . . . . . . . . . . . . . . . . . . . . . . . . . 559
Camera, microphone, clipboard, mouse, and keyboard access . . . . . . . . . . . . . . . . . . . . . . . . . . . . 560

1
Chapter 1: About this manual
This manual provides a foundation for developing applications in ActionScript™ 3.0. To best understand the ideas
and techniques described, you should already be familiar with general programming concepts such as data types,
variables, loops, and functions. You should also understand basic object-oriented programming concepts such as
classes and inheritance. Prior knowledge of ActionScript 1.0 or ActionScript 2.0 is helpful but not necessary.
Contents
Using this manual . . . . . . . . . . . . . . . . . . . . . . . . . . . . . . . . . . . . . . . . . . . . . . . . . . . . . . . . . . . . . . . . . . . . . . . . . . . . . . . . . . 1
Accessing ActionScript documentation. . . . . . . . . . . . . . . . . . . . . . . . . . . . . . . . . . . . . . . . . . . . . . . . . . . . . . . . . . . . . . . . 2
ActionScript learning resources . . . . . . . . . . . . . . . . . . . . . . . . . . . . . . . . . . . . . . . . . . . . . . . . . . . . . . . . . . . . . . . . . . . . . . 3
Using this manual
The chapters in this manual are organized into the following logical groups to help you better find related areas of
ActionScript documentation:
This manual also contains numerous sample files that demonstrate application programming concepts for important
or commonly used classes. Sample files are packaged in ways to make them easier to load and use with Adobe® Flex™
Builder™ 2 and may include wrapper files. However, the core sample code is pure ActionScript 3.0 that you can use
in whichever development environment you prefer.
ActionScript 3.0 can be written and compiled a number of ways, including:
•Using the Adobe Flex Builder 2 development environment
•Using any text editor and a command-line compiler, such as the one provided with Flex Builder 2
•Using the Adobe® Flash® CS3 Professional authoring tool
For more information about ActionScript development environments, see “Introduction to ActionScript 3.0” on
page 4
Chapters Description
Chapters 1 through 4, overview of ActionScript
programming
Discusses core ActionScript 3.0 concepts, including language syntax, state-
ments and operators, the ECMAScript edition 4 draft language specification,
object-oriented ActionScript programming, and the new approach to
managing display objects on the Adobe® Flash® Player 9 Adobe® AIR™ display
list.
Chapters 5 through 10, core ActionScript 3.0 data
types and classes
Describes top-level data types in ActionScript 3.0 that are also part of the ECMA-
Script draft specification.
Chapters 11 through 26, Flash Player APIs Describes important features that are implemented in packages and classes
specific to Adobe Flash Player 9 and AIR, including event handling, networking
and communications, file input and output, the external interface, the applica-
tion security model, and more.

ADOBE FLEX 3
Developer Guide
2
To understand the code samples in this manual, you don’t need to have prior experience using integrated devel-
opment environments for ActionScript, such as Flex Builder or the Flash authoring tool. You will, however, want to
refer to the documentation for those tools to learn how to use them to write and compile ActionScript 3.0 code. For
more information, see “Accessing ActionScript documentation” on page 2.
Accessing ActionScript documentation
Because this manual focuses on describing ActionScript 3.0, which is a rich and powerful object-oriented
programming language, it does not extensively cover the application development process or workflow within a
particular tool or server architecture. So in addition to Programming ActionScript 3.0, you’ll want to consult other
sources of documentation as you design, develop, test, and deploy ActionScript 3.0 applications.
ActionScript 3.0 documentation
This manual familiarizes you with the concepts behind the ActionScript 3.0 programming language and gives you
implementation details and samples illustrating important language features. However, this manual is not a complete
language reference. For that, see the Flex 2 Language Reference, which describes every class, method, property, and
event in the language. The Flex 2 Language Reference provides detailed reference information about the core
language, Adobe® Flex™ MXML™ classes and components (in the mx packages), and Flash Player APIs (in the flash
packages).
Flex documentation
If you use the Flex development environment, you may want to consult these manuals:
Book Description
How Flex Works Provides a quick overview of essential Flex concepts and
how Adobe Flex works
Getting Started with Flex 2 Contains an overview of Flex features and application
development procedures
Using Flex Builder 2 Describes how to use the Flex interface
Flex 2 Developer’s Guide Describes in detail how to develop applications using Flex
Building and Deploying Flex 2 Applications Describes the process of building and deploying Flex appli-
cations
Creating and Extending Flex 2 Components Describes how to create custom Flex components in MXML
and ActionScript
Programming ActionScript 3.0 Describes specific usage of the ActionScript language and
core Flash Player API
Flex 2 Language Reference Provides syntax, usage, and code examples for the Flex
MXML and ActionScript API

ADOBE FLEX 3
Developer Guide
3
ActionScript learning resources
In addition to the content in these manuals, Adobe provides regularly updated articles, design ideas, and examples
at the Adobe Developer Center and the Adobe Design Center.
Adobe Developer Center
The Adobe Developer Center is your resource for up-to-the-minute information on ActionScript, articles about real-
world application development, and information about important emerging issues. View the Developer Center at
www.adobe.com/devnet/.
Adobe Design Center
Learn the latest in digital design and motion graphics. Browse work by leading artists, discover new design trends,
and hone your skills with tutorials, key workflows, and advanced techniques. Check back twice a month for fresh
tutorials and articles, and inspirational gallery pieces. View the Design Center at www.adobe.com/designcenter/.

4
Chapter 2: Introduction to
ActionScript 3.0
This chapter provides an overview of ActionScript™ 3.0, the newest and most revolutionary version of ActionScript.
Contents
About ActionScript. . . . . . . . . . . . . . . . . . . . . . . . . . . . . . . . . . . . . . . . . . . . . . . . . . . . . . . . . . . . . . . . . . . . . . . . . . . . . . . . . 4
Advantages of ActionScript 3.0. . . . . . . . . . . . . . . . . . . . . . . . . . . . . . . . . . . . . . . . . . . . . . . . . . . . . . . . . . . . . . . . . . . . . . . 5
What’s new in ActionScript 3.0. . . . . . . . . . . . . . . . . . . . . . . . . . . . . . . . . . . . . . . . . . . . . . . . . . . . . . . . . . . . . . . . . . . . . . . 5
Compatibility with previous versions. . . . . . . . . . . . . . . . . . . . . . . . . . . . . . . . . . . . . . . . . . . . . . . . . . . . . . . . . . . . . . . . . . 7
About ActionScript
ActionScript is the programming language for the Adobe® Flash® Player and Adobe® AIR™run-time environments. It
enables interactivity, data handling, and much more in Flash, Flex, and AIR content and applications.
ActionScript is executed by the ActionScript Virtual Machine (AVM), which is part of Flash Player and AIR. Action-
Script code is typically compiled into bytecode format (a sort of programming language that’s written and understood
by computers) by a compiler, such as the one built into Adobe® Flash® CS3 Professional or Adobe® Flex™ Builder™, or
that is available in the Adobe® Flex™ SDK and the Flex™ Data Services. The bytecode is embedded in SWF files, which
are executed by Flash Player and AIR.
ActionScript 3.0 offers a robust programming model that will be familiar to developers with a basic knowledge of
object-oriented programming. Some of the key features of ActionScript 3.0 include the following:
•A new ActionScript Virtual Machine, called AVM2, that uses a new bytecode instruction set and provides signif-
icant performance improvements
•A more modern compiler code base that adheres much more closely to the ECMAScript (ECMA 262) standard
and that performs deeper optimizations than previous versions of the compiler
•An expanded and improved application programming interface (API), with low-level control of objects and a
true object-oriented model
•A core language based on the upcoming ECMAScript (ECMA-262) edition 4 draft language specification
•An XML API based on the ECMAScript for XML (E4X) specification (ECMA-357 edition 2). E4X is a language
extension to ECMAScript that adds XML as a native data type of the language.
•An event model based on the Document Object Model (DOM) Level 3 Events Specification

ADOBE FLEX 3
Developer Guide
5
Advantages of ActionScript 3.0
ActionScript 3.0 goes beyond the scripting capabilities of previous versions of ActionScript. It is designed to facilitate
the creation of highly complex applications with large data sets and object-oriented, reusable code bases. While
ActionScript 3.0 is not required for content that runs in Adobe Flash Player 9 or AIR, it opens the door to perfor-
mance improvements that are only available with the AVM2, the new virtual machine. ActionScript 3.0 code can
execute up to ten times faster than legacy ActionScript code.
The older version of ActionScript Virtual Machine, AVM1, executes ActionScript 1.0 and ActionScript 2.0 code.
AVM1 is supported by Flash Player 9 for backward compatibility with existing and legacy content. For more infor-
mation, see “Compatibility with previous versions” on page 7.
What’s new in ActionScript 3.0
Although ActionScript 3.0 contains many classes and features that will be familiar to ActionScript programmers,
ActionScript 3.0 is architecturally and conceptually different from previous versions of ActionScript. The enhance-
ments in ActionScript 3.0 include new features of the core language and an improved Flash Player API that provides
increased control of low-level objects.
Note: Adobe® AIR™ applications can also use the Flash Player APIs.
Core language features
The core language defines the basic building blocks of the programming language, such as statements, expressions,
conditions, loops, and types. ActionScript 3.0 contains many new features that speed up the development process.
Run-time exceptions
ActionScript 3.0 reports more error conditions than previous versions of ActionScript. Run-time exceptions are used
for common error conditions, improving the debugging experience and enabling you to develop applications that
handle errors robustly. Run-time errors can provide stack traces annotated with source file and line number infor-
mation, helping you quickly pinpoint errors.
Run-time types
In ActionScript 2.0, type annotations were primarily a developer aid; at run time, all values were dynamically typed.
In ActionScript 3.0, type information is preserved at run time, and used for a number of purposes. Flash Player 9
and the Adobe AIR runtime perform run-time type checking, improving the system’s type safety. Type information
is also used to represent variables in native machine representations, improving performance and reducing memory
usage.
Sealed classes
ActionScript 3.0 introduces the concept of sealed classes. A sealed class possesses only the fixed set of properties and
methods that were defined at compile time; additional properties and methods cannot be added. This enables
stricter compile-time checking, resulting in more robust programs. It also improves memory usage by not requiring
an internal hash table for each object instance. Dynamic classes are also possible using the dynamic keyword. All
classes in ActionScript 3.0 are sealed by default, but can be declared to be dynamic with the dynamic keyword.

ADOBE FLEX 3
Developer Guide
6
Method closures
ActionScript 3.0 enables a method closure to automatically remember its original object instance. This feature is
useful for event handling. In ActionScript 2.0, method closures would not remember what object instance they were
extracted from, leading to unexpected behavior when the method closure was invoked. The mx.utils.Delegate class
was a popular workaround, but it is no longer needed.
ECMAScript for XML (E4X)
ActionScript 3.0 implements ECMAScript for XML (E4X), recently standardized as ECMA-357. E4X offers a
natural, fluent set of language constructs for manipulating XML. In contrast to traditional XML-parsing APIs, XML
with E4X performs like a native data type of the language. E4X streamlines the development of applications that
manipulate XML by drastically reducing the amount of code needed. For more information about the ActionScript
3.0 implementation of E4X, see “Working with XML” on page 207.
To view ECMA’s E4X specification, go to www.ecma-international.org.
Regular expressions
ActionScript 3.0 includes native support for regular expressions so that you can quickly search for and manipulate
strings. ActionScript 3.0 implements support for regular expressions as they are defined in the ECMAScript (ECMA-
262) edition 3 language specification.
Namespaces
Namespaces are similar to the traditional access specifiers used to control visibility of declarations (public,
private, protected). They work as custom access specifiers, which can have names of your choice. Namespaces
are outfitted with a Universal Resource Identifier (URI) to avoid collisions, and are also used to represent XML
namespaces when you work with E4X.
New primitive types
ActionScript 2.0 has a single numeric type, Number, a double-precision, floating-point number. ActionScript 3.0
contains the int and uint types. The int type is a 32-bit signed integer that lets ActionScript code take advantage of
the fast integer math capabilities of the CPU. The int type is useful for loop counters and variables where integers are
used. The uint type is an unsigned, 32-bit integer type that is useful for RGB color values, byte counts, and more.
Flash Player API features
The Flash Player APIs in ActionScript 3.0 contain many new classes that allow you to control objects at a low level.
The architecture of the language is completely new and more intuitive. While there are too many new classes to cover
in detail here, the following sections highlight some significant changes.
Note: Adobe® AIR™ applications can also use the Flash Player APIs.
DOM3 event model
Document Object Model Level 3 event model (DOM3) provides a standard way of generating and handling event
messages so that objects within applications can interact and communicate, maintaining their state and responding
to change. Patterned after the World Wide Web Consortium DOM Level 3 Events Specification, this model provides
a clearer and more efficient mechanism than the event systems available in previous versions of ActionScript.
Events and error events are located in the flash.events package. The Flex application framework uses the same event
model as the Flash Player API, so the event system is unified across the Flash platform.
Display list API
The API for accessing the Flash Player and Adobe AIR display list—the tree that contains any visual elements in the
application—consists of classes for working with visual primitives.

ADOBE FLEX 3
Developer Guide
7
The new Sprite class is a lightweight building block, similar to the MovieClip class but more appropriate as a base
class for UI components. The new Shape class represents raw vector shapes. These classes can be instantiated
naturally with the new operator and can be dynamically re-parented at any time.
Depth management is now automatic and built into Flash Player and Adobe AIR, rendering assignment of depth
numbers unnecessary. New methods are provided for specifying and managing the z-order of objects.
Handling dynamic data and content
ActionScript 3.0 contains mechanisms for loading and handling assets and data in your application that are intuitive
and consistent across the API. The new Loader class provides a single mechanism for loading SWF files and image
assets and provides a way to access detailed information about loaded content. The URLLoader class provides a
separate mechanism for loading text and binary data in data-driven applications. The Socket class provides a means
to read and write binary data to server sockets in any format.
Low-level data access
Various APIs provide low-level access to data that was never before available in ActionScript. For data that is being
downloaded, the URLStream class, which is implemented by URLLoader, provides access to data as raw binary data
while it is being downloaded. The ByteArray class lets you optimize reading, writing, and working with binary data.
The new Sound API provides detailed control of sound through the SoundChannel and SoundMixer classes. New
APIs dealing with security provide information about the security privileges of a SWF file or loaded content,
enabling you to better handle security errors.
Working with text
ActionScript 3.0 contains a flash.text package for all text-related APIs. The TextLineMetrics class provides detailed
metrics for a line of text within a text field; it replaces the TextFormat.getTextExtent() method in ActionScript
2.0. The TextField class contains a number of interesting new low-level methods that can provide specific infor-
mation about a line of text or a single character in a text field. These methods include getCharBoundaries(), which
returns a rectangle representing the bounding box of a character, getCharIndexAtPoint(), which returns the
index of the character at a specified point, and getFirstCharInParagraph(), which returns the index of the first
character in a paragraph. Line-level methods include getLineLength(), which returns the number of characters in
a specified line of text, and getLineText(), which returns the text of the specified line. A new Font class provides
a means to manage embedded fonts in SWF files.
Compatibility with previous versions
As always, Flash Player provides full backward compatibility with previously published content. Any content that ran
in previous versions of Flash Player runs in Flash Player 9. The introduction of ActionScript 3.0 in Flash Player 9,
however, does present some challenges for interoperability between old and new content running in Flash Player 9.
The compatibility issues include the following:
•A single SWF file cannot combine ActionScript 1.0 or 2.0 code with ActionScript 3.0 code.
•ActionScript 3.0 code can load a SWF file written in ActionScript 1.0 or 2.0, but it cannot access the SWF file’s
variables and functions.
•SWF files written in ActionScript 1.0 or 2.0 cannot load SWF files written in ActionScript 3.0. This means that
SWF files authored in Flash 8 or Flex Builder 1.5 or earlier versions cannot load ActionScript 3.0 SWF files.

ADOBE FLEX 3
Developer Guide
8
The only exception to this rule is that an ActionScript 2.0 SWF file can replace itself with an ActionScript 3.0
SWF file, as long as the ActionScript 2.0 SWF file hasn't previously loaded anything into any of its levels. An
ActionScript 2.0 SWF file can do this through a call to loadMovieNum(), passing a value of 0 to the level
parameter.
•In general, SWF files written in ActionScript 1.0 or 2.0 must be migrated if they are to work together with SWF
files written in ActionScript 3.0. For example, say you created a media player using ActionScript 2.0. The media
player loads various content that was also created using ActionScript 2.0. You cannot create new content in Action-
Script 3.0 and load it in the media player. You must migrate the video player to ActionScript 3.0.
If, however, you create a media player in ActionScript 3.0, that media player can perform simple loads of your
ActionScript 2.0 content.
The following tables summarize the limitations of previous versions of Flash Player in relation to loading new
content and executing code, as well as the limitations for cross-scripting between SWF files written in different
versions of ActionScript.
Supported functionality Flash Player 7 Flash Player 8 Flash Player 9
Can load SWFs published for 7 and earlier 8 and earlier 9 and earlier
Contains this AVM AVM1 AVM1 AVM1 and AVM2
Runs SWFs written in ActionScript 1.0 and 2.0 1.0 and 2.0 1.0 and 2.0, and 3.0
Supported functionality*
*. Content running in Flash Player 9 or later. Content running in Flash Player 8 or earlier
can load, display, execute, and cross-script only ActionScript 1.0 and 2.0.
Content created in
ActionScript 1.0 and 2.0
Content created in ActionScript 3.0
Can load content and execute code
in content created in
ActionScript 1.0 and 2.0
only
ActionScript 1.0 and 2.0, and Action-
Script 3.0
Can cross script content created in ActionScript 1.0 and 2.0
only†
†. ActionScript 3.0 through Local Connection.
ActionScript 3.0‡
‡. ActionScript 1.0 and 2.0 through LocalConnection.

9
Chapter 3: Getting started with
ActionScript
This chapter is designed to get you started with ActionScript programming and give you the background you’ll need
to understand the concepts and examples in the rest of this manual. We’ll begin with a discussion of basic
programming concepts, described in the context of how to apply them in ActionScript. We’ll also cover the essentials
of how to organize and build an ActionScript application.
Contents
Programming fundamentals . . . . . . . . . . . . . . . . . . . . . . . . . . . . . . . . . . . . . . . . . . . . . . . . . . . . . . . . . . . . . . . . . . . . . . . . . 9
Working with objects . . . . . . . . . . . . . . . . . . . . . . . . . . . . . . . . . . . . . . . . . . . . . . . . . . . . . . . . . . . . . . . . . . . . . . . . . . . . . . 11
Common program elements . . . . . . . . . . . . . . . . . . . . . . . . . . . . . . . . . . . . . . . . . . . . . . . . . . . . . . . . . . . . . . . . . . . . . . . . 19
Building applications with ActionScript . . . . . . . . . . . . . . . . . . . . . . . . . . . . . . . . . . . . . . . . . . . . . . . . . . . . . . . . . . . . . . 21
Creating your own classes . . . . . . . . . . . . . . . . . . . . . . . . . . . . . . . . . . . . . . . . . . . . . . . . . . . . . . . . . . . . . . . . . . . . . . . . . . 24
Example: Creating a basic application . . . . . . . . . . . . . . . . . . . . . . . . . . . . . . . . . . . . . . . . . . . . . . . . . . . . . . . . . . . . . . . . 27
Running subsequent examples . . . . . . . . . . . . . . . . . . . . . . . . . . . . . . . . . . . . . . . . . . . . . . . . . . . . . . . . . . . . . . . . . . . . . . 32
Programming fundamentals
Since ActionScript is a programming language, it will help you learn ActionScript if you first understand a few
general computer programming concepts.
What computer programs do
First of all, it’s useful to have a conceptual idea of what a computer program is and what it does. There are two main
aspects to a computer program:
•A program is a series of instructions or steps for the computer to carry out.
•Each step ultimately involves manipulating some piece of information or data.
In a general sense, a computer program is just a list of step-by-step instructions that you give to the computer, which
it performs one by one. Each individual instruction is known as a statement. As you’ll see throughout this manual,
in ActionScript, each statement is written with a semicolon at the end.
In essence, all that a given instruction in a program does is manipulate some bit of data that’s stored in the computer’s
memory. In a simple case, you might instruct the computer to add two numbers and store the result in its memory.
In a more complex case, imagine there is a rectangle drawn on the screen, and you want to write a program to move
it somewhere else on the screen. The computer is keeping track of certain information about the rectangle—the x, y
coordinates where it’s located, how wide and tall it is, what color it is, and so forth. Each of those bits of information
is stored somewhere in the computer’s memory. A program to move the rectangle to a different location would have
steps like “change the x coordinate to 200; change the y coordinate to 150” (in other words, specifying new values to
be used for the x and y coordinates). Of course, the computer does something with this data to actually turn those
numbers into the image that appears on the computer screen; but for the level of detail we’re interested in, it’s enough
to know that the process of “moving a rectangle on the screen” really just involves changing bits of data in the
computer’s memory.

ADOBE FLEX 3
Developer Guide
10
Variables and constants
Since programming mainly involves changing pieces of information in the computer’s memory, there needs to be a
way to represent a single piece of information in the program. A variable is a name that represents a value in the
computer’s memory. As you write statements to manipulate values, you write the variable’s name in place of the value;
any time the computer sees the variable name in your program, it looks in its memory and uses the value it finds
there. For example, if you have two variables named value1 and value2, each containing a number, to add those
two numbers you could write the statement:
value1 + value2
When it’s actually carrying out the steps, the computer will look to see the values in each variable, and add them
together.
In ActionScript 3.0, a variable actually consists of three different parts:
•The variable’s name
•The type of data that can be stored in the variable
•The actual value stored in the computer’s memory
We’ve just discussed how the computer uses the name as a placeholder for the value. The data type is also important.
When you create a variable in ActionScript, you specify the specific type of data that it will hold; from that point on,
your program’s instructions can store only that type of data in the variable, and you can manipulate the value using
the particular characteristics associated with its data type. In ActionScript, to create a variable (known as declaring
the variable), you use the var statement:
var value1:Number;
In this case, we’ve told the computer to create a variable named value1, which will hold only Number data
(“Number” is a specific data type defined in ActionScript). You can also store a value in the variable right away:
var value2:Number = 17;
A constant is very similar to a variable in the sense that it is a name that represents a value in the computer’s memory,
with a specified data type. The difference is that a constant can only be assigned a value one time in the course of an
ActionScript application. Once a constant’s value is assigned, it is the same throughout the application. The syntax
for declaring a constant is the same as that for declaring a variable, except that you use the const keyword instead
of the var keyword:
const SALES_TAX_RATE:Number = 0.07;
A constant is useful for defining a value that is used in multiple places throughout a project, which won’t change
under normal circumstances. Using a constant rather than a literal value makes your code more readable. For
example, it’s easier to understand the purpose of a line of code that multiplies a price by SALES_TAX_RATE, compared
to a line of code that muliplies the price by 0.07. In addition, if the value defined by a constant ever does need to
change, if you use a constant to represent that value throughout your project you only need to change the value in
one place (the constant declaration), instead of needing to change it in various places as you would if you use hard-
coded literal values.
Data types
In ActionScript, there are many data types that you can use as the data type of the variables you create. Some of these
can be thought of as “simple” or “fundamental” data types:
•String: a textual value, like a name or the text of a book chapter
•Numeric: ActionScript 3.0 includes three specific data types for numeric data:

ADOBE FLEX 3
Developer Guide
11
•Number: any numeric value, including values with or without a fraction
•int: an integer (a whole number without a fraction)
•uint: an “unsigned” integer, meaning a whole number that can’t be negative
•Boolean: a true-or-false value, such as whether a switch is on or whether two values are equal
The simple data types represent a single piece of information: for example, a single number or a single sequence of
text. However, the majority of the data types defined in ActionScript could be described as complex data types,
because they represent a set of values grouped together. For example, a variable with the data type Date represents a
single value—a moment in time. Nevertheless, that date value is actually represented as several values: the day,
month, year, hours, minutes, seconds, and so on, all of which are individual numbers. So while we think of a date as
a single value (and we can treat it as a single value by creating a Date variable), internally the computer thinks of it
as a group of several values that, put together, define a single date.
Most of the built-in data types, as well as data types defined by programmers, are complex data types. Some of the
complex data types you might recognize are:
•MovieClip: a movie clip symbol
•TextField: a dynamic or input text field
•SimpleButton: a button symbol
•Date: information about a single moment in time (a date and time)
Two words that are often used as synonyms for data type are class and object. A class is simply the definition of a data
type—it’s like a template for all objects of the data type, like saying “all variables of the Example data type have these
characteristics: A, B, and C.” An object, on the other hand, is just an actual instance of a class; a variable whose data
type is MovieClip could be described as a MovieClip object. The following are different ways of saying the same
thing:
•The data type of the variable myVariable is Number.
•The variable myVariable is a Number instance.
•The variable myVariable is a Number object.
•The variable myVariable is an instance of the Number class.
Working with objects
ActionScript is what’s known as an object-oriented programming language. Object-oriented programming is simply
an approach to programming—really nothing more than a way to organize the code in a program, using objects.
Earlier we defined a computer program as a series of steps or instructions that the computer performs. Conceptually,
then, we might imagine a computer program as just a single long list of instructions. However, in object-oriented
programming, the program instructions are divided among different objects—the code is grouped into chunks of
functionality, so related types of functionality or related pieces of information are grouped together in one container.
In fact, if you’ve worked with symbols in Flash, you’re already used to working with objects. Imagine you’ve defined
a movie clip symbol—let’s say it’s a drawing of a rectangle—and you’ve placed a copy of it on the Stage. That movie
clip symbol is also (literally) an object in ActionScript; it’s an instance of the MovieClip class.

ADOBE FLEX 3
Developer Guide
12
There are various characteristics of the movie clip that you can modify. For example, when it’s selected there are
values you can change in the Property inspector, like its x coordinate, or its width, or various color adjustments like
changing its alpha (transparency), or applying a drop-shadow filter to it. Other Flash tools let you make more
changes, like using the Free Transform tool to rotate the rectangle. All of these things that you can do to modify a
movie clip symbol in the Flash authoring environment are also things you can do in ActionScript by changing the
pieces of data that are all put together into a single bundle called a MovieClip object.
In ActionScript object-oriented programming, there are three types of characteristics that any class can include:
•Properties
•Methods
•Events
Together, these elements are used to manage the pieces of data used by the program and to decide what actions are
carried out and in what order.
Properties
A property represents one of the pieces of data that are bundled together in an object. A song object might have
properties named artist and title; the MovieClip class has properties like rotation, x, width, and alpha. You
work with properties like individual variables—in fact, you might think of properties as simply the “child” variables
contained in an object.
Here are some examples of ActionScript code that uses properties. This line of code moves the MovieClip named
square to the x coordinate 100 pixels:
square.x = 100;
This code uses the rotation property to make the square MovieClip rotate to match the rotation of the triangle
MovieClip:
square.rotation = triangle.rotation;
This code alters the horizontal scale of the square MovieClip so that it’s one-and-a-half times wider than it used to
be:
square.scaleX = 1.5;
Notice the common structure: you use a variable (square, triangle) as the name of the object, followed by a period
(.) and then the name of the property (x, rotation, scaleX). The period, known as the dot operator, is used to
indicate that you’re accessing one of the child elements of an object. The whole structure together, “variable name-
dot-property name,” is used like a single variable, as a name for a single value in the computer’s memory.
Methods
A method is an action that can be performed by an object. For example, if you’ve made a movie clip symbol in Flash
with several keyframes and animation on its timeline, that movie clip can play, or stop, or be instructed to move the
playhead to a particular frame.
This code instructs the MovieClip named shortFilm to start playing:
shortFilm.play();
This line makes the MovieClip named shortFilm stop playing (the playhead stops in place, like pausing a video):
shortFilm.stop();

ADOBE FLEX 3
Developer Guide
13
This code makes a MovieClip named shortFilm move its playhead to Frame 1 and stop playing (like rewinding a
video):
shortFilm.gotoAndStop(1);
As you can see, methods, like properties, are accessed by writing the object’s name (a variable), then a period, and
then the name of the method followed by parentheses. The parentheses are the way that you indicate that you’re
calling the method—or in other words, instructing the object to perform that action. Sometimes values (or variables)
are placed in the parentheses, as a way to pass along additional information that is needed to carry out the action.
These values are known as method parameters. For example, the gotoAndStop() method needs to know which
frame it should go to, so it requires a single parameter in the parentheses. Other methods, like play() and stop(),
are self-explanatory, so they don’t require extra information. Nevertheless, they are still written with parentheses.
Unlike properties (and variables), methods aren’t used as value placeholders. However, some methods can perform
calculations and return a result that can be used like a variable. For example, the Number class’s toString() method
converts the numeric value to its text representation:
var numericData:Number = 9;
var textData:String = numericData.toString();
For instance, you would use the toString() method if you wanted to display the value of a Number variable in a
text field on the screen. The TextField class’s text property (which represents the actual text content displayed on
the screen) is defined as a String, so it can contain only text values. This line of code converts the numeric value in
the variable numericData to text, and then makes it show up on the screen in the TextField object named
calculatorDisplay:
calculatorDisplay.text = numericData.toString();
Events
We’ve described a computer program as a series of instructions that the computer carries out step-by-step. Some
simple computer programs consist of nothing more than that—a few steps which the computer carries out, at which
point the program ends. However, ActionScript programs are designed to keep running, waiting for user input or
other things to happen. Events are the mechanism that determines which instructions the computer carries out and
when.
In essence, events are things that happen that ActionScript is aware of and can respond to. Many events are related
to user interaction—like a user clicking a button, or pressing a key on the keyboard—but there are also other types
of events. For example, if you use ActionScript to load an external image, there is an event that can let you know when
the image has finished loading. In essence, when an ActionScript program is running, Adobe Flash Player just sits
and waits for certain things to happen, and when those things happen, it runs the specific ActionScript code that
you’ve specified for those events.
Basic event handling
The technique for specifying certain actions that should be performed in response to particular events is known as
event handling. When you are writing ActionScript code to perform event handling, there are three important
elements you’ll want to identify:
•The event source: Which object is the one the event is going to happen to? For instance, which button will be
clicked, or which Loader object is loading the image? The event source is also known as the event target, because it’s
the object where the event is targeted by Flash Player or AIR (that is, where the event actually happens).
•The event: What is the thing that is going to happen, the thing that you want to respond to? This is important to
identify, because many objects trigger several events.

ADOBE FLEX 3
Developer Guide
14
•The response: What step(s) do you want performed when the event happens?
Any time you write ActionScript code to handle events, it will include these three elements, and the code will follow
this basic structure (elements in bold are placeholders you’d fill in for your specific case):
function eventResponse(eventObject:EventType):void
{
// Actions performed in response to the event go here.
}
eventSource.addEventListener(EventType.EVENT_NAME, eventResponse);
This code does two things. First, it defines a function, which is the way to specify the actions you want performed in
response to the event. Next, it calls the addEventListener() method of the source object, in essence “subscribing”
the function to the specified event so that when the event happens, the function’s actions are carried out. We’ll
consider each of these parts in more detail.
A function provides a way for you to group actions together, with a single name that is like a shortcut name to carry
out the actions. A function is identical to a method except that it isn’t necessarily associated with a specific class (in
fact, a method could be defined as a function that is associated with a particular class). When you’re creating a
function for event handling, you must choose the name for the function (named eventResponse in this case), and
you must also specify one parameter (named eventObject in this example). Specifying a function parameter is like
declaring a variable, so you also have to indicate the data type of the parameter. There is an ActionScript class defined
for each event, and the data type you specify for the function parameter is always the class associated with the
particular event you want to respond to. Finally, between the opening and closing curly braces ({ ... }), you write the
instructions you want the computer to carry out when the event happens.
Once you’ve written the event-handling function, you need to tell the event source object (the object that the event
happens to—for example, the button) that you want your function to be called when the event happens. You do this
by calling the addEventListener() method of that object (all objects that have events also have an
addEventListener() method). The addEventListener() method takes two parameters:
•First, the name of the specific event you want to respond to. Once again, each event is affiliated with a specific
class, and that class will have a special value predefined for each event—sort of like the event’s own unique name,
which you should use for the first parameter.
•Second, the name of your event response function. Note that a function name is written without parentheses
when it’s passed as a parameter.
Examining the event-handling process
The following is a step-by-step description of the process that happens when you create an event listener. In this case,
it’s an example of creating a listener function that is called when an object named myButton is clicked.
The actual code written by the programmer is as follows:
function eventResponse(event:MouseEvent):void
{
// Actions performed in response to the event go here.
}
myButton.addEventListener(MouseEvent.CLICK, eventResponse);
Here is how this code would actually work when it’s running in Flash Player:

ADOBE FLEX 3
Developer Guide
15
1When the SWF file loads, Flash Player or Adobe® AIR™ makes note of the fact that there’s a function named
eventResponse().
2Flash Player or AIR then runs the code (specifically, the lines of code that aren’t in a function). In this case that’s
only one line of code: calling the addEventListener() method on the event source object (named myButton) and
passing the eventResponse function as a parameter.
aInternally, myButton has a list of functions that are listening to each of its events, so when its
addEventListener() method is called, myButton stores the eventResponse() function in its list of event
listeners.
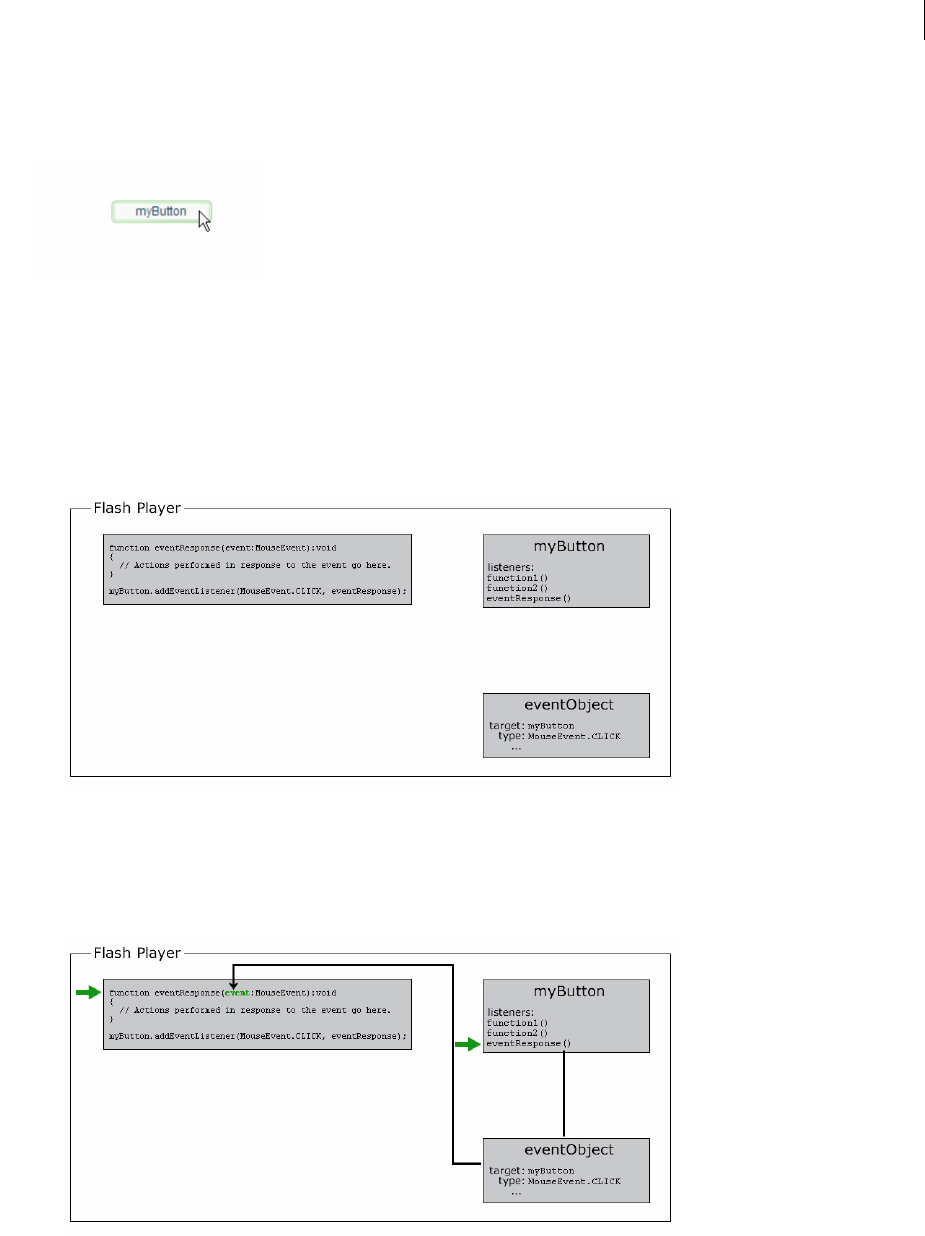
ADOBE FLEX 3
Developer Guide
16
3At some point, the user clicks the myButton object, triggering its click event (identified as MouseEvent.CLICK
in the code).
At that point, the following occurs:
aFlash Player or AIR creates an object, an instance of the class associated with the event in question
(MouseEvent in this example). For many events this will be an instance of the Event class; for mouse events it
will be a MouseEvent instance; and for other events it will be an instance of the class that’s associated with that
event. This object that’s created is known as the event object, and it contains specific information about the event
that happened: what type of event it is, where it happened, and other event-specific information if applicable.
bFlash Player or AIR then looks at the list of event listeners stored by myButton. It goes through these
functions one by one, calling each function and passing the event object to the function as a parameter. Since the
eventResponse() function is one of myButton’s listeners, as part of this process Flash Player or AIR calls the
eventResponse() function.
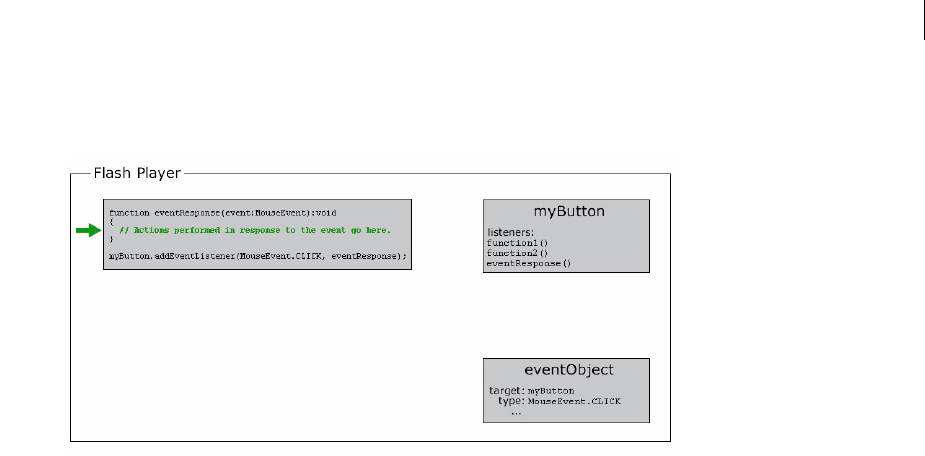
ADOBE FLEX 3
Developer Guide
17
cWhen the eventResponse() function is called, the code in that function runs, so your specified actions are
carried out.
Event-handling examples
Here are a few more concrete examples of events to give you an idea of some of the common event elements and
possible variations available when you write event-handling code:
•Clicking a button to start the current movie clip playing. In the following example, playButton is the instance
name of the button, and this is a special name meaning “the current object”:
this.stop();
function playMovie(event:MouseEvent):void
{
this.play();
}
playButton.addEventListener(MouseEvent.CLICK, playMovie);
•Detecting typing in a text field. In this example, entryText is an input text field, and outputText is a dynamic
text field:
function updateOutput(event:TextEvent):void
{
var pressedKey:String = event.text;
outputText.text = "You typed: " + pressedKey;
}
entryText.addEventListener(TextEvent.TEXT_INPUT, updateOutput);
•Clicking a button to navigate to a URL. In this case, linkButton is the instance name of the button:
function gotoAdobeSite(event:MouseEvent):void
{
var adobeURL:URLRequest = new URLRequest("http://www.adobe.com/");
navigateToURL(adobeURL);
}
linkButton.addEventListener(MouseEvent.CLICK, gotoAdobeSite);

ADOBE FLEX 3
Developer Guide
18
Creating object instances
Of course, before you can use an object in ActionScript, the object has to exist in the first place. One part of creating
an object is declaring a variable; however, declaring a variable only creates an empty place in the computer’s memory.
You must assign an actual value to the variable—that is, create an object and store it in the variable—before you
attempt to use or manipulate it. The process of creating an object is known as instantiating the object—in other
words, creating an instance of a particular class.
One simple way to create an object instance doesn’t involve ActionScript at all. In Flash, when you place a movie clip
symbol, button symbol, or text field on the Stage, and you assign it an instance name in the Property inspector, Flash
automatically declares a variable with that instance name, creates an object instance, and stores that object in the
variable. Likewise, in Adobe Flex Builder when you create a component in Macromedia® MXML™ from Adobe
(either by coding an MXML tag or by placing the component on the editor in Design mode) and assign an ID to that
component (in the MXML markup or in the Flex Properties view), that ID becomes the name of an ActionScript
variable, and an instance of the component is created and stored in the variable.
However, you won’t always want to create an object visually. There are also several ways you can create object
instances using only ActionScript. First, with several ActionScript data types, you can create an instance using a
literal expression—a value written directly into the ActionScript code. Here are some examples:
•Literal numeric value (enter the number directly):
var someNumber:Number = 17.239;
var someNegativeInteger:int = -53;
var someUint:uint = 22;
•Literal String value (surround the text with double quotation marks):
var firstName:String = "George";
var soliloquy:String = "To be or not to be, that is the question...";
•Literal Boolean value (use the literal values true or false):
var niceWeather:Boolean = true;
var playingOutside:Boolean = false;
•Literal Array value (wrap a comma-separated list of values in square brackets):
var seasons:Array = ["spring", "summer", "autumn", "winter"];
•Literal XML value (enter the XML directly):
var employee:XML = <employee>
<firstName>Harold</firstName>
<lastName>Webster</lastName>
</employee>;
ActionScript also defines literal expressions for the Array, RegExp, Object, and Function data types. For details on
these classes, see “Working with arrays” on page 144, “Using regular expressions” on page 188, and “Object data
type” on page 54.
For any other data type, to create an object instance you use the new operator with the class name, like this:
var raceCar:MovieClip = new MovieClip();
var birthday:Date = new Date(2006, 7, 9);
Creating an object using the new operator is often referred to as “calling the class’s constructor.” A constructor is a
special method that is called as part of the process of creating an instance of a class. Notice that when you create an
instance in this way, you put parentheses after the class name, and sometimes you specify parameter values—two
things that you also do when calling a method.

ADOBE FLEX 3
Developer Guide
19
Note: Even for those data types that let you create instances using a literal expression, you can still use the new operator
to create an object instance. For instance, these two lines of code do exactly the same thing:
var someNumber:Number = 6.33;
var someNumber:Number = new Number(6.33);
It’s important to be familiar with the new ClassName() way of creating objects. If you need to create an instance of
any ActionScript data type that doesn’t have a visual representation (and hence can’t be created by placing an item
on the Flash Stage or the Design mode of Flex Builder’s MXML editor), you can only do so by creating the object
directly in ActionScript using the new operator.
In Flash specifically, the new operator can also be used to create an instance of a movie clip symbol that is defined in
the Library but isn’t placed on the Stage. For more about this, see “Creating MovieClip objects with ActionScript” on
page 350.
Common program elements
In addition to declaring variables, creating object instances, and manipulating objects using their properties and
methods, there are a few other building blocks that you use to create an ActionScript program.
Operators
Operators are special symbols (or occasionally words) that are used to perform calculations. They are mostly used
for math operations, and also used when comparing values to each other. As a general rule, an operator uses one or
more values and “works out” to a single result. For example:
•The addition operator (+) adds two values together, resulting in a single number:
var sum:Number = 23 + 32;
•The multiplication operator (*) multiplies one value by another, resulting in a single number:
var energy:Number = mass * speedOfLight * speedOfLight;
•The equality operator (==) compares two values to see if they are equal, resulting in a single true-or-false
(Boolean) value:
if (dayOfWeek == "Wednesday")
{
takeOutTrash();
}
As shown here, the equality operator and the other “comparison” operators are most commonly used with the
if statement to determine if certain instructions should be carried out or not.
For more details and examples of using operators, see “Operators” on page 63.
Comments
As you’re writing ActionScript, you’ll often want to leave notes to yourself, perhaps explaining how certain lines of
code work or why you made a particular choice. Code comments are a tool you can use to write text that the computer
should ignore in your code. ActionScript includes two kinds of comments:
•Single-line comment: A single-line comment is designated by placing two slashes anywhere on a line. Everything
after the slashes up to the end of that line is ignored by the computer:
// This is a comment; it’s ignored by the computer.

ADOBE FLEX 3
Developer Guide
20
var age:Number = 10; // Set the age to 10 by default.
•Multiline comments: A multiline comment includes a starting comment marker (/*), then the comment
content, and an ending comment marker (*/). Everything between the starting and ending markers is ignored by
the computer, regardless of how many lines the comment spans:
/*
This might be a really long description, perhaps describing what
a particular function is used for or explaining a section of code.
In any case, these lines are all ignored by the computer.
*/
Another common use of comments is to temporarily “turn off” one or more lines of code—for example, if you’re
testing out a different way of doing something, or trying to figure out why certain ActionScript code isn’t working
the way you expect.
Flow control
Many times in a program, you will want to repeat certain actions, perform only certain actions and not others,
perform alternative actions depending on certain conditions, and so on. Flow control is the control over which
actions are performed. There are several types of flow control elements available in ActionScript.
•Functions: Functions are like shortcuts—they provide a way to group a series of actions under a single name, and
can be used to perform calculations. Functions are particularly important for handling events, but are also used as a
general tool for grouping a series of instructions. For more on functions, see “Functions” on page 74.
•Loops: Loop structures let you designate a set of instructions that the computer will perform a set number of
times or until some condition changes. Often loops are used to manipulate several related items, using a variable
whose value changes each time the computer works through the loop. For more on loops, see “Looping” on page 71.
•Conditional statements: Conditional statements provide a way to designate certain instructions that are carried
out only under certain circumstances or to provide alternative sets of instructions for different conditions. The most
common type of conditional statement is the if statement. The if statement checks a value or expression in its
parentheses. If the value is true, the lines of code in curly braces are carried out; otherwise, they are ignored. For
example:
if (age < 20)
{
// show special teenager-targeted content
}
The if statement’s companion, the else statement, lets you designate alternative instructions to be performed
if the condition is not true:
if (username == "admin")
{
// do some administrator-only things, like showing extra options
}
else
{
// do some non-administrator things
}
For more on conditional statements, see “Conditionals” on page 69.

ADOBE FLEX 3
Developer Guide
21
Building applications with ActionScript
The process of writing ActionScript to build an application involves more than just knowing the syntax and the
names of the classes you’ll use. While most of the information in this manual is geared towards those two topics
(syntax and using ActionScript classes), you’ll also want to know some information such as what programs can be
used for writing ActionScript, how ActionScript code can be organized and included in an application, and what
steps you should follow in developing an ActionScript application.
Options for organizing your code
You can use ActionScript 3.0 code to power everything from simple graphics animations to complex client-server
transaction processing systems. Depending on the type of application you’re building, you may prefer to use one or
more of these different ways of including ActionScript in your project.
Embedding code in Flex MXML files . . . . . . . . . . . . . . . . . . . . . . . . . . . . . . . . . . . . . . . . . . . . . . . . . . . . . . . . . . . . . . . . 21
Embedding code in Flex MXML files
In an Adobe Flex development environment, you can include ActionScript code inside an <mx:Script> tag in a Flex
MXML file. However, this flexibility comes with a cost. When you build larger applications, it becomes easy to lose
track of which frames contain which scripts. This can make the application more difficult to maintain over time.
Note: You can specify a source parameter for an <mx:Script> tag, which lets you insert ActionScript code as if it was
typed directly within the <mx:Script> tag. However, the source file that you use cannot define its own class, which
limits its reusability.
However, this flexibility comes with a cost. In order to use the same code in another Flex project, you must copy and
paste the code into the new file. If you want to be able to use your ActionScript code in other Flex projects in the
future, you will want to store your code in external ActionScript files (text files with the .as extension).
Storing code in ActionScript files
If your project involves significant ActionScript code, the best way to organize your code is in separate ActionScript
source files (text files with the .as extension). An ActionScript file can be structured in one of two ways, depending
on how you intend to use it in your application.
•Unstructured ActionScript code: Lines of ActionScript code, including statements or function definitions,
written as though they were entered directly in a timeline script, MXML file, and so on.
ActionScript written in this way can be accessed using the include statement in ActionScript, or the
<mx:Script> tag in Adobe Flex MXML. The ActionScript include statement causes the contents of an external
ActionScript file to be inserted at a specific location and within a given scope in a script, as if it were entered
there directly. In the Flex MXML language, the <mx:Script> tag lets you specify a source attribute that identifies
an external ActionScript file to be loaded at that point in the application. For example, the following tag will load
an external ActionScript file named Box.as:
<mx:Script source=“Box.as” />
•ActionScript class definition: A definition of an ActionScript class, including its method and property defini-
tions.

ADOBE FLEX 3
Developer Guide
22
When you define a class, you can access the ActionScript code in the class by creating an instance of the class
and using its properties, methods, and events, just as you would with any of the built-in ActionScript classes.
This requires two parts:
•Use the import statement to specify the full name of the class, so the ActionScript compiler knows where to
find it. For example, if you want to use the MovieClip class in ActionScript, you first need to import that class
using its full name, including package and class:
import flash.display.MovieClip;
Alternatively, you can import the package that contains the MovieClip class, which is equivalent to writing
separate import statements for each class in the package:
import flash.display.*;
The only exceptions to the rule that a class must be imported if you refer to that class in your code are the
top-level classes, which are not defined in a package.
Note: In Flash, for scripts attached to frames on the Timeline, the built-in classes (in the flash.* packages) are
automatically imported. However, when you write your own classes, or if you’re working with Flash authoring
components (the fl.* packages) or if you’re working in Flex, you will need to explicitly import any class in order
to write code that creates instances of that class.
•Write code which specifically refers to the class name (usually declaring a variable with that class as its data
type, and creating an instance of the class to store in the variable). By referring to another class name in Action-
Script code, you tell the compiler to load the definition of that class. For example, given an external class called
Box, this statement causes a new instance of the Box class to be created:
var smallBox:Box = new Box(10,20);
When the compiler comes across the reference to the Box class for the first time, it searches the loaded source
code to locate the Box class definition.
Choosing the right tool
Depending on the needs of your project and the resources you have available to you, you may want to use one of
several tools (or multiple tools in conjunction with each other) for writing and editing your ActionScript code.
Flash authoring tool
In addition to its graphics and animation creation capabilities, Adobe Flash CS3 Professional includes tools for
working with ActionScript code, either attached to elements in a FLA file or in external ActionScript-only files. The
Flash authoring tool is ideal for projects that involve significant animation or video or where you want to create most
of the graphic assets yourself, particularly projects with minimal user interaction or functionality requiring Action-
Script. Another reason you may choose to use the Flash authoring tool to develop your ActionScript project is if you
prefer to create visual assets and write code in the same application. You may also want to use Flash authoring if you
want to use pre-built user interface components, but smaller SWF size or easier visual skinning are key priorities for
your project.
Adobe Flash CS3 Professional includes two tools for writing ActionScript code:
•Actions panel: Available when working in a FLA file, this panel allows you to write ActionScript code attached
to frames on a timeline.
•Script window: The Script window is a dedicated text editor for working with ActionScript (.as) code files.

ADOBE FLEX 3
Developer Guide
23
Flex Builder
Adobe Flex Builder is the premier tool for creating projects with the Flex framework. In addition to its visual layout
and MXML editing tools, Flex Builder also includes a full-featured ActionScript editor, so it can be used to create
Flex or ActionScript-only projects. Flex applications have several benefits, including a rich set of pre-built user
interface controls, flexible dynamic layout controls, and built-in mechanisms for working with external data sources
and linking external data to user interface elements. However, because of the additional code required to provide
these features, Flex applications can have a larger SWF file size and can’t be completely re-skinned as easily as their
Flash counterparts.
Use Flex Builder if you are creating full-featured, data-driven rich Internet applications with Flex, and you want to
edit ActionScript code, edit MXML code, and lay out your application visually, all within a single tool.
Third-party ActionScript editor
Because ActionScript (.as) files are stored as simple text files, any program that is capable of editing plain text files
can be used to write ActionScript files. In addition to Adobe’s ActionScript products, several third-party text editing
programs with ActionScript-specific capabilities have been created. You can write an MXML file or ActionScript
classes using any text editor program. You can then create a SWF application (either a Flex or an ActionScript-only
application) from those files using the Flex SDK, which includes the Flex framework classes as well as the Flex
compiler. Alternatively, many developers use a third-party ActionScript editor for writing ActionScript classes, in
combination with the Flash authoring tool for creating graphical content.
You might choose to use a third-party ActionScript editor if:
•You prefer to write ActionScript code in a separate program in conjunction with designing visual elements in
Flash.
•You use an application for non-ActionScript programming (such as creating HTML pages or building applica-
tions in another programming language), and you want to use the same application for your ActionScript coding as
well.
•You want to create ActionScript-only or Flex projects using the Flex SDK without the expense of Flash or Flex
Builder.
Some of the notable code editors providing ActionScript-specific support include:
•Adobe Dreamweaver® CS3
•ASDT
•FDT
•FlashDevelop
•PrimalScript
•SE|PY
•XCode (with ActionScript template and code-hint files)
The ActionScript development process
No matter whether your ActionScript project is large or small, using a process to design and develop your application
will help you work more efficiently and effectively. The following steps describe a basic development process for
building an application that uses ActionScript 3.0:
1Design your application.
You should describe your application in some way before you start building it.

ADOBE FLEX 3
Developer Guide
24
2Compose your ActionScript 3.0 code.
You can create ActionScript code using Flash, Flex Builder, Dreamweaver, or a text editor.
3Create a Flash or Flex application file to run your code.
In the Flash authoring tool, this involves creating a new FLA file, setting up the publish settings, adding user
interface components to the application, and referencing the ActionScript code. In the Flex development
environment, creating a new application file involves defining the application and adding user interface compo-
nents using MXML, and referencing the ActionScript code.
4Publish and test your ActionScript application.
This involves running your application from within the Flash authoring or Flex development environment, and
making sure it does everything you intended.
Note that you don’t necessarily have to follow these steps in order, or completely finish one step before working on
another. For example, you might design one screen of your application (step 1), and then create the graphics, buttons,
and so forth (step 3), before writing ActionScript code (step 2) and testing (step 4). Or you might design part of it,
and then add one button or interface element at a time, writing ActionScript for each one and testing it as it’s built.
Although it’s helpful to remember these four stages of the development process, in real-world development it’s
usually more effective to move back and forth among the stages as appropriate.
Creating your own classes
The process of creating classes for use in your projects can seem daunting. However, the more difficult part of
creating a class is the task of designing the class—identifying the methods, properties, and events that it will include.
Strategies for designing a class
The topic of object-oriented design is a complex one; entire careers have been devoted to the academic study and
professional practice of this discipline. Nevertheless, here are a few suggested approaches that can help you get
started.
1Think about the role that the instances of this class will play in the application. Generally, objects serve one of
these three roles:
•Value object: These objects serve primarily as containers of data—that is, they likely have several properties
and fewer methods (or sometimes no methods). They are generally code representations of clearly defined items,
such as a Song class (representing a single real-world song) or Playlist class (representing a conceptual group of
songs) in a music player application.
•Display object: These are objects that actually appear on the screen. Examples include user-interface
elements like a drop-down list or status readout, graphical elements like creatures in a video game, and so forth.
•Application structure: These objects play a broad range of supporting roles in the logic or processing
performed by applications. Examples include an object that performs certain calculations in a biology
simulation; one that is responsible for synchronizing values between a dial control and a volume readout in a
music player application; one that manages the rules in a video game; or one that loads a saved picture in a
drawing application.
2Decide the specific functionality that the class will need. The different types of functionality often become the
methods of the class.

ADOBE FLEX 3
Developer Guide
25
3If the class is intended to serve as a value object, decide the data that the instances will include. These items are
good candidates for properties.
4Since your class is being designed specifically for your project, what’s most important is that you provide the
functionality that your application needs. It might help to answer these questions for yourself:
•What pieces of information will your application be storing, tracking, and manipulating? Deciding this helps
you identify any value objects and properties you may want.
•What sets of actions will need to be performed—for example, when the application first loads, when a
particular button is clicked, when a movie stops playing, and so forth? These are good candidates for methods
(or properties, if the “actions” just involve changing individual values).
•For any given action, what information will the class need to know in order to perform that action? Those
pieces of information become the parameters of the method.
•As the application proceeds to do its work, what things will change in your class that other parts of your
application will need to know about? These are good candidates for events.
5If there is an existing object that is similar to the object you need, except that it’s lacking some additional
functionality you want to add, consider creating a subclass (a class which builds on the functionality of an existing
class, rather than defining all of its own functionality). For example, if you want to create a class that will be a visual
object on the screen, you’ll want to use the behavior of one of the existing display objects (for example, Sprite or
MovieClip) as a basis for your class. In that case, MovieClip (or Sprite) would be the base class, and your class would
extend that class. For more information about creating a subclass, see “Inheritance” on page 101.
Writing the code for a class
Once you have a design plan for your class, or at least some idea of what information it will need to keep track of and
what actions it will need to carry out, the actual syntax of writing a class is fairly straightforward.
Here are the minimum steps to create your own ActionScript class:
1Open a new text document, in an ActionScript-specific program such as Flex Builder or Flash, in a general
programming tool such as Dreamweaver, or in any program that allows you to work with plain text documents.
2Enter a class statement to define the name of the class. To do this, enter the words public class, and then the
class’s name, followed by opening and closing curly braces that will surround the contents of the class (the method
and property definitions). For example:
public class MyClass
{
}
The word public indicates that the class can be accessed from any other code. For other alternatives, see “Access
control namespace attributes” on page 88.
3Type a package statement to indicate the name of the package in which your class will be found. The syntax is
the word package, followed by the full package name, followed by opening and closing curly braces (which will
surround the class statement block). For example, we’d change the code in the previous step to this:
package mypackage
{
public class MyClass
{
}
}

ADOBE FLEX 3
Developer Guide
26
4Define each property in the class using the var statement within the class body; the syntax is the same as you use
to declare any variable (with the addition of the public modifier). For example, adding these lines between the
opening and closing curly braces of the class definition will create properties named textVariable,
numericVariable, and dateVariable:
public var textVariable:String = "some default value";
public var numericVariable:Number = 17;
public var dateVariable:Date;
5Define each method in the class using the same syntax that’s used to define a function. For example:
•To create a myMethod() method, enter:
public function myMethod(param1:String, param2:Number):void
{
// do something with parameters
}
•To create a constructor (the special method that is called as part of the process of creating an instance of a
class), create a method whose name matches exactly the name of the class:
public function MyClass()
{
// do stuff to set initial values for properties
// and otherwise set up the object
textVariable = "Hello there!";
dateVariable = new Date(2001, 5, 11);
}
If you don’t include a constructor method in your class, the compiler will automatically create an empty
constructor (one with no parameters and no statements) in your class.
There are a few more class elements that you can define.These elements are more involved.
•Accessors are a special cross between a method and a property. When you write the code to define the class, you
write the accessor like a method so you can perform multiple actions (rather than just reading or assigning a value,
which is all you can do when you define a property). However, when you create an instance of your class, you treat
the accessor like a property—using just the name to read or assign the value. For more information, see “Get and set
accessor methods” on page 94.
•Events in ActionScript aren’t defined using a specific syntax. Instead, you define events in your class by using the
functionality of the EventDispatcher class to keep track of event listeners and notify them of events. For more on
creating events in your own classes, see “Handling events” on page 227.
Suggestions for organizing your classes
Unlike previous ActionScript versions, ActionScript 3.0 does not have the one file, one class restriction that limits
you to using only one class per file. Using ActionScript 3.0, you can save the source code for more than one class in
a single .as file. In some cases, it might seem more convenient to pack multiple classes into a single source file, but
in general, this is considered a bad programming practice, for a couple of reasons:
•It is difficult to reuse individual classes if they are packed together into a single large file.
•It is difficult to locate the source code for a specific class when its filename does not correspond to the class name.
For these reasons, Adobe recommends that you always save the source code for each individual class in its own file,
and give the file the same name as the class.

ADOBE FLEX 3
Developer Guide
27
Example: Creating a basic application
You can create external ActionScript source files with an .as extension using Flash, Flex Builder, Dreamweaver, or
any text editor.
ActionScript 3.0 can be used within a number of application development environments, including the Flash
authoring and Flex Builder tools.
This section walks through the steps in creating and enhancing a simple ActionScript 3.0 application using the Flash
authoring tool or the Flex Builder 2 tool. The application you’ll build presents a simple pattern for using external
ActionScript 3.0 class files in Flash and Flex applications. That pattern will apply to all of the other sample applica-
tions in this manual.
Designing your ActionScript application
You should have some idea about the application you want to build before you start building it.
The representation of your design can be as simple as the name of the application and a brief statement of its purpose,
or as complicated as a set of requirements documents containing numerous Unified Modeling Language (UML)
diagrams. This manual doesn’t discuss the discipline of software design in detail, but it’s important to keep in mind
that application design is an essential step in the development of ActionScript applications.
Our first example of an ActionScript application will be a standard “Hello World” application, so its design is very
simple:
•The application will be called HelloWorld.
•It will display a single text field containing the words “Hello World!”
•In order to be easily reused, it will use a single object-oriented class, named Greeter, which can be used from
within a Flash document or a Flex application.
•After you create a basic version of the application, you will add new functionality to have the user enter a user
name and have the application check the name against a list of known users.
With that concise definition in place, you can start building the application itself.
Creating the HelloWorld project and the Greeter class
The design statement for the Hello World application said that its code should be easy to reuse. With this goal in
mind, the application uses a single object-oriented class, named Greeter, which is used from within an application
that you create in Flex Builder or the Flash authoring tool.
To create the HelloWorld project and Greeter class in Flex Builder:
1In Flex Builder, select File > New> Flex Project,
2If the New Flex Project dialog box asks you to select a Flex Server Technology, select Basic, and then click Next.
3Type HelloWorld as the Project Name, and then click Finish.
Your new project will be created and should be showing in the Navigator panel. By default the project should
already contain a file named HelloWorld.mxml, and that file should be open in the Editor panel.
4Now to create a custom ActionScript class file in the Flex Builder tool, select File > New > ActionScript File.
5In the New ActionScript File dialog box, select HelloWorld as the parent folder, type Greeter.as the filename,
and then click Finish.

ADOBE FLEX 3
Developer Guide
28
A new ActionScript editing window is displayed.
Continue with “adding code to the Greeter class” on page 28.
adding code to the Greeter class
The Greeter class defines an object, Greeter, that you will be able to use in your HelloWorld application.
To add code to the Greeter class:
1Type the following code into the new file:
package
{
public class Greeter
{
public function sayHello():String
{
var greeting:String;
greeting = "Hello World!";
return greeting;
}
}
}
The Greeter class includes a single sayHello() method, which returns a string that says “Hello World!”.
2Select File > Save to save this ActionScript file.
The Greeter class is now ready to be used in an application.
Creating an application that uses your ActionScript code
The Greeter class that you have built defines a self-contained set of software functions, but it does not represent a
complete application. To use the class, you need to create a Flash document or Flex application.
The HelloWorld application creates an new instance of the Greeter class. Here’s how to attach the Greeter class to
your application.
var myGreeter:Greeter = new Greeter();
mainText.text = myGreeter.sayHello();
To create an ActionScript application using Flex Builder:
1Open the HelloWorld.mxml file, and type the following code:
<?xml version="1.0" encoding="utf-8"?>
<mx:Application xmlns:mx="http://www.adobe.com/2006/mxml" xmlns="*"
layout="vertical"
creationComplete = "initApp()" >
<mx:Script>
<![CDATA[
private var myGreeter:Greeter = new Greeter();
public function initApp():void
{
// says hello at the start, and asks for the user's name
mainTxt.text = myGreeter.sayHello();
}
]]>

ADOBE FLEX 3
Developer Guide
29
</mx:Script>
<mx:TextArea id = "mainTxt" width="400" />
</mx:Application>
This Flex project includes three MXML tags:
•An <mx:Application> tag, which defines the Application container
•An <mx:Script> tag that includes some ActionScript code
•An <mx:TextArea> tag, which defines a field to display text messages to the user
The code in the <mx:Script> tag defines a initApp() method that is called when the application loads. The
initApp() method sets the text value of the mainTxt TextArea to the “Hello World!” string returned by the
sayHello() method of the custom class Greeter, which you just wrote.
2Select File > Save to save the application.
Continue with “Publishing and testing your ActionScript application” on page 29.
Publishing and testing your ActionScript application
Software development is an iterative process. You write some code, try to compile it, and edit the code until it
compiles cleanly. You run the compiled application, test it to see if it fulfills the intended design, and if it doesn’t, you
edit the code again until it does. The Flash and Flex Builder development environments offer a number of ways to
publish, test, and debug your applications.
Here are the basic steps for testing the HelloWorld application in each environment.
To publish and test an ActionScript application using Flex Builder:
1Select Run > Run. Make sure that the Project field shows “HelloWorld” and the Application file field shows
“HelloWorld.mxml”.
2In the Run dialog box, click Run.
The HelloWorld application starts.
•If any errors or warnings are displayed in the Output window when you test your application, fix the causes
of these errors in the HelloWorld.mxml or Greeter.as files, and then try testing the application again.
•If there are no compilation errors, a browser window opens showing the Hello World application. The text
“Hello World!” should be displayed.
You have just created a simple but complete object-oriented application that uses ActionScript 3.0. Continue with
“Enhancing the HelloWorld application” on page 29.
Enhancing the HelloWorld application
To make the application a little more interesting, you’ll now make it ask for and validate a user name against a
predefined list of names.
First, you will update the Greeter class to add new functionality. Then you will update the application to use the new
functionality.

ADOBE FLEX 3
Developer Guide
30
To update the Greeter.as file:
1Open the Greeter.as file.
2Change the contents of the file to the following (new and changed lines are shown in boldface):
package
{
public class Greeter
{
/**
* Defines the names that should receive a proper greeting.
*/
public static var validNames:Array = ["Sammy", "Frank", "Dean"];
/**
* Builds a greeting string using the given name.
*/
public function sayHello(userName:String = ""):String
{
var greeting:String;
if (userName == "")
{
greeting = "Hello. Please type your user name, and then press the Enter
key.";
}
else if (validName(userName))
{
greeting = "Hello, " + userName + ".";
}
else
{
greeting = "Sorry " + userName + ", you are not on the list.";
}
return greeting;
}
/**
* Checks whether a name is in the validNames list.
*/
public static function validName(inputName:String = ""):Boolean
{
if (validNames.indexOf(inputName) > -1)
{
return true;
}
else
{
return false;
}
}
}
}
The Greeter class now has a number of new features:
•The validNames array lists valid user names. The array is initialized to a list of three names when the Greeter
class is loaded.

ADOBE FLEX 3
Developer Guide
31
•The sayHello() method now accepts a user name and changes the greeting based on some conditions. If
the userName is an empty string (""), the greeting property is set to prompt the user for a name. If the user
name is valid, the greeting becomes "Hello, userName.” Finally, if either of those two conditions are not met,
the greeting variable is set to "Sorry userName, you are not on the list."
•The validName() method returns true if the inputName is found in the validNames array, and false if it
is not found. The statement validNames.indexOf(inputName) checks each of the strings in the validNames
array against the inputName string. The Array.indexOf() method returns the index position of the first
instance of an object in an array, or the value -1 if the object is not found in the array.
Next you will edit the Flash or Flex file that references this ActionScript class.
var myGreeter:Greeter = new Greeter();
mainText.text = myGreeter.sayHello("");
To modify the application using Flex Builder:
1Open the HelloWorld.mxml file.
2Next modify the <mx:TextArea> tag to indicate to the user that it is for display only, by changing the
background color to a light gray and preventing the user from editing the displayed text:
<mx:TextArea id = "mainTxt" width="400" backgroundColor="#DDDDDD" editable="false" />
3Now add the following lines right after the <mx:TextArea> closing tag. These lines create a new TextInput field
that lets the user enter a user name value:
<mx:HBox width="400">
<mx:Label text="User Name:"/>
<mx:TextInput id="userNameTxt" width="100%" enter="mainTxt.text =
myGreeter.sayHello(userNameTxt.text);" />
</mx:HBox>
The enter attribute specifies that when the user presses the Enter key in the userNameTxt field, the text in the
field will be passed to the Greeter.sayHello() method, and the greeting displayed in the mainTxt field will
change accordingly.
The final contents of the HelloWorld.mxml file should look like this:
<?xml version="1.0" encoding="utf-8"?>
<mx:Application xmlns:mx="http://www.adobe.com/2006/mxml" xmlns="*"
layout="vertical"
creationComplete = "initApp()" >
<mx:Script>
<![CDATA[
private var myGreeter:Greeter = new Greeter();
public function initApp():void
{
// says hello at the start, and asks for the user's name
mainTxt.text = myGreeter.sayHello();
}
]]>
</mx:Script>
<mx:TextArea id = "mainTxt" width="400" backgroundColor="#DDDDDD" editable="false" />
<mx:HBox width="400">
<mx:Label text="User Name:"/>

ADOBE FLEX 3
Developer Guide
32
<mx:TextInput id="userNameTxt" width="100%" enter="mainTxt.text =
myGreeter.sayHello(userNameTxt.text);" />
</mx:HBox>
</mx:Application>
4Save the edited HelloWorld.mxml file. Select File > Run to run the application.
When you run the application, you will be prompted to enter a user name. If it is valid (Sammy, Frank, or Dean),
the application will display the “Hello, userName” confirmation message.
Running subsequent examples
Now that you’ve developed and run the “Hello World” ActionScript 3.0 application, you should have the basic
knowledge you need to run the other code examples presented in this manual.
Working with end-of-chapter examples
Like this chapter, most chapters in this manual include a significant end-of-chapter example that ties together many
of the concepts discussed in the chapter. However, unlike the Hello World example in this chapter, those examples
will not be presented in a step-by-step tutorial format. The relevant ActionScript 3.0 code in each example will be
highlighted and discussed, but instructions about running the examples in specific development environments won’t
be provided. However, the example files distributed with this manual will include all of the files you need to compile
and run the examples easily in your chosen development environment.

33
Chapter 4: ActionScript language
and syntax
ActionScript 3.0 comprises both the core ActionScript language and the Adobe Flash Player Application
Programming Interface (API). The core language is the part of ActionScript that implements the draft ECMAScript
(ECMA-262), Edition 4 draft language specification. The Flash Player API provides programmatic access to Flash
Player.
This chapter provides a brief introduction to the core ActionScript language and syntax. After reading this chapter,
you should have a basic understanding of how to work with data types and variables, how to use proper syntax, and
how to control the flow of data in your program.
Contents
Language overview . . . . . . . . . . . . . . . . . . . . . . . . . . . . . . . . . . . . . . . . . . . . . . . . . . . . . . . . . . . . . . . . . . . . . . . . . . . . . . . . 33
Objects and classes . . . . . . . . . . . . . . . . . . . . . . . . . . . . . . . . . . . . . . . . . . . . . . . . . . . . . . . . . . . . . . . . . . . . . . . . . . . . . . . . 34
Packages and namespaces . . . . . . . . . . . . . . . . . . . . . . . . . . . . . . . . . . . . . . . . . . . . . . . . . . . . . . . . . . . . . . . . . . . . . . . . . . 35
Variables . . . . . . . . . . . . . . . . . . . . . . . . . . . . . . . . . . . . . . . . . . . . . . . . . . . . . . . . . . . . . . . . . . . . . . . . . . . . . . . . . . . . . . . . . 44
Data types. . . . . . . . . . . . . . . . . . . . . . . . . . . . . . . . . . . . . . . . . . . . . . . . . . . . . . . . . . . . . . . . . . . . . . . . . . . . . . . . . . . . . . . . 48
Syntax . . . . . . . . . . . . . . . . . . . . . . . . . . . . . . . . . . . . . . . . . . . . . . . . . . . . . . . . . . . . . . . . . . . . . . . . . . . . . . . . . . . . . . . . . . . 59
Operators . . . . . . . . . . . . . . . . . . . . . . . . . . . . . . . . . . . . . . . . . . . . . . . . . . . . . . . . . . . . . . . . . . . . . . . . . . . . . . . . . . . . . . . . 63
Conditionals . . . . . . . . . . . . . . . . . . . . . . . . . . . . . . . . . . . . . . . . . . . . . . . . . . . . . . . . . . . . . . . . . . . . . . . . . . . . . . . . . . . . . 69
Looping. . . . . . . . . . . . . . . . . . . . . . . . . . . . . . . . . . . . . . . . . . . . . . . . . . . . . . . . . . . . . . . . . . . . . . . . . . . . . . . . . . . . . . . . . . 71
Functions . . . . . . . . . . . . . . . . . . . . . . . . . . . . . . . . . . . . . . . . . . . . . . . . . . . . . . . . . . . . . . . . . . . . . . . . . . . . . . . . . . . . . . . . 74
Language overview
Objects lie at the heart of the ActionScript 3.0 language—they are its fundamental building blocks. Every variable
you declare, every function you write, and every class instance you create is an object. You can think of an Action-
Script 3.0 program as a group of objects that carry out tasks, respond to events, and communicate with one another.
Programmers familiar with object-oriented programming (OOP) in Java or C++ may think of objects as modules
that contain two kinds of members: data stored in member variables or properties, and behavior accessible through
methods. The ECMAScript edition 4 draft, the standard upon which ActionScript 3.0 is based, defines objects in a
similar but slightly different way. In the ECMAScript draft, objects are simply collections of properties. These
properties are containers that can hold not only data, but also functions or other objects. If a function is attached to
an object in this way, it is called a method.
While the ECMAScript draft definition may seem a little odd to programmers with a Java or C++ background, in
practice, defining object types with ActionScript 3.0 classes is very similar to the way classes are defined in Java or
C++. The distinction between the two definitions of object is important when discussing the ActionScript object
model and other advanced topics, but in most other situations the term properties means class member variables as
opposed to methods. The ActionScript 3.0 Language and Components Reference, for example, uses the term properties
to mean variables or getter-setter properties. It uses the term methods to mean functions that are part of a class.

ADOBE FLEX 3
Developer Guide
34
One subtle difference between classes in ActionScript and classes in Java or C++ is that in ActionScript, classes are
not just abstract entities. ActionScript classes are represented by class objects that store the class’s properties and
methods. This allows for techniques that may seem alien to Java and C++ programmers, such as including state-
ments or executable code at the top level of a class or package.
Another difference between ActionScript classes and Java or C++ classes is that every ActionScript class has
something called a prototype object. In previous versions of ActionScript, prototype objects, linked together into
prototype chains, served collectively as the foundation of the entire class inheritance hierarchy. In ActionScript 3.0,
however, prototype objects play only a small role in the inheritance system. The prototype object can still be useful,
however, as an alternative to static properties and methods if you want to share a property and its value among all
the instances of a class.
In the past, advanced ActionScript programmers could directly manipulate the prototype chain with special built-in
language elements. Now that the language provides a more mature implementation of a class-based programming
interface, many of these special language elements, such as __proto__ and __resolve, are no longer part of the
language. Moreover, optimizations of the internal inheritance mechanism that provide significant Flash Player and
Adobe AIR performance improvements preclude direct access to the inheritance mechanism.
Objects and classes
In ActionScript 3.0, every object is defined by a class. A class can be thought of as a template or a blueprint for a type
of object. Class definitions can include variables and constants, which hold data values, and methods, which are
functions that encapsulate behavior bound to the class. The values stored in properties can be primitive values or
other objects. Primitive values are numbers, strings, or Boolean values.
ActionScript contains a number of built-in classes that are part of the core language. Some of these built-in classes,
such as Number, Boolean and String, represent the primitive values available in ActionScript. Others, such as the
Array, Math, and XML classes, define more complex objects that are part of the ECMAScript standard.
All classes, whether built-in or user-defined, derive from the Object class. For programmers with previous Action-
Script experience, it is important to note that the Object data type is no longer the default data type, even though all
other classes still derive from it. In ActionScript 2.0, the following two lines of code were equivalent because the lack
of a type annotation meant that a variable would be of type Object:
var someObj:Object;
var someObj;
ActionScript 3.0, however, introduces the concept of untyped variables, which can be designated in the following two
ways:
var someObj:*;
var someObj;
An untyped variable is not the same as a variable of type Object. The key difference is that untyped variables can
hold the special value undefined, while a variable of type Object cannot hold that value.
You can define your own classes using the class keyword. You can declare class properties in three ways: constants
can be defined with the const keyword, variables are defined with the var keyword, and getter and setter properties
are defined by using the get and set attributes in a method declaration. You can declare methods with the function
keyword.

ADOBE FLEX 3
Developer Guide
35
You create an instance of a class by using the new operator. The following example creates an instance of the Date
class called myBirthday.
var myBirthday:Date = new Date();
Packages and namespaces
Packages and namespaces are related concepts. Packages allow you to bundle class definitions together in a way that
facilitates code sharing and minimizes naming conflicts. Namespaces allow you to control the visibility of identifiers,
such as property and method names, and can be applied to code whether it resides inside or outside a package.
Packages let you organize your class files, and namespaces let you manage the visibility of individual properties and
methods.
Packages
Packages in ActionScript 3.0 are implemented with namespaces, but are not synonymous with them. When you
declare a package, you are implicitly creating a special type of namespace that is guaranteed to be known at compile
time. Namespaces, when created explicitly, are not necessarily known at compile time.
The following example uses the package directive to create a simple package containing one class:
package samples
{
public class SampleCode
{
public var sampleGreeting:String;
public function sampleFunction()
{
trace(sampleGreeting + " from sampleFunction()");
}
}
}
The name of the class in this example is SampleCode. Because the class is inside the samples package, the compiler
automatically qualifies the class name at compile time into its fully qualified name: samples.SampleCode. The
compiler also qualifies the names of any properties or methods, so that sampleGreeting and sampleFunction()
become samples.SampleCode.sampleGreeting and samples.SampleCode.sampleFunction(), respectively.
Many developers, especially those with Java programming backgrounds, may choose to place only classes at the top
level of a package. ActionScript 3.0, however, supports not only classes at the top level of a package, but also variables,
functions, and even statements. One advanced use of this feature is to define a namespace at the top level of a package
so that it will be available to all classes in that package. Note, however, that only two access specifiers, public and
internal, are allowed at the top level of a package. Unlike Java, which allows you to declare nested classes as private,
ActionScript 3.0 supports neither nested nor private classes.
In many other ways, however, ActionScript 3.0 packages are similar to packages in the Java programming language.
As you can see in the previous example, fully qualified package references are expressed using the dot operator (.),
just as they are in Java. You can use packages to organize your code into an intuitive hierarchical structure for use by
other programmers. This facilitates code sharing by allowing you to create your own package to share with others,
and to use packages created by others in your code.

ADOBE FLEX 3
Developer Guide
36
The use of packages also helps to ensure that the identifier names that you use are unique and do not conflict with
other identifier names. In fact, some would argue that this is the primary benefit of packages. For example, two
programmers who wish to share their code with each other may have each created a class called SampleCode.
Without packages, this would create a name conflict, and the only resolution would be to rename one of the classes.
With packages, however, the name conflict is easily avoided by placing one, or preferably both, of the classes in
packages with unique names.
You can also include embedded dots in your package name to create nested packages. This allows you to create a
hierarchical organization of packages. A good example of this is the flash.xml package provided by the Flash Player
API. The flash.xml package is nested inside the flash package.
The flash.xml package contains the legacy XML parser that was used in previous versions of ActionScript. One
reason that it now resides in the flash.xml package is that the name of the legacy XML class conflicts with the name
of the new XML class that implements the XML for ECMAScript (E4X) specification functionality available in
ActionScript 3.0.
Although moving the legacy XML class into a package is a good first step, most users of the legacy XML classes will
import the flash.xml package, which will generate the same name conflict unless you remember to always use the
fully qualified name of the legacy XML class (flash.xml.XML). To avoid this situation, the legacy XML class is now
named XMLDocument, as the following example shows:
package flash.xml
{
class XMLDocument {}
class XMLNode {}
class XMLSocket {}
}
Most of the Flash Player API is organized under the flash package. For example, the flash.display package contains
the display list API, and the flash.events package contains the new event model.
Creating packages
ActionScript 3.0 provides significant flexibility in the way you organize your packages, classes, and source files.
Previous versions of ActionScript allowed only one class per source file and required that the name of the source file
match the name of the class. ActionScript 3.0 allows you to include multiple classes in one source file, but only one
class in each file can be made available to code that is external to that file. In other words, only one class in each file
can be declared inside a package declaration. You must declare any additional classes outside your package
definition, which makes those classes invisible to code outside that source file. The name of the class declared inside
the package definition must match the name of the source file.
ActionScript 3.0 also provides more flexibility in the way you declare packages. In previous versions of ActionScript,
packages merely represented directories in which you placed source files, and you didn’t declare packages with the
package statement, but rather included the package name as part of the fully qualified class name in your class decla-
ration. Although packages still represent directories in ActionScript 3.0, packages can contain more than just classes.
In ActionScript 3.0, you use the package statement to declare a package, which means that you can also declare
variables, functions, and namespaces at the top level of a package. You can even include executable statements at the
top level of a package. If you do declare variables, functions, or namespaces at the top level of a package, the only
attributes available at that level are public and internal, and only one package-level declaration per file can use
the public attribute, whether that declaration is a class, variable, function, or namespace.

ADOBE FLEX 3
Developer Guide
37
Packages are useful for organizing your code and for preventing name conflicts. You should not confuse the concept
of packages with the unrelated concept of class inheritance. Two classes that reside in the same package will have a
namespace in common, but are not necessarily related to each other in any other way. Likewise, a nested package
may have no semantic relationship to its parent package.
Importing packages
If you want to use a class that is inside a package, you must import either the package or the specific class. This differs
from ActionScript 2.0, where importing classes was optional.
For example, consider the SampleCode class example from earlier in this chapter. If the class resides in a package
named samples, you must use one of the following import statements before using the SampleCode class:
import samples.*;
or
import samples.SampleCode;
In general, import statements should be as specific as possible. If you plan to use only the SampleCode class from
the samples package, you should import only the SampleCode class rather than the entire package to which it
belongs. Importing entire packages may lead to unexpected name conflicts.
You must also place the source code that defines the package or class within your classpath. The classpath is a user-
defined list of local directory paths that determines where the compiler will search for imported packages and
classes. The classpath is sometimes called the build path or source path.
After you have properly imported the class or package, you can use either the fully qualified name of the class
(samples.SampleCode) or merely the class name by itself (SampleCode).
Fully qualified names are useful when identically named classes, methods, or properties result in ambiguous code,
but can be difficult to manage if used for all identifiers. For example, the use of the fully qualified name results in
verbose code when you instantiate a SampleCode class instance:
var mySample:samples.SampleCode = new samples.SampleCode();
As the levels of nested packages increase, the readability of your code decreases. In situations where you are confident
that ambiguous identifiers will not be a problem, you can make your code easier to read by using simple identifiers.
For example, instantiating a new instance of the SampleCode class is much less verbose if you use only the class
identifier:
var mySample:SampleCode = new SampleCode();
If you attempt to use identifier names without first importing the appropriate package or class, the compiler will not
be able to find the class definitions. On the other hand, if you do import a package or class, any attempt to define a
name that conflicts with an imported name will generate an error.
When a package is created, the default access specifier for all members of that package is internal, which means
that, by default, package members are only visible to other members of that package. If you want a class to be available
to code outside the package, you must declare that class to be public. For example, the following package contains
two classes, SampleCode and CodeFormatter:
// SampleCode.as file
package samples
{
public class SampleCode {}
}

ADOBE FLEX 3
Developer Guide
38
// CodeFormatter.as file
package samples
{
class CodeFormatter {}
}
The SampleCode class is visible outside the package because it is declared as a public class. The CodeFormatter
class, however, is visible only within the samples package itself. If you attempt to access the CodeFormatter class
outside the samples package, you will generate an error, as the following example shows:
import samples.SampleCode;
import samples.CodeFormatter;
var mySample:SampleCode = new SampleCode(); // okay, public class
var myFormatter:CodeFormatter = new CodeFormatter(); // error
If you want both classes to be available outside the package, you must declare both classes to be public. You cannot
apply the public attribute to the package declaration.
Fully qualified names are useful for resolving name conflicts that may occur when using packages. Such a scenario
may arise if you import two packages that define classes with the same identifier. For example, consider the following
package, which also has a class named SampleCode:
package langref.samples
{
public class SampleCode {}
}
If you import both classes, as follows, you will have a name conflict when referring to the SampleCode class:
import samples.SampleCode;
import langref.samples.SampleCode;
var mySample:SampleCode = new SampleCode(); // name conflict
The compiler has no way of knowing which SampleCode class to use. To resolve this conflict, you must use the fully
qualified name of each class, as follows:
var sample1:samples.SampleCode = new samples.SampleCode();
var sample2:langref.samples.SampleCode = new langref.samples.SampleCode();
Note: Programmers with a C++ background often confuse the import statement with #include. The #include
directive is necessary in C++ because C++ compilers process one file at a time, and will not look in other files for class
definitions unless a header file is explicitly included. ActionScript 3.0 has an include directive, but it is not designed to
import classes and packages. To import classes or packages in ActionScript 3.0, you must use the import statement and
place the source file that contains the package in the class path.
Namespaces
Namespaces give you control over the visibility of the properties and methods that you create. Think of the public,
private, protected, and internal access control specifiers as built-in namespaces. If these predefined access
control specifiers do not suit your needs, you can create your own namespaces.
If you are familiar with XML namespaces, much of this discussion will not be new to you, although the syntax and
details of the ActionScript implementation are slightly different from those of XML. If you have never worked with
namespaces before, the concept itself is straightforward, but the implementation has specific terminology that you
will need to learn.
To understand how namespaces work, it helps to know that the name of a property or method always contains two
parts: an identifier and a namespace. The identifier is what you generally think of as a name. For example, the identi-
fiers in the following class definition are sampleGreeting and sampleFunction():

ADOBE FLEX 3
Developer Guide
39
class SampleCode
{
var sampleGreeting:String;
function sampleFunction () {
trace(sampleGreeting + " from sampleFunction()");
}
}
Whenever definitions are not preceded by a namespace attribute, their names are qualified by the default internal
namespace, which means they are visible only to callers in the same package. If the compiler is set to strict mode, the
compiler issues a warning that the internal namespace applies to any identifier without a namespace attribute. To
ensure that an identifier is available everywhere, you must specifically precede the identifier name with the public
attribute. In the previous example code, both sampleGreeting and sampleFunction() have a namespace value of
internal.
There are three basic steps to follow when using namespaces. First, you must define the namespace using the
namespace keyword. For example, the following code defines the version1 namespace:
namespace version1;
Second, you apply your namespace by using it instead of an access control specifier in a property or method decla-
ration. The following example places a function named myFunction() into the version1 namespace:
version1 function myFunction() {}
Third, once you’ve applied the namespace, you can reference it with the use directive or by qualifying the name of
an identifier with a namespace. The following example references the myFunction() function through the use
directive:
use namespace version1;
myFunction();
You can also use a qualified name to reference the myFunction() function, as the following example shows:
version1::myFunction();
Defining namespaces
Namespaces contain one value, the Uniform Resource Identifier (URI), which is sometimes called the namespace
name. A URI allows you to ensure that your namespace definition is unique.
You create a namespace by declaring a namespace definition in one of two ways. You can either define a namespace
with an explicit URI, as you would define an XML namespace, or you can omit the URI. The following example
shows how a namespace can be defined using a URI:
namespace flash_proxy = “http://www.adobe.com/flash/proxy”;
The URI serves as a unique identification string for that namespace. If you omit the URI, as in the following example,
the compiler will create a unique internal identification string in place of the URI. You do not have access to this
internal identification string.
namespace flash_proxy;
Once you define a namespace, with or without a URI, that namespace cannot be redefined in the same scope. An
attempt to define a namespace that has been defined earlier in the same scope results in a compiler error.

ADOBE FLEX 3
Developer Guide
40
If a namespace is defined within a package or a class, the namespace may not be visible to code outside that package
or class unless the appropriate access control specifier is used. For example, the following code shows the
flash_proxy namespace defined within the flash.utils package. In the following example, the lack of an access
control specifier means that the flash_proxy namespace would be visible only to code within the flash.utils package
and would not be visible to any code outside the package:
package flash.utils
{
namespace flash_proxy;
}
The following code uses the public attribute to make the flash_proxy namespace visible to code outside the
package:
package flash.utils
{
public namespace flash_proxy;
}
Applying namespaces
Applying a namespace means placing a definition into a namespace. Definitions that can be placed into namespaces
include functions, variables, and constants (you cannot place a class into a custom namespace).
Consider, for example, a function declared using the public access control namespace. Using the public attribute
in a function definition places the function into the public namespace, which makes the function available to all
code. Once you have defined a namespace, you can use the namespace that you defined the same way you would use
the public attribute, and the definition will be available to code that can reference your custom namespace. For
example, if you define a namespace example1, you can add a method called myFunction() using example1 as an
attribute, as the following example shows:
namespace example1;
class someClass
{
example1 myFunction() {}
}
Declaring the myFunction() method using the namespace example1 as an attribute means that the method belongs
to the example1 namespace.
You should bear in mind the following when applying namespaces:
•You can apply only one namespace to each declaration.
•There is no way to apply a namespace attribute to more than one definition at a time. In other words, if you want
to apply your namespace to ten different functions, you must add your namespace as an attribute to each of the ten
function definitions.
•If you apply a namespace, you cannot also specify an access control specifier because namespaces and access
control specifiers are mutually exclusive. In other words, you cannot declare a function or property as public,
private, protected, or internal in addition to applying your namespace.

ADOBE FLEX 3
Developer Guide
41
Referencing namespaces
There is no need to explicitly reference a namespace when you use a method or property declared with any of the
access control namespaces, such as public, private, protected, and internal. This is because access to these
special namespaces is controlled by context. For example, definitions placed into the private namespace are
automatically available to code within the same class. For namespaces that you define, however, such context sensi-
tivity does not exist. In order to use a method or property that you have placed into a custom namespace, you must
reference the namespace.
You can reference namespaces with the use namespace directive or you can qualify the name with the namespace
using the name qualifier (::) punctuator. Referencing a namespace with the use namespace directive “opens” the
namespace, so that it can apply to any identifiers that are not qualified. For example, if you have defined the
example1 namespace, you can access names in that namespace by using use namespace example1:
use namespace example1;
myFunction();
You can open more than one namespace at a time. Once you open a namespace with use namespace, it remains
open throughout the block of code in which it was opened. There is no way to explicitly close a namespace.
Having more than one open namespace, however, increases the likelihood of name conflicts. If you prefer not to
open a namespace, you can avoid the use namespace directive by qualifying the method or property name with the
namespace and the name qualifier punctuator. For example, the following code shows how you can qualify the name
myFunction() with the example1 namespace:
example1::myFunction();
Using namespaces
You can find a real-world example of a namespace that is used to prevent name conflicts in the flash.utils.Proxy class
that is part of the Flash Player API. The Proxy class, which is the replacement for the Object.__resolve property
from ActionScript 2.0, allows you to intercept references to undefined properties or methods before an error occurs.
All of the methods of the Proxy class reside in the flash_proxy namespace in order to prevent name conflicts.
To better understand how the flash_proxy namespace is used, you need to understand how to use the Proxy class.
The functionality of the Proxy class is available only to classes that inherit from it. In other words, if you want to use
the methods of the Proxy class on an object, the object’s class definition must extend the Proxy class. For example, if
you want to intercept attempts to call an undefined method, you would extend the Proxy class and then override the
callProperty() method of the Proxy class.
You may recall that implementing namespaces is usually a three-step process of defining, applying, and then refer-
encing a namespace. Because you never explicitly call any of the Proxy class methods, however, the flash_proxy
namespace is only defined and applied, but never referenced. The Flash Player API defines the flash_proxy
namespace and applies it in the Proxy class. Your code only needs to apply the flash_proxy namespace to classes
that extend the Proxy class.
The flash_proxy namespace is defined in the flash.utils package in a manner similar to the following:
package flash.utils
{
public namespace flash_proxy;
}

ADOBE FLEX 3
Developer Guide
42
The namespace is applied to the methods of the Proxy class as shown in the following excerpt from the Proxy class:
public class Proxy
{
flash_proxy function callProperty(name:*, ... rest):*
flash_proxy function deleteProperty(name:*):Boolean
...
}
As the following code shows, you must first import both the Proxy class and the flash_proxy namespace. You must
then declare your class such that it extends the Proxy class (you must also add the dynamic attribute if you are
compiling in strict mode). When you override the callProperty() method, you must use the flash_proxy
namespace.
package
{
import flash.utils.Proxy;
import flash.utils.flash_proxy;
dynamic class MyProxy extends Proxy
{
flash_proxy override function callProperty(name:*, ...rest):*
{
trace("method call intercepted: " + name);
}
}
}
If you create an instance of the MyProxy class and call an undefined method, such as the testing() method called
in the following example, your Proxy object intercepts the method call and executes the statements inside the
overridden callProperty() method (in this case, a simple trace() statement).
var mySample:MyProxy = new MyProxy();
mySample.testing(); // method call intercepted: testing
There are two advantages to having the methods of the Proxy class inside the flash_proxy namespace. First, having
a separate namespace reduces clutter in the public interface of any class that extends the Proxy class. (There are about
a dozen methods in the Proxy class that you can override, all of which are not designed to be called directly. Placing
all of them in the public namespace could be confusing.) Second, use of the flash_proxy namespace avoids name
conflicts in case your Proxy subclass contains instance methods with names that match any of the Proxy class
methods. For example, you may want to name one of your own methods callProperty(). The following code is
acceptable, because your version of the callProperty() method is in a different namespace:
dynamic class MyProxy extends Proxy
{
public function callProperty() {}
flash_proxy override function callProperty(name:*, ...rest):*
{
trace("method call intercepted: " + name);
}
}
Namespaces can also be helpful when you want to provide access to methods or properties in a way that cannot be
accomplished with the four access control specifiers (public, private, internal, and protected). For example,
you may have a few utility methods that are spread out across several packages. You want these methods available to
all of your packages, but you don’t want the methods to be public. To accomplish this, you can create a new
namespace and use it as your own special access control specifier.

ADOBE FLEX 3
Developer Guide
43
The following example uses a user-defined namespace to group together two functions that reside in different
packages. By grouping them into the same namespace, you can make both functions visible to a class or package
through a single use namespace statement.
This example uses four files to demonstrate the technique. All of the files must be within your classpath. The first
file, myInternal.as, is used to define the myInternal namespace. Because the file is in a package named example,
you must place the file into a folder named example. The namespace is marked as public so that it can be imported
into other packages.
// myInternal.as in folder example
package example
{
public namespace myInternal = "http://www.adobe.com/2006/actionscript/examples";
}
The second and third files, Utility.as and Helper.as, define the classes that contain methods that should be available
to other packages. The Utility class is in the example.alpha package, which means that the file should be placed inside
a folder named alpha that is a subfolder of the example folder. The Helper class is in the example.beta package, which
means that the file should be placed inside a folder named beta that is also a subfolder of the example folder. Both of
these packages, example.alpha and example.beta, must import the namespace before using it.
// Utility.as in the example/alpha folder
package example.alpha
{
import example.myInternal;
public class Utility
{
private static var _taskCounter:int = 0;
public static function someTask()
{
_taskCounter++;
}
myInternal static function get taskCounter():int
{
return _taskCounter;
}
}
}
// Helper.as in the example/beta folder
package example.beta
{
import example.myInternal;
public class Helper
{
private static var _timeStamp:Date;
public static function someTask()
{
_timeStamp = new Date();
}

ADOBE FLEX 3
Developer Guide
44
myInternal static function get lastCalled():Date
{
return _timeStamp;
}
}
}
The fourth file, NamespaceUseCase.as, is the main application class, and should be a sibling to the example folder.
In Adobe Flash CS3 Professional, this class would be used as the document class for the FLA. The Namespa-
ceUseCase class also imports the myInternal namespace and uses it to call the two static methods that reside in the
other packages. The example uses static methods only to simplify the code. Both static and instance methods can be
placed in the myInternal namespace.
// NamespaceUseCase.as
package
{
import flash.display.MovieClip;
import example.myInternal; // import namespace
import example.alpha.Utility;// import Utility class
import example.beta.Helper;// import Helper class
public class NamespaceUseCase extends MovieClip
{
public function NamespaceUseCase()
{
use namespace myInternal;
Utility.someTask();
Utility.someTask();
trace(Utility.taskCounter); // 2
Helper.someTask();
trace(Helper.lastCalled); // [time someTask() was last called]
}
}
}
Variables
Variables allow you to store values that you use in your program. To declare a variable, you must use the var
statement with the variable name. In ActionScript 2.0, use of the var statement is only required if you use type
annotations. In ActionScript 3.0, use of the var statement is always required. For example, the following line of
ActionScript declares a variable named i:
var i;
If you omit the var statement when declaring a variable, you will get a compiler error in strict mode and run-time
error in standard mode. For example, the following line of code will result in an error if the variable i has not been
previously defined:
i; // error if i was not previously defined

ADOBE FLEX 3
Developer Guide
45
To associate a variable with a data type, you must do so when you declare the variable. Declaring a variable without
designating the variable’s type is legal, but will generate a compiler warning in strict mode. You designate a variable’s
type by appending the variable name with a colon (:), followed by the variable’s type. For example, the following code
declares a variable i that is of type int:
var i:int;
You can assign a value to a variable using the assignment operator (=). For example, the following code declares a
variable i and assigns the value 20 to it:
var i:int;
i = 20;
You may find it more convenient to assign a value to a variable at the same time that you declare the variable, as in
the following example:
var i:int = 20;
The technique of assigning a value to a variable at the time it is declared is commonly used not only when assigning
primitive values such as integers and strings, but also when creating an array or instantiating an instance of a class.
The following example shows an array that is declared and assigned a value using one line of code.
var numArray:Array = ["zero", "one", "two"];
You can create an instance of a class by using the new operator. The following example creates an instance of a named
CustomClass, and assigns a reference to the newly created class instance to the variable named customItem:
var customItem:CustomClass = new CustomClass();
If you have more than one variable to declare, you can declare them all on one line of code by using the comma
operator (,) to separate the variables. For example, the following code declares three variables on one line of code:
var a:int, b:int, c:int;
You can also assign values to each of the variables on the same line of code. For example, the following code declares
three variables (a, b, and c) and assigns each a value:
var a:int = 10, b:int = 20, c:int = 30;
Although you can use the comma operator to group variable declarations into one statement, doing so may reduce
the readability of your code.
Understanding variable scope
The scope of a variable is the area of your code where the variable can be accessed by a lexical reference. A global
variable is one that is defined in all areas of your code, whereas a local variable is one that is defined in only one part
of your code. In ActionScript 3.0, variables are always assigned the scope of the function or class in which they are
declared. A global variable is a variable that you define outside of any function or class definition. For example, the
following code creates a global variable strGlobal by declaring it outside of any function. The example shows that
a global variable is available both inside and outside the function definition.
var strGlobal:String = "Global";
function scopeTest()
{
trace(strGlobal); // Global
}
scopeTest();
trace(strGlobal); // Global

ADOBE FLEX 3
Developer Guide
46
You declare a local variable by declaring the variable inside a function definition. The smallest area of code for which
you can define a local variable is a function definition. A local variable declared within a function will exist only in
that function. For example, if you declare a variable named str2 within a function named localScope(), that
variable will not be available outside the function.
function localScope()
{
var strLocal:String = "local";
}
localScope();
trace(strLocal); // error because strLocal is not defined globally
If the variable name you use for your local variable is already declared as a global variable, the local definition hides
(or shadows) the global definition while the local variable is in scope. The global variable will still exist outside of
the function. For example, the following code creates a global string variable named str1, and then creates a local
variable of the same name inside the scopeTest() function. The trace statement inside the function outputs the
local value of the variable, but the trace statement outside the function outputs the global value of the variable.
var str1:String = "Global";
function scopeTest ()
{
var str1:String = "Local";
trace(str1); // Local
}
scopeTest();
trace(str1); // Global
ActionScript variables, unlike variables in C++ and Java, do not have block-level scope. A block of code is any group
of statements between an opening curly brace ( { ) and a closing curly brace ( } ). In some programming languages,
such as C++ and Java, variables declared inside a block of code are not available outside that block of code. This
restriction of scope is called block-level scope, and does not exist in ActionScript. If you declare a variable inside a
block of code, that variable will be available not only in that block of code, but also in any other parts of the function
to which the code block belongs. For example, the following function contains variables that are defined in various
block scopes. All the variables are available throughout the function.
function blockTest (testArray:Array)
{
var numElements:int = testArray.length;
if (numElements > 0)
{
var elemStr:String = "Element #";
for (var i:int = 0; i < numElements; i++)
{
var valueStr:String = i + ": " + testArray[i];
trace(elemStr + valueStr);
}
trace(elemStr, valueStr, i); // all still defined
}
trace(elemStr, valueStr, i); // all defined if numElements > 0
}
blockTest(["Earth", "Moon", "Sun"]);
An interesting implication of the lack of block-level scope is that you can read or write to a variable before it is
declared, as long as it is declared before the function ends. This is because of a technique called hoisting, which means
that the compiler moves all variable declarations to the top of the function. For example, the following code compiles
even though the initial trace() function for the num variable happens before the num variable is declared:

ADOBE FLEX 3
Developer Guide
47
trace(num); // NaN
var num:Number = 10;
trace(num); // 10
The compiler will not, however, hoist any assignment statements. This explains why the initial trace() of num
results in NaN (not a number), which is the default value for variables of the Number data type. This means that you
can assign values to variables even before they are declared, as shown in the following example:
num = 5;
trace(num); // 5
var num:Number = 10;
trace(num); // 10
Default values
A default value is the value that a variable contains before you set its value. You initialize a variable when you set its
value for the first time. If you declare a variable, but do not set its value, that variable is uninitialized. The value of an
uninitialized variable depends on its data type. The following table describes the default values of variables,
organized by data type:
For variables of type Number, the default value is NaN (not a number), which is a special value defined by the IEEE-
754 standard to mean a value that does not represent a number.
If you declare a variable, but do not declare its data type, the default data type * will apply, which actually means that
the variable is untyped. If you also do not initialize an untyped variable with a value, its default value is undefined.
For data types other than Boolean, Number, int, and uint, the default value of any uninitialized variable is null. This
applies to all the classes defined by the Flash Player API, as well as any custom classes that you create.
The value null is not a valid value for variables of type Boolean, Number, int, or uint. If you attempt to assign a value
of null to a such a variable, the value is converted to the default value for that data type. For variables of type Object,
you can assign a value of null. If you attempt to assign the value undefined to a variable of type Object, the value
is converted to null.
For variables of type Number, there is a special top-level function named isNaN() that returns the Boolean value
true if the variable is not a number, and false otherwise.
Data type Default value
Boolean false
int 0
Number NaN
Object null
String null
uint 0
Not declared (equivalent to type annotation *)undefined
All other classes, including user-defined classes. null

ADOBE FLEX 3
Developer Guide
48
Data types
A data type defines a set of values. For example, the Boolean data type is the set of exactly two values: true and
false. In addition to the Boolean data type, ActionScript 3.0 defines several more commonly used data types, such
as String, Number, and Array. You can define your own data types by using classes or interfaces to define a custom
set of values. All values in ActionScript 3.0, whether they are primitive or complex, are objects.
A primitive value is a value that belongs to one of the following data types: Boolean, int, Number, String, and uint.
Working with primitive values is usually faster than working with complex values, because ActionScript stores
primitive values in a special way that makes memory and speed optimizations possible.
Note: For readers interested in the technical details, ActionScript stores primitive values internally as immutable objects.
The fact that they are stored as immutable objects means that passing by reference is effectively the same as passing by
value. This cuts down on memory usage and increases execution speed, because references are usually significantly
smaller than the values themselves.
A complex value is a value that is not a primitive value. Data types that define sets of complex values include Array,
Date, Error, Function, RegExp, XML, and XMLList.
Many programming languages distinguish between primitive values and their wrapper objects. Java, for example, has
an int primitive and the java.lang.Integer class that wraps it. Java primitives are not objects, but their wrappers are,
which makes primitives useful for some operations, and wrapper objects better suited for other operations. In
ActionScript 3.0, primitive values and their wrapper objects are, for practical purposes, indistinguishable. All values,
even primitive values, are objects. Flash Player and Adobe AIR treat these primitive types as special cases that behave
like objects but that don’t require the normal overhead associated with creating objects. This means that the
following two lines of code are equivalent:
var someInt:int = 3;
var someInt:int = new int(3);
All the primitive and complex data types listed above are defined by the ActionScript 3.0 core classes. The core
classes allow you to create objects using literal values instead of using the new operator. For example, you can create
an array using a literal value or the Array class constructor, as follows:
var someArray:Array = [1, 2, 3]; // literal value
var someArray:Array = new Array(1,2,3); // Array constructor
Type checking
Type checking can occur at either compile time or run time. Statically typed languages, such as C++ and Java, do
type checking at compile time. Dynamically typed languages, such as Smalltalk and Python, handle type checking at
run time. As a dynamically typed language, ActionScript 3.0 has run-time type checking, but also supports compile-
time type checking with a special compiler mode called strict mode. In strict mode, type checking occurs at both
compile time and run time, but in standard mode, type checking occurs only at run time.
Dynamically typed languages offer tremendous flexibility when you structure your code, but at the cost of allowing
type errors to manifest at run time. Statically typed languages report type errors at compile time, but at the cost of
requiring that type information be known at compile time.

ADOBE FLEX 3
Developer Guide
49
Compile-time type checking
Compile-time type checking is often favored in larger projects because as the size of a project grows, data type flexi-
bility usually becomes less important than catching type errors as early as possible. This is why, by default, the
ActionScript compiler in Adobe Flash CS3 Professional and Adobe Flex Builder 2 is set to run in strict mode. You
can disable strict mode in Flex Builder 2 through the ActionScript compiler settings in the Project Properties dialog
box.
In order to provide compile-time type checking, the compiler needs to know the data type information for the
variables or expressions in your code. To explicitly declare a data type for a variable, add the colon operator (:)
followed by the data type as a suffix to the variable name. To associate a data type with a parameter, use the colon
operator followed by the data type. For example, the following code adds data type information to the xParam
parameter, and declares a variable myParam with an explicit data type:
function runtimeTest(xParam:String)
{
trace(xParam);
}
var myParam:String = “hello”;
runtimeTest(myParam);
In strict mode, the ActionScript compiler reports type mismatches as compiler errors. For example, the following
code declares a function parameter xParam, of type Object, but later attempts to assign values of type String and
Number to that parameter. This produces a compiler error in strict mode.
function dynamicTest(xParam:Object)
{
if (xParam is String)
{
var myStr:String = xParam; // compiler error in strict mode
trace("String: " + myStr);
}
else if (xParam is Number)
{
var myNum:Number = xParam; // compiler error in strict mode
trace("Number: " + myNum);
}
}
Even in strict mode, however, you can selectively opt of out compile-time type checking by leaving the right side of
an assignment statement untyped. You can mark a variable or expression as untyped by either omitting a type
annotation, or using the special asterisk (*) type annotation. For example, if the xParam parameter in the previous
example is modified so that it no longer has a type annotation, the code will compile in strict mode:
function dynamicTest(xParam)
{
if (xParam is String)
{
var myStr:String = xParam;
trace("String: " + myStr);
}
else if (xParam is Number)
{
var myNum:Number = xParam;
trace("Number: " + myNum);
}
}
dynamicTest(100)
dynamicTest("one hundred");

ADOBE FLEX 3
Developer Guide
50
Run-time type checking
Run-time type checking occurs in ActionScript 3.0 whether you compile in strict mode or standard mode. Consider
a situation in which the value 3 is passed as an argument to a function that expects an array. In strict mode, the
compiler will generate an error, because the value 3 is not compatible with the data type Array. If you disable strict
mode, and run in standard mode, the compiler does not complain about the type mismatch, but run-time type
checking by Flash Player and Adobe AIR results in a run-time error.
The following example shows a function named typeTest() that expects an Array argument but is passed a value
of 3. This causes a run-time error in standard mode, because the value 3 is not a member of the parameter’s declared
data type (Array).
function typeTest(xParam:Array)
{
trace(xParam);
}
var myNum:Number = 3;
typeTest(myNum);
// run-time error in ActionScript 3.0 standard mode
There may also be situations where you get a run-time type error even when you are operating in strict mode. This
is possible if you use strict mode, but opt out of compile-time type checking by using an untyped variable. When you
use an untyped variable, you are not eliminating type checking but rather deferring it until run time. For example, if
the myNum variable in the previous example does not have a declared data type, the compiler cannot detect the type
mismatch, but Flash Player and Adobe AIR will generate a run-time error because it compares the run-time value of
myNum, which is set to 3 as a result of the assignment statement, with the type of xParam, which is set to the Array
data type.
function typeTest(xParam:Array)
{
trace(xParam);
}
var myNum = 3;
typeTest(myNum);
// run-time error in ActionScript 3.0
Run-time type checking also allows more flexible use of inheritance than does compile-time checking. By deferring
type checking to run time, standard mode allows you to reference properties of a subclass even if you upcast. An
upcast occurs when you use a base class to declare the type of a class instance but use a subclass to instantiate it. For
example, you can create a class named ClassBase that can be extended (classes with the final attribute cannot be
extended):
class ClassBase
{
}
You can subsequently create a subclass of ClassBase named ClassExtender, which has one property named
someString, as follows:
class ClassExtender extends ClassBase
{
var someString:String;
}
Using both classes, you can create a class instance that is declared using the ClassBase data type, but instantiated
using the ClassExtender constructor. An upcast is considered a safe operation, because the base class does not
contain any properties or methods that are not in the subclass.
var myClass:ClassBase = new ClassExtender();

ADOBE FLEX 3
Developer Guide
51
A subclass, however, does contain properties or methods that its base class does not. For example, the ClassExtender
class contains the someString property, which does not exist in the ClassBase class. In ActionScript 3.0 standard
mode, you can reference this property using the myClass instance without generating a compile-time error, as
shown in the following example:
var myClass:ClassBase = new ClassExtender();
myClass.someString = "hello";
// no error in ActionScript 3.0 standard mode
The is operator
The is operator, which is new for ActionScript 3.0, allows you to test whether a variable or expression is a member
of a given data type. In previous versions of ActionScript, the instanceof operator provided this functionality, but
in ActionScript 3.0 the instanceof operator should not be used to test for data type membership. The is operator
should be used instead of the instanceof operator for manual type checking, because the expression x instanceof
y merely checks the prototype chain of x for the existence of y (and in ActionScript 3.0, the prototype chain does
not provide a complete picture of the inheritance hierarchy).
The is operator examines the proper inheritance hierarchy and can be used to check not only whether an object is
an instance of a particular class, but also whether an object is an instance of a class that implements a particular
interface. The following example creates an instance of the Sprite class named mySprite and uses the is operator to
test whether mySprite is an instance of the Sprite and DisplayObject classes, and whether it implements the IEvent-
Dispatcher interface:
var mySprite:Sprite = new Sprite();
trace(mySprite is Sprite); // true
trace(mySprite is DisplayObject);// true
trace(mySprite is IEventDispatcher); // true
The is operator checks the inheritance hierarchy and properly reports that mySprite is compatible with the Sprite
and DisplayObject classes (the Sprite class is a subclass of the DisplayObject class). The is operator also checks
whether mySprite inherits from any classes that implement the IEventDispatcher interface. Because the Sprite class
inherits from the EventDispatcher class, which implements the IEventDispatcher interface, the is operator correctly
reports that mySprite implements the same interface.
The following example shows the same tests from the previous example, but with instanceof instead of the is
operator. The instanceof operator correctly identifies that mySprite is an instance of Sprite or DisplayObject, but
it returns false when used to test whether mySprite implements the IEventDispatcher interface.
trace(mySprite instanceof Sprite); // true
trace(mySprite instanceof DisplayObject);// true
trace(mySprite instanceof IEventDispatcher); // false
The as operator
The as operator, which is new in ActionScript 3.0, also allows you to check whether an expression is a member of a
given data type. Unlike the is operator, however, the as operator does not return a Boolean value. Rather, the as
operator returns the value of the expression instead of true, and null instead of false. The following example
shows the results of using the as operator instead of the is operator in the simple case of checking whether a Sprite
instance is a member of the DisplayObject, IEventDispatcher, and Number data types.
var mySprite:Sprite = new Sprite();
trace(mySprite as Sprite); // [object Sprite]
trace(mySprite as DisplayObject); // [object Sprite]
trace(mySprite as IEventDispatcher); // [object Sprite]
trace(mySprite as Number); // null

ADOBE FLEX 3
Developer Guide
52
When you use the as operator, the operand on the right must be a data type. An attempt to use an expression other
than a data type as the operand on the right will result in an error.
Dynamic classes
A dynamic class defines an object that can be altered at run time by adding or changing properties and methods. A
class that is not dynamic, such as the String class, is a sealed class. You cannot add properties or methods to a sealed
class at run time.
You create dynamic classes by using the dynamic attribute when you declare a class. For example, the following code
creates a dynamic class named Protean:
dynamic class Protean
{
private var privateGreeting:String = "hi";
public var publicGreeting:String = "hello";
function Protean()
{
trace("Protean instance created");
}
}
If you subsequently instantiate an instance of the Protean class, you can add properties or methods to it outside the
class definition. For example, the following code creates an instance of the Protean class and adds a property named
aString and a property named aNumber to the instance:
var myProtean:Protean = new Protean();
myProtean.aString = "testing";
myProtean.aNumber = 3;
trace(myProtean.aString, myProtean.aNumber); // testing 3
Properties that you add to an instance of a dynamic class are run-time entities, so any type checking is done at run
time. You cannot add a type annotation to a property that you add in this manner.
You can also add a method to the myProtean instance by defining a function and attaching the function to a property
of the myProtean instance. The following code moves the trace statement into a method named traceProtean():
var myProtean:Protean = new Protean();
myProtean.aString = "testing";
myProtean.aNumber = 3;
myProtean.traceProtean = function ()
{
trace(this.aString, this.aNumber);
};
myProtean.traceProtean(); // testing 3
Methods created in this way, however, do not have access to any private properties or methods of the Protean class.
Moreover, even references to public properties or methods of the Protean class must be qualified with either the
this keyword or the class name. The following example shows the traceProtean() method attempting to access
the private and public variables of the Protean class.
myProtean.traceProtean = function ()
{
trace(myProtean.privateGreeting); // undefined
trace(myProtean.publicGreeting); // hello
};
myProtean.traceProtean();

ADOBE FLEX 3
Developer Guide
53
Data type descriptions
The primitive data types include Boolean, int, Null, Number, String, uint, and void. The ActionScript core classes
also define the following complex data types: Object, Array, Date, Error, Function, RegExp, XML, and XMLList.
Boolean data type
The Boolean data type comprises two values: true and false. No other values are valid for variables of Boolean
type. The default value of a Boolean variable that has been declared but not initialized is false.
int data type
The int data type is stored internally as a 32-bit integer and comprises the set of integers from
-2,147,483,648 (-231) to 2,147,483,647 (231 - 1), inclusive. Previous versions of ActionScript offered only the Number
data type, which was used for both integers and floating-point numbers. In ActionScript 3.0, you now have access to
low-level machine types for 32-bit signed and unsigned integers. If your variable will not use floating-point numbers,
using the int data type instead of the Number data type should be faster and more efficient.
For integer values outside the range of the minimum and maximum int values, use the Number data type, which can
handle values between positive and negative 9,007,199,254,740,992 (53-bit integer values). The default value for
variables that are of the data type int is 0.
Null data type
The Null data type contains only one value, null. This is the default value for the String data type and all classes that
define complex data types, including the Object class. None of the other primitive data types, such as Boolean,
Number, int and uint, contain the value null. Flash Player and Adobe AIR will convert the value null to the appro-
priate default value if you attempt to assign null to variables of type Boolean, Number, int, or uint. You cannot use
this data type as a type annotation.
Number data type
In ActionScript 3.0, the Number data type can represent integers, unsigned integers, and floating-point numbers.
However, to maximize performance, you should use the Number data type only for integer values larger than the 32-
bit int and uint types can store or for floating-point numbers. To store a floating-point number, include a decimal
point in the number. If you omit a decimal point, the number will be stored as an integer.
The Number data type uses the 64-bit double-precision format as specified by the IEEE Standard for Binary
Floating-Point Arithmetic (IEEE-754). This standard dictates how floating-point numbers are stored using the 64
available bits. One bit is used to designate whether the number is positive or negative. Eleven bits are used for the
exponent, which is stored as base 2. The remaining 52 bits are used to store the significand (also called the mantissa),
which is the number that is raised to the power indicated by the exponent.
By using some of its bits to store an exponent, the Number data type can store floating-point numbers significantly
larger than if it used all of its bits for the significand. For example, if the Number data type used all 64 bits to store
the significand, it could store a number as large as 265 - 1. By using 11 bits to store an exponent, the Number data type
can raise its significand to a power of 21023.
The maximum and minimum values that the Number type can represent are stored in static properties of the
Number class called Number.MAX_VALUE and Number.MIN_VALUE.
Number.MAX_VALUE == 1.79769313486231e+308
Number.MIN_VALUE == 4.940656458412467e-324

ADOBE FLEX 3
Developer Guide
54
Although this range of numbers is enormous, the cost of this range is precision. The Number data type uses 52 bits
to store the significand, with the result that numbers that require more than 52 bits to represent precisely, such as the
fraction 1/3, are only approximations. If your application requires absolute precision with decimal numbers, you
need to use software that implements decimal floating-point arithmetic as opposed to binary floating-point arith-
metic.
When you store integer values with the Number data type, only the 52 bits of the significand are used. The Number
data type uses these 52 bits and a special hidden bit to represent integers from -9,007,199,254,740,992 (-253) to
9,007,199,254,740,992 (253).
Flash Player and Adobe AIR use the NaN value not only as the default value for variables of type Number, but also as
the result of any operation that should return a number but does not. For example, if you attempt to calculate the
square root of a negative number, the result will be NaN. Other special Number values include positive infinity and
negative infinity.
Note: The result of division by 0 is only NaN if the divisor is also 0. Division by 0 produces infinity when the dividend
is positive or -infinity when the dividend is negative.
String data type
The String data type represents a sequence of 16-bit characters. Strings are stored internally as Unicode characters,
using the UTF-16 format. Strings are immutable values, just as they are in the Java programming language. An
operation on a String value returns a new instance of the string. The default value for a variable declared with the
String data type is null. The value null is not the same as the empty string (""), even though they both represent
the absence of any characters.
uint data type
The uint data type is stored internally as a 32-bit unsigned integer and comprises the set of integers from 0 to
4,294,967,295 (232 - 1), inclusive. Use the uint data type for special circumstances that call for non-negative integers.
For example, you must use the uint data type to represent pixel color values, because the int data type has an internal
sign bit that is not appropriate for handling color values. For integer values larger than the maximum uint value, use
the Number data type, which can handle 53-bit integer values. The default value for variables that are of data type
uint is 0.
void data type
The void data type contains only one value, undefined. In previous versions of ActionScript, undefined was the
default value for instances of the Object class. In ActionScript 3.0, the default value for Object instances is null. If
you attempt to assign the value undefined to an instance of the Object class, Flash Player or Adobe AIR will convert
the value to null. You can only assign a value of undefined to variables that are untyped. Untyped variables are
variables that either lack any type annotation, or use the asterisk (*) symbol for type annotation. You can use void
only as a return type annotation.
Object data type
The Object data type is defined by the Object class. The Object class serves as the base class for all class definitions
in ActionScript. The ActionScript 3.0 version of the Object data type differs from that of previous versions in three
ways. First, the Object data type is no longer the default data type assigned to variables with no type annotation.
Second, the Object data type no longer includes the value undefined, which used to be the default value of Object
instances. Third, in ActionScript 3.0, the default value for instances of the Object class is null.

ADOBE FLEX 3
Developer Guide
55
In previous versions of ActionScript, a variable with no type annotation was automatically assigned the Object data
type. This is no longer true in ActionScript 3.0, which now includes the idea of a truly untyped variable. Variables
with no type annotation are now considered untyped. If you prefer to make it clear to readers of your code that your
intention is to leave a variable untyped, you can use the new asterisk (*) symbol for the type annotation, which is
equivalent to omitting a type annotation. The following example shows two equivalent statements, both of which
declare an untyped variable x:
var x
var x:*
Only untyped variables can hold the value undefined. If you attempt to assign the value undefined to a variable
that has a data type, Flash Player or Adobe AIR will convert the value undefined to the default value of that data
type. For instances of the Object data type, the default value is null, which means that Flash Player or Adobe AIR
will convert the value undefined to null if you attempt to assign undefined to an Object instance.
Type conversions
A type conversion is said to occur when a value is transformed into a value of a different data type. Type conversions
can be either implicit or explicit. Implicit conversion, which is also called coercion, is sometimes performed by Flash
Player or Adobe AIR at run time. For example, if the value 2 is assigned to a variable of the Boolean data type, Flash
Player or Adobe AIR converts the value 2 to the Boolean value true before assigning the value to the variable.
Explicit conversion, which is also called casting, occurs when your code instructs the compiler to treat a variable of
one data type as if it belongs to a different data type. When primitive values are involved, casting actually converts
values from one data type to another. To cast an object to a different type, you wrap the object name in parentheses
and precede it with the name of the new type. For example, the following code takes a Boolean value and casts it to
an integer:
var myBoolean:Boolean = true;
var myINT:int = int(myBoolean);
trace(myINT); // 1
Implicit conversions
Implicit conversions happen at run time in a number of contexts:
•In assignment statements
•When values are passed as function arguments
•When values are returned from functions
•In expressions using certain operators, such as the addition (+) operator
For user-defined types, implicit conversions succeed when the value to be converted is an instance of the destination
class or a class that derives from the destination class. If an implicit conversion is unsuccessful, an error occurs. For
example, the following code contains a successful implicit conversion and an unsuccessful implicit conversion:
class A {}
class B extends A {}
var objA:A = new A();
var objB:B = new B();
var arr:Array = new Array();
objA = objB; // Conversion succeeds.
objB = arr; // Conversion fails.
For primitive types, implicit conversions are handled by calling the same internal conversion algorithms that are
called by the explicit conversion functions. The following sections discuss these primitive type conversions in detail.

ADOBE FLEX 3
Developer Guide
56
Explicit conversions
It’s helpful to use explicit conversions, or casting, when you compile in strict mode, because there may be times when
you do not want a type mismatch to generate a compile-time error. This may be the case when you know that
coercion will convert your values correctly at run time. For example, when working with data received from a form,
you may want to rely on coercion to convert certain string values to numeric values. The following code generates a
compile-time error even though the code would run correctly in standard mode:
var quantityField:String = "3";
var quantity:int = quantityField; // compile time error in strict mode
If you want to continue using strict mode, but would like the string converted to an integer, you can use explicit
conversion, as follows:
var quantityField:String = "3";
var quantity:int = int(quantityField); // Explicit conversion succeeds.
Casting to int, uint, and Number
You can cast any data type into one of the three number types: int, uint, and Number. If Flash Player or Adobe AIR
is unable to convert the number for some reason, the default value of 0 is assigned for the int and uint data types, and
the default value of NaN is assigned for the Number data type. If you convert a Boolean value to a number, true
becomes the value 1 and false becomes the value 0.
var myBoolean:Boolean = true;
var myUINT:uint = uint(myBoolean);
var myINT:int = int(myBoolean);
var myNum:Number = Number(myBoolean);
trace(myUINT, myINT, myNum); // 1 1 1
myBoolean = false;
myUINT = uint(myBoolean);
myINT = int(myBoolean);
myNum = Number(myBoolean);
trace(myUINT, myINT, myNum); // 0 0 0
String values that contain only digits can be successfully converted into one of the number types. The number types
can also convert strings that look like negative numbers or strings that represent a hexadecimal value (for example,
0x1A). The conversion process ignores leading and trailing white space characters in the string value. You can also
cast strings that look like floating-point numbers using Number(). The inclusion of a decimal point causes uint()
and int() to return an integer, truncating the decimal and the characters following it. For example, the following
string values can be cast into numbers:
trace(uint("5")); // 5
trace(uint("-5"));// 4294967291. It wraps around from MAX_VALUE
trace(uint(" 27 "));// 27
trace(uint("3.7")); // 3
trace(int("3.7"));// 3
trace(int("0x1A")); // 26
trace(Number("3.7")); // 3.7
String values that contain non-numeric characters return 0 when cast with int() or uint() and NaN when cast with
Number(). The conversion process ignores leading and trailing white space, but returns 0 or NaN if a string has white
space separating two numbers.
trace(uint("5a"));// 0
trace(uint("ten")); // 0
trace(uint("17 63")); // 0

ADOBE FLEX 3
Developer Guide
57
In ActionScript 3.0, the Number() function no longer supports octal, or base 8, numbers. If you supply a string with
a leading zero to the ActionScript 2.0 Number() function, the number is interpreted as an octal number, and
converted to its decimal equivalent. This is not true with the Number() function in ActionScript 3.0, which instead
ignores the leading zero. For example, the following code generates different output when compiled using different
versions of ActionScript:
trace(Number("044"));
// ActionScript 3.0 44
// ActionScript 2.0 36
Casting is not necessary when a value of one numeric type is assigned to a variable of a different numeric type. Even
in strict mode, the numeric types are implicitly converted to the other numeric types. This means that in some cases,
unexpected values may result when the range of a type is exceeded. The following examples all compile in strict
mode, though some will generate unexpected values:
var myUInt:uint = -3; // Assign int/Number value to uint variable
trace(myUInt); // 4294967293
var myNum:Number = sampleUINT; // Assign int/uint value to Number variable
trace(myNum) // 4294967293
var myInt:int = uint.MAX_VALUE + 1; // Assign Number value to uint variable
trace(myInt); // 0
myInt = int.MAX_VALUE + 1; // Assign uint/Number value to int variable
trace(myInt); // -2147483648
The following table summarizes the results of casting to the Number, int, or uint data type from other data types.
Casting to Boolean
Casting to Boolean from any of the numeric data types (uint, int, and Number) results in false if the numeric value
is 0, and true otherwise. For the Number data type, the value NaN also results in false. The following example
shows the results of casting the numbers -1, 0, and 1:
var myNum:Number;
for (myNum = -1; myNum<2; myNum++)
{
trace("Boolean(" + myNum +") is " + Boolean(myNum));
}
The output from the example shows that, of the three numbers, only 0 returns a value of false:
Boolean(-1) is true
Boolean(0) is false
Boolean(1) is true
Data type or value Result of conversion to Number, int or uint
Boolean If the value is true, 1; otherwise, 0.
Date The internal representation of the Date object, which is the number of milliseconds since midnight
January 1, 1970, universal time.
null 0
Object If the instance is null and converted to Number, NaN; otherwise, 0.
String A number if Flash Player or Adobe AIR can convert the string to a number; otherwise, NaN if converted to
Number, or 0 if converted to int or uint.
undefined If converted to Number, NaN; if converted to int or uint, 0.

ADOBE FLEX 3
Developer Guide
58
Casting to Boolean from a String value returns false if the string is either null or an empty string (""). Otherwise,
it returns true.
var str1:String; // Uninitialized string is null.
trace(Boolean(str1));// false
var str2:String = "";// empty string
trace(Boolean(str2));// false
var str3:String = " "; // white space only
trace(Boolean(str3));// true
Casting to Boolean from an instance of the Object class returns false if the instance is null; otherwise, it returns
true:
var myObj:Object;// Uninitialized object is null.
trace(Boolean(myObj)); // false
myObj = new Object();// instantiate
trace(Boolean(myObj)); // true
Boolean variables get special treatment in strict mode in that you can assign values of any data type to a Boolean
variable without casting. Implicit coercion from all data types to the Boolean data type occurs even in strict mode.
In other words, unlike almost all other data types, casting to Boolean is not necessary to avoid strict mode errors.
The following examples all compile in strict mode and behave as expected at run time:
var myObj:Object = new Object();// instantiate
var bool:Boolean = myObj;
trace(bool); // true
bool = "random string";
trace(bool); // true
bool = new Array();
trace(bool); // true
bool = NaN;
trace(bool); // false
The following table summarizes the results of casting to the Boolean data type from other data types:
Casting to String
Casting to the String data type from any of the numeric data types returns a string representation of the number.
Casting to the String data type from a Boolean value returns the string “true” if the value is true, and returns the
string “false” if the value is false.
Casting to the String data type from an instance of the Object class returns the string “null” if the instance is null.
Otherwise, casting to the String type from the Object class returns the string “[object Object]”.
Casting to String from an instance of the Array class returns a string comprising a comma-delimited list of all the
array elements. For example, the following cast to the String data type returns one string containing all three
elements of the array:
Data type or value Result of conversion to Boolean
String false if the value is null or the empty string (""); true otherwise.
null false
Number, int or uint false if the value is NaN or 0; true otherwise.
Object false if the instance is null; true otherwise.

ADOBE FLEX 3
Developer Guide
59
var myArray:Array = ["primary", "secondary", "tertiary"];
trace(String(myArray)); // primary,secondary,tertiary
Casting to String from an instance of the Date class returns a string representation of the date that the instance
contains. For example, the following example returns a string representation of the Date class instance (the output
shows result for Pacific Daylight Time):
var myDate:Date = new Date(2005,6,1);
trace(String(myDate)); // Fri Jul 1 00:00:00 GMT-0700 2005
The following table summarizes the results of casting to the String data type from other data types.
Syntax
The syntax of a language defines a set of rules that must be followed when writing executable code.
Case sensitivity
ActionScript 3.0 is a case-sensitive language. Identifiers that differ only in case are considered different identifiers.
For example, the following code creates two different variables:
var num1:int;
var Num1:int;
Dot syntax
The dot operator (.) provides a way to access the properties and methods of an object. Using dot syntax, you can
refer to a class property or method by using an instance name, followed by the dot operator and name of the property
or method. For example, consider the following class definition:
class DotExample
{
public var prop1:String;
public function method1():void {}
}
Using dot syntax, you can access the prop1 property and the method1() method by using the instance name created
in the following code:
var myDotEx:DotExample = new DotExample();
myDotEx.prop1 = “hello”;
myDotEx.method1();
Data type or value Result of conversion to string
Array A string comprising all array elements.
Boolean "true" or "false"
Date A string representation of the Date object.
null "null"
Number, int or uint A string representation of the number.
Object If the instance is null, "null"; otherwise, "[object Object]”.

ADOBE FLEX 3
Developer Guide
60
You can use dot syntax when you define packages. You use the dot operator to refer to nested packages. For example,
the EventDispatcher class resides in a package named events that is nested within the package named flash. You can
refer to the events package using the following expression:
flash.events
You can also refer to the EventDispatcher class using this expression:
flash.events.EventDispatcher
Slash syntax
Slash syntax is not supported in ActionScript 3.0. Slash syntax was used in earlier versions of ActionScript to indicate
the path of a movie clip or variable.
Literals
A literal is a value that appears directly in your code. The following examples are all literals:
17
"hello"
-3
9.4
null
undefined
true
false
Literals can also be grouped to form compound literals. Array literals are enclosed in bracket characters ([]) and use
the comma to separate array elements.
An array literal can be used to initialize an array. The following examples show two arrays that are initialized using
array literals. You can use the new statement and pass the compound literal as a parameter to the Array class
constructor, but you can also assign literal values directly when instantiating instances of the following ActionScript
core classes: Object, Array, String, Number, int, uint, XML, XMLList and Boolean.
// Use new statement.
var myStrings:Array = new Array(["alpha", "beta", "gamma"]);
var myNums:Array = new Array([1,2,3,5,8]);
// Assign literal directly.
var myStrings:Array = ["alpha", "beta", "gamma"];
var myNums:Array = [1,2,3,5,8];
Literals can also be used to initialize a generic object. A generic object is an instance of the Object class. Object literals
are enclosed in curly braces ({}) and use the comma to separate object properties. Each property is declared with
the colon character (:), which separates the name of the property from the value of the property.
You can create a generic object using the new statement, and pass the object literal as a parameter to the Object class
constructor, or you can assign the object literal directly to the instance you are declaring. The following example
demonstrates two alternative ways to create a new generic object and initialize the object with three properties
(propA, propB, and propC), each with values set to 1, 2, and 3, respectively:
// Use new statement and add properties.
var myObject:Object = new Object();
myObject.propA = 1;
myObject.propB = 2;
myObject.propC = 3;

ADOBE FLEX 3
Developer Guide
61
// Assign literal directly.
var myObject:Object = {propA:1, propB:2, propC:3};
For more information, see “Basics of strings” on page 130, “Basics of regular expressions” on page 188, and “Initial-
izing XML variables” on page 215.
Semicolons
You can use the semicolon character (;) to terminate a statement. Alternatively, if you omit the semicolon character,
the compiler will assume that each line of code represents a single statement. Because many programmers are accus-
tomed to using the semicolon to denote the end of a statement, your code may be easier to read if you consistently
use semicolons to terminate your statements.
Using a semicolon to terminate a statement allows you to place more than one statement on a single line, but this
may make your code more difficult to read.
Parentheses
You can use parentheses (()) in three ways in ActionScript 3.0. First, you can use parentheses to change the order of
operations in an expression. Operations that are grouped inside parentheses are always executed first. For example,
parentheses are used to alter the order of operations in the following code:
trace(2 + 3 * 4);// 14
trace( (2 + 3) * 4); // 20
Second, you can use parentheses with the comma operator (,) to evaluate a series of expressions and return the result
of the final expression, as shown in the following example:
var a:int = 2;
var b:int = 3;
trace((a++, b++, a+b)); // 7
Third, you can use parentheses to pass one or more parameters to functions or methods, as shown in the following
example, which passes a String value to the trace() function:
trace("hello"); // hello
Comments
ActionScript 3.0 code supports two types of comments: single-line comments and multiline comments. These
commenting mechanisms are similar to the commenting mechanisms in C++ and Java. The compiler will ignore text
that is marked as a comment.
Single-line comments begin with two forward slash characters (//) and continue until the end of the line. For
example, the following code contains a single-line comment:
var someNumber:Number = 3; // a single line comment
Multiline comments begin with a forward slash and asterisk (/*) and end with an asterisk and forward slash (*/).
/* This is multiline comment that can span
more than one line of code. */

ADOBE FLEX 3
Developer Guide
62
Keywords and reserved words
Reserved words are words that you cannot use as identifiers in your code because the words are reserved for use by
ActionScript. Reserved words include lexical keywords, which are removed from the program namespace by the
compiler. The compiler will report an error if you use a lexical keyword as an identifier. The following table lists
ActionScript 3.0 lexical keywords.
There is a small set of keywords, called syntactic keywords, that can be used as identifiers, but that have special
meaning in certain contexts. The following table lists ActionScript 3.0 syntactic keywords.
There are also several identifiers that are sometimes referred to as future reserved words. These identifiers are not
reserved by ActionScript 3.0, though some of them may be treated as keywords by software that incorporates Action-
Script 3.0. You might be able to use many of these identifiers in your code, but Adobe recommends that you do not
use them because they may appear as keywords in a subsequent version of the language.
Constants
ActionScript 3.0 supports the const statement, which you can use to create constants. Constants are properties with
a fixed value that cannot be altered. You can assign a value to a constant only once, and the assignment must occur
in close proximity to the declaration of the constant. For example, if a constant is declared as a member of a class,
you can assign a value to that constant only as part of the declaration or inside the class constructor.
as break case catch
class const continue default
delete do else extends
false finally for function
if implements import in
instanceof interface internal is
native new null package
private protected public return
super switch this throw
to true try typeof
use var void while
with
each get set namespace
include dynamic final native
override static
abstract boolean byte cast
char debugger double enum
export float goto intrinsic
long prototype short synchronized
throws to transient type
virtual volatile

ADOBE FLEX 3
Developer Guide
63
The following code declares two constants. The first constant, MINIMUM, has a value assigned as part of the decla-
ration statement. The second constant, MAXIMUM, has a value assigned in the constructor. Note that this example only
compiles in standard mode because strict mode only allows a constant’s value to be assigned at initialization time.
class A
{
public const MINIMUM:int = 0;
public const MAXIMUM:int;
public function A()
{
MAXIMUM = 10;
}
}
var a:A = new A();
trace(a.MINIMUM); // 0
trace(a.MAXIMUM); // 10
An error results if you attempt to assign an initial value to a constant in any other way. For example, if you attempt
to set the initial value of MAXIMUM outside the class, a run-time error will occur.
class A
{
public const MINIMUM:int = 0;
public const MAXIMUM:int;
}
var a:A = new A();
a["MAXIMUM"] = 10; // run-time error
The Flash Player API defines a wide range of constants for your use. By convention, constants in ActionScript use all
capital letters, with words separated by the underscore character (_). For example, the MouseEvent class definition
uses this naming convention for its constants, each of which represents an event related to mouse input:
package flash.events
{
public class MouseEvent extends Event
{
public static const CLICK:String = "click";
public static const DOUBLE_CLICK:String = "doubleClick";
public static const MOUSE_DOWN:String = "mouseDown";
public static const MOUSE_MOVE:String = "mouseMove";
...
}
}
Operators
Operators are special functions that take one or more operands and return a value. An operand is a value—usually a
literal, a variable, or an expression—that an operator uses as input. For example, in the following code, the addition
(+) and multiplication (*) operators are used with three literal operands (2, 3, and 4) to return a value. This value is
then used by the assignment (=) operator to assign the returned value, 14, to the variable sumNumber.
var sumNumber:uint = 2 + 3 * 4; // uint = 14

ADOBE FLEX 3
Developer Guide
64
Operators can be unary, binary, or ternary. A unary operator takes one operand. For example, the increment (++)
operator is a unary operator, because it takes only one operand. A binary operator takes two operands. For example,
the division (/) operator takes two operands. A ternary operator takes three operands. For example, the conditional
(?:) operator takes three operands.
Some operators are overloaded, which means that they behave differently depending on the type or quantity of
operands passed to them. The addition (+) operator is an example of an overloaded operator that behaves differently
depending on the data type of the operands. If both operands are numbers, the addition operator returns the sum of
the values. If both operands are strings, the addition operator returns the concatenation of the two operands. The
following example code shows how the operator behaves differently depending on the operands:
trace(5 + 5); // 10
trace("5" + "5"); // 55
Operators can also behave differently based on the number of operands supplied. The subtraction (-) operator is
both a unary and binary operator. When supplied with only one operand, the subtraction operator negates the
operand and returns the result. When supplied with two operands, the subtraction operator returns the difference
between the operands. The following example shows the subtraction operator used first as a unary operator, and then
as a binary operator.
trace(-3);// -3
trace(7-2); // 5
Operator precedence and associativity
Operator precedence and associativity determine the order in which operators are processed. Although it may seem
natural to those familiar with arithmetic that the compiler processes the multiplication (*) operator before the
addition (+) operator, the compiler needs explicit instructions about which operators to process first. Such instruc-
tions are collectively referred to as operator precedence. ActionScript defines a default operator precedence that you
can alter using the parentheses (()) operator. For example, the following code alters the default precedence in the
previous example to force the compiler to process the addition operator before the multiplication operator:
var sumNumber:uint = (2 + 3) * 4; // uint == 20
You may encounter situations in which two or more operators of the same precedence appear in the same expression.
In these cases, the compiler uses the rules of associativity to determine which operator to process first. All of the
binary operators, except the assignment operators, are left-associative, which means that operators on the left are
processed before operators on the right. The assignment operators and the conditional (?:) operator are right-
associative, which means that the operators on the right are processed before operators on the left.
For example, consider the less-than (<) and greater-than (>) operators, which have the same precedence. If both
operators are used in the same expression, the operator on the left is processed first because both operators are left-
associative. This means that the following two statements produce the same output:
trace(3 > 2 < 1); // false
trace((3 > 2) < 1); // false
The greater-than operator is processed first, which results in a value of true, because the operand 3 is greater than
the operand 2. The value true is then passed to the less-than operator along with the operand 1. The following code
represents this intermediate state:
trace((true) < 1);
The less-than operator converts the value true to the numeric value 1 and compares that numeric value to the
second operand 1 to return the value false (the value 1 is not less than 1).
trace(1 < 1); // false

ADOBE FLEX 3
Developer Guide
65
You can alter the default left associativity with the parentheses operator. You can instruct the compiler to process the
less-than operator first by enclosing that operator and its operands in parentheses. The following example uses the
parentheses operator to produce a different output using the same numbers as the previous example:
trace(3 > (2 < 1)); // true
The less-than operator is processed first, which results in a value of false because the operand 2 is not less than the
operand 1. The value false is then passed to the greater-than operator along with the operand 3. The following code
represents this intermediate state:
trace(3 > (false));
The greater-than operator converts the value false to the numeric value 0 and compares that numeric value to the
other operand 3 to return true (the value 3 is greater than 0).
trace(3 > 0); // true
The following table lists the operators for ActionScript 3.0 in order of decreasing precedence. Each row of the table
contains operators of the same precedence. Each row of operators has higher precedence than the row appearing
below it in the table.
Primary operators
The primary operators include those used for creating Array and Object literals, grouping expressions, calling
functions, instantiating class instances, and accessing properties.
All the primary operators, as listed in the following table, have equal precedence. Operators that are part of the E4X
specification are indicated by the (E4X) notation.
Group Operators
Primary [] {x:y} () f(x) new x.y x[y] <></> @ :: ..
Postfix x++ x--
Unary ++x --x + - ~ ! delete typeof void
Multiplicative * / %
Additive + -
Bitwise shift << >> >>>
Relational < > <= >= as in instanceof is
Equality == != === !==
Bitwise AND &
Bitwise XOR ^
Bitwise OR |
Logical AND &&
Logical OR ||
Conditional ?:
Assignment = *= /= %= += -= <<= >>= >>>= &= ^= |=
Comma ,

ADOBE FLEX 3
Developer Guide
66
Postfix operators
The postfix operators take one operator and either increment or decrement the value. Although these operators are
unary operators, they are classified separately from the rest of the unary operators because of their higher precedence
and special behavior. When a postfix operator is used as part of a larger expression, the expression’s value is returned
before the postfix operator is processed. For example, the following code shows how the value of the expression
xNum++ is returned before the value is incremented:
var xNum:Number = 0;
trace(xNum++); // 0
trace(xNum); // 1
All the postfix operators, as listed in the following table, have equal precedence:
Unary operators
The unary operators take one operand. The increment (++) and decrement (--) operators in this group are prefix
operators, which means that they appear before the operand in an expression. The prefix operators differ from their
postfix counterparts in that the increment or decrement operation is completed before the value of the overall
expression is returned. For example, the following code shows how the value of the expression ++xNum is returned
after the value is incremented:
var xNum:Number = 0;
trace(++xNum); // 1
trace(xNum); // 1
All the unary operators, as listed in the following table, have equal precedence:
Operator Operation performed
[] Initializes an array
{x:y} Initializes an object
() Groups expressions
f(x) Calls a function
new Calls a constructor
x.y x[y] Accesses a property
<></> Initializes an XMLList object (E4X)
@Accesses an attribute (E4X)
:: Qualifies a name (E4X)
.. Accesses a descendant XML element (E4X)
Operator Operation performed
++ Increments (postfix)
-- Decrements (postfix)

ADOBE FLEX 3
Developer Guide
67
Multiplicative operators
The multiplicative operators take two operands and perform multiplication, division, or modulo calculations.
All the multiplicative operators, as listed in the following table, have equal precedence:
Additive operators
The additive operators take two operands and perform addition or subtraction calculations. All the additive
operators, as listed in the following table, have equal precedence:
Bitwise shift operators
The bitwise shift operators take two operands and shift the bits of the first operand to the extent specified by the
second operand. All the bitwise shift operators, as listed in the following table, have equal precedence:
Operator Operation performed
++ Increments (prefix)
-- Decrements (prefix)
+Unary +
-Unary - (negation)
!Logical NOT
~Bitwise NOT
delete Deletes a property
typeof Returns type information
void Returns undefined value
Operator Operation performed
*Multiplication
/Division
%Modulo
Operator Operation performed
+Addition
-Subtraction
Operator Operation performed
<< Bitwise left shift
>> Bitwise right shift
>>> Bitwise unsigned right shift

ADOBE FLEX 3
Developer Guide
68
Relational operators
The relational operators take two operands, compare their values, and return a Boolean value. All the relational
operators, as listed in the following table, have equal precedence:
Equality operators
The equality operators take two operands, compare their values, and return a Boolean value. All the equality
operators, as listed in the following table, have equal precedence:
Bitwise logical operators
The bitwise logical operators take two operands and perform bit-level logical operations. The bitwise logical
operators differ in precedence and are listed in the following table in order of decreasing precedence:
Logical operators
The logical operators take two operands and return a Boolean result. The logical operators differ in precedence and
are listed in the following table in order of decreasing precedence:
Operator Operation performed
<Less than
>Greater than
<= Less than or equal to
>= Greater than or equal to
as Checks data type
in Checks for object properties
instanceof Checks prototype chain
is Checks data type
Operator Operation performed
== Equality
!= Inequality
=== Strict equality
!== Strict inequality
Operator Operation performed
&Bitwise AND
^Bitwise XOR
|Bitwise OR

ADOBE FLEX 3
Developer Guide
69
Conditional operator
The conditional operator is a ternary operator, which means that it takes three operands. The conditional operator
is a shorthand method of applying the if..else conditional statement.
Assignment operators
The assignment operators take two operands and assign a value to one operand, based on the value of the other
operand. All the assignment operators, as listed in the following table, have equal precedence:
Conditionals
ActionScript 3.0 provides three basic conditional statements that you can use to control program flow.
if..else
The if..else conditional statement allows you to test a condition and execute a block of code if that condition
exists, or execute an alternative block of code if the condition does not exist. For example, the following code tests
whether the value of x exceeds 20, generates a trace() function if it does, or generates a different trace() function
if it does not:
Operator Operation performed
&& Logical AND
|| Logical OR
Operator Operation performed
?: Conditional
Operator Operation performed
=Assignment
*= Multiplication assignment
/= Division assignment
%= Modulo assignment
+= Addition assignment
-= Subtraction assignment
<<= Bitwise left shift assignment
>>= Bitwise right shift assignment
>>>= Bitwise unsigned right shift assignment
&= Bitwise AND assignment
^= Bitwise XOR assignment
|= Bitwise OR assignment

ADOBE FLEX 3
Developer Guide
70
if (x > 20)
{
trace("x is > 20");
}
else
{
trace("x is <= 20");
}
If you do not want to execute an alternative block of code, you can use the if statement without the else statement.
if..else if
You can test for more than one condition using the if..else if conditional statement. For example, the following
code not only tests whether the value of x exceeds 20, but also tests whether the value of x is negative:
if (x > 20)
{
trace("x is > 20");
}
else if (x < 0)
{
trace("x is negative");
}
If an if or else statement is followed by only one statement, the statement does not need to be enclosed in braces.
For example, the following code does not use braces:
if (x > 0)
trace("x is positive”);
else if (x < 0)
trace("x is negative");
else
trace("x is 0");
However, Adobe recommends that you always use braces, because unexpected behavior can occur if statements are
later added to a conditional statement that lacks braces. For example, in the following code the value of
positiveNums increases by 1 whether or not the condition evaluates to true:
var x:int;
var positiveNums:int = 0;
if (x > 0)
trace("x is positive");
positiveNums++;
trace(positiveNums); // 1
switch
The switch statement is useful if you have several execution paths that depend on the same condition expression.
It provides functionality similar to a long series of if..else if statements, but is somewhat easier to read. Instead
of testing a condition for a Boolean value, the switch statement evaluates an expression and uses the result to
determine which block of code to execute. Blocks of code begin with a case statement and end with a break
statement. For example, the following switch statement prints the day of the week, based on the day number
returned by the Date.getDay() method:
var someDate:Date = new Date();
var dayNum:uint = someDate.getDay();
switch(dayNum)

ADOBE FLEX 3
Developer Guide
71
{
case 0:
trace("Sunday");
break;
case 1:
trace("Monday");
break;
case 2:
trace("Tuesday");
break;
case 3:
trace("Wednesday");
break;
case 4:
trace("Thursday");
break;
case 5:
trace("Friday");
break;
case 6:
trace("Saturday");
break;
default:
trace("Out of range");
break;
}
Looping
Looping statements allow you to perform a specific block of code repeatedly using a series of values or variables.
Adobe recommends that you always enclose the block of code in braces ({}). Although you can omit the braces if
the block of code contains only one statement, this practice is not recommended for the same reason that it is not
recommended for conditionals: it increases the likelihood that statements added later will be inadvertently excluded
from the block of code. If you later add a statement that you want to include in the block of code, but forget to add
the necessary braces, the statement will not be executed as part of the loop.
for
The for loop allows you to iterate through a variable for a specific range of values. You must supply three expressions
in a for statement: a variable that is set to an initial value, a conditional statement that determines when the looping
ends, and an expression that changes the value of the variable with each loop. For example, the following code loops
five times. The value of the variable i starts at 0 and ends at 4, and the output will be the numbers 0 through 4, each
on its own line.
var i:int;
for (i = 0; i < 5; i++)
{
trace(i);
}

ADOBE FLEX 3
Developer Guide
72
for..in
The for..in loop iterates through the properties of an object, or the elements of an array. For example, you can use
a for..in loop to iterate through the properties of a generic object (object properties are not kept in any particular
order, so properties may appear in a seemingly random order):
var myObj:Object = {x:20, y:30};
for (var i:String in myObj)
{
trace(i + ": " + myObj[i]);
}
// output:
// x: 20
// y: 30
You can also iterate through the elements of an array:
var myArray:Array = ["one", "two", "three"];
for (var i:String in myArray)
{
trace(myArray[i]);
}
// output:
// one
// two
// three
What you cannot do is iterate through the properties of an object if it is an instance of a user-defined class, unless
the class is a dynamic class. Even with instances of dynamic classes, you will be able to iterate only through properties
that are added dynamically.
for each..in
The for each..in loop iterates through the items of a collection, which can be tags in an XML or XMLList object,
the values held by object properties, or the elements of an array. For example, as the following excerpt shows, you
can use a for each..in loop to iterate through the properties of a generic object, but unlike the for..in loop, the
iterator variable in a for each..in loop contains the value held by the property instead of the name of the property:
var myObj:Object = {x:20, y:30};
for each (var num in myObj)
{
trace(num);
}
// output:
// 20
// 30
You can iterate through an XML or XMLList object, as the following example shows:
var myXML:XML = <users>
<fname>Jane</fname>
<fname>Susan</fname>
<fname>John</fname>
</users>;
for each (var item in myXML.fname)
{
trace(item);
}
/* output
Jane

ADOBE FLEX 3
Developer Guide
73
Susan
John
*/
You can also iterate through the elements of an array, as this example shows:
var myArray:Array = ["one", "two", "three"];
for each (var item in myArray)
{
trace(item);
}
// output:
// one
// two
// three
You cannot iterate through the properties of an object if the object is an instance of a sealed class. Even for instances
of dynamic classes, you cannot iterate through any fixed properties, which are properties defined as part of the class
definition.
while
The while loop is like an if statement that repeats as long as the condition is true. For example, the following code
produces the same output as the for loop example:
var i:int = 0;
while (i < 5)
{
trace(i);
i++;
}
One disadvantage of using a while loop instead of a for loop is that infinite loops are easier to write with while
loops. The for loop example code does not compile if you omit the expression that increments the counter variable,
but the while loop example does compile if you omit that step. Without the expression that increments i, the loop
becomes an infinite loop.
do..while
The do..while loop is a while loop that guarantees that the code block is executed at least once, because the
condition is checked after the code block is executed. The following code shows a simple example of a do..while
loop that generates output even though the condition is not met:
var i:int = 5;
do
{
trace(i);
i++;
} while (i < 5);
// output: 5

ADOBE FLEX 3
Developer Guide
74
Functions
Functions are blocks of code that carry out specific tasks and can be reused in your program. There are two types of
functions in ActionScript 3.0: methods and function closures. Whether a function is a called a method or a function
closure depends on the context in which the function is defined. A function is called a method if you define it as part
of a class definition or attach it to an instance of an object. A function is called a function closure if it is defined in
any other way.
Functions have always been extremely important in ActionScript. In ActionScript 1.0, for example, the class
keyword did not exist, so “classes” were defined by constructor functions. Although the class keyword has since
been added to the language, a solid understanding of functions is still important if you want to take full advantage
of what the language has to offer. This can be a challenge for programmers who expect ActionScript functions to
behave similarly to functions in languages such as C++ or Java. Although basic function definition and invocation
should not present a challenge to experienced programmers, some of the more advanced features of ActionScript
functions require some explanation.
Basic function concepts
This section discusses basic function definition and invocation techniques.
Calling functions
You call a function by using its identifier followed by the parentheses operator (()). You use the parentheses operator
to enclose any function parameters you want to send to the function. For example, the trace() function, which is
a top-level function in the Flash Player API, is used throughout this book:
trace(“Use trace to help debug your script”);
If you are calling a function with no parameters, you must use an empty pair of parentheses. For example, you can
use the Math.random() method, which takes no parameters, to generate a random number:
var randomNum:Number = Math.random();
Defining your own functions
There are two ways to define a function in ActionScript 3.0: you can use a function statement or a function
expression. The technique you choose depends on whether you prefer a more static or dynamic programming style.
Define your functions with function statements if you prefer static, or strict mode, programming. Define your
functions with function expressions if you have a specific need to do so. Function expressions are more often used
in dynamic, or standard mode, programming.
Function statements
Function statements are the preferred technique for defining functions in strict mode. A function statement begins
with the function keyword, followed by:
•The function name
•The parameters, in a comma-delimited list enclosed in parentheses
•The function body—that is, the ActionScript code to be executed when the function is invoked, enclosed in curly
braces
For example, the following code creates a function that defines a parameter and then invokes the function using the
string “hello” as the parameter value:

ADOBE FLEX 3
Developer Guide
75
function traceParameter(aParam:String)
{
trace(aParam);
}
traceParameter("hello"); // hello
Function expressions
The second way to declare a function is to use an assignment statement with a function expression, which is also
sometimes called a function literal or an anonymous function. This is a more verbose method that is widely used in
earlier versions of ActionScript.
An assignment statement with a function expression begins with the var keyword, followed by:
•The function name
•The colon operator (:)
•The Function class to indicate the data type
•The assignment operator (=)
•The function keyword
•The parameters, in a comma-delimited list enclosed in parentheses
•The function body—that is, the ActionScript code to be executed when the function is invoked, enclosed in curly
braces
For example, the following code declares the traceParameter function using a function expression:
var traceParameter:Function = function (aParam:String)
{
trace(aParam);
};
traceParameter("hello"); // hello
Notice that you do not specify a function name, as you do in a function statement. Another important difference
between function expressions and function statements is that a function expression is an expression rather than a
statement. This means that a function expression cannot stand on its own as a function statement can. A function
expression can be used only as a part of a statement, usually an assignment statement. The following example shows
a function expression assigned to an array element:
var traceArray:Array = new Array();
traceArray[0] = function (aParam:String)
{
trace(aParam);
};
traceArray[0]("hello");
Choosing between statements and expressions
As a general rule, use a function statement unless specific circumstances call for the use of an expression. Function
statements are less verbose, and they provide a more consistent experience between strict mode and standard mode
than function expressions.
Function statements are easier to read than assignment statements that contain function expressions. Function state-
ments make your code more concise; they are less confusing than function expressions, which require you to use
both the var and function keywords.

ADOBE FLEX 3
Developer Guide
76
Function statements provide a more consistent experience between the two compiler modes in that you can use dot
syntax in both strict and standard mode to invoke a method declared using a function statement. This is not neces-
sarily true for methods declared with a function expression. For example, the following code defines a class named
Example with two methods: methodExpression(), which is declared with a function expression, and
methodStatement(), which is declared with a function statement. In strict mode, you cannot use dot syntax to
invoke the methodExpression() method.
class Example
{
var methodExpression = function() {}
function methodStatement() {}
}
var myEx:Example = new Example();
myEx.methodExpression(); // error in strict mode; okay in standard mode
myEx.methodStatement(); // okay in strict and standard modes
Function expressions are considered better suited to programming that focuses on run-time, or dynamic, behavior.
If you prefer to use strict mode, but also need to call a method declared with a function expression, you can use either
of two techniques. First, you can call the method using square brackets ([]) instead of the dot (.) operator. The
following method call succeeds in both strict mode and standard mode:
myExample["methodLiteral"]();
Second, you can declare the entire class as a dynamic class. Although this allows you to call the method using the dot
operator, the downside is that you sacrifice some strict mode functionality for all instances of that class. For example,
the compiler does not generate an error if you attempt to access an undefined property on an instance of a dynamic
class.
There are some circumstances in which function expressions are useful. One common use of function expressions
is for functions that are used only once and then discarded. Another less common use is for attaching a function to
a prototype property. For more information, see “The prototype object” on page 112.
There are two subtle differences between function statements and function expressions that you should take into
account when choosing which technique to use. The first difference is that function expressions do not exist
independently as objects with regard to memory management and garbage collection. In other words, when you
assign a function expression to another object, such as an array element or an object property, you create the only
reference to that function expression in your code. If the array or object to which your function expression is
attached goes out of scope or is otherwise no longer available, you will no longer have access to the function
expression. If the array or object is deleted, the memory that the function expression uses will become eligible for
garbage collection, which means that the memory is eligible to be reclaimed and reused for other purposes.
The following example shows that for a function expression, once the property to which the expression is assigned
is deleted, the function is no longer available. The class Test is dynamic, which means that you can add a property
named functionExp that holds a function expression. The functionExp() function can be called with the dot
operator, but once the functionExp property is deleted, the function is no longer accessible.
dynamic class Test {}
var myTest:Test = new Test();
// function expression
myTest.functionExp = function () { trace("Function expression") };
myTest.functionExp(); // Function expression
delete myTest.functionExp;
myTest.functionExp(); // error

ADOBE FLEX 3
Developer Guide
77
If, on the other hand, the function is first defined with a function statement, it exists as its own object and continues
to exist even after you delete the property to which it is attached. The delete operator only works on properties of
objects, so even a call to delete the function stateFunc() itself does not work.
dynamic class Test {}
var myTest:Test = new Test();
// function statement
function stateFunc() { trace("Function statement") }
myTest.statement = stateFunc;
myTest.statement(); // Function statement
delete myTest.statement;
delete stateFunc; // no effect
stateFunc();// Function statement
myTest.statement(); // error
The second difference between function statements and function expressions is that function statements exist
throughout the scope in which they are defined, including in statements that appear before the function statement.
Function expressions, by contrast, are defined only for subsequent statements. For example, the following code
successfully calls the scopeTest() function before it is defined:
statementTest(); // statementTest
function statementTest():void
{
trace("statementTest");
}
Function expressions are not available before they are defined, so the following code results in a run-time error:
expressionTest(); // run-time error
var expressionTest:Function = function ()
{
trace("expressionTest");
}
Returning values from functions
To return a value from your function, use the return statement followed by the expression or literal value that you
want to return. For example, the following code returns an expression representing the parameter:
function doubleNum(baseNum:int):int
{
return (baseNum * 2);
}
Notice that the return statement terminates the function, so that any statements below a return statement will not
be executed, as follows:
function doubleNum(baseNum:int):int {
return (baseNum * 2);
trace("after return"); // This trace statement will not be executed.
}
In strict mode, you must return a value of the appropriate type if you choose to specify a return type. For example,
the following code generates an error in strict mode, because it does not return a valid value:
function doubleNum(baseNum:int):int
{
trace("after return");
}

ADOBE FLEX 3
Developer Guide
78
Nested functions
You can nest functions, which means that functions can be declared within other functions. A nested function is
available only within its parent function unless a reference to the function is passed to external code. For example,
the following code declares two nested functions inside the getNameAndVersion() function:
function getNameAndVersion():String
{
function getVersion():String
{
return "9";
}
function getProductName():String
{
return "Flash Player";
}
return (getProductName() + " " + getVersion());
}
trace(getNameAndVersion()); // Flash Player 9
When nested functions are passed to external code, they are passed as function closures, which means that the
function retains any definitions that are in scope when the function is defined. For more information, see “Function
closures” on page 83.
Function parameters
ActionScript 3.0 provides some functionality for function parameters that may seem novel for programmers new to
the language. Although the idea of passing parameters by value or reference should be familiar to most
programmers, the arguments object and the ... (rest) parameter may be new to many of you.
Passing arguments by value or by reference
In many programming languages, it’s important to understand the distinction between passing arguments by value
or by reference; the distinction can affect the way code is designed.
To be passed by value means that the value of the argument is copied into a local variable for use within the function.
To be passed by reference means that only a reference to the argument is passed instead of the actual value. No copy
of the actual argument is made. Instead, a reference to the variable passed as an argument is created and assigned to
a local variable for use within the function. As a reference to a variable outside the function, the local variable gives
you the ability to change the value of the original variable.
In ActionScript 3.0, all arguments are passed by reference, because all values are stored as objects. However, objects
that belong to the primitive data types, which includes Boolean, Number, int, uint, and String, have special operators
that make them behave as if they were passed by value. For example, the following code creates a function named
passPrimitives() that defines two parameters named xParam and yParam, both of type int. These parameters are
similar to local variables declared inside the body of the passPrimitives() function. When the function is called
with the arguments xValue and yValue, the parameters xParam and yParam are initialized with references to the
int objects represented by xValue and yValue. Because the arguments are primitives, they behave as if passed by
value. Although xParam and yParam initially contain only references to the xValue and yValue objects, any changes
to the variables within the function body generate new copies of the values in memory.
function passPrimitives(xParam:int, yParam:int):void
{
xParam++;
yParam++;
trace(xParam, yParam);
}

ADOBE FLEX 3
Developer Guide
79
var xValue:int = 10;
var yValue:int = 15;
trace(xValue, yValue);// 10 15
passPrimitives(xValue, yValue); // 11 16
trace(xValue, yValue);// 10 15
Within the passPrimitives() function, the values of xParam and yParam are incremented, but this does not affect
the values of xValue and yValue, as shown in the last trace statement. This would be true even if the parameters
were named identically to the variables, xValue and yValue, because the xValue and yValue inside the function
would point to new locations in memory that exist separately from the variables of the same name outside the
function.
All other objects—that is, objects that do not belong to the primitive data types—are always passed by reference,
which gives you ability to change the value of the original variable. For example, the following code creates an object
named objVar with two properties, x and y. The object is passed as an argument to the passByRef() function.
Because the object is not a primitive type, the object is not only passed by reference, but also stays a reference. This
means that changes made to the parameters within the function will affect the object properties outside the function.
function passByRef(objParam:Object):void
{
objParam.x++;
objParam.y++;
trace(objParam.x, objParam.y);
}
var objVar:Object = {x:10, y:15};
trace(objVar.x, objVar.y); // 10 15
passByRef(objVar); // 11 16
trace(objVar.x, objVar.y); // 11 16
The objParam parameter references the same object as the global objVar variable. As you can see from the trace
statements in the example, changes to the x and y properties of the objParam object are reflected in the objVar
object.
Default parameter values
New in ActionScript 3.0 is the ability to declare default parameter values for a function. If a call to a function with
default parameter values omits a parameter with default values, the value specified in the function definition for that
parameter is used. All parameters with default values must be placed at the end of the parameter list. The values
assigned as default values must be compile-time constants. The existence of a default value for a parameter effectively
makes that parameter an optional parameter. A parameter without a default value is considered a required parameter.
For example, the following code creates a function with three parameters, two of which have default values. When
the function is called with only one parameter, the default values for the parameters are used.
function defaultValues(x:int, y:int = 3, z:int = 5):void
{
trace(x, y, z);
}
defaultValues(1); // 1 3 5
The arguments object
When parameters are passed to a function, you can use the arguments object to access information about the
parameters passed to your function. Some important aspects of the arguments object include the following:
•The arguments object is an array that includes all the parameters passed to the function.
•The arguments.length property reports the number of parameters passed to the function.

ADOBE FLEX 3
Developer Guide
80
•The arguments.callee property provides a reference to the function itself, which is useful for recursive calls
to function expressions.
Note: The arguments object is not available if any parameter is named arguments or if you use the ... (rest) parameter.
ActionScript 3.0 allows function calls to include more parameters than those defined in the function definition, but
will generate a compiler error in strict mode if the number of parameters doesn’t match the number of required
parameters (and optionally, any optional parameters). You can use the array aspect of the arguments object to access
any parameter passed to the function, whether or not that parameter is defined in the function definition. The
following example, which only compiles in standard mode, uses the arguments array along with the
arguments.length property to trace all the parameters passed to the traceArgArray() function:
function traceArgArray(x:int):void
{
for (var i:uint = 0; i < arguments.length; i++)
{
trace(arguments[i]);
}
}
traceArgArray(1, 2, 3);
// output:
// 1
// 2
// 3
The arguments.callee property is often used in anonymous functions to create recursion. You can use it to add
flexibility to your code. If the name of a recursive function changes over the course of your development cycle, you
need not worry about changing the recursive call in your function body if you use arguments.callee instead of
the function name. The arguments.callee property is used in the following function expression to enable
recursion:
var factorial:Function = function (x:uint)
{
if(x == 0)
{
return 1;
}
else
{
return (x * arguments.callee(x - 1));
}
}
trace(factorial(5)); // 120
If you use the ... (rest) parameter in your function declaration, the arguments object will not be available to you.
Instead, you must access the parameters using the parameter names that you declared for them.
You should also be careful to avoid using the string “arguments” as a parameter name, because it will shadow the
arguments object. For example, if the function traceArgArray() is rewritten so that an arguments parameter is
added, the references to arguments in the function body refer to the parameter rather than the arguments object.
The following code produces no output:
function traceArgArray(x:int, arguments:int):void
{
for (var i:uint = 0; i < arguments.length; i++)
{

ADOBE FLEX 3
Developer Guide
81
trace(arguments[i]);
}
}
traceArgArray(1, 2, 3);
// no output
The arguments object in previous versions of ActionScript also contained a property named caller, which is a
reference to the function that called the current function. The caller property is not present in ActionScript 3.0,
but if you need a reference to the calling function, you can alter the calling function so that it passes an extra
parameter that is a reference to itself.
The ... (rest) parameter
ActionScript 3.0 introduces a new parameter declaration called the ... (rest) parameter. This parameter allows you to
specify an array parameter that accepts any number of comma- delimited arguments. The parameter can have any
name that is not a reserved word. This parameter declaration must be the last parameter specified. Use of this
parameter makes the arguments object unavailable. Although the ... (rest) parameter gives you the same function-
ality as the arguments array and arguments.length property, it does not provide functionality similar to that
provided by arguments.callee. You should ensure that you do not need to use arguments.callee before using
the ... (rest) parameter.
The following example rewrites the traceArgArray() function using the ... (rest) parameter instead of the
arguments object:
function traceArgArray(... args):void
{
for (var i:uint = 0; i < args.length; i++)
{
trace(args[i]);
}
}
traceArgArray(1, 2, 3);
// output:
// 1
// 2
// 3
The ... (rest) parameter can also be used with other parameters, as long as it is the last parameter listed. The following
example modifies the traceArgArray() function so that its first parameter, x, is of type int, and the second
parameter uses the ... (rest) parameter. The output skips the first value, because the first parameter is no longer part
of the array created by the ... (rest) parameter.
function traceArgArray(x: int, ... args)
{
for (var i:uint = 0; i < args.length; i++)
{
trace(args[i]);
}
}
traceArgArray(1, 2, 3);
// output:
// 2
// 3

ADOBE FLEX 3
Developer Guide
82
Functions as objects
Functions in ActionScript 3.0 are objects. When you create a function, you are creating an object that can not only
be passed as a parameter to another function, but also have properties and methods attached to it.
Functions passed as arguments to another function are passed by reference and not by value. When you pass a
function as an argument, you use only the identifier and not the parentheses operator that you use to call the method.
For example, the following code passes a function named clickListener() as an argument to the
addEventListener() method:
addEventListener(MouseEvent.CLICK, clickListener);
The Array.sort() method also defines a parameter that accepts a function. For an example of a custom sort
function that is used as an argument to the Array.sort() function, see “Sorting an array” on page 148.
Although it may seem strange to programmers new to ActionScript, functions can have properties and methods, just
as any other object can. In fact, every function has a read-only property named length that stores the number of
parameters defined for the function. This is different from the arguments.length property, which reports the
number of arguments sent to the function. Recall that in ActionScript, the number of arguments sent to a function
can exceed the number of parameters defined for that function. The following example, which compiles only in
standard mode because strict mode requires an exact match between the number of arguments passed and the
number of parameters defined, shows the difference between the two properties:
// Compiles only in standard mode
function traceLength(x:uint, y:uint):void
{
trace("arguments received: " + arguments.length);
trace("arguments expected: " + traceLength.length);
}
traceLength(3, 5, 7, 11);
/* output:
arguments received: 4
arguments expected: 2 */
In standard mode you can define your own function properties by defining them outside your function body.
Function properties can serve as quasi-static properties that allow you to save the state of a variable related to the
function. For example, you may want to track the number of times a particular function is called. Such functionality
could be useful if you are writing a game and want to track the number of times a user uses a specific command,
although you could also use a static class property for this. The following example, which compiles only in standard
mode because strict mode does not allow you to add dynamic properties to functions, creates a function property
outside the function declaration and increments the property each time the function is called:
// Compiles only in standard mode
var someFunction:Function = function ():void
{
someFunction.counter++;
}
someFunction.counter = 0;
someFunction();
someFunction();
trace(someFunction.counter); // 2

ADOBE FLEX 3
Developer Guide
83
Function scope
A function’s scope determines not only where in a program that function can be called, but also what definitions the
function can access. The same scope rules that apply to variable identifiers apply to function identifiers. A function
declared in the global scope is available throughout your code. For example, ActionScript 3.0 contains global
functions, such as isNaN() and parseInt(), that are available anywhere in your code. A nested function—a
function declared within another function—can be used anywhere in the function in which it was declared.
The scope chain
Any time a function begins execution, a number of objects and properties are created. First, a special object called
an activation object is created that stores the parameters and any local variables or functions declared in the function
body. You cannot access the activation object directly, because it is an internal mechanism. Second, a scope chain is
created that contains an ordered list of objects that Flash Player or Adobe AIR checks for identifier declarations.
Every function that executes has a scope chain that is stored in an internal property. For a nested function, the scope
chain starts with its own activation object, followed by its parent function’s activation object. The chain continues in
this manner until it reaches the global object. The global object is created when an ActionScript program begins, and
contains all global variables and functions.
Function closures
A function closure is an object that contains a snapshot of a function and its lexical environment. A function’s lexical
environment includes all the variables, properties, methods, and objects in the function’s scope chain, along with
their values. Function closures are created any time a function is executed apart from an object or a class. The fact
that function closures retain the scope in which they were defined creates interesting results when a function is
passed as an argument or a return value into a different scope.
For example, the following code creates two functions: foo(), which returns a nested function named rectArea()
that calculates the area of a rectangle, and bar(), which calls foo() and stores the returned function closure in a
variable named myProduct. Even though the bar() function defines its own local variable x (with a value of 2),
when the function closure myProduct() is called, it retains the variable x (with a value of 40) defined in function
foo(). The bar() function therefore returns the value 160 instead of 8.
function foo():Function
{
var x:int = 40;
function rectArea(y:int):int // function closure defined
{
return x * y
}
return rectArea;
}
function bar():void
{
var x:int = 2;
var y:int = 4;
var myProduct:Function = foo();
trace(myProduct(4)); // function closure called
}
bar(); // 160
Methods behave similarly in that they also retain information about the lexical environment in which they were
created. This characteristic is most noticeable when a method is extracted from its instance, which creates a bound
method. The main difference between a function closure and a bound method is that the value of the this keyword
in a bound method always refers to the instance to which it was originally attached, whereas in a function closure
the value of the this keyword can change. For more information, see “Bound methods” on page 95.

84
Chapter 5: Object-oriented programming
in ActionScript
This chapter describes the elements of ActionScript™ that support object-oriented programming (OOP). The chapter
does not describe general OOP principles such as object design, abstraction, encapsulation, inheritance, and
polymorphism. The chapter focuses on how to apply these principles using ActionScript 3.0.
Because of ActionScript’s roots as a scripting language, ActionScript 3.0 OOP support is optional. This affords
programmers flexibility in choosing the best approach for projects of varying scope and complexity. For small tasks,
you may find that using ActionScript with a procedural programming paradigm is all you need. For larger projects,
applying OOP principles can make your code easier to understand, maintain, and extend.
Contents
Basics of object-oriented programming. . . . . . . . . . . . . . . . . . . . . . . . . . . . . . . . . . . . . . . . . . . . . . . . . . . . . . . . . . . . . . . 84
Classes. . . . . . . . . . . . . . . . . . . . . . . . . . . . . . . . . . . . . . . . . . . . . . . . . . . . . . . . . . . . . . . . . . . . . . . . . . . . . . . . . . . . . . . . . . . 85
Interfaces . . . . . . . . . . . . . . . . . . . . . . . . . . . . . . . . . . . . . . . . . . . . . . . . . . . . . . . . . . . . . . . . . . . . . . . . . . . . . . . . . . . . . . . . 98
Inheritance. . . . . . . . . . . . . . . . . . . . . . . . . . . . . . . . . . . . . . . . . . . . . . . . . . . . . . . . . . . . . . . . . . . . . . . . . . . . . . . . . . . . . . 101
Advanced topics . . . . . . . . . . . . . . . . . . . . . . . . . . . . . . . . . . . . . . . . . . . . . . . . . . . . . . . . . . . . . . . . . . . . . . . . . . . . . . . . . 108
Example: GeometricShapes . . . . . . . . . . . . . . . . . . . . . . . . . . . . . . . . . . . . . . . . . . . . . . . . . . . . . . . . . . . . . . . . . . . . . . . . 115
Basics of object-oriented programming
Introduction to object-oriented programming
Object-oriented programming (OOP) is a way of organizing the code in a program by grouping it into objects—
individual elements that include information (data values) and functionality. Using an object-oriented approach to
organizing a program allows you to group particular pieces of information (for example, music information like
album title, track title, or artist name) together with common functionality or actions associated with that infor-
mation (such as “add track to playlist” or “play all songs by this artist”). These items are combined into a single item,
an object (for example, an “Album” or “MusicTrack”). Being able to bundle these values and functions together
provides several benefits, including only needing to keep track of a single variable rather than multiple ones,
organizing related functionality together, and being able to structure programs in ways that more closely match the
real world.
Common object-oriented programming tasks
In practice, object-oriented programming has two parts. One part is the strategies and techniques for designing a
program (often called object-oriented design). This is a broad subject and is not discussed in this chapter. The other
part of OOP is the actual programming structures that are available in a given programming language to build a
program using an object-oriented approach. This chapter covers the following common tasks in OOP:
•Defining classes
•Creating properties, methods, and get and set accessors (accessor methods)
•Controlling access to classes, properties, methods, and accessors

ADOBE FLEX 3
Developer Guide
85
•Creating static properties and methods
•Creating enumeration-like structures
•Defining and using interfaces
•Working with inheritance, including overriding class elements
Important concepts and terms
The following reference list contains important terms that you will encounter in this chapter:
•Attribute: A characteristic assigned to a class element (such as a property or method) in the class definition.
Attributes are commonly used to define whether the property or method will be available for access by code in other
parts of the program. For example, private and public are attributes. A private method can be called only by code
within the class, while a public method can be called by any code in the program.
•Class: The definition of the structure and behavior of objects of a certain type (like a template or blueprint for
objects of that data type).
•Class hierarchy: The structure of multiple related classes, specifying which classes inherit functionality from
other classes.
•Constructor: A special method you can define in a class, which is called when an instance of the class is created.
A constructor is commonly used to specify default values or otherwise perform setup operations for the object.
•Data type: The type of information that a particular variable can store. In general, data type means the same thing
as class.
•Dot operator: The period sign (.), which in ActionScript (and many other programming languages) is used to
indicate that a name refers to a child element of an object (such as a property or method). For instance, in the
expression myObject.myProperty, the dot operator indicates that the term myProperty is referring to some value
that is an element of the object named myObject.
•Enumeration: A set of related constant values, grouped together for convenience as properties of a single class.
•Inheritance: The OOP mechanism that allows one class definition to include all the functionality of a different
class definition (and generally add to that functionality).
•Instance: An actual object created in a program.
•Namespace: Essentially a custom attribute, allowing more refined control over which code can access other code.
Classes
A class is an abstract representation of an object. A class stores information about the types of data that an object can
hold and the behaviors that an object can exhibit. The usefulness of such an abstraction may not be apparent when
you write small scripts that contain only a few objects interacting with one another. As the scope of a program grows,
however, and the number of objects that must be managed increases, you may find that classes allow you to better
control how objects are created and how they interact with one another.
As far back as ActionScript 1.0, ActionScript programmers could use Function objects to create constructs that
resembled classes. ActionScript 2.0 added formal support for classes with keywords such as class and extends.
ActionScript 3.0 not only continues to support the keywords introduced in ActionScript 2.0, but also adds some new
capabilities, such as enhanced access control with the protected and internal attributes, and better control over
inheritance with the final and override keywords.

ADOBE FLEX 3
Developer Guide
86
If you have ever created classes in programming languages like Java, C++, or C#, you will find that ActionScript
provides a familiar experience. ActionScript shares many of the same keywords and attribute names, such as class,
extends, and public, all of which are discussed in the following sections.
Note: In this chapter, the term property means any member of an object or class, including variables, constants, and
methods. In addition, although the terms class and static are often used interchangeably, in this chapter these terms are
distinct. For example, in this chapter the phrase class properties refers to all the members of a class, rather than only the
static members.
Class definitions
ActionScript 3.0 class definitions use syntax that is similar to that used in ActionScript 2.0 class definitions. Proper
syntax for a class definition calls for the class keyword followed by the class name. The class body, which is enclosed
by curly braces ({}), follows the class name. For example, the following code creates a class named Shape that
contains one variable, named visible:
public class Shape
{
var visible:Boolean = true;
}
One significant syntax change involves class definitions that are inside a package. In ActionScript 2.0, if a class is
inside a package, the package name must be included in the class declaration. In ActionScript 3.0, which introduces
the package statement, the package name must be included in the package declaration instead of in the class decla-
ration. For example, the following class declarations show how the BitmapData class, which is part of the
flash.display package, is defined in ActionScript 2.0 and ActionScript 3.0:
// ActionScript 2.0
class flash.display.BitmapData {}
// ActionScript 3.0
package flash.display
{
public class BitmapData {}
}
Class attributes
ActionScript 3.0 allows you to modify class definitions using one of the following four attributes:
For each of these attributes, except for internal, you must explicitly include the attribute to get the associated
behavior. For example, if you do not include the dynamic attribute when defining a class, you will not be able to add
properties to a class instance at run time. You explicitly assign an attribute by placing it at the beginning of the class
definition, as the following code demonstrates:
dynamic class Shape {}
Attribute Definition
dynamic Allow properties to be added to instances at run time.
final Must not be extended by another class.
internal (default) Visible to references inside the current package.
public Visible to references everywhere.

ADOBE FLEX 3
Developer Guide
87
Notice that the list does not include an attribute named abstract. This is because abstract classes are not supported
in ActionScript 3.0. Notice also that the list does not include attributes named private and protected. These
attributes have meaning only inside a class definition, and cannot be applied to classes themselves. If you do not want
a class to be publicly visible outside a package, place the class inside a package and mark the class with the internal
attribute. Alternatively, you can omit both the internal and public attributes, and the compiler will automatically
add the internal attribute for you. If you do not want a class to be visible outside the source file in which it is
defined, place the class at the bottom of your source file, below the closing curly brace of the package definition.
Class body
The class body, which is enclosed by curly braces, is used to define the variables, constants, and methods of your
class. The following example shows the declaration for the Accessibility class in the Adobe Flash Player API:
public final class Accessibility
{
public static function get active():Boolean;
public static function updateProperties():void;
}
You can also define a namespace inside a class body. The following example shows how a namespace can be defined
within a class body and used as an attribute of a method in that class:
public class SampleClass
{
public namespace sampleNamespace;
sampleNamespace function doSomething():void;
}
ActionScript 3.0 allows you to include not only definitions in a class body, but also statements. Statements that are
inside a class body, but outside a method definition, are executed exactly once—when the class definition is first
encountered and the associated class object is created. The following example includes a call to an external function,
hello(), and a trace statement that outputs a confirmation message when the class is defined:
function hello():String
{
trace("hola");
}
class SampleClass
{
hello();
trace("class created");
}
// output when class is created
hola
class created
In contrast to previous versions of ActionScript, in ActionScript 3.0 it is permissible to define a static property and
an instance property with the same name in the same class body. For example, the following code declares a static
variable named message and an instance variable of the same name:
class StaticTest
{
static var message:String = "static variable";
var message:String = "instance variable";
}
// In your script
var myST:StaticTest = new StaticTest();
trace(StaticTest.message); // output: static variable
trace(myST.message); // output: instance variable

ADOBE FLEX 3
Developer Guide
88
Class property attributes
In discussions of the ActionScript object model, the term property means anything that can be a member of a class,
including variables, constants, and methods. This differs from the way the term is used in the ActionScript 3.0
Language and Components Reference, where the term is used more narrowly and includes only class members that
are variables or are defined by a getter or setter method. In ActionScript 3.0, there is a set of attributes that can be
used with any property of a class. The following table lists this set of attributes.
Access control namespace attributes
ActionScript 3.0 provides four special attributes that control access to properties defined inside a class: public,
private, protected, and internal.
The public attribute makes a property visible anywhere in your script. For example, to make a method available to
code outside its package, you must declare the method with the public attribute. This is true for any property,
whether it is declared using the var, const, or function keywords.
The private attribute makes a property visible only to callers within the property’s defining class. This behavior
differs from that of the private attribute in ActionScript 2.0, which allowed a subclass to access a private property
in a superclass. Another significant change in behavior has to do with run-time access. In ActionScript 2.0, the
private keyword prohibited access only at compile time and was easily circumvented at run time. In ActionScript
3.0, this is no longer true. Properties that are marked as private are unavailable at both compile time and run time.
For example, the following code creates a simple class named PrivateExample with one private variable, and then
attempts to access the private variable from outside the class. In ActionScript 2.0, compile-time access was
prohibited, but the prohibition was easily circumvented by using the property access operator ([]), which does the
property lookup at run time rather than at compile time.
class PrivateExample
{
private var privVar:String = "private variable";
}
var myExample:PrivateExample = new PrivateExample();
trace(myExample.privVar);// compile-time error in strict mode
trace(myExample["privVar"]); // ActionScript 2.0 allows access, but in ActionScript 3.0,
this is a run-time error.
In ActionScript 3.0, an attempt to access a private property using the dot operator (myExample.privVar) results in
a compile-time error if you are using strict mode. Otherwise, the error is reported at run time, just as it is when you
use the property access operator (myExample["privVar"]).
The following table summarizes the results of attempting to access a private property that belongs to a sealed (not
dynamic) class:
Attribute Definition
internal (default) Visible to references inside the same package.
private Visible to references in the same class.
protected Visible to references in the same class and derived classes.
public Visible to references everywhere.
static Specifies that a property belongs to the class, as opposed to instances of the class.
UserDefinedNamespace Custom namespace name defined by user.

ADOBE FLEX 3
Developer Guide
89
In classes declared with the dynamic attribute, attempts to access a private variable will not result in a run-time error.
Instead, the variable is simply not visible, so Flash Player or Adobe® AIR™ returns the value undefined. A compile-
time error occurs, however, if you use the dot operator in strict mode. The following example is the same as the
previous example, except that the PrivateExample class is declared as a dynamic class:
dynamic class PrivateExample
{
private var privVar:String = "private variable";
}
var myExample:PrivateExample = new PrivateExample();
trace(myExample.privVar);// compile-time error in strict mode
trace(myExample["privVar"]); // output: undefined
Dynamic classes generally return the value undefined instead of generating an error when code external to a class
attempts to access a private property. The following table shows that an error is generated only when the dot operator
is used to access a private property in strict mode:
The protected attribute, which is new for ActionScript 3.0, makes a property visible to callers within its own class
or in a subclass. In other words, a protected property is available within its own class or to classes that lie anywhere
below it in the inheritance hierarchy. This is true whether the subclass is in the same package or in a different
package.
For those familiar with ActionScript 2.0, this functionality is similar to the private attribute in ActionScript 2.0.
The ActionScript 3.0 protected attribute is also similar to the protected attribute in Java, but differs in that the
Java version also permits access to callers within the same package. The protected attribute is useful when you have
a variable or method that your subclasses need but that you want to hide from code that is outside the inheritance
chain.
The internal attribute, which is new for ActionScript 3.0, makes a property visible to callers within its own package.
This is the default attribute for code inside a package, and it applies to any property that does not have any of the
following attributes:
•public
•private
•protected
•a user-defined namespace
The internal attribute is similar to the default access control in Java, although in Java there is no explicit name for
this level of access, and it can be achieved only through the omission of any other access modifier. The internal
attribute is available in ActionScript 3.0 to give you the option of explicitly signifying your intent to make a property
visible only to callers within its own package.
Strict mode Standard mode
dot operator (.) compile-time error run-time error
bracket operator ([]) run-time error run-time error
Strict mode Standard mode
dot operator (.)compile-time error
undefined
bracket operator ([])undefined undefined

ADOBE FLEX 3
Developer Guide
90
static attribute
The static attribute, which can be used with properties declared with the var, const, or function keywords,
allows you to attach a property to the class rather than to instances of the class. Code external to the class must call
static properties by using the class name instead of an instance name.
Static properties are not inherited by subclasses, but the properties are part of a subclass’s scope chain. This means
that within the body of a subclass, a static variable or method can be used without referencing the class in which it
was defined. For more information, see “Static properties not inherited” on page 106.
User-defined namespace attributes
As an alternative to the predefined access control attributes, you can create a custom namespace for use as an
attribute. Only one namespace attribute can be used per definition, and you cannot use a namespace attribute in
combination with any of the access control attributes (public, private, protected, internal). For more infor-
mation about using namespaces, see “Namespaces” on page 38.
Variables
Variables can be declared with either the var or const keywords. Variables declared with the var keyword can have
their values changed multiple times throughout the execution of a script. Variables declared with the const keyword
are called constants, and can have values assigned to them only once. An attempt to assign a new value to an
initialized constant results in an error. For more information, see “Constants” on page 62.
Static variables
Static variables are declared using a combination of the static keyword and either the var or const statement.
Static variables, which are attached to a class rather than an instance of a class, are useful for storing and sharing
information that applies to an entire class of objects. For example, a static variable is appropriate if you want to keep
a tally of the number of times a class is instantiated or if you want to store the maximum number of class instances
that are allowed.
The following example creates a totalCount variable to track the number of class instantiations and a MAX_NUM
constant to store the maximum number of instantiations. The totalCount and MAX_NUM variables are static, because
they contain values that apply to the class as a whole rather than to a particular instance.
class StaticVars
{
public static var totalCount:int = 0;
public static const MAX_NUM:uint = 16;
}
Code that is external to the StaticVars class and any of its subclasses can reference the totalCount and MAX_NUM
properties only through the class itself. For example, the following code works:
trace(StaticVars.totalCount); // output: 0
trace(StaticVars.MAX_NUM); // output: 16
You cannot access static variables through an instance of the class, so the following code returns errors:
var myStaticVars:StaticVars = new StaticVars();
trace(myStaticVars.totalCount); // error
trace(myStaticVars.MAX_NUM); // error
Variables that are declared with both the static and const keywords must be initialized at the same time as you
declare the constant, as the StaticVars class does for MAX_NUM. You cannot assign a value to MAX_NUM inside the
constructor or an instance method. The following code will generate an error, because it is not a valid way to initialize
a static constant:

ADOBE FLEX 3
Developer Guide
91
// !! Error to initialize static constant this way
class StaticVars2
{
public static const UNIQUESORT:uint;
function initializeStatic():void
{
UNIQUESORT = 16;
}
}
Instance variables
Instance variables include properties declared with the var and const keywords, but without the static keyword.
Instance variables, which are attached to class instances rather than to an entire class, are useful for storing values
that are specific to an instance. For example, the Array class has an instance property named length, which stores
the number of array elements that a particular instance of the Array class holds.
Instance variables, whether declared as var or const, cannot be overridden in a subclass. You can, however, achieve
functionality that is similar to overriding variables by overriding getter and setter methods. For more information,
see “Get and set accessor methods” on page 94.
Methods
Methods are functions that are part of a class definition. Once an instance of the class is created, a method is bound
to that instance. Unlike a function declared outside a class, a method cannot be used apart from the instance to which
it is attached.
Methods are defined using the function keyword. You can use a function statement such as the following:
public function sampleFunction():String {}
Or you can use a variable to which you assign a function expression, as follows:
public var sampleFunction:Function = function () {}
In most cases you will want to use a function statement instead of a function expression for the following reasons:
•Function statements are more concise and easier to read.
•Function statements allow you to use the override and final keywords. For more information, see
“Overriding methods” on page 104.
•Function statements create a stronger bond between the identifier—that is, the name of the function—and the
code within the method body. Because the value of a variable can be changed with an assignment statement, the
connection between a variable and its function expression can be severed at any time. Although you can work around
this issue by declaring the variable with const instead of var, such a technique is not considered a best practice,
because it makes the code hard to read and prevents the use of the override and final keywords.
One case in which you must use a function expression is when you choose to attach a function to the prototype
object. For more information, see “The prototype object” on page 112.
Constructor methods
Constructor methods, sometimes simply called constructors, are functions that share the same name as the class in
which they are defined. Any code that you include in a constructor method is executed whenever an instance of the
class is created with the new keyword. For example, the following code defines a simple class named Example that
contains a single property named status. The initial value of the status variable is set inside the constructor
function.

ADOBE FLEX 3
Developer Guide
92
class Example
{
public var status:String;
public function Example()
{
status = "initialized";
}
}
var myExample:Example = new Example();
trace(myExample.status); // output: initialized
Constructor methods can only be public, but the use of the public attribute is optional. You cannot use any of the
other access control specifiers, including private, protected, or internal, on a constructor. You also cannot use
a user-defined namespace with a constructor method.
A constructor can make an explicit call to the constructor of its direct superclass by using the super() statement. If
the superclass constructor is not explicitly called, the compiler automatically inserts a call before the first statement
in the constructor body. You can also call methods of the superclass by using the super prefix as a reference to the
superclass. If you decide to use both super() and super in the same constructor body, be sure to call super() first.
Otherwise, the super reference will not behave as expected. The super() constructor should also be called before
any throw or return statement.
The following example demonstrates what happens if you attempt to use the super reference before calling the
super() constructor. A new class, ExampleEx, extends the Example class. The ExampleEx constructor attempts to
access the status variable defined in its superclass, but does so before calling super(). The trace() statement inside
the ExampleEx constructor produces the value null, because the status variable is not available until the super()
constructor executes.
class ExampleEx extends Example
{
public function ExampleEx()
{
trace(super.status);
super();
}
}
var mySample:ExampleEx = new ExampleEx(); // output: null
Although it is legal to use the return statement inside a constructor, it is not permissible to return a value. In other
words, return statements must not have associated expressions or values. Accordingly, constructor methods are not
allowed to return values, which means that no return type may be specified.
If you do not define a constructor method in your class, the compiler will automatically create an empty constructor
for you. If your class extends another class, the compiler will include a super() call in the constructor it generates.
Static methods
Static methods, also called class methods, are methods that are declared with the static keyword. Static methods,
which are attached to a class rather than to an instance of a class, are useful for encapsulating functionality that affects
something other than the state of an individual instance. Because static methods are attached to a class as a whole,
static methods can be accessed only through a class and not through an instance of the class.

ADOBE FLEX 3
Developer Guide
93
Static methods are useful for encapsulating functionality that is not limited to affecting the state of class instances.
In other words, a method should be static if it provides functionality that does not directly affect the value of a class
instance. For example, the Date class has a static method named parse(), which takes a string and converts it to a
number. The method is static because it does not affect an individual instance of the class. Instead, the parse()
method takes a string that represents a date value, parses the string, and returns a number in a format compatible
with the internal representation of a Date object. This method is not an instance method, because it does not make
sense to apply the method to an instance of the Date class.
Contrast the static parse() method with one of the instance methods of the Date class, such as getMonth(). The
getMonth() method is an instance method, because it operates directly on the value of an instance by retrieving a
specific component, the month, of a Date instance.
Because static methods are not bound to individual instances, you cannot use the keywords this or super within
the body of a static method. Both the this reference and the super reference have meaning only within the context
of an instance method.
In contrast with some other class-based programming languages, static methods in ActionScript 3.0 are not
inherited. For more information, see “Static properties not inherited” on page 106.
Instance methods
Instance methods are methods that are declared without the static keyword. Instance methods, which are attached
to instances of a class instead of the class as a whole, are useful for implementing functionality that affects individual
instances of a class. For example, the Array class contains an instance method named sort(), which operates
directly on Array instances.
Within the body of an instance method, both static and instance variables are in scope, which means that variables
defined in the same class can be referenced using a simple identifier. For example, the following class, CustomArray,
extends the Array class. The CustomArray class defines a static variable named arrayCountTotal to track the total
number of class instances, an instance variable named arrayNumber that tracks the order in which the instances
were created, and an instance method named getPosition() that returns the values of these variables.
public class CustomArray extends Array
{
public static var arrayCountTotal:int = 0;
public var arrayNumber:int;
public function CustomArray()
{
arrayNumber = ++arrayCountTotal;
}
public function getArrayPosition():String
{
return ("Array " + arrayNumber + " of " + arrayCountTotal);
}
}
Although code external to the class must refer to the arrayCountTotal static variable through the class object using
CustomArray.arrayCountTotal, code that resides inside the body of the getPosition() method can refer
directly to the static arrayCountTotal variable. This is true even for static variables in superclasses. Though static
properties are not inherited in ActionScript 3.0, static properties in superclasses are in scope. For example, the Array
class has a few static variables, one of which is a constant named DESCENDING. Code that resides in an Array subclass
can refer to the static constant DESCENDING using a simple identifier:

ADOBE FLEX 3
Developer Guide
94
public class CustomArray extends Array
{
public function testStatic():void
{
trace(DESCENDING); // output: 2
}
}
The value of the this reference within the body of an instance method is a reference to the instance to which the
method is attached. The following code demonstrates that the this reference points to the instance that contains the
method:
class ThisTest
{
function thisValue():ThisTest
{
return this;
}
}
var myTest:ThisTest = new ThisTest();
trace(myTest.thisValue() == myTest); // output: true
Inheritance of instance methods can be controlled with the keywords override and final. You can use the
override attribute to redefine an inherited method, and the final attribute to prevent subclasses from overriding
a method. For more information, see “Overriding methods” on page 104.
Get and set accessor methods
Get and set accessor functions, also called getters and setters, allow you to adhere to the programming principles of
information hiding and encapsulation while providing an easy-to-use programming interface for the classes that you
create. Get and set functions allow you to keep your class properties private to the class, but allow users of your class
to access those properties as if they were accessing a class variable instead of calling a class method.
The advantage of this approach is that it allows you to avoid the traditional accessor functions with unwieldy names,
such as getPropertyName() and setPropertyName(). Another advantage of getters and setters is that you can
avoid having two public-facing functions for each property that allows both read and write access.
The following example class, named GetSet, includes get and set accessor functions named publicAccess() that
provide access to the private variable named privateProperty:
class GetSet
{
private var privateProperty:String;
public function get publicAccess():String
{
return privateProperty;
}
public function set publicAccess(setValue:String):void
{
privateProperty = setValue;
}
}
If you attempt to access the property privateProperty directly, an error will result, as follows:
var myGetSet:GetSet = new GetSet();
trace(myGetSet.privateProperty); // error occurs

ADOBE FLEX 3
Developer Guide
95
Instead, a user of the GetSet class will use something that appears to be a property named publicAccess, but that
is really a pair of get and set accessor functions that operate on the private property named privateProperty. The
following example instantiates the GetSet class, and then sets the value of the privateProperty using the public
accessor named publicAccess:
var myGetSet:GetSet = new GetSet();
trace(myGetSet.publicAccess); // output: null
myGetSet.publicAccess = "hello";
trace(myGetSet.publicAccess); // output: hello
Getter and setter functions also make it possible to override properties that are inherited from a superclass,
something that is not possible when you use regular class member variables. Class member variables that are
declared using the var keyword cannot be overridden in a subclass. Properties that are created using getter and setter
functions, however, do not have this restriction. You can use the override attribute on getter and setter functions
that are inherited from a superclass.
Bound methods
A bound method, sometimes called a method closure, is simply a method that is extracted from its instance. Examples
of bound methods include methods that are passed as arguments to a function or returned as values from a function.
New in ActionScript 3.0, a bound method is similar to a function closure in that it retains its lexical environment
even when extracted from its instance. The key difference, however, between a bound method and a function closure
is that the this reference for a bound method remains linked, or bound, to the instance that implements the method.
In other words, the this reference in a bound method always points to the original object that implemented the
method. For function closures, the this reference is generic, which means that it points to whatever object the
function is associated with at the time it is invoked.
Understanding bound methods is important if you use the this keyword. Recall that the this keyword provides a
reference to a method’s parent object. Most ActionScript programmers expect that the this keyword always refers
to the object or class that contains the definition of a method. Without method binding, however, this would not
always be true. In previous versions of ActionScript, for example, the this reference did not always refer to the
instance that implemented the method. When methods are extracted from an instance in ActionScript 2.0, not only
is the this reference not bound to the original instance, but also the member variables and methods of the instance’s
class are not available. This is not a problem in ActionScript 3.0, because bound methods are automatically created
when you pass a method as a parameter. Bound methods ensure that the this keyword always references the object
or class in which a method is defined.
The following code defines a class named ThisTest, which contains a method named foo() that defines the bound
method, and a method named bar() that returns the bound method. Code external to the class creates an instance
of the ThisTest class, calls the bar() method, and stores the return value in a variable named myFunc.
class ThisTest
{
private var num:Number = 3;
function foo():void // bound method defined
{
trace("foo's this: " + this);
trace("num: " + num);
}
function bar():Function
{
return foo; // bound method returned
}
}
var myTest:ThisTest = new ThisTest();

ADOBE FLEX 3
Developer Guide
96
var myFunc:Function = myTest.bar();
trace(this); // output: [object global]
myFunc();
/* output:
foo's this: [object ThisTest]
output: num: 3 */
The last two lines of code show that the this reference in the bound method foo() still points to an instance of
ThisTest class, even though the this reference in the line just before it points to the global object. Moreover, the
bound method stored in the myFunc variable still has access to the member variables of the ThisTest class. If this
same code is run in ActionScript 2.0, the this references would match, and the num variable would be undefined.
One area where the addition of bound methods is most noticeable is with event handlers, because the
addEventListener() method requires that you pass a function or method as an argument. For more information,
see “Listener function defined as a class method” on page 237.
Enumerations with classes
Enumerations are custom data types that you create to encapsulate a small set of values. ActionScript 3.0 does not
support a specific enumeration facility, unlike C++ with its enum keyword or Java with its Enumeration interface.
You can, however, create enumerations using classes and static constants. For example, the PrintJob class in the Flash
Player API uses an enumeration named PrintJobOrientation to store the set of values comprising "landscape" and
"portrait", as shown in the following code:
public final class PrintJobOrientation
{
public static const LANDSCAPE:String = "landscape";
public static const PORTRAIT:String = "portrait";
}
By convention, an enumeration class is declared with the final attribute, because there is no need to extend the
class. The class comprises only static members, which means that you do not create instances of the class. Instead,
you access the enumeration values directly through the class object, as shown in the following code excerpt:
var pj:PrintJob = new PrintJob();
if(pj.start())
{
if (pj.orientation == PrintJobOrientation.PORTRAIT)
{
...
}
...
}
All of the enumeration classes in the Flash Player API contain only variables of type String, int, or uint. The
advantage of using enumerations instead of literal string or number values is that typographical mistakes are easier
to find with enumerations. If you mistype the name of an enumeration, the ActionScript compiler generates an error.
If you use literal values, the compiler does not complain if you spell a word incorrectly or use the wrong number. In
the previous example, the compiler generates an error if the name of the enumeration constant is incorrect, as the
following excerpt shows:
if (pj.orientation == PrintJobOrientation.PORTRAI) // compiler error
However, the compiler does not generate an error if you misspell a string literal value, as follows:
if (pj.orientation == "portrai") // no compiler error

ADOBE FLEX 3
Developer Guide
97
A second technique for creating enumerations also involves creating a separate class with static properties for the
enumeration. This technique differs, however, in that each of the static properties contains an instance of the class
instead of a string or integer value. For example, the following code creates an enumeration class for the days of the
week:
public final class Day
{
public static const MONDAY:Day = new Day();
public static const TUESDAY:Day = new Day();
public static const WEDNESDAY:Day = new Day();
public static const THURSDAY:Day = new Day();
public static const FRIDAY:Day = new Day();
public static const SATURDAY:Day = new Day();
public static const SUNDAY:Day = new Day();
}
This technique is not used by the Flash Player API but is used by many developers who prefer the improved type
checking that the technique provides. For example, a method that returns an enumeration value can restrict the
return value to the enumeration data type. The following code shows not only a function that returns a day of the
week, but also a function call that uses the enumeration type as a type annotation:
function getDay():Day
{
var date:Date = new Date();
var retDay:Day;
switch (date.day)
{
case 0:
retDay = Day.MONDAY;
break;
case 1:
retDay = Day.TUESDAY;
break;
case 2:
retDay = Day.WEDNESDAY;
break;
case 3:
retDay = Day.THURSDAY;
break;
case 4:
retDay = Day.FRIDAY;
break;
case 5:
retDay = Day.SATURDAY;
break;
case 6:
retDay = Day.SUNDAY;
break;
}
return retDay;
}
var dayOfWeek:Day = getDay();
You can also enhance the Day class so that it associates an integer with each day of the week, and provides a
toString() method that returns a string representation of the day. You might want to enhance the Day class in this
manner as an exercise.

ADOBE FLEX 3
Developer Guide
98
Embedded asset classes
ActionScript 3.0 uses special classes, called embedded asset classes, to represent embedded assets. An embedded asset
is an asset, such as a sound, image, or font, that is included in a SWF file at compile time. Embedding an asset instead
of loading it dynamically ensures that it will be available at run time, but at the cost of increased SWF file size.
var piano:PianoMusic = new PianoMusic();
var sndChannel:SoundChannel = piano.play();
Using embedded asset classes in Flex
To embed an asset in ActionScript code, use the [Embed] metadata tag. Place the asset in the main source folder or
another folder that is in your project’s build path. When the Adobe Flex compiler encounters an Embed metadata
tag, it creates the embedded asset class for you. You can access the class through a variable of data type Class that you
declare immediately following the [Embed] metadata tag. For example, the following code embeds a sound named
sound1.mp3 and uses a variable named soundCls to store a reference to the embedded asset class associated with
that sound. The example then creates an instance of the embedded asset class and calls the play() method on that
instance:
package
{
import flash.display.Sprite;
import flash.media.SoundChannel;
import mx.core.SoundAsset;
public class SoundAssetExample extends Sprite
{
[Embed(source="sound1.mp3")]
public var soundCls:Class;
public function SoundAssetExample()
{
var mySound:SoundAsset = new soundCls() as SoundAsset;
var sndChannel:SoundChannel = mySound.play();
}
}
}
To use the [Embed] metadata tag in an Adobe Flex Builder 2 ActionScript project, you must import any necessary
classes from the Flex framework. For example, to embed sounds, you must import the mx.core.SoundAsset class. To use
the Flex framework, include the file framework.swc in your ActionScript build path. This will increase the size of your
SWF file.
Alternatively, you can embed an asset with the @Embed() directive in an MXML tag definition. For more infor-
mation, see “About embedding assets” on page 1497 in the Flex Developer’s Guide.
Interfaces
An interface is a collection of method declarations that allows unrelated objects to communicate with one another.
For example, the Flash Player API defines the IEventDispatcher interface, which contains method declarations that
a class can use to handle event objects. The IEventDispatcher interface establishes a standard way for objects to pass
event objects to one another. The following code shows the definition of the IEventDispatcher interface:

ADOBE FLEX 3
Developer Guide
99
public interface IEventDispatcher
{
function addEventListener(type:String, listener:Function,
useCapture:Boolean=false, priority:int=0,
useWeakReference:Boolean = false):void;
function removeEventListener(type:String, listener:Function,
useCapture:Boolean=false):void;
function dispatchEvent(event:Event):Boolean;
function hasEventListener(type:String):Boolean;
function willTrigger(type:String):Boolean;
}
Interfaces are based on the distinction between a method’s interface and its implementation. A method’s interface
includes all the information necessary to invoke that method, including the name of the method, all of its param-
eters, and its return type. A method’s implementation includes not only the interface information, but also the
executable statements that carry out the method’s behavior. An interface definition contains only method interfaces,
and any class that implements the interface is responsible for defining the method implementations.
In the Flash Player API, the EventDispatcher class implements the IEventDispatcher interface by defining all of the
IEventDispatcher interface methods and adding method bodies to each of the methods. The following code is an
excerpt from the EventDispatcher class definition:
public class EventDispatcher implements IEventDispatcher
{
function dispatchEvent(event:Event):Boolean
{
/* implementation statements */
}
...
}
The IEventDispatcher interface serves as a protocol that EventDispatcher instances use to process event objects and
pass them to other objects that have also implemented the IEventDispatcher interface.
Another way to describe an interface is to say that it defines a data type just as a class does. Accordingly, an interface
can be used as a type annotation, just as a class can. As a data type, an interface can also be used with operators, such
as the is and as operators, that require a data type. Unlike a class, however, an interface cannot be instantiated. This
distinction has led many programmers to think of interfaces as abstract data types and classes as concrete data types.
Defining an interface
The structure of an interface definition is similar to that of a class definition, except that an interface can contain
only methods with no method bodies. Interfaces cannot include variables or constants but can include getters and
setters. To define an interface, use the interface keyword. For example, the following interface, IExternalizable, is
part of the flash.utils package in the Flash Player API. The IExternalizable interface defines a protocol for serializing
an object, which means converting an object into a format suitable for storage on a device or for transport across a
network.
public interface IExternalizable
{
function writeExternal(output:IDataOutput):void;
function readExternal(input:IDataInput):void;
}
Note that the IExternalizable interface is declared with the public access control modifier. Interface definitions may
only be modified by the public and internal access control specifiers. The method declarations inside an interface
definition cannot have any access control specifiers.

ADOBE FLEX 3
Developer Guide
100
The Flash Player API follows a convention in which interface names begin with an uppercase I, but you can use any
legal identifier as an interface name. Interface definitions are often placed at the top level of a package. Interface
definitions cannot be placed inside a class definition or inside another interface definition.
Interfaces can extend one or more other interfaces. For example, the following interface, IExample, extends the
IExternalizable interface:
public interface IExample extends IExternalizable
{
function extra():void;
}
Any class that implements the IExample interface must include implementations not only for the extra() method,
but also for the writeExternal() and readExternal() methods inherited from the IExternalizable interface.
Implementing an interface in a class
A class is the only ActionScript 3.0 language element that can implement an interface. Use the implements keyword
in a class declaration to implement one or more interfaces. The following example defines two interfaces, IAlpha and
IBeta, and a class, Alpha, that implements them both:
interface IAlpha
{
function foo(str:String):String;
}
interface IBeta
{
function bar():void;
}
class Alpha implements IAlpha, IBeta
{
public function foo(param:String):String {}
public function bar():void {}
}
In a class that implements an interface, implemented methods must do the following:
•Use the public access control identifier.
•Use the same name as the interface method.
•Have the same number of parameters, each with data types that match the interface method parameter data
types.
•Use the same return type.
You do have some flexibility, however, in how you name the parameters of methods that you implement. Although
the number of parameters and the data type of each parameter in the implemented method must match that of the
interface method, the parameter names do not need to match. For example, in the previous example the parameter
of the Alpha.foo() method is named param:
public function foo(param:String):String {}
But the parameter is named str in the IAlpha.foo() interface method:
function foo(str:String):String;

ADOBE FLEX 3
Developer Guide
101
You also have some flexibility with default parameter values. An interface definition can include function declara-
tions with default parameter values. A method that implements such a function declaration must have a default
parameter value that is a member of the same data type as the value specified in the interface definition, but the
actual value does not have to match. For example, the following code defines an interface that contains a method
with a default parameter value of 3:
interface IGamma
{
function doSomething(param:int = 3):void;
}
The following class definition implements the Igamma interface but uses a different default parameter value:
class Gamma implements IGamma
{
public function doSomething(param:int = 4):void {}
}
The reason for this flexibility is that the rules for implementing an interface are designed specifically to ensure data
type compatibility, and requiring identical parameter names and default parameter values is not necessary to achieve
that objective.
Inheritance
Inheritance is a form of code reuse that allows programmers to develop new classes that are based on existing classes.
The existing classes are often referred to as base classes or superclasses, while the new classes are usually called
subclasses. A key advantage of inheritance is that it allows you to reuse code from a base class yet leave the existing
code unmodified. Moreover, inheritance requires no changes to the way that other classes interact with the base
class. Rather than modifying an existing class that may have been thoroughly tested or may already be in use, using
inheritance you can treat that class as an integrated module that you can extend with additional properties or
methods. Accordingly, you use the extends keyword to indicate that a class inherits from another class.
Inheritance also allows you to take advantage of polymorphism in your code. Polymorphism is the ability to use a
single method name for a method that behaves differently when applied to different data types. A simple example is
a base class named Shape with two subclasses named Circle and Square. The Shape class defines a method named
area(), which returns the area of the shape. If polymorphism is implemented, you can call the area() method on
objects of type Circle and Square and have the correct calculations done for you. Inheritance enables polymorphism
by allowing subclasses to inherit and redefine, or override, methods from the base class. In the following example,
the area() method is redefined by the Circle and Square classes:
class Shape
{
public function area():Number
{
return NaN;
}
}

ADOBE FLEX 3
Developer Guide
102
class Circle extends Shape
{
private var radius:Number = 1;
override public function area():Number
{
return (Math.PI * (radius * radius));
}
}
class Square extends Shape
{
private var side:Number = 1;
override public function area():Number
{
return (side * side);
}
}
var cir:Circle = new Circle();
trace(cir.area()); // output: 3.141592653589793
var sq:Square = new Square();
trace(sq.area()); // output: 1
Because each class defines a data type, the use of inheritance creates a special relationship between a base class and
a class that extends it. A subclass is guaranteed to possess all the properties of its base class, which means that an
instance of a subclass can always be substituted for an instance of the base class. For example, if a method defines a
parameter of type Shape, it is legal to pass an argument of type Circle because Circle extends Shape, as in the
following:
function draw(shapeToDraw:Shape) {}
var myCircle:Circle = new Circle();
draw(myCircle);
Instance properties and inheritance
An instance property, whether defined with the function, var, or const keywords, is inherited by all subclasses as
long as the property is not declared with the private attribute in the base class. For example, the Event class in the
Flash Player API has a number of subclasses that inherit properties common to all event objects.
For some types of events, the Event class contains all the properties necessary to define the event. These types of
events do not require instance properties beyond those defined in the Event class. Examples of such events are the
complete event, which occurs when data has loaded successfully, and the connect event, which occurs when a
network connection has been established.
The following example is an excerpt from the Event class that shows some of the properties and methods that are
inherited by subclasses. Because the properties are inherited, an instance of any subclass can access these properties.
public class Event
{
public function get type():String;
public function get bubbles():Boolean;
...
public function stopPropagation():void {}
public function stopImmediatePropagation():void {}

ADOBE FLEX 3
Developer Guide
103
public function preventDefault():void {}
public function isDefaultPrevented():Boolean {}
...
}
Other types of events require unique properties not available in the Event class. These events are defined using
subclasses of the Event class so that new properties can be added to the properties defined in the Event class. An
example of such a subclass is the MouseEvent class, which adds properties unique to events associated with mouse
movement or mouse clicks, such as the mouseMove and click events. The following example is an excerpt from the
MouseEvent class that shows the definition of properties that exist on the subclass but not on the base class:
public class MouseEvent extends Event
{
public static const CLICK:String= "click";
public static const MOUSE_MOVE:String = "mouseMove";
...
public function get stageX():Number {}
public function get stageY():Number {}
...
}
Access control specifiers and inheritance
If a property is declared with the public keyword, the property is visible to code anywhere. This means that the
public keyword, unlike the private, protected, and internal keywords, places no restrictions on property
inheritance.
If a property is declared with private keyword, it is visible only in the class that defines it, which means that it is
not inherited by any subclasses. This behavior is different from previous versions of ActionScript, where the
private keyword behaved more like the ActionScript 3.0 protected keyword.
The protected keyword indicates that a property is visible not only within the class that defines it, but also to all
subclasses. Unlike the protected keyword in the Java programming language, the protected keyword in Action-
Script 3.0 does not make a property visible to all other classes in the same package. In ActionScript 3.0, only
subclasses can access a property declared with the protected keyword. Moreover, a protected property is visible to
a subclass whether the subclass is in the same package as the base class or in a different package.
To limit the visibility of a property to the package in which it is defined, use the internal keyword or do not use
any access control specifier. The internal access control specifier is the default access control specifier that applies
when one is not specified. A property marked as internal will be inherited only by a subclass that resides in the
same package.
You can use the following example to see how each of the access control specifiers affects inheritance across package
boundaries. The following code defines a main application class named AccessControl and two other classes named
Base and Extender. The Base class is in a package named foo and the Extender class, which is a subclass of the Base
class, is in a package named bar. The AccessControl class imports only the Extender class and creates an instance of
Extender that attempts to access a variable named str that is defined in the Base class. The str variable is declared
as public so that the code compiles and runs as shown in the following excerpt:

ADOBE FLEX 3
Developer Guide
104
// Base.as in a folder named foo
package foo
{
public class Base
{
public var str:String = "hello"; // change public on this line
}
}
// Extender.as in a folder named bar
package bar
{
import foo.Base;
public class Extender extends Base
{
public function getString():String {
return str;
}
}
}
// main application class in file named AccessControl.as
package
{
import flash.display.MovieClip;
import bar.Extender;
public class AccessControl extends MovieClip
{
public function AccessControl()
{
var myExt:Extender = new Extender();
trace(myExt.str);// error if str is not public
trace(myExt.getString()); // error if str is private or internal
}
}
}
To see how the other access control specifiers affect compilation and execution of the preceding example, change the
str variable’s access control specifier to private, protected, or internal after deleting or commenting out the
following line from the AccessControl class:
trace(myExt.str);// error if str is not public
Overriding variables not permitted
Properties that are declared with the var or const keywords are inherited but cannot be overridden. To override a
property means to redefine the property in a subclass. The only type of property that can be overridden are
methods—that is, properties declared with the function keyword. Although you cannot override an instance
variable, you can achieve similar functionality by creating getter and setter methods for the instance variable and
overriding the methods. For more information, see “Overriding getters and setters” on page 106.
Overriding methods
To override a method means to redefine the behavior of an inherited method. Static methods are not inherited and
cannot be overridden. Instance methods, however, are inherited by subclasses and can be overridden as long as the
following two criteria are met:

ADOBE FLEX 3
Developer Guide
105
•The instance method is not declared with the final keyword in the base class. When used with an instance
method, the final keyword indicates the programmer’s intent to prevent subclasses from overriding the method.
•The instance method is not declared with the private access control specifier in the base class. If a method is
marked as private in the base class, there is no need to use the override keyword when defining an identically
named method in the subclass, because the base class method will not be visible to the subclass.
To override an instance method that meets these criteria, the method definition in the subclass must use the
override keyword and must match the superclass version of the method in the following ways:
•The override method must have the same level of access control as the base class method. Methods marked as
internal have the same level of access control as methods that have no access control specifier.
•The override method must have the same number of parameters as the base class method.
•The override method parameters must have the same data type annotations as the parameters in the base class
method.
•The override method must have the same return type as the base class method.
The names of the parameters in the override method, however, do not have to match the names of the parameters in
the base class, as long as the number of parameters and the data type of each parameter matches.
The super statement
When overriding a method, programmers often want to add to the behavior of the superclass method they are
overriding instead of completely replacing the behavior. This requires a mechanism that allows a method in a
subclass to call the superclass version of itself. The super statement provides such a mechanism, in that it contains
a reference to the immediate superclass. The following example defines a class named Base that contains a method
named thanks() and a subclass of the Base class named Extender that overrides the thanks() method. The
Extender.thanks() method uses the super statement to call Base.thanks().
package {
import flash.display.MovieClip;
public class SuperExample extends MovieClip
{
public function SuperExample()
{
var myExt:Extender = new Extender()
trace(myExt.thanks()); // output: Mahalo nui loa
}
}
}
class Base {
public function thanks():String
{
return "Mahalo";
}
}
class Extender extends Base
{
override public function thanks():String
{
return super.thanks() + " nui loa";
}
}

ADOBE FLEX 3
Developer Guide
106
Overriding getters and setters
Although you cannot override variables defined in a superclass, you can override getters and setters. For example,
the following code overrides a getter named currentLabel that is defined in the MovieClip class in the Flash Player
API.:
package
{
import flash.display.MovieClip;
public class OverrideExample extends MovieClip
{
public function OverrideExample()
{
trace(currentLabel)
}
override public function get currentLabel():String
{
var str:String = "Override: ";
str += super.currentLabel;
return str;
}
}
}
The output of the trace() statement in the OverrideExample class constructor is Override: null, which shows
that the example was able to override the inherited currentLabel property.
Static properties not inherited
Static properties are not inherited by subclasses. This means that static properties cannot be accessed through an
instance of a subclass. A static property can be accessed only through the class object on which it is defined. For
example, the following code defines a base class named Base and a subclass that extends Base named Extender. A
static variable named test is defined in the Base class. The code as written in the following excerpt does not compile
in strict mode and generates a run-time error in standard mode.
package {
import flash.display.MovieClip;
public class StaticExample extends MovieClip
{
public function StaticExample()
{
var myExt:Extender = new Extender();
trace(myExt.test);// error
}
}
}
class Base {
public static var test:String = "static";
}
class Extender extends Base { }
The only way to access the static variable test is through the class object, as shown in the following code:
Base.test;

ADOBE FLEX 3
Developer Guide
107
It is permissible, however, to define an instance property using the same name as a static property. Such an instance
property can be defined in the same class as the static property or in a subclass. For example, the Base class in the
preceding example could have an instance property named test. The following code compiles and executes because
the instance property is inherited by the Extender class. The code would also compile and execute if the definition
of the test instance variable is moved, but not copied, to the Extender class.
package
{
import flash.display.MovieClip;
public class StaticExample extends MovieClip
{
public function StaticExample()
{
var myExt:Extender = new Extender();
trace(myExt.test);// output: instance
}
}
}
class Base
{
public static var test:String = "static";
public var test:String = "instance";
}
class Extender extends Base {}
Static properties and the scope chain
Although static properties are not inherited, they are within the scope chain of the class that defines them and any
subclass of that class. As such, static properties are said to be in scope of both the class in which they are defined and
any subclasses. This means that a static property is directly accessible within the body of the class that defines the
static property and any subclass of that class.
The following example modifies the classes defined in the previous example to show that the static test variable
defined in the Base class is in scope of the Extender class. In other words, the Extender class can access the static
test variable without prefixing the variable with the name of the class that defines test.
package
{
import flash.display.MovieClip;
public class StaticExample extends MovieClip
{
public function StaticExample()
{
var myExt:Extender = new Extender();
}
}
}
class Base {
public static var test:String = "static";
}

ADOBE FLEX 3
Developer Guide
108
class Extender extends Base
{
public function Extender()
{
trace(test); // output: static
}
}
If an instance property is defined that uses the same name as a static property in the same class or a superclass, the
instance property has higher precedence in the scope chain. The instance property is said to shadow the static
property, which means that the value of the instance property is used instead of the value of the static property. For
example, the following code shows that if the Extender class defines an instance variable named test, the trace()
statement uses the value of the instance variable instead of the value of the static variable.:
package
{
import flash.display.MovieClip;
public class StaticExample extends MovieClip
{
public function StaticExample()
{
var myExt:Extender = new Extender();
}
}
}
class Base
{
public static var test:String = "static";
}
class Extender extends Base
{
public var test:String = "instance";
public function Extender()
{
trace(test); // output: instance
}
}
Advanced topics
This section begins with a brief history of ActionScript and OOP and continues with a discussion of the ActionScript
3.0 object model and how it enables the new ActionScript Virtual Machine (AVM2) to perform significantly faster
than previous versions of Flash Player that contain the old ActionScript Virtual Machine (AVM1).
History of ActionScript OOP support
Because ActionScript 3.0 builds upon previous versions of ActionScript, it may be helpful to understand how the
ActionScript object model has evolved. ActionScript began as a simple scripting mechanism for early versions of the
Flash authoring tool. Subsequently, programmers began building increasingly complex applications with Action-
Script. In response to the needs of such programmers, each subsequent release has added language features that facil-
itate the creation of complex applications.

ADOBE FLEX 3
Developer Guide
109
ActionScript 1.0
ActionScript 1.0 refers to the version of the language used in Flash Player 6 and earlier. Even at this early stage of
development, the ActionScript object model was based on the concept of the object as a fundamental data type. An
ActionScript object is a compound data type with a group of properties. When discussing the object model, the term
properties includes everything that is attached to an object, such as variables, functions, or methods.
Although this first generation of ActionScript does not support the definition of classes with a class keyword, you
can define a class using a special kind of object called a prototype object. Instead of using a class keyword to create
an abstract class definition that you instantiate into concrete objects, as you do in class-based languages like Java and
C++, prototype-based languages like ActionScript 1.0 use an existing object as a model (or prototype) for other
objects. While objects in a class-based language may point to a class that serves as its template, objects in a prototype-
based language point instead to another object, its prototype, that serves as its template.
To create a class in ActionScript 1.0, you define a constructor function for that class. In ActionScript, functions are
actual objects, not just abstract definitions. The constructor function that you create serves as the prototypical object
for instances of that class. The following code creates a class named Shape and defines one property named visible
that is set to true by default:
// base class
function Shape() {}
// Create a property named visible.
Shape.prototype.visible = true;
This constructor function defines a Shape class that you can instantiate with the new operator, as follows:
myShape = new Shape();
Just as the Shape() constructor function object serves as the prototype for instances of the Shape class, it can also
serve as the prototype for subclasses of Shape—that is, other classes that extend the Shape class.
The creation of a class that is a subclass of the Shape class is a two-step process. First, create the class by defining a
constructor function for the class, as follows:
// child class
function Circle(id, radius)
{
this.id = id;
this.radius = radius;
}
Second, use the new operator to declare that the Shape class is the prototype for the Circle class. By default, any class
you create uses the Object class as its prototype, which means that Circle.prototype currently contains a generic
object (an instance of the Object class). To specify that Circle’s prototype is Shape instead of Object, use the following
code to change the value of Circle.prototype so that it contains a Shape object instead of a generic object:
// Make Circle a subclass of Shape.
Circle.prototype = new Shape();

ADOBE FLEX 3
Developer Guide
110
The Shape class and the Circle class are now linked together in an inheritance relationship that is commonly known
as the prototype chain. The diagram illustrates the relationships in a prototype chain:
The base class at the end of every prototype chain is the Object class. The Object class contains a static property
named Object.prototype that points to the base prototype object for all objects created in ActionScript 1.0. The
next object in our example prototype chain is the Shape object. This is because the Shape.prototype property was
never explicitly set, so it still holds a generic object (an instance of the Object class). The final link in this chain is the
Circle class, which is linked to its prototype, the Shape class (the Circle.prototype property holds a Shape object).
If we create an instance of the Circle class, as in the following example, the instance inherits the prototype chain of
the Circle class:
// Create an instance of the Circle class.
myCircle = new Circle();
Recall that we created a property named visible as a member of the Shape class. In our example, the visible
property does not exist as a part of the myCircle object, only as a member of the Shape object, yet the following line
of code outputs true:
trace(myCircle.visible); // output: true
Flash Player is able to ascertain that the myCircle object inherits the visible property by walking up the prototype
chain. When executing this code, Flash Player first searches through the properties of the myCircle object for a
property named visible, but does not find such a property. Flash Player looks next in the Circle.prototype
object, but still does not find a property named visible. Continuing up the prototype chain, Flash Player finally
finds the visible property defined on the Shape.prototype object and outputs the value of that property.
In the interest of simplicity, this section omits many of the details and intricacies of the prototype chain, and aims
instead to provide enough information to help you understand the ActionScript 3.0 object model.
ActionScript 2.0
ActionScript 2.0 introduced new keywords such as class, extends, public, and private, that allowed you to
define classes in a way that is familiar to anyone who works with class-based languages like Java and C++. It’s
important to understand that the underlying inheritance mechanism did not change between ActionScript 1.0 and
ActionScript 2.0. ActionScript 2.0 merely added a new syntax for defining classes. The prototype chain works the
same way in both versions of the language.
The new syntax introduced by ActionScript 2.0, shown in the following excerpt, allows you to define classes in a way
that many programmers find more intuitive:
// base class
class Shape
{
var visible:Boolean = true;
}
Object.prototype
Shape.prototype
Circle.prototype
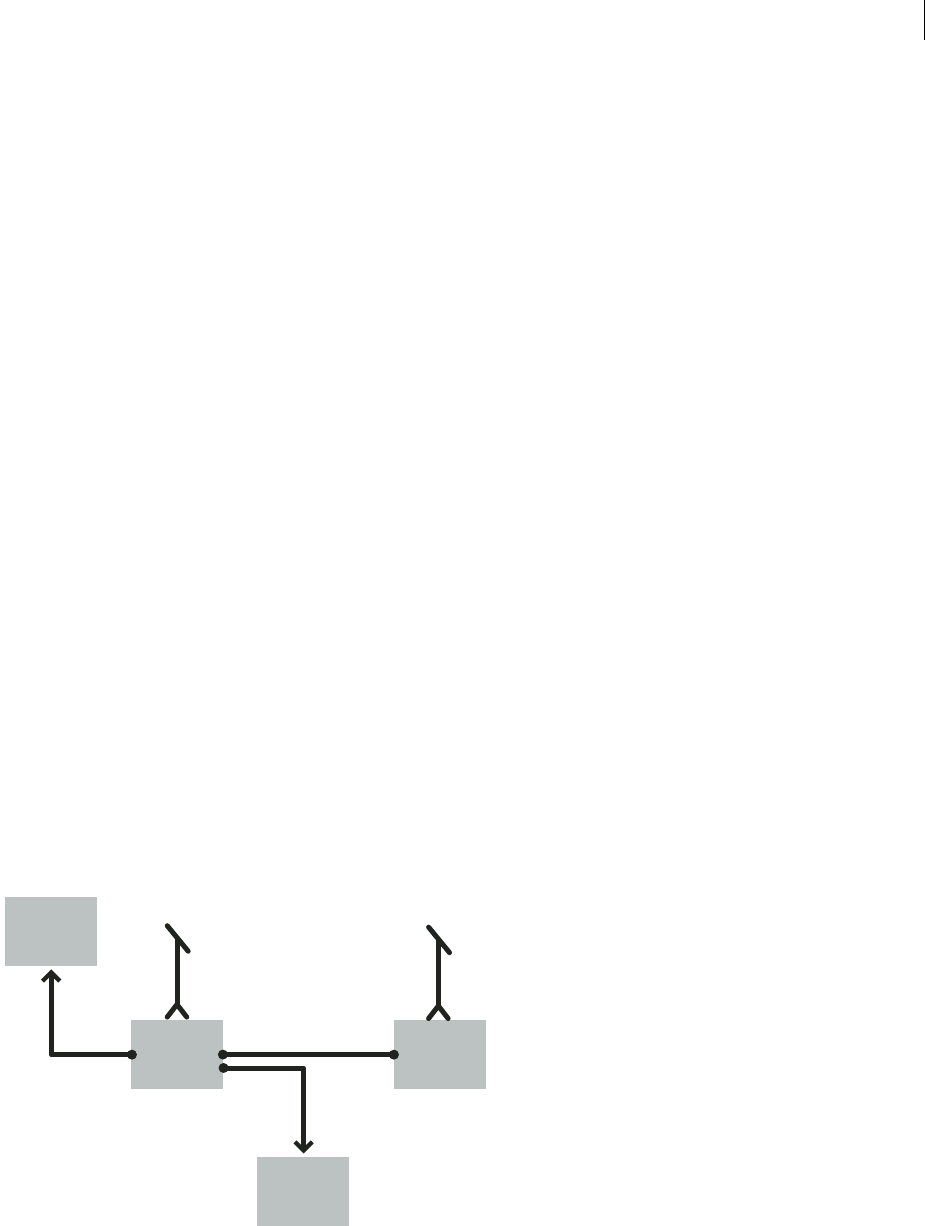
ADOBE FLEX 3
Developer Guide
111
Note that ActionScript 2.0 also introduced type annotations for use with compile-time type checking. This allows
you to declare that the visible property in the previous example should contain only a Boolean value. The new
extends keyword also simplifies the process of creating a subclass. In the following example, the two-step process
necessary in ActionScript 1.0 is accomplished in one step with the extends keyword:
// child class
class Circle extends Shape
{
var id:Number;
var radius:Number;
function Circle(id, radius)
{
this.id = id;
this.radius = radius;
}
}
The constructor is now declared as part of the class definition, and the class properties id and radius must also be
declared explicitly.
ActionScript 2.0 also added support for the definition of interfaces, which allow you to further refine your object-
oriented programs with formally defined protocols for inter-object communication.
The ActionScript 3.0 class object
A common object-oriented programming paradigm, most commonly associated with Java and C++, uses classes to
define types of objects. Programming languages that adopt this paradigm also tend to use classes to construct
instances of the data type that the class defines. ActionScript uses classes for both of these purposes, but its roots as
a prototype-based language add an interesting characteristic. ActionScript creates for each class definition a special
class object that allows sharing of both behavior and state. For many ActionScript programmers, however, this
distinction may have no practical coding implications. ActionScript 3.0 is designed such that you can create sophis-
ticated object-oriented ActionScript applications without using, or even understanding, these special class objects.
For advanced programmers who want to take advantage of class objects, this section discusses the issues in depth.
The following diagram shows the structure of a class object that represents a simple class named A that is defined
with the statement class A {}:
TCA
PA
CA
TA
Class.prototype Object.prototype
delegate
constructor
delegate
prototype
type
traits

ADOBE FLEX 3
Developer Guide
112
Each rectangle in the diagram represents an object. Each object in the diagram has a subscript character A to
represent that it belongs to class A. The class object (CA) contains references to a number of other important objects.
An instance traits object (TA) stores the instance properties that are defined within a class definition. A class traits
object (TCA) represents the internal type of the class and stores the static properties defined by the class (the
subscript character C stands for “class”). The prototype object (PA) always refers to the class object to which it was
originally attached through the constructor property.
The traits object
The traits object, which is new in ActionScript 3.0, was implemented with performance in mind. In previous versions
of ActionScript, name lookup could be a time-consuming process as Flash Player walked the prototype chain. In
ActionScript 3.0, name lookup is much more efficient and less time consuming, because inherited properties are
copied down from superclasses into the traits object of subclasses.
The traits object is not directly accessible to programmer code, but its presence can be felt by the improvements in
performance and memory usage. The traits object provides the AVM2 with detailed information about the layout
and contents of a class. With such knowledge, the AVM2 is able to significantly reduce execution time, because it can
often generate direct machine instructions to access properties or call methods directly without a time-consuming
name lookup.
Thanks to the traits object, an object’s memory footprint can be significantly smaller than a similar object in previous
versions of ActionScript. For example, if a class is sealed (that is, the class is not declared dynamic), an instance of
the class does not need a hash table for dynamically added properties, and can hold little more than a pointer to the
traits objects and some slots for the fixed properties defined in the class. As a result, an object that required 100 bytes
of memory in ActionScript 2.0 could require as little as 20 bytes of memory in ActionScript 3.0.
Note: The traits object is an internal implementation detail, and there is no guarantee that it will not change or even
disappear in future versions of ActionScript.
The prototype object
Every ActionScript class object has a property named prototype, which is a reference to the class’s prototype object.
The prototype object is a legacy of ActionScript’s roots as prototype-based language. For more information, see
“ActionScript 1.0” on page 109.
The prototype property is read-only, which means that it cannot be modified to point to different objects. This
differs from the class prototype property in previous versions of ActionScript, where the prototype could be
reassigned so that it pointed to a different class. Although the prototype property is read-only, the prototype object
that it references is not. In other words, new properties can be added to the prototype object. Properties added to the
prototype object are shared among all instances of the class.
The prototype chain, which was the only inheritance mechanism in previous versions of ActionScript, serves only a
secondary role in ActionScript 3.0. The primary inheritance mechanism, fixed property inheritance, is handled
internally by the traits object. A fixed property is a variable or method that is defined as part of a class definition.
Fixed property inheritance is also called class inheritance, because it is the inheritance mechanism that is associated
with keywords such as class, extends, and override.
The prototype chain provides an alternative inheritance mechanism that is more dynamic than fixed property inher-
itance. You can add properties to a class’s prototype object not only as part of the class definition, but also at run time
through the class object’s prototype property. Note, however, that if you set the compiler to strict mode, you may
not be able to access properties added to a prototype object unless you declare a class with the dynamic keyword.

ADOBE FLEX 3
Developer Guide
113
A good example of a class with several properties attached to the prototype object is the Object class. The Object
class’s toString() and valueOf() methods are actually functions assigned to properties of the Object class’s
prototype object. The following is an example of how the declaration of these methods could, in theory, look (the
actual implementation differs slightly because of implementation details):
public dynamic class Object
{
prototype.toString = function()
{
// statements
};
prototype.valueOf = function()
{
// statements
};
}
As mentioned previously, you can attach a property to a class’s prototype object outside the class definition. For
example, the toString() method can also be defined outside the Object class definition, as follows:
Object.prototype.toString = function()
{
// statements
};
Unlike fixed property inheritance, however, prototype inheritance does not require the override keyword if you
want to redefine a method in a subclass. For example. if you want to redefine the valueOf() method in a subclass
of the Object class, you have three options. First, you can define a valueOf() method on the subclass’s prototype
object inside the class definition. The following code creates a subclass of Object named Foo and redefines the
valueOf() method on Foo’s prototype object as part of the class definition. Because every class inherits from Object,
it is not necessary to use the extends keyword.
dynamic class Foo
{
prototype.valueOf = function()
{
return "Instance of Foo";
};
}
Second, you can define a valueOf() method on Foo’s prototype object outside the class definition, as shown in the
following code:
Foo.prototype.valueOf = function()
{
return "Instance of Foo";
};
Third, you can define a fixed property named valueOf() as part of the Foo class. This technique differs from the
others in that it mixes fixed property inheritance with prototype inheritance. Any subclass of Foo that wants to
redefine valueOf() must use the override keyword. The following code shows valueOf() defined as a fixed
property in Foo:
class Foo
{
function valueOf():String
{
return "Instance of Foo";
}
}

ADOBE FLEX 3
Developer Guide
114
The AS3 namespace
The existence of two separate inheritance mechanisms, fixed property inheritance and prototype inheritance, creates
an interesting compatibility challenge with respect to the properties and methods of the core classes. Compatibility
with the ECMAScript, Edition 4 draft language specification requires the use of prototype inheritance, which means
that the properties and methods of a core class are defined on the prototype object of that class. On the other hand,
compatibility with the Flash Player API calls for the use of fixed property inheritance, which means that the
properties and methods of a core class are defined in the class definition using the const, var, and function
keywords. Moreover, the use of fixed properties instead of the prototype versions can lead to significant increases in
run-time performance.
ActionScript 3.0 solves this problem by using both prototype inheritance and fixed property inheritance for the core
classes. Each core class contains two sets of properties and methods. One set is defined on the prototype object for
compatibility with the ECMAScript specification, and the other set is defined with fixed properties and the AS3
namespace for compatibility with the Flash Player API.
The AS3 namespace provides a convenient mechanism for choosing between the two sets of properties and methods.
If you do not use the AS3 namespace, an instance of a core class inherits the properties and methods defined on the
core class’s prototype object. If you decide to use the AS3 namespace, an instance of a core class inherits the AS3
versions because fixed properties are always preferred over prototype properties. In other words, whenever a fixed
property is available, it is always used instead of an identically named prototype property.
You can selectively use the AS3 namespace version of a property or method by qualifying it with the AS3 namespace.
For example, the following code uses the AS3 version of the Array.pop() method:
var nums:Array = new Array(1, 2, 3);
nums.AS3::pop();
trace(nums); // output: 1,2
Alternatively, you can use the use namespace directive to open the AS3 namespace for all the definitions within a
block of code. For example, the following code uses the use namespace directive to open the AS3 namespace for
both the pop() and push() methods:
use namespace AS3;
var nums:Array = new Array(1, 2, 3);
nums.pop();
nums.push(5);
trace(nums) // output: 1,2,5
ActionScript 3.0 also provides compiler options for each set of properties so that you can apply the AS3 namespace
to your entire program. The -as3 compiler option represents the AS3 namespace, and the -es compiler option
represents the prototype inheritance option (es stands for ECMAScript). To open the AS3 namespace for your entire
program, set the -as3 compiler option to true and the -es compiler option to false. To use the prototype versions,
set the compiler options to the opposite values. The default compiler settings for Adobe Flex Builder 2 and Adobe
Flash CS3 Professional are -as3 = true and -es = false.If you plan to extend any of the core classes and override
any methods, you should understand how the AS3 namespace can affect how you must declare an overridden
method. If you are using the AS3 namespace, any method override of a core class method must also use the AS3
namespace along with the override attribute. If you are not using the AS3 namespace and want to redefine a core
class method in a subclass, you should not use the AS3 namespace or the override keyword.

ADOBE FLEX 3
Developer Guide
115
Example: GeometricShapes
The GeometricShapes sample application shows how a number of object-oriented concepts and features can be
applied using ActionScript 3.0, including:
•Defining classes
•Extending classes
•Polymorphism and the override keyword
•Defining, extending and implementing interfaces
It also includes a “factory method” that creates class instances, showing how to declare a return value as an instance
of an interface, and use that returned object in a generic way.
To get the application files for this sample, see www.adobe.com/go/learn_programmingAS3samples_flash. The
GeometricShapes application files can be found in the folder Samples/GeometricShapes. The application consists of
the following files:
Defining the GeometricShapes classes
The GeometricShapes application lets the user specify a type of geometric shape and a size. It then responds with a
description of the shape, its area, and distance around its perimeter.
The application user interface is trivial, including a few controls for selecting the type of shape, setting the size, and
displaying the description. The most interesting part of this application is under the surface, in the structure of the
classes and interfaces themselves.
This application deals with geometric shapes, but it doesn’t display them graphically. It provides a small library of
classes and interfaces that will be reused in a later chapter’s example (see “Example: SpriteArranger” on page 287).
The SpriteArranger example displays the shapes graphically and lets the user manipulate them, based on the class
framework provided here in the GeometricShapes application.
File Description
GeometricShapes.mxml
or
GeometricShapes.fla
The main application file in Flash (FLA) or Flex (MXML).
com/example/programmingas3/geometricshapes/IGeometricShape.as The base interface defining methods to be imple-
mented by all GeometricShapes application classes.
com/example/programmingas3/geometricshapes/IPolygon.as An interface defining methods to be implemented by
GeometricShapes application classes that have
multiple sides.
com/example/programmingas3/geometricshapes/RegularPolygon.as A type of geometric shape that has sides of equal
length postponed symmetrically around the shape’s
center.
com/example/programmingas3/geometricshapes/Circle.as A type of geometric shape that defines a circle.
com/example/programmingas3/geometricshapes/EquilateralTriangle.as A subclass of RegularPolygon that defines a triangle
with all sides the same length.
com/example/programmingas3/geometricshapes/Square.as A subclass of RegularPolygon defining a rectangle with
all four sides the same length.
com/example/programmingas3/geometricshapes/GeometricShapeFactory.as A class containing a factory method for creating
shapes given a shape type and size.
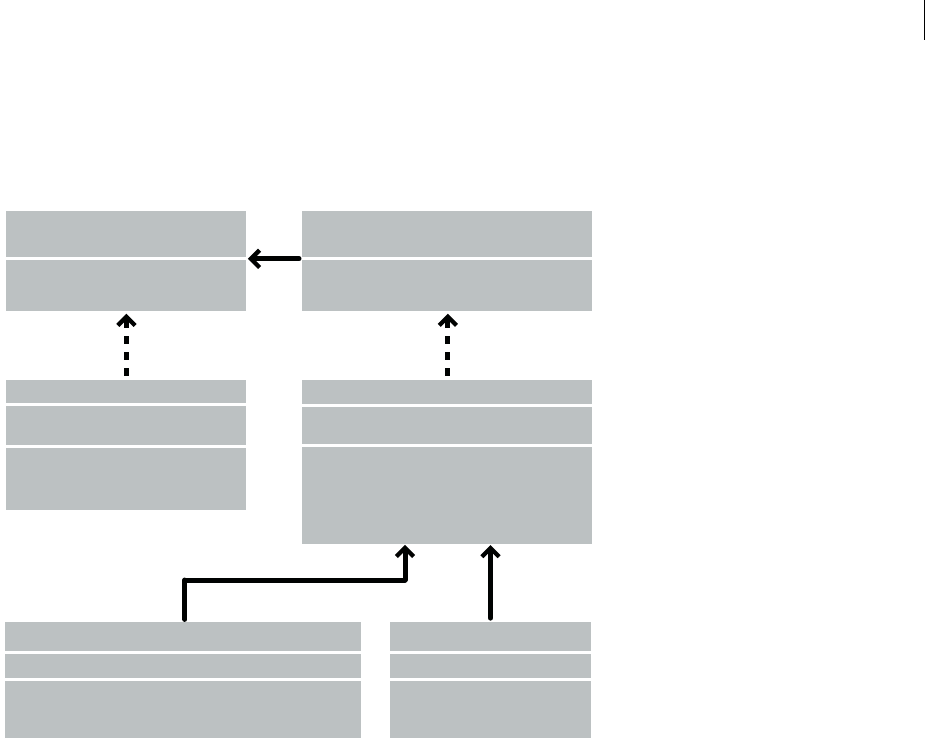
ADOBE FLEX 3
Developer Guide
116
The classes and interfaces that define the geometric shapes in this example are shown in the following diagram using
Unified Modeling Language (UML) notation:
Defining common behavior with interfaces
This GeometricShapes application deals with three types of shapes: circles, squares, and equilateral triangles. The
GeometricShapes class structure begins with a very simple interface, IGeometricShape, that lists methods common
to all three types of shapes:
package com.example.programmingas3.geometricshapes
{
public interface IGeometricShape
{
function getArea():Number;
function describe():String;
}
}
The interface defines two methods: the getArea() method, which calculates and returns the area of the shape, and
the describe() method, which assembles a text description of the shape’s properties.
We also want to know the distance around the perimeter of each shape. However, the perimeter of a circle is called
the circumference, and it’s calculated in a unique way, so the behavior diverges from that of a triangle or a square.
Still there is enough similarity between triangles, squares, and other polygons that it makes sense to define a new
interface class just for them: IPolygon. The IPolygon interface is also rather simple, as shown here:
GeometricShapes Example Classes
<< interface >>
IGeometricShape
+getArea (): Number
+describe (): Strin
<< interface >>
IPolygon
+getPerimeter (): Number
+getSumOfAngles (): Number
Circle
+diameter:Number
+Circle () : Circle
+getArea () : Number
+describe () : String
+getCircumference () : Number
+numSides : int
+sideLength : Number
+RegularPolygon (): RegularPolygon
+getSumOfAngles (): Number
+getPerimeter (): Number
+getArea (): Number
+describe (): String
RegularPolygon
+EquilateralTriangle (): EquilateralTriangle
+getArea (): Number
+describe (): String
EquilateralTriangle
+Square (): Square
+getArea (): Number
+describe (): String
Square

ADOBE FLEX 3
Developer Guide
117
package com.example.programmingas3.geometricshapes
{
public interface IPolygon extends IGeometricShape
{
function getPerimeter():Number;
function getSumOfAngles():Number;
}
}
This interface defines two methods common to all polygons: the getPerimeter() method that measures the
combined distance of all the sides, and the getSumOfAngles() method that adds up all the interior angles.
The IPolygon interface extends the IGeometricShape interface, which means that any class that implements the
IPolygon interface must declare all four methods—the two from the IGeometricShape interface, and the two from
the IPolygon interface.
Defining the shape classes
Once you have a good idea about the methods common to each type of shape, you can define the shape classes
themselves. In terms of how many methods you need to implement, the simplest shape is the Circle class, shown
here:
package com.example.programmingas3.geometricshapes
{
public class Circle implements IGeometricShape
{
public var diameter:Number;
public function Circle(diam:Number = 100):void
{
this.diameter = diam;
}
public function getArea():Number
{
// The formula is Pi * radius * radius.
var radius:Number = diameter / 2;
return Math.PI * radius * radius;
}
public function getCircumference():Number
{
// The formula is Pi * diameter.
return Math.PI * diameter;
}
public function describe():String
{
var desc:String = "This shape is a Circle.\n";
desc += "Its diameter is " + diameter + " pixels.\n";
desc += "Its area is " + getArea() + ".\n";
desc += "Its circumference is " + getCircumference() + ".\n";
return desc;
}
}
}
The Circle class implements the IGeometricShape interface, so it must provide code for both the getArea() method
and the describe() method. In addition, it defines the getCircumference() method, which is unique to the
Circle class. The Circle class also declares a property, diameter, which won’t be found in the other polygon classes.

ADOBE FLEX 3
Developer Guide
118
The other two types of shapes, squares and equilateral triangles, have some other things in common: they each have
sides of equal length, and there are common formulas you can use to calculate the perimeter and sum of interior
angles for both. In fact, those common formulas will apply to any other regular polygons that you need to define in
the future as well.
The RegularPolygon class will be the superclass for both the Square class and the EquilateralTriangle class. A super-
class lets you define common methods in one place, so you don’t have to define them separately in each subclass.
Here is the code for the RegularPolygon class:
package com.example.programmingas3.geometricshapes
{
public class RegularPolygon implements IPolygon
{
public var numSides:int;
public var sideLength:Number;
public function RegularPolygon(len:Number = 100, sides:int = 3):void
{
this.sideLength = len;
this.numSides = sides;
}
public function getArea():Number
{
// This method should be overridden in subclasses.
return 0;
}
public function getPerimeter():Number
{
return sideLength * numSides;
}
public function getSumOfAngles():Number
{
if (numSides >= 3)
{
return ((numSides - 2) * 180);
}
else
{
return 0;
}
}
public function describe():String
{
var desc:String = "Each side is " + sideLength + " pixels long.\n";
desc += "Its area is " + getArea() + " pixels square.\n";
desc += "Its perimeter is " + getPerimeter() + " pixels long.\n";
desc += "The sum of all interior angles in this shape is " + getSumOfAngles() +
" degrees.\n";
return desc;
}
}
}
First, the RegularPolygon class declares two properties that are common to all regular polygons: the length of each
side (the sideLength property) and the number of sides (the numSides property).

ADOBE FLEX 3
Developer Guide
119
The RegularPolygon class implements the IPolygon interface and declares all four of the IPolygon interface methods.
It implements two of these—the getPerimeter() and getSumOfAngles() methods—using common formulas.
Because the formula for the getArea() method will differ from shape to shape, the base class version of the method
cannot include common logic that can be inherited by the subclass methods. Instead, it simply returns a 0 default
value to indicate that the area was not calculated. To calculate the area of each shape correctly, the subclasses of the
RegularPolygon class will have to override the getArea() method themselves.
The following code for the EquilateralTriangle class show how the getArea() method is overridden:
package com.example.programmingas3.geometricshapes
{
public class EquilateralTriangle extends RegularPolygon
{
public function EquilateralTriangle(len:Number = 100):void
{
super(len, 3);
}
public override function getArea():Number
{
// The formula is ((sideLength squared) * (square root of 3)) / 4.
return ( (this.sideLength * this.sideLength) * Math.sqrt(3) ) / 4;
}
public override function describe():String
{
/* starts with the name of the shape, then delegates the rest
of the description work to the RegularPolygon superclass */
var desc:String = "This shape is an equilateral Triangle.\n";
desc += super.describe();
return desc;
}
}
}
The override keyword indicates that the EquilateralTriangle.getArea() method intentionally overrides the
getArea() method from the RegularPolygon superclass. When the EquilateralTriangle.getArea() method is
called, it calculates the area using the formula in the preceding code, and the code in the
RegularPolygon.getArea() method never executes.
In contrast, the EquilateralTriangle class doesn’t define its own version of the getPerimeter() method. When the
EquilateralTriangle.getPerimeter() method is called, the call goes up the inheritance chain and executes the
code in the getPerimeter() method of the RegularPolygon superclass.
The EquilateralTriangle() constructor uses the super() statement to explicitly invoke the RegularPolygon()
constructor of its superclass. If both constructors had the same set of parameters, you could have omitted the
EquilateralTriangle() constructor completely, and the RegularPolygon() constructor would be executed
instead. However, the RegularPolygon() constructor needs an extra parameter, numSides. So the
EquilateralTriangle() constructor calls super(len, 3), which passes along the len input parameter and the
value 3 to indicate that the triangle will have 3 sides.
The describe() method also uses the super() statement, but in a different way—to invoke the RegularPolygon
superclass’ version of the describe() method. The EquilateralTriangle.describe() method first sets the
desc string variable to a statement about the type of shape. Then it gets the results of the
RegularPolygon.describe() method by calling super.describe(), and it appends that result to the desc
string.

ADOBE FLEX 3
Developer Guide
120
The Square class won’t be described in detail here, but it is similar to the EquilateralTriangle class, providing a
constructor and its own implementations of the getArea() and describe() methods.
Polymorphism and the factory method
A set of classes that make good use of interfaces and inheritance can be used in many interesting ways. For example,
all of the shape classes described so far either implement the IGeometricShape interface or extend a superclass that
does. So if you define a variable to be an instance of IGeometricShape, you don’t have to know whether it is actually
an instance of the Circle or the Square class in order to call its describe() method.
The following code shows how this works:
var myShape:IGeometricShape = new Circle(100);
trace(myShape.describe());
When myShape.describe() is called, it executes the method Circle.describe(), because even though the
variable is defined as an instance of the IGeometricShape interface, Circle is its underlying class.
This example shows the principle of polymorphism in action: the exact same method call results in different code
being executed, depending on the class of the object whose method is being invoked.
The GeometricShapes application applies this kind of interface-based polymorphism using a simplified version of a
design pattern known as the factory method. The term factory method refers to a function that returns an object
whose underlying data type or contents can differ depending on the context.
The GeometricShapeFactory class shown here defines a factory method named createShape():
package com.example.programmingas3.geometricshapes
{
public class GeometricShapeFactory
{
public static var currentShape:IGeometricShape;
public static function createShape(shapeName:String,
len:Number):IGeometricShape
{
switch (shapeName)
{
case "Triangle":
return new EquilateralTriangle(len);
case "Square":
return new Square(len);
case "Circle":
return new Circle(len);
}
return null;
}
public static function describeShape(shapeType:String, shapeSize:Number):String
{
GeometricShapeFactory.currentShape =
GeometricShapeFactory.createShape(shapeType, shapeSize);
return GeometricShapeFactory.currentShape.describe();
}
}
}

ADOBE FLEX 3
Developer Guide
121
The createShape() factory method lets the shape subclass constructors define the details of the instances that they
create, while returning the new objects as IGeometricShape instances so that they can be handled by the application
in a more general way.
The describeShape() method in the preceding example shows how an application can use the factory method to
get a generic reference to a more specific object. The application can get the description for a newly created Circle
object like this:
GeometricShapeFactory.describeShape(“Circle”, 100);
The describeShape() method then calls the createShape() factory method with the same parameters, storing
the new Circle object in a static variable named currentShape, which was typed as an IGeometricShape object.
Next, the describe() method is called on the currentShape object, and that call is automatically resolved to
execute the Circle.describe() method, returning a detailed description of the circle.
Enhancing the sample application
The real power of interfaces and inheritance becomes apparent when you enhance or change your application.
Say that you wanted to add a new shape, a pentagon, to this sample application. You would create a new Pentagon
class that extends the RegularPolygon class and defines its own versions of the getArea() and describe()
methods. Then you would add a new Pentagon option to the combo box in the application’s user interface. But that’s
it. The Pentagon class would automatically get the functionality of the getPerimeter() method and the
getSumOfAngles() method from the RegularPolygon class by inheritance. Because it inherits from a class that
implements the IGeometricShape interface, a Pentagon instance can be treated as an IGeometricShape instance too.
That means that to add a new type of shape, you do not need to change the method signature of any of the methods
in the GeometricShapeFactory class (and consequently, you don’t need to change any of the code that uses the
GeometricShapeFactory class either).
You may want to add a Pentagon class to the Geometric Shapes example as an exercise, to see how interfaces and
inheritance can ease the workload of adding new features to an application.

122
Chapter 6: Working with dates and times
Timing might not be everything, but it's usually a key factor in software applications. ActionScript™ 3.0 provides
powerful ways to manage calendar dates, times, and time intervals. Two main classes provide most of this timing
functionality: the Date class and the new Timer class in the flash.utils package.
Contents
Basics of dates and times . . . . . . . . . . . . . . . . . . . . . . . . . . . . . . . . . . . . . . . . . . . . . . . . . . . . . . . . . . . . . . . . . . . . . . . . . . 122
Managing calendar dates and times . . . . . . . . . . . . . . . . . . . . . . . . . . . . . . . . . . . . . . . . . . . . . . . . . . . . . . . . . . . . . . . . . 123
Controlling time intervals . . . . . . . . . . . . . . . . . . . . . . . . . . . . . . . . . . . . . . . . . . . . . . . . . . . . . . . . . . . . . . . . . . . . . . . . . 125
Example: Simple analog clock . . . . . . . . . . . . . . . . . . . . . . . . . . . . . . . . . . . . . . . . . . . . . . . . . . . . . . . . . . . . . . . . . . . . . . 127
Basics of dates and times
Introduction to working with dates and times
Dates and times are a common type of information used in ActionScript programs. For instance, you might need to
know the current day of the week or to measure how much time a user spends on a particular screen, among many
other possibilities. In ActionScript, you can use the Date class to represent a single moment in time, including date
and time information. Within a Date instance are values for the individual date and time units, including year,
month, date, day of the week, hour, minutes, seconds, milliseconds, and time zone. For more advanced uses, Action-
Script also includes the Timer class, which you can use to perform actions after a certain delay or at repeated
intervals.
Common date and time tasks
This chapter describes the following common tasks for working with date and time information:
•Working with Date objects
•Getting the current date and time
•Accessing individual date and time units (days, years, hours, minutes, and so on)
•Performing arithmetic with dates and times
•Converting between time zones
•Performing repeating actions
•Performing actions after a set time interval
Important concepts and terms
The following reference list contains important terms that you will encounter in this chapter:
•UTC time: Coordinated Universal Time—the “zero hour” reference time zone. All other time zones are defined
as a number of hours relative to (ahead of or behind) UTC time.

ADOBE FLEX 3
Developer Guide
123
Managing calendar dates and times
All of the calendar date and time management functions in ActionScript 3.0 are concentrated in the top-level Date
class. The Date class contains methods and properties that let you handle dates and times in either Coordinated
Universal Time (UTC) or in local time specific to a time zone. UTC is a standard time definition that is essentially
the same as Greenwich Mean Time (GMT).
Creating Date objects
The Date class boasts one of the most versatile constructor methods of all the core classes. You can invoke it four
different ways.
First, if given no parameters, the Date() constructor returns a Date object containing the current date and time, in
local time based on your time zone. Here’s an example:
var now:Date = new Date();
Second, if given a single numeric parameter, the Date() constructor treats that as the number of milliseconds since
January 1, 1970, and returns a corresponding Date object. Note that the millisecond value you pass in is treated as
milliseconds since January 1, 1970, in UTC. However, the Date object shows values in your local time zone, unless
you use the UTC-specific methods to retrieve and display them. If you create a new Date object using a single milli-
seconds parameter, make sure you account for the time zone difference between your local time and UTC. The
following statements create a Date object set to midnight on the day of January 1, 1970, in UTC:
var millisecondsPerDay:int = 1000 * 60 * 60 * 24;
// gets a Date one day after the start date of 1/1/1970
var startTime:Date = new Date(millisecondsPerDay);
Third, you can pass multiple numeric parameters to the Date() constructor. It treats those parameters as the year,
month, day, hour, minute, second, and millisecond, respectively, and returns a corresponding Date object. Those
input parameters are assumed to be in local time rather than UTC. The following statements get a Date object set to
midnight at the start of January 1, 2000, in local time:
var millenium:Date = new Date(2000, 0, 1, 0, 0, 0, 0);
Fourth, you can pass a single string parameter to the Date() constructor. It will try to parse that string into date or
time components and then return a corresponding Date object. If you use this approach, it’s a good idea to enclose
the Date() constructor in a try..catch block to trap any parsing errors. The Date() constructor accepts a number
of different string formats, as listed in the ActionScript 3.0 Language and Components Reference. The following
statement initializes a new Date object using a string value:
var nextDay:Date = new Date(“Mon May 1 2006 11:30:00 AM”);
If the Date() constructor cannot successfully parse the string parameter, it will not raise an exception. However, the
resulting Date object will contain an invalid date value.
Getting time unit values
You can extract the values for various units of time within a Date object using properties or methods of the Date class.
Each of the following properties gives you the value of a time unit in the Date object:
•The fullYear property
•The month property, which is in a numeric format with 0 for January up to 11 for December
•The date property, which is the calendar number of the day of the month, in the range of 1 to 31

ADOBE FLEX 3
Developer Guide
124
•The day property, which is the day of the week in numeric format, with 0 standing for Sunday
•The hours property, in the range of 0 to 23
•The minutes property
•The seconds property
•The milliseconds property
In fact, the Date class gives you a number of ways to get each of these values. For example, you can get the month
value of a Date object in four different ways:
•The month property
•The getMonth() method
•The monthUTC property
•The getMonthUTC() method
All four ways are essentially equivalent in terms of efficiency, so you can use whichever approach suits your appli-
cation best.
The properties just listed all represent components of the total date value. For example, the milliseconds property
will never be greater than 999, since when it reaches 1000 the seconds value increases by 1 and the milliseconds
property resets to 0.
If you want to get the value of the Date object in terms of milliseconds since January 1, 1970 (UTC), you can use the
getTime() method. Its counterpart, the setTime() method, lets you change the value of an existing Date object
using milliseconds since January 1, 1970 (UTC).
Performing date and time arithmetic
You can perform addition and subtraction on dates and times with the Date class. Date values are kept internally in
terms of milliseconds, so you should convert other values to milliseconds before adding them to or subtracting them
from Date objects.
If your application will perform a lot of date and time arithmetic, you might find it useful to create constants that
hold common time unit values in terms of milliseconds, like the following:
public static const millisecondsPerMinute:int = 1000 * 60;
public static const millisecondsPerHour:int = 1000 * 60 * 60;
public static const millisecondsPerDay:int = 1000 * 60 * 60 * 24;
Now it is easy to perform date arithmetic using standard time units. The following code sets a date value to one hour
from the current time using the getTime() and setTime() methods:
var oneHourFromNow:Date = new Date();
oneHourFromNow.setTime(oneHourFromNow.getTime() + millisecondsPerHour);
Another way to set a date value is to create a new Date object using a single milliseconds parameter. For example, the
following code adds 30 days to one date to calculate another:
// sets the invoice date to today’s date
var invoiceDate:Date = new Date();
// adds 30 days to get the due date
var dueDate:Date = new Date(invoiceDate.getTime() + (30 * millisecondsPerDay));
Next, the millisecondsPerDay constant is multiplied by 30 to represent 30 days’ time and the result is added to the
invoiceDate value and used to set the dueDate value.

ADOBE FLEX 3
Developer Guide
125
Converting between time zones
Date and time arithmetic comes in handy when you want to convert dates from one time zone to another. So does
the getTimezoneOffset() method, which returns the value in minutes by which the Date object’s time zone differs
from UTC. It returns a value in minutes because not all time zones are set to even-hour increments—some have half-
hour offsets from neighboring zones.
The following example uses the time zone offset to convert a date from local time to UTC. It does the conversion by
first calculating the time zone value in milliseconds and then adjusting the Date value by that amount:
// creates a Date in local time
var nextDay:Date = new Date("Mon May 1 2006 11:30:00 AM");
// converts the Date to UTC by adding or subtracting the time zone offset
var offsetMilliseconds:Number = nextDay.getTimezoneOffset() * 60 * 1000;
nextDay.setTime(nextDay.getTime() + offsetMilliseconds);
Controlling time intervals
When you develop applications using Adobe Flash CS3 Professional, you have access to the timeline, which provides
a steady, frame-by-frame progression through your application. In pure ActionScript projects, however, you must
rely on other timing mechanisms.
Loops versus timers
In some programming languages, you must devise your own timing schemes using loop statements like for or
do..while.
Loop statements generally execute as fast as the local machine allows, which means that the application runs faster
on some machines and slower on others. If your application needs a consistent timing interval, you need to tie it to
an actual calendar or clock time. Many applications, such as games, animations, and real-time controllers, need
regular, time-driven ticking mechanisms that are consistent from machine to machine.
The ActionScript 3.0 Timer class provides a powerful solution. Using the ActionScript 3.0 event model, the Timer
class dispatches timer events whenever a specified time interval is reached.
The Timer class
The preferred way to handle timing functions in ActionScript 3.0 is to use the Timer class (flash.utils.Timer), which
can be used to dispatch events whenever an interval is reached.
To start a timer, you first create an instance of the Timer class, telling it how often to generate a timer event and how
many times to do so before stopping.
For example, the following code creates a Timer instance that dispatches an event every second and continues for 60
seconds:
var oneMinuteTimer:Timer = new Timer(1000, 60);
The Timer object dispatches a TimerEvent object each time the given interval is reached. A TimerEvent object’s
event type is timer (defined by the constant TimerEvent.TIMER). A TimerEvent object contains the same
properties as a standard Event object.
If the Timer instance is set to a fixed number of intervals, it will also dispatch a timerComplete event (defined by
the constant TimerEvent.TIMER_COMPLETE) when it reaches the final interval.

ADOBE FLEX 3
Developer Guide
126
Here is a small sample application showing the Timer class in action:
package
{
import flash.display.Sprite;
import flash.events.TimerEvent;
import flash.utils.Timer;
public class ShortTimer extends Sprite
{
public function ShortTimer()
{
// creates a new five-second Timer
var minuteTimer:Timer = new Timer(1000, 5);
// designates listeners for the interval and completion events
minuteTimer.addEventListener(TimerEvent.TIMER, onTick);
minuteTimer.addEventListener(TimerEvent.TIMER_COMPLETE, onTimerComplete);
// starts the timer ticking
minuteTimer.start();
}
public function onTick(event:TimerEvent):void
{
// displays the tick count so far
// The target of this event is the Timer instance itself.
trace("tick " + event.target.currentCount);
}
public function onTimerComplete(event:TimerEvent):void
{
trace("Time's Up!");
}
}
}
When the ShortTimer class is created, it creates a Timer instance that will tick once per second for five seconds. Then
it adds two listeners to the timer: one that listens to each tick, and one that listens for the timerComplete event.
Next, it starts the timer ticking, and from that point forward, the onTick() method executes at one-second intervals.
The onTick() method simply displays the current tick count. After five seconds have passed, the
onTimerComplete() method executes, telling you that the time is up.
When you run this sample, you should see the following lines appear in your console or trace window at the rate of
one line per second:
tick 1
tick 2
tick 3
tick 4
tick 5
Time's Up!
Timing functions in the flash.utils package
ActionScript 3.0 contains a number of timing functions similar to those that were available in ActionScript 2.0.
These functions are provided as package-level functions in the flash.utils package, and they operate just as they did
in ActionScript 2.0.

ADOBE FLEX 3
Developer Guide
127
These functions remain in ActionScript 3.0 for backward compatibility. Adobe does not recommend that you use
them in new ActionScript 3.0 applications. In general, it is easier and more efficient to use the Timer class in your
applications.
Example: Simple analog clock
A simple analog clock example illustrates two of the date and time concepts discussed in this chapter:
•Getting the current date and time and extracting values for the hours, minutes, and seconds
•Using a Timer to set the pace of an application
To get the application files for this sample, see www.adobe.com/go/learn_programmingAS3samples_flash. The
SimpleClock application files can be found in the folder Samples/SimpleClock. The application consists of the
following files:
Defining the SimpleClock class
The clock example is simple, but it’s a good idea to organize even simple applications well so you could easily expand
them in the future. To that end, the SimpleClock application uses the SimpleClock class to handle the startup and
time-keeping tasks, and then uses another class named AnalogClockFace to actually display the time.
Here is the code that defines and initializes the SimpleClock class (note that in the Flash version, SimpleClock
extends the Sprite class instead):
public class SimpleClock extends UIComponent
{
/**
* The time display component.
*/
private var face:AnalogClockFace;
/**
Function Description
clearInterval(id:uint):void Cancels a specified setInterval() call.
clearTimeout(id:uint):void Cancels a specified setTimeout() call.
getTimer():int Returns the number of milliseconds that have elapsed since Adobe® Flash®
Player or Adobe® AIR™ was initialized.
setInterval(closure:Function,
delay:Number, ... arguments):uint
Runs a function at a specified interval (in milliseconds).
setTimeout(closure:Function,
delay:Number, ... arguments):uint
Runs a specified function after a specified delay (in milliseconds).
File Description
SimpleClockApp.mxml
or
SimpleClockApp.fla
The main application file in Flash (FLA) or Flex (MXML).
com/example/programmingas3/simpleclock/SimpleClock.as The main application file.
com/example/programmingas3/simpleclock/AnalogClockFace.as Draws a round clock face and hour, minute, and seconds hands
based on the time.

ADOBE FLEX 3
Developer Guide
128
* The Timer that acts like a heartbeat for the application.
*/
private var ticker:Timer;
The class has two important properties:
•The face property, which is an instance of the AnalogClockFace class
•The ticker property, which is an instance of the Timer class
The SimpleClock class uses a default constructor. The initClock() method takes care of the real setup work,
creating the clock face and starting the Timer instance ticking.
Creating the clock face
The next lines in the SimpleClock code create the clock face that is used to display the time:
/**
* Sets up a SimpleClock instance.
*/
public function initClock(faceSize:Number = 200)
{
// creates the clock face and adds it to the display list
face = new AnalogClockFace(Math.max(20, faceSize));
face.init();
addChild(face);
// draws the initial clock display
face.draw();
The size of the face can be passed in to the initClock() method. If no faceSize value is passed, a default size of
200 pixels is used.
Next, the application initializes the face and then adds it to the display list using the addChild() method inherited
from the DisplayObject class. Then it calls the AnalogClockFace.draw() method to display the clock face once,
showing the current time.
Starting the timer
After creating the clock face, the initClock() method sets up a timer:
// creates a Timer that fires an event once per second
ticker = new Timer(1000);
// designates the onTick() method to handle Timer events
ticker.addEventListener(TimerEvent.TIMER, onTick);
// starts the clock ticking
ticker.start();
First this method instantiates a Timer instance that will dispatch an event once per second (every 1000 milliseconds).
Since no second repeatCount parameter is passed to the Timer() constructor, the Timer will keep repeating indef-
initely.

ADOBE FLEX 3
Developer Guide
129
The SimpleClock.onTick() method will execute once per second when the timer event is received:
public function onTick(event:TimerEvent):void
{
// updates the clock display
face.draw();
}
The AnalogClockFace.draw() method simply draws the clock face and hands.
Displaying the current time
Most of the code in the AnalogClockFace class involves setting up the clock face’s display elements. When the
AnalogClockFace is initialized, it draws a circular outline, places a numeric text label at each hour mark, and then
creates three Shape objects, one each for the hour hand, the minute hand, and the second hand on the clock.
Once the SimpleClock application is running, it calls the AnalogClockFace.draw() method each second, as
follows:
/**
* Called by the parent container when the display is being drawn.
*/
public override function draw():void
{
// stores the current date and time in an instance variable
currentTime = new Date();
showTime(currentTime);
}
This method saves the current time in a variable, so the time can’t change in the middle of drawing the clock hands.
Then it calls the showTime() method to display the hands, as the following shows:
/**
* Displays the given Date/Time in that good old analog clock style.
*/
public function showTime(time:Date):void
{
// gets the time values
var seconds:uint = time.getSeconds();
var minutes:uint = time.getMinutes();
var hours:uint = time.getHours();
// multiplies by 6 to get degrees
this.secondHand.rotation = 180 + (seconds * 6);
this.minuteHand.rotation = 180 + (minutes * 6);
// Multiply by 30 to get basic degrees, then
// add up to 29.5 degrees (59 * 0.5)
// to account for the minutes.
this.hourHand.rotation = 180 + (hours * 30) + (minutes * 0.5);
}
First, this method extracts the values for the hours, minutes, and seconds of the current time. Then it uses these
values to calculate the angle for each hand. Since the second hand makes a full rotation in 60 seconds, it rotates 6
degrees each second (360/60). The minute hand rotates the same amount each minute.
The hour hand updates every minute, too, so it can show some progress as the minutes tick by. It rotates 30 degrees
each hour (360/12), but it also rotates half a degree each minute (30 degrees divided by 60 minutes).

130
Chapter 7: Working with strings
The String class contains methods that let you work with text strings. Strings are important in working with many
objects. The methods described in this chapter are useful in working with strings used in objects such as TextField,
StaticText, XML, ContextMenu, and FileReference objects.
Strings are sequences of characters. ActionScript™ 3.0 supports ASCII and Unicode characters.
Contents
Basics of strings . . . . . . . . . . . . . . . . . . . . . . . . . . . . . . . . . . . . . . . . . . . . . . . . . . . . . . . . . . . . . . . . . . . . . . . . . . . . . . . . . . 130
Creating strings . . . . . . . . . . . . . . . . . . . . . . . . . . . . . . . . . . . . . . . . . . . . . . . . . . . . . . . . . . . . . . . . . . . . . . . . . . . . . . . . . . 131
The length property . . . . . . . . . . . . . . . . . . . . . . . . . . . . . . . . . . . . . . . . . . . . . . . . . . . . . . . . . . . . . . . . . . . . . . . . . . . . . . 132
Working with characters in strings. . . . . . . . . . . . . . . . . . . . . . . . . . . . . . . . . . . . . . . . . . . . . . . . . . . . . . . . . . . . . . . . . . 133
Comparing strings . . . . . . . . . . . . . . . . . . . . . . . . . . . . . . . . . . . . . . . . . . . . . . . . . . . . . . . . . . . . . . . . . . . . . . . . . . . . . . . 133
Obtaining string representations of other objects . . . . . . . . . . . . . . . . . . . . . . . . . . . . . . . . . . . . . . . . . . . . . . . . . . . . . 134
Concatenating strings. . . . . . . . . . . . . . . . . . . . . . . . . . . . . . . . . . . . . . . . . . . . . . . . . . . . . . . . . . . . . . . . . . . . . . . . . . . . . 134
Finding substrings and patterns in strings . . . . . . . . . . . . . . . . . . . . . . . . . . . . . . . . . . . . . . . . . . . . . . . . . . . . . . . . . . . 135
Converting strings between uppercase and lowercase. . . . . . . . . . . . . . . . . . . . . . . . . . . . . . . . . . . . . . . . . . . . . . . . . . 138
Example: ASCII art . . . . . . . . . . . . . . . . . . . . . . . . . . . . . . . . . . . . . . . . . . . . . . . . . . . . . . . . . . . . . . . . . . . . . . . . . . . . . . . 139
Basics of strings
Introduction to working with strings
In programming parlance, a string is a text value—a sequence of letters, numbers, or other characters strung together
into a single value. For instance, this line of code creates a variable with the data type String and assigns a literal string
value to that variable:
var albumName:String = "Three for the money";
As this example shows, in ActionScript you can denote a string value by surrounding text with double or single
quotation marks. Here are several more examples of strings:
"Hello"
"555-7649"
"http://www.adobe.com/"
Any time you manipulate a piece of text in ActionScript, you are working with a string value. The ActionScript String
class is the data type you can use to work with text values. String instances are frequently used for properties, method
parameters, and so forth in many other ActionScript classes.
Common tasks for working with strings
The following are common string-related tasks that are explored in this chapter:
•Creating String objects
•Working with special characters such as carriage-return, tab, and non-keyboard characters

ADOBE FLEX 3
Developer Guide
131
•Measuring string length
•Isolating individual characters in a string
•Joining strings
•Comparing strings
•Finding, extracting, and replacing portions of a string
•Making strings uppercase or lowercase
Important concepts and terms
The following reference list contains important terms that you will encounter in this chapter:
•ASCII: A system for representing text characters and symbols in computer programs. The ASCII system
supports the 26-letter English alphabet, plus a limited set of additional characters.
•Character: The smallest unit of text data (a single letter or symbol).
•Concatenation: Joining multiple string values together by adding one to the end of the other, creating a new
string value.
•Empty string: A string that contains no text, white space, or other characters, written as "". An empty string
value is different from a String variable with a null value—a null String variable is a variable that does not have a
String instance assigned to it, whereas an empty string has an instance with a value that contains no characters.
•String: A textual value (sequence of characters).
•String literal (or “literal string”): A string value written explicitly in code, written as a text value surrounded by
double quotation marks or single quotation marks.
•Substring: A string that is a portion of another string.
•Unicode: A standard system for representing text characters and symbols in computer programs. The Unicode
system allows for the use of any character in any writing system.
Creating strings
The String class is used to represent string (textual) data in ActionScript 3.0. ActionScript strings support both
ASCII and Unicode characters. The simplest way to create a string is to use a string literal. To declare a string literal,
use straight double quotation mark (") or single quotation mark (') characters. For example, the following two
strings are equivalent:
var str1:String = "hello";
var str2:String = 'hello';
You can also declare a string by using the new operator, as follows:
var str1:String = new String("hello");
var str2:String = new String(str1);
var str3:String = new String(); // str3 == ""
The following two strings are equivalent:
var str1:String = "hello";
var str2:String = new String("hello");

ADOBE FLEX 3
Developer Guide
132
To use single quotation marks (') within a string literal defined with single quotation mark (') delimiters, use the
backslash escape character (\). Similarly, to use double quotation marks (") within a string literal defined with
double quotation marks (") delimiters, use the backslash escape character (\). The following two strings are equiv-
alent:
var str1:String = "That's \"A-OK\"";
var str2:String = 'That\'s "A-OK"';
You may choose to use single quotation marks or double quotation marks based on any single or double quotation
marks that exist in a string literal, as in the following:
var str1:String = "ActionScript <span class='heavy'>3.0</span>";
var str2:String = '<item id="155">banana</item>';
Keep in mind that ActionScript distinguishes between a straight single quotation mark (') and a left or right single
quotation mark (‘ or ’). The same is true for double quotation marks. Use straight quotation marks to delineate
string literals. When pasting text from another source into ActionScript, be sure to use the correct characters.
As the following table shows, you can use the backslash escape character (\) to define other characters in string
literals:
The length property
Every string has a length property, which is equal to the number of characters in the string:
var str:String = "Adobe";
trace(str.length); // output: 5
An empty string and a null string both have a length of 0, as the following example shows:
var str1:String = new String();
trace(str1.length); // output: 0
str2:String = '';
trace(str2.length); // output: 0
Escape sequence Character
\b Backspace
\f Form feed
\n Newline
\r Carriage return
\t Tab
\unnnn The Unicode character with the character code specified by the hexadecimal number nnnn; for example,
\u263a is the smiley character.
\xnn The ASCII character with the character code specified by the hexadecimal number nn
\' Single quotation mark
\" Double quotation mark
\\ Single backslash character

ADOBE FLEX 3
Developer Guide
133
Working with characters in strings
Every character in a string has an index position in the string (an integer). The index position of the first character
is 0. For example, in the following string, the character y is in position 0 and the character w is in position 5:
"yellow"
You can examine individual characters in various positions in a string using the charAt() method and the
charCodeAt() method, as in this example:
var str:String = "hello world!";
for (var i:int = 0; i < str.length; i++)
{
trace(str.charAt(i), "-", str.charCodeAt(i));
}
When you run this code, the following output is produced:
h - 104
e - 101
l - 108
l - 108
o - 111
- 32
w - 119
o - 111
r - 114
l - 108
d - 100
! - 33
You can also use character codes to define a string using the fromCharCode() method, as the following example
shows:
var myStr:String = String.fromCharCode(104,101,108,108,111,32,119,111,114,108,100,33);
// Sets myStr to "hello world!"
Comparing strings
You can use the following operators to compare strings: <, <=, !=, ==, =>, and >. These operators can be used with
conditional statements, such as if and while, as the following example shows:
var str1:String = "Apple";
var str2:String = "apple";
if (str1 < str2)
{
trace("A < a, B < b, C < c, ...");
}
When using these operators with strings, ActionScript considers the character code value of each character in the
string, comparing characters from left to right, as in the following:
trace("A" < "B"); // true
trace("A" < "a"); // true
trace("Ab" < "az"); // true
trace("abc" < "abza"); // true

ADOBE FLEX 3
Developer Guide
134
Use the == and != operators to compare strings with each other and to compare strings with other types of objects,
as the following example shows:
var str1:String = "1";
var str1b:String = "1";
var str2:String = "2";
trace(str1 == str1b); // true
trace(str1 == str2); // false
var total:uint = 1;
trace(str1 == total); // true
Obtaining string representations of other objects
You can obtain a String representation for any kind of object. All objects have a toString() method for this
purpose:
var n:Number = 99.47;
var str:String = n.toString();
// str == "99.47"
When using the + concatenation operator with a combination of String objects and objects that are not strings, you
do not need to use the toString() method. For details on concatenation, see the next section.
The String() global function returns the same value for a given object as the value returned by the object calling
the toString() method.
Concatenating strings
Concatenation of strings means taking two strings and joining them sequentially into one. For example, you can use
the + operator to concatenate two strings:
var str1:String = "green";
var str2:String = "ish";
var str3:String = str1 + str2; // str3 == "greenish"
You can also use the += operator to the produce the same result, as the following example shows:
var str:String = "green";
str += "ish"; // str == "greenish"
Additionally, the String class includes a concat() method, which can be used as follows:
var str1:String = "Bonjour";
var str2:String = "from";
var str3:String = "Paris";
var str4:String = str1.concat(" ", str2, " ", str3);
// str4 == "Bonjour from Paris"
If you use the + operator (or the += operator) with a String object and an object that is not a string, ActionScript
automatically converts the nonstring object to a String object in order to evaluate the expression, as shown in this
example:
var str:String = "Area = ";
var area:Number = Math.PI * Math.pow(3, 2);
str = str + area; // str == "Area = 28.274333882308138"

ADOBE FLEX 3
Developer Guide
135
However, you can use parentheses for grouping to provide context for the + operator, as the following example shows:
trace("Total: $" + 4.55 + 1.45); // output: Total: $4.551.45
trace("Total: $" + (4.55 + 1.45)); // output: Total: $6
Finding substrings and patterns in strings
Substrings are sequential characters within a string. For example, the string "abc" has the following substrings: "",
"a", "ab", "abc", "b", "bc", "c". You can use ActionScript methods to locate substrings of a string.
Patterns are defined in ActionScript by strings or by regular expressions. For example, the following regular
expression defines a specific pattern—the letters A, B, and C followed by a digit character (the forward slashes are
regular expression delimiters):
/ABC\d/
ActionScript includes methods for finding patterns in strings and for replacing found matches with replacement
substrings. These methods are described in the following sections.
Regular expressions can define intricate patterns. For more information, see “Using regular expressions” on
page 188.
Finding a substring by character position
The substr() and substring() methods are similar. Both return a substring of a string. Both take two parameters.
In both methods, the first parameter is the position of the starting character in the given string. However, in the
substr() method, the second parameter is the length of the substring to return, and in the substring() method,
the second parameter is the position of the character at the end of the substring (which is not included in the returned
string). This example shows the difference between these two methods:
var str:String = "Hello from Paris, Texas!!!";
trace(str.substr(11,15)); // output: Paris, Texas!!!
trace(str.substring(11,15)); // output: Pari
The slice() method functions similarly to the substring() method. When given two non-negative integers as
parameters, it works exactly the same. However, the slice() method can take negative integers as parameters, in
which case the character position is taken from the end of the string, as shown in the following example:
var str:String = "Hello from Paris, Texas!!!";
trace(str.slice(11,15)); // output: Pari
trace(str.slice(-3,-1)); // output: !!
trace(str.slice(-3,26)); // output: !!!
trace(str.slice(-3,str.length)); // output: !!!
trace(str.slice(-8,-3)); // output: Texas
You can combine non-negative and negative integers as the parameters of the slice() method.
Finding the character position of a matching substring
You can use the indexOf() and lastIndexOf() methods to locate matching substrings within a string, as the
following example shows:
var str:String = "The moon, the stars, the sea, the land";
trace(str.indexOf("the")); // output: 10
Notice that the indexOf() method is case-sensitive.

ADOBE FLEX 3
Developer Guide
136
You can specify a second parameter to indicate the index position in the string from which to start the search, as
follows:
var str:String = "The moon, the stars, the sea, the land"
trace(str.indexOf("the", 11)); // output: 21
The lastIndexOf() method finds the last occurrence of a substring in the string:
var str:String = "The moon, the stars, the sea, the land"
trace(str.lastIndexOf("the")); // output: 30
If you include a second parameter with the lastIndexOf() method, the search is conducted from that index
position in the string working backward (from right to left):
var str:String = "The moon, the stars, the sea, the land"
trace(str.lastIndexOf("the", 29)); // output: 21
Creating an array of substrings segmented by a delimiter
You can use the split() method to create an array of substrings, which is divided based on a delimiter. For example,
you can segment a comma-delimited or tab-delimited string into multiple strings.
The following example shows how to split an array into substrings with the ampersand (&) character as the delimiter:
var queryStr:String = "first=joe&last=cheng&title=manager&StartDate=3/6/65";
var params:Array = queryStr.split("&", 2); // params == ["first=joe","last=cheng"]
The second parameter of the split() method, which is optional, defines the maximum size of the array that is
returned.
You can also use a regular expression as the delimiter character:
var str:String = "Give me\t5."
var a:Array = str.split(/\s+/); // a == ["Give","me","5."]
For more information, see “Using regular expressions” on page 188 and the ActionScript 3.0 Language and Compo-
nents Reference.
Finding patterns in strings and replacing substrings
The String class includes the following methods for working with patterns in strings:
•Use the match() and search() methods to locate substrings that match a pattern.
•Use the replace() method to find substrings that match a pattern and replace them with a specified substring.
These methods are described in the following sections.
You can use strings or regular expressions to define patterns used in these methods. For more information on regular
expressions, see “Using regular expressions” on page 188.
Finding matching substrings
The search() method returns the index position of the first substring that matches a given pattern, as shown in this
example:
var str:String = "The more the merrier.";
// (This search is case-sensitive.)
trace(str.search("the")); // output: 9
You can also use regular expressions to define the pattern to match, as this example shows:
var pattern:RegExp = /the/i;

ADOBE FLEX 3
Developer Guide
137
var str:String = "The more the merrier.";
trace(str.search(pattern)); // 0
The output of the trace() method is 0, because the first character in the string is index position 0. The i flag is set
in the regular expression, so the search is not case-sensitive.
The search() method finds only one match and returns its starting index position, even if the g (global) flag is set
in the regular expression.
The following example shows a more intricate regular expression, one that matches a string in double quotation
marks:
var pattern:RegExp = /"[^"]*"/;
var str:String = "The \"more\" the merrier.";
trace(str.search(pattern)); // output: 4
str = "The \"more the merrier.";
trace(str.search(pattern)); // output: -1
// (Indicates no match, since there is no closing double quotation mark.)
The match() method works similarly. It searches for a matching substring. However, when you use the global flag
in a regular expression pattern, as in the following example, match() returns an array of matching substrings:
var str:String = "bob@example.com, omar@example.org";
var pattern:RegExp = /\w*@\w*\.[org|com]+/g;
var results:Array = str.match(pattern);
The results array is set to the following:
["bob@example.com","omar@example.org"]
For more information on regular expressions, see “Using regular expressions” on page 188.
Replacing matched substrings
You can use the replace() method to search for a specified pattern in a string and replace matches with the
specified replacement string, as the following example shows:
var str:String = "She sells seashells by the seashore.";
var pattern:RegExp = /sh/gi;
trace(str.replace(pattern, "sch"));
//sche sells seaschells by the seaschore.
Note that in this example, the matched strings are not case-sensitive because the i (ignoreCase) flag is set in the
regular expression, and multiple matches are replaced because the g (global) flag is set. For more information, see
“Using regular expressions” on page 188.
You can include the following $ replacement codes in the replacement string. The replacement text shown in the
following table is inserted in place of the $replacement code:
$ Code Replacement Text
$$ $
$& The matched substring.
$` The portion of the string that precedes the matched substring. This code uses the straight left single quotation mark
character (`), not the straight single quotation mark (') or the left curly single quotation mark (‘).
$' The portion of the string that follows the matched substring. This code uses the straight single quotation mark (’).

ADOBE FLEX 3
Developer Guide
138
For example, the following shows the use of the $2 and $1 replacement codes, which represent the first and second
capturing group matched:
var str:String = "flip-flop";
var pattern:RegExp = /(\w+)-(\w+)/g;
trace(str.replace(pattern, "$2-$1")); // flop-flip
You can also use a function as the second parameter of the replace() method. The matching text is replaced by the
returned value of the function.
var str:String = "Now only $9.95!";
var price:RegExp = /\$([\d,]+.\d+)+/i;
trace(str.replace(price, usdToEuro));
function usdToEuro(matchedSubstring:String, capturedMatch1:String, index:int,
str:String):String
{
var usd:String = capturedMatch1;
usd = usd.replace(",", "");
var exchangeRate:Number = 0.853690;
var euro:Number = usd * exchangeRate;
const euroSymbol:String = String.fromCharCode(8364);
return euro.toFixed(2) + " " + euroSymbol;
}
When you use a function as the second parameter of the replace() method, the following arguments are passed to
the function:
•The matching portion of the string.
•Any capturing parenthetical group matches. The number of arguments passed this way will vary depending on
the number of parenthetical matches. You can determine the number of parenthetical matches by checking
arguments.length - 3 within the function code.
•The index position in the string where the match begins.
•The complete string.
Converting strings between uppercase and lowercase
As the following example shows, the toLowerCase() method and the toUpperCase() method convert alphabetical
characters in the string to lowercase and uppercase, respectively:
var str:String = "Dr. Bob Roberts, #9."
trace(str.toLowerCase()); // dr. bob roberts, #9.
trace(str.toUpperCase()); // DR. BOB ROBERTS, #9.
After these methods are executed, the source string remains unchanged. To transform the source string, use the
following code:
str = str.toUpperCase();
$nThe nth captured parenthetical group match, where n is a single digit, 1-9, and $n is not followed by a decimal digit.
$nn The nnth captured parenthetical group match, where nn is a two-digit decimal number, 01–99. If the nnth capture is
undefined, the replacement text is an empty string.
$ Code Replacement Text

ADOBE FLEX 3
Developer Guide
139
These methods work with extended characters, not simply a–z and A–Z:
var str:String = "José Barça";
trace(str.toUpperCase(), str.toLowerCase()); // JOSÉ BARÇA josé barça
Example: ASCII art
This ASCII Art example shows a number of features of working with the String class in ActionScript 3.0, including
the following:
•The split() method of the String class is used to extract values from a character-delimited string (image infor-
mation in a tab-delimited text file).
•Several string-manipulation techniques, including split(), concatenation, and extracting a portion of the
string using substring() and substr(), are used to capitalize the first letter of each word in the image titles.
•The getCharAt() method is used to get a single character from a string (to determine the ASCII character
corresponding to a grayscale bitmap value).
•String concatenation is used to build up the ASCII art representation of an image one character at a time.
The term ASCII art refers to a text representations of an image, in which a grid of monospaced font characters, such
as Courier New characters, plots the image. The following image shows an example of ASCII art produced by the
application:
The ASCII art version of the graphic is shown on the right.
To get the application files for this sample, see www.adobe.com/go/learn_programmingAS3samples_flash. The
ASCIIArt application files can be found in the folder Samples/AsciiArt. The application consists of the following
files:

ADOBE FLEX 3
Developer Guide
140
Extracting tab-delimited values
This example uses the common practice of storing application data separate from the application itself; that way, if
the data changes (for example, if another image is added or an image’s title changes), there is no need to recreate the
SWF file. In this case, the image metadata, including the image title, the URL of the actual image file, and some values
that are used to manipulate the image, are stored in a text file (the txt/ImageData.txt file in the project). The contents
of the text file are as follows:
FILENAMETITLEWHITE_THRESHHOLDBLACK_THRESHHOLD
FruitBasket.jpgPear, apple, orange, and bananad810
Banana.jpgA picture of a bananaC820
Orange.jpgorangeFF20
Apple.jpgpicture of an apple6E10
The file uses a specific tab-delimited format. The first line (row) is a heading row. The remaining lines contain the
following data for each bitmap to be loaded:
•The filename of the bitmap.
•The display name of the bitmap.
•The white-threshold and black-threshold values for the bitmaps. These are hex values above which and
below which a pixel is to be considered completely white or completely black.
As soon as the application starts, the AsciiArtBuilder class loads and parses the contents of the text file in order to
create the “stack” of images that it will display, using the following code from the AsciiArtBuilder class’s
parseImageInfo() method:
var lines:Array = _imageInfoLoader.data.split("\n");
var numLines:uint = lines.length;
for (var i:uint = 1; i < numLines; i++)
{
var imageInfoRaw:String = lines[i];
...
if (imageInfoRaw.length > 0)
{
// Create a new image info record and add it to the array of image info.
var imageInfo:ImageInfo = new ImageInfo();
File Description
AsciiArtApp.mxml
or
AsciiArtApp.fla
The main application file in Flash (FLA) or Flex (MXML)
com/example/programmingas3/asciiArt/AsciiArtBuilder.as The class that provides the main functionality of the application,
including extracting image metadata from a text file, loading the
images, and managing the image-to-text conversion process.
com/example/programmingas3/asciiArt/BitmapToAsciiCon-
verter.as
A class that provides the parseBitmapData() method for
converting image data into a String version.
com/example/programmingas3/asciiArt/Image.as A class which represents a loaded bitmap image.
com/example/programmingas3/asciiArt/ImageInfo.as A class representing metadata for an ASCII art image (such as title,
image file URL, and so on).
image/ A folder containing images used by the application.
txt/ImageData.txt A tab-delimited text file, containing information on the images to be
loaded by the application.

ADOBE FLEX 3
Developer Guide
141
// Split the current line into values (separated by tab (\t)
// characters) and extract the individual properties:
var imageProperties:Array = imageInfoRaw.split("\t");
imageInfo.fileName = imageProperties[0];
imageInfo.title = normalizeTitle(imageProperties[1]);
imageInfo.whiteThreshold = parseInt(imageProperties[2], 16);
imageInfo.blackThreshold = parseInt(imageProperties[3], 16);
result.push(imageInfo);
}
}
The entire contents of the text file are contained in a single String instance, the _imageInfoLoader.data property.
Using the split() method with the newline character ("\n") as a parameter, the String instance is divided into an
Array (lines) whose elements are the individual lines of the text file. Next, the code uses a loop to work with each
of the lines (except the first, because it contains only headers rather than actual content). Inside the loop, the
split() method is used once again to divide the contents of the single line into a set of values (the Array object
named imageProperties). The parameter used with the split() method in this case is the tab ("\t") character,
because the values in each line are delineated by tab characters.
Using String methods to normalize image titles
One of the design decisions for this application is that all the image titles are displayed using a standard format, with
the first letter of each word capitalized (except for a few words that are commonly not capitalized in English titles).
Rather than assume that the text file contains properly formatted titles, the application formats the titles while they’re
being extracted from the text file.
In the previous code listing, as part of extracting individual image metadata values, the following line of code is used:
imageInfo.title = normalizeTitle(imageProperties[1]);
In that code, the image’s title from the text file is passed through the normalizeTitle() method before it is stored
in the ImageInfo object:
private function normalizeTitle(title:String):String
{
var words:Array = title.split(" ");
var len:uint = words.length;
for (var i:uint; i < len; i++)
{
words[i] = capitalizeFirstLetter(words[i]);
}
return words.join(" ");
}
This method uses the split() method to divide the title into individual words (separated by the space character),
passes each word through the capitalizeFirstLetter() method, and then uses the Array class’s join() method
to combine the words back into a single string again.

ADOBE FLEX 3
Developer Guide
142
As its name suggests, the capitalizeFirstLetter() method actually does the work of capitalizing the first letter
of each word:
/**
* Capitalizes the first letter of a single word, unless it's one of
* a set of words that are normally not capitalized in English.
*/
private function capitalizeFirstLetter(word:String):String
{
switch (word)
{
case "and":
case "the":
case "in":
case "an":
case "or":
case "at":
case "of":
case "a":
// Don't do anything to these words.
break;
default:
// For any other word, capitalize the first character.
var firstLetter:String = word.substr(0, 1);
firstLetter = firstLetter.toUpperCase();
var otherLetters:String = word.substring(1);
word = firstLetter + otherLetters;
}
return word;
}
In English, the initial character of each word in a title is not capitalized if it is one of the following words: “and,” “the,”
“in,” “an,” “or,” “at,” “of,” or “a.” (This is a simplified version of the rules.) To execute this logic, the code first uses a
switch statement to check if the word is one of the words that should not be capitalized. If so, the code simply jumps
out of the switch statement. On the other hand, if the word should be capitalized, that is done in several steps, as
follows:
1The first letter of the word is extracted using substr(0, 1), which extracts a substring starting with the
character at index 0 (the first letter in the string, as indicated by the first parameter 0). The substring will be one
character in length (indicated by the second parameter 1).
2That character is capitalized using the toUpperCase() method.
3The remaining characters of the original word are extracted using substring(1), which extracts a substring
starting at index 1 (the second letter) through the end of the string (indicated by leaving off the second parameter of
the substring() method).
4The final word is created by combining the newly capitalized first letter with the remaining letters using string
concatenation: firstLetter + otherLetters.

ADOBE FLEX 3
Developer Guide
143
Generating the ASCII art text
The BitmapToAsciiConverter class provides the functionality of converting a bitmap image to its ASCII text repre-
sentation. This process is performed by the parseBitmapData() method, which is partially shown here:
var result:String = "";
// Loop through the rows of pixels top to bottom:
for (var y:uint = 0; y < _data.height; y += verticalResolution)
{
// Within each row, loop through pixels left to right:
for (var x:uint = 0; x < _data.width; x += horizontalResolution)
{
...
// Convert the gray value in the 0-255 range to a value
// in the 0-64 range (since that's the number of "shades of
// gray" in the set of available characters):
index = Math.floor(grayVal / 4);
result += palette.charAt(index);
}
result += "\n";
}
return result;
This code first defines a String instance named result that will be used to build up the ASCII art version of the
bitmap image. Next, it loops through individual pixels of the source bitmap image. Using several color-manipulation
techniques (omitted here for brevity), it converts the red, green, and blue color values of an individual pixel to a single
grayscale value (a number from 0 to 255). The code then divides that value by 4 (as shown) to convert it to a value
in the 0-63 scale, which is stored in the variable index. (The 0-63 scale is used because the “palette” of available
ASCII characters used by this application contains 64 values.) The palette of characters is defined as a String instance
in the BitmapToAsciiConverter class:
// The characters are in order from darkest to lightest, so that their
// position (index) in the string corresponds to a relative color value
// (0 = black).
private static const palette:String =
"@#$%&8BMW*mwqpdbkhaoQ0OZXYUJCLtfjzxnuvcr[]{}1()|/?Il!i><+_~-;,. ";
Since the index variable defines which ASCII character in the palette corresponds to the current pixel in the bitmap
image, that character is retrieved from the palette String using the charAt() method. It is then appended to the
result String instance using the concatenation assignment operator (+=). In addition, at the end of each row of
pixels, a newline character is concatenated to the end of the result String, forcing the line to wrap to create a new
row of character “pixels.”

144
Chapter 8: Working with arrays
Arrays allow you to store multiple values in a single data structure. You can use simple indexed arrays that store
values using fixed ordinal integer indexes or complex associative arrays that store values using arbitrary keys. Arrays
can also be multidimensional, containing elements that are themselves arrays. This chapter discusses how to create
and manipulate various types of arrays.
Contents
Basics of arrays . . . . . . . . . . . . . . . . . . . . . . . . . . . . . . . . . . . . . . . . . . . . . . . . . . . . . . . . . . . . . . . . . . . . . . . . . . . . . . . . . . 144
Indexed arrays . . . . . . . . . . . . . . . . . . . . . . . . . . . . . . . . . . . . . . . . . . . . . . . . . . . . . . . . . . . . . . . . . . . . . . . . . . . . . . . . . . . 145
Associative arrays . . . . . . . . . . . . . . . . . . . . . . . . . . . . . . . . . . . . . . . . . . . . . . . . . . . . . . . . . . . . . . . . . . . . . . . . . . . . . . . . 152
Multidimensional arrays . . . . . . . . . . . . . . . . . . . . . . . . . . . . . . . . . . . . . . . . . . . . . . . . . . . . . . . . . . . . . . . . . . . . . . . . . . 155
Cloning arrays . . . . . . . . . . . . . . . . . . . . . . . . . . . . . . . . . . . . . . . . . . . . . . . . . . . . . . . . . . . . . . . . . . . . . . . . . . . . . . . . . . . 156
Advanced topics . . . . . . . . . . . . . . . . . . . . . . . . . . . . . . . . . . . . . . . . . . . . . . . . . . . . . . . . . . . . . . . . . . . . . . . . . . . . . . . . . 157
Example: PlayList . . . . . . . . . . . . . . . . . . . . . . . . . . . . . . . . . . . . . . . . . . . . . . . . . . . . . . . . . . . . . . . . . . . . . . . . . . . . . . . . 161
Basics of arrays
Introduction to working with arrays
Often in programming you’ll need to work with a set of items rather than a single object; for example, in a music
player application, you might want to have a list of songs waiting to be played. You wouldn’t want to have to create a
separate variable for each song on that list—it would be preferable to have all the Song objects together in a bundle,
and be able to work with them as a group.
An array is a programming element that acts as a container for a set of items, such as a list of songs. Most commonly
all the items in an array will be instances of the same class, but that is not a requirement in ActionScript™. The
individual items in an array are known as the array’s elements. You might think of an array as a file drawer for
variables. Variables can be added as elements in the array, which is like putting a folder into the file drawer. Once
several files are in the drawer, you can work with the array as a single variable (like carrying the whole drawer to a
different location); you can work with the variables as a group (like flipping through the folders one by one searching
for a piece of information); or you can access them individually (like opening the drawer and selecting a single
folder).
For example, imagine you’re creating a music player application where a user can select multiple songs and add them
to a playlist. In your ActionScript code, you might have a method named addSongsToPlaylist(), which accepts a
single array as a parameter. No matter how many songs are to be added to the list (a few, a lot, or even only one), you
have to call the addSongsToPlaylist() method only one time, passing it the array containing the Song objects.
Inside the addSongsToPlaylist() method, you can use a loop to go through the array’s elements (the songs) one
by one and actually add them to the playlist.

ADOBE FLEX 3
Developer Guide
145
The most common type of ActionScript array is an indexed array, which is an array where each item is stored in a
numbered slot (known as an index), and items are accessed using the number, like an address. The Array class is used
to represent an indexed array. Indexed arrays work well for most programming needs. A special use of an indexed
array is a multidimensional array, which is an indexed array whose elements are indexed arrays (which in turn
contain other elements). Another type of array is an associative array, which uses a string key instead of a numeric
index to identify individual elements. Finally, for advanced users, ActionScript 3.0 also includes the Dictionary class,
which represents a dictionary—an array that allows you to use any type of object as a key to distinguish between
elements.
Common array tasks
The following common activities for working with arrays are described in this chapter:
•Creating indexed arrays
•Adding and removing array elements
•Sorting array elements
•Extracting portions of an array
•Working with associative arrays and dictionaries
•Working with multidimensional arrays
•Copying array elements
•Creating an array subclass
Important concepts and terms
The following reference list contains important terms that you will encounter in this chapter:
•Array: An object that serves as a container to group multiple objects together.
•Associative array: An array that uses string keys to identify individual elements.
•Dictionary: An array whose items consist of pairs of objects, known as the key and the value. The key is used
instead of a numeric index to identify a single element.
•Element: A single item in an array.
•Index: The numeric “address” used to identify a single element in an indexed array.
•Indexed array: The standard type of array that stores each element in a numbered element, and uses the number
(index) to identify individual elements.
•Key: The string or object used to identify a single element in an associative array or a dictionary.
•Multidimensional array: An array containing items that are arrays rather than single values.
Indexed arrays
Indexed arrays store a series of one or more values organized such that each value can be accessed using an unsigned
integer value. The first index is always the number 0, and the index increments by 1 for each subsequent element
added to the array. As the following code shows, you can create an indexed array by calling the Array class
constructor or by initializing the array with an array literal:

ADOBE FLEX 3
Developer Guide
146
// Use Array constructor.
var myArray:Array = new Array();
myArray.push("one");
myArray.push("two");
myArray.push("three");
trace(myArray); // output: one,two,three
// Use Array literal.
var myArray:Array = ["one", "two", "three"];
trace(myArray); // output: one,two,three
The Array class also contains properties and methods that allow you to modify indexed arrays. These properties and
methods apply almost exclusively to indexed arrays rather than associative arrays.
Indexed arrays use an unsigned 32-bit integer for the index number. The maximum size of an indexed array is 232 -
1 or 4,294,967,295. An attempt to create an array that is larger than the maximum size results in a run-time error.
An array element can hold a value of any data type. ActionScript 3.0 does not support the concept of typed arrays,
which means that you cannot specify that all the elements of an array belong to a specific data type.
This section explains how to create and modify indexed arrays using the Array class, starting with how to create an
array. The methods that modify arrays are grouped into three categories that cover how to insert elements, remove
elements, and sort arrays. Methods in a final group treat an existing array as read-only; these methods merely query
arrays. Rather than modifying an existing array, the query methods all return a new array. The section concludes
with a discussion about extending the Array class.
Creating arrays
The Array constructor function can be used in three ways. First, if you call the constructor with no arguments, you
get an empty array. You can use the length property of the Array class to verify that the array has no elements. For
example, the following code calls the Array constructor with no arguments:
var names:Array = new Array();
trace(names.length); // output: 0
Second, if you use a number as the only parameter to the Array constructor, an array of that length is created, with
each element’s value set to undefined. The argument must be an unsigned integer between the values 0 and
4,294,967,295. For example, the following code calls the Array constructor with a single numeric argument:
var names:Array = new Array(3);
trace(names.length); // output: 3
trace(names[0]); // output: undefined
trace(names[1]); // output: undefined
trace(names[2]); // output: undefined
Third, if you call the constructor and pass a list of elements as parameters, an array is created, with elements corre-
sponding to each of the parameters. The following code passes three arguments to the Array constructor:
var names:Array = new Array("John", "Jane", "David");
trace(names.length); // output: 3
trace(names[0]); // output: John
trace(names[1]); // output: Jane
trace(names[2]); // output: David
You can also create arrays with array literals or object literals. An array literal can be assigned directly to an array
variable, as shown in the following example:
var names:Array = ["John", "Jane", "David"];

ADOBE FLEX 3
Developer Guide
147
Inserting array elements
Three of the Array class methods—push(), unshift(), and splice()—allow you to insert elements into an array.
The push() method appends one or more elements to the end of an array. In other words, the last element inserted
into the array using the push() method will have the highest index number. The unshift() method inserts one or
more elements at the beginning of an array, which is always at index number 0. The splice() method will insert
any number of items at a specified index in the array.
The following example demonstrates all three methods. An array named planets is created to store the names of
the planets in order of proximity to the Sun. First, the push() method is called to add the initial item, Mars. Second,
the unshift() method is called to insert the item that belongs at the front of the array, Mercury. Finally, the
splice() method is called to insert the items Venus and Earth after Mercury, but before Mars. The first argument
sent to splice(), the integer 1, directs the insertion to begin at index 1. The second argument sent to splice(),
the integer 0, indicates that no items should be deleted. Finally, the third and fourth arguments sent to splice(),
Venus and Earth, are the items to be inserted.
var planets:Array = new Array();
planets.push("Mars"); // array contents: Mars
planets.unshift("Mercury"); // array contents: Mercury,Mars
planets.splice(1, 0, "Venus", "Earth");
trace(planets); // array contents: Mercury,Venus,Earth,Mars
The push() and unshift() methods both return an unsigned integer that represents the length of the modified
array. The splice() method returns an empty array when used to insert elements, which may seem strange, but
makes more sense in light of the splice() method’s versatility. You can use the splice() method not only to insert
elements into an array, but also to remove elements from an array. When used to remove elements, the splice()
method returns an array containing the elements removed.
Removing array elements
Three methods of the Array class—pop(), shift(), and splice()—allow you to remove elements from an array.
The pop() method removes an element from the end of the array. In other words, it removes the element at the
highest index number. The shift() method removes an element from the beginning of the array, which means that
it always removes the element at index number 0. The splice() method, which can also be used to insert elements,
removes an arbitrary number of elements starting at the index number specified by the first argument sent to the
method.
The following example uses all three methods to remove elements from an array. An array named oceans is created
to store the names of large bodies of water. Some of the names in the array are lakes rather than oceans, so they need
to be removed.
First, the splice() method is used to remove the items Aral and Superior, and insert the items Atlantic and
Indian. The first argument sent to splice(), the integer 2, indicates that the operation should start with the third
item in the list, which is at index 2. The second argument, 2, indicates that two items should be removed. The
remaining arguments, Atlantic and Indian, are values to be inserted at index 2.
Second, the pop() method is used to remove last element in the array, Huron. And third, the shift() method is
used to remove the first item in the array, Victoria.
var oceans:Array = ["Victoria", "Pacific", "Aral", "Superior", "Indian", "Huron"];
oceans.splice(2, 2, "Arctic", "Atlantic"); // replaces Aral and Superior
oceans.pop(); // removes Huron
oceans.shift(); // removes Victoria
trace(oceans);// output: Pacific,Arctic,Atlantic,Indian

ADOBE FLEX 3
Developer Guide
148
The pop() and shift() methods both return the item that was removed. The data type of the return value is Object
because arrays can hold values of any data type. The splice() method returns an array containing the values
removed. You can change the oceans array example so that the call to splice() assigns the array to a new array
variable, as shown in the following example:
var lakes:Array = oceans.splice(2, 2, "Arctic", "Atlantic");
trace(lakes); // output: Aral,Superior
You may come across code that uses the delete operator on an array element. The delete operator sets the value
of an array element to undefined, but it does not remove the element from the array. For example, the following
code uses the delete operator on the third element in the oceans array, but the length of the array remains 5:
var oceans:Array = ["Arctic", "Pacific", "Victoria", "Indian", "Atlantic"];
delete oceans[2];
trace(oceans);// output: Arctic,Pacific,,Indian,Atlantic
trace(oceans[2]); // output: undefined
trace(oceans.length); // output: 5
You can truncate an array using an array’s length property. If you set the length property of an array to a length
that is less than the current length of the array, the array is truncated, removing any elements stored at index numbers
higher than the new value of length minus 1. For example, if the oceans array were sorted such that all valid entries
were at the beginning of the array, you could use the length property to remove the entries at the end of the array,
as shown in the following code:
var oceans:Array = ["Arctic", "Pacific", "Victoria", "Aral", "Superior"];
oceans.length = 2;
trace(oceans); // output: Arctic,Pacific
Sorting an array
There are three methods—reverse(), sort(), and sortOn()—that allow you to change the order of an array,
either by sorting or reversing the order. All of these methods modify the existing array. The reverse() method
changes the order of the array such that the last element becomes the first element, the penultimate element becomes
the second element, and so on. The sort() method allows you to sort an array in a variety of predefined ways, and
even allows you to create custom sorting algorithms. The sortOn() method allows you to sort an indexed array of
objects that have one or more common properties that can be used as sort keys.
The reverse() method takes no parameters and does not return a value, but allows you to toggle the order of your
array from its current state to the reverse order. The following example reverses the order of the oceans listed in the
oceans array:
var oceans:Array = ["Arctic", "Atlantic", "Indian", "Pacific"];
oceans.reverse();
trace(oceans); // output: Pacific,Indian,Atlantic,Arctic
The sort() method rearranges the elements in an array using the default sort order. The default sort order has the
following characteristics:
•The sort is case-sensitive, which means that uppercase characters precede lowercase characters. For example, the
letter D precedes the letter b.
•The sort is ascending, which means that lower character codes (such as A) precede higher character codes (such
as B).
•The sort places identical values adjacent to each other but in no particular order.
•The sort is string-based, which means that elements are converted to strings before they are compared (for
example, 10 precedes 3 because the string "1" has a lower character code than the string "3" has).

ADOBE FLEX 3
Developer Guide
149
You may find that you need to sort your array without regard to case, or in descending order, or perhaps your array
contains numbers that you want to sort numerically instead of alphabetically. The sort() method has an options
parameter that allows you to alter each characteristic of the default sort order. The options are defined by a set of
static constants in the Array class, as shown in the following list:
•Array.CASEINSENSITIVE: This option makes the sort disregard case. For example, the lowercase letter b
precedes the uppercase letter D.
•Array.DESCENDING: This reverses the default ascending sort. For example, the letter B precedes the letter A.
•Array.UNIQUESORT: This causes the sort to abort if two identical values are found.
•Array.NUMERIC: This causes numerical sorting, so that 3 precedes 10.
The following example highlights some of these options. An array named poets is created that is sorted using several
different options.
var poets:Array = ["Blake", "cummings", "Angelou", "Dante"];
poets.sort(); // default sort
trace(poets); // output: Angelou,Blake,Dante,cummings
poets.sort(Array.CASEINSENSITIVE);
trace(poets); // output: Angelou,Blake,cummings,Dante
poets.sort(Array.DESCENDING);
trace(poets); // output: cummings,Dante,Blake,Angelou
poets.sort(Array.DESCENDING | Array.CASEINSENSITIVE); // use two options
trace(poets); // output: Dante,cummings,Blake,Angelou
You can also write your own custom sort function, which you can pass as a parameter to the sort() method. For
example, if you have a list of names in which each list element contains a person’s full name, but you want to sort the
list by last name, you must use a custom sort function to parse each element and use the last name in the sort
function. The following code shows how this can be done with a custom function that is used as a parameter to the
Array.sort() method:
var names:Array = new Array("John Q. Smith", "Jane Doe", "Mike Jones");
function orderLastName(a, b):int
{
var lastName:RegExp = /\b\S+$/;
var name1 = a.match(lastName);
var name2 = b.match(lastName);
if (name1 < name2)
{
return -1;
}
else if (name1 > name2)
{
return 1;
}
else
{
return 0;
}
}
trace(names); // output: John Q. Smith,Jane Doe,Mike Jones
names.sort(orderLastName);
trace(names); // output: Jane Doe,Mike Jones,John Q. Smith

ADOBE FLEX 3
Developer Guide
150
The custom sort function orderLastName() uses a regular expression to extract the last name from each element
to use for the comparison operation. The function identifier orderLastName is used as the sole parameter when
calling the sort() method on the names array. The sort function accepts two parameters, a and b, because it works
on two array elements at a time. The sort function’s return value indicates how the elements should be sorted:
•A return value of -1 indicates that the first parameter, a, precedes the second parameter, b.
•A return value of 1 indicates that the second parameter, b, precedes the first, a.
•A return value of 0 indicates that the elements have equal sorting precedence.
The sortOn() method is designed for indexed arrays with elements that contain objects. These objects are expected
to have at least one common property that can be used as the sort key. The use of the sortOn() method for arrays
of any other type yields unexpected results.
The following example revises the poets array so that each element is an object instead of a string. Each object holds
both the poet’s last name and year of birth.
var poets:Array = new Array();
poets.push({name:"Angelou", born:"1928"});
poets.push({name:"Blake", born:"1757"});
poets.push({name:"cummings", born:"1894"});
poets.push({name:"Dante", born:"1265"});
poets.push({name:"Wang", born:"701"});
You can use the sortOn() method to sort the array by the born property. The sortOn() method defines two param-
eters, fieldName and options. The fieldName argument must be specified as a string. In the following example,
sortOn() is called with two arguments, "born" and Array.NUMERIC. The Array.NUMERIC argument is used to
ensure that the sort is done numerically instead of alphabetically. This is a good practice even when all the numbers
have the same number of digits because it ensures that the sort will continue to behave as expected if a number with
fewer or more digits is later added to the array.
poets.sortOn("born", Array.NUMERIC);
for (var i:int = 0; i < poets.length; ++i)
{
trace(poets[i].name, poets[i].born);
}
/* output:
Wang 701
Dante 1265
Blake 1757
cummings 1894
Angelou 1928
*/
Generally, the sort() and sortOn() methods modify an array. If you wish to sort an array without modifying the
existing array, pass the Array.RETURNINDEXEDARRAY constant as part of the options parameter. This option directs
the methods to return a new array that reflects the sort and to leave the original array unmodified. The array
returned by the methods is a simple array of index numbers that reflects the new sort order and does not contain any
elements from the original array. For example, to sort the poets array by birth year without modifying the array,
include the Array.RETURNINDEXEDARRAY constant as part of the argument passed for the options parameter.
The following example stores the returned index information in an array named indices and uses the indices
array in conjunction with the unmodified poets array to output the poets in order of birth year:
var indices:Array;
indices = poets.sortOn("born", Array.NUMERIC | Array.RETURNINDEXEDARRAY);
for (var i:int = 0; i < indices.length; ++i)
{

ADOBE FLEX 3
Developer Guide
151
var index:int = indices[i];
trace(poets[index].name, poets[index].born);
}
/* output:
Wang 701
Dante 1265
Blake 1757
cummings 1894
Angelou 1928
*/
Querying an array
The remaining four methods of the Array class—concat(), join(), slice(), toString()—all query the array for
information, but do not modify the array. The concat() and slice() methods both return new arrays, while the
join() and toString() methods both return strings. The concat() method takes a new array or list of elements
as arguments and combines it with the existing array to create a new array. The slice() method has two parameters,
aptly named startIndex and an endIndex, and returns a new array containing a copy of the elements “sliced” from
the existing array. The slice begins with the element at startIndex and ends with the element just before endIndex.
That bears repeating: the element at endIndex is not included in the return value.
The following example uses concat() and slice() to create new arrays using elements of other arrays:
var array1:Array = ["alpha", "beta"];
var array2:Array = array1.concat("gamma", "delta");
trace(array2); // output: alpha,beta,gamma,delta
var array3:Array = array1.concat(array2);
trace(array3); // output: alpha,beta,alpha,beta,gamma,delta
var array4:Array = array3.slice(2,5);
trace(array4); // output: alpha,beta,gamma
You can use the join() and toString() methods to query the array and return its contents as a string. If no param-
eters are used for the join() method, the two methods behave identically—they return a string containing a
comma-delimited list of all elements in the array. The join() method, unlike the toString() method, accepts a
parameter named delimiter, which allows you to choose the symbol to use as a separator between each element in
the returned string.
The following example creates an array called rivers and calls both join() and toString() to return the values
in the array as a string. The toString() method is used to return comma-separated values (riverCSV), while the
join() method is used to return values separated by the + character.
var rivers:Array = ["Nile", "Amazon", "Yangtze", "Mississippi"];
var riverCSV:String = rivers.toString();
trace(riverCSV); // output: Nile,Amazon,Yangtze,Mississippi
var riverPSV:String = rivers.join("+");
trace(riverPSV); // output: Nile+Amazon+Yangtze+Mississippi
One issue to be aware of with the join() method is that any nested arrays are always returned with comma-
separated values, no matter what separator you specify for the main array elements, as the following example shows:
var nested:Array = ["b","c","d"];
var letters:Array = ["a",nested,"e"];
var joined:String = letters.join("+");
trace(joined); // output: a+b,c,d+e

ADOBE FLEX 3
Developer Guide
152
Associative arrays
An associative array, sometimes called a hash or map, uses keys instead of a numeric index to organize stored values.
Each key in an associative array is a unique string that is used to access a stored value. An associative array is an
instance of the Object class, which means that each key corresponds to a property name. Associative arrays are
unordered collections of key and value pairs. Your code should not expect the keys of an associative array to be in a
specific order.
ActionScript 3.0 introduces an advanced type of associative array called a dictionary. Dictionaries, which are
instances of the Dictionary class in the flash.utils package, use keys that can be of any data type but are usually
instances of the Object class. In other words, dictionary keys are not limited to values of type String.
This section describes how to create associative arrays that use strings for keys and how to use the Dictionary class.
Associative arrays with string keys
There are two ways to create associative arrays in ActionScript 3.0. The first way is to use the Object constructor,
which has the advantage of allowing you to initialize your array with an object literal. An instance of the Object class,
also called a generic object, is functionally identical to an associative array. Each property name of the generic object
serves as the key that provides access to a stored value.
The following example creates an associative array named monitorInfo, using an object literal to initialize the array
with two key and value pairs:
var monitorInfo:Object = {type:"Flat Panel", resolution:"1600 x 1200"};
trace(monitorInfo["type"], monitorInfo["resolution"]);
// output: Flat Panel 1600 x 1200
If you do not need to initialize the array at declaration time, you can use the Object constructor to create the array,
as follows:
var monitorInfo:Object = new Object();
After the array is created using either an object literal or the Object class constructor, you can add new values to the
array using either the bracket operator ([]) or the dot operator (.). The following example adds two new values to
monitorArray:
monitorInfo["aspect ratio"] = "16:10"; // bad form, do not use spaces
monitorInfo.colors = "16.7 million";
trace(monitorInfo["aspect ratio"], monitorInfo.colors);
// output: 16:10 16.7 million
Note that the key named aspect ratio contains a space character. This is possible with the bracket operator, but
generates an error if attempted with the dot operator. Using spaces in your key names is not recommended.
The second way to create an associative array is to use the Array constructor (or the constructor of any dynamic
class) and then use either the bracket operator ([]) or the dot operator (.) to add key and value pairs to the array. If
you declare your associative array to be of type Array, you cannot use an object literal to initialize the array. The
following example creates an associative array named monitorInfo using the Array constructor and adds a key
called type and a key called resolution, along with their values:
var monitorInfo:Array = new Array();
monitorInfo["type"] = "Flat Panel";
monitorInfo["resolution"] = "1600 x 1200";
trace(monitorInfo["type"], monitorInfo["resolution"]);
// output: Flat Panel 1600 x 1200

ADOBE FLEX 3
Developer Guide
153
There is no advantage in using the Array constructor to create an associative array. You cannot use the
Array.length property or any of the methods of the Array class with associative arrays, even if you use the Array
constructor or the Array data type. The use of the Array constructor is best left for the creation of indexed arrays.
Associative arrays with object keys
You can use the Dictionary class to create an associative array that uses objects for keys rather than strings. Such
arrays are sometimes called dictionaries, hashes, or maps. For example, consider an application that determines the
location of a Sprite object based on its association with a specific container. You can use a Dictionary object to map
each Sprite object to a container.
The following code creates three instances of the Sprite class that serve as keys for the Dictionary object. Each key is
assigned a value of either GroupA or GroupB. The values can be of any data type, but in this example both GroupA
and GroupB are instances of the Object class. Subsequently, you can access the value associated with each key with
the property access ([]) operator, as shown in the following code:
import flash.display.Sprite;
import flash.utils.Dictionary;
var groupMap:Dictionary = new Dictionary();
// objects to use as keys
var spr1:Sprite = new Sprite();
var spr2:Sprite = new Sprite();
var spr3:Sprite = new Sprite();
// objects to use as values
var groupA:Object = new Object();
var groupB:Object = new Object();
// Create new key-value pairs in dictionary.
groupMap[spr1] = groupA;
groupMap[spr2] = groupB;
groupMap[spr3] = groupB;
if (groupMap[spr1] == groupA)
{
trace("spr1 is in groupA");
}
if (groupMap[spr2] == groupB)
{
trace("spr2 is in groupB");
}
if (groupMap[spr3] == groupB)
{
trace("spr3 is in groupB");
}
Iterating with object keys
You can iterate through the contents of a Dictionary object with either a for..in loop or a for each..in loop. A
for..in loop allows you to iterate based on the keys, whereas a for each..in loop allows you to iterate based on
the values associated with each key.
Use the for..in loop for direct access to the object keys of a Dictionary object. You can also access the values of the
Dictionary object with the property access ([]) operator. The following code uses the previous example of the
groupMap dictionary to show how to iterate through a Dictionary object with the for..in loop:

ADOBE FLEX 3
Developer Guide
154
for (var key:Object in groupMap)
{
trace(key, groupMap[key]);
}
/* output:
[object Sprite] [object Object]
[object Sprite] [object Object]
[object Sprite] [object Object]
*/
Use the for each..in loop for direct access to the values of a Dictionary object. The following code also uses the
groupMap dictionary to show how to iterate through a Dictionary object with the for each..in loop:
for each (var item:Object in groupMap)
{
trace(item);
}
/* output:
[object Object]
[object Object]
[object Object]
*/
Object keys and memory management
Adobe® Flash® Player and Adobe® AIR™ use a garbage collection system to recover memory that is no longer used.
When an object has no references pointing to it, the object becomes eligible for garbage collection, and the memory
is recovered the next time the garbage collection system executes. For example, the following code creates a new
object and assigns a reference to the object to the variable myObject:
var myObject:Object = new Object();
As long as any reference to the object exists, the garbage collection system will not recover the memory that the
object occupies. If the value of myObject is changed such that it points to a different object or is set to the value null,
the memory occupied by the original object becomes eligible for garbage collection, but only if there are no other
references to the original object.
If you use myObject as a key in a Dictionary object, you are creating another reference to the original object. For
example, the following code creates two references to an object—the myObject variable, and the key in the myMap
object:
import flash.utils.Dictionary;
var myObject:Object = new Object();
var myMap:Dictionary = new Dictionary();
myMap[myObject] = "foo";
To make the object referenced by myObject eligible for garbage collection, you must remove all references to it. In
this case, you must change the value of myObject and delete the myObject key from myMap, as shown in the
following code:
myObject = null;
delete myMap[myObject];
Alternatively, you can use the useWeakReference parameter of the Dictionary constructor to make all of the
dictionary keys weak references. The garbage collection system ignores weak references, which means that an object
that has only weak references is eligible for garbage collection. For example, in the following code, you do not need
to delete the myObject key from myMap in order to make the object eligible for garbage collection:

ADOBE FLEX 3
Developer Guide
155
import flash.utils.Dictionary;
var myObject:Object = new Object();
var myMap:Dictionary = new Dictionary(true);
myMap[myObject] = "foo";
myObject = null; // Make object eligible for garbage collection.
Multidimensional arrays
Multidimensional arrays contain other arrays as elements. For example, consider a list of tasks that is stored as an
indexed array of strings:
var tasks:Array = ["wash dishes", "take out trash"];
If you want to store a separate list of tasks for each day of the week, you can create a multidimensional array with one
element for each day of the week. Each element contains an indexed array, similar to the tasks array, that stores the
list of tasks. You can use any combination of indexed or associative arrays in multidimensional arrays. The examples
in the following sections use either two indexed arrays or an associative array of indexed arrays. You might want to
try the other combinations as exercises.
Two indexed arrays
When you use two indexed arrays, you can visualize the result as a table or spreadsheet. The elements of the first
array represent the rows of the table, while the elements of the second array represent the columns.
For example, the following multidimensional array uses two indexed arrays to track task lists for each day of the
week. The first array, masterTaskList, is created using the Array class constructor. Each element of the array repre-
sents a day of the week, with index 0 representing Monday, and index 6 representing Sunday. These elements can be
thought of as the rows in the table. You can create each day’s task list by assigning an array literal to each of the seven
elements that you create in the masterTaskList array. The array literals represent the columns in the table.
var masterTaskList:Array = new Array();
masterTaskList[0] = ["wash dishes", "take out trash"];
masterTaskList[1] = ["wash dishes", "pay bills"];
masterTaskList[2] = ["wash dishes", "dentist", "wash dog"];
masterTaskList[3] = ["wash dishes"];
masterTaskList[4] = ["wash dishes", "clean house"];
masterTaskList[5] = ["wash dishes", "wash car", "pay rent"];
masterTaskList[6] = ["mow lawn", "fix chair"];
You can access individual items on any of the task lists using bracket notation. The first set of brackets represents the
day of the week, and the second set of brackets represents the task list for that day. For example, to retrieve the second
task from Wednesday’s list, first use index 2 for Wednesday, and then use index 1 for the second task in the list.
trace(masterTaskList[2][1]); // output: dentist
To retrieve the first task from Sunday’s list, use index 6 for Sunday and index 0 for the first task on the list.
trace(masterTaskList[6][0]); // output: mow lawn

ADOBE FLEX 3
Developer Guide
156
Associative array with an indexed array
To make the individual arrays easier to access, you can use an associative array for the days of the week and an
indexed array for the task lists. Using an associative array allows you to use dot syntax when referring to a particular
day of the week, but at the cost of extra run-time processing to access each element of the associative array. The
following example uses an associative array as the basis of a task list, with a key and value pair for each day of the
week:
var masterTaskList:Object = new Object();
masterTaskList["Monday"] = ["wash dishes", "take out trash"];
masterTaskList["Tuesday"] = ["wash dishes", "pay bills"];
masterTaskList["Wednesday"] = ["wash dishes", "dentist", "wash dog"];
masterTaskList["Thursday"] = ["wash dishes"];
masterTaskList["Friday"] = ["wash dishes", "clean house"];
masterTaskList["Saturday"] = ["wash dishes", "wash car", "pay rent"];
masterTaskList["Sunday"] = ["mow lawn", "fix chair"];
Dot syntax makes the code more readable by making it possible to avoid multiple sets of brackets.
trace(masterTaskList.Wednesday[1]); // output: dentist
trace(masterTaskList.Sunday[0]);// output: mow lawn
You can iterate through the task list using a for..in loop, but you must use bracket notation instead of dot syntax
to access the value associated with each key. Because masterTaskList is an associative array, the elements are not
necessarily retrieved in the order that you may expect, as the following example shows:
for (var day:String in masterTaskList)
{
trace(day + ": " + masterTaskList[day])
}
/* output:
Sunday: mow lawn,fix chair
Wednesday: wash dishes,dentist,wash dog
Friday: wash dishes,clean house
Thursday: wash dishes
Monday: wash dishes,take out trash
Saturday: wash dishes,wash car,pay rent
Tuesday: wash dishes,pay bills
*/
Cloning arrays
The Array class has no built-in method for making copies of arrays. You can create a shallow copy of an array by
calling either the concat() or slice() methods with no arguments. In a shallow copy, if the original array has
elements that are objects, only the references to the objects are copied rather than the objects themselves. The copy
points to the same objects as the original does. Any changes made to the objects are reflected in both arrays.
In a deep copy, any objects found in the original array are also copied so that the new array does not point to the same
objects as does the original array. Deep copying requires more than one line of code, which usually calls for the
creation of a function. Such a function could be created as a global utility function or as a method of an Array
subclass.
The following example defines a function named clone() that does deep copying. The algorithm is borrowed from
a common Java programming technique. The function creates a deep copy by serializing the array into an instance
of the ByteArray class, and then reading the array back into a new array. This function accepts an object so that it
can be used with both indexed arrays and associative arrays, as shown in the following code:

ADOBE FLEX 3
Developer Guide
157
import flash.utils.ByteArray;
function clone(source:Object):*
{
var myBA:ByteArray = new ByteArray();
myBA.writeObject(source);
myBA.position = 0;
return(myBA.readObject());
}
Advanced topics
Extending the Array class
The Array class is one of the few core classes that is not final, which means that you can create your own subclass of
Array. This section provides an example of how to create a subclass of Array and discusses some of the issues that
can arise during the process.
As mentioned previously, arrays in ActionScript are not typed, but you can create a subclass of Array that accepts
elements of only a specific data type. The example in the following sections defines an Array subclass named
TypedArray that limits its elements to values of the data type specified in the first parameter. The TypedArray class
is presented merely as an example of how to extend the Array class and may not be suitable for production purposes
for several reasons. First, type checking occurs at run time rather than at compile time. Second, when a TypedArray
method encounters a mismatch, the mismatch is ignored and no exception is thrown, although the methods can be
easily modified to throw exceptions. Third, the class cannot prevent the use of the array access operator to insert
values of any type into the array. Fourth, the coding style favors simplicity over performance optimization.
Declaring the subclass
Use the extends keyword to indicate that a class is a subclass of Array. A subclass of Array should use the dynamic
attribute, just as the Array class does. Otherwise, your subclass will not function properly.
The following code shows the definition of the TypedArray class, which contains a constant to hold the data type, a
constructor method, and the four methods that are capable of adding elements to the array. The code for each
method is omitted in this example, but is delineated and explained fully in the sections that follow:
public dynamic class TypedArray extends Array
{
private const dataType:Class;
public function TypedArray(...args) {}
AS3 override function concat(...args):Array {}
AS3 override function push(...args):uint {}
AS3 override function splice(...args) {}
AS3 override function unshift(...args):uint {}
}
The four overridden methods all use the AS3 namespace instead of the public attribute because this example
assumes that the compiler option -as3 is set to true and the compiler option -es is set to false. These are the
default settings for Adobe Flex Builder 2 and for Adobe® Flash® CS3 Professional. For more information, see “The
AS3 namespace” on page 114.

ADOBE FLEX 3
Developer Guide
158
If you are an advanced developer who prefers to use prototype inheritance, you can make two minor changes to the
TypedArray class to make it compile with the compiler option -es set to true. First, remove all occurrences of the
override attribute and replace the AS3 namespace with the public attribute. Second, substitute Array.prototype
for all four occurrences of super.
TypedArray constructor
The subclass constructor poses an interesting challenge because the constructor must accept a list of arguments of
arbitrary length. The challenge is how to pass the arguments on to the superconstructor to create the array. If you
pass the list of arguments as an array, the superconstructor considers it a single argument of type Array and the
resulting array is always 1 element long. The traditional way to handle pass-through argument lists is to use the
Function.apply() method, which takes an array of arguments as its second parameter but converts it to a list of
arguments when executing the function. Unfortunately, the Function.apply() method cannot be used with
constructors.
The only option left is to recreate the logic of the Array constructor in the TypedArray constructor. The following
code shows the algorithm used in the Array class constructor, which you can reuse in your Array subclass
constructor:
public dynamic class Array
{
public function Array(...args)
{
var n:uint = args.length
if (n == 1 && (args[0] is Number))
{
var dlen:Number = args[0];
var ulen:uint = dlen;
if (ulen != dlen)
{
throw new RangeError("Array index is not a 32-bit unsigned integer
("+dlen+")");
}
length = ulen;
}
else
{
length = n;
for (var i:int=0; i < n; i++)
{
this[i] = args[i]
}
}
}
}
The TypedArray constructor shares most of the code from the Array constructor, with only four changes to the code.
First, the parameter list includes a new required parameter of type Class that allows specification of the array’s data
type. Second, the data type passed to the constructor is assigned to the dataType variable. Third, in the else
statement, the value of the length property is assigned after the for loop so that length includes only arguments
that are the proper type. Fourth, the body of the for loop uses the overridden version of the push() method so that
only arguments of the correct data type are added to the array. The following example shows the TypedArray
constructor function:

ADOBE FLEX 3
Developer Guide
159
public dynamic class TypedArray extends Array
{
private var dataType:Class;
public function TypedArray(typeParam:Class, ...args)
{
dataType = typeParam;
var n:uint = args.length
if (n == 1 && (args[0] is Number))
{
var dlen:Number = args[0];
var ulen:uint = dlen
if (ulen != dlen)
{
throw new RangeError("Array index is not a 32-bit unsigned integer
("+dlen+")")
}
length = ulen;
}
else
{
for (var i:int=0; i < n; i++)
{
// type check done in push()
this.push(args[i])
}
length = this.length;
}
}
}
TypedArray overridden methods
The TypedArray class overrides the four methods of the Array class that are capable of adding elements to an array.
In each case, the overridden method adds a type check that prevents the addition of elements that are not the correct
data type. Subsequently, each method calls the superclass version of itself.
The push() method iterates through the list of arguments with a for..in loop and does a type check on each
argument. Any argument that is not the correct type is removed from the args array with the splice() method.
After the for..in loop ends, the args array contains values only of type dataType. The superclass version of
push() is then called with the updated args array, as the following code shows:
AS3 override function push(...args):uint
{
for (var i:* in args)
{
if (!(args[i] is dataType))
{
args.splice(i,1);
}
}
return (super.push.apply(this, args));
}
The concat() method creates a temporary TypedArray named passArgs to store the arguments that pass the type
check. This allows the reuse of the type check code that exists in the push() method. A for..in loop iterates
through the args array, and calls push() on each argument. Because passArgs is typed as TypedArray, the
TypedArray version of push() is executed. The concat() method then calls its own superclass version, as the
following code shows:

ADOBE FLEX 3
Developer Guide
160
AS3 override function concat(...args):Array
{
var passArgs:TypedArray = new TypedArray(dataType);
for (var i:* in args)
{
// type check done in push()
passArgs.push(args[i]);
}
return (super.concat.apply(this, passArgs));
}
The splice() method takes an arbitrary list of arguments, but the first two arguments always refer to an index
number and the number of elements to delete. This is why the overridden splice() method does type checking
only for args array elements in index positions 2 or higher. One point of interest in the code is that there appears to
be a recursive call to splice() inside the for loop, but this is not a recursive call because args is of type Array rather
than TypedArray, which means that the call to args.splice() is a call to the superclass version of the method. After
the for..in loop concludes, the args array contains only values of the correct type in index positions 2 or higher,
and splice() calls its own superclass version, as shown in the following code:
AS3 override function splice(...args):*
{
if (args.length > 2)
{
for (var i:int=2; i< args.length; i++)
{
if (!(args[i] is dataType))
{
args.splice(i,1);
}
}
}
return (super.splice.apply(this, args));
}
The unshift() method, which adds elements to the beginning of an array, also accepts an arbitrary list of
arguments. The overridden unshift() method uses an algorithm very similar to that used by the push() method,
as shown in the following example code:
AS3 override function unshift(...args):uint
{
for (var i:* in args)
{
if (!(args[i] is dataType))
{
args.splice(i,1);
}
}
return (super.unshift.apply(this, args));
}
}

ADOBE FLEX 3
Developer Guide
161
Example: PlayList
The PlayList example demonstrates techniques for working with arrays, in the context of a music playlist application
that manages a list of songs. These techniques are:
•Creating an indexed array
•Adding items to an indexed array
•Sorting an array of objects by different properties, using different sorting options
•Converting an array to a character-delimited string
To get the application files for this sample, see www.adobe.com/go/learn_programmingAS3samples_flash. The
PlayList application files can be found in the Samples/PlayList folder. The application consists of the following files:
PlayList class overview
The PlayList class manages a set of Song objects. It has public methods with functionality for adding a song to the
playlist (the addSong() method) and sorting the songs in the list (the sortList() method). In addition, the class
includes a read-only accessor property, songList, which provides access to the actual set of songs in the playlist.
Internally, the PlayList class keeps track of its songs using a private Array variable:
public class PlayList
{
private var _songs:Array;
private var _currentSort:SortProperty = null;
private var _needToSort:Boolean = false;
...
}
In addition to the _songs Array variable, which is used by the PlayList class to keep track of its list of songs, two
other private variables keep track of whether the list needs to be sorted (_needToSort) and which property the song
list is sorted by at a given time (_currentSort).
As with all objects, declaring an Array instance is only half the job of creating an Array. Before accessing an Array
instance’s properties or methods, it must be instantiated, which is done in the PlayList class’s constructor.
public function PlayList()
{
this._songs = new Array();
// Set the initial sorting.
this.sortList(SortProperty.TITLE);
}
The first line of the constructor instantiates the _songs variable, so that it is ready to be used. In addition, the
sortList() method is called to set the initial sort-by property.
File Description
PlayList.mxml
or
PlayList.fla
The main application file in Flash (FLA) or Flex (MXML).
com/example/programmingas3/playlist/Song.as A value object representing information about a single song. The
items that are managed by the PlayList class are Song instances.
com/example/programmingas3/playlist/SortProperty.as A pseudo-enumeration whose available values represent the proper-
ties of the Song class by which a list of Song objects can be sorted.

ADOBE FLEX 3
Developer Guide
162
Adding a song to the list
When a user enters a new song into the application, the code in the data entry form calls the PlayList class’s
addSong() method.
/**
* Adds a song to the playlist.
*/
public function addSong(song:Song):void
{
this._songs.push(song);
this._needToSort = true;
}
Inside addSong(), the _songs array’s push() method is called, adding the Song object that was passed to
addSong() as a new element in that array. With the push() method, the new element is added to the end of the
array, regardless of any sorting that might have been applied previously. This means that after the push() method
has been called, the list of songs is likely to no longer be sorted correctly, so the _needToSort variable is set to true.
In theory, the sortList() method could be called immediately, removing the need to keep track of whether the list
is sorted or not at a given time. In practice, however, there is no need for the list of songs to be sorted until immedi-
ately before it is retrieved. By deferring the sorting operation, the application doesn’t perform sorting that is unnec-
essary if, for example, several songs are added to the list before it is retrieved.
Sorting the list of songs
Because the Song instances that are managed by the playlist are complex objects, users of the application may wish
to sort the playlist according to different properties, such as song title or year of publication. In the PlayList appli-
cation, the task of sorting the list of songs has three parts: identifying the property by which the list should be sorted,
indicating what sorting options need to be used when sorting by that property, and performing the actual sort
operation.
Properties for sorting
A Song object keeps track of several properties, including song title, artist, publication year, filename, and a user-
selected set of genres in which the song belongs. Of these, only the first three are practical for sorting. As a matter of
convenience for developers, the example includes the SortProperty class, which acts as an enumeration with values
representing the properties available for sorting.
public static const TITLE:SortProperty = new SortProperty("title");
public static const ARTIST:SortProperty = new SortProperty("artist");
public static const YEAR:SortProperty = new SortProperty("year");
The SortProperty class contain three constants, TITLE, ARTIST, and YEAR, each of which stores a String containing
the actual name of the associated Song class property that can be used for sorting. Throughout the rest of the code,
whenever a sort property is indicated, it is done using the enumeration member. For instance, in the PlayList
constructor, the list is sorted initially by calling the sortList() method, as follows:
// Set the initial sorting.
this.sortList(SortProperty.TITLE);
Because the property for sorting is specified as SortProperty.TITLE, the songs are sorted according to their title.
Sorting by property and specifying sort options
The work of actually sorting the list of songs is performed by the PlayList class in the sortList() method, as
follows:

ADOBE FLEX 3
Developer Guide
163
/**
* Sorts the list of songs according to the specified property.
*/
public function sortList(sortProperty:SortProperty):void
{
...
var sortOptions:uint;
switch (sortProperty)
{
case SortProperty.TITLE:
sortOptions = Array.CASEINSENSITIVE;
break;
case SortProperty.ARTIST:
sortOptions = Array.CASEINSENSITIVE;
break;
case SortProperty.YEAR:
sortOptions = Array.NUMERIC;
break;
}
// Perform the actual sorting of the data.
this._songs.sortOn(sortProperty.propertyName, sortOptions);
// Save the current sort property.
this._currentSort = sortProperty;
// Record that the list is sorted.
this._needToSort = false;
}
When sorting by title or artist, it makes sense to sort alphabetically, but when sorting by year, it’s most logical to
perform a numeric sort. The switch statement is used to define the appropriate sorting option, stored in the variable
sortOptions, according to the value specified in the sortProperty parameter. Here again the named enumeration
members are used to distinguish between properties, rather than hard-coded values.
With the sort property and sort options determined, the _songs array is actually sorted by calling its sortOn()
method, passing those two values as parameters. The current sort property is recorded, as is the fact that the song
list is currently sorted.
Combining array elements into a character-delimited string
In addition to using an array to maintain the song list in the PlayList class, in this example arrays are also used in the
Song class to help manage the list of genres to which a given song belongs. Consider this snippet from the Song class’s
definition:
private var _genres:String;
public function Song(title:String, artist:String, year:uint, filename:String, genres:Array)
{
...
// Genres are passed in as an array
// but stored as a semicolon-separated string.
this._genres = genres.join(";");
}

ADOBE FLEX 3
Developer Guide
164
When creating a new Song instance, the genres parameter that is used to specify the genre (or genres) the song
belongs to is defined as an Array instance. This makes it convenient to group multiple genres together into a single
variable that can be passed to the constructor. However, internally the Song class maintains the genres in the private
_genres variable as a semicolon-separated String instance. The Array parameter is converted into a semicolon-
separated string by calling its join() method with the literal string value ";" as the specified delimiter.
By the same token, the genres accessors allow genres to be set or retrieved as an Array:
public function get genres():Array
{
// Genres are stored as a semicolon-separated String,
// so they need to be transformed into an Array to pass them back out.
return this._genres.split(";");
}
public function set genres(value:Array):void
{
// Genres are passed in as an array,
// but stored as a semicolon-separated string.
this._genres = value.join(";");
}
The genres set accessor behaves exactly the same as the constructor; it accepts an Array and calls the join()
method to convert it to a semicolon-separated String. The get accessor performs the opposite operation: the
_genres variable’s split() method is called, splitting the String into an array of values using the specified delimiter
(the literal string value ";" as before).

165
Chapter 9: Handling errors
To “handle” an error means you build logic into your application that responds to, or fixes, an error, generated either
when an application is compiled or when a compiled application is running. When your application handles errors,
something occurs as a response when the error is encountered, as opposed to no response and whatever process
created the error failing silently. Used correctly, error handling helps shield your application and its users from
otherwise unexpected behavior.
However, error handling is a broad category that includes responding to many kinds of errors that are thrown during
compilation or at run time. This chapter focuses on how to handle run-time errors, the different types of errors that
can be generated, and the advantages of the new error-handling system in ActionScript™ 3.0. This chapter also
explains how to implement your own custom error-handling strategies for your applications.
Contents
Basics of error handling . . . . . . . . . . . . . . . . . . . . . . . . . . . . . . . . . . . . . . . . . . . . . . . . . . . . . . . . . . . . . . . . . . . . . . . . . . . 165
Types of errors. . . . . . . . . . . . . . . . . . . . . . . . . . . . . . . . . . . . . . . . . . . . . . . . . . . . . . . . . . . . . . . . . . . . . . . . . . . . . . . . . . . 167
Error handling in ActionScript 3.0. . . . . . . . . . . . . . . . . . . . . . . . . . . . . . . . . . . . . . . . . . . . . . . . . . . . . . . . . . . . . . . . . . 169
Working with the debugger versions of Flash Player and AIR . . . . . . . . . . . . . . . . . . . . . . . . . . . . . . . . . . . . . . . . . . . 170
Handling synchronous errors in an application . . . . . . . . . . . . . . . . . . . . . . . . . . . . . . . . . . . . . . . . . . . . . . . . . . . . . . . 171
Creating custom error classes . . . . . . . . . . . . . . . . . . . . . . . . . . . . . . . . . . . . . . . . . . . . . . . . . . . . . . . . . . . . . . . . . . . . . . 175
Responding to error events and status. . . . . . . . . . . . . . . . . . . . . . . . . . . . . . . . . . . . . . . . . . . . . . . . . . . . . . . . . . . . . . . 175
Comparing the Error classes . . . . . . . . . . . . . . . . . . . . . . . . . . . . . . . . . . . . . . . . . . . . . . . . . . . . . . . . . . . . . . . . . . . . . . . 178
Example: CustomErrors application. . . . . . . . . . . . . . . . . . . . . . . . . . . . . . . . . . . . . . . . . . . . . . . . . . . . . . . . . . . . . . . . . 183
Basics of error handling
Introduction to error handling
A run-time error is something that goes wrong in your ActionScript code that stops the ActionScript content from
running in Adobe® Flash® Player or Adobe® AIR™. To ensure that your ActionScript code runs smoothly for users,
you must write code in your application that handles the error—that fixes it, works around it, or at least lets the user
know that it’s happened. This process is called error handling.
Error handling is a broad category that includes responding to many kinds of errors that are thrown during compi-
lation or at run time. Errors that happen at compile time are often easier to identify—you must fix them in order to
complete the process of creating a SWF file. This chapter doesn’t discuss compile-time errors; for more information
on writing code that doesn’t contain compile-time errors, see “ActionScript language and syntax” on page 33 and
“Object-oriented programming in ActionScript” on page 84. This chapter focuses on run-time errors.
Run-time errors can be more difficult to detect, because in order for them to occur the erroneous code must actually
be run. If a segment of your program has several branches of code, like an if..then..else statement, you must test
every possible condition, with all the possible input values that real users might use, in order to confirm that your
code is error-free.

ADOBE FLEX 3
Developer Guide
166
Run-time errors can be divided into two categories: program errors are mistakes in your ActionScript code, such as
specifying the wrong data type for a method parameter; logical errors are mistakes in the logic (the data checking and
value manipulation) of your program, such as using the wrong formula to calculate interest rates in a banking appli-
cation. Again, both of these types of errors can often be detected and corrected ahead of time by diligently testing
your application.
Ideally, you’ll want to identify and remove all errors from your application before it is released to end users. However,
not all errors can be foreseen or prevented. For example, suppose your ActionScript application loads information
from a particular website that is outside of your control. If at some point that website isn’t available, the part of your
application that depends on that external data won’t behave correctly. The most important aspect of error handling
involves preparing for these unknown cases and handling them gracefully so that users can continue to use your
application, or at least get a friendly error message explaining why it isn’t working.
Run-time errors are represented in two ways in ActionScript:
•Error classes: Many errors have an error class associated with them. When an error occurs, Flash Player or Adobe
AIR creates an instance of the specific error class that is associated with that particular error. Your code can use the
information contained in that error object to make an appropriate response to the error.
•Error events: Sometimes an error occurs when Flash Player or Adobe AIR would normally trigger an event. In
those cases, Flash Player and Adobe AIR trigger an error event instead. Like other events, each error event has a class
associated with it, and Flash Player and Adobe AIR pass an instance of that class to the methods that are subscribed
to the error event.
To determine whether a particular method can trigger an error or error event, see the method’s entry in the Action-
Script 3.0 Language and Components Reference.
Common error-handling tasks
These are common error-related tasks you might need to perform with your code:
•Writing code to handle errors
•Testing for, catching, and re-throwing errors
•Defining your own error class
•Responding to error and status events
Important concepts and terms
The following reference list contains important terms that you will encounter in this chapter:
•Asynchronous: A program command such as a method call that doesn’t provide an immediate result; instead it
gives a result (or error) in the form of an event.
•Catch: When an exception (a run-time error) occurs and your code becomes aware of the exception, that code
is said to catch the exception. Once an exception is caught, Flash Player and Adobe AIR stop notifying other Action-
Script code of the exception.
•Debugger version: A special version of Flash Player or Adobe AIR (ADL) that contains code for notifying users
of run-time errors. In the standard version of Flash Player or Adobe AIR (the one that most users have), errors that
aren’t handled by your ActionScript code are ignored. In the debugger versions (which are included with Adobe
Flash CS3 Professional, Adobe Flex, and Adobe AIR), a warning message appears when an unhandled error happens.
•Exception: An error that happens while a program is running and that the run-time environment (that is, Flash
Player or Adobe AIR) can’t resolve on its own.

ADOBE FLEX 3
Developer Guide
167
•Re-throw: When your code catches an exception, Flash Player and Adobe AIR no longer notify other objects of
the exception. If it’s important for other objects to be notified of the exception, your code must re-throw the exception
to start the notification process again.
•Synchronous: A program command, such as a method call, that provides an immediate result (or immediately
throws an error), meaning the response can be used within the same code block.
•Throw: The act of notifying Flash Player or Adobe AIR (and consequently, notifying other objects and Action-
Script code) that an error has occurred is known as throwing an error.
Types of errors
When you develop and run applications, you encounter different types of errors and error terminology. The
following list introduces the major error types and terms:
•Compile-time errors are raised by the ActionScript compiler during code compilation. Compile-time errors
occur when syntactical problems in your code prevent your application from being built.
•Run-time errors occur when you run your application after you compile it. Run-time errors represent errors that
are caused while a SWF file plays in Adobe Flash Player 9 or Adobe AIR. In most cases, you will be able to handle
run-time errors as they occur, reporting them to the user and taking steps to keep your application running. If the
error is a fatal error, such as not being able to connect to a remote website or load required data, you can use error
handling to allow your application to finish gracefully.
•Synchronous errors are run-time errors that occur at the time a function is invoked—for example, when you try
to use a specific method and the argument you pass to the method is invalid, so Flash Player or Adobe AIR throws
an exception. Most errors occur synchronously—at the time the statement executes—and the flow of control passes
immediately to the most applicable catch statement.
For example, the following code excerpt throws a run-time error because the browse() method is not called
before the program attempts to upload a file:
var fileRef:FileReference = new FileReference();
try
{
fileRef.upload("http://www.yourdomain.com/fileupload.cfm");
}
catch (error:IllegalOperationError)
{
trace(error);
// Error #2037: Functions called in incorrect sequence, or earlier
// call was unsuccessful.
}
In this case, a run-time error is thrown synchronously because Flash Player determined that the browse()
method was not called before the file upload was attempted.
For detailed information on synchronous error handling, see “Handling synchronous errors in an application”
on page 171.

ADOBE FLEX 3
Developer Guide
168
•Asynchronous errors are run-time errors that occur at various points during run time; they generate events and
are caught by event listeners. An asynchronous operation is one in which a function initiates an operation, but
doesn’t wait for it to complete. You can create an error event listener to wait for the application or user to try some
operation, and if the operation fails, you catch the error with an event listener and respond to the error event. Then,
the event listener calls an event handler function to respond to the error event in a useful manner. For example, the
event handler could launch a dialog box that prompts the user to resolve the error.
Consider the file-upload synchronous error example presented earlier. If you successfully call the browse()
method before beginning a file upload, Flash Player would dispatch several events. For example, when an upload
starts, the open event is dispatched. When the file upload operation completes successfully, the complete event
is dispatched. Because event handling is asynchronous (that is, it does not occur at specific, known, predesig-
nated times), you need to use the addEventListener() method to listen for these specific events, as the
following code shows:
var fileRef:FileReference = new FileReference();
fileRef.addEventListener(Event.SELECT, selectHandler);
fileRef.addEventListener(Event.OPEN, openHandler);
fileRef.addEventListener(Event.COMPLETE, completeHandler);
fileRef.browse();
function selectHandler(event:Event):void
{
trace("...select...");
var request:URLRequest = new URLRequest("http://www.yourdomain.com/fileupload.cfm");
request.method = URLRequestMethod.POST;
event.target.upload(request.url);
}
function openHandler(event:Event):void
{
trace("...open...");
}
function completeHandler(event:Event):void
{
trace("...complete...");
}
For detailed information on asynchronous error handling, see “Responding to error events and status” on
page 175.
•Uncaught exceptions are errors thrown with no corresponding logic (like a catch statement) to respond to them.
If your application throws an error, and no appropriate catch statement or event handler can be found at the current
or higher level to handle the error, the error is considered an uncaught exception.
At run time, Flash Player ignores, by design, uncaught errors and tries to continue playing if the error doesn’t
stop the current SWF file, because users can’t necessarily resolve an error themselves. The process of ignoring an
uncaught error is called “failing silently” and can complicate debugging applications. The debugger version of
Flash Player responds to an uncaught error by terminating the current script and displaying the uncaught error
in trace statement output or writing the error message to a log file. If the exception object is an instance of the
Error class or one of its subclasses, the getStackTrace() method is invoked, and the stack trace information
will also be displayed in trace statement output or in a log file. For more information about using the debugger
version of Flash Player, see “Working with the debugger versions of Flash Player and AIR” on page 170.

ADOBE FLEX 3
Developer Guide
169
Error handling in ActionScript 3.0
Since many applications can run without building the logic to handle errors, developers are tempted to postpone
building error handling into their applications. However, without error handling, an application may easily stall or
frustrate the user if something doesn’t work as expected. ActionScript 2.0 has an Error class that allows you to build
logic into custom functions to throw an exception with a specific message. Because error handling is critical for
making a user-friendly application, ActionScript 3.0 includes an expanded architecture for catching errors.
Note: While the ActionScript 3.0 Language and Components Reference documents the exceptions thrown by many
methods, it may not include all possible exceptions for each method. A method may throw an exception for syntax errors
or other problems that are not noted explicitly in the method description, even when the description does list some of the
exceptions a method throws.
ActionScript 3.0 error-handling elements
ActionScript 3.0 includes many tools for error handling, including:
•Error classes. In compliance with the ECMAScript (ECMA-262) edition 4 draft language specification, Action-
Script 3.0 includes a broad range of Error classes to expand the scope of situations that may produce error objects.
Each Error class helps applications handle and respond to specific error conditions, whether they are related to
system errors (like a MemoryError condition), coding errors (like an ArgumentError condition), networking and
communication errors (like a URIError condition), or other situations. For more information on each class, see
“Comparing the Error classes” on page 178.
•Fewer silent failures. In earlier versions of Flash Player, errors were generated and reported only if you explicitly
used the throw statement. For Flash Player 9 and Adobe AIR, native ActionScript methods and properties throw
run-time errors that allow you to handle these exceptions more effectively when they occur, and then individually
react to each exception.
•Clear error messages displayed during debugging. When you are using the debugger version of Flash Player or
Adobe AIR, problematic code or situations will generate robust error messages, which help you easily identify
reasons why a particular block of code fails. This makes fixing errors more efficient. For more information, see
“Working with the debugger versions of Flash Player and AIR” on page 170.
•Precise errors allow for clear error messages displayed to users at run time. In previous versions of Flash Player,
the FileReference.upload() method returned a Boolean value of false if the upload() call was unsuccessful,
indicating one of five possible errors. If an error occurs when you call the upload() method in ActionScript 3.0, you
can throw one of four specific errors, which helps you display more accurate error messages to end users.
•Refined error handling. Distinct errors are thrown for many common situations. For example, in ActionScript
2.0, before a FileReference object has been populated, the name property has the value null (so, before you can use
or display the name property, you need to ensure that the value is set and not null). In ActionScript 3.0, if you
attempt to access the name property before it has been populated, Flash Player or AIR throws an IllegalOperation-
Error, which informs you that the value has not been set, and you can use try..catch..finally blocks to handle
the error. For more information see “Using try..catch..finally statements” on page 171.
•No significant performance drawbacks. Using try..catch..finally blocks to handle errors takes little or no
additional resources compared to previous versions of ActionScript.
•An ErrorEvent class that allows you to build listeners for specific asynchronous error events. For more infor-
mation see “Responding to error events and status” on page 175.

ADOBE FLEX 3
Developer Guide
170
Error-handling strategies
As long as your application doesn’t encounter a problematic condition, it may still run successfully if you don’t build
error-handling logic into your code. However, if you don’t actively handle errors and your application does
encounter a problem, your users will never know why your application fails when it does.
There are different ways you can approach error handling in your application. The following list summarizes the
three major options for handling errors:
•Use try..catch..finally statements. These will catch synchronous errors as they occur. You can nest your
statements into a hierarchy to catch exceptions at various levels of code execution. For more information, see “Using
try..catch..finally statements” on page 171.
•Create your own custom error objects. You can use the Error class to create your own custom error objects to
track specific operations in your application that are not covered by built-in error types. Then you can use
try..catch..finally statements on your custom error objects. For more information see “Creating custom error
classes” on page 175.
•Write event listeners and handlers to respond to error events. By using this strategy, you can create global error
handlers that let you handle similar events without duplicating a lot of code in try..catch..finally blocks. You
are also more likely to catch asynchronous errors using this approach. For more information, see “Responding to
error events and status” on page 175.
Working with the debugger versions of Flash Player
and AIR
Adobe provides developers with special editions of the Flash Player and Adobe AIR to assist debugging efforts. You
obtain a copy of the debugger version of Flash Player when you install Adobe Flash CS3 Professional or Adobe Flex
Builder 2. You also obtain the debugger version of Adobe AIR, which is called ADL, when you install it.
There is a notable difference in how the debugger versions and the release versions of Flash Player and Adobe AIR
indicate errors. The debugger versions shows the error type (such as a generic Error, IOError, or EOFError), error
number, and a human-readable error message. The release versions shows only the error type and error number. For
example, consider the following code:
try
{
tf.text = myByteArray.readBoolean();
}
catch (error:EOFError)
{
tf.text = error.toString();
}
If the readBoolean() method threw an EOFError in the debugger version of Flash Player, the following message
would be displayed in the tf text field: “EOFError: Error #2030: End of file was encountered.”
The same code in a release version of Flash Player or Adobe AIR would display the following text: “EOFError: Error
#2030.”
In order to keep resources and size to a minimum in the release versions, error message strings are not present. You
can look up the error number in the documentation (the appendixes of the ActionScript 3.0 Language and Compo-
nents Reference) to correlate to an error message. Alternatively, you can reproduce the error using the debugger
versions of Flash Player and AIR to see the full message.

ADOBE FLEX 3
Developer Guide
171
Handling synchronous errors in an application
The most common error handling is synchronous error-handling logic, where you insert statements into your code
to catch synchronous errors at run time. This type of error handling lets your application notice and recover from
run-time errors when functions fail. The logic for catching a synchronous error includes try..catch..finally
statements, which literally try an operation, catch any error response from Flash Player or Adobe AIR, and finally
execute some other operation to handle the failed operation.
Using try..catch..finally statements
When you work with synchronous run-time errors, use the try..catch..finally statements to catch errors.
When a run-time error occurs, Flash Player or Adobe AIR throws an exception, which means that it suspends
normal execution and creates a special object of type Error. The Error object is then thrown to the first available
catch block.
The try statement encloses statements that have the potential to create errors. You always use the catch statement
with a try statement. If an error is detected in one of the statements in the try statement block, the catch statements
that are attached to that try statement will execute.
The finally statement encloses statements that will execute whether or not an error occurs in the try block. If there
is no error, the statements within the finally block execute after the try block statements complete. If there is an
error, the appropriate catch statement executes first, followed by the statements in the finally block.
The following code demonstrates the syntax for using the try..catch..finally statements:
try
{
// some code that could throw an error
}
catch (err:Error)
{
// code to react to the error
}
finally
{
// Code that runs whether or not an error was thrown. This code can clean
// up after the error, or take steps to keep the application running.
}
Each catch statement identifies a specific type of exception that it handles. The catch statement can specify only
error classes that are subclasses of the Error class. Each catch statement is checked in order. Only the first catch
statement that matches the type of error thrown will execute. In other words, if you first check the higher-level Error
class and then a subclass of the Error class, only the higher-level Error class will match. The following code illustrates
this point:
try
{
throw new ArgumentError("I am an ArgumentError");
}
catch (error:Error)
{
trace("<Error> " + error.message);
}
catch (error:ArgumentError)
{
trace("<ArgumentError> " + error.message);
}

ADOBE FLEX 3
Developer Guide
172
The previous code displays the following output:
<Error> I am an ArgumentError
In order to correctly catch the ArgumentError, you need to make sure that the most specific error types are listed
first and the more generic error types are listed later, as the following code shows:
try
{
throw new ArgumentError("I am an ArgumentError");
}
catch (error:ArgumentError)
{
trace("<ArgumentError> " + error.message);
}
catch (error:Error)
{
trace("<Error> " + error.message);
}
Several methods and properties in the Flash Player API throw run-time errors if they encounter errors while they
execute. For example, the close() method in the Sound class throws an IOError if the method is unable to close the
audio stream, as demonstrated in the following code:
var mySound:Sound = new Sound();
try
{
mySound.close();
}
catch (error:IOError)
{
// Error #2029: This URLStream object does not have an open stream.
}
As you become more familiar with the ActionScript 3.0 Language and Components Reference, you’ll notice which
methods throw exceptions, as detailed in each method’s description.
The throw statement
Flash Player and Adobe AIR throw exceptions when they encounter errors in your application at run time. In
addition, you can explicitly throw exceptions yourself using the throw statement. When explicitly throwing errors,
Adobe recommends that you throw instances of the Error class or its subclasses. The following code demonstrates a
throw statement that throws an instance of the Error class, MyErr, and eventually calls a function, myFunction(),
to respond after the error is thrown:
var MyError:Error = new Error("Encountered an error with the numUsers value", 99);
var numUsers:uint = 0;
try
{
if (numUsers == 0)
{
trace("numUsers equals 0");
}
}
catch (error:uint)
{
throw MyError; // Catch unsigned integer errors.
}

ADOBE FLEX 3
Developer Guide
173
catch (error:int)
{
throw MyError; // Catch integer errors.
}
catch (error:Number)
{
throw MyError; // Catch number errors.
}
catch (error:*)
{
throw MyError; // Catch any other error.
}
finally
{
myFunction(); // Perform any necessary cleanup here.
}
Notice that the catch statements are ordered so that the most specific data types are listed first. If the catch
statement for the Number data type was listed first, neither the catch statement for the uint data type nor the catch
statement for the int data type would ever get executed.
Note: In the Java programming language, each function that can throw an exception must declare this fact, listing the
exception classes it can throw in a throws clause attached to the function declaration. ActionScript does not require you
to declare the exceptions that can be thrown by a function.
Displaying a simple error message
One of the biggest benefits of the new exception and error event model is that it allows you to tell users when and
why an action has failed. Your part is to write the code to display the message and offer options in response.
The following code shows a simple try..catch statement to display the error in a text field:
package
{
import flash.display.Sprite;
import flash.text.TextField;
public class SimpleError extends Sprite
{
public var employee:XML =
<EmpCode>
<costCenter>1234</costCenter>
<costCenter>1-234</costCenter>
</EmpCode>;
public function SimpleError()
{
try
{
if (employee.costCenter.length() != 1)
{
throw new Error("Error, employee must have exactly one cost center
assigned.");
}
}

ADOBE FLEX 3
Developer Guide
174
catch (error:Error)
{
var errorMessage:TextField = new TextField();
errorMessage.autoSize = TextFieldAutoSize.LEFT;
errorMessage.textColor = 0xFF0000;
errorMessage.text = error.message;
addChild(errorMessage);
}
}
}
}
Using a wider range of error classes and built-in compiler errors, ActionScript 3.0 offers more information than
previous versions of ActionScript about why something has failed. This enables you to build more stable applications
with better error handling.
Rethrowing errors
When you build applications, there are several occasions in which you may need to rethrow an error if you are unable
to handle the error properly. For example, the following code shows a nested try..catch block, which rethrows a
custom ApplicationError if the nested catch block is unable to handle the error:
try
{
try
{
trace("<< try >>");
throw new ArgumentError("some error which will be rethrown");
}
catch (error:ApplicationError)
{
trace("<< catch >> " + error);
trace("<< throw >>");
throw error;
}
catch (error:Error)
{
trace("<< Error >> " + error);
}
}
catch (error:ApplicationError)
{
trace("<< catch >> " + error);
}
The output from the previous snippet would be the following:
<< try >>
<< catch >> ApplicationError: some error which will be rethrown
<< throw >>
<< catch >> ApplicationError: some error which will be rethrown
The nested try block throws a custom ApplicationError error that is caught by the subsequent catch block. This
nested catch block can try to handle the error, and if unsuccessful, throw the ApplicationError object to the
enclosing try..catch block.

ADOBE FLEX 3
Developer Guide
175
Creating custom error classes
You can extend one of the standard Error classes to create your own specialized error classes in ActionScript. There
are a number of reasons to create your own error classes:
•To identify specific errors or groups of errors that are unique to your application.
For example, you may want to take different actions for errors thrown by your own code, in addition to those
trapped by Flash Player or Adobe AIR. You can create a subclass of the Error class to track the new error data
type in try..catch blocks.
•To provide unique error display capabilities for errors generated by your application.
For example, you can create a new toString() method that formats your error messages in a certain way. You
can also define a lookupErrorString() method that takes an error code and retrieves the proper message
based on the user’s language preference.
A specialized error class must extend the core ActionScript Error class. Here is an example of a specialized AppError
class that extends the Error class:
public class AppError extends Error
{
public function AppError(message:String, errorID:int)
{
super(message, errorID);
}
}
The following shows an example of using AppError in your project:
try
{
throw new AppError("Encountered Custom AppError", 29);
}
catch (error:AppError)
{
trace(error.errorID + ": " + error.message)
}
Note: If you want to override the Error.toString() method in your subclass, you need to give it one ...(rest)
parameter. The ECMAScript (ECMA-262) edition 3 language specification defines the Error.toString() method
that way, and ActionScript 3.0 defines it the same way for backward compatibility with that specification. Therefore,
when you override the Error.toString() method, you must match the parameters exactly. You will not want to pass
any parameters to your toString() method at run time, because those parameters are ignored.
Responding to error events and status
One of the most noticeable improvements to error handling in ActionScript 3.0 is the support for error event
handling for responding to asynchronous run-time errors. (For a definition of asynchronous errors, see “Types of
errors” on page 167.)

ADOBE FLEX 3
Developer Guide
176
You can create event listeners and event handlers to respond to the error events. Many classes dispatch error events
the same way they dispatch other events. For example, an instance of the XMLSocket class normally dispatches three
types of events: Event.CLOSE, Event.CONNECT, and DataEvent.DATA. However, when a problem occurs, the
XMLSocket class can dispatch the IOErrorEvent.IOError or the SecurityErrorEvent.SECURITY_ERROR. For
more information about event listeners and event handlers, see “Handling events” on page 227.
Error events fit into one of two categories:
•Error events that extend the ErrorEvent class
The flash.events.ErrorEvent class contains the properties and methods for managing run-time errors related
to networking and communication operations. The AsyncErrorEvent, IOErrorEvent, and SecurityError-
Event classes extend the ErrorEvent class. If you’re using the debugger version of Flash Player or Adobe AIR,
a dialog box will inform you at run-time of any error events without listener functions that the player
encounters.
•Status-based error events
The status-based error events are related to the netStatus and status properties of the networking and
communication classes. If Flash Player or Adobe AIR encounters a problem when reading or writing data,
the value of the netStatus.info.level or status.level properties (depending on the class object you’re
using) is set to the value "error". You respond to this error by checking if the level property contains the
value "error" in your event handler function.
Working with error events
The ErrorEvent class and its subclasses contain error types for handling errors dispatched by Flash Player and Adobe
AIR as they try to read or write data.
The following example uses both a try..catch statement and error event handlers to display any errors detected
while trying to read a local file. You can add more sophisticated handling code to provide a user with options or
otherwise handle the error automatically in the places indicated by the comment “your error-handling code here”:
package
{
import flash.display.Sprite;
import flash.errors.IOError;
import flash.events.IOErrorEvent;
import flash.events.TextEvent;
import flash.media.Sound;
import flash.media.SoundChannel;
import flash.net.URLRequest;
import flash.text.TextField;
import flash.text.TextFieldAutoSize;
public class LinkEventExample extends Sprite
{
private var myMP3:Sound;
public function LinkEventExample()
{
myMP3 = new Sound();
var list:TextField = new TextField();
list.autoSize = TextFieldAutoSize.LEFT;
list.multiline = true;
list.htmlText = "<a href=\"event:track1.mp3\">Track 1</a><br>";
list.htmlText += "<a href=\"event:track2.mp3\">Track 2</a><br>";

ADOBE FLEX 3
Developer Guide
177
addEventListener(TextEvent.LINK, linkHandler);
addChild(list);
}
private function playMP3(mp3:String):void
{
try
{
myMP3.load(new URLRequest(mp3));
myMP3.play();
}
catch (err:Error)
{
trace(err.message);
// your error-handling code here
}
myMP3.addEventListener(IOErrorEvent.IO_ERROR, errorHandler);
}
private function linkHandler(linkEvent:TextEvent):void
{
playMP3(linkEvent.text);
// your error-handling code here
}
private function errorHandler(errorEvent:IOErrorEvent):void
{
trace(errorEvent.text);
// your error-handling code here
}
}
}
Working with status change events
Flash Player and Adobe AIR dynamically change the value of the netStatus.info.level or status.level
properties for the classes that support the level property. The classes that have the netStatus.info.level
property are NetConnection, NetStream, and SharedObject. The classes that have the status.level property are
HTTPStatusEvent, Camera, Microphone, and LocalConnection. You can write a handler function to respond to the
change in level value and track communication errors.
The following example uses a netStatusHandler() function to test the value of the level property. If the level
property indicates that an error has been encountered, the code traces the message “Video stream failed”.
package
{
import flash.display.Sprite;
import flash.events.NetStatusEvent;
import flash.events.SecurityErrorEvent;
import flash.media.Video;
import flash.net.NetConnection;
import flash.net.NetStream;
public class VideoExample extends Sprite
{
private var videoUrl:String = "Video.flv";
private var connection:NetConnection;

ADOBE FLEX 3
Developer Guide
178
private var stream:NetStream;
public function VideoExample()
{
connection = new NetConnection();
connection.addEventListener(NetStatusEvent.NET_STATUS, netStatusHandler);
connection.addEventListener(SecurityErrorEvent.SECURITY_ERROR,
securityErrorHandler);
connection.connect(null);
}
private function netStatusHandler(event:NetStatusEvent):void
{
if (event.info.level == "error")
{
trace("Video stream failed")
}
else
{
connectStream();
}
}
private function securityErrorHandler(event:SecurityErrorEvent):void
{
trace("securityErrorHandler: " + event);
}
private function connectStream():void
{
var stream:NetStream = new NetStream(connection);
var video:Video = new Video();
video.attachNetStream(stream);
stream.play(videoUrl);
addChild(video);
}
}
}
Comparing the Error classes
ActionScript™ provides a number of predefined Error classes. Many of these classes are used by Flash Player and
Adobe AIR, but you can also use the same Error classes in your own code. There are two main types of Error classes
in ActionScript 3.0: ActionScript core Error classes and flash.error package Error classes. The core Error classes are
prescribed by the ECMAScript (ECMA-262) edition 4 draft language specification. The flash.error package contents
are additional classes introduced to aid ActionScript 3.0 application development and debugging.
ECMAScript core Error classes
The ECMAScript core error classes include the Error, EvalError, RangeError, ReferenceError, SyntaxError,
TypeError, and URIError classes. Each of these classes are located in the top-level namespace.

ADOBE FLEX 3
Developer Guide
179
Class name Description Notes
Error The Error class can be used for throwing excep-
tions, and is the base class for the other exception
classes defined in ECMAScript: EvalError,
RangeError, ReferenceError, SyntaxError, TypeError,
and URIError.
The Error class serves as the base class for all run-time errors
thrown by Flash® Player and Adobe® AIR®, and is the recom-
mended base class for any custom error classes.
EvalError An EvalError exception is thrown if any parameters
are passed to the Function class’s constructor or if
user code calls the eval() function.
In ActionScript 3.0, support for the eval() function has
been removed and attempts to use the function cause an
error to be thrown.
Earlier versions of Flash Player used the eval() function to
access variables, properties, objects, or movie clips by name.
RangeError A RangeError exception is thrown if a numeric
value falls outside of an acceptable range.
For example, a RangeError would be thrown by the Timer
class if a delay was either negative or was not finite. A
RangeError could also be thrown if you attempted to add a
display object at an invalid depth.
ReferenceError A ReferenceError exception is thrown when a refer-
ence to an undefined property is attempted on a
sealed (nondynamic) object. Versions of the
ActionScript compiler before ActionScript 3.0 did
not throw an error when access was attempted to a
property that was undefined. However, because
the new ECMAScript specification specifies that an
error should be thrown in this condition, Action-
Script 3.0 throws the ReferenceError exception.
Exceptions for undefined variables point to potential bugs,
helping you improve software quality. However, if you are
not used to having to initialize your variables, this new
ActionScript behavior may require some changes in your
coding habits.

ADOBE FLEX 3
Developer Guide
180
ActionScript core Error classes
In addition to the core ECMAScript Error classes, ActionScript adds several classes of its own for ActionScript-
specific error conditions and error-handling functionality.
Because these classes are ActionScript language extensions to ECMAScript edition 4 draft language specification
that could potentially be interesting additions to the draft specification, they are kept at the top level instead of being
placed in a package like flash.error.
SyntaxError A SyntaxError exception is thrown when a parsing
error occurs in your ActionScript code.
For more information, see Section 15.11.6.4 of the
ECMAScript (ECMA-262) edition 3 (until edition 4 is
available) language specification at www.ecma-
international.org/publications/standards/Ecma-
262.htm, as well as Section 10.3.1 of the ECMAS-
cript for XML (E4X) specification (ECMA-357 edition
2) at www.ecma-international.org/publica-
tions/standards/Ecma-357.htm.
A SyntaxError can be thrown under the following circum-
stances:
•ActionScript throws SyntaxError exceptions when an
invalid regular expression is parsed by the RegExp class.
•ActionScript throws SyntaxError exceptions when
invalid XML is parsed by the XMLDocument class.
TypeError The TypeError exception is thrown when the actual
type of an operand is different from the expected
type.
For more information, see Section 15.11.6.5 of the
ECMAScript specification at www.ecma-interna-
tional.org/publications/standards/Ecma-262.htm,
as well as Section 10.3 of the E4X specification at
www.ecma-international.org/publications/stan-
dards/Ecma-357.htm.
A TypeError can be thrown under the following circum-
stances:
•An actual parameter of a function or method could not
be coerced to the formal parameter type.
•A value is assigned to a variable and cannot be coerced
to the variable’s type.
•The right side of the is or instanceof operator is not
a valid type.
•The super keyword is used illegally.
•A property lookup results in more than one binding, and
is therefore ambiguous.
•A method is invoked on an incompatible object. For
example, a TypeError exception is thrown if a method in
the RegExp class is “grafted” onto a generic object and
then invoked.
URIError The URIError exception is thrown when one of the
global URI handling functions is used in a way that
is incompatible with its definition.
For more information, see Section 15.11.6.6 of the
ECMAScript specification at www.ecma-interna-
tional.org/publications/standards/Ecma-262.htm.
A URIError can be thrown under the following circumstances:
An invalid URI is specified for a Flash Player API function that
expects a valid URI, such as Socket.connect().
Class name Description Notes

ADOBE FLEX 3
Developer Guide
181
flash.error package Error classes
The flash.error package contains Error classes that are considered part of the Flash Player API. In contrast to the
Error classes just described, the flash.error package communicates errors events that are specific to Flash Player or
Adobe AIR.
Class name Description Notes
ArgumentError The ArgumentError class represents an error that
occurs when the parameter values supplied during a
function call do not match the parameters defined
for that function.
Some examples of argument errors include the
following:
•Too few or too many arguments are supplied to a
method.
•An argument was expected to be a member of an
enumeration and was not.
SecurityError The SecurityError exception is thrown when a secu-
rity violation takes place and access is denied.
Some examples of security errors include the following:
•An unauthorized property access or method call is
made across a security sandbox boundary.
•An attempt was made to access a URL not
permitted by the security sandbox.
•A socket connection was attempted to an unau-
thorized port number—for example, a port below
1024—without a policy file present.
•An attempt was made to access the user's camera
or microphone, and the request to access the device
was denied by the user.
VerifyError A VerifyError exception is thrown when a malformed
or corrupted SWF file is encountered.
When a SWF file loads another SWF file, the parent SWF
can catch a VerifyError generated by the loaded SWF.

ADOBE FLEX 3
Developer Guide
182
Class name Description Notes
EOFError An EOFError exception is thrown when you
attempt to read past the end of the available
data.
For example, an EOFError is thrown when one of the
read methods in the IDataInput interface is called
and there is insufficient data to satisfy the read
request.
IllegalOperationError An IllegalOperationError exception is thrown
when a method is not implemented or the
implementation doesn't cover the current
usage.
Examples of illegal operation error exceptions
include the following:
•A base class, such as DisplayObjectContainer,
provides more functionality than the Stage can
support. For example, if you attempt to get or set
a mask on the Stage (using stage.mask), Flash
Player and Adobe AIR will throw an IllegalOpera-
tionError with the message “The Stage class does
not implement this property or method.”
•A subclass inherits a method it does not require
and does not want to support.
•Certain accessibility methods are called when
Flash Player is compiled without accessibility
support.
•Authoring-only features are invoked from a
run-time version of Flash Player.
•You attempt to set the name of an object
placed on the timeline.
IOError An IOError exception is thrown when some type
of I/O exception occurs.
You get this error, for example, when a read-write
operation is attempted on a socket that is not
connected or that has become disconnected.
MemoryError A MemoryError exception is thrown when a
memory allocation request fails.
By default, ActionScript Virtual Machine 2 does not
impose a limit on how much memory an Action-
Script program may allocate. On a desktop PC,
memory allocation failures are infrequent. You see
an error thrown when the system is unable to allo-
cate the memory required for an operation. So, on a
desktop PC, this exception is rare unless an alloca-
tion request is extremely large; for example, a
request for 3 billion bytes is impossible because a
32-bit Microsoft® Windows® program can access
only 2 GB of address space.
ScriptTimeoutError A ScriptTimeoutError exception is thrown when
a script timeout interval of 15 seconds is
reached. By catching a ScriptTimeoutError
exception, you can handle the script timeout
more gracefully. If there is no exception handler,
the uncaught exception handler will display a
dialog box with an error message.
To prevent a malicious developer from catching the
exception and staying in an infinite loop, only the
first ScriptTimeoutError exception thrown in the
course of a particular script can be caught. A subse-
quent ScriptTimeoutError exception cannot be
caught by your code and will immediately go to the
uncaught exception handler.
StackOverflowError The StackOverflowError exception is thrown
when the stack available to the script has been
exhausted.
A StackOverflowError exception might indicate that
infinite recursion has occurred.

ADOBE FLEX 3
Developer Guide
183
Example: CustomErrors application
The CustomErrors application demonstrates techniques for working with custom errors when building an appli-
cation. These techniques are:
•Validating an XML packet
•Writing a custom error
•Throwing custom errors
•Notifying users when an error is thrown
To get the application files for this sample, see www.adobe.com/go/learn_programmingAS3samples_flash. The
CustomErrors application files can be found in the Samples/CustomError folder. The application consists of the
following files:
CustomErrors application overview
When the application loads, the initApp() method is called in Flex or the timeline (non-function) code is executed
in Flash. This code defines a sample XML packet that will be verified by the Validator class. The following code is
run:
employeeXML =
<employee id="12345">
<firstName>John</firstName>
<lastName>Doe</lastName>
<costCenter>12345</costCenter>
<costCenter>67890</costCenter>
</employee>;
}
The XML packet is later displayed in a TextArea component instance on the Stage. This allows you to modify the
XML packet before attempting to revalidate it.
When the user clicks the Validate button, the validateData() method is called. This method validates the
employee XML packet using the validateEmployeeXML() method in the Validator class. The following code shows
the validateData() method:
File Description
CustomErrors.mxml
or
CustomErrors.fla
The main application file in Flash (FLA) or Flex (MXML)
com/example/programmingas3/errors/ApplicationError.as A class that serves as the base error class for both the FatalError and
WarningError classes.
com/example/programmingas3/errors/FatalError.as A class that defines a FatalError error that can be thrown by the appli-
cation. This class extends the custom ApplicationError class.
com/example/programmingas3/errors/Validator.as A class that defines a single method that validates a user-supplied
employee XML packet.
com/example/programmingas3/errors/WarningError.as A class that defines a WarningError error that can be thrown by the
application. This class extends the custom ApplicationError class.

ADOBE FLEX 3
Developer Guide
184
function validateData():void
{
try
{
var tempXML:XML = XML(xmlText.text);
Validator.validateEmployeeXML(tempXML);
status.text = "The XML was successfully validated.";
}
catch (error:FatalError)
{
showFatalError(error);
}
catch (error:WarningError)
{
showWarningError(error);
}
catch (error:Error)
{
showGenericError(error);
}
}
First, a temporary XML object is created using the contents of the TextArea component instance xmlText. Next, the
validateEmployeeXML() method in the custom Validator class
(com.example.programmingas3/errors/Validator.as) is invoked and passes the temporary XML object as a
parameter. If the XML packet is valid, the status Label component instance displays a success message and the
application exits. If the validateEmployeeXML() method throws a custom error (that is, a FatalError,
WarningError, or a generic Error occurs), the appropriate catch statement executes and calls either the
showFatalError(), showWarningError(), or showGenericError() methods. Each of these methods displays an
appropriate message in a text area named statusText to notify the user of the specific error that occurred. Each
method also updates the status Label component instance with a specific message.
If a fatal error occurs during an attempt to validate the employee XML packet, the error message is displayed in the
statusText text area, and the xmlText TextArea component instance and validateBtn Button component
instance are disabled, as the following code shows:
function showFatalError(error:FatalError):void
{
var message:String = error.message + "\n\n";
var title:String = error.getTitle();
statusText.text = message + " " + title + "\n\nThis application has ended.";
this.xmlText.enabled = false;
this.validateBtn.enabled = false;
hideButtons();
}
If a warning error instead of a fatal error occurs, the error message is displayed in the statusText Tex tAre a instanc e,
but the xmlText TextField and Button component instances aren’t disabled. The showWarningError() method
displays the custom error message in the statusText text area. The message also asks the user to decide if they want
to proceed with validating the XML or abort the script. The following excerpt shows the showWarningError()
method:
function showWarningError(error:WarningError):void
{
var message:String = error.message + "\n\n" + "Do you want to exit this application?";
showButtons();
var title:String = error.getTitle();
statusText.text = message;
}

ADOBE FLEX 3
Developer Guide
185
When the user clicks either the Yes or No button, the closeHandler() method is invoked. The following excerpt
shows the closeHandler() method:
function closeHandler(event:CloseEvent):void
{
switch (event.detail)
{
case yesButton:
showFatalError(new FatalError(9999));
break;
case noButton:
statusText.text = "";
hideButtons();
break;
}
}
If the user chooses to abort the script by clicking Yes, a FatalError is thrown, causing the application to terminate.
Building a custom validator
The custom Validator class contains a single method, validateEmployeeXML(). The validateEmployeeXML()
method takes a single argument, employee, which is the XML packet that you wish to validate. The
validateEmployeeXML() method is as follows:
public static function validateEmployeeXML(employee:XML):void
{
// checks for the integrity of items in the XML
if (employee.costCenter.length() < 1)
{
throw new FatalError(9000);
}
if (employee.costCenter.length() > 1)
{
throw new WarningError(9001);
}
if (employee.ssn.length() != 1)
{
throw new FatalError(9002);
}
}
To be validated, an employee must belong to one (and only one) cost center. If the employee doesn’t belong to any
cost centers, the method throws a FatalError, which bubbles up to the validateData() method in the main appli-
cation file. If the employee belongs to more than one cost center, a WarningError is thrown. The final check in the
XML validator is that the user has exactly one social security number defined (the ssn node in the XML packet). If
there is not exactly one ssn node, a FatalError error is thrown.
You can add additional checks to the validateEmployeeXML() method—for instance, to ensure that the ssn node
contains a valid number, or that the employee has at least one phone number and e-mail address defined, and that
both values are valid. You can also modify the XML so that each employee has a unique ID and specifies the ID of
their manager.

ADOBE FLEX 3
Developer Guide
186
Defining the ApplicationError class
The ApplicationError class serves as the base class for both the FatalError and WarningError classes. The Applica-
tionError class extends the Error class, and defines its own custom methods and properties, including defining an
error ID, severity, and an XML object that contains the custom error codes and messages. This class also defines two
static constants that are used to define the severity of each error type.
The ApplicationError class’s constructor method is as follows:
public function ApplicationError()
{
messages =
<errors>
<error code="9000">
<![CDATA[Employee must be assigned to a cost center.]]>
</error>
<error code="9001">
<![CDATA[Employee must be assigned to only one cost center.]]>
</error>
<error code="9002">
<![CDATA[Employee must have one and only one SSN.]]>
</error>
<error code="9999">
<![CDATA[The application has been stopped.]]>
</error>
</errors>;
}
Each error node in the XML object contains a unique numeric code and an error message. Error messages can be
easily looked up by their error code using E4X, as seen in the following getMessageText() method:
public function getMessageText(id:int):String
{
var message:XMLList = messages.error.(@code == id);
return message[0].text();
}
The getMessageText() method takes a single integer argument, id, and returns a string. The id argument is the
error code for the error to look up. For example, passing an id of 9001 retrieves the error saying that employees must
be assigned to only one cost center. If more than one error has the same error code, ActionScript™ returns the error
message only for the first result found (message[0] in the returned XMLList object).
The next method in this class, getTitle(), doesn’t take any parameters and returns a string value that contains the
error ID for this specific error. This value is used to help you easily identify the exact error that occurred during
validation of the XML packet. The following excerpt shows the getTitle() method:
public function getTitle():String
{
return "Error #" + id;
}
The final method in the ApplicationError class is toString(). This method overrides the function defined in the
Error class so that you can customize the presentation of the error message. The method returns a string that
identifies the specific error number and message that occurred.
public override function toString():String
{
return "[APPLICATION ERROR #" + id + "] " + message;
}

ADOBE FLEX 3
Developer Guide
187
Defining the FatalError class
The FatalError class extends the custom ApplicationError class and defines three methods: the FatalError
constructor, getTitle(), and toString(). The first method, the FatalError constructor, takes a single integer
argument, errorID, and sets the error’s severity using the static constant values defined in the ApplicationError
class, and gets the specific error’s error message by calling the getMessageText() method in the ApplicationError
class. The FatalError constructor is as follows:
public function FatalError(errorID:int)
{
id = errorID;
severity = ApplicationError.FATAL;
message = getMessageText(errorID);
}
The next method in the FatalError class, getTitle(), overrides the getTitle() method defined earlier in the
ApplicationError class, and appends the text “-- FATAL” in the title to inform the user that a fatal error has occurred.
The getTitle() method is as follows:
public override function getTitle():String
{
return "Error #" + id + " -- FATAL";
}
The final method in this class, toString(), overrides the toString() method defined in the ApplicationError
class. The toString() method is
public override function toString():String
{
return "[FATAL ERROR #" + id + "] " + message;
}
Defining the WarningError class
The WarningError class extends the ApplicationError class and is nearly identical to the FatalError class, except for
a couple minor string changes and sets the error severity to ApplicationError.WARNING instead of Application-
Error.FATAL, as seen in the following code:
public function WarningError(errorID:int)
{
id = errorID;
severity = ApplicationError.WARNING;
message = super.getMessageText(errorID);
}

188
Chapter 10: Using regular expressions
A regular expression describes a pattern that is used to find and manipulate matching text in strings. Regular expres-
sions resemble strings, but they can include special codes to describe patterns and repetition. For example, the
following regular expression matches a string that starts with the character A followed by one or more sequential
digits:
/A\d+/
This chapter describes the basic syntax for constructing regular expressions. However, regular expressions can have
many complexities and nuances. You can find detailed resources on regular expressions on the web and in
bookstores. Keep in mind that different programming environments implement regular expressions in different
ways. ActionScript™ 3.0 implements regular expressions as defined in the ECMAScript edition 3 language specifi-
cation (ECMA-262).
Contents
Basics of regular expressions . . . . . . . . . . . . . . . . . . . . . . . . . . . . . . . . . . . . . . . . . . . . . . . . . . . . . . . . . . . . . . . . . . . . . . . 188
Regular expression syntax . . . . . . . . . . . . . . . . . . . . . . . . . . . . . . . . . . . . . . . . . . . . . . . . . . . . . . . . . . . . . . . . . . . . . . . . . 189
Methods for using regular expressions with strings. . . . . . . . . . . . . . . . . . . . . . . . . . . . . . . . . . . . . . . . . . . . . . . . . . . . 202
Example: A Wiki parser . . . . . . . . . . . . . . . . . . . . . . . . . . . . . . . . . . . . . . . . . . . . . . . . . . . . . . . . . . . . . . . . . . . . . . . . . . . 203
Basics of regular expressions
Introduction to using regular expressions
A regular expression describes a pattern of characters. Regular expressions are typically used to verify that a text
value conforms to a particular pattern (such as verifying that a user-entered phone number has the proper number
of digits) or to replace portions of a text value that matches a particular pattern.
Regular expressions can be simple. For example, suppose you wanted to confirm that a particular string matches
“ABC,” or wanted to replace every occurrence of “ABC” in a string with some other text. In that case, you could use
the following regular expression, which defines the pattern consisting of the letters A, B, and C in sequence:
/ABC/
Note that the regular expression literal is delineated with the forward slash (/) character.
Regular expression patterns can also be complex, and sometimes cryptic in appearance, such as the following
expression to match a valid e-mail address:
/([0-9a-zA-Z]+[-._+&])*[0-9a-zA-Z]+@([-0-9a-zA-Z]+[.])+[a-zA-Z]{2,6}/
Most commonly you will use regular expressions to search for patterns in strings and to replace characters. In those
cases, you will create a regular expression object and use it as a parameter for one of several String class methods.
The following methods of the String class take regular expressions as parameters: match(), replace(), search(),
and split(). For more information on these methods, see “Finding patterns in strings and replacing substrings” on
page 136.
The RegExp class includes the following methods: test() and exec(). For more information, see “Methods for
using regular expressions with strings” on page 202.

ADOBE FLEX 3
Developer Guide
189
Common regular expression tasks
There are several common uses for regular expressions, which are described in detail in this chapter:
•Creating a regular expression pattern
•Using special characters in patterns
•Identifying sequences of multiple characters (such as “a two-digit number” or “between seven and ten letters”)
•Identifying any character in a range of letters or numbers (such as “any letter from a to m”)
•Identifying a character in a set of possible characters
•Identifying subsequences (segments within a pattern)
•Matching and replacing text based on patterns
Important concepts and terms
The following reference list contains important terms used in this chapter:
•Escape character: A character indicating that the character that follows should be treated as a metacharacter
rather than a literal character. In regular expression syntax, the backslash character (\) is the escape character, so a
backslash followed by another character is a special code rather than just the character itself.
•Flag: A character that specifies some option about how the regular expression pattern should be used, such as
whether to distinguish between uppercase and lowercase characters.
•Metacharacter: A character that has special meaning in a regular expression pattern, as opposed to literally repre-
senting that character in the pattern.
•Quantifier: A character (or several characters) indicating how many times a part of the pattern should repeat.
For example, a quantifier would be used to designate that a United States postal code should contain five or nine
numbers.
•Regular expression: A program statement defining a pattern of characters that can be used to confirm whether
other strings match that pattern or to replace portions of a string.
Regular expression syntax
This section describes all of the elements of ActionScript regular expression syntax. As you’ll see, regular expressions
can have many complexities and nuances. You can find detailed resources on regular expressions on the web and in
bookstores. Keep in mind that different programming environments implement regular expressions in different
ways. ActionScript 3.0 implements regular expressions as defined in the ECMAScript edition 3 language specifi-
cation (ECMA-262).
Generally, you use regular expressions that match more complicated patterns than a simple string of characters. For
example, the following regular expression defines the pattern consisting of the letters A, B, and C in sequence
followed by any digit:
/ABC\d/
The \d code represents “any digit.” The backslash (\) character is called the escape character, and combined with the
character that follows it (in this case the letter d), it has special meaning in the regular expression. This chapter
describes these escape character sequences and other regular expression syntax features.

ADOBE FLEX 3
Developer Guide
190
The following regular expression defines the pattern of the letters ABC followed by any number of digits (note the
asterisk):
/ABC\d*/
The asterisk character (*) is a metacharacter. A metacharacter is a character that has special meaning in regular
expressions. The asterisk is a specific type of metacharacter called a quantifier, which is used to quantify the amount
of repetition of a character or group of characters. For more information, see “Quantifiers” on page 195.
In addition to its pattern, a regular expression can contain flags, which specify how the regular expression is to be
matched. For example, the following regular expression uses the i flag, which specifies that the regular expression
ignores case sensitivity in matching strings:
/ABC\d*/i
For more information, see “Flags and properties” on page 199.
You can use regular expressions with the following methods of the String class: match(), replace(), and search().
For more information on these methods, see “Finding patterns in strings and replacing substrings” on page 136.
Creating an instance of a regular expression
There are two ways to create a regular expression instance. One way uses forward slash characters (/) to delineate
the regular expression; the other uses the new constructor. For example, the following regular expressions are equiv-
alent:
var pattern1:RegExp = /bob/i;
var pattern2:RegExp = new RegExp("bob", "i");
Forward slashes delineate a regular expression literal in the same way as quotation marks delineate a string literal.
The part of the regular expression within the forward slashes defines the pattern. The regular expression can also
include flags after the final delineating slash. These flags are considered to be part of the regular expression, but they
are separate from its pattern.
When using the new constructor, you use two strings to define the regular expression. The first string defines the
pattern, and the second string defines the flags, as in the following example:
var pattern2:RegExp = new RegExp("bob", "i");
When including a forward slash within a regular expression that is defined by using the forward slash delineators,
you must precede the forward slash with the backslash (\) escape character. For example, the following regular
expression matches the pattern 1/2:
var pattern:RegExp = /1\/2/;
To include quotation marks within a regular expression that is defined with the new constructor, you must add
backslash (\) escape character before the quotation marks (just as you would when defining any String literal). For
example, the following regular expressions match the pattern eat at "joe's":
var pattern1:RegExp = new RegExp("eat at \"joe's\"", "");
var pattern2:RegExp = new RegExp('eat at "joe\'s"', "");
Do not use the backslash escape character with quotation marks in regular expressions that are defined by using the
forward slash delineators. Similarly, do not use the escape character with forward slashes in regular expressions that
are defined with the new constructor. The following regular expressions are equivalent, and they define the pattern
1/2 "joe's":

ADOBE FLEX 3
Developer Guide
191
var pattern1:RegExp = /1\/2 "joe's"/;
var pattern2:RegExp = new RegExp("1/2 \"joe's\"", "");
var pattern3:RegExp = new RegExp('1/2 "joe\'s"', '');
Also, in a regular expression that is defined with the new constructor, to use a metasequence that begins with the
backslash (\) character, such as \d (which matches any digit), type the backslash character twice:
var pattern:RegExp = new RegExp("\\d+", ""); // matches one or more digits
You must type the backlash character twice in this case, because the first parameter of the RegExp() constructor
method is a string, and in a string literal you must type a backslash character twice to have it recognized as a single
backslash character.
The sections that follow describe syntax for defining regular expression patterns.
For more information on flags, see “Flags and properties” on page 199.
Characters, metacharacters, and metasequences
The simplest regular expression is one that matches a sequence of characters, as in the following example:
var pattern:RegExp = /hello/;
However, the following characters, known as metacharacters, have special meanings in regular expressions:
^ $ \ . * + ? ( ) [ ] { } |
For example, the following regular expression matches the letter A followed by zero or more instances of the letter B
(the asterisk metacharacter indicates this repetition), followed by the letter C:
/AB*C/
To include a metacharacter without its special meaning in a regular expression pattern, you must use the backslash
(\) escape character. For example, the following regular expression matches the letter A followed by the letter B,
followed by an asterisk, followed by the letter C:
var pattern:RegExp = /AB\*C/;
A metasequence, like a metacharacter, has special meaning in a regular expression. A metasequence is made up of
more than one character. The following sections provide details on using metacharacters and metasequences.
About metacharacters
The following table summarizes the metacharacters that you can use in regular expressions:
Metacharacter Description
^ (caret) Matches at the start of the string. With the m (multiline) flag set, the caret matches the start of a line as well
(see “The m (multiline) flag” on page 200). Note that when used at the start of a character class, the caret indi-
cates negation, not the start of a string. For more information, see“Character classes” on page 193.
$ (dollar sign) Matches at the end of the string. With the m (multiline) flag set, $ matches the position before a newline
(\n) character as well. For more information, see “The m (multiline) flag” on page 200.
\ (backslash) Escapes the special metacharacter meaning of special characters.
Also, use the backslash character if you want to use a forward slash character in a regular expression literal, as
in /1\/2/ (to match the character 1, followed by the forward slash character, followed by the character 2).
. (dot) Matches any single character.
A dot matches a newline character (\n) only if the s (dotall) flag is set. For more information, see “The s
(dotall) flag” on page 200.

ADOBE FLEX 3
Developer Guide
192
About metasequences
Metasequences are sequences of characters that have special meaning in a regular expression pattern. The following
table describes these metasequences:
* (star) Matches the previous item repeated zero or more times.
For more information, see “Quantifiers” on page 195.
+ (plus) Matches the previous item repeated one or more times.
For more information, see “Quantifiers” on page 195.
? (question mark) Matches the previous item repeated zero times or one time.
For more information, see “Quantifiers” on page 195.
( and ) Defines groups within the regular expression. Use groups for the following:
•To confine the scope of the | alternator: /(a|b|c)d/
•To define the scope of a quantifier: /(walla.){1,2}/
•In backreferences. For example, the \1 in the following regular expression matches whatever matched
the first parenthetical group of the pattern:
/(\w*) is repeated: \1/
For more information, see “Groups” on page 196.
[ and ] Defines a character class, which defines possible matches for a single character:
/[aeiou]/ matches any one of the specified characters.
Within character classes, use the hyphen (-) to designate a range of characters:
/[A-Z0-9]/ matches uppercase A through Z or 0 through 9.
Within character classes, insert a backslash to escape the ] and
- characters:
/[+\-]\d+/ matches either + or - before one or more digits.
Within character classes, other characters, which are normally metacharacters, are treated as normal charac-
ters (not metacharacters), without the need for a backslash:
/[$£]/ matches either $ or £.
For more information, see “Character classes” on page 193.
| (pipe) Used for alternation, to match either the part on the left side or the part on the right side:
/abc|xyz/ matches either abc or xyz.
Metacharacter Description

ADOBE FLEX 3
Developer Guide
193
Character classes
You use character classes to specify a list of characters to match one position in the regular expression. You define
character classes with square brackets ( [ and ] ). For example, the following regular expression defines a character
class that matches bag, beg, big, bog, or bug:
/b[aeiou]g/
Escape sequences in character classes
Most metacharacters and metasequences that normally have special meanings in a regular expression do not have
those same meanings inside a character class. For example, in a regular expression, the asterisk is used for repetition,
but this is not the case when the asterisk appears in a character class. The following character class matches the
asterisk literally, along with any of the other characters listed:
/[abc*123]/
However, the three characters listed in the following table do function as metacharacters, with special meaning, in
character classes:
Metasequence Description
{n}
{n,}
and
{n,n}
Specifies a numeric quantifier or quantifier range for the previous item:
/A{27}/ matches the character A repeated 27 times.
/A{3,}/ matches the character A repeated 3 or more times.
/A{3,5}/ matches the character A repeated 3 to 5 times.
For more information, see “Quantifiers” on page 195.
\b Matches at the position between a word character and a nonword character. If the first or last character in the
string is a word character, also matches the start or end of the string.
\B Matches at the position between two word characters. Also matches the position between two nonword
characters.
\d Matches a decimal digit.
\D Matches any character other than a digit.
\f Matches a form feed character.
\n Matches the newline character.
\r Matches the return character.
\s Matches any white-space character (a space, tab, newline, or return character).
\S Matches any character other than a white-space character.
\t Matches the tab character.
\unnnn Matches the Unicode character with the character code specified by the hexadecimal number nnnn. For
example, \u263a is the smiley character.
\v Matches a vertical feed character.
\w Matches a word character (A–Z, a–z, 0-9, or _). Note that \w does not match non-English characters, such as
é, ñ, or ç.
\W Matches any character other than a word character.
\xnn Matches the character with the specified ASCII value, as defined by the hexadecimal number nn.

ADOBE FLEX 3
Developer Guide
194
For any of these characters to be recognized as literal characters (without the special metacharacter meaning), you
must precede the character with the backslash escape character. For example, the following regular expression
includes a character class that matches any one of four symbols ($, \, ], or -):
/[$\\\]\-]/
In addition to the metacharacters that retain their special meanings, the following metasequences function as
metasequences within character classes:
Other regular expression metasequences and metacharacters are treated as normal characters within a character
class.
Ranges of characters in character classes
Use the hyphen to specify a range of characters, such as A-Z, a-z, or 0-9. These characters must constitute a valid
range in the character set. For example, the following character class matches any one of the characters in the range
a-z or any digit:
/[a-z0-9]/
You can also use the \xnn ASCII character code to specify a range by ASCII value. For example, the following
character class matches any character from a set of extended ASCII characters (such as é and ê):
/[\x80-\x9A]/
Negated character classes
When you use a caret (^) character at the beginning of a character class, it negates that class—any character not listed
is considered a match. The following character class matches any character except for a lowercase letter (a–z) or a
digit:
/[^a-z0-9]/
You must type the caret (^) character at the beginning of a character class to indicate negation. Otherwise, you are
simply adding the caret character to the characters in the character class. For example, the following character class
matches any one of a number of symbol characters, including the caret:
/[!.,#+*%$&^]/
Metacharacter Meaning in character classes
]Defines the end of the character class.
-Defines a range of characters (see “Ranges of characters in character classes” on page 194).
\Defines metasequences and undoes the special meaning of metacharacters.
Metasequence Meaning in character classes
\n Matches a newline character.
\r Matches a return character.
\t Matches a tab character.
\unnnn Matches the character with the specified Unicode code point value (as defined by the hexadecimal number
nnnn).
\xnn Matches the character with the specified ASCII value (as defined by the hexadecimal number nn).

ADOBE FLEX 3
Developer Guide
195
Quantifiers
You use quantifiers to specify repetitions of characters or sequences in patterns, as follows:
You can apply a quantifier to a single character, to a character class, or to a group:
•/a+/ matches the character a repeated one or more times.
•/\d+/ matches one or more digits.
•/[abc]+/ matches a repetition of one or more character, each of which is either a, b, or c.
•/(very, )*/ matches the word very followed by a comma and a space repeated zero or more times.
You can use quantifiers within parenthetical groupings that have quantifiers applied to them. For example, the
following quantifier matches strings such as word and word-word-word:
/\w+(-\w+)*/
By default, regular expressions perform what is known as greedy matching. Any subpattern in the regular expression
(such as .*) tries to match as many characters in the string as possible before moving forward to the next part of the
regular expression. For example, consider the following regular expression and string:
var pattern:RegExp = /<p>.*<\/p>/;
str:String = "<p>Paragraph 1</p> <p>Paragraph 2</p>";
The regular expression matches the entire string:
<p>Paragraph 1</p> <p>Paragraph 2</p>
Suppose, however, that you want to match only one <p>...</p> grouping. You can do this with the following:
<p>Paragraph 1</p>
Add a question mark (?) after any quantifier to change it to what is known as a lazy quantifier. For example, the
following regular expression, which uses the lazy *? quantifier, matches <p> followed by the minimum number of
characters possible (lazy), followed by </p>:
/<p>.*?<\/p>/
Keep in mind the following points about quantifiers:
•The quantifiers {0} and {0,0} do not exclude an item from a match.
•Do not combine multiple quantifiers, as in /abc+*/.
•The dot (.) does not span lines unless the s (dotall) flag is set, even if it is followed by a * quantifier. For
example, consider the following code:
Quantifier metacharacter Description
* (star) Matches the previous item repeated zero or more times.
+ (plus) Matches the previous item repeated one or more times.
? (question mark) Matches the previous item repeated zero times or one time.
{n}
{n,}
and
{n,n}
Specifies a numeric quantifier or quantifier range for the previous item:
/A{27}/ matches the character A repeated 27 times.
/A{3,}/ matches the character A repeated 3 or more times.
/A{3,5}/ matches the character A repeated 3 to 5 times.

ADOBE FLEX 3
Developer Guide
196
var str:String = "<p>Test\n";
str += "Multiline</p>";
var re:RegExp = /<p>.*<\/p>/;
trace(str.match(re)); // null;
re = /<p>.*<\/p>/s;
trace(str.match(re));
// output: <p>Test
// Multiline</p>
For more information, see “The s (dotall) flag” on page 200.
Alternation
Use the | (pipe) character in a regular expression to have the regular expression engine consider alternatives for a
match. For example, the following regular expression matches any one of the words cat, dog, pig, rat:
var pattern:RegExp = /cat|dog|pig|rat/;
You can use parentheses to define groups to restrict the scope of the | alternator. The following regular expression
matches cat followed by nap or nip:
var pattern:RegExp = /cat(nap|nip)/;
For more information, see “Groups” on page 196.
The following two regular expressions, one using the | alternator, the other using a character class (defined with [
and ] ), are equivalent:
/1|3|5|7|9/
/[13579]/
For more information, see “Character classes” on page 193.
Groups
You can specify a group in a regular expression by using parentheses, as follows:
/class-(\d*)/
A group is a subsection of a pattern. You can use groups to do the following things:
•Apply a quantifier to more than one character.
•Delineate subpatterns to be applied with alternation (by using the | character).
•Capture substring matches (for example, by using \1 in a regular expression to match a previously matched
group, or by using $1 similarly in the replace() method of the String class).
The following sections provide details on these uses of groups.
Using groups with quantifiers
If you do not use a group, a quantifier applies to the character or character class that precedes it, as the following
shows:
var pattern:RegExp = /ab*/ ;
// matches the character a followed by
// zero or more occurrences of the character b

ADOBE FLEX 3
Developer Guide
197
pattern = /a\d+/;
// matches the character a followed by
// one or more digits
pattern = /a[123]{1,3}/;
// matches the character a followed by
// one to three occurrences of either 1, 2, or 3
However, you can use a group to apply a quantifier to more than one character or character class:
var pattern:RegExp = /(ab)*/;
// matches zero or more occurrences of the character a
// followed by the character b, such as ababab
pattern = /(a\d)+/;
// matches one or more occurrences of the character a followed by
// a digit, such as a1a5a8a3
pattern = /(spam ){1,3}/;
// matches 1 to 3 occurrences of the word spam followed by a space
For more information on quantifiers, see “Quantifiers” on page 195.
Using groups with the alternator (|) character
You can use groups to define the group of characters to which you want to apply an alternator (|) character, as
follows:
var pattern:RegExp = /cat|dog/;
// matches cat or dog
pattern = /ca(t|d)og/;
// matches catog or cadog
Using groups to capture substring matches
When you define a standard parenthetical group in a pattern, you can later refer to it in the regular expression. This
is known as a backreference, and these sorts of groups are known as capturing groups. For example, in the following
regular expression, the sequence \1 matches whatever substring matched the capturing parenthetical group:
var pattern:RegExp = /(\d+)-by-\1/;
// matches the following: 48-by-48
You can specify up to 99 of these backreferences in a regular expression by typing \1,\2, ... , \99.
Similarly, in the replace() method of the String class, you can use $1–$99 to insert captured group substring
matches in the replacement string:
var pattern:RegExp = /Hi, (\w+)\./;
var str:String = "Hi, Bob.";
trace(str.replace(pattern, "$1, hello."));
// output: Bob, hello.
Also, if you use capturing groups, the exec() method of the RegExp class and the match() method of the String
class return substrings that match the capturing groups:
var pattern:RegExp = /(\w+)@(\w+).(\w+)/;
var str:String = "bob@example.com";
trace(pattern.exec(str));
// bob@example.com,bob,example,com

ADOBE FLEX 3
Developer Guide
198
Using noncapturing groups and lookahead groups
A noncapturing group is one that is used for grouping only; it is not “collected,” and it does not match numbered
backreferences. Use (?: and ) to define noncapturing groups, as follows:
var pattern = /(?:com|org|net);
For example, note the difference between putting (com|org) in a capturing versus a noncapturing group (the
exec() method lists capturing groups after the complete match):
var pattern:RegExp = /(\w+)@(\w+).(com|org)/;
var str:String = "bob@example.com";
trace(pattern.exec(str));
// bob@example.com,bob,example,com
//noncapturing:
var pattern:RegExp = /(\w+)@(\w+).(?:com|org)/;
var str:String = "bob@example.com";
trace(pattern.exec(str));
// bob@example.com,bob,example
A special type of noncapturing group is the lookahead group, of which there are two types: the positive lookahead
group and the negative lookahead group.
Use (?= and ) to define a positive lookahead group, which specifies that the subpattern in the group must match at
the position. However, the portion of the string that matches the positive lookahead group can match remaining
patterns in the regular expression. For example, because (?=e) is a positive lookahead group in the following code,
the character e that it matches can be matched by a subsequent part of the regular expression—in this case, the
capturing group, \w*):
var pattern:RegExp = /sh(?=e)(\w*)/i;
var str:String = "Shelly sells seashells by the seashore";
trace(pattern.exec(str));
// Shelly,elly
Use (?! and ) to define a negative lookahead group that specifies that the subpattern in the group must not match
at the position. For example:
var pattern:RegExp = /sh(?!e)(\w*)/i;
var str:String = "She sells seashells by the seashore";
trace(pattern.exec(str));
// shore,ore
Using named groups
A named group is a type of group in a regular expression that is given a named identifier. Use (?P<name> and ) to
define the named group. For example, the following regular expression includes a named group with the identifier
named digits:
var pattern = /[a-z]+(?P<digits>\d+)[a-z]+/;
When you use the exec() method, a matching named group is added as a property of the result array:
var myPattern:RegExp = /([a-z]+)(?P<digits>\d+)[a-z]+/;
var str:String = "a123bcd";
var result:Array = myPattern.exec(str);
trace(result.digits); // 123
Here is another example, which uses two named groups, with the identifiers name and dom:
var emailPattern:RegExp =
/(?P<name>(\w|[_.\-])+)@(?P<dom>((\w|-)+))+\.\w{2,4}+/;
var address:String = "bob@example.com";

ADOBE FLEX 3
Developer Guide
199
var result:Array = emailPattern.exec(address);
trace(result.name); // bob
trace(result.dom); // example
Note: Named groups are not part of the ECMAScript language specification. They are an added feature in ActionScript
3.0.
Flags and properties
The following table lists the five flags that you can set for regular expressions. Each flag can be accessed as a property
of the regular expression object.
Note that these properties are read-only. You can set the flags (g, i, m, s, x) when you set a regular expression variable,
as follows:
var re:RegExp = /abc/gimsx;
However, you cannot directly set the named properties. For instance, the following code results in an error:
var re:RegExp = /abc/;
re.global = true; // This generates an error.
By default, unless you specify them in the regular expression declaration, the flags are not set, and the corresponding
properties are also set to false.
Additionally, there are two other properties of a regular expression:
•The lastIndex property specifies the index position in the string to use for the next call to the exec() or
test() method of a regular expression.
•The source property specifies the string that defines the pattern portion of the regular expression.
The g (global) flag
When the g (global) flag is not included, a regular expression matches no more than one match. For example, with
the g flag not included in the regular expression, the String.match() method returns only one matching substring:
var str:String = "she sells seashells by the seashore.";
var pattern:RegExp = /sh\w*/;
trace(str.match(pattern)) // output: she
When the g flag is set, the Sting.match() method returns multiple matches, as follows:
var str:String = "she sells seashells by the seashore.";
var pattern:RegExp = /sh\w*/g;
// The same pattern, but this time the g flag IS set.
trace(str.match(pattern)); // output: she,shells,shore
Flag Property Description
g global Matches more than one match.
i ignoreCase Case-insensitive matching. Applies to the A—Z and a—z characters, but not to extended characters
such as É and é.
m multiline With this flag set, $ and ^ can match the beginning of a line and end of a line, respectively.
s dotall With this flag set, . (dot) can match the newline character (\n).
x extended Allows extended regular expressions. You can type spaces in the regular expression, which are
ignored as part of the pattern. This lets you type regular expression code more legibly.

ADOBE FLEX 3
Developer Guide
200
The i (ignoreCase) flag
By default, regular expression matches are case-sensitive. When you set the i (ignoreCase) flag, case sensitivity is
ignored. For example, the lowercase s in the regular expression does not match the uppercase letter S, the first
character of the string:
var str:String = "She sells seashells by the seashore.";
trace(str.search(/sh/)); // output: 13 -- Not the first character
With the i flag set, however, the regular expression does match the capital letter S:
var str:String = "She sells seashells by the seashore.";
trace(str.search(/sh/i)); // output: 0
The i flag ignores case sensitivity only for the A–Z and a–z characters, but not for extended characters such as É and
é.
The m (multiline) flag
If the m (multiline) flag is not set, the ^ matches the beginning of the string and the $ matches the end of the string.
If the m flag is set, these characters match the beginning of a line and end of a line, respectively. Consider the following
string, which includes a newline character:
var str:String = "Test\n";
str += "Multiline";
trace(str.match(/^\w*/g)); // Match a word at the beginning of the string.
Even though the g (global) flag is set in the regular expression, the match() method matches only one substring,
since there is only one match for the ^—the beginning of the string. The output is:
Test
Here is the same code with the m flag set:
var str:String = "Test\n";
str += "Multiline";
trace(str.match(/^\w*/gm)); // Match a word at the beginning of lines.
This time, the output includes the words at the beginning of both lines:
Test,Multiline
Note that only the \n character signals the end of a line. The following characters do not:
•Return (\r) character
•Unicode line-separator (\u2028) character
•Unicode paragraph-separator (\u2029) character
The s (dotall) flag
If the s (dotall or “dot all”) flag is not set, a dot (.) in a regular expression pattern does not match a newline
character (\n). So for the following example, there is no match:
var str:String = "<p>Test\n";
str += "Multiline</p>";
var re:RegExp = /<p>.*?<\/p>/;
trace(str.match(re));
However, if the s flag is set, the dot matches the newline character:
var str:String = "<p>Test\n";
str += "Multiline</p>";
var re:RegExp = /<p>.*?<\/p>/s;
trace(str.match(re));

ADOBE FLEX 3
Developer Guide
201
In this case, the match is the entire substring within the <p> tags, including the newline character:
<p>Test
Multiline</p>
The x (extended) flag
Regular expressions can be difficult to read, especially when they include a lot of metasymbols and metasequences.
For example:
/<p(>|(\s*[^>]*>)).*?<\/p>/gi
When you use the x (extended) flag in a regular expression, any blank spaces that you type in the pattern are
ignored. For example, the following regular expression is identical to the previous example:
/ <p (> | (\s* [^>]* >)) .*? <\/p> /gix
If you have the x flag set and do want to match a blank space character, precede the blank space with a backslash. For
example, the following two regular expressions are equivalent:
/foo bar/
/foo \ bar/x
The lastIndex property
The lastIndex property specifies the index position in the string at which to start the next search. This property
affects the exec() and test() methods called on a regular expression that has the g flag set to true. For example,
consider the following code:
var pattern:RegExp = /p\w*/gi;
var str:String = "Pedro Piper picked a peck of pickled peppers.";
trace(pattern.lastIndex);
var result:Object = pattern.exec(str);
while (result != null)
{
trace(pattern.lastIndex);
result = pattern.exec(str);
}
The lastIndex property is set to 0 by default (to start searches at the beginning of the string). After each match, it
is set to the index position following the match. Therefore, the output for the preceding code is the following:
0
5
11
18
25
36
44
If the global flag is set to false, the exec() and test() methods do not use or set the lastIndex property.
The match(), replace(), and search() methods of the String class start all searches from the beginning of the
string, regardless of the setting of the lastIndex property of the regular expression used in the call to the method.
(However, the match() method does set lastIndex to 0.)
You can set the lastIndex property to adjust the starting position in the string for regular expression matching.
The source property
The source property specifies the string that defines the pattern portion of a regular expression. For example:
var pattern:RegExp = /foo/gi;
trace(pattern.source); // foo

ADOBE FLEX 3
Developer Guide
202
Methods for using regular expressions with strings
The RegExp class includes two methods: exec() and test().
In addition to the exec() and test() methods of the RegExp class, the String class includes the following methods
that let you match regular expressions in strings: match(), replace(), search(), and splice().
The test() method
The test() method of the RegExp class simply checks the supplied string to see if it contains a match for the regular
expression, as the following example shows:
var pattern:RegExp = /Class-\w/;
var str = "Class-A";
trace(pattern.test(str)); // output: true
The exec() method
The exec() method of the RegExp class checks the supplied string for a match of the regular expression and returns
an array with the following:
•The matching substring
•Substring matches for any parenthetical groups in the regular expression
The array also includes an index property, indicating the index position of the start of the substring match.
For example, consider the following code:
var pattern:RegExp = /\d{3}\-\d{3}-\d{4}/; //U.S phone number
var str:String = "phone: 415-555-1212";
var result:Array = pattern.exec(str);
trace(result.index, " - ", result);
// 7-415-555-1212
Use the exec() method multiple times to match multiple substrings when the g (global) flag is set for the regular
expression:
var pattern:RegExp = /\w*sh\w*/gi;
var str:String = "She sells seashells by the seashore";
var result:Array = pattern.exec(str);
while (result != null)
{
trace(result.index, "\t", pattern.lastIndex, "\t", result);
result = pattern.exec(str);
}
//output:
// 0 3 She
// 10 19 seashells
// 27 35 seashore
String methods that use RegExp parameters
The following methods of the String class take regular expressions as parameters: match(), replace(), search(),
and split(). For more information on these methods, see “Finding patterns in strings and replacing substrings” on
page 136.

ADOBE FLEX 3
Developer Guide
203
Example: A Wiki parser
This simple Wiki text conversion example illustrates a number of uses for regular expressions:
•Converting lines of text that match a source Wiki pattern to the appropriate HTML output strings.
•Using a regular expression to convert URL patterns to HTML <a> hyperlink tags.
•Using a regular expression to convert U.S. dollar strings (such as "$9.95") to euro strings (such as "8.24 €").
To get the application files for this sample, see www.adobe.com/go/learn_programmingAS3samples_flash. The
WikiEditor application files can be found in the folder Samples/WikiEditor. The application consists of the following
files:
Defining the WikiParser class
The WikiParser class includes methods that convert Wiki input text into the equivalent HTML output. This is not a
very robust Wiki conversion application, but it does illustrate some good uses of regular expressions for pattern
matching and string conversion.
The constructor function, along with the setWikiData() method, simply initializes a sample string of Wiki input
text, as follows:
public function WikiParser()
{
wikiData = setWikiData();
}
When the user clicks the Test button in the sample application, the application invokes the parseWikiString()
method of the WikiParser object. This method calls a number of other methods, which in turn assemble the resulting
HTML string.
public function parseWikiString(wikiString:String):String
{
var result:String = parseBold(wikiString);
result = parseItalic(result);
result = linesToParagraphs(result);
result = parseBullets(result);
return result;
}
Each of the methods called—parseBold(), parseItalic(), linesToParagraphs(), and parseBullets()—
uses the replace() method of the string to replace matching patterns, defined by a regular expression, in order to
transform the input Wiki text into HTML-formatted text.
File Description
WikiEditor.mxml
or
WikiEditor.fla
The main application file in Flash (FLA) or Flex (MXML).
com/example/programmingas3/regExpExamples/WikiParser.as A class that includes methods that use regular expressions
to convert Wiki input text patterns to the equivalent HTML
output.
com/example/programmingas3/regExpExamples/URLParser.as A class that includes methods that use regular expressions
to convert URL strings to HTML <a> hyperlink tags.
com/example/programmingas3/regExpExamples/CurrencyConverter.as A class that includes methods that use regular expressions
to convert U.S. dollar strings to euro strings.

ADOBE FLEX 3
Developer Guide
204
Converting boldface and italic patterns
The parseBold() method looks for a Wiki boldface text pattern (such as '''foo''') and transforms it into its
HTML equivalent (such as <b>foo</b>), as follows:
private function parseBold(input:String):String
{
var pattern:RegExp = /'''(.*?)'''/g;
return input.replace(pattern, "<b>$1</b>");
}
Note that the (.?*) portion of the regular expression matches any number of characters (*) between the two
defining ''' patterns. The ? quantifier makes the match nongreedy, so that for a string such as '''aaa''' bbb
'''ccc''', the first matched string will be '''aaa''' and not the entire string (which starts and ends with the '''
pattern).
The parentheses in the regular expression define a capturing group, and the replace() method refers to this group
by using the $1 code in the replacement string. The g (global) flag in the regular expression ensures that the
replace() method replaces all matches in the string (not simply the first one).
The parseItalic() method works similarly to the parseBold() method, except that it checks for two apostrophes
('') as the delimiter for italic text (not three):
private function parseItalic(input:String):String
{
var pattern:RegExp = /''(.*?)''/g;
return input.replace(pattern, "<i>$1</i>");
}
Converting bullet patterns
As the following example shows, the parseBullet() method looks for the Wiki bullet line pattern (such as * foo)
and transforms it into its HTML equivalent (such as <li>foo</li>):
private function parseBullets(input:String):String
{
var pattern:RegExp = /^\*(.*)/gm;
return input.replace(pattern, "<li>$1</li>");
}
The ^ symbol at the beginning of the regular expression matches the beginning of a line. The m (multiline) flag in
the regular expression causes the regular expression to match the ^ symbol against the start of a line, not simply the
start of the string.
The \* pattern matches an asterisk character (the backslash is used to signal a literal asterisk instead of a *
quantifier).
The parentheses in the regular expression define a capturing group, and the replace() method refers to this group
by using the $1 code in the replacement string. The g (global) flag in the regular expression ensures that the
replace() method replaces all matches in the string (not simply the first one).
Converting paragraph Wiki patterns
The linesToParagraphs() method converts each line in the input Wiki string to an HTML <p> paragraph tag.
These lines in the method strip out empty lines from the input Wiki string:
var pattern:RegExp = /^$/gm;
var result:String = input.replace(pattern, "");

ADOBE FLEX 3
Developer Guide
205
The ^ and $ symbols the regular expression match the beginning and end of a line. The m (multiline) flag in the
regular expression causes the regular expression to match the ^ symbol against the start of a line, not simply the start
of the string.
The replace() method replaces all matching substrings (empty lines) with an empty string (""). The g (global)
flag in the regular expression ensures that the replace() method replaces all matches in the string (not simply the
first one).
Converting URLs to HTML <a> tags
When the user clicks the Test button in the sample application, if the user selected the urlToATag check box, the
application calls the URLParser.urlToATag() static method to convert URL strings from the input Wiki string into
HTML <a> tags.
var protocol:String = "((?:http|ftp)://)";
var urlPart:String = "([a-z0-9_-]+\.[a-z0-9_-]+)";
var optionalUrlPart:String = "(\.[a-z0-9_-]*)";
var urlPattern:RegExp = new RegExp(protocol + urlPart + optionalUrlPart, "ig");
var result:String = input.replace(urlPattern, "<a href='$1$2$3'><u>$1$2$3</u></a>");
The RegExp() constructor function is used to assemble a regular expression (urlPattern) from a number of
constituent parts. These constituent parts are each strings that define part of the regular expression pattern.
The first part of the regular expression pattern, defined by the protocol string, defines an URL protocol: either
http:// or ftp://. The parentheses define a noncapturing group, indicated by the ? symbol. This means that the
parentheses are simply used to define a group for the | alternation pattern; the group will not match backreference
codes ($1, $2, $3) in the replacement string of the replace() method.
The other constituent parts of the regular expression each use capturing groups (indicated by parentheses in the
pattern), which are then used in the backreference codes ($1, $2, $3) in the replacement string of the replace()
method.
The part of the pattern defined by the urlPart string matches at least one of the following characters: a-z, 0-9, _,
or -. The + quantifier indicates that at least one character is matched. The \. indicates a required dot (.) character.
And the remainder matches another string of at least one of these characters: a-z, 0-9, _, or -.
The part of the pattern defined by the optionalUrlPart string matches zero or more of the following: a dot (.)
character followed by any number of alphanumeric characters (including _ and -). The * quantifier indicates that
zero or more characters are matched.
The call to the replace() method employs the regular expression and assembles the replacement HTML string,
using backreferences.
The urlToATag() method then calls the emailToATag() method, which uses similar techniques to replace e-mail
patterns with HTML <a> hyperlink strings. The regular expressions used to match HTTP, FTP, and e-mail URLs in
this sample file are fairly simple, for the purposes of exemplification; there are much more complicated regular
expressions for matching such URLs more correctly.
Converting U.S. dollar strings to euro strings
When the user clicks the Test button in the sample application, if the user selected the dollarToEuro check box,
the application calls the CurrencyConverter.usdToEuro() static method to convert U.S. dollar strings (such as
"$9.95") to euro strings (such as "8.24 €"), as follows:
var usdPrice:RegExp = /\$([\d,]+.\d+)+/g;
return input.replace(usdPrice, usdStrToEuroStr);

ADOBE FLEX 3
Developer Guide
206
The first line defines a simple pattern for matching U.S. dollar strings. Notice that the $ character is preceded with
the backslash (\) escape character.
The replace() method uses the regular expression as the pattern matcher, and it calls the usdStrToEuroStr()
function to determine the replacement string (a value in euros).
When a function name is used as the second parameter of the replace() method, the following are passed as
parameters to the called function:
•The matching portion of the string.
•Any captured parenthetical group matches. The number of arguments passed this way varies depending on the
number of captured parenthetical group matches. You can determine the number of captured parenthetical group
matches by checking arguments.length - 3 within the function code.
•The index position in the string where the match begins.
•The complete string.
The usdStrToEuroStr() method converts U.S. dollar string patterns to euro strings, as follows:
private function usdToEuro(...args):String
{
var usd:String = args[1];
usd = usd.replace(",", "");
var exchangeRate:Number = 0.828017;
var euro:Number = Number(usd) * exchangeRate;
trace(usd, Number(usd), euro);
const euroSymbol:String = String.fromCharCode(8364); // €
return euro.toFixed(2) + " " + euroSymbol;
}
Note that args[1] represents the captured parenthetical group matched by the usdPrice regular expression. This
is the numerical portion of the U.S. dollar string: that is, the dollar amount without the $ sign. The method applies
an exchange rate conversion and returns the resulting string (with a trailing € symbol instead of a leading $ symbol).

207
Chapter 11: Working with XML
ActionScript™ 3.0 includes a group of classes based on the ECMAScript for XML (E4X) specification (ECMA-357
edition 2). These classes include powerful and easy-to-use functionality for working with XML data. Using E4X, you
will be able to develop code with XML data faster than was possible with previous programming techniques. As an
added benefit, the code you produce will be easier to read.
This chapter describes how to use E4X to process XML data.
Contents
Basics of XML . . . . . . . . . . . . . . . . . . . . . . . . . . . . . . . . . . . . . . . . . . . . . . . . . . . . . . . . . . . . . . . . . . . . . . . . . . . . . . . . . . . 207
The E4X approach to XML processing . . . . . . . . . . . . . . . . . . . . . . . . . . . . . . . . . . . . . . . . . . . . . . . . . . . . . . . . . . . . . . 210
XML objects. . . . . . . . . . . . . . . . . . . . . . . . . . . . . . . . . . . . . . . . . . . . . . . . . . . . . . . . . . . . . . . . . . . . . . . . . . . . . . . . . . . . . 211
XMLList objects . . . . . . . . . . . . . . . . . . . . . . . . . . . . . . . . . . . . . . . . . . . . . . . . . . . . . . . . . . . . . . . . . . . . . . . . . . . . . . . . . 214
Initializing XML variables . . . . . . . . . . . . . . . . . . . . . . . . . . . . . . . . . . . . . . . . . . . . . . . . . . . . . . . . . . . . . . . . . . . . . . . . . 215
Assembling and transforming XML objects . . . . . . . . . . . . . . . . . . . . . . . . . . . . . . . . . . . . . . . . . . . . . . . . . . . . . . . . . . 216
Traversing XML structures . . . . . . . . . . . . . . . . . . . . . . . . . . . . . . . . . . . . . . . . . . . . . . . . . . . . . . . . . . . . . . . . . . . . . . . . 217
Using XML namespaces. . . . . . . . . . . . . . . . . . . . . . . . . . . . . . . . . . . . . . . . . . . . . . . . . . . . . . . . . . . . . . . . . . . . . . . . . . . 221
XML type conversion . . . . . . . . . . . . . . . . . . . . . . . . . . . . . . . . . . . . . . . . . . . . . . . . . . . . . . . . . . . . . . . . . . . . . . . . . . . . . 222
Reading external XML documents. . . . . . . . . . . . . . . . . . . . . . . . . . . . . . . . . . . . . . . . . . . . . . . . . . . . . . . . . . . . . . . . . . 224
Example: Loading RSS data from the Internet . . . . . . . . . . . . . . . . . . . . . . . . . . . . . . . . . . . . . . . . . . . . . . . . . . . . . . . . 224
Basics of XML
Introduction to working with XML
XML is a standard way of representing structured information so that it is easy for computers to work with and
reasonably easy for people to write and understand. XML is an abbreviation for eXtensible Markup Language. The
XML standard is available at www.w3.org/XML/.
XML offers a standard and convenient way to categorize data, to make it easier to read, access, and manipulate. XML
uses a tree structure and tag structure that is similar to HTML. Here is a simple example of XML data:
<song>
<title>What you know?</title>
<artist>Steve and the flubberblubs</artist>
<year>1989</year>
<lastplayed>2006-10-17-08:31</lastplayed>
</song>
XML data can also be more complex, with tags nested in other tags as well as attributes and other structural compo-
nents. Here is a more complex example of XML data:
<album>
<title>Questions, unanswered</title>
<artist>Steve and the flubberblubs</artist>
<year>1989</year>
<tracks>
<song tracknumber="1" length="4:05">

ADOBE FLEX 3
Developer Guide
208
<title>What do you know?</title>
<artist>Steve and the flubberblubs</artist>
<lastplayed>2006-10-17-08:31</lastplayed>
</song>
<song tracknumber="2" length="3:45">
<title>Who do you know?</title>
<artist>Steve and the flubberblubs</artist>
<lastplayed>2006-10-17-08:35</lastplayed>
</song>
<song tracknumber="3" length="5:14">
<title>When do you know?</title>
<artist>Steve and the flubberblubs</artist>
<lastplayed>2006-10-17-08:39</lastplayed>
</song>
<song tracknumber="4" length="4:19">
<title>Do you know?</title>
<artist>Steve and the flubberblubs</artist>
<lastplayed>2006-10-17-08:44</lastplayed>
</song>
</tracks>
</album>
Notice that this XML document contains other complete XML structures within it (such as the song tags with their
children). It also demonstrates other XML structures such as attributes (tracknumber and length in the song tags),
and tags that contain other tags rather than containing data (such as the tracks tag).
Getting started with XML
If you have little or no experience with XML, here is a brief description of the most common aspects of XML data.
XML data is written in plain-text form, with a specific syntax for organizing the information into a structured
format. Generally, a single set of XML data is known as an XML document. In XML format, data is organized into
elements (which can be single data items or containers for other elements) using a hierarchical structure. Every XML
document has a single element as the top level or main item; inside this root element there may be a single piece of
information, although there are more likely to be other elements, which in turn contain other elements, and so forth.
For example, this XML document contains the information about a music album:
<song tracknumber="1" length="4:05">
<title>What do you know?</title>
<artist>Steve and the flubberblubs</artist>
<mood>Happy</mood>
<lastplayed>2006-10-17-08:31</lastplayed>
</song>
Each element is distinguished by a set of tags—the element’s name wrapped in angle brackets (less-than and greater-
than signs). The opening tag, indicating the start of the element, has the element name:
<title>
The closing tag, which marks the end of the element, has a forward slash before the element’s name:
</title>
If an element contains no content, it can be written as an empty element (sometimes called a self-closing element).
In XML, this element:
<lastplayed/>
is identical to this element:
<lastplayed></lastplayed>

ADOBE FLEX 3
Developer Guide
209
In addition to the element’s content contained between the opening and closing tags, an element can also include
other values, known as attributes, defined in the element’s opening tag. For example, this XML element defines a
single attribute named length, with the value “4:19”:
<song length="4:19"></song>
Each XML element has content, which is either a single value, one or more XML elements, or nothing (for an empty
element).
Learning more about XML
To learn more about working with XML, there are a number of additional books and resources for learning more
about XML, including these web sites:
•W3Schools XML Tutorial: http://w3schools.com/xml/
•XML.com: http://www.xml.com/
•XMLpitstop tutorials, discussion lists, and more: http://xmlpitstop.com/
ActionScript classes for working with XML
ActionScript 3.0 includes several classes that are used for working with XML-structured information. The two main
classes are as follows:
•XML: Represents a single XML element, which can be an XML document with multiple children or a single-
value element within a document.
•XMLList: Represents a set of XML elements. An XMLList object is used when there are multiple XML elements
that are “siblings” (at the same level, and contained by the same parent, in the XML document’s hierarchy). For
instance, an XMLList instance would be the easiest way to work with this set of XML elements (presumably
contained in an XML document):
<artist type="composer">Fred Wilson</artist>
<artist type="conductor">James Schmidt</artist>
<artist type="soloist">Susan Harriet Thurndon</artist>
For more advanced uses involving XML namespaces, ActionScript also includes the Namespace and QName classes.
For more information, see “Using XML namespaces” on page 221.
In addition to the built-in classes for working with XML, ActionScript 3.0 also includes several operators that
provide specific functionality for accessing and manipulating XML data. This approach to working with XML using
these classes and operators is known as ECMAScript for XML (E4X), as defined by the ECMA-357 edition 2 speci-
fication.
Common XML tasks
When you work with XML in ActionScript, you are likely to do the following tasks:
•Constructing XML documents (adding elements and values)
•Accessing XML elements, values, and attributes
•Filtering (searching in) XML elements
•Looping over a set of XML elements
•Converting data between XML classes and the String class
•Working with XML namespaces
•Loading external XML files

ADOBE FLEX 3
Developer Guide
210
Important concepts and terms
The following reference list contains important terms used in this chapter:
•Element: A single item in an XML document, identified as the content contained between a starting tag and an
ending tag (including the tags). XML elements can contain text data or other elements, or can be empty.
•Empty element: An XML element that contains no child elements. Empty elements are often written as self-
closing tags (such as <element/>).
•Document: A single XML structure. An XML document can contain any number of elements (or can consist
only of a single empty element); however, an XML document must have a single top-level element that contains all
the other elements in the document.
•Node: Another name for an XML element.
•Attribute: A named value associated with an element that is written into the opening tag of the element in
attributename="value" format, rather than being written as a separate child element nested inside the element.
The E4X approach to XML processing
The ECMAScript for XML specification defines a set of classes and functionality for working with XML data. These
classes and functionality are known collectively as E4X. ActionScript 3.0 includes the following E4X classes: XML,
XMLList, QName, and Namespace.
The methods, properties, and operators of the E4X classes are designed with the following goals:
•Simplicity—Where possible, E4X makes it easier to write and understand code for working with XML data.
•Consistency—The methods and reasoning behind E4X are internally consistent and consistent with other parts
of ActionScript.
•Familiarity—You manipulate XML data with well-known operators, such as the dot (.) operator.
Note: There was an XML class in ActionScript 2.0. In ActionScript 3.0 it has been renamed XMLDocument, so that it
does not conflict with the ActionScript 3.0 XML class that is part of E4X. In ActionScript 3.0, the legacy classes—
XMLDocument, XMLNode, XMLParser, and XMLTag—are included in the flash.xml package primarily for legacy
support. The new E4X classes are core classes; you need not import a package to use them. This chapter does not go into
detail on the legacy ActionScript 2.0 XML classes. For details on these, see the flash.xml package in the ActionScript 3.0
Language and Components Reference.
Here is an example of manipulating data with E4X:
var myXML:XML =
<order>
<item id='1'>
<menuName>burger</menuName>
<price>3.95</price>
</item>
<item id='2'>
<menuName>fries</menuName>
<price>1.45</price>
</item>
</order>
Often, your application will load XML data from an external source, such as a web service or a RSS feed. However,
for clarity, the examples in this chapter assign XML data as literals.

ADOBE FLEX 3
Developer Guide
211
As the following code shows, E4X includes some intuitive operators, such as the dot (.) and attribute identifier (@)
operators, for accessing properties and attributes in the XML:
trace(myXML.item[0].menuName); // Output: burger
trace(myXML.item.(@id==2).menuName); // Output: fries
trace(myXML.item.(menuName=="burger").price); // Output: 3.95
Use the appendChild() method to assign a new child node to the XML, as the following snippet shows:
var newItem:XML =
<item id="3">
<menuName>medium cola</menuName>
<price>1.25</price>
</item>
myXML.appendChild(newItem);
Use the @ and . operators not only to read data, but also to assign data, as in the following:
myXML.item[0].menuName="regular burger";
myXML.item[1].menuName="small fries";
myXML.item[2].menuName="medium cola";
myXML.item.(menuName=="regular burger").@quantity = "2";
myXML.item.(menuName=="small fries").@quantity = "2";
myXML.item.(menuName=="medium cola").@quantity = "2";
Use a for loop to iterate through nodes of the XML, as follows:
var total:Number = 0;
for each (var property:XML in myXML.item)
{
var q:int = Number(property.@quantity);
var p:Number = Number(property.price);
var itemTotal:Number = q * p;
total += itemTotal;
trace(q + " " + property.menuName + " $" + itemTotal.toFixed(2))
}
trace("Total: $", total.toFixed(2));
XML objects
An XML object may represent an XML element, attribute, comment, processing instruction, or text element.
An XML object is classified as having either simple content or complex content. An XML object that has child nodes
is classified as having complex content. An XML object is said to have simple content if it is any one of the following:
an attribute, a comment, a processing instruction, or a text node.
For example, the following XML object contains complex content, including a comment and a processing
instruction:
XML.ignoreComments = false;
XML.ignoreProcessingInstructions = false;
var x1:XML =
<order>
<!--This is a comment. -->
<?PROC_INSTR sample ?>
<item id='1'>
<menuName>burger</menuName>

ADOBE FLEX 3
Developer Guide
212
<price>3.95</price>
</item>
<item id='2'>
<menuName>fries</menuName>
<price>1.45</price>
</item>
</order>
As the following example shows, you can now use the comments() and processingInstructions() methods to
create new XML objects, a comment and a processing instruction:
var x2:XML = x1.comments()[0];
var x3:XML = x1.processingInstructions()[0];
XML properties
The XML class has five static properties:
•The ignoreComments and ignoreProcessingInstructions properties determine whether comments or
processing instructions are ignored when the XML object is parsed.
•The ignoreWhitespace property determines whether white space characters are ignored in element tags and
embedded expressions that are separated only by white space characters.
•The prettyIndent and prettyPrinting properties are used to format the text that is returned by the
toString() and toXMLString() methods of the XML class.
For details on these properties, see the ActionScript 3.0 Language and Components Reference.
XML methods
The following methods allow you to work with the hierarchical structure of XML objects:
•appendChild()
•child()
•childIndex()
•children()
•descendants()
•elements()
•insertChildAfter()
•insertChildBefore()
•parent()
•prependChild()
The following methods allow you to work with XML object attributes:
•attribute()
•attributes()
The following methods allow you to you work with XML object properties:
•hasOwnProperty()
•propertyIsEnumerable()

ADOBE FLEX 3
Developer Guide
213
•replace()
•setChildren()
The following methods are for working with qualified names and namespaces:
•addNamespace()
•inScopeNamespaces()
•localName()
•name()
•namespace()
•namespaceDeclarations()
•removeNamespace()
•setLocalName()
•setName()
•setNamespace()
The following methods are for working with and determining certain types of XML content:
•comments()
•hasComplexContent()
•hasSimpleContent()
•nodeKind()
•processingInstructions()
•text()
The following methods are for conversion to strings and for formatting XML objects:
•defaultSettings()
•setSettings()
•settings()
•normalize()
•toString()
•toXMLString()
There are a few additional methods:
•contains()
•copy()
•valueOf()
•length()
For details on these methods, see the ActionScript 3.0 Language and Components Reference.

ADOBE FLEX 3
Developer Guide
214
XMLList objects
An XMLList instance represents an arbitrary collection of XML objects. It can contain full XML documents, XML
fragments, or the results of an XML query.
The following methods allow you to work with the hierarchical structure of XMLList objects:
•child()
•children()
•descendants()
•elements()
•parent()
The following methods allow you to work with XMLList object attributes:
•attribute()
•attributes()
The following methods allow you to you work with XMLList properties:
•hasOwnProperty()
•propertyIsEnumerable()
The following methods are for working with and determining certain types of XML content:
•comments()
•hasComplexContent()
•hasSimpleContent()
•processingInstructions()
•text()
The following are for conversion to strings and for formatting the XMLList object:
•normalize()
•toString()
•toXMLString()
There are a few additional methods:
•contains()
•copy()
•length()
•valueOf()
For details on these methods, see the ActionScript 3.0 Language and Components Reference.
For an XMLList object that contains exactly one XML element, you can use all properties and methods of the XML
class, because an XMLList with one XML element is treated the same as an XML object. For example, in the following
code, because doc.div is an XMLList object containing one element, you can use the appendChild() method from
the XML class:

ADOBE FLEX 3
Developer Guide
215
var doc:XML =
<body>
<div>
<p>Hello</p>
</div>
</body>;
doc.div.appendChild(<p>World</p>);
For a list of XML properties and methods, see “XML objects” on page 211.
Initializing XML variables
You can assign an XML literal to an XML object, as follows:
var myXML:XML =
<order>
<item id='1'>
<menuName>burger</menuName>
<price>3.95</price>
</item>
<item id='2'>
<menuName>fries</menuName>
<price>1.45</price>
</item>
</order>
As the following snippet shows, you can also use the new constructor to create an instance of an XML object from a
string that contains XML data:
var str:String = "<order><item id='1'><menuName>burger</menuName>"
+ "<price>3.95</price></item></order>";
var myXML:XML = new XML(str);
If the XML data in the string is not well formed (for example, if a closing tag is missing), you will see a run-time error.
You can also pass data by reference (from other variables) into an XML object, as the following example shows:
var tagname:String = "item";
var attributename:String = "id";
var attributevalue:String = “5”;
var content:String = "Chicken";
var x:XML = <{tagname} {attributename}={attributevalue}>{content}</{tagname}>;
trace(x.toXMLString())
// Output: <item id="5">Chicken</item>
To load XML data from a URL, use the URLLoader class, as the following example shows:
import flash.events.Event;
import flash.net.URLLoader;
import flash.net.URLRequest;
var externalXML:XML;
var loader:URLLoader = new URLLoader();
var request:URLRequest = new URLRequest("xmlFile.xml");
loader.load(request);
loader.addEventListener(Event.COMPLETE, onComplete);

ADOBE FLEX 3
Developer Guide
216
function onComplete(event:Event):void
{
var loader:URLLoader = event.target as URLLoader;
if (loader != null)
{
externalXML = new XML(loader.data);
trace(externalXML.toXMLString());
}
else
{
trace("loader is not a URLLoader!");
}
}
To read XML data from a socket connection, use the XMLSocket class. For more information, see the XMLSocket
entry in the ActionScript 3.0 Language and Components Reference.
Assembling and transforming XML objects
Use the prependChild() method or the appendChild() method to add a property to the beginning or end of an
XML object’s list of properties, as the following example shows:
var x1:XML = <p>Line 1</p>
var x2:XML = <p>Line 2</p>
var x:XML = <body></body>
x = x.appendChild(x1);
x = x.appendChild(x2);
x = x.prependChild(<p>Line 0</p>);
// x == <body><p>Line 0</p><p>Line 1</p><p>Line 2</p></body>
Use the insertChildBefore() method or the insertChildAfter() method to add a property before or after a
specified property, as follows:
var x:XML =
<body>
<p>Paragraph 1</p>
<p>Paragraph 2</p>
</body>
var newNode:XML = <p>Paragraph 1.5</p>
x = x.insertChildAfter(x.p[0], newNode)
x = x.insertChildBefore(x.p[2], <p>Paragraph 1.75</p>)
As the following example shows, you can also use curly brace operators ( { and } ) to pass data by reference (from
other variables) when constructing XML objects:
var ids:Array = [121, 122, 123];
var names:Array = [["Murphy","Pat"], ["Thibaut","Jean"], ["Smith","Vijay"]]
var x:XML = new XML("<employeeList></employeeList>");

ADOBE FLEX 3
Developer Guide
217
for (var i:int = 0; i < 3; i++)
{
var newnode:XML = new XML();
newnode =
<employee id={ids[i]}>
<last>{names[i][0]}</last>
<first>{names[i][1]}</first>
</employee>;
x = x.appendChild(newnode)
}
You can assign properties and attributes to an XML object by using the = operator, as in the following:
var x:XML =
<employee>
<lastname>Smith</lastname>
</employee>
x.firstname = "Jean";
x.@id = "239";
This sets the XML object x to the following:
<employee id="239">
<lastname>Smith</lastname>
<firstname>Jean</firstname>
</employee>
You can use the + and += operators to concatenate XMLList objects:
var x1:XML = <a>test1</a>
var x2:XML = <b>test2</b>
var xList:XMLList = x1 + x2;
xList += <c>test3</c>
This sets the XMLList object xList to the following:
<a>test1</a>
<b>test2</b>
<c>test3</c>
Traversing XML structures
One of the powerful features of XML is its ability to provide complex, nested data via a linear string of text characters.
When you load data into an XML object, ActionScript parses the data and loads its hierarchical structure into
memory (or it sends a run-time error if the XML data is not well formed).
The operators and methods of the XML and XMLList objects make it easy to traverse the structure of XML data.
Use the dot (.) operator and the descendent accessor (..) operator to access child properties of an XML object.
Consider the following XML object:
var myXML:XML =
<order>
<book ISBN="0942407296">
<title>Baking Extravagant Pastries with Kumquats</title>
<author>
<lastName>Contino</lastName>
<firstName>Chuck</firstName>
</author>

ADOBE FLEX 3
Developer Guide
218
<pageCount>238</pageCount>
</book>
<book ISBN="0865436401">
<title>Emu Care and Breeding</title>
<editor>
<lastName>Case</lastName>
<firstName>Justin</firstName>
</editor>
<pageCount>115</pageCount>
</book>
</order>
The object myXML.book is an XMLList object containing child properties of the myXML object that have the name
book. These are two XML objects, matching the two book properties of the myXML object.
The object myXML..lastName is an XMLList object containing any descendent properties with the name lastName.
These are two XML objects, matching the two lastName of the myXML object.
The object myXML.book.editor.lastName is an XMLList object containing any children with the name lastName
of children with the name editor of children with the name book of the myXML object: in this case, an XMLList
object containing only one XML object (the lastName property with the value "Case").
Accessing parent and child nodes
The parent() method returns the parent of an XML object.
You can use the ordinal index values of a child list to access specific child objects. For example, consider an XML
object myXML that has two child properties named book. Each child property named book has an index number
associated with it:
myXML.book[0]
myXML.book[1]
To access a specific grandchild, you can specify index numbers for both the child and grandchild names:
myXML.book[0].title[0]
However, if there is only one child of x.book[0] that has the name title, you can omit the index reference, as
follows:
myXML.book[0].title
Similarly, if there is only one book child of the object x, and if that child object has only one title object, you can omit
both index references, like this:
myXML.book.title
You can use the child() method to navigate to children with names based on a variable or expression, as the
following example shows:
var myXML:XML =
<order>
<book>
<title>Dictionary</title>
</book>
</order>;
var childName:String = "book";
trace(myXML.child(childName).title) // output: Dictionary

ADOBE FLEX 3
Developer Guide
219
Accessing attributes
Use the @ symbol (the attribute identifier operator) to access attributes in an XML or XMLList object, as shown in
the following code:
var employee:XML =
<employee id="6401" code="233">
<lastName>Wu</lastName>
<firstName>Erin</firstName>
</employee>;
trace(employee.@id); // 6401
You can use the * wildcard symbol with the @ symbol to access all attributes of an XML or XMLList object, as in the
following code:
var employee:XML =
<employee id="6401" code="233">
<lastName>Wu</lastName>
<firstName>Erin</firstName>
</employee>;
trace(employee.@*.toXMLString());
// 6401
// 233
You can use the attribute() or attributes() method to access a specific attribute or all attributes of an XML or
XMLList object, as in the following code:
var employee:XML =
<employee id="6401" code="233">
<lastName>Wu</lastName>
<firstName>Erin</firstName>
</employee>;
trace(employee.attribute("id")); // 6401
trace(employee.attribute("*").toXMLString());
// 6401
// 233
trace(employee.attributes().toXMLString());
// 6401
// 233
Note that you can also use the following syntax to access attributes, as the following example shows:
employee.attribute("id")
employee["@id"]
employee.@["id"]
These are each equivalent to employee.@id. However, the syntax employee.@id is the preferred approach.
Filtering by attribute or element value
You can use the parentheses operators— ( and ) —to filter elements with a specific element name or attribute value.
Consider the following XML object:
var x:XML =
<employeeList>
<employee id="347">
<lastName>Zmed</lastName>
<firstName>Sue</firstName>
<position>Data analyst</position>
</employee>
<employee id="348">
<lastName>McGee</lastName>

ADOBE FLEX 3
Developer Guide
220
<firstName>Chuck</firstName>
<position>Jr. data analyst</position>
</employee>
</employeeList>
The following expressions are all valid:
•x.employee.(lastName == "McGee")—This is the second employee node.
•x.employee.(lastName == "McGee").firstName—This is the firstName property of the second employee
node.
•x.employee.(lastName == "McGee").@id—This is the value of the id attribute of the second employee
node.
•x.employee.(@id == 347)—The first employee node.
•x.employee.(@id == 347).lastName—This is the lastName property of the first employee node.
•x.employee.(@id > 300)—This is an XMLList with both employee properties.
•x.employee.(position.toString().search("analyst") > -1)—This is an XMLList with both position
properties.
If you try to filter on attributes or elements that may not exist, Flash® Player and Adobe® AIR™ will throw an
exception. For example, the final line of the following code generates an error, because there is no id attribute in the
second p element:
var doc:XML =
<body>
<p id='123'>Hello, <b>Bob</b>.</p>
<p>Hello.</p>
</body>;
trace(doc.p.(@id == '123'));
Similarly, the final line of following code generates an error because there is no b property of the second p element:
var doc:XML =
<body>
<p id='123'>Hello, <b>Bob</b>.</p>
<p>Hello.</p>
</body>;
trace(doc.p.(b == 'Bob'));
To avoid these errors, you can identify the properties that have the matching attributes or elements by using the
attribute() and elements() methods, as in the following code:
var doc:XML =
<body>
<p id='123'>Hello, <b>Bob</b>.</p>
<p>Hello.</p>
</body>;
trace(doc.p.(attribute('id') == '123'));
trace(doc.p.(elements('b') == 'Bob'));
You can also use the hasOwnProperty() method, as in the following code:
var doc:XML =
<body>
<p id='123'>Hello, <b>Bob</b>.</p>
<p>Hello.</p>
</body>;
trace(doc.p.(hasOwnProperty('@id') && @id == '123'));
trace(doc.p.(hasOwnProperty('b') && b == 'Bob'));

ADOBE FLEX 3
Developer Guide
221
Using the for..in and the for each..in statements
ActionScript 3.0 includes the for..in statement and the for each..in statement for iterating through XMLList
objects. For example, consider the following XML object, myXML, and the XMLList object, myXML.item. The
XMLList object, myXML.item, consists of the two item nodes of the XML object.
var myXML:XML =
<order>
<item id='1' quantity='2'>
<menuName>burger</menuName>
<price>3.95</price>
</item>
<item id='2' quantity='2'>
<menuName>fries</menuName>
<price>1.45</price>
</item>
</order>;
The for..in statement lets you iterate over a set of property names in an XMLList:
var total:Number = 0;
for (var pname:String in myXML.item)
{
total += myXML.item.@quantity[pname] * myXML.item.price[pname];
}
The for each..in statement lets you iterate through the properties in the XMLList:
var total2:Number = 0;
for each (var prop:XML in myXML.item)
{
total2 += prop.@quantity * prop.price;
}
Using XML namespaces
Namespaces in an XML object (or document) identify the type of data that the object contains. For example, in
sending and delivering XML data to a web service that uses the SOAP messaging protocol, you declare the
namespace in the opening tag of the XML:
var message:XML =
<soap:Envelope xmlns:soap="http://schemas.xmlsoap.org/soap/envelope/"
soap:encodingStyle="http://schemas.xmlsoap.org/soap/encoding/">
<soap:Body xmlns:w="http://www.test.com/weather/">
<w:getWeatherResponse>
<w:tempurature >78</w:tempurature>
</w:getWeatherResponse>
</soap:Body>
</soap:Envelope>;
The namespace has a prefix, soap, and a URI that defines the namespace,
http://schemas.xmlsoap.org/soap/envelope/.
ActionScript 3.0 includes the Namespace class for working with XML namespaces. For the XML object in the
previous example, you can use the Namespace class as follows:

ADOBE FLEX 3
Developer Guide
222
var soapNS:Namespace = message.namespace("soap");
trace(soapNS); // Output: http://schemas.xmlsoap.org/soap/envelope/
var wNS:Namespace = new Namespace("w", "http://www.test.com/weather/");
message.addNamespace(wNS);
var encodingStyle:XMLList = message.@soapNS::encodingStyle;
var body:XMLList = message.soapNS::Body;
message.soapNS::Body.wNS::GetWeatherResponse.wNS::tempurature = "78";
The XML class includes the following methods for working with namespaces: addNamespace(),
inScopeNamespaces(), localName(), name(), namespace(), namespaceDeclarations(),
removeNamespace(), setLocalName(), setName(), and setNamespace().
The default xml namespace directive lets you assign a default namespace for XML objects. For example, in the
following, both x1 and x2 have the same default namespace:
var ns1:Namespace = new Namespace("http://www.example.com/namespaces/");
default xml namespace = ns1;
var x1:XML = <test1 />;
var x2:XML = <test2 />;
XML type conversion
You can convert XML objects and XMLList objects to String values. Similarly, you can convert strings to XML objects
and XMLList objects. Also, keep in mind that all XML attribute values, names, and text values are strings. The
following sections discuss all these forms of XML type conversion.
Converting XML and XMLList objects to strings
The XML and XMLList classes include a toString() method and a toXMLString() method. The toXMLString()
method returns a string that includes all tags, attributes, namespace declarations, and content of the XML object. For
XML objects with complex content (child elements), the toString() method does exactly the same as the
toXMLString() method. For XML objects with simple content (those that contain only one text element), the
toString() method returns only the text content of the element, as the following example shows:
var myXML:XML =
<order>
<item id='1' quantity='2'>
<menuName>burger</menuName>
<price>3.95</price>
</item>
<order>;
trace(myXML.item[0].menuName.toXMLString());
// <menuName>burger</menuName>
trace(myXML.item[0].menuName.toString());
// burger
If you use the trace() method without specifying toString() or toXMLString(), the data is converted using the
toString() method by default, as this code shows:

ADOBE FLEX 3
Developer Guide
223
var myXML:XML =
<order>
<item id='1' quantity='2'>
<menuName>burger</menuName>
<price>3.95</price>
</item>
<order>;
trace(myXML.item[0].menuName);
// burger
When using the trace() method to debug code, you will often want to use the toXMLString() method so that the
trace() method outputs more complete data.
Converting strings to XML objects
You can use the new XML() constructor to create an XML object from a string, as follows:
var x:XML = new XML("<a>test</a>");
If you attempt to convert a string to XML from a string that represents invalid XML or XML that is not well formed,
a run-time error is thrown, as follows:
var x:XML = new XML("<a>test"); // throws an error
Converting attribute values, names, and text values from strings
All XML attribute values, names, and text values are String data types, and you may need to convert these to other
data types. For example, the following code uses the Number() function to convert text values to numbers:
var myXML:XML =
<order>
<item>
<price>3.95</price>
</item>
<item>
<price>1.00</price>
</item>
</order>;
var total:XML = <total>0</total>;
myXML.appendChild(total);
for each (var item:XML in myXML.item)
{
myXML.total.children()[0] = Number(myXML.total.children()[0])
+ Number(item.price.children()[0]);
}
trace(myXML.total); // 4.35;
If this code did not use the Number() function, the code would interpret the + operator as the string concatenation
operator, and the trace() method in the last line would output the following:
01.003.95

ADOBE FLEX 3
Developer Guide
224
Reading external XML documents
You can use the URLLoader class to load XML data from a URL. To use the following code in your applications,
replace the XML_URL value in the example with a valid URL:
var myXML:XML = new XML();
var XML_URL:String = "http://www.example.com/Sample3.xml";
var myXMLURL:URLRequest = new URLRequest(XML_URL);
var myLoader:URLLoader = new URLLoader(myXMLURL);
myLoader.addEventListener("complete", xmlLoaded);
function xmlLoaded(event:Event):void
{
myXML = XML(myLoader.data);
trace("Data loaded.");
}
You can also use the XMLSocket class to set up an asynchronous XML socket connection with a server. For more
information, see the ActionScript 3.0 Language and Components Reference.
Example: Loading RSS data from the Internet
The RSSViewer sample application shows a number of features of working with XML in ActionScript, including the
following:
•Using XML methods to traverse XML data in the form of an RSS feed.
•Using XML methods to assemble XML data in the form of HTML to use in a text field.
The RSS format is widely used to syndicate news via XML. A simple RSS data file may look like the following:
<?xml version="1.0" encoding="UTF-8" ?>
<rss version="2.0" xmlns:dc="http://purl.org/dc/elements/1.1/">
<channel>
<title>Alaska - Weather</title>
<link>http://www.nws.noaa.gov/alerts/ak.html</link>
<description>Alaska - Watches, Warnings and Advisories</description>
<item>
<title>
Short Term Forecast - Taiya Inlet, Klondike Highway (Alaska)
</title>
<link>
http://www.nws.noaa.gov/alerts/ak.html#A18.AJKNK.1900
</link>
<description>
Short Term Forecast Issued At: 2005-04-11T19:00:00
Expired At: 2005-04-12T01:00:00 Issuing Weather Forecast Office
Homepage: http://pajk.arh.noaa.gov
</description>
</item>
<item>
<title>
Short Term Forecast - Haines Borough (Alaska)
</title>
<link>
http://www.nws.noaa.gov/alerts/ak.html#AKZ019.AJKNOWAJK.190000
</link>

ADOBE FLEX 3
Developer Guide
225
<description>
Short Term Forecast Issued At: 2005-04-11T19:00:00
Expired At: 2005-04-12T01:00:00 Issuing Weather Forecast Office
Homepage: http://pajk.arh.noaa.gov
</description>
</item>
</channel>
</rss>
The SimpleRSS application reads RSS data from the Internet, parses the data for headlines (titles), links, and descrip-
tions, and returns that data. The SimpleRSSUI class provides the UI and calls the SimpleRSS class, which does all of
the XML processing.
To get the application files for this sample, see www.adobe.com/go/learn_programmingAS3samples_flash. The
RSSViewer application files can be found in the folder Samples/RSSViewer. The application consists of the following
files:
Reading and parsing XML data
The RSSParser class includes an xmlLoaded() method that converts the input RSS data, stored in the rssXML
variable, into an string containing HTML-formatted output, rssOutput.
Near the beginning of the method, code sets the default XML namespace if the source RSS data includes a default
namespace:
if (rssXML.namespace("") != undefined)
{
default xml namespace = rssXML.namespace("");
}
The next lines then loop through the contents of the source XML data, examining each descendant property named
item:
for each (var item:XML in rssXML..item)
{
var itemTitle:String = item.title.toString();
var itemDescription:String = item.description.toString();
var itemLink:String = item.link.toString();
outXML += buildItemHTML(itemTitle,
itemDescription,
itemLink);
}
The first three lines simply set string variables to represent the title, description and link properties of the item
property of the XML data. The next line then calls the buildItemHTML() method to get HTML data in the form of
an XMLList object, using the three new string variables as parameters.
File Description
RSSViewer.mxml
or
RSSViewer.fla
The main application file in Flash (FLA) or Flex (MXML).
com/example/programmingas3/rssViewer/RSSParser.as A class that contains methods that use E4X to traverse RSS (XML) data and
generate a corresponding HTML representation.
RSSData/ak.rss A sample RSS file. The application is set up to read RSS data from the web,
at a Flex RSS feed hosted by Adobe. However, you can easily change the
application to read RSS data from this document, which uses a slightly
different schema than that of the Flex RSS feed.

ADOBE FLEX 3
Developer Guide
226
Assembling XMLList data
The HTML data (an XMLList object) is of the following form:
<b>itemTitle</b>
<p>
itemDescription
<br />
<a href="link">
<font color="#008000">More...</font>
</a>
</p>
The first lines of the method clear the default xml namespace:
default xml namespace = new Namespace();
The default xml namespace directive has function block-level scope. This means that the scope of this declaration
is the buildItemHTML() method.
The lines that follow assemble the XMLList, based on the string arguments passed to the function:
var body:XMLList = new XMLList();
body += new XML("<b>" + itemTitle + "</b>");
var p:XML = new XML("<p>" + itemDescription + "</p>");
var link:XML = <a></a>;
link.@href = itemLink; // <link href="itemLinkString"></link>
link.font.@color = "#008000";
// <font color="#008000"></font></a>
// 0x008000 = green
link.font = "More...";
p.appendChild(<br/>);
p.appendChild(link);
body += p;
This XMLList object represents string data suitable for an ActionScript HTML text field.
The xmlLoaded() method uses the return value of the buildItemHTML() method and converts it to a string:
XML.prettyPrinting = false;
rssOutput = outXML.toXMLString();
Extracting the title of the RSS feed and sending a custom event
The xmlLoaded() method sets a rssTitle string variable, based on information in the source RSS XML data:
rssTitle = rssXML.channel.title.toString();
Finally, the xmlLoaded() method generates an event, which notifies the application that the data is parsed and
available:
dataWritten = new Event("dataWritten", true);

227
Chapter 12: Handling events
An event-handling system allows programmers to respond to user input and system events in a convenient way. The
ActionScript™ 3.0 event model is not only convenient, but also standards-compliant, and well integrated with the
Adobe® Flash® Player 9 and Adobe® AIR™ display lists. Based on the Document Object Model (DOM) Level 3 Events
Specification, an industry-standard event-handling architecture, the new event model provides a powerful yet
intuitive event-handling tool for ActionScript programmers.
This chapter is organized in five sections. The first two sections provide background information about event
handling in ActionScript. The last three sections describe the main concepts behind the event model: the event flow,
the event object, and event listeners. The ActionScript 3.0 event-handling system interacts closely with the display
list, and this chapter assumes that you have a basic understanding of the display list. For more information, see
“Display programming” on page 247.
Contents
Basics of handling events . . . . . . . . . . . . . . . . . . . . . . . . . . . . . . . . . . . . . . . . . . . . . . . . . . . . . . . . . . . . . . . . . . . . . . . . . . 227
How ActionScript 3.0 event handling differs from earlier versions. . . . . . . . . . . . . . . . . . . . . . . . . . . . . . . . . . . . . . . 229
The event flow . . . . . . . . . . . . . . . . . . . . . . . . . . . . . . . . . . . . . . . . . . . . . . . . . . . . . . . . . . . . . . . . . . . . . . . . . . . . . . . . . . . 231
Event objects . . . . . . . . . . . . . . . . . . . . . . . . . . . . . . . . . . . . . . . . . . . . . . . . . . . . . . . . . . . . . . . . . . . . . . . . . . . . . . . . . . . . 232
Event listeners . . . . . . . . . . . . . . . . . . . . . . . . . . . . . . . . . . . . . . . . . . . . . . . . . . . . . . . . . . . . . . . . . . . . . . . . . . . . . . . . . . . 236
Example: Alarm Clock . . . . . . . . . . . . . . . . . . . . . . . . . . . . . . . . . . . . . . . . . . . . . . . . . . . . . . . . . . . . . . . . . . . . . . . . . . . . 242
Basics of handling events
Introduction to handling events
You can think of events as occurrences of any kind in your SWF file that are of interest to you as a programmer. For
example, most SWF files support user interaction of some sort—whether it's something as simple as responding to
a mouse click or something more complex, such as accepting and processing data entered into a form. Any such user
interaction with your SWF file is considered an event. Events can also occur without any direct user interaction, such
as when data has finished loading from a server or when an attached camera has become active.
In ActionScript 3.0, each event is represented by an event object, which is an instance of the Event class or one of its
subclasses. An event object not only stores information about a specific event, but also contains methods that facil-
itate manipulation of the event object. For example, when Flash Player or AIR detects a mouse click, it creates an
event object (an instance of the MouseEvent class) to represent that particular mouse click event.
After creating an event object, Flash Player or AIR dispatches it, which means that the event object is passed to the
object that is the target of the event. An object that serves as the destination for a dispatched event object is called an
event target. For example, when an attached camera becomes active, Flash Player dispatches an event object directly
to the event target, which in this case is the object that represents the camera. If the event target is on the display list,
however, the event object is passed down through the display list hierarchy until it reaches the event target. In some
cases, the event object then “bubbles” back up the display list hierarchy along the same route. This traversal of the
display list hierarchy is called the event flow.

ADOBE FLEX 3
Developer Guide
228
You can “listen” for event objects in your code using event listeners. Event listeners are the functions or methods that
you write to respond to specific events. To ensure that your program responds to events, you must add event listeners
either to the event target or to any display list object that is part of an event object’s event flow.
Any time you write event listener code, it follows this basic structure (elements in bold are placeholders you’d fill in
for your specific case):
function eventResponse(eventObject:EventType):void
{
// Actions performed in response to the event go here.
}
eventTarget.addEventListener(EventType.EVENT_NAME, eventResponse);
This code does two things. First, it defines a function, which is the way to specify the actions that will be performed
in response to the event. Next, it calls the addEventListener() method of the source object, in essence
“subscribing” the function to the specified event so that when the event happens, the function’s actions are carried
out. When the event actually happens, the event target checks its list of all the functions and methods that are regis-
tered as event listeners. It then calls each one in turn, passing the event object as a parameter.
You need to alter four things in this code to create your own event listener. First, you must change the name of the
function to the name you want to use (this must be changed in two places, where the code says eventResponse).
Second, you must specify the appropriate class name of the event object that is dispatched by the event you want to
listen for (EventType in the code), and you must specify the appropriate constant for the specific event (EVENT_NAME
in the listing). Third, you must call the addEventListener() method on the object that will dispatch the event
(eventTarget in this code). Optionally, you can change the name of the variable used as the function’s parameter
(eventObject in this code).
Common event-handling tasks
The following are common event-handling tasks, each of which is described in this chapter:
•Writing code to respond to events
•Stopping code from responding to events
•Working with event objects
•Working with event flow:
•Identifying event flow information
•Stopping event flow
•Preventing default behavior
•Dispatching events from your classes
•Creating a custom event type
Important concepts and terms
The following reference list contains important terms that you will encounter in this chapter:
•Default behavior: Some events include a behavior that normally happens along with the event, known as the
default behavior. For example, when a user types text in a text field, a text input event is raised. The default behavior
for that event is to actually display the character that was typed into the text field—but you can override that default
behavior (if for some reason you don’t want the typed character to be displayed).

ADOBE FLEX 3
Developer Guide
229
•Dispatch: To notify event listeners that an event has occurred.
•Event: Something that happens to an object that the object can tell other objects about.
•Event flow: When events happen to an object on the display list (an object displayed on the screen), all the objects
that contain the object are notified of the event and notify their event listeners in turn. This process starts with the
Stage and proceeds through the display list to the actual object where the event occurred, and then proceeds back to
the Stage again. This process is known as the event flow.
•Event object: An object that contains information about a particular event’s occurrence, which is sent to all
listeners when an event is dispatched.
•Event target: The object that actually dispatches an event. For example, if the user clicks a button that is inside a
Sprite that is in turn inside the Stage, all those objects dispatch events, but the event target is the one where the event
actually happened—in this case, the clicked button.
•Listener: An object or function that has registered itself with an object, to indicate that it should be notified when
a specific event takes place.
How ActionScript 3.0 event handling differs from
earlier versions
The most noticeable difference between event handling in ActionScript 3.0 and event handling in previous versions
of ActionScript is that in ActionScript 3.0 there is only one system for event handling, whereas in previous versions
of ActionScript there are several different event-handling systems. This section begins with an overview of how event
handling worked in previous versions of ActionScript, and then discusses how event handling has changed for
ActionScript 3.0.
Event handling in previous versions of ActionScript
Versions of ActionScript before ActionScript 3.0 provided a number of different ways to handle events:
•on() event handlers that can be placed directly on Button and MovieClip instances
•onClipEvent() handlers that can be placed directly on MovieClip instances
•Callback function properties, such as XML.onload and Camera.onActivity
•Event listeners that you register using the addListener() method
•The UIEventDispatcher class that partially implemented the DOM event model.
Each of these mechanisms presents its own set of advantages and limitations. The on() and onClipEvent()
handlers are easy to use, but make subsequent maintenance of projects more difficult because code placed directly
on buttons and movie clips can be difficult to find. Callback functions are also simple to implement, but limit you to
only one callback function for any given event. Event listeners are more difficult to implement—they require not only
the creation of a listener object and function, but also the registration of the listener with the object that generates
the event. This increased overhead, however, enables you to create several listener objects and register them all for
the same event.
The development of components for ActionScript 2.0 engendered yet another event model. This new model,
embodied in the UIEventDispatcher class, was based on a subset of the DOM Events Specification. Developers who
are familiar with component event handling will find the transition to the new ActionScript 3.0 event model
relatively painless.

ADOBE FLEX 3
Developer Guide
230
Unfortunately, the syntax used by the various event models overlap in various ways, and differ in others. For
example, in ActionScript 2.0, some properties, such as TextField.onChanged, can be used as either a callback
function or an event listener. However, the syntax for registering listener objects differs depending on whether you
are using one of the six classes that support listeners or the UIEventDispatcher class. For the Key, Mouse, MovieCli-
pLoader, Selection, Stage, and TextField classes, you use the addListener() method, but for components event
handling, you use a method called addEventListener().
Another complexity introduced by the different event-handling models was that the scope of the event handler
function varied widely depending on the mechanism used. In other words, the meaning of the this keyword was
not consistent among the event-handling systems.
Event handling in ActionScript 3.0
ActionScript 3.0 introduces a single event-handling model that replaces the many different event-handling mecha-
nisms that existed in previous versions of the language. The new event model is based on the Document Object
Model (DOM) Level 3 Events Specification. Although the SWF file format does not adhere specifically to the
Document Object Model standard, there are sufficient similarities between the display list and the structure of the
DOM to make implementation of the DOM event model possible. An object on the display list is analogous to a node
in the DOM hierarchical structure, and the terms display list object and node are used interchangeably throughout
this discussion.
The Flash Player and AIR implementation of the DOM event model includes a concept named default behaviors. A
default behavior is an action that Flash Player or AIR executes as the normal consequence of certain events.
Default behaviors
Developers are usually responsible for writing code that responds to events. In some cases, however, a behavior is so
commonly associated with an event that Flash Player or AIR automatically executes the behavior unless the
developer adds code to cancel it. Because Flash Player or AIR automatically exhibits the behavior, such behaviors are
called default behaviors.
For example, when a user enters text into a TextField object, the expectation that the text will be displayed in that
TextField object is so common that the behavior is built into Flash Player and AIR. If you do not want this default
behavior to occur, you can cancel it using the new event-handling system. When a user inputs text into a TextField
object, Flash Player or AIR creates an instance of the TextEvent class to represent that user input. To prevent Flash
Player or AIR from displaying the text in the TextField object, you must access that specific TextEvent instance and
call that instance’s preventDefault() method.
Not all default behaviors can be prevented. For example, Flash Player and AIR generate a MouseEvent object when
a user double-clicks a word in a TextField object. The default behavior, which cannot be prevented, is that the word
under the cursor is highlighted.
Many types of event objects do not have associated default behaviors. For example, Flash Player dispatches a connect
event object when a network connection is established, but there is no default behavior associated with it. The API
documentation for the Event class and its subclasses lists each type of event and describes any associated default
behavior, and whether that behavior can be prevented.
It is important to understand that default behaviors are associated only with event objects dispatched by Flash Player
or AIR, and do not exist for event objects dispatched programmatically through ActionScript. For example, you can
use the methods of the EventDispatcher class to dispatch an event object of type textInput, but that event object
will not have a default behavior associated with it. In other words, Flash Player and AIR will not display a character
in a TextField object as a result of a textInput event that you dispatched programmatically.

ADOBE FLEX 3
Developer Guide
231
What’s new for event listeners in ActionScript 3.0
For developers with experience using the ActionScript 2.0 addListener() method, it may be helpful to point out
the differences between the ActionScript 2.0 event listener model and the ActionScript 3.0 event model. The
following list describes a few major differences between the two event models:
•To add event listeners in ActionScript 2.0, you use addListener() in some cases and addEventListener() in
others, whereas in ActionScript 3.0, you use addEventListener() in all situations.
•There is no event flow in ActionScript 2.0, which means that the addListener() method can be called only on
the object that broadcasts the event, whereas in ActionScript 3.0, the addEventListener() method can be called
on any object that is part of the event flow.
•In ActionScript 2.0, event listeners can be either functions, methods, or objects, whereas in ActionScript 3.0, only
functions or methods can be event listeners.
The event flow
Flash Player or AIR dispatches event objects whenever an event occurs. If the event target is not on the display list,
Flash Player or AIR dispatches the event object directly to the event target. For example, Flash Player dispatches the
progress event object directly to a URLStream object. If the event target is on the display list, however, Flash Player
dispatches the event object into the display list, and the event object travels through the display list to the event target.
The event flow describes how an event object moves through the display list. The display list is organized in a
hierarchy that can be described as a tree. At the top of the display list hierarchy is the Stage, which is a special display
object container that serves as the root of the display list. The Stage is represented by the flash.display.Stage class and
can only be accessed through a display object. Every display object has a property named stage that refers to the
Stage for that application.
When Flash Player or AIR dispatches an event object for a display list-related event, that event object makes a
roundtrip journey from the Stage to the target node. The DOM Events Specification defines the target node as the
node representing the event target. In other words, the target node is the display list object where the event occurred.
For example, if a user clicks on a display list object named child1, Flash Player or AIR will dispatch an event object
using child1 as the target node.
The event flow is conceptually divided into three parts. The first part is called the capture phase; this phase comprises
all of the nodes from the Stage to the parent of the target node. The second part is called the target phase, which
consists solely of the target node. The third part is called the bubbling phase. The bubbling phase comprises the
nodes encountered on the return trip from the parent of the target node back to the Stage.
The names of the phases make more sense if you conceive of the display list as a vertical hierarchy with the Stage at
the top, as shown in the following diagram:
Stage
Parent Node
Child1 Node Child2 Node
ADOBE FLEX 3
Developer Guide
232
If a user clicks on Child1 Node, Flash Player or AIR dispatches an event object into the event flow. As the following
image shows, the object’s journey starts at Stage, moves down to Parent Node, then moves to Child1 Node, and
then “bubbles” back up to Stage, moving through Parent Node again on its journey back to Stage.
In this example, the capture phase comprises Stage and Parent Node during the initial downward journey. The
target phase comprises the time spent at Child1 Node. The bubbling phase comprises Parent Node and Stage as
they are encountered during the upward journey back to the root node.
The event flow contributes to a more powerful event-handling system than that previously available to ActionScript
programmers. In previous versions of ActionScript, the event flow does not exist, which means that event listeners
can be added only to the object that generates the event. In ActionScript 3.0, you can add event listeners not only to
a target node, but also to any node along the event flow.
The ability to add event listeners along the event flow is useful when a user interface component comprises more
than one object. For example, a button object often contains a text object that serves as the button’s label. Without
the ability to add a listener to the event flow, you would have to add a listener to both the button object and the text
object to ensure that you receive notification about click events that occur anywhere on the button. The existence of
the event flow, however, allows you to place a single event listener on the button object that handles click events that
occur either on the text object or on the areas of the button object that are not obscured by the text object.
Not every event object, however, participates in all three phases of the event flow. Some types of events, such as the
enterFrame and init event types, are dispatched directly to the target node and participate in neither the capture
phase nor the bubbling phase. Other events may target objects that are not on the display list, such as events
dispatched to an instance of the Socket class. These event objects will also flow directly to the target object, without
participating in the capture and bubbling phases.
To find out how a particular event type behaves, you can either check the API documentation or examine the event
object's properties. Examining the event object’s properties is described in the following section.
Event objects
Event objects serve two main purposes in the new event-handling system. First, event objects represent actual events
by storing information about specific events in a set of properties. Second, event objects contain a set of methods
that allow you to manipulate event objects and affect the behavior of the event-handling system.
To facilitate access to these properties and methods, the Flash Player API defines an Event class that serves as the
base class for all event objects. The Event class defines a fundamental set of properties and methods that are common
to all event objects.
Stage
Parent Node
Child1 Node Child2 Node
Capture
Phase
Bubbling
Phase
Target Phase

ADOBE FLEX 3
Developer Guide
233
This section begins with a discussion of the Event class properties, continues with a description of the Event class
methods, and concludes with an explanation of why subclasses of the Event class exist.
Understanding Event class properties
The Event class defines a number of read-only properties and constants that provide important information about
an event object.The following are especially important:
•Event object types are represented by constants and stored in the Event.type property.
•Whether an event’s default behavior can be prevented is represented by a Boolean value and stored in the
Event.cancelable property.
•Event flow information is contained in the remaining properties.
Event object types
Every event object has an associated event type. Event types are stored in the Event.type property as string values.
It is useful to know the type of an event object so that your code can distinguish objects of different types from one
another. For example, the following code specifies that the clickHandler() listener function should respond to any
mouse click event objects that are passed to myDisplayObject:
myDisplayObject.addEventListener(MouseEvent.CLICK, clickHandler);
Some two dozen event types are associated with the Event class itself and are represented by Event class constants,
some of which are shown in the following excerpt from the Event class definition:
package flash.events
{
public class Event
{
// class constants
public static const ACTIVATE:String = "activate";
public static const ADDED:String= "added";
// remaining constants omitted for brevity
}
}
These constants provide an easy way to refer to specific event types. You should use these constants instead of the
strings they represent. If you misspell a constant name in your code, the compiler will catch the mistake, but if you
instead use strings, a typographical error may not manifest at compile time and could lead to unexpected behavior
that could be difficult to debug. For example, when adding an event listener, use the following code:
myDisplayObject.addEventListener(MouseEvent.CLICK, clickHandler);
rather than:
myDisplayObject.addEventListener("click", clickHandler);
Default behavior information
Your code can check whether the default behavior for any given event object can be prevented by accessing the
cancelable property. The cancelable property holds a Boolean value that indicates whether or not a default
behavior can be prevented. You can prevent, or cancel, the default behavior associated with a small number of events
using the preventDefault() method. For more information, see “Cancelling default event behavior” on page 235.

ADOBE FLEX 3
Developer Guide
234
Event flow information
The remaining Event class properties contain important information about an event object and its relationship to the
event flow, as described in the following list:
•The bubbles property contains information about the parts of the event flow in which the event object partici-
pates.
•The eventPhase property indicates the current phase in the event flow.
•The target property stores a reference to the event target.
•The currentTarget property stores a reference to the display list object that is currently processing the event
object.
The bubbles property
An event is said to bubble if its event object participates in the bubbling phase of the event flow, which means that
the event object is passed from the target node back through its ancestors until it reaches the Stage. The
Event.bubbles property stores a Boolean value that indicates whether the event object participates in the bubbling
phase. Because all events that bubble also participate in the capture and target phases, any event that bubbles partic-
ipates in all three of the event flow phases. If the value is true, the event object participates in all three phases. If the
value is false, the event object does not participate in the bubbling phase.
The eventPhase property
You can determine the event phase for any event object by investigating its eventPhase property. The eventPhase
property contains an unsigned integer value that represents one of the three phases of the event flow. The Flash
Player API defines a separate EventPhase class that contains three constants that correspond to the three unsigned
integer values, as shown in the following code excerpt:
package flash.events
{
public final class EventPhase
{
public static const CAPTURING_PHASE:uint = 1;
public static const AT_TARGET:uint = 2;
public static const BUBBLING_PHASE:uint= 3;
}
}
These constants correspond to the three valid values of the eventPhase property. You can use these constants to
make your code more readable. For example, if you want to ensure that a function named myFunc() is called only if
the event target is in the target stage, you can use the following code to test for this condition:
if (event.eventPhase == EventPhase.AT_TARGET)
{
myFunc();
}
The target property
The target property holds a reference to the object that is the target of the event. In some cases, this is straight-
forward, such as when a microphone becomes active, the target of the event object is the Microphone object. If the
target is on the display list, however, the display list hierarchy must be taken into account. For example, if a user
inputs a mouse click on a point that includes overlapping display list objects, Flash Player and AIR always choose the
object that is farthest away from the Stage as the event target.

ADOBE FLEX 3
Developer Guide
235
For complex SWF files, especially those in which buttons are routinely decorated with smaller child objects, the
target property may not be used frequently because it will often point to a button’s child object instead of the
button. In these situations, the common practice is to add event listeners to the button and use the currentTarget
property because it points to the button, whereas the target property may point to a child of the button.
The currentTarget property
The currentTarget property contains a reference to the object that is currently processing the event object.
Although it may seem odd not to know which node is currently processing the event object that you are examining,
keep in mind that you can add a listener function to any display object in that event object's event flow, and the
listener function can be placed in any location. Moreover, the same listener function can be added to different display
objects. As a project increases in size and complexity, the currentTarget property becomes more and more useful.
Understanding Event class methods
There are three categories of Event class methods:
•Utility methods, which can create copies of an event object or convert it to a string
•Event flow methods, which remove event objects from the event flow
•Default behavior methods, which prevent default behavior or check whether it has been prevented
Event class utility methods
There are two utility methods in the Event class. The clone() method allows you to create copies of an event object.
The toString() method allows you to generate a string representation of the properties of an event object along
with their values. Both of these methods are used internally by the event model system, but are exposed to developers
for general use.
For advanced developers creating subclasses of the Event class, you must override and implement versions of both
utility methods to ensure that the event subclass will work properly.
Stopping event flow
You can call either the Event.stopPropogation() method or the Event.stopImmediatePropogation()
method to prevent an event object from continuing on its way through the event flow. The two methods are nearly
identical and differ only in whether the current node’s other event listeners are allowed to execute:
•The Event.stopPropogation() method prevents the event object from moving on to the next node, but only
after any other event listeners on the current node are allowed to execute.
•The Event.stopImmediatePropogation() method also prevents the event object from moving on to the next
node, but does not allow any other event listeners on the current node to execute.
Calling either of these methods has no effect on whether the default behavior associated with an event occurs. Use
the default behavior methods of the Event class to prevent default behavior.
Cancelling default event behavior
The two methods that pertain to cancelling default behavior are the preventDefault() method and the
isDefaultPrevented() method. Call the preventDefault() method to cancel the default behavior associated
with an event. To check whether preventDefault() has already been called on an event object, call the
isDefaultPrevented() method, which returns a value of true if the method has already been called and false
otherwise.

ADOBE FLEX 3
Developer Guide
236
The preventDefault() method will work only if the event’s default behavior can be cancelled. You can check
whether this is the case by referring to the API documentation for that event type, or by using ActionScript to
examine the cancelable property of the event object.
Cancelling the default behavior has no effect on the progress of an event object through the event flow. Use the event
flow methods of the Event class to remove an event object from the event flow.
Subclasses of the Event class
For many events, the common set of properties defined in the Event class is sufficient. Other events, however, have
unique characteristics that cannot be captured by the properties available in the Event class. For these events, the
Flash Player API defines several subclasses of the Event class.
Each subclass provides additional properties and event types that are unique to that category of events. For example,
events related to mouse input have several unique characteristics that cannot be captured by the properties defined
in the Event class. The MouseEvent class extends the Event class by adding ten properties that contain information
such as the location of the mouse event and whether specific keys were pressed during the mouse event.
An Event subclass also contains constants that represent the event types that are associated with the subclass. For
example, the MouseEvent class defines constants for several mouse event types, include the click, doubleClick,
mouseDown, and mouseUp event types.
As described in the section “Event class utility methods” on page 235, when creating an Event subclass you must
override the clone() and toString() methods to provide functionality specific to the subclass.
Event listeners
Event listeners, which are also called event handlers, are functions that Flash Player and AIR execute in response to
specific events. Adding an event listener is a two-step process. First, you create a function or class method for Flash
Player or AIR to execute in response to the event. This is sometimes called the listener function or the event handler
function. Second, you use the addEventListener() method to register your listener function with the target of the
event or any display list object that lies along the appropriate event flow.
Creating a listener function
The creation of listener functions is one area where the ActionScript 3.0 event model deviates from the DOM event
model. In the DOM event model, there is a clear distinction between an event listener and a listener function: an
event listener is an instance of a class that implements the EventListener interface, whereas a listener function is a
method of that class named handleEvent(). In the DOM event model, you register the class instance that contains
the listener function rather than the actual listener function.
In the ActionScript 3.0 event model, there is no distinction between an event listener and a listener function. Action-
Script 3.0 does not have an EventListener interface, and listener functions can be defined outside a class or as part of
a class. Moreover, listener functions do not have to be named handleEvent()—they can be named with any valid
identifier. In ActionScript 3.0, you register the name of the actual listener function.
Listener function defined outside of a class
The following code creates a simple SWF file that displays a red square shape. A listener function named
clickHandler(), which is not part of a class, listens for mouse click events on the red square.

ADOBE FLEX 3
Developer Guide
237
package
{
import flash.display.Sprite;
public class ClickExample extends Sprite
{
public function ClickExample()
{
var child:ChildSprite = new ChildSprite();
addChild(child);
}
}
}
import flash.display.Sprite;
import flash.events.MouseEvent;
class ChildSprite extends Sprite
{
public function ChildSprite()
{
graphics.beginFill(0xFF0000);
graphics.drawRect(0,0,100,100);
graphics.endFill();
addEventListener(MouseEvent.CLICK, clickHandler);
}
}
function clickHandler(event:MouseEvent):void
{
trace("clickHandler detected an event of type: " + event.type);
trace("the this keyword refers to: " + this);
}
When a user interacts with the resulting SWF file by clicking on the square, Flash Player or AIR generates the
following trace output:
clickHandler detected an event of type: click
the this keyword refers to: [object global]
Notice that the event object is passed as an argument to clickHandler(). This allows your listener function to
examine the event object. In this example, you use the event object's type property to ascertain that the event is a
click event.
The example also checks the value of the this keyword. In this case, this represents the global object, which makes
sense because the function is defined outside of any custom class or object.
Listener function defined as a class method
The following example is identical to the previous example that defines the ClickExample class except that the
clickHandler() function is defined as a method of the ChildSprite class:

ADOBE FLEX 3
Developer Guide
238
package
{
import flash.display.Sprite;
public class ClickExample extends Sprite
{
public function ClickExample()
{
var child:ChildSprite = new ChildSprite();
addChild(child);
}
}
}
import flash.display.Sprite;
import flash.events.MouseEvent;
class ChildSprite extends Sprite
{
public function ChildSprite()
{
graphics.beginFill(0xFF0000);
graphics.drawRect(0,0,100,100);
graphics.endFill();
addEventListener(MouseEvent.CLICK, clickHandler);
}
private function clickHandler(event:MouseEvent):void
{
trace("clickHandler detected an event of type: " + event.type);
trace("the this keyword refers to: " + this);
}
}
When a user interacts with the resulting SWF file by clicking on the red square, Flash Player or AIR generates the
following trace output:
clickHandler detected an event of type: click
the this keyword refers to: [object ChildSprite]
Note that the this keyword refers to the ChildSprite instance named child. This is a change in behavior from
ActionScript 2.0. If you used components in ActionScript 2.0, you may remember that when a class method was
passed in to UIEventDispatcher.addEventListener(), the scope of the method was bound to the component
that broadcast the event instead of the class in which the listener method was defined. In other words, if you used
this technique in ActionScript 2.0, the this keyword would refer to the component broadcasting the event instead
of the ChildSprite instance.
This was a significant issue for some programmers because it meant that they could not access other methods and
properties of the class containing the listener method. As a workaround, ActionScript 2.0 programmers could use
the mx.util.Delegate class to change the scope of the listener method. This is no longer necessary, however,
because ActionScript 3.0 creates a bound method when addEventListener() is called. As a result, the this
keyword refers to the ChildSprite instance named child, and the programmer has access to the other methods and
properties of the ChildSprite class.
Event listener that should not be used
There is a third technique in which you create a generic object with a property that points to a dynamically assigned
listener function, but it is not recommended. It is discussed here because it was commonly used in ActionScript 2.0,
but should not be used in ActionScript 3.0. This technique is not recommended because the this keyword will refer
to the global object instead of your listener object.

ADOBE FLEX 3
Developer Guide
239
The following example is identical to the previous ClickExample class example, except that the listener function is
defined as part of a generic object named myListenerObj:
package
{
import flash.display.Sprite;
public class ClickExample extends Sprite
{
public function ClickExample()
{
var child:ChildSprite = new ChildSprite();
addChild(child);
}
}
}
import flash.display.Sprite;
import flash.events.MouseEvent;
class ChildSprite extends Sprite
{
public function ChildSprite()
{
graphics.beginFill(0xFF0000);
graphics.drawRect(0,0,100,100);
graphics.endFill();
addEventListener(MouseEvent.CLICK, myListenerObj.clickHandler);
}
}
var myListenerObj:Object = new Object();
myListenerObj.clickHandler = function (event:MouseEvent):void
{
trace("clickHandler detected an event of type: " + event.type);
trace("the this keyword refers to: " + this);
}
The results of the trace will look like this:
clickHandler detected an event of type: click
the this keyword refers to: [object global]
You w ou l d e x pec t t hat this would refer to myListenerObj and that the trace output would be [object Object],
but instead it refers to the global object. When you pass in a dynamic property name as an argument to
addEventListener(), Flash Player or AIR is unable to create a bound method. This is because what you are passing
as the listener parameter is nothing more than the memory address of your listener function, and Flash Player and
AIR have no way to link that memory address with the myListenerObj instance.
Managing event listeners
You can manage your listener functions using the methods of the IEventDispatcher interface. The IEventDispatcher
interface is the ActionScript 3.0 version of the EventTarget interface of the DOM event model. Although the name
IEventDispatcher may seem to imply that its main purpose is to send (or dispatch) event objects, the methods of this
class are actually used much more frequently to register event listeners, check for event listeners, and remove event
listeners. The IEventDispatcher interface defines five methods, as shown in the following code:

ADOBE FLEX 3
Developer Guide
240
package flash.events
{
public interface IEventDispatcher
{
function addEventListener(eventName:String,
listener:Object,
useCapture:Boolean=false,
priority:Integer=0,
useWeakReference:Boolean=false):Boolean;
function removeEventListener(eventName:String,
listener:Object,
useCapture:Boolean=false):Boolean;
function dispatchEvent(eventObject:Event):Boolean;
function hasEventListener(eventName:String):Boolean;
function willTrigger(eventName:String):Boolean;
}
}
The Flash Player API implements the IEventDispatcher interface with the EventDispatcher class, which serves as a
base class for all classes that can be event targets or part of an event flow. For example, the DisplayObject class
inherits from the EventDispatcher class. This means that any object on the display list has access to the methods of
the IEventDispatcher interface.
Adding event listeners
The addEventListener() method is the workhorse of the IEventDispatcher interface. You use it to register your
listener functions. The two required parameters are type and listener. You use the type parameter to specify the
type of event. You use the listener parameter to specify the listener function that will execute when the event
occurs. The listener parameter can be a reference to either a function or a class method.
Note: Do not use parentheses when you specify the listener parameter. For example, the clickHandler() function
is specified without parentheses in the following call to the addEventListener() method:
addEventListener(MouseEvent.CLICK, clickHandler).
The useCapture parameter of the addEventListener() method allows you to control the event flow phase on
which your listener will be active. If useCapture is set to true, your listener will be active during the capture phase
of the event flow. If useCapture is set to false, your listener will be active during the target and bubbling phases of
the event flow. To listen for an event during all phases of the event flow, you must call addEventListener() twice,
once with useCapture set to true, and then again with useCapture set to false.
The priority parameter of the addEventListener() method is not an official part of the DOM Level 3 event
model. It is included in ActionScript 3.0 to provide you with more flexibility in organizing your event listeners. When
you call addEventListener(), you can set the priority for that event listener by passing an integer value as the
priority parameter. The default value is 0, but you can set it to negative or positive integer values. The higher the
number, the sooner that event listener will be executed. Event listeners with the same priority are executed in the
order that they were added, so the earlier a listener is added, the sooner it will be executed.
The useWeakReference parameter allows you to specify whether the reference to the listener function is weak or
normal. Setting this parameter to true allows you to avoid situations in which listener functions persist in memory
even though they are no longer needed. Flash Player and AIR use a technique called garbage collection to clear objects
from memory that are no longer in use. An object is considered no longer in use if no references to it exist. The
garbage collector disregards weak references, which means that a listener function that has only a weak reference
pointing to it is eligible for garbage collection.

ADOBE FLEX 3
Developer Guide
241
One important consequence of this parameter involves working with display objects’ events. Normally, you might
expect a display object to be removed from memory when it is removed from the display list. However, if other
objects have subscribed as listeners to that display object, with the useWeakReference parameter set to false (the
default), the display object will continue to exist in Flash Player’s or AIR’s memory even though it no longer appears
on the screen. To work around this issue, either have all the listeners subscribe to the display object with the
useWeakReference parameter set to true, or else remove all the event listeners from the display object using the
removeEventListener() method.
Removing event listeners
You can use the removeEventListener() method to remove an event listener that you no longer need. It is a good
idea to remove any listeners that will no longer be used. Required parameters include the eventName and listener
parameters, which are the same as the required parameters for the addEventListener() method. Recall that you
can listen for events during all event phases by calling addEventListener() twice, once with useCapture set to
true, and then again with it set to false. To remove both event listeners, you would need to call
removeEventListener() twice, once with useCapture set to true, and then again with it set to false.
Dispatching events
The dispatchEvent() method can be used by advanced programmers to dispatch a custom event object into the
event flow. The only parameter accepted by this method is a reference to an event object, which must be an instance
of the Event class or a subclass of the Event class. Once dispatched, the target property of the event object is set to
the object on which dispatchEvent() was called.
Checking for existing event listeners
The final two methods of the IEventDispatcher interface provide useful information about the existence of event
listeners. The hasEventListener() method returns true if an event listener is found for a specific event type on a
particular display list object. The willTrigger() method also returns true if a listener is found for a particular
display list object, but willTrigger() checks for listeners not only on that display object, but also on all of that
display list object’s ancestors for all phases of the event flow.
Error events without listeners
Exceptions, rather than events, are the primary mechanism for error handling in ActionScript 3.0, but exception
handling does not work for asynchronous operations such as loading files. If an error occurs during such an
asynchronous operation, Flash Player and AIR dispatch an error event object. If you do not create a listener for the
error event, the debugger versions of Flash Player and AIR will bring up a dialog box with information about the
error. For example, using an invalid URL when loading a file produces this dialog box in the debugger version of
Flash Player:

ADOBE FLEX 3
Developer Guide
242
Most error events are based on the ErrorEvent class, and as such will have a property named text that is used to
store the error message that Flash Player or AIR displays. The two exceptions are the StatusEvent and NetStatusEvent
classes. Both of these classes have a level property (StatusEvent.level and NetStatusEvent.info.level).
When the value of the level property is "error", these event types are considered to be error events.
An error event will not cause a SWF file to stop running. It will manifest only as a dialog box on the debugger
versions of the browser plug-ins and stand-alone players, as a message in the output panel in the authoring player,
and as an entry in the log file for Adobe Flex Builder 2. It will not manifest at all in the release versions of Flash Player
or AIR.
Example: Alarm Clock
The Alarm Clock example consists of a clock that allows the user to specify a time at which an alarm will go off, as
well as a message to be displayed at that time. The Alarm Clock example builds on the SimpleClock application from
“Working with dates and times” on page 122 Alarm Clock illustrates several aspects of working with events in
ActionScript 3.0, including:
•Listening and responding to an event
•Notifying listeners of an event
•Creating a custom event type
To get the application files for this sample, see www.adobe.com/go/learn_programmingAS3samples_flash. The
Alarm Clock application files can be found in the Samples/AlarmClock folder. The application includes these files:
Alarm Clock overview
The primary functionality of the clock in this example, including tracking the time and displaying the clock face,
reuses the SimpleClock application code, which is described in “Example: Simple analog clock” on page 127. The
AlarmClock class extends the SimpleClock class from that example by adding the functionality required for an alarm
clock, including setting the alarm time and providing notification when the alarm “goes off.”
File Description
AlarmClockApp.mxml
or
AlarmClockApp.fla
The main application file in Flash (FLA) or Flex (MXML).
com/example/programmingas3/clock/AlarmClock.as A class which extends the SimpleClock class, adding alarm clock
functionality.
com/example/programmingas3/clock/AlarmEvent.as A custom event class (a subclass of flash.events.Event) which serves
as the event object for the AlarmClock class’s alarm event.
com/example/programmingas3/clock/AnalogClockFace.as Draws a round clock face and hour, minute, and seconds hands
based on the time (described in the SimpleClock example).
com/example/programmingas3/clock/SimpleClock.as A clock interface component with simple timekeeping functionality
(described in the SimpleClock example).

ADOBE FLEX 3
Developer Guide
243
Providing notification when something happens is the job that events are made for. The AlarmClock class exposes
the Alarm event, which other objects can listen for in order to perform desired actions. In addition, the AlarmClock
class uses an instance of the Timer class to determine when to trigger its alarm. Like the AlarmClock class, the Timer
class provides an event to notify other objects (an AlarmClock instance, in this case) when a certain amount of time
has passed. As with most ActionScript applications, events form an important part of the functionality of the Alarm
Clock sample application.
Triggering the alarm
As mentioned previously, the only functionality that the AlarmClock class actually provides relates to setting and
triggering the alarm. The built-in Timer class (flash.utils.Timer) provides a way for a developer to define code that
will be executed after a specified amount of time. The AlarmClock class uses a Timer instance to determine when to
set off the alarm.
import flash.events.TimerEvent;
import flash.utils.Timer;
/**
* The Timer that will be used for the alarm.
*/
public var alarmTimer:Timer;
...
/**
* Instantiates a new AlarmClock of a given size.
*/
public override function initClock(faceSize:Number = 200):void
{
super.initClock(faceSize);
alarmTimer = new Timer(0, 1);
alarmTimer.addEventListener(TimerEvent.TIMER, onAlarm);
}
The Timer instance defined in the AlarmClock class is named alarmTimer. The initClock() method, which
performs necessary setup operations for the AlarmClock instance, does two things with the alarmTimer variable.
First, the variable is instantiated with parameters instructing the Timer instance to wait 0 milliseconds and only
trigger its timer event one time. After instantiating alarmTimer, the code calls that variable’s addEventListener()
method to indicate that it wants to listen to that variable’s timer event. A Timer instance works by dispatching its
timer event after a specified amount of time has passed. The AlarmClock class will need to know when the timer
event is dispatched in order to set off its own alarm. By calling addEventListener(), the AlarmClock code registers
itself as a listener with alarmTimer. The two parameters indicate that the AlarmClock class wants to listen for the
timer event (indicated by the constant TimerEvent.TIMER), and that when the event happens, the AlarmClock
class’s onAlarm() method should be called in response to the event.
In order to actually set the alarm, the AlarmClock class’s setAlarm() method is called, as follows:
/**
* Sets the time at which the alarm should go off.
* @param hour The hour portion of the alarm time.
* @param minutes The minutes portion of the alarm time.
* @param message The message to display when the alarm goes off.
* @return The time at which the alarm will go off.
*/
public function setAlarm(hour:Number = 0, minutes:Number = 0, message:String =
"Alarm!"):Date
{
this.alarmMessage = message;
var now:Date = new Date();

ADOBE FLEX 3
Developer Guide
244
// Create this time on today's date.
alarmTime = new Date(now.fullYear, now.month, now.date, hour, minutes);
// Determine if the specified time has already passed today.
if (alarmTime <= now)
{
alarmTime.setTime(alarmTime.time + MILLISECONDS_PER_DAY);
}
// Stop the alarm timer if it's currently set.
alarmTimer.reset();
// Calculate how many milliseconds should pass before the alarm should
// go off (the difference between the alarm time and now) and set that
// value as the delay for the alarm timer.
alarmTimer.delay = Math.max(1000, alarmTime.time - now.time);
alarmTimer.start();
return alarmTime;
}
This method does several things, including storing the alarm message and creating a Date object (alarmTime) repre-
senting the actual moment in time when the alarm is to go off. Of most relevance to the current discussion, in the
final several lines of the method, the alarmTimer variable’s timer is set and activated. First, its reset() method is
called, stopping the timer and resetting it in case it is already running. Next, the current time (represented by the now
variable) is subtracted from the alarmTime variable’s value to determine how many milliseconds need to pass before
the alarm goes off. The Timer class doesn’t trigger its timer event at an absolute time, so it is this relative time
difference that is assigned to the delay property of alarmTimer. Finally, the start() method is called to actually
start the timer.
Once the specified amount of time has passed, alarmTimer dispatches the timer event. Because the AlarmClock
class registered its onAlarm() method as a listener for that event, when the timer event happens, onAlarm() is
called.
/**
* Called when the timer event is dispatched.
*/
public function onAlarm(event:TimerEvent):void
{
trace("Alarm!");
var alarm:AlarmEvent = new AlarmEvent(this.alarmMessage);
this.dispatchEvent(alarm);
}
A method that is registered as an event listener must be defined with the appropriate signature (that is, the set of
parameters and return type of the method). To be a listener for the Timer class’s timer event, a method must define
one parameter whose data type is TimerEvent (flash.events.TimerEvent), a subclass of the Event class. When the
Timer instance calls its event listeners, it passes a TimerEvent instance as the event object.
Notifying others of the alarm
Like the Timer class, the AlarmClock class provides an event that allows other code to receive notifications when the
alarm goes off. For a class to use the event-handling framework built into ActionScript, that class must implement
the flash.events.IEventDispatcher interface. Most commonly, this is done by extending the flash.events.EventDis-
patcher class, which provides a standard implementation of IEventDispatcher (or by extending one of EventDis-
patcher’s subclasses). As described previously, the AlarmClock class extends the SimpleClock class, which in turn
extends the mx.core.UIComponent class, which (through a chain of inheritance) extends the EventDispatcher class.
All of this means that the AlarmClock class already has built-in functionality to provide its own events.

ADOBE FLEX 3
Developer Guide
245
Other code can register to be notified of the AlarmClock class’s alarm event by calling the addEventListener()
method that AlarmClock inherits from EventDispatcher. When an AlarmClock instance is ready to notify other
code that its alarm event has been raised, it does so by calling the dispatchEvent() method, which is also inherited
from EventDispatcher.
var alarm:AlarmEvent = new AlarmEvent(this.alarmMessage);
this.dispatchEvent(alarm);
These lines of code are taken from the AlarmClock class’s onAlarm() method (shown in its entirety previously). The
AlarmClock instance’s dispatchEvent() method is called, which in turn notifies all the registered listeners that the
AlarmClock instance’s alarm event has been triggered. The parameter that is passed to dispatchEvent() is the
event object that will be passed along to the listener methods. In this case, it is an instance of the AlarmEvent class,
an Event subclass created specifically for this example.
Providing a custom alarm event
All event listeners receive an event object parameter with information about the particular event being triggered. In
many cases, the event object is an instance of the Event class. However, in some cases it is useful to provide additional
information to event listeners. As described earlier in the chapter, a common way to accomplish this is to define a
new class, a subclass of the Event class, and use an instance of that class as the event object. In this example, an Alarm-
Event instance is used as the event object when the AlarmClock class’s alarm event is dispatched. The AlarmEvent
class, shown here, provides additional information about the alarm event, specifically the alarm message:
import flash.events.Event;
/**
* This custom Event class adds a message property to a basic Event.
*/
public class AlarmEvent extends Event
{
/**
* The name of the new AlarmEvent type.
*/
public static const ALARM:String = "alarm";
/**
* A text message that can be passed to an event handler
* with this event object.
*/
public var message:String;
/**
*Constructor.
*@param message The text to display when the alarm goes off.
*/
public function AlarmEvent(message:String = "ALARM!")
{
super(ALARM);
this.message = message;
}
...
}

ADOBE FLEX 3
Developer Guide
246
The best way to create a custom event object class is to define a class that extends the Event class, as shown in the
preceding example. To supplement the inherited functionality, the AlarmEvent class defines a property message that
contains the text of the alarm message associated with the event; the message value is passed in as a parameter in
the AlarmEvent constructor. The AlarmEvent class also defines the constant ALARM, which can be used to refer to
the specific event (alarm) when calling the AlarmClock class’s addEventListener() method.
In addition to adding custom functionality, every Event subclass must override the inherited clone() method as
part of the ActionScript event-handling framework. Event subclasses can also optionally override the inherited
toString() method to include the custom event’s properties in the value returned when the toString() method
is called.
/**
* Creates and returns a copy of the current instance.
* @return A copy of the current instance.
*/
public override function clone():Event
{
return new AlarmEvent(message);
}
/**
* Returns a String containing all the properties of the current
* instance.
* @return A string representation of the current instance.
*/
public override function toString():String
{
return formatToString("AlarmEvent", "type", "bubbles", "cancelable", "eventPhase",
"message");
}
The overridden clone() method needs to return a new instance of the custom Event subclass, with all the custom
properties set to match the current instance. In the overridden toString() method, the utility method
formatToString() (inherited from Event) is used to provide a string with the name of the custom type, as well as
the names and values of all its properties.

247
Chapter 13: Display programming
Display programming in ActionScript™ 3.0 allows you to work with elements that appear on the Stage of Adobe®
Flash® Player 9 or Adobe®AIR™. This chapter describes the basic concepts for working with on-screen elements.
You’ll learn the details about programmatically organizing visual elements. You’ll also learn about creating your own
custom classes for display objects.
Contents
Basics of display programming . . . . . . . . . . . . . . . . . . . . . . . . . . . . . . . . . . . . . . . . . . . . . . . . . . . . . . . . . . . . . . . . . . . . . 247
Core display classes. . . . . . . . . . . . . . . . . . . . . . . . . . . . . . . . . . . . . . . . . . . . . . . . . . . . . . . . . . . . . . . . . . . . . . . . . . . . . . . 251
Advantages of the display list approach. . . . . . . . . . . . . . . . . . . . . . . . . . . . . . . . . . . . . . . . . . . . . . . . . . . . . . . . . . . . . . 252
Working with display objects . . . . . . . . . . . . . . . . . . . . . . . . . . . . . . . . . . . . . . . . . . . . . . . . . . . . . . . . . . . . . . . . . . . . . . 255
Manipulating display objects. . . . . . . . . . . . . . . . . . . . . . . . . . . . . . . . . . . . . . . . . . . . . . . . . . . . . . . . . . . . . . . . . . . . . . . 265
Masking display objects . . . . . . . . . . . . . . . . . . . . . . . . . . . . . . . . . . . . . . . . . . . . . . . . . . . . . . . . . . . . . . . . . . . . . . . . . . . 281
Animating objects . . . . . . . . . . . . . . . . . . . . . . . . . . . . . . . . . . . . . . . . . . . . . . . . . . . . . . . . . . . . . . . . . . . . . . . . . . . . . . . . 283
Example: SpriteArranger . . . . . . . . . . . . . . . . . . . . . . . . . . . . . . . . . . . . . . . . . . . . . . . . . . . . . . . . . . . . . . . . . . . . . . . . . . 287
Basics of display programming
Introduction to display programming
Each application built with ActionScript 3.0 has a hierarchy of displayed objects known as the display list. The display
list contains all the visible elements in the application. Display elements fall into one or more of the following groups:
•The Stage
The Stage is the base container of display objects. Each application has one Stage object, which contains all on-
screen display objects. The Stage is the top-level container and is at the top of the display list hierarchy:
ADOBE FLEX 3
Developer Guide
248
Each SWF file has an associated ActionScript class, known as the main class of the SWF file. When Flash Player
opens a SWF file in an HTML page, Flash Player calls the constructor function for that class and the instance
that is created (which is always a type of display object) is added as a child of the Stage object. The main class of
a SWF file always extends the Sprite class (for more information, see “Advantages of the display list approach” on
page 252).
You can access the Stage through the stage property of any DisplayObject instance. For more information, see
“Setting Stage properties” on page 260.
•Display objects
In ActionScript 3.0, all elements that appear on screen in an application are types of display objects. The
flash.display package includes a DisplayObject class, which is a base class extended by a number of other classes.
These different classes represent different types of display objects, such as vector shapes, movie clips, and text
fields, to name a few. For an overview of these classes, see “Advantages of the display list approach” on page 252.
•Display object containers
Display object containers are special types of display objects that, in addition to having their own visual repre-
sentation, can also contain child objects that are also display objects.
Display Object
Container
Display Object
Display Object
Container
Display Object
Container
Instance of
the main class of
the SWF file
Stage
Stage
Display Object
Container
Display Object
Display Object

ADOBE FLEX 3
Developer Guide
249
The DisplayObjectContainer class is a subclass of the DisplayObject class. A DisplayObjectContainer object can
contain multiple display objects in its child list. For example, the following illustration shows a type of Display-
ObjectContainer object known as a Sprite that contains various display objects:
A. A SimpleButton object. This type of display object has different “up,” “down,” and “over” states. B. A Bitmap object. In this case, the
Bitmap object was loaded from an external JPEG through a Loader object. C. A Shape object. The “picture frame” contains a rounded
rectangle that is drawn in ActionScript. This Shape object has a Drop Shadow filter applied to it. D. A TextField object.
In the context of discussing display objects, DisplayObjectContainer objects are also known as display object
containers or simply containers.
Although all visible display objects inherit from the DisplayObject class, the type of each is of a specific subclass
of DisplayObject class. For example, there is a constructor function for the Shape class or the Video class, but
there is no constructor function for the DisplayObject class.
As noted earlier, the Stage is a display object container.
Common display programming tasks
Since so much of ActionScript programming involves creating and manipulating visual elements, there are
numerous tasks that are related to display programming. This chapter describes common tasks that apply to all
display objects, including:
•Working with the display list and display object containers
•Adding display objects to the display list
•Removing objects from the display list
•Moving objects among display containers
•Moving objects in front of or behind other objects
•Working with the Stage
•Setting the frame rate
•Controlling Stage scaling
•Working with full-screen mode
•Handling display object events
•Positioning display objects, including creating drag-and-drop interaction

ADOBE FLEX 3
Developer Guide
250
•Resizing, scaling, and rotating display objects
•Applying blending modes, color transformations, and transparency to display objects
•Masking display objects
•Animating display objects
•Loading external display content (such as SWF files or images)
Later chapters in this manual describe additional tasks for working with display objects. These tasks include both
tasks that apply to any display object and tasks associated with specific types of display objects:
•Drawing vector graphics with ActionScript on display objects, described in “Using the drawing API” on page 294
•Applying geometric transformations to display objects, described in “Working with geometry” on page 307
•Applying graphical filter effects such as blur, glow, drop shadow and more to display objects, described in
“Filtering display objects” on page 318
•Working with MovieClip-specific characteristics, described in “Working with movie clips” on page 346
•Working with TextField objects, described in “Working with text” on page 355
•Working with bitmap graphics, described in “Working with bitmaps” on page 377
•Working with video elements, described in “Working with video” on page 397
Important concepts and terms
The following reference list contains important terms that you will encounter in this chapter:
•Alpha: The color value representing the amount of transparency (or more correctly, the amount of opacity) in a
color. For example, a color with an alpha channel value of 60% only shows 60% of its full strength, and is 40% trans-
parent.
•Bitmap graphic: A graphic that is defined in the computer as a grid (rows and columns) of colored pixels.
Commonly bitmap graphics include digital photos and similar images.
•Blending mode: A specification of how the contents of two overlapping images should interact. Commonly an
opaque image on top of another image simply blocks the image underneath so that it isn’t visible at all; however,
different blending modes cause the colors of the images to blend together in different ways so the resulting content
is some combination of the two images.
•Display list: The hierarchy of display objects that will be rendered as visible screen content by Flash Player and
AIR. The Stage is the root of the display list, and all the display objects that are attached to the Stage or one of its
children form the display list (even if the object isn’t actually rendered, for example if it’s outside the boundaries of
the Stage).
•Display object: An object which represents some type of visual content in Flash Player or AIR. Only display
objects can be included in the display list, and all display object classes are subclasses of the DisplayObject class.
•Display object container: A special type of display object which can contain child display objects in addition to
(generally) having its own visual representation.
•Main class of the SWF file: The class that defines the behavior for the outermost display object in a SWF file,
which conceptually is the class for the SWF file itself. For instance, a SWF created in Flash authoring has a “main
timeline” which contains all other timelines; the main class of the SWF file is the class of which the main timeline is
an instance.
ADOBE FLEX 3
Developer Guide
251
•Masking: A technique of hiding from view certain parts of an image (or conversely, only allowing certain parts
of an image to display). The portions of the mask image become transparent, so content underneath shows through.
The term is related to painter’s masking tape that is used to prevent paint from being applied to certain areas.
•Stage: The visual container that is the base or background of all visual content in a SWF.
•Transformation: An adjustment to a visual characteristic of a graphic, such as rotating the object, altering its
scale, skewing or distorting its shape, or altering its color.
•Vector graphic: A graphic that is defined in the computer as lines and shapes drawn with particular character-
istics (such as thickness, length, size, angle, and position).
Core display classes
The ActionScript 3.0 flash.display package includes classes for visual objects that can appear in Flash Player or AIR.
The following illustration shows the subclass relationships of these core display object classes.
The illustration shows the class inheritance of display object classes. Note that some of these classes, specifically
StaticText, TextField, and Video, are not in the flash.display package, but they still inherit from the DisplayObject
class.
All classes that extend the DisplayObject class inherit its methods and properties. For more information, see
“Properties and methods of the DisplayObject class” on page 255.
You can instantiate objects of the following classes contained in the flash.display package:
•Bitmap—You use the Bitmap class to define bitmap objects, either loaded from external files or rendered through
ActionScript. You can load bitmaps from external files through the Loader class. You can load GIF, JPG, or PNG files.
You can also create a BitmapData object with custom data and then create a Bitmap object that uses that data. You
can use the methods of the BitmapData class to alter bitmaps, whether they are loaded or created in ActionScript.
For more information, see “Loading display objects” on page 285 and “Working with bitmaps” on page 377.
MorphShape
DisplayObject
AVM1Movie Shape StaticText Video
DisplayObjectContainer TextField
Bitmap InteractiveObject
SimpleButton
StageLoader
MovieClip
Sprite

ADOBE FLEX 3
Developer Guide
252
•Loader—You use the Loader class to load external assets (either SWF files or graphics). For more information,
see “Loading display content dynamically” on page 285.
•Shape—You use the Shape class to create vector graphics, such as rectangles, lines, circles, and so on. For more
information, see “Using the drawing API” on page 294.
•SimpleButton—A SimpleButton object is the ActionScript representation of a Flash button symbol. A Simple-
Button instance has four button states: up, down, over, and hit test (the area that responds to mouse and keyboard
events).
•Sprite—A Sprite object can contain graphics of its own, and it can contain child display objects. (The Sprite class
extends the DisplayObjectContainer class). For more information, see “Working with display object containers” on
page 255 and “Using the drawing API” on page 294.
•MovieClip—A MovieClip object is the ActionScript form of a movie clip symbol created in Flash authoring. In
practice, a MovieClip is similar to a Sprite object, except that it also has a timeline. For more information, see
“Working with movie clips” on page 346.
The following classes, which are not in the flash.display package, are subclasses of the DisplayObject class:
•The TextField class, included in the flash.text package, is a display object for text display and input. For more
information, see “Working with text” on page 355.
•The Video class, included in the flash.media package, is the display object used for displaying video files. For
more information, see “Working with video” on page 397.
The following classes in the flash.display package extend the DisplayObject class, but you cannot create instances of
them. Instead, they serve as parent classes for other display objects, combining common functionality into a single
class.
•AVM1Movie—The AVM1Movie class is used to represent loaded SWF files that are authored in ActionScript
1.0 and 2.0.
•DisplayObjectContainer—The Loader, Stage, Sprite, and MovieClip classes each extend the DisplayObjectCon-
tainer class. For more information, see “Working with display object containers” on page 255.
•InteractiveObject—InteractiveObject is the base class for all objects used to interact with the mouse and
keyboard. SimpleButton, TextField, Loader, Sprite, Stage, and MovieClip objects are all subclasses of the Interactive-
Object class. For more information on creating mouse and keyboard interaction, see “Capturing user input” on
page 450.
•MorphShape—These objects are created when you create a shape tween in the Flash authoring tool. You cannot
instantiate them using ActionScript, but they can be accessed from the display list.
•Stage—The Stage class extends the DisplayObjectContainer class. There is one Stage instance for an application,
and it is at the top of the display list hierarchy. To access the Stage, use the stage property of any DisplayObject
instance. For more information, see “Setting Stage properties” on page 260.
Also, the StaticText class, in the flash.text package, extends the DisplayObject class, but you cannot create an instance
of it in code. Static text fields are created only in Adobe Flash CS3 Professional.
Advantages of the display list approach
In ActionScript 3.0, there are separate classes for different types of display objects. In ActionScript 1.0 and 2.0, many
of the same types of objects are all included in one class: the MovieClip class.

ADOBE FLEX 3
Developer Guide
253
This individualization of classes and the hierarchical structure of display lists have the following benefits:
•More efficient rendering and reduced memory usage
•Improved depth management
•Full traversal of the display list
•Off-list display objects
•Easier subclassing of display objects
These benefits are described in the next sections.
More efficient rendering and smaller file sizes
In ActionScript 1.0 and 2.0, you could draw shapes only in a MovieClip object. In ActionScript 3.0, there are simpler
display object classes in which you can draw shapes. Because these ActionScript 3.0 display object classes do not
include the full set of methods and properties that a MovieClip object includes, they are less taxing on memory and
processor resources.
For example, each MovieClip object includes properties for the timeline of the movie clip, whereas a Shape object
does not. The properties for managing the timeline can use a lot of memory and processor resources. In ActionScript
3.0, using the Shape object results in better performance. The Shape object has less overhead than the more complex
MovieClip object. Flash Player and AIR do not need to manage unused MovieClip properties, which improves speed
and reduces the memory footprint the object uses.
Improved depth management
In ActionScript 1.0 and 2.0, depth was managed through a linear depth management scheme and methods such as
getNextHighestDepth().
ActionScript 3.0 includes the DisplayObjectContainer class, which has more convenient methods and properties for
managing the depth of display objects.
In ActionScript 3.0, when you move a display object to a new position in the child list of a DisplayObjectContainer
instance, the other children in the display object container are repositioned automatically and assigned appropriate
child index positions in the display object container.
Also, in ActionScript 3.0 it is always possible to discover all of the child objects of any display object container. Every
DisplayObjectContainer instance has a numChildren property, which lists the number of children in the display
object container. And since the child list of a display object container is always an indexed list, you can examine every
object in the list from index position 0 through the last index position (numChildren - 1). This was not possible
with the methods and properties of a MovieClip object in ActionScript 1.0 and 2.0.
In ActionScript 3.0, you can easily traverse the display list sequentially; there are no gaps in the index numbers of a
child list of a display object container. Traversing the display list and managing the depth of objects is much easier
than was possible in ActionScript 1.0 and 2.0. In ActionScript 1.0 and 2.0, a movie clip could contain objects with
intermittent gaps in the depth order, which could make it difficult to traverse the list of object. In ActionScript 3.0,
each child list of a display object container is cached internally as an array, resulting in very fast lookups (by index).
Looping through all children of a display object container is also very fast.
In ActionScript 3.0, you can also access children in a display object container by using the getChildByName()
method of the DisplayObjectContainer class.

ADOBE FLEX 3
Developer Guide
254
Full traversal of the display list
In ActionScript 1.0 and 2.0, you could not access some objects, such as vector shapes, that were drawn in the Flash
authoring tool. In ActionScript 3.0, you can access all objects on the display list—both those created using Action-
Script and all display objects created in the Flash authoring tool. For details, see “Traversing the display list” on
page 259.
Off-list display objects
In ActionScript 3.0, you can create display objects that are not on the visible display list. These are known as off-list
display objects. A display object is added to the visible display list only when you call the addChild() or
addChildAt() method of a DisplayObjectContainer instance that has already been added to the display list.
You can use off-list display objects to assemble complex display objects, such as those that have multiple display
object containers containing multiple display objects. By keeping display objects off-list, you can assemble compli-
cated objects without using the processing time to render these display objects. You can then add an off-list display
object to the display list when it is needed. Also, you can move a child of a display object container on and off the
display list and to any desired position in the display list at will.
Easier subclassing of display objects
In ActionScript 1.0 and 2.0, you would often have to add new MovieClip objects to a SWF file to create basic shapes
or to display bitmaps. In ActionScript 3.0, the DisplayObject class includes many built-in subclasses, including Shape
and Bitmap. Because the classes in ActionScript 3.0 are more specialized for specific types of objects, it is easier to
create basic subclasses of the built-in classes.
For example, in order to draw a circle in ActionScript 2.0, you could create a CustomCircle class that extends the
MovieClip class when an object of the custom class is instantiated. However, that class would also include a number
of properties and methods from the MovieClip class (such as totalFrames) that do not apply to the class. In Action-
Script 3.0, however, you can create a CustomCircle class that extends the Shape object, and as such does not include
the unrelated properties and methods that are contained in the MovieClip class. The following code shows an
example of a CustomCircle class:
import flash.display.*;
public class CustomCircle extends Shape
{
var xPos:Number;
var yPos:Number;
var radius:Number;
var color:uint;
public function CustomCircle(xInput:Number,
yInput:Number,
rInput:Number,
colorInput:uint)
{
xPos = xInput;
yPos = yInput;
radius = rInput;
color = colorInput;
this.graphics.beginFill(color);
this.graphics.drawCircle(xPos, yPos, radius);
}
}

ADOBE FLEX 3
Developer Guide
255
Working with display objects
Now that you understand the basic concepts of the Stage, display objects, display object containers, and the display
list, this section provides you with some more specific information about working with display objects in Action-
Script 3.0.
Properties and methods of the DisplayObject class
All display objects are subclasses of the DisplayObject class, and as such they inherit the properties and methods of
the DisplayObject class. The properties inherited are basic properties that apply to all display objects. For example,
each display object has an x property and a y property that specifies the object’s position in its display object
container.
You cannot create a DisplayObject instance using the DisplayObject class constructor. You must create another type
of object (an object that is a subclass of the DisplayObject class), such as a Sprite, to instantiate an object with the new
operator. Also, if you want to create a custom display object class, you must create a subclass of one of the display
object subclasses that has a usable constructor function (such as the Shape class or the Sprite class). For more infor-
mation, see the DisplayObject class description in the ActionScript 3.0 Language and Components Reference.
Adding display objects to the display list
When you instantiate a display object, it will not appear on-screen (on the Stage) until you add the display object
instance to a display object container that is on the display list. For example, in the following code, the myText
TextField object would not be visible if you omitted the last line of code. In the last line of code, the this keyword
must refer to a display object container that is already added to the display list.
import flash.display.*;
import flash.text.TextField;
var myText:TextField = new TextField();
myText.text = "Buenos dias.";
this.addChild(myText);
When you add any visual element to the Stage, that element becomes a child of the Stage object. The first SWF file
loaded in an application (for example, the one that you embed in an HTML page) is automatically added as a child
of the Stage. It can be an object of any type that extends the Sprite class.
Any display objects that you create without using ActionScript—for example, by adding an MXML tag in Adobe Flex
Builder 2 or by placing an item on the Stage in Flash—are added to the display list. Although you do not add these
display objects through ActionScript, you can access them through ActionScript. For example, the following code
adjusts the width of an object named button1 that was added in the authoring tool (not through ActionScript):
button1.width = 200;
Working with display object containers
If a DisplayObjectContainer object is deleted from the display list, or if it is moved or transformed in some other
way, each display object in the DisplayObjectContainer is also deleted, moved, or transformed.

ADOBE FLEX 3
Developer Guide
256
A display object container is itself a type of display object—it can be added to another display object container. For
example, the following image shows a display object container, pictureScreen, that contains one outline shape and
four other display object containers (of type PictureFrame):
A. A shape defining the border of the pictureScreen display object container B. Four display object containers that are children of the picture-
Screen object
In order to have a display object appear in the display list, you must add it to a display object container that is on the
display list. You do this by using the addChild() method or the addChildAt() method of the container object. For
example, without the final line of the following code, the myTextField object would not be displayed:
var myTextField:TextField = new TextField();
myTextField.text = "hello";
this.root.addChild(myTextField);
In this code sample, this.root points to the MovieClip display object container that contains the code. In your
actual code, you may specify a different container.
Use the addChildAt() method to add the child to a specific position in the child list of the display object container.
These zero-based index positions in the child list relate to the layering (the front-to-back order) of the display
objects. For example, consider the following three display objects. Each object was created from a custom class called
Ball.
The layering of these display objects in their container can be adjusted using the addChildAt() method. For
example, consider the following code:
ball_A = new Ball(0xFFCC00, "a");
ball_A.name = "ball_A";
ball_A.x = 20;
ball_A.y = 20;
container.addChild(ball_A);
ball_B = new Ball(0xFFCC00, "b");
ball_B.name = "ball_B";
ball_B.x = 70;

ADOBE FLEX 3
Developer Guide
257
ball_B.y = 20;
container.addChild(ball_B);
ball_C = new Ball(0xFFCC00, "c");
ball_C.name = "ball_C";
ball_C.x = 40;
ball_C.y = 60;
container.addChildAt(ball_C, 1);
After executing this code, the display objects are positioned as follows in the container DisplayObjectContainer
object. Notice the layering of the objects.
To reposition an object to the top of the display list, simply re-add it to the list. For example, after the previous code,
to move ball_A to the top of the stack, use this line of code:
container.addChild(ball_A);
This code effectively removes ball_A from its location in container’s display list, and re-adds it to the top of the
list—which has the end result of moving it to the top of the stack.
You can use the getChildAt() method to verify the layer order of the display objects. The getChildAt() method
returns child objects of a container based on the index number you pass it. For example, the following code reveals
names of display objects at different positions in the child list of the container DisplayObjectContainer object:
trace(container.getChildAt(0).name); // ball_A
trace(container.getChildAt(1).name); // ball_C
trace(container.getChildAt(2).name); // ball_B
If you remove a display object from the parent container’s child list, the higher elements on the list each move down
a position in the child index. For example, continuing with the previous code, the following code shows how the
display object that was at position 2 in the container DisplayObjectContainer moves to position 1 if a display object
that is lower in the child list is removed:
container.removeChild(ball_C);
trace(container.getChildAt(0).name); // ball_A
trace(container.getChildAt(1).name); // ball_B
The removeChild() and removeChildAt() methods do not delete a display object instance entirely. They simply
remove it from the child list of the container. The instance can still be referenced by another variable. (Use the
delete operator to completely remove an object.)
Because a display object has only one parent container, you can add an instance of a display object to only one display
object container. For example, the following code shows that the display object tf1 can exist in only one container
(in this case, a Sprite, which extends the DisplayObjectContainer class):
tf1:TextField = new TextField();
tf2:TextField = new TextField();
tf1.name = "text 1";
tf2.name = "text 2";
container1:Sprite = new Sprite();
container2:Sprite = new Sprite();

ADOBE FLEX 3
Developer Guide
258
container1.addChild(tf1);
container1.addChild(tf2);
container2.addChild(tf1);
trace(container1.numChildren); // 1
trace(container1.getChildAt(0).name); // text 2
trace(container2.numChildren); // 1
trace(container2.getChildAt(0).name); // text 1
If you add a display object that is contained in one display object container to another display object container, it is
removed from the first display object container’s child list.
In addition to the methods described above, the DisplayObjectContainer class defines several methods for working
with child display objects, including the following:
•contains(): Determines whether a display object is a child of a DisplayObjectContainer.
•getChildByName(): Retrieves a display object by name.
•getChildIndex(): Returns the index position of a display object.
•setChildIndex(): Changes the position of a child display object.
•swapChildren(): Swaps the front-to-back order of two display objects.
•swapChildrenAt(): Swaps the front-to-back order of two display objects, specified by their index values.
For more information, see the relevant entries in the ActionScript 3.0 Language and Components Reference.
Recall that a display object that is off the display list—one that is not included in a display object container that is a
child of the Stage—is known as an off-list display object.
ADOBE FLEX 3
Developer Guide
259
Traversing the display list
As you’ve seen, the display list is a tree structure. At the top of the tree is the Stage, which can contain multiple display
objects. Those display objects that are themselves display object containers can contain other display objects, or
display object containers.
The DisplayObjectContainer class includes properties and methods for traversing the display list, by means of the
child lists of display object containers. For example, consider the following code, which adds two display objects,
title and pict, to the container object (which is a Sprite, and the Sprite class extends the DisplayObjectContainer
class):
var container:Sprite = new Sprite();
var title:TextField = new TextField();
title.text = "Hello";
var pict:Loader = new Loader();
var url:URLRequest = new URLRequest("banana.jpg");
pict.load(url);
pict.name = "banana loader";
container.addChild(title);
container.addChild(pict);
The getChildAt() method returns the child of the display list at a specific index position:
trace(container.getChildAt(0) is TextField); // true
You can also access child objects by name. Each display object has a name property, and if you don’t assign it, Flash
Player or AIR assigns a default value, such as "instance1". For example, the following code shows how to use the
getChildByName() method to access a child display object with the name "banana loader":
trace(container.getChildByName("banana loader") is Loader); // true
Display Object
Container
Display Object
Display Object
Container
Display Object
Container
Instance of
the main class of
the SWF file
Stage
Stage
Display Object
Container
Display Object
Display Object

ADOBE FLEX 3
Developer Guide
260
Using the getChildByName() method can result in slower performance than using the getChildAt() method.
Since a display object container can contain other display object containers as child objects in its display list, you can
traverse the full display list of the application as a tree. For example, in the code excerpt shown earlier, once the load
operation for the pict Loader object is complete, the pict object will have one child display object, which is the
bitmap, loaded. To access this bitmap display object, you can write pict.getChildAt(0). You can also write
container.getChildAt(0).getChildAt(0) (since container.getChildAt(0) == pict).
The following function provides an indented trace() output of the display list from a display object container:
function traceDisplayList(container:DisplayObjectContainer,indentString:String = ""):void
{
var child:DisplayObject;
for (var i:uint=0; i < container.numChildren; i++)
{
child = container.getChildAt(i);
trace(indentString, child, child.name);
if (container.getChildAt(i) is DisplayObjectContainer)
{
traceDisplayList(DisplayObjectContainer(child), indentString + "")
}
}
}
If you use Flex, you should know that Flex defines many component display object classes, and these classes override
the display list access methods of the DisplayObjectContainer class. For example, the Container class of the mx.core
package overrides the addChild() method and other methods of the DisplayObjectContainer class (which the
Container class extends). In the case of the addChild() method, the class overrides the method in such a way that
you cannot add all types of display objects to a Container instance in Flex. The overridden method, in this case,
requires that the child object that you are adding be a type of mx.core.UIComponent object.
Setting Stage properties
The Stage class overrides most properties and methods of the DisplayObject class. If you call one of these overridden
properties or methods, Flash Player and AIR throw an exception. For example, the Stage object does not have x or y
properties, since its position is fixed as the main container for the application. The x and y properties refer to the
position of a display object relative to its container, and since the Stage is not contained in another display object
container, these properties do not apply.
Note: Some properties and methods of the Stage class are only available to display objects that are in the same security
sandbox as the first SWF file loaded. For details, see “Stage security” on page 551.
Controlling the playback frame rate
The framerate property of the Stage class is used to set the frame rate for all SWF files loaded into the application.
For more information, see the ActionScript 3.0 Language and Components Reference.
import flash.display.Stage;
import flash.display.StageAlign;
import flash.display.StageScaleMode;
import flash.events.Event;
var swfStage:Stage = videoScreen.stage;
swfStage.scaleMode = StageScaleMode.NO_SCALE;
swfStage.align = StageAlign.TOP_LEFT;

ADOBE FLEX 3
Developer Guide
261
function resizeDisplay(event:Event):void
{
var swfWidth:int = swfStage.stageWidth;
var swfHeight:int = swfStage.stageHeight;
// Resize the video window.
var newVideoHeight:Number = swfHeight - controlBar.height;
videoScreen.height = newVideoHeight;
videoScreen.scaleX = videoScreen.scaleY;
// Reposition the control bar.
controlBar.y = newVideoHeight;
}
swfStage.addEventListener(Event.RESIZE, resizeDisplay);
Working with full-screen mode
Full-screen mode allows you to set a movie’s stage to fill a viewer’s entire monitor without any container borders or
menus. The Stage class’s displayState property is used to toggle full-screen mode on and off for a SWF. The
displayState property can be set to one of the values defined by the constants in the flash.display.StageDisplayState
class. To turn on full-screen mode, set displayState to StageDisplayState.FULL_SCREEN:
// Send the stage to full-screen in AS3
stage.displayState = StageDisplayState.FULL_SCREEN;
// Exit full-screen mode in AS3
stage.displayState = StageDisplayState.NORMAL;
// Send the stage to full-screen in AS2
Stage.displayState = "fullScreen";
// Exit full-screen mode in AS2
Stage.displayState = "normal";
In addition, a user can choose to leave full-screen mode by switching focus to a different window or by using one of
several key combinations: the Esc key (all platforms), Ctrl-W (Windows), Command-W (Mac), or Alt-F4
(Windows).
Stage scaling behavior for full-screen mode is the same as under normal mode; the scaling is controlled by the Stage
class’s scaleMode property. If the scaleMode property is set to StageScaleMode.NO_SCALE, the Stage’s
stageWidth and stageHeight properties change to reflect the size of the screen area occupied by the SWF (the
entire screen, in this case); if viewed in the browser the HTML parameter for this controls the setting.
You can use the Stage class’s fullScreen event to detect and respond when full-screen mode is turned on or off. For
example, you might want to reposition, add, or remove items from the screen when entering or leaving full-screen
mode, as in this example:
import flash.events.FullScreenEvent;
function fullScreenRedraw(event:FullScreenEvent):void
{
if (event.fullScreen)
{
// Remove input text fields.
// Add a button that closes full-screen mode.
}
else
{
// Re-add input text fields.

ADOBE FLEX 3
Developer Guide
262
// Remove the button that closes full-screen mode.
}
}
mySprite.stage.addEventListener(FullScreenEvent.FULL_SCREEN, fullScreenRedraw);
As this code shows, the event object for the fullScreen event is an instance of the flash.events.FullScreenEvent
class, which includes a fullScreen property indicating whether full-screen mode is enabled (true) or not (false).
When working with full-screen mode in ActionScript, you’ll want to keep the following considerations in mind:
•In Flash Player, full-screen mode can only be initiated through ActionScript in response to a mouse click
(including right-click) or keypress. AIR content running in the application security sandbox does not require that
full-screen mode be entered in response to a user gesture.
•For users with multiple monitors, the SWF content will expand to fill only one monitor. Flash Player and AIR
use a metric to determine which monitor contains the greatest portion of the SWF, and uses that monitor for full-
screen mode.
•For a SWF file embedded in an HTML page, the HTML code to embed Flash Player must include a param tag
and embed attribute with the name allowFullScreen and value true, like this:
<object>
...
<param name="allowFullScreen" value="true" />
<embed ... allowfullscreen="true" />
</object>
If you are using JavaScript in a web page to generate the SWF-embedding tags, you must alter the JavaScript to
add the allowFullScreen param tag and attribute. For example, if your HTML page uses the
AC_FL_RunContent() function (which is used by both Flex Builder and Flash-generated HTML pages), you
should add the allowFullScreen parameter to that function call as follows:
AC_FL_RunContent(
...
'allowFullScreen','true',
...
); //end AC code
This does not apply to SWF files running in the stand-alone Flash Player.
•All keyboard-related ActionScript, such as keyboard events and text entry in TextField instances, is disabled in
full-screen mode. The exception is the keyboard shortcuts that close full-screen mode.
There are a few additional security-related restrictions you’ll want to understand, too. These are described in
“Security sandboxes” on page 543.
Hardware scaling
You can use the Stage class’s fullScreenSourceRect property to set Flash Player or AIR to scale a specific region
of the stage to full-screen mode. Flash Player and AIR scale in hardware, if available. using the graphics and video
card on a user's computer, and generally display content more quickly than software scaling.
To take advantage of hardware scaling, you set the whole stage or part of the stage to full-screen mode. The following
AS3 code sets the whole stage to full-screen mode:
import flash.geom.*;
{
stage.fullScreenSourceRect = new Rectangle(0,0,320,240);
stage.displayState = StageDisplayState.FULL_SCREEN;
}
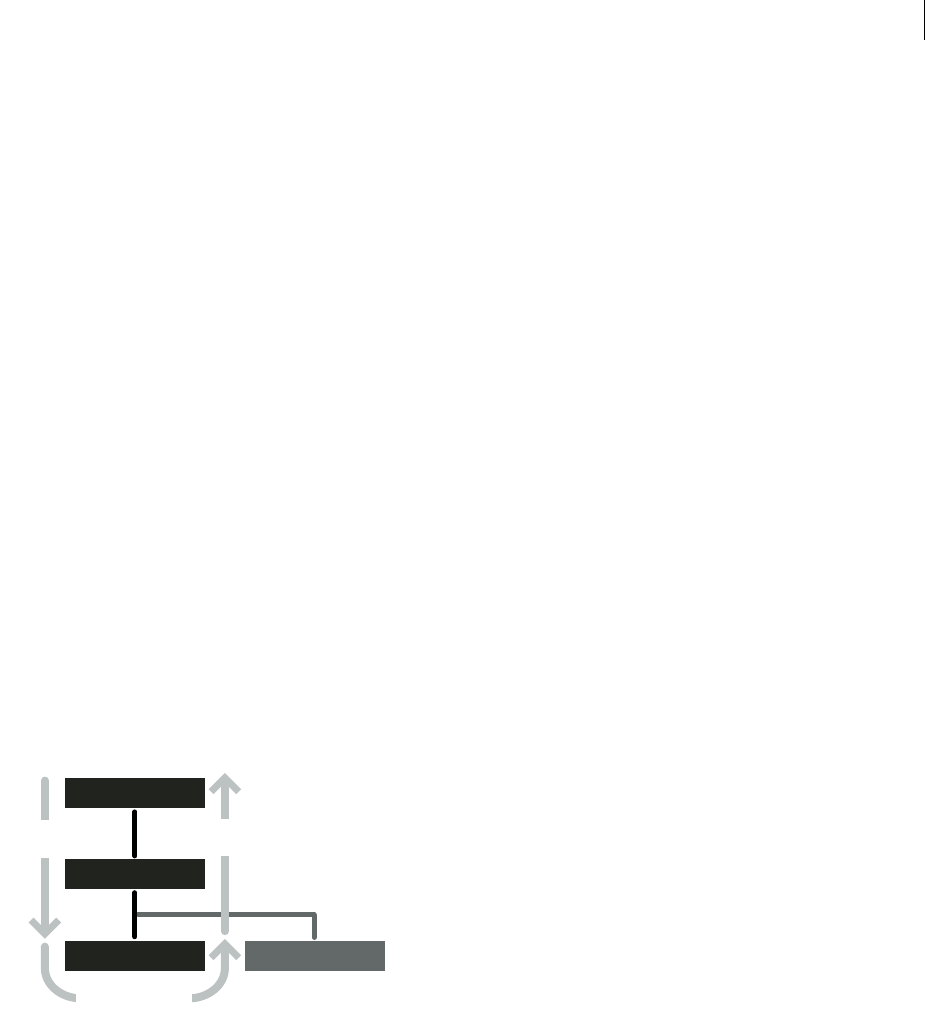
ADOBE FLEX 3
Developer Guide
263
When this property is set to a valid rectangle and the displayState property is set to full-screen mode, Flash Player
and AIR scale the specified area. The actual Stage size in pixels within ActionScript does not change. Flash Player
and AIR enforce a minimum limit for the size of the rectangle to accommodate the standard “Press Esc to exit full-
screen mode” message. This limit is usually around 260 by 30 pixels but can vary depending on platform and Flash
Player version.
The fullScreenSourceRect property can only be set when Flash Player or AIR is not in full-screen mode. To use this
property correctly, set this property first, then set the displayState property to full-screen mode, as shown in the code
examples.
To enable scaling, set the fullScreenSourceRect property to a rectangle object.
stage.fullScreenSourceRect = new Rectangle(0,0,320,240); // Valid, will enable hardware
scaling.
To disable scaling, set the fullScreenSourceRect property to null in AS3, and undefined in AS2.
stage.fullScreenSourceRect = null;
Handling events for display objects
The DisplayObject class inherits from the EventDispatcher class. This means that every display object can participate
fully in the event model (described in “Handling events” on page 227). Every display object can use its
addEventListener() method—inherited from the EventDispatcher class—to listen for a particular event, but only
if the listening object is part of the event flow for that event.
When Flash Player or AIR dispatches an event object, that event object makes a round-trip journey from the Stage
to the display object where the event occurred. For example, if a user clicks on a display object named child1, Flash
Player dispatches an event object from the Stage through the display list hierarchy down to the child1 display object.
The event flow is conceptually divided into three phases, as illustrated in this diagram:
For more information, see “Handling events” on page 227.
One important issue to keep in mind when working with display object events is the effect that event listeners can
have on whether display objects are automatically removed from memory (garbage collected) when they’re removed
from the display list. If a display object has objects subscribed as listeners to its events, that display object will not be
removed from memory even when it’s removed from the display list, because it will still have references to those
listener objects. For more information, see “Managing event listeners” on page 239.
Stage
Parent Node
Child1 Node Child2 Node
Capture
Phase
Bubbling
Phase
Target Phase

ADOBE FLEX 3
Developer Guide
264
Choosing a DisplayObject subclass
With several options to choose from, one of the important decisions you’ll make when you’re working with display
objects is which display object to use for what purpose. Here are some guidelines to help you decide. These same
suggestions apply whether you need an instance of a class or you’re choosing a base class for a class you’re creating:
•If you don’t need an object that can be a container for other display objects (that is, you just need one that serves
as a stand-alone screen element), choose one of these DisplayObject or InteractiveObject subclasses, depending on
what it will be used for:
•Bitmap for displaying a bitmap image.
•TextField for adding text.
•Video for displaying video.
•Shape for a “canvas” for drawing content on-screen. In particular, if you want to create an instance for
drawing shapes on the screen, and it won’t be a container for other display objects, you’ll gain significant perfor-
mance benefits using Shape instead of Sprite or MovieClip.
•MorphShape, StaticText, or SimpleButton for Flash authoring-specific items. (You can’t create instances of
these classes programmatically, but you can create variables with these data types to refer to items created using
the Flash authoring program.)
•If you need a variable to refer to the main Stage, use the Stage class as its data type.
•If you need a container for loading an external SWF file or image file, use a Loader instance. The loaded content
will be added to the display list as a child of the Loader instance. Its data type will depend on the nature of the loaded
content, as follows:
•A loaded image will be a Bitmap instance.
•A loaded SWF file written in ActionScript 3.0 will be a Sprite or MovieClip instance (or an instance of a
subclass of those classes, as specified by the content creator).
•A loaded SWF file written in ActionScript 1.0 or ActionScript 2.0 will be an AVM1Movie instance.
•If you need an object to serve as a container for other display objects (whether or not you’ll also be drawing onto
the display object using ActionScript), choose one of the DisplayObjectContainer subclasses:
•Sprite if the object will be created using only ActionScript, or as the base class for a custom display object
that will be created and manipulated solely with ActionScript.
•MovieClip if you’re creating a variable to refer to a movie clip symbol created in the Flash authoring tool.
•If you are creating a class that will be associated with a movie clip symbol in the Flash library, choose one of these
DisplayObjectContainer subclasses as your class’s base class:
•MovieClip if the associated movie clip symbol has content on more than one frame
•Sprite if the associated movie clip symbol has content only on the first frame

ADOBE FLEX 3
Developer Guide
265
Manipulating display objects
Regardless of which display object you choose to use, there are a number of manipulations that all display objects
have in common as elements that are displayed on the screen. For example, they can all be positioned on the screen,
moved forward or backward in the stacking order of display objects, scaled, rotated, and so forth. Because all display
objects inherit this functionality from their common base class (DisplayObject), this functionality behaves the same
whether you’re manipulating a TextField instance, a Video instance, a Shape instance, or any other display object.
The following sections detail several of these common display object manipulations.
Changing position
The most basic manipulation to any display object is positioning it on the screen. To set a display object’s position,
change the object’s x and y properties.
myShape.x = 17;
myShape.y = 212;
The display object positioning system treats the Stage as a Cartesian coordinate system (the common grid system
with a horizontal x axis and vertical y axis). The origin of the coordinate system (the 0,0 coordinate where the x and
y axes meet) is at the top-left corner of the Stage. From there, x values are positive going right and negative going left,
while (in contrast to typical graphing systems) y values are positive going down and negative going up. For example,
the previous lines of code move the object myShape to the x coordinate 17 (17 pixels to the right of the origin) and
y coordinate 212 (212 pixels below the origin).
By default, when a display object is created using ActionScript, the x and y properties are both set to 0, placing the
object at the top-left corner of its parent content.
Changing position relative to the Stage
It’s important to remember that the x and y properties always refer to the position of the display object relative to the
0,0 coordinate of its parent display object’s axes. So for a Shape instance (such as a circle) contained inside a Sprite
instance, setting the Shape object’s x and y properties to 0 will place the circle at the top-left corner of the Sprite,
which is not necessarily the top-left corner of the Stage. To position an object relative to the global Stage coordinates,
you can use the globalToLocal() method of any display object to convert coordinates from global (Stage) coordi-
nates to local (display object container) coordinates, like this:
// Position the shape at the top-left corner of the Stage,
// regardless of where its parent is located.
// Create a Sprite, positioned at x:200 and y:200.
var mySprite:Sprite = new Sprite();
mySprite.x = 200;
mySprite.y = 200;
this.addChild(mySprite);
// Draw a dot at the Sprite's 0,0 coordinate, for reference.
mySprite.graphics.lineStyle(1, 0x000000);
mySprite.graphics.beginFill(0x000000);
mySprite.graphics.moveTo(0, 0);
mySprite.graphics.lineTo(1, 0);
mySprite.graphics.lineTo(1, 1);
mySprite.graphics.lineTo(0, 1);
mySprite.graphics.endFill();
// Create the circle Shape instance.
var circle:Shape = new Shape();

ADOBE FLEX 3
Developer Guide
266
mySprite.addChild(circle);
// Draw a circle with radius 50 and center point at x:50, y:50 in the Shape.
circle.graphics.lineStyle(1, 0x000000);
circle.graphics.beginFill(0xff0000);
circle.graphics.drawCircle(50, 50, 50);
circle.graphics.endFill();
// Move the Shape so its top-left corner is at the Stage's 0, 0 coordinate.
var stagePoint:Point = new Point(0, 0);
var targetPoint:Point = mySprite.globalToLocal(stagePoint);
circle.x = targetPoint.x;
circle.y = targetPoint.y;
You can likewise use the DisplayObject class’s localToGlobal() method to convert local coordinates to Stage
coordinates.
Creating drag-and-drop interaction
One common reason for moving a display object is to create a drag-and-drop interaction, so that when the user clicks
an object, the object moves as the mouse moves, until the mouse button is released. Drag-and-drop interaction can
be created in two ways in ActionScript. In either case, two mouse events are used: when the mouse button is pressed
down, the object is told to follow the mouse cursor, and when it’s released, the object is told to stop following the
mouse cursor.
The first way, using the startDrag() method, is simpler, but more limited. When the mouse button is pressed, the
startDrag() method of the display object to be dragged is called. When the mouse button is released, the
stopDrag() method is called.
// This code creates a drag-and-drop interaction using the startDrag()
// technique.
// square is a DisplayObject (e.g. a MovieClip or Sprite instance).
import flash.events.MouseEvent;
// This function is called when the mouse button is pressed.
function startDragging(event:MouseEvent):void
{
square.startDrag();
}
// This function is called when the mouse button is released.
function stopDragging(event:MouseEvent):void
{
square.stopDrag();
}
square.addEventListener(MouseEvent.MOUSE_DOWN, startDragging);
square.addEventListener(MouseEvent.MOUSE_UP, stopDragging);
This technique suffers from one fairly significant limitation: only one item at a time can be dragged using
startDrag(). If one display object is being dragged and the startDrag() method is called on another display
object, the first display object stops following the mouse immediately. For example, if the startDragging()
function is changed as shown here, only the circle object will be dragged, in spite of the square.startDrag()
method call:

ADOBE FLEX 3
Developer Guide
267
function startDragging(event:MouseEvent):void
{
square.startDrag();
circle.startDrag();
}
As a consequence of the fact that only one object can be dragged at a time using startDrag(), the stopDrag()
method can be called on any display object and it stops whatever object is currently being dragged.
If you need to drag more than one display object, or to avoid the possibility of conflicts where more than one object
might potentially use startDrag(), it’s best to use the mouse-following technique to create the dragging effect. With
this technique, when the mouse button is pressed, a function is subscribed as a listener to the mouseMove event of
the Stage. This function, which is then called every time the mouse moves, causes the dragged object to jump to the
x, y coordinate of the mouse. Once the mouse button is released, the function is unsubscribed as a listener, meaning
it is no longer called when the mouse moves and the object stops following the mouse cursor. Here is some code that
demonstrates this technique:
// This code creates a drag-and-drop interaction using the mouse-following
// technique.
// circle is a DisplayObject (e.g. a MovieClip or Sprite instance).
import flash.events.MouseEvent;
var offsetX:Number;
var offsetY:Number;
// This function is called when the mouse button is pressed.
function startDragging(event:MouseEvent):void
{
// Record the difference (offset) between where
// the cursor was when the mouse button was pressed and the x, y
// coordinate of the circle when the mouse button was pressed.
offsetX = event.stageX - circle.x;
offsetY = event.stageY - circle.y;
// tell Flash Player to start listening for the mouseMove event
stage.addEventListener(MouseEvent.MOUSE_MOVE, dragCircle);
}
// This function is called when the mouse button is released.
function stopDragging(event:MouseEvent):void
{
// Tell Flash Player to stop listening for the mouseMove event.
stage.removeEventListener(MouseEvent.MOUSE_MOVE, dragCircle);
}
// This function is called every time the mouse moves,
// as long as the mouse button is pressed down.
function dragCircle(event:MouseEvent):void
{
// Move the circle to the location of the cursor, maintaining
// the offset between the cursor’s location and the
// location of the dragged object.
circle.x = event.stageX - offsetX;
circle.y = event.stageY - offsetY;
// Instruct Flash Player to refresh the screen after this event.
event.updateAfterEvent();
}

ADOBE FLEX 3
Developer Guide
268
circle.addEventListener(MouseEvent.MOUSE_DOWN, startDragging);
circle.addEventListener(MouseEvent.MOUSE_UP, stopDragging);
In addition to making a display object follow the mouse cursor, a common part of drag-and-drop interaction
includes moving the dragged object to the front of the display, so that it appears to be floating above all the other
objects. For example, suppose you have two objects, a circle and a square, that both have a drag-and-drop interaction.
If the circle happens to be below the square on the display list, and you click and drag the circle so that the cursor is
over the square, the circle will appear to slide behind the square, which breaks the drag-and-drop illusion. Instead,
you can make it so that when the circle is clicked, it moves to the top of the display list, and thus always appears on
top of any other content.
The following code (adapted from the previous example) creates a drag-and-drop interaction for two display objects,
a circle and a square. Whenever the mouse button is pressed over either one, that item is moved to the top of the
Stage’s display list, so that the dragged item always appears on top. Code that is new or changed from the previous
listing appears in boldface.
// This code creates a drag-and-drop interaction using the mouse-following
// technique.
// circle and square are DisplayObjects (e.g. MovieClip or Sprite
// instances).
import flash.display.DisplayObject;
import flash.events.MouseEvent;
var offsetX:Number;
var offsetY:Number;
var draggedObject:DisplayObject;
// This function is called when the mouse button is pressed.
function startDragging(event:MouseEvent):void
{
// remember which object is being dragged
draggedObject = DisplayObject(event.target);
// Record the difference (offset) between where the cursor was when
// the mouse button was pressed and the x, y coordinate of the
// dragged object when the mouse button was pressed.
offsetX = event.stageX - draggedObject.x;
offsetY = event.stageY - draggedObject.y;
// move the selected object to the top of the display list
stage.addChild(draggedObject);
// Tell Flash Player to start listening for the mouseMove event.
stage.addEventListener(MouseEvent.MOUSE_MOVE, dragObject);
}
// This function is called when the mouse button is released.
function stopDragging(event:MouseEvent):void
{
// Tell Flash Player to stop listening for the mouseMove event.
stage.removeEventListener(MouseEvent.MOUSE_MOVE, dragObject);
}

ADOBE FLEX 3
Developer Guide
269
// This function is called every time the mouse moves,
// as long as the mouse button is pressed down.
function dragObject(event:MouseEvent):void
{
// Move the dragged object to the location of the cursor, maintaining
// the offset between the cursor’s location and the location
// of the dragged object.
draggedObject.x = event.stageX - offsetX;
draggedObject.y = event.stageY - offsetY;
// Instruct Flash Player to refresh the screen after this event.
event.updateAfterEvent();
}
circle.addEventListener(MouseEvent.MOUSE_DOWN, startDragging);
circle.addEventListener(MouseEvent.MOUSE_UP, stopDragging);
square.addEventListener(MouseEvent.MOUSE_DOWN, startDragging);
square.addEventListener(MouseEvent.MOUSE_UP, stopDragging);
To extend this effect further, such as for a game where tokens or cards are moved among piles, you could add the
dragged object to the Stage’s display list when it’s “picked up,” and then add it to another display list—such as the
“pile” where it is dropped—when the mouse button is released.
Finally, to enhance the effect, you could apply a drop shadow filter to the display object when it is clicked (when you
start dragging it) and remove the drop shadow when the object is released. For details on using the drop shadow filter
and other display object filters in ActionScript, see “Filtering display objects” on page 318.
Panning and scrolling display objects
If you have a display object that is too large for the area in which you want it to display it, you can use the scrollRect
property to define the viewable area of the display object. In addition, by changing the scrollRect property in
response to user input, you can cause the content to pan left and right or scroll up and down.
The scrollRect property is an instance of the Rectangle class, which is a class that combines the values needed to
define a rectangular area as a single object. To initially define the viewable area of the display object, create a new
Rectangle instance and assign it to the display object’s scrollRect property. Later, to scroll or pan, you read the
scrollRect property into a separate Rectangle variable, and change the desired property (for instance, change the
Rectangle instance’s x property to pan or y property to scroll). Then you reassign that Rectangle instance to the
scrollRect property to notify the display object of the changed value.
For example, the following code defines the viewable area for a TextField object named bigText that is too tall to fit
in the SWF file’s boundaries. When the two buttons named up and down are clicked, they call functions that cause
the contents of the TextField object to scroll up or down by modifying the y property of the scrollRect Rectangle
instance.
import flash.events.MouseEvent;
import flash.geom.Rectangle;
// Define the initial viewable area of the TextField instance:
// left: 0, top: 0, width: TextField’s width, height: 350 pixels.
bigText.scrollRect = new Rectangle(0, 0, bigText.width, 350);
// Cache the TextField as a bitmap to improve performance.
bigText.cacheAsBitmap = true;

ADOBE FLEX 3
Developer Guide
270
// called when the "up" button is clicked
function scrollUp(event:MouseEvent):void
{
// Get access to the current scroll rectangle.
var rect:Rectangle = bigText.scrollRect;
// Decrease the y value of the rectangle by 20, effectively
// shifting the rectangle down by 20 pixels.
rect.y -= 20;
// Reassign the rectangle to the TextField to "apply" the change.
bigText.scrollRect = rect;
}
// called when the "down" button is clicked
function scrollDown(event:MouseEvent):void
{
// Get access to the current scroll rectangle.
var rect:Rectangle = bigText.scrollRect;
// Increase the y value of the rectangle by 20, effectively
// shifting the rectangle up by 20 pixels.
rect.y += 20;
// Reassign the rectangle to the TextField to "apply" the change.
bigText.scrollRect = rect;
}
up.addEventListener(MouseEvent.CLICK, scrollUp);
down.addEventListener(MouseEvent.CLICK, scrollDown);
As this example illustrates, when you work with the scrollRect property of a display object, it’s best to specify that
Flash Player or AIR should cache the display object’s content as a bitmap, using the cacheAsBitmap property. When
you do so, Flash Player and AIR don’t have to re-draw the entire contents of the display object each time it is scrolled,
and can instead use the cached bitmap to render the necessary portion directly to the screen. For details, see
“Caching display objects” on page 273.
Manipulating size and scaling objects
You can measure and manipulate the size of a display object in two ways, using either the dimension properties
(width and height) or the scale properties (scaleX and scaleY).
Every display object has a width property and a height property, which are initially set to the size of the object in
pixels. You can read the values of those properties to measure the size of the display object. You can also specify new
values to change the size of the object, as follows:
// Resize a display object.
square.width = 420;
square.height = 420;
// Determine the radius of a circle display object.
var radius:Number = circle.width / 2;
Changing the height or width of a display object causes the object to scale, meaning its contents stretch or squeeze
to fit in the new area. If the display object contains only vector shapes, those shapes will be redrawn at the new scale,
with no loss in quality. Any bitmap graphic elements in the display object will be scaled rather than redrawn. So, for
example, a digital photo whose width and height are increased beyond the actual dimensions of the pixel information
in the image will be pixelated, making it look jagged.

ADOBE FLEX 3
Developer Guide
271
When you change the width or height properties of a display object, Flash Player and AIR update the scaleX and
scaleY properties of the object as well. These properties represent the relative size of the display object compared to
its original size. The scaleX and scaleY properties use fraction (decimal) values to represent percentage. For
example, if a display object’s width has been changed so that it’s half as wide as its original size, the object’s scaleX
property will have the value .5, meaning 50 percent. If its height has been doubled, its scaleY property will have the
value 2, meaning 200 percent.
// circle is a display object whose width and height are 150 pixels.
// At original size, scaleX and scaleY are 1 (100%).
trace(circle.scaleX); // output: 1
trace(circle.scaleY); // output: 1
// When you change the width and height properties,
// Flash Player changes the scaleX and scaleY properties accordingly.
circle.width = 100;
circle.height = 75;
trace(circle.scaleX); // output: 0.6622516556291391
trace(circle.scaleY); // output: 0.4966887417218543
Size changes are not proportional. In other words, if you change the height of a square but not its width, its propor-
tions will no longer be the same, and it will be a rectangle instead of a square. If you want to make relative changes
to the size of a display object, you can set the values of the scaleX and scaleY properties to resize the object, as an
alternative to setting the width or height properties. For example, this code changes the width of the display object
named square, and then alters the vertical scale (scaleY) to match the horizontal scale, so that the size of the square
stays proportional.
// Change the width directly.
square.width = 150;
// Change the vertical scale to match the horizontal scale,
// to keep the size proportional.
square.scaleY = square.scaleX;
Controlling distortion when scaling
Normally when a display object is scaled (for example, stretched horizontally), the resulting distortion is spread
equally across the object, so that each part is stretched the same amount. For graphics and design elements, this is
probably what you want. However, sometimes it’s preferable to have control over which portions of the display object
stretch and which portions remain unchanged. One common example of this is a button that’s a rectangle with
rounded corners. With normal scaling, the corners of the button will stretch, making the corner radius change as the
button resizes.
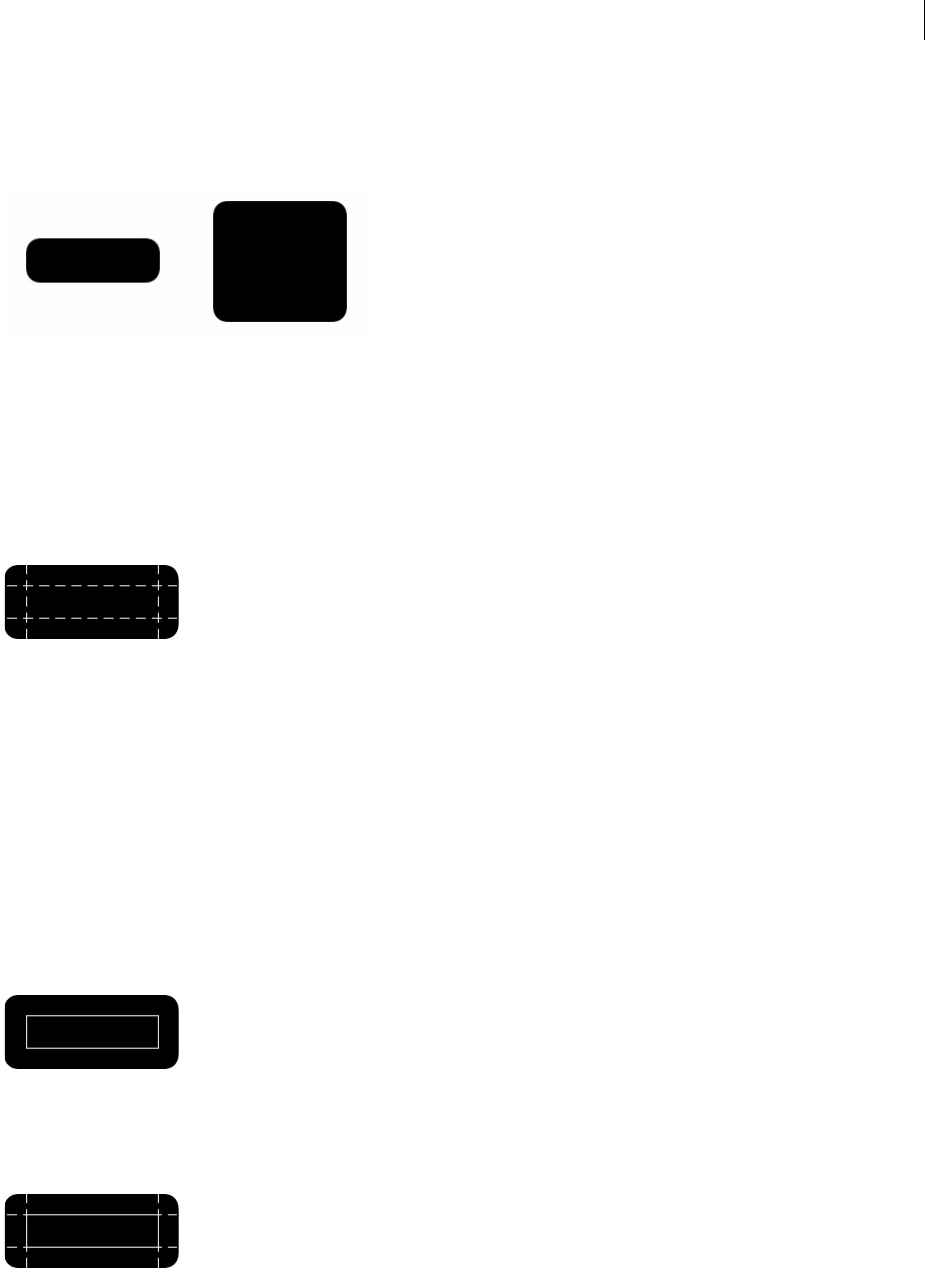
ADOBE FLEX 3
Developer Guide
272
However, in this case it would be preferable to have control over the scaling—to be able to designate certain areas
which should scale (the straight sides and middle) and areas which shouldn’t (the corners)—so that scaling happens
without visible distortion.
You can use 9-slice scaling (Scale-9) to create display objects where you have control over how the objects scale. With
9-slice scaling, the display object is divided into nine separate rectangles (a 3 by 3 grid, like the grid of a tic-tac-toe
board). The rectangles aren’t necessarily the same size—you designate where the grid lines are placed. Any content
that lies in the four corner rectangles (such as the rounded corners of a button) will not be stretched or compressed
when the display object scales. The top-center and bottom-center rectangles will scale horizontally but not vertically,
while the left-middle and right-middle rectangles will scale vertically but not horizontally. The center rectangle will
scale both horizontally and vertically.
Keeping this in mind, if you’re creating a display object and you want certain content to never scale, you just have to
make sure that the dividing lines of the 9-slice scaling grid are placed so that the content ends up in one of the corner
rectangles.
In ActionScript, setting a value for the scale9Grid property of a display object turns on 9-slice scaling for the object
and defines the size of the rectangles in the object’s Scale-9 grid. You use an instance of the Rectangle class as the
value for the scale9Grid property, as follows:
myButton.scale9Grid = new Rectangle(32, 27, 71, 64);
The four parameters of the Rectangle constructor are the x coordinate, y coordinate, width, and height. In this
example, the rectangle’s top-left corner is placed at the point x: 32, y: 27 on the display object named myButton. The
rectangle is 71 pixels wide and 65 pixels tall (so its right edge is at the x coordinate 103 on the display object and its
bottom edge is at the y coordinate 92 on the display object).
The actual area contained in the region defined by the Rectangle instance represents the center rectangle of the Scale-
9 grid. The other rectangles are calculated by Flash Player and AIR by extending the sides of the Rectangle instance,
as shown here:

ADOBE FLEX 3
Developer Guide
273
In this case, as the button scales up or down, the rounded corners will not stretch or compress, but the other areas
will adjust to accommodate the scaling.
A. myButton.width = 131;myButton.height = 106; B. myButton.width = 73;myButton.height = 69; C. myButton.width = 54;myButton.height
= 141;
Caching display objects
As your designs in Flash grow in size, whether you are creating an application or complex scripted animations, you
need to consider performance and optimization. When you have content that remains static (such as a rectangle
Shape instance), Flash does not optimize the content. Therefore, when you change the position of the rectangle, Flash
redraws the entire Shape instance.
You can cache specified display objects to improve the performance of your SWF file. The display object is a surface,
essentially a bitmap version of the instance’s vector data, which is data that you do not intend to change much over
the course of your SWF file. Therefore, instances with caching turned on are not continually redrawn as the SWF file
plays, letting the SWF file render quickly.
Note: You can update the vector data, at which time the surface is recreated. Therefore, the vector data cached in the
surface does not need to remain the same for the entire SWF file.
Setting a display object’s cacheAsBitmap property to true makes the display object cache a bitmap representation
of itself. Flash creates a surface object for the instance, which is a cached bitmap instead of vector data. If you change
the bounds of the display object, the surface is recreated instead of resized. Surfaces can nest within other surfaces.
The child surface copies its bitmap onto its parent surface. For more information, see “Enabling bitmap caching” on
page 275.
The DisplayObject class’s opaqueBackground property and scrollRect property are related to bitmap caching
using the cacheAsBitmap property. Although these three properties are independent of each other, the
opaqueBackground and scrollRect properties work best when an object is cached as a bitmap—you see perfor-
mance benefits for the opaqueBackground and scrollRect properties only when you set cacheAsBitmap to true.
For more information about scrolling display object content, see “Panning and scrolling display objects” on page 269.
For more information about setting an opaque background, see “Setting an opaque background color” on page 276.
For information on alpha channel masking, which requires you to set the cacheAsBitmap property to true, see
“Alpha channel masking” on page 282.
When to enable caching
Enabling caching for a display object creates a surface, which has several advantages, such as helping complex vector
animations to render fast. There are several scenarios in which you will want to enable caching. It might seem as
though you would always want to enable caching to improve the performance of your SWF files; however, there are
situations in which enabling caching does not improve performance, or can even decrease it. This section describes
scenarios in which caching should be used, and when to use regular display objects.

ADOBE FLEX 3
Developer Guide
274
Overall performance of cached data depends on how complex the vector data of your instances are, how much of the
data you change, and whether or not you set the opaqueBackground property. If you are changing small regions, the
difference between using a surface and using vector data could be negligible. You might want to test both scenarios
with your work before you deploy the application.
When to use bitmap caching
The following are typical scenarios in which you might see significant benefits when you enable bitmap caching.
•Complex background image: An application that contains a detailed and complex background image of vector
data (perhaps an image where you applied the trace bitmap command, or artwork that you created in Adobe Illus-
trator®). You might animate characters over the background, which slows the animation because the background
needs to continuously regenerate the vector data. To improve performance, you can set the opaqueBackground
property of the background display object to true. The background is rendered as a bitmap and can be redrawn
quickly, so that your animation plays much faster.
•Scrolling text field: An application that displays a large amount of text in a scrolling text field. You can place the
text field in a display object that you set as scrollable with scrolling bounds (the scrollRect property). This enables
fast pixel scrolling for the specified instance. When a user scrolls the display object instance, Flash shifts the scrolled
pixels up and generates the newly exposed region instead of regenerating the entire text field.
•Windowing system: An application with a complex system of overlapping windows. Each window can be open
or closed (for example, web browser windows). If you mark each window as a surface (by setting the cacheAsBitmap
property to true), each window is isolated and cached. Users can drag the windows so that they overlap each other,
and each window doesn’t need to regenerate the vector content.
•Alpha channel masking: When you are using alpha channel masking, you must set the cacheAsBitmap property
to true. For more information, see “Alpha channel masking” on page 282.
Enabling bitmap caching in all of these scenarios improves the responsiveness and interactivity of the application by
optimizing the vector graphics.
In addition, whenever you apply a filter to a display object, cacheAsBitmap is automatically set to true, even if you
explicitly set it to false. If you clear all the filters from the display object, the cacheAsBitmap property returns to
the value it was last set to.
When to avoid using bitmap caching
Misusing this feature could negatively affect your SWF file. When you use bitmap caching, remember the following
guidelines:
•Do not overuse surfaces (display objects with caching enabled). Each surface uses more memory than a regular
display object, which means that you should only enable surfaces when you need to improve rendering performance.
A cached bitmap can use significantly more memory than a regular display object. For example, if a Sprite
instance on the Stage is 250 pixels by 250 pixels in size, when cached it might use 250 KB instead of 1 KB when
it’s a regular (un-cached) Sprite instance.
•Avoid zooming into cached surfaces. If you overuse bitmap caching, a large amount of memory is consumed (see
previous bullet), especially if you zoom in on the content.
•Use surfaces for display object instances that are largely static (non-animating). You can drag or move the
instance, but the contents of the instance should not animate or change a lot. (Animation or changing content are
more likely with a MovieClip instance containing animation or a Video instance.) For example, if you rotate or
transform an instance, the instance changes between the surface and vector data, which is difficult to process and
negatively affects your SWF file.

ADOBE FLEX 3
Developer Guide
275
•If you mix surfaces with vector data, it increases the amount of processing that Flash Player and AIR (and
sometimes the computer) need to do. Group surfaces together as much as possible—for example, when you create
windowing applications.
Enabling bitmap caching
To enable bitmap caching for a display object, you set its cacheAsBitmap property to true:
mySprite.cacheAsBitmap = true;
After you set the cacheAsBitmap property to true, you might notice that the display object automatically pixel-
snaps to whole coordinates. When you test the SWF file, you should notice that any animation performed on a
complex vector image renders much faster.
A surface (cached bitmap) is not created, even if cacheAsBitmap is set to true, if one or more of the following
occurs:
•The bitmap is greater than 2880 pixels in height or width.
•The bitmap fails to allocate (because of an out-of-memory error).
The following example demonstrates the benefit that can be derived from using bitmap caching. In the example,
several complex drawings are placed on the display list and animated. When the viewer clicks anywhere on the Stage,
the bitmap caching state is toggled on or off.
You’ll notice that the animation changes from appearing to animate at one frame per second, to a smooth animation
where the instances animate back and forth across the Stage. When you click the Stage, it toggles the cacheAsBitmap
setting between true and false.
In this example, the Star class is a class which is associated with a movie clip symbol in the FLA’s Library panel. That
symbol contains a complex vector drawing.
To set up a FLA to recreate this example:
1Create a new Flash document.
2Type 24 into the fps box in the Property inspector (Window > Properties > Properties).
3Create a complex vector graphic and convert it to a symbol or import a symbol into the FLA file’s Library panel.
You can find a complex vector graphic in the FLA file in the following directory:
•On Windows, browse to boot drive\Program Files\Adobe\Adobe Flash CS3\Samples and
Tutorials\Samples\ActionScript\CacheBitmap.
•On the Macintosh, browse to Macintosh HD/Applications/Adobe Flash CS3/Samples and
Tutorials/Samples/ActionScript/CacheBitmap.
4With the Library panel open, select the symbol. From the Library panel menu, choose Properties. The Symbol
Properties dialog box appears.
5If necessary, click the Advanced button to show the Linkage properties section.
6Select Export for ActionScript (which also selects Export in First Frame).
7Type Star into the Class field.
8Click OK to apply your changes.
If you toggle caching on and off, as demonstrated in the previous example, it frees the data that is cached.

ADOBE FLEX 3
Developer Guide
276
Setting an opaque background color
You can set an opaque background for a display object. For example, when your SWF has a background that contains
complex vector art, you can set the opaqueBackground property to a specified color (typically the same color as the
Stage). The color is specified as a number (commonly a hexadecimal color value). The background is then treated as
a bitmap, which helps optimize performance.
When you set cacheAsBitmap to true, and also set the opaqueBackground property to a specified color, the
opaqueBackground property allows the internal bitmap to be opaque and rendered faster. If you do not set
cacheAsBitmap to true, the opaqueBackground property adds an opaque vector-square shape to the background
of the display object. It does not create a bitmap automatically.
The following example shows how to set the background of a display object to optimize performance:
myShape.cacheAsBitmap = true;
myShape.opaqueBackground = 0xFF0000;
In this case, the background color of the Shape named myShape is set to red (0xFF0000). Assuming the Shape
instance contains a drawing of a green triangle, on a Stage with a white background, this would show up as a green
triangle with red in the empty space in the Shape instance’s bounding box (the rectangle that completely encloses the
Shape).
Of course, this code would make more sense if it were used with a Stage with a solid red background. On another
colored background, that color would be specified instead. For example, in a SWF with a white background, the
opaqueBackground property would most likely be set to 0xFFFFFF, or pure white.
Applying blending modes
Blending modes involve combining the colors of one image (the base image) with the colors of another image (the
blend image) to produce a third image—the resulting image is the one that is actually displayed on the screen. Each
pixel value in an image is processed with the corresponding pixel value of the other image to produce a pixel value
for that same position in the result.
Every display object has a blendMode property that can be set to one of the following blending modes. These are
constants defined in the BlendMode class. Alternatively, you can use the String values (in parentheses) that are the
actual values of the constants.
•BlendMode.ADD ("add"): Commonly used to create an animated lightening dissolve effect between two images.
•BlendMode.ALPHA ("alpha"): Commonly used to apply the transparency of the foreground on the background.
•BlendMode.DARKEN ("darken"): Commonly used to superimpose type.
•BlendMode.DIFFERENCE ("difference"): Commonly used to create more vibrant colors.
•BlendMode.ERASE ("erase"): Commonly used to cut out (erase) part of the background using the foreground
alpha.
•BlendMode.HARDLIGHT ("hardlight"): Commonly used to create shading effects.
•BlendMode.INVERT ("invert"): Used to invert the background.

ADOBE FLEX 3
Developer Guide
277
•BlendMode.LAYER ("layer"): Used to force the creation of a temporary buffer for precomposition for a
particular display object.
•BlendMode.LIGHTEN ("lighten"): Commonly used to superimpose type.
•BlendMode.MULTIPLY ("multiply"): Commonly used to create shadows and depth effects.
•BlendMode.NORMAL ("normal"): Used to specify that the pixel values of the blend image override those of the
base image.
•BlendMode.OVERLAY ("overlay"): Commonly used to create shading effects.
•BlendMode.SCREEN ("screen"): Commonly used to create highlights and lens flares.
•BlendMode.SUBTRACT ("subtract"): Commonly used to create an animated darkening dissolve effect between
two images.
<<Need an example here, ideally. Here’s the old AS2 one:>>
The following procedure loads a dynamic image and lets you apply different blending modes to the image by
selecting a blending mode from a combo box on the Stage.
To apply different blending modes to an image:
1Create a new Flash document and save it as blendmodes.fla.
2Drag a ComboBox component instance onto the Stage and give it an instance name of blendMode_cb.
3Add the following ActionScript to Frame 1 of the Timeline:
var blendMode_dp:Array = new Array();
blendMode_dp.push({data:"add", label:"add"});
blendMode_dp.push({data:"alpha", label:"alpha"});
blendMode_dp.push({data:"darken", label:"darken"});
blendMode_dp.push({data:"difference", label:"difference"});
blendMode_dp.push({data:"erase", label:"erase"});
blendMode_dp.push({data:"hardlight", label:"hardlight"});
blendMode_dp.push({data:"invert", label:"invert"});
blendMode_dp.push({data:"layer", label:"layer"});
blendMode_dp.push({data:"lighten", label:"lighten"});
blendMode_dp.push({data:"multiply", label:"multiply"});
blendMode_dp.push({data:"normal", label:"normal"});
blendMode_dp.push({data:"overlay", label:"overlay"});
blendMode_dp.push({data:"screen", label:"screen"});
blendMode_dp.push({data:"subtract", label:"subtract"});
blendMode_cb.dataProvider = blendMode_dp;
var mclListener:Object = new Object();
mclListener.onLoadInit = function(target_mc:MovieClip) {
var blendModeClip:MovieClip = target_mc.createEmptyMovieClip("blendModeType_mc",
20);
with (blendModeClip) {
beginFill(0x999999);
moveTo(0, 0);
lineTo(target_mc._width / 2, 0);
lineTo(target_mc._width / 2, target_mc._height);
lineTo(0, target_mc._height);
lineTo(0, 0);
endFill();
}

ADOBE FLEX 3
Developer Guide
278
target_mc._x = (Stage.width - target_mc._width) / 2;
target_mc._y = (Stage.height - target_mc._height) / 2;
blendModeClip.blendMode = blendMode_cb.value;
};
this.createEmptyMovieClip("img_mc", 10);
var img_mcl:MovieClipLoader = new MovieClipLoader();
img_mcl.addListener(mclListener);
img_mcl.loadClip("http://www.helpexamples.com/flash/images/image1.jpg", img_mc);
function cbListener(eventObj:Object):Void {
img_mc.blendModeType_mc.blendMode = eventObj.target.value;
}
blendMode_cb.addEventListener("change", cbListener);
This ActionScript code populates the combo box with each type of blending mode, so the user can view each
effect on the dynamically loaded image. A listener object is created, which is used with a MovieClipLoader
instance. The listener object defines a single event listener, onLoadInit, which is invoked when the image is
completely downloaded and is initialized by Flash. The event listener creates a new movie clip named
blendModeType_mc, and uses the Drawing API to draw a rectangular shape over the left half of the image. The
currently selected blending mode for the ComboBox instance is then applied to the blendModeType_mc movie
clip.
The rest of the code sets up the MovieClipLoader instance, which is responsible for loading the specified image
into a movie clip on the Stage. Finally, a listener is defined for the blendMode_cb ComboBox instance, which
applies the selected blending mode whenever a new item is selected from the ComboBox instance.
4Select Control > Test Movie to test the document.
Adjusting DisplayObject colors
You can use the methods of the ColorTransform class (flash.geom.ColorTransform) to adjust the color of a display
object. Each display object has a transform property, which is an instance of the Transform class, and contains
information about various transformations that are applied to the display object (such as rotation, changes in scale
or position, and so forth). In addition to its information about geometric transformations, the Transform class also
includes a colorTransform property, which is an instance of the ColorTransform class, and provides access to make
color adjustments to the display object. To access the color transformation information of a display object, you can
use code such as this:
var colorInfo:ColorTransform = myDisplayObject.transform.colorTransform;
Once you’ve created a ColorTransform instance, you can read its property values to find out what color transforma-
tions have already been applied, or you can set those values to make color changes to the display object. To update
the display object after any changes, you must reassign the ColorTransform instance back to the
transform.colorTransform property.
var colorInfo:ColorTransform = my DisplayObject.transform.colorTransform;
// Make some color transformations here.
// Commit the change.
myDisplayObject.transform.colorTransform = colorInfo;

ADOBE FLEX 3
Developer Guide
279
Setting color values with code
The color property of the ColorTransform class can be used to assign a specific red, green, blue (RGB) color value
to the display object. The following example uses the color property to change the color of the display object named
square to blue, when the user clicks a button named blueBtn:
// square is a display object on the Stage.
// blueBtn, redBtn, greenBtn, and blackBtn are buttons on the Stage.
import flash.events.MouseEvent;
import flash.geom.ColorTransform;
// Get access to the ColorTransform instance associated with square.
var colorInfo:ColorTransform = square.transform.colorTransform;
// This function is called when blueBtn is clicked.
function makeBlue(event:MouseEvent):void
{
// Set the color of the ColorTransform object.
colorInfo.color = 0x003399;
// apply the change to the display object
square.transform.colorTransform = colorInfo;
}
blueBtn.addEventListener(MouseEvent.CLICK, makeBlue);
Note that when you change a display object’s color using the color property, it completely changes the color of the
entire object, regardless of whether the object previously had multiple colors. For example, if there is a display object
containing a green circle with black text on top, setting the color property of that object’s associated Color-
Transform instance to a shade of red will make the entire object, circle and text, turn red (so the text will no longer
be distinguishable from the rest of the object).
Altering color and brightness effects with code
Suppose you have a display object with multiple colors (for example, a digital photo) and you don’t want to
completely recolor the object; you just want to adjust the color of a display object based on the existing colors. In this
scenario, the ColorTransform class includes a series of multiplier and offset properties that you can use to make this
type of adjustment. The multiplier properties, named redMultiplier, greenMultiplier, blueMultiplier, and
alphaMultiplier, work like colored photographic filters (or colored sunglasses), amplifying or diminishing certain
colors in the display object. The offset properties (redOffset, greenOffset, blueOffset, and alphaOffset) can
be used to add extra amounts of a certain color to the object, or to specify the minimum value that a particular color
can have.
These multiplier and offset properties are identical to the advanced color settings that are available for movie clip
symbols in the Flash authoring tool when you choose Advanced from the Color pop-up menu on the Property
inspector.
The following code loads a JPEG image and applies a color transformation to it, which adjusts the red and green
channels as the mouse pointer moves along the x axis and y axis. In this case, because no offset values are specified,
the color value of each color channel displayed on screen will be a percentage of the original color value in the
image—meaning that the most red or green displayed in any given pixel will be the original amount of red or green
in that pixel.

ADOBE FLEX 3
Developer Guide
280
import flash.display.Loader;
import flash.events.MouseEvent;
import flash.geom.Transform;
import flash.geom.ColorTransform;
import flash.net.URLRequest;
// Load an image onto the Stage.
var loader:Loader = new Loader();
var url:URLRequest = new URLRequest("http://www.helpexamples.com/flash/images/image1.jpg");
loader.load(url);
this.addChild(loader);
// This function is called when the mouse moves over the loaded image.
function adjustColor(event:MouseEvent):void
{
// Access the ColorTransform object for the Loader (containing the image)
var colorTransformer:ColorTransform = loader.transform.colorTransform;
// Set the red and green multipliers according to the mouse position.
// The red value ranges from 0% (no red) when the cursor is at the left
// to 100% red (normal image appearance) when the cursor is at the right.
// The same applies to the green channel, except it's controlled by the
// position of the mouse in the y axis.
colorTransformer.redMultiplier = (loader.mouseX / loader.width) * 1;
colorTransformer.greenMultiplier = (loader.mouseY / loader.height) * 1;
// Apply the changes to the display object.
loader.transform.colorTransform = colorTransformer;
}
loader.addEventListener(MouseEvent.MOUSE_MOVE, adjustColor);
Rotating objects
Display objects can be rotated using the rotation property. You can read this value to find out whether an object
has been rotated, or to rotate the object you can set this property to a number (in degrees) representing the amount
of rotation to be applied to the object. For instance, this line of code rotates the object named square 45 degrees (one
eighth of one complete revolution):
square.rotation = 45;
Alternatively, you can rotate a display object using a transformation matrix, described in “Working with geometry”
on page 307.
Fading objects
You can control the transparency of a display object to make it partially (or completely transparent), or change the
transparency to make the object appear to fade in or out. The DisplayObject class’s alpha property defines the trans-
parency (or more accurately, the opacity) of a display object. The alpha property can be set to any value between 0
and 1, where 0 is completely transparent, and 1 is completely opaque. For example, these lines of code make the
object named myBall partially (50 percent) transparent when it is clicked with the mouse:
function fadeBall(event:MouseEvent):void
{
myBall.alpha = .5;
}
myBall.addEventListener(MouseEvent.CLICK, fadeBall);

ADOBE FLEX 3
Developer Guide
281
You can also alter the transparency of a display object using the color adjustments available through the Color-
Transform class. For more information, see “Adjusting DisplayObject colors” on page 278.
Masking display objects
You can use a display object as a mask to create a hole through which the contents of another display object are
visible.
Defining a mask
To indicate that a display object will be the mask for another display object, set the mask object as the mask property
of the display object to be masked:
// Make the object maskSprite be a mask for the object mySprite.
mySprite.mask = maskSprite;
The masked display object is revealed under all opaque (nontransparent) areas of the display object acting as the
mask. For instance, the following code creates a Shape instance containing a red 100 by 100 pixel square and a Sprite
instance containing a blue circle with a radius of 25 pixels. When the circle is clicked, it is set as the mask for the
square, so that the only part of the square that shows is the part that is covered by the solid part of the circle. In other
words, only a red circle will be visible.
// This code assumes it’s being run within a display object container
// such as a MovieClip or Sprite instance.
import flash.display.Shape;
// Draw a square and add it to the display list.
var square:Shape = new Shape();
square.graphics.lineStyle(1, 0x000000);
square.graphics.beginFill(0xff0000);
square.graphics.drawRect(0, 0, 100, 100);
square.graphics.endFill();
this.addChild(square);
// Draw a circle and add it to the display list.
var circle:Sprite = new Sprite();
circle.graphics.lineStyle(1, 0x000000);
circle.graphics.beginFill(0x0000ff);
circle.graphics.drawCircle(25, 25, 25);
circle.graphics.endFill();
this.addChild(circle);
function maskSquare(event:MouseEvent):void
{
square.mask = circle;
circle.removeEventListener(MouseEvent.CLICK, maskSquare);
}
circle.addEventListener(MouseEvent.CLICK, maskSquare);

ADOBE FLEX 3
Developer Guide
282
The display object that is acting as a mask can be draggable, animated, resized dynamically, and can use separate
shapes within a single mask. The mask display object doesn’t necessarily need to be added to the display list.
However, if you want the mask object to scale when the Stage is scaled or if you want to enable user interaction with
the mask (such as user-controlled dragging and resizing), the mask object must be added to the display list. The
actual z-index (front-to-back order) of the display objects doesn’t matter, as long as the mask object is added to the
display list. (The mask object will not appear on the screen except as a mask.) If the mask object is a MovieClip
instance with multiple frames, it plays all the frames in its timeline, the same as it would if it were not serving as a
mask. You can remove a mask by setting the mask property to null:
// remove the mask from mySprite
mySprite.mask = null;
You cannot use a mask to mask another mask. You cannot set the alpha property of a mask display object. Only fills
are used in a display object that is used as a mask; strokes are ignored.
About masking device fonts
You can use a display object to mask text that is set in a device font. When you use a display object to mask text set
in a device font, the rectangular bounding box of the mask is used as the masking shape. That is, if you create a non-
rectangular display object mask for device font text, the mask that appears in the SWF file is the shape of the rectan-
gular bounding box of the mask, not the shape of the mask itself.
Alpha channel masking
Alpha channel masking is supported if both the mask and the masked display objects use bitmap caching, as shown
here:
// maskShape is a Shape instance which includes a gradient fill.
mySprite.cacheAsBitmap = true;
maskShape.cacheAsBitmap = true;
mySprite.mask = maskShape;
For instance, one application of alpha channel masking is to use a filter on the mask object independently of a filter
that is applied to the masked display object.
In the following example, an external image file is loaded onto the Stage. That image (or more accurately, the Loader
instance it is loaded into) will be the display object that is masked. A gradient oval (solid black center fading to trans-
parent at the edges) is drawn over the image; this will be the alpha mask. Both display objects have bitmap caching
turned on. The oval is set as a mask for the image, and it is then made draggable.
// This code assumes it’s being run within a display object container
// such as a MovieClip or Sprite instance.
import flash.display.GradientType;
import flash.display.Loader;
import flash.display.Sprite;
import flash.geom.Matrix;
import flash.net.URLRequest;
// Load an image and add it to the display list.
var loader:Loader = new Loader();
var url:URLRequest = new URLRequest("http://www.helpexamples.com/flash/images/image1.jpg");
loader.load(url);
this.addChild(loader);
// Create a Sprite.
var oval:Sprite = new Sprite();
// Draw a gradient oval.
var colors:Array = [0x000000, 0x000000];

ADOBE FLEX 3
Developer Guide
283
var alphas:Array = [1, 0];
var ratios:Array = [0, 255];
var matrix:Matrix = new Matrix();
matrix.createGradientBox(200, 100, 0, -100, -50);
oval.graphics.beginGradientFill(GradientType.RADIAL,
colors,
alphas,
ratios,
matrix);
oval.graphics.drawEllipse(-100, -50, 200, 100);
oval.graphics.endFill();
// add the Sprite to the display list
this.addChild(oval);
// Set cacheAsBitmap = true for both display objects.
loader.cacheAsBitmap = true;
oval.cacheAsBitmap = true;
// Set the oval as the mask for the loader (and its child, the loaded image)
loader.mask = oval;
// Make the oval draggable.
oval.startDrag(true);
Animating objects
Animation is the process of making something move, or alternatively, of making something change over time.
Scripted animation is a fundamental part of video games, and is often used to add polish and useful interaction clues
to other applications.
The fundamental idea behind scripted animation is that a change needs to take place, and that change needs to be
divided into increments over time. It’s easy to make something repeat in ActionScript, using a common looping
statement. However, a loop will run through all its iterations before updating the display. To create scripted
animation, you need to write ActionScript that performs some action repeatedly over time and also updates the
screen each time it runs.
For example, imagine you want to create a simple animation, such as making a ball travel across the screen. Action-
Script includes a simple mechanism that allows you to track the passage of time and update the screen accordingly—
meaning you could write code that moves the ball a small amount each time, until it reaches its destination. After
each move the screen would update, making the cross-Stage motion visible to the viewer.
From a practical standpoint, it makes sense to synchronize scripted animation with the SWF file’s frame rate (in
other words, make one animation change each time a new frame displays or would display), since that is how fast
Flash Player updates the screen. Each display object has an enterFrame event that is dispatched according to the
frame rate of the SWF file—one event per frame. Most developers who create scripted animation use the
enterFrame event as a way to create actions that repeat over time. You could write code that listens to the
enterFrame event, moving the animated ball a certain amount each frame, and as the screen is updated (each
frame), the ball would be redrawn in its new location, creating motion.
Note: Another way to perform an action repeatedly over time is to use the Timer class. A Timer instance triggers an event
notification each time a specified amount of time has past. You could write code that performs animation by handling
the Timer class’s timer event, setting the time interval to a small one (some fraction of a second). For more information
about using the Timer class, see “Controlling time intervals” on page 125.

ADOBE FLEX 3
Developer Guide
284
In the following example, a circle Sprite instance, named circle, is created on the Stage. When the user clicks the
circle, a scripted animation sequence begins, causing circle to fade (its alpha property is decreased) until it is
completely transparent:
import flash.display.Sprite;
import flash.events.Event;
import flash.events.MouseEvent;
// draw a circle and add it to the display list
var circle:Sprite = new Sprite();
circle.graphics.beginFill(0x990000);
circle.graphics.drawCircle(50, 50, 50);
circle.graphics.endFill();
addChild(circle);
// When this animation starts, this function is called every frame.
// The change made by this function (updated to the screen every
// frame) is what causes the animation to occur.
function fadeCircle(event:Event):void
{
circle.alpha -= .05;
if (circle.alpha <= 0)
{
circle.removeEventListener(Event.ENTER_FRAME, fadeCircle);
}
}
function startAnimation(event:MouseEvent):void
{
circle.addEventListener(Event.ENTER_FRAME, fadeCircle);
}
circle.addEventListener(MouseEvent.CLICK, startAnimation);
When the user clicks the circle, the function fadeCircle() is subscribed as a listener of the enterFrame event,
meaning it begins to be called once per frame. That function fades circle by changing its alpha property, so once
per frame the circle’s alpha decreases by .05 (5 percent) and the screen is updated. Eventually, when the alpha value
is 0 (circle is completely transparent), the fadeCircle() function is removed as an event listener, ending the
animation.
The same code could be used, for example, to create animated motion instead of fading. By substituting a different
property for alpha in the function that is an enterFrame event listener, that property will be animated instead. For
example, changing this line
circle.alpha -= .05;
to this code
circle.x += 5;
will animate the x property, causing the circle to move to the right across the Stage. The condition that ends the
animation could be changed to end the animation (that is, unsubscribe the enterFrame listener) when the desired
x coordinate is reached.

ADOBE FLEX 3
Developer Guide
285
Loading display content dynamically
You can load any of the following external display assets into an ActionScript 3.0 application:
•A SWF file authored in ActionScript 3.0—This file can be a Sprite, MovieClip, or any class that extends Sprite.
•An image file—This includes JPG, PNG, and GIF files.
•An AVM1 SWF file—This is a SWF file written in ActionScript 1.0 or 2.0.
You load these assets by using the Loader class.
Loading display objects
Loader objects are used to load SWF files and graphics files into an application. The Loader class is a subclass of the
DisplayObjectContainer class. A Loader object can contain only one child display object in its display list—the
display object representing the SWF or graphic file that it loads. When you add a Loader object to the display list, as
in the following code, you also add the loaded child display object to the display list once it loads:
var pictLdr:Loader = new Loader();
var pictURL:String = "banana.jpg"
var pictURLReq:URLRequest = new URLRequest(pictURL);
pictLdr.load(pictURLReq);
this.addChild(pictLdr);
Once the SWF file or image is loaded, you can move the loaded display object to another display object container,
such as the container DisplayObjectContainer object in this example:
import flash.display.*;
import flash.net.URLRequest;
import flash.events.Event;
var container:Sprite = new Sprite();
addChild(container);
var pictLdr:Loader = new Loader();
var pictURL:String = "banana.jpg"
var pictURLReq:URLRequest = new URLRequest(pictURL);
pictLdr.load(pictURLReq);
pictLdr.contentLoaderInfo.addEventListener(Event.COMPLETE, imgLoaded);
function imgLoaded(event:Event):void
{
container.addChild(pictLdr.content);
}
Monitoring loading progress
Once the file has started loading, a LoaderInfo object is created. A LoaderInfo object provides information such as
load progress, the URLs of the loader and loadee, the number of bytes total for the media, and the nominal height
and width of the media. A LoaderInfo object also dispatches events for monitoring the progress of the load.
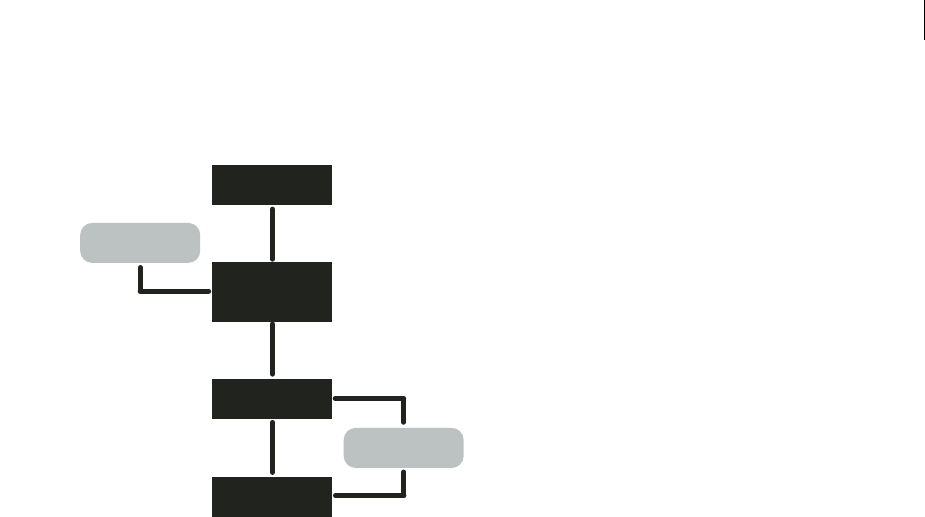
ADOBE FLEX 3
Developer Guide
286
The following diagram shows the different uses of the LoaderInfo object—for the instance of the main class of the
SWF file, for a Loader object, and for an object loaded by the Loader object:
The LoaderInfo object can be accessed as a property of both the Loader object and the loaded display object. As soon
as loading begins, the LoaderInfo object can be accessed through the contentLoaderInfo property of the Loader
object. Once the display object has finished loading, the LoaderInfo object can also be accessed as a property of the
loaded display object through the display object’s loaderInfo property. The loaderInfo property of the loaded
display object refers to the same LoaderInfo object as the contentLoaderInfo property of the Loader object. In
other words, a LoaderInfo object is shared between a loaded object and the Loader object that loaded it (between
loader and loadee).
In order to access properties of loaded content, you will want to add an event listener to the LoaderInfo object, as in
the following code:
import flash.display.Loader;
import flash.display.Sprite;
import flash.events.Event;
var ldr:Loader = new Loader();
var urlReq:URLRequest = new URLRequest("Circle.swf");
ldr.load(urlReq);
ldr.contentLoaderInfo.addEventListener(Event.COMPLETE, loaded);
addChild(ldr);
function loaded(event:Event):void
{
var content:Sprite = event.target.content;
content.scaleX = 2;
}
For more information, see “Handling events” on page 227.
Specifying loading context
When you load an external file into Flash Player or AIR through the load() or loadBytes() method of the Loader
class, you can optionally specify a context parameter. This parameter is a LoaderContext object.
Stage
Instance of
the main class of
the SWF file
Loader object
LoaderInfo object
content
contentLoaderInfo
property
loaderInfo
property
LoaderInfo object
loaderInfo
property

ADOBE FLEX 3
Developer Guide
287
The LoaderContext class includes three properties that let you define the context of how the loaded content can be
used:
•checkPolicyFile: Use this property only when loading an image file (not a SWF file). If you set this property
to true, the Loader checks the origin server for a cross-domain policy file (see “Website controls (cross-domain
policy files)” on page 540). This is necessary only for content originating from domains other than that of the SWF
file containing the Loader object. If the server grants permission to the Loader domain, ActionScript from SWF files
in the Loader domain can access data in the loaded image; in other words, you can use the BitmapData.draw()
command to access data in the loaded image.
Note that a SWF file from other domains than that of the Loader object can call Security.allowDomain() to
permit a specific domain.
•securityDomain: Use this property only when loading a SWF file (not an image). Specify this for a SWF file
from a domain other than that of the file containing the Loader object. When you specify this option, Flash Player
checks for the existence of a cross-domain policy file, and if one exists, SWF files from the domains permitted in the
cross-policy file can cross-script the loaded SWF content. You can specify
flash.system.SecurityDomain.currentDomain as this parameter.
•applicationDomain: Use this property only when loading a SWF file written in ActionScript 3.0 (not an image
or a SWF file written in ActionScript 1.0 or 2.0). When loading the file, you can specify that the file be included in
the same application domain as that of the Loader object, by setting the applicationDomain parameter to
flash.system.ApplicationDomain.currentDomain. By putting the loaded SWF file in the same application
domain, you can access its classes directly. This can be useful if you are loading a SWF file that contains embedded
media, which you can access via their associated class names. For more information, see “Using the Application-
Domain class” on page 498.
Here’s an example of checking for a cross-domain policy file when loading a bitmap from another domain:
var context:LoaderContext = new LoaderContext();
context.checkPolicyFile = true;
var urlReq:URLRequest = new URLRequest("http://www.[your_domain_here].com/photo11.jpg");
var ldr:Loader = new Loader();
ldr.load(urlReq, context);
Here’s an example of checking for a cross-domain policy file when loading a SWF from another domain, in order to
place the file in the same security sandbox as the Loader object. Additionally, the code adds the classes in the loaded
SWF file to the same application domain as that of the Loader object:
var context:LoaderContext = new LoaderContext();
context.securityDomain = SecurityDomain.currentDomain;
context.applicationDomain = ApplicationDomain.currentDomain;
var urlReq:URLRequest = new URLRequest("http://www.[your_domain_here].com/library.swf");
var ldr:Loader = new Loader();
ldr.load(urlReq, context);
For more information, see the LoaderContext class in the ActionScript 3.0 Language and Components Reference.
Example: SpriteArranger
The SpriteArranger sample application builds upon the Geometric Shapes sample application described separately
(see “Example: GeometricShapes” on page 115).

ADOBE FLEX 3
Developer Guide
288
The SpriteArranger sample application illustrates a number of concepts for dealing with display objects:
•Extending display object classes
•Adding objects to the display list
•Layering display objects and working with display object containers
•Responding to display object events
•Using properties and methods of display objects
To get the application files for this sample, see www.adobe.com/go/learn_programmingAS3samples_flash. The
SpriteArranger application files can be found in the folder Examples/SpriteArranger. The application consists of the
following files:
File Description
SpriteArranger.mxml
or
SpriteArranger.fla
The main application file in Flash (FLA) or Flex
(MXML).
com/example/programmingas3/SpriteArranger/CircleSprite.as A class defining a type of Sprite object that renders
a circle on-screen.
com/example/programmingas3/SpriteArranger/DrawingCanvas.as A class defining the canvas, which is a display
object container that contains GeometricSprite
objects.
com/example/programmingas3/SpriteArranger/SquareSprite.as A class defining a type of Sprite object that renders
a square on-screen.
com/example/programmingas3/SpriteArranger/TriangleSprite.as A class defining a type of Sprite object that renders
a triangle on-screen.
com/example/programmingas3/SpriteArranger/GeometricSprite.as A class that extends the Sprite object, used to
define an on-screen shape. The CircleSprite, Squa-
reSprite, and TriangleSprite each extend this class.
com/example/programmingas3/geometricshapes/IGeometricShape.as The base interface defining methods to be imple-
mented by all geometric shape classes.
com/example/programmingas3/geometricshapes/IPolygon.as An interface defining methods to be implemented
by geometric shape classes that have multiple
sides.
com/example/programmingas3/geometricshapes/RegularPolygon.as A type of geometric shape that has sides of equal
length positioned symmetrically around the
shape’s center.
com/example/programmingas3/geometricshapes/Circle.as A type of geometric shape that defines a circle.
com/example/programmingas3/geometricshapes/EquilateralTriangle.as A subclass of RegularPolygon that defines a
triangle with all sides the same length.
com/example/programmingas3/geometricshapes/Square.as A subclass of RegularPolygon defining a rectangle
with all four sides the same length.
com/example/programmingas3/geometricshapes/GeometricShapeFactory.as A class containing a “factory method” for creating
shapes given a shape type and size.

ADOBE FLEX 3
Developer Guide
289
Defining the SpriteArranger classes
The SpriteArranger application lets the user add a variety of display objects to the on-screen “canvas.”
The DrawingCanvas class defines a drawing area, a type of display object container, to which the user can add on-
screen shapes. These on-screen shapes are instances of one of the subclasses of the GeometricSprite class.
The DrawingCanvas class
In Flex, all child display objects added to a Container object must be of a class that descends from the
mx.core.UIComponent class. This application adds an instance of the DrawingCanvas class as a child of an
mx.containers.VBox object, as defined in MXML code in the SpriteArranger.mxml file. This inheritance is defined
in the DrawingCanvas class declaration, as follows:
public class DrawingCanvas extends UIComponent
The UIComponent class inherits from the DisplayObject, DisplayObjectContainer, and Sprite classes, and the code
in the DrawingCanvas class uses methods and properties of those classes.
public class DrawingCanvas extends Sprite
The DrawingCanvas() constructor method sets up a Rectangle object, bounds, which is property that is later used
in drawing the outline of the canvas. It then calls the initCanvas() method, as follows:
this.bounds = new Rectangle(0, 0, w, h);
initCanvas(fillColor, lineColor);
AS the following example shows, the initCanvas() method defines various properties of the DrawingCanvas
object, which were passed as arguments to the constructor function:
this.lineColor = lineColor;
this.fillColor = fillColor;
this.width = 500;
this.height = 200;
The initCanvas() method then calls the drawBounds() method, which draws the canvas using the Drawing-
Canvas class’s graphics property. The graphics property is inherited from the Shape class.
this.graphics.clear();
this.graphics.lineStyle(1.0, this.lineColor, 1.0);
this.graphics.beginFill(this.fillColor, 1.0);
this.graphics.drawRect(bounds.left - 1,
bounds.top - 1,
bounds.width + 2,
bounds.height + 2);
this.graphics.endFill();
The following additional methods of the DrawingCanvas class are invoked based on user interactions with the appli-
cation:
•The addShape() and describeChildren() methods, which are described in “A d d i n g d i s p l a y o b j e c t s t o t h e
canvas” on page 290
•The moveToBack(), moveDown(), moveToFront(), and moveUp() methods, which are described in
“Rearranging display object layering” on page 292
•The onMouseUp() method, which is described in “Clicking and dragging display objects” on page 291

ADOBE FLEX 3
Developer Guide
290
The GeometricSprite class and its subclasses
Each display object the user can add to the canvas is an instance of one of the following subclasses of the Geomet-
ricSprite class:
•CircleSprite
•SquareSprite
•TriangleSprite
The GeometricSprite class extends the flash.display.Sprite class:
public class GeometricSprite extends Sprite
The GeometricSprite class includes a number of properties common to all GeometricSprite objects. These are set in
the constructor function based on parameters passed to the function. For example:
this.size = size;
this.lineColor = lColor;
this.fillColor = fColor;
The geometricShape property of the GeometricSprite class defines an IGeometricShape interface, which defines
the mathematical properties, but not the visual properties, of the shape. The classes that implement the IGeometric-
Shape interface are defined in the GeometricShapes sample application (see “Example: GeometricShapes” on
page 115).
The GeometricSprite class defines the drawShape() method, which is further refined in the override definitions in
each subclass of GeometricSprite. For more information, see the Adding display objects to the canvas section, which
follows.
The GeometricSprite class also provides the following methods:
•The onMouseDown() and onMouseUp() methods, which are described in “Clicking and dragging display
objects” on page 291
•The showSelected() and hideSelected() methods, which are described in “Clicking and dragging display
objects” on page 291
Adding display objects to the canvas
When the user clicks the Add Shape button, the application calls the addShape() method of the DrawingCanvas
class. It instantiates a new GeometricSprite by calling the appropriate constructor function of one of the Geometric-
Sprite subclasses, as the following example shows:
public function addShape(shapeName:String, len:Number):void
{
var newShape:GeometricSprite;
switch (shapeName)
{
case "Triangle":
newShape = new TriangleSprite(len);
break;
case "Square":
newShape = new SquareSprite(len);
break;
case "Circle":
newShape = new CircleSprite(len);
break;
}

ADOBE FLEX 3
Developer Guide
291
newShape.alpha = 0.8;
this.addChild(newShape);
}
Each constructor method calls the drawShape() method, which uses the graphics property of the class (inherited
from the Sprite class) to draw the appropriate vector graphic. For example, the drawShape() method of the Circle-
Sprite class includes the following code:
this.graphics.clear();
this.graphics.lineStyle(1.0, this.lineColor, 1.0);
this.graphics.beginFill(this.fillColor, 1.0);
var radius:Number = this.size / 2;
this.graphics.drawCircle(radius, radius, radius);
The second to last line of the addShape() function sets the alpha property of the display object (inherited from the
DisplayObject class), so that each display object added to the canvas is slightly transparent, letting the user see the
objects behind it.
The final line of the addChild() method adds the new display object to the child list of the instance of the Drawing-
Canvas class, which is already on the display list. This causes the new display object to appear on the Stage.
The interface for the application includes two text fields, selectedSpriteTxt and outputTxt. The text properties
of these text fields are updated with information about the GeometricSprite objects that have been added to the
canvas or selected by the user. The GeometricSprite class handles this information-reporting task by overriding the
toString() method, as follows:
public override function toString():String
{
return this.shapeType + “ of size “ + this.size + " at " + this.x + ", " + this.y;
}
The shapeType property is set to the appropriate value in the constructor method of each GeometricSprite subclass.
For example, the toString() method might return the following value for a CircleSprite instance recently added to
the DrawingCanvas instance:
Circle of size 50 at 0, 0
The describeChildren() method of the DrawingCanvas class loops through the canvas’s child list, using the
numChildren property (inherited from the DisplayObjectContainer class) to set the limit of the for loop. It
generates a string listing each child, as follows:
var desc:String = "";
var child:DisplayObject;
for (var i:int=0; i < this.numChildren; i++)
{
child = this.getChildAt(i);
desc += i + ": " + child + '\n';
}
The resulting string is used to set the text property of the outputTxt text field.
Clicking and dragging display objects
When the user clicks on a GeometricSprite instance, the application calls the onMouseDown() event handler. As the
following shows, this event handler is set to listen for mouse down events in the constructor function of the Geomet-
ricSprite class:
this.addEventListener(MouseEvent.MOUSE_DOWN, onMouseDown);

ADOBE FLEX 3
Developer Guide
292
The onMouseDown() method then calls the showSelected() method of the GeometricSprite object. If it is the first
time this method has been called for the object, the method creates a new Shape object named
selectionIndicator and it uses the graphics property of the Shape object to draw a red highlight rectangle, as
follows:
this.selectionIndicator = new Shape();
this.selectionIndicator.graphics.lineStyle(1.0, 0xFF0000, 1.0);
this.selectionIndicator.graphics.drawRect(-1, -1, this.size + 1, this.size + 1);
this.addChild(this.selectionIndicator);
If this is not the first time the onMouseDown() method is called, the method simply sets the selectionIndicator
shape’s visible property (inherited from the DisplayObject class), as follows:
this.selectionIndicator.visible = true;
The hideSelected() method hides the selectionIndicator shape of the previously selected object by setting its
visible property to false.
The onMouseDown() event handler method also calls the startDrag() method (inherited from the Sprite class),
which includes the following code:
var boundsRect:Rectangle = this.parent.getRect(this.parent);
boundsRect.width -= this.size;
boundsRect.height -= this.size;
this.startDrag(false, boundsRect);
This lets the user drag the selected object around the canvas, within the boundaries set by the boundsRect rectangle.
When the user releases the mouse button, the mouseUp event is dispatched. The constructor method of the Drawing-
Canvas sets up the following event listener:
this.addEventListener(MouseEvent.MOUSE_UP, onMouseUp);
This event listener is set for the DrawingCanvas object, rather than for the individual GeometricSprite objects. This
is because when the GeometricSprite object is dragged, it could end up behind another display object (another
GeometricSprite object) when the mouse is released. The display object in the foreground would receive the mouse
up event but the display object the user is dragging would not. Adding the listener to the DrawingCanvas object
ensures that the event is always handled.
The onMouseUp() method calls the onMouseUp() method of the GeometricSprite object, which in turn calls the
stopDrag() method of the GeometricSprite object.
Rearranging display object layering
The user interface for the application includes buttons labeled Move Back, Move Down, Move Up, and Move to
Front. When the user clicks one of these buttons, the application calls the corresponding method of the Drawing-
Canvas class: moveToBack(), moveDown(), moveUp(), or moveToFront(). For example, the moveToBack()
method includes the following code:
public function moveToBack(shape:GeometricSprite):void
{
var index:int = this.getChildIndex(shape);
if (index > 0)
{
this.setChildIndex(shape, 0);
}
}

ADOBE FLEX 3
Developer Guide
293
The method uses the setChildIndex() method (inherited from the DisplayObjectContainer class) to position the
display object in index position 0 in the child list of the DrawingCanvas instance (this).
The moveDown() method works similarly, except that it decrements the index position of the display object by 1 in
the child list of the DrawingCanvas instance:
public function moveDown(shape:GeometricSprite):void
{
var index:int = this.getChildIndex(shape);
if (index > 0)
{
this.setChildIndex(shape, index - 1);
}
}
The moveUp() and moveToFront() methods work similarly to the moveToBack() and moveDown() methods.

294
Chapter 14: Using the drawing API
Although imported images and artwork are important, the functionality known as the drawing API, which allows
you to draw lines and shapes in ActionScript, gives you the freedom to start an application with the computer equiv-
alent of a blank canvas, on which you can create whatever images you wish. The ability to create your own graphics
opens up broad possibilities for your applications. With the techniques covered in this chapter you can create a
drawing program, make animated, interactive art, or programmatically create your own user interface elements,
among many possibilities.
Contents
Basics of using the drawing API . . . . . . . . . . . . . . . . . . . . . . . . . . . . . . . . . . . . . . . . . . . . . . . . . . . . . . . . . . . . . . . . . . . . 294
Understanding the Graphics class . . . . . . . . . . . . . . . . . . . . . . . . . . . . . . . . . . . . . . . . . . . . . . . . . . . . . . . . . . . . . . . . . . 295
Drawing lines and curves. . . . . . . . . . . . . . . . . . . . . . . . . . . . . . . . . . . . . . . . . . . . . . . . . . . . . . . . . . . . . . . . . . . . . . . . . . 296
Drawing shapes using built-in methods . . . . . . . . . . . . . . . . . . . . . . . . . . . . . . . . . . . . . . . . . . . . . . . . . . . . . . . . . . . . . 298
Creating gradient lines and fills . . . . . . . . . . . . . . . . . . . . . . . . . . . . . . . . . . . . . . . . . . . . . . . . . . . . . . . . . . . . . . . . . . . . 299
Using the Math class with drawing methods . . . . . . . . . . . . . . . . . . . . . . . . . . . . . . . . . . . . . . . . . . . . . . . . . . . . . . . . . 303
Animating with the drawing API . . . . . . . . . . . . . . . . . . . . . . . . . . . . . . . . . . . . . . . . . . . . . . . . . . . . . . . . . . . . . . . . . . . 303
Example: Algorithmic Visual Generator . . . . . . . . . . . . . . . . . . . . . . . . . . . . . . . . . . . . . . . . . . . . . . . . . . . . . . . . . . . . . 304
Basics of using the drawing API
Introduction to using the drawing API
The drawing API is the name for the functionality built into ActionScript that allows you to create vector graphics—
lines, curves, shapes, fills, and gradients—and display them on the screen using ActionScript. The
flash.display.Graphics class provides this functionality. You can draw with ActionScript on any Shape, Sprite, or
MovieClip instance, using the graphics property defined in each of those classes. (Each of those classes’ graphics
property is in fact an instance of the Graphics class.)
If you’re just getting started with drawing with code, the Graphics class includes several methods that make it easy
to draw common shapes like circles, ellipses, rectangles, and rectangles with rounded corners. You can draw them as
empty lines or filled shapes. When you need more advanced functionality, the Graphics class also includes methods
for drawing lines and quadratic Bézier curves, which you can use in conjunction with the trigonometry functions in
the Math class to create any shape you need.
Common drawing API tasks
The following tasks are things you’ll likely want to accomplish using the drawing API in ActionScript, which are
described in this chapter:
•Defining line styles and fill styles for drawing shapes
•Drawing straight lines and curves
•Using methods for drawing shapes such as circles, ellipses, and rectangles
•Drawing with gradient lines and fills

ADOBE FLEX 3
Developer Guide
295
•Defining a matrix for creating a gradient
•Using trigonometry with the drawing API
•Incorporating the drawing API into animation
Important concepts and terms
The following reference list contains important terms that you will encounter in this chapter:
•Anchor point: One of the two end points of a quadratic Bézier curve.
•Control point: The point that defines the direction and amount of curve of a quadratic Bézier curve. The curved
line never reaches the control point; however, the line curves as though being drawn toward the control point.
•Coordinate space: The graph of coordinates contained in a display object, on which its child elements are
positioned.
•Fill: The solid inner portion of a shape that has a line filled in with color, or all of a shape that has no outline.
•Gradient: A color that consists of a gradual transition from one color to one or more other colors (as opposed to
a solid color).
•Point: A single location in a coordinate space. In the 2-d coordinate system used in ActionScript, a point is
defined by its location along the x axis and the y axis (the point’s coordinates).
•Quadratic Bézier curve: A type of curve defined by a particular mathematical formula. In this type of curve, the
shape of the curve is calculated based on the positions of the anchor points (the end points of the curve) and a control
point that defines the amount and direction of the curve.
•Scale: The size of an object relative to its original size. When used as a verb, to scale an object means to change
its size by stretching or shrinking the object.
•Stroke: The outline portion of a shape that has a line filled in with color, or the lines of an un-filled shape.
•Translate: To change a point’s coordinates from one coordinate space to another.
•X axis: The horizontal axis in the 2-d coordinate system used in ActionScript.
•Y axis: The vertical axis in the 2-d coordinate system used in ActionScript.
Understanding the Graphics class
Each Shape, Sprite, and MovieClip object has a graphics property, which is an instance of the Graphics class. The
Graphics class includes properties and methods for drawing lines, fills, and shapes. If you want a display object to
use solely as a canvas for drawing content, you can use a Shape instance. A Shape instance will perform better than
other display objects for drawing, because it doesn’t have the overhead of the additional functionality in the Sprite
and MovieClip classes. If you want a display object on which you can draw graphical content and also want that
object to contain other display objects, you can use a Sprite instance. For more information on determining which
display object to use for various tasks, see “Choosing a DisplayObject subclass” on page 264.

ADOBE FLEX 3
Developer Guide
296
Drawing lines and curves
All drawing that you do with a Graphics instance is based on basic drawing with lines and curves. Consequently, all
ActionScript drawing must be performed using the same series of steps:
•Define line and fill styles
•Set the initial drawing position
•Draw lines, curves, and shapes (optionally moving the drawing point)
•If necessary, finish creating a fill
Defining line and fill styles
To draw with the graphics property of a Shape, Sprite, or MovieClip instance, you must first define the style (line
size and color, fill color) to use when drawing. Just like when you use the drawing tools in Adobe® Flash® CS3 Profes-
sional or another drawing application, when you’re using ActionScript to draw you can draw with or without a
stroke, and with or without a fill color. You specify the appearance of the stroke using the lineStyle() or
lineGradientStyle() method. To create a solid line, use the lineStyle() method. When calling this method,
the most common values you’ll specify are the first three parameters: line thickness, color, and alpha. For example,
this line of code tells the Shape named myShape to draw lines that are 2 pixels thick, red (0x990000), and 75% opaque:
myShape.graphics.lineStyle(2, 0x990000, .75);
The default value for the alpha parameter is 1.0 (100%), so you can leave that parameter off if you want a completely
opaque line. The lineStyle() method also accepts two additional parameters for pixel hinting and scale mode; for
more information about using those parameters see the description of the Graphics.lineStyle() method in the
ActionScript 3.0 Language and Components Reference.
To create a gradient line, use the lineGradientStyle() method. This method is described in “Creating gradient
lines and fills” on page 299.
If you want to create a filled shape, you call the beginFill(), beginGradientFill(), or beginBitmapFill()
methods before starting the drawing. The most basic of these, the beginFill() method, accepts two parameters:
the fill color, and (optionally) an alpha value for the fill color. For example, if you want to draw a shape with a solid
green fill, you would use the following code (assuming you’re drawing on an object named myShape):
myShape.graphics.beginFill(0x00FF00);
Calling any fill method implicitly ends any previous fill before starting a new one. Calling any method that specifies
a stroke style replaces the previous stroke, but does not alter a previously specified fill, and vice versa.
Once you have specified the line style and fill properties, the next step is to indicate the starting point for your
drawing. The Graphics instance has a drawing point, like the tip of a pen on a piece of paper. Wherever the drawing
point is located, that is where the next drawing action will begin. Initially a Graphics object begins with its drawing
point at the point 0, 0 in the coordinate space of the object on which it’s drawing. To start the drawing at a different
point, you can first call the moveTo() method before calling one of the drawing methods. This is analogous to lifting
the pen tip off of the paper and moving it to a new position.
With the drawing point in place you draw using a series of calls to the drawing methods lineTo() (for drawing
straight lines) and curveTo() (for drawing curved lines).
While you are drawing, you can call the moveTo() method at any time to move the drawing point to a new position
without drawing.

ADOBE FLEX 3
Developer Guide
297
While drawing, if you have specified a fill color, you can tell Adobe Flash Player or Adobe® AIR™ to close off the fill
by calling the endFill() method. If you have not drawn a closed shape (in other words, if at the time you call
endFill() the drawing point is not at the starting point of the shape), when you call the endFill() method Flash
Player or AIR automatically closes the shape by drawing a straight line from the current drawing point to the location
specified in the most recent moveTo() call. If you have started a fill and not called endFill(), calling beginFill()
(or one of the other fill methods) closes the current fill and starts the new one.
Drawing straight lines
When you call the lineTo() method, the Graphics object draws a straight line from the current drawing point to
the coordinates you specify as the two parameters in the method call, drawing with the line style you have specified.
For example, this line of code puts the drawing point at the point 100, 100 then draws a line to the point 200, 200:
myShape.graphics.moveTo(100, 100);
myShape.graphics.lineTo(200, 200);
The following example draws red and green triangles with a height of 100 pixels:
var triangleHeight:uint = 100;
var triangle:Shape = new Shape();
// red triangle, starting at point 0, 0
triangle.graphics.beginFill(0xFF0000);
triangle.graphics.moveTo(triangleHeight/2, 0);
triangle.graphics.lineTo(triangleHeight, triangleHeight);
triangle.graphics.lineTo(0, triangleHeight);
triangle.graphics.lineTo(triangleHeight/2, 0);
// green triangle, starting at point 200, 0
triangle.graphics.beginFill(0x00FF00);
triangle.graphics.moveTo(200 + triangleHeight/2, 0);
triangle.graphics.lineTo(200 + triangleHeight, triangleHeight);
triangle.graphics.lineTo(200, triangleHeight);
triangle.graphics.lineTo(200 + triangleHeight/2, 0);
this.addChild(triangle);
Drawing curves
The curveTo() method draws a quadratic Bézier curve. This draws an arc that connects two points (called anchor
points) while bending toward a third point (called the control point). The Graphics object uses the current drawing
position as the first anchor point. When you call the curveTo() method, you pass four parameters: the x and y
coordinates of the control point, followed by the x and y coordinates of the second anchor point. For example, the
following code draws a curve starting at point 100, 100 and ending at point 200, 200. Because the control point is at
point 175, 125, this creates a curve that moves to the right and then downward:
myShape.graphics.moveTo(100, 100);
myShape.graphics.curveTo(175, 125, 200, 200);
The following example draws red and green circular objects with a width and height of 100 pixels. Note that due to
the nature of the quadratic Bézier equation, these are not perfect circles:
var size:uint = 100;
var roundObject:Shape = new Shape();
// red circular shape
roundObject.graphics.beginFill(0xFF0000);
roundObject.graphics.moveTo(size / 2, 0);

ADOBE FLEX 3
Developer Guide
298
roundObject.graphics.curveTo(size, 0, size, size / 2);
roundObject.graphics.curveTo(size, size, size / 2, size);
roundObject.graphics.curveTo(0, size, 0, size / 2);
roundObject.graphics.curveTo(0, 0, size / 2, 0);
// green circular shape
roundObject.graphics.beginFill(0x00FF00);
roundObject.graphics.moveTo(200 + size / 2, 0);
roundObject.graphics.curveTo(200 + size, 0, 200 + size, size / 2);
roundObject.graphics.curveTo(200 + size, size, 200 + size / 2, size);
roundObject.graphics.curveTo(200, size, 200, size / 2);
roundObject.graphics.curveTo(200, 0, 200 + size / 2, 0);
this.addChild(roundObject);
Drawing shapes using built-in methods
For convenience when drawing common shapes such as circles, ellipses, rectangles, and rectangles with rounded
corners, ActionScript 3.0 has methods that draw these common shapes for you. These are the drawCircle(),
drawEllipse(), drawRect(), drawRoundRect(), and drawRoundRectComplex() methods of the Graphics class.
These methods may be used in place of the lineTo() and curveTo() methods. Note, however, that you must still
specify line and fill styles before calling these methods.
The following example recreates the example of drawing red, green, and blue squares with width and height of 100
pixels. This code uses the drawRect() method, and additionally specifies that the fill color has an alpha of 50% (0.5):
var squareSize:uint = 100;
var square:Shape = new Shape();
square.graphics.beginFill(0xFF0000, 0.5);
square.graphics.drawRect(0, 0, squareSize, squareSize);
square.graphics.beginFill(0x00FF00, 0.5);
square.graphics.drawRect(200, 0, squareSize, squareSize);
square.graphics.beginFill(0x0000FF, 0.5);
square.graphics.drawRect(400, 0, squareSize, squareSize);
square.graphics.endFill();
this.addChild(square);
In a Sprite or MovieClip object, the drawing content created with the graphics property always appears behind all
child display objects that are contained by the object. Also, the graphics property content is not a separate display
object so it does not appear in the list of a Sprite or MovieClip object’s children. For example, the following Sprite
object has a circle drawn with its graphics property, and it has a TextField object in its list of child display objects:
var mySprite:Sprite = new Sprite();
mySprite.graphics.beginFill(0xFFCC00);
mySprite.graphics.drawCircle(30, 30, 30);
var label:TextField = new TextField();
label.width = 200;
label.text = "They call me mellow yellow...";
label.x = 20;
label.y = 20;
mySprite.addChild(label);
this.addChild(mySprite);
Note that the TextField appears on top of the circle drawn with the graphics object.

ADOBE FLEX 3
Developer Guide
299
Creating gradient lines and fills
The graphics object can also draw strokes and fills with gradients rather than solid colors. A gradient stroke is created
with the lineGradientStyle() method and a gradient fill is created with the beginGradientFill() method.
Both methods accept the same parameters. The first four are required: type, colors, alphas, and ratios. The remaining
four are optional but are useful for advanced customization.
•The first parameter specifies the type of gradient you are creating. Acceptable values are GradientFill.LINEAR
or GradientFill.RADIAL.
•The second parameter specifies the array of the color values to use. In a linear gradient, the colors will be
arranged from left to right. In a radial gradient, they will be arranged from inside to outside. The order of the colors
of the array represents the order that the colors will be drawn in the gradient.
•The third parameter specifies the alpha transparency values of the corresponding colors in the previous
parameter.
•The fourth parameter specifies ratios, or the emphasis each color has within the gradient. Acceptable values
range from 0-255. These values do not represent any width or height, but rather the position within the gradient; 0
represents the beginning of the gradient, 255 represents the end of the gradient. The array of ratios must increase
sequentially and have the same number of entries as both the color and alpha arrays specified in the second and third
parameters.
Although the fifth parameter, the transformation matrix, is optional, it is commonly used because it provides an easy
and powerful way to control the gradient’s appearance. This parameter accepts a Matrix instance. The easiest way to
create a Matrix object for a gradient is to use the Matrix class’s createGradientBox() method.
Defining a Matrix object for use with a gradient
You use the beginGradientFill() and lineGradientStyle() methods of the flash.display.Graphics class to
define gradients for use in shapes. When you define a gradient, you supply a matrix as one of the parameters of these
methods.
The easiest way to define the matrix is by using the Matrix class’s createGradientBox() method, which creates a
matrix that is used to define the gradient. You define the scale, rotation, and position of the gradient using the param-
eters passed to the createGradientBox() method. The createGradientBox() method accepts the following
parameters:
•Gradient box width: the width (in pixels) to which the gradient will spread
•Gradient box height: the height (in pixels) to which the gradient will spread
•Gradient box rotation: the rotation (in radians) that will be applied to the gradient
•Horizontal translation: how far (in pixels) the gradient is shifted horizontally
•Vertical translation: how far (in pixels) the gradient is shifted vertically
For example, consider a gradient with the following characteristics:
•GradientType.LINEAR
•Two colors, green and blue, with the ratios array set to [0, 255]
•SpreadMethod.PAD
•InterpolationMethod.LINEAR_RGB
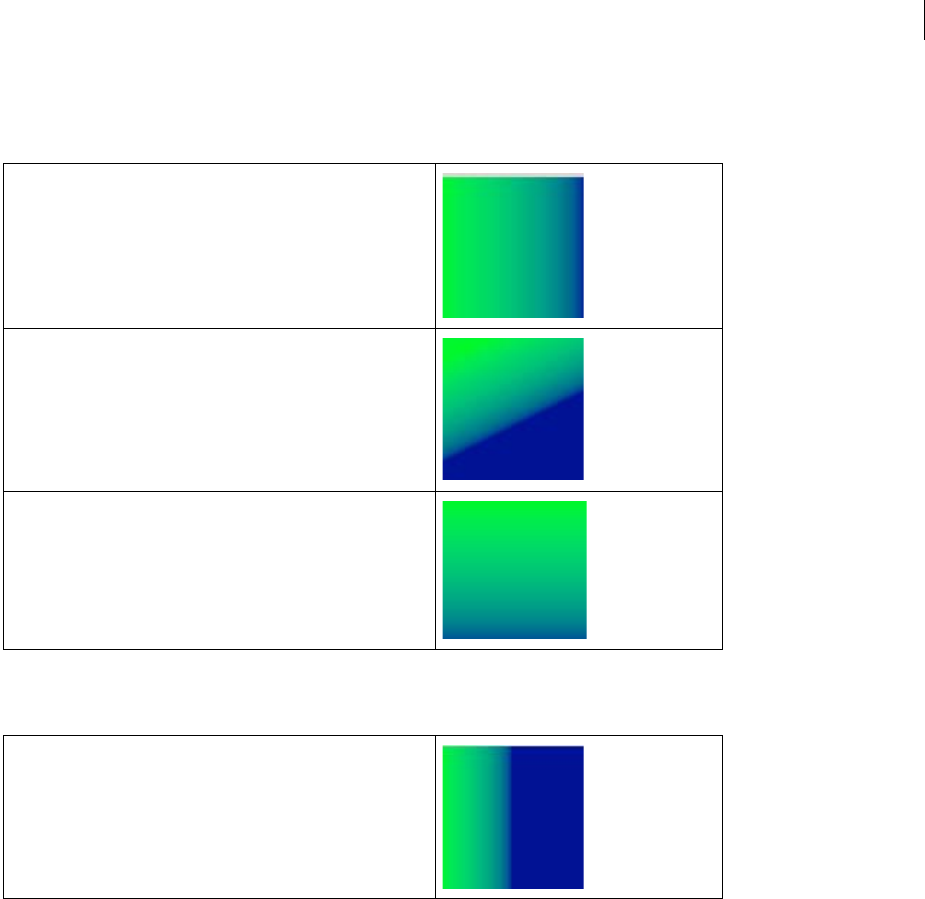
ADOBE FLEX 3
Developer Guide
300
The following examples show gradients in which the rotation parameter of the createGradientBox() method
differs as indicated, but all other settings stay the same:
The following examples show the effects on a green-to-blue linear gradient in which the rotation, tx, and ty
parameters of the createGradientBox() method differ as indicated, but all other settings stay the same:
width = 100;
height = 100;
rotation = 0;
tx = 0;
ty = 0;
width = 100;
height = 100;
rotation = Math.PI/4; // 45°
tx = 0;
ty = 0;
width = 100;
height = 100;
rotation = Math.PI/2; // 90°
tx = 0;
ty = 0;
width = 50;
height = 100;
rotation = 0;
tx = 0;
ty = 0;

ADOBE FLEX 3
Developer Guide
301
The width, height, tx, and ty parameters of the createGradientBox() method affect the size and position of a
radial gradient fill as well, as the following example shows:
The following code produces the last radial gradient illustrated:
import flash.display.Shape;
import flash.display.GradientType;
import flash.geom.Matrix;
var type:String = GradientType.RADIAL;
var colors:Array = [0x00FF00, 0x000088];
var alphas:Array = [1, 1];
var ratios:Array = [0, 255];
var spreadMethod:String = SpreadMethod.PAD;
var interp:String = InterpolationMethod.LINEAR_RGB;
var focalPtRatio:Number = 0;
var matrix:Matrix = new Matrix();
var boxWidth:Number = 50;
var boxHeight:Number = 100;
var boxRotation:Number = Math.PI/2; // 90°
var tx:Number = 25;
var ty:Number = 0;
matrix.createGradientBox(boxWidth, boxHeight, boxRotation, tx, ty);
var square:Shape = new Shape;
width = 50;
height = 100;
rotation = 0
tx = 50;
ty = 0;
width = 100;
height = 50;
rotation = Math.PI/2; // 90°
tx = 0;
ty = 0;
width = 100;
height = 50;
rotation = Math.PI/2; // 90°
tx = 0;
ty = 50;
width = 50;
height = 100;
rotation = 0;
tx = 25;
ty = 0;

ADOBE FLEX 3
Developer Guide
302
square.graphics.beginGradientFill(type,
colors,
alphas,
ratios,
matrix,
spreadMethod,
interp,
focalPtRatio);
square.graphics.drawRect(0, 0, 100, 100);
addChild(square);
Note that the width and height of the gradient fill is determined by the width and height of the gradient matrix rather
than the width or height that is drawn using the Graphics object. When drawing with the Graphics object, you draw
what exists at those coordinates in the gradient matrix. Even if you use one of the shape methods of a Graphics object
such as drawRect(), the gradient does not stretch itself to the size of the shape that is drawn—the gradient’s size
must be specified in the gradient matrix itself.
The following illustrates the visual difference between the dimensions of the gradient matrix and the dimensions of
the draw itself:
var myShape:Shape = new Shape();
var gradientBoxMatrix:Matrix = new Matrix();
gradientBoxMatrix.createGradientBox(100, 40, 0, 0, 0);
myShape.graphics.beginGradientFill(GradientType.LINEAR, [0xFF0000, 0x00FF00, 0x0000FF], [1,
1, 1], [0, 128, 255], gradientBoxMatrix);
myShape.graphics.drawRect(0, 0, 50, 40);
myShape.graphics.drawRect(0, 50, 100, 40);
myShape.graphics.drawRect(0, 100, 150, 40);
myShape.graphics.endFill();
this.addChild(myShape);
This code draws three gradients with the same fill style, specified with an equal distribution of red, green, and blue.
The gradients are drawn using the drawRect() method with pixel widths of 50, 100, and 150 respectively. The
gradient matrix which is specified in the beginGradientFill() method is created with a width of 100 pixels. This
means that the first gradient will encompass only half of the gradient spectrum, the second will encompass all of it,
and the third will encompass all of it and have an additional 50 pixels of blue extending to the right.
The lineGradientStyle() method works similarly to beginGradientFill() except that in addition to defining
the gradient, you must specify the thickness of the stroke using the lineStyle() method before drawing. The
following code draws a box with a red, green, and blue gradient stroke:
var myShape:Shape = new Shape();
var gradientBoxMatrix:Matrix = new Matrix();
gradientBoxMatrix.createGradientBox(200, 40, 0, 0, 0);
myShape.graphics.lineStyle(5, 0);
myShape.graphics.lineGradientStyle(GradientType.LINEAR, [0xFF0000, 0x00FF00, 0x0000FF], [1,
1, 1], [0, 128, 255], gradientBoxMatrix);
myShape.graphics.drawRect(0, 0, 200, 40);
this.addChild(myShape);
For more information on the Matrix class, see “Using Matrix objects” on page 313.

ADOBE FLEX 3
Developer Guide
303
Using the Math class with drawing methods
A Graphics object draws circles and squares, but can also draw more complex forms, particularly when the drawing
methods are used in combination with the properties and methods of the Math class. The Math class contains
constants of common mathematical interest, such as Math.PI (approximately 3.14159265...), a constant for the ratio
of the circumference of a circle to its diameter. It also contains methods for trigonometry functions, including
Math.sin(), Math.cos(), and Math.tan() among others. Drawing shapes using these methods and constants
create more dynamic visual effects, particularly when used with repetition or recursion.
Many methods of the Math class expect circular measurements in units of radians rather than degrees. Converting
between these two types of units is a common use of the Math class:
var degrees = 121;
var radians = degrees * Math.PI / 180;
trace(radians) // 2.111848394913139
The following example creates a sine wave and a cosine wave, to highlight the difference between the Math.sin()
and Math.cos() methods for a given value.
var sinWavePosition = 100;
var cosWavePosition = 200;
var sinWaveColor:uint = 0xFF0000;
var cosWaveColor:uint = 0x00FF00;
var waveMultiplier:Number = 10;
var waveStretcher:Number = 5;
var i:uint;
for(i = 1; i < stage.stageWidth; i++)
{
var sinPosY:Number = Math.sin(i / waveStretcher) * waveMultiplier;
var cosPosY:Number = Math.cos(i / waveStretcher) * waveMultiplier;
graphics.beginFill(sinWaveColor);
graphics.drawRect(i, sinWavePosition + sinPosY, 2, 2);
graphics.beginFill(cosWaveColor);
graphics.drawRect(i, cosWavePosition + cosPosY, 2, 2);
}
Animating with the drawing API
One advantage of creating content with the drawing API is that you are not limited to positioning your content once.
What you draw can be modified by maintaining and modifying the variables you use to draw. You can convey
animation by changing variables and redrawing, either over a period of frames or with a timer.
For example, the following code changes the display with each passing frame (by listening to the
Event.ENTER_FRAME event), incrementing the current degree count, and directs the graphics object to clear and
redraw with the updated position.
stage.frameRate = 31;
var currentDegrees:Number = 0;
var radius:Number = 40;
var satelliteRadius:Number = 6;
var container:Sprite = new Sprite();
container.x = stage.stageWidth / 2;

ADOBE FLEX 3
Developer Guide
304
container.y = stage.stageHeight / 2;
addChild(container);
var satellite:Shape = new Shape();
container.addChild(satellite);
addEventListener(Event.ENTER_FRAME, doEveryFrame);
function doEveryFrame(event:Event):void
{
currentDegrees += 4;
var radians:Number = getRadians(currentDegrees);
var posX:Number = Math.sin(radians) * radius;
var posY:Number = Math.cos(radians) * radius;
satellite.graphics.clear();
satellite.graphics.beginFill(0);
satellite.graphics.drawCircle(posX, posY, satelliteRadius);
}
function getRadians(degrees:Number):Number
{
return degrees * Math.PI / 180;
}
To produce a significantly different result, you can experiment by modifying the initial seed variables at the
beginning of the code, currentDegrees, radius, and satelliteRadius. For example, try shrinking the radius
variable and/or increasing the totalSatellites variable. This is only one example of how the drawing API can create a
visual display whose complexity conceals the simplicity of its creation.
Example: Algorithmic Visual Generator
The Algorithmic Visual Generator example dynamically draws to the stage several “satellites”, or circles moving in a
circular orbit. Among the features explored are:
•Using the drawing API to draw a basic shape with dynamic appearances
•Connecting user interaction with the properties that are used in a draw
•Conveying animation by clearing the stage on each frame and redrawing
The example in the previous subsection animated a solitary “satellite” using the Event.ENTER_FRAME event. This
example expands upon this, building a control panel with series of sliders that immediately update the visual display
of several satellites. This example formalizes the code into external classes and wraps the satellite creation code into
a loop, storing a reference to each satellite in a satellites array.
To get the application files for this sample, see www.adobe.com/go/learn_programmingAS3samples_flash. The
application files can be found in the folder Samples/AlgorithmicVisualGenerator. This folder contains the following
files:
File Description
AlgorithmicVisualGenerator.fla The main application file in Flash (FLA).
com/example/programmingas3/algorithmic/AlgorithmicVisualGenerator.as The class that provides the main functionality of the
application, including drawing satellites on the stage
and responding to events from the control panel to
update the variables that affect the drawing of satel-
lites.

ADOBE FLEX 3
Developer Guide
305
Setting the listeners
The application first creates three listeners. The first listens for a dispatched event from the control panel that a
rebuild of the satellites is necessary. The second listens to changes to the size of the SWF file’s stage. The third listens
for each passing frame in the SWF file and to redraw using the doEveryFrame() function.
Creating the satellites
Once these listeners are set, the build() function is called. This function first calls the clear() function, which
empties the satellites array and clears any previous draws to the stage. This is necessary since the build()
function could be recalled whenever the control panel sends an event to do so, such as when the color settings have
been changed. In such a case, the satellites must be removed and recreated.
The function then creates the satellites, setting the initial properties needed for creation, such as a the position
variable, which starts at a random position in the orbit, and the color variable, which in this example does not
change once the satellite has been created.
As each satellite is created, a reference to it is added to the satellites array. When the doEveryFrame() function
is called, it will update to all satellites in this array.
Updating the satellite position
The doEveryFrame() function is the heart of the application’s animation process. It is called for every frame, at a
rate equal the framerate of the SWF file. Because the variables of the draw change slightly, this conveys the
appearance of animation.
The function first clears all previous draws and redraws the background. Then, it loops through each satellite
container and increments the position property of each satellite, and updates the radius and orbitRadius
properties that may have changed from user interaction with the control panel. Finally, the satellite updates to its new
position by calling the draw() method of the Satellite class.
Note that the counter, i, only increments up to the visibleSatellites variable. This is because if the user has
limited the amount of satellites that are displayed through the control panel, the remaining satellites in the loop
should not be redrawn but should instead be hidden. This occurs in a loop which immediately follows the loop
responsible for drawing.
When the doEveryFrame() function completes, the number of visibleSatellites update in position across the
screen.
Responding to user interaction
User interaction occurs via the control panel, which is managed by the ControlPanel class. This class sets a listener
along with the individual minimum, maximum, and default values of each slider. As the user moves these sliders,
the changeSetting() function is called. This function updates the properties of the control panel. If the change
requires a rebuild of the display, an event is dispatched which is then handled in the main application file. As the
control panel settings change, the doEveryFrame() function draws each satellite with the updated variables.
com/example/programmingas3/algorithmic/ControlPanel.as A class that manages user interaction with several
sliders and dispatching events when this occurs.
com/example/programmingas3/algorithmic/Satellite.as A class which represents the display object that
rotates in an orbit around a central point and
contains properties related to its current draw state.
File Description

ADOBE FLEX 3
Developer Guide
306
Customizing further
This example is only a basic schematic of how to generate visuals using the drawing API. It uses relatively few lines
of code to create an interactive experience that appears quite complex. Even so, this example could be extended with
minor changes. A few ideas:
•The doEveryFrame() function could increment the color value of the satellite.
•The doEveryFrame() function could shrink or expand the satellite radius over time.
•The satellite radius does not have to be circular; it could use the Math class to move according to a sine wave, for
example.
•Satellites could use hit detection with other satellites.
The drawing API can be used as an alternative to creating visual effects in the Flash authoring environment, drawing
basic shapes at run time. But it can also be used to create visual effects of a variety and scope that are not possible to
create by hand. Using the drawing API and a bit of mathematics, the ActionScript author can give life to many
unexpected creations.

307
Chapter 15: Working with geometry
The flash.geom package contains classes that define geometric objects such as points, rectangles, and transformation
matrixes. You use these classes to define the properties of objects that are used in other classes.
Contents
Basics of geometry . . . . . . . . . . . . . . . . . . . . . . . . . . . . . . . . . . . . . . . . . . . . . . . . . . . . . . . . . . . . . . . . . . . . . . . . . . . . . . . 307
Using Point objects . . . . . . . . . . . . . . . . . . . . . . . . . . . . . . . . . . . . . . . . . . . . . . . . . . . . . . . . . . . . . . . . . . . . . . . . . . . . . . . 308
Using Rectangle objects . . . . . . . . . . . . . . . . . . . . . . . . . . . . . . . . . . . . . . . . . . . . . . . . . . . . . . . . . . . . . . . . . . . . . . . . . . . 310
Using Matrix objects. . . . . . . . . . . . . . . . . . . . . . . . . . . . . . . . . . . . . . . . . . . . . . . . . . . . . . . . . . . . . . . . . . . . . . . . . . . . . . 313
Example: Applying a matrix transformation to a display object . . . . . . . . . . . . . . . . . . . . . . . . . . . . . . . . . . . . . . . . . 314
Basics of geometry
Introduction to working with geometry
Geometry may be a subject many people try to get through in school while retaining as little as possible, but a little
geometry knowledge can be a powerful tool in ActionScript™.
The flash.geom package contains classes that define geometric objects such as points, rectangles, and transformation
matrixes. These classes don’t necessarily provide functionality by themselves; however, they are used to define the
properties of objects that are used in other classes.
All the geometry classes are based around the notion that locations on the screen are represented as a two-dimen-
sional plane. The screen is treated like a flat graph with a horizontal (x) axis and a vertical (y) axis. Any location (or
point) on the screen can be represented as a pair of x and y values—the coordinates of that location.
Every display object, include the Stage, has its own coordinate space—essentially its own graph for plotting the
locations of child display objects, drawings, and so forth. Commonly, the origin (the place with the coordinate 0, 0
where the x and y axes meet) is placed at the top-left corner of the display object. While this is always true for the
Stage, it is not necessarily true for any other display object. As in standard two-dimensional coordinate systems,
values on the x axis get bigger going toward the right, and smaller going toward the left—for locations to the left of
the origin, the x coordinate is negative. However, contrary to traditional coordinate systems, in ActionScript values
on the y axis get bigger going down and smaller going up the screen (with values above the origin having a negative
y coordinate). Since the top-left corner of the Stage is the origin of its coordinate space, any object on the Stage will
have an x coordinate greater than 0 and smaller than the Stage width, and will have a y coordinate larger than 0 and
smaller than the Stage height.
You can use Point class instances to represent individual points in a coordinate space. You can create a Rectangle
instance to represent a rectangular region in a coordinate space. For advanced users, you can use a Matrix instance
to apply multiple or complex transformations to a display object. Many simple transformations, such as rotation,
position, and scale changes, can be applied directly to a display object using that object’s properties. For more infor-
mation on applying transformations using display object properties, see “Manipulating display objects” on page 265.

ADOBE FLEX 3
Developer Guide
308
Common geometry tasks
The following tasks are things you’ll likely want to accomplish using the geometry classes in ActionScript:
•Calculating distance between two points
•Determining coordinates of a point in different coordinate spaces
•Moving a display object using angle and distance
•Working with Rectangle instances:
•Repositioning a Rectangle instance
•Resizing a Rectangle instance
•Determining combined size or overlapping areas of Rectangle instances
•Creating Matrix objects
•Using a Matrix object to apply transformations to a display object
Important concepts and terms
The following reference list contains important terms that you will encounter in this chapter:
•Cartesian coordinates: Coordinates are commonly written as a pair of number (like 5, 12 or 17, -23). The two
numbers are the x coordinate and the y coordinate, respectively.
•Coordinate space: The graph of coordinates contained in a display object, on which its child elements are
positioned.
•Origin: The point in a coordinate space where the x axis meets the y axis. This point has the coordinate 0, 0.
•Point: A single location in a coordinate space. In the 2-d coordinate system used in ActionScript, a point is
defined by its location along the x axis and the y axis (the point’s coordinates).
•Registration point: In a display object, the origin (0, 0 coordinate) of its coordinate space.
•Scale: The size of an object relative to its original size. When used as a verb, to scale an object means to change
its size by stretching or shrinking the object.
•Translate: To change a point’s coordinates from one coordinate space to another.
•Transformation: An adjustment to a visual characteristic of a graphic, such as rotating the object, altering its
scale, skewing or distorting its shape, or altering its color.
•X axis: The horizontal axis in the 2-d coordinate system used in ActionScript.
•Y axis: The vertical axis in the 2-d coordinate system used in ActionScript.
Using Point objects
A Point object defines a Cartesian pair of coordinates. It represents location in a two-dimensional coordinate system,
where x represents the horizontal axis and y represents the vertical axis.

ADOBE FLEX 3
Developer Guide
309
To define a Point object, you set its x and y properties, as follows:
import flash.geom.*;
var pt1:Point = new Point(10, 20); // x == 10; y == 20
var pt2:Point = new Point();
pt2.x = 10;
pt2.y = 20;
Finding the distance between two points
You can use the distance() method of the Point class to find the distance between two points in a coordinate space.
For example, the following code finds the distance between the registration points of two display objects, circle1
and circle2, in the same display object container:
import flash.geom.*;
var pt1:Point = new Point(circle1.x, circle1.y);
var pt2:Point = new Point(circle2.x, circle2.y);
var distance:Number = Point.distance(pt1, pt2);
Translating coordinate spaces
If two display objects are in different display object containers, they may be in different coordinate spaces. You can
use the localToGlobal() method of the DisplayObject class to translate the coordinates to the same (global)
coordinate space, that of the Stage. For example, the following code finds the distance between the registration points
of two display objects, circle1 and circle2, in the different display object containers:
import flash.geom.*;
var pt1:Point = new Point(circle1.x, circle1.y);
pt1 = circle1.localToGlobal(pt1);
var pt2:Point = new Point(circle2.x, circle2.y);
pt2 = circle2.localToGlobal(pt2);
var distance:Number = Point.distance(pt1, pt2);
Similarly, to find the distance of the registration point of a display object named target from a specific point on the
Stage, you can use the localToGlobal() method of the DisplayObject class:
import flash.geom.*;
var stageCenter:Point = new Point();
stageCenter.x = this.stage.stageWidth / 2;
stageCenter.y = this.stage.stageHeight / 2;
var targetCenter:Point = new Point(target.x, target.y);
targetCenter = target.localToGlobal(targetCenter);
var distance:Number = Point.distance(stageCenter, targetCenter);
Moving a display object by a specified angle and distance
You can use the polar() method of the Point class to move a display object a specific distance by a specific angle.
For example, the following code moves the myDisplayObject object 100 pixels by 60 degrees:
import flash.geom.*;
var distance:Number = 100;
var angle:Number = 2 * Math.PI * (90 / 360);
var translatePoint:Point = Point.polar(distance, angle);
myDisplayObject.x += translatePoint.x;
myDisplayObject.y += translatePoint.y;

ADOBE FLEX 3
Developer Guide
310
Other uses of the Point class
You can use Point objects with the following methods and properties:
Using Rectangle objects
A Rectangle object defines a rectangular area. A Rectangle object has a position, defined by the x and y coordinates
of its top-left corner, a width property, and a height property. You can define these properties for a new Rectangle
object by invoking the Rectangle() constructor function, as follows:
import flash.geom.Rectangle;
var rx:Number = 0;
var ry:Number = 0;
var rwidth:Number = 100;
var rheight:Number = 50;
var rect1:Rectangle = new Rectangle(rx, ry, rwidth, rheight);
Resizing and repositioning Rectangle objects
There are a number of ways to resize and reposition Rectangle objects.
You can directly reposition the Rectangle object by changing its x and y properties. This has no effect on the width
or height of the Rectangle object.
import flash.geom.Rectangle;
var x1:Number = 0;
var y1:Number = 0;
var width1:Number = 100;
var height1:Number = 50;
Class Methods or properties Description
DisplayObjectContainer areInaccessibleObjectsUnderPoint(
)
getObjectsUnderPoint()
Used to return a list of objects under a point in
a display object container.
BitmapData hitTest() Used to define the pixel in the BitmapData
object as well as the point that you are checking
for a hit.
BitmapData applyFilter()
copyChannel()
merge()
paletteMap()
pixelDissolve()
threshold()
Used to define the positions of rectangles that
define the operations.
Matrix deltaTransformPoint()
transformPoint()
Used to define points for which you want to
apply a transformation.
Rectangle bottomRight
size
topLeft
Used to define these properties.

ADOBE FLEX 3
Developer Guide
311
var rect1:Rectangle = new Rectangle(x1, y1, width1, height1);
trace(rect1) // (x=0, y=0, w=100, h=50)
rect1.x = 20;
rect1.y = 30;
trace(rect1); // (x=20, y=30, w=100, h=50)
As the following code shows, if you change the left or top property of a Rectangle object, it is also repositioned,
with its x and y properties matching the left and top properties, respectively. However, the position of the bottom-
left corner of the Rectangle object does not change, so it is resized.
import flash.geom.Rectangle;
var x1:Number = 0;
var y1:Number = 0;
var width1:Number = 100;
var height1:Number = 50;
var rect1:Rectangle = new Rectangle(x1, y1, width1, height1);
trace(rect1) // (x=0, y=0, w=100, h=50)
rect1.left = 20;
rect1.top = 30;
trace(rect1); // (x=20, y=30, w=80, h=20)
Similarly, as the following example shows, if you change the bottom or right property of a Rectangle object, the
position of its top-left corner does not change, so it is resized accordingly:
import flash.geom.Rectangle;
var x1:Number = 0;
var y1:Number = 0;
var width1:Number = 100;
var height1:Number = 50;
var rect1:Rectangle = new Rectangle(x1, y1, width1, height1);
trace(rect1) // (x=0, y=0, w=100, h=50)
rect1.right = 60;
trect1.bottom = 20;
trace(rect1); // (x=0, y=0, w=60, h=20)
You can also reposition a Rectangle object by using the offset() method, as follows:
import flash.geom.Rectangle;
var x1:Number = 0;
var y1:Number = 0;
var width1:Number = 100;
var height1:Number = 50;
var rect1:Rectangle = new Rectangle(x1, y1, width1, height1);
trace(rect1) // (x=0, y=0, w=100, h=50)
rect1.offset(20, 30);
trace(rect1); // (x=20, y=30, w=100, h=50)
The offsetPt() method works similarly, except that it takes a Point object as its parameter, rather than x and y
offset values.
You can also resize a Rectangle object by using the inflate() method, which includes two parameters, dx and dy.
The dx parameter represents the number of pixels that the left and right sides of the rectangle will move from the
center, and the dy parameter represents the number of pixels that the top and bottom of the rectangle will move from
the center:
import flash.geom.Rectangle;
var x1:Number = 0;
var y1:Number = 0;
var width1:Number = 100;
var height1:Number = 50;
var rect1:Rectangle = new Rectangle(x1, y1, width1, height1);
trace(rect1) // (x=0, y=0, w=100, h=50)

ADOBE FLEX 3
Developer Guide
312
rect1.inflate(6,4);
trace(rect1); // (x=-6, y=-4, w=112, h=58)
The inflatePt() method works similarly, except that it takes a Point object as its parameter, rather than dx and dy
values.
Finding unions and intersections of Rectangle objects
You use the union() method to find the rectangular region formed by the boundaries of two rectangles:
import flash.display.*;
import flash.geom.Rectangle;
var rect1:Rectangle = new Rectangle(0, 0, 100, 100);
trace(rect1); // (x=0, y=0, w=100, h=100)
var rect2:Rectangle = new Rectangle(120, 60, 100, 100);
trace(rect2); // (x=120, y=60, w=100, h=100)
trace(rect1.union(rect2)); // (x=0, y=0, w=220, h=160)
You use the intersection() method to find the rectangular region formed by the overlapping region of two
rectangles:
import flash.display.*;
import flash.geom.Rectangle;
var rect1:Rectangle = new Rectangle(0, 0, 100, 100);
trace(rect1); // (x=0, y=0, w=100, h=100)
var rect2:Rectangle = new Rectangle(80, 60, 100, 100);
trace(rect2); // (x=120, y=60, w=100, h=100)
trace(rect1.intersection(rect2)); // (x=80, y=60, w=20, h=40)
You use the intersects() method to find out whether two rectangles intersect. You can also use the intersects()
method to find out whether a display object is in a certain region of the Stage. For example, in the following code,
assume that the coordinate space of the display object container that contains the circle object is the same as that
of the Stage. The example shows how to use the intersects() method to determine if a display object, circle,
intersects specified regions of the Stage, defined by the target1 and target2 Rectangle objects:
import flash.display.*;
import flash.geom.Rectangle;
var circle:Shape = new Shape();
circle.graphics.lineStyle(2, 0xFF0000);
circle.graphics.drawCircle(250, 250, 100);
addChild(circle);
var circleBounds:Rectangle = circle.getBounds(stage);
var target1:Rectangle = new Rectangle(0, 0, 100, 100);
trace(circleBounds.intersects(target1)); // false
var target2:Rectangle = new Rectangle(0, 0, 300, 300);
trace(circleBounds.intersects(target2)); // true
Similarly, you can use the intersects() method to find out whether the bounding rectangles of two display objects
overlap. You can use the getRect() method of the DisplayObject class to include any additional space that the
strokes of a display object may add to a bounding region.

ADOBE FLEX 3
Developer Guide
313
Other uses of Rectangle objects
Rectangle objects are used in the following methods and properties:
Using Matrix objects
The Matrix class represents a transformation matrix that determines how to map points from one coordinate space
to another. You can perform various graphical transformations on a display object by setting the properties of a
Matrix object, applying that Matrix object to the matrix property of a Transform object, and then applying that
Transform object as the transform property of the display object. These transformation functions include trans-
lation (x and y repositioning), rotation, scaling, and skewing.
Defining Matrix objects
Although you could define a matrix by directly adjusting the properties (a, b, c, d, tx, ty) of a Matrix object, it is
easier to use the createBox() method. This method includes parameters that let you directly define the scaling,
rotation, and translation effects of the resulting matrix. For example, the following code creates a Matrix object that
has the effect of scaling an object horizontally by 2.0, scaling it vertically by 3.0, rotating it by 45 degrees, moving
(translating) it 10 pixels to the right, and moving it 20 pixels down:
var matrix:Matrix = new Matrix();
var scaleX:Number = 2.0;
var scaleY:Number = 3.0;
var rotation:Number = 2 * Math.PI * (45 / 360);
var tx:Number = 10;
var ty:Number = 20;
matrix.createBox(scaleX, scaleY, rotation, tx, ty);
You can also adjust the scaling, rotation, and translation effects of a Matrix object by using the scale(), rotate(),
and translate() methods. Note that these methods combine with the values of the existing Matrix object. For
instance, the following code sets a Matrix object that scales an object by a factor of 4 and rotates it 60 degrees, since
the scale() and rotate() methods are called twice:
var matrix:Matrix = new Matrix();
var rotation:Number = 2 * Math.PI * (30 / 360); // 30°
Class Methods or properties Description
BitmapData applyFilter(), colorTransform(),
copyChannel(), copyPixels(), draw(),
fillRect(), generateFilterRect(),
getColorBoundsRect(), getPixels(),
merge(), paletteMap(),
pixelDissolve(), setPixels(), and
threshold()
Used as the type for some parameters to define a
region of the BitmapData object.
DisplayObject getBounds(), getRect(), scrollRect,
scale9Grid
Used as the data type for the property or the data
type returned.
PrintJob addPage() Used to define the printArea parameter.
Sprite startDrag() Used to define the bounds parameter.
TextField getCharBoundaries() Used as the return value type.
Transform pixelBounds Used as the data type.

ADOBE FLEX 3
Developer Guide
314
var scaleFactor:Number = 2;
matrix.scale(scaleFactor, scaleFactor);
matrix.rotate(rotation);
matrix.scale(scaleX, scaleY);
matrix.rotate(rotation);
myDisplayObject.transform.matrix = matrix;
To apply a skew transformation to a Matrix object, adjust its b or c property. Adjusting the b property skews the
matrix vertically, and adjusting the c property skews the matrix horizontally. The following code skews the
myMatrix Matrix object vertically by a factor of 2:
var skewMatrix:Matrix = new Matrix();
skewMatrix.b = Math.tan(2);
myMatrix.concat(skewMatrix);
You can apply a Matrix transformation to the transform property of a display object. For example, the following
code applies a matrix transformation to a display object named myDisplayObject:
var matrix:Matrix = myDisplayObject.transform.matrix;
var scaleFactor:Number = 2;
var rotation:Number = 2 * Math.PI * (60 / 360); // 60°
matrix.scale(scaleFactor, scaleFactor);
matrix.rotate(rotation);
myDisplayObject.transform.matrix = matrix;
The first line sets a Matrix object to the existing transformation matrix used by the myDisplayObject display object
(the matrix property of the transformation property of the myDisplayObject display object). This way, the
Matrix class methods that you call will have a cumulative effect on the display object’s existing position, scale, and
rotation.
Note: The ColorTransform class is also included in the flash.geometry package. This class is used to set the
colorTransform property of a Transform object. Since it does not apply any sort of geometrical transformation, it is
not discussed in this chapter. For more information, see the ColorTransform class in the ActionScript 3.0 Language and
Components Reference.
Example: Applying a matrix transformation to a
display object
The DisplayObjectTransformer sample application shows a number of features of using the Matrix class to transform
a display object, including the following:
•Rotating the display object
•Scaling the display object
•Translating (repositioning) the display object
•Skewing the display object
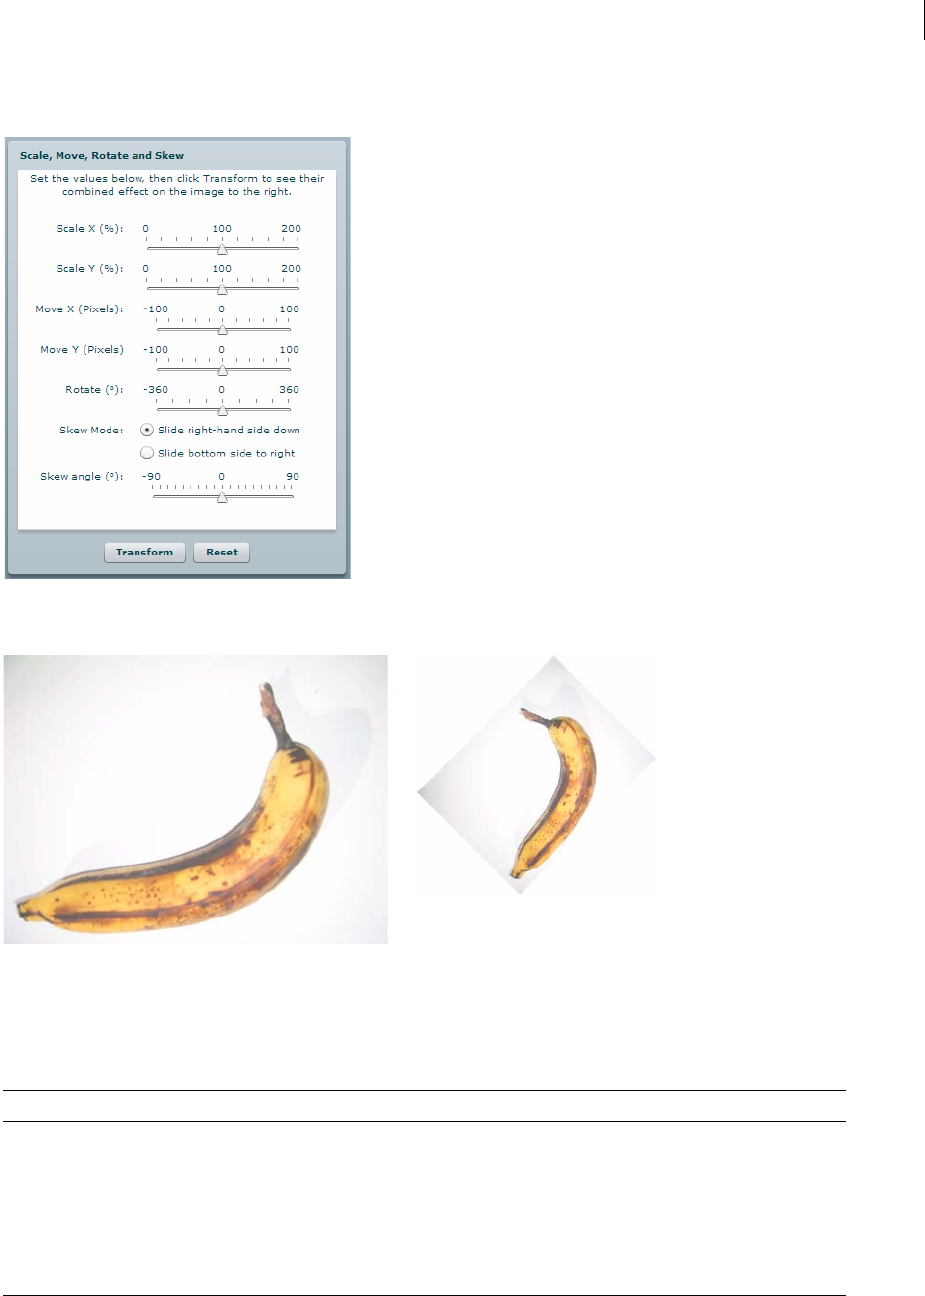
ADOBE FLEX 3
Developer Guide
315
The application provides an interface for adjusting the parameters of the matrix transformation, as follows:
When the user clicks the Transform button, the application applies the appropriate transformation.
The original display object, and the display object rotated by -45° and scaled by 50%
To get the application files for this sample, see www.adobe.com/go/learn_programmingAS3samples_flash. The
DisplayObjectTransformer application files can be found in the folder Samples/DisplayObjectTransformer. The
application consists of the following files:
File Description
DisplayObjectTransformer.mxml
or
DisplayObjectTransformer.fla
The main application file in Flash (FLA) or Flex (MXML)
com/example/programmingas3/geometry/MatrixTransformer.as A class that contains methods for applying matrix transforma-
tions.
img/ A directory containing sample image files used by the application.

ADOBE FLEX 3
Developer Guide
316
Defining the MatrixTransformer class
The MatrixTransformer class includes static methods that apply geometric transformations of Matrix objects.
The transform() method
The transform() method includes parameters for each of the following:
•sourceMatrix—The input matrix, which the method transforms
•xScale and yScale—The x and y scale factor
•dx and dy—The x and y translation amounts, in pixels
•rotation—The rotation amount, in degrees
•skew—The skew factor, as a percentage
•skewType—The direction in which the skew, either "right" or "left"
The return value is the resulting matrix.
The transform() method calls the following static methods of the class:
•skew()
•scale()
•translate()
•rotate()
Each returns the source matrix with the applied transformation.
The skew() method
The skew() method skews the matrix by adjusting the b and c properties of the matrix. An optional parameter,
unit, determines the units used to define the skew angle, and if necessary, the method converts the angle value to
radians:
if (unit == "degrees")
{
angle = Math.PI * 2 * angle / 360;
}
if (unit == "gradients")
{
angle = Math.PI * 2 * angle / 100;
}
A skewMatrix Matrix object is created and adjusted to apply the skew transformation. Initially, it is the identity
matrix, as follows:
var skewMatrix:Matrix = new Matrix();
The skewSide parameter determines the side to which the skew is applied. If it is set to "right", the following code
sets the b property of the matrix:
skewMatrix.b = Math.tan(angle);
Otherwise, the bottom side is skewed by adjusting the c property of the Matrix, as follows:
skewMatrix.c = Math.tan(angle);

ADOBE FLEX 3
Developer Guide
317
The resulting skew is then applied to the existing matrix by concatenating the two matrixes, as the following example
shows:
sourceMatrix.concat(skewMatrix);
return sourceMatrix;
The scale() method
As the following example shows, the scale() method first adjusts the scale factor if it is provided as a percentage,
and then uses the scale() method of the matrix object:
if (percent)
{
xScale = xScale / 100;
yScale = yScale / 100;
}
sourceMatrix.scale(xScale, yScale);
return sourceMatrix;
The translate() method
The translate() method simply applies the dx and dy translation factors by calling the translate() method of
the matrix object, as follows:
sourceMatrix.translate(dx, dy);
return sourceMatrix;
The rotate() method
The rotate() method converts the input rotation factor to radians (if it is provided in degrees or gradients), and
then calls the rotate() method of the matrix object:
if (unit == "degrees")
{
angle = Math.PI * 2 * angle / 360;
}
if (unit == "gradients")
{
angle = Math.PI * 2 * angle / 100;
}
sourceMatrix.rotate(angle);
return sourceMatrix;
Calling the MatrixTransformer.transform() method from the application
The application contains a user interface for getting the transformation parameters from the user. It then passes
these, along with the matrix property of the transform property of the display object, to the Matrix.transform()
method, as follows:
tempMatrix = MatrixTransformer.transform(tempMatrix,
xScaleSlider.value,
yScaleSlider.value,
dxSlider.value,
dySlider.value,
rotationSlider.value,
skewSlider.value,
skewSide );
The application then applies the return value to the matrix property of the transform property of the display
object, thereby triggering the transformation:
img.content.transform.matrix = tempMatrix;

318
Chapter 16: Filtering display objects
Historically, the application of filter effects to bitmap images has been the domain of specialized image editing
software such as Adobe Photoshop® and Adobe Fireworks®. ActionScript™ 3.0 includes the flash.filters package,
which contains a series of bitmap effect filter classes to allow developers to programmatically apply filters to bitmaps
and display objects to achieve many of the same effects that are available in graphics manipulation applications.
Contents
Basics of filtering display objects . . . . . . . . . . . . . . . . . . . . . . . . . . . . . . . . . . . . . . . . . . . . . . . . . . . . . . . . . . . . . . . . . . . 318
Creating and applying filters . . . . . . . . . . . . . . . . . . . . . . . . . . . . . . . . . . . . . . . . . . . . . . . . . . . . . . . . . . . . . . . . . . . . . . . 319
Available display filters. . . . . . . . . . . . . . . . . . . . . . . . . . . . . . . . . . . . . . . . . . . . . . . . . . . . . . . . . . . . . . . . . . . . . . . . . . . . 325
Example: Filter Workbench . . . . . . . . . . . . . . . . . . . . . . . . . . . . . . . . . . . . . . . . . . . . . . . . . . . . . . . . . . . . . . . . . . . . . . . . 338
Basics of filtering display objects
Introduction to filtering display objects
One of the ways to add polish to an application is to add simple graphic effects, such as a drop shadow behind a photo
to create the illusion of 3-d, or a glow around a button to show that it is active. ActionScript 3.0 includes nine filters
that you can apply to any display object or to a BitmapData instance. These range from basic filters, such as the drop
shadow and glow filters, to complex filters for creating various effects, such as the displacement map filter and the
convolution filter.
Common filtering tasks
The following tasks are things you’ll likely want to accomplish using filters in ActionScript:
•Creating a filter
•Applying a filter to a display object
•Removing a filter from a display object
•Applying a filter to the image data in a BitmapData instance
•Removing filters from an object
•Creating various filter effects, such as glow, blur, drop shadow, sharpness, displacement, edge detection,
embossing, and other effects
Important concepts and terms
The following reference list contains important terms that you will encounter in this chapter:
•Bevel: An edge created by lightening pixels on two sides and darkening pixels on the opposite two sides, creating
a three-dimensional border effect commonly used for raised or indented buttons and similar graphics.
•Convolution: Distorting pixels in an image by combining each pixel’s value with the values of some or all of its
neighboring pixels, using various ratios.

ADOBE FLEX 3
Developer Guide
319
•Displacement: Shifting or moving pixels in an image to a new position.
•Matrix: A grid of numbers used to perform certain mathematical calculations by applying the numbers in the
grid to various values, then combining the results.
Creating and applying filters
Filters allow you to apply a range of effects to bitmap and display objects, ranging from drop shadows to bevels and
blurs. Each filter is defined as a class, so applying filters involves creating instances of filter objects, which is no
different from constructing any other object. Once you’ve created an instance of a filter object, it can easily be applied
to a display object by using the object’s filters property, or in the case of a BitmapData object, by using the
applyFilter() method.
Creating a new filter
To create a new filter object, simply call the constructor method of your selected filter class. For example, to create a
new DropShadowFilter object, use the following code:
import flash.filters.DropShadowFilter;
var myFilter:DropShadowFilter = new DropShadowFilter();
Although not shown here, the DropShadowFilter() constructor (like all the filter classes’ constructors) accepts
several optional parameters that can be used to customize the appearance of the filter effect.
Applying a filter
Once you've constructed a filter object, you can apply it to a display object or a BitmapData object; how you apply
the filter depends on the object to which you’re applying it.
Applying a filter to a display object
When you apply filter effects to a display object, you apply them through the filters property. The filters
property of a display object is an Array instance, whose elements are the filter objects applied to the display object.
To apply a single filter to a display object, create the filter instance, add it to an Array instance, and assign that Array
object to the display object’s filters property:
import flash.display.Bitmap;
import flash.display.BitmapData;
import flash.filters.DropShadowFilter;
// Create a bitmapData object and render it to screen
var myBitmapData:BitmapData = new BitmapData(100,100,false,0xFFFF3300);
var myDisplayObject:Bitmap = new Bitmap(myBitmapData);
addChild(myDisplayObject);
// Create a DropShadowFilter instance.
var dropShadow:DropShadowFilter = new DropShadowFilter();
// Create the filters array, adding the filter to the array by passing it as
// a parameter to the Array() constructor.
var filtersArray:Array = new Array(dropShadow);
// Assign the filters array to the display object to apply the filter.
myDisplayObject.filters = filtersArray;

ADOBE FLEX 3
Developer Guide
320
If you want to assign multiple filters to the object, simply add all the filters to the Array instance before assigning it
to the filters property. You can add multiple objects to an Array by passing them as parameters to its constructor.
For example, this code applies a bevel filter and a glow filter to the previously created display object:
import flash.filters.BevelFilter;
import flash.filters.GlowFilter;
// Create the filters and add them to an array.
var bevel:BevelFilter = new BevelFilter();
var glow:GlowFilter = new GlowFilter();
var filtersArray:Array = new Array(bevel, glow);
// Assign the filters array to the display object to apply the filter.
myDisplayObject.filters = filtersArray;
Note: When you’re creating the array containing the filters, you can create it using the new Array() constructor (as
shown in the previous examples) or you can use Array literal syntax, wrapping the filters in square braces ([]). For
instance, this line of code:
var filters:Array = new Array(dropShadow, blur);
does the same thing as this line of code:
var filters:Array = [dropShadow, blur];
If you apply multiple filters to display objects, they are applied in a cumulative, sequential manner. For example, if a
filters array has two elements, a bevel filter added first and a drop shadow filter added second, the drop shadow filter
is applied to both the bevel filter and the display object. This is because of the drop shadow filter’s second position
in the filters array. If you want to apply filters in a noncumulative manner, you must apply each filter to a new copy
of the display object.
If you’re only assigning one or a few filters to a display object, you can create the filter instance and assign it to the
object in a single statement. For instance, the following line of code applies a blur filter to a display object called
myDisplayObject:
myDisplayObject.filters = [new BlurFilter()];
The previous code creates an Array instance using Array literal syntax (square braces), creates a new BlurFilter
instance as an element in the Array, and assigns that Array to the filters property of the display object named
myDisplayObject.
Removing filters from a display object
Removing all filters from a display object is as simple as assigning a null value to the filters property:
myDisplayObject.filters = null;
If you’ve applied multiple filters to an object and want to remove only one of the filters, you must go through several
steps to change the filters property array. For more information, see “Changing filters at run time” on page 321.
Applying a filter to a BitmapData object
Applying a filter to a BitmapData object requires the use of the BitmapData object’s applyFilter() method:
myBitmapData.applyFilter(sourceBitmapData);
The applyFilter() method applies a filter to a source BitmapData object, producing a new, filtered image. This
method does not modify the original source image; instead, the result of the filter being applied to the source image
is stored in the BitmapData instance on which the applyFilter() method is called.

ADOBE FLEX 3
Developer Guide
321
How filters work
Display object filtering works by caching a copy of the original object as a transparent bitmap.
Once a filter has been applied to a display object, Adobe Flash Player or Adobe® AIR™ caches the object as a bitmap
for as long as the object has a valid filter list. This source bitmap is then used as the original image for all subsequently
applied filter effects.
Each display object usually contains two bitmaps: one with the original unfiltered source display object and another
for the final image after filtering. The final image is used when rendering. As long as the display object does not
change, the final image does not need updating.
Potential issues for working with filters
There are several potential sources of confusion or trouble to keep in mind when you’re working with filters. These
are described in the following sections.
Filters and bitmap caching
To apply a filter to a display object, bitmap caching must be enabled for that object. When you apply a filter to a
display object whose cacheAsBitmap property is set to false, Flash Player or AIR automatically sets the value of
the object’s cacheAsBitmap property to true. If you later remove all the filters from the display object, Flash Player
or AIR resets the cacheAsBitmap property to the last value it was set to.
Changing filters at run time
If a display object already has one or more filters applied to it, you can’t change the set of filters by adding additional
filters to or removing filters from the filters property array. Instead, to add to or change the set of filters being
applied, you must make your changes to a separate array, then assign that array to the filters property of the display
object for the filters to be applied to the object. The simplest way to do this is to read the filters property array
into an Array variable and make your modifications to this temporary array. You then reassign this array back to the
filters property of the display object. In more complex cases, you might need to keep a separate master array of
filters. You make any changes to that master filter array, and reassign the master array to the display object’s filters
property after each change.
Adding an additional filter
The following code demonstrates the process of adding an additional filter to a display object that already has one
or more filters applied to it. Initially, a glow filter is applied to the display object named myDisplayObject; later,
when the display object is clicked, the addFilters() function is called. In this function, two additional filters are
applied to myDisplayObject:
import flash.events.MouseEvent;
import flash.filters.*;
myDisplayObject.filters = [new GlowFilter()];
function addFilters(event:MouseEvent):void
{
// Make a copy of the filters array.
var filtersCopy:Array = myDisplayObject.filters;
// Make desired changes to the filters (in this case, adding filters).
filtersCopy.push(new BlurFilter());
filtersCopy.push(new DropShadowFilter());

ADOBE FLEX 3
Developer Guide
322
// Apply the changes by reassigning the array to the filters property.
myDisplayObject.filters = filtersCopy;
}
myDisplayObject.addEventListener(MouseEvent.CLICK, addFilters);
Removing one filter from a set of filters
If a display object has multiple filters applied to it, and you want to remove one of the filters while the other filters
continue to be applied to the object, you copy the filters into a temporary array, remove the unwanted filter from that
array, and reassign the temporary array to the display object’s filters property. Several ways to remove one or more
elements from any array are described in “Removing array elements” on page 147.
The most straightforward situation is to remove the top-most filter on the object (the last filter applied to the object).
You use the Array class’s pop() method to remove the filter from the array:
// Example of removing the top-most filter from a display object
// named "filteredObject".
var tempFilters:Array = filteredObject.filters;
// Remove the last element from the Array (the top-most filter).
tempFilters.pop();
// Apply the new set of filters to the display object.
filteredObject.filters = tempFilters;
Similarly, to remove the bottom-most filter (the first one applied to the object) you use the same code, substituting
the Array class’s shift() method in place of the pop() method.
To remove a filter from the middle of an array of filters (assuming that the array has more than two filters) you can
use the splice() method. You must know the index (the position in the array) of the filter you want to remove. For
example, the following code removes the second filter (the filter at index 1) from a display object:
// Example of removing a filter from the middle of a stack of filters
// applied to a display object named "filteredObject".
var tempFilters:Array = filteredObject.filters;
// Remove the second filter from the array. It's the item at index 1
// because Array indexes start from 0.
// The first "1" indicates the index of the filter to remove; the
// second "1" indicates how many elements to remove.
tempFilters.splice(1, 1);
// Apply the new set of filters to the display object.
filteredObject.filters = tempFilters;
Determining a filter’s index
You need to know which filter to remove from the array, so that you know the index of the filter. You must either
know (by virtue of the way the application is designed), or calculate the index of the filter to remove.
The best approach is to design your application so that the filter you want to remove is always in the same position
in the set of filters. For example, if you have a single display object with a convolution filter and a drop-shadow filter
applied to it (in that order), and you want to remove the drop-shadow filter but keep the convolution filter, the filter
is in a known position (the top-most filter) so that you can know ahead of time which Array method to use (in this
case Array.pop() to remove the drop-shadow filter).

ADOBE FLEX 3
Developer Guide
323
If the filter you want to remove is always a certain type, but not necessarily always in the same position in the set of
filters, you can check the data type of each filter in the array to determine which one to remove. For example, the
following code determines which of a set of filters is a glow filter, and removes that filter from the set.
// Example of removing a glow filter from a set of filters, where the
// filter you want to remove is the only GlowFilter instance applied
// to the filtered object.
var tempFilters:Array = filteredObject.filters;
// Loop through the filters to find the index of the GlowFilter instance.
var glowIndex:int;
var numFilters:int = tempFilters.length;
for (var i:int = 0; i < numFilters; i++)
{
if (tempFilters[i] is GlowFilter)
{
glowIndex = i;
break;
}
}
// Remove the glow filter from the array.
tempFilters.splice(glowIndex, 1);
// Apply the new set of filters to the display object.
filteredObject.filters = tempFilters;
In a more complex case, such as if the filter to remove is selected at runtime, the best approach is to keep a separate,
persistent copy of the filter array that serves as the master list of filters. Any time you make a change to the set of
filters (add a filter or remove a filter), change the master list, then apply that filter array as the filters property of
the display object.
For example, in the following code listing, multiple convolution filters are applied to a display object to create
different visual effects, and at a later point in the application one of those filters is removed while the others are
retained. In this case, the code keeps a master copy of the filters array, as well as a reference to the filter to remove.
Finding and removing the specific filter is similar to the preceding approach, except that instead of making a
temporary copy of the filters array, the master copy is manipulated and then applied to the display object.
// Example of removing a filter from a set of
// filters, where there may be more than one
// of that type of filter applied to the filtered
// object, and you only want to remove one.
// A master list of filters is stored in a separate,
// persistent Array variable.
var masterFilterList:Array;
// At some point, you store a reference to the filter you
// want to remove.
var filterToRemove:ConvolutionFilter;
// ... assume the filters have been added to masterFilterList,
// which is then assigned as the filteredObject.filters:
filteredObject.filters = masterFilterList;

ADOBE FLEX 3
Developer Guide
324
// ... later, when it's time to remove the filter, this code gets called:
// Loop through the filters to find the index of masterFilterList.
var removeIndex:int = -1;
var numFilters:int = masterFilterList.length;
for (var i:int = 0; i < numFilters; i++)
{
if (masterFilterList[i] == filterToRemove)
{
removeIndex = i;
break;
}
}
if (removeIndex >= 0)
{
// Remove the filter from the array.
masterFilterList.splice(removeIndex, 1);
// Apply the new set of filters to the display object.
filteredObject.filters = masterFilterList;
}
In this approach (when you’re comparing a stored filter reference to the items in the filters array to determine which
filter to remove), you must keep a separate copy of the filters array—the code does not work if you compare the stored
filter reference to the elements in a temporary array copied from the display object’s filters property. This is
because internally, when you assign an array to the filters property, Flash Player or AIR makes a copy of each filter
object in the array. Those copies (rather than the original objects) are applied to the display object, and when you
read the filters property into a temporary array, the temporary array contains references to the copied filter
objects rather than references to the original filter objects. Consequently, if in the preceding example you try to
determine the index of filterToRemove by comparing it to the filters in a temporary filters array, no match is found.
Filters and object transformations
No filtered region—a drop shadow, for example—outside of a display object’s bounding box rectangle is considered
to be part of the surface for the purposes of hit detection (determining if an instance overlaps or intersects with
another instance). Because the DisplayObject class’s hit detection methods are vector-based, you cannot perform a
hit detection on the bitmap result. For example, if you apply a bevel filter to a button instance, hit detection is not
available on the beveled portion of the instance.
Scaling, rotating, and skewing are not supported by filters; if the filtered display object itself is scaled (if scaleX and
scaleY are not 100%), the filter effect does not scale with the instance. This means that the original shape of the
instance rotates, scales, or skews; however, the filter does not rotate, scale, or skew with the instance.
You can animate an instance with a filter to create realistic effects, or nest instances and use the BitmapData class to
animate filters to achieve this effect.
Filters and Bitmap objects
When you apply any filter to a BitmapData object, the cacheAsBitmap property is automatically set to true. In this
way, the filter is actually applied to the copy of the object rather than to the original.
This copy is then placed on the main display (over the original object) as close as possible to the nearest pixel. If the
bounds of the original bitmap change, the filtered copy bitmap is recreated from the original, rather than being
stretched or distorted.
If you clear all filters for a display object, the cacheAsBitmap property is reset to what it was before the filter was
applied.

ADOBE FLEX 3
Developer Guide
325
Available display filters
ActionScript 3.0 includes nine filter classes that you can apply to display objects and BitmapData objects:
•Bevel filter (BevelFilter class)
•Blur filter (BlurFilter class)
•Drop shadow filter (DropShadowFilter class)
•Glow filter (GlowFilter class)
•Gradient bevel filter (GradientBevelFilter class)
•Gradient glow filter (GradientGlowFilter class)
•Color matrix filter (ColorMatrixFilter class)
•Convolution filter (ConvolutionFilter class)
•Displacement map filter (DisplacementMapFilter class)
The first six filters are simple filters that can be used to create one specific effect, with some customization of the
effect available. Those six filters can be applied using ActionScript, and can also be applied to objects in Adobe Flash
CS3 Professional using the Filters panel. Consequently, even if you’re applying filters using ActionScript, if you have
the Flash authoring tool you can use the visual interface to quickly try out different filters and settings to figure out
how to create a desired effect.
The final three filters are available in ActionScript only. Those filters, the color matrix filter, convolution filter, and
displacement map filter, are much more flexible in the types of effects that they can be used to create; rather than
being optimized for a single effect, they provide power and flexibility. For example, by selecting different values for
its matrix, the convolution filter can be used to create effects such as blurring, embossing, sharpening, finding color
edges, transformations, and more.
Each of the filters, whether simple or complex, can be customized using their properties. Generally, you have two
choices for setting filter properties. All the filters let you set the properties by passing parameter values to the filter
object’s constructor. Alternatively, whether or not you set the filter properties by passing parameters, you can adjust
the filters later by setting values for the filter object’s properties. Most of the example code listings set the properties
directly, in order to make the example easier to follow. Nevertheless, you could usually achieve the same result in
fewer lines of code by passing the values as parameters in the filter object’s constructor. For more details on the
specifics of each filter, its properties and its constructor parameters, see the listings for the flash.filters package in the
ActionScript 3.0 Language and Components Reference.
Bevel filter
The BevelFilter class allows you to add a 3D beveled edge to the filtered object. This filter makes the hard corners or
edges of your object look like they have been chiseled, or beveled, away.
The BevelFilter class properties allow you to customize the appearance of the bevel. You can set highlight and shadow
colors, bevel edge blurs, bevel angles, and bevel edge placement; you can even create a knockout effect.
The following example loads an external image and applies a bevel filter to it.
import flash.display.*;
import flash.filters.BevelFilter;
import flash.filters.BitmapFilterQuality;
import flash.filters.BitmapFilterType;
import flash.net.URLRequest;

ADOBE FLEX 3
Developer Guide
326
// Load an image onto the Stage.
var imageLoader:Loader = new Loader();
var url:String = "http://www.helpexamples.com/flash/images/image3.jpg";
var urlReq:URLRequest = new URLRequest(url);
imageLoader.load(urlReq);
addChild(imageLoader);
// Create the bevel filter and set filter properties.
var bevel:BevelFilter = new BevelFilter();
bevel.distance = 5;
bevel.angle = 45;
bevel.highlightColor = 0xFFFF00;
bevel.highlightAlpha = 0.8;
bevel.shadowColor = 0x666666;
bevel.shadowAlpha = 0.8;
bevel.blurX = 5;
bevel.blurY = 5;
bevel.strength = 5;
bevel.quality = BitmapFilterQuality.HIGH;
bevel.type = BitmapFilterType.INNER;
bevel.knockout = false;
// Apply filter to the image.
imageLoader.filters = [bevel];
Blur filter
The BlurFilter class smears, or blurs, a display object and its contents. Blur effects are useful for giving the impression
that an object is out of focus or for simulating fast movement, as in a motion blur. By setting the quality property
of the blur filter to low, you can simulate a softly out-of-focus lens effect. Setting the quality property to high results
in a smooth blur effect similar to a Gaussian blur.
The following example creates a circle object using the drawCircle() method of the Graphics class and applies a
blur filter to it:
import flash.display.Sprite;
import flash.filters.BitmapFilterQuality;
import flash.filters.BlurFilter;
// Draw a circle.
var redDotCutout:Sprite = new Sprite();
redDotCutout.graphics.lineStyle();
redDotCutout.graphics.beginFill(0xFF0000);
redDotCutout.graphics.drawCircle(145, 90, 25);
redDotCutout.graphics.endFill();
// Add the circle to the display list.
addChild(redDotCutout);
// Apply the blur filter to the rectangle.
var blur:BlurFilter = new BlurFilter();
blur.blurX = 10;
blur.blurY = 10;
blur.quality = BitmapFilterQuality.MEDIUM;
redDotCutout.filters = [blur];

ADOBE FLEX 3
Developer Guide
327
Drop shadow filter
Drop shadows give the impression that there is a separate light source situated above a target object. The position
and intensity of this light source can be modified to produce a variety of different drop shadow effects.
The drop shadow filter uses an algorithm that is similar to the blur filter’s algorithm. The main difference is that the
drop shadow filter has a few more properties that you can modify to simulate different light-source attributes (such
as alpha, color, offset and brightness).
The drop shadow filter also allows you to apply custom transformation options on the style of the drop shadow,
including inner or outer shadow and knockout (also known as cutout) mode.
The following code creates a square box sprite and applies a drop shadow filter to it:
import flash.display.Sprite;
import flash.filters.DropShadowFilter;
// Draw a box.
var boxShadow:Sprite = new Sprite();
boxShadow.graphics.lineStyle(1);
boxShadow.graphics.beginFill(0xFF3300);
boxShadow.graphics.drawRect(0, 0, 100, 100);
boxShadow.graphics.endFill();
addChild(boxShadow);
// Apply the drop shadow filter to the box.
var shadow:DropShadowFilter = new DropShadowFilter();
shadow.distance = 10;
shadow.angle = 25;
// You can also set other properties, such as the shadow color,
// alpha, amount of blur, strength, quality, and options for
// inner shadows and knockout effects.
boxShadow.filters = [shadow];
Glow filter
The GlowFilter class applies a lighting effect to display objects, making it appear that a light is being shined up from
underneath the object to create a soft glow.
Similar to the drop shadow filter, the glow filter includes properties to modify the distance, angle, and color of the
light source to produce varying effects. The GlowFilter also has several options for modifying the style of the glow,
including inner or outer glow and knockout mode.
The following code creates a cross using the Sprite class and applies a glow filter to it:
import flash.display.Sprite;
import flash.filters.BitmapFilterQuality;
import flash.filters.GlowFilter;
// Create a cross graphic.
var crossGraphic:Sprite = new Sprite();
crossGraphic.graphics.lineStyle();
crossGraphic.graphics.beginFill(0xCCCC00);
crossGraphic.graphics.drawRect(60, 90, 100, 20);
crossGraphic.graphics.drawRect(100, 50, 20, 100);
crossGraphic.graphics.endFill();
addChild(crossGraphic);

ADOBE FLEX 3
Developer Guide
328
// Apply the glow filter to the cross shape.
var glow:GlowFilter = new GlowFilter();
glow.color = 0x009922;
glow.alpha = 1;
glow.blurX = 25;
glow.blurY = 25;
glow.quality = BitmapFilterQuality.MEDIUM;
crossGraphic.filters = [glow];
Gradient bevel filter
The GradientBevelFilter class lets you apply an enhanced bevel effect to display objects or BitmapData objects. Using
a gradient color on the bevel greatly improves the spatial depth of the bevel, giving edges a more realistic, 3D
appearance.
The following code creates a rectangle object using the drawRect() method of the Shape class and applies a gradient
bevel filter to it.
import flash.display.Shape;
import flash.filters.BitmapFilterQuality;
import flash.filters.GradientBevelFilter;
// Draw a rectangle.
var box:Shape = new Shape();
box.graphics.lineStyle();
box.graphics.beginFill(0xFEFE78);
box.graphics.drawRect(100, 50, 90, 200);
box.graphics.endFill();
// Apply a gradient bevel to the rectangle.
var gradientBevel:GradientBevelFilter = new GradientBevelFilter();
gradientBevel.distance = 8;
gradientBevel.angle = 225; // opposite of 45 degrees
gradientBevel.colors = [0xFFFFCC, 0xFEFE78, 0x8F8E01];
gradientBevel.alphas = [1, 0, 1];
gradientBevel.ratios = [0, 128, 255];
gradientBevel.blurX = 8;
gradientBevel.blurY = 8;
gradientBevel.quality = BitmapFilterQuality.HIGH;
// Other properties let you set the filter strength and set options
// for inner bevel and knockout effects.
box.filters = [gradientBevel];
// Add the graphic to the display list.
addChild(box);
Gradient glow filter
The GradientGlowFilter class lets you apply an enhanced glow effect to display objects or BitmapData objects. The
effect gives you greater color control of the glow, and in turn produces a more realistic glow effect. Additionally, the
gradient glow filter allows you to apply a gradient glow to the inner, outer, or upper edges of an object.
The following example draws a circle on the Stage, and applies a gradient glow filter to it. As you move the mouse
further to the right and down, the amount of blur increases in the horizontal and vertical directions respectively. In
addition, any time you click on the Stage, the strength of the blur increases.

ADOBE FLEX 3
Developer Guide
329
import flash.events.MouseEvent;
import flash.filters.BitmapFilterQuality;
import flash.filters.BitmapFilterType;
import flash.filters.GradientGlowFilter;
// Create a new Shape instance.
var shape:Shape = new Shape();
// Draw the shape.
shape.graphics.beginFill(0xFF0000, 100);
shape.graphics.moveTo(0, 0);
shape.graphics.lineTo(100, 0);
shape.graphics.lineTo(100, 100);
shape.graphics.lineTo(0, 100);
shape.graphics.lineTo(0, 0);
shape.graphics.endFill();
// Position the shape on the Stage.
addChild(shape);
shape.x = 100;
shape.y = 100;
// Define a gradient glow.
var gradientGlow:GradientGlowFilter = new GradientGlowFilter();
gradientGlow.distance = 0;
gradientGlow.angle = 45;
gradientGlow.colors = [0x000000, 0xFF0000];
gradientGlow.alphas = [0, 1];
gradientGlow.ratios = [0, 255];
gradientGlow.blurX = 10;
gradientGlow.blurY = 10;
gradientGlow.strength = 2;
gradientGlow.quality = BitmapFilterQuality.HIGH;
gradientGlow.type = BitmapFilterType.OUTER;
// Define functions to listen for two events.
function onClick(event:MouseEvent):void
{
gradientGlow.strength++;
shape.filters = [gradientGlow];
}
function onMouseMove(event:MouseEvent):void
{
gradientGlow.blurX = (stage.mouseX / stage.stageWidth) * 255;
gradientGlow.blurY = (stage.mouseY / stage.stageHeight) * 255;
shape.filters = [gradientGlow];
}
stage.addEventListener(MouseEvent.CLICK, onClick);
stage.addEventListener(MouseEvent.MOUSE_MOVE, onMouseMove);
Example: Combining basic filters
The following code example uses several basic filters, combined with a Timer for creating repeating actions, to create
an animated traffic light simulation.
import flash.display.Shape;
import flash.events.TimerEvent;
import flash.filters.BitmapFilterQuality;
import flash.filters.BitmapFilterType;

ADOBE FLEX 3
Developer Guide
330
import flash.filters.DropShadowFilter;
import flash.filters.GlowFilter;
import flash.filters.GradientBevelFilter;
import flash.utils.Timer;
var count:Number = 1;
var distance:Number = 8;
var angleInDegrees:Number = 225; // opposite of 45 degrees
var colors:Array = [0xFFFFCC, 0xFEFE78, 0x8F8E01];
var alphas:Array = [1, 0, 1];
var ratios:Array = [0, 128, 255];
var blurX:Number = 8;
var blurY:Number = 8;
var strength:Number = 1;
var quality:Number = BitmapFilterQuality.HIGH;
var type:String = BitmapFilterType.INNER;
var knockout:Boolean = false;
// Draw the rectangle background for the traffic light.
var box:Shape = new Shape();
box.graphics.lineStyle();
box.graphics.beginFill(0xFEFE78);
box.graphics.drawRect(100, 50, 90, 200);
box.graphics.endFill();
// Draw the 3 circles for the three lights.
var stopLight:Shape = new Shape();
stopLight.graphics.lineStyle();
stopLight.graphics.beginFill(0xFF0000);
stopLight.graphics.drawCircle(145,90,25);
stopLight.graphics.endFill();
var cautionLight:Shape = new Shape();
cautionLight.graphics.lineStyle();
cautionLight.graphics.beginFill(0xFF9900);
cautionLight.graphics.drawCircle(145,150,25);
cautionLight.graphics.endFill();
var goLight:Shape = new Shape();
goLight.graphics.lineStyle();
goLight.graphics.beginFill(0x00CC00);
goLight.graphics.drawCircle(145,210,25);
goLight.graphics.endFill();
// Add the graphics to the display list.
addChild(box);
addChild(stopLight);
addChild(cautionLight);
addChild(goLight);
// Apply a gradient bevel to the traffic light rectangle.
var gradientBevel:GradientBevelFilter = new GradientBevelFilter(distance, angleInDegrees,
colors, alphas, ratios, blurX, blurY, strength, quality, type, knockout);
box.filters = [gradientBevel];
// Create the inner shadow (for lights when off) and glow
// (for lights when on).
var innerShadow:DropShadowFilter = new DropShadowFilter(5, 45, 0, 0.5, 3, 3, 1, 1, true,
false);
var redGlow:GlowFilter = new GlowFilter(0xFF0000, 1, 30, 30, 1, 1, false, false);
var yellowGlow:GlowFilter = new GlowFilter(0xFF9900, 1, 30, 30, 1, 1, false, false);

ADOBE FLEX 3
Developer Guide
331
var greenGlow:GlowFilter = new GlowFilter(0x00CC00, 1, 30, 30, 1, 1, false, false);
// Set the starting state of the lights (green on, red/yellow off).
stopLight.filters = [innerShadow];
cautionLight.filters = [innerShadow];
goLight.filters = [greenGlow];
// Swap the filters based on the count value.
function trafficControl(event:TimerEvent):void
{
if (count == 4)
{
count = 1;
}
switch (count)
{
case 1:
stopLight.filters = [innerShadow];
cautionLight.filters = [yellowGlow];
goLight.filters = [innerShadow];
break;
case 2:
stopLight.filters = [redGlow];
cautionLight.filters = [innerShadow];
goLight.filters = [innerShadow];
break;
case 3:
stopLight.filters = [innerShadow];
cautionLight.filters = [innerShadow];
goLight.filters = [greenGlow];
break;
}
count++;
}
// Create a timer to swap the filters at a 3 second interval.
var timer:Timer = new Timer(3000, 9);
timer.addEventListener(TimerEvent.TIMER, trafficControl);
timer.start();
Color matrix filter
The ColorMatrixFilter class is used to manipulate the color and alpha values of the filtered object. This allows you
to create saturation changes, hue rotation (shifting a palette from one range of colors to another), luminance-to-
alpha changes, and other color manipulation effects using values from one color channel and potentially applying
them to other channels.
Conceptually, the filter goes through the pixels in the source image one by one and separates each pixel into its red,
green, blue, and alpha components. It then multiplies values provided in the color matrix by each of these values,
adding the results together to determine the resulting color value that will be displayed on the screen for that pixel.
The matrix property of the filter is an array of 20 numbers that are used in calculating the final color. For details of
the specific algorithm used to calculate the color values, see the entry describing the ColorMatrixFilter class’s matrix
property in the ActionScript 3.0 Language and Components Reference.
Further information and examples of the color matrix filter can be found in the article “Using Matrices for Transfor-
mations, Color Adjustments, and Convolution Effects in Flash” on the Adobe Developer Center web site.

ADOBE FLEX 3
Developer Guide
332
Convolution filter
The ConvolutionFilter class can be used to apply a wide range of imaging transformations to BitmapData objects or
display objects, such as blurring, edge detection, sharpening, embossing, and beveling.
The convolution filter conceptually goes through each pixel in the source image one by one and determines the final
color of that pixel using the value of the pixel and its surrounding pixels. A matrix, specified as an array of numeric
values, indicates to what degree the value of each particular neighboring pixel affects the final resulting value.
Consider the most commonly used type of matrix, which is a three by three matrix. The matrix includes nine values:
NNN
NPN
NNN
When Flash Player or AIR is applying the convolution filter to a certain pixel, it will look at the color value of the
pixel itself (“P” in the example), as well as the values of the surrounding pixels (labelled “N” in the example).
However, by setting values in the matrix, you specify how much priority certain pixels have in affecting the resulting
image.
For example, the following matrix, applied using a convolution filter, will leave an image exactly as it was:
000
010
000
The reason the image is unchanged is because the original pixel’s value has a relative strength of 1 in determining the
final pixel color, while the surrounding pixels’ values have relative strength of 0—meaning their colors don’t affect
the final image.
Similarly, this matrix will cause the pixels of an image to shift one pixel to the left:
000
001
000
Notice that in this case, the pixel itself has no effect on the final value of the pixel displayed in that location on the
final image—only the value of the pixel to the right is used to determine the pixel’s resulting value.
In ActionScript, you create the matrix as a combination of an Array instance containing the values and two
properties specifying the number of rows and columns in the matrix. The following example loads an image and,
when the image finishes loading, applies a convolution filter to the image using the matrix in the previous listing:
// Load an image onto the Stage.
var loader:Loader = new Loader();
var url:URLRequest = new URLRequest("http://www.helpexamples.com/flash/images/image1.jpg");
loader.load(url);
this.addChild(loader);
function applyFilter(event:MouseEvent):void
{
// Create the convolution matrix.
var matrix:Array = [0, 0, 0,
0, 0, 1,
0, 0, 0];
var convolution:ConvolutionFilter = new ConvolutionFilter();
convolution.matrixX = 3;
convolution.matrixY = 3;

ADOBE FLEX 3
Developer Guide
333
convolution.matrix = matrix;
convolution.divisor = 1;
loader.filters = [convolution];
}
loader.addEventListener(MouseEvent.CLICK, applyFilter);
Something that isn’t obvious in this code is the effect of using values other than 1 or 0 in the matrix. For example,
the same matrix, with the number 8 instead of 1 in the right-hand position, performs the same action (shifting the
pixels to the left). In addition, it affects the colors of the image, making them 8 times brighter. This is because the
final pixel color values are calculated by multiplying the matrix values by the original pixel colors, adding the values
together, and dividing by the value of the filter’s divisor property. Notice that in the example code, the divisor
property is set to 1. As a general rule, if you want the brightness of the colors to stay about the same as in the original
image, you should make the divisor equal to the sum of the matrix values. So with a matrix where the values add up
to 8, and a divisor of 1, the resulting image is going to be roughly 8 times brighter than the original image.
Although the effect of this matrix isn’t very noticeable, other matrix values can be used to create various effects. Here
are several standard sets of matrix values for different effects using a three by three matrix:
•Basic blur (divisor 5):
0 1 0
1 1 1
0 1 0
•Sharpening (divisor 1):
0, -1, 0
-1, 5, -1
0, -1, 0
•Edge detection (divisor 1):
0, -1, 0
-1, 4, -1
0, -1, 0
•Embossing effect (divisor 1):
-2, -1, 0
-1, 1, 1
0, 1, 2
Notice that with most of these effects, the divisor is 1. This is because the negative matrix values added to the positive
matrix values result in 1 (or 0 in the case of edge detection, but the divisor property’s value cannot be 0).
Displacement map filter
The DisplacementMapFilter class uses pixel values from a BitmapData object (known as the displacement map
image) to perform a displacement effect on a new object. The displacement map image is typically different than the
actual display object or BitmapData instance to which the filter is being applied. A displacement effect involves
displacing pixels in the filtered image—in other words, shifting them away from their original location to some
extent. This filter can be used to create a shifted, warped, or mottled effect.
The location and amount of displacement applied to a given pixel is determined by the color value of the
displacement map image. When working with the filter, in addition to specifying the map image, you specify the
following values to control how the displacement is calculated from the map image:

ADOBE FLEX 3
Developer Guide
334
•Map point: The location on the filtered image at which the top-left corner of the displacement filter will be
applied. You can use this if you only want to apply the filter to part of an image.
•X component: Which color channel of the map image affects the x position of pixels.
•Y component: Which color channel of the map image affects the y position of pixels.
•X scale: A multiplier value that specifies how strong the x axis displacement is.
•Y scale: A multiplier value that specifies how strong the y axis displacement is.
•Filter mode: Determines what Flash Player or AIR should do in any empty spaces created by pixels being shifted
away. The options, defined as constants in the DisplacementMapFilterMode class, are to display the original pixels
(filter mode IGNORE), to wrap the pixels around from the other side of the image (filter mode WRAP, which is the
default), to use the nearest shifted pixel (filter mode CLAMP), or to fill in the spaces with a color (filter mode COLOR).
To get a basic understanding of how the displacement map filter works, consider a basic example. In the following
code, an image is loaded, and when it finishes loading it is centered on the Stage and a displacement map filter is
applied to it, causing the pixels in the entire image to shift horizontally to the left.
import flash.display.BitmapData;
import flash.display.Loader;
import flash.events.MouseEvent;
import flash.filters.DisplacementMapFilter;
import flash.geom.Point;
import flash.net.URLRequest;
// Load an image onto the Stage.
var loader:Loader = new Loader();
var url:URLRequest = new URLRequest("http://www.helpexamples.com/flash/images/image3.jpg");
loader.load(url);
this.addChild(loader);
var mapImage:BitmapData;
var displacementMap:DisplacementMapFilter;
// This function is called when the image finishes loading.
function setupStage(event:Event):void
{
// Center the loaded image on the Stage.
loader.x = (stage.stageWidth - loader.width) / 2;
loader.y = (stage.stageHeight - loader.height) / 2;
// Create the displacement map image.
mapImage = new BitmapData(loader.width, loader.height, false, 0xFF0000);
// Create the displacement filter.
displacementMap = new DisplacementMapFilter();
displacementMap.mapBitmap = mapImage;
displacementMap.mapPoint = new Point(0, 0);
displacementMap.componentX = BitmapDataChannel.RED;
displacementMap.scaleX = 250;
loader.filters = [displacementMap];
}
loader.contentLoaderInfo.addEventListener(Event.COMPLETE, setupStage);

ADOBE FLEX 3
Developer Guide
335
The properties used to define the displacement are as follows:
•Map bitmap: The displacement bitmap is a new BitmapData instance created by the code. Its dimensions match
the dimensions of the loaded image (so the displacement is applied to the entire image). It is filled with solid red
pixels.
•Map point: This value is set to the point 0, 0—again, causing the displacement to be applied to the entire image.
•X component: This value is set to the constant BitmapDataChannel.RED, meaning the red value of the map
bitmap will determine how much the pixels are displaced (how much they move) along the x axis.
•X scale: This value is set to 250. The full amount of displacement (from the map image being completely red)
only displaces the image by a small amount (roughly one-half of a pixel), so if this value was set to 1 the image would
only shift .5 pixels horizontally. By setting it to 250, the image shifts by approximately 125 pixels.
These settings cause the filtered image’s pixels to shift 250 pixels to the left. The direction (left or right) and amount
of shift is based on the color value of the pixels in the map image. Conceptually, Flash Player or AIR goes through
the pixels of the filtered image one by one (at least, the pixels in the region where the filter is applied, which in this
case means all the pixels), and does the following with each pixel:
1It finds the corresponding pixel in the map image. For example, when Flash Player or AIR is calculating the
displacement amount for the pixel in the top-left corner of the filtered image, it looks at the pixel in the top-left
corner of the map image.
2It determines the value of the specified color channel in the map pixel. In this case, the x component color
channel is the red channel, so Flash Player and AIR look to see what the value of the red channel of the map image
is at the pixel in question. Since the map image is solid red, the pixel’s red channel is 0xFF, or 255. This is used as the
displacement value.
3It compares the displacement value to the “middle” value (127, which is halfway between 0 and 255). If the
displacement value is lower than the middle value, the pixel shifts in a positive direction (to the right for x
displacement; down for y displacement). On the other hand, if the displacement value is higher than the middle
value (as in this example), the pixel shifts in a negative direction (to the left for x displacement; up for y
displacement). To be more precise, Flash Player and AIR subtract the displacement value from 127, and the result
(positive or negative) is the relative amount of displacement that is applied.
4Finally, it determines the actual amount of displacement by determining what percentage of full displacement
the relative displacement value represents. In this case, full red means 100% displacement. That percentage is then
multiplied by the x scale or y scale value to determine the number of pixels of displacement that will be applied. In
this example, 100% times a multiplier of 250 determines the amount of displacement—roughly 125 pixels to the left.
Because no values were specified for y component and y scale, the defaults (which cause no displacement) were
used—that’s why the image doesn’t shift at all in the vertical direction.
The default filter mode setting, WRAP, is used in the example, so as the pixels shift to the left the empty space on the
right is filled in by the pixels that shifted off the left edge of the image. You can experiment with this value to see the
different effects. For instance, if you add the following line to the portion of code where the displacement properties
are being set (before the line loader.filters = [displacementMap]), it will make the image look as though it
has been smeared across the Stage:
displacementMap.mode = DisplacementMapFilterMode.CLAMP;
For a more complex example, the following listing uses a displacement map filter to create a magnifying glass effect
on an image:
import flash.display.Bitmap;
import flash.display.BitmapData;
import flash.display.BitmapDataChannel;

ADOBE FLEX 3
Developer Guide
336
import flash.display.GradientType;
import flash.display.Loader;
import flash.display.Shape;
import flash.events.MouseEvent;
import flash.filters.DisplacementMapFilter;
import flash.filters.DisplacementMapFilterMode;
import flash.geom.Matrix;
import flash.geom.Point;
import flash.net.URLRequest;
// Create the gradient circles that will together form the
// displacement map image
var radius:uint = 50;
var type:String = GradientType.LINEAR;
var redColors:Array = [0xFF0000, 0x000000];
var blueColors:Array = [0x0000FF, 0x000000];
var alphas:Array = [1, 1];
var ratios:Array = [0, 255];
var xMatrix:Matrix = new Matrix();
xMatrix.createGradientBox(radius * 2, radius * 2);
var yMatrix:Matrix = new Matrix();
yMatrix.createGradientBox(radius * 2, radius * 2, Math.PI / 2);
var xCircle:Shape = new Shape();
xCircle.graphics.lineStyle(0, 0, 0);
xCircle.graphics.beginGradientFill(type, redColors, alphas, ratios, xMatrix);
xCircle.graphics.drawCircle(radius, radius, radius);
var yCircle:Shape = new Shape();
yCircle.graphics.lineStyle(0, 0, 0);
yCircle.graphics.beginGradientFill(type, blueColors, alphas, ratios, yMatrix);
yCircle.graphics.drawCircle(radius, radius, radius);
// Position the circles at the bottom of the screen, for reference.
this.addChild(xCircle);
xCircle.y = stage.stageHeight - xCircle.height;
this.addChild(yCircle);
yCircle.y = stage.stageHeight - yCircle.height;
yCircle.x = 200;
// Load an image onto the Stage.
var loader:Loader = new Loader();
var url:URLRequest = new URLRequest("http://www.helpexamples.com/flash/images/image1.jpg");
loader.load(url);
this.addChild(loader);
// Create the map image by combining the two gradient circles.
var map:BitmapData = new BitmapData(xCircle.width, xCircle.height, false, 0x7F7F7F);
map.draw(xCircle);
var yMap:BitmapData = new BitmapData(yCircle.width, yCircle.height, false, 0x7F7F7F);
yMap.draw(yCircle);
map.copyChannel(yMap, yMap.rect, new Point(0, 0), BitmapDataChannel.BLUE,
BitmapDataChannel.BLUE);
yMap.dispose();

ADOBE FLEX 3
Developer Guide
337
// Display the map image on the Stage, for reference.
var mapBitmap:Bitmap = new Bitmap(map);
this.addChild(mapBitmap);
mapBitmap.x = 400;
mapBitmap.y = stage.stageHeight - mapBitmap.height;
// This function creates the displacement map filter at the mouse location.
function magnify():void
{
// Position the filter.
var filterX:Number = (loader.mouseX) - (map.width / 2);
var filterY:Number = (loader.mouseY) - (map.height / 2);
var pt:Point = new Point(filterX, filterY);
var xyFilter:DisplacementMapFilter = new DisplacementMapFilter();
xyFilter.mapBitmap = map;
xyFilter.mapPoint = pt;
// The red in the map image will control x displacement.
xyFilter.componentX = BitmapDataChannel.RED;
// The blue in the map image will control y displacement.
xyFilter.componentY = BitmapDataChannel.BLUE;
xyFilter.scaleX = 35;
xyFilter.scaleY = 35;
xyFilter.mode = DisplacementMapFilterMode.IGNORE;
loader.filters = [xyFilter];
}
// This function is called when the mouse moves. If the mouse is
// over the loaded image, it applies the filter.
function moveMagnifier(event:MouseEvent):void
{
if (loader.hitTestPoint(loader.mouseX, loader.mouseY))
{
magnify();
}
}
loader.addEventListener(MouseEvent.MOUSE_MOVE, moveMagnifier);

ADOBE FLEX 3
Developer Guide
338
The code first generates two gradient circles, which are combined together to form the displacement map image. The
red circle creates the x axis displacement (xyFilter.componentX = BitmapDataChannel.RED), and the blue circle
creates the y axis displacement (xyFilter.componentY = BitmapDataChannel.BLUE). To help you understand
what the displacement map image looks like, the code adds the original circles as well as the combined circle that
serves as the map image to the bottom of the screen.
The code then loads an image and, as the mouse moves, applies the displacement filter to the portion of the image
that’s under the mouse. The gradient circles used as the displacement map image causes the displaced region to
spread out away from the mouse pointer. Notice that the gray regions of the displacement map image don’t cause any
displacement. The gray color is 0x7F7F7F. The blue and red channels of that shade of gray exactly match the middle
shade of those color channels, so there is no displacement in a gray area of the map image. Likewise, in the center of
the circle there is no displacement. Although the color there isn’t gray, that color’s blue channel and red channel are
identical to the blue channel and red channel of medium gray, and since blue and red are the colors that cause
displacement, no displacement happens there.
Example: Filter Workbench
The Filter Workbench provides a user interface to apply different filters to images and other visual content and see
the resulting code that can be used to generate the same effect in ActionScript. In addition to providing a tool for
experimenting with filters, this application demonstrates the following techniques:
•Creating instances of various filters
•Applying multiple filters to a display object
To get the application files for this sample, see www.adobe.com/go/learn_programmingAS3samples_flash. The
Filter Workbench application files can be found in the Samples/FilterWorkbench folder. The application consists of
the following files:

ADOBE FLEX 3
Developer Guide
339
File Description
com/example/programmingas3/filterWorkbench/FilterWork-
benchController.as
Class that provides the main functionality of the application,
including switching content to which filters are applied, and
applying filters to content.
com/example/programmingas3/filterWorkbench/IFilterFac-
tory.as
Interface defining common methods that are implemented by each
of the filter factory classes. This interface defines the common func-
tionality that the FilterWorkbenchController class uses to interact
with the individual filter factory classes.
in folder com/example/programmingas3/filterWorkbench/:
BevelFactory.as
BlurFactory.as
ColorMatrixFactory.as
ConvolutionFactory.as
DropShadowFactory.as
GlowFactory.as
GradientBevelFactory.as
GradientGlowFactory.as
Set of classes, each of which implements the IFilterFactory interface.
Each of these classes provides the functionality of creating and
setting values for a single type of filter. The filter property panels in
the application use these factory classes to create instances of their
particular filters, which the FilterWorkbenchController class
retrieves and applies to the image content.
com/example/programmingas3/filterWorkbench/IFilterPanel.as Interface defining common methods that are implemented by
classes that define the user interface panels that are used to manip-
ulate filter values in the application.
com/example/programmingas3/filterWorkbench/ColorString-
Formatter.as
Utility class that includes a method to convert a numeric color value
to hexadecimal String format
com/example/programmingas3/filterWorkbench/Gradient-
Color.as
Class that serves as a value object, combining into a single object
the three values (color, alpha, and ratio) that are associated with
each color in the GradientBevelFilter and GradientGlowFilter
User interface (Flex)
FilterWorkbench.mxml The main file defining the application’s user interface.
flexapp/FilterWorkbench.as Class that provides the functionality for the main application’s user
interface; this class is used as the code-behind class for the applica-
tion MXML file.
In folder flexapp/filterPanels:
BevelPanel.as
BlurPanel.as
ColorMatrixPanel.as
ConvolutionPanel.as
DropShadowPanel.as
GlowPanel.as
GradientBevelPanel.as
GradientGlowPanel.as
Set of classes that provide the functionality for each panel that is
used to set options for a single filter.
For each class, there is also an associated MovieClip symbol in the
library of the main application FLA file, whose name matches the
name of the class (for example, the symbol “BlurPanel” is linked to
the class defined in BlurPanel.as). The components that make up the
user interface are positioned and named within those symbols.
flexapp/ImageContainer.as A display object that serves as a container for the loaded image on
the screen
flexapp/controls/BGColorCellRenderer.as Custom cell renderer used to change the background color of a cell
in the DataGrid component
flexapp/controls/QualityComboBox.as Custom control defining a combo box that can be used for the
Quality setting in several filter panels.

ADOBE FLEX 3
Developer Guide
340
Experimenting with ActionScript filters
The Filter Workbench application is designed to help you experiment with various filter effects and generate the
relevant ActionScript code for that effect. The application lets you select from three different files containing visual
content, including bitmap images and a Flash animation, and apply eight different ActionScript filters to the selected
image, either individually or in combination with other filters. The application includes the following filters:
•Bevel (flash.filters.BevelFilter)
•Blur (flash.filters.BlurFilter)
•Color matrix (flash.filters.ColorMatrixFilter)
•Convolution (flash.filters.ConvolutionFilter)
•Drop shadow (flash.filters.DropShadowFilter)
•Glow (flash.filters.GlowFilter)
•Gradient bevel (flash.filters.GradientBevelFilter)
•Gradient glow (flash.filters.GradientGlowFilter)
flexapp/controls/TypeComboBox.as Custom control defining a combo box that can be used for the Type
setting in several filter panels.
Filtered image content
com/example/programmingas3/filterWorkbench/ImageType.as This class serves as a value object containing the type and URL of a
single image file to which the application can load and apply filters.
The class also includes a set of constants representing the actual
image files available.
images/sampleAnimation.swf,
images/sampleImage1.jpg,
images/sampleImage2.jpg
Images and other visual content to which filters are applied in the
application.
File Description
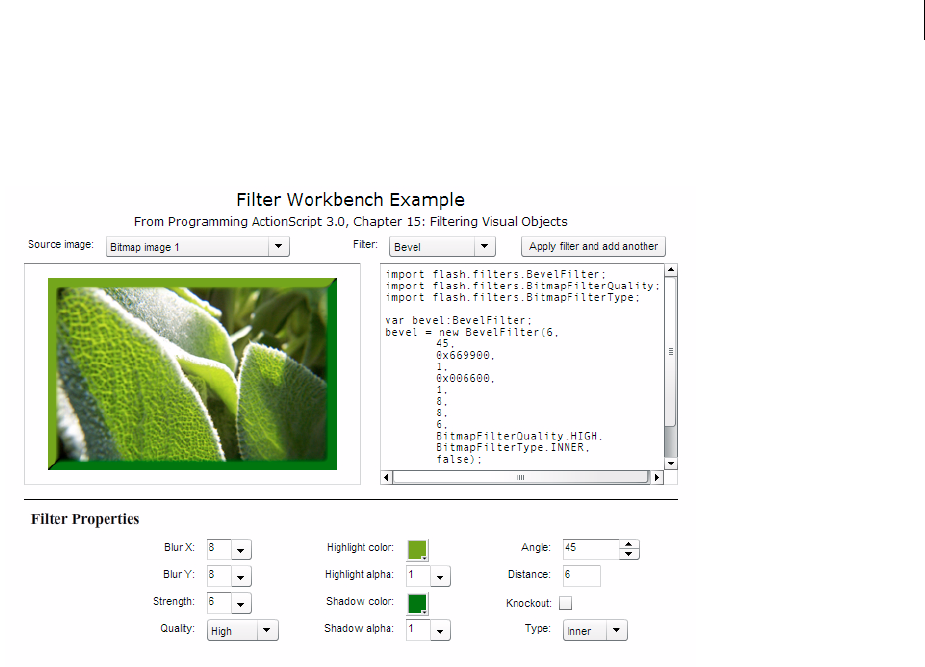
ADOBE FLEX 3
Developer Guide
341
Once a user has selected an image and a filter to apply to that image, the application displays a panel with controls
for setting the specific properties of the selected filter. For example, the following image shows the application with
the Bevel filter selected:
As the user adjusts the filter properties, the preview updates in real time. The user can also apply multiple filters by
customizing one filter, clicking the Apply button, customizing another filter, clicking the Apply button, and so forth.
There are a few features and limitations in the application’s filter panels:
•The color matrix filter includes a set of controls for directly manipulating common image properties including
brightness, contrasts, saturation, and hue. In addition, custom color matrix values can be specified.
•The convolution filter, which is only available using ActionScript, includes a set of commonly used convolution
matrix values, or custom values can be specified. However, while the ConvolutionFilter class accepts a matrix of any
size, the Filter Workbench application uses a fixed 3 x 3 matrix, the most commonly used filter size.
•The displacement map filter, which is only available in ActionScript, is not available in the Filter Workbench
application. A displacement map filter requires a map image in addition to the filtered image content. The map image
is the primary input that determines the result of the filter, so without the ability to load or create a map image, the
ability to experiment with the displacement map filter would be extremely limited.
Creating filter instances
The Filter Workbench application includes a set of classes, one for each of the available filters, which are used by the
individual panels to create the filters. When a user selects a filter, the ActionScript code associated with the filter
panel creates an instance of the appropriate filter factory class. (These classes are known as factory classes because
their purpose is to create instances of other objects, much like a real-world factory creates individual products.)

ADOBE FLEX 3
Developer Guide
342
Whenever the user changes a property value on the panel, the panel’s code calls the appropriate method in the factory
class. Each factory class includes specific methods that the panel uses to create the appropriate filter instance. For
example, if the user selects the Blur filter, the application creates a BlurFactory instance. The BlurFactory class
includes a modifyFilter() method that accepts three parameters: blurX, blurY, and quality, which together are
used to create the desired BlurFilter instance:
private var _filter:BlurFilter;
public function modifyFilter(blurX:Number = 4, blurY:Number = 4, quality:int = 1):void
{
_filter = new BlurFilter(blurX, blurY, quality);
dispatchEvent(new Event(Event.CHANGE));
}
On the other hand, if the user selects the Convolution filter, that filter allows for much greater flexibility and conse-
quently has a larger set of properties to control. In the ConvolutionFactory class, the following code is called when
the user selects a different value on the filter panel:
private var _filter:ConvolutionFilter;
public function modifyFilter(matrixX:Number = 0,
matrixY:Number = 0,
matrix:Array = null,
divisor:Number = 1.0,
bias:Number = 0.0,
preserveAlpha:Boolean = true,
clamp:Boolean = true,
color:uint = 0,
alpha:Number = 0.0):void
{
_filter = new ConvolutionFilter(matrixX, matrixY, matrix, divisor, bias, preserveAlpha,
clamp, color, alpha);
dispatchEvent(new Event(Event.CHANGE));
}
Notice that in each case, when the filter values are changed, the factory object dispatches an Event.CHANGE event to
notify listeners that the filter’s values have changed. The FilterWorkbenchController class, which does the work of
actually applying filters to the filtered content, listens for that event to ascertain when it needs to retrieve a new copy
of the filter and re-apply it to the filtered content.
The FilterWorkbenchController class doesn’t need to know specific details of each filter factory class—it just needs
to know that the filter has changed and to be able to access a copy of the filter. To support this, the application
includes an interface, IFilterFactory, that defines the behavior a filter factory class needs to provide so the appli-
cation’s FilterWorkbenchController instance can do its job. The IFilterFactory defines the getFilter() method
that’s used in the FilterWorkbenchController class:
function getFilter():BitmapFilter;
Notice that the getFilter() interface method definition specifies that it returns a BitmapFilter instance rather than
a specific type of filter. The BitmapFilter class does not define a specific type of filter. Rather, BitmapFilter is the base
class on which all the filter classes are built. Each filter factory class defines a specific implementation of the
getFilter() method in which it returns a reference to the filter object it has built. For example, here is an abbre-
viated version of the ConvolutionFactory class’s source code:

ADOBE FLEX 3
Developer Guide
343
public class ConvolutionFactory extends EventDispatcher implements IFilterFactory
{
// ------- Private vars -------
private var _filter:ConvolutionFilter;
...
// ------- IFilterFactory implementation -------
public function getFilter():BitmapFilter
{
return _filter;
}
...
}
In the ConvolutionFactory class’s implementation of the getFilter() method, it returns a ConvolutionFilter
instance, although any object that calls getFilter() doesn’t necessarily know that—according to the definition of
the getFilter() method that ConvolutionFactory follows, it must return any BitmapFilter instance, which could
be an instance of any of the ActionScript filter classes.
Applying filters to display objects
As explained in the previous section, the Filter Workbench application uses an instance of the FilterWorkbenchCon-
troller class (hereafter referred to as the “controller instance”), which performs the actual task of applying filters to
the selected visual object. Before the controller instance can apply a filter, it first needs to know what image or visual
content the filter should be applied to. When the user selects an image, the application calls the setFilterTarget()
method in the FilterWorkbenchController class, passing in one of the constants defined in the ImageType class:
public function setFilterTarget(targetType:ImageType):void
{
...
_loader = new Loader();
...
_loader.contentLoaderInfo.addEventListener(Event.COMPLETE, targetLoadComplete);
...
}
Using that information the controller instance loads the designated file, storing it in an instance variable named
_currentTarget once it loads:
private var _currentTarget:DisplayObject;
private function targetLoadComplete(event:Event):void
{
...
_currentTarget = _loader.content;
...
}
When the user selects a filter, the application calls the controller instance’s setFilter() method, giving the
controller a reference to the relevant filter factory object, which it stores in an instance variable named
_filterFactory.

ADOBE FLEX 3
Developer Guide
344
private var _filterFactory:IFilterFactory;
public function setFilter(factory:IFilterFactory):void
{
...
_filterFactory = factory;
_filterFactory.addEventListener(Event.CHANGE, filterChange);
}
Notice that, as described previously, the controller instance doesn’t know the specific data type of the filter factory
instance that it is given; it only knows that the object implements the IFilterFactory instance, meaning it has a
getFilter() method and it dispatches a change (Event.CHANGE) event when the filter changes.
When the user changes a filter’s properties in the filter’s panel, the controller instance finds out that the filter has
changed through the filter factory’s change event, which calls the controller instance’s filterChange() method.
That method, in turn, calls the applyTemporaryFilter() method:
private function filterChange(event:Event):void
{
applyTemporaryFilter();
}
private function applyTemporaryFilter():void
{
var currentFilter:BitmapFilter = _filterFactory.getFilter();
// Add the current filter to the set temporarily
_currentFilters.push(currentFilter);
// Refresh the filter set of the filter target
_currentTarget.filters = _currentFilters;
// Remove the current filter from the set
// (This doesn't remove it from the filter target, since
// the target uses a copy of the filters array internally.)
_currentFilters.pop();
}
The work of applying the filter to the display object occurs within the applyTemporaryFilter() method. First, the
controller retrieves a reference to the filter object by calling the filter factory’s getFilter() method.
var currentFilter:BitmapFilter = _filterFactory.getFilter();
The controller instance has an Array instance variable named _currentFilters, in which it stores all the filters that
have been applied to the display object. The next step is to add the newly updated filter to that array:
_currentFilters.push(currentFilter);
Next, the code assigns the array of filters to the display object’s filters property, which actually applies the filters
to the image:
_currentTarget.filters = _currentFilters;
Finally, since this most recently added filter is still the “working” filter, it shouldn’t be permanently applied to the
display object, so it is removed from the _currentFilters array:
_currentFilters.pop();

ADOBE FLEX 3
Developer Guide
345
Removing this filter from the array doesn’t affect the filtered display object, because a display object makes a copy of
the filters array when it is assigned to the filters property, and it uses that internal array rather than the original
one. For this reason, any changes that are made to the array of filters don’t affect the display object until the array is
assigned to the display object’s filters property again.

346
Chapter 17: Working with movie clips
The MovieClip class is the core class for animation and movie clip symbols created in Adobe® Flash® CS3 Profes-
sional. It has all the behaviors and functionality of display objects, but with additional properties and methods for
controlling a movie clip’s timeline. This chapter explains how to use ActionScript™ to control movie clip playback
and to create a movie clip dynamically.
Contents
Basics of movie clips . . . . . . . . . . . . . . . . . . . . . . . . . . . . . . . . . . . . . . . . . . . . . . . . . . . . . . . . . . . . . . . . . . . . . . . . . . . . . . 346
Controlling movie clip playback. . . . . . . . . . . . . . . . . . . . . . . . . . . . . . . . . . . . . . . . . . . . . . . . . . . . . . . . . . . . . . . . . . . . 348
Creating MovieClip objects with ActionScript. . . . . . . . . . . . . . . . . . . . . . . . . . . . . . . . . . . . . . . . . . . . . . . . . . . . . . . . 350
Loading an external SWF file . . . . . . . . . . . . . . . . . . . . . . . . . . . . . . . . . . . . . . . . . . . . . . . . . . . . . . . . . . . . . . . . . . . . . . 350
Example: RuntimeAssetsExplorer . . . . . . . . . . . . . . . . . . . . . . . . . . . . . . . . . . . . . . . . . . . . . . . . . . . . . . . . . . . . . . . . . . 351
Basics of movie clips
Introduction to working with movie clips
Movie clips are a key element for people who create animated content with the Flash authoring tool and want to
control that content with ActionScript. Whenever you create a movie clip symbol in Flash, Flash adds the symbol to
the library of that Flash document. By default, this symbol becomes an instance of the MovieClip class, and as such
has the properties and methods of the MovieClip class.
When an instance of a movie clip symbol is placed on the Stage, the movie clip automatically progresses through its
timeline (if it has more than one frame) unless its playback is altered using ActionScript. It is this timeline that distin-
guishes the MovieClip class, allowing you to create animation through motion or shape tweens through the Flash
authoring tool. By contrast, with a display object that is an instance of the Sprite class, you can create animation only
by programmatically changing the object’s values.
In previous versions of ActionScript, the MovieClip class was the base class of all instances on the Stage. In Action-
Script 3.0, a movie clip is only one of many display objects that can appear on the screen. If a timeline is not necessary
for the function of a display object, using the Shape class or Sprite class in lieu of the MovieClip class may improve
rendering performance. For more information on choosing the appropriate display object for a task, see “Choosing
a DisplayObject subclass” on page 264.
Common movie clip tasks
The following common movie clips tasks are described in this chapter:
•Making movie clips play and stop
•Playing movie clips in reverse
•Moving the playhead to specific points in a movie clip’s timeline
•Working with frame labels in ActionScript
•Accessing scene information in ActionScript
•Creating instances of library movie clip symbols using ActionScript

ADOBE FLEX 3
Developer Guide
347
•Loading and controlling external SWF files, including files created for previous Flash Player versions
•Building an ActionScript system for creating graphical assets to be loaded and used at run time
Important concepts and terms
The following reference list contains important terms used in this chapter:
•AVM1 SWF: A SWF file created using ActionScript 1.0 or ActionScript 2.0, usually targeting Flash Player 8 or
earlier.
•AVM2 SWF: A SWF file created using ActionScript 3.0 for Adobe Flash Player 9 or Adobe AIR.
•External SWF: A SWF file that is created separately from the project SWF file and is intended to be loaded into
the project SWF file and played back within that SWF file.
•Frame: The smallest division of time on the timeline. As with a motion picture filmstrip, each frame is like a
snapshot of the animation in time, and when frames are played quickly in sequence, the effect of animation is
created.
•Timeline: The metaphorical representation of the series of frames that make up a movie clip’s animation
sequence. The timeline of a MovieClip object is equivalent to the timeline in the Flash authoring tool.
•Playhead: A marker identifying the location (frame) in the timeline that is being displayed at a given moment.
Working with MovieClip objects
When you publish a SWF file, Flash converts all movie clip symbol instances on the Stage to MovieClip objects. You
can make a movie clip symbol available to ActionScript by giving it an instance name in the Instance Name field of
the Property inspector. When the SWF file is created, Flash generates the code that creates the MovieClip instance
on the Stage and declares a variable using the instance name. If you have named movie clips that are nested inside
other named movie clips, those child movie clips are treated like properties of the parent movie clip—you can access
the child movie clip using dot syntax. For example, if a movie clip with the instance name childClip is nested within
another clip with the instance name parentClip, you can make the child clip’s timeline animation play by calling
this code:
parentClip.childClip.play();
Note: : Children instances placed on the Stage in the Flash authoring tool cannot be accessed by code from within the
constructor of a parent instance since they have not been created at that point in code execution. Before accessing the
child, the parent must instead either create the child instance by code or delay access to a callback function that listens
for the child to dispatch its Event.ADDED_TO_STAGE event.
While some legacy methods and properties of the ActionScript 2.0 MovieClip class remain the same, others have
changed. All properties prefixed with an underscore have been renamed. For example, _width and _height
properties are now accessed as width and height, while _xscale and _yscale are now accessed as scaleX and
scaleY. For a complete list of the properties and methods of the MovieClip class, consult the ActionScript 3.0
Language and Components Reference.

ADOBE FLEX 3
Developer Guide
348
Controlling movie clip playback
Flash uses the metaphor of a timeline to convey animation or a change in state. Any visual element that employs a
timeline must be either a MovieClip object or extend from the MovieClip class. While ActionScript can direct any
movie clip to stop, play, or go to another point on the timeline, it cannot be used to dynamically create a timeline or
add content at specific frames; this is only possible using the Flash authoring tool.
When a MovieClip is playing, it progresses along its timeline at a speed dictated by the frame rate of the SWF file.
Alternatively, you can override this setting by setting the Stage.frameRate property in ActionScript.
Playing movie clips and stopping playback
The play() and stop() methods allow basic control of a movie clip across its timeline. For example, suppose you
have a movie clip symbol on the Stage which contains an animation of a bicycle moving across the screen, with its
instance name set to bicycle. If the following code is attached to a keyframe on the main timeline,
bicycle.stop();
the bicycle will not move (its animation will not play). The bicycle’s movement could start through some other user
interaction. For example, if you had a button named startButton, the following code on a keyframe on the main
timeline would make it so that clicking the button causes the animation to play:
// This function will be called when the button is clicked. It causes the
// bicycle animation to play.
function playAnimation(event:MouseEvent):void
{
bicycle.play();
}
// Register the function as a listener with the button.
startButton.addEventListener(MouseEvent.CLICK, playAnimation);
Fast-forwarding and rewinding
The play() and stop() methods are not the only way of controlling playback in a movie clip. You can also move
the playhead forward or backward along the timeline manually by using the nextFrame() and prevFrame()
methods. Calling either of these methods stops playback and moves the playhead one frame forward or backward,
respectively.
Using the play() method is analogous to calling nextFrame() every time the movie clip object’s enterFrame event
is triggered. Along these lines, you could make the bicycle movie clip play backwards by creating an event listener
for the enterFrame event and telling bicycle to go to its previous frame in the listener function, as follows:
// This function is called when the enterFrame event is triggered, meaning
// it’s called once per frame.
function everyFrame(event:Event):void
{
if (bicycle.currentFrame == 1)
{
bicycle.gotoAndStop(bicycle.totalFrames);
}
else
{
bicycle.prevFrame();
}
}
bicycle.addEventListener(Event.ENTER_FRAME, everyFrame);

ADOBE FLEX 3
Developer Guide
349
In normal playback, if a movie clip contains more than a single frame, it will loop indefinitely when playing; that is,
it will return to Frame 1 if it progresses past its final frame. When you use prevFrame() or nextFrame(), this
behavior does not happen automatically (calling prevFrame() when the playhead is on Frame 1 doesn’t move the
playhead to the last frame). The if condition in the example above checks to see if the playhead has progressed
backwards to the first frame, and sets the playhead ahead to its final frame, effectively creating a continuous loop of
the movie clip playing backwards.
Jumping to a different frame and using frame labels
Sending a movie clip to a new frame is a simple affair. Calling either gotoAndPlay() or gotoAndStop() will jump
the movie clip to the frame number specified as a parameter. Alternatively, you can pass a string that matches the
name of a frame label. Any frame on the timeline can be assigned a label. To do this, select a frame on the timeline
and then enter a name in the Frame Label field on the Property inspector.
The advantages of using frame labels instead of numbers are particularly evident when creating a complex movie
clip. When the number of frames, layers, and tweens in an animation becomes large, consider labeling important
frames with explanatory descriptions that represent shifts in the behavior of the movie clip (for example, “off,”
“walking,” or “running”). This improves code readability and also provides flexibility, since ActionScript calls that
go to a labeled frame are pointers to a single reference—the label—rather than a specific frame number. If later on
you decide to move a particular segment of the animation to a different frame, you will not need to change your
ActionScript code as long as you keep the same label for the frames in the new location.
To represent frame labels in code, ActionScript 3.0 includes the FrameLabel class. Each instance of this class repre-
sents a single frame label, and has a name property representing the name of the frame label as specified in the
Property inspector, and a frame property representing the frame number of the frame where the label is placed on
the timeline.
In order to get access to the FrameLabel instances associated with a movie clip instance, the MovieClip class includes
two properties that directly return FrameLabel objects. The currentLabels property returns an array that consists
of all FrameLabel objects across the entire timeline of a movie clip. The currentLabel property returns a string
containing the name of the frame label encountered most recently along the timeline.
Suppose you were creating a movie clip named robot and had labeled the various states of its animation. You could
set up a condition that checks the currentLabel property to access the current state of robot, as in the following
code:
if (robot.currentLabel == "walking")
{
// do something
}
Working with scenes
In the Flash authoring environment, you can use scenes to demarcate a series of timelines that a SWF file will
progress through. Using the second parameter of the gotoAndPlay() or gotoAndStop() methods, you can specify
a scene to send the playhead to. All FLA files start with only the initial scene, but you can create new scenes.
Using scenes is not always the best approach because scenes have a number of drawbacks. A Flash document that
contains multiple scenes can be difficult to maintain, particularly in multiauthor environments. Multiple scenes can
also be inefficient in bandwidth, because the publishing process merges all scenes into a single timeline. This causes
a progressive download of all scenes, even if they are never played. For these reasons, use of multiple scenes is often
discouraged except for organizing lengthy multiple timeline-based animations.

ADOBE FLEX 3
Developer Guide
350
The scenes property of the MovieClip class returns an array of Scene objects representing all the scenes in the SWF
file. The currentScene property returns a Scene object that represents the scene that is currently playing.
The Scene class has several properties that give information about a scene. The labels property returns an array of
FrameLabel objects representing the frame labels in that scene. The name property returns the scene’s name as a
string. The numFrames property returns an int representing the total number of frames in the scene.
Creating MovieClip objects with ActionScript
One way of adding content to the screen in Flash is by dragging assets from the library onto the Stage, but that is not
the only workflow. For complex projects, experienced developers commonly prefer to create movie clips programat-
ically. This approach brings several advantages: easier re-use of code, faster compile-time speed, and more sophisti-
cated modifications that are available only to ActionScript.
The display list API of ActionScript 3.0 streamlines the process of dynamically creating MovieClip objects. The
ability to instantiate a MovieClip instance directly, separate from the process of adding it to the display list, provides
flexibility and simplicity without sacrificing control.
In ActionScript 3.0, when you create a movie clip (or any other display object) instance programatically, it is not
visible on the screen until it is added to the display list by calling the addChild() or the addChildAt() method on
a display object container. This allows you to create a movie clip, set its properties, and even call methods before it
is rendered to the screen. For more information on working with the display list, see “Working with display object
containers” on page 255.
Loading an external SWF file
In ActionScript 3.0, SWF files are loaded using the Loader class. To load an external SWF file, your ActionScript
needs to do four things:
1Create a new URLRequest object with the url of the file.
2Create a new Loader object.
3Call the Loader object’s load() method, passing the URLRequest instance as a parameter.
4Call the addChild() method on a display object container (such as the main timeline of a Flash document) to
add the Loader instance to the display list.
Ultimately, the code looks like this:
var request:URLRequest = new URLRequest(“http://www.[yourdomain].com/externalSwf.swf”);
var loader:Loader = new Loader()
loader.load(request);
addChild(loader);

ADOBE FLEX 3
Developer Guide
351
This same code can be used to load an external image file such as a JPEG, GIF, or PNG image, by specifying the image
file’s url rather than a SWF file’s url. A SWF file, unlike an image file, may contain ActionScript. Thus, although the
process of loading a SWF file may be identical to loading an image, when loading an external SWF file both the SWF
file doing the loading and the SWF file being loaded must reside in the same security sandbox if Flash Player or AIR
is playing the SWF and you plan to use ActionScript to communicate in any way to the external SWF file.
Additionally, if the external SWF file contains classes that share the same namespace as classes in the loading SWF
file, you may need to create a new application domain for the loaded SWF file in order to avoid namespace conflicts.
For more information on security and application domain considerations, see “Using the ApplicationDomain class”
on page 498 and “Loading SWF files and images” on page 548.
When the external SWF file is successfully loaded, it can be accessed through the Loader.content property. If the
external SWF file is published for ActionScript 3.0, this will be either a movie clip or a sprite, depending on which
class it extends.
Considerations for loading an older SWF file
If the external SWF file has been published with an older version of ActionScript, there are important limitations to
consider. Unlike an ActionScript 3.0 SWF file that runs in AVM2 (ActionScript Virtual Machine 2), a SWF file
published for ActionScript 1.0 or 2.0 runs in AVM1 (ActionScript Virtual Machine 1).
When an AVM1 SWF file is successfully loaded, the loaded object (the Loader.content property) will be an
AVM1Movie object. An AVM1Movie instance is not the same as a MovieClip instance. It is a display object, but
unlike a movie clip, it does not include timeline-related methods or properties. The parent AVM2 SWF file will not
have access to the properties, methods, or objects of the loaded AVM1Movie object.
There are additional restrictions on an AVM1 SWF file loaded by an AVM2 SWF file. For details, see the
AVM1Movie class listing in the ActionScript 3.0 Language and Components Reference.
Example: RuntimeAssetsExplorer
The Export for ActionScript functionality can be especially advantageous for libraries that may be useful across more
than one project. If Flash Player or AIR executes a SWF file, symbols that have been exported to ActionScript are
available to any SWF file within the same security sandbox as the SWF that loads it. In this way, a single Flash
document can generate a SWF file that is designated for the sole purpose of holding graphical assets. This technique
is particularly useful for larger projects where designers working on visual assets can work in parallel with developers
who create a “wrapper” SWF file that then loads the graphical assets SWF file at run time. You can use this method
to maintain a series of versioned files where graphical assets are not dependent upon the progress of programming
development.
The RuntimeAssetsExplorer application loads any SWF file that is a subclass of RuntimeAsset and allows you to
browse the available assets of that SWF file. The example illustrates the following:
•Loading an external SWF file using Loader.load()
•Dynamic creation of a library symbol exported for ActionScript
•ActionScript control of MovieClip playback
Before beginning, note that each of the SWF files to run in Flash Player must be located in the same security sandbox.
For more information, see “Security sandboxes” on page 543.

ADOBE FLEX 3
Developer Guide
352
To get the application files for this sample, see www.adobe.com/go/learn_programmingAS3samples_flash. The
RuntimeAssetsExplorer application files can be found in the folder Samples/RuntimeAssetsExplorer. The appli-
cation consists of the following files:
Establishing a run-time library interface
In order for the explorer to properly interact with a SWF library, the structure of the run-time asset libraries must be
formalized. We will accomplish this by creating an interface, which is similar to a class in that it’s a blueprint of
methods that demarcate an expected structure, but unlike a class it includes no method bodies. The interface
provides a way for both the run-time library and the explorer to communicate to one another. Each SWF of run-time
assets that is loaded in our browser will implement this interface. For more information about interfaces and how
they can be useful, see “Interfaces” on page 98.
The RuntimeLibrary interface will be very simple—we merely require a function that can provide the explorer with
an array of classpaths for the symbols to be exported and available in the run-time library. To this end, the interface
has a single method: getAssets().
package com.example.programmingas3.runtimeassetexplorer
{
public interface RuntimeLibrary
{
function getAssets():Array;
}
}
Creating the asset library SWF file
By defining the RuntimeLibrary interface, it’s possible to create multiple asset library SWF files that can be loaded
into another SWF file. Making an individual SWF library of assets involves four tasks:
•Creating a class for the asset library SWF file
•Creating classes for individual assets contained in the library
•Creating the actual graphic assets
•Associating graphic elements with classes and publishing the library SWF
File Description
RuntimeAssetsExample.mxml
or
RuntimeAssetsExample.fla
The user interface for the application for Flex (MXML)
or Flash (FLA).
GeometricAssets.as An example class that implements the RuntimeAsset
interface.
GeometricAssets.fla A FLA file linked to the GeometricAssets class (the
document class of the FLA) containing symbols that
are exported for ActionScript.
com/example/programmingas3/runtimeassetsexplorer/RuntimeLibrary.as An interface that defines the required methods
expected of all run-time asset SWF files that will be
loaded into the explorer container.
com/example/programmingas3/runtimeassetsexplorer/AnimatingBox.as The class of the library symbol in the shape of a
rotating box.
com/example/programmingas3/runtimeassetsexplorer/AnimatingStar.as The class of the library symbol in the shape of a
rotating star.

ADOBE FLEX 3
Developer Guide
353
Creating a class to implement the RuntimeLibrary interface
Next, we’ll create the GeometricAssets class that will implement the RuntimeLibrary interface. This will be the
document class of the FLA. The code for this class is very similar to the RuntimeLibrary interface—the difference
between them is that in the class definition the getAssets() method has a method body.
package
{
import flash.display.Sprite;
import com.example.programmingas3.runtimeassetexplorer.RuntimeLibrary;
public class GeometricAssets extends Sprite implements RuntimeLibrary
{
public function GeometricAssets() {
}
public function getAssets():Array {
return [ "com.example.programmingas3.runtimeassetexplorer.AnimatingBox",
"com.example.programmingas3.runtimeassetexplorer.AnimatingStar" ];
}
}
}
If we were to create a second run-time library, we could create another FLA based upon another class (for example,
AnimationAssets) that provides its own getAssets() implementation.
Creating classes for each MovieClip asset
For this example, we’ll merely extend the MovieClip class without adding any functionality to the custom assets. The
following code for AnimatingStar is analogous to that of AnimatingBox:
package com.example.programmingas3.runtimeassetexplorer
{
import flash.display.MovieClip;
public class AnimatingStar extends MovieClip
{
public function AnimatingStar() {
}
}
}
Publishing the library
We’ll now connect the MovieClip-based assets to the new class by creating a new FLA and entering GeometricAssets
into the Document Class field of the Property inspector. For the purposes of this example, we’ll create two very basic
shapes that use a timeline tween to make one clockwise rotation over 360 frames. Both the animatingBox and
animatingStar symbols are set to Export for ActionScript and have the Class field set to the respective classpaths
specified in the getAssets() implementation. The default base class of flash.display.MovieClip remains, as
we want to subclass the standard MovieClip methods.
After setting up your symbol’s export settings, publish the FLA. You now have your first run-time library. This SWF
file could be loaded into another AVM2 SWF file and the AnimatingBox and AnimatingStar symbols would be
available to the new SWF file.
Loading the library into another SWF file
The last functional piece to deal with is the user interface for the asset explorer. In this example, the path to the run-
time library is hard-coded as a variable named ASSETS_PATH. Alternatively, you could use the FileReference class—
for example, to create an interface that browses for a particular SWF file on your hard drive.

ADOBE FLEX 3
Developer Guide
354
When the run-time library is successfully loaded, Flash Player calls the runtimeAssetsLoadComplete() method:
private function runtimeAssetsLoadComplete(event:Event):void
{
var rl:* = event.target.content;
var assetList:Array = rl.getAssets();
populateDropdown(assetList);
stage.frameRate = 60;
}
In this method, the variable rl represents the loaded SWF file. The code calls the getAssets() method of the loaded
SWF file, obtaining the list of assets that are available, and uses them to populate a ComboBox component with a list
of available assets by calling the populateDropDown() method. That method in turn stores the full classpath of each
asset. Clicking the Add button on the user interface triggers the addAsset() method:
private function addAsset():void
{
var className:String = assetNameCbo.selectedItem.data;
var AssetClass:Class = getDefinitionByName(className) as Class;
var mc:MovieClip = new AssetClass();
...
}
which gets the classpath of whichever asset is currently selected in the ComboBox
(assetNameCbo.selectedItem.data), and uses the getDefinitionByName() function (from the flash.utils
package) to obtain an actual reference to the asset’s class in order to create a new instance of that asset.

355
Chapter 18: Working with text
In ActionScript™ 3.0, text is usually displayed within a text field, but can occasionally appear as a property of an item
on the display list (for example, as the label on a UI component). This chapter explains how to work with the script-
defined contents of a text field and with user input, dynamic text from a remote file, or static text defined in Adobe®
Flash™ CS3 Professional. As an ActionScript 3.0 programmer, you can establish specific content for text fields, or
designate the source for the text, and then set the appearance of that text using styles and formats. You can also
respond to user events as the user inputs text or clicks a hyperlink.
Contents
Basics of working with text . . . . . . . . . . . . . . . . . . . . . . . . . . . . . . . . . . . . . . . . . . . . . . . . . . . . . . . . . . . . . . . . . . . . . . . . 355
Displaying text. . . . . . . . . . . . . . . . . . . . . . . . . . . . . . . . . . . . . . . . . . . . . . . . . . . . . . . . . . . . . . . . . . . . . . . . . . . . . . . . . . . 356
Selecting and manipulating text . . . . . . . . . . . . . . . . . . . . . . . . . . . . . . . . . . . . . . . . . . . . . . . . . . . . . . . . . . . . . . . . . . . . 359
Capturing text input . . . . . . . . . . . . . . . . . . . . . . . . . . . . . . . . . . . . . . . . . . . . . . . . . . . . . . . . . . . . . . . . . . . . . . . . . . . . . . 360
Restricting text input . . . . . . . . . . . . . . . . . . . . . . . . . . . . . . . . . . . . . . . . . . . . . . . . . . . . . . . . . . . . . . . . . . . . . . . . . . . . . 361
Formatting text . . . . . . . . . . . . . . . . . . . . . . . . . . . . . . . . . . . . . . . . . . . . . . . . . . . . . . . . . . . . . . . . . . . . . . . . . . . . . . . . . . 362
Advanced text rendering . . . . . . . . . . . . . . . . . . . . . . . . . . . . . . . . . . . . . . . . . . . . . . . . . . . . . . . . . . . . . . . . . . . . . . . . . . 365
Working with static text . . . . . . . . . . . . . . . . . . . . . . . . . . . . . . . . . . . . . . . . . . . . . . . . . . . . . . . . . . . . . . . . . . . . . . . . . . . 367
Example: Newspaper-style text formatting . . . . . . . . . . . . . . . . . . . . . . . . . . . . . . . . . . . . . . . . . . . . . . . . . . . . . . . . . . . 369
Basics of working with text
Introduction to working with text
To display any text on the screen in Adobe Flash Player or Adobe® AIR™, you use an instance of the TextField class.
The TextField class is the basis for other text-based components, like the TextArea components or the TextInput
components, that are provided in the Adobe Flex framework and in the Flash authoring environment. For more
information about using Flex text components please see “About text controls” in the Flex 2 Developer’s Guide.
Text field content can be pre-specified in the SWF file, loaded from an external source like a text file or database, or
entered by users interacting with your application. Within a text field, the text can appear as rendered HTML
content, with images embedded in the rendered HTML. Once you establish an instance of a text field, you can use
flash.text package classes, like the TextFormat class and the StyleSheet class, to control the text’s appearance. The
flash.text package contains nearly all the classes related to creating, managing, and formatting text in ActionScript.
You can format text by defining the formatting with a TextFormat object and assigning that object to the text field.
If your text field contains HTML text, you can apply a StyleSheet object to the text field to assign styles to specific
pieces of the text field content. The TextFormat object or StyleSheet object contains properties defining the
appearance of the text, such as color, size, and weight. The TextFormat object assigns the properties to all the content
within a text field or to a range of text. For example, within the same text field, one sentence can be bold red text and
the next sentence can be blue italic text.
For more information on text formats, see “Assigning text formats” on page 362.
For more information on HTML text in text fields, see “Displaying HTML text” on page 358.
For more information on style sheets, see “Applying cascading style sheets” on page 363.

ADOBE FLEX 3
Developer Guide
356
In addition to the classes in the flash.text package, you can use the flash.events.TextEvent class to respond to user
actions related to text.
Common tasks for working with text
The following common text-related tasks are described in this chapter:
•Modifying text field contents
•Using HTML in text fields
•Using images in text fields
•Selecting text and working with user-selected text
•Capturing text input
•Restricting text input
•Applying formatting and CSS styles to text
•Fine-tuning text display with sharpness, thickness, and anti-aliasing
•Accessing and working with static text fields from ActionScript
Important concepts and terms
The following reference list contains important terms that you will encounter in this chapter:
•Cascading style sheets: A standard syntax for specifying styles and formatting for content that’s structured in
XML (or HTML) format.
•Device font: A font that is installed on the user’s machine.
•Dynamic text field: A text field whose contents can be changed by ActionScript but not by user input.
•Embedded font: A font that has data its character outline data stored in the application’s SWF file.
•HTML text: Text content entered into a text field using ActionScript that includes HTML formatting tags along
with actual text content.
•Input text field: A text field whose contents can be changed either by user input or by ActionScript.
•Static text field: A text field created in the Flash authoring tool, whose content cannot change when the SWF file
is running.
•Text line metrics: Measurements of the size of various parts of the text content in a text field, such as the baseline
of the text, the height of the top of the characters, size of descenders (the part of some lowercase letters that extends
below the baseline), and so on.
Displaying text
Although authoring tools like Adobe Flex Builder and the Flash authoring tool provide several options for displaying
text, including text-related components or text tools, the primary way to display text programmatically is through a
text field.

ADOBE FLEX 3
Developer Guide
357
Types of text
The type of text within a text field is characterized by its source:
•Dynamic text
Dynamic text includes content that is loaded from an external source, such as a text file, an XML file, or even a
remote web service. For more information, see “Types of text” on page 357.
•Input text
Input text is any text entered by a user or dynamic text that a user can edit. You can set up a style sheet to format
input text, or use the flash.text.TextFormat class to assign properties to the text field for the input content. For
more information, see “Capturing text input” on page 360.
•Static text
Static text is created through the Flash authoring tool only. You cannot create a static text instance using Action-
Script 3.0. However, you can use ActionScript classes like StaticText and TextSnapshot to manipulate an existing
static text instance. For more information, see “Working with static text” on page 367.
Modifying the text field contents
You can define dynamic text by assigning a string to the flash.text.TextField.text property. You assign a string
directly to the property, as follows:
myTextField.text = “Hello World”;
You can also assign the text property a value from a variable defined in your script, as in the following example:
package
{
import flash.display.Sprite;
import flash.text.*;
public class TextWithImage extends Sprite
{
private var myTextBox:TextField = new TextField();
private var myText:String = "Hello World";
public function TextWithImage()
{
addChild(myTextBox);
myTextBox.text = myText;
}
}
}
Alternatively, you can assign the text property a value from a remote variable. You have three options for loading
text values from remote sources:
•The flash.net.URLLoader and flash.net.URLRequest classes load variables for the text from a local or remote
location.
•The FlashVars attribute is embedded in the HTML page hosting the SWF file and can contain values for text
variables.
•The flash.net.SharedObject class manages persistent storage of values. For more information, see “Storing local
data” on page 475.

ADOBE FLEX 3
Developer Guide
358
Displaying HTML text
The flash.text.TextField class has an htmlText property that you can use to identify your text string as one
containing HTML tags for formatting the content. As in the following example, you must assign your string value to
the htmlText property (not the text property) for Flash Player or AIR to render the text as HTML:
var myText:String = "<p>This is <b>some</b> content to <i>render</i> as <u>HTML</u>
text.</p>";
myTextBox.htmlText = myText;
Flash Player and AIR support a subset of HTML tags and entities for the htmlText property. The
flash.text.TextField.htmlText property description in the ActionScript 3.0 Language and Components
Reference provides detailed information about the supported HTML tags and entities.
Once you designate your content using the htmlText property, you can use style sheets or the textformat tag to
manage the formatting of your content. For more information, see “Formatting text” on page 362.
Using images in text fields
Another advantage to displaying your content as HTML text is that you can include images in the text field. You can
reference an image, local or remote, using the img tag and have it appear within the associated text field.
The following example creates a text field named myTextBox and includes a JPG image of an eye, stored in the same
directory as the SWF file, within the displayed text:
package
{
import flash.display.Sprite;
import flash.text.*;
public class TextWithImage extends Sprite
{
private var myTextBox:TextField;
private var myText:String = "<p>This is <b>some</b> content to <i>test</i> and
<i>see</i></p><p><img src='eye.jpg' width='20' height='20'></p><p>what can be
rendered.</p><p>You should see an eye image and some <u>HTML</u> text.</p>";
public function TextWithImage()
{
myTextBox.width = 200;
myTextBox.height = 200;
myTextBox.multiline = true;
myTextBox.wordWrap = true;
myTextBox.border = true;
addChild(myTextBox);
myTextBox.htmlText = myText;
}
}
}
The img tag supports JPEG, GIF, PNG, and SWF files.
Scrolling text in a text field
In many cases, your text will be longer than the text field displaying the text. Or you may have an input field that
allows a user to input more text than can be displayed at one time. You can use the scroll-related properties of the
flash.text.TextField class to manage lengthy content, either vertically or horizontally.

ADOBE FLEX 3
Developer Guide
359
The scroll-related properties include TextField.scrollV, TextField.scrollH and maxScrollV and
maxScrollH. Use these properties to respond to events, like a mouse click or a keypress.
The following example creates a text field that is a set size and contains more text than the field can display at one
time. As the user clicks on the text field, the text scrolls vertically.
package
{
import flash.display.Sprite;
import flash.text.*;
import flash.events.MouseEvent;
public class TextScrollExample extends Sprite
{
private var myTextBox:TextField = new TextField();
private var myText:String = "Hello world and welcome to the show. It's really nice
to meet you. Take your coat off and stay a while. OK, show is over. Hope you had fun. You
can go home now. Don't forget to tip your waiter. There are mints in the bowl by the door.
Thank you. Please come again.";
public function TextScrollExample()
{
myTextBox.text = myText;
myTextBox.width = 200;
myTextBox.height = 50;
myTextBox.multiline = true;
myTextBox.wordWrap = true;
myTextBox.background = true;
myTextBox.border = true;
var format:TextFormat = new TextFormat();
format.font = "Verdana";
format.color = 0xFF0000;
format.size = 10;
myTextBox.defaultTextFormat = format;
addChild(myTextBox);
myTextBox.addEventListener(MouseEvent.MOUSE_DOWN, mouseDownScroll);
}
public function mouseDownScroll(event:MouseEvent):void
{
myTextBox.scrollV++;
}
}
}
Selecting and manipulating text
You can select dynamic or input text. Since the text selection properties and methods of the TextField class use index
positions to set the range of text to manipulate, you can programmatically select dynamic or input text even if you
don’t know the content.
Note: In the Flash authoring tool, if you choose the selectable option on a static text field, the text field that is exported
and placed on the display list is a regular, dynamic text field.

ADOBE FLEX 3
Developer Guide
360
Selecting text
The flash.text.TextField.selectable property is true by default, and you can programmatically select text
using the setSelection() method.
For example, you can set specific text within a text field to be selected when the user clicks on the text field:
var myTextField:TextField = new TextField();
myTextField.text = "No matter where you click on this text field the TEXT IN ALL CAPS is
selected.";
myTextField.autoSize = TextFieldAutoSize.LEFT;
addChild(myTextField);
addEventListener(MouseEvent.CLICK, selectText);
function selectText(event:MouseEvent):void
{
myTextField.setSelection(49, 65);
}
Similarly, if you want text within a text field to be selected as the text is initially displayed, create an event handler
function that is called as the text field is added to the display list.
Capturing user-selected text
The TextField class’s selectionBeginIndex and selectionEndIndex properties, which are “read-only” so they
can’t be set to programmatically select text, can be used to capture whatever the user has currently selected.
Additionally, input text fields can use the caretIndex property.
For example, the following code traces the index values of user-selected text:
var myTextField:TextField = new TextField();
myTextField.text = "Please select the TEXT IN ALL CAPS to see the index values for the first
and last letters.";
myTextField.autoSize = TextFieldAutoSize.LEFT;
addChild(myTextField);
addEventListener(MouseEvent.MOUSE_UP, selectText);
function selectText(event:MouseEvent):void
{
trace("First letter index position: " + myTextField.selectionBeginIndex);
trace("Last letter index position: " + myTextField.selectionEndIndex);
}
You can apply a collection of TextFormat object properties to the selection to change the text’s appearance. For more
information about applying a collection of TextFormat properties to selected text, see “Formatting ranges of text
within a text field” on page 365.
Capturing text input
By default, a text field’s type property is set to dynamic. If you set the type property to input using the
TextFieldType class, you can collect user input and save the value for use in other parts of your application. Input text
fields are useful for forms and any application that wants the user to define a text value for use elsewhere in the
program.

ADOBE FLEX 3
Developer Guide
361
For example, the following code creates an input text field called myTextBox. As the user enters text in the field, the
textInput event is triggered. An event handler called textInputCapture captures the string of text entered and
assigns it a variable. Flash Player or AIR displays the new text in another text field, called myOutputBox.
package
{
import flash.display.Sprite;
import flash.display.Stage;
import flash.text.*;
import flash.events.*;
public class CaptureUserInput extends Sprite
{
private var myTextBox:TextField = new TextField();
private var myOutputBox:TextField = new TextField();
private var myText:String = "Type your text here.";
public function CaptureUserInput()
{
captureText();
}
public function captureText():void
{
myTextBox.type = TextFieldType.INPUT;
myTextBox.background = true;
addChild(myTextBox);
myTextBox.text = myText;
myTextBox.addEventListener(TextEvent.TEXT_INPUT, textInputCapture);
}
public function textInputCapture(event:TextEvent):void
{
var str:String = myTextBox.text;
createOutputBox(str);
}
public function createOutputBox(str:String):void
{
myOutputBox.background = true;
myOutputBox.x = 200;
addChild(myOutputBox);
myOutputBox.text = str;
}
}
}
Restricting text input
Since input text fields are often used for forms or dialog boxes in applications, you may want to limit the types of
characters a user can enter in a text field, or even keep the text hidden —for example, for a password. The
flash.text.TextField class has a displayAsPassword property and a restrict property that you can set to control
user input.

ADOBE FLEX 3
Developer Guide
362
The displayAsPassword property simply hides the text (displaying it as a series of asterisks) as the user types it.
When displayAsPassword is set to true, the Cut and Copy commands and their corresponding keyboard
shortcuts will not function. As the following example shows, you assign the displayAsPassword property just as
you would other properties, such as background and color:
myTextBox.type = TextFieldType.INPUT;
myTextBox.background = true;
myTextBox.displayAsPassword = true;
addChild(myTextBox);
The restrict property is a little more complicated since you need to specify what characters the user is allowed to
type in an input text field. You can allow specific letters, numbers, or ranges of letters, numbers, and characters. The
following code allows the user to enter only uppercase letters (and not numbers or special characters) in the text
field:
myTextBox.restrict = “A-Z”;
ActionScript 3.0 uses hyphens to define ranges, and carets to define excluded characters. For more information about
defining what is restricted in an input text field, see the flash.text.TextField.restrict property entry in the
ActionScript 3.0 Language and Components Reference.
Formatting text
You have several options for programmatically formatting the display of text. You can set properties directly on the
TextField instance—for example, the TextFIeld.thickness, TextField.textColor, and
TextField.textHeight properties. Or you can designate the content of the text field using the htmlText property
and use the supported HTML tags, such as b, i, and u. But you can also apply TextFormat objects to text fields
containing plain text, or StyleSheet objects to text fields containing the htmlText property. Using TextFormat and
StyleSheet objects provides the most control and consistency over the appearance of text throughout your appli-
cation. You can define a TextFormat or StyleSheet object and apply it to many or all text fields in your application.
Assigning text formats
You can use the TextFormat class to set a number of different text display properties and to apply them to the entire
contents of a TextField object, or to a range of text.
The following example applies one TextFormat object to an entire TextField object and applies a second TextFormat
object to a range of text within that TextField object:
var tf:TextField = new TextField();
tf.text = "Hello Hello";
var format1:TextFormat = new TextFormat();
format1.color = 0xFF0000;
var format2:TextFormat = new TextFormat();
format2.font = "Courier";
tf.setTextFormat(format1);
var startRange:uint = 6;
tf.setTextFormat(format2, startRange);
addChild(tf);

ADOBE FLEX 3
Developer Guide
363
The TextField.setTextFormat() method only affects text that is already displayed in the text field. If the content
in the TextField changes, your application might need to call the TextField.setTextFormat() method again to
reapply the formatting. You can also set the TextField object’s defaultTextFormat property to specify the format
to be used for user-entered text.
Applying cascading style sheets
Text fields can contain either plain text or HTML-formatted text. Plain text is stored in the text property of the
instance, and HTML text is stored in the htmlText property.
You can use CSS style declarations to define text styles that you can apply to many different text fields. CSS style
declarations can be created in your application code or loaded in at run time from an external CSS file.
The flash.text.StyleSheet class handles CSS styles. The StyleSheet class recognizes a limited set of CSS properties. For
a detailed list of the style properties that the StyleSheet class supports, see the flash.textStylesheet entry in the Action-
Script 3.0 Language and Components Reference.
As the following example shows, you can create CSS in your code and apply those styles to HTML text by using a
StyleSheet object:
var style:StyleSheet = new StyleSheet();
var styleObj:Object = new Object();
styleObj.fontSize = "bold";
styleObj.color = "#FF0000";
style.setStyle(".darkRed", styleObj);
var tf:TextField = new TextField();
tf.styleSheet = style;
tf.htmlText = "<span class = 'darkRed'>Red</span> apple";
addChild(tf);
After creating a StyleSheet object, the example code creates a simple object to hold a set of style declaration
properties. Then it calls the StyleSheet.setStyle() method, which adds the new style to the stylesheet with the
name “.darkred”. Next, it applies the stylesheet formatting by assigning the StyleSheet object to the TextField object’s
styleSheet property.
For CSS styles to take effect, the stylesheet should be applied to the a TextField object before the htmlText property
is set.
By design, a text field with a style sheet is not editable. If you have an input text field and assign a style sheet to it, the
text field shows the style sheet’s properties, but the text field will not allow users to enter new text into it. Also, you
cannot use the following ActionScript APIs on a text field with an assigned style sheet:
•The TextField.replaceText() method
•The TextField.replaceSelectedText() method
•The TextField.defaultTextFormat property
•The TextField.setTextFormat() method
If a text field has a style sheet assigned to it, but later the TextField.styleSheet property is set to null, the
contents of both TextField.text and TextField.htmlText properties will add tags and attributes to their content
to incorporate the formatting from the previously assigned style sheet. To preserve the original htmlText property,
save it in a variable before setting the style sheet to null.

ADOBE FLEX 3
Developer Guide
364
Loading an external CSS file
The CSS approach to formatting is more powerful when you can load CSS information from an external file at run
time. When the CSS data is external to the application itself, you can change the visual style of text in your application
without having to change your ActionScript 3.0 source code. After your application has been deployed, you can
change an external CSS file to change the look of the application, without having to redeploy the application’s SWF
file.
The StyleSheet.parseCSS() method converts a string that contains CSS data into style declarations in the
StyleSheet object. The following example shows how to read an external CSS file and apply its style declarations to a
TextField object.
First, here is the content of the CSS file to be loaded, which will be named example.css:
p {
font-family: Times New Roman, Times, _serif;
font-size: 14;
}
h1 {
font-family: Arial, Helvetica, _sans;
font-size: 20;
font-weight: bold;
}
.bluetext {
color: #0000CC;
}
Next is the ActionScript code for a class that loads the example.css file and applies the styles to TextField content:
package
{
import flash.display.Sprite;
import flash.events.Event;
import flash.net.URLLoader;
import flash.net.URLRequest;
import flash.text.StyleSheet;
import flash.text.TextField;
import flash.text.TextFieldAutoSize;
public class CSSFormattingExample extends Sprite
{
var loader:URLLoader;
var field:TextField;
var exampleText:String = "<h1>This is a headline</h1>” +
“<p>This is a line of text. <span class='bluetext'>” +
“This line of text is colored blue.</span></p>";
public function CSSFormattingExample():void
{
field = new TextField();
field.width = 300;
field.autoSize = TextFieldAutoSize.LEFT;
field.wordWrap = true;
addChild(field);
var req:URLRequest = new URLRequest("example.css");

ADOBE FLEX 3
Developer Guide
365
loader = new URLLoader();
loader.addEventListener(Event.COMPLETE, onCSSFileLoaded);
loader.load(req);
}
public function onCSSFileLoaded(event:Event):void
{
var sheet:StyleSheet = new StyleSheet();
sheet.parseCSS(loader.data);
field.styleSheet = sheet;
field.htmlText = exampleText;
}
}
}
When the CSS data is loaded, the onCSSFileLoaded() method executes and calls the StyleSheet.parseCSS()
method to transfer the style declarations to the StyleSheet object.
Formatting ranges of text within a text field
A particularly useful method of the flash.text.TextField class is the setTextFormat() method. Using
setTextFormat(), you can assign specific properties to part of a text field’s contents to respond to user input, such
as forms that need to remind users that certain entries are required or to change the emphasis of a subsection of a
passage of text within a text field as a user selects parts of the text.
The following example uses TextField.setTextFormat() on a range of characters to change the appearance of
part of the content of myTextField when the user clicks on the text field:
var myTextField:TextField = new TextField();
myTextField.text = "No matter where you click on this text field the TEXT IN ALL CAPS changes
format.";
myTextField.autoSize = TextFieldAutoSize.LEFT;
addChild(myTextField);
addEventListener(MouseEvent.CLICK, changeText);
var myformat:TextFormat = new TextFormat();
myformat.color = 0xFF0000;
myformat.size = 18;
myformat.underline = true;
function changeText(event:MouseEvent):void
{
myTextField.setTextFormat(myformat, 49, 65);
}
Advanced text rendering
ActionScript 3.0 provides a variety of classes in the flash.text package to control the properties of displayed text,
including embedded fonts, anti-aliasing settings, alpha channel control, and other specific settings. The ActionScript
3.0 Language and Components Reference provides detailed descriptions of these classes and properties, including the
CSMSettings, Font, and TextRenderer classes.

ADOBE FLEX 3
Developer Guide
366
Using embedded fonts
When you specify a specific font for a TextField in your application, Flash Player or AIR will look for a device font
(a font that resides on the user’s computer) with the same name. If it doesn’t find that font on the user’s system, or if
the user has a slightly different version of a font with that name, the text display could look very different from what
you intend.
To make sure the user sees exactly the right font, you can embed that font in your application’s SWF file. Embedded
fonts have a number of benefits:
•Embedded font characters are anti-aliased, making their edges appear smoother, especially for larger text.
•You can rotate text that uses embedded fonts.
•Embedded font text can be made transparent or semitransparent.
•You can use the kerning CSS style with embedded fonts.
The biggest limitation to using embedded fonts is that they increase the file size or download size of your application.
The exact method of embedding a font file into your application’s SWF file varies according to your development
environment.
Once you have embedded a font you can make sure a TextField uses the correct embedded font:
•Set the embedFonts property of the TextField to true.
•Create a TextFormat object, set its fontFamily property to the name of the embedded font, and apply the
TextFormat object to the TextField. When specifying an embedded font, the fontFamily property should only
contain a single name; it cannot use a comma-delimited list of multiple font names.
•If using CSS styles to set fonts for TextFields or components, set the font-family CSS property to the name of
the embedded font. The font-family property must contain a single name and not a list of names if you want to
specify an embedded font.
Embedding a font in Flex
There are many ways to embed fonts in a Flex application, including:
•Using the [Embed] metadata tag in a script
•Using the @font-face style declaration
•Establish a class for the font and use the [Embed] tag to embed it, as described in “Embedded asset classes” on
page 98.
For more details about how to embed fonts in Flex applications, see “Using embedded fonts” in the Flex 2 Developer’s
Guide.
You can only embed True Type fonts directly in a Flex application. Fonts in other formats like Type 1 Postscript fonts
can first be embedded in a Flash SWF file using the Flash authoring tool and then that SWF file can be used in your
Flex application. For more details about using embedded fonts from SWF files in Flex, see “Embedding fonts from
SWF files” in the Flex 2 Developer’s Guide.

ADOBE FLEX 3
Developer Guide
367
Controlling sharpness, thickness, and anti-aliasing
By default, Flash Player or AIR determines the settings for text display controls like sharpness, thickness, and anti-
aliasing as text resizes, changes color, or is displayed on various backgrounds. In some cases, like when you have very
small or very large text, or text on a variety of unique backgrounds, you may want to maintain your own control over
these settings. You can override the Flash Playeror AIR settings using the flash.text.TextRenderer class and its
associated classes, like the CSMSettings class. These classes give you precise control over the rendering quality of
embedded text. For more information about embedded fonts, see “Using embedded fonts” on page 366.
Note: The flash.text.TextField.antiAliasType property must have the value AntiAliasType.ADVANCED in order
for you to set the sharpness, thickness, or the gridFitType property, or to use the
TextRenderer.setAdvancedAntiAliasingTable() method.
The following example applies custom continuous stroke modulation (CSM) properties and formatting to displayed
text using an embedded font called myFont. When the user clicks on the displayed text, Flash Player applies the
custom settings:
var format:TextFormat = new TextFormat();
format.color = 0x336699;
format.size = 48;
format.font = "myFont";
var myText:TextField = new TextField();
myText.embedFonts = true;
myText.autoSize = TextFieldAutoSize.LEFT;
myText.antiAliasType = AntiAliasType.ADVANCED;
myText.defaultTextFormat = format;
myText.selectable = false;
myText.mouseEnabled = true;
myText.text = "Hello World";
addChild(myText);
myText.addEventListener(MouseEvent.CLICK, clickHandler);
function clickHandler(event:Event):void
{
var myAntiAliasSettings = new CSMSettings(48, 0.8, -0.8);
var myAliasTable:Array = new Array(myAntiAliasSettings);
TextRenderer.setAdvancedAntiAliasingTable("myFont", FontStyle.ITALIC,
TextColorType.DARK_COLOR, myAliasTable);
}
Working with static text
Static text is created only within the Flash authoring tool. You cannot programmatically instantiate static text using
ActionScript. Static text is useful if the text is very short and is not intended to change (as dynamic text can). Think
of static text as a sort of graphic element like a circle or square drawn on the Stage in the Flash authoring tool. While
static text is more limited than dynamic text, ActionScript 3.0 does support the ability to read the property values of
static text using the flash.text.StaticText class. In addition, you can use the flash.text.TextSnapshot class to read values
out of the static text.

ADOBE FLEX 3
Developer Guide
368
Accessing static text fields with the StaticText class
Typically, you use the flash.text.StaticText class in the Actions panel of the Flash authoring tool to interact with a
static text instance placed on the Stage. You may also work in ActionScript files that interact with a SWF file
containing static text. In either case, you can’t instantiate a static text instance programmatically. Static text is created
in the Flash CS3 authoring tool.
To create a reference to an existing static text field in ActionScript 3.0, you can iterate over the items in the display
list and assign a variable. For example:
for (var i = 0; i < this.numChildren; i++) {
var displayitem:DisplayObject = this.getChildAt(i);
if (displayitem instanceof StaticText) {
trace("a static text field is item " + i + " on the display list");
var myFieldLabel:StaticText = StaticText(displayitem);
trace("and contains the text: " + myFieldLabel.text);
}
}
Once you have a reference to a static text field, you can use the properties of that field in ActionScript 3.0. The
following code is attached to a frame in the Timeline, and assumes a variable named myFieldLabel assigned to a
static text reference. In the example, a dynamic text field named myField is positioned relative to the x and y values
of myFieldLabel and displays the value of myFieldLabel again.
var myField:TextField = new TextField();
addChild(myField);
myField.x = myFieldLabel.x;
myField.y = myFieldLabel.y + 20;
myField.autoSize = TextFieldAutoSize.LEFT;
myField.text = "and " + myFieldLabel.text
Using the TextSnapshot class
If you want to programmatically work with an existing static text instance, you can use the flash.text.TextSnapshot
class to work with the textSnapshot property of a flash.display.DisplayObjectContainer. In other words, you create
a TextSnapshot instance from the DisplayObjectContainer.textSnapshot property. You can then apply
methods to that instance to retrieve values or select parts of the static text.
For example, place a static text field that contains the text "TextSnapshot Example" on the Stage. Add the following
ActionScript to Frame 1 of the Timeline:
var mySnap:TextSnapshot = this.textSnapshot;
var count:Number = mySnap.charCount;
mySnap.setSelected(0, 4, true);
mySnap.setSelected(1, 2, false);
var myText:String = mySnap.getSelectedText(false);
trace(myText);
The TextSnapshot class is useful for getting the text out of static text fields in a loaded SWF, in case you want to use
the text as a value in another part of an application.

ADOBE FLEX 3
Developer Guide
369
Example: Newspaper-style text formatting
The News Layout example formats text to look something like a story in a printed newspaper. The input text can
contain a headline, a subtitle, and the body of the story. Given a display width and height, this News Layout example
will format the headline and the subtitle to take the full width of the display area. The story text will be distributed
across two or more columns.
This example illustrates the following ActionScript programming techniques:
•Extending the TextField class
•Loading and applying an external CSS file
•Converting CSS styles into TextFormat objects
•Using the TextLineMetrics class to get information about text display size
To get the application files for this sample, see www.adobe.com/go/learn_programmingAS3samples_flash. The
News Layout application files can be found in the folder Samples/NewsLayout. The application consists of the
following files:
Reading the external CSS file
The News Layout application starts by reading story text from a local XML file. Then it reads an external CSS file
that provides the formatting information for the headline, subtitle, and main text.
The CSS file defines three styles, a standard paragraph style for the story, and the h1 and h2 styles for the headline
and subtitle respectively.
p {
font-family: Georgia, "Times New Roman", Times, _serif;
font-size: 12;
leading: 2;
text-align: justify;
indent: 24;
}
File Description
NewsLayout.mxml
or
NewsLayout.fla
The user interface for the application for Flex (MXML) or Flash (FLA).
StoryLayoutComponent.as A Flex UIComponent class that places the StoryLayout instance.
StoryLayout.as The main ActionScript class that arranges all the components of a news story for display.
FormattedTextField.as A subclass of the TextField class that manages its own TextFormat object.
HeadlineTextField.as A subclass of the FormattedTextField class that adjusts font sizes to fit a desired width.
MultiColumnTextField.as An ActionScript class that splits text across two or more columns.
story.css A CSS file that defines text styles for the layout.

ADOBE FLEX 3
Developer Guide
370
h1 {
font-family: Verdana, Arial, Helvetica, _sans;
font-size: 20;
font-weight: bold;
color: #000099;
text-align: left;
}
h2 {
font-family: Verdana, Arial, Helvetica, _sans;
font-size: 16;
font-weight: normal;
text-align: left;
}
The technique used to read the external CSS file is that same as the technique described in “Loading an external CSS
file” on page 364. When the CSS file has been loaded the application executes the onCSSFileLoaded() method,
shown below.
public function onCSSFileLoaded(event:Event):void
{
this.sheet = new StyleSheet();
this.sheet.parseCSS(loader.data);
h1Format = getTextStyle("h1", this.sheet);
if (h1Format == null)
{
h1Format = getDefaultHeadFormat();
}
h2Format = getTextStyle("h2", this.sheet);
if (h2Format == null)
{
h2Format = getDefaultHeadFormat();
h2Format.size = 16;
}
pFormat = getTextStyle("p", this.sheet);
if (pFormat == null)
{
pFormat = getDefaultTextFormat();
pFormat.size = 12;
}
displayText();
}
The onCSSFileLoaded() method creates a new StyleSheet object and has it parse the input CSS data. The main text
for the story will be displayed in a MultiColumnTextField object, which can use a StyleSheet object directly. However,
the headline fields use the HeadlineTextField class, which uses a TextFormat object for its formatting.
The onCSSFileLoaded() method calls the getTextStyle() method twice to convert a CSS style declaration into
a TextFormat object for use with each of the two HeadlineTextField objects. The getTextStyle() method is shown
below:

ADOBE FLEX 3
Developer Guide
371
public function getTextStyle(styleName:String, ss:StyleSheet):TextFormat
{
var format:TextFormat = null;
var style:Object = ss.getStyle(styleName);
if (style != null)
{
var colorStr:String = style.color;
if (colorStr != null && colorStr.indexOf("#") == 0)
{
style.color = colorStr.substr(1);
}
format = new TextFormat(style.fontFamily,
style.fontSize,
style.color,
(style.fontWeight == "bold"),
(style.fontStyle == "italic"),
(style.textDecoration == "underline"),
style.url,
style.target,
style.textAlign,
style.marginLeft,
style.marginRight,
style.indent,
style.leading);
if (style.hasOwnProperty("letterSpacing"))
{
format.letterSpacing = style.letterSpacing;
}
}
return format;
}
The property names and the meaning of the property values differ between CSS style declarations and TextFormat
objects. The getTextStyle() method translates CSS property values into the values expected by the TextFormat
object.
Arranging story elements on the page
The StoryLayout class formats and lays out the headline, subtitle, and main text fields into a newspaper-style
arrangement. The displayText() method initially creates and places the various fields.
public function displayText():void
{
headlineTxt = new HeadlineTextField(h1Format);
headlineTxt.wordWrap = true;
headlineTxt.x = this.paddingLeft;
headlineTxt.y = this.paddingTop;
headlineTxt.width = this.preferredWidth;
this.addChild(headlineTxt);
headlineTxt.fitText(this.headline, 1, true);
subtitleTxt = new HeadlineTextField(h2Format);
subtitleTxt.wordWrap = true;
subtitleTxt.x = this.paddingLeft;
subtitleTxt.y = headlineTxt.y + headlineTxt.height;

ADOBE FLEX 3
Developer Guide
372
subtitleTxt.width = this.preferredWidth;
this.addChild(subtitleTxt);
subtitleTxt.fitText(this.subtitle, 2, false);
storyTxt = new MultiColumnText(this.numColumns, 20,
this.preferredWidth, 400, true, this.pFormat);
storyTxt.x = this.paddingLeft;
storyTxt.y = subtitleTxt.y + subtitleTxt.height + 10;
this.addChild(storyTxt);
storyTxt.text = this.content;
...
Each field is simply placed below the previous field by setting its y property equal to the y property of the previous
field plus the height of the previous field. This dynamic placement calculation is needed because HeadlineTextField
objects and MultiColumnTextField objects can change their height to fit their contents.
Altering font size to fit the field size
Given a width in pixels and a maximum number of lines to display, the HeadlineTextField alters the font size to make
the text fit the field. If the text is short the font size will be very large, creating a tabloid-style headline. If the text is
long the font size will of course be smaller.
The HeadlineTextField.fitText() method shown below does the font sizing work:
public function fitText(msg:String, maxLines:uint = 1, toUpper:Boolean = false,
targetWidth:Number = -1):uint
{
this.text = toUpper ? msg.toUpperCase() : msg;
if (targetWidth == -1)
{
targetWidth = this.width;
}
var pixelsPerChar:Number = targetWidth / msg.length;
var pointSize:Number = Math.min(MAX_POINT_SIZE, Math.round(pixelsPerChar * 1.8 *
maxLines));
if (pointSize < 6)
{
// the point size is too small
return pointSize;
}
this.changeSize(pointSize);
if (this.numLines > maxLines)
{
return shrinkText(--pointSize, maxLines);
}
else
{
return growText(pointSize, maxLines);
}
}

ADOBE FLEX 3
Developer Guide
373
public function growText(pointSize:Number, maxLines:uint = 1):Number
{
if (pointSize >= MAX_POINT_SIZE)
{
return pointSize;
}
this.changeSize(pointSize + 1);
if (this.numLines > maxLines)
{
// set it back to the last size
this.changeSize(pointSize);
return pointSize;
}
else
{
return growText(pointSize + 1, maxLines);
}
}
public function shrinkText(pointSize:Number, maxLines:uint=1):Number
{
if (pointSize <= MIN_POINT_SIZE)
{
return pointSize;
}
this.changeSize(pointSize);
if (this.numLines > maxLines)
{
return shrinkText(pointSize - 1, maxLines);
}
else
{
return pointSize;
}
}
The HeadlineTextField.fitText() method uses a simple recursive technique to size the font. First it guesses an
average number of pixels per character in the text and from there calculates a starting point size. Then it changes the
text field’s font size and checks whether the text has word wrapped to create more than the maximum number of text
lines. If there are too many lines it calls the shrinkText() method to decrease the font size and try again. If there
are not too many lines it calls the growText() method to increase the font size and try again. The process stops at
the point where incrementing the font size by one more point would create too many lines.
Splitting text across multiple columns
The MultiColumnTextField class spreads text among multiple TextField objects which are then arranged like
newspaper columns.
The MultiColumnTextField() constructor first creates an array of TextField objects, one for each column, as
shown here:
for (var i:int = 0; i < cols; i++)
{
var field:TextField = new TextField();
field.multiline = true;

ADOBE FLEX 3
Developer Guide
374
field.autoSize = TextFieldAutoSize.NONE;
field.wordWrap = true;
field.width = this.colWidth;
field.setTextFormat(this.format);
this.fieldArray.push(field);
this.addChild(field);
}
Each TextField object is added to the array and added to the display list with the addChild() method.
Whenever the StoryLayout object’s text property or styleSheet property changes, it calls the layoutColumns()
method to redisplay the text. The layoutColumns() method calls the getOptimalHeight() method, shown below,
to figure out the correct pixel height needed to fit all of the text within the given layout width.
public function getOptimalHeight(str:String):int
{
if (field.text == "" || field.text == null)
{
return this.preferredHeight;
}
else
{
this.linesPerCol = Math.ceil(field.numLines / this.numColumns);
var metrics:TextLineMetrics = field.getLineMetrics(0);
this.lineHeight = metrics.height;
var prefHeight:int = linesPerCol * this.lineHeight;
return prefHeight + 4;
}
}
First the getOptimalHeight() method calculates the width of each column. Then it sets the width and htmlText
property of the first TextField object in the array. The getOptimalHeight() method uses that first TextField object
to discover the total number of word-wrapped lines in the text, and from that it identifies how many lines should be
in each column. Next it calls the TextField.getLineMetrics() method to retrieve a TextLineMetrics object that
contains details about size of the text in the first line. The TextLineMetrics.height property represents the full
height of a line of text, in pixels, including the ascent, descent, and leading. The optimal height for the MultiColumn-
TextField object is then the line height multiplied by the number of lines per column, plus 4 to account for the 2 pixel
border at the top and the bottom of a TextField object.
Here is the code for the full layoutColumns() method:
public function layoutColumns():void
{
if (this._text == "" || this._text == null)
{
return;
}
var field:TextField = fieldArray[0] as TextField;
field.text = this._text;
field.setTextFormat(this.format);
this.preferredHeight = this.getOptimalHeight(field);
var remainder:String = this._text;
var fieldText:String = "";
var lastLineEndedPara:Boolean = true;

ADOBE FLEX 3
Developer Guide
375
var indent:Number = this.format.indent as Number;
for (var i:int = 0; i < fieldArray.length; i++)
{
field = this.fieldArray[i] as TextField;
field.height = this.preferredHeight;
field.text = remainder;
field.setTextFormat(this.format);
var lineLen:int;
if (indent > 0 && !lastLineEndedPara && field.numLines > 0)
{
lineLen = field.getLineLength(0);
if (lineLen > 0)
{
field.setTextFormat(this.firstLineFormat, 0, lineLen);
}
}
field.x = i * (colWidth + gutter);
field.y = 0;
remainder = "";
fieldText = "";
var linesRemaining:int = field.numLines;
var linesVisible:int = Math.min(this.linesPerCol, linesRemaining);
for (var j:int = 0; j < linesRemaining; j++)
{
if (j < linesVisible)
{
fieldText += field.getLineText(j);
}
else
{
remainder +=field.getLineText(j);
}
}
field.text = fieldText;
field.setTextFormat(this.format);
if (indent > 0 && !lastLineEndedPara)
{
lineLen = field.getLineLength(0);
if (lineLen > 0)
{
field.setTextFormat(this.firstLineFormat, 0, lineLen);
}
}
var lastLine:String = field.getLineText(field.numLines - 1);
var lastCharCode:Number = lastLine.charCodeAt(lastLine.length - 1);

ADOBE FLEX 3
Developer Guide
376
if (lastCharCode == 10 || lastCharCode == 13)
{
lastLineEndedPara = true;
}
else
{
lastLineEndedPara = false;
}
if ((this.format.align == TextFormatAlign.JUSTIFY) &&
(i < fieldArray.length - 1))
{
if (!lastLineEndedPara)
{
justifyLastLine(field, lastLine);
}
}
}
}
After the preferredHeight property has been set by calling the getOptimalHeight() method, the
layoutColumns() method iterates through the TextField objects, setting the height of each to the
preferredHeight value. The layoutColumns() method then distributes just enough lines of text to each field so
that no scrolling occurs in any individual field, and the text in each successive field begins where the text in the
previous field ended. If the text alignment style has been set to “justify” then the justifyLastLine() method is
called to justify the final line of text in a field. Otherwise that last line would be treated as an end-of-paragraph line
and not justified.

377
Chapter 19: Working with bitmaps
In addition to its vector drawing capabilities, ActionScript™ 3.0 includes the ability to create bitmap images or manip-
ulate the pixel data of external bitmap images that are loaded into a SWF. With the ability to access and change
individual pixel values, you can create your own filter-like image effects and use the built-in noise functions to create
textures and random noise. All of these techniques are described in this chapter.
Contents
Basics of working with bitmaps. . . . . . . . . . . . . . . . . . . . . . . . . . . . . . . . . . . . . . . . . . . . . . . . . . . . . . . . . . . . . . . . . . . . . 377
The Bitmap and BitmapData classes . . . . . . . . . . . . . . . . . . . . . . . . . . . . . . . . . . . . . . . . . . . . . . . . . . . . . . . . . . . . . . . . 379
Manipulating pixels . . . . . . . . . . . . . . . . . . . . . . . . . . . . . . . . . . . . . . . . . . . . . . . . . . . . . . . . . . . . . . . . . . . . . . . . . . . . . . 380
Copying bitmap data . . . . . . . . . . . . . . . . . . . . . . . . . . . . . . . . . . . . . . . . . . . . . . . . . . . . . . . . . . . . . . . . . . . . . . . . . . . . . 383
Making textures with noise functions . . . . . . . . . . . . . . . . . . . . . . . . . . . . . . . . . . . . . . . . . . . . . . . . . . . . . . . . . . . . . . . 384
Scrolling bitmaps. . . . . . . . . . . . . . . . . . . . . . . . . . . . . . . . . . . . . . . . . . . . . . . . . . . . . . . . . . . . . . . . . . . . . . . . . . . . . . . . . 386
Taking advantage of mipmapping. . . . . . . . . . . . . . . . . . . . . . . . . . . . . . . . . . . . . . . . . . . . . . . . . . . . . . . . . . . . . . . . . . . 386
Example: Animated spinning moon. . . . . . . . . . . . . . . . . . . . . . . . . . . . . . . . . . . . . . . . . . . . . . . . . . . . . . . . . . . . . . . . . 387
Basics of working with bitmaps
Introduction to working with bitmaps
When you work with digital images, you’re likely to encounter two main types of graphics: bitmap and vector. Bitmap
graphics, also known as raster graphics, are composed of tiny squares (pixels) that are arranged in a rectangular grid
formation. Vector graphics are composed of mathematically generated geometric shapes such as lines, curves, and
polygons.
Bitmap images are defined by the width and height of the image, measured in pixels, and the number of bits
contained in each pixel, which represents the number of colors a pixel can contain. In the case of a bitmap image that
utilizes the RGB color model, the pixels are made up of three bytes: red, green, and blue. Each of these bytes contains
a value ranging from 0 to 255. When the bytes are combined within the pixel, they produce a color similar to an artist
mixing paint colors. For example, a pixel containing byte values of red-255, green-102 and blue-0 would produce a
vibrant orange color.
The quality of a bitmap image is determined by combining the resolution of the image with its color depth bit value.
Resolution relates to the number of pixels contained within an image. The greater the number of pixels, the higher
the resolution and the finer the image appears. Color depth relates to the amount of information a pixel can contain.
For example, an image that has a color depth value of 16 bits per pixel cannot represent the same number of colors
as an image that has a color depth of 48 bits. As a result, the 48-bit image will have smoother degrees of shading than
its 16-bit counterpart.
Because bitmap graphics are resolution-dependent, they don’t scale very well. This is most noticeable when bitmap
images are scaled up in size. Scaling up a bitmap usually results in a loss of detail and quality.

ADOBE FLEX 3
Developer Guide
378
Bitmap file formats
Bitmap images are grouped into a number of common file formats. These formats use different types of compression
algorithms to reduce file size, as well as optimize image quality based on the end purpose of the image. The bitmap
image formats supported by Adobe® Flash™ Player and Adobe® AIR™ are GIF, JPG, and PNG.
GIF
The Graphics Interchange Format (GIF) was originally developed by CompuServe in 1987 as a means to transmit
images with 256 colors (8-bit color). The format provides small file sizes and is ideal for web-based images. Because
of this format’s limited color palette, GIF images are generally not suitable for photographs, which typically require
high degrees of shading and color gradients. GIF images permit single-bit transparency, which allows colors to be
mapped as clear (or transparent). This results in the background color of a web page showing through the image
where the transparency has been mapped.
JPEG
Developed by the Joint Photographic Experts Group (JPEG), the JPEG (often written JPG) image format uses a lossy
compression algorithm to allow 24-bit color depth with a small file size. Lossy compression means that each time the
image is saved, the image loses quality and data but results in a smaller file size. The JPEG format is ideal for photo-
graphs because it is capable of displaying millions of colors. The ability to control the degree of compression applied
to an image allows you to manipulate image quality and file size.
PNG
The Portable Network Graphics (PNG) format was produced as an open-source alternative to the patented GIF file
format. PNGs support up to 64-bit color depth, allowing for up to 16 million colors. Because PNG is a relatively new
format, some older browsers don’t support PNG files. Unlike JPGs, PNGs use lossless compression, which means
that none of the image data is lost when the image is saved. PNG files also support alpha transparency, which allows
for up to 256 levels of transparency.
Transparent bitmaps and opaque bitmaps
Bitmap images that use either the GIF or PNG formats can have an extra byte (alpha channel) added to each pixel.
This extra pixel byte represents the transparency value of the pixel.
GIF images allow single-bit transparency, which means that you can specify a single color, from a 256-color palette,
to be transparent. PNG images, on the other hand, can have up to 256 levels of transparency. This function is
especially beneficial when images or text are required to blend into backgrounds.
ActionScript 3.0 replicates this extra transparency pixel byte within the BitmapData class. Similar to the PNG trans-
parency model, the BitmapDataChannel.ALPHA constant offers up to 256 levels of transparency.
Common tasks for working with bitmaps
The following list describes several tasks you may want to perform when working with bitmap images in Action-
Script:
•Displaying bitmaps on the screen
•Retrieving and setting pixel color values
•Copying bitmap data:
•Creating an exact copy of a bitmap
•Copying data from one color channel of a bitmap into one color channel of another bitmap
•Copying a snapshot of a screen display object into a bitmap

ADOBE FLEX 3
Developer Guide
379
•Creating noise and textures in bitmap images
•Scrolling bitmaps
Important concepts and terms
The following list contains important terms that you will encounter in this chapter:
•Alpha: The level of transparency (or more accurately, opacity) in a color or an image. The amount of alpha is
often described as the alpha channel value.
•ARGB color: A color scheme where each pixel’s color is a mixture of red, green, and blue color values, and its
transparency is specified as an alpha value.
•Color channel: Commonly, colors are represented as a mixture of a few basic colors—usually (for computer
graphics) red, green, and blue. Each basic color is considered a color channel; the amount of color in each color
channel, mixed together, determines the final color.
•Color depth: Also known as bit depth, this refers to the amount of computer memory that is devoted to each
pixel, which in turn determines the number of possible colors that can be represented in the image.
•Pixel: The smallest unit of information in a bitmap image—essentially a dot of color.
•Resolution: The pixel dimensions of an image, which determines the level of fine-grained detail contained in the
image. Resolution is often expressed in terms of width and height in number of pixels.
•RGB color: A color scheme where each pixel’s color is represented as a mixture of red, green, and blue color
values.
The Bitmap and BitmapData classes
The main ActionScript 3.0 classes for working with bitmap images are the Bitmap class, which is used to display
bitmap images on the screen, and the BitmapData class, which is used to access and manipulate the raw image data
of a bitmap.
Understanding the Bitmap class
As a subclass of the DisplayObject class, the Bitmap class is the main ActionScript 3.0 class used for displaying
bitmap images. These images may have been loaded into Flash via the flash.display.Loader class or created dynami-
cally using the Bitmap() constructor. When loading an image from an external source, a Bitmap object can only use
GIF, JPEG, or PNG format images. Once instantiated, the Bitmap instance can be considered a wrapper for a
BitmapData object that needs to be rendered to the Stage. Because a Bitmap instance is a display object, all the
characteristics and functionality of display objects can be used to manipulate a Bitmap instance as well. For more
information about working with display objects, see “Display programming” on page 247.
Pixel snapping and smoothing
In addition to the functionality common to all display objects, the Bitmap class provides some additional features
that are specific to bitmap images.

ADOBE FLEX 3
Developer Guide
380
Similar to the snap-to-pixel feature found in the Flash authoring tool, the pixelSnapping property of the Bitmap
class determines whether or not a Bitmap object snaps to its nearest pixel. This property accepts one of three
constants defined in the PixelSnapping class: ALWAYS, AUTO, and NEVER.
The syntax for applying pixel snapping is as follows:
myBitmap.pixelSnapping = PixelSnapping.ALWAYS;
Often, when bitmap images are scaled, they become blurred and distorted. To help reduce this distortion, use the
smoothing property of the BitmapData class. This Boolean property, when set to true, smooths, or anti-aliases, the
pixels within the image when it is scaled. This gives the image a clearer and more natural appearance.
Understanding the BitmapData class
The BitmapData class, which is in the flash.display package, can be likened to a photographic snapshot of the pixels
contained within a loaded or dynamically created bitmap image. This snapshot is represented by an array of pixel
data within the object. The BitmapData class also contains a series of built-in methods that are useful for creation
and manipulation of pixel data.
To instantiate a BitmapData object, use the following code:
var myBitmap:BitmapData = new BitmapData(width:Number, height:Number, transparent:Boolean,
fillColor:uinit);
The width and height parameters specify the size of the bitmap; the maximum value of both is 2880 pixels. The
transparent parameter specifies whether the bitmap data includes an alpha channel (true) or not (false). The
fillColor parameter is a 32-bit color value that specifies the background color, as well as the transparency value
(if it has been set to true). The following example creates a BitmapData object with an orange background that is 50
percent transparent:
var myBitmap:BitmapData = new BitmapData(150, 150, true, 0x80FF3300);
To render a newly created BitmapData object to the screen, assign it to or wrap it in a Bitmap instance. To do this,
you can either pass the BitmapData object as a parameter of the Bitmap object’s constructor, or you can assign it to
the bitmapData property of an existing Bitmap instance. You must also add the Bitmap instance to the display list
by calling the addChild() or addChildAt() methods of the display object container that will contain the Bitmap
instance. For more information on working with the display list, see “Adding display objects to the display list” on
page 255.
The following example creates a BitmapData object with a red fill, and displays it in a Bitmap instance:
var myBitmapDataObject:BitmapData = new BitmapData(150, 150, false, 0xFF0000);
var myImage:Bitmap = new Bitmap(myBitmapDataObject);
addChild(myImage);
Manipulating pixels
The BitmapData class contains a set of methods that allow you to manipulate pixel data values.
Manipulating individual pixels
When changing the appearance of a bitmap image at a pixel level, you first need to get the color values of the pixels
contained within the area you wish to manipulate. You use the getPixel() method to read these pixel values.

ADOBE FLEX 3
Developer Guide
381
The getPixel() method retrieves an RGB value from a set of x, y (pixel) coordinates that are passed as a parameter.
If any of the pixels that you want to manipulate include transparency (alpha channel) information, you need to use
the getPixel32() method. This method also retrieves an RGB value, but unlike with getPixel(), the value
returned by getPixel32() contains additional data that represents the alpha channel (transparency) value of the
selected pixel.
Alternatively, if you simply want to change the color or transparency of a pixel contained within a bitmap, you can
use the setPixel() or setPixel32() method. To set a pixel’s color, simply pass in the x, y coordinates and the color
value to one of these methods.
The following example uses setPixel() to draw a cross on a green BitmapData background. It then uses
getPixel() to retrieve the color value from the pixel at the coordinate 50, 50 and traces the returned value.
import flash.display.Bitmap;
import flash.display.BitmapData;
var myBitmapData:BitmapData = new BitmapData(100, 100, false, 0x009900);
for (var i:uint = 0; i < 100; i++)
{
var red:uint = 0xFF0000;
myBitmapData.setPixel(50, i, red);
myBitmapData.setPixel(i, 50, red);
}
var myBitmapImage:Bitmap = new Bitmap(myBitmapData);
addChild(myBitmapImage);
var pixelValue:uint = myBitmapData.getPixel(50, 50);
trace(pixelValue.toString(16));
If you want to read the value of a group of pixels, as opposed to a single pixel, use the getPixels() method. This
method generates a byte array from a rectangular region of pixel data that is passed as a parameter. Each of the
elements of the byte array (in other words, the pixel values) are unsigned integers—32-bit, unmultiplied pixel values.
Conversely, to change (or set) the value of a group of pixels, use the setPixels() method. This method expects two
parameters (rect and inputByteArray), which are combined to output a rectangular region (rect) of pixel data
(inputByteArray).
As data is read (and written) out of the inputByteArray, the ByteArray.readUnsignedInt() method is called for
each of the pixels in the array. If, for some reason, the inputByteArray doesn't contain a full rectangle worth of pixel
data, the method stops processing the image data at that point.
It's important to remember that, for both getting and setting pixel data, the byte array expects 32-bit alpha, red, green,
blue (ARGB) pixel values.
The following example uses the getPixels() and setPixels() methods to copy a group of pixels from one
BitmapData object to another:
import flash.display.Bitmap;
import flash.display.BitmapData;
import flash.utils.ByteArray;
import flash.geom.Rectangle;
var bitmapDataObject1:BitmapData = new BitmapData(100, 100, false, 0x006666FF);
var bitmapDataObject2:BitmapData = new BitmapData(100, 100, false, 0x00FF0000);

ADOBE FLEX 3
Developer Guide
382
var rect:Rectangle = new Rectangle(0, 0, 100, 100);
var bytes:ByteArray = bitmapDataObject1.getPixels(rect);
bytes.position = 0;
bitmapDataObject2.setPixels(rect, bytes);
var bitmapImage1:Bitmap = new Bitmap(bitmapDataObject1);
addChild(bitmapImage1);
var bitmapImage2:Bitmap = new Bitmap(bitmapDataObject2);
addChild(bitmapImage2);
bitmapImage2.x = 110;
Pixel-level collision detection
The BitmapData.hitTest() method performs pixel-level collision detection between the bitmap data and another
object or point.
The BitmapData.hitTest() method accepts five parameters:
•firstPoint (Point): This parameter refers to the pixel position of the upper-left corner of the first BitmapData
upon which the hit test is being performed.
•firstAlphaThreshold (uint): This parameter specifies the highest alpha channel value that is considered
opaque for this hit test.
•secondObject (Object): This parameter represents the area of impact. The secondObject object can be a
Rectangle, Point, Bitmap, or BitmapData object. This object represents the hit area on which the collision detection
is being performed.
•secondBitmapDataPoint (Point): This optional parameter is used to define a pixel location in the second
BitmapData object. This parameter is used only when the value of secondObject is a BitmapData object. The
default is null.
•secondAlphaThreshold (uint): This optional parameter represents the highest alpha channel value that is
considered opaque in the second BitmapData object. The default value is 1. This parameter is only used when the
value of secondObject is a BitmapData object and both BitmapData objects are transparent.
When performing collision detection on opaque images, keep in mind that ActionScript treats the image as though
it were a fully opaque rectangle (or bounding box). Alternatively, when performing pixel-level hit testing on images
that are transparent, both of the images are required to be transparent. In addition to this, ActionScript uses the alpha
threshold parameters to determine at what point the pixels change from being transparent to opaque.
The following example creates three bitmap images and checks for pixel collision using two different collision points
(one returns false, the other true):
import flash.display.Bitmap;
import flash.display.BitmapData;
import flash.geom.Point;
var bmd1:BitmapData = new BitmapData(100, 100, false, 0x000000FF);
var bmd2:BitmapData = new BitmapData(20, 20, false, 0x00FF3300);
var bm1:Bitmap = new Bitmap(bmd1);
this.addChild(bm1);

ADOBE FLEX 3
Developer Guide
383
// Create a red square.
var redSquare1:Bitmap = new Bitmap(bmd2);
this.addChild(redSquare1);
redSquare1.x = 0;
// Create a second red square.
var redSquare2:Bitmap = new Bitmap(bmd2);
this.addChild(redSquare2);
redSquare2.x = 150;
redSquare2.y = 150;
// Define the point at the top-left corner of the bitmap.
var pt1:Point = new Point(0, 0);
// Define the point at the center of redSquare1.
var pt2:Point = new Point(20, 20);
// Define the point at the center of redSquare2.
var pt3:Point = new Point(160, 160);
trace(bmd1.hitTest(pt1, 0xFF, pt2)); // true
trace(bmd1.hitTest(pt1, 0xFF, pt3)); // false
Copying bitmap data
To copy bitmap data from one image to another, you can use several methods: clone(), copyPixels(),
copyChannel(), and draw().
As its name suggests, the clone() method lets you clone, or sample, bitmap data from one BitmapData object to
another. When called, the method returns a new BitmapData object that is an exact clone of the original instance it
was copied from.
The following example clones a copy of an orange (parent) square and places the clone beside the original parent
square:
import flash.display.Bitmap;
import flash.display.BitmapData;
var myParentSquareBitmap:BitmapData = new BitmapData(100, 100, false, 0x00ff3300);
var myClonedChild:BitmapData = myParentSquareBitmap.clone();
var myParentSquareContainer:Bitmap = new Bitmap(myParentSquareBitmap);
this.addChild(myParentSquareContainer);
var myClonedChildContainer:Bitmap = new Bitmap(myClonedChild);
this.addChild(myClonedChildContainer);
myClonedChildContainer.x = 110;
The copyPixels() method is a quick and easy way of copying pixels from one BitmapData object to another. The
method takes a rectangular snapshot (defined by the sourceRect parameter) of the source image and copies it to
another rectangular area (of equal size). The location of the newly “pasted” rectangle is defined within the
destPoint parameter.
The copyChannel() method samples a predefined color channel value (alpha, red, green, or blue) from a source
BitmapData object and copies it into a channel of a destination BitmapData object. Calling this method does not
affect the other channels in the destination BitmapData object.

ADOBE FLEX 3
Developer Guide
384
The draw() method draws, or renders, the graphical content from a source sprite, movie clip, or other display object
on to a new bitmap. Using the matrix, colorTransform, blendMode, and destination clipRect parameters, you
can modify the way in which the new bitmap is rendered. This method uses the vector renderer in Flash Player and
AIR to generate the data.
When you call draw(), you pass the source object (sprite, movie clip, or other display object) as the first parameter,
as demonstrated here:
myBitmap.draw(movieClip);
If the source object has had any transformations (color, matrix, and so forth) applied to it after it was originally
loaded, these transformations are not copied across to the new object. If you want to copy the transformations to the
new bitmap, then you need to copy the value of the transform property from the original object to the transform
property of the Bitmap object that uses the new BitmapData object.
Making textures with noise functions
To modify the appearance of a bitmap, you can apply a noise effect to it, using either the noise() method or the
perlinNoise() methods. A noise effect can be likened to the static that appears on an untuned television screen.
To apply a noise effect to a a bitmap, use the noise() method. This method applies a random color value to pixels
within a specified area of a bitmap image.
This method accepts five parameters:
•randomSeed (int): The random seed number that determines the pattern. Despite its name, this number actually
creates the same results if the same number is passed. To get a true random result, use the Math.random() method
to pass a random number for this parameter.
•low (uint): This parameter refers to the lowest value to be generated for each pixel (0 to 255). The default value
is 0. Setting this value lower results in a darker noise pattern, while setting it to a higher value results in a brighter
pattern.
•high (uint): This parameter refers to the highest value to be generated for each pixel (0 to 255). The default value
is 255. Setting this value lower results in a darker noise pattern, while setting it to a higher value results in a brighter
pattern.
•channelOptions (uint): This parameter specifies to which color channel of the bitmap object the noise pattern
will be applied. The number can be a combination of any of the four color channel ARGB values. The default value
is 7.
•grayScale (Boolean): When set to true, this parameter applies the randomSeed value to the bitmap pixels,
effectively washing all color out of the image. The alpha channel is not affected by this parameter. The default value
is false.
The following example creates a bitmap image and applies a blue noise pattern to it:
import flash.display.Bitmap;
import flash.display.BitmapData;
var myBitmap:BitmapData = new BitmapData(250, 250,false, 0xff000000);
myBitmap.noise(500, 0, 255, BitmapDataChannel.BLUE,false);
var image:Bitmap = new Bitmap(myBitmap);
addChild(image);

ADOBE FLEX 3
Developer Guide
385
If you want to create a more organic-looking texture, use the perlinNoise() method. The perlinNoise()
method produces realistic, organic textures that are ideal for smoke, clouds, water, fire, or even explosions.
Because it is generated by an algorithm, the perlinNoise() method uses less memory than bitmap-based textures.
However, it can still have an impact on processor usage, slowing down your Flash content and causing the screen to
be redrawn more slowly than the frame rate, especially on older computers. This is mainly due to the floating-point
calculations that need to occur to process the perlin noise algorithms.
The method accepts nine parameters (the first six are required):
•baseX (Number): Determines the x (size) value of patterns created.
•baseY (Number): Determines the y (size) value of the patterns created.
•numOctaves (uint): Number of octaves or individual noise functions to combine to create this noise. Larger
numbers of octaves create images with greater detail but also require more processing time.
•randomSeed (int): The random seed number works exactly the same way as it does in the noise() function. To
get a true random result, use the Math.random() method to pass a random number for this parameter.
•stitch (Boolean): If set to true, this method attempts to stitch (or smooth) the transition edges of the image to
create seamless textures for tiling as a bitmap fill.
•fractalNoise (Boolean): This parameter relates to the edges of the gradients being generated by the method.
If set to true, the method generates fractal noise that smooths the edges of the effect. If set to false, it generates
turbulence. An image with turbulence has visible discontinuities in the gradient that can make it better approximate
sharper visual effects, like flames and ocean waves.
•channelOptions (uint): The channelOptions parameter works exactly the same way as it does in the noise()
method. It specifies to which color channel (of the bitmap) the noise pattern is applied. The number can be a combi-
nation of any of the four color channel ARGB values. The default value is 7.
•grayScale (Boolean): The grayScale parameter works exactly the same way as it does in the noise() method.
If set to true, it applies the randomSeed value to the bitmap pixels, effectively washing all color out of the image. The
default value is false.
•offsets (Array): An array of points that correspond to x and y offsets for each octave. By manipulating the
offset values, you can smoothly scroll the layers of the image. Each point in the offset array affects a specific octave
noise function. The default value is null.
The following example creates a 150 x 150 pixel BitmapData object that calls the perlinNoise() method to generate
a green and blue cloud effect:
import flash.display.Bitmap;
import flash.display.BitmapData;
var myBitmapDataObject:BitmapData = new BitmapData(150, 150, false, 0x00FF0000);
var seed:Number = Math.floor(Math.random() * 100);
var channels:uint = BitmapDataChannel.GREEN | BitmapDataChannel.BLUE
myBitmapDataObject.perlinNoise(100, 80, 6, seed, false, true, channels, false, null);
var myBitmap:Bitmap = new Bitmap(myBitmapDataObject);
addChild(myBitmap);

ADOBE FLEX 3
Developer Guide
386
Scrolling bitmaps
Imagine you have created a street mapping application where each time the user moves the map you are required to
update the view (even if the map has been moved by just a few pixels).
One way to create this functionality would be to re-render a new image containing the updated map view each time
the user moves the map. Alternatively, you could create a large single image and the scroll() method.
The scroll() method copies an on-screen bitmap and then pastes it to a new offset location—specified by (x, y)
parameters. If a portion of the bitmap happens to reside off-stage, this gives the effect that the image has shifted.
When combined with a timer function (or an enterFrame event), you can make the image appear to be animating
or scrolling.
The following example takes the previous perlin noise example and generates a larger bitmap image (three-fourths
of which is rendered off-stage). The scroll() method is then applied, along with an enterFrame event listener that
offsets the image by one pixel in a diagonally downward direction. This method is called each time the frame is
entered and as a result, the offscreen portions of the image are rendered to the Stage as the image scrolls down.
import flash.display.Bitmap;
import flash.display.BitmapData;
var myBitmapDataObject:BitmapData = new BitmapData(1000, 1000, false, 0x00FF0000);
var seed:Number = Math.floor(Math.random() * 100);
var channels:uint = BitmapDataChannel.GREEN | BitmapDataChannel.BLUE;
myBitmapDataObject.perlinNoise(100, 80, 6, seed, false, true, channels, false, null);
var myBitmap:Bitmap = new Bitmap(myBitmapDataObject);
myBitmap.x = -750;
myBitmap.y = -750;
addChild(myBitmap);
addEventListener(Event.ENTER_FRAME, scrollBitmap);
function scrollBitmap(event:Event):void
{
myBitmapDataObject.scroll(1, 1);
}
Taking advantage of mipmapping
MIP maps (also known as mipmaps), are bitmaps grouped together and associated with a texture to increase runtime
rendering quality and performance. Flash Player 9.0.xx.0 and later versions and AIR implement this technology (the
process is called mipmapping), by creating optimized versions of varying scale of each bitmap (starting at 50%).
Flash Player and AIR create MIP maps for bitmaps (JPEG, GIF, or PNG files) that you display using the ActionScript
3.0 Loader class or a BitmapData object; Flash Player creates MIP maps for the bitmaps that you display using the
the ActionScript 2.0 loadMovie() function.
MIP maps are not applied to filtered objects or bitmap-cached movie clips. However, MIP maps are applied if you
have bitmap transformations within a filtered display object, even if the bitmap is within masked content.

ADOBE FLEX 3
Developer Guide
387
Flash Player and AIR mipmapping happens automatically, but you can follow a few guidelines to make sure your
images take advantage of this optimization:
•For video playback, set the smoothing property to true for the Video object (see the Video class).
•For bitmaps, the smoothing property does not have to be set to true, but the quality improvements are more
visible when bitmaps use smoothing.
•Use bitmap sizes that are divisible by 4 or 8 for two-dimensional images (such as 640 x 128, which can be reduced
as follows: 320 x 64 > 160 x 32 > 80 x 16 > 40 x 8 > 20 x 4 > 10 x 2 > 5 x 1) and 2^n for three-dimensional textures.
MIP maps are generated from bitmaps that have a width and height that are 2^n (such as 256 x 256, 512 x 512, 1024
x 1024). Mipmapping stops when Flash Player or AIR encounters an odd width or height.
Example: Animated spinning moon
The Animated spinning moon example demonstrates techniques for working with Bitmap objects and bitmap image
data (BitmapData objects). The example creates an animation of a spinning, spherical moon using a flat image of the
moon’s surface as the raw image data. The following techniques are demonstrated:
•Loading an external image and accessing its raw image data
•Creating animation by repeatedly copying pixels from different parts of a source image
•Creating a bitmap image by setting pixel values
To get the application files for this sample, see www.adobe.com/go/learn_programmingAS3samples_flash. The
Animated spinning moon application files can be found in the Samples/SpinningMoon folder. The application
consists of the following files:
Loading an external image as bitmap data
The first main task this sample performs is loading an external image file, which is a photograph of the moon’s
surface. The loading operation is handled by two methods in the MoonSphere class: the MoonSphere() constructor,
where the loading process is initiated, and the imageLoadComplete() method, which is called when the external
image is completely loaded.
Loading an external image is similar to loading an external SWF; both use an instance of the flash.display.Loader
class to perform the loading operation. The actual code in the MoonSphere() method that starts loading the image
is as follows:
var imageLoader:Loader = new Loader();
imageLoader.contentLoaderInfo.addEventListener(Event.COMPLETE, imageLoadComplete);
imageLoader.load(new URLRequest("moonMap.png"));
File Description
SpinningMoon.fla The main application file.
com/example/programmingas3/moon/MoonSphere.as Class that performs the functionality of loading, displaying, and
animating the moon.
moonMap.png Image file containing a photograph of the moon’s surface, which is loaded
and used to create the animated, spinning moon.

ADOBE FLEX 3
Developer Guide
388
The first line declares the Loader instance named imageLoader. The third line actually starts the loading process by
calling the Loader object’s load() method, passing a URLRequest instance representing the URL of the image to
load. The second line sets up the event listener that will be triggered when the image has completely loaded. Notice
that the addEventListener() method is not called on the Loader instance itself; instead, it’s called on the Loader
object’s contentLoaderInfo property. The Loader instance itself doesn’t dispatch events relating to the content
being loaded. Its contentLoaderInfo property, however, contains a reference to the LoaderInfo object that’s
associated with the content being loaded into the Loader object (the external image in this case). That LoaderInfo
object does provide several events relating to the progress and completion of loading the external content, including
the complete event (Event.COMPLETE) that will trigger a call to the imageLoadComplete() method when the
image has completely loaded.
While starting the external image loading is an important part of the process, it’s equally important to know what to
do when it finishes loading. As shown in the code above, the imageLoadComplete() function is called when the
image is loaded. That function does several things with the loaded image data, described in subsequent sections.
However, to use the image data, it needs to access that data. When a Loader object is used to load an external image,
the loaded image becomes a Bitmap instance, which is attached as a child display object of the Loader object. In this
case, the Loader instance is available to the event listener method as part of the event object that’s passed to the
method as a parameter. The first lines of the imageLoadComplete() method are as follows:
private function imageLoadComplete(event:Event):void
{
textureMap = event.target.content.bitmapData;
...
}
Notice that the event object parameter is named event, and it’s an instance of the Event class. Every instance of the
Event class has a target property, which refers to the object triggering the event (in this case, the LoaderInfo
instance on which the addEventListener() method was called, as described previously). The LoaderInfo object,
in turn, has a content property that (once the loading process is complete) contains the Bitmap instance with the
loaded bitmap image. If you want to display the image directly on the screen, you can attach this Bitmap instance
(event.target.content) to a display object container. (You could also attach the Loader object to a display object
container). However, in this sample, the loaded content is used as a source of raw image data rather than being
displayed on the screen. Consequently, the first line of the imageLoadComplete() method reads the bitmapData
property of the loaded Bitmap instance (event.target.content.bitmapData) and stores it in the instance
variable named textureMap, which, as described in the following section, is used as a source of the image data to
create the animation of the rotating moon.
Creating animation by copying pixels
A basic definition of animation is the illusion of motion, or change, created by changing an image over time. In this
sample, the goal is to create the illusion of a spherical moon rotating around its vertical axis. However, for the
purposes of the animation, you can ignore the spherical distortion aspect of the sample. Consider the actual image
that’s loaded and used as the source of the moon image data:

ADOBE FLEX 3
Developer Guide
389
As you can see, the image is not one or several spheres; it’s a rectangular photograph of the surface of the moon.
Because the photo was taken exactly at the moon’s equator, the parts of the image that are closer to the top and
bottom of the image are stretched and distorted. To remove the distortion from the image and make it appear
spherical, we will use a displacement map filter, as described later. However, because this source image is a rectangle,
to create the illusion that the sphere is rotating, the code simply needs to slide the moon surface photo horizontally,
as described in the following paragraphs.
Notice that the image actually contains two copies of the moon surface photograph next to each other. This image is
the source image from which image data is copied repeatedly to create the appearance of motion. By having two
copies of the image next to each other, a continuous, uninterrupted scrolling effect can more easily be created. Let’s
walk through the process of the animation step-by-step to see how this works.
The process actually involves two separate ActionScript objects. First, there is the loaded source image, which in the
code is represented by the BitmapData instance named textureMap. As described previously, textureMap is
populated with image data as soon as the external image loads, using this code:
textureMap = event.target.content.bitmapData;
The content of textureMap is the image shown previously. In addition, to create the animated rotation, the sample
uses a Bitmap instance named sphere, which is the actual display object that shows the moon image onscreen. Like
textureMap, the sphere object is created and populated with its initial image data in the imageLoadComplete()
method, using the following code:
sphere = new Bitmap();
sphere.bitmapData = new BitmapData(textureMap.width / 2, textureMap.height);
sphere.bitmapData.copyPixels(textureMap,
new Rectangle(0, 0, sphere.width, sphere.height),
new Point(0, 0));
As the code shows, sphere is instantiated. Its bitmapData property (the raw image data that is displayed by sphere)
is created with the same height and half the width of textureMap. In other words, the content of sphere will be the
size of one moon photo (since the textureMap image contains two moon photos side-by-side). Next the
bitmapData property is filled with image data using its copyPixels() method. The parameters in the
copyPixels() method call indicate several things:
•The first parameter indicates that the image data is copied from textureMap.
•The second parameter, a new Rectangle instance, specifies from which part of textureMap the image snapshot
should be taken; in this case the snapshot is a rectangle starting from the top left corner of textureMap (indicated
by the first two Rectangle() parameters: 0, 0) and the rectangle snapshot’s width and height match the width and
height properties of sphere.
•The third parameter, a new Point instance with x and y values of 0, defines the destination of the pixel data—in
this case, the top-left corner (0, 0) of sphere.bitmapData.
Represented visually, the code copies the pixels from textureMap outlined in the following image and pastes them
onto sphere. In other words, the BitmapData content of sphere is the portion of textureMap highlighted here:

ADOBE FLEX 3
Developer Guide
390
Remember, however, that this is just the initial state of sphere—the first image content that’s copied onto sphere.
With the source image loaded and sphere created, the final task performed by the imageLoadComplete() method
is to set up the animation. The animation is driven by a Timer instance named rotationTimer, which is created and
started by the following code:
var rotationTimer:Timer = new Timer(15);
rotationTimer.addEventListener(TimerEvent.TIMER, rotateMoon);
rotationTimer.start();
The code first creates the Timer instance named rotationTimer; the parameter passed to the Timer() constructor
indicates that rotationTimer should trigger its timer event every 15 milliseconds. Next, the
addEventListener() method is called, specifying that when the timer event (TimerEvent.TIMER) occurs, the
method rotateMoon() is called. Finally, the timer is actually started by calling its start() method.
Because of the way rotationTimer is defined, approximately every 15 milliseconds Flash Player calls the
rotateMoon() method in the MoonSphere class, which is where the animation of the moon happens. The source
code of the rotateMoon() method is as follows:
private function rotateMoon(event:TimerEvent):void
{
sourceX += 1;
if (sourceX > textureMap.width / 2)
{
sourceX = 0;
}
sphere.bitmapData.copyPixels(textureMap,
new Rectangle(sourceX, 0, sphere.width, sphere.height),
new Point(0, 0));
event.updateAfterEvent();
}
The code does three things:
1The value of the variable sourceX (initially set to 0) increments by 1.
sourceX += 1;
As you’ll see, sourceX is used to determine the location in textureMap from which the pixels will be copied
onto sphere, so this code has the effect of moving the rectangle one pixel to the right on textureMap. Going
back to the visual representation, after several cycles of animation the source rectangle will have moved several
pixels to the right, like this:
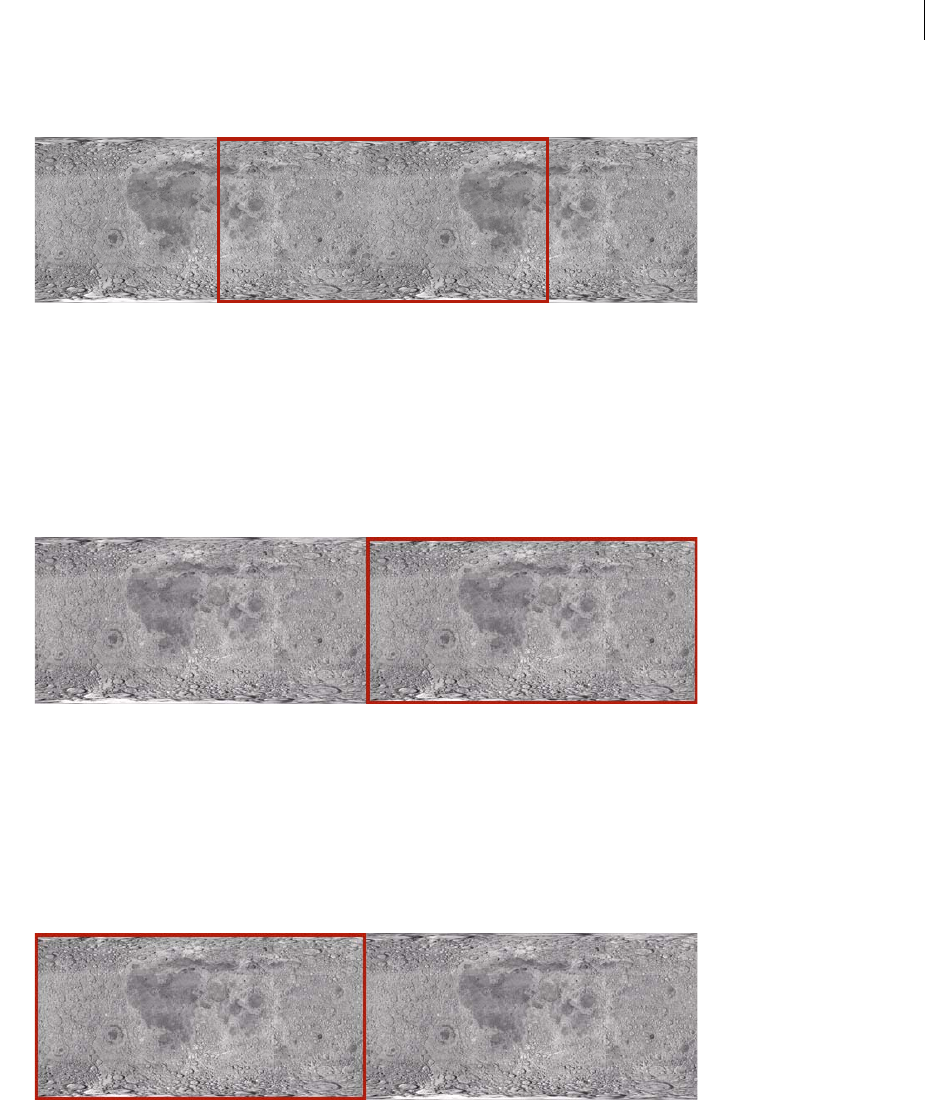
ADOBE FLEX 3
Developer Guide
391
After several more cycles, the rectangle will have moved even farther:
This gradual, steady shift in the location from which the pixels are copied is the key to the animation. By slowly
and continuously moving the source location to the right, the image that is displayed on the screen in sphere
appears to continuously slide to the left. This is the reason why the source image (textureMap) needs to have
two copies of the moon surface photo. Because the rectangle is continually moving to the right, most of the time
it is not over one single moon photo but rather overlaps the two moon photos.
2With the source rectangle slowly moving to the right, there is one problem. Eventually the rectangle will reach
the right edge of textureMap and it will run out of moon photo pixels to copy onto sphere:
The next lines of code address this issue:
if (sourceX >= textureMap.width / 2)
{
sourceX = 0;
}
The code checks if sourceX (the left edge of the rectangle) has reached the middle of textureMap. If so, it resets
sourceX back to 0, moving it back to the left edge of textureMap and starting the cycle over again:
3With the appropriate sourceX value calculated, the final step in creating the animation is to actually copy the
new source rectangle pixels onto sphere. The code that does this is very similar to the code that initially populated
sphere (described previously); the only difference is that in this case, in the new Rectangle() constructor call, the
left edge of the rectangle is placed at sourceX:
sphere.bitmapData.copyPixels(textureMap,
new Rectangle(sourceX, 0, sphere.width, sphere.height),
new Point(0, 0));

ADOBE FLEX 3
Developer Guide
392
Remember that this code is called repeatedly, every 15 milliseconds. As the source rectangle’s location is continu-
ously shifted, and the pixels are copied onto sphere, the appearance on the screen is that the moon photo image
represented by sphere continuously slides. In other words, the moon appears to rotate continuously.
Creating the spherical appearance
The moon, of course, is a sphere and not a rectangle. Consequently, the sample needs to take the rectangular moon
surface photo, as it continuously animates, and convert it into a sphere. This involves two separate steps: a mask is
used to hide all the content except for a circular region of the moon surface photo, and a displacement map filter is
used to distort the appearance of the moon photo to make it look three-dimensional.
First, a circle-shaped mask is used to hide all the content of the MoonSphere object except for the sphere created by
the filter. The following code creates the mask as a Shape instance and applies it as the mask of the MoonSphere
instance:
moonMask = new Shape();
moonMask.graphics.beginFill(0);
moonMask.graphics.drawCircle(0, 0, radius);
this.addChild(moonMask);
this.mask = moonMask;
Note that since MoonSphere is a display object (it is based on the Sprite class), the mask can be applied directly to
the MoonSphere instance using its inherited mask property.
Simply hiding parts of the photo using a circle-shaped mask isn’t enough to create a realistic-looking rotating-sphere
effect. Because of the way the photo of the moon’s surface was taken, its dimensions aren’t proportional; the portions
of the image that are more toward the top or bottom of the image are more distorted and stretched compared to the
portions in the equator. To distort the appearance of the moon photo to make it look three-dimensional, we’ll use a
displacement map filter.
A displacement map filter is a type of filter that is used to distort an image. In this case, the moon photo will be
“distorted” to make it look more realistic, by squeezing the top and bottom of the image horizontally, while leaving
the middle unchanged. Assuming the filter operates on a square-shaped portion of the photo, squeezing the top and
bottom but not the middle will turn the square into a circle. A side effect of animating this distorted image is that the
middle of the image seems to move farther in actual pixel distance than the areas close to the top and bottom, which
creates the illusion that the circle is actually a three-dimensional object (a sphere).

ADOBE FLEX 3
Developer Guide
393
The following code is used to create the displacement map filter, named displaceFilter:
var displaceFilter:DisplacementMapFilter;
displaceFilter = new DisplacementMapFilter(fisheyeLens,
new Point(radius, 0),
BitmapDataChannel.RED,
BitmapDataChannel.GREEN,
radius, 0);
The first parameter, fisheyeLens, is known as the map image; in this case it is a BitmapData object that is created
programmatically. The creation of that image is described below in the section “Creating a bitmap image by setting
pixel values” on page 394. The other parameters describe the position in the filtered image at which the filter should
be applied, which color channels will be used to control the displacement effect, and to what extent they will affect
the displacement. Once the displacement map filter is created, it is applied to sphere, still within the
imageLoadComplete() method:
sphere.filters = [displaceFilter];
The final image, with mask and displacement map filter applied, looks like this:
With every cycle of the rotating moon animation, the BitmapData content of sphere is overwritten by a new snapshot
of the source image data. However, the filter does not need to be re-applied each time. This is because the filter is
applied to the Bitmap instance (the display object) rather than to the bitmap data (the raw pixel information).
Remember, the Bitmap instance is not the actual bitmap data; it is a display object that displays the bitmap data on
the screen. To use an analogy, a Bitmap instance is like the slide projector that is used to display photographic slides
on a screen, and a BitmapData object is like the actual photographic slide that can be presented through a slide
projecter. A filter can be applied directly to a BitmapData object, which would be comparable to drawing directly
onto a photographic slide to alter the image. A filter can also be applied to any display object, including a Bitmap
instance; this would be like placing a filter in front of the slide projector’s lens to distort the output shown on the
screen (without altering the original slide at all). Because the raw bitmap data is accessible through a Bitmap
instance’s bitmapData property, the filter could have been applied directly to the raw bitmap data. However, in this
case, it makes sense to apply the filter to the Bitmap display object rather than to the bitmap data.
For detailed information about using the displacement map filter in ActionScript, see “Filtering display objects” on
page 318.

ADOBE FLEX 3
Developer Guide
394
Creating a bitmap image by setting pixel values
One important aspect of a displacement map filter is that it actually involves two images. One image, the source
image, is the image that is actually altered by the filter. In this sample, the source image is the Bitmap instance named
sphere. The other image used by the filter is known as the map image. The map image is not actually displayed on
the screen. Instead, the color of each of its pixels is used as an input to the displacement function—the color of the
pixel at a certain x, y coordinate in the map image determines how much displacement (physical shift in position) is
applied to the pixel at that x, y coordinate in the source image.
Consequently, to use the displacement map filter to create a sphere effect, the sample needs the appropriate map
image—one that has a gray background and a circle that’s filled with a gradient of a single color (red) going horizon-
tally from dark to light, as shown here:
Because only one map image and filter are used in this sample, the map image is only created once, in the
imageLoadComplete() method (in other words, when the external image finishes loading). The map image, named
fisheyeLens, is created by calling the MoonSphere class’s createFisheyeMap() method:
var fisheyeLens:BitmapData = createFisheyeMap(radius);
Inside the createFisheyeMap() method, the map image is actually drawn one pixel at a time using the BitmapData
class’s setPixel() method. The complete code for the createFisheyeMap() method is listed here, followed by a
step-by-step discussion of how it works:
private function createFisheyeMap(radius:int):BitmapData
{
var diameter:int = 2 * radius;
var result:BitmapData = new BitmapData(diameter,
diameter,
false,
0x808080);
// Loop through the pixels in the image one by one
for (var i:int = 0; i < diameter; i++)
{
for (var j:int = 0; j < diameter; j++)
{
// Calculate the x and y distances of this pixel from
// the center of the circle (as a percentage of the radius).
var pctX:Number = (i - radius) / radius;
var pctY:Number = (j - radius) / radius;
// Calculate the linear distance of this pixel from
// the center of the circle (as a percentage of the radius).
var pctDistance:Number = Math.sqrt(pctX * pctX + pctY * pctY);
// If the current pixel is inside the circle,
// set its color.

ADOBE FLEX 3
Developer Guide
395
if (pctDistance < 1)
{
// Calculate the appropriate color depending on the
// distance of this pixel from the center of the circle.
var red:int;
var green:int;
var blue:int;
var rgb:uint;
red = 128 * (1 + 0.75 * pctX * pctX * pctX / (1 - pctY * pctY));
green = 0;
blue = 0;
rgb = (red << 16 | green << 8 | blue);
// Set the pixel to the calculated color.
result.setPixel(i, j, rgb);
}
}
}
return result;
}
First, when the method is called it receives a parameter, radius, indicating the radius of the circle-shaped image to
create. Next, the code creates the BitmapData object on which the circle will be drawn. That object, named result,
is eventually passed back as the return value of the method. As shown in the following code snippet, the result
BitmapData instance is created with a width and height as big as the diameter of the circle, without transparency
(false for the third parameter), and pre-filled with the color 0x808080 (middle gray):
var result:BitmapData = new BitmapData(diameter,
diameter,
false,
0x808080);
Next, the code uses two loops to iterate over each pixel of the image. The outer loop goes through each column of
the image from left to right (using the variable i to represent the horizontal position of the pixel currently being
manipulated), while the inner loop goes through each pixel of the current column from top to bottom (with the
variable j representing the vertical position of the current pixel). The code for the loops (with the inner loop’s
contents omitted) is shown here:
for (var i:int = 0; i < diameter; i++)
{
for (var j:int = 0; j < diameter; j++)
{
...
}
}
As the loops cycle through the pixels one by one, at each pixel a value (the color value of that pixel in the map image)
is calculated. This process involves four steps:
1The code calculates the distance of the current pixel from the center of the circle along the x axis (i - radius).
That value is divided by the radius to make it a percentage of the radius rather than an absolute distance ((i -
radius) / radius). That percentage value is stored in a variable named pctX, and the equivalent value for the y
axis is calculated and stored in the variable pctY, as shown in this code:
var pctX:Number = (i - radius) / radius;
var pctY:Number = (j - radius) / radius;

ADOBE FLEX 3
Developer Guide
396
2Using a standard trigonometric formula, the Pythagorean theorem, the linear distance between the center of the
circle and the current point is calculated from pctX and pctY. That value is stored in a variable named pctDistance,
as shown here:
var pctDistance:Number = Math.sqrt(pctX * pctX + pctY * pctY);
3Next, the code checks whether the distance percentage is less than 1 (meaning 100% of the radius, or in other
words, if the pixel being considered is within the radius of the cicle). If the pixel falls inside the circle, it is assigned
a calculated color value (omitted here, but described in step 4); if not, nothing further happens with that pixel so its
color is left as the default middle gray:
if (pctDistance < 1)
{
...
}
4For those pixels that fall inside the circle, a color value is calculated for the pixel. The final color will be a shade
of red ranging from black (0% red) at the left edge of the circle to bright (100%) red at the right edge of the circle.
The color value is initially calculated in three parts (red, green, and blue), as shown here:
red = 128 * (1 + 0.75 * pctX * pctX * pctX / (1 - pctY * pctY));
green = 0;
blue = 0;
Notice that only the red portion of the color (the variable red) actually has a value. The green and blue values
(the variables green and blue) are shown here for clarity, but could be omitted. Since the purpose of this method
is to create a circle that contains a red gradient, no green or blue values are needed.
Once the three individual color values are determined, they are combined into a single integer color value using
a standard bit-shifting algorithm, shown in this code:
rgb = (red << 16 | green << 8 | blue);
Finally, with the color value calculated, that value is actually assigned to the current pixel using the setPixel()
method of the result BitmapData object, shown here:
result.setPixel(i, j, rgb);

397
Chapter 20: Working with video
Flash® video is one of the standout technologies on the Internet. However, the traditional presentation of video—in
a rectangular screen with a progress bar and some control buttons underneath—is only one possible use of video in
a Flash application. Through ActionScript™, you have fine-tuned access to and control over video loading, presen-
tation, and playback.
Contents
Basics of video . . . . . . . . . . . . . . . . . . . . . . . . . . . . . . . . . . . . . . . . . . . . . . . . . . . . . . . . . . . . . . . . . . . . . . . . . . . . . . . . . . . 397
Understanding the Flash Video (FLV) format . . . . . . . . . . . . . . . . . . . . . . . . . . . . . . . . . . . . . . . . . . . . . . . . . . . . . . . . 398
Understanding the Video class . . . . . . . . . . . . . . . . . . . . . . . . . . . . . . . . . . . . . . . . . . . . . . . . . . . . . . . . . . . . . . . . . . . . . 399
Loading video files . . . . . . . . . . . . . . . . . . . . . . . . . . . . . . . . . . . . . . . . . . . . . . . . . . . . . . . . . . . . . . . . . . . . . . . . . . . . . . . 400
Controlling video playback . . . . . . . . . . . . . . . . . . . . . . . . . . . . . . . . . . . . . . . . . . . . . . . . . . . . . . . . . . . . . . . . . . . . . . . . 400
Streaming video files. . . . . . . . . . . . . . . . . . . . . . . . . . . . . . . . . . . . . . . . . . . . . . . . . . . . . . . . . . . . . . . . . . . . . . . . . . . . . . 402
Understanding cue points . . . . . . . . . . . . . . . . . . . . . . . . . . . . . . . . . . . . . . . . . . . . . . . . . . . . . . . . . . . . . . . . . . . . . . . . . 402
Writing callback methods for onCuePoint and onMetaData . . . . . . . . . . . . . . . . . . . . . . . . . . . . . . . . . . . . . . . . . . . . 403
Using cue points . . . . . . . . . . . . . . . . . . . . . . . . . . . . . . . . . . . . . . . . . . . . . . . . . . . . . . . . . . . . . . . . . . . . . . . . . . . . . . . . . 408
Using video metadata. . . . . . . . . . . . . . . . . . . . . . . . . . . . . . . . . . . . . . . . . . . . . . . . . . . . . . . . . . . . . . . . . . . . . . . . . . . . . 408
Capturing camera input . . . . . . . . . . . . . . . . . . . . . . . . . . . . . . . . . . . . . . . . . . . . . . . . . . . . . . . . . . . . . . . . . . . . . . . . . . . 411
Advanced topics . . . . . . . . . . . . . . . . . . . . . . . . . . . . . . . . . . . . . . . . . . . . . . . . . . . . . . . . . . . . . . . . . . . . . . . . . . . . . . . . . 417
Example: Video Jukebox . . . . . . . . . . . . . . . . . . . . . . . . . . . . . . . . . . . . . . . . . . . . . . . . . . . . . . . . . . . . . . . . . . . . . . . . . . 418
Basics of video
Introduction to working with video
One important capability of Adobe® Flash® Player is the ability to display and manipulate video information with
ActionScript in the same way that you can manipulate other visual content such as images, animation, text, and so
on.
When you create a Flash Video (FLV) file in Adobe Flash CS3 Professional, you have the option to select a skin for
your video including common playback controls. However, there is no reason you need to limit yourself to the
options available. Using ActionScript, you have fine-tuned control over loading, displaying, and controlling playback
of video—meaning you could create your own video player skin, or use your video in any less traditional way that
you want.
Working with video in ActionScript involves working with a combination of several classes:
•Video class: The actual video content box on the Stage is an instance of the Video class. The Video class is a
display object, so it can be manipulated using the same techniques that can be applied to other display objects, such
as positioning, applying transformations, applying filters and blending modes, and so forth.
•NetStream class: When you’re loading a video file to be controlled by ActionScript, a NetStream instance is used
to represent the source of the video content—in this case, a stream of video data. Using a NetStream instance also
involves using a NetConnection object, which is the connection to the video file—like the tunnel that the video data
is fed through.

ADOBE FLEX 3
Developer Guide
398
•Camera class: When you’re working with video data from a camera connected to the user’s computer, a Camera
instance represents the source of the video content—the user’s camera and the video data it makes available.
When you’re loading external video, you can load the file from a standard web server for progressive download
playback, or you can work with streaming video delivered by a specialized server such as Adobe’s Macromedia®
Flash® Media Server.
Common video tasks
This chapter describes the following video-related tasks that you will likely want to perform:
•Displaying and controlling video on the screen
•Loading external FLV files
•Handling metadata and cue point information in a video file
•Capturing and displaying video input from a user’s camera
Important concepts and terms
•Cue point: A marker that can be placed at a specific moment in time in a video file, for example to act like a
bookmark for locating that point in time, or to provide additional data that is associated with that moment in time.
•Encoding: The process of taking video data in one format and converting it to another video data format; for
example, taking a high resolution source video and converting it to a format that’s suitable for Internet delivery.
•Frame: A single segment of video information; each frame is like a still image representing a snapshot of a
moment in time. By playing frames in sequence at high speed, the illusion of motion is created.
•Keyframe: A video frame which contains the full information for the frame. Other frames that follow a keyframe
only contain information about how they differ from the keyframe, rather than containing the full frame’s worth of
information.
•Metadata: Information about a video file that can be embedded within the video file and retrieved when the
video has loaded.
•Progressive download: When a video file is delivered from a standard web server, the video data is loaded using
progressive download, meaning the video information loads in sequence. This has the benefit that the video can
begin playing before the entire file is downloaded; however, it prevents you from jumping ahead to a part of the video
that hasn’t loaded.
•Streaming: As an alternative to progressive download, a special video server can be used to deliver video over
the Internet using a technique known as streaming (sometimes called “true streaming”). With streaming, the
viewer’s computer never downloads the entire video at one time. To speed up download times, at any moment the
computer only needs a portion of the total video information. Because a special server controls the delivery of the
video content, any part of the video can be accessed at any time, rather than needing to wait for it to download before
accessing it.
Understanding the Flash Video (FLV) format
The FLV file format contains encoded audio and video data for delivery by using Flash Player. For example, if you
have a QuickTime or Windows Media video file, you use an encoder (such as Flash Video Encoder, or Sorenson™
Squeeze) to convert that file to an FLV file.

ADOBE FLEX 3
Developer Guide
399
You can create FLV files by importing video into the Flash authoring tool and exporting it as an FLV file. You can use
the FLV Export plug-in to export FLV files from supported video-editing applications.
Using external FLV files provides certain capabilities that are not available when you use imported video:
•Longer video clips can be used in your Flash documents without slowing down playback. External FLV files play
using cached memory, which means that large files are stored in small pieces and accessed dynamically, requiring
less memory than embedded video files.
•An external FLV file can have a different frame rate than the Flash document in which it plays. For example, you
can set the Flash document frame rate to 30 frames per second (fps) and the video frame rate to 21 fps. This setting
gives you better control of the video than embedded video, to ensure smooth video playback. It also allows you to
play FLV files at different frame rates without the need to alter existing Flash content.
•With external FLV files, Flash document playback does not have to be interrupted while the video file is loading.
Imported video files can sometimes interrupt document playback to perform certain functions, such as accessing a
CD-ROM drive. FLV files can perform functions independently of the Flash document, which does not interrupt
playback.
•Captioning video content is easier with external FLV files because you can access the video’s metadata using
event handlers.
To load FLV files from a web server, you might need to register the file extension and MIME type with your web
server; check your web server documentation. The MIME type for FLV files is video/x-flv. For more infor-
mation, see “About configuring FLV files for hosting on a server” on page 417.
Understanding the Video class
The Video class enables you to display live streaming video in an application without embedding it in your SWF file.
You can capture and play live video using the Camera.getCamera() method. You can also use the Video class to
play back FLV files over HTTP or from the local file system. There are several different ways to use Video in your
projects:
•Load an FLV dynamically using the NetConnection and NetStream classes and display the video in a Video
object.
•Capture input from the user’s camera.
•Use the VideoDisplay control.
Note: Instances of a Video object on the Stage are instances of the Video class.
Even though the Video class is in the flash.media package, it inherits from the flash.display.DisplayObject class,
therefore all display object functionality (such as matrix transformations and filters) also applies to Video instances.
For more information see “Manipulating display objects” on page 265, “Working with geometry” on page 307, and
“Filtering display objects” on page 318.

ADOBE FLEX 3
Developer Guide
400
Loading video files
Loading videos using the NetStream and NetConnection classes is a multistep process:
1The first step is to create a NetConnection object. The NetConnection class lets you play streaming FLV files
from either an HTTP address or a local drive by passing the value null to the connect() method, if you are
connecting to a local FLV file that is not using a server such as Adobe's Flash Media Server 2 or Adobe Flex.
var nc:NetConnection = new NetConnection();
nc.connect(null);
2The second step is to create a NetStream object which takes a NetConnection object as a parameter and specify
which FLV file you want to load. The following snippet connects a NetStream object to the specified NetConnection
instance and loads an FLV named video.flv in the same directory as the SWF file:
var ns:NetStream = new NetStream(nc);
ns.addEventListener(AsyncErrorEvent.ASYNC_ERROR, asyncErrorHandler);
ns.play("video.flv");
function asyncErrorHandler(event:AsyncErrorEvent):void
{
// ignore error
}
3The third step is to create a new Video object and attach the previously created NetStream object using the Video
class’s attachNetStream() method. Then you can add the video object to the display list using the addChild()
method, as seen in the following snippet:
var vid:Video = new Video();
vid.attachNetStream(ns);
addChild(vid);
After entering the previous code, Flash Player will attempt to load the video.flv video file in the same directory as
your SWF file.
To load FLV files from a web server, you might need to register the file extension and MIME type with your web
server; check your web server documentation. The MIME type for FLV files is video/x-flv. For more information,
see “About configuring FLV files for hosting on a server” on page 417.
Controlling video playback
The NetStream class offers four main methods for controlling video playback:
pause(): Pauses playback of a video stream. If the video is already paused, calling this method does nothing.
resume(): Resumes playback of a video stream that is paused. If the video is already playing, calling this method
does nothing.
seek(): Seeks the keyframe closest to the specified location (an offset, in seconds, from the beginning of the
stream).
togglePause(): Pauses or resumes playback of a stream.
Note: There is no stop() method. In order to stop a stream you must pause playback and seek to the beginning of the
video stream.
Note: The play() method does not resume playback, it is used for loading video files.

ADOBE FLEX 3
Developer Guide
401
The following example demonstrates how to control a video using several different buttons. To run the following
example, create a new document and add four button instances to your workspace (pauseBtn, playBtn, stopBtn,
and togglePauseBtn):
var nc:NetConnection = new NetConnection();
nc.connect(null);
var ns:NetStream = new NetStream(nc);
ns.addEventListener(AsyncErrorEvent.ASYNC_ERROR, asyncErrorHandler);
ns.play("video.flv");
function asyncErrorHandler(event:AsyncErrorEvent):void
{
// ignore error
}
var vid:Video = new Video();
vid.attachNetStream(ns);
addChild(vid);
pauseBtn.addEventListener(MouseEvent.CLICK, pauseHandler);
playBtn.addEventListener(MouseEvent.CLICK, playHandler);
stopBtn.addEventListener(MouseEvent.CLICK, stopHandler);
togglePauseBtn.addEventListener(MouseEvent.CLICK, togglePauseHandler);
function pauseHandler(event:MouseEvent):void
{
ns.pause();
}
function playHandler(event:MouseEvent):void
{
ns.resume();
}
function stopHandler(event:MouseEvent):void
{
// Pause the stream and move the playhead back to
// the beginning of the stream.
ns.pause();
ns.seek(0);
}
function togglePauseHandler(event:MouseEvent):void
{
ns.togglePause();
}
Clicking on the pauseBtn button instance while the video is playing causes the video file to pause. If the video is
already paused, clicking this button has no effect. Clicking on the playBtn button instance resumes video playback
if playback was previously paused, otherwise the button has no effect if the video was already playing.
Detecting the end of a video stream
In order to listen for the beginning and end of a video stream, you need to add an event listener to the NetStream
instance to listen for the netStatus event. The following code demonstrates how to listen for the various codes
throughout the video’s playback:
ns.addEventListener(NetStatusEvent.NET_STATUS, statusHandler);
function statusHandler(event:NetStatusEvent):void
{
trace(event.info.code)
}

ADOBE FLEX 3
Developer Guide
402
The previous code generates the following output:
NetStream.Play.Start
NetStream.Buffer.Empty
NetStream.Buffer.Full
NetStream.Buffer.Empty
NetStream.Buffer.Full
NetStream.Buffer.Empty
NetStream.Buffer.Full
NetStream.Buffer.Flush
NetStream.Play.Stop
NetStream.Buffer.Empty
NetStream.Buffer.Flush
The two codes that you want to specifically listen for are “NetStream.Play.Start” and “NetStream.Play.Stop” which
signal the beginning and end of the video’s playback. The following snippet uses a switch statement to filter these two
codes and trace a message:
function statusHandler(event:NetStatusEvent):void
{
switch (event.info.code)
{
case "NetStream.Play.Start":
trace("Start [" + ns.time.toFixed(3) + " seconds]");
break;
case "NetStream.Play.Stop":
trace("Stop [" + ns.time.toFixed(3) + " seconds]");
break;
}
}
By listening for the netStatus event (NetStatusEvent.NET_STATUS), you can build a video player which loads the
next video in a playlist once the current video has finished playing.
Streaming video files
To stream files from Flash Media Server, you can use the NetConnection and NetStream classes to connect to a
remote server instance and play a specified stream. To specify a Real-Time Messaging Protocol (RTMP) server, you
pass the desired RTMP URL, such as “rtmp://localhost/appName/appInstance”, to the NetConnection.connect()
method instead of passing null. To play a specific live or recorded stream from the specified Flash Media Server,
you pass an identifying name for live data published by NetStream.publish(), or a recorded filename for playback
to the NetStream.play() method. For more information, see the Flash Media Server documentation.
Understanding cue points
Not all FLV files contain cue points. Cue points are typically embedded in an FLV file during FLV encoding, although
tools exist for embedding cue points in existing FLV files.
You can use several different kinds of cue points with Flash Video. You can use ActionScript to interact with cue
points that you embed in an FLV file (when you create the FLV file), or that you create by using ActionScript.

ADOBE FLEX 3
Developer Guide
403
•Navigation cue points: You embed navigation cue points in the FLV stream and FLV metadata packet when you
encode the FLV file. You use navigation cue points to let users seek to a specified part of a file.
•Event cue points: You embed event cue points in the FLV stream and FLV metadata packet when you encode the
FLV file. You can write code to handle the events that are triggered at specified points during FLV playback.
•ActionScript cue points: External cue points that you create by using ActionScript code. You can write code to
trigger these cue points in relation to the video's playback. These cue points are less accurate than embedded cue
points (up to a tenth of a second), because the video player tracks them separately.
Navigation cue points create a keyframe at the specified cue point location, so you can use code to move a video
player's playhead to that location. You can set particular points in an FLV file where you might want users to seek.
For example, your video might have multiple chapters or segments, and you can control the video by embedding
navigation cue points in the video file.
If you plan to create an application in which you want users to navigate to a cue point, you should create and embed
cue points when you encode the file instead of using ActionScript cue points. You should embed the cue points in
the FLV file, because they are more accurate to work with. For more information on encoding FLV files with cue
points, see “Embed cue points” in Using Flash.
You can access cue point parameters by writing ActionScript. Cue point parameters are a part of the event object
received from the onCuePoint callback handler.
To trigger certain actions in your code when a video reaches a specific cue point, you use the
NetStream.onCuePoint event handler. For more information, see “Writing callback methods for onCuePoint and
onMetaData” on page 403.
Writing callback methods for onCuePoint and
onMetaData
You can trigger actions in your application when specific cue points are reached or specific metadata is received by
the player. To trigger such actions, you use the onCuePoint and onMetaData event handlers. You must write
callback methods for these handlers, or Flash Player may throw errors. For example, the following code plays an FLV
file named video.flv in the same folder as your SWF document:
var nc:NetConnection = new NetConnection();
nc.connect(null);
var ns:NetStream = new NetStream(nc);
ns.addEventListener(AsyncErrorEvent.ASYNC_ERROR, asyncErrorHandler);
ns.play("video.flv");
function asyncErrorHandler(event:AsyncErrorEvent):void
{
trace(event.text);
}
var vid:Video = new Video();
vid.attachNetStream(ns);
addChild(vid);

ADOBE FLEX 3
Developer Guide
404
The previous code loads a local FLV file named video.flv and listens for the asyncError
(AsyncErrorEvent.ASYNC_ERROR) to be dispatched. This event is dispatched when an exception is thrown from
native asynchronous code. In this case, it is dispatched when an FLV contains metadata or cue point information,
and the appropriate listeners have not been defined. The previous code handles the asyncError event and ignores
the error if you are not interested in the video file’s metadata or cue point information. If you had an FLV with
metadata and several cue points, the following information would be traced:
Error #2095: flash.net.NetStream was unable to invoke callback onMetaData.
Error #2095: flash.net.NetStream was unable to invoke callback onCuePoint.
Error #2095: flash.net.NetStream was unable to invoke callback onCuePoint.
Error #2095: flash.net.NetStream was unable to invoke callback onCuePoint.
The error occurs because the NetStream object was unable to find an onMetaData or onCuePoint callback method.
There are several ways to define these callback methods within your applications:
•Set the NetStream object’s client property to an Object
•Create a custom class and define methods to handle the callback methods
•Extend the NetStream class and add methods to handle the callback methods
•Extend the NetStream class and make it dynamic
•Set the NetStream object’s client property to this
Set the NetStream object’s client property to an Object
By setting the client property to either an Object or a subclass of NetStream, you can reroute the onMetaData and
onCuePoint callback methods or ignore them completely. The following example demonstrates how you can use an
empty Object to ignore the callback methods without listening for the asyncError event:
var nc:NetConnection = new NetConnection();
nc.connect(null);
var customClient:Object = new Object();
var ns:NetStream = new NetStream(nc);
ns.client = customClient;
ns.play("video.flv");
var vid:Video = new Video();
vid.attachNetStream(ns);
addChild(vid);
If you wanted to listen for either the onMetaData or onCuePoint callback methods, you would need to define
methods to handle those callback methods, as shown in the following snippet:
var customClient:Object = new Object();
customClient.onMetaData = metaDataHandler;
function metaDataHandler(infoObject:Object):void
{
trace("metadata");
}
The previous code listens for the onMetaData callback method and calls the metaDataHandler() method, which
traces a string. If Flash Player encountered a cue point, no errors would be generated even though no onCuePoint
callback method is defined.

ADOBE FLEX 3
Developer Guide
405
Create a custom class and define methods to handle the callback methods
The following code sets the NetStream object’s client property to a custom class, CustomClient, which defines
handlers for the callback methods:
var nc:NetConnection = new NetConnection();
nc.connect(null);
var ns:NetStream = new NetStream(nc);
ns.client = new CustomClient();
ns.play("video.flv");
var vid:Video = new Video();
vid.attachNetStream(ns);
addChild(vid);
The CustomClient class is as follows:
package
{
public class CustomClient
{
public function onMetaData(infoObject:Object):void
{
trace("metadata");
}
}
}
The CustomClient class defines a handler for the onMetaData callback handler. If a cue point was encountered and
the onCuePoint callback handler was called, an asyncError event (AsyncErrorEvent.ASYNC_ERROR) would be
dispatched saying “flash.net.NetStream was unable to invoke callback onCuePoint.” To prevent this error, you would
either need to define an onCuePoint callback method in your CustomClient class, or define an event handler for the
asyncError event.
Extend the NetStream class and add methods to handle the callback methods
The following code creates an instance of the CustomNetStream class, which is defined in a later code listing:
var ns:CustomNetStream = new CustomNetStream();
ns.play("video.flv");
var vid:Video = new Video();
vid.attachNetStream(ns);
addChild(vid);
The following code listing defines the CustomNetStream class that extends the NetStream class, handles the creation
of the necessary NetConnection object, and handles the onMetaData and onCuePoint callback handler methods:
package
{
import flash.net.NetConnection;
import flash.net.NetStream;
public class CustomNetStream extends NetStream
{
private var nc:NetConnection;
public function CustomNetStream()
{
nc = new NetConnection();
nc.connect(null);
super(nc);

ADOBE FLEX 3
Developer Guide
406
}
public function onMetaData(infoObject:Object):void
{
trace("metadata");
}
public function onCuePoint(infoObject:Object):void
{
trace("cue point");
}
}
}
If you want to rename the onMetaData() and onCuePoint() methods in the CustomNetStream class, you could use
the following code:
package
{
import flash.net.NetConnection;
import flash.net.NetStream;
public class CustomNetStream extends NetStream
{
private var nc:NetConnection;
public var onMetaData:Function;
public var onCuePoint:Function;
public function CustomNetStream()
{
onMetaData = metaDataHandler;
onCuePoint = cuePointHandler;
nc = new NetConnection();
nc.connect(null);
super(nc);
}
private function metaDataHandler(infoObject:Object):void
{
trace("metadata");
}
private function cuePointHandler(infoObject:Object):void
{
trace("cue point");
}
}
}
Extend the NetStream class and make it dynamic
You can extend the NetStream class and make the subclass dynamic so that onCuePoint and onMetaData callback
handlers can be added dynamically. This is demonstrated in the following listing:
var ns:DynamicCustomNetStream = new DynamicCustomNetStream();
ns.play("video.flv");
var vid:Video = new Video();
vid.attachNetStream(ns);
addChild(vid);
The DynamicCustomNetStream class is as follows:
package
{
import flash.net.NetConnection;
import flash.net.NetStream;

ADOBE FLEX 3
Developer Guide
407
public dynamic class DynamicCustomNetStream extends NetStream
{
private var nc:NetConnection;
public function DynamicCustomNetStream()
{
nc = new NetConnection();
nc.connect(null);
super(nc);
}
}
}
Even with no handlers for the onMetaData and onCuePoint callback handlers, no errors are thrown since the
DynamicCustomNetStream class is dynamic. If you want to define methods for the onMetaData and onCuePoint
callback handlers, you could use the following code:
var ns:DynamicCustomNetStream = new DynamicCustomNetStream();
ns.onMetaData = metaDataHandler;
ns.onCuePoint = cuePointHandler;
ns.play("http://www.helpexamples.com/flash/video/cuepoints.flv");
var vid:Video = new Video();
vid.attachNetStream(ns);
addChild(vid);
function metaDataHandler(infoObject:Object):void
{
trace("metadata");
}
function cuePointHandler(infoObject:Object):void
{
trace("cue point");
}
Set the NetStream object’s client property to this
By setting the client property to this, Flash Player looks in the current scope for onMetaData() and
onCuePoint() methods. You can see this in the following example:
var nc:NetConnection = new NetConnection();
nc.connect(null);
var ns:NetStream = new NetStream(nc);
ns.client = this;
ns.play("video.flv");
var vid:Video = new Video();
vid.attachNetStream(ns);
addChild(vid);
If the onMetaData or onCuePoint callback handlers are called and no methods exist to handle the callback, no
errors are generated. To handle these callback handlers, create an onMetaData() and onCuePoint() method in
your code, as seen in the following snippet:
function onMetaData(infoObject:Object):void
{
trace("metadata");
}

ADOBE FLEX 3
Developer Guide
408
function onCuePoint(infoObject:Object):void
{
trace("cue point");
}
Using cue points
The following example uses a simple for..in loop to iterate over each of the properties in the onCuePoint callback
handler’s infoObject parameter and trace a message when cue point data is received:
var nc:NetConnection = new NetConnection();
nc.connect(null);
var ns:NetStream = new NetStream(nc);
ns.client = this;
ns.play("video.flv");
var vid:Video = new Video();
vid.attachNetStream(ns);
addChild(vid);
function onCuePoint(infoObject:Object):void
{
var key:String;
for (key in infoObject)
{
trace(key + ": " + infoObject[key]);
}
}
The following output appears:
parameters:
name: point1
time: 0.418
type: navigation
This code used one of several techniques to set the object on which the callback method was invoked. You can use
other techniques; for more information, see Writing callback methods for onCuePoint and onMetaData.
Using video metadata
You can use the onMetaData callback handler to view the metadata information in your FLV file. Metadata includes
information about your FLV file, such as duration, width, height, and frame rate. The metadata information that is
added to your FLV file depends on the software you use to encode your FLV file or the software you use to add
metadata information.
var nc:NetConnection = new NetConnection();
nc.connect(null);
var ns:NetStream = new NetStream(nc);
ns.client = this;
ns.play("video.flv");
var vid:Video = new Video();

ADOBE FLEX 3
Developer Guide
409
vid.attachNetStream(ns);
addChild(vid);
function onMetaData(infoObject:Object):void
{
var key:String;
for (key in infoObject)
{
trace(key + ": " + infoObject[key]);
}
}
The previous code generates code similar to the following, assuming your FLV file contains cue points and audio:
width: 320
audiodelay: 0.038
canSeekToEnd: true
height: 213
cuePoints: ,,
audiodatarate: 96
duration: 16.334
videodatarate: 400
framerate: 15
videocodecid: 4
audiocodecid: 2
If your video does not have audio, the audio-related metadata information (such as audiodatarate) returns
undefined because no audio information is added to the metadata during encoding.
In the previous code, the cue point information was not displaying. In order to display the cue point metadata, you
can use the following function which recursively displays the items in an Object:
function traceObject(obj:Object, indent:uint = 0):void
{
var indentString:String = "";
var i:uint;
var prop:String;
var val:*;
for (i = 0; i < indent; i++)
{
indentString += "\t";
}
for (prop in obj)
{
val = obj[prop];
if (typeof(val) == "object")
{
trace(indentString + " " + j + ": [Object]");
traceObject(val, indent + 1);
}
else
{
trace(indentString + " " + prop + ": " + val);
}
}
}

ADOBE FLEX 3
Developer Guide
410
Using the previous code snippet to trace the infoObject parameter in the onMetaData() method creates the
following output:
width: 320
audiodatarate: 96
audiocodecid: 2
videocodecid: 4
videodatarate: 400
canSeekToEnd: true
duration: 16.334
audiodelay: 0.038
height: 213
framerate: 15
cuePoints: [Object]
0: [Object]
parameters: [Object]
lights: beginning
name: point1
time: 0.418
type: navigation
1: [Object]
parameters: [Object]
lights: middle
name: point2
time: 7.748
type: navigation
2: [Object]
parameters: [Object]
lights: end
name: point3
time: 16.02
type: navigation
Info objects for onMetaData
The following table shows the possible values for video metadata
:
Parameter Description
audiocodecid A number that indicates the audio codec (code/decode technique) that was used.
audiodatarate A number that indicates the rate at which audio was encoded, in kilobytes per second.
audiodelay A number that indicates what time in the FLV file "time 0" of the original FLV file exists. The video content needs
to be delayed by a small amount to properly synchronize the audio.
canSeekToEnd A Boolean value that is true if the FLV file is encoded with a keyframe on the last frame that allows seeking to
the end of a progressive download movie clip. It is false if the FLV file is not encoded with a keyframe on the
last frame.
cuePoints An array of objects, one for each cue point embedded in the FLV file. Value is undefined if the FLV file does not
contain any cue points. Each object has the following properties:
•type: a string that specifies the type of cue point as either "navigation" or "event".
•name: a string that is the name of the cue point.
•time: a number that is the time of the cue point in seconds with a precision of three decimal places (milli-
seconds).
•parameters: an optional object that has name-value pairs that are designated by the user when creating
the cue points.
duration A number that specifies the duration of the FLV file, in seconds.

ADOBE FLEX 3
Developer Guide
411
The following table shows the possible values for the videocodecid parameter:
The following table shows the possible values for the audiocodecid parameter:
Capturing camera input
In addition to external video files, a camera attached to a user’s computer can serve as a source of video data that you
can display and manipulate using ActionScript. The Camera class is the mechanism built into ActionScript for
working with a computer camera.
Understanding the Camera class
The Camera object allows you to connect to the user’s local camera and broadcast the video either locally (back to
the user) or remotely to a server (such as Flash Media Server).
Using the Camera class, you can access the following kinds of information about the user’s camera:
•Which cameras installed on the user’s computer are available to Flash Player
•Whether a camera is installed
•Whether Flash Player is allowed or denied access to the user’s camera
•Which camera is currently active
•The width and height of the video being captured
framerate A number that is the frame rate of the FLV file.
height A number that is the height of the FLV file, in pixels.
videocodecid A number that is the codec version that was used to encode the video.
videodatarate A number that is the video data rate of the FLV file.
width A number that is the width of the FLV file, in pixels.
videocodecid Codec name
2 Sorenson H.263
3 Screen video (SWF 7 and later only)
4 VP6 (SWF 8 and later only)
5 VP6 video with alpha channel (SWF 8 and later only)
audiocodecid Codec Name
0 uncompressed
1ADPCM
2mp3
5Nellymoser 8kHz mono
6Nellymoser
Parameter Description

ADOBE FLEX 3
Developer Guide
412
The Camera class includes several useful methods and properties for working with camera objects. For example, the
static Camera.names property contains an array of camera names currently installed on the user’s computer. You can
also use the name property to display the name of the currently active camera.
Displaying camera content on-screen
Connecting to a camera can require less code than using the NetConnection and NetStream classes to load an FLV.
The camera class can also quickly become tricky since you need a user’s permission to have Flash Player connect to
their camera before you can access it.
The following code demonstrates how you can use the Camera class to connect to a user’s local camera:
var cam:Camera = Camera.getCamera();
var vid:Video = new Video();
vid.attachCamera(cam);
addChild(vid);
Note: The Camera class does not have a constructor method. In order to create a new Camera instance you use the static
Camera.getCamera() method.
Designing your camera application
When writing an application that connects to a user’s camera, you need to account for the following in your code:
•Check if the user has a camera currently installed.
•Check if the user has explicitly allowed Flash Player to access their camera. For security reasons the player
displays the Flash Player Settings dialog which lets the user allow or deny access to their camera. This prevents Flash
Player from connecting to a user’s camera and broadcasting a video stream without their permission. If a user clicks
allow, your application can connect to the user’s camera. If the user clicks deny, your application will be unable to
access the user’s camera. Your applications should always handle both cases gracefully.
Connecting to a user’s camera
The first step when connecting to a user’s camera is to create a new camera instance by creating a variable of type
Camera and initializing it to the return value of the static Camera.getCamera() method.
The next step is to create a new video object and attach the Camera object to it.
The third step is to add the video object to the display list. You need to perform steps 2 and 3 because the Camera
class does not extend the DisplayObject class so it cannot be added directly to the display list. To display the camera’s
captured video, you create a new video object and call the attachCamera() method.
The following code shows these three steps:
var cam:Camera = Camera.getCamera();
var vid:Video = new Video();
vid.attachCamera(cam);
addChild(vid);
Note that if a user does not have a camera installed, Flash Player will not display anything.
In real life, you need to perform additional steps for your application. See Verifying that cameras are installed and
Detecting permissions for camera access for further information.

ADOBE FLEX 3
Developer Guide
413
Verifying that cameras are installed
Before you attempt to use any methods or properties on a camera instance, you’ll want to verify that the user has a
camera installed. There are two ways to check whether the user has a camera installed:
•Check the static Camera.names property which contains an array of camera names which are available. Typically
this array will have one or fewer strings, as most users will not likely have more than one camera installed at a time.
The following code demonstrates how you could check the Camera.names property to see if the user has any
available cameras:
if (Camera.names.length > 0)
{
trace("User has at least one camera installed.");
var cam:Camera = Camera.getCamera(); // Get default camera.
}
else
{
trace("User has no cameras installed.");
}
•Check the return value of the static Camera.getCamera() method. If no cameras are available or installed, this
method returns null, otherwise it returns a reference to a Camera object. The following code demonstrates how you
could check the Camera.getCamera() method to see if the user has any available cameras:
var cam:Camera = Camera.getCamera();
if (cam == null)
{
trace("User has no cameras installed.");
}
else
{
trace("User has at least 1 camera installed.");
}
Since the Camera class doesn’t extend the DisplayObject class, it cannot be directly added to the display list using the
addChild() method. In order to display the camera’s captured video, you need to create a new Video object and call
the attachCamera() method on the Video instance.
This snippet shows how you can attach the camera if one exists; if not, Flash Player simply displays nothing:
var cam:Camera = Camera.getCamera();
if (cam != null)
{
var vid:Video = new Video();
vid.attachCamera(cam);
addChild(vid);
}
Detecting permissions for camera access
Before the camera’s output can be displayed, the user must explicitly allow Flash Player to access the camera. When
the attachCamera() method gets called Flash Player displays the Flash Player Settings dialog box which prompts
the user to either allow or deny Flash Player access to the camera and microphone. If the user clicked the Allow
button, the camera’s output is displayed in the Video instance on the Stage. If the user clicked the Deny button, Flash
Player is unable to connect to the camera and the Video object will not display anything.

ADOBE FLEX 3
Developer Guide
414
If the user does not have a camera installed, Flash Player will display nothing. If the user does have a camera installed,
Flash Player will display the Flash Player Settings dialog which prompts the user to either allow or deny Flash Player
to access the Camera. If the user allows access to their camera the video will be displayed back to the user, otherwise
nothing will be displayed.
If you want to detect whether the user allowed or denied access to the camera, you can listen for the camera’s status
event (StatusEvent.STATUS), as seen in the following code:
var cam:Camera = Camera.getCamera();
if (cam != null)
{
cam.addEventListener(StatusEvent.STATUS, statusHandler);
var vid:Video = new Video();
vid.attachCamera(cam);
addChild(vid);
}
function statusHandler(event:StatusEvent):void
{
// This event gets dispatched when the user clicks the "Allow" or "Deny"
// button in the Flash Player Settings dialog box.
trace(event.code); // "Camera.Muted" or "Camera.Unmuted"
}
The statusHandler() function gets called as soon as the user clicks either Allow or Deny. You can detect which
button the user clicked, using one of two methods:
•The event parameter of the statusHandler() function contains a code property which contains the string
“Camera.Muted” or “Camera.Unmuted”. If the value is “Camera.Muted” the user clicked the Deny button and Flash
Player is unable to access the camera. You can see an example of this in the following snippet:
function statusHandler(event:StatusEvent):void
{
switch (event.code)
{
case "Camera.Muted":
trace("User clicked Deny.");
break;
case "Camera.Unmuted":
trace("User clicked Accept.");
break;
}
}
•The Camera class contains a read-only property named muted which specifies whether the user has denied
access to the camera (true) or allowed access (false) in the Flash Player Privacy panel. You can see an example of
this in the following snippet:
function statusHandler(event:StatusEvent):void
{
if (cam.muted)
{
trace("User clicked Deny.");
}
else
{
trace("User clicked Accept.");
}
}

ADOBE FLEX 3
Developer Guide
415
By checking for the status event to be dispatched, you can write code that handles the user accepting or denying
access to the camera and clean up appropriately. For example, if the user clicks the Deny button, you could display a
message to the user stating that they need to click Allow if they want to participate in a video chat, or you could
instead make sure the Video object on the display list is deleted to free up system resources.
Maximizing video quality
By default, new instances of the Video class are 320 pixels wide by 240 pixels high. In order to maximize video quality
you should always ensure that your video object matches the same dimensions as the video being returned by the
camera object. You can get the camera object’s width and height by using the Camera class’s width and height
properties, you can then set the video object’s width and height properties to match the camera objects dimensions,
or you can pass the camera’s width and height to the Video class’s constructor method, as seen in the following
snippet:
var cam:Camera = Camera.getCamera();
if (cam != null)
{
var vid:Video = new Video(cam.width, cam.height);
vid.attachCamera(cam);
addChild(vid);
}
Since the getCamera() method returns a reference to a camera object (or null if no cameras are available) you can
access the camera’s methods and properties even if the user denies access to their camera. This allows you to set the
size of the video instance using the camera’s native height and width.
var vid:Video;
var cam:Camera = Camera.getCamera();
if (cam == null)
{
trace("Unable to locate available cameras.");
}
else
{
trace("Found camera: " + cam.name);
cam.addEventListener(StatusEvent.STATUS, statusHandler);
vid = new Video();
vid.attachCamera(cam);
}
function statusHandler(event:StatusEvent):void
{
if (cam.muted)
{
trace("Unable to connect to active camera.");
}
else
{
// Resize Video object to match camera settings and
// add the video to the display list.
vid.width = cam.width;
vid.height = cam.height;
addChild(vid);
}
// Remove the status event listener.
cam.removeEventListener(StatusEvent.STATUS, statusHandler);
}
For information about full-screen mode, see “Working with full-screen mode” on page 261.

ADOBE FLEX 3
Developer Guide
416
Monitoring playback conditions
The camera class contains several properties which allow you to monitor the Camera object’s current status. For
example, the following code displays several of the camera’s properties using a Timer object and a text field instance
on the display list:
var vid:Video;
var cam:Camera = Camera.getCamera();
var tf:TextField = new TextField();
tf.x = 300;
tf.autoSize = TextFieldAutoSize.LEFT;
addChild(tf);
if (cam != null)
{
cam.addEventListener(StatusEvent.STATUS, statusHandler);
vid = new Video();
vid.attachCamera(cam);
}
function statusHandler(event:StatusEvent):void
{
if (!cam.muted)
{
vid.width = cam.width;
vid.height = cam.height;
addChild(vid);
t.start();
}
cam.removeEventListener(StatusEvent.STATUS, statusHandler);
}
var t:Timer = new Timer(100);
t.addEventListener(TimerEvent.TIMER, timerHandler);
function timerHandler(event:TimerEvent):void
{
tf.text = "";
tf.appendText("activityLevel: " + cam.activityLevel + "\n");
tf.appendText("bandwidth: " + cam.bandwidth + "\n");
tf.appendText("currentFPS: " + cam.currentFPS + "\n");
tf.appendText("fps: " + cam.fps + "\n");
tf.appendText("keyFrameInterval: " + cam.keyFrameInterval + "\n");
tf.appendText("loopback: " + cam.loopback + "\n");
tf.appendText("motionLevel: " + cam.motionLevel + "\n");
tf.appendText("motionTimeout: " + cam.motionTimeout + "\n");
tf.appendText("quality: " + cam.quality + "\n");
}
Every 1/10 of a second (100 milliseconds) the Timer object’s timer event is dispatched and the timerHandler()
function updates the text field on the display list.
Sending video to a server
If you want to build more complex applications involving video or camera objects, Flash Media Server offers a
combination of streaming media capabilities and a development environment for creating and delivering media
applications to a wide audience. This combination enables developers to create applications such as Video on
Demand, live web-event broadcasts, and mp3 streaming as well as video blogging, video messaging, and multimedia
chat environments. For more information, see the Flash Media Server documentation online at
http://livedocs.macromedia.com/fms/2/docs/.

ADOBE FLEX 3
Developer Guide
417
Advanced topics
The following topics address some special issues for working with video.
Flash Player compatibility with encoded FLV files
Flash Player 7 supports FLV files that are encoded with the Sorenson™ Spark™ video codec. Flash Player 8 supports
FLV files encoded with Sorenson Spark or On2 VP6 encoder in Flash Professional 8. The On2 VP6 video codec
supports an alpha channel. Different Flash Player versions support FLV in different ways. For more information, see
the following table:
Flash Player 9.0.115.0 and later versions support files derived from the standard MPEG-4 container format including
F4V, MP4, M4A, MOV, MP4V, 3GP, and 3G2 if they contain H.264 video and/or HEAAC v2 encoded audio. H.264
delivers higher quality video at lower bitrates when compared to the same encoding profile in Sorenson or On2. HE-
AAC v2 is an extension of AAC (a standard audio format defined in the MPEG-4 video standard) that uses Spectral
Band Replication (SBR) and Parametric Stereo (PS) techniques to increase coding efficiency at low bitrates. To learn
more about H.264 encoding, see Exploring Flash Player support for high-definition H.264 video and AAC audio.
About configuring FLV files for hosting on a server
When you work with FLV files, you might have to configure your server to work with the FLV file format. Multi-
purpose Internet Mail Extensions (MIME) is a standardized data specification that lets you send non-ASCII files
over Internet connections. Web browsers and e-mail clients are configured to interpret numerous MIME types so
that they can send and receive video, audio, graphics, and formatted text. To load FLV files from a web server, you
might need to register the file extension and MIME type with your web server, so you should check your web server
documentation. The MIME type for FLV files is video/x-flv. The full information for the FLV file type is as
follows:
•Mime Type: video/x-flv
•File extension: .flv
•Required parameters: none
•Optional parameters: none
•Encoding considerations: FLV files are binary files; some applications might require the application/octet-
stream subtype to be set.
•Security issues: none
•Published specification: www.adobe.com/go/flashfileformat.
Codec SWF file version (publish version) Flash Player version required for playback
Sorenson Spark 6 6, 7, or 8
77, 8
On2 VP6 6 8*
*. If your SWF file loads an FLV file, you can use the On2 VP6 video without having to republish your SWF file
for Flash Player 8, as long as users use Flash Player 8 to view your SWF file. Only Flash Player 8 supports publish
and playback of On2 VP6 video.
78
88

ADOBE FLEX 3
Developer Guide
418
Microsoft changed the way streaming media is handled in Microsoft Internet Information Services (IIS) 6.0 web
server from earlier versions. Earlier versions of IIS do not require any modification to stream Flash Video. In IIS 6.0,
the default web server that comes with Windows 2003, the server requires a MIME type to recognize that FLV files
are streaming media.
When SWF files that stream external FLV files are placed on Microsoft Windows Server® 2003 and are viewed in a
browser, the SWF file plays correctly, but the FLV video does not stream. This issue affects all FLV files placed on
Windows Server 2003, including files you make with earlier versions of the Flash authoring tool, the Macromedia
Flash Video Kit for Dreamweaver MX 2004 from Adobe. These files work correctly if you test them on other
operating systems.
For information about configuring Microsoft Windows 2003 and Microsoft IIS Server 6.0 to stream FLV video, see
www.adobe.com/go/tn_19439.
About targeting local FLV files on the Macintosh
If you attempt to play a local FLV from a non-system drive on an Apple® Macintosh® computer by using a path that
uses a relative slash (/), the video will not play. Non-system drives include, but are not limited to, CD-ROMs, parti-
tioned hard disks, removable storage media, and connected storage devices.
Note: The reason for this failure is a limitation of the operating system, not a limitation in Flash Player.
For an FLV file to play from a non-system drive on a Macintosh, refer to it with an absolute path using a colon-based
notation (:) rather than slash-based notation (/). The following list shows the difference in the two kinds of notation:
•Slash-based notation: myDrive/myFolder/myFLV.flv
•Colon-based notation: (Mac OS®) myDrive:myFolder:myFLV.flv
You can also create a projector file for a CD-ROM you intend to use for Macintosh playback. For the latest infor-
mation on Mac OS CD-ROMs and FLV files, see www.adobe.com/go/3121b301.
Example: Video Jukebox
The following example builds a simple video jukebox which dynamically loads a list of videos to play back in a
sequential order. This allows you to build an application that lets a user browse through a series of video tutorials, or
perhaps specifies which advertisements should be played back before delivering the user’s requested video. This
example demonstrates the following features of ActionScript 3.0:
•Updating a playhead based on a video file’s playback progress
•Listening for and parsing a video file’s metadata
•Handling specific codes in a net stream
•Loading, playing, pausing, and stopping a dynamically loaded FLV
•Resizing a video object on the display list based on the net stream’s metadata
To get the application files for this sample, see www.adobe.com/go/learn_programmingAS3samples_flash. The
Video Jukebox application files can be found in the folder Samples/VideoJukebox. The application consists of the
following files:

ADOBE FLEX 3
Developer Guide
419
Loading an external video playlist file
The external playlist.xml file specifies which videos to load, and the order to play them back in. In order to load the
XML file, you need to use a URLLoader object and a URLRequest object, as seen in the following code:
uldr = new URLLoader();
uldr.addEventListener(Event.COMPLETE, xmlCompleteHandler);
uldr.load(new URLRequest(PLAYLIST_XML_URL));
This code is placed in the VideoJukebox class’s constructor so the file is loaded before any other code is run. As soon
as the XML file has finished loading, the xmlCompleteHandler() method is called which parses the external file
into an XML object, as seen in the following code:
private function xmlCompleteHandler(event:Event):void
{
playlist = XML(event.target.data);
videosXML = playlist.video;
main();
}
The playlist XML object contains the raw XML from the external file, whereas the videosXML is an XMLList object
which contains just the video nodes. A sample playlist.xml file can be seen in the following snippet:
<videos>
<video url="video/caption_video.flv" />
<video url="video/cuepoints.flv" />
<video url="video/water.flv" />
</videos>
Finally, the xmlCompleteHandler() method calls the main() method which sets up the various component
instances on the display list, as well as the NetConnection and NetStream objects which are used to load the external
FLV files.
Creating the user interface
To build the user interface you need to drag five Button instances onto the display list and give them the following
instance names: playButton, pauseButton, stopButton, backButton, and forwardButton.
For each of these Button instances, you’ll need to assign a handler for the click event, as seen in the following
snippet:
playButton.addEventListener(MouseEvent.CLICK, buttonClickHandler);
pauseButton.addEventListener(MouseEvent.CLICK, buttonClickHandler);
stopButton.addEventListener(MouseEvent.CLICK, buttonClickHandler);
backButton.addEventListener(MouseEvent.CLICK, buttonClickHandler);
forwardButton.addEventListener(MouseEvent.CLICK, buttonClickHandler);
The buttonClickHandler() method uses a switch statement to determine which button instance was clicked, as
seen in the following code:
File Description
VideoJukebox.as The class that provides the main functionality of the application.
VideoJukebox.fla The main application file for Flash.
playlist.xml A file that lists which video files will be loaded into the video jukebox.

ADOBE FLEX 3
Developer Guide
420
private function buttonClickHandler(event:MouseEvent):void
{
switch (event.currentTarget)
{
case playButton:
ns.resume();
break;
case pauseButton:
ns.togglePause();
break;
case stopButton:
ns.pause();
ns.seek(0);
break;
case backButton:
playPreviousVideo();
break;
case forwardButton:
playNextVideo();
break;
}
}
Next, add a Slider instance to the display list and give it an instance name of volumeSlider. The following code sets
the slider instance’s liveDragging property to true and defines an event listener for the slider instance’s change
event:
volumeSlider.value = volumeTransform.volume;
volumeSlider.minimum = 0;
volumeSlider.maximum = 1;
volumeSlider.snapInterval = 0.1;
volumeSlider.tickInterval = volumeSlider.snapInterval;
volumeSlider.liveDragging = true;
volumeSlider.addEventListener(SliderEvent.CHANGE, volumeChangeHandler);
Add a ProgressBar instance to the display list and give it an instance name of positionBar. Set its mode property to
manual, as seen in the following snippet:
positionBar.mode = ProgressBarMode.MANUAL;
Finally add a Label instance to the display list and give it an instance name of positionLabel. This Label instance’s
value will be set by the timer instance
Listening for a video object’s metadata
When Flash Player encounters metadata for each of the loaded videos, the onMetaData() callback handler is called
on the NetStream object’s client property. The following code initializes an Object and sets up the specified
callback handler:
client = new Object();
client.onMetaData = metadataHandler;
The metadataHandler() method copies its data to the metaproperty defined earlier in the code. This allows you to
access the metadata for the current video anytime throughout the entire application. Next, the video object on the
Stage is resized to match the dimensions returned from the metadata. Finally, the positionBar progress bar instance
is moved and resized based on the size of the currently playing video. The following code contains the entire
metadataHandler() method:

ADOBE FLEX 3
Developer Guide
421
private function metadataHandler(metadataObj:Object):void
{
meta = metadataObj;
vid.width = meta.width;
vid.height = meta.height;
positionBar.move(vid.x, vid.y + vid.height);
positionBar.width = vid.width;
}
Dynamically loading a Flash video
To dynamically load each of the Flash videos the application uses a NetConnection and NetStream object. The
following code creates a NetConnection object and passes null to the connect() method. By specifying null, Flash
Player connects to a video on the local server instead of connecting to a server, such as a Flash Media Server.
The following code creates both the NetConnection and NetStream instances, defines an event listener for the
netStatus event, and assigns the client Object to the client property:
nc = new NetConnection();
nc.connect(null);
ns = new NetStream(nc);
ns.addEventListener(NetStatusEvent.NET_STATUS, netStatusHandler);
ns.client = client;
The netStatusHandler() method is called whenever the status of the video is changed. This includes when a video
starts or stops playback, is buffering or if a video stream cannot be found. The following code lists the
netStatusHandler() event:
private function netStatusHandler(event:NetStatusEvent):void
{
try
{
switch (event.info.code)
{
case "NetStream.Play.Start":
t.start();
break;
case "NetStream.Play.StreamNotFound":
case "NetStream.Play.Stop":
t.stop();
playNextVideo();
break;
}
}
catch (error:TypeError)
{
// Ignore any errors.
}
}
The previous code evaluates the code property of the info object and filters whether the code is
“NetStream.Play.Start”, “NetStream.Play.StreamNotFound”, or “NetStream.Play.Stop”. All other codes will be
ignored. If the net stream is starting the code starts the Timer instance which updates the playhead. If the net stream
cannot be found or is stopped, the Timer instance is stopped and the application attempts to play the next video in
the playlist.

ADOBE FLEX 3
Developer Guide
422
Every time the Timer executes, the positionBar progress bar instance updates its current position by calling the
setProgress() method of the ProgressBar class and the positionLabel Label instance is updated with the time
elapsed and total time of the current video.
private function timerHandler(event:TimerEvent):void
{
try
{
positionBar.setProgress(ns.time, meta.duration);
positionLabel.text = ns.time.toFixed(1) + " of " meta.duration.toFixed(1) + "
seconds";
}
catch (error:Error)
{
// Ignore this error.
}
}
Controlling the volume of the video
You can control the volume for the dynamically loaded video by setting the soundTransform property on the
NetStream object. The video jukebox application allows you to modify the volume level by changing the value of the
volumeSlider Slider instance. The following code shows how you can change the volume level by assigning the
value of the Slider component to a SoundTransform object which is set to the soundTransform property on the
NetStream object:
private function volumeChangeHandler(event:SliderEvent):void
{
volumeTransform.volume = event.value;
ns.soundTransform = volumeTransform;
}
Controlling video playback
The rest of the application controls video playback when the video reaches the end of the video stream or the user
skips to the previous or next video.
The following method retrieves the video URL from the XMLList for the currently selected index:
private function getVideo():String
{
return videosXML[idx].@url;
}
The playVideo() method calls the play() method on the NetStream object to load the currently selected video:
private function playVideo():void
{
var url:String = getVideo();
ns.play(url);
}
The playPreviousVideo() method decrements the current video index, calls the playVideo() method to load the
new video file and sets the progress bar to visible:

ADOBE FLEX 3
Developer Guide
423
private function playPreviousVideo():void
{
if (idx > 0)
{
idx--;
playVideo();
positionBar.visible = true;
}
}
The final method, playNextVideo(), increments the video index and calls the playVideo() method. If the current
video is the last video in the playlist, the clear() method is called on the Video object and the progress bar instance’s
visible property is set to false:
private function playNextVideo():void
{
if (idx < (videosXML.length() - 1))
{
idx++;
playVideo();
positionBar.visible = true;
}
else
{
idx++;
vid.clear();
positionBar.visible = false;
}
}

424
Chapter 21: Working with sound
ActionScript™ is made for immersive, interactive applications—and one often overlooked element of powerfully
immersive applications is sound. You can add sound effects to a video game, audio feedback to an application user
interface, or even make a program that analyzes mp3 files loaded over the Internet, with sound at the core of the
application.
In this chapter, you’ll learn about loading external audio files and working with audio that’s embedded in a SWF.
You’ll learn to control the audio, to create visual representations of the sound information, and to capture sound from
a user’s microphone.
Contents
Basics of working with sound . . . . . . . . . . . . . . . . . . . . . . . . . . . . . . . . . . . . . . . . . . . . . . . . . . . . . . . . . . . . . . . . . . . . . . 424
Understanding the sound architecture. . . . . . . . . . . . . . . . . . . . . . . . . . . . . . . . . . . . . . . . . . . . . . . . . . . . . . . . . . . . . . . 426
Loading external sound files . . . . . . . . . . . . . . . . . . . . . . . . . . . . . . . . . . . . . . . . . . . . . . . . . . . . . . . . . . . . . . . . . . . . . . . 427
Working with embedded sounds . . . . . . . . . . . . . . . . . . . . . . . . . . . . . . . . . . . . . . . . . . . . . . . . . . . . . . . . . . . . . . . . . . . 429
Working with streaming sound files . . . . . . . . . . . . . . . . . . . . . . . . . . . . . . . . . . . . . . . . . . . . . . . . . . . . . . . . . . . . . . . . 430
Playing sounds. . . . . . . . . . . . . . . . . . . . . . . . . . . . . . . . . . . . . . . . . . . . . . . . . . . . . . . . . . . . . . . . . . . . . . . . . . . . . . . . . . . 431
Security considerations when loading and playing sounds . . . . . . . . . . . . . . . . . . . . . . . . . . . . . . . . . . . . . . . . . . . . . 434
Controlling sound volume and panning . . . . . . . . . . . . . . . . . . . . . . . . . . . . . . . . . . . . . . . . . . . . . . . . . . . . . . . . . . . . . 435
Working with sound metadata . . . . . . . . . . . . . . . . . . . . . . . . . . . . . . . . . . . . . . . . . . . . . . . . . . . . . . . . . . . . . . . . . . . . . 436
Accessing raw sound data . . . . . . . . . . . . . . . . . . . . . . . . . . . . . . . . . . . . . . . . . . . . . . . . . . . . . . . . . . . . . . . . . . . . . . . . . 437
Capturing sound input. . . . . . . . . . . . . . . . . . . . . . . . . . . . . . . . . . . . . . . . . . . . . . . . . . . . . . . . . . . . . . . . . . . . . . . . . . . . 440
Example: Podcast Player . . . . . . . . . . . . . . . . . . . . . . . . . . . . . . . . . . . . . . . . . . . . . . . . . . . . . . . . . . . . . . . . . . . . . . . . . . 443
Basics of working with sound
Introduction to working with sound
Just as computers can encode images in a digital format, store them on a computer, and retrieve them to display on
the screen, computers can capture and encode digital audio—computer representation of sound information—and
can store it and retrieve it to play back over speakers connected to the computer. You can play back sound using either
Adobe® Flash® Player or Adobe® AIR™ and ActionScript.
When sound data is converted to digital form, it has various characteristics, such as the sound’s volume and whether
it is stereo or mono sound. When you play back a sound in ActionScript, you can adjust these characteristics as
well—make the sound louder, or make it seem to be coming from a certain direction, for instance.
Before you can control a sound in ActionScript, you need to have the sound information loaded into Flash Player or
AIR. There are four ways you can get audio data into Flash Player or AIR so that you can work with it using Action-
Script. You can load an external sound file such as an mp3 file into the SWF; you can embed the sound information
into the SWF file directly when it’s being created; you can get audio input using a microphone attached to a user’s
computer, and you can access sound data that’s streamed from a server.
When you load sound data from an external sound file, you can begin playing back the start of the sound file while
the rest of the sound data is still loading.

ADOBE FLEX 3
Developer Guide
425
Although there are various sound file formats used to encode digital audio, ActionScript 3.0, Flash Player and AIR
support sound files that are stored in the mp3 format. They cannot directly load or play sound files in other formats
like WAV or AIFF.
While you’re working with sound in ActionScript, you’ll likely work with several classes from the flash.media
package. The Sound class is the class you use to get access to audio information by loading a sound file and starting
playback. Once you start playing a sound, Flash Player and AIR give you access to a SoundChannel object. Since an
audio file that you’ve loaded may only be one of several sounds that you play on a user’s computer, each individual
sound that’s playing uses its own SoundChannel object; the combined output of all the SoundChannel objects mixed
together is what actually plays over the computer’s speakers. You use this SoundChannel instance to control
properties of the sound and to stop its playback. Finally, if you want to control the combined audio, the SoundMixer
class gives you control over the mixed output.
You can also use several other classes to perform more specific tasks when you’re working with sound in Action-
Script; for more information on all the sound-related classes, see “Understanding the sound architecture” on
page 426.
Common tasks for working with sound
This chapter describes the following sound-related tasks that you will likely want to perform:
•Loading external mp3 files and tracking their loading progress
•Playing, pausing, resuming, and stopping sounds
•Playing streaming sounds while they are being loaded
•Manipulating sound volume and panning
•Retrieving ID3 metadata from an mp3 file
•Using raw sound wave data
•Capturing and replaying sound input from a user’s microphone
Important concepts and terms
The following reference list contains important terms that you will encounter in this chapter:
•Amplitude: The distance of a point on the sound waveform from the zero or equilibrium line.
•Bit rate: The amount of data that is encoded or streamed for each second of a sound file. For mp3 files, the bit
rate is usually stated in terms of thousands of bits per second (kbps). A higher bit rate generally means a higher
quality sound wave.
•Buffering: The receiving and storing of sound data before it is played back.
•mp3: MPEG-1 Audio Layer 3, or mp3, is a popular sound compression format.
•Panning: The positioning of an audio signal between the left and right channels in a stereo soundfield.
•Peak: The highest point in a waveform.
•Sampling rate: Defines the number of samples per second taken from an analog audio signal to make a digital
signal. The sampling rate of standard compact disc audio is 44.1 kHz or 44,100 samples per second.
•Streaming: The process of playing the early portions of a sound file or video file while later portions of that file
are still being loaded from a server.

ADOBE FLEX 3
Developer Guide
426
•Volume: The loudness of a sound.
•Waveform: The shape of a graph of the varying amplitudes of a sound signal over time.
Understanding the sound architecture
Your applications can load sound data from four main sources:
•External sound files loaded at run time
•Sound resources embedded within the application’s SWF file
•Sound data from a microphone attached to the user’s system
•Sound data streamed from a remote media server, such as Flash Media Server
Sound data can be fully loaded before it is played back, or it can be streamed, meaning that it is played back while it
is still loading.
ActionScript 3.0, Flash Player, and AIR support sound files that are stored in the mp3 format. They cannot directly
load or play sound files in other formats like WAV or AIFF.
The ActionScript 3.0 sound architecture makes use of the following classes in the flash.media package.
Class Description
flash.media.Sound The Sound class handles the loading of sound, manages basic
sound properties, and starts a sound playing.
flash.media.SoundChannel When an application plays a Sound object, a new SoundChannel
object is created to control the playback. The SoundChannel
object controls the volume of both the left and right playback
channels of the sound. Each sound that plays has its own Sound-
Channel object.
flash.media.SoundLoaderContext The SoundLoaderContext class specifies how many seconds of
buffering to use when loading a sound, and whether Flash Player
or AIR looks for a cross-domain policy file from the server when
loading a file. A SoundLoaderContext object is used as a param-
eter to the Sound.load() method.
flash.media.SoundMixer The SoundMixer class controls playback and security properties
that pertain to all sounds in an application. In effect, multiple
sound channels are mixed through a common SoundMixer
object, so property values in the SoundMixer object will affect all
SoundChannel objects that are currently playing.
flash.media.SoundTransform The SoundTransform class contains values that control sound
volume and panning. A SoundTransform object can be applied to
an individual SoundChannel object, to the global SoundMixer
object, or to a Microphone object, among others.
flash.media.ID3Info An ID3Info object contains properties that represent ID3 meta-
data information that is often stored in mp3 sound files.
flash.media.Microphone The Microphone class represents a microphone or other sound
input device attached to the user’s computer. Audio input from a
microphone can be routed to local speakers or sent to a remote
server. The Microphone object controls the gain, sampling rate,
and other characteristics of its own sound stream.

ADOBE FLEX 3
Developer Guide
427
Each sound that is loaded and played needs its own instance of the Sound class and the SoundChannel class. The
output from multiple SoundChannel instances is then mixed together by the global SoundMixer class during
playback,
The Sound, SoundChannel, and SoundMixer classes are not used for sound data obtained from a microphone or
from a streaming media server like Flash Media Server.
Loading external sound files
Each instance of the Sound class exists to load and trigger the playback of a specific sound resource. An application
can’t reuse a Sound object to load more than one sound. If it wants to load a new sound resource, it should create a
new Sound object.
If you are loading a small sound file, such as a click sound to be attached to a button, your application can create a
new Sound and have it automatically load the sound file, as shown below:
var req:URLRequest = new URLRequest("click.mp3");
var s:Sound = new Sound(req);
The Sound() constructor accepts a URLRequest object as its first parameter. When a value for the URLRequest
parameter is supplied, the new Sound object starts loading the specified sound resource automatically.
In all but the simplest cases, your application should pay attention to the sound’s loading progress and watch for
errors during loading. For example, if the click sound is fairly large, it might not be completely loaded by the time
the user clicks the button that triggers the sound. Trying to play an unloaded sound could cause a run-time error. It’s
safer to wait for the sound to load completely before letting users take actions that might start sounds playing.
A Sound object dispatches a number of different events during the sound loading process. Your application can listen
for these events to track loading progress and make sure that the sound loads completely before playing. The
following table lists the events that can be dispatched by a Sound object.
The following code illustrates how to play a sound after it has finished loading:
import flash.events.Event;
import flash.media.Sound;
import flash.net.URLRequest;
var s:Sound = new Sound();
s.addEventListener(Event.COMPLETE, onSoundLoaded);
var req:URLRequest = new URLRequest("bigSound.mp3");
s.load(req);
Event Description
open (Event.OPEN) Dispatched right before the sound loading operation begins.
progress (ProgressEvent.PROGRESS) Dispatched periodically during the sound loading process when data is received
from the file or stream.
id3 (Event.ID3) Dispatched when ID3 data is available for an mp3 sound.
complete (Event.COMPLETE) Dispatched when all of the sound resource’s data has been loaded.
ioError (IOErrorEvent.IO_ERROR) Dispatched when a sound file cannot be located or when the loading process is inter-
rupted before all sound data can be received.

ADOBE FLEX 3
Developer Guide
428
function onSoundLoaded(event:Event):void
{
var localSound:Sound = event.target as Sound;
localSound.play();
}
First, the code sample creates a new Sound object without giving it an initial value for the URLRequest parameter.
Then, it listens for the Event.COMPLETE event from the Sound object, which causes the onSoundLoaded() method
to execute when all the sound data is loaded. Next, it calls the Sound.load() method with a new URLRequest value
for the sound file.
The onSoundLoaded() method executes when the sound loading is complete. The target property of the Event
object is a reference to the Sound object. Calling the play() method of the Sound object then starts the sound
playback.
Monitoring the sound loading process
Sound files can be very large and take a long time to load. While Flash Player and AIR let your application play
sounds even before they are fully loaded, you might want to give the user an indication of how much of the sound
data has been loaded and how much of the sound has already been played.
The Sound class dispatches two events that make it relatively easy to display the loading progress of a sound:
ProgressEvent.PROGRESS and Event.COMPLETE. The following example shows how to use these events to display
progress information about the sound being loaded:
import flash.events.Event;
import flash.events.ProgressEvent;
import flash.media.Sound;
import flash.net.URLRequest;
var s:Sound = new Sound();
s.addEventListener(ProgressEvent.PROGRESS, onLoadProgress);
s.addEventListener(Event.COMPLETE, onLoadComplete);
s.addEventListener(IOErrorEvent.IO_ERROR, onIOError);
var req:URLRequest = new URLRequest("bigSound.mp3");
s.load(req);
function onLoadProgress(event:ProgressEvent):void
{
var loadedPct:uint = Math.round(100 * (event.bytesLoaded / event.bytesTotal));
trace("The sound is " + loadedPct + "% loaded.");
}
function onLoadComplete(event:Event):void
{
var localSound:Sound = event.target as Sound;
localSound.play();
}
function onIOError(event:IOErrorEvent)
{
trace("The sound could not be loaded: " + event.text);
}
This code first creates a Sound object and then adds listeners to that object for the ProgressEvent.PROGRESS and
Event.COMPLETE events. After the Sound.load() method has been called and the first data is received from the
sound file, a ProgressEvent.PROGRESS event occurs and triggers the onSoundLoadProgress() method.

ADOBE FLEX 3
Developer Guide
429
The percentage of the sound data that has been loaded is equal to the value of the bytesLoaded property of the
ProgressEvent object divided by the value of the bytesTotal property. The same bytesLoaded and bytesTotal
properties are available on the Sound object as well. The example above simply shows messages about the sound
loading progress, but you can easily use the bytesLoaded and bytesTotal values to update progress bar compo-
nents, such as the ones that come with the Adobe Flex 2 framework or the Flash authoring tool.
This example also shows how an application can recognize and respond to an error when loading sound files. For
example, if a sound file with the given filename cannot be located, an Event.IO_ERROR event is dispatched by the
Sound object. In the previous code, the onIOError() method executes and displays a brief error message when an
error occurs.
Working with embedded sounds
Using embedded sounds, instead of loading sound from an external file, is most useful for small sounds that are used
as indicators within your application’s user interface, such as sounds that play when buttons are clicked.
When you embed a sound file in your application, the size of the resulting SWF file increases by the size of the sound
file. In other words, embedding large sound files in your application can increase the size of your SWF file to an
undesirable size.
The exact method of embedding a sound file into your application’s SWF file varies according to your development
environment.
Using an embedded sound file in Flex
There are many ways to embed sound assets in a Flex application, including:
•Using the [Embed] metadata tag in a script
•Using the @Embed directive in MXML to assign an embedded asset as a property of a component like a Button
or a SoundEffect.
•Using the @Embed directive within a CSS file
This section describes the first option: how to embed sounds in ActionScript code within a Flex application using
the [Embed] metadata tag. For information about the other ways to use embedded sounds in Flex, see “Embedding
Assets” in the Flex 2 Language Reference.
To embed an asset in ActionScript code, use the [Embed] metadata tag.
Place the sound file in the main source folder or another folder that is in your project’s build path. When the Flex
compiler encounters an Embed metadata tag, it creates the embedded asset class for you. You can access the class
through a variable of data type Class that you declare immediately after the [Embed] metadata tag.
The following code embeds a sound named smallSound.mp3 and uses a variable named soundClass to store a
reference to the embedded asset class associated with that sound. The code then creates an instance of the embedded
asset class, casts it as an instance of the Sound class, and calls the play() method on that instance:
package
{
import flash.display.Sprite;
import flash.media.Sound;
import flash.media.SoundChannel;

ADOBE FLEX 3
Developer Guide
430
public class EmbeddedSoundExample extends Sprite
{
[Embed(source="smallSound.mp3")]
public var soundClass:Class;
public function EmbeddedSoundExample()
{
var smallSound:Sound = new soundClass() as Sound;
smallSound.play();
}
}
}
To use the embedded sound to set a property of a Flex component, it should be cast as an instance of the
mx.core.SoundAsset class instead of as an instance of the Sound class. For a similar example that uses the SoundAsset
class see “Embedded asset classes” on page 98.
Working with streaming sound files
When a sound file or video file is playing back while its data is still being loaded, it is said to be streaming. External
sound files that are loaded from a remote server are often streamed so that the user doesn’t have to wait for all the
sound data to load before listening to the sound.
The SoundMixer.bufferTime property represents the number of milliseconds of sound data that Flash Player or
AIR should gather before letting the sound play. In other words, if the bufferTime property is set to 5000, Flash
Player or AIR loads at least 5000 milliseconds worth of data from the sound file before the sound begins to play. The
default SoundMixer.bufferTime value is 1000.
Your application can override the global SoundMixer.bufferTime value for an individual sound by explicitly speci-
fying a new bufferTime value when loading the sound. To override the default buffer time, first create a new
instance of the SoundLoaderContext class, set its bufferTime property, and then pass it as a parameter to the
Sound.load() method, as shown below:
import flash.media.Sound;
import flash.media.SoundLoaderContext;
import flash.net.URLRequest;
var s:Sound = new Sound();
var req:URLRequest = new URLRequest("bigSound.mp3");
var context:SoundLoaderContext = new SoundLoaderContext(8000, true);
s.load(req, context);
s.play();
As playback continues, Flash Player and AIR try to keep the sound buffer at the same size or greater. If the sound
data loads faster than the playback speed, playback will continue without interruption. However, if the data loading
rate slows down because of network limitations, the playhead could reach the end of the sound buffer. If this
happens, playback is suspended, though it automatically resumes once more sound data has been loaded.
To find out if playback is suspended because Flash Player or AIR is waiting for data to load, use the
Sound.isBuffering property.

ADOBE FLEX 3
Developer Guide
431
Playing sounds
Playing a loaded sound can be as simple as calling the Sound.play() method for a Sound object, as follows:
var snd:Sound = new Sound(new URLRequest("smallSound.mp3"));
snd.play();
When playing back sounds using ActionScript 3.0, you can perform the following operations:
•Play a sound from a specific starting position
•Pause a sound and resume playback from the same position later
•Know exactly when a sound finishes playing
•Track the playback progress of a sound
•Change volume or panning while a sound plays
To perform these operations during playback, use the SoundChannel, SoundMixer, and SoundTransform classes.
The SoundChannel class controls the playback of a single sound. The SoundChannel.position property can be
thought of as a playhead, indicating the current point in the sound data that’s being played.
When an application calls the Sound.play() method, a new instance of the SoundChannel class is created to control
the playback.
Your application can play a sound from a specific starting position by passing that position, in terms of milliseconds,
as the startTime parameter of the Sound.play() method. It can also specify a fixed number of times to repeat the
sound in rapid succession by passing a numeric value in the loops parameter of the Sound.play() method.
When the Sound.play() method is called with both a startTime parameter and a loops parameter, the sound is
played back repeatedly from the same starting point each time, as shown in the following code:
var snd:Sound = new Sound(new URLRequest("repeatingSound.mp3"));
snd.play(1000, 3);
In this example, the sound is played from a point one second after the start of the sound, three times in succession.
Pausing and resuming a sound
If your application plays long sounds, like songs or podcasts, you probably want to let users pause and resume the
playback of those sounds. A sound cannot literally be paused during playback in ActionScript; it can only be stopped.
However, a sound can be played starting from any point. You can record the position of the sound at the time it was
stopped, and then replay the sound starting at that position later.
For example, let’s say your code loads and plays a sound file like this:
var snd:Sound = new Sound(new URLRequest("bigSound.mp3"));
var channel:SoundChannel = snd.play();
While the sound plays, the SoundChannel.position property indicates the point in the sound file that is currently
being played. Your application can store the position value before stopping the sound from playing, as follows:
var pausePosition:int = channel.position;
channel.stop();

ADOBE FLEX 3
Developer Guide
432
To resume playing the sound, pass the previously stored position value to restart the sound from the same point it
stopped at before.
channel = snd.play(pausePosition);
Monitoring playback
Your application might want to know when a sound stops playing so it can start playing another sound, or clean up
some resources used during the previous playback. The SoundChannel class dispatches an Event.SOUND_COMPLETE
event when its sound finishes playing. Your application can listen for this event and take appropriate action, as shown
below:
import flash.events.Event;
import flash.media.Sound;
import flash.net.URLRequest;
var snd:Sound = new Sound();
var req:URLRequest = new URLRequest("smallSound.mp3");
snd.load(req);
var channel:SoundChannel = snd.play();
channel.addEventListener(Event.SOUND_COMPLETE, onPlaybackComplete);
public function onPlaybackComplete(event:Event)
{
trace(“The sound has finished playing.”);
}
The SoundChannel class does not dispatch progress events during playback. To report on playback progress, your
application can set up its own timing mechanism and track the position of the sound playhead.
To calculate what percentage of a sound has been played, you can divide the value of the SoundChannel.position
property by the length of the sound data that’s being played:
var playbackPercent:uint = 100 * (channel.position / snd.length);
However, this code only reports accurate playback percentages if the sound data was fully loaded before playback
began. The Sound.length property shows the size of the sound data that is currently loaded, not the eventual size
of the entire sound file. To track the playback progress of a streaming sound that is still loading, your application
should estimate the eventual size of the full sound file and use that value in its calculations. You can estimate the
eventual length of the sound data using the bytesLoaded and bytesTotal properties of the Sound object, as
follows:
var estimatedLength:int =
Math.ceil(snd.length / (snd.bytesLoaded / snd.bytesTotal));
var playbackPercent:uint = 100 * (channel.position / estimatedLength);
The following code loads a larger sound file and uses the Event.ENTER_FRAME event as its timing mechanism for
showing playback progress. It periodically reports on the playback percentage, which is calculated as the current
position value divided by the total length of the sound data:
import flash.events.Event;
import flash.media.Sound;
import flash.net.URLRequest;

ADOBE FLEX 3
Developer Guide
433
var snd:Sound = new Sound();
var req:URLRequest = new
URLRequest("http://av.adobe.com/podcast/csbu_dev_podcast_epi_2.mp3");
snd.load(req);
var channel:SoundChannel;
channel = snd.play();
addEventListener(Event.ENTER_FRAME, onEnterFrame);
channel.addEventListener(Event.SOUND_COMPLETE, onPlaybackComplete);
function onEnterFrame(event:Event):void
{
var estimatedLength:int =
Math.ceil(snd.length / (snd.bytesLoaded / snd.bytesTotal));
var playbackPercent:uint =
Math.round(100 * (channel.position / estimatedLength));
trace("Sound playback is " + playbackPercent + "% complete.");
}
function onPlaybackComplete(event:Event)
{
trace("The sound has finished playing.");
removeEventListener(Event.ENTER_FRAME, onEnterFrame);
}
After the sound data starts loading, this code calls the snd.play() method and stores the resulting SoundChannel
object in the channel variable. Then it adds an event listener to the main application for the Event.ENTER_FRAME
event and another event listener to the SoundChannel object for the Event.SOUND_COMPLETE event that occurs
when playback is complete.
Each time the application reaches a new frame in its animation, the onEnterFrame() method is called. The
onEnterFrame() method estimates the total length of the sound file based on the amount of data that has already
been loaded, and then it calculates and displays the current playback percentage.
When the entire sound has been played, the onPlaybackComplete() method executes, removing the event listener
for the Event.ENTER_FRAME event so that it doesn’t try to display progress updates after playback is done.
The Event.ENTER_FRAME event can be dispatched many times per second. In some cases, you won’t want to display
playback progress that frequently. In those cases, your application can set up its own timing mechanism using the
flash.util.Timer class; see “Working with dates and times” on page 122.
Stopping streaming sounds
There is a quirk in the playback process for sounds that are streaming—that is, for sounds that are still loading while
they are being played. When your application calls the SoundChannel.stop() method on a SoundChannel instance
that is playing back a streaming sound, the sound playback stops for one frame, and then on the next frame, it restarts
from the beginning of the sound. This occurs because the sound loading process is still underway. To stop both the
loading and the playback of a streaming sound, call the Sound.close() method.

ADOBE FLEX 3
Developer Guide
434
Security considerations when loading and playing
sounds
Your application’s ability to access sound data can be limited according to the Flash Player or AIR security model.
Each sound is subject to the restrictions of two different security sandboxes, the sandbox for the content itself (the
“content sandbox”), and the sandbox for the application or object that loads and plays the sound (the “owner
sandbox”). For AIR application content in the application security sandbox, all sounds, including those loaded from
other domains, are accessible to content in the application security sandbox. However, content in other security
security sandboxes observe the same rules as content running in Flash Player. For more information about the Flash
Player security model in general, and the definition of sandboxes, see “Flash Player security” on page 535.
The content sandbox controls whether detailed sound data can be extracted from the sound using the id3 property
or the SoundMixer.computeSpectrum() method. It doesn’t restrict the loading or playing of the sound file itself.
The domain of origin of the sound file defines the security limitations of the content sandbox. Generally, if a sound
file is located in the same domain or folder as the SWF file of the application or object that loads it, the application
or object will have full access to that sound file. If the sound comes from a different domain than the application
does, it can still be brought within the content sandbox by using a cross-domain policy file.
Your application can pass a SoundLoaderContext object with a checkPolicyFile property as a parameter to the
Sound.load() method. Setting the checkPolicyFile property to true tells Flash Player or AIR to look for a cross-
domain policy file on the server from which the sound is loaded. If a cross-domain policy file exists, and it grants
access to the domain of the loading SWF file, the SWF file can load the sound file, access the id3 property of the
Sound object, and call the SoundMixer.computeSpectrum() method for loaded sounds.
The owner sandbox controls local playback of the sounds. The application or object that starts playing a sound
defines the owner sandbox.
The SoundMixer.stopAll() method silences the sounds in all SoundChannel objects that are currently playing, as
long as they meet the following criteria:
•The sounds were started by objects within the same owner sandbox.
•The sounds are from a source with a cross-domain policy file that grants access to the domain of the application
or object that calls the SoundMixer.stopAll() method.
However, in an AIR application, content in the application security sandbox (content installed with the AIR appli-
cation) are not restricted by these security limitations.
To find out if the SoundMixer.stopAll() method will indeed stop all playing sounds, your application can call the
SoundMixer.areSoundsInaccessible() method. If that method returns a value of true, some of the sounds
being played are outside the control of the current owner sandbox and will not be stopped by the
SoundMixer.stopAll() method.
The SoundMixer.stopAll() method also stops the playhead from continuing for all sounds that were loaded from
external files. However, sounds that are embedded in FLA files and attached to frames in the timeline using the Flash
Authoring tool might start playing again if the animation moves to a new frame.

ADOBE FLEX 3
Developer Guide
435
Controlling sound volume and panning
An individual SoundChannel object controls both the left and the right stereo channels for a sound. If an mp3 sound
is a monaural sound, the left and right stereo channels of the SoundChannel object will contain identical waveforms.
You can find out the amplitude of each stereo channel of the sound being played using the leftPeak and rightPeak
properties of the SoundChannel object. These properties show the peak amplitude of the sound waveform itself.
They do not represent the actual playback volume. The actual playback volume is a function of the amplitude of the
sound wave and the volume values set in the SoundChannel object and the SoundMixer class.
The pan property of a SoundChannel object can be used to specify a different volume level for each of the left and
right channels during playback. The pan property can have a value ranging from -1 to 1, where -1 means the left
channel plays at top volume while the right channel is silent, and 1 means the right channel plays at top volume while
the left channel is silent. Numeric values in between -1 and 1 set proportional values for the left and right channel
values, and a value of 0 means that both channels play at a balanced, mid-volume level.
The following code example creates a SoundTransform object with a volume value of 0.6 and a pan value of -1 (top
left channel volume and no right channel volume). It passes the SoundTransform object as a parameter to the play()
method, which applies that SoundTransform object to the new SoundChannel object that is created to control the
playback.
var snd:Sound = new Sound(new URLRequest("bigSound.mp3"));
var trans:SoundTransform = new SoundTransform(0.6, -1);
var channel:SoundChannel = snd.play(0, 1, trans);
You can alter the volume and panning while a sound is playing by setting the pan or volume properties of a
SoundTransform object and then applying that object as the soundTransform property of a SoundChannel object.
You can also set global volume and pan values for all sounds at once using the soundTransform property of the
SoundMixer class, as the following example shows:
SoundMixer.soundTransform = new SoundTransform(1, -1);
You can also use a SoundTransform object to set volume and pan values for a Microphone object (see “Capturing
sound input” on page 440) and for Sprite objects and SimpleButton objects.
The following example alternates the panning of the sound from the left channel to the right channel and back while
the sound plays.
import flash.events.Event;
import flash.media.Sound;
import flash.media.SoundChannel;
import flash.media.SoundMixer;
import flash.net.URLRequest;
var snd:Sound = new Sound();
var req:URLRequest = new URLRequest("bigSound.mp3");
snd.load(req);
var panCounter:Number = 0;
var trans:SoundTransform;
trans = new SoundTransform(1, 0);
var channel:SoundChannel = snd.play(0, 1, trans);
channel.addEventListener(Event.SOUND_COMPLETE, onPlaybackComplete);
addEventListener(Event.ENTER_FRAME, onEnterFrame);

ADOBE FLEX 3
Developer Guide
436
function onEnterFrame(event:Event):void
{
trans.pan = Math.sin(panCounter);
channel.soundTransform = trans; // or SoundMixer.soundTransform = trans;
panCounter += 0.05;
}
function onPlaybackComplete(event:Event):void
{
removeEventListener(Event.ENTER_FRAME, onEnterFrame);
}
This code starts by loading a sound file and then creating a new SoundTransform object with volume set to 1 (full
volume) and pan set to 0 (evenly balanced between left and right). Then it calls the snd.play() method, passing the
SoundTransform object as a parameter.
While the sound plays, the onEnterFrame() method executes repeatedly. The onEnterFrame() method uses the
Math.sin() function to generate a value between -1 and 1, a range that corresponds to the acceptable values of the
SoundTransform.pan property. The SoundTransform object’s pan property is set to the new value, and then the
channel’s soundTransform property is set to use the altered SoundTransform object.
To run this example, replace the filename bigSound.mp3 with the name of a local mp3 file. Then run the example.
You should hear the left channel volume getting louder while the right channel volume gets softer, and vice versa.
In this example, the same effect could be achieved by setting the soundTransform property of the SoundMixer class.
However, that would affect the panning of all sounds currently playing, not just the single sound being played by this
SoundChannel object.
Working with sound metadata
Sound files that use the mp3 format can contain additional data about the sound in the form of ID3 tags.
Not every mp3 file contains ID3 metadata. When a Sound object loads an mp3 sound file, it dispatches an
Event.ID3 event if the sound file contains ID3 metadata. To prevent run-time errors, your application should wait
to receive the Event.ID3 event before accessing the Sound.id3 property for a loaded sound.
The following code shows how to recognize when the ID3 metadata for a sound file has been loaded:
import flash.events.Event;
import flash.media.ID3Info;
import flash.media.Sound;
var s:Sound = new Sound();
s.addEventListener(Event.ID3, onID3InfoReceived);
s.load("mySound.mp3");
function onID3InfoReceived(event:Event)
{
var id3:ID3Info = event.target.id3;
trace("Received ID3 Info:");
for (var propName:String in id3)
{
trace(propName + " = " + id3[propName]);
}
}
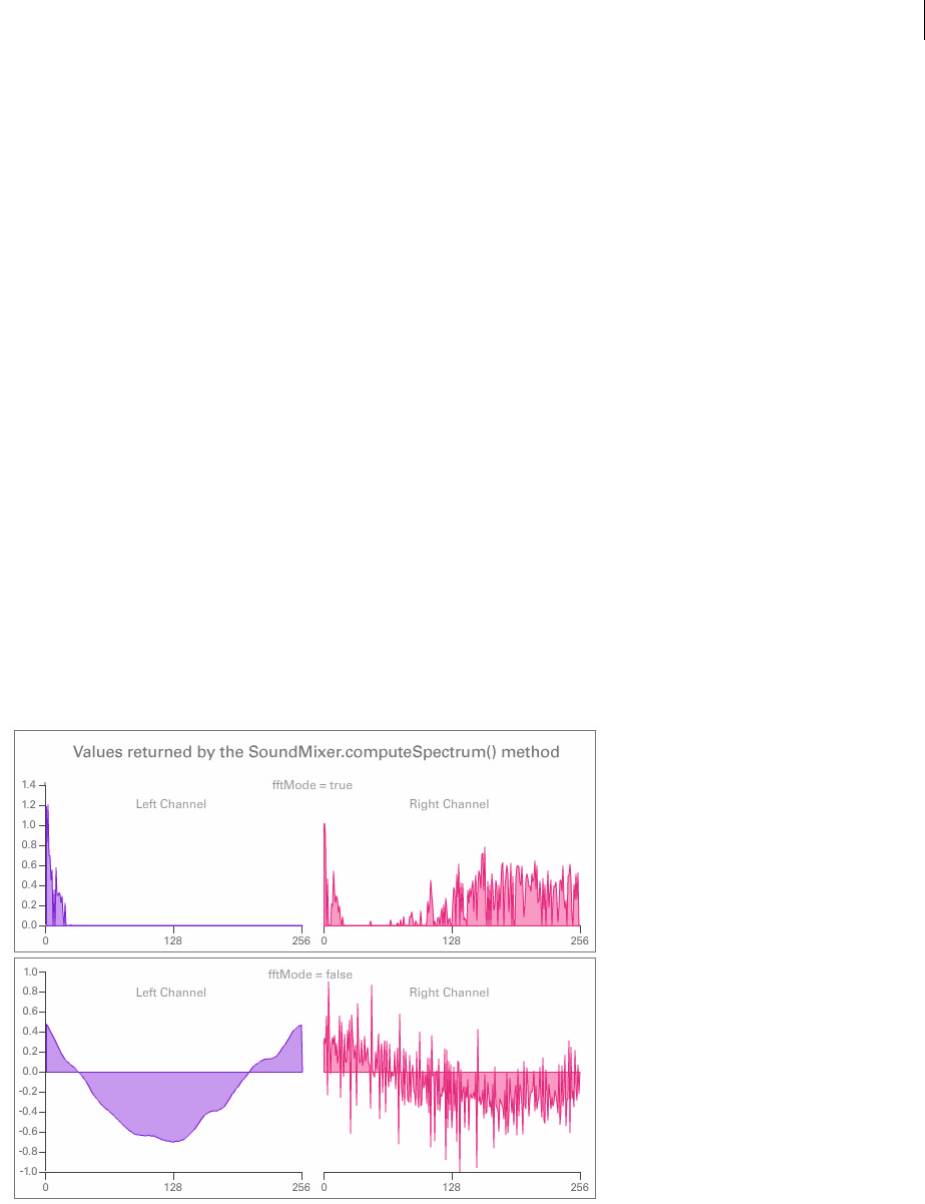
ADOBE FLEX 3
Developer Guide
437
This code starts by creating a Sound object and telling it to listen for the Event.ID3 event. When the sound file’s ID3
metadata is loaded, the onID3InfoReceived() method is called. The target of the Event object that is passed to the
onID3InfoReceived() method is the original Sound object, so the method then gets the Sound object’s id3
property and then iterates through all of its named properties to trace their values.
Accessing raw sound data
The SoundMixer.computeSpectrum() method lets an application read the raw sound data for the waveform that
is currently being played. If more than one SoundChannel object is currently playing the
SoundMixer.computeSpectrum() method shows the combined sound data of every SoundChannel object mixed
together.
The sound data is returned as a ByteArray object containing 512 bytes of data, each of which contains a floating point
value between -1 and 1. These values represent the amplitude of the points in the sound waveform being played. The
values are delivered in two groups of 256, the first group for the left stereo channel and the second group for the right
stereo channel.
The SoundMixer.computeSpectrum() method returns frequency spectrum data rather than waveform data if the
FFTMode parameter is set to true. The frequency spectrum shows amplitude arranged by sound frequency, from
lowest frequency to highest. A Fast Fourier Transform (FFT) is used to convert the waveform data into frequency
spectrum data. The resulting frequency spectrum values range from 0 to roughly 1.414 (the square root of 2).
The following diagram compares the data returned from the computeSpectrum() method when the FFTMode
parameter is set to true and when it is set to false. The sound whose data was used for this diagram contains a loud
bass sound in the left channel and a drum hit sound in the right channel.

ADOBE FLEX 3
Developer Guide
438
The computeSpectrum() method can also return data that has been resampled at a lower bit rate. Generally, this
results in smoother waveform data or frequency data at the expense of detail. The stretchFactor parameter
controls the rate at which the computeSpectrum() method data is sampled. When the stretchFactor parameter
is set to 0, the default, the sound data is sampled at a rate of 44.1 kHz. The rate is halved at each successive value of
the stretchFactor parameter, so a value of 1 specifies a rate of 22.05 kHz, a value of 2 specifies a rate of 11.025 kHz,
and so on. The computeSpectrum() method still returns 256 bytes per stereo channel when a higher
stretchFactor value is used.
The SoundMixer.computeSpectrum() method has some limitations:
•Because sound data from a microphone or from RTMP streams do not pass through the global SoundMixer
object, the SoundMixer.computeSpectrum() method will not return data from those sources.
•If one or more of the sounds being played come from sources outside the current content sandbox, security
restrictions will cause the SoundMixer.computeSpectrum() method to throw an error. For more detail about the
security limitations of the SoundMixer.computeSpectrum() method please see “Security considerations when
loading and playing sounds” on page 434 and “Accessing loaded media as data” on page 553.
However, in an AIR application, content in the application security sandbox (content installed with the AIR appli-
cation) are not restricted by these security limitations.
Building a simple sound visualizer
The following example uses the SoundMixer.computeSpectrum() method to show a chart of the sound waveform
that animates with each frame:
import flash.display.Graphics;
import flash.events.Event;
import flash.media.Sound;
import flash.media.SoundChannel;
import flash.media.SoundMixer;
import flash.net.URLRequest;
const PLOT_HEIGHT:int = 200;
const CHANNEL_LENGTH:int = 256;
var snd:Sound = new Sound();
var req:URLRequest = new URLRequest("bigSound.mp3");
snd.load(req);
var channel:SoundChannel;
channel = snd.play();
addEventListener(Event.ENTER_FRAME, onEnterFrame);
snd.addEventListener(Event.SOUND_COMPLETE, onPlaybackComplete);
var bytes:ByteArray = new ByteArray();

ADOBE FLEX 3
Developer Guide
439
function onEnterFrame(event:Event):void
{
SoundMixer.computeSpectrum(bytes, false, 0);
var g:Graphics = this.graphics;
g.clear();
g.lineStyle(0, 0x6600CC);
g.beginFill(0x6600CC);
g.moveTo(0, PLOT_HEIGHT);
var n:Number = 0;
// left channel
for (var i:int = 0; i < CHANNEL_LENGTH; i++)
{
n = (bytes.readFloat() * PLOT_HEIGHT);
g.lineTo(i * 2, PLOT_HEIGHT - n);
}
g.lineTo(CHANNEL_LENGTH * 2, PLOT_HEIGHT);
g.endFill();
// right channel
g.lineStyle(0, 0xCC0066);
g.beginFill(0xCC0066, 0.5);
g.moveTo(CHANNEL_LENGTH * 2, PLOT_HEIGHT);
for (i = CHANNEL_LENGTH; i > 0; i--)
{
n = (bytes.readFloat() * PLOT_HEIGHT);
g.lineTo(i * 2, PLOT_HEIGHT - n);
}
g.lineTo(0, PLOT_HEIGHT);
g.endFill();
}
function onPlaybackComplete(event:Event)
{
removeEventListener(Event.ENTER_FRAME, onEnterFrame);
}
This example first loads and plays a sound file and then listens for the Event.ENTER_FRAME event which will trigger
the onEnterFrame() method while the sound plays. The onEnterFrame() method starts by calling the
SoundMixer.computeSpectrum() method, which stores the sound wave data in the bytes ByteArray object.
ADOBE FLEX 3
Developer Guide
440
The sound waveform is plotted using the vector drawing API. A for loop cycles through the first 256 data values,
representing the left stereo channel, and draws a line from each point to the next using the Graphics.lineTo()
method. A second for loop cycles through the next set of 256 values, plotting them in reverse order this time, from
right to left. The resulting waveform plots can produce an interesting mirror-image effect, as shown in the following
image.
Capturing sound input
The Microphone class lets your application connect to a microphone or other sound input device on the user’s
system and broadcast the input audio to that system’s speakers or send the audio data to a remote server, such as the
Flash Media Server.
Accessing a microphone
The Microphone class does not have a constructor method. Instead, you use the static Microphone.getMicrophone()
method to obtain a new Microphone instance, as shown below:
var mic:Microphone = Microphone.getMicrophone();
Calling the Microphone.getMicrophone() method without a parameter returns the first sound input device
discovered on the user’s system.
A system can have more than one sound input device attached to it. Your application can use the Microphone.names
property to get an array of the names of all available sound input devices. Then it can call the
Microphone.getMicrophone() method with an index parameter that matches the index value of a device’s name
in the array.
A system might not have a microphone or other sound input device attached to it. You can use the
Microphone.names property or the Microphone.getMicrophone() method to check whether the user has a
sound input device installed. If the user doesn’t have a sound input device installed, the names array has a length of
zero, and the getMicrophone() method returns a value of null.

ADOBE FLEX 3
Developer Guide
441
When your application calls the Microphone.getMicrophone() method, Flash Player displays the Flash Player
Settings dialog box, which prompts the user to either allow or deny Flash Player access to the camera and micro-
phone on the system. After the user clicks on either the Allow button or the Deny button in this dialog, a StatusEvent
is dispatched. The code property of that StatusEvent instance indicates whether microphone access was allowed or
denied, as shown in this example:
import flash.media.Microphone;
var mic:Microphone = Microphone.getMicrophone();
mic.addEventListener(StatusEvent.STATUS, this.onMicStatus);
function onMicStatus(event:StatusEvent):void
{
if (event.code == "Microphone.Unmuted")
{
trace("Microphone access was allowed.");
}
else if (event.code == "Microphone.Muted")
{
trace("Microphone access was denied.");
}
}
The StatusEvent.code property will contain “Microphone.Unmuted” if access was allowed, or “Micro-
phone.Muted” if access was denied.
Note: The Microphone.muted property is set to true or false when the user allows or denies microphone access,
respectively. However the muted property is not set on the Microphone instance until the StatusEvent has been
dispatched, so your application should also wait for the StatusEvent.STATUS event to be dispatched before checking
the Microphone.muted property.
Routing microphone audio to local speakers
Audio input from a microphone can be routed to the local system speakers by calling the
Microphone.setLoopback() method with a parameter value of true.
When sound from a local microphone is routed to local speakers, there is a risk of creating an audio feedback loop,
which can cause loud squealing sounds and can potentially damage sound hardware. Calling the
Microphone.setUseEchoSuppression() method with a parameter value of true reduces, but does not completely
eliminate, the risk that audio feedback will occur. Adobe recommends you always call
Microphone.setUseEchoSuppression(true) before calling Microphone.setLoopback(true), unless you are
certain that the user is playing back the sound using headphones or something other than speakers.
The following code shows how to route the audio from a local microphone to the local system speakers:
var mic:Microphone = Microphone.getMicrophone();
mic.setUseEchoSuppression(true);
mic.setLoopBack(true);
Altering microphone audio
Your application can alter the audio data that comes from a microphone in two ways. First, it can change the gain of
the input sound, which effectively multiplies the input values by a specified amount to create a louder or quieter
sound. The Microphone.gain property accepts numeric values between 0 and 100 inclusive. A value of 50 acts like
a multiplier of one and specifies normal volume. A value of zero acts like a multiplier of zero and effectively silences
the input audio. Values above 50 specify higher than normal volume.

ADOBE FLEX 3
Developer Guide
442
Your application can also change the sample rate of the input audio. Higher sample rates increase sound quality, but
they also create denser data streams that use more resources for transmission and storage. The Microphone.rate
property represents the audio sample rate measured in kilohertz (kHz). The default sample rate is 8 kHz. You can set
the Microphone.rate property to a value higher than 8 kHz if your microphone supports the higher rate. For
example, setting the Microphone.rate property to a value of 11 sets the sample rate to 11 kHz; setting it to 22 sets
the sample rate to 22 kHz and so on.
Detecting microphone activity
To conserve bandwidth and processing resources, Flash Player tries to detect when no sound is being transmitted by
a microphone. When the microphone’s activity level stays below the silence level threshold for a period of time, Flash
Player stops transmitting the audio input and dispatches a simple ActivityEvent instead.
Three properties of the Microphone class monitor and control the detection of activity:
•The read-only activityLevel property indicates the amount of sound the microphone is detecting, on a scale
from 0 to 100.
•The silenceLevel property specifies the amount of sound needed to activate the microphone and dispatch an
ActivityEvent.ACTIVITY event. The silenceLevel property also uses a scale from 0 to 100, and the default value
is 10.
•The silenceTimeout property describes the number of milliseconds that the activity level must stay below the
silence level, until an ActivityEvent.ACTIVITY event is dispatched to indicate that the microphone is now silent.
The default silenceTimeout value is 2000.
Both the Microphone.silenceLevel property and the Microphone.silenceTimeout property are read only, but
their values can be changed by using the Microphone.setSilenceLevel() method.
In some cases, the process of activating the microphone when new activity is detected can cause a short delay.
Keeping the microphone active at all times can remove such activation delays. Your application can call the
Microphone.setSilenceLevel() method with the silenceLevel parameter set to zero to tell Flash Player to
keep the microphone active and keep gathering audio data, even when no sound is being detected. Conversely,
setting the silenceLevel parameter to 100 prevents the microphone from being activated at all.
The following example displays information about the microphone and reports on activity events and status events
dispatched by a Microphone object:
import flash,events.ActivityEvent;
import flash,events.StatusEvent;
import flash.media.Microphone;
var deviceArray:Array = Microphone.names;
trace("Available sound input devices:");
for (var i:int = 0; i < deviceArray.length; i++)
{
trace(" " + deviceArray[i]);
}
var mic:Microphone = Microphone.getMicrophone();
mic.gain = 60;
mic.rate = 11;
mic.setUseEchoSuppression(true);
mic.setLoopBack(true);
mic.setSilenceLevel(5, 1000);

ADOBE FLEX 3
Developer Guide
443
mic.addEventListener(ActivityEvent.ACTIVITY, this.onMicActivity);
mic.addEventListener(StatusEvent.STATUS, this.onMicStatus);
var micDetails:String = "Sound input device name: " + mic.name + '\n';
micDetails += "Gain: " + mic.gain + '\n';
micDetails += "Rate: " + mic.rate + " kHz" + '\n';
micDetails += "Muted: " + mic.muted + '\n';
micDetails += "Silence level: " + mic.silenceLevel + '\n';
micDetails += "Silence timeout: " + mic.silenceTimeout + '\n';
micDetails += "Echo suppression: " + mic.useEchoSuppression + '\n';
trace(micDetails);
function onMicActivity(event:ActivityEvent):void
{
trace("activating=" + event.activating + ", activityLevel=" +
mic.activityLevel);
}
function onMicStatus(event:StatusEvent):void
{
trace("status: level=" + event.level + ", code=" + event.code);
}
When you run the above example, speak or makes noises into your system microphone and watch the resulting trace
statements appear in a console or debug window.
Sending audio to and from a media server
Additional audio capabilities are available when using ActionScript with a streaming media server such as Flash
Media Server.
In particular, your application can attach a Microphone object to a NetStream object and transmit data directly from
the user’s microphone to the server. Audio data can also be streamed from the server to a Flash or Flex application
and played back as part of a MovieClip or by using a Video object.
For more information, see the Flash Media Server documentation online at http://livedocs.macromedia.com.
Example: Podcast Player
A podcast is a sound file that is distributed over the Internet, on demand or by subscription. Podcasts are usually
published as part of a series, which is also called a podcast channel. Because podcast episodes can last anywhere from
one minute to many hours, they are usually streamed while playing. Podcast episodes, which are also called items,
are usually delivered in the mp3 file format. Video podcasts are also popular, but this sample application plays only
audio podcasts that use mp3 files.
This example is not a full-featured podcast aggregator application. For example, it does not manage subscriptions to
specific podcasts or remember which podcasts the user has listened to the next time the application is run. It could
serve as a starting point for a more full-featured podcast aggregator.
The Podcast Player example illustrates the following ActionScript programming techniques:
•Reading an external RSS feed and parsing its XML content
•Creating a SoundFacade class to simplify loading and playback of sound files

ADOBE FLEX 3
Developer Guide
444
•Displaying sound playback progress
•Pausing and resuming sound playback
To get the application files for this sample, see www.adobe.com/go/learn_programmingAS3samples_flash. The
Podcast Player application files can be found in the folder Samples/PodcastPlayer. The application consists of the
following files:
Reading RSS data for a podcast channel
The Podcast Player application starts by reading information about a number of podcast channels and their episodes:
1. First, the application reads an XML configuration file that contains a list of podcast channels and displays the list
of channels to the user.
2. When the user selects one of the podcast channels, it reads the RSS feed for the channel and displays a list of the
channel episodes.
This example uses the URLLoader utility class to retrieve text-based data from a remote location or a local file. The
Podcast Player first creates a URLLoader object to get a list of RSS feeds in XML format from the playerconfig.xml
file. Next, when the user selects a specific feed from the list, a new URLLoader object is created to read the RSS data
from that feed’s URL.
Simplifying sound loading and playback using the SoundFacade class
The ActionScript 3.0 sound architecture is powerful but complex. Applications that only need basic sound loading
and playback features can use a class that hides some of the complexity by providing a simpler set of method calls
and events. In the world of software design patterns, such a class is called a facade.
The SoundFacade class presents a single interface for performing the following tasks:
•Loading sound files using a Sound object, a SoundLoaderContext object, and the SoundMixer class
•Playing sound files using the Sound object and the SoundChannel object
File Description
PodcastPlayer.mxml
or
PodcastPlayer.fla
The user interface for the application for Flex (MXML) or Flash (FLA).
SoundPlayer.mxml An MXML component that displays playback buttons and progress bars and controls sound playback, for
Flex only.
RSSBase.as A base class that provides common properties and methods for the RSSChannel class and the RSSItem
class.
RSSChannel.as An ActionScript class that holds data about an RSS channel.
RSSItem.as An ActionScript class that holds data about an RSS item.
SoundFacade.as The main ActionScript class for the application. It encapsulates the methods and events of the Sound
class and the SoundChannel class and adds support for pausing and resuming playback.
URLService.as An ActionScript class that retrieves data from a remote URL.
playerconfig.xml An XML file containing a list of RSS feeds that represent podcast channels.

ADOBE FLEX 3
Developer Guide
445
•Dispatching playback progress events
•Pausing and resuming playback of the sound using the Sound object and the SoundChannel object
The SoundFacade class tries to offer most of the functionality of the ActionScript sound classes with less complexity.
The following code shows the class declaration, the class properties, and the SoundFacade() constructor method:
public class SoundFacade extends EventDispatcher
{
public var s:Sound;
public var sc:SoundChannel;
public var url:String;
public var bufferTime:int = 1000;
public var isLoaded:Boolean = false;
public var isReadyToPlay:Boolean = false;
public var isPlaying:Boolean = false;
public var isStreaming:Boolean = true;
public var autoLoad:Boolean = true;
public var autoPlay:Boolean = true;
public var pausePosition:int = 0;
public static const PLAY_PROGRESS:String = "playProgress";
public var progressInterval:int = 1000;
public var playTimer:Timer;
public function SoundFacade(soundUrl:String, autoLoad:Boolean = true,
autoPlay:Boolean = true, streaming:Boolean = true,
bufferTime:int = -1):void
{
this.url = soundUrl;
// Sets Boolean values that determine the behavior of this object
this.autoLoad = autoLoad;
this.autoPlay = autoPlay;
this.isStreaming = streaming;
// Defaults to the global bufferTime value
if (bufferTime < 0)
{
bufferTime = SoundMixer.bufferTime;
}
// Keeps buffer time reasonable, between 0 and 30 seconds
this.bufferTime = Math.min(Math.max(0, bufferTime), 30000);
if (autoLoad)
{
load();
}
}
The SoundFacade class extends the EventDispatcher class so that it can dispatch its own events. The class code first
declares properties for a Sound object and a SoundChannel object. The class also stores the value of the URL of the
sound file and a bufferTime property to use when streaming the sound. In addition, it accepts some Boolean
parameter values that affect the loading and playback behavior:

ADOBE FLEX 3
Developer Guide
446
•The autoLoad parameter tells the object that sound loading should start as soon as this object is created.
•The autoPlay parameter indicates that sound playing should start as soon as enough sound data has been
loaded. If this is a streaming sound, playback will begin as soon as enough data, as specified by the bufferTime
property, has loaded.
•The streaming parameter indicates that this sound file can start playing before loading has completed.
The bufferTime parameter defaults to a value of -1. If the constructor method detects a negative value in the
bufferTime parameter, it sets the bufferTime property to the value of SoundMixer.bufferTime. This lets the
application default to the global SoundMixer.bufferTime value as desired.
If the autoLoad parameter is set to true, the constructor method immediately calls the following load() method
to start loading the sound file:
public function load():void
{
if (this.isPlaying)
{
this.stop();
this.s.close();
}
this.isLoaded = false;
this.s = new Sound();
this.s.addEventListener(ProgressEvent.PROGRESS, onLoadProgress);
this.s.addEventListener(Event.OPEN, onLoadOpen);
this.s.addEventListener(Event.COMPLETE, onLoadComplete);
this.s.addEventListener(Event.ID3, onID3);
this.s.addEventListener(IOErrorEvent.IO_ERROR, onIOError);
this.s.addEventListener(SecurityErrorEvent.SECURITY_ERROR, onIOError);
var req:URLRequest = new URLRequest(this.url);
var context:SoundLoaderContext = new SoundLoaderContext(this.bufferTime, true);
this.s.load(req, context);
}
The load() method creates a new Sound object and then adds listeners for all of the important sound events. Then
it tells the Sound object to load the sound file, using a SoundLoaderContext object to pass in the bufferTime value.
Because the url property can be changed, a SoundFacade instance can be used to play different sound files in
succession: simply change the url property and call the load() method, and the new sound file will be loaded.
The following three event listener methods show how the SoundFacade object tracks loading progress and decides
when to start playing the sound:
public function onLoadOpen(event:Event):void
{
if (this.isStreaming)
{
this.isReadyToPlay = true;
if (autoPlay)
{
this.play();
}
}
this.dispatchEvent(event.clone());
}

ADOBE FLEX 3
Developer Guide
447
public function onLoadProgress(event:ProgressEvent):void
{
this.dispatchEvent(event.clone());
}
public function onLoadComplete(event:Event):void
{
this.isReadyToPlay = true;
this.isLoaded = true;
this.dispatchEvent(evt.clone());
if (autoPlay && !isPlaying)
{
play();
}
}
The onLoadOpen() method executes when sound loading starts. If the sound can be played in streaming mode, the
onLoadComplete() method sets the isReadyToPlay flag to true right away. The isReadyToPlay flag determines
whether the application can start the sound playing, perhaps in response to a user action like clicking a Play button.
The SoundChannel class manages the buffering of sound data, so there is no need to explicitly check whether enough
data has been loaded before calling the play() method.
The onLoadProgress() method executes periodically during the loading process. It simply dispatches a clone of its
ProgressEvent object for use by code that uses this SoundFacade object.
When the sound data has been fully loaded the onLoadComplete() method executes, calling the play() method
for non-streaming sounds if needed. The play() method itself is shown below.
public function play(pos:int = 0):void
{
if (!this.isPlaying)
{
if (this.isReadyToPlay)
{
this.sc = this.s.play(pos);
this.sc.addEventListener(Event.SOUND_COMPLETE, onPlayComplete);
this.isPlaying = true;
this.playTimer = new Timer(this.progressInterval);
this.playTimer.addEventListener(TimerEvent.TIMER, onPlayTimer);
this.playTimer.start();
}
}
}
The play() method calls the Sound.play() method if the sound is ready to play. The resulting SoundChannel
object is stored in the sc property. The play() method then creates a Timer object that will be used to dispatch
playback progress events at regular intervals.
Displaying playback progress
Creating a Timer object to drive playback monitoring is complex operation that you should only have to code once.
Encapsulating this Timer logic in a reusable class like the SoundFacade class lets applications listen to the same kinds
of progress events when a sound is loading and when it is playing.
The Timer object that is created by the SoundFacade.play() method dispatches a TimerEvent instance every
second. The following onPlayTimer() method executes whenever a new TimerEvent arrives:

ADOBE FLEX 3
Developer Guide
448
public function onPlayTimer(event:TimerEvent):void
{
var estimatedLength:int =
Math.ceil(this.s.length / (this.s.bytesLoaded / this.s.bytesTotal));
var progEvent:ProgressEvent =
new ProgressEvent(PLAY_PROGRESS, false, false, this.sc.position, estimatedLength);
this.dispatchEvent(progEvent);
}
The onPlayTimer() method implements the size estimation technique described in the section “Monitoring
playback” on page 432. Then it creates a new ProgressEvent instance with an event type of
SoundFacade.PLAY_PROGRESS, with the bytesLoaded property set to the current position of the SoundChannel
object and the bytesTotal property set to the estimated length of the sound data.
Pausing and resuming playback
The SoundFacade.play() method shown previously accepts a pos parameter corresponding to a starting position
in the sound data. If the pos value is zero, the sound starts playing from the beginning.
The SoundFacade.stop() method also accepts a pos parameter as shown here:
public function stop(pos:int = 0):void
{
if (this.isPlaying)
{
this.pausePosition = pos;
this.sc.stop();
this.playTimer.stop();
this.isPlaying = false;
}
}
Whenever the SoundFacade.stop() method is called, it sets the pausePosition property so that the application
knows where to position the playhead if the user wants to resume playback of the same sound.
The SoundFacade.pause() and SoundFacade.resume() methods shown below invoke the
SoundFacade.stop() and SoundFacade.play() methods respectively, passing a pos parameter value each time.
public function pause():void
{
stop(this.sc.position);
}
public function resume():void
{
play(this.pausePosition);
}
The pause() method passes the current SoundChannel.position value to the play() method, which stores that
value in the pausePosition property. The resume() method starts playing the same sound again using the
pausePosition value as the starting point.
Extending the Podcast Player example
This example presents a bare-bones Podcast Player that showcases the use of the reusable SoundFacade class. You
could add other features to enhance the usefulness of this application, including the following:

ADOBE FLEX 3
Developer Guide
449
•Store the list of feeds and usage information about each episode in a SharedObject instance that can be used the
next time the user runs the application.
•Let the user add his or her own RSS feeds to the list of podcast channels.
•Remember the position of the playhead when the user stops or leaves an episode, so it can be restarted from that
point next time the user runs the application.
•Download mp3 files of episodes for listening offline, when the user is not connected to the Internet.
•Add subscription features that periodically check for new episodes in a podcast channel and update the episode
list automatically.
•Add podcast searching and browsing functionality using an API from a podcast hosting service like Odeo.com.

450
Chapter 22: Capturing user input
This chapter describes how to create interactivity by using ActionScript™ 3.0 to respond to user activity. It discusses
keyboard and mouse events, and then proceeds to more advanced topics, including customization of the context
menu and focus management. This chapter concludes with WordSearch, an example of an application that responds
to mouse input.
Note that this chapter assumes that you are already familiar with the ActionScript 3.0 event model. For more infor-
mation, see “Handling events” on page 227.
Contents
Basics of user input . . . . . . . . . . . . . . . . . . . . . . . . . . . . . . . . . . . . . . . . . . . . . . . . . . . . . . . . . . . . . . . . . . . . . . . . . . . . . . . 450
Capturing keyboard input . . . . . . . . . . . . . . . . . . . . . . . . . . . . . . . . . . . . . . . . . . . . . . . . . . . . . . . . . . . . . . . . . . . . . . . . . 451
Capturing mouse input . . . . . . . . . . . . . . . . . . . . . . . . . . . . . . . . . . . . . . . . . . . . . . . . . . . . . . . . . . . . . . . . . . . . . . . . . . . 453
Example: WordSearch . . . . . . . . . . . . . . . . . . . . . . . . . . . . . . . . . . . . . . . . . . . . . . . . . . . . . . . . . . . . . . . . . . . . . . . . . . . . 456
Basics of user input
Introduction to capturing user input
User interaction, whether by keyboard, mouse, camera, or a combination of these devices, is the foundation of inter-
activity. In ActionScript 3.0, identifying and responding to user interaction primarily involves listening to events.
The InteractiveObject class, a subclass of the DisplayObject class, provides the common structure of events and
functionality necessary for handling user interaction. You do not directly create an instance of the InteractiveObject
class. Instead, display objects such as SimpleButton, Sprite, TextField, and various Flash and Flex components inherit
their user interaction model from this class and therefore share a common structure. This means that the techniques
you learn and the code you write to handle user interaction in an object derived from InteractiveObject are appli-
cable to all the others.
The following typical user interaction tasks are described in this chapter:
•Capturing application-wide keyboard input
•Capturing keyboard input to a specific display object
•Capturing application-wide mouse actions
•Capturing mouse input to a specific display object
•Creating drag-and-drop interactivity
•Creating a custom mouse cursor (mouse pointer)
•Adding new behaviors to the context menu
•Managing focus
Important concepts and terms
It’s important to familiarize yourself with the following key user interaction terms before proceeding:

ADOBE FLEX 3
Developer Guide
451
•Character code: A numeric code representing a character in the current character set (associated with a key
being pressed on the keyboard). For example, “D” and “d” have different character codes even though they’re created
by the same key on a U.S. English keyboard.
•Context menu: The menu that appears when a user right-clicks or uses a particular keyboard-mouse combi-
nation. Context menu commands typically apply directly to what has been clicked. For example, a context menu for
an image may contain a command to show the image in a separate window and a command to download it.
•Focus: The indication that a selected element is active and that it is the target of keyboard or mouse interaction.
•Key code: A numeric code corresponding to a physical key on the keyboard.
Capturing keyboard input
Display objects that inherit their interaction model from the InteractiveObject class can respond to keyboard events
by using event listeners. For example, you can place an event listener on the Stage to listen for and respond to
keyboard input. In the following code, an event listener captures a key press, and the key name and key code
properties are displayed:
function reportKeyDown(event:KeyboardEvent):void
{
trace("Key Pressed: " + String.fromCharCode(event.charCode) + " (character code: " +
event.charCode + ")");
}
stage.addEventListener(KeyboardEvent.KEY_DOWN, reportKeyDown);
Some keys, such as the Ctrl key, generate events even though they have no glyph representation.
In the previous code example, the keyboard event listener captured keyboard input for the entire Stage. You can also
write an event listener for a specific display object on the Stage; this event listener is triggered when the object has
the focus.
In the following example, keystrokes are reflected in the Output panel only when the user types inside the TextField
instance. Holding the Shift key down temporarily changes the border color of the TextField to red.
This code assumes there is a TextField instance named tf on the Stage.
tf.border = true;
tf.type = "input";
tf.addEventListener(KeyboardEvent.KEY_DOWN,reportKeyDown);
tf.addEventListener(KeyboardEvent.KEY_UP,reportKeyUp);
function reportKeyDown(event:KeyboardEvent):void
{
trace("Key Pressed: " + String.fromCharCode(event.charCode) + " (key code: " +
event.keyCode + " character code: " + event.charCode + ")");
if (event.keyCode == Keyboard.SHIFT) tf.borderColor = 0xFF0000;
}

ADOBE FLEX 3
Developer Guide
452
function reportKeyUp(event:KeyboardEvent):void
{
trace("Key Released: " + String.fromCharCode(event.charCode) + " (key code: " +
event.keyCode + " character code: " + event.charCode + ")");
if (event.keyCode == Keyboard.SHIFT)
{
tf.borderColor = 0x000000;
}
}
The TextField class also reports a textInput event that you can listen for when a user enters text. For more infor-
mation, see “Capturing text input” on page 360.
Understanding key codes and character codes
You can access the keyCode and charCode properties of a keyboard event to determine what key was pressed and
then trigger other actions. The keyCode property is a numeric value that corresponds to the value of a key on the
keyboard. The charCode property is the numeric value of that key in the current character set. (The default character
set is UTF-8, which supports ASCII.)
The primary difference between the key code and character values is that a key code value represents a particular
key on the keyboard (the 1 on a keypad is different than the 1 in the top row, but the key that generates “1” and the
key that generates “!” are the same key) and the character value represents a particular character (the R and r
characters are different).
Note: For the mappings between keys and their character code values in ASCII, see “Keyboard Keys and Key Code
Values” on page 711 in Learning ActionScript 2.0 in Flash.
The mappings between keys and their key codes is dependent on the device and the operating system. For this
reason, you should not use key mappings to trigger actions. Instead, you should use the predefined constant values
provided by the Keyboard class to reference the appropriate keyCode properties. For example, instead of using the
key mapping for the Shift key, use the Keyboard.SHIFT constant (as shown in the preceding code sample).
Understanding KeyboardEvent precedence
As with other events, the keyboard event sequence is determined by the display object hierarchy and not the order
in which addEventListener() methods are assigned in code.
For example, suppose you place a text field called tf inside a movie clip called container and add an event listener
for a keyboard event to both instances, as the following example shows:
container.addEventListener(KeyboardEvent.KEY_DOWN,reportKeyDown);
container.tf.border = true;
container.tf.type = "input";
container.tf.addEventListener(KeyboardEvent.KEY_DOWN,reportKeyDown);
function reportKeyDown(event:KeyboardEvent):void
{
trace(event.currentTarget.name + " hears key press: " +
String.fromCharCode(event.charCode) + " (key code: " + event.keyCode + " character code: "
+ event.charCode + ")");
}
Because there is a listener on both the text field and its parent container, the reportKeyDown() function is called
twice for every keystroke inside the TextField. Note that for each key pressed, the text field dispatches an event before
the container movie clip dispatches an event.

ADOBE FLEX 3
Developer Guide
453
The operating system and the web browser will process keyboard events before Adobe Flash Player or AIR. For
example, in Microsoft Internet Explorer, pressing Ctrl+W closes the browser window before any contained SWF file
dispatches a keyboard event.
Capturing mouse input
Mouse clicks create mouse events that can be used to trigger interactive functionality. You can add an event listener
to the Stage to listen for mouse events that occur anywhere within the SWF file. You can also add event listeners to
objects on the Stage that inherit from InteractiveObject (for example, Sprite or MovieClip); these listeners are
triggered when the object is clicked.
As with keyboard events, mouse events bubble. In the following example, because square is a child of the Stage, the
event dispatches both from the sprite square as well as from the Stage object when the square is clicked:
var square:Sprite = new Sprite();
square.graphics.beginFill(0xFF0000);
square.graphics.drawRect(0,0,100,100);
square.graphics.endFill();
square.addEventListener(MouseEvent.CLICK, reportClick);
square.x =
square.y = 50;
addChild(square);
stage.addEventListener(MouseEvent.CLICK, reportClick);
function reportClick(event:MouseEvent):void
{
trace(event.currentTarget.toString() + " dispatches MouseEvent. Local coords [" +
event.localX + "," + event.localY + "] Stage coords [" + event.stageX + "," + event.stageY
+ "]");
}
In the previous example, notice that the mouse event contains positional information about the click. The localX
and localY properties contain the location of the click on the lowest child in the display chain. For example, clicking
at the top-left corner of square reports local coordinates of [0,0] because that is the registration point of square.
Alternatively, the stageX and stageY properties refer to the global coordinates of the click on the Stage. The same
click reports [50,50] for these coordinates, because square was moved to these coordinates. Both of these coordinate
pairs can be useful depending on how you want to respond to user interaction.
The MouseEvent object also contains altKey, ctrlKey, and shiftKey Boolean properties. You can use these
properties to check if the Alt, Ctrl, or Shift key is also being pressed at the time of the mouse click.
Creating drag-and-drop functionality
Drag-and-drop functionality allows users to select an object while pressing the left mouse button, move the object
to a new location on the screen, and then drop it at the new location by releasing the left mouse button. The following
code shows an example of this:
import flash.display.Sprite;
import flash.events.MouseEvent;
var circle:Sprite = new Sprite();
circle.graphics.beginFill(0xFFCC00);
circle.graphics.drawCircle(0, 0, 40);

ADOBE FLEX 3
Developer Guide
454
var target1:Sprite = new Sprite();
target1.graphics.beginFill(0xCCFF00);
target1.graphics.drawRect(0, 0, 100, 100);
target1.name = "target1";
var target2:Sprite = new Sprite();
target2.graphics.beginFill(0xCCFF00);
target2.graphics.drawRect(0, 200, 100, 100);
target2.name = "target2";
addChild(target1);
addChild(target2);
addChild(circle);
circle.addEventListener(MouseEvent.MOUSE_DOWN, mouseDown)
function mouseDown(event:MouseEvent):void
{
circle.startDrag();
}
circle.addEventListener(MouseEvent.MOUSE_UP, mouseReleased);
function mouseReleased(event:MouseEvent):void
{
circle.stopDrag();
trace(circle.dropTarget.name);
}
For more details, see “Creating drag-and-drop interaction” on page 266.
Customizing the mouse cursor
The mouse cursor (mouse pointer) can be hidden or swapped for any display object on the Stage. To hide the mouse
cursor, call the Mouse.hide() method. Customize the cursor by calling Mouse.hide(), listening to the Stage for the
MouseEvent.MOUSE_MOVE event, and setting the coordinates of a display object (your custom cursor) to the stageX
and stageY properties of the event. The following example illustrates a basic execution of this task:
var cursor:Sprite = new Sprite();
cursor.graphics.beginFill(0x000000);
cursor.graphics.drawCircle(0,0,20);
cursor.graphics.endFill();
addChild(cursor);
stage.addEventListener(MouseEvent.MOUSE_MOVE,redrawCursor);
Mouse.hide();
function redrawCursor(event:MouseEvent):void
{
cursor.x = event.stageX;
cursor.y = event.stageY;
}
Customizing the context menu
Every object that inherits from the InteractiveObject class can have a unique context menu, which is displayed when
a user right-clicks within the SWF file. Several commands are included by default, including Forward, Back, Print,
Quality, and Zoom.

ADOBE FLEX 3
Developer Guide
455
You can remove all the default commands from the menu, except for the Settings and About commands. Setting the
Stage property showDefaultContextMenu to false removes these commands from the context menu.
To create a customized context menu for a specific display object, create a new instance of the ContextMenu class,
call the hideBuiltInItems() method, and assign that instance to the contextMenu property of that DisplayObject
instance. The following example provides a dynamically drawn square with a context menu command to change it
to a random color:
var square:Sprite = new Sprite();
square.graphics.beginFill(0x000000);
square.graphics.drawRect(0,0,100,100);
square.graphics.endFill();
square.x =
square.y = 10;
addChild(square);
var menuItem:ContextMenuItem = new ContextMenuItem("Change Color");
menuItem.addEventListener(ContextMenuEvent.MENU_ITEM_SELECT,changeColor);
var customContextMenu:ContextMenu = new ContextMenu();
customContextMenu.hideBuiltInItems();
customContextMenu.customItems.push(menuItem);
square.contextMenu = customContextMenu;
function changeColor(event:ContextMenuEvent):void
{
square.transform.colorTransform = getRandomColor();
}
function getRandomColor():ColorTransform
{
return new ColorTransform(Math.random(), Math.random(), Math.random(),1,(Math.random()
* 512) - 255, (Math.random() * 512) -255, (Math.random() * 512) - 255, 0);
}
Managing focus
An interactive object can receive focus, either programmatically or through a user action. In both cases, setting the
focus changes the object’s focus property to true. Additionally, if the tabEnabled property is set to true, the user
can pass focus from one object to another by pressing the Tab key. Note that the tabEnabled value is false by
default, except in the following cases:
•For a SimpleButton object, the value is true.
•For a input text field, the value is true.
•For a Sprite or MovieClip object with buttonMode set to true, the value is true.
In each of these situations, you can add a listener for FocusEvent.FOCUS_IN or FocusEvent.FOCUS_OUT to provide
additional behavior when focus changes. This is particularly useful for text fields and forms, but can also be used on
sprites, movie clips, or any object that inherits from the InteractiveObject class. The following example shows how
to enable focus cycling with the Tab key and how to respond to the subsequent focus event. In this case, each square
changes color as it receives focus.
Note: The Flash authoring tool uses keyboard shortcuts to manage focus; therefore, to properly simulate focus
management, SWF files should be tested in a browser or AIR rather than within Flash.
var rows:uint = 10;
var cols:uint = 10;
var rowSpacing:uint = 25;
var colSpacing:uint = 25;

ADOBE FLEX 3
Developer Guide
456
var i:uint;
var j:uint;
for (i = 0; i < rows; i++)
{
for (j = 0; j < cols; j++)
{
createSquare(j * colSpacing, i * rowSpacing, (i * cols) + j);
}
}
function createSquare(startX:Number, startY:Number, tabNumber:uint):void
{
var square:Sprite = new Sprite();
square.graphics.beginFill(0x000000);
square.graphics.drawRect(0, 0, colSpacing, rowSpacing);
square.graphics.endFill();
square.x = startX;
square.y = startY;
square.tabEnabled = true;
square.tabIndex = tabNumber;
square.addEventListener(FocusEvent.FOCUS_IN, changeColor);
addChild(square);
}
function changeColor(event:FocusEvent):void
{
event.target.transform.colorTransform = getRandomColor();
}
function getRandomColor():ColorTransform
{
// Generate random values for the red, green, and blue color channels.
var red:Number = (Math.random() * 512) - 255;
var green:Number = (Math.random() * 512) - 255;
var blue:Number = (Math.random() * 512) - 255;
// Create and return a ColorTransform object with the random colors.
return new ColorTransform(1, 1, 1, 1, red, green, blue, 0);
}
Example: WordSearch
This example demonstrates user interaction by handling mouse events. Users build as many words as possible from
a random grid of letters, spelling by moving horizontally or vertically in the grid, but never using the same letter
twice.This example demonstrates the following features of ActionScript 3.0:
•Building a grid of components dynamically
•Responding to mouse events
•Maintaining a score based on user interaction
To get the application files for this sample, see www.adobe.com/go/learn_programmingAS3samples_flash. The
WordSearch application files can be found in the folder Samples/WordSearch. The application consists of the
following files:

ADOBE FLEX 3
Developer Guide
457
Loading a dictionary
To create a game that involves finding words, a dictionary is needed. The example includes a text file called
dictionary.txt that contains a list of words separated by carriage returns. After creating an array named words, the
loadDictionary() function requests this file, and when it loads successfully, the file becomes a long string. You can
parse this string into an array of words by using the split() method, breaking at each instance of a carriage return
(character code 10) or new line (character code 13). This parsing occurs in the dictionaryLoaded() function:
words = dictionaryText.split(String.fromCharCode(13, 10));
Creating the user interface
After the words have been stored, you can set up the user interface. Create two Button instances: one for submitting
a word, and another for clearing a word that is currently being spelled. In each case, you must respond to user input
by listening to the MouseEvent.CLICK event that the button broadcasts and then calling a function. In the
setupUI() function, this code creates the listeners on the two buttons:
submitWordButton.addEventListener(MouseEvent.CLICK,submitWord);
clearWordButton.addEventListener(MouseEvent.CLICK,clearWord);
Generating a game board
The game board is a grid of random letters. In the generateBoard() function, a two-dimensional grid is created by
nesting one loop inside another. The first loop increments rows and the second increments the total number of
columns per row. Each of the cells created by these rows and columns contains a button that represents a letter on
the board.
private function generateBoard(startX:Number, startY:Number, totalRows:Number,
totalCols:Number, buttonSize:Number):void
{
buttons = new Array();
var colCounter:uint;
var rowCounter:uint;
for (rowCounter = 0; rowCounter < totalRows; rowCounter++)
{
for (colCounter = 0; colCounter < totalCols; colCounter++)
{
var b:Button = new Button();
b.x = startX + (colCounter*buttonSize);
b.y = startY + (rowCounter*buttonSize);
b.addEventListener(MouseEvent.CLICK, letterClicked);
b.label = getRandomLetter().toUpperCase();
b.setSize(buttonSize,buttonSize);
b.name = "buttonRow"+rowCounter+"Col"+colCounter;
addChild(b);
buttons.push(b);
}
}
}
File Description
WordSearch.as The class that provides the main functionality of the application.
WordSearch.fla The main application file for Flash.
dictionary.txt A file used to determine if spelled words are scorable and spelled correctly.

ADOBE FLEX 3
Developer Guide
458
Although a listener is added for a MouseEvent.CLICK event on only one line, because it is in a for loop, it is assigned
to each Button instance. Also, each button is assigned a name derived from its row and column position, which
provides an easy way to reference the row and column of each button later in the code.
Building words from user input
Words can be spelled by selecting letters that are vertically or horizontally adjacent, but never using the same letter
twice. Each click generates a mouse event, at which point the word the user is spelling must be checked to ensure it
properly continues from letters that have previously been clicked. If it is not, the previous word is removed and a new
one is started. This check occurs in the isLegalContinuation() method.
private function isLegalContinuation(prevButton:Button, currButton:Button):Boolean
{
var currButtonRow:Number = Number(currButton.name.charAt(currButton.name.
indexOf("Row") + 3));
var currButtonCol:Number = Number(currButton.name.charAt(currButton.name.indexOf("Col")
+ 3));
var prevButtonRow:Number = Number(prevButton.name.charAt(prevButton.name.indexOf("Row")
+ 3));
var prevButtonCol:Number = Number(prevButton.name.charAt(prevButton.name.indexOf("Col")
+ 3));
return ((prevButtonCol == currButtonCol && Math.abs(prevButtonRow - currButtonRow) <= 1)
||
(prevButtonRow == currButtonRow && Math.abs(prevButtonCol - currButtonCol) <=
1));
}
The charAt() and indexOf() methods of the String class retrieve the appropriate rows and columns from both the
currently clicked button and the previously clicked button. The isLegalContinuation() method returns true if
the row or column is unchanged and if the row or column that has been changed is within a single increment from
the previous one. If you want to change the rules of the game and allow diagonal spelling, you can remove the checks
for an unchanged row or column and the final line would look like this:
return (Math.abs(prevButtonRow - currButtonRow) <= 1) && Math.abs(prevButtonCol -
currButtonCol) <= 1));
Checking word submissions
To complete the code for the game, mechanisms for checking word submissions and tallying the score are needed.
The searchForWord() method contains both:
private function searchForWord(str:String):Number
{
if (words && str)
{
var i:uint = 0
for (i = 0; i < words.length; i++)
{
var thisWord:String = words[i];
if (str == words[i])
{
return i;
}
}
return -1;
}

ADOBE FLEX 3
Developer Guide
459
else
{
trace("WARNING: cannot find words, or string supplied is null");
}
return -1;
}
This function loops through all of the words in the dictionary. If the user’s word matches a word in the dictionary,
its position in the dictionary is returned. The submitWord() method then checks the response and updates the score
if the position is valid.
Customization
At the beginning of the class are several constants. You can modify this game by modifying these variables. For
example, you can change the amount of time available to play by increasing the TOTAL_TIME variable. You can also
increase the PERCENT_VOWELS variable slightly to increase the likelihood of finding words.

460
Chapter 23: Networking and
communication
This chapter explains how to enable your SWF file to communicate with external files and other Adobe Flash® Player
9 and Adobe® AIR™ instances. It also explains how to load data from external sources, send messages between a Java
server and Flash Player, and perform file uploads and downloads using the FileReference and FileReferenceList
classes.
Contents
Basics of networking and communication . . . . . . . . . . . . . . . . . . . . . . . . . . . . . . . . . . . . . . . . . . . . . . . . . . . . . . . . . . . 460
Working with external data . . . . . . . . . . . . . . . . . . . . . . . . . . . . . . . . . . . . . . . . . . . . . . . . . . . . . . . . . . . . . . . . . . . . . . . . 462
Connecting to other Flash Player and AIR instances . . . . . . . . . . . . . . . . . . . . . . . . . . . . . . . . . . . . . . . . . . . . . . . . . . 467
Socket connections . . . . . . . . . . . . . . . . . . . . . . . . . . . . . . . . . . . . . . . . . . . . . . . . . . . . . . . . . . . . . . . . . . . . . . . . . . . . . . . 472
Storing local data. . . . . . . . . . . . . . . . . . . . . . . . . . . . . . . . . . . . . . . . . . . . . . . . . . . . . . . . . . . . . . . . . . . . . . . . . . . . . . . . . 475
Working with file upload and download . . . . . . . . . . . . . . . . . . . . . . . . . . . . . . . . . . . . . . . . . . . . . . . . . . . . . . . . . . . . . 478
Example: Building a Telnet client . . . . . . . . . . . . . . . . . . . . . . . . . . . . . . . . . . . . . . . . . . . . . . . . . . . . . . . . . . . . . . . . . . . 486
Example: Uploading and downloading files . . . . . . . . . . . . . . . . . . . . . . . . . . . . . . . . . . . . . . . . . . . . . . . . . . . . . . . . . . 488
Basics of networking and communication
Introduction to networking and communication
When you build more complex ActionScript™ applications, you often need to communicate with server-side scripts,
or load data from external XML or text files. The flash.net package contains classes to send and receive data across
the Internet—for example, to load content from remote URLs, to communicate with other Flash Player or AIR
instances, and to connect to remote websites.
In ActionScript 3.0, you can load external files with the URLLoader and URLRequest classes. You then use a specific
class to access the data, depending on the type of data that was loaded. For instance, if the remote content is
formatted as name-value pairs, you use the URLVariables class to parse the server results. Alternatively, if the file
loaded using the URLLoader and URLRequest classes is a remote XML document, you can parse the XML document
using the XML class’s constructor, the XMLDocument class’s constructor, or the XMLDocument.parseXML()
method. This allows you to simplify your ActionScript code because the code for loading external files is the same
whether you use the URLVariables, XML, or some other class to parse and work with the remote data.
The flash.net package also contains classes for other types of remote communication. These include the FileRef-
erence class for uploading and downloading files from a server, the Socket and XMLSocket classes that allow you to
communicate directly with remote computers over socket connections, and the NetConnection and NetStream
classes, which are used for communicating with Flash-specific server resources (such as Flash Media Server and
Flash Remoting servers) as well as for loading video files.

ADOBE FLEX 3
Developer Guide
461
Finally, the flash.net package includes classes for communication on the users’ local computer. These include the
LocalConnection class, which allows you to communicate between two or more SWF files running on a single
computer, and the SharedObject class, which allows you to store data on a user’s computer and retrieve it later when
they return to your application.
Common networking and communication tasks
The following list describes the most common things you’ll want to do related to external communication from
ActionScript; these tasks are described in this chapter:
•Loading data from an external file or server script
•Sending data to a server script
•Communicating with other local SWF files
•Working with binary socket connections
•Communicating with XML sockets
•Storing persistent local data
•Uploading files to a server
•Downloading files from a server to the user’s machine
Important concepts and terms
The following reference list contains important terms that you will encounter in this chapter:
•External data: Data that is stored in some form outside of the SWF file, and loaded into the SWF file when
needed. This data could be stored in a file that’s loaded directly, or stored in a database or other form that is retrieved
by calling scripts or programs running on a server.
•URL-encoded variables: The URL-encoded format provides a way to represent several variables (pairs of variable
names and values) in a single string of text. Individual variables are written in the format name=value. Each variable
(that is, each name-value pair) is separated by ampersand characters, like this:
variable1=value1&variable2=value2. In this way, an indefinite number of variables can be sent as a single
message.
•MIME type: A standard code used to identify the type of a given file in Internet communication. Any given file
type has a specific code that is used to identify it. When sending a file or message, a computer (such as a web server
or a user’s Flash Player or AIR instance) will specify the type of file being sent.
•HTTP: Hypertext Transfer Protocol—a standard format for delivering web pages and various other types of
content that are sent over the Internet.
•Request method: When a program such as Flash Player or a web browser sends a message (called an HTTP
request) to a web server, any data being sent can be embedded in the request in one of two ways; these are the two
request methods GET and POST. On the server end, the program receiving the request will need to look in the appro-
priate portion of the request to find the data, so the request method used to send data from ActionScript should
match the request method used to read that data on the server.
•Socket connection: A persistent connection for communication between two computers.
•Upload: To send a file to another computer.
•Download: To retrieve a file from another computer.

ADOBE FLEX 3
Developer Guide
462
Working with IPv6 addresses
Flash Player 9.0 and later versions supports IPv6 (Internet Protocol version 6). IPv6 is a version of Internet Protocol
that supports 128-bit addresses (an improvement on the earlier IPv4 protocol that supports 32-bit addresses). You
might need to activate IPv6 on your networking interfaces. For more information, see the Help for the operating
system hosting the data.
If IPv6 is supported on the hosting system, you can specify numeric IPv6 literal addresses in URLs enclosed in
brackets ([]), as in the following:
rtmp://[2001:db8:ccc3:ffff:0:444d:555e:666f]:1935/test
Flash Player returns literal IPv6 values, according to the following rules:
•Flash Player returns the long form of the string for IPv6 addresses.
•The IP value has no double-colon abbreviations.
•Hexadecimal digits are lowercase only.
•IPv6 addresses are enclosed in square brackets ([]).
•Each address quartet is output as 0 to 4 hexadecimal digits, with the leading zeros omitted.
•An address quartet of all zeros is output as a single zero (not a double colon) except as noted in the following list
of exceptions.
The IPv6 values that Flash Player returns have the following exceptions:
•An unspecified IPv6 address (all zeros) is output as [::].
•The loopback or localhost IPv6 address is output as [::1].
•IPv4 mapped (converted to IPv6) addresses are output as [::ffff:a.b.c.d], where a.b.c.d is a typical IPv4 dotted-
decimal value.
•IPv4 compatible addresses are output as [::a.b.c.d], where a.b.c.d is a typical IPv4 dotted-decimal value.
Working with external data
ActionScript 3.0 includes mechanisms for loading data from external sources. Those sources can be static content
such as text files, or dynamic content such as a web script that retrieves data from a database. The data can be
formatted in a variety of ways, and ActionScript provides functionality for decoding and accessing the data. You can
also send data to the external server as part of the process of retrieving data.
Using the URLLoader and URLVariables classes
ActionScript 3.0 uses the URLLoader and URLVariables classes for loading external data. The URLLoader class
downloads data from a URL as text, binary data, or URL-encoded variables. The URLLoader class is useful for
downloading text files, XML, or other information to use in dynamic, data-driven ActionScript applications. The
URLLoader class takes advantage of the ActionScript 3.0 advanced event-handling model, which allows you to listen
for such events as complete, httpStatus, ioError, open, progress, and securityError. The new event-
handling model is a significant improvement over the ActionScript 2.0 support for the LoadVars.onData,
LoadVars.onHTTPStatus, and LoadVars.onLoad event handlers because it allows you to handle errors and events
more efficiently. For more information on handling events, see “Handling events” on page 227

ADOBE FLEX 3
Developer Guide
463
Much like the XML and LoadVars classes in earlier versions of ActionScript, the data of the URLLoader URL is not
available until the download has completed. You can monitor the progress of the download (bytes loaded and bytes
total) by listening for the flash.events.ProgressEvent.PROGRESS event to be dispatched, although if a file loads
too quickly a ProgressEvent.PROGRESS event may not be dispatched. When a file has successfully downloaded,
the flash.events.Event.COMPLETE event will be dispatched. The loaded data is decoded from UTF-8 or UTF-16
encoding into a string.
Note: If no value is set for URLRequest.contentType, values are sent as application/x-www-form-urlencoded.
The URLLoader.load() method (and optionally the URLLoader class’s constructor) takes a single parameter,
request, which is a URLRequest instance. A URLRequest instance contains all of the information for a single HTTP
request, such as the target URL, request method (GET or POST), additional header information, and the MIME type
(for example, when you upload XML content).
For example, to upload an XML packet to a server-side script, you could use the following ActionScript 3.0 code:
var secondsUTC:Number = new Date().time;
var dataXML:XML =
<login>
<time>{secondsUTC}</time>
<username>Ernie</username>
<password>guru</password>
</login>;
var request:URLRequest = new URLRequest("http://www.yourdomain.com/login.cfm");
request.contentType = "text/xml";
request.data = dataXML.toXMLString();
request.method = URLRequestMethod.POST;
var loader:URLLoader = new URLLoader();
try
{
loader.load(request);
}
catch (error:ArgumentError)
{
trace("An ArgumentError has occurred.");
}
catch (error:SecurityError)
{
trace("A SecurityError has occurred.");
}
The previous snippet creates an XML instance named dataXML that contains an XML packet to be sent to the server.
Next, you set the URLRequest contentType property to "text/xml" and set the URLRequest data property to the
contents of the XML packet, which are converted to a string by using the XML.toXMLString() method. Finally, you
create a new URLLoader instance and send the request to the remote script by using the URLLoader.load()
method.
There are three ways in which you can specify parameters to pass in a URL request:
•Within the URLVariables constructor
•Within the URLVariables.decode() method
•As specific properties within the URLVariables object itself
When you define variables within the URLVariables constructor or within the URLVariables.decode() method,
you need to make sure that you URL-encode the ampersand character because it has a special meaning and acts as
a delimiter. For example, when you pass an ampersand, you need to URL-encode the ampersand by changing it from
& to %26 because the ampersand acts as a delimiter for parameters.

ADOBE FLEX 3
Developer Guide
464
Loading data from external documents
When you build dynamic applications with ActionScript 3.0, it’s a good idea to load data from external files or from
server-side scripts. This lets you build dynamic applications without having to edit or recompile your ActionScript
files. For example, if you build a “tip of the day” application, you can write a server-side script that retrieves a random
tip from a database and saves it to a text file once a day. Then your ActionScript application can load the contents of
a static text file instead of querying the database each time.
The following snippet creates a URLRequest and URLLoader object, which loads the contents of an external text file,
params.txt:
var request:URLRequest = new URLRequest("params.txt");
var loader:URLLoader = new URLLoader();
loader.load(request);
You can simplify the previous snippet to the following:
var loader:URLLoader = new URLLoader(new URLRequest("params.txt"));
By default, if you do not define a request method, Flash Player and Adobe AIR load the content using the HTTP GET
method. If you want to send the data using the POST method, you need to set the request.method property to POST
using the static constant URLRequestMethod.POST, as the following code shows:
var request:URLRequest = new URLRequest("sendfeedback.cfm");
request.method = URLRequestMethod.POST;
The external document, params.txt, that is loaded at run time contains the following data:
monthNames=January,February,March,April,May,June,July,August,September,October,November,De
cember&dayNames=Sunday,Monday,Tuesday,Wednesday,Thursday,Friday,Saturday
The file contains two parameters, monthNames and dayNames. Each parameter contains a comma-separated list that
is parsed as strings. You can split this list into an array using the String.split() method.
Avoid using reserved words or language constructs as variable names in external data files, because doing so makes
reading and debugging your code more difficult.
Once the data has loaded, the Event.COMPLETE event is dispatched, and the contents of the external document are
available to use in the URLLoader’s data property, as the following code shows:
private function completeHandler(event:Event):void
{
var loader2:URLLoader = URLLoader(event.target);
trace(loader2.data);
}
If the remote document contains name-value pairs, you can parse the data using the URLVariables class by passing
in the contents of the loaded file, as follows:
private function completeHandler(event:Event):void
{
var loader2:URLLoader = URLLoader(event.target);
var variables:URLVariables = new URLVariables(loader2.data);
trace(variables.dayNames);
}
Each name-value pair from the external file is created as a property in the URLVariables object. Each property within
the variables object in the previous code sample is treated as a string. If the value of the name-value pair is a list of
items, you can convert the string into an array by calling the String.split() method, as follows:
var dayNameArray:Array = variables.dayNames.split(",");

ADOBE FLEX 3
Developer Guide
465
If you are loading numeric data from external text files, you need to convert the values into numeric values by using
a top-level function, such as int(), uint(), or Number().
Instead of loading the contents of the remote file as a string and creating a new URLVariables object, you could
instead set the URLLoader.dataFormat property to one of the static properties found in the URLLoader-
DataFormat class. The three possible values for the URLLoader.dataFormat property are as follows:
•URLLoaderDataFormat.BINARY—The URLLoader.data property will contain binary data stored in a
ByteArray object.
•URLLoaderDataFormat.TEXT—The URLLoader.data property will contain text in a String object.
•URLLoaderDataFormat.VARIABLES—The URLLoader.data property will contain URL-encoded variables
stored in a URLVariables object.
The following code demonstrates how setting the URLLoader.dataFormat property to
URLLoaderDataFormat.VARIABLES allows you to automatically parse loaded data into a URLVariables object:
package
{
import flash.display.Sprite;
import flash.events.*;
import flash.net.URLLoader;
import flash.net.URLLoaderDataFormat;
import flash.net.URLRequest;
public class URLLoaderDataFormatExample extends Sprite
{
public function URLLoaderDataFormatExample()
{
var request:URLRequest = new
URLRequest("http://www.[yourdomain].com/params.txt");
var variables:URLLoader = new URLLoader();
variables.dataFormat = URLLoaderDataFormat.VARIABLES;
variables.addEventListener(Event.COMPLETE, completeHandler);
try
{
variables.load(request);
}
catch (error:Error)
{
trace("Unable to load URL: " + error);
}
}
private function completeHandler(event:Event):void
{
var loader:URLLoader = URLLoader(event.target);
trace(loader.data.dayNames);
}
}
}
Note: The default value for URLLoader.dataFormat is URLLoaderDataFormat.TEXT.
As the following example shows, Loading XML from an external file is the same as loading URLVariables. You can
create a URLRequest instance and a URLLoader instance and use them to download a remote XML document.
When the file has completely downloaded, the Event.COMPLETE event is dispatched and the contents of the external
file are converted to an XML instance, which you can parse using XML methods and properties.

ADOBE FLEX 3
Developer Guide
466
package
{
import flash.display.Sprite;
import flash.errors.*;
import flash.events.*;
import flash.net.URLLoader;
import flash.net.URLRequest;
public class ExternalDocs extends Sprite
{
public function ExternalDocs()
{
var request:URLRequest = new
URLRequest("http://www.[yourdomain].com/data.xml");
var loader:URLLoader = new URLLoader();
loader.addEventListener(Event.COMPLETE, completeHandler);
try
{
loader.load(request);
}
catch (error:ArgumentError)
{
trace("An ArgumentError has occurred.");
}
catch (error:SecurityError)
{
trace("A SecurityError has occurred.");
}
}
private function completeHandler(event:Event):void
{
var dataXML:XML = XML(event.target.data);
trace(dataXML.toXMLString());
}
}
}
Communicating with external scripts
In addition to loading external data files, you can also use the URLVariables class to send variables to a server-side
script and process the server’s response. This is useful, for example, if you are programming a game and want to send
the user’s score to a server to calculate whether it should be added to the high scores list, or even send a user’s login
information to a server for validation. A server-side script can process the user name and password, validate it
against a database, and return confirmation of whether the user-supplied credentials are valid.
The following snippet creates a URLVariables object named variables, which creates a new variable called name.
Next, a URLRequest object is created that specifies the URL of the server-side script to send the variables to. Then
you set the method property of the URLRequest object to send the variables as an HTTP POST request. To add the
URLVariables object to the URL request, you set the data property of the URLRequest object to the URLVariables
object created earlier. Finally, the URLLoader instance is created and the URLLoader.load() method is invoked,
which initiates the request.
var variables:URLVariables = new URLVariables("name=Franklin");
var request:URLRequest = new URLRequest();
request.url = "http://www.[yourdomain].com/greeting.cfm";
request.method = URLRequestMethod.POST;
request.data = variables;
var loader:URLLoader = new URLLoader();
loader.dataFormat = URLLoaderDataFormat.VARIABLES;

ADOBE FLEX 3
Developer Guide
467
loader.addEventListener(Event.COMPLETE, completeHandler);
try
{
loader.load(request);
}
catch (error:Error)
{
trace("Unable to load URL");
}
function completeHandler(event:Event):void
{
trace(event.target.data.welcomeMessage);
}
The following code contains the contents of the Adobe ColdFusion® greeting.cfm document used in the previous
example:
<cfif NOT IsDefined("Form.name") OR Len(Trim(Form.Name)) EQ 0>
<cfset Form.Name = "Stranger" />
</cfif>
<cfoutput>welcomeMessage=#UrlEncodedFormat("Welcome, " & Form.name)#
</cfoutput>
Connecting to other Flash Player and AIR instances
The LocalConnection class lets you communicate between different Flash Player and AIR instances, such as a SWF
in an HTML container or in an embedded or stand-alone player. This allows you to build very versatile applications
that can share data between Flash Player and AIR instances, such as SWF files running in a web browser or
embedded in desktop applications.
LocalConnection class
The LocalConnection class lets you develop SWF files that can send instructions to other SWF files without the use
of the fscommand() method or JavaScript. LocalConnection objects can communicate only among SWF files that
are running on the same client computer, but they can run in different applications. For example, a SWF file running
in a browser and a SWF file running in a projector can share information, with the projector maintaining local infor-
mation and the browser-based SWF connecting remotely. (A projector is a SWF file saved in a format that can run
as a stand-alone application—that is, the projector doesn’t require Flash Player to be installed because it is embedded
inside the executable.)
LocalConnection objects can be used to communicate between SWFs using different ActionScript versions:
•ActionScript 3.0 LocalConnection objects can communicate with LocalConnection objects created in Action-
Script 1.0 or 2.0.
•ActionScript 1.0 or 2.0 LocalConnection objects can communicate with LocalConnection objects created in
ActionScript 3.0.
Flash Player handles this communication between LocalConnection objects of different versions automatically.

ADOBE FLEX 3
Developer Guide
468
The simplest way to use a LocalConnection object is to allow communication only between LocalConnection objects
located in the same domain. That way, you won’t have to worry about security issues. However, if you need to allow
communication between domains, you have several ways to implement security measures. For more information,
see the discussion of the connectionName parameter of the send() method and the allowDomain() and domain
entries in the LocalConnection class listing in the ActionScript 3.0 Language and Components Reference.
It is possible to use LocalConnection objects to send and receive data within a single SWF file, but Adobe does not
recommended doing so. Instead, you should use shared objects.
There are three ways to add callback methods to your LocalConnection objects:
•Subclass the LocalConnection class and add methods.
•Set the LocalConnection.client property to an object that implements the methods.
•Create a dynamic class that extends LocalConnection and dynamically attach methods.
The first way to add callback methods is to extend the LocalConnection class. You define the methods within the
custom class instead of dynamically adding them to the LocalConnection instance. This approach is demonstrated
in the following code:
package
{
import flash.net.LocalConnection;
public class CustomLocalConnection extends LocalConnection
{
public function CustomLocalConnection(connectionName:String)
{
try
{
connect(connectionName);
}
catch (error:ArgumentError)
{
// server already created/connected
}
}
public function onMethod(timeString:String):void
{
trace("onMethod called at: " + timeString);
}
}
}
In order to create a new instance of the DynamicLocalConnection class, you can use the following code:
var serverLC:CustomLocalConnection;
serverLC = new CustomLocalConnection("serverName");
The second way to add callback methods is to use the LocalConnection.client property. This involves creating
a custom class and assigning a new instance to the client property, as the following code shows:
var lc:LocalConnection = new LocalConnection();
lc.client = new CustomClient();
The LocalConnection.client property indicates the object callback methods that should be invoked. In the
previous code, the client property was set to a new instance of a custom class, CustomClient. The default value for
the client property is the current LocalConnection instance. You can use the client property if you have two data
handlers that have the same set of methods but act differently—for example, in an application where a button in one
window toggles the view in a second window.

ADOBE FLEX 3
Developer Guide
469
To create the CustomClient class, you could use the following code:
package
{
public class CustomClient extends Object
{
public function onMethod(timeString:String):void
{
trace("onMethod called at: " + timeString);
}
}
}
The third way to add callback methods, creating a dynamic class and dynamically attaching the methods, is very
similar to using the LocalConnection class in earlier versions of ActionScript, as the following code shows:
import flash.net.LocalConnection;
dynamic class DynamicLocalConnection extends LocalConnection {}
Callback methods can be dynamically added to this class by using the following code:
var connection:DynamicLocalConnection = new DynamicLocalConnection();
connection.onMethod = this.onMethod;
// Add your code here.
public function onMethod(timeString:String):void
{
trace("onMethod called at: " + timeString);
}
The previous way of adding callback methods is not recommended because the code is not very portable. In
addition, using this method of creating local connections could create performance issues, because accessing
dynamic properties is dramatically slower than accessing sealed properties.
Sending messages between two Flash Player instances
You use the LocalConnection class to communicate between different instances of Flash Player and Adobe AIR. For
example, you could have multiple Flash Player instances on a web page, or have a Flash Player instance retrieve data
from a Flash Player instance in a pop-up window.
The following code defines a local connection object that acts as a server and accepts incoming calls from other Flash
Player instances:
package
{
import flash.net.LocalConnection;
import flash.display.Sprite;
public class ServerLC extends Sprite
{
public function ServerLC()
{
var lc:LocalConnection = new LocalConnection();
lc.client = new CustomClient1();
try
{
lc.connect("conn1");
}

ADOBE FLEX 3
Developer Guide
470
catch (error:Error)
{
trace("error:: already connected");
}
}
}
}
This code first creates a LocalConnection object named lc and sets the client property to a custom class,
CustomClient1. When another Flash Player instance calls a method in this local connection instance, Flash Player
looks for that method in the CustomClient1 class.
Whenever a Flash Player instance connects to this SWF file and tries to invoke any method for the specified local
connection, the request is sent to the class specified by the client property, which is set to the CustomClient1 class:
package
{
import flash.events.*;
import flash.system.fscommand;
import flash.utils.Timer;
public class CustomClient1 extends Object
{
public function doMessage(value:String = ""):void
{
trace(value);
}
public function doQuit():void
{
trace("quitting in 5 seconds");
this.close();
var quitTimer:Timer = new Timer(5000, 1);
quitTimer.addEventListener(TimerEvent.TIMER, closeHandler);
}
public function closeHandler(event:TimerEvent):void
{
fscommand("quit");
}
}
}
To create a LocalConnection server, call the LocalConnection.connect() method and provide a unique
connection name. If you already have a connection with the specified name, an ArgumentError error is generated,
indicating that the connection attempt failed because the object is already connected.
The following snippet demonstrates how to create a new socket connection with the name conn1:
try
{
connection.connect("conn1");
}
catch (error:ArgumentError)
{
trace("Error! Server already exists\n");
}
Connecting to the primary SWF file from a secondary SWF file requires that you create a new LocalConnection
object in the sending LocalConnection object and then call the LocalConnection.send() method with the name
of the connection and the name of the method to execute. For example, to connect to the LocalConnection object
that you created earlier, you use the following code:
sendingConnection.send("conn1", "doQuit");

ADOBE FLEX 3
Developer Guide
471
This code connects to an existing LocalConnection object with the connection name conn1 and invokes the
doQuit() method in the remote SWF file. If you want to send parameters to the remote SWF file, you specify
additional arguments after the method name in the send() method, as the following snippet shows:
sendingConnection.send("conn1", "doMessage", "Hello world");
Connecting to SWF documents in different domains
To allow communications only from specific domains, you call the allowDomain() or allowInsecureDomain()
method of the LocalConnection class and pass a list of one or more domains that are allowed to access this Local-
Connection object.
In earlier versions of ActionScript, LocalConnection.allowDomain() and
LocalConnection.allowInsecureDomain() were callback methods that had to be implemented by developers
and that had to return a Boolean value. In ActionScript 3.0, LocalConnection.allowDomain() and
LocalConnection.allowInsecureDomain() are both built-in methods, which developers can call just like
Security.allowDomain() and Security.allowInsecureDomain(), passing one or more names of domains to
be allowed.
There are two special values that you can pass to the LocalConnection.allowDomain() and
LocalConnection.allowInsecureDomain() methods: * and localhost. The asterisk value (*) allows access
from all domains. The string localhost allows calls to the SWF file from SWF files that are locally installed.
Flash Player 8 introduced security restrictions on local SWF files. A SWF file that is allowed to access the Internet
cannot also have access to the local file system. If you specify localhost, any local SWF file can access the SWF file.
If the LocalConnection.send() method attempts to communicate with a SWF file from a security sandbox to
which the calling code does not have access, a securityError event (SecurityErrorEvent.SECURITY_ERROR)
is dispatched. To work around this error, you can specify the caller's domain in the receiver's
LocalConnection.allowDomain() method.
If you implement communication only between SWF files in the same domain, you can specify a connectionName
parameter that does not begin with an underscore (_) and does not specify a domain name (for example,
myDomain:connectionName). Use the same string in the LocalConnection.connect(connectionName)
command.
If you implement communication between SWF files in different domains, you specify a connectionName
parameter that begins with an underscore. Specifying the underscore makes the SWF file with the receiving Local-
Connection object more portable between domains. Here are the two possible cases:
•If the string for connectionName does not begin with an underscore, Flash Player adds a prefix with the super-
domain name and a colon (for example, myDomain:connectionName). Although this ensures that your connection
does not conflict with connections of the same name from other domains, any sending LocalConnection objects
must specify this superdomain (for example, myDomain:connectionName). If you move the SWF file with the
receiving LocalConnection object to another domain, Flash Player changes the prefix to reflect the new superdomain
(for example, anotherDomain:connectionName). All sending LocalConnection objects have to be manually edited
to point to the new superdomain.
•If the string for connectionName begins with an underscore (for example, _connectionName), Flash Player
does not add a prefix to the string. This means the receiving and sending LocalConnection objects will use identical
strings for connectionName. If the receiving object uses LocalConnection.allowDomain() to specify that
connections from any domain will be accepted, you can move the SWF file with the receiving LocalConnection
object to another domain without altering any sending LocalConnection objects.

ADOBE FLEX 3
Developer Guide
472
Socket connections
There are two different types of socket connections possible in ActionScript 3.0: XML socket connections and binary
socket connections. An XML socket lets you connect to a remote server and create a server connection that remains
open until explicitly closed. This lets you exchange XML data between a server and client without having to contin-
ually open new server connections. Another benefit of using an XML socket server is that the user doesn’t need to
explicitly request data. You can send data from the server without requests, and you can send data to every client
connected to the XML socket server.
A binary socket connection is similar to an XML socket except that the client and server don’t need to exchange XML
packets specifically. Instead, the connection can transfer data as binary information. This allows you to connect to a
wide range of services, including mail servers (POP3, SMTP, and IMAP), and news servers (NNTP).
Socket class
Introduced in ActionScript 3.0, the Socket class enables ActionScript to make socket connections and to read and
write raw binary data. It is similar to the XMLSocket class, but does not dictate the format of the received and trans-
mitted data. The Socket class is useful for interoperating with servers that use binary protocols. By using binary
socket connections, you can write code that allows interaction with several different Internet protocols, such as
POP3, SMTP, IMAP, and NNTP. This in turn enables Flash Player to connect to mail and news servers.
Flash Player can interface with a server by using the binary protocol of that server directly. Some servers use the big-
endian byte order, and some use the little-endian byte order. Most servers on the Internet use the big-endian byte
order because “network byte order” is big-endian. The little-endian byte order is popular because the Intel® x86
architecture uses it. You should use the endian byte order that matches the byte order of the server that is sending or
receiving data. All operations that are performed by the IDataInput and IDataOutput interfaces, and the classes that
implement those interfaces (ByteArray, Socket, and URLStream), are encoded by default in big-endian format; that
is, with the most significant byte first. This is done to match Java and official network byte order. To change whether
big-endian or little-endian byte order is used, you can set the endian property to Endian.BIG_ENDIAN or
Endian.LITTLE_ENDIAN.
The Socket class inherits all the methods implemented by the IDataInput and IDataOutput interfaces (located in the
flash.utils package), and those methods should be used to write to and read from the Socket.
XMLSocket class
ActionScript provides a built-in XMLSocket class, which lets you open a continuous connection with a server. This
open connection removes latency issues and is commonly used for real-time applications such as chat applications
or multiplayer games. A traditional HTTP-based chat solution frequently polls the server and downloads new
messages using an HTTP request. In contrast, an XMLSocket chat solution maintains an open connection to the
server, which lets the server immediately send incoming messages without a request from the client.
To create a socket connection, you must create a server-side application to wait for the socket connection request and
send a response to the SWF file. This type of server-side application can be written in a programming language such
as Java, Python, or Perl. To use the XMLSocket class, the server computer must run a daemon that understands the
protocol used by the XMLSocket class. The protocol is described in the following list:
•XML messages are sent over a full-duplex TCP/IP stream socket connection.
•Each XML message is a complete XML document, terminated by a zero (0) byte.
•An unlimited number of XML messages can be sent and received over a single XMLSocket connection.

ADOBE FLEX 3
Developer Guide
473
Note: The XMLSocket class cannot tunnel through firewalls automatically because, unlike the Real-Time Messaging
Protocol (RTMP), XMLSocket has no HTTP tunneling capability. If you need to use HTTP tunneling, consider using
Flash Remoting or Flash Media Server (which supports RTMP) instead.
The following restrictions apply to how and where an XMLSocket object can connect to the server:
•The XMLSocket.connect() method can connect only to TCP port numbers greater than or equal to 1024. One
consequence of this restriction is that the server daemons that communicate with the XMLSocket object must also
be assigned to port numbers greater than or equal to 1024. Port numbers below 1024 are often used by system
services such as FTP (21), Telnet (23), SMTP (25), HTTP (80), and POP3 (110), so XMLSocket objects are barred
from these ports for security reasons. The port number restriction limits the possibility that these resources will be
inappropriately accessed and abused.
•The XMLSocket.connect() method can connect only to computers in the same domain where the SWF file
resides. This restriction does not apply to SWF files running off a local disk. (This restriction is identical to the
security rules for URLLoader.load().) To connect to a server daemon running in a domain other than the one
where the SWF resides, you can create a security policy file on the server that allows access from specific domains.
Note: Setting up a server to communicate with the XMLSocket object can be challenging. If your application does not
require real-time interactivity, use the URLLoader class instead of the XMLSocket class.
You can use the XMLSocket.connect() and XMLSocket.send() methods of the XMLSocket class to transfer XML
to and from a server over a socket connection. The XMLSocket.connect() method establishes a socket connection
with a web server port. The XMLSocket.send() method passes an XML object to the server specified in the socket
connection.
When you invoke the XMLSocket.connect() method, Flash Player opens a TCP/IP connection to the server and
keeps that connection open until one of the following occurs:
•The XMLSocket.close() method of the XMLSocket class is called.
•No more references to the XMLSocket object exist.
•Flash Player exits.
•The connection is broken (for example, the modem disconnects).
Creating and connecting to a Java XML socket server
The following code demonstrates a simple XMLSocket server written in Java that accepts incoming connections and
displays the received messages in the command prompt window. By default, a new server is created on port 8080 of
your local machine, although you can specify a different port number when starting your server from the command
line.
Create a new text document and add the following code:
import java.io.*;
import java.net.*;
class SimpleServer
{
private static SimpleServer server;
ServerSocket socket;
Socket incoming;
BufferedReader readerIn;
PrintStream printOut;

ADOBE FLEX 3
Developer Guide
474
public static void main(String[] args)
{
int port = 8080;
try
{
port = Integer.parseInt(args[0]);
}
catch (ArrayIndexOutOfBoundsException e)
{
// Catch exception and keep going.
}
server = new SimpleServer(port);
}
private SimpleServer(int port)
{
System.out.println(">> Starting SimpleServer");
try
{
socket = new ServerSocket(port);
incoming = socket.accept();
readerIn = new BufferedReader(new
InputStreamReader(incoming.getInputStream()));
printOut = new PrintStream(incoming.getOutputStream());
printOut.println("Enter EXIT to exit.\r");
out("Enter EXIT to exit.\r");
boolean done = false;
while (!done)
{
String str = readerIn.readLine();
if (str == null)
{
done = true;
}
else
{
out("Echo: " + str + "\r");
if(str.trim().equals("EXIT"))
{
done = true;
}
}
incoming.close();
}
}
catch (Exception e)
{
System.out.println(e);
}
}
private void out(String str)
{
printOut.println(str);
System.out.println(str);
}
}

ADOBE FLEX 3
Developer Guide
475
Save the document to your hard disk as SimpleServer.java and compile it using a Java compiler, which creates a Java
class file named SimpleServer.class.
You can start the XMLSocket server by opening a command prompt and typing java SimpleServer. The
SimpleServer.class file can be located anywhere on your local computer or network; it doesn’t need to be placed in
the root directory of your web server.
If you’re unable to start the server because the files are not located within the Java classpath, try starting the server with
java -classpath . SimpleServer.
To connect to the XMLSocket from your ActionScript application, you need to create a new instance of the
XMLSocket class, and call the XMLSocket.connect() method while passing a host name and port number, as
follows:
var xmlsock:XMLSocket = new XMLSocket();
xmlsock.connect("127.0.0.1", 8080);
A securityError (flash.events.SecurityErrorEvent) event occurs if a call to XMLSocket.connect() attempts to
connect either to a server outside the caller’s security sandbox or to a port lower than 1024.
Whenever you receive data from the server, the data event (flash.events.DataEvent.DATA) is dispatched:
xmlsock.addEventListener(DataEvent.DATA, onData);
private function onData(event:DataEvent):void
{
trace("[" + event.type + "] " + event.data);
}
To send data to the XMLSocket server, you use the XMLSocket.send() method and pass an XML object or string.
Flash Player converts the supplied parameter to a String object and sends the content to the XMLSocket server
followed by a zero (0) byte:
xmlsock.send(xmlFormattedData);
The XMLSocket.send() method does not return a value that indicates whether the data was successfully trans-
mitted. If an error occurred while trying to send data, an IOError error is thrown.
Each message you send to the XML socket server must be terminated by a newline (\n) character.
Storing local data
A shared object, sometimes referred to as a “Flash cookie,” is a data file that can be created on your computer by the
sites that you visit. Shared objects are most often used to enhance your web-browsing experience—for example, by
allowing you to personalize the look and feel of a website that you frequently visit. Shared objects, by themselves,
can’t do anything to or with the data on your computer. More important, shared objects can never access or
remember your e-mail address or other personal information—unless you willingly provide such information.
New shared object instances can be created using the static SharedObject.getLocal() or
SharedObject.getRemote() methods. The getLocal() method attempts to load a locally persistent shared object
that is available only to the current client, whereas the getRemote() method attempts to load a remote shared object
that can be shared across multiple clients by means of a server, such as Flash Media Server. If the local or remote
shared object does not exist, the getLocal() and getRemote() methods will create a new SharedObject instance.
The following code attempts to load a local shared object named test. If this shared object doesn’t exist, a new
shared object with this name will be created.

ADOBE FLEX 3
Developer Guide
476
var so:SharedObject = SharedObject.getLocal("test");
trace("SharedObject is " + so.size + " bytes");
If a shared object named test cannot be found, a new one is created with a size of 0 bytes. If the shared object previ-
ously existed, its current size (in bytes) is returned.
You can store data in a shared object by assigning values to the data object, as seen in the following example:
var so:SharedObject = SharedObject.getLocal("test");
so.data.now = new Date().time;
trace(so.data.now);
trace("SharedObject is " + so.size + " bytes");
If there is already a shared object with the name test and the parameter now, the existing value is overwritten. You
can use the SharedObject.size property to determine if a shared object already exists, as the following example
shows:
var so:SharedObject = SharedObject.getLocal("test");
if (so.size == 0)
{
// Shared object doesn't exist.
trace("created...");
so.data.now = new Date().time;
}
trace(so.data.now);
trace("SharedObject is " + so.size + " bytes");
The previous code uses the size parameter to determine if the shared object instance with the specified name
already exists. If you test the following code, you’ll notice that each time you run the code, the shared object is
recreated. In order for a shared object to be saved to the user’s hard drive, you must explicitly call the
SharedObject.flush() method, as the following example shows:
var so:SharedObject = SharedObject.getLocal("test");
if (so.size == 0)
{
// Shared object doesn't exist.
trace("created...");
so.data.now = new Date().time;
}
trace(so.data.now);
trace("SharedObject is " + so.size + " bytes");
so.flush();
When using the flush() method to write shared objects to a user’s hard drive, you should be careful to check
whether the user has explicitly disabled local storage using the Flash Player Settings Manager (www.macro-
media.com/support/documentation/en/flashplayer/help/settings_manager07.html), as shown in the following
example:
var so:SharedObject = SharedObject.getLocal("test");
trace("Current SharedObject size is " + so.size + " bytes.");
so.flush();
Values can be retrieved from a shared object by specifying the property’s name in the shared object’s data property.
For example, if you run the following code, Flash Player will display how many minutes ago the SharedObject
instance was created:

ADOBE FLEX 3
Developer Guide
477
var so:SharedObject = SharedObject.getLocal("test");
if (so.size == 0)
{
// Shared object doesn't exist.
trace("created...");
so.data.now = new Date().time;
}
var ageMS:Number = new Date().time - so.data.now;
trace("SharedObject was created " + Number(ageMS / 1000 / 60).toPrecision(2) + " minutes
ago");
trace("SharedObject is " + so.size + " bytes");
so.flush();
The first time the previous code is run, a new SharedObject instance named test will be created and have an initial
size of 0 bytes. Because the initial size is 0 bytes, the if statement evaluates to true and a new property named now
is added to the local shared object. The shared object’s age is calculated by subtracting the value of the now property
from the current time. Each subsequent time the previous code is run, the size of the shared object should be greater
than 0, and the code will trace how many minutes ago the shared object was created.
Displaying contents of a shared object
Values are stored in shared objects within the data property. You can loop over each value within a shared object
instance by using a for..in loop, as the following example shows:
var so:SharedObject = SharedObject.getLocal("test");
so.data.hello = "world";
so.data.foo = "bar";
so.data.timezone = new Date().timezoneOffset;
for (var i:String in so.data)
{
trace(i + ":\t" + so.data[i]);
}
Creating a secure SharedObject
When you create either a local or remote SharedObject using getLocal() or getRemote(), there is an optional
parameter named secure that determines whether access to this shared object is restricted to SWF files that are
delivered over an HTTPS connection. If this parameter is set to true and your SWF file is delivered over HTTPS,
Flash Player creates a new secure shared object or gets a reference to an existing secure shared object. This secure
shared object can be read from or written to only by SWF files delivered over HTTPS that call
SharedObject.getLocal() with the secure parameter set to true. If this parameter is set to false and your SWF
file is delivered over HTTPS, Flash Player creates a new shared object or gets a reference to an existing shared object.
This shared object can be read from or written to by SWF files delivered over non-HTTPS connections. If your SWF
file is delivered over a non-HTTPS connection and you try to set this parameter to true, the creation of a new shared
object (or the access of a previously created secure shared object) fails, an error is thrown, and the shared object is
set to null. If you attempt to run the following snippet from a non-HTTPS connection, the
SharedObject.getLocal() method will throw an error:
try
{
var so:SharedObject = SharedObject.getLocal("contactManager", null, true);
}
catch (error:Error)
{
trace("Unable to create SharedObject.");
}

ADOBE FLEX 3
Developer Guide
478
Regardless of the value of this parameter, the created shared objects count toward the total amount of disk space
allowed for a domain.
Working with file upload and download
The FileReference class lets you add the ability to upload and download files between a client and a server. Users are
prompted to select a file to upload or a location for download from a dialog box (such as the Open dialog box on the
Windows operating system).
Each FileReference object that you create with ActionScript refers to a single file on the user’s hard disk. The object
has properties that contain information about the file’s size, type, name, creation date, and modification date.
Note: The creator property is supported on Mac OS only. All other platforms return null.
You can create an instance of the FileReference class in two ways. You can use the new operator, as the following code
shows:
import flash.net.FileReference;
var myFileReference:FileReference = new FileReference();
Or you can call the FileReferenceList.browse() method, which opens a dialog box on the user’s system to
prompt the user to select one or more files to upload and then creates an array of FileReference objects if the user
selects one or more files successfully. Each FileReference object represents a file selected by the user from the dialog
box. A FileReference object does not contain any data in the FileReference properties (such as name, size, or
modificationDate) until one of the following happens:
•The FileReference.browse() method or FileReferenceList.browse() method has been called, and the
user has selected a file from the file picker.
•The FileReference.download() method has been called, and the user has selected a file from the file picker.
Note: When performing a download, only the FileReference.name property is populated before the download is
complete. After the file has been downloaded, all properties are available.
While calls to the FileReference.browse(), FileReferenceList.browse(), or FileReference.download()
method are executing, most players will continue SWF file playback.
FileReference class
The FileReference class allows you to upload and download files between a user’s computer and a server. An
operating system dialog box prompts the user to select a file to upload or a location for download. Each FileReference
object refers to a single file on the user’s disk and has properties that contain information about the file’s size, type,
name, creation date, modification date, and creator.
FileReference instances can be created in two ways:
•When you use the new operator with the FileReference constructor, as in the following:
var myFileReference:FileReference = new FileReference();
•When you call FileReferenceList.browse(), which creates an array of FileReference objects.
For uploading and downloading operations, a SWF file can access files only within its own domain, including any
domains specified by a cross-domain policy file. You need to put a policy file on the file server if the SWF file initi-
ating the upload or download doesn't come from the same domain as the file server.

ADOBE FLEX 3
Developer Guide
479
Note: You can only perform one browse() or download() action at a time, because only one dialog box can be open
at any point.
The server script that handles the file upload should expect an HTTP POST request with the following elements:
•Content-Type with a value of multipart/form-data.
•Content-Disposition with a name attribute set to “Filedata” and a filename attribute set to the name of the
original file. You can specify a custom name attribute by passing a value for the uploadDataFieldName parameter
in the FileReference.upload() method.
•The binary contents of the file.
Here is a sample HTTP POST request:
POST /handler.asp HTTP/1.1
Accept: text/*
Content-Type: multipart/form-data;
boundary=----------Ij5ae0ae0KM7GI3KM7ei4cH2ei4gL6
User-Agent: Shockwave Flash
Host: www.mydomain.com
Content-Length: 421
Connection: Keep-Alive
Cache-Control: no-cache
------------Ij5ae0ae0KM7GI3KM7ei4cH2ei4gL6
Content-Disposition: form-data; name="Filename"
sushi.jpg
------------Ij5ae0ae0KM7GI3KM7ei4cH2ei4gL6
Content-Disposition: form-data; name="Filedata"; filename="sushi.jpg"
Content-Type: application/octet-stream
Test File
------------Ij5ae0ae0KM7GI3KM7ei4cH2ei4gL6
Content-Disposition: form-data; name="Upload"
Submit Query
------------Ij5ae0ae0KM7GI3KM7ei4cH2ei4gL6
(actual file data,,,)
The following sample HTTP POST request sends three POST variables: api_sig, api_key, and auth_token, and uses
a custom upload data field name value of "photo":
POST /handler.asp HTTP/1.1
Accept: text/*
Content-Type: multipart/form-data;
boundary=----------Ij5ae0ae0KM7GI3KM7ei4cH2ei4gL6
User-Agent: Shockwave Flash
Host: www.mydomain.com
Content-Length: 421
Connection: Keep-Alive
Cache-Control: no-cache
------------Ij5GI3GI3ei4GI3ei4KM7GI3KM7KM7
Content-Disposition: form-data; name="Filename"
sushi.jpg
------------Ij5GI3GI3ei4GI3ei4KM7GI3KM7KM7
Content-Disposition: form-data; name="api_sig"
XXXXXXXXXXXXXXXXXXXXXXXXXXXXXXXX

ADOBE FLEX 3
Developer Guide
480
------------Ij5GI3GI3ei4GI3ei4KM7GI3KM7KM7
Content-Disposition: form-data; name="api_key"
XXXXXXXXXXXXXXXXXXXXXXXXXXXXXXXX
------------Ij5GI3GI3ei4GI3ei4KM7GI3KM7KM7
Content-Disposition: form-data; name="auth_token"
XXXXXXXXXXXXXXXXXXXXXXX
------------Ij5GI3GI3ei4GI3ei4KM7GI3KM7KM7
Content-Disposition: form-data; name="photo"; filename="sushi.jpg"
Content-Type: application/octet-stream
(actual file data,,,)
------------Ij5GI3GI3ei4GI3ei4KM7GI3KM7KM7
Content-Disposition: form-data; name="Upload"
Submit Query
------------Ij5GI3GI3ei4GI3ei4KM7GI3KM7KM7--
Uploading files to a server
To upload files to a server, first call the browse() method to allow a user to select one or more files. Next, when the
FileReference.upload() method is called, the selected file will be transferred to the server. If the user selected
multiple files using the FileReferenceList.browse() method, Flash Player creates an array of selected files called
FileReferenceList.fileList. You can then use the FileReference.upload() method to upload each file
individually.
Note: Using the FileReference.browse() method allows you to upload single files only. To allow a user to upload
multiple files, you must use the FileReferenceList.browse() method.
By default, the system file picker dialog box allows users to pick any file type from the local computer, although
developers can specify one or more custom file type filters by using the FileFilter class and passing an array of file
filter instances to the browse() method:
var imageTypes:FileFilter = new FileFilter("Images (*.jpg, *.jpeg, *.gif, *.png)", "*.jpg;
*.jpeg; *.gif; *.png");
var textTypes:FileFilter = new FileFilter("Text Files (*.txt, *.rtf)", "*.txt; *.rtf");
var allTypes:Array = new Array(imageTypes, textTypes);
var fileRef:FileReference = new FileReference();
fileRef.browse(allTypes);
When the user has selected the files and clicked the Open button in the system file picker, the Event.SELECT event
is dispatched. If the FileReference.browse() method was used to select a file to upload, the following code is
needed to send the file to a web server:
var fileRef:FileReference = new FileReference();
fileRef.addEventListener(Event.SELECT, selectHandler);
fileRef.addEventListener(Event.COMPLETE, completeHandler);
try
{
var success:Boolean = fileRef.browse();
}
catch (error:Error)
{
trace("Unable to browse for files.");
}
function selectHandler(event:Event):void
{
ADOBE FLEX 3
Developer Guide
481
var request:URLRequest = new
URLRequest("http://www.[yourdomain].com/fileUploadScript.cfm")
try
{
fileRef.upload(request);
}
catch (error:Error)
{
trace("Unable to upload file.");
}
}
function completeHandler(event:Event):void
{
trace("uploaded");
}
You can send data to the server with the FileReference.upload() method by using the URLRequest.method
and URLRequest.data properties to send variables using the POST or GET methods.
When you attempt to upload a file using the FileReference.upload() method, any of the following events may
be dispatched:
•Event.OPEN: Dispatched when an upload operation starts.
•ProgressEvent.PROGRESS: Dispatched periodically during the file upload operation.
•Event.COMPLETE: Dispatched when the file upload operation completes successfully.
•SecurityErrorEvent.SECURITY_ERROR: Dispatched when an upload fails because of a security violation.
•HTTPStatusEvent.HTTP_STATUS: Dispatched when an upload fails because of an HTTP error.
•IOErrorEvent.IO_ERROR: Dispatched if the upload fails because of any of the following reasons:
•An input/output error occurred while Flash Player is reading, writing, or transmitting the file.
•The SWF tried to upload a file to a server that requires authentication (such as a user name and password).
During upload, Flash Player does not provide a means for users to enter passwords.
•The url parameter contains an invalid protocol. The FileReference.upload() method must use either
HTTP or HTTPS.
Flash Player does not offer complete support for servers that require authentication. Only SWF files that are running
in a browser using the browser plug-in or Microsoft ActiveX® control can provide a dialog box to prompt the user to
enter a user name and password for authentication, and then only for downloads. For uploads using the plug-in or
ActiveX control or upload/download using either the stand-alone or external player, the file transfer fails.
If you create a server script in ColdFusion to accept a file upload from Flash Player, you can use code similar to the
following:
<cffile action="upload" filefield="Filedata" destination="#ExpandPath('./')#"
nameconflict="OVERWRITE" />
This ColdFusion code uploads the file sent by Flash Player and saves it to the same directory as the ColdFusion
template, overwriting any file with the same name. The previous code shows the bare minimum amount of code
necessary to accept a file upload; this script should not be used in a production environment. Ideally, you should add
data validation to ensure that users upload only accepted file types, such as an image instead of a potentially
dangerous server-side script.
The following code demonstrates file uploads using PHP, and it includes data validation. The script limits the
number of uploaded files in the upload directory to 10, ensures that the file is less than 200 KB, and permits only
JPEG, GIF, or PNG files to be uploaded and saved to the file system.

ADOBE FLEX 3
Developer Guide
482
<?php
$MAXIMUM_FILESIZE = 1024 * 200; // 200KB
$MAXIMUM_FILE_COUNT = 10; // keep maximum 10 files on server
echo exif_imagetype($_FILES['Filedata']);
if ($_FILES['Filedata']['size'] <= $MAXIMUM_FILESIZE)
{
move_uploaded_file($_FILES['Filedata']['tmp_name'],
"./temporary/".$_FILES['Filedata']['name']);
$type = exif_imagetype("./temporary/".$_FILES['Filedata']['name']);
if ($type == 1 || $type == 2 || $type == 3)
{
rename("./temporary/".$_FILES['Filedata']['name'],
"./images/".$_FILES['Filedata']['name']);
}
else
{
unlink("./temporary/".$_FILES['Filedata']['name']);
}
}
$directory = opendir('./images/');
$files = array();
while ($file = readdir($directory))
{
array_push($files, array('./images/'.$file, filectime('./images/'.$file)));
}
usort($files, sorter);
if (count($files) > $MAXIMUM_FILE_COUNT)
{
$files_to_delete = array_splice($files, 0, count($files) - $MAXIMUM_FILE_COUNT);
for ($i = 0; $i < count($files_to_delete); $i++)
{
unlink($files_to_delete[$i][0]);
}
}
print_r($files);
closedir($directory);
function sorter($a, $b)
{
if ($a[1] == $b[1])
{
return 0;
}
else
{
return ($a[1] < $b[1]) ? -1 : 1;
}
}
?>
You can pass additional variables to the upload script using either the POST or GET request method. To send
additional POST variables to your upload script, you can use the following code:
var fileRef:FileReference = new FileReference();
fileRef.addEventListener(Event.SELECT, selectHandler);
fileRef.addEventListener(Event.COMPLETE, completeHandler);
fileRef.browse();

ADOBE FLEX 3
Developer Guide
483
function selectHandler(event:Event):void
{
var params:URLVariables = new URLVariables();
params.date = new Date();
params.ssid = "94103-1394-2345";
var request:URLRequest = new
URLRequest("http://www.yourdomain.com/FileReferenceUpload/fileupload.cfm");
request.method = URLRequestMethod.POST;
request.data = params;
fileRef.upload(request, "Custom1");
}
function completeHandler(event:Event):void
{
trace("uploaded");
}
The previous example creates a new URLVariables object that you pass to the remote server- side script. In previous
versions of ActionScript, you could pass variables to the server upload script by passing values in the query string.
ActionScript 3.0 allows you to pass variables to the remote script using a URLRequest object, which allows you to
pass data using either the POST or GET method; this, in turn, makes passing larger sets of data easier and cleaner. In
order to specify whether the variables are passed using the GET or POST request method, you can set the
URLRequest.method property to either URLRequestMethod.GET or URLRequestMethod.POST, respectively.
ActionScript 3.0 also lets you override the default Filedata upload file field name by providing a second parameter
to the upload() method, as demonstrated in the previous example (which replaced the default value Filedata with
Custom1).
By default, Flash Player will not attempt to send a test upload, although you can override this by passing a value of
true as the third parameter to the upload() method. The purpose of the test upload is to check whether the actual
file upload will be successful and that server authentication, if required, will succeed.
Note: A test upload occurs only on Windows-based Flash Players at this time.
Downloading files from a server
You can let users download files from a server using the FileReference.download() method, which takes two
parameters: request and defaultFileName. The first parameter is the URLRequest object that contains the URL
of the file to download. The second parameter is optional—it lets you specify a default filename that appears in the
download file dialog box. If you omit the second parameter, defaultFileName, the filename from the specified URL
is used.
The following code downloads a file named index.xml from the same directory as the SWF document:
var request:URLRequest = new URLRequest("index.xml");
var fileRef:FileReference = new FileReference();
fileRef.download(request);
To set the default name to currentnews.xml instead of index.xml, specify the defaultFileName parameter, as the
following snippet shows:
var request:URLRequest = new URLRequest("index.xml");
var fileToDownload:FileReference = new FileReference();
fileToDownload.download(request, "currentnews.xml");

ADOBE FLEX 3
Developer Guide
484
Renaming a file can be very useful if the server filename was not intuitive or was server-generated. It’s also good to
explicitly specify the defaultFileName parameter when you download a file using a server-side script, instead of
downloading the file directly. For example, you need to specify the defaultFileName parameter if you have a
server-side script that downloads specific files based on URL variables passed to it. Otherwise, the default name of
the downloaded file is the name of your server-side script.
Data can be sent to the server using the download() method by appending parameters to the URL for the server
script to parse. The following ActionScript 3.0 snippet downloads a document based on which parameters are passed
to a ColdFusion script:
package
{
import flash.display.Sprite;
import flash.net.FileReference;
import flash.net.URLRequest;
import flash.net.URLRequestMethod;
import flash.net.URLVariables;
public class DownloadFileExample extends Sprite
{
private var fileToDownload:FileReference;
public function DownloadFileExample()
{
var request:URLRequest = new URLRequest();
request.url = "http://www.[yourdomain].com/downloadfile.cfm";
request.method = URLRequestMethod.GET;
request.data = new URLVariables("id=2");
fileToDownload = new FileReference();
try
{
fileToDownload.download(request, "file2.txt");
}
catch (error:Error)
{
trace("Unable to download file.");
}
}
}
}
The following code demonstrates the ColdFusion script, download.cfm, that downloads one of two files from the
server, depending on the value of a URL variable:
<cfparam name="URL.id" default="1" />
<cfswitch expression="#URL.id#">
<cfcase value="2">
<cfcontent type="text/plain" file="#ExpandPath('two.txt')#" deletefile="No" />
</cfcase>
<cfdefaultcase>
<cfcontent type="text/plain" file="#ExpandPath('one.txt')#" deletefile="No" />
</cfdefaultcase>
</cfswitch>
FileReferenceList class
The FileReferenceList class lets the user select one or more files to upload to a server-side script. The file upload is
handled by the FileReference.upload() method, which must be called on each file that the user selects.

ADOBE FLEX 3
Developer Guide
485
The following code creates two FileFilter objects (imageFilter and textFilter) and passes them in an array to
the FileReferenceList.browse() method. This causes the operating system file dialog box to display two
possible filters for file types.
var imageFilter:FileFilter = new FileFilter("Image Files (*.jpg, *.jpeg, *.gif, *.png)",
"*.jpg; *.jpeg; *.gif; *.png");
var textFilter:FileFilter = new FileFilter("Text Files (*.txt, *.rtf)", "*.txt; *.rtf");
var fileRefList:FileReferenceList = new FileReferenceList();
try
{
var success:Boolean = fileRefList.browse(new Array(imageFilter, textFilter));
}
catch (error:Error)
{
trace("Unable to browse for files.");
}
Allowing the user to select and upload one or more files by using the FileReferenceList class is the same as using
FileReference.browse() to select files, although the FileReferenceList allows you to select more than one file.
Uploading multiple files requires you to upload each of the selected files by using FileReference.upload(), as the
following code shows:
var fileRefList:FileReferenceList = new FileReferenceList();
fileRefList.addEventListener(Event.SELECT, selectHandler);
fileRefList.browse();
function selectHandler(event:Event):void
{
var request:URLRequest = new
URLRequest("http://www.[yourdomain].com/fileUploadScript.cfm");
var file:FileReference;
var files:FileReferenceList = FileReferenceList(event.target);
var selectedFileArray:Array = files.fileList;
for (var i:uint = 0; i < selectedFileArray.length; i++)
{
file = FileReference(selectedFileArray[i]);
file.addEventListener(Event.COMPLETE, completeHandler);
try
{
file.upload(request);
}
catch (error:Error)
{
trace("Unable to upload files.");
}
}
}
function completeHandler(event:Event):void
{
trace("uploaded");
}
Because the Event.COMPLETE event is added to each individual FileReference object in the array, Flash Player calls
the completeHandler() method when each individual file finishes uploading.

ADOBE FLEX 3
Developer Guide
486
Example: Building a Telnet client
The Telnet example demonstrates techniques for connecting with a remote server and transmitting data using the
Socket class. The example demonstrates the following techniques:
•Creating a custom telnet client using the Socket class
•Sending text to the remote server using a ByteArray object
•Handling received data from a remote server
To get the application files for this sample, see www.adobe.com/go/learn_programmingAS3samples_flash. The
Telnet application files can be found in the Samples/Telnet folder. The application consists of the following files:
Telnet socket application overview
The main TelnetSocket.mxml file is responsible for creating the user interface (UI) for the entire application.
In addition to the UI, this file also defines two methods, login() and sendCommand(), to connect the user to the
specified server.
The following code lists the ActionScript in the main application file:
import com.example.programmingas3.socket.Telnet;
private var telnetClient:Telnet;
private function connect():void
{
telnetClient = new Telnet(serverName.text, int(portNumber.text), output);
console.title = "Connecting to " + serverName.text + ":" + portNumber.text;
console.enabled = true;
}
private function sendCommand():void
{
var ba:ByteArray = new ByteArray();
ba.writeMultiByte(command.text + "\n", "UTF-8");
telnetClient.writeBytesToSocket(ba);
command.text = "";
}
The first line of code imports the Telnet class from the custom com.example.programmingas.socket package. The
second line of code declares an instance of the Telnet class, telnetClient, that will be initialized later by the
connect() method. Next, the connect() method is declared and initializes the telnetClient variable declared
earlier. This method passes the user-specified telnet server name, telnet server port, and a reference to a TextArea
component on the display list, which is used to display the text responses from the socket server. The final two lines
of the connect() method set the title property for the Panel and enable the Panel component, which allows the
user to send data to the remote server. The final method in the main application file, sendCommand(), is used to send
the user's commands to the remote server as a ByteArray object.
File Description
TelnetSocket.mxml The main application file consisting of the MXML user interface.
com/example/programmingas3/Telnet/Telnet.as Provides the Telnet client functionality for the application, such as connecting to
a remote server, and sending, receiving, and displaying data.

ADOBE FLEX 3
Developer Guide
487
Telnet class overview
The Telnet class is responsible for connecting to the remote Telnet server and sending/receiving data.
The Telnet class declares the following private variables:
private var serverURL:String;
private var portNumber:int;
private var socket:Socket;
private var ta:TextArea;
private var state:int = 0;
The first variable, serverURL, contains the user-specified server address to connect to.
The second variable, portNumber, is the port number that the Telnet server is currently running on. By default, the
Telnet service runs on port 23.
The third variable, socket, is a Socket instance that will attempt to connect to the server defined by the serverURL
and portNumber variables.
The fourth variable, ta, is a reference to a TextArea component instance on the Stage. This component is used to
display responses from the remote Telnet server, or any possible error messages.
The final variable, state, is a numeric value that is used to determine which options your Telnet client supports.
As you saw before, the Telnet class's constructor function is called by the connect() method in the main application
file.
The Telnet constructor takes three parameters: server, port, and output. The server and port parameters specify
the server name and port number where the Telnet server is running. The final parameter, output, is a reference to
a TextArea component instance on the Stage where server output will be displayed to users.
public function Telnet(server:String, port:int, output:TextArea)
{
serverURL = server;
portNumber = port;
ta = output;
socket = new Socket();
socket.addEventListener(Event.CONNECT, connectHandler);
socket.addEventListener(Event.CLOSE, closeHandler);
socket.addEventListener(ErrorEvent.ERROR, errorHandler);
socket.addEventListener(IOErrorEvent.IO_ERROR, ioErrorHandler);
socket.addEventListener(ProgressEvent.SOCKET_DATA, dataHandler);
Security.loadPolicyFile("http://" + serverURL + "/crossdomain.xml");
try
{
msg("Trying to connect to " + serverURL + ":" + portNumber + "\n");
socket.connect(serverURL, portNumber);
}
catch (error:Error)
{
msg(error.message + "\n");
socket.close();
}
}

ADOBE FLEX 3
Developer Guide
488
Writing data to a socket
To write data to a socket connection, you call any of the write methods in the Socket class (such as writeBoolean(),
writeByte(), writeBytes(), or writeDouble()), and then flush the data in the output buffer using the flush()
method. In the Telnet server, data is written to the socket connection using the writeBytes() method which takes
the byte array as a parameter and sends it to the output buffer. The writeBytesToSocket() method is as follows:
public function writeBytesToSocket(ba:ByteArray):void
{
socket.writeBytes(ba);
socket.flush();
}
This method gets called by the sendCommand() method of the main application file.
Displaying messages from the socket server
Whenever a message is received from the socket server, or an event occurs, the custom msg() method is called. This
method appends a string to the TextArea on the Stage and calls a custom setScroll() method, which causes the
TextArea component to scroll to the very bottom. The msg() method is as follows:
private function msg(value:String):void
{
ta.text += value;
setScroll();
}
If you didn’t automatically scroll the contents of the TextArea component, users would need to manually drag the
scroll bars on the text area to see the latest response from the server.
Scrolling a TextArea component
The setScroll() method contains a single line of ActionScript that scrolls the TextArea component’s contents
vertically so the user can see the last line of the returned text. The following snippet shows the setScroll() method:
public function setScroll():void
{
ta.verticalScrollPosition = ta.maxVerticalScrollPosition;
}
This method sets the verticalScrollPosition property, which is the line number of the top row of characters
that is currently displayed, and sets it to the value of the maxVerticalScrollPosition property.
Example: Uploading and downloading files
The FileIO example demonstrates techniques for performing file downloading and uploading in Flash Player. These
techniques are:
•Downloading files to a user’s computer
•Uploading files from a user’s computer to a server
•Cancelling a download in progress
•Cancelling an upload in progress

ADOBE FLEX 3
Developer Guide
489
To get the application files for this sample, see www.adobe.com/go/learn_programmingAS3samples_flash. The
FileIO application files are found in the Samples/FileIO folder. The application consists of the following files:
FileIO application overview
The FileIO application contains the user interface that allows a user to upload or download files using Flash Player.
The application first defines a couple of custom components, FileUpload and FileDownload, which can be found in
the com.example.programmingas3.fileio package. Once each custom component dispatches its contentComplete
event, the component’s init() method is called and passes references to a ProgressBar and Button component
instance, which allow users to see the file’s upload or download progress or cancel the file transfer in progress.
The relevant code from the FileIO.mxml file is as follows (Note that in the Flash version, the FLA file contains
components placed on the stage, whose names match the names of the Flex components described in this step):
<example:FileUpload id="fileUpload" creationComplete="fileUpload.init(uploadProgress,
cancelUpload);" />
<example:FileDownload id="fileDownload"
creationComplete="fileDownload.init(downloadProgress, cancelDownload);" />
The following code shows the Upload File panel, which contains a progress bar and two buttons. The first button,
startUpload, calls the FileUpload.startUpload() method, which calls the FileReference.browse()
method. The following excerpt shows the code for the Upload File panel:
<mx:Panel title="Upload File" paddingTop="10" paddingBottom="10" paddingLeft="10"
paddingRight="10">
<mx:ProgressBar id="uploadProgress" label="" mode="manual" />
<mx:ControlBar horizontalAlign="right">
<mx:Button id="startUpload" label="Upload..." click="fileUpload.startUpload();" />
<mx:Button id="cancelUpload" label="Cancel" click="fileUpload.cancelUpload();"
enabled="false" />
</mx:ControlBar>
</mx:Panel>
This code places a ProgressBar component instance and two Button component button instances on the Stage. When
the user clicks the Upload button (startUpload), an operating system dialog box is launched that allows the user
to select a file to upload to a remote server. The other button, cancelUpload, is disabled by default, although when
a user begins a file upload, the button becomes enabled and allows the user to abort the file transfer at any time.
The code for the Download File panel is as follows:
<mx:Panel title="Download File" paddingTop="10" paddingBottom="10" paddingLeft="10"
paddingRight="10">
<mx:ProgressBar id="downloadProgress" label="" mode="manual" />
<mx:ControlBar horizontalAlign="right">
<mx:Button id="startDownload" label="Download..."
click="fileDownload.startDownload();" />
File Description
FileIO.fla
or
FileIO.mxml
The main application file in Flash (FLA) or Flex (MXML).
com/example/programmingas3/fileio/FileDownload.as A class that includes methods for downloading files from a server.
com/example/programmingas3/fileio/FileUpload.as A class that includes methods for uploading files to a server.

ADOBE FLEX 3
Developer Guide
490
<mx:Button id="cancelDownload" label="Cancel"
click="fileDownload.cancelDownload();" enabled="false" />
</mx:ControlBar>
</mx:Panel>
This code is very similar to the file upload code. When the user clicks the Download button, (startDownload), the
FileDownload.startDownload() method is called, which begins downloading the file specified in the
FileDownload.DOWNLOAD_URL variable. As the file downloads, the progress bar updates, showing what percentage
of the file has downloaded. The user can cancel the download at any point by clicking the cancelDownload button,
which immediately stops the file download in progress.
Downloading files from a remote server
Downloading of files from a remote server is handled by the flash.net.FileReference class and the custom
com.example.programmingas3.fileio.FileDownload class. When the user clicks the Download button, Flash Player
begins to download the file specified in the FileDownload class’s DOWNLOAD_URL variable.
The FileDownload class begins by defining four variables within the com.example.programmingas3.fileio package,
as the following code shows:
/**
* Hard-code the URL of file to download to user's computer.
*/
private const DOWNLOAD_URL:String = "http://www.yourdomain.com/file_to_download.zip";
/**
* Create a FileReference instance to handle the file download.
*/
private var fr:FileReference;
/**
* Define reference to the download ProgressBar component.
*/
private var pb:ProgressBar;
/**
* Define reference to the "Cancel" button which will immediately stop
* the current download in progress.
*/
private var btn:Button;
The first variable, DOWNLOAD_URL, contains the path to the file, which gets downloaded onto the user’s computer
when the user clicks the Download button in the main application file.
The second variable, fr, is a FileReference object that gets initialized within the FileDownload.init() method and
will handle the downloading of the remote file to the user’s computer.
The last two variables, pb and btn, contain references to ProgressBar and Button component instances on the Stage,
which get initialized by the FileDownload.init() method.
Initializing the FileDownload component
The FileDownload component is initialized by calling the init() method in the FileDownload class. This method
takes two parameters, pb and btn, which are ProgressBar and Button component instances, respectively.

ADOBE FLEX 3
Developer Guide
491
The code for the init() method is as follows:
/**
* Set references to the components, and add listeners for the OPEN,
* PROGRESS, and COMPLETE events.
*/
public function init(pb:ProgressBar, btn:Button):void
{
// Set up the references to the progress bar and cancel button,
// which are passed from the calling script.
this.pb = pb;
this.btn = btn;
fr = new FileReference();
fr.addEventListener(Event.OPEN, openHandler);
fr.addEventListener(ProgressEvent.PROGRESS, progressHandler);
fr.addEventListener(Event.COMPLETE, completeHandler);
}
Beginning the file download
When the user clicks the Download Button component instance on the Stage, the startDownload() method is to
initiate the file download process. The following excerpt shows the startDownload() method:
/**
* Begin downloading the file specified in the DOWNLOAD_URL constant.
*/
public function startDownload():void
{
var request:URLRequest = new URLRequest();
request.url = DOWNLOAD_URL;
fr.download(request);
}
First, the startDownload() method creates a new URLRequest object, and sets the target URL to the value specified
by the DOWNLOAD_URL variable. Next, the FileReference.download() method is called, and the newly created
URLRequest object is passed as a parameter. This causes the operating system to display a dialog box on the user’s
computer prompting them to select a location to save the requested document. Once the user selects a location, the
open event (Event.OPEN) is dispatched and the openHandler() method is invoked.
The openHandler() method sets the text format for the ProgressBar component’s label property, and enables the
Cancel button, which allows the user to immediately stop the download in progress. The openHandler() method
is as follows:
/**
* When the OPEN event has dispatched, change the progress bar's label
* and enable the "Cancel" button, which allows the user to abort the
* download operation.
*/
private function openHandler(event:Event):void
{
pb.label = "DOWNLOADING %3%%";
btn.enabled = true;
}

ADOBE FLEX 3
Developer Guide
492
Monitoring a file’s download progress
As a file downloads from a remote server to the user’s computer, the progress event (ProgressEvent.PROGRESS)
is dispatched at regular intervals. Whenever the progress event is dispatched, the progressHandler() method is
invoked and the ProgressBar component instance on the Stage is updated. The code for the progressHandler()
method is as follows:
/**
* While the file is downloading, update the progress bar's status.
*/
private function progressHandler(event:ProgressEvent):void
{
pb.setProgress(event.bytesLoaded, event.bytesTotal);
}
The progress event contains two properties, bytesLoaded and bytesTotal, which are used to update the
ProgressBar component on the Stage. This gives the user a sense of how much of the file has already finished
downloading and how much remains. The user can abort the file transfer at any time by clicking the Cancel button
below the progress bar.
If the file is downloaded successfully, the complete event (Event.COMPLETE) invokes the completeHandler()
method, which notifies the user that the file has completed downloading and disables the Cancel button. The code
for the completeHandler() method is as follows:
/**
* Once the download has completed, change the progress bar's label one
* last time and disable the "Cancel" button since the download is
* already completed.
*/
private function completeHandler(event:Event):void
{
pb.label = "DOWNLOAD COMPLETE";
btn.enabled = false;
}
Cancelling a file download
A user can abort a file transfer and stop any further bytes from being downloaded at any time by clicking the Cancel
button on the Stage. The following excerpt shows the code for cancelling a download:
/**
* Cancel the current file download.
*/
public function cancelDownload():void
{
fr.cancel();
pb.label = "DOWNLOAD CANCELLED";
btn.enabled = false;
}
First, the code stops the file transfer immediately, preventing any further data from downloading. Next, the progress
bar’s label property is updated to notify the user that the download has been successfully cancelled. Finally, the
Cancel button is disabled, which prevents the user from clicking the button again until they attempt to download the
file again.

ADOBE FLEX 3
Developer Guide
493
Uploading files to a remote server
The file upload process is very similar to the file download process. The FileUpload class declares the same four
variables, as shown in the following code:
private const UPLOAD_URL:String = "http://www.yourdomain.com/your_upload_script.cfm";
private var fr:FileReference;
private var pb:ProgressBar;
private var btn:Button;
Unlike the FileDownload.DOWNLOAD_URL variable, the UPLOAD_URL variable contains the URL to the server-side
script that will upload the file from the user’s computer. The remaining three variables behave the same as their
counterparts in the FileDownload class.
Initializing the FileUpload component
The FileUpload component contains an init() method, which gets called from the main application. This method
takes two parameters, pb and btn, which are references to a ProgressBar and Button component instance on the
Stage. Next, the init() method initializes the FileReference object defined earlier in the FileUpload class. Finally,
the method assigns four event listeners to the FileReference object. The code for the init() method is as follows:
public function init(pb:ProgressBar, btn:Button):void
{
this.pb = pb;
this.btn = btn;
fr = new FileReference();
fr.addEventListener(Event.SELECT, selectHandler);
fr.addEventListener(Event.OPEN, openHandler);
fr.addEventListener(ProgressEvent.PROGRESS, progressHandler);
fr.addEventListener(Event.COMPLETE, completeHandler);
}
Beginning a file upload
The file upload is initiated when the user clicks on the Upload button on the Stage, which invokes the
FileUpload.startUpload() method. This method calls the browse() method of the FileReference class which
causes the operating system to display a system dialog box prompting the user to select a file to upload to the remote
server. The following excerpt shows the code for the startUpload() method:
public function startUpload():void
{
fr.browse();
}
Once the user selects a file to upload, the select event (Event.SELECT) is dispatched, causing the
selectHandler() method to be invoked. The selectHandler() method creates a new URLRequest object and
sets the URLRequest.url property to the value of the UPLOAD_URL constant defined earlier in the code. Finally, the
FileReference object uploads the selected file to the specified server-side script. The code for the selectHandler()
method is as follows:
private function selectHandler(event:Event):void
{
var request:URLRequest = new URLRequest();
request.url = UPLOAD_URL;
fr.upload(request);
}

ADOBE FLEX 3
Developer Guide
494
The remaining code in the FileUpload class is the same as the code defined in the FileDownload class. If a user wishes
to terminate the upload at any point, they can click the Cancel button, which sets the label on the progress bar and
stops the file transfer immediately. The progress bar gets updated whenever the progress event
(ProgressEvent.PROGRESS) is dispatched. Similarly, once the upload has completed, the progress bar is updated to
notify the user that the file has uploaded successfully. The Cancel button is then disabled until the user begins a new
file transfer.

495
Chapter 24: Client system environment
This chapter explains how to interact with the user’s system. It shows you how to determine what features are
supported and how to build multilingual SWF files using the user’s installed input method editor (IME) if available.
It also shows typical uses for application domains.
Contents
Basics of the client system environment . . . . . . . . . . . . . . . . . . . . . . . . . . . . . . . . . . . . . . . . . . . . . . . . . . . . . . . . . . . . . 495
Using the System class . . . . . . . . . . . . . . . . . . . . . . . . . . . . . . . . . . . . . . . . . . . . . . . . . . . . . . . . . . . . . . . . . . . . . . . . . . . . 496
Using the Capabilities class . . . . . . . . . . . . . . . . . . . . . . . . . . . . . . . . . . . . . . . . . . . . . . . . . . . . . . . . . . . . . . . . . . . . . . . . 497
Using the ApplicationDomain class . . . . . . . . . . . . . . . . . . . . . . . . . . . . . . . . . . . . . . . . . . . . . . . . . . . . . . . . . . . . . . . . . 498
Using the IME class. . . . . . . . . . . . . . . . . . . . . . . . . . . . . . . . . . . . . . . . . . . . . . . . . . . . . . . . . . . . . . . . . . . . . . . . . . . . . . . 500
Example: Detecting system capabilities . . . . . . . . . . . . . . . . . . . . . . . . . . . . . . . . . . . . . . . . . . . . . . . . . . . . . . . . . . . . . . 504
Basics of the client system environment
Introduction to the client system environment
As you build more advanced ActionScript™ applications, you may find a need to know details about—and access
functions of—your users’ operating systems. The client system environment is a collection of classes in the
flash.system package that allow you to access system-level functionality such as the following:
•Determining which application and security domain a SWF is executing in
•Determining the capabilities of the user’s Flash® Player or Adobe® AIR™ instance, such as the screen size
(resolution) and whether certain functionality is available, such as mp3 audio
•Building multilingual sites using the IME
•Interacting with the Flash Player’s container (which could be an HTML page or a container application) or AIR’s
container.
•Saving information to the user’s clipboard
The flash.system package also includes the IMEConversionMode and SecurityPanel classes. These classes contain
static constants that you use with the IME and Security classes, respectively.
Common client system environment tasks
The following common tasks for working with the client system using ActionScript are described in this chapter:
•Determining how much memory your application is using
•Copying text to the user’s clipboard
•Determining capabilities of the user’s computer, such as:
•Screen resolution, color, DPI, and pixel aspect ratio
•Operating system

ADOBE FLEX 3
Developer Guide
496
•Support for streaming audio, streaming video, and mp3 playback
•Whether the installed Flash Player is a debugger version
•Working with application domains:
•Defining an application domain
•Separating SWF files’ code into application domains
•Working with an IME in your application:
•Determining whether an IME is installed
•Determining and setting the IME conversion mode
•Disabling the IME for text fields
•Detecting when IME conversion happens
Important concepts and terms
The following reference list contains important terms used in this chapter:
•Operating system: The main program that runs on a computer, within which all other applications run—such as
Microsoft Windows, Mac OS X, or Linux®.
•Clipboard: The operating system’s container for holding text or items that are copied or cut, and from which
items are pasted into applications.
•Application domain: A mechanism for separating classes used in different SWF files, so that if the SWF files
include different classes with the same name, the classes don’t overwrite each other.
•IME (input method editor): A program (or operating system tool) that is used to enter complex characters or
symbols using a standard keyboard.
•Client system: In programming terms, a client is the part of an application (or whole application) that runs on
an individual’s computer and is used by a single user. The client system is the underlying operating system on the
user’s computer.
Using the System class
The System class contains methods and properties that allow you to interact with the user’s operating system and
retrieve the current memory usage for Flash Player or AIR. The methods and properties of the System class also
allow you to listen for imeComposition events, instruct Flash Player or AIR to load external text files using the user’s
current code page or to load them as Unicode, or set the contents of the user’s clipboard.
Getting data about the user’s system at run time
By checking the System.totalMemory property, you can determine the amount of memory (in bytes) that Flash
Player or AIR is currently using. This property allows you to monitor memory usage and optimize your applications
based on how the memory level changes. For example, if a particular visual effect causes a large increase in memory
usage, you may want to consider modifying the effect or eliminating it altogether.
The System.ime property is a reference to the currently installed Input Method Editor (IME). This property allows
you to listen for imeComposition events (flash.events.IMEEvent.IME_COMPOSITION) by using the
addEventListener() method.

ADOBE FLEX 3
Developer Guide
497
The third property in the System class is useCodePage. When useCodePage is set to true, Flash Player and AIR use
the traditional code page of the operating system that is running the player to load external text files. If you set this
property to false, you tell Flash Player or AIR to interpret the external file as Unicode.
If you set System.useCodePage to true, remember that the traditional code page of the operating system running
the player must include the characters used in your external text file in order for the text to display. For example, if
you load an external text file that contains Chinese characters, those characters cannot display on a system that uses
the English Windows code page because that code page does not include Chinese characters.
To ensure that users on all platforms can view the external text files that are used in your SWF files, you should
encode all external text files as Unicode and leave System.useCodePage set to false by default. This way, Flash
Player and AIR interpret the text as Unicode.
Saving text to the clipboard
The System class includes a method called setClipboard() that allows Flash Player and AIR to set the contents of
the user’s clipboard with a specified string. For security reasons, there is no Security.getClipboard() method,
since such a method could potentially allow malicious sites to access the data last copied to the user’s clipboard.
The following code illustrates how an error message can be copied to the user’s clipboard when a security error
occurs. The error message can be useful if the user wants to report a potential bug with an application.
private function securityErrorHandler(event:SecurityErrorEvent):void
{
var errorString:String = "[" + event.type + "] " + event.text;
trace(errorString);
System.setClipboard(errorString);
}
Using the Capabilities class
The Capabilities class allows developers to determine the environment in which a SWF file is being run. Using
various properties of the Capabilities class, you can find out the resolution of the user’s system, whether the user’s
system supports accessibility software, and the language of the user’s operating system, as well as the currently
installed version of Flash Player or AIR.
By checking the properties in the Capabilities class, you can customize your application to work best with the specific
user’s environment. For example, by checking the Capabilities.screenResolutionX and
Capabilities.screenResolutionY properties, you can determine the display resolution the user’s system is using
and decide which video size may be most appropriate. Or you can check the Capabilities.hasMP3 property to see
if the user’s system supports mp3 playback before attempting to load an external mp3 file.
The following code uses a regular expression to parse the Flash Player version that the client is using:
var versionString:String = Capabilities.version;
var pattern:RegExp = /^(\w*) (\d*),(\d*),(\d*),(\d*)$/;
var result:Object = pattern.exec(versionString);
if (result != null)
{
trace("input: " + result.input);
trace("platform: " + result[1]);
trace("majorVersion: " + result[2]);
trace("minorVersion: " + result[3]);

ADOBE FLEX 3
Developer Guide
498
trace("buildNumber: " + result[4]);
trace("internalBuildNumber: " + result[5]);
}
else
{
trace("Unable to match RegExp.");
}
If you want to send the user’s system capabilities to a server-side script so that the information can be stored in a
database, you can use the following ActionScript code:
var url:String = "log_visitor.cfm";
var request:URLRequest = new URLRequest(url);
request.method = URLRequestMethod.POST;
request.data = new URLVariables(Capabilities.serverString);
var loader:URLLoader = new URLLoader(request);
Using the ApplicationDomain class
The purpose of the ApplicationDomain class is to store a table of ActionScript 3.0 definitions. All code in a SWF file
is defined to exist in an application domain. You use application domains to partition classes that are in the same
security domain. This allows multiple definitions of the same class to exist and also lets children reuse parent defini-
tions.
You can use application domains when loading an external SWF file written in ActionScript 3.0 using the Loader
class API. (Note that you cannot use application domains when loading an image or SWF file written in ActionScript
1.0 or ActionScript 2.0.) All ActionScript 3.0 definitions contained in the loaded class are stored in the application
domain. When loading the SWF file, you can specify that the file be included in the same application domain as that
of the Loader object, by setting the applicationDomain parameter of the LoaderContext object to
ApplicationDomain.currentDomain. By putting the loaded SWF file in the same application domain, you can
access its classes directly. This can be useful if you are loading a SWF file that contains embedded media, which you
can access via their associated class names, or if you want to access the loaded SWF file’s methods, as shown in the
following example:
package
{
import flash.display.Loader;
import flash.display.Sprite;
import flash.events.*;
import flash.net.URLRequest;
import flash.system.ApplicationDomain;
import flash.system.LoaderContext;
public class ApplicationDomainExample extends Sprite
{
private var ldr:Loader;
public function ApplicationDomainExample()
{
ldr = new Loader();
var req:URLRequest = new URLRequest("Greeter.swf");
var ldrContext:LoaderContext = new LoaderContext(false,
ApplicationDomain.currentDomain);
ldr.contentLoaderInfo.addEventListener(Event.COMPLETE, completeHandler);
ldr.load(req, ldrContext);
}

ADOBE FLEX 3
Developer Guide
499
private function completeHandler(event:Event):void
{
ApplicationDomain.currentDomain.getDefinition("Greeter");
var myGreeter:Greeter = Greeter(event.target.content);
var message:String = myGreeter.welcome("Tommy");
trace(message); // Hello, Tommy
}
}
}
Other things to keep in mind when you work with application domains include the following:
•All code in a SWF file is defined to exist in an application domain. The current domain is where your main appli-
cation runs. The system domain contains all application domains, including the current domain, which means that
it contains all Flash Player classes.
•All application domains, except the system domain, have an associated parent domain. The parent domain for
your main application's application domain is the system domain. Loaded classes are defined only when their parent
doesn't already define them. You cannot override a loaded class definition with a newer definition.
The following diagram shows an application that loads content from various SWF files within a single domain,
domain1.com. Depending on the content you load, different application domains can be used. The text that follows
describes the logic used to set the appropriate application domain for each SWF file in the application.
A. Usage A B. Usage B C. Usage C
The main application file is application1.swf. It contains Loader objects that load content from other SWF files. In
this scenario, the current domain is Application domain 1. Usage A, usage B, and usage C illustrate different
techniques for setting the appropriate application domain for each SWF file in an application.
Usage A Partition the child SWF file by creating a child of the system domain. In the diagram, Application domain
2 is created as a child of the system domain.The application2.swf file is loaded in Application domain 2, and its class
definitions are thus partitioned from the classes defined in application1.swf.
Loader
Loader
Loader
Application
Loader
Stage
Module
Module
Application domain 1
Security domain: domain1.com
module1.swf
module3.swf
Application domain 3
Module
application2.swf
application1.swf
Application domain 2
mx.core.Application
mx.core.Application

ADOBE FLEX 3
Developer Guide
500
One use of this technique is to have an old application dynamically loading a newer version of the same application
without conflict. There is no conflict because although the same class names are used, they are partitioned into
different application domains.
The following code creates an application domain that is a child of the system domain, and starts loading a SWF
using that application domain:
var appDomainA:ApplicationDomain = new ApplicationDomain();
var contextA:LoaderContext = new LoaderContext(false, appDomainA);
var loaderA:Loader = new Loader();
loaderA.load(new URLRequest("application2.swf"), contextA);
Usage B: dd new class definitions to current class definitions. The application domain of module1.swf is set to the
current domain (Application domain 1). This lets you add to the application’s current set of class definitions with
new class definitions. This could be used for a run-time shared library of the main application. The loaded SWF is
treated as a remote shared library (RSL). Use this technique to load RSLs by a preloader before the application starts.
The following code loads a SWF, setting its application domain to the current domain:
var appDomainB:ApplicationDomain = ApplicationDomain.currentDomain;
var contextB:LoaderContext = new LoaderContext(false, appDomainB);
var loaderB:Loader = new Loader();
loaderB.load(new URLRequest("module1.swf"), contextB);
Usage C: se the parent’s class definitions by creating a new child domain of the current domain. The application
domain of module3.swf is a child of the current domain, and the child uses the parent's versions of all classes. One
use of this technique might be a module of a multiple-screen rich Internet application (RIA), loaded as a child of the
main application, that uses the main application's types. If you can ensure that all classes are always updated to be
backward compatible, and that the loading application is always newer than the things it loads, the children will use
the parent versions. Having a new application domain also allows you to unload all the class definitions for garbage
collection, if you can ensure that you do not continue to have references to the child SWF.
This technique lets loaded modules share the loader's singleton objects and static class members.
The following code creates a new child domain of the current domain, and starts loading a SWF using that appli-
cation domain:
var appDomainC:ApplicationDomain = new ApplicationDomain(ApplicationDomain.currentDomain);
var contextC:LoaderContext = new LoaderContext(false, appDomainC);
var loaderC:Loader = new Loader();
loaderC.load(new URLRequest("module3.swf"), contextC);
Using the IME class
The IME class lets you manipulate the operating system’s IME within Flash Player or Adobe AIR.
Using ActionScript, you can determine the following:
•If an IME is installed on the user's computer (Capabilities.hasIME)
•If the IME is enabled or disabled on the user’s computer (IME.enabled)
•The conversion mode the current IME is using (IME.conversionMode)

ADOBE FLEX 3
Developer Guide
501
You can associate an input text field with a particular IME context. When you switch between input fields, you can
also switch the IME between Hiragana (Japanese), full-width numbers, half-width numbers, direct input, and so on.
An IME lets users type non-ASCII text characters in multibyte languages, such as Chinese, Japanese, and Korean.
For more information on working with IMEs, see the documentation for the operating system for which you are
developing the application. For additional resources, see the following web sites:
•http://www.microsoft.com/globaldev/default.mspx
•http://developer.apple.com/documentation/
•http://java.sun.com/
Note: If an IME is not active on the user's computer, calls to IME methods or properties, other than
Capabilities.hasIME, will fail. Once you manually activate an IME, subsequent ActionScript calls to IME methods
and properties will work as expected. For example, if you are using a Japanese IME, you must activate it before you can
call any IME method or property.
Checking if an IME is installed and enabled
Before you call any of the IME methods or properties, you should always check to see if the user’s computer currently
has an IME installed and enabled. The following code illustrates how to check that the user has an IME both installed
and active before you call any methods:
if (Capabilities.hasIME)
{
if (IME.enabled)
{
trace("IME is installed and enabled.");
}
else
{
trace("IME is installed but not enabled. Please enable your IME and try again.");
}
}
else
{
trace("IME is not installed. Please install an IME and try again.");
}
The previous code first checks to see if the user has an IME installed using the Capabilities.hasIME property. If
this property is set to true, the code then checks whether the user’s IME is currently enabled, using the
IME.enabled property.
Determining which IME conversion mode is currently enabled
When building multilingual applications, you may need to determine which conversion mode the user currently has
active. The following code demonstrates how to check whether the user has an IME installed, and if so, which IME
conversion mode is currently active:
if (Capabilities.hasIME)
{
switch (IME.conversionMode)
{
case IMEConversionMode.ALPHANUMERIC_FULL:
tf.text = "Current conversion mode is alphanumeric (full-width).";
break;

ADOBE FLEX 3
Developer Guide
502
case IMEConversionMode.ALPHANUMERIC_HALF:
tf.text = "Current conversion mode is alphanumeric (half-width).";
break;
case IMEConversionMode.CHINESE:
tf.text = "Current conversion mode is Chinese.";
break;
case IMEConversionMode.JAPANESE_HIRAGANA:
tf.text = "Current conversion mode is Japananese Hiragana.";
break;
case IMEConversionMode.JAPANESE_KATAKANA_FULL:
tf.text = "Current conversion mode is Japanese Katakana (full-width).";
break;
case IMEConversionMode.JAPANESE_KATAKANA_HALF:
tf.text = "Current conversion mode is Japanese Katakana (half-width).";
break;
case IMEConversionMode.KOREAN:
tf.text = "Current conversion mode is Korean.";
break;
default:
tf.text = "Current conversion mode is " + IME.conversionMode + ".";
break;
}
}
else
{
tf.text = "Please install an IME and try again.";
}
The previous code first checks to see whether the user has an IME installed. Next it checks which conversion mode
the current IME is using by comparing the IME.conversionMode property against each of the constants in the
IMEConversionMode class.
Setting the IME conversion mode
When you change the conversion mode of the user’s IME, you need to make sure that the code is wrapped in a
try..catch block, because setting a conversion mode using the conversionMode property can throw an error if
the IME is unable to set the conversion mode. The following code demonstrates how to use a try..catch block
when setting the IME.conversionMode property:
var statusText:TextField = new TextField;
statusText.autoSize = TextFieldAutoSize.LEFT;
addChild(statusText);
if (Capabilities.hasIME)
{
try
{
IME.enabled = true;
IME.conversionMode = IMEConversionMode.KOREAN;
statusText.text = "Conversion mode is " + IME.conversionMode + ".";
}
catch (error:Error)
{
statusText.text = "Unable to set conversion mode.\n" + error.message;
}
}

ADOBE FLEX 3
Developer Guide
503
The previous code first creates a text field, which is used to display a status message to the user. Next, if the IME is
installed, the code enables the IME and sets the conversion mode to Korean. If the user’s computer does not have a
Korean IME installed, an error is thrown by Flash Player or AIR and is caught by the try..catch block. The
try..catch block displays the error message in the previously created text field.
Disabling the IME for certain text fields
In some cases, you may want to disable the user’s IME while they type characters. For example, if you had a text field
that only accepts numeric input, you may not want the IME to come up and slow down data entry.
The following example demonstrates how you can listen for the FocusEvent.FOCUS_IN and
FocusEvent.FOCUS_OUT events and disable the user’s IME accordingly:
var phoneTxt:TextField = new TextField();
var nameTxt:TextField = new TextField();
phoneTxt.type = TextFieldType.INPUT;
phoneTxt.addEventListener(FocusEvent.FOCUS_IN, focusInHandler);
phoneTxt.addEventListener(FocusEvent.FOCUS_OUT, focusOutHandler);
phoneTxt.restrict = "0-9";
phoneTxt.width = 100;
phoneTxt.height = 18;
phoneTxt.background = true;
phoneTxt.border = true;
addChild(phoneTxt);
nameField.type = TextFieldType.INPUT;
nameField.x = 120;
nameField.width = 100;
nameField.height = 18;
nameField.background = true;
nameField.border = true;
addChild(nameField);
function focusInHandler(event:FocusEvent):void
{
if (Capabilities.hasIME)
{
IME.enabled = false;
}
}
function focusOutHandler(event:FocusEvent):void
{
if (Capabilities.hasIME)
{
IME.enabled = true;
}
}
This example creates two input text fields, phoneTxt and nameTxt, and then adds two event listeners to the
phoneTxt text field. When the user sets focus to the phoneTxt text field, a FocusEvent.FOCUS_IN event is
dispatched and the IME is disabled. When the phoneTxt text field loses focus, the FocusEvent.FOCUS_OUT event
is dispatched to re-enable the IME.

ADOBE FLEX 3
Developer Guide
504
Listening for IME composition events
IME composition events are dispatched when a composition string is being set. For example, if the user has their
IME enabled and active and types a string in Japanese, the IMEEvent.IME_COMPOSITION event would dispatch as
soon as the user selects the composition string. In order to listen for the IMEEvent.IME_COMPOSITION event, you
need to add an event listener to the static ime property in the System class
(flash.system.System.ime.addEventListener(...)), as shown in the following example:
var inputTxt:TextField;
var outputTxt:TextField;
inputTxt = new TextField();
inputTxt.type = TextFieldType.INPUT;
inputTxt.width = 200;
inputTxt.height = 18;
inputTxt.border = true;
inputTxt.background = true;
addChild(inputTxt);
outputTxt = new TextField();
outputTxt.autoSize = TextFieldAutoSize.LEFT;
outputTxt.y = 20;
addChild(outputTxt);
if (Capabilities.hasIME)
{
IME.enabled = true;
try
{
IME.conversionMode = IMEConversionMode.JAPANESE_HIRAGANA;
}
catch (error:Error)
{
outputTxt.text = "Unable to change IME.";
}
System.ime.addEventListener(IMEEvent.IME_COMPOSITION, imeCompositionHandler);
}
else
{
outputTxt.text = "Please install IME and try again.";
}
function imeCompositionHandler(event:IMEEvent):void
{
outputTxt.text = "you typed: " + event.text;
}
The previous code creates two text fields and adds them to the display list. The first text field, inputTxt, is an input
text field that allows the user to enter Japanese text. The second text field, outputTxt, is a dynamic text field that
displays error messages to the user, or echoes the Japanese string that the user types into the inputTxt text field.
Example: Detecting system capabilities
The CapabilitiesExplorer example demonstrates how you can use the flash.system.Capabilities class to determine
which features the user’s version of Flash Player or AIR supports. This example teaches the following techniques:

ADOBE FLEX 3
Developer Guide
505
•Detecting which capabilities the user’s version of Flash Player or AIR supports using the Capabilities class
•Using the ExternalInterface class to detect which browser settings the user’s browser supports
To get the application files for this sample, see www.adobe.com/go/learn_programmingAS3samples_flash. The
CapabilitiesExplorer application files can be found in the folder Samples/CapabilitiesExplorer. This application
consists of the following files:
CapabilitiesExplorer overview
The CapabilitiesExplorer.mxml file is responsible for setting up the user interface for the CapabilitiesExplorer appli-
cation. The capabilities of the user’s version of Flash Player or AIR will be displayed within a DataGrid component
instance on the Stage. Their browser capabilities will also be displayed if they are running the application from an
HTML container and if the external API is available.
When the main application file’s creationComplete event is dispatched, the initApp() method is invoked. The
initApp() method calls the getCapabilities() method from within the com.example.programmingas3.capabil-
ities.CapabilitiesGrabber class. The code for the initApp() method is as follows:
private function initApp():void
{
var dp:Array = CapabilitiesGrabber.getCapabilities();
capabilitiesGrid.dataProvider = dp;
}
The CapabilitiesGrabber.getCapabilities() method returns a sorted array of the AIR, or Flash Player and
browser capabilities, which then gets set to the dataProvider property of the capabilitiesGrid DataGrid
component instance on the Stage.
CapabilitiesGrabber class overview
The static getCapabilities() method of the CapabilitiesGrabber class adds each property from the
flash.system.Capabilities class to an array (capDP). It then calls the static getBrowserObjects() method in the
CapabilitiesGrabber class. The getBrowserObjects() method uses the external API to loop over the browser’s
navigator object, which contains the browser’s capabilities. The getCapabilities() method is as follows:
public static function getCapabilities():Array
{
var capDP:Array = new Array();
capDP.push({name:"Capabilities.avHardwareDisable",
value:Capabilities.avHardwareDisable});
capDP.push({name:"Capabilities.hasAccessibility",
value:Capabilities.hasAccessibility});
File Description
CapabilitiesExplorer.fla
or
CapabilitiesExplorer.mxml
The main application file in Flash (FLA) or Flex (MXML).
com/example/programmingas3/capabilities/CapabilitiesGrabber.as The class that provides the main functionality of the applica-
tion, including adding the system Capabilities to an array,
sorting the items, and using the ExternalInterface class to
retrieve browser capabilities.
capabilities.html An HTML container that contains the necessary JavaScript to
communicate with the external API.

ADOBE FLEX 3
Developer Guide
506
capDP.push({name:"Capabilities.hasAudio", value:Capabilities.hasAudio});
...
capDP.push({name:"Capabilities.version", value:Capabilities.version});
var navArr:Array = CapabilitiesGrabber.getBrowserObjects();
if (navArr.length > 0)
{
capDP = capDP.concat(navArr);
}
capDP.sortOn("name", Array.CASEINSENSITIVE);
return capDP;
}
The getBrowserObjects() method returns an array of each of the properties in the browser’s navigator object. If
this array has a length of one or more items, the array of browser capabilities (navArr) is appended to the array of
Flash Player capabilities (capDP), and the entire array is sorted alphabetically. Finally, the sorted array is returned to
the main application file, which then populates the data grid. The code for the getBrowserObjects() method is as
follows:
private static function getBrowserObjects():Array
{
var itemArr:Array = new Array();
var itemVars:URLVariables;
if (ExternalInterface.available)
{
try
{
var tempStr:String = ExternalInterface.call("JS_getBrowserObjects");
itemVars = new URLVariables(tempStr);
for (var i:String in itemVars)
{
itemArr.push({name:i, value:itemVars[i]});
}
}
catch (error:SecurityError)
{
// ignore
}
}
return itemArr;
}
If the external API is available in the current user environment, Flash Player calls the JavaScript
JS_getBrowserObjects() method, which loops over the browser’s navigator object and returns a string of URL-
encoded values to ActionScript. This string is then converted into a URLVariables object (itemVars) and added to
the itemArr array, which is returned to the calling script.
Communicating with JavaScript
The final piece in building the CapabilitiesExplorer application is writing the necessary JavaScript to loop over each
of the items in the browser’s navigator object and append a name-value pair to a temporary array. The code for the
JavaScript JS_getBrowserObjects() method in the container.html file is as follows:
<script language="JavaScript">
function JS_getBrowserObjects()
{
// Create an array to hold each of the browser's items.
var tempArr = new Array();
// Loop over each item in the browser's navigator object.

ADOBE FLEX 3
Developer Guide
507
for (var name in navigator)
{
var value = navigator[name];
// If the current value is a string or Boolean object, add it to the
// array, otherwise ignore the item.
switch (typeof(value))
{
case "string":
case "boolean":
// Create a temporary string which will be added to the array.
// Make sure that we URL-encode the values using JavaScript's
// escape() function.
var tempStr = "navigator." + name + "=" + escape(value);
// Push the URL-encoded name/value pair onto the array.
tempArr.push(tempStr);
break;
}
}
// Loop over each item in the browser's screen object.
for (var name in screen)
{
var value = screen[name];
// If the current value is a number, add it to the array, otherwise
// ignore the item.
switch (typeof(value))
{
case "number":
var tempStr = "screen." + name + "=" + escape(value);
tempArr.push(tempStr);
break;
}
}
// Return the array as a URL-encoded string of name-value pairs.
return tempArr.join("&");
}
</script>
The code begins by creating a temporary array that will hold all the name-value pairs in the navigator object. Next,
the navigator object is looped over using a for..in loop, and the data type of the current value is evaluated to filter
out unwanted values. In this application, we are interested only in String or Boolean values, and other data types
(such as functions or arrays) are ignored. Each String or Boolean value in the navigator object is appended to the
tempArr array. Next, the browser’s screen object is looped over using a for..in loop, and each numeric value is
added to the tempArr array. Finally, the temporary array is converted into a string using the Array.join() method.
The array uses an ampersand (&) as a delimiter, which allows ActionScript to easily parse the data using the URLVa-
riables class.

508
Chapter 25: Printing
Adobe® Flash® Player 9 and Adobe® AIR™ can communicate with an operating system’s printing interface so that you
can pass pages to the print spooler. Each page Flash Player or AIR sends to the spooler can contain content that is
visible, dynamic, or offscreen to the user, including database values and dynamic text. Additionally, Flash Player and
AIR set the properties of the flash.printing.PrintJob class based on a user’s printer settings, so that you can format
pages appropriately.
This chapter details strategies for using the flash.printing.PrintJob class methods and properties to create a print job,
read a user’s print settings, and make adjustments to a print job based on feedback from Flash Player or AIR and the
user’s operating system.
Contents
Basics of printing. . . . . . . . . . . . . . . . . . . . . . . . . . . . . . . . . . . . . . . . . . . . . . . . . . . . . . . . . . . . . . . . . . . . . . . . . . . . . . . . . 508
Printing a page. . . . . . . . . . . . . . . . . . . . . . . . . . . . . . . . . . . . . . . . . . . . . . . . . . . . . . . . . . . . . . . . . . . . . . . . . . . . . . . . . . . 509
Flash Player and AIR tasks and system printing. . . . . . . . . . . . . . . . . . . . . . . . . . . . . . . . . . . . . . . . . . . . . . . . . . . . . . . 510
Setting size, scale, and orientation . . . . . . . . . . . . . . . . . . . . . . . . . . . . . . . . . . . . . . . . . . . . . . . . . . . . . . . . . . . . . . . . . . 512
Example: Multiple-page printing . . . . . . . . . . . . . . . . . . . . . . . . . . . . . . . . . . . . . . . . . . . . . . . . . . . . . . . . . . . . . . . . . . . 514
Example: Scaling, cropping, and responding . . . . . . . . . . . . . . . . . . . . . . . . . . . . . . . . . . . . . . . . . . . . . . . . . . . . . . . . . 516
Basics of printing
Introduction to printing
In ActionScript 3.0, you use the PrintJob class to create snapshots of display content to convert to the ink-and-paper
representation in a printout. In some ways, setting up content for printing is the same as setting it up for on-screen
display—you position and size elements to create the desired layout. However, printing has some idiosyncrasies that
make it different from screen layout. For instance, printers use different resolution than computer monitors; the
contents of a computer screen are dynamic and can change, while printed content is inherently static; and in
planning printing, the constraints of fixed page size and possibility of multipage printing need to be considered.
Even though these differences may seem obvious, it’s important to keep them in mind when setting up printing with
ActionScript. Since accurate printing depends on a combination of the values specified by you and the characteristics
of the user’s printer, the PrintJob class includes properties that allow you to determine the important characteristics
of the user’s printer that you’ll need to take into account.
Common printing tasks
The following common printing tasks are described in this chapter:
•Starting a print job
•Adding pages to a print job
•Determining whether the user cancels a print job
•Specifying whether to use bitmap or vector rendering
•Setting page size, scale, and orientation

ADOBE FLEX 3
Developer Guide
509
•Specifying the printable area of content
•Converting screen size to page size
•Printing multipage print jobs
Important concepts and terms
The following reference list contains important terms used in this chapter:
•Spooler: A portion of the operating system or printer driver software that keeps track of pages as they are waiting
to be printed and sends them to the printer when it is available.
•Page orientation: The rotation of the printed content in relation to the paper—either horizontal (landscape) or
vertical (portrait).
•Print job: The page or set of pages that make up a single printout.
Printing a page
You use an instance of the PrintJob class to handle printing. To print a basic page through Flash Player or AIR, you
use these four statements in sequence:
•new PrintJob(): Creates a new print job instance of the name you specify.
•PrintJob.start(): Initiates the printing process for the operating system, invoking the print dialog box for the
user, and populates the read-only properties of the print job.
•PrintJob.addPage(): Contains the details about the print job contents, including the Sprite object (and any
children it contains), the size of the print area, and whether the printer should print the image as a vector or bitmap.
You can use successive calls to addPage() to print multiple sprites over several pages.
•PrintJob.send(): Sends the pages to the operating system’s printer.
So, for example, a very simple print job script may look like the following (including package, import and class
statements for compiling):
package
{
import flash.printing.PrintJob;
import flash.display.Sprite;
public class BasicPrintExample extends Sprite
{
var myPrintJob:PrintJob = new PrintJob();
var mySprite:Sprite = new Sprite();
public function BasicPrintExample()
{
myPrintJob.start();
myPrintJob.addPage(mySprite);
myPrintJob.send();
}
}
}

ADOBE FLEX 3
Developer Guide
510
Note: This example is intended to show the basic elements of a print job script, and does not contain any error handling.
To build a script that responds properly to a user canceling a print job, see “Working with exceptions and returns” on
page 510.
If you need to clear a PrintJob object’s properties for any reason, set the PrintJob variable to null (as in myPrintJob
= null).
Flash Player and AIR tasks and system printing
Because Flash Player and AIR dispatch pages to the operating system’s printing interface, you should understand the
scope of the tasks managed by Flash Player, and AIR and the tasks managed by an operating system’s own printing
interface. Flash Player and AIR can initiate a print job, read some of a printer’s page settings, pass the content for a
print job to the operating system, and verify if the user or system has cancelled a print job. Other processes, such as
displaying printer specific dialog boxes, cancelling a spooled print job, or reporting on the printer’s status, are all
handled by the operating system. Flash Player and AIR are able to respond if there is a problem initiating or
formatting a print job, but can report back only on certain properties or conditions from the operating system’s
printing interface. As a developer, your code should have the ability to respond to these properties or conditions.
Working with exceptions and returns
You should check to see if the PrintJob.start() method returns true before executing addPage() and send()
calls, in case the user has cancelled the print job. A simple way to check whether these methods have been cancelled
before continuing is to wrap them in an if statement, as follows:
if (myPrintJob.start())
{
// addPage() and send() statements here
}
If PrintJob.start() is true, meaning the user has selected Print (or Flash Player or AIR has initiated a Print
command), the addPage() and send() methods can be called.
Also, to help manage the printing process, Flash Player and AIR throw exceptions for the PrintJob.addPage()
method, so that you can catch errors and provide information and options to the user. If a PrintJob.addPage()
method fails, you can also call another function or stop the current print job. You catch these exceptions by
embedding addPage() calls within a try..catch statement, as in the following example. In the example, [params]
is a placeholder for the parameters specifying the actual content you want to print:
if (myPrintJob.start())
{
try
{
myPrintJob.addPage([params]);
}
catch (error:Error)
{
// Handle error,
}
myPrintJob.send();
}

ADOBE FLEX 3
Developer Guide
511
After the print job starts, you can add the content using PrintJob.addPage() and see if that generates an exception
(for example, if the user has cancelled the print job). If it does, you can add logic to the catch statement to provide
the user (or Flash Player or AIR) with information and options, or you can stop the current print job. If you add the
page successfully, you can proceed to send the pages to the printer using PrintJob.send().
If Flash Player or AIR encounters a problem sending the print job to the printer (for example, if the printer is offline),
you can catch that exception, too, and provide the user (or Flash Player or AIR) with information or more options
(such as displaying message text or providing an alert within the Flash animation). For example, you can assign new
text to a text field in an if..else statement, as the following code shows:
if (myPrintJob.start())
{
try
{
myPrintJob.addPage([params]);
}
catch (error:Error)
{
// Handle error.
}
myPrintJob.send();
}
else
{
myAlert.text = "Print job canceled";
}
For a working example, see “Example: Scaling, cropping, and responding” on page 516.
Working with page properties
Once the user clicks OK in the Print dialog box and PrintJob.start() returns true, you can access the properties
defined by the printer’s settings. These include the paper width, paper height (pageHeight and pageWidth), and
content orientation on the paper. Because these are printer settings, not controlled by Flash Player or AIR, you
cannot alter these settings; however, you can use them to align the content you send to the printer to match the
current settings. For more information, see “Setting size, scale, and orientation” on page 512.
Setting vector or bitmap rendering
You can manually set the print job to spool each page as vector graphics or a bitmap image. In some cases, vector
printing will produce a smaller spool file, and a better image than bitmap printing. However, if your content includes
a bitmap image, and you want to preserve any alpha transparency or color effects, you should print the page as a
bitmap image. Also, a non-PostScript printer automatically converts any vector graphics to bitmap images. You
specify bitmap printing in the third parameter of PrintJob.addPage(), by passing a PrintJobOptions object with
the printAsBitmap parameter set to true, as follows:
var options:PrintJobOptions = new PrintJobOptions();
options.printAsBitmap = true;
myPrintJob.addPage(mySprite, null, options);
If you don’t specify a value for the third parameter, the print job will use the default, which is vector printing.
Note: If you don't want to specify a value for printArea (the second parameter) but want to specify a value for bitmap
printing, use null for printArea.

ADOBE FLEX 3
Developer Guide
512
Timing print job statements
ActionScript 3.0 does not restrict a PrintJob object to a single frame (as did previous versions of ActionScript).
However, because the operating system displays print status information to the user once the user has clicked the OK
button in the Print dialog box, you should call PrintJob.addPage() and PrintJob.send() as soon as possible to
send pages to the spooler. A delay reaching the frame containing the PrintJob.send() call will delay the printing
process.
In ActionScript 3.0, there is a script time-out limit of 15 seconds. Therefore, the time between each major statement
in a print job sequence cannot exceed 15 seconds. In other words, the 15-second script time-out limit applies to the
following intervals:
•Between PrintJob.start() and the first PrintJob.addPage()
•Between PrintJob.addPage() and the next PrintJob.addPage()
•Between the last PrintJob.addPage() and PrintJob.send()
If any of these intervals spans more than 15 seconds, the next call to PrintJob.start() on the PrintJob instance
returns false, and the next PrintJob.addPage() on the PrintJob instance causes Flash Player or AIR to throw a
run-time exception.
Setting size, scale, and orientation
The section “Printing a page” on page 509 details the steps for a basic print job, where the output directly reflects the
printed equivalent of the screen size and position of the specified sprite. However, printers use different resolutions
for printing, and can have settings that adversely affect the appearance of the printed sprite.
Flash Player and AIR can read an operating system’s printing settings, but note that these properties are read-only:
although you can respond to their values, you can’t set them. So, for example, you can find out the printer’s page size
setting and adjust your content to fit the size. You can also determine a printer’s margin settings and page orientation.
To respond to the printer settings, you may need to specify a print area, adjust for the difference between a screen’s
resolution and a printer’s point measurements, or transform your content to meet the size or orientation settings of
the user’s printer.
Using rectangles for the print area
The PrintJob.addPage() method allows you to specify the region of a sprite that you want printed. The second
parameter, printArea, is in the form of a Rectangle object. You have three options for providing a value for this
parameter:
•Create a Rectangle object with specific properties and then use that rectangle in the addPage() call, as in the
following example:
private var rect1:Rectangle = new Rectangle(0, 0, 400, 200);
myPrintJob.addPage(sheet, rect1);
•If you haven’t already specified a Rectangle object, you can do it within the call itself, as in the following example:
myPrintJob.addPage(sheet, new Rectangle(0, 0, 100, 100));
•If you plan to provide values for the third parameter in the addPage() call, but don’t want to specify a rectangle,
you can use null for the second parameter, as in the following;
myPrintJob.addPage(sheet, null, options);

ADOBE FLEX 3
Developer Guide
513
Note: If you plan to specify a rectangle for the printing dimensions, remember to import the
flash.display.Rectangle class.
Comparing points and pixels
A rectangle's width and height are pixel values. A printer uses points as print units of measurement. Points are a fixed
physical size (1/72 inch), but the size of a pixel on the screen depends on the resolution of the particular screen. The
conversion rate between pixels and points depends on the printer settings and whether the sprite is scaled. An
unscaled sprite that is 72 pixels wide will print out one inch wide, with one point equal to one pixel, independent of
screen resolution.
You can use the following equivalencies to convert inches or centimeters to twips or points (a twip is 1/20 of a point):
•1 point = 1/72 inch = 20 twips
•1 inch = 72 points = 1440 twips
•1 centimeter = 567 twips
If you omit the printArea parameter, or if it is passed incorrectly, the full area of the sprite is printed.
Scaling
If you want to scale a Sprite object before you print it, set the scale properties (see “Manipulating size and scaling
objects” on page 270) before calling the PrintJob.addPage() method, and set them back to their original values
after printing. The scale of a Sprite object has no relation to the printArea property. In other words, if you specify
a print area that is 50 pixels by 50 pixels, 2500 pixels are printed. If you scale the Sprite object, the same 2500 pixels
are printed, but the Sprite object is printed at the scaled size.
For an example, see “Example: Scaling, cropping, and responding” on page 516.
Printing for landscape or portrait orientation
Because Flash Player and AIR can detect the settings for orientation, you can build logic into your ActionScript to
adjust the content size or rotation in response to the printer settings, as the following example illustrates:
if (myPrintJob.orientation == PrintJobOrientation.LANDSCAPE)
{
mySprite.rotation = 90;
}
Note:
Note: import flash.printing.PrintJobOrientation;
Note: If you plan to read the system setting for content orientation on the paper, remember to import the PrintJobOri-
entation class by using the following:
Responding to page height and width
Using a strategy that is similar to handling printer orientation settings, you can read the page height and width
settings and respond to them by embedding some logic into an if statement. The following code shows an example:
if (mySprite.height > myPrintJob.pageHeight)
{
mySprite.scaleY = .75;
}

ADOBE FLEX 3
Developer Guide
514
In addition, a page’s margin settings can be determined by comparing the page and paper dimensions, as the
following example illustrates:
margin_height = (myPrintJob.paperHeight - myPrintJob.pageHeight) / 2;
margin_width = (myPrintJob.paperWidth - myPrintJob.pageWidth) / 2;
Example: Multiple-page printing
When printing more than one page of content, you can associate each page of content with a different sprite (in this
case, sheet1 and sheet2), and then use PrintJob.addPage() for each sprite. The following code illustrates this
technique:
package
{
import flash.display.MovieClip;
import flash.printing.PrintJob;
import flash.printing.PrintJobOrientation;
import flash.display.Stage;
import flash.display.Sprite;
import flash.text.TextField;
import flash.geom.Rectangle;
public class PrintMultiplePages extends MovieClip
{
private var sheet1:Sprite;
private var sheet2:Sprite;
public function PrintMultiplePages():void
{
init();
printPages();
}
private function init():void
{
sheet1 = new Sprite();
createSheet(sheet1, "Once upon a time...", {x:10, y:50, width:80, height:130});
sheet2 = new Sprite();
createSheet(sheet2, "There was a great story to tell, and it ended
quickly.\n\nThe end.", null);
}
private function createSheet(sheet:Sprite, str:String, imgValue:Object):void
{
sheet.graphics.beginFill(0xEEEEEE);
sheet.graphics.lineStyle(1, 0x000000);
sheet.graphics.drawRect(0, 0, 100, 200);
sheet.graphics.endFill();
var txt:TextField = new TextField();
txt.height = 200;
txt.width = 100;
txt.wordWrap = true;
txt.text = str;

ADOBE FLEX 3
Developer Guide
515
if (imgValue != null)
{
var img:Sprite = new Sprite();
img.graphics.beginFill(0xFFFFFF);
img.graphics.drawRect(imgValue.x, imgValue.y, imgValue.width,
imgValue.height);
img.graphics.endFill();
sheet.addChild(img);
}
sheet.addChild(txt);
}
private function printPages():void
{
var pj:PrintJob = new PrintJob();
var pagesToPrint:uint = 0;
if (pj.start())
{
if (pj.orientation == PrintJobOrientation.LANDSCAPE)
{
throw new Error("Page is not set to an orientation of portrait.");
}
sheet1.height = pj.pageHeight;
sheet1.width = pj.pageWidth;
sheet2.height = pj.pageHeight;
sheet2.width = pj.pageWidth;
try
{
pj.addPage(sheet1);
pagesToPrint++;
}
catch (error:Error)
{
// Respond to error.
}
try
{
pj.addPage(sheet2);
pagesToPrint++;
}
catch (error:Error)
{
// Respond to error.
}
if (pagesToPrint > 0)
{
pj.send();
}
}
}
}
}

ADOBE FLEX 3
Developer Guide
516
Example: Scaling, cropping, and responding
In some cases, you may want adjust the size (or other properties) of a display object when printing it to accommodate
differences between the way it appears on screen and the way it appears printed on paper. When you adjust the
properties of a display object before printing (for example, by using the scaleX and scaleY properties), be aware
that if the object scales larger than the defined rectangle for the print area, the object will be cropped. You will also
probably want to reset the properties after the pages have been printed.
The following code scales the dimensions of the txt display object (but not the green box background), and the text
field ends up being cropped by the dimensions of the specified rectangle. After printing, the text field is returned to
its original size for display on screen. If the user cancels the print job from the operating system’s Print dialog box,
the content in the Flash Player or AIR changes to alert the user that the job has been canceled.
package
{
import flash.printing.PrintJob;
import flash.display.Sprite;
import flash.text.TextField;
import flash.display.Stage;
import flash.geom.Rectangle;
public class PrintScaleExample extends Sprite
{
private var bg:Sprite;
private var txt:TextField;
public function PrintScaleExample():void
{
init();
draw();
printPage();
}
private function printPage():void
{
var pj:PrintJob = new PrintJob();
txt.scaleX = 3;
txt.scaleY = 2;
if (pj.start())
{
trace(">> pj.orientation: " + pj.orientation);
trace(">> pj.pageWidth: " + pj.pageWidth);
trace(">> pj.pageHeight: " + pj.pageHeight);
trace(">> pj.paperWidth: " + pj.paperWidth);
trace(">> pj.paperHeight: " + pj.paperHeight);
try
{
pj.addPage(this, new Rectangle(0, 0, 100, 100));
}
catch (error:Error)
{
// Do nothing.
}
pj.send();
}

ADOBE FLEX 3
Developer Guide
517
else
{
txt.text = "Print job canceled";
}
// Reset the txt scale properties.
txt.scaleX = 1;
txt.scaleY = 1;
}
private function init():void
{
bg = new Sprite();
bg.graphics.beginFill(0x00FF00);
bg.graphics.drawRect(0, 0, 100, 200);
bg.graphics.endFill();
txt = new TextField();
txt.border = true;
txt.text = "Hello World";
}
private function draw():void
{
addChild(bg);
addChild(txt);
txt.x = 50;
txt.y = 50;
}
}
}

518
Chapter 26: Using the external API
The ActionScript™ 3.0 external API enables straightforward communication between ActionScript and the container
application within which Adobe® Flash™ Player 9 or Adobe® AIR™ is running. There are several situations in which
you may want to use the external API—for example, when you create interaction between a SWF document and
JavaScript in an HTML page, or when you build a desktop application that uses Flash Player or AIR to display a SWF
file.
This chapter describes how to use the external API to interact with a container application, how to pass data between
ActionScript and JavaScript in an HTML page, and how to establish communication and exchange data between
ActionScript and a desktop application.
Note: This chapter only covers communication between ActionScript in a SWF and the container application that
includes a reference to the Flash Player or instance in which the SWF is loaded. Any other use of Flash Player within an
application is outside the scope of this documentation. Flash Player is designed to be used as a browser plug-in or as a
projector (standalone application). Other usage scenarios may have limited support.
Contents
Basics of using the external API . . . . . . . . . . . . . . . . . . . . . . . . . . . . . . . . . . . . . . . . . . . . . . . . . . . . . . . . . . . . . . . . . . . . 518
External API requirements and advantages . . . . . . . . . . . . . . . . . . . . . . . . . . . . . . . . . . . . . . . . . . . . . . . . . . . . . . . . . . 519
Using the ExternalInterface class . . . . . . . . . . . . . . . . . . . . . . . . . . . . . . . . . . . . . . . . . . . . . . . . . . . . . . . . . . . . . . . . . . . 520
Example: Using the external API with a web page container . . . . . . . . . . . . . . . . . . . . . . . . . . . . . . . . . . . . . . . . . . . . 524
Example: Using the external API with an ActiveX container . . . . . . . . . . . . . . . . . . . . . . . . . . . . . . . . . . . . . . . . . . . . 529
Basics of using the external API
Introduction to using the external API
Although in some cases a SWF file can run on its own (for example, if you create a SWF projector), in the majority
of cases a SWF application runs as an element inside of another application. Commonly, the container that includes
the SWF is an HTML file; somewhat less frequently, a SWF file is used for all or part of the user interface of a desktop
application.
As you work on more advanced applications, you may find a need to set up communication between the SWF file
and the container application. For instance, it’s common for a web page to display text or other information in
HTML, and include a SWF file to display dynamic visual content such as a chart or video. In such a case, you might
want to make it so that when users click a button on the web page, it changes something in the SWF file. ActionScript
contains a mechanism, known as the external API, that facilitates this type of communication between ActionScript
in a SWF file and other code in the container application.
Common external API tasks
The following common external API tasks are explained in this chapter:
•Getting information about the container application
•Using ActionScript to call code in a container application, including a web page or desktop application

ADOBE FLEX 3
Developer Guide
519
•Calling ActionScript code from code in a container application
•Creating a proxy to simplify calling ActionScript code from a container application
Important concepts and terms
The following reference list contains important terms used in this chapter:
•ActiveX container: A container application (not a web browser) that includes an instance of the Flash Player
ActiveX control to display SWF content within the application.
•Container application: The application within which Flash Player is running a SWF file, such as a web browser
and HTML page that includes Flash Player content.
•Projector: A SWF file that has been converted into a standalone executable file including Flash Player as well as
the SWF file’s content. A projector can be created in Adobe Flash CS3 Professional or using the standalone Flash
Player. Projectors are commonly used to distribute SWF files by CD-ROM or in similar situations where download
size is not an issue and the SWF author wants to be certain the user will be able to run the SWF file, regardless of
whether Flash Player is installed on the user’s computer.
•Proxy: A go-between application or code that calls code in one application (the “external application”) on behalf
of another application (the “calling application”), and returns values to the calling application. A proxy can be used
for various reasons, including:
•To simplify the process of making external function calls by converting native function calls in the calling
application into the format understood by the external application
•To work around security or other restrictions that prevent the caller from communicating directly with the
external application
•Serialize: To convert objects or data values into a format that can be used to pass the values in messages between
two programming systems, such as over the Internet or between two different applications running on a single
computer.
External API requirements and advantages
The external API is the portion of ActionScript that provides a mechanism for communication between ActionScript
and code running in an “external application” that is acting as a container for Flash Player (commonly a web browser
or stand-alone projector application). In ActionScript 3.0, the functionality of the external API is provided by the
ExternalInterface class. In Flash Player versions prior to Flash Player 8, the fscommand() action was used to carry
out communication with the container application. The ExternalInterface class is a replacement for fscommand(),
and its use is recommended for all communication between JavaScript and ActionScript.
Note: If you need to use the old fscommand() function—for example, to maintain compatibility with older applications
or to interact with a third-party SWF container application or the stand-alone Flash Player—it is still available as a
package-level function in the flash.system package.
The ExternalInterface class is a subsystem that lets you easily communicate from ActionScript and Flash Player to
JavaScript in an HTML page, or to any desktop application that includes an instance of Flash Player.

ADOBE FLEX 3
Developer Guide
520
The ExternalInterface class is available only under the following conditions:
•In all supported versions of Internet Explorer for Windows (5.0 and later)
•In a container application such as a desktop application using an instance of the Flash Player ActiveX control
•In any browser that supports the NPRuntime interface, which currently includes Firefox 1.0 and later, Mozilla
1.7.5 and later, Netscape 8.0 and later, and Safari 1.3 and later.
In all other situations (such as running in a stand-alone player), the ExternalInterface.available property
returns false.
From ActionScript, you can call a JavaScript function on the HTML page. The external API offers the following
improved functionality compared with fscommand():
•You can use any JavaScript function, not only the functions that you can use with the fscommand() function.
•You can pass any number of arguments, with any names; you aren't limited to passing a command and a single
string argument. This gives the external API much more flexibility than fscommand().
•You can pass various data types (such as Boolean, Number, and String); you are no longer limited to String
parameters.
•You can receive the value of a call, and that value returns immediately to ActionScript (as the return value of the
call you make).
Important: In addition, if the HTML tags that define the Flash Player instance (the object and embed tags) are nested
in an HTML form tag, ExternalInterface calls from ActionScript will not work.
Important: If the name given to the Flash Player instance in an HTML page (the object tag’s id attribute) includes a
hyphen (-) or other characters that are defined as operators in JavaScript (such as +, *, /, \, ., and so on), Exter-
nalInterface calls from ActionScript will not work when the container web page is viewed in Internet Explorer.
Using the ExternalInterface class
Communication between ActionScript and the container application can take one of two forms: either ActionScript
can call code (such as a JavaScript function) defined in the container, or code in the container can call an Action-
Script function that has been designated as being callable. In either case, information can be sent to the code being
called, and results can be returned to the code making the call.
To facilitate this communication, the ExternalInterface class includes two static properties and two static methods.
These properties and methods are used to obtain information about the external interface connection, to execute
code in the container from ActionScript, and to make ActionScript functions available to be called by the container.
Getting information about the external container
The ExternalInterface.available property indicates whether the current Flash Player is in a container that
offers an external interface. If the external interface is available, this property is true; otherwise, it is false. Before
using any of the other functionality in the ExternalInterface class, you should always check to make sure that the
current container supports external interface communication, as follows:
if (ExternalInterface.available)
{
// Perform ExternalInterface method calls here.
}

ADOBE FLEX 3
Developer Guide
521
Note: The ExternalInterface.available property reports whether the current container is a type that supports
ExternalInterface connectivity. It will not tell you if JavaScript is enabled in the current browser.
The ExternalInterface.objectID property allows you to determine the unique identifier of the Flash Player
instance (specifically, the id attribute of the object tag in Internet Explorer or the name attribute of the embed tag
in browsers using the NPRuntime interface). This unique ID represents the current SWF document in the browser,
and can be used to make reference to the SWF document—for example, when calling a JavaScript function in a
container HTML page. When the Flash Player container is not a web browser, this property is null.
Calling external code from ActionScript
The ExternalInterface.call() method executes code in the container application. It requires at least one
parameter, a string containing the name of the function to be called in the container application. Any additional
parameters passed to the ExternalInterface.call() method are passed along to the container as parameters of
the function call.
// calls the external function "addNumbers"
// passing two parameters, and assigning that function's result
// to the variable "result"
var param1:uint = 3;
var param2:uint = 7;
var result:uint = ExternalInterface.call("addNumbers", param1, param2);
If the container is an HTML page, this method invokes the JavaScript function with the specified name, which must
be defined in a script element in the containing HTML page. The return value of the JavaScript function is passed
back to ActionScript.
<script language="JavaScript">
// adds two numbers, and sends the result back to ActionScript
function addNumbers(num1, num2)
{
return (num1 + num2);
}
</script>
If the container is some other ActiveX container, this method causes the Flash Player ActiveX control to dispatch its
FlashCall event. The specified function name and any parameters are serialized into an XML string by Flash Player.
The container can access that information in the request property of the event object and use it to determine how
to execute its own code. To return a value to ActionScript, the container code calls the ActiveX object’s
SetReturnValue() method, passing the result (serialized into an XML string) as a parameter of that method. For
more information about the XML format used for this communication, see “The external API’s XML format” on
page 522.
Whether the container is a web browser or another ActiveX container, if the call fails or the container method does
not specify a return value, null is returned. The ExternalInterface.call() method throws a SecurityError
exception if the containing environment belongs to a security sandbox to which the calling code does not have
access. You can work around this by setting an appropriate value for allowScriptAccess in the containing
environment. For example, to change the value of allowScriptAccess in an HTML page, you would edit the appro-
priate attribute in the object and embed tags.
Calling ActionScript code from the container
A container can only call ActionScript code that’s in a function—no other ActionScript code can be called by a
container. To call an ActionScript function from the container application, you must do two things: register the
function with the ExternalInterface class, and then call it from the container’s code.

ADOBE FLEX 3
Developer Guide
522
First, you must register your ActionScript function to indicate that it should be made available to the container. Use
the ExternalInterface.addCallback() method, as follows:
function callMe(name:String):String
{
return "busy signal";
}
ExternalInterface.addCallback("myFunction", callMe);
The addCallback() method takes two parameters. The first, a function name as a String, is the name by which the
function will be known to the container. The second parameter is the actual ActionScript function that will be
executed when the container calls the defined function name. Because these names are distinct, you can specify a
function name that will be used by the container, even if the actual ActionScript function has a different name. This
is especially useful if the function name is not known—for example, if an anonymous function is specified, or if the
function to be called is determined at run time.
Once an ActionScript function has been registered with the ExternalInterface class, the container can actually call
the function. How this is done varies according to the type of container. For example, in JavaScript code in a web
browser, the ActionScript function is called using the registered function name as though it’s a method of the Flash
Player browser object (that is, a method of the JavaScript object representing the object or embed tag). In other
words, parameters are passed and a result is returned as though a local function is being called.
<script language="JavaScript">
// callResult gets the value "busy signal"
var callResult = flashObject.myFunction("my name");
</script>
...
<object id="flashObject"...>
...
<embed name="flashObject".../>
</object>
Alternatively, when calling an ActionScript function in a SWF file running in a desktop application, the registered
function name and any parameters must be serialized into an XML-formatted string. Then the call is actually
performed by calling the CallFunction() method of the ActiveX control with the XML string as a parameter. For
more information about the XML format used for this communication, see “The external API’s XML format” on
page 522.
In either case, the return value of the ActionScript function is passed back to the container code, either directly as a
value when the caller is JavaScript code in a browser, or serialized as an XML-formatted string when the caller is an
ActiveX container.
The external API’s XML format
Communication between ActionScript and an application hosting the Shockwave Flash ActiveX control uses a
specific XML format to encode function calls and values. There are two parts to the XML format used by the external
API. One format is used to represent function calls. Another format is used to represent individual values; this
format is used for parameters in functions as well as function return values. The XML format for function calls is
used for calls to and from ActionScript. For a function call from ActionScript, Flash Player passes the XML to the
container; for a call from the container, Flash Player expects the container application to pass it an XML string in this
format. The following XML fragment shows an example XML-formatted function call:

ADOBE FLEX 3
Developer Guide
523
<invoke name="functionName" returntype="xml">
<arguments>
... (individual argument values)
</arguments>
</invoke>
The root node is the invoke node. It has two attributes: name indicates the name of the function to call, and
returntype is always xml. If the function call includes parameters, the invoke node has a child arguments node,
whose child nodes will be the parameter values formatted using the individual value format explained next.
Individual values, including function parameters and function return values, use a formatting scheme that includes
data type information in addition to the actual values. The following table lists ActionScript classes and the XML
format used to encode values of that data type:
Note: By way of example, this table shows equivalent C# classes in addition to ActionScript classes; however, the external
API can be used to communicate with any programming language or run time that supports ActiveX controls, and is not
limited to C# applications.
When you are building your own applications using the external API with an ActiveX container application, you’ll
probably find it convenient to write a proxy that will perform the task of converting native function calls to the
serialized XML format. For an example of a proxy class written in C#, see “Inside the ExternalInterfaceProxy class”
on page 533.
ActionScript
class/value
C# class/value Format Comments
null null <null/>
Boolean true bool true <true/>
Boolean false bool false <false/>
String string <string>string value</string>
Number, int, uint single, double, int, uint <number>27.5</number>
<number>-12</number>
Array (elements can be
mixed types)
A collection that allows
mixed-type elements, such
as ArrayList or object[]
<array>
<property id="0">
<number>27.5</number>
</property>
<property id="1">
<string>Hello
there!</string>
</property>
...
</array>
The property node defines individual
elements, and the id attribute is the
numeric, zero-based index.
Object A dictionary with string keys
and object values, such as a
HashTable with string keys
<object>
<property id="name">
<string>John
Doe</string>
</property>
<property id="age">
<string>33</string>
</property>
...
</object>
The property node defines individual
properties, and the id attribute is the
property name (a string).
Other built-in or custom
classes
<null/>
or
<object></object>
ActionScript encodes other objects as
null or as an empty object. In either case
any property values are lost.

ADOBE FLEX 3
Developer Guide
524
Example: Using the external API with a web page
container
This sample application demonstrates appropriate techniques for communicating between ActionScript and JavaS-
cript in a web browser, in the context of an Instant Messaging application that allows a person to chat with him or
herself (hence the name of the application: Introvert IM). Messages are sent between an HTML form in the web page
and a SWF interface using the external API. The techniques demonstrated by this example include the following:
•Properly initiating communication by verifying that the browser is ready to communicate before setting up
communication
•Checking whether the container supports the external API
•Calling JavaScript functions from ActionScript, passing parameters, and receiving values in response
•Making ActionScript methods available to be called by JavaScript, and performing those calls
To get the application files for this sample, see www.adobe.com/go/learn_programmingAS3samples_flash. The
Introvert IM application files can be found in the Samples/IntrovertIM_HTML folder. The application consists of
the following files:
Preparing for ActionScript-browser communication
One of the most common uses for the external API is to allow ActionScript applications to communicate with a web
browser. Using the external API, ActionScript methods can call code written in JavaScript and vice versa. Because of
the complexity of browsers and how they render pages internally, there is no way to guarantee that a SWF document
will register its callbacks before the first JavaScript on the HTML page runs. For that reason, before calling functions
in the SWF document from JavaScript, your SWF document should always call the HTML page to notify it that the
SWF document is ready to accept connections.
For example, through a series of steps performed by the IMManager class, the Introvert IM determines whether the
browser is ready for communication and prepares the SWF file for communication. The first step, determining when
the browser is ready for communication, happens in the IMManager constructor, as follows:
File Description
IntrovertIMApp.fla
or
IntrovertIMApp.mxml
The main application file for Flash (FLA) or Flex (MXML).
com/example/programmingas3/introvertIM/IMManager.as The class that establishes and manages communication between
ActionScript and the container.
com/example/programmingas3/introvertIM/IMMessag-
eEvent.as
Custom event type, dispatched by the IMManager class when a
message is received from the container.
com/example/programmingas3/introvertIM/IMStatus.as Enumeration whose values represent the different “availability” status
values that can be selected in the application.
html-flash/IntrovertIMApp.html
or
html-template/index.template.html
The HTML page for the application for Flash (html-flash/IntrovertI-
MApp.html) or the template that is used to create the container HTML
page for the application for Adobe Flex (html-
template/index.template.html). This file contains all the JavaScript
functions that make up the container part of the application.

ADOBE FLEX 3
Developer Guide
525
public function IMManager(initialStatus:IMStatus)
{
_status = initialStatus;
// Check if the container is able to use the external API.
if (ExternalInterface.available)
{
try
{
// This calls the isContainerReady() method, which in turn calls
// the container to see if Flash Player has loaded and the container
// is ready to receive calls from the SWF.
var containerReady:Boolean = isContainerReady();
if (containerReady)
{
// If the container is ready, register the SWF’s functions.
setupCallbacks();
}
else
{
// If the container is not ready, set up a Timer to call the
// container at 100ms intervals. Once the container responds that
// it's ready, the timer will be stopped.
var readyTimer:Timer = new Timer(100);
readyTimer.addEventListener(TimerEvent.TIMER, timerHandler);
readyTimer.start();
}
}
...
}
else
{
trace("External interface is not available for this container.");
}
}
First of all, the code checks whether the external API is even available in the current container using the
ExternalInterface.available property. If so, it begins the process of setting up communication. Because
security exceptions and other errors can occur when you attempt communication with an external application, the
code is wrapped in a try block (the corresponding catch blocks were omitted from the listing for brevity).
The code next calls the isContainerReady() method, listed here:
private function isContainerReady():Boolean
{
var result:Boolean = ExternalInterface.call("isReady");
return result;
}
The isContainerReady() method in turn uses ExternalInterface.call() method to call the JavaScript
function isReady(), as follows:
<script language="JavaScript">
<!--
// ------- Private vars -------
var jsReady = false;
...

ADOBE FLEX 3
Developer Guide
526
// ------- functions called by ActionScript -------
// called to check if the page has initialized and JavaScript is available
function isReady()
{
return jsReady;
}
...
// called by the onload event of the <body> tag
function pageInit()
{
// Record that JavaScript is ready to go.
jsReady = true;
}
...
//-->
</script>
The isReady() function simply returns the value of the jsReady variable. That variable is initially false; once the
onload event of the web page has been triggered, the variable’s value is changed to true. In other words, if Action-
Script calls the isReady() function before the page is loaded, JavaScript returns false to
ExternalInterface.call("isReady"), and consequently the ActionScript isContainerReady() method
returns false. Once the page has loaded, the JavaScript isReady() function returns true, so the ActionScript
isContainerReady() method also returns true.
Back in the IMManager constructor, one of two things happens depending on the readiness of the container. If
isContainerReady() returns true, the code simply calls the setupCallbacks() method, which completes the
process of setting up communication with JavaScript. On the other hand, if isContainerReady() returns false,
the process is essentially put on hold. A Timer object is created and is told to call the timerHandler() method every
100 milliseconds, as follows:
private function timerHandler(event:TimerEvent):void
{
// Check if the container is now ready.
var isReady:Boolean = isContainerReady();
if (isReady)
{
// If the container has become ready, we don't need to check anymore,
// so stop the timer.
Timer(event.target).stop();
// Set up the ActionScript methods that will be available to be
// called by the container.
setupCallbacks();
}
}
Each time the timerHandler() method gets called, it once again checks the result of the isContainerReady()
method. Once the container is initialized, that method returns true. The code then stops the Timer and calls the
setupCallbacks() method to finish the process of setting up communication with the browser.
Exposing ActionScript methods to JavaScript
As the previous example showed, once the code determines that the browser is ready, the setupCallbacks()
method is called. This method prepares ActionScript to receive calls from JavaScript, as shown here:
private function setupCallbacks():void
{
// Register the SWF client functions with the container
ExternalInterface.addCallback("newMessage", newMessage);
ExternalInterface.addCallback("getStatus", getStatus);

ADOBE FLEX 3
Developer Guide
527
// Notify the container that the SWF is ready to be called.
ExternalInterface.call("setSWFIsReady");
}
The setCallBacks() method finishes the task of preparing for communication with the container by calling
ExternalInterface.addCallback() to register the two methods that will be available to be called from JavaS-
cript. In this code, the first parameter—the name by which the method is known to JavaScript ("newMessage" and
"getStatus")—is the same as the method’s name in ActionScript. (In this case, there was no benefit to using
different names, so the same name was reused for simplicity.) Finally, the ExternalInterface.call() method is
used to call the JavaScript function setSWFIsReady(), which notifies the container that the ActionScript functions
have been registered.
Communication from ActionScript to the browser
The Introvert IM application demonstrates a range of examples of calling JavaScript functions in the container page.
In the simplest case (an example from the setupCallbacks() method), the JavaScript function setSWFIsReady()
is called without passing any parameters or receiving a value in return:
ExternalInterface.call("setSWFIsReady");
In another example from the isContainerReady() method, ActionScript calls the isReady() function and
receives a Boolean value in response:
var result:Boolean = ExternalInterface.call("isReady");
You can also pass parameters to JavaScript functions using the external API. For instance, consider the IMManager
class’s sendMessage() method, which is called when the user is sending a new message to his or her “conversation
partner”:
public function sendMessage(message:String):void
{
ExternalInterface.call("newMessage", message);
}
Once again, ExternalInterface.call() is used to call the designated JavaScript function, notifying the browser
of the new message. In addition, the message itself is passed as an additional parameter to
ExternalInterface.call(), and consequently it is passed as a parameter to the JavaScript function
newMessage().
Calling ActionScript code from JavaScript
Communication is supposed to be a two-way street, and the Introvert IM application is no exception. Not only does
the Flash Player IM client call JavaScript to send messages, but the HTML form calls JavaScript code to send
messages to and ask for information from the SWF file as well. For example, when the SWF file notifies the container
that it has finished establishing contact and it’s ready to communicate, the first thing the browser does is call the
IMManager class’s getStatus() method to retrieve the initial user availability status from the SWF IM client. This
is done in the web page, in the updateStatus() function, as follows:

ADOBE FLEX 3
Developer Guide
528
<script language="JavaScript">
...
function updateStatus()
{
if (swfReady)
{
var currentStatus = getSWF("IntrovertIMApp").getStatus();
document.forms["imForm"].status.value = currentStatus;
}
}
...
</script>
The code checks the value of the swfReady variable, which tracks whether the SWF file has notified the browser that
it has registered its methods with the ExternalInterface class. If the SWF file is ready to receive communication, the
next line (var currentStatus = ...) actually calls the getStatus() method in the IMManager class. Three things
happen in this line of code:
•The getSWF() JavaScript function is called, returning a reference to the JavaScript object representing the SWF
file. The parameter passed to getSWF() determines which browser object is returned in case there is more than one
SWF file in an HTML page. The value passed to that parameter must match the id attribute of the object tag and
name attribute of the embed tag used to include the SWF file.
•Using the reference to the SWF file, the getStatus() method is called as though it’s a method of the SWF object.
In this case the function name “getStatus” is used because that’s the name under which the ActionScript function
is registered using ExternalInterface.addCallback().
•The getStatus() ActionScript method returns a value, and that value is assigned to the currentStatus
variable, which is then assigned as the content (the value property) of the status text field.
Note: The ${application} text is a placeholder in the HTML page template; when Adobe Flex Builder 2 generates the
actual HTML page for the application, this placeholder text is replaced by the same text that is used as the object tag’s
id attribute and the embed tag’s name attribute (IntrovertIMApp in the example). That is the value that is expected
by the getSWF() function.
Note: var currentStatus = getSWF("${application}").getStatus();
Note: If you’re following along in the code, you’ve probably noticed that in the source code for the updateStatus()
function, the line of code that calls the getSWF() function, is actually written as follows:
The sendMessage() JavaScript function demonstrates passing a parameter to an ActionScript function.
(sendMessage() is the function that is called when the user presses the Send button on the HTML page.)
<script language="JavaScript">
...
function sendMessage(message)
{
if (swfReady)
{
...
getSWF("IntrovertIMApp").newMessage(message);
}
}
...
</script>
The newMessage() ActionScript method expects one parameter, so the JavaScript message variable gets passed to
ActionScript by using it as a parameter in the newMessage() method call in the JavaScript code.

ADOBE FLEX 3
Developer Guide
529
Detecting the browser type
Because of differences in how browsers access content, it’s important to always use JavaScript to detect which browser
the user is running and to access the movie according to the browser-specific syntax, using the window or document
object, as shown in the getSWF() JavaScript function in this example:
<script language="JavaScript">
...
function getSWF(movieName)
{
if (navigator.appName.indexOf("Microsoft") != -1)
{
return window[movieName];
}
else
{
return document[movieName];
}
}
...
</script>
If your script does not detect the user’s browser type, the user might see unexpected behavior when playing SWF files
in an HTML container.
Example: Using the external API with an ActiveX
container
This example demonstrates using the external API to communicate between ActionScript and a desktop application
that uses the ActiveX control. The example reuses the Introvert IM application, including the ActionScript code and
even the same SWF file, and therefore does not describe the use of the external API in ActionScript. Familiarity with
the preceding example will be helpful in understanding this one.
The desktop application in this example is written in C# using Microsoft Visual Studio .NET. The focus of the
discussion is the specific techniques for working with the external API using the ActiveX control. This example
demonstrates the following:
•Calling ActionScript functions from a desktop application hosting the Flash Player ActiveX control
•Receiving function calls from ActionScript and processing them in an ActiveX container
•Using a proxy class to hide the details of the serialized XML format that Flash Player uses for messages sent to
an ActiveX container
To get the application files for this sample, see www.adobe.com/go/learn_programmingAS3samples_flash. The
Introvert IM C# files can be found in the Samples/IntrovertIM_CSharp folder. The application consists of the
following files:
File Description
AppForm.cs The main application file with the C# Windows Forms interface.
bin/Debug/IntrovertIMApp.swf The SWF file loaded by the application.
ExternalInterfaceProxy/ExternalInterfaceProxy.cs The class that serves as a wrapper around the ActiveX control for External
Interface communication. It provides mechanisms for calling and receiving
calls from ActionScript.

ADOBE FLEX 3
Developer Guide
530
Overview of the Introvert IM C# Application
This sample application represents two instant-messaging client programs (one within a SWF file and another built
with Windows Forms) that communicate with each other. The user interface includes an instance of the Shockwave
Flash ActiveX control, within which the SWF file containing the ActionScript IM client is loaded. The interface also
includes several text fields that make up the Windows Forms IM client: a field for entering messages (MessageText),
another that displays the transcript of the messages sent between the clients (Transcript), and a third (Status) that
displays the availability status as set in the SWF IM client.
Including the Shockwave Flash ActiveX control
To include the Shockwave Flash ActiveX control in your own Windows Forms application, you must first add it to
the Microsoft Visual Studio Toolbox.
To add the control to the toolbox:
1Open the Visual Studio Toolbox.
2Right-click the Windows Forms section in Visual Studio 2003 or any section in Visual Studio 2005. From the
context menu select Add/Remove Items in Visual Studio 2003 (Choose Items... in Visual Studio 2005).
This opens the Customize Toolbox (2003)/Choose Toolbox Items (2005) dialog box.
3Select the COM Components tab, which lists all of the available COM components on your computer, including
the Flash Player ActiveX control.
4Scroll to Shockwave Flash Object and select it.
If this item is not listed, make sure that the Flash Player ActiveX control is installed on your system.
Understanding ActionScript to ActiveX container communication
Communication using the external API with an ActiveX container application works like communication with a web
browser, with one important difference. As described earlier, when ActionScript communicates with a web browser,
as far as the developer is concerned, the functions are called directly; the details of how the function calls and
responses are formatted to pass them between the player and browser are hidden. However, when the external API
is used to communicate with an ActiveX container application, Flash Player sends messages (function calls and
return values) to the application in a specific XML format, and it expects function calls and return values from the
container application to use the same XML format. The developer of the ActiveX container application must write
code that understands and can create function calls and responses in the appropriate format.
ExternalInterfaceProxy/ExternalInterfaceSerializer.cs The class that performs the task of converting Flash Player’s XML format
messages to .NET objects.
ExternalInterfaceProxy/ExternalInterfaceEventArgs.cs This file defines two C# types (classes): a custom delegate, and an event
arguments class, which are used by the ExternalInterfaceProxy class to
notify a listener of a function call from ActionScript.
ExternalInterfaceProxy/ExternalInterfaceCall.cs This class is a value object representing a function call from ActionScript to
the ActiveX container, with properties for the function name and parame-
ters.
bin/Debug/IntrovertIMApp.swf The SWF file loaded by the application.
obj/AxInterop.ShockwaveFlashObjects.dll,
obj/Interop.ShockwaveFlashObjects.dll
Wrapper assemblies created by Visual Studio .NET that are required to
access the Flash Player (Adobe Shockwave® Flash) ActiveX control from
managed code.
File Description

ADOBE FLEX 3
Developer Guide
531
The Introvert IM C# example includes a set of classes that allow you to avoid formatting messages; instead, you can
work with standard data types when calling ActionScript functions and receiving function calls from ActionScript.
The ExternalInterfaceProxy class, together with other helper classes, provides this functionality, and can be reused
in any .NET project to facilitate external API communication.
The following sections of code, excerpted from the main application form (AppForm.cs), demonstrate the simplified
interaction that is achieved by using the ExternalInterfaceProxy class:
public class AppForm : System.Windows.Forms.Form
{
...
private ExternalInterfaceProxy proxy;
...
public AppForm()
{
...
// Register this app to receive notification when the proxy receives
// a call from ActionScript.
proxy = new ExternalInterfaceProxy(IntrovertIMApp);
proxy.ExternalInterfaceCall += new
ExternalInterfaceCallEventHandler(proxy_ExternalInterfaceCall);
...
}
...
The application declares and creates an ExternalInterfaceProxy instance named proxy, passing in a reference to the
Shockwave Flash ActiveX control that is in the user interface (IntrovertIMApp). Next, the code registers the
proxy_ExternalInterfaceCall() method to receive the proxy’s ExternalInterfaceCall event. This event is
dispatched by the ExternalInterfaceProxy class when a function call comes from Flash Player. Subscribing to this
event is the way the C# code receives and responds to function calls from ActionScript.
When a function call comes from ActionScript, the ExternalInterfaceProxy instance (proxy) receives the call,
converts it from XML format, and notifies the objects that are listeners for the proxy’s ExternalInterfaceCall
event. In the case of the AppForm class, the proxy_ExternalInterfaceCall() method handles that event, as
follows:
/// <summary>
/// Called by the proxy when an ActionScript ExternalInterface call
/// is made by the SWF
/// </summary>
private object proxy_ExternalInterfaceCall(object sender,
ExternalInterfaceCallEventArgs e)
{
switch (e.FunctionCall.FunctionName)
{
case "isReady":
return isReady();
case "setSWFIsReady":
setSWFIsReady();
return null;
case "newMessage":
newMessage((string)e.FunctionCall.Arguments[0]);
return null;

ADOBE FLEX 3
Developer Guide
532
case "statusChange":
statusChange();
return null;
default:
return null;
}
}
...
The method gets passed an ExternalInterfaceCallEventArgs instance, named e in this example. That object, in turn,
has a FunctionCall property that is an instance of the ExternalInterfaceCall class.
An ExternalInterfaceCall instance is a simple value object with two properties. The FunctionName property
contains the function name specified in the ActionScript ExternalInterface.Call() statement. If any param-
eters are added in ActionScript, those parameters are included in the ExternalInterfaceCall object’s Arguments
property. In this case, the method that handles the event is simply a switch statement that acts like a traffic manager.
The value of the FunctionName property (e.FunctionCall.FunctionName) determines which method of the
AppForm class is called.
The branches of the switch statement in the previous code listing demonstrate common method call scenarios. For
instance, any method must return a value to ActionScript (for example, the isReady() method call) or else should
return null (as seen in the other method calls). Accessing parameters passed from ActionScript is demonstrated in
the newMessage() method call (which passes along a parameter e.FunctionCall.Arguments[0], the first
element of the Arguments array).
Calling an ActionScript function from C# using the ExternalInterfaceProxy class is even more straightforward than
receiving a function call from ActionScript. To call an ActionScript function, you use the ExternalInterfaceProxy
instance’s Call() method, as follows:
/// <summary>
/// Called when the "Send" button is pressed; the value in the
/// MessageText text field is passed in as a parameter.
/// </summary>
/// <param name="message">The message to send.</param>
private void sendMessage(string message)
{
if (swfReady)
{
...
// Call the newMessage function in ActionScript.
proxy.Call("newMessage", message);
}
}
...
/// <summary>
/// Call the ActionScript function to get the current "availability"
/// status and write it into the text field.
/// </summary>
private void updateStatus()
{
Status.Text = (string)proxy.Call("getStatus");
}
...
}

ADOBE FLEX 3
Developer Guide
533
As this example shows, the ExternalInterfaceProxy class’s Call() method is very similar to its ActionScript
counterpart, ExternalInterface.Call(). The first parameter is a string, the name of the function to call. Any
additional parameters (not shown here) are passed along to the ActionScript function. If the ActionScript function
returns a value, that value is returned by the Call() method (as seen in the previous example).
Inside the ExternalInterfaceProxy class
Using a proxy wrapper around the ActiveX control may not always be practical, or you may wish to write your own
proxy class (for instance, in a different programming language or targeting a different platform). Although not all
the details of creating a proxy will be explained here, it is instructive to understand the inner workings of the proxy
class in this example.
You use the Shockwave Flash ActiveX control’s CallFunction() method to call an ActionScript function from the
ActiveX container using the external API. This is shown in this extract from the ExternalInterfaceProxy class’s
Call() method:
// Call an ActionScript function on the SWF in "_flashControl",
// which is a Shockwave Flash ActiveX control.
string response = _flashControl.CallFunction(request);
In this code excerpt, _flashControl is the Shockwave Flash ActiveX control. ActionScript function calls are made
using the CallFunction() method. That method takes one parameter (request in the example), which is a string
containing XML-formatted instructions including the name of the ActionScript function to call and any parameters.
Any value returned from ActionScript is encoded as an XML-formatted string and sent back as the return value of
the CallFunction() call. In this example, that XML string is stored in the response variable.
Receiving a function call from ActionScript is a multistep process. Function calls from ActionScript cause the
Shockwave Flash ActiveX control to dispatch its FlashCall event, so a class (such as the ExternalInterfaceProxy class)
that intends to receive calls from a SWF file needs to define a handler for that event. In the ExternalInterfaceProxy
class, the event handler function is named _flashControl_FlashCall(), and it is registered to listen for the event
in the class constructor, as follows:
private AxShockwaveFlash _flashControl;
public ExternalInterfaceProxy(AxShockwaveFlash flashControl)
{
_flashControl = flashControl;
_flashControl.FlashCall += new
_IShockwaveFlashEvents_FlashCallEventHandler(_flashControl_FlashCall);
}
...
private void _flashControl_FlashCall(object sender, _IShockwaveFlashEvents_FlashCallEvent
e)
{
// Use the event object’s request property ("e.request")
// to execute some action.
...
// Return a value to ActionScript;
// the returned value must first be encoded as an XML-formatted string.
_flashControl.SetReturnValue(encodedResponse);
}

ADOBE FLEX 3
Developer Guide
534
The event object (e) has a request property (e.request) that is a string containing information about the function
call, such as the function name and parameters, in XML format. This information can be used by the container to
determine what code to execute. In the ExternalInterfaceProxy class, the request is converted from XML format to
an ExternalInterfaceCall object, which provides the same information in a more accessible form. The ActiveX
control’s SetReturnValue() method is used to return a function result to the ActionScript caller; once again, the
result parameter must be encoded in the XML format used by the external API.
Communication between ActionScript and an application hosting the Shockwave Flash ActiveX control uses a
specific XML format to encode function calls and values. In the Introvert IM C# example, the ExternalInter-
faceProxy class makes it possible for the code in the application form to operate directly on values sent to or received
from ActionScript, and ignore the details of the XML format used by Flash Player. In order to accomplish this, the
ExternalInterfaceProxy class uses the methods of the ExternalInterfaceSerializer class to actually translate the XML
messages into .NET objects. The ExternalInterfaceSerializer class has four public methods:
•EncodeInvoke(): Encodes a function name and a C# ArrayList of arguments into the appropriate XML format.
•EncodeResult(): Encodes a result value into the appropriate XML format.
•DecodeInvoke(): Decodes a function call from ActionScript. The FlashCall event object’s request property is
passed to the DecodeInvoke() method, and it translates the call into an ExternalInterfaceCall object.
•DecodeResult(): Decodes the XML received as the result of calling an ActionScript function.
These methods encode C# values into the external API’s XML format and decode the XML into C# objects. For
details on the XML format used by Flash Player, see “The external API’s XML format” on page 522.

535
Chapter 27: Flash Player security
Security is a key concern of Adobe, users, website owners, and content developers. For this reason, Adobe®Flash™
Player 9 includes a set of security rules and controls to safeguard the user, website owner, and content developer. This
chapter discusses how to work with the Flash Player security model when you are developing applications. In this
chapter, all SWF files discussed are assumed to be published with ActionScript™ 3.0 (and thus running in Flash Player
9 or later), unless otherwise noted. For information about Adobe AIR security issues, see AIR Security in Developing
Adobe AIR Applications with Flash CS3 Professional or Developing AIR Applications with Adobe Flex 3
This chapter is intended as an overview of security; it does not try to comprehensively explain all implementation
details, usage scenarios, or ramifications for using certain APIs. For a more detailed discussion of Flash Player
Security concepts, see the Flash Player 9 Security white paper, at www.adobe.com/go/fp9_0_security.
Contents
Flash Player security overview . . . . . . . . . . . . . . . . . . . . . . . . . . . . . . . . . . . . . . . . . . . . . . . . . . . . . . . . . . . . . . . . . . . . . 535
Overview of permission controls . . . . . . . . . . . . . . . . . . . . . . . . . . . . . . . . . . . . . . . . . . . . . . . . . . . . . . . . . . . . . . . . . . . 537
Security sandboxes . . . . . . . . . . . . . . . . . . . . . . . . . . . . . . . . . . . . . . . . . . . . . . . . . . . . . . . . . . . . . . . . . . . . . . . . . . . . . . . 543
Restricting networking APIs . . . . . . . . . . . . . . . . . . . . . . . . . . . . . . . . . . . . . . . . . . . . . . . . . . . . . . . . . . . . . . . . . . . . . . . 545
Full-screen mode security . . . . . . . . . . . . . . . . . . . . . . . . . . . . . . . . . . . . . . . . . . . . . . . . . . . . . . . . . . . . . . . . . . . . . . . . . 547
Loading content. . . . . . . . . . . . . . . . . . . . . . . . . . . . . . . . . . . . . . . . . . . . . . . . . . . . . . . . . . . . . . . . . . . . . . . . . . . . . . . . . . 548
Cross-scripting . . . . . . . . . . . . . . . . . . . . . . . . . . . . . . . . . . . . . . . . . . . . . . . . . . . . . . . . . . . . . . . . . . . . . . . . . . . . . . . . . . 550
Accessing loaded media as data . . . . . . . . . . . . . . . . . . . . . . . . . . . . . . . . . . . . . . . . . . . . . . . . . . . . . . . . . . . . . . . . . . . . 553
Loading data . . . . . . . . . . . . . . . . . . . . . . . . . . . . . . . . . . . . . . . . . . . . . . . . . . . . . . . . . . . . . . . . . . . . . . . . . . . . . . . . . . . . 555
Loading embedded content from SWF files imported into a security domain . . . . . . . . . . . . . . . . . . . . . . . . . . . . . 557
Working with legacy content. . . . . . . . . . . . . . . . . . . . . . . . . . . . . . . . . . . . . . . . . . . . . . . . . . . . . . . . . . . . . . . . . . . . . . . 557
Setting LocalConnection permissions . . . . . . . . . . . . . . . . . . . . . . . . . . . . . . . . . . . . . . . . . . . . . . . . . . . . . . . . . . . . . . . 558
Controlling access to scripts in a host web page. . . . . . . . . . . . . . . . . . . . . . . . . . . . . . . . . . . . . . . . . . . . . . . . . . . . . . . 558
Shared objects . . . . . . . . . . . . . . . . . . . . . . . . . . . . . . . . . . . . . . . . . . . . . . . . . . . . . . . . . . . . . . . . . . . . . . . . . . . . . . . . . . . 559
Camera, microphone, clipboard, mouse, and keyboard access . . . . . . . . . . . . . . . . . . . . . . . . . . . . . . . . . . . . . . . . . . 560
Flash Player security overview
Much of Flash Player security is based on the domain of origin for loaded SWF files, media, and other assets. A SWF
file from a specific Internet domain, such as www.example.com, can always access all data from that domain. These
assets are put in the same security grouping, known as a security sandbox. (For more information, see “Security
sandboxes” on page 543.)
For example, a SWF file can load SWF files, bitmaps, audio, text files, and any other asset from its own domain. Also,
cross-scripting between two SWF files from the same domain is always permitted, as long as both files are written
using ActionScript 3.0. Cross-scripting is the ability of one SWF file to use ActionScript to access the properties,
methods, and objects in another SWF file. Cross-scripting is not supported between SWF files written using Action-
Script 3.0 and those using previous versions of ActionScript; however, these files can communicate by using the
LocalConnection class. For more information, see “Cross-scripting” on page 550.

ADOBE FLEX 3
Developer Guide
536
The following basic security rules always apply by default:
•Resources in the same security sandbox can always access each other.
•SWF files in a remote sandbox can never access local files and data.
Flash Player considers the following to be individual domains, and sets up individual security sandboxes for each:
•http://example.com
•http://www.example.com
•http://store.example.com
•https://www.example.com
•http://192.0.34.166
Even if a named domain, such as http://example.com, maps to a specific IP address, such as http://192.0.34.166, Flash
Player sets up separate security sandboxes for both.
There are two basic methods that a developer can use to grant a SWF file access to assets from sandboxes other than
that of the SWF file:
•The Security.allowDomain() method (see “Author (developer) controls” on page 543)
•The cross-domain policy file (see “Website controls (cross-domain policy files)” on page 540)
The ability of a SWF file to cross-script ActionScript 3.0 SWF files from other domains and to load data from other
domains is prohibited by default. It can be granted with a call to the Security.allowDomain() method in the
loaded SWF file. For details, see “Cross-scripting” on page 550.
In the Flash Player security model, there is a distinction between loading content and accessing or loading data:
•Loading content—Content is defined as media, including visual media Flash Player can display, audio, video, or
a SWF file that includes displayed media. Data is defined as something that is accessible only to ActionScript code.
You can load content using classes such as the Loader, Sound, and NetStream classes.
•Accessing content as data or loading data—You can access data in two ways: by extracting data from loaded
media content or by directly loading data from an external file (such as an XML file). You can extract data from
loaded media by using Bitmap objects, the BitmapData.draw() method, the Sound.id3 property, or the
SoundMixer.computeSpectrum() method. You can load data using classes such as the URLStream, URLLoader,
Socket, and XMLSocket classes.
The Flash Player security model defines different rules for loading content and accessing data. In general, there are
fewer restrictions on loading content than on accessing data.
In general, content (SWF files, bitmaps, mp3 files, and videos) can be loaded from anywhere, but if the content is
from a domain other than that of the loading SWF file, it will be partitioned in a separate security sandbox.
There are a few barriers to loading content:
•By default, local SWF files (those loaded from a non-network address, such as a user’s hard drive) are classified
in the local-with-filesystem sandbox. These files cannot load content from the network. For more information, see
“Local sandboxes” on page 544.
•Real-Time Messaging Protocol (RTMP) servers can limit access to content. For more information, see “Content
delivered using RTMP servers” on page 550.
If the loaded media is an image, audio, or video, its data, such as pixel data and sound data, cannot be accessed by a
SWF file outside its security sandbox, unless the domain of that SWF file has been included in a cross-domain policy
file at the origin domain of the media. For details, see “Accessing loaded media as data” on page 553.
ADOBE FLEX 3
Developer Guide
537
Other forms of loaded data include text or XML files, which are loaded with a URLLoader object. Again in this case,
to access any data from another security sandbox, permission must be granted by means of a cross-domain policy
file at the origin domain. For details, see “Using URLLoader and URLStream” on page 555.
Overview of permission controls
The Flash Player client run-time security model has been designed around resources, which are objects such as SWF
files, local data, and Internet URLs. Stakeholders are the parties who own or use those resources. Stakeholders can
exercise controls (security settings) over their own resources, and each resource has four stakeholders. Flash Player
strictly enforces a hierarchy of authority for these controls, as the following illustration shows:
Hierarchy of security controls
This means, for instance, that if an administrator restricts access to a resource, no other stakeholders can override
that restriction.
Administrator, user, and website controls are detailed in the following sections. Author (developer) settings are
described in the rest of this chapter.
Administrative user controls
An administrative user of a computer (a user who has logged in with administrative rights) can apply Flash Player
security settings that affect all users of the computer. In a nonenterprise environment, such as on a home computer,
there is usually one user who also has administrative access. Even in an enterprise environment, individual users may
have administrative rights to the computer.
There are two types of administrative user controls:
•The mms.cfg file
•The Global Flash Player Trust directory
The mms.cfg file
On Mac OS X systems, the mms.cfg file is located at /Library/Application Support/Macromedia/mms.cfg. On
Microsoft Windows systems, the file is located in the Macromedia Flash Player folder in the system directory (for
example, C:\windows\system32\macromed\flash\mms.cfg on a default Windows XP or Windows Vista instal-
lation).
When Flash Player starts, it reads its security settings from this file, and uses them to limit functionality.
Administrator
(User Institution)
settings
User settings
Website settings
Author settings

ADOBE FLEX 3
Developer Guide
538
The mms.cfg file includes settings that the administrator uses to perform the following tasks:
•Data loading—Restrict the reading of local SWF files, disable file downloading and uploading, and set the
storage limit for persistent shared objects.
•Privacy controls—Disable microphone and camera access, prevent SWF files from playing windowless content,
and prevent SWF files in a domain that does not match the URL displayed in a browser window from accessing
persistent shared objects.
•Flash Player updates—Set the interval for checking for an updated version of Flash Player, specify the URL to
check for Flash Player update information, specify the URL from which to download updated versions of Flash
Player, and disable automatic updates of Flash Player entirely.
•Legacy file support—Specify whether older-version SWF files should be placed in the local-trusted sandbox.
•Local file security—Specify whether local files can be placed in the local-trusted sandbox.
•Full-screen mode—Disable full-screen mode.
A SWF file can access some information on capabilities that have been disabled by calling the
Capabilities.avHardwareDisable and Capabilities.localFileReadDisable properties. However, most of
the settings in the mms.cfg file cannot be queried from ActionScript.
To enforce application-independent security and privacy policies for a computer, the mms.cfg file should be
modified only by system administrators. The mms.cfg file is not for use by application installers. While an installer
running with administrative privileges could modify the contents of the mms.cfg file, Adobe considers such usage a
violation of the user’s trust and urges creators of installers never to modify the mms.cfg file.
The Global Flash Player Trust directory
Administrative users and installer applications can register specified local SWF files as trusted. These SWF files are
assigned to the local-trusted sandbox. They can interact with any other SWF files, and they can load data from
anywhere, remote or local. Files are designated as trusted in the Global Flash Player Trust directory, which is in the
same directory as the mms.cfg file, in the following locations (locations are specific to the current user):
•Windows: system\Macromed\Flash\FlashPlayerTrust
(for example, C:\windows\system32\Macromed\Flash\FlashPlayerTrust)
•Mac: app support/Macromedia/FlashPlayerTrust
(for example, /Library/Application Support/Macromedia/FlashPlayerTrust)
The Flash Player Trust directory can contain any number of text files, each of which lists trusted paths, with one path
per line. Each path can be an individual SWF file, HTML file, or directory. Comment lines begin with the # symbol.
For example, a Flash Player trust configuration file containing the following text grants trusted status to all files in
the specified directory and all subdirectories:
# Trust files in the following directories:
C:\Documents and Settings\All Users\Documents\SampleApp
The paths listed in a trust configuration file should always be local paths or SMB network paths. Any HTTP path in
a trust configuration file is ignored; only local files can be trusted.
To avoid conflicts, give each trust configuration file a filename corresponding to the installing application, and use
a .cfg file extension.

ADOBE FLEX 3
Developer Guide
539
As a developer distributing a locally run SWF file through an installer application, you can have the installer appli-
cation add a configuration file to the Global Flash Player Trust directory, granting full privileges to the file that you
are distributing. The installer application must be run by a user with administrative rights. Unlike the mms.cfg file,
the Global Flash Player Trust directory is included for the purpose of installer applications granting trust permis-
sions. Both administrative users and installer applications can designate trusted local applications using the Global
Flash Player Trust directory.
There are also Flash Player Trust directories for individual users (see the next section, User controls).
User controls
Flash Player provides three different user-level mechanisms for setting permissions: the Settings UI, the Settings
Manager, and the User Flash Player Trust directory.
The Settings UI and Settings Manager
The Settings UI is a quick, interactive mechanism for configuring the settings for a specific domain. The Settings
Manager presents a more detailed interface and provides the ability to make global changes that affect permissions
for many or all domains. Additionally, when a new permission is requested by a SWF file, requiring run-time
decisions concerning security or privacy, dialog boxes are displayed in which users can adjust some Flash Player
settings.
The Settings Manager and Settings UI provide the following security-related options:
•Camera and microphone settings—The user can control Flash Player access to the camera and microphone on
the computer. The user can allow or deny access for all sites or for specific sites. If the user does not specify a setting
for all sites or a specific site, a dialog box is displayed when a SWF file attempts to access the camera or microphone,
letting the user choose whether or not to allow the SWF file to access the device. The user can also specify the camera
or microphone to use, and can set the sensitivity of the microphone.
•Shared object storage settings—The user can select the amount of disk space that a domain can use to store
persistent shared objects. The user can make these settings for any numbers of specific domains, and can specify the
default setting for new domains. The default limit is 100 KB of disk space. For more information on persistent shared
objects, see the SharedObject class in the ActionScript 3.0 Language and Components Reference.
Note: Any settings made in the mms.cfg file (see “Administrative user controls” on page 537) are not reflected in the
Settings Manager.
For details on the Settings Manager, see www.adobe.com/go/settingsmanager.
The User Flash Player Trust directory
Users and installer applications can register specified local SWF files as trusted. These SWF files are assigned to the
local-trusted sandbox. They can interact with any other SWF files, and they can load data from anywhere, remote or
local. A user designates a file as trusted in the User Flash Player Trust directory, which is in same directory as the
Flash shared object storage area, in the following locations (locations are specific to the current user):
•Windows: app data\Macromedia\Flash Player\#Security\FlashPlayerTrust
(for example, C:\Documents and Settings\JohnD\Application Data\Macromedia\Flash Player\#Security\Flash-
PlayerTrust on Windows XP or C:\Users\JohnD\AppData\Roaming\Macromedia\Flash Player\#Security\Flash-
PlayerTrust on Windows Vista)
Note: In Windows, the Application Data folder is hidden by default. To show hidden folders and files, select My
Computer to open Windows Explorer, select Tools>Folder Options and then select the View tab. Under the View tab,
select the Show hidden files and folders radio button.

ADOBE FLEX 3
Developer Guide
540
•Mac: app data/Macromedia/Flash Player/#Security/FlashPlayerTrust
(for example, /Users/JohnD/Library/Preferences/Macromedia/Flash Player/#Security/FlashPlayerTrust)
These settings affect only the current user, not other users who log in to the computer. If a user without adminis-
trative rights installs an application in their own portion of the system, the User Flash Player Trust directory lets the
installer register the application as trusted for that user.
As a developer distributing a locally run SWF file by way of an installer application, you can have the installer appli-
cation add a configuration file to the User Flash Player Trust directory, granting full privileges to the file that you are
distributing. Even in this situation, the User Flash Player Trust directory file is considered a user control, because a
user action (installation) initiates it.
There is also a Global Flash Player Trust directory, used by the administrative user or installers to register an appli-
cation for all users of a computer (see “Administrative user controls” on page 537).
Website controls (cross-domain policy files)
To make data from a web server available to SWF files from other domains, you can create a cross-domain policy file
on your server. A cross-domain policy file is an XML file that provides a way for the server to indicate that its data
and documents are available to SWF files served from certain domains or from all domains. Any SWF file that is
served from a domain specified by the server’s policy file is permitted to access data or assets from that server.
Cross-domain policy files affect access to a number of assets, including the following:
•Data in bitmaps, sounds, and videos
•Loading XML and text files
•Access to socket and XML socket connections
•Importing SWF files from other security domains into the security domain of the loading SWF file
Full details are provided in the rest of this chapter.
Policy file syntax
The following example shows a policy file that permits access to SWF files that originate from *.example.com,
www.friendOfExample.com and 192.0.34.166:
<?xml version="1.0"?>
<cross-domain-policy>
<allow-access-from domain="*.example.com" />
<allow-access-from domain="www.friendOfExample.com" />
<allow-access-from domain="192.0.34.166" />
</cross-domain-policy>
When a SWF file attempts to access data from another domain, Flash Player automatically attempts to load a policy
file from that domain. If the domain of the SWF file that is attempting to access the data is included in the policy file,
the data is automatically accessible.
By default, policy files must be named crossdomain.xml and must reside in the root directory of the server.
However, a SWF file can check for a different name or in a different directory location by calling the
Security.loadPolicyFile() method. A cross-domain policy file applies only to the directory from which it is
loaded and to its child directories. So a policy file in the root directory applies to the whole server, but a policy file
loaded from an arbitrary subdirectory applies only to that directory and its subdirectories.

ADOBE FLEX 3
Developer Guide
541
A policy file affects access only to the particular server on which it resides. For example, a policy file located at
https://www.adobe.com:8080/crossdomain.xml will apply only to data- loading calls made to www.adobe.com over
HTTPS at port 8080.
A cross-domain policy file contains a single <cross-domain-policy> tag, which in turn contains zero or more
<allow-access-from> tags. Each <allow-access-from> tag contains an attribute, domain, which specifies either
an exact IP address, an exact domain, or a wildcard domain (any domain). Wildcard domains are indicated by either
a single asterisk (*), which matches all domains and all IP addresses, or an asterisk followed by a suffix, which
matches only those domains that end with the specified suffix. Suffixes must begin with a dot. However, wildcard
domains with suffixes can match domains that consist of only the suffix without the leading dot. For example,
foo.com is considered to be part of *.foo.com. Wildcards are not allowed in IP domain specifications.
If you specify an IP address, access is granted only to SWF files loaded from that IP address using IP syntax (for
example, http://65.57.83.12/flashmovie.swf), not those loaded using domain-name syntax. Flash Player does not
perform DNS resolution.
You can permit access to documents originating from any domain, as shown in the following example:
<?xml version="1.0"?>
<!-- http://www.foo.com/crossdomain.xml -->
<cross-domain-policy>
<allow-access-from domain="*" />
</cross-domain-policy>
Each <allow-access-from> tag also has the optional secure attribute, which defaults to true. You can set the
attribute to false if your policy file is on an HTTPS server, and you want to allow SWF files on a non-HTTPS server
to load data from the HTTPS server.
Setting the secure attribute to false could compromise the security offered by HTTPS. In particular, setting this
attribute to false opens secure content to snooping and spoofing attacks. Adobe strongly recommends that you not
set the secure attribute to false.
If data to be loaded is on a HTTPS server, but the SWF file loading it is on an HTTP server, Adobe recommends that
you move the loading SWF file to an HTTPS server so that you can keep all copies of your secure data under the
protection of HTTPS. However, if you decide that you must keep the loading SWF file on an HTTP server, add the
secure="false" attribute to the <allow-access-from> tag, as shown in the following code:
<allow-access-from domain="www.example.com" secure="false" />
A policy file that contains no <allow-access-from> tags has the same effect as not having a policy on a server.
Socket policy files
ActionScript objects instantiate two different kinds of server connections: document-based server connections and
socket connections. ActionScript objects like Loader, Sound, URLLoader, and URLStream instantiate document-
based server connections, and these each load a file from a URL. ActionScript Socket and XMLSocket objects make
socket connections, which operate with streaming data, not loaded documents. Flash Player supports two kinds of
policy files: document-based policy files and socket policy files. Document-based connections require document-
based policy files, while socket connections require socket policy files.
Flash Player requires that a policy file be transmitted using the same kind of protocol that the attempted connection
wishes to use. For example, when you place a policy file on your HTTP server, SWF files from other domains are
allowed to load data from it as an HTTP server. However, by not providing a socket policy file at the same server,
you are forbidding SWF files from other domains to connect to the server at the socket level. The means by which a
socket policy file is retrieved must match the means of connecting.

ADOBE FLEX 3
Developer Guide
542
A policy file served by a socket server has the same syntax as any other policy file, except that it must also specify the
ports to which it grants access. When a policy file comes from a port number that is less than 1024, it may grant
access to any ports; when a policy file comes from port 1024 or higher, it may only grant access to ports 1024 and
higher. The allowed ports are specified in a to-ports attribute in the <allow-access-from> tag. Single port
numbers, port ranges, and wildcards are accepted values.
Here is an example XMLSocket policy file:
<cross-domain-policy>
<allow-access-from domain="*" to-ports="507" />
<allow-access-from domain="*.example.com" to-ports="507,516" />
<allow-access-from domain="*.example2.com" to-ports="516-523" />
<allow-access-from domain="www.example2.com" to-ports="507,516-523" />
<allow-access-from domain="www.example3.com" to-ports="*" />
</cross-domain-policy>
When policy files were first introduced in Flash Player 6, there was no support for socket policy files. Connections
to socket servers were authorized by a policy file from the default location of the cross-domain policy file on an
HTTP server on port 80 of the same host as the socket server. To make it possible to preserve existing server arrange-
ments, Flash Player 9 still supports this capability. However, Flash Player’s default is now to retrieve a socket policy
file on the same port as the socket connection. If you wish to use an HTTP-based policy file to authorize a socket
connection, you must explicitly request the HTTP policy file using code such as the following:
Security.loadPolicyFile("http://socketServerHost.com/crossdomain.xml")
In addition, in order to authorize socket connections, an HTTP policy file must come only from the default location
of the cross-domain policy file, and not from any other HTTP location. A policy file obtained from an HTTP server
implicitly authorizes socket access to all ports 1024 and above; any to-ports attributes in an HTTP policy file are
ignored.
For more information on socket policy files, see “Connecting to sockets” on page 555.
Preloading policy files
Loading data from a server or connecting to a socket is an asynchronous operation, and Flash Player simply waits
for the cross-domain policy file to finish downloading before it begins the main operation. However, extracting pixel
data from images or extracting sample data from sounds is a synchronous operation—the cross-domain policy file
must load before you can extract data. When you load the media, you need to specify that it check for a cross-domain
policy file:
•When using the Loader.load() method, set the checkPolicyFile property of the context parameter, which
is a LoaderContext object.
•When embedding an image in a text field using the <img> tag, set the checkPolicyFile attribute of the <img>
tag to "true", as in the following: <img checkPolicyFile = "true" src = "example.jpg">.
•When using the Sound.load() method, set the checkPolicyFile property of the context parameter, which
is a SoundLoaderContext object.
•When using the NetStream class, set the checkPolicyFile property of the NetStream object.
When you set one of these parameters, Flash Player first checks for any policy files that it already has downloaded
for that domain. Then it considers any pending calls to the Security.loadPolicyFile() method to see if they are
in scope, and waits for those if they are. Then it looks for the cross-domain policy file in the default location on the
server.

ADOBE FLEX 3
Developer Guide
543
Author (developer) controls
The main ActionScript API used to grant security privileges is the Security.allowDomain() method, which grant
privileges to SWF files in the domains that you specify. In the following example, a SWF file grants access to SWF
files served from the www.example.com domain:
Security.allowDomain("www.example.com")
This method grants permissions for the following:
•Cross-scripting between SWF files (see “Cross-scripting” on page 550)
•Display list access (see “Traversing the display list” on page 552)
•Event detection (see “Event security” on page 553)
•Full access to properties and methods of the Stage object (see “Stage security” on page 551)
The primary purpose of calling the Security.allowDomain() method is to grant permission for SWF files in an
outside domain to script the SWF file calling the Security.allowDomain() method. For more information, see
“Cross-scripting” on page 550.
Specifying an IP address as a parameter to the Security.allowDomain() method does not permit access by all
parties that originate at the specified IP address. Instead, it permits access only by a party that contains the specified
IP address as its URL, rather than a domain name that maps to that IP address. For example, if the domain name
www.example.com maps to the IP address 192.0.34.166, a call to Security.allowDomain("192.0.34.166") does
not grant access to www.example.com.
You can pass the "*" wildcard to the Security.allowDomain() method to allow access from all domains. Because
it grants permission for SWF files from all domains to script the calling SWF file, use the "*" wildcard with care.
ActionScript includes a second permission API, called Security.allowInsecureDomain(). This method does the
same thing as the Security.allowDomain() method, except that, when called from a SWF file served by a secure
HTTPS connection, it additionally permits access to the calling SWF file by other SWF files that are served from an
insecure protocol, such as HTTP. However, it is not a good security practice to allow scripting between files from a
secure protocol (HTTPS) and those from insecure protocols (such as HTTP); doing so can open secure content to
snooping and spoofing attacks. Here is how such attacks can work: since the Security.allowInsecureDomain()
method allows access to your secure HTTPS data by SWF files served over HTTP connections, an attacker inter-
posed between your HTTP server and your users could replace your HTTP SWF file with one of their own, which
can then access your HTTPS data.
Another important security-related method is the Security.loadPolicyFile() method, which causes Flash
Player to check for a cross-domain policy file at a nonstandard location. For more information, see “Website controls
(cross-domain policy files)” on page 540.
Security sandboxes
Client computers can obtain individual SWF files from a number of sources, such as from external web sites or from
a local file system. Flash Player individually assigns SWF files and other resources, such as shared objects, bitmaps,
sounds, videos, and data files, to security sandboxes based on their origin when they are loaded into Flash Player.
The following sections describe the rules, enforced by Flash Player, that govern what a SWF file within a given
sandbox can access.
For more information on security sandboxes, see the Flash Player 9 Security white paper.

ADOBE FLEX 3
Developer Guide
544
Remote sandboxes
Flash Player classifies assets (including SWF files) from the Internet in separate sandboxes that correspond to their
website origin domains. By default, these files are authorized to access any resources from their own server. Remote
SWF files can be allowed to access additional data from other domains by explicit website and author permissions,
such as cross-domain policy files and the Security.allowDomain() method. For details, see “Website controls
(cross-domain policy files)” on page 540 and “Author (developer) controls” on page 543.
Remote SWF files cannot load any local files or resources.
For more information, see the Flash Player 9 Security white paper.
Local sandboxes
Local file describes any file that is referenced by using the file: protocol or a Universal Naming Convention (UNC)
path. Local SWF files are placed into one of three local sandboxes:
•The local-with-filesystem sandbox—For security purposes, Flash Player places all local SWF files and assets in
the local-with-file-system sandbox, by default. From this sandbox, SWF files can read local files (by using the
URLLoader class, for example), but they cannot communicate with the network in any way. This assures the user
that local data cannot be leaked out to the network or otherwise inappropriately shared.
•The local-with-networking sandbox—When compiling a SWF file, you can specify that it has network access
when run as a local file (see “Setting the sandbox type of local SWF files” on page 544).These files are placed in the
local-with-networking sandbox. SWF files that are assigned to the local-with-networking sandbox forfeit their local
file access. In return, the SWF files are allowed to access data from the network. However, a local-with-networking
SWF file is still not allowed to read any network-derived data unless permissions are present for that action, through
a cross-domain policy file or a call to the Security.allowDomain() method. In order to grant such permission, a
cross-domain policy file must grant permission to all domains by using <allow-access-from domain="*"/> or
by using Security.allowDomain("*"). For more information, see “Website controls (cross-domain policy files)”
on page 540 and “Author (developer) controls” on page 543.
•The local-trusted sandbox—Local SWF files that are registered as trusted (by users or by installer programs) are
placed in the local-trusted sandbox. System administrators and users also have the ability to reassign (move) a local
SWF file to or from the local-trusted sandbox based on security considerations (see “Administrative user controls”
on page 537 and “User controls” on page 539). SWF files that are assigned to the local-trusted sandbox can interact
with any other SWF files and can load data from anywhere (remote or local).
Communication between the local-with-networking and local-with-filesystem sandboxes, as well as communication
between the local-with-filesystem and remote sandboxes, is strictly forbidden. Permission to allow such communi-
cation cannot be granted by a Flash application or by a user or administrator.
Scripting in either direction between local HTML files and local SWF files—for example, using the ExternalInterface
class—requires that both the HTML file and SWF file involved be in the local-trusted sandbox. This is because the
local security models for browsers differ from the Flash Player local security model.
SWF files in the local-with-networking sandbox cannot load SWF files in the local-with-filesystem sandbox. SWF
files in the local-with-filesystem sandbox cannot load SWF files in the local-with-networking sandbox.
Setting the sandbox type of local SWF files
You can configure a SWF file for the local-with-filesystem sandbox or the local-with-networking sandbox by setting
the use-network flag in the Adobe Flex compiler. For more information, see “About the application compiler
options” on page 2220 in Building and Developing Flex Applications.

ADOBE FLEX 3
Developer Guide
545
An end user or the administrator of a computer can specify that a local SWF file is trusted, allowing it to load data
from all domains, both local and network. This is specified in the Global Flash Player Trust and User Flash Player
Trust directories. For more information, see “Administrative user controls” on page 537 and “User controls” on
page 539.
For more information on local sandboxes, see “Local sandboxes” on page 544.
The Security.sandboxType property
An author of a SWF file can use the read-only static Security.sandboxType property to determine the type of
sandbox to which Flash Player has assigned the SWF file. The Security class includes constants that represent
possible values of the Security.sandboxType property, as follows:
•Security.REMOTE—The SWF file is from an Internet URL, and operates under domain-based sandbox rules.
•Security.LOCAL_WITH_FILE—The SWF file is a local file, but it has not been trusted by the user and was not
published with a networking designation. The SWF file can read from local data sources but cannot communicate
with the Internet.
•Security.LOCAL_WITH_NETWORK—The SWF file is a local file and has not been trusted by the user, but it was
published with a networking designation. The SWF can communicate with the Internet but cannot read from local
data sources.
•Security.LOCAL_TRUSTED—The SWF file is a local file and has been trusted by the user, using either the
Settings Manager or a Flash Player trust configuration file. The SWF file can both read from local data sources and
communicate with the Internet.
Restricting networking APIs
You can control a SWF file’s access to network functionality by setting the allowNetworking parameter in the
<object> and <embed> tags in the HTML page that contains the SWF content.
Possible values of allowNetworking are:
•"all" (the default)—All networking APIs are permitted in the SWF.
•"internal"—The SWF file may not call browser navigation or browser interaction APIs, listed later in this
section, but it may call any other networking APIs.
•"none"—The SWF file may not call browser navigation or browser interaction APIs, listed later in this section,
and it cannot use any SWF-to-SWF communication APIs, also listed later.
Calling a prevented API throws a SecurityError exception.
To set the allowNetworking parameter, in the <object> and <embed> tags in the HTML page that contains a
reference the SWF file, add the allowNetworking parameter and set its value, as shown in the following example:
<object classid="clsid:d27cdb6e-ae6d-11cf-96b8-444553540000"
codebase="http://fpdownload.macromedia.com/pub/shockwave/cabs/flash/swflash.cab#version=9,
0,18,0"
width="600" height="400" id="test" align="middle">
<param name="allowNetworking" value="none" />
<param name="movie" value="test.swf" />
<param name="bgcolor" value="#333333" />
<embed src="test.swf" allowNetworking="none" bgcolor="#333333"

ADOBE FLEX 3
Developer Guide
546
width="600" height="400"
name="test" align="middle" type="application/x-shockwave-flash"
pluginspage="http://www.macromedia.com/go/getflashplayer" />
</object>
An HTML page may also use a script to generate SWF-embedding tags. You need to alter the script so that it inserts
the proper allowNetworking settings. HTML pages generated by Flash and Adobe Flex Builder use the
AC_FL_RunContent() function to embed references to SWF files, and you need to add the allowNetworking
parameter settings to the script, as in the following:
AC_FL_RunContent( ... "allowNetworking", "none", ...)
The following APIs are prevented when allowNetworking is set to "internal":
•navigateToURL()
•fscommand()
•ExternalInterface.call()
An addition to those APIs on the previous list, the following APIs are also prevented when allowNetworking is set
to "none":
•sendToURL()
•FileReference.download()
•FileReference.upload()
•Loader.load()
•LocalConnection.connect()
•LocalConnection.send()
•NetConnection.connect()
•NetStream.play()
•Security.loadPolicyFile()
•SharedObject.getLocal()
•SharedObject.getRemote()
•Socket.connect()
•Sound.load()
•URLLoader.load()
•URLStream.load()
•XMLSocket.connect()
Even if the selected allowNetworking setting permits a SWF file to use a networking API, there may be other
restrictions based on security sandbox limitations, as described in this chapter.
When allowNetworking is set to "none", you cannot reference external media in an <img> tag in the htmlText
property of a TextField object (a SecurityError exception is thrown).

ADOBE FLEX 3
Developer Guide
547
Full-screen mode security
Flash Player 9.0.27.0 and later support full-screen mode, in which Flash content can fill the entire screen. To enter
full-screen mode, the displayState property of the Stage is set to the StageDisplayState.FULL_SCREEN
constant. For more information, see “Working with full-screen mode” on page 261.
For SWF files running in a browser, there are some security considerations.
To enable full-screen mode, in the <object> and <embed> tags in the HTML page that contains a reference to the
SWF file, add the allowFullScreen parameter, with its value set to "true" (the default value is "false"), as shown
in the following example:
<object classid="clsid:d27cdb6e-ae6d-11cf-96b8-444553540000"
codebase="http://fpdownload.macromedia.com/pub/shockwave/cabs/flash/swflash.cab#version=9,
0,18,0"
width="600" height="400" id="test" align="middle">
<param name="allowFullScreen" value="true" />
<param name="movie" value="test.swf" />
<param name="bgcolor" value="#333333" />
<embed src="test.swf" allowFullScreen="true" bgcolor="#333333"
width="600" height="400"
name="test" align="middle" type="application/x-shockwave-flash"
pluginspage="http://www.macromedia.com/go/getflashplayer" />
</object>
An HTML page may also use a script to generate SWF-embedding tags. You must alter the script so that it inserts
the proper allowFullScreen settings. HTML pages generated by Flash and Flex Builder use the
AC_FL_RunContent() function to embed references to SWF files, and you need to add the allowFullScreen
parameter settings, as in the following:
AC_FL_RunContent( ... "allowFullScreen", "true", ...)
The ActionScript that initiates full-screen mode can be called only in response to a mouse event or keyboard event.
If it is called in other situations, Flash Player throws an exception.
Users cannot enter text in text input fields while in full-screen mode. All keyboard input and keyboard-related
ActionScript is disabled while in full-screen mode, with the exception of the keyboard shortcuts (such as pressing
the Esc key) that return the application to normal mode.
A message appears when the content enters full-screen mode, instructing the user how to exit and return to normal
mode. The message appears for a few seconds and then fades out.
Calling the displayState property of a Stage object throws an exception for any caller that is not in the same
security sandbox as the Stage owner (the main SWF file). For more information, see “Stage security” on page 551.
Administrators can disable full-screen mode for SWF files running in browsers by setting FullScreenDisable =
1 in the mms.cfg file. For details, see “Administrative user controls” on page 537.
In a browser, a SWF file must be contained in an HTML page to allow full-screen mode.
Full-screen mode is always permitted in the stand-alone player or in a projector file.

ADOBE FLEX 3
Developer Guide
548
Loading content
A SWF file can load the following types of content:
•SWF files
•Images
•Sound
•Video
Loading SWF files and images
You use the Loader class to load SWF files and images (JPG, GIF, or PNG files). Any SWF file, other than one in the
local-with-filesystem sandbox, can load SWF files and images from any network domain. Only SWF files in local
sandboxes can load SWF files and images from the local file system. However, files in the local-with-networking
sandbox can only load local SWF files that are in the local-trusted or local-with-networking sandbox. SWF files in
the local-with-networking sandbox load local content other than SWF files (such as images), however they cannot
access data in the loaded content.
When loading a SWF file from a non-trusted source (such as a domain other than that of the Loader object’s root
SWF file), you may want to define a mask for the Loader object, to prevent the loaded content (which is a child of
the Loader object) from drawing to portions of the Stage outside of that mask, as in the following code:
import flash.display.*;
import flash.net.URLRequest;
var rect:Shape = new Shape();
rect.graphics.beginFill(0xFFFFFF);
rect.graphics.drawRect(0, 0, 100, 100);
addChild(rect);
var ldr:Loader = new Loader();
ldr.mask = rect;
var url:String = "http://www.unknown.example.com/content.swf";
var urlReq:URLRequest = new URLRequest(url);
ldr.load(urlReq);
addChild(ldr);
When you call the load() method of the Loader object, you can specify a context parameter, which is a Loader-
Context object. The LoaderContext class includes three properties that let you define the context of how the loaded
content can be used:
•checkPolicyFile: Use this property only when loading an image file (not a SWF file). Specify this for an image
file from a domain other than that of the file containing the Loader object. If you set this property to true, the Loader
checks the origin server for a cross-domain policy file (see “Website controls (cross-domain policy files)” on
page 540). If the server grants permission to the Loader domain, ActionScript from SWF files in the Loader domain
can access data in the loaded image. In other words, you can use the Loader.content property to obtain a reference
to the Bitmap object that represents the loaded image, or the BitmapData.draw() method to access pixels from the
loaded image.
•securityDomain: Use this property only when loading a SWF file (not an image). Specify this for a SWF file
from a domain other than that of the file containing the Loader object. Only two values are currently supported for
the securityDomain property: null (the default) and SecurityDomain.currentDomain. If you specify
SecurityDomain.currentDomain, this requests that the loaded SWF file be imported to the sandbox of the loading
SWF file, meaning that it operates as though it had been loaded from the loading SWF file’s own server. This is only
permitted if a cross-domain policy file is found on the loaded SWF file’s server, allowing access by the loading SWF

ADOBE FLEX 3
Developer Guide
549
file’s domain. If the required policy file is found, the loader and loadee can freely script each other once the load
begins, since they are in the same sandbox. Note that sandbox importing can mostly be replaced by performing an
ordinary load and then having the loaded SWF file call the Security.allowDomain() method. This latter method
may be easier to use, since the loaded SWF file will then be in its own natural sandbox, and thus able to access
resources on its own actual server.
•applicationDomain: Use this property only when loading a SWF file written in ActionScript 3.0 (not an image
or a SWF file written in ActionScript 1.0 or 2.0). When loading the file, you can specify that the file be placed into a
particular application domain, rather than the default of being placed in a new application domain that is a child of
the loading SWF file’s application domain. Note that application domains are subunits of security domains, and thus
you can specify a target application domain only if the SWF file that you are loading is from your own security
domain, either because it is from your own server, or because you have successfully imported it into your security
domain using the securityDomain property. If you specify an application domain but the loaded SWF file is part
of a different security domain, the domain you specify in applicationDomain is ignored. For more information,
see “Using the ApplicationDomain class” on page 498.
For details, see “Specifying loading context” on page 286.
An important property of a Loader object is the contentLoaderInfo property, which is a LoaderInfo object. Unlike
most other objects, a LoaderInfo object is shared between the loading SWF file and the loaded content, and it is
always accessible to both parties. When the loaded content is a SWF file, it can access the LoaderInfo object through
the DisplayObject.loaderInfo property. LoaderInfo objects include information such as load progress, the URLs
of loader and loadee, the trust relationship between loader and loadee, and other information. For more information,
see “Monitoring loading progress” on page 285.
Loading sound and videos
All SWF files, other than those in the local-with-filesystem sandbox, are allowed to load sound and video from
network origins, using the Sound.load(), NetConnection.connect(), and NetStream.play() methods.
Only local SWF files can load media from the local file system. Only SWF files in the local-with-filesystem sandbox
or the local-trusted sandbox can access data in these loaded files.
There are other restrictions on accessing data from loaded media. For details, see “Accessing loaded media as data”
on page 553.
Loading SWF files and images using the <img> tag in a text field
You can load SWF files and bitmaps into a text field by using the <img> tag, as in the following code:
<img src = 'filename.jpg' id = 'instanceName' >
You can access content loaded this way by using the getImageReference() method of the TextField instance, as in
the following code:
var loadedObject:DisplayObject = myTextField.getImageReference('instanceName');
Note, however, that SWF files and images loaded in this way are put in the sandbox that corresponds to their origin.
When you load an image file using an <img> tag in a text field, access to the data in the image may be permitted by
a cross-domain policy file. You can check for a policy file by adding a checkPolicyFile attribute to the <img> tag,
as in the following code:
<img src = 'filename.jpg' checkPolicyFile = 'true' id = 'instanceName' >

ADOBE FLEX 3
Developer Guide
550
When you load a SWF using an <img> tag in a text field, you can permit access to that SWF file’s data through a call
to the Security.allowDomain() method.
When you use an <img> tag in a text field to load an external file (as opposed to using a Bitmap class embedded
within your SWF), a Loader object is automatically created as a child of the TextField object, and the external file is
loaded into that Loader just as if you had used a Loader object in ActionScript to load the file. In this case, the
getImageReference() method returns the Loader that was automatically created. No security check is needed to
access this Loader object because it is in the same security sandbox as the calling code.
However, when you refer to the content property of the Loader object to access the loaded media, security rules
apply. If the content is an image, you need to implement a cross-domain policy file, and if the content is a SWF file,
you need to have the code in the SWF file call the allowDomain() method.
Content delivered using RTMP servers
Flash Media Server uses the Real-Time Media Protocol (RTMP) to serve data, audio, and video. A SWF file loads
this media by using the connect() method of the NetConnection class, passing an RTMP URL as the parameter.
Flash Media Server can restrict connections and prevent content from downloading, based on the domain of the
requesting file. For details, see the Flash Media Server documentation.
For media loaded from RTMP sources, you cannot use the BitmapData.draw() and
SoundMixer.computeSpectrum() methods to extract run-time graphics and sound data.
Cross-scripting
If two SWF files written with ActionScript 3.0 are served from the same domain—for example, the URL for one SWF
file is http://www.example.com/swfA.swf and the URL for the other is http://www.example.com/swfB.swf—then one
SWF file can examine and modify variables, objects, properties, methods, and so on in the other, and vice versa. This
is called cross-scripting.
Cross-scripting is not supported between AVM1 SWF files and AVM2 SWF files. An AVM1 SWF file is one created
by using ActionScript 1.0 or ActionScript 2.0. (AVM1 and AVM2 refer to the ActionScript Virtual Machine.) You
can, however, use the LocalConnection class to send data between AVM1 and AVM2.
If two SWF files written with ActionScript 3.0 are served from different domains—for example,
http://siteA.com/swfA.swf and http://siteB.com/swfB.swf—then, by default, Flash Player does not allow swfA.swf to
script swfB.swf, nor swfB.swf to script swfA.swf. A SWF file gives permission to SWF files from other domains by
calling Security.allowDomain(). By calling Security.allowDomain("siteA.com"), swfB.swf gives SWF files
from siteA.com permission to script it.
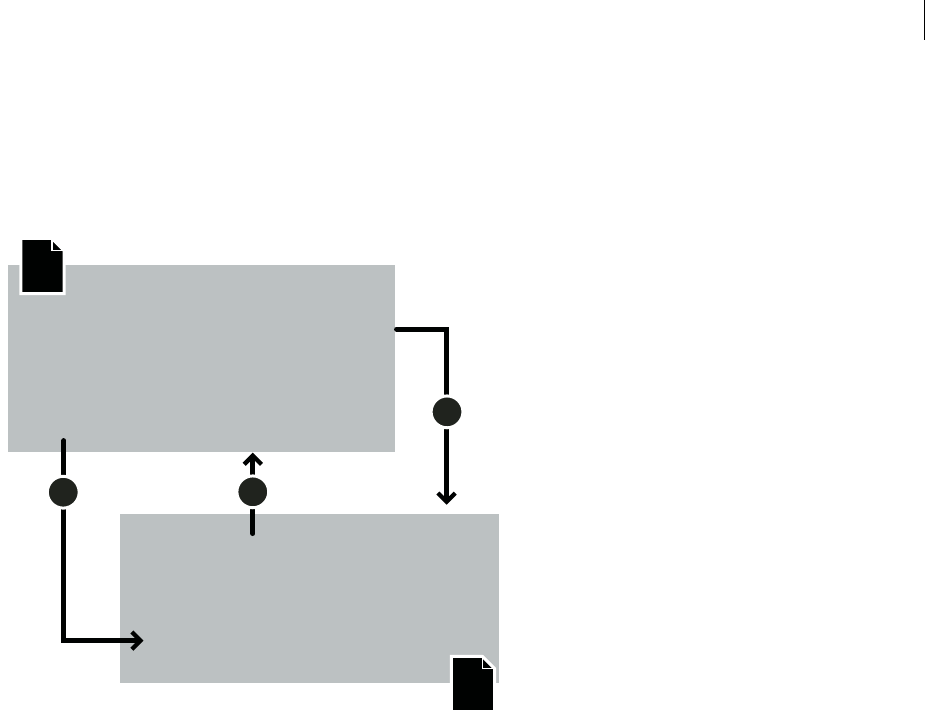
ADOBE FLEX 3
Developer Guide
551
In any cross-domain situation, it is important to be clear about the two parties involved. For the purposes of this
discussion, the side that is performing the cross-scripting is called the accessing party (usually the accessing SWF),
and the other side is called the party being accessed (usually the SWF being accessed). When siteA.swf scripts
siteB.swf, siteA.swf is the accessing party, and siteB.swf is the party being accessed, as the following illustration
shows:
Cross-domain permissions that are established with the Security.allowDomain() method are asymmetrical. In
the previous example, siteA.swf can script siteB.swf, but siteB.swf cannot script siteA.swf, because siteA.swf has not
called the Security.allowDomain() method to give SWF files at siteB.com permission to script it. You can set up
symmetrical permissions by having both SWF files call the Security.allowDomain() method.
In addition to protecting SWF files from cross-domain scripting originated by other SWF files, Flash Player protects
SWF files from cross-domain scripting originated by HTML files. HTML-to-SWF scripting can occur with callbacks
established through the ExternalInterface.addCallback() method. When HTML-to-SWF scripting crosses
domains, the SWF file being accessed must call the Security.allowDomain() method, just as when the accessing
party is a SWF file, or the operation will fail. For more information, see “Author (developer) controls” on page 543.
Also, Flash Player provides security controls for SWF-to-HTML scripting. For more information, see “Controlling
access to scripts in a host web page” on page 558.
Stage security
Some properties and methods of the Stage object are available to any sprite or movie clip on the display list.
However, the Stage object is said to have an owner: the first SWF file loaded. By default, the following properties and
methods of the Stage object are available only to SWF files in the same security sandbox as the Stage owner:
Security.allowDomain("siteA.com");
var eggCount:Number;
function DisplayEggs() { ... };
siteA.com / swfA.swf
siteB.com / swfB.swf
load
1
SWF
SWF
cross-script
32permission
var url:String = "http://siteB.com/swfB.swf";
var req:URLRequest = new URLRequest(url);
myLoader.load(req);
myLoader.content.eggCount = 3;
myLoader.content.DisplayEggs();

ADOBE FLEX 3
Developer Guide
552
In order for a SWF file in a sandbox other than that of the Stage owner to access these properties and methods, the
Stage owner SWF file must call the Security.allowDomain() method to permit the domain of the external
sandbox. For more information, see “Author (developer) controls” on page 543.
The frameRate property is a special case—any SWF file can read the frameRate property. However, only those in
the Stage owner’s security sandbox (or those granted permission by a call to the Security.allowDomain()
method) can change the property.
There are also restrictions on the removeChildAt() and swapChildrenAt() methods of the Stage object, but these
are different from the other restrictions. Rather than needing to be in the same domain as the Stage owner, to call
these methods code must be in the same domain as the owner of the affected child object(s), or the child object(s)
can call the Security.allowDomain() method.
Traversing the display list
The ability of one SWF file to access display objects loaded from other sandboxes is restricted. In order for a SWF
file to access a display object created by another SWF file in a different sandbox, the SWF file being accessed must
call the Security.allowDomain() method to permit access by the domain of the accessing SWF file. For more
information, see “Author (developer) controls” on page 543.
To access a Bitmap object that was loaded by a Loader object, a cross-domain policy file must exist on the origin
server of the image file, and that cross-domain policy file must grant permission to the domain of the SWF file trying
to access the Bitmap object (see “Website controls (cross-domain policy files)” on page 540).
The LoaderInfo object that corresponds to a loaded file (and to the Loader object) includes the following three
properties, which define the relationship between the loaded object and the Loader object: childAllowsParent,
parentAllowsChild, and sameDomain.
Properties Methods
align addChild()
displayState addChildAt()
frameRate addEventListener()
height dispatchEvent()
mouseChildren hasEventListener()
numChildren setChildIndex()
quality willTrigger()
scaleMode
showDefaultContextMenu
stageFocusRect
stageHeight
stageWidth
tabChildren
textSnapshot
width

ADOBE FLEX 3
Developer Guide
553
Event security
Events related to the display list have security access limitations, based on the sandbox of the display object that is
dispatching the event. An event in the display list has bubbling and capture phases (described in “Handling events”
on page 227). During the bubbling and capture phases, an event migrates from the source display object through
parent display objects in the display list. If a parent object is in a different security sandbox than the source display
object, the capture and bubble phase stops below that parent object, unless there is mutual trust between the owner
of the parent object and the owner of the source object. This mutual trust can be achieved by the following:
1The SWF file that owns the parent object must call the Security.allowDomain() method to trust the domain
of the SWF file that owns the source object.
2The SWF file that owns the source object must call the Security.allowDomain() method to trust the domain
of the SWF file that owns the parent object.
The LoaderInfo object that corresponds to a loaded file (and to the Loader object) includes the following two
properties, which define the relationship between the loaded object and the Loader object: childAllowsParent and
parentAllowsChild.
For events that are dispatched from objects other than display objects, there are no security checks or security-related
implications.
Accessing loaded media as data
You access loaded data using methods such as BitmapData.draw() and SoundMixer.computeSpectrum(). By
default, a SWF file from one security sandbox cannot obtain pixel data or audio data from graphic or audio objects
rendered or played by loaded media in another sandbox. However, you can use the following methods to grant this
permission:
•In a loaded SWF file, call the Security.allowDomain() method to grant data access to SWF files in other
domains.
•For a loaded image, sound, or video, add a cross-domain policy file on the server of the loaded file. This policy
file must grant access to the domain of the SWF file that is attempting to call the BitmapData.draw() or
SoundMixer.computeSpectrum() methods to extract data from the file.
The following sections provide details on accessing bitmap, sound, and video data.
Accessing bitmap data
The draw() method of a BitmapData object lets you draw the currently displayed pixels of any display object to the
BitmapData object. This could include the pixels of a MovieClip object, a Bitmap object, or any display object. The
following conditions must be met for the draw() method to draw pixels to the BitmapData object:
•In the case of a source object other than a loaded bitmap, the source object and (in the case of a Sprite or
MovieClip object) all of its child objects must come from the same domain as the object calling the draw() method,
or they must be in a SWF file that is accessible to the caller by having called the Security.allowDomain() method.
•In the case of a Loaded bitmap source object, the source object must come from the same domain as the object
calling the draw() method, or its source server must include a cross-domain policy file that grants permission to the
calling domain.
If these conditions are not met, a SecurityError exception is thrown.

ADOBE FLEX 3
Developer Guide
554
When you load the image using the load() method of the Loader class, you can specify a context parameter, which
is a LoaderContext object. If you set the checkPolicyFile property of the LoaderContext object to true, Flash
Player checks for a cross-domain policy file on the server from which the image is loaded. If there is a cross-domain
policy file, and the file permits the domain of the loading SWF file, the file is allowed to access data in the Bitmap
object; otherwise, access is denied.
You c a n a l s o s p e ci f y a checkPolicyFile property in an image loaded via an <img> tag in a text field. For details,
see “Loading SWF files and images using the <img> tag in a text field” on page 549.
Accessing sound data
The following sound-related ActionScript 3.0 APIs have security restrictions:
•The SoundMixer.computeSpectrum() method—Always permitted for SWF files that are in the same security
sandbox as the sound file. For files in other sandboxes, there are security checks.
•The SoundMixer.stopAll() method—Always permitted for SWF files that are in the same security sandbox
as the sound file. For files in other sandboxes, there are security checks.
•The id3 property of the Sound class—Always permitted for SWF files that are in the same security sandbox as
the sound file. For files in other sandboxes, there are security checks.
Every sound has two kinds of sandboxes associated with it—a content sandbox and an owner sandbox:
•The origin domain for the sound determines the content sandbox, and this determines whether data can be
extracted from the sound via the id3 property of the sound and the SoundMixer.computeSpectrum() method.
•The object that started the sound playing determines the owner sandbox, and this determines whether the sound
can be stopped using the SoundMixer.stopAll() method.
When you load the sound using the load() method of the Sound class, you can specify a context parameter, which
is a SoundLoaderContext object. If you set the checkPolicyFile property of the SoundLoaderContext object to
true, Flash Player checks for a cross-domain policy file on the server from which the sound is loaded. If there is a
cross-domain policy file, and the file permits the domain of the loading SWF file, the file is allowed to access the id
property of the Sound object; otherwise, it will not. Also, setting the checkPolicyFile property can enable the
SoundMixer.computeSpectrum() method for loaded sounds.
You can use the SoundMixer.areSoundsInaccessible() method to find out whether a call to the
SoundMixer.stopAll() method would not stop all sounds because the sandbox of one or more sound owners is
inaccessible to the caller.
Calling the SoundMixer.stopAll() method stops those sounds whose owner sandbox is the same as that of the
caller of stopAll(). It also stops those sounds whose playback was started by SWF files that have called the
Security.allowDomain() method to permit access by the domain of the SWF file calling the stopAll() method.
Any other sounds are not stopped, and the presence of such sounds can be revealed by calling the
SoundMixer.areSoundsInaccessible() method.
Calling the computeSpectrum() method requires that every sound that is playing be either from the same sandbox
as the object calling the method or from a source that has granted permission to the caller's sandbox; otherwise, a
SecurityError exception is thrown. For sounds that were loaded from embedded sounds in a library in a SWF file,
permission is granted with a call to the Security.allowDomain() method in the loaded SWF file. For sounds
loaded from sources other than SWF files (originating from loaded mp3 files or from Flash video), a cross-domain
policy file on the source server grants access to data in loaded media. You cannot use the computeSpectrum()
method if a sound is loaded from RTMP streams.

ADOBE FLEX 3
Developer Guide
555
For more information, see “Author (developer) controls” on page 543 and “Website controls (cross-domain policy
files)” on page 540.
Accessing video data
You can use the BitmapData.draw() method to capture the pixel data of the current frame of a video.
There are two different kinds of video:
•RTMP video
•Progressive video, which is loaded from an FLV file without an RTMP server
You cannot use the BitmapData.draw() method to access RTMP video.
When you call the BitmapData.draw() method with progressive video as the source parameter, the caller of
BitmapData.draw() must either be from the same sandbox as the FLV file, or the server of the FLV file must have
a policy file that grants permission to the domain of the calling SWF file. You can request that the policy file be
downloaded by setting the checkPolicyFile property of the NetStream object to true.
Loading data
SWF files can load data from servers into ActionScript, and send data from ActionScript to servers. Loading data is
a different kind of operation from loading media, because the loaded information appears directly in ActionScript,
rather than being displayed as media. Generally, SWF files may load data from their own domains. However, they
usually require cross-domain policy files in order to load data from other domains.
Using URLLoader and URLStream
You can load data, such as an XML file or a text file. The load() methods of the URLLoader and URLStream classes
are governed by cross-domain policy file permissions.
If you use the load() method to load content from a domain other than that of the SWF file that is calling the
method, Flash Player checks for a cross-domain policy file on the server of the loaded assets. If there is a cross-
domain policy file, and it grants access to the domain of the loading SWF file, you can load the data.
Connecting to sockets
Cross-domain access to socket and XML socket connections is disabled by default. Also disabled by default is access
to socket connections in the same domain as the SWF file on ports lower than 1024. You can permit access to these
ports by serving a cross-domain policy file from any of the following locations:
•The same port as the main socket connection
•A different port
•An HTTP server on port 80 in the same domain as the socket server
If you serve the cross-domain policy file from same port as the main socket connection, or in a different port, you
enumerate permitted ports by using a to-ports attribute in the cross-domain policy file, as the following example
shows:
<?xml version="1.0"?>
<!DOCTYPE cross-domain-policy SYSTEM "http://www.adobe.com/xml/dtds/cross-domain-
policy.dtd">

ADOBE FLEX 3
Developer Guide
556
<!-- Policy file for xmlsocket://socks.mysite.com -->
<cross-domain-policy>
<allow-access-from domain="*" to-ports="507" />
<allow-access-from domain="*.example.com" to-ports="507,516" />
<allow-access-from domain="*.example.org" to-ports="516-523" />
<allow-access-from domain="adobe.com" to-ports="507,516-523" />
<allow-access-from domain="192.0.34.166" to-ports="*" />
</cross-domain-policy>
To retrieve a socket policy file from the same port as a main socket connection, simply call the Socket.connect()
or XMLSocket.connect() method, and, if the specified domain is not the same as the domain of the calling SWF
file, Flash Player automatically attempts to retrieve a policy file from the same port as the main connection you are
attempting. To retrieve a socket policy file from a different port on the same server as your main connection, call the
Security.loadPolicyFile() method with the special "xmlsocket" syntax, as in the following:
Security.loadPolicyFile("xmlsocket://server.com:2525");
Call the Security.loadPolicyFile() method before calling the Socket.connect() or XMLSocket.connect()
method. Flash Player then waits until it has fulfilled your policy file request before deciding whether to allow your
main connection.
If you are implementing a socket server and you need to provide a socket policy file, decide whether you will provide
the policy file using the same port that accepts main connections, or using a different port. In either case, your server
must wait for the first transmission from your client before deciding whether to send a policy file or set up a main
connection. When Flash Player requests a policy file, it always transmits the following string as soon as a connection
is established:
<policy-file-request/>
Once the server receives this string, it can transmit the policy file. Do not expect to reuse the same connection for
both a policy file request and a main connection; you should close the connection after transmitting the policy file.
If you do not, Flash Player closes the policy file connection before reconnecting to set up the main connection.
For more information, see “Socket policy files” on page 541.
Sending data
Data sending occurs when ActionScript code from a SWF file sends data to a server or resource. Sending data is
always permitted for network domain SWF files. A local SWF file can send data to network addresses only if it is in
the local-trusted or local-with-networking sandbox. For more information, see “Local sandboxes” on page 544.
You can use the flash.net.sendToURL() function to send data to a URL. Other methods also send requests to
URLs. These include loading methods, such as Loader.load() and Sound.load(), and data-loading methods,
such as URLLoader.load() and URLStream.load().
Uploading and downloading files
The FileReference.upload() method starts the upload of a file selected by a user to a remote server. You must
call the FileReference.browse() or FileReferenceList.browse() method before calling the
FileReference.upload() method.
Calling the FileReference.download() method opens a dialog box in which the user can download a file from a
remote server.
Note: If your server requires user authentication, only SWF files running in a browser—that is, using the browser plug-
in or ActiveX control—can provide a dialog box to prompt the user for a user name and password for authentication,
and only for downloads. Flash Player does not allow uploads to a server that requires user authentication.

ADOBE FLEX 3
Developer Guide
557
Uploads and downloads are not allowed if the calling SWF file is in the local-with-filesystem sandbox.
By default, a SWF file may not initiate an upload to, or a download from, a server other than its own. A SWF file may
upload to, or download from, a different server if that server provides a cross-domain policy file that grants
permission to the domain of the invoking SWF file.
Loading embedded content from SWF files imported
into a security domain
When you load a SWF file, you can set the context parameter of the load() method of the Loader object that is
used to load the file. This parameter takes a LoaderContext object. When you set the securityDomain property of
this LoaderContext object to Security.currentDomain, Flash Player checks for a cross-domain policy file on the
server of the loaded SWF file. If there is a cross-domain policy file, and it grants access to the domain of the loading
SWF file, you can load the SWF file as imported media. In this way, the loading file can get access to objects in the
library of the SWF file.
An alternative way for a SWF file to access classes in loaded SWF files from a different security sandbox is to have
the loaded SWF file call the Security.allowDomain() method to grant access to the domain of the calling SWF
file. You can add the call to the Security.allowDomain() method to the constructor method of the main class of
the loaded SWF file, and then have the loading SWF file add an event listener to respond to the init event
dispatched by the contentLoaderInfo property of the Loader object. When this event is dispatched, the loaded
SWF file has called the Security.allowDomain() method in the constructor method, and classes in the loaded
SWF file are available to the loading SWF file. The loading SWF file can retrieve classes from the loaded SWF file by
calling Loader.contentLoaderInfo.applicationDomain.getDefinition().
Working with legacy content
In Flash Player 6, the domain that is used for certain Flash Player settings is based on the trailing portion of the
domain of the SWF file. These settings include settings for camera and microphone permissions, storage quotas, and
storage of persistent shared objects.
If the domain of a SWF file includes more than two segments, such as www.example.com, the first segment of the
domain (www) is removed, and the remaining portion of the domain is used. So, in Flash Player 6,
www.example.com and store.example.com both use example.com as the domain for these settings. Similarly,
www.example.co.uk and store.example.co.uk both use example.co.uk as the domain for these settings. This can lead
to problems in which SWF files from unrelated domains, such as example1.co.uk and example2.co.uk, have access
to the same shared objects.
In Flash Player 7 and later, player settings are chosen by default according to a SWF file’s exact domain. For example,
a SWF file from www.example.com would use the player settings for www.example.com. A SWF file from
store.example.com would use the separate player settings for store.example.com.
In a SWF file written using ActionScript 3.0, when Security.exactSettings is set to true (the default), Flash
Player uses exact domains for player settings. When it is set to false, Flash Player uses the domain settings used in
Flash Player 6. If you change exactSettings from its default value, you must do so before any events occur that
require Flash Player to choose player settings—for example, using a camera or microphone, or retrieving a persistent
shared object.

ADOBE FLEX 3
Developer Guide
558
If you published a version 6 SWF file and created persistent shared objects from it, to retrieve those persistent shared
objects from a SWF that uses ActionScript 3.0, you must set Security.exactSettings to false before calling
SharedObject.getLocal().
Setting LocalConnection permissions
The LocalConnection class lets you develop SWF files that can send instructions to each other. LocalConnection
objects can communicate only among SWF files that are running on the same client computer, but they can be
running in different applications—for example, a SWF file running in a browser and a SWF file running in a
projector.
For every LocalConnection communication, there is a sender SWF file and a listener SWF file. By default, Flash
Player allows LocalConnection communication between SWF files in the same domain. For SWF files in different
sandboxes, the listener must allow the sender permission by using the LocalConnection.allowDomain() method.
The string you pass as an argument to the LocalConnection.allowDomain() method can contain any of the
following: exact domain names, IP addresses, and the * wildcard.
Note: The allowDomain() method has changed from the form it had in ActionScript 1.0 and 2.0. In those earlier
versions, allowDomain() was a callback method that you implemented. In ActionScript 3.0, allowDomain() is a
built-in method of the LocalConnection class that you call. With this change, allowDomain() works in much the same
way as Security.allowDomain().
A SWF file can use the domain property of the LocalConnection class to determine its domain.
Controlling access to scripts in a host web page
Outbound scripting is achieved through use of the following ActionScript 3.0 APIs:
•The flash.system.fscommand() function
•The flash.net.navigateToURL() function (when specifying a scripting statement, such as
navigateToURL("javascript: alert('Hello from Flash Player.')")
•The flash.net.navigateToURL() function (when the window parameter is set to "_top", "_self", or
"_parent")
•The ExternalInterface.call() method
For SWF files running locally, calls to these methods are successful only if the SWF file and the containing web page
(if there is one) are in the local-trusted security sandbox. Calls to these methods fail if the content is in the local-
with-networking or local-with-filesystem sandbox.
The AllowScriptAccess parameter in the HTML code that loads a SWF file controls the ability to perform
outbound scripting from within a SWF file.
Set this parameter in the HTML code for the web page that hosts a SWF file. You set the parameter in the PARAM or
EMBED tag.
The AllowScriptAccess parameter can have one of three possible values: "always", "sameDomain", or "never":
•When AllowScriptAccess is "sameDomain", outbound scripting is allowed only if the SWF file and the web
page are in the same domain. This is the default for AVM2 content.

ADOBE FLEX 3
Developer Guide
559
•When AllowScriptAccess is "never", outbound scripting always fails.
•When AllowScriptAccess is "always", outbound scripting always succeeds.
If the AllowScriptAccess parameter is not specified for a SWF file in an HTML page, it defaults to "sameDomain"
for AVM2 content.
Here is an example of setting the AllowScriptAccess tag in an HTML page:
<object id='MyMovie.swf' classid='clsid:D27CDB6E-AE6D-11cf-96B8-444553540000'
codebase='http://download.adobe.com/pub/shockwave/cabs/flash/swflash.cab#version=9,0,0,0'
height='100%' width='100%'>
<param name='AllowScriptAccess' value='never'/>
<param name='src' value=''MyMovie.swf'/>
<embed name='MyMovie.swf' pluginspage='http://www.adobe.com/go/getflashplayer'
src='MyMovie.swf' height='100%' width='100%' AllowScriptAccess='never'/>
</object>
The AllowScriptAccess parameter can prevent a SWF file hosted from one domain from accessing a script in an
HTML page that comes from another domain. Using AllowScriptAccess="never" for all SWF files hosted from
another domain can ensure the security of scripts located in an HTML page.
For more information, see the following entries in the ActionScript 3.0 Language and Components Reference:
•The flash.system.fscommand() function
•The flash.net.navigateToURL() function
•The call() method of the ExternalInterface class
Shared objects
Flash Player provides the ability to use shared objects, which are ActionScript objects that persist outside of a SWF
file, either locally on a user’s file system or remotely on an RTMP server. Shared objects, like other media in Flash
Player, are partitioned into security sandboxes. However, the sandbox model for shared objects is somewhat
different, because shared objects are not resources that can ever be accessed across domain boundaries. Instead,
shared objects are always retrieved from a shared object store that is particular to the domain of each SWF file that
calls methods of the SharedObject class. Usually a shared object store is even more particular than a SWF file’s
domain: by default, each SWF file uses a shared object store particular to its entire origin URL.
A SWF file can use the localPath parameter of the SharedObject.getLocal() and
SharedObject.getRemote() methods to use a shared object store associated with only a part of its URL. In this
way, the SWF file can permit sharing with other SWF files from other URLs. Even if you pass '/' as the localPath
parameter, this still specifies a shared object store particular to its own domain.
Users can restrict shared object access by using the Flash Player Settings dialog box or the Settings Manager. By
default, shared objects can be created up to a maximum of 100 KB of data per domain. Administrative users and
users can also place restrictions on the ability to write to the file system. For more information, see “Administrative
user controls” on page 537 and “User controls” on page 539.
You can specify that a shared object is secure, by specifying true for the secure parameter of the
SharedObject.getLocal() method or the SharedObject.getRemote() method. Note the following about the
secure parameter:

ADOBE FLEX 3
Developer Guide
560
•If this parameter is set to true, Flash Player creates a new secure shared object or gets a reference to an existing
secure shared object. This secure shared object can be read from or written to only by SWF files delivered over
HTTPS that call SharedObject.getLocal() with the secure parameter set to true.
•If this parameter is set to false, Flash Player creates a new shared object or gets a reference to an existing shared
object that can be read from or written to by SWF files delivered over non-HTTPS connections.
If the calling SWF file is not from an HTTPS URL, specifying true for the secure parameter of the
SharedObject.getLocal() method or the SharedObject.getRemote() method results in a SecurityError
exception.
The choice of a shared object store is based on a SWF file’s origin URL. This is true even in the two situations where
a SWF file does not originate from a simple URL: import loading and dynamic loading. Import loading refers to the
situation where you load a SWF file with the LoaderContext.securityDomain property set to
SecurityDomain.currentDomain. In this situation, the loaded SWF file will have a pseudo-URL that begins with
its loading SWF file’s domain and then specifies its actual origin URL. Dynamic loading refers to the loading of a
SWF file using the Loader.loadBytes() method. In this situation, the loaded SWF file will have a pseudo-URL
that begins with its loading SWF file’s full URL followed by an integer ID. In both the import loading and dynamic
loading cases, a SWF file’s pseudo-URL can be examined using the LoaderInfo.url property. The pseudo-URL is
treated exactly like a real URL for the purposes of choosing a shared object store. You can specify a shared object
localPath parameter that uses part or all of the pseudo-URL.
Users and administrators can elect to disable the use of third-party shared objects. This is the usage of shared objects
by any SWF file that is executing in a web browser, when that SWF file’s origin URL is from a different domain than
the URL shown in the browser’s address bar. Users and administrators may choose to disable third-party shared
object usage for reasons of privacy, wishing to avoid cross-domain tracking. In order to avoid this restriction, you
may wish to ensure that any SWF file using shared objects is loaded only within HTML page structures that ensure
that the SWF file comes from the same domain as is shown in the browser's address bar. When you attempt to use
shared objects from a third-party SWF file, and third-party shared object use is disabled, the
SharedObject.getLocal() and SharedObject.getRemote() methods return null. For more information, see
www.adobe.com/products/flashplayer/articles/thirdpartylso.
Camera, microphone, clipboard, mouse, and keyboard
access
When a SWF file attempts to access a user's camera or microphone using the Camera.get() or Microphone.get()
methods, Flash Player displays a Privacy dialog box, in which the user can allow or deny access to their camera and
microphone. The user and the administrative user can also disable camera access on a per-site or global basis,
through controls in the mms.cfg file, the Settings UI, and the Settings Manager (see “Administrative user controls”
on page 537 and “User controls” on page 539). With user restrictions, the Camera.get() and Microphone.get()
methods each return a null value. You can use the Capabilities.avHardwareDisable property to determine
whether the camera and microphone have been administratively prohibited (true) or allowed (false).
The System.setClipboard() method allows a SWF file to replace the contents of the clipboard with a plain-text
string of characters. This poses no security risk. To protect against the risk posed by passwords and other sensitive
data being cut or copied to clipboards, there is no corresponding “getClipboard” (read) method.
A Flash application can monitor only keyboard and mouse events that occur within its focus. A Flash application
cannot detect keyboard or mouse events in another application.

561
Index
Symbols
!= (inequality) operator 133
!== (strict inequality) operator 133
$ metacharacter 191
$ replacement codes 137
& (ampersand) 463
( ) (parentheses) metacharacters 191
( ) (parentheses) operators 61
( ) (XML filtering) operators 219
* (asterisk) metacharacter 191
* (asterisk) type annotation 47, 49, 54,
55
* (wildcard) operator, XML 219
+ (addition) operator 134
+ (concatenation) operator,
XMLList 217
+ (plus) metacharacter 191
+= (addition assignment)
operator 134, 217
, (comma) operator 45
. (dot) metacharacter 191
. (dot) operator 59, 76
. (dot) operator, XML 211, 217
.. (descendent accessor) operator,
XML 217
... (rest) parameter 81
/ (forward slash) 190, 191
: (colon) operator 49
< operator 64
== operator 133
=== operator 133
> operator 64, 133
>= operator 133
? (question mark) 191
?: (conditional) operator 69
@ (attribute identifier) operator,
XML 211, 219
[ (left bracket) 191
\ (backslash)
in regular expressions 191
in strings 132
] (right bracket) 191
^ (caret) 191
__proto__ 34
__resolve 34
| (pipe) 196
Numerics
128-bit addresses 462
A
abstract classes 87
accessor functions, get and set 94
ActionScript
about 33
advantages of 5
building applications with 21
compatibility with previous
versions 7
description of 4
development process 23
documentation 2
embedding in Flex MXML files 21
history of OOP support 108
new features in 5
storing in ActionScript files 21
tools for writing 22
ways to include in applications 21
writing with text editors 23
ActionScript 1.0 109
ActionScript 2.0, prototype chain 110
ActionScript Virtual Machine
(AVM1) 108
ActionScript Virtual Machine 2
(AVM2) 108, 112
activation object 83
addCallback() method 551
addEventListener() method 96, 231,
240
addition (+) operator 134
addition assignment (+=)
operator 134
additive operators 67
addListener() method 231
allowDomain() method
about cross-scripting 550
constructor and 557
img tag and 550
loading context 287
LocalConnection class 471
sound and 554
allowFullScreen attribute 547
allowInsecureDomain() method 471
allowNetworking tag 545
AllowScriptAccess parameter 558
alpha channel masking 282
alternation in regular expressions 196
ampersand (&) 463
animation 283
anonymous functions 75, 80
anti-aliasing text 367
application/x-www-form-
urlencoded 463
ApplicationDomain class 287, 498,
549
applications, development
decisions 21
apply() method 158
arguments object 78, 79, 81
arguments, passing by reference or
value 78
arguments.callee property 79
arguments.caller property 81
arguments.length property 79
Array class
concat() method 151
constructor algorithm 158
extending 157
join() method 151
length property 148, 153
pop() method 147
push() method 147, 158
reverse() method 148
shift() method 147
slice() method 151
sort() method 148
sortOn() method 148, 150
splice() method 147
toString() method 151
unshift() method 147
arrays
about 144
array literals 60, 146
associative 152
cloning 156
common tasks 145
constructor 146
creating 136, 146

INDEX 562
deep copy of 156
delete operator 148
examples 161
indexed 145
inserting elements 147
iterating through 153
key and value pairs 152
length of 148
maximum size 146
multidimensional 155
nested arrays and join()
method 151
object keys 153
querying 151
removing elements 147
shallow copy 156
sorting 148
superconstructor 158
terms 145
typed arrays not supported 146
using associative and indexed
arrays 156
as operator 51, 99
-as3 compiler option 157
AS3 namespace 114, 157
ASCII characters 130
assignment operators 69
associativity, rules of 64
asterisk (*) metacharacter 191
asterisk (*) type annotation 47, 49, 54,
55
asterisk (wildcard) operator,
XML 219
asynchronous errors 168
asynchronous operation 241
attribute identifier (@) operator,
XML 211, 219
audio playback, monitoring 447
audio security 554
avHardwareDisable property 538
AVM1 (ActionScript Virtual
Machine) 108
AVM1Movie class 252
AVM2 (ActionScript Virtual
Machine 2) 108, 112
B
background color, making
opaque 276
backslash (\) character
in regular expressions 191
in strings 132
bar (|) character 196
base classes 101
basic concepts
comments 19
creating object instances 18
events 13
flow control 20
methods 12
objects 11
operators 19
properties 12
variables 10
beginGradientFill() method 299
big-endian byte order 472
binary operators 64
bitmap caching
advantages and disadvantages 273
filters and 321
when to avoid 274
when to use 274
Bitmap class 251, 379
bitmap data, copying 383
bitmap printing 511
BitmapData class 379
BitmapData objects, applying
filters 320
bitmaps
about 377
defining in Bitmap class 251
file formats 378
optimizing 387
security 553
smoothing 380
transparent versus opaque 378
bitwise logical operators 68
bitwise shift operators 67
block-level scope 46
Boolean class
casting 57
implicit coercion in strict mode 56
Boolean data type 53
bound methods 83, 95
brace operators ({ and }) in XML 216
bracket ([ and ]) characters 191
bracket ([ and ]) operators 76
browse() method 556
bubbles property 234
bubbling phase 231
build path 37
built-in classes 34
byte order 472
ByteArray class 156
bytes loaded 286
C
caching filters and bitmaps 321
call() method (ExternalInterface
class) 546, 558
callback methods
handling 405
callee property 79
caller property 81
Camera class 411
cameras
capturing input 411
displaying content on-screen 412
permissions 413
playback conditions 416
security 557, 560
verifying installation 413
cancelable property 233
Capabilities class 497
Capabilities.avHardwareDisable
property 538
Capabilities.localFileReadDisable
property 538
capture phase 231
capturing camera input 411
capturing user-selected text 360
caret (^) character 191
cascading style sheets. See CSS
case replacement in strings 138
case sensitivity 59
casting 55, 56, 57
catch blocks 171
character classes (in regular
expressions) 193
character codes 452
character ranges, specifying 194
character-delimited string,
combining arrays into 163
characters
in regular expressions 191
in strings 133, 135
charAt() method 133
charCodeAt() method 133
checkPolicyFile property 542
childAllowsParent property 552, 553

INDEX 563
class definitions, multiple 498
class inheritance 112
class keyword 86
class object 34, 111
classes
about 85
about writing code for 25
abstract not supported 87
attributes 86
base 101
body 87
built-in 34
characteristics 12
creating custom 24
declaring static and instance
properties 87
default access control 89
defining namespaces inside 87
definitions of 86
dynamic 52, 76, 89
dynamic attribute 86
inheriting instance properties 102
internal attribute 89
organizing 26
private attribute 88
private classes 35
property attributes 88
protected attribute 89
public attribute 88
public classes 38
sealed 52
static properties 106
subclasses 101
top-level statements 87
classpath 37
clearInterval() function 127
clearTimeout() function 127
client system environment
about 495
common tasks 495
Clipboard
saving text 497
security 560
clock example 127
clone() method (BitmapData
class) 383
clone() method (Event class) 235
close bracket 191
close parenthesis 191
code, ways to include in
applications 21
ColdFusion 467
collision detection at pixel level 382
colon (:) operator 49
colors
adjusting in display objects 278
altering specific 279
background 276
combining from different
images 276
setting for display objects 279
ColorTransform class 314
colorTransform property 314
comma operator 45
comments
about 19, 61
in XML 211, 212
communication
between Flash Player instances 467
between SWF files 469
between SWF files in different
domains 471
compatibility, Flash Player and FLV
files 417
compiler options 157
compile-time type checking 49
complex values 48
compound literals 60
computeSpectrum() method
(SoundMixer class) 550, 553,
554
concat() method
Array class 151
String class 134
concatenation
of strings 134
of XML objects 217
concatenation (+) operator,
XMLList 217
conditional (?:) operator 69
conditionals 69
connect() method
LocalConnection class 546
NetConnection class 546, 549
Socket class 546
XMLSocket class 473, 546
constants 62, 90, 233
constructors
about 91
in ActionScript 1.0 109
content property (Loader class) 550
content, loading dynamically 285
contentLoaderInfo property 286, 557
contentType property 463
context menu, customizing 455
cookies 475
coordinate spaces
defined 307
translating 309
Coordinated Universal Time
(UTC) 123
core Error classes in ActionScript 180
core Error classes in ECMAScript 178
createBox() method 313
createGradientBox() method 299
cross-domain policy files 555
checkPolicyFile property and 287,
554
extracting data 553
img tag and 549
securityDomain property and 549
URLLoader and URLStream
classes 555
cross-scripting 550
CSS
defined 356
loading 364
styles 363
cue points
triggering actions 403
in video 402
currentDomain property 557
currentTarget property 235
cursors, customizing 454
custom classes 24
custom data types, enumerations 96
custom error classes 175
custom LocalConnection client 468
D
data
loading external 462
security of 553, 556
sending to servers 466
data property (URLRequest
class) 463
data structures 144
data types
about 10
Boolean 53

INDEX 564
custom 96
default (untyped) 34
defined 48
int 53
Number 53
simple and complex 10
String 54
uint 54
void 54
dataFormat property 466
date arithmetic 124
Date class
about 122
constructor 123
date property 123
day property 124
fullYear property 123
getMonth() method 93, 124
getMonthUTC() method 124
getTime() method 124
getTimezoneOffset() method 125
hours property 124
milliseconds property 124
minutes property 124
month property 123
monthUTC property 124
parse() method 93
seconds property 124
setTime() method 124
Date objects
example of creating 123
getting time values from 123
date property 123
Date() constructor 123
dates and times
about 122
day property 124
debugger version, Flash Player 242
debugging 170
decode() method 463
decrementing values 66
default behavior
canceling 233
defined 230
default data type 34
default parameter values 79
default xml namespace directive 222
Delegate class 238
delete operator 77, 148
delimiter character, splitting strings
into array 136
depth management, improved 253
descendent accessor (..) operator,
XML 217
development
planning 21
process 23
device fonts 356
Dictionary class
about 153
useWeakReference parameter 154
dispatchEvent() method 241
dispatching events 227
display architecture 247, 294
display content, loading
dynamically 285
display list
about 247
advantages 252
event flow 231
security 552
traversing 259
display list object 230
display object containers 248, 249,
255
display objects
about 248
adding to display list 255
adjusting colors 278
animating 283
assembling complicated
objects 254
bitmaps 377
caching 273
choosing a subclass 264
clicking and dragging example 291
common tasks 249
creating 255
depth management 253
drawing API and 294
events 263
example 287, 304
example of rearranging 292
fading 280
filtering 318, 319, 325
grouping 255
inheritance of core classes 251
masking 281
matrix transformation 314
movie clips 346
off-list 254
positioning 265
removing filters 320
rotating 280, 313
scaling 270, 271, 313
security 552
setting colors of 279
size 270
skewing 313
subclassing 254
terms 250
translation 313
types of 251
user input and 450
display programming, about 247
displaying camera content on-
screen 412
DisplayObject class
about 248, 255
stage property 231
subclasses 251
DisplayObjectContainer class 248,
252, 255
displayState property 261, 547
distance() method 309
division by zero 54
do..while loop 73
Document Object Model (DOM)
Level 3 Events specification 227,
230
documentation
ActionScript 2
Adobe Developer Center and
Adobe Design Center 3
Programming ActionScript 3.0
contents 1
related to Flex 2
dollar sign ($) metacharacter 191
dollar sign ($) replacement codes 137
DOM Events specification 227, 230
domain property (LocalConnection
class) 558
domains, communicating
between 471
dot (.) metacharacter 191
dot (.) operator 59, 76
dot (.) operator, XML 211, 217
dot syntax 59
dotall flag in regular expressions 200

INDEX 565
dotall property of regular
expressions 199
double quotation mark in strings 132
download() method 546, 556
downloading files 483, 556
drag-and-drop
capturing interactions 453
creating interaction 266
draw() method 287, 548, 550, 553,
555
dynamic attribute 86
dynamic classes 52, 76, 89
dynamic text fields 356
E
E4X. See XML
ECMAScript edition 4 draft 33
ECMAScript for XML. See XML
effects using blending modes 277
embedded asset classes 98
embedded fonts 366
defined 356
using 366
embedFonts property 366
encoding ampersand (&) 463
Endian.BIG_ENDIAN 472
Endian.LITTLE_ENDIAN 472
enterFrame event 232
enumerations 96
equality operators 68, 133
Error classes
about 178
ActionScript 180
ECMAScript 178
error events 175, 241
error handling
common tasks 166
default behaviors 230
examples 242
strategies 170
terms 166
tools 169
ErrorEvent class 176, 242
errors
about handling 165
asynchronous 168
custom classes 175
debugging tools 170
displaying 173
ErrorEvent class 176, 242
print 510
rethrowing 174
status-based events 176
throw statement 172
types of 165, 167
-es compiler option 157
escape sequences in character
classes 193
Event class
about 232
bubbles property 234
cancelable property 233
clone() method 235
constants 233
currentTarget property 235
eventPhase property 234
isDefaultPrevented() method 235
method categories 235
preventDefault() method 230, 235
stopImmediatePropogation()
method 235
stopPropogation() method 235
subclasses 236
target property 234
toString() method 235
type property 233
event flow 227, 231, 234
event handlers 229, 403
event listeners
about 228
changes in ActionScript 3.0 231
as class methods 237
creating 236
managing 239
outside a class 236
removing 241
technique to avoid 238
event objects 227
event target 227, 231
Event.COMPLETE 463
EventDispatcher class
addEventListener() method 96,
231
dispatchEvent() method 241
IEventDispatch interface and 99
references to 60
willTrigger() method 241
eventPhase property 234
events
basic concepts 13
default behaviors 230
dispatching 227, 241
for display objects 263
enterFrame event 232
error 175, 241
event flow 227, 231, 234
event objects 232
init event 232
parent node 232
security 553
status change 177
target node 231
this keyword 238
See also event listeners
exactSettings property (Security
class) 557
examples
arrays 161
building a Telnet client 486
detecting system capabilities 504
error handling 242
filtering images 338
GeometricShapes 115
loading RSS data 224
Matrix class 314
multi-page printing 514
rearranging display object
layers 292
regular expressions 203
RunTimeAssetsExplorer 351
SimpleClock 127
sound application 443
SpriteArranger class 289
strings 138
text formatting 369
using external API with a web page
container 524
video jukebox 418
Wiki parser 203
WordSearch 456
exceptions 167
exec() method 202
explicit type conversion 55
extended flag in regular
expressions 201
extended property of regular
expressions 199
extends keyword 101
external API

INDEX 566
about 518
advantages 519
common tasks 518
concepts and terms 519
example 524
XML format 522
external code, calling from
ActionScript 521
external containers, getting
information about 520
external data, loading 462
external documents, loading data 464
external SWF files, loading 350
ExternalInterface class 519, 546, 558
ExternalInterface.addCallback()
method 551
F
facade class 444
fading display objects 280
fast-forwarding movie clips 348
file size, smaller for shapes 253
FileReference class 478, 546, 556
FileReferenceList class 484, 556
files
downloading 556
uploading 484, 556
filtering XML data 219
filters
applying for display objects 319
applying to BitmapData
objects 320
bitmap caching and 321
changing at run time 321
common tasks 318
creating 319
for display and bitmap objects 325
explanation of 321
for images, example 338
removing for display objects 320
final attribute 50, 94, 96, 105
first sprite loaded 248, 286
fixed property inheritance 112
flags in regular expressions 199
Flash authoring, when to use for
ActionScript 22
Flash cookie 475
Flash Media Server 550
flash package 36
Flash Player
communicating between
instances 467
compatibility with encoded
FLV 417
debugger version 242
IME and 500
version 6 109
Flash Video. See FLV
flash.display package
about display programming 247
bitmaps and 377
drawing API and 294
filtering and 318
movie clips and 346
sound and 424
text and 355
user input and 450
flash.geom package 307
flash_proxy namespace 41
Flex
embedding ActionScript 21
Flex, when to use for ActionScript 23
flow control, basic concepts 20
FLV
configuring for hosting on
server 417
file format 398
Flash Player and 417
on Macintosh 418
focus, managing in interactions 455
fonts
device 356
embedded 356, 366
for each..in statement 72, 153, 221
for loops 71
for loops, XML 211, 221
for..in statement 72, 153, 221
form feed character 132
formatting text 362, 365
forward slash 190, 191
frameRate property 260
frames, jumping to 349
fromCharCode() method 133
fscommand() function 467, 546, 558
fullScreen event 261
full-screen mode 261, 262, 547
fullScreenSourceRect property 262
fullYear property 123
function closures 74, 78, 83
function expressions 75
function keyword 74, 91
function objects 85
function parameters 78
function statements 74
Function.apply() method 158
functions
about 74
accessor 94
adding properties to 82
anonymous 75, 80
arguments object 78
calling 74
nested 78, 83
objects 82
parameters 78
parentheses 74
recursive 80
returning values 77
scope 77, 83
timing 126
G
g flag (in regular expressions) 199
garbage collection 76, 154
generic objects 60, 152
GeometricShapes example 115
geometry
about 307
common tasks using 308
concepts and terms 295, 308
getDefinition() method 557
getImageReference() method 550
getLocal() method 475, 546, 558, 559
getMonth() method 93, 124
getMonthUTC() method 124
getRect() method 312
getRemote() method 475, 546, 559
getters and setters
about 94
overriding 106
getTime() method 124
getTimer() function 127
getTimezoneOffset() method 125
GIF graphics 285
global flag in regular expressions 199
global object 83
global property of regular
expressions 199
global scope 83

INDEX 567
global variables 45
gradients 299
graphics, loading 285
greater-than operator 64, 133
greater-than-or-equal-to
operator 133
grouping display objects 255
groups, in regular expressions 196
H
Hardware scaling 262
hashes 152, 153
hoisting 46
hours property 124
HTML text
and CSS 363
displaying 358
htmlText property 358
HTTP tunneling 473
I
i flag (in regular expressions) 199
id3 property 554
IDataInput and IDataOutput
interfaces 472
identifiers 38
IEventDispatcher interface 98, 239,
240
if statement 69
if..else statement 69
ignore flag in regular expressions 200
ignoreCase property of regular
expressions 199
images
applying blending modes 277
defining in Bitmap class 251
filtering example 338
loading 285
security 553
in text fields 358
IME
checking availability 501
composition events 504
manipulating in Flash Player 500
IME conversion mode
determining 501
setting 502
img tag in text fields, security 549
implicit type conversion 55
import statement 37
importing SWF files 557
incrementing values 66
index positions in strings 133
indexed arrays 145
indexOf() method 135
inequality (!=) operator 133
infinity 54
inheritance
defined 101
fixed property 112
instance properties 102
static properties 106
init event 232
input text fields 356
instance methods 93
instance properties
declaring 87
inheriting 102
instance variables 91
instanceof operator 51
instances, creating 18
int class, casting 56
int data type 53
InteractiveObject class 252
interfaces
about 98
defining 99
extending 100
implementing in a class 100
internal attribute 37, 39, 89
intersection() method 312
intersects() method 312
IPv6 462
is operator 51, 99
isDefaultPrevented() method 235
isNaN() global function 47
iterating though arrays 153
J
Java socket server 473
join() method 151
JPG graphics 285
K
key codes 452
keyboard input, capturing 451
keyboard security 560
keys, string 152
keywords 62
L
landscape printing 513
lastIndexOf() method 135
layering, rearranging 292
left bracket 191
left parenthesis 191
left-associative operators 64
length property
arguments object 79
Array class 148
strings 132
less-than operator 64, 133
less-than-or-equal operator 133
level property 242
lexical environment 83
lineGradientStyle() method 299
listeners. See event listeners
literal values
about 60
array literals 60, 146
object 152
little-endian byte order 472
load progress 286
load() method (Loader class) 286,
542, 546
load() method (Sound class) 542, 546,
549, 556
load() method (URLLoader
class) 463, 546
load() method (URLStream
class) 546, 556
loadBytes() method 286, 542
loaded media, accessing as data 553
Loader class 285, 546, 554, 557
LoaderContext class 286, 548, 554
LoaderContext object 542
LoaderInfo class
display object access 552
monitoring loading progress 285
loaderInfo property 286
loading context 286
loading graphics 285
loadPolicyFile() method 546
local storage 475
local variables 45
LocalConnection class
about 467
connectionName parameter 471
permissions 558
restricted 546

INDEX 568
LocalConnection.allowDomain()
method 471, 558
LocalConnection.allowInsecureDom
ain() method 471
LocalConnection.client property 468
LocalConnection.connect()
method 546
localFileReadDisable property 538
localToGlobal() method 309
logical operators 68
looping
do..while 73
for 71
for (XML) 211, 221
for each..in 72, 153, 221
for..in 72, 153, 221
while 73
M
m flag (in regular expressions) 199
Macintosh, FLV files 418
mantissa 53
maps 152, 153
masking display objects 281
masking for alpha channel 282
match() method 136
Matrix class
defined 313
defining gradients with 299
example 314
objects, defining 313
rotating 313
scaling 313
skewing 314
translating 313
MAX_VALUE (Number class) 53
memory management 154
metacharacters, in regular
expressions 191
metadata, video 408, 410
metasequences, in regular
expressions 191, 192
method property (URLRequest
class) 463
methods
basic concepts 12
bound 83, 95
constructors 91
defined 91
getters and setters 94, 106
instance 93
overriding 104
static 92
microphone
accessing 440
detecting activity 442
routing to local speakers 441
security 557, 560
Microphone class 234
milliseconds property 124
MIN_VALUE (Number class) 53
minutes property 124
MIP maps 387
monitor, full-screen mode 261
month property 123
monthUTC property 124
MorphShape class 252
mouse cursors, customizing 454
mouse security 560
MouseEvent class 230, 236
movie clips
about 346
common tasks 346
concepts and terms 347
fast-forwarding 348
frame rate 260
playing and stopping 348
rewinding 348
MovieClip class 252
frame rates 260
MovieClip objects, creating 350
multiline flag in regular
expressions 200
multiline property of regular
expressions 199
multiple class definitions 498
multiplicative operators 67
mx.util.Delegate class 238
N
name conflicts, avoiding 36, 38
named groups (in regular
expressions) 198
namespaces
about 38
access control specifiers 40
applying 40
AS3 114, 157
default namespace 39
defining 39, 87
flash_proxy 41
importing 43
namespace keyword 39
opening 41
referencing 41
use namespace directive 41, 43,
114
user-defined attributes 90
XML 221
NaN value 54
navigateToURL() function 546, 558
negated character classes (in regular
expressions) 194
negative infinity 54
nested functions 78, 83
nested packages 36
NetConnection class 546
NetConnection.connect()
method 546, 549
NetStream class 542, 546, 549
network byte order 472
networking
about 460
concepts and terms 461
restricting 545
new operator 35
newline character 132
nodes in XML, accessing 218
noncapturing groups in regular
expressions 198
null value 47, 53, 54, 154
Number class
casting 56
default value 47
integer range 54
isNaN() global function 47
precision 54
Number data type 53
O
Object class
associative arrays 152
data type and 54
prototype property 110, 112
valueOf() method 113
object keys in arrays 153
object literals 152
object-oriented programming
common tasks for 84
concepts 85

INDEX 569
objects
basic concepts 11
instantiating 18
octal numbers 57
off-list display objects 254
on() event handlers 229
onClipEvent() function 229
onCuePoint event handlers 403
opaque background 276
open bracket ([) 191
open parenthesis 191
operators
about 63
additive 67
assignment 69
basic concepts 19
bitwise logical 68
bitwise shift 67
conditional 69
equality 68, 133
logical 68
multiplicative 67
postfix 66
precedence 64
prefix 66
primary 65
relational 68
unary 64, 66
optional parameters 79
overloaded operators 64
override keyword 94, 95
overriding getters and setters 106
P
package statement 86
packages
about 35
creating 36
dot operator 35, 59
dot syntax 60
importing 37
nested packages 36
top level 35, 36
page properties 511
parameters
optional or required 79
passing by value or by reference 78
parentAllowsChild property 552, 553
parentheses
empty 74
metacharacters 191
operators 61
XML filtering operators 219
parse() method 93
performance, improving for display
objects 273
period (.). See dot
permissions
camera 413
LocalConnection class 558
pipe (|) character 196
pixel snapping 380
pixels, manipulating individual 381
play() method (NetStream class) 546
playback
camera and 416
controlling frame rate 260
monitoring audio 447
of movie clips 348
pausing and resuming audio 448
video 400
player. See Flash Player
plus sign (+) 191
PNG graphics 285
podcast applications
creating 443
extending 448
Point objects
about 308
additional uses for 310
distance between points 309
translating coordinate spaces 309
pointers (cursors), customizing 454
points versus pixels 513
polar() method 309
polymorphism 101
pop() method 147
portrait printing 513
ports, security 555
positions
of characters in strings 135
of display objects 265
positive infinity 54
postfix operators 66
prefix operators 66
preventDefault() method 230, 235
primary operators 65
primitive types, implicit
conversions 55
primitive values 34, 48
printArea parameter 511
printing
about 508
common tasks 508
concepts and terms 509
exceptions and returns 510
multiple pages, example 514
orientation 513
page height and width 513
page properties 511
pages 509
points 513
Rectangle objects 512
scaling 513
specifying area 512
timeout 512
vector or bitmap 511
PrintJob statements, timing 512
PrintJob() constructor 509
priority parameter,
addEventListener() method 240
private attribute 88
private classes 35
private constructors not
supported 92
program flow 69
programs, basic definition 9
progress of audio playback 447
ProgressEvent.PROGRESS 463
properties
ActionScript versus other
languages 33
adding to functions 82
basic concepts 12
defined, for ActionScript 3.0 88
of regular expressions 199
static and instance 87, 106
XML 212
property access operator 153
protected attribute 89
__proto__ 34
prototype chain 34, 110
prototype object 76, 110, 112
prototype property 110, 112
Proxy class 41
public attribute 88
public classes 38

INDEX 570
push() method 147, 158
Q
quantifiers (in regular
expressions) 195
question mark (?) metacharacter 191
quotation marks 132
R
Real-Tiime Messaging Protocol
content security 550
Rectangle objects
additional uses for 313
defined 310
intersections 312
printing 512
repositioning 310
resizing 310
unions 312
recursive functions 80
reference, passing by 78
RegExp class
about 188
methods 202
properties 199
regular expressions
about 188
alternation using pipe (|)
metacharacter 196
alternators and character
groups 197
capturing substring matches 197
character classes 193
characters in 191
creating 190
example 203
flags 199
forward slash delimiter 190
groups 196
metacharacters 191
metasequences 191, 192
methods for working with 202
named groups 198
parameters in String methods 202
properties 199
quantifiers 195
searching 201
relational operators 68
replace() method 127, 137
replacement codes 137
replacing text in strings 136
required parameters 79
reserved words 62
__resolve 34
rest parameter 81
return statement 77, 92
reverse() method 148
rewinding movie clips 348
right bracket (]) 191
right parenthesis 191
right-associative operators 64
right-click menu (context menu) 455
rotate() method 313
rotating display objects 280, 313
rotating matrixes 313
RSS data
loading, example 224
reading for a podcast channel 444
RTMP content security 550
run time, determining user’s
system 496
S
s flag (in regular expressions) 199
sameDomain property 552
scale() method 313
scaling
controlling distortion 271
display objects 313
matrixes 313
printing 513
scenes, to demarcate timelines 349
scope
block-level 46
functions and 77, 83
global 83
variables 45
scope chain 83, 107
script timeout limit 512
scrolling text 358, 359
sealed classes 52
search() method 136
search, in regular expressions 201
searching strings 136
seconds property 124
security
accessing loaded media as data 553
allowNetworking tag 545
bitmaps 553
camera 557, 560
Clipboard 560
display list 552
event-related 553
files, uploading and
downloading 556
full-screen mode 547
images 553
img tag 549
imported SWF files 557
keyboard 560
LocalConnection class 558
microphone 557, 560
mouse 560
ports 555
RTMP 550
sending data 556
shared objects 557, 559
sockets 555
sound 549, 554
Stage 551
URLLoader 555
URLStream 555
video 549, 555
See also cross-domain policy files
Security class 546
Security.allowDomain() method
about cross-scripting 550
constructor and 557
img tag and 550
loading context 287
sound and 554
Security.currentDomain
property 557
Security.exactSettings property 557
SecurityDomain class 287, 549
semicolons 61
send() method (LocalConnection
class) 468, 546
sendToURL() function 546, 556
Server, Flash Media 550
server-side scripts 466
setClipboard() method 560
setInterval() function 127
setters. See getters and setters
setTime() method 124
setTimeout() method 127
shadow 108
Shape class 252
shared objects

INDEX 571
about 475
displaying contents of 477
Flash Player settings and 557
security and 477, 559
SharedObject class 475, 546
SharedObject.getLocal() method 558,
559
SharedObject.getRemote()
method 559
shift() method 147
shortcut menu (context menu) 455
significand 53
SimpleButton class 252
SimpleClock example 127
single quotation mark in strings 132
skewing display objects 313
skewing matrixes 313, 314
slash syntax 60
slashes
backslash (\) 132, 191
forward slash (/) 190, 191
slice() method
Array class 151
String class 135
smoothing bitmaps 380
Socket class 472, 546, 555
socket connections 472
socket server 473
sorting arrays 148, 149
sound
sample application 443
security of 549, 554
sending to and from a server 443
Sound class 542, 546, 549
SoundFacade class 444
SoundLoaderContext class 542
SoundMixer.computeSpectrum()
method 550, 553, 554
SoundMixer.stopAll() method 554
source path 37
speakers and microphones 441
speed, improving for rendering 273
splice() method 147
split() method 136
Sprite class 252
sprite, first loaded 248, 286
SpriteArranger class example 289
Stage
about 231, 247
as display object container 249
properties, setting 260
security 551
Stage class 231
Stage owner 551
StageDisplayState class 547
standard mode 50, 76
star (*). See asterisk
static attribute 90
static methods 92
static properties
declaring 87
inheritance 106
within scope chain 107
XML 212
static text
accessing 368
creating 252
static text fields 356
static variables 90
StaticText class 252
status change events 177
status-based error events 176
stopAll() method (SoundMixer
class) 554
stopImmediatePropogation()
method 235
stopping movie clips 348
stopPropogation() method 235
storing data 475
streaming video 402
strict inequality (!==) operator 133
strict mode
about 48
casting 56
dot syntax and 76
explicit conversion 56
returning values 77
run-time errors 50
String class
charAt() method 133
charCodeAt() method 133
concat() method 134
fromCharCode() method 133
indexOf() method 135
lastIndexOf() method 135
match() method 136
replace() method 137
search() method 136
slice() method 135
split() method 136
substr() and substring()
methods 135
toLowerCase() and toUpperCase()
methods 138
String data type 54
string keys 152
string representations of objects 134
strings
character position 135
checking matches in regular
expressions 202
combining arrays into character-
delimited string 163
common tasks 130
comparing 133
concatenating 134
converting case 138
converting data type for XML
attributes 223
converting XML objects to 222
declaring 131
example 138, 139
finding substrings 135
index positions 133
length 132
matching substrings 197
patterns, finding 135, 136
replacing text 136
substrings 135, 136
terms 131
style sheets. See CSS
StyleSheet class 363
subclasses 101
substr() and substring() methods 135
substrings
about 135
creating based on a delimiter 136
finding and replacing 135, 136
matching in regular
expressions 197
super statement 92, 93, 105
superclasses 101
superconstructor for arrays 158
SWF files
communication between
domains 471
communication between
instances 469
determining run-time
environment 497

INDEX 572
importing loaded 557
loading 285
loading external 350
loading older versions 351
switch statement 70
symbols in regular expressions 191
synchronous errors 167
syntactic keywords 62
syntax 59
system, determining user’s 496
System.setClipboard() method 560
T
tab character 132
target node or phase 231
target property 234
Telnet client example 486
terminating statements 61
ternary operators 64
test() method 202
text
about 355
anti-aliasing 367
assigning formats 362
available types 357
capturing input 360
common tasks 356
concepts and terms 356
displaying 356
formatting 362, 369
formatting ranges of 365
manipulating 359
replacing 136
restricting input 361
saving to Clipboard 497
scrolling 358, 359
selecting 360
sharpness 367
static 252, 368
thickness 367
text editors 23
text fields
disabling IME for 503
dynamic 356
HTML in 363
images in 358
img tag and security 549
input 356
modifying 357
scrolling text 358
static 356
text line metrics 356, 374
TextEvent class 230
TextField class 230, 252
TextFormat class 362
TextLineMetrics class 374
TextSnapshot class 368
this keyword 93, 94, 95, 238
throw statement 172
time formats 123
time intervals 125
time unit values 123
time zones 123, 125
timeout limit 512
Timer class
about 125
monitoring playback 447
timer events 125
timers 125
timing functions 126
toLowerCase() method 138
toString() method
about 134
Array class 151
Event class 235
toUppercase() method 138
traits object 112
Transform class
transform property 314
transformation matrixes. See Matrix
class
translate() method 313
translating matrixes 313
try..catch..finally statements 171
twips 513
type annotations 45, 49
type checking
compile-time 48
run-time 50
type conversion 55, 56, 222
type mismatches 49
type property (Event class) 233
typed arrays 146
types. See data types
U
UIEventDispatcher class 229
uint class, casting 56
uint data type 54
unary operators 64, 66
undefined 34, 54, 55, 146
Unicode characters 130
Uniform Resource Identifier
(URI) 39
union() method 312
Universal Time (UTC) 123
unordered arrays 152
unshift() method 147
untyped variables 34, 47
upcasting 50
upload() method 546, 556
uploading files 480, 484, 556
URIs 39
URL encoding 463
URLLoader class
about 462
loading XML data 215, 224
security and 555
when restricted 546
URLLoader constructor 463
URLLoader.dataFormat
property 466
URLLoader.load() method 463
URLLoaderDataFormat.VARIABLE
S466
URLRequest instance 463
URLRequest.contentType
property 463
URLRequest.data property 463
URLRequest.method property 463
URLRequestMethod.GET 464
URLRequestMethod.POST 464
URLs of loaded objects 286
URLStream class 546, 555
URLVariables class 462
URLVariables.decode() method 463
use namespace directive 41, 43, 114
useCapture parameter,
addEventListener() method 240
user input
about 450
common tasks 450
concepts and terms 450
user interactions, managing
focus 455
user’s system, determining at run
time 496
user-selected text, capturing 360
useWeakReference parameter 154

INDEX 573
UTC (Coordinated Universal
Time) 123
V
valueOf() method (Object class) 113
values
assigning to variables 44
passing arguments by 78
var keyword 44, 90
variables
basic concepts 10
declaring 90
default value 47
initializing 47, 215
instance 91
overriding not permitted 91
scope of 45
static 90
type annotations 45, 49
types of 90
uninitialized 47
untyped 34, 47
var statement 44
vector printing 511
video
about 397
common tasks 398
end of stream 401
loading 400
on Macintosh 418
metadata 408, 410
mipmapping 387
playback 400
quality 415
security 549, 555
sending to server 416
streaming 402
Video class 399
video jukebox example 418
visual objects. See display objects
void 54
W
weak references 154
while loop 73
white space 212
Wiki parser example 203
wildcard (*) operator, XML 219
willTrigger() method 241
words, reserved 62
WordSearch example 456
wrapper objects 48
X
x flag (in regular expressions) 199
XML
accessing attributes 219
ActionScript for 209
basic concepts 207
brace operators ({ and }) 216
child nodes 218
comments 211, 212
common tasks 209
concepts and terms 210
documents 208
E4X (ECMAScript for XML) 36,
207, 210
filtering 219
for each..in loops 72
for loops 211, 221
format for external API 522
initializing variables 215
loading data 215, 224
methods 212
namespaces 221
parent nodes 218
processing instructions 211
properties 212
socket server 473
transforming 216
traversing structures 217
type conversion 222
white space 212
XML class 36
XMLDocument class 36, 210
XMLList objects
about 214
concatenating 217
XMLNode class 210
XMLParser class 210
XMLSocket class 216, 224, 472, 546,
555
XMLSocket.connect() method 473,
546
XMLTag class 210
