Adobe InCopy CS6 JavaScript Scripting Guide In Copy Guide: Java Script JS EN
User Manual: adobe InCopy - CS6 - Scripting Guide: JavaScript Free User Guide for Adobe InCopy Software, Manual
Open the PDF directly: View PDF ![]() .
.
Page Count: 105 [warning: Documents this large are best viewed by clicking the View PDF Link!]
- Adobe InCopy CS6 Scripting Guide: JavaScript
- Introduction
- Getting Started
- Scripting Features
- Text and Type
- User Interfaces
- Menus
- Events
- Notes
- Tracking Changes
- Assignments
- XML
- Overview
- The best approach to scripting XML in InCopy
- Scripting XML Elements
- Setting XML preferences
- Setting XML import preferences
- Importing XML
- Creating an XML tag
- Loading XML tags
- Saving XML tags
- Creating an XML element
- Moving an XML element
- Deleting an XML element
- Duplicating an XML element
- Removing items from the XML structure
- Creating an XML comment
- Creating an XML processing instruction
- Working with XML attributes
- Working with XML stories
- Exporting XML
- Adding XML elements to a story

ADOBE® INCOPY® CS6
ADOBE INCOPY CS6
SCRIPTING GUIDE:
JAVASCRIPT

2012 Adobe Systems Incorporated. All rights reserved.
Adobe® InCopy® CS6 Scripting Guide: JavaScript
If this guide is distributed with software that includes an end user agreement, this guide, as well as the software
described in it, is furnished under license and may be used or copied only in accordance with the terms of such license.
Except as permitted by any such license, no part of this guide may be reproduced, stored in a retrieval system, or
transmitted, in any form or by any means, electronic, mechanical, recording, or otherwise, without the prior written
permission of Adobe Systems Incorporated. Please note that the content in this guide is protected under copyright law
even if it is not distributed with software that includes an end user license agreement.
The content of this guide is furnished for informational use only, is subject to change without notice, and should not be
construed as a commitment by Adobe Systems Incorporated. Adobe Systems Incorporated assumes no responsibility or
liability for any errors or inaccuracies that may appear in the informational content contained in this guide.
Please remember that existing artwork or images that you may want to include in your project may be protected under
copyright law. The unauthorized incorporation of such material into your new work could be a violation of the rights of
the copyright owner. Please be sure to obtain any permission required from the copyright owner.
Any references to company names in sample templates are for demonstration purposes only and are not intended to
refer to any actual organization.
Adobe, the Adobe logo, Creative Suite, InCopy, InDesign, Illustrator, and Photoshop are registered trademarks or
trademarks of Adobe Systems Incorporated in the United States and/or other countries. Microsoft and Windows are
registered trademarks or trademarks of Microsoft Corporation in the United States and/or other countries. Apple and
Mac OS are trademarks of Apple Computer, Incorporated, registered in the United States and other countries. All other
trademarks are the property of their respective owners.
Adobe Systems Incorporated, 345 Park Avenue, San Jose, California 95110, USA. Notice to U.S. Government End Users.
The Software and Documentation are “Commercial Items,” as that term is defined at 48 C.F.R. §2.101, consisting of
“Commercial Computer Software” and “Commercial Computer Software Documentation,” as such terms are used in 48
C.F.R. §12.212 or 48 C.F.R. §227.7202, as applicable. Consistent with 48 C.F.R. §12.212 or 48 C.F.R. §§227.7202-1 through
227.7202-4, as applicable, the Commercial Computer Software and Commercial Computer Software Documentation are
being licensed to U.S. Government end users (a) only as Commercial Items and (b) with only those rights as are granted
to all other end users pursuant to the terms and conditions herein. Unpublished-rights reserved under the copyright
laws of the United States. Adobe Systems Incorporated, 345 Park Avenue, San Jose, CA 95110-2704, USA. For U.S.
Government End Users, Adobe agrees to comply with all applicable equal opportunity laws including, if appropriate, the
provisions of Executive Order 11246, as amended, Section 402 of the Vietnam Era Veterans Readjustment Assistance Act
of 1974 (38 USC 4212), and Section 503 of the Rehabilitation Act of 1973, as amended, and the regulations at 41 CFR
Parts 60-1 through 60-60, 60-250, and 60-741. The affirmative action clause and regulations contained in the preceding
sentence shall be incorporated by reference.
Document Update Status
(for entire document; see each chapter for chapter-specific update status)
CS6 Updated Throughout document, changed CS5 to CS6 and version 7.0 to 8.0.
3
Contents
1 Introduction . . . . . . . . . . . . . . . . . . . . . . . . . . . . . . . . . . . . . . . . . . . . . . . . . . . . . . . . . . . . . . 7
How to use the scripts in this document . . . . . . . . . . . . . . . . . . . . . . . . . . . . . . . . . . . . . . . . . . . . . . . . . . . . . . 7
About the structure of the scripts . . . . . . . . . . . . . . . . . . . . . . . . . . . . . . . . . . . . . . . . . . . . . . . . . . . . . 7
For more information . . . . . . . . . . . . . . . . . . . . . . . . . . . . . . . . . . . . . . . . . . . . . . . . . . . . . . . . . . . . . . . . . . . . . . . . 8
About InCopy . . . . . . . . . . . . . . . . . . . . . . . . . . . . . . . . . . . . . . . . . . . . . . . . . . . . . . . . . . . . . . . . . . . . . . . . . . . . . . . . 8
Relationships between InCopy and InDesign files . . . . . . . . . . . . . . . . . . . . . . . . . . . . . . . . . . . . . . . . . . . . . 8
Stories . . . . . . . . . . . . . . . . . . . . . . . . . . . . . . . . . . . . . . . . . . . . . . . . . . . . . . . . . . . . . . . . . . . . . . . . . . . . . . . 8
Page geometry . . . . . . . . . . . . . . . . . . . . . . . . . . . . . . . . . . . . . . . . . . . . . . . . . . . . . . . . . . . . . . . . . . . . . . 9
Metadata . . . . . . . . . . . . . . . . . . . . . . . . . . . . . . . . . . . . . . . . . . . . . . . . . . . . . . . . . . . . . . . . . . . . . . . . . . . . 9
The document model . . . . . . . . . . . . . . . . . . . . . . . . . . . . . . . . . . . . . . . . . . . . . . . . . . . . . . . . . . . . . . . . 9
User-interface differences . . . . . . . . . . . . . . . . . . . . . . . . . . . . . . . . . . . . . . . . . . . . . . . . . . . . . . . . . . . 10
Design and architecture . . . . . . . . . . . . . . . . . . . . . . . . . . . . . . . . . . . . . . . . . . . . . . . . . . . . . . . . . . . . . . . . . . . . . 10
2 Getting Started . . . . . . . . . . . . . . . . . . . . . . . . . . . . . . . . . . . . . . . . . . . . . . . . . . . . . . . . . . 11
Installing scripts . . . . . . . . . . . . . . . . . . . . . . . . . . . . . . . . . . . . . . . . . . . . . . . . . . . . . . . . . . . . . . . . . . . . . . . . . . . . . 11
Running scripts . . . . . . . . . . . . . . . . . . . . . . . . . . . . . . . . . . . . . . . . . . . . . . . . . . . . . . . . . . . . . . . . . . . . . . . . . . . . . 12
Using the scripts panel . . . . . . . . . . . . . . . . . . . . . . . . . . . . . . . . . . . . . . . . . . . . . . . . . . . . . . . . . . . . . . . . . . . . . . 12
JavaScript language details . . . . . . . . . . . . . . . . . . . . . . . . . . . . . . . . . . . . . . . . . . . . . . . . . . . . . . . . . . . . . . . . . . 12
Other JavaScript development options . . . . . . . . . . . . . . . . . . . . . . . . . . . . . . . . . . . . . . . . . . . . . . 13
Using the scripts in this document . . . . . . . . . . . . . . . . . . . . . . . . . . . . . . . . . . . . . . . . . . . . . . . . . . . . . . . . . . . 13
Your first InCopy script . . . . . . . . . . . . . . . . . . . . . . . . . . . . . . . . . . . . . . . . . . . . . . . . . . . . . . . . . . . . . . . . . . . . . . 14
Walking through the script . . . . . . . . . . . . . . . . . . . . . . . . . . . . . . . . . . . . . . . . . . . . . . . . . . . . . . . . . . 14
Scripting terminology and the InCopy object model . . . . . . . . . . . . . . . . . . . . . . . . . . . . . . . . . . . . . . . . . . 15
Scripting terminology . . . . . . . . . . . . . . . . . . . . . . . . . . . . . . . . . . . . . . . . . . . . . . . . . . . . . . . . . . . . . . . 15
Understanding the InDesign and InCopy object model . . . . . . . . . . . . . . . . . . . . . . . . . . . . . . . 18
Measurements and positioning . . . . . . . . . . . . . . . . . . . . . . . . . . . . . . . . . . . . . . . . . . . . . . . . . . . . . . 21
Adding features to “Hello World” . . . . . . . . . . . . . . . . . . . . . . . . . . . . . . . . . . . . . . . . . . . . . . . . . . . . . . . . . . . . 22
3 Scripting Features . . . . . . . . . . . . . . . . . . . . . . . . . . . . . . . . . . . . . . . . . . . . . . . . . . . . . . . 24
Script preferences . . . . . . . . . . . . . . . . . . . . . . . . . . . . . . . . . . . . . . . . . . . . . . . . . . . . . . . . . . . . . . . . . . . . . . . . . . . 24
Getting the current script . . . . . . . . . . . . . . . . . . . . . . . . . . . . . . . . . . . . . . . . . . . . . . . . . . . . . . . . . . . . . . . . . . . . 25
Script versioning . . . . . . . . . . . . . . . . . . . . . . . . . . . . . . . . . . . . . . . . . . . . . . . . . . . . . . . . . . . . . . . . . . . . . . . . . . . . 25
Targeting . . . . . . . . . . . . . . . . . . . . . . . . . . . . . . . . . . . . . . . . . . . . . . . . . . . . . . . . . . . . . . . . . . . . . . . . . . . 26
Compilation . . . . . . . . . . . . . . . . . . . . . . . . . . . . . . . . . . . . . . . . . . . . . . . . . . . . . . . . . . . . . . . . . . . . . . . . 26
Interpretation . . . . . . . . . . . . . . . . . . . . . . . . . . . . . . . . . . . . . . . . . . . . . . . . . . . . . . . . . . . . . . . . . . . . . . . 26
Using the doScript method . . . . . . . . . . . . . . . . . . . . . . . . . . . . . . . . . . . . . . . . . . . . . . . . . . . . . . . . . . . . . . . . . . 27
Sending parameters to doScript . . . . . . . . . . . . . . . . . . . . . . . . . . . . . . . . . . . . . . . . . . . . . . . . . . . . . 27
Returning values from doScript . . . . . . . . . . . . . . . . . . . . . . . . . . . . . . . . . . . . . . . . . . . . . . . . . . . . . . 27
Running scripts at start-up . . . . . . . . . . . . . . . . . . . . . . . . . . . . . . . . . . . . . . . . . . . . . . . . . . . . . . . . . . . . . . . . . . 28
4
Session and main script execution . . . . . . . . . . . . . . . . . . . . . . . . . . . . . . . . . . . . . . . . . . . . . . . . . . . . . . . . . . . 28
4 Text and Type . . . . . . . . . . . . . . . . . . . . . . . . . . . . . . . . . . . . . . . . . . . . . . . . . . . . . . . . . . . 30
Entering and importing text . . . . . . . . . . . . . . . . . . . . . . . . . . . . . . . . . . . . . . . . . . . . . . . . . . . . . . . . . . . . . . . . . 30
Stories and text frames . . . . . . . . . . . . . . . . . . . . . . . . . . . . . . . . . . . . . . . . . . . . . . . . . . . . . . . . . . . . . . 30
Adding text to a story . . . . . . . . . . . . . . . . . . . . . . . . . . . . . . . . . . . . . . . . . . . . . . . . . . . . . . . . . . . . . . . 30
Replacing text . . . . . . . . . . . . . . . . . . . . . . . . . . . . . . . . . . . . . . . . . . . . . . . . . . . . . . . . . . . . . . . . . . . . . . 31
Inserting special characters . . . . . . . . . . . . . . . . . . . . . . . . . . . . . . . . . . . . . . . . . . . . . . . . . . . . . . . . . . 31
Placing text and setting text-import preferences . . . . . . . . . . . . . . . . . . . . . . . . . . . . . . . . . . . . . . . . . . . . . 32
Exporting text and setting text-export preferences . . . . . . . . . . . . . . . . . . . . . . . . . . . . . . . . . . . . . . . . . . . 35
Text objects . . . . . . . . . . . . . . . . . . . . . . . . . . . . . . . . . . . . . . . . . . . . . . . . . . . . . . . . . . . . . . . . . . . . . . . . . . . . . . . . . 39
Selections . . . . . . . . . . . . . . . . . . . . . . . . . . . . . . . . . . . . . . . . . . . . . . . . . . . . . . . . . . . . . . . . . . . . . . . . . . 40
Moving and copying text . . . . . . . . . . . . . . . . . . . . . . . . . . . . . . . . . . . . . . . . . . . . . . . . . . . . . . . . . . . . 40
Text objects and iteration . . . . . . . . . . . . . . . . . . . . . . . . . . . . . . . . . . . . . . . . . . . . . . . . . . . . . . . . . . . 42
Formatting text . . . . . . . . . . . . . . . . . . . . . . . . . . . . . . . . . . . . . . . . . . . . . . . . . . . . . . . . . . . . . . . . . . . . . . . . . . . . . 43
Setting text defaults . . . . . . . . . . . . . . . . . . . . . . . . . . . . . . . . . . . . . . . . . . . . . . . . . . . . . . . . . . . . . . . . 43
Fonts . . . . . . . . . . . . . . . . . . . . . . . . . . . . . . . . . . . . . . . . . . . . . . . . . . . . . . . . . . . . . . . . . . . . . . . . . . . . . . . 45
Applying a font . . . . . . . . . . . . . . . . . . . . . . . . . . . . . . . . . . . . . . . . . . . . . . . . . . . . . . . . . . . . . . . . . . . . . 46
Changing text properties . . . . . . . . . . . . . . . . . . . . . . . . . . . . . . . . . . . . . . . . . . . . . . . . . . . . . . . . . . . . 46
Changing text color . . . . . . . . . . . . . . . . . . . . . . . . . . . . . . . . . . . . . . . . . . . . . . . . . . . . . . . . . . . . . . . . . 47
Creating and applying styles . . . . . . . . . . . . . . . . . . . . . . . . . . . . . . . . . . . . . . . . . . . . . . . . . . . . . . . . 48
Deleting a style . . . . . . . . . . . . . . . . . . . . . . . . . . . . . . . . . . . . . . . . . . . . . . . . . . . . . . . . . . . . . . . . . . . . . 49
Importing paragraph and character styles . . . . . . . . . . . . . . . . . . . . . . . . . . . . . . . . . . . . . . . . . . . 49
Finding and changing text . . . . . . . . . . . . . . . . . . . . . . . . . . . . . . . . . . . . . . . . . . . . . . . . . . . . . . . . . . . . . . . . . . 50
Find/change preferences . . . . . . . . . . . . . . . . . . . . . . . . . . . . . . . . . . . . . . . . . . . . . . . . . . . . . . . . . . . . 50
Finding text . . . . . . . . . . . . . . . . . . . . . . . . . . . . . . . . . . . . . . . . . . . . . . . . . . . . . . . . . . . . . . . . . . . . . . . . . 51
Finding and changing formatting . . . . . . . . . . . . . . . . . . . . . . . . . . . . . . . . . . . . . . . . . . . . . . . . . . . 52
Using grep . . . . . . . . . . . . . . . . . . . . . . . . . . . . . . . . . . . . . . . . . . . . . . . . . . . . . . . . . . . . . . . . . . . . . . . . . . 53
Using glyph search . . . . . . . . . . . . . . . . . . . . . . . . . . . . . . . . . . . . . . . . . . . . . . . . . . . . . . . . . . . . . . . . . . 55
Tables . . . . . . . . . . . . . . . . . . . . . . . . . . . . . . . . . . . . . . . . . . . . . . . . . . . . . . . . . . . . . . . . . . . . . . . . . . . . . . . . . . . . . . 55
Autocorrect . . . . . . . . . . . . . . . . . . . . . . . . . . . . . . . . . . . . . . . . . . . . . . . . . . . . . . . . . . . . . . . . . . . . . . . . . . . . . . . . . 58
Footnotes . . . . . . . . . . . . . . . . . . . . . . . . . . . . . . . . . . . . . . . . . . . . . . . . . . . . . . . . . . . . . . . . . . . . . . . . . . . . . . . . . . . 59
5 User Interfaces . . . . . . . . . . . . . . . . . . . . . . . . . . . . . . . . . . . . . . . . . . . . . . . . . . . . . . . . . . . 60
Dialog-box overview . . . . . . . . . . . . . . . . . . . . . . . . . . . . . . . . . . . . . . . . . . . . . . . . . . . . . . . . . . . . . . . . . . . . . . . . 60
Your first InCopy dialog box . . . . . . . . . . . . . . . . . . . . . . . . . . . . . . . . . . . . . . . . . . . . . . . . . . . . . . . . . . . . . . . . . 61
Adding a user interface to “Hello World” . . . . . . . . . . . . . . . . . . . . . . . . . . . . . . . . . . . . . . . . . . . . . . . . . . . . . 62
Creating a more complex user interface . . . . . . . . . . . . . . . . . . . . . . . . . . . . . . . . . . . . . . . . . . . . . . . . . . . . . . 63
Working with ScriptUI . . . . . . . . . . . . . . . . . . . . . . . . . . . . . . . . . . . . . . . . . . . . . . . . . . . . . . . . . . . . . . . . . . . . . . . 65
Creating a progress bar with ScriptUI . . . . . . . . . . . . . . . . . . . . . . . . . . . . . . . . . . . . . . . . . . . . . . . . 65
Creating a button-bar panel with ScriptUI . . . . . . . . . . . . . . . . . . . . . . . . . . . . . . . . . . . . . . . . . . . . 65
6 Menus . . . . . . . . . . . . . . . . . . . . . . . . . . . . . . . . . . . . . . . . . . . . . . . . . . . . . . . . . . . . . . . . . . . 68
Understanding the menu model . . . . . . . . . . . . . . . . . . . . . . . . . . . . . . . . . . . . . . . . . . . . . . . . . . . . . . . . . . . . . 68
Localization and menu names . . . . . . . . . . . . . . . . . . . . . . . . . . . . . . . . . . . . . . . . . . . . . . . . . . . . . . . 70
Running a menu action from a script . . . . . . . . . . . . . . . . . . . . . . . . . . . . . . . . . . . . . . . . . . . . . . . . . . . . . . . . . 71
5
Adding menus and menu items . . . . . . . . . . . . . . . . . . . . . . . . . . . . . . . . . . . . . . . . . . . . . . . . . . . . . . . . . . . . . 71
Menus and events . . . . . . . . . . . . . . . . . . . . . . . . . . . . . . . . . . . . . . . . . . . . . . . . . . . . . . . . . . . . . . . . . . . . . . . . . . . 72
Working with script menu actions . . . . . . . . . . . . . . . . . . . . . . . . . . . . . . . . . . . . . . . . . . . . . . . . . . . . . . . . . . . 73
7 Events . . . . . . . . . . . . . . . . . . . . . . . . . . . . . . . . . . . . . . . . . . . . . . . . . . . . . . . . . . . . . . . . . . . 75
Understanding the event scripting model . . . . . . . . . . . . . . . . . . . . . . . . . . . . . . . . . . . . . . . . . . . . . . . . . . . . 75
About event properties and event propagation . . . . . . . . . . . . . . . . . . . . . . . . . . . . . . . . . . . . . . 77
Working with eventListeners . . . . . . . . . . . . . . . . . . . . . . . . . . . . . . . . . . . . . . . . . . . . . . . . . . . . . . . . . . . . . . . . 78
A sample “afterNew” eventListener . . . . . . . . . . . . . . . . . . . . . . . . . . . . . . . . . . . . . . . . . . . . . . . . . . . . . . . . . . 80
8 Notes . . . . . . . . . . . . . . . . . . . . . . . . . . . . . . . . . . . . . . . . . . . . . . . . . . . . . . . . . . . . . . . . . . . 82
Entering and importing a note . . . . . . . . . . . . . . . . . . . . . . . . . . . . . . . . . . . . . . . . . . . . . . . . . . . . . . . . . . . . . . . 82
Adding a note to a story . . . . . . . . . . . . . . . . . . . . . . . . . . . . . . . . . . . . . . . . . . . . . . . . . . . . . . . . . . . . . 82
Replacing text of a note . . . . . . . . . . . . . . . . . . . . . . . . . . . . . . . . . . . . . . . . . . . . . . . . . . . . . . . . . . . . . 82
Converting between notes and text . . . . . . . . . . . . . . . . . . . . . . . . . . . . . . . . . . . . . . . . . . . . . . . . . . . . . . . . . 83
Converting a note to text . . . . . . . . . . . . . . . . . . . . . . . . . . . . . . . . . . . . . . . . . . . . . . . . . . . . . . . . . . . . 83
Converting text to a note . . . . . . . . . . . . . . . . . . . . . . . . . . . . . . . . . . . . . . . . . . . . . . . . . . . . . . . . . . . . 83
Expanding and collapsing notes . . . . . . . . . . . . . . . . . . . . . . . . . . . . . . . . . . . . . . . . . . . . . . . . . . . . . . . . . . . . . 83
Collapsing a note . . . . . . . . . . . . . . . . . . . . . . . . . . . . . . . . . . . . . . . . . . . . . . . . . . . . . . . . . . . . . . . . . . . 83
Expanding a note . . . . . . . . . . . . . . . . . . . . . . . . . . . . . . . . . . . . . . . . . . . . . . . . . . . . . . . . . . . . . . . . . . . 83
Removing a note . . . . . . . . . . . . . . . . . . . . . . . . . . . . . . . . . . . . . . . . . . . . . . . . . . . . . . . . . . . . . . . . . . . . . . . . . . . . 84
Navigating among notes . . . . . . . . . . . . . . . . . . . . . . . . . . . . . . . . . . . . . . . . . . . . . . . . . . . . . . . . . . . . . . . . . . . . 84
Going to the first note in a story . . . . . . . . . . . . . . . . . . . . . . . . . . . . . . . . . . . . . . . . . . . . . . . . . . . . . 84
Going to the next note in a story . . . . . . . . . . . . . . . . . . . . . . . . . . . . . . . . . . . . . . . . . . . . . . . . . . . . 84
Going to the previous note in a story . . . . . . . . . . . . . . . . . . . . . . . . . . . . . . . . . . . . . . . . . . . . . . . . 84
Going to the last note in a story . . . . . . . . . . . . . . . . . . . . . . . . . . . . . . . . . . . . . . . . . . . . . . . . . . . . . 85
9 Tracking Changes . . . . . . . . . . . . . . . . . . . . . . . . . . . . . . . . . . . . . . . . . . . . . . . . . . . . . . . . 86
Tracking Changes . . . . . . . . . . . . . . . . . . . . . . . . . . . . . . . . . . . . . . . . . . . . . . . . . . . . . . . . . . . . . . . . . . . . . . . . . . . 86
Navigating tracked changes . . . . . . . . . . . . . . . . . . . . . . . . . . . . . . . . . . . . . . . . . . . . . . . . . . . . . . . . . 86
Accepting and reject tracked changes . . . . . . . . . . . . . . . . . . . . . . . . . . . . . . . . . . . . . . . . . . . . . . . 87
Information about tracked changes . . . . . . . . . . . . . . . . . . . . . . . . . . . . . . . . . . . . . . . . . . . . . . . . . 87
Preferences for tracking changes . . . . . . . . . . . . . . . . . . . . . . . . . . . . . . . . . . . . . . . . . . . . . . . . . . . . . . . . . . . . 88
10 Assignments . . . . . . . . . . . . . . . . . . . . . . . . . . . . . . . . . . . . . . . . . . . . . . . . . . . . . . . . . . . . . 90
Assignment object . . . . . . . . . . . . . . . . . . . . . . . . . . . . . . . . . . . . . . . . . . . . . . . . . . . . . . . . . . . . . . . . . . . . . . . . . . 90
Opening assignment files . . . . . . . . . . . . . . . . . . . . . . . . . . . . . . . . . . . . . . . . . . . . . . . . . . . . . . . . . . . 90
Iterating through assignment properties . . . . . . . . . . . . . . . . . . . . . . . . . . . . . . . . . . . . . . . . . . . . . 90
Assignment packages . . . . . . . . . . . . . . . . . . . . . . . . . . . . . . . . . . . . . . . . . . . . . . . . . . . . . . . . . . . . . . . 91
An assignment story . . . . . . . . . . . . . . . . . . . . . . . . . . . . . . . . . . . . . . . . . . . . . . . . . . . . . . . . . . . . . . . . . . . . . . . . 91
Assigned-story object . . . . . . . . . . . . . . . . . . . . . . . . . . . . . . . . . . . . . . . . . . . . . . . . . . . . . . . . . . . . . . . 91
Iterating through the assigned-story properties . . . . . . . . . . . . . . . . . . . . . . . . . . . . . . . . . . . . . . 91
11 XML . . . . . . . . . . . . . . . . . . . . . . . . . . . . . . . . . . . . . . . . . . . . . . . . . . . . . . . . . . . . . . . . . . . . . 93
Overview . . . . . . . . . . . . . . . . . . . . . . . . . . . . . . . . . . . . . . . . . . . . . . . . . . . . . . . . . . . . . . . . . . . . . . . . . . . . . . . . . . . 93
6
The best approach to scripting XML in InCopy . . . . . . . . . . . . . . . . . . . . . . . . . . . . . . . . . . . . . . . . . . . . . . . 93
Scripting XML Elements . . . . . . . . . . . . . . . . . . . . . . . . . . . . . . . . . . . . . . . . . . . . . . . . . . . . . . . . . . . . . . . . . . . . . 94
Setting XML preferences . . . . . . . . . . . . . . . . . . . . . . . . . . . . . . . . . . . . . . . . . . . . . . . . . . . . . . . . . . . . 94
Setting XML import preferences . . . . . . . . . . . . . . . . . . . . . . . . . . . . . . . . . . . . . . . . . . . . . . . . . . . . . 94
Importing XML . . . . . . . . . . . . . . . . . . . . . . . . . . . . . . . . . . . . . . . . . . . . . . . . . . . . . . . . . . . . . . . . . . . . . . 95
Creating an XML tag . . . . . . . . . . . . . . . . . . . . . . . . . . . . . . . . . . . . . . . . . . . . . . . . . . . . . . . . . . . . . . . . 95
Loading XML tags . . . . . . . . . . . . . . . . . . . . . . . . . . . . . . . . . . . . . . . . . . . . . . . . . . . . . . . . . . . . . . . . . . . 96
Saving XML tags . . . . . . . . . . . . . . . . . . . . . . . . . . . . . . . . . . . . . . . . . . . . . . . . . . . . . . . . . . . . . . . . . . . . 96
Creating an XML element . . . . . . . . . . . . . . . . . . . . . . . . . . . . . . . . . . . . . . . . . . . . . . . . . . . . . . . . . . . 96
Moving an XML element . . . . . . . . . . . . . . . . . . . . . . . . . . . . . . . . . . . . . . . . . . . . . . . . . . . . . . . . . . . . 96
Deleting an XML element . . . . . . . . . . . . . . . . . . . . . . . . . . . . . . . . . . . . . . . . . . . . . . . . . . . . . . . . . . . 97
Duplicating an XML element . . . . . . . . . . . . . . . . . . . . . . . . . . . . . . . . . . . . . . . . . . . . . . . . . . . . . . . . 97
Removing items from the XML structure . . . . . . . . . . . . . . . . . . . . . . . . . . . . . . . . . . . . . . . . . . . . . 97
Creating an XML comment . . . . . . . . . . . . . . . . . . . . . . . . . . . . . . . . . . . . . . . . . . . . . . . . . . . . . . . . . . 97
Creating an XML processing instruction . . . . . . . . . . . . . . . . . . . . . . . . . . . . . . . . . . . . . . . . . . . . . . 98
Working with XML attributes . . . . . . . . . . . . . . . . . . . . . . . . . . . . . . . . . . . . . . . . . . . . . . . . . . . . . . . . 98
Working with XML stories . . . . . . . . . . . . . . . . . . . . . . . . . . . . . . . . . . . . . . . . . . . . . . . . . . . . . . . . . . . 99
Exporting XML . . . . . . . . . . . . . . . . . . . . . . . . . . . . . . . . . . . . . . . . . . . . . . . . . . . . . . . . . . . . . . . . . . . . . . 99
Adding XML elements to a story . . . . . . . . . . . . . . . . . . . . . . . . . . . . . . . . . . . . . . . . . . . . . . . . . . . . . . . . . . . . . 99
Associating XML elements with text . . . . . . . . . . . . . . . . . . . . . . . . . . . . . . . . . . . . . . . . . . . . . . . . 100
Applying styles to XML elements . . . . . . . . . . . . . . . . . . . . . . . . . . . . . . . . . . . . . . . . . . . . . . . . . . . 102
Working with XML tables . . . . . . . . . . . . . . . . . . . . . . . . . . . . . . . . . . . . . . . . . . . . . . . . . . . . . . . . . . . 103

7
1Introduction
This document shows how to do the following:
Work with the Adobe® InCopy® scripting environment.
Use advanced scripting features.
Work with text and type in an InCopy document, including finding and changing text.
Create dialog boxes and other user-interface items.
Customize and add menus and create menu actions.
Respond to user-interface events.
Work with XML, from creating XML elements and importing XML to adding XML elements to a layout.
How to use the scripts in this document
For the most part, the scripts shown in this document are not complete scripts. They are only fragments of
scripts, and are intended to show only the specific part of a script relevant to the point being discussed in
the text. You can copy the script lines shown in this document and paste them into your script editor, but
you should not expect them to run without further editing. Note, in addition, that scripts copied out of this
document may contain line breaks and other characters (due to the document layout) that will prevent
them from executing properly.
A zip archive of all of the scripts shown in this document is available at the InCopy scripting home page, at:
http://www.adobe.com/products/InCopy/scripting/index.html. After you have downloaded and
expanded the archive, move the folders corresponding to the scripting language(s) of your choice into the
Scripts Panel folder inside the Scripts folder in your InCopy folder. At that point, you can run the scripts
from the Scripts panel inside InCopy.
About the structure of the scripts
The script examples are all written using a common template that includes the functions “main,”
“mySetup,” “mySnippet,” and “myTeardown.” We did this to simplify automated testing and
publication—there’s no reason for you to construct your scripts this way. Most of the time, the part of the
script you’ll be interested in will be inside the “mySnippet” function.
Chapter Update Status
CS6 Unchanged

CHAPTER Introduction For more information 8
For more information
For more information on InCopy scripting, you also can visit the InCopy Scripting User to User forum, at
http://www.adobeforums.com. In the forum, scripters can ask questions, post answers, and share their
newest scripts. The forum contains hundreds of sample scripts.
About InCopy
InCopy is a collaborative, text-editing application developed for integrated use with Adobe InDesign®.
InCopy enables you to track changes, add editorial notes, and fit copy tightly into the space designed for it.
InCopy uses the same text-composition engine as InDesign, so InCopy and InDesign fit copy within a
layout with identical composition.
InCopy is for the editorial environment. It allows editorial workflow participants to collaborate on
magazines, newspapers, and corporate publishing, enabling concurrent text and layout editing. Its users
are editors, writers, proofreaders, copy editors, and copy processors.
InCopy shares many panels and palettes with InDesign but also provides its own user-interface items.
Relationships between InCopy and InDesign files
Relationships between InDesign and InCopy files are important because of the division of labor in a
publication workflow that occurs when much of the same material is opened and modified in both
applications.
There are two common scenarios for exporting from InCopy:
You can export an (IDML based) ICML file.
You can export an (INX based) INCX file.
There are two common scenarios for exporting from InDesign that involve InCopy in some way:
Stories exported from InDesign as InCopy files are XML files or streams; the InCopyExport and
InCopyWorkflow plug-ins loaded into InDesign provide this function. Some practical implications of
this approach for InCopy files are that they are much smaller, they are faster over the network, they do
not contain any page geometry, and data within the XML file or stream is available outside
InDesign/InCopy (for search engines, database tools, and so on).
Groupings within an article (such as a headline, byline, copy, graphics, or captions) also can be
exported. InDesign and Incopy support the creation of groupings with assignment files, which handle
file management by adding an additional file that tracks the other files. In essence, an assignment is a
set of files whose contents are assigned to one person for some work to be done (for example, copy
edit, layout, and/or writing). Any stories in an assignment are exported as InCopy files. Geometry
information and the relationship of the files are held in the assignment file. InDesign allows the user to
export a given set of stories by exporting into an assignment. InCopy opens all stories that are in an
assignment together (as one unit). For details, see Chapter 10, “Assignments.”
Stories
Each InCopy file represents one story. An InDesign document containing several stories can be
modularized to the same number of InCopy documents, through export. Those exported InDesign stories

CHAPTER Introduction Relationships between InCopy and InDesign files 9
contain a link, which may be viewed in the Links panel (InDesign) or the Assignments palette as
assignment files (InCopy).
InCopy does not maintain a link to the InDesign document it is associated with (if one exists). InDesign
maintains any links with InCopy files as bidirectional links.
Stories can be structured in XML. This means XML data can be contained within XML data. This feature can
be used to design a data structure in which the raw text of a story is contained within an outer structure
that contains data specific to InCopy (like styles).
Within InCopy, content can be saved in an ICML/INCX format or, if there is structure in the story, the logical
structure can be exported in XML.
An ICML or INCX file can contain both InCopy data and marked-up text. If the file is exported as XML data,
the data specific to InCopy is stripped out, leaving the marked-up content minus the information about
how it is to be styled.
Page geometry
InCopy files do not contain page geometry. When geometry is needed, it must be obtained from the
InDesign document. InCopy can open InDesign documents and extract design information and links to
the exported stories where needed. When page geometry is desired from within InCopy, assignment files
can be supplied with it.
Metadata
The Adobe Extensible Metadata Platform (XMP) provides a practical method for creating, interchanging,
and managing metadata. InCopy files support XMP.
Just as InDesign provides the File > File Info command to view XMP data, InCopy provides the File >
Content File Info command. System integrators can retain this data or strip it out during export.
Metadata added to stories by third-party software developers is preserved when incorporated into
InDesign documents. Added metadata can be viewed within InDesign (from the File Info dialog box,
available from the Links panel menu), as well as viewed within InCopy. Further, third-party software
developers can add functionality to InDesign to view that metadata in a custom user interface.
An extensibility point exists for service providers to add metadata content to InCopy files. For more
information, see Chapter 11, “XML.”
The document model
InDesign documents are the basis for all content in InDesign. InCopy also uses InDesign documents, but
they are not the default document type.
In both InDesign and InCopy, the basic document always is a database; in InCopy, however, this document
may be an incomplete document. In InDesign, the main document typically is an opened InDesign file, but
it also can be an opened INX or IDML file, which typically appears to be an unsaved InDesign document.
InCopy has other permutations. There is the basic InDesign file, as well as a new document with an InCopy
story (or plain or RTF text) imported into it. Also, there are IDML- and INX-based assignment files, which
have some part of an InDesign file stored in an XML file. The InDesign/InCopy document model
corresponds to the base required model plug-in set, versioned against changes over time. It is important
CHAPTER Introduction Design and architecture 10
that all IDML/INX scripting work in both InDesign and InCopy, so documents can be moved with high
fidelity between the applications.
User-interface differences
InDesign and InCopy share most of their panels, but InCopy has a smaller set and several additional
toolbars along the top, left, and bottom screen borders. Most InCopy panels also can be docked on these
bars, providing a smaller but always-visible view of the panel.
InCopy also has a custom window layout with multiple views, in a main window with three tabs: Galley
view, Story view, and Layout view. Layout view is the InDesign window view. Galley and story views are
simply the story-editor view, with and without accurate line endings, respectively.
Design and architecture
Story/file relationship
ICML is an IDML-based representation of an InCopy story. It represents the future direction of
InDesign/InCopy and is an especially good choice if you need to edit a file outside of InDesign.
ICML format
Each InCopy file or stream is in XML. An advantage of this is that InCopy files can be parsed easily and
opened by any text editor.
INCX format
INCX is an INX-based representation of an InCopy story. This format is not as readable as ICML, but it is still
available to support INCX-based workflows.
Document operations
InCopy provides default implementations of document operations (file actions) like New, Save, Save As,
Save A Copy, Open, Close, Revert, and Update Design. All these InCopy file actions are in one plug-in
(InCopyFileActions) in source-code form. Software developers or system integrators are expected to
replace this with their own implementations, to customize the interaction for their workflow system.
Using XMP metadata
Users can enter and edit metadata by choosing File > Content File Info. This metadata is saved in the
InCopy file. Software developers and system integrators can create and store their own metadata using
the XMP SDK.

11
2Getting Started
Scripting is the most powerful feature in Adobe® InCopy®. No other feature—no tool, panel, or dialog box
you see in the program’s user interface—can save you as much time, trouble, and money as scripting.
This document is for every InCopy user. It does not matter if you havenever created a script before; this
manual shows you how to get started. If you wrote scripts before for other applications, this manual shows
you how to apply your knowledge to InCopy scripting. It covers installing and running an InCopy script,
and it describes what InCopy scripting can and cannot do. It also discusses the software you need to get
started writing your own scripts.
Almost anything you can do with the InCopy user interface, you can do with a script. You can enter and
format text, find and change text, add notes, and print or export the pages of the document. Any action
that can change a document or its contents can be scripted. There are even a few things that you can do in
scripting that you cannot do using the user interface.
Scripts can create menus, add menu items, create and display dialogs and panels, and respond to your
user-interface selections. Scripts can read and write text files, parse XML data, and communicate with
other applications. Scripts can do everything from very small tasks (like setting a tab stop at the location of
the text cursor) to providing complete features. You can start with very simple scripts that do only one
thing and move on to scripts that automate your entire publishing workflow.
Most of the things scripting cannot do—like setting up a workspace or defining a set of keyboard
shortcuts—are related to the user interface. In addition, scripts cannot add new kinds of objects to an
InCopy document or add new, fundamental capabilities to the program, like a new text-composition
engine. For that type of extensibility, you must to turn to the InCopy Software Development Kit (SDK),
which shows you how to write compiled plug-ins using C++.
This document talks about Adobe InDesign® as well as InCopy, because InCopy almost always is used in
conjunction with InDesign documents. In addition, InDesign and InCopy scripting are very similar. For
more on InDesign scripting, see Adobe InDesign Scripting Tutorial and Adobe InDesign Scripting Guide.
Installing scripts
To install an InCopy script, just put the script file in the Scripts Panel folder in the Scripts folder in your
InCopy application folder.
Alternately, put the script in the Scripts Panel folder in your user-preferences folder. You can find your user
preferences folder at the following locations, where <username> is your user name and ~ (tilde) is your
system volume:
Mac OS®: /Users/<username>/Library/Preferences/Adobe InCopy/
Version 8.0/<locale>/Scripts
Windows® XP: C:\Documents and Settings\<username>\Application Data\Adobe\InCopy\
Version 8.0\<locale>\Scripts
Chapter Update Status
CS6 Updated Removed or changed specific references to CS5. .
Getting Started Running scripts 12
Windows® Vista: C:\Users\<username>\App Data\Roaming\Adobe\InCopy\
Version 8.0\<locale>\Scripts
Once the script is in the folder, it appears in the Scripts panel inside InCopy (choose Window > Scripts to
display the panel).
You also can put in the Scripts Panel folder aliases/shortcuts to scripts or folders containing scripts, and
they will appear in the Scripts panel.
Running scripts
To run a script, display the Scripts panel (choose Window > Scripts), then double-click the script name in
the Scripts panel. Many scripts display user-interface items (like dialogs or panels) and display alerts if
necessary.
Using the scripts panel
The Scripts panel can run compiled or uncompiled AppleScripts (files with the file extension .spt, .as, or
.applescript), JavaScripts (files with the file extension .js or .jsx), VBScripts (files with the extension
.vbs), or executable programs from the Scripts panel.
To edit a script shown in the Scripts panel, hold down Option (Mac OS) or Alt (Windows) key and
double-click the script’s name. This opens the script in the editor you defined for the script file type.
To open the folder containing a script shown in the Scripts panel, hold down the Command (Mac OS) or
Ctrl-Shift (Windows) keys and double-click the script’s name. Alternately, choose Reveal in Finder (Mac OS)
or Reveal in Explorer (Windows) from the Scripts panel menu. The folder containing the script opens in the
Finder (Mac OS) or Explorer (Windows).
Scripts run as a series of actions, which means you can undo the changes the script made to a document
by choosing Undo from the Edit menu. This can help you troubleshoot a script, as you can step backward
through each change.
To add a keyboard shortcut for a script, choose Edit > Keyboard Shortcuts, select an editable shortcut set
from the Set menu, then choose Product Area > Scripts. A list of the scripts in your Scripts panel appears.
Select a script and assign a keyboard shortcut as you would for any other InCopy feature.
JavaScript language details
InCopy’s JavaScript support is based on an Adobe implementation of JavaScript known as ExtendScript.
The ExtendScript interpreter conforms to the current ECMA 262 standard for JavaScript. All language
features of JavaScript 1.5 are supported. Adobe Illustrator®, Adobe Photoshop®, and other Adobe Creative
Suite® products also use the ExtendScript JavaScript interpreter.
Although you can write scripts using other versions of JavaScript, such as Late Night Software’s OSA
JavaScript (on Mac OS) or Microsoft® JScript (on Windows), the terms you use in those languages are not
the same as the terms you use in ExtendScript. ExtendScript examples do not work in other JavaScript
versions.
NOTE: Because ExtendScript tools and features are used in several Adobe products, we consolidated all
ExtendScript documentation. To learn more about JavaScript utilities like the ExtendScript Toolkit (a

Getting Started Using the scripts in this document 13
JavaScript development environment and object-model inspector) and the ScriptUI user-interface
module, see Creative Suite 5 JavaScript Tools Guide.
Other JavaScript development options
You can use the ExtendScript Toolkit to create JavaScript scripts explicitly for InCopy, or you can use the
Creative Suite Extension Builder (CS Extension Builder) to develop CS extensions in ActionScript. CS
extensions are Flash-based (SWF) and can potentially work in a variety of Creative Suite applications.
CS applications have an extensibility infrastructure that allows developers to extend the capabilities of the
applications; the infrastructure is based on Flash/Flex technology, and each CS extension is delivered as a
compiled Flash (SWF) file. CS includes the Extension Manager to enable installation of CS extensions.
An example of a CS extension that ships with the point products is Adobe Kuler. Kuler has a consistent user
interface across the different suite applications, but has different logic in each, adapted to the host
application.
The user interface for an extension is written in ActionScript, using the Flex framework. A C5 extension is
typically accessed through its own menu item in the application’s Extensions menu. CS Extension Builder
allows you to design the user interface interactively using the Design view of FlashBuilder. It also allows
you to develop all of the application logic for your CS extension in ActionScript; you can develop and
debug your extension in the familiar FlashBuilder environment.
To develop your application logic, we recommend using the Creative Suite ActionScript Wrapper Library
(CSAWLib), which exposes the scripting DOM of each host application as an ActionScript library. This is
tightly integrated with the CS Extension Builder environment, which includes wizards to help you build
your extension’s basic structure, and run and debug your code against suite applications such as Adobe
InDesign, Photoshop, and Illustrator.
The methods, properties, and behavior of the scripting DOM is as described in the JavaScript Scripting
Reference for the host application. For details of how to use CS Extension Builder and the wrapper libraries,
see the Creative Suite SDK documentation, which is accessible from within the Flash Builder or Eclipse
Help system when you have installed CS Extension Builder.
Using the scripts in this document
To use any script from this document, you can either open the tutorial script file (the filename is given
before each script) or copy the code shown in this chapter.
The script files are stored in a zip archive, InCopyCS6ScriptingGuideScripts.zip. When you
uncompress the archive, you can move the folder containing the scripts written in the scripting language
you want to use (AppleScript, JavaScript, or VBScript) to your Scripts Panel folder. Working with the script
files is much easier than entering the script yourself or copying and pasting from this document.
If you do not have access to the script archive, you can enter the scripting code shown in this chapter. To
do this:
1. Copy the script from this Adobe PDF document and paste it into the ExtendScript Toolkit.
2. Save the script as a plain-text file in the Scripts Panel folder (see “Installing scripts” on page 11), using
the file extension .jsx.
3. Choose Windows > Scripts to display the Scripts panel.

Getting Started Your first InCopy script 14
4. Double-click the script name in the Scripts panel to run the script.
Entering scripts manually will work only for the scripts shown in this chapter. The scripts shown in the
other chapters are script fragments, not complete scripts. To run these scripts, you must use the scripts
from the script archive.
NOTE: If you are entering the examples yourself (rather than using the scripts from the script archive), it is
very important that you use the same capitalization as shown in the example. JavaScript is case sensitive,
and the scripts will fail if they do not use the capitalization shown.
NOTE: If you are copying and pasting scripts from this document, be aware that line breaks caused by the
layout of the document can cause errors in your script. As it can be very difficult to find such errors, we
recommend hat you use the scripts in the zip archive.
Your first InCopy script
Next, we create an InCopy script that creates a new document, adds a text frame, then enters text in the
text frame. While this seems trivial, it demonstrates how to do the following:
Establish communication with InCopy.
Create a new document.
Add text to a story.
Start the ExtendScript Toolkit (or a text editor). Enter the following script (or open the HelloWorld.jsx
tutorial script):
var myDocument = app.documents.add();
var myStory = myDocument.stories.item(0);
myStory.contents = "Hello World!";
Save the script as a plain-text file with the file extension .jsx in the Scripts Panel folder (see “Installing
scripts” on page 11). To run the script, double-click the script name in the Scripts panel or select InCopy
from the application target pop-up menu in the ExtendScript Toolkit, then click Run.
Walking through the script
Here is a step-by-step analysis of what the Hello World script does.
1. Establish communication with the InCopy application object:
Refer to the application as app.
2. Create a new document and a reference to the document:
Var myDocument = app.documents.add();
3. Get a reference to the first story in the document (a standalone document always contains a story):
var myStory = myDocument.stories.item(0);
4. Add text to the story by setting the contents property to a string.
myStory.contents = "Hello World!";

Getting Started Scripting terminology and the InCopy object model 15
Scripting terminology and the InCopy object model
Now that you created your first InCopy script, it is time to learn more about the terminology of scripting
languages in general and InCopy scripting in particular.
Scripting terminology
First, let’s review a few common scripting terms and concepts.
Comments
Comments give you a way to add descriptive text to a script. The scripting system ignores comments as
the script executes; this prevents comments from producing errors when you run your script. Comments
are useful when you want to document the operation of a script (for yourself or someone else). In this
document, we use comments in the tutorial scripts.
To include a comment in JavaScript, type // to the left of the comment, or surround the comment with /*
and */. For example:
// this is a comment
/* and so is this */
Values
The point size of a text character, the contents of a note, and the filename of a document are examples of
values used in InCopy scripting. Values are the data your scripts use to do their work.
The type of a value defines what sort of data the value contains. For example, the value type of the
contents of a word is a text string; the value type of the leading of a paragraph is a number. Usually, the
values used in scripts are numbers or text. The following table explains the value types most commonly
used in InCopy scripting:
Value Type What it is Example
Boolean Logical True or False. True
Integer Whole numbers (no decimal
points). Integers can be positive or
negative.
14
Number A high-precision number that can
contain a decimal point.
13.9972
String A series of text characters. Strings
appear inside (straight) quotation
marks.
"I am a string"
Array A list of values (the values can be
any type).
["0p0", "0p0", "16p4", "20p6"]
Getting Started Scripting terminology and the InCopy object model 16
Converting values from one type to another
JavaScript provides ways to convert variable values from one type to another. The most common
converstions involved converting numbers to strings (so you can enter them in text or display them in
dialogs) or converting strings to numbers (so you can use them to set a point size or page location).
//To convert from a number to a string:
myNumber = 2;
myString = myNumber + "";
//To convert from a string to an integer:
myString = "2";
myNumber = parseInt(myString);
//If your string contains a decimal value, use "parseFloat" rather than "parseInt":
myNumber = parseFloat(myString);
//You can also convert strings to numbers using the following:
myNumber = +myString;
Variables
A variable is a container for a value. They are called “variables” because the values they contain might
change. A variable might hold a number, a string of text, or a reference to an InCopy object. Variables have
names, and you refer to a variable by its name. To put a value into a variable, you assign the data to the
variable.
In all examples and tutorial scripts that come with InCopy, all variables start with my. This enables you to
easily differentiate variables we created in a script from scripting-language terms.
Assigning a value to a variable
Assigning values or strings to variables is fairly simple, as shown in these examples:
var myNumber = 10;
var myString = "Hello, World!";
var myTextFrame = myDocument.pages.item(0).textFrames.add();
NOTE: In JavaScript, all variables not preceded by var are considered global by default; that is, they are not
bound to a specific function. While var is not required, we recommend that you use it in any script with
more than one function.
Try to use descriptive names for your variables, like firstPage or corporateLogo, rather than x or c. This
makes your script easier to read. Longer names do not affect the execution speed of the script.
Variable names must be one word, but you can use internal capitalization (like myFirstPage) or
underscore characters (my_first_page) to create more readable names. Variable names cannot begin
with a number, and they cannot contain punctuation or quotation marks.
Array variables
An Array object is a container for a series of values:
myArray = [1, 2, 3, 4];
To refer to an item in an array, refer to its index in the array.In JavaScript, the first item in an array is item 0:
var myFirstArrayItem = myArray[0];
Arrays can include other arrays, as shown in the following examples:
var myArray = [[0,0], [72,72]];
Getting Started Scripting terminology and the InCopy object model 17
Finding the value type of a variable
Sometimes, your scripts must make decisions based on the value type of an object. If you are working on a
script that operates on a text selection, for example, you might want that script to stop if nothing is
selected.
//Given a variable of unknown type, "myMysteryVariable"...
myType = myMysteryVariable.constructor.name;
//myType will be a string corresponding to the JavaScript type (e.g., "Rectangle")
Operators
Operators use variables or values to perform calculations (addition, subtraction, multiplication, and
division) and return a value. For example:
MyWidth/2
returns a value equal to half of the content of the variable myWidth.
You also can use operators to perform comparisons (equal to (=), not equal to(<>), greater than (>), or less
than (<)). For example:
MyWidth > myHeight
returns the value true (or 1) if myWidth is greater than myHeight; otherwise, false (0).
In JavaScript, use the plus sign (+) to join the two strings:
"Pride " + "and Prejudice"
//returns the string: "Pride and Prejudice"
Conditional statements
“If the size of the selected text is 12 points, set the point size to 10 points.” This is an example of a
conditional statement. Conditional statements make decisions; they give your scripts a way to evaluate
something (like the color of the selected text, number of pages in the document, or date), then act
according to the result. Most conditional statements start with if.
Control structures
If you could talk to InCopy, you might say, “Repeat the following procedure 20 times.” In scripting terms,
this is a control structure. Control structures provide repetitive processes, or loops. The idea of a loop is to
repeat an action over and over again, with or without changes between instances (or iterations) of the
loop, until a specific condition is met. Control structures usually start with the for.
Functions
Functions are scripting modules to which you can refer from within your script. Typically, you send a value
or series of values to a function and get back another value or values. There is nothing special about the
code used in functions; they are simply conveniences to avoid having to type the same lines of code
repeatedly in your script. Functions start with function.
Getting Started Scripting terminology and the InCopy object model 18
Understanding the InDesign and InCopy object model
When you think about InCopy and InDesign documents, you probably organize the programs and their
components in your mind. You know that paragraphs are contained by text frames, which in turn appear
on a page. A page is a part of a spread, and one or more spreads make up a document. Documents contain
colors, styles, layers, and master spreads. As you think about the objects in the documents you create, you
intuitively understand that there is an order to them.
InDesign and InCopy “think” about the contents of a document the same way you do. A document
contains pages, which contain page items (text frames, rectangles, ellipses, and so on). Text frames contain
characters, words, paragraphs, and anchored frames; graphics frames contain images, EPSs, or PDFs;
groups contain other page items. The things we mention here are the objects that make up an InDesign
publication, and they are what we work with when we write InDesign and InCopy scripts.
Objects in your publication are arranged in a specific order: paragraphs are inside a story, which is inside a
document, which is inside the InCopy application object. When we speak of an object model or a hierarchy,
we are talking about this structure. Understanding the object model is key to finding the object you want
to work with. Your best guide to InCopy scripting is your knowledge of InCopy itself.
Objects have properties (attributes). For example, the properties of a text object include the font used to
format the text, point size, and leading applied to the text.
Properties have values; for example, the point size of text can be either a number (in points) or the string
“Auto” for auto leading. The fill-color property of text can be set to a color, gradient, mixed ink, or swatch.
Properties also can be read/write or read only. Read/write properties can be set to other values; read-only
properties cannot.
Objects also have methods. Methods are the verbs of the scripting world, the actions an object can
perform. For example, the document object has print, export, and save methods.
Methods have parameters, or values that define the effect of the method. The open method, for example,
has a parameter that defines the file you want to open.
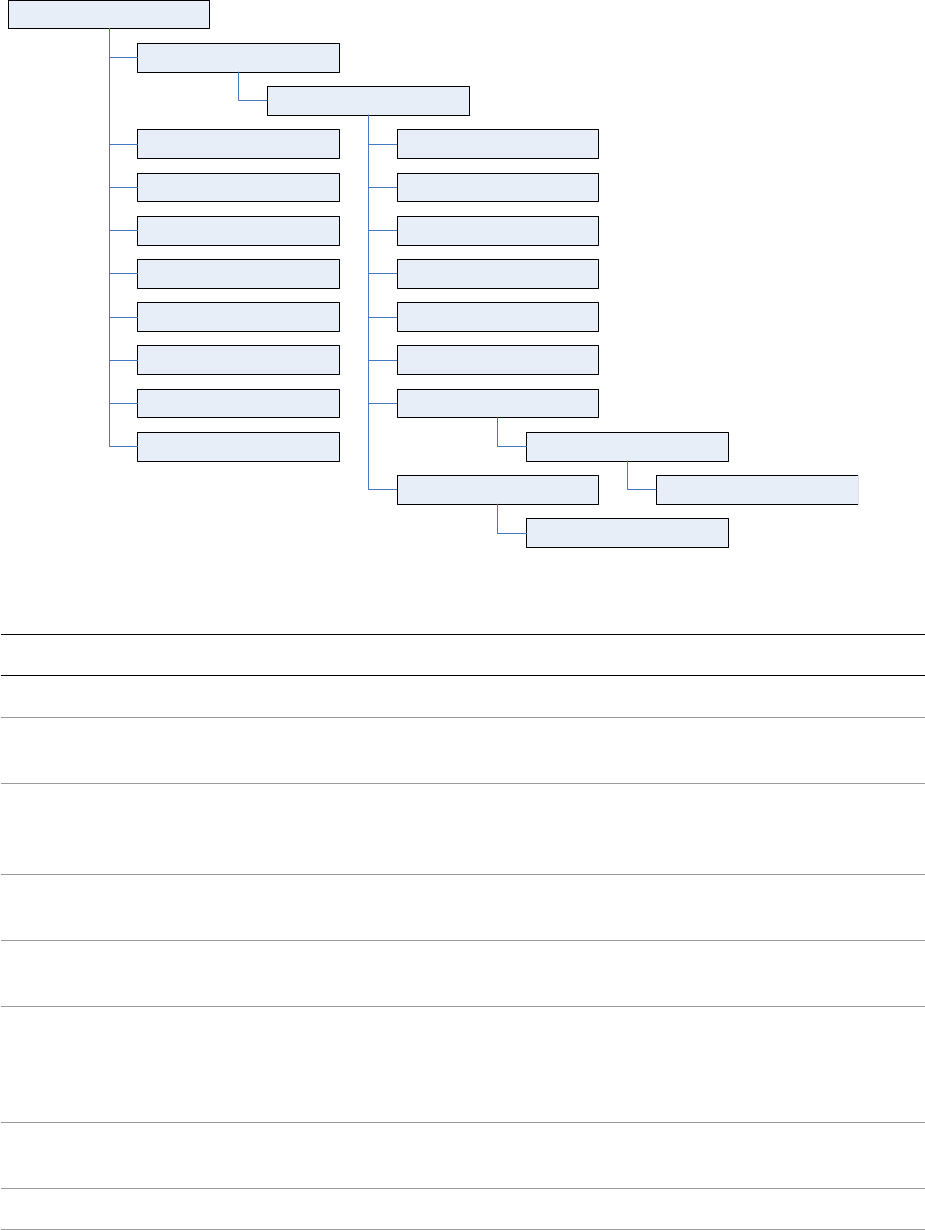
The following block diagram is an overview of the InCopy object model. The diagram is not a
comprehensive list of objects available to InCopy scripting; instead, it is a conceptual framework for
understanding the relationships between the types of objects.
Getting Started Scripting terminology and the InCopy object model 19
The objects in the diagram are explained in the following table:
Term What it represents:
Application InCopy.
Application
defaults
Application default settings, such as colors, paragraph styles, and object styles.
Application defaults affect all new documents.
Application
events
The things that happen as a user or script works with the application. Events are
generated by opening, closing, or saving a document or choosing a menu item. Scripts
can be triggered by events.
Application
menus
The menus, submenus, and context menus displayed in the InCopy user interface.
Scripts can be attached to menu choices and can execute menu actions.
Application
methods
The actions the application can take; for example, finding and changing text, copying
the selection, creating new documents, and opening libraries.
Application
preferences
Examples are text preferences, PDF export preferences, and document preferences.
Many preferences objects also exist at the document level. Just as in the user interface,
application preferences are applied to new documents; document preferences change
the settings of a specific document.
Application
properties
The properties of the application; for example, the full path to the application, the locale
of the application, and the user name.
Books A collection of open books.
Document An InCopy document.
documents
libraries
application defaults
application
books
application preferences
application events
application menus
application methods
application properties
a document
document defaults
document preferences
document events
document methods
document properties
pages or spreads
page
page itemsstories
text objects
document elements

Getting Started Scripting terminology and the InCopy object model 20
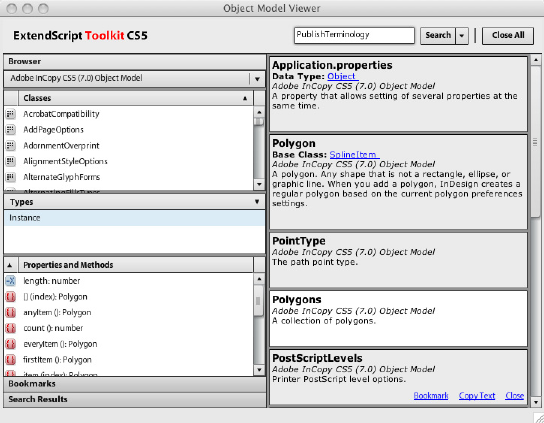
Looking at the InCopy object model
You can view the InCopy object model from inside your script-editing application. All reference
information on objects and their properties and methods is stored in the model and can be viewed,
To view the InCopy object model in the ExtendScript Toolkit:
1. Start the ExtendScript Toolkit.
2. Choose Help > InCopy CS6 Main Dictionary. The ExtendScript Toolkit loads the InCopy dictionary and
displays it in a separate window.
3. From the Classes list, select the object you want to view, then click the property or method you want
to view in more detail in the Properties and Methods list. The ExtendScript toolkit displays more
information on the property or method you selected:
Document
defaults
Document default settings, such as colors, paragraph styles, and text formatting
defaults.
Document
elements
For example, the stories, imported graphics, and pages of a document. The figure above
shows pages and stories, because those objects are extremely important containers for
other objects; however, document elements also include rectangles, ovals, groups, XML
elements, and any other type of object you can import or create.
Document
events
Events that occur at the document level, such as importing text. See application events in
this table.
Document
methods
The actions the document can take; for example, closing a document, printing a
document, and exporting a document.
Document
preferences
The preferences of a document, such as guide preferences, view preferences, or
document preferences.
Document
properties
For example, the document filename, number of pages, and zero-point location.
Documents A collection of open documents.
Libraries A collection of open libraries.
Page One page in an InCopy document.
Page item Any object you can create or place on a page. There are many types of page items, such
as text frames, rectangles, graphic lines, and groups.
Pages or
spreads
The pages or spreads in an InCopy document.
Stories The text in an InCopy document.
Text objects Characters, words, lines, paragraphs, and text columns are examples of text objects in an
InCopy story.
Term What it represents:
Getting Started Scripting terminology and the InCopy object model 21
For more on using the ExtendScript Toolkit object model viewer, see Creative Suite 5 JavaScript Tools Guide.
Measurements and positioning
All items and objects in InCopy are positioned on the page according to measurements you specify. It is
useful to know how the InCopy coordinate system works and what measurement units it uses.
Coordinates
InCopy, like every other page-layout and drawing program, uses simple, two-dimensional geometry to set
the position of objects on a page or spread. The horizontal component of a coordinate pair is referred to as
x; the vertical component, y. You can see these coordinates in the Transform panel or Control when you
select an object using the Selection tool. As in the InCopy user interface, coordinates are measured relative
to the current location of the ruler’s zero point.
There is one difference between the coordinates used in InCopy and the coordinate system used in a
Geometry textbook: on the InCopy vertical (or y) axis, coordinates below the zero point are positive
numbers; coordinates above the zero point are negative numbers.
Measurement units
When you send measurement values to InCopy, you can send numbers (for example, 14.65) or
measurement strings (for example, “1p7.1”). If you send numbers, InCopy uses the publication’s current
units of measurement; if you send measurement strings (see the table below), InCopy uses the units of
measurement specified in the string.
InCopy returns coordinates and other measurement values using the publication’s current measurement
units. In some cases, these units do not resemble the measurement values shown in the InCopy Transform
panel. For example, if the current measurement system is picas, InCopy returns fractional values as
decimals, rather than using the picas-and-points notation used by the Transform panel. So, for example,
“1p6,” is returned as “1.5.” InCopy does this because your scripting system would have trouble trying to
perform arithmetic operations using measurement strings. For instance, trying to add “0p3.5” to “13p4”
produces a script error, while adding .2916 to 13.333 (the converted pica measurements) does not.

Getting Started Adding features to “Hello World” 22
If your script depends on adding, subtracting, multiplying, or dividing specific measurement values, you
might want to set the corresponding measurement units at the beginning of the script. At the end of the
script, you can set the measurement units back to whatever they were before you ran the script.
Alternately, you can use measurement overrides, like many of the sample scripts. A measurement override
is a string containing a special character, as shown in the following table:
Adding features to “Hello World”
Next, we create a new script that makes changes to the “Hello World” publication we created with our first
script. Our second script demonstrates how to do the following:
Get the active document.
Change the formatting of the text in the first story.
Add a note.
Either open the ImprovedHelloWorld tutorial script or follow these steps to create the script:
1. Make sure you have the document you created earlier open. If you closed the document without
saving it, simply run the HelloWorld.jsx script again to make a new document.
2. Enter the following JavaScript in a new text file:
Override Meaning Example
c ciceros (add didots after the c, if necessary) 1.4c
cm centimeters .635cm
i (or in) inches .25i
mm millimeters 6.35mm
p picas (add points after the p, if necessary) 1p6
pt points 18pt

Getting Started Adding features to “Hello World” 23
//Get a reference to a font.
try{
//Enter the name of a font on your system, if necessary.
var myFont = app.fonts.item("Arial");
}
on(myError){}
//Get the active document and assign the result to the variable "myDocument"
var myDocument = app.documents.item(0);
with(myDocument.stories.item(0)){
//Change the font, size, and paragraph alignment.
try{
appliedFont = myFont;
}
on(myError){}
justification = Justification.centerAlign;
pointSize = 48;
//Enter the note at the last insertion point of the story.
var myNote = insertionPoints.item(-1).notes.add();
myNote.texts.item(0).contents = "This is a note."
}
3. Save the text as a plain text file with the file extension .jsx in the Scripts Panel folder (see “Installing
scripts” on page 11).
4. Double-click the script name in the Scripts panel to run the new script.
24
3Scripting Features
This chapter covers scripting techniques that relate to InCopy’s scripting environment. Almost every other
object in the InCopy scripting model controls a feature that can change a document or the application
defaults. By contrast, the features in this chapter control how scripts operate.
This document discusses the following:
The scriptPreferences object and its properties.
Getting a reference to the executing script.
Running scripts in prior versions of the scripting object model.
Using the doScript method to run scripts.
Running scripts at InCopy start-up.
Controlling the ExtendScript engine in which scripts execute.
We assume that you have already read Chapter 2, “Getting Started” and know how to write, install, and run
InCopy scripts in the scripting language of your choice.
Script preferences
The scriptPreferences object provides objects and properties related to the way InCopy runs scripts.
The following table provides more detail on each property of the scriptPreferences object:
Chapter Update Status
CS6 Edited “Script versioning” on page 25 and its three subsections have been updated, corrected, and clarified.
Property Description
EnableRedraw Turns screen redraw on or off while a script is running from the Scripts
panel.
scriptsFolder The path to the scripts folder.
scriptsList A list of the available scripts. This property is an array of arrays, in the
following form:
[[fileName, filePath], …]
Where fileName is the name of the script file and filePath is the full path
to the script. You can use this feature to check for the existence of a script
in the installed set of scripts.

Scripting Features Getting the current script 25
Getting the current script
You can get a reference to the current script using the activeScript property of the application object.
You can use this property to help you locate files and folders relative to the script, as shown in the
following example (from the ActiveScript tutorial script):
var myScript = app.activeScript;
alert("The current script is: " + myScript);
var myParentFolder = File(myScript).parent;
alert("The folder containing the active script is: " + myParentFolder);
When you debug scripts using a script editor, the activeScript property returns an error. Only scripts run
from the Scripts palette appear in the activeScript property.
When you debug scripts from the ExtendScript Toolkit, using the activeScript property returns an error.
To avoid this error and create a way of debugging scripts that use the activeScript property, use the
following error handler (from the GetScriptPath tutorial script):
function myGetScriptPath() {
try{
return app.activeScript;
}
catch(myError){
return File(myError.fileName);
}
}
Script versioning
InCopy can run scripts using earlier versions of the InCopy scripting object model. To run an older script in
a newer version of InCopy, you must consider the following:
Targeting — Scripts must be targeted to the InCopy version in which they are being run (that is, the
current version). The mechanics of targeting are language specific as described in “Targeting” on
page 26.
userInteractionLevel This property controls the alerts and dialogs that InCopy presents to the
user. When you set this property to
UserInteractionLevels.neverInteract, InCopy does not display any
alerts or dialogs; set it to UserInteractionLevels.interactWithAlerts
to enable alerts but disable dialogs; and set it to interactWithAll to
restore the normal display of alerts and dialogs. The ability to turn off alert
displays is very useful when you are opening documents via script; often,
InCopy displays an alert for missing fonts or linked graphics files. To avoid
this alert, set the user-interaction level to
UserInteractionLevels.neverInteract before opening the
document, then restore user interaction (set the property to
interactWithAll) before completing script execution.
version The version of the scripting environment in use. For more information, see
“Script versioning” on page 25. Note that this property is not the same as
the version of the application.
Property Description

Scripting Features Script versioning 26
Compilation — This involves mapping the names in the script to the underlying script IDs, which are
what InCopy understands. The mechanics of compilation are language specific as described in
“Compilation” on page 26.
Interpretation — This involves matching the IDs to the appropriate request handler within InCopy so
that InCopy correctly interprets a script written for an earlier version of the scripting object model. To
do this, either explicitly set the application’s script preferences to the old object model within the
script (as shown in “Interpretation” on page 26) or run the script from a folder in the Scripts panel
folder as follows:
Version 8.0 Scripts
Version 7.0 Scripts
Version 6.0 Scripts
Version 5.0 Scripts
Version 2.0 Scripts
Targeting
A script must always target the version of InCopy under which it is running (the current version), either
explicitly or implicitly. Targeting is implicit when the script is launched from the Scripts panel.
Otherwise, if the script is launched externally (from the ESTK), explicit targeting for JavaScripts is done
using the target directive:
//target CS6
#target "InCopy-8.0"
//target the latest version of InCopy
#target "InCopy"
Compilation
JavaScripts are not precompiled. For compilation, Incopy uses the same version of the DOM that is set for
interpretation.
Interpretation
The InCopy application object contains a scriptPreferences object, which allows a script to get or set
the version of the scripting object model to use for interpreting scripts. The version defaults to the current
version of the application and persists.
For example, to change the version of the scripting object model to CS5:
//Set to 7.0 scripting object model
app.scriptPreferences.version = 7.0;
Folder For InCopy version of scripts
CS6
CS5 and CS5.5
CS4
CS3
CS2

Scripting Features Using the doScript method 27
Using the doScript method
The doScript method gives a script a way to execute another script. The script can be a string of valid
scripting code or a file on disk. The script can be in the same scripting language as the current script or
another scripting language. The available languages vary by platform: on Mac OS, you can run either an
AppleScript or a JavaScript; on Windows, you can run a VBScript or a JavaScript.
The doScript method has many possible uses:
Running a script in another language that provides a feature missing in your main scripting language.
For example, VBScript lacks the ability to display a file or folder browser, which JavaScript has.
AppleScript can be very slow to compute trigonometric functions (sine and cosine), but JavaScript
performs these calculations rapidly. JavaScript does not have a way to query Microsoft® Excel for the
contents of a specific spreadsheet cell, but both AppleScript and VBScript have this capability. In all
these examples, the doScript method can execute a snippet of scripting code in another language,
to overcome a limitation of the language used for the body of the script.
Creating a script “on the fly.” Your script can create a script (as a string) during its execution, which it
can then execute using the doScript method. This is a great way to create a custom dialog or panel
based on the contents of the selection or the attributes of objects the script creates.
Embedding scripts in objects. Scripts can use the doScript method to run scripts that were saved as
strings in the label property of objects. Using this technique, an object can contain a script that
controls its layout properties or updates its content according to certain parameters. Scripts also can
be embedded in XML elements as an attribute of the element or as the contents of an element. See
“Running scripts at start-up” on page 28.
Sending parameters to doScript
To send a parameter to a script executed by doScript, use the following form (from the
DoScriptParameters tutorial script):
var myParameters = ["Hello from DoScript", "Your message here."];
var myJavaScript = "alert(\"First argument: \" + arguments[0] + \"\\rSecond argument:
\" + arguments[1]);";
app.doScript(myJavaScript, ScriptLanguage.javascript, myParameters);
if(File.fs == "Windows"){
var myVBScript = "msgbox arguments(1), vbOKOnly, \"First argument: \" &
arguments(0)";
app.doScript(myVBScript, ScriptLanguage.visualBasic, myParameters);
}
else{
var myAppleScript = "tell application \"Adobe InCopy CS6\"\rdisplay dialog(\"First
argument: \" & item 1 of arguments & return & \"Second argument: \" & item 2 of
arguments)\rend tell";
app.doScript(myAppleScript, ScriptLanguage.applescriptLanguage, myParameters);
}
Returning values from doScript
To return a value from a script executed by doScript, you can use the scriptArgs (short for “script
arguments”) object of the application. The following script fragment shows how to do this (for the
complete script, see the DoScriptReturnValue tutorial script):

Scripting Features Running scripts at start-up 28
var myJavaScript = "app.scriptArgs.setValue(\"ScriptArgumentA\", \"This is the first
script argument value.\");\r";
myJavaScript += "app.scriptArgs.setValue(\"ScriptArgumentB\", \"This is the second
script argument value.\")";
var myScriptArgumentA = app.scriptArgs.getValue("ScriptArgumentA");
var myScriptArgumentB = app.scriptArgs.getValue("ScriptArgumentB");
alert("ScriptArgumentA: " + myScriptArgumentA + "\rScriptArgumentB: " +
myScriptArgumentB);
if(File.fs == "Windows"){
var myVBScript = "Set myInCopy = CreateObject(\"InCopy.Application\")\r";
myVBScript += "myInCopy.ScriptArgs.SetValue \"ScriptArgumentA\", \"This is the
first script argument value.\"\r";
myVBScript += "myInCopy.ScriptArgs.SetValue \"ScriptArgumentB\", \"This is the
second script argument value.\"";
app.doScript(myVBScript, ScriptLanguage.visualBasic);
}
else{
var myAppleScript = "tell application \"Adobe InCopy CS6\"\r";
myAppleScript += "make script arg with properties{name:\"ScriptArgumentA\",
value:\"This is the first script argument value.\"}\r";
myAppleScript += "make script arg with properties{name:\"ScriptArgumentB\",
value:\"This is the second script argument value.\"}\r";
myAppleScript += "end tell\r";
app.doScript(myAppleScript, ScriptLanguage.applescriptLanguage);
}
var myScriptArgumentA = app.scriptArgs.getValue("ScriptArgumentA");
var myScriptArgumentB = app.scriptArgs.getValue("ScriptArgumentB");
alert("ScriptArgumentA: " + myScriptArgumentA + "\rScriptArgumentB: " +
myScriptArgumentB);
Running scripts at start-up
To run a script when InCopy starts, put the script in the Startup Scripts folder in the Scripts folder (for more
information, see “Installing scripts” on page 11).
NOTE: Scripts run in the session ExtendScript engine when InCopy starts can create objects and functions
that will be available to other scripts for the duration of the session. For more information, see “Session
and main script execution” on page 28.
Session and main script execution
InCopy has two ways to run a JavaScript: session and main. These names correspond to the ExtendScript
“engine” used to run the script.
By default, when you run an InCopy JavaScript, the script is interpreted and executed by the “main”
ExtendScript engine, which is destroyed when the script completes execution. Script objects created by
the script do not persist.
Scripts run in the session engine can create objects that persist until you close InCopy. You can refer to
these objects from other scripts run in the session engine. To set the session engine as the target of an
InCopy JavaScript, add the following line to the start of your script.
#targetengine "session"
Scripting Features Session and main script execution 29
You can create your own persistent ExtendScript interpretation and execution environment. To do this, use
the #targetenging statement and provide your own ExtendScript engine name, as shown in the
following script fragment:
#targetengine "adobe"

30
4Text and Type
Entering, editing, and formatting text make up the bulk of the time spent working on most InCopy
documents. As a result, automating text and type operations can result in large productivity gains.
This tutorial shows how to script the most common operations involving text and type. The sample scripts
in this chapter are presented in order of complexity, starting with very simple scripts and building toward
more complex operations.
We assume that you have already read Chapter 2, “Getting Started” and know how to create, install, and
run a script. We also assume that you have some knowledge of working with text in InCopy and
understand basic typesetting terms.
Entering and importing text
This section covers the process of getting text into your InCopy documents. Just as you can type text into
text frames and place text files using the InCopy user interface, you can create text frames, insert text into
a story, or place text files using scripting.
Stories and text frames
All text in an InCopy layout is part of a story, and every story can contain one or more text frames. If you are
working with a standalone InCopy document, the document contains one story, and InCopy adds text
frames only when necessary to display the text of the story. This also is true for stories exported from
InDesign as InCopy stories (.icml files).
When you work with an InCopy story within an InDesign document, the document can contain any
number of stories, and you will see the text frames as they were created in the InDesign layout. Unlike
InDesign, InCopy cannot add new text frames using scripting.
For more on understanding the relationships between text objects in an InCopy document, see “Text
objects” on page 39.
Adding text to a story
To add text to a story, use the contents property. The following sample script uses this technique to add
text at the end of a story (for the complete script, see AddText):
Chapter Update Status
CS6 Unchanged
Text and Type Entering and importing text 31
var myDocument = app.documents.add();
//Add text to the default story.
var myStory = myDocument.stories.item(0);
myStory.contents = "This is the first paragraph of example text.";
//To add more text to the story, we'll use the last insertion point
//in the story. ("\r" is a return character in JavaScript.)
var myInsertionPoint = myStory.insertionPoints.item(-1);
myInsertionPoint.contents = "\rThis is the second paragraph.";
Replacing text
The following script replaces a word with a phrase, by changing the contents of the appropriate object (for
the complete script, see ReplaceWord):
//Enters text in the default story and then replaces
//a word in the story with a different phrase.
var myDocument = app.documents.add();
var myStory = myDocument.stories.item(0);
myStory.contents = "This is some example text.";
//Replace the third word "some" with the phrase
//"a little bit of".
myStory.words.item(2).contents = "a little bit of";
The following script replaces the text in a paragraph (for the complete script, see ReplaceText):
//Enters text in the default story, and then replaces
//the text in the second paragraph.
var myDocument = app.documents.add();
var myStory = myDocument.stories.item(0);
myStory.contents = "Paragraph 1.\rParagraph 2.\rParagraph 3.\r";
//Replace the text in the second paragraph without replacing
//the return character at the end of the paragraph. To do this,
//we'll use the ItemByRange method.
var myStartCharacter = myStory.paragraphs.item(1).characters.item(0);
var myEndCharacter = myStory.paragraphs.item(1).characters.item(-2);
myStory.texts.itemByRange(myStartCharacter, myEndCharacter).contents = "This text
replaces the text in paragraph 2.";
In the preceding script, we used the itemByRange method to exclude the return character in the second
paragraph. We did this because deleting the return might change the paragraph style applied to the
paragraph. We supplied two characters—the starting and ending characters of the paragraph—as
parameters to the itemByRange method.
Inserting special characters
Because the ExtendScript Toolkit supports Unicode, you can simply enter Unicode characters in text
strings you send to InCopy. Alternately, you can use the JavaScript method of explicitly entering Unicode
characters by their glyph ID number: \unnnn (where nnnn is the Unicode code for the character). The
following script shows several ways to enter special characters (for the complete script, see
SpecialCharacters):

Text and Type Placing text and setting text-import preferences 32
var myDocument = app.documents.add();
var myStory = myDocument.stories.item(0);
//Entering special characters directly.
myStory.contents = "Registered trademark: ®\rCopyright: ©\rTrademark: ™\r";
//Entering special characters by their Unicode glyph ID value:
myStory.insertionPoints.item(-1).contents = "Not equal to: \u2260\rSquare root:
\u221A\rParagraph: \u00B6\r";
//Entering InCopy special characters by their enumerations:
myStory.insertionPoints.item(-1).contents = "Automatic page number marker:";
myStory.insertionPoints.item(-1).contents = SpecialCharacters.autoPageNumber;
myStory.insertionPoints.item(-1).contents = "\r";
myStory.insertionPoints.item(-1).contents = "Section symbol:";
myStory.insertionPoints.item(-1).contents = SpecialCharacters.sectionSymbol;
myStory.insertionPoints.item(-1).contents = "\r";
myStory.insertionPoints.item(-1).contents = "En dash:";
myStory.insertionPoints.item(-1).contents = SpecialCharacters.enDash;
myStory.insertionPoints.item(-1).contents = "\r";
The easiest way to find the Unicode ID for a character is to use the Glyphs palette in InCopy (choose Type >
Glyphs to display the palette)—move the cursor over a character in the palette, and InCopy will display its
Unicode value. You can find out more about Unicode by visiting http://www.unicode.org.
Placing text and setting text-import preferences
In addition to entering text strings, you can place text files created with word processors and text editors.
The following script shows you how to place a text file in the default story of a new document (for the
complete script, see PlaceTextFile):
//Places a text file in the default story of a new document.
var myDocument = app.documents.add();
//Parameters for InsertionPoint.place():
//File as File object,
//[ShowingOptions as Boolean = False]
//You'll have to fill in your own file path.
myDocument.stories.item(0).insertionPoints.item(0).place(File("/c/test.txt"), false);
To specify the import options for the specific type of text file you are placing, use the corresponding
import-preferences object. The following script shows how to set text-import preferences (for the
complete script, see TextImportPreferences). Comments in the script show the possible values for each
property.
//Sets the text import filter preferences.
with(app.textImportPreferences){
//Options for characterSet:
//TextImportCharacterSet.ansi
//TextImportCharacterSet.chineseBig5
//TextImportCharacterSet.gb18030
//TextImportCharacterSet.gb2312
//TextImportCharacterSet.ksc5601
//TextImportCharacterSet.macintoshCE
//TextImportCharacterSet.macintoshCyrillic
//TextImportCharacterSet.macintoshGreek
//TextImportCharacterSet.macintoshTurkish
//TextImportCharacterSet.recommendShiftJIS83pv
//TextImportCharacterSet.shiftJIS90ms
//TextImportCharacterSet.shiftJIS90pv
//TextImportCharacterSet.utf8
//TextImportCharacterSet.utf16
Text and Type Placing text and setting text-import preferences 33
//TextImportCharacterSet.windowsBaltic
//TextImportCharacterSet.windowsCE
//TextImportCharacterSet.windowsCyrillic
//TextImportCharacterSet.windowsEE
//TextImportCharacterSet.windowsGreek
//TextImportCharacterSet.windowsTurkish
characterSet = TextImportCharacterSet.utf16;
convertSpacesIntoTabs = true;
spacesIntoTabsCount = 3;
//The dictionary property can take any of the following
//language names (as strings):
//Bulgarian
//Catalan
//Croatian
//Czech
//Danish
//Dutch
//English: Canadian
//English: UK
//English: USA
//English: USA Legal
//English: USA Medical
//Estonian
//Finnish
//French
//French: Canadian
//German: Reformed
//German: Swiss
//German: Traditional
//Greek
//Hungarian
//Italian
//Latvian
//Lithuanian
//Neutral
//Norwegian: Bokmal
//Norwegian: Nynorsk
//Polish
//Portuguese
//Portuguese: Brazilian
//Romanian
//Russian
//Slovak
//Slovenian
//Spanish: Castilian
//Swedish
//Turkish
dictionary = "English: USA";
//platform options:
//ImportPlatform.macintosh
//ImportPlatform.pc
platform = ImportPlatform.macintosh;
stripReturnsBetweenLines = true;
stripReturnsBetweenParagraphs = true;
useTypographersQuotes = true;
}
The following script shows how to set tagged text-import preferences (for the complete script, see
TaggedTextImportPreferences):
Text and Type Placing text and setting text-import preferences 34
//Sets the tagged text import filter preferences.
with(app.taggedTextImportPreferences){
removeTextFormatting = false;
//styleConflict property can be:
//StyleConflict.publicationDefinition
//StyleConflict.tagFileDefinition
styleConflict = StyleConflict.publicationDefinition;
useTypographersQuotes = true;
}
The following script shows how to set Word and RTF import preferences (for the complete script, see
WordRTFImportPreferences):
//Sets the Word/RTF import filter preferences.
with(app.wordRTFImportPreferences){
//convertPageBreaks property can be:
//ConvertPageBreaks.columnBreak
//ConvertPageBreaks.none
//ConvertPageBreaks.pageBreak
convertPageBreaks = ConvertPageBreaks.none;
//convertTablesTo property can be:
//ConvertTablesOptions.unformattedTabbedText
//ConvertTablesOptions.unformattedTable
convertTablesTo = ConvertTablesOptions.unformattedTable;
importEndnotes = true;
importFootnotes = true;
importIndex = true;
importTOC = true;
importUnusedStyles = false;
preserveGraphics = false;
preserveLocalOverrides = false;
preserveTrackChanges = false;
removeFormatting = false;
//resolveCharacterSytleClash and resolveParagraphStyleClash properties can be:
//ResolveStyleClash.resolveClashAutoRename
//ResolveStyleClash.resolveClashUseExisting
//ResolveStyleClash.resolveClashUseNew
resolveCharacterStyleClash = ResolveStyleClash.resolveClashUseExisting;
resolveParagraphStyleClash = ResolveStyleClash.resolveClashUseExisting;
useTypographersQuotes = true;
}
The following script shows how to set Excel import preferences (for the complete script, see
ExcelImportPreferences):
Text and Type Exporting text and setting text-export preferences 35
//Sets the Excel import filter preferences.
with(app.excelImportPreferences){
//alignmentStyle property can be:
//AlignmentStyleOptions.centerAlign
//AlignmentStyleOptions.leftAlign
//AlignmentStyleOptions.rightAlign
//AlignmentStyleOptions.spreadsheet
alignmentStyle = AlignmentStyleOptions.spreadsheet;
decimalPlaces = 4;
preserveGraphics = false;
//Enter the range you want to import as "start cell:end cell".
rangeName = "A1:B16";
sheetIndex = 1;
//You'll have to enter a valid worksheet name.
sheetName = "pathpoints";
showHiddenCells = false;
//tableFormatting property can be:
//TableFormattingOptions.excelFormattedTable
//TableFormattingOptions.excelUnformattedTabbedText
//TableFormattingOptions.excelUnformattedTable
tableFormatting = TableFormattingOptions.excelFormattedTable;
useTypographersQuotes = true;
viewName = "";
}
Exporting text and setting text-export preferences
The following script shows how to export text from an InCopy document. You must use text or story
objects to export in text-file formats; you cannot export all the text in a document in one operation. (For
the complete script, see ExportTextFile.)
//Creates a story in an example document and then exports the text to a text file.
var myDocument = app.documents.add();
var myStory = myDocument.stories.item(0);
//Fill the story with placeholder text.
var myTextFrame = myStory.textContainers[0];
myTextFrame.contents = TextFrameContents.placeholderText;
//Text exportFile method parameters:
//Format as ExportFormat
//To As File
//[ShowingOptions As Boolean = False]
//
//Format parameter can be:
//ExportFormat.inCopyCSDocument
//ExportFormat.inCopyDocument
//ExportFormat.rtf
//ExportFormat.taggedText
//ExportFormat.textType
//
//Export the story as text. You'll have to fill in a valid file path on your system.
myStory.exportFile(ExportFormat.textType, File("/c/test.txt"));
The following example shows how to export a specific range of text. (We omitted the myGetBounds
function from this listing; see the ExportTextRange tutorial script.)
Text and Type Exporting text and setting text-export preferences 36
var myDocument = app.documents.add();
var myStory = myDocument.stories.item(0);
//Fill the story with placeholder text.
var myTextFrame = myStory.textContainers[0];
myTextFrame.contents = TextFrameContents.placeholderText;
var myStartCharacter = myStory.paragraphs.item(0).characters.item(0);
var myEndCharacter = myStory.paragraphs.item(1).characters.item(-1);
var myText = myStory.texts.itemByRange(myStartCharacter, myEndCharacter);
//Text exportFile method parameters:
//Format as ExportFormat
//To As File
//[ShowingOptions As Boolean = False]
//
//Format parameter can be:
//ExportFormat.inCopyCSDocument
//ExportFormat.inCopyDocument
//ExportFormat.rtf
//ExportFormat.taggedText
//ExportFormat.textType
//
//Export the text range. You must fill in a valid file path on your system.
myText.exportFile(ExportFormat.textType, File("/c/test.txt"));
To specify the export options for the specific type of text file you are exporting, use the corresponding
export-preferences object. The following script sets text-export preferences (for the complete script, see
TextExportPreferences):
//Sets the text export filter preferences.
with(app.textExportPreferences){
//Options for characterSet:
//TextExportCharacterSet.utf8
//TextExportCharacterSet.utf16
//TextExportCharacterSet.defaultPlatform
characterSet = TextExportCharacterSet.utf16;
//platform options:
//ImportPlatform.macintosh
//ImportPlatform.pc
platform = ImportPlatform.macintosh;
}
The following script sets tagged text-export preferences (for the complete script, see
TaggedTextExportPreferences):
//Sets the tagged text export filter preferences.
with(app.taggedTextExportPreferences){
//Options for characterSet:
//TagTextExportCharacterSet.ansi
//TagTextExportCharacterSet.ascii
//TagTextExportCharacterSet.gb18030
//TagTextExportCharacterSet.ksc5601
//TagTextExportCharacterSet.shiftJIS
//TagTextExportCharacterSet.utf8
//TagTextExportCharacterSet.utf16
characterSet = TagTextExportCharacterSet.utf16;
//tagForm options:
//TagTextForm.abbreviated
//TagTextForm.verbose
tagForm = TagTextForm.verbose;
}
Text and Type Exporting text and setting text-export preferences 37
Do not assume that you are limited to exporting text using existing export filters. Because JavaScript can
write text files to disk, you can have your script traverse the text in a document and export it in any order
you like, using whatever text-markup scheme you prefer. Here is a very simple example that shows how to
export InCopy text as HTML (for the complete script, see ExportHTML):
function myExportHTML(){
var myStory, myParagraph, myString, myTag, myStartTag, myEndTag,
myTextStyleRange, myTable;
//Use the myStyleToTagMapping array to set up your paragraph style to tag mapping.
var myStyleToTagMapping = new Array;
//For each style to tag mapping, add a new item to the array.
myStyleToTagMapping.push(["body_text", "p"]);
myStyleToTagMapping.push(["heading1", "h1"]);
myStyleToTagMapping.push(["heading2", "h2"]);
myStyleToTagMapping.push(["heading3", "h3"]);
//End of style to tag mapping.
if(app.documents.length !=0){
if(app.documents.item(0).stories.length != 0){
//Open a new text file.
var myTextFile = File.saveDialog("Save HTML As", undefined);
//If the user clicked the Cancel button, the result is null.
if(myTextFile != null){
//Open the file with write access.
myTextFile.open("w");
//Iterate through the stories.
for(var myCounter = 0; myCounter <
app.documents.item(0).stories.length; myCounter ++){
myStory = app.documents.item(0).stories.item(myCounter);
for(var myParagraphCounter = 0; myParagraphCounter <
myStory.paragraphs.length; myParagraphCounter ++){
myParagraph = myStory.paragraphs.item(myParagraphCounter);
if(myParagraph.tables.length == 0){
if(myParagraph.textStyleRanges.length == 1){
//If the paragraph is a simple paragraph--no tables,
//no local formatting--simply export the text
//of the pararaph with the appropriate tag.
myTag = myFindTag(myParagraph.appliedParagraphStyle.
name, myStyleToTagMapping);
//If the tag comes back empty,
//map it to the basic paragraph tag.
if(myTag == ""){
myTag = "p";
}
myStartTag = "<" + myTag + ">";
myEndTag = "</" + myTag + ">";
//If the paragraph is not the last paragraph in the
//story, omit the return character.
if(myParagraph.characters.item(-1).contents == "\r"){
myString = myParagraph.texts.itemByRange
(myParagraph.characters.item(0),
myParagraph.characters.item(-2)).contents;
}
else{
myString = myParagraph.contents;
}
//Write the paragraphs' text to the text file.
myTextFile.writeln(myStartTag + myString + myEndTag);
}
else{
//Handle text style range export by iterating
Text and Type Exporting text and setting text-export preferences 38
//through the text style ranges in the paragraph.
for(var myRangeCounter = 0; myRangeCounter <
myParagraph.textStyleRanges.length;
myRangeCounter ++){
myTextStyleRange = myParagraph.textStyleRanges.
item(myRangeCounter);
if(myTextStyleRange.characters.item(-1)=="\r"){
myString = myTextStyleRange.texts.itemByRange
(myTextStyleRange.characters.item(1),
myTextStyleRange.characters.item(-2)).
contents;
}
else{
myString = myTextStyleRange.contents;
}
switch(myTextStyleRange.fontStyle){
case "Bold":
myString = "<b>" + myString + "</b>"
break;
case "Italic":
myString = "<i>" + myString + "</i>"
break;
}
myTextFile.write(myString);
}
myTextFile.write("\r");
}
}
else{
//Handle table export (assumes that there is only
//one table per paragraph,and that the table is in the
//paragraph by itself).
myTable = myParagraph.tables.item(0);
myTextFile.writeln("<table border = 1>");
for(var myRowCounter = 0; myRowCounter <
myTable.rows.length; myRowCounter ++){
myTextFile.writeln("<tr>");
for(var myColumnCounter = 0; myColumnCounter <
myTable.columns.length; myColumnCounter++){
if(myRowCounter == 0){
myString = "<th>" + myTable.rows.item
(myRowCounter).cells.item(myColumnCounter).
texts.item(0).contents + "</th>";
}
else{
myString = "<td>" + myTable.rows.item
(myRowCounter).cells.item(myColumnCounter).
texts.item(0).contents + "</td>";
}
myTextFile.writeln(myString);
}
myTextFile.writeln("</tr>");
}
myTextFile.writeln("</table>");
}
}
}
//Close the text file.
myTextFile.close();
}

Text and Type Text objects 39
}
}
}
function myFindTag (myStyleName, myStyleToTagMapping){
var myTag = "";
var myDone = false;
var myCounter = 0;
do{
if(myStyleToTagMapping[myCounter][0] == myStyleName){
myTag = myStyleToTagMapping[myCounter][1];
break;
}
myCounter ++;
} while((myDone == false)||(myCounter < myStyleToTagMapping.length))
return myTag;
}
Text objects
The following diagram shows a view of InCopy’s text-object model. There are two main types of text
object: layout objects (text frames) and text-stream objects (stories, insertion points, characters, and words,
for example). The diagram uses the natural-language terms for the objects; when you write scripts, you will
use the corresponding terms from your scripting language:
For any text-stream object, the parent of the object is the story containing the object. To get a reference
to the text frame (or text frames) containing a given text object, use the parentTextFrames property.
For a text frame, the parent of the text frame usually is the page or spread containing the text frame. If the
text frame is inside a group or was pasted inside another page item, the parent of the text frame is the
story
insertion points
characters
words
lines
paragraphs
text columns
text style ranges
texts
text frame
insertion points
characters
words
lines
paragraphs
text columns
text style ranges
texts
text containers
document
spread, page, layer
notes
notes
Text and Type Text objects 40
containing page item. If the text frame was converted to an anchored frame, the parent of the text frame
is the character containing the anchored frame.
Selections
Usually, InCopy scripts act on a text selection. The following script shows how to determine the type of the
current selection. Unlike many other sample scripts, this script does not actually do anything; it simply
presents a selection filtering routine you can use in your own scripts. (For the complete script, see
TextSelection.)
//Shows how to determine whether the current selection is a text selection.
//Check to see if any documents are open.
if (app.documents.length != 0){
//If the selection contains more than one item, the selection
//is not text selected with the Type tool.
if (app.selection.length != 0){
//Evaluate the selection based on its type.
switch (app.selection[0].constructor.name){
case "InsertionPoint":
case "Character":
case "Word":
case "TextStyleRange":
case "Line":
case "Paragraph":
case "TextColumn":
case "Text":
case "Story":
//The object is a text object; display the text object type.
//A practical script would do something with the selection,
//or pass the selection on to a function.
alert("Selection is a " + app.selection[0].constructor.name);
//If the selection is inside a note, the parent of the selection
//will be a note object.
if(app.selection[0].parent.constructor.name == "Note"){
alert("Selection is inside a note.");
}
break;
default:
alert("The selected object is not a text object. Select some text and try
again.");
break;
}
}
else{
alert("Please select some text and try again.");
}
}
else{
alert("No documents are open.");
}
Moving and copying text
To move a text object to another location in text, use the move method. To copy the text, use the
duplicate method (which has exactly the same parameters as the move method). The following script
fragment shows how it works (for the complete script, see MoveText):
Text and Type Text objects 41
//Create an example document.
var myDocument = app.documents.add();
//Create a series of paragraphs in the default story.
var myStory = myDocument.stories.item(0);
myStory.contents = "WordA\rWordB\rWordC\rWordD\r";
//Move WordC before WordA.
myStory.paragraphs.item(2).move(LocationOptions.before, myStory.paragraphs.item(0));
//Move WordB after WordD (into the same paragraph).
myStory.paragraphs.item(2).move(LocationOptions.after,
myStory.paragraphs.item(-1).words.item(0));
//Note that moving text removes it from its original location.
When you want to transfer formatted text from one document to another, you also can use the move
method. Using the move or duplicate method is better than using copy and paste; to use copy and paste,
you must make the document visible and select the text you want to copy. Using move or duplicate is
much faster and more robust. The following script shows how to move text from one document to another
using move and duplicate (for the complete script, see MoveTextBetweenDocuments):
//Moves formatted text from one document to another.
var mySourceDocument = app.documents.add();
//Add text to the default story.
var mySourceStory = mySourceDocument.stories.item(0);
mySourceStory.contents = "This is the source text.\rThis text is not the source text.";
mySourceStory.paragraphs.item(0).pointSize = 24;
//Create a new document to move the text to.
var myTargetDocument = app.documents.add();
var myTargetStory = myTargetDocument.stories.item(0);
myTargetStory.contents = "This is the target text. Insert the source text after this
paragraph.\r";
mySourceStory.paragraphs.item(0).duplicate(LocationOptions.after,
myTargetStory.insertionPoints.item(-1));
One way to copy unformatted text from one text object to another is to get the contents property of a
text object, then use that string to set the contents property of another text object. The following script
shows how to do this (for the complete script, see CopyUnformattedText):
//Shows how to remove formatting from text as you move it
//to other locations in a document.
//Create an example document.
var myDocument = app.documents.add();
var myStory = myDocument.stories.item(0);
myStory.contents = "This is a formatted string.\rText pasted after this text will
retain its formatting.\r\rText moved to the following line will take on the formatting
of the insertion point.\rItalic: ";
//Apply formatting to the first paragraph.
myStory.paragraphs.item(0).fontStyle = "Bold";
//Apply formatting to the last paragraph.
myStory.paragraphs.item(-1).fontStyle = "Italic";
//Copy from one frame to another using a simple copy.
app.select(myStory.paragraphs.item(0).words.item(0));
app.copy();
app.select(myStory.paragraphs.item(1).insertionPoints.item(-1));
app.paste();
//Copy the unformatted string from the first word to the end of the story
//by getting and setting the contents of text objects. Note that this does
//not really copy the text; it replicates the text string from one text
//location to another.
myStory.insertionPoints.item(-1).contents =
myStory.paragraphs.item(0).words.item(0).contents;
Text and Type Text objects 42
Text objects and iteration
When your script moves, deletes, or adds text while iterating through a series of text objects, you can
easily end up with invalid text references. The following script demonstrates this problem (for the
complete script, see TextIterationWrong):
//Shows how *not* to iterate through text.
var myDocument = app.documents.add();
var myString = "Paragraph 1.\rDelete this paragraph.\rParagraph 2.\rParagraph
3.\rParagraph 4.\rParagraph 5.\rDelete this paragraph.\rParagraph 6.\r";
var myStory = myDocument.stories.item(0);
myStory.contents = myString;
//The following for loop will fail to format all of the paragraphs.
for(var myParagraphCounter = 0; myParagraphCounter < myStory.paragraphs.length;
myParagraphCounter ++){
if(myStory.paragraphs.item(myParagraphCounter).words.item(0).contents ==
"Delete"){
myStory.paragraphs.item(myParagraphCounter).remove();
}
else{
myStory.paragraphs.item(myParagraphCounter).pointSize = 24;
}
}
In the preceding example, some paragraphs are left unformatted. How does this happen? The loop in the
script iterates through the paragraphs from the first paragraph in the story to the last. As it does so, it
deletes paragraphs beginning with “Delete.” When the script deletes the second paragraph, the third
paragraph moves up to take its place. When the loop counter reaches 2, the script processes the paragraph
that had been the fourth paragraph in the story; the original third paragraph is now the second paragraph
and is skipped.
To avoid this problem, iterate backward through the text objects, as shown in the following script (from
the TextIterationRight tutorial script):
//Shows the correct way to iterate through text.
var myDocument = app.documents.add();
var myString = "Paragraph 1.\rDelete this paragraph.\rParagraph 2.\rParagraph
3.\rParagraph 4.\rParagraph 5.\rDelete this paragraph.\rParagraph 6.\r";
var myStory = myDocument.stories.item(0);
myStory.contents = myString;
//The following for loop will format all of the paragraphs by iterating
//backwards through the paragraphs in the story.
for(var myParagraphCounter = myStory.paragraphs.length-1; myParagraphCounter >= 0;
myParagraphCounter --){
if(myStory.paragraphs.item(myParagraphCounter).words.item(0).contents ==
"Delete"){
myStory.paragraphs.item(myParagraphCounter).remove();
}
else{
myStory.paragraphs.item(myParagraphCounter).pointSize = 24;
}
}
Text and Type Formatting text 43
Formatting text
In the previous sections of this chapter, we added text to a document and worked with stories and text
objects. In this section, we apply formatting to text. All the typesetting capabilities of InCopy are available
to scripting.
Setting text defaults
You can set text defaults for both the application and each document. Text defaults for the application
determine the text defaults in all new documents. Text defaults for a document set the formatting of all
new text objects in that document. (For the complete script, see TextDefaults.)
//Sets the text defaults of the application, which set the default formatting
//for all new documents. Existing text frames are unaffected.
//Set the measurement units to points.
app.viewPreferences.horizontalMeasurementUnits = MeasurementUnits.points;
app.viewPreferences.verticalMeasurementUnits = MeasurementUnits.points;
//To set the text formatting defaults for a document, replace "app"
//in the following lines with a reference to a document.
with(app.textDefaults){
alignToBaseline = true;
//Because the font might not be available, it's usually best
//to apply the font within a try...catch structure. Fill in the
//name of a font on your system.
try{
appliedFont = app.fonts.item("Minion Pro");
}
catch(e){}
//Because the font style might not be available, it's usually best
//to apply the font style within a try...catch structure.
try{
fontStyle = "Regular";
}
catch(e){}
//Because the language might not be available, it's usually best
//to apply the language within a try...catch structure.
try{
appliedLanguage = "English: USA";
}
catch(e){}
autoLeading = 100;
balanceRaggedLines = false;
baselineShift = 0;
capitalization = Capitalization.normal;
composer = "Adobe Paragraph Composer";
desiredGlyphScaling = 100;
desiredLetterSpacing = 0;
desiredWordSpacing = 100;
dropCapCharacters = 0;
if(dropCapCharacters != 0){
dropCapLines = 3;
//Assumes the application has a default character style named "myDropCap"
dropCapStyle = app.characterStyles.item("myDropCap");
}
fillColor = app.colors.item("Black");
fillTint = 100;
firstLineIndent = 14;
Text and Type Formatting text 44
gridAlignFirstLineOnly = false;
horizontalScale = 100;
hyphenateAfterFirst = 3;
hyphenateBeforeLast = 4;
hyphenateCapitalizedWords = false;
hyphenateLadderLimit = 1;
hyphenateWordsLongerThan = 5;
hyphenation = true;
hyphenationZone = 36;
hyphenWeight = 9;
justification = Justification.leftAlign;
keepAllLinesTogether = false;
keepLinesTogether = true;
keepFirstLines = 2;
keepLastLines = 2;
keepWithNext = 0;
kerningMethod = "Optical";
kerningValue = 0;
leading = 14;
leftIndent = 0;
ligatures = true;
maximumGlyphScaling = 100;
maximumLetterSpacing = 0;
maximumWordSpacing = 160;
minimumGlyphScaling = 100;
minimumLetterSpacing = 0;
minimumWordSpacing = 80;
noBreak = false;
otfContextualAlternate = true;
otfDiscretionaryLigature = false;
otfFigureStyle = OTFFigureStyle.proportionalOldstyle;
otfFraction = true;
otfHistorical = false;
otfOrdinal = false;
otfSlashedZero = false;
otfSwash = false;
otfTitling = false;
overprintFill = false;
overprintStroke = false;
pointSize = 11;
position = Position.normal;
rightIndent = 0;
ruleAbove = false;
if(ruleAbove == true){
ruleAboveColor = app.colors.item("Black");
ruleAboveGapColor = app.swatches.item("None");
ruleAboveGapOverprint = false;
ruleAboveGapTint = 100;
ruleAboveLeftIndent = 0;
ruleAboveLineWeight = .25;
ruleAboveOffset = 14;
ruleAboveOverprint = false;
ruleAboveRightIndent = 0;
ruleAboveTint = 100;
ruleAboveType = app.strokeStyles.item("Solid");
ruleAboveWidth = RuleWidth.columnWidth;
}
ruleBelow = false;
if(ruleBelow == true){
ruleBelowColor = app.colors.item("Black");
Text and Type Formatting text 45
ruleBelowGapColor = app.swatches.item("None");
ruleBelowGapOverprint = false;
ruleBelowGapTint = 100;
ruleBelowLeftIndent = 0;
ruleBelowLineWeight = .25;
ruleBelowOffset = 0;
ruleBelowOverprint = false;
ruleBelowRightIndent = 0;
ruleBelowTint = 100;
ruleBelowType = app.strokeStyles.item("Solid");
ruleBelowWidth = RuleWidth.columnWidth;
}
singleWordJustification = SingleWordJustification.leftAlign;
skew = 0;
spaceAfter = 0;
spaceBefore = 0;
startParagraph = StartParagraph.anywhere;
strikeThru = false;
if(strikeThru == true){
strikeThroughColor = app.colors.item("Black");
strikeThroughGapColor = app.swatches.item("None");
strikeThroughGapOverprint = false;
strikeThroughGapTint = 100;
strikeThroughOffset = 3;
strikeThroughOverprint = false;
strikeThroughTint = 100;
strikeThroughType = app.strokeStyles.item("Solid");
strikeThroughWeight = .25;
}
strokeColor = app.swatches.item("None");
strokeTint = 100;
strokeWeight = 0;
tracking = 0;
underline = false;
if(underline == true){
underlineColor = app.colors.item("Black");
underlineGapColor = app.swatches.item("None");
underlineGapOverprint = false;
underlineGapTint = 100;
underlineOffset = 3;
underlineOverprint = false;
underlineTint = 100;
underlineType = app.strokeStyles.item("Solid");
underlineWeight = .25
}
verticalScale = 100;
}
Fonts
The fonts collection of an InCopy application object contains all fonts accessible to InCopy. By contrast, the
fonts collection of a document contains only those fonts used in the document. The fonts collection of a
document also contains any missing fonts—fonts used in the document that are not accessible to InCopy.
The following script shows the difference between application fonts and document fonts (for the
complete script, see FontCollections):
Text and Type Formatting text 46
//Shows the difference between the fonts collection of the application
//and the fonts collection of a document.
var myApplicationFonts = app.fonts;
var myDocument = app.documents.add();
var myStory = myDocument.stories.item(0);
var myDocumentFonts = myDocument.fonts;
var myFontNames = myApplicationFonts.everyItem().name;
if(myDocumentFonts.length > 0){
var myDocumentFontNames = myDocumentFonts.everyItem().name;
var myString = "Document Fonts:\r";
for(var myCounter = 0;myCounter<myDocumentFontNames.length; myCounter++){
myString += myDocumentFontNames[myCounter] + "\r";
}
}
myString += "\rApplication Fonts:\r";
for(var myCounter = 0;myCounter<myFontNames.length; myCounter++){
myString += myFontNames[myCounter] + "\r";
}
myStory.contents = myString;
NOTE: Font names typically are of the form familyName<tab>fontStyle, where familyName is the name
of the font family, <tab> is a tab character, and fontStyle is the name of the font style. For example:
"Adobe Caslon Pro<tab>Semibold Italic"
Applying a font
To apply a local font change to a range of text, use the appliedFont property, as shown in the following
script fragment (from the ApplyFont tutorial script):
//Given a font name "myFontName" and a text object "myText"
myText.appliedFont = app.fonts.item(myFontName);
You also can apply a font by specifying the font-family name and font style, as shown in the following
script fragment:
myText.appliedFont = app.fonts.item("Adobe Caslon Pro");
myText.fontStyle = "Semibold Italic";
Changing text properties
Text objects in InCopy have literally dozens of properties corresponding to their formatting attributes.
Even a single insertion point features properties that affect the formatting of text—up to and including
properties of the paragraph containing the insertion point. The SetTextProperties tutorial script shows
how to set every property of a text object. A fragment of the script follows:
Text and Type Formatting text 47
//Shows how to set all read/write properties of a text object.
var myDocument = app.documents.add();
var myStory = myDocument.stories.item(0);
myStory.contents = "x";
var myTextObject = myStory.characters.item(0);
myTextObject.alignToBaseline = false;
myTextObject.appliedCharacterStyle = myDocument.characterStyles.item("[None]");
myTextObject.appliedFont = app.fonts.item("Minion ProRegular");
myTextObject.appliedLanguage = app.languagesWithVendors.item("English: USA");
myTextObject.appliedNumberingList = myDocument.numberingLists.item("[Default]");
myTextObject.appliedParagraphStyle = myDocument.paragraphStyles.item("[No Paragraph
Style]");
myTextObject.autoLeading = 120;
myTextObject.balanceRaggedLines = BalanceLinesStyle.noBalancing;
myTextObject.baselineShift = 0;
myTextObject.bulletsAlignment = ListAlignment.leftAlign;
myTextObject.bulletsAndNumberingListType = ListType.noList;
myTextObject.bulletsCharacterStyle = myDocument.characterStyles.item("[None]");
myTextObject.bulletsTextAfter = "^t";
myTextObject.capitalization = Capitalization.normal;
myTextObject.composer = "Adobe Paragraph Composer";
myTextObject.desiredGlyphScaling = 100;
myTextObject.desiredLetterSpacing = 0;
myTextObject.desiredWordSpacing = 100;
myTextObject.dropCapCharacters = 0;
myTextObject.dropCapLines = 0;
myTextObject.dropCapStyle = myDocument.characterStyles.item("[None]");
myTextObject.dropcapDetail = 0;
//More text properties in the tutorial script.
Changing text color
You can apply colors to the fill and stroke of text characters, as shown in the following script fragment
(from the TextColors tutorial script):
//Given two colors "myColorA" and "myColorB"...
var myStory = myDocument.stories.item(0);
//Enter text in the text frame.
myStory.contents = "Text\rColor"
var myText = myStory.paragraphs.item(0)
myText.pointSize = 72;
myText.justification = Justification.centerAlign;
//Apply a color to the fill of the text.
myText.fillColor = myColorA;
//Use the itemByRange method to apply the color to the stroke of the text.
myText.strokeColor = myColorB;
var myText = myStory.paragraphs.item(1)
myText.strokeWeight = 3;
myText.pointSize = 144;
myText.justification = Justification.centerAlign;
myText.fillColor = myColorB;
myText.strokeColor = myColorA;
myText.strokeWeight = 3;
Text and Type Formatting text 48
Creating and applying styles
While you can use scripting to apply local formatting—as in some of the examples earlier in this
chapter—you probably will want to use character and paragraph styles to format your text. Using styles
creates a link between the formatted text and the style, which makes it easier to redefine the style, collect
the text formatted with a given style, or find and/or change the text. Paragraph and character styles are
key to text-formatting productivity and should be a central part of any script that applies text formatting.
The following script fragment shows how to create and apply paragraph and character styles (for the
complete script, see CreateStyles):
//Shows how to create and apply a paragraph style and a character style.
var myParagraphStyle, myCharacterStyle, myColor, myName;
//Create an example document.
var myDocument = app.documents.add();
//Create a color for use by one of the paragraph styles we'll create.
try{
myColor = myDocument.colors.item("Red");
//If the color does not exist, trying to get its name generates an error.
myName = myColor.name;
}
catch (myError){
//The color style did not exist, so create it.
myColor = myDocument.colors.add({name:"Red", model:ColorModel.process,
colorValue:[0, 100, 100, 0]});
}
var myStory = myDocument.stories.item(0);
//Fill the text frame with placeholder text.
myStory.textContainers[0].contents = "Normal text. Text with a character style applied
to it. More normal text.";
//Create a character style named "myCharacterStyle" if
//no style by that name already exists.
try{
myCharacterStyle = myDocument.characterStyles.item("myCharacterStyle");
//If the style does not exist, trying to get its name generates an error.
myName = myCharacterStyle.name;
}
catch (myError){
//The style did not exist, so create it.
myCharacterStyle = myDocument.characterStyles.add({name:"myCharacterStyle"});
}
//At this point, the variable myCharacterStyle contains a reference to a
//character-style object, which you can now use to specify formatting.
myCharacterStyle.fillColor = myColor;
//Create a paragraph style named "myParagraphStyle" if
//no style by that name already exists.
try{
myParagraphStyle = myDocument.paragraphStyles.item("myParagraphStyle");
Text and Type Formatting text 49
//If the paragraph style does not exist, trying to get its name generates
//an error.
myName = myParagraphStyle.name;
}
catch (myError){
//The paragraph style did not exist, so create it.
myParagraphStyle = myDocument.paragraphStyles.add({name:"myParagraphStyle"});
}
//At this point, the variable myParagraphStyle contains a reference to a
//paragraph-style object, which you can now use to specify formatting.
myStory.texts.item(0).applyParagraphStyle(myParagraphStyle, true);
var myStartCharacter = myStory.characters.item(13);
var myEndCharacter = myStory.characters.item(54);
myStory.texts.itemByRange(myStartCharacter,
myEndCharacter).applyCharacterStyle(myCharacterStyle);
Why use the applyParagraphStyle method instead of setting the appliedParagraphStyle property of
the text object? The method gives the ability to override existing formatting; setting the property to a style
retains local formatting.
Why check for the existence of a style when creating a new document? It always is possible that the style
exists as an application default style. If it does, trying to create a new style with the same name results in an
error.
Nested styles apply character-style formatting to a paragraph according to a pattern. The following script
fragment shows how to create a paragraph style containing nested styles (for the complete script, see
NestedStyles):
//At this point, the variable myParagraphStyle contains a reference to a
//paragraph-style object, which you can now use to specify formatting.var myNestedStyle
= myParagraphStyle.nestedStyles.add({appliedCharacterStyle:myCharacterStyle,
delimiter:".", inclusive:true, repetition:1});
var myStartCharacter = myStory.characters.item(0);
var myEndCharacter = myStory.characters.item(-1);
//Use the itemByRange method to apply the paragraph to all text in the
//story. (Note the story object does not have the applyStyle method.)
myStory.texts.itemByRange(myStartCharacter,
myEndCharacter).applyParagraphStyle(myParagraphStyle, true);
Deleting a style
When you delete a style using the user interface, you can choose how you want to format any text tagged
with that style. InCopy scripting works the same way, as shown in the following script fragment (from the
RemoveStyle tutorial script):
//Remove the paragraph style myParagraphStyleA and replace with myParagraphStyleB.
myParagraphStyleA.remove(myDocument.paragraphStyles.item("myParagraphStyleB"));
Importing paragraph and character styles
You can import paragraph and character styles from other InCopy documents. The following script
fragment shows how (for the complete script, see ImportTextStyles):

Text and Type Finding and changing text 50
//Import the styles from the saved document.
//importStyles parameters:
//Format as ImportFormat enumeration. Options for text styles are:
// ImportFormat.paragraphStylesFormat
// ImportFormat.characterStylesFormat
// ImportFormat.textStylesFormat
//From as File
//GlobalStrategy as GlobalClashResolutionStrategy enumeration. Options are:
// GlobalClashResolutionStrategy.doNotLoadTheStyle
// GlobalClashResolutionStrategy.loadAllWithOverwrite
// GlobalClashResolutionStrategy.loadAllWithRename
myDocument.importStyles(ImportFormat.textStylesFormat, File(myFilePath),
GlobalClashResolutionStrategy.loadAllWithOverwrite);
Finding and changing text
The find/change feature is one of the most powerful InCopy tools for working with text. It is fully
supported by scripting, and scripts can use find/change to go far beyond what can be done using the
InCopy user interface. InCopy has three ways of searching for text:
You can find text and text formatting and change it to other text and/or text formatting. This type of
find and change operation uses the findTextPreferences and changeTextPreferences objects to
specify parameters for the findText and changeText methods.
You can find text using regular expressions, or “grep.” This type of find and change operation uses the
findGrepPreferences and changeGrepPreferences objects to specify parameters for the findGrep
and changeGrep methods.
You can find specific glyphs (and their formatting) and replace them with other glyphs and formatting.
This type of find and change operation uses thefindGlyphPreferences and
changeGlyphPreferences objects to specify parameters for the findGlyph and changeGlyph
methods.
All find and change methods take a single optional parameter, reverseOrder, which specifies the order in
which the results of the search are returned. If you are processing the results of a find or change operation
in a way that adds or removes text from a story, you might face the problem of invalid text references, as
discussed in “Text objects and iteration” on page 42. In this case, you can either construct your loops to
iterate backward through the collection of returned text objects, or you can have the search operation
return the results in reverse order and then iterate through the collection normally.
Find/change preferences
Before searching for text, you probably will want to clear find and change preferences, to make sure the
settings from previous searches have no effect on your search. You also need to set a few find and change
preferences to specify the text, formatting, regular expression, or glyph you want to find and/or change. A
typical find/change operation involves the following steps:
1. Clear the find/change preferences. Depending on the type of find/change operation, this can take one
of the following three forms:
Text and Type Finding and changing text 51
//find/change text preferences
app.findTextPreferences = NothingEnum.nothing;
app.changeTextPreferences = NothingEnum.nothing;
//find/change grep preferences
app.findGrepPreferences = NothingEnum.nothing;
app.changeGrepPreferences = NothingEnum.nothing;
//find/change glyph preferences
app.findGlyphPreferences = NothingEnum.nothing;
app.changeGlyphPreferences = NothingEnum.nothing;
2. Set up find/change parameters.
3. Execute the find/change operation.
4. Clear find/change preferences again.
Finding text
The following script fragment shows how to find a specified string of text. While the script fragment
searches the entire document, you also can search stories, text frames, paragraphs, text columns, or any
other text object. The findText method and its parameters are the same for all text objects. (For the
complete script, see FindText.)
//Clear the find/change preferences.
app.findTextPreferences = NothingEnum.nothing;
app.changeTextPreferences = NothingEnum.nothing;
//Search the document for the string "Text".
app.findTextPreferences.findWhat = "text";
//Set the find options.
app.findChangeTextOptions.caseSensitive = false;
app.findChangeTextOptions.includeFootnotes = false;
app.findChangeTextOptions.includeHiddenLayers = false;
app.findChangeTextOptions.includeLockedLayersForFind = false;
app.findChangeTextOptions.includeLockedStoriesForFind = false;
app.findChangeTextOptions.includeMasterPages = false;
app.findChangeTextOptions.wholeWord = false;
var myFoundItems = app.documents.item(0).findText();
alert("Found " + myFoundItems.length + " instances of the search string.");
The following script fragment shows how to find a specified string of text and replace it with a different
string (for the complete script, see ChangeText):
Text and Type Finding and changing text 52
//Clear the find/change preferences.
app.findTextPreferences = NothingEnum.nothing;
app.changeTextPreferences = NothingEnum.nothing;
//Set the find options.
app.findChangeTextOptions.caseSensitive = false;
app.findChangeTextOptions.includeFootnotes = false;
app.findChangeTextOptions.includeHiddenLayers = false;
app.findChangeTextOptions.includeLockedLayersForFind = false;
app.findChangeTextOptions.includeLockedStoriesForFind = false;
app.findChangeTextOptions.includeMasterPages = false;
app.findChangeTextOptions.wholeWord = false;
//Search the document for the string "copy" and change it to "text".
app.findTextPreferences.findWhat = "copy";
app.changeTextPreferences.changeTo = "text";
app.documents.item(0).changeText();
//Clear the find/change preferences after the search.
app.findTextPreferences = NothingEnum.nothing;
app.changeTextPreferences = NothingEnum.nothing;
Finding and changing formatting
To find and change text formatting, you set other properties of the findTextPreferences and
changeTextPreferences objects, as shown in the following script fragment (from the
FindChangeFormatting tutorial script):
//Clear the find/change preferences.
app.findTextPreferences = NothingEnum.nothing;
app.changeTextPreferences = NothingEnum.nothing;
//Set the find options.
app.findChangeTextOptions.caseSensitive = false;
app.findChangeTextOptions.includeFootnotes = false;
app.findChangeTextOptions.includeHiddenLayers = false;
app.findChangeTextOptions.includeLockedLayersForFind = false;
app.findChangeTextOptions.includeLockedStoriesForFind = false;
app.findChangeTextOptions.includeMasterPages = false;
app.findChangeTextOptions.wholeWord = false;
//Search the document for the 24 point text and change it to 10 point text.
app.findTextPreferences.pointSize = 24;
app.changeTextPreferences.pointSize = 10;
app.documents.item(0).changeText();
//Clear the find/change preferences after the search.
app.findTextPreferences = NothingEnum.nothing;
app.changeTextPreferences = NothingEnum.nothing;
You also can search for a string of text and apply formatting, as shown in the following script fragment
(from the FindChangeStringFormatting tutorial script):
Text and Type Finding and changing text 53
//Clear the find/change preferences.
app.findTextPreferences = NothingEnum.nothing;
app.changeTextPreferences = NothingEnum.nothing;
//Set the find options.
app.findChangeTextOptions.caseSensitive = false;
app.findChangeTextOptions.includeFootnotes = false;
app.findChangeTextOptions.includeHiddenLayers = false;
app.findChangeTextOptions.includeLockedLayersForFind = false;
app.findChangeTextOptions.includeLockedStoriesForFind = false;
app.findChangeTextOptions.includeMasterPages = false;
app.findChangeTextOptions.wholeWord = false;
app.findTextPreferences.findWhat = "WIDGET^9^9^9^9";
//The following line will only work if your default font
//has a font style named "Bold" if not, change the text to
//a font style used by your default font.
app.changeTextPreferences.fontStyle = "Bold";
//Search the document. In this example, we'll use the
//InCopy search metacharacter "^9" to find any digit.
var myFoundItems = app.documents.item(0).changeText();
alert("Changed " + myFoundItems.length + " instances of the search string.");
//Clear the find/change preferences after the search.
app.findTextPreferences = NothingEnum.nothing;
app.changeTextPreferences = NothingEnum.nothing;
Using grep
InCopy supports regular expression find/change through the findGrep and changeGrep methods.
Regular-expression find and change also can find text with a specified format or replace text formatting
with formatting specified in the properties of the changeGrepPreferences object. The following script
fragment shows how to use these methods and the related preferences objects (for the complete script,
see FindGrep):
//Clear the find/change preferences.
app.findGrepPreferences = NothingEnum.nothing;
app.changeGrepPreferences = NothingEnum.nothing;
//Set the find options.
app.findChangeGrepOptions.includeFootnotes = false;
app.findChangeGrepOptions.includeHiddenLayers = false;
app.findChangeGrepOptions.includeLockedLayersForFind = false;
app.findChangeGrepOptions.includeLockedStoriesForFind = false;
app.findChangeGrepOptions.includeMasterPages = false;
//Regular expression for finding an email address.
app.findGrepPreferences.findWhat = "(?i)[A-Z]*?@[A-Z]*?[.]...";
//Apply the change to 24-point text only.
app.findGrepPreferences.pointSize = 24;
app.changeGrepPreferences.underline = true;
app.documents.item(0).changeGrep();
//Clear the find/change preferences after the search.
app.findGrepPreferences = NothingEnum.nothing;
app.changeGrepPreferences = NothingEnum.nothing;
NOTE: The findChangeGrepOptions object lacks two properties of the findChangeTextOptions object:
wholeWord and caseSensitive. This is because you can set these options using the regular expression
string itself. Use (?i) to turn case sensitivity on and (?-i) to turn case sensitivity off. Use \> to match the
beginning of a word and \< to match the end of a word, or use \b to match a word boundary.
One handy use for grep find/change is to convert text markup (that is, some form of tagging plain text
with formatting instructions) into InCopy formatted text. PageMaker paragraph tags (which are not the
Text and Type Finding and changing text 54
same as PageMaker tagged text-format files) are an example of a simplified text-markup scheme. In a text
file marked up using this scheme, paragraph style names appear at the start of a paragraph, as shown in
these examples:
<heading1>This is a heading.
<body_text>This is body text.
We can create a script that uses grep find in conjunction with text find/change operations to apply
formatting to the text and remove the markup tags, as shown in the following script fragment (from the
ReadPMTags tutorial script):
function myReadPMTags(myStory){
var myName, myString, myStyle, myStyleName;
var myDocument = app.documents.item(0);
//Reset the findGrepPreferences to ensure that previous settings
//do not affect the search.
app.findGrepPreferences = NothingEnum.nothing;
app.changeGrepPreferences = NothingEnum.nothing;
//Find the tags (since this is a JavaScript string, backslashes must be escaped).
app.findGrepPreferences.findWhat = "(?i)^<\\s*\\w+\\s*>";
var myFoundItems = myStory.findGrep();
if(myFoundItems.length != 0){
var myFoundTags = new Array;
for(var myCounter = 0; myCounter<myFoundItems.length; myCounter++){
myFoundTags.push(myFoundItems[myCounter].contents);
}
myFoundTags = myRemoveDuplicates(myFoundTags);
//At this point, we have a list of tags to search for.
for(myCounter = 0; myCounter < myFoundTags.length; myCounter++){
myString = myFoundTags[myCounter];
//Find the tag using findWhat.
app.findTextPreferences.findWhat = myString;
//Extract the style name from the tag.
myStyleName = myString.substring(1, myString.length-1);
//Create the style if it does not already exist.
try{
myStyle = myDocument.paragraphStyles.item(myStyleName);
myName = myStyle.name;
}
catch (myError){
myStyle = myDocument.paragraphStyles.add({name:myStyleName});
}
//Apply the style to each instance of the tag.
app.changeTextPreferences.appliedParagraphStyle = myStyle;
myStory.changeText();
//Reset the changeTextPreferences.
app.changeTextPreferences = NothingEnum.nothing;
//Set the changeTo to an empty string.
app.changeTextPreferences.changeTo = "";
//Search to remove the tags.
myStory.changeText();
//Reset the find/change preferences again.
app.changeTextPreferences = NothingEnum.nothing;
}
}
//Reset the findGrepPreferences.
app.findGrepPreferences = NothingEnum.nothing;
}
Text and Type Tables 55
function myRemoveDuplicates(myArray){
//Semi-clever method of removing duplicate array items; much faster
//than comparing every item to every other item!
var myNewArray = new Array;
myArray = myArray.sort();
myNewArray.push(myArray[0]);
if(myArray.length > 1){
for(var myCounter = 1; myCounter < myArray.length; myCounter ++){
if(myArray[myCounter] != myNewArray[myNewArray.length -1]){
myNewArray.push(myArray[myCounter]);
}
}
}
return myNewArray;
}
Using glyph search
You can find and change individual characters in a specific font using the findGlyph and changeGlyph
methods and the associated findGlyphPreferences and changeGlyphPreferences objects. The
following scripts fragment shows how to find and change a glyph in a sample document (for the complete
script, see FindChangeGlyphs):
//Clear glyph search preferences.
app.findGlyphPreferences = NothingEnum.nothing;
app.changeGlyphPreferences = NothingEnum.nothing;
var myDocument = app.documents.item(0);
//You must provide a font that is used in the document for the
//appliedFont property of the findGlyphPreferences object.
app.findGlyphPreferences.appliedFont = app.fonts.item("Minion ProRegular");
//Provide the glyph ID, not the glyph Unicode value.
app.findGlyphPreferences.glyphID = 500;
//The appliedFont of the changeGlyphPreferences object can be
//any font available to the application.
app.changeGlyphPreferences.appliedFont = app.fonts.item("Times New RomanRegular");
app.changeGlyphPreferences.glyphID = 374;
myDocument.changeGlyph();
//Clear glyph search preferences.
app.findGlyphPreferences = NothingEnum.nothing;
app.changeGlyphPreferences = NothingEnum.nothing;
Tables
Tables can be created from existing text using the convertTextToTable method, or an empty table can
be created at any insertion point in a story. The following script fragment shows three different ways to
create a table (for the complete script, see MakeTable):
Text and Type Tables 56
var myStory = myDocument.stories.item(0);
var myStartCharacter = myStory.paragraphs.item(6).characters.item(0);
var myEndCharacter = myStory.paragraphs.item(6).characters.item(-2);
var myText = myStory.texts.itemByRange(myStartCharacter, myEndCharacter);
//The convertToTable method takes three parameters:
//[ColumnSeparator as string]
//[RowSeparator as string]
//[NumberOfColumns as integer] (only used if the ColumnSeparator
//and RowSeparator values are the same)
//In the last paragraph in the story, columns are separated by commas
//and rows are separated by semicolons, so we provide those characters
//to the method as parameters.
var myTable = myText.convertToTable(",",";");
var myStartCharacter = myStory.paragraphs.item(1).characters.item(0);
var myEndCharacter = myStory.paragraphs.item(4).characters.item(-2);
var myText = myStory.texts.itemByRange(myStartCharacter, myEndCharacter);
//In the second through the fifth paragraphs, colums are separated by
//tabs and rows are separated by returns. These are the default delimiter
//parameters, so we don't need to provide them to the method.
var myTable = myText.convertToTable();
//You can also explicitly add a table--you don't have to convert text to a table.
var myTable = myStory.insertionPoints.item(-1).tables.add();
myTable.columnCount = 3;
myTable.bodyRowCount = 3;
The following script fragment shows how to merge table cells (for the complete script, see
MergeTableCells):
var myDocument = app.documents.add();
var myStory = myDocument.stories.item(0);
var myString = "Table\r";
myStory.contents = myString;
var myTable = myStory.insertionPoints.item(-1).tables.add();
myTable.columnCount = 4;
myTable.bodyRowCount = 4;
//Merge all cells in the first column.
myTable.cells.item(0).merge(myTable.columns.item(0).cells.item(-1));
//Convert column 2 into 2 cells (rather than 4).
myTable.columns.item(1).cells.item(-1).merge(myTable.columns.item(1).cells.item(-2));
myTable.columns.item(1).cells.item(0).merge(myTable.columns.item(1).cells.item(1));
//Merge the last two cells in row 1.
myTable.rows.item(0).cells.item(-2).merge(myTable.rows.item(0).cells.item(-1));
//Merge the last two cells in row 3.
myTable.rows.item(2).cells.item(-2).merge(myTable.rows.item(2).cells.item(-1));
The following script fragment shows how to split table cells (for the complete script, see SplitTableCells):
myTable.cells.item(0).split(HorizontalOrVertical.horizontal);
myTable.columns.item(0).split(HorizontalOrVertical.vertical);
myTable.cells.item(0).split(HorizontalOrVertical.vertical);
myTable.rows.item(-1).split(HorizontalOrVertical.horizontal);
myTable.cells.item(-1).split(HorizontalOrVertical.vertical);
for(myRowCounter = 0; myRowCounter < myTable.rows.length; myRowCounter ++){
myRow = myTable.rows.item(myRowCounter);
for(myCellCounter = 0; myCellCounter < myRow.cells.length; myCellCounter ++){
myString = "Row: " + myRowCounter + " Cell: " + myCellCounter;
myRow.cells.item(myCellCounter).contents = myString;
}
}
Text and Type Tables 57
The following script fragment shows how to create header and footer rows in a table (for the complete
script, see HeaderAndFooterRows):
var myTable = app.documents.item(0).stories.item(0).tables.item(0);
//Convert the first row to a header row.
myTable.rows.item(0).rowType = RowTypes.headerRow;
//Convert the last row to a footer row.
myTable.rows.item(-1).rowType = RowTypes.footerRow;
The following script fragment shows how to apply formatting to a table (for the complete script, see
TableFormatting):
var myTable = myDocument.stories.item(0).tables.item(0);
//Convert the first row to a header row.
myTable.rows.item(0).rowType = RowTypes.headerRow;
//Use a reference to a swatch, rather than to a color.
myTable.rows.item(0).fillColor = myDocument.swatches.item("DGC1_446b");
myTable.rows.item(0).fillTint = 40;
myTable.rows.item(1).fillColor = myDocument.swatches.item("DGC1_446a");
myTable.rows.item(1).fillTint = 40;
myTable.rows.item(2).fillColor = myDocument.swatches.item("DGC1_446a");
myTable.rows.item(2).fillTint = 20;
myTable.rows.item(3).fillColor = myDocument.swatches.item("DGC1_446a");
myTable.rows.item(3).fillTint = 40;
//Use everyItem to set the formatting of multiple cells at once.
myTable.cells.everyItem().topEdgeStrokeColor = myDocument.swatches.item("DGC1_446b");
myTable.cells.everyItem().topEdgeStrokeWeight = 1;
myTable.cells.everyItem().bottomEdgeStrokeColor =
myDocument.swatches.item("DGC1_446b");
myTable.cells.everyItem().bottomEdgeStrokeWeight = 1;
//When you set a cell stroke to a swatch, make certain you also set the
//stroke weight.
myTable.cells.everyItem().leftEdgeStrokeColor = myDocument.swatches.item("None");
myTable.cells.everyItem().leftEdgeStrokeWeight = 0;
myTable.cells.everyItem().rightEdgeStrokeColor = myDocument.swatches.item("None");
myTable.cells.everyItem().rightEdgeStrokeWeight = 0;
The following script fragment shows how to add alternating row formatting to a table (for the complete
script, see AlternatingRows):
//Given a table "myTable" containing at least four rows and a document
//"myDocument" containing the colors "DGC1_446a" and "DGC1_446b"...
//Convert the first row to a header row.
myTable.rows.item(0).rowType = RowTypes.headerRow;
//Applly alternating fills to the table.
myTable.alternatingFills = AlternatingFillsTypes.alternatingRows;
myTable.startRowFillColor = myDocument.swatches.item("DGC1_446a");
myTable.startRowFillTint = 60;
myTable.endRowFillColor = myDocument.swatches.item("DGC1_446b");
myTable.endRowFillTint = 50;
The following script fragment shows how to process the selection when text or table cells are selected. In
this example, the script displays an alert for each selection condition, but a real production script would
then do something with the selected item(s). (For the complete script, see TableSelection.)
Text and Type Autocorrect 58
if(app.documents.length != 0){
if(app.selection.length != 0){
switch(app.selection[0].constructor.name){
//When a row, a column, or a range of cells is selected,
//the type returned is "Cell"
case "Cell":
alert("A cell is selected.");
break;
case "Table":
alert("A table is selected.");
break;
case "InsertionPoint":
case "Character":
case "Word":
case "TextStyleRange":
case "Line":
case "Paragraph":
case "TextColumn":
case "Text":
if(app.selection[0].parent.constructor.name == "Cell"){
alert("The selection is inside a table cell.");
}
else{
alert("The selection is not inside a table.");
}
break;
default:
alert("The selection is not inside a table.");
break;
}
}
}
Autocorrect
The autocorrect feature can correct text as you type. The following script shows how to use it (for the
complete script, see Autocorrect):
//The autocorrect preferences object turns the
//autocorrect feature on or off.
app.autoCorrectPreferences.autoCorrect = true;
app.autoCorrectPreferences.autoCorrectCapitalizationErrors = true;
//Add a word pair to the autocorrect list. Each AutoCorrectTable is linked
//to a specific language.
var myAutoCorrectTable = app.autoCorrectTables.item("English: USA");
//To safely add a word pair to the auto correct table, get the current
//word pair list, then add the new word pair to that array, and then
//set the autocorrect word pair list to the array.
var myWordPairList = myAutoCorrectTable.autoCorrectWordPairList;
//Add a new word pair to the array.
myWordPairList.push(["paragarph", "paragraph"]);
//Update the word pair list.
myAutoCorrectTable.autoCorrectWordPairList = myWordPairList;
//To clear all autocorrect word pairs in the current dictionary:
//myAutoCorrectTable.autoCorrectWordPairList = [[]];
Text and Type Footnotes 59
Footnotes
The following script fragment shows how to add footnotes to a story (for the complete script, see
Footnotes):
var myWord, myFootnote;
var myDocument = app.documents.item(0);
var myStory = myDocument.stories.item(0);
//Add four footnotes at random locations in the story.
for(myCounter = 0; myCounter < 4; myCounter ++){
myWord = myStory.words.item(myGetRandom(0, myStory.words.length));
var myFootnote = myWord.insertionPoints.item(-1).footnotes.add();
//Note: when you create a footnote, it contains text--the footnote
//marker and the separator text (if any). If you try to set the text of
//the footnote by setting the footnote contents, you will delete the
//marker. Instead, append the footnote text, as shown below.
myFootnote.insertionPoints.item(-1).contents = "This is a footnote.";
//This function gets a random number in the range myStart to myEnd.
function myGetRandom(myStart, myEnd){
var myRange = myEnd - myStart;
return myStart + Math.floor(Math.random()*myRange);
}
60
5User Interfaces
JavaScript can create dialog boxes for simple yes/no questions and text entry, but you probably will need
to create more complex dialog boxes for your scripts. InCopy scripting can add dialog boxes and can
populate them with common user-interface controls, like pop-up lists, text-entry fields, and numeric-entry
fields. If you want your script to collect and act on information entered by you or any other user of your
script, use the dialog object.
This chapter shows how to work with InCopy dialog scripting. The sample scripts in this chapter are
presented in order of complexity, starting with very simple scripts and building toward more complex
operations.
NOTE: InCopy scripts written in JavaScript also can include user interfaces created using the Adobe ScriptUI
component. This chapter includes some ScriptUI scripting tutorials; for more information, see Adobe
Creative Suite® 3 JavaScript Tools Guide.
We assume that you have already read Chapter 2, “Getting Started” and know how to create, install, and
run a script.
Dialog-box overview
An InCopy dialog box is an object like any other InCopy scripting object. The dialog box can contain
several different types of elements (known collectively as “widgets”), as shown in the following figure:
Chapter Update Status
CS6 Unchanged
dialog dialog column
border panel
checkbox control
radiobutton group
radiobutton control
static text
measurement editbox
dropdown

User Interfaces Your first InCopy dialog box 61
The items in the figure are defined in the following table:
The dialog object itself does not directly contain the controls; that is the purpose of the dialogColumn
object. dialogColumns give you a way to control the positioning of controls within a dialog box. Inside
dialogColumns, you can further subdivide the dialog box into other dialogColumns or borderPanels
(both of which can, if necessary, contain more dialogColumns and borderPanels).
Like any other InCopy scripting object, each part of a dialog box has its own properties. For example, a
checkboxControl has a property for its text (staticLabel) and another property for its state
(checkedState). The dropdown control has a property (stringList) for setting the list of options that
appears on the control’s menu.
To use a dialog box in your script, create the dialog object, populate it with various controls, display the
dialog box, and then gather values from the dialog-box controls to use in your script. Dialog boxes remain
in InCopy’s memory until they are destroyed. This means you can keep a dialog box in memory and have
data stored in its properties used by multiple scripts, but it also means the dialog boxes take up memory
and should be disposed of when they are not in use. In general, you should destroy a dialog-box object
before your script finishes executing.
Your first InCopy dialog box
The process of creating an InCopy dialog box is very simple: add a dialog box, add a dialog column to the
dialog box, and add controls to the dialog column. The following script demonstrates the process (for the
complete script, see SimpleDialog).
Dialog-box element InCopy name
Text-edit fields Text editbox control
Numeric-entry fields Real editbox, integer editbox, measurement
editbox, percent editbox, angle editbox
Pop-up menus Drop-down control
Control that combines a text-edit field with a
pop-up menu
Combo-box control
Check box Check-box control
Radio buttons Radio-button control

User Interfaces Adding a user interface to “Hello World” 62
var myDialog = app.dialogs.add({name:"Simple Dialog"});
//Add a dialog column.
with(myDialog.dialogColumns.add()){
staticTexts.add({staticLabel:"This is a very simple dialog box."});
}
//Show the dialog box.
var myResult = myDialog.show();
//Display a message.
if(myResult == true){
alert("You clicked the OK button.");
}
else{
alert("You clicked the Cancel button.");
}
//Remove the dialog box from memory.
myDialog.destroy();
Adding a user interface to “Hello World”
In this example, we add a simple user interface to the Hello World tutorial script presented in Chapter 2,
“Getting Started.” The options in the dialog box provide a way for you to specify the sample text and
change the point size of the text. For the complete script, see HelloWorldUI.
var myDialog = app.dialogs.add({name:"Simple User Interface Example
Script",canCancel:true});
with(myDialog){
//Add a dialog column.
with(dialogColumns.add()){
//Create a text edit field.
var myTextEditField = textEditboxes.add({editContents:"Hello World!",
minWidth:180});
//Create a number (real) entry field.
var myPointSizeField = realEditboxes.add({editValue:72});
}
}
//Display the dialog box.
var myResult = myDialog.show();
if(myResult == true){
//Get the values from the dialog box controls.
var myString = myTextEditField.editContents;
var myPointSize = myPointSizeField.editValue;
//Remove the dialog box from memory.
myDialog.destroy();
//Create a new document.
var myDocument = app.documents.add()
with(myDocument){
var myStory = myDocument.stories.item(0);
//Enter the text from the dialog box.
myStory.contents=myString;
//Set the size of the text to the size you entered in the dialog box.
myStory.texts.item(0).pointSize = myPointSize;
}
}
else{
//User clicked Cancel, so remove the dialog box from memory.
myDialog.destroy();
}
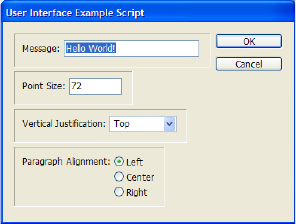
User Interfaces Creating a more complex user interface 63
Creating a more complex user interface
In the next example, we add more controls and different types of controls to the sample dialog box. The
example creates a dialog box that resembles the following:
For the complete script, see ComplexUI.
var myDialog = app.dialogs.add({name:"ComplexUI", canCancel:true});
with(myDialog){
var mySwatchNames = app.swatches.everyItem().name;
//Add a dialog column.
with(dialogColumns.add()){
//Create a border panel.
with(borderPanels.add()){
with(dialogColumns.add()){
with(dialogRows.add()){
//The following line shows how to set a property
//as you create an object.
staticTexts.add({staticLabel:"Message:"});
//The following line shows how to set multiple
//properties as you create an object.
var myTextEditField = textEditboxes.add(
{editContents:"Hello World!", minWidth:180});
}
}
}
//Create another border panel.
with(borderPanels.add()){
with(dialogColumns.add()){
with(dialogRows.add()){
staticTexts.add({staticLabel:"Point Size:"});
//Create a number entry field. Note that this field uses
//editValue rather than editText (as a textEditBox would).
var myPointSizeField = measurementEditboxes.add({editValue:72,
editUnits:MeasurementUnits.points});
}
}
}
//Create another border panel.
with(borderPanels.add()){
with(dialogColumns.add()){
with(dialogRows.add()){
staticTexts.add({staticLabel:"Paragraph Alignment:"});
var myRadioButtonGroup = radiobuttonGroups.add();
with(myRadioButtonGroup){
radiobuttonControls.add({staticLabel:"Left",
checkedState:true});
User Interfaces Creating a more complex user interface 64
radiobuttonControls.add({staticLabel:"Center"});
radiobuttonControls.add({staticLabel:"Right"});
}
}
}
}
//Create another border panel.
with(borderPanels.add()){
with(dialogColumns.add()){
with(dialogRows.add()){
staticTexts.add({staticLabel:"Text Color:"});
}
var mySwatchDropdown = dropdowns.add({stringList:mySwatchNames,
selectedIndex:4});
}
}
}
}
//Display the dialog box.
if(myDialog.show() == true){
var myParagraphAlignment, myString, myPointSize, myVerticalJustification;
//If the user didn't click the Cancel button,
//then get the values back from the dialog box.
//Get the example text from the text edit field.
var myString = myTextEditField.editContents
//Get the point size from the point size field.
var myPointSize = myPointSizeField.editValue;
//Get the paragraph alignment setting from the radiobutton group.
if(myRadioButtonGroup.selectedButton == 0){
myParagraphAlignment = Justification.leftAlign;
}
else if(myRadioButtonGroup.selectedButton == 1){
myParagraphAlignment = Justification.centerAlign;
}
else{
myParagraphAlignment = Justification.rightAlign;
}
var mySwatchName = mySwatchNames[mySwatchDropdown.selectedIndex];
//Remove the dialog box from memory.
myDialog.destroy();
//Now create the document and apply the properties to the text.
var myDocument = app.documents.add();
with(myDocument.stories.item(0)){
//Set the contents of the story to the string you entered
//in the dialog box.
contents = myString;
//Set the alignment of the paragraph.
texts.item(0).justification = myParagraphAlignment;
//Set the point size of the text.
texts.item(0).pointSize = myPointSize;
//Set the fill color of the text.
texts.item(0).fillColor = myDocument.swatches.item(mySwatchName);
}
}
else{
myDialog.destroy()
}
User Interfaces Working with ScriptUI 65
Working with ScriptUI
JavaScripts can make, create, and define user-interface elements using an Adobe scripting component
named ScriptUI. ScriptUI gives script writers a way to create floating palettes, progress bars, and interactive
dialog boxes that are far more complex than InCopy’s built-in dialog object.
This does not mean, however, that user-interface elements written using Script UI are not accessible to
users. InCopy scripts can execute scripts written in other scripting languages using the method.
Creating a progress bar with ScriptUI
The following sample script shows how to create a progress bar using JavaScript and ScriptUI, then how to
use the progress bar from an (for the complete script, see ProgressBar):
#targetengine "session"
var myProgressPanel;
var myMaximumValue = 300;
var myProgressBarWidth = 300;
var myIncrement = myMaximumValue/myProgressBarWidth;
myCreateProgressPanel(myMaximumValue, myProgressBarWidth);
function myCreateProgressPanel(myMaximumValue, myProgressBarWidth){
myProgressPanel = new Window('window', 'Progress');
with(myProgressPanel){
myProgressPanel.myProgressBar = add('progressbar', [12, 12, myProgressBarWidth,
24], 0, myMaximumValue);
}
}
The following script fragment shows how to call the progress bar created in the preceding script using a
separate JavaScript (for the complete script, see CallProgressBar):
#targetengine "session"
myCreateProgressPanel(20, 400);
myProgressPanel.show();
var myStory = app.documents.item(0).stories.item(0);
for(var myCounter = 0; myCounter < 20; myCounter ++){
//Scale the value change to the maximum value of the progress bar.
myProgressPanel.myProgressBar.value = myCounter/myIncrement;
var myInsertionPoint = myStory.insertionPoints.item(-1);
myInsertionPoint.contents = "This is a paragraph\r.";
}
myProgressPanel.myProgressBar.value = 0;
myProgressPanel.hide();
Creating a button-bar panel with ScriptUI
If you want to run your scripts by clicking buttons in a floating palette, you can create one using JavaScript
and ScriptUI. It does not matter which scripting language the scripts themselves use.
The following tutorial script shows how to create a simple floating panel. The panel can contain a series of
buttons, with each button being associated with a script stored on disk. Click the button, and the panel
runs the script (the script, in turn, can display dialog boxes or other user-interface elements). The button in
the panel can contain text or graphics. (For the complete script, see ButtonBar.)
The tutorial script reads an XML file in the following form:
User Interfaces Working with ScriptUI 66
<buttons>
<button>
<buttonType></buttonType>
<buttonName></buttonName>
<buttonFileName></buttonFileName>
<buttonIconFile></buttonIconFile>
</button>
...
</buttons>
For example:
<buttons>
<button>
<buttonType>text</buttonType>
<buttonName>FindChangeByList</buttonName>
<buttonFileName>/c/buttons/FindChangeByList.jsx</buttonFileName>
<buttonIconFile></buttonIconFile>
</button>
<button>
<buttonType>text</buttonType>
<buttonName>SortParagraphs</buttonName>
<buttonFileName>/c/buttons/SortParagraphs.jsx</buttonFileName>
<buttonIconFile></buttonIconFile>
</button>
</buttons>
The following functions read the XML file and set up the button bar:
#targetengine "session"
var myButtonBar;
main();
function main(){
myButtonBar = myCreateButtonBar();
myButtonBar.show();
}
function myCreateButtonBar(){
var myButtonName, myButtonFileName, myButtonType, myButtonIconFile, myButton;
var myButtons = myReadXMLPreferences();
if(myButtons != ""){
myButtonBar = new Window('window', 'Script Buttons', undefined,
{maximizeButton:false, minimizeButton:false});
with(myButtonBar){
spacing = 0;
margins = [0,0,0,0];
with(add('group')){
spacing = 2;
orientation = 'row';
for(var myCounter = 0; myCounter < myButtons.length(); myCounter++){
myButtonName = myButtons[myCounter].xpath("buttonName");
myButtonType = myButtons[myCounter].xpath("buttonType");
myButtonFileName = myButtons[myCounter].xpath("buttonFileName");
myButtonIconFile = myButtons[myCounter].xpath("buttonIconFile");
if(myButtonType == "text"){
myButton = add('button', undefined, myButtonName);
}
else{
myButton = add('iconbutton', undefined,
File(myButtonIconFile));
}
myButton.scriptFile = myButtonFileName;
User Interfaces Working with ScriptUI 67
myButton.onClick = function(){
myButtonFile = File(this.scriptFile)
app.doScript(myButtonFile);
}
}
}
}
}
return myButtonBar;
}
function myReadXMLPreferences(){
myXMLFile = File.openDialog("Choose the file containing your
button bar defaults");
var myResult = myXMLFile.open("r", undefined, undefined);
var myButtons = "";
if(myResult == true){
var myXMLDefaults = myXMLFile.read();
myXMLFile.close();
var myXMLDefaults = new XML(myXMLDefaults);
var myButtons = myXMLDefaults.xpath("/buttons/button");
}
return myButtons;
}

68
6Menus
InCopy scripting can add menu items, remove menu items, perform any menu command, and attach
scripts to menu items.
This chapter shows how to work with InCopy menu scripting. The sample scripts in this chapter are
presented in order of complexity, starting with very simple scripts and building toward more complex
operations.
We assume that you have read Chapter 2, “Getting Started” and know how to create, install, and run a
script.
Understanding the menu model
The InCopy menu-scripting model is made up of a series of objects that correspond to the menus you see
in the application’s user interface, including menus associated with panels as well as those displayed on
the main menu bar. A menu object contains the following objects:
menuItems — The menu options shown on a menu. This does not include submenus.
menuSeparators — Lines used to separate menu options on a menu.
submenus — Menu options that contain further menu choices.
menuElements — All menuItems, menuSeparators and submenus shown on a menu.
eventListeners — These respond to user (or script) actions related to a menu.
events — The events triggered by a menu.
Every menuItem is connected to a menuAction through the associatedMenuAction property. The
properties of the menuAction define what happens when the menu item is chosen. In addition to the
menuActions defined by the user interface, InCopy scripters can create their own, scriptMenuActions,
which associate a script with a menu selection.
A menuAction or scriptMenuAction can be connected to zero, one, or more menuItems.
The following diagram shows how the different menu objects relate to each other:
Chapter Update Status
CS6 Unchanged

Menus Understanding the menu model 69
To create a list (as a text file) of all visible menu actions, run the following script fragment (from the
GetMenuActions tutorial script):
var myMenuActionNames = app.menuActions.everyItem().name;
//Open a new text file.
var myTextFile = File.saveDialog("Save Menu Action Names As", undefined);
//If the user clicked the Cancel button, the result is null.
if(myTextFile != null){
//Open the file with write access.
myTextFile.open("w");
for(var myCounter = 0; myCounter < myMenuActionNames.length; myCounter++){
myTextFile.writeln(myMenuActionNames[myCounter]);
}
myTextFile.close();
}
To create a list (as a text file) of all available menus, run the following script fragment (for the complete
script listing, refer to the GetMenuNames tutorial script). Note that these scripts can be very slow, as there
are a large number of menu names in InCopy.
application
menuActions
scriptMenuAction
area
enabled
checked
eventListeners
events
id
index
label
name
parent
title
same as menuAction
menuAction
scriptMenuActions
eventListener
eventListener
event
...
...
event
Menus Understanding the menu model 70
var myMenu;
//Open a new text file.
var myTextFile = File.saveDialog("Save Menu Action Names As", undefined);
//If the user clicked the Cancel button, the result is null.
if(myTextFile != null){
//Open the file with write access.
myTextFile.open("w");
for(var myMenuCounter = 0;myMenuCounter< app.menus.length; myMenuCounter++){
myMenu = app.menus.item(myMenuCounter);
myTextFile.writeln(myMenu.name);
myProcessMenu(myMenu, myTextFile);
}
myTextFile.close();
alert("done!");
}
function myProcessMenu(myMenu, myTextFile){
var myMenuElement;
var myIndent = myGetIndent(myMenu);
for(var myCounter = 0; myCounter < myMenu.menuElements.length; myCounter++){
myMenuElement = myMenu.menuElements.item(myCounter);
if(myMenuElement.getElements()[0].constructor.name != "MenuSeparator"){
myTextFile.writeln(myIndent + myMenuElement.name);
if(myMenuElement.getElements()[0].constructor.name == "Submenu"){
if(myMenuElement.menuElements.length > 0){
myProcessMenu(myMenuElement, myTextFile);
}
}
}
}
}
function myGetIndent(myObject){
var myString = "\t";
var myDone = false;
do{
if((myObject.parent.constructor.name == "Menu")||
(myObject.parent.constructor.name == "Application")){
myDone = true;
}
else{
myString = myString + "\t";
myObject = myObject.parent;
}
}while(myDone == false)
return myString;
}
Localization and menu names
in InCopy scripting, menuItems, menus, menuActions,and submenus are all referred to by name. Because of
this, scripts need a method of locating these objects that is independent of the installed locale of the
application. To do this, you can use an internal database of strings that refer to a specific item, regardless of
the locale. For example, to get the locale-independent name of a menu action, you can use the following
script fragment (for the complete script, see GetKeyStrings):
Menus Running a menu action from a script 71
var myString = "";
var myMenuAction = app.menuActions.item("$ID/Convert to Note");
var myKeyStrings = app.findKeyStrings(myMenuAction.name);
if(myKeyStrings.constructor.name == "Array"){
for(var myCounter = 0; myCounter < myKeyStrings.length; myCounter ++){
myString += myKeyStrings[myCounter] + "\r";
}
}
else{
myString = myKeyStrings;
}
alert(myString);
NOTE: It is much better to get the locale-independent name of a menuAction than of a menu, menuItem, or
submenu, because the title of a menuAction is more likely to be a single string. Many of the other menu
objects return multiple strings when you use the getKeyStrings method.
Once you have the locale-independent string you want to use, you can include it in your scripts. Scripts
that use these strings will function properly in locales other than that of your version of InCopy.
To translate a locale-independent string into the current locale, use the following script fragment (from the
TranslateKeyString tutorial script):
var myString = app.translateKeyString("$ID/Convert to Note");
alert(myString);
Running a menu action from a script
Any of InCopy’s built-in menuActions can be run from a script. The menuAction does not need to be
attached to a menuItem; however, in every other way, running a menuItem from a script is exactly the same
as choosing a menu option in the user interface. If selecting the menu option displays a dialog box,
running the corresponding menuAction from a script also displays a dialog box.
The following script shows how to run a menuAction from a script (for the complete script, see
InvokeMenuAction):
//Get a reference to a menu action.
var myMenuAction = app.menuActions.item("$ID/Convert to Note");
//Run the menu action. This example action will fail if you do not
//have text selected.
myMenuAction.invoke();
NOTE: In general, you should not try to automate InCopy processes by scripting menu actions and
user-interface selections; InCopy’s scripting object model provides a much more robust and powerful way
to work. Menu actions depend on a variety of user-interface conditions, like the selection and the state of
the window. Scripts using the object model work with the objects in an InCopy document directly, which
means they do not depend on the user interface; this, in turn, makes them faster and more consistent.
Adding menus and menu items
Scripts also can create new menus and menu items or remove menus and menu items, just as you can in
the InCopy user interface. The following sample script shows how to duplicate the contents of a submenu
to a new menu in another menu location (for the complete script, see CustomizeMenu):

Menus Menus and events 72
var myMainMenu = app.menus.item("Main");
var myTypeMenu = myMainMenu.menuElements.item("Type");
var myFontMenu = myTypeMenu.menuElements.item("Font");
var myKozukaMenu = myFontMenu.submenus.item("Kozuka Mincho Pro ");
var mySpecialFontMenu = myMainMenu.submenus.add("Kozuka Mincho Pro");
for(myCounter = 0;myCounter < myKozukaMenu.menuItems.length; myCounter++){
var myAssociatedMenuAction =
myKozukaMenu.menuItems.item(myCounter).associatedMenuAction;
mySpecialFontMenu.menuItems.add(myAssociatedMenuAction);
}
To remove the custom menu added by the preceding script, run the RemoveSpecialFontMenu script.
var myMainMenu = app.menus.item("Main");
var mySpecialFontMenu = myMainMenu.submenus.item("Kozuka Mincho Pro");
mySpecialFontMenu.remove();
Menus and events
Menus and submenus generate events as they are chosen in the user interface, and menuActions and
scriptMenuActions generate events as they are used. Scripts can install eventListeners to respond to
these events. The following table shows the events for the different menu scripting components:
For more about events and eventListeners, see Chapter 7, “Events."
To change the items displayed in a menu, add an eventListener for the beforeDisplay event. When the
menu is selected, the eventListener can then run a script that enables or disables menu items, changes
the wording of menu item, or performs other tasks related to the menu. This mechanism is used internally
to change the menu listing of available fonts, recent documents, or open windows.
Object Event Description
menu beforeDisplay Runs the attached script before the contents of the menu is
shown.
menuAction afterInvoke Runs the attached script when the associated menuItem is
selected, but after the onInvoke event.
beforeInvoke Runs the attached script when the associated menuItem is
selected, but before the onInvoke event.
scriptMenuAction afterInvoke Runs the attached script when the associated menuItem is
selected, but after the onInvoke event.
beforeInvoke Runs the attached script when the associated menuItem is
selected, but before the onInvoke event.
beforeDisplay Runs the attached script before an internal request for the
enabled/checked status of the
scriptMenuActionscriptMenuAction.
onInvoke Runs the attached script when the scriptMenuAction is
invoked.
submenu beforeDisplay Runs the attached script before the contents of the submenu
are shown.
Menus Working with script menu actions 73
Working with script menu actions
You can use scriptMenuAction to create a new menuAction whose behavior is implemented through the
script registered to run when the onInvoke event is triggered.
The following script shows how to create a scriptMenuAction and attach it to a menu item (for the
complete script, see MakeScriptMenuAction). This script simply displays an alert when the menu item is
selected.
var mySampleScriptAction = app.scriptMenuActions.add("Display Message");
var myEventListener = mySampleScriptAction.eventListeners.add("onInvoke",
function(){alert("This menu item was added by a script.");});
//If the submenu "Script Menu Action" does not already exist, create it.
try{
var mySampleScriptMenu = app.menus.item("$ID/Main").submenus.item(
"Script Menu Action");
mySampleScriptMenu.title;
}
catch (myError){
var mySampleScriptMenu = app.menus.item("$ID/Main").submenus.add
("Script Menu Action");
}
var mySampleScriptMenuItem = mySampleScriptMenu.menuItems.add(mySampleScriptAction);
To remove the menu, submenu, menuItem, and scriptMenuAction created by the preceding script, run the
following script fragment (from the RemoveScriptMenuAction tutorial script):
#targetengine "session"
var mySampleScriptAction = app.scriptMenuActions.item("Display Message");
mySampleScriptAction.remove();
var mySampleScriptMenu = app.menus.item("$ID/Main").submenus.item
("Script Menu Action");
mySampleScriptMenu.remove();
You also can remove all scriptMenuAction, as shown in the following script fragment (from the
RemoveAllScriptMenuActions tutorial script). This script also removes the menu listings of the
scriptMenuAction, but it does not delete any menus or submenus you might have created.
#targetengine "session"
app.scriptMenuActions.everyItem().remove();
You can create a list of all current scriptMenuActions, as shown in the following script fragment (from
the GetScriptMenuActions tutorial script):
var myScriptMenuActionNames = app.scriptMenuActions.everyItem().name;
//Open a new text file.
var myTextFile = File.saveDialog("Save Script Menu Action Names As", undefined);
//If the user clicked the Cancel button, the result is null.
if(myTextFile != null){
//Open the file with write access.
myTextFile.open("w");
for(var myCounter = 0; myCounter < myScriptMenuActionNames.length; myCounter++){
myTextFile.writeln(myScriptMenuActionNames[myCounter]);
}
myTextFile.close();
}
scriptMenuAction also can run scripts during their beforeDisplay event, in which case they are
executed before an internal request for the state of the scriptMenuAction (for example, when the menu
Menus Working with script menu actions 74
item is about to be displayed). Among other things, the script can then change the menu names and/or
set the enabled/checked status.
In the following sample script, we add an eventListener to the beforeDisplay event that checks the
current selection. If there is no selection, the script in the eventListener disables the menu item. If an
item is selected, the menu item is enabled, and choosing the menu item displays the type of the first item
in the selection. (For the complete script, see BeforeDisplay.)
var mySampleScriptAction = app.scriptMenuActions.add("Display Message");
var myEventListener = mySampleScriptAction.eventListeners.add("onInvoke",
myOnInvokeHandler, false);
var mySampleScriptMenu = app.menus.item("$ID/Main").submenus.add("Script Menu
Action");
var mySampleScriptMenuItem = mySampleScriptMenu.menuItems.add(mySampleScriptAction);
mySampleScriptMenu.eventListeners.add("beforeDisplay", myBeforeDisplayHandler,
false);
//JavaScript function to run before the menu item is drawn.
function myBeforeDisplayHandler(myEvent){
var mySampleScriptAction = app.scriptMenuActions.item("Display Message");
if(app.documents.length > 0){
if(app.selection.length > 0){
mySampleScriptAction.enabled = true;
}
else{
mySampleScriptAction.enabled = false;
}
}
else{
mySampleScriptAction.enabled = false;
}
}
//JavaScript function to run when the menu item is selected.
function myOnInvokeHandler(myEvent){
myString = app.selection[0].constructor.name;
alert("The first item in the selection is a " + myString + ".");
}

75
7Events
InCopy scripting can respond to common application and document events, like opening a file, creating a
new file, printing, and importing text and graphic files from disk. In InCopy scripting, the event object
responds to an event that occurs in the application. Scripts can be attached to events using the
eventListener scripting object. Scripts that use events are the same as other scripts—the only difference
is that they run automatically, as the corresponding event occurs, rather than being run by the user (from
the Scripts palette).
This chapter shows how to work with InCopy event scripting. The sample scripts in this chapter are
presented in order of complexity, starting with very simple scripts and building toward more complex
operations.
We assume that you have already read Chapter 2, “Getting Started” and know how to create, install, and
run a script.
This chapter covers application and document events. For a discussion of events related to menus, see
Chapter 6, “Menus.”
The InCopy event scripting model is similar to the Worldwide Web Consortium (W3C) recommendation for
Document Object Model Events. For more information, see http://www.w3c.org.
Understanding the event scripting model
The InCopy event scripting model is made up of a series of objects that correspond to the events that
occur as you work with the application. The first object is the event, which corresponds to one of a limited
series of actions in the InCopy user interface (or corresponding actions triggered by scripts).
To respond to an event, you register an eventListener with an object capable of receiving the event.
When the specified event reaches the object, the eventListener executes the script function defined in
its handler function (which can be either a script function or a reference to a script file on disk).
The following table shows a list of events to which eventListeners can respond. These events can be
triggered by any available means, including menu selections, keyboard shortcuts, or script actions.
Chapter Update Status
CS6 Unchanged

Events Understanding the event scripting model 76
User-Interface
event Event name Description Object type
Any menu
action
beforeDisplay Appears before the menu or
submenu is displayed.
Event
beforeDisplay Appears before the script menu
action is displayed or changed.
Event
beforeInvoke Appears after the menu action is
chosen but before the content of the
menu action is executed.
Event
afterInvoke Appears after the menu action is
executed.
Event
onInvoke Executes the menu action or script
menu action.
Event
Close beforeClose Appears after a close document
request is made but before the
document is closed.
DocumentEvent
afterClose Appears after a document is closed. DocumentEvent
Export beforeExport Appears after an export request is
made but before the document or
page item is exported.
ImportExportEvent
afterExport Appears after a document or page
item is exported.
ImportExportEvent
Import beforeImport Appears before a file is imported but
before the incoming file is imported
into a document (before place).
ImportExportEvent
afterImport Appears after a file is imported but
before the file is placed on a page.
ImportExportEvent
New beforeNew Appears after a new document
request but before the document is
created.
DocumentEvent
afterNew Appears after a new document is
created.
DocumentEvent
Open beforeOpen Appears after an open document
request but before the document is
opened.
DocumentEvent
afterOpen Appears after a document is opened. DocumentEvent
Print beforePrint Appears after a print document
request is made but before the
document is printed.
DocumentEvent
afterPrint Appears after a document is printed. DocumentEvent

Events Understanding the event scripting model 77
About event properties and event propagation
When an action—whether initiated by a user or by a script—triggers an event, the event can spread, or
propagate, through the scripting objects capable of responding to the event. When an event reaches an
object that has an eventListener registered for that event, the eventListener is triggered by the event.
An event can be handled by more than one object as it propagates.
There are three types of event propagation:
None — Only the eventListeners registered to the event target are triggered by the event. The
beforeDisplay event is an example of an event that does not propagate.
Capturing — The event starts at the top of the scripting object model—the application—then
propagates through the model to the target of the event. Any eventListeners capable of
responding to the event registered to objects above the target will process the event.
Bubbling — The event starts propagation at its target and triggers any qualifying eventListeners
registered to the target. The event then proceeds upward through the scripting object model,
triggering any qualifying eventListeners registered to objects above the target in the scripting
object model hierarchy.
The following table provides more detail on the properties of an event and the ways in which they relate
to event propagation through the scripting object model.
Revert beforeRevert Appears after a document revert
request is made but before the
document is reverted to an earlier
saved state.
DocumentEvent
afterRevert Appears after a document is reverted
to an earlier saved state.
DocumentEvent
Save beforeSave Appears after a save document
request is made but before the
document is saved.
DocumentEvent
afterSave Appears after a document is saved. DocumentEvent
Save A Copy beforeSaveACopy Appears after a document
save-a-copy-as request is made but
before the document is saved.
DocumentEvent
afterSaveACopy Appears after a document is saved. DocumentEvent
Save As beforeSaveAs Appears after a document save-as
request is made but before the
document is saved.
DocumentEvent
afterSaveAs Appears after a document is saved. DocumentEvent
User-Interface
event Event name Description Object type

Events Working with eventListeners 78
Working with eventListeners
When you create an eventListener, you specify the event type (as a string) the event handler (as a
JavaScript function or file reference), and whether the eventListener can be triggered in the capturing
phase of the event. The following script fragment shows how to add an eventListener for a specific
event (for the complete script, see AddEventListener).
#targetengine "session"
main();
function main(){
var myEventListener = app.addEventListener("afterNew", myDisplayEventType,
false);
}
function myDisplayEventType(myEvent){
alert("This event is the " + myEvent.eventType + " event.");
}
To remove the eventListener created by the above script, run the following script (from the
RemoveEventListener tutorial script):
app.removeEventListener("afterNew", myDisplayEventType, false);
When an eventListener responds an event, the event may still be processed by other eventListeners
that might be monitoring the event (depending on the propagation of the event). For example, the
Property Description
Bubbles If true, the event propagates to scripting objects above the object initiating
the event.
Cancelable If true, the default behavior of the event on its target can be canceled. To do
this, use the PreventDefault method.
Captures If true, the event may be handled by eventListeners registered to scripting
objects above the target object of the event during the capturing phase of
event propagation. This means an eventListener on the application, for
example, can respond to a document event before an eventListener is
triggered.
CurrentTarget The current scripting object processing the event. See target in this table.
DefaultPrevented If true, the default behavior of the event on the current target (see target in
this table) was prevented, thereby cancelling the action.
EventPhase The current stage of the event propagation process.
EventType The type of the event, as a string (for example, "beforeNew").
PropagationStopped If true, the event has stopped propagating beyond the current target (see
target in this table). To stop event propagation, use the stopPropagation
method.
Target The object from which the event originates. For example, the target of a
beforeImport event is a document; of a beforeNew event, the application.
TimeStamp The time and date the event occurred.

Events Working with eventListeners 79
afterOpen event can be observed by eventListeners associated with both the application and the
document.
eventListeners do not persist beyond the current InCopy session. To make an eventListener available
in every InCopy session, add the script to the startup scripts folder (for more on installing scripts, see
Chapter 2, “Getting Started.”). When you add an eventListener script to a document, it is not saved with
the document or exported to INX.
NOTE: If you are having trouble with a script that defines an eventListener, you can either run a script
that removes the eventListener or quit and restart InCopy.
eventListeners that use handler functions defined inside the script (rather than in an external file) must
use #targetengine "session". If the script is run using #targetengine "main" (the default), the
function is not available when the event occurs, and the script generates an error.
An event can trigger multiple eventListeners as it propagates through the scripting object model. The
following sample script demonstrates an event triggering eventListeners registered to different objects
(for the full script, see MultipleEventListeners):
#targetengine "session"
main();
function main(){
var myApplicationEventListener = app.eventListeners.add("beforeImport",
myEventInfo, false);
var myDocumentEventListener = app.documents.item(0).eventListeners.add
("beforeImport", myEventInfo, false);
}
function myEventInfo(myEvent){
var myString = "Current Target: " + myEvent.currentTarget.name;
alert(myString);
}
When you run the preceding script and place a file, InCopy displays alerts showing, in sequence, the name
of the document, then the name of the application.
The following sample script creates an eventListener for each supported event and displays information
about the event in a simple dialog box. For the complete script, see EventListenersOn.
main()
function main(){
app.scriptPreferences.version = 5.0;
var myEventNames = [
"beforeQuit", "afterQuit",
"beforeNew", "afterNew",
"beforeOpen", "afterOpen",
"beforeClose", "afterClose",
"beforeSave", "afterSave",
"beforeSaveAs", "afterSaveAs",
"beforeSaveACopy", "afterSaveACopy",
"beforeRevert", "afterRevert",
"beforePrint", "afterPrint",
"beforeExport", "afterExport",
"beforeImport", "afterImport"
] ;
for (var myCounter = 0; myCounter < myEventNames.length; myCounter ++){
app.addEventListener(myEventNames[myCounter], myEventInfo, false);
}
}
function myEventInfo(myEvent){
Events A sample “afterNew” eventListener 80
var myString = "Handling Event: " +myEvent.eventType;
myString += "\r\rTarget: " + myEvent.target + " " +myEvent.target.name;
myString += "\rCurrent: " +myEvent.currentTarget + " "
myStirng += myEvent.currentTarget.name;
myString += "\r\rPhase: " + myGetPhaseName(myEvent.eventPhase );
myString += "\rCaptures: " +myEvent.captures;
myString += "\rBubbles: " + myEvent.bubbles;
myString += "\r\rCancelable: " +myEvent.cancelable;
myString += "\rStopped: " +myEvent.propagationStopped;
myString += "\rCanceled: " +myEvent.defaultPrevented;
myString += "\r\rTime: " +myEvent.timeStamp;
alert(myString);
function myGetPhaseName(myPhase){
switch(myPhase){
case EventPhases.atTarget:
myPhaseName = "At Target";
break;
case EventPhases.bubblingPhase:
myPhaseName = "Bubbling";
break;
case EventPhases.capturingPhase:
myPhaseName = "Capturing";
break;
case EventPhases.done:
myPhaseName = "Done";
break;
case EventPhases.notDispatching:
myPhaseName = "Not Dispatching";
break;
}
return myPhaseName;
}
}
The following sample script shows how to turn off all eventListeners for the application object. For the
complete script, see EventListenersOff.
//EventListenersOff.jsx
//An InCopy CS6 JavaScript
#targetengine "session"
app.eventListeners.everyItem().remove();
A sample “afterNew” eventListener
The afterNew event provides a convenient place to add information to the document, like user name,
document creation date, copyright information, and other job-tracking information. The following sample
script shows how to add this sort of information to document metadata (also known as file info or XMP
information). For the complete script listing, refer to the AfterNew tutorial script.
Events A sample “afterNew” eventListener 81
#targetengine "session"
//Creates an event listener that will run after a new document is created.
main();
function main(){
var myEventListener = app.eventListeners.add("afterNew",
myAfterNewHandler, false);
}
function myAfterNewHandler(myEvent){
var myDocument = myEvent.parent;
main(myDocument);
function main(myDocument){
app.userName = "Adobe";
myAddXMPData(myDocument);
}
function myAddXMPData(myDocument){
with(myDocument.metadataPreferences){
author = "Adobe Systems";
description = "This is a sample document with XMP metadata. Created:"
+ myEvent.timeStamp + "\rby: " + app.userName;
}
}
}

82
8Notes
With the InDesign and InCopy inline editorial-notes features, you can add comments and annotations as
notes directly to text without affecting the flow of a story. Notes features are designed to be used in a
workgroup environment. Notes can be color coded or turned on or off based on certain criteria.
Notes can be created using the Note tool in the toolbox, the Notes > New Note command, or the New
Note icon on the Notes palette.
We assume that you have already read Chapter 2, “Getting Started” and know how to create, install, and
run a script. We also assume you have some knowledge of working with notes in InCopy.
Entering and importing a note
This section covers the process of getting a note into your InCopy document. Just as you can create a note
and replace the text of the note using the InCopy user interface, you can create notes and insert text into a
note using scripting.
Adding a note to a story
To add note to a story, use the add method. The following sample adds a note at the last insertion point.
For the complete script, see InsertNote.
var myDocument = app.documents.item(0);
var myStory = myDocument.stories.item(0);
//Add note to a default story. We'll use the last insertion point in the story.
var myNote = myStory.insertionPoints.item(-1).notes.add();
//Add text to the note
myNote.texts.item(0).contents = "This is a note."
Replacing text of a note
To replace the text of a note, use the contents property, as shown in the following sample. For the
complete script, see Replace.
var myDocument = app.documents.item(0);
var myStory = myDocument.stories.item(0);
var myNote = myStory.notes.item(0);
//Replace text of note with "This is a replaced note."
myNote.texts.item(0).contents = "This is a replaced note."
Chapter Update Status
CS6 Unchanged
Notes Converting between notes and text 83
Converting between notes and text
Converting a note to text
To convert a note to text, use the convertToText method, as shown in the following sample. For the
complete script, see ConvertToText.
var myDocument = app.documents.item(0);
var myStory = myDocument.stories.item(0);
//Convert the note to text
myStory.notes.item(0).convertToText();
Converting text to a note
To convert text to a note, use the convertToNote method, as shown in the following sample. For the
complete script, see ConvertToNote.
var myDocument = app.documents.item(0);
myStory = myDocument.stories.item(0);
//Convert text to note
myStory.words.item(0).convertToNote();
Expanding and collapsing notes
Collapsing a note
The following script fragment shows how to collapse a note. For the complete script, see CollapseNote.
var myDocument = app.documents.item(0);
var myStory = myDocument.stories.item(0);
var myNote = myStory.notes.item(0);
//Collapse a note
myNote.collapsed = true;
Expanding a note
The following script fragment shows how to expand a note. For the complete script, see ExpandNote.
var myDocument = app.documents.item(0);
var myStory = myDocument.stories.item(0);
var myNote = myStory.notes.item(0);
//Expand a note
myNote.collapsed = false;
Notes Removing a note 84
Removing a note
To remove a note, use the remove method, as shown in the following sample. For the complete script, see
RemoveNote.
var myDocument = app.documents.item(0);
var myStory = myDocument.stories.item(0);
//Remove the note
myStory.notes.item(0).remove(myStory.notes.item(0));
Navigating among notes
Going to the first note in a story
The following script fragment shows how to go to the first note in a story. For the complete script, see
FirstNote.
var myDocument = app.documents.item(0);
var myStory = myDocument.stories.item(0);
//Get next note
var myNote = myStory.notes.firstItem();
//Add text to the note
myNote.texts.item(0).contents = "This is the first note."
Going to the next note in a story
The following script fragment shows how to go to the next note in a story. For the complete script, see
NextNote.
var myDocument = app.documents.item(0);
var myStory = myDocument.stories.item(0);
//Get next note
var myNote = myStory.notes.nextItem(myStory.notes.item(0));
text to the note
myNote.texts.item(0).contents = "This is the next note."
Going to the previous note in a story
The following script fragment shows how to go to the previous note in a story. For the complete script, see
PreviousNote.
var myDocument = app.documents.item(0);
var myStory = myDocument.stories.item(0);
//Get previous note
var myNote = myStory.notes.previousItem(myStory.notes.item(1));
//Add text to the note
myNote.texts.item(0).contents = "This is the prev note."
Notes Navigating among notes 85
Going to the last note in a story
The following script fragment shows how to go to the last note in a story. For the complete script, see
LastNote.
var myDocument = app.documents.item(0);
var myStory = myDocument.stories.item(0);
//Get next note
var myNote = myStory.notes.lastItem();
//Add text to the note
myNote.texts.item(0).contents = "This is the last note."

86
9Tracking Changes
Writers can track, show, hide, accept, and reject changes as a document moves through the writing and
editing process. All changes are recorded and visualized to make it easier to review a document.
This chapter shows how to script the most common operations involving tracking changes.
We assume that you have already read Chapter 2, “Getting Started” and know how to create, install, and
run a script. We also assume that you have some knowledge of working with text in InCopy and
understand basic typesetting terms.
Tracking Changes
This section shows how to navigate tracked changes, accept changes, and reject changes using scripting.
Whenever anyone adds, deletes, or moves text within an existing story, the change is marked in galley and
story views.
Navigating tracked changes
If the story contains a record of tracked changes, the user can navigate sequentially through tracked
changes. The following scripts show how to navigate the tracked changes.
The followinng script uses the nextItem method to navigate to the change following the insertion point:
var myDocument = app.documents.item(0);
var myStory = myDocument.stories.item(0);
//Story.trackChanges If true, track changes is turned on.
if(myStory.trackChanges==true )
{
var myChangeCount =myStory.changes.length;
var myChange = myStory.changes.item(0);
if(myChangeCount>1)
{
var myChange0 = myStory.changes.nextItem(myChange);
}
}
In the following script, we use the previousItem method to navigate to the change following the
insertion point:
Chapter Update Status
CS6 Unchanged
Tracking Changes Tracking Changes 87
var myDocument = app.documents.item(0);
var myStory = myDocument.stories.item(0);
//Story.trackChanges If true, track changes is turned on.
if(myStory.trackChanges==true )
{
var myChangeCount =myStory.changes.length;
var myChange = myStory.changes.lastItem();
if(myChangeCount>1)
{
var myChange0 = myStory.changes.previousItem(myChange);
}
}
Accepting and reject tracked changes
When changes are made to a story, by you or others, the change-tracking feature enables you to review all
changes and decide whether to incorporate them into the story. You can accept and reject
changes—added, deleted, or moved text—made by any user.
In the following script, the change is accepted:
var myDocument = app.documents.item(0);
var myStory = myDocument.stories.item(0);
var myChange = myStory.changes.item(0);
myChange.accept () ;
In the following script, the change is rejected:
var myDocument = app.documents.item(0);
var myStory = myDocument.stories.item(0);
var myChange = myStory.changes.item(0);
myChange.reject() ;
Information about tracked changes
Change information includes include date and time. The following script shows the information of a
tracked change:
var myDocument = app.documents.item(0);
var myStory = myDocument.stories.item(0);
var myChange = myStory.changes.item(0);
//ChangeTypes.DELETED_TEXT (Read Only) Deleted text.
//ChangeTypes.DELETED_TEXT (Read Only) Deleted text.
//ChangeTypes.MOVED_TEXT (Read Only) Moved text.
var myChangeTypes = myChange.changeType;
//Characters A collection of characters.
var myCharacters = myChange.characters;
//Character = myCharacters.item(0);
var myDate = myChange.date;
//InsertionPoints A collection of insertion points.
// insertpoint = myInsertionPoints.item(0);
var myInsertionPoints = myChange.insertionPoints;
//Change.lines (Read Only) A collection of lines.
var myLines = myChange.lines;
Tracking Changes Preferences for tracking changes 88
//Change.paragraphs (Read Only) A collection of paragraphs.
var myParagraphs =myChange.paragraphs;
//InsertionPoints A collection of insertion points.
// insertpoint = myInsertionPoints.item(0);
var myStoryOffset = myChange.storyOffset;
//Change.textColumns (Read Only) A collection of text columns.
var myTextColumns = myChange.textColumns;
//Change.textStyleRanges (Read Only) A collection of text style ranges.
var myTextStyleRanges = myChange.textStyleRanges;
//Change.textVariableInstances (Read Only) A collection of text variable instances.
var myTextVariableInstances = myChange.textVariableInstances;
//Change.texts (Read Only) A collection of text objects.
var myTexts = myChange.texts;
var myUserName = myChange.userName;
var myWords = myChange.words;
Preferences for tracking changes
Track-changes preferences are user settings for tracking changes. For example, you can define which
changes are tracked (adding, deleting, or moving text). You can specify the appearance of each type of
tracked change, and you can have changes identified with colored change bars in the margins. The
following script shows how to set and get these preferences:
var myTrackChangesPreference = app.trackChangesPreferences ;
with(myTrackChangesPreference)
{addedBackgroundColorChoice =
ChangeBackgroundColorChoices.CHANGE_BACKGROUND_USES_CHANGE_PREF_COLOR;
addedTextColorChoice = ChangeTextColorChoices.CHANGE_USES_CHANGE_PREF_COLOR ;
backgroundColorForAddedText = UIColors.gray;
var myColor = backgroundColorForDeletedText;
backgroundColorForDeletedText = UIColors.red;
backgroundColorForMovedText = UIColors.pink;
changeBarColor = UIColors.charcoal;
deletedBackgroundColorChoice
=ChangeBackgroundColorChoices.CHANGE_BACKGROUND_USES_CHANGE_PREF_COLOR;
deletedTextColorChoice =ChangeTextColorChoices.CHANGE_USES_CHANGE_PREF_COLOR ;
//ChangebarLocations.LEFT_ALIGN (Read Only) Change bars are in the left margin.
//ChangebarLocations.RIGHT_ALIGN (Read Only) Change bars are in the right margin
locationForChangeBar = ChangebarLocations.LEFT_ALIGN;
//ChangeMarkings.OUTLINE (Read Only) Outlines changed text.
//ChangeMarkings.NONE (Read Only) Does not mark changed text.
//ChangeMarkings.STRIKETHROUGH (Read Only) Uses a strikethrough to mark changed
text.
//ChangeMarkings.UNDERLINE_SINGLE (Read Only) Underlines changed text.
Tracking Changes Preferences for tracking changes 89
markingForAddedText =ChangeMarkings.OUTLINE;
markingForDeletedText = ChangeMarkings.STRIKETHROUGH;
markingForMovedText = ChangeMarkings.UNDERLINE_SINGLE;
movedBackgroundColorChoice
=ChangeBackgroundColorChoices.CHANGE_BACKGROUND_USES_CHANGE_PREF_COLOR;
movedTextColorChoice = ChangeTextColorChoices.CHANGE_USES_CHANGE_PREF_COLOR ;
showAddedText = true;
shhowDeletedText =true;
showMovedText = true;
spellCheckDeletedtext = true;
showChangeBar = true;
textColorForAddedText=UIColors.blue;
textColorForDeletedText=UIColors.yellow;
textColorForMovedText=UIColors.green;
}

90
10 Assignments
An assignment is a container for text and graphics in an InDesign file that can be viewed and edited in
InCopy. Typically, an assignment contains related text and graphics, such as body text, captions, and
illustrations that make up a magazine article. Only InDesign can create assignments and assignment files.
This tutorial shows how to script the most common operations involving assignments.
We assume that you have already read Chapter 2, “Getting Started” and know how to create, install, and
run a script.
Assignment object
The section shows how to work with assignments and assignment files. Using scripting, you can open the
assignment file and get assignment properties.
Opening assignment files
The following script shows how to open an existing assignment file:
//Open an exist assignment file
var myDocument = app.open(File("/c/a.icma"));
var myAssignement = myDocument.assignments.item(0);
Iterating through assignment properties
The following script fragment shows how to get assignment properties, such as the assignment name,
user name, location of the assignment file, and export options for the assignment.
var myName = myAssignement.name;
var myUserName = myAssignement.userName;
var myDocument = app.documents.item(0);
var myAssignement = myDocument.assignments.item(0);
var myFilePath = myAssignement.filePath;
var myFramecolor = myAssignement.frameColor;
// exportOptions property can be:
// AssignmentExportOptions.ASSIGNED_SPREADS
// AssignmentExportOptions.EMPTY_FRAMES
// AssignmentExportOptions.EVERYTHING
var myExportOptions = myAssignement.exportOptions;
Chapter Update Status
CS6 Unchanged
Assignments An assignment story 91
Assignment packages
Assignment packages (.incp files created by InCopy) are compressed folders that contain assignment files.
An assignment can be packaged using the createPackage method. The following sample script uses this
technique to create a package file:
var myDocument = app.documents.item(0);
var myAssignement = myDocument.assignments.item(0);
if(myAssignement.packaged==false)
{
var myFile= new File("/c/b.icap");
// PackageType.FORWARD_PACKAGE Creates an assignment package for export.
// PackageType.RETURN_PACKAGE Create a package to place in the main document.
myAssignement.createPackage(myFile,PackageType.FORWARD_PACKAGE);
}
An assignment story
The following diagram shows InCopy’s assignment object model. An assignment document contains one
or more assignments; an assignment contains zero, one, or more assigned stories. Each assigned story
references a text story or image story.
This section covers the process of getting assigned stories and assignment story properties.
Assigned-story object
The following script shows how to get an assigned story from an assignment object:
var myDocument = app.documents.item(0);
var myAssignement = myDocument.assignments.item(0);
var myAssignmentStory = myAssignement.assignedStories.item(0);
Iterating through the assigned-story properties
In InCopy, assigned-story objects have properties. The following script shows how to get all properties of
an assigned-story object:
document
assignment
assigned story
text/image story
1
1…*
0…*
1
1
1
Assignments An assignment story 92
var myDocument = app.documents.item(0);
var myAssignement = myDocument.assignments.item(0);
var myAssignmentStory = myAssignement.assignedStories.item(0);
if(myAssignmentStory != null)
{
var myName = myAssignmentStory.name;
var myIsvalid = myAssignmentStory.isValid;
var myFilePath = myAssignmentStory.filePath;
var myStoryReference = myAssignmentStory.storyReference;
}

93
11 XML
Extensible Markup Language, or XML, is a text-based mark-up system created and managed by the World
Wide Web Consortium (www.w3.org). Like Hypertext Markup Language (HTML), XML uses angle brackets
to indicate markup tags (for example, <article> or <para>). While HTML has a predefined set of tags,
XML allows you to describe content more precisely by creating custom tags.
Because of its flexibility, XML increasingly is used as a format for storing data. InCopy includes a complete
set of features for importing XML data into page layouts, and these features can be controlled using
scripting.
We assume that you have already read Chapter 2, “Getting Started” and know how to create, install, and
run a script. We also assume that you have some knowledge of XML, DTDs, and XSLT.
Overview
Because XML is entirely concerned with content and explicitly not concerned with formatting, making
XML work in a page-layout context is challenging. InCopy’s approach to XML is quite complete and
flexible, but it has a few limitations:
Once XML elements are imported into an InCopy document, they become InCopy elements that
correspond to the XML structure. The InCopy representations of the XML elements are not the same thing
as the XML elements themselves.
Each XML element can appear only once in a layout. If you want to duplicate the information of the
XML element in the layout, you must duplicate the XML element itself.
The order in which XML elements appear in a layout depends largely on the order in which they
appear in the XML structure.
Any text that appears in a story associated with an XML element becomes part of that element’s data.
The best approach to scripting XML in InCopy
You might want to do most of the work on an XML file outside InCopy, before importing the file into an
InCopy layout. Working with XML outside InCopy, you can use a wide variety of excellent tools, like XML
editors and parsers.
When you need to rearrange or duplicate elements in a large XML data structure, the best approach is to
transform the XML using XSLT. You can do this as you import the XML file.
Chapter Update Status
CS6 Unchanged

XML Scripting XML Elements 94
Scripting XML Elements
This section shows how to set XML preferences and XML import preferences, import XML, create XML
elements, and add XML attributes. The scripts in this section demonstrate techniques for working with the
XML content itself; for scripts that apply formatting to XML elements, see “Adding XML elements to a
story” on page 99.
Setting XML preferences
You can control the appearance of the InCopy structure panel using the XML view-preferences object, as
shown in the following script fragment (from the XMLViewPreferences tutorial script):
var myDocument = app.documents.add();
var myXMLViewPreferences = myDocument.xmlViewPreferences;
myXMLViewPreferences.showAttributes = true;
myXMLViewPreferences.showStructure = true;
myXMLViewPreferences.showTaggedFrames = true;
myXMLViewPreferences.showTagMarkers = true;
myXMLViewPreferences.showTextSnippets = true;
You also can specify XML tagging-preset preferences (the default tag names and user-interface colors for
tables and stories) using the XML-preferences object, as shown in the following script fragment (from the
XMLPreferences tutorial script):
var myDocument = app.documents.add();
var myXMLPreferences = myDocument.xmlPreferences;
myXMLPreferences.defaultCellTagColor = UIColors.blue;
myXMLPreferences.defaultCellTagName = "cell";
myXMLPreferences.defaultImageTagColor = UIColors.brickRed;
myXMLPreferences.defaultImageTagName = "image";
myXMLPreferences.defaultStoryTagColor = UIColors.charcoal;
myXMLPreferences.defaultStoryTagName = "text";
myXMLPreferences.defaultTableTagColor = UIColors.cuteTeal;
myXMLPreferences.defaultTableTagName = "table";
Setting XML import preferences
Before importing an XML file, you can set XML-import preferences that can apply an XSLT transform,
govern the way white space in the XML file is handled, or create repeating text elements. You do this using
the XML import-preferences object, as shown in the following script fragment (from the
XMLImportPreferences tutorial script):
XML Scripting XML Elements 95
var myDocument = app.documents.add();
var myXMLImportPreferences = myDocument.xmlImportPreferences;
myXMLImportPreferences.allowTransform = false;
myXMLImportPreferences.createLinkToXML = false;
myXMLImportPreferences.ignoreUnmatchedIncoming = true;
myXMLImportPreferences.ignoreWhitespace = true;
myXMLImportPreferences.importCALSTables = true;
myXMLImportPreferences.importStyle = XMLImportStyles.mergeImport;
myXMLImportPreferences.importTextIntoTables = false;
myXMLImportPreferences.importToSelected = false;
myXMLImportPreferences.removeUnmatchedExisting = false;
myXMLImportPreferences.repeatTextElements = true;
//The following properties are only used when the
//AllowTransform property is set to True.
//myXMLImportPreferences.transformFilename = "c:\myTransform.xsl"
//If you have defined parameters in your XSL file, then you can pass
//parameters to the file during the XML import process. For each parameter,
//enter an array containing two strings. The first string is the name of the
//parameter, the second is the value of the parameter.
//myXMLImportPreferences.transformParameters = [["format", "1"]];
Importing XML
Once you set the XML-import preferences the way you want them, you can import an XML file, as shown in
the following script fragment (from the ImportXML tutorial script):
myDocument.importXML(File("/c/completeDocument.xml"));
When you need to import the contents of an XML file into a specific XML element, use the importXML
method of the XML element, rather than the corresponding method of the document. See the following
script fragment (from the ImportXMLIntoElement tutorial script):
var myXMLTag = myDocument.xmlTags.add("xml_element");
var myXMLElement = myDocument.xmlElements.item(0).xmlElements.add(myXMLTag);
//Import into the new XML element.
myXMLElement.importXML(File("/c/completeDocument.xml"));
You also can set the importToSelected property of the xmlImportPreferences object to true, then
select the XML element, and then import the XML file, as shown in the following script fragment (from the
ImportXMLIntoSelectedXMLElement tutorial script):
var myXMLTag = myDocument.xmlTags.add("xml_element");
var myXMLElement = myDocument.xmlElements.item(0).xmlElements.add(myXMLTag);
myDocument.select(myXMLElement);
myDocument.xmlImportPreferences.importToSelected = true;
//Import into the selected XML element.
myDocument.importXML(File("/c/test.xml"));
Creating an XML tag
XML tags are the names of XML elements that you want to create in a document. When you import XML,
the element names in the XML file are added to the list of XML tags in the document. You also can create
XML tags directly, as shown in the following script fragment (from the MakeXMLTags tutorial script):
XML Scripting XML Elements 96
//You can create an XML tag without specifying a color for the tag.
var myXMLTagA = myDocument.xmlTags.add("XML_tag_A");
//You can define the highlight color of the XML tag using the UIColors enumeration...
var myXMLTagB = myDocument.xmlTags.add("XML_tag_B", UIColors.gray);
//...or you can provide an RGB array to set the color of the tag.
var myXMLTagC = myDocument.xmlTags.add("XML_tag_C", [0, 92, 128]);
Loading XML tags
You can import XML tags from an XML file without importing the XML contents of the file. You might want
to do this to work out a tag-to-style or style-to-tag mapping before importing the XML data, as shown in
the following script fragment (from the LoadXMLTags tutorial script):
myDocument.loadXMLTags(File("/c/test.xml"));
Saving XML tags
Just as you can load XML tags from a file, you can save XML tags to a file, as shown in the following script.
When you do this, only the tags themselves are saved in the XML file; document data is not included. As
you would expect, this process is much faster than exporting XML, and the resulting file is much smaller.
The following sample script shows how to save XML tags (for the complete script, see SaveXMLTags):
myDocument.saveXMLTags(File("/c/xml_tags.xml"), "Tag set created October 5, 2006");
Creating an XML element
Ordinarily, you create XML elements by importing an XML file, but you also can create an XML element
using InCopy scripting, as shown in the following script fragment (from the CreateXMLElement tutorial
script):
var myXMLTag = myDocument.xmlTags.add("myXMLTag");
var myRootElement = myDocument.xmlElements.item(0);
var myXMLElment = myRootElement.xmlElements.add(myXMLTag);
myXMLElement.contnets = "This is an XML element containing text."
Moving an XML element
You can move XML elements within the XML structure using the move method, as shown in the following
script fragment (from the MoveXMLElement tutorial script):
XML Scripting XML Elements 97
var myDocument = app.documents.add();
var myRootXMLElement = myDocument.xmlElements.item(0);
var myXMLTag = myDocument.xmlTags.add("xml_element");
var myXMLElementA = myRootXMLElement.xmlElements.add(myXMLTag);
myXMLElementA.contents = "A";
var myXMLElementB = myRootXMLElement.xmlElements.add(myXMLTag);
myXMLElementB.contents = "B";
var myXMLElementC = myRootXMLElement.xmlElements.add(myXMLTag);
myXMLElementC.contents = "C";
var myXMLElementD = myRootXMLElement.xmlElements.add(myXMLTag);
myXMLElementD.contents = "D";
//Move the XML element containing "A" to after
//the XML element containing "C"
myXMLElementA.move(LocationOptions.after, myRootXMLElement.xmlElements.item(2));
//Move the XML element containing "D" to the beginning of its parent.
myRootXMLElement.xmlElements.item(-1).move(LocationOptions.atBeginning);
//Place the XML structure so that you can see the result.
myDocument.stories.item(0).placeXML(myRootXMLElement);
Deleting an XML element
Deleting an XML element removes it from both the layout and the XML structure, as shown in the
following script fragment (from the DeleteXMLElement tutorial script):
myRootXMLElement.xmlElements.item(0).remove();
Duplicating an XML element
When you duplicate an XML element, the new XML element appears immediately after the original XML
element in the XML structure, as shown in the following script fragment (from the DuplicateXMLElement
tutorial script):
var myDocument = app.documents.item(0);
var myRootXMLElement = myDocument.xmlElements.item(0);
//Duplicate the XML element containing "A"
var myNewXMLElement = myRootXMLElement.xmlElements.item(0).duplicate();
//Change the content of the duplicated XML element.
myNewXMLElement.contents = myNewXMLElement.contents + " duplicate";
Removing items from the XML structure
To break the association between a text object and an XML element, use the untag method, as shown in
the following script. The objects are not deleted, but they are no longer tied to an XML element (which is
deleted). Any content of the deleted XML element becomes associated with the parent XML element. If
the XML element is the root XML element, any layout objects (text or page items) associated with the XML
element remain in the document. (For the complete script, see UntagElement.)
var myXMLElement = myDocument.xmlElements.item(0).xmlElements.item(-2);
myXMLElement.untag();
Creating an XML comment
XML comments are used to make notes in XML data structures. You can add an XML comment using
something like the following script fragment (from the MakeXMLComment tutorial script):
XML Scripting XML Elements 98
var myRootXMLElement = myDocument.xmlElements.item(0);
var myXMLElement = myRootXMLElement.xmlElements.item(1);
myXMLElement.xmlComments.add("This is an XML comment.");
Creating an XML processing instruction
A processing instruction (PI) is an XML element that contains directions for the application reading the
XML document. XML processing instructions are ignored by InCopy but can be inserted in an InCopy XML
structure for export to other applications. An XML document can contain multiple processing instructions.
An XML processing instruction has two parts, target and value. The following is an example of an XML
processing instruction:
<?xml-stylesheet type="text/css" href="generic.css"?>
The following script fragment shows how to add an XML processing instruction (for the complete script,
see MakeProcessingInstruction):
var myRootXMLElement = myDocument.xmlElements.item(0);
var myXMLProcessingInstruction = myRootXMLElement.xmlInstructions.add("xml-stylesheet
type=\"text/css\" ", "href=\"generic.css\"");
Working with XML attributes
XML attributes are “metadata” that can be associated with an XML element. To add an attribute to an
element, use something like the following script fragment. An XML element can have any number of XML
attributes, but each attribute name must be unique within the element (that is, you cannot have two
attributes named “id”).
The following script fragment shows how to add an XML attribute to an XML element (for the complete
script, see MakeXMLAttribute):
var myDocument = app.documents.item(0);
var myRootXMLElement = myDocument.xmlElements.item(0);
var myXMLElementB = myRootXMLElement.xmlElements.item(1);
myXMLElementB.xmlAttributes.add("example_attribute", "This is an XML attribute. It
will not appear in the layout!");
In addition to creating attributes directly using scripting, you can convert XML elements to attributes.
When you do this, the text contents of the XML element become the value of an XML attribute added to
the parent of the XML element. Because the name of the XML element becomes the name of the attribute,
this method can fail when an attribute with that name already exists in the parent of the XML element. If
the XML element contains page items, those page items are deleted from the layout.
When you convert an XML attribute to an XML element, you can specify the location where the new XML
element is added. The new XML element can be added to the beginning or end of the parent of the XML
attribute. By default, the new element is added at the beginning of the parent element.
You also can specify an XML mark-up tag for the new XML element. If you omit this parameter, the new
XML element is created with the same XML tag as the XML element containing the XML attribute.
The following script shows how to convert an XML element to an XML attribute (for the complete script,
see the ConvertElementToAttribute tutorial script):
XML Adding XML elements to a story 99
var myDocument = app.documents.add();
var myRootXMLElement = myDocument.xmlElements.item(0);
var myXMLTag = myDocument.xmlTags.add("myXMLElement");
var myXMLElement = myRootXMLElement.xmlElements.add(myXMLTag);
myXMLElement.contents = "This is content in an XML element.";
myXMLElement.convertToAttribute();
//Place the XML content so that you can see the result of the change.
var myStory = myDocument.stories.item(0);
myStory.placeXML(myRootXMLElement);
You also can convert an XML attribute to an XML element, as shown in the following script fragment (from
the ConvertAttributeToElement tutorial script):
var myRootXMLElement = myDocument.xmlElements.item(0);
var myXMLElementB = myRootXMLElement.xmlElements.item(1);
//The "at" parameter can be either LocationOptions.atEnd or
LocationOptions.atBeginning, but cannot
//be LocationOptions.after or LocationOptions.before.
myXMLElementB.xmlAttributes.item(0).convertToElement(XMLElementLocation.elementEnd,
myDocument.xmlTags.item("myXMLElement"));
Working with XML stories
When you import XML elements that were not associated with a layout element (a story or page item),
they are stored in an XML story. You can work with text in unplaced XML elements just as you would work
with the text in a text frame. The following script fragment shows how this works (for the complete script,
see XMLStory):
var myXMLStory = myDocument.xmlStories.item(0);
//Though the text has not yet been placed in the layout, all text
//properties are available.
myXMLStory.texts.item(0).pointSize = 72;
//Place the XML element in the layout to see the result.
myDocument.xmlElements.item(0).xmlElements.item(0).placeXML(myDocument.pages.item(0).
textFrames.item(0));
Exporting XML
To export XML from an InCopy document, export either the entire XML structure in the document or one
XML element (including any child XML elements it contains). The following script fragment shows how to
do this (for the complete script, see ExportXML):
myDocument.exportFile("XML", File("/c/test.xml")
Adding XML elements to a story
Previously, we covered the process of getting XML data into InCopy documents and working with the XML
structure in a document. In this section, we discuss techniques for getting XML information into a story
and applying formatting to it.
XML Adding XML elements to a story 100
Associating XML elements with text
To associate text with an existing XML element, use the placeXML method. This replaces the content of the
page item with the content of the XML element, as shown in the following script fragment (from the
PlaceXML tutorial script):
myDocument.stories.item(0).placeXML(xmlElements.item(0);
To associate an existing text object with an existing XML element, use the markup method. This merges
the content of the text object with the content of the XML element (if any). The following script fragment
shows how to use the markup method (for the complete script, see Markup):
var myDocument = app.documents.add();
var myRootXMLElement = myDocument.xmlElements.item(0);
var myStory = myDocument.stories.item(0);
myStory.placeXML(myRootXMLElement);
myString = "This is the first paragraph in the story.\r";
myString += "This is the second paragraph in the story.\r";
myString += "This is the third paragraph in the story.\r";
myString += "This is the fourth paragraph in the story.\r";
myStory.contents = myString;
var myXMLTag = myDocument.xmlTags.add("myXMLlement");
var myXMLElement = myRootXMLElement.xmlElements.add(myXMLTag);
myStory.paragraphs.item(2).markup(myXMLElement);
Inserting text in and around XML text elements
When you place XML data into an InCopy story, you often need to add white space (for example, return
and tab characters) and static text (labels like “name” or “address”) to the text of your XML elements. The
following sample script shows how to add text in and around XML elements (for the complete script, see
InsertTextAsContent):
var myXMLElement = myDocument.xmlElements.item(0).xmlElements.item(0);
//By inserting the return character after the XML element, the character
//becomes part of the content of the parent XML element, not of the element itself.
myXMLElement.insertTextAsContent("\r", XMLElementPosition.afterElement);
myXMLElement = myDocument.xmlElements.item(0).xmlElements.item(1);
myXMLElement.insertTextAsContent("Static text: ", XMLElementPosition.beforeElement);
myXMLElement.insertTextAsContent("\r", XMLElementPosition.afterElement);
//To add text inside the element, set the location option to beginning or end.
myXMLElement = myDocument.xmlElements.item(0).xmlElements.item(2);
myXMLElement.insertTextAsContent("Text at the start of the element: ",
XMLElementPosition.elementStart);
myXMLElement.insertTextAsContent(" Text at the end of the element.",
XMLElementPosition.elementEnd);
myXMLElement.insertTextAsContent("\r", XMLElementPosition.afterElement);
//Add static text outside the element.
myXMLElement = myDocument.xmlElements.item(0).xmlElements.item(3);
myXMLElement.insertTextAsContent("Text before the element: ",
XMLElementPosition.beforeElement);
myXMLElement.insertTextAsContent(" Text after the element.",
XMLElementPosition.afterElement);
//To insert text inside the text of an element, work with the text
//objects contained by the element.
myXMLElement.words.item(2).insertionPoints.item(0).contents = "(the third word of) ";
XML Adding XML elements to a story 101
Mapping tags to styles
One of the quickest ways to apply formatting to XML text elements is to use xmlImportMaps, also known
as tag-to-style-mappings. When you do this, you can associate a specific XML tag with a paragraph or
character style. When you use themapTagsToStyles method of the document, InCopy applies the style to
the text, as shown in the following script fragment (from the MapTagsToStyles tutorial script):
var myDocument = app.documents.item(0);
//Create a tag to style mapping.
myDocument.xmlImportMaps.add(myDocument.xmlTags.item("heading_1"),
myDocument.paragraphStyles.item("heading 1"));
myDocument.xmlImportMaps.add(myDocument.xmlTags.item("heading_2"),
myDocument.paragraphStyles.item("heading 2"));
myDocument.xmlImportMaps.add(myDocument.xmlTags.item("para_1"),
myDocument.paragraphStyles.item("para 1"));
myDocument.xmlImportMaps.add(myDocument.xmlTags.item("body_text"),
myDocument.paragraphStyles.item("body text"));
//Apply the tag to style mapping.
myDocument.mapXMLTagsToStyles();
//Place the XML element in the layout to see the result.
myDocument.stories.item(0).placeXML(myDocument.xmlElements.item(0));
Mapping styles to tags
When you have formatted text that is not associated with any XML elements, and you want to move that
text into an XML structure, use style-to-tag mapping, which associates paragraph and character styles with
XML tags. To do this, use xmlExportMaps objects to create the links between XML tags and styles, then use
the mapStylesToTags method to create the corresponding XML elements, as shown in the following
script fragment (from the MapStylesToTags tutorial script):
var myDocument = app.documents.item(0);
//Create a style to tag mapping.
myDocument.xmlExportMaps.add(myDocument.paragraphStyles.item("heading 1"),
myDocument.xmlTags.item("heading_1"));
myDocument.xmlExportMaps.add(myDocument.paragraphStyles.item("heading 2"),
myDocument.xmlTags.item("heading_2"));
myDocument.xmlExportMaps.add(myDocument.paragraphStyles.item("para 1"),
myDocument.xmlTags.item("para_1"));
myDocument.xmlExportMaps.add(myDocument.paragraphStyles.item("body text"),
myDocument.xmlTags.item("body_text"));
//Apply the style to tag mapping.
myDocument.mapStylesToXMLTags();
Another approach is simply to have your script create a new XML tag for each paragraph or character style
in the document, and then apply the style to tag mapping, as shown in the following script fragment (from
the MapAllStylesToTags tutorial script):
XML Adding XML elements to a story 102
var myDocument = app.documents.item(0);
//Create tags that match the style names in the document,
//creating an XMLExportMap for each tag/style pair.
for(var myCounter = 0; myCounter<myDocument.paragraphStyles.length; myCounter++){
var myParagraphStyle = myDocument.paragraphStyles.item(myCounter);
var myParagraphStyleName = myParagraphStyle.name;
var myXMLTagName = myParagraphStyleName.replace(/\ /gi, "_")
myXMLTagName = myXMLTagName.replace(/\[/gi, "")
myXMLTagName = myXMLTagName.replace(/\]/gi, "")
var myXMLTag = myDocument.xmlTags.add(myXMLTagName);
myDocument.xmlExportMaps.add(myParagraphStyle, myXMLTag);
}
//Apply the tag to style mapping.
myDocument.mapStylesToXMLTags();
Applying styles to XML elements
In addition to using tag-to-style and style-to-tag mappings or applying styles to the text and page items
associated with XML elements, you also can apply styles to XML elements directly. The following script
fragment shows how to use the methods applyParagraphStyle and applyCharacterStyle. (For the
complete script, see ApplyStylesToXMLElements.)
var myDocument = app.documents.add();
myDocument.viewPreferences.horizontalMeasurementUnits = MeasurementUnits.points;
myDocument.viewPreferences.verticalMeasurementUnits = MeasurementUnits.points;
//Create a series of XML tags.
var myHeading1XMLTag = myDocument.xmlTags.add("heading_1");
var myHeading2XMLTag = myDocument.xmlTags.add("heading_2");
var myPara1XMLTag = myDocument.xmlTags.add("para_1");
var myBodyTextXMLTag = myDocument.xmlTags.add("body_text");
//Create a series of paragraph styles.
var myHeading1Style = myDocument.paragraphStyles.add();
myHeading1Style.name = "heading 1";
myHeading1Style.pointSize = 24;
var myHeading2Style = myDocument.paragraphStyles.add();
myHeading2Style.name = "heading 2";
myHeading2Style.pointSize = 14;
myHeading2Style.spaceBefore = 12;
var myPara1Style = myDocument.paragraphStyles.add();
myPara1Style.name = "para 1";
myPara1Style.pointSize = 12;
myPara1Style.firstLineIndent = 0;
var myBodyTextStyle = myDocument.paragraphStyles.add();
myBodyTextStyle.name = "body text";
myBodyTextStyle.pointSize = 12;
myBodyTextStyle.firstLineIndent = 24;
//Create a character style.
var myCharacterStyle = myDocument.characterStyles.add();
myCharacterStyle.name = "Emphasis";
myCharacterStyle.fontStyle = "Italic";
//Add XML elements and apply paragraph styles.
var myRootXMLElement = myDocument.xmlElements.item(0);
var myXMLElementA = myRootXMLElement.xmlElements.add(myHeading1XMLTag);
myXMLElementA.contents = "Heading 1";
myXMLElementA.insertTextAsContent("\r", XMLElementPosition.afterElement);
myXMLElementA.applyParagraphStyle(myHeading1Style, true);
var myXMLElementB = myRootXMLElement.xmlElements.add(myPara1XMLTag);
myXMLElementB.contents = "This is the first paragraph in the article.";
XML Adding XML elements to a story 103
myXMLElementB.insertTextAsContent("\r", XMLElementPosition.afterElement);
myXMLElementB.applyParagraphStyle(myPara1Style, true);
var myXMLElementC = myRootXMLElement.xmlElements.add(myBodyTextXMLTag);
myXMLElementC.contents = "This is the second paragraph in the article.";
myXMLElementC.insertTextAsContent("\r", XMLElementPosition.afterElement);
myXMLElementC.applyParagraphStyle(myBodyTextStyle, true);
var myXMLElementD = myRootXMLElement.xmlElements.add(myHeading2XMLTag);
myXMLElementD.contents = "Heading 2";
myXMLElementD.insertTextAsContent("\r", XMLElementPosition.afterElement);
myXMLElementD.applyParagraphStyle(myHeading2Style, true);
var myXMLElementE = myRootXMLElement.xmlElements.add(myPara1XMLTag);
myXMLElementE.contents = "This is the first paragraph following the subhead.";
myXMLElementE.insertTextAsContent("\r", XMLElementPosition.afterElement);
myXMLElementE.applyParagraphStyle(myPara1Style, true);
var myXMLElementF = myRootXMLElement.xmlElements.add(myBodyTextXMLTag);
myXMLElementF.contents = "This is the second paragraph following the subhead.";
myXMLElementF.insertTextAsContent("\r", XMLElementPosition.afterElement);
myXMLElementF.applyParagraphStyle(myBodyTextStyle, true);
var myXMLElementG = myRootXMLElement.xmlElements.add(myBodyTextXMLTag);
myXMLElementG.contents = "Note:";
myXMLElementG = myXMLElementG.move(LocationOptions.atBeginning, myXMLElementF)
myXMLElementG.insertTextAsContent(" ", XMLElementPosition.afterElement);
myXMLElementG.applyCharacterStyle(myCharacterStyle, true);
// Associate the root XML element with the story.
myDocument.stories.item(0).placeXML(myRootXMLElement);
Working with XML tables
InCopy automatically imports XML data into table cells when the data is marked up using HTML standard
table tags. If you cannot or prefer not to use the default table mark-up, InCopy can convert XML elements
to a table using the convertElementToTable method.
To use this method, the XML elements to be converted to a table must conform to a specific structure.
Each row of the table must correspond to a specific XML element, and that element must contain a series
of XML elements corresponding to the cells in the row. The following script fragment shows how to use
this method (for the complete script, see ConvertXMLElementToTable). The XML element used to denote
the table row is consumed by this process.
XML Adding XML elements to a story 104
var myDocument = app.documents.add();
//Create a series of XML tags.
var myRowTag = myDocument.xmlTags.add("row");
var myCellTag = myDocument.xmlTags.add("cell");
var myTableTag = myDocument.xmlTags.add("table");
//Add XML elements.
var myRootXMLElement = myDocument.xmlElements.item(0);
with(myRootXMLElement){
var myTableXMLElement = xmlElements.add(myTableTag);
with(myTableXMLElement){
for(var myRowCounter = 1;myRowCounter < 7;myRowCounter++){
with(xmlElements.add(myRowTag)){
myString = "Row " + myRowCounter;
for(var myCellCounter = 1; myCellCounter < 5; myCellCounter++){
with(xmlElements.add(myCellTag)){
contents = myString + ":Cell " + myCellCounter;
}
}
}
}
}
}
var myTable = myTableXMLElement.convertElementToTable(myRowTag, myCellTag);
var myStory = myDocument.stories.item(0);
myStory.placeXML(myDocument.xmlElements.item(0));
Once you are working with a table containing XML elements, you can apply table styles and cell styles to
the XML elements directly, rather than having to apply the styles to the tables or cells associated with the
XML elements. To do this, use the applyTableStyle and applyCellStyle methods, as shown in the
following script fragment (from the ApplyTableStyle tutorial script):
var myDocument = app.documents.add();
//Create a series of XML tags.
var myRowTag = myDocument.xmlTags.add("row");
var myCellTag = myDocument.xmlTags.add("cell");
var myTableTag = myDocument.xmlTags.add("table");
//Create a table style and a cell style.
var myTableStyle = myDocument.tableStyles.add({name:"myTableStyle"});
myTableStyle.startRowFillColor = myDocument.colors.item("Black");
myTableStyle.startRowFillTint = 25;
myTableStyle.endRowFillColor = myDocument.colors.item("Black");
myTableStyle.endRowFillTint = 10;
var myCellStyle = myDocument.cellStyles.add();
myCellStyle.fillColor = myDocument.colors.item("Black");
myCellStyle.fillTint = 45
//Add XML elements.
var myRootXMLElement = myDocument.xmlElements.item(0);
with(myRootXMLElement){
var myTableXMLElement = xmlElements.add(myTableTag);
with(myTableXMLElement){
for(var myRowCounter = 1;myRowCounter < 7;myRowCounter++){
with(xmlElements.add(myRowTag)){
myString = "Row " + myRowCounter;
for(var myCellCounter = 1; myCellCounter < 5; myCellCounter++){
with(xmlElements.add(myCellTag)){
contents = myString + ":Cell " + myCellCounter;
}
}
XML Adding XML elements to a story 105
}
}
}
}
var myTable = myTableXMLElement.convertElementToTable(myRowTag, myCellTag);
var myTableXMLElement = myDocument.xmlElements.item(0).xmlElements.item(0);
myTableXMLElement.applyTableStyle(myTableStyle);
myTableXMLElement.xmlElements.item(0).applyCellStyle(myCellStyle);
myTableXMLElement.xmlElements.item(5).applyCellStyle(myCellStyle);
myTableXMLElement.xmlElements.item(10).applyCellStyle(myCellStyle);
myTableXMLElement.xmlElements.item(15).applyCellStyle(myCellStyle);
myTableXMLElement.xmlElements.item(16).applyCellStyle(myCellStyle);
myTableXMLElement.xmlElements.item(21).applyCellStyle(myCellStyle);
myDocument.stories.item(0).placeXML(myDocument.xmlElements.item(0));
myTable.alternatingFills = AlternatingFillsTypes.alternatingRows;
