Adobe Getting Started With Form Guides Live Cycle ES 8.0 Livecycle Qsg
User Manual: adobe Adobe LiveCycle - ES 8.0 - Getting Started Free User Guide for Adobe LiveCycle Software, Manual
Open the PDF directly: View PDF ![]() .
.
Page Count: 27
- Contents
- About This Document
- About Form Guides
- Creating, Rendering, and Deploying Form Guides
- Walking Through Creating a New Form Guide
- Using a Form Guide in Workspace ES
- Customizing Form Guides Using Flex Builder
- Index

bbc
Getting Started with Form Guides
Adobe® LiveCycle® ES
Version 8.0
July 2007
© 2007 Adobe Systems Incorporated. All rights reserved.
Adobe® LiveCycle® ES 8.0 Getting Started with Form Guides for Microsoft® Windows®
Edition 1.1, July 2007
If this guide is distributed with software that includes an end user agreement, this guide, as well as the software described in it, is furnished
under license and may be used or copied only in accordance with the terms of such license. Except as permitted by any such license, no part
of this guide may be reproduced, stored in a retrieval system, or transmitted, in any form or by any means, electronic, mechanical, recording,
or otherwise, without the prior written permission of Adobe Systems Incorporated. Please note that the content in this guide is protected
under copyright law even if it is not distributed with software that includes an end user license agreement.
The content of this guide is furnished for informational use only, is subject to change without notice, and should not be construed as a
commitment by Adobe Systems Incorporated. Adobe Systems Incorporated assumes no responsibility or liability for any errors or
inaccuracies that may appear in the informational content contained in this guide.
Please remember that existing artwork or images that you may want to include in your project may be protected under copyright law. The
unauthorized incorporation of such material into your new work could be a violation of the rights of the copyright owner. Please be sure to
obtain any permission required from the copyright owner.
Any references to company names, company logos and user names in sample material or sample forms included in this documentation
and/or software are for demonstration purposes only and are not intended to refer to any actual organization or persons.
Adobe, the Adobe logo, Acrobat, Flash, Flex, Flex Builder, LiveCycle, and Reader are either registered trademarks or trademarks of Adobe
Systems Incorporated in the United States and/or other countries.
Microsoft and Windows are either registered trademarks or trademarks of Microsoft Corporation in the United States and/or other countries.
All other trademarks are the property of their respective owners.
This product contains either BISAFE and/or TIPEM software by RSA Data Security, Inc.
This product includes software developed by the Apache Software Foundation (http://www.apache.org/).
This product includes code licensed from RSA Data Security.
This product includes software developed by the JDOM Project (http://www.jdom.org/).
Macromedia Flash 8 video is powered by On2 TrueMotion video technology. © 1992-2005 On2 Technologies, Inc. All Rights Reserved.
http://www.on2.com.
This product includes software developed by the OpenSymphony Group (http://www.opensymphony.com/).
Portions of this code are licensed from Nellymoser(www.nellymoser.com).
MPEG Layer-3 audio compression technology licensed by Fraunhofer IIS and THOMSON Multimedia (http://www.iis.fhg.de/amm/).
This product includes software developed by L2FProd.com (http://www.L2FProd.com/).
The JBoss library is licensed under the GNU Library General Public LIcense, a copy of which is included with this software.
The BeanShell library is licensed under the GNU Library General Public License, a copy of which is included with this software.
This product includes software developed by The Werken Company (http://jaxen.werken.com/).
This product includes software developed by the IronSmith Project (http://www.ironsmith.org/).
The OpenOffice.org library is licensed under the GNU Library General Public License, a copy of which is included with this software.
Adobe Systems Incorporated, 345 Park Avenue, San Jose, California 95110, USA.
Notice to U.S. Government End Users. The Software and Documentation are “Commercial Items,” as that term is defined at 48 C.F.R. §2.101,
consisting of “Commercial Computer Software” and “Commercial Computer Software Documentation,” as such terms are used in 48 C.F.R.
§12.212 or 48 C.F.R. §227.7202, as applicable. Consistent with 48 C.F.R. §12.212 or 48 C.F.R. §§227.7202-1 through 227.7202-4, as applicable,
the Commercial Computer Software and Commercial Computer Software Documentation are being licensed to U.S. Government end users
(a) only as Commercial Items and (b) with only those rights as are granted to all other end users pursuant to the terms and conditions herein.
Unpublished-rights reserved under the copyright laws of the United States. Adobe Systems Incorporated, 345 Park Avenue, San Jose, CA
95110-2704, USA. For U.S. Government End Users, Adobe agrees to comply with all applicable equal opportunity laws including, if
appropriate, the provisions of Executive Order 11246, as amended, Section 402 of the Vietnam Era Veterans Readjustment Assistance Act of
1974 (38 USC 4212), and Section 503 of the Rehabilitation Act of 1973, as amended, and the regulations at 41 CFR Parts 60-1 through 60-60,
60-250, and 60-741. The affirmative action clause and regulations contained in the preceding sentence shall be incorporated by reference.

3
Contents
About This Document.................................................................................................................. 4
Who should read this document? ............................................................................................................................................ 4
Additional information................................................................................................................................................................. 4
1 About Form Guides...................................................................................................................... 6
2 Creating, Rendering, and Deploying Form Guides................................................................... 9
Creating form guides ..................................................................................................................................................................10
Rendering form guides ..............................................................................................................................................................10
Deploying form guides ..............................................................................................................................................................10
3 Walking Through Creating a New Form Guide........................................................................ 11
Getting started ..............................................................................................................................................................................11
Step 1: Starting Guide Builder..................................................................................................................................................12
Step 2: Creating the form guide structure ..........................................................................................................................14
Linking field captions ...........................................................................................................................................................15
Step 3: Previewing your form guide......................................................................................................................................16
Step 4: Customizing your form guide...................................................................................................................................17
Form guide and panel layouts ..........................................................................................................................................17
Form guide properties .........................................................................................................................................................17
Panel properties and display rules...................................................................................................................................18
Visual appearance..................................................................................................................................................................18
Step 5: Saving your form guide...............................................................................................................................................19
Next steps........................................................................................................................................................................................19
4 Using a Form Guide in Workspace ES....................................................................................... 20
Prerequisites...................................................................................................................................................................................20
Getting started ..............................................................................................................................................................................20
Adding your form design and assets to the repository ...........................................................................................20
Creating a new process to deploy a form guide ...............................................................................................................21
Drawing a process diagram .........................................................................................................................................21
Creating an xfaForm variable ............................................................................................................................................22
Updating your process to use the xfaForm variable.................................................................................................23
Activating your process.......................................................................................................................................................24
Deploying a process to Workspace ES using Archive Administration ......................................................................24
Testing in Workspace ES ............................................................................................................................................................25
Next steps........................................................................................................................................................................................25
5 Customizing Form Guides Using Flex Builder ......................................................................... 26
Index ........................................................................................................................................... 27
4
About This Document
Welcome to Getting Started with Form Guides. This document introduces you to form guides, an
alternative view of a form that guides users through the form-filling process step by step. It provides
high-level information about these topics:
●What form guides are
●Overview of how to create, render, and deploy form guides
●A walk-through of creating a simple form guide based on a form design
●A walk-through of deploying a form guide to Adobe® LiveCycle® Workspace ES
●Overview of the process for customizing form guides
Who should read this document?
This document is intended for anyone who is interested in learning about form guides. Although no
previous knowledge is assumed, you should have an understanding of Adobe LiveCycle Designer ES,
Adobe LiveCycle Workbench ES, Workspace ES, and Adobe LiveCycle ES (Enterprise Suite).
Additional information
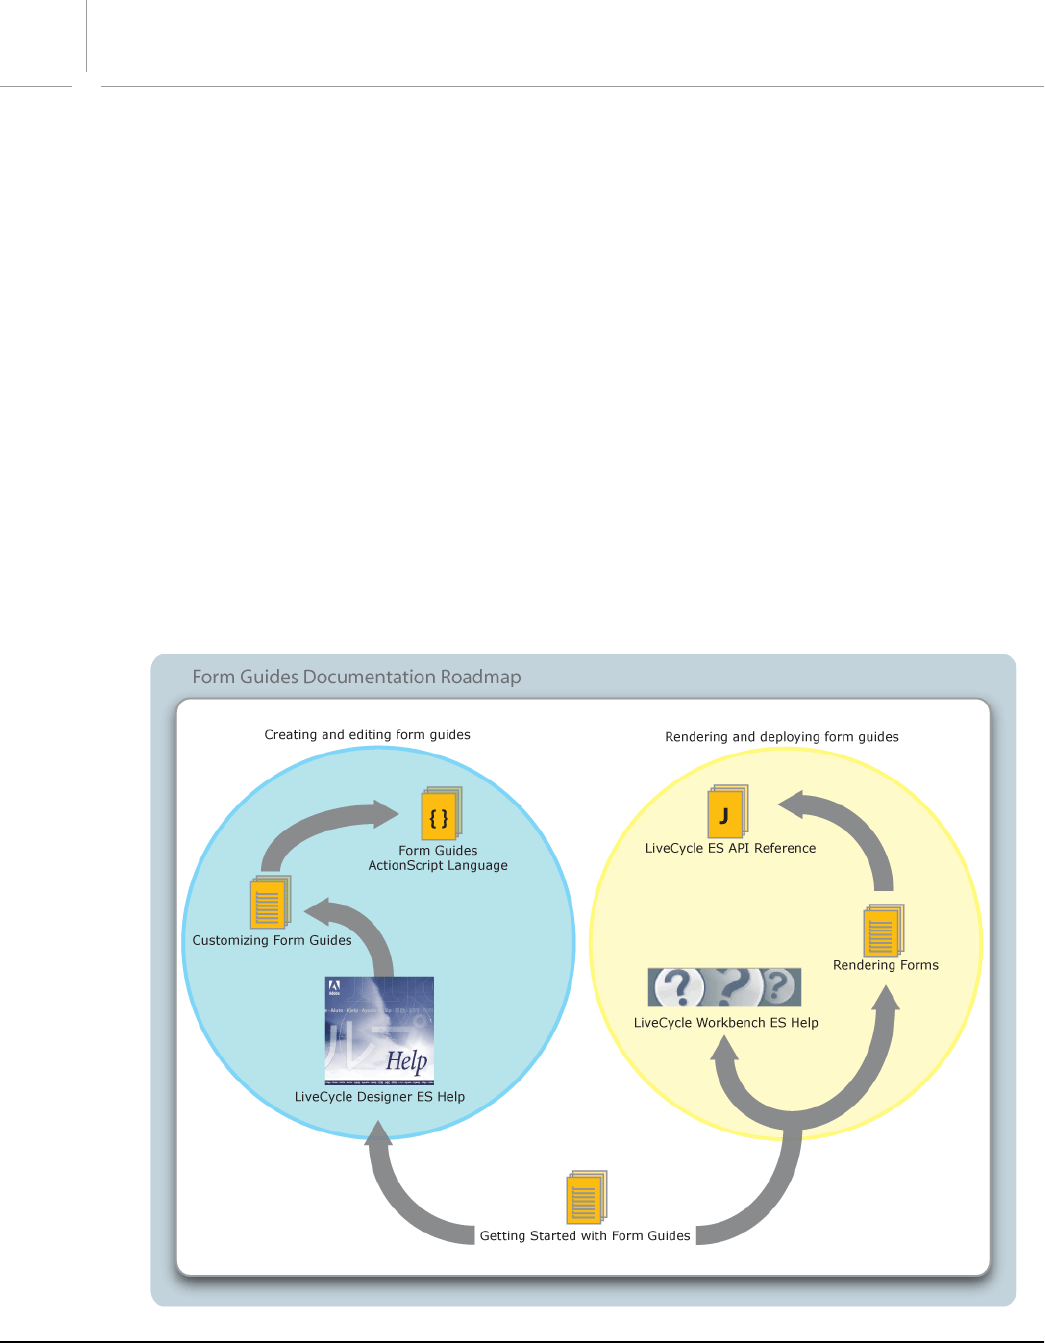
Adobe has a wide variety of resources about form guides, targeted at a variety of audiences.

Adobe LiveCycle ES About This Document
Getting Started with Form Guides Additional information 5
To view these resources, go to the location specified in the See column in the following table.
For information about See
Detailed information about creating and editing
form guides using Guide Builder.
LiveCycle Designer ES Help, available within
Designer ES]
Customizing form guide layouts and components
using Adobe Flex™ Builder™
Customizing Form Guides, available at
www.adobe.com/go/learn_lc_fgCustomizing
The ActionScript™ classes and properties
included with LiveCycle ES.
LiveCycle ES ActionScript Language, available at
www.adobe.com/go/learn_lc_fgActionScript
Rendering and deploying form guides using
processes created in Workbench ES.
LiveCycle Workbench ES Help, available within
Workbench ES
Rendering a form guide using the Adobe
LiveCycle Forms ES API.
Developing Applications Using LiveCycle ES APIs,
available at
www.adobe.com/go/learn_lc_programming
Detailed information about the classes and
methods included with LiveCycle ES.
LiveCycle ES Java API Reference, available at
www.adobe.com/go/learn_lc_JavaAPI
LiveCycle ES terminology LiveCycle ES Glossary, available at
www.adobe.com/go/learn_lc_glossary
Other services and products that integrate with
LiveCycle ES
www.adobe.com
Patch updates, technical notes, and additional
information on this product version
www.adobe.com/support/products/enterprise/ind
ex.html

6
1About Form Guides
Form guides are an alternative view of a form that guides users through the form-filling process step by
step. Form guides are based on the Adobe Flash® technology. To create form guides, form authors build on
an existing form design to provide a more visually appealing and streamlined method of capturing form
data. The enhanced interface can help reduce data entry errors through improved usability by simplifying
the amount of information presented to a form filler at a given time.
Along with the form guide you can also provide an Adobe PDF rendition of the form. The PDF often
provides the contract or document of record of the transaction, which is useful for saving locally, printing,
and archiving. In addition, if a digital signature is required, users sign the PDF and not the form guide.
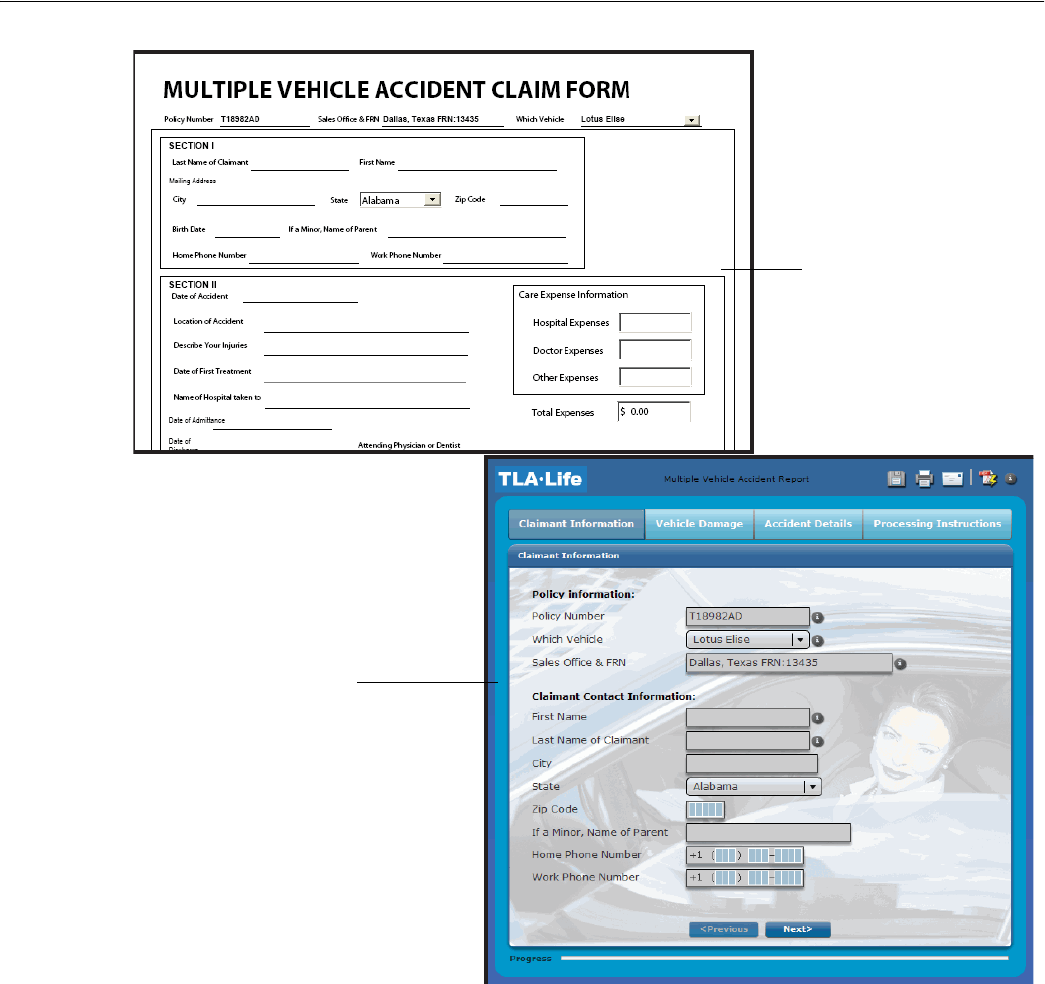
Each form guide is a collection of layouts, sections, panels, and controls that together provide an
alternative interface of a form for users to view and fill. For example, the following images show a form and
a form guide that are used to collect information for an accident claim. The original form uses a more
traditional layout that is consistent with a printed form, whereas the form guide uses a layout similar to
those used for content on a website.
Adobe LiveCycle ES About Form Guides
Getting Started with Form Guides 7
Form guides provide form authors with various ways to customize and present forms to users. For
example, form authors can use form guides to group required data into logical groups called sections.
Form authors select a form guide layout that defines the presentation of sections and dictates how users
navigate between sections. Each section is composed of one or more panels that contain a set of fields
from the original form and any form guide navigational controls, such as Previous or Next buttons. The
form guide then steps users through data entry by section. In each section, form authors can display help
text or video to provide assistance to users with filling the fields in that section. Form authors can also set
rules to control the display of optional sections based on user-entered data. When the form guide is
completed, users can submit their form, either electronically or by printing a paper copy, according to the
submission method defined by the form guide.
In addition to the presentation enhancements that form authors can implement, form authors can import
existing cascading style sheet (CSS) files to assist in creating a form guide appearance that is consistent
with existing materials.
Original form
Form guide based on the
original form

Adobe LiveCycle ES About Form Guides
Getting Started with Form Guides 8
Each form guide is derived from a form, and data collected in a form guide automatically passes through
to the form itself. Therefore, most scripts, validations, and other business logic on your form will continue
to function on a form guide. For detailed information about form guide scripting support, see
LiveCycle Designer ES Help.
9
2Creating, Rendering, and Deploying Form Guides
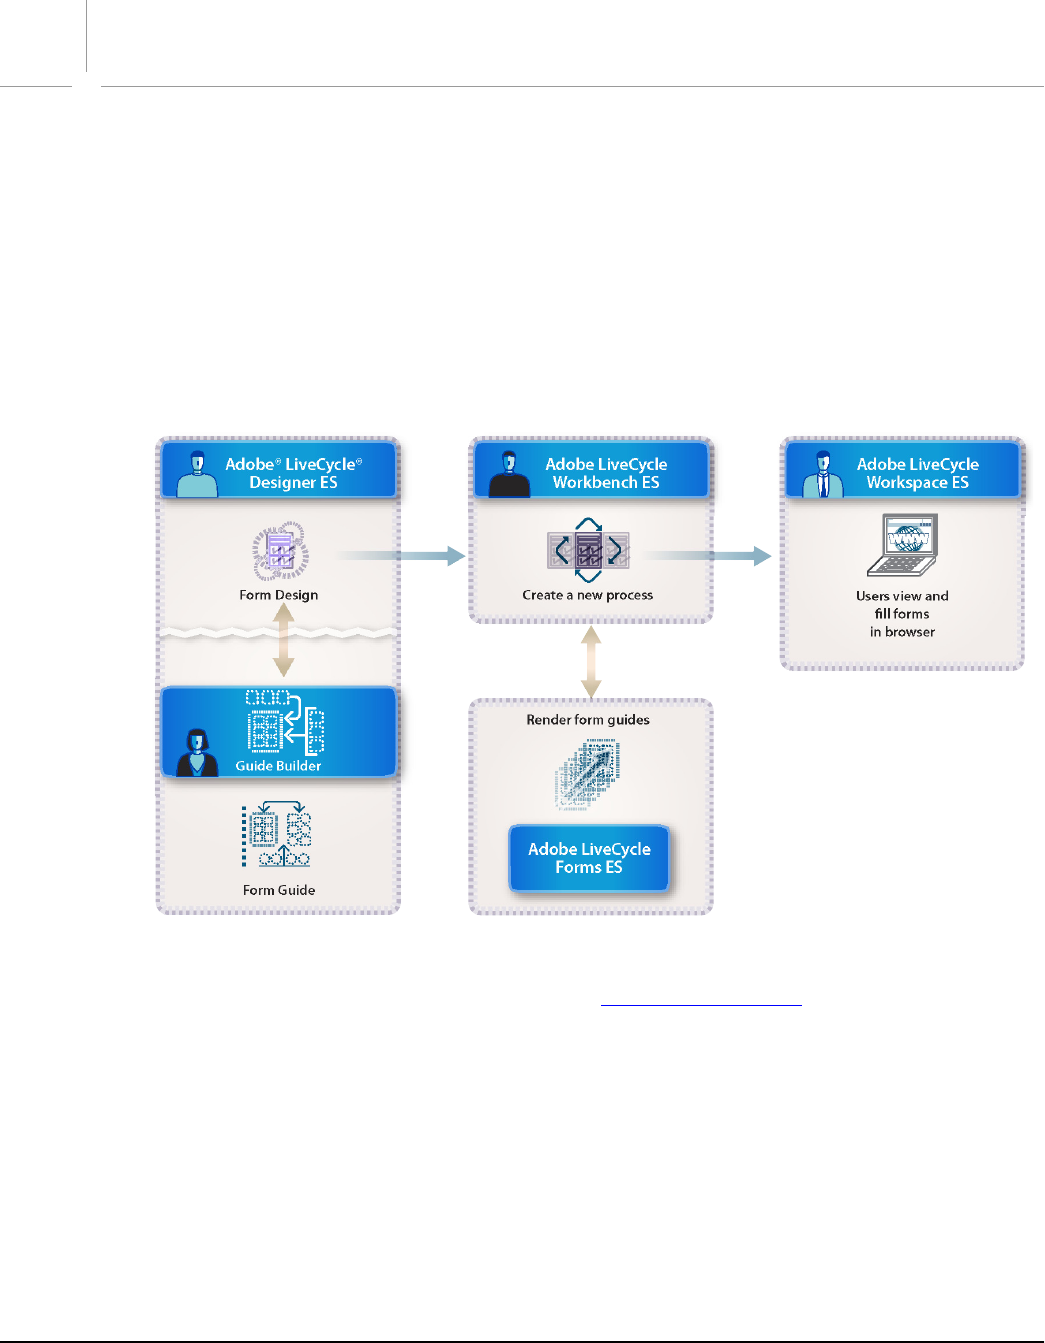
Form guides are integrated throughout LiveCycle ES. The process of creating, rendering, and deploying
form guides involves various LiveCycle ES solution components as well as various skill sets. The image
below illustrates the general process of creating, rendering, and deploying form guides as part of a
LiveCycle ES solution. This process involves these tasks in the order shown:
1. Form authors create a form guide based on an existing form design by using Guide Builder in
Designer ES.
2. After a form guide is created, a developer creates a new process in Workbench ES that includes a call to
Adobe LiveCycle Forms ES to render the form design as a form guide (SWF file).
3. Using Workspace ES, the rendered form guide is made available to end users to view, fill, and submit.
Note: You can also deploy form guides by creating a custom Java™ or web services application that calls
the API for Forms ES to render a form guide. See Deploying form guides.
Adobe LiveCycle
Forms ES
Form Design
Render form guides
Create a new process
Adobe LiveCycle
Workspace ES
Users view and
ll forms
in browser
Form Guide
Guide Builder

Adobe LiveCycle ES Creating, Rendering, and Deploying Form Guides
Getting Started with Form Guides Creating form guides 10
Creating form guides
You create and edit form guides by using Guide Builder in Designer ES. Creating a form guide involves
these general tasks in Guide Builder:
●Adding new sections and panels
●Dragging and dropping the form objects that will appear in each panel
●Changing the layout of the form guide and the individual panels
●Modifying the color of buttons, text, and backgrounds
●Specifying rule-based or answer-based conditional navigation of form guide panels based on form
data or feedback
●Previewing your form guide in a web browser
●(Optional) Importing custom CSS or SWC files to share styles among form guides
●(Optional) Importing custom Flex library SWC files that contain custom form guide layouts, panels, or
controls for use with your form guide
For more information about Guide Builder and creating form guides, see Adobe Designer ES Help. For a
general introduction to creating a new form guide, see “Walking Through Creating a New Form Guide” on
page 11.
Rendering form guides
The process for rendering form guides is similar to the process used to render forms in PDF or HTML. You
must create a new process in Workbench ES that uses the form guide rendering operation
renderFormGuide. For more information about how to render a form guide by using the Forms service
within Workbench ES, see Using a Form Guide in Workspace ES.
It is also possible to call the API for Forms ES outside of Workbench ES by using either a Java or web
services-based application. For more information, see Developing Applications Using LiveCycle ES API at
http://www.adobe.com/go/learn_lc_programming.
Deploying form guides
When deploying a form guide in a LiveCycle ES solution, you can give users the ability to fill the form guide
directly from their To Do lists within Workspace ES. To enable this functionality, you create a process in
Workbench ES that includes a step to render a form design as a form guide. The process is deployed to
Workspace ES where form fillers can view, fill, and submit the rendered form guide. For more information
about deploying processes to Workspace ES, see Using a Form Guide in Workspace ES.
You can also deploy form guides by using a Java or web services application. The application first calls the
API for Forms ES to render a form design as a form guide and then returns the rendered form guide to a
user either in a browser or by making the necessary files available in a publicly accessible URL. For more
information, see Developing Applications Using LiveCycle ES APIs.

11
3Walking Through Creating a New Form Guide
This section walks you through the process involved in creating a new form guide from an existing
Designer ES form design.
Getting started
The first step in creating a form guide is to start Designer ES and either open an existing form design or
create a new form design within Designer ES. After you create and save your form design, you create a new
form guide by following these general steps:
●Start Guide Builder.
●Define the form guide structure.
●Preview your form guide to verify the structure.
●Customize the appearance and behavior of the form guide.
●Save the form guide style information and apply the form guide updates to the form design.
Note: To correctly preview form guides in a web browser, you must have Adobe Flash® Player 9.0.28.0 or
later installed.
Sample form design
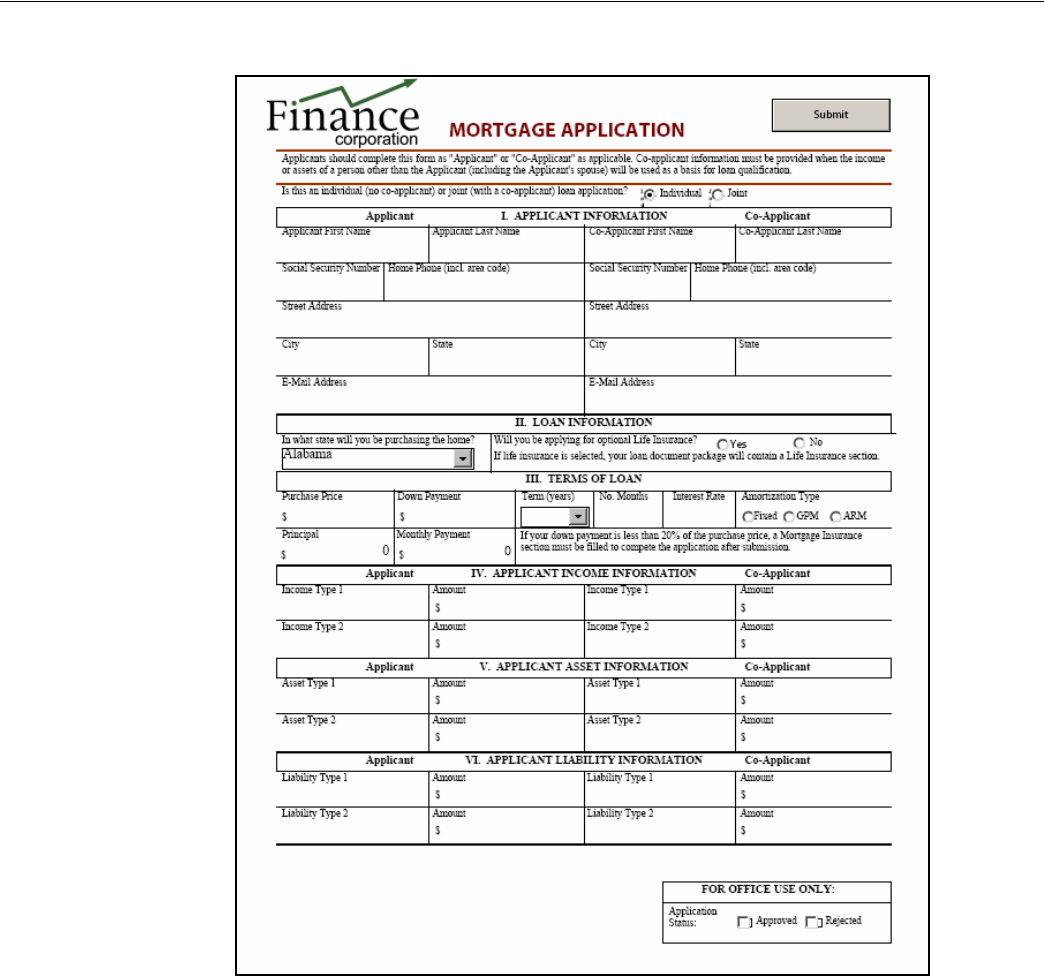
Throughout this chapter, you will use a mortgage application form as an example. The mortgage
application form illustrates an electronic form that is based on an original paper form design.
The sample mortgage application form uses conventions and layout techniques that are logical in
situations where the form needs to be printed. However, those same conventions limit the online data
entry experience. For example, all of the form fields are arranged on one side of a sheet of paper. Due to
the space restriction, text size has been kept small and is difficult to read when viewing the entire form at
once. The form is divided using plain white rectangles, and more meaningful text is not noticeable due to
the space required for data entry.
Adobe LiveCycle ES Walking Through Creating a New Form Guide
Getting Started with Form Guides Step 1: Starting Guide Builder 12
The following image illustrates what the mortgage application form looks like when viewed in PDF.
This situation is typical where a form guide could be created to greatly improve a user’s online form-filling
experience. In the next steps, you will walk through converting this form to a form guide.
Step 1: Starting Guide Builder
After you open or create a form in Designer ES, the first step is to start Guide Builder. Guide Builder is the
tool within Designer ES that you will use to create and edit form guides.
Each time you start Guide Builder, it opens in the default expanded view. From the expanded view, you
can access all of the features of Guide Builder, such as customizing the appearance and behavior of your
form guide and previewing the form guide in a web browser.
Adobe LiveCycle ES Walking Through Creating a New Form Guide
Getting Started with Form Guides Step 1: Starting Guide Builder 13
➤To start Guide Builder
1. Start Designer ES.
2. Open a form design (either an XDP file or a PDF file) created in Designer ES.
3. Select Tools > Create or Edit Form Guide.
To change to the simplified view, click Hide Properties. From this view, you can modify the structure of
your form guide, and drag text and field objects directly from your form design onto sections and panels.

Adobe LiveCycle ES Walking Through Creating a New Form Guide
Getting Started with Form Guides Step 2: Creating the form guide structure 14
Note: The default behavior of the Guide Builder window is not to remain on top of other applications. To
change the behavior to always be on top, right-click and select Always On Top.
Before experimenting with the various Guide Builder options, you should first consider how you want to
logically structure your form guide to collect user data.
Step 2: Creating the form guide structure
The most important aspect of creating a new form guide is determining what information you need to
collect from your users. Your original form design likely contains fields for capturing all of the necessary
data; however, it may contain additional fields or information that is unnecessary for some form fillers. For
example, the mortgage application form contains fields that record the status of the mortgage
application, either Accepted or Rejected, in a section marked For Office Use Only. These fields can be
omitted from the form guide because they are not relevant to the user filling the form.
When you determine what information you need to collect, you must consider how to arrange the various
text and fields from your original form. A form guide is organized into a hierarchy that consists of three
different types of containers:
Guide At the highest level, a guide stores all of the information for a particular form guide. You can
create multiple form guides for each form design to handle different scenarios. For example, you can
create one guide for a mortgage applicant, another for a mortgage broker, and another for a bank
manager.
Section Within a guide, you create one or more sections, which contain panels, which are used to
organize into logical categories the information that you display to users. For example, you can divide
the mortgage application into sections for the applicant information and loan information.
Panel Each section contains one or more panels, which are the containers into which you will add or
link text and fields from your original form, such as the form fields for the applicant name, address, and
telephone number.
➤To add a guide, section, or panel to the form guide hierarchy:
●Click Add Guide, Add Section, or Add Panel to add the corresponding item to the form guide
hierarchy.
➤To add text objects and fields to a panel:
1. In the Guide Builder expanded view, click Add or Bind Fields.
2. Drag objects from the Form Objects view onto panels in the form guide hierarchy.
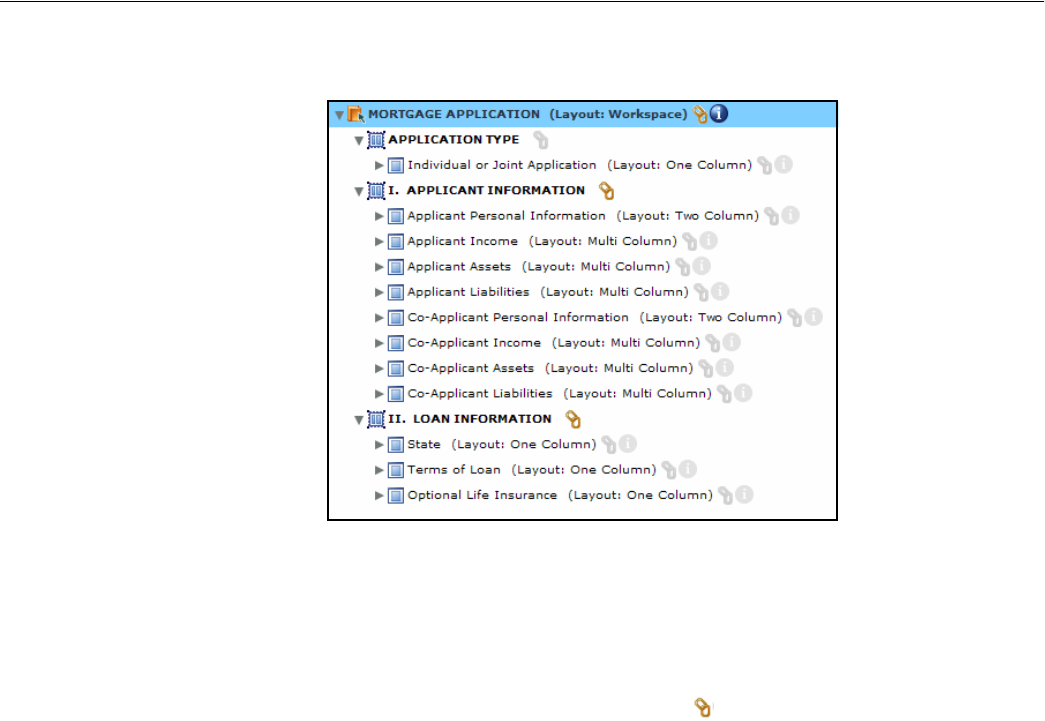
Using the mortgage application example, the following image illustrates one way to structure a form
guide based on the original form design. In this example, a new section was created for six of the seven
sections on the form design. Within each section, where appropriate, the structure includes separate
panels to display the applicant and co-applicant information. The seventh section, named Signatures And
Adobe LiveCycle ES Walking Through Creating a New Form Guide
Getting Started with Form Guides Linking field captions 15
Processing, is omitted from the form guide because it requires users to digitally sign the form, which is an
operation they can only perform on the PDF.
Linking field captions
On some forms, such as the mortgage application example, field captions may exist as separate text
objects instead of text entered specifically as the caption of a data entry field in Designer ES. In these
situations, you can link the text from a text object to the caption of a data entry field or even the name of a
guide, section, or panel by dragging the text object onto the link icon for the associated field.
Notice that in the preceding illustration that some captions are linked and some are not. The link icon is
available when a link exists.
➤To link text from a text object to an item in the form guide hierarchy:
1. In the Guide Builder expanded view, click Add Or Bind Fields.
2. In the Form Objects hierarchy, select the text object to bind.
3. Drag the text object onto one of the following items in the form guide hierarchy:
●Field
●Panel
●Section
●Guide
The link symbol beside the item in the form guide hierarchy is no longer grayed out is now available,
indicating that the object is now bound to a text object.
After you create the structure of your form guide and add all relevant text and fields from your form
design, you can preview your progress and visualize how users will interact with the form guide. At this
point, the preview will only use default Guide Builder options. Later, you can customize the appearance of
your form guide to suit your specific needs.
Adobe LiveCycle ES Walking Through Creating a New Form Guide
Getting Started with Form Guides Step 3: Previewing your form guide 16
Step 3: Previewing your form guide
You can preview your form guide at any time in the expanded Guide Builder view by clicking the Preview
button in the title bar. When you preview, Guide Builder renders your form guide as a SWF file and displays
it in your default web browser.
Note: To correctly preview form guides in a web browser, you must have Flash Player 9.0.28.0 or later
installed.
If you are using Microsoft® Internet Explorer, depending on your internet browser security settings, you
may need to manually allow form guides to be displayed each time you preview. You can disable this
behavior by starting Internet Explorer, selecting Tools > Internet Options > Advanced > Security, and
selecting Allow Active Content To Run In Files On My Computer.
When previewing, Guide Builder displays warnings or errors, as well as log information, that occur during
form guide rendering to help with debugging. If you encounter problems related to scripting, you can
optionally turn off all scripting on your form guide by using the Exclude Scripting option in the Preview
view. This allows you to temporarily ignore scripting errors so that you can debug the other areas of your
form guide.
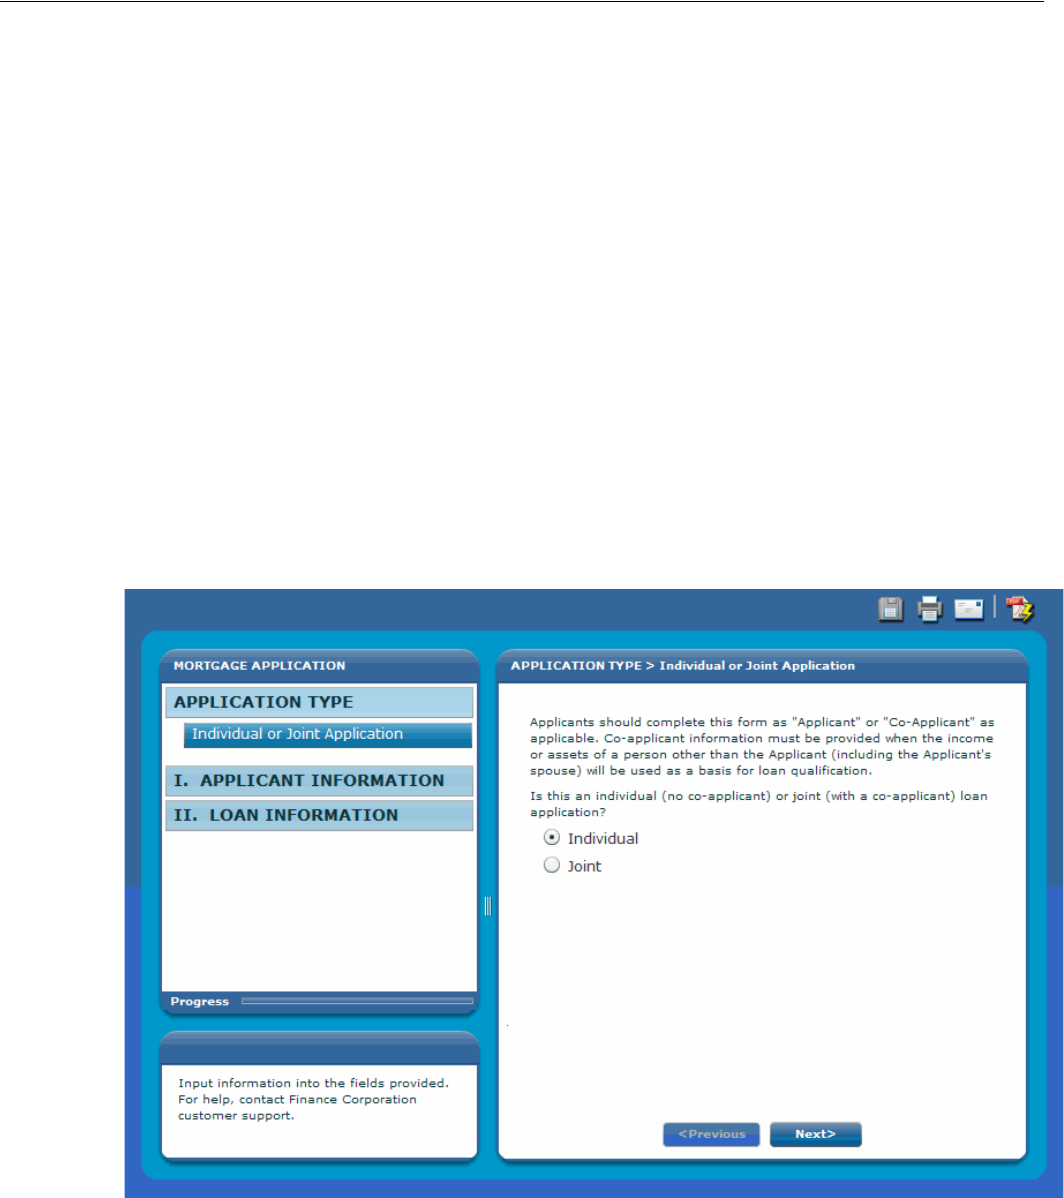
Using the mortgage application example, the following image illustrates preview output using default
Guide Builder settings.
After you define the structure of your form guide, you can alter the appearance and behavior by using the
customization capabilities of Guide Builder.

Adobe LiveCycle ES Walking Through Creating a New Form Guide
Getting Started with Form Guides Step 4: Customizing your form guide 17
Step 4: Customizing your form guide
Using Guide Builder, you can modify the appearance and behavior of your form guide at both the guide
level and the panel level, and you can also modify the appearance of text, fields, logos, and other form
guide components.
Form guide and panel layouts
The visual customization that affects the form filler the most is applying layouts at the guide and panel
levels within the form guide. Guide layouts specify the type of navigation control that the form guide uses
and the placement of the navigational hierarchy, guide help text, and data entry panels. Panel layouts
specify the flow of data within a single data entry panel.
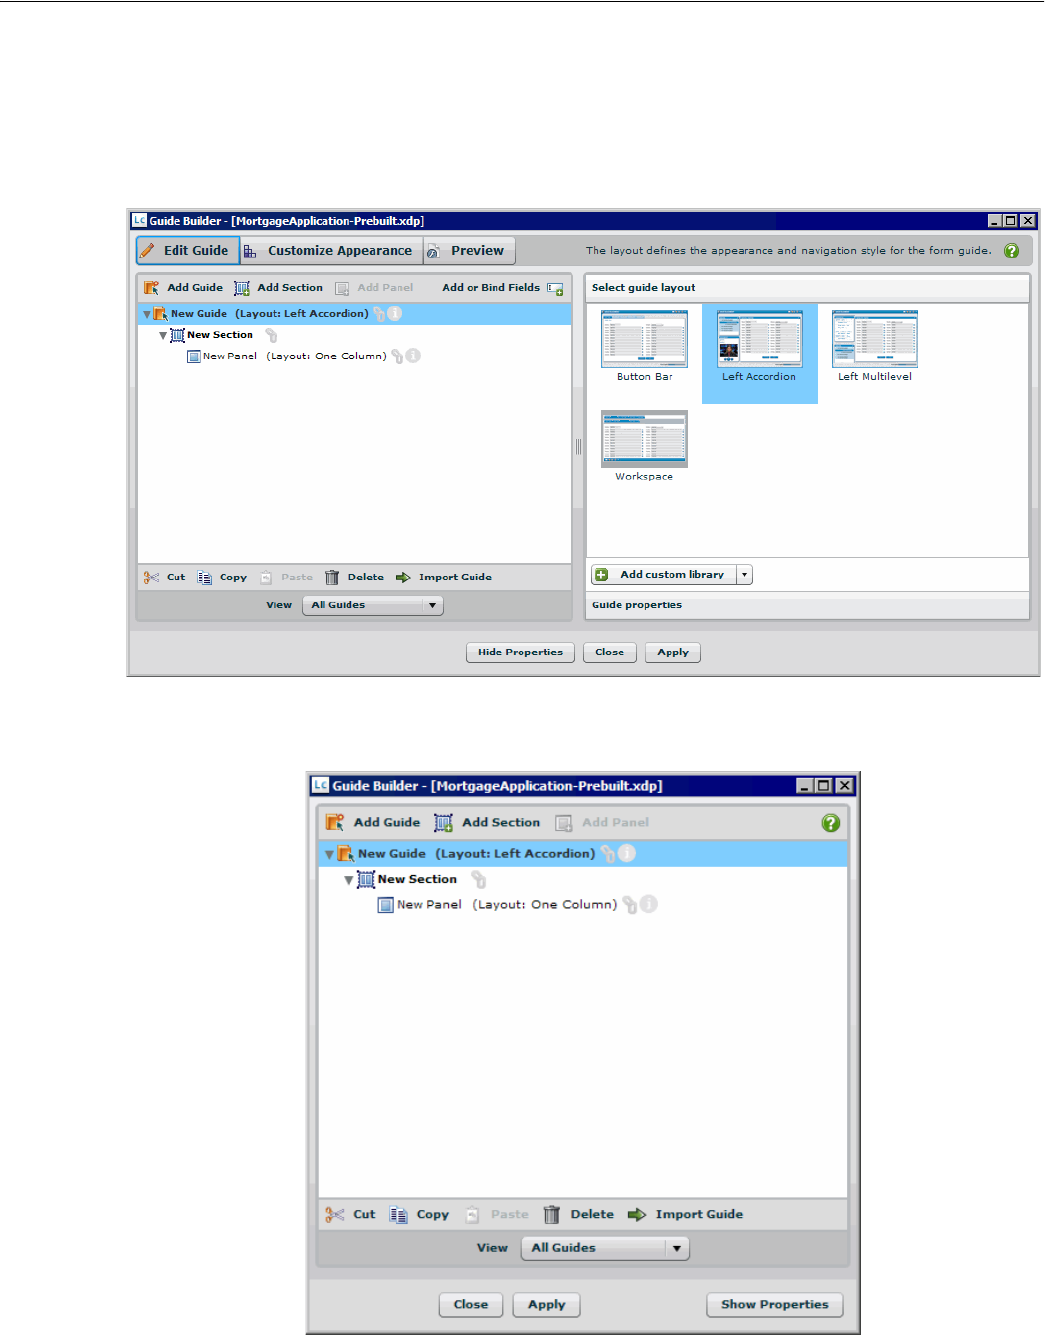
By default, Guide Builder uses the Left Accordion guide layout for the form guide and the One Column
panel layout for all panels within the form guide. The image of the mortgage application example in Step
3: Previewing your form guide illustrates the appearance of these default layouts.
➤To apply a new guide layout:
1. In the Guide Builder expanded view, click Edit Guide.
2. In the form guide hierarchy, select the guide container.
3. If it is not already displayed, click Select Guide Layout.
4. Select a form guide layout.
➤To apply a new panel layout:
1. In the Guide Builder expanded view, click Edit Guide.
2. In the form guide hierarchy, select the panel container whose layout you want to change.
3. If it is not already displayed, click Select Panel Layout.
4. Select a form guide layout.
Form guide properties
At the guide container level, in addition to specifying a guide layout, specify any preferred behaviors for
the form guide, including these behaviors:
●Visual effects that are displayed when the form guide initially renders in a browser
●Visual transitions that appear when navigating through the panels
●Form guide help text
●How data from the form guide is submitted from the form guide itself, from the PDF form, as a printed
PDF, or from a hosted application such as Workspace ES.
Note: If you choose to submit data from the form guide, you do not have to specify the submit button
that will submit the data unless you have defined additional data processing on the submit
button.

Adobe LiveCycle ES Walking Through Creating a New Form Guide
Getting Started with Form Guides Panel properties and display rules 18
➤To view and change form guide properties:
1. In the Guide Builder expanded view, click Edit Guide.
2. In the form guide hierarchy, select the guide container.
3. If it is not already displayed, click Guide Properties.
4. Change form guide properties as necessary.
Panel properties and display rules
At the panel container level, in addition to specifying a panel layout, specify any properties for the panel.
However, unlike guide containers, in addition to properties, you can set certain display rules for panels that
allow them to be displayed only in specific situations. For example, you can specify that a certain panel is
displayed only when a field value is true. You can also create answer-based navigation by specifying
simple questions that appear after a form filler navigates from the current panel to another panel. The
answer-based navigation allows you to control which panel to present to the form filler based on how the
form filler answers the question. For example, asking a form filler whether there is a co-applicant for the
loan can eliminate displaying co-applicant related information.
➤To view and change panel properties and display rules:
1. In the Guide Builder expanded view, click Edit Guide.
2. In the form guide hierarchy, select a panel container.
3. Click Set Panel Properties and change any of the panel properties.
4. Click Specify Panel Display Rules, select Use Display Rules, and add any display rules.
5. Click Specify Answer-Based Navigation and add any questions.
Visual appearance
Using Guide Builder, you can set the color schemes for all aspects of a form guide, including these:
●Form guide borders and backgrounds
●Form guide help and panel help
●Panel borders and backgrounds
●Buttons
●All levels of the form guide navigation tree
●Progress bar
●Colors and fonts of all form guide text
Note: Guide Builder resets all form guide style information if you select a new form guide layout. You must
save your style information in either a CSS file or a SWC file to reuse or share the information.
➤To customize the visual appearance of your form guide:
1. In the Guide Builder expanded view, click Customize Appearance.

Adobe LiveCycle ES Walking Through Creating a New Form Guide
Getting Started with Form Guides Step 5: Saving your form guide 19
2. Browse through the following accordion menus and change any color and font options:
●Customize Guide, Logo, And Progress Bar
●Customize Panels
●Customize Field And Text
●Customize Buttons and Repeater Layouts
●Customize Navigation
When you make changes to the visual appearance of your form guide, before you can apply your form
guide changes or return to your form guide hierarchy, you will be prompted to save your form guide style
changes. For more information, see “Step 5: Saving your form guide” on page 19.
Step 5: Saving your form guide
If you have not made any style changes, you can save your form guide at any time by clicking Apply. This
action stores the form guide information within the original form design.
Note: Even after you have applied your form guide to the original form design, you must also save the
original form design in Designer ES to save your form guide for future design sessions.
When you make changes by using the Customize Appearance view in Guide Builder, you must save your
style changes before applying your form guide changes or returning to the form guide hierarchy. All style
information is saved in an external SWC file which must be stored and deployed with the form design that
contains the form guide.
After you save your form guide, close Guide Builder and save your form design in Designer ES.
Next steps
After you create a form guide, you must render and deploy it to your users. Using a Form Guide in
Workspace ES discusses rendering and deploying form guides to your users by using processes created in
Workbench ES.
For more information, see the Form Guides Documentation Roadmap in the section Additional
information.

20
4Using a Form Guide in Workspace ES
This section introduces you to the steps involved in rendering and deploying form guides to Workspace ES
by using a process created in Workbench ES. This section only briefly introduces the form guide rendering
and deployment options that are available. For more information, see LiveCycle Workbench ES Help at
http://www.adobe.com/go/learn_lc_workbench.
Prerequisites
It is assumed that you have already created your first LiveCycle ES application using Creating Your First
LiveCycle ES Application or that you are already familiar with creating a process diagram.
In addition, you must have completed these tasks before you precede with this walk-through:
●Installed and configured Workbench ES, where you will create the process.
●Acquired access to Workspace ES with the appropriate permissions.
●Created a form guide from an existing form design using Guide Builder, a tool within Designer ES.
Guide Builder includes a default form guide layout called Workspace that is configured to present a
form guide in a way that is visually consistent with the Workspace ES interface. For more information
about creating a form guide, see Walking Through Creating a New Form Guide.
Example form design
Throughout this section, you will use a mortgage application form as an example. The mortgage
application form design illustrates an electronic form that is based on an original paper form. For more
information about the mortgage application example form design, see Walking Through Creating a New
Form Guide.
Getting started
Before you can begin to create a process that incorporates a form guide, you must ensure that you have
completed the following tasks:
●Added the form design that contains your form guide and the form design asset files, such as your SWC
file and associated image files, to the LiveCycle ES repository. For more information, see Adding your
form design and assets to the repository.
●Imported the LiveCycle ES samples as part of the LiveCycle ES installation. To complete this chapter,
you must use the Render Form Guide and Submit Form Guide processes located in the Samples - Forms
category in Workbench ES.
Adding your form design and assets to the repository
To include a form guide in a process, you must first add the associated form design and its assets to the
LiveCycle ES repository. Assets include image files used on the form design, even if they are embedded
into the form design, associated schema files, and form guide style information saved in a SWC file. Your
form design and its asset files must exist within the repository in the same relative folder structure as they
did when the form design was created. For example, if you stored the form guide style information in

Adobe LiveCycle ES Using a Form Guide in Workspace ES
Getting Started with Form Guides Creating a new process to deploy a form guide 21
either a CSS file or a SWC file that existed in the same folder as the form design, both files must exist in the
same folder in the repository.
➤To add your form design and assets to the LiveCycle ES repository:
1. Start Workbench ES.
2. Select File > Login and log in to LiveCycle ES.
3. In Workbench ES, select the Resources view. If the Resources view is not displayed, select Window >
Show Views > Resources.
4. (Optional) To create a folder or folders to store your form design and its assets, in the Resources view,
right-click and select New Folder, type a unique name for the folder, and then click OK.
5. Drag your form design from the location on your local file system into the Resources view and place it
in the appropriate location.
6. Repeat Step 5 for all asset files associated with the form design.
After the form design and associated assets are added to the repository, users can make changes by using
the stand-alone version of Designer ES and dragging the updated files into the repository, or by using the
Adobe Form Design perspective within Workbench ES.
Creating a new process to deploy a form guide
After you complete all of the steps in the Getting started section, you are ready to create a simple process
that you can deploy to Workspace ES. In this example, you will create a process that renders a form guide
to a user in Workspace ES and then routes the submitted form guide back to the user who initiated the
process.
In general, to create a process that deploys a form guide, you must complete the following tasks:
●Drawing a process diagram
●Creating an xfaForm variable
●Updating your process to use the xfaForm variable
●Activating your process
When you have finished creating your process, you must configure it using LiveCycle Administration
Console to make it available in Workspace ES.
Drawing a process diagram
A process diagram is the visual representations of the business process that is being automated. For the
purposes of this walk-through, we are using a simple example of a process diagram that has a single
operation that assigns everything back to the user who initiated the process within Workspace ES.
For more information about constructing process diagrams, see “Creating Processes” in
LiveCycle Workbench ES Help.
➤To construct a new process diagram:
1. Select File > New > New Process.

Adobe LiveCycle ES Using a Form Guide in Workspace ES
Getting Started with Form Guides Creating an xfaForm variable 22
2. Ensure that Create A New Process is selected and click Next.
3. Assign the process a unique name, category, and description, and then click Finish. For example, using
the Mortgage Application form, type the following values:
Name: Mortgage Application - Prebuilt
Category: Mortgage Application
Description: Mortgage application process for the prebuilt example
4. Click Finish.
5. In the Services view, select Process Management > User and drag the Assign Task operation into
your process diagram.
6. In the Properties view, expand the General section and assign the operation a unique name. For
example, type Fill and submit the mortgage application form guide as the name.
7. In the Properties view, expand the Initial User Selection section and select Assign To Process
Creator.
8. Save your process diagram.
After you have created your process diagram, you must create and configure a new xfaForm variable for
the operation in your process. For more information, see Creating an xfaForm variable.
Creating an xfaForm variable
When you implement your process, you create a variable of type xfaForm to point to the form you want to
use in your process. The xfaForm variable specifies the form design you want to render as a form guide,
and also specifies the processes that will be used to render the form guide and handle the data submission
in Workspace ES
For more information about xfaForm variables, see “Creating xfaForm variables” in LiveCycle Workbench ES
Help.
➤To create an xfaForm variable for your process:
1. Select the process you created in the section Drawing a process diagram.
2. In the Variables view, click Create New Variable .
3. Assign the variable a unique name, title, and description. For example, you could use the following
values:
Name: fgVar
Title: Mortgage Application Variable
Description: Mortgage application xfaForm variable.
4. In the Type list select xfaForm.
5. In the General section, select Required and select Input.
6. In the DataType Specific Settings section, type the LiveCycle ES repository folder path and file name
of the form design to include in your process.

Adobe LiveCycle ES Using a Form Guide in Workspace ES
Getting Started with Form Guides Updating your process to use the xfaForm variable 23
7. Click Advanced Settings, click Browse, select the invoke operation of the Render Form Guide process
located in the Samples - Forms category, and then click OK.
8. In the Service Input section, do the following tasks:
●For the formUrl parameter, select task from the first list and select Form URL from the second list.
●For the inDocData parameter, select task from the first list and select Form Data from the second
list.
●For the targetURL parameter, select Custom Configuration from the first list and select targetUrl
from the second list.
●For the userAgent parameter, select Custom Configuration from the first list and select
userAgent from the second list.
9. In the Service Output section, do the following tasks:
●For the outFormDoc parameter, select task from the first list and then Document from the second
list.
10. Click the Submit Service tab, click Enable Submit Service, click Browse, select the invoke operation
of the Submit Form Guide process located in the Samples - Forms category, and then click OK.
11. In the Service Input section, do the following tasks:
●For the document parameter, select task from the first list and select Submitted Content from the
second list.
●For the environmentBuffer parameter, select Custom Configuration from the first list and select
environmentBuffer from the second list.
●For the targetUrl parameter, select Custom Configuration from the first list and select targetUrl
from the second list.
●For the userAgent parameter, select Custom Configuration from the first list and select
userAgent from the second list.
12. In the Service Output section, do the following tasks:
●For the outputDocument parameter, select task from the first list and select Form Data from the
second list.
13. Click OK, and then click OK again.
After you have created your xfaForm variable, you must configure your process to use the new variable for
data mapping. For more information, see Updating your process to use the xfaForm variable.
Updating your process to use the xfaForm variable
After you have created the xfaForm variable, you must update the operation in your process diagram to
use the variable for input and output data mapping.
Caution: If you do not configure your operation to use the xfaForm variable for data mapping,
unexpected results may occur in Workspace ES when a form is submitted.
➤To assign the xfaForm variable for input and output data mapping:
1. Select the operation in the process diagram you created in the section Drawing a process diagram.

Adobe LiveCycle ES Using a Form Guide in Workspace ES
Getting Started with Form Guides Activating your process 24
2. In the Properties view, expand the Form Data Mappings section and type the path to your xfaForm
variable in the Input Form Variable and Output Form Data fields. For example, you can assign the
following values:
Input Form Variable: /process_data/fgVar
Output Form Data: /process_data/fgVar
3. Save your process diagram.
At this point, all that remains is to activate your process to make it available to Workspace ES. For more
information, see Activating your process.
Activating your process
The last step in creating your process is to make it available to Workspace ES by activating it in
Workbench ES. For your process to work correctly, the render and submit processes you specified in the
Creating an xfaForm variable section must also be activated in Workbench ES. If they are not, activate
them by following the procedure below.
➤To activate your process:
●In the Processes view, right-click your process and select Activate.
Deploying a process to Workspace ES using Archive Administration
After you finish creating your process, you must create a new Workspace ES category and set an endpoint
using Archive Administration.
For more information about using Archive Administration, see Archive Administration Help in LiveCycle
Administration Console.
➤To create Workspace ES category and endpoints using Archive Administration:
1. Start LiveCycle Administration Console and log in using administrator privileges. By default, the URL of
the LiveCycle Administration Console is http://servername:8080/adminui/.
2. From the Home page, click Services > Archive Administration > Category Management.
3. Click Add .
4. Type a unique category name and a description. For example, you could use the following values:
Name: Mortgage Application
Description: A prebuilt form guide mortgage application example.
5. Return to Archive Administration and click Service Management.
6. Locate your process and select it from the list.
7. On the Configure Mortgage Application - Prebuilt page, click the End Points tab and select
TaskManager from the list.
8. Click Add.

Adobe LiveCycle ES Using a Form Guide in Workspace ES
Getting Started with Form Guides Testing in Workspace ES 25
9. Type a unique endpoint name, a description, and any task instructions. For example, you could use the
following values:
Name: Mortgage Application - Prebuilt
Description: A prebuilt example of a mortgage application form guide.
Task Instructions: Fill and submit the mortgage application form.
Categorization: Mortgage Application
Operation Name: invoke
10. In the Categorization list, select the category you created in Step 6 and, in the Operation Name list,
select invoke.
11. Click Add.
12. Click the Security tab and click Add Principal.
13. Select the entry named All Principals, select the INVOKE_PERM permission, and then click Add.
The process is now available for all users to initiate from within Workspace ES.
Testing in Workspace ES
When a process is available in Workspace ES, users can initiate the process and test to verify that process
routing, form guide rendering, and data handling are working correctly. To view a form guide in
Workspace ES, users must be members of the Workspace ES role. For information about adding users to
the Workspace ES role, see LiveCycle Workbench ES Help.
➤To test your form guide using Workspace ES:
1. Start Workspace ES and log in.
2. Click Start Process.
3. Select the new category you created and click the corresponding process. For example, select the
Mortgage Application category and click the Mortgage Application - Prebuilt process.
The form guide renders on the Form tab within Workspace ES.
4. Fill out the form guide and then click Complete.
5. In Workspace ES, click To Do.
6. Click the form in the process, verify that the data you entered appears correctly, and then click
Complete.
Next steps
To learn more about additional documentation related to form guides, see the Form Guides
Documentation Roadmap in the section Additional information.

26
5Customizing Form Guides Using Flex Builder
Guide Builder in Designer ES provides a number of ways for you to customize the appearance and
behavior of form guides. However, advanced developers can choose to customize their form guides in the
following ways:
●Creating custom CSS files that you can import into Guide Builder to quickly update form guide styles
and easily share styles across multiple form guides.
●Creating custom form guide layouts, panel layouts, and controls by using Flex Builder. Flex Builder is an
open-source integrated development environment (IDE) built on the Eclipse workbench.
Note: Creating customized form guide layouts, panel layouts, and controls is optional. Only advanced
users who have a thorough knowledge of Flex Builder should attempt to modify form guide
components in Flex Builder.
For more information about customizing form guides by using a CSS file or Flex Builder, see Customizing
Form Guides at www.adobe.com/go/learn_lc_fgCustomizing.
For more information about using Flex Builder, go to www.adobe.com/go/learn_lc_Flex.

27
Index
A
ActionScript 26
activating a process 24
Adobe Flash 9
Adobe LiveCycle Designer ES 10
Adobe LiveCycle Forms ES 10
Adobe LiveCycle Workbench ES 10
Adobe LiveCycle Workspace ES 10
B
binding field captions to text objects 15
C
controls 6, 10
creating
form guides 11
process diagrams 21
xfaForm variables 22
creating form guides 9
creating new form guides 10
CSS files 6
custom CSS files 10
customizing form guides
guide and panel layouts 17
using Flex Builder 26
D
deploying a form guide 20
deploying a form guide, process 21
deploying form guides 9, 10
display rules 18
documentation, related 4
F
Flex Builder 26
form guide hierarchy 14
form guide layouts 10
form guide properties 17
form guides
about 6
creating 10
customizing 26
deploying 10
rendering 10
G
guide 14
Guide Builder 10
default view 12
simplified view 12
H
hierarchy, form guide 14
HTML transformation 10
I
information resources 4
L
layouts 6
libraries, SWC 10
linking 15
LiveCycle ES. See Adobe entries
P
panel 14
panel display rules 18
panel properties 18
panels 6, 10
PDF transformation 10
previewing 16
process diagram, creating 21
properties
form guide 17
panel 18
R
renderForm operation 10
rendering a form guide 20
rendering form guides 9, 10
repository, adding a form guide 20
S
saving a form guide 19
section 14
sections 6
starting Guide Builder 12
SWC libraries 10
SWF 9
T
testing a form guide in Workspace ES 25
U
using a form guide in Workspace ES 20
X
xfaForm variables
creating 22
using in processes 23
