Adobe Acrobat 8 Professional User Guide 8.0 Pro En
User Manual: adobe Acrobat - 8.0 Professional - User Guide Free User Guide for Adobe Acrobat Reader Software, Manual
Open the PDF directly: View PDF ![]() .
.
Page Count: 585 [warning: Documents this large are best viewed by clicking the View PDF Link!]
- Contents
- Chapter 1: Before you begin
- Chapter 2: Workspace
- Quickstart
- Work area basics
- Customizing the work area
- Viewing PDF pages
- Open a PDF
- Opening pages in a PDF
- Page through a document
- View, sort, and search components in a PDF package
- Automatically scroll through a document
- Retrace your viewing path
- Change the PDF/A viewing mode
- Navigate with links
- PDFs with file attachments
- Open or close reading mode
- View PDFs in Full Screen mode
- Viewing PDFs in a web browser
- Read articles
- Preferences for viewing PDFs
- Adjusting PDF views
- Grids, guides, and measurements
- Saving PDFs
- Organizer
- Maintaining the software
- Non-English languages
- Chapter 3: Creating PDFs
- Quickstart
- Overview of creating PDFs
- Creating simple PDFs with Acrobat
- Using the Adobe PDF printer
- Creating PDFs with PDFMaker
- Application-specific features of PDFMaker
- Convert email messages to PDFs (Windows)
- Migrating old Outlook PDF archives to PDF packages (Windows)
- Migrate old Outlook PDF archives to PDF packages (Windows)
- Set up automatic email archiving (Windows)
- Create PDFs from Word mail merges
- PDFs from Microsoft Project, Publisher, and Access (Windows)
- Convert Visio files to PDF (Windows)
- Convert AutoCAD files to PDF (Windows)
- Application-specific PDFMaker settings
- Settings for a single conversion for Office 2007 applications
- Converting web pages to PDF
- Creating PDFs with Acrobat Distiller
- Adobe PDF conversion settings
- Fonts
- Chapter 4: Combining PDF content
- Chapter 5: Exporting PDFs
- Chapter 6: Review and comment
- Quickstart
- Preparing for a PDF review
- Starting and managing a review
- Meetings
- Participating in a PDF review
- Tracking PDF reviews
- Commenting
- Commenting and markup tools overview
- Commenting preferences
- Change the look of your comments
- Add a sticky note
- Mark up text with edits
- Highlight, cross out, or underline text
- Stamp a document
- Create a custom stamp
- Add a line, arrow, or shape
- Group and ungroup markups
- Add comments in a text box or callout
- Add an audio comment
- Add comments in a file attachment
- Paste images as comments
- Managing comments
- Importing and exporting comments
- Approval workflows
- Chapter 7: Forms
- Quickstart
- Forms basics
- Filling in PDF forms
- Submitting forms
- Planning a PDF form
- Creating and editing forms
- Laying out new form fields
- Form fields behaviors
- About Acrobat form field properties
- Modify form field properties in Acrobat
- General tab for form field properties
- Appearance tab for form field properties
- Options tab for form field properties
- Actions tab for form field properties
- Calculate tab for form field properties
- Set the calculation order of form fields
- Signed tab for form field properties
- Format tab for form field properties
- Validation tab for form field properties
- Value tab for form field properties
- Manage custom barcode settings
- Redefine form field property defaults
- Setting action buttons in Acrobat
- Distributing forms
- Publishing interactive web forms
- Collecting and managing form data
- Chapter 8: Security
- Chapter 9: Digital signatures
- Chapter 10: Accessibility, tags, and reflow
- Accessibility features
- Checking the accessibility of PDFs
- Reading PDFs with reflow and accessibility features
- Creating accessible PDFs
- Making existing PDFs accessible
- Add tags to an existing PDF
- About the Add Tags Report
- TouchUp Reading Order tool overview
- Check and correct reading order
- Edit tags with the TouchUp Reading Order tool
- Edit tags for figures and tables
- Remove or replace document structure tags
- Add accessible links
- Set the document language
- Prevent security settings from interfering with screen readers
- About watermarks and screen readers
- Editing document structure with the Content and Tags tabs
- Chapter 11: Editing PDFs
- Chapter 12: Searching and indexing
- Chapter 13: Movies, sounds, and 3D models
- Movies and sounds
- Adding 3D models to PDFs
- Interacting with 3D models
- Displaying 3D models
- 3D toolbar overview
- Examples of model rendering modes
- Editing 3D models
- Change rendering mode, lighting, projection, and background
- Model Tree overview
- Hide, isolate, and change the appearance of parts
- Create cross sections
- Measure 3D objects
- Measuring preferences
- Set 3D views
- 3D preferences
- Comment on 3D designs
- Run a JavaScript
- Chapter 14: Color management
- Understanding color management
- Keeping colors consistent
- Color-managing imported images
- Color-managing documents for online viewing
- Proofing colors
- Color-managing documents when printing
- Working with color profiles
- About color profiles
- About monitor calibration and characterization
- Calibrate and profile your monitor
- Install a color profile
- Embed a color profile
- Embed a color profile (Acrobat)
- Changing the color profile for a document
- Assign or remove a color profile (Illustrator, Photoshop)
- Assign or remove a color profile (InDesign)
- Convert document colors to another profile (Photoshop)
- Convert document colors to another profile
- Color settings
- Chapter 15: Printing
- Quickstart
- Basic printing tasks
- Other ways to print PDFs
- Printing custom sizes
- Advanced print settings
- About PPD files
- Select a PPD file
- About advanced print settings
- Set advanced print options
- PostScript options
- Downloading Asian fonts to a printer
- Output options
- About halftone screen frequency
- Specify halftone screen frequency
- About emulsion and image exposure
- Specify the emulsion and image exposure
- Include marks and bleeds
- Printing color
- Chapter 16: Print production tools
- Chapter 17: Preflight
- Chapter 18: JDF instructions
- Chapter 19: Adobe Version Cue
- Using Adobe Version Cue
- Working with Version Cue projects
- Working with files in Version Cue
- Disconnecting from projects
- Deleting files, folders, and projects
- Version Cue versions
- Editing and synchronizing offline files
- The Version Cue Administration utility
- Creating, editing, and managing projects in Version Cue Administration
- Working with users and privileges
- Viewing logs, reports, and workspace information
- Version Cue PDF reviews
- Chapter 20: Keyboard shortcuts
- Index

USER GUIDE
© 2007 Adobe Systems Incorporated. All rights reserved.
Adobe® Acrobat® 8 Professional for Windows® and Mac OS
If this guide is distributed with software that includes an end user agreement, this guide, as well as the software described in it, is furnished under license and may be used or
copied only in accordance with the terms of such license. Except as permitted by any such license, no part of this guide may be reproduced, stored in a retrieval system, or trans-
mitted, in any form or by any means, electronic, mechanical, recording, or otherwise, without the prior written permission of Adobe Systems Incorporated.Pleasenotethatthe
content in this guide is protected under copyright law even if it is not distributed with software that includes an end user license agreement.
Thecontentofthis guideisfurnishedforinformational useonly, is subjecttochangewithoutnotice,andshouldnotbeconstruedas acommitmentbyAdobe Systems Incorpo-
rated. Adobe Systems Incorporated assumes no responsibility or liability for any errors or inaccuracies that may appear in the informational content contained in this guide.
Please remember that existing artwork or images that you may want to include in your project may be protected under copyright law. The unauthorized incorporation of such
material into your new work could be a violation of the rights of the copyright owner. Please be sure to obtain any permission required from the copyright owner.
Any references to company names in sample templates or images are for demonstration purposes only and are not intended to refer to any actual organization.
Adobe, the Adobe logo, Acrobat, Acrobat Capture, Acrobat Connect, Breeze, Creative Suite, Distiller, Flash, FrameMaker, FreeHand, GoLive, Illustrator, InCopy, InDesign,
LiveCycle, Photoshop, PostScript, PostScript 3, Reader, and Version Cue are either registered trademarks or trademarks of Adobe Systems Incorporated in the United States
and/or other countries.
Apple, Mac and Macintosh are trademarks of Apple Inc., registered in the United States and other countries. Microsoft, MS-DOS, OpenType, Vista, and Windows are either regis-
tered trademarks or trademarks of Microsoft Corporation in the United States and/or other countries. UNIX is a registered trademark op The Open Group in the US and other
countries. Helvetica and Times are trademarks of Heidelberger Druckmaschinen AG exclusively licensed through Linotype Library GmbH, and may be registered in certain juris-
dictions. All other trademarks are the property of their respective owners.
The Spelling portion of this product is based on Proximity Linguistic Technology. © Copyright 1989, 2004 All Rights Reserved Proximity Technology A Division of Franklin
Electronic Publishers, Inc. Burlington, New Jersey USA. © Copyright 1990 Merriam-Webster Inc. © Copyright 1990 All Rights Reserved Proximity Technology A Division of
Franklin Electronic Publishers, Inc. Burlington, New Jersey USA. © Copyright 2003, 2004 Franklin Electronic Publishers, Inc. © Copyright 2003, 2004 All Rights Reserved
Proximity Technology A Division of Franklin Electronic Publishers, Inc. Burlington, New Jersey USA. © Copyright 1991 Dr. Lluis de Yzaguirre I Maura. © Copyright 1991 All
Rights Reserved Proximity Technology A Division of Franklin Electronic Publishers, Inc. Burlington, New Jersey USA. © Copyright 1990 Munksgaard International Publishers
Ltd. © Copyright 1990 All Rights Reserved Proximity Technology A Division of Franklin Electronic Publishers, Inc. Burlington, New Jersey USA. © Copyright 1990, 1995 Van
Dale Lexicografie bv © Copyright 1990, 1996 All Rights Reserved Proximity Technology A Division of Franklin Electronic Publishers, Inc. Burlington, New Jersey USA. ©
Copyright 1990, 2004 IDE a.s. © Copyright 1990, 2004 All Rights Reserved Proximity Technology A Division of Franklin Electronic Publishers, Inc. Burlington, New Jersey USA.
© Copyright 1992 Hachette / Franklin Electronic Publishers, Inc. © Copyright 2004 All Rights Reserved Proximity Technology A Division of Franklin Electronic Publishers, Inc.
Burlington, New Jersey USA. © Copyright 1991 Text & Satz Datentechnik © Copyright 1991 All Rights Reserved Proximity Technology A Division of Franklin Electronic
Publishers, Inc. Burlington, New Jersey USA. © Copyright 2004 Bertelsmann Lexikon Verlag © Copyright 2004 All Rights Reserved Proximity Technology A Division of Franklin
Electronic Publishers, Inc. Burlington, New Jersey USA. © Copyright 2004 MorphoLogic Inc. © Copyright 2004 All Rights Reserved Proximity Technology A Division of Franklin
Electronic Publishers, Inc. Burlington, New Jersey USA. © Copyright 1990 William Collins Sons & Co. Ltd. © Copyright 1990 All Rights Reserved Proximity Technology A
Division of Franklin Electronic Publishers, Inc. Burlington, New Jersey USA. © Copyright 1993, 1994, 1995 Russicon Company Ltd. © Copyright 1995 All Rights Reserved
Proximity Technology A Division of Franklin Electronic Publishers, Inc. Burlington, New Jersey USA.
Portions of Adobe Acrobat include technology used under license from Autonomy and are copyrighted.
This product contains either BISAFE and/or TIPEM software by RSA Data Security, Inc.
e_Db is a licensed product from Simple Software Solutions, Inc.
Adobe Systems Incorporated, 345 Park Avenue, San Jose, California 95110, USA.
Notice to U.S. Government End Users. The Software and Documentation are “Commercial Items,” as that term is defined at 48 C.F.R. §2.101, consisting of “Commercial
Computer Software” and “Commercial Computer Software Documentation,” as such terms are used in 48 C.F.R. §12.212 or 48 C.F.R. §227.7202, as applicable. Consistent with
48 C.F.R. §12.212 or 48 C.F.R. §§227.7202-1 through 227.7202-4, as applicable, the Commercial Computer Software and Commercial Computer Software Documentation are
being licensed to U.S. Government end users (a) only as Commercial Items and (b) with only those rights as are granted to all other end users pursuant to the terms and conditions
herein. Unpublished-rights reserved under the copyright laws of the United States. Adobe agrees to comply with all applicable equal opportunity laws including, if appropriate,
the provisions of Executive Order 11246, as amended, Section 402 of the Vietnam Era Veterans Readjustment Assistance Act of 1974 (38 USC 4212), and Section 503 of the
Rehabilitation Act of 1973, as amended, and the regulations at 41 CFR Parts 60-1 through 60-60, 60-250, and 60-741. The affirmative action clause and regulations contained in
the preceding sentence shall be incorporated by reference.

iii
Contents
Chapter 1: Before you begin
Installation . . . . . . . . . . . . . . . . . . . . . . . . . . . . . . . . . . . . . . . . . . . . . . . . . . . . . . . . . . . . . . . . . . . . . . . . . . . . . . . 1
Using Adobe Help . . . . . . . . . . . . . . . . . . . . . . . . . . . . . . . . . . . . . . . . . . . . . . . . . . . . . . . . . . . . . . . . . . . . . . . . 2
Resources . . . . . . . . . . . . . . . . . . . . . . . . . . . . . . . . . . . . . . . . . . . . . . . . . . . . . . . . . . . . . . . . . . . . . . . . . . . . . . . . 4
What’s new . . . . . . . . . . . . . . . . . . . . . . . . . . . . . . . . . . . . . . . . . . . . . . . . . . . . . . . . . . . . . . . . . . . . . . . . . . . . . . . 9
Chapter 2: Workspace
Quickstart . . . . . . . . . . . . . . . . . . . . . . . . . . . . . . . . . . . . . . . . . . . . . . . . . . . . . . . . . . . . . . . . . . . . . . . . . . . . . . . 13
Work area basics . . . . . . . . . . . . . . . . . . . . . . . . . . . . . . . . . . . . . . . . . . . . . . . . . . . . . . . . . . . . . . . . . . . . . . . . . 15
Customizing the work area . . . . . . . . . . . . . . . . . . . . . . . . . . . . . . . . . . . . . . . . . . . . . . . . . . . . . . . . . . . . . . . 19
Viewing PDF pages . . . . . . . . . . . . . . . . . . . . . . . . . . . . . . . . . . . . . . . . . . . . . . . . . . . . . . . . . . . . . . . . . . . . . . 25
Adjusting PDF views . . . . . . . . . . . . . . . . . . . . . . . . . . . . . . . . . . . . . . . . . . . . . . . . . . . . . . . . . . . . . . . . . . . . . 37
Grids, guides, and measurements . . . . . . . . . . . . . . . . . . . . . . . . . . . . . . . . . . . . . . . . . . . . . . . . . . . . . . . . . 42
Saving PDFs . . . . . . . . . . . . . . . . . . . . . . . . . . . . . . . . . . . . . . . . . . . . . . . . . . . . . . . . . . . . . . . . . . . . . . . . . . . . . 45
Organizer . . . . . . . . . . . . . . . . . . . . . . . . . . . . . . . . . . . . . . . . . . . . . . . . . . . . . . . . . . . . . . . . . . . . . . . . . . . . . . . . 47
Maintaining the software . . . . . . . . . . . . . . . . . . . . . . . . . . . . . . . . . . . . . . . . . . . . . . . . . . . . . . . . . . . . . . . . 52
Non-English languages . . . . . . . . . . . . . . . . . . . . . . . . . . . . . . . . . . . . . . . . . . . . . . . . . . . . . . . . . . . . . . . . . . 53
Chapter 3: Creating PDFs
Quickstart . . . . . . . . . . . . . . . . . . . . . . . . . . . . . . . . . . . . . . . . . . . . . . . . . . . . . . . . . . . . . . . . . . . . . . . . . . . . . . . 55
Overview of creating PDFs . . . . . . . . . . . . . . . . . . . . . . . . . . . . . . . . . . . . . . . . . . . . . . . . . . . . . . . . . . . . . . . 58
Creating simple PDFs with Acrobat . . . . . . . . . . . . . . . . . . . . . . . . . . . . . . . . . . . . . . . . . . . . . . . . . . . . . . . 61
Using the Adobe PDF printer . . . . . . . . . . . . . . . . . . . . . . . . . . . . . . . . . . . . . . . . . . . . . . . . . . . . . . . . . . . . . 69
Creating PDFs with PDFMaker . . . . . . . . . . . . . . . . . . . . . . . . . . . . . . . . . . . . . . . . . . . . . . . . . . . . . . . . . . . . 73
Application-specific features of PDFMaker . . . . . . . . . . . . . . . . . . . . . . . . . . . . . . . . . . . . . . . . . . . . . . . . 77
Converting web pages to PDF . . . . . . . . . . . . . . . . . . . . . . . . . . . . . . . . . . . . . . . . . . . . . . . . . . . . . . . . . . . . 88
Creating PDFs with Acrobat Distiller . . . . . . . . . . . . . . . . . . . . . . . . . . . . . . . . . . . . . . . . . . . . . . . . . . . . . . 95
Adobe PDF conversion settings . . . . . . . . . . . . . . . . . . . . . . . . . . . . . . . . . . . . . . . . . . . . . . . . . . . . . . . . . . 99
Fonts . . . . . . . . . . . . . . . . . . . . . . . . . . . . . . . . . . . . . . . . . . . . . . . . . . . . . . . . . . . . . . . . . . . . . . . . . . . . . . . . . . . 113
Chapter 4: Combining PDF content
Quickstart . . . . . . . . . . . . . . . . . . . . . . . . . . . . . . . . . . . . . . . . . . . . . . . . . . . . . . . . . . . . . . . . . . . . . . . . . . . . . . 116
Combining files into PDFs . . . . . . . . . . . . . . . . . . . . . . . . . . . . . . . . . . . . . . . . . . . . . . . . . . . . . . . . . . . . . . . 119
Adding unifying page elements . . . . . . . . . . . . . . . . . . . . . . . . . . . . . . . . . . . . . . . . . . . . . . . . . . . . . . . . . 125
Rearranging pages in a PDF . . . . . . . . . . . . . . . . . . . . . . . . . . . . . . . . . . . . . . . . . . . . . . . . . . . . . . . . . . . . . 135
Chapter 5: Exporting PDFs
Quickstart . . . . . . . . . . . . . . . . . . . . . . . . . . . . . . . . . . . . . . . . . . . . . . . . . . . . . . . . . . . . . . . . . . . . . . . . . . . . . . 140
Exporting PDFs to other file formats . . . . . . . . . . . . . . . . . . . . . . . . . . . . . . . . . . . . . . . . . . . . . . . . . . . . . 142
Reusing PDF content . . . . . . . . . . . . . . . . . . . . . . . . . . . . . . . . . . . . . . . . . . . . . . . . . . . . . . . . . . . . . . . . . . . . 146

iv
Chapter 6: Review and comment
Quickstart . . . . . . . . . . . . . . . . . . . . . . . . . . . . . . . . . . . . . . . . . . . . . . . . . . . . . . . . . . . . . . . . . . . . . . . . . . . . . . 150
Preparing for a PDF review . . . . . . . . . . . . . . . . . . . . . . . . . . . . . . . . . . . . . . . . . . . . . . . . . . . . . . . . . . . . . . 153
Starting and managing a review . . . . . . . . . . . . . . . . . . . . . . . . . . . . . . . . . . . . . . . . . . . . . . . . . . . . . . . . . 157
Meetings . . . . . . . . . . . . . . . . . . . . . . . . . . . . . . . . . . . . . . . . . . . . . . . . . . . . . . . . . . . . . . . . . . . . . . . . . . . . . . . 160
Participating in a PDF review . . . . . . . . . . . . . . . . . . . . . . . . . . . . . . . . . . . . . . . . . . . . . . . . . . . . . . . . . . . . 161
Tracking PDF reviews . . . . . . . . . . . . . . . . . . . . . . . . . . . . . . . . . . . . . . . . . . . . . . . . . . . . . . . . . . . . . . . . . . . 165
Commenting . . . . . . . . . . . . . . . . . . . . . . . . . . . . . . . . . . . . . . . . . . . . . . . . . . . . . . . . . . . . . . . . . . . . . . . . . . . 168
Managing comments . . . . . . . . . . . . . . . . . . . . . . . . . . . . . . . . . . . . . . . . . . . . . . . . . . . . . . . . . . . . . . . . . . . 181
Importing and exporting comments . . . . . . . . . . . . . . . . . . . . . . . . . . . . . . . . . . . . . . . . . . . . . . . . . . . . . 187
Approval workflows . . . . . . . . . . . . . . . . . . . . . . . . . . . . . . . . . . . . . . . . . . . . . . . . . . . . . . . . . . . . . . . . . . . . . 191
Chapter 7: Forms
Quickstart . . . . . . . . . . . . . . . . . . . . . . . . . . . . . . . . . . . . . . . . . . . . . . . . . . . . . . . . . . . . . . . . . . . . . . . . . . . . . . 195
Forms basics . . . . . . . . . . . . . . . . . . . . . . . . . . . . . . . . . . . . . . . . . . . . . . . . . . . . . . . . . . . . . . . . . . . . . . . . . . . . 198
Filling in PDF forms . . . . . . . . . . . . . . . . . . . . . . . . . . . . . . . . . . . . . . . . . . . . . . . . . . . . . . . . . . . . . . . . . . . . . 201
Submitting forms . . . . . . . . . . . . . . . . . . . . . . . . . . . . . . . . . . . . . . . . . . . . . . . . . . . . . . . . . . . . . . . . . . . . . . . 205
Planning a PDF form . . . . . . . . . . . . . . . . . . . . . . . . . . . . . . . . . . . . . . . . . . . . . . . . . . . . . . . . . . . . . . . . . . . . 206
Creating and editing forms . . . . . . . . . . . . . . . . . . . . . . . . . . . . . . . . . . . . . . . . . . . . . . . . . . . . . . . . . . . . . . 212
Laying out new form fields . . . . . . . . . . . . . . . . . . . . . . . . . . . . . . . . . . . . . . . . . . . . . . . . . . . . . . . . . . . . . . 214
Form fields behaviors . . . . . . . . . . . . . . . . . . . . . . . . . . . . . . . . . . . . . . . . . . . . . . . . . . . . . . . . . . . . . . . . . . . 222
Setting action buttons in Acrobat . . . . . . . . . . . . . . . . . . . . . . . . . . . . . . . . . . . . . . . . . . . . . . . . . . . . . . . 232
Distributing forms . . . . . . . . . . . . . . . . . . . . . . . . . . . . . . . . . . . . . . . . . . . . . . . . . . . . . . . . . . . . . . . . . . . . . . 236
Publishing interactive web forms . . . . . . . . . . . . . . . . . . . . . . . . . . . . . . . . . . . . . . . . . . . . . . . . . . . . . . . . 238
Collecting and managing form data . . . . . . . . . . . . . . . . . . . . . . . . . . . . . . . . . . . . . . . . . . . . . . . . . . . . . 241
Chapter 8: Security
Quickstart . . . . . . . . . . . . . . . . . . . . . . . . . . . . . . . . . . . . . . . . . . . . . . . . . . . . . . . . . . . . . . . . . . . . . . . . . . . . . . 244
Opening restricted documents . . . . . . . . . . . . . . . . . . . . . . . . . . . . . . . . . . . . . . . . . . . . . . . . . . . . . . . . . 247
Removing sensitive content . . . . . . . . . . . . . . . . . . . . . . . . . . . . . . . . . . . . . . . . . . . . . . . . . . . . . . . . . . . . 248
Creating or obtaining digital IDs . . . . . . . . . . . . . . . . . . . . . . . . . . . . . . . . . . . . . . . . . . . . . . . . . . . . . . . . . 253
Sharing and managing certificates . . . . . . . . . . . . . . . . . . . . . . . . . . . . . . . . . . . . . . . . . . . . . . . . . . . . . . 258
Directory servers . . . . . . . . . . . . . . . . . . . . . . . . . . . . . . . . . . . . . . . . . . . . . . . . . . . . . . . . . . . . . . . . . . . . . . . 262
Securing PDFs . . . . . . . . . . . . . . . . . . . . . . . . . . . . . . . . . . . . . . . . . . . . . . . . . . . . . . . . . . . . . . . . . . . . . . . . . . 263
Security policies . . . . . . . . . . . . . . . . . . . . . . . . . . . . . . . . . . . . . . . . . . . . . . . . . . . . . . . . . . . . . . . . . . . . . . . . 269
Chapter 9: Digital signatures
Quickstart . . . . . . . . . . . . . . . . . . . . . . . . . . . . . . . . . . . . . . . . . . . . . . . . . . . . . . . . . . . . . . . . . . . . . . . . . . . . . . 274
Digital signatures . . . . . . . . . . . . . . . . . . . . . . . . . . . . . . . . . . . . . . . . . . . . . . . . . . . . . . . . . . . . . . . . . . . . . . . 275
Signing PDFs . . . . . . . . . . . . . . . . . . . . . . . . . . . . . . . . . . . . . . . . . . . . . . . . . . . . . . . . . . . . . . . . . . . . . . . . . . . 278
Validating signatures . . . . . . . . . . . . . . . . . . . . . . . . . . . . . . . . . . . . . . . . . . . . . . . . . . . . . . . . . . . . . . . . . . . . 282
Chapter 10: Accessibility, tags, and reflow
Accessibility features . . . . . . . . . . . . . . . . . . . . . . . . . . . . . . . . . . . . . . . . . . . . . . . . . . . . . . . . . . . . . . . . . . . . 287
Checking the accessibility of PDFs . . . . . . . . . . . . . . . . . . . . . . . . . . . . . . . . . . . . . . . . . . . . . . . . . . . . . . . 290
Reading PDFs with reflow and accessibility features . . . . . . . . . . . . . . . . . . . . . . . . . . . . . . . . . . . . . . 293
Creating accessible PDFs . . . . . . . . . . . . . . . . . . . . . . . . . . . . . . . . . . . . . . . . . . . . . . . . . . . . . . . . . . . . . . . . 299

v
Making existing PDFs accessible . . . . . . . . . . . . . . . . . . . . . . . . . . . . . . . . . . . . . . . . . . . . . . . . . . . . . . . . . 305
Editing document structure with the Content and Tags tabs . . . . . . . . . . . . . . . . . . . . . . . . . . . . . . 314
Chapter 11: Editing PDFs
Quickstart . . . . . . . . . . . . . . . . . . . . . . . . . . . . . . . . . . . . . . . . . . . . . . . . . . . . . . . . . . . . . . . . . . . . . . . . . . . . . . 322
Page thumbnails and bookmarks . . . . . . . . . . . . . . . . . . . . . . . . . . . . . . . . . . . . . . . . . . . . . . . . . . . . . . . . 324
Links and attachments . . . . . . . . . . . . . . . . . . . . . . . . . . . . . . . . . . . . . . . . . . . . . . . . . . . . . . . . . . . . . . . . . . 331
Actions and scripting . . . . . . . . . . . . . . . . . . . . . . . . . . . . . . . . . . . . . . . . . . . . . . . . . . . . . . . . . . . . . . . . . . . 336
Converted web pages . . . . . . . . . . . . . . . . . . . . . . . . . . . . . . . . . . . . . . . . . . . . . . . . . . . . . . . . . . . . . . . . . . . 339
Articles . . . . . . . . . . . . . . . . . . . . . . . . . . . . . . . . . . . . . . . . . . . . . . . . . . . . . . . . . . . . . . . . . . . . . . . . . . . . . . . . . 340
Optimizing . . . . . . . . . . . . . . . . . . . . . . . . . . . . . . . . . . . . . . . . . . . . . . . . . . . . . . . . . . . . . . . . . . . . . . . . . . . . . 343
Editing text and objects . . . . . . . . . . . . . . . . . . . . . . . . . . . . . . . . . . . . . . . . . . . . . . . . . . . . . . . . . . . . . . . . . 347
Setting up a presentation . . . . . . . . . . . . . . . . . . . . . . . . . . . . . . . . . . . . . . . . . . . . . . . . . . . . . . . . . . . . . . . 353
Document properties and metadata . . . . . . . . . . . . . . . . . . . . . . . . . . . . . . . . . . . . . . . . . . . . . . . . . . . . . 356
Layers . . . . . . . . . . . . . . . . . . . . . . . . . . . . . . . . . . . . . . . . . . . . . . . . . . . . . . . . . . . . . . . . . . . . . . . . . . . . . . . . . . 360
Processing in batches . . . . . . . . . . . . . . . . . . . . . . . . . . . . . . . . . . . . . . . . . . . . . . . . . . . . . . . . . . . . . . . . . . . 364
Chapter 12: Searching and indexing
Quickstart . . . . . . . . . . . . . . . . . . . . . . . . . . . . . . . . . . . . . . . . . . . . . . . . . . . . . . . . . . . . . . . . . . . . . . . . . . . . . . 368
Searching PDFs . . . . . . . . . . . . . . . . . . . . . . . . . . . . . . . . . . . . . . . . . . . . . . . . . . . . . . . . . . . . . . . . . . . . . . . . . 369
Creating PDF indexes . . . . . . . . . . . . . . . . . . . . . . . . . . . . . . . . . . . . . . . . . . . . . . . . . . . . . . . . . . . . . . . . . . . 375
Chapter 13: Movies, sounds, and 3D models
Movies and sounds . . . . . . . . . . . . . . . . . . . . . . . . . . . . . . . . . . . . . . . . . . . . . . . . . . . . . . . . . . . . . . . . . . . . . 381
Adding 3D models to PDFs . . . . . . . . . . . . . . . . . . . . . . . . . . . . . . . . . . . . . . . . . . . . . . . . . . . . . . . . . . . . . . 386
Interacting with 3D models . . . . . . . . . . . . . . . . . . . . . . . . . . . . . . . . . . . . . . . . . . . . . . . . . . . . . . . . . . . . . 388
Chapter 14: Color management
Understanding color management . . . . . . . . . . . . . . . . . . . . . . . . . . . . . . . . . . . . . . . . . . . . . . . . . . . . . . 402
Keeping colors consistent . . . . . . . . . . . . . . . . . . . . . . . . . . . . . . . . . . . . . . . . . . . . . . . . . . . . . . . . . . . . . . . 404
Color-managing imported images . . . . . . . . . . . . . . . . . . . . . . . . . . . . . . . . . . . . . . . . . . . . . . . . . . . . . . . 407
Color-managing documents for online viewing . . . . . . . . . . . . . . . . . . . . . . . . . . . . . . . . . . . . . . . . . . 409
Proofing colors . . . . . . . . . . . . . . . . . . . . . . . . . . . . . . . . . . . . . . . . . . . . . . . . . . . . . . . . . . . . . . . . . . . . . . . . . 410
Color-managing documents when printing . . . . . . . . . . . . . . . . . . . . . . . . . . . . . . . . . . . . . . . . . . . . . . 412
Working with color profiles . . . . . . . . . . . . . . . . . . . . . . . . . . . . . . . . . . . . . . . . . . . . . . . . . . . . . . . . . . . . . . 414
Color settings . . . . . . . . . . . . . . . . . . . . . . . . . . . . . . . . . . . . . . . . . . . . . . . . . . . . . . . . . . . . . . . . . . . . . . . . . . . 419
Chapter 15: Printing
Quickstart . . . . . . . . . . . . . . . . . . . . . . . . . . . . . . . . . . . . . . . . . . . . . . . . . . . . . . . . . . . . . . . . . . . . . . . . . . . . . . 424
Basic printing tasks . . . . . . . . . . . . . . . . . . . . . . . . . . . . . . . . . . . . . . . . . . . . . . . . . . . . . . . . . . . . . . . . . . . . . 425
Other ways to print PDFs . . . . . . . . . . . . . . . . . . . . . . . . . . . . . . . . . . . . . . . . . . . . . . . . . . . . . . . . . . . . . . . . 429
Printing custom sizes . . . . . . . . . . . . . . . . . . . . . . . . . . . . . . . . . . . . . . . . . . . . . . . . . . . . . . . . . . . . . . . . . . . 432
Advanced print settings . . . . . . . . . . . . . . . . . . . . . . . . . . . . . . . . . . . . . . . . . . . . . . . . . . . . . . . . . . . . . . . . . 433
Printing color . . . . . . . . . . . . . . . . . . . . . . . . . . . . . . . . . . . . . . . . . . . . . . . . . . . . . . . . . . . . . . . . . . . . . . . . . . . 439

vi
Chapter 16: Print production tools
Quickstart . . . . . . . . . . . . . . . . . . . . . . . . . . . . . . . . . . . . . . . . . . . . . . . . . . . . . . . . . . . . . . . . . . . . . . . . . . . . . . 444
Tools for high-end output . . . . . . . . . . . . . . . . . . . . . . . . . . . . . . . . . . . . . . . . . . . . . . . . . . . . . . . . . . . . . . . 445
Trapping color . . . . . . . . . . . . . . . . . . . . . . . . . . . . . . . . . . . . . . . . . . . . . . . . . . . . . . . . . . . . . . . . . . . . . . . . . . 446
Previewing output . . . . . . . . . . . . . . . . . . . . . . . . . . . . . . . . . . . . . . . . . . . . . . . . . . . . . . . . . . . . . . . . . . . . . . 454
Color conversion and ink management . . . . . . . . . . . . . . . . . . . . . . . . . . . . . . . . . . . . . . . . . . . . . . . . . . 458
Printer marks, cropping, and hairlines . . . . . . . . . . . . . . . . . . . . . . . . . . . . . . . . . . . . . . . . . . . . . . . . . . . . 463
Transparency flattening . . . . . . . . . . . . . . . . . . . . . . . . . . . . . . . . . . . . . . . . . . . . . . . . . . . . . . . . . . . . . . . . . 465
Chapter 17: Preflight
Quickstart . . . . . . . . . . . . . . . . . . . . . . . . . . . . . . . . . . . . . . . . . . . . . . . . . . . . . . . . . . . . . . . . . . . . . . . . . . . . . . 472
Analyzing documents for print readiness . . . . . . . . . . . . . . . . . . . . . . . . . . . . . . . . . . . . . . . . . . . . . . . . 473
Viewing preflight results, objects, and resources . . . . . . . . . . . . . . . . . . . . . . . . . . . . . . . . . . . . . . . . . 476
Preflight reports . . . . . . . . . . . . . . . . . . . . . . . . . . . . . . . . . . . . . . . . . . . . . . . . . . . . . . . . . . . . . . . . . . . . . . . . 480
Advanced inspections . . . . . . . . . . . . . . . . . . . . . . . . . . . . . . . . . . . . . . . . . . . . . . . . . . . . . . . . . . . . . . . . . . 482
Preflight profiles . . . . . . . . . . . . . . . . . . . . . . . . . . . . . . . . . . . . . . . . . . . . . . . . . . . . . . . . . . . . . . . . . . . . . . . . 483
Additional checks . . . . . . . . . . . . . . . . . . . . . . . . . . . . . . . . . . . . . . . . . . . . . . . . . . . . . . . . . . . . . . . . . . . . . . . 488
Correcting problem areas . . . . . . . . . . . . . . . . . . . . . . . . . . . . . . . . . . . . . . . . . . . . . . . . . . . . . . . . . . . . . . . 493
PDF/X- and PDF/A-compliant files . . . . . . . . . . . . . . . . . . . . . . . . . . . . . . . . . . . . . . . . . . . . . . . . . . . . . . . 497
Automating document analysis . . . . . . . . . . . . . . . . . . . . . . . . . . . . . . . . . . . . . . . . . . . . . . . . . . . . . . . . . 499
Output intents . . . . . . . . . . . . . . . . . . . . . . . . . . . . . . . . . . . . . . . . . . . . . . . . . . . . . . . . . . . . . . . . . . . . . . . . . . 500
Chapter 18: JDF instructions
Job definition format (JDF) files . . . . . . . . . . . . . . . . . . . . . . . . . . . . . . . . . . . . . . . . . . . . . . . . . . . . . . . . . . 502
Submitting print jobs . . . . . . . . . . . . . . . . . . . . . . . . . . . . . . . . . . . . . . . . . . . . . . . . . . . . . . . . . . . . . . . . . . . 509
Chapter 19: Adobe Version Cue
Using Adobe Version Cue . . . . . . . . . . . . . . . . . . . . . . . . . . . . . . . . . . . . . . . . . . . . . . . . . . . . . . . . . . . . . . . 512
Working with Version Cue projects . . . . . . . . . . . . . . . . . . . . . . . . . . . . . . . . . . . . . . . . . . . . . . . . . . . . . . 515
Working with files in Version Cue . . . . . . . . . . . . . . . . . . . . . . . . . . . . . . . . . . . . . . . . . . . . . . . . . . . . . . . . 520
Disconnecting from projects . . . . . . . . . . . . . . . . . . . . . . . . . . . . . . . . . . . . . . . . . . . . . . . . . . . . . . . . . . . . 526
Deleting files, folders, and projects . . . . . . . . . . . . . . . . . . . . . . . . . . . . . . . . . . . . . . . . . . . . . . . . . . . . . . 527
Version Cue versions . . . . . . . . . . . . . . . . . . . . . . . . . . . . . . . . . . . . . . . . . . . . . . . . . . . . . . . . . . . . . . . . . . . . 529
Editing and synchronizing offline files . . . . . . . . . . . . . . . . . . . . . . . . . . . . . . . . . . . . . . . . . . . . . . . . . . . 531
The Version Cue Administration utility . . . . . . . . . . . . . . . . . . . . . . . . . . . . . . . . . . . . . . . . . . . . . . . . . . . 533
Creating, editing, and managing projects in Version Cue Administration . . . . . . . . . . . . . . . . . . 538
Working with users and privileges . . . . . . . . . . . . . . . . . . . . . . . . . . . . . . . . . . . . . . . . . . . . . . . . . . . . . . 545
Viewing logs, reports, and workspace information . . . . . . . . . . . . . . . . . . . . . . . . . . . . . . . . . . . . . . . 548
Version Cue PDF reviews . . . . . . . . . . . . . . . . . . . . . . . . . . . . . . . . . . . . . . . . . . . . . . . . . . . . . . . . . . . . . . . . 549
Chapter 20: Keyboard shortcuts
Keyboard shortcuts . . . . . . . . . . . . . . . . . . . . . . . . . . . . . . . . . . . . . . . . . . . . . . . . . . . . . . . . . . . . . . . . . . . . . 554
Index . . . . . . . . . . . . . . . . . . . . . . . . . . . . . . . . . . . . . . . . . . . . . . . . . . . . . . . . . . . . . . . . . . . . . . . . . . . . . . . . . . 561

1
Chapter 1: Before you begin
Installation
Requirements
To review complete system requirements and recommendations for your Adobe® software, see the Read Me file
included with your software.
Install the software
1 Close any other Adobe applications open on your computer.
2 Insert the installation disc into the disc drive, and follow the on-screen instructions.
Note: For more information, see the Read Me file included with your software.
Activate the software
Adobe software may include license management technology to ensure compliance with the product license
agreement. When present, this technology prompts you to verify the license of your product within 30 days after you
first use it. Verification is mandatory.
You may be prompted to activate the software. The verification process doesn’t collect, transmit, or use any infor-
mation about the identity of users. For more information on this topic, see the Read Me file on your installation disc,
or visit the Adobe website at www.adobe.com/go/activation.
1 If the Activation dialog box isn’t already open, choose Help > Activation > Activate.
2 Follow the on-screen instructions.
Note: Ifyouwanttoinstallthesoftwareonadifferentcomputer,youmustfirstdeactivatethesoftwareonyourcomputer:
Choose Help > Activation > Deactivate.
Register
Register your product to receive complimentary installation support, notifications of updates, and other services.
❖ To register, follow the on-screen instructions in the Registration dialog box, which appears after you install and
activate the software.
If you postpone registration, you can register at any time by choosing Help > Registration.
Read Me
The installation disc contains the Read Me file for your software. (This file is also copied to the application folder
during product installation.) Open the file to read important information about the following topics:
• System requirements
• Installation
• Registration
2
ADOBE ACROBAT 8 PROFESSIONAL
User Guide
• Electronic licensing
• Legal notices
Using Adobe Help
Adobe Help resources
Documentation for your Adobe software is available in a variety of formats.
In-product and LiveDocs Help
In-product Help provides access to all documentation and instructional content available at the time the software
ships. It is available through the Help menu in your Adobe software.
LiveDocs Help includes all the content from in-product Help, plus updates and links to additional instructional
content available on the web. For some products, you can also add comments to the topics in LiveDocs Help. Find
LiveDocs Help for your product in the Adobe Help Resource Center, at www.adobe.com/go/documentation.
Most versions of in-product and LiveDocs Help let you search across the Help systems of multiple products. Topics
may also contain links to relevant content on the web or to topics in the Help of another product.
Think of Help, both in the product and on the web, as a hub for accessing additional content and communities of
users. The most complete and up-to-date version of Help is always on the web.
How To topics
The How To topics provide a brief overview of the most common tasks. If you need more information, click the link
at the bottom of the How To topic to view the related Help topic.

3
ADOBE ACROBAT 8 PROFESSIONAL
User Guide
PDF documentation
The in-product Help is also available as an Adobe PDF that is optimized for printing. Other documents, such as
installation guides and white papers, may also be provided as PDFs.
All PDF documentation is available through the Adobe Help Resource Center, at www.adobe.com/go/documen-
tation. To see the PDF documentation included with your software, look in the Documents folder on the installation
or content DVD.
Printed documentation
Printed editions of the in-product Help may be available for purchase in the Adobe Store, at
www.adobe.com/go/store. You can also find books published by Adobe publishing partners in the Adobe Store.
A printed workflow guide is included with all Adobe Creative Suite® 3 products, and stand-alone Adobe products
may include a printed getting started guide.
Note: Printed documentation is not available in all languages.
Using Help in the product
In-product Help isavailablethrough theHelpmenu.AfteryoustarttheAdobeHelpViewer,youcanaccessHelp for
additional Adobe products installed on your computer. Topics may contain links to additional content on the web.
If
t
you search for a phrase, such as “shape tool,” enclose it in quotation marks to see only those topics that include all
he words in the phrase (applies to roman language versions of the software).
Accessibility features
Adobe Help content is accessible to people with disabilities—such as mobility impairments, blindness, and low
vision. In-product Help supports these standard accessibility features:
• The user can change text size with standard context menu commands (Microsoft® Windows®) and standard menu
commands (Apple Mac OS).
• Links are underlined for easy recognition.
• If link text doesn’t match the title of the destination, the title is referenced in the Title attribute of the Anchor tag.
For example, the Previous and Next links include the titles of the previous and next topics.
• Content supports high-contrast mode.
• Images without captions include alternate text.
• Each frame has a title to indicate its purpose.
• Standard HTML tags define content structure for screen reading or text-to-speech tools.
• Style sheets control formatting, so there are no embedded fonts.
Keyboard shortcuts for Help toolbar controls (Windows)
Back button Alt+Left Arrow
Forward button Alt+Right Arrow
Print Ctrl+P
About button Ctrl+I
Help For menu Alt+Down Arrow or Alt+Up Arrow to view Help for another application
4
ADOBE ACROBAT 8 PROFESSIONAL
User Guide
Keyboard shortcuts for Help navigation (Windows)
• To move between panes, press Ctrl+Tab (forward) and Shift+Ctrl+Tab (backward).
• To move through and outline links in a pane, press Tab (forward) or Shift+Tab (backward).
• To activate an outlined link, press Enter.
• To change text size, press Ctrl/Command+plus sign (+) or Ctrl/Command+minus sign (-).
Resources
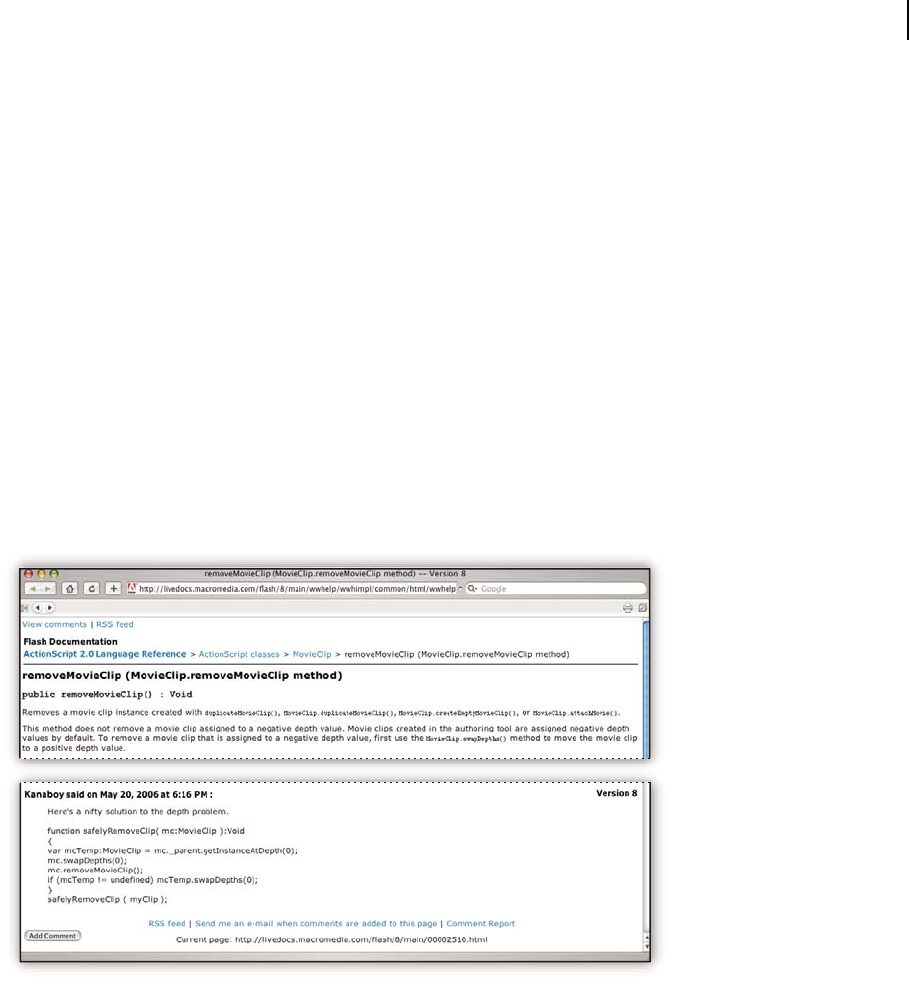
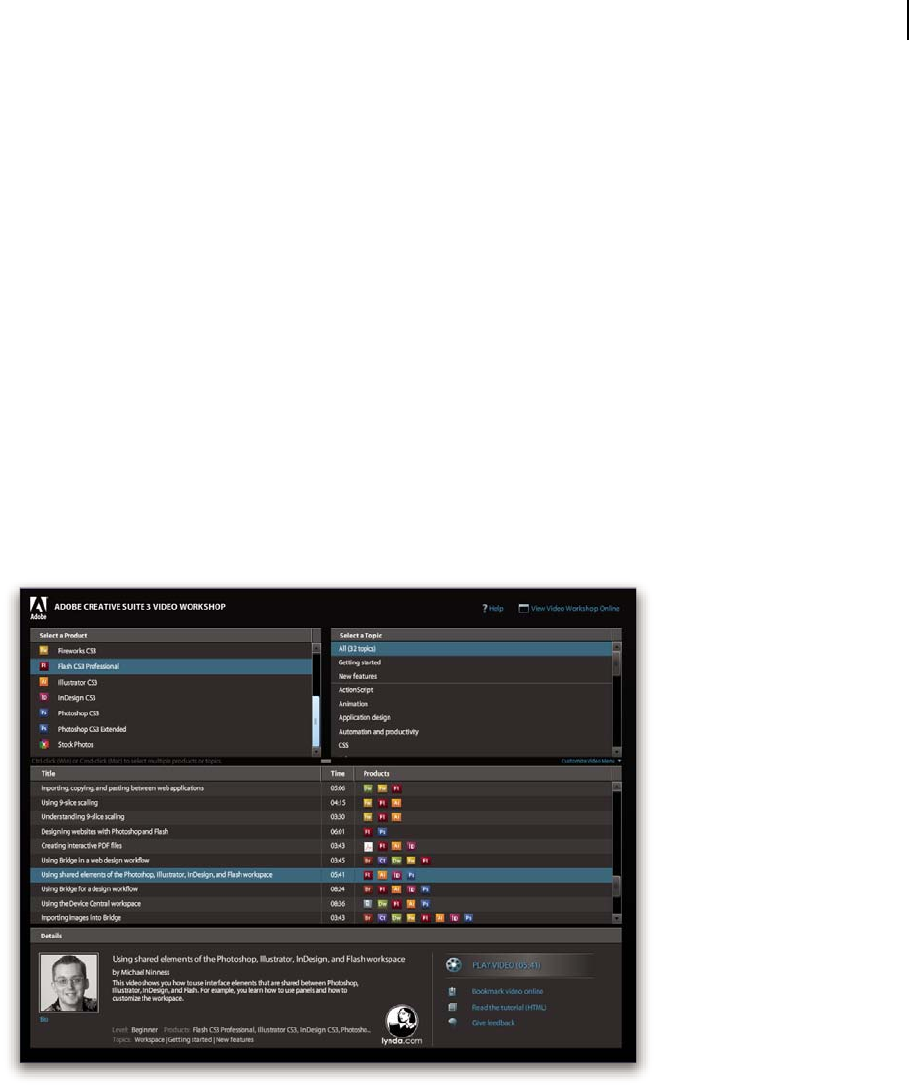
Adobe Video Workshop
Adobe Creative Suite 3 Video Workshop offers over 200 training videos covering a wide range of subjects for print,
web, and video professionals.
You can use Adobe Video Workshop to learn about any Creative Suite 3 product. Many videos show you how to use
Adobe applications together.
Note: Adobe Video Workshop is not available in all languages.
5
ADOBE ACROBAT 8 PROFESSIONAL
User Guide
When you start Adobe Video Workshop, you choose the products you want to learn and the subjects you want to
view. You can see details about each video to focus and direct your learning.
Community of presenters
With this release, Adobe Systems invited the community of its users to share their expertise and insights. Adobe and
lynda.com present tutorials, tips, and tricks from leading designers and developers such as Joseph Lowery, Katrin
Eismann, and Chris Georgenes. You can see and hear Adobe experts such as Lynn Grillo, Greg Rewis, and Russell
Brown. In all, over 30 product experts share their knowledge.
Tutorials and source files
Adobe Video Workshop includes training for novices and experienced users. You’ll also find videos on new features
and key techniques. Each video covers a single subject and typically runs about 3-5 minutes. Most videos come with
an illustrated tutorial and source files, so you can print detailed steps and try the tutorial on your own.
Using Adobe Video Workshop
Youcan access AdobeVideoWorkshop usingtheDVDincludedwithyourCreativeSuite 3product.It’salsoavailable
online at www.adobe.com/go/learn_videotutorials. Adobe will regularly add new videos to the online Video
Workshop, so check in to see what’s new.
Acrobat videos
Adobe Video Workshop covers a wide range of subjects for Adobe Acrobat®, including these:
• Setting up the workspace and taskbars
• Combining files into a PDF
• Converting PDFs
• Modifying PDFs

6
ADOBE ACROBAT 8 PROFESSIONAL
User Guide
• Adding comments to PDFs
• Working with shared reviews
• Reviewing and summarizing comments
• Adding security to forms
• Collaborating in real time with Adobe Acrobat Connect™
• Preflighting files
• Printing documents
To access Adobe Creative Suite 3 video tutorials, visit Adobe Video Workshop at
www.adobe.com/go/learn_videotutorials.
Note: Adobe Video Workshop is not available in all languages.
Extras
You have access to a wide variety of resources that will help you make the most of your Adobe software. Some of
these resources are installed on your computer during the setup process; additional content is included on the instal-
lation or content disc, if applicable. Unique extras are also offered online by the Adobe Exchange community, at
www.adobe.com/go/exchange.
Installed resources
During software installation, a number of resources are placed in your application folder. To view those files, navigate
to the application folder on your computer.
Disc content
The disc included with your product may contain additional resources for use with the software, such as presets,
plug-ins, a PDF version of the Help, technical information, and other documents.
Adobe Exchange
For more free content, visit www.adobe.com/go/exchange, an online community where users download and share
thousands of free actions, extensions, plug-ins, and other content for use with Adobe products.
7
ADOBE ACROBAT 8 PROFESSIONAL
User Guide
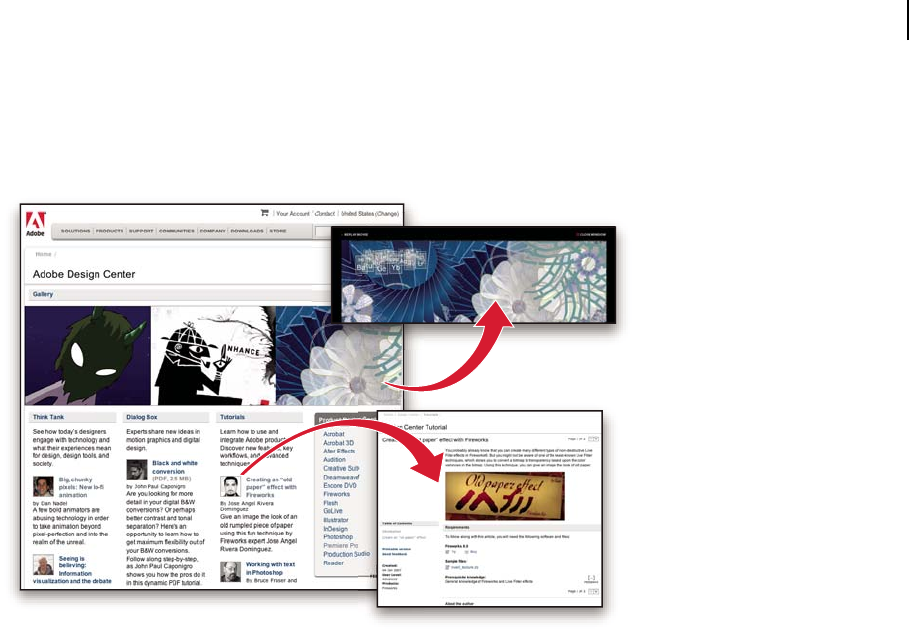
Adobe Design Center
Adobe Design Center offers articles, inspiration, and instruction from industry experts, top designers, and Adobe
publishing partners. New content is added monthly.
You can find hundreds of tutorials for design products and learn tips and techniques through videos, HTML
tutorials, and sample book chapters.
New ideas are the heart of Think Tank, Dialog Box, and Gallery:
• ThinkTankarticlesconsiderhowtoday’sdesignersengagewithtechnology andwhattheirexperiencesmeanfor
design, design tools, and society.
• In Dialog Box, experts share new ideas in motion graphics and digital design.
• The Gallery showcases how artists communicate design in motion.
Visit Adobe Design Center at www.adobe.com/designcenter.
8
ADOBE ACROBAT 8 PROFESSIONAL
User Guide
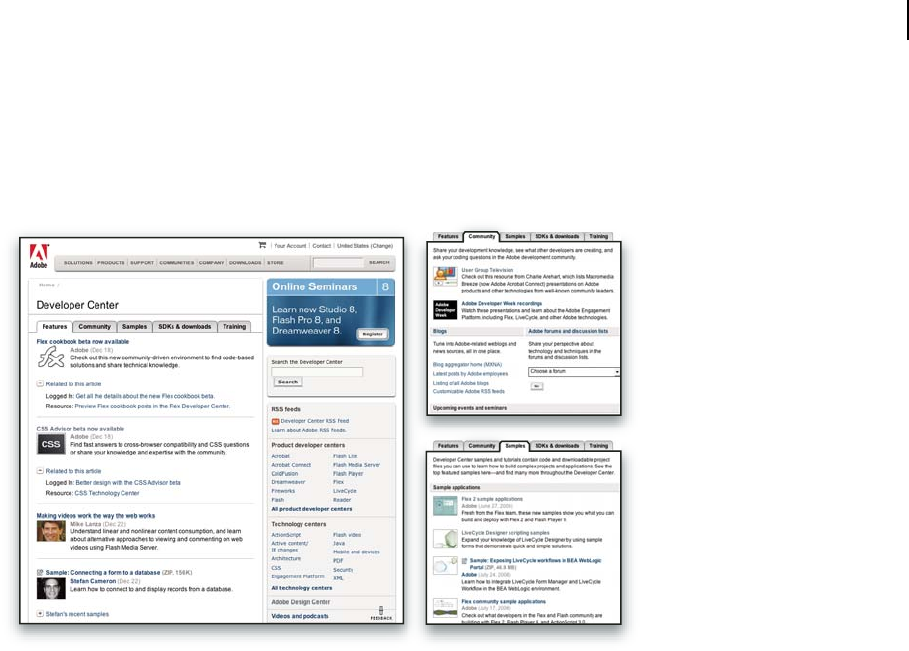
Adobe Developer Center
Adobe Developer Center provides samples, tutorials, articles, and community resources for developers who build
rich Internet applications, websites, mobile content, and other projects using Adobe products. The Developer Center
also contains resources for developers who develop plug-ins for Adobe products.
In addition to sample code and tutorials, you'll find RSS feeds, online seminars, SDKs, scripting guides, and other
technical resources.
Visit Adobe Developer Center at www.adobe.com/go/developer.
Customer support
VisittheAdobeSupportwebsite,at www.adobe.com/support, to find troubleshooting information for your product
and to learn about free and paid technical support options. Follow the Training link for access to Adobe Press books,
a variety of training resources, Adobe software certification programs, and more.
Downloads
Visit www.adobe.com/go/downloads to find free updates, tryouts, and other useful software. In addition, the Adobe
Store (at www.adobe.com/go/store) provides access to thousands of plug-ins from third-party developers, helping
you to automate tasks, customize workflows, create specialized professional effects, and more.
Adobe Labs
Adobe Labs gives you the opportunity to experience and evaluate new and emerging technologies and products from
Adobe.
At Adobe Labs, you have access to resources such as these:
• Prerelease software and technologies
• Code samples and best practices to accelerate your learning
• Early versions of product and technical documentation

9
ADOBE ACROBAT 8 PROFESSIONAL
User Guide
• Forums, wiki-based content, and other collaborative resources to help you interact with like-minded developers
Adobe Labs fosters a collaborative software development process. In this environment, customers quickly become
productive with new products and technologies. Adobe Labs is also a forum for early feedback, which the Adobe
development teams use to create software that meets the needs and expectations of the community.
Visit Adobe Labs at www.adobe.com/go/labs.
User communities
User communities feature forums, blogs, and other avenues for users to share technologies, tools, and information.
Users can ask questions and find out how others are getting the most out of their software. User-to-user forums are
available in English, French, German, and Japanese; blogs are posted in a wide range of languages.
To participate in forums or blogs, visit www.adobe.com/communities.
What’s new
Viewing, navigating, and searching
Getting Started window At a glance, see the main features of Adobe® Acrobat® 8 Professional and click links to start
tasks or learn more about features. See “Start in the Getting Started window” on page 19.
Maximized work area View PDFs in a new visual design for the work area, navigation pane, and toolbars. User
interface elements have been removed to maximize space. See “View the work area” on page 15.
Customizable toolbars Easily hide or show individual tools by right-clicking/Control-clicking a toolbar, or use the
More Tools dialog box to customize toolbars. See “Display and arrange toolbars” on page 20.
Search enhancements Find words or use advanced search tools, all from the same integrated toolbar. View search
results in a floating, resizable panel. Search documents in a PDF package. See “Search features overview” on
page 369.
Embedded PDF search index Embed a search index for a specific file directly within the PDF to speed up searching.
See “Create and manage an index in a PDF” on page 375.
PDF creation, assembly, and editing
PDF from a blank page Create a blank PDF page and type text onto the page. Format text using formatting controls.
Lock the document so that it can’t be edited. See “Create a PDF from a blank page” on page 62.
PDF packages Assemble PDF files (including PDF forms) and non-PDF files into a single package. Files aren’t
modified when packaged, so signatures and security options stay intact. Documents within a package are viewed in
the same window. Easily add, delete, or extract documents from the package. Search and print the current or selected
document, or all documents within the package. See “About PDF packages” on page 119.
Combined files user interface Combine files into a single PDF with concatenated pages, or assemble files into a PDF
package. Choose simple options to control the size of the resulting PDF. See “Combining different types of files” on
page 119.
Mail merge to PDF within Microsoft® Word Convert Word mail merge documents to PDF and send them out by
email. See “Create PDFs from Word mail merges” on page 80.
Microsoft Excel worksheet enhancements (Windows) Select and order worksheets for conversion. Convert all links
and bookmarks. Create PDF/A-compliant files. See “Application-specific PDFMaker settings” on page 85.

10
ADOBE ACROBAT 8 PROFESSIONAL
User Guide
Microsoft PowerPoint presentation enhancements (Windows) Convert overlapping shapes and images, action
buttons, action settings, and speaker notes. Convert backgrounds to a separate, nonprinting layer. Create PDF/A-
compliant files. See “Application-specific PDFMaker settings” on page 85.
Email conversion enhancements Convert an email message or a complete mail folder to PDF from Lotus Notes.
Create PDF packages of email from both Microsoft Outlook and Lotus Notes. In Outlook on Windows, convert
email archives to PDF packages and automatically archive email on a schedule. See “Convert email messages to PDFs
(Windows)” on page 77, “Migrate old Outlook PDF archives to PDF packages (Windows)” on page 79, and “Set up
automatic email archiving (Windows)” on page 79.
Scanning enhancements Scan to PDF or PDF/A from a broader range of scanners. Add metadata while scanning.
Optimize a scanned PDF. See “Scan a paper document to PDF” on page 63.
PDF/A-compliant files Create PDF/A-compliant files when scanning paper documents and when creating PDFs
from Word, Microsoft Excel, Microsoft PowerPoint, Adobe Acrobat Distiller, and the Acrobat Preflight tool.
Bates numbering Apply identifying labels to a batch of related documents—typically legal documents associated
withacourtcase.Batesnumberingappearsas aheaderorfooteroneachpageofeachPDFin thebatch.See “Adda
Bates numbering header or footer” on page 128.
Document examination Inspect PDFs for metadata, annotations, attachments, hidden data, form fields, hidden
layers, or bookmarks. Remove some or all of the information. See “Examine a PDF for hidden content” on page 248.
Headers, footers, watermarks, and backgrounds Save header, footer, watermark, and background options as named
settings for reuse. Remove or update existing headers, footers, watermarks, and backgrounds. Shrink content to
accommodate headers and footers. Preview changes in real time. Set underline text. See “Add and edit headers and
footers” on page 125.
Review and commenting
Acrobat Connect meetings Access the real-time, web-based collaboration capabilities of Acrobat Connect (sold
separately). Click the Start Meeting button to escalate from a document review to real-time communication with
others over the Internet. Acrobat Connect uses Adobe Flash® CS3 Professional and a personal meeting room for
screen sharing, audio and video conferencing, whiteboarding, and more. When you first click the Start Meeting
button, you can create a free trial account. Each subsequent time, you go directly to your Acrobat Connect personal
meeting room. (Acrobat Connect is not available in all languages.) See “Meetings” on page 160.
Shared reviews Initiate a review where comments are stored on a central server, allowing all participants to see
comments in real time. No extra server software is needed. Shared reviews work with a folder on a network server,
a Windows SharePoint workspace, or a web folder on a web server. Comments are automatically retrieved, even if
Reader isn’trunningandcouldbeaddedevenwhenyou aredisconnectedfromthenetwork.Notificationsalertusers
that there are new comments. Comments from reviewers outside the firewall can be merged into the shared review,
and you can enable Reader users to participate in reviews. See “Start a shared review” on page 157.
Review Tracker Provides details about all active reviews. For shared reviews, details include the number of
comments from a reviewer, the review deadline, server status, unread reviews, and a summary of updated shared
reviews. See “Tracking PDF reviews” on page 165.
Commenting and markup enhancements View and accurately place callout and cloud markups as you apply them.
The callout leader automatically moves as you position the callout. Selected comments are highlighted for easier
visibility when zoomed out. Rotate stamps and select all tools from a single, integrated toolbar. See “Commenting”
on page 168.

11
ADOBE ACROBAT 8 PROFESSIONAL
User Guide
Forms
Simple forms creation (Windows) Use a wizard to create PDF forms from templates, existing electronic documents,
paper forms, or spreadsheet data. Customize forms with contact information and logos. Edit in Adobe LiveCycle®
Designer. See “Creating and editing forms” on page 212.
PDF background artwork Import a PDF as background artwork on a form in LiveCycle Designer. Add form fields
on top of the background. See LiveCycle Designer Help.
Forms Tracker Track the forms you initiate or fill out. See “About Forms Tracker” on page 243.
Export and compile form data Aggregate returned forms into a PDF package. Export the form data to a spreadsheet.
See “Submitting forms” on page 205 and “Export records from a PDF data set” on page 242.
Form field recognition Automatically recognize form fields on noninteractive PDF documents and convert them to
interactive fields that can be filled electronically. See “Creating new forms” on page 212.
Reader-enabled rights Enable Reader 7 and 8 users to fill in, digitally sign, and locally save forms and other PDFs.
See “Enable Reader users to save form data” on page 213.
Digital signatures
Roaming IDs Enroll in a signing service where the server holds your private key. Authenticate to the server from
Acrobat and allow the document to be signed with your credentials stored on the server. See “Set up a roaming ID
account” on page 255.
Signature preview mode and conformance checker Before signing, view the document content as it will appear after
eliminating transparency, scripts, fonts, and other dynamic content that can alter a document’s appearance. Acrobat
automatically runs the Document Integrity Checker, which now includes checking for Qualified Signatures
conformance before entering signature preview mode. See “Sign in Preview Document mode” on page 280.
Certificate enhancements Predetermine the signing certificate. Configure the chain model for certificate validation.
See “Sharing and managing certificates” on page 258.
Seed values Specify which choices a user can make when signing a document. See “Customizing signature
properties using seed values” on page 277.
Signatures in Reader Allow Reader users to draw a signature field. See “Before you certify a PDF” on page 281.
Architecture, engineering, and construction
Batch conversion/direct conversion From Autodesk AutoCAD, convert multiple AutoCAD files to multiple PDFs.
Convert AutoCAD files to PDF with improved speed. See “Convert AutoCAD files to PDF (Windows)” on page 83.
DWG/DWF support 2D Measurement tool enhancements Measurement is recalculated if start or end points move.
Measurements snap to lines, intersections, or corners. See “Measure the height, width, or area of objects” on page 43.
Legal
Redaction tools Mark text, images, and sensitive areas for redaction. Permanently apply redaction. Modify the
appearance of redaction marks, including color and codes. See “Redact sensitive content” on page 249.
Search and redact From within the Search feature, mark some or all search results for redaction. See “Search and
redact words” on page 250.
Bates numbering Apply identifying labels to a batch of related documents—typically legal documents associated
withacourtcase.Batesnumberingappearsas aheaderorfooteroneachpageofeachPDFin thebatch.See “Adda
Bates numbering header or footer” on page 128.

12
ADOBE ACROBAT 8 PROFESSIONAL
User Guide
Creative professional
Color management improvements In Adobe Creative Suite, synchronize settings for on-screen color across the
applications with a single click. See “Synchronize color settings across Adobe applications” on page 406.
Shared transparency flattener presets Define flattener presets in one Adobe application, such as Acrobat, and then
easily share those swatches with other applications, such as Adobe Illustrator® and Adobe InDesign®. See “Create a
flattener preset” on page 470.
Preflight Locate, modify, or remove PDF elements using customizable fixup profiles. Create an inventory of PDF
content, including Extensible Metadata Platform (XMP) metadata. Perform advanced inspections on Cos objects
and fonts. Convert to and validate PDF/X-4 and PDF/A files. Edit droplet settings for automated preflight inspec-
tions. See “Correcting problem areas” on page 493 and “Advanced inspections” on page 482.
Booklet printing Print pages as a simple booklet, such as 2-up, saddle-stitched. See “Print a booklet” on page 429.
Metadata in documents and objects Maintain and access document and object-level metadata. See “Document
properties and metadata” on page 356.
TouchUp Object tool enhancement See and change the color space of a selected object. Scale, rotate, or clip an
object. See “Move or edit an object” on page 351.
Additional new features
FIPS mode Version 8.1 of Acrobat provides a FIPS mode to restrict data protection to Federal Information
Processing Standard (FIPS) 140-2 approved algorithms using the RSABSAFE Crypto-C 2.0 encryption module with
FIPS 140-2 validation certificate 608. See “Securing PDFs in FIPS mode (Windows)” on page 264.
Microsoft Windows Vista™ support Version 8.1 of Acrobat supports Windows Vista.
Installing Acrobat on 64-bit versions of Windows Version 8.1 of Acrobat supports the 64-bit versions of Microsoft
Windows XP and Windows Vista.
Version Cue 2.0 Manage files and versions as a single user or in a small workgroup. Integrate with Adobe Bridge to
manage files for your Creative Suite projects. See “Adobe Version Cue” on page 512.
Digital Editions Read and organize eBooks and other publications with Adobe® Digital Editions (a separate
product). When you first click the Digital Editions menu item, you can download and install the Adobe Digital
Editions software. After installation, choose Digital Editions to go directly to your Adobe Digital Editions bookshelf.
See “Adobe Digital Editions” on page 53.
Printing over the Internet Print documents to a FedEx Kinkos office in the United States. See “Print over the
Internet” on page 425.
2D Measurement tool enhancements Measurement is recalculated if start or end points move. Measurements snap
to lines, intersections, or corners. See “Measure the height, width, or area of objects” on page 43.

13
Chapter 2: Workspace
As you get acquainted with Adobe® Acrobat® 8 Professional, make setting up your Acrobat work environment a
priority. The more you learn about its potential, the better you can take advantage of its features, tools, and options.
There’s much more to the application than you see at first glance. Acrobat has hidden tools, preferences, and options
that can enhance your experience and give you greater control over how your work area is arranged and displayed.
Quickstart
Customize the work area
You can change the work area to suit your needs.
• To change the toolbars that appear, choose View > Toolbars, and select the desired toolbars.
• To change the navigation pane view, click one of the buttons to the left of the navigation pane.
• To customize the display colors for page background and document text, choose Edit > Preferences > Accessi-
bility.
• To set the default zoom level and page layout, choose Edit > Preferences > Page Display.
See also
“Customizing the work area” on page 19
Move a toolbar
Sometoolbars,suchasthe Taskstoolbar,appearinthe toolbararea.Others,suchastheComment&Markup toolbar,
open as floating toolbars.
❖ To move a toolbar, drag the grabber bar at the left edge of the toolbar:
• Drag a toolbar to a new location in the toolbar area.
• Drag a toolbar out of the toolbar area to create a floating toolbar.
• Drag a floating toolbar into the toolbar area.
See also
“Display and arrange toolbars” on page 20
Add tools and toolbars
You can customize Acrobat to display the tools and toolbars you use most often.
❖ Right-click/Control-click a toolbar and do any of the following:
• Select the buttons you want to display.
• Choose Hide Toolbars and select the toolbars you want to hide.

14
ADOBE ACROBAT 8 PROFESSIONAL
User Guide
• Choose More Tools, and select the toolbars and buttons you want to display.
See also
“Show and hide toolbar elements” on page 22
Change the look of a tool or object
You can easily change the properties for many tools and objects, including comments, form fields, and bookmarks.
1 Right-click/Control-click the tool or object you want to change.
2 Choose Properties or Tool Default Properties.
3 Set the desired properties.
To apply an object’s settings to all subsequent objects of the same type, right-click/Control-click the object and
choose Make Current Properties Default or Use Current Properties As New Defaults.
See also
“Review properties for tools and objects” on page 22
Change viewing mode
To give you more space for reading a document, you can change the viewing mode.
❖ Choose View > Reading Mode or Full Screen Mode.
In Reading mode, toolbars and the navigation pane are hidden but the menu bar is present. In Full Screen mode,
everything but the document is hidden. To exit from Full Screen mode, press Esc.
See also
“View PDFs in Full Screen mode” on page 30
View PDFs in a package
An Adobe PDF package opens with a list of the PDFs it contains and a PDF package navigation bar.
❖ Open the package and do any of the following:
• To view a PDF, select it from the PDF list or click Open Next or Open Previous .
• To change the position of the PDF list, click one of the list position icons.
• To access package-related commands, click Options and choose the desired command.
See also
“View, sort, and search components in a PDF package” on page 27
View attachments
A PDF may have other PDFs attached to it, either as single files or a PDF package. When you open a PDF containing
attachments, the Attachment panel opens automatically.
❖ Double-click the desired PDF. The attachment opens in a new window.

15
ADOBE ACROBAT 8 PROFESSIONAL
User Guide
If the attachment is a PDF package, the first PDF in the package opens along with a list of all PDFs in the package.
Click a PDF to view it.
See also
“PDFs with file attachments” on page 30
Reduce PDF file size
Reducing the size of PDFs improves their performance—particularly when they’re being accessed on the web.
1 Choose Document > Reduce File Size.
2 Select the version compatibility you need, and click OK.
3 Specify a filename and location, and click Save.
If you’re certain that all your users use Acrobat 8 or Adobe Reader 8, limiting compatibility to the latest version can
further reduce file size.
See also
“Reduce file size by saving” on page 47
Locate PDFs in the Organizer
TheOrganizer helpsyou quicklylocatePDFsyou’vepreviouslyopenedandPDFsyou’veorganizedintocollections
or favorites.
1 Choose File > Organizer > Open Organizer.
2 Click in the categories pane on the left to locate PDFs.
All PDFs found are listed in the files pane. After you locate a PDF, you can use the buttons at the top of the Organizer
to work with the file.
See also
“Organizer window overview” on page 47
Work area basics
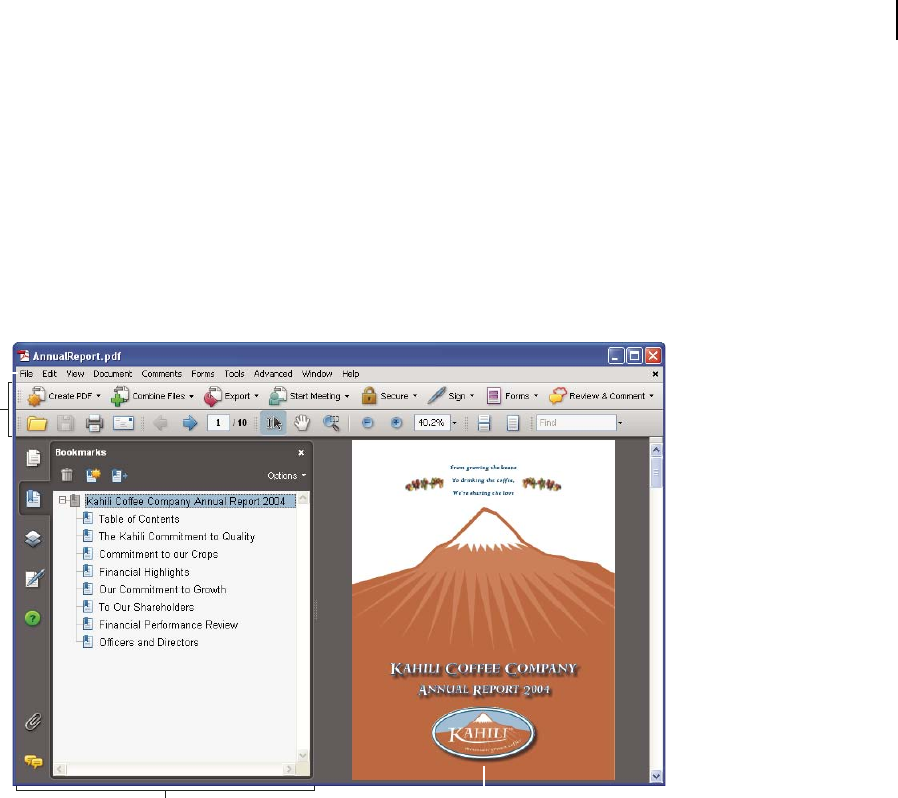
View the work area
Acrobat opens in two different ways: as a stand-alone application, and in a web browser. The associated work areas
differ in small but important ways.
The Acrobat work area includes a document pane that displays PDFs and a navigation pane ontheleftsidethathelps
you browse through the current PDF. Toolbars near the top of the window provide other controls that you can use
to work with PDFs.
Note: Openingcertaintypesof PDFscauses specializedpartsoftheworkareatoappear: thedocumentmessagebarand
PDF package navigation features. For other types of PDFs, these areas are not seen and not available.
ADOBE ACROBAT 8 PROFESSIONAL 16
User Guide
See also
“Document message bar” on page 18
“Navigation areas for PDF packages” on page 18
View the work area for PDFs open in the application
1 Click the Acrobat icon on the desktop, or use the Start menu (Windows) or Finder (Mac OS) to start the Acrobat
application.
2 Choose File > Open, navigate to and select any PDF on your computer, and click Open.
A
B
D
Acrobat window
A. Menu bar B. Toolbars C. Navigation pane (Bookmarks panel displayed) D. Document pane
View the work area for PDFs open in a web browser
1 Open a web browser application.
2 Do one of the following:
• Select a PDF anywhere on the Internet and open it.
• Choose File > Open (or Open File). If necessary, choose PDF or All Files in the pop-up menu for the type of file.
Then navigate to and select any PDF on your computer or local network, and click Open.
3 Identify items in the work area.
C
17
ADOBE ACROBAT 8 PROFESSIONAL
User Guide
A
B
CD
PDF open within a web browser
A. Web browser application menu bar and buttons B. Acrobat toolbars C. Navigation pane (Bookmarks panel displayed) D. Document
pane
Opening PDFs
You can open a PDF in many ways: from within the Acrobat application, from your email application, from your file
system, or on a network from within a web browser. The initial view of the PDF depends on how its creator set the
document properties. For example, a document may open at a particular page or magnification.
Some PDFs are restricted and open only after you enter a password provided to you by the PDF owner. If a document
is encrypted, you may need the permission of its creator to open it. In the case of some restricted or certified
documents, you may be prevented from printing a file or copying information to another application. If you have
trouble opening a PDF or can’t use certain features, contact its author or owner.
If adocumentissettoopeninFullScreenmode,the toolbar,commandbar,menubar,andwindowcontrolsarenot
visible. You can quit Full Screen mode by pressing the Esc key if your preferences are set this way, or by pressing
Ctrl+L/Command+L.
See also
“Defining initial view as Full Screen mode” on page 353
“Navigation areas for PDF packages” on page 18
“Open secured PDFs” on page 247
Select another tool
By default, the Select tool is active when Acrobat opens, because it is the most versatile tool.
Specialized tools, such as those for zooming in or adding review comments, are available in toolbars and in the Tools
menus.
18
ADOBE ACROBAT 8 PROFESSIONAL
User Guide
Select a tool
❖ Do one of the following:
• Select a tool in a toolbar.
• Choose Tools > [toolbar name] > [tool].
Switch temporarily to the Zoom In or Hand tool
You can use these tools temporarily, without deselecting the current tool.
• To select the Hand tool temporarily, hold down the spacebar.
• To select the Zoom In tool temporarily, hold down Ctrl+spacebar/Command+spacebar.
When you release the keys, Acrobat reverts to the previously active tool.
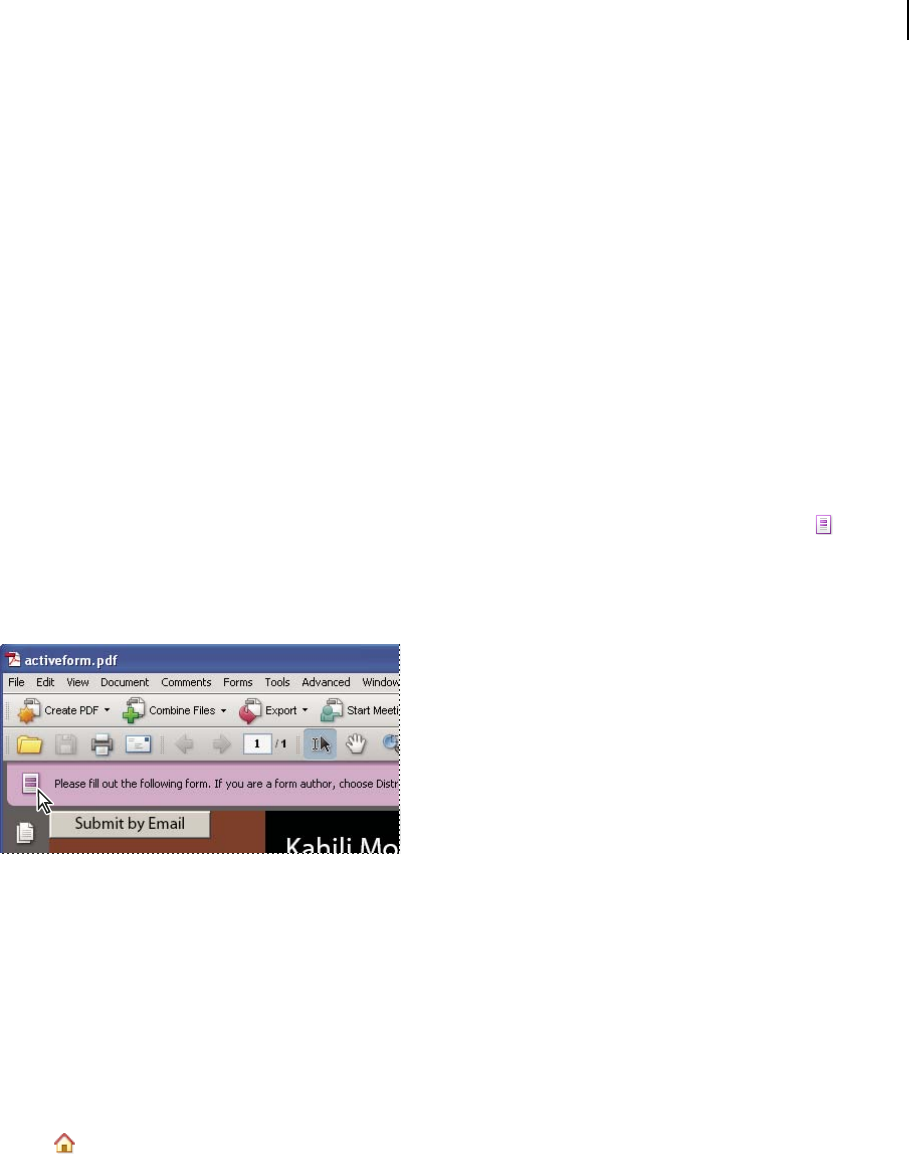
Document message bar
The document message bar appears only in certain types of PDFs. Typically, you see this area when you open a PDF
form, a PDF that has been sent to you for review, or a PDF with special rights or security restrictions. The document
message bar appears immediately below the toolbar area, and can be hidden or shown by clicking its button on
the left side of the work area.
Look on the document message bar for instructions on how to proceed and for any special buttons associated with
the task. The bar is color coded: purple for forms, yellow for reviews, and blue for certified or secure PDFs.
Document message bar for a form
See also
“Filling in PDF forms” on page 201
“Commenting” on page 168
Navigation areas for PDF packages
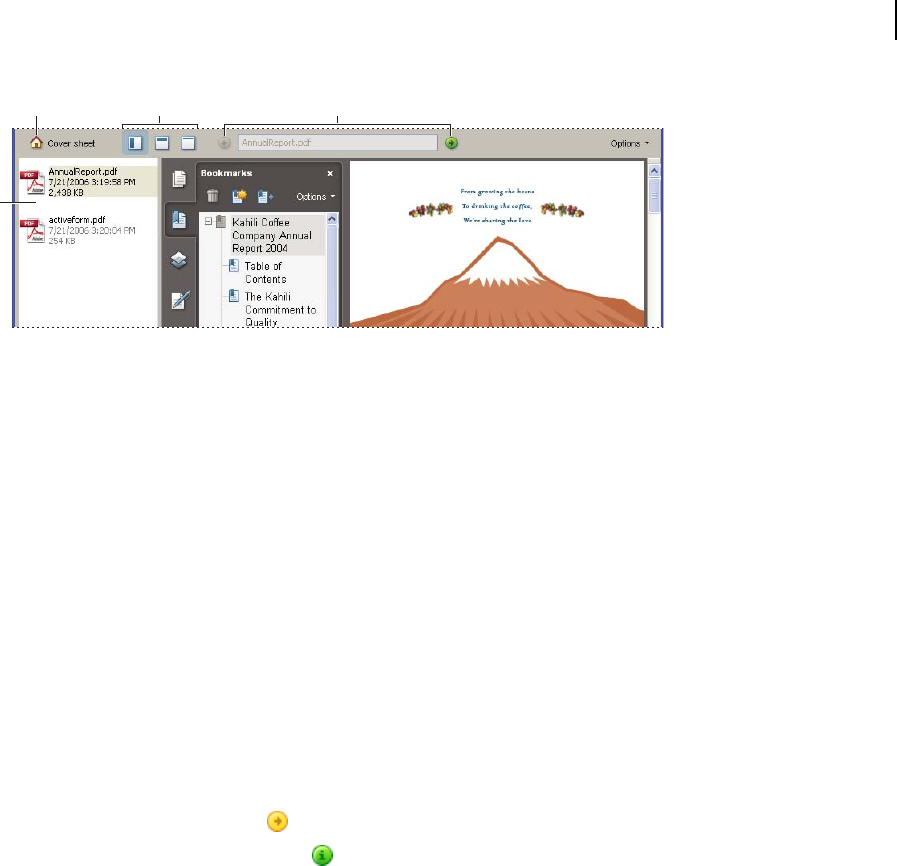
When you open a PDF package, two unique areas appear:
PDF package navigation bar Located immediately below the toolbars area. Look here for the Cover Sheet
button , buttons that hide or set the orientation of the list of component documents, buttons for moving to the
next or previous component document, and an Options menu with commands for viewing, editing, and using the
PDF package.
List of component documents Bydefault, locatedbetweenthePDF packagenavigationbarandthedocumentpane,
but can be hidden or displayed vertically, to the left of the navigation pane. Selecting a component file in the list
opens it in the document pane.
19
ADOBE ACROBAT 8 PROFESSIONAL
User Guide
D
E
A cB
Navigation areas for PDF packages
A. Cover Sheet button B. PDF list display options C. Open Previous button, currently displayed PDF filename, Open Next button D. PDF
package navigation bar E. List of component PDFs (shown vertically)
See also
“About PDF packages” on page 119
“View, sort, and search components in a PDF package” on page 27
Start in the Getting Started window
The Getting Started window opens by default when you start Acrobat. The home page in this window contains links
that open additional pages. All Getting Started pages include buttons and links that start specific tasks or display
topics in the full Acrobat Help system (which you are reading now).
You can open or close the Getting Started window, or simply let it remain open behind or beside the Acrobat work area.
Start a task from the Getting Started window
1 On the Getting Started home page, select a task group, such as Create PDF or Review & Comment.
2 Start a task or view a Help topic:
• Click an action text link or button to initiate a task.
• Click an information text link or button to open full Acrobat Help to the related Help topic.
Ifyoudecidetotryadifferenttaskgroup,clickHomeintheupper-left cornertoreturn totheGetting Startedhomepage.
Reopen and reset the Getting Started window
1 Choose Help > Getting Started With Adobe Acrobat®.
2 Deselect the Do Not Show At Startup option in the upper-right corner.
Customizing the work area
Displaying menus
Ordinarily, it’s a good idea to keep the Acrobat menus visible so that they are available as you work. It is possible to
hide them,usingtheView>MenuBarcommand.However,theonlywaytodisplayandusethem againisbypressing
F9/Shift+Command+M.
20
ADOBE ACROBAT 8 PROFESSIONAL
User Guide
Acrobat also has numerous context-sensitive menus. These menus appear when you right-click/Control-click an
element in the work area or PDF that has such a menu associated with it. A context menu displays commands that
relate to the item or area that you clicked. For example, when you right-click/Control-click the toolbar area, that
context menu displays the same commands as the View > Toolbars menu.
Note: The Acrobat menu bar appears only if Acrobat is open as a stand-alone application. If Acrobat is open within the
browser, only the browser application menu appears at the top of the window. However, context menus are available in
both cases.
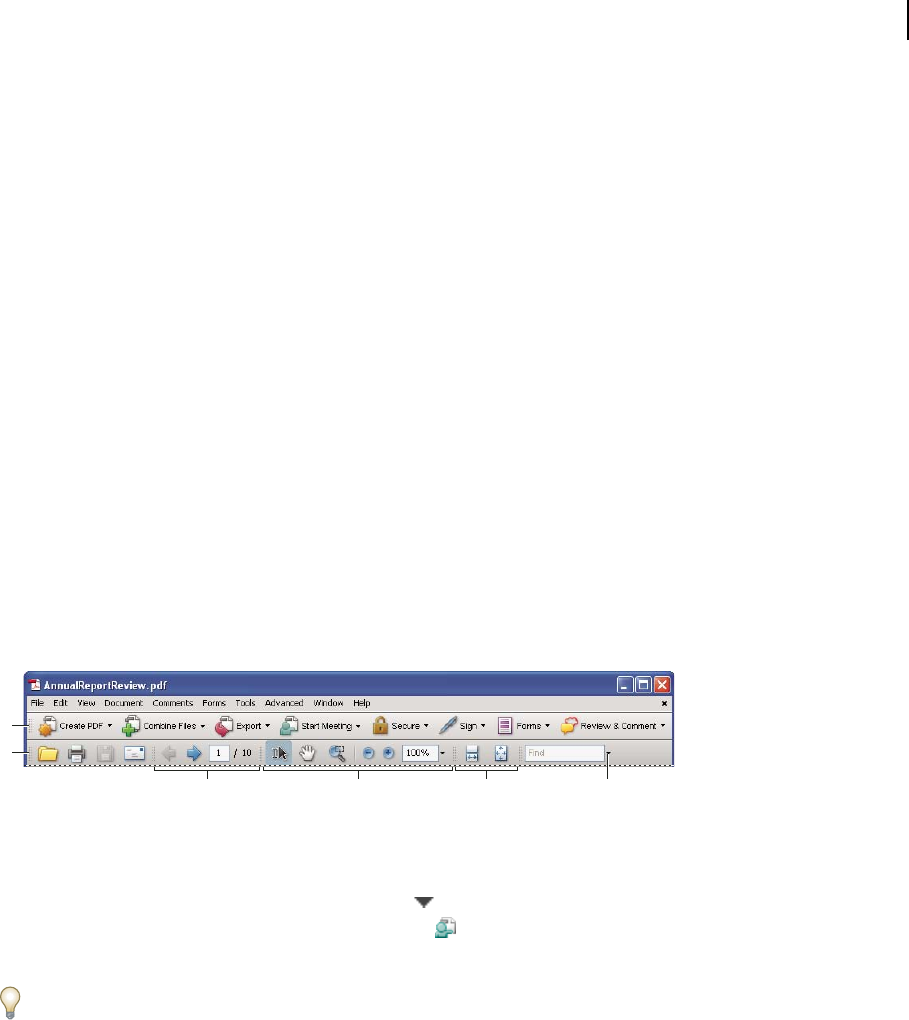
About toolbars
Toolbars reduce clutter in the work area by arranging tools in task-related groups. For example, the Page Display
toolbarincludesbuttonsforchanginghowmanypagesyoucansee at atimeinthe documentwindow.TheComment
& Markup toolbar contains tools for reviewing and annotating a PDF.
Any toolbar can float or be docked. Docked toolbars appear in the toolbar area. Floating toolbars appear as
independent panels that you can move anywhere in the work area.
Each toolbar has a grabber bar, which is a vertical gray stripe at the left end of the toolbar.
• When you position the pointer over a grabber bar, a tool tip displays the name of the associated toolbar.
• When you drag a grabber bar, the toolbar moves. You can drag toolbars off the toolbar area (so that they float),
dock them in the toolbar area, or rearrange them in the toolbar area.
Some toolbars appear by default and some are hidden.
B
A
C D E F
Toolbars open by default
A. Tasks toolbar B. File toolbar C. Page Navigation toolbar D. Select & Zoom toolbar E. Page Display toolbar F. Find toolbar
Buttons in the Tasks toolbar behave somewhat differently from other toolbar buttons. Each of these buttons is
associated with a menu of commands. Click the arrow to t
on t
he right of the button name to open the menu. For
example, click the arrow next to the Start Meeting butt o display a menu of commands related to Adobe
Acrobat Connect meetings.
Po
ed
Toolba
sition the pointer over a tool to see a description of the tool. Position the pointer over the grabber bar on the left
ge of a toolbar to see its name. All tools are identified by name in the More Tools dialog box (Tools > Customize
rs).
See also
“Customizing the work area” on page 19
“Displaying menus” on page 19
Display and arrange toolbars
When your work does not involve using the tools in a toolbar, you can close the toolbar to tidy up the work area. For
example,ifyouarenotaddingreviewcommentstoaPDF,there’snoneedtohavetheComment&Markuptoolbaropen.
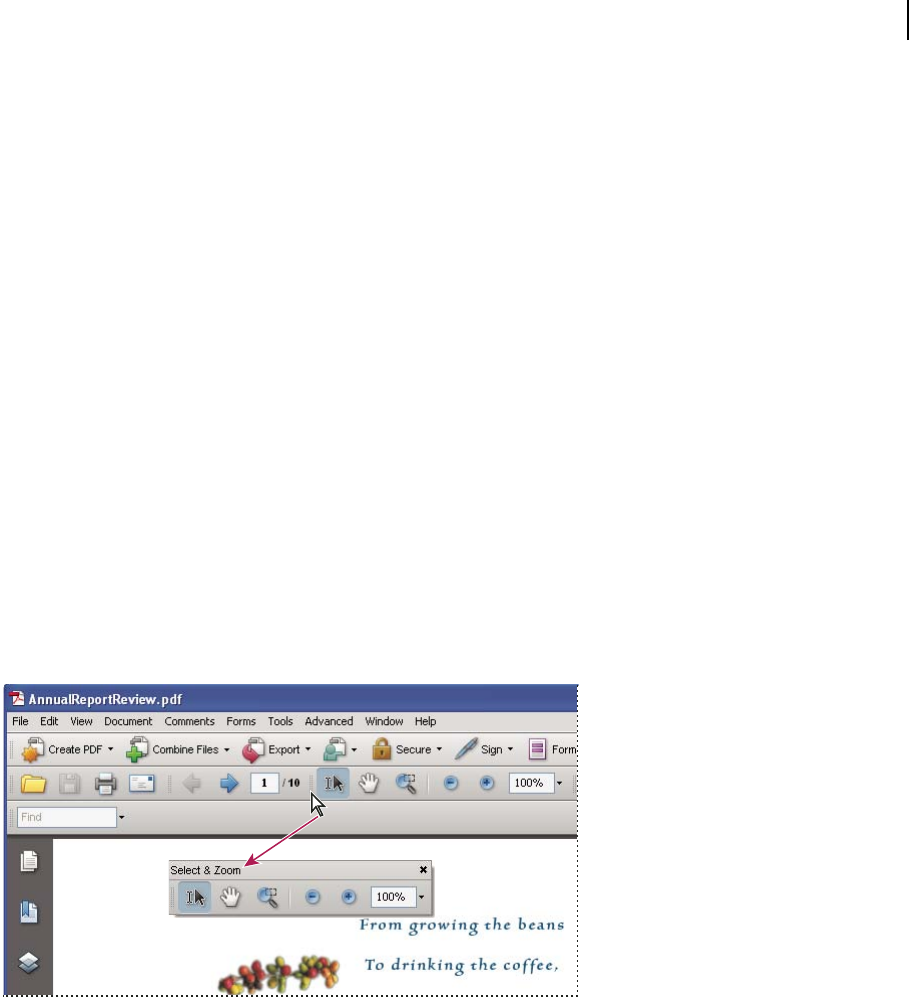
21
ADOBE ACROBAT 8 PROFESSIONAL
User Guide
Whenyouneedeasyaccesstoatoolbar thatishiddenbydefault,youcanopenit.This toolbarappearsas afloating
panel, which you can move or dock in the toolbar area.
Note: If several PDFs are open, you can customize the toolbars for each PDF independently. The different customized
states persist as you switch between PDFs.
Show or hide toolbars
• To o pen a to ol bar, ch oos e Vi ew > To olb ar s > [ toolbar name]. A check mark next to the toolbar name indicates that
the toolbar is displayed.
• To hide all toolbars, choose View > Toolbars > Hide Toolbars.
• To change a toolbar that is either shown or hidden, right-click/Control-click the toolbar area, and choose the
toolbar you want to show or hide.
• To change the visibility of several toolbars, choose Tools > Customize Toolbars or View > Toolbars > More Tools.
Then, select and deselect toolbars. (Check marks by the toolbar names indicate which ones are currently visible.)
Note: Whether a new toolbar opens as a floating toolbar or docked in the toolbar area depends on its default position or
where it appeared in your previous configuration of the work area, if any.
Move toolbars
• To rearrange the docked toolbars, use the toolbar grabber bars to drag them from one position to another.
• To move a floating toolbar, drag it by its title bar or grabber bar to another location in the work area.
• To float a docked toolbar, drag it by its grabber bar from the toolbar area.
Use the title bar to move a section of tools from the toolbar area.
• To dock a floating toolbar, drag it by its title bar or grabber bar to the toolbar area.
• To move all floating toolbars to the toolbar area, choose View > Toolbars > Dock Toolbars.
Rows may be added to or removed from the toolbar area as you move the toolbars in and out.
Return toolbars to their default configuration
❖ Choose View > Toolbars > Reset Toolbars.

22
ADOBE ACROBAT 8 PROFESSIONAL
User Guide
Lock or unlock the toolbar area
Locking the toolbars prevents any rearrangement of the toolbar area, so all grabber bars disappear when the toolbar
area is locked. Locking does not affect the positions of any floating toolbars.
❖ Choose View > Toolbars > Lock Toolbars.
Select the command a second time to unlock the toolbar area.
Note: When the toolbar area is locked, you can still move floating toolbars by dragging them by their title bars. However,
you can’t dock them unless you unlock the toolbar area.
About the Properties toolbar
The Properties toolbar looks like any other toolbar and can be moved, docked, or floated in the same way. It also
contains buttons and can be hidden or displayed by choosing it by name from the View > Toolbars menu.
The buttons in the Properties toolbar display properties of the currently selected tool or object. Unlike buttons in
most toolbars, the buttons in the Properties toolbar can’t be hidden. Also, many of the buttons merely display infor-
mation, so you cannot use them to make changes to the PDF.
Show and hide toolbar elements
You can alter the display within an individual toolbar to keep just the tools you need available with a minimum of
wasted space. You can also show and hide tool labels.
Show or hide individual tools
Acrobat includes more tools and more toolbars than the set that appears by default. You can customize the toolbars
so that the tools you use most often appear in the toolbar area.
❖ Do any of the following:
• Right-click/Control-click the toolbar, and select a tool that you want to display or deselect a tool that is already
displayed if you want to hide it.
• Right-click/Control-click any toolbar and choose More Tools. Then select individual tools and toolbars that you
want to display, and deselect those that you want to hide.
Note: A selected tool appears in the toolbar area only if its toolbar is also selected in the More Tools dialog box.
Show or hide tool labels
Thedefaultviewshowslabelsforsometoolbarbuttons.Youcanshowlabelsforallbuttonstohelpyouasyoulearn
to use Acrobat, or you can hide all tool labels to save space in the toolbar area.
❖ Choose View > Toolbars > Button Labels > [option].
Note: Tool labels are turned off selectively when space in the toolbar area becomes limited.
Review properties for tools and objects
The Properties toolbar provides easy access to the properties for many tools and objects such as links, comments,
form fields, media clips, and bookmarks. For example, if you select the Note tool, the Properties toolbar displays the
current default properties for that tool. If you select a note in the document, the Properties toolbar displays
properties for that note.
YoucanusetheProperties toolbartochangemanyofthesettingsthatappearthere.Afewitemsonlyprovideinfor-
mation and cannot be edited.

23
ADOBE ACROBAT 8 PROFESSIONAL
User Guide
Likealltoolbars, thePropertiestoolbarcanfloator bedockedin thetoolbararea.ThePropertiestoolbarisdifferent
in that it doesn’t contain tools and can’t be customized to hide options.
1 Do one of the following:
• Choose View > Toolbars > Properties Bar.
• Right-click/Control-click the toolbar area, and choose Properties Bar from the context menu.
2 Select the object or tool that you want to review.
3 Change properties for the selected item, as desired.
If
obj
you want to change object properties other than those listed in the Properties toolbar, right-click/Control-click the
ect, and choose Properties.
Show or hide the navigation pane
The navigation pane is an area of the work space that can display different navigation panels. Typically, these panels
act like a table of contents, with items you can click to jump to a specific place in the document. For example, the
Pages panel contains thumbnail images of each page; clicking a thumbnail opens that page in the document.
When you open a PDF, the navigation pane is closed by default, but buttons along the left side of the work area
provideeasyaccesstovariouspanels,suchasthePagespanelbutton an
unava
dtheBookmarkspanelbutton .When
Acrobat is open but empty (no PDF is open), the navigation pane is ilable.
1 To open the navigation pane, do one of the following:
• Click any panel button on the left side of the work area to open that panel.
• Choose View > Navigation Panels > Show Navigation Pane.
2 To close the navigation pane, do one of the following:
• Click the button for the currently open panel in the navigation pane.
• Choose View > Navigation Panels > Hide Navigation Pane.
Note: The creator of the PDF can control the contents of some navigation panels and may make them empty.
Adjust navigation panels
Like toolbars, navigation panels can be docked in the navigation pane, or they can float anywhere in the work area. You
canhideorclosepanelsyoudon’tneed andopenthe ones youdo.Youcan alsoadjustthewidth ofthenavigationpane.
Change the display area for navigation panels
• To change the width of the navigation pane, drag its right border.
• To collapse a floating panel without closing it, click the tab name at the top of the window. Click the tab name again
to restore the panel to its full size.
Change the orientation of a docked navigation panel
By default, some panels, such as Bookmarks, appear in a column on the left side of the work area. Others, such as the
Comments panel, appear horizontally across the bottom of the document pane. You can change the orientation of
anypanel toeithervertical orhorizontalby dragging thebuttonforthatpanel,whichappearsontheleftsideofthe
work area.
• To orient the panel vertically, drag its button to the upper part of the navigation pane, near the buttons of other
vertically oriented panels.
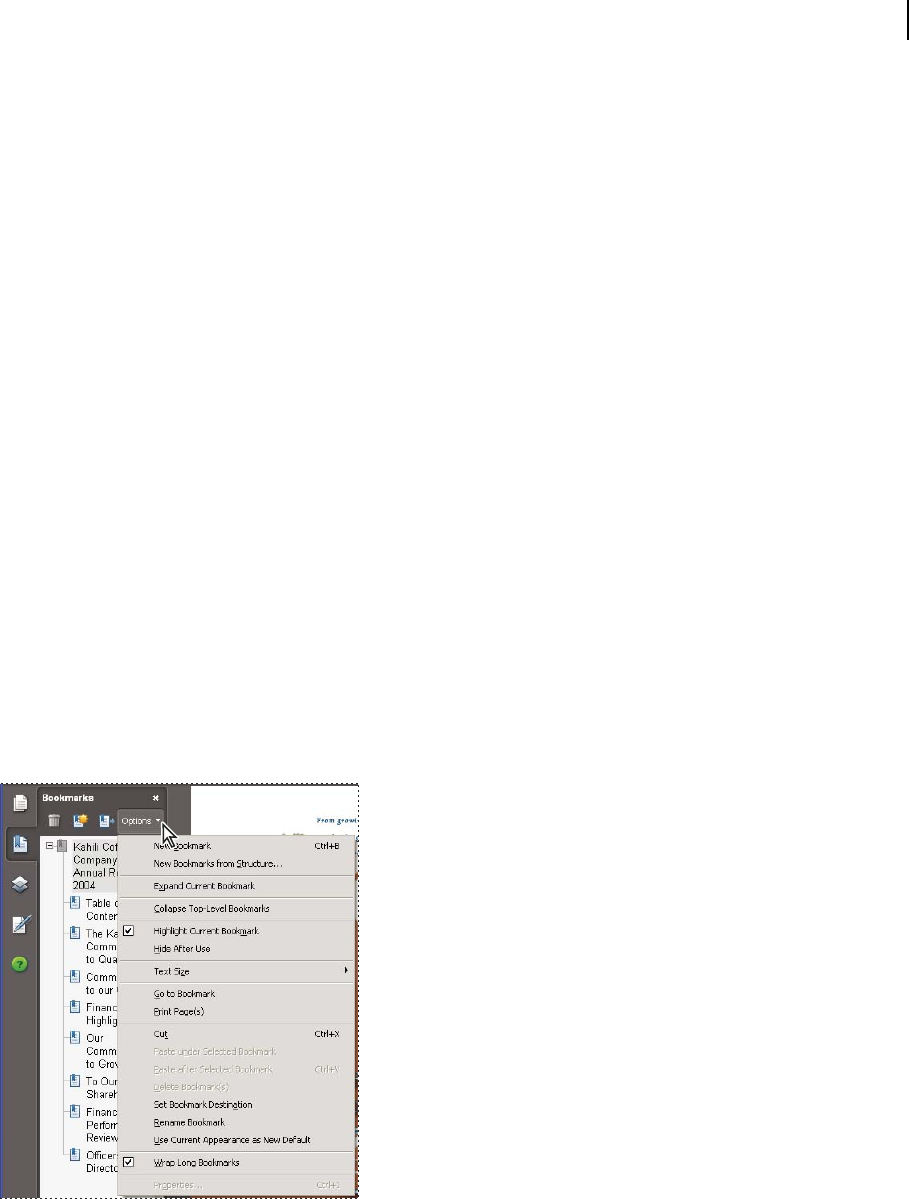
24
ADOBE ACROBAT 8 PROFESSIONAL
User Guide
• To orient the panel horizontally, drag its button to the lower part of the navigation pane, near the buttons of other
horizontally oriented panels.
In either case, a gray frame highlights the entire panel buttons area. If you release the mouse button before the area
is highlighted, the panel will float above the work area. If that happens, try again by dragging the panel tab into the
upper or lower part of the button area.
View a different panel in the navigation pane
By default,only aselectedsetofpanelbuttonsappearsontheleftside of theworkarea.Otherpanelsareincludedin
theViewmenuandmayopenasfloatingpanelsratherthaninthe navigation pane.However,youcandockthe panel
in the navigation pane later.
❖ Do one of the following:
• On the left side of the navigation pane, select the button for the panel.
• Choose View > Navigation Panels > [panel name].
Dock or float navigation panels
• To float a panel that is docked in the navigation pane, drag the panel button into the document pane.
• To dock a floating panel, drag the tab to the navigation pane.
• To group two floating panels, drag the tab of one panel into the other floating panel.
Options in a navigation panel
All navigation panels have an Options menu in the upper-right corner. The commands available in these menu vary.
Some panels also contain other buttons that affect the items in the panel. Again, these vary among the different
panels, and some panels have none.
Click Options to open the menu.

25
ADOBE ACROBAT 8 PROFESSIONAL
User Guide
Viewing PDF pages
Open a PDF
You can open a PDF from within the Acrobat application, from the desktop, or from within certain other applica-
tions.
Open a PDF in the application
❖ Start Acrobat and do one of the following:
• Choose File > Open, or click the Open button i
sually
n the toolbar. In the Open dialog box, select one or more
filenames, and click Open. PDF documents u have the extension .pdf.
• (Windows) Choose File > [a previously opened PDF].
• (Mac OS) Choose File > Open Recent File > [a previously opened PDF].
• FromeithertheFile>Organizersubmenu or theOrganizerbuttonmenuontheFiletoolbar,chooseCollections
> [collection name] > [PDF filename].
• From the File menu or the Organizer button menu on the File toolbar, choose History > [time period] > [PDF
filename].
If more than one document is open, you can switch between documents by choosing the document name from the
Window menu. In Windows, the application places a button for each open document on the Windows taskbar. You
can click this button to move between open documents.
Open a PDF from the desktop or within another application
❖ Do one of the following:
• To open a PDF attached to an email message, open the message, either by double-clicking the PDF icon or right-
clicking/Control-clicking and choosing Open.
• To open a PDF linked to an open web page, click the PDF file link. The PDF usually opens in the web browser.
• Double-click the PDF File icon in your file system.
Note: In Mac OS, you may not be able to open a PDF created in Windows by double-clicking the icon. Instead, choose
File > Open With > Acrobat.
Opening pages in a PDF
Depending on the PDF you open, you may need to move forward through multiple pages, see different parts of the
page, or change the magnification. There are many ways to navigate, but the following items are commonly used:
Note: If you do not see these items, choose View > Toolbars > Reset Toolbars.
Next and Previous The Next Page and
ive, so you
Previous Page b
ge nu
uttons appear on the Page Navigation toolbar. The text
box next to them is also interact can type a pa mber and press Enter to go directly to that page.
Scroll bars Vertical and horizontal scroll bars appear to the right and bottom of the document pane whenever the
view does not show the entire document. Click the arrows or drag to view other pages or different areas of the page.
Select & Zoom toolbar This toolbar contains buttons and controls for changing the page magnification.
Pages panel The Pages button on the left side of the work area opens the navigation pane to the Pages panel,
which displays thumbnail images of each page. Click a page thumbnail to open that page in the document pane.

26
ADOBE ACROBAT 8 PROFESSIONAL
User Guide
See also
“Retrace your viewing path” on page 29
“Adjust page magnification” on page 37
Page through a document
There are many ways to turn pages in a PDF. Many people use the buttons on the Page Navigation toolbar, but you
can also use arrow keys, scroll bars, and other features to move forward and backward through a multipage PDF.
ThePageNavigationtoolbar opensbydefault.The defaulttoolbar containsfrequentlyusedtools: theNextPage ,
by
PreviousPage ,a
the T
ndPage Number.Likealltoolbars,the Page Navigationtoolbarcanbehidden andreopened
choosing it on oolbars menu under the View menu. You can display additional tools on the Page Navigation
toolbar by right-clicking/Control-clicking the toolbar and choosing an individual tool, Show All Tools, or More
Tools and then selecting and deselecting tools in the dialog box.
See also
“About bookmarks” on page 327
“About page thumbnails” on page 324
“Set the page layout and orientation” on page 40
Move through a PDF
❖ Do one of the following:
• Click the Previous Page or Next Page button on the toolbar.
• Choose View > Go To > [location].
• Choose View > Go To > Page, and then type the page number in the Go To Page dialog box.
• Press the Page Up and Page Down keys.
Jump to a specific page
❖ Do one of the following:
• Drag the vertical scroll bar until the page appears in the small pop-up display.
• Type the page number to replace the one currently displayed in the Page Navigation toolbar, and press Enter or
Return.
Note: If thedocumentpagenumbersaredifferentfrom theactualpagepositioninthe PDFfile,thepage’spositionwithin
thefileappearsinparenthesesafter theassignedpagenumberinthePageNavigationtoolbar.Forexample,ifyouassign
numbering for a file that is an 18-page chapter to begin with page 223, the number shown when the first page is active
is 223 (1 of 18). You can turn off logical page numbers in the Page Display preferences. See “Renumber pages” on
page 138 and “Preferences for viewing PDFs” on page 33.
Jump to bookmarked pages
Bookmarks provide a table of contents and usually represent the chapters and sections in a document. Bookmarks
appear in the navigation pane.
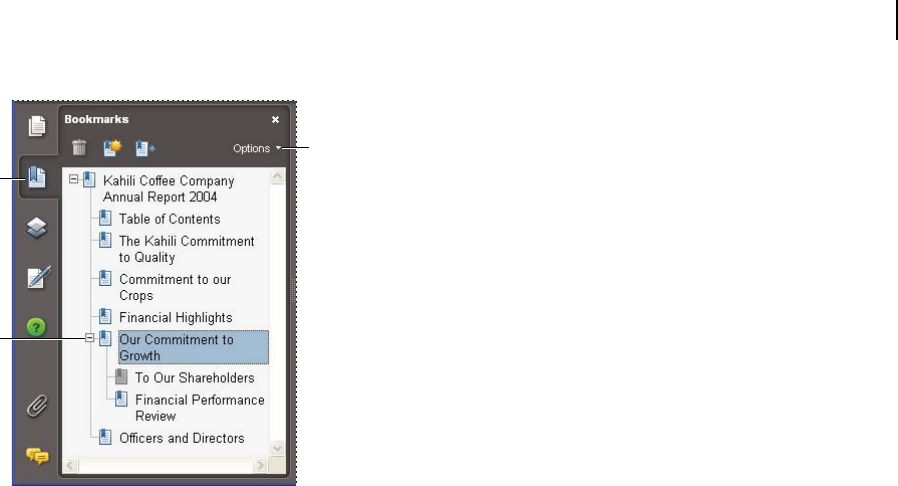
27
ADOBE ACROBAT 8 PROFESSIONAL
User Guide
A
C
B
Bookmarks panel
A. Bookmarks button B. Expanded bookmark C. Click to display bookmark Options menu.
1 Click the Bookmarks button, or choose View > Navigation Panels > Bookmarks.
2 To jump to a topic, click the bookmark. Click the plus (+) or minus (-) sign to expand or collapse the bookmark
contents.
Note: Depending on how the bookmark was defined, clicking it may not take you to that location but perform some other
action instead.
If the list of bookmarks disappears when you click a bookmark, click the Bookmarks button to display the list again.
If you want to hide the Bookmarks button after you click a bookmark, select Hide After Use on the Options menu.
Use page thumbnails to jump to specific pages
Page thumbnails provide miniature previews of document pages. You can use thumbnails in the Pages panel to
change the display of pages and to go to other pages. The red page-view box in the page thumbnail indicates which
area of the page appears. You can resize this box to change the zoom percentage.
1 Click the Pages button or choose View > Navigation Panels > Pages to display the Pages panel.
2 To jump to another page, click its thumbnail.
View, sort, and search components in a PDF package
Both Adobe Reader users and Acrobat users can view, sort, and search component files in a PDF package.
Note: You can dramatically increase the speed of searches by creating an embedded index when you create a PDF
package.
See also
“Searching PDFs” on page 369
“Creating PDF indexes” on page 375
28
ADOBE ACROBAT 8 PROFESSIONAL
User Guide
View component PDFs in a PDF package
ThePDF packagenavigationbarcontainsbuttonsthatcontrolthevisibilityand placementofthelistofcomponent
files. If the list is hidden, the View Top button or View Left button will make the list visible either horizontally or
vertically adjacent to the document pane.
1 Open the PDF package in Acrobat.
2 In the PDF package navigation bar, select the View Left o
t a
r View Top button , as
bu
needed, so that you can
see the list of component PDFs.
3 Select the PDF you want to read. Or, use the Open Nex nd Open Previous ttons to review the
component PDFs one by one.
Sort the components of a PDF package
Because the data categories are shown in columns in View Top mode, use that view to complete this procedure.
1 In the PDF package navigation bar, select the View Top button , if necessary, so that you can see the list of
component PDFs and the categories bar across the top of the list.
2 Do any of the following:
• Click a category name. Click it a second time to reverse the order between Ascending and Descending.
• In the PDF package navigation bar, choose Options > Sort By > [category name].
• Right-click/Control-click a PDF in the list or anywhere in the categories bar and choose Sort By > [category name].
• Right-click/Control-click a PDF in the list or anywhere in the categories bar and choose Package Properties. Then
choose options in the Sort By and Sort Order menus. (This sets the default sorting for the PDF package.)
Note: Unless you change the default sorting for the PDF package, the sorting remains in place for only the current session
or until you change the sorting again. The next time you open the PDF package, it will appear in the default sorting order.
Search component PDFs in a PDF package
1 Choose Edit > Search, or choose Open Full Acrobat Search on the Find toolbar pop-up menu.
2 Select which PDFs to search. You can search only the currently open document, several documents that you select,
or all the PDFs in the package.
3 Enter the search text and select other options for searching, as usual.
Automatically scroll through a document
Automatic scrolling advances your view of the PDF at a steady rate, moving vertically down the document. If you
interrupt the process by using the scroll bars to move back or forward to another page or position, automatic
scrolling continues from that point forward. At the end of the PDF, automatic scrolling stops and does not begin
again until you choose automatic scrolling again.
1 Choose View > Automatically Scroll.
2 Press Esc to stop scrolling.

29
ADOBE ACROBAT 8 PROFESSIONAL
User Guide
Retrace your viewing path
You can find PDF pages that you viewed earlier by retracing your viewing path. It’s helpful to understand the
difference between previous and next pages and previous and next views. In the case of pages, previous and next refer
to the two adjacent pages, before and after the currently active page. In the case of views, previous and next refer to
your viewing history. For example, if you jump forward and backward in a document, your viewing history retraces
those steps, showing you the pages you viewed in the reverse order that you viewed them.
Retrace your path in a PDF
1 Choose View > Go To > Previous View.
2 To continue seeing another part of your path, do either of the following:
• Repeat step 1.
• Choose View > Go To > Next View.
Note: You can make the Previous View button a
tion to
nd Go To Next View button
the
available in the toolbar area by
right-clicking/Control-clicking the Page Naviga olbar and choosing them on context menu, or choosing Show
All Tools.
Retrace your path through multiple PDFs
❖ Choose View > Go To > Previous Document or Next Document. These commands open the other PDF
documents if the documents are closed.
Note: If Acrobatisopeninawebbrowser,youcanusethewebbrowser’sBackandForwardoptions as usualtoretrace
your steps.
Change the PDF/A viewing mode
PDF/A is an ISO standard for PDFs. Documents you scan to PDF are PDF/A-compliant. You can specify when and
whether you want to view documents in this viewing mode.
1 Choose Edit > Preferences (Windows) or Acrobat> Preferences (Mac OS).
2 Select Documents under Categories.
3 Choose an option for View Documents In PDF/A: Never, Always, or Only For PDF/A Documents.
You can switch in or out of PDF/A viewing mode by changing this preference setting again.
Navigate with links
Links can take you to another location in the current document, to other PDF documents, or to websites. Clicking
a link can also open file attachments and play 3D content, movies, and sound clips. To play these media clips, you
must have the appropriate hardware and software installed.
The person who created the PDF document determines what links look like in the PDF.
Note: Unless a link was created in Acrobat using the Link tool, you must have the Automatically Detect URLs From Text
option selected in the General preferences for a link to work correctly.
1 Choose the Select tool
2 Position the pointer over the linked area on the page until the pointer changes to the hand with a pointing finger.
A plus sign (+) or a w appears within the hand if the link points to the web. Then click the link.
.

30
ADOBE ACROBAT 8 PROFESSIONAL
User Guide
See also
“Links and attachments” on page 331
“Multimedia preferences” on page 381
PDFs with file attachments
IfyouopenaPDFthathas oneormoreattachedfiles,the Attachmentspanelautomaticallyopens,listing theattached
files. You can open these files for viewing, edit the attachments, and save your changes, as permitted by the document
authors.
If you move the PDF to a new location, the attachments automatically move with it.
See also
“Open, save, or delete an attachment” on page 335
Open or close reading mode
The reading mode view hides everything in the work area except the document and the menu bar.
❖ Choose View > Reading Mode.
Choosing Reading Mode again restores the work area to its previous view, with the same navigation buttons and
toolbar displays.
View PDFs in Full Screen mode
In Full Screen mode, PDF pages fill the entire screen; the menu bar, toolbars, and window controls are hidden. A
PDF creator can set a PDF to open in Full Screen mode, or you can set the view yourself. Full Screen mode is often
used for presentations, sometimes with automatic page advancement and transitions.
The pointer remains active in Full Screen mode so that you can click links and open notes. There are two ways to
advance through a PDF in Full Screen mode: You can use keyboard shortcuts for navigational and magnification
commands, and you can set a Full Screen preference to display Full Screen navigation buttons that you click to
change pages or exit Full Screen mode.
See also
“Preferences for viewing PDFs” on page 33
“Setting up a presentation” on page 353
Set the Full Screen navigation bar preference
1 Choose Edit > Preferences.
2 Under Categories, select Full Screen.
3 Select Show Navigation Bar.
4 Select View > Full Screen Mode.
The Full Screen navigation bar contains Previous Page , Ne
.
xt Page , and Close Full Screen View buttons,
which appear in the lower left corner of the work area

31
ADOBE ACROBAT 8 PROFESSIONAL
User Guide
Read a document in Full Screen mode
If the Full Screen navigation bar is not shown, you can use keyboard shortcuts to navigate through a PDF.
Note: If you have two monitors installed, the Full Screen mode of a page may appear on only one of the monitors. To
page through the document, click the screen displaying the page in Full Screen mode.
1 Choose View > Full Screen Mode.
2 Do any of the following:
• To go to the next page, press the Enter, Page Down, or Right Arrow key.
• To go to the previous page, press Shift+Enter, Page Up, or the Left Arrow key.
• To change the magnification, press Ctrl+0/Command+0 for Fit Page view, Ctrl+1/Command+1 for actual size,
Ctrl+2/Command+2 for Fit Width view, or Ctrl+3/Command+3 for Fit Visible view.
Y
to
ou can show a Full Screen tool on
n Mode
the Page Display toolbar by right-clicking/Control-clicking the Page Display
olbar and choosing Full Scree . Then, you can click the Full Screen tool to switch to Full Screen mode.
Close Full Screen mode
❖ Do one of the following:
• Press Ctrl+L/Command+L.
• Press Esc. (Escape Key Exits must be selected in the Full Screen preferences. This is the default setting.)
Viewing PDFs in a web browser
You can view PDFs in a supported web browser, or you can set your Acrobat Internet preferences to open linked or
downloaded PDF files in a separate Acrobat window. If you open PDFs in Acrobat outside the browser, you cannot
use Fast Web Viewing, form submittal in a browser, or search highlighting on the web.
Because keyboard commands may be mapped to the web browser, some Acrobat shortcuts may not be available.
Similarly, you may need to use the tools and commands in the Acrobat toolbar rather than the browser toolbar or
menu bar. For example, to print a PDF document, use the Print button in the Acrobat toolbar rather than the Print
command in the browser. (In Microsoft Internet Explorer, you can choose File > Print, Edit > Copy, and Edit > Find
on the Internet Explorer toolbar.)
Important: (Mac OS) If you have Adobe Reader installed on your system and subsequently install Acrobat, Safari
continues to use Adobe Reader to open PDFs in your browser. To reconfigure Safari to use Acrobat, you must quit Safari
and all versions of Acrobat or Adobe Reader, start Acrobat, and then start Safari while Acrobat is running.
Internet preferences
To open the Internet preferences, choose Edit > Preferences (Windows) or Acrobat > Preferences (Mac OS), and
select Internet under Categories.
Display PDF In Browser Displays any PDF opened from the web in the browser window. If this option is not selected,
PDFs open in a separate Acrobat window. On Mac OS, if you have installed versions of Adobe Reader and Acrobat,
you can select which application and which version to use.
Allow Fast Web View Downloads PDFs for viewing on the web one page at a time. If this option is not selected, the
entire PDF downloads before it is displayed. If you want the entire PDF to continue downloading in the background
while you view the first page of requested information, also select Allow Speculative Downloading In The
Background.

32
ADOBE ACROBAT 8 PROFESSIONAL
User Guide
Allow Speculative Downloading In The Background Allows a PDF to continue downloading from the web, even
after the first requested page appears. Downloading in the background stops when any other task, such as paging
through the document, is initiated in Acrobat.
Connection Speed Choose a connection speed from the menu. This setting is also used by the multimedia plug-in.
Internet Settings [or Network Settings] Click to open the Internet or network connection dialog box or panel for
your computer. For more information, consult your operating system Help, your Internet service provider, or your
local network administrator.
Read articles
In PDFs, articles are optional electronic threads that the PDF author may define within that PDF. Articles lead
readers through the PDF content, jumping over pages or areas of the page that are not included in the article, in the
same way that you might skim through a traditional newspaper or magazine, following one specific story and
ignoring the rest. When you read an article, the page view may zoom in or out so that the current part of the article
fills the screen.
See also
“Articles” on page 340
Open and navigate an article thread
1 Choose Tools > Select & Zoom > Hand Tool, or click the Hand Tool on the Select & Zoom toolbar.
2 Choose View > Navigation Panels > Articles to open the Articles panel.
Note: You cannot open the Articles panel if you are viewing the PDF inside a browser. You must open the PDF in Acrobat.
3 Double-click the article icon to go to the beginning of that article. The icon changes to the follow-article
pointer .
Note: If the Articles panel is blank, then the author has not defined any article threads for this PDF.
4 With the article thread open, do any of the following:
• To scroll through the article one pane at a time, press Enter/Return or click in the article.
• To scroll backward through the article one pane at a time, Shift-click in the article, or press Shift+Return.
• To go to the beginning of the article, Ctrl-click/Option-click within the article.
5 At the end of the article, click in the article again.
The previous page view is restored, and the pointer changes to the end-article pointer .
Exit a thread before the end of the article
1 Make sure that the Hand tool is selected.
2 Shift+Ctrl-click/Shift+Option-click the page or press Enter/Return.
The previous page view is restored.

33
ADOBE ACROBAT 8 PROFESSIONAL
User Guide
Preferences for viewing PDFs
The Preferences dialog box defines a default page layout and customizes your application in many other ways. To
modify preferences, choose Edit > Preferences (Windows) or Acrobat > Preferences (Mac OS), and select the panel
you want under Categories. For viewing PDFs, examine the preferences options for Documents, General, Multi-
media, and Page Display.
The preferences settings control how the application behaves whenever you use it; they are not associated with any
particular PDF document.
Note: If you install any third-party plug-ins, set these preferences using the Third-Party Preferences menu item.
See also
“3D preferences” on page 399
“Multimedia preferences” on page 381
“Setting accessibility preferences” on page 293
Documents preferences
Open Settings
Show Each Document In Its Own Window Creates multiple Acrobat windows rather than opening multiple PDFs in
one instance of Acrobat.
Restore Last View Settings When Reopening Documents Determines whether documents open automatically to the
last viewed page within a work session.
Open Cross-document Links In Same Window Closes the current document and opens the document being linked
to in the same window, minimizing the number of windows open. If the document being linked to is already open
in another window, the current document is not closed when you click a link to the open document. If you do not
select this option, a new window opens each time you click a link to a different document.
Allow Layer State To Be Set By User Information Allows the author of a layered PDF document to specify layer
visibility based on user information.
Allow Documents To Hide The Menu Bar, Toolbars, And Window Controls AllowsthePDFtodeterminewhetherthe
menu bar, toolbar, and window controls are hidden when the PDF is opened.
Documents In Recently Used List Sets the maximum number of documents listed in the File menu (Windows) or
when you choose File > Open Recent File (Mac OS). The default is five for Windows and nine for Mac OS.
Remember Files In Organizer History For Specifies how long PDF files remain in the History list.
Save Settings
Automatically Save Document Changes To Temporary File Every _ Minutes Determines how often Acrobat automat-
ically saves changes to an open document.
Save As Optimizes For Fast Web View Restructures a PDF document for page-at-a-time downloading from web
servers.
PDF/A View Mode
View Documents In PDF/A Mode Specifies when to use this viewing mode: Always, Never, or Only For PDF/A
Documents.

34
ADOBE ACROBAT 8 PROFESSIONAL
User Guide
Examine Document
Examine Document Examines the PDF for items that may not be apparent, such as metadata, file attachments,
comments, and hidden text and layers. The examination results appear in a dialog box, and you can remove any type
of item that appears there.
• Examine Document When Closing Document (Not selected by default.)
• Examine Document When Sending Document By Email (Not selected by default.)
Adobe Version Cue CS3
Enable Version Cue File-Version Manager Turns on Adobe Version Cue® CS3 (a feature of Adobe Creative Suite 3)
and adds the Save A Version command and the Versions command to the File menu.
Note: To use Version Cue in Acrobat, you must be able to access a Version Cue Workspace in Creative Suite.
Full Screen preferences
Full Screen Setup
Current Document Only Specifies whether or not the display is limited to a single PDF.
Fill Screen With One Page At A Time Sets the page view to the maximum screen coverage by a single page.
Alert When Document Requests Full Screen Displays a message before going into Full Screen mode. Selecting this
option overrides a previous selection of Do Not Show This Message Again in that message.
Which Monitor To Use Specifies the monitor on which full-screen display appears (for users with multiple-monitor
configurations).
Full Screen Navigation
Escape Key Exits Lets you exit Full Screen mode by pressing the Esc key. If this option is not selected, you can exit
by pressing Ctrl+L/Command+L.
Show Navigation Bar Shows a minimal navigation toolbar regardless of the document settings.
Left Click To Go Forward One Page; Right Click To Go Back One Page Lets you page through an Adobe PDF
document by clicking the mouse. You can also page through a document by pressing Return, Shift-Return (to go
backward), or the arrow keys.
Loop After Last Page Lets you page through a PDF document continuously, returning to the first page after the last.
This option is typically used for setting up kiosk displays.
Advance Every _ Seconds Specifies whether to advance automatically from page to page every set number of
seconds. You can page through a document using mouse or keyboard commands even if automatic paging is
selected.
Full Screen Appearance
Background Color Specifies the window’s background color in Full Screen mode. You can select a color from the
color palettet to customize the background color.
Mouse Cursor Specifies whether to show or hide the pointer when Full Screen mode is in operation.
Full Screen Transitions
Ignore All Transitions Removes transition effects from presentations that you view in Full Screen mode.

35
ADOBE ACROBAT 8 PROFESSIONAL
User Guide
Default Transition Specifies the transition effect to display when you switch pages in Full Screen mode and no
transition effect has been set for the document.
Direction Determines the flow of the selected default transition on the screen, such as Down, Left, Horizontally, and
so forth. The available options vary according to the transition. If no directional options affect the selected default
transition, this option is not available.
Navigation Controls Direction Mimics the user’s progress through the presentation, such as transitioning from top
tobottom whentheuserproceedstothenext pageandfrombottomtotop whentheuserbacktrackstothe previous
page. Available only for transitions with directional options.
General preferences
Basic Tools
Use Single Key Accelerators To Access Tools Enables you to select tools with a single keystroke. This is off by default.
Create Links From URLs Specifies whether links that weren’t created with Acrobat are automatically identified in the
PDF document and become clickable links.
Make The Hand Tool Select Text Enables the Hand tool to function as the Select tool when it hovers over text in an
Adobe PDF.
Make The Hand Tool Read Articles Changes the appearance of the Hand tool pointer when over an article thread.
Uponthefirstclick,thearticlezoomstofillthedocumentpanehorizontally;subsequentclicksfollowthethreadof
the article.
Make The Hand Tool Use Mouse-wheel Zooming Changes the action of the mouse wheel from scrolling to zooming.
Make The Select Tool Select Images Before Text Changes the order in which the Select tool selects.
Use Fixed Resolution For Snapshot Tool Images Sets the resolution used to copy an image captured with the
Snapshot tool.
Warnings
Do Not Show Edit Warnings Disables warning boxes that would normally appear when you delete items such as
links, pages, page thumbnails, and bookmarks.
Reset All Warnings Restores default settings for warnings.
Print
Show Page Thumbnails In Print Dialog Controls the print preview display in the Print dialog box. Deselecting this
option speeds up the preview.
Emit Passthrough PostScript When Printing EnablesAdobePostScript®XObjectsinthePDFfiletobeemitted when
that PDF file is printed to a PostScript printer.
Application Startup
Show Splash Screen Determines whether the application splash screen appears each time the application starts.
Use Only Certified Plug-Ins Ensures that only Adobe-certified third-party plug-ins are loaded.

36
ADOBE ACROBAT 8 PROFESSIONAL
User Guide
Page Display preferences
Default Layout And Zoom
Resolution
Use System Setting Uses the system settings for monitor resolution.
Custom Resolution Sets the monitor resolution.
Rendering
Smooth Text Specifies the kind of text-smoothing to apply: None, For Monitor, or For Laptop/LCD.
Smooth Line Art Applies smoothing to remove abrupt angles in lines.
Smooth Images Applies smoothing to minimize abrupt changes in images.
Use Local Fonts Specifies whether the application uses or ignores local fonts installed on your system. When
deselected, substitute fonts are used for any font not embedded in the PDF. If a font cannot be substituted, the text
appears as bullets and an error message appears.
Use 2D GPU Acceleration (Appears only if your computer hardware supports 2D GPU acceleration.) Speeds up
zooming, scrolling, and redrawing of page content, and speeds the rendering and manipulation of 2D PDF content.
This option is deselected by default.
Note: If the 2D GPU Acceleration option appears on the Page Display preferences but is not available, you may need to
updateyourGPUcarddrivertoenablethis hardware feature. Contactyourcardvendororcomputermanufacturerfor
an updated driver.
Use Page Cache Places the next page in a buffer before the current page is viewed to reduce the time required to page
through a document.
Page Content And Information
Show Large Images Displays large images. If your system is slow to display image-intensive pages, you can deselect
this option.
Overprint Preview Turns overprint preview on or off. The Overprint Preview mode lets you see (on-screen) the
effects of ink aliasing in the printed output. A printer or service provider may create an ink alias if a document
contains two similar spot colors and only one is required, for example.
Show Art, Trim, & Bleed Boxes Displays any art, trim, or bleed boxes defined for a document.
Show Transparency Grid Displays the grid behind transparent objects.
Use Logical Page Numbers Enables the Number Pages command for matching the position of the page in the PDF
to the number printed on the page. A page number, followed by the page position in parentheses, appears in the Page
Navigation toolbar and in the Go To Page and Print dialog boxes—for example, i (1 of 1) if the printed number of
the first page is i. If this option is not selected, pages are numbered with arabic numbers starting at 1. Selecting this
option helps prevent unexpected behavior when clicking Back or Go Back in your web browser.
Always Show Document Page Size Displays the page measurements beside the horizontal scroll bar.
Use Smooth Zooming When deselected, turns off animation effects, which improves performance.
Use Smooth Scrolling When deselected, turns off animation effects, which improves performance.
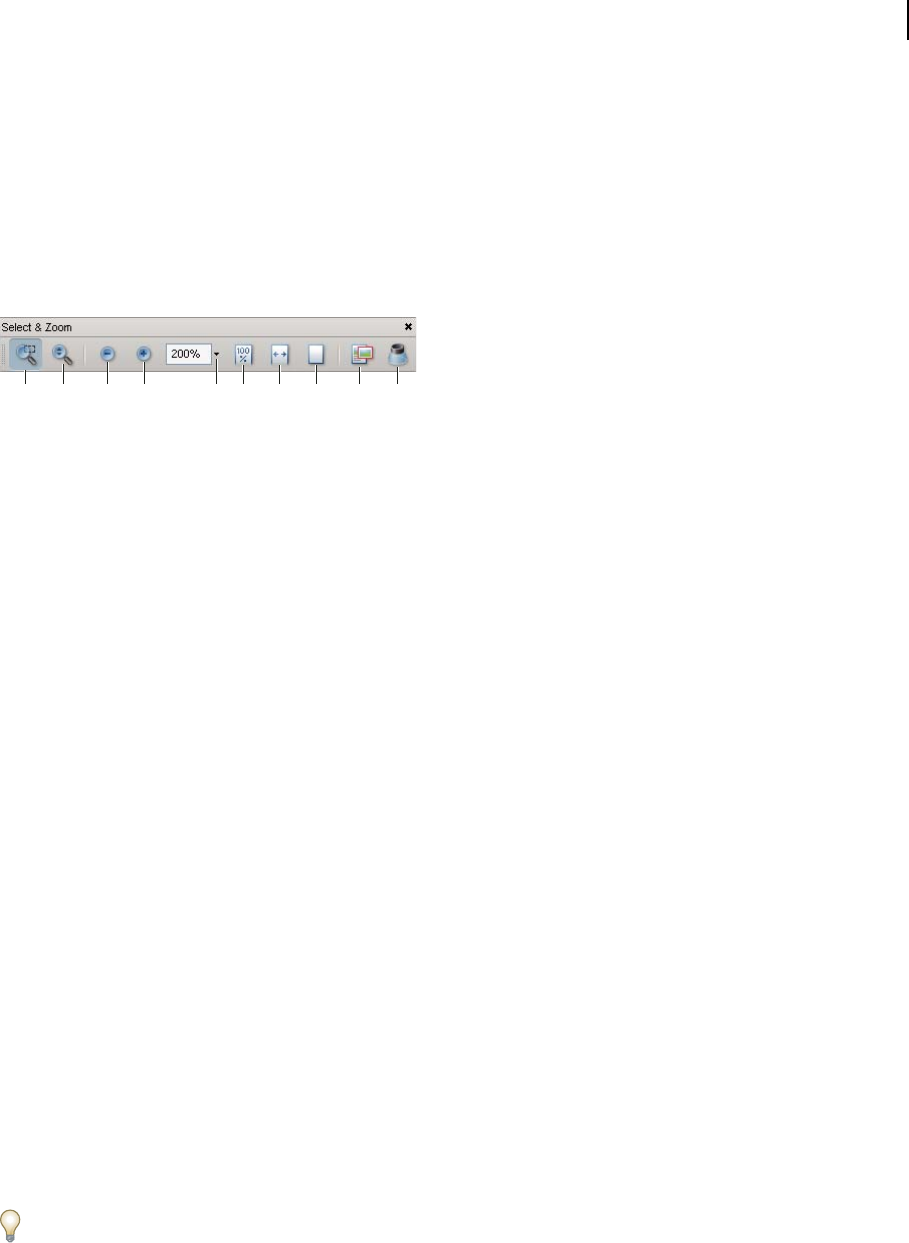
37
ADOBE ACROBAT 8 PROFESSIONAL
User Guide
Adjusting PDF views
Adjust page magnification
Tools on the Select & Zoom toolbar can change the magnification of PDF documents. Only some of these tools
appear on the default view of the toolbar. You can see all the tools by right-clicking/Control-clicking the Select &
Zoom toolbar and choosing either individual tools, Show All Tools, or More Tools and then selecting individual
tools.
A B C D E F G H I J
All zoom tools
A. Marquee Zoom tool B. DynamicZoomtool C. Zoom Out button D. Zoom In button E. Zoom Value menu button F. Actual Size button
G. Fit Width button H. Fit Page button I. Pan & Zoom Window tool J. Loupe tool
• The Marquee Zoom tool works in a few different ways. You can use it to drag a rectangle around a portion of the
page that you want to fill the viewing area. Or, simply clicking the Marquee Zoom tool increases the magnification
by one preset level, centering on the point where you clicked. To decrease the magnification by one preset level,
Ctrl-click/Option-click the Marquee Zoom tool.
• The Dynamic Zoom tool zooms in when you drag it up the page and it zooms out when you drag down. If you
use a mouse wheel, this tool zooms in when you roll forward and zooms out when you roll backward.
• Zoom In and Zoom Out buttons change the document magnification by preset levels.
•
The Zoom Value option changes the page view according to a percentage you type in or select from a pop-up menu.
• Actual Size displays the page at 100% magnification.
• Fit Width adjusts the magnification so that the PDF fills the document pane horizontally.
• Fit Page adjusts the magnification so that one page fills the document pane vertically.
• The Pan & Zoom Window tool adjusts the magnification and position of the view area to match the area in an
adjustable rectangle in the Pan & Zoom window’s thumbnail view of the page.
• TheLoupe Toolwindow displaysamagnified portionofthe PDFthatmatchestheareainanadjustablerectangle
on the document pane.
Resize a page to fit the window
• To resize the page to fit entirely in the document pane, choose View > Zoom > Fit Page.
• To resize the page to fit the width of the window, choose View > Zoom > Fit Width. Part of the page may be out
of view.
• Toresizethepagetofittheheightofthewindow,chooseView > Zoom >Fit Height.Partofthepage maybeout
of view.
• Toresize thepagesothatits textandimagesfitthewidthofthewindow,chooseView > Zoom>FitVisible.Part
of the page may be out of view.
To see keyboard shortcuts for resizing the document, open the View menu.

38
ADOBE ACROBAT 8 PROFESSIONAL
User Guide
Show a page at actual size
❖ Choose View > Zoom > Actual Size.
The actual size for a PDF page is typically 100%, but the document may have been set to another magnification level
when it was created.
Change the magnification with zoom tools
❖ Do one of the following:
• Click the Zoom In button or the Zoom Out button in the toolbar.
• Enter a magnification percentage in the Select & Zoom toolbar, either by typing or choosing from the pop-up
menu.
• Drag the Marquee Zoom tool to
l u
define the area of the page that you want to fill the document pane.
• Drag the Dynamic Zoom too p to increase the magnification and down to decrease magnification.
When the Marquee Zoom tool is selected, you can Ctrl-click/Option-click or Ctrl-drag/Option-drag to zoom out.
Holding down Shift switches temporarily from the Marquee Zoom tool to the Dynamic Zoom tool.
Change the magnification with the Pan & Zoom Window tool
1 Choose Tools > Select & Zoom > Pan & Zoom Window, or select the Pan & Zoom Window tool on the Select
& Zoom toolbar.
2 Do any of the following:
• Drag the handles of the box in the Pan & Zoom window to change the document magnification.
• Drag the center of the box to pan across the area you want to see.
• Click the navigation buttons to move to a different page.
• Enter a value in the zoom text box, or click the plus or minus buttons to increase or decrease the magnifi-
cation by preset levels.
Change the magnification with the Loupe tool
1 ChooseTools>Select&Zoom>Loupe,orselecttheLoupetool ontheSelect&Zoomtoolbar,ifitisdisplayed.
2
Click the area of the document you want to view in closer detail. A rectangle appears in the document, corresponding
to the area shown in the Loupe Tool window. You can drag or resize the rectangle to change the Loupe tool view.
3 To change the magnification of the Loupe tool, do any of the following:
• Drag the slider.
• Click the plus or minus buttons.
• Enter a value in the zoom text box.
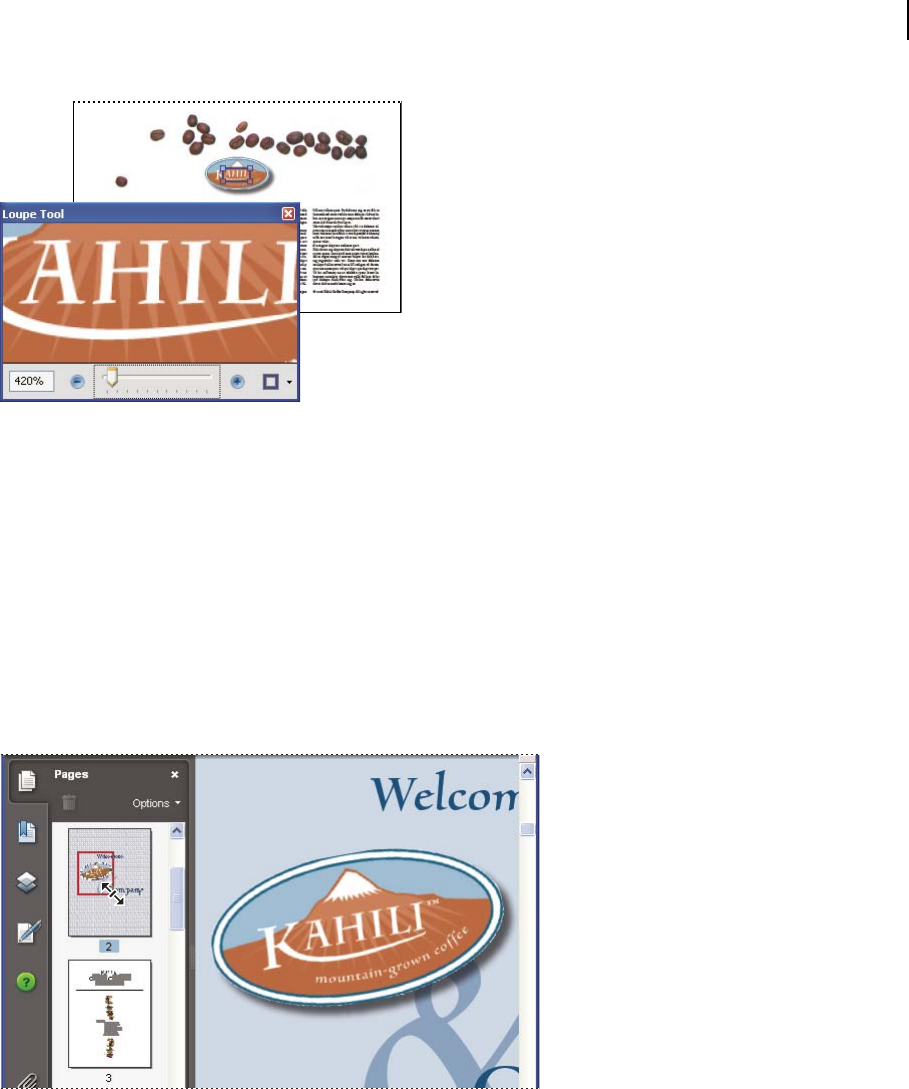
39
ADOBE ACROBAT 8 PROFESSIONAL
User Guide
Use the Loupe tool to view a magnified area of the document.
Note: You can change the color of the Loupe tool rectangle, click the Line Color pop-up menu in the lower right corner
of the Loupe Tool window, and select a new color.
Change the magnification by using a page thumbnail
1 Click the Pages button on the left side of the window to view the page thumbnails.
2 Locatethethumbnailforthecurrentpage,andthenpositionthepointeroverthe lowerrightcornerofthepage-
view box until the pointer changes into a double-headed arrow.
3 Drag the corner of the box to reduce or expand the view of the page.
4 As needed, move the pointer over the zoom box frame within the thumbnail until it changes to a Hand icon, and
then drag the frame to see a different area of the page in the document pane.
A page-view box in a page thumbnail indicates the area of the page currently showing in the document pane.
Change the default magnification
1 Choose Edit > Preferences.
2 Under Categories, select Page Display.
3 Open the Zoom pop-up menu and choose a default magnification level.

40
ADOBE ACROBAT 8 PROFESSIONAL
User Guide
Set the page layout and orientation
Changing thepagelayoutisespeciallyusefulwhenyou wanttozoomouttoget anoverviewofthedocumentlayout.
You can use the following page layouts when viewing PDF documents:
Single Page Displays one page at a time, with no portion on other pages visible.
Single Page Continuous Displays pages in a continuous vertical column that is one page wide.
Two-Up Displays each two-page spread with no portion of other pages visible.
Two-Up Continuous Displays facing pages side by side in a continuous vertical column.
Note: If a document has more than two pages, the Two-Up and Two-Up Continuous views display the first page alone
on the right side of the document pane, to ensure proper display of two-page spreads.
Single Page, Single Page Continuous, Two-Up, Two-Up Continuous page layouts
Set page layout
• To see only one page at a time, choose View > Page Display > Single Page.
• To see two pages at a time, side by side, choose View > Page Display > Two-Up.
• To scroll down continuously through one page after another, choose View > Page Display > Single Page
Continuous.
• To scroll down continuously through two pages at a time, choose View > Page Display > Two-Up Continuous.
You can also display buttons for each of these options in the Display Pages toolbar by choosing Tools > Toolbars >
More Tools, and selecting them in the More Tools dialog box.
Note: In Single Page layout, choosing Edit > Select All selects all text on the current page. In other layouts, Select All
selects all text in the PDF.
Rotate the page view
You can change the view of a page in 90˚ increments. This changes the view of the page, not its actual orientation.
You can’t save this change.
❖ Choose View > Rotate View > Clockwise or Counterclockwise, or click the Rotate Clockwise button or the
Rotate Counterclockwise button in the toolbar.
Note: If you want the rotation to be saved with the document, choose Document > Rotate Pages.
Change the default page layout
1 Choose Edit > Preferences.
2 Under Categories, select Page Display.
3 Open the Page Layout menu and choose Automatic, Continuous, Single Page, Two-Up, or Two-Up Continuous.

41
ADOBE ACROBAT 8 PROFESSIONAL
User Guide
Use split-window view
You can view a PDF with the document pane divided into two panes (Split command) or four panes (Spreadsheet
Split command).
WithSplitview,youcanscroll,changethemagnification level, orturntoadifferent pageintheactivepanewithout
affecting the other pane.
The Spreadsheet Split view is useful if you want to keep column headings and row labels visible while scrolling
through a large spreadsheet or table. In this mode, changing the magnification in one pane changes the magnifi-
cation in all panes. Also, scrolling is coordinated between the panes: scrolling a pane horizontally also scrolls the
pane above or below it; scrolling vertically also scrolls the pane to the left or right of that pane.
1 Start creating the type of split view you want:
• To split the view into two panes, choose Window > Split, or drag the gray box above the vertical scroll bar.
• To split the view into four panes with synchronized scrolling and zoom levels, choose Window > Spreadsheet Split.
2 Drag the splitter bars up, down, left, or right to resize the panes, as needed.
3 Adjust the zoom level, as needed:
• In Split view, click a pane to make it active, and change the zoom level for that pane only.
• In Spreadsheet Split view, adjust the zoom level to change the displays in all four panes.
4 Scroll, as needed:
• In Split view, click a pane to make it active, and scroll to change that pane only.
• In Spreadsheet Split view, click a pane, and scroll vertically to change the views in the active pane and the pane
beside it. Scroll horizontally to change the views in the active pane and the pane above or below it.
5 To restore single-pane view, choose Window > Remove Split.
View a document in multiple windows
You can create multiple windows for the same document using the New Window command. New windows have the
same size, magnification, and layout as the original window and open at the same page and on top of the original
window. When you open a new window, Acrobat adds the suffix 1 to the original filename and assigns the suffix 2
tothenew window.Youcanopenmultiplewindowswiththesuffixincrementingwitheachnewwindow.Closing a
window causes the remaining open windows to be renumbered sequentially; that is, if you have five windows open
and you close the third window that you opened, the windows are renumbered with the suffixes 1 to 4.
Note: This feature is not available when PDFs are viewed in a browser.
Open a new window
❖ Select Window > New Window.
Close a window
❖ Click the close box in the window. You are prompted to save any changes. Closing a window does not close a
document if more than one window is open.
Close all windows for a document
❖ Choose File > Close. You are prompted to save any changes before each window is closed.

42
ADOBE ACROBAT 8 PROFESSIONAL
User Guide
Display off-screen areas of a magnified page
When you zoom in to a high magnification, you may be able to see only part of a page. You can shift the view to show
other areas of the page without changing the magnification level.
❖ Do either of the following:
• Use the vertical scroll bars to move up and down the pages or the horizontal scroll bars to move across the page.
• Select the Hand tool in the Select & Zoom toolbar, or choose Tools > Select & Zoom > Hand Tool, and drag to
move the page, as if moving a piece of paper on a table.
See also
“About PDF layers” on page 360
Display PDFs in Line Weights view
The Line Weights view applies a constant stroke width (1 pixel) to lines, regardless of zoom. When you print the
document, the stroke will print at the true width. Line Weights view is off by default.
❖ Choose View > Line Weights. To turn off Line Weights view, choose View > Line Weights again.
Note: Line Weights view is not available for viewing PDFs within a web browser.
Grids, guides, and measurements
About grids, rulers, and measurement tools
Acrobat includes a set of tools that helps you fine-tune the layout of your Adobe PDF documents. Tools such as grids,
rulers, guides, measurement tools, and the Info panel are especially useful when you’re designing forms, inspecting
CAD (computer-aided design) drawings, and preparing for professional printing.
View grids
You can use grids to accurately line up text and objects in a document. When turned on, the grid is visible over the
document. The Snap To Grid option aligns an object with the nearest grid line when you move the object.
View or hide the grid
❖ Choose View > Grid. A check mark appears next to the command name when the grid is displayed.
Turn the Snap To Grid option on or off
❖ Choose View > Snap To Grid. A check mark appears next to the command name when the option is turned on.
Change the grid appearance
1 Choose Edit > Preferences (Windows) or Acrobat > Preferences (Mac OS), and then select Units & Guides under
Categories.
2 To change grid settings, do any of the following:
• To change the spacing between grid lines, use the arrow keys or the text box to enter a value for Width Between
Lines and Height Between Lines.

43
ADOBE ACROBAT 8 PROFESSIONAL
User Guide
• Tochange theoriginofthe grid,use thearrowkeys orthetextboxtoenteravalueforGridOffsetFrom Left Edge
and Grid Offset From Top Edge.
• Tochangethenumberofsubdivisionswithineachgridsquare,usethearrowkeysorthe text boxtoenteravalue
for Subdivisions. Subdivision lines are lighter than grid lines.
• To change the color of the grid lines, click the Grid Line Color square and choose a new color from the Color
panel. Then click OK.
3 Click OK to close the Preferences dialog box.
Create ruler guides
Horizontal and vertical rulers let you check the size of objects in your documents. You can also create guides in your
document, which are especially useful for lining up objects, such as form fields. You can change the unit of
measurement and color used in the ruler.
Create new ruler guides
1 Choose View > Rulers.
2 Do one of the following:
• Drag down from the horizontal ruler to create a horizontal guide, or drag to the right of the vertical ruler to create
a vertical guide.
• Double-click a location on the horizontal ruler to create a vertical guide, or double-click a location on the vertical
ruler to create a horizontal guide.
Show or hide guides
❖ Choose View > Guides.
Move or delete ruler guides
❖ Click the guide to select it, and then drag it to a new location, or press Delete. To delete all guides, right-
click/Control-click in the ruler area and choose Clear All Guides or Clear Guides On Page.
Change guide colors
1 Choose Edit > Preferences (Windows) or Acrobat > Preferences (Mac OS), and then select Units & Guides under
Categories.
2 Click the Guide Color square and choose a new color from the Color pop-up menu, and then click OK.
Measure the height, width, or area of objects
The Measuring toolbar contains tools you can use to measure distances and areas of objects in PDF documents. The
measuring tools are especially useful when you need to know the distances or areas associated with objects in a form
or computer-aided design (CAD) drawing, or when you want to measure certain areas of a document before sending
it to a professional printer. The measuring tools are available to Reader users only if the PDF creator enables
measuring functionality.
When you use a measuring tool, the tool dialog box displays the measurements of the line segments you draw.
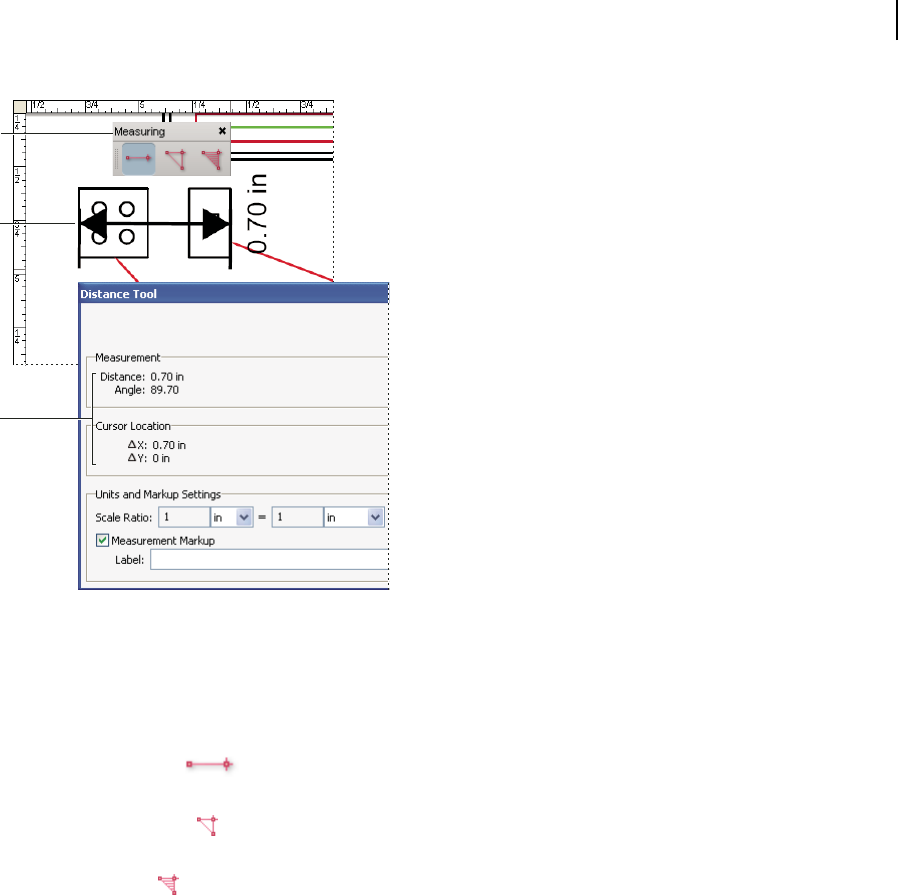
44
ADOBE ACROBAT 8 PROFESSIONAL
User Guide
A
B
C
Measuring tools
A. Measuring toolbar B. Object being measured C. Tool display
1 Choose Tools > Measuring, and select a measuring tool. Or, right-click/Control-click the toolbar area, and then
choose Measuring.
2 To measure areas of your PDF document, do any of the following:
• SelecttheDistancetool tomeasure thedistancebetweentwopoints.Clickthefirstpoint,movethepointer
to the second point, and then click again. The measurements appear in the tool dialog box.
• Select the Perimeter tool to
lick th
measure a set of distances between multiple points. Click each point you want to
measure. Then, double-c e last point, or hold the pointer over the last point and click.
• SelecttheAreatool to
ave clic
measuretheareawithinthelinesegmentsthatyou draw. Clickeachpointyouwantto
measure. After you h ked at least two points, click the first point to complete the area measurement.
Note: You can also finish a measurement by right-clicking/Control-clicking and choosing Complete Measurement from
the context menu.
3 While measuring objects, do any of the following:
• To change the scaling ratio (such as 3:2) on the drawing areas, specify the appropriate numbers in the tool dialog
box. If desired, change the unit of measurement next to this ratio.
• Select Measurement Markup in the tool dialog box if you want the lines you draw to appear as a comment. You
canthenusetheHandtooltodouble-clickthecommentandviewthemeasurementforthelinesegmentsthatyou
draw.UnlessAnnotateisselected,theobjectyoudrawwilldisappearwhenyoumeasureanotherobjectorselect
another tool.

45
ADOBE ACROBAT 8 PROFESSIONAL
User Guide
View the Info panel
The Info panel lets you see the coordinate position of the pointer within the document pane. The position
numbering begins at the upper left corner of the document. The Info panel also shows the width and height of a
selected object as you resize it.
View x and y coordinates
1 Choose View > Navigation Panels > Info.
2 Move the mouse pointer to view x and y coordinates.
Change the panel’s measurement units
❖ In the Options menu in the Info panel, choose a different unit of measurement. The currently selected option has
a check mark next to its name.
Saving PDFs
About saving PDFs
You can save a copy of a PDF with any comments, entries in form fields, or digital signatures that you have added to
the PDF. If the PDF restricts your usage rights, the document message bar under the toolbar area describes these
restrictions when you open the document.
You can also save the contents of a PDF in text format. This allows you to easily reuse the text from a PDF and to use
the content with a screen reader, screen magnifier, or other assistive technology.
Save a copy of a PDF
1 Choose File > Save As (or Save A Copy, if Save As is not shown).
2 In the Save As dialog box, enter the filename and location, and click Save.
Save comments, form field entries, and digital signatures
❖ Do one of the following:
• Choose File > Save to save changes to the current file.
• Choose File > Save As to save changes to a new file.
If yo
Cop
u are viewing a PDF in a web browser, the Acrobat File menu is not available. However, you can use the Save A
y button in the Acrobat toolbar to save the PDF.
See also
“Filling in PDF forms” on page 201
“Participating in a PDF review” on page 161

46
ADOBE ACROBAT 8 PROFESSIONAL
User Guide
Save document changes
If you modify a PDF—such as by adding new pages from another file or deleting pages—you can save your changes
by saving the PDF or by saving a copy of the PDF. You can also save changes to your work incrementally and then
recover those changes if a problem occurs.
Note: Saving a digitally signed PDF invalidates the signature.
Save changes
• To save the changes to the current document, choose File > Save.
• To save the modified document to a new file, choose File > Save As. For Save As Type (Windows) or Format (Mac
OS), choose Adobe PDF Files (*.pdf). Type a name and location, and click Save.
Recover the last saved version
❖ Choose File > Revert, and then click Revert.
About the Autosave feature
The Autosave feature guards against losing your work in case of a power failure by incrementally, and at regular
intervals, saving file changes to a specified location. The original file is not modified. Instead, Acrobat creates an
autosave file of changes, which includes all the changes you made to the open file since the last automatic save. The
amount of new information that the autosave file contains depends on how frequently Acrobat saves the autosave
file. If you set the autosave interval to 15 minutes, you could lose the last 14 minutes of your work if a problem occurs.
Frequent automatic saving prevents loss of data, and is especially useful if you make extensive changes to a
document, such as by adding comments.
You can apply autosave changes to the original files when you restart Acrobat. When you close, save manually, or
revert to the last-saved version of a file, the autosave file is deleted.
Note: If you use assistive technology, such as a screen reader, you may want to disable the Autosave feature so that you
don’t lose your place when the file is reloaded.
The Autosave feature won’t work in the following cases:
• A document that has its security changed. You must save the document to re-enable automatic saving of document
changes.
• A document created using the WebCapture feature or extracted from a larger PDF (Document > Extract Pages).
You must save the document to enable automatic saving of changes.
• A document displayed in a web browser or incorporated into a container document that supports Object Linking
and Embedding (OLE). This document appears outside the default file system and cannot support automatic
saving.
Recover lost changes
To prevent lost changes after an unexpected interruption, the Autosave feature must be enabled, which is the default
setting.
Set up automatic saving
1 Choose Edit > Preferences (Windows) or Acrobat > Preferences (Mac OS).
2 Select Documents in the Categories list.

47
ADOBE ACROBAT 8 PROFESSIONAL
User Guide
3 If Automatically Save Document Changes To Temporary File Every xx Minutes (1-99) is not selected, select it now.
4 In the Minutes box, specify how often you want Acrobat to save files.
Recover lost changes after an unexpected shutdown
1 Start Acrobat or open the file you were working on last.
2 When prompted, click Yes to open the autosave file or files. If multiple files were open, Acrobat opens all of the
files for you.
3 Save the file or files with the same names as the files you were originally working on.
Reduce file size by saving
You can sometimes reduce the file size of a PDF simply by using the Save As command. Reducing the size of PDFs
improves their performance—particularly when they’re being accessed on the web—without altering their
appearance.
The Reduce File Size command resamples and recompresses images, removes embedded fonts, compresses
document structure, and cleans up elements such as invalid bookmarks. If the file size is already as small as possible,
this command has no effect.
Note: Reducing the file size of a digitally signed document removes the signature.
1 Choose Document > Reduce File Size.
2 Select the version compatibility that you need, and click OK.
If you’re certain that all your users use Acrobat 8 or Adobe Reader 8, limiting compatibility to the latest version can
further reduce file size.
If you want to control changes and quality trade-offs, use PDF Optimizer, which makes more options available.
Note: If you select Acrobat 4.0 And Later, and the document contains transparency, the transparency is flattened.
See also
“PDF Optimizer” on page 343
Organizer
Organizer window overview
Organizer helps you find PDFs that you’ve previously opened and PDFs that you’ve organized into collections and
favorites. With Organizer, you can see thumbnail images of PDF pages to quickly identify files. You can also use
Organizer to organize related PDFs without changing their location in your file structure, and quickly browse, find,
and sort PDFs that you recently viewed.
You access the Organizer and Organizer-related commands in the File menu. After you select one or more files
within the Organizer, you can start one of several different tasks using the buttons above the file list.
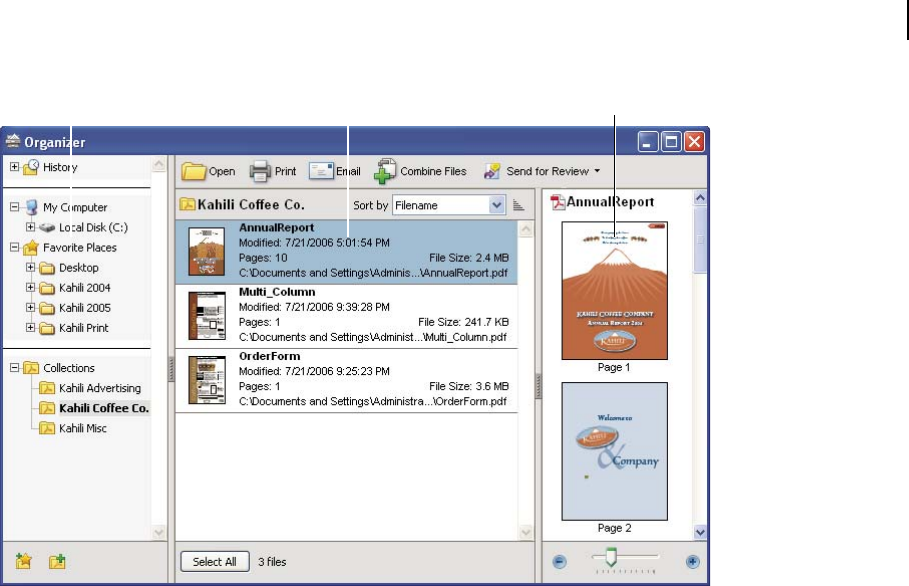
48
ADOBE ACROBAT 8 PROFESSIONAL
User Guide
A B C
Organizer window in Windows
A. Categories pane B. Files pane C. Pages pane
Categories pane
The categories pane of the Organizer window is divided vertically into sections that contain categories. These items
can help you locate and organize PDFs that reside on your computer, on a network, and on the web.
History Contains subcategories that list all the PDFs that you’ve opened during a specified period of time. You can’t
change the subcategory names or manually add PDFs to the History, which is automatically updated each time you
open a PDF and as time passes, but you can clear the entire history by using the Clear History button in the files pane.
You can also control the maximum length of the file history or turn it off with the Remember Files In Organizer
History For option in Edit > Preferences > Documents.
My Computer (Windows) or [disk name] (Mac OS) Lists the hard drives and folders in their current hierarchy. This
category is especially useful if you know where a particular PDF resides.
Favorite Places Lists any folders, network locations, and web directories that you’ve specified as favorite destina-
tions. This category functions like bookmarks or favorite destinations that you create for quick access in a web
browser, except that the destinations are folders or disk drives that contain PDFs. You can add or remove destinations
from the Favorite Places list, but you can’t edit the destination names.
Collections Contains collection folders that list all PDFs that you’ve associated with each particular collection folder.
Each collection folder can point to multiple PDFs no matter where each PDF is located; for example, a single
collection folder can list PDFs that are actually located in different folders on your computer, on a network, and also
on the web. You can change each collection folder’s name, add new collection folders, and add PDFs to each
collection folder.
Note: Collections and PDF packages both involve multiple PDFs, but in very different ways. A PDF package is itself a
PDF file that can be composed of multiple PDFs and that exists in a folder on your computer. For example, you can
attach a PDF package to an email message. Collections are more like reminders that help you find related files that may
be stored in different locations on your computer.
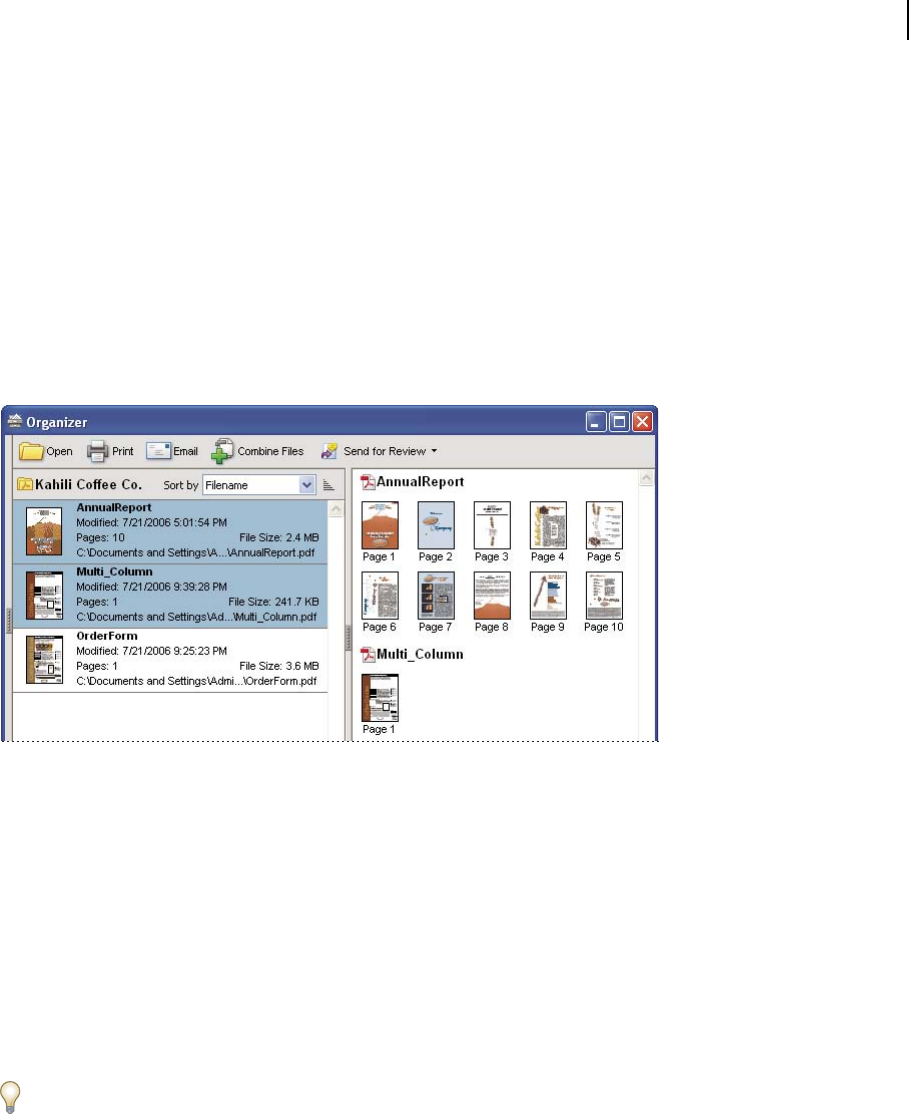
49
ADOBE ACROBAT 8 PROFESSIONAL
User Guide
Files pane
The files pane in the Organizer window lists the PDFs that are within the subcategory or folder selected in the
categories pane; each PDF listing shows the filename, modification date, page number, file size, location, and a
thumbnail image of the first page. You can sort the list by filename, metadata information, number of pages, file size,
modification date, and date last opened.
Use the buttons at the top of the Organizer window to open, print, email, or combine one or more selected PDFs; in
addition, you can send a selected PDF for review or approval, or upload it for a browser-based review.
Pages pane
The pages pane of the Organizer window displays thumbnails for every page of all PDF files that are selected in the
files pane. The Zoom slider and buttons at the bottom of the pages pane let you adjust the size of the page thumbnails.
Selecting a PDF (left) reveals a thumbnail for each page in the pages pane (right).
Adjust the Organizer window
You can make changes to your view of the Organizer.
See also
“Combining files into PDFs” on page 119
“Starting and managing a review” on page 157
Display the Organizer window
❖ Choose File > Organizer > Open Organizer.
It i
ad
sn’t necessary to open the Organizer window if you want to open a PDF in a collection, create a new collection,
d an open PDF to a collection, or open a PDF from your history of opened PDFs. Choose File > Organizer or File >
History to access commands that let you do all of these things.
Resize the Organizer and its panes
• To resize a pane relative to the other panes, drag the vertical bar that separates two panes.
• To resize the Organizer window, drag the left, right, or bottom edge of the window.

50
ADOBE ACROBAT 8 PROFESSIONAL
User Guide
Sort the files pane list
1 If necessary, select a subcategory or folder in the categories pane to display PDFs in the files pane.
2 In the files pane, do any of the following:
• To sort the list of PDF files according to a particular property, choose a property from the Sort By menu.
• To change the sorting direction, click the Ascending Sort Order button o
t
r the Descending Sort Order button
o the right of the Sort By menu.
• To view the location of the selected PDFs, right-click/Control-click, and choose Show In Windows Explorer
(Windows) or Show In Finder (Mac OS).
Organize PDF collections
You can manage PDF collections in the Organizer window.
Add a PDF to a collection
❖ Do any of the following:
• Right-click/Control-click the collection, choose Add Files, select one or more PDFs, and click Add.
• Right-click/Control-click the PDF in the files pane, and choose Add To A Collection > [collection name].
• Drag a PDF from Windows Explorer or Mac OS Finder to the collection in the categories pane.
• After selecting a subcategory in the History, My Computer, or Favorite Places category, drag a PDF from the files
pane to the desired collection.
• In Acrobat, open the PDF and choose File > Organizer > Add To A Collection. Then either select the collection
to which you want to add the PDF or click New Collection, type a name, and click Create.
Y
P
oucan openanyPDFfromacollectionbyusingtheOpenbutton intheOrganizerwindoworbychoosingthe
DFfilenamefromasubmenudirectlyinAcrobat.ToopenaPDFfromacollectioninAcrobat,chooseCollections
> [collection name] > [PDF filename] from either the File > Organizer submenu or the Organizer menu in the File
toolbar.
Edit the collection folders
• To rename a collection, right-click/Control-click the collection name, choose Rename Collection, and then type
the new name.
• To delete a collection, right-click/Control-click the collection name, choose Delete Collection, and then click Yes
in the confirmation dialog box. The PDF files within the collection aren’t deleted from their original locations.
• To create a new collection, click the Create A New Collection button in the Organizer window. Or, in Acrobat,
choose File > Organizer > Create A New Collection. Type a name for the collection.
Move a PDF to a different collection
❖ To move a PDF from one collection to another, select the collection that contains the PDF, right-click/Control-
click the PDF file in the files pane, and choose Move To Collection > [collection name].
Remove a PDF from a collection
❖ To remove a PDF from a collection, select the collection, right-click/Control-click the PDF in the files pane, and
choose Remove From [collection name].

51
ADOBE ACROBAT 8 PROFESSIONAL
User Guide
Organize PDFs with the Favorite Places category
1 To add an existing folder or hard drive to the category, do one of the following:
• Click the Add A Favorite Place button , select a folder or hard drive, and click OK.
• Right-click/Control-click the folder in the My Computer (Windows) or [disk name] (Mac OS) category, and
choose Add [folder name] To Favorite Places.
• Right-click/Control-click the subfolder in the Favorite Places category, and choose Add [favorite place name] To
Favorite Places.
2 To remove a folder or hard drive from the list of Favorite Places, right-click/Control-click the item, and choose
Remove [folder name] From Favorite Places.
Expand views in the Categories pane
Items in the Categories pane can be expanded and collapsed by clicking the plus sign [+] (Windows) or arrow
(Mac OS) so that you can see more of the structure. When you select a date category, folder, or collection, all PDFs
in that item are listed in the pages pane.
Expand an Organizer category
1 Toexpand or collapseacategoryorfolderinthe categories pane,click theicontothe leftofthecategoryiconor
folder icon.
2 Select a subcategory or folder under a main category. The pages pane lists all PDFs associated with that subcat-
egory or folder.
Expand the file structure
❖ Select a folder in the My Computer (Windows) or [disk name] (Mac OS) category. All PDFs in that folder are listed
in the files pane.
Start a task from the Organizer files pane
1 Select a subcategory or folder under a main category in the categories pane to display PDFs in the files pane.
2 Select the file or files you want to work with:
• To select a listed PDF file, click it.
• To select all the PDF files listed, click Select All.
• To add noncontiguous PDF files to or remove them from the selection, Ctrl-click/Command-click them.
• To add contiguous PDF files to the selection, Shift-click them.
3 To perform an action on the selected PDF files, click one of the task buttons at the top of the Organizer window:
• To open, print, or email the PDF files, use the buttons above the files pane.
• To start combining PDF files into a single PDF file, click the Combine Files button and follow the instructions in
the wizard.
• To start a review, select the PDF and choose Send For Review > Send For Shared Review or Send For Review >
Attach For Email Review.

52
ADOBE ACROBAT 8 PROFESSIONAL
User Guide
See also
“Combining files into PDFs” on page 119
“Starting and managing a review” on page 157
Erase the history of opened PDFs
1 Select a History subcategory in the categories pane.
2 Click Clear History in the files pane.
Maintaining the software
About the updating process
Acrobat application files and components can be updated in a variety of ways. Some updates are available when you
open a PDF that triggers the updating process automatically. For example, if you open a form that uses Asian-
language fonts, Acrobat asks whether you want to download the fonts. Other updates are available only from the
Help menu, and you must install them manually. Some updates are available both automatically and manually.
Depending on your preferences settings, Acrobat downloads updates in the background.
Update the software
❖ Choose Help > Check For Updates, and follow any on-screen instructions.
Change updating preferences
1 Choose Help > Check For Updates.
2 In the Adobe Updater dialog box, click Preferences.
3 Select Automatically Check For Adobe Updates, and specify whether you want automatic checking on a weekly
or monthly basis and whether or not you want to be asked before updates are downloaded.
4 Makesurethattheapplicationyouarerunning(AdobeReaderorAdobeAcrobat)is selectedasthesoftwarethat
will be updated.
5 If appropriate, click Browse to navigate to the location in which you want the downloads to be placed.
About Speed Launcher (Windows)
When you install Acrobat, the Speed Launcher program is installed into your computer’s Common Startup group.
The Speed Launcher shortens the time needed to start Acrobat.
Although this is not recommended, you can disable Speed Launcher by dragging its icon out of the Startup folder.
Note: If you have both Acrobat and Reader installed on the same system, two Speed Launcher icons appear in the Startup
folder. If you want to disable Speed Launcher, remove both Speed Launcher icons from the Startup folder.
For more information about this topic, see the Adobe support website.

53
ADOBE ACROBAT 8 PROFESSIONAL
User Guide
Manage plug-ins
Plug-ins add more functionality, but they also increase the memory needed. To minimize memory requirements,
you may want to install only the plug-ins that you use. To load a plug-in correctly, you must place it in the plug-ins
folder. You can temporarily disable plug-ins when starting your software.
Disable a plug-in
1 Do one of the following:
• (Windows) Open the plug_ins folder (Program Files/Adobe/ Acrobat 8.0/ Acrobat/plug_ins).
• (Mac OS) Control-click the application icon, and choose Show Package Contents. Then double-click the Contents
folder and open the Plug-ins folder.
2 Select the plug-ins you do not want to load, and move them out of the folder. Some of the plug-ins may be in
folders nested inside the plug-ins folder.
Disable all plug-ins temporarily
❖ Press the Shift key immediately after starting Acrobat.
Adobe Digital Editions
Acrobat 8 changes the way you open and manage eBooks. Now, you use the free Adobe® Digital Editions software to
read and organize eBooks and other publications. Digital Editions is a separate web-based Rich Internet Application
(RIA) that replaces the eBooks features in previous versions of Acrobat.
When you install Digital Editions, your existing bookshelf items are automatically imported and available within the
new Digital Editions bookshelf experience. You can also manually import individual PDFs into your Digital Editions
bookshelf.
Note: When you double-click the icon for an eBook, Acrobat automatically opens the Digital Editions download website,
where you can start installing the software.
To learn more about how to make the transition to this new solution for eBooks and for a link to the secure download
website, go to the Adobe website.
Non-English languages
Asian language PDFs
You can use Acrobat to view, search, and print PDF documents that contain Asian text (Traditional and Simplified
Chinese, Japanese, and Korean). You can also use these languages when you fill in forms, add comments, and apply
digital signatures.
Almost allofthe Acrobatfeaturesare supportedforTraditionaland SimplifiedChinese,Japanese, andKoreantext.
In Windows, you must install the Asian language support files by using the custom installation and selecting the
Asian Language Support options under Create Adobe PDF and View Adobe PDF.
PDFMaker and the Adobe PDF printer automatically embed most Asian fonts in your file when creating PDF files.
You can control whether Asian fonts are embedded.

54
ADOBE ACROBAT 8 PROFESSIONAL
User Guide
In Windows, you may be able to view and print files that contain Asian languages without having the necessary Asian
language support installed on your system. If you try to open a PDF file for which language support is required, you
are automatically prompted to install the required fonts.
Cyrillic, Central European, and Eastern European language PDFs
You can work with Adobe PDF files that contain Cyrillic text (including Bulgarian and Russian), Central European
text, and Eastern European text (including Czech, Hungarian, and Polish) if the fonts are embedded in the PDF files.
If the fonts are embedded, you can view and print the files on any system. Fonts do not need to be embedded to use
the Search feature.
Note: If you open a PDF file in which form fields or text boxes contain these languages but the fonts are not embedded
and are not installed on your system, choosing Help > Check For Updates Now automatically prompts you to download
and install the necessary fonts.
Hebrew, Arabic, Thai, and Vietnamese language PDFs
Acrobat supports the entry and display of Thai and Vietnamese text. In Windows only, Acrobat also supports Arabic
and Hebrew. By default, Right-To-Left Language Options is enabled under Arabic and Hebrew regional settings (in
Windows).
Enable right-to-left languages
Enabling right-to-left language options displays the user interface elements for controlling paragraph direction, digit
style, and ligature. When this option is selected, you can specify the writing direction (left-to-right or right-to-left)
and type of digits (Western or Arabic-Indic) used for creating and filling out certain form fields, adding digital signa-
tures, and creating text box markups.
Enable Right-To-Left Language Options is enabled by default under Arabic and Hebrew regional settings.
1 Choose Edit > Preferences (Windows) or Acrobat > Preferences (Mac OS).
2 Under Categories, select International.
3 Select Enable Right-To-Left Language Options.

55
Chapter 3: Creating PDFs
Adobe PDF is the solution of choice for capturing robust information from any application on any computer system.
You can create PDFs from blank pages, document files, scanned paper documents, and clipboard images.
Quickstart
Following are quick steps for some common PDF creation tasks.
Create from a file
To create a PDF from within Acrobat, the application that created the original file must be installed on the system in
most cases.
1 Click the Create PDF button and choose From File.
2 Select the file you want to convert, and click Open.
The authoring application opens automatically or a progress dialog box appears. If the file is in an unsupported
format, a message appears, telling you that the file cannot be converted to a PDF.
See also
“Convert a file to PDF” on page 61
Create from a paper document
You can create a PDF directly from a paper document using Acrobat and your scanner.
1 Click the Create PDF button and choose From Scanner.
2 Select the input, output, and document options in the Acrobat Scan dialog box, and then click Scan.
3 If creating a new PDF, specify a filename and location, and click Save.
4 Select Scan More Pages or Scanning Complete.
See also
“Scan a paper document to PDF” on page 63
Create from a web page
You can download and convert web pages from the top level, or any number of subordinate levels, of a URL.
1 Click the Create PDF button an
ox. (Cl
d choose From Web Page.
2 Type the URL into the text b ick Browse to convert a web page you have already downloaded.)
3 Specify the number of levels to download and where to download files from, and then click Create.

56
ADOBE ACROBAT 8 PROFESSIONAL
User Guide
See also
“Convert web pages to PDF in Acrobat” on page 91
Create from scratch
You can create small PDFs that can be edited in Acrobat.
1 Choose File > Create PDF > From Blank Page.
2 Click in the document and begin typing. Use options on the New Document toolbar to change text attributes.
3 Save the document.
4 To continue editing, choose Document > Resume Editing.
To convert the PDF so that it cannot be re-edited, choose Document > Prevent Further Edits.
See also
“Create a PDF from a blank page” on page 62
Create from Word
After you install Acrobat, an Acrobat PDFMaker toolbar is added to Microsoft® Word. In Word 2007 for Windows,
you access the PDFMaker options from the Acrobat ribbon instead of the toolbar.
1 In Word, open the file you want to convert.
2 Do one of the following:
• (Word 2007 for Windows) Click Acrobat and then click the Create PDF button
• (Other versions of Word) Click the Convert To Adobe PDF button .
3 Specify a filename and location, and click Save.
4 (Mac OS only) Click View File or Done.
You can also convert a file to PDF and then email it for review by clicking Create And Send For Review (Office
2007) or Send For Review (other versions of Office).
See also
“Creating PDFs with PDFMaker” on page 73
Create from Outlook (Windows)
After you install Acrobat, an Acrobat PDFMaker toolbar is added to Outlook.
1 Select the desired email messages and click Create Adobe PDF From Selected Messages .
2 Specify a filename and location, and click Save.
The selected messages are converted to a PDF package or a merged PDF, depending upon conversion settings. To
convert email folders, select the desired folders and click Create Adobe PDF From Folders . You can also automat-
ically archive email messages and folders.
See also
“Convert email messages to PDFs (Windows)” on page 77
.

57
ADOBE ACROBAT 8 PROFESSIONAL
User Guide
Automatically archive email (Windows)
You can automatically archive your Outlook email messages as PDFs.
1 In Outlook, choose Adobe PDF > Setup Automatic Archival.
2 Click the Automatic Archival tab, and select Enable Automatic Archival.
3 Specify frequency and run time. If desired, set up a log file and embedded index.
4 Click Add, select the desired folders, and specify a filename and location for the archive.
To create an archive immediately, click Run Archival Now.
See also
“Set up automatic email archiving (Windows)” on page 79
Create from Lotus Notes (Windows)
After you install Acrobat, an Acrobat PDFMaker toolbar is added to IBM Lotus Notes and commands are added to
the Actions menu.
1 Select the desired email messages and click Convert Selected Messages To Adobe PDF .
2 Specify a filename and location, and click Save.
The messages are converted to a merged PDF or a PDF package, depending upon conversion settings. You can
F . convert an entire folder to PDF by clicking Convert Selected Folder To Adobe PD
See also
“Convert email messages to PDFs (Windows)” on page 77
Create from Internet Explorer (Windows)
You can convert an entire web page or a selected portion of it to PDF.
1 In Microsoft Internet Explorer, open the web page you want to convert.
2 (Optional) Drag to select the text and images you want to convert.
3 Click Convert Web Page To PDF .
4 Specify a filename and location, and click Save.
You can also convert one or more web pages, and even entire websites, from within Acrobat.
See also
“Convert web pages to PDF in Internet Explorer (Windows)” on page 89
Create using Adobe PDF printer
In many applications, you can use the Print command with the Adobe PDF printer to convert a file to PDF.
1 Open the file you want to convert, and choose File > Print.
2 Choose Adobe PDF from the list of printers, and print the file.
3 If prompted, specify a filename and location, and click Save.

58
ADOBE ACROBAT 8 PROFESSIONAL
User Guide
You can also choose a different default Adobe PDF printer setting or create a customized setting.
See also
“Create PDFs by printing to file” on page 69
Overview of creating PDFs
What’s the best way to create a PDF?
There are many correct answers to this question. You create a PDF by converting other documents and resources to
Portable Document Format.
Adobe Acrobat is a powerful tool with many uses, but it is not an authoring application—that is, not an application
in which you design page layouts, write text, or create and place images on a blank page. Instead, it works in harmony
with other applications and built-in operating system features to produce PDFs that you can then use for a variety of
purposes.
The best method for creating a PDF depends on several things:
• What is the source document?
You can create PDFs from documents printed on paper, Word documents, InDesign files, images taken by a digital
camera, and spreadsheets, to name just a few examples. Different types of sources have different tools available for
PDF conversion.
• What is already running on your computer?
You can save time by using the most readily available Acrobat conversion feature. If the document you want to
convert is already open in its authoring application (for example, a spreadsheet that is open in Excel), there are
severalwaystoconvert thefiletoPDFwithoutopening Acrobat.Similarly,ifAcrobatisalreadyopen,you don’thave
to open the authoring application to convert a file to PDF.
• How will you use the PDF?
Every PDF strikes a balance between efficiency (small file size) and quality (such as resolution and color). When that
balance is critical to your task, you’ll want to use a method that includes access to various conversion options as a
part of the process.
For example, you can drag and drop files on the Acrobat icon on the desktop to create PDFs, but Acrobat simply
applies the most recently used conversion settings without offering you access to those settings. If you want more
control over the process, another method might be a better choice.
Note: In Acrobat 8, you can also create a new PDF from a blank page.
See also
“Create a PDF from a blank page” on page 62
PDF creation methods by file type
Refer to the following lists to determine the methods available for the different types of files.

59
ADOBE ACROBAT 8 PROFESSIONAL
User Guide
Most files
These methods can be used for documents and images in almost all file formats.
Create PDF menu Within Acrobat, by choosing From File.
Adobe PDF printer Within most applications, in the Print dialog box.
Drag and drop On the desktop, in Windows Explorer or in Mac OS Finder.
Context menu On the desktop, in Windows Explorer or in Mac OS Finder (by right-clicking/Control-clicking).
Paper documents
Requires a scanner and a hard copy of the document.
Create PDF menu Within Acrobat, by choosing From Scanner. Or, for previously scanned paper documents, by
choosing From File.
Document menu Within Acrobat, by choosing Scan To PDF.
Microsoft Office documents
PDFMaker Within the authoring application, in the PDF toolbar and on the Adobe PDF menu. For Office 2007
applications, in the Acrobat Ribbon and on the Microsoft Office Button menu.
Adobe PDF printer Within the authoring application, in the Print dialog box.
Drag and drop On the desktop, in Windows Explorer or in Mac OS Finder.
Context menu On the desktop, in Windows Explorer or in Mac OS Finder (by right-clicking/Control-clicking).
Email messages
PDFMaker (Windows only) Within Microsoft Outlook or Lotus Notes, by clicking Acrobat PDFMaker toolbar
buttons or choosing commands in the Adobe PDF menu (Outlook) or the Actions menu (Lotus Notes).
Adobe PDF printer Within the email application, in the Print dialog box. Creates a PDF (not a PDF package).
Web pages
Create PDF menu Within Acrobat, by choosing From Web Page.
PDFMaker Within Internet Explorer or when editing in a web-authoring application that supports PDFMaker, such
as Word; in the Acrobat PDFMaker toolbar and on the Adobe PDF menu.
Adobe PDF printer Within Internet Explorer or when editing in a web-authoring application that supports
PDFMaker, such as Word; in the Print dialog box.
Drag and drop On the desktop, in Windows Explorer or in Mac OS Finder, dragging the HTML file.
Context menu (HTML files) On the desktop, in Windows Explorer or in Mac OS Finder (by right-clicking/Control-
clicking the HTML file).
Images copied on the clipboard
Create PDF menu Within Acrobat, by choosing From Clipboard Image.
Adobe Creative Suite files
Adobe PDF printer Within the authoring application, in the Print dialog box.
Export Within InDesign or Adobe GoLive®, on the File menu. (In InDesign, using the file type menu in the Export
dialog box; in GoLive, using the HTML As Adobe PDF command on the Export submenu.)

60
ADOBE ACROBAT 8 PROFESSIONAL
User Guide
Save As Within Adobe Photoshop® or Adobe Illustrator, on the File menu and using the file type menu in the Save
As dialog box.
Drag and drop On the desktop, in Windows Explorer or in Mac OS Finder.
Context menu On the desktop, in Windows Explorer or in Mac OS Finder (by right-clicking/Control-clicking).
AutoCAD files
Create PDF menu Within Acrobat, by choosing From File.
PDFMaker Within AutoCAD, in the Acrobat PDFMaker toolbar or on the Adobe PDF menu.
Adobe PDF printer Within AutoCAD, in the Print dialog box.
Context menu On the desktop, in Windows Explorer or in Mac OS Finder (by right-clicking/Control-clicking).
PostScript and EPS files
Drag and drop On the desktop, in Windows Explorer or in Mac OS Finder, by dragging to the Acrobat Distiller icon
or into the Acrobat Distiller window.
Double-clicking (PostScript files only) On the desktop, in Windows Explorer or Mac OS Finder.
Open command Within Acrobat Distiller, on the File menu.
Create PDF menu Within Acrobat, by choosing From File.
Adobe PDF printer Within the authoring application, in the Print dialog box.
Context menu On the desktop, in Windows Explorer or in Mac OS Finder (by right-clicking/Control-clicking).
3D captures
Note: Requires Adobe Acrobat 3D. Adobe Acrobat Professional and Adobe Acrobat Standard cannot convert 3D files to PDF.
Create PDF menu Within Acrobat 3D, by choosing From 3D Capture.
Adobe PDF printer Within the authoring application, in the Print dialog box.
Context menu On the desktop, in Windows Explorer or in Mac OS Finder (by right-clicking/Control-clicking).
Balancing PDF file size and quality
Thereareimportantsettingsthatyou canselectsothatyourPDFhasthebestbalancebetweenfilesize,resolution,
conformity to specific standards, and other factors. Which settings you select depends on your goals for the PDF that
you are creating. For example, a PDF intended for high-quality commercial printing requires different settings than
a PDF intended only for on-screen viewing and quick downloading over the Internet.
Once selected, these settings apply across PDFMaker, Acrobat, and Acrobat Distiller. However, there are some
settings that are limited to specific contexts or file types. For example, PDFMaker options can vary among the
different types of Microsoft Office applications.
For convenience, you can select one of the conversion presets available in Acrobat. You can also create, define, save,
and reuse custom presets that are uniquely suited to your purposes.
See also
“Adobe PDF conversion settings” on page 99

61
ADOBE ACROBAT 8 PROFESSIONAL
User Guide
Creating simple PDFs with Acrobat
Convert a file to PDF
1 In Acrobat, do one of the following:
• Choose File > Create PDF > From File.
• On the toolbar, click the Create PDF button and choose From File.
2 IntheOpendialogbox,selectthefileyouwanttoconverttoPDF.Youcanbrowseallfiletypesorselectaspecific
type in the Files Of Type menu.
3 (Optional) Click Settings to change the conversion options. The options available vary depending on the file type.
Note: TheSettingsbuttonisunavailableifyouchooseAllFilesasthe filetypeor ifnoconversionsettingsareavailable
for the selected file type.
4 Click Open to convert the file to a PDF.
Depending on the type of file being converted, the authoring application opens automatically or a progress dialog
box appears. If the file is in an unsupported format, a message appears, telling you that the file cannot be converted
to PDF.
5 When the new PDF opens, choose File > Save or File > Save As; then select a name and location for the PDF.
W
sp
filena
hen naming a PDF that’s intended for electronic distribution, limit the filename to eight characters (with no
aces) and include the .pdf extension. This ensures that email programs or network servers don’t truncate the
me and that the PDF opens as expected.
See also
“View PDFMaker conversion settings” on page 75
“Combining PDF content” on page 116
Drag and drop to create PDFs
This method is usually best reserved for small, simple files, such as small image files or plain text files, when the
balance between file size and output quality is not important. You can use this technique with many other types of
files, but you won’t have the opportunity to adjust any conversion settings during the process.
1 Using Explorer (Windows) or the Finder (Mac OS), select the file icons of one or more files that you want to
convert to PDF.
2 Drag the file icons onto the Acrobat application icon. Or, (Windows only) drag the files into the open Acrobat
window.
If a message appears saying that the file could not be opened in Acrobat, then that file type cannot be converted to
PDF by the drag-and-drop method. Use one of the other conversion methods for that file.
Note: You can also convert PostScript and EPS files to PDF by dragging them onto the Acrobat Distiller window or the
Distiller application icon.
3 Save the PDF.
(Windows only) You can also right-click a file in Windows Explorer and choose Create PDF.

62
ADOBE ACROBAT 8 PROFESSIONAL
User Guide
Convert clipboard images to PDF
You can create PDFs from screen captures and other images you copy from an image-editing application.
❖ Use the method described for the operating system running on your computer:
• (Windows) Capture a displayed image to the Clipboard, either by using the Copy command in an image-editing
application, such as Adobe Photoshop, or by pressing the PrintScreen key. Then in Acrobat, choose File > Create
PDF > From Clipboard Image, or choose From Clipboard Image in the Create PDF toolbar menu.
• (Mac OS) Choose Acrobat > Services > Grab > [Screen, Selection, or Timed Screen]. (Grab is the Mac OS X
screen-capture utility.) Your screen capture automatically converts to a PDF and opens.
Note: The From Clipboard Image command appears only when there is an image copied to the clipboard. If the clipboard
is empty or if you have copied text to the clipboard, the command does not appear.
Create a PDF from a blank page
Adobe® Acrobat® 8 Professional introduces the PDF Editor feature. With it, you can create a PDF from a blank page
rather than beginning with a file, a clipboard image, or scanning.
Thisprocesscan beuseful forcreatingrelativelysmallPDFs of uptoaboutadozenpages.For longer,morecomplex,
or heavily formatted new documents, it’s usually better to create the source document in an authoring application
that offers more layout and formatting options, such as Adobe InDesign or various business software products.
Note: The PDF Editor can make changes in text only with PDFs created from blank pages. To add a blank page to a PDF
created by another method, create a blank document in another application and convert that file to PDF and import it
into the existing PDF.
Create and add text to a new, blank PDF
1 Choose File > Create PDF > From Blank Page.
2 Begin typing the text you want to add to the blank page.
3 Add any formatting to the text by selecting it and selecting options on the New Document toolbar.
4 As needed, select other tools and options that you want to apply to the PDF.
5 Choose File > Save, and select a name and location for the PDF file.
Note: When the page is filled with text, the PDF Editor automatically adds a new blank page to the document.
Edit text in a PDF created from a blank page
1 Choose File > Open, and locate and select a PDF created with PDF Editor (that is, one created from a blank page).
2 Choose Document > Resume Editing.
3 Add text and formatting as needed.
Prevent changes in PDF Editor
You can freeze the text you have added to PDFs created from a blank page. This prevents anyone from adding or
changing the text. There is no Undo for this process.
1 Choose Document > Prevent Further Edits.
2 In the message that appears, click Prevent Further Edits to confirm your choice. Or, click Keep Text Editable if you
want to continue adding or editing text with the PDF Editor.

63
ADOBE ACROBAT 8 PROFESSIONAL
User Guide
3 In the Save As dialog box, select a new name and location for the file, or leave the original name and location
selected to replace the original file with the uneditable version.
Preferences for the PDF Editor
You can access the PDF Editor preferences options by choosing Edit > Preferences (Windows) or Acrobat > Prefer-
ences (Mac OS) and then selecting New Document in the list under Categories.
Font Specifies the font family that will be used by default for typing on a new, blank page.
Size Specifies the font size of the default font.
Default Margins Specifies the measurements of the insets from the edges of the page: Left, Right, Top, and Bottom.
Size (under Default Page) Specifies the standard paper size, such as Letter, Tabloid, A4, and so on.
Orientation Specifies whether the longer side of the page runs horizontally (Landscape) or vertically (Portrait).
Scan a paper document to PDF
You can create a PDF file directly from a paper document, starting within Acrobat and using your scanner. In
Windows XP, Acrobat supports TWAIN scanner drivers and Windows Image Acquisition (WIA) drivers.
If you need to convert large numbers of paper documents to PDF archives, consider purchasing Adobe Acrobat
Capture®.
Note: You can also scan paper forms in a way that converts them into interactive PDF forms. See “Creating new forms”
on page 212.
Scan a paper document directly to PDF
1 In Acrobat, do one of the following:
• Choose File > Create PDF > From Scanner.
• Choose Document > Scan To PDF.
• Choose From Scanner from the Create PDF menu on the toolbar.
2 In the Acrobat Scan dialog box, select basic scanning options.

64
ADOBE ACROBAT 8 PROFESSIONAL
User Guide
Note: The Options button under Text Recognition And Metadata is not available unless Make Searchable (Run OCR)
is selected.
3 As needed, click Scanner Options and the two Options buttons to access advanced settings for your selected
scanner, Optimization Options, and Recognize Text settings.
Note: If you specify that you want to use your scanner’s native interface instead of the Acrobat interface, other windows
or dialog boxes appear. Consult the scanner manufacturer’s documentation for more information on available options.
In Mac OS, the scanner’s interface is always shown.
4 Click Scan.
5 Click the Scan More Pages (Put Sheet N+1) option if you are scanning multiple pages (where N is the number of
pages already scanned); click Scanning Complete and OK if you are finished scanning.
Optimize a scanned PDF
1 Open a PDF created from a scanned document.
2 Choose Document > Optimize Scanned PDF.
3 Select options in the dialog box, and click OK.
The options available in the Optimized Scanned PDF dialog box also appear in the Optimization Options dialog box,
which are described in detail under that heading in this topic.
Basic scanning options
Scanner Select an installed scanner. You must have the manufacturer’s scanning software installed on your
computer.
Scanner Options (Windows only) Click to open the Scanner Options dialog box. (Available only after you select a
scanner.)
Sides Specify single or double-sided scanning. If you select Both Sides and the scanner’s own settings are for only
one side, the scanner setting overrides the Acrobat settings.
Note: You can scan both sides of pages even on scanners that do not themselves support two-sided scanning. When Both
Sidesisselected, adialogboxappearsafterthefirstsidesare scanned. You can then reverse the original paper documents
inthetray,select theScanReverse Side (Put ReverseOfSheets) option in that dialog box, and click OK to scan the back
sides of the paper pages. This produces a PDF with all pages in the proper sequence.
Color Mode (Windows only) Select a basic color mode (Color, Black and White, or Grayscale) supported by your
scanner. This option is enabled if your Scanner Options are set to use the Acrobat scanning dialog box instead of the
scanner application.
Resolution (Windows only) Select a resolution supported by your scanner. This option is enabled if your Scanner
Options are set to use the Acrobat scanning dialog box instead of the scanner application.
Note: If you select a Color Mode or Resolution option not supported by your scanner, a message appears and your
scanner’s application window opens, where you can select different options.
New PDF Document Select this to create a new PDF; deselect it if you want to append the scanned pages to an
existing PDF.
Append Select this if you want to add the converted scan to an existing PDF. Use the pop-up menu to select an open
PDF or click Browse to find and select another PDF.

65
ADOBE ACROBAT 8 PROFESSIONAL
User Guide
Make PDF/A Compliant Select this option to make the PDF conform to ISO standards for PDF/A-1b. When selected,
only Searchable Image (Exact) is available in the Recognize Text - Settings dialog box for the PDF Output Style
option.
Optimization Drag the slider to set the balance point between file size and quality. Click the Options button if you
want to customize optimization with specific settings for file compression and filtering.
Make Searchable (Run OCR) Select this option to make text and images in the PDF searchable and selectable. This
option applies OCR and font and page recognition to the text images and converts them to normal text. Click the
Options button to select specific settings in the Recognize Text - Settings dialog box. See “Recognize text in scanned
documents” on page 67.
Make Accessible Select this option to add tags to the document, which improve accessibility for disabled users.
(Available only when Make Searchable (Run OCR) is selected.)
Add Metadata Select this if you want to add information about the scanned document to the PDF file. When this
option is selected, the Document Properties dialog box appears after scanning, where you can type in the metadata
you want to add.
Scanner Options dialog box
Data Transfer Method Native Mode transfers in the default mode for your scanner. Memory Mode is automatically
selected for scanning in resolutions over 600 dots per inch (dpi).
User Interface The Hide Scanner’s Native Interface option bypasses the windows and dialog boxes provided by the
scanner manufacturer. Instead, scanning from Acrobat opens the Acrobat Scan dialog box.
Paper Size The menu lists available standard page sizes.
Invert Black And White This option creates positive images from black-and-white negatives, for example.
Optimization Options dialog box
The Optimization Options dialog box for image settings controls how scanned images are filtered and compressed
for the PDF. Default settings are suitable for a wide range of document pages, but you may want to customize settings
for higher-quality images, smaller file sizes, or scanning issues.
Automatic Applies default settings to balance file size and quality at a moderate level.
• Aggressive Applies settings that minimize file size. In some cases, selecting this option may visibly affect the
quality of the scanned PDF.
Custom Settings Makes additional settings available under Compression and Filtering and disables the Aggressive
setting under Automatic. If you select Custom Settings, the Color/Grayscale or Monochrome settings are available,
depending on the option you selected in the Acrobat Scan dialog box.
Color/Grayscale settings When scanning color or grayscale pages, select one of the following:
• Lossless Does not apply compression or filters—such as Deskew, Background Removal, and so forth—to scanned
pages.
• Adaptive Divides each page into black-and-white, grayscale, and color regions and chooses a representation that
preserves appearance while highly compressing each kind of content. Recommended scanning resolutions are 300
pixels per inch (ppi) for grayscale and RGB input, or 600 ppi for black-and-white input.
• JPEG Applies JPEG compression to the entire grayscale or RGB input page.

66
ADOBE ACROBAT 8 PROFESSIONAL
User Guide
Note: The scanner uses either the selected Color/Grayscale option or the selected Monochrome option. Which one is used
depends on the settings you select in the Acrobat Scan dialog box or in the scanner’s TWAIN interface, which may open
after you click Scan in the Acrobat Scan dialog box. (By default, the scanner application dialog box does not open.)
Monochrome When scanning black-and-white or monotone images, select one of the following:
• JBIG2 Applies the JBIG2 compression method to black-and-white input pages. Settings of 0.95 or higher use the
lossless method; at lower settings, text is highly compressed. Text pages typically are 60% smaller than CCITT Group
4 compressed pages, but processing is slow. Compatible with Acrobat 5.0 (PDF 1.4) and later.
Note: For compatibility with Acrobat 4.0, use a compression method other than JBIG2.
• Adaptive (As described above, under Color/Grayscale settings.)
• CCITT Group 4 Applies CCITT Group 4 compression to black-and-white input page images. This fast, lossless
compression method is compatible with Acrobat 3.0 (PDF 1.2) and later.
Deskew Rotatesanypagethatis notsquarewiththe sidesofthescannerbed,tomakethePDFpagealignvertically.
Choose Automatic or Off.
Background Removal Whitens nearly white areas of grayscale and color input (not black-and-white input).
F
p
off-w
or best results, calibrate your scanner’s contrast and brightness settings so that a scan of a normal black-and-white
age has dark gray or black text and a white background. Then, Off or Low should produce good results. If scanning
hite paper or newsprint, use Medium or High to clean up the page.
Edge Shadow Removal Removes dark streaks that occur at the edges of scanned pages, where the scanner light is
shadowed by the paper edge. Choose Off, Cautious, or Aggressive.
Despeckle Removes isolated black marks in black-and-white page content. Low uses a basic peephole filter. Medium
and High use both a peephole filter and a large area filter that removes larger spots farther from nearby features.
Descreen Removes halftone dot structure, which can reduce JPEG compression, cause moire patterns, and make
text difficult to recognize. Suitable for 200–400 ppi grayscale or RGB input or, for Adaptive compression, 400–600
ppi black-and-white input. The Automatic setting (recommended) applies the filter for 300 ppi or higher grayscale
and RGB input. Select Off when scanning a page with no pictures or filled areas, or when scanning at a resolution
higher than the effective range.
Halo Removal When On (recommended), removes excess color at high-contrast edges, which may have been intro-
duced during either printing or scanning. This filter is used only on color input pages.
Scanning tips
• Acrobat scanning accepts images between 10 and 3000 ppi. If you select Searchable Image or Formatted Text &
Graphics for PDF Output Style, input resolution of 72 ppi or higher is required, and input resolution higher than
600 ppi is downsampled to 600 ppi or lower.
• On the Color/Grayscale menu in the Optimization Options dialog box, apply lossless compression to a scanned
image by choosing CCITT for black-and-white images or Lossless for color or grayscale images. If this image is
appendedtoaPDFdocument,andthefileissavedbySave,the scannedimageremainsuncompressed.IfthePDF
document is saved using Save As, the scanned image may be compressed.
• For most pages, black-and-white scanning at 300 ppi produces text best suited for conversion. At 150 ppi, OCR
accuracy is slightly lower, and more font-recognition errors occur; at 400 ppi and higher resolution, processing
slows and compressed pages are bigger. If a page has many unrecognized words or very small text (9 points or
smaller), try scanning at higher resolution. Scan in black and white whenever possible.

67
ADOBE ACROBAT 8 PROFESSIONAL
User Guide
• When Recognize Text Using OCR is disabled, full 10-to-3000 ppi resolution range may be used, but the recom-
mended resolution is 72 and higher ppi. For Adaptive compression, 300 ppi is recommended for grayscale or RGB
input, or 600 ppi for black-and-white input.
• Pages scanned in 24-bit color, 300 ppi, at 8-1/2–by-11 inches (21.59-by-27.94 cm) result in large images (25 MB)
prior to compression. Your system may require 50 MB of virtual memory or more to scan the image. At 600 ppi,
both scanning and processing typically are about four times slower than at 300 ppi.
• Avoid dithering or halftone scanner settings. These can improve the appearance of photographs, but they make it
difficult to recognize text.
• For text printed on colored paper, try increasing the brightness and contrast by about 10%. If your scanner has
color-filtering capability, consider using a filter or lamp that drops out the background color. Or if the text isn’t
crisp or drops out, try adjusting scanner contrast and brightness to clarify the scan.
• If yourscannerhasamanualbrightnesscontrol,adjustitsothatcharactersare cleanandwellformed.Ifcharacters
are touching, use a higher (brighter) setting. If characters are separated, use a lower (darker) setting.
Recognize text in scanned documents
You can use Acrobat to recognize text in previously scanned documents that have already been converted to PDF.
OCR runs with header/footer/Bates number on image PDF files.
1 Open the scanned PDF.
2 Choose Document > OCR Text Recognition > Recognize Text Using OCR.
3 In the Recognize Text dialog box, select an option under Pages.
4 (Optional) Click Edit to open the Recognize Text - Settings dialog box, and select the options you want to use.
Recognize Text - Settings
Optical Character Recognition (OCR) software enables you to search, correct, and copy the text in a scanned PDF.
If you do not apply OCR when you create a PDF by scanning a paper document, you can apply OCR to the PDF later
if you have set the scanner resolution at 72 ppi and higher.
OCR runs with header/footer/Bates number on image PDF files.
Primary OCR Language Specifies the language for the OCR engine to use to identify the characters.
PDF Output Style Determines the type of PDF to be produced. All options require an input resolution of 72 ppi or
higher (recommended). All formats apply OCR and font and page recognition to the text images and convert them
to normal text.
• Searchable Image Ensuresthattextissearchableandselectable.Thisoptionkeepstheoriginalimage,deskewsit
as needed, and places an invisible text layer over it. The selection for Downsample Images in this same dialog box
determines whether or not the image will be downsampled and to what extent.
• Searchable Image (Exact) Ensuresthattextissearchableandselectable.Thisoptionkeepstheoriginalimage and
places an invisible text layer over it. Recommended for cases requiring maximum fidelity to the original image.
• Formatted Text & Graphics Reconstructs the original page using recognized text, fonts, and graphic elements. The
accuracy of the results depends on the scanning resolution and other factors. You may need to review and correct
the OCR text in the new PDF page after scanning.
Note: The Formatted Text & Graphics option is available for only some languages.

68
ADOBE ACROBAT 8 PROFESSIONAL
User Guide
Bl
an
by abo
ack-and-white scanning at 300 ppi produces the best text for conversion. At 150 ppi, OCR accuracy is slightly lower,
d more font-recognition errors occur. For text printed on colored paper, try increasing the brightness and contrast
ut 10%. If your scanner has color-filtering capability, consider using a filter or lamp that drops out the background
color.
Downsample Images Decreases the number of pixels in color, grayscale, and monochrome images after OCR is
complete. Choose the degree of downsampling that you want to apply. Higher-numbered options do less downsam-
pling, producing higher-resolution PDFs.
Correct OCR text in PDFs
When you scan to Formatted Text & Graphics output, Acrobat analyzes bitmaps of text and substitutes words and
characters for those bitmap areas. If the ideal substitution is uncertain, Acrobat marks the word as suspect. Suspects
appear in thePDFastheoriginalbitmapoftheword,but thetextisincludedonaninvisiblelayerbehindthebitmap
of the word. This makes the word searchable even though it is displayed as a bitmap. You can accept these suspects
as they are, or you can use the TouchUp Text tool to correct them.
Note: If you try to select text in a scanned PDF that does not have OCR applied, or try to perform a Read Out Loud
operationonanimage file,Acrobatasksif youwanttorun OCR.IfyouclickOK,theRecognizeText dialogboxopens
and you can select options, which are described in detail under the previous topic.
1 Do one of the following:
• Choose Document > OCR Text Recognition > Find All OCR Suspects. All suspect words on the page are enclosed
in boxes. Click any suspect word to show the suspect text in the Find Element dialog box.
• Choose Document > OCR Text Recognition > Find First OCR Suspect.
Note: If you close the Find Element window before correcting all suspect words, you can return to the process by choosing
Document > OCR Text Recognition > Find First OCR Suspect, or by clicking any suspect word with the TouchUp Text tool.
2 In the Find option, choose OCR Suspects.
3 Compare the word in the Suspect text box with the actual word in the scanned document, and accept, correct, or
ignore the word. If the suspect was incorrectly identified as text, click the Not Text button.
4 Review and correct the remaining suspect words, and then close the Find Element dialog box.
Enable Fast Web View in a PDF
Fast Web View restructures a PDF document for page-at-a-time downloading (byte-serving) from web servers. With
Fast Web View, the web server sends only the requested page, rather than the entire PDF. This is especially important
with large documents that can take a long time to download from a server.
Check with your webmaster to make sure that the web server software you use supports page-at-a-time
downloading. To ensure that the PDF documents on your website appear in older browsers, you may also want to
create HTML links (versus ASP scripts or the POST method) to the PDF documents and use relatively short path
names (256 characters or fewer).
Verify that an existing PDF is enabled for Fast Web View
❖ Do one of the following:
• Open the PDF in Acrobat, and choose File > Properties. Look in the lower right area of the Description panel of
the dialog box for the Fast Web View setting (Yes or No).

69
ADOBE ACROBAT 8 PROFESSIONAL
User Guide
• (Windows only) In Windows Explorer, right-click the PDF file icon and choose Properties. Click the PDF tab and
look near the bottom of the panel for the Fast Web View setting (Yes or No).
Verify the Fast Web View Preferences setting
Follow this procedure to make sure that you have Acrobat set up to enable Fast Web View during the PDF creation
process.
1 Choose Edit > Preferences (Windows) or Acrobat > Preferences (Mac OS).
2 Under Categories, select Documents.
3 Ontherightsideof thedialogbox,underSaveSettings,makesurethatSaveAsOptimizesForFastWeb Viewis
selected, or select it now, and click OK.
Enable Fast Web View for an existing PDF
Usethisprocedureafteryouhaveverifiedyour FastWebViewPreferencessettingandcheckedthePDFproperties
to be sure that the file is not already enabled for Fast Web View.
1 Open the PDF that you want to have Fast Web View.
2 Choose File > Save As. Select the same filename and location.
3 When a message appears asking if you want to overwrite the existing file, click OK.
Y
a
ou can also quickly enable Fast Web View in entire folders of Adobe PDF files by using a batch sequence. See “Run
predefined batch sequence” on page 364.
Using the Adobe PDF printer
Create PDFs by printing to file
Inmany authoringapplications,youcanusethePrintcommandwiththeAdobePDFprinter toconvertyourfileto
PDF. Your source document is converted to PostScript and fed directly to Distiller for conversion to PDF, without
manually starting Distiller. The current Distiller preference settings and Adobe PDF settings are used to convert the
file. If you’re working with nonstandard page sizes, create a custom page size.
Note: The Adobe PDF printer creates untagged PDFs. A tagged structure is required for reflowing content to a handheld
device and is preferable for producing reliable results with a screen reader.
See also
“Creating accessible PDFs” on page 299
Create a PDF using the Print command (Windows)
1 Open the file that you want to convert to a PDF in its authoring application, and choose File > Print.
2 Choose Adobe PDF from the printers menu.
3 Click the Properties (or Preferences) button to customize the Adobe PDF printer setting. (In some applications,
you may need to click Setup in the Print dialog box to access the list of printers, and then click Properties or Prefer-
ences.)
4 In the Print dialog box, click OK.

70
ADOBE ACROBAT 8 PROFESSIONAL
User Guide
Note: By default, your PDF is saved in the folder specified in the printer port. The default location is My Documents.
Thefilenameand destinationare controlledbythePromptFor AdobePDFFilenamesettingintheAdobePDFPrinting
Preferences dialog box.
Create a PDF using the Print command (Mac OS)
1 Open the file that you want to convert to a PDF in its authoring application, and choose File > Print.
2 Choose Adobe PDF 8.0 from the printers menu.
3 Choose PDF Options from the pop-up menu that is beneath the Presets menu (it may show Copies & Pages by
default).
4 For Adobe PDF Settings, choose one of the default settings, or customize the settings using Distiller. Any custom
settings that you have defined are listed.
For most users, the default Adobe PDF conversion settings are adequate.
5 For After PDF Creation, specify whether or not to open the PDF.
6 Click Print.
7 Select a name and location for your PDF, and click Save.
Note: By default, your PDF is saved with the same filename and a .pdf extension.
Adobe PDF printing preferences (Windows)
Printing preferences apply to all applications that use the Adobe PDF printer, unless you change the settings in an
authoring application by using the Page Setup, Document Setup, or Print menu.
Note: The dialog box for setting printing preferences is named Adobe PDF Printing Preferences, Adobe PDF Printing
Defaults, or Adobe PDF Document Properties, depending on how you access it.
To access printing preferences:
• Click the Start button and choose Settings > Printers And Faxes. Right-click the Adobe PDF printer, and choose
Printing Preferences.
• In an authoring application such as Adobe InDesign, choose File > Print. Select Adobe PDF as the printer, and
click the Properties (or Preferences) button. (In some applications, you may need to click Setup in the Print dialog
box to access the list of printers, and then click Properties or Preferences to customize the Adobe PDF settings.)
PDF-specific options appear in the Adobe PDF Settings tab. The Paper Quality tab and Layout tab contain other
familiar options for the paper source, printer ink, page orientation, and number of pages per sheet.
Note: Printing Preferences are different from printer Properties. The Preferences include Adobe PDF-specific options for
the conversion process; the Properties dialog box contains tabs of options that are available for any type of printer.
Adobe PDF Conversion Settings Select a predefined set of options from the Default Settings menu or click Edit to
view or change the settings in the Adobe PDF Settings dialog box.
Adobe PDF Security To add security to the PDF, choose one of the following options, or click Edit to view or change
the security settings:
• Reconfirm Security For Each Job Opens the Adobe PDF - Security dialog box each time you create a PDF using
the Adobe PDF printer. Specify settings in the dialog box.
• Use The Last Known Security Settings Uses the same security settings that were used the last time a PDF was
created using the Adobe PDF printer on your computer.

71
ADOBE ACROBAT 8 PROFESSIONAL
User Guide
Adobe PDF Output Folder Choose an output folder for the converted PDF, or click Browse to add or change the
output folder. Choose Prompt For Adobe PDF Filename to specify a location and filename at conversion time.
Adobe PDF Page Size menu Select a custom page size that you have defined.
View Adobe PDF Results Automatically starts Acrobat and displays the converted document immediately.
Add Document Information Includes information such as the filename and date and time of creation.
Rely On System Fonts Only; Do Not Use Document Fonts Deselect this option to download fonts when creating the
PDF. All your fonts will be available in the PDF, but it will take longer to create it. Leave this option selected if you
are working with Asian-language documents.
Delete Log Files For Successful Jobs Automatically deletes the log files unless the job fails.
Ask To Replace Existing PDF File Warns you when you are about to overwrite an existing PDF with a file of the same
name.
See also
“Create and use a custom page size” on page 72
Set Adobe PDF printer properties (Windows)
In Windows, you can usually leave the Adobe PDF printer’s properties unchanged, unless you have configured
printer sharing or set security.
Note: Printing Properties are different from printer Preferences. The Properties dialog box contains tabs of options that
apply to any type of printer; the Preferences include conversion options specifically for the Adobe PDF printer.
Set Adobe PDF printer properties
1 Open the Printers window from the Start menu, and right-click the Adobe PDF printer.
2 Choose Properties.
3 Click the tabs, and select options as needed.
Reassign the port that the Adobe PDF printer uses
1 Quit Distiller if it is running, and allow all queued jobs to the Adobe PDF printer to complete.
2 Open the Printers window from the Start menu.
3 Right-click the Adobe PDF printer, and choose Properties.
4 Click the Ports tab, and then click Add Port.
5 Select Adobe PDF Port from the list of available port types, and click New Port.
6 Select a local folder for PDF output files, and click OK. Then click Close to quit the Printer Ports dialog box.
7 In the Adobe PDF Properties dialog box, click Apply, and then click OK.
For
are
best results, select a folder on the same system where Distiller is installed. Although remote or network folders
supported, they have limited user access and security issues.
Delete a folder and reassign the Adobe PDF printer to the default port
1 Quit Distiller if it is running, and allow a few minutes for all queued jobs to Adobe PDF to complete.
2 Open the Printers window from the Start menu.

72
ADOBE ACROBAT 8 PROFESSIONAL
User Guide
3 Right-click the Adobe PDF printer, and choose Properties.
4 Click the Ports tab.
5 Select the default port, My Documents, and click Apply.
6 Select the port to delete, click Delete Port, and then click Yes to confirm the deletion.
7 Select the My Documents port again and click Close.
Configure the Adobe PDF printer (Mac OS)
In Mac OS, you must configure the Adobe PDF printer in three places: Distiller, your authoring application’s Page
Setup menu, and your authoring application’s Print dialog box.
1 In Distiller, specify the Adobe PDF settings, font locations, and security.
2 In an authoring application such as Adobe InDesign, choose File > Page Setup.
3 Select Adobe PDF 8.0 from the Format For menu.
4 Specify the paper size, orientation, and scale as necessary.
5 In your authoring application, choose File > Print, and select Adobe PDF 8.0 from the Printer menu.
6 In the pop-up menu below the Presets menu, choose PDF Options, and set any of the following options:
• Select a set of predefined conversion settings from the Adobe PDF Settings menu if you want to override default
settings. Default settings are the settings currently defined in Distiller.
• Specify whether to open the converted files in Acrobat in the After PDF Creation menu.
7 Specify print settings as desired in the other menus available in the pop-up menu below the Presets menu.
Create and use a custom page size
It’s important to distinguish between page size (as defined in the source application’s Document Setup dialog box for
your document) and paper size (the sheet of paper, piece of film, or area of the printing plate you’ll print on). Your
page size might be U.S. Letter (8-1/2-by-11 inches or 21.59-by-27.94 cm), but you might need to print on a larger
piece of paper or film to accommodate any printer’s marks or the bleed area. To ensure that your document prints
as expected, set up your page size in both the source application and the printer.
The list of paper sizes available to Acrobat comes from the PPD file (PostScript printers) or from the printer driver
(non-PostScript printers). If the printer and PPD file you’ve chosen for PostScript printing support custom paper
sizes, you see a Custom option in the Paper Size menu. For printers capable of producing very large print areas,
Acrobat supports pages as large as 15,000,000 inches (38,100,000 cm) by 15,000,000 inches (38,100,000 cm).
Create a custom page size (Windows)
1 Do one of the following:
• Open the Printers or Printer And Faxes window from the Start menu. Right-click the Adobe PDF printer, and
choose Printing Preferences.
• In an authoring application such as Adobe InDesign, choose File > Print. Select Adobe PDF as the printer, and
click the Properties button. (In some applications, you may need to click Setup in the Print dialog box to access
the list of printers, and then click Properties or Preferences to customize the Adobe PDF settings.)
2 In the Adobe PDF Settings tab, click the Add button next to the Adobe PDF Page Size menu.

73
ADOBE ACROBAT 8 PROFESSIONAL
User Guide
3 Specify the name, width, height, and unit of measurement. Click Add/Modify to add the custom page size name
to the Adobe PDF Page Size menu.
Create a custom page size (Mac OS)
1 In an authoring application such as Adobe InDesign, choose File > Page Setup.
2 In the Settings pop-up menu, select Custom Paper Size.
3 Click the New button.
4 Specify the name, height, width, and margins. The unit of measurement depends on the system language.
5 Click Save, and then click OK.
Use the custom page size
1 Choose File > Print Setup.
2 Select the new custom page size from the Paper Size menu, and click OK.
Creating PDFs with PDFMaker
About Acrobat PDFMaker
PDFMaker is an Acrobat feature that operates within many business applications, such as Microsoft Office applica-
tionsandLotusNotes.WhenyouinstallAcrobat,PDFMakercontrolsappearintheworkarea oftheauthoringappli-
cation.
Using PDFMaker within an authoring application is a simple, one-click procedure. It involves clicking an Acrobat
PDFMaker toolbar button or (Windows only) choosing acommand on theAdobePDFmenu.Itis notnecessaryto
open Acrobat.
Use PDFMaker to convert a file to PDF (Windows)
In Windows, Acrobat installs both an Acrobat PDFMaker toolbar and an Adobe PDF menu in many popular
authoring applications. You can use either the toolbar buttons or the Adobe PDF menu (the Action menu in Lotus
Notes) to create PDFs, but the menu also provides access to conversion settings. Although many of the conversion
options are common to all authoring applications, a few are application-specific.
For Microsoft Office 2007 applications such as Word, Excel, and PowerPoint, the options for creating PDFs are
available from the Acrobat Ribbon.
Note: If you don’t see the PDF toolbar buttons in an application, choose View > Toolbars > Acrobat PDFMaker 8.0. Or,
in Lotus Notes only, choose File > Preferences > Toolbar Preferences, click Toolbars, and select the Visible check box for
Acrobat PDFMaker 8.0.
See also
“Customize Adobe PDF settings” on page 101
“Create PDFs from Word mail merges” on page 80
Convert a file to PDF
1 Open the file in the application used to create it.

74
ADOBE ACROBAT 8 PROFESSIONAL
User Guide
2 Click the Convert To Adobe PDF button on
otes o
the Acrobat PDFMaker toolbar, or (if available) choose Adobe
PDF > Convert To Adobe PDF. (In Lotus N nly, PDF conversion commands appear on the Actions menu.)
For Microsoft Office 2007 applications such as Word, Excel, PowerPoint, and Access, click the Create PDF button
on the Acrobat Ribbon.
3 In the Save Adobe PDF File As dialog box, enter a filename and location for the PDF, and click Save.
Create a PDF as an email attachment
1 Open the file in the application used to create it.
2 Choose Adobe PDF > Convert To Adobe PDF And Email.
For Microsoft Office 2007 applications such as Word, Excel, PowerPoint, and Access, click the Create And Attach To
Email button on
nversio
the Acrobat Ribbon.
When the co n is finished, a blank message with the new PDF included as an attachment automatically opens
in your default email application. You can then address and complete the message and either send it or save it as a
draft.
Attach a file as PDF (Outlook)
1 In the Outlook email Message window, click the Attach As PDF button
F > Chan
.
Note: If the Attach As PDF button isn’t visible, in Outlook, choose Adobe PD ge Conversion Settings, and then
select Show Attach As Adobe PDF Buttons. The Attach As PDF button is not available for Outlook 2007.
2 Select a file to attach, and click Open.
Convert files to a secured PDF and attach it to an email message (Outlook)
1 In the Outlook email Message window, click the Attach As Secured Adobe PDF button .
obe LiveCycle PNote: The Attach As Secured Adobe PDF button appears only after you’ve configured an Ad olicy Server
using the Advanced > Security Settings menu.
2 Click Browse, select a file to convert, and click Open.
3 Specify the users that can open the PDF, and then click OK:
• To specify only users that receive the PDF, select Restrict Access Only To People In This Message’s To:, Cc:, And
Bcc: List. In this case, the PDF isn’t secured until you send the email message.
• To specify only users that are specified by a security policy, select Restrict Access By Applying The Following
SecurityPolicy,andthenselectasecuritypolicyinthelist.Inthiscase,thePDFissecuredbeforeitisattachedto
the email message.
4 If prompted, enter your user name and password to log in to the Adobe Policy Server.
Create a PDF and send it for review
1 Open the file in the application used to create it.
2 Click the Convert To Adobe PDF And Send For Review button on t
d For Re
he Acrobat PDFMaker toolbar, or (if
available) choose Adobe PDF > Convert To Adobe PDF And Sen view.
For Microsoft Office 2007 applications such as Word, Excel, PowerPoint, and Access, click the Create And Send For
Review button on the Acrobat Ribbon.
3 When the Identity Setup dialog box appears, enter the appropriate information about yourself, and click
Complete.

75
ADOBE ACROBAT 8 PROFESSIONAL
User Guide
4 Follow the directions in the wizard that appears, as described in “Start an email-based review” on page 158.
Use PDFMaker to convert a file to PDF (Mac OS)
The default Acrobat installation adds Convert To Adobe PDF buttons to Office application toolbars. You can use
these buttons to create Adobe PDF files quickly and easily from Microsoft Word, Excel, and PowerPoint files without
opening Acrobat.
The PDF creation process applies the currently selected conversion settings. If you want to change those settings, you
must open Acrobat Distiller and select options there. In most cases, the default settings produce good results.
Note: Password-protected Excel files can’t be converted to PDF on Mac OS. Also, many PowerPoint features aren’t
converted when you produce a PDF from a PowerPoint file on Mac OS. For example, animations and transitions aren’t
converted.
1 Open the file in the Office application.
2 On the Adobe Acrobat PDFMaker 8 toolbar, select one of the following:
• Convert To Adobe PDF.
• Convert To Adobe PDF And EMail.
3 In the Save dialog box, type a filename, select a folder in which to save the PDF, and click Save.
4 When the conversion is complete, choose View File if you want to open the new PDF in Acrobat, or Done if you
want to close the Acrobat PDFMaker status dialog box without opening the PDF.
IfyouselectedConvert ToAdobePDF AndEmail,thenewlycreatedPDFisattachedtoablankemailthatopensin
your default email application. You can either address, complete, and send the message immediately or save it as a
draft to send later.
See also
“Customize Adobe PDF settings” on page 101
View PDFMaker conversion settings
PDFMaker conversion settings vary according to file types. For example, the options available for PowerPoint files
aren’tthesameasthoseavailableforOutlookfiles.Onceyou’veselectedconversionsettings, thosechoicesapplyto
all subsequent PDFs you create from that file type. It’s a good idea to review the settings occasionally.
1 Open a PDFMaker-enabled application (such as Word or Excel).
2 Do one of the following:
• (Lotus Notes) Choose Actions > Change Adobe PDF Conversion Settings.
• (Office 2007 applications) Choose Acrobat > Preferences.
• (All other applications) Choose Adobe PDF > Change Conversion Settings.
3 (Optional) To revert to the original default settings, click Restore Defaults on the Settings tab.
Note: PDFMaker isn’t available for email applications on Mac OS.

76
ADOBE ACROBAT 8 PROFESSIONAL
User Guide
See also
“Application-specific features of PDFMaker” on page 77
“Adobe PDF conversion settings” on page 99
Settings tab of the Conversion Settings
The settings available for PDFMaker depend on the application in which you’re using PDFMaker.
Conversion Settings Specifies the standard by which the PDF will be optimized. When you choose an item in the
menu, a description of that preset appears immediately below it.
View Adobe PDF Result Opens the converted document directly into Acrobat. (Exception: when you choose
Convert To Adobe PDF And Email.)
Prompt For Adobe PDF File Name Lets you enter a custom filename for the resulting PDF. Deselect this option to
save the file in the same folder as the source file, using the same name but with a .pdf extension.
Convert Document Information Adds document information from the Properties dialog box of the source file. This
setting overrides the printer preferences and settings in the Advanced panel of the Adobe PDF Settings dialog box.
Note: The Advanced Settings button opens the Adobe PDF Settings dialog box, which contains many additional
conversion options. These conversion settings apply to all Acrobat features that create PDFs, such as Acrobat Distiller,
PDFMaker, and the Acrobat application itself.
Create PDF/A Compliant PDF File Creates the PDF so that it conforms to this ISO standard for long-term preser-
vation of electronic documents. (In the Microsoft Publisher application alone, PDFMaker does not support the
PDF/A standard.)
Note: When Conversion Settings are opened from within Word, Excel, or PowerPoint, this option specifies PDF/A 1-
a:2005. When opened from within Microsoft Visio, Access, Microsoft Project, AutoCAD, or Publisher, it specifies PDF/A
1-b:2005.
Security tab of the Conversion Settings
The settings available for PDFMaker depend on the application in which you’re using PDFMaker.
Require A Password To Open The Document Whenselected,makestheDocumentOpenPasswordoptionavailable,
where you type to set a password that users must use in order to open the document.
Restrict Editing And Printing Of The Document When selected, makes the other Permissions options available.
Change Permissions Password Specifies a password you set that users must use in order to do any allowable printing
or editing.
Printing Allowed Specifies whether users who use the Permissions Password can print the document and at what
resolution.
Changes Allowed Specifies what kind of changes users who use the Permissions Password can make.
Enable Copying Of Text, Images, And Other Contents Prevents or allows users from copying from the PDF.
Enable Text Access For Screen Reader Devices For The Visually Impaired Prevents or allows screen reader devices to
access text. (Selected by default.)
Enable Plaintext Metadata Specifies whether or not the search engine can access the document metadata. Available
only when the PDF-compatibility is set to Acrobat 6.0 (PDF 1.5) or later.

77
ADOBE ACROBAT 8 PROFESSIONAL
User Guide
Application-specific features of PDFMaker
Convert email messages to PDFs (Windows)
You can use PDFMaker to convert one or more Microsoft Outlook or Lotus Notes email messages or entire folders
of messagestoamergedPDFor PDFpackage.Withinapackage, eachemailmessageappearsasaseparatePDFfile.
The Acrobat PDFMaker Conversion Settings dialog box contains the option that determines whether email messages
are merged into one continuous PDF or assembled into a PDF package.
The controls that activate an email conversion to PDF appear in two places within the email application: on the
Acrobat PDFMaker toolbar and on a menu. In Outlook, the menu is called Adobe PDF and appears to the right of
the Outlook Help menu. In Lotus Notes, PDF commands appear under the Actions menu.
Yo
sel
proces
u can convert one currently open email message to PDF (not to a PDF package) by choosing File > Print, and
ecting Adobe PDF as the printer in the Print dialog box. The PDFMaker conversion settings do not affect this
s.
See also
“Application-specific PDFMaker settings” on page 85
“Create and manage an index in a PDF” on page 375
Specify whether email messages become merged PDFs or PDF packages
1 Do one of the following:
• (Outlook) Choose Adobe PDF > Change Conversion Settings.
• (Lotus Notes) Choose Actions > Change Adobe PDF Conversion Settings.
2 Do one of the following:
• To convert and merge email messages into a PDF as sequential pages of one document, deselect Output Adobe
PDF Package When Creating A New PDF File.
• To assemble converted email messages as components of a PDF package, select Output Adobe PDF Package When
Creating A New PDF File.
Convert an open email message to PDF (Outlook)
❖ Choose Adobe PDF > Convert To Adobe PDF.
Yo
too
u can also convert a different file to PDF from within an open Outlook email message if the Attach As Adobe PDF
lbar is shown. Clicking this button opens a series of dialog boxes for selecting and saving the new PDF and also
starts Acrobat, if it is not already running. The resulting PDF is attached to the open email message.
Convert email messages to a new PDF
1 In Outlook or Lotus Notes, select the individual email messages that you want to archive.
2 Do one of the following:
• (Outlook) Click the Convert Messages button in the Acrobat PDFMaker toolbar, or choose Adobe PDF >
Convert To Adobe PDF > Selected Messages.
• (Lotus Notes) Click the Convert Selected Messages To Adobe PDF button in the Acrobat PDFMaker toolbar,
or choose Actions > Convert Selected Messages To Adobe PDF.

78
ADOBE ACROBAT 8 PROFESSIONAL
User Guide
3 In the Save Adobe PDF As dialog box, select a location, type a filename, and click Save.
Note: For security reasons, the default settings in Outlook 2003 block automatic downloading of pictures in HTML email
messages from unknown senders and sites. If you want to download such images and include them in the conversion to
PDF,youcanchange thatsettinginOutlook by choosingTools> Options, clicking the Security tab, and then clicking the
Change Automatic Download Settings, where specific options are available. For more information, see the Outlook Help
system.
Add email messages to an existing PDF
1 In Outlook or Lotus Notes, select the individual email messages that you want to convert and add to a PDF.
2 Do one of the following:
• (Outlook) Choose Adobe PDF > Convert And Append To Existing Adobe PDF > Selected Messages.
• (Lotus Notes) Choose Actions > Append Selected Messages To Existing Adobe PDF.
3 Locate and select the PDF or PDF package to which you want to add the converted emails, and click Open.
Important: Do not type a new name for the PDF. If you do, a warning message appears telling you that the PDF was not
found. Click OK, and select a PDF without changing its name.
4 (Outlook only) If a message appears, alerting you that the existing PDF was creating using an earlier version of
PDFMaker, do one of the following:
• To create a PDF package from the original PDF archive, click Yes, and select a name and location for the new
archive. (The default name adds _Packaged to the original PDF filename.) When the conversion is complete and
the Creating Adobe PDF dialog box closes, the new archive opens in Acrobat.
• To not create a PDF package from the original PDF archive, click No and cancel the process.
Note: In earlier versions of Acrobat and for email merged into a single PDF, messages might be duplicated when running
the append process. For PDF packages of email converted or migrated in Acrobat 8, only new messages—that is, messages
that are not already part of the PDF package—are appended.
(Lotus Notes) Convert an email folder to a new PDF
1 In Lotus Notes, select the folder that you want to convert to PDF.
2 ClicktheConvertSelectedFolderToAdobePDFbutton ontheAcrobatPDFMakertoolbar,orchooseActions
> Convert Selected Folder To Adobe PDF.
3 In the Save Adobe PDF File As, specify a location and name for the PDF package, and click Save.
To convert other Lotus Notes folders to PDF, repeat this procedure for each folder.
(Outlook) Convert email folders to a new PDF
In Outlook, PDFMaker can convert multiple folders to PDF in one procedure. It is not necessary to select those
folders at the beginning of the process because you can make these selection in a dialog box that appears automati-
cally.
1 In Outlook, choose Adobe PDF > Convert To Adobe PDF > Selected Folders.
2 In the Convert Folder(s) To PDF dialog box, select the folders you want to convert, and then select or deselect the
Convert This Folder And All Sub Folders option.
3 In the Save Adobe PDF File As, select a location and name for the PDF package.
TheCreatingAdobePDFstatusdialogbox showstheprogress oftheconversion.When theconversioniscomplete,
the new PDF opens in Acrobat.

79
ADOBE ACROBAT 8 PROFESSIONAL
User Guide
Migrating old Outlook PDF archives to PDF packages (Windows)
There are two good reasons for migrating old PDF email archives to PDF packages: to facilitate sorting and other
functions, and to make it possible to add new email messages to those archives.
InPDFpackages, eachemailmessage isconvertedasacomponentPDF.Youcanthensortthe messagesbymessage
folder, sender, subject line, date, size, or attachments. Also, you can create custom categories and sort by those.
You can open email archives you created with earlier version of Acrobat in Acrobat 8.0, but you cannot add email
messages to that archive in the same way. If you try, messages will appear that will guide you through the process of
creating a new archive from the old one and appending the selected messages to the new PDF package archive.
Migrate old Outlook PDF archives to PDF packages (Windows)
1 Open Outlook.
2 Choose Adobe PDF > Migrate Old PDF Archives To PDF Packages.
3 If a message appears, click Yes to continue the migration process.
4 Locate and select the old PDF archive, and click Open.
5 Selectalocationand name forthe migratedPDFpackage,and clickSave. (Thedefaultnamingadds _Packaged to
the existing filename, such as renaming an archive called Inbox.pdf as Inbox_Packaged.pdf.)
When the conversion process is complete and the Creating Adobe PDF dialog box closes, the new archive opens in
Acrobat.
Set up automatic email archiving (Windows)
In Microsoft Outlook, you can set up PDFMaker to automatically archive your email messages.
1 In Outlook, choose Adobe PDF > Setup Automatic Archival.
2 OntheAutomaticArchival taboftheAcrobatPDFMakerdialogbox,selectEnableAutomaticArchival,andthen
select options for Frequency and the time of day at which automatic archiving occurs.
3 Select other options, according to your needs:
Maintain Log Of Archival Creates a record of each archiving session.
Choose File Specifies the name and location of the archiving log.
Embed Index For Faster Search Creates an index that you can search to find specific words or characters instead of
having to search each individual document.
4 ClickAdd,and selecttheemailfoldersandsubfoldersthat youwantPDFMakertoarchive.Thenselectordeselect
the Convert This Folder And All Sub Folders option, as preferred, and click OK.
5 IntheSavePDFArchiveFileAsdialogbox,selectanameandlocationforthearchivedemailPDF.ThenclickOpen.
6 Review the settings and the archive folder names listed in the Acrobat PDFMaker dialog box, and do any of the
following:
• To add other email folders to the list, click Add and select the folder.
• To remove folders from the list, select the ones you want to remove and click Delete.
• To make changes to an archive file, select any folder name on the list, click Change Archive File, and specify the
name and location.
• To start archiving email immediately, click Run Archival Now.

80
ADOBE ACROBAT 8 PROFESSIONAL
User Guide
Create PDFs from Word mail merges
Mail merges from Word generate documents like form letters—for one common example—which are personalized
with information like the names and addresses of the individuals to whom they will be sent. With Acrobat
PDFMaker, you can save steps by using a Word mail merge document and corresponding data file to output mail
merges directly to PDF. You can even set up PDFMaker to attach those PDFs to email messages that are generated
during the PDF-creation process.
Note: For more information on setting up files for the Word Mail Merge feature, see Microsoft Office Word Help.
1 InMicrosoftWord,openthetemplatethatyouhavecreatedasthebasisofyourmailmerge,orcreatethefileusing
the Word Mail Merge toolbar and Mail Merge wizard, as needed.
Important: Do not complete the mail merge in Word. Instead, set up and preview the mail merge as usual, so that you
can verify that the merge will work correctly.
2 Do one of the following:
• Choose Adobe PDF > Mail Merge To Adobe PDF.
• Click the Mail Merge To Adobe PDF button on the Mail Merge toolbar (View > Toolbars > Mail Merge).
• (Word 2007) Choose Acrobat > Mail Merge.
3 In the Acrobat PDFMaker - Mail Merge dialog box, select the options you want:
• To specify which records in the data file will be imported into the merged files, select All or Current, or enter a
range of pages by typing in the From and To boxes.
• To name the PDF that will be created, type in the Specify PDF File Name box.
Note: The PDF will be named using this text plus a series of numbers. For example, if you type JulyLetter in the Specify
PDF File Name box, the mail-merged PDFs might appear as JulyLetter_0000123, JulyLetter_0000124, July
Letter_0000125, and so forth.
4 For Automatically Send Adobe PDF Files By Email, do one of the following:
• To create and save merged PDFs for printing or sending later in email, leave the option deselected, and click OK.
• To createmergedPDFsandattacheachoneto anemailmessageto theappropriaterecipient,selectthischeckbox,
and fill in the other Email options.
5 When the Browse For Folder dialog box appears, navigate to the location you want to use and click OK.
Status indicators appear as PDFMaker generates the individual PDFs, which takes an amount of time that is propor-
tional to the complexity of the merge and the number of PDFs you create.
6 If you selected Automatically Send Adobe PDF Files By Email, a dialog box appears asking for your email profile.
Enter the appropriate information and click OK.
When the job is finished, a message appears, telling you that the process was successful.
Email options for PDF mail merges
To Use the pop-up menu to select the field or column in the associated data file that contains the email addresses in
each individual’s record.
Subject Line Type the text that you want to appear in the subject line of each message.
Message Type to add or edit text that you want to appear in the body of the email messages.

81
ADOBE ACROBAT 8 PROFESSIONAL
User Guide
PDFs from Microsoft Project, Publisher, and Access (Windows)
There are specific differences to be aware of when you create PDFs from files authored in these applications:
Microsoft Project You can create PDFs of only the currently selected view. Views designated as nonprintable in
Project cannot be converted to PDF.
Note: Converting Project files requires Acrobat Professional or Acrobat 3D.
Microsoft Publisher PDFs converted from Microsoft Publisher support crop marks, links, bookmarks, spot colors,
transparency, bleed marks, printing bleed marks, and CMYK color conversion.
Microsoft Access When creating PDFs from Access files, the process can involve two additional steps:
• You must select the object in the Access file to be created as a PDF before using the PDFMaker button or
command.
• You can choose Adobe PDF > Convert Multiple Reports To Single Adobe PDF. For Access 2007, click Acrobat and
then click Convert Multiple Report. You can select individual reports that you want to include, and click Add
Report(s). When all of the reports that you want to convert appear in the Reports In PDF list, click Convert to start
creating the PDF.
Note: When you convert an Access 2003 or Access 2002 file to PDF, Access reports, tables, queries, and forms are
converted. When you convert an Access 2000 file to PDF, only reports are converted.
Convert Visio files to PDF (Windows)
PDFs created from Visio files preserve page sizes and support layers, searchable text, custom properties, links,
bookmarks, and comments, depending on your settings in the conversion settings. (Choose Adobe PDF > Change
Conversion Settings to review these, if needed.)
When you convert your Visio file, only shapes and guides that are printable and visible in the Visio drawing are
converted and appear in the PDF. Shapes are converted regardless of their protection or behavior. Shape custom
properties can be converted to PDF object data.
WhenyouconverttheVisio filetoaPDF,you canpreserveall orjustsomelayers,oryou canflattenalllayers.Ifyou
flatten layers, the PDF will look like the original drawing, but won’t contain any layer information. When flattened,
the contents of only visible and printable layers will appear in the converted PDF.
See also
“Adobe PDF conversion settings” on page 99
Convert Visio files
1 If you want to change the PDFMaker conversion settings, open Visio and choose Adobe PDF > Change
Conversion Settings. (For information about a setting, place the pointer over the setting to display a tool tip below.)
2 If you want to convert each page in the Visio file to a bookmarked page in the PDF file, choose Adobe PDF >
Convert All Pages In Drawing. If this option is deselected, only the current page is converted.
3 Do one of the following:
• Click the Convert To Adobe PDF button in the Adobe PDF toolbar.
• Choose Adobe PDF > Convert To Adobe PDF.
• ChooseAdobePDF>ConvertToAdobePDFAndEMail.ThePDFfileattachestoanewemail messageinyour
default email application.

82
ADOBE ACROBAT 8 PROFESSIONAL
User Guide
• Choose Adobe PDF > Convert To Adobe PDF And Send For Review. The file converts to an Adobe PDF file, and
an email-based review process begins.
4 If you want to include the custom properties of shapes, select that option.
5 Click Continue.
6 Select a layers option to retain or flatten layers in the resulting PDF, and click Continue.
Note: If youselectRetainSomeLayersInTheSelectedPage,you’llbepromptedtochoosewhichVisiolayerstoinclude.
7 Click Convert To Adobe PDF, specify a location and filename, and click Save.
Select Visio layers to convert
You can convert a Visio drawing that contains layers to a PDF and retain some or all of the layers in the resulting
PDF, or you can flatten the layers. You can also organize the Visio layers in layer sets, which are folders in the Acrobat
Layers panel.
1 With the multilayered file open in Visio, click a button in the Adobe PDF toolbar, and select Retain Some Layers
In The Selected Page.
Note: If the Retain Some Layers In The Selected Page option is not available, deselect the Convert All Pages In Drawing
option.
2 Select one or more layers in the Layers In Visio Drawing list:
• To select a single layer, click the name of the layer.
• To select all layers, right-click and choose Select All.
• To select more than one layer, Ctrl-click the desired layers. (You can also Ctrl-click a layer to remove it from a
selection.)
3 To add the selected Visio layers to the list of layers to convert to the PDF file, do one of the following:
• To convert the selected Visio layers to individual PDF layers within a PDF layer set, click Create Layer Set, and
optionally, type a layer name.
• To convert the selected Visio layers to individual layers (but not grouped under a layer set), click the Add Layer(s)
button.
Note: ThenameofalayerintheLayersInVisioDrawinglistisunavailableifthatlayerisincludedintheLayersInPDF
list. When you select that layer in the Layers In PDF list, a bullet appears next to the layer’s name in the Layers In Visio
Drawing list.
4 Optionally, do any of the following:
• To reorder the layers in the Layers In PDF list, drag an item up or down in the list.
• To include a visibility property that can be switched on oroffinAcrobat, deselect Locked On adjacent to thePDF
layer; to lock the resulting PDF layer’s visibility on, select Locked On.
• To save the current settings of Visio layers selected, click Save PDF Settings, and click OK. These settings are used
the next time you convert the current Visio file to a PDF file.
5 Click Convert To PDF, specify a folder in the Save In box in which to save the PDF file, type a filename, and then
click Save.
Note: Visio layers that were selected for conversion and that have Visio settings for visible, printable, or lock are
converted to PDF layers; the visible and printable properties are included in the resulting PDF layers. If the Visio file
contains a background page, header, or footer, the PDF file automatically has PDF layers named for those items.

83
ADOBE ACROBAT 8 PROFESSIONAL
User Guide
Convert AutoCAD files to PDF (Windows)
If you’re working in AutoCAD, you can convert files from within the application with the Acrobat PDFMaker.
Note: Converting AutoCAD files in DWF or DST formats to PDF requires use of the default filters installed with the
AutoCAD application. For more information, refer to the AutoCAD application documentation.
See also
“Adobe PDF conversion settings” on page 99
“What’s the best way to create a PDF?” on page 58
Convert AutoCAD files when AutoCAD is not installed
The default Acrobat installation installs Autodesk filters that allow you to convert files with DWG, DWF, or DST
format into PDF, without the native application installed. All layers and layouts will be created in the PDF file.
For information about different methods to convert AutoCAD files to PDF, see “PDF creation methods by file type”
on page 58.
Convert AutoCAD files when AutoCAD is installed
The default Acrobat installation adds two Convert To Adobe PDF buttons to the toolbar that allow you to convert
your AutoCAD data into a PDF that preserves layers and layouts. You can create PDF settings to define the layers
and layer status in the resulting PDF. You can then name, save, and reuse these settings for subsequent conversions.
Note: Acrobat PDFMaker automatically acquires and uses the necessary page size and plotting information of the
respective layout to create a correctly sized PDF file.
1 If you want to change the PDF conversion settings, choose Adobe PDF > Change Conversion Settings in
AutoCAD. (For information on the conversion settings, place the pointer over each option to display a tool tip.)
2 Do one of the following:
• Click a button on the Adobe PDF toolbar: Convert To Adobe PDF or Convert To Adobe PDF And Send For
Review button .
PDF >
• Choose Adobe Convert To Adobe PDF.
• Choose Adobe PDF > Convert To Adobe PDF And Email.
• Choose Adobe PDF > Convert To Adobe PDF And Send For Review.
3 To select which AutoCAD layouts to include in the resulting PDF and their order, do any of the following in the
Acrobat PDFMaker dialog box, and then click OK:
• To include one or more AutoCAD layouts, select the layouts in the Layouts In Drawing list, and click Add.
• To remove AutoCAD layouts from the list of layouts to include, select the layouts in the Layouts In PDF list, and
click Remove.
• To reorder the PDF layouts, select a layout in the Layouts In PDF list, and click Move Up or Move Down.
4 To determine how the AutoCAD layers are converted, select one of the following, and click Continue:
• Flatten All Layers.
• Retain All Or Some Layers. The Acrobat PDFMaker dialog box displays a screen in which you must choose which
layers to include in the resulting PDF.
5 Choose a location in which to save the resulting PDF file in the Save In box, type a filename, and click Save.

84
ADOBE ACROBAT 8 PROFESSIONAL
User Guide
Select AutoCAD layers to convert
If you choose to create a PDF file that retains some AutoCAD layers, you can specify which layers are preserved in
the PDF.
The Layers In Drawing list shows all the layers in the AutoCAD file. You transfer layers that you want to be present
inthePDFfrom theLayersInDrawinglist totheLayersInPDFlist.Onlylayersandobjectsoflayerspresent inthe
Layers In PDF list are present in the PDF.
1 In AutoCAD, start to convert an AutoCAD file and select the Retain All Or Some Layers option.
2 To show AutoCAD layers in the Acrobat PDFMaker dialog box, do any of the following:
• Choose an option from the Named Layer Filters menu to list all layers that fit that criterion.
• SelecttheInvertoptiontolistalllayersexceptthosethatare describedbythe selectedchoice in theNamedLayer
Filters menu.
• To change the sort order of the layers, click the headings.
Note: To change a layer’s On, Frozen, or Plot properties, click Cancel Conversion, change the properties in the AutoCAD
drawing, and restart the procedure.
3 Do any of the following to select the AutoCAD layers from the Layers In Drawing list that you want to convert
and include in the PDF:
• To select a set of layers you’ve already saved, choose a layer setting from the PDF Layer Settings menu.
• To select a single layer, click the name of the layer.
• To select more than one layer, Ctrl-click the desired layers.
• To select all layers, right-click and choose Select All.
Note: To navigate through the AutoCAD layers, use the Up and Down Arrow keys. Use the scroll bar at the bottom of
the column to scroll horizontally through the table.
4 To add the selected AutoCAD layers to the list of layers to convert to PDF, do one of the following:
• To convert the selected AutoCAD layers to individual PDF layers within a PDF layer set, click Create Layer Set,
and optionally, type a layer name. (A PDF layer set is a folder for organizing layers in the Layers panel in Acrobat.)
• To convert the selected AutoCAD layers to individual layers, click the Add Layer(s) button.
The name of a layer in the Layers In Drawing list is unavailable if that layer is included in the Layers In PDF list. When
you select that layer in the Layers In PDF list, a bullet appears next to the layer’s name in the Layers In Drawing list.
5 Optionally, do any of the following:
• To reorder the layers in the Layers In PDF list, drag an item up or down in the list.
• To include a visibility property that can be switched on oroffinAcrobat, deselect Locked On adjacent to thePDF
layer; to lock the resulting PDF layer’s visibility on, select Locked On.
• To save the current settings of AutoCAD layers selected, click Add PDF Settings, name the layer setting, and click
OK. The Add PDF Settings button is unavailable unless you’ve added at least one AutoCAD layer from the Layers
In Drawing list to the Layers In PDF list. These settings are used the next time you convert an AutoCAD file to
PDF and can be renamed or edited at any time.
6 ClicktheConvertToPDFbutton,specifyafolderintheSaveInboxin whichtosavethePDFfile,typeafilename,
and then click Save.

85
ADOBE ACROBAT 8 PROFESSIONAL
User Guide
Convert AutoCAD files in batches
❖ Choose Adobe PDF > Batch Conversion, and follow the instructions.
Application-specific PDFMaker settings
PDFMaker is a flexible feature of Acrobat that adapts according to its environment. The conversion settings available
in one PDFMaker-enabled application may be different than those you would encounter within a different appli-
cation.
Some PDFMaker settings are common to several or most applications. Some options are unique to a specific appli-
cation.
See also
“Adobe PDF conversion settings” on page 99
“Convert web pages to PDF in Internet Explorer (Windows)” on page 89
“Settings for a single conversion for Office 2007 applications” on page 88
Settings tab options available from within most applications
The following settings appear on the Settings tab accessed from within most PDFMaker-enabled applications.
Attach Source File To Adobe PDF Includes the document being converted as an attachment to the PDF.
Add Bookmarks To Adobe PDF Converts certain elements in original Office documents to PDF bookmarks: Word
headings, Excel worksheet names, or PowerPoint titles. Selecting this option overrides any settings in the Bookmarks
tab of the Conversion Settings dialog box.
Note: In Microsoft Publisher 2003 documents, PDFMaker includes Publisher headings as bookmarks in the PDF.
PDFMaker does not support the conversion of Publisher 2002 bookmarks, links, transparency, or crop marks and bleed
marks.
Add Links To Adobe PDF Includes active links and hypertext in the PDF.
Enable Accessibility And Reflow With Tagged Adobe PDF Embeds tags in the PDF.
Excel-specific options on the Settings tab
Convert Comments To Notes Converts user-created Excel comments to notes and lists them in the Acrobat
Comments panel.
Fit Worksheet To A Single Page Adjusts the size of each worksheet so that all the entries on that worksheet appear on
the same page of the PDF.
Prompt For Selecting Excel Sheets Opens a dialog box at the beginning of the file conversion process, in which you
can specify which worksheets are included in the PDF and the order in which the sheets appear in the PDF.
PowerPoint-specific options on the Settings tab
Convert Multimedia To PDF Multimedia Adds any linked audio-video files to the PDF.
Save Animations In Adobe PDF Converts any animation effects in the PowerPoint file to equivalent animations in
the PDF.
Save Slide Transitions In Adobe PDF Converts PowerPoint slide transition effects to PDF transition effects.

86
ADOBE ACROBAT 8 PROFESSIONAL
User Guide
Convert Hidden Slides To PDF Pages Converts any PowerPoint slides that are not seen in the usual playing of the
presentation to PDF pages.
Convert Speaker Notes To Text Notes In Adobe PDF Converts any speaker notes for the PowerPoint presentation
into Text notes in the PDF.
PDF Layout Based On PowerPoint Printer Settings Uses the same printer settings in the PDF as in the original file.
Email-specific options on the Settings tab
Thefollowingoptionsappearwhenyou openthePDFMakersettingsfromwithinMicrosoftOutlookorLotusNotes.
Attachments Indicates whether or not all files attached to email messages will be included in the new PDF.
Output Adobe PDF Package When Creating A New PDF File When selected, always converts individual messages as
component files of a PDF package. When deselected, merges individual messages as separate pages of a PDF.
Embed Index For Faster Search Creates an embedded index, which speeds up searches, especially when you convert
large numbers of email messages or message folders.
Show “Attach As Adobe PDF” Buttons If selected, the Attach As Adobe PDF button appears in the Outlook email
message window.
Page Layout options Specify page properties, similar to those found in the Print dialog box: page dimensions, orien-
tation, and margins.
AutoCAD-specific options on the Settings tab
Open Layers Pane When Viewed In Acrobat Shows layers structure when a PDF is opened in Acrobat or Adobe
Reader.
Embed Scale Information Preserves drawing-scale information, which is usable with the Acrobat measurement
tools.
Choose Layout Specifies whether Current Layout, All Layouts, or Selected Layouts are included in the PDF.
Choose Layer Specifies whether All Layers, Selected Layers, or No Layers are included as layers in the PDF.
Visio-specific options on the Settings tab
The following options appear when you open the PDFMaker settings from within Microsoft Visio.
Include Visio Custom Properties As Object Data In The Adobe PDF Indicates whether or not custom properties of
the Visio image will be included as object data in the new PDF.
Exclude Visio Objects With No Custom Properties Indicates if the new PDF should exclude Visio objects without
custom properties.
Convert Comments To Adobe PDF Indicates if the comments in the Visio file should be converted to PDF comments
in the new PDF.
Always Flatten Layers In Adobe PDF Specifies if the layers should be flattened. If you flatten layers, the PDF will look
like the original drawing, but won’t contain any layer information. All shapes in the Visio drawing are converted,
regardless of their protection or behavior, and shape custom properties can be converted to PDF object data.
Word 2007-specific options on the Settings tab
The following options appear when you open the PDFMaker settings from within Microsoft Word 2007.
Fully Functional PDF creates a fully functional, high-quality, and compact PDF file.

87
ADOBE ACROBAT 8 PROFESSIONAL
User Guide
Quick And Simple PDF CreatesabasicPDFfileforviewing.TheBookmarkandWordtabsettingsarenotavailable
for quick and simple PDFs.
Word tab settings (Microsoft Word)
Convert Displayed Comments To Notes In The Adobe PDF Changes any Word comment entries to PDF comments. If
the currently open Word document contains comments, more options appear in the Comments list on this tab:
• Reviewer Lists the names of reviewers who have entered comments in the current Word document.
• Include When deselected, does not include that reviewer’s comments in the PDF.
• Notes Open Specifies whether the PDF comment windows automatically open or are closed for that reviewer’s
comments.
• Color Shows the color for that reviewer’s comment icons. Clicking the color icon repeatedly cycles through a
limited set of available colors.
Convert Cross-References And Table Of Contents To Links Enables one-click navigation of these elements in the new
PDF.
Convert Footnote And Endnote Links Integrates these into the PDF.
Enable Advanced Tagging Integrates this into the PDF.
Bookmarks tab settings (Microsoft Word)
The options you specify on this tab determine which items are converted into PDF bookmarks in the PDF.
Important: The Add Bookmarks To Adobe PDF option on the Settings tab must be selected in order to include any
bookmarks in the conversion process. If you deselect that option, it overrides any options you select on this tab and no
bookmarks will be created.
Convert Word Headings To Bookmarks Selects all the headings in the Elements list for conversion to PDF
bookmarks.
Convert Word Styles To Bookmarks Selects all the text styles in the Elements list for conversion to PDF bookmarks.
(Deselected by default.)
Convert Word Bookmarks Converts any user-created Word bookmarks to PDF bookmarks.
Element list Specifies which Word headings and styles will be converted as PDF bookmarks.
• Element Lists the names of all available Word headings and styles. The icons for Headings and Styles
indicate the element types.
• Type Also indicates whether the element is a heading or style in the Word document.
• Bookmark Displays X’s, indicating whether or not individual elements will be converted to PDF bookmarks.
Clicking an individual Bookmark check box changes the selection status for that element.
• Level Specifies where the element will fit in the hierarchy structure of the PDF Bookmarks panel. Clicking an
individual Level number opens a menu that you can use to change the value.
Note: When some but not all of the available Word headings and styles are selected for conversion to PDF bookmarks,
themarkerinthe corresponding checkboxesatthetopofthetabchange.Ifallelementsofthetypeare selected,acheck
mark appears. If only some of the elements of that type are selected, a colored square appears. Otherwise, the check box
is empty.

88
ADOBE ACROBAT 8 PROFESSIONAL
User Guide
Settings for a single conversion for Office 2007 applications
For Word 2007, Excel 2007, and PowerPoint 2007 applications, if you want the settings to be used only for the
selected conversion and not for future conversions, you can define the settings by accessing the conversion options
from the Save Adobe PDF File As dialog box.
View and modify options for a single conversion
1 Click the Office button and choose Save As > Adobe PDF.
2 Select the View Result check box if you want to view the PDF file after the conversion is complete.
3 (Word 2007) Specify if you want the PDF to be complete and fully functional or if you just need a quick and simple
PDF. The quick and simple PDF option does not allow you to create bookmarks from Word styles.
4 Click Adobe PDF Conversion Options to define the options to be used for the current conversion.
The initial settings in the Conversion Options dialog box are based on the options that you set using the Preferences
button on the Acrobat Ribbon.
Converting web pages to PDF
Web pages and PDFs
The core of a web page is a file written in Hypertext Markup Language (HTML). Typically, the HTML file includes
associations with other files that either appear on the web page or govern how it looks or works.
When you convert a web page to PDF, the HTML file and all associated files—such as JPEG images, Adobe Flash
files, cascading style sheets, text files, image maps, and forms—are included in the conversion process.
The resulting PDF behaves much like the original web page. For example, the images, links, image maps, and most
media files appear and function normally within the PDF. (Animated GIF files appear as still images, showing the
last frame of the animation.)
Also, the PDF functions like any other PDF. For example, you can navigate through the file by scrolling or using
bookmarks; users can add comments to it; you can add security, form fields, and other features that enhance it.
In preparing to convert web pages to PDF, there are decisions to consider that affect how you approach the
conversion process:
• How much do you want to convert?
If you want to convert only a selected area of the currently open web page, use PDFMaker from within Internet
Explorer. If you want to convert several levels or all of a multipage web site to PDF, work within Acrobat.
• Do you want to create a new PDF from the web pages or to append the converted pages to an existing PDF?
YoucandothisineitherAcrobatorInternetExplorerPDFMaker,butyouchoosedifferentbuttonsorcommandsto
accomplish these things.
• Do you need to apply advanced conversion settings to the process?
The conversion settings available from within Internet Explorer are limited. Use Acrobat for the conversion process
if you need to select additional settings. When you finish your selections and have converted at least one web page to
PDF from within Acrobat, those settings will apply when you convert web pages from within Internet Explorer, too.
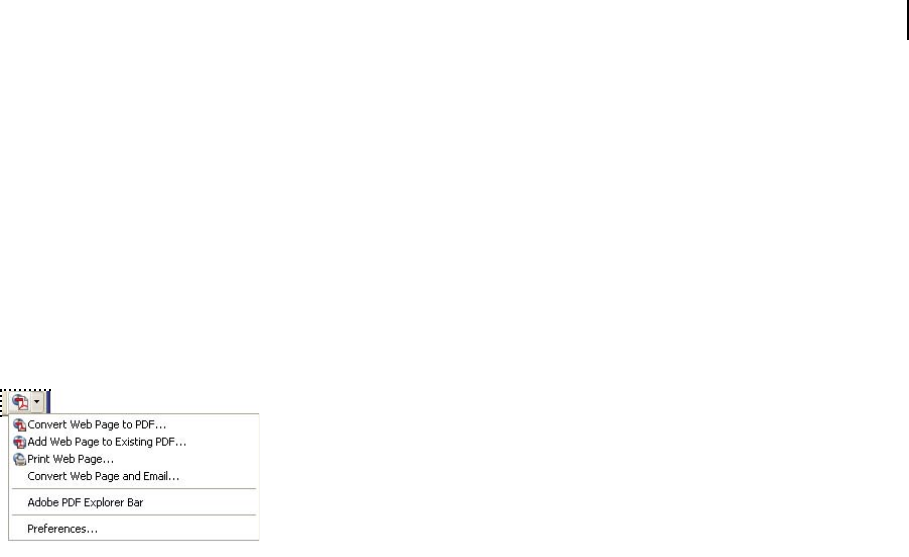
89
ADOBE ACROBAT 8 PROFESSIONAL
User Guide
Note: To convert Chinese, Japanese, and Korean (CJK) language web pages to PDF on a Roman (Western) system in
Windows,youmusthaveinstalledtheCJK languagesupportfiles whileinstalling Acrobat. Also,itispreferabletoselect
an appropriate encoding from the HTML conversion settings.
Convert web pages to PDF in Internet Explorer (Windows)
When you install Acrobat, Internet Explorer (version 6.0 and later) gains an Adobe PDF toolbar. Using the
commands on this toolbar, you can convert the currently displayed web page to PDF in various ways: You can
convertthe entirewebpageorjustaselected partofit;you cancreateanewPDF orappend theconverted webpage
to an existing PDF. The Adobe PDF toolbar menu also contains commands that initiate further actions after
conversion, such as attaching the new PDF to a new email message or printing it.
A menu on the PDF toolbar provides easy conversion and print capabilities.
Convert a web page to PDF
1 Start Internet Explorer and go to the web page that you want to convert to PDF.
2 Using the Adobe PDF toolbar menu, do one of the following:
Note: If you don’t see the Adobe PDF toolbar in Internet Explorer, choose View > Toolbars > Adobe PDF.
• TocreateanewPDFfromthecurrentlyopenwebpage,chooseConvert WebPageToPDF.Thenselectalocation,
type a filename, and click Save.
• ToaddaPDFofthecurrentlyopenweb pageto anotherPDF,chooseAddWebPageToExistingPDF.Thenlocate
and select the PDF to which the converted file will be added, and click Save.
• To create and print a new PDF from the currently open web page, choose Print Web Page. When the conversion
is complete and the Print dialog box opens, select options and click OK.
• To create a new PDF from the currently open web page and attach it to a blank email message, choose Convert
Web Page And Email. Then select a location for the PDF, type a filename, and click Save. Type the appropriate
information in the email message that opens after the conversion is complete.
Convert part of a web page to PDF
You can convert text or images on a web page. This is useful if you want to save content without saving navigation
frames or advertising.
1 Drag the pointer to select text and images on a web page.
2 On the Adobe PDF toolbar menu, choose one of the following:
• To create a new PDF, choose Convert Web Page To PDF. Then select a name and location for the PDF.
• ToappendtheselectedcontenttoanotherPDF,chooseAddWebPageToExistingPDF.Thenlocateand selectthe
PDF to which the selection will be added.
3 Make sure that Only Convert Selection is selected, and click Save.

90
ADOBE ACROBAT 8 PROFESSIONAL
User Guide
Convert a linked web page to PDF
❖ In the open web page, right-click the linked text and choose one of the following:
• To convert the linked web page to a new PDF, choose Convert Link Target To Adobe PDF.
• To add the linked web page to an existing PDF, choose Convert Link Target To Existing PDF. Then locate and
select the existing PDF, and click Save.
Set PDF conversion preferences for Internet Explorer (Windows)
The Internet Explorer PDF preferences determine only whether converted files open in Acrobat automatically, and
whether you are prompted to confirm the deletion of files or addition of pages to an existing PDF.
1 In Internet Explorer, choose Preferences from the Adobe PDF toolbar menu.
2 Select and deselect options in the Adobe PDF Preferences, as needed:
• To continue working in Internet Explorer after the conversion without opening the new PDF in Acrobat, deselect
Open PDF Files In Acrobat After Conversion.
• To delete PDF files without further notice, deselect Ask For Confirmation Before Deleting PDF Files.
• To append PDF files without further notice, deselect Ask For Confirmation Before Adding Pages To PDF Files.
• To skip alerts reminding you that the PDF file you are appending to has been changed, deselect Warn Before
Adding Pages If The PDF File Has Been Modified.
Manage PDFs in Internet Explorer (Windows)
You can open the Adobe PDF Explorer Bar within Internet Explorer to see PDF files and folders on your computer
in a familiar navigation-tree pane and format. All other types of files do not appear, which makes it easier to find the
PDFs on your computer. You can move PDFs and folders, rename them, or delete them, just like in Windows
Explorer.
The Adobe PDF Explorer Bar also contains buttons for converting the current web page to PDF or creating new
folders on your computer.
Note: When you right-click a web page, the context-sensitive menu includes some commands for converting PDFs. Which
commands are available depends on the element you right-click on the web page. For example, the commands that appear
when you right-click a text link differ from those that appear when you right-click ordinary text on the web page.
1 Open the Adobe PDF pane in Internet Explorer, using one of the following methods:
• Choose Adobe PDF Explorer Bar from the Adobe PDF toolbar menu.
• Choose View > Explorer Bar > Adobe PDF.
2 In the Adobe PDF pane, manage folders by doing any of the following:
• To add a new folder, select the location for the folder in the tree structure and click New Folder, or right-click the
location icon and choose New Folder.
• To rename a folder, right-click the folder, choose Rename, and type a new name.
• To delete a folder, right-click the folder and choose Delete.
Note: Only PDF files appear in the navigation structure in the Adobe PDF pane, but other files may be present in folders.
If you attempt to delete a folder that contains files that aren’t visible, a confirmation message appears. If you’re not sure
that you want to delete those files, click No.

91
ADOBE ACROBAT 8 PROFESSIONAL
User Guide
3 In the Adobe PDF pane, manage PDFs by right-clicking a PDF and choosing one of the following:
Open In Internet Explorer Opens the selected PDF within the document pane of Internet Explorer.
Open In Acrobat Opens the selected PDF in a standalone instance of Acrobat.
Open Containing Folder Opens the folder in which the PDF is located, as a new instance of Windows Explorer.
Add Web Page To This File
ConvertsthecurrentlyopenwebpagetoPDFandaddsitasanewpagetotheselectedPDF.
Add Selection To This File Converts your selection within the currently open web page to PDF and adds it as a new
page to the selected PDF.
Note: You can also rename or delete the selected PDF from the right-click menu.
Convert web pages to PDF in Acrobat
Although you can convert an open web page to PDF from Internet Explorer, you get additional options when you
run the conversion from the Acrobat application. For example, you can include an entire website in the PDF or just
some levels of a website. Also, you can select Web Page Conversion options that apply when you create PDFs from
web pages.
See also
“Asian language PDFs” on page 53
“Web Page Conversion options in Acrobat” on page 93
Convert a web page to PDF
1 In Acrobat, choose File > Create PDF > From Web Page, or click the Create PDF From Web Page button on
the toolbar to open the dialog box.
2 In URL, enter the complete path to the web page, or click Browse and locate the HTML page that you want to
convert.
3 UnderSettings, enterthenumberoflevelsyouwanttoinclude,orselectGetEntireSitetoincludeall levelsfrom
the website.
Note: Some websites may have hundreds or even thousands of pages. This can take a long time to download, may make
your system slow and unresponsive, and can even use up all available hard disk space and memory, causing a system
crash. You may want to begin by downloading only one level of pages and then go through them to find particular links
to download.
4 Select one or both of the following options:
Stay On Same Path Downloads only web pages subordinate to the specified URL.
Stay On Same Server Downloads only web pages stored on the same server.
5 ClickSettings,andreviewtheselectedoptionsintheWebPageConversionSettingsdialogbox.Makeanychanges
you want on the General and Page Layout tabs, and click OK.
6 Click Create.
Note: You can view PDF pages while they are downloading; however, you cannot modify a page until the download
process is complete.
If y
For
ou closed the Download Status dialog box, Choose Advanced > Web Capture > Bring Status Dialogs To
eground to see the dialog box again.

92
ADOBE ACROBAT 8 PROFESSIONAL
User Guide
Add an unlinked web page to an existing PDF
UsethisproceduretoappendpagestoawritablePDF.If theoriginalPDFisread-only,theresultwillbeanewPDF
rather than new pages in the existing PDF.
1 Open the existing PDF in Acrobat (the PDF to which you want to append a web page).
2 Choose Advanced > Web Capture > Create PDF From/Append Web Page.
3 Enter the URL to the web page you want to append and select options, as described for converting web pages to
PDF, and then click Create.
Add a linked web page to an existing PDF
1 Open the previously converted PDF in Acrobat. If necessary, scroll to the page containing links to the pages you
want to add.
2 Do one of the following:
• Click a web link in your PDF.
• Right-click/Control-click the web link, and choose Append To Document.
• Choose Advanced > Web Capture > View Web Links. The dialog box lists all the links on the current page or on
the tagged bookmark’s pages. Using the Shift key or Ctrl key as needed, click to select the linked pages you want
to add, or click Select All. Click Properties to set the download options, as needed, and then click Download.
• Choose Advanced > Web Capture > Append All Links On Page.
Note: After pages have been converted, links to these pages change to internal links, and clicking a link takes you to the
PDF page, rather than to the original HTML page on the web.
Convert a linked web page to a new PDF
1 Open the previously converted PDF in Acrobat. If necessary, scroll to the page containing a web link you want to
convert.
2 Do one of the following:
• Right-click/Control-click the web link, and choose Open Weblink As New Document.
• Ctrl-click/Control-click the web link.
Note: In Windows, you can also convert a linked page from a web page displayed in Internet Explorer, using a similar
right-click command.
Copy the URL of a web link
Use this procedure to copy the path for a web link to the clipboard, to use it for other purposes.
1 Open the previously converted PDF in Acrobat. If necessary, scroll to the page containing links to the pages you
want to copy.
2 Right-click/Control-click the web link and choose Copy Link Location.
Change Acrobat web page conversion options
The settings for converting web pages to PDF apply to the conversion process. Any changes you make to these
settings apply to PDFs you create from web pages after changing the settings. The settings changes do not affect
existing PDFs.

93
ADOBE ACROBAT 8 PROFESSIONAL
User Guide
Edit the web page conversion options
1 Choose File > Create PDF > From Web Page.
2 Click the Settings button.
3 On the General tab, select new options under File Type Settings and PDF Settings, as needed. If you select a text
file type, you can click the Settings button to see additional options for that file type.
4 On the Page Layout tab, select options for page size, orientation, and scaling, as needed, and then click OK.
Reset web page conversion options to default settings
1 Choose Edit > Preferences.
2 Under Categories, select Web Capture, and then click Reset Conversion Settings To Defaults.
Web Page Conversion options in Acrobat
The Web Page Conversion Settings dialog box is available only from within Acrobat. The Settings button in the
Create PDF From Web Page dialog box opens the Web Page Conversion Settings.
Note: Theoptions availableinthe WebPageConversionSettingsare differentfromthoseavailableintheWebCapture
Preferences. Together, these settings apply to both the web conversion and web capture processes.
General tab
File Type Settings Specifies the file type to be downloaded. If you select HTML or Plain Text as the file type, click
Settings to select the font properties and other display characteristics.
Create Bookmarks Creates a tagged bookmark for each converted web page using the page’s title (HTML Title
element) as the bookmark name. If the page has no title, the URL is used as the bookmark name.
Create PDF Tags Stores a structure in the PDF that corresponds to the HTML structure of the web pages and lets
you create tagged bookmarks for paragraphs, list elements, and other items that use HTML elements.
Place Headers & Footers On New Pages Places a header and footer on every page. Headers show the web page’s title;
footers show the page’s URL, the page number in the downloaded set, and the date and time of the download.
Save Refresh Commands Saves a list of all URLs and remembers how they were downloaded in the PDF for
refreshing (updating) purposes. Must be selected before you can update a PDF-converted website.
Page Layout tab
The upper portion of this tab shows options similar to those on a Page Setup or Print dialog box, specifying a
selection of page sizes and options for width, height, margin measurements, and page orientation. The right side of
the tab area shows a Sample Page that adjusts when you change the measurements or orientation options.
The Scaling portion of the tab area shows these options:
Scale Wide Contents To Fit Page (Windows)/Scale Contents To Fit Page (Mac OS) Rescales a page’s contents, if
necessary, to fit the width of the page. If this option is not selected, the paper size adjusts to fit the page’s contents if
necessary.
Switch To Landscape If Scaled Smaller Than Changes the page orientation to landscape if the new version of a page
is less than 70% of the original size. Available only if you selected portrait orientation.

94
ADOBE ACROBAT 8 PROFESSIONAL
User Guide
HTML Conversion Settings
This dialog box opens when you select HTML on the General tab of the Web Page Conversion Settings dialog box,
and then click the Settings button.
General tab Lets you specify the following options:
• Default Colors Sets the default colors for text, page backgrounds, web links, and text that replace unavailable
images. Click the color button to open a palette, and select the color. To use these colors on all pages, select Force
These Settings For All Pages.
• Background Options Specifies whether to display colors and tiled images in page backgrounds and colors in table
cells. If options are deselected, converted web pages may look different than they do in a web browser, but may be
easier to read when printed.
• Line Wrap Wraps preformatted (HTML) lines of text. When selected, this option changes the line breaks so that
the text fits on the PDF pages. Select this setting if an HTML file has unreasonably long lines of preformatted text.
• Multimedia Determines whether to reference multimedia (such as SWF files) by URL, disable multimedia
capture, or embed multimedia files when possible.
• Convert Images Includes images in the conversion to PDF. If you do not select this option, an image is indicated
by a colored border (and possibly text, if specified by the page’s design).
• Underline Links Underlines textual web links on the pages.
Fonts And Encoding tab Lets you specify the following options:
• Default Under Input Encoding, sets the input encoding of a file’s text from a menu of operating systems and
alphabets.
• Always Ignores any encoding that is specified in the HTML source file and uses the selection shown in the
Default option.
• When Page Doesn’t Specify Encoding Uses the selection shown in the Default option only if the HTML source file
does not specify a type of encoding.
• Language Specific Font Settings Use these settings to change the fonts used to display body text, headings, and
preformatted text. Click Change, select new fonts from the menus, and click OK.
• Font Size Sets the font sizes used for body text, headings, and preformatted text.
• Embed Platform Fonts When Possible Stores the fonts used on the pages in the PDF so that the text always
appears in the original fonts. Note that embedding fonts increases the size of the file.
Plain Text Conversion Settings
General tab Lets you specify the following options:
• Color swatches Swatches indicate the colors selected for text and background. Colors can be changed by clicking
the swatch and selecting a new color in the color picker that opens.
• Wrap Lines At Margin Inserts a soft return when the text reaches the edge of the text area on the page.
• Reflow Text (Available only when Wrap Lines At Margin is selected.) Makes text more accessible for users with
special needs.
• Limit Lines Per Page Sets the maximum number of lines that can appear on a single page, based on the entry in
Max Lines.

95
ADOBE ACROBAT 8 PROFESSIONAL
User Guide
Fonts And Encoding tab Lets you specify the following options:
• Default Under Input Encoding, sets the input encoding of a file’s text.
• Language Specific Font Settings Use these settings to change the fonts used to display body text, headings, and
preformatted text. Click Change, select new fonts from the menus, and click OK.
• Font Size Sets the font sizes used for body text, headings, and preformatted text.
• Embed Platform Fonts When Possible Stores the fonts used on the pages in the PDF so that the text always
appears in the original fonts. Note that embedding fonts increases the size of the file.
Web Capture preferences in Acrobat
You can set several preferences for opening PDFs created from web pages and for customizing the process of
converting web pages to PDFs. To open the Web Capture Preferences, choose Edit > Preferences (Windows) or
Acrobat > Preferences (Mac OS) and select Web Capture under Categories.
Note: The options available in the Web Capture Preferences are different from those available in the Web Page
Conversion Settings. Together, these settings apply to both the web conversion and web capture processes.
Verify Stored Images Specifies how often to check whether images on the website have changed.
Show Bookmarks Panel When New PDF File (Created From Web Page) Is Opened When selected, automatically
opens the navigation pane and displays tagged bookmarks when you open a new file. (When deselected, the
navigation pane is closed when you open converted web pages, but the tagged bookmarks are still created. Click the
Bookmarks button to see the tagged bookmarks in the navigation pane.)
Skip Downloading Secured Pages Select Always to skip secured pages when downloading multiple levels of a
website. If you select After, a password dialog box appears that times out and skips the secured pages after the
specified number of seconds.
Reset Conversion Settings To Defaults ChangestheoptionsintheWebPageConversionSettingsdialogbox backto
the original settings.
Note: If you select this option, the settings revert immediately and irreversibly. If you want to restore your custom
conversion options, you must enter each of those settings again.
Creating PDFs with Acrobat Distiller
Acrobat Distiller overview
In Acrobat Distiller, you can select settings used to convert documents to PDFs, security options, and font infor-
mation. You also use the Acrobat Distiller window to monitor the jobs you’ve lined up for PDF conversion.
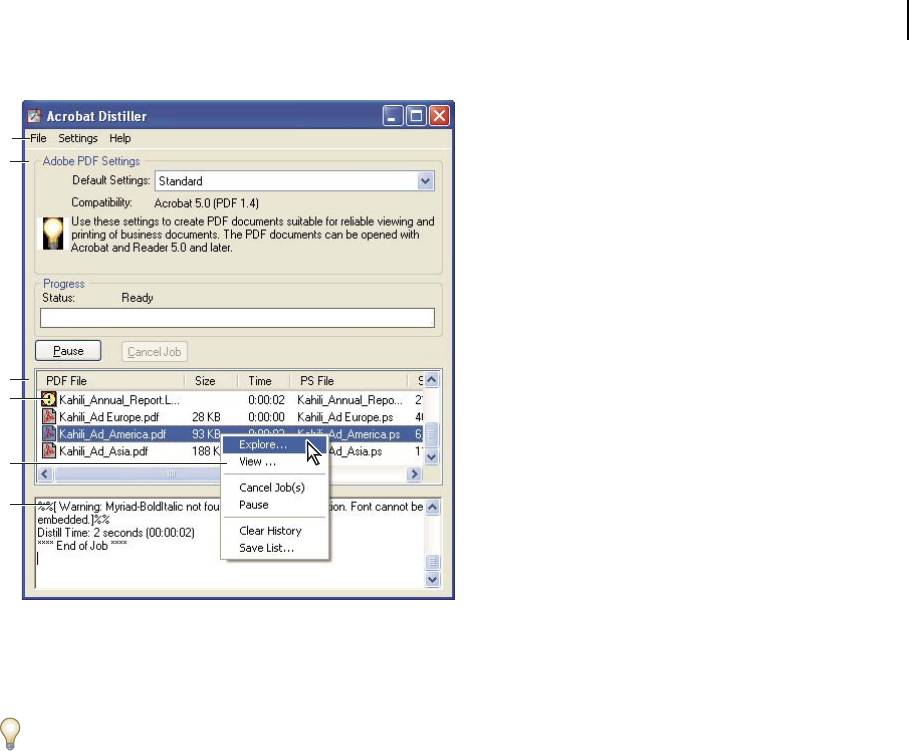
96
ADOBE ACROBAT 8 PROFESSIONAL
User Guide
A
C
D
F
B
E
Acrobat Distiller main window (Windows)
A. Menus B. Adobe PDF settings files C. Files in job queue D. Failed job E. Context menu F. Status window
Note: In Mac OS, there is no context menu. Instead, a Clear List button clears all distilled jobs from the list.
To convert PostScript files automatically, set up a watched folder in Distiller.
Start Acrobat Distiller
❖ Do one of the following:
• In Acrobat, choose Advanced > Print Production > Acrobat Distiller.
• (Windows) Choose Start > Programs > Acrobat Distiller 8.0.
• (Mac OS) Use the Finder to locate Acrobat Distiller 8.0, and double-click it to open the Distiller application.
Manage the conversion queue
Distiller lets you queue PostScript files that you create in authoring applications and then monitor them throughout
the PDF conversion process.
Queue a PostScript file
1 In Distiller, select an Adobe PDF settings file from the Default Settings pop-up menu.
2 (Optional) Choose Settings > Security and select an encryption level.
3 Open the PostScript file and start the conversion process, using either method:
• Choose File > Open, select a PostScript file, and click Open.
• Drag one or more PostScript files from the desktop to the Acrobat Distiller window.

97
ADOBE ACROBAT 8 PROFESSIONAL
User Guide
Click Pause before doing step 3 if you want to review the queue before Distiller starts converting the files.
Change the queue during processing
Do any of the following:
• To temporarily stop processing the current job, click Pause. Or (Windows only), right-click the job queue and
choose Pause.
• To resume processing the current job, click Resume. Or (Windows only), right-click the job queue and choose
Resume.
• To delete files from the queue, click Cancel Job. Cancel Jobs deletes all files from the queue that are not yet success-
fully completed. Or (Windows only), select and right-click individual files in the job queue and choose Cancel
Job(s) to delete only those files.
• (Windows only) To open the folder where the selected files are, right-click the job queue and choose Explore.
• (Windows only) To open the selected PDF in Acrobat, a browser, or Reader, right-click the job queue and choose
View. Or, double-click the PDF to open it in Acrobat.
Save a history of the job queue (Windows)
❖ Right-click the job queue, and choose Save List.
Distiller saves and opens the history as a PDF.
Clear the queue
Remove all paused and successfully converted files from the list:
• (Windows) Right-click the job queue, and choose Clear History.
• (Mac OS) Click the Clear List button above the queue.
Distiller preferences
The Distiller preferences control global Distiller settings. You set Distiller preferences by choosing File > Preferences
(Windows) or Distiller > Preferences (Mac OS).
Notify When Watched Folders Are Unavailable Returns a message if a watched folder becomes unavailable or can’t
be found.
(Windows) Notify When Windows TEMP Folder Is Nearly Full Warnsyouifavailableharddiskspaceislessthan1MB.
Required hard disk space is often double the size of the PostScript file being processed.
Ask For PDF File Destination Lets you specify the name and location for files when using drag-and-drop or the Print
command.
Ask To Replace Existing PDF File Warns you if you are about to overwrite an existing PDF.
View PDF When Using Distiller Automatically opens the converted PDF.
Delete Log Files For Successful Jobs Creates a log file (named messages.log) only if there are messages from inter-
preting the PostScript file or if a PostScript error occurs. (Log files for failed jobs are always created.)

98
ADOBE ACROBAT 8 PROFESSIONAL
User Guide
Guidelines for creating PostScript files
If you want to fine-tune the creation of the PDF with Distiller parameters or pdfmark operators, first create a
PostScript file and then convert that file to PDF. For details, download the Adobe Acrobat 8 SDK or specific parts of
it,suchasthe pdfmark Reference Manual, from various tabs on the Acrobat SDK documentation page (English only)
on the Adobe website.
In authoring applications such as Adobe InDesign, use the Print command with the Adobe PDF printer to convert
a file to PostScript. The Print dialog boxes can vary from application to application. For instructions on creating a
PostScript file from your specific application, see the application’s documentation.
Keep the following guidelines in mind when creating PostScript files:
• UsePostScriptLanguageLevel3wheneverpossibletotakeadvantageof themostadvancedfeaturesofPostScript.
• Use the Adobe PDF printer as your PostScript printer.
• (Windows) Send the fonts used in the document.
• Give a PostScript file the same name as the original document, but with the extension .ps. (Some applications use
a .prn extension instead.)
• Use color and custom page sizes that are available with the Acrobat Distiller 8.0 PPD file. Other PPD files may
cause inappropriate colors, fonts, or page sizes in the PDF.
• Send PostScript files as 8-bit binary data when using FTP to transfer the files between computers, especially if the
platforms are different, to avoid converting line feeds to carriage returns or vice versa.
About watched folders
You can configure Distiller to look for PostScript files in certain folders called watched folders. Distiller can monitor
up to 100 watched folders. When Distiller finds a PostScript file located in the In folder of a watched folder, it
converts the file to PDF and then moves the PDF (and usually the PostScript file and any associated log file) to the
Out folder. A watched folder can have its own Adobe PDF settings and security settings that apply to all files
processed from that folder. Security settings for a watched folder take priority over the security settings for Distiller.
For example, Distiller does not convert a PostScript file in a watched folder if the file is marked with read-only
permission.
(Windows) Settings and preferences are unique to each user. On a non-NT File System (NTFS), custom settings files
stored in this settings folder are read- and write-accessible by every user on the system. On an NTFS, only files
created by respective users are read- and write-accessible. Settings files created by other users are read-only. (The
default settings files installed with Adobe Acrobat Distiller are Read Only and Hidden.)
(Mac OS) Each user’s settings and preferences for Distiller are normally not accessible to any other user. To share a
watched folder with other users, the folder’s creator must set the appropriate permissions for the In and Out folders.
Sharing enables other users to copy files to the In folder and get files from the Out folder. The creator must be logged
into the system and have Distiller running. The other users must log in remotely to access the live watched folder
and have their files processed.
Important: You can’t set up watched folders as a network service for other users. Every user who creates PDFs must have
either an Acrobat Professional or Acrobat 3D license.
Set watched folders
1 In Acrobat Distiller, choose Settings > Watched Folders.

99
ADOBE ACROBAT 8 PROFESSIONAL
User Guide
2 Click Add Folder, and select the target folder. Distiller automatically puts an In folder and an Out folder in the
target folder. You can place In and Out folders at any level of a disk drive.
3 To define security options for a folder, select the folder and click Edit Security. Click OK to return to the Watched
Folders dialog box.
Note: A security icon is prepended to any folder name for which security is set. To return a folder to the original options
selected in the Distiller window, select the folder, and click Clear Security.
4 Set Adobe PDF conversion settings for the folders:
• To edit the Adobe PDF settings to be applied to a folder, select the folder, click Edit Settings, and edit the Adobe
PDF settings. Click OK to save it to the watched folder as folder.joboptions.
• To use a different set of Adobe PDF settings, select the folder and click Load Settings. Use any settings that you
have defined, named, and saved, and then click OK.
5 Set options to manage the processing of files:
• Enter a number of seconds to specify how often to check the folders. You can enter up to 9999. (For example, 120
equals 2 minutes, and 9999 equals about 2-3/4 hours.)
• Choose what to do with a PostScript file after it has been processed. The file can be moved to the Out folder along
with the PDF file or deleted. Any log file is also automatically copied to the Out folder.
• To delete PDFs after a certain period of time, enter a number of days, up to 999. This option also deletes PostScript
and log files, if you have chosen to delete them.
6 If you want to remove a folder, select the folder and click Remove Folder. Make sure that Distiller has finished
processing all the files in the folder before you remove it.
Note: When you remove a watched folder, Distiller does not delete the In and Out folders, their contents, or the
folder.joboptions file. You can delete these manually when appropriate.
See also
“Customize Adobe PDF settings” on page 101
Adobe PDF conversion settings
Choose an Adobe PDF preset for converting files
1 Do one of the following:
• Start Acrobat Distiller 8.0.
• In an Adobe Creative Suite application, choose File > Print, select Adobe PDF as the target printer, and click
Properties.
• (Windows) In Office 2007 applications, choose Acrobat > Preferences.
• (Windows) In another authoring application or utility, choose Adobe PDF > Change Conversion Settings.
2 Choose a preset from the Default Settings (or Conversion Settings) menu.
Note: All settings create PDFs that can be opened in Acrobat 5.0 and later, and Acrobat Reader 5.0 and later, unless
otherwise described.

100
ADOBE ACROBAT 8 PROFESSIONAL
User Guide
Adobe PDF presets
A PDF preset is a group of settings that affect the process of creating a PDF. These settings are designed to balance
file size with quality, depending on how the PDF will be used. Most predefined presets are shared across Adobe
Creative Suite applications, including InDesign, Illustrator, Photoshop, and Acrobat. You can also create and share
custom presets for your unique output requirements.
A few of the presets listed below are not available until you move them—as needed—from the Extras folder (where
they installed by default) to the Settings folder for custom settings.
Typically, the Extras and Settings folders for default settings are found in (Windows) Documents and Settings/All
Users/Application Data/Adobe/Adobe PDF, (Vista) ProgramData/Adobe/Adobe PDF, or (Mac OS) Library/Appli-
cation Support/Adobe PDF. The default settings files installed with Distiller are Read Only and Hidden.
The custom settings are found in (Windows) Documents and Settings/[username]/Application Data/Adobe/Adobe
PDF/Settings, (Vista) Users/[username]/AppData/Roaming/Adobe/Adobe PDF/Settings, or (Mac OS)
Users/[username]/Library/Application Support/Adobe/Adobe PDF/Settings.
Some presets are not available in some Creative Suite applications.
R
a
eview your PDF settings periodically. The settings do not automatically revert to the default settings. Applications
nd utilities that create PDFs use the last set of PDF settings defined or selected.
High Quality Print Creates PDFs for quality printing on desktop printers and proofing devices. This preset uses PDF
1.4, downsamples color and grayscale images to 300 ppi and monochrome images to 1200 ppi, embeds subsets of all
fonts, leaves color unchanged, and does not flatten transparency (for file types capable of transparency). These PDFs
can be opened in Acrobat 5.0 and Acrobat Reader 5.0 and later. In InDesign, this preset also creates tagged PDFs.
Illustrator Default (Illustrator only) Creates a PDF in which all Illustrator data is preserved. PDFs created with this
preset can be reopened in Illustrator without any loss of data.
Oversized Pages (Acrobat only) Creates PDFs suitable for viewing and printing of engineering drawings larger than
200 x 200 inches (508 x 508 cm). These PDFs can be opened in Acrobat and Reader 7.0 and later.
PDF/A-1b: 2005 (CMYK and RGB) (Acrobat only) Used for long-term preservation (archival) of electronic
documents. PDF/A-1b uses PDF 1.4 and converts all colors to either CMYK or RGB, depending on which standard
you choose. These PDFs can be opened in Acrobat and Reader versions 5.0 and later.
PDF/X-1a (2001 and 2003) PDF/X-1a requires all fonts to be embedded, the appropriate PDF bounding boxes to be
specified, and color to appear as CMYK, spot colors, or both. Compliant files must contain information describing
the printing condition for which they are prepared. PDF files created with PDF/X-1a compliance can be opened in
Acrobat 4.0 and Acrobat Reader 4.0 and later.
PDF/X-1a uses PDF 1.3, downsamples color and grayscale images to 300 ppi and monochrome images to 1200 ppi,
embeds subsets of all fonts, creates untagged PDFs, and flattens transparency using the High Resolution setting.
Note: The PDF/X1-a:2003 and PDF/X-3 (2003) presets are placed on your computer during installation but aren’t
available until you move them from the Extras folder to the Settings folder.
PDF/X-4 (2007) In Acrobat 8, this preset is called PDF/X-4 DRAFT to reflect the draft state of the ISO specification
at Acrobat ship time. This preset is based on PDF 1.4, which includes support for live transparency. PDF/X-4 has the
same color-management and International Color Consortium (ICC) color specifications as PDF/X-3. You can create
PDF/X-4-compliant files directly with Creative Suite 3 applications (Illustrator, InDesign, and Photoshop). In
Acrobat 8, use the Preflight feature to convert PDFs to PDF/X-4 DRAFT.
PDF files created with PDF/X-4 compliance can be opened in Acrobat 7.0 and Reader 7.0 and later.

101
ADOBE ACROBAT 8 PROFESSIONAL
User Guide
Press Quality Creates PDF files for high-quality print production (for example, for digital printing or for separations
to an imagesetter or platesetter), but does not create files that are PDF/X-compliant. In this case, the quality of the
content is the highest consideration. The objective is to maintain all the information in a PDF file that a commercial
printer or print service provider needs in order to print the document correctly. This set of options uses PDF 1.4,
converts colors to CMYK, downsamples color and grayscale images to 300 ppi and monochrome images to 1200 ppi,
embeds subsets of all fonts, and preserves transparency (for file types capable of transparency).
These PDF files can be opened in Acrobat 5.0 and Acrobat Reader 5.0 and later.
Note: Before creating an Adobe PDF file to send to a commercial printer or print service provider, find out what the
output resolution and other settings should be, or ask for a .joboptions file with the recommended settings. You might
need to customize the Adobe PDF settings for a particular provider and then provide a .joboptions file of your own.
Rich Content PDF Creates accessible PDF files that include tags, hyperlinks, bookmarks, interactive elements, and
layers. This set of options uses PDF 1.5 and embeds subsets of all fonts. It also optimizes files for byte serving. These
PDF files can be opened in Acrobat 6.0 and Adobe Reader 6.0 and later. (The Rich Content PDF preset is in the
Extras folder.)
Note: This preset was called eBook in earlier versions of some applications.
Smallest File Size Creates PDF files for displaying on the web or an intranet, or for distribution through an email
system. This set of options uses compression, downsampling, and a relatively low image resolution. It converts all
colors to sRGB, and (for Adobe Acrobat Distiller-based conversions) does not embed fonts. It also optimizes files for
byte serving.
These PDF files can be opened in Acrobat 5.0 and Acrobat Reader 5.0 and later.
Standard (Acrobat only) Creates PDF files to be printed to desktop printers or digital copiers, published on a CD, or
sent to a client as a publishing proof. This set of options uses compression and downsampling to keep the file size
down, but also embeds subsets of all (allowed) fonts used in the file, converts all colors to sRGB, and prints to a
medium resolution. Note that Windows font subsets are not embedded by default. PDF files created with this settings
file can be opened in Acrobat 5.0 and Acrobat Reader 5.0 and later.
For
Gu
more information about shared PDF settings for Adobe Creative Suite applications, see the PDF Integration
ide on the Creative Suite CD.
Customize Adobe PDF settings
You may want to create custom conversion settings for certain jobs or output devices. The selections you make
determine such things as whether the document fonts are embedded and subsetted at 100%, how vector objects and
images are compressed and/or sampled, and whether the resulting PDF includes high-end printing information such
as OPI (Open Prepress Interface) comments. Default settings files cannot be modified, but can be duplicated to help
create new settings files.
Note: If the PDF is intended for high-end printing, ask your service provider for their custom .joboptions file with the
recommended output resolution and other settings. This way, the PDF you give them will have characteristics optimized
for your print workflow.
Create a custom Adobe PDF settings file
1 Do one of the following:
• In Acrobat Distiller, select one of the predefined sets of options from the Default Settings menu to use as a starting
point, and then choose Settings > Edit Adobe PDF Settings.
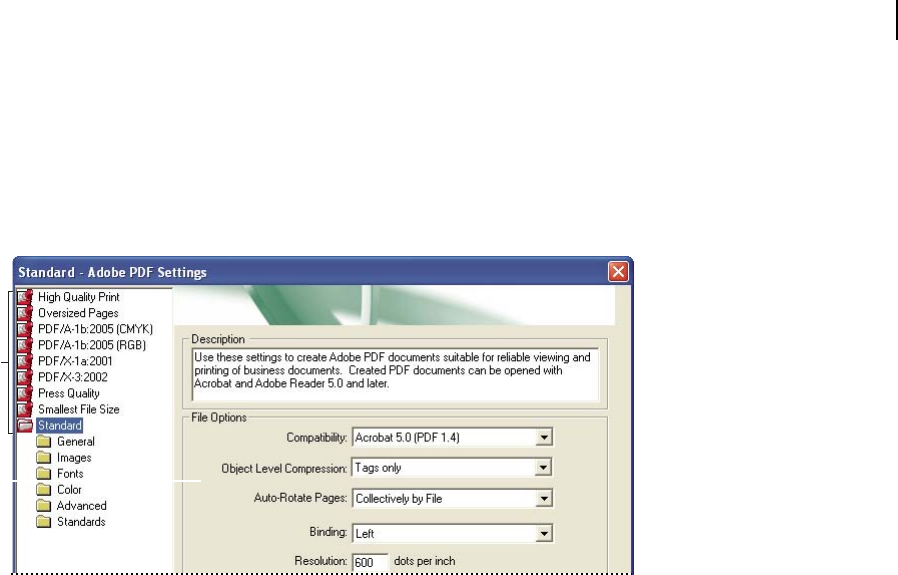
102
ADOBE ACROBAT 8 PROFESSIONAL
User Guide
• In authoring applications or utilities, select Adobe PDF as the target printer—typically in the Page Setup or Print
dialog boxes—and click Properties.
• (Windows) In the Acrobat PDFMaker dialog box, click Advanced Settings in the Settings tab.
Note: InWindows,youcanswitchto adifferentpresetfromwithintheAdobePDFSettingsdialogbox.Todothis,select
Show All Settings at the bottom left and then select a preset from the list on the left.
B
A
Adobe PDF Settings dialog box (Windows)
A. Predefined Adobe PDF settings B. Options panel
2 Select panels one at a time, using the folder icons in the list (Windows) or the tab buttons across the top of the
dialog box (Mac OS), and make the changes that you want to apply.
3 Save your customized preset in one of the following ways:
• Click OK to save a duplicate of the custom preset file, which will automatically be renamed. For example, if you
edit the Press Quality preset, your first customized version appears as Press Quality (1).
• Click Save As, type a new descriptive name for the file, and click Save.
The custom file is saved in (Windows) /Documents and Settings/[user name]/Application Data/Adobe/Adobe
PDF/Settings, (Vista) User/[user name]/AppData/Roaming/Adobe/Adobe PDF/Settings, or (Mac OS) Users/[user
name]/Library/Application Support/Adobe/PDF/Settings
Delete custom Adobe PDF settings files
1 In Acrobat Distiller, choose Settings > Remove Adobe PDF Settings.
2 Select a custom file that you want to delete, and click Remove.
3 Repeat step 2 as needed, and then click Cancel to close the Remove Adobe PDF Settings dialog box.
Adobe PDF settings
The Adobe PDF Settings dialog box in Acrobat Distiller contains panels of options that you can select to customize
your PDF output.
See also
“PDF/X- and PDF/A-compliant files” on page 497
“Find PostScript font names” on page 115

103
ADOBE ACROBAT 8 PROFESSIONAL
User Guide
General panel options
Use this panel to select a version of Acrobat for file compatibility and other file and device settings. (The panel
appearance differs in Windows and Mac OS.)
Compatibility Sets the compatibility level of the PDF. Use the most recent version (in this case, version 1.7) to
include all the latest features and functionality. If you’re creating PDFs that will be distributed widely, choose an
earlier level, to ensure that all users can view and print the document.
Object Level Compression Compresses structural information (such as bookmarks, accessibility, and noncom-
pressible objects), making this information neither visible or usable in Acrobat 5.0 or Reader 5.0. Tags Only
compresses structural information; Off applies no compression.
Auto-Rotate Pages Automatically rotates pages according to the direction of text.
• Collectively By File Rotates all pages to match the orientation of the majority of text in the document.
• Individually Rotates each page based on the orientation of the text on that page.
• Off Prevents pages from rotating.
Note: If Process DSC Comments is selected in the Advanced panel and if %%Viewing Orientation comments are
included, these comments take precedence in determining page orientation.
Binding Specifies whether to display a PDF with left-side or right-side binding. The Binding setting affects the
display of pages in the Two-Up Continuous view and the display of thumbnails side by side.
Resolution Use for PostScript files to emulate resolutions based on the printer they are printing to. Permitted values
range from 72 to 4000. Use the default setting unless you plan to print the PDF on a specific printer while emulating
the resolution defined in the original PostScript file.
Note: Increasing the resolution setting increases file size and may slightly increase the time required to process some files.
Pages Specifies which pages to convert to PDF.
Embed Thumbnails Embeds a thumbnail preview for each page in the PDF, increasing the file size. Deselect this
setting when users of Acrobat 5.0 and later will view and print the PDF; these versions generate thumbnails dynam-
ically each time you click the Pages panel of a PDF.
Optimize For Fast Web View Restructures the file for faster access (page-at-a-time downloading, or byte serving)
from web servers. This option compresses text and line art, overriding compression selections on the Images panel.
Default Page Size Specifies the page size to use when one is not specified in the original file. EPS files give a
bounding box size, not a page size.
Images panel options
The options in the Images panel specify compression and resampling for color, grayscale, and monochrome images.
You may want to experiment with these options to find an appropriate balance between file size and image quality.
The resolution setting for color and grayscale images should be 1.5 to 2 times the line screen ruling at which the file
will be printed. The resolution for monochrome images should be the same as the output device, but be aware that
saving a monochrome image at a resolution higher than 1500 dpi increases the file size without noticeably improving
image quality. Images that will be magnified, such as maps, may require higher resolutions.
Note: Resampling monochrome images can have unexpected viewing results, such as no image display. If this happens,
turn off resampling and convert the file again. This problem is most likely to occur with subsampling, and least likely
with bicubic downsampling.
104
ADOBE ACROBAT 8 PROFESSIONAL
User Guide
The following table shows common types of printers and their resolution measured in dpi, their default screen ruling
measured in lines per inch (lpi), and a resampling resolution for images measured in pixels per inch (ppi). For
example, if you were printing to a 600-dpi laser printer, you would enter 170 for the resolution at which to resample
images.
Printer resolution Default line screen Image resolution
300 dpi (laser printer) 60 lpi 120 ppi
600 dpi (laser printer) 85 lpi 170 ppi
1200 dpi (image-
setter)
120 lpi 240 ppi
2400 dpi (image-
setter)
150 lpi 300 ppi
Downsample (Off) Reduces image resolutions that exceed the For Images Above value to the resolution of the output
device by combining pixels in a sample area of the image to make one larger pixel.
Average Downsampling To Averages the pixels in a sample area and replaces the entire area with the average pixel
color at the specified resolution.
Subsampling To Replaces an entire area with a pixel selected from that sample area, at the specified resolution.
Causes faster conversion time than downsampling, but resulting images are less smooth and continuous.
Bicubic Downsampling To Uses a weighted average, instead of a simple average (as in downsampling) to determine
pixel color. This method is slowest but produces the smoothest tonal gradations.
Compression/Image Quality Applies compression to color, grayscale, and monochrome images. For color and
grayscale images, also sets the image quality.
Anti-Alias To Gray Smooths jagged edges in monochrome images. Choose 2 bit, 4 bit, or 8 bit to specify 4, 16, or 256
levels of gray. (Anti-aliasing may cause small type or thin lines to look blurry.)
Note: Compression of text and line art is always on. If you need to turn it off, you can do so by setting the appropriate
Distiller parameter. For details, see the documentation available for download on the Acrobat SDK documentation page
(English only) on the Adobe website.
Policy Opens the Image Policy dialog box, where you can set processing options for Color, Grayscale, and
Monochrome imagesthat arelessthanthe resolutionsyouspecify. Foreachtypeofimage,enteraresolutionvalue,
and then choose Ignore, Warn And Continue, or Cancel Job.
Fonts panel options
The Fonts options specify which fonts to embed in a PDF, and whether to embed a subset of characters used in the
PDF. You can embed OpenType®, TrueType, and Type 1 fonts. Fonts that have license restrictions are preceded by a
lock icon . If
rea of t
you select a font that has a license restriction, the nature of the restriction is described in the expla-
nation a he Adobe PDF Options dialog box.
Note: When you combine PDF files that have the same font subset, Acrobat attempts to combine the font subsets.
Embed All Fonts Embeds all fonts used in the file. Font embedding is required for PDF/X compliance.
Embed OpenType Fonts Embeds all OpenType fonts used in the file, and maintains OpenType font information for
advanced line layout. This option is available only if either Acrobat 7 (PDF 1.6) or Acrobat 8 (PDF 1.7) is selected
from the Compatibility menu in the General panel.

105
ADOBE ACROBAT 8 PROFESSIONAL
User Guide
Subset Embedded Fonts When Percent Of Characters Used Is Less Than Specifies a threshold percentage if you want
to embed only a subset of the fonts. For example, if the threshold is 35, and less than 35% of the characters are used,
Distiller embeds only those characters.
When Embedding Fails
Specifies how Distiller should respond if it cannot find a font to embed when processing a file.
Always Embed To embed only certain fonts, move them into the Always Embed list. Make sure that Embed All Fonts
is not selected.
Never Embed Move fontsthatyoudonotwanttoembedtothislist.Ifnecessary,chooseadifferentfontfolder from
the pop-up menu to display the font in the font list.
Note: Fonts that have license restrictions are preceded by a lock icon. If you select a font with a license restriction, the
nature of the restriction is described in the explanation area of the Adobe PDF Options dialog box.
Add Name If the font you want is not in a font folder, click Add Name, enter the name of the font, select Always
Embed List (or Never Embed List), and click Add.
Note: A TrueType font can contain a setting added by the font’s designer that prevents the font from being embedded in
PDF files.
Remove Removes a font from the Always Embed or Never Embed list. The font isn’t removed from your system; the
reference to it is removed from the list.
Note: Acrobat 8 does not include the Times, Helvetica, and ZapfDingbats fonts that have been included in Acrobat 5.0
and earlier. If you want these fonts to be viewed and printed in PDFs that you create, embed the fonts.
Color panel options
Whether you’re using color management information in the PostScript file, using Distiller CSFs, or defining custom
settings, you set all color management information for Distiller on the Color panel of the Adobe PDF Settings dialog box.
Settings File Lists color settings, including those used in graphics applications. The None setting lets you edit the
Color Management Policies and Working Spaces settings.
Color Management Policies Specifies how Distiller converts unmanaged color in a PostScript file when you don’t use
a Distiller color settings file. This menu is available when None is selected in the Settings File menu.
Note: Color Management Policies values may affect a PDF differently depending on the compatibility setting you choose
in the General panel.
• Leave Color Unchanged Leaves device-dependent colors unchanged and preserves device-independent colors as
the nearest possible equivalent. This is a useful option for print shops that have calibrated their devices, have used
that information to specify color in the file, and are only outputting to those devices.
• Tag (Or Convert) Everything For Color Management Tags color objects with an ICC profile and calibrates colors,
making them device-independent in PDFs compatible with Acrobat 4.0 (PDF 1.3) and later. Converts device-
dependent color spaces in images (RGB, Grayscale, and CMYK) to device-independent color spaces (CalRGB,
CalGray, and Cie L*a*b) in Acrobat 3.0 (PDF 1.2) compatible PDFs.
• Tag (Or Convert) Only Images For Color Management Tags ICC profiles in images only (not text or vector
objects), which prevents black text from undergoing any color shift when distilling Acrobat 4.0 (PDF 1.3) compatible
PDFs. Converts device-dependent color spaces in images (RGB, Grayscale, and CMYK) to device-independent color
spaces (CalRGB, CalGray, and Lab) in Acrobat 3.0 (PDF 1.2) compatible PDFs.
• Convert All Colors To sRGB (or Convert Everything To CalRGB) Calibrates color, making it device-independent.
Converts CMYK and RGB images to sRGB in PDFs compatible with Acrobat 4.0 (PDF 1.3) or later. Converts CMYK

106
ADOBE ACROBAT 8 PROFESSIONAL
User Guide
and RGB images to calibrated RGB (CalRGB) in Acrobat 3.0 (PDF 1.2) compatible PDFs. Recommended for PDFs
that will be used on-screen or with low-resolution printers.
• Convert All Colors To CMYK Converts color spaces to DeviceGray or DeviceCMYK according to the options
specified in the Working Spaces menu. All Working Spaces must be specified.
Document Rendering Intent Choose a method to map colors between color spaces. The result of any particular
method depends on the profiles of the color spaces. For example, some profiles produce identical results with
different methods.
Acrobat shares four rendering intents (Perceptual, Saturation, Relative Colorimetric, and Absolute Colorimetric)
with other Creative Suite applications. For descriptions of these rendering intents, see “About rendering intents” on
page 423.
Acrobat also includes a rendering intent called Preserve, which indicates that the intent is specified in the output
device rather than in the PDF. In many output devices, Relative Colorimetric is the default intent.
Note: In all cases, intents may be ignored or overridden by color management operations that occur subsequent to the
creation of the PDF file.
Working Spaces For all Color Management Policies values other than Leave Color Unchanged, choose a working
space to specify which ICC profiles are used for defining and calibrating the grayscale, RGB, and CMYK color spaces
in distilled PDFs. For more information on working spaces, see “About color working spaces” on page 419.
• Gray Choose a profile to define the color space of all grayscale images in files. The default ICC profile for gray
images is Adobe Gray - 20% Dot Gain. Choose None to prevent grayscale images from being converted.
• RGB Choose a profile to define the color space of all RGB images in files. The default, sRGB IEC61966-2.1, is
recognized by many output devices. Choose None to prevent RGB images from being converted.
• CMYK Choose a profile to define the color space of all CMYK images in files. The default is U.S. Web Coated
(SWOP) v2. Choose None to prevent CMYK images from being converted.
Note: Choosing None for all three working spaces has the same effect as selecting the option Leave Color Unchanged.
Yo
fol
u can add ICC profiles (such as ones provided by your print service bureau) by placing them in the ICCProfiles
der in the Common folder, the Windows\System\Color folder (Windows), or the System Folder/ColorSync folder
(Mac OS).
Preserve CMYK Values For Calibrated CMYK Color Spaces When selected, device-independent CMYK values are
treated as device-dependent (DeviceCMYK) values, device-independent color spaces are discarded, and PDF/X-1a
files use the Convert All Colors To CMYK value. When deselected, device-independent color spaces convert to
CMYK, provided that Color Management Policies is set to Convert All Colors To CMYK.
Preserve Under Color Removal And Black Generation Retains these settings if they exist in the PostScript file. Black
generation calculates the amount of black to use when reproducing a color. Undercolor removal (UCR) reduces cyan,
magenta, and yellow to compensate for black generation. Because UCR uses less ink, it’s suitable for uncoated stock.
When Transfer Functions Are Found Specifies how to handle transfer functions in PDFs. Transfer functions are used
for artistic effect and to correct for the characteristics of a specific output device.
• Remove Deletesanyappliedtransferfunctions.Appliedtransferfunctionsshouldberemoved,unlessthePDFis
to be output to the same device that the source PostScript file was created for.
• Preserve Retains the transfer functions traditionally used to compensate for dot gain or dot loss that may occur
when an image is transferred to film. Dot gain or loss occurs when the ink dots that make up a printed image are
larger or smaller than in the halftone screen.

107
ADOBE ACROBAT 8 PROFESSIONAL
User Guide
• Apply Appliesthetransferfunction,changingthecolorsinthefilebutdoesn’tkeepit.Thismethodisuseful for
creating color effects in a file.
Preserve Halftone Information Retains any halftone information in files. Halftone information is intended for use
with a particular output device.
Advanced panel options
The Advanced options specify which Document Structuring Conventions (DSC) comments to keep in a PDF and
how to set other options that affect the conversion from PostScript. In a PostScript file, DSC comments contain infor-
mation about the file (such as the originating application, the creation date, and the page orientation) and provide
structure for page descriptions in the file (such as beginning and ending statements for a prologue section). DSC
comments can be useful when your document is going to print or press.
When you work with the Advanced options, it is helpful to have an understanding of the PostScript language and
how it is translated to PDF. See PostScript Language Reference, Third Edition (Addison-Wesley) and PDF Reference
Fifth Edition: Adobe Portable Document Format Version 1.6 on the PDF reference page (English only) on the Adobe
website. The same website has more detailed descriptions of the Advanced options and their parameters.
Note: The ASCII Format option has been removed from Distiller, but is still available as a Distiller parameter.
Allow PostScript File To Override Adobe PDF Settings Uses settings stored in a PostScript file rather than the
current PDF settings file. For details, see the documentation available for download on the Acrobat SDK documen-
tation page (English only) of the Adobe website.
Allow PostScript XObjects PostScript XObjects store fragments of PostScript code to be used when a PDF is printed
on a PostScript printer. Use only in controlled workflows where there is no other option. Available when the Standard
or Smallest File Size is selected from the Default Settings menu.
Convert Gradients To Smooth Shades Converts blends to smooth shades for Acrobat 4.0 and later, improving quality
and reducing file size of PDFs. Distiller converts gradients from Adobe Illustrator, Adobe InDesign, Adobe
FreeHand, CorelDraw, QuarkXPress, and Microsoft PowerPoint.
Convert Smooth Lines To Curves Reduces the amount of control points used to build curves in CAD drawings,
which results in smaller PDFs and faster on-screen rendering.
Preserve Level 2 Copypage Semantics Uses the copypage operator defined in PostScript Level 2 rather than in
Language Level 3 PostScript. If you have a PostScript file and select this option, a copypage operator copies the page.
If this option is not selected, the equivalent of a showpage operation is executed, except that the graphics state is not
reinitialized.
Preserve Overprint Settings Retains any overprint settings in files being converted to PDF. Overprint settings create
color by printing one ink on top of another ink.
Overprinting Default Is Nonzero Overprinting Prevents overprinted objects with zero CMYK values from knocking
out CMYK objects beneath them.
Save Adobe PDF Settings Inside PDF File Embeds the settings file (.joboptions) used to create the PDF as an
attachment. (To view the settings file, choose View > Navigation Panels > Attachments in Acrobat.)
Save Original JPEG Image In PDF If Possible Processes compressed JPEG images (images that are already
compressed using DCT encoding) without recompressing them. When deselected, performance improves because
only decompression, not recompression, occurs.
Save Portable Job Ticket Inside PDF File Preserves a PostScript job ticket in a PDF. Job tickets describe the PostScript
file and can be used later in a workflow or for printing the PDF.

108
ADOBE ACROBAT 8 PROFESSIONAL
User Guide
Use Prologue.ps and Epilogue.ps Sends a prologue and epilogue file with each job. These files can be used to add
custom PostScript code that you want to have executed at the beginning or end of every PostScript job being
converted.
Sample Prologue.ps and Epilogue.ps files are located in (Windows) /Documents and Settings/All Users/Application
Data/Adobe/Adobe PDF/Distiller/Data, (Vista) /Users/All Users/Adobe/Adobe PDF/Distiller/Data, or (Mac
OS)/Library/Application Support/Adobe/Adobe PDF/Distiller/Data.
In Windows Explorer, the Application Data folder is typically hidden; to make it visible, choose Tools > Folder
Options, click the View tab, and select Show Hidden Files And Folders. Or, you can type the path into the Address
text box.
Note: Distiller processes prologue and epilogue files only if both files are present and located properly. The two files must
be used together. If the prologue and epilogue files are at the same level as the In and Out folders of a watched folder,
they are used instead of the ones in the Distiller folder.
Process DSC Comments Maintains DSC information from a PostScript file.
• Log DSC Warnings Displays warning messages about problematic DSC comments during processing and adds
them to a log file.
• Preserve EPS Information From DSC Retains information for an EPS file, such as the originating application and
creation date.
• Preserve OPI Comments Retains information needed to replace a For Placement Only (FPO) image or comment
with the high-resolution image located on servers that support Open Prepress Interface (OPI) versions 1.3 and 2.0.
For more information, see the OPI 2.0 specification (English only) on the Adobe website.
• Preserve Document Information From DSC Retains document properties, such as the title, creation date, and
time, in the PDF.
• Resize Page And Center Artwork For EPS Files Centers an EPS image and resizes the page to fit closely around the
image.Ifdeselected,thepageis sizedand centeredbasedontheupperleftcorneroftheupperleftobjectandlower
right corner of the lower right object on the page. This option applies only to jobs that consist of a single EPS file.
Standards panel options
By using Standards options, you can check document content in the PostScript file to make sure it meets standard
PDF/X1-a, PDF/X-3, or PDF/A criteria before creating the PDF. For PDF/X-compliant files, you can also require that
the PostScript file meet additional criteria by selecting options in the Standards panel. The availability of options
depends on the standard you select. You can also create a PDF/X file from a compliant PDF by using the Preflight
feature in Acrobat.
PDF/X-compliant Complies with the PDF/X standard for high-resolution print production.
Note: PDFMaker, the conversion method used to convert Microsoft Word and other application files to PDF, does not
create PDF/X-compliant files.
PDF/A-compliant Complies with the PDF/A standard for archival documents.
Note: If you set up a watched folder for creating PDF/A-compliant files, be sure that you do not add security to the folder;
the PDF/A standard does not allow encryption.
Compliance Standard Produces a report that indicates whether the file complies with the standard you select, and if
not, what problems were encountered. The .log file appears at the bottom of the dialog box.
Note: PDFs that complied with both PDF/X-1a and PDF/X-3 standards in Acrobat 6.0 will default to PDF/X-1a in
Acrobat 8.

109
ADOBE ACROBAT 8 PROFESSIONAL
User Guide
When Not Compliant Specifies whether to create the PDF if the PostScript file does not comply with the standard’s
requirements.
• Continue Creates a PDF even if the PostScript file doesn’t meet the PDF/X requirements and notes these
problems in the report.
• Cancel Job Creates a PDF only if the PostScript file meets the PDF/X requirements of the selected report options,
and is otherwise valid.
Report As Error Flags the PostScript file as noncompliant if one of the reporting options is selected and a trim box
or art box is missing from any page.
Set TrimBox To MediaBox With Offsets (Points) Computes values for the trim box based on the offsets for the media
box of respective pages if neither the trim box nor art box is specified. The trim box is always as small as or smaller
than the enclosing media box.
Set BleedBox To MediaBox Uses the media box values for the bleed box if the bleed box is not specified.
Set BleedBox To TrimBox With Offsets (Points) Computes values for the bleed box based on the offsets for the trim
box of respective pages if the bleed box is not specified. The bleed box is always as large as or larger than the enclosed
trim box. This option uses the units specified on the General panel of the Adobe PDF Settings dialog box.
Output Intent Profile Name Indicates the characterized printing condition for which the document has been
prepared, and is required for PDF/X compliance. If a document doesn’t specify an output intent profile name,
Distiller uses the selected value from this menu. If your workflow requires that the document specify the output
intent, choose None.
Output Condition Identifier Indicatesthe referencenamethatisspecifiedbytheregistry of theoutputintentprofile
name. For more information, click the question mark next to the option.
Output Condition Describes the intended printing condition. This entry can be useful for the intended receiver of
the PDF. For more information, click the question mark next to the option.
Registry Name (URL) Indicates the web address for finding more information about the output intent profile. The
URL is automatically entered for ICC registry names. The registry name is optional, but recommended. For more
information, click the question mark next to the option.
Trapped Indicates the state of trapping in the document. PDF/X compliance requires a value of True or False. If the
document does not specify the trapped state, the value provided here is used. If your workflow requires that the
document specify the trapped state, choose Leave Undefined.
PDF compatibility levels
WhenyoucreatePDFs,youneedtodecidewhichPDFversiontouse. Youcan change thePDF versionbyswitching
to a different preset or choosing a compatibility option when you save as PDF or edit a PDF preset.
Generally speaking, unless there’s a specific need for backward compatibility, you should use the most recent version
(in this case, version 1.7). The latest version will include all the newest features and functionality. However, if you’re
creating documents that will be distributed widely, consider choosing Acrobat 5 (PDF 1.4) or Acrobat 6 (PDF 1.5)
to ensure that all users can view and print the document.
The following table compares some of the functionality in PDFs created using the different compatibility settings.

110
ADOBE ACROBAT 8 PROFESSIONAL
User Guide
Acrobat 4.0 (PDF 1.3) Acrobat 5.0 (PDF 1.4) Acrobat 6.0 (PDF 1.5) Acrobat 7.0 (PDF 1.6) and
Acrobat 8 (PDF 1.7)
PDFs can be opened with PDFs can be opened with Most PDFs can be opened Most PDFs can be opened
Acrobat 3.0 and Acrobat Acrobat 3.0 and Acrobat with Acrobat 4.0 and with Acrobat 4.0 and
Reader 3.0 and later. Reader 3.0 and later.
However, features specific
to later versions may be lost
or not viewable.
Acrobat Reader 4.0 and
later. However, features
specific to later versions
may be lost or not view-
able.
Acrobat Reader 4.0 and
later. However, features
specific to later versions
may be lost or not view-
able.
Cannot contain artwork Supports the use of live Supports the use of live Supports the use of live
that uses live transparency transparency in artwork. transparency in artwork. transparency in artwork.
effects. Any transparency (The Acrobat Distiller (The Acrobat Distiller (The Acrobat Distiller
must be flattened prior to feature flattens transpar- feature flattens transpar- feature flattens transpar-
converting to PDF 1.3. ency.) ency.) ency.)
Layers are not supported. Layers are not supported. Preserves layers when
creating PDFs from applica-
tions that support the
generation of layered PDF
documents, such as
Illustrator CS and later or
InDesign CS and later.
Preserves layers when
creating PDFs from applica-
tions that support the
generation of layered PDF
documents, such as
Illustrator CS and later or
InDesign CS and later.
DeviceN color space with 8
colorants is supported.
DeviceN color space with 8
colorants is supported.
DeviceN color space with
up to 31 colorants is
supported.
DeviceN color space with
up to 31 colorants is
supported.
Multibyte fonts can be
embedded. (Distiller
converts the fonts when
embedding.)
Multibyte fonts can be
embedded.
Multibyte fonts can be
embedded.
Multibyte fonts can be
embedded.
40-bit RC4 security 128-bit RC4 security 128-bit RC4 security 128-bit RC4 and 128-bit
supported. supported. supported. AES (Advanced Encryption
Standard) security
supported.
Share custom PDF settings
You can save and reuse your own Adobe PDF preset definitions. You can also share a custom preset by sending a
copy of the resulting file to other users, who can then add it to the Distiller applications installed on their own
computers.
Note: PDF settings files have the extension .joboptions. Custom preset files are stored in (Windows) Documents and
Settings/[username]/Application Data/Adobe/Adobe PDF/Settings or (Mac OS) User/[username]/Library/Application
Support/Adobe/Adobe PDF/Settings.
❖ To add a custom PDF settings file to the menu, do one of the following:
• Drag the .joboptions file onto the Distiller window.
• In Acrobat Distiller, choose Settings > Add Adobe PDF Settings, browse to the copied .joboptions file, select it,
and click Open.
The settings file appears as the selected option in the Default Settings menu.

111
ADOBE ACROBAT 8 PROFESSIONAL
User Guide
Compressing and downsampling images
When converting PostScript files to PDF, you can compress vector objects (such as text and line art) and compress
and downsample images. Line art is described with a mathematical equation and is usually created with a drawing
program such as Adobe Illustrator. Images—whether color, monochrome, or grayscale—are described as pixels and
are created with applications like Adobe Photoshop or by scanning. Monochrome images include most black-and-
white illustrations made by paint programs and any images scanned with an image depth of 1 bit.
When you downsample (or decrease the number of pixels), information is deleted from the image. With Distiller,
you specify an interpolation method—average downsampling, bicubic downsampling, or subsampling—to
determine how pixels are deleted. Depending on the settings you choose, compression and downsampling can signif-
icantly reduce the size of a PDF with little or no loss of detail and precision.
WhenDistillerprocessesafile,itnormally appliesthecompressionsettingstoimagesthroughoutthefile.However,
you can assign different compression and downsampling methods to individual images.
Varying the compression and downsampling methods within a PDF
Before you create a PDF, you can take various approaches to applying different compression and downsampling
options to the individual images that will go into that PDF:
• Use Adobe Photoshop to resample and compress existing image files before using Distiller. When you are ready
to create the PDF in Distiller, be careful to deselect the compression and downsampling or subsampling options.
• Create separate PostScript files for each part of the document that you want to process differently, and use different
compression options to distill each part. Then use Distiller to merge the files into a single PDF.
• When you create color, grayscale, and monochrome images in an art application (such as Adobe Photoshop),
select the compression and downsampling settings that you want when you save each image from within that
application.
• InsertDistillerparametersbeforeimagesinaPostScriptfile.Youcanusethistechniquetoprocesseveryimagein
a document differently. This technique is the most difficult, because it requires knowledge of PostScript
programming. For more information on using parameters, see the documentation available for download on the
Acrobat SDK documentation page (English only) of the Adobe website.
Note: To apply the inserted Distiller parameters, select Allow PostScript File To Override Adobe PDF Settings on the
Advanced panel of the Adobe PDF Settings dialog box in Distiller. This option overrides settings you selected in the
Adobe PDF dialog box.
Compression methods
Distiller applies ZIP compression to text and line art, ZIP or JPEG compression to color and grayscale images, and
ZIP, CCITT Group 3 or 4, or Run Length compression to monochrome images.
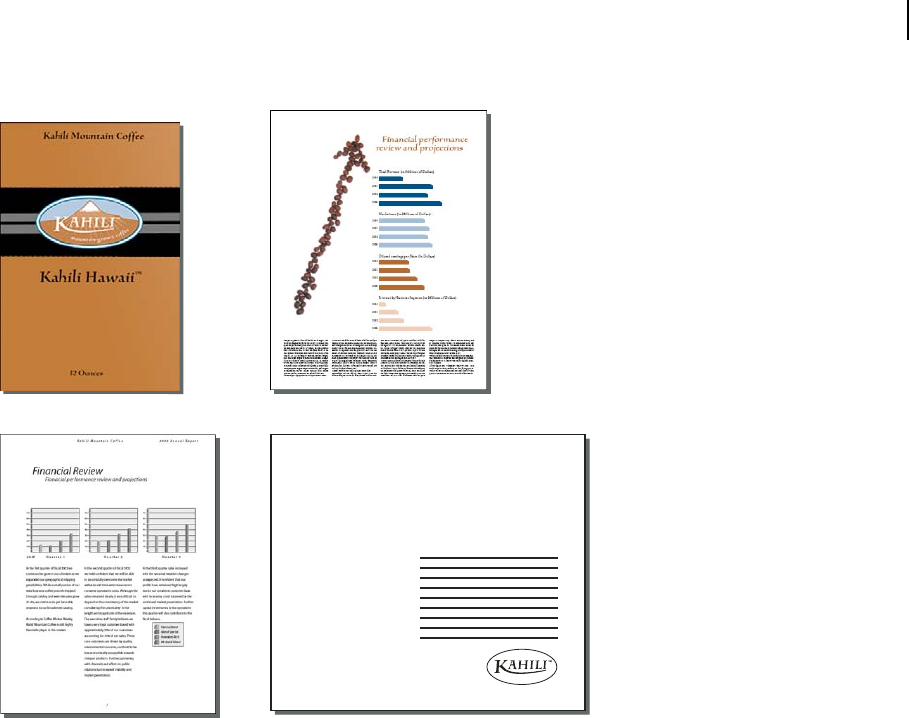
112
C
ADOBE ACROBAT 8 PROFESSIONAL
User Guide
A B
Sales Plan
Kahili Mountain Coffee
D
Suitable compression methods for different art types
A. ZIP B. JPEG C. CCITT D. Run Length
You can choose from the following compression methods:
ZIP Works well on images with large areas of single colors or repeating patterns, and for black-and-white images
that contain repeating patterns. Acrobat supports only 8-bit ZIP compression, which is lossless; that is, data is not
removed to reduce file size, so image quality is not affected.
Note: Adobe implementation of the ZIP filter is derived from the zlib package of Jean-loup Gailly and Mark Adler, whose
generous assistance we gratefully acknowledge.
JPEG Suitable for grayscale or color images, such as continuous-tone photographs. JPEG is lossy, which means that
itremovesimage dataandmayreduceimagequality;however,itattemptstoreducefilesizewiththeminimumloss
of information. Because JPEG compression eliminates data, it can achieve much smaller file sizes than ZIP
compression.
CCITT Available only for monochrome bitmap images. CCITT (Consultative Committee on International Teleg-
raphy and Telephony) compression is appropriate for black-and-white images and any images scanned with an image
depth of 1 bit. Group 4 is a general-purpose method that produces good compression for most monochrome images.
Group 3, used by most fax machines, compresses monochrome images one row at a time.
Run Length Produces the best results for images that contain large areas of solid white or black.
113
ADOBE ACROBAT 8 PROFESSIONAL
User Guide
Fonts
Font embedding and substitution
A font can be embedded only if it contains a setting by the font vendor that permits it to be embedded. Embedding
prevents font substitution when readers view or print the file, and ensures that readers see the text in its original font.
Embedding increases file size only slightly, unless the document uses CID fonts, a font format commonly used for
Asian languages. You can embed or substitute fonts in Acrobat or when you export an InDesign document to PDF.
You can embed the entire font, or just a subset of the characters used in the file. Subsetting ensures that your fonts
and font metrics are used at print time by creating a custom font name. That way, for example, your version of Adobe
Garamond®, not your service provider’s version, can always be used by the service provider for viewing and printing.
Type 1 and TrueType fonts can be embedded if they are included in the PostScript file, or are available in one of the
font locations that Distiller monitors and are not restricted from embedding.
Note: (Acrobat) In some cases, TrueType fonts that have gone through a PostScript driver can no longer be searched,
copied, cut, or pasted. To minimize this problem, use Acrobat on the same system on which the PostScript file was
created, and make sure that the TrueType fonts used in the file are available on the system.
When a font cannot be embedded due to the font vendor’s settings, and someone who opens or prints a PDF does
not have access to the original font, a Multiple Master typeface is temporarily substituted: AdobeSerifMM for a
missing serif font, and AdobeSansMM for a missing sans serif font.
The Multiple Master typeface can stretch or condense to fit, to ensure that line and page breaks in the original
document are maintained. The substitution cannot always match the shape of the original characters, however,
especially if the characters are unconventional ones, such as script typefaces.
Note: (Acrobat) For Asian text, Acrobat uses fonts from the installed Asian language kit or from similar fonts on the
user’s system. Fonts from some languages or with unknown encodings cannot be substituted; in these cases, the text
appears as bullets in the file.
If characters are unconventional (left), the substitution font will not match (right).
Accessing and embedding fonts using Distiller
When converting a PostScript file to PDF, Distiller needs access to the file’s fonts to insert the appropriate infor-
mation in the PDF. Distiller first searches the PostScript file for Type 1, TrueType, and OpenType fonts. If the font
isn’t embedded in the PostScript file, Distiller searches additional font folders. Distiller searches the following font
folders in Windows:
• /Resource/Font in the Acrobat folder
• /Windows/Fonts
Distiller searches the following font folders in Mac OS:
• /Resource/Font in the Acrobat folder
• /Users/[user name]/Library/Fonts

114
ADOBE ACROBAT 8 PROFESSIONAL
User Guide
• /Library/Fonts
• /System/Library/Fonts
The Acrobat installation includes width-only versions of many common Chinese, Japanese, and Korean fonts,
therefore Distiller can then access these fonts in Acrobat. Make sure that the fonts are available on your computer.
(In Windows, choose Complete when you install Acrobat, or choose Custom and select the Asian Language Support
option. In Mac OS, these fonts are installed automatically.)
For information on including fonts in a PostScript file, see the documentation that came with the application and
printer driver you use to create PostScript files.
Note: Distiller does not support Type 32 fonts.
Preview PDFs without local fonts
You can create a printable preview of your document that substitutes default fonts for any text formatted in fonts that
are available on your local machine but are not embedded in the PDF. This can help you decide whether or not to
embed those local fonts in the PDF, to achieve the look you want for your document.
1 In Acrobat, choose Edit > Preferences (Windows) or Acrobat 8 > Preferences (Mac OS.
2 Under Categories, select Page Display, and then deselect Use Local Fonts.
Note: If a font cannot be substituted, the text appears as bullets, and Acrobat displays an error message.
Add more folders to Distiller font searches
In addition to the default font folders, Distiller can also search other font folders that you specify.
1 Start Acrobat Distiller by doing one of the following:
• In Acrobat, choose Advanced > Print Production > Acrobat Distiller.
•
Click or double-click an Acrobat Distiller icon or shortcut on the desktop, Start menu (Windows), or Dock (Mac OS).
2 Choose Settings > Font Locations. The dialog box displays a list of the folders that Distiller searches for fonts.
These folders can be on your hard drive or on a network.
Distiller indicates that a font folder is available by displaying a folder icon to the left of the folder name. If no icon
appears, or if an icon with an x through it appears with a folder name, the connection to the folder has probably been
lost. You’ll need to reestablish the connection.
3 To add a font folder, click Add, select the folder to add, and click OK (Windows) or Select Folder (Mac OS).
Note: To provide Distiller with access to a font folder that has been moved, use this dialog box to remove the folder listed
in its old location and add it in its new location.
4 To remove a font folder, select the folder, and click Remove.
5 Select Ignore TrueType Versions Of Standard PostScript Fonts to exclude TrueType fonts that have the same name
as a font in the PostScript 3 font collection.
6 Click OK.

115
ADOBE ACROBAT 8 PROFESSIONAL
User Guide
Find PostScript font names
If you need to enter a font name manually on the Fonts panel of the Adobe PDF Settings dialog box, you can use a
PDF to find the exact spelling of the name.
1 Use any application to create a one-page document with the font.
2 Create a PDF from the document.
3 Open the PDF in Acrobat, and choose File > Properties > Fonts.
4 Write down the name of the font, using the exact spelling, capitalization, and hyphenation of the name as it
appears in the Font Info dialog box.

116
Chapter 4: Combining PDF content
Creating complex Adobe PDFs that include different types of files—files created in a variety of formats, even if they
have different page sizes and page orientations—is actually quite easy in Acrobat 8.
It’s also easier than you might imagine to make changes in a complex PDF so that it contains just the information
you want to include, and does so in an orderly, unified, and efficient document that serves your needs.
Quickstart
The following topics provide brief overviews of common tasks for combining PDFs and adding unifying elements.
Create a PDF from multiple files
You can easily merge files of different types into a single PDF.
1 Click Combine Files , and then click Add Files.
2 Select the files you want to combine, and click Add Files.
3 Adjust the order of files as desired, and then choose a file size and conversion setting.
4 Click Next, select Merge Files Into A Single PDF, and click Create.
Rather than merging files, you can also create a PDF package of files.
See also
“Create merged PDFs and PDF packages” on page 121
Assemble PDFs in a package
A PDF package lets you assemble related information into a single PDF while maintaining individual PDFs within it.
1 Click Combine Files , a
ant to
nd then click Add Files.
2 Select the files you w combine, and click Add Files.
3 Adjust the order of files as desired, and then choose a file size and conversion setting.
4 Click Next, select Assemble Files Into A PDF Package, and click Create.
See also
“Create merged PDFs and PDF packages” on page 121
Modify a list of files to combine
When combining files, you have several options for adjusting the set of files.
1 Click Combine Files , click Add Files, and add the desired files.

117
ADOBE ACROBAT 8 PROFESSIONAL
User Guide
2 To modify the list of files or remove a file from the list, select a file, and then do any of the following:
• Click Move Up or Move Down or drag the file to a new location.
• Click Choose Pages to include a subset of pages. (Button name might change based on file type.)
• Click Remove or press Delete.
See also
“Create merged PDFs and PDF packages” on page 121
Add headers and footers
You can add a single header and footer throughout a PDF or apply different headers and footers selectively to various
pages.
1 Choose Document > Header & Footer > Add. If a message appears, click Add New.
2 Specify font and margin settings.
3 In the header and footer text boxes, type the desired text. Click the buttons below the boxes to insert a page
number or date.
You can save header and footer settings for easy reuse.
See also
“Add and edit headers and footers” on page 125
Add a watermark
A watermark is text or an image that appears either behind or on top of content in a PDF.
1 Choose Document > Watermark > Add.
2 Do one of the following:
• Type the desired text and set the font attributes.
• Click File and browse to select the desired file.
3 Specify rotation, opacity, scale, location, and position.
You can save watermark settings for reuse. For example, save a “Draft” watermark to add to all review PDFs.
See also
“Add and edit watermarks” on page 131
Add a background
A background is an image or color that’s placed behind content in a PDF.
1 Choose Document > Background > Add/Replace.
2 Do one of the following:
• Click From Color, click the color swatch, and choose a background color.
• Click File and browse to select the desired image file.

118
ADOBE ACROBAT 8 PROFESSIONAL
User Guide
3 Set the rotation, opacity, scale, and position.
You can save background settings for reuse. For example, save an organizational emblem to add to official correspon-
dence.
See also
“Add and edit backgrounds” on page 129
Rotate pages
You can rotate all or selected pages in a PDF.
1 Choose Document > Rotate Pages.
2 Specify the direction of the rotation and the page range.
3 Choose the desired options from the Rotate menus.
To temporarily rotate a page, choose View > Rotate View > Clockwise or Counterclockwise.
See also
“Rotate a page” on page 135
Delete pages
After combining files, you can delete unwanted or blank pages.
1 (Optional) Click the Pages button in the navigation pane and select the pages you want to delete.
2 Choose Document > Delete Pages.
3 Click Selected to delete selected pages or click From and specify a range.
IfyouwanttoretainacopyoftheoriginalPDF,makesurethatyou savethenew documentusingSaveAsratherthanSave.
See also
“Delete or replace a page” on page 136
Replace pages
To quickly update a PDF, you can replace individual pages.
1 Choose Document > Replace Pages.
2 Select the document that contains the replacement pages, and click Select.
3 Under Original, specify the pages you want to replace. Under Replacement, specify the beginning replacement page.
Interactive elements, such as links and bookmarks, associated with the original pages aren’t deleted.
See also
“Delete or replace a page” on page 136

119
ADOBE ACROBAT 8 PROFESSIONAL
User Guide
Renumber pages
Whenyourenumberpages,onlythenumbersthatappearinthePagespanel andthe toolbarareaffected.Tochange
the numbers that appear on the document pages, add a header or footer.
1 Click the Pages button , and choose Number Pages from the Options menu.
2 Specify which pages the numbering will be applied to.
3 Specify the numbering style, prefix (if any), and starting number.
You can also continue the numbering style of the previous section.
See also
“Renumber pages” on page 138
Combining files into PDFs
Combining different types of files
You already know that you can convert many types of files into Adobe PDFs. But you can also group files as you
convert them, so that the end result keeps those files together. For example, you could combine all the documents
for a specific project—such as the text documents, email messages, spreadsheets, CAD drawings, PowerPoint
presentations, and so forth—into a PDF or PDF package. When you use the Combine Files wizard, you can even limit
the conversion to specific pages (or spreadsheets, or slides) within individual source documents.
There are three types of PDFs that involve multiple files:
Merged PDFs You can convert multiple files of various types to produce a merged PDF: one in which converted
documents flow into the PDF as sequential pages.
PDF packages You can use the Combine Files wizard to convert multiple files of various types into a PDF package:a
set PDF components in which each file appears separately and has its own pagination. Component files also retain
their individual security settings, forms features, and default views, and digital signatures stay intact. On Windows,
you can archive Outlook or Lotus Notes email messages and message folders as PDF packages, using PDFMaker
within the email application.
PDFs embedded in other files You can insert PDFs into files in other formats that support Object Linking and
Embedding (OLE), such as Adobe InDesign or Word documents.
See also
“Convert email messages to PDFs (Windows)” on page 77
About PDF packages
A PDF package converts multiple files—which can be in different formats and created in different applications—and
assembles them into an integrated PDF unit. The original files retain their individual identities, but are still part of
the one PDF package file. Each component file can be opened, read, edited, and formatted independently of the other
component files in the PDF package.

120
ADOBE ACROBAT 8 PROFESSIONAL
User Guide
You can create PDF packages when you use the Combine Files wizard, starting either from the Getting Started
window,theTaskstoolbar,ortheFile>CombineFilescommand.InWindows,theAcrobatPDFMakerinOutlook
and Lotus Notes can create PDF packages when you convert email messages to PDF or migrate PDF email archives
created in earlier versions of Acrobat.
Depending on the circumstances, PDF packages offer several advantages over merging multiple files into an
ordinary PDF:
Adding and deleting Youcanaddorremovecomponentdocumentseasily,withouthavingtofindandselectallthe
pages that originated in that file.
Viewing The component files do not open in separate windows, so you can quickly flip through them and make
changes without having to pause for the Open or Save dialog boxes.
Editing You can make changes to individual PDFs within the PDF package without affecting the other component
PDFs. For example, you can change the page numbering within that PDF, digitally sign, select different security
settings, and so forth, without those changes applying to the other component documents. You can also rename
components.
Distribution Because the PDF package is one file, you can share it with others and be sure that they are getting all
the component parts.
Sorting The component PDFs in a PDF packages are listed under an assortment of categories that you can add to,
delete, hide, and customize. Then, you simply click the category name to sort the list.
Printing The Print command on the File menu includes commands for printing the currently open document, all
the documents in the PDF package, or multiple component documents selected in the PDF package list.
Searching The Advanced Search window includes options for searching the currently open document, all the
documents in the PDF package, or multiple component documents selected in the PDF package list.
Incorporating other formats You can add non-PDF files to an existing PDF package without converting them to
PDF. This can be done by a simple drag-and-drop process from the desktop, Microsoft Explorer, or the Mac OS
Finder to the list of components in the open PDF package. Of course, non-PDF files do not enjoy all of the benefits
of PDFs in the package.
Independence from source files The source files of a PDF packages—even existing PDFs you add to the package—
are not changed when you create a PDF. Changes you make to the PDFs within the PDF package do not change the
original files from which you created the PDF. You can move a PDF package anywhere on your computer or network
without any risk of losing or disconnecting its components.
Reuse You can include or convert the same original source file into multiple PDF packages.
There are two limitations to PDF packages. They cannot be reviewed using one of the formal wizards or sent out in
a data-collection workflow.
Note: PDF packages are completely different from Collections that you create in the Acrobat Organizer. Organizer
Collections are simply tools that help you find related PDFs, regardless of where they are stored in the folder structure on
your computer. PDF packages are actual PDF files, each of which is stored in a single location on your computer. Also,
PDFs attached to other PDFs do not offer the same benefits as PDF packages.

121
ADOBE ACROBAT 8 PROFESSIONAL
User Guide
See also
“View, sort, and search components in a PDF package” on page 27
“Convert email messages to PDFs (Windows)” on page 77
“Print documents in a PDF package” on page 431
Create merged PDFs and PDF packages
The choices you make in the Combine Files wizard determine whether the files are merged into a single PDF or
combined into a PDF package.
1 Choose File > Combine Files, or click Combine Files on the Tasks toolbar.
If a PDF is currently open, it appears on the list of included files.
2 In the Combine Files wizard, do any or all of the following:
• To add individual files, click Add Files ,
s.
navigate as needed, select the files, and click Add Files. Repeat as
needed to add files in other location
• To select all the files in a specific location, click Add Folders , navigate to the needed folder, select it, and click
OK. Repeat as needed.
• To select files that you have combined into PDFs in other sessions, click Reuse Files . Select
at you wa
a previously created
PDF on the left list, and then, in the right list, select the component documents th nt to include. (If you
have not used the Combine Files wizard before, this button is not available.)
• To add other currently open PDFs, click Add Open Files, and select those PDFs.
• (Windows) To add files or folders from Windows Explorer, drag them into the Combine Files wizard or right-click
the selected items and choose Combine Supported Files In Acrobat.
If any files are password-protected, one or more messages appear, in which you must enter the correct password.
Yo
bl
u can add a file more than once. For example, one file could be used for transition pages between other files or a
ank file could be used to add blank pages.
3 Using the list of files, do any of the following:
• Torearrangetheorderoffilesonthelist,selectafileanddragitupordownthelist.Or,selectafileandclickMove
Up or Move Down.
• To remove a file from the list, select the filename and click Remove.
• To convert only part of a multipage source file, double-click the file, or select the file and click the Choose Pages
button (see Note). In the Preview, review and select pages, as needed, following the instructions in the dialog box,
which vary according to file type, and click OK. (Do not attempt to edit the document itself in the Preview.)
Note: The name of the Choose button varies according to file type. For PDFs and Word documents, it is labeled Choose
Pages. For PowerPoint files, it is Choose Slides; for Excel files, Choose Sheets; for AutoCAD, Choose Layouts; for Visio
files, Sheet Selection.
4 Select an appropriate file size and conversion options (as described in the following topic).
5 Click Next, and then do one of the following:
• To combine the files as sequential pages of a PDF, select Merge Files Into A Single PDF.
• To combine the files into a PDF package, select Assemble Files Into A PDF Package. Then select a cover-sheet
option: Use Adobe Template or Use First Document.

122
ADOBE ACROBAT 8 PROFESSIONAL
User Guide
Note: If any of the selected files involve digital signatures, security settings, or XML forms, warnings will appear if you
select Merge Files Into A Single PDF. In this case, combining the files into a PDF package is recommended. Also, a
warning may appear if the first file listed is itself a PDF package because its cover sheet will be modified.
6 Use the Move Up, Move Down, and Remove buttons to make any final adjustments to the file sequence, if
necessary, and then click Create.
Astatusdialogboxshowstheprogressof thefileconversions.Somesourceapplicationsmay startandcloseautomat-
ically.
7 When the conversion is complete, review the preview thumbnails. If you want to make changes, click the Back
button in the wizard, make the changes, and proceed forward again.
8 Click Save, and select a name and location for the merged PDF or PDF package.
The default name of a new package is Package [n].
See also
“Convert email messages to PDFs (Windows)” on page 77
“Adobe PDF conversion settings” on page 99
Conversion settings
Conversion settings affect all files that will be converted to PDF from other file formats. The three options available
in the Combine Files wizard apply three different conversion presets.
You can customize the default conversion preferences (choose Edit > Preferences, select Convert To PDF under
Categories, and then specify the settings you want to use).
Smaller File Size Reduces large images to screen resolution and compresses, using low-quality JPEG. Suitable for on-
screen display, email, and the Internet.
Note: If any of the source files are already PDFs, the Smaller File Size option applies the Reduce File Size feature to those
files. This is not done if either the Default File Size or Larger File Size option is selected.
Default File Size Creates PDFs suitable for reliable viewing and printing of business documents.
Larger File Size Applies the High Quality Print conversion preset.
Options button Opens the Options For Conversion Settings dialog box, which contains the following options:
• Always Enable Accessibility And Reflow Improves the readability for users with disabilities and on small-screen
devices.
• Always Add Bookmarks To Adobe PDF Converts existing bookmarks in different native file formats to Adobe PDF
bookmarks.
Note: An individual PDF created by merging multiple files into a single PDF has structured bookmarks that you can use
to print or delete individual documents from the PDF. You can also use the bookmarks to extract the original component
files as independent PDFs.
Add custom cover sheets to PDF packages
Each PDF package includes a cover sheet, which appears each time you open the file. Typically, the cover sheet
provides instructions or information that is helpful to users reading the package. The default cover sheet is the Adobe
template, which briefly discusses viewing PDF packages.

123
ADOBE ACROBAT 8 PROFESSIONAL
User Guide
The cover sheet does not appear in the list of component PDFs. However, you can go back to the cover sheet by
clicking the Cover Sheet button in th
tion of yo
e PDF package navigation bar.
1 Using the authoring applica ur choice, create the cover sheet.
2 In Acrobat, choose File > Combine Files, and proceed as usual to select files, folders, and pages, and to choose a
conversion option, and click Next. Be sure to include your custom cover sheet as one of the files, and then click Next.
3 Select Assemble Files Into A PDF Package.
4 Selectthecustomcoversheetsourcefile,anddragitorclicktheMoveUpbuttonuntil itappearsatthe topofthelist.
5 Under Select Cover Sheet, choose Use First Document, and then click Create.
6 When the conversion is complete, click Save and specify and location and name for the PDF package file.
Extract component files in a PDF package
1 In the list of component files, select the files that you want to extract.
2 Do one of the following:
• Adjust the Acrobat window so that it does not completely fill the screen, and then drag the file onto the desktop,
Windows Explorer, or the Finder.
• On the PDF package navigation bar, choose Options > Save File As, and select a location and name for the
extracted file.
• Right-click/Control-click and choose Options > Save File As, and select a location and name for the extracted file.
See also
“View, sort, and search components in a PDF package” on page 27
Edit a PDF package
Editing a PDF package involves changes at the package level. For example, you can add or remove component files
or set up new categories to facilitate sorting the components.
Editingthe componentPDFswithinapackageinvolvesthe sametechniquesused to makechangestoanyPDF, which
are presented elsewhere in Help.
See also
“Editing text and objects” on page 347
“Adding unifying page elements” on page 125
Add unconverted files to a PDF package
1 On the PDF package navigation bar, choose Options > Add File, and select a location and name for the extracted
file. Or, right-click/Control-click and choose Add File.
2 Open the PDF package, and adjust the Acrobat window so that it does not completely fill the screen.
3 On the desktop or in Windows Explorer or the Finder, select the file or files you want to add to the PDF package,
and drag them into the list of component files in the Acrobat work area.

124
ADOBE ACROBAT 8 PROFESSIONAL
User Guide
Add PDFs to a PDF package
❖ Do any of the following:
• In Windows Explorer or the Finder, select the PDFs you want to add to the currently open PDF package and drag
them into the list of component files.
• In the PDF package navigation bar, choose Options > Add File or right-click/Control-click and choose Add File.
Then locate and select the files you want to add.
Remove component files from a PDF package
❖ In thelistofcomponent filesfortheopenPDFpackage, selectthefiles thatyouwanttoremoveand pressDelete,
or choose Options > Delete File.
Customize categories for the PDF list
1 Do one of the following:
• On the PDF package navigation bar, choose Options > Package Properties
• Right-click/Control-click the categories pane in the PDF package navigation pane, and choose Package Properties.
2 Click Add, and type a name for the new category in the Add Field dialog box.
3 Make any other changes you want in the Package Properties dialog box:
• To change the order in which the categories appear, select individual categories and click Up or Down until you
have them in the order you want.
• To hide a category, deselect its check box, or select the category and click Hide.
• To show a category, select its check box, or select the category and click Show.
• To remove a category, select the category and click Delete.
• To change the default category for sorting the PDFs, choose another category name in the Sort By menu.
• To set the sorting order, select Ascending or Descending.
• To specify the default locations of the PDF list, select Top, Left, or Minimized in the Initial View menu.
• To open the currently displayed PDF each time you reopen the PDF package, select Show Current Document
When Opening Collection.
Note: Changes made to the Package Properties affect the entire PDF package and can be viewed by other users who open
the PDF package.
Edit category entries for the currently open component PDF
1 In the list of component files, select the file that you want to edit.
2 Do one of the following:
• On the PDF package navigation bar, choose Options > Edit Value > [category name].
• Right-click/Control-click the categories bar or the selected component file, and choose Edit Value > [category
name].
3 In the Edit [category name] dialog box, type the text to appear under this category for the currently selected
component file.
Insert one PDF into another
1 Open the PDF that you want to serve as the basis of the combined file, and choose Document > Insert Pages.

125
ADOBE ACROBAT 8 PROFESSIONAL
User Guide
2 Select a PDF that you want to insert into the target document, and click Select.
3 In the Insert Pages dialog box, specify where you want to insert the document (before or after the first, last, or a
designated page of the open PDF), and click OK.
4 To leave the original PDF intact as a separate file, choose Save As, and type a new name for the merged PDF.
You ca
add di
n also add an existing PDF with a currently open PDF by dragging the desktop icon for the PDF you want to
rectly into position in the Pages panel of the open PDF.
Placing PDFs as linked files in other documents
You can incorporate PDFs into other types of files that support Object Linking and Embedding (OLE), such as
InDesign or Word files. These files are called OLE container documents. Later, if you make changes to the original
PDF, the OLE features in the container application can update the embedded file in the container document,
reflecting your changes to the original PDF.
❖ Do one of the following:
• Choose the OLE container application’s Insert Object command or Insert Hyperlink command.
• In Acrobat, choose Edit > Copy File To Clipboard, and then choose the Paste Special command in the container
application.
Adding unifying page elements
Add and edit headers and footers
A header and footer present consistent information in the page margins throughout a PDF. For example, the infor-
mation could be a date, automatic page numbering, the title of the overall document, or author’s name.
You can vary the headers and footers within a PDF. For example, you can add a header that displays the page number
on the right side of odd-numbered pages, and another header that displays the page number on the left side of even-
numbered pages. Each of these headers must be added individually.
You can define and save your headers and footers to reuse them later, or you can simply apply a header and footer
andforgetit.Afterapplyingaheaderandfooter,youcan edit,replace,ordeleteitinthe PDF.Youcan also preview
headers and footers before applying them and adjust the header and footer margins so that they don’t overlap other
page content.
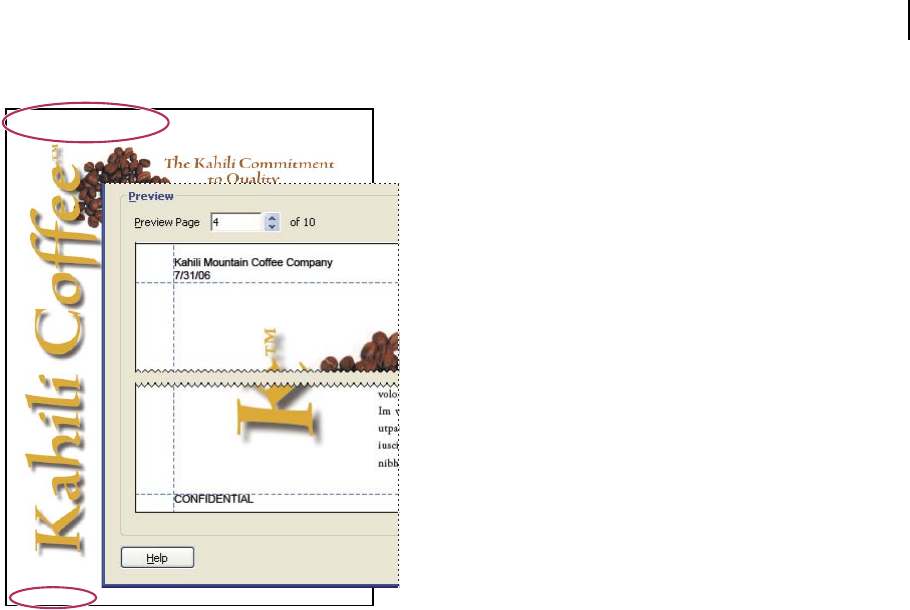
126
ADOBE ACROBAT 8 PROFESSIONAL
User Guide
Kahili Mountain Coffee Company
7/31/06
CONFIDENTIAL 4
A header appears at the top of the page. A footer appears at the bottom of a page.
Define and apply headers and footers
You can add one or more sets of headers and footers to a PDF and apply them either globally or selectively to its
pages. Each set of headers and footers must be applied in a separate session in the Add Header And Footer dialog
box. Headers and footers can include automatically generated information and formatting, such as page numbering
and the current date.
If you use the same types of headers and footers frequently, you can save header and footer definitions so that you
can quickly apply them to other PDFs.
1 Choose Document > Header & Footer > Add. If a message appears, click Add New.
2 Select your preferences for the font, type size, text color, and text underlining of the header and footer.
Note: The text properties apply to all header and footer entries that are part of this setting definition. You cannot apply
different settings to individual header or footer text boxes within the same session in the Add Header And Footer dialog box.
3 Using the three header text boxes and three footer text boxes, type the text that you want to appear in any of these
locations, and then do any of the following:
• To add the date of creation, click inside one of the header or footer text boxes, and click the Insert Date button.
• To add automatic page numbering, click inside one of the header or footer text boxes, and click the Insert Page
Number button.
• To select formatting for automatic entries, click the Page Number And Date Format button, and choose the Date
Format, Page Number Format, and Start Page Numbers At settings that you want to use.
Note: You can combine text with dates and page numbers. You can also add several lines of text to an entry. Text typed
in the Left, Center, and Right boxes appears left-aligned, centered, and right-aligned, respectively.
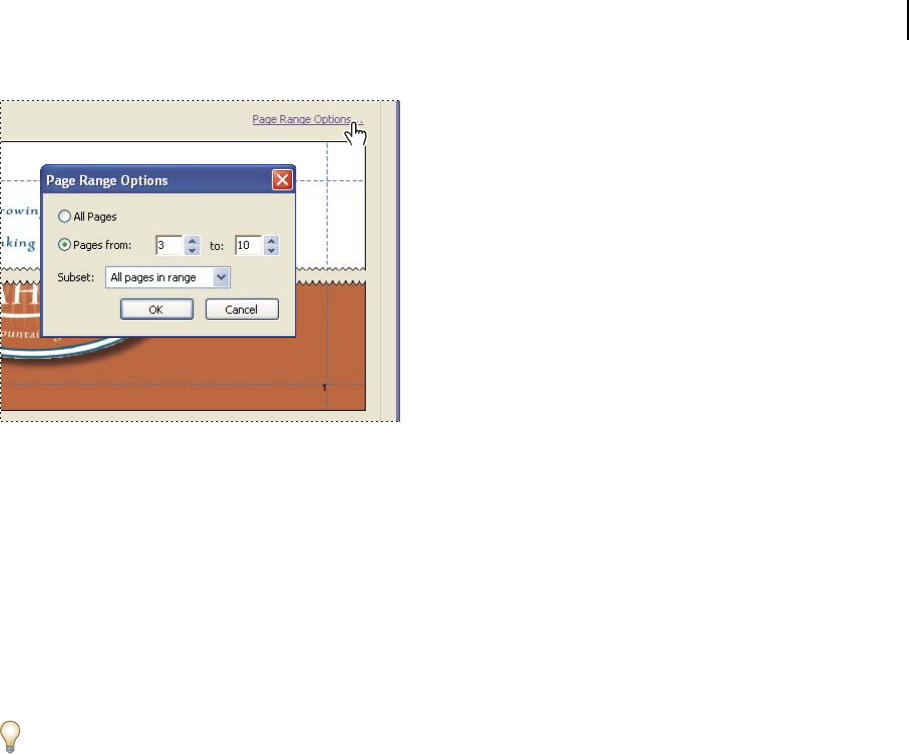
127
ADOBE ACROBAT 8 PROFESSIONAL
User Guide
Limiting header and footer to a range of pages
4 If you want to limit the pages on which the header and footer appear, click the Page Range Options button, and
do the following:
• To limit the header and footer to a specific range of pages, select Pages From, and enter the beginning and ending
page numbers.
• Tolimittheheaderandfootertoonesideortheotherof adocumentwithfacingpages,chooseanoptiononthe
Subset menu: Even Pages Only or Odd Pages Only. Otherwise, leave the default setting: All Pages In Range.
5 As needed,change thevaluesintheTop,Bottom,Left,andRight optionstoadjustthemarginswithintheheader
and footer, using the Preview area to evaluate the results.
To
O
prevent any overlapping, you can click the Appearance Options button and select Shrink Document To Avoid
verwriting The Document’s Text And Graphics. To prevent resizing or repositioning when printing the PDF in large
format, select Keep Position And Size Of Header/Footer Text Constant When Printing On Different Page Sizes.
6 Examine the results in the Preview area, using the Preview Page option to see different pages of the PDF.
7 (Optional) At the top of the dialog box, click Save Settings, type a descriptive name for the header and footer
settings, and click OK. Then click OK again to apply the header and footer to the PDF.
If you want to add additional headers or footers, simply repeat this procedure.
Update the headers and footers
Updating applies to the most recently added header and footer set.
1 Choose Document > Header & Footer > Update.
2 Make the changes you want.
Add another header and footer
1 Choose Document > Header & Footer > Add, and then click Add New in the message that appears.
The preview shows any existing headers and footers.
2 Type text in the header and footer text boxes to add more headers and footers, noticing that the preview updates
the appearance of the complete headers and footers on the page.
3 Select new formatting options, as preferred, again noticing the updating in the preview.

128
ADOBE ACROBAT 8 PROFESSIONAL
User Guide
Replace all headers and footers
1 Choose Document > Header & Footer > Add, and then click Replace Existing in the message that appears.
2 Type text in the header and footer text boxes.
3 Select formatting options, as needed.
Note: This process applies only to headers and footers added in either Acrobat 7 or Acrobat 8.
Remove all headers and footers
❖ Do one of the following:
• To remove all headers and footers, choose Document > Header & Footer > Remove, and then click Yes in the
confirmation message that appears.
• To remove one header and footer immediately after adding it, choose Edit > Undo Headers/Footers.
Note: This process applies only to headers and footers added in either Acrobat 7 or Acrobat 8.
Add a Bates numbering header or footer
Bates numbering is a method of indexing legal documents for easy identification and retrieval. Each page of each
document is assigned a unique Bates number that also indicates its relationship to other Bates-numbered
documents. Bates numbers appear as headers or footers on the pages of each PDF in the batch.
Although the Bates identifier is referred to as a number, it can include an alphanumeric prefix and suffix, which can
make it easier to recognize the central subject matter of the files.
Adding Bates numbering does not change the filenames of the PDFs, rearrange them in desktop folders, link them,
or add them to a collection in the Organizer. You can tell that Bates numbering has been added only by opening the
PDF and looking at the headers and footers.
Note: Bates numbering is unavailable for protected or encrypted files and some forms, and it applies only to the cover
sheets of existing PDF packages. However, Bates numbering can be applied to individual PDFs that are then assembled
into a PDF package.
Add Bates numbering
1 In Acrobat, choose Advanced > Document Processing > Bates Numbering > Add.
2 In the Bates Number dialog box, do any of the following:
• To include any open PDFs, select Include All Open PDF Documents.
• To add other PDFs, click Browse, navigate to a folder, and select the files you want to apply Bates numbers to.
Repeat as needed until all the PDFs you want to include are listed.
3 Adjust the list of PDFs, as needed:
• To change the order in which Bates numbers will be assigned, select a PDF in the list and drag it to a different
position or click Move Up or Move Down as needed.
• To verify a PDF on the list, select it and click Preview, which opens a window in which you can see each individual
page of the PDF.
• To remove a PDF from the list, select it and click Remove.
4 Click Next. Then, in the Add Header And Footer dialog box, click to place the insertion point in the header or
footer text box in which you want the Bates number to appear (such as Left Header Text or Center Footer Text).

129
ADOBE ACROBAT 8 PROFESSIONAL
User Guide
5 Click Insert Bates Number. Then enter the text that you want to make up the Bates numbers:
• In Number Of Digits, specify how many digits make up the Bates number, entering any number between 6 and
15. The default number is 6, which produces Bates numbers such as 000001, 000002, and so forth.
• In Start Number, enter the number that will be assigned to the first PDF on the list. The default number is 1.
• In Prefix, type any text that you want to appear before the Bates number.
• In Suffix, type any text that you want to appear after the Bates number.
Note: For court cases involving very large numbers of pages, enter a higher value in Number Of Digits. Do not use the #
character in the Prefix or Suffix text.
6 Click OK and then make any other changes to the settings, as you would for any other header and footer.
Add more documents to a Bates numbering series
Before you begin, be sure that you know the last applied Bates number in the series.
1 Follow the procedure described above to start the Bates numbering process, selecting the files that you want to
add to the series.
2 After you click Insert Bates Number, type the Suffix and Prefix text that matches the rest of the series, and then
type the next number in the series in Start Number.
3 When you finish changing settings in the Add Header And Footer dialog box, click OK.
Search for Bates-numbered PDFs
1 Choose Edit > Search.
2 As the search word or phrase, type in all or part of the Bates numbering that you want to find.
For example, if you want to find a specific document and know its Bates number, type in the complete number as the
search text. If you want to find any documents in a Bates number series, type in a distinctive portion of the Bates
series, such as the prefix or suffix.
3 Under Look For Files In, click Browse (if necessary) and select the folder, computer drive, or network location that
you want to search, and then click Search.
Remove Bates numbering
You can remove Bates numbering, but this also removes all the headers and footers in the PDFs.
1 In Acrobat, choose Advanced > Document Processing > Bates Numbering > Remove.
2 In the Bates Number dialog box, click Browse, navigate to a folder, and select PDFs. Repeat as needed until all the
PDFs you want are listed, and then click Next.
3 Click OK to remove the Bates numbering and all other headers and footers, or click Cancel and start over if you
want to start over and choose different files.
Add and edit backgrounds
A background appears behind text or images on the page. The background can be as simple as a solid color or you
can use an image. You can selectively apply a background to only specific pages or page ranges in a PDF. A PDF
supports only one background per page, but the backgrounds can vary from page to page.
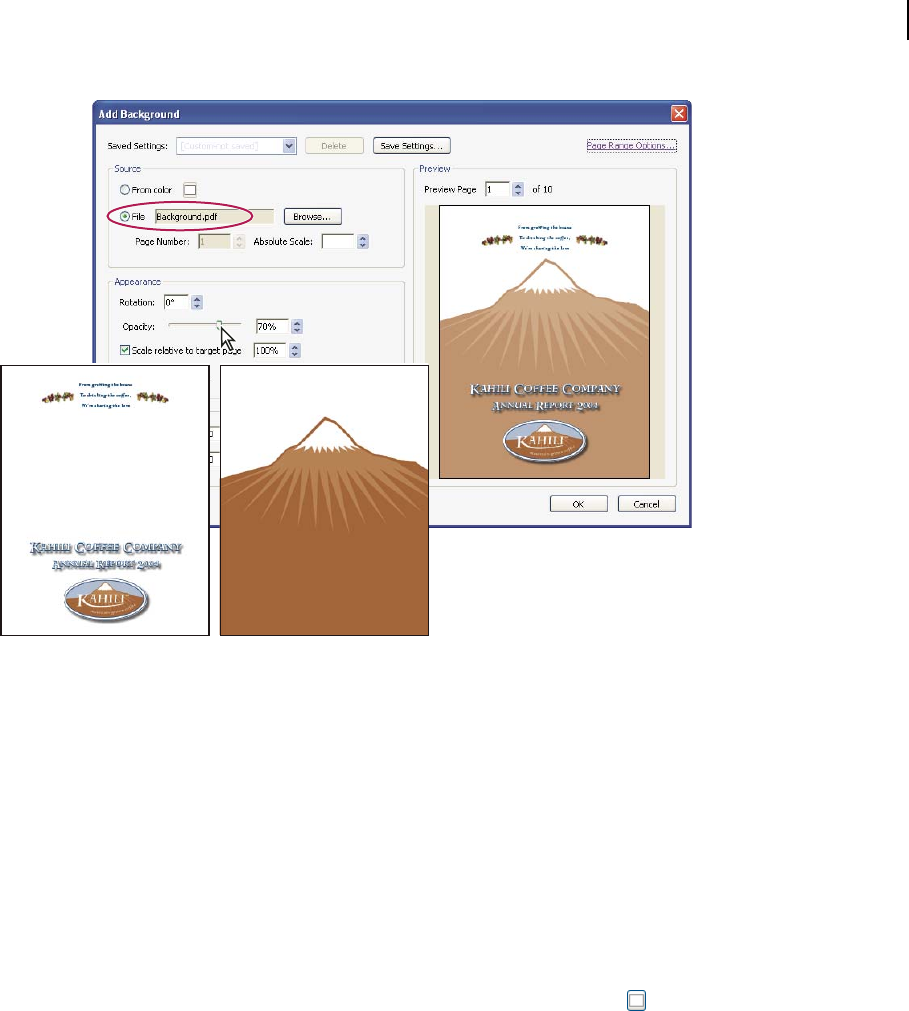
130
ADOBE ACROBAT 8 PROFESSIONAL
User Guide
Before and after adding a background
Add, replace, or edit a background
1 Choose Document > Background > Add/Replace.
Note: If a message appears, telling you that the current document already has a background, click Replace Background.
If you apply the new background to a limited range of pages, the old background will remain unchanged on pages outside
of that range.
2 (Optional) To apply the background selectively to individual pages, click Page Range Options, select Pages From,
and enter beginning and ending page numbers; then choose a Subset option for applying the background only to odd
pages, even pages, or both.
3 For Source, specify what you want to serve as the background:
• To reuse a background and background options that you saved in an earlier session, select it in the Saved Settings menu.
• Toapplyasolid colorbackground, selectFromColor.Thenclickthe colorswatch toopenthe colorpicker, and
select a color swatch or custom color.
• To use an image, select File. Then click Browse, locate the image file you want to use, and select it.
Note: Only PDF, JPEG, and BMP files can be used as background images.
4 Adjust the appearance and position of the background, as needed:
• To select a specific image in a multipage file, enter it in Page Number.
• To show an image file at a specific percentage of its full-size display, enter a value in Absolute Scale.
• To rotate a background image or colored area, enter a value in Rotation.
• To give the background image or color some transparency, drag the Opacity slider to the left or enter a percentage
value.

131
ADOBE ACROBAT 8 PROFESSIONAL
User Guide
• To resize a background image as a percentage of the PDF page size, select Scale Relative To Target Page.
• To show or hide the background when printing or viewing on screen, click Appearance Options and select the
items you want to apply.
• To shift the position of the background image or colored area, enter values for the Vertical Distance from the Top,
Center, or Bottom of the page and the Horizontal Distance from the Left, Center, or Right of the page.
5 If a message appears after you click OK, telling you that backgrounds have already been defined for some pages
in the page range, click OK.
Update a recently edited background image
If the original image file that you are using as a background changes, you can update the PDF to show the new version
of the image rather than removing the old version and re-adding the new one.
1 Choose Document > Background > Update.
2 Click OK, or make other changes to the background options and then click OK.
Note: This process applies only to backgrounds added in either Acrobat 7 or Acrobat 8.
Remove a background from PDF pages
❖ Do one of the following:
• To remove the background from only some pages in the PDF, choose Document > Background > Add/Replace.
Then click Page Range Options, and enter page numbers and Subset options to restrict the background to the
designated pages.
• To remove the background from all pages, choose Document > Background > Remove, and click OK to confirm
the removal.
• To remove a background from all pages immediately after adding it, choose Edit > Undo Add Background.
Add and edit watermarks
A watermark is text or an image that appears either above or behind existing document content, similar to a stamp.
For example, you might want to apply a “Confidential” watermark to pages with sensitive information. You can add
multiple watermarks to a PDF, and you can specify the page or range of pages on which each watermark appears.
Note: Unlike astamp,awatermarkisintegratedintoPDFpagesasafixedelement.AstampisatypeofPDFcomment,
which others reading the PDF may open to display a text annotation, move, change, or delete.

132
ADOBE ACROBAT 8 PROFESSIONAL
User Guide
Before and after adding a watermark
Add or replace a watermark
You can add multiple watermarks to a PDF, but each one must be added separately.
1 Choose Document > Watermark > Add. If the PDF already contains one or more watermarks, a message appears;
select Add New if you want to create an additional watermark, or select Replace Existing if you want to replace all
existing watermarks with a new one.
2 (Optional) To apply the watermark selectively to individual pages, click Page Range Options, select Pages From,
and enter beginning and ending page numbers; then choose a Subset option for applying the watermark only to odd
pages, even pages, or both.
3 Specify the Source option:
• Tocreateatextwatermark,selectText, typethetextyouwant toappear asthewatermarkinthetextbox,andthen
adjust the font, font size, font color, underlining, and paragraph-alignment options, as needed.
• Touseanimageasawatermark,selectFile.Then clickBrowse,locatetheimagefileyouwanttouse,selectit,and
click Open. If the file has multiple pages with images, click the Page Number up and down arrows to select the
page you want.
Note: Only PDF, JPEG, and BMP images can be used as watermarks.
4 To change the size of an image watermark, do one of the following:
• To resize the watermark in relation to the actual size of the original image file, enter a percentage in the Absolute
Scale option (in the Source area of the dialog box).

133
ADOBE ACROBAT 8 PROFESSIONAL
User Guide
• To resize the watermark in relation to the PDF page dimensions, enter a percentage in the Scale Relative To Target
Page (in the Appearance area of the dialog box).
5 Adjust the appearance of the text or image watermark, as needed:
• To rotate the watermark, select an angle of rotation or enter a custom value.
• To give the watermark some transparency, drag the Opacity slider or enter a percentage.
• To stack the watermark relative to the page content, select Appear Behind Page (page content overprints the
watermark) or Appear On Top Of Page (watermark overprints the page content).
• To specify when the watermark appears, click Appearance Options and select or deselect Show When Printing and
Show When Displaying On Screen.
• To control variations in a PDF with pages of varying sizes, click Appearance Options and select or deselect Keep
Position And Size Of Watermark Text Constant When Printing On Different Page Sizes.
6 Specify the position in which you want the watermark to appear by entering the vertical and horizontal distances
between the watermark and the left, right, center, top, or bottom of the page.
Update a watermark
1 Choose Document > Watermark > Update.
2 Make changes to the watermark, and then click OK.
Important: If you have multiple watermarks in a PDF, this procedure will update only the first watermark you added
and will discard all other watermarks. If you change your mind about updating the watermarks after you have
completed this process, immediately choose Edit > Undo Watermark.
Remove watermarks
❖ Do one of the following:
• To remove all watermarks from all pages, choose Document > Watermark > Remove, and click OK to confirm the
removal.
• To remove a watermark from all pages immediately after adding it, choose Edit > Undo Watermark.
Crop pages
The Crop Pages dialog box is where you can adjust the visible page area. This can help you create consistency within
a PDF composed of pages of different sizes.
Cropping does not reduce file size because information is merely hidden, not discarded.
Whe
dialo
Boxes opt
n you prepare a PDF for printing, you can change the Art, Trim, and Bleed areas for a PDF page in the Crop
g box. If you want to see indicators of these areas in the document pane, select the Display Art, Trim, Bleed
ion in the Page Display Preferences. (Choose Edit > Preferences (Windows) or Acrobat > Preferences (Mac OS),
and select Page Display under Categories.)
Crop empty areas around page content
1 Choose Document > Crop Pages.
2 Under Margin Controls, select Remove White Margins.
Crop one or more pages
1 Choose Document > Crop Pages.

134
ADOBE ACROBAT 8 PROFESSIONAL
User Guide
2 In the pop-up menu in the upper left corner, leave CropBox selected, and then adjust values for the Margin
Controls: Top, Bottom, Left, and Right.
A black rectangle in the thumbnail page display shows the adjusted boundaries of the cropped page.
3 (Optional) One by one, select ArtBox, TrimBox, and BleedBox in the pop-up menu, and adjust the Margin
Control values each time. The adjusted boundaries appear as rectangles in the thumbnail page display: red, green,
and blue, respectively.
4 Select other options under Change Page Size, as appropriate for your PDF.
5 Under Page Range, in the lower right area of the dialog box, do any of the following:
• To crop all pages in the PDF, select All.
• To crop only one page or a range of pages, select From, and enter page numbers in the From and To options.
• To crop only every other page, choose either Odd Pages Only or Even Pages Only from the Apply To menu.
Otherwise, leave Even And Odd Pages selected.
Note: If you select a range of pages to be cropped, the odd- or even-pages setting applies only within that range.
Otherwise, it applies to all pages in the document.
Because the Crop property is selected by default, the margin values that you specify determine the final Crop
boundary. The dialog box displays each selected property as a differently colored box in the preview area. Select
Show All Boxes to preview all properties at once. Select each property that you want to adjust.
Crop a page with the Crop tool
1 Choose Tools > Advanced Editing > Crop Tool.
2 Drag a rectangle on the page you want to crop. If necessary, drag the corner handles of the cropping rectangle until
the page is the size you want.
3 Double-click inside the cropping rectangle.
The Crop Pages dialog box opens, indicating the margin measurements of the cropping rectangle and the page to be
cropped. You can override these settings or apply other options by making new selections in the dialog box before
clicking OK.
Crop Pages dialog box settings
Show All Boxes Shows the black, red, green, and blue rectangles indicating the CropBox, ArtBox, TrimBox, and
BleedBox on the page thumbnails. When two (or more) margins coincide, only a colored line appears.
CropBox Defines the boundary for the contents of a page when it’s displayed or printed. If not otherwise specified
(for example, in the JDF settings), the crop boundary determines how page contents are positioned on the output
medium.
ArtBox Defines the meaningful content of the page, including white space.
TrimBox Defines the finished dimensions of the page after trimming.
BleedBox Definestheclippingpathwhenthepageisprintedprofessionally to allowfor papertrimmingand folding.
Printing marks may fall outside the bleed area.
Remove White Margins Crops the page to the artwork boundary. This option is useful for trimming the edges of
presentation slides saved as PDFs.
Set To Zero Restores the crop margins to zero.
Revert To Selection Reverts to the crop margin selected with the Crop tool.

135
ADOBE ACROBAT 8 PROFESSIONAL
User Guide
Undo cropping
CroppingaPDFdoes notreducefilesizebecauseinformationismerelyhidden, notdiscarded.Byresettingthepage
size, you can restore the page and its content to its original condition.
1 Open the Crop Pages dialog box by choosing one of the following:
• Document > Crop Pages.
• Crop Pages from the Options menu on the Pages panel.
2 Reset the margins to the original dimensions.
Rearranging pages in a PDF
Rotate a page
You can rotate all or selected pages in a document. Rotation is based on 90˚ increments.
1 Open the Rotate Pages dialog box using one of the following methods:
• Choose Document > Rotate Pages.
• From the Options menu on the Pages panel, choose Rotate Pages.
2 For Direction, select the amount and direction of the rotations: Counterclockwise 90 Degrees, Clockwise 90
Degrees, or 180 Degrees.
3 For Pages, specify whether all pages, a selection of pages, or a range of pages are to be rotated.
4 From the Rotate menu, specify even pages, odd pages, or both, and select the orientation of pages to be rotated.
To te
origin
mporarily change your view of the page, choose View > Rotate View > Clockwise or Counterclockwise. The
al page orientation is restored the next time you open the PDF.
Extract pages in a PDF
Extraction is the process of reusing selected pages of one PDF in a different PDF. Extracted pages contain not only
the content but also all form fields, comments, and links associated with the original page content.
You can leave the extracted pages in the original document or remove them during the extraction process—compa-
rable to the familiar processes of cutting-and-pasting or copying-and-pasting, but on the page level.
Note: Any bookmarks or article threading associated with pages are not extracted.
1 Open the PDF in Acrobat and choose Document > Extract Pages.
2 Specify the range of pages to extract.
3 In the Extract Pages dialog box, do one or more of the following before you click OK:
• To remove the extracted pages from the original document, select Delete Pages After Extracting.
• To create a single-page PDF for each extracted page, select Extract Pages As Separate Files.
• To leave the original pages in the document and create a single PDF that includes all of the extracted pages, leave
both check boxes deselected.
4 If a message appears asking you to confirm the deletion, click Yes to delete the extracted pages from the original
PDF, or click No to go back to the Extract Pages dialog box.

136
ADOBE ACROBAT 8 PROFESSIONAL
User Guide
The extracted pages are placed in a new document named Pages From [original document name]-[n].
Note: The creator of a PDF document can set the security to prevent the extraction of pages. To view the security settings
for a document, choose File > Properties, and select Security.
See also
“Extract component files in a PDF package” on page 123
Move or copy a page
You can use page thumbnails to copy or move pages within a document and between documents.
When you drag a page thumbnail in a Pages panel, a bar appears near other thumbnails, indicating the position in
whichitwillappearinthePDF.Thisbarappearsatthebottomortopwhenthethumbnailsareinasinglecolumn,
or to the left or right if more than one column of thumbnails is displayed.
Note: Tagged bookmarks affect the order that reading devices follow, such as devices for the visually impaired. Tagged
bookmarks do not change the sequence of pages in a PDF.
See also
“Insert one PDF into another” on page 124
“About tags, accessibility, reading order, and reflow” on page 289
Move or copy a page within a PDF, using page thumbnails
1 Click the Pages button to open the Pages panel, and select one or more page thumbnails.
2 Do one of the following:
• To move a page, drag the page number box of the corresponding page thumbnail or the page thumbnail itself to
the new location. A bar appears to show the new position of the page thumbnail. The pages are renumbered.
• To copy a page, Ctrl-drag/Option-drag the page thumbnail to a second location.
Move or copy a page between two PDFs, using page thumbnails
1 Open both PDFs, and display them side by side.
2 Open the Pages panels for both PDFs, and do one of the following:
• To copy a page, drag the page thumbnail into the Pages panel of the target PDF. The page is copied into the
document, and the pages are renumbered.
• To remove a page from one PDF and insert it into another PDF, select the page thumbnail and Ctrl-drag/Option-
drag it into the Pages panel of the target PDF. The page is inserted into the target document and deleted from the
source document. The pages are renumbered.
Delete or replace a page
You can replace an entire PDF page with another PDF page. Only the text and images on the original page are
replaced. Any interactive elements associated with the original page, such as links and bookmarks, are not affected.
Likewise, bookmarks and links that may have been previously associated with the replacement page do not carry
over. Comments, however, are carried over and are combined with any existing comments in the document.
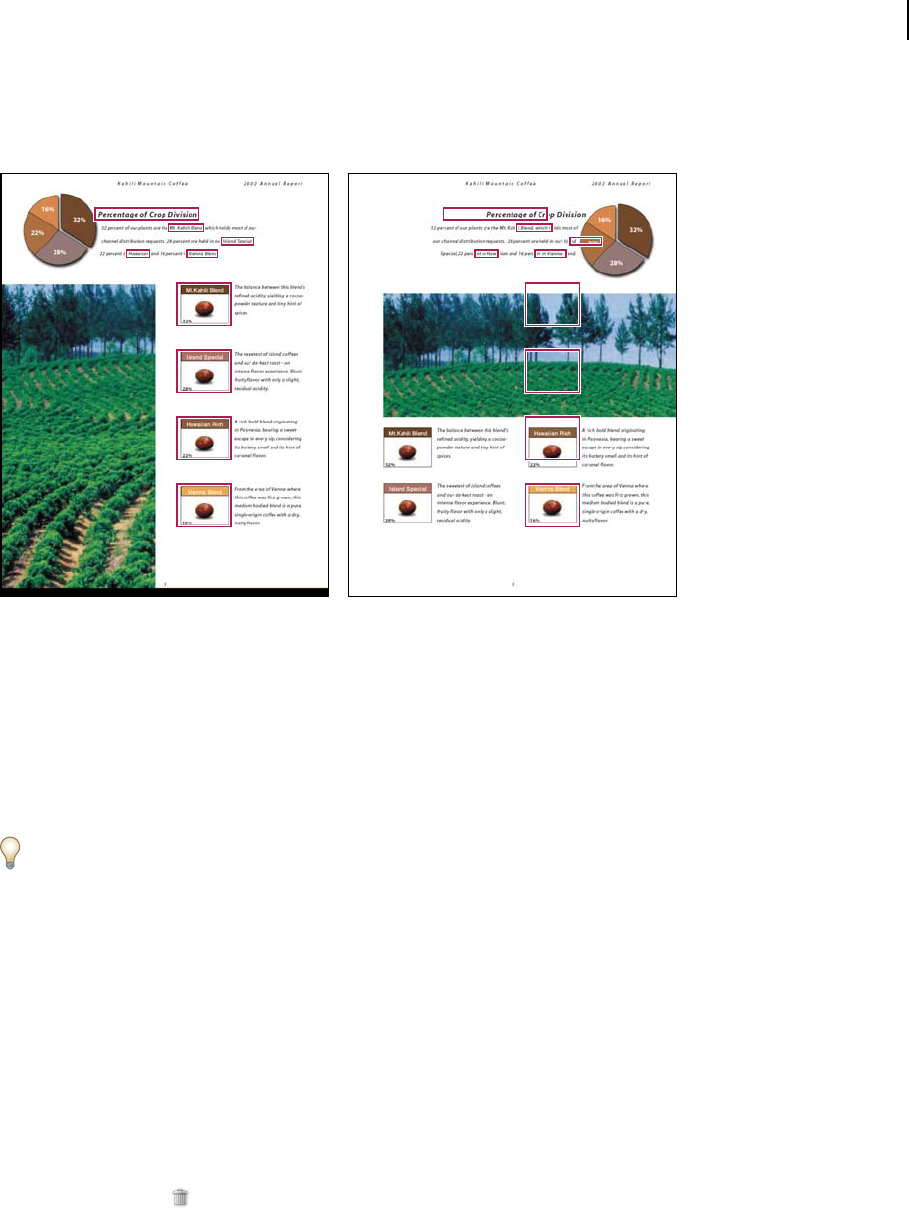
137
ADOBE ACROBAT 8 PROFESSIONAL
User Guide
After you delete or replace pages, it’s a good idea to use the Reduce File Size command to rename and save the
restructured document to the smallest possible file size.
A page before and after it is replaced. The page’s bookmarks and links remain in the same locations.
Delete pages, using the Delete command
Note: You cannot undo the Delete command.
1 Choose Document > Delete Pages.
2 Enter the page range to be deleted, and click OK.
You cannot delete all pages; at least one page must remain in the document.
If
nu
youselectUseLogicalPageNumbersin thePageDisplaypanelofthePreferencesdialogbox,you canenterapage
mber in parentheses to delete the logical equivalent of the page number. For example, if the first page in the
document is numbered i, you can enter (1) in the Delete Pages dialog box, and the page is deleted.
Delete pages, using page thumbnails
1 In the Pages panel, select a page or group of pages:
• Select the page number box of the thumbnail or the page thumbnail itself.
• Shift-click to select a range of page thumbnails. Ctrl-click/Command-click to add to the selection. Or, in
Windows, press Ctrl+A to select all thumbnails, and then Ctrl-click to deselect the pages that you want to keep.
• Drag a rectangle around a group of page thumbnails.
2 Do one of the following:
• Choose Delete Pages from the Pages panel Options menu, and click OK.
• Click the trash icon at the top of the Pages panel.
Delete material associated with a tagged bookmark
1 In the Bookmarks panel, click the tagged bookmark for the material you want to delete. Shift-click to select
multiple bookmarks.

138
ADOBE ACROBAT 8 PROFESSIONAL
User Guide
2 Choose Delete Page(s) from the Options menu. The tagged bookmark and its associated page are deleted from
the document.
Replace the contents of a page
1 Open the PDF that contains the pages you want to replace.
2 Choose Document > Replace Pages.
3 Select the document containing the replacement pages, and click Select.
4 Under Original, enter the pages to be replaced in the original document.
5 Under Replacement, enter the first page of the replacement page range. The last page is calculated based on the
number of pages to be replaced in the original document.
Replace pages using a page thumbnail
1 Open the PDF that contains the pages you want to replace, and then open the PDF that contains the replacement
pages.
2 In the Pages panel of the PDF that contains the replacement pages, select a page or group of pages:
• Select the page number boxes of the page thumbnails that you want to use as replacement pages.
• Shift-click to select multiple page thumbnails. Ctrl-click/Command-click to add to the selection.
• Drag a rectangle around a group of page thumbnails.
3 DragtheselectedpagethumbnailsontothePagespanelofthetargetdocument.Releasethe mousebuttonwhen
the pointer is directly over the page number box of the first page thumbnail you want to replace so that these pages
become highlighted.
Thepagesyouselectedinthefirstdocumentreplacethesamenumberofpagesintheseconddocument, starting at
the page number you selected to drop the new pages on.
Renumber pages
Thepagenumbersonthedocumentpagesdonotalwaysmatch thepagenumbersthatappearbelowthe pagethumb-
nails and in the Page Navigation toolbar. Pages are numbered with integers, starting with page 1 for the first page of
the document. Because some PDFs may contain front matter, such as a copyright page and table of contents, their
body pages may not follow the numbering shown in the Page Navigation toolbar.
Printed page numbering (top) compared to logical page numbering (bottom)
You can number the pages in your document in a variety of ways. You can specify a different numbering style for
groups of pages, such as 1, 2, 3, or i, ii, iii, or a, b, c. You can also customize the numbering system by adding a prefix.
For example, the numbering for chapter 1 could be 1-1, 1-2, 1-3, and so on, and for chapter 2, it could be 2-1, 2-2, 2-
3, and so on.

139
ADOBE ACROBAT 8 PROFESSIONAL
User Guide
Usi
pa
ng the Number Pages command affects only the page thumbnails on the Pages panel. You can physically add new
ge numbers to a PDF using the headers and footers feature.
1 Click the Pages button to open the Pages panel, and choose Number Pages from the Options menu.
2 Specify a page range. (Selected refers to pages selected in the Pages panel.)
3 Select one of the following, and then click OK:
Begin New Section Starts a new numbering sequence. Choose a style from the pop-up menu, and enter a starting
page number for the section. Specify a prefix, if desired.
Extend Numbering Used In Preceding Section To Selected Pages Continues the numbering sequence from previous
pages without interruption.
See also
“Add and edit headers and footers” on page 125
140
Chapter 5: Exporting PDFs
If you don’t have access to the source files that created an Adobe PDF, you can still copy images and text from the
PDF to use elsewhere, or export the PDF to a reusable format. You can also export images in a PDF to another format.
Quickstart
Following are overview steps to some common conversion tasks.
Export as Word
Ifyoudon’t havetheoriginalfilefromwhichaPDFwascreated,youcansavethePDFasaWord documentthatyou
can then edit in Word.
1 Click Export in the Tasks toolbar, and then choose Word Document.
2 Click Settings to set conversion options.
Note: When you save a PDF to Word format, the resulting file isn’t equivalent to a file created in Word; some coding
information may be lost.
See also
“Export PDFs as text” on page 145
Export as HTML or XML
To easily use the content of a PDF on the web, simply convert the PDF to HTML or XML format.
1 Click Export in the Tasks toolbar, and then choose HTML Web Page or XML 1.0.
2 Click Settings to set conversion options.
You can save a PDF in HTML 3.2 format by clicking Export, and choosing More Formats > HTML 3.2.
See also
“Export PDFs” on page 142
Export as text
You can save a PDF in Rich Text Format (RTF), as accessible text, or as plain text. RTF preserves the most formatting.
Accessible text preserves such items as comments, form fields, and alternate text.
1 Click Export in t
RTF or p
he Tasks toolbar, choose More Formats, and then choose the desired text format.
2 If saving to lain text, click Settings to adjust the conversion settings.
See also
“Export PDFs as text” on page 145

141
ADOBE ACROBAT 8 PROFESSIONAL
User Guide
Select and copy text
You can copy words, lines, or columns of text from a PDF.
1 Using the Select tool , do any of the following:
• Drag across text.
• Double-click or triple-click to select a word or a line of text.
2 Move the pointer over the icon that appears next to the selected text, and then choose an option from the menu.
If you cannot select text, it may be part of an image or from a scanned document.
See also
“Select and copy text” on page 146
Select and copy an image
You can copy an image from a PDF to the clipboard or to another application, or you can save it to a file.
1
Using the Select tool , click an image or drag to select a portion of it after the pointer changes to a crosshairs icon.
2 Do any of the following:
• Drag the image into an open document in another application.
• Right-click/Control-click the image and choose Copy Image or Save Image As.
See also
“Copy images” on page 148
Take a snapshot of a page
Use the Snapshot tool to copy all selected content. Text and images are both copied as an image.
1 Choose Tools > Select & Zoom > Snapshot tool.
2 Drag on the page to select content, or click to copy the entire page.
The selected content is copied to the clipboard when you release the mouse button.
See also
“Take a snapshot of a page” on page 149

142
ADOBE ACROBAT 8 PROFESSIONAL
User Guide
Exporting PDFs to other file formats
Export PDFs
You can save a PDF to a number of different file formats, and then open and use that file in other applications. The
available formats include both text and image formats. To make a PDF compatible with earlier versions of Adobe
Acrobat and Adobe Reader, you can resave the PDF to an earlier version of the PDF format.
1 With the PDF open, do one of the following:
• Click the Export button in the Tasks toolbar and choose a file format or choose More Formats.
• Choose File > Export, and choose a file format.
• Choose File > Save As, and choose a file format from the menu.
2 Click Settings to set conversion options. (If the Settings button is unavailable, there are no options for the format
that you selected.) Click OK to apply the settings. Conversion settings can also be edited in the Convert From PDF
Preferences.
Note: These conversion settings are stored separately from the settings used with the Export All Images command.
3 Click Save to export the PDF to the selected file format.
Bydefault, thesourcefilenameisusedasthefile name,withthenewextension,and theexportedfileissavedin the
same folder as the source file. When you save a PDF in an image format, each page is saved as a separate file.
File format options
When you export PDFs to different file formats using the Save As command, each file format includes unique
conversion settings.
If yo
Con
u want to use the same settings every time you convert PDFs to a particular format, specify those settings in the
vert From PDF preferences. Choose Edit > Preferences (Windows) or Acrobat > Preferences (Mac OS), and select
Convert From PDF from the left. Select a file format from the list and click Edit Settings. (Click the Default button at
any time to revert to the default settings.)
Adobe PDF options
You can resave PDFs as optimized PDFs, using settings in the PDF Optimizer dialog box. The PDF Optimizer lets
you change the compatibility version of your PDFs so they can be viewed using older versions of Acrobat or Adobe
Reader. When you change the compatibility setting, newer features may be unavailable in the PDF. For an expla-
nation of each compatibility setting, see “PDF compatibility levels” on page 109.
PostScript or Encapsulated PostScript (EPS) options
You can export a PDF to PostScript for use in printing and prepress applications. The PostScript file includes full
DSC (Document Structuring Conventions) comments and other advanced information preserved by Adobe Acrobat
Distiller. You can also create an EPS file from any PDF for placement or opening in other applications. The options
available depend on whether you are converting a document to PostScript or EPS. (For a complete description of
PostScript options, see “PostScript options” on page 434.)
Note: If you are creating EPS files for separations, all image color spaces should be CMYK.
Printer Description File The PostScript Printer Description (PPD) provides the necessary information to format a
PostScript file correctly for a particular output device. Device Independent creates only composite (not color-
separated) PostScript or EPS files. Acrobat Default provides a starting point and reference for creating all types of

143
ADOBE ACROBAT 8 PROFESSIONAL
User Guide
PostScript and restores all default settings for the conversion. Adobe PDF 7.0 is compatible with most devices.This
option is available only for PostScript (PS) format.
ASCII or Binary Specifies the output format of image data. Binary output yields smaller files, but not all workflows
can accommodate binary output.
PostScript Specifies the level of PostScript compatibility. Use Language Level 3 only if the target output device
supports it. Language Level 2 is suitable for EPS files that will be placed in another document and color-separated as
part of that document. Use Language Level 2 for EPS files that you import into Microsoft applications.
Page Range Specifies the pages you want to export. When you export files to EPS output, each page in the range is
saved as a separate EPS file.
HTML or XML options
When you export a PDF file to HTML or XML format, any images in PDF are converted to JPEG format.
Encoding Refers to the binary values, based on international standards, used to represent the text characters. UTF-
8 is a Unicode representation of characters using one or more 8-bit bytes per character; UTF-16 represents characters
using 16-bit bytes. ISO-Latin-1 is an 8-bit representation of characters that is a superset of ASCII. UCS-4 is a
Universal Character Set coded in 4 octets. HTML/ASCII is a 7-bit representation of characters developed by ANSI.
Use Mapping Table Default uses the default character encoding defined in mapping tables, which appear in the Plug-
ins/SaveAsXML/MappingTables folder. These mapping tables specify many characteristics of how the data is output,
including the following default character encodings: UTF-8 (Save as XML or HTML 4.0.1) and HTML/ASCII (Save
as HTML 3.2).
Generate Bookmarks Generates bookmark links to content for HTML or XML documents. Links are placed at the
beginning of the resulting HTML or XML document.
Generate Tags For Untagged Files Generates tags for files that are not already tagged, such as PDFs created using
Acrobat 4.0 or earlier. If this option is not selected, untagged files are not converted.
Note: Tags are applied only as part of the conversion process and are discarded after the conversion. This is not a method
for creating tagged PDFs from legacy files.
Generate Images Controls how images are converted. Converted image files are referenced from within XML and
HTML documents.
Use Sub-Folder Specifies the folder in which to store generated images. The default is Images.
Use Prefix Specifiestheprefixaddedtotheimagefilenamesifyouhaveseveralversionsof thesameimagefile.File
names assigned to images have the format filename_img_#.
Output Format Specifies the final format. The default is JPG.
Downsample To Downsamples image files to the specified resolution. If you do not select this option, image files
have the same resolution as in the source file. Image files are never upsampled.
JPEG and JPEG2000 options
If y
ch
our PDF contains a collection of images, you can export them individually as JPEG, PNG, or TIFF files by
oosing Advanced > Document Processing > Export All Images.
Note that the options available depend on whether you are exporting a document to JPEG or JPEG2000.
Grayscale/Color Specifies a compression setting that balances file size with image quality. The smaller the file, the
lesser the image quality.

144
ADOBE ACROBAT 8 PROFESSIONAL
User Guide
Tile Size Divides the image being compressed into tiles of the given size. (If the image height or width is not an even
multiple of the tile size, partial tiles are used on the edges.) Image data for each tile is individually compressed and
can be individually decompressed. The default value of 256 is recommended. This option is available only for
JPEG2000 format.
Format Determines how the file is displayed. Available only for JPEG format.
• Baseline (Standard) Displays the image when it has fully downloaded. This JPEG format is recognizable to most
web browsers.
• Baseline (Optimized) Optimizes color quality of the image and produces smaller file sizes but is not supported by
all web browsers.
• Progressive (3 scans-5 scans) Downloads the image first as a low-resolution image, with incremental quality
improvements as downloading continues.
RGB/CMYK/Grayscale Specifiesthetypeofcolormanagementtobeappliedtotheoutputfileandwhethertoembed
an ICC profile.
Note: If you use the Save As or Export All Images command on a PDF that contains JPEG and JPEG2000 images, and
export the content to JPEG or JPEG2000 format, the resulting image may look different when opened in Acrobat. This
can happen if the images have a color profile included at the page level but not inside the image data. In this case, Acrobat
cannot bring the page-level color profile into the resulting saved image.
Colorspace/Resolution Specifies a color space and resolution for the output file. You can let Acrobat determine these
settings automatically. To convert color images in the file to shades of gray, choose Grayscale.
Note: Higher resolutions, such as 2400 pixels per inch (ppi), are suitable only for small page sizes (up to 6.826 inches or
173.380 millimeters).
PNG options
PNG format is useful for images that will be used on the web.
Interlace Specifies if the image is interlaced. None creates an image that displays in a web browser only after
downloading is complete. Adam7 creates an image that displayslow-resolutionversionsinabrowserwhilethefull
image file is downloading. Adam7 can make downloading time seem shorter and assures viewers that downloading
is in progress; however, it increases file size.
Filter Lets you select a filtering algorithm.
• None Compresses the image without a filter. Recommended for indexed-color and bitmap-mode images.
• Sub Optimizes the compression of images with even horizontal patterns or blends.
• Up Optimizes the compression of images with even vertical patterns.
• Average Optimizes the compression of low-level noise by averaging the color values of adjacent pixels.
• Paeth Optimizes the compression of low-level noise by reassigning adjacent color values.
• Adaptive Applies the filtering algorithm—Sub, Up, Average, or Paeth—best suited for the image. Select Adaptive
if you are unsure of which filter to use.
RGB/CMYK/Grayscale Specifies the type of color management for the output file and whether to embed an ICC
profile.
Colorspace/Resolution Specifies a color space and resolution for the output file. You can let Acrobat determine these
settings automatically. To convert color images in the file to shades of gray, choose Grayscale.

145
ADOBE ACROBAT 8 PROFESSIONAL
User Guide
Note: Higher resolutions, such as 2400 ppi, are suitable only for small page sizes (up to 6.826 inches or 173.380 milli-
meters).
TIFF options
TIFF is a flexible bitmap image format supported by virtually all paint, image-editing, and page-layout applications.
Resolution is determined automatically.
Monochrome Specifies a compression format. CCITTG4 is the default and generally produces the smallest file size.
ZIP compression also produces a small file.
Note: Some applications cannot open TIFF files that are saved with JPEG or ZIP compression. In these cases, LZW
compression is recommended.
RGB/CMYK/Grayscale/Other Specifies the type of color management for the output file.
Colorspace/Resolution Specifies a color space and resolution for the output file. You can let Acrobat determine these
settings automatically. To convert color images in the file to shades of gray, choose Grayscale.
Note: Higher resolutions, such as 2400 ppi, are suitable only for small page sizes (up to 6.826 inches or 173.380 milli-
meters).
Export PDFs as text
If youhaveaPDFversionof adocument,butyou don’thavetheoriginal applicationfile,youcanexportthetextto
Rich Text Format (RTF), a standard for exchanging content between text-editing applications, or Microsoft Word
format. Images in the PDF are saved by default in JPEG format. The text file you obtain when you export a PDF to
RTF or Word format is not equivalent to the source file in the authoring application. Some coding information may
be lost in the conversion.
You can also export a PDF to plain text or accessible text. Accessible text follows the reading order preference selected
in the Reading preferences, and includes comments and form fields in its output. Accessible text also includes some
formatting, such as line breaks. Any alternate text in the document tags is used in place of images and figures. Plain
text follows the structure order of text in the document and ignores all artifacts and figure elements in the
conversion. Hard hyphens are preserved, and soft hyphens are removed.
1 Do one of the following:
• Click the Export button in the Tasks toolbar, and choose Word Document.
• Choose File > Save As, and then choose a text format: Microsoft Word Document (*.doc); Rich Text Format
(*.rtf); Text (Accessible) (*.txt); or Text (Plain) (*.txt).
2 Click Settings, select the options you want, click OK, and click Save.
Word and RTF options
(For a list of plain text options, see the options for HTML and XML.)
Include Comments Preserves PDF comments.
Include Images Includes images in the final output. The default image format is JPEG.
Output Format Specifies the image format. Select JPEG or PNG, and then select the color space and resolution
options.
Use Colorspace Specifies the color space. You can choose Color or Grayscale, or let the color space be determined
automatically.
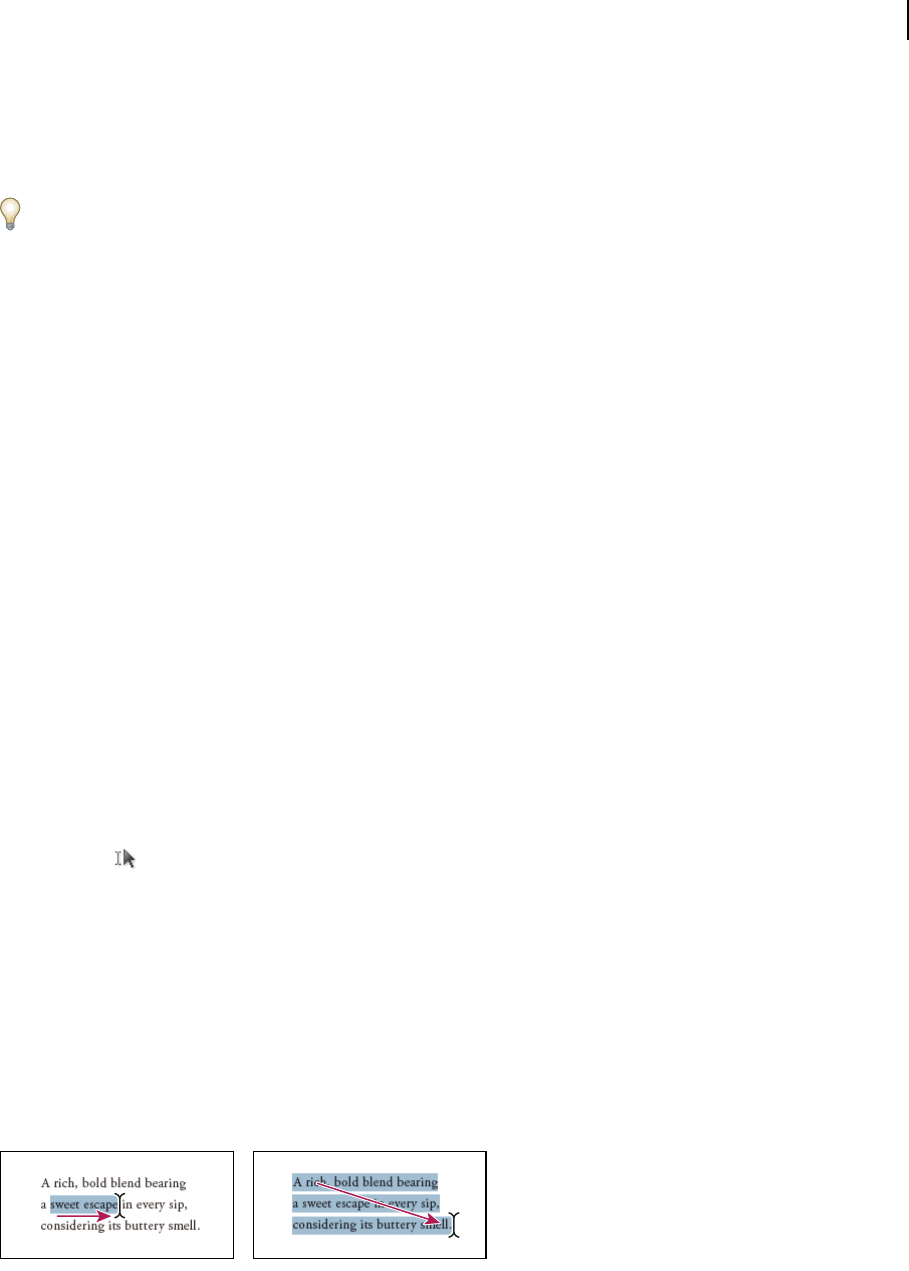
146
ADOBE ACROBAT 8 PROFESSIONAL
User Guide
Change Resolution Downsamples images. If you do not select this option, images are created at the same resolution
as in the PDF.
Downsample To Specifies the resolution for downsampling images. Images are never upsampled.
You can export multiple PDFs to RTF using the Advanced > Document Processing > Batch Processing command.
Export images to another format
In addition to saving every page (all text, images, and vector objects on a page) to an image format using the File >
Save As command, you can export each image in a PDF to an image format.
Note: You can export raster images, but not vector objects.
1 Choose Advanced > Document Processing > Export All Images.
2 In the Export All Images As dialog box, choose a file format for the images.
By default, exported image files use the source file name.
3 Click Settings.
4 In the Export All Images As Settings dialog box, select the file settings, color management, and conversion settings
for the file type.
5 For Exclude Images Smaller Than, select the smallest size of image to be extracted. Select No Limit to extract all
images.
6 Click OK. In the Export All Images As dialog box, click Save or OK.
Reusing PDF content
Select and copy text
TheSelecttool lets youselecthorizontaland verticaltextorcolumnsoftextinaPDF.YoucanusetheCopyand
Paste commands to copy the selected text into another application. If you hold the pointer over the text selection, a
menu appears that lets you copy, highlight, or underline the text, among other options. Note the following:
• If you’re unable to select text, the text may be part of an image. Export image text to text that can be selected by
using either the File > Create PDF > From Scanner command or the Document > OCR Text Recognition >
Recognize Text Using OCR command.
• If the Cut, Copy, and Paste commands are unavailable when you select text, the author of the PDF may have set
restrictions against copying text.
• If the text you copy uses a font that isn’t available on your system, the font will be substituted with a close match
or a default font.
Select text by dragging from an insertion point to an end point (left) or by dragging diagonally over text (right).
147
ADOBE ACROBAT 8 PROFESSIONAL
User Guide
See also
“Open secured PDFs” on page 247
Select a word or line of text
1 Move the Select tool over the text you want to select. When the pointer changes to the I-beam icon , do one
of the following:
• Drag across the text to be selected. (You can also click to create an insertion point, and Shift-click to create a
second insertion point. The text between the two insertion points is selected.)
• Double-click to select a word.
• Triple-click to select a line of text.
2 Ifyouwanttoextendaselectionletterbyletter, pressShiftandanarrowkey.Toextendaselectionwordbyword,
press Shift+Ctrl (Windows) or Shift+Command (Mac OS) and an arrow key.
Select a column of text
1 Using the Select tool , m
sed, the
ove the pointer toward a column of text. When the pointer changes to a vertical bar
with a box superimpo Select tool is in column select mode.
Yo
rec
ucanforcecolumnselectmodebypressing theAltkey(Windows)ortheCommandkey(MacOS)as youdraga
tangle over the column of text.
2 Drag a rectangle over the column of text. To select text in more than one column, drag from the beginning of the
text in one column to the end of text you want to select.
Select all the text on a page
1 Choose View > Page Display > Single Page.
2 Do one of the following:
• Choose Edit > Select All.
• Select any text on the page and then press Ctrl+A (Windows) or Command+A (Mac OS).
• Click four times in the text. This method selects all the text on the page regardless of the page layout.
Note: If you choose any other page layout, all the text in the document is selected.
Copy selected text
1 Use the Select tool to select any amount of text on the page.
2 Copy the text:
• Choose Edit > Copy to copy the selected text to another application.
• Hold the pointer over the selection until a menu appears, and then select Copy.
• Hold the pointer over the selection until a menu appears, and then choose Copy To Clipboard or Copy With
Formatting. (Copy With Formatting, which preserves the column layout, appears only if the document is tagged
properly.)
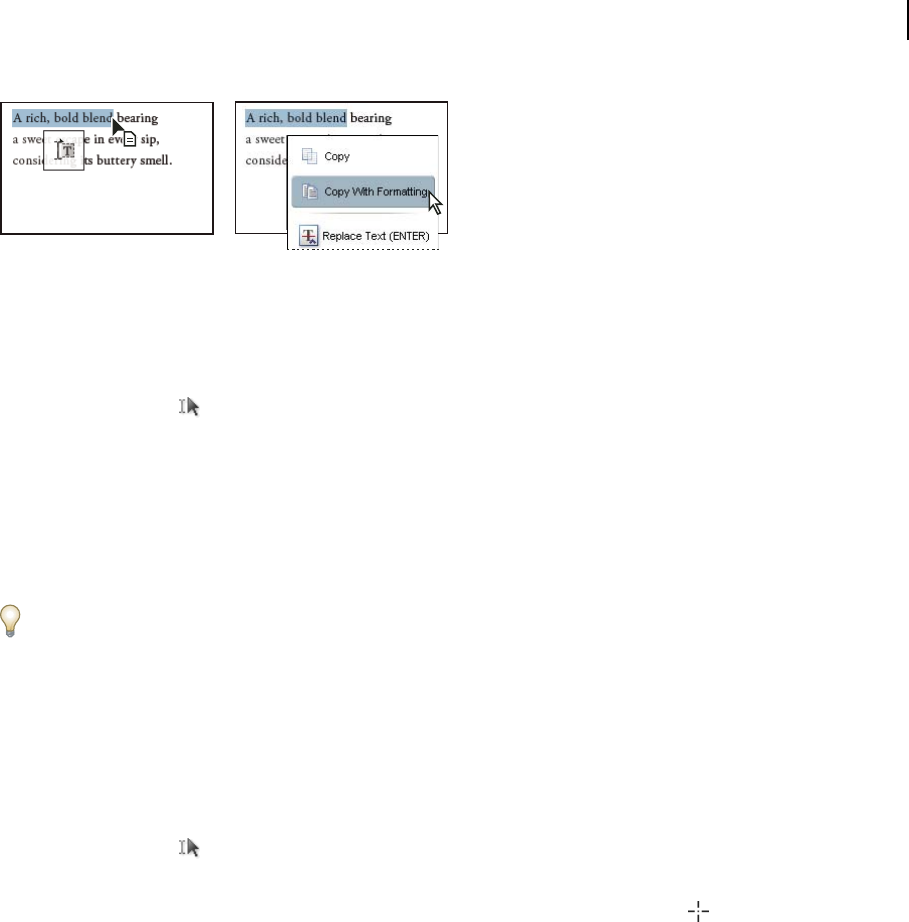
148
ADOBE ACROBAT 8 PROFESSIONAL
User Guide
A menu appears when you hold the pointer over selected text.
You can paste copied text into comments and bookmarks as well as into documents authored in other applications.
Copy tables and charts
1 Using the Select tool , hi
-click t
ghlight the entire table or the rows and columns to be copied.
2 Right-click/Control he selection, and choose one of the following options:
Copy As Table Preserves formatting when you copy the table to Excel. In Excel, use the Paste Special command and
select XML Spreadsheet.
Save As Table Lets you paste the table to a new file.
Open Table In Spreadsheet Opens the table in a CSV-compliant application, such as Excel.
To copy a table in RTF, drag the selected table into an open document in the target application.
Copy images
You can copy and paste individual images from a PDF to the clipboard (Windows only), to another application, or
to a file using the Select tool.
Ifyoucannotselectanimagebecauseofoverlappingtext,chooseEdit>Preferences(Windows) or Acrobat>Prefer-
ences (Mac OS), select General on the left, and select the Make Select Tool Select Images Before Text option.
1 Using the Select tool , do one of the following:
• To select the entire image, click it or drag a rectangle around it.
• To select a portion of an image, hold the pointer over the image until the crosshairs icon appears, and then
drag a rectangle around the portion.
Note: To deselect an image and start over, click outside it.
2 Copy the image:
• Choose Edit > Copy, and then choose Edit > Paste to paste the image in an open document in another application.
• Right-click/Control-click the image and choose an option to copy the image to the clipboard or to a new file.
• Drag the image into an open document in another application.
See also
“Export images to another format” on page 146

149
ADOBE ACROBAT 8 PROFESSIONAL
User Guide
Take a snapshot of a page
You can use the Snapshot tool to copy all selected content (text, images, or both) to the clipboard or to another appli-
cation. Text and images are copied as an image.
1 Select the Snapshot tool by
:
choosing Tools > Select & Zoom.
2 Do one of the following
• Click anywhere in the page to capture the entire content displayed on the screen.
• Drag a rectangle around the text or images, or a combination of both.
• Drag a rectangle within an image to copy just a portion of the image.
Colors in the selected area are inverted momentarily to highlight the selection. The selection is copied automatically
to the clipboard when you release the mouse button. If a document is open in another application, you can choose
Edit > Paste to paste the copied selection directly into the target document.
You can save all the images from a PDF. See “Export images to another format” on page 146

150
Chapter 6: Review and comment
You can conduct reviews for many types of content by sending out an Adobe PDF version of the source document
for others to review, or by posting a PDF to a shared server. Reviewers add their comments to the PDF using
commenting and markup tools and then send, or upload, their comments.
If you create documents in Microsoft Word for Windows or Autodesk AutoCAD, you can import comments directly
into the source document to revise the content.
Quickstart
The following steps provide a quick overview of common review and commenting tasks.
Start an email review
An email-based review lets you track review status and merge received comments into the PDF.
1 Click Review & Comment an
entity i
d choose Attach For Email Review.
2 If prompted, enter your id nformation to create a reviewer profile.
3 Follow the on-screen instructions to select the PDF, invite reviewers, and send the email invitation.
If your email application doesn’t send email automatically, you may need to answer alert messages and switch to your
email application to finish sending the message.
See also
“Start an email-based review” on page 158
Start a shared review
A shared review allows reviewers, including those using Adobe Reader, to see and respond to others’ comments
during the review.
Important: To conduct a shared review, you and your reviewers need write access to a shared comment server.
1 Click Review & Comment an
entity i
d choose Send For Shared Review.
2 If prompted, enter your id nformation to create a reviewer profile.
3 Follow the on-screen instructions to select (or add) a server, select the PDF, invite reviewers, and send the email
invitation.
See also
“Start a shared review” on page 157

151
ADOBE ACROBAT 8 PROFESSIONAL
User Guide
Invite additional reviewers
Ifyouinitiated areview,youcaninvite more reviewers.Ifyouare areviewer,asktheinitiatortoaddreviewerssothe
initiator can track all reviewers and receive notification when comments are received.
1 Click Review & Comment , and choose Review Tracker.
2 Select the desired PDF under Reviews I’ve Sent, and click Add Reviewers.
3 Follow the on-screen instructions to add email addresses, change the message as needed, and send the invitation.
See also
“Invite additional reviewers” on page 160
Track and manage reviews
The Review Tracker provides information for all documents that you’ve sent and received for review. Use the Review
Tracker to rejoin a review, send a reminder, or invite additional reviewers.
1 Click Review & Comment , an
the left.
d choose Review Tracker.
2 Select the desired PDF on
3 Do any of the following:
• To rejoin a review, double-click the PDF.
• To send a message, click Email All Reviewers or Email Initiator.
• To invite additional reviewers, click Add Reviewers.
See also
“Tracking PDF reviews” on page 165
Start a meeting
If you have an Adobe Acrobat Connect account, you can start a meeting to review PDFs in a web browser. You can
also create a trial account to start a meeting.
Note: Acrobat Connect is not available in all languages.
1 Click Start Meeting in
hen typ
the Tasks toolbar.
2 Click Log In, and t e your Meeting URL, login, and password. (Or click Create Trial Account and follow
the on-screen instructions.)
3 Click Send An E-mail Invitation or Share My Screen.
See also
“Start a meeting” on page 160
Participate in an email review
When youopenthePDFattachmentinanemail review,atrackedcopyofthePDFopenswithadocumentmessage
bar, a Send Comments button, and a Comment & Markup toolbar.

152
ADOBE ACROBAT 8 PROFESSIONAL
User Guide
Important: If you’re prompted to connect to a server when you open the PDF, you’ve been invited to a shared review.
1 Open the PDF attachment from your email application.
2 Use commenting tools to add comments.
3 Save the PDF, and then click Send Comments.
See also
“Review a PDF” on page 161
Participate in a shared review
When you open the shared PDF, commenting tools and a document message bar with instructions also open.
1 Open the PDF attachment or link.
2 Click Connect, and type your login name and password, if prompted.
3 Type your name, email address, and job title to create a reviewer profile, if prompted.
4 Add comments.
5 When you want to share your comments, click Publish Comments.
In a shared review, you can see all reviewers’ comments that have been published.
See also
“Review a PDF” on page 161
Add a sticky note
The sticky note is the most common type of comment.
1 Click Review & Comment in the Tasks toolbar, and then choose Add Sticky Note.
2 Type your comment in the pop-up note. (Your comment remains if you close the note.)
3 (Optional) Drag the sticky note icon or pop-up window to a new location.
You can also add other types of comments, such as markups and text edits.
See also
“Add a sticky note” on page 172
Mark up text with edits
Add editing markups to indicate where text should be inserted, deleted, or replaced.
1 Click Review & Comment , and choose Comment & Markup Tools > Text Edits Tool.
2 Select the text you want to edit or place the insertion point where you want to add text.
3 Move thepointerover theiconthatappears,and chooseanoption fromthepop-upmenu, orsimplybegintyping.
See also
“Mark up text with edits” on page 173

153
ADOBE ACROBAT 8 PROFESSIONAL
User Guide
Create drawing markups
You can add lines, arrows, and shapes to a PDF by using the drawing markup tools.
1 Choose Tools > Comment & Markup, and choose the desired tool.
2 Draw in the PDF. For example, click and drag to form a line, arrow, or rectangle.
3 (Optional) Using the Select tool, double-click the markup, and then type a comment in the pop-up note.
To change properties, such as line color and width, right-click/Control-click the markup and choose Properties.
See also
“Add a line, arrow, or shape” on page 177
Preparing for a PDF review
Choosing a review type
Whileyou cansendoutaPDFforreviewthrough email,it’s easiertosetupamanagedreviewusingawizard.That
way you don’t have to do the work of importing comments, enabling commenting for Adobe Reader users, or
manually tracking reviewer responses.
Note: Acrobat Professional is required to enable commenting for Adobe Reader users in shared reviews and email-based
reviews.
Acrobat includes three types of managed reviews. Each type of review has a wizard that helps you distribute a PDF
with special tools and instructions to reviewers. The Review Tracker tracks all managed reviews and provides access
to the PDF file and to information about the review and its participants.
Shared reviews and email-based reviews are the best choices for most document reviews. To initiate any managed
review, you need a supported email application and a mail server connection. (No additional server software is
required for shared or browser-based reviews.) In addition to managed reviews, Acrobat offers a meeting option that
lets you share your desktop with others to collaborate on documents. (See “Start a meeting” on page 160.)
Shared reviews
Shared reviews are best for groups that work behind a firewall and have access to a remote server. Shared reviews are
the most collaborative form of review because participants can read and reply to each other’s comments whether they
review the PDF locally, as an email attachment, or on a remote server. Reviewers outside the firewall can also partic-
ipate by sending their comments to a reviewer within the firewall, who then publishes them to the shared PDF.
Of all the managed reviews, shared reviews provide the most detailed information about the active review. A notifi-
cation feature lets you know when new comments are available, even when Acrobat is closed, and you’re informed
ofallrecentreviewactivityeachtimeyou openthePDF.Published comments aresavedto theserverandto thelocal
hard drive, and Acrobat synchronizes comments between these two locations at regular intervals to download all the
latest comments and changes.
Note: To view other reviewers’ comments in a shared review, you must use Acrobat 8 or Adobe Reader 8. Reviewers using
Acrobat 6.0 or 7.0 must send their comments in email. Shared reviews do not support commenting in Acrobat 3D files.
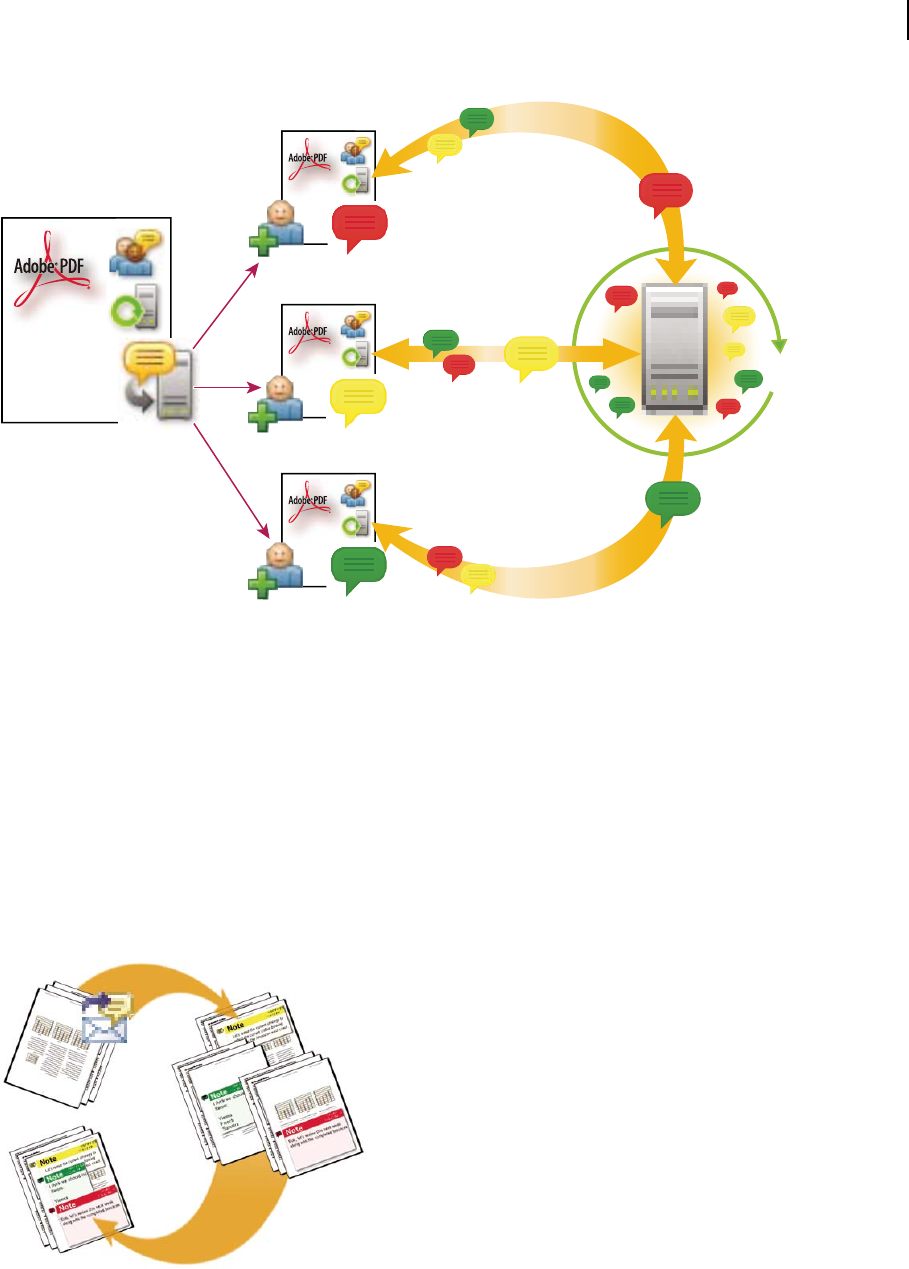
154
ADOBE ACROBAT 8 PROFESSIONAL
User Guide
In a shared review, the PDF file contains special information that lets recipients easily join the review and share their comments.
Email-based reviews
Email-based reviews are ideal for soliciting feedback from individuals who either don’t have access to a remote server
or who don’t require a collaborative approach to reviewing documents.
In an email-based review, the initiator sends a PDF to reviewers as an email attachment. Reviewers add their
comments to the PDF and return the document by using the Send Comments button in either the Comment &
Markup toolbar or the document message bar. When receiving these comments, the initiator can merge them into
their copy of the PDF.
The primary limitation to email-based reviews is that participants can’t view each other’s comments during the
review. Initiators can view comments only after receiving them.
Note: Acrobat 6.0 or later or Adobe Reader 7.0 or later is required to participate in an email-based review.
In an email-based review, participants send their comments to the initiator, who merges the comments into the master copy of the PDF.
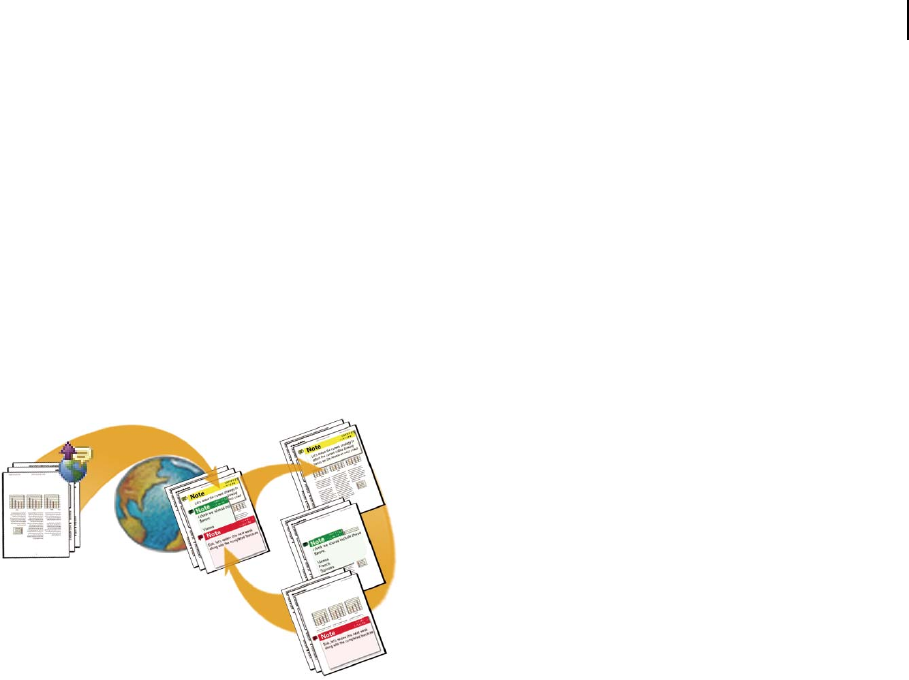
155
ADOBE ACROBAT 8 PROFESSIONAL
User Guide
Browser-based reviews
Like shared reviews, browser-based reviews are suitable for collaborative groups with access to a shared server.
Reviewers can view each other’s comments during the review process. In a browser-based review, the initiator
uploads a PDF to the server and then sends an email invitation to reviewers. The invitation includes a setup file that,
when clicked, opens the PDF in the default browser. Reviewers click the Send Comments button in the Comment &
Markup toolbar to upload their comments, which are stored in a comments repository on the shared server.
Browser-based reviews lack many of the advantages of shared reviews in terms of setup and tracking tools, and
support for network folders. In addition, Acrobat must download all comments in the PDF each time you join the
review, often a time-consuming process. For these reasons, Adobe recommends shared reviews as the preferred
collaborative method.
Note: Acrobat 6.0 or later is required to participate in browser-based reviews. (Adobe Reader users cannot participate.)
In a browser-based review, the initiator uploads a PDF to the server and sends a setup file to the reviewers, who can see each other’s comments.
Enable commenting for Adobe Reader users
By enabling commenting rights in a PDF, Adobe Reader 8 users can participate in reviews of that PDF. When a PDF
with commenting rights opens in Reader, it includes a document message bar, a How To pane with instructions, and
commenting tools that are otherwise unavailable.
❖ Use either of these methods to enable commenting for Reader users:
• In an open PDF, choose Comments > Enable For Commenting In Adobe Reader, and then save the PDF.
• Start the wizard to initiate a shared review or an email-based review and follow the on-screen instructions. When
you’re finished, commenting is enabled in the PDF that you specify for the review.
See also
“Start a shared review” on page 157
“Start an email review” on page 150

156
ADOBE ACROBAT 8 PROFESSIONAL
User Guide
Select an email application for reviews
Youneedanemailapplicationand amailserverconnectiontosendaPDFfor reviewandtosendcomments.Acrobat
supports most email applications. If more than one email application is installed on your system, Acrobat might not
start the preferred application when it sends a PDF as an attachment. To specify which application starts, do one of
the following:
• (Windows) Double-click Internet Options in the Control Panel. In the Internet Properties dialog box, select the
Programs tab, and then select the preferred email application. Restart Acrobat for the changes to take effect.
• (Windows) Change the MAPI settings in your email application. Adobe Reader uses the Messaging Application
Program Interface (MAPI) to communicate with your email application. Most email applications come with
MAPI settings to handle this communication. For more information on configuring your email applications, see
the email application’s Help.
• (Mac OS) In Mail, choose Mail > Preferences, select General, and then choose the preferred email application
from the Default Email Reader menu. Restart Acrobat for the changes to take effect. If your application isn’t listed,
choose Select from the menu and browse to the location. If you select an application that isn’t listed in the Default
Email Reader menu, Acrobat may not support it.
After you verify that Acrobat works with your email application, you can initiate a review.
Specify a server for comments
You must specify a server location to store all the comments that are submitted during a shared review or a browser-
based review. This server location is referred to as the comment server (also called a comments repository). Reviewers
must have read and write access to the comment server you specify. Ask your network administrator to provide a
suitable server location for storing comments. No additional software is required to set up a comment server.
For a shared review, you can specify a network folder, a WebDAV server, or a Windows server running Microsoft
SharePoint Services. If all reviewers are within a local area network, network folders and SharePoint servers are the
best choices for a comment server—network folders being the cheapest and most reliable. To initiate a review on a
SharePoint server, the initiator must use Windows; however, reviewers can use either Windows or Mac OS. All
participants must have read and write access to the Document Library folder within the specified workspace.
WebDAV servers (web servers that use the WebDAV protocol) are best used only if you have reviewers that are
outside of a firewall or local area network.
Forabrowser-basedreview, youcanspecifyeitheranetworkfolderoraWebDAVserver.Ifyou useanetworkfolder,
comments may not be viewable to reviewers on both platforms. Even if all reviewers use the same platform, they may
not see comments if they access the server location as a mapped drive instead of by its full file path. If you use a
WebDAV server, make sure that all reviewers have unique login names that aren’t differentiated solely by case.
Specify a server for shared reviews
❖ Start the wizard to initiate a shared review, click Add Folder, and follow the on-screen instructions.
Specify a server for browser-based reviews
1 Choose Edit > Preferences (Windows) or Acrobat > Preferences (Mac OS), and select Reviewing from the list on
the left.
2 For the Online Comments Repository, choose a server type from the menu.
3 To specify the server settings, do one of the following, and then click OK:
• Click Browse (Windows) or Choose (Mac OS) to select a network folder, and then click OK.

157
ADOBE ACROBAT 8 PROFESSIONAL
User Guide
• Type the path in the Administrator Provided Server Settings box. For example, type a WebDAV server using a web
address (such as http://server/folder), or a network folder using a UNC (Universal Naming Convention) address
(such as \\server\folder).
• If your organization subscribes to automatic configuration services, click Configure Automatically.
If the server information changes for subsequent reviews, you must respecify the location.
Starting and managing a review
Start a shared review
To conduct a shared review, you and your reviewers must have read and write access to the server you use for storing
comments. (See “Specify a server for comments” on page 156.)
The shared PDF that you send includes the Comment & Markup toolbar and instructions in the document message bar.
1 Start the setup wizard for a shared review:
• Click the Review & Comment button in the Task toolbar and choose Send For Shared Review.
• Choose Comments > Send For Shared Review.
2 If prompted, type your name, email address, and job title in the Review Profile dialog box, and click OK.
3 Choose the shared location that you’ll use to store comments, or click Add New Location. If you set up a new
location, type a descriptive name, specify the type of server (network folder, SharePoint workspace, or WebDAV
folder), and click Next. Type the full path of the folder location, using the examples in the screen, or browse to select
the folder. Verify that you have write access to that location, and then click Add Folder and click Next.
The option to enable commenting for Reader users is selected by default.
4 Select the PDF to be reviewed, and then specify whether to send it as an email attachment, or to post it on the
network and send an email invitation with a URL. If you want to distribute the PDF later or use a different method
(such as FTP), select the option to save a copy to your local hard drive. Click Next.
5 Specify reviewers by typing their email addresses, or by clicking Address Book and selecting email addresses from
aLotus NotesorMicrosoftOutlookaddressbook.Insertasemicolonorareturnbetweeneachaddress.Ifyouwant
to specify a date when the review ends, select Set Deadline, and enter the month, day, and year. Click Next.
6 Review the invitation, and then click Finish.
The shared PDF now contains the following information: the email addresses of reviewers, the path to the shared
folder, and the initiator’s profile. No matter when or how you send this PDF, each recipient gets this information,
which appears in the Welcome screen with news of recent activity when the PDF is opened.
7 If you’re sending the shared PDF as an email attachment and your email application doesn’t let you send email
automatically for security reasons, answer any alert messages that this application might return, and send the
message.
If you distribute the shared PDF after the review has started, any review comments that have been published up to
that point will appear in the file, even if the recipient doesn’t have access to the comment server.

158
ADOBE ACROBAT 8 PROFESSIONAL
User Guide
See also
“Save the PDF with comments” on page 166
Start an email-based review
When you start an email-based review, you send out a tracked copy of the PDF, enabling you to easily merge
comments that you receive. (Form fields in a PDF aren’t fillable during the review.)
Start the review
Before you start an email-based review, make sure that your email application is configured to work with Acrobat.
(See “Select an email application for reviews” on page 156.)
1 Start the email-based review wizard by using any of these methods:
• Click the Review & Comment button in the Task toolbar and choose Attach For Email Review.
• Choose Comments > Attach For Email Review.
Yo
Wo
u can also start an email-based review directly from other applications that use PDFMaker, such as Microsoft
rd. Choose Adobe PDF > Convert To Adobe PDF And Send For Review, or click the Convert To Adobe PDF And
Send For Review button. For Office 2007 applications, choose Acrobat > Create And Send For Review.
2 If prompted, enter information in the Identity Setup dialog box.
3 Specify a PDF if it isn’t already open, and then click Next. The PDF that you specify becomes the master file. You’ll
merge comments you receive from reviewers into this file.
4 Specify reviewers by typing their email addresses, or by clicking Address Book and selecting email addresses from
a Lotus Notes or Microsoft Outlook address book. Insert a semicolon or return between each address.
5
To specify that persons other than yourself receive the review comments, click Customize Review Options and type
the email addresses of those individuals in the Request That Reviewers Return Their Comments To box. Click OK.
The option to enable commenting for Reader users is selected, by default.
6 Click Next to preview the email invitation, and then click Send Invitation. If your email application doesn’t let you
send email automatically for security reasons, answer any alert messages that this application might return, and send
the message.
A copy of the PDF is sent to the reviewers as an attachment. When reviewers open this file attachment, Acrobat
presents commenting tools and a PDF that provides instructions.
Merge comments
Afteryoureceivecommentsfromreviewers,youcanmerge thecommentsintothe masterPDFsothat they’reinone
location.
1 After a reviewer sends you comments, open the attached file in your email application. If the email application
can’t find the original version of the PDF, it prompts you to browse for it.
Note: If you didn’t initiate the review and you receive comments that you want to forward to the initiator, merge these
comments into your copy of the PDF and then send them (see “Send comments in email” on page 164). If you’ve already
sent your comments, the initiator will receive only new comments. Merged comments retain the original author name.
2 If you initiated the review, the Merge Comments dialog box appears. Select one of the following options:
Ye s
Opens the master copy of the PDF and merges all comments into it. After comments are merged, save the master PDF.

159
ADOBE ACROBAT 8 PROFESSIONAL
User Guide
No, Open This Copy Only Opens the reviewer’s copy of the PDF with comments. If you select this option, you can
still merge comments by choosing Comments > Merge Comments Onto Master PDF.
Cancel Closes the reviewer’s PDF that contains comments.
You ca
the PD
n hide comments that you don’t want to merge by using the Sort menu in the Comments list. Save and reopen
F, and then select Yes in the Merge PDF dialog box.
Start a browser-based review
When you initiate a browser-based review, a PDF is uploaded to a server, and reviewers receive an email message
with a setup file in Forms Data Format (FDF). When reviewers click this file, the PDF opens in the default web
browser and review settings are configured to enable comments to be uploaded to the remote server. Uploaded
comments are stored as an FDF file in the comments repository, anonlinelocationthatisaccessibletoall reviewers.
You can set up the comments repository on the same or a different server as the uploaded PDF.
Note: Add comments to the PDF after you upload it to the server. If you add comments to the PDF before you upload it
to the server, the comments are embedded in the PDF, and you can’t edit them later.
1 Specify the comments repository in the Reviewing preferences. (See “Specify a server for comments” on
page 156.)
2 Start the setup wizard by choosing Comments > Upload For Browser Review.
3 If you’re prompted to enter information in the Identity Setup dialog box, do so.
4 Specify the PDF to upload, and then click Next.
5 Select a server, using either of these methods:
• Type the path for the server location in the text box, and click Next.
• Click Browse (Windows) or Choose (Mac OS) to select a network folder, click Save, and click Next.
You can upload the PDF to a WebDAV server using a web address (such as http://server/folder), or to a network
folder using a UNC (Universal Naming Convention) address (such as \\server\folder).
6 In the Invite Reviewers box, specify reviewers by typing their email addresses, or by selecting email addresses from
a Lotus Notes or Microsoft Outlook address book. Insert a semicolon or return between each address. Click Next.
7 Edit the invitation message as necessary, and then click Send Invitation.
8 If your email application doesn’t let you send email automatically for security reasons, make the email application
active, answer any alert messages that this application might return, and send the message.
9 To make sure that the setup is correct, add a comment to the document, and then click the Send And Receive
Comments button in the Comment & Markup toolbar. If your comments aren’t uploaded to the server, your
Reviewing preferences settings are likely incorrect. Contact your network administrator for assistance.
See also
“Save the PDF with comments” on page 166

160
ADOBE ACROBAT 8 PROFESSIONAL
User Guide
Invite additional reviewers
If you’re the review initiator, you can invite others to participate in the review. If you’re a reviewer and want other
people to participate, ask the review initiator to invite them. That way, the initiator can automatically track all partic-
ipants and receive notification when their comments are received.
1 Do one of the following:
• Choose Comments > Invite Additional Reviewers.
• Choose Comments > Review Tracker, select the PDF, and then click Add Reviewers on the right.
2 Specify the email addresses of the reviewers to be added, change the message as needed, and then send the
message.
Additional reviewers appear with other participants in the right pane of the Review Tracker.
Send a message
During a review, you may want to contact other reviewers or send them a reminder of their approaching deadline.
1 Do one of the following:
• Choose Comments > Send Review Reminder.
• Choose Comments > Review Tracker, select the PDF, and click Email All Reviewers.
2 In the email message, make changes as needed to the To and Subject boxes or in the body of the email message,
and then click Send.
Meetings
Start a meeting
From Acrobat, you can start a meeting to share your desktop and review PDF documents. Adobe Acrobat Connect
is a personal web-conference tool that you can access from Acrobat to conduct real-time meetings on your desktop.
Attendees join the meeting by logging into a web-based meeting space from their own computers.
You must have an Acrobat Connect account to start and attend meetings. You can subscribe or set up a trial account
by clicking the Start Meeting button in Acrobat to get started.
Note: Acrobat Connect is not available in all languages.
1 To start a meeting, do one of the following:
• Click the Start Meeting button.
eting.
appears, do
• Choose File > Start Me
2 In the dialog box that one of the following:
• If you have an account, click Log In. Type the Meeting URL, login, and password for your Acrobat Connect
account, and then click Log In. Your Acrobat Connect account uses your Adobe ID (your email address) for your
login.
Note: You can also use Meeting URLs for Macromedia Breeze® and Adobe Acrobat Connect Pro accounts. These
accounts require a login that is different than your Adobe ID.
• If you don’t have an account, click Create Trial Account, and follow the on-screen directions.

161
ADOBE ACROBAT 8 PROFESSIONAL
User Guide
3 Do one of the following:
• To invite participants to a meeting, click Send An E-mail Invitation, type the email addresses of those you want to
invite, and then click Send.
• To share the document that’s displayed on your screen, click Share My Screen.
As participants join the meeting, their names appear in the Attendee List.
4 Do any of the following:
• Type a message in the Chat pod, select who to send the message to, and click the Send Message button.
• Take notes in the Notes pod and send them out after the meeting.
• If you want another attendee to share his or her desktop, select that person’s name in the Attendee List, click the
Set User Role button, and choose Set As Presenter.
Attend a meeting
If you don’t have an Acrobat Connect account, you can join a meeting as a guest.
Note: Acrobat Connect is not available in all languages.
1 In the email invitation, click the URL for the meeting or type the Meeting URL in the address box of a browser.
2 Type the login and password for your Acrobat Connect account, or log in as a guest.
3 In the Acrobat Connect meeting, do any of the following:
• To send a message, type it in the Chat pod, select who to send it to, and click the Send Message button.
• To clear the Chat pod or change the font size, click the Pod Options button and choose an option.
• To take notes, type them in the Note pod.
Acrobat Connect preferences
When you start an Acrobat Connect meeting, the Meeting URL and login you provide are stored in the Acrobat
Connect preferences. To change your Acrobat Connect account settings, choose Edit > Preferences (Windows) or
Acrobat > Preferences (Mac OS), and select Meeting on the left.
The login for your Acrobat Connect account is your Adobe ID. To change your login, create a new Adobe ID on the
Adobe website.
Note: Acrobat Connect is not available in all languages.
Participating in a PDF review
Review a PDF
When you receive an email invitation to a PDF review, the invitation typically includes the PDF as an attachment or
provides a URL to the PDF. Alternatively, you may receive a Forms Data Format (FDF) attachment. When opened,
an FDF file configures your review settings and opens the PDF in a web browser.
PDFs in a review have special features, including commenting tools and a document message bar with instructions.
Use the commenting tools to add comments to the PDF and then submit them, either by publishing comments to a
comment server where others can see them, or by sending comments as an email attachment to the review initiator.

162
ADOBE ACROBAT 8 PROFESSIONAL
User Guide
Note: If you receive a PDF that doesn’t include special features, add your comments using tools from the Comment &
Markup toolbar, save the PDF, and then send it back. (See “Commenting and markup tools overview” on page 168.)
ToreviewthePDFlater, reopenitfrom theReviewTracker toensurethatyourcommentsareaddedtothetracked
copy of the PDF, and that the initiator receives your comments. If you don’t send or publish your comments right
away, save the PDF before you close it to avoid losing your comments. Until the initiator receives your comments,
they appear only in your local copy of the PDF and aren’t visible to other reviewers.
If you review a PDF using a version earlier than Acrobat 8 or Reader 8, some features may not be available.
See also
“Reply to comments” on page 182
“Rejoin a review” on page 165
“Save the PDF with comments” on page 166
Join a review
1 In your email application, open the PDF by double-clicking the attachment (PDF or FDF) or URL.
2 Do one or more of the following, if prompted:
• Click Connect in the Join Shared Review dialog box.
• Click OK in the Welcome To Shared Review window. This window tells you who’s invited to the review and if
they’ve made any comments, and it tells where the comment server is located.
• Type your login name and password for the comment server. If you don’t have access to the comment server, click
Work Offline, or click Save And Work Offline in the Comment & Markup toolbar.
• Type your name, email address, company name, and job title, if prompted.
3 Save the file to a location that you can find easily, such as the desktop.
4 Addcommentstothe PDFusing toolsinthe Comment&Markuptoolbar.Ifyouneedtodeleteacomment, select
it and press Delete. (You can delete only comments that you made.)
5 Do all of the following that apply:
• If you’re notified that new comments from other reviewers are available, click the message. New comments appear
in the PDF.
• If you want to find out if new comments are available from other reviewers, click the Check For New Comments
button
it your com
.
6 Subm ments by doing one of the following:
• Click Publish Comments in the document message bar.
• Click Send Comments or Send And Receive Comments in the Comment & Markup toolbar.
• Choose Comments > Send Comments To Review Initiator.
When you send comments, a PDF containing your comments is sent as an email attachment to the review initiator.
When you publish comments, your comments are saved to the comment server.
Options in the document message bar
The options that are available in the document message bar depend on how the initiator set up the review and
whether you can access the comment server. Similar options may also appear in the Comment & Markup toolbar.

163
ADOBE ACROBAT 8 PROFESSIONAL
User Guide
For information about the different types of reviews, see “Choosing a review type” on page 153.
Check For New Comments Prompts Acrobat to synchronize comments between the comment server and the local
hard drive. If you don’t click this button, Acrobat checks for new comments at the intervals specified in the Reviewing
preferences. This button is available only when new comments are published to the server in a shared review.
Merge Comments Copies the comments in the open PDF to your copy. This option is available only for PDFs you
receive from reviewers in email-based reviews.
Publish Comments Uploads your new comments to the comment server. This option is available only in shared
reviews.
Send Comments Creates an email message addressed to the review initiator that contains the commented PDF as an
attachment. This option is always available in email-based reviews, and it appears in shared reviews only after an
attempt to connecting to the comment server has failed.
Status Displays the connected state of the comment server. If clicked, a menu with additional options appears.
ReviewTrackeropenstheReviewTracker.SaveAsArchiveCopy savesacopyof thePDF that isnolongerconnected
to the review. Work Offline saves a copy of the PDF that is temporarily disconnected from the review. Reconnect To
Server appears only in the PDF you created by choosing Work Offline.
Check for newly published comments
When you participate in a shared review, Acrobat synchronizes published comments on your local drive with those
on the comment server, and then notifies you when new comments are available. Notifications appear as bezel-style
messages in the open PDF. In Windows, notifications also appear as balloon-style messages in the notification area
(system tray). Because synchronization continues after the PDF is closed, you’ll continue to receive notifications.
Messages in the notification area inform you when new reviewers join the review, when updates occur (multiple
reviews), and when synchronization attempts fail. They also inform you when a new broadcast subscription is added
in the Review Tracker. You can change how often messages appear and how often comments are synchronized, and
you can manually trigger the synchronization process.
View new comments
Toviewnewcomments, youmustbeabletoconnecttothenetwork wherethecommentserverislocated.Ifyoucan’t
connect, check the server status in the Review Tracker to determine the cause of the problem. (See “Check server
status” on page 167.)
❖ Do one of the following:
• Click the Check For New Comments button in
ments.
the document message bar.
• Choose Comments > Check For New Com
• Click the message in the notification area (Windows).
Change frequency of synchronization and notifications
1 Open the Reviewing preferences:
• Choose Edit > Preferences (Windows) or Acrobat > Preferences (Mac OS), and then click Reviewing on the left.
• In Windows, right-click the notification icon in the notification area, and choose Reviewing Preferences.

164
ADOBE ACROBAT 8 PROFESSIONAL
User Guide
2 Move the sliders to change the following settings:
Check For New Comments The top slider specifies (in minutes) how often comments are synchronized when a
shared PDF is open. The bottom slider specifies (in hours, weeks, days, or months) how often comments are
synchronized when a shared PDF is closed.
Show Review Tracker Alerts Specifies how often alert messages appear.
Disable notifications
❖ Do one of the following:
• Choose Edit > Preferences (Windows) or Acrobat > Preferences (Mac OS), click Reviewing on the left, move the
slider for Show Review Tracker Alerts to the far left until the value Never appears, and then click OK.
• In Windows, right-click the notification icon in
check
the notification area. If a check mark appears next to Show
Review Notifications, select that option so a mark no longer appears.
Send comments in email
If you review a PDF offline or outside of a firewall, or if you lose your connection to the comment server, you may
need to send your comments in an email message.
❖ Do one of the following:
• Clickthe Emailbuttoninthetoolbar.Typetheinitiator’semailaddressintheTotextbox,typethemessage,and
click Send.
• Choose File > Attach To Email, type the initiator’s email address, and click Send.
• Click the Send Comments button in the Comments & Markups toolbar, type the address for the initiator in the To
text box, and click Send.
Note: IfthePDF exceedsthe5MBfile-sizelimit,you’repromptedtosendyourcommentsinasmallerFormsDataFormat
(FDF) file, which the initiator can import. To adjust the limit, choose Edit > Preferences (Windows) or Acrobat > Prefer-
ences (Mac OS), select Reviewing, and enter the new value for Send Comments As FDF For Files Greater Than [#] MB.
Publish comments from other reviewers
When you participate in a review, you may receive comments from other reviewers. If a reviewer can’t access the
comment server, they may send you their comments. If you solicited feedback from individuals who weren’t initially
invitedtothereview,theymayreturnacopyofthereviewPDFtoyouwiththeircomments.By takingownershipof
the comments, you can share them with everyone in the review.
Note: If you publish comments from a reviewer who later gains access to the comments server, those comments may
appear in the PDF in duplicate.
1 Open the PDF that contains comments.
2 Do one of the following:
• Click OK when asked if you want to publish comments for this reviewer. The published comments appear in the
PDF. Your name appears in the title bar and the author’s name appears in the body of the comments, preceded by
the text “On behalf of.”
• Click Yes when asked if you want to merge comments, or click Merge Comments in the document message bar
and then click Send Comments. Add email addresses for other reviewers, as needed, and then click Send.

165
ADOBE ACROBAT 8 PROFESSIONAL
User Guide
• Choose Comments > Import Comments, and then click Send Comments. Add email addresses for other
reviewers, as needed, and then click Send.
Only new or edited comments are published or sent.
Rejoin a review
Usethe Review TrackertoreopenPDFsinanactivereview.IfyoureceivedaPDFattachmentwithanemailmessage
anddidn’tsaveitthefirsttimeyouopened it,reopenthePDFinyouremail application.OnlyPDFsthatyou’vesaved
appear in the Review Tracker.
1 Choose Comments > Review Tracker.
2 In the Review Tracker, double-click the PDF.
In shared reviews, the Welcome Back To Shared Review window shows the number of new comments that were
published since the last time you opened the PDF. Click OK to close this window.
3 Add new comments or edit existing comments. If you need to delete a comment, select it, and press Delete.
Deleted comments are removed from the online PDF the next time comments are synchronized or the browser
window is refreshed. If you delete comments that you sent in an earlier email message, they aren’t deleted in the
initiator’s document.
4 Submit your new comments by doing one of the following:
• Click Publish Comments in the document message bar.
• Click Send Comments or Send And Receive Comments in the Comment & Markup toolbar.
Only new or edited comments are published or sent.
See also
“Save the PDF with comments” on page 166
Tracking PDF reviews
Review Tracker overview
You can use the Review Tracker to manage your document reviews. From this window, you can see who’s joined a
shared review and how many comments they’ve published. You can also rejoin a review, access comment servers
used in reviews, and email participants.
The Review Tracker includes links to all PDF documents in managed reviews. Each link lists the date and time the
PDF was sent and the list of invited reviewers. Links to shared PDFs provide additional information, including the
deadline (if set) and the number of comments submitted per reviewer. Deleting a link in the Review Tracker doesn’t
delete the PDF file.
In addition totheReviewTracker panel,theReviewTrackerincludes twootherpanels whereyoucanmanageforms
and web broadcast subscriptions (known as RSS feeds). You can access these panels by clicking the Forms button or
the Subscriptions button on the left side of the window.
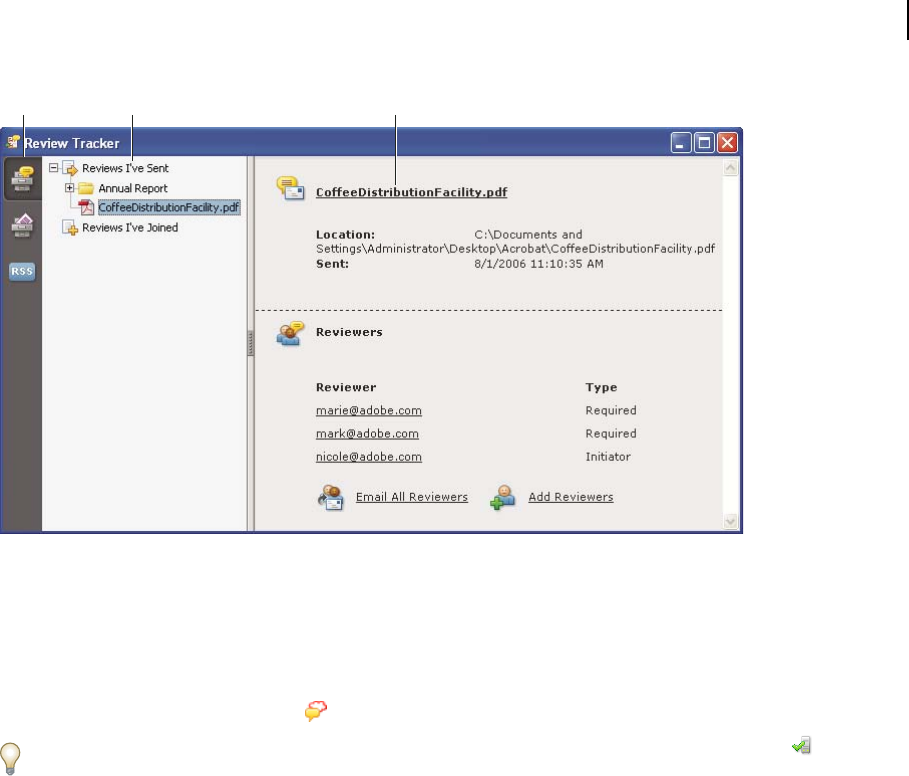
166
ADOBE ACROBAT 8 PROFESSIONAL
User Guide
A B C
Review Tracker
A. Review Tracker icon B. Reviews you initiated or received C. Information for the selected review
Open the Review Tracker
❖ Do one of the following:
• Choose Comments > Review Tracker.
• Click the Review & Comment button in the Task toolbar, and choose Review Tracker.
If
in
you’re participating in a shared review, you can open the Review Tracker by clicking the Status button menu
the document message bar of the shared PDF.
Track reviewed PDFs
1 Choose Comments > Review Tracker.
2 Expand the appropriate folder:
Reviews I’ve Sent Lists PDFs in reviews that you initiated.
Reviews I’ve Joined Contains PDFs in reviews that you’ve received. PDFs appear in this list only after you open
them.
Note: PDFs listed in bold contain comments that you haven’t yet read.
3 Select a PDF.
Informationspecificto theselectedPDF reviewappearsontheright. Shared reviewsopenasummarypagethatlists
reviewers who have joined the review and the number of new comments.
Save the PDF with comments
You can save a copy of the review PDF that contains all the comments that reviewers have published or that you’ve
imported (merged).
If the PDF is in a shared review, you can save an archive copy. The copy is no longer connected to the shared review,
and you can edit both content and comments in it.
167
ADOBE ACROBAT 8 PROFESSIONAL
User Guide
If you
includ
its connect
want to create a copy of a shared PDF to distribute to others, use the Save As command. The resulting file will
e all comments that were published up to that point, and it can be moved, copied, or renamed without affecting
ion to the review or to the comment server.
❖ To save a copy of a review PDF with all the comments, open the file, and then do one of the following:
• Forasharedreview,chooseFile > SaveAsArchiveCopy,orclicktheStatusbuttoninthedocumentmessagebar
and choose Save As Archive Copy.
• Foranemail-basedreview,chooseFile >SaveAs tosaveanew copyof thePDF.Thismostrecentlysavedversion
is now the tracked PDF. The old version is the archive copy.
• For a browser-based review, use the Save And Work Offline button in the Comment & Review toolbar to save a
copy of the PDF with all the comments to the local hard drive.
Check server status
Check the server status in a shared PDF or in the Review Tracker to determine if you can connect to the comment
server.
Check status in a shared PDF
The Status button in the document message bar indicates whether the last attempt to connect to the comment
server was successful.
1 Open the shared PDF.
2 In the upper-right corner of the document, the Status button displays either the last attempt successful icon ,
the last attempt unsuccessful icon , or the attempting to connect icon .
Check status in the Review Tracker
1 Choose Comments > Review Tracker.
2 On the left, click the plus sign (+) next to Review Servers to expand the list.
The green icon next to the server name indicates that the last synchronization attempt was successful. The red
icon i
ork,
ndicates that the last synchronization attempt was unsuccessful. The server may be disconnected from the
netw it may have problems writing data to the disk, or it may have some other problem. Contact your network
administrator for help.
Update your profile
Your comments identify you as the author by displaying your name—the name you provided when you joined or
startedareview,oryoursystemlogin.Youcanchangetheauthornameand otherprofileinformationatanytime.If
you do, your updated profile appears only in new comments; existing comments aren’t affected.
Update your review profile
s
Youcanalso update yourreviewprofilefromtheWelcomeBackToReviewwindowthatappearswhen yourejoina
hared review.
1 Choose Edit > Preferences (Windows) or Acrobat > Preferences (Mac OS).
2 To change your author name, select Commenting from the list on the left, and deselect Always Use Log-In Name
For Author Name.
3 Select Identity from the list on the left.

168
ADOBE ACROBAT 8 PROFESSIONAL
User Guide
4 Edit your profile, making sure to include the email address that you’ll use for reviews. Click OK.
Update your profile for a shared review
1 Open the shared PDF.
2 In the Welcome screen that appears, click the Edit button for Reviewer Profile.
3 Edit your profile, making sure to include a valid email address, and click OK.
If you change the name in your profile, it will appear twice—in the list of invited participants, and in the list of
uninvited participants.
Subscribe to web broadcast services
You can use the Review Tracker as a news reader by subscribing to web content that uses the RSS (Really Simple
Syndication) format, such as news feeds or music channels. RSS format is compatible with XML and RDF formats.
1 Do one of the following:
• Click the Subscriptions button on the left side of the Review Tracker. Click the Subscribe button, enter a web
address in the URL box, and then click OK.
• Click the link for an RSS service.
2 If a security warning prompts you to approve the link, click OK.
Commenting
Commenting and markup tools overview
You use commenting and markup tools (View > Toolbars > Comment & Markup) to add comments.Commentsare
notes and drawings that communicate ideas or provide feedback for PDFs. You can type a text message using the
Sticky Note tool, or you can use a drawing tool to add a line, circle, or other shape and then type a message in the
associated pop-up note. Text-editing tools let you add editing marks to indicate changes you want in the source
document. Most commenting and markup tools don’t appear in the toolbar until you add them.
Most comments include two parts: the icon, or markup,thatappearsonthepage,andthetext messagethatappears
in a pop-up note when you click or double-click the icon or place the pointer over the icon.
After you add a comment, it stays selected until you click elsewhere on the page. A selected comment is highlighted
byabluehalotohelpyoufindthemarkuponthepage.Awireframewithselectionhandlesappearssoyoucanadjust
the size and shape.
You can add tags to your comments so that readers with motion or vision limitations can read them using assistive
technologies.
A B C D E F G H I J K L M
Comment & Markup toolbar
A. Sticky Note tool B. Text Edits tool C. Stamp tool and menu D. Highlight Text tool E. Callout tool F. Text Box tool G. Cloud tool H. Arrow
tool I. Line tool J. Rectangle tool K. Oval tool L. Pencil tool M. Show menu

169
ADOBE ACROBAT 8 PROFESSIONAL
User Guide
A
B
C
D
Types of comments in a PDF
A. Stamp B. Text edit C. Comment rollover (tool tip) D. Sticky note
See also
“Show and hide toolbar elements” on page 22
“Add tags to comments” on page 318
“Comment on 3D designs” on page 400
Show the Comment & Markup toolbar
The Comment & Markup toolbar doesn’t appear by default, except when you open a PDF in a managed review
workflow.
❖ Do one of the following:
• Choose View > Toolbars > Comment & Markup.
• Choose Comments > Show Comment & Markup Toolbar.
• Choose Tools > Comment & Markup > Show Comment & Markup Toolbar.
• Click the Review & Comment button in the Task toolbar, and choose Show Comment & Markup Toolbar.
To ad
Custo
d or remove tools for this toolbar, right-click/Control-click the toolbar, and select the tool. Or, choose Tools >
mize Toolbars.
Select a commenting or markup tool
❖ Do one of the following:
• Select a tool from the Comment & Markup toolbar.
• Choose Tools > Comment & Markup > [tool].
• Choose Comments > Comment & Markup Tools > [tool].
Note: After you make an initial comment, the tool changes back to the Select tool so that you can move, resize, or edit
your comment. (The Pencil, Highlight Text, and Line tools stay selected.)

170
ADOBE ACROBAT 8 PROFESSIONAL
User Guide
Keep a commenting tool selected
You can add multiple comments without reselecting the tool.
1 Select the tool you want to use (but don’t use it yet).
2 Choose View > Toolbars > Properties Bar.
3 Select Keep Tool Selected.
Commenting preferences
Commenting preferences affect both the appearance of and the way you view comments and markups in PDFs.
Note: Because comments can be placed anywhere within the document frame, you may need to scroll or zoom out to see
comments that are located off the page.
To set commenting preferences, choose Edit > Preferences (Windows) or Acrobat > Preferences (Mac OS), and then
select Commenting on the left side.
Font, Font Size In Windows, you can determine the font and the size of text in pop-up notes. In Mac OS, you can
select only Large, Medium, or Small settings for the font. This setting applies to all new and existing comments.
Pop-up Opacity Determines the opacity of comment pop-up notes in values from 1-100. When a pop-up note is
open but not selected, an opacity value of 100 makes the note opaque, while lower values make it more transparent.
Enable Text Indicators And Tooltips Shows a tool tip containing the author name, comment status, and two lines of
the text when you place the pointer over a comment that includes a pop-up note. Selected by default.
Print Notes And Pop-ups Specifies that pop-up notes associated with comments, and icons for note, audio, and file
attachments, print exactly as they appear on the page.
Instead of selecting this option, you can print comment text in various layouts by choosing File > Print, and clicking
Summarize Comments.
Show Lines Connecting Comment Markups To Their Pop-ups On Mouse Rollover When you place the pointer over a
comment markup (such as a highlight or a note icon), the shaded connector line between the comment and the open
pop-up note appears. Selected by default.
Ensure That Pop-ups Are Visible As The Document Is Scrolled As you scroll a PDF, the pop-up notes on a given page
shift to stay in view within the document pane. Selected by default.
Automatically Open Comment Pop-ups For Comments Other Than Notes A pop-up note appears when you create a
new comment using a drawing tool, the Stamp tool, or the Pencil tool.
Hide Comment Pop-ups When Comments List Is Open Helps reduce screen clutter when a page includes many
comments. Selected by default.
Automatically Open Pop-ups On Mouse Rollover When you place the pointer over a comment of any type, including
drawing markups and stamps, the pop-up note opens.
Always Use Log-in Name For Author Name Determines which name appears in the pop-up note you create. If this
option is selected, the Login Name in the Identity panel of the Preferences dialog box is used. If this option isn’t
selected, the default name you specify for Author in a comment properties dialog box is used. Selected by default.
Create New Pop-ups Aligned To The Edge Of The Document Aligns pop-up notes with the right side of the
document window, regardless of where the comment markup (such as a note icon or highlighting comment) is
added. If this option is deselected, the pop-up note appears next to the comment markup. Selected by default.
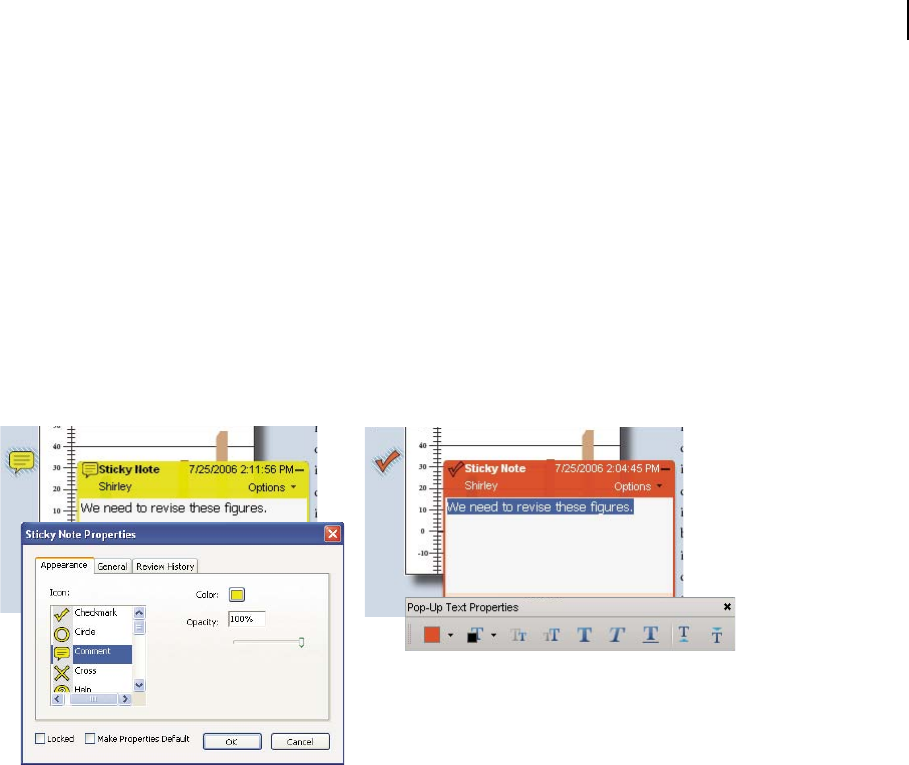
171
ADOBE ACROBAT 8 PROFESSIONAL
User Guide
Copy Encircled Text Into Drawing Comment Pop-Ups Copies text that you circle using the drawing tools in the pop-
up note associated with the drawing markup.
Copy Selected Text Into Highlight, Cross-Out, And Underline Comment Pop-ups Copies selected text to the pop-up
note associated with text editing comments, such as those created by the Highlight Text tool.
Change the look of your comments
You can change the color and appearance of comments or markups before or after you create them. You can set the
new look as the default appearance for that tool.
Note: If you want to change how your name appears in comments, open the Commenting preferences—choose Edit >
Preferences (Windows) or Acrobat > Preferences (Mac OS), and choose Commenting on the left—and deselect Always
Use Log-in Name For Author Name in the Commenting panel of the Preferences dialog box.
A
B
Properties toolbar
A. With note icon selected B. With pop-up text selected
Change a comment’s look and set it as the default
1 After you create a comment, do one of the following:
• Choose Properties from the Options menu of the pop-up note.
• Right-click/Control-click the markup, and then choose Properties.
2 In the Properties dialog box, do any of the following, and then click Close:
• Click the Appearance tab to change such options as the color and type of icon used. The type of comment selected
determines which options are available.
• Click the General tab to change the author’s name and subject of the comment.
• Click the Review History tab to see the history of changes people have made to the status of a comment during a
review.
• Select Locked at the bottom of the Properties dialog box to prevent the comment from being edited or deleted.
• Select Make Current Properties Default at the bottom of the Properties dialog box to apply these properties to all
subsequent comments of this type that you make.
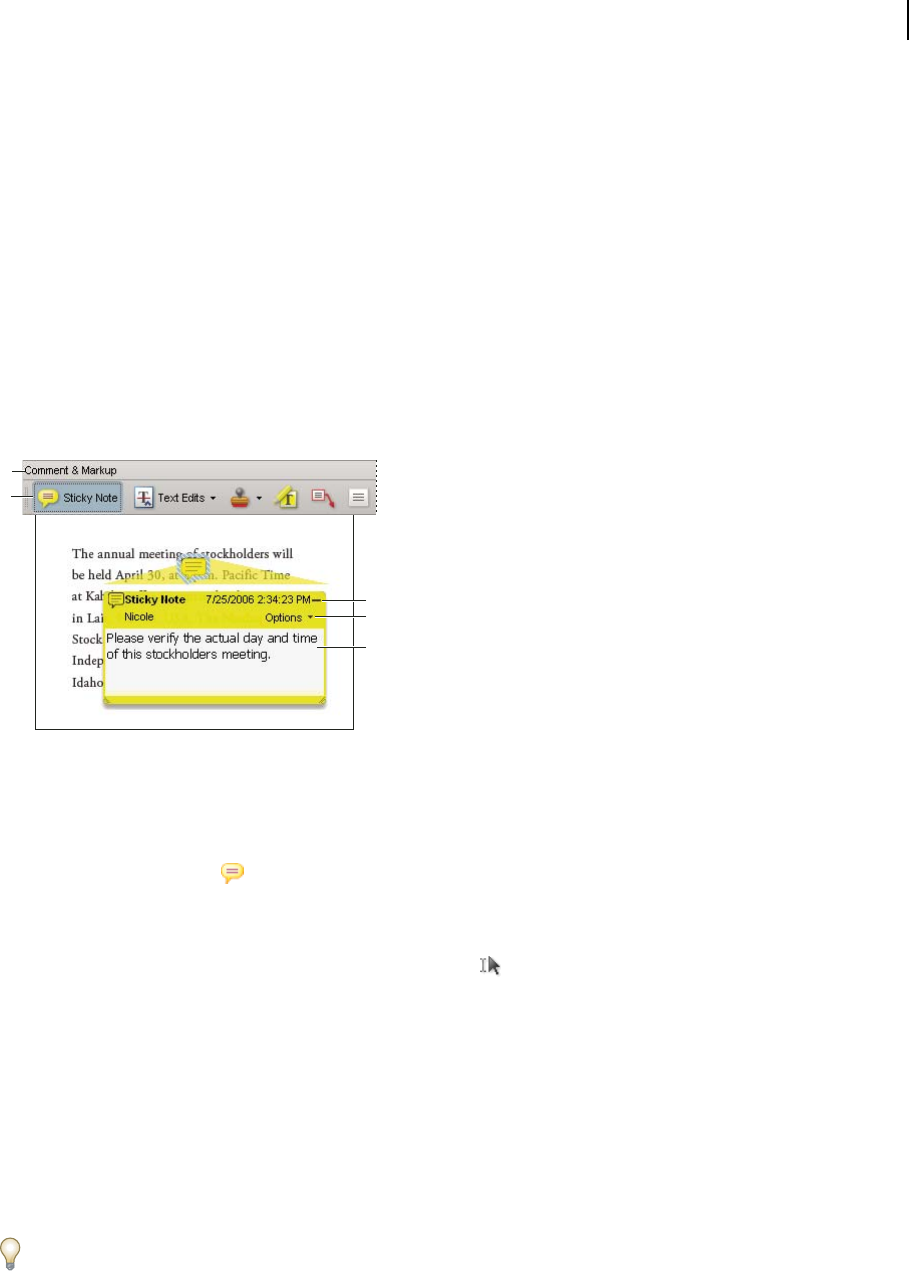
172
ADOBE ACROBAT 8 PROFESSIONAL
User Guide
Set the default look for a tool
1 In the Comment & Markup toolbar, right-click/Control-click the tool you want to use, and choose Tool Default
Properties.
Note: If the tool you want doesn’t appear in the Comment & Markup toolbar, right-click/Control-click the toolbar, and
select the tool.
2 Set the properties as desired, and click OK.
Allcommentsyoucreate usingthistoolwilldisplaythepropertiesyouset.Existingcommentsaren’taffected,noris
the appearance of text in pop-up notes.
Add a sticky note
Themostcommontypeofcommentisthestickynote.Astickynotehasanoteiconthatappearsonthepageand a
pop-up note for your text message. You can add a sticky note anywhere on the page or in the document area.
A
B
C
D
E
Use the Sticky Note tool to add a text message in a pop-up note.
A. Comment & Markup toolbar B. Sticky Note tool C. Close button D. Options menu E. Text message
Add a sticky note comment
1 Do one of the following:
• Select the Sticky Note tool in the Comment & Markup toolbar, and either click where you want to place the
note, or drag to create a custom-sized note.
• Choose Comments > Add Sticky Note.
2 Type text in the pop-up note. You can also use the Select tool to copy and paste text from a PDF into the note.
Note: If you close the pop-up note, your text remains.
Edit a sticky note comment
1 Click or double-click the note icon.
2 Make changes, as needed:
• To resize the pop-up note, drag the lower-left or lower-right corner.
• To change the text formatting, choose View > Toolbars > Properties Bar, select the text, and then select the
property you want in the toolbar. Or, select the text, right-click/Control-click, and choose a text style option.
Use
sett
the Commenting panel in the Preferences dialog box to change the font size, default pop-up behavior, and other
ings for creating and viewing comments.
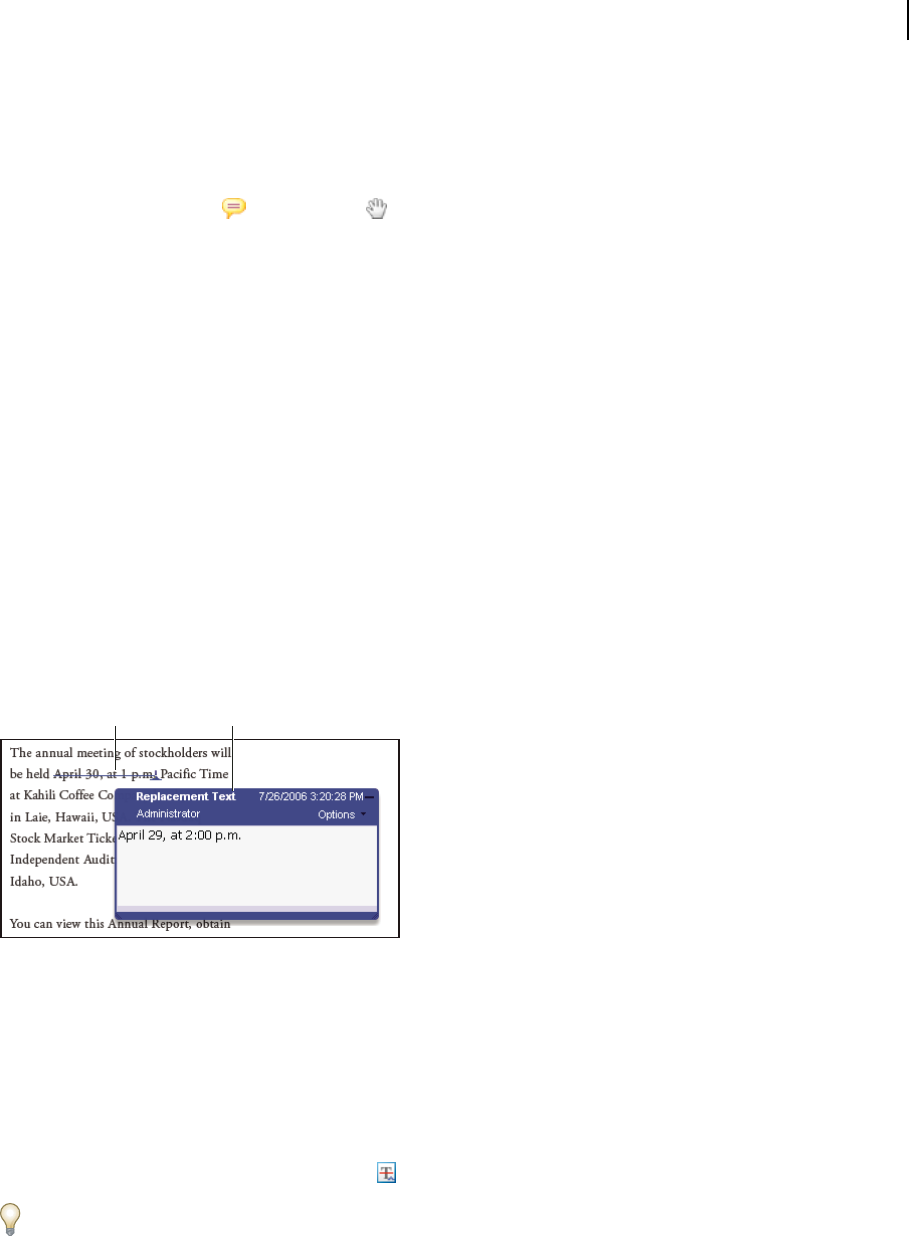
173
ADOBE ACROBAT 8 PROFESSIONAL
User Guide
When you’re finished, click the minimize button in the upper-right corner of the pop-up note, or click outside the
pop-up note.
Delete a sticky note
1 Select the Sticky Note tool , t
ress D
he Hand tool , or the Select tool.
2 Select the note icon, and p elete.
Alternatively, double-click the note icon and choose Delete from the Options menu of the pop-up note.
Mark up text with edits
You can use text edit comments in a PDF to indicate where text should be edited in the source file. Text edit
comments do not change the actual text in the PDF. Instead, they indicate which text should be deleted, inserted, or
replaced in the source file from which the PDF was created.
You can use the Select tool or the Text Edits tool to add most types of text edits. Shortly after you click or select text
with the Text Edits tool, an icon appears. If you right-click this icon, a menu of text editing options appears.
In Windows, you can export text edits directly to the Microsoft Word document that the PDF is based on to revise
thesourcedocument.Tousethisfeature,youmustusePDFMakerinWordtocreatethePDF.Before youexportyour
text edits, make sure that insertion comments use the exact text, including spaces and paragraph returns, that you
want to add. If you add extra instructional words (such as “Add the following:”), these words will have to be deleted
manually from the Word document.
In Windows, you can export text edit comments directly to an Autodesk AutoCAD document that the PDF is based
on to incorporate your edits. To use this feature, you must use PDFMaker in AutoCAD to create the PDF.
A B
Replace Text option
A. Selected text is struck out. B. New text is added to a linked pop-up note.
See also
“Export comments to Word (Windows)” on page 189
“Export comments to AutoCAD (Windows)” on page 190
Replace text
1 Use the Select tool, or select the Text Edits tool from the Comment & Markup toolbar.
If
S
you don’t want the Indicating Text Edits dialog box to appear each time you select the Text Edits tool, select Don’t
how Again in the dialog box, and then click OK.
2 Select the text you want to replace.
174
ADOBE ACROBAT 8 PROFESSIONAL
User Guide
3 Press Enter or Return, or choose Replace Text from the menu that appears, and then do one of the following:
• Type the text to be inserted or added. This text appears in a pop-up note. Any selected text is crossed out. The
insertion caret appears.
• To indicate that a new paragraph should be added, close the pop-up note without adding text. The paragraph
insertion caret appears.
Add a note to a text edit
1 Use the Select tool or the Text Edits tool from the Comment & Markup toolbar.
2 Select Add Note At Cursor from the menu that appears.
3 Type your note in the pop-up note.
Note: If you export your text edits to Microsoft Word, any text you add to the pop-up note that’s associated with a text
edit is imported (into Word) with the text edit.
Show inserted text
1 Select the Text Edits tool fro
or cha
m the Comment & Markup toolbar.
2 Click between the words racters where you want to insert text.
3 Do any of the following:
• Type the text you want to insert.
• To indicate that a new paragraph should be added, press Enter or Return, and then close the pop-up note without
adding text. The paragraph insertion caret appears.
• To indicate that a space should be added, press the spacebar, and then close the pop-up note without adding text.
The space insertion caret appears.
Yo
an
u can also indicate text edits by using the Select tool to select text, right-click/Control-click the selected text,
d then choose Replace Text (Comment).
Delete inserted text
1 In the Comment & Markup toolbar, choose the Text Edits tool
2 Select the text, and then press Backspace or Delete, or choose Cross-Out Text from the menu.
Delete text markups
If
n
markup comments are stacked, delete the comments in the Comments list: Click the Comments button in the
avigation pane to open the Comments list, select the comment, and press Delete.
❖ Do one of the following:
• Select the markup and press Delete.
• Right-click/Control-click the markup, such as the highlighting or cross-out, and then choose Delete.
Highlight, cross out, or underline text
You can use the Highlight Text tool, Cross-Out Text tool, and the Underline Text tool to add comments by
themselves or in conjunction with notes. The Cross-Out Text tool and the Underline Text tool don’t appear in the
Comment & Markup toolbar, by default.
.
175
ADOBE ACROBAT 8 PROFESSIONAL
User Guide
You can add a highlight with a note or you can cross out text by selecting the text using the Select tool or Text Edits
tool, and then choosing that option from the menu that appears. However, if you’re marking up a lot of text, the
specialized tools are faster and easier to use.
1 Choose Tools > Comment & Markups, and select the Highlight Text tool , the Cross-Out Text tool , or the
Underline Text tool .
Note: If you want to apply more than one comment using the Cross-Out Text tool or the Underline Text tool, choose
View > Toolbars > Properties Bar, and select Keep Tool Selected in the Properties toolbar after you select the tool. The
Highlight Text tool stays selected after you make the first comment.
2 Drag from the beginning of the text you want to mark up. Ctrl-drag (Windows) or Option-drag (Mac OS) to mark
up a rectangular area of text. This is especially useful when marking up text in a column.
3 (Optional) To add a note, double-click the markup to add text in a pop-up note.
Stamp a document
You apply a stamp to a PDF in much the same way you apply a rubber stamp to a paper document. You can choose
from a list of predefined stamps, or you can create your own stamps. Dynamic stamps obtain information from your
system and from the Identity panel of the Preferences dialog box, allowing you to indicate name, date, and time infor-
mation on the stamp.
The Stamp tool appears in the Comment & Markup toolbar, by default.
A
B
C
D
Stamp tool categories
A. Dynamic stamp B. Sign Here stamp C. Standard Business stamp D. Custom stamp
Open the Stamps palette
❖ Do one of the following:
• Choose Tools > Comment & Markup > Stamps > Show Stamps Palette.
• In the Comment & Markup toolbar, click the arrow next to the Stamp tool and choose Show Stamps Palette.
Apply a stamp
1 Select a stamp by doing one of the following:
• Click the Stamp tool. The mostly recently used stamp is selected.
• In the Stamps Palette, choose a category from the menu, and then select a stamp.

176
ADOBE ACROBAT 8 PROFESSIONAL
User Guide
2 Click the document page where you want to place the stamp, or drag a rectangle to define the size and placement
of the stamp.
3 If you haven’t provided a name in the Identity preferences, the Identity Setup dialog box prompts you to do so.
Change a stamp’s location or appearance
❖ Using the Select tool or the Hand tool, do any of the following:
• To move a stamp, drag it to a new location.
• To resize a stamp, click it, and then drag a corner handle.
• Torotateastamp,clickit,movethe pointeroverthehandle atthetopofthestamp,anddragwhentherotate stamp
icon appears.
• To delete a stamp, right-click/Control-click the stamp and choose Delete.
• To change the stamp’s opacity or the color of its pop-up note, right-click/Control-click the stamp, and choose
Properties. In the Appearance tab, set the opacity or color.
Move a stamp to the favorites list
1 Using the Select tool or the Hand tool, select a stamp markup on the page.
2 IntheComment&Markuptoolbar,clicktheStamp toolandchooseFavorites >AddCurrentStamp ToFavorites.
Create a custom stamp
You can create custom stamps from a number of different formats, including (but not limited to) PDF, JPEG, bitmap,
Adobe® Illustrator® (AI), Adobe® Photoshop® (PSD), and Autodesk AutoCAD (DWT, DWG) files.
Note: Toaddanimage to aPDF onetimeonly,simplypastetheimageintothedocument.Pastedimageshavethesame
characteristics as other stamp comments; each includes a pop-up note and editable properties.
1 Choose Tools > Comment & Markup > Stamps > Show Stamps Palette.
2 Click Import, select the file you want to use, and then click Select.
3 If the file has more than one page, scroll to the page you want, and then click OK.
4 Choose a category from the menu or type a new category name, name the custom stamp, and then click OK.
Change the name or category for a custom stamp
1 Choose Tools > Comment & Markup > Stamps > Show Stamps Palette.
2 Choose the stamp category, right-click/Control-click the stamp, and choose Edit.
3 Edit the category or name of the stamp, or replace the image, and then click OK.
Delete a custom stamp
You can delete only the custom stamps that you created, not the predefined stamps. When you delete a stamp, the
stamp is removed from the Stamp tool menu, but the stamp file isn’t deleted.
1 Choose Tools > Comment & Markup > Stamps > Show Stamps Palette.
2 Choose the stamp category from the menu, right-click/Control-click the custom stamp, and choose Delete.
3 If you haven’t provided a name in the Identity preferences, the Identity Setup dialog box prompts you to do so.

177
ADOBE ACROBAT 8 PROFESSIONAL
User Guide
Delete a custom stamp category
1 Choose Tools > Comment & Markup > Stamps > Manage Stamps.
2 Select the category you want to delete, and then press Delete.
Note: Deleting all stamps in a custom stamp category deletes the custom stamp category.
Add a line, arrow, or shape
When selecting a drawing tool, consider the effect you want.
1 Choose Tools > Comment & Markup, and select a drawing tool:
• The Rectangle tool , the Oval tool , the Arrow tool , and the Line tool let you create simple shapes.
• The Cloud tool and Polygon tool create closed shapes with multiple segments. The Polygon Line
tool creates open shapes with multiple segments.
• The Pencil tool creates free-form drawings, and the Pencil Eraser tool removes the pencil markups.
ch
To specify the line width, color, and other properties before you draw, right-click/Control-click the drawing tool,
oose Properties, and set the desired options in the Properties dialog box.
2 Draw in the PDF:
• To create a cloud or polygon shape, click to create the start point, move the pointer, and click to create each
segment. To finish drawing the shape, click the start point, or right-click/Control-click and choose Complete from
the menu. Double-click to end a polygon line.
• To draw a line, arrow, or rectangle, either drag across the area where you want the markup to appear, or click twice:
once to create the start point and once to create the end point.
• To draw a square or circle, or to draw a line that’s horizontal, vertical, or at a 45˚ angle, press Shift while you draw.
• To draw free-form lines using the Pencil tool , drag where you want to begin drawing. You can release the
mouse button, move the pointer to a new location, and continue drawing. To erase parts of the drawing, select the
Pencil Eraser tool and drag across the areas of the drawing that you want to remove.
3 To edit or resize the markup, select it and drag one of the handles to make your adjustments.
4 To add a pop-up note to the markup, select the Hand tool, and double-click the markup.
5 (Optional) Click the close button in the pop-up note. A note icon appears to the right of the markup to indicate
the presence of text in the pop-up note.
Note: To delete a drawing markup, select it and press Delete.
Group and ungroup markups
You can group two or more markups so that your comments function as a single comment. You might group
markups temporarily to move them to a new location or to modify their properties rather than editing each one
individually. Grouping also helps to distinguish your markups from other reviewers’ markups in a document review.
Note: You cannot group text edit markups.
Group markups
1 Using the Select tool or the Hand tool, select a markup.
2 Ctrl-click/Command-click to select the markups you want to group.
3 Right-click/Control-click within the selection, and choose Group.
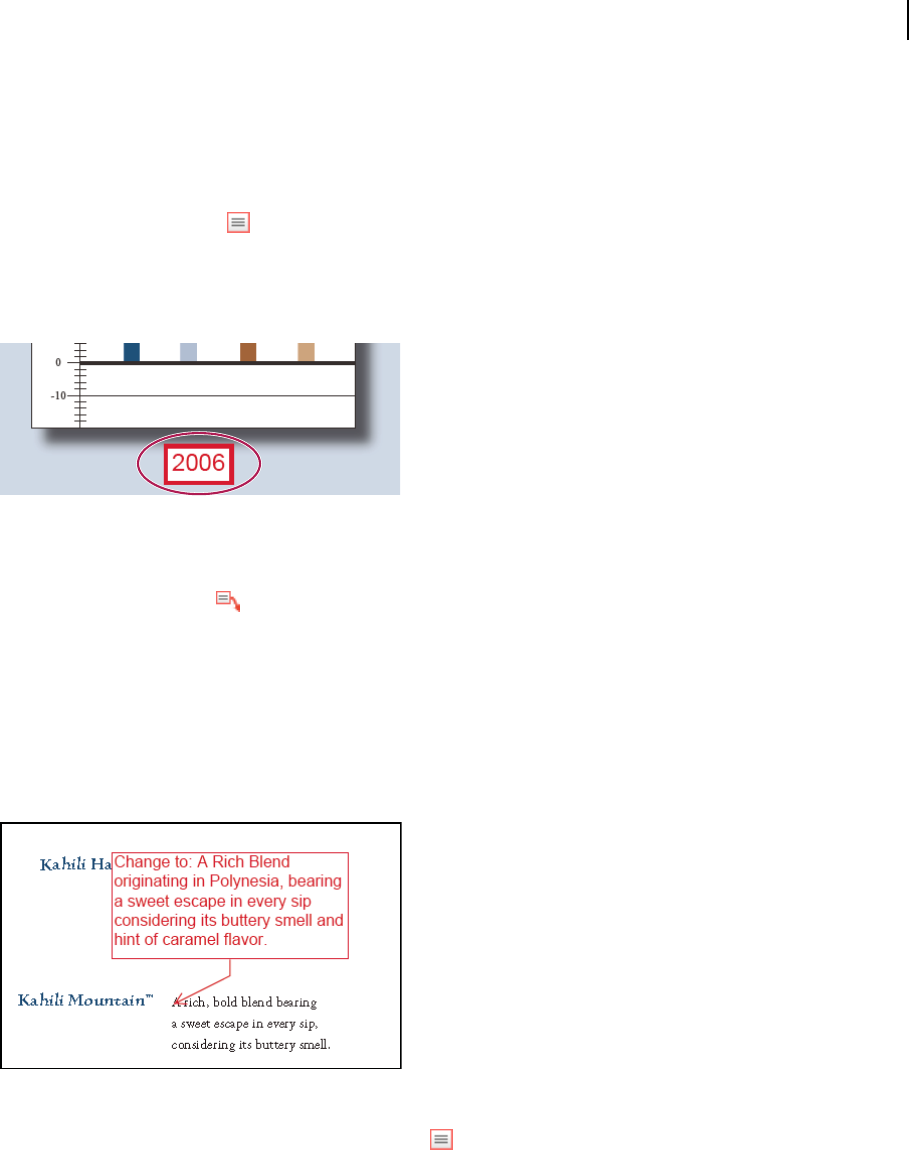
178
ADOBE ACROBAT 8 PROFESSIONAL
User Guide
Ungroup markups
❖ Right-click/Control-click the grouped selection, and choose Ungroup.
Add comments in a text box or callout
You can use the Text Box tool to create a box that contains text. You can position it anywhere on the page and
adjust it to any size. A text box remains visible on the document page; it doesn’t close like a pop-up note.
Another way to add a text box is simply to paste copied text into the PDF. Text font and size are based on the system
default settings.
Note: You can add comments to Japanese, Chinese, and Korean text with the Text Box tool, but you must have the Asian-
language resource files installed. Text boxes allow for horizontal text only.
YoucanusetheCallouttool to
ure—a p
createacallouttextbox.Callouttextboxesareespeciallyuseful when youwant
to single out—but not obsc articular area of a document. Callout text boxes have three parts: a text box, a
knee line, and an end-point line. You can resize each part by dragging a handle. The knee line can be resized in one
direction only; horizontal knee lines can be resized horizontally only; vertical knee lines can be resized vertically
only. The text box expands vertically as you type so that all text remains visible.
You can move the text box bar itself or together with the end-point line. The text box moves around a stationary
anchor point—the arrow on the end-point line—which is created when you first click in the PDF. You can modify
the color and appearance of the text box and add arrows or leaders to the end-point line.
Add a text box
1 Choose Tools > Comment & Markup > Text Box Tool .
2 Click in the PDF.
3 Choose View > Toolbars > Properties Bar, and set the color, alignment, and font attributes for the text.
4 Type the text.
Text wraps automatically when it reaches the right edge of the box.

179
ADOBE ACROBAT 8 PROFESSIONAL
User Guide
.
5 (Optional) To make further changes to the text box:
• Using the Select tool or the Text Box tool, click an edge of the text box to select it, and then drag a corner to resize
it. Use the Properties toolbar to change the border and fill options.
• Double-click the text box to edit the text or change the text attributes. Drag across text to select it, and then select
options from the Properties toolbar.
6 To delete the text box, right-click/Control-click the text box, and then choose Delete.
Ac
You can also paste a block of text by selecting and copying the text in any application, selecting the Hand tool in
robat, and choosing Edit > Paste.
Add a callout
1 Choose Tools > Comment & Markup > Callout tool
2 Click once to set the location of the end point, and click again to set the location of the text box.
3 Choose View > Toolbars > Properties Bar, and select the color, alignment, and font attributes for the text.
4 Type the text.
Text wraps automatically when it reaches the right edge of the box.
5 (Optional) To make further changes to the text box:
• To resize the callout, select it and drag any of the handles that appear.
• To move the text box, click inside the box and drag it.
• To move the entire callout, click either the end-point line or an edge of the text box, and drag it.
• To change the color, opacity, or line characteristics, use the Select tool to right-click/Control-click the callout,
choose Properties, and select the options you want.
Add an audio comment
You can use the Record Audio Comment tool to add a prerecorded WAV or AIFF file as a comment or to record and
placeanaudiocommentinadocument.Audioattachmentsappearinthe Commentslist andcan beplayed backon
any platform. However, the appropriate hardware and software for playing audio files must be installed.
The Record Audio Comment tool doesn’t not appear in the Comment & Markup toolbar by default. However, you
can add it by choosing Tools > Customize Toolbars.
See also
“Change the look of your comments” on page 171
“Add movies or sounds to PDFs” on page 382
Add a prerecorded audio comment
1 Choose Tools > Comment & Markup > Record Audio Comment tool and then click in the PDF where you
want to place the audio comment.
2 Click Browse (Windows) or Choose (Mac OS), and select the audio file you want to add.
3
(Optional) To hear the audio comment, click the Play button . When you’re finished, click Stop and then click OK.
4 Specify options in the Properties dialog box, and then click OK.

180
ADOBE ACROBAT 8 PROFESSIONAL
User Guide
. l
Record an audio comment
1 Choose Tools > Comment & Markup > Record Audio Comment tool and then click in the PDF where you
want to place the audio comment.
2 In the dialog box that appears, click the Record button and then speak into the microphone. When you’ve
finished recording, click the Stop button , and then click OK.
3 Specify options in the Properties dialog box, and then click OK.
Add comments in a file attachment
Use the Attach File As Comment tool to embed a file at a selected location in a PDF, so that the reader can open it
for viewing. By adding attachments as a comment, you can reference longer documents that can’t easily be pasted
intoapop-upnoteortextbox.Ifyou move thePDF to anewlocation,theembedded file automaticallygoeswithit.
To view an attachment, the reader must have an application installed that can open the attachment.
Important: Be sure to use the Attach A File As A Comment tool in the Comment & Markup toolbar when attaching files
for a document review. Document-level file attachments that you attach using the paper clip icon (Attach A File tool)
from the File toolbar aren’t tracked with other comments in a review workflow and may cause your attached comments
to be lost.
1 Choose Tools > Comment & Markup > Attach A File As A Comment Too
2 Click in the PDF where you want to place the attachment.
3 Select the file that you want to attach, and then click Select. If you’re attaching a PDF, you can highlight areas of
interest in the file using comments.
4 In the Properties dialog box, select the settings for the file icon that appears in the PDF, and then click Close.
The comment attachment appears in the Attachments tab with a page number indicating its location.
Note: To delete the attachment, right-click/Control-click the attached comment icon, and choose Delete.
Paste images as comments
YoucanusethePasteClipboardImageAsStamp tooltoaddimagestoaPDF.Youcancopy most imageformats from
drawing and image-editing applications, such as Adobe Photoshop and Adobe Illustrator. If you want to add the
image to PDFs repeatedly, create a custom stamp of the image.
Note: The Paste Clipboard Image As Stamp tool isn’t available until you copy an image.
1 Copy an image by doing one of the following:
• In Acrobat, choose Tools > Select & Zoom > Snapshot Tool , an
opy.
d select an image from a PDF.
• In another application, select an image and choose Edit > C
2 Open a PDF.
3 Choose Tools > Comment & Markup > Stamps > Paste Clipboard Image As Stamp Tool.
4 Click in the PDF where you want the image to appear.
5 Do any of the following:
• To move the image, drag it.
• To resize the image, select it and then drag one of its handles. Press the Shift key when resizing the image to
maintain the original proportions.
• To change the image properties, right-click/Control-click it and choose Properties.
181
ADOBE ACROBAT 8 PROFESSIONAL
User Guide
• To delete the image, right-click/Control-click it and choose Delete.
See also
“Copy images” on page 148
Managing comments
View comments
The Comments list displays all the comments in a PDF, and it provides a toolbar with common options, such as
sorting, filtering, deleting, and replying to comments.
The Comments button in the navigation pane opens the Comments list.
Open the Comments list
1 Do one of the following:
• Click the Comments button in
Comm
the navigation pane.
• Choose Comments > Show ents List.
• Click the Review & Comment button in the Task toolbar and choose Show Comments List.
2 Using the options at the top of the Comments list, do any of the following:
• Expand or collapse the comments. Click Expand All or Collapse All in the Comments List toolbar. To expand or
collapse individual comments, click the plus and minus signs next to the comment.
• Browse through the comments. Click a comment in the list, or click the Next button or the Previous button
on to go to the next or previous comment. (These buttons are unavailable if no comment is selected.) The page
whichtheselectedcommentislocatedappearsinthedocumentpane,andtheselectedcommentscrollsintoview.
To go to the page where another comment is located, simply click the comment in the list.

182
ADOBE ACROBAT 8 PROFESSIONAL
User Guide
Sort comments
You can sort comments in the Comments list by author, page, type, date, color, checked state, or status by person. In
a thread of replies, only the first message is sorted, and the reply messages are sorted in the same category as the first
message in the thread.
1 Click the Comments button in the navigation pane.
2 Choose an option from the Sort By menu in the Comments list.
Show or hide comments
You can hide or show comments based on type, reviewer (author), status, or checked state. Hiding comments is also
called filtering. Filtering affects the appearance of comments in both the document window and the Comments list.
When you print or summarize comments, you can specify whether hidden comments are printed or summarized.
When you hide a note comment that has been replied to, all other replies in the thread are hidden as well.
Note: In an email-based review, hidden comments aren’t included when you send the comments to the initiator.
❖ From the Show menu in the Comments list, do one of the following:
• To show all comments, choose Show All Comments.
• To hide all comments, choose Hide All Comments.
• To filter comments, choose the categories that you want to appear. For example, if you want only note comments
that you haven’t checked to appear, choose Show By Type > Notes so that only the note comments appear, and then
choose Show By Checked State > Unchecked so that only unchecked note comments appear.
• To reverse a filter, choose the All command for hidden categories. For example, if you filtered comments so that
only those by a certain reviewer appear, choose Show > Show By Reviewer > All Reviewers.
Reply to comments
Replies to comments are especially useful in shared and browser-based reviews, when participants can read each
other’s comments. They can also be used by review initiators to let reviewers know how their suggestions are being
implemented. When one or more reviewers reply to a comment, the set of replies is called a thread. All replies in a
thread appear in the pop-up note and in the Comments list. Replies are indented below the original comment. The
number of replies that a comment has received appears in a box when you place the pointer over the comment.
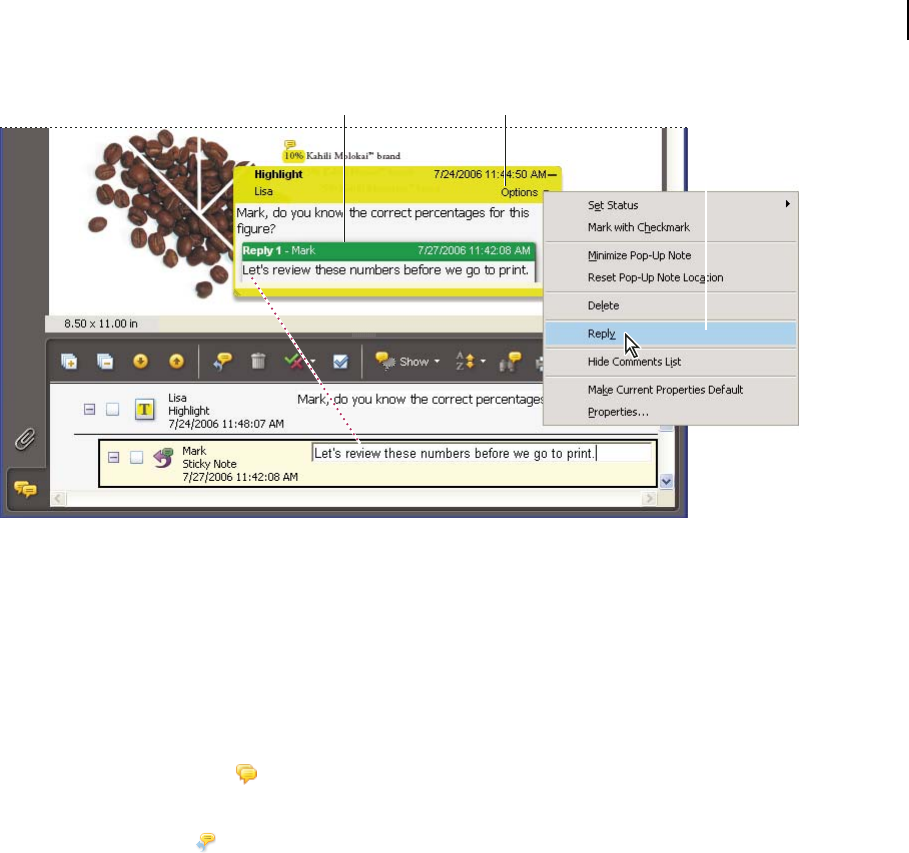
183
ADOBE ACROBAT 8 PROFESSIONAL
User Guide
AB C
Replies appear directly below the comment, in the pop-up note and in the Comments list.
A. Reply heading B. Options menu C. Reply option in Options menu
Reply in the pop-up note
1 Open the pop-up note for the comment.
2 Choose Reply from the Options menu.
3 Type your reply in the box that appears.
Reply in the Comments list
1 Click the Comments button in the navigation pane.
2 Select a comment in the Comments list.
3 Click the Reply button .
4 Type your reply in the box that appears.
Delete a reply
If you delete a comment that’s been replied to, only the comment is deleted. Any replies remain in the PDF, but they
are no longer part of a thread. These replies may be difficult to view in the PDF because they are stacked. You may
want to view them in the Comments list.
❖ Do one of the following:
• In the pop-up note, right-click/Control-click the reply and choose Delete This Reply.
• Select the reply in the Comments list and then click the trash icon in the Comments List toolbar.
184
ADOBE ACROBAT 8 PROFESSIONAL
User Guide
Set a status or check mark
Statusesandcheck marksareusefulforkeepingtrackofcommentsthatyou’vereadorthatrequirefurther action.In
Windows, you can use a status or a check mark to indicate which comments you want to export to a Word document.
By setting the review status, you can show or hide a group of comments and let review participants know how you
are going to handle the comment. Once the review status is set, you cannot remove the review status display from
thecommentintheCommentslist,evenifyouchangethereviewstatustoNone. Checkmarksareforyourpersonal
use and do not appear when others view the PDF unless you change the status of comments.
Set a status
1 Select the comment in the Comments list, click the Set Status button , and choose an option.
The review status appears in the comment along with the name of who set the review status. If another reviewer sets
the review status for that comment, both reviewers’ names and review statuses appear in the Comments list.
2 To view a comment’s history of changes, right-click/Control-click the note icon, markup, or title bar of a pop-up
note, and then choose Properties. Click the Review History tab.
Flag comments with a check mark
❖ In the Comments list, click the check box next to a comment so that the check mark icon appears.
Print a comment summary
Summarizing comments is a convenient way to get a synopsis of all the comments associated with a PDF. When you
summarize comments, you can either create a new PDF with comments that you can print, or you can print the
summary directly. The summary is neither associated with nor linked to the PDF that the comments are derived from.
AB
CD
Page layout options for comment summaries
A. Document and comments with connector lines on single page B. Document and comments with connector lines on separate pages
C. Comments only D. Document and comments with sequence numbers

185
ADOBE ACROBAT 8 PROFESSIONAL
User Guide
By default, Acrobat prints PDFs with any stamps that were applied. For the greatest control over how comments are
printed, choose Comments > Print With Comments Summary.
1 Filter the comments to show only those you want in the summary. (In the Comments list, click the Show button
and choose the categories of comments you want to show.)
2 For the greatest control over how comments are printed, choose Comments > Print With Comments Summary.
Alternatively, to create a separate PDF of the comments, do one of the following:
• Choose Comments > Summarize Comments.
• Choose Summarize Comments from the Options menu in the Comments list.
3 In the Summarize Options dialog box, do the following, and then click OK:
• Choose a layout for the document and comments. The layout determines available options.
• Choose how to sort the comments.
• Specify a page range and choose whether to include pages without comments.
• Select whether you want all comments to appear in the summary or only the comments that currently appear.
4 Do one of the following:
• Click Print Comment Summary, and click OK. (This option appears only if you chose the Print With Comments
Summary command.)
• Click Create PDF Comment Summary.
To print or summarize comments directly without opening the Summarize Options dialog box, click the Print
Comments button in the Comments List toolbar, and choose Print Comments Summary or Create PDF Of
Comments Summary.
Find a comment
Locate a comment in the Comments list by searching for a particular word or phrase.
1 Click the Comments button in the navigation pane to display the Comments list.
2 Click the Search Comments button in the Comments List toolbar.
3 In the Search window, specify the word or phrase you want to search for, and then click Search Comments.
See also
“Search features overview” on page 369
Delete comments
You cannot delete other reviewers’ comments in a shared review or a browser-based review, nor can you delete locked
comments. If you add comments to a PDF before you upload it to a remote server for review, you can’t delete those
comments.
T
o
o delete all of the comments in a PDF, use the Examine Document feature. See “Examine a PDF for hidden content”
n page 248.

186
ADOBE ACROBAT 8 PROFESSIONAL
User Guide
Delete a comment
❖ Do one of the following:
• Select the comment and press Delete.
• Right-click/Control-click the comment, and choose Delete.
• In the Comments list, select the comments you want to delete, and then click the trash icon
Note: Before pressing the Delete key, make sure that the comment is selected.
Unlock a comment
1 Right-click/Control-click the comment and choose Properties.
2 Deselect Locked, and then click Close.
Spell-check comments
You can spell-check the text you add in note comments and form fields. However, you cannot spell-check the text in
the underlying PDF. Unrecognized words appear underlined after you type them. You can edit these words in
context, or you can open the Check Spelling dialog box. The comment in the document window is updated with your
changes.
See also
“Spell-check form entries” on page 203
Spell-check a single word
1 Open the pop-up note of a comment.
2 Select the word you want to check, and right-click/Control-click the selection.
3 Select the correct word from the list of alternatives that appear at the top of the menu.
Spell-check all text in comments
1 Choose Edit > Check Spelling > In Comments, Fields, & Editable Text. If the PDF is open in a browser, make sure
that the Edit toolbar is open, and click the Spell Check button .
2 Click Start to begin the spell check. When a word that may be misspelled is found, it appears under Word Not
Found. Suggested corrections appear under Suggestions.
3 To change the word that may be misspelled, do one of the following:
• Edit the selected word. To undo your change, click Undo Edit. To accept your change, click Change.
• Double-click a suggested correction.
• Click Ignore if you don’t want to change the word and want to continue with the check.
• Click Ignore All to ignore every instance of the word. Click Add to add the word to your personal dictionary.
• Select a suggested correction and then click Change. Click Change All to replace every instance of the unrecog-
nized word with the suggested correction.
4 Click Done.
Specify a language dictionary
1 Choose Edit > Check Spelling > Edit Dictionary.
.

187
ADOBE ACROBAT 8 PROFESSIONAL
User Guide
2 Choose a language dictionary from the Dictionary menu, and click Done.
Add a word to the dictionary
By adding words to the spell-check dictionary, you can reduce the number of words that are flagged during a spell
check, such as names and company terminology. You can also exclude words from being considered during a spell
check. For example, if you want to use an alternate spelling for a common word like “bicycle,” add it to the list of
excludedwordssothatitisflaggedduringaspellcheck. Aseparateset of addedandexcluded wordsismaintained
for each installed language.
1 To add a word, do one of the following:
• During a spell check, if an unrecognized word appears in the Check Spelling dialog box, click Add to add it to the
dictionary. The word is added to the language dictionary selected from the Add To menu.
• Choose Edit > Spell Checking > Edit Dictionary. Type the word you want to add in the Entry box, and then click
Add. When you’re finished adding words, click Done.
2 To remove a word from the list, select the word in the Edit Custom Dictionary dialog box, and then click Delete.
Exclude a word from a spell check
1 Choose Edit > Check Spelling > Edit Dictionary.
2 Choose a language from the Dictionary menu, and then choose Excluded Words from the unnamed menu.
3 Type the word you want to exclude in the Entry box, and then click Add. When you’re finished adding words, click
Done.
Spelling preferences
You can specify whether words are spell-checked while you type, which color is used to underline words, and which
dictionary language is used as the default. To open the Spelling preferences, choose Edit > Preferences (Windows)
or Acrobat > Preferences (Mac OS), and select Spelling from the list on the left.
Check Spelling While Typing When selected, underlines unrecognized words as you type in a form field or
comment.
Underline Color Specifies the color for underlining unrecognized words.
Dictionaries Lists available language dictionaries for spell-checking the PDF. Dictionaries appear in the order in
whichthe spellcheckergoesthroughdictionariesinsearchofwords.The dictionaryat thetopofthelististhe first
dictionary searched. Click Up or Down to change its position in the list.
Importing and exporting comments
Import Comments
Comments can be imported from a PDF document. You can also import comments from a Forms Data Format
(FDF) file or an XFDF file, which is an XML-based FDF file. You cannot open and view FDF files or XFDF files on
their own.
1 In the document that you want to receive comments, choose Comments > Import Comments.
2 Choose All Files (*.*) from the menu. If you know the file format of the comments you want to import, choose it.
3 Double-click the name of the document with the comments.

188
ADOBE ACROBAT 8 PROFESSIONAL
User Guide
The comment positioning matches that of the file from which they were imported. If comments appear out of place,
the source and recipient PDF documents are likely different. For example, if you import comments from a ten-page
document to a two-page document, only comments from the first two pages appear.
Export comments
If you add comments to a PDF that isn’t part of a managed review, you may need to export your comments to send
them to someone, or you may need to import comments you receive. (PDFs in a managed review workflow include
special options that let you send or publish your comments, rather than export them.)
When you export comments, you create a Forms Data Format (FDF) file that contains only comments. Conse-
quently, FDF files are usually smaller than PDFs. You or another reviewer can then import the comments from the
FDF file into the original PDF.
Export comments to a data file
1 In the PDF that contains comments, choose Comments > Export Comments To Data File.
2 Choose either Acrobat FDF Files (*.fdf) or Acrobat XFDF Files (*.xfdf) from the menu.
3 Name the file and specify a location for it.
4 Click Save to create a data file that contains only the comments.
Export selected comments
1 In the Comments list, select the comments you want to export.
2 From the Options menu in the Comments list, choose Export Selected Comments.
3 Name the file and choose Acrobat FDF Files (*.fdf) or Acrobat XFDF Files (*.xfdf) for the file type.
4 Specify a location for the file, and then click Save.
Compare a revised PDF to an earlier version
The Document Compare feature lets you see the differences in two versions of a PDF, as well as select the type of
differences you’re looking for to verify that the appropriate changes have been made. The Document Compare
feature does not compare comments in the PDF.
1 Choose Advanced > Compare Documents.
2 Specify the two documents to be compared. If necessary, click Choose, select the file, and then click Open. If the
documents are open, you can select them from a menu.
3 Under Type Of Comparison, select one of the following:
Page By Page Visual Differences Finds any textual or graphic differences between the documents. Select the level of
detail you want from the menu.
Textual Differences Shows which text has been inserted, deleted, or moved.
Include Font Information Compares formatting.
4 Under Choose Compare Report Type, select one of the following:
Side By Side Report Creates a new PDF that displays the two documents in Continuous-Facing mode.
Consolidated Report Adds markups where the differences occur in the current document. When you hold the
pointer over a markup in a consolidated report using the Hand tool, the differences appear.

189
ADOBE ACROBAT 8 PROFESSIONAL
User Guide
To
fo
compare text-based documents, you may want to select Textual Differences to appear in Side By Side Report
rmat. For technical drawings, you may want to select Page By Page Visual Differences to appear in Consolidated
Report format.
Export comments to Word (Windows)
In some instances, reviewers make comments in a PDF that was created from a Microsoft Word document. You can
revise the original Word document by exporting these comments from the PDF. For example, text that has been
inserted, crossed out, or replaced using the text edit tools in the PDF can be deleted or transferred directly to the
source Word document. Formatting added to comments (for example, boldface text) is lost during this process and
must be added to the Word document manually.
To revise a Word document using comments, you must create a tagged PDF from the Word document. Before you
transfer text edits from the PDF, remove any extra words or information and then merge them to one PDF (if you
have comments from multiple reviewers). If you plan to import comments more than once, you may want to make
a copy of the Word document before you import the comments or comments may not be imported correctly.
1 Do one of the following:
• Choose Comments > Export Comments To Word.
• In Word, open the source document, and then choose Acrobat Comments > Import Comments From Acrobat.
For Word 2007, click Acrobat, and then choose Acrobat Comments > Import Comments From Acrobat.
2 Read the instructions, and click OK.
3 In the Import Comments From Adobe Acrobat dialog box, select the PDF and Word files, select from the
following options, and click Continue:
All Comments Imports all comments.
All Comments With Checkmarks Imports only those comments marked with check marks.
Text Edits Only: Insertions, Deletions, And Replaces Imports only those comments that you’ve added using the text
edit commands in the Comment & Markup toolbar.
Apply Custom Filters To Comments Imports only comments that you specify by author, type, or status.
Turn Track Changes On Before Importing Comments Shows the changes made by the imported comments in Word.
4 (Optional) If you imported text edits, click Integrate Text Edits in the Successful Import dialog box to review and
apply each edit individually. For each edit, select one of the following options:
Apply Makesthechangeinthedocumentanddeletesthecommentbubble.If acomment appearstobeempty,you
may want to integrate it to see if it’s a space or a paragraph return.
Discard Rejects the edit and deletes the comment bubble.
Next Skips to the next text edit. Text edits that are skipped or not integrated appear as bubbles in the Word
document.
Apply All Integrates all remaining text edits and deletes the comment bubbles.
Undo Last Undoes the last text edit, including any manual changes.
5 Delete comment bubbles that appear in the Word document:
• Right-click the comment bubble and choose Delete Comment.
• Choose Acrobat Comments > Delete All Comments In Document. For Word 2007, this option is on the Acrobat
Ribbon.
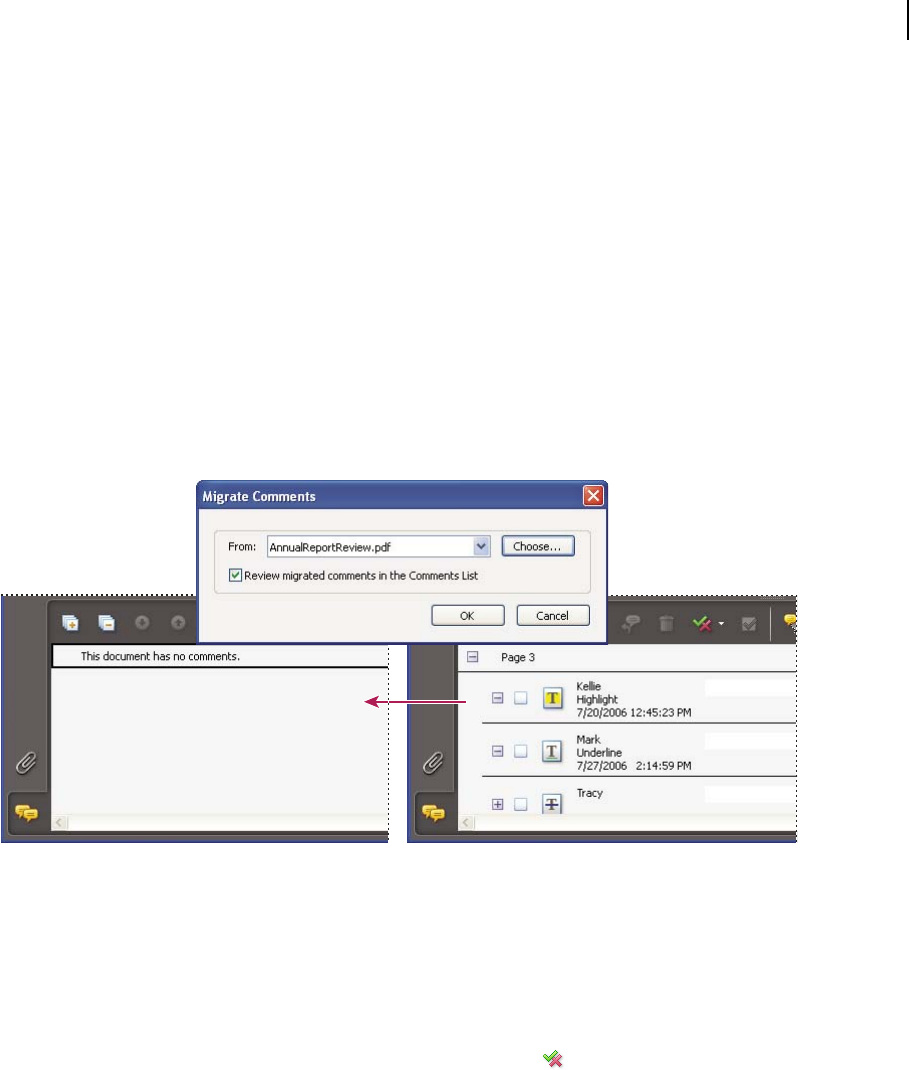
190
ADOBE ACROBAT 8 PROFESSIONAL
User Guide
Import comments to a revised PDF
ToimportneworunresolvedcommentstoaPDFafter thedocumenthasbeenrevised, usetheMigrateComments
feature. This feature attempts to place comments in the correct location by searching specific word groupings and
structural elements in the revised PDF.
Note: Results may be less reliable in untagged PDFs, which lack the internal structure necessary to correctly place
imported comments in a revised document.
Text comments that reference particular words, such as highlights, cross-outs, and insertion carets, appear within
the word grouping where they were originally placed. Drawing markups and sticky notes appear in the same struc-
tural location as they did in the original document. Circle, polygon, rectangle, and stamp comments always appear
on the same page as the original document.
If the revised PDF no longer contains the original word groupings or logical structure order that the comment refer-
ences, the migrated comment appears on the same page as the original document (or on the last page if the refer-
enced page doesn’t exist). In this case, text edits are converted to note comments.
Migrate comments to a revised PDF
1 Open the original PDF and the revised PDF.
2 In the revised PDF, choose Comments > Migrate Comments.
3 Choose the original PDF from the From menu, and click OK.
Set the migration status for a comment
❖ In the Comments list, select the comment, click the Set Status button , and choose Migration > [status].
Export comments to AutoCAD (Windows)
You may have reviewers add comments to a PDF that was created from an AutoCAD drawing in Windows XP or
Windows 2000. If you use AutoCAD PDFMaker to create a PDF, you can import comments into the AutoCAD
drawing, rather than switch between AutoCAD and Acrobat. You can import most comment types, including
drawing markups, sticky notes, stamps, and text edits.
1 Save the PDF to ensure that recently added comments are included.
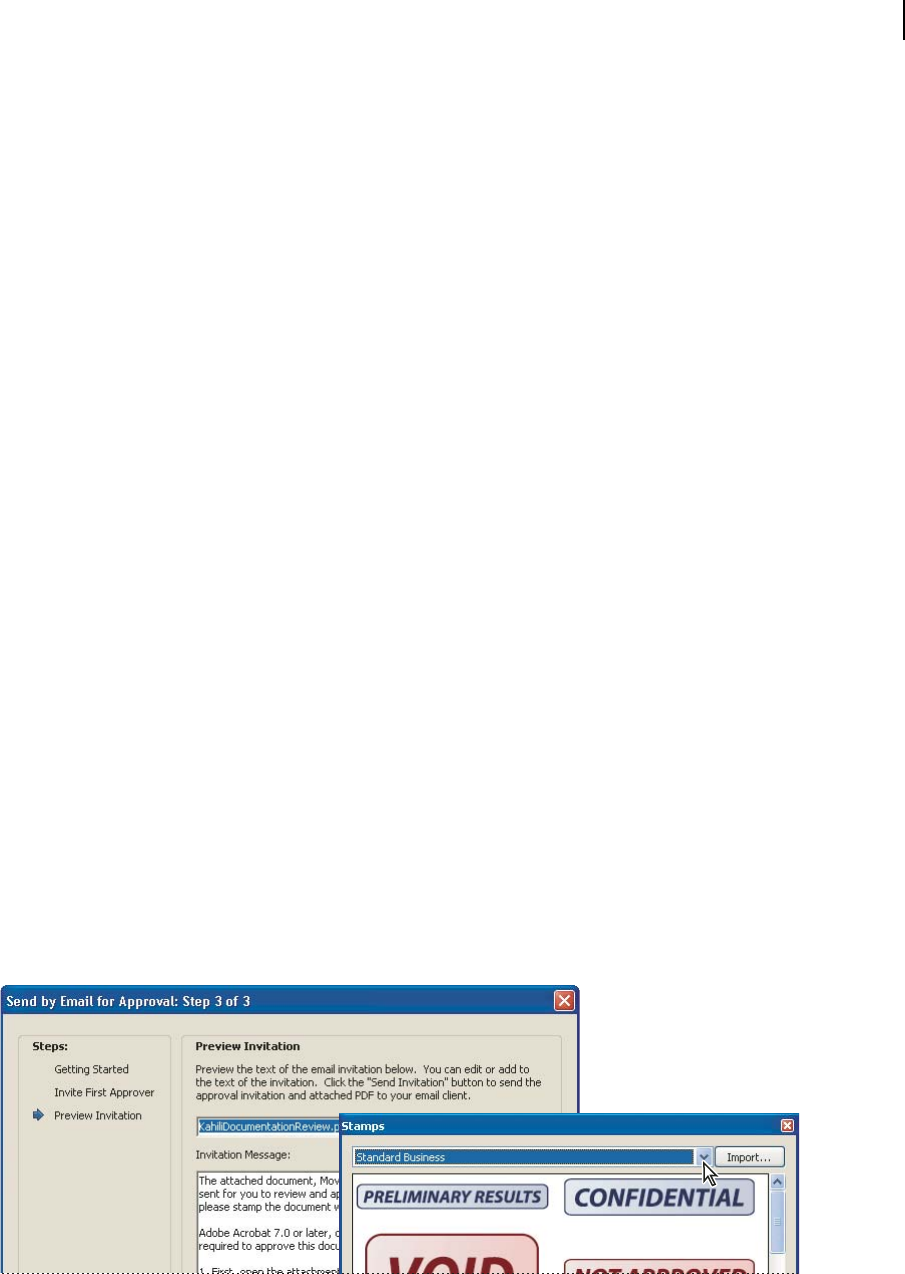
191
ADOBE ACROBAT 8 PROFESSIONAL
User Guide
2 Do one of the following:
• In Acrobat, choose Comments > Export Comments To AutoCAD, and then specify the PDF file and the
AutoCAD file in the Import Comments dialog box.
• In AutoCAD, choose Acrobat Markups > Import Comments From Acrobat.
3 In the Import Comments dialog box, specify the PDF that contains the comments, specify which comments to
import, and click Continue. If you import a custom set of comments, specify the set by making sure that only the
characteristics you want are selected. You must select at least one option in each category.
Show By Reviewer Imports comments by individual reviewers.
Show By Type Imports comments by type, such as text edits or note comments.
Show By Status Imports comments by review status.
Show By Checked State Imports comments that are checked.
All imported comments appear in the Adobe Acrobat Markups layer as custom objects that you can edit, filter, or
delete.
4 To modify an imported comment (change the status, add a check mark, or modify text), right-click the comment,
choose Acrobat Comments, and then choose an option.
Approval workflows
About approval workflows
In Acrobat (Traditional Chinese, Simplified Chinese, Japanese, and Korean only), you can send PDFs as email attach-
ments for others to approve. When participants open an approval request in Acrobat (all languages), they can
approve the PDF by adding a digital identity stamp. Then, they can send the PDF to other approvers, or return the
PDF to the initiator and other appropriate participants. The initiator can track progress by choosing to be notified
each time the PDF is approved. The workflow ends when the last participant adds the final approval. If a PDF isn’t
approved, the approval workflow must be reinitiated.
Note: To initiate an approval workflow, you must use Acrobat 7.0 or later (except for Acrobat Elements). If you use
Acrobat Professional to initiate the workflow, you can invite users of Adobe Reader 7.0 or later to participate by enabling
commenting in the PDF.
Wizard sets up approval workflows (left); Stamps palette provides digital identity stamps for approving documents (right).

192
ADOBE ACROBAT 8 PROFESSIONAL
User Guide
Send a PDF for approval
WhenyousendaPDFbyemailforapproval(TraditionalChinese,SimplifiedChinese,Japanese,andKoreanonly),
approvers receive the PDF as an email attachment. When recipients open the PDF attachment, they can apply a
digital identitystampfromtheStampspaletteandthenmaketheappropriateselectioninthedocumentmessagebar.
To send a PDF for approval, use the wizard in Acrobat. The wizard provides on-screen instructions to help you invite
approvers, customize instructions, and send the PDF.
The wizard enables commenting in the PDF so that Adobe Reader users can participate in the approval workflow.
Beforeyouinitiateanapprovalworkflow,makesurethatyouremailapplicationisconfiguredtoworkwithAcrobat.
1 To start an approval workflow, do one of the following:
• Click the Review & Comment button in the Task toolbar, and choose Send By Email For Approval.
• Choose Comments > Send By Email For Approval.
2 If prompted, enter your email address in the Identity Setup dialog box.
3 Click Browse (Windows) or Choose (Mac OS), select a PDF, click Open, and click Next.
4 Type the email address for the first approver in the To box.
5 If you want to enable Reader users to participate or if you want to be notified of the approval status for each partic-
ipant, specify those options.
6 (Optional) Type additional instructions for the first approver at the top of the email message.
Only the default text message and instructions are forwarded to subsequent approvers.
Note: The invitation email contains instructions to help participants complete the approval process. Avoid changing or
removing this text.
7 Click Send Invitation.
Participate in an approval workflow
If you’re invited to participate in an approval workflow, you receive an email message that provides step-by-step
instructions for approving the attached PDF. When you open the PDF, the Stamps palette and the How To window
open, and the document message bar appears at the top of the PDF. If your version of Acrobat is earlier than 7.0,
you’re prompted to download the latest version of Adobe Reader.
You can select any of the digital identity stamps in the Stamps palette to approve the document. A digital identity
stamp contains identity information that you provide, such as name, title, organization, and email address, and it can
be used in place of a signature. When you apply a stamp, it becomes part of the document’s page content. You can
delete your own stamp during the approval process; however, once the approval process is completed, your stamp is
locked. You can’t move or delete stamps from other participants.
You may also reject documents that don’t meet your standards.
In addition to adding digital stamps to a PDF, you can add other types of comments, including note comments, text
edits, custom stamps, and file attachments.
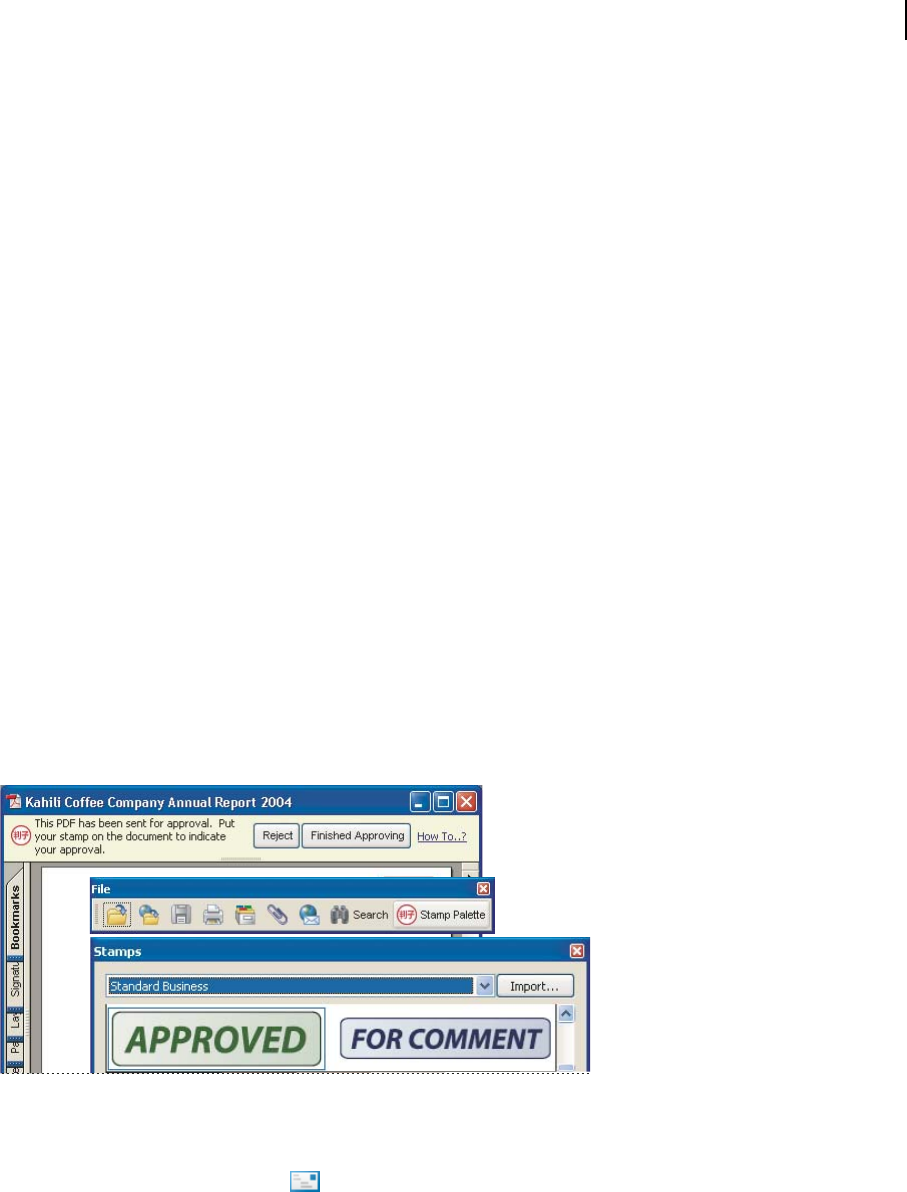
193
ADOBE ACROBAT 8 PROFESSIONAL
User Guide
See also
“Create a custom stamp” on page 176
“Commenting and markup tools overview” on page 168
“Select an email application for reviews” on page 156
Approve a PDF
1 Open the PDF attachment in the approval invitation email message.
Note: If you haven’t added identity information to the stamp, you’re prompted to do so.
2 Select a stamp from the Stamps palette. (To view all stamps, scroll or drag a corner to resize the window.)
3 Click the document to apply your approval stamp.
Note: Todelete adigital identity stampthatyou’veapplied,selectitand pressDelete. IfyouselectPrint,SaveACopy,or
Email during the approval process, you can’t delete your stamp.
4 Do one of the following:
• To send the document to the next approver, click the Approve button in the document message bar. In the Send
To Next Approver dialog box, type the email address for the next approver in the To box, add addresses for other
recipients as appropriate, and click Send.
• To complete the approval process, click the Final Approval button in the document message bar. In the Complete
Final Approval dialog box, specify whether to send an approval notification from the Final Approval Method
menu. If you send a notification, type an email address in the To box, add addresses for other recipients as appro-
priate, and click Send. If you don’t send a notification, click Complete.
If the Notify Initiator Of Approval Status Via Email option is selected, a separate email notification appears,
addressed to the initiator. Click Send to send this notification.
PDFs in an approval workflow present instructions and tools.
5 Save the PDF.
Important: If you use the Email button in the toolbar to send the PDF, the PDF is no longer part of the workflow,
and approval options aren’t available to the recipient of that email message.

194
ADOBE ACROBAT 8 PROFESSIONAL
User Guide
Reject a PDF
If the PDF you received in an approval request doesn’t meet the requirements for approval, use the options in the
document message bar to reject the document and return it to the initiator. If a PDF is rejected, the approval
workflow must be reinitiated.
1 Open the PDF attachment in the approval invitation email message.
2 Click the Reject button in the document message bar.
3 In the Reject And Send Notification dialog box, type the email address for the initiator in the To box. If the Notify
Initiator Of Approval Status Via Email option is selected, a separate email message is sent to the approval initiator.
Click Send.
4 Click Send in the email message that appears.
Add or change identity information for a digital stamp
1 From the Stamp menu, choose Show Stamps Palette.
2 In the Stamps palette, select Digital Identity Stamps, right-click/Control-click your stamp, and choose Edit
Identity.
3 In the Identity Setup dialog box, type or edit your name, title, company name, department, and email address, and
click Complete.
You can also change your identity information by choosing Edit > Preferences (Windows) or Acrobat > Preferences
(Mac OS) and selecting Identity on the left.

195
Chapter 7: Forms
Adobe PDFs can be interactive forms that can streamline the process of filling out a form and of collecting form
information.
You can create PDF forms using either Adobe Acrobat 8 Professional or Adobe LiveCycle Designer (included with
Acrobat Professional). Filling in a form can be done in either Acrobat or the free Adobe Reader.
Quickstart
The following topics provide overview steps to some common forms tasks.
Fill in a form with fields
An interactive PDF form contains form fields that can be selected or filled in.
1 Click to select options, such as radio buttons. Click inside a text field to type.
2 Press Tab to move forward or Shift+Tab to move backward.
3 When finished, click the submit button, if applicable, and save or print the form if desired.
To fill out noninteractive PDF forms, use the Typewriter tool (if enabled).
See also
“Fill in and clear a form” on page 201
Type on a form without fields
If a PDF form doesn’t contain interactive form fields that can be selected or filled in, you can still fill in the form
online.
1 Choose Tools > Typewriter > Typewriter.
2 Click over a blank form field and type.
3 (Optional) Choose Tools > Typewriter > Show Typewriter Toolbar. Use these tools to change the size or position
of the typed text.
4 When finished, print a copy of the completed form.
See also
“Fill in and clear a form” on page 201
Return a filled-in form
You have several options for returning form data.
1 To return an interactive form, do any of the following:
• Click the submit button.

196
ADOBE ACROBAT 8 PROFESSIONAL
User Guide
• Save and email the form (if enabled by the form creator).
• Print and mail the form.
2 To return a noninteractive form, do one of the following:
• If you filled in the form with the Typewriter tool, print and mail the form.
• Print the form, fill it in by hand, and mail it.
See also
“Fill in and clear a form” on page 201
Create a form
The Create New Form wizard guides you through creating a PDF form from a template (Windows only), an
electronic document, spreadsheet data, or a scanned paper document.
1 Click Forms on the toolbar, and choose Create New Form.
2 Select the source for the PDF form, and click Continue.
3 Follow the on-screen instructions.
Forms created with the wizard are LiveCycle Designer forms. To create an Acrobat form instead, choose Forms >
Run Form Field Recognition.
See also
“Creating new forms” on page 212
Edit a form
Depending upon how a PDF form was created, you can edit it in either Acrobat or LiveCycle Designer (Windows
only).
Note: (Windows) PDF forms created in Acrobat can be edited in LiveCycle Designer, but those created or edited in
LiveCycle Designer cannot be edited in Acrobat.
1 Open a PDF form.
2 Choose Forms > Edit Form In Designer or Edit Form In Acrobat.
3 Add or modify form fields and field properties as desired.
See also
“Create form fields in Acrobat” on page 214
Distribute a form
After you create a PDF form, you can distribute it by using the Distribute Form wizard.
Note: To use the wizard, the form must contain a submit button.
1 Open the desired form.
2 Click the Forms button on the Tasks toolbar, and choose Distribute Form.

197
ADOBE ACROBAT 8 PROFESSIONAL
User Guide
3 Follow the on-screen instructions to prepare the form for distribution.
4 Specify if you want to email the form or save and send it later.
5 Follow the on-screen instructions to distribute the form.
See also
“Distribute a form by email” on page 236
Track and manage forms
The Forms Tracker helps you manage forms you’ve distributed.
1 Click the Forms button on the Tasks toolbar, and choose Track Forms.
2 Select an icon on the left to see forms in that category:
• To Do displays forms you’ve received.
• History displays forms you’ve distributed.
• Search Results allows you to search for specific forms.
• Forms Library displays forms you’ve saved in the library for future distribution.
See also
“About Forms Tracker” on page 243
Compile data received by email
As users return their form data, you can compile it into a data set.
1 Open the email attachment containing the returned form.
2 In the dialog box that appears, select an existing data set or create a new set for the form data.
The new data is added and the data set opens, allowing you to review all responses. You can also compile data by
clicking Forms on the Tasks toolbar, and choosing Compile Returned Forms.
See also
“Compile form data” on page 241
Review form responses
After you’ve compiled returned form data into a data set, the PDF automatically opens for you to review the
responses.
❖ With the desired data set PDF open, do any of the following:
• To review an individual response, select a line in the response list.
• To sort the response list, click the desired column heading.
• To add data, click Import Data
• To delete data, select a record and press Delete.
.

198
ADOBE ACROBAT 8 PROFESSIONAL
User Guide
See also
“Manage form data files” on page 242
Export form data to a spreadsheet
Once you’ve collected PDF form data in FDF or XML format, you can organize the form data into a comma-
delimited spreadsheet (CSV) file.
1 Choose Forms > Manage Form Data > Merge Data Files Into Spreadsheet.
2 Click Add Files, and then select the desired data files.
3 Click Export, choose a location for the CSV file, and click Save.
See also
“Export records from a PDF data set” on page 242
Forms basics
What are PDF forms?
You’re already familiar with paper forms: documents with blanks that people fill in and deliver to the appropriate
person or organization. An Adobe PDF form is a computer-based version of a form, which can either be distributed
through email or CDs, or published on a website.
PDF forms can be ordinary PDFs with blank form fields or they can be interactive.OrdinaryPDFsareaconvenient
way of publishing forms that must be printed, filled out by hand, and physically delivered, such as by mail or fax. An
interactive form can be filled out on a computer and may be submitted through an Internet or local network
connection. The built-in security features can safeguard the privacy of electronically submitted data.
Interactive forms simplify the work users must do to provide the needed information. Electronically submitted forms
can be labor-saving at the receiving end, too, because the data from many individuals can be set up to be collated
automatically.
If you already use other kinds of forms, you can quickly make them into interactive PDF forms: You can scan paper
forms and you can convert electronic forms in other formats (such as Word documents, InDesign layouts, and Excel
spreadsheets) to interactive PDF forms.
Viewing a PDF form
When you open a form that someone sends you to fill out, a document message bar appears between the Acrobat
toolbars and the form itself.
The left side of the message bar typically displays instructions about how to complete and return the form. If you
open the form in Adobe Reader, the usage rights associated with that form are also described in this area. You can
hide or show the document message bar by clicking its button
Therightsideof themessagebarhasoneormorebuttons.ThefirstisaHighlightFieldsbutton ,whichcolorsthe
backgrounds of all blanks to be filled in and outlines any required blanks, making it easy to see them at a glance.
You navigate and adjust views of a form in exactly the same way that you do in ordinary PDFs.
.

199
ADOBE ACROBAT 8 PROFESSIONAL
User Guide
Note: You can change the default settings for highlight color, whether forms open with the document message bar visible
or hidden, and other viewing options in the forms preferences. Choose Edit > Preferences (Windows) or Acrobat >
Preferences (Mac OS), and select Forms under Categories.
Types of PDF forms
The way in which you fill in and submit information on a PDF form is determined by the person who created it.
Fill-and-print PDF forms Contain interactive form fields or static form fields; either way, the person filling in the
form must manually deliver a printed copy of the form, such as by mail or fax.
Submit-by-email PDF forms Contain a button that either extracts all interactive-field data from the PDF form and
attaches it to an email message or attaches the entire filled-in PDF form to the message.
Submit-online PDF forms Contain a button that sends all interactive-field data to an online repository, such as a
database. Available only when Acrobat is open inside a web browser.
b
When you fill in a PDF form, you can press Tab to jump from one form field to the next. After you Tab to a check
ox or button that you want to select, press Enter or spacebar to select it (or to deselect it, if it’s already selected).
Another important distinction is between XML forms and other PDF forms. You can create and edit XML forms in
LiveCycle Designer but not in Acrobat.
Printing and saving PDF forms
Interactive forms can be filled in using either Adobe Reader or Acrobat. Users running either of these applications
can save a blank version of the form, and they can print copies of their completed forms before submitting them.
After a form is filled in, Acrobat users can save a copy of the completed form, showing all the information they typed.
Whether or not Adobe Reader users can save a copy of a completed form depends on the usage rights set up by the
person who created that form.
Note: When you open a form in Adobe Reader, the usage rights appear in the notification area above the form itself.
About security for PDF forms
As with all sensitive data you transmit, precautions should be taken to minimize the likelihood of interception and
use by malicious parties. Such precautions may include the use of encryption, passwords, and other security
measures on your document.
All Adobe products enforce the restrictions set by the permissions password. However, not all third-party products
fully support and respect these settings. Recipients might be able to bypass some or all of the restrictions you’ve set.
See also
“Opening restricted documents” on page 247
Forms preferences
Set forms preferences to control various aspects of your interaction with form fields.
To open the Preferences dialog box, choose Edit > Preferences (Windows) or Acrobat > Preferences (Mac OS), and
then select Forms on the left. The forms preferences are organized in three sections: General, Highlight Color, and
Auto-Complete

200
ADOBE ACROBAT 8 PROFESSIONAL
User Guide
Note: The forms preferences apply to the way the application handles open forms as you work. The preferences aren’t
saved with the PDF forms themselves.
See also
“Change the Auto-Complete options” on page 202
General
Automatically Calculate Field Values Automatically performs all field calculations upon user entry.
Show Focus Rectangle Indicates which form field currently has the focus.
Keep Forms Data Temporarily Available On Disk Retains forms data in the web browser if you briefly go to another
web page and then click Back to return to the PDF form.
Show Text Field Overflow Indicator Displays a plus sign (+) in text fields that exceed the bounds specified when the
fields were created.
Always Hide Forms Document Message Bar Hides the forms document message bar by default whenever a PDF
form is opened in Adobe Reader.
Show Field Preview When Creating Or Editing Form Fields Displays the appearance of a form field when you create
or edit forms.
Manage Barcode Parameters Opens a dialog box with a list of barcode items (including the Parameter Set Name,
Symbology, and Built-in status for each item). Includes New, Edit, Delete, Import, and Export buttons for working
with new or selected parameter sets.
Highlight Color
Show Border Hover Color For Fields Displays a black outline around a form field when you place the pointer over it.
Fields Highlight Color Opens a color picker for selecting the color of highlighted form fields. The highlight appears
when the Highlight Fields button on the document message bar is clicked.
Required Fields Highlight Color Opensacolorpickerforselectingtheborder colorofformfieldsthatmustbefilled
in. The border appears for required form fields only after you attempt to submit the form.
Auto-Complete
Auto-Complete menu Displays three options for Auto-Complete: Off, Basic, or Advanced.
Remember Numerical Data Suggests your previously entered numerical entries when you type the same first
character into a similar field. When deselected, Auto-Complete offers suggestions only for text entries. (Available
only when Basic or Advanced is selected.)
Edit Entry List Displays current entries stored in the Auto-Complete memory. You can select and delete any entries
that you don’t want to keep for filling in future forms. (This option isn’t available if no entries are in the memory.)

201
ADOBE ACROBAT 8 PROFESSIONAL
User Guide
Filling in PDF forms
Fill in and clear a form
If a PDF form contains interactive form fields, you can fill in the form with one of the tools in the Select & Zoom
toolbar: the Hand tool or the Select tool. When you place the pointer over an interactive form field, the
pointer icon changes to one of the following:
• PointingFinger orPointingHandPlusicon .Appearswhenthepointerisoverabutton,radiobutton,check
box, or item in a list.
• Arrow . Appears when you can select an item in a list of options.
• I-beam icon . Appears when you can type text into the form field.
If the form fields aren’t interactive, the basic pointer icon doesn’t change.
Noninteractive PDF forms can be printed and filled in by hand. Or, you can choose Tools > Typewriter > Typewriter
anduse theTypewritertooltotypeinformationovertheblankform fields andthenprintacopyofthe completedform.
Note: Some text fields are dynamic, meaning that they automatically resize to accommodate the amount of data you
enter and can span across pages.
See also
“Forms preferences” on page 199
Fill in an interactive form
1 If necessary, select either the Hand tool or the Select tool.
2 (Optional) To make form fields easier to identify, click the Highlight Fields button on the document message
bar. Form fields appear with a colored background (light blue by default), and all required form fields are outlined
in another color (red by default).
3 Click in the first form field you want to fill in, either to select that option or to place an I-beam pointer in the field
so you can start typing.
4 After making a selection or entering text, do any of the following:
• Press Tab or Shift+Tab to accept the form field change and go to the next or previous field.
• PresstheUpArroworLeftArrowkeytoselectthepreviousradiobuttoninagroupofradiobuttons,orpressthe
Down Arrow or Right Arrow key to select the next radio button.
• Press Esc to reject the form field change and deselect the current form field. If you’re viewing the form in Full
Screen mode, pressing Esc a second time causes you to exit Full Screen mode.
Note: If the current form field is a single-line text box, you can press Enter (Windows) or Return (Mac OS) to accept your
typing and deselect the field. If the current field is a check box, pressing Enter or Return turns the check box on or off. In
a multiline text form field, pressing Enter or Return creates a paragraph return in the same form field. In all cases, you
can press Enter on the keypad to accept the change and deselect the current form field.
5 After you fill in the form fields, do any of the following:
• Click the submit form button, if one exists. Clicking this button sends the form data to a database across the web
or over your company intranet.
• Choose File > Save As, and rename the file to save the form with the data you entered.

202
ADOBE ACROBAT 8 PROFESSIONAL
User Guide
• Export the form data.
• Print the form.
Clear a form in a browser
❖ Do either of the following:
• Select the reset form button, if one exists. You cannot undo this action.
• Quit the browser, and start again.
Note: Clicking the web browser’s Reload or Refresh button, the Back or Go Back button, or following a link to another
page may not completely clear the form.
Clear unsaved form entries
❖ Choose File > Revert.
Change the Auto-Complete options
The Auto-Complete feature stores any entries that you type in a PDF form field, and then suggests or even automat-
ically enters responses that match your typing in other form fields. The suggestions appear in a pop-up menu, from
which you can select a match. The Auto-Complete feature is off by default, so you must enable it in the forms prefer-
ences if you want to use it.
If you want to remove an entry from the Auto-Complete memory—such as a misspelled entry that you found and
corrected later—you can edit the list in the preferences.
Enable the Auto-Complete feature
1 Choose Edit > Preferences (Windows) or choose Acrobat > Preferences (Mac OS).
2 Select Forms on the left.
3 Under Auto-Complete, choose Basic or Advanced from the menu.
4 Select Remember Numerical Data if you want the Auto-Complete memory to store numbers that you type into
forms.
W
ap
hen you select an option in the Auto-Complete menu, a description of how it affects the Auto-Complete behavior
pears in the text area below.
Delete an entry from the Auto-Complete memory
1 Choose Edit > Preferences (Windows) or choose Acrobat > Preferences (Mac OS).
2 Select Forms on the left.
3 Click Edit Entry List.
4 In the Auto-Complete Entry List dialog box, do one of the following, and then click Yes in the confirmation dialog box:
• To remove all of the entries, click Remove All.
• To remove some of the entries, select the entries and click Remove. (Shift-click to select multiple adjacent entries;
Ctrl-click /Command-click to select multiple nonadjacent entries.)

203
ADOBE ACROBAT 8 PROFESSIONAL
User Guide
Adding lengthy entries in forms
PDF forms can contain dynamic text fields, whichgrowinsizetoaccommodate thetextyou typeintoit.Ascrollbar
appears in dynamic text fields when the text you type exceeds the current size of the field; when you’re finished
typing and the field is deactivated, the text field expands to display all of the typed text.
If necessary, the field may span onto the next page. If you want to continue editing a dynamic text field that spans
across pages, you can begin editing the field on either page; you’ll have access to all of the text in the field.
Entering text in form field that spans across two pages
Filling in forms with barcodes
Some forms include barcode fields, which capture and display other information in the form as a black-and-white
pattern. You don’t have to do anything with the barcode area itself. As you fill in the form on your computer, the
information you enter is included in the barcode and changes the barcode appearance.
Important: For any form with barcode fields, it’s essential that you fill it in on your computer. Don’t fill it in by hand on
aprintedcopy.Ifyou’regoing to submittheformonpaper,suchasbymailorfax,besuretofillitinelectronicallybefore
you print it.
The barcode field makes collecting data easier for the form recipient because the barcode can simply be scanned. The
results are an accurate and detailed summary of your input.
Search a form
When you search for words in a PDF, the search includes any text appearing in form fields (as well as other text in
the PDF), whether you typed the text or selected it from a list or menu on the form.
❖ Do one of the following:
• Type the text you want to search for in the Find box in the toolbar, and then press Enter. To find the next instance
of the search text, press Enter again.
• Choose Edit > Search, and type the text into the Search window. Then select other basic or advanced options for
searching, and click Search.
Spell-check form entries
You can spell-check the text you typed in note comments and form fields. If you want to check the spelling in a
comment, first open the comment window.
You cannot check the spelling of text in the underlying Adobe PDF document.

204
ADOBE ACROBAT 8 PROFESSIONAL
User Guide
.
Correct a misspelling
❖ Right-click/Control-click the word in the form field or comment window, and then choose the correct word from
the list of alternatives.
Spell-check entries and comments
1 Choose Edit > Check Spelling > In Comments. If the PDF document is open in a web browser, make sure that the
Edit toolbar is open, and click the Spell Check button
2 Click Start to begin the spell check. When a word that may be misspelled is found, it appears under Word Not
Found. Suggested corrections appear under Suggestions.
3 If a possibly misspelled word appears under Word Not Found, do any of the following:
• Edit the unrecognized word by typing. To undo your change, click Undo Edit. To accept your change, click
Change. To change all instances of the unrecognized word, click Change All.
• Select the correct version of the unrecognized word from the Suggested Corrections section and click Change. Or,
simply double-click the correct version of the word. To change all instances of the word to the selected correct
version, click Change All.
• Click Ignore if you don’t want to change the word and want to continue with the check.
• Click Ignore All to ignore every instance of the word. Click Add if you want to add the word to your personal
dictionary.
4 After you make a selection in step 3, the next unrecognized word (if any) is highlighted; repeat step 3 until the
Restart button appears.
5 Click Done.
Specify a dictionary
1 Choose Edit > Check Spelling > Edit Dictionary.
2 Choose the language dictionary you want to use from the Dictionary menu, and then click Done.
Import form data
As an alternate to filling in a PDF form manually, you can import file data from a text (TXT), Extensible Markup
Language (XML), Acrobat Form Data Format (FDF), XML Data Package File (XDP), FormFlow99 Data File (XFD),
or Acrobat XFDF (XFDF) file into a PDF form. Some file formats are available only if you import the data into
particular PDF forms, such as a PDF form created in LiveCycle Designer.
Note: If you import data from a text file, each row in a text file must be tab-delimited to create columns, as in a table.
When a row of data is imported, each cell becomes the value of the form field that corresponds to the column name.
1 Open the PDF form.
2 Choose Forms > Manage Form Data > Import Data.
3 Choose the form data type from the Files Of Type menu, select a file, and click Select.
Note: If you import form data from a form that doesn’t match the form you’re importing into, only the form fields that
match are updated, and those that don’t match are ignored. Existing text in text form fields is replaced if you import data
to those fields.

205
ADOBE ACROBAT 8 PROFESSIONAL
User Guide
Commenting on forms
Acrobat users can comment on PDF forms, just as on any other PDF. If the form creator has extended rights to Adobe
Reader users, they can also add comments.
Whether or not these comments are included when the form is submitted depends on how it’s submitted. For
example, if you use Reader to print the form for mailing or faxing, the comments don’t appear. If you attach the filled-
in form to email as a complete PDF, the comments are included.
See also
“Commenting” on page 168
“Enable Reader users to save form data” on page 213
Submitting forms
Exporting and emailing forms
You can export data you enter into a form to a separate file. When you export the form data, it’s saved in a file that’s
considerably smaller than the original PDF. A smaller file is preferable for archiving or sharing the data electronically.
Depending on how the form was created, you can save the form data as a tab-separated text (TXT), Acrobat XFDF
(XFDF), Acrobat Form Data Format (FDF), or Extensible Markup Language (XML) file; or, you are able to save the
form only in XML or XDP format.
You can also import data from an exported file into another form if that form has fields with the same names. Alter-
natively, you can import file data from a text file.
PDF forms can contain an email-based submit button that exports the data you entered. You can email the form data
with a desktop or web-based email application, or you can submit the form data at a later time.
Note: If the PDF form doesn’t contain an email-based submit button, it may have a submit button that sends the form
data via the web or some other service.
See also
“Import form data” on page 204
Export form data to a file
1 Open the PDF form and fill it in.
2 Choose Forms > Manage Form Data > Export Data.
3 Choose a format from the Save As Type menu, specify a location and filename, and click Save.
Email a form using your email application
When you click an email-based submit button in a PDF form, you have the option to submit the form data with your
preferred desktop email application.
1 Click the submit or return form button on the PDF form.
2 In the Select Email Client dialog box, select Desktop Email Application; then click OK.

206
ADOBE ACROBAT 8 PROFESSIONAL
User Guide
Your default email application displays a new email message with the To, Subject, Body, and Attachment fields
automatically filled in.
3 Send the email.
Email a form using a web service
When you click an email-based submit button in a PDF form, you have the option to submit the form data with a
web-based email service.
1 Click the submit or return form button on the PDF form.
2 In the Select Email Client dialog box, select Internet Email; then click OK.
3 Click Save PDF File or Save Data File, specify a location for the file, and click Save.
4 Log in to your web-based email service, and create a new, blank email message.
5 In the Sending The PDF File dialog box in Acrobat, copy the text in the To box.
6 In the blank email message, paste the copied text into the To box. Repeat the process for the Subject and Message
Text boxes.
7 Attach the file that you saved to the email message.
Submit a PDF form at a later time
When you click an email-based submit button in a PDF form, you have the option of not submitting the form data,
but instead saving it on your computer to send at a later time.
1 Click the submit or return form button on the PDF form.
2 In the Select Email Client dialog box, select Other, and then click OK.
3 Click Save PDF File or Save Data File, specify a location for the file, and click Save.
4 Write down the values that appear in the To, Subject, and Message Text boxes so you’ll have them when you’re
ready to email the form data.
5 To email the form data, create a new message in your email application. Enter the To, Subject, and Message Text
values that you wrote down, attach the data file that you saved, and send the email.
Planning a PDF form
Options for creating PDF forms
There are many approaches to creating PDF forms. If you have existing paper forms, you can convert them to PDF
in various ways, depending on their current format. If you have noninteractive PDF forms, you can transform them
into interactive PDF forms that can be filled in and submitted electronically through a network or Internet
connection.
Using LiveCycle Designer (included with Adobe Acrobat Professional for Windows), you can also create entirely new
PDF forms from blank pages or from designer-created templates.
Paper forms Using a scanner, you can convert a paper form to PDF and use the forms tools to create interactive form
fields in the same page locations as on the paper form.

207
ADOBE ACROBAT 8 PROFESSIONAL
User Guide
Electronic documents In Windows, you can start with an existing form or you can create a new one in an authoring
application, such as Word, Excel, or InDesign, and convert it to PDF. Or you can start with an existing PDF and use
Acrobat to add form fields and other forms features.
Blank documents InAcrobat8,you cancreateaPDFfromablankpageandusethenew PDFEditorfeatureto add
text. Then, you can use the Forms tools to add form fields of various types. Or, in Windows, you can create a form
in LiveCycle Designer, taking advantage of its powerful collection of advanced features and tools.
LiveCycle Designer templates (Windows) Using the wizard from the Forms > Create New Form command, you can
select an appropriate type of form document. Then, you personalize it by swapping out placeholder text, graphics,
form fields, and properties with custom ones that you provide or define.
Using Acrobat versus LiveCycle Designer (Windows)
LiveCycle Designer is included with Acrobat Professional for Windows. LiveCycle Designer enhances the form-
creation features in Acrobat and offers a robust collection of advanced features and controls.
Note: Acrobat users on Mac OS can create and edit forms in Acrobat only if those forms haven’t been opened and saved
onWindowsinLiveCycleDesigner.Ofcourse,AcrobatandReaderusersonMac OS canopenandfill inanyPDFform,
regardless of whether it was created on Windows or Mac OS, or which program was used to save it.
Similarities Use either Acrobat or LiveCycle Designer to do any of the following:
• Use a paper document scanned to PDF as the basis of a form.
• Convert an existing electronic document to PDF, to be the basis of a form.
• Design forms, starting with a blank page. (Forms created from a PDF using the PDF Editor feature in Acrobat have
limited formatting options available.)
• Run automatic form-field recognition on existing PDFs and documents converted to PDF.
• Edit PDF forms created in Acrobat.
• Create forms to distribute by email or post on a website for people to download onto their computers for
completing in Acrobat or Reader or for printing and completing by hand.
• Create forms that users can complete in Acrobat or Reader and submit through email.
Differences Acrobat and LiveCycle Designer differ in these ways:
• In LiveCycle Designer, you can start with one of the blank, built-in templates—predesigned layouts that you edit
and customize.
• YoumustuseLiveCycleDesignertoeditanyformsthathavebeenopenedandsavedinLiveCycleDesigner,even
if the form was originally created in Acrobat.
• In LiveCycle Designer, you can extend compatibility back as far as Acrobat 6.0 and Reader 6.0 for most form data
fields. In Acrobat, you can extend compatibility as far as Acrobat 4.0 and Reader 4.0.
• LiveCycle Designer can create forms in formats that it can convert into HTML. This ability makes LiveCycle
Designer the better application to use if you intend to post the interactive form on a website for people to fill in
and submit from within a browser. You can also integrate PDF forms into existing workflows by binding forms to
XML schemas, XML sample data files, databases, and web services.
• With LiveCycle Designer, you can use scripting objects, integrate a form with a data source, and create dynamic
forms.

208
ADOBE ACROBAT 8 PROFESSIONAL
User Guide
Note: You can start LiveCycle Designer from the Windows Start menu, or from within Acrobat Professional, either by
choosing Forms > Create New Form and following the wizard for creating a new form or by selecting a Forms task in the
Getting Started window.
Decisions based on form content
Planning your PDF form depends on what information will be exchanged through the form. Different types of infor-
mation correspond to various form elements, which are designed especially for that kind of data.
In Windows, the choice between editing a form in Acrobat or editing it in LiveCycle Designer is also influenced by
the content of the form.
Your answers to the following questions may guide your decision about what elements to include in the form layout
and which application to use to create and edit the form.
What information do I need to collect from the user?
This most basic planning step depends on your goals in sending out the form.
What information should I provide to the user?
Besides providing the questions and labels for information the person filling in the form will provide, many forms
identify the person or organization that originated the form and provide contact information, instructions, graphics,
logos, and so forth.
If youwanttoeditthetext or changethelayoutofanexistingPDFform,youmustedittheoriginalsourcedocument
in its native authoring application or, in Windows only, you can edit the file in LiveCycle Designer.
Do I want to receive barcoded information? (Windows)
Barcoding fields are supported by both Acrobat and LiveCycle Designer, with more options available in LiveCycle
Designer.
What are the different types of information the users will submit?
PDF forms can collect many kinds of data: typed text, numbers, a single selection from limited choices, multiple
selections from limited choices, and so on. The data you want to collect affects the types of form fields you use.
For example, List Box fields force users to choose just one answer from a list of limited possibilities, but you could
configure radio buttons that would do the same thing. Which you use might depend on the amount of space
available, usability factors, and design aesthetics.
What user-input is essential and what information can be optional?
This issue is an offshoot of your primary goal for the form. It’s helpful to identify what data fields are essential and
should be set up as required, as compared to data that is only supplementary for other purposes. For example, if the
form is a purchase order, you cannot send the merchandise to the purchaser without a shipping address. However, if
the user left a “Comments” field blank, you could still carry out the primary function of the form, so you wouldn’t
want to mark it as a required field.

209
ADOBE ACROBAT 8 PROFESSIONAL
User Guide
Which form fields could benefit from information formatting?
Many types of form fields can be configured to accept only certain types of information. For example, text boxes can
be set up to accept only numbers, only letters, or a combination of the two. You can restrict input to specific
sequences, such as those for dates, telephone numbers, or Social Security numbers. You can create fields that
automatically display calculations from other fields. You can set text field properties so that the field area scrolls,
allowing users to write lengthy responses without taking up a large area of the form.
Decisions about the form’s work cycle
Planning your PDF form depends on the methods you’ll use for collecting data. In Windows, the planning also influ-
ences your choice between editing a form in Acrobat or editing it in LiveCycle Designer.
Your answers to the following questions may guide your decision about what elements to include in the form.
How do I want users to send back information?
The possibilities include:
• On paper or fax, to be collated manually.
• On paper or fax, to be scanned and save as an electronic document.
• On paper or fax, to be scanned and interpreted from one or more barcode fields included in the form.
• As an email attachment that includes the entire form.
• As an email attachment that includes only the form data.
• Through an Internet or network connection directly to a database.
What are the needs of those who will fill out the forms?
Consider the following factors, which affect who can fill in a form and how comfortable they are in doing so.
• Compatibility. Consider whether all members of your intended audience are likely to be using the latest version
of Acrobat or Reader to fill in the form. You may need to set up the form to be compatible with earlier versions.
• Security. Especially if the form captures sensitive or personal information, consider adding security measures,
such as passwords, digital signatures, or masked form data to protect you and your audience, and to prevent others
from being able to access the data.
• Adobe Reader users. Consider granting Reader users extended rights for the form so they can save a copy of the
completed form before submitting it.
Do I want to track response levels?
Acrobat8offers trackingfeaturesthat youcanusetokeepyourselfinformedonthe submitteddata.Formoreinfor-
mation on this topic, go to the Adobe website.
Choosing form elements
Once you’ve determined what information you want to receive from users, you can match information types with
appropriate form elements.
• For text and numeric data that the user will type in, design the form to use text boxes or combo boxes.
• For a single choice from a limited number of options, use radio buttons, a list box, or a combo box.
• For a limited number of options from which the user can select none, one, or more items, use check boxes, or use
a list box and set the form field properties to allow multiple selections.

210
ADOBE ACROBAT 8 PROFESSIONAL
User Guide
• For actions, such as opening a file, playing a sound or video, submitting form data, and so forth, use buttons.
• For added security, add a digital signature field that verifies the user’s identity.
You can also make changes to individual form field properties, making it even easier and more foolproof for users
filling in the PDF form.
Barcode workflow
Barcode fields translate a user’s form entries into a visual pattern that can be scanned, interpreted, and incorporated
into a database. Barcodes are helpful when users submit the form on paper or by fax.
The advantages of using barcodes are that they save time, eliminate the need for responses to be manually read and
recorded, and bypass data-entry errors that can occur.
A typical barcode workflow includes the following phases:
• The form author makes sure that Automatically Calculate Field Values is selected in the forms preferences, and
then creates the form in Acrobat, setting up all the other fields as usual.
• The form author adds the barcode field to the form, setting up the barcode so that it captures the needed data.
• The form author enables the form for Reader users (if the author wants to allow Reader users to save their own
filled-in copy of the form or if it contains certain barcode fields).
• The form author distributes the form to other users.
• Users fill in the form on their computers, print a copy, and deliver the copy to the form distributor.
• The received barcode data is interpreted in one of the following ways, and can then be reviewed, sorted, and used
by the form receiver:
Forms faxed to a fax server The form receiver can use Adobe Acrobat Capture to collect TIFF images from the fax
server and place them in an Adobe LiveCycle Designer Barcoded Forms Decoder watched folder, if the receiver owns
those products.
Forms delivered on paper The form receiver can scan paper forms and then use an application such as Adobe
LiveCycle Barcoded Forms Decoder to decode the barcodes within those forms.
Note: Acrobat Capture and LiveCycle Barcoded Forms Decoder are standalone products appropriate for enterprise
workflows and are sold separately from Acrobat.
Design tips for barcodes
Issuesthataffecthowyoudesignandplacebarcodesincludeusabilityandspace.Asanexample,thebarcodesizecan
also limit the amount of data that can be encoded. For the best results, follow these guidelines.
• Position the barcode so that it’s unlikely to get folded when placed in an envelope, and position it far enough from
the edges of the page so that it won’t get clipped off during printing or faxing.
• Position it so that it can be easily seen and scanned. If a handheld scanner will be used, avoid barcodes wider than
4 inches (10.3 cm). Tall, narrow barcodes generally work best in this case. Also, avoid compressing the contents of
the barcode when using a handheld scanner.
• Makesurethatthesizeofthebarcodecanaccommodatetheamountofdatatoencode.Ifthebarcodeareaistoo
small, it turns a solid gray. Be sure to test a completed form before distributing it to make sure that the barcode
area is large enough.

211
ADOBE ACROBAT 8 PROFESSIONAL
User Guide
See also
“Create, test, and edit barcode fields” on page 219
“Manage custom barcode settings” on page 230
Form elements in Acrobat
A PDF form created with Acrobat can contain the following types of elements:
Barcodes Encode the input from selected fields and display it as a visual pattern that can be interpreted by decoding
software or hardware (available separately).
Buttons Initiateachange ontheuser’scomputer,suchas openingafile,playingasound,orsubmittingdatatoaweb
server. These buttons can be customized with images, text, and visual changes triggered by mouse actions.
Note: Action buttons have a different purpose than radio buttons, which represent data choices made by the user.
Check boxes Present yes-or-no choices for individual items. If the form contains multiple check boxes, the user can
typically select as many or few of these as wanted.
Combo boxes Let the user either choose an item from a pop-up menu or type in a value.
Digital signature field Lets the user electronically sign a PDF document with a digital signature.
Document message bar Displays automatically generated information about the PDF form and can display action
buttons and other options. The document message bar also informs Reader users about their usage rights for the
form.
Note: If form recipients are using older versions of Acrobat or Reader, the document message bar may not be visible or
may contain different information.
List boxes Display a list of options the user can select.
Note: You can set a form field property that enables the user to Shift-click or Ctrl-click/Control-click to select multiple
items on the list.
Radio buttons Present a group of choices from which the user can select only one item.
Text boxes Let the user type in text, such as name, address, or phone number.
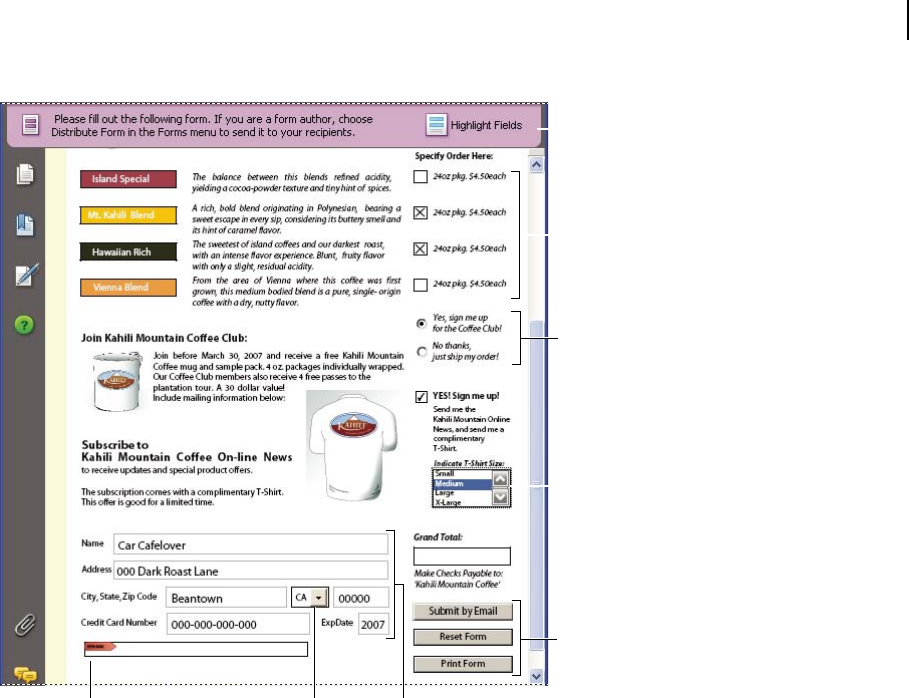
212
ADOBE ACROBAT 8 PROFESSIONAL
User Guide
A BC
Adobe Acrobat PDF form
A. Digital signature field B. Combo box C. Text boxes D. Forms document message bar E. Check boxes F. Radio buttons G. List box
H. Buttons
See also
“Setting action buttons in Acrobat” on page 232
“Enable Reader users to save form data” on page 213
Creating and editing forms
Creating new forms
You can add interactive form fields to a PDF by using the extensive form tools in LiveCycle Designer (Windows) or
the basic form tools in Acrobat Professional.
LiveCycle Designer is a standalone application that is included with Acrobat Professional for Windows or can be
purchased separately.
In Windows, you can initiate the process of creating a LiveCycle Designer form either from within that application
or from Acrobat, using the Create New Forms wizard.
In Acrobat, you can initiate the process of creating an Acrobat form by clicking either Convert An Existing
Document or Scan A Paper Form in the Getting Started window, or by opening an existing PDF and choosing
Forms > Run Form Field Recognition.
D
E
F
G
H

213
ADOBE ACROBAT 8 PROFESSIONAL
User Guide
Note: PDF form fields that were created in Acrobat Professional can be modified in LiveCycle Designer, but PDF form
fields that were created in LiveCycle Designer can’t be modified in Acrobat Professional.
See also
“Using Acrobat versus LiveCycle Designer (Windows)” on page 207
About the Create New Forms wizard
The Create New Forms wizard initiates the process of creating a form in LiveCycle Designer. Forms saved in
LiveCycle Designer can be opened and distributed in Acrobat, but you cannot use the Acrobat Forms toolbar or
other Acrobat forms features to edit a LiveCycle Designer form.
There are several ways to start the Create New Forms wizard from the Acrobat work area: from the Acrobat Forms
menu, the Acrobat File menu, or from the Forms page of the Getting Started window, by clicking Browse The
Template Library or Create New Form.
Each page in the wizard contains complete instructions on how to proceed. For information on how to edit forms in
LiveCycle Designer, refer to LiveCycle Designer Help by starting the LiveCycle Designer application and choosing
Help > Adobe LiveCycle Designer Help.
Enable Reader users to save form data
Ordinarily, Reader users can’t save filled-in copies of forms that they complete. However, you can extend rights to
Reader users so they have the ability to do so. These extended rights also include the ability to add comments, use
the Typewriter tool, and digitally sign the PDF.
1 Choose Advanced > Enable User Rights In Adobe Reader.
2 Read the instructions that appear, and then click Save Now.
These extended privileges are limited to the current PDF. When you create a different PDF form, you must perform
this task again if you want to enable Reader users to save their own filled-in copies of that PDF.
Creating secure PDF forms
PDF forms can be secured in the same ways and by the same methods as other PDFs. Security can be especially
important when sensitive information is included in the form.
See also
“Securing PDFs” on page 263
“About digital IDs” on page 253
Make Adobe PDF forms accessible (Acrobat)
You can make form fields accessible to vision- and motion-challenged users by adding tags to the PDF and by
properly structuring it. In addition, you can use the Tooltip form field property to provide the user with information
about the field or to provide instructions. For example, using the Tooltip property’s value, the screen reader could
say “Your name.” Without the Tooltip property, a screen reader simply names the type of form field.
1 If necessary, choose Forms > Edit Form In Acrobat, and make sure that the Select Object tool is selected.

214
ADOBE ACROBAT 8 PROFESSIONAL
User Guide
Note: If the Forms menu shows the Edit Form In LiveCycle Designer command, then use the corresponding procedure
for that application. See LiveCycle Designer Help.
2 Do one of the following to open the form field’s Properties window:
• Double-click a selected form field.
•
Click the More button in the Properties toolbar. (If this toolbar is hidden, choose View > Toolbars > Properties bar.)
3 In the General tab, type a description into the Tooltip box.
See also
“Accessibility features” on page 287
Adding JavaScript to forms
The JavaScript language lets you create interactive web pages. Adobe has enhanced JavaScript so that you can easily
integrate interactivity into PDF forms. The most common uses for JavaScript in Acrobat Professional forms are
formatting, calculating, validating data, and assigning an action. In Windows, you can also configure Adobe PDF
forms to connect directly to databases using Open Database Connection (ODBC). For more information, see the
JavaScript™ for Acrobat® API Reference on the JavaScript support page (English only) of the Adobe website.
Note: If you’re creating dynamic forms, keep in mind that Reader doesn’t support some custom JavaScripts, so the form
may not function properly when viewed in Reader unless additional usage rights are added to the PDF.
For information on customizing Acrobat, see the Acrobat Software Development Kit (SDK). The Acrobat SDK is
providedtomembersoftheAdobeSolutions Network(ASN)DeveloperProgram.ForinformationonthisSDK,visit
the Adobe Acrobat SDK page (English only) on the Adobe website.
See also
“Enable commenting for Adobe Reader users” on page 155
Laying out new form fields
Create form fields in Acrobat
In Acrobat, you create a form field by choosing one of the form tools, dragging on the document page to define the
size and location of the field, and naming the field. For each field type, you can set a variety of options through the
form field Properties dialog box.
Note: In Windows, you can use LiveCycle Designer to edit forms that were created in Acrobat, but Acrobat can’t edit
form fields that have been opened and saved in LiveCycle Designer. LiveCycle Designer offers additional features and
possibilities than are available in Acrobat alone. However, there are some situations in which Acrobat forms are
preferable.
See also
“Using Acrobat versus LiveCycle Designer (Windows)” on page 207
“Form fields behaviors” on page 222

215
ADOBE ACROBAT 8 PROFESSIONAL
User Guide
Create a new form field
1 Do one of the following:
• Choose Forms > Edit Form In Acrobat.
• Choose View > Toolbars > Forms.
2 In the Forms toolbar, select a forms tool, and do one of the following:
• Drag to create a form field of the required size.
• Double-click the page to create a form field using the default size.
Note: You cannot create a form field on top of a comment.
3 In the [form field name] Properties dialog box, which opens automatically, select property options to specify the
form field behavior.
To addformfieldstoaPDFdocument’stagstreeatthesametimethat youcreatetheformfields inAcrobat,make
sure thatTagAnnotations is selected in theOptions menuoftheTagstab.Selecttheiteminthetagstreethatshould
be the parent of the form field you’re about to create, and create the form field.
Create multiple copies of form fields
You can create multiple copies of form fields even if the fields have different types. The new form field names are
basedontheoriginal formfieldsandappendedwithanumber.Allnewfieldsarecreatedsequentially,usingstandard
array format.
1 Select one or more form fields that you want to copy.
2 Choose Forms > Edit Fields > Place Multiple Fields.
3 In the Create Multiple Copies Of Fields dialog box, do the following:
• To specify the number of rows to be created, enter a number in Copy Selected Fields Down.
• To specify the number of columns to be created, enter a number in Copy Selected Fields Across.
• To specify the width of the area in which the columns of fields appear, enter a number in Change Width.
• To specify the height of the area in which the columns of fields appear, enter a number in Change Height.
Note: The width and height values don’t change the dimensions of individual fields but designate the size of the entire
area for all of the selected and newly created fields.
• To change the position of the fields, use the Up, Down, Left, and Right buttons.
4 Click Preview to apply the results, make any additional changes, and click OK.
Note: Copies of form fields function independently of each other. You can use a different procedure to duplicate form
fields, creating an information-sharing relationship among these form fields.
Lay out Acrobat form fields on a grid
You can use grids to help position form fields precisely on a page. You can define the grid spacing, color, and position.
You can also choose whether to have the boundaries of a form field snap to grid lines when you’re editing the form
field. Grid lines don’t print.
1 Choose View > Grid.
2 To make form fields snap to the nearest grid lines when you create or move them, choose View > Snap To Grid.

216
ADOBE ACROBAT 8 PROFESSIONAL
User Guide
Copy an Acrobat form field
Yo u c a n c r e a t e copies of a form field on a single page of a PDF form and you can copy a form field and paste it onto
other pages. When you create duplicate form fields, replicas of the original field are added to one or more other pages,
always in the same position on each page as the original. Both copies and duplicates can be dragged to different
locations on a page, but not from one page to another.
Bothcopiesandduplicatesarecreatedwiththe samenameastheoriginalformfield,butwithanumberappended.
Allformfieldswiththesamebasicnamesharethesameuserdataand actionproperties.Consequently,whenauser
adds or edits a response to any one of the copies or duplicates, that response appears in all fields with the same basic
name.
Ifyouchangethepropertiesofanyoneofmultipleversionsofaformfieldthathavethesamebasicname—suchas
the appearance or behavior options for the selected form field—those changes affect only that copy of the form field.
The exception is when you change an Actions listing if the trigger isn’t a mouse action.
I
r
f youwanttopreventaduplicatedorcopiedformfield fromreactinginunison withtheoriginalfield touser-entered
esponses, change the name of the new form field using the General tab in form field Properties dialog box.
Create a copy of a form field
❖ Select the form field, and do one of the following:
• To copy the form field to the center of the current view, choose Edit > Copy, and then choose Edit > Paste.
• To copy the form field and move it to another location on the page, Ctrl-drag/Option-drag it.
To constrain the vertical or horizontal movement as you drag, press Shift.
Create multiple copies of a form field on a page
1 Do one of the following:
• Select the form field and choose Forms > Edit Fields > Place Multiple Fields.
• Right-click/Control-click the form field and choose Create Multiple Copies.
2 In the Create Multiple Copies Of Fields dialog box, select Preview, and move the dialog box as needed so that you
can see the original field and the copies on the form page.
3 Make the selections you want to apply:
• To change the number of copies being created, enter different values in the Copy Selected Fields Down and Copy
Selected Fields Across options.
• To change the dimensions of the original field and all the copies, enter different values in the Change Width and
Change Height options.
• To move the original field and all the copies, click the Up, Down, Left, and Right buttons.
Duplicate a form field across multiple pages
1 Select the form field that you want to duplicate.
2 Choose Forms > Edit Fields > Duplicate.
Note: The Duplicate command isn’t available for forms with only one page.
3 Do one of the following:
• To duplicate the form field on every page in the form, select All, and click OK.

217
ADOBE ACROBAT 8 PROFESSIONAL
User Guide
• To duplicate the form field on a limited range of pages, click the From button, and type the start and ending pages
on which you want the form field to appear.
Note: Including or not including the page on which the form field originally appears doesn’t affect the duplication process.
Including that page won’t create a second copy on top of the original one, and not including it won’t remove the original
form field.
Select multiple form fields in Acrobat
Selecting multiple form fields is an essential step in several tasks you can perform, such as creating copies, aligning
form fields, and adjusting the spacing between form fields.
❖ If necessary, choose Forms > Edit Form In Acrobat, and then do any of the following:
• To select all form fields of all types, choose Edit > Select All.
• To select a range of form fields, click the first form field in the range, and then Shift-click the last form field. All
form fields between the two form fields are selected.
• To select individual form fields in different parts of the PDF page, Ctrl-click/Command-click each form field.
• Toselectallformfieldsinanareaofthepage,use theSelectObjecttool todragaselectionmarquee around thearea.
• To select all form fields of a specific type in an area of the page, select the forms tool for that type of field and drag
a selection marquee around the area. For example, if you select the Radio Button tool, only radio button form fields
are selected.
• To deselect an individual form field, Ctrl-click/Command-click that field.
The form field highlighted in red is the anchor. When you select multiple form fields by clicking, the last field
selected is the anchor. When you use a marquee, the form field that was created first is the anchor. If you Ctrl-
click/Command-click to deselect the anchor, the form field located in the upper left of the selection becomes the new
anchor form field.
Resize and arrange form fields in Acrobat
After you create form fields, you may need to rearrange, resize, or move them to give the page a cleaner, more profes-
sional look.
To make adjustments in the layout of form fields, you must be in editing mode (choose Forms > Edit Form In
Acrobat or choose Tools > Advanced Editing > Select Object Tool).
Resize a form field
1 Select either the Select Object tool or the form tool that was used to create the form field.
2 Select the form field that you want to resize.
3 Do any of the following:
• To resize the field manually, click to select the form field, and then drag a border handle. Press Shift to maintain
the current aspect ratio of the form field.
• To resize the field by 1 pixel, press Ctrl+Arrow key/Command+Arrow key; to resize the fields by 10 pixels, press
Ctrl+Shift+Arrow key/Command+Shift+Arrow key.
Resize multiple form fields to match a selected form field
1 Select all the form fields that you want to resize.

218
ADOBE ACROBAT 8 PROFESSIONAL
User Guide
2 Right-click/Control-click the form field that you want the other selected form fields to match, choose Size, and
then select one of the following:
Height Adjusts the heights without changing the widths.
Width Adjusts the widths without changing the heights.
Both Adjust all widths and heights to match.
Move individual form fields
You can move form fields by simply dragging them. For greater precision in less time, you can use special features
that align them with each other, adjust the spacing between them, and center them on the page.
1 Using the Select Object tool, select one or more form fields that you want to move.
2 Do one of the following:
• To move to an approximate location, drag the selected form fields to the new location.
To
to
constrain movement to a horizontal or vertical direction, begin dragging, and then press Shift while continuing
drag the selection.
• To move either horizontally or vertically in small increments, press the arrow keys to nudge the selected form field
into position.
• To move the form field to the exact center of a page, choose Edit > Cut, navigate to the desired page, and then
choose Edit > Paste.
Note: Fields are placed in the center of the page only the first time they’re pasted. Additional pasted fields are offset from
the previously pasted field.
Align and center multiple form fields
1 Select two or more form fields that you want to align.
2 Right-click/Control-click the field to which the others will align, choose Align, and then choose a command as
follows:
• To align a column of fields, choose Left, Right, or Vertical to align them respectively to the left edge, right edge,
or vertical axis (center) of the anchor form field.
• To align a row of fields, choose Top, Bottom, or Horizontally to align them respectively to the top edge, bottom
edge, or horizontal axis (center) of the anchor form field.
Note: When you right-click/Control-click one of the selected fields, it’s highlighted in red instead of blue, indicating that
it’s the anchor form field. The Align menu commands move the other selected form fields to line up with the edges of the
anchor form field.
Adjust the spacing between form fields
In the context of laying out form fields on a page, distributing meanstogiveagroupofformfieldsuniformspacing,
measured from the centers of adjacent fields. The Distribute commands take precedence over the Snap To Grid
command.
1 Press Shift and select the form fields that you want to adjust.
2 Right-click/Control-click any one of the selected form fields, and do one of the following:
• To distribute the fields evenly between the topmost and bottommost fields, choose Distribute > Vertically.
• To distribute the fields evenly between the leftmost and rightmost fields, choose Distribute > Horizontally.

219
ADOBE ACROBAT 8 PROFESSIONAL
User Guide
Note: The Distribute button in the Forms toolbar has a different function: Use that button to send your form to others,
who will fill in the information and return the data to you.
Delete a form field
1 Select the form fields you want to delete.
2 Press Delete, or choose Edit > Delete.
Create, test, and edit barcode fields
One of the ways in which you can improve a PDF form barcode is by creating custom scripts. Writing such scripts
requires a basic competency with JavaScript and a familiarity with Acrobat-specific JavaScript. For information, see
Developing Acrobat® Applications Using JavaScript™ on the JavaScript support page (English only) of the Adobe
website. For information about basic JavaScript, refer to any of the many resources available on that subject.
A
th
fter inserting a barcode of maximum size, changing the cell size or decode condition may cause the barcode to cross
e page borders. Avoid this behavior by selecting the appropriate cell size and decode conditions for the barcode.
See also
“Design tips for barcodes” on page 210
“Manage custom barcode settings” on page 230
“Value tab for form field properties” on page 230
“Options tab for form field properties” on page 224
Add a barcode field
1 Open the form in Acrobat, choose Edit > Preferences and select Forms on the left. Then select Automatically
Calculate Field Values.
2 Click the Barcode tool in the Forms toolbar, or choose Tools > Forms > Barcode Tool.
3 Drag a rectangle to define the barcode area. The Barcode Field Properties dialog box opens.
4 In the Value tab, do one of the following:
• Select Encode Using, and then select a format (XML or Tab Delimited). Click the Pick button and select the fields
that you want to be encoded in the barcode field. If you don’t want to include the field names in the barcode data,
deselect Include Field Names.
• Select Custom Calculation Script, click Edit, and then enter your custom JavaScript code in the JavaScript Editor
dialog box.
5 In the Options tab, do all of the following:
• Select a Symbology option: PDF417, QR Code, or Data Matrix.
• Select Compress Data Before Encoding To Barcode if you want to apply this compression. Do not select this option
if a handheld scanner will be used to capture data from returned forms.
• In Decode Condition, choose the type of hardware that will process returned forms: Handheld Barcode Scanner,
Fax Server, Document Scanner, or Custom.
• If necessary, click Custom and enter values for X Dimension, Y/X Ratio, and Error Correction Level.
6 Make any other changes in the General and Actions tabs. Then click OK to close the Barcode Field Properties
dialog box.

220
ADOBE ACROBAT 8 PROFESSIONAL
User Guide
JavaScript code is generated automatically to encode the selected fields in the XML or Tab Delimited format, the
Barcode Field Properties dialog box closes, and the barcode for which you specified values appears on the form.
Note: Ifyouaddanewfieldtoaformafteryouhavecreatedthebarcode,the newfieldwillnotautomaticallybe included
in the data for existing barcodes. However, you can manually include additional data fields in the barcode.
Test a barcode field
1 Choose Forms > Edit Form In Acrobat to deselect it, or click the Preview button in the Forms toolbar.
2 Fill in the form, using sample data that represents the maximum amount of information that a each field allows
or that you expect any user might enter.
3 If the barcode field is grayed out, follow either the procedure for resizing the barcode field or for adjusting the
content data. (See the following tasks.)
4 When you are sure that the barcode field area is large enough to contain all of the incoming data, choose Forms >
Clear Form, to remove the sample data, and then choose File > Save.
The barcode form field is now ready for distribution.
Include additional data fields in the barcode
1 Using either the Barcode tool or the Select Object tool, select the barcode field and choose Forms > Show Field
Properties.
2 In the Value tab, do one of the following:
• If Encode Using is selected, click Pick, and select additional form fields to be encoded.
• If Custom Calculation Script is selected, click Edit, and write additional JavaScript to include the additional fields.
After including new data fields in the barcode, be sure that the barcode area is large enough by testing sample data.
If the barcode area is grayed out, adjust the barcode size, barcode properties, or text field properties so that the data
content fits into the barcode area.
Resize a barcode field
The most common error when authoring barcoded forms is when the barcode area is too small to accommodate the
data. If this occurs during your test of sample data, the barcode appears as a solid gray rectangle instead of showing
its coding pattern.
1 Select the Barcode tool , and select the barcode field.
Important: Be sure to use only the Barcode tool to resize a barcode. If you resize a barcode using the Text Field tool or
the Select Object tool, the barcode can be distorted and becomes unusable.
2 Drag a handle along the edges or corners of the barcode field frame.
3 If necessary, drag the barcode from inside its frame to move it to another location on the page.
Adjust data content to fit in a barcode field
1 To edit the barcode properties so that it can accommodate more data, select it, choose Forms > Show Field
Properties, and do any of the following:
• In the Options tab, click the Custom button and enter lower values for Error Correction Level and Y/X Ratio.
• In the Options tab, select Tab Delimited rather than XML as the data-encoding format. XML requires more
barcode area to encode information than Tab Delimited does.

221
ADOBE ACROBAT 8 PROFESSIONAL
User Guide
• In the Options tab, select Compress Data Before Encoding To Barcode, but only if you will be using an Adobe
software decoder (available separately).
• In the Options tab, select a different Symbology option.
• In the Value tab, click the Pick button, and deselect any fields that you don’t need to encode. For example, don’t
include fields with redundant information
• In the Value tab, enter a custom script that converts user-entered text to either all lowercase or all uppercase
characters during the encoding process.
Note: The National Association of Computerized Tax Processors (NACTP) guidelines, used by the United States Internal
Revenue Service and state tax agencies, recommend using all uppercase characters for 2D barcode data
2 To edit a text field to minimize the amount of barcode area needed to contain the data, select the text field, choose
Forms > Edit Field Properties, and do either of the following:
• In the Options tab, enter a value (or reduce the existing value) for Limit Of Characters.
• In the Validate tab, write a custom script that restricts data to alphanumeric characters and to a single case. (Text
that is either all uppercase or all lowercase requires less barcode area than the same text written in a mixture of
uppercase and lowercase characters.)
Consider creating additional barcode fields in the form and mapping different data to each barcode field.
Set form-field tabbing order in Acrobat
If aPDFdocument isn’ttaggedanddoesn’thaveaspecifiedtaborder, theorderin whichtheformfieldswerecreated
determines their tabbing order. If a PDF document is tagged, the document structure determines the form fields’
tabbing order unless the user has deselected the Tab Order option in the Accessibility preferences.
You can change the tabbing order after you create the fields in either of two ways: by setting the tabbing order in the
Page Properties, or manually.
See also
“Creating new forms” on page 212
“Make Adobe PDF forms accessible (Acrobat)” on page 213
Set tabbing order in Page Properties
1 Click the Pages button or choose View > Navigation Panels > Pages to open the Pages panel.
2 Select one or more page icons, and choose Page Properties in the Pages panel Options menu.
3 Select a Tab Order option:
Use Row Order Tabs from the upper left field, moving first left to right and then down, one row at a time.
Use Column Order Tabsfromtheupper left field,movingfirstfromtoptobottomandthenacrossfromlefttoright,
one column at a time.
Use Document Structure For forms with tagged fields, follows the order set up in the tagging.
Unspecified Uses the existing sequence. For untagged forms, this is the order in which the fields were created.
Reset tabbing order automatically
1 Choose Forms > Edit Fields > Set Tab Order.

222
ADOBE ACROBAT 8 PROFESSIONAL
User Guide
Note: You can choose this command only if the tab order property in the Page Properties is set to Unspecified.
2 Click Yes in the message that appears to automatically determine the tab order.
Set tabbing order manually
1 Choose Forms > Edit Fields > Set Tab Order.
Note: You can choose this command only if the tab order property in the Page Properties is set to Unspecified. You can
verify this by selecting the page in the Pages panel and choosing Page Properties in the Pages panel Options menu or
context menu.
2 Click No in the message that appears.
Numbers representing the tabbing order for the fields appear in the upper left corner of each field.
Note: If you decide not the change the tabbing order, click a blank area of the page or a part of the page that is not part
of a field. This hides the tabbing order numbers so that clicking a field no longer changes the tabbing order.
3 Click anywhere in the field that you want to be first in the tabbing order.
The number in the upper left corner is set as 1.
4 Click each of the other fields in the order that you want tabbing to occur.
Form fields behaviors
About Acrobat form field properties
How a form field behaves is determined by settings in the Properties dialog box for that individual field. You can set
properties that apply formatting, determine how the form field information relates to other form fields, impose
limitations on what the user can enter in the form field, trigger custom scripts, and so forth.
You can set a variety of properties for an Acrobat form field, depending on the form field type. The properties for
each type of form field are selected on a series of tabs.
All types of form fields have a General tab, Appearance tab, and an Actions tab. Other tabs appear only in specific
typesofformfields. TheOptionstabappears formostformfieldtypesbuttheoptionsavailableareunique toeach
type of form field.
Two items are available on every tab. If you select one on any tab, a check mark will appear, and the option will be
checked on all tabs. These are:
Locked When selected, prevents any further changes to any form field properties.
Close Applies and saves the current form field properties, and closes the form field Properties dialog box.
Note: If you select Locked on any tab, it locks all options for the field, not just the options on that tab.
Modify form field properties in Acrobat
You can access Acrobat form field properties only when you are in editing mode (by choosing Forms > Edit Form In
Acrobat or Tools > Advanced Editing > Select Object Tool). You can change the properties for multiple form fields
at a time.

223
ADOBE ACROBAT 8 PROFESSIONAL
User Guide
Note: Some basic options can be changed on the Properties toolbar, which you can open or hide by choosing View >
Toolbars > Properties Bar.
1 Open the Properties dialog box using one of the following methods:
• To edit a single form field, double-click it or right-click/Control-click it and choose Properties.
• To edit multiple form fields, select the fields that you want to edit, right-click/Control-click one of the selected
fields, and choose Properties.
2 Make changes to the properties on each of the available tabs, as needed.
3 Click Close to apply and save the changed properties to the selected form fields.
If you select form fields that have different property values, some options in the Properties dialog box are not
available. Otherwise, changes to the available options are applied to all selected form fields.
Toa
you c
voidaccidentalchangestotheformfield,selectLockedinthelowerleftcorneroftheProperties dialog boxbefore
lose it. To unlock, click the check box again.
See also
“Setting action buttons in Acrobat” on page 232
General tab for form field properties
The General tab appears for all types of form fields and includes the following options:
Name Specifies the unique name of the selected form field.
Tooltip Displays text that the hesitant user may find helpful in filling in the form field. Tooltips appear when the
pointer hovers briefly over the form field.
Form Field Specifies whether the form field can be seen, either on screen or in print. The choices are: Visible,
Hidden, Visible But Doesn’t Print, and Hidden But Printable.
Orientation Rotates the form field by 0, 90, 180, or 270 Degrees
Read Only Prevents the user from changing the form field content.
Required Forces the user to fill in the selected form field. If the user attempts to submit the form while a required
field is blank, an error message appears and the empty required form field is highlighted.
Appearance tab for form field properties
Appearancepropertiesdeterminehowtheformfield looksonthe page.The Appearancetabappearsforalltypesof
form fields and includes the following options:
Border Color Opens a color picker in which you can select a color swatch for the frame surrounding the field. To
leave the field without a frame, select No Color.
Line Thickness Specifies the width of the frame surrounding the form field: Thin, Medium, or Thick.
Fill Color Opensacolorpickerinwhichyoucanselectacolor swatchforthebackground behind thefield.Toleave
the field uncolored, select No Color.
Note: A Fill Color choice other than No Color will block any images on the PDF page that are behind the form field.
Line Style Alters the appearance of the frame. Select Solid, Dashed, Beveled, Inset, or Underline.

224
ADOBE ACROBAT 8 PROFESSIONAL
User Guide
Font Size Sets the size of user-entered text or of the selection marker for radio buttons and check boxes. The choices
include Auto, various preset values, and typing in a different value.
Text Color Opens a color picker in which you can select a color swatch for the text or selection marker.
Font Lists the fonts available on your computer. This option is not available for form fields that do not display text.
Note: TheEnableRight-To-LeftLanguageOptionsin theInternational panelofthePreferencesdialogbox affectswhat
appears in the Appearance tab of the Properties dialog box. When that preference is selected, the Appearance tab includes
options for changing the digit style (Western or Arabic-Indic) and text direction for text fields, combo boxes, and list
boxes.
Options tab for form field properties
The options available on this tab change according to the type of form field selected. The Options tab appears for all
form field types except digital signatures.
Barcode
The Options tab for barcode field properties contains the following:
Symbology Includes the PDF417, QR Code, and Data Matrix barcode types.
Note: If your organization processes forms by multiple methods, select the method that accommodates the lowest quality
barcode images. For example, if forms will be returned by fax and mail, choose Fax Server as the decode condition to
ensure high read rates on all forms.
Compress Data Before Encoding To Barcode Specifies that data will be compressed before it is encoded. Data is
compressed with the Flate compression method. Compressed data usually requires less storage space in the barcode,
allowing more data to be stored. In general, select this option if you will use the Acrobat barcode forms decoder to
interpret the returned data. Do not select this option if you will use a handheld barcode scanner, because most of
these cannot decode compressed data.
Decode Condition The preset decode conditions represent recommended starting points that you can adjust by
clicking the Custom button.
Custom Opens a dialog box in which you can select custom processing parameters that are best for your specific
scanning and faxing hardware. (The available options vary according to barcode types.)
• X Dimension Width, in mils (1 mil = 0.001 inch or 0.0254mm), of the cell.
• Y/X Ratio Height/width ratio of the cell. For example, for a data cell that is twice as high as it is wide, enter 2.
(Available only for PDF417 barcodes.)
Note: If you are planning to decode the barcode using a handheld laser scanner, avoid creating barcodes wider than 4
inches (10.2 cm). Taller and narrower barcodes generally work better with handheld scanners. Barcode height and width
will not be an issue if you are using an Adobe barcode decoder (available separately).
• Error Correction Level Corresponds to the level of data redundancy that is added to the barcode to correct any
potential decoding errors. Higher levels provide more redundancy and a more robust barcode that will generate
more successful decode results. However, higher levels will also result in a larger barcode and a reduced ability to
encode user-supplied or form structure data into the barcode. A more robust barcode can reduce problems created
by pen marks, poor print quality, degradation caused by fax transmission, or folds in the document. This option is
available for PDF417 and QR Code barcodes.
Manage Barcode Parameters Enablesyoutosaveyourcustombarcodeselectionsinafile.Youcanthenexportthe
file and make it available to other form authors in your organization.

225
ADOBE ACROBAT 8 PROFESSIONAL
User Guide
Check boxes
Check Box Style Specifies the shape of the marker that appears inside the check box when the user selects it: Check
(the default), Circle, Cross, Diamond, Square, or Star. This property does not alter the shape of the check box itself.
Note: Thesizeofthemarkerinsidethecheck boxisdeterminedbythesizeofthefontyouspecifyintheAppearancetab.
Export Value Specifies a value to represent the item if the data will be exported. If left blank, the entry for Name in
the General tab is used as the export value.
Check Box Is Checked By Default Shows the check box selected unless the user deselects it.
Combo box and list box
For either combo boxes or list boxes, you use the Options tab to create a list of items from which the user selects.
Althoughmostof thepropertiesonthistabarecommontoboththese typesofformfields, afewareexclusive toone
type or the other.
Item Accepts the text that you type for options that you want to appear in the menu for the field.
Add Moves the current entry in Item to the Item List.
Export Value Where you type in a value to represent the item if the data will be exported. If left blank, the entry for
Name in the General tab is used as the export value.
Item List Displays the choices that will be available in the list.
Note: The highlighted item in the Item List box appears as the default selected item in the combo box field. To change
the default item, highlight another item from the list.
Up and down arrows Change the order in which the items are listed in the combo-box list. These buttons are not
available if Sort Items is selected.
Note: The highlighted item in the Item List box appears as the default selected item in the combo box field. To change
the default item, highlight another item from the list.
Delete Removes the selected item from the list.
Sort Items Arranges the listed items numerically and alphabetically. A numerical sort (if applicable) is performed
before an alphabetical sort.
Allow User To Enter Custom Text (Combo boxes only) Enables users to enter a value other than the ones in the list.
Check Spelling (Combo boxes only) Checks the spelling of user-entered text. This option is available only if Allow
User To Enter Custom Text is selected.
Multiple Selection (List boxes only) Enables users to choose more than one item in the list.
Commit Selected Value Immediately Saves the value as soon as the user selects it. If this option is not selected, the
value is saved only when the user tabs out of the current field or clicks another form field. For list boxes only, this
option is not available if Multiple Selection is selected.
Radio buttons
Button Style Specifies the shape of the marker that appears inside the button when the user selects it: Check, Circle
(the default), Cross, Diamond, Square, or Star. This property does not alter the shape of the radio button itself.
Export Value Identifies the radio button and differentiates it from other radio buttons that share the same Name
value.
Button Is Checked By Default Sets the selection state of the button when the user first opens the form.
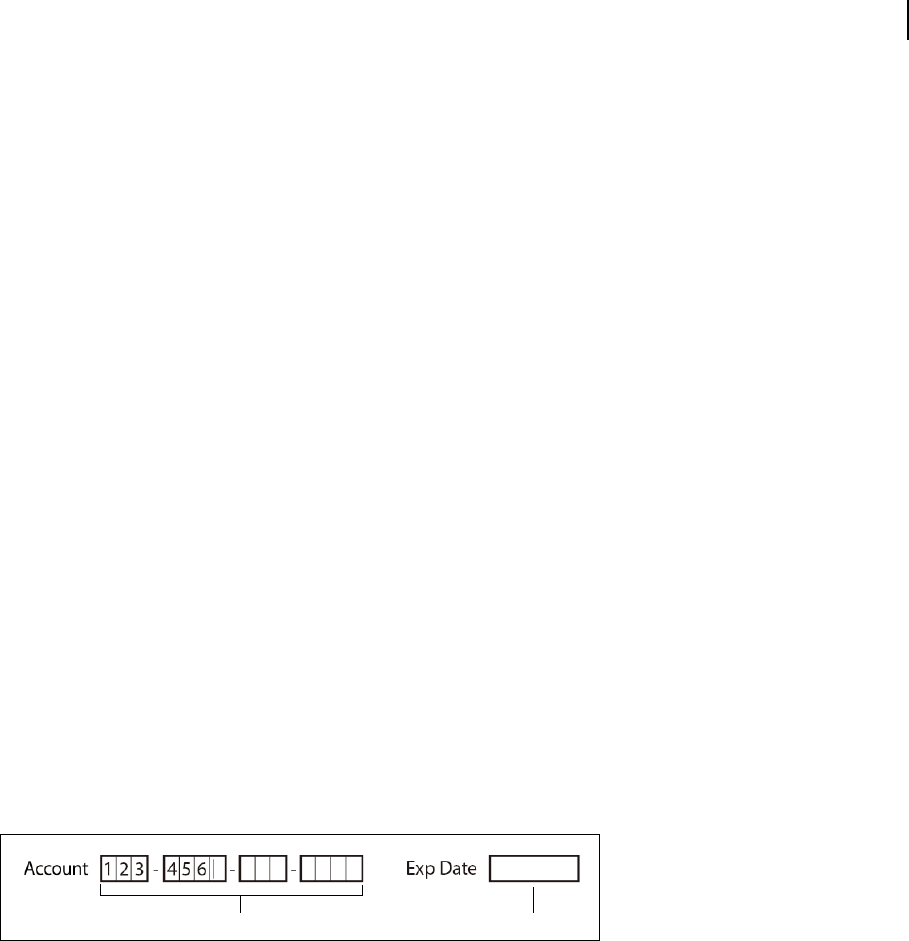
226
ADOBE ACROBAT 8 PROFESSIONAL
User Guide
Buttons With The Same Name And Value Are Selected In Unison Allows single-click selection of multiple related
radio buttons. For example, if the user selects a radio button that has the same field name and export value as another,
both radio buttons are selected.
Text Fields
Text fields accept user input, which can be alphabetic characters, numbers, or both.
Alignment Aligns the text left, right, or center within the field.
Default Value Specifies the text that appears until the user overwrites it by typing in the field. Enter the default value
by typing in this option.
Multi-line Allows more than a single-line entry in the text field.
Scroll Long Text Compensates for text that extends beyond the boundaries of the text field.
Allow Rich Text Formatting Allows users to apply styling information to the text, such as bold or italic. This might
be useful in certain text fields where such styling information is important to the meaning of the text, such as an
essay.
Limit Of Characters Allows entries of up to the number of characters you specify.
Note: If you entered a default value, that value is clipped to this limit.
Password Displays the user-entered text as a series of asterisks (*). This option is available only if Check Spelling is
deselected.
Field Is Used For File Selection Allows the user to enter a file path as the field’s value when a file is submitted along
with the form. This option is available only when Scroll Long Text is the only selected option in the Options tab.
Check Spelling Checks the spelling of user-entered text.
Comb Of Characters Spreads the user-entered text evenly across the width of the text field. If a border color is
specified in the Appearance tab, each character entered in the field is separated by lines of that color. This option is
available only when no other check box is selected.
A B
Text fields with and without the Comb property
A. Four text fields with a border color, using the Comb property B. Text field without the Comb property
Actions tab for form field properties
Actions properties specify any actions that you want to associate with the form field, such as jumping to a specific
page or playing a media clip. The Actions tab appears for all types of form fields and includes the following options:
Select Trigger Specifies the user action that initiates an action: Mouse Up, Mouse Down, Mouse Enter, Mouse Exit,
On Focus, or On Blur.
Select Action Specifies the event that occurs when the user triggers the action: Execute A Menu Item, Go To A 3D
View, Go To A Page View; Import Form Data, Open A File, Open A Web Link, Play A Sound, Play Media (Acrobat
5 Compatible), Play Media (Acrobat 6 And Later Compatible), Read An Article, Reset A Form, Run A JavaScript, Set
Layer Visibility, Show/Hide A Field, and Submit A Form.
Add Opens a Browse-for-file window.

227
ADOBE ACROBAT 8 PROFESSIONAL
User Guide
Actions Displays the list of triggers and actions that you’ve defined.
Up and down arrows Changetheorderin whichtheselectedactionappearslistedunder thetrigger.(Availableonly
when you have defined multiple actions for the same trigger.)
Edit Opens a dialog box with specific options for the selected action.
Delete Removes the selected action or trigger-action pair.
Calculate tab for form field properties
TheCalculatetabappears inthePropertiesdialogboxes foronlytextboxesandcombo boxes. Usetheseoptionsto
perform mathematical operations on existing form field entries and display the result.
Value Is Not Calculated Select this if you want the user to type.
Value Is The Select this to make further options available:
• Pop-up Menu Lists the mathematical functions to apply to the selected fields. Choose Sum to add the values
entered in the selected fields, Product to multiply them, Average, Minimum, or Maximum.
• Pick Opens a dialog box with a list of the available fields in the form that you select to add or deselect to remove
from the calculation.
Simplified Field Notation Uses JavaScript with field names and simple arithmetic signs. The Edit button opens a
dialog box in which you can write, edit, and add scripts.
Custom Calculation Script Displays any custom scripts you have added for calculations. The Edit button opens a
dialog box in which you can write and add new JavaScripts.
Set the calculation order of form fields
When you define two or more calculations in a form, the order in which they are carried out is the order in which
you defined the calculations. In some cases, you may need to modify the calculation order to obtain correct results.
For example, if you wanted to use the result obtained from calculating two form fields to calculate the value of a third
form field, the first two form fields must be calculated together first to obtain the correct final results.
1 Choose Forms > Edit Fields > Set Field Calculation Order.
The Calculate Fields dialog box displays all calculable fields in your form and the order in which the calculations are
performed.
2 Tochangethefieldcalculationorder,selectthefieldfromthelist,and thenclicktheUporDownbuttonas needed.
Acrobat automatically performs all assigned field calculations when you are creating and testing your form fields.
For convenience while you work, you can turn off automatic calculation in the forms preferences.
Signed tab for form field properties
The Signed tab is available only in the Digital Signature Properties dialog box. Selections made here determine what
happens when the user applies a digital signature to the form.
Nothing Happens When Signed This is the default.
Mark As Read-Only
Prevents further changes to the digitally signed form, according to the selection in the pop-up menu:
• All Fields Prevents any changes to any form field.

228
ADOBE ACROBAT 8 PROFESSIONAL
User Guide
• All Fields Except These Allows changes only to the form fields you select by clicking the Pick button and selecting
check boxes for the fields that you want the user to be able to edit after signing.
• Just These Fields Prevents changes in only the form fields you pick.
This Script Executes When Field Is Signed Activates a custom JavaScript when the user digitally signs the form. Use
the Edit button to change or create a new JavaScript action.
See also
“Adding JavaScript to forms” on page 214
Format tab for form field properties
The Format tab appears in the Properties dialog box for only text form fields or combo box form fields. The options
that are available depend on your selection in the Select Format Category pop-up menu.
None
No additional options are available. The input in a text or combo box with this property does not require any specific
formatting.
Number
Automatically imposes the selected formatting options on numeric data entries.
Decimal Places Sets the number of digits that appear to the right of the decimal point.
Separator Style Sets the placement of commas and periods.
Currency Symbol Sets the type of currency, such as Euros, Dollars, or Yen.
Negative Number Style Sets hownegativenumbersaredisplayed.YoucanchooseShowParentheses,Use RedText,
neither, or both.
Percentage
Automatically imposes the selected formatting options on numeric data expressed as a percentage.
Decimal Places Sets the number of digits that appear to the right of the decimal point
Separator Style Sets the placement of commas and periods.
Date
List includes one-, two-, and four-digit variations where d stands for the day, m stands for month, and y stands for year.
Time
List includes display variations where h stands for the hour on a 12-hour clock, H stands for the hour on a 24-hour
clock, MM stands for minutes, ss stands for the seconds, and tt stands for AM or PM.
Special
Zip Code For a five-digit U.S. postal code.
Zip Code + 4 For a nine-digit U.S. postal code.
Phone Number For a ten-digit telephone number.
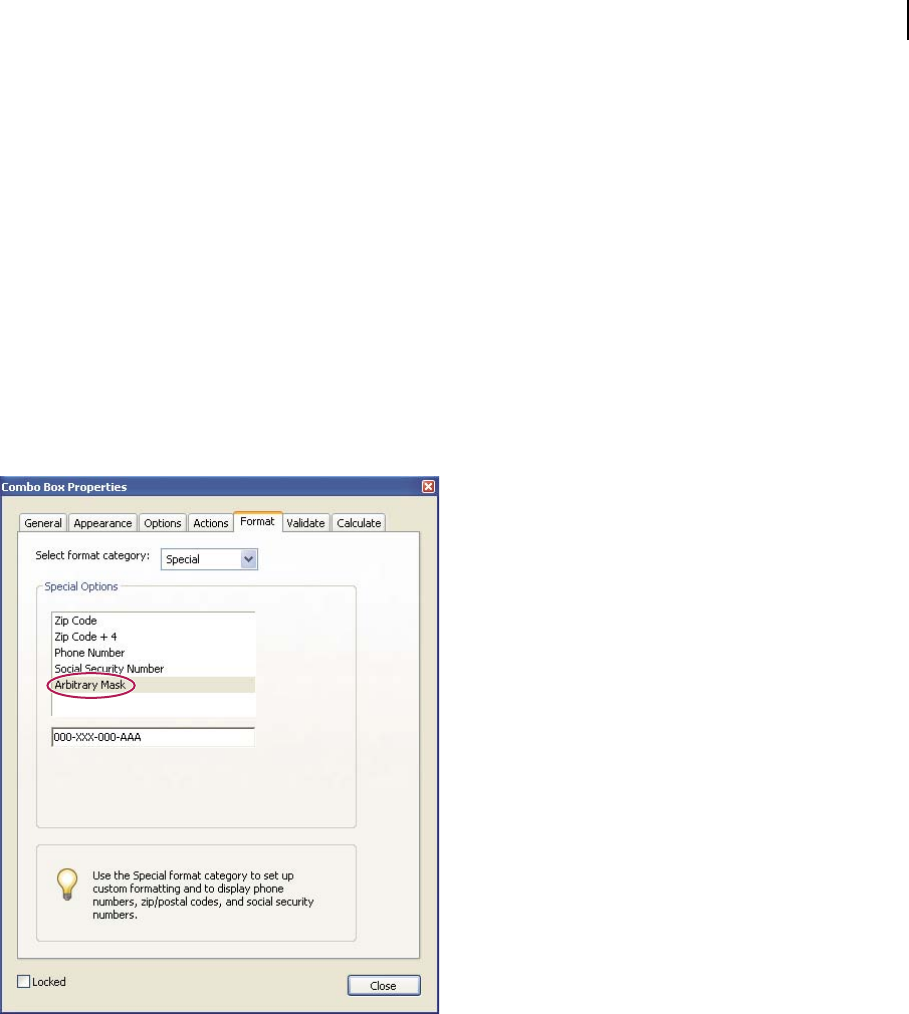
229
ADOBE ACROBAT 8 PROFESSIONAL
User Guide
Social Security Number For a nine-digit U.S. Social Security Number. Hyphens are inserted automatically after the
third and fifth digits.
Arbitrary Mask Changes the format category to Custom and makes another text box available, in which you can type
a custom format. Use this option to specify which types of characters the user can enter in any given position, and
how the data displays in the field.
• A Accepts only letters (A–Z, a–z).
• X Accepts spaces and most printable characters, including all characters available on a standard keyboard and
ANSI characters in the ranges of 32–126 and 128–255.
• O The letter “O” accepts alphanumeric characters (A–Z, a–z, and 0–9).
• 9 Accepts only numeric characters (0–9).
For example, a mask setting of AAA--p#999 accepts the input BOE--p#767. A mask setting of OOOOO@XXX
accepts the input vad12@3Up.
Example of an Arbitrary Mask entry
Custom
Makes additional options available to form designers who want to write their own JavaScripts for formatting and
keystrokes. For example, a custom script could define a new currency format or limit the user entry to specific
keystroke characters.
Custom Format Script Displays any custom scripts you have added for formats. The Edit button opens a dialog box
in which you can write and add new scripts.
Custom Keystroke Script Displays any custom scripts you have added to validate keystrokes. The Edit button opens
a dialog box in which you can write and add new scripts.

230
ADOBE ACROBAT 8 PROFESSIONAL
User Guide
To g et t he JavaScript for Acrobat API Reference,gotothe JavaScript support page (English only) of the Adobe website.
Validation tab for form field properties
The Validation tab appears only in the Text Field Properties and Combo Box Properties dialog boxes. Validation
properties restrict entries to specified ranges, values, or characters, ensuring that users enter the appropriate data for
a specified form field.
Field Value Is Not Validated Turns off validation.
Field Value Is In Range Sets a numeric range for form fields using values you enter in either as a number or a
percentage.
Run Custom Validation Script Validates by a JavaScript that you create or provide.
See also
“Adding JavaScript to forms” on page 214
Value tab for form field properties
The Value tab appears for barcode form fields only.
Encode Using Activates these options:
• XML Encodes the data into the barcode in standard XFDF format. JavaScript script is automatically generated.
• Tab Delimited Encodes the fields into the barcode as tab-delimited values. JavaScript script is automatically
generated. If the form is configured to output the data in individual XFDF or XDP files, the data must be in a tab-
delimited format with the field names in the first line. This option is also useful if you want to fit more data into a
barcode or if you intend to copy the data into database or spreadsheet tables.
• Pick Opens a dialog box in which you select which user data fields will be encoded in the barcode for you to
retrieve.
• Include Field Names (Available only when Tab Delimited encoding is selected.) Encodes field names as the first
line of the barcode contents. The values are encoded under them.
Custom Calculation Script Displays the default script. Click the Edit button to open the JavaScript Editor dialog box,
in which you can write custom calculation scripts for your barcode.
Reference To published Form Shows the path to the PDF form. You can edit this by typing in the URL to the
published form. Later, you can re-create a digital version of the completed form by merging the form template with
an instance of user-supplied data. You can also maintain the relationship between a specific form template and its
related barcode data files. When you encode a barcode using XML values, the URL reference is encoded into the
barcode and is displayed on the form, below the barcode.
http://www.adobe.com/formscatalog/thisform.pdf
A type of barcode, with the URL reference below
Manage custom barcode settings
You can save, reuse, and share a set of custom settings for barcode parameters, to apply them when you create new
barcode form fields. You can make further adjustments to your custom parameter sets after you define them.

231
ADOBE ACROBAT 8 PROFESSIONAL
User Guide
All of these processes begin by opening the barcode form field properties dialog box, which you can do by using the
Select Object tool (Tools > Advanced Editing > Select Object Tool) to select a barcode form field, and then choosing
Forms > Show Field Properties.
See also
“Create, test, and edit barcode fields” on page 219
“Design tips for barcodes” on page 210
Create a new barcode parameters set
1 In the Barcode Field Properties dialog box, click the Options tab, and then click Manage Barcode Parameters.
2 Select the existing parameter set that you want to use as the basis of the new set, and click New.
3 Type a name in the Name box and a description in the Description box.
4 Select options for Barcode Type, X Dimension, Y/X Ratio, and Error Correction Level, and then click OK.
The newly defined parameter set appears in the list in the Manage Barcode Parameters dialog box, and all the buttons
on the right side of the dialog box become available. The new definition also appears in the Decode Condition menu
in the Options tab of the Barcode Field Properties dialog box.
Edit or delete a set of custom barcode parameters
1 In the Barcode Field Properties dialog box, click the Options tab, and then click Manage Barcode Parameters.
2 Select a custom parameter set from the list.
3 Choose the appropriate action:
• Click Edit and make the changes to the settings; then click OK.
• Click Delete. Confirm the deletion in the message that appears by clicking OK.
Export or import a set of custom barcode parameters
1 In the Barcode Field Properties dialog box, click the Options tab, and then click Manage Barcode Parameters.
2 Choose the appropriate action:
• Select a barcode parameter set from the list and click Export. Select a location and file name for the file that has
the file name extension .bps.
• Click Import, and navigate to and select the BPS file that you want to import.
Redefine form field property defaults
After you change properties for a specific type of form field, you can set those properties as the default set for that
type. For example, you can create a check box, change its properties, and then save the properties as the default
values. This would not affect the default properties of other types of form fields, such as text boxes or radio buttons.
1 If necessary, do one of the following to go to form-editing mode and to activate the Select Object tool:
• Choose Forms > Edit Form In Acrobat so that a check mark appears next to that command in the Forms menu.
• Choose Tools > Advanced Editing > Select Object Tool.
2 Right-click/Control-click the form field for which you have already changed properties, and choose Use Current
Properties As New Defaults.

232
ADOBE ACROBAT 8 PROFESSIONAL
User Guide
Note: Changingthedefaultpropertiesdoesnotchangethe settingsforexistingformfieldsofthattype.Thenewdefaults
apply only to new fields that you create.
Setting action buttons in Acrobat
About buttons
Buttons are most commonly associated with forms, but you can add them to any document. Buttons can open a file,
play a sound or movie clip, submit data to a web server, and much more. When deciding on how to initiate an action,
remember that buttons offer the following capabilities that links and bookmarks do not:
• A button can activate a single action or a series of actions.
• A button can change appearance in response to mouse actions.
• A button can be easily copied across many pages.
• Mouse actions can activate different button actions. For example, Mouse Down (a click), Mouse Up (releasing
after a click), Mouse Enter (moving the pointer over the button), and Mouse Exit (moving the pointer away from
the button) can all start a different action for the same button.
Buttonsarean easy,intuitivewaytoletusersinitiateanactioninPDFdocuments.Buttonscanhave acombination
oflabelsandiconstoleadusersthrough aseriesofactionsoreventsby changingasthemouseismoved.Forexample,
you can create buttons with “Play,” “Pause,” and “Stop” labels and appropriate icons. Then you can set actions for
these buttons to play, pause, and stop a movie clip. You can select any combination of mouse behaviors for a button
and specify any combination of actions for a mouse behavior.
Add a button to an Acrobat PDF form
1 In Acrobat, choose Tools > Forms > Button Tool.
2 Drag the cross hair to create the button area.
3 Click the General tab, and then specify a name, tool tip text, and other common properties.
4 ClicktheAppearancetab,andthenspecifyoptions todeterminehowthebuttonwilllookonthe page.Remember,
if you select a background color, you won’t be able to see through to any images behind the button. The text options
affect the label you specify in the Options tab, not the button name in the General tab.
Note: If Enable Right-To-Left Language Options is selected in the International panel of the Preferences dialog box, the
Appearance tab includes options for changing the digit style and text direction for buttons.
5 Click the Options tab, and select options to determine how labels and icons appear on the button.
6 Click the Actions tab, and then specify options to determine what happens when the button is clicked, such as
jumping to a different page or playing a media clip.
7 Click Close.
If you’re creating a set of buttons, you may want to snap the object to grid lines or guides.

233
ADOBE ACROBAT 8 PROFESSIONAL
User Guide
Add a submit button
Forms that will be returned by a network or Internet connection must have a submit button, which users click to
send completed forms back to you.
1 Using the Button tool, create a button and set options in the General and Options tabs.
2 In the Appearance tab, choose an option in the Layout menu for the button label, icon image, or both, and then
do one or both of the following:
• Type text in the Label option to identify the button as a submit button.
•
ClickChooseIconandeithertype thepathtoanimagefileor clickBrowseandlocate theimage file youwanttouse.
3 In the Actions tab, choose Submit A Form on the Select Action menu, and then click Add.
4 In the Enter A URL For This Link box, do one of the following:
• To collect form data on a server, type the location. For example: http://www.[domain]/[folder]/[subfolder]/ for
an Internet address or \\[server]\[folder]\[subfolder]\ for a location on a local network.
• To collect form data as attachments to email, type mailto: followed by the email address. For example,
mailto:nobody@adobe.com.
5 Select options for Export Format, Field Select, and Date Options, and click OK.
Note: If the data returns in FDF or XFDF format, the server URL must end with the #FDF suffix—for example,
http://myserver/cgi-bin/myscript#FDF.
Submit Form Selections options
The following options are available in the Submit Forms Selections dialog box:
FDF Returns the user input without sending back the underlying PDF file. You can select options to include
Comments and Incremental Changes To The PDF.
Note: Selecting the option for incremental changes is useful for receiving digital signatures in a way that is easily read
and reconstructed by a server.
HTML Returns the form in hypertext markup language.
XFDF Returns the user input as an XML file. You can include Comments with the field data or just the field data.
PDF Returns the entire PDF file with the user input.
Field Selection Specifies what fields are returned. To receive only some of the completed field data, select Only
These, click Select Fields, and select which fields to include or exclude in the Field Selection dialog box.
Forexample,youmightusethisto excludesomecalculatedorduplicatefieldsthatappearintheformfortheuser’s
benefit but which do not add new information.
Date Options Standardizes the format for dates that the user enters.
Making buttons change appearance
A button can have a label, an icon, or both. You can change how the button appears in each mouse state (Up, Down,
and Rollover). For example, you could create a button that has a “Home” label until the pointer is moved over the
button, when it might have a “Click to return to Home page” label.
234
ADOBE ACROBAT 8 PROFESSIONAL
User Guide
Kahili Kahili
Kahili
Kahili
Kahili Kahili
Kahili
Kahili
ABC D E F G
Button layouts
A. Label only B. Icon only C. Icon top, label bottom D. Label top, icon bottom E. Icon left, label right F. Label left, icon right G. Label over
icon
You can make button icons from any file format that Acrobat can display, including PDF, JPEG, GIF, and other image
formats.Forwhichever formatyouselect,theentirepageisused,soifyouwanttouseonly aportionof apageasan
icon, you need to crop the image or page before carrying out this procedure. The smallest allowable PDF page size
is 1-by-1 inch (2.54-by-2.54 cm). If you want the icon to appear smaller than 1-by-1 inch, scale it to fit the size of the
box drawn with the button tool. Clicking Advanced in the Options tab of the Button Properties dialog box lets you
determine how a button icon is scaled to fit inside a button.
Edit a button in Acrobat
❖ Select the Button tool , and then do any of the following:
• To edit the button’s properties, double-click the button.
• To change the button’s appearance, click the button, and then specify options using the Properties toolbar. You can
also change these appearance options in the Appearance tab of the Properties dialog box.
• To align, center, or distribute the button with other form fields, or to resize or duplicate the button, right-click
(Windows) or Control-click (Mac OS) the button, and then choose an option from the context menu.
See also
“Scale and position buttons in Acrobat” on page 235
Specify Acrobat button display properties
1 Select the Button tool or the Select Object tool .
2 Double-click an existing button, and then click the Options tab in the Button Properties dialog box.
3 For Layout, choose the type of label display you want. (For information on scaling button icons, see the next
procedure.)
4 For Behavior, specify the display of the button when clicked.
5 To define the label or icon that appears on the button, do the following:
• If a label option is selected from the Layout menu, type the text in the Label box.
• If an icon option is selected from the Layout menu, click Choose Icon, and then click Browse. Select the file type
from the Objects of Type (Windows) or Show (Mac OS) menu, double-click the file name, and then click OK.
(Click Clear to remove the selected icon.)
6 Click Close to accept these display properties.
Button Behavior options
None Keeps the appearance of the button the same.
Push Specifies appearances for the Up, Down, and Rollover states of the mouse. Select an option under State, and
then specify a label or icon option:

235
ADOBE ACROBAT 8 PROFESSIONAL
User Guide
Up Determines what the button looks like when the mouse button isn’t clicked.
Down Determines what the button looks like when the mouse is clicked on the button, but before it’s released.
Rollover Determines what the button looks like when the pointer is held over the button.
Outline Highlights the button border.
Invert Reverses the dark and light shades of the button.
Scale and position buttons in Acrobat
1 Select the Button tool or the Select Object tool .
2 Double-click an existing button to open the Button Properties dialog box.
3 Click the Options tab, select one of the icon options from the Layout menu, and then click Advanced.
Note: The Advanced button isn’t available if you choose Label Only from the Layout menu.
4 Select an option from the When To Scale menu:
Always Scales the icon as defined regardless of its size in relation to the button size.
Never Preserves the icon’s original size; the button border crops the icon if it doesn’t fit. If Never is selected, scale
options aren’t available.
Icon Is Too Big Scales the icon as defined only if it is larger than the button.
Icon Is Too Small Scales the icon as defined only if it is smaller than the button.
5 From the Scale menu, select whether or not to scale the icon proportionally. If the icon is scaled nonpropor-
tionally, it may be skewed.
6 Tomakesurethateitherthetop andbottomorleftand rightsidesoftheiconareflushagainstthebuttonedges,
select Fit To Bounds.
7 To define where the icon is placed inside the button, drag the slider arrows. Icon placement is defined according
to the percentage of space preserved between the icon and the left field boundary, and between the icon and the
bottom field boundary. The default setting (50, 50) places the icon in the middle of a field. You can click Reset at any
time to revert to the default placement setting.
8 Click OK, and then click Close.
Hide an Acrobat button except during rollover
In some cases, you may want the button area to be invisible until the pointer moves over it. By alternately showing
and hiding a button, you can create interesting visual effects in a document. For example, when you move a pointer
over a city on a map, a detail map of the city could be displayed, and the detail map could disappear when the pointer
moves away from the city.
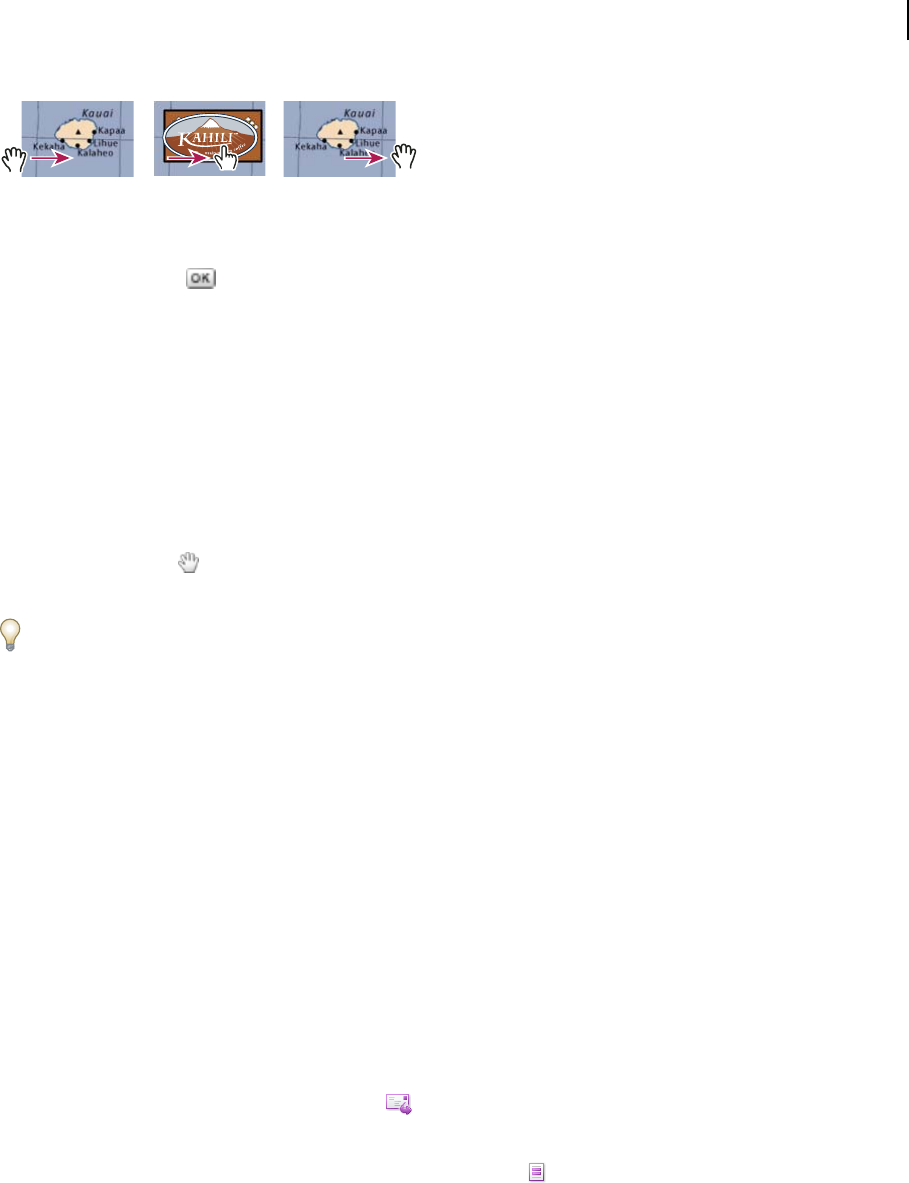
236
ADOBE ACROBAT 8 PROFESSIONAL
User Guide
AB C
Showing and hiding icons
A. Pointer not over button area B. Pointer enters button area C. Pointer exits button area
1 Using the Button tool , drag across the area where you want the pop-up button to appear. For example, if the
PDF file contains a map of France, drag across the area where you want a detailed map of Paris to pop up.
2 Double-click the button.
3 Click the Options tab, and choose Icon Only from the Layout menu.
4 Choose Push from the Behavior menu, and then choose Rollover from the State list.
5 Click Choose Icon, and then click Browse. Select the file type from the File Of Type (Windows) or Show (Mac OS)
menu, navigate to the location of the image file, and then double-click the file. In this example, you would select a
map of Paris. Click OK to accept the previewed image as the button.
6 Click the Appearance tab. If needed, deselect Border Color and Fill Color, and then click Close.
7 Select the Hand tool , and move the pointer across the button. The image field you defined appears as the
pointer rolls over the button area and disappears when it exits.
I
t
f youwanttheimagetobelarger thantherolloverarea,orifyouwanttheimagetobeinadifferentlocationthan
he image button that pops up, use the Show/Hide A Field action. First, you specify an icon for the button that will
be shown and hidden. Next, you create a second button that acts as a hot spot when the mouse rolls over it. You do not
assign an icon for the appearance of the second button. Instead, you use the Actions tab to show the first button when
the pointer enters the second button, and hide the first button when the pointer exits.
Distributing forms
Distribute a form by email
If you want to distribute the form immediately and through your default email application, you can complete the
distribution process entirely in the Distribute Form wizard. However, if you want to distribute the form later, or if
you want to distribute it through a web-based email account, the process is slightly different.
Distribute the form now
1 Do one of the following:
• Choose Forms > Distribute Form.
• In the Forms toolbar, click the Distribute button .
• Choose Tools> Forms> Distribute.
• On the Tasks toolbar, choose Distribute Form on the Forms button menu.
Note: In order to distribute a form, it must contain a submit button. Otherwise, the Distribute commands and Distribute
button may not be available.
2 A series of messages might appear, depending on the conditions Acrobat detects in your form. Respond to the on-
screen instructions as needed, to finalize fields, add a submit button, clear any sample data, and save the form.

237
ADOBE ACROBAT 8 PROFESSIONAL
User Guide
.
3 In the form Distribution Options dialog box, select Send Now Via Email.
4 Follow the instructions that appear in the Distribute Form wizard providing all the following information, and
clicking Next after each addition:
• The email address to which the form data will return.
• A location for the data collection file.
• Email addresses for all the individuals to whom the form will be sent.
•
Text for the email subject line and message body text, if you want something other than the default text. Or, you
can click Select Text File and browse to select a text file that you have created with content for the message body text.
5 Click Done, and then open the Outbox in your default email application and review the prepared message.
Notice that the recipient addresses are automatically listed in the Bcc box, so that the identities of the addressees are
hidden from all recipients.
Prepare the form for later distribution
1 Do one of the following:
• Choose Forms > Distribute Form.
• In the Forms toolbar, click the Distribute button
• In the Tasks toolbar, choose Distribute Form on the Forms button menu.
Note: In order to distribute a form, it must contain a submit button. Otherwise, the Distribute commands and Distribute
button may not be available.
2 A series of messages might appear, depending on the conditions Acrobat detects in your form. Respond to the on-
screen instructions as needed, to finalize fields, add a submit button, clear any sample data, and save the form.
3 In the form Distribution Options dialog box, select Save And Send Later.
4 Follow the instructions that appear in the Distribute Form wizard.
The wizard saves two versions of the PDF form. The default name given to one is [original file
name]_dataset_0001.pdf, which is where returned data will be collected. The other PDF is the one that is attached
to email for distribution. Its default name is [original file name]_pub_0001.pdf.
5 When you are ready to distribute the form, open the email application or web-based email site, create a new
message, address it to the people you want to fill in the form, and add Subject line and message text.
li
When you send out a form to more than one person, it’s usually a good idea to place all addresses on the Bcc address
ne so that the identities of the recipients are hidden from all viewers.
6 Add the [original file name]_pub_0001.pdf as an attachment to the outgoing email message, and click Send.
Send secure forms
Sending a secure form certifies the form-originator’s identity to form recipients and encrypts the data that the recip-
ients submit when returning a filled-in form.
1 Open the form, and do one of the following:
• If the form is open in Acrobat, choose Forms > Distribute Forms.
• If the form is open in LiveCycle Designer, choose File > Distribute Forms.

238
ADOBE ACROBAT 8 PROFESSIONAL
User Guide
2 In the Form Distribution Options dialog box, specify whether you want to send the form now or save it to send
later.
3 In the Distribute Form wizard, enter the email address to which completed forms will be sent, and select Secure
Forms On Return.
4 Continue through the Distribute Form wizard, following the on-screen instructions.
Requirements
• TheformmustbeanAdobe XFAform, whichistheformatappliedbyLiveCycleDesigner.Ifyouedited theform
in Acrobat, you must save it in LiveCycle Designer (available only for Windows) before you can use the send-
secure feature.
• The form must contain a submit button that is configured with an email return address, such as
mailto:nobody@adobe.com.
• The form originator must have a digital ID. See “Creating or obtaining digital IDs” on page 253.
Publishing interactive web forms
About web forms
PDF forms can be useful for submitting and collecting information over the web. This is done by providing several
button actions that perform functions similar to some HTML scripting macros. You must have a Common Gateway
Interface (CGI) application on the web server to collect and route the data to a database. Any existing CGI appli-
cation that collects data from forms (in HTML, FDF, or XML format) can be used.
Before you make your forms web-ready, make sure that your form-field names match those set in the CGI appli-
cation.
Important: CGI scripts must be built outside Acrobat, and their creation is not covered by the Adobe Acrobat product.
Add submit functionality
Use the Submit A Form action to send form data to an email address or to a web server by specifying a URL. You can
also use the submit button to send other files back to a server or database. For example, you can attach scanned
images or files to a form. The files are submitted along with the rest of the form data when you click the submit
button.
If yo
distr
ur PDF form contains an email-based submit button, you can use the Distribute Form workflow to facilitate
ibuting the form to others.
1 In the Acrobat Forms toolbar, select the Button tool, and create a button.
2 Double-click the button to open the Button Properties dialog box.
3 Click the Actions tab, and select Mouse Up from the Select Trigger menu.
4 Select Submit a Form from the Select Action menu, and then click Add.
5 In the Submit Form Selections dialog box, type an entry in Enter A URL For This Link:
• To send the form data to a web server, enter the destination URL.
• To send the form data to an email address, enter mailto: followed by the email address. For example, type
mailto:nobody@adobe.com.

239
ADOBE ACROBAT 8 PROFESSIONAL
User Guide
6 Make additional changes to the available options, and then click OK to close the dialog box.
7 Change settings on other tabs in the Button Properties dialog box as needed, and then click Close.
Submit Form Selections options
FDF Exports as an FDF file. You can select one or more of the available options: user-entered data, comments, and
incremental changes to the PDF file. The Incremental Changes To The PDF option is useful for exporting a digital
signature in a way a server can easily read and reconstruct.
Note: If the server returns data to the user in FDF or XFDF format, the server’s URL must end with the #FDF suffix—
for example, http://myserver/cgi-bin/myscript#FDF.
HTML Exports as an HTML file.
XFDF Exports as an XML file. You can choose to export the form fields data, comments, or both.
PDF The Complete Document Exports the entire PDF file that is your form. Although this creates a larger file than
the FDF option, it is useful for preserving digital signatures.
Note: If theusersthatfillinthePDFformareusingAdobeReader, youmustchooseeitherFDForXFDFfortheExport
Format option.
All Fields Exports all form fields even if the form fields do not contain values.
Only These Exports only the form fields you specify by clicking Select Fields and indicating which form fields to
include and whether you want to include empty fields.
Convert Date To Standard Format Exports all form dates in a single format, regardless of how they are entered in the
form.
Add a Reset Form button (in Acrobat)
AReset Formbuttonclearsanydataauserhasalreadyentered intheform. Itis similartothe Forms>ClearForm
feature, which is available to you when you create and edit Acrobat forms. However, you can set up your reset button
so that it clears only specific fields.
1 In the Forms toolbar, select the Button tool, and create a button.
2 Double-click the button to open the Button Properties dialog box.
3 Click the Actions tab, and select Mouse Up from the Select Trigger menu.
4 Select Reset A Form from the Select Action menu, and then click Add.
5 In the Reset A Form dialog box, either click individual check boxes to select or deselect the fields that you want
to be reset by the button or select Select All. Then click OK.
The list in the Actions tab now shows Reset A Form nested under the Mouse Up action.
As needed, you can open other tabs in the Button Properties dialog box and apply other types of properties to the
button.
See also
“Form fields behaviors” on page 222

240
ADOBE ACROBAT 8 PROFESSIONAL
User Guide
Add an Import Data button (in Acrobat)
You can use the Import Form Data action to enable users to fill out common form fields, such as name and email
address, with data imported from another form. Users can also use the Import Data button to populate common
form fields with their personal profile information. Only form fields that match are updated. Those that do not
match are ignored. Before you create an Import Form Data action, you must have set up a form with common infor-
mation form fields from which the data will be exported.
Note: The Import Form Data action searches for the data file from which to import data in different locations in
Windows than on Mac OS. In Windows, the Import Form Data action searches the Acrobat or Acrobat Reader folder,
the current folder, the System folder, the Windows folder, My Documents\Adobe\Acrobat, and the folders that are in the
PATH statement. On Mac OS, the Import Form Data action searches the Acrobat or Acrobat Reader folder and the
System Preferences folder.
1 In the Forms toolbar, select the Button tool, and create a button.
2 Double-click the button to open the Button Properties dialog box.
3 Click the Actions tab, and select Mouse Up from the Select Trigger menu.
4 Select Import Form Data from the Select Action menu, and then click Add.
5 Locate and select an FDF file, and click Select.
6 Click OK to accept the selections.
7 Click another tab in the Button Properties dialog box to continue defining properties for the button, or
click Close.
See also
“Import form data” on page 204
“Add a button to an Acrobat PDF form” on page 232
CGI export values
An export value is the information sent to a CGI application to identify a user-selected form field. You need to define
an export value only if both of the following are true:
• The data is collected electronically in a database over a company intranet or the web.
• The data is different from the item designated by the form field, or the form field is a radio button.
When defining export values, keep the following guidelines in mind:
• Use the default export value (Yes) to indicate that a check box or radio button has been selected.
• Enter an export value for combo boxes or list boxes only if you want the value to be different from the item listed—
for example, to match the name of the form field in a database. The item selected in the combo box or list box is
used as the export value unless a different export value is explicitly entered in the Properties dialog box.
• Related radio buttons must have exactly the same form field name but different export values. This ensures that
the radio buttons toggle and that the correct values will be collected in the database.

241
ADOBE ACROBAT 8 PROFESSIONAL
User Guide
Collecting and managing form data
About data set files
Data set files are PDF packages that contain individual records submitted for a specific form that you have
distributed. You create the data set file during the distribution process, as one of the steps in the Distribute Form
wizard.
You can also create a data set file after the distribution process and then add individual records to that file.
For more information, choose Help > Complete Adobe Acrobat 8 Professional Help, and search for “About PDF
packages” and “Distributing forms.”
Add completed form data to a data set file
1 In your email application, open an email message with a completed form attached to it.
2 Double-click the returned form icon in the email.
3 In the Add Completed Form To Data Set dialog box, select one of the following:
Add To An Existing Data Set Compiles the data in the data set you created when you used the Distribute Form
wizard to send out the form. (If necessary, click Browse and locate that data set file.)
Create A New Data Set Creates a new data set, using the name and location you specify by typing and clicking the
Browse button.
The data set opens after you click OK. Each returned form added to the data set appears as a component file of a PDF
package.
Compile form data
1 In Acrobat, choose Forms > Compile Returned Forms.
2 In the Compile Data dialog box, do one of the following to select a PDF data set file:
• Click Browse, and then locate and select the data set file.
• Choose a data set file from the menu.
• Type the path to the data set file.
3 Click Add File, and navigate to the returned form.
4 Repeat the previous step as many times as necessary to add more returned forms.
After you click OK, the data from the selected forms is added to the data set. Each returned form appears as a
component file of a PDF package.
Add records to an existing data set
1 In Acrobat, open the data set PDF file.
2 In the data set navigation bar (between the toolbar area and the document pane), click Import Data.
3 In the Add Returned Forms dialog box, click Add File. Then locate and select the returned form data files, and
click Open.
4 Repeat the previous step to add any returned forms in other folders. When finished, click OK.
When you finish, each added data file appears as a component file of the data set PDF package.

242
ADOBE ACROBAT 8 PROFESSIONAL
User Guide
Export records from a PDF data set
Use this process to save all the entries in a data set PDF package to a spreadsheet or XML file.
1 In Acrobat, open the data set PDF file.
2 In the data set navigation bar (between the toolbar area and the document pane), click Export Data.
3 In the Select Folder To Save File dialog box, specify a name, location, and file format (CSV or XML) for the form
data, and click Save.
Manage form data files
Youcanmove theanswersonaPDFformtoandfromotherfileformatsthatpreserveall thedatainmuchlessspace
than a full PDF.
Import form data
In some workflow scenarios, individuals submit filled-in forms as data-only files rather than as complete PDF files.
These files are not PDFs, but use another file format, such as FDF or XML. You can view the data submitted by an
individual recipient in the context of the PDF by opening the original file and importing the information in the data
file.
1 In Acrobat, open the PDF form into which you want to import data.
2 Choose Forms > Clear Form.
Note: When you import data from another file into a PDF form, the imported data replaces any information that
appeared previously in the individual form fields. However, if the imported data file contains one or more blank form
fields, importing will not clear the original data.
3 Choose Forms > Manage Form Data > Import Data.
4 In the Select File Containing Form Data dialog box, select a format in File Of Type (FDF, XFDF, XML, XDP, XFT,
TXT, or All Files) corresponding to the data file you want to import. Then locate and select that file, and click Select.
Note: Some formats are available only for specific types of PDF forms, depending on the application used to create the
form, such as Acrobat or LiveCycle Designer. Data you import from a text file (.txt) must be formatted in tab-delimited
rows that form columns.
Export file data
You can save the information in a completed PDF form as a data file in another file format. Later, you can reuse the
data to fill in the form again or another form with the same fields and field names.
1 In Acrobat, open the completed form file.
2 Choose Forms > Manage Form Data > Export Data.
3 In the Export Form Data As dialog box, select the format in which you want to save the form data (FDF, XFDF,
XML, or TXT). Then select a location and filename, and click Save.
Note: Some file formats are available only for specific types of PDF forms, depending on how the form was created.
Merge exported data files to a spreadsheet
If you want to compile data from forms that are not already in a data set, use the following process.
1 Choose Forms > Manage Form Data > Merge Data Files Into Spreadsheet.
2 In the Export Data From Multiple Forms dialog box, click Add Files.

243
ADOBE ACROBAT 8 PROFESSIONAL
User Guide
3 In the Select file Containing Form Data dialog box, select a file format option in File Of Type option (Acrobat
Form Data Files or All Files). Then locate the form files that you want to merge into the spreadsheet, select them,
and click Select.
4 Repeat the previous step to add form data files that are in other locations, as needed.
5 Click Export. Then select a folder and filename for the spreadsheet, and click Save.
6 In the Export Progress dialog box, click either View File Now to open the spreadsheet file or Close Dialog to return
to Acrobat.
Note: When returned forms are in a data set, the most efficient way to export the information into a spreadsheet is to
use the Export Data button in the navigation bar for the data set PDF package.
About Forms Tracker
The Forms Tracker is a panel of the same window in which you track PDF reviews and subscriptions.
There are several ways to open the Forms Tracker:
• Choose Forms > Track Forms.
• In the Tasks toolbar, choose Track Forms from the Forms button pop-up menu.
• In the Review Tracker window (opened by choosing Comments > Review Tracker), click the Forms Tracker
button on the left side of the window.
Four buttons appear on the left side of the Forms Tracker. Each one opens a different panel when clicked: To Do,
History, Search Results, and Forms Library. These panels can remind you of the status of various forms that are part
of your workflow and make it easy to find and reopen those forms.
You add a form to the Forms Library panel during the forms-distribution process. At the end of the Distribute Form
wizard, a message appears, stating that the form has been sent to your default email application. This message also
includes an Add To My Form Library option.
Search for forms
It is not necessary to have any PDF open when you search for forms.
1 Choose Forms > Track Forms.
2 In the Search text box at the top of the Forms Tracker, type all or part of the filename for the forms you want to
find, and then click Search.
The Search Results panel opens automatically, showing a list of forms that match your search text.

244
Chapter 8: Security
Document security is similar to home security. Just as you lock your doors to prevent someone from entering your
house without permission, you use security features to lock an Adobe PDF. For example, you can use passwords to
restrict users from opening, printing, and editing PDFs. You can use a certificate to encrypt PDFs so that only an
approved list of users can open them. If you want to save security settings for later use, you can create a security
policy that stores security settings.
Note: To apply security features to PDFs, you need Adobe Acrobat 8 Professional, Acrobat 8 Standard, or Acrobat 3D
Version 8.
Quickstart
The following topics provide an overview of some common security tasks.
Check security restrictions
When you receive a PDF, it may contain restrictions preventing actions such as printing or copying information.
1 Click Security Settings or Signatures to the left of the document window. (The Security Settings button
only appears when the PDF contains security restrictions.)
2 View restriction information. In the Security Settings panel, you can click Permission Details to get more infor-
mation.
If you cannot open a PDF or are restricted from using certain features, contact the PDF author.
See also
“Open secured PDFs” on page 247
Examine a PDF for hidden content
BeforemakingaPDFavailabletoothers,youmaywishtoremovecontentthatrevealsthedocumenthistoryor that
contains your personal information, such as metadata that lists your name as the author.
1 Choose Document > Examine Document.
2 Select the items you want removed from the PDF, and click Remove All Checked Items.
3 Save the document with a new name.
You can also examine a PDF at the end of a redaction process.
See also
“Examine a PDF for hidden content” on page 248
Redact sensitive content
Use redaction to remove sensitive content from a PDF.

245
ADOBE ACROBAT 8 PROFESSIONAL
User Guide
Important: Save a copy of the PDF before applying redaction markups.
1 Choose View > Toolbars > Redaction.
2 Click Mark For Redaction , and do any of the following:
• Double-click a word or an image.
• Drag across text.
• Ctrl-drag/Control-drag over an area of the page.
3 Click Apply Redactions . Search for and remove hidden content, if desired.
Use Search And Redact to remove all instances of a search string.
See also
“Redact sensitive content” on page 249
Register a digital ID
You must register a digital ID in Acrobat before you can use it.
1 Choose Advanced > Security Settings.
2 Select Digital IDs, and click Add ID.
3 Select Browse For An Existing Digital ID File.
4 Follow the on-screen instructions to select the digital ID file, type your password, and register the digital ID.
You can create self-signed digital IDs in Acrobat. Or, see the Adobe website for information on acquiring a digital
ID from Adobe security partners.
See also
“Register a digital ID” on page 254
Create a self-signed digital ID
A digital ID is required to sign documents and apply certificate security. Self-signed digital IDs created from Acrobat
may be adequate for many situations. See the Adobe website for information on acquiring a digital ID from Adobe
security partners.
1 Choose Advanced > Security Settings.
2 Select Digital IDs, and click Add ID.
3 Select Create A Self-Signed Digital ID For Use With Acrobat.
4 Follow the on-screen instructions to set up the self-signed digital ID.
See also
“Create a self-signed digital ID” on page 254

246
ADOBE ACROBAT 8 PROFESSIONAL
User Guide
.
rtificate or s
Share your certificate
Your digital ID includes a certificate that others require to validate your signature and encrypt documents for you.
1 Choose Advanced > Security Settings.
2 Select Digital IDs on the left.
3 Select the ID you want to share, and click Export
4 Follow the on-screen instructions to email the ce ave it to a file.
If you use a third-party security method, you usually don’t need to share your certificate with others.
See also
“Sharing certificates with others” on page 258
Add a document password
One way to restrict access to a PDF is to add a Document Open password.
Important: There is no way to open the PDF if you forget the password.
1 Click Secure on the Tasks toolbar, and choose Password Encrypt.
2 Select Require A Password To Open The Document, and type a case-sensitive password in the text box.
If the PDF already has security applied, you may need to supply the Permissions password that lets you change
security settings.
See also
“Set passwords for PDFs” on page 264
Prevent changes to a PDF
Add security restrictions to help prevent others from changing your PDF.
1 Click Secure on the Tasks toolbar, and choose Password Encryption.
2 Select Restrict Editing And Printing Of The Document, and type a Permissions password.
3 Choose an option from the Changes Allowed menu.
For information on using other security methods to restrict access, see Help.
See also
“Set passwords for PDFs” on page 264
Create secure attachments
You can add security to both PDF and non-PDF documents by embedding them in an encrypted envelope, called a
security envelope, that you can send as an email attachment.
1 Click Secure on the Tasks toolbar, and choose Create Security Envelope.
2 Click Add File To Send, and select the desired documents.
3 Click Next, and follow the on-screen instructions to create the security envelope.

247
ADOBE ACROBAT 8 PROFESSIONAL
User Guide
Recipients can extract and save the encrypted documents. Once saved, the documents are no longer encrypted.
See also
“Create secure attachments” on page 268
Opening restricted documents
Open secured PDFs
If you receive a PDF that is protected by security features, you may need a password to open the document. Some
protected documents have restrictions that prevent you from printing, editing, or copying content in the document.
If a document has restricted features, any tools and menu items related to those features are dimmed.
❖ If a document is restricted or has a special status, the Security Settings button or the Signatures button
appear to the left of the document window. Click the button to discover the protection settings and determine which
features are restricted.
If you have trouble opening a PDF, or if you’re restricted from using certain features, contact the author of the PDF.
Restrict URLs and attachments in PDFs
Acrobat warns you any time you try to open a URL (web link) or a file attachment that uses a disallowed file type.
URLs and disallowed file types (for example, EXE) are potentially dangerous because they can transfer or run
programs, macros, or viruses that can damage your computer.
You can allow Acrobat to contact specific websites by adding those URLs to your list of allowed websites in the Trust
Manager preferences. Remove any URLs you no longer want to visit. To open file attachments in Acrobat, you must
respond to a prompt by indicating that you always allow files of that type. The attachment’s file type is then added to
a list stored in the registry. If you want to restrict a file type that you permitted in the past, you can reset this list to
its default settings in the Trust Manager preferences.
Trust Manager preferences
To open the Trust Manager preferences, choose Edit > Preferences (Windows) or Acrobat > Preferences (Mac OS),
and select Trust Manager on the left.
Allow Opening Of Non-PDF File Attachments With External Applications When selected, allows file attachments to
start external applications when you open the files. You must have the external applications to open the files.
Restore Default List Of Allowed And Disallowed File Attachment Types Removes saved settings you chose for
opening attachments. For example, if you chose to always open TMP attachments when prompted, TMP appears on
the list of allowed file attachment types. By clicking Restore, you remove TMP from the list.
Change Settings When clicked, lets you specify the default behavior for accessing the Internet from PDFs. To
restrict access to only the URLs you specify, select Let Me Specify A List Of Allowed And Blocked Web Sites (the
default). To allow access to all URLs, select Allow All Web Sites. To restrict access with all URLs in PDFs, select Block
All Web Sites.
To specify a list of allowed and blocked websites, type each URL in the text box, and click Allow or Block. Then
specify the default behavior for Acrobat for websites that aren’t in the list.

248
ADOBE ACROBAT 8 PROFESSIONAL
User Guide
Note: If you open a protected PDF and a security warning dialog box prompts you to allow or block a URL, select
Remember My Action For This Site, and the URL is added to this list.
Allow External Content Allows Acrobat to read data from stream objects in a PDF. Stream objects are URLs or file
specifications identified by flags, as specified in PDF Reference Version Fifth Edition: Adobe Portable Document
Format Version 1.6. Use this option if you’re a PDF developer who creates PDF files that contain streams, or if you
work with these types of files.
Removing sensitive content
Preparing PDFs for distribution
Before you distribute a PDF, you may want to examine the document for sensitive content or private information
that can trace the document to you. Such information may be hidden or not immediately apparent. For example, if
you created the PDF, the document metadata likely lists your name as the author.
You may also want to remove content that can inadvertently change and modify the document’s appearance.
JavaScripts, actions, and form fields are types of content that are subject to change. If your document doesn’t require
theseitems,removethembeforeyoudistributethedocument.YoucanusetheExamineDocumentcommandto find
and remove hidden content from a PDF.
To remove sensitive images and text that are visible in a PDF, use the Redaction tools.
Examine a PDF for hidden content
UsetheExamineDocumentfeature to findandremovecontentfromadocumentthatyoudon’twant,such ashidden
text, metadata, comments, and attachments.
If you want to examine every PDF for hidden content before you close it or send it in email, specify that option in the
Documents preferences (choose Edit > Preferences [Windows] or Acrobat > Preferences [Mac OS], and select
Documents on the left).
1 Choose Document > Examine Document.
If items are found, they are listed in the Examine Document dialog box with a selected check box beside each item.

249
ADOBE ACROBAT 8 PROFESSIONAL
User Guide
2 Make sure that the check boxes are selected only for the items that you want to remove from the document:
Metadata Metadata includes information about the document and its contents, such as the author’s name, keywords,
and copyright information, that can be used by search utilities. To view metadata, choose File > Properties.
File Attachments FilesofanyformatcanbeattachedtothePDFasanattachment.To viewattachments,chooseView
> Navigation Panel > Attachments.
Annotations And Comments This item includes all comments that were added to the PDF using the comment and
markup tools, including files attached as comments. To view comments, choose View > Navigation Panel >
Comments.
Form Field Logic Or Actions This item includes form fields (including signature fields), and all actions and calcula-
tionsassociatedwithformfields.Ifyouremovethisitem,allformfieldsareflattenedand cannolongerbefilledout,
edited, or signed.
Hidden Text This item indicates text in the PDF that is either transparent, covered up by other content, or the same
color as the background. To view hidden text, click Preview. Click the double-arrow buttons to navigate pages that
contain hidden text, and select options to show hidden text, visible text, or both.
Hidden Layers PDFs can contain multiple layers that can be shown or hidden. Removing hidden layers removes
these layers from the PDF and flattens remaining layers into a single layer. To view layers, choose View > Navigation
Panel > Layers.
Bookmarks Bookmarks are links with representational text that open specific pages in the PDF. To view bookmarks,
choose View > Navigation Panel > Bookmarks.
Embedded Search Index An embedded search index speeds up searches in the file. To determine if the PDF contains
a search index, choose Advanced > Document Processing > Manage Embedded Index. Removing indexes decreases
file size but increases search time for the PDF.
Deleted Hidden Page And Image Content PDFs sometimes retain content that has been removed and which is no
longer visible, such as cropped or deleted pages, or deleted images.
Note: TheExamine Document featuredoesn’t find or removelinks.Ifyouwanttoremovelinks,usePDFOptimizer.See
“PDF Optimizer” on page 343
3 Click Remove All Checked Items to delete selected items from the file, and click OK.
Note: When you remove checked items, additional items are automatically removed from the document: digital signa-
tures; document information added by third-party plug-ins and applications; and special features that enable Adobe
Reader users to review, sign, and fill in PDF documents.
4 Choose File > Save, and specify a filename and location. If you don’t want to overwrite the original file, save the
file to a different name, location, or both.
Theselectedcontentispermanentlyremovedwhenyousavethefile.Ifyou closethefilewithoutsavingit,youmust
repeat this process, making sure to save the file.
Redact sensitive content
The Redaction tools let you permanently remove (redact) visible text and images from PDFs. In place of the removed
items, you can have redaction marks that appear as colored boxes, or you can leave the area blank. You can specify
custom text or redaction codes to appear over the redaction marks.
Note: If you want to locate and remove specific words or phrases, use the Search And Redact tool instead.
250
ADOBE ACROBAT 8 PROFESSIONAL
User Guide
Text marked for redaction (left), and redacted (right)
1 Choose View > Toolbars > Redaction.
2 (Optional) To set the appearance of redaction marks, click Redaction Properties.
3 Select the Mark For Redaction tool .
4 Mark items you want to remove by doing any of the following:
• Double-click to select a word or image.
• Press Ctrl/Control as you drag to select a line, a block of text, an object, or an area. Use this method to select areas
of a page in a scanned document.
To preview how your redaction marks will look, hold the pointer over the marked area.
5 To redact the marked items, click Apply Redactions in the Redaction toolbar.
6 Click OK to remove the items. The items aren’t permanently removed from the document until you save it.
7 If you want to search for and remove hidden information in the document by using the Examine Document
feature, click Yes. Otherwise, click No.
8 Choose File > Save, and specify a filename and location. If you don’t want to overwrite the original file, save the
file to a different name, location, or both.
Search and redact words
Use the Search And Redact tool to find and remove words or phrases in one or more PDFs that contain searchable text.
Note: The Search And Redact tool doesn’t search secured (encrypted) PDFs.
1 Choose View > Toolbars > Redaction, and select the Search And Redact tool .
2 In the text box, type the word or phrase you want to remove.
3 Specify if you want to search the current PDF or PDFs in another location.
4 Select Whole Words Only and Case-Sensitive if you want to apply these conditions to the search.
5 Click Search And Redact.
6 In the search results, click the plus sign (+) next to the document name to see all occurrences of the word or
phrase. Then, select the occurrences you want to mark for redaction:
• To select all occurrences in the list, click Check All.
• To select individual occurrences, click the check box for each one you want to redact. Click the text next to a check
box to view the occurrence on the page.

251
ADOBE ACROBAT 8 PROFESSIONAL
User Guide
• To mark none of the occurrences, close the Search window or click New Search to start over.
7 If you selected occurrences that you want to mark for redaction, click Mark Checked Results For Redaction.
The Search window closes, and the items you checked in the list are shown marked for redaction.
Note: If you haven’t saved the file, you can select redaction marks in the document and press Delete to remove the
redaction mark. The redaction marks become permanent after you save the file.
8 To remove the marked items, click Apply Redactions in the Redaction toolbar, and then click OK.
The items aren’t permanently removed from the document until you save it.
9 If you want to search for and remove hidden information in the document by using the Examine Document
feature, click Yes. Otherwise, click No.
10 Choose File > Save, and specify a filename and location. If you don’t want to overwrite the original file, save the
file to a different name, location, or both.
See also
“Searching PDFs” on page 369
Change the look of redaction markers
By default, black boxes appear in place of redacted images and text. You can set the default appearance of redaction
marks before you mark items for redaction, or you can change the look of redaction marks before you apply the
redactions.
Set the default look of all marks
1 In the Redaction toolbar, click Redaction Properties.
2 On the Appearance tab, select options you want to change, and then click OK:
• Click the Redacted Area Fill Color icon and select a fill color from the Color palette for the boxes that replace
removed items. Choose No Color to leave the redacted area blank.
• Select Use Overlay Text if you want to select the custom text or redaction code options. Select the font, size, and
text alignment.
• Select Custom Text, and type the text you want to appear in the redacted area.
• Select Redaction Code and then either select a code within an existing set, or click Edit to define a new code set
or a new code.
Change the look of a mark
1 After you apply redactions, right-click/Control-click a redaction mark, and choose Properties.
2 Select the options you want, and then click OK.
Properties for redaction text
Custom Text Displays text you type into the Custom Text option over the redaction mark.
Font Displays custom text in the selected font.
Font Size Displays custom text in the selected point size.
Auto-Size Text To Fit Redaction Region Resizes custom text to fit within the redacted area. When selected, this
option overrides the Font Size setting for the overlay text.

252
ADOBE ACROBAT 8 PROFESSIONAL
User Guide
Font Color Displays custom text in the selected color, which you can change by clicking the color swatch.
Repeat Overlay Text Fills the redacted area with as many instances of the custom text as needed, without changing
the font size. For example, if you specify the letter x or a hyphen (-) as the custom text, these characters are repeated
throughout the redacted area.
Text Alignment Sets the text alignment.
Create and edit redaction codes
Both the Redaction Code and Custom Text options create text that overprints areas that contain redaction markers.
The difference is that redaction codes are text entries that you can save, export, and import. One code set can contain
multiple codes.
Note: Codes don’t save the current attributes for overlay text as part of the code definition, such as colors, font charac-
teristics, and repetition or size of text. Codes only make the overlay text itself reusable in future sessions and by other
users with whom you share code sets. You set other attributes for the code in the Redaction Tool Properties dialog box.
Create redaction codes and code sets
1 Click Redaction Properties in the Redaction toolbar.
2 Select Use Overlay Text.
3 Select Redaction Code, and then click Edit Codes.
4 In the Redaction Code Editor dialog box, click Add Set.
5 (Optional) Type a new name for the set in the text box below the list of code sets, and then click Rename Set.
6 Click Add Code, and type the text that you want to appear as overlay text in the text box below the list of code
entries, and then click Rename Code.
7 Repeat the previous step to add another code entry to that code set, or repeat the previous three steps to create
additional code sets and codes.
Edit redaction codes and code sets
1 Click Redaction Properties in the Redaction toolbar.
2 Select Use Overlay Text, and then select Redaction Code.
3 Select a code set from the list on the left, and click Edit Codes.
4 In the Redaction Code Editor dialog box, do any of the following:
• To remove a code set and all of the code entries within it, select the code set and click Remove Set.
• To export a code set to a separate XML file that you can reuse in other PDFs or share with others, select the code
set and click Export Set, specify a filename and location, and click Save.
• To import a previously saved code set, click Import Set, locate and select that file, and click Open.
• To rename a code set, type a new name in the box below the list and click Rename Set.
5 With the code set selected, select the code entry that you want to edit, and do one of the following:
• To remove a code entry, click Remove Code.
• To rename a code entry, type a new name in the box below the list and click Rename Code.
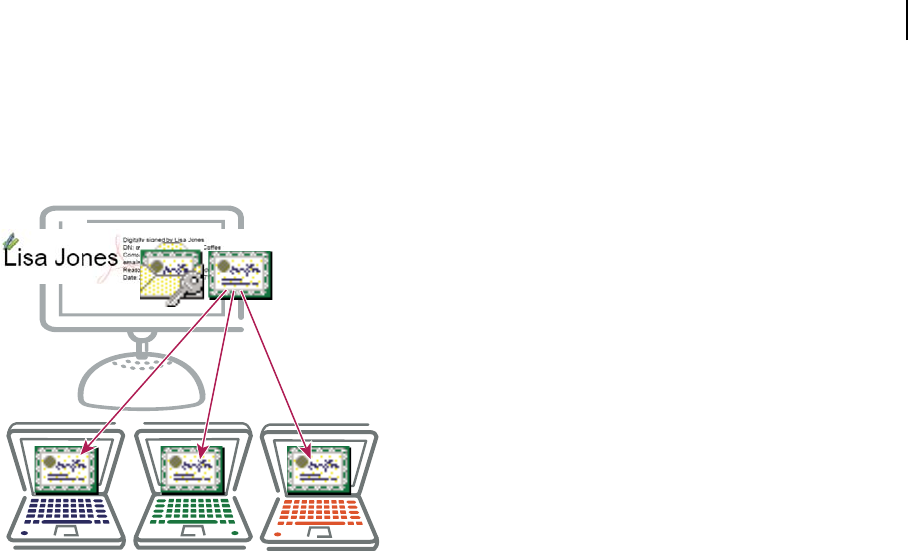
253
ADOBE ACROBAT 8 PROFESSIONAL
User Guide
Creating or obtaining digital IDs
About digital IDs
Digital IDs include a private key that you safeguard and a public key (certificate) that you share.
A digital ID is like a driver’s license or passport. It proves your identity to people and institutions that you commu-
nicate with electronically. A digital ID usually contains your name and email address, the name of the company that
issued your digital ID, a serial number, and an expiration date.
Digital IDs operate by using a key pair: the public key locks, or encrypts, data; the private key unlocks, or decrypts,
that data. When you sign PDF documents, you use the private key to apply your digital signature. You distribute the
certificate that contains your public key and other identifying information to those who need to validate your
signature, verify your identity, or encrypt information for you. Only your private key can unlock information that
was encrypted using your certificate, so be sure to store your digital ID in a safe place.
You must have a digital ID to sign, certify, and apply certificate encryption to PDFs. You can get a digital ID from a
third-party provider, or you can create a self-signed digital ID. Self-signed digital IDs may be adequate for many
situations. However, to prove your identity in most business transactions, you may need a digital ID from a trusted
third-party provider, called a certificate authority. Because the certificate authority is responsible for verifying your
identity to others, choose one that is trusted by major companies doing business on the Internet. See the Adobe
website for information about Adobe security partners that offer digital IDs and other security solutions.
You can have multiple digital IDs that you use for different purposes, particularly if you sign documents in different
roles or using different certification methods. Digital IDs are usually password protected and can be stored on your
computer in PKCS #12 file format, on a smart card or hardware token, in the Windows certificate store, or on a
signing server (for roaming IDs). Acrobat includes a default signature handler that can access digital IDs from any
of these following locations. (You must register the digital ID in Acrobat for it to be available for use.)
See also
“Sharing certificates with others” on page 258
“Smart cards and hardware tokens” on page 255

254
ADOBE ACROBAT 8 PROFESSIONAL
User Guide
Register a digital ID
You must register your digital ID in Acrobat before you can use it. If you obtained or created a digital ID file that
doesn’t appear in your list of digital IDs, you can search for the missing digital ID file and add it to the list. You can
identify digital ID files by their file extensions. For PKCS #12 files, the extension is .pfx in Windows and .p12 in Mac
OS. Digital ID files from some earlier versions of Acrobat have an .apf extension. If you select an .apf digital ID file,
youmaybepromptedto convertittoasupportedfiletype. Youmay needthepasswordcreatedforthe digitalIDto
complete this task.
1 Choose Advanced > Security Settings.
2 Select Digital IDs on the left.
3 Click the Add ID button .
4 Select one of the following options:
Browse For An Existing Digital ID File Select this option if you obtained a digital ID as an electronic file or if you store
it in the Windows certificate store. Follow the prompts to select the digital ID file, type your password, and add the
digital ID to the list.
Configure A Roaming ID For Use On This Computer Select this option to use a digital ID that’s stored on a signing
server. When prompted, type the server name and URL where the roaming ID is located.
Create A Self-signed Digital ID For Use With Acrobat Select this option to create a self-signed digital ID.
Look For Newly Inserted Hardware Tokens Select this option if you have a security token or hardware token
connected to your computer.
5 Click Next, and follow the on-screen instructions to register your digital ID.
Create a self-signed digital ID
If you’re not using a third-party digital ID, you can create your own self-signed digital ID. When you create a self-
signed digital ID, the resulting file stores an encrypted private key used for signing or decrypting documents and a
public key contained in a certificate, which is used for validating signatures and encrypting documents.
1 Choose Advanced > Security Settings.
2 Select Digital IDs on the left, and then click the Add ID button .
3 Select Create A Self-Signed Digital ID For Use With Acrobat, and click Next.
4 Specify where to store the digital ID, and click Next.
New PKCS#12 Digital ID File Stores the information in a file that you can send to others. This is a standard
encryption format with a .pfx extension in Windows and .p12 in Mac OS.
Windows Certificate Store (Windows only) Stores the file where other Windows applications can also retrieve it.
5 Type a name, email address, and other personal information for your digital ID. When you certify or sign a
document, the name appears in the Signatures panel and in the signature field.
6 (Optional) To use Unicode values for extended characters, select Enable Unicode Support, and then specify
Unicode values in the appropriate boxes.
7 Choose an option from the Key Algorithm menu. 2048-bit RSA offers more security than 1024-bit RSA, but 1024-
bit RSA is more universally compatible.
8 From the Use Digital ID For menu, choose whether you want to use the digital ID for signatures, data encryption,
or both. Click Next.

255
ADOBE ACROBAT 8 PROFESSIONAL
User Guide
9 Specify a filename and location for the digital ID file.
10 Type a password; passwords are case-sensitive, must contain at least six characters, and may not contain double
quotation marks or the following characters: ! @ # $ % ^ & * , | \ ; < > _. Type the same password in both the Password
and Confirm Password boxes. Click Finish.
You can export and send your certificate file to those who need to validate your signature.
Important: Make a backup copy of your digital ID file. If your digital ID file is lost or corrupted, or if you forget your
password, you cannot use that profile to add or validate signatures.
See also
“Sharing and managing certificates” on page 258
Set up a roaming ID account
A roaming ID is a digital ID that is stored on a server and can be downloaded—at the subscriber’s request—to the
roaming subscriber’s location. You must have a working Internet connection to access a roaming ID.
1 Choose Advanced > Security Settings.
2 Expand Digital IDs on the left, select Roaming ID Accounts, and click Add Account.
3 Type the name and URL for the roaming ID server, and click Next.
4 Type the user name and password you’ve been assigned or follow the directions to create a new account. Click
Next, and then click Finish.
5 If you don’t need to use your roaming ID, select it, and click Logout.
When you perform a task that uses your roaming ID, you’re automatically logged in to the roaming ID server if your
authentication assertion hasn’t expired.
See also
“Configure a directory server manually” on page 262
Smart cards and hardware tokens
A smart card looks like a credit card and stores your digital ID on an embedded microprocessor chip. You can use
the digital ID on a smart card to sign and decrypt documents on devices that include a smart card reader.
Similarly, a security hardware token is a small, keychain-sized device that you can use to store digital IDs and authen-
tication data. You can access your digital ID by connecting the token to a USB port on your computer or mobile
device. The token may include a keypad that lets you type a personal identification number (PIN).
If you store your digital ID on a smart card or hardware token, you must specify that information when you sign or
certify documents.
See also
“Register a digital ID” on page 254

256
ADOBE ACROBAT 8 PROFESSIONAL
User Guide
Change the signing method
You may need to specify a different signing method than the default security method provided in Acrobat.
1 If necessary, install a third-party signature provider.
2 Choose Edit > Preferences (Windows) or Acrobat > Preferences (Mac OS), and click Security on the left.
3 Click Advanced Preferences, and click the Creation tab.
4 From the menu in the Creation tab, choose the default method you want for signing and encrypting documents,
and click OK.
The menu lists all the security methods installed in the Acrobat plug-ins folder.
Specify the default digital ID
Before you certify, sign, or encrypt a PDF, you may be prompted to select a digital ID file. To avoid being prompted
repeatedly, you can select a digital ID to use every time you sign or certify a document.
1 Choose Advanced > Security Settings.
2 Click Digital IDs on the left, and then select the digital ID you want to use as the default.
3 Click the Usage Options button , and choose a task for which you want the digital ID as the default. If you want
to specify the digital ID as the default for two tasks, click the Usage Options button again and select a second option.
A check mark appears next to selected options. If you select only the signing option, the Pen icon appears next
to the digital ID. If you select only the encryption option, the Lock icon appears. If you select only the certifying
option, or if you select the signing and certifying options, the Blue Ribbon icon appears.
To clear a default digital ID, repeat these steps, and deselect the usage options you selected.
Change a digital ID’s password and timeout
Passwords and timeouts can be set for PKCS #12 IDs and Windows Personal Certificates. If the PKCS #12 ID
contains multiple IDs, you must configure the password and timeout at the file level.
1 Choose Advanced > Security Settings.
2 Expand Digital IDs on the left, select Digital ID Files, and then select a digital ID on the right.
3 Click the Change Password button. Type the old password and a new password. Confirm the new password, and
then click OK.
4 With the ID still selected, click the Password Timeout button.
5 Specify how often you want to be prompted for a password:
Always Prompts you each time you use the digital ID.
After Lets you specify an interval.
Once Per Session Prompts you once each time you open Acrobat.
Never You’re never prompted for a password.
6 Type the password, and click OK.

257
ADOBE ACROBAT 8 PROFESSIONAL
User Guide
Delete your digital ID
When you delete a digital ID in Acrobat, you delete the actual PKCS #12 file that contains both the private key and
the certificate. Before you delete your digital ID, make sure that it isn’t in use by other programs or required by any
documents for decryption.
Note: You can delete only self-signed digital IDs that you created in Acrobat.
1 Choose Advanced > Security Settings.
2 Select Digital IDs on the left, and then select a digital ID on the right.
3 Click Remove ID, and click OK.
See also
“Delete a certificate from trusted identities” on page 261
Protecting digital IDs
By protecting your digital IDs, you can prevent unauthorized use of your private keys for signing or decrypting confi-
dential documents. Make sure that you have a procedure in place in the event your digital ID is lost or stolen.
How to protect your digital IDs
When private keys are stored on hardware tokens, smart cards, and other hardware devices that are password- or
PIN-protected, be sure to use a strong password or PIN. Never divulge your password to others. You should not write
your password down, but if you must, store it in a secure location. Keep your password strong by following these
rules: Use eight or more characters; mix uppercase and lowercase letters with numbers and special characters; choose
apasswordthatisdifficulttoguessorhack,butthatyou canrememberwithouthavingtowriteitdown;do notuse
a correctly spelled word in any language, as these are subject to "dictionary attacks" that can crack these passwords
in minutes; change your password on a regular basis. Contact your system administrator for guidelines on choosing
a strong password.
To protect private keys stored in P12/PFX files, use a strong password and set your password timeout options appro-
priately. If using a P12 file to store private keys that you use for signing, set your password timeout option so that
your password is always required (this is the default behavior). If using your P12 file to store private keys that are
used to decrypt documents, ensure that there is a backup copy of your private key or P12 file so that you can continue
to open encrypted documents should you lose your keys.
The mechanisms used to protect private keys stored in the Windows certificate store vary depending on what
company has provided the storage. Contact the provider to determine how best to protect these keys from unautho-
rizedaccessandforbackuppurposes.Ingeneral,you shouldusethe strongestauthenticationmechanismavailable
and should seek to require a strong password or PIN when possible.
What to do if a digital ID is lost or stolen
If your digital ID was issued by a certificate authority, immediately notify the certificate authority and request the
revocation of your certificate. You should also stop using your private key.
If your digital ID was self-issued, destroy the private key and notify anyone to whom you sent the corresponding
public key (certificate).

258
ADOBE ACROBAT 8 PROFESSIONAL
User Guide
Sharing and managing certificates
Sharing certificates with others
Your digital ID includes a certificate that others require to validate your digital signature and to encrypt documents
for you. If you know that others will need your certificate, you can send it in advance to avoid delays when
exchanging secure documents. Businesses that use certificates to identify participants in signing and secure
workflows often store certificates on a directory server that participants can search to expand their list of trusted
identities.
If you use a third-party security method, you usually don’t need to share your certificate with others. Third-party
providers may validate identities using other methods, or these validation methods may be integrated with Acrobat.
See the documentation for the third-party provider.
When you receive a certificate from someone, their name is added to your list of trusted identities as a contact.
Contacts are usually associated with one or more certificates and can be edited, removed, or reassociated with
another certificate. If you trust a contact, you can set your trust settings to trust all digital signatures and certified
documents created with their certificate.
You can also import certificates from a certificate store, such as the Windows certificate store. A certificate store may
contain numerous certificates issued by different certification authorities.
Send your certificate to others
1 Choose Advanced > Security Settings.
2 Select Digital IDs on the left.
3 Verify that your certificate information is correct: Select the digital ID you want to share, and click the Certificate
Details button . Click OK to return to the Security Settings dialog box.
4 With the digital ID selected, click the Export button .
5 Do one of the following:
• Select Email The Data To Someone, and click Next to send your certificate as an FDF file to another user. Type the
email address, click Email, and then send the email message that appears in the default email application.
• SelectSaveTheDataToAFile,andclickNext. Chooseafiletypefromthemenu,specifyanameand locationfor
the file, and click Save.
Get certificates from other users
You keep certificates that you receive from other users in a list of trusted identities. This list is like an address book
that stores certificates. It lets you validate the signatures of these users on any documents you receive. You can also
use the list to encrypt files.
See also
“Encrypt a PDF and create a recipient list” on page 266
Request a certificate from another user
1 Choose Advanced > Manage Trusted Identities.
2 Click Request Contact.

259
ADOBE ACROBAT 8 PROFESSIONAL
User Guide
3 Type your name, email address, and contact information.
4 To allow other users to add your certificate to their list of trusted identities, select Include My Certificates.
5 Select whether to email the request or save it as a file to email later, and then click Next.
6 Select the digital ID file to use, and then click Select.
7 Do one of the following:
• If the Compose Email dialog box appears, type the email address of the person you’re requesting a certificate from,
and click Email. Send the email message that appears, with the attached certificate, in the default email application.
• If the Export Data As dialog box appears, specify a name and location for the file, click Save, and then click OK.
Add a certificate from email
1 After a user sends you certificate information, open the email attachment in Acrobat, and then click Set Contact
Trust in the dialog box that appears.
2 Select trust options, click OK, and follow the prompts.
Add a Windows certificate (Windows only)
This option is recommended if you use the Windows certificate store to organize certificates.
1 In the Security preferences, click Advanced Preferences.
2 Click the Windows Integration tab, and select Enable Searching The Windows Certificate Store For Certificates
Other Than Yours. Select the desired options, and click OK twice.
3 Choose Advanced > Manage Trusted Identities.
4 Click Add Contacts.
5 Do any of the following:
• If Windows certificate digital IDs are allowed, select the appropriate directory and group.
• If you configured an identity search directory, select the appropriate directory and group. You can then click
Search to locate specific certificates.
• Click Browse, select the certificate file, and click Open.
6 Select the added certificate in the Contacts list to add it to the Certificates list. Select the certificate in the Certif-
icates list, and click Details.
7 In the Certificate Viewer dialog box, click the Details tab and note the MD5 digest and SHA1 digest values (finger-
print). Contact the certificate’s originator to confirm that the values are correct. The certificate should be trusted only
if the values are correct. Click OK.
8 After you verify that the information is correct, click Trust, specify trust options, and click OK.
Import certificates using the Windows Certificate Wizard (Windows only)
If you use the Windows certificate store to organize your certificates, you can import certificates using a wizard in
Windows Explorer.
1 In Windows Explorer, right-click the certificate file and choose Install Certificate.
2 Follow the on-screen instructions to add the certificate to the Windows certificate store.

260
ADOBE ACROBAT 8 PROFESSIONAL
User Guide
3 If you’re prompted to validate the certificate before installing it, note the MD5 digest and SHA1 digest values
(fingerprint). Contact the certificate’s originator to confirm that the values are correct. The certificate should be
trusted only if the values are correct. Click OK.
Add a certificate using a signature in a PDF
You can safely add a certificate to your trusted identities from a signed PDF by first verifying the fingerprint with the
certificate’s originator.
1 Open the PDF containing the user’s self-signed signature.
2 Click the signature in the document to check whether it’s valid.
3 Click Signature Properties, and then click Show Certificate.
4 In the Certificate Viewer dialog box, click the Details tab and note the MD5 digest and SHA1 digest values (finger-
print). Contact the certificate’s originator to confirm that the values are correct. The certificate should be trusted only
if the values are correct.
5 After you verify that the certificate information is correct, click the Trust tab, click Add To Trusted Identities, click
OK, specify trust options, and click OK.
Associate a certificate with a contact
Contacts are typically trusted identities with whom you exchange documents. To exchange encrypted PDFs with a
contact, you must associate at least one certificate with that contact.
Adding a contact may or may not add a certificate because certificates aren’t necessarily attached to the contact infor-
mation. Add contact information by browsing to the contact file location or search for the file.
1 Choose Advanced > Manage Trusted Identities.
2 Select the contact, and click Details.
3 Select a name from the list, and click Associate Certificate.
4 Select a certificate, and click OK. Click OK again.
Verify information on a certificate
The Certificate Viewer dialog box provides user attributes and other information about a certificate. When other
users import your certificate, they may ask you to check your fingerprint information against the information they
receive with the certificate. (The fingerprint refers to the MD5 digest and SHA1 digest values.) You can check certif-
icate information for your own digital ID files or for ID files that you import.
The Certificate Viewer dialog box provides the validation period in which the certificate is valid, the certificate’s
intended usage, and certificate data such as a unique serial number and public key method. You can also check if the
certificate authority has revoked the certificate. Certificates are typically revoked when an employee leaves the
company or when security is compromised in some way.
Verify information on your own certificate
1 Choose Advanced > Security Settings.
2 Select your digital ID, and then click Certificate Details
Verify information on someone else’s certificate
1 Choose Advanced > Manage Trusted Identities.
.

261
ADOBE ACROBAT 8 PROFESSIONAL
User Guide
2 Select the contact, and click Details.
3 Select the certificate name, and click Show Certificate.
4 Click the Revocation tab, and then click Check Revocation.
The results of the revocation check appear in the Details box.
Set the trust level of a certificate
You can change the trust settings of certificates. For example, if you have verified the fingerprint in a certificate that
you received from someone else, you can change the settings so that you explicitly trust all digital signatures and
certified documents created with this certificate. You can even choose to trust the certified document’s dynamic
content and embedded JavaScript.
A certificate must be explicitly trusted before you can use it to encrypt PDFs for the person associated with that
certificate. If you have multiple certificates for a person, set trust levels for at least one of their certificates.
You can also trust a certificate by trusting the root certificate. The root certificate is the originating authority in a
chain of certificate authorities that issued the certificate. By trusting the root certificate, you trust all certificates
issued by that certificate authority. Exercise caution when trusting root certificates.
1 Choose Advanced > Manage Trusted Identities.
2 Select a contact, and click Details.
3 Select the certificate name, and click Edit Trust.
4 In the Trust tab, select any of the following items to trust this certificate for:
Signatures And As a Trusted Root Trusts signatures for this certificate and trusts the certificate as a trusted root so
that any other certificates that have this certificate as the root in a certificate chain are also trusted.
Certified Documents Trusts documents in which the author has certified the document with an author signature.
Dynamic Content Trusts movies, sound files, and other dynamic elements.
Embedded High Privilege JavaScript Trusts embedded scripts.
5 Click OK, click OK again, and then click Close.
Delete a certificate from trusted identities
1 Choose Advanced > Manage Trusted Identities.
2 Choose Certificates from the Display menu.
3 Select the certificate, and click Delete.

262
ADOBE ACROBAT 8 PROFESSIONAL
User Guide
Directory servers
About directory servers
Directory servers are commonly used as centralized repositories of identities within an organization. As such, the
server acts as an ideal location to store user certificates in enterprises that use certificate encryption. Directories help
you locate certificates from network servers, including LDAP (Lightweight Directory Access Protocol) servers. After
you locate a certificate, you can add it to your list of trusted identities so that you don’t have to look it up again. By
developing a storage area for trusted certificates, you or a member of your workgroup can facilitate the use of
encryption in the workgroup.
Configure a directory server manually
1 Choose Advanced > Security Settings.
2 Select Directory Servers on the left.
3 Click the New button , type the directory name and server settings, and click OK.
For more information on server settings, contact your system administrator.
Import and export directory server settings
Administrators and users can export directory settings as a Form Data Format (FDF) file, and use that file to
configure the directory server on another computer. As you export the file, you can choose to send it as a signed
email attachment.
Export directory server settings
1 Choose Advanced > Security Settings.
2 Select Directory Servers on the left, and select a server on the right.
3 Click Export.
4 Select a destination, and click Next.
5 If you need to verify the information in the FDF file, click Sign, add your signature, and then click Next.
6 Do one of the following:
• If you’re saving the file, specify a name and location for it, and click Save.
• If you’re sending the file as an email attachment, type an email address in the To box, click Next, and then click
Finish.
Import directory server settings
1 Do one of the following:
• Double-click the FDF file.
• Choose Advanced > Security Settings, select Directory Servers on the left, and then click Import. Select the FDF
file, and click Open.
2 If the FDF file is signed, right-click/Control-click the signature and choose options to validate the signature or
view signature properties.
3 Click Import Search Directory Settings.
263
ADOBE ACROBAT 8 PROFESSIONAL
User Guide
4 Click OK if prompted to confirm your choice, and then click Close.
The directory server appears in the Security Settings dialog box.
Securing PDFs
Choosing which type of security to use
Acrobat takes advantage of the security features of Windows XP and a number of other security systems. You can
secure a PDF by using the following security methods:
Note: “Security” is sometimes confused with “accessibility,” which involves making documents easier to read for the
visually impaired.
Password encryption Add passwords and set security options to restrict opening, editing, and printing PDFs.
Certification encryption Encrypt a document so that only a specified set of users has access to it.
Certify a document Save the PDF as a certified document. Certifying a PDF adds a (visible or invisible) certifying
signature that lets the document author restrict changes to the document.
Server-based security policies Apply server-based security policies to PDFs (for example, using Adobe LiveCycle
Policy Server). Server-based security policies are especially useful if you want others to have access to PDFs for a
limited time.
Before you secure a PDF, you may want to remove any sensitive or dynamic page content that can compromise the
document’s integrity. If others will be filling in, or signing, form fields in the document, you may want to set the form
field properties to read-only to prevent modifications to the form fields.
If you want to do this: Do this:
Require a password to open a
PDF, or copy or print its contents
Secure the document by choosing Password Encryption
from the Secure button in the Tasks toolbar.
If your company is signed up, you can also use Adobe
LiveCycle Policy Server to secure documents.
Indicate that you approve of the
PDF’s content
Sign and certify the PDF. You must obtain a digital ID to
add digital signatures.
For Asian languages, you can add an approval stamp.
Prevent forms from being
tampered with
Use LiveCycle Designer to secure forms and create
locking signature fields. See the Adobe LiveCycle
Designer Help.
Send secure file attachments via
email
Use security envelopes.
Allow only the people you
specify to view a PDF
Encrypt the document. Choose Certificate Encryption
from the Secure button in the Tasks toolbar, or apply
security using Adobe LiveCycle Policy Server. You must
have certificates for those who can view the documents.
If
B
you often apply the same security settings to PDFs, consider creating a security policy to simplify your workflow.
oth Adobe LiveCycle Policy Server and certificate encryption let you save settings as a policy. If you apply security
settings to large collections of PDFs, you can automate the steps by using the Batch Processing command.

264
ADOBE ACROBAT 8 PROFESSIONAL
User Guide
See also
“Removing sensitive content” on page 248
“Modify form field properties in Acrobat” on page 222
“Run a predefined batch sequence” on page 364
Securing PDFs in FIPS mode (Windows)
Version 8.1 of Acrobat and Reader provides a FIPS mode to restrict data protection to Federal Information
Processing Standard (FIPS) 140-2 approved algorithms using the RSA BSAFE Crypto-C 2.0 encryption module with
FIPS 140-2 validation certificate 608.
The following options aren’t available in FIPS mode:
• Applying password-based security policies to documents. You can use public key certificates or Adobe LiveCycle
Policy Server to secure the document, but you cannot use password encryption to secure the document.
• Creating self-signed certificates. In FIPS mode, you cannot create self-signed certificates.
In FIPS mode, you can open and view documents that are protected with non-FIPS compliant algorithms, but you
cannot save any changes to the document using password security. To apply security policies to the document, use
either public key certificates or LiveCycle Policy Server.
Configure FIPS mode (Windows)
1 Exit from Acrobat.
2 Choose Start > Run, and then type regedit in the Open box.
3 Navigate to the following key in the registry: HKEY_CURRENT_USER>SOFTWARE>Adobe>Adobe
Acrobat>8.0>AVGeneral.
4 Right-click AVGeneral, and then select New > DWORD Value.
5 Change the name of the new value to bFIPSMode.
6 In the right pane of the Registry Editor, double-click bFIPSMode.
7 Set the value of bFIPSMode to 1 to enable or 0 to disable FIPS mode.
Set passwords for PDFs
You can limit access to a PDF by setting passwords and by restricting certain features, such as printing and editing.
A PDF can have two kinds of passwords: a Document Open password and a Permissions password. When you set a
Document Open password (also known as a user password), anyone who tries to open the PDF must type in the
password you specify. When you set a Permissions password (also known as a master password), recipients don’t
need a password to open the document, but they must type the Permissions password to set or change the restricted
features. If the PDF is secured with both types of passwords, it can be opened with either password, but only the
Permissions password allows the user to change the restricted features. Because of the added security, setting both
types of passwords is preferable to setting just one.
All Adobe products enforce the restrictions set by the Permissions password. However, because third-party products
may not support or respect these settings, document recipients may be able to bypass some or all of the restrictions
you set.
Important: If you forget a password, there’s no way to recover it from the PDF. Consider keeping a backup copy of the
PDF that isn’t password-protected.

265
ADOBE ACROBAT 8 PROFESSIONAL
User Guide
See also
“Secure PDFs using policies” on page 273
Add a password and security
1 Click the Secure button in the Tasks toolbar, and choose Password Encrypt.
2 Click Yes to the prompt about changing the security, and if necessary, type the Permissions password that lets you
change security settings. If you don’t know the password, contact the author of the PDF.
3 In the Password Security - Settings dialog box, set the security options as desired, confirm the password, click OK,
and then click OK again.
4 Save the document to apply the security settings.
Note: You can also restrict editing capabilities when you certify a document, or when you apply a policy to a PDF.
Remove passwords and security settings
You can remove passwords and security policies from an open PDF if you have the permissions to do so. If the PDF
is secured with a security policy that resides on a server, the changes can be made only by the author of the policy or
by a server administrator.
1 Do one of the following:
• Click the Secure button in the Tasks toolbar, and choose Remove Security. Type your password, and click Yes
to the prompt about removing the security.
• In the Security tab of the Document Properties dialog box, choose No Security from the Security Method menu.
2 When prompted, specify the Permissions password, and then click OK.
Security options
YoucansetthefollowingoptionswhenyoucreateaPDForwhenyouapplypasswordprotectiontoaPDF.Options
vary depending on the Compatibility setting. Security options are not available for PDF/X standards or presets.
Compatibility Sets the type of encryption for opening a password-protected document. The Acrobat 3 And Later
option uses a low encryption level (40-bit RC4), while the other options use a high encryption level (128-bit RC4 or
AES). Acrobat 6 And Later lets you enable metadata for searching.
Be awarethatanyoneusinganearlierversionofAcrobatcannotopenaPDFdocumentwithahigher compatibility
setting. For example, if you select the Acrobat 7 And Later option, the document cannot be opened in Acrobat 6.0
or earlier.
Encrypt All Document Contents Select this option to encrypt the document and the document metadata. If this
option is selected, search engines cannot access the document metadata.
Encrypt All Document Contents Except Metadata Select this option to encrypt the contents of a document but still
allow search engines access to the document metadata.
Encrypt Only File Attachments Select this option to require a password for opening file attachments. However, users
can open the document without a password.
Require A Password To Open The Document Select this option to require users to type the password you specify to
open the document. This option is unavailable if Encrypt Only File Attachments is selected.
Document Open Password Specify the password that users must type to open the PDF file.

266
ADOBE ACROBAT 8 PROFESSIONAL
User Guide
Note: If you forget a password, there is no way to recover it from the document. It’s a good idea to store passwords in a
separate secure location in case you forget them.
Use A Password To Restrict Editing And Printing Of The Document Restricts access to the PDF file’s security settings.
If thefileisopenedinAdobeAcrobat,theusercanviewthefilebutmustenterthespecifiedPermissionspassword
in order to change the file’s Security and Permissions settings. If the file is opened in Illustrator, Photoshop, or
InDesign, the user must enter the Permissions password, since it is not possible to open the file in a view-only mode.
Permissions Password Specify a password that is required to change the permissions settings. This option is
available only if the previous option is selected.
Printing Allowed Specifies the level of printing that users are allowed for the PDF document.
• None Prevents users from printing the document.
• Low Resolution (150 dpi) Lets users print at no higher than 150-dpi resolution. Printing may be slower because
each page is printed as a bitmap image. This option is available only if the Compatibility option is set to Acrobat 5
(PDF 1.4) or later.
• High Resolution Lets users print at any resolution, directing high-quality vector output to PostScript and other
printers that support advanced high-quality printing features.
Changes Allowed Defines which editing actions are allowed in the PDF document.
• None Prevents users from making any changes to the document that are listed in the Changes Allowed menu,
such as filling in form fields and adding comments.
• Inserting, Deleting, And Rotating Pages Lets users insert, delete, and rotate pages, and create bookmarks and
thumbnails. This option is only available for high (128-bit RC4 or AES) encryption.
• Filling In Form Fields And Signing Existing Signature Fields Lets users fill in forms and add digital signatures.
This option doesn’t allow them to add comments or create form fields. This option is only available for high (128-bit
RC4 or AES) encryption.
• Commenting, Filling In Form Fields, And Signing Existing Signature Fields Lets users add comments and digital
signatures, and fill in forms. This option doesn’t allow users to move page objects or create form fields.
• Page Layout, Filling In Form Fields, And Signing Lets users insert, rotate, or delete pages and create bookmarks or
thumbnail images, fill out forms, and add digital signatures. This option doesn’t allow them to create form fields. This
option is only available for low (40-bit RC4) encryption.
• Any Except Extracting Pages Lets users edit the document, create and fill in form fields, and add comments and
digital signatures.
Enable Copying Of Text, Images, And Other Content Lets users select and copy the contents of a PDF.
Enable Text Access For Screen Reader Devices For The Visually Impaired Lets visually impaired users read the
document with screen readers, but doesn’t allow users to copy or extract the document’s contents. This option is
available only for high (128-bit RC4 or AES) encryption.
Encrypt a PDF and create a recipient list
To encrypt PDFs, you use public-key cryptography. Public-key cryptography uses two keys: a public key, which is
stored inside a certificate that can be shared with other users, and a private key, which you don’t share with others.
The public key (certificate) is used to encrypt documents or to verify digital signatures, and the private key is used
to decrypt documents or to create digital signatures. Both keys are included in a digital ID.

267
ADOBE ACROBAT 8 PROFESSIONAL
User Guide
Theadvantageofsecuringdocumentswithcertificatesisthatauthorscanspecifyuniquepermissionsforeachgroup
in their company. For example, authors can permit employees to sign and fill forms, and permit managers to edit text
or remove pages. When you encrypt a PDF using a certificate, you specify a list of recipients and define each
recipient’s level of access to the file—for example, whether the recipient can edit, copy, or print the file. You can
specify certificates from your list of trusted identities, from files on disk, from an LDAP server, or from the Windows
certificate store (Windows only). Be sure to include your own certificate in the list so that you are later able to open
the document.
Note: If possible, encrypt documents using certificates from third-party digital IDs. If the certificate is lost or stolen, the
issuing authority can replace it. If a self-signed digital ID is deleted, all PDFs that were encrypted using the certificate
from that ID are forever inaccessible.
Ifyouneedtoencryptalargenumber ofPDFs,usetheBatchProcessingcommandtoapplyapredefinedsequence,
or edit an existing sequence to add the security features you want. You can also save your certificate settings as a
security policy and reuse it to encrypt PDFs.
1 Do one of the following:
• Click the Secure button in the Tasks toolbar, choose Show Security Properties, and then choose Certificate
Security from the Security Method menu. (Use this method if you want to save your settings as a security policy.)
• Choose Advanced > Security > Certificate Encryption.
• Click the Secure button in the Tasks toolbar, and choose Certificate Encryption.
2 In the Certificate Security Settings dialog box, specify whether to save your settings as a policy or discard them
after applying (if available).
3 Select which document components to encrypt.
4 From the Encryption Algorithm menu, choose 128-bit AES or 128-bit RC4. If you select 128-bit AES, Adobe
Acrobat 7.0 or later or Adobe Reader 7.0 or later is required to open the document. Click Next.
5 Select the digital ID you want to use.
6 Create a recipient list for the encrypted PDF: Click Search to locate identities in a directory server or in your list
of trusted identities, or click Browse to locate the file that contains certificates.
7 In the Recipients list, select the recipient(s) for whom you wish to set levels of access, click Permissions, and click
OK in the Acrobat Security dialog box. Then select the levels of access. If you don’t set permissions, recipients have
full access by default.
8 Click OK to implement your settings, and then click Next. Review your settings and then click Finish.
When a recipient opens the PDF, the security settings you specified for that person are used.
See also
“About digital IDs” on page 253
“Get certificates from other users” on page 258
Change or remove encryption from a PDF
You can change or remove security settings from PDF files that you’ve encrypted.
Change encryption settings
1 Click the Secure button in the Tasks toolbar, and choose Show Security Properties.
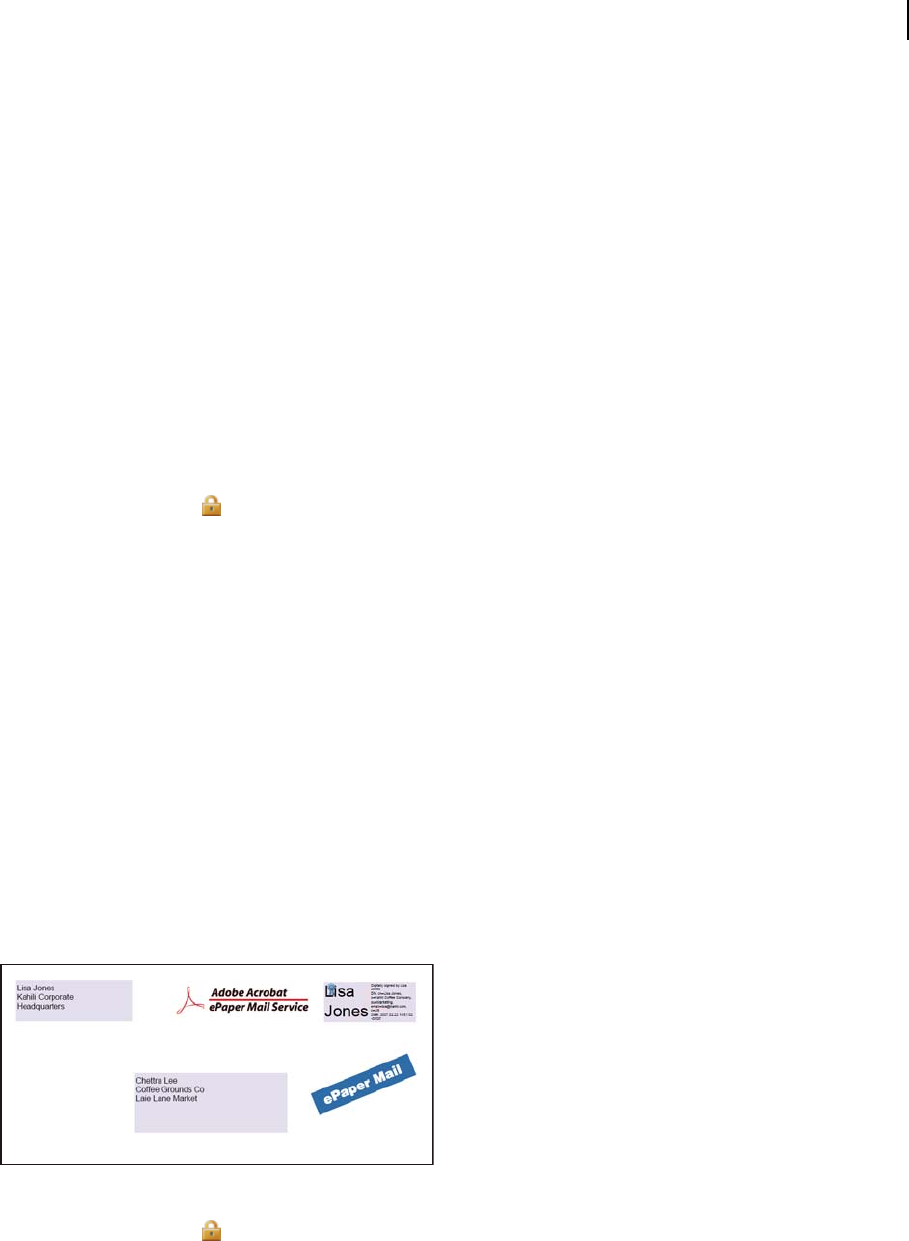
268
ADOBE ACROBAT 8 PROFESSIONAL
User Guide
2 Click Change Settings.
3 Do any of the following, and then click Next.
• To encrypt different document components, select that option.
• To change the encryption algorithm, choose it from the menu.
4 Do any of the following:
• To check a recipient’s trusted identity, select the recipient, and then click Details.
• To remove recipients, select one or more recipients, and then click Remove. Do not remove your own certificate
from this list, or you won’t have access to the file using that certificate.
• To change recipients’ permissions, select one or more recipients, and then click Permissions.
5 Click Next, and then click Finish. Click OK to close the Document Properties dialog box, and save the document
to apply your changes.
Remove encryption settings
1 Click the Secure button in the Tasks toolbar, and choose Remove Security.
2 If prompted, type the Permissions password. If you don’t know the Permissions password, contact the author of
the PDF.
Create secure attachments
You can add security to any document by embedding it in an encrypted envelope, called a security envelope (or
eEnvelope, in earlier versions) and sending it as an email attachment. This method is especially useful if you want to
send a secure file attachment without modifying the attached file. When other users open the security envelope, they
can extract the file attachments and save them to disk. The saved files are identical to the original file attachments
and are no longer encrypted when saved.
For example, suppose that you want to send several documents, including non-PDF documents, to your accountant,
but you don’t want anyone else to view the documents. You can embed these documents as file attachments in a
security envelope, encrypt the security envelope so that only your accountant can open the attachments, and then
email the envelope. Anyone can open the envelope, view its cover page, and even view a list of the contents of that
envelope, but only your accountant can view the embedded attachments and extract them to the computer.
When you create a secure attachment, you’re prompted to select or create a security policy.
Embed file attachments in security envelopes for secure transit.
1 Click the Secure button in the Tasks toolbar, and choose Create Security Envelope.
2 Click Add File To Send, select the documents you want to attach, and then click Open. Select any PDFs in the list
that you don’t want to include and click Remove Selected Files.

269
ADOBE ACROBAT 8 PROFESSIONAL
User Guide
3 Click Next.
4 Select an envelope template, and click Next.
5 Select a delivery method, and click Next.
6 Select Show All Policies, and then select a security policy from the list of available policies (or create a new policy
if needed). Click Next.
7 Follow the on-screen instructions to complete the security envelope. If prompted, provide your identity infor-
mation.
8 Type an email address in the message that appears and click Send, or save the security envelope to send later.
See also
“Secure PDFs using policies” on page 273
Security policies
About security policies
If you often apply the same security settings to multiple PDFs, you can save your settings as a policy that you can
reuse. Security policies include the type of security encryption, the permission settings, and information about who
can open the PDFs or change security settings. There are two kinds of security policies:
• A user policy is developed and applied by an individual user. If you apply the same security settings to various
documents, you can save time by creating a user policy and then reapplying the user policy to documents without
having to specify the security settings each time. User policies for passwords and public key certificates are stored
on your local computer. If you have access to Adobe LiveCycle Policy Server, you can create a user policy that’s
stored on a policy server and is available only to you.
• An organizational policy is created by an Adobe LiveCycle Policy Server administrator and is stored on a policy
server to be shared by a group of users. Adobe LiveCycle Policy Server controls access to PDFs and auditing events
as defined by the security policy. You can use Adobe LiveCycle Policy Server if your company has licensed the
software and made it available to you.
How organizational policies are authenticated
In addition to allowing the reuse of the same security settings, policies stored on Adobe LiveCycle Policy Server have
the added benefit of letting you expire and revoke documents (no matter how many copies were created or
distributed), and maintain accountability by auditing users who open protected documents.
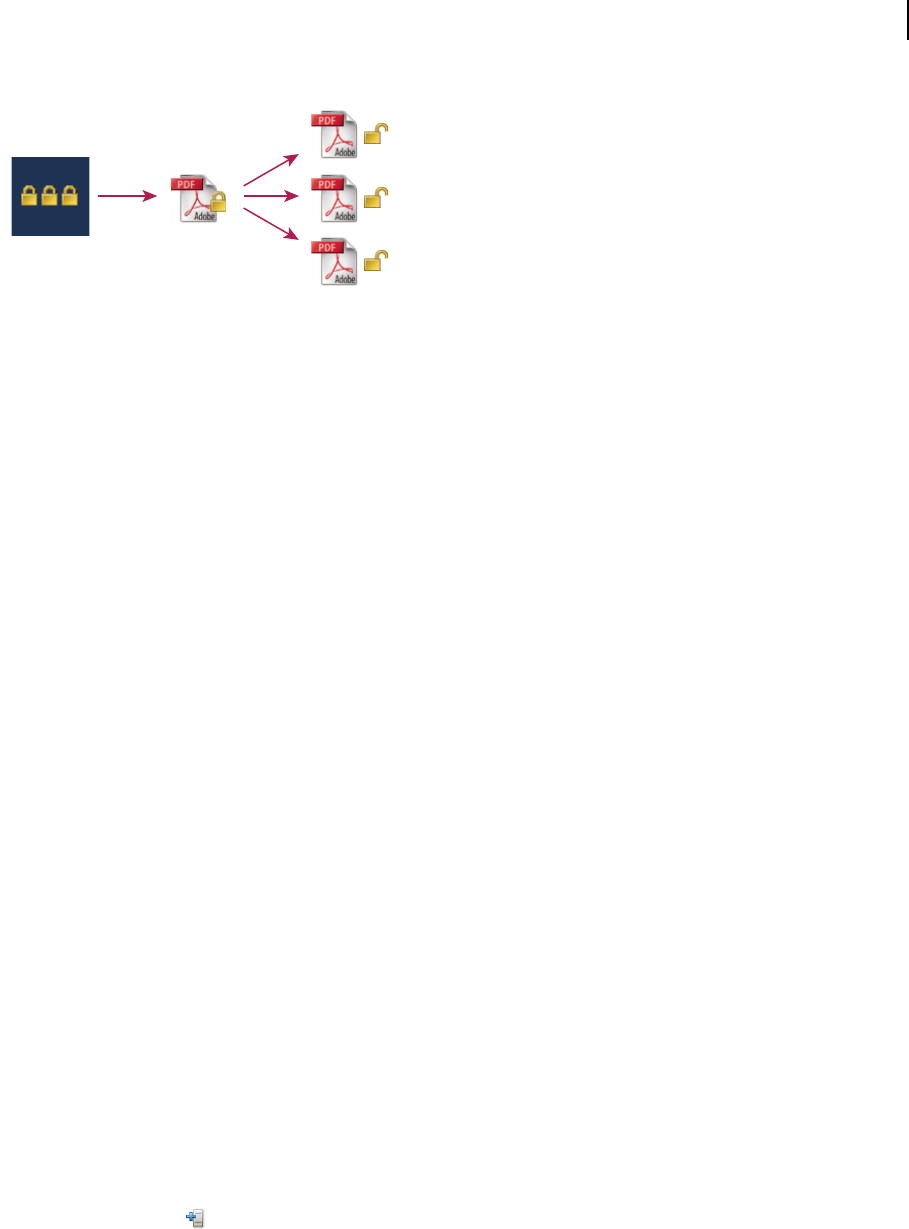
270
ADOBE ACROBAT 8 PROFESSIONAL
User Guide
A B C
Security policies
A. Policies are stored on server. B. Policies are applied to PDF. C. Users can open, edit, and print document only if permitted by policy.
The process of using server-based security policies involves four main stages:
Configure the policy server The system administrator of your company or group usually configures Adobe
LiveCycle Policy Server, manages accounts, and sets up organizational policies. For more information on configuring
the policy server, see the Adobe website.
Publish a document with a security policy An author creates a PDF and applies a policy stored on Adobe LiveCycle
Policy Server to the PDF. The policy server generates a license and unique encryption key for the PDF. Acrobat
embeds the license in the PDF and encrypts it using the encryption key. The author or administrator can use this
license to track and audit the PDF.
View a document with a policy applied When users try to open the secure PDF in Acrobat 8.0 (or Reader 8.0), they
must authenticate their identities. If the user is granted access to the PDF, the PDF is decrypted and opens with
whatever permissions are specified in the policy.
Administer events and modifying access By logging in to an Adobe LiveCycle Policy Server account, the author or
administrator can track events and change access to policy-secured PDFs. Administrators can view all PDF and
system events, modify configuration settings, and change access to policy-secured PDFs. Users may be required to
check in the PDF periodically to continue to have access to it.
Adobe LiveCycle Policy Server
Adobe LiveCycle Policy Server is a server-based security system that provides dynamic control over PDFs. Adobe
LiveCycle Policy Server can be configured to run with LDAP, ADS, and other enterprise systems. Policies provided
by Adobe LiveCycle Policy Server are stored on the server and can be refreshed from the server. You must connect
to Adobe LiveCycle Policy Server to use these server policies.
Whilesecuritypoliciesare storedon apolicyserver,thePDFsaren’t.However,usersmaybe required toconnectto
thepolicyserversothattheycanopenorcontinuetousePDFstowhichasecuritypolicyhasbeen applied.Forinfor-
mation on configuring an Adobe LiveCycle Policy Server, click Help on the Adobe LiveCycle Policy Server website
after you log in to your account.
Connect to an Adobe LiveCycle Policy Server
1 Choose Advanced > Security Settings.
2 Click Adobe LiveCycle Policy Servers on the left.
3 Click the New button
4 Type a name in the Name box and the URL in the Server Name box. Add the port number and click Connect To
This Server.
.

271
ADOBE ACROBAT 8 PROFESSIONAL
User Guide
5 Type the user name and password for your account, and click OK.
View Adobe LiveCycle Policy Server policies
1 Click the Secure button in the Tasks toolbar, and choose Adobe Policy Server > Manage My Account.
The Adobe LiveCycle Policy Server page opens in your web browser.
2 If prompted, type your user name and password, and click Login.
3 Click the Policies link on the page.
For more information on using Adobe LiveCycle Policy Server, click the Help link in the upper right corner.
Create a user security policy
You can create three types of security policies: password security (to password-protect documents), certificate
security (to encrypt documents for a list of recipients), and Adobe LiveCycle Policy Server policies. Creating policies
for password and certificate security lets you reuse the same security settings for a set of PDFs without having to
change security settings for each. The policies for password and certificate security are stored on the local computer.
When youcreateausersecuritypolicy usingAdobeLiveCyclePolicyServer,thepolicyisstoredonaserver,letting
you audit actions and change security settings dynamically. You can use Adobe LiveCycle Policy Server if your
company has licensed the software and made it available to you.
See also
“Encrypt a PDF and create a recipient list” on page 266
Create a password policy
1 Choose Advanced > Security > Manage Security Policies.
2 Click New.
3 Select Use Passwords, and then click Next.
4 Type a name and description for the policy, do one of the following, and then click Next:
• If you want to specify passwords and restrictions whenever you apply this policy to a document, deselect Save
Passwords With The Policy.
• If you want to save passwords and restriction settings with the policy, select Save Passwords With The Policy.
5 Specify a compatibility setting and password options. If you selected Save Passwords With The Policy, specify the
password and restrictions. Click Next.
6 Review the policy details, and then click Finish.
Create a certificate policy
1 Choose Advanced > Security > Manage Security Policies.
2 Click New.
3 Select Use Public Key Certificates, and then click Next.
4 Type a name and description for the policy, and specify the document components to encrypt.
5 If you want to specify recipients whenever you apply this policy to a document, select Ask For Recipients When
Applying This Policy, and click Next.

272
ADOBE ACROBAT 8 PROFESSIONAL
User Guide
6 If Ask For Recipients When Applying This Policy is not selected, specify recipients by selecting the digital IDs you
want to use to encrypt the document (including your own digital ID), and click Next.
7 Click Finish.
Create a user policy with Adobe LiveCycle Policy Server
When you create a user policy using the Adobe LiveCycle Policy Server, you’re redirected to the Adobe LiveCycle
Policy Server web page.
1 Choose Advanced > Security > Manage Security Policies.
2 Click New.
3 Select Use The Adobe LiveCycle Policy Server, and click Next.
4 On the Adobe LiveCycle Policy Server web page, click Policies, and then click New.
5 Type a name and description, set the validity period, and any other options.
6 Select the users or groups, set permissions for them, and click OK.
7 Specify the document components you want to encrypt, and whether you want a watermark.
8 When you’re done, click Save at the top of the page.
Manage security policies
Afteryoucreatesecurity policies,youcanmanagethembycopying,editing,anddeletingthem.Youcanalsosetup
a list of favorite policies so that they’re easy to access.
1 Choose Advanced > Security > Manage Security Policies.
2 From the Show menu, choose whether you want to display all policies that you have access to, user policies that
you’ve created, or organizational policies.
3 Select a policy and do one or more of the following:
Note: Options to edit or delete organizational policies aren’t available unless you have administrator rights to the Adobe
LiveCycle Policy Server. Changes to these policies can be made only on the Adobe LiveCycle Policy Server, which opens
automatically when you select an option.
• To create a new policy, click New.
• Tocopy anexistingpolicy,click Copy.Thisoptionisusefulifyou wanttocreateanewpolicythat’sbasedonthe
settings of an existing policy.
• To edit a policy, click Edit. For password and certificate policies, which are stored on the local computer, editing
a policy affects only those documents to which the policy is applied after the policy is edited. For user policies
stored on a server, you can edit the permission settings and other options. This option isn’t available for organiza-
tional policies.
• To delete the policy, click Delete. This option may not be available for organizational policies.
• To make the policy easier to get to, click Favorite. This option adds the selected policy to the Secure menu in the
Tasks toolbar, and to the Advanced > Security menu. You can apply the Favorite option to multiple policies.
A star appears next to a favorite policy. (To remove a policy from the favorites, click Favorite again.)
4 Click Close.

273
ADOBE ACROBAT 8 PROFESSIONAL
User Guide
Secure PDFs using policies
You can apply either an organization policy or a user policy to a PDF. You must be online with a connection to your
Adobe LiveCycle Policy Server host to apply an Adobe LiveCycle Policy Server policy to a document. Adobe
LiveCycle Policy Server security policies must be stored on a policy server, but PDFs to which the policies are applied
need not be. You can apply policies to PDFs using Acrobat, server-side batch sequences, or other applications, such
as Microsoft Outlook.
To remove a policy from a PDF, you must be the one who applied it. Similarly, only the person who created the user
policy can edit it. To edit organizational policies, you must be the policy administrator. For details on editing security
policies, click the Secure button in the Tasks toolbar, choose Adobe Policy Server > Manage My Account, and then
click Help in the upper right corner.
See also
“Adobe LiveCycle Policy Server” on page 270
Apply a security policy to a PDF
❖ Open a PDF, and do one of the following:
• Click the Secure button in the Tasks toolbar and choose Adobe Policy Server > Refresh Security Policies to
ensure that you have access to the most up-to-date server policies. Then, click the Secure button in the Tasks
toolbar and choose a policy. Click OK to any warnings about changing the security for the document.
In the Secure menu, you can identify organizational policies by the Enterprise Policy icon , and user policies by
the Personal Policy icon .
• Choose Advanced > Security > Manage Security Policies. Select a policy, and then click Apply To Document.
Apply a policy to attachments in Outlook
You can send different types of files as secure PDF attachments in Microsoft Outlook. This option is available only
if Adobe LiveCycle Policy Server is set up and available in Acrobat.
1 In Outlook, choose File > New > Mail Message.
2 In the toolbar, click the Attach As Secured Adobe PDF button .
3 Select the file you want to attach by typing the file path or by clicking Browse.
4 Specify how you want to secure the document, and click OK.
The file is converted to PDF and encrypted using the security method you choose.
5 Complete the email message, and then click Send.
Remove a user security policy from a PDF
❖ Click the Secure button in the Tasks toolbar, choose Remove Security, and click OK.
Revoke a policy-protected PDF
If you need to restrict access to a policy-protected PDF that you made available to a group of users, you can revoke
the document.
1 Open the PDF to which you applied the policy, and log in to the Adobe LiveCycle Policy server.
2 Choose Advanced > Security > Adobe Policy Server > Revoke Document.
3 From the menu on the web page, choose an option that explains why you’re revoking the document or type a
message. If you’re replacing the revoked document, type the URL location of the new document.
4 Click OK to save your changes.

274
Chapter 9: Digital signatures
You use a digital signature much like a handwritten signature—to approve documents. A digital signature verifies
your identity and may include a photo, an image of your handwritten signature, or other personal details that you
choose. Document authors can attest to the contents of their documents by adding a certifying signature. If you
receive a signed Adobe PDF, status icons let you know if the signature is valid. If a signature is questionable, you can
verify it manually.
Quickstart
The following topics provide overview steps to some common digital signature tasks.
Create a signature appearance
You can modify your digital signature appearance. For example, you can include your scanned signature.
1 (Optional) Save the desired image on a page by itself, and convert the page to PDF.
2 Choose Edit > Preferences (Windows) or Acrobat (Mac OS) > Preferences, and select Security.
3 Click New, and type a title.
4 (Optional) Select Imported Graphic, click File, and select the desired file.
5 Specify options as desired.
See also
“Create the signature appearance” on page 276
Sign a PDF
Use a digital signature to indicate your approval. For best results, change your security preferences to always sign in
Preview Document mode, so that you can view and sign the PDF in a secure state.
1 Click the signature field. Or, click Sign , and choose Sign Document.
2 Follow the on-screen instructions to apply your digital signature.
If the document does not contain an unsigned signature field, click Sign and choose Place Signature to sign the PDF.
See also
“Sign a PDF” on page 279
Certify a PDF
Certifying a PDF indicates that you approve of its content and allows you to specify the types of changes that are
permitted for the PDF to remain certified.
1 Click Sign on the Tasks toolbar, choose Certify With Visible Signature or Certify Without Visible Signature,
and click OK.

275
ADOBE ACROBAT 8 PROFESSIONAL
User Guide
2 If certifying with a visible signature, draw a signature field.
3 Follow the on-screen instructions to apply the certifying signature.
4 Save the PDF using a different filename.
See also
“Certify a PDF” on page 281
Validate signatures
When you open a document, a status icon appears next to the signature, indicating if the signature is valid.
1 Click Signatures in the navigation pane, and select the signature.
2 Right-click/Control-click and choose Show Signature Properties.
3 Use the various tabs and options in the Signature Properties dialog box to resolve any signature issues. For
example, if the identity is unknown or unverified, click the Signer tab, and click Show Certificate to determine if the
certificate is trusted.
See also
“Validating signatures” on page 282
Digital signatures
About digital signatures
A digital signature, like a conventional handwritten signature, identifies the person signing a document. Unlike a
handwritten signature, a digital signature is difficult to forge because it contains encrypted information that is
unique to the signer and easily verified.
Most digital signatures are referred to as approval signatures.Signaturesthatcertify aPDFarecalled certifying signa-
tures. Only the first person to sign a PDF (most often, the author) can add a certifying signature. A certifying
signature attests to the contents of the document and allows the signer to specify the types of changes allowed for the
document to remain certified. Changes to the document are detected in the Signatures panel.
To sign a document, you must obtain a digital ID or create a self-signed digital ID in Acrobat. The digital ID contains
a private key that is used to add the digital signature, and it contains a certificate that you share with those who need
to validate your signature.
Note: You cannot create self-signed digital IDs from within FIPS mode.
When you apply a digital signature, Acrobat uses a hashing algorithm to generate a message digest, which it encrypts
using your private key. Acrobat embeds the encrypted message digest in the PDF, along with details from your certif-
icate, a visual representation of your signature, and a version of the document at the time it was signed.
Note: For the latest information about digital signatures, choose Help > Online Support > Knowledge Base to open the
Adobe Acrobat support page on the Adobe website, and then search for “digital signatures.”
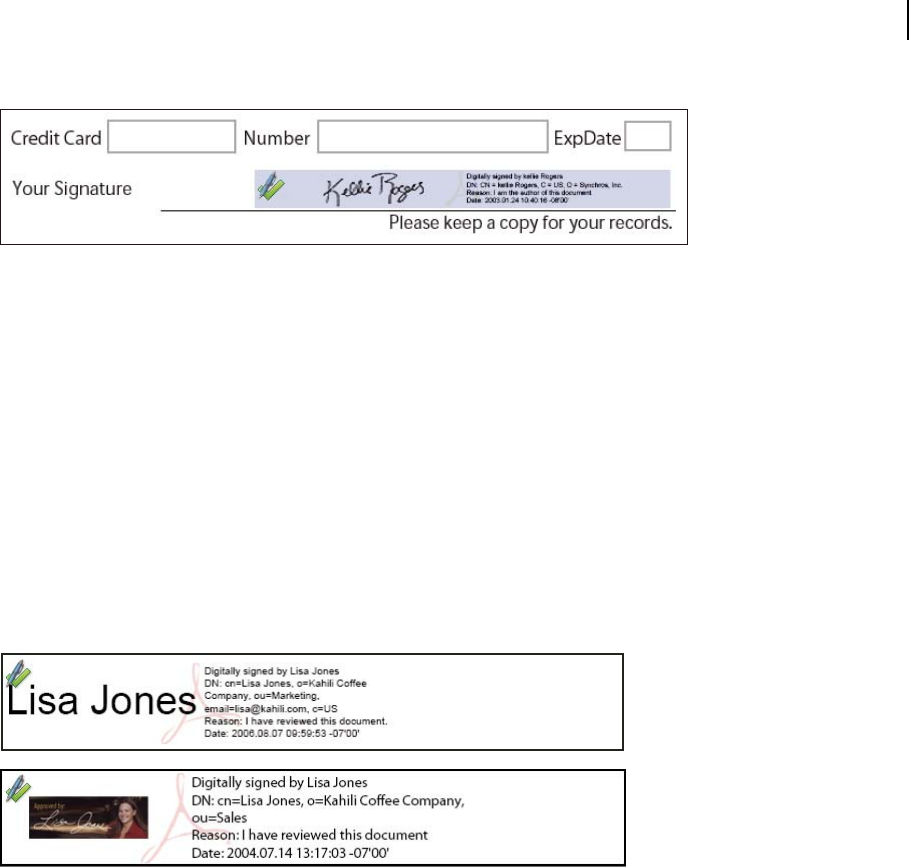
276
ADOBE ACROBAT 8 PROFESSIONAL
User Guide
Valid digital signature in a PDF form
See also
“About digital IDs” on page 253
Create the signature appearance
You can set the appearance of your digital signature by selecting options in the Security Preferences. For example,
you can include an image of your handwritten signature, a company logo, or a photograph. You can also create
alternatesignatureappearancesthatyouusefor different purposes.Forsome,you maywanttoprovide agreater level
of detail.
A signature appearance can also include information that helps others verify your signature, such as certificate
revocation status, reasons for signing, contact information, and more. By selecting these preferences, you add
options to the Sign Document dialog box that appears each time you sign a PDF.
B
A
Signature formats
A. Text signature B. Graphic signature
1 If you want to include an image of your handwritten signature in the digital signature, scan your signature and
save it as an image file. Place the image in a document by itself, and convert the document to PDF.
2 Choose Edit > Preferences (Windows) or Acrobat (Mac OS) > Preferences, select Security on the left, and then
click New to create a new signature appearance.
3 In the Configure Signature Appearance dialog box, type a title for the signature appearance. When you sign a
document, you select the signature appearance by its title, so use a short, descriptive title.
4 For Configure Graphic, choose an option:
No Graphic Displays only the default digital signature icon and other information specified in the Configure Text
section.
Imported Graphic Displays an image with your digital signature. Select this option to include an image of your
handwritten signature. To import the image file, click File, click Browse, select the image file, click Select, and then
click OK (Windows) or Select (Mac OS).

277
ADOBE ACROBAT 8 PROFESSIONAL
User Guide
Name Displays only the default digital signature icon and your name as it appears in your digital ID file.
5 For Configure Text, select the options that you want to appear in the signature. Distinguished Name shows the
user attributes defined in your digital ID, including your name, organization, and country.
Important: To include a reason and a location in your signature, you must select those options both in this dialog box
and in the Advanced Preferences.
6 For Text Properties, specify the writing direction and type of digits (Western or Arabic-Indic) used, and then click OK.
7 Click Advanced Preferences, click the Creation tab, select any of the following, click OK, and click OK again:
Include Signature’s Revocation Status When Signing Embeds information about whether your certificate is valid or
has been revoked (required for signature validation). Selecting this option speeds the validation process by not
having to go online to determine whether the certificate has been revoked.
Show Reasons When Signing Adds your reason for signing to the signature field. When you sign a PDF, a menu
appears in the Sign Document dialog box from which you can select the option that best describes your reason for
signing the PDF.
Show Location And Contact Information When Signing Adds your location information to the signature field.
Contact information appears in the Signer tab of the Signature Properties dialog box. When you sign a PDF, text
boxes appear in the Sign Document dialog box where you can type this information.
Enable Reviewing Of Document Warnings Analyzesdocumentsinasigningworkflowfor contentthatmightchange
the document appearance and then provides an option in the Sign Document dialog box to review this content.
Specify Always, Never, or When Certifying A Document. Available options depend on the Prevent Signing Until
Document Warnings Are Reviewed setting.
Prevent Signing Until Document Warnings Are Reviewed Enable this option to require the signer to review
document warnings before signing or certifying a document. Specify Always, Never, or When Certifying A
Document.
To edit or delete a signature appearance, select it in the Appearance box, and then click Edit or Delete.
See also
“Enable right-to-left languages” on page 54
Customizing signature properties using seed values
Seed values offer additional control to document authors by letting them specify which choices a user can make when
signing a document. By applying seed values to signature fields in unsigned PDFs, authors can customize options,
automate tasks, and specify signature requirements for items such as certificates and timestamp servers. For more
information on this topic, go to Acrobat Developer Center and search for the Acrobat 8.0 Security User Guide.
Add a timestamp to signatures
You can include the date and time you signed the document as part of your signature. Like signatures, timestamps
are easier to verify when they’re associated with a timestamp authority’s trusted certificate. Including a timestamp
helps to prove that the document wasn’t changed after you signed it and reduces the chances of an invalid signature.
You can obtain a timestamp from a third-party timestamp authority or from the certificate authority that issued your
digital ID.

278
ADOBE ACROBAT 8 PROFESSIONAL
User Guide
.
Timestamps appear in the signature field and in the Signature Properties dialog box. If a timestamp server is
configured, that timestamp appears in the Date/Time tab of the Signature Properties dialog box. If no timestamp
server is configured, the signatures field displays the local time of the computer at the moment of signing.
Configure a timestamp server
To configure a timestamp server, you need the server name and URL or a Forms Data Format (FDF) file that contains
the server settings.
1 Choose Advanced > Security Settings.
2 Select Time Stamp Servers on the left.
3 Do one of the following:
• If you have an FDF file with the timestamp server settings, click the Import button . Select the FDF file, and
click Open.
• If you have a URL for the timestamp server, click the New button . Type a name and then type the server URL.
Specify whether the server requires a user name and password, and then click OK.
Set a timestamp server as the default
If you have two or more timestamp servers configured, you can set one of them as the default.
Note: Before you set a timestamp server as the default, you may want to check if the timestamp authorities charge a usage fee.
1 Choose Advanced > Security Settings.
2 Select the timestamp server, and click the Set Default button
3 Click OK to confirm your selection.
About graphics tablet signatures
You can sign PDFs using graphics tablets and other input devices by using third-party software. Digital signature
providers, such as Silanis and the Communication Intelligence Corporation (CIC), provide this capability in an
Acrobat supported plug-in. These plug-ins may limit your access of certain encryption features in Acrobat. For more
information about third-party providers, visit the Adobe website.
Signing PDFs
Before you sign a PDF
You can expedite the signing process and optimize your results by making the following preparations in advance:
• Obtain a digital ID, or create a self-signed digital ID in Acrobat.
Note: You cannot create self-signed digital IDs from within FIPS mode.
• Set the default signing method.
• Create an appearance for your digital signature.
• Use Preview Document mode to suppress any dynamic content that may alter the appearance of the document
and mislead you into signing something you shouldn’t.
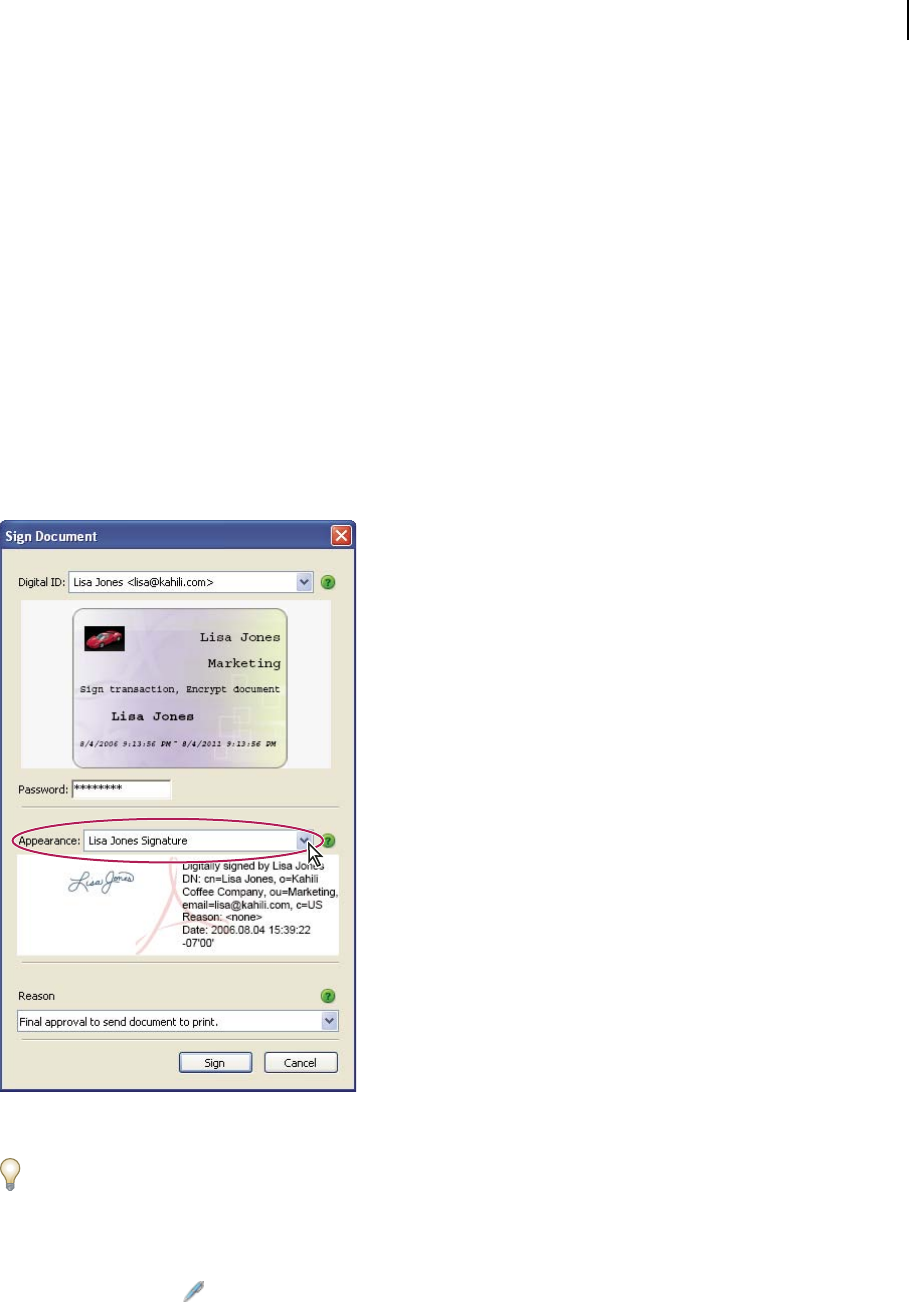
279
ADOBE ACROBAT 8 PROFESSIONAL
User Guide
• Review all the pages in a document before you sign. Documents may contain signature fields on multiple pages.
When you sign one field, your signature appears in all occurrences of the field, whether you approve those pages
or not.
See also
“About digital IDs” on page 253
“Change the signing method” on page 256
Sign a PDF
You can sign a PDF to indicate your approval. A PDF can be signed more than once and by more than one person.
When you sign a document, your digital signature appears in the signature field. The appearance of the signature
depends on options you choose. The actual information for your digital signature is embedded in the PDF.
The first person to sign a document (typically the document author) has the option of adding a certifying signature,
which allows one to restrict changes to the document.
Sign a PDF
For best results, use Preview Document mode to add your signature. See “Sign in Preview Document mode” on page 280.
1 Click the signature field, or do one of the following:
• Choose Advanced > Sign & Certify > Sign Document.
• Click the Sign button in the Tasks toolbar and choose Sign Document or Place Signature.

280
ADOBE ACROBAT 8 PROFESSIONAL
User Guide
2 If you chose Place Signature, you’re prompted to draw a signature field for your signature.
3 If you haven’t specified a digital ID, you’re prompted to find or create one.
4 In the Sign Document dialog box, choose the digital ID you want to use. If you defined a personalized signature,
choose it from the menu.
5 If you selected advanced digital signature preferences, do any of the following:
• Choose a reason for signing the document.
• Type your location and contact information.
• Review any document warnings about content that may impact signing.
6 If your digital ID requires a password, type it in the Password box.
7 Click Sign, and specify a new name for the document so you can make changes to the original PDF without inval-
idating the signature, and click Save.
Sign a PDF in a web browser
To sign a PDF on the web, the document must contain an empty signature field. When you sign a document in a
browser, only the incremental portion of the file is saved to your hard drive.
1 Click a signature field, and then follow the steps to add your digital signature.
2 To retain a copy of the signed document, click the Save A Copy button in the File toolbar.
Sign in Preview Document mode
For best results, use the Preview Document feature when you sign documents. This feature analyzes the document
for content that may alter the document’s appearance, and then suppresses that content, allowing you to view and
sign the document in a static and secure state.
When you view a PDF in Preview Document mode, a document message bar lets you know if the PDF complies with
the PDF/SigQ Level A and Level B specification. Level A indicates that the document contains no dynamic content
that can alter its appearance. Level B indicates that the document contains dynamic content that can be suppressed
during signing. If the document doesn’t comply with Level A or B, you may want to refrain from signing the
document and contact the document author about the problem.
You can also use Preview Document mode outside of a signing workflow to check the integrity of a document.
Sign a PDF in Preview Document mode
1 Choose Edit > Preferences (Windows) or Acrobat > Preferences (Mac OS), and select Security on the left.
2 Select View Documents In Preview Document Mode When Signing, and click OK.
3 In the PDF, click the signature field, or click the Sign button in the Tasks toolbar and choose Sign Document or
Place Signature.
The document message bar appears with the compliance status and options.
4 (Optional) Click View Report in the document message bar (if available) and select each item in the list to show
details. When you’re done, close the PDF/SigQ Conformance dialog box.
5 If you’re satisfied with the compliance status of the document, click Sign Document in the document message bar,
and add your digital signature.

281
ADOBE ACROBAT 8 PROFESSIONAL
User Guide
6 Save the PDF using a different name than the original, and close the document without making any further
changes. If you save the document a second time, your signature must be verified by using the View Signed Version
option in the Signatures panel. (See “View previous versions of a signed document” on page 286.)
View a PDF in Preview Document mode
1 Choose Advanced > Sign & Certify > Preview Document.
2 In the document message bar, click View Report (if available) and select each item in the list to show details. When
you’re done, click Close, and then click Exit.
Before you certify a PDF
Document authors can improve document integrity and ensure that their documents remain certified by addressing
the following issues before they certify PDFs:
• Disable or remove content that could modify the document or compromise its integrity, such as JavaScripts,
actions, or embedded media.
• If you intend for others to sign the document, enable usage rights to let Adobe Reader users add a digital signature
(choose Advanced > Enable Usage Rights In Adobe Reader).
• Certify or sign a PDF only after you make final changes to it. If you make changes or resave the PDF after you sign
it, you may compromise the validity of your signature or the document’s certified status.
Document authors can use Adobe LiveCycle Designer (Windows) to create signature fields that lock after signing,
preventing changes that may invalidate signatures. For more information, see Adobe LiveCycle Designer Help.
See also
“Examine a PDF for hidden content” on page 248
Certify a PDF
When you certify a PDF, you indicate that you approve of its contents. You also specify the types of changes that are
permitted for the document to remain certified. For example, suppose that a government agency creates a form with
signaturefields.When theformiscomplete,theagencycertifiesthedocument,allowinguserstochangeonlyform
fields and sign the document. Users can fill in the form and sign the document, but if they remove pages or add
comments, the document doesn’t retain its certified status.
You can apply a certifying signature only if the PDF doesn’t contain any other signatures. Certifying signatures can
be visible or invisible, and are indicated by the blue ribbon icon in the Signatures panel (and if visibly signed, in
the signature field). A digital ID is required to add digital signatures (see “About digital signatures” on page 275.)
1 Change the default signing method, if needed.
2 Click the Sign button in the Tasks toolbar and choose one of the following options:
• Certify With Visible Signature.
• Certify Without Visible Signature. If you choose this option, your signature appears only in the Signatures panel.

282
ADOBE ACROBAT 8 PROFESSIONAL
User Guide
Note: If you enabled View Documents In Preview Document Mode When Signing in the Security Preferences, click Sign
Document in the document message bar.
3 Click OK in the Save As Certified Document dialog box.
4 If you’re adding a visible signature, draw the signature field on the page. Follow the on-screen instructions to select
a digital ID, if prompted.
Specify a default ID to avoid being prompted each time you sign a PDF.
5 In the Certify Document dialog box, specify the permitted changes, type your password, and then click Sign.
6 Save the PDF using a different filename than the original file, and then close the document without making
additional changes.
See also
“Change the signing method” on page 256
“Specify the default digital ID” on page 256
“About digital IDs” on page 253
Clear or remove a digital signature
❖ Do one of the following:
• To remove a signature, right-click/Control-click the signature field and choose Clear Signature Field.
• To remove all signatures in a PDF, choose Clear All Signature Fields from the Options menu in the Signatures
panel.
fi
If you want to delete the signature field, choose Tools > Advanced Editing > Select Object Tool, select the signature
eld, and press the Delete key.
Validating signatures
Checking the validity of a signature
By default, signatures are validated when you open a PDF. An icon appears in the signature field on the document
page to indicate the signature status. Further details about the status appear in the Signatures panel and in the
Signature Properties dialog box.
Third-party signature handlers may provide alternate methods of validating signatures. Check the documentation
included with your third-party digital ID.
Important: To ensure that signatures are validated when you open a PDF and that all verification details appear with
the signature, set your verification preferences in advance (see “Set signature verification preferences” on page 284).
• Thedigitalsignatureicon along withthenameofthe fieldintheSignatures panelindicatethepresence
of an unsigned signature field.
• The blue ribbon icon indicates that the PDF is certified—that is, it contains a valid certifying signature. (Certi-
fying signatures can be visible or invisible.)
• The check mark icon indicates that the signature is valid.

283
ADOBE ACROBAT 8 PROFESSIONAL
User Guide
• The red x icon indicates that the signature is invalid.
• The caution triangle icon indicates that the document was modified after the signature was added.
• The question mark icon indicates that the signature couldn’t be validated because the signer’s certificate isn’t
in your list of trusted identities.
If the signature status is unknown or unverified, or if the document was modified after it was signed, validate the
signature manually to determine the problem’s cause and possible solution. If the signature status is invalid (indicated
by the red x icon), contact the signer about the problem.
See also
“Verify information on a certificate” on page 260
“Get certificates from other users” on page 258
What makes a digital signature invalid?
A signature can have an invalid status for the following reasons:
• The signer’s certificate was revoked.
• The signer’s certificate has expired.
• The signer’s certificate was removed from the trusted identities list or the trust level changed.
• The PDF was modified after it was signed or certified.
Validate a signature manually
You can assess the validity of a digital signature by checking the signature properties.
1 Set your signature verification preferences. For more information, see “Set signature verification preferences” on
page 284.
2 Open the PDF containing the signature, and click the Signatures button on the left to open the Signatures
panel.
3 Select the signature in the Signatures panel, and then choose Validate Signature from the Options menu. The
Signature Validation Status describes the validity of the signature.
4 Click Signature Properties, and do the following:
• Ifthestatusisunknown,clicktheSignertab,andthenclickShowCertificateto viewthedetailsofthecertificate.
If you’re working with self-signed digital IDs, confirm that the certificate details are valid. If the certificate isn’t
valid, request a valid certificate from the signer. Click OK.
• Click the Date/Time tab to verify the timestamp, if needed.
• Click the Legal tab to learn more about the legal restrictions of the signature. In the Legal tab, click View
Document Integrity Properties to check if the document is PDF/SiqQ-compliant, or if it contains items that could
alter its appearance.
If the document was modified after it was signed, check the signed version of the document and compare it to the
current version.

284
ADOBE ACROBAT 8 PROFESSIONAL
User Guide
See also
“Validate a timestamp certificate” on page 285
“Sign in Preview Document mode” on page 280
“View previous versions of a signed document” on page 286
Set signature verification preferences
Before you open signed documents, set your preferences to optimize Acrobat for validating signatures.
1 Choose Edit > Preferences (Windows) or Acrobat > Preferences (Mac OS), and select Security on the left.
2 To automatically validate all signatures in a PDF when you open the document, select Verify Signatures When The
Document Is Opened. This option is enabled by default.
3 Click Advanced Preferences, and then click the Verification tab.
4 Choose the following options:
When Verifying These options specify methods that determine which plug-in to choose when verifying a signature.
The appropriate plug-in is often selected automatically. Contact your system administrator about specific plug-in
requirements for validating signatures.
Require That Certificate Revocation Checking Be Done Whenever Possible During Signature Verification Select this
option to require certificates to be checked against a list of excluded certificates during validation. If this option isn’t
selected, the revocation status for approval signatures is ignored. The revocation status is always checked for certi-
fying signatures.
Verify Signatures Using Select an option to determine whether the time that appears in the digital signature reflects
the time the signature was validated (Current Time), the time set by the default timestamp server specified in the
Security Settings, or the time the signature was created.
Hide Signature Field Validity Icon When Signature Is Valid Hidesthe signaturestatusifthesignatureisvalid,evenif
the document has changed since it’s been signed (indicated by a green check mark and caution triangle icon).
5 Click the Windows Integration tab, and specify whether you can import identities from the Windows Certificates
feature into the list of trusted identities. In addition, specify whether to trust all root certificates in the Windows
Certificates feature when validating signatures and when validating certified documents. Be aware that selecting
these options might compromise security.
Signatures panel overview
The Signatures panel lists all the signatures in the current document. Each signature has an icon identifying its verifi-
cation status. Verification details are listed beneath each signature and can be viewed by expanding the signature, or
by making selections from the Options menu in the Security panel.
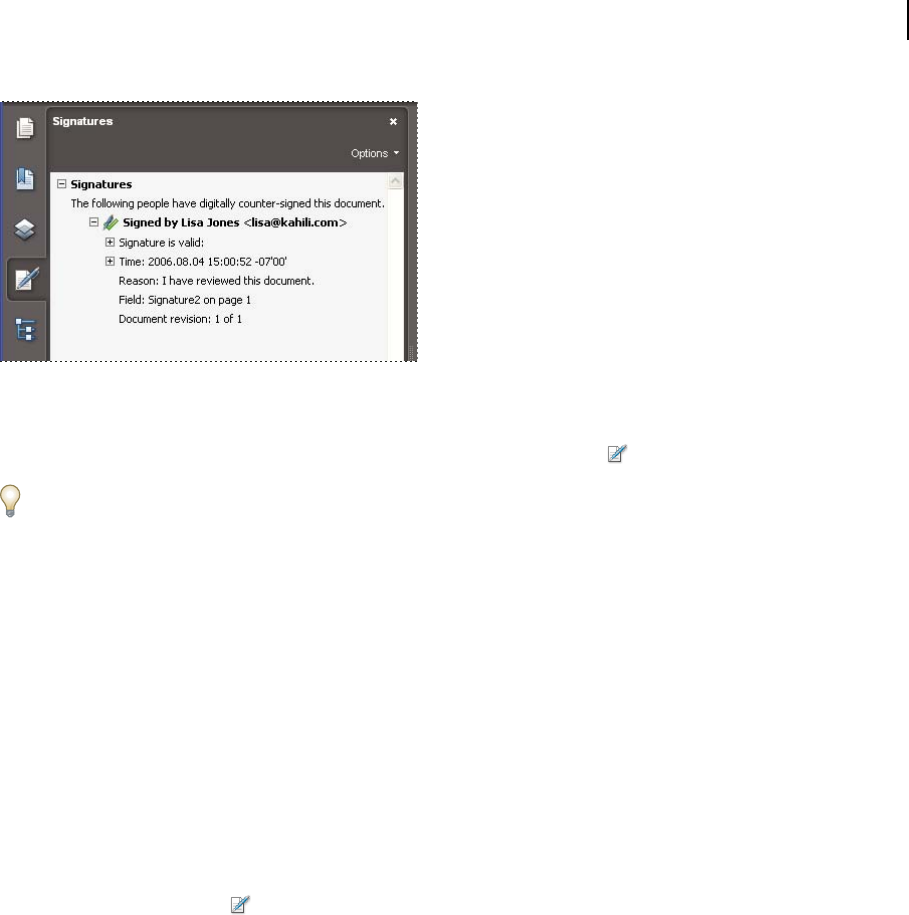
285
ADOBE ACROBAT 8 PROFESSIONAL
User Guide
Verify signatures in the Signatures panel.
Display the Signatures panel
❖ Choose View > Navigation Panels > Signatures, or click the Signatures button in the navigation pane.
You can right-click/Control-click a signature field in the Signatures panel to do most signature-related tasks,
including adding, clearing, and validating signatures. In some cases, however, the signature field may become locked
after you sign it.
Expand or collapse a signature
❖ In the Signatures panel, click the plus sign (Windows) or triangle (Mac OS) next to the signature to expand it.
Click the minus sign (Windows) or the rotated triangle (Mac OS) to collapse it.
When collapsed, the signature shows only the name, date, and status.
Validate a timestamp certificate
If a signature displays the date and time, that time is the local time on the signer’s computer. However, a second date
and time may appear in the Signature Properties dialog box, indicating that the signer uses a timestamp server. To
validate a signature that contains a timestamp, you must obtain the certificate for the timestamp server and add it to
your list of trusted identities. Otherwise, the timestamp appears in the Signatures panel as unverified, and you must
validate the timestamp manually.
1 Click the Signatures button in the navigation pane, select the signature, and choose Validate Signature from
the Options menu.
2 Click the Signature Properties button in the Signature Validation Status dialog box.
3 In the Signature Properties dialog box, click the Date/Time tab to view the timestamp authority, and then click
the Show Certificate button. (This button appears in the Date/Time tab only if the signer used a timestamp server.)
4 In the Certificate Viewer, click the Trust tab to determine if the timestamp certificate is trusted. If it isn’t trusted,
click Add To Trusted Identities. If a certificate for the timestamp server isn’t listed, request one from the signer.
See also
“Sharing and managing certificates” on page 258

286
ADOBE ACROBAT 8 PROFESSIONAL
User Guide
View previous versions of a signed document
Eachtimeadocumentissigned,asignedversionof thePDF issavedwiththePDF.Each versionissaved asappend-
only so that it cannot be modified. All signatures and their corresponding versions can be accessed from the Signa-
tures panel.
1 In the Signatures panel, select the signature, and choose View Signed Version from the Option menu.
The previous version opens in a new PDF, with the version information and the name of the signer in the title bar.
2 To return to the original document, choose the document name from the Window menu.
Compare versions of a signed document
After a document is signed, you can display a list of the changes made to the document after the last version.
1 In the Signatures panel, select the signature.
2 Choose Compare Signed Version To Current Version from the Option menu.
3 When you’re done, close the temporary document.

287
Chapter 10: Accessibility, tags, and reflow
Accessibility features assist people with disabilities—such as mobility impairments, blindness, and low vision—in
their use of Adobe Acrobat and Adobe PDFs.
Accessibility features
About accessibility features
A document or application is accessible if it can be used by people with disabilities—such as mobility impairments,
blindness, and low vision—and not just by people who can see well and use a mouse. Accessibility features in Adobe
Acrobat, Adobe Reader, and Adobe Portable Document Format (PDF) make it easier for people with disabilities to
use PDF documents and forms, with or without the aid of assistive software and devices such as screen readers,
screen magnifiers, and braille printers.
Making PDFs accessible tends to benefit all users. For example, the underlying document structure that makes it
possible for a screen reader to properly read a PDF out loud also makes it possible for a mobile device to correctly
reflow and display the document on a small screen. Similarly, the preset tab order of an accessible PDF form helps
all users—not just users with mobility impairments—fill the form more easily.
Accessibility features in Acrobat and Reader fall into two broad categories: features to make the reading of PDF
documents more accessible and features to create accessible PDF documents. To create accessible PDF documents,
you must use Acrobat, not Reader.
Features for accessible reading of PDFs
• Preferences and commands to optimize output for assistive software and devices, such as saving as accessible text
for a braille printer
• Preferences and commands to make navigation of PDFs more accessible, such as automatic scrolling and opening
PDFs to the last page read
• Accessibility Setup Assistant for easy setting of most preferences related to accessibility
• Keyboard alternates to mouse actions
• Reflow capability to temporarily present the text of a PDF in a single easy-to-read column
• Read Out Loud text-to-speech conversion
• Support for screen readers and screen magnifiers
Features for creating accessible PDFs
• Creation of tagged PDFs from authoring applications
• Conversion of untagged PDFs to tagged PDFs
• Security setting that allows screen readers to access text while preventing users from copying, printing, editing,
and extracting text
• Ability to add text to scanned pages to improve accessibility
• Tools for editing reading order and document structure

288
ADOBE ACROBAT 8 PROFESSIONAL
User Guide
• Tools for creating accessible PDF forms
Though Acrobat Standard provides some functionality for making existing PDFs accessible, you must use Acrobat
Professional or Acrobat 3D to perform certain tasks—such as editing reading order or editing document structure
tags—that may be necessary to make some PDF documents and forms accessible.
For more information about creating accessible PDFs and using accessibility features to read PDFs, see
http://www.adobe.com/go/accessibility.
About accessible PDFs
Accessible PDFs have the following characteristics.
Searchable text
A document that consists of scanned images of text is inherently inaccessible because the content of the document
is images, not searchable text. Assistive software cannot read or extract the words, users cannot select or edit the text,
and you cannot manipulate the PDF for accessibility. You must convert the scanned images of text to searchable text
using optical character recognition (OCR) before you can use other accessibility features with the document.
Alternate text descriptions
Document features such as images and interactive form fields can’t be read by a screen reader unless they have
associated alternate text. Though web links are read by screen readers, you can provide more meaningful descrip-
tions as alternate text. Alternate text and tool tips can aid many users, including those with learning disabilities.
Fonts that allow characters to be extracted to text
The fonts in an accessible PDF must contain enough information for Acrobat to correctly extract all of the characters
to text for purposes other than displaying text on the screen. Acrobat extracts characters to Unicode text when you
read a PDF with a screen reader or the Read Out Loud feature, or when you save as text for a braille printer. This
extraction fails if Acrobat cannot determine how to map the font to Unicode characters.
Reading order and document structure tags
To read a document’s text and present it in a way that makes sense to the user, a screen reader or other text-to-speech
tool requires that the document be structured. Document structure tags in a PDF define the reading order and
identify headings, paragraphs, sections, tables, and other page elements.
Interactive form fields
Some PDFs contain forms that a person is to fill out using a computer. To be accessible, form fields must be inter-
active—meaning that a user must be able to enter values into the form fields.
Navigational aids
Navigational aids in a PDF—such as links, bookmarks, headings, a table of contents, and a preset tab order for form
fields—assist all users in using the document without having to read through the entire document, word by word.
Bookmarks are especially useful and can be created from document headings.
Document language
Specifying the document language in a PDF enables some screen readers to switch to the appropriate language.

289
ADOBE ACROBAT 8 PROFESSIONAL
User Guide
Security that doesn’t interfere with assistive software
Some authors of PDFs restrict users from printing, copying, extracting, adding comments to, or editing text. The text
of an accessible PDF must be available to a screen reader. You can use Acrobat to ensure that security settings don’t
interfere with a screen reader’s ability to convert the on-screen text to speech.
See also
“Recognize text in scanned documents” on page 67
“Check and correct reading order” on page 307
“Workflow for creating accessible PDF forms” on page 304
“Add alternate text and supplementary information to tags” on page 317
“Set the document language” on page 313
“Prevent security settings from interfering with screen readers” on page 313
“Check accessibility with Full Check” on page 291
About tags, accessibility, reading order, and reflow
PDF tags are similar in many ways to XML tags. PDF tags indicate document structure: which text is a heading,
which content makes up a section, which text is a bookmark, and so on. A logical structure tree of tags represents
the organizational structure of the document. Thus tags can indicate the precise reading order and improve
navigation—particularly for longer, more complex documents—without changing the appearance of the PDF.
Forpeoplewhoareunabletoseeor interpretthevisual appearanceofadocument,assistivesoftwarecandetermine
howtopresentandinterpretthecontentofthedocumentbyusingthelogicalstructuretree.Mostassistivesoftware
depends on document structure tags to determine the appropriate reading order of text and to convey the meaning
of images and other content in an alternate format, such as sound. In an untagged document, there is no such
structure information, and Acrobat must infer a structure based on the Reading Order preference setting, which
often results in page items being read in the wrong order or not at all.
Reflowing a document for viewing on the small screen of a mobile device relies on these same document structure tags.
Often, Acrobat tags PDFs when you create them. To determine whether a PDF contains tags, choose File >
Properties, and look at the Tagged PDF value in the Advanced pane of the Description tab.
The logical structure tree appears on the Tags tab and shows document content as page elements nested at various
levels.
See also
“Reading PDFs with reflow and accessibility features” on page 293
“Creating accessible PDFs” on page 299
“Making existing PDFs accessible” on page 305
“Standard PDF tags” on page 319

290
ADOBE ACROBAT 8 PROFESSIONAL
User Guide
Checking the accessibility of PDFs
About accessibility checkers
Of course, the best way to test the accessibility of a document is to attempt to use the document with the tools that
your readers will use. However, even if you don’t have a screen reader or braille printer, you can still use any of several
methods provided by Acrobat for checking the accessibility of a PDF.
• Use Quick Check to check for document structure tags, searchable text, and appropriate security settings for
accessibility. This method is often the best way to check for accessibility before attempting to use a PDF.
• Use Full Check to perform a more thorough check for many characteristics of accessible PDFs, such as the use of
fonts that can be mapped reliably to Unicode text.
• Use Reflow view to quickly check reading order.
• Use Read Out Loud to experience the document as it will be experienced by readers who use this text-to-speech
conversion tool.
• Save the document as accessible text and then read the saved text file in a word-processing application to
experience the document as it will be experienced by readers who use a braille printer.
• Use the TouchUp Reading Order tool, Tags tab, and Content tab to examine the structure, reading order, and
contents of a PDF in detail.
Note: The accessibility checker tools can help to identify areas of documents that may be in conflict with the Adobe inter-
pretation of the accessibility guidelines referenced in the application and its documentation. However, these tools don’t
check documents against all accessibility criteria, including those in such referenced guidelines, and Adobe doesn’t
warrant that documents comply with any specific guidelines or regulations.
See also
“Reading a PDF with a screen reader” on page 298
“Reflow a PDF” on page 297
“Read a PDF with Read Out Loud” on page 298
“Save as accessible text for a braille printer” on page 297
“Check and correct reading order” on page 307
“View tags in the Tags tab” on page 315
Check accessibility with Quick Check
Use Quick Check to examine a PDF to see if it has searchable text, document structure tags, and appropriate security
settings to make it accessible.
❖ Press Shift+Ctrl+6/Shift+Command+6.
If the document is unstructured, a message may appear, suggesting that you change reading order preferences.
See also
“Setting accessibility preferences” on page 293

291
ADOBE ACROBAT 8 PROFESSIONAL
User Guide
Accessibility Quick Check results
“This document has logical structure but it is not a Tagged PDF. Some accessibility information may be missing.”
Quick Check has found an underlying document structure in the document, so Acrobat will use the available
document structure to control the reading order, rather than analyzing the document itself. However, this untagged
document structure might be incomplete or unreliable, so assistive software and the accessibility features in Acrobat
(such as the Read Out Loud and the Save As Text features) may not read the page properly. If the reading order of
the page seems to be wrong, select Override The Reading Order In Tagged Documents in the Reading panel of the
Preferences dialog box.
“This document is not structured, so the reading order may not be correct. Try different reading orders using the
Reading Preferences panel.” Quick Check has found no underlying document structure that Acrobat can use for
reading order. Acrobat will analyze the reading order of the document using the current analysis method set in the
Reading Order preference, but this PDF might not be read correctly by screen readers. If the reading order seems
wrong, select a different option for Reading Order in the Reading panel of the Preferences dialog box.
“No accessibility problems were detected in this quick check. Choose the Full Check command to check more
thoroughly.” QuickCheckhasfoundthat thePDFcontains searchable text,istagged,hasanunderlyingdocument
structure, and has no security settings that prohibit access for screen readers. To check for other types of accessibility
problems that may be present in the PDF, use Full Check.
“This document’s security settings prevent access by screen readers.” Quick Check has found that the PDF has
security settings that interfere with screen readers’ ability to extract text for conversion to speech. You may be able
to use a screen reader with this document if your assistive technology product is registered with Adobe as a Trusted
Agent. Contact your assistive technology product vendor.
“This document appears to contain no text. It may be a scanned image.” Quick Check has found that the PDF
contains no searchable text, probably because the document consists entirely of one or more scanned images. This
means that screen readers, Read Out Loud, Reflow view, and most other accessibility features—which rely on text as
input—will not work with this document.
Check accessibility with Full Check
Use Full Check to check a PDF for many of the characteristics of accessible PDFs.
You can choose which kinds of accessibility problems to look for and how you want to view the results.
1 Choose Advanced > Accessibility > Full Check.
2 Select options for how you want to view the results, the page range to check, and which types of accessibility
problems to check for.
3 Click Start Checking.
Note: A full accessibility check can be time-consuming. You can stop the process by pressing the Esc key. Consider
choosing a smaller page range.
You can choose to view the results of a full accessibility check as an HTML file or as comments that are placed
throughout the document where the accessibility problems are detected.
Because the Full Check feature is unable to distinguish between essential and nonessential content types, it may
report issues that don’t affect readability. It’s a good idea to review all issues to determine which ones require
correction.

292
ADOBE ACROBAT 8 PROFESSIONAL
User Guide
Accessibility Full Check options
Create Accessibility Report Creates an HTML report of accessibility issues, which is opened in the navigation pane
and saved in the location indicated by the Folder field.
Include Repair Hints In Accessibility Report Adds suggestions for fixing accessibility problems to the HTML report
or comments.
Create Comments In Document Adds comments to the document that indicate accessibility problems.
Delete all accessibility comments from the PDF after you repair the accessibility issues.
Page Range The range of pages to check.
Name The set of accessibility criteria to check. For the Section 508 and W3C guidelines, the options area includes a
Browse button that links to the website for the respective guidelines. Select Adobe PDF to choose from options for
the Adobe PDF accessibility standard:
• Alternative Descriptions Are Provided Checks for tagged figures that are missing alternate text.
• Text Language Is Specified Checks for paragraphs that don’t have a language specified for them. Setting the
language for an entire document in the Document Properties dialog box corrects all errors related to this option.
• Reliable Character Encoding Is Provided Checks for fonts that are inaccessible to screen readers and other
assistivesoftware. Fontsmustcontainenough informationfor Acrobattocorrectlyextractall thecharacterstotext.
If one or more fonts don’t allow for the correct extraction of all the characters, the PDF is inaccessible.
• All Content Is Contained In The Document Structure Checks for page elements that may have been overlooked
during tagging. Adding these elements to the tag tree (if necessary) ensures that a screen reader can present the
content to a user.
• All Form Fields Have Descriptions Checks for form fields that are missing descriptions.
• Tab Order Is Consistent With The Structure Order Checks whether tags properly reflect the document’s structure.
• List And Table Structure Is Correct Checks whether tags that have been generated for lists and tables meet the
requirements of tagged PDF.
View Full Check results
If you choose Create Accessibility Report in the Accessibility Full Check dialog box, you can specify a folder where
you want the report to be saved. When the full check is complete, the accessibility report appears in the navigation
pane and is also saved in the folder indicated. The name of the report file is the same as that of the source PDF, except
that .pdf is replaced by PDF.html.
1 Choose Advanced > Accessibility > Open Accessibility Report.
2 Select the HTML file, and then click OK. The report appears in the navigation pane.
Links in the accessibility report take you to the location of inaccessible elements in the document pane or to proce-
dures that briefly explain how to fix accessibility problems.
Note: If you want to reopen the accessibility report with the associated PDF, don’t move or rename either file after
running the full check. The HTML file refers to the PDF file with a relative path.

293
ADOBE ACROBAT 8 PROFESSIONAL
User Guide
Reading PDFs with reflow and accessibility features
Setting accessibility preferences
Acrobat provides several preferences that help make the reading of PDFs more accessible for visually impaired and
motion-impaired users, including preferences that control how PDFs appear on the screen and are read by a screen
reader.
Most preferences related to accessibility are available through the Accessibility Setup Assistant, which provides on-
screen instructions for setting these preferences. Some preferences that affect accessibility aren’t available through
the Accessibility Setup Assistant; these include preferences in the Reading, Forms, and Multimedia categories. You
can set all preferences in the Preferences dialog box.
The names shown for some preferences in the Accessibility Setup Assistant are different from the names for the same
preferences shown in the Preferences dialog box. Acrobat Help uses the names shown in the Preferences dialog box.
For more information about accessibility features in Acrobat and PDF, visit the accessibility page of the Adobe
website.
Set accessibility preferences with the Accessibility Setup Assistant
1 Start the Accessibility Setup Assistant by doing one of the following:
• Choose Advanced > Accessibility > Setup Assistant.
• (Windows only) Start Acrobat for the first time while a screen reader or screen magnifier is running.
2 Choose the option that is appropriate for your assistive software and devices.
The assistant presents only preferences that are appropriate for your assistive software and devices, according to the
option that you choose.
3 Follow the on-screen instructions. If you click Cancel at any point, Acrobat uses default settings for the prefer-
ences set by the assistant (not recommended).
Set accessibility preferences with the Preferences dialog box
1 Choose Edit > Preferences (Windows) or Acrobat > Preferences (Mac OS).
2 Setpreferencesasappropriateforyour assistivesoftwareanddevicesinvariouspanelsofthePreferencesdialogbox.
Accessibility preferences
Accessibility preferences in Accessibility panel
Replace Document Colors When this preference is selected, you can choose from a list of contrasting color combi-
nations for text and background, or you can create your own. These settings correspond to the Use High Contrast
Colors For Document Text option in the Accessibility Setup Assistant.
Always Use Page Layout Style Corresponds to the Override Page Layout Style option in the Accessibility Setup
Assistant.
Always Use Zoom Setting Corresponds to the Override Document Zoom option in the Accessibility Setup Assistant.
Use Document Structure For Tab Order When No Explicit Tab Order Is Specified Improves navigation of form fields
and links in documents that don’t specify a tab order.
Always Display The Keyboard Selection Cursor Select this option if you use a screen magnifier. This preference
corresponds to the Always Display The Keyboard Selection Cursor option in the Accessibility Setup Assistant.

294
ADOBE ACROBAT 8 PROFESSIONAL
User Guide
Accessibility preferences in Documents panel
Automatically Save Document Changes To Temporary File When deselected, this preference disables the auto-save
action. Each time a PDF is saved, the screen reader or magnifier must reload the document. This preference corre-
sponds to the Disable Document Auto-Save option in the Accessibility Setup Assistant.
Accessibility preferences in Forms panel
Fields Highlight Color and Required Fields Highlight Color These preferences specify what colors will be used to
highlight fillable form fields. They correspond to the Field Highlight Color and Required Field Highlight Color
options in the Accessibility Setup Assistant.
Auto-Complete Enables Acrobat to automatically offer to complete some entries in form fields so that filling form
fields requires fewer keystrokes. This preference doesn’t correspond to an option in the Accessibility Setup Assistant.
Accessibility preferences in Internet panel
Display PDF In Browser Causes PDFs linked to from web pages to open in the web browser instead of a separate
Acrobat window. Deselect this preference for greater control when navigating a document in a screen reader. This
preference corresponds to the Display PDF Documents In The Web Browser option in the Accessibility Setup
Assistant.
Accessibility preferences in Multimedia panel
• Show Subtitles When Available
• Play Dubbed Audio When Available
• Show Supplemental Text Captions When Available
• Show Audio Description (Or Video Description, Or Descriptive Video) When Available
These preferences don’t correspond to any options in the Accessibility Setup Assistant.
Accessibility preferences in Page Display panel
Zoom Sets the on-screen magnification of documents and allows low-vision readers to read reflowed PDFs more
easily. This preference corresponds to the Override Document Zoom option in the Accessibility Setup Assistant.
Smooth Text Controls anti-aliasing of text. To disable smoothing of text and make text sharper and easier to read
with a screen magnifier, choose None. This preference corresponds to the Disable Text Smoothing option in the
Accessibility Setup Assistant.
Accessibility preferences in Reading panel
Reading Order Specifies the reading order of documents. The reading order preferences also appear in the Accessi-
bility Setup Assistant.
• Infer Reading Order From Document (Recommended) Interprets the reading order of untagged documents by
using an advanced method of structure-inference layout analysis.
• Left-To-Right, Top-To-Bottom Reading Order Delivers the text according to its placement on the page, reading
from left to right and then top to bottom. This method is faster than Infer Reading Order From Document. This
method analyzes text only; form fields are ignored and tables aren’t recognized as such.
• Use Reading Order In Raw Print Stream Delivers text in the order in which it was recorded in the print stream.
This method is faster than Infer Reading Order From Document. This method analyzes text only; form fields are
ignored and tables aren’t recognized as such.

295
ADOBE ACROBAT 8 PROFESSIONAL
User Guide
Override The Reading Order In Tagged Documents Uses the reading order specified in the Reading preferences
insteadofthatspecifiedbythetagstructureof thedocument. Usethispreferenceonlywhenyou encounterproblems
in poorly tagged PDFs. This preference corresponds to the Override The Reading Order In Tagged Documents
option in the Accessibility Setup Assistant.
Page Vs Document This preference determines how much of a document is delivered to a screen reader at a time. If
a PDF isn’t tagged, Acrobat may analyze the document and attempt to infer its structure and reading order, which
cantakealongtimeforalong document.YoumaywanttosetAcrobattodeliveronly thecurrently visiblepageso
that it analyzes only a small piece of the document at a time. This consideration will vary depending on the size and
complexity of the document and on the features of the screen reader. When Acrobat delivers information to a screen
reader, screen magnifier, or other assistive software, it loads information into a memory buffer that is directly
availabletotheassistivesoftware. Theamountofinformationthatisdeliveredtothememorybuffercanaffecthow
long Acrobat takes to perform tasks, such as opening the document, advancing to the next page, changing views, and
carrying out commands.
• Only Read The Currently Visible Pages This option is usually best when you use a screen magnifier. It improves
performance by eliminating the need for the software to process parts of the document that aren’t visible. When
Acrobatsends only thecurrently visiblepages ofaPDFtothememorybuffer,theassistivetechnology hasaccess to
thosepagesonly.ItcannotgotoanotherpageuntilthenextpageisvisibleandAcrobathas sentthepageinformation
to the memory buffer. Therefore, if this option is selected, you must use the navigation features of Acrobat, not those
of the assistive technology, to navigate from page to page in the document. You should also set the Default Page
Layout option in preferences to Single Page if you choose to have Acrobat send only the currently visible pages to the
assistive technology. Because Acrobat sends page information about all visible pages, the assistive technology
receivesinformationabout pagesthatmay beonly partiallyvisible(suchasthebottomof onepageorthetopofthe
next), as well as those pages that are completely visible. If you use a page display setting other than Single Page, such
as Continuous, and then you display the next page, the technology may not correctly track which portion of a
previous page it has already read aloud. For instructions on setting the default page layout to Single Page, see “Prefer-
ences for viewing PDFs” on page 33.
This option corresponds to the Only Read The Currently Visible Pages option in the Accessibility Setup Assistant.
• Read The Entire Document This option can be best if you use a screen reader that has its own navigation and
search tools and that is more familiar to you than the tools in Acrobat. This option corresponds to the Read The
Entire Document At Once option in the Accessibility Setup Assistant.
• For Large Documents, Only Read The Currently Visible Pages This option is selected by default and is usually best
if you use a screen reader with long or complex PDFs. It allows Acrobat to deliver an entire small document but revert
to page-by-page delivery for large documents. This preference corresponds to the For Large Documents, Only Read
The Currently Visible Pages option in the Accessibility Setup Assistant.
Confirm Before Tagging Documents When selected, lets the user confirm the options that will be used before
Acrobat prepares an untagged document for reading. Tagging can be a time-consuming procedure, especially for
larger documents. This preference corresponds to the Confirm Before Tagging Documents option in the Accessi-
bility Setup Assistant.
Read Out Loud Options Set preferences in this section to control volume, speed, and pitch of the voice used for Read
Out Loud. You can choose to use the default voice or any of the voices provided by your operating system. Select
Read Form Fields to have Read Out Loud read the contents of form fields. These preferences don’t correspond to
options in the Accessibility Setup Assistant.

296
ADOBE ACROBAT 8 PROFESSIONAL
User Guide
Navigate and control the application with the keyboard
Youcannavigateby usingthekeyboardinsteadofthemouse.SeveralkeyboardaccessfeaturesareavailableonMac
OS; see the documentation for your operating system for details. On Windows, some of the keyboard shortcuts used
to navigate in Acrobat may differ from those used in other Windows applications.
When you open Acrobat within a web browser, keyboard commands are mapped to the web browser first. Conse-
quently, some keyboard shortcuts may not be available for Acrobat or may be available only after you shift the focus
to the PDF.
For information on accessibility features for navigating Acrobat and PDF documents with the keyboard, visit the
accessibility page of the Adobe website.
See also
“Keys for navigating a PDF” on page 556
“Keys for selecting tools” on page 554
“Keys for editing” on page 555
“Keys for general navigating” on page 557
“Keys for working with navigation panels” on page 558
“Keys for navigating the Help window” on page 559
“Keys for navigating the How To panel” on page 559
Enable single-key accelerators
You can select some tools and perform some actions with single-key accelerators. Most keyboard shortcuts in
Acrobat don’t require that you enable single-key accelerators.
1 Choose Edit > Preferences (Windows) or Acrobat > Preferences (Mac OS).
2 Select General, and then select Use Single-Key Accelerators To Access Tools.
Note: Some screen readers do not work with Acrobat single-key accelerators.
Scroll automatically
The automatic scrolling feature makes it easier to scan through long PDFs, especially reflowed documents. You can
scroll through pages without using keystrokes or mouse actions.
1 Choose View > Automatically Scroll.
2 Do any of the following:
• To change the scrolling speed to a specific speed, press a number key (9 for fastest, 0 for slowest).
• To increase or decrease the scrolling speed, press the Up Arrow or Down Arrow key, depending on the direction
of scrolling.
• To reverse the direction of scrolling, press the minus sign (-) key.
• To jump to the next or previous page, press the Left Arrow or Right Arrow key.
To stop automatic scrolling, press Esc or choose View > Automatically Scroll again.

297
ADOBE ACROBAT 8 PROFESSIONAL
User Guide
Save as accessible text for a braille printer
Note: Thisdocumentusestheterm“brailleprinter”torefertoanydevicethatisusedtoconvertaccessibletexttoaform
that can be used by a person with blindness or low vision.
You can save a PDF as accessible text to print on a braille printer. Accessible text can be imported and printed out as
formatted grade 1 or 2 braille documents by using a braille translation application. See the documentation included
with the braille translator for more information.
A text version of a PDF contains no images or multimedia objects, although the text version of an accessible PDF
contains alternate text descriptions for such objects.
1 Choose File > Save As.
2 Choose Text (Accessible) from the Save As Type (Windows) or Format (Mac OS) menu.
Reflow a PDF
YoucanreflowaPDF totemporarilypresentit asasinglecolumnthatisthewidthofthedocumentpane.Thisreflow
viewcanmakethedocumenteasiertoreadonthesmallscreenofamobiledeviceoronastandardmonitoratalarge
magnification, without the need to scroll horizontally to read each line of text.
You cannot save, edit, or print a document while it is in Reflow view.
In most cases, only readable text appears in the reflow view. Text that doesn’t reflow includes forms, comments,
digital signature fields, and page artifacts, such as page numbers, headers, and footers. Pages that contain both
readable text and form or digital signature fields don’t reflow. Vertical text reflows horizontally.
Acrobat temporarily tags an untagged document before reflowing it. As an author, you can optimize your PDFs for
reflow by tagging them yourself. Tagging ensures that text blocks reflow and that content follows the appropriate
sequences, so readers can follow a story that spans different pages and columns without other stories interrupting
the flow.
A quick way to check the reading order of a document is to view it in Reflow view.
If the tagged PDF doesn’t reflow the way you want, the content order or reading order of the PDF file may contain
inconsistencies, or the tagging process itself may be the cause. You can use the Content tab or TouchUp Reading
Order tool to resolve reflow problems.
If the problem is simply that words don’t hyphenate the way you expect them to, then you can insert special
characters to resolve the problem. (See “Insert special characters” on page 350.)
Headings and columns (left) reflow in a logical reading order (right).

298
ADOBE ACROBAT 8 PROFESSIONAL
User Guide
Reflow a tagged PDF
❖ Do one of the following:
• Choose View > Zoom > Reflow.
• Press Ctrl+4/Command+4.
If the Page Display setting for the document is Two-Up before you choose Reflow view, the Page Display setting
automatically becomes Single Page when the document is reflowed. If the Page Display setting for the document is
Two-Up Continuous before you choose Reflow view, the Page Display setting automatically becomes Continuous
when the document is reflowed.
Return to unreflowed view
❖ When in Reflow view, do one of the following:
• Choose View > Zoom > Reflow.
• Press Ctrl+4/Command+4.
Reading a PDF with a screen reader
Acrobat supports assistive software and devices—such as screen readers and screen magnifiers—that enable visually
impaired users to interact with computer applications. When assistive software and devices are in use, Acrobat may
add temporary tags to open PDFs to improve their readability. Use the Accessibility Setup Assistant to improve how
Acrobat interacts with the types of assistive software and devices that you use. When using a screen reader, you can
change your reading settings for the current document by pressing Shift+Ctrl+5 (Windows) or Shift+Command+5
(Mac OS).
See the documentation for your assistive software or device, or contact the vendor for more information about
system requirements, compatibility requirements, and instructions for using this software or device with Acrobat.
Read a PDF with Read Out Loud
The Read Out Loud feature reads aloud the text in a PDF, including the text in comments and alternate text descrip-
tions for images and fillable fields. In tagged PDFs, content is read in the order in which it appears in the document’s
logical structure tree. In untagged documents, the reading order is inferred, unless a reading order has been specified
in the Reading preferences.
Read Out Loud uses the available voices installed on your system. If you have SAPI 4 or SAPI 5 voices installed from
text-to-speech or language applications, you can choose them to read your PDFs.
Note: Read Out Loud isn’t a screen reader, and some operating systems may not support it.
Activate or deactivate Read Out Loud
YoumustactivateReadOutLoudbeforeyoucanuseit.YoucandeactivateReadOutLoudtofreesystemresources
and improve performance of other operations.
❖ Do one of the following:
• Choose View > Read Out Loud > Activate Read Out Loud or press Shift+Ctrl+Y/Shift+Command+Y.
• Choose View > Read Out Loud > Deactivate Read Out Loud or press Shift+Ctrl+Y/Shift+Command+Y.
Read a PDF with Read Out Loud
1 Navigate to the page that you want to read.

299
ADOBE ACROBAT 8 PROFESSIONAL
User Guide
2 Do one of the following:
• Choose View > Read Out Loud > Read This Page Only or press Shift+Ctrl+V/Shift+Command+V.
• Choose View > Read Out Loud > Read To End Of Document or press Shift+Ctrl+B/Shift+Command+B.
Read PDF form fields out loud
1 In the Reading panel of the Preferences dialog box, select Read Form Fields in the Read Out Loud Options section.
2 In the PDF form, press Tab to select the first form field.
3 Make entries and selections as needed, and then press Tab to move to the next field, repeating this step until the
form is completed. Acrobat reads the state of selected check boxes and radio buttons.
Interrupt reading out loud
❖ Do one of the following:
• Choose View > Read Out Loud > Pause or press Shift+Ctrl+C/Shift+Command+C.
• Choose View > Read Out Loud > Stop or press Shift+Ctrl+E/Shift+Command+E.
About operating system accessibility tools
Accessibility tools in Windows
Windows 2000, XP, and Vista operating systems have built-in tools that provide increased or alternate access to infor-
mation on the computer screen. Narrator is a light version of a screen reader. Magnifier is a screen magnification
tool.
For more information on the accessibility tools in the Windows 2000, XP, or Vista operating systems, visit the
Microsoft accessibility website at http://www.microsoft.com/enable.
Accessibility tools in Mac OS
Mac OS X has built-in tools that provide increased or alternate access to information on the computer screen.
For more information on the accessibility tools in the Mac OS X operating system, visit the Apple Computer, Inc.
accessibility website at http://www.apple.com/accessibility.
Creating accessible PDFs
Workflow for creating accessible PDFs
At a high level, the process of creating accessible PDFs consists of a few basic stages:

300
ADOBE ACROBAT 8 PROFESSIONAL
User Guide
1. Consider accessibility before you convert a document to PDF.
2. Add fillable form fields and descriptions, and set the tab order.
3. Tag the PDF.
4. Add other accessibility features to the PDF.
5. Evaluate the PDF and repair tagging problems.
Though these stages are presented in an order that suits most needs, you may perform tasks in these stages in a
different order or iterate between some of the stages. In all cases, you should first examine the document, determine
its intended purpose, and use that analysis to determine the workflow that you apply.
6. Consider accessibility before you convert a document to PDF.
Whenever possible, think about accessibility when you create the source files in an authoring application, such as a
word-processing or page-layout application.
Typical tasks to do in the authoring application include adding alternate text to graphics, optimizing tables, and
applying paragraph styles or other document-structure features that can be converted to tags. For more information,
see “Creating a tagged PDF from an authoring application” on page 302.
Note: If you intend to design PDF forms, Adobe recommends using Adobe LiveCycle Designer, which is dedicated to the
design of interactive and static forms. LiveCycle Designer adds structure tags to forms, improving accessibility.
7. Add fillable form fields and descriptions, and set the tab order.
If your document includes form fields, you must make form fields interactive (fillable) and include descriptions for
the form fields. Use Forms > Run Form Fields Recognition to automatically detect form fields and make them
fillable. For more information on detecting form fields and making them fillable, see “Creating new forms” on
page 212.
Acrobat Professional and Acrobat 3D have a Forms toolbar that provides numerous tools for creating fillable form
fields, such as buttons, check boxes, list boxes, and text boxes. When you create a field, you can type a description for
it in the Tooltip box in the General tab of the field’s Properties dialog box. Screen readers will read this text aloud to
the user. You can also use the TouchUp Reading Order tool to add descriptions to form fields.
For information on setting the tab order to use document structure, see “Set form-field tabbing order in Acrobat” on
page 221.
8. Tag the PDF.
Improve the accessibility of PDFs by adding tags in Acrobat. If a PDF doesn’t contain tags, Acrobat may attempt to
tag it automatically when users read or reflow it, and the results may be disappointing. If you provide users with a
tagged PDF,thelogicalstructuretreesendsthecontentstoascreen readeror otherassistivesoftwareorhardwarein
an appropriate order.
For best results, tag a document when converting it to PDF from an authoring application. Alternatively, you can tag
a PDF any time in Acrobat.

301
ADOBE ACROBAT 8 PROFESSIONAL
User Guide
Tagging during conversion to PDF requires an authoring application that supports tagging in PDF. Tagging during
conversion enables the authoring application to draw from the source document’s paragraph styles or other struc-
tural information to produce a logical structure tree that reflects an accurate reading order and appropriate levels of
tags. This tagging can more readily interpret the structure of complex layouts, such as embedded sidebars, closely
spaced columns, irregular text alignment, and tables. Tagging during conversion can also properly tag the links,
cross-references, bookmarks, and alternate text (when available) that are in the file.
To tag a PDF in Acrobat, use the Add Tags To Document command. This command works on any untagged PDF,
such asonecreatedwithAdobePDFPrinter.Acrobatanalyzesthecontentofthe PDFtointerprettheindividualpage
elements, their hierarchical structure, and the intended reading order of each page, and then builds a tag tree that
reflects that information. It also creates tags for any links, cross-references, and bookmarks that you added to the
document in Acrobat.
Though the Add Tags To Document command adequately tags most standard layouts, it cannot always correctly
interpret the structure and reading order of complex page elements, such as closely spaced columns, irregular text
alignment, nonfillable form fields, and tables that don’t have borders. Tagging these pages by using the Add Tags To
Document command can result in improperly combined elements or out-of-sequence tags that cause reading order
problems in the PDF.
For more information, see “Add tags to an existing PDF” on page 305.
9. Add other accessibility features to the PDF.
This stage includes setting the document language, making sure that security settings don’t interfere with screen
readers, creating accessible links, and adding bookmarks. For more information, see “Set the document language”
on page 313, “Prevent security settings from interfering with screen readers” on page 313, “Add accessible links” on
page 312, and “About bookmarks” on page 327.
10. Evaluate the PDF and repair tagging problems.
Once you have a tagged PDF, you must evaluate the document for reading order problems, tagging errors, and acces-
sibility errors, and then repair them as needed.
No matter which method you use to tag the PDF, you’ll probably need to use Acrobat to touch up the tagging and
reading order for complex page layouts or unusual page elements. For example, the Add Tags To Document
command can’t always distinguish between instructive figures and decorative page elements such as borders, lines,
or background elements. It may incorrectly tag all of these as figures. Similarly, the Add Tags To Document
command may erroneously tag graphical characters within text—such as drop caps—as figures instead of including
them in the tag that represents the rest of the text block. Such errors can clutter the tag tree and complicate the
reading order that assistive technology relies on.
If you tag a document from within Acrobat, the application generates an error report after it completes the tagging
process. You can use this report to guide you as you repair tagging problems. You can identify other tagging, reading
order, andaccessibilityproblemsforanyPDFinAcrobatbyusingtheFullChecktoolortheTouchUpReadingOrder
tool. For more information, see “Check accessibility with Full Check” on page 291 and “Check and correct reading
order” on page 307.
Create a tagged PDF from a web page
APDFthatyoucreatefromawebpageisonlyasaccessibleastheHTMLsourcethatitisbasedon.Forexample,if
the web page relies on tables for its layout design (as many web pages do), the HTML code for the table may not flow
in the same logical reading order as a tagged PDF would require, even though the HTML code is sufficiently struc-
tured to display all the elements correctly in a browser.

302
ADOBE ACROBAT 8 PROFESSIONAL
User Guide
Depending on the complexity of the web page, you may need to do extensive repairs by using the TouchUp Reading
Order tool or editing the tag tree in Acrobat.
To produce the most accessible PDFs from web pages you create, first establish a logical reading order in their HTML
code. For best results, employ the Web Content Accessibility Guidelines that are published by the World Wide Web
Consortium (W3C). The guidelines are available on the W3C website at www.w3.org.
1 Choose File > Create PDF > From Web Page.
2 For URL, type the address of the web page, or navigate to the web page location.
3 Click Settings.
4 In the General tab, select Create PDF Tags, and then click OK.
5 Select any other options as appropriate, and then click Create.
Creating a tagged PDF from an authoring application
In most cases, you create tagged PDFs from within an authoring application, such as Adobe FrameMaker®, Adobe
InDesign, or Microsoft Word. Creating tags in the authoring application generally provides better results than
adding tags in Acrobat.
PDFMaker provides conversion settings that let you create tagged PDFs in Microsoft Excel, PowerPoint, and Word.
For an in-depth guide to creating accessible PDFs, visit the accessibility page of the Adobe website.
For more information, see the documentation for your authoring application.
About tags in combined PDFs
You can combine multiple files from different applications in one operation to create a single PDF. For example, you
can combine word-processing files with slide presentations, spreadsheets, and web pages.
During conversion, Acrobat opens each authoring application, creates a tagged PDF, and assembles these PDFs into
a single tagged PDF.
Theconversionprocessdoesn’talwayscorrectly interpretthedocumentstructureforthecombinedPDF,becausethe
files being assembled often use different formats. Because you may need to modify the reading order and tag tree of
the combined document, you may need to use Acrobat Professional or Acrobat 3D to create an accessible PDF from
multiple documents.
When you combine multiple PDFs into one tagged PDF, start with all untagged PDFs or all tagged PDFs. Combining
tagged and untagged PDFs results in a partially tagged PDF that isn’t accessible to people with disabilities; some
users—such as those using screen readers—will be completely unaware of the pages that don’t have tags. If you start
with a mix of tagged and untagged PDFs, tag the untagged files before proceeding. If the PDFs are all untagged, add
tags to the combined PDF after you finish inserting, replacing, and deleting pages.
Keep in mind that when you insert, replace, or delete pages, Acrobat accepts existing tags into the tag tree of the
consolidated PDF in the following manner:
• WhenyouinsertpagesintoaPDF,Acrobataddsthetags(ifany)forthenewpagestotheendofthetag tree,even
if you insert the new pages at the beginning or the middle of the document.
• When you replace pages in a PDF, Acrobat adds the tags (if any) from the incoming pages to the end of the tag
tree, even if you replace pages at the beginning or the middle of the document. Acrobat retains the tags (if any) for
the replaced pages.

303
ADOBE ACROBAT 8 PROFESSIONAL
User Guide
• When you delete pages from a PDF, Acrobat retains the tags (if any) of the deleted pages.
Pages whose tags are out of order in the logical structure tree can cause problems for screen readers. Screen readers
read tags in sequence down the tree, and therefore they might not reach the tags for an inserted page until the end
of the tree. To fix this problem, you’d use Acrobat Professional or Acrobat 3D to rearrange the tag tree to put large
groups of tags in the same reading order as the pages themselves. To avoid the need for this advanced step, plan so
that you always insert pages to the end of a PDF, building the document from front to back in sequence. For example,
if you create a title page PDF separately from the PDF that contains the body of the text, add the body PDF to the
titlepagePDF,eventhoughthebody document ismuchlarger to process. Thisapproach putsthetagsforthebody
of thetextafter thetagsfor thetitlepage,andeliminatestheneedforyoutorearrangethetagslater in AcrobatProfes-
sional or Acrobat 3D.
Thetagsthatremainfromadeletedorreplacedpagedon’tconnecttoany contentinthedocument.Essentially,they
are large pieces of empty tag tree sections. These unneeded tags increase the file size of the document, slow down
screen readers, and can make screen readers present confusing results. You should use Acrobat Professional or
Acrobat 3D to delete the tags of deleted pages from the tag tree.
For more information, see “Create merged PDFs and PDF packages” on page 121.
About tools for creating accessible PDF forms
Adobe offers several tools for the creation of accessible PDF forms:
Acrobat Professional or Acrobat 3D Use either application to open untagged or tagged PDF forms (except PDF
forms that are created from LiveCycle Designer) to add fillable form fields, such as text boxes, check boxes, and
buttons. Then use the application’s other tools to make the form accessible by adding descriptions to form fields,
tagging untagged forms, setting the set tab order, manipulating tags, and performing the other PDF accessibility
tasks.
Adobe PDF Forms Access Use this tool to open and tag untagged PDF forms that you created by using Acrobat
Professional or Acrobat 3D, and to manipulate the tags of these forms. You can then open the tagged PDF in Acrobat
Professional or Acrobat 3D and perform other accessibility tasks. If you often process complex untagged PDF forms,
consider purchasing Adobe PDF Forms Access. Its tagging feature is optimized for interpreting forms content, and
its tags editor is much easier to use than the tags editor in Acrobat Professional or Acrobat 3D for correcting tagging
problems in forms.
LiveCycle Designer (Available in Acrobat Professional and Acrobat 3D) Use this product to design and build new
forms or to import untagged PDF forms and make their form fields fillable and accessible. You can deploy forms in
tagged PDF, XML, and other formats from LiveCycle Designer. Once you create or edit an Acrobat form in LiveCycle
Designer, it becomes a LiveCycle Designer file—it is no longer a PDF that you can edit or manipulate in Acrobat.
Both Acrobat and Reader can open and read PDF forms that you create from LiveCycle Designer. These PDF forms,
however, don’t include permissions to modify the file. You should therefore use LiveCycle Designer only for PDFs
that are intended to contain only form-based information. Don’t use it to add form fields to a document that
combines pages of narrative with an occasional page that has form fields. In this case, you should use Acrobat Profes-
sional or Acrobat 3D to add the form fields and then complete the accessibility tasks for the rest of the document’s
content.
Authoring applications Most authoring applications that you can use to design forms don’t retain their fillable form
fields whenyouconvertthefilestoPDF.Youthereforeneedto usetheformstoolsinAcrobatProfessionalorAcrobat
3Dto addfillableformfields.Moreover,ifyoutagtheformduringconversionto PDF, theauthoring applicationmay
generate inappropriate tags for the text labels of the form fields. In a complex form, for instance, the text labels for
all the fields may run together into a single line that screen readers can’t interpret as individual labels. Such reading
order problems can require time-consuming work in Acrobat Professional or Acrobat 3D to split the labels apart. In

304
ADOBE ACROBAT 8 PROFESSIONAL
User Guide
this case, producing an untagged PDF form from the authoring application is sometimes the better course. You can
then use the Forms tools in Acrobat Professional or Acrobat 3D to add fillable form fields before you tag the entire
document.Someforms,however,arestraightforwardenoughthatyoucanproduceataggedPDFfrom theauthoring
application and do only light touchup in Acrobat Professional or Acrobat 3D after you add the fillable form fields.
Workflow for creating accessible PDF forms
UsingAcrobat,you canopenuntaggedand taggedPDFforms,addfillableformfields,adddescriptions to thefields,
set the tab order, add alternate text to form fields, and tag the forms (if they aren’t already tagged). You can also edit
the tags of any tagged PDF form by using the TouchUp Reading Order tool or the tag tree.
1. Design the form for accessibility.
Forms tend to have relatively complex layouts compared to documents that have a simple, single-column structure.
The success that an application has in analyzing and tagging a form depends largely on the original formatting and
layout, and on the types of fields that it uses.
When you design a form, include headings, instructions, and fields in which users are to enter data. At a minimum,
give each field a label. Also add special instructions for fields that need them. Use graphics tools to draw lines and
boxes—don’t use characters, such as underscores and vertical bars, because these text characters can confuse screen
readers.
Adding descriptions to form fields enables screen readers to identify the fields to users. Users hear the description
read aloud when they tab to the field. Write descriptions that are terse but complete. For example, the description
“First name” is appropriate for a first-name field. Don’t use instructions (such as “Enter first name”) as a description.
2. Set and test the tab order of a form.
The tab order for form fields enables people with disabilities to use a keyboard to move from field to field in a logical
order. In PDF forms, you should set the tab order to Use Document Structure. You can test a form’s tab order by using
the following keyboard commands:
• Tab to move focus to the next field
• Shift+Tab to move focus to the previous field
• Spacebar to select options
• Arrow keys to select radio button options or list items
3. Tag the PDF form and correct tagging issues.
If thePDFform isalreadytagged,usetheTouchUpReadingOrdertoolin Acrobattotageachform field.Thistool
also enables you to fix any reading order problems of the text labels for the form fields. For example, you may need
to split merged lines of fields into individual fields.
See also
“Set form-field tabbing order in Acrobat” on page 221
“Edit tags with the TouchUp Reading Order tool” on page 308

305
ADOBE ACROBAT 8 PROFESSIONAL
User Guide
Making existing PDFs accessible
Add tags to an existing PDF
Creating a tagged document directly from an authoring application is the best way to make PDFs accessible.
However, if a PDF was created without tags, you can add them using Add Tags To Document.
1 Open the PDF.
2 Choose Advanced > Accessibility > Add Tags To Document.
After the process is complete, the PDF is tagged and—if any potential problems were encountered—the Add Tags
Report appears in the navigation pane.
Note: TheAddTagsTo Documentcommandremovesanytagsthatwereinthedocumentbeforethecommandwasrun.
About the Add Tags Report
If Acrobat encounters potential problems while running the Adds Tags To Document command, the Add Tags
Reportopensinthenavigationpane.The reportlistspotentialproblemsbypage,providesanavigationallinktoeach
problem, and offers suggestions for fixing them.
You should assess the context of an error before following a particular suggestion for fixing it. For example, the report
might state that an element that has been tagged as a figure requires alternate text to make it accessible. When you
examine the figure in its context on the page, you may decide that the figure is a background design element, not an
illustration that conveys valuable meaning to the user. In the case of a nonessential image, you would change the
Figure tag to a Background tag; in the case of an image intended to convey meaning to the reader, you would add the
missing alternate text.
Note: The Add Tags Report highlights tagging-related problems only, and it is a temporary file that you cannot save. You
can assess other tagging, reading order, and accessibility problems by using Full Check.
See also
“Check accessibility with Full Check” on page 291
TouchUp Reading Order tool overview
The TouchUp Reading Order tool provides the easiest and quickest way to fix reading order and basic tagging
problems. When you select the TouchUp Reading Order tool, a dialog box opens that lets you see overlay highlights
that show the order of page content. Each highlighted region is numbered and highlighted with gray or colored
blocks; the number indicates the region’s placement in the page’s reading order. After you check the reading order of
the page, you can correct other, more subtle tagging issues as needed.
The TouchUp Reading Order tool is intended for repairing PDFs that were tagged using Acrobat, not for repairing
PDFs that were tagged during conversion from an authoring application. Whenever possible, you should return to
thesourcefileandaddaccessibilityfeaturesinthe authoringapplication.Repairing theoriginalfileensuresthat you
don’t have to repeatedly touch up future iterations of the PDF in Acrobat.
You use the TouchUp Reading Order tool to perform the following accessibility tasks:
• Visually check, and then repair, the reading order of page content
• Tag fillable form fields and their labels
• Add alternate text to figures and descriptions to form fields

306
ADOBE ACROBAT 8 PROFESSIONAL
User Guide
• Fix the tagging of simple tables, and prepare complex tables for more advanced manipulation in the logical
structure tree
• Remove nonessential content, such as ornamental page borders, from the logical structure tree
To perform more advanced reading order and tagging tasks—such as fixing complex tables, removing obsolete tags
after you delete pages, and adding alternate text to links—you need to use the Tags tab, which contains an alternate
set of tools and features for manipulating PDF tags. For more information, see “Edit tags with the Tags tab” on
page 316.
Select the TouchUp Reading Order tool
• Do one of the following:
• Choose Advanced > Accessibility > TouchUp Reading Order.
• Choose Tools > Advanced Editing > TouchUp Reading Order Tool.
• Click the TouchUp Reading Order tool button in the Advanced Editing toolbar.
Tips for using the TouchUp Reading Order tool
• Savethedocument(oracopyofit)before youusetheTouchUpReadingOrdertool.Youcan’tuseUndo to reverse
changes made with this tool, so reverting to a saved document is the only way to undo such a change.
• Choose View > Page Display > Single Page, when using the TouchUp Reading Order tool. When you click the
Clear Structure button, Acrobat clears tags from all visible pages—even pages that are only partially visible.
TouchUp Reading Order options
You can select TouchUp Reading Order options from the dialog box, from the pop-up menu that appears when you
right-click/Control-click a highlighted region, or from the Options menu in the Order tab. The TouchUp Reading
Order tool includes the following options:
Tex t Tags the selection as text.
Figure Tags the selection as a figure. Text contained within a figure tag is defined as part of the image and is not read
by screen readers.
Form Field Tags the selection as a form field.
Figure/Caption Tags a selected figure and caption as a single tag. Any text contained in the tag is defined as a caption.
Useful for tagging photos and captions and preventing caption text from being incorrectly added to adjacent text
blocks. Figures may require alternate text.
Heading 1, Heading 2, Heading 3 Tags the selection as a first, second, or third level heading tag. You can convert
heading tags to bookmarks to help users navigate the document.
Table
Tags the selection as a table after the selection is analyzed to determine the location of headings, columns, and rows.
Cell Tags the selection as a table or header cell. Use this option to merge cells that are incorrectly split.
Formula Tags the selection as a formula. Because speech software may handle formula tags differently from normal
text, you may want to add a description using alternate text.
Background Tags the selection as a background element, or artifact, removing the item from the tag tree so that it
doesn’t appear in the reflowed document and isn’t read by screen readers.
Table Inspector Automatically analyzes the selected table into cells and applies the appropriate tags. The table must
be tagged as a table before you can use the Table Inspector command on it.

307
ADOBE ACROBAT 8 PROFESSIONAL
User Guide
Show Page Content Order Shows content elements as highlighted areas that contain numbers to indicate the reading
order. Specify the highlight color by clicking the color swatch.
Show Table Cells Highlights the content of individual table cells. Specify the highlight color by clicking the color
swatch.
Show Tables And Figures Outlines each table and figure with a crossed-out box. The box also indicates whether the
element includes alternate text. Specify the box color by clicking the color swatch.
Clear Page Structure Removes the tagging structure from the page. Use this option to start over and create a new
structure if the existing structure contains too many problems.
Show Order Panel Opens the Order tab to allow you to reorder highlighted content.
Edit Alternate Text Available in the menu that appears when you right-click/Control-click a highlighted figure.
Allows the user to add or edit a text description about the figure properties that is read by a screen reader or other
assistive technology.
Edit Form Field Text Available in the menu that appears when you right-click/Control-click a form field. Allows the
user to add or edit a form field text description that is read by a screen reader or other assistive technology.
Edit Table Summary Available in the menu that appears when you right-click/Control-click a highlighted table.
Allows the user to add or edit a text description about the table properties that is read by a screen reader or other
assistive technology.
Check and correct reading order
You can quickly check the reading order of tagged PDFs by using the TouchUp Reading Order tool. You can also use
this tool to add alternate text to images and correct many types of tagging problems that are outlined in the report
that Acrobat generates when you add tags to a PDF.
Reading-order problems are readily apparent when you use the TouchUp Reading Order tool. Each section of
contiguous page content appears as a separate highlighted region and is numbered according to its placement in the
reading order. Within each region, text is ordered left to right and top to bottom. (You can change this order in the
TouchUp preferences.) If a single highlighted region contains two columns of text or text that won’t flow normally,
divide the region into parts that can be reordered. Because highlighted regions are rectangular, they may overlap
somewhat, especially if their page content is irregularly shaped. Unless page content overlaps or is contained within
two highlighted regions, no reading order problem is indicated. Page content should belong to no more than one
highlighted region.
You can change the reading order of the highlighted regions by moving an item in the Order tab or by dragging it on
the page in the document pane. By reordering highlighted regions on the page, you can make a figure and caption
read at the specific point that they are referenced in the text. By changing the order of a highlighted region, you effec-
tively change the reading order of that item without changing the actual appearance of the PDF.
Check reading order with the TouchUp Reading Order tool
1 Select the TouchUp Reading Order tool.
2 In the TouchUp Reading Order dialog box, select Show Page Content Order.
Note: If highlighted regions don’t appear in the document pane, the document doesn’t contain tags.
3 Optionally, do any of the following:
• To specify a highlight color, click the color swatch, and then click the color you want.
• To highlight tables and figures, and to view alternate text for figures, select Show Tables And Figures.

308
ADOBE ACROBAT 8 PROFESSIONAL
User Guide
4 Check the reading order of text within each highlighted region.
Zooming in can make this step easier.
5 Check the numbered order of all highlighted regions. If consecutive, numbered regions don’t follow one another,
reorder them in the Order tab.
6 Click Show Order Panel, and then select each content entry (in square brackets [ ]) in the Order tab to highlight
that content region in the document pane. Use this method to find numbered regions that you can’t see or locate on
the page.
Change the reading order in the Order tab
1 Select the TouchUp Reading Order tool.
2 In the TouchUp Reading Order dialog box, click Show Order Panel.
3 In the Order tab, navigate to view a list of highlighted regions that appear in the document pane.
4 In the Order tab, drag the tag for a highlighted region to the location you want. As you drag, a line appears to show
potential locations. After you drag an item to a new location, the highlighted regions are renumbered to show the
new reading order. You can select and move multiple, adjacent regions.
Change the reading order by dragging on the page
1 Select the TouchUp Reading Order tool.
2 In the TouchUp Reading Order dialog box, select Show Page Content Order.
3 In the document pane, place the pointer over the number for the highlighted region you want to move, and drag
it to where you want it to be read. The text-insertion pointer shows target locations within the text.
When you release the highlighted region, the location of the text-insertion pointer becomes the dividing line as the
underlying highlighted region is split into two new highlighted regions. All highlighted regions are renumbered to
show the new reading order.
Edit tags with the TouchUp Reading Order tool
You can use the TouchUp Reading Order tool to create tags in untagged PDFs or to add new tags to an existing
structure. However, this manual tagging doesn’t provide the same level of detail to the tagging structure as the Add
Tags To Document command, such as paragraphs, bulleted and numbered lists, line breaks, and hyphens. Before you
clear the existing structure, make sure that manual tagging is your only recourse.
Tag a region
1 Using the TouchUp Reading Order tool, drag within the document pane to select a region of the page that contains
one type of content (for example, a text block).
2 Do one of the following:
• To add more page content to the current selection, Shift-drag.
• To remove page content from the current selection, Ctrl-drag/Command-drag.
3 Click the appropriate button in the TouchUp Reading Order dialog box to specify the tag type.

309
ADOBE ACROBAT 8 PROFESSIONAL
User Guide
Change the tag for a region
If Acrobat tags a page element incorrectly, you can change the tag type for the highlighted region.
1 Select the TouchUp Reading Order tool.
2 In the TouchUp Reading Order dialog box, select Show Page Content Order.
3 To select a highlighted region, do one of the following:
• Drag to select it.
• Click the number of a highlighted region.
4 Click the button for the tag type that you want for the highlighted region.
Add or remove content from a tagged region
The TouchUp Reading Order tool always displays as few highlighted regions as possible. If content within a
highlighted region doesn’t flow properly, you may need to split a region to reorder it. Highlighted regions may also
contain adjacent page content that is unrelated or that requires a different tag type. Page content may become
orphaned from related elements, particularly if the content doesn’t fit within a rectangular shape. Use the TouchUp
Reading Order tool to add or remove content from a region, or to split a region to reorder the content.
1 Select the TouchUp Reading Order tool.
2 In the TouchUp Reading Order dialog box, select Show Page Content Order.
3 In the document pane, select a highlighted region.
4 Do one of the following:
• To add content to the current selection, Shift-click the content you want to add. The pointer changes to include a
plus sign (+).
• To remove content from the current selection, Ctrl-click/Command-click the content you want to remove. The
pointer changes to include a minus sign (-).
5 Click the button for the tag type that you want for the highlighted region.
Split a region into two regions
1 Select the TouchUp Reading Order tool.
2 In the TouchUp Reading Order dialog box, select Show Page Content Order.
3 Inthedocumentpane,dragtoselectasmallportionofcontentneartheboundaryof thefirstregionthatyouwant
to create.
4 Click the Background button in the dialog box. The highlighted region splits into two regions, numbered from
right to left.
5 If you need to correct the reading order, click Show Order Panel, and drag the new highlighted region to the
correct location in the Order tab.
6 Drag to select the first content region you created, including the region you defined as Background, and then set
the tag by clicking a button in the TouchUp Reading Order dialog box.
Apply a heading tag
To help readers navigate a document and find the information they need, make sure that headings are tagged with
the appropriate level to indicate their hierarchy in the content.
1 Select the TouchUp Reading Order tool, and then select the heading text in the PDF.

310
ADOBE ACROBAT 8 PROFESSIONAL
User Guide
2 In the TouchUp Reading Order dialog box, click the button corresponding to the appropriate heading tag (for
example, Heading 1, Heading 2).
After applying heading tags, you can convert the headings to bookmarks to improve navigation. For more infor-
mation, see “Add tagged bookmarks” on page 330.
Remove page elements from the tag structure
When tagging a PDF, Acrobat can’t always distinguish between instructive figures and decorative page elements.
Items that visually enhance page layout, such as decorative borders, lines, or background elements, can add clutter
to the structure layout and should be removed. Therefore, Acrobat may incorrectly tag artifacts or page elements as
figuretags.Youcanremoveartifactsandirrelevantpageelementsfromthe tagstructurebyredefining themwiththe
Background tag or by deleting their tags. If a tagged image in the document doesn’t contain useful or illustrative
information for the user, you can remove the element from the tagging structure so that it isn’t read out loud or
reflowed.
1 Select the TouchUp Reading Order tool.
2 In the TouchUp Reading Order dialog box, select Show Page Content Order and Show Tables And Figures.
3 Remove the page element by doing one of the following:
• In the document pane, select the page element, and then click Background in the dialog box.
• In the Order tab, select the page element, and then press Delete.
Edit tags for figures and tables
You can use the TouchUp Reading Order tool to add and edit tags and alternate text for figures and tables.
Apply a figure tag
You can select an element and define it as a figure by using the TouchUp Reading Order tool. Once you define it as
a figure, you can add alternate text to describe the figure.
1 Using the TouchUp Reading Order tool, select the figure.
2 In the TouchUp Reading Order dialog box, click Figure.
3 In the document pane, right-click/Control-click the region and choose Edit Alternate Text.
4 Enter alternate text, and click OK.
Check and correct figure tags
You can use the TouchUp Reading Order tool to identify and correct tagging results for figures. Determine whether
figures include or require alternate text in order to be read correctly with assistive technologies. Ideally, figure tags
should identify image content that is meaningful to the document as a whole, such as graphs or illustrative photo-
graphs. If background elements that shouldn’t be read are tagged as figures, redefine them as background.
1 Select the TouchUp Reading Order tool, and then click Show Tables And Figures in the dialog box.
2 Do any of the following:
• If a figure isn’t tagged as a figure, select the content region you want, and then click Figure or Figure/Caption in
the dialog box.
• To remove text that was incorrectly combined with a figure, drag to select the text, and click the Text button in the
dialog box.

311
ADOBE ACROBAT 8 PROFESSIONAL
User Guide
• To include a caption that is grouped with the figure, select the figure and caption, and click the Figure/Caption
button in the dialog box.
Check and add alternate text for figures
If you want screen readers to describe graphical elements that illustrate important concepts in a document, you must
provide the description using alternate text. Figures aren’t recognized or read by a screen reader unless you add
alternate text to the tag properties. If you apply alternate text to text elements, only the description, not the actual
text, is read.
1 Select the TouchUp Reading Order tool.
2 Select Show Tables And Figures in the dialog box.
3 Right-click/Control-click the figure, and choose Edit Alternate Text from the pop-up menu.
4 In the Edit Alternate Text dialog box, type a new (or edit an existing) description for the figure, and then click OK.
Edit table tags and tag unrecognized tables
Tables pose a special challenge for screen readers because they present textual or numerical data to be easily refer-
enced visually. Content within table cells can be complex and might contain lists, paragraphs, form fields, or another
table.
For best results when tagging tables, use the application that you created the document with to add tags when you
create the PDF. If a PDF isn’t tagged, you can add tags by using the Add Tags To Document command. Most tables
are properly recognized using this command; however, the command may not recognize a table that lacks clear
borders, headings, columns, and rows. Use the TouchUp Reading Order tool to determine if the table has been
properly recognized and to correct recognition problems. To add specialized formatting to tables and table cells, use
the Tags tab.
You can use the Table Inspector to automatically analyze a table into its components and apply the appropriate tags,
but you may still need to check and correct some of these tags manually. By viewing table tags, you can determine
whether columns, rows, and cells have been correctly identified. Tables that lack well-defined borders and rules are
often tagged incorrectly or contain adjacent page elements. You can correct poorly tagged tables by selecting and
redefining them; you can split combined cells by creating a tag for each cell.
To correct complex tagging problems for tables, you often must use the Tags tab.
1 Select the TouchUp Reading Order tool, and then click Show Tables And Figures.
2 If the table isn’t clearly labeled in the document pane, drag to select the entire table, and then click Table in the
dialog box.
3 Click Show Table Cells to make sure that all cells in the table are defined as individual elements.
4 If cells don’t appear as separate elements, do one of the following:
• If one or more cells are merged, use the TouchUp Reading Order tool to select the area within a single cell, and
then click Cell in the dialog box. Repeat for each merged cell.
• If cells aren’t highlighted, the table might not use standard table formatting. Re-create the table in the authoring
application.
5 If the table contains cells that are intended to span across two or more columns, set ColSpan and RowSpan
attributes for these rows in the tag structure.

312
ADOBE ACROBAT 8 PROFESSIONAL
User Guide
Remove or replace document structure tags
If adding tags to a PDF in Adobe Acrobat results in a tagging structure that is overly complicated or too problematic
to fix, you can use the TouchUp Reading Order tool to remove or replace the current structure. If the document
contains mostly text, you can select a page and then remove headings, tables, and other elements to create a cleaner,
simpler tagging structure.
Acrobat can retag an already tagged document after you first remove all existing tags from the tree.
Remove all tags from a PDF
1 Open the Tags tab (View > Navigation Panels > Tags) and select the root (topmost) tag, Tags.
2 In the Tags tab, choose Options > Delete tag.
Note: The Clear Page Structure command in the TouchUp Reading Order dialog box removes all tags from the currently
visible pages.
Replace the existing tag structure
This procedure works best in pages that contain a single column of text. If the page contains multiple columns, each
column must be selected and tagged individually.
1 Select the TouchUp Reading Order tool.
2 In the document pane, drag to select the entire page. The selection includes both text and nontext elements.
3 Ctrl-drag/Command-drag around nontext page elements—such as figures and captions—to deselect them, until
only text is selected on the page. Click Text in the TouchUp Reading Order dialog box.
4 In the document pane, select a nontext page element, such as a figure and caption, and click the appropriate button
in the dialog box to tag it. Repeat until all page content is tagged.
Add accessible links
With thoughtfully provided links, users can quickly move from one part of a document to another, to related infor-
mation in a different document, or to a website that is relevant to the content.
For URLs to be accessible to screen readers, you must convert them to active links and make sure that they are
correctly tagged in the PDF.
Note: If you tagged the Adobe PDF during conversion from an authoring application, the links and URLs in the
document are probably already active and included in the tag tree so that they are accessible to screen readers. You
probably don’t have to do this task unless you want to add more links.
Acrobat provides several ways to create active links for text, objects, and URLs in a PDF. However, the methods differ
in how they affect the tag tree. The best way to create accessible links is with the Create Link command.
Unlike the other methods for creating links in a tagged PDF (by using the Links tool or the Create From URLs In
Document command), the Create Link command adds all three tags that screen readers require in order to recognize
a link. The other methods create only one of the three tags, meaning that you must manually edit the tag tree to add
the remaining two tags for each link and place these tags in the proper reading order in the tree. Although you must
activate links one by one, using the Create Link command provides the fastest results and the least amount of follow-
up work to make the links accessible to screen readers. All that is left to do is optional editing of the tag tree to add
alternate text to the new links.
Creating links with Acrobat Standard doesn’t generate any tags for the links.

313
ADOBE ACROBAT 8 PROFESSIONAL
User Guide
Do the following to make links active and add them to the tag tree:
1 Select the text or object for which you want to create a link.
2 Right-click/Control-click the selection, and choose Create Link from the context menu.
3 In the Create Link dialog box, select the appropriate options, and then follow the on-screen instructions to specify
a URL, page view, or file as the link target.
By default, the selected text for each link becomes the link text. After you add all the links, you can edit the tag tree
to add alternate text to the links, further improving the accessibility of the PDF.
Set the document language
Setting the document language in a PDF enables some screen readers to switch to the appropriate language. You can
set the document language for an entire document with Acrobat Professional, Acrobat 3D, or Acrobat Standard. You
can set the document language for specific portions of a multilanguage document with Acrobat Professional or
Acrobat 3D.
• To set the language for an entire document, choose File > Properties, and select a language from the Language
menu in the Reading Options area of the Advanced tab.
• To set the language for an entire document to a language not in the Language menu, choose File > Properties, and
enter the ISO 639 code for the language in the Language field in the Reading Options area of the Advanced tab.
For more information, see the ISO Language Codes on http://www.loc.gov/standards.
• Tosetthe languageforindividualsectionsorwords,selectthe appropriatetextelementintheTagstab,andchoose
Properties from the Options menu. In the TouchUp Properties dialog box, select the Tag tab. Select a language
from the Language menu, and click Close.
Note: The language that you specify for an element also applies to all elements nested under it in the logical structure tree.
Prevent security settings from interfering with screen readers
A document author can specify that no part of an accessible PDF is to be copied, printed, extracted, commented on,
or edited. This setting could interfere with a screen reader’s ability to read the document, because screen readers must
be able to copy or extract the document’s text in order to convert it to speech.
To maintain document security while allowing screen readers access to text, use one of the following settings:
• For low-encryption-level security, select Enable Copying Of Text, Images, And Other Content in the Password
Security - Settings dialog box.
• For high-encryption-level security, select Enable Text Access For Screen Reader Devices For The Visually
Impaired in the Password Security - Settings dialog box. This option overrides the document’s security settings
only for the purpose of giving assistive software, such as screen readers, access to the content.
For instructions on how to set document security, see “Set passwords for PDFs” on page 264.
If your assistive technology product is registered with Adobe as a Trusted Agent, you can read PDFs that might be
inaccessible to another assistive technology product. Acrobat recognizes when a screen reader or other product is a
Trusted Agent and overrides security settings that would typically limit access to the content for accessibility
purposes. However, the security settings remain in effect for all other purposes, such as to prevent printing, copying,
extracting, commenting, or editing text.

314
ADOBE ACROBAT 8 PROFESSIONAL
User Guide
About watermarks and screen readers
Youcan addawatermarktoataggedPDFwithoutalsoaddingittothetagtree.Nothavingthewatermarkappearin
the tag tree is helpful for people who are using screen readers, because they won’t hear the watermark read as
document content.
The best way to add a watermark that doesn’t interfere with screen readers is to insert an untagged PDF of the
watermark into a tagged PDF.
See also
“Add and edit watermarks” on page 131
Editing document structure with the Content and Tags
tabs
Correct reflow problems with the Content tab
Use the Content tab to correct reflow problems in a PDF that can’t be corrected by using the TouchUp Reading Order
tool. Because you can damage a PDF by editing content objects, make sure that you’re familiar with PDF structure
before you make any changes. For comprehensive information about PDF structure, see the PDF Reference Fifth
Edition: Adobe Portable Document Format Version 1.6, on the PDF reference page (English only) of the Adobe
website.
TheContent tabprovidesahierarchicalviewoftheobjectsthatmakeupaPDF,includingthe PDFobjectitself.Each
document includes one or more pages, a set of annotations (such as comments and links), and the content objects
for the page, consisting of containers, text, paths, and images. Objects are listed in the order in which they appear on
thepage,similartotagsinthelogicalstructure tree.However,PDFsdon’trequiretagsforyoutovieworchangethe
object structure.
1 Choose View > Navigation Panels > Content.
2 Click the plus sign (+) (Windows) or the triangle (Mac OS) next to the document name to view pages and objects.
3 Move a container or object by selecting it and doing one of the following:
• Drag it to the location you want.
• Choose Cut from the Options menu, select the tag above the location you want to paste the cut tag, and choose
Paste from the Options menu.
Note: Container elements can’t be pasted directly to page elements. To move a container to another page, cut the
container you want to move, select a container on the page you want to move the container to, and choose Paste from
the Options menu. Then, drag the container out one level to the location that you want.
Content tab options
In the Content tab, use the Options menu or right-click/Control-click an object to choose from the following
options:
New Container Adds a new container object at the end of the selected page or container.
Edit Container Dictionary Specifies the dictionary for the container. Errors in this dialog box may damage the PDF.
Available only for containers that include dictionaries.

315
ADOBE ACROBAT 8 PROFESSIONAL
User Guide
Cut Cuts and copies the selected object (not the related page content).
Paste Pastes content directly below the selected object at the same hierarchical level.
Paste Child Pastes content into the selected object as a child content item.
Delete Removes the object (not the related page content) from the document.
Find Content From Selection Searches for the object in the Content tab that contains the object selected in the
document pane.
Find Searches for unmarked (untagged) artifacts, content, comments, and links. Options allow you to search the
page or document, and to add tags to found items.
Create Artifact Defines selected objects as artifacts. Artifacts are not read by a screen reader or by the Read Out Loud
feature. Page numbers, headers, and footers are often best tagged as artifacts.
Remove Artifact Removes the artifact definition from the selected object.
Highlight Content When selected, highlights appear in the document pane around content that relates to a selected
object in the Content tab.
Show Metadata Allows viewing and editing of image or object metadata.
Properties Opens the TouchUp Properties dialog box.
About the Tags tab
The Tags tab allows you to view and edit tags in the logical structure tree, or tags tree, of a PDF. In the Tags tab, tags
appear in a hierarchical order that indicates the reading sequence of the document. The first item in this structure is
the Tags root. All other items are tags and are children of the Tags root. Tags use coded element types that appear in
angle brackets (<>). Each element, including structural elements such as sections and articles, appears in the logical
structure order by type, followed by a title and the element’s content or a description of the content. Structural
elements are typically listed as container—or parent—tags and include several smaller elements—or child tags—
within them.
Note: For more information on logical structures, refer to the PDF Reference Fifth Edition: Adobe Portable Document
Format Version 1.6, on the PDF reference page (English only) of the Adobe website.
Though youcancorrectmosttaggingissuesbyusingtheTouchUpReadingOrdertool,you mustusetheTagstabto
address detailed tagging of tables and substructure items—such as paragraphs, lists, and sections that require
multiple languages. Add tags manually to a document in the Tags tab only as a last resort. First consider using the
Add Tags To Document command.
Important: Operations performed in the Tags tab cannot be undone with the Undo command. Save a backup copy of a
document before you begin work on it in the Tags tab.
View tags in the Tags tab
1 Choose View > Navigation Panels > Tags.
2 Do one of the following:
• Click the plus sign (Windows) or triangle (Mac OS) next to the tags root and tags to expand the section you want.
• Ctrl-click the plus sign (Windows) or Option-click the triangle (Mac OS) next to the Tags root to show all tags in
the logical structure tree.

316
ADOBE ACROBAT 8 PROFESSIONAL
User Guide
Edit tags with the Tags tab
You can edit a tag title, change a tag location, or change the tag type for an element. All page content must be tagged,
marked as an artifact, or removed from the logical structure tree.
Edit a tag title
1 In the Tags tab, expand the section of the logical structure that you want to edit.
2 To edit the title, Select the tag, choose Properties from the Options menu, enter text in the Title box, and click
Close.
Move a tag
1 In the Tags tab, expand the Tags root to view all tags.
2 Select the Tag icon of the element that you want to move.
3 Do one of the following:
• Drag the tag to the location you want. As you drag, a line appears at viable locations.
• ChooseCutfromtheOptionsmenu,andselectthetagthatappearsabovethelocationyouwanttopastethecut
tag. From the Options menu, choose Paste to move the tag to the same level as the selected tag, or choose Paste
Child to move the tag within the selected tag.
Change the element type
1 In the Tags tab, expand the section of the logical structure that you want to change.
2 Select an element and choose Properties from the Options menu.
3 Choose a new element type from the Type menu, and then click Close.
Tags tab options
In the Tags tab, use the Options menu or right-click/Control-click a tag in the logical structure tree to choose from
the following options:
New Tag Creates a new tag in the logical structure tree after the currently selected item. Specify type and title of the
new tag.
Cut Removes the selected tag from its current location and puts it on the clipboard.
Paste Places the tag that’s on the clipboard into the location specified, replacing the selected tag.
Paste Child Places the tag that’s on the clipboard into the location specified, as a child of the selected tag.
Delete Tag Removes the selected tag.
Find Tag From Selection Searches for the tag in the Tags tab that contains the text or object selected in the document
pane.
Create Tag From Selection Creates a new tag in the logical structure tree after the item selected in the document
pane. Specify type and title of the new tag.
Find Searches for artifacts, OCR suspects, and unmarked (untagged) content, comments, links, and annotations.
Options allow you to search the page or document and add tags to found items.
Change Tag To Artifact Changes selected tags to artifacts and removes the tagged content from the structure tree.
Copy Contents To Clipboard Copies all content contained within the selected tags.

317
ADOBE ACROBAT 8 PROFESSIONAL
User Guide
Edit Class Map Allowsyoutoadd,change,anddelete theclass map,orstyledictionary, forthedocument.Classmaps
store attributes that are associated with each element.
Edit Role Map Allows you to add, change, and delete role maps for the document. Role maps allow each document
to contain a uniquely defined tag set. By mapping these custom tags to predefined tags in Acrobat, custom tags are
easier to identify and edit.
Tag Annotations When selected, all new comments and form fields are added to the tag tree after the selected tag
element; existing comments and form fields aren’t added to the tag tree. Highlight and Underline comments are
automatically associated and tagged with the text that they annotate and don’t require this option.
Document Is Tagged PDF Flags the PDF as a tagged document. Deselect to remove the flag.
Important: This option doesn’t necessarily indicate that the PDF conforms to PDF guidelines and should be used
judiciously.
Highlight Content When selected, causes highlights to appear around content in the document pane when you
select the related tag in the Tags tab.
Show Metadata Opens a read-only dialog box that contains reference information about the selected tag.
Properties Opens the TouchUp Properties dialog box.
Add alternate text and supplementary information to tags
Some tagged PDFs might not contain all the information necessary to make the document contents fully accessible.
For example, if you want to make a document available to a screen reader, the PDF should contain alternate text for
figures, language properties for portions of the text that use a different language than the default language for the
document, and expansion text for abbreviations. Designating the appropriate language for different text elements
ensures that the correct characters are used when you repurpose the document and that it is spell-checked with the
correct dictionary.
You can add alternate text and multiple languages to a tag from the Tags tab. (If only one language is required, choose
thelanguagewithFile>Propertiesinstead.)YoucanalsoaddalternatetextbyusingtheTouchUp ReadingOrdertool.
Note: Keep alternate text descriptions as concise as possible.
Add alternate text to links
Screen readers can read the URLs of web links out loud, but adding meaningful alternate text to links can help users
immensely. For example, by adding alternate text you can have a screen reader tell a user to “go to the Acrobat acces-
sibility page of adobe.com” rather than “go to http://www.adobe.com/products/acrobat/solutionsacc.html.”
You add alternate text to the <Link> tag of a link.
Note: You must add alternate text only to tags that don’t have child tags. Adding alternate text to a parent tag prevents
a screen reader from reading any of that tag’s child tags.
1 In the tag tree, select the <Link> tag for the link and choose Options > Properties.
2 In the TouchUp Properties dialog box, select the Tag tab.
3 Type alternate text for the link, and click Close.
Add alternate text for a figure
1 Choose View > Navigation Panels > Tags.
2 Expand the logical structure tree to find and select the <Figure> tag element for the image.

318
ADOBE ACROBAT 8 PROFESSIONAL
User Guide
To find a tag more easily, use the TouchUp Reading Order tool to select the figure—or text near the figure—in the
document pane, and then choose Find Tag From Selection from the Options menu in the Tags tab.
3 Choose Highlight Content from the Options menu in the Tags tab to see a highlighted area in the document that
corresponds to the tag.
4 Choose Properties from the Options menu in the Tags tab.
5 In the TouchUp Properties dialog box, click the Tag tab.
6 For Alternate Text, type text that describes the figure.
Add alternate text for an abbreviated term
1 In the Tags panel, locate the abbreviated term by doing one of the following:
• Expand the tag tree as needed to see the elements that contain the abbreviation.
• Use the TouchUp Text tool or the Select tool to select the abbreviation in the document, and then choose Find Tag
From Selection from the Options menu to locate the text in the tag tree.
2 Select the tag for that element, and choose Properties from the Options menu.
Note: If the abbreviation includes additional text, cut the additional text and place it in a new <Span> child tag within
the same <Span> parent tag.
3 In the TouchUp Properties dialog box, select the Tag tab.
4 For Alternate Text, type the unabbreviated version of the term.
5 Click Close.
Create a new child tag
1 IntheTagstab,selectthe parent node (the iconlocatedatthe same levelatwhichyouwanttocreateachildtag)
in the Tags tree for which you want to create a child tag.
2 Choose New Tag from the Options menu.
3 Select the appropriate tag type from the Type pop-up menu, or type a custom tag type, name the tag (optional),
and then click OK.
Add tags to comments
When you tag a PDF that includes comments, the comments are tagged as well. However, if you add comments to a
PDF that’s already tagged, your comments are untagged unless you enable comment tagging first.
Note: To Enable comment tagging in a PDF, in the Tags tab, choose Tag Annotations from the Options menu. Comments
or markups that you add to the PDF are tagged automatically.
If a document contains untagged comments, you can locate them in the logical structure tree and tag them by using
the Find command in the Tags tab.
1 In the Tags tab, choose Find from the Options menu.
2 In the Find Element dialog box, choose Unmarked Comments from the Find pop-up menu, and click Find.
3 When the comment type appears in the Type field (for example, Text), click Tag Element, choose Annotation from
the Type pop-up menu in the New Tag dialog box, and then click OK.
4 In the Find Element dialog box, click Find Next to locate and tag all comments, and then click Close.

319
ADOBE ACROBAT 8 PROFESSIONAL
User Guide
Correct table tags with the Tags tab
Use the TouchUp Reading Order tool to make sure that tables are tagged correctly. If you need to structure figures
and text within the cells of your table, you may prefer to re-create the table in the authoring application before you
convert it as an accessible PDF. Adding tags on a cell level in Acrobat is a labor-intensive procedure.
Before you make any changes to table elements, use the TouchUp Reading Order tool to determine that the table is
tagged correctly.
Check table elements
1 In the Tags tab, expand the tags root to view a table tag.
2 Select the table tag <Table> and verify that it contains one of the following elements:
• Table Rows, each of which contains Table Header <TH> or Table Data <TD> cells.
• <THead>, <TBody>, and <TFoot> sections, each of which contains Table Rows. (The Table Rows contain <TH>
cells, <TD> cells, or both.)
3 Do one or more of the following:
• If the tag for the table doesn’t contain these elements, but rows, columns, and cells appear in the table in the
document pane, use the TouchUp Reading Order tool to select and define the table or individual cells.
• If the table contains rows that span two or more columns, set ColSpan and RowSpan attributes for these rows in
the tag structure.
• Re-create the table in the authoring application, and then convert it to a tagged PDF.
Set ColSpan and RowSpan attributes
1 In the Tags tab, select a <TD> or <TH> element.
2 Choose Properties from the Options menu.
3 In the TouchUp Properties dialog box, click the Tag tab, and then click Edit Attribute Objects.
4 Select Attribute Objects, and then click New Item to create a new Attribute Object Dictionary.
5 Expand the new dictionary, select the Layout attribute, and then click Change Item.
6 Change the Layout value to Table.
7 Select the Attribute Object Dictionary, and click New Item.
8 In the Add Key And Value dialog box, type ColSpan or RowSpan in the Key box, enter the number of columns
or rows spanned in the Value box, choose Integer from the Value Type pop-up menu, and click OK.
Standard PDF tags
This section describes the standard tag types that apply to tagged PDFs. These standard tags provide assistive
software and devices with a base set of semantic and structural elements to use in interpreting document structure
and presenting content to a user in a useful manner.
The PDF tags architecture is extensible, so any PDF document can contain any tag set that an authoring application
decides to use. For instance, a PDF might have XML tags that came in from an XML schema. Any custom tags that
you define (such as tag names that were generated from paragraph styles from an authoring application) should have
a role map that matches each custom tag to one of the standard tags here. When assistive software encounters a
custom tag,thesoftwarecanrefertothisrolemapandproperlyinterpret thetags. TaggingPDFsbyusing oneofthe
methods described in this guide generally produces a correct role map for the document.

320
ADOBE ACROBAT 8 PROFESSIONAL
User Guide
Note: You can view and edit the role map of a PDF by choosing Options > Edit Role Map in the Tags tab.
ThestandardAdobeelementtag typesareavailableinthe NewTag dialog boxand intheTouchUpProperties dialog
box in Acrobat Professional or Acrobat 3D. Adobe strongly encourages using these tag types, because they provide
the best results when tagged content must be converted to a different format, such as HTML, Microsoft Word, or an
accessible text format for use by other types of assistive technology.
Block-level elements are page elements that consist of text laid out in paragraph-like forms. Block-level elements are
part of a document’s logical structure. Such elements are further classified as container elements, heading and
paragraph elements, label and list elements, special text elements, and table elements.
Container elements
Container elements are the highest level of element and provide hierarchical grouping for other block-level elements.
Document Document element. The root element of a document’s tag tree.
Part Part element. A large division of a document; may group smaller units of content together, such as division
elements, article elements, or section elements.
Div Division element. A generic block-level element or group of block-level elements.
Art Article element. A self-contained body of text considered to be a single narrative.
Sect Section element. A general container element type, comparable to Division (DIV Class=“Sect”) in HTML,
which is usually a component of a part element or an article element.
Heading and paragraph elements
Heading and paragraph elements are paragraph-like, block-level elements that include specific level heading and
generic paragraph (P ) tags. A heading (H) element should appear as the first child of any higher-level division. Six
levels of headings (H1 to H6) are available for applications that don’t hierarchically nest sections.
Label and list elements
Label and list elements are block-level elements used for structuring lists.
L List element. Any sequence of items of similar meaning or other relevance; immediate child elements should be
list item elements.
LI List item element. Any one member of a list; may have a label element (optional) and a list body element
(required) as a child.
LBL
Label element. A bullet, name, or number that identifies and distinguishes an element from others in the same list.
LBody List body element. The descriptive content of a list item.
Special text elements
Special text elements identify text that isn’t used as a generic paragraph (P).
BlockQuote Block quote element. One or more paragraphs of text attributed to someone other than the author of
the immediate surrounding text.
Caption Caption element. A brief portion of text that describes a table or a figure.
Index Index element. A sequence of entries that contain identifying text and reference elements that point out the
occurrence of the text in the main body of the document.
TOC Table of contents element. An element that contains a structured list of items and labels identifying those items;
has its own discrete hierarchy.

321
ADOBE ACROBAT 8 PROFESSIONAL
User Guide
TOCI Table of contents item element. An item contained in a list associated with a table of contents element.
Table elements
Table elements are special elements for structuring tables.
Table Table element. A two-dimensional arrangement of data or text cells that contains table row elements as child
elements and may have a caption element as its first or last child element.
TR Table row element. One row of headings or data in a table; may contain table header cell elements and table data
cell elements.
TD Table data cell element. A table cell that contains nonheader data.
TH Table header cell element. A table cell that contains header text or data describing one or more rows or columns
of a table.
Inline-level elements
Inline-level elements identify a span of text that has specific formatting or behavior. They are differentiated from
block-level elements. Inline-level elements may be contained in or contain block-level elements.
BibEntry Bibliography entry element. A description of where some cited information may be found.
Quote
Quote entry element. An inline portion of text that is attributed to someone other than the author of the text
surrounding it; different from a block quote, which is a whole paragraph or multiple paragraphs, as opposed to inline text.
Span Span entry element. Any inline segment of text; commonly used to delimit text that is associated with a set of
styling properties.
Special inline-level elements
Similar to inline-level elements, special inline-level elements describe an inline portion of text that has special
formatting or behavior.
Code Code entry element. Computer program text embedded within a document.
Figure Figure entry element. A graphic or graphic representation associated with text.
Form Form entry element. A PDF form annotation that can be or has been filled out.
Formula Formula entry element. A mathematical formula.
Link Link entry element. A hypertext link that is embedded within a document. The target can be in the same
document, in another PDF document, or on a website.
Note Note entry element. Explanatory text or documentation, such as a footnote or endnote, that is referred to in
the main body of text.
Reference Reference entry element. A citation to text or data that is found elsewhere in the document.

322
Chapter 11: Editing PDFs
It’safactthatAdobe PDFisunlikeotherdocument formats,inwhichyou canfreelycopy, paste,andmovetextand
images on a page. Instead, consider a PDF as a snapshot of your original file. Use Adobe Acrobat to touch up and
enhance the file for readability and distribution, and reserve more substantial revisions for your source application.
Quickstart
The following topics provide quick steps to some common PDF editing tasks.
Add a bookmark
You can add navigation to a PDF with bookmarks.
1 Open to the desired page and adjust the view settings.
2 (Optional) To bookmark text, select the desired text.
3 Click the Bookmarks button in the navigation pane, and choose New Bookmark from the Options menu.
4 Type or edit the bookmark name.
You can also add bookmarks to specific portions of a page, such as an image or a table, or to another PDF.
See also
“Create a bookmark” on page 327
Add a link
Links take you to other locations in the same document, to other documents, or to websites. They can also trigger
actions, such as playing a sound or movie file or submitting a form.
1 Choose Tools > Advanced Editing > Link Tool.
2 Drag a rectangle where you want to create a link.
3 In the Create Link dialog box, choose the desired link appearance and action.
4 Follow the on-screen instructions to create the link.
See also
“Create a link” on page 331
Attach files to a PDF
You can attach many types of files to a PDF.
1 Choose Document > Attach A File.
2 Select the file you want to attach, and click Open.

323
ADOBE ACROBAT 8 PROFESSIONAL
User Guide
3 (Optional) To add a description to distinguish the file from similar attachments, select the file in the Attachment
panel, and choose Options > Edit Description.
You can also collect files into a PDF package or merge files into a single PDF.
See also
“Add an attachment” on page 334
Optimize a PDF
Reduce file size by removing embedded fonts, compressing images, and removing unneeded items from a PDF.
1 Choose Advanced > PDF Optimizer.
2 Choose an option from the Make Compatible With menu.
3 Select an item on the left, and then specify settings. For example, select Images, and then set compression for color,
grayscale, and monochrome images.
4 Specify a filename and location, and click Save.
Some compression methods may make images unusable in a print production workflow.
See also
“PDF Optimizer” on page 343
Edit text
You can add or replace small amounts of text in a PDF if the font is installed on the system. Otherwise, you can edit
text attributes only. For extensive changes, edit the original document from which the PDF was created.
1 Choose Tools > Advanced Editing > TouchUp Text Tool.
2 Select the text you want to edit.
3 Type to replace text, or press Delete to remove text.
If you cannot edit text, the document may have security restrictions.
See also
“Edit text” on page 348
Format text
You can change text attributes such as font and font size, color, character and word spacing, baseline offset, and
horizontal scaling.
1 Choose Tools > Advanced Editing > TouchUp Text Tool.
2 Click in the text you want to edit, and then right-click/Control-click and choose Properties.
3 Change text attributes as desired.
If the necessary font is installed on the system, you can also use the TouchUp Text tool to edit the text.

324
ADOBE ACROBAT 8 PROFESSIONAL
User Guide
See also
“Edit text” on page 348
Edit an image
You can change the size, location, and properties of an image in a PDF.
1 Choose Tools > Advanced Editing > TouchUp Object Tool.
2 Select the desired image, and do one of the following:
• To change image properties or edit the image, right-click/Control-click and choose the relevant command.
• To move the image, drag it to a new location on the page.
• To resize the image, drag one of the image handles.
See also
“Move or edit an object” on page 351
View object metadata
You can view the metadata information of certain images, tags, and objects. Do one of the following:
• For an object, choose Tools > Advanced Editing > TouchUp Object Tool. Right-click/Control-click the object, and
choose Show Metadata. (If the command isn’t available, the object has no metadata.)
• For a Visio object, choose Tools > Object Data > Object Data Tool. Double-click the object to view its metadata in
the Model Tree.
See also
“View object data and metadata” on page 358
View content on layers
To view information stored on different layers of a PDF, use the Layers panel.
1 Click the Layers button in the navigation pane.
2 Click the eye icon to hide a layer’s content. Click the empty box to show a layer’s content.
To save a different view of a layered PDF, you must change the default state of the layers in the Layer Properties dialog box.
See also
“Show or hide layers” on page 360
Page thumbnails and bookmarks
About page thumbnails
Page thumbnails are miniature previews of the pages in a document. You can use page thumbnails in Acrobat to jump
quickly to a selected page or to adjust the view of the page.
325
ADOBE ACROBAT 8 PROFESSIONAL
User Guide
When you move, copy, or delete a page thumbnail, you actually move, copy, or delete the corresponding page.
Create page thumbnails
Becausepagethumbnailsincreasefilesize,they arenotautomaticallycreated.Afteryoucreatepagethumbnails, you
can embed them in the PDF. Embedding prevents the page thumbnails from redrawing each time you click the Pages
button, often a time-consuming process. Embedded page thumbnails won’t reflect changes that you make to
document pages until you unembed the page thumbnails.
Both Acrobat Distiller and the batch processing feature in Acrobat provide alternate methods of embedding page
thumbnails.
See also
“Run a predefined batch sequence” on page 364
“PostScript options” on page 434
Create page thumbnails
❖ Click the Pages button on the left.
Page thumbnails appear in the navigation pane. This process may require several seconds, particularly in larger
documents. The drawing of page thumbnails may pause if you interact with the application during this process.
326
ADOBE ACROBAT 8 PROFESSIONAL
User Guide
Resize page thumbnails
❖ In the Pages panel, choose Reduce Page Thumbnails or Enlarge Page Thumbnails from the Options menu.
Embed or unembed page thumbnails in a PDF
❖ In the Pages panel, choose Embed All Page Thumbnails or Remove Embedded Page Thumbnails from the Options
menu.
Embed or unembed page thumbnails in a PDF package
1 Choose Advanced > Document Processing > Batch Processing.
2 Do one of the following:
• To embed page thumbnails, click Embed Page Thumbnails, and then click Run Sequence. Follow the instructions
provided.
• To unembed page thumbnails, click New Sequence, and set up a new batch processing operation to remove the
embedded page thumbnails.
Define the tabbing order
InthePagespanel,youcansettheorderinwhichausertabsthrough formfields,links, andcommentsforeachpage.
1 Click the Pages button on the left.
2 Select a page thumbnail, and choose Page Properties from the Options menu.
3 In the Page Properties dialog box, click Tab Order, and select the tab order:
Use Row Order Moves through rows from left to right, or right to left for pages with a right-to-left binding.
Use Column Order Movesthroughcolumnsfromlefttorightandfromtop tobottom,orrightto leftforpages with
a right-to-left binding.
Use Document Structure Moves in the order specified by the authoring application.
Note: For structured documents—PDFs that were created from desktop publishing applications or that contain tags—
it’s best to select the Use Document Structure option to match the intention of the authoring application.
If the document was created in an earlier version of Acrobat, the tab order is Unspecified by default. With this setting,
form fields are tabbed through first, followed by links and then comments ordered by row.
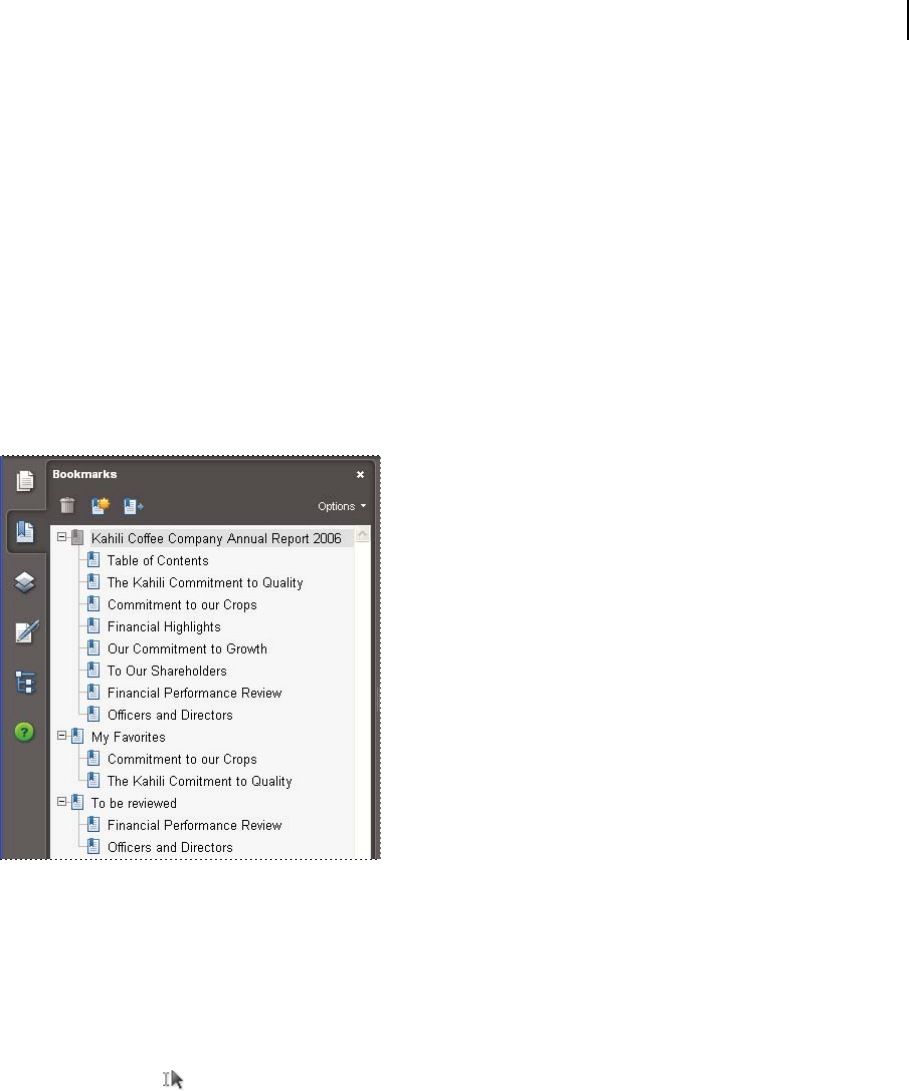
327
ADOBE ACROBAT 8 PROFESSIONAL
User Guide
About bookmarks
A bookmark is a type of link with representative text in the Bookmarks panel in the navigation pane. Each bookmark
goes to a different view or page in the document. Bookmarks are generated automatically during PDF creation from
the table-of-contents entries of documents created by most desktop publishing programs. These bookmarks are
often tagged and can be used to make edits in the PDF.
Initially, a bookmark displays the page that was in view when the bookmark was created, which is the bookmark’s
destination. Although you can set bookmark destinations as you create each bookmark, it is sometimes easier to
create a group of bookmarks, and then set the destinations later.
You can use bookmarks to mark a place in the PDF to which you want to return, or to jump to a destination in the
PDF, another document, or a web page. Bookmarks can also perform actions, such as executing a menu item or
submitting a form.
Note: A user can add bookmarks to a document only if the security settings allow it.
Bookmarks act as a table of contents for some PDFs.
See also
“About tags, accessibility, reading order, and reflow” on page 289
Create a bookmark
1 Open the page where you want the bookmark to link to, and adjust the view settings.
2 Use the Select tool to create the bookmark:
• To bookmark a single image, click in the image, or drag a rectangle around the image.
• To bookmark a portion of an image, Ctrl-drag/drag a rectangle around the portion.
• To bookmark selected text, drag to select it. The selected text becomes the label of the new bookmark. You can
edit the label.
3 ClicktheBookmarksbutton, andselectthebookmark underwhichyouwanttoplacethenewbookmark.Ifyou
don’t select a bookmark, the new bookmark is automatically added at the end of the list.
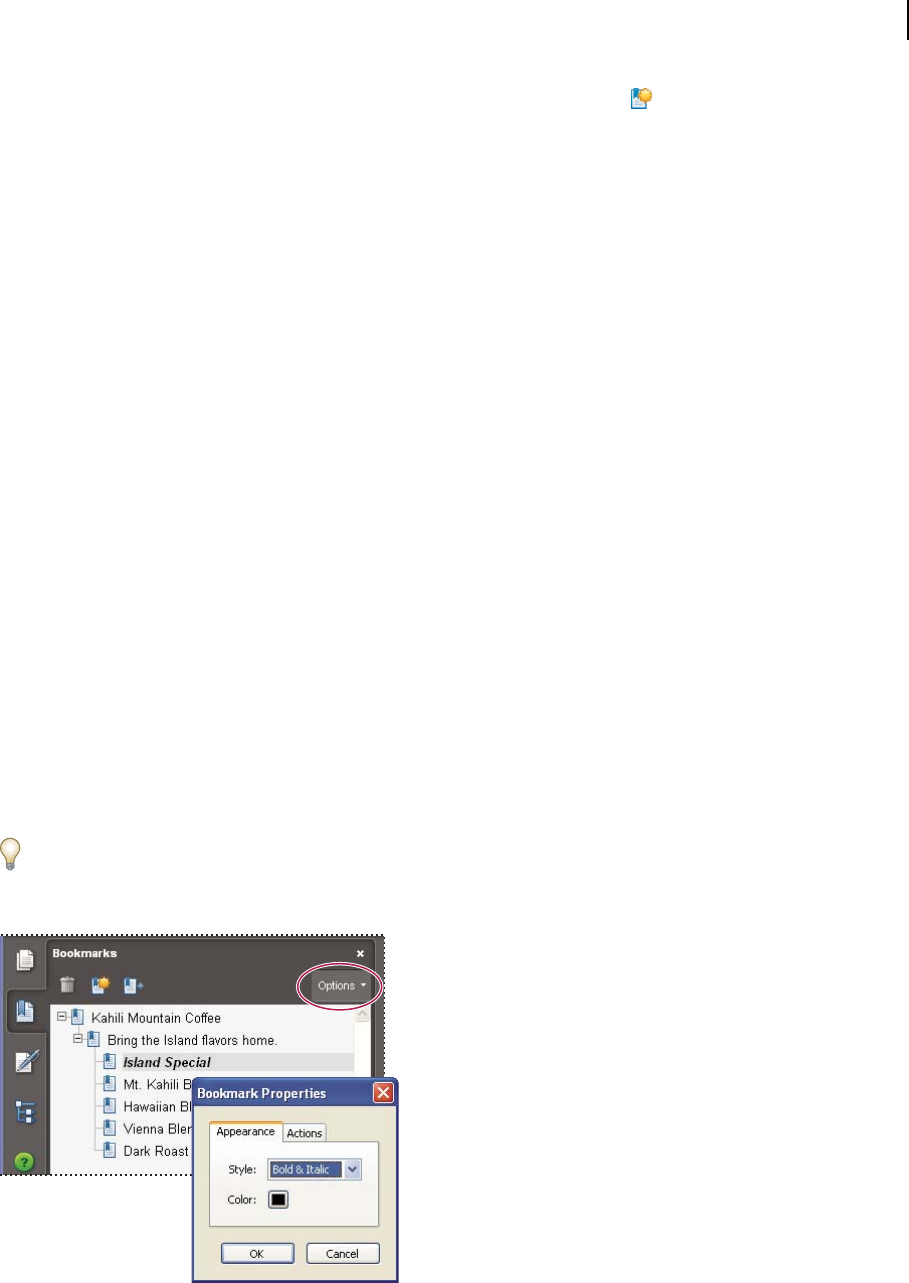
328
ADOBE ACROBAT 8 PROFESSIONAL
User Guide
4 ChooseNewBookmarkfromtheOptionsmenu,orclicktheNewBookmarkicon atthetopoftheBookmarks
panel.
5 Type or edit the name of the new bookmark, and press Enter/Return.
Edit a bookmark
You can change a bookmark’s attributes at any time.
See also
“Action types” on page 337
Rename a bookmark
❖ Select the bookmark in the Bookmarks panel, choose Rename Bookmark in the Options menu, and type the new
bookmark name.
Wrap text in a long bookmark
❖ Click the Bookmarks button, and choose Wrap Long Bookmarks from the Options menu.
All the text of long bookmarks shows regardless of the width of the navigation pane. (This option is on when
checked, and off when not checked.)
Change the text appearance of a bookmark
You can change the appearance of a bookmark to draw attention to it.
1 In the Bookmarks panel, select one or more bookmarks.
2 Change the color and style of the text by doing one of the following:
• Choose View > Toolbars > Properties Bar to open the Properties toolbar.
• Right-click/Control-click the bookmark, and select Properties. Click the Appearance tab.
After you have defined a bookmark’s appearance, you can reuse the appearance settings by selecting the bookmark
and choosing the Use Current Appearance As New Default command from the bookmark’s context menu.
3 To change the font size, click the Options menu, and choose Text Size > [size].
Set a bookmark’s appearance in the Bookmark Properties dialog box.
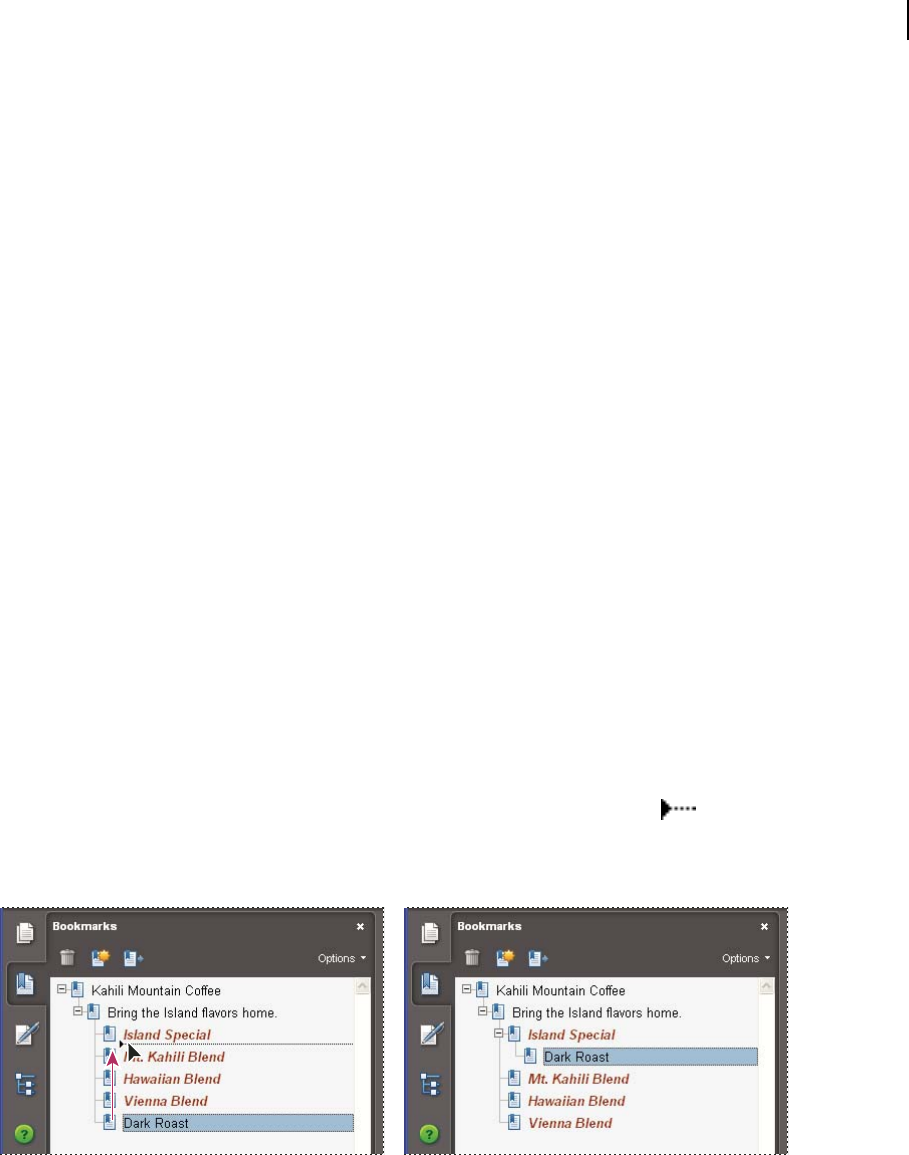
329
ADOBE ACROBAT 8 PROFESSIONAL
User Guide
Change a bookmark’s destination
1 Click the Bookmarks button, and select the bookmark.
2 In the document pane, move to the location you want to specify as the new destination.
3 If necessary, adjust the view magnification.
4 Choose Set Bookmark Destination in the Options menu.
Add an action to a bookmark
1 Click the Bookmarks button.
2 Right-click/Control-click a bookmark, and choose Properties.
3 In the Bookmark Properties dialog box, click Actions.
4 Choose an action from the Select Action menu, and click Add.
Delete a bookmark
1 Click the Bookmarks button, and select the bookmark or range of bookmarks you want to delete.
2 Choose Delete Bookmark(s) in the Options menu.
Important: Deleting a bookmark deletes any bookmarks that are subordinate to it. Deleting a bookmark does not delete
any document text.
Create a bookmark hierarchy
You can nest a list of bookmarks to show a relationship between topics. Nesting creates a parent/child relationship.
You can expand and collapse this hierarchical list as desired.
Nest one or more bookmarks
1 Select the bookmark or range of bookmarks you want to nest.
2 Drag the icon or icons directly underneath the parent bookmark icon. The Line icon shows the position of
the icon or icons.
The bookmark is nested; however, the actual page remains in its original location in the document.
Nesting a bookmark (left), and the result (right)
Move bookmarks out of a nested position
1 Select the bookmark or range of bookmarks you want to move.
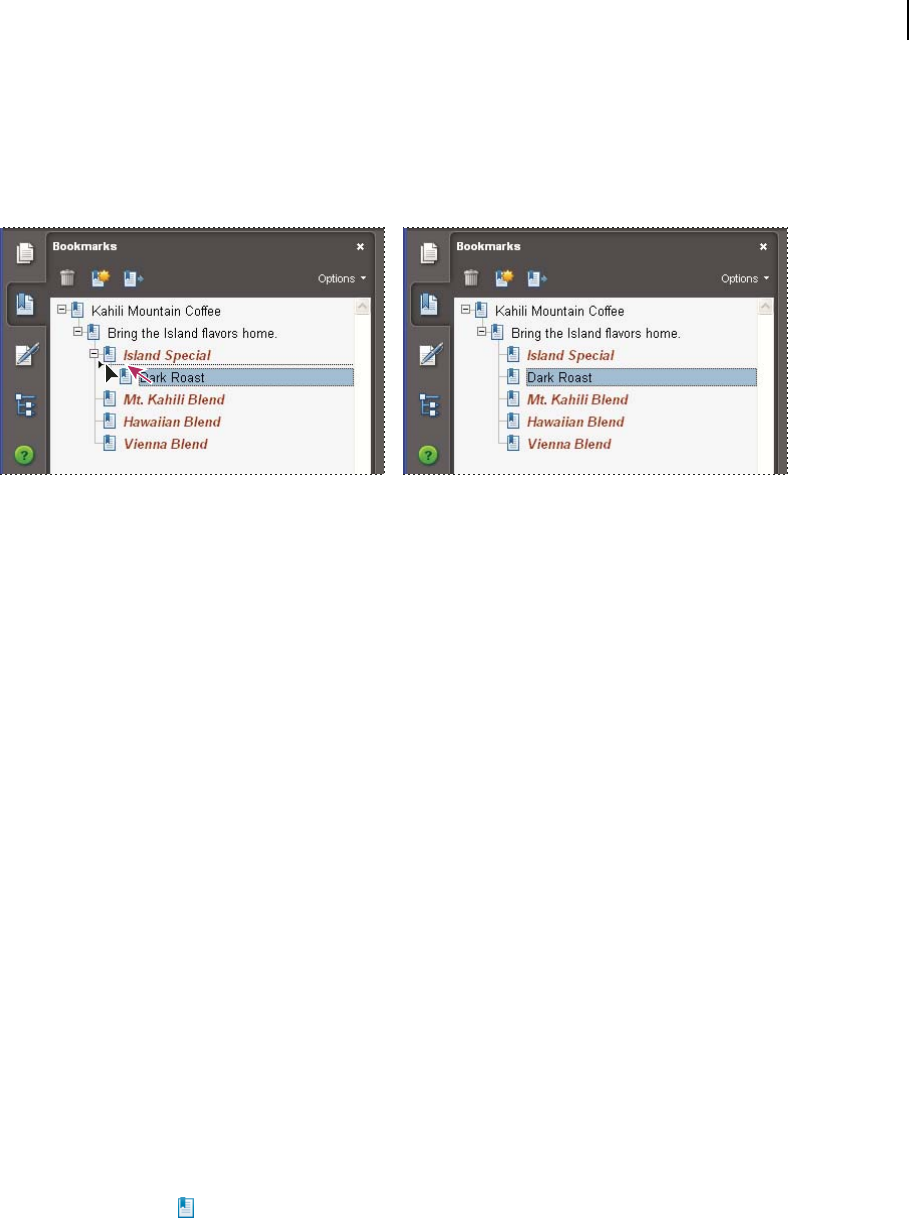
330
ADOBE ACROBAT 8 PROFESSIONAL
User Guide
2 Move the selection by doing one of the following:
• Drag the icon or icons, positioning the arrow directly under the label of the parent bookmark.
• Choose Cut from the Options menu, select the parent bookmark, and then choose Paste Under Selected
Bookmark from the Options menu.
Moving a bookmark out of its nested position (left), and the result (right)
Expand or collapse a bookmark
Do one of the following:
• Click the plus sign (+) or horizontal triangle next to the bookmark icon to show any children. Click the minus sign
(-) or inverted triangle to collapse the list again.
• Select the bookmark, and choose Expand Current Bookmark from the Options menu.
Expand or collapse all top-level bookmarks
❖ From the Options menu, choose Expand Top-Level Bookmarks or Collapse Top-Level Bookmarks.
Add tagged bookmarks
Tagged bookmarks give you greater control over page content than do regular bookmarks. Because tagged
bookmarks use the underlying structural information of the document elements (for example, heading levels,
paragraphs, table titles), you can use them to edit the document, such as rearranging their corresponding pages in
the PDF, or deleting pages. If you move or delete a parent tagged bookmark, its children tagged bookmarks are
moved or deleted along with it.
Many desktop publishing applications, such as Adobe InDesign and Microsoft Word, create structured documents.
When you convert these documents to PDF, the structure is converted to tags, which support the addition of tagged
bookmarks. Converted web pages typically include tagged bookmarks.
If your document doesn’t include tags, you can always add them in Acrobat.
1 Click the Bookmarks button, and choose New Bookmarks From Structure from the Options menu. (If this option
isn’t available, the document isn’t structured.)
2 Select the structure elements you want specified as tagged bookmarks. Ctrl-click/Command-click to add to the
selection.
The tagged bookmarks are nested under a new, untitled bookmark.
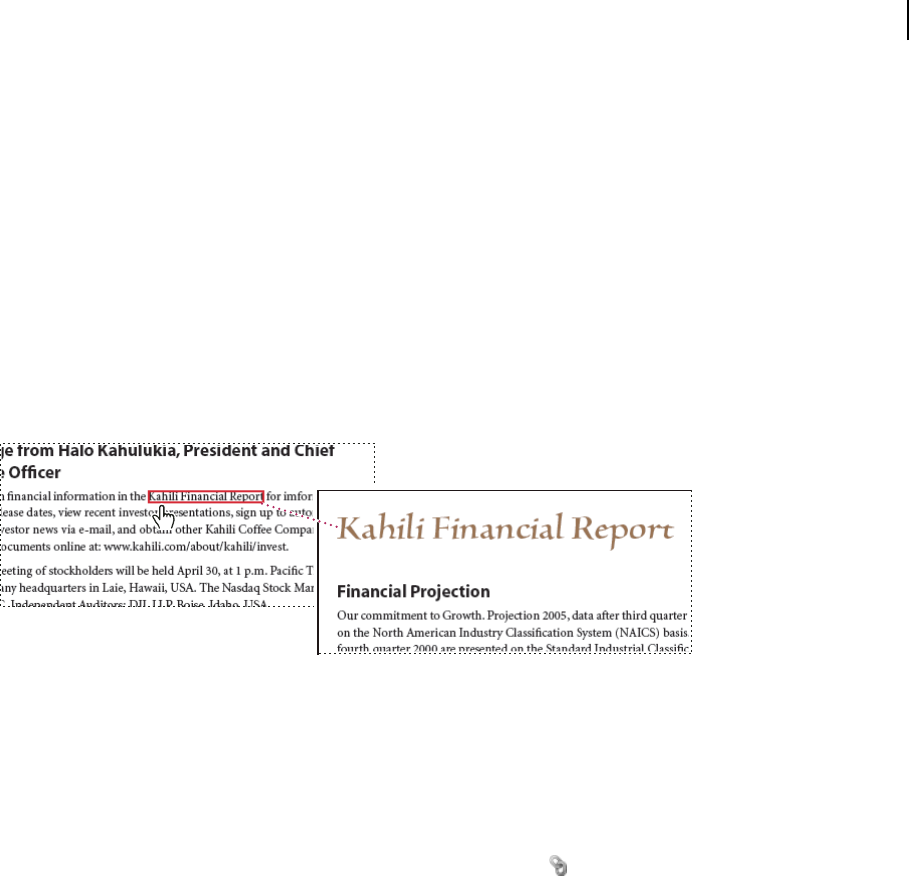
331
ADOBE ACROBAT 8 PROFESSIONAL
User Guide
See also
“Edit tags with the Tags tab” on page 316
“Links and bookmarks in web pages” on page 339
Links and attachments
Create a link
Links let you jump to other locations in the same document, to other electronic documents including attachments,
or to websites. You can use links to initiate actions or to ensure that your reader has immediate access to related infor-
mation. You can also add actions to play a sound or movie file.
Clicking a link jumps to another page, document, or website.
See also
“Movies and sounds” on page 381
“Destinations” on page 333
Create a link using the Link tool
1 Choose Tools > Advanced Editing > Link Tool, or select the Link tool in the Advanced Editing toolbar.
The pointer becomes a cross hair (+), and any existing links in the document, including invisible links, are tempo-
rarily visible.
2 Drag a rectangle where you want to create a link. This is the area in which the link is active.
3 In the Create Link dialog box, choose the options you want for the link appearance.
4 Select one of the following link actions:
Go To A Page View Click Next to set the page number and view magnification you want in the current document or
in another document (such as a file attachment), and then click Set Link.
Open A File Select the destination file and click Select. If the file is a PDF, specify how the document should open
(for example in a new window or within an existing window), and then click OK.
Note: If the filename is too long to fit in the text box, the middle of the name is truncated.
Open A Web Page Provide the URL of the destination web page.
Custom Link Click Next to open the Link Properties dialog box. In this dialog box, you can set any action, such as
reading an article, or executing a menu command, to be associated with the link.

332
ADOBE ACROBAT 8 PROFESSIONAL
User Guide
Create a link using the Select tool or Snapshot tool
1 Using the Select tool or the Snapshot tool (Tools > Select & Zoom), drag to select the text or image from
which you want to create a link.
2 Right-click/Control-click the selection, and choose Create Link.
3 Select the options you want in the Create Link dialog box.
Note: The Custom Link option is not available for links created from selected text.
Edit a link
You can edit a link at any time. You can change its hotspot area or associated link action, delete or resize the link
rectangle, or change the destination of the link. Changing the properties of an existing link affects only the currently
selected link. If a link isn’t selected, the properties will apply to the next link you create.
You can change the properties of several links at once if you drag a rectangle to select them using the Link tool or the
Select Object tool.
Move or resize a link rectangle
1 Select the Link tool or the Select Object tool , and then move the pointer over the link rectangle so that the
handles appear.
2 Do one of the following:
• To move the link rectangle, drag it.
• To resize the link rectangle, drag any corner point.
Change the appearance of a link
1 Select the Link tool and double-click the link rectangle.
2 In the Appearance tab of the Link Properties dialog box, choose a color, line thickness, and line style for the link.
3 Select a highlight style for when the link is selected:
None Doesn’t change the appearance of the link.
Invert Changes the link’s color to its opposite.
Outline Changes the link’s outline color to its opposite.
Inset Creates the appearance of an embossed rectangle.
Note: The Link Type, Color, and Line Style options are not available if Invisible is selected for Appearance.
4 Select Invisible Rectangle for Link Type if you don’t want users to see the link in the PDF. An invisible link is useful
if the link is over an image.
5 Select the Locked option if you want to prevent users from accidentally changing your settings.
6 To test the link, select the Hand tool.
Note: The link properties in the Create Link dialog box apply to all new links that you create until you change the
properties. To reuse the appearance settings for a link, right-click/Control-click the link whose properties you want to use
as the default, and choose Use Current Appearance As New Default.
Edit a link action
1 Select the Link tool and double-click the link rectangle.

333
ADOBE ACROBAT 8 PROFESSIONAL
User Guide
2 In the Actions tab of the Link Properties dialog box, select the listed action you want to change, and click Edit.
Delete a link
1 Select the Link tool or the Select Object tool .
2 Select the link rectangle you want to delete.
3 Choose Edit > Delete, or press the Delete key.
Create web links from URLs
You can automatically create links in a PDF from all URLs or from URLs on selected pages. When selected, the
Create Links From URLs setting in the General preferences generates active links from text in all PDFs that you open.
Create web links
1 Choose Advanced > Document Processing > Create Links From URLs.
2 In the Create Web Links dialog box, select All to create links from all URLs in the document, or select From and
enter a page range to create links on selected pages.
Remove all web links
❖ Choose Advanced > Document Processing > Remove All Links.
Link to a file attachment
You can direct users to a PDF attachment by creating a link in the parent PDF document that jumps to the
attachment.
Note: Don’t confuse file attachments with files that can be opened from a link. Linked documents may be stored in
different locations; file attachments are always saved with the PDF.
1 Open a PDF that contains a PDF file attachment.
2 Go to where you want to create a link. If that location is in the file attachment, click the Attachments button in the
navigation pane, select the file attachment, and click Open.
3 Choose Tools > Advanced Editing > Link Tool, or select the Link tool in the Advanced Editing toolbar.
4 Select the area for the link.
5 In the Create Link dialog box, set the link appearance, select Go To A Page View, and then click Next.
6 Set the page number and view magnification you want, either in the parent PDF document or in the file
attachment, and then click Set Link.
Destinations
A destination is the end point of a link and is represented by text in the Destinations panel. Destinations enable you
to set navigation paths across a collection of PDFs. Linking to a destination is recommended when linking across
documents because, unlike a link to a page, a link to a destination is not affected by the addition or deletion of pages
within the target document.
View and manage destinations
Manage destinations from the Destinations panel in the navigation pane.

334
ADOBE ACROBAT 8 PROFESSIONAL
User Guide
View destinations
❖ Choose View > Navigation Panels > Destinations. All destinations are automatically scanned.
Sort the destinations list
❖ Do one of the following:
• To sort destination names alphabetically, click the Name label at the top of the Destinations panel.
• To sort destinations by page number, click the Page label at the top of the Destinations panel.
Change or delete a destination
❖ In the Destinations panel, right-click/Control-click the destination, and choose a command:
• To move to the target location, choose Go To Destination.
• To delete the destination, choose Delete.
• To reset the target of the destination to the page displayed, choose Set Destination.
• To give the destination a different name, choose Rename.
Create and link a destination
You can create a link to a destination in the same or another PDF.
1 In the target document (destination), choose View > Navigation Panels > Destinations. If the document already
includes a destination that you want to link to, skip to step 5.
2 Navigate to the location where you want to create a destination, and set the desired view.
3 In the Destinations panel, choose New Destination from the Options menu, and name the destination.
4 Save the target document.
5 In the source document (where you want to create the link), choose Tools > Advanced Editing > Link tool , and
drag a rectangle to specify a location for the link.
6 In the Create Link dialog box, set the link appearance, select Go To A Page View, and then click Next.
7 In the target document, in the Destinations panel, double-click the destination.
8 Save the source document.
Add an attachment
YoucanattachPDFsandothertypesoffilestoaPDF.IfyoumovethePDFto anew location,theattachmentsmove
with it. Attachments may include links to or from the parent document or to other attachments.
Don’t confuse attached comments with file attachments. Attached comments appear in the page with the File
Attachment icon or the Speaker icon , and in the Comments List with other comments. (See “Add comments
in a file attachment” on page 180.)
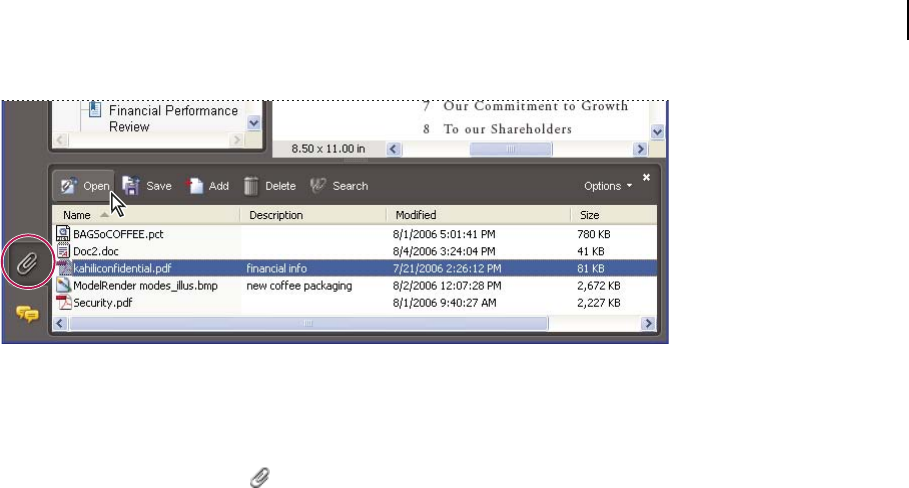
335
ADOBE ACROBAT 8 PROFESSIONAL
User Guide
Use the Attachments panel to add, delete, or view attachments.
1 Add an attachment by doing one of the following:
• Choose Document > Attach A File.
• Click the Attach A File button in the File toolbar.
Note: The Attach A File button doesn’t appear by default. To add it, right-click/Control-click the toolbar background,
choose More Tools, select Attach A File located under File Toolbar, and click OK.
2 In the Add Attachment dialog box, select the file you want to attach, and click Open.
Important: If you try to attach certain file formats (such as EXE, VBS, or ZIP), Acrobat warns you that it won’t open
the file once attached because the format is associated with malicious programs, macros, and viruses that can damage
your computer. To open and save file attachments that you trust, regardless of file format, set your Trust Manager prefer-
ences. See “Restrict URLs and attachments in PDFs” on page 247.
3 To make the attachment viewable in Acrobat 5.0 or earlier, do one of the following:
• Click the Attachments button in the navigation pane, and select Show Attachments By Default from the Options
menu (selected by default).
• Choose File > Properties, click the Initial View tab, choose Attachments Panel And Page from the Show menu,
and click OK.
4 Save the PDF.
5 (Optional) To add a description to the attachment that helps differentiate between similar files in the Attachments
panel, select the attached file, and choose Options > Edit Description. Edit the text of the description, and then save
the file.
Open, save, or delete an attachment
You can open a PDF attachment and make changes to it—if you have permissions—and your changes are applied to
the PDF attachment.
For other types of file attachments, you have an option of opening or saving the file. Opening the file starts the appli-
cation that handles the file format of the attachment—you must have that application to open the attachment. Any
changesyou makearenotappliedtotheattachment.Instead,savechangestothefile,and thenreattachittothePDF
document.
Note: Acrobat requires your approval every time you open or save certain file formats (such as EXE, VBS, or ZIP)
because these formats are associated with malicious programs, macros, and viruses that can damage your computer. To
open and save trusted file attachments without being prompted, set your Trust Manager preferences. See “Restrict URLs
and attachments in PDFs” on page 247.

336
ADOBE ACROBAT 8 PROFESSIONAL
User Guide
Open an attachment
❖ In the Attachments panel, select the attachment, and then click Open or choose Open Attachment from the
Options menu.
Save an attachment
1 In the Attachments panel, select one or more attachments, and click Save or choose Save Attachment from the
Options menu.
If you selected a single attachment, you have the option to rename the file.
2 Specify a location, and then click Save.
Delete an attachment
❖ In the Attachments panel, select an attachment, and click the Delete button or choose Delete Attachment from the
Options menu.
Search in attachments
When searching for specific words or phrases, you can include PDF attachments in the search. Search results from
attachments appear in the Results list beneath the attachment filename and icon. Attachments in other formats are
ignored by the search engine.
Search PDF attachments from the Attachments panel
1 In the Attachments panel, click the Search Attachment button or choose Search Attachments from the
Options menu. The Search PDF window opens.
2 Type the word or phrase that you want to search for, select the results option you want, and then click Search
Attachments.
Search PDF attachments from the Search PDF window
1 Open the Search PDF window by doing one of the following:
• From the Find menu, choose Open Full Acrobat Search.
• Choose Edit > Search.
2 Type the word or phrase that you want to search for, and select the results option you want.
3 Click Use Advanced Search Options at the bottom of the window, and then select Include Attachments.
Actions and scripting
About Actions
You can cause an action to occur when a bookmark or link is clicked, or when a page is viewed. For example, you
can use links and bookmarks to jump to different locations in a document, execute commands from a menu, and
perform other actions. Actions are set in the Properties dialog box.
For bookmarks or links, you specify an action that occurs when the bookmark or link is clicked. For other items,
such as pages, media clips and form fields, you define a trigger that causes the action to occur and then define the
action itself. You can add multiple actions to one trigger.

337
ADOBE ACROBAT 8 PROFESSIONAL
User Guide
TheLockedoptionpreventstheappearanceandactionsassociatedwithanobjectfrombeingaccidentallychanged.
Add an action
1 Do one of the following:
• Using the Hand tool, right-click/Control-click the bookmark or page thumbnail, and choose Properties.
• Using the Select Object tool, double-click the link, media clip, or form field, and choose Properties.
2 Click the Actions tab.
3 From the Select Action menu, select the action type to occur, and then click Add. You can add multiple actions;
actions execute in the order that they appear in the Actions list box.
4 (Optional) Select an action in the Actions tab, and use the buttons to reorder, edit, or delete the action.
5 Close the window to accept the actions.
Add actions with page thumbnails
To enhance the interactive quality of a document, you can specify actions, such as changing the zoom value, to occur
when a page is opened or closed.
1 Click the Pages button on the left.
2 Select the page thumbnail corresponding to the page, and choose Page Properties from the Options menu.
3 Click the Actions tab.
4 FromtheSelectTriggermenu,choosePageOpentoset an actionwhen thepageopens,orchoosePageClose to
set an action when the page closes.
5 Choose an action from the Select Action menu, and click Add.
6 Specify the options for the action, and click OK. The options available depend on the action selected.
7 To create a series of actions, choose another action from the menu, and click Add again. Use the Up and Down
buttons to arrange the actions in the order you want them to occur.
Note: If you set an action that switches to Full Screen view on Page Open or Page Close, the next time the same page
opens or closes, Full Screen view is turned off.
Action types
You can assign the following actions to links, bookmarks, pages, media clips, and form fields:
Execute A Menu Item Executes a specified menu command as the action.
Go To A 3D View Jumps to the specified 3D view.
Go To A Page View Jumps to the specified destination in the current document or in another document.
Import Form Data Brings in form data from another file, and places it in the active form.
Open A File Launches and opens a file. If you are distributing a PDF file with a link to another file, the reader needs
the native application of that linked file to open it successfully. (You may need to add opening preferences for the
target file.)
Open A Web Link Jumps to the specified destination on the Internet. You can use http, ftp, and mailto protocols to
define your link.

338
ADOBE ACROBAT 8 PROFESSIONAL
User Guide
Play A Sound Plays the specified sound file. The sound is embedded into the PDF document in a cross-platform
format that plays in Windows and Mac OS.
Play Media (Acrobat 5 Compatible) Plays the specified QuickTime or AVI movie that was created as Acrobat 5-
compatible. The specified movie must be embedded in a PDF document.
Play Media (Acrobat 6 And Later Compatible) Plays a specified movie that was created as Acrobat 6-compatible. The
specified movie must be embedded in a PDF document.
Read An Article Follows an article thread in the active document or in another PDF document.
Reset A Form Clearspreviouslyentereddatainaform.Youcancontrolthefieldsthatare resetwiththe Select Fields
dialog box.
Run A JavaScript Runs the specified JavaScript.
Set Layer Visibility Determines which layer settings are active. Before you add this action, specify the appropriate
layer settings.
Show/Hide A Field Toggles between showing and hiding a field in a PDF document. This option is especially useful
in form fields. For example, if you want an object to pop up whenever the pointer is over a button, you can set an
action that shows a field on the Mouse Enter trigger and hides a field on Mouse Exit.
Submit A Form Sends the form data to the specified URL.
Trigger types
Triggers determine how actions are activated in media clips, pages, and form fields. For example, you can specify a
movie or sound clip to play when a page is opened or closed. The available options depend on the specified page
element.
You can use the following triggers for media clips and form fields (not links or bookmarks):
Mouse Up When the mouse button is released after a click. This is the most common button trigger, because it gives
the user one last chance to drag the pointer off the button and not activate the action.
Page Visible (media clips only) When the page containing the media clip is visible, regardless of whether it is the
current page. It’s possible for a page to be visible without being the current page, such as when a continuous page
layout displays pages side-by-side.
Page Invisible (media clips only) When the page containing the media clip is moved out of view.
Page Enter (media clips only) When the page containing the media clip becomes the current page.
Page Exit (media clips only) When a user leaves the page that contains the media clip.
Mouse Down When the mouse button is clicked (without being released). In most cases, Mouse Up is the preferred
trigger.
Mouse Enter When the pointer enters the field or play area.
Mouse Exit When the pointer exits the field or play area.
On Receive Focus (media clips only) When the link area receives focus, either through a mouse action or tabbing.
On Lose Focus (media clips only) When the focus moves to a different link area.

339
ADOBE ACROBAT 8 PROFESSIONAL
User Guide
About JavaScript in Acrobat
The JavaScript language was developed by Netscape Communications as a means to create interactive web pages
more easily. Adobe has enhanced JavaScript so that you can easily integrate this level of interactivity into your PDF
documents.
You can invoke JavaScript code using actions associated with bookmarks, links, and pages. The Set Document
Actions command lets you create document-level JavaScript actions that apply to the entire document. For example,
selecting Document Did Save runs the JavaScript after a document is saved.
You can also use JavaScript with PDF forms and batch sequences. The most common uses for JavaScript in forms are
formatting data, calculating data, validating data, and assigning an action. Field-level scripts are associated with a
specific form field or fields, such as a button.This type of script is executed when an event occurs, such as a Mouse
Up action.
To learn how to create JavaScript scripts, download the JavaScript manuals from the Adobe website. Developing
Acrobat® Applications Using JavaScript™ contains background information and tutorials, and the JavaScript™ for
Acrobat® API Reference containsdetailedreferenceinformation.Theseandother JavaScriptresourcesarelocatedon
the Adobe website.
Converted web pages
Links and bookmarks in web pages
You can work with a PDF document created from web pages the same way you work with any other PDF. Depending
on how you configured Acrobat, clicking a link on a converted web page adds the page for that link to the end of the
PDF, if it isn’t already included.
Note: Remember that one web page can become multiple PDF pages. A web page is a single topic (or URL) from a website
and is often one continuous HTML page. When you convert a web page to PDF, it may be divided into multiple
standard-size PDF pages.
When you first create a PDF from web pages, tagged bookmarks are generated if Create Bookmarks is selected in the
Web Page Conversion Settings dialog box. A standard (untagged) bookmark representing the web server appears at
the top of the Bookmarks tab. Under that bookmark is a tagged bookmark for each web page downloaded; the tagged
bookmark’s name comes from the page’s HTML title or the URL, if no title is present. Tagged web bookmarks are
initially all at the same level, but you can rearrange them and nest them in family groups to help keep track of the
hierarchy of material on the web pages.
If Create PDF Tags is selected when you create a PDF from web pages, structure information that corresponds to the
HTML structure of the original pages is stored in the PDF. You can use this information to add tagged bookmarks
to the file for paragraphs and other items that have HTML elements.
See also
“About bookmarks” on page 327
Get information on converted web pages
You can display a dialog box with the current page’s URL, title, date and time downloaded, and other information.
❖ Choose Advanced > Web Capture > Page Info.

340
ADOBE ACROBAT 8 PROFESSIONAL
User Guide
Refresh converted web pages
You can refresh web pages in a PDF to retrieve the most up-to-date version from the website. When you refresh, you
download the entire website or link again and build a new PDF. The resulting new PDF lists any pages where compo-
nents have changed, including text, web links, embedded filenames, and formatting. New pages are downloaded if
they have been added to the site. The changed pages are listed as bookmarks in the Bookmarks panel under a
bookmark labeled New And Changed Pages.
You can refresh web pages only if Save Refresh Commands was selected when the pages were first downloaded.
When you refresh web pages, both the original PDF pages and the refreshed version are retained. To keep an archive
of changes made to a website, save both versions.
1 Choose Advanced > Web Capture > Refresh Pages.
2 Toviewnewand changedpages,selectCreateBookmarksForNewAndChangedPages.Thenspecifythescope
of the updated tagged bookmarks that you want to compare:
Compare Only Page Text To Detect Changed Pages Compares only the text on the pages.
Compare All Page Components To Detect Changed Pages Compares all page components, including text, images,
web links, embedded filenames, and formatting.
3 To not resubmit any previously submitted form data, deselect Resubmit Form Data. Be careful if you have
Resubmit Form Data selected because it can result in duplicate purchases or other submissions. This option is
available only if a form and query results are on the pages.
4 To change which pages are updated by refreshing, select Edit Refresh Commands List, select the URLs you want,
and click OK.
5 Click Refresh.
Compare converted pages with current web pages
❖ To open a page or web link, do one of the following:
• To open the current page in a web browser, choose Advanced > Web Capture > Open Page In Web Browser.
• To open the bookmarked page, right-click/Control-click a tagged bookmark, and choose Open Page In Web
Browser.
• To open a linked page, right-click/Control-click a link in the PDF version of the web page, and choose Open Web
Link In Browser.
The browser opens in a new application window to the page you specify.
Articles
About articles
Many traditional print documents, such as magazines and newspapers, arrange text in multiple columns. Stories flow
from column to column and sometimes across several pages. While the format is effective for printed material, this
type of structure can be difficult to follow on-screen because of the scrolling and zooming required.
The article feature enables you to guide readers through material presented in multiple columns and across a series
of pages.
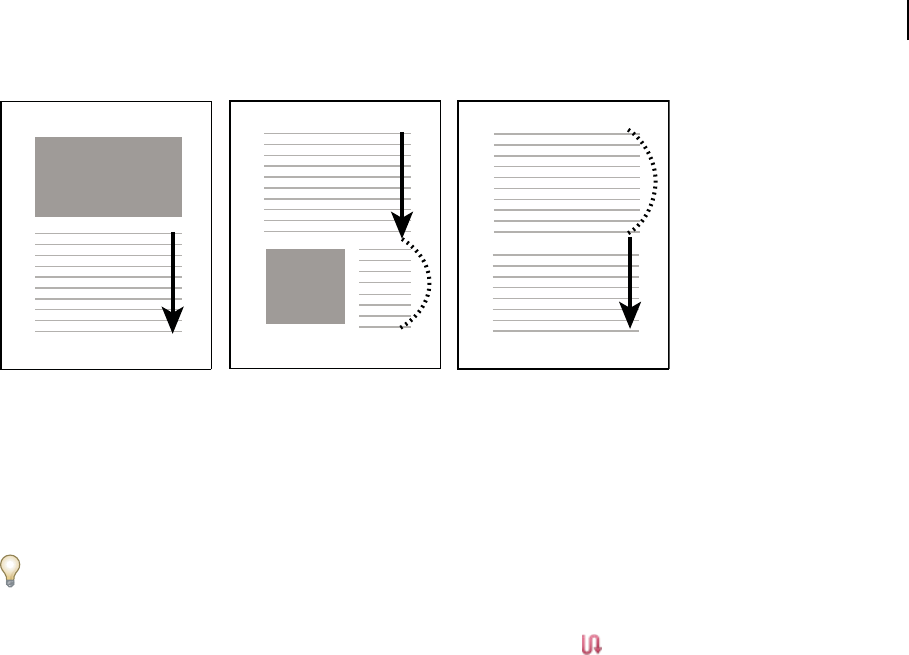
341
ADOBE ACROBAT 8 PROFESSIONAL
User Guide
1
A
3
A
C
2
A
B
The flow of an article thread. The user reads through text A, skips text B and C, and moves on to text A again.
Define articles
Youcreateanarticlebydefiningaseriesofboxesaroundthecontentin theorderin whichyouwantthecontentread.
The navigational path you define for an article is known as the article thread. You create a thread connecting the
various boxes, unifying them into a continuous text flow.
Most desktop publishing programs allow you to generate article threads automatically as you convert the files to
Adobe PDF. If the file you’re viewing has articles, you can show the names of the articles on a tab and navigate easily
through them.
1 Choose Tools > Advanced Editing > Article Tool, or select the Article tool in the Advanced Editing toolbar.
The pointer appears as a cross-hair pointer in the document window.
2 Drag a rectangle to define the first article box. An article box appears around the enclosed text, and the pointer
changes to the article pointer.
Each article box you create has a label that consists of the article number and its sequence within the article. For
example, the first box for the first article is labeled 1-1, the second box 1-2, and so on. The boxes for the second article
in the same document are labeled 2-1, 2-2, 2-3, and so on.
3 Go to the next part of the document you want to include in the article, and draw a rectangle around that text.
Repeat until you have defined the entire article.
Note: To resize or move an article box, you must first end the article.
4 To end the article, press Enter or Return.
5 In the Article Properties dialog box, enter the article title, subject, author, and any keywords to describe the article,
and click OK.
View and edit an article
Use the Article tool to create, display, and make changes to an article box in the PDF document.
View articles on the page
❖ Choose Tools > Advanced Editing > Article Tool.
View articles in the PDF
1 Choose View > Navigation Panels > Articles.
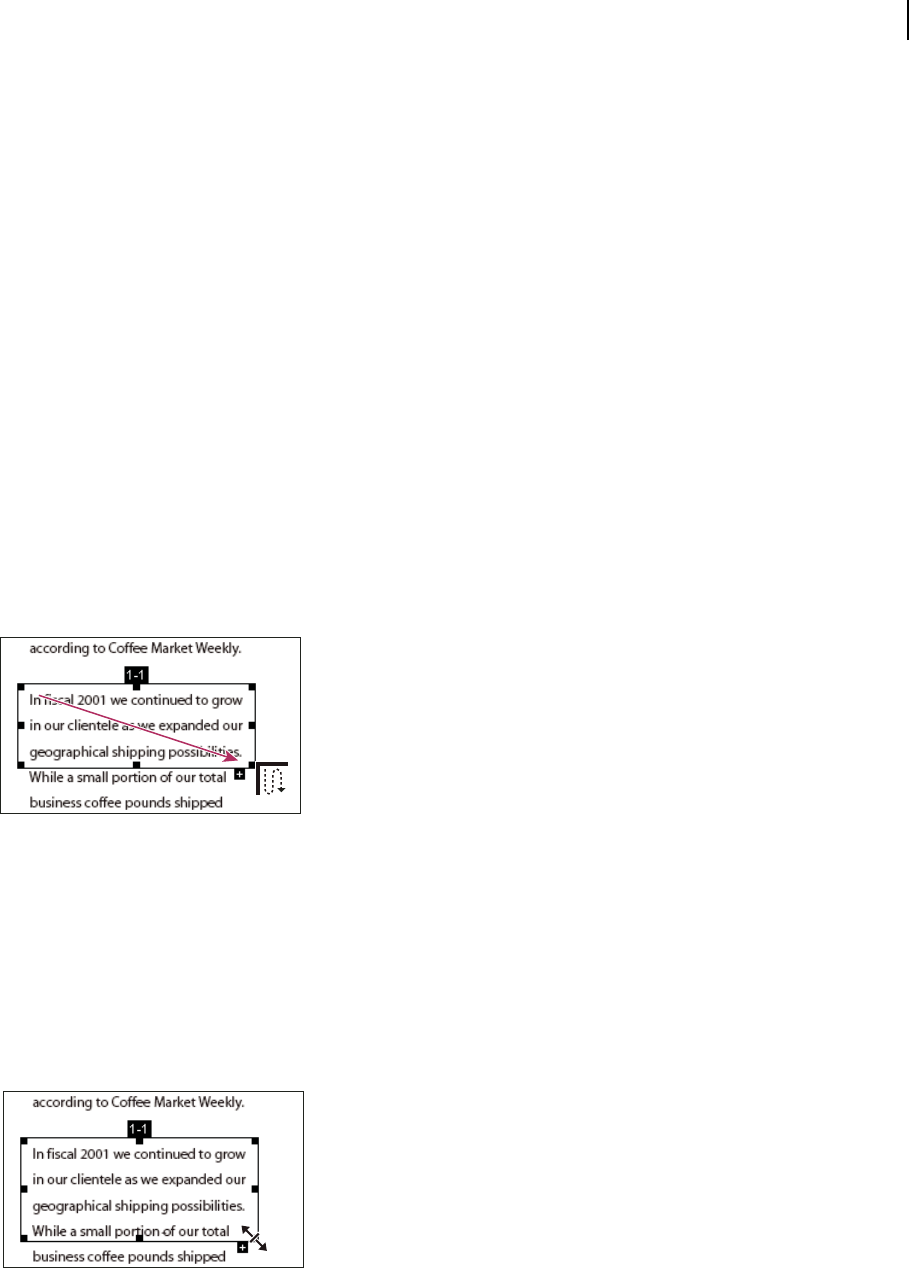
342
ADOBE ACROBAT 8 PROFESSIONAL
User Guide
Note: The Articles panel is a floating panel; it is not docked in the navigation pane by default. Drag the Articles panel to
the navigation pane to dock it with the other panels.
2 To read an article, double-click it, or select the article and choose Read Article from the Options menu in the
Articles panel.
The first line of the article appears in the upper left corner.
3 To hide the Articles panel after the article opens, select Hide After Use in the Options menu of the Articles panel.
Delete an article or article box
❖ In the Articles panel, do one of the following:
• To delete the entire article, select the article in the Articles panel, and press the Delete key.
• To delete only one box from an article, right-click/Control-click the box, and choose Delete. In the warning
message, select Box. If you select Article, the entire article is deleted.
The remaining articles or article boxes are automatically renumbered.
Insert an article box into an article thread
1 In the Articles panel, select the article box that you want the new article box to follow.
2 Click the plus sign (+) at the bottom of the selected box, and click OK when prompted to drag and create a new
article box.
An example of selecting an article with the Article tool
3 Draw a new article box. The new box is inserted into the article flow, and all following boxes are renumbered.
Move or resize an article box
❖ Using the Article tool, select the article box, and do one of the following:
• To move the box, drag it to the new location.
• To resize the box, drag a center handle to change only height or width, or drag a corner handle to change both
dimensions.
An example of resizing an article box

343
ADOBE ACROBAT 8 PROFESSIONAL
User Guide
Edit article properties
1 Using the Article tool, select the article box that you want to edit.
2 Right-click/Control-click the box, and choose Properties.
3 Change the information in the Articles Properties dialog box, and click OK.
Combine two articles
1 In the document pane, select any article box in the article you want to be read first.
2
Selecttheplussign(+)atthebottomofthe articlebox,andclickOKtodismisstheprompttocreateanewarticlebox.
3 Ctrl-click/Option-click an article box you want to be read next. The second article is appended to the end of the
first article. All article boxes in the piece are renumbered automatically.
Optimizing
PDF Optimizer
PDF Optimizer provides many settings for reducing the size of PDF files. Some of the PDF Optimizer settings are
comparable to the settings that are available when you create a PDF file using Distiller. Whether you use all of these
settingsoronly afewdependsonhowyouintendtousethefiles andontheessentialpropertiesafilemusthave.In
most cases, the default settings are appropriate for maximum efficiency—saving space by removing embedded fonts,
compressing images, and removing items from the file that are no longer needed.
Before you optimize a file, it’s a good idea to audit the file’s space usage. The space audit results may give you ideas
aboutwherebest to reducefile size.YoucanalsoreducethesizeofyourPDFbyusing theReduceFileSizecommand.
Important: Some methods of compression may make images unusable in a print production workflow. You should
experiment with various settings before making changes that can’t be discarded.
See also
“Reduce file size by saving” on page 47
Open the PDF Optimizer
❖ To open the PDF Optimizer dialog box, do one of the following:
• Choose Advanced > PDF Optimizer.
• Choose Advanced > Print Production > PDF Optimizer.
• Click the PDF Optimizer icon in the Print Production toolbar.
Note: PDF Optimizer isn’t available when Reflow is selected in the View menu.
Audit the space usage of a PDF
Auditing the space usage gives you a report of the total number of bytes used for specific document elements,
including fonts, images, bookmarks, forms, named destinations, and comments, as well as the total file size. The
results are reported both in bytes and as a percentage of the total file size.
1 Choose Advanced > PDF Optimizer.
2 Click the Audit Space Usage button at the top of the dialog box.

344
ADOBE ACROBAT 8 PROFESSIONAL
User Guide
Optimize a PDF
Note: Optimizing a digitally signed document removes (and invalidates) the digital signatures.
1 Open the PDF Optimizer dialog box.
2 To use the default settings, choose Standard from the Settings menu, and then skip to step 6. If you change any
settings in the PDF Optimizer dialog box, the Settings menu automatically switches to Custom.
3 From the Make Compatible With menu, choose Retain Existing to keep the current PDF version of the file, or
choose a version of Acrobat that you want the PDF to be compatible with. (The options available in panels vary
depending on this choice.)
4 Select the check box next to a panel (for example, Images, Fonts, Transparency), and then select options in that
panel.
5 (Optional) To save your customized settings, click the Save button and name the settings. (You can delete any
saved settings by choosing it in the Settings menu and clicking the Delete button.)
6 When you are finished selecting options, click OK.
7 In the Save Optimized As dialog box, click Save to overwrite the original PDF with the optimized PDF, or select
a new name or location.
To optimize a number of documents at the same time, use the Output options for the Batch Processing command.
See also
“Run a predefined batch sequence” on page 364
PDF Optimizer options
You can reduce the size of a PDF by selecting options from the panels in the PDF Optimizer dialog box.
Images panel
The Images panel of the PDF Optimizer lets you set options for color, grayscale, and monochrome image
compression.
The Images panel of the PDF Optimizer dialog box. You can change the PDF compatibility in this dialog box.

345
ADOBE ACROBAT 8 PROFESSIONAL
User Guide
In the Images panel, you can select the following options:
Downsample Reduces file size by lowering the resolution of images, which involves merging the colors of original
pixels into larger pixels.
Note: Masked images and images with a size less than 16-by-16 pixels are not downsampled.
Compression Reduces file size by eliminating unnecessary pixel data. In general, JPEG and JPEG2000 compression
give better results on images like photographs with gradual transitions from color to color. ZIP is the better choice
for illustrations with large areas of solid, flat color or patterns made up of flat colors. For monochrome images, JBIG2
compression, which is available in PDF Optimizer but not in Distiller, is superior to CCITT.
Quality Can be set only for JPEG and JPEG2000 compression. JPEG and JPEG2000 compression methods are
typically lossy, a process that permanently removes some pixel data. You can apply lossy JPEG or JPEG2000
compression to color images at various levels (minimum, low, medium, high, maximum). For JPEG2000
compression, you can also specify lossless so that no pixel data is removed. Compression for monochrome images is
lossless, except for JBIG2 compression, which provides both lossy and lossless modes of compression.
See also
“Transparency flattening” on page 465
“Edit a flattener preset in the PDF Optimizer” on page 471
“Examine a PDF for hidden content” on page 248
Fonts panel
To ensure an exact match to the source document, you should embed all fonts used in the document. If an exact
match is not needed and you prefer a smaller file, you can choose not to embed fonts for roman text and East Asian
text (Traditional Chinese, Simplified Chinese, Korean, and Japanese). Text in these languages is replaced with a
substitution font when viewed on a system that does not have the original fonts. The Fonts panel of the PDF
Optimizer contains two lists for fonts, fonts that are available for unembedding, and fonts to be unembedded.
Certain fonts aren’t available for unembedding and don’t appear in the Fonts panel. To unembed fonts in a document,
select one or more fonts in the Embedded Fonts list, and click the Unembed button. If you change your mind about
unembedding a font, select it in the list on the right and click the Retain button.
Transparency panel
If your PDF includes artwork that contains transparency, you can use presets in the Transparency panel of PDF
Optimizer to flatten transparency and reduce file size. (Flattening incorporates transparency into corresponding
artwork by sectioning it into vector-based areas and rasterized areas.) PDF Optimizer applies transparency options
to all pages in the document before applying other optimization options.
If you select the Acrobat 4.0 And Later compatibility setting, the Transparency panel is enabled and all transparency
in the file is flattened during optimization. This ensures compatibility with Acrobat 5.0 and earlier, which doesn’t
support transparency.
When you create flattening presets, they appear with the default presets in the Transparency panel.
Note: Transparency flattening cannot be undone after the file is saved.

346
ADOBE ACROBAT 8 PROFESSIONAL
User Guide
Discard Objects panel
The Discard Objects panel lets you specify objects to remove from the PDF and lets you optimize curved lines in
CAD drawings. You can discard objects created in Acrobat and in other applications. Selecting an object removes all
occurrences of that object within the PDF.
In the Discard Objects area, you can select from these and other options:
Discard All Form Submission, Import And Reset Actions Disablesallactionsrelatedtosubmittingorimportingform
data, and resets form fields. This option retains form objects to which actions are linked.
Flatten Form Fields Makes form fields unusable with no change to their appearance. Form data is merged with the
page to become page content.
Discard All JavaScript Actions Removes any actions in the PDF that use JavaScript.
Discard All Alternate Images Removes all versions of an image except the one destined for on-screen viewing. Some
PDFs include multiple versions of the same image for different purposes, such as low-resolution on-screen viewing
and high-resolution printing.
Discard Embedded Page Thumbnails Removes embedded page thumbnails. This is useful for large documents,
which can take a long time to draw page thumbnails after you click the Pages button.
Discard Document Tags Removes tags from the document, which also removes the accessibility and reflow capabil-
ities for the text.
Convert Smooth Lines To Curves Reduces the number of control points used to build curves in CAD drawings,
which results in smaller PDF files and faster on-screen rendering.
Detect And Merge Image Fragments Looks for images or masks that are fragmented into thin slices and tries to
merge the slices into a single image or mask.
Discard Embedded Print Settings Removes embedded print settings, such as page scaling and duplex mode, from
the document.
Discard Embedded Search Index Removes embedded search indexes, which reduces file size.
Discard Bookmarks Removes all bookmarks from the document.
Discard User Data panel
Use the Discard User Data panel to remove any personal information that you don’t want to distribute or share with
others. If you’re unable to find personal information, it may be hidden. You can locate hidden text and user-related
information by using the Examine Document command from the Document menu.
Discard All Comments, Forms, And Multimedia Removes all comments, forms, and multimedia from the PDF.
Discard Document Information And Metadata Removes information in the document information dictionary and
all metadata streams. (Use the Save As command to restore metadata streams to a copy of the PDF.)
Discard All Object Data Removes all objects from the PDF.
Discard File Attachments Removes all file attachments, including attachments added to the PDF as comments. (PDF
Optimizer doesn’t optimize attached files.)
Discard External Cross References Removes links to other documents. Links that jump to other locations within the
PDF are not removed.
Discard Private Data Of Other Applications Strips information from a PDF document that is useful only to the appli-
cationthat createdthe document.Thisdoesnot affectthefunctionality of thePDF,butit doesdecrease thefilesize.

347
ADOBE ACROBAT 8 PROFESSIONAL
User Guide
Discard Hidden Layer Content And Flatten Visible Layers Decreases file size. The optimized document looks like the
original PDF but doesn’t contain layer information.
Clean Up panel
The options in the Clean Up panel of the PDF Optimizer remove useless items from the document. These items
include elements that are obsolete or unnecessary to your intended use of the document. Be aware that removing
certain elements may seriously affect the functionality of the PDF. By default, only elements that do not affect
functionality are selected. If you are unsure of the implications of removing other options, you should use the default
selections.
In the Clean Up area, you can select these options:
Use Flate To Encode Streams That Are Not Encoded Applies Flate compression to all streams that aren’t encoded.
In Streams That Use LZW Encoding, Use Flate Instead Applies Flate compression to all content streams and images
that use LZW encoding.
Remove Invalid Bookmarks Removes bookmarks that point to pages in the document that have been deleted.
Remove Invalid Links Removes links that jump to invalid destinations.
Remove Unreferenced Named Destinations Removes named destinations that are not being referenced internally
from within the PDF document. Because this option does not check for links from other PDF files or websites, it may
not fit in some workflows.
Optimize The PDF For Fast Web View Restructures a PDF document for page-at-a-time downloading (byte-serving)
from web servers.
Editing text and objects
Choosing a tool
AcommonmisconceptionaboutPDFdocumentsisthattheyshouldbehavelikeanyotherdocumentthatcontains
images and text, letting you freely move or edit items on a page. A PDF is like a snapshot of your original document.
You can perform minor touch-ups, but if your PDF requires substantial revision, it’s easier to make changes to the
source document and regenerate the PDF.
For editing text and objects, choose from the tools in the Advanced Editing toolbar. To insert editing marks in a PDF
to indicate your changes to the original document, see “Mark up text with edits” on page 173.
The TouchUp Text tool lets you add to and replace existing text if the fonts used are available on the system. If the
fonts aren’t available, you can change only the appearance of existing text. However, you can add new blocks of text
using the TouchUp Text tool. The Typewriter tool also lets you create new text, but provides fewer options to modify
new text than the TouchUp Text tool.
Note: Using the TouchUp Text tool may affect how the document reflows, which can make the document less accessible
to the visually impaired.
The Select Object tool provides basic editing capabilities for most objects. You can modify the size, page location,
and properties of images, links, fields, and multimedia objects. You can make these same changes with the tool used
to create the object.
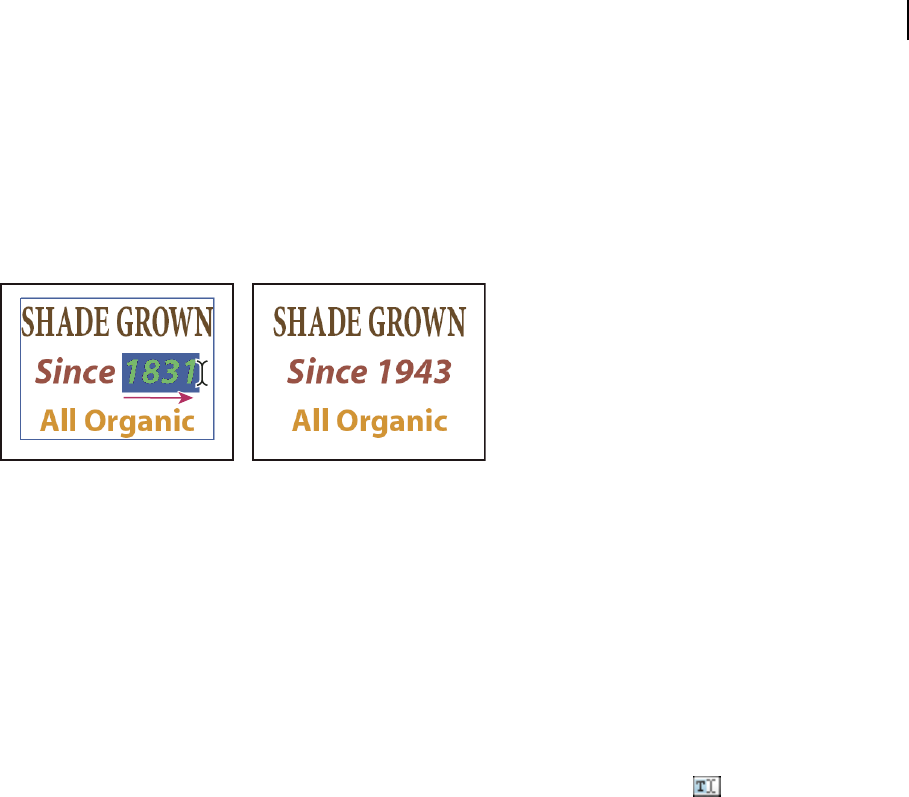
348
ADOBE ACROBAT 8 PROFESSIONAL
User Guide
To scale, rotate, flip, or clip an image or object (including text blocks), use the TouchUp Object tool. The TouchUp
Object tool can also place images and change an object’s color space (see “Convert colors to a different color space”
on page 459). If you need to edit the source file for an embedded image or object, the TouchUp Object tool can start
an image-editing or object-editing application.
Note: Comments—even though they have a graphic appearance—are not considered page elements and therefore cannot
be selected or manipulated using the touchup tools.
Editing text with the TouchUp Text tool
Edit text
You can add or replace text only if the font used for that text is installed on your system. If the font isn’t installed on
your systembutisembeddedorsubsetted in thePDF,youcanmakechangesonlytocolor,wordspacing, character
spacing, baseline offset, or font size.
You can edit text on rotated lines in the same way as on horizontal lines, and you can edit text using vertical fonts in
the same way as text using horizontal fonts. The baseline offset or shift for vertical fonts is left and right, instead of
up and down for horizontal fonts.
Edit text using the TouchUp Text tool
1 Choose Tools > Advanced Editing > TouchUp Text Tool, or select the TouchUp Text tool in the Advanced
Editing toolbar.
2 Click in the text you want to edit. A bounding box outlines the selectable text.
3 Select the text you want to edit:
• Choose Edit > Select All to select all the text in the bounding box.
• Drag to select characters, spaces, words, or a line.
4 Edit the text by doing one of the following:
• Type new text to replace the selected text.
• Press Delete, or choose Edit > Delete to remove the text.
• Choose Edit > Copy to copy the selected text.
• Right-click/Control-click the text and choose the appropriate option.
Click outside the selection to deselect it and start over.
Edit text attributes
1 Select the TouchUp Text tool.
2 Click in the text you want to edit.
3 Right-click/Control-click the text, and choose Properties.

349
ADOBE ACROBAT 8 PROFESSIONAL
User Guide
4 In the TouchUp Properties dialog box, click the Text tab. You can change any of the following text attributes:
Font Changes the font used by the selected text to the font you specify. You can select any font installed on your
system or fully embedded in the PDF document. Document fonts are listed at the top; system fonts are listed below.
Font Size Changes the font size to the size (in points) that you specify.
Character Spacing Inserts uniform spacing between two or more characters in selected text.
Word Spacing Inserts uniform spacing between two or more words in selected text.
Horizontal Scaling Specifies the proportion between the height and the width of the type.
Baseline Offset Offsets the text from the baseline. The baseline is the line on which the type rests.
Fill Specifies the fill color.
Stroke Specifies the stroke color.
Stroke Width Specifies the width of the stroke.
Note: Forlegalreasons, youmusthavepurchased afontand haveit installedonyoursystemtorevisetextusingthat font.
Add new text
You can add new text to a PDF using any of the fonts installed on the system.
1 Select the TouchUp Text tool.
2 Ctrl-click/Option-click where you want to add text.
3 In the New Font dialog box, select the font and mode you want, and click OK.
4 Type the new text.
5 Do any of the following:
• To change the font size and other attributes, select the text, right-click/Control-click, and choose Properties.
• To move the text block, use the TouchUp Object tool.
Add text using the Typewriter tool
Use the Typewriter tool to type text anywhere on a PDF page. Organizations sometimes provide PDF versions of
their paper forms without interactive form fields. The Typewriter tool provides a simple solution for filling out such
forms. The Typewriter tool is similar to the Text Box tool, but includes a different set of default properties.
1 Choose Tools > Typewriter > Show Typewriter Toolbar, and then click the Typewriter button.
2 Click where you want to type, and then begin typing. Press Enter to add a second line.
3 To change the text size, select the text, and click the Decrease Text Size button or the Increase Text Size button in
the Typewriter toolbar.
4 To change the line spacing (leading), select the text, and click the Decrease Line Spacing button or the Increase
Line Spacing button.
5 To move or resize Typewriter text block, select the Select tool, click a Typewriter text block, and drag the text block
or one of its corners.
6 To edit the text again, select the Typewriter tool, and then double-click in the Typewriter text.
Note: To let Reader users type text in a PDF by using the Typewriter tool, open the PDF in Acrobat Professional, choose
Tools > Typewriter > Enable Typewriter Tool In Adobe Reader, and save the PDF.

350
ADOBE ACROBAT 8 PROFESSIONAL
User Guide
Insert special characters
You can insert certain special characters (line breaks, soft hyphens, nonbreaking spaces, and em dashes) in a tagged
PDF to improve the way it reflows. You can also insert these special characters in any PDF to improve the way it’s
read by a screen reader or simply to edit it for general readability purposes. You do not need to have the font installed
in order to insert special characters.
1 Select the TouchUp Text Tool.
2 Click where you want to insert the character, or select text to be replaced by the character.
3 Right-click/Control-click the selected text or location, choose Insert and then select an option.
See also
“Reflow a PDF” on page 297
Embed fonts using the TouchUp Text tool
Embedding fonts ensures that your PDF uses the same fonts as the original document, no matter where you open
the PDF or what fonts are installed on that system.
1 Choose Tools > Advanced Editing > TouchUp Text Tool, or select the TouchUp Text tool in the Advanced
Editing toolbar.
2 Click in the text containing the font embedding or subsetting you want to edit. A paragraph of text is enclosed in
a bounding box. You can select text within the paragraph by dragging.
3 Right-click/Control-click the text, and choose Properties.
4 In the TouchUp Properties dialog box, click the Text tab to display the font name and font properties as well as
embedding and subset capabilities.
5 To see a list of all the fonts, scroll through the Font menu. Document fonts are listed first. Your system fonts are
listed below the document fonts.
6 Choose afontinthe Font menu,checkthepermissionstodeterminewhichoptionsare availableforthat font,and
then select an embedding option:
Can Embed Font You can select both the embed and subset options. To embed the entire font rather than a subset,
make sure that Subset is not selected.
Can Embed Font For Print And Preview Only You can only subset-embed the font. You can embed the font for print
and preview but not for editing.
Cannot Embed Font Neither the embed nor subset option is available.
No System Font Available Neither the embed nor subset option is available.
See also
“Fonts” on page 113
Place an image or object
1 Choose Tools > Advanced Editing > TouchUp Object Tool .
2 Right-click/Control-click the page and choose Place Image.
3 Choose one of the following file formats: BMP, GIF, JPEG, PCX, PNG, EPS/PS, or TIFF.

351
ADOBE ACROBAT 8 PROFESSIONAL
User Guide
4 Select an image file, and click Open.
A copy of the image file appears in the center of the page, at the same resolution as the original file.
Move or edit an object
A selected object usually shows a bounding box. Selection handles appear when the pointer is over the object. When
thepointer isover alockedobject, no selectionhandles appear.Whenyou select multipleobjects, thelastobjectyou
select becomes the anchor and appears red; the others appear blue. The anchor object remains stationary during
alignment operations.
To make another object in the selection the anchor object, Ctrl-click/Option-click the new target object twice, once
to remove the object from the selection, and once to add it back to the selection. As the last object added to the
selection, it becomes the anchor object.
When objects of the same type are selected and the selection covers multiple pages, you can change the appearance
of the objects but not move them.
When you edit a text box, the entire text box is selected; however, the TouchUp Object tool cannot select individual
characters that are part of larger text blocks. You must use the TouchUp Text tool to edit individual characters and
words.
Use the Select Object tool to select and move objects such as form fields and links.
Use the TouchUp Object tool to select and move placed images, text blocks, and embedded objects.
Select an object
1 Select one or more objects:
• Click the object with the TouchUp Object tool (Tools > Advanced Editing).
• Click the object with the Select Object tool , or with the tool you used to create the object.
• Right-click/Control-click the object and choose Select All from the context menu. If the Select Object tool is active
and the document uses single-page layout, all objects on the current page are selected. If the document is in any
other page layout, all objects in the document are selected. If a tool in the Advanced Editing toolbar is active, all
objects of that type in the document are selected.
• Drag to create a rectangle around the desired objects. If the Select Object tool is active, all objects within the
rectangle are selected. If an Advanced Editing tool is active, press Ctrl as you drag; all objects of the tool type
within the rectangle are selected.
2 (Optional) Add one or more objects to the current selection:
• Ctrl-click/Option-click an object.
• Shift-click to add a range of objects. (The Select Object tool includes all objects when you Shift-click.) Using Shift
selects all items that lie within the rectangular bounding box formed by all items in the selection (including the
item that was just added).
Move an object
1 Click the object with the TouchUp Object tool , the Select Object tool , or the tool used to create the object.
2 Move the image or object:
• Drag the object to the desired location. Objects cannot be dragged to a different page (you can cut and paste them
to a new page instead). Shift-drag the object to constrain movement up or down, or right or left.

352
ADOBE ACROBAT 8 PROFESSIONAL
User Guide
.
• Right-click/Control-click the image and choose an option to move the image on the page.
Resize an object
1 Click the object with the TouchUp Object tool , the Select Object tool , or with the tool used to create it.
2 Drag a handle of the object. Shift-drag the handle to retain the original aspect ratio.
Clip an object
1 Select the TouchUp Object tool
2 Right-click/Control-click the object, and choose Set Clip. When you hold the pointer over the selection, the
clipping icon appears.
3 Drag a selection handle in the direction you want until the clip rectangle displays the results you want.
4 Click inside the selection to exit the clipping mode.
Edit an object using the TouchUp Object tool
1 Choose Tools > Advanced Editing > TouchUp Object tool.
2 Select the object, right-click/Control-click the selection, and choose one of the following:
Place Image Embeds an image file in the PDF.
Set Clip Sets a clipping region for the object, if one exists.
Delete Clip Delete Clip deletes objects that are clipping the selected object. For example, if you scale text and the
resultingcharactersare clipped,selectingthisoptionshowsyouthe completecharacters.Thisoptionappearsonlyif
you chose Set Clip.
Flip Horizontal, Flip Vertical Flip Horizontal flips the image horizontally, on the vertical axis. Flipping text blocks
horizontally creates a mirror effect. Flip Vertical flips the image vertically, on the horizontal axis.
Create Artifact Removes the object from the reading order so it isn’t read by a screen reader or the Read Out Loud
command.
Edit Image, Edit Object Starts the image editor or object editor you specify in the TouchUp preferences. Edit Image
is available when a vector image is selected; Edit Object is available when a bitmap image is selected. Selecting these
options removes tags from the PDF, potentially changing how the PDF reflows and affecting accessibility. For
example, changing the location of an object affects the order in which that object (or its alternate text) is read by a
screen reader.
Rotate Clockwise, Rotate Counterclockwise, Rotate Selection
Rotate Clockwise and Rotate Counterclockwise rotate
the selected object ninety degrees in the indicated direction. Rotate Selection lets you rotate the selection incrementally
by dragging a selection handle in the direction you choose. You must click inside the selection to exit the rotate mode.
TouchUp Properties Lets you edit properties for the content, tag, and text, such as adding alternate text to an image
to make it accessible.

353
ADOBE ACROBAT 8 PROFESSIONAL
User Guide
Start an image editor using the TouchUp Object tool
By default, the TouchUp Object tool starts Adobe Photoshop (if installed) to edit images and objects. To use a
different editing application, specify the application in the TouchUp preferences. Choose Edit > Preferences
(Windows) or Acrobat > Preferences (Mac OS), and select TouchUp on the left side of the Preferences dialog box.
Click Image Editor (for bitmap images) or Page/Object Editor, (for vector images) and select the application on your
hard drive.
1 Using the TouchUp Object tool, select the image or object or Shift-click to select multiple images or objects. If you
change the object selection, the editing session terminates.
To edit all the images and objects on the page, right-click/Control-click the page, and choose Edit Page.
2 Right-click/Control-click the selection, and choose Edit Image or Edit Object. (The available command depends
on what is selected.)
Note: If the image can’t open in Adobe Photoshop, verify that Photoshop is configured correctly. If a message asks whether
to convert to ICC profiles, choose Don’t Convert. If the image window displays a checkerboard pattern when it opens,
the image data could not be read.
3 Make the desired changes in the external editing application.
4 If you are working in Photoshop, flatten the image.
If you change the dimensions of the image in Photoshop, the image may not align correctly in the PDF. Also, trans-
parency information is preserved only for masks that are specified as index values in an indexed color space. Image
masks are not supported. If you change image modes while editing the image, you may lose valuable information
that can be applied only in the original mode.
5 In the editing application, choose File > Save. The object is automatically updated and displayed in the PDF when
you bring Acrobat to the foreground.
Important: For Photoshop, if the image is in a format supported by Photoshop 6.0 or later, your edited image is saved
back into the PDF. However, if the image is in an unsupported format, Photoshop handles the image as a generic PDF
image, and the edited image is saved to disk instead of back into the PDF.
Setting up a presentation
Defining initial view as Full Screen mode
Full Screen mode is a property you can set for PDFs used for presentations. In Full Screen mode, PDF pages fill the
entire screen, and the Acrobat menu bar, toolbar, and window controls are hidden. You can also set other opening
views,sothatyourdocumentsorcollectionsof documentsopentoaconsistentview.Ineithercase,youcanaddpage
transitions to enhance the visual effect as the viewer pages through the document.
To control how you navigate a PDF (for example, advancing pages automatically), use the options in the Full Screen
preferences. These preferences are specific to a system—not a PDF document—and affect all PDFs that you open on
that system. Therefore, if you set up your presentation on a system you control, you can control these preferences.
To set the Full Screen preferences, choose Edit > Preferences (Windows) or Acrobat > Preferences (Mac OS) and
select Full Screen on the left.
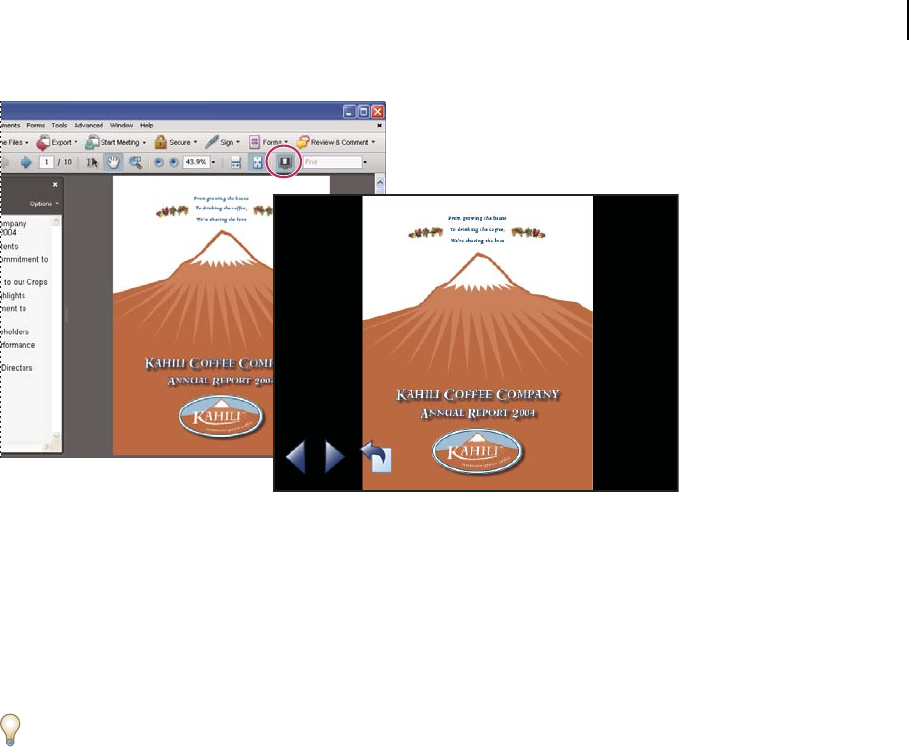
354
ADOBE ACROBAT 8 PROFESSIONAL
User Guide
Use the Full Screen button (circled) to view and navigate PDFs as a slide show.
Define an initial view
When a user opens your PDF document or PDF package, they see the initial view of the PDF. You can set the initial
view to the magnification level, page, and page layout that you want to have appear. If your PDF is a presentation,
you may want to set the initial view to Full Screen mode.
After you define the initial view of the PDF, you can add page transitions to selected pages or the entire document.
Acrobat supports page transitions and bullet fly-ins from PowerPoint.
Define the initial view
1 Choose File > Properties.
2 In the Document Properties dialog box, click Initial View.
3 Select the options you want, and then click OK. You have to save and reopen the file to see the effects.
Define the initial view as Full Screen mode
When setting the initial view of a PDF to Full Screen mode, you must define how the document opens.
1 Choose File > Properties.
2 In the Document Properties dialog box, select Initial View.
3 For best results, do the following:
• Choose Page Only from the Navigation Panel menu.
• Choose Single Page from the Page Layout menu.
• Set Open To Page to the page on which you want to start the presentation.
4 Select Open In Full Screen Mode to open the document without the menu bar, toolbar, or window controls
displayed. Click OK. (You have to save and reopen the file to see the effects.)

355
ADOBE ACROBAT 8 PROFESSIONAL
User Guide
Note: Users can exit Full Screen mode by pressing Esc if their preferences are set this way. However, in Full Screen mode,
users cannot apply commands and select tools unless they know the keyboard shortcuts. You may want to set up page
actions in the document to provide this functionality.
Initial View options for document properties
The Initial View options in the Document Properties are organized into three areas: Layout And Magnification,
Window Options, and User Interface Options.
Layout And Magnification Determines the appearance of the document.
• Navigation Panel Determines which panels are displayed in the navigation pane.
• Page Layout Determines how document pages are arranged.
• Magnification Sets thezoomlevelthedocumentwillappearatwhenopened.Defaultusesthemagnificationset
by the user.
• Open To Page Specifies the page that appears when the document opens.
Note: Setting Default for the Magnification and Page Layout options uses the individual users’ settings in the Page
Display preferences.
Window Options Determine how the window adjusts in the screen area when a user opens the document. These
options apply to the document window itself in relationship to the screen area of the user’s monitor.
• Resize Window To Initial Page Adjusts the document window to fit snugly around the opening page, according to
the options that you selected under Document Options.
• Center Window On Screen Positions the window in the center of the screen area.
• Open In Full Screen Mode Maximizes the document window and displays the document without the menu bar,
toolbar, or window controls.
• Show File Name Shows the filename in the title bar of the window.
• Show Document Title Shows the document title in the title bar of the window. The document title is obtained
from the Description panel of the Document Properties dialog box.
User Interface Options Determine which parts of the interface—the menu bar, the toolbars, and the window
controls—are hidden.
Note: If you hide the menu bar and toolbars, users cannot apply commands and select tools unless they know the
keyboard shortcuts. You may want to set up page actions that temporarily hide interface controls while the page is in
view. (See “Add actions with page thumbnails” on page 337.)
Add page transitions
You can create an interesting effect that occurs each time a page advances by using page transitions.
You can also set page transitions for a group of documents using the Batch Processing command.
1 Do one of the following:
• Choose Advanced > Document Processing > Page Transitions.
• In thePages panel,selectthepagethumbnailsyouwantto applytransitionsto,andchoosePageTransitionsfrom
the Options menu.
2 In the Set Transitions dialog box, choose a transition effect from the Transition menu. These transition effects are
the same as those set in the Full Screen preferences.

356
ADOBE ACROBAT 8 PROFESSIONAL
User Guide
3 Choose the direction in which the transition effect occurs. Available options depend on the transition.
4 Choose the speed of the transition effect.
5 Select Auto Flip, and enter the number of seconds between automatic page turning. If you do not select this
option, the user turns pages using keyboard commands or the mouse.
6 Select the Page Range you want to apply transitions to.
Note: If users select Ignore All Transitions in the Full Screen preferences, they do not see the page transitions.
Document properties and metadata
View document properties
When you view a PDF, you can get information about it, such as the title, the fonts used, and security settings. Some
of this information is set by the person who created the document, and some is generated automatically.
You can change any information that can be set by the document creator, unless the file has been saved with security
settings that prevent changes.
1 Choose File > Properties.
2 Click a tab in the Document Properties dialog box.
See also
“Securing PDFs” on page 263
“Create print presets” on page 428
Document Properties
Description Shows basic information about the document. The title, author, subject, and keywords may have been
set by the person who created the document in the source application, such as Word or InDesign, or by the person
who created the PDF. You can search for these description items in Acrobat to find particular documents. The
Keywords section can be particularly useful for narrowing searches.
Note that many search engines use the title to describe the document in their search results list. If a PDF does not
have a title, the filename appears in the results list instead. A file’s title is not necessarily the same as its filename.
The Advanced area shows the PDF version, the page size, number of pages, whether the document is tagged, and if
it’s enabled for Fast Web View. (The size of the first page is reported in PDFs or PDF packages that contain multiple
page sizes.) This information is generated automatically and cannot be modified.
Security Describeswhatchangesandfunctionalityare allowedwithinthePDF.Ifapassword,certificate, or security
policy has been applied to the PDF, the method is listed here.
Fonts Lists the fonts and the font types used in the original document, and the fonts, font types, and encoding used
to display the original fonts.
If substitute fonts are used and you aren’t satisfied with their appearance, you may want to install the original fonts
on your system or ask the document creator to re-create the document with the original fonts embedded in it.
Initial View Describes how the PDF appears when it’s opened. This includes the initial window size, the opening
page number and magnification level, and whether bookmarks, thumbnails, the toolbar, and the menu bar are
displayed. You can change any of these settings to control how the document appears the next time it is opened.

357
ADOBE ACROBAT 8 PROFESSIONAL
User Guide
Custom Lets you add document properties to your document.
Advanced Lists PDF settings, print dialog presets, and reading options for the document.
In the PDF settings, you can set a base Uniform Resource Locator (URL) for web links in the document. Specifying
a base URL makes it easy for you to manage web links to other websites. If the URL to the other site changes, you can
simply edit the base URL and not have to edit each individual web link that refers to that site. The base URL is not
used if a link contains a complete URL address.
You can also associate a catalog index file (PDX) with the PDF. When the PDF is searched with the Search PDF
window, all of the PDFs that are indexed by the specified PDX file are also searched.
You can include prepress information, such as trapping, for the document. You can define print presets for a
document, which prepopulate the Print dialog box with document-specific values. You can also set reading options
that determine how the PDF is read by a screen reader or other assistive device.
Add a description to Document Properties
You can add keywords to the document properties of a PDF that other people might use in a search utility to locate
the PDF.
1 Choose File > Properties.
2 Click the Description tab, and type the author’s name, subject, and keywords.
3 (Optional) Click Additional Metadata to add other descriptive information, such as copyright information.
Create document properties
You can add custom document properties that store specific types of metadata, such as the version number or
companyname,inaPDF.Propertiesyou createappearin theDocumentPropertiesdialogbox.Propertiesyoucreate
must have unique names that do not appear in the other tabs in the Document Properties dialog box.
1 Choose File > Properties, and then select Custom.
2 To add a property, type the name and value, and then click Add.
3 To change the properties, do any of the following, and then click OK:
• To edit a property, select it, change the Value, and then click Change.
• To delete a property, select it and click Delete.
To changethenameofacustomproperty,deletethepropertyandcreateanewcustompropertywiththenameyouwant.
Edit document metadata
PDF documents created in Acrobat 5.0 or later contain document metadata in XML format. Metadata includes infor-
mation about the document and its contents, such as the author’s name, keywords, and copyright information, that
can be used by search utilities. The document metadata contains (but is not limited to) information that also appears
in the Description tab of the Document Properties dialog box. Document metadata can be extended and modified
using third-party products.
The Extensible Metadata Platform (XMP) provides Adobe applications with a common XML framework that
standardizes the creation, processing, and interchange of document metadata across publishing workflows. You can
save and import the document metadata XML source code in XMP format, making it easy to share metadata among
different documents. You can also save document metadata to a metadata template that you can reuse in Acrobat.

358
ADOBE ACROBAT 8 PROFESSIONAL
User Guide
View document metadata
1 Choose File > Properties, and click the Additional Metadata button in the Description tab.
2 Click Advanced to display all the metadata embedded in the document. (Metadata is displayed by schema—that
is, in predefined groups of related information.) Display or hide the information in schemas by clicking the plus or
minus sign (Windows) or arrows (Mac OS) next to the schema name. If a schema doesn’t have a recognized name,
it is listed as Unknown. The XML name space is contained in parentheses after the schema name.
Edit or append document metadata
1 Choose File > Properties, click the Description tab, and then click Additional Metadata.
2 Select Advanced from the list on the left.
3 To edit the metadata, do any of the following, and then click OK.
• To add previously saved information, click Append, select an XMP or FFO file, and click Open.
• To add new information and replace the current metadata with information stored in an XMP file, click Replace,
select a saved XMP or FFO file, and click Open. New properties are added, existing properties that are also
specified in the new file are replaced, and existing properties that are not in the replacement file remain in the
metadata.
• To delete an XML schema, select it and click Delete.
• To append the current metadata with metadata from a template, hold down Ctrl/Command (and choose a
template name from the dialog box menu in the upper right corner.
Note: You must save a metadata template before you can import metadata from a template.
• To replace the current metadata with a template of metadata, choose a template file (XMP) from the dialog box
menu in the upper right corner.
Save metadata as a template or file
1 Choose File > Properties, click the Description tab, and then click Additional Metadata.
2 Select Advanced from the list on the left.
3 Save the document metadata, and then click OK:
• To save the metadata to an external file, click Save and name the file. The metadata is stored as a file in XMP
format. (To use the saved metadata in another PDF, open the document and use these instructions to replace or
append metadata in the document.)
• To save the metadata as a template, choose Save Metadata Template from the dialog box menu in the upper right
corner, and name the file.
View object data and metadata
You can view the metadata information of certain objects, tags, and images within a PDF. You can edit and export
metadata for Visio objects only.
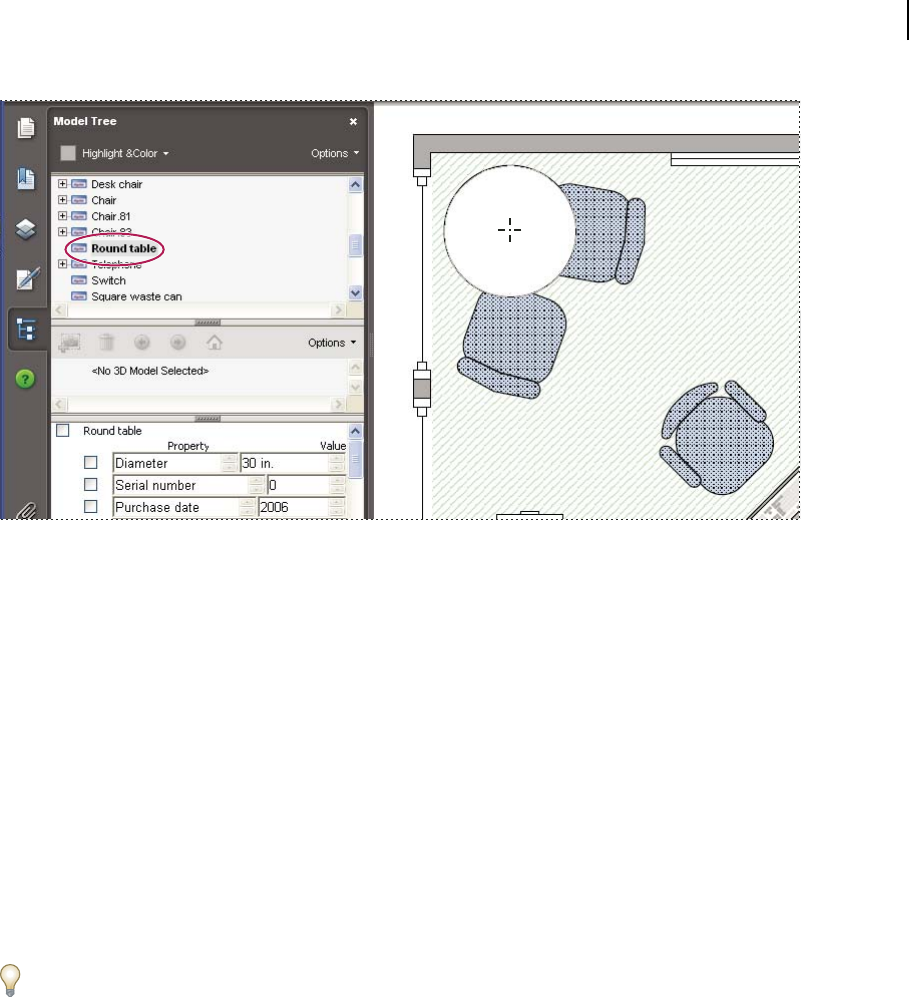
359
ADOBE ACROBAT 8 PROFESSIONAL
User Guide
Use the Object Data tool to view object grouping and object data.
See also
“Find text in multiple PDFs” on page 371
View object metadata
1 Choose Tools > Advanced Editing > TouchUp Object tool.
2 Select an object, right-click/Control-click the selection, and choose Show Metadata. (If Show Metadata is
unavailable, the image has no metadata associated with it.)
View and edit Visio object metadata
1 Choose Tools > Object Data > Object Data Tool.
2 Double-click an object on the page to show its metadata.
The Model Tree opens and shows a hierarchical list of all structural elements. The selected object’s metadata appears
as editable properties and values at the bottom of the Model Tree.
Theselectedobjectishighlightedon thepage.UsetheHighlightColormenu at thetopoftheModelTreeto choosea
different color.
3 To edit the metadata, type in the boxes at the bottom of the Model Tree. To save your changes, choose Write Back
from the Options menu at the top of the Model tree.
4 To export object metadata, choose Export To XML > Whole Tree to export all objects in the Model Tree, or choose
Export To XML > Current Node to export only the selected object and its children. Name and save the file.
Export Visio object metadata
1 Choose Tools > Object Data > Object Data Tool.
2 Double-click an object on the page to show its metadata.
3 In the Options menu at the top of the Model Tree, do one of the following:
• Choose Export As XML > Whole Tree to export all objects.

360
ADOBE ACROBAT 8 PROFESSIONAL
User Guide
• Choose Export As XML > Current Node to export only the selected object and its children.
4 Name and save the file.
Layers
About PDF layers
Acrobat supports viewing, navigating, and printing layered content in PDFs created from applications such as
InDesign, AutoCAD, and Visio.
You can control the display of layers using the default and initial state settings. For example, if your document
contains a copyright notice, you can easily hide the layer containing that notice whenever the document is displayed
on-screen while ensuring that the layer always prints.
Youcanrenameandmergelayers,changethepropertiesoflayers,andadd actionstolayers.Youcan also locklayers
to prevent them from being hidden.
Acrobat does not allow you to author layers that change visibility according to the zoom level. However, you can
highlight a portion of a layer that is especially important by creating a bookmark that magnifies or hides the layer
using page actions. You can also add links that let users click a visible or invisible link to navigate to or zoom in on a
layer.
To retain layers when you convert InDesign CS or later documents to PDF, make sure that Compatibility is set to
Acrobat 6 (PDF 1.5) and that Create Acrobat Layers is selected in the Export PDF dialog box.
Show or hide layers
Information can be stored on different layers of a PDF. The layers that appear in the PDF are based on the layers
created in the original application. You cannot create layers in Acrobat; however, you can examine layers and show
or hide the content associated with each layer using the Layers panel in the navigation pane. Items on locked layers
cannot be hidden.
Note: A Lock icon in the Layers panel indicates that a layer is for information only. Locked layers can be created from
AutoCAD and Visio files. Use the Layer Properties dialog box to change the visibility of a locked layer.
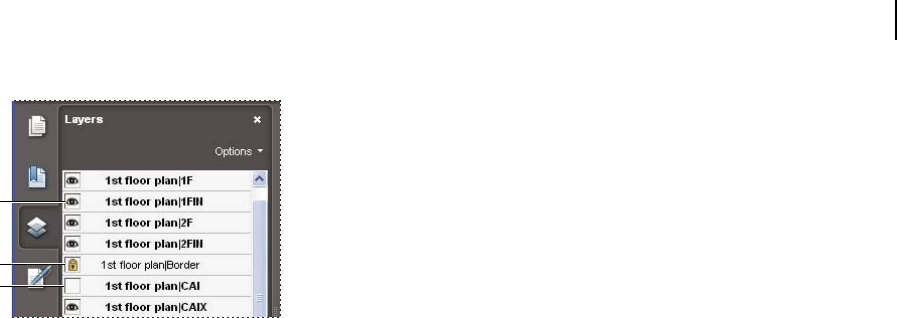
361
ADOBE ACROBAT 8 PROFESSIONAL
User Guide
A
B
C
Layers panel
A. Eye icon indicates a displayed layer B. Locked layer C. Hidden layer
1 Choose View > Navigation Panels > Layers, and then do one of the following:
• To hide a layer, click the eye icon. To show a hidden layer, click the empty box. (A layer is visible when the eye icon
is present, and hidden when the eye icon is absent. This setting temporarily overrides the settings in the Layer
Properties dialog box.)
• To show or hide multiple layers, choose an option from the Options menu in the Layers panel.
2 From the Options menu in the Layers panel, choose one of the following:
List Layers For All Pages Shows every layer across every page of the document.
List Layers For Visible Pages Shows layers only on the currently visible pages.
Reset To Initial Visibility Resets layers to their default state.
Apply Layer Overrides Displays all layers. This option affects all optional content in the PDF, even layers that are not
listed in the Layers panel. All layers are visible, regardless of the settings in the Layer Properties dialog box. You
cannot change layer visibility using the eye icon until you deselect this command. You can edit layer properties in
the Layer Properties dialog box, but changes (except changes to the layer name) are not effective until you choose
Reset To Initial Visibility in the Options menu.
Note: Youcannotsavetheview ofalayered PDFbyusingtheeyeiconintheLayerspanel toshow andhidelayers.When
you save the file, the visibility of the layers automatically reverts to the initial visibility state.
If you want to save a different view of a layered PDF, you must change the default state of the layers in the Layer
Properties dialog box.
Edit layer properties
You can combine the default state setting, the visibility setting, and the print setting to control when a layer is visible
and when it prints. If a layer contains a watermark, for example, you may want the layer to not show on-screen but
always to print and always to export to other applications. In this case you can set the default state to on, the initial
visibility to never visible (the image doesn’t show on-screen), and the initial print and initial export states to always
print and always export. The layer need not be listed in the Layers panel, since all the state changes are handled
automatically.
Note: The settings in the Layer Properties dialog box take effect only if Allow Layer State To Be Set By User Information
is selected in the Documents preferences. If it is not selected, Layer Properties dialog box settings, other than Layer Name
and Default State, are ignored.
1 Click the Layers button in the navigation pane.
2 Select a layer, and choose Layer Properties from the Options menu.

362
ADOBE ACROBAT 8 PROFESSIONAL
User Guide
3 In the Layer Properties dialog box, edit the layer name or any of the following properties, and then click OK:
Default State Defines the initial visibility state of the layer when a document is first opened or when the initial
visibilityisreset.Theeye iconsforlayers areinitiallyshownorhiddenbasedon this value.Forexample,ifthisvalue
is set to off, the eye icon for a layer is hidden when the document is first opened or when Reset To Initial Visibility
is chosen from the Options menu.
Intent Select View to allow the layer to be turned on or off, or select Reference to keep the layer on at all times and
permit editing of the properties. When the Reference Intent option is selected, the layer appears in italics.
Visibility Definestheon-screenvisibilityofthePDFlayer.Youcanshowalayerwhenthedocumentisopened,you
can hide a layer when the document is opened, or you can let the default state determine whether a layer is shown
or hidden when the document is opened.
Print Determines whether a layer will print.
Export Determines whether the layer appears in the resulting document when the PDF file is exported to an appli-
cation or file format that supports layers.
Any additional properties that the creator of the layered PDF has associated with a specific layer are shown in the
box at the bottom of the Layer Properties dialog box.
Add layer navigation
You can add links and destinations to layers, allowing you to change the view of a document when the user clicks a
bookmark or link.
Note: Ingeneral,changestolayervisibilitymadeusingtheeyeiconintheLayerspanelarenotrecordedintheNavigation
toolbar.
Associate layer visibility with bookmarks
1 Set the required layer properties, visibility, and magnification level for the target PDF layer in the document pane.
2 Click the Bookmarks button, and choose New Bookmark from the Options menu.
3 Select the new bookmark, and choose Properties from the Options menu.
4 In the Bookmark Properties dialog box, click the Actions tab.
5 For Select Action, choose Set Layer Visibility, click Add, and then click OK.
6 Select the bookmark label in the Bookmarks panel, and name the bookmark.
Associate layer visibility with a link destination
1 Set the required layer properties for the destination in the document pane.
2 Choose View > Navigation Panels > Destinations.
The Destinations panel appears in a floating panel. You can add it to the other panels by dragging it to the navigation
pane. If the panel is collapsed, click the Destinations button to expand it.
3 Click the Create New Destination button or select New Destination from the Options menu, and name the
destination.
4 Select the Link tool , and drag in the document pane to create a link. (Because content is added to all layers, it
doesn’t matter that you are apparently creating the link on the target layer. The link works from any layer.)
5 In the Create Link dialog box, select Custom Link and click Next.
6 Click the Appearance tab in the Link Properties dialog box, and set the appearance of the link.

363
ADOBE ACROBAT 8 PROFESSIONAL
User Guide
7 Click the Actions tab in the Link Properties dialog box, choose Set Layer Visibility, and click Add.
8 Close the dialog boxes.
You can test the link by changing the layer settings, selecting the Hand tool, and clicking the link.
Merge or flatten layers
Merged layers acquire the properties of the layer into which they are merged (the target layer). Flattening PDF layers
hides any content that is not visible when the flattening operation is executed and consolidates all layers.
Important: You cannot undo either a merging or a flattening operation.
Merge layers
1 Click the Layers button, and select Merge Layers from the Options menu.
2 In the left pane (Layers To Be Merged), select one or more layers to be merged. Ctrl-click/Command-click to select
multiple layers, and click Add. Click Add All to merge all layers.
3 To remove a layer from the center panel, select the layer or layers. Ctrl-click/Command-click to select multiple
layers. When your selection is complete, click Remove.
4 In the right pane (Layer To Be Merged Into), select the layer into which to merge the selected layers, and click OK.
Flatten layers
❖ Click the Layers button, and select Flatten Layers from the Options menu.
Editing layered content
You can select or copy content in a layered PDF document using the Select tool or the Snapshot tool. You can edit
content using a touchup tool. These tools recognize and select any content that is visible, regardless of whether the
content is on a selected layer.
If the content that you edit or delete is associated with one layer, the content of the layer reflects the change. If the
content that you edit or delete is associated with more than one layer, the content in all the layers reflects the change.
For example, if you want to change a title and byline that appear on the same line on the first page of a document,
and the title and byline are on two different visible layers, editing the content on one layer changes the content on
both layers.
You can add content, such as review comments, stamps, or form fields, to layered documents just as you would to
any other PDF document. However, the content is not added to a specific layer, even if that layer is selected when the
content is added. Rather, the content is added to the entire document.
You can use the Create PDF From Multiple Files command to combine PDF documents that contain layers. The
layers for each document are grouped under a separate heading in the Layers panel of the navigation pane. You
expand and collapse the group by clicking the icon in the title bar for the group.
See also
“Move or edit an object” on page 351

364
ADOBE ACROBAT 8 PROFESSIONAL
User Guide
Processing in batches
About batch sequences
When you apply one or more routine sets of commands to your files, you can save time and keystrokes by using an
automated batch sequence—a defined series of commands with specific settings and in a specific order that you apply
in a single step. You can apply a sequence to a single document, to several documents, or to an entire collection of
documents.
You can use the batch sequences provided or define your own. Batch sequences that you define appear (in alpha-
betical order) in the list of predefined sequences so that you can reuse them in later work sessions.
Developers can further enhance batch processing and other robust capabilities in Acrobat by using the Acrobat
Software Development Kit (SDK) to create scripts and plug-ins for their particular needs. For more information, see
the Acrobat Developer Center (English only).
Run a predefined batch sequence
Acrobat includes a number of simple, predefined batch sequences that you can use to streamline your work. These
batch sequences represent common tasks that you routinely need to perform to prepare files for distribution. You do
not have to open any of the PDF files before you begin to run these batch sequences.
You can avoid password prompts when you run a sequence on PDFs that require passwords by automating password
entry, or by specifying a security method for these files in the Batch Processing preferences. If you select Do Not Ask
For Password, PDFs that require passwords won’t be processed. To open the Batch Processing preferences, choose Edit >
Preferences (Windows) or Acrobat > Preferences (Mac OS).
1 Choose Advanced > Document Processing > Batch Processing.
2 In the Batch Sequences dialog box, select a batch sequence, and then click the Run Sequence button.
3 In the Run Sequence Confirmation dialog box, verify that the sequence you selected is the one you want, and click OK.
To prevent this dialog box from appearing in the future, deselect the Show The Run Sequence Confirmation Dialog
option in the Batch Processing preferences after you complete this procedure.
4 IntheSelectFilesToProcessdialogbox,selectthefilesthatyou want,and thenclickSelect.(InWindows,these
files must be in the same folder.)
5 If a message asks for additional input for a specific command in the sequence, select the options you want and
click OK.
6 When the progress bar disappears, click Close.
You can click Stop in the Progress dialog box to stop processing. The Progress dialog box expands automatically to
show the percentage of completion and any error or warning messages. Any files already processed are saved as
defined in the batch sequence. When the Progress dialog box closes, errors are automatically written to the batch-
processing error log, depending on the selections in the Batch Preferences dialog box.
Predefined batch sequences
Embed Page Thumbnails Embeds miniature images of each page for display in the Pages panel.
Fast Web View Enables users to download long documents incrementally.
Open All Opens all the specified files. This batch sequence creates PDFs for any input files if they are a supported
file type.

365
ADOBE ACROBAT 8 PROFESSIONAL
User Guide
Print 1st Page Of All Prints only the first page of each of the PDFs in the batch sequence. The pages print on your
default printer, using your current default print settings.
Print All Prints all pages of the files included in the batch sequence. The files print on your default printer, using your
current default print settings.
Remove File Attachments Removes files that have been attached to the PDF files in the batch sequence.
Save All As RTF Saves the files in Rich Text Format (RTF).
Set Security To No Changes Limits access to a PDF by setting up passwords and restricting certain features, such as
editing.
Modify a batch sequence
You can add, rearrange, and delete commands in the batch sequence definitions to suit your work requirements. You
can also edit the options for individual commands in the batch sequence or add interactive pauses at strategic points
in the batch processing.
Anychangesyoumake toapredefinedbatchsequence areautomaticallysavedasapart ofthesequence.To restore
the predefined batch sequence to its default settings, you must manually remove any changes you made to it. If you
require a sequence of complex or highly customized commands, consider creating a new batch sequence.
Edit a batch sequence
1 Choose Advanced > Document Processing > Batch Processing, select the batch sequence, and click Edit Sequence.
2 In the Edit Sequence dialog box, click Select Commands.
3 To modify the sequence of commands, do any of the following:
• Toaddacommandtothe sequence,selectitinthelistontheleftandclickAdd tomoveit tothelistonthe right.
• To delete a command from the sequence, select it on the right and click Remove.
• To change the order in which the commands are applied, select a command, and click Move Up or Move Down.
4 To change the options for a particular command, select the command from the list on the right, and click Edit.
(The Edit button is unavailable if you select a command that has no options.) When you’re done, click OK, and then
click OK to return to the Edit Batch Sequence dialog box.
Note: To review the command options, click the plus sign (+) to expand the command display.
5 Specify which files you want to process from the Run Commands On menu by navigating to the folder or file, and
then clicking Source File Options to make changes as needed.
6 From the Select Output Locations menu, choose a location option for the files that are created by the batch
processing. If you choose Specific Folder, navigate to that folder.
7 Click Output Options, and specify the format to name and save the processed files, and then click OK.
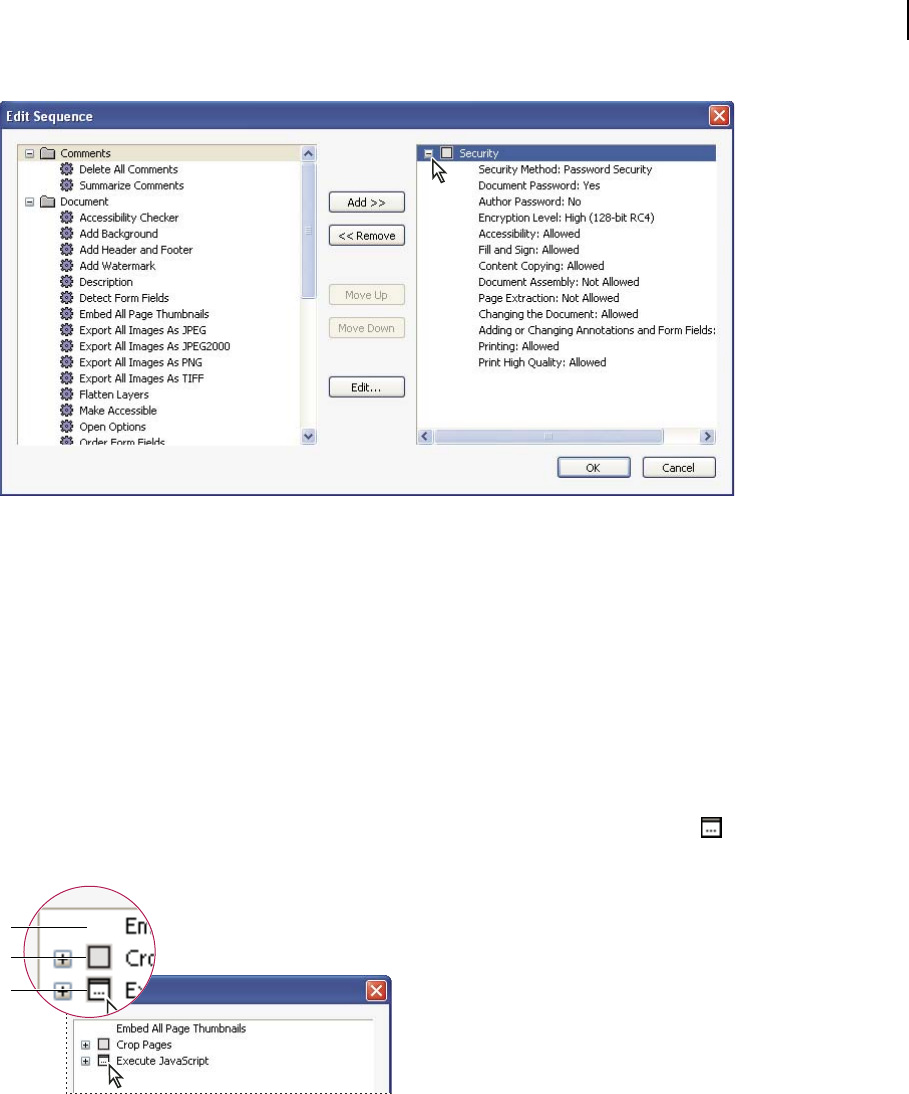
366
ADOBE ACROBAT 8 PROFESSIONAL
User Guide
Expanding the command display in the Edit Sequence dialog box
Make a batch sequence interactive
If your work requires that different documents use slightly different options for the same commands, you can still
use batch processing to automate the work. By making a batch sequence interactive, you can set up your batch-
processing definitions to have pauses between specific commands so that you can modify command options before
they execute.
Note: You can’t add interactivity to commands that don’t have interactive options.
1 Choose Advanced > Document Processing > Batch Processing, select the batch sequence you want to add inter-
activity to, and click Edit Sequence.
2 In the Batch Edit Sequence dialog box, click Select Commands.
3 On therightsideoftheEditSequencedialogbox,selecttheToggleInteractiveMode option forthecommands
that you want to provide input to during processing, and then click OK.
A
B
C
Toggle Interactive Mode
A. Interactive mode is not available. B. Interactive mode is available but not selected. C. Interactive mode is selected.
Create a new batch sequence
1 Choose Advanced > Document Processing > Batch Processing.
2 Click New Sequence.
3 Type a descriptive name for your sequence in the Name Sequence dialog box and click OK.

367
ADOBE ACROBAT 8 PROFESSIONAL
User Guide
4 In the Batch Edit Sequence dialog box, click Select Commands.
5 Select a command on the left side of the Edit Sequence dialog box and click Add.
6 Click Edit to change the settings for the selected command.
7 Repeat steps 5–6 to add and edit additional commands. Use the Move Up and Move Down buttons to rearrange
the commands in the order you want, and then click OK.
8 In the Edit Batch Sequence dialog box, choose the settings you want from the menus.
9 Click Output Options, select the options you want to include, and then click OK.
Automate password entry for a batch sequence
Before you batch process PDFs that are encrypted or password protected, you can set your digital ID to enter the
required password automatically.
1 Choose Advanced > Security Settings.
2 Select Digital IDs from the left.
3 Select an ID from the list on the right and then select the following:
Login Logs in using the specified digital ID. Type the password and click OK.
Logout Logs out the specified digital ID when you run a sequence.
See also
“About digital IDs” on page 253

368
Chapter 12: Searching and indexing
You have lots of control and lots of possibilities for running effective and efficient searches in Adobe Acrobat. A
search can be broad or narrow, including many different kinds of data and covering multiple Adobe PDFs.
If you work with large numbers of related PDFs, you can define them as a catalog, which generates a PDF index for
the PDFs. Searching the PDF index—instead of the PDFs themselves—dramatically speeds up searches.
Quickstart
The following topics provide simple steps to some common searching tasks.
Search for text
Use Find to search for text in an open PDF.
1 Type search terms in the Find text box on the toolbar.
2 (Optional) Click the arrow next to the Find text box and select any desired options, such as Include Bookmarks.
3 Press Enter.
To search all PDFs in a folder, choose Open Full Acrobat Search from the Find pop-up menu, click All PDF
Documents In, and then select the folder you want to search.
See also
“Find text in a PDF” on page 370
Search for text in comments
You can search for text in comments, as well as the body of the PDF.
1 Type search terms in the Find text box on the toolbar.
2 Click the arrow next to the Find text box and select Include Comments.
3 Press Enter.
To see all search results at once, choose Open Full Acrobat Search from the Find pop-up menu and select In The
Current PDF Document and Include Comments.
See also
“Find text in a PDF” on page 370
Search PDFs in a package
You can search all PDFs in an Adobe PDF package or only selected PDFs.
1 Open the package you want to search.
2 Type search terms in the Find text box, and choose Open Full Acrobat Search from the Find pop-up menu.
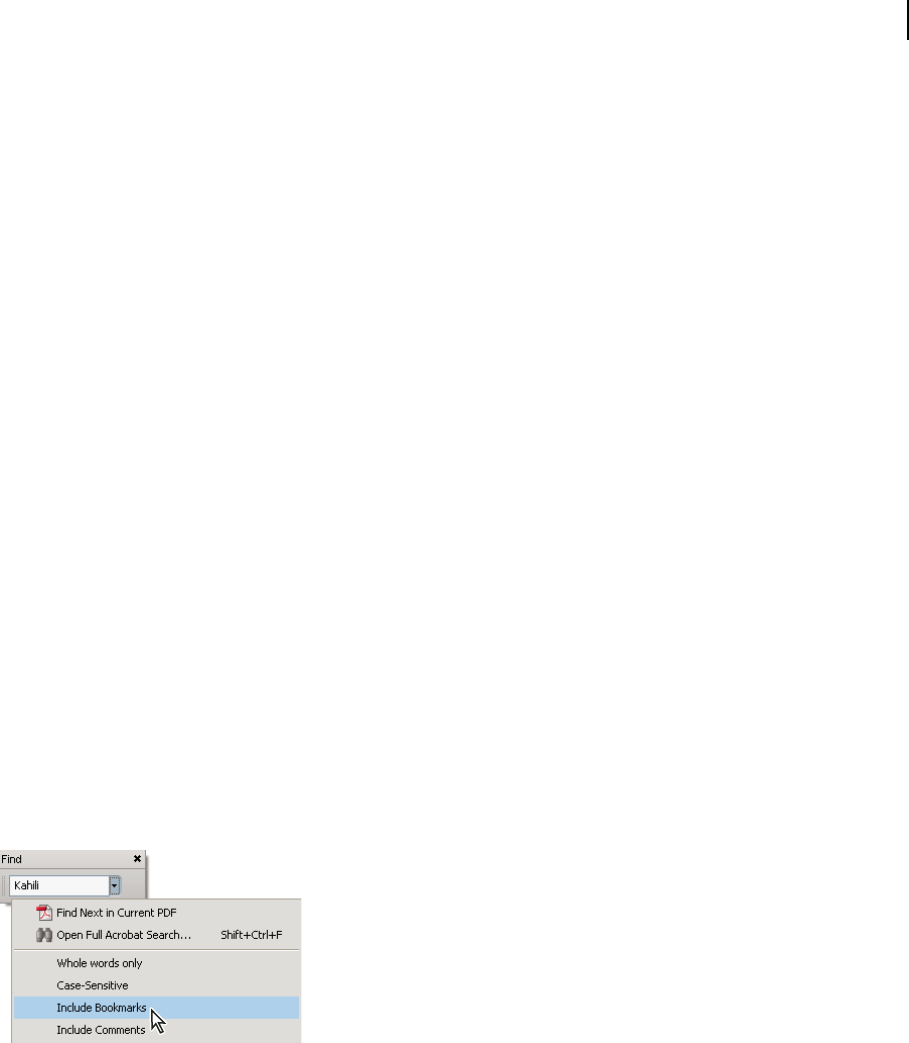
369
ADOBE ACROBAT 8 PROFESSIONAL
User Guide
3 Choose In The Entire PDF Package. Or choose In Selected PDF Documents, and then select the desired PDFs
from the list of PDFs included in the package.
See also
“Find text in multiple PDFs” on page 371
Search attachments
You can search for words in single PDF or in multiple PDFs, along with any attached PDFs up to two levels deep.
1 Choose Edit > Search, and click Use Advanced Search Options at the bottom of the window.
2 Type search terms in the text box, and choose how you want to restrict the search results.
3 Choose where you want to search.
4 Select Include Attachments, and then click Search.
See also
“Advanced Search Options” on page 372
Searching PDFs
Search features overview
You run searches to find specific items in PDFs. You can run a simple search, looking for a search term within in a
single file, or you can run a more complex search, looking for various kinds of data in one or more PDFs.
You can run a search using either the Search window or the Find toolbar. In either case, Acrobat searches the PDF
body text, layers, form fields, and digital signatures. You can also include bookmarks and comments in the search.
The Search window offers more options and more kinds of searches than the Find toolbar. When you use the Search
window, object data and image XIF (extended image file format) metadata are also searched. For searches across
multiple PDFs, Acrobat also looks at document properties and XMP metadata, and it searches indexed structure tags
when searching a PDF index. If some of the PDFs you search have attached PDFs, you can include the attachments
in the search.
Note: PDFs can have multiple layers. If the search results include an occurrence on a hidden layer, selecting that occur-
rence displays an alert that asks if you want to make that layer visible.

370
ADOBE ACROBAT 8 PROFESSIONAL
User Guide
See also
“Show or hide layers” on page 360
“Examine a PDF for hidden content” on page 248
“Search and redact words” on page 250
Access the search features
Where you start your search depends on the type of search you want to run. Use the Find toolbar for a quick search
of the current PDF. Use the Search window to look for words or document properties across multiple PDFs, use
advanced search options, and search PDF indexes.
Display the Find toolbar
By default, the Find toolbar is already open. Use this procedure to open it if it has been closed.
❖ Do one of the following:
• Choose Edit > Find.
• Right-click/Control-click the toolbar area and choose Find on the context menu.
• Press Ctrl+F/Command+F.
Open the Search window
❖ Do one of the following:
• Choose Edit > Search.
• On the Find toolbar, click the arrow and choose Open Full Acrobat Search.
Search appears as a separate window that you can move, resize, minimize, or arrange partially or completely behind
the PDF window.
Arrange the PDF document window and Search window
❖ In the Search window, click Arrange Windows.
Acrobat resizes and arranges the two windows side by side so that together they almost fill the entire screen.
Note: Clicking the Arrange Windows button a second time resizes the document window but leaves the Search window
unchanged. If you want to make the Search window larger or smaller, drag the corner or edge, as you would to resize any
window on your operating system.
Find text in a PDF
The Find toolbar searches the currently open PDF.
1 Type the text you want to search for in the text box on the Find toolbar.
2 (Optional) Click the arrow next to the text box and choose one or more of the following:
Whole Words Only Finds only occurrences of the complete word you type in the text box. For example, if you search
for the word stick, the words tick and sticky aren’t found.
Case-Sensitive Finds only occurrences of the words that match the capitalization you type. For example, if you
search for the word Web, the words web and WEB aren’t found.
Include Bookmarks Also searches the text in the Bookmarks panel.

371
ADOBE ACROBAT 8 PROFESSIONAL
User Guide
Include Comments Also searches the text of any comments.
3 Press Enter.
Acrobat jumps to the first instance of the search term, which appears highlighted.
4 Press Enter repeatedly to go to the next instances of the search term.
Find text in multiple PDFs
The Search window enables you to look for search terms in multiple PDFs. For example, you can search across all
open PDF documents, all PDFs in a specific location, or an open PDF package.
Note: If documents are encrypted (have security applied to them), you cannot search them as part of a multiple-
document search. You must open those documents first and search them one at a time. However, documents encrypted
as Adobe Digital Editions are an exception and can be searched as part of a multiple-document search.
See also
“About PDF packages” on page 119
Find text in PDFs in a specific folder
1 Open Acrobat on your desktop (not in a web browser).
2 Do one of the following.
• In the Find toolbar, type the text you want to search for, and then choose Open Full Acrobat Search from the pop-
up menu.
• In the Search window, type the text you want to search for in the text box.
3 In the Search window, select All PDF Documents In. From the pop-up menu directly below this option, choose
Browse For Location.
4 Select the location you want to search, either on your computer or on a network, and click OK.
5 If you want to specify additional search criteria, click Use Advanced Search Options, and select the options you want.
6 Click Search.
During a search, you can click a result or use keyboard shortcuts to navigate the results without interrupting the
search. Clicking the Stop button under the search-progress bar cancels further searching and limits the results to the
occurrences already found. It doesn’t close the Search window or delete the Results list. To see more results, you must run
a new search.
Search a PDF package
1 Open the PDF in Acrobat on your desktop (not in a web browser).
2 Do one of the following.
• In the Find toolbar, type the text you want to search for in the text box and then choose Open Full Acrobat Search
from the pop-up menu.
• In the Search window, type the text you want to search for in the text box.
3 In the Search window, choose a location to look in:
• To search all PDFs in the package, choose In The Entire PDF Package.

372
ADOBE ACROBAT 8 PROFESSIONAL
User Guide
• To search only some PDFs in the package, choose In Selected PDF Documents. Then select the PDFs you want to
search in the PDF package navigation area.
4 If you want to specify additional search criteria, click Use Advanced Search Options, and select the options you want.
5 Click Search.
Review search results
After you run a search from the Search window, the results appear in page order, nested under the names of each
searched document. Each item listed includes a few words of context (if applicable) and an icon that indicates the
type of occurrence.
Jump to a specific instance in the search results
1 If necessary, click the plus sign (+) (Windows) or the triangle (Mac OS) to expand the search results. Then
select an instance in the results to view that instance in the PDF.
2 To view other instances, do any of the following:
• Click another instance in the results.
• Choose Edit > Search Results, and then choose Next Result or Previous Result.
Sort instances in the search results
❖ Select an option from the Sort By menu near the bottom of the Search window. Results can be sorted by Relevance
Ranking, Date Modified, Filename, or Location.
Icons shown with search results
The icon next to an instance of the search results indicates the search area in which the instance appears. Selecting
an icon has the following effect:
Document icon Makes the PDF active in the document window. Click the plus (+) (Windows) or the triangle
(Mac OS) next to the icon to show the list of individual search results within that PDF.
(General) Search Result icon Jumpstothatinstanceofthesearchterm,usuallyinthebodytextofthePDF. The
instance of the search term is highlighted in the document.
Bookmark icon Opens the Bookmarks panel and highlights the instances of the search terms.
Comments icon Opens the Comments panel and highlights the instances of the search terms.
Layer icon May open a message indicating that the layer is hidden and asking if you want to make it visible.
Attachment icon Opens a PDF file that is attached to the searched parent PDF and shows the highlighted
instances of the search terms.
Advanced Search Options
By default, the Search window displays basic search options. Click Use Advanced Search Options near the bottom of
the window to display additional options. To restore the basic options, click Use Basic Search Options near the
bottom of the window.

373
ADOBE ACROBAT 8 PROFESSIONAL
User Guide
You can set a preference so that advanced search options always appear in the Search window. Access preferences by
choosing Edit > Preferences (Windows) or Acrobat > Preferences (Mac OS). Then select Search under Categories.
Return Results Containing Restricts your search results according to the option you choose:
• Match Exact Word Or Phrase Searches for the entire string of characters, including spaces, in the same order in
which they appear in the text box.
• Match Any Of The Words Searches for any instances of at least one of the words typed. For example, if you search
for each of, the results include any instances in which one or both of the two words appear: each, of, each of, or of each.
• Match All Of The Words Searches for instances that contain all your search words, but not necessarily in the order
you type them. Available only for a search of multiple PDFs or index definition files.
• Boolean Query Uses the Boolean operators that you type with the search words into the What Word Or Phrase
Would You Like To Search For box. Available only for searching multiple PDFs or PDF indexes.
Note: You cannot run wildcard searches using asterisks (*) or question marks (?) when searching PDF indexes.
Use These Additional Criteria (text options) Includes the basic search options plus four additional options:
• Look In Restricts the search to the current PDF, parts or all of a currently open PDF package (if applicable), an
index, or a location on your computer. If you choose to search an index, a location, or a PDF package, additional
options appear under Use These Additional Criteria.
• Proximity Searches for two or more words that are separated by no more than a specified number of words, as set
in the Search preferences. Available only for a search of multiple documents or index definition files, and when
Match All Of The Words is selected.
• Stemming Finds words that contain part (the stem) of the specified search word. For example, a search for
opening finds instances of open, opened, opens, and openly.Thisoptionapplies tosinglewordsandphraseswhenyou
search the current PDF, a folder, or an index created with Acrobat 6.0 or later. Wildcard characters (*, ?) aren’t
permitted in stemming searches. Stemming isn’t available if either Whole Words Only or Case-Sensitive is selected.
• Include Bookmarks Searches the text of any bookmarks, as viewed in the Bookmarks panel.
• Include Comments Searches the text of any comments added to the PDF, as viewed in the Comments panel.
• Include Attachments Searches PDFs that are attached to the current PDF or other attached PDFs (up to two levels
deep).
Use These Additional Criteria (document properties) Appears only for searches across multiple PDFs or PDF
indexes. You can select multiple property-modifier-value combinations and apply them to searches.
Note: You can search by document properties alone by using document property options in combination with a search
for specific text.
• Check box Applies the criteria set in the three connected options to the search. (The check box is selected
automatically when you enter information in any of the three options for that set. After you enter options, deselecting
the check box doesn’t clear the entries; they just aren’t applied to the search.)
• First menu (property) Indicates the document characteristic to search for. The available options include Date
Created, Date Modified, Author, Title, Subject, Filename, Keywords, Bookmarks, Comments, JPEG Images, XMP
Metadata, and Object Data.
• Second menu (modifier) Indicates the level of matching. If the first menu selection is a date, the available options
in thesecondmenuare IsExactly,IsBefore,IsAfter,IsNot.Otherwise,the availableoptions areContainsandDoes
Not Contain.

374
ADOBE ACROBAT 8 PROFESSIONAL
User Guide
• Third box (value or text) Indicates the information to be matched, which you type in. If the first menu selection
is a date, you can click the arrow to open a calendar that you can navigate to find and select the date you want.
Boolean operators
Commonly used Boolean operators include the following:
AND Use between two words to find documents that contain both terms, in any order. For example, type paris AND
france to identify documents that contain both paris and france.SearcheswithANDandnoother Booleanoperators
produce the same results as selecting the All Of The Words option.
NOT Use before a search term to exclude any documents that contain that term. For example, type NOT kentucky
to find all documents that don’t contain the word kentucky.Or, type paris NOT kentucky to find all documents that
contain the word paris but not the word kentucky.
OR Use to search for all instances of either term. For example, type email OR e-mail to find all documents with
occurrences of either spelling. Searches with OR and no other Boolean operators produce the same results as
selecting the Any Of The Words option.
^ (exclusive OR) Use to search for all instances that have either term but not both. For example, type cat ^ dog to
find all documents with occurrences of either cat or dog but not both cat and dog.
( ) Use parentheses to specify the order of evaluation of terms. For example, type white AND (whale OR ahab) to
find all documents that contain either white and whale or white and ahab. (The query processor performs an OR
query on whale and ahab and then performs an AND query on those results with white.
To learn more about Boolean queries, syntax, and other Boolean operators that you can use in your searches, refer
to any standard text, website, or other resource with complete Boolean information.
Search index files of cataloged PDFs
A full-text index is created when someone uses Acrobat to define a catalog of PDFs. You can search that index for
the words you want to find rather than running a full-text search of each individual PDF in the catalog. An index
search produces a results list with links to the occurrences of the indexed documents.
Note: To search a PDF index, you must open Acrobat as a standalone application, not within your web browser. In
Mac OS, indexes created with some older versions of Acrobat are not compatible with the Acrobat 8 Search feature and
must be updated before you can use Acrobat 8 to search them.
1 OpentheSearchwindow,typethewordsyouwanttofind,andthenclickUseAdvancedSearchOptions(nearthe
bottom of the window).
2 For Look In, choose Select Index.
3 IntheIndexSelectiondialogbox,selectanindex,iftheoneyouwanttosearch isavailable,orclickAddandthen
locate and select the index to be searched, and click Open. Repeat as needed until all the indexes you want to search
are selected.
Note: You can read file data about a selected index by clicking Info, and you can exclude indexes from the search either
by selecting them and choosing Remove or by clearing the check box for that index.
4 Click OK to close the Index Selection dialog box, and then choose Currently Selected Indexes on the Look In pop-
up menu.
5 Proceed with your search as usual, selecting other options you want to apply, and clicking Search.
Note: Selecting the Match Whole Word Only option when searching indexes significantly reduces the time taken to
return results.

375
ADOBE ACROBAT 8 PROFESSIONAL
User Guide
See also
“Creating PDF indexes” on page 375
Search features preferences
Access preferences for search features by choosing Edit > Preferences (Windows) or Acrobat > Preferences
(Mac OS), and then clicking Search under Categories.
Ignore Asian Character Width Finds both half-width and full-width instances of the Asian language characters in the
search text.
Ignore Diacritics And Accents Finds the search terms with any variation of the alphabetical characters. For example,
typing cafe finds both cafe and café.Likewise,typing café finds both versions. If this option isn’t selected, typing cafe
doesn’t find café, and vice versa.
Always Use Advanced Search Options Makes the advanced options available in the Search window, in addition to
the basic options.
Maximum Number Of Documents Returned In Results Limits the search results in the Search PDF window to a
specific number of documents. The default value is 500, but you can enter any number from 1 to 10,000.
Range Of Words For Proximity Searches Limits the search results to those in which the number of words between
the search terms isn’t greater than the number you specify. Accepts a range from 1 to 10,000.
Enable Fast Find Generates a cache of information from any PDF that you search. This cache reduces subsequent
search times for that PDF.
Maximum Cache Size Limits the temporary cache of search information for the Fast Find option to the specified size
in megabytes (between 5 and 10,000). The default setting is 100.
Purge Cache Contents Deletes the Fast Find option’s entire temporary cache of search information.
If you accidentally close the Search window while reviewing the results of a search, click the Search button to display
the results, or choose Edit > Search Results > Next Result or Previous Result. The most recent search results remain
until you run another search or close Acrobat.
Creating PDF indexes
Create and manage an index in a PDF
You can reduce the time required to search a long PDF by embedding an index of the words in the document.
Acrobat can search the index much faster than it can search the document. The embedded index is included in
distributed or shared copies of the PDF. Users search PDFs with embedded indexes exactly as they search those
without embedded indexes; no extra steps are required.
Add an index to a PDF
1 With the document open in Acrobat, choose Advanced > Document Processing > Manage Embedded Index.
2 In the Manage Embedded Index dialog box, click Embed Index.
3 Read the messages that appear, and click OK.
Note: In Outlook and Lotus Notes, you have the option of embedding an index when you convert email messages or
folders to PDF. This is especially recommended for folders containing many email messages.

376
ADOBE ACROBAT 8 PROFESSIONAL
User Guide
Update or remove the embedded index in a PDF
1 Choose Advanced > Document Processing > Manage Embedded Index.
2 Click either Update Index or Remove Index.
3 Click OK in the confirmation message.
About the Catalog feature
You can define a specific group of PDFs as a catalog and create a unified index for that entire collection of documents.
When users search the cataloged PDFs for specific information, the index makes the search process much faster.
When you distribute or publish the collection on a CD or website, you can include the index with the PDFs.
You can catalog documents written in Roman, Chinese, Japanese, or Korean characters. The items you can catalog
include the document text, comments, bookmarks, form fields, tags, object and document metadata, attachments,
document information, digital signatures, image XIF (extended image file format) metadata, and custom document
properties.
Preparing PDFs for indexing
Begin by creating a folder to contain the PDFs you want to index. All PDFs should be complete in both content and
electronic features, such as links, bookmarks, and form fields. If the files to be indexed include scanned documents,
make sure that the text is searchable. Break long documents into smaller, chapter-sized files, to improve search
performance. You can also add information to a file’s document properties to improve the file’s searchability.
Before you index a document collection, it’s essential that you set up the document structure on the disk drive or
network server volume and verify cross-platform filenames. Filenames may become truncated and hard to retrieve
in a cross-platform search. To prevent this problem, consider these guidelines:
• Rename files, folders, and indexes using the MS-DOS file-naming convention (eight characters or fewer followed
by a three-character file extension), particularly if you plan to deliver the document collection and index on an
ISO 9660-formatted CD-ROM disc.
• Remove extended characters, such as accented characters and non-English characters, from file and folder names.
(The font used by the Catalog feature does not support character codes 133 through 159.)
• Don’t use deeply nested folders or path names that exceed 256 characters for indexes that will be searched by Mac
OS users.
• If you use Mac OS with an OS/2 LAN server, configure IBM® LAN Server Macintosh (LSM) to enforce MS-DOS
file-naming conventions, or index only FAT (File Allocation Table) volumes. (HPFS [High Performance File
System] volumes may contain long unretrievable filenames.)
If the document structure includes subfolders that you don’t want indexed, you can exclude them during the
indexing process.
Adding metadata to document properties
To make a PDF easier to search, you can add file information, called metadata,tothe documentproperties.(Youcan
see the properties for the currently open PDF by choosing File > Properties, and clicking the Description tab.)
(Windows) You can also enter and read the data properties information from the desktop. Right-click the document
in Windows Explorer, choose Properties, and click the PDF tab. Any information you type or edit in this dialog box
also appears in the Document Properties Description when you open the file.
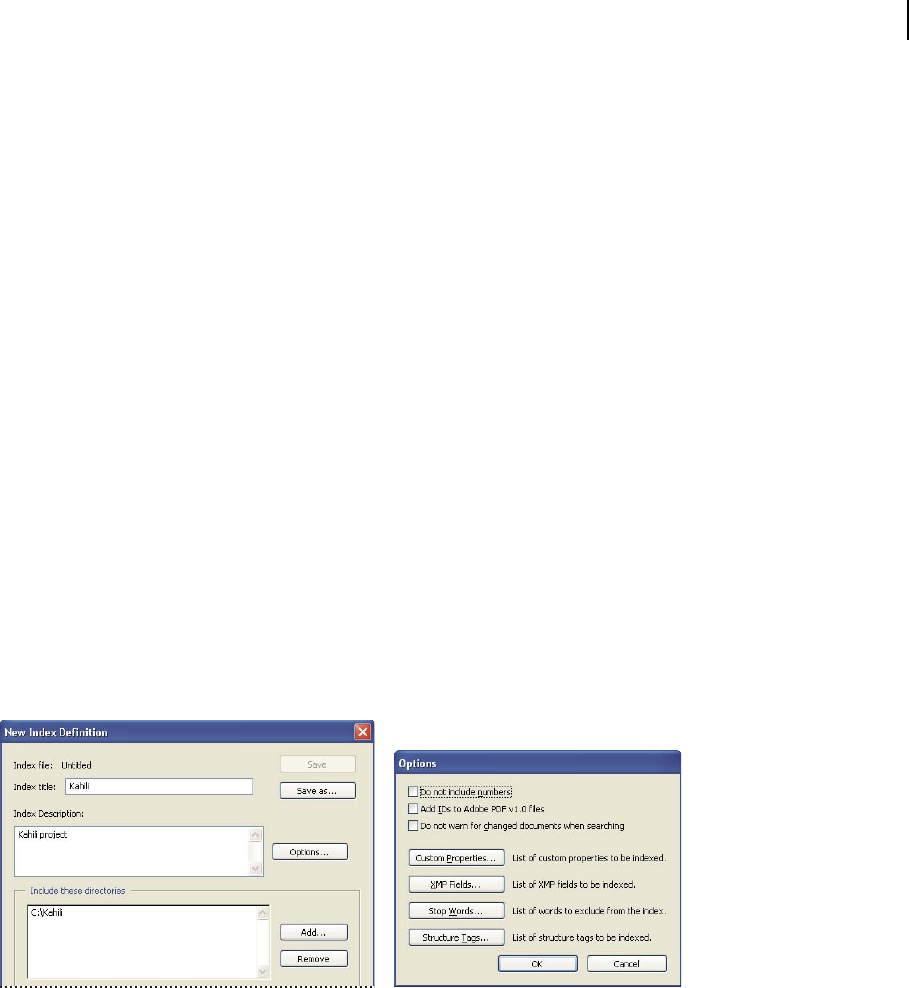
377
ADOBE ACROBAT 8 PROFESSIONAL
User Guide
When adding data for document properties, consider the following recommendations:
• Use a good descriptive title in the Title field. The filename of the document should appear in the Search Results
dialog box.
• Always use the same option (field) for similar information. For example, don’t add an important term to the
Subject option for some documents and to the Keywords option for others.
• Use a single, consistent term for the same information. For example, don’t use biology for some documents and life
sciences for others.
• Use the Author option to identify the group responsible for the document. For example, the author of a hiring
policy document might be the Human Resources department.
• If you use document part numbers, add them as keywords. For example, adding doc#=m234 in Keywords could
indicate a specific document in a series of several hundred documents on a particular subject.
• Use the Subject or Keywords option, either alone or together, to categorize documents by type. For example, you
might use status report as a Subject entry and monthly or weekly as a Keywords entry for a single document.
If you already have specialized training in Adobe PDF, you can define custom data fields, such as Document Type,
Document Number, and Document Identifier, when you create the index. This is recommended only for advanced
users and is not covered in Acrobat Complete Help.
Create an index for a collection
When you build a new index, Acrobat creates a file with the .pdx extension and a new support folder, which contains
one or more files with .idx extensions. The IDX files contain the index entries. All of these files must be available to
users who want to search the index.
Dialog boxes for the index-creation process
1 Choose Advanced > Document Processing > Full Text Index with Catalog, and then click New Index.
2 In Index Title, type a name for the index file.
3 In Index Description, type a few words about the type of index or its purpose.
4 Click Options, select any advanced options you want to apply to your index, and click OK.
5 Under Include These Directories, click Add, select a folder containing some or all of the PDF files to be indexed,
and click OK. To add more folders, repeat this step.
Note: Any folder nested under an included folder will also be included in the indexing process. You can add folders from
multiple servers or disk drives, as long as you do not plan to move the index or any items in the document collection.

378
ADOBE ACROBAT 8 PROFESSIONAL
User Guide
6 Under Exclude These Subdirectories, click Add, and select any nested folder that contains PDF files you do not
want to be indexed. Click OK and repeat, as needed.
7 Review your selections. To make changes to the list of folders to be included or excluded, select the folder you want
to change and click Remove.
8 Click Build, and then specify the location for the index file. Click Save, and then:
• Click Close when the indexing finishes.
• Click Stop to cancel the indexing process.
Note: If you stop the indexing, you cannot resume the same indexing session but you don’t have to redo the work. The
options and folder selections remain intact. You can click Open Index select the partially finished index, and revise it.
If long path names are truncated in the Include These Directories And Exclude These Subdirectories options, hold
the pointer over each ellipsis (...) until a tool tip appears, displaying the complete path of the included or excluded
folder.
See also
“Catalog preferences” on page 379
Indexing Options dialog box
Do Not Include Numbers Select this option to exclude all numbers that appear in the document text from the index.
Excluding numbers can significantly reduce the size of an index, making searches faster.
Add IDs To Adobe PDF v1.0 Files Select this option if your collection includes PDFs created before Acrobat 2.0,
which did not automatically add identification numbers. ID numbers are needed when long Mac OS filenames are
shortened as they are translated into MS-DOS filenames. Acrobat 2.0 and later versions automatically add identifiers.
Do Not Warn For Changed Documents When Searching When this option is not selected, a message appears when
you search documents that have changed since the most recent index build.
Custom Properties Use this option to include custom document properties in the index; only custom document
properties that already exist in the PDFs you index are indexed. Type the property, make a selection from the Type
menu, and then click Add. These properties appear as a search option in the Search PDF window's additional criteria
pop-up menus when you search the resulting index. For example, if you enter the custom property Document Name
and choose the string property from the Type menu, a user searching the index can then search within the custom
property by selecting Document Name from the Use These Additional Criteria menu.
Note: When you create custom fields in a Microsoft Office application in which the Convert Document Information
option is selected in the PDFMaker application, the fields transfer over to any PDFs you create.
XMP Fields Use this option to include custom XMP fields. The custom XMP fields are indexed and appear in the
additional criteria pop-up menus to be searchable in the selected indexes.
Stop Words Use to exclude specific words (500 maximum) from the index search results. Type the word, click Add,
and repeat as needed. Excluding words can make the index 10% to 15% smaller. A stop word can contain up to 128
characters and is case sensitive. Certain common words, such as the, and, and to are already excluded from index
searching, so it is not necessary to add them yourself.
Note: To prevent users from trying to search phrases that contain these words, list words that aren’t indexed in the
Catalog Read Me file.
Structure Tags Use this option to make specific leaf-element tag nodes searchable in documents that have a tagged
logical structure.

379
ADOBE ACROBAT 8 PROFESSIONAL
User Guide
Note: The Custom Properties, Stop Words, and Tags settings apply to the current index only. To apply these settings
globally to any index you create, you can change the default settings for custom fields, stop words, and tags in the Catalog
panel of the Preferences dialog box.
Catalog Readme files
It is often a good idea to create a separate Readme file and put it in the folder with the index. This Readme file can
give people details about your index, such as:
• The kind of documents indexed.
• The search options supported.
• The person to contact or a phone number to call with questions.
• A list of numbers or words that are excluded from the index.
• A list of the folders containing documents included in a LAN-based index, or a list of the documents included in
a disk-based index. You might also include a brief description of the contents of each folder or document.
• A list of the values for each document if you assign Document Info field values.
If a catalog has an especially large number of documents, consider including a table that shows the values assigned
to each document. The table can be part of your Readme file or a separate document. While you are developing the
index, you can use the table to maintain consistency.
Revise an index
You can update, rebuild, or purge an existing index.
1 Select Advanced > Document Processing > Full Text Index With Catalog, and then click Open Index.
2 Locate and select the index definition file (PDX) for the index, and click Open.
3 If the index was created with Acrobat 5.0 or earlier, select Create Copy to create a new index (without overwriting
the earlier version), or select Overwrite Old Index to overwrite the earlier index.
4 In the Index Definition dialog box, make any changes you want, and then click the function you want Acrobat to
perform:
Build Creates a new IDX file with the existing information, and updates it by adding new entries and marking
changed or outdated entries as invalid. If you make a large number of changes, or use this option repeatedly instead
of creating a new index, search times may increase.
Rebuild Creates a new index, overwriting the existing index folder and its contents (the IDX files).
Purge Deletes the index contents (the IDX files) without deleting the index file itself (PDX).
Catalog preferences
Youcansetpreferencesforindexingthatapplygloballytoallsubsequentindexesyoubuild.Youcanoverridesome
of these preferences for an individual index by selecting new options during the index-building process.
You open catalog preferences by choosing Edit > Preferences (Windows) or Acrobat > Preferences (Mac OS) and
selecting Catalog under Categories. Many of the options are identical to those described for the index-building
process.

380
ADOBE ACROBAT 8 PROFESSIONAL
User Guide
The Force ISO 9660 Compatibility On Folders option is useful when you don’t want to change long PDF filenames
to MS-DOS filenames as you prepare documents for indexing. However, you must still use MS-DOS file-naming
conventions for the folder names (8 characters or fewer) even though this isn’t necessary for the filenames.
Scheduled index updates
You can schedule when and how often to automatically build, rebuild, update, and purge an index by using the
Catalog feature and a catalog batch PDX file (.bpdx). A BPDX file is a text file that contains a list of platform-
dependent catalog index file paths and flags. You use a scheduling application, such as Windows Scheduler or
Scheduler for Mac OS, to display the BPDX file in Acrobat. Acrobat then re-creates the index according to the flags
in the BPDX file.
Formoredetailedinformationonschedulinganindexingupdate,searchforBPDXonthe Support page of the Adobe
website.
Moving collections and their indexes
You can develop and test an indexed document collection on a local hard drive and then move the finished document
collection to a network server or disk. An index definition contains relative paths between the index definition file
(PDX) and the folders containing the indexed documents. If these relative paths are unchanged, you don’t have to
rebuild the index after moving the indexed document collection. If the PDX file and the folders containing the
indexed documents are in the same folder, you can maintain the relative path simply by moving that folder.
If the relative path changes, you must create a new index after you move the indexed document collection. However,
you can still use the original PDX file. To use the original PDX file, first move the indexed documents. Then copy
thePDX filetothefolderwhere youwanttocreatethenewindex,andedittheincludeandexclude listsofdirectories
and subdirectories, as necessary.
If the index resides on a drive or server volume separate from any part of the collection it applies to, moving either
the collection or the index breaks the index. If you intend to move a document collection either to another network
location or onto a CD, create and build the index in the same location as the collection.

381
Chapter 13: Movies, sounds, and 3D
models
The possibilities for Adobe PDFs extend to the richness of multimedia communication. PDFs can include video
clips, digital audio, and 3D models that readers can move, turn, zoom in on, and examine part by part.
Movies and sounds
Play movies and sounds
PDFs can include many types of movie and sound files, including (but not limited to) Flash, QuickTime, mp3,
MPEG, and Windows Media files. These files may be accessed on a page or within a link, bookmark, form field, or
page action. Each movie and sound file includes a play area from which the media can be activated. The play area
typically appears on the PDF page as an image or a rectangle, but can also be invisible.
Note: You must have the necessary hardware and software installed to play the media files.
To help protect your computer from viruses, Acrobat solicits your approval before playing multimedia files from
unverified sources. You can change this default behavior in the Multimedia Trust preferences.
❖ UsingtheHand tool or theSelecttool, clickthe playareaofthemovieor soundfile. Whenthepointer ispositioned
over the play area, it changes to the play mode icon .
Multimedia preferences
You can specify the media player you want to play movies and sounds by choosing Edit > Preferences (Windows) or
Acrobat > Preferences (Mac OS), and then selecting Multimedia from the left side of the dialog box.
Preferred Media Player Choose the default player that plays media clips from the list of currently installed media
players.
Accessibility Options Specify if you want special features (if available) to appear when media plays, such as subtitles
and dubbed audio. Specify the preferred language for the media, in case multiple languages are available.
Multimedia Trust preferences
In the Multimedia Trust preferences, you can specify whether to play embedded multimedia files in trusted or
nontrusted PDF documents. A trusted document is a document that you approved or that was produced by an author
you approved. By setting your permissions to play multimedia only in trusted documents, you can prevent programs,
macros, and viruses from playing on, and potentially damaging, your computer.
The list of trusted documents and authors is stored internally and can’t be viewed. If you add a certified document
tothelist,boththedocumentandtheauthor’scertificateareaddedtothelistoftrusteddocuments.Alldocuments
that are certified by this author are trusted. (Trusted documents also include PDFs that were created by authors in
your list of trusted identities.)

382
ADOBE ACROBAT 8 PROFESSIONAL
User Guide
To access these preferences, choose Edit > Preferences (Windows) or Acrobat > Preferences (Mac OS), and then
select Multimedia Trust from the left side of the dialog box.
Display Permissions For Choose whether you want to display security permissions for trusted documents or other
(nontrusted) documents.
Allow Multimedia Operations Select this option to allow media clips to be played. When selected, you can change
the permission settings for a particular player and enable options that determine the appearance of the media during
playback.
Change Permission Settings For A Player Select the player in the list, and then choose one of the following options
from the menu:
• Always Allows the player to be used without prompting.
• Never Prevents the player from being used.
• Prompt Asks the user whether the player can be used. If you select this option and allow the player to play the
media in a particular document, that document becomes trusted.
Clear Your List Of Trusted Documents Deletes the current list of trusted documents and authors. Use this option to
prevent media from playing in documents that were previously trusted documents or created by trusted authors.
This option is available only when a PDF that contains multimedia is open.
Add movies or sounds to PDFs
You can add movies and sounds to PDFs in Windows if the media is playable in Windows Media Player, Flash Player,
RealPlayer, or QuickTime. In Mac OS, you can add QuickTime compatible movies and sounds to PDFs.
Before you add a movie or sound clip to a PDF, you must decide if your clip will be compatible—that is, playable—
inAcrobat6andlater,orinearlierversionsaswell.IfyouchoosetheAcrobat 6CompatibleMedia option,youhave
many more choices, such as the option to embed the movie and add multiple renditions. However, users with earlier
versions of Acrobat will have to download Adobe Reader to play your clip.
You can provide different renditions of the movie that play if the users’ settings vary. For example, you may want to
include a low-resolution rendition for users with slow Internet connections.
Note: If an alert message tells you that no media handler is available, you must install the appropriate player before you
can add clips to the PDF. For example, you must install QuickTime if you want to embed an MOV file in a PDF.
See also
“View PDFs in Full Screen mode” on page 30
“About Actions” on page 336
Add a movie or sound clip
1 Choose Tools > Advanced Editing, and select either the Movie tool or the Sound tool .
2 Drag or double-click to select the area on the page where you want the movie or sound to appear. For movies, the
play area is the exact size of the movie frame (if Acrobat can read the movie clip’s dimensions).
3 In the dialog box that appears, select a compatibility setting for your clip:
Acrobat 6 (And Later) Compatible Media Provides access to all options, but the user must have version 6.0 or later
of Acrobat or Adobe Reader to play the clip.
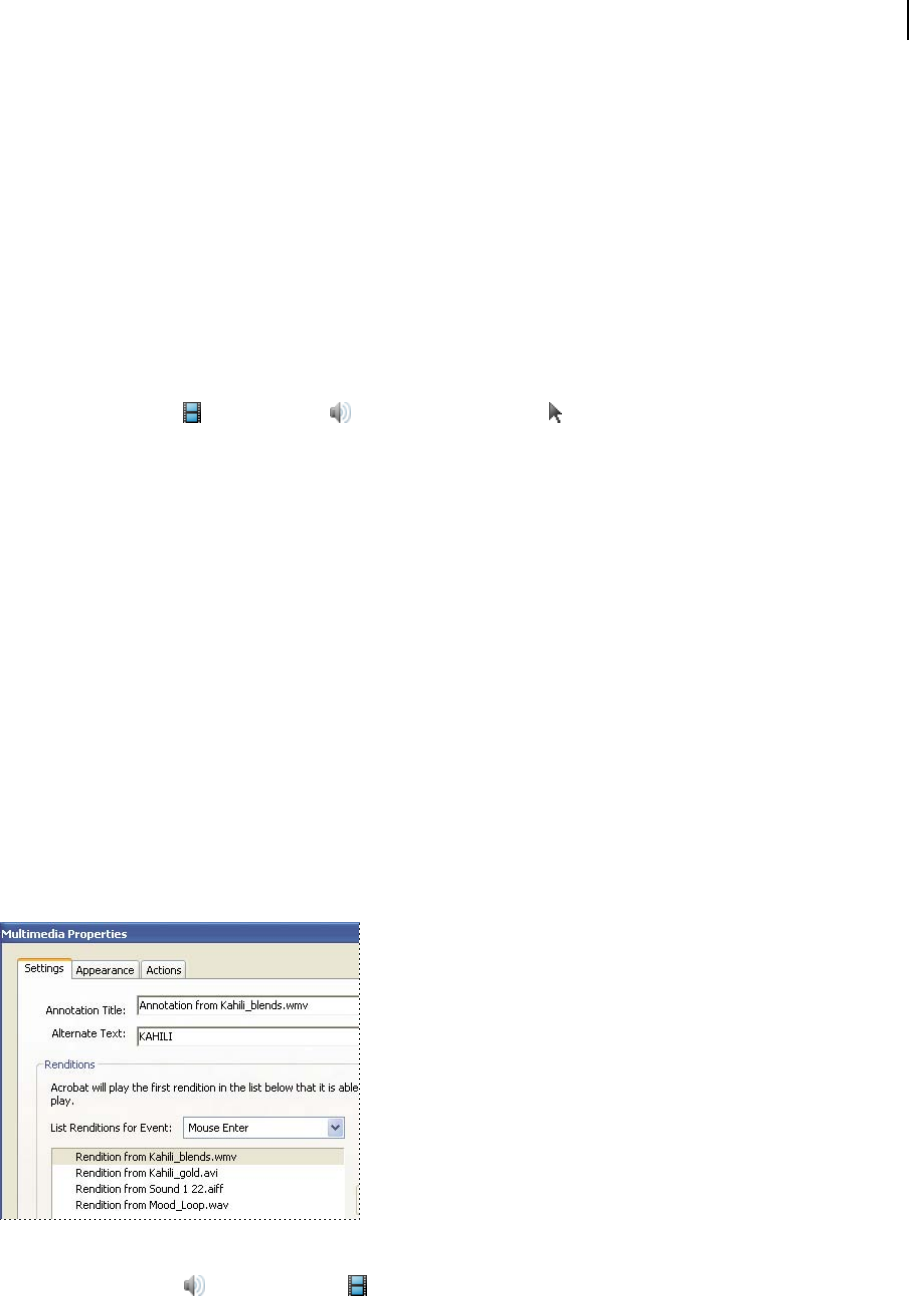
383
ADOBE ACROBAT 8 PROFESSIONAL
User Guide
Acrobat 5 (And Earlier) Compatible Media Ensures that your clip is available to users who have not yet upgraded
from version 5.0 or earlier of Acrobat or Adobe Reader. This option requires that you select media that is playable in
the QuickTime player.
4 To specify the clip, type the path or URL in the Location box, or click Browse (Windows) or Choose (Mac OS)
and double-click the movie file.
5 If you selected Acrobat 6 (And Later) Compatible Media, you can include the clip with the PDF by selecting
Embed Content In Document. This option will increase the file size of the PDF.
6 To display an image in the play area when the movie isn’t playing, select a poster option, and then click OK. After
you add the movie to the PDF, you can specify additional properties that determine how the clip appears and plays.
Edit the play area
1 Using the Movie tool , the Sound tool , or the Select Object tool , click the play area to select it.
When youmoveanyof thesetoolsovertheplayarea,handlesappearonthebordersoftheplay area,evenonthose
with invisible borders.
2 Do any of the following:
• Move the clip by dragging its icon to a new location on the page.
• Delete the clip by selecting it and pressing Delete.
• Resize the clip by dragging one of the corners of the frame until it is the desired size. Hold down Shift to retain the
correct proportions for movie clips.
Create alternate renditions
By default, the movie clip you add to a PDF is the first and only rendition listed in the Multimedia Properties dialog
box. You can create alternate renditions or add other renditions to ensure that users can play the movie clip on their
systems. For example, you can have a large, high-quality movie file and a smaller, low-quality movie file. You can
specify system settings that a rendition requires to play; the rendition that best matches the user’s system is played.
RenditionsareassignedtotheMouseUpactionbydefault,whichmeansthatwhenthemousebuttonisclickedand
released, the rendition is played. You can assign different renditions to different actions, although (in most cases) the
Mouse Up action is best.
If the first rendition cannot be played, the next available rendition is played.
1 Using the Sound tool or the Movie tool , double-click the play area.
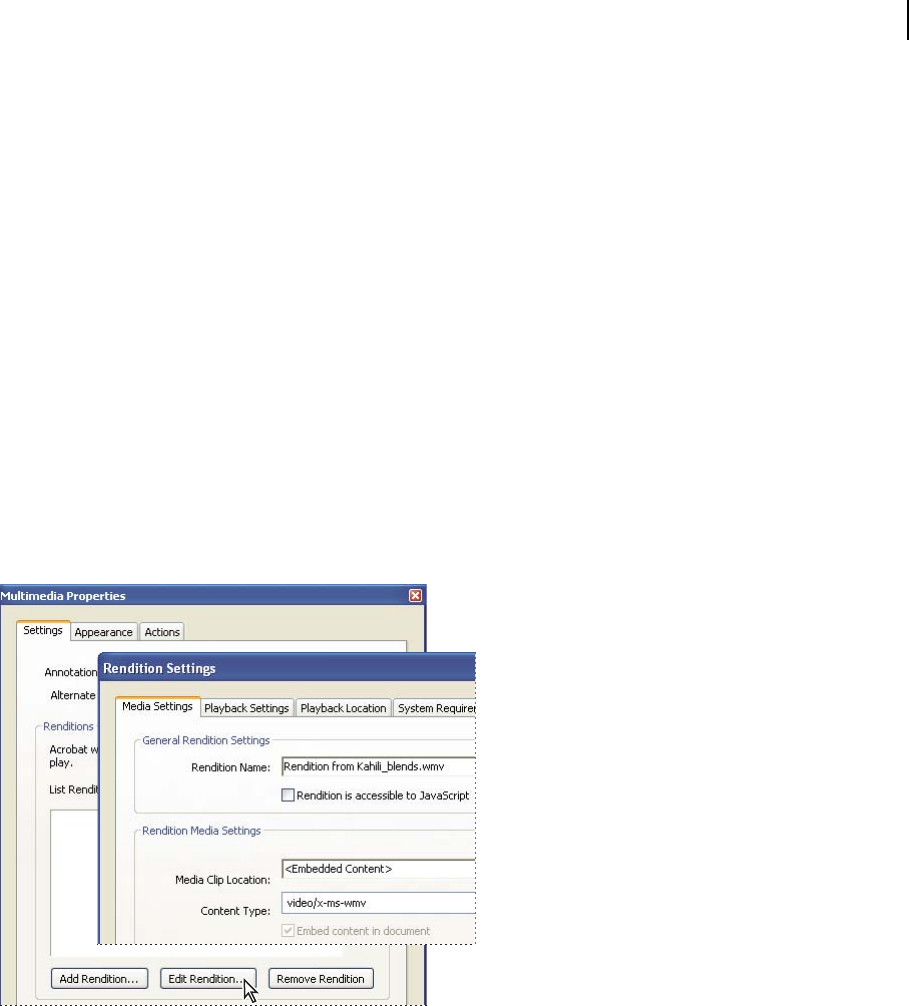
384
ADOBE ACROBAT 8 PROFESSIONAL
User Guide
2 On the Settings tab, click Add Rendition, choose one of the following options, and then click OK:
Using A File Double-click the file you want to add to the rendition list (for example, it may be a low-resolution
version of the movie clip that contains the same content as the first rendition). The content type is selected automat-
ically.
Using A URL Type the URL, and then specify the content type.
By Copying An Existing Rendition Select the rendition that you want to copy.
3 Select the rendition, and then click Edit Rendition. Specify the minimum system requirements, playback require-
ments, and other settings to differentiate it from other renditions.
4 Add and edit as many renditions as needed.
5 Usethearrowkeysonthe rightsideofthelist boxtoarrangetherenditionsintheappropriateorder.Renditions
are played in the order listed, provided the rendition meets the requirements you’ve specified.
6 When you’re finished adding and editing renditions, click Close.
Rendition settings
The Rendition Settings dialog box appears when you click Edit Rendition on the Settings tab of the Multimedia
Properties dialog box.
Note: Media players have different capabilities. Some rendition settings, such as player controls, are not available for
some players. In such cases, you can determine whether the player may be used to play the rendition by changing the
requirement settings on the Playback Requirements tab.
Media Settings Use this tab to specify general properties for the movie clip:
• Rendition Name Enter the name for the rendition, which will appear in the list of renditions. (This name does not
determine which media file is played.)
• Rendition Is Accessible To JavaScript Use this option if you’re using JavaScript code that makes use of the
rendition.

385
ADOBE ACROBAT 8 PROFESSIONAL
User Guide
• Media Clip Location Specify the clip by typing or navigating to it. (When you specify the clip location, Content
Type is set automatically. Changing the Content Type setting may cause problems playing the media.)
• Rendition Alternate Text Type a description of the rendition that may be read aloud to visually impaired viewers.
• Allow Temp File Specify whether writing a temp file is allowed and when. Some media players write a temp file
when they play a movie clip. If you want to prevent users from easily copying the media content in a secure
document, you may want to disallow the creation of temp files. However, selecting this setting may prevent the movie
from being played by media players that require the use of temp files.
Playback Settings Use this tab to determine how the movie clip is played.
• Keep Player Open Selectwhetheryouwant theplayertocloseafteritplaysthemovieclip,beleftopenindefinitely,
or be left open for the number of seconds you specify.
• Volume Lets you specify how loud the movie is played.
• Show Player Controls When selected, displays a controller bar at the bottom of the play area that lets users stop,
pause, and play, provided the media player supports player controls.
• Repeat Lets you replay a clip two or more times, or continuously.
• Player List Click Add to specify a player and the settings that are required, preferred, or disallowed to play the
movie clip. Select the name of the player, the minimum version number of the player, and the status. If you set the
status of more than one player to Required, only one of the required players may be used to play the rendition. If you
set the status of players to Preferred, these players are selected over nonpreferred players (but not over required
players). If you set the status of players to Disallowed, they are not used to play the rendition.
Playback Location Usethistabtodeterminewhetheramovieclipisplayedin thePDF,remainshiddenwhileplayed
(recommended for sound clips), is played in a floating window, or is played full screen. When Floating Window is
selected, you can add a title, set the window position, and let the user resize or close the window. Note that the user’s
preference settings may require (or ignore) title bar text for playback.
The window position is determined relative to the document window, application window, or, for dual-monitor
configurations, the virtual desktop or primary desktop. You may also specify the width and height of the floating
window. Click Get From Media to obtain the movie clip’s dimensions, if available, and then edit as necessary.
System Requirements Use this tab to choose the minimum settings for systems on which the movie clip is played.
For example, you can require that a user have at least a 1024-by-768 screen resolution to play the movie clip. For
optionssuchasPlayDubbedAudio,you canselectEither,Disabled,orEnabled.IfyouselectEither,youdefertothe
settings in the user’s Multimedia panel of the Preferences dialog box. If you select Disabled or Enabled, the corre-
sponding setting in Multimedia preferences must allow the rendition to be used. For example, if the Play Dubbed
Audio option is enabled, the rendition may be used only if the Play Dubbed Audio preference option is selected.
Playback Requirements Use this tab to select which attributes are required for the rendition to be played. The
attributes on this tab include settings from the other tabs, letting you indicate which ones are required. For example,
if you set the volume to 50% in the Playback Requirements tab, and you don’t want the rendition to be played unless
this volume level can be used, select the Required box next to Volume.
Set multimedia properties
You can specify properties for Acrobat 6.0 compatible multimedia files and Acrobat 5.0 compatible multimedia files.
For instance, you can specify the appearance of a movie’s play area, and whether the movie plays once or continu-
ously.

386
ADOBE ACROBAT 8 PROFESSIONAL
User Guide
The compatibility version you choose determines the features that are available to you. For example, to include
alternate renditions with a multimedia file, you must choose Acrobat 6.0 compatibility.
Set Acrobat 6.0-compatible properties
1 Select the Movie tool , the Sound tool , or the Select Object tool , and then double-click the play area.
2 Click the Settings tab in the Multimedia Properties dialog box.
3 Type the title of the movie in the Annotation Title box. This title does not determine which media file is played.
4 Type a description of the media file in the Alternate Text box. This description may be read aloud for visually
impaired viewers.
5 To change media settings, such as showing player controls and setting the volume level, select the media clip
rendition, and click Edit Rendition. (For a description of rendition settings, see “Create alternate renditions” on
page 383.) Click OK to return to the Multimedia Properties dialog box.
6 To add alternate renditions, such as low-resolution files, click Add Rendition, and specify the file source for the
rendition (from file, URL, or existing rendition).
7 Click the Appearance tab to select options to determine the border appearance of the play area and the poster
image.
8 Click the Actions tab to define new actions for the various mouse movements, and then click Close.
Set Acrobat 5.0-compatible properties
1 Select the Movie tool , the Sound tool , or the Select Object tool , and then double-click the play area.
2 Type a name in the Title box. By default, the name of the media file appears as the title. If you create an action that
refers to this media title, changing its name prevents the action from working properly.
3 To specify a different media file on a local drive, select Local File and then click Change Location; to specify a
different media file located on the Internet, select URL and then type the web address in the Location box. Click
Close.
4 On the Playback tab, select from the following options:
Show Player Controls Displays a controller bar at the bottom of the play area.
Use Floating Window Plays the media clip in a separate window. Specify the dimensions (using scale factors) of the
floating window in the Size menu.
Play Determines the play action of the media clip.
5 On the Appearance tab, specify the appearance of the border and poster for the play area. The poster defines the
appearance of the play area when the movie isn’t playing. To reduce file size (and possibly the image quality) select
256 Colors. Click Close.
Adding 3D models to PDFs
Ways to put 3D models in PDFs
When PDF files include 3D models, viewers using Adobe Reader or Adobe Acrobat can interact with the 3D models
using built-in features such as zoom, pan, and rotation tools. Creating PDF files with 3D models requires Acrobat
3D, which supports a variety of 3D file formats.

387
ADOBE ACROBAT 8 PROFESSIONAL
User Guide
Note: Acrobat Professional can create 3D PDFs but only from U3D version 1.0 files.
See also
“Interacting with 3D models” on page 388
Add 3D models to a PDF page
You can use the 3D tool to place a 3D file (in U3D 3rd edition format) on a PDF page.
After you place a 3D file, you can adjust the area or canvas in which the 3D model appears, edit the presentation
properties for the 3D toolbar and content, and create additional views.
Foradditional3Dfeatures,suchastheabilityto convert3Dfilesto PDForadd JavaScriptsto3Dobjects,consider
upgrading to Acrobat 3D.
See also
“3D toolbar overview” on page 388
Add a 3D model to a page
1 Choose Tools > Advanced Editing > 3D Tool.
2 Drag a rectangle on the page to define the canvas area for the 3D file.
3 Under 3D Model, click Browse to select the 3D file, and click Open.
Move, delete, or resize the 3D canvas
1 Choose Tools > Advanced Editing > Select Object Tool .
Note: Be careful not to confuse the Select Object tool with the basic Select tool. You must use the Select Object tool to
adjust a 3D canvas.
2 Select the 3D canvas and make any changes you want to apply:
• To move the canvas, drag it to a new location on the page.
• To delete the canvas (and the 3D model), select it and press Delete.
• To resize the canvas, drag the frame corners. The 3D content stays proportional within the adjusted frame.
3D properties
Open the 3D Properties dialog box for a file by choosing Tools > Advanced Editing > Select Object Tool, right-
clicking/Control-clicking the embedded 3D model, and choosing Properties.
Enable Default 3D Interaction Lets users rotate, move, and interact with the 3D model in standard ways.
Show 3D Toolbar By Default Displays the 3D toolbar when you activate the 3D model.
Open Model Tree By Default Displays the Model Tree when you activate the 3D model.
Enable 3D When Specifies when the 3D model (also called the annotation) is activated. When the 3D model is
enabled, you can interact with it, with the 3D navigation tools, for example.
Default Animation State Sets the default animation behavior upon activation as Playing or Paused.
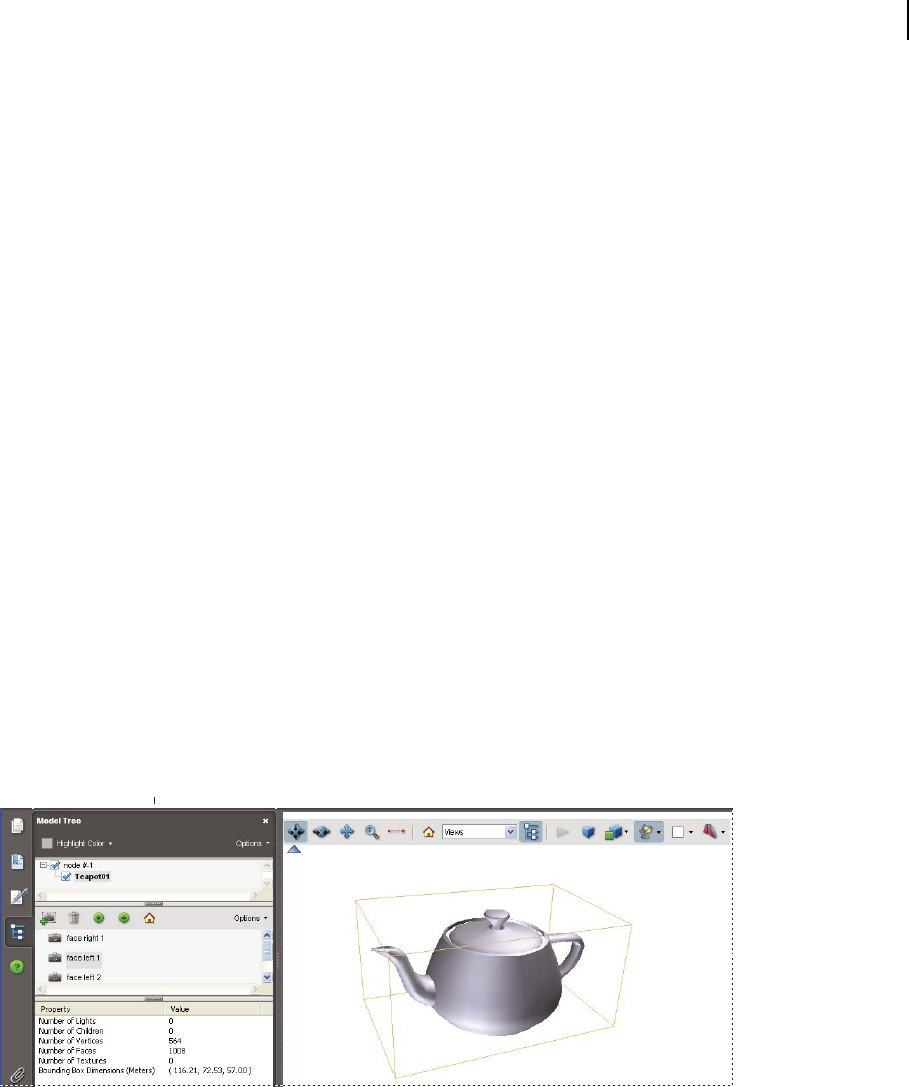
388
ADOBE ACROBAT 8 PROFESSIONAL
User Guide
Disable 3D When Determines how the 3D model can be deactivated. If you choose Explicit Deactivation, the user
must right-click the 3D model (with the Hand tool or one of the 3D navigation tools) and choose Disable 3D. When
a 3D model is disabled, the 2D preview image or poster appears in the canvas.
When 3D Is Disabled Determines the default animation behavior upon deactivation of the 3D model. Choose
Choose Keep The Content Playing, Pause The Content to leave the animation activated but not playing, or Reset The
3D Content to display the poster in the 3D canvas.
Edit Content Opens the Add 3D Content dialog box, which you can use to replace the embedded 3D file, JavaScript,
or poster image.
Manage Views Opens the Manage Views dialog box, which you can use to add, remove, and reorganize views of the
3D model.
See also
“Set 3D views” on page 397
Interacting with 3D models
Displaying 3D models
In Acrobat, you can view and interact with high-quality 3D content created in professional 3D CAD or 3D modeling
programs and embedded in PDFs. For example, you can selectively hide and show parts of a 3D model, remove a
cover to look inside, and turn parts around as if holding them in your hands.
3D content may initially appear as a two-dimensional preview image. Clicking the 3D model with the Hand or Select
tool enables (or activates) the model, opens the 3D toolbar, and plays any animation.
B
C
A
Selected 3D object
A. Model Tree B. 3D toolbar C. 3D object
3D toolbar overview
The 3D toolbar appears after you click the 3D model with the Hand tool, which also enables the 3D model and plays
any animations associated with it. The 3D toolbar always appears in the area above the upper left corner of the 3D
model and cannot be moved. A small blue triangle appears immediately below the 3D toolbar, which you can click
to hide and show the toolbar.
389
ADOBE ACROBAT 8 PROFESSIONAL
User Guide
Note: You can disable or enable the blue triangle toggle by choosing Edit > Preferences (Windows) or Acrobat > Prefer-
ences (Mac OS), selecting 3D under Categories, and then clicking the Enable Toggle For 3D Toolbar Control option.
Youcanusethe3D toolbartozoominandout, rotate,andpan acrosstheobject.Usethe ModelTreetohide orisolate
parts, or make parts transparent.
You manipulate a 3D model by selecting and dragging various 3D navigation tools. When you navigate in 3D, it may
help to think of it as viewing the stationary 3D model from a camera’s perspective. You can rotate, pan (move up,
down, or side-to-side), and zoom in or out.
Note: You can hide the toolbar by right-clicking/Control-clicking the 3D model and choosing Hide Toolbar. To show the
toolbar, choose Show Toolbar from the same context menu.
3D navigation tools
Rotate Turns 3D objects around relative to the screen. How the objects move depends on the starting view,
where you start dragging, and the direction you drag, such as in a straight line or in curves, circles, or loops.
Note: You can also use the Hand tool to rotate an object if Enable 3D Selection For The Hand Tool is selected in the 3D
panel of the Preferences dialog box.
Spin Turns a 3D model in parallel to two fixed axes in the 3D model, the x-axis and the z-axis.
Pan Moves the model vertically and horizontally only. You can also pan with the Hand tool: Ctrl-
drag/Command-drag.
Zoom Moves you toward, or away from, objects in the scene when you drag vertically. You can also zoom with
the Hand tool by holding down Shift as you drag.
Walk
Pivots horizontally around the scene when you drag horizontally; moves forward or backward in the scene when
you drag vertically; maintains a constant elevation level, regardless of how you drag.The Walk tool is especially useful for
architectural 3D models. To change the walking speed, change the default display units in the Preferences (3D).
Note: The Walk tool is available when you select the Preferences setting that consolidates tools or when you right-click
/Control-click the 3D model and choose Tools > Walk.
3D Measurement Tool Measures part sizes and distances in the 3D model.
(Windows) Use the right mouse button to change the way several of the 3D navigation tools work. For the Rotate
and Spin tools, right-click dragging temporarily shifts to the Zoom tool. For the Zoom tool, it makes the tool function
like a Marquee Zoom tool, zooming to the area that you define when you drag. For the Walk tool, right-click dragging
makes the tool function as the Pan tool. (Mac OS) If you have a one-button mouse, you can Control-drag or Option-
drag to make the Rotate and Spin tools temporarily act as the Pan tool.
3D toolbar view controls
Default View Returns to a preset zoom, pan, rotation, and projection mode of the 3D model. You can use the
Options menu in the View pane of the Model Tree or the Manage Views command on the 3D toolbar Views menu
to set a different view as the default.
If anobject ever movesout ofyourview,youhave,inessence,turnedyourcameracompletelyawayfromtheobject.
Click the Default View icon on the 3D toolbar to move the object back into view.
Views menu Lists any views defined for the current 3D model.
Toggle Model Tree Opens and hides the Model Tree.
Play/Pause Animation Plays or pauses any JavaScript-enabled animation. The Play/Pause Animation pop-up
menu opens a slider that you can drag back and forth to move to different times in the animation sequence.
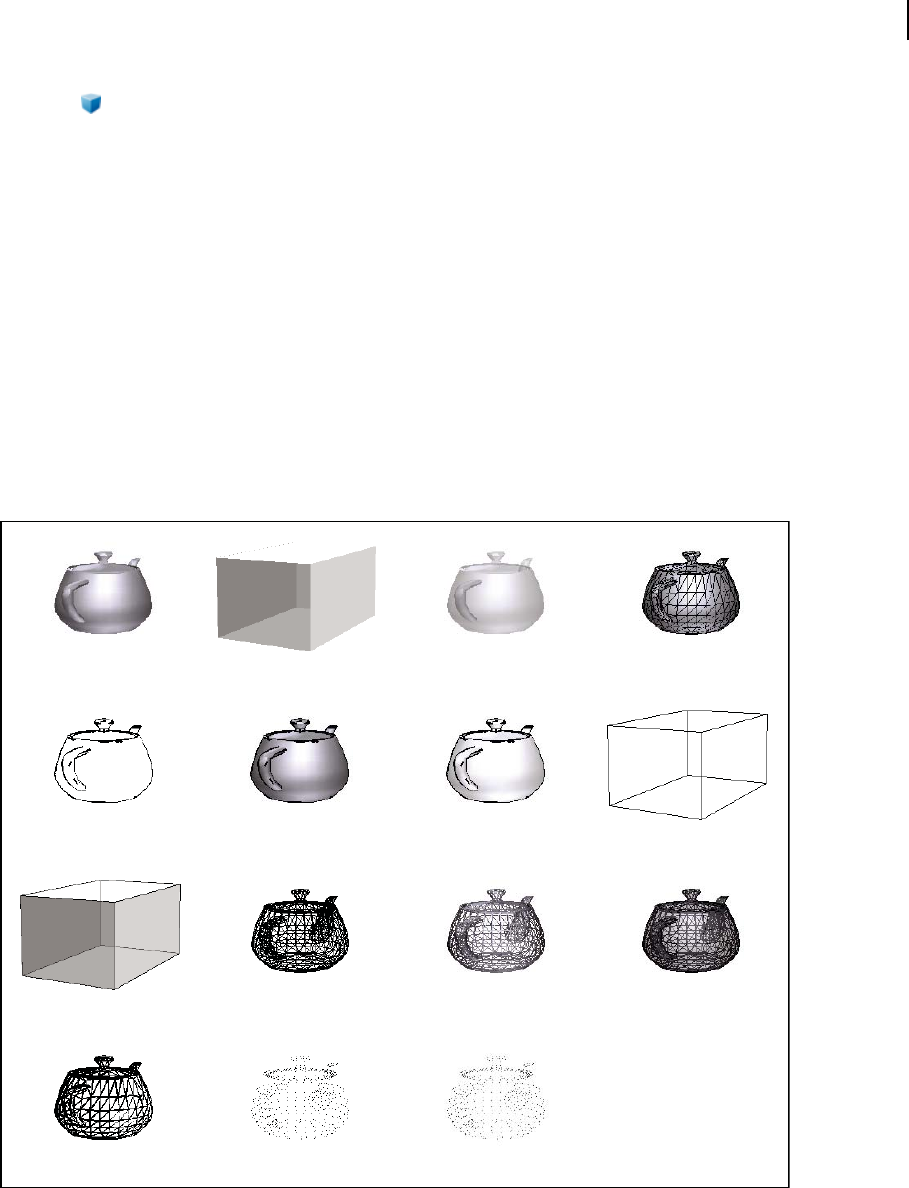
390
ADOBE ACROBAT 8 PROFESSIONAL
User Guide
Projection Toggles between using perspective and orthographic projection of the 3D object.
Model Render Mode menu Determines how the 3D shape appears. For an illustrated guide, see “Examples of model
rendering modes” on page 390.
Enable Extra Lighting menu Lists the different lighting effects, in which the number, color, orientation, and
brightness of the lights, the reflectivity of the surface, and other factors affect the illumination of the 3D object.
Experiment to get the visual effects you want.
Background Color swatch Opens the color picker, which you can use to select a different color for the space
surrounding the 3D object.
Toggle Cross Section Shows and hides cross sections of the object. Click the pop-up button to open the Cross
Section Properties dialog box. For more information, see “Create cross sections” on page 393.
Examples of model rendering modes
The model rendering modes include combinations of factors that affect the appearance of the 3D object. The illus-
tration below shows a simple object rendered in each of the available modes.
AB C D
E F G H
I J K L
M N O
Model rendering modes
A. Solid B. Transparent Bounding Box C. Transparent D. Solid Wireframe E. Illustration F. Solid Outline G. Shaded Illustration
H. Bounding Box I. Transparent Bounding Box Outline J. Wireframe K. Shaded Wireframe L. Transparent Wireframe M. Hidden
Wireframe N. Ver tic es O. Shaded Vertices
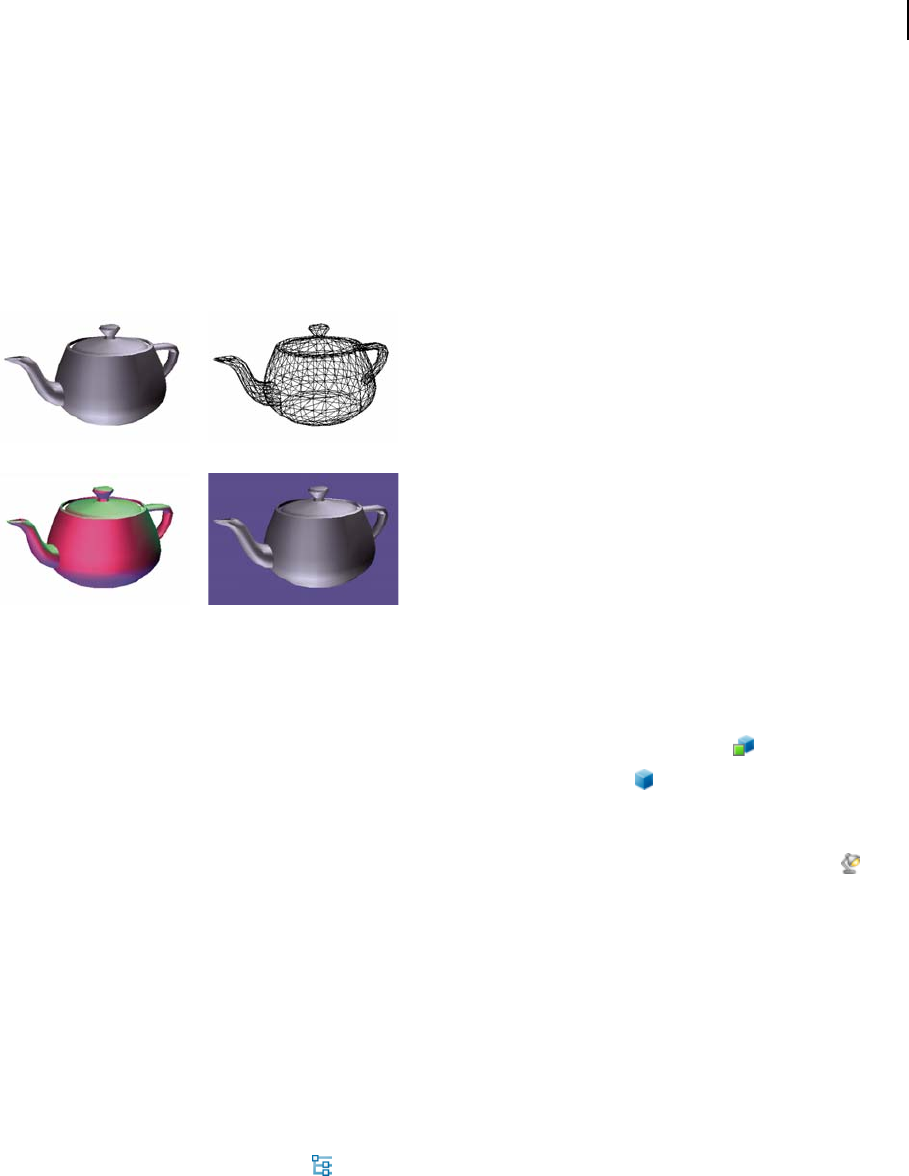
391
ADOBE ACROBAT 8 PROFESSIONAL
User Guide
Editing 3D models
Use a 3D authoring application to make changes to your 3D source images.
Change rendering mode, lighting, projection, and background
The model rendering mode determines the surface appearance of the 3D model. The default rendering mode is
usually solid, but you can also choose another rendering mode. You can also change the lighting of the 3D model as
well as the background.
A B
C D
Changing the appearance of the 3D model
A. Default appearance B. Wireframe rendering mode C. Colored lighting D. Different background color
❖ Use items on the 3D toolbar to make any of these changes:
• To change the rendering mode, choose an option from the Model Render Mode pop-up menu
• To view an orthographic projection, click the Use Orthographic Projection button . An orthographic projection
effectively removes a dimension, preserving the size ratio between objects but giving the 3D model a less realistic
appearance. Click the button again to use perspective projection.
• To turn lighting on or off or to change lighting, choose an option from the Enable Extra Lighting pop-up menu
• To change the background color, click the arrow next to the Background Color swatch and choose a color.
Note: Model rendering modes, lighting schemes, and background color options are also available by right-
clicking/Control-clicking the 3D model. Model rendering modes also appear under the Options menu on the Model Tree.
See also
“Examples of model rendering modes” on page 390
Model Tree overview
The Model Tree appears in the navigation pane on the left side of the work area. You can also open the Model Tree
by clicking the Toggle Model Tree button on the 3D toolbar, or by right-clicking/Control-clicking the 3D model
and choosing Show Model Tree.
Note: Using the Model Tree requires version 7.0.7 or later of either Acrobat or Adobe Reader. Users with earlier versions
can interact with 3D models but not with the Model Tree.
.
.
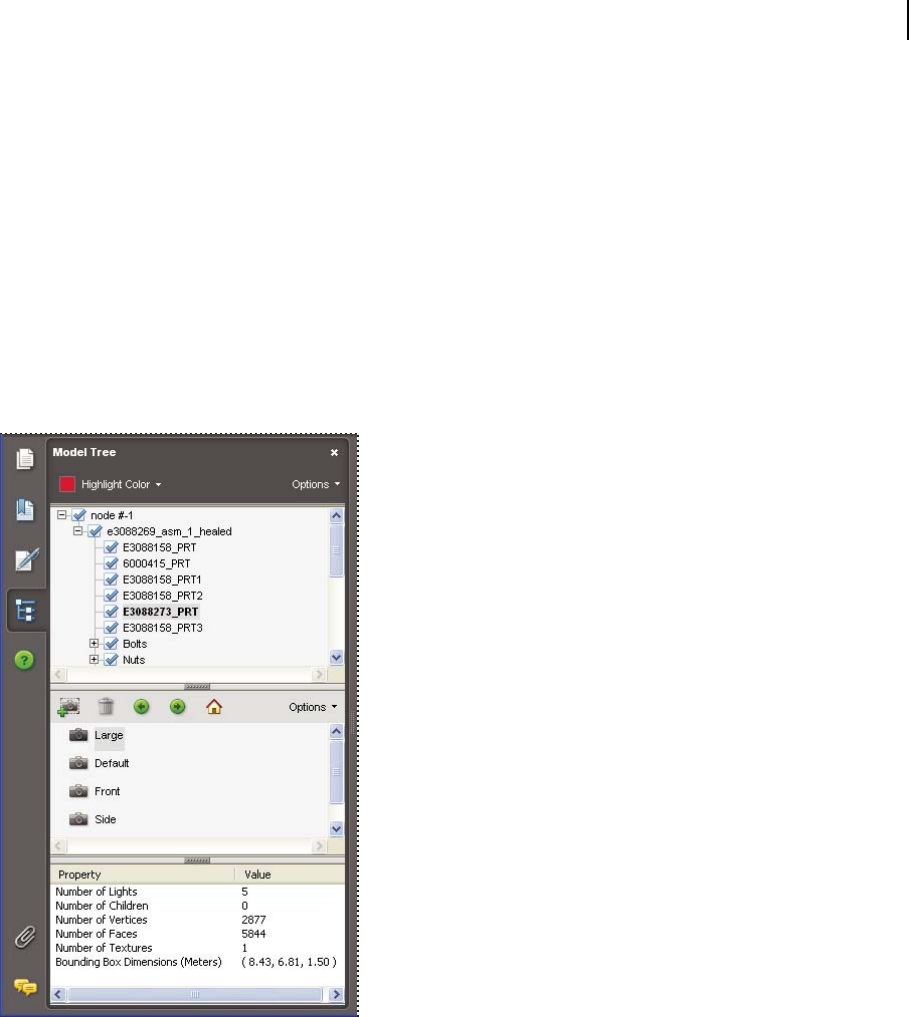
392
ADOBE ACROBAT 8 PROFESSIONAL
User Guide
The Model Tree has three panes, each of which displays a specific type of information or controls.
Structure pane The topmost pane shows the tree structure of the 3D object. For example, a 3D object depicting a
car may have separate groups of objects (called nodes) for the chassis, engine, and wheels. In this pane, you can move
through the hierarchy and select, isolate, or hide various parts.
Product Manufacturing Information (PMI) appears as a group of items on the same hierarchical level as its related
object or assembly.
View pane The middle pane lists the defined views, which you can add to and edit. For example, after you isolate
and rotate a part, you can save that particular view. After making other transformations, you can simply click the
view you created to return the 3D model to the view that you saved earlier. See “Set 3D views” on page 397.
Object Data pane The lower pane displays other information, including properties and metadata, if any, about the
object or part. You cannot edit this information for 3D objects in Acrobat.
A
B
C
Model Tree
A. 3D object’s hierarchy B. Saved views C. Part or object information
Note: You can change the default behavior for the Model Tree by choosing Edit > Preferences (Windows) or Acrobat >
Preferences (Mac OS), selecting 3D under Categories, and then choosing an option from the Open Model Tree On 3D
Activation menu.
In some instances, the author of the PDF can set up a 3D model in the conversion settings so that clicking it automat-
ically displays the Model Tree.
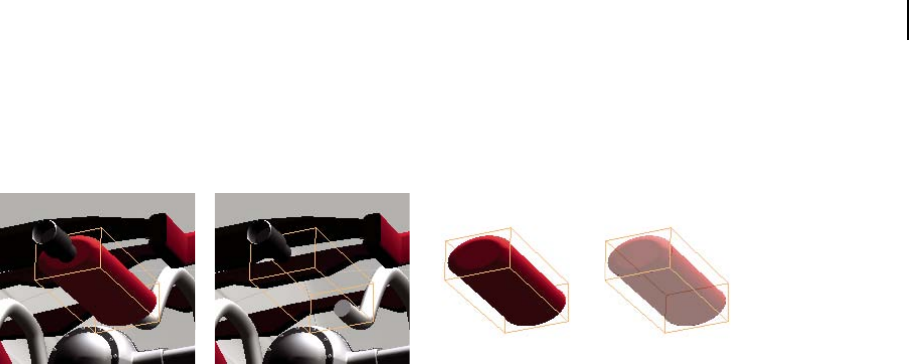
393
ADOBE ACROBAT 8 PROFESSIONAL
User Guide
Hide, isolate, and change the appearance of parts
Some 3D models are composed of individual parts. You can use the Model Tree to hide or isolate parts, zoom in to
parts, or make parts transparent. Parts that show in the 3D model appear in the tree with a check mark next to them.
AB C D
Manipulating parts
A. Selected part B. Hidden part C. Isolated part D. Transparent part
1 In the 3D model, use the Hand tool to click the part you want to manipulate. If a preference setting prevents you
fromusingthe Hand tool,use theObjectDatatool(Tools>Object Data >ObjectDataTool) to selectparts. Or,select
the part in the Model Tree list.
2 From the Options menu in the top pane of the Model Tree, choose any of the following:
Note: The items that appear on the Options menu and the order in which they are listed depend on whether the selected
3D model is composed of just one part or multiple parts. Many of these options are also available by right-
clicking/Control-clicking a part in the 3D model.
Model Render Mode Changes the surface appearance of the entire 3D model according to the item you choose from
the submenu: Transparent Bounding Box, Solid, Transparent, Solid Wireframe, and so on.
Show All Parts Displays the entire 3D model.
Fit Visible Displays all visible parts and centers them in the view.
Display Bounding Box Displays the box that encloses the 3D object or selected parts of the model.
Set Bounding Box Color
Changes the color of the bounding box. Choose this option, select a color, and then click OK.
Hide Displays themodel withoutshowingtheselectedparts.Youcanalsoselectanddeselectcheck boxesinthetop
pane of the Model Tree to hide and show different parts.
Isolate Displays only the selected part, hiding all others.
Zoom To Part Changes the center focus from the entire 3D model to the selected parts. This setting is especially
useful for rotating a part, allowing the rotation to occur around the part’s center focus rather than that of the entire
model.
Transparent Displays a see-through version of the selected part.
Export As XML Creates a separate XML file of either Whole Tree or Current Node of the 3D model.
Note: If the 3D model was created to include Product Manufacturing Information (PMI), options for showing and hiding
the PMI may be available on this menu.
Create cross sections
Displaying a cross section of a 3D model is like cutting it in half and looking inside. Use the Cross Section Controls
dialog box to adjust the alignment, offset, and tilt of the cutting plane.
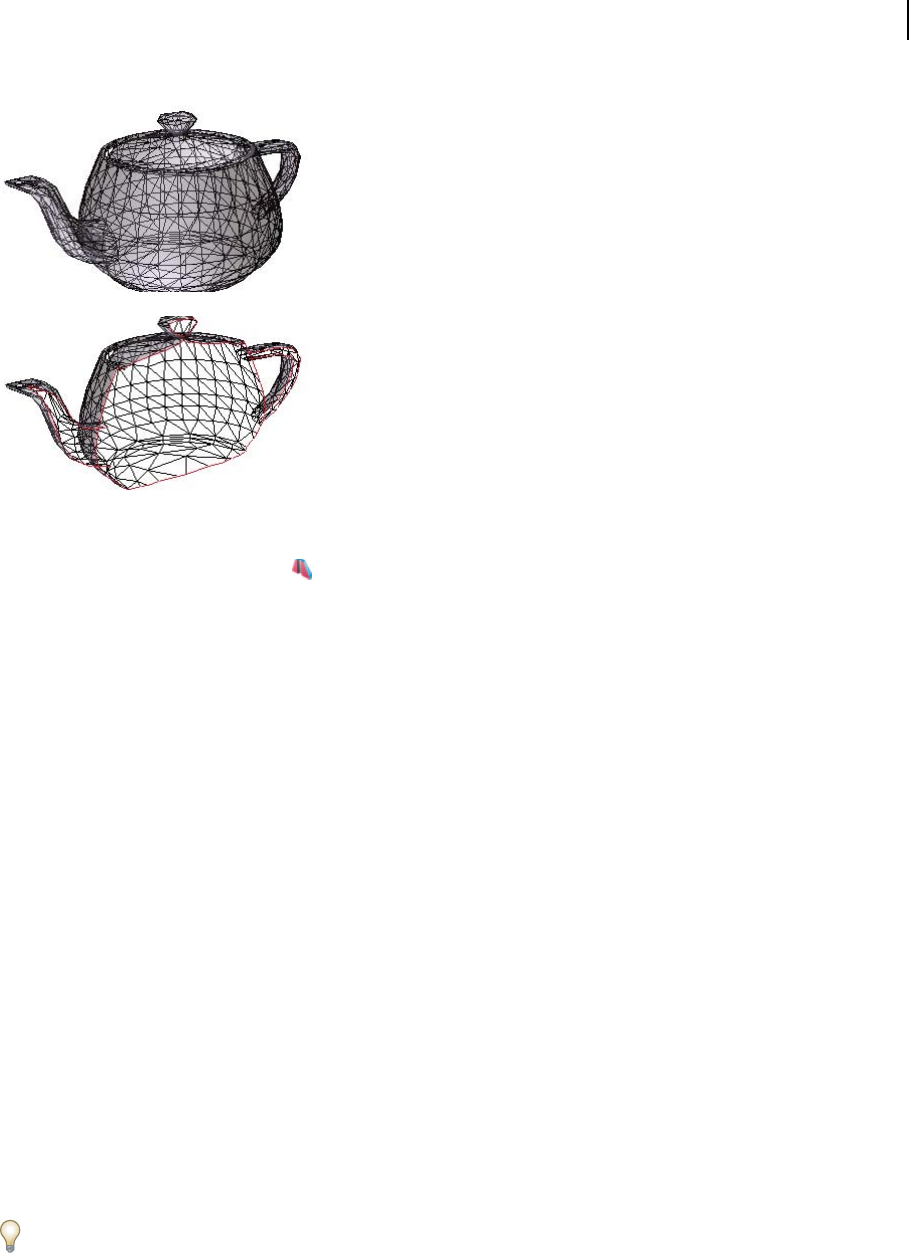
394
ADOBE ACROBAT 8 PROFESSIONAL
User Guide
Before and after cross section
1 Click the Toggle Cross Section icon on the 3D toolbar to turn on or off the cross section.
2 (Optional) Click the arrow next to the Toggle Cross Section icon, and choose Cross Section Properties, which
opens the Cross Section Controls dialog box. Then do any of the following:
• Change settings under Alignment, Display Settings, and Position And Orientation.
• Click the Save Section View button to save the current cross-sectional view. (The saved view will appear on the
Views menu in the 3D toolbar and in the View pane of the Model Tree with a default name, SectionView[n].)
Cross Section Controls options
Changes you make here are applied immediately. To see these changes, make sure that the Cross Section Controls
window does not block your view of the active 3D model. The Cross Section Controls window remains on top if you
focus or interact with the underlying PDF. To close it, click the Close button in the upper right corner.
Enable Cross Section When selected, makes the other options available.
Alignment Determines the axis (x, y, or z) to which the cross section aligns.
Align To Face Cutsthecross sectiononaplanedefinedbythesurfaceofanyfacethatyouthenclickinthe 3D model.
Align To 3 Points Cuts the cross section on a plane defined by any three points that you click on the 3D model.
Show Intersections Indicates where the cutting plane slices the 3D model by adding a colored outline. Click the
color swatch if you want to select a different color.
Show Cutting Plane Displays the two-dimensional field that cuts the 3D model. Click the color swatch if you want
to select a different color, and enter a different percentage if you want to change the opacity of the plane.
Align Camera With Cutting Plane Rotates the 3D model so that it’s level with the cross section’s cutting plane.
Offset Determines how much of the 3D model is sliced. Drag the slider left or right, or change the percentage.
To understand how each axis divides the 3D model, select an axis and then drag the Offset slider back and forth and
observe the changes in the embedded 3D model.
Flip Reverses the cross section. For example, if the top half of the model is cut off in the cross section, clicking Flip
displays the top half and cuts off the bottom half.
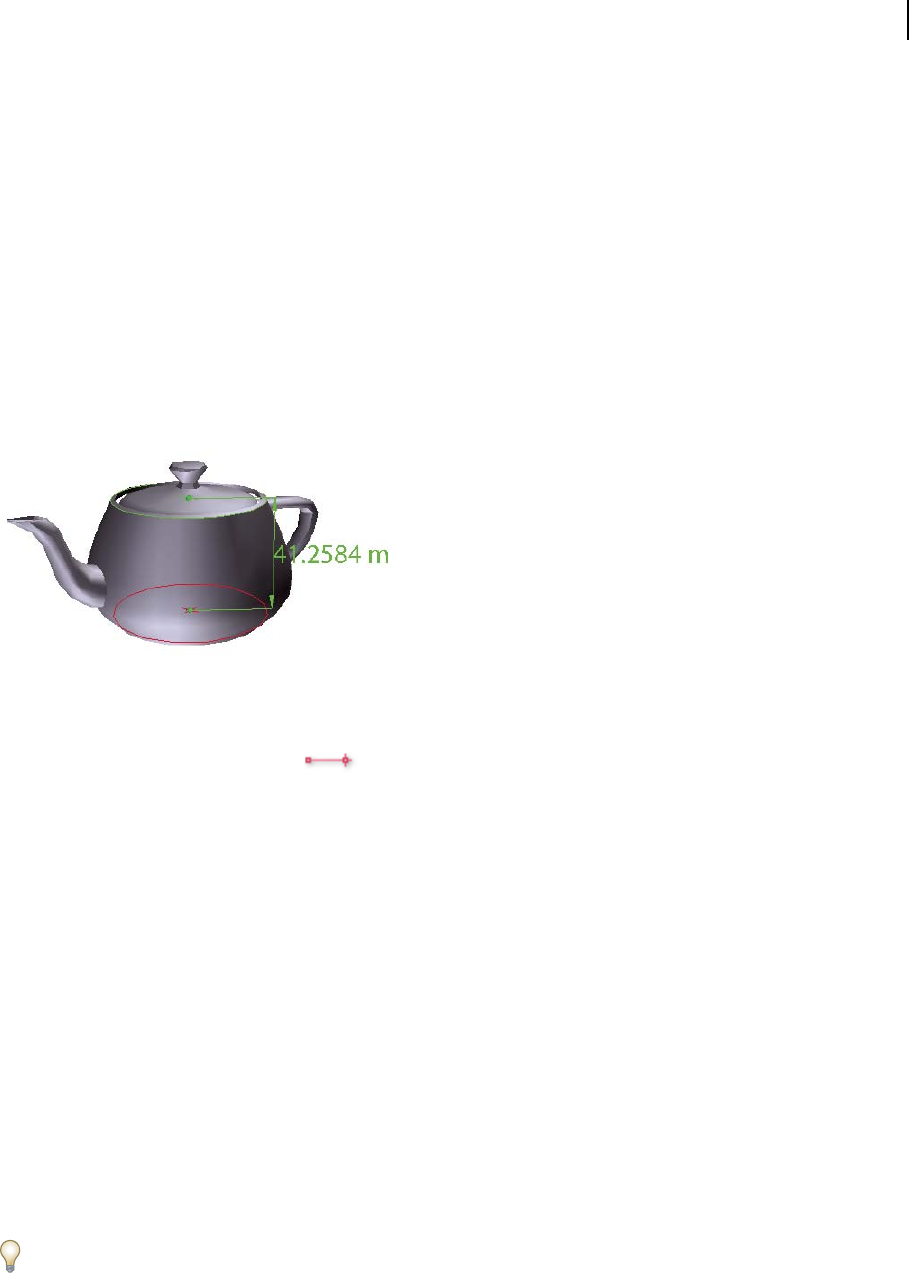
395
ADOBE ACROBAT 8 PROFESSIONAL
User Guide
Tilt sliders Determine the angles between the cutting plane and the axes. Drag the sliders left or right, or change the
percentages.
Save Section View Adds the current cross-sectional view to the lists in the 3D toolbar and Model Tree, where you
can select it to return the model to this view. The saved view is given a default name, SectionView[n].
Measure 3D objects
Use the 3D Measurement Tool to measure 3D models. You can create measurements between combinations of points
or edges of the 3D model. As you move the pointer over the 3D model, specific points and edges are highlighted. The
3D Measurement Tool supports four types of measurements: perpendicular distance between two straight edges,
linear distance between two points, the radius of circular edges, and the angle between two edges (or three points).
You can also display comments while taking measurements. However, these comments (also called measurement
markups) are not preserved after the document is closed.
3D measurement display
1 Click a 3D model in a PDF to enable it.
2 Click the 3D Measurement Tool icon on the 3D toolbar. (If the 3D toolbar view is set for consolidated
tools, the 3D Measurement tool is available on the pop-up menu under the Rotate, Spin, Pan, Zoom, or Walk tool.)
3 Select the options you want in the Snap Enables, Measurement Types, and Units And Markup Settings areas of the
3D Measurement Tool palette.
4 Under Units And Markup Settings, change the options, as needed. Leave the 3D Measurement Tool palette open.
5 Measure the 3D model:
• To measure the distance between two positions on the 3D model, click to set a start point and move the pointer
to another location or an edge.
• To measure the circumference of a round shape, move the pointer to the edge of the shape so that a circle appears,
and click once.
• To create and set the position of an annotation on the measurement, select Measurement Markup in the 3D
Measurement Tool palette and then type a markup message in Annotation. Measure the 3D model as described
above, but click to set the end point for the measurement and then click a third time to set the location of the
measurement and annotation text.
• To discontinue a measurement, right-click/Control-click and choose Cancel Measurement.
• To delete a measurement markup, click it with the 3D Measurement Tool and press Delete.
While you measure, you can Alt-drag/Command-drag to rotate. Hold down Shift and drag to pan. Hold down
Alt+Shift/Command+Shift and drag to zoom. Hold down Ctrl to disable snap.

396
ADOBE ACROBAT 8 PROFESSIONAL
User Guide
Snap Enables options in the 3D Measurement Tool palette
3D Snap To Edge Endpoints
s S
s S
Sna
Snaps to the entire edge.
3D Snap To Linear Edge naps to a straight-line segment of an edge.
3D Snap To Radial Edge naps to a circumference.
3D Snap To Silhouettes ps to the apparent edge of a part, such as the side of a cylinder.
3D Snap To Planar Faces Snaps to the geometric plane making up a face of the part.
Measurement Types options in the 3D Measurement Tool palette
3D Point To Point Measurement Measures thedistancebetweentwopositionsonthe3Dmodel thatyouclickto
set a start point and then click another location to set an end point or edge.
3D Perpendicular Dimension
Measu
t
Measuresthedistancebetweentwoedgestakenatarightangletothestartingedge.
3D Radial Dimension res the radius at the location clicked.
3D Angle Measuremen Measures the angle between two edges.
Units And Markup options in the 3D Measurement Tool palette
Note: If you do not see these settings, choose Show Details on the palette’s Options menu.
Model Units Scale Ratio Shows the relationship between units in the model and real object measurements. Use the
Display Units menu to select a different unit for the real object measurements.
Measurement Markup Select to have the measurements appear as comments in the PDF.
Label Type text that you want to appear with the measurement, both in the 3D model area and in the Comments
panel. (Not available if Measurement Markup is not selected.)
3D Measurement Tool viewing options
Use the Options menu in the 3D Measurement tool palette to set viewing options.
Note: The3DMeasurementToolpalettechangestotheDistanceToolpalette afterabriefdelaywhenthepointer moves
outside the canvas area of the 3D model. Moving the pointer back over the 3D model restores the 3D Measurement Tool
options. The Ortho option is available only for the 2D Distance, Perimeter, and Area tools.
Show Details Shows or hides the Cursor Location and Units And Markup Settings options in the 3D Measurement
Tool palette.
Show Rulers Shows or hides vertical and horizontal rulers on the page. (Has the same effect as choosing View >
Rulers.)
Snap To 2D Content Ensures precise measurement in 2D objects.
Snap To 3D Content Ensures precise measurement in 3D objects
3D Measurement Navigation Tips Opens a dialog box with keyboard shortcuts for several 3D features. You can use
these shortcuts while you are measuring.

397
ADOBE ACROBAT 8 PROFESSIONAL
User Guide
Measuring preferences
Change the 3D Measuring preferences to determine how 3D data is measured. These options appear in the
Measuring (3D) panel of the Preferences dialog box.
Use Scales And Units From Model (When Present) Displays measurements based on the model units, if present,
generated from the original 3D model. Deselect this option to specify the units of measurements manually. This
setting can be changed in the 3D Measurement Tool palette.
Use Default Display Unit Uses units of measurement that you specify here rather than those in the 3D model.
Significant Digits To Display Specifies the maximum number of digits in the measurement number.
3D Measuring Line Color Specifies the color of the line that appears when you click or drag to measure an object.
Measure Feedback Size Sets the text size for the measurement display.
Angular Measurements Shown In Specifies units as either degrees or radians.
Circular Measurements Shown As Designates whether the diameter or radius is measured for circular parts.
3D Snap Settings Turns on snap and specifies whether points, arcs, edges, silhouette edges, or faces are snapped to.
Sensitivityindicateshowclosethepointer needstobetothe itembeingsnappedto.For SnapHintColor, specifythe
color of the snap line that appears when you hold the pointer over the 3D object.
Set 3D views
The default view of a 3D model lets you quickly revert to a starting point at any time as you interact with the model.
A default view is different from a preview, which determines what the 3D model looks like when it’s not activated.
The list of all available views for the 3D model appears in the Views menu on the 3D toolbar and in the View pane
of the Model Tree.
You can also create additional views of the 3D model in Acrobat that let you quickly navigate the 3D content as you
want (such as top, bottom, left, right, inside, outside, exploded, or assembled). A view can include lighting, camera
position, rendering mode, the Model Tree state, and transparency and cross section settings. When you add a
comment or markup to the 3D model, Acrobat automatically creates a view.
Youcanlinkviews to bookmarksintheBookmarkspanel,oryou canusetheGoTo3DViewactiontolinkviews to
buttons and links that you create on the page.
Create a new view
1 With the Hand tool, click the 3D model to enable it.
2 Use the Rotate, Pan, and Zoom tools in the 3D toolbar to change the view.
3 In the Model Tree, click the Create View icon .
Display a view
❖ Use these methods to change the view, as appropriate:
• From the 3D toolbar, select the view from the Views pop-up menu.
• In the Model Tree, click the view name.
• Click the Default View icon .

398
ADOBE ACROBAT 8 PROFESSIONAL
User Guide
Change the default view
❖ In the View pane of the Model Tree, do one of the following:
• Select a view, and then choose Set As Default View from the Options menu.
• Right-click/Control-click a view, and then choose Set As Default View.
Add a 3D view to a bookmark or link
This process requires a 3D model with one or more defined views, which you can create. You can associate the view
with an existing bookmark or link, or you can create a new one for this purpose.
1 Do one of the following:
• To create a new bookmark, click the New Bookmark button at the top of the Bookmarks panel, and type a new
name for the bookmark. Then, right-click/Control-click it and choose Properties.
• To create a new link, choose Tools > Advanced Editing > Link Tool, and drag to create a link rectangle anywhere
on the page. Then, under Link Action, in the Create Link dialog box, select Custom Link, and click Next.
• To link a view to an existing bookmark or link, right-click/Control-click the bookmark or link, and choose
Properties.
2 In the Properties dialog box, click the Actions tab.
3 From the Select Action menu, choose Go To A 3D View, and then click Add.
4 In the Select A 3D View dialog box, select the 3D annotation for the 3D model from the list on the left, and then
select a view option on the right:
Current View Matches the 3D rotation, pan, and zoom characteristics that are active in your document at the time
you create the link or bookmark, whether or not this view is listed on the Model Tree as a defined view.
First View Changes to the view that appears at the top of the list in the Model Tree.
Last View Changes to the view definition that appears at the bottom of the list in the Model Tree.
Previous View Moves up the Model Tree list of defined views, one view at a time.
Next View Moves down the Model Tree list of defined views, one view at a time.
Named View Changes to the defined view that you select from the list appearing below this option.
5 (Optional) To make a bookmark or link also jump to a specific page and page view, choose Go To A Page View
on the Selection Action menu, and click Add. Then use the scroll bars and zoom tools to adjust the page view before
you click the Set Link button. When finished, click Close in the Properties dialog box.
Delete a 3D view
❖ Do one of the following:
• On the3Dtoolbar,openthe Viewspop-upmenuand chooseManage Views.Selecttheviews youwanttoremove,
and click Delete View.
• IntheViewpaneoftheModelTreepanel,selecttheviewsyou want toremove.FromwithintheViewpane,either
click the Delete button or click the Options button and choose Delete View.

399
ADOBE ACROBAT 8 PROFESSIONAL
User Guide
3D preferences
In the 3D panel of the Preferences dialog box—Edit > Preferences (Windows) or Acrobat > Preferences (Mac OS)—
you can determine whether the 3D toolbar and Model Tree are displayed by default. You can also specify a default
renderer and determine whether animations are allowed.
Preferred Renderer Specifiestherenderingengineusedtoaffectbothperformanceandquality,soit’simportantto
select the appropriate renderer. Depending on your system, you may want to change your render engine. For
Windows XP, you may be able to select DirectX 8, DirectX 9, or Software. For Mac OS 10.3 or later, you can select
OpenGL or Software. If you select a DirectX or OpenGL option, all rendering takes place using the graphics chip on
thevideocard.IfSoftwareisselected,renderingmaytakemoretime,buttheperformancemaybemoreconsistent
with that of the model in its originating application.
Enable Double-Sided Rendering Some model parts have two sides. To save time and space, you can deselect this
option to render only the side facing the user. If the user looks inside a part rendered with only one side, the back
side would be invisible.
Preferred 3D PMI Rendering Mode Specifies the PMI mode to use for rendering. You can select one of the following
options:
Use Content Setting—The rendering of the PMI uses the setting of each PMI to decide whether or not it uses the Z-
buffer.
Always Render 3D PMI In Front Of Model—The rendering of the PMI ignores the Z-buffer regardless of the setting
in the file.
Always Render 3D PMI Using Z-buffer—The rendering of the PMI always turns on Z-buffer regardless of the setting
in the file.
Enable Hardware Rendering For Legacy Video Cards Forces the use of a hardware accelerator for even video cards
that do not support a pixel shader.
Open Model Tree On 3D Activation Determines whether the Model Tree is displayed when the 3D model is
activated. Choose Use Annotation’s Setting to use whichever setting the author used when adding the 3D model to
the PDF.
Default Toolbar State Determines whether the 3D toolbar is shown or hidden when a 3D model is activated. Choose
Use Annotation’s Setting to use whichever setting the author used when adding the 3D model to the PDF.
Enable Toggle For 3D Toolbar Control Places a triangular button over the selected 3D model that hides or displays
the 3D toolbar.
Enable 3D Selection For The Hand Tool Lets the user select and highlight parts of the 3D model using the Hand tool.
If this option is not selected, use the Object Data tool (Tools > Object Data > Object Data Tool) to select the object.
Consolidate 3D Tools On The 3D Toolbar Selecting this option places the manipulation and navigation tools under
the Rotate tool, thereby shortening the 3D toolbar.
Enable View Transitions Some 3D models include animated transitions between views. Deselect this option if you
want to prevent this 3D animation.
Optimization Scheme For Low Framerate Specifies what happens to animations of complex models when the
framerate becomes low. None does not compromise the visuals and leaves the framerate low. Bounding Box shows
the three-dimensional planes enclosing the parts instead of the parts themselves, which keeps the framerate high.
Drop Objects does not show some parts of the model in order to keep the framerate high.
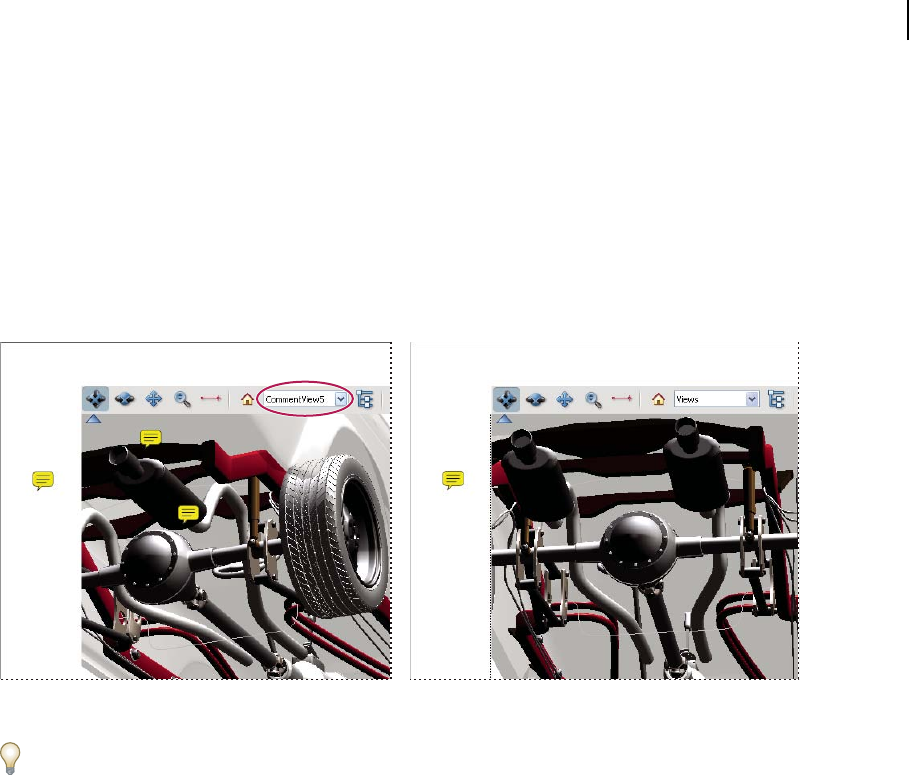
400
ADOBE ACROBAT 8 PROFESSIONAL
User Guide
Framerate Threshold Sets the minimum framerate, either by dragging the slider or entering a number in the value
box. If the framerate drops below that number of frames per second, the Optimization Scheme For Low Framerate
option goes into effect.
Comment on 3D designs
Comments added to a 3D object are associated with specific views that are defined when the comments are added.
If the view is changed—for example, if the 3D object is rotated or moved—the comments are no longer visible.
Note: Adding comments to 3D model views requires version 7.0.7 or later of Acrobat or Reader.
When the view of a 3D object is changed, any comment associated with that object disappears (right).
If you don’t want a comment to be associated with a 3D view, add the comment to another part of the page, outside
the 3D object area.
See also
“Enable commenting for Adobe Reader users” on page 155
“Commenting” on page 168
Add comments to a 3D object
Note: Adobe Reader users can add comments to a PDF if the document author enables commenting for that PDF.
1 Select a tool from the Comment & Markup toolbar. (The Text Edit tools have no effect on 3D objects.)
2 Click inside the 3D object area to create a new comment and also a new view definition in the Model Tree with a
default name such as “CommentView1.”
3 To add more comments, do one of the following:
• Tocreatean additionalcommentinaview,makesurethatthecommentingviewyouwantisselectedintheModel
Tree, and click inside the 3D object area.
• To create an additional comment in a new commenting view, make sure that no commenting view is selected in
the Model Tree, and click inside the 3D object area.

401
ADOBE ACROBAT 8 PROFESSIONAL
User Guide
Note: If you delete one of these automatically generated commenting views, the associated comments are still available.
You can view and select them in the Comments panel or in the Model Tree, where they are listed under the views.
Selecting a comment switches the 3D model to the same viewing configuration it had when the comment was added.
Display comments for a 3D object
1 Do one of the following:
• In the Model Tree, select a view that contains comments.
• Click the Comments button or choose View > Navigation Panels > Comments.
• In the View pane of the Model Tree, click Options and choose List Comments.
2 Double-click a comment to open its comment window.
3 Repeat steps 1 and 2 as needed to see other comments associated with other views.
Whenyouselectacomment,the3Dmodelappearsinthesameviewingconfigurationithadwhenthecommentwas
added, whether or not that view has been deleted from the list.
Run a JavaScript
If there is a separate JavaScript file associated with the 3D model PDF, you can activate it.
1 Open the PDF in Acrobat.
2 Right-click/Control-click the 3D model in the PDF, and choose Run JavaScript.

402
Chapter 14: Color management
Understanding color management
Why colors sometimes don’t match
No device in a publishing system is capable of reproducing the full range of colors viewable to the human eye. Each
device operates within a specific color space that can produce a certain range, or gamut, of colors.
A color model determines the relationship between values, and the color space defines the absolute meaning of those
values as colors. Some color models (such as CIE L*a*b) have a fixed color space because they relate directly to the
way humans perceive color. These models are described as being device-independent. Other color models (RGB,
HSL, HSB, CMYK, and so forth) can have many different color spaces. Because these models vary with each
associated color space or device, they are described as being device-dependent.
Because of these varying color spaces, colors can shift in appearance as you transfer documents between different
devices. Color variations can result from differences in image sources; the way software applications define color;
print media (newsprint paper reproduces a smaller gamut than magazine-quality paper); and other natural varia-
tions, such as manufacturing differences in monitors or monitor age.
CMYK
RGB
A B
C
Color gamuts of various devices and documents
A. Lab color space B. Documents (working space) C. Devices
What is a color management system?
Color-matching problems result from various devices and software using different color spaces. One solution is to
have a system that interprets and translates color accurately between devices. A color management system (CMS)
comparesthecolorspaceinwhichacolorwascreated tothecolorspaceinwhichthesamecolorwill beoutput,and
makes the necessary adjustments to represent the color as consistently as possible among different devices.
A color management system translates colors with the help of color profiles. A profile is a mathematical description
of a device’s color space. For example, a scanner profile tells a color management system how your scanner “sees”
colors. Adobe color management uses ICC profiles, a format defined by the International Color Consortium (ICC)
as a cross-platform standard.

403
ADOBE ACROBAT 8 PROFESSIONAL
User Guide
Because no single color-translation method is ideal for all types of graphics, a color management system provides a
choice of rendering intents, or translation methods, so that you can apply a method appropriate to a particular
graphics element. For example, a color translation method that preserves correct relationships among colors in a
wildlife photograph may alter the colors in a logo containing flat tints of color.
Note: Don’t confuse color management with color correction. A color management system won’t correct an image that
was saved with tonal or color balance problems. It provides an environment where you can evaluate images reliably in
the context of your final output.
See also
“About color profiles” on page 414
“About rendering intents” on page 423
Do you need color management?
Without a color management system, your color specifications are device-dependent. You might not need color
management if your production process is tightly controlled for one medium only. For example, you or your print
service provider can tailor CMYK images and specify color values for a known, specific set of printing conditions.
The value of color management increases when you have more variables in your production process. Color
management is recommended if you anticipate reusing color graphics for print and online media, using various
kinds of devices within a single medium (such as different printing presses), or if you manage multiple workstations.
You will benefit from a color management system if you need to accomplish any of the following:
• Get predictable and consistent color output on multiple output devices including color separations, your desktop
printer, and your monitor. Color management is especially useful for adjusting color for devices with a relatively
limited gamut, such as a four-color process printing press.
• Accurately soft-proof (preview) a color document on your monitor by making it simulate a specific output device.
(Soft-proofing is subject to the limitations of monitor display, and other factors such as room lighting conditions.)
• Accurately evaluate and consistently incorporate color graphics from many different sources if they also use color
management, and even in some cases if they don’t.
• Send color documents to different output devices and media without having to manually adjust colors in
documents or original graphics. This is valuable when creating images that will eventually be used both in print
and online.
• Print color correctly to an unknown color output device; for example, you could store a document online for
consistently reproducible on-demand color printing anywhere in the world.
Creating a viewing environment for color management
Your work environment influences how you see color on your monitor and on printed output. For best results,
control the colors and light in your work environment by doing the following:
• View your documents in an environment that provides a consistent light level and color temperature. For example,
the color characteristics of sunlight change throughout the day and alter the way colors appear on your screen, so
keep shades closed or work in a windowless room. To eliminate the blue-green cast from fluorescent lighting, you
can install D50 (5000˚ Kelvin) lighting. You can also view printed documents using a D50 lightbox.
404
ADOBE ACROBAT 8 PROFESSIONAL
User Guide
• View your document in a room with neutral-colored walls and ceiling. A room’s color can affect the perception of
both monitor color and printed color. The best color for a viewing room is neutral gray. Also, the color of your
clothing reflecting off the glass of your monitor may affect the appearance of colors on-screen.
• Remove colorful background patterns on your monitor desktop. Busy or bright patterns surrounding a document
interfere with accurate color perception. Set your desktop to display neutral grays only.
• View document proofs in the real-world conditions under which your audience will see the final piece. For
example, you might want to see how a housewares catalog looks under the incandescent light bulbs used in homes,
or view an office furniture catalog under the fluorescent lighting used in offices. However, always make final color
judgements under the lighting conditions specified by the legal requirements for contract proofs in your country.
Keeping colors consistent
About color management in Adobe applications
Adobe color management helps you maintain the appearance of colors as you bring images in from external sources,
edit documents and transfer them between Adobe applications, and output your finished compositions. This system
is based on conventions developed by the International Color Consortium, a group responsible for standardizing
profile formats and procedures so that consistent and accurate color can be achieved throughout a workflow.
By default, color management is turned on in color-managed Adobe applications. If you purchased the Adobe
Creative Suite, color settings are synchronized across applications to provide consistent display for RGB and CMYK
colors. This means that colors look the same no matter which application you view them in.
Color settings for Adobe Creative Suite are synchronized in a central location through Adobe Bridge.
If you decide to change the default settings, easy-to-use presets let you configure Adobe color management to match
common output conditions. You can also customize color settings to meet the demands of your particular color
workflow.

405
ADOBE ACROBAT 8 PROFESSIONAL
User Guide
Keep in mind that the kinds of images you work with and your output requirements influence how you use color
management. For example, there are different color-consistency issues for an RGB photo printing workflow, a
CMYK commercial printing workflow, a mixed RGB/CMYK digital printing workflow, and an Internet publishing
workflow.
Basic steps for producing consistent color
1. Consult with your production partners (if you have any) to ensure that all aspects of your color
management workflow integrate seamlessly with theirs.
Discuss how the color workflow will be integrated with your workgroups and service providers, how software and
hardware will be configured for integration into the color management system, and at what level color management
will be implemented. (See “Do you need color management?” on page 403.)
2. Calibrate and profile your monitor.
A monitor profile is the first profile you should create. Seeing accurate color is essential if you are making creative
decisions involving the color you specify in your document. (See “Calibrate and profile your monitor” on page 416.)
3. Add color profiles to your system for any input and output devices you plan to use, such as scanners and
printers.
The color management system uses profiles to know how a device produces color and what the actual colors in a
document are. Device profiles are often installed when a device is added to your system. You can also use third-party
software and hardware to create more accurate profiles for specific devices and conditions. If your document will be
commercially printed, contact your service provider to determine the profile for the printing device or press
condition. (See “About color profiles” on page 414 and “Install a color profile” on page 416.)
4. Set up color management in Adobe applications.
The default color settings are sufficient for most users. However, you can change the color settings by doing one of
the following:
• If you use multiple Adobe applications, use Adobe® Bridge CS3 to choose a standard color management configu-
ration and synchronize color settings across applications before working with documents. (See “Synchronize color
settings across Adobe applications” on page 406.)
• If you use only one Adobe application, or if you want to customize advanced color management options, you can
change color settings for a specific application. (See “Set up color management” on page 406.)
5. (Optional) Preview colors using a soft proof.
After you create a document, you can use a soft proof to preview how colors will look when printed or viewed on a
specific device. (See “Soft-proofing colors” on page 410.)
Note: A soft proof alone doesn’t let you preview how overprinting will look when printed on an offset press. If you work
with documents that contain overprinting, turn on Overprint Preview to accurately preview overprints in a soft proof.
6. Use color management when printing and saving files.
Keeping the appearance of colors consistent across all of the devices in your workflow is the goal of color
management. Leave color management options enabled when printing documents, saving files, and preparing files
for online viewing. (See “Printing with color management” on page 412 and “Color-managing documents for online
viewing” on page 409.)

406
ADOBE ACROBAT 8 PROFESSIONAL
User Guide
Synchronize color settings across Adobe applications
If you use Adobe Creative Suite, you can use Adobe Bridge to automatically synchronize color settings across appli-
cations. This synchronization ensures that colors look the same in all color-managed Adobe applications.
If colorsettingsarenotsynchronized, awarningmessageappearsatthetop of theColor Settingsdialogboxineach
application. Adobe recommends that you synchronize color settings before you work with new or existing
documents.
1 Open Bridge.
To open Bridge from a Creative Suite application, choose File > Browse. To open Bridge directly, either choose Adobe
Bridge from the Start menu (Windows) or double-click the Adobe Bridge icon (Mac OS).
2 Choose Edit > Creative Suite Color Settings.
3 Select a color setting from the list, and click Apply.
If none of the default settings meet your requirements, select Show Expanded List Of Color Setting Files to view
additional settings. To install a custom settings file, such as a file you received from a print service provider, click
Show Saved Color Settings Files.
Set up color management
1 Do one of the following:
• (Illustrator, InDesign, Photoshop) Choose Edit > Color Settings.
• (Acrobat) Select the Color Management category of the Preferences dialog box.
2 Select a color setting from the Settings menu, and click OK.
The setting you select determines which color working spaces are used by the application, what happens when you
open and import files with embedded profiles, and how the color management system converts colors. To view a
description of a setting, select the setting and then position the pointer over the setting name. The description
appears at the bottom of the dialog box.
Note: Acrobat color settings are a subset of those used in InDesign, Illustrator, and Photoshop.
In certain situations, such as if your service provider supplies you with a custom output profile, you may need to
customize specific options in the Color Settings dialog box. However, customizing is recommended for advanced
users only.
Note: If you work with more than one Adobe application, it is highly recommended that you synchronize your color
settings across applications. (See “Synchronize color settings across Adobe applications” on page 406.)
See also
“Customize color settings” on page 419
Change the appearance of CMYK black (Illustrator, InDesign)
Pure CMYK black (K=100) appears jet black (or rich black) when viewed on-screen, printed to a non-PostScript
desktop printer, or exported to an RGB file format. If you prefer to see the difference between pure black and rich
black as it will appear when printed on a commercial press, you can change the Appearance Of Black preferences.
These preferences do not change the color values in a document.
1 Choose Edit > Preferences > Appearance Of Black (Windows) or [application name] > Preferences > Appearance
Of Black (Mac OS).

407
ADOBE ACROBAT 8 PROFESSIONAL
User Guide
2 Choose an option for On Screen:
Display All Blacks Accurately Displays pure CMYK black as dark gray. This setting allows you to see the difference
between pure black and rich black.
Display All Blacks As Rich Black Displays pure CMYK black as jet black (RGB=000). This setting makes pure black
and rich black appear the same on-screen.
3 Choose an option for Printing/Exporting:
Output All Blacks Accurately When printing to a non-PostScript desktop printer or exporting to an RGB file format,
outputs pure CMYK black using the color numbers in the document. This setting allows you to see the difference
between pure black and rich black.
Output All Blacks As Rich Black When printing to a non-PostScript desktop printer or exporting to an RGB file
format, outputs pure CMYK black as jet black (RGB=000). This setting makes pure black and rich black appear the
same.
Managing process and spot colors
When color management is on, any color you apply or create within a color-managed Adobe application automati-
cally uses a color profile that corresponds to the document. If you switch color modes, the color management system
uses the appropriate profiles to translate the color to the new color model you choose.
Keep in mind the following guidelines for working with process and spot colors:
• Choose a CMYK working space that matches your CMYK output conditions to ensure that you can accurately
define and view process colors.
• Select colors from a color library. Adobe applications come with several standard color libraries, which you can
load using the Swatches panel menu.
• (Acrobat, Illustrator, and InDesign) Turn on Overprint Preview to get an accurate and consistent preview of spot
colors.
• (Acrobat, Illustrator, and InDesign) Use Lab values (the default) to display predefined spot colors (such as colors
from the TOYO, PANTONE, DIC, and HKS libraries) and convert these colors to process colors. Using Lab values
provides the greatest accuracy and guarantees the consistent display of colors across Creative Suite applications. If
you want the display and output of these colors to match earlier versions of Illustrator or InDesign, use CMYK
equivalent values instead. For instructions on switching between Lab values and CMYK values for spot colors,
search Illustrator or InDesign Help.
Note: Color-managing spot colors provides a close approximation of a spot color on your proofing device and monitor.
However, it is difficult to exactly reproduce a spot color on a monitor or proofing device because many spot color inks
exist outside the gamuts of many of those devices.
Color-managing imported images
Color-managing imported images (Illustrator, InDesign)
How imported images are integrated into a document’s color space depends on whether or not the image has an
embedded profile:
• When youimportanimagethat contains no profile,theAdobe applicationusesthe currentdocumentprofileto
define the colors in the image.

408
ADOBE ACROBAT 8 PROFESSIONAL
User Guide
• When you import an image that contains an embedded profile, color policies in the Color Settings dialog box
determine how the Adobe application handles the profile.
See also
“Color management policy options” on page 421
Using a safe CMYK workflow
A safe CMYK workflow ensures that CMYK color numbers are preserved all the way to the final output device, as
opposed to being converted by your color management system. This workflow is beneficial if you want to incremen-
tally adopt color management practices. For example, you can use CMYK profiles to soft-proof and hard-proof
documents without the possibility of unintended color conversions occurring during final output.
Illustrator and InDesign support a safe CMYK workflow by default. As a result, when you open or import a CMYK
image with an embedded profile, the application ignores the profile and preserves the raw color numbers. If you want
your application to adjust color numbers based on an embedded profile, change the CMYK color policy to Preserve
Embedded Profiles in the Color Settings dialog box. You can easily restore the safe CMYK workflow by changing the
CMYK color policy back to Preserve Numbers (Ignore Linked Profiles).
You can override safe CMYK settings when you print a document or save it to Adobe PDF. However, doing so may
cause colors to be reseparated. For example, pure CMYK black objects may be reseparated as rich black. For more
information on color management options for printing and saving PDFs, search in Help.
See also
“Color management policy options” on page 421
Preparing imported graphics for color management
Use the following general guidelines to prepare graphics for being color-managed in Adobe applications:
• Embed an ICC-compliant profile when you save the file. The file formats that support embedded profiles are
JPEG, PDF, PSD (Photoshop), AI (Illustrator), INDD (InDesign), Photoshop EPS, Large Document Format, and
TIFF.
• If you plan to reuse a color graphic for multiple final output devices or media, such as for print, video, and the web,
prepare the graphic using RGB or Lab colors whenever possible. If you must save in a color model other than RGB
or Lab, keep a copy of the original graphic. RGB and Lab color models represent larger color gamuts than most
output devices can reproduce, retaining as much color information as possible before being translated to a smaller
output color gamut.
See also
“Embed a color profile” on page 417

409
ADOBE ACROBAT 8 PROFESSIONAL
User Guide
View or change profiles for imported bitmap images (InDesign)
InDesignallowsyoutoview, override,ordisableprofilesforimportedbitmapimages.This maybenecessary when
you are importing an image containing no profile or an incorrectly embedded profile. For example, if the scanner
manufacturer’s default profile was embedded but you have since generated a custom profile, you can assign the newer
profile.
1 Do one of the following:
• If the graphic is already in layout, select it and choose Object > Image Color Settings.
• If you’re about to import the graphic, choose File > Place, select Show Import Options, select and open the file,
and then select the Color tab.
2 For Profile, choose the source profile to apply to the graphic in your document. If a profile is currently embedded,
the profile name appears at the top of the Profile menu.
3 (Optional) Choose a rendering intent, and then click OK. In most cases, it’s best to use the default rendering
intent.
Note: You can also view or change profiles for objects in Acrobat.
See also
“Convert document colors to another profile” on page 419
“Convert document colors to another profile (Photoshop)” on page 418
Color-managing documents for online viewing
Color-managing documents for online viewing
Color management for online viewing is very different from color management for printed media. With printed
media, you have far more control over the appearance of the final document. With online media, your document
will appear on a wide range of possibly uncalibrated monitors and video display systems, significantly limiting your
control over color consistency.
When you color-manage documents that will be viewed exclusively on the web, Adobe recommends that you use the
sRGB color space. sRGB is the default working space for most Adobe color settings, but you can verify that sRGB is
selected in the Color Settings dialog box (Photoshop, Illustrator, InDesign) or the Color Management preferences
(Acrobat). With the working space set to sRGB, any RGB graphics you create will use sRGB as the color space.
When working with images that have an embedded color profile other than sRGB, you should convert the image’s
colorstosRGBbeforeyousavetheimagefor useontheweb.Ifyouwanttheapplicationtoautomaticallyconvertthe
colors to sRGB when you open the image, select Convert To Working Space as the RGB color management policy.
(Make sure that your RGB working space is set to sRGB.) In Photoshop and InDesign, you can also manually convert
the colors to sRGB using the Edit > Convert To Profile command.
Note: In InDesign, the Convert To Profile command only converts colors for native, not placed, objects in the document.
See also
“About color working spaces” on page 419
“Color management policy options” on page 421
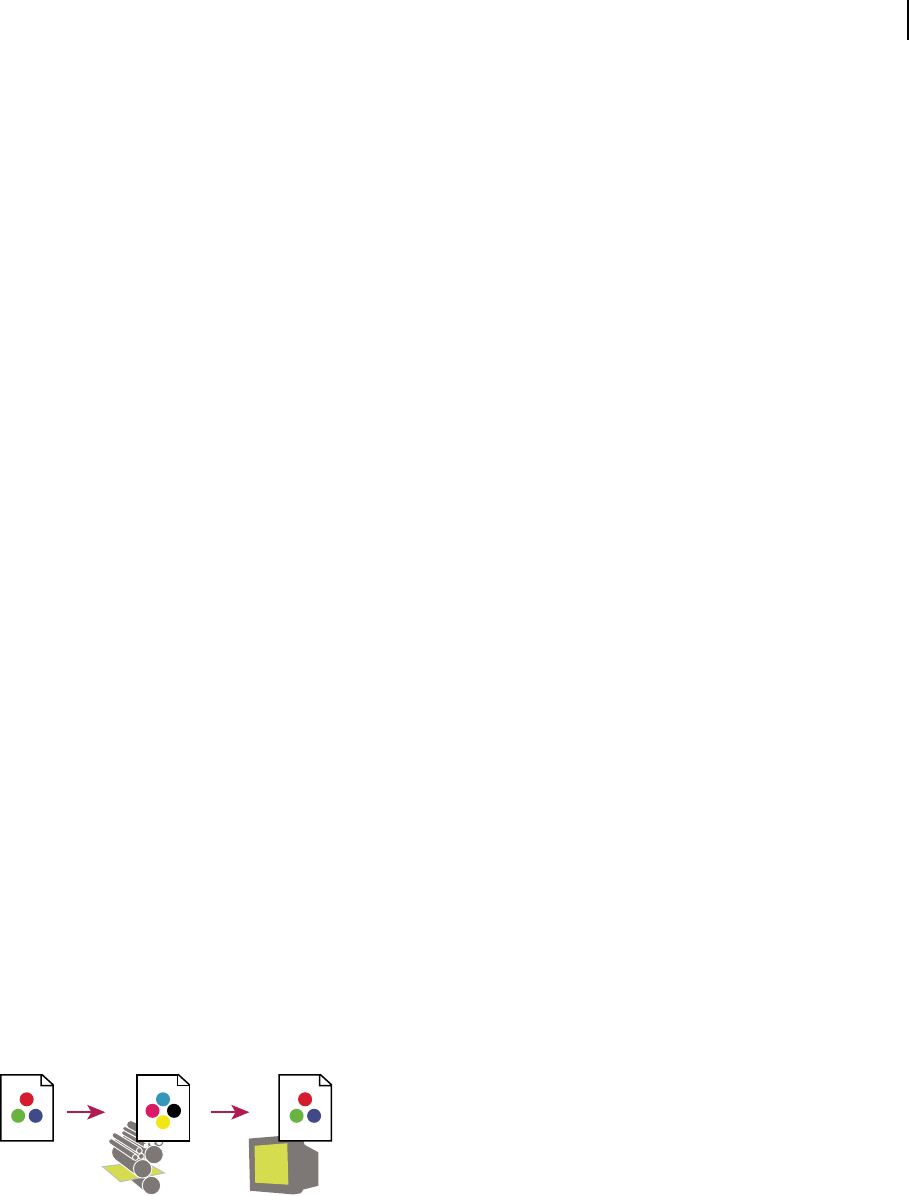
410
ADOBE ACROBAT 8 PROFESSIONAL
User Guide
Color-managing PDFs for online viewing
When you export PDFs, you can choose to embed profiles. PDFs with embedded profiles reproduce color consis-
tently in Acrobat 4.0 or later running under a properly configured color management system.
Keep in mind that embedding color profiles increases the size of PDFs. RGB profiles are usually small (around 3 KB);
however, CMYK profiles can range from 0.5 to 2 MB.
See also
“Printing with color management” on page 412
“Color-managing PDFs for printing” on page 413
Color-managing HTML documents for online viewing
Many web browsers do not support color management. Of the browsers that do support color management, not all
instances can be considered color-managed because they may be running on systems where the monitors are not
calibrated. In addition, few web pages contain images with embedded profiles. If you manage a highly controlled
environment, such as the intranet of a design studio, you may be able to achieve some degree of HTML color
management for images by equipping everyone with a browser that supports color management and calibrating all
monitors.
You can approximate how colors will look on uncalibrated monitors by using the sRGB color space. However,
because color reproduction varies among uncalibrated monitors, you still won’t be able to anticipate the true range
of potential display variations.
Proofing colors
Soft-proofing colors
In a traditional publishing workflow, you print a hard proof of your document to preview how its colors will look
when reproduced on a specific output device. In a color-managed workflow, you can use the precision of color
profiles to soft-proof your document directly on the monitor. You can display an on-screen preview of how your
document’s colors will look when reproduced on a particular output device.
Keep in mind that the reliability of the soft proof depends upon the quality of your monitor, the profiles of your
monitor and output devices, and the ambient lighting conditions of your work environment.
Note: A soft proof alone doesn’t let you preview how overprinting will look when printed on an offset press. If you work
with documents that contain overprinting, turn on Overprint Preview to accurately preview overprints in a soft proof.
A B C
Using a soft proof to preview the final output of a document on your monitor
A. Document is created in its working color space. B. Document’s color values are translated to color space of chosen proof profile (usually the
output device’s profile). C. Monitor displays proof profile’s interpretation of document’s color values.

411
ADOBE ACROBAT 8 PROFESSIONAL
User Guide
Soft-proof colors
1 Choose View > Proof Setup, and do one of the following:
• Choose a preset that corresponds to the output condition you want to simulate.
• Choose Custom (Photoshop and InDesign) or Customize (Illustrator) to create a custom proof setup for a specific
output condition. This option is recommended for the most accurate preview of your final printed piece.
2 Choose View > Proof Colors to toggle the soft-proof display on and off. When soft proofing is on, a check mark
appears next to the Proof Colors command, and the name of the proof preset or profile appears at the top of the
document window.
To compare the colors in the original image and the colors in the soft proof, open the document in a new window
before you set up the soft proof.
Soft-proof presets
Working CMYK Creates a soft proof of colors using the current CMYK working space as defined in the Color Settings
dialog box.
Document CMYK (InDesign) Creates a soft proof of colors using the document’s CMYK profile.
Working Cyan Plate, Working Magenta Plate, Working Yellow Plate, Working Black Plate, or Working CMY Plates
(Photoshop) Creates a soft proof of specific CMYK ink colors using the current CMYK working space.
Macintosh RGB or Windows RGB (Photoshop and Illustrator) Createsasoftproofofcolorsinanimage usingeithera
standard Mac OS or Windows monitor as the proof profile space to simulate. Both options assume that the simulated
device will display your document without using color management. Neither option is available for Lab or CMYK
documents.
Monitor RGB (Photoshop and Illustrator) Creates a soft proof of colors in an RGB document using your current
monitor color space as the proof profile space. This option assumes that the simulated device will display your
document without using color management. This option is unavailable for Lab and CMYK documents.
Custom soft-proof options
Device To Simulate Specifies the color profile of the device for which you want to create the proof. The usefulness of
the chosen profile depends on how accurately it describes the device’s behavior. Often, custom profiles for specific
paper and printer combinations create the most accurate soft proof.
Preserve CMYK Numbers or Preserve RGB Numbers Simulates how the colors will appear without being converted to
the color space of the output device. This option is most useful when you are following a safe CMYK workflow.
Rendering Intent (Photoshop and Illustrator) When the Preserve Numbers option is deselected, specifies a
rendering intent for converting colors to the device you are trying to simulate.
Use Black Point Compensation (Photoshop) Ensures that the shadow detail in the image is preserved by simulating
the full dynamic range of the output device. Select this option if you plan to use black point compensation when
printing (which is recommended in most situations).
Simulate Paper Color Simulates the dingy white of real paper, according to the proof profile. Not all profiles support
this option.
Simulate Black Ink Simulates the dark gray you really get instead of a solid black on many printers, according to the
proof profile. Not all profiles support this option.
In Photoshop, if you want the custom proof setup to be the default proof setup for documents, close all document
windows before choosing the View > Proof Setup > Custom command.

412
ADOBE ACROBAT 8 PROFESSIONAL
User Guide
Save or load a custom proof setup
1 Choose View > Proof Setup > Custom.
2 Do either of the following:
• To save a custom proof setup, click Save. To ensure that the new preset appears in the View > Proof Setup menu,
save the preset in the default location.
• To load a custom proof setup, click Load.
Soft-proof colors (Acrobat)
1 Choose Advanced > Print Production > Output Preview.
2 Choose the color profile of a specific output device from the Simulation Profile menu.
3 Choose a soft-proof option:
Simulate Black Ink Simulates the dark gray you really get instead of a solid black on many printers, according to the
proof profile. Not all profiles support this option.
Simulate Paper Color Simulates the dingy white of real paper, according to the proof profile. Not all profiles support
this option.
Color-managing documents when printing
Printing with color management
Color management options for printing let you specify how you want Adobe applications to handle the outgoing
image data so the printer will print colors consistent with what you see on your monitor. Your options for printing
color-managed documents depend on the Adobe application you use, as well as the output device you select. In
general, you have the following choices for handling colors during printing:
• Let the printer determine colors.
• Let the application determine colors.
• (Photoshop and InDesign) Do not use color management. In this workflow, no color conversion occurs. You may
also need to turn off color management in your printer driver. This method is useful primarily for printing test
targets or generating custom profiles.
Letting the printer determine colors when printing
In this workflow, the application does no color conversion, but sends all necessary conversion information to the
output device. This method is especially convenient when printing to inkjet photo printers, because each combi-
nation of paper type, printing resolution, and additional printing parameters (such as high-speed printing) requires
a different profile. Most new inkjet photo printers come with fairly accurate profiles built into the driver, so letting
the printer select the right profile saves time and alleviates mistakes. This method is also recommended if you are
not familiar with color management.
If you choose this method, it is very important that you set up printing options and turn on color management in
your printer driver. Search Help for additional instructions.

413
ADOBE ACROBAT 8 PROFESSIONAL
User Guide
If you select a PostScript printer, you can take advantage of PostScript color management. PostScript color
managementmakesitpossibletoperformcolorcomposite outputorcolorseparations attherasterimageprocessor
(RIP)—a process called in-RIP separations—so that a program need only specify parameters for separation and let
thedevicecalculatethefinal colorvalues. PostScriptcolor-managedoutputworkflowsrequireanoutputdevicethat
supports PostScript color management using PostScript Level 2 version 2017 or later, or PostScript Lanuage Level 3.
Letting the application determine colors when printing
In this workflow, the application does all the color conversion, generating color data specific to one output device.
Theapplicationusestheassignedcolorprofiles to convertcolorstotheoutputdevice’sgamut,andsendstheresulting
values to the output device. The accuracy of this method depends on the accuracy of the printer profile you select.
Use this workflow when you have custom ICC profiles for each specific printer, ink, and paper combination.
If you choose this option, it is very important that you disable color management in your printer driver. Letting the
application and the printer driver simultaneously manage colors during printing results in unpredictable color.
Search Help for additional instructions.
Obtaining custom profiles for desktop printers
If the output profiles that come with your printer don’t produce satisfactory results, you obtain custom profiles in the
following ways:
• Purchase a profile for your type of printer and paper. This is usually the easiest and least expensive method.
• Purchase a profile for your specific printer and paper. This method involves printing a profiling target on your
printer and paper, and providing that target to a company that will create a specific profile. This is more expensive
than purchasing a standard profile, but can provide better results because it compensates for any manufacturing
variations in printers.
• Create your own profile using a scanner-based system. This method involves using profile-creation software and
your own flatbed scanner to scan the profiling target. It can provide excellent results for matte surface papers, but
not glossy papers. (Glossy papers tend to have fluorescent brighteners in them that look different to a scanner than
they do in room light.)
• Create your own profile using a hardware profile-creation tool. This method is expensive but can provide the best
results. A good hardware tool can create an accurate profile even with glossy papers.
• Tweak a profile created using one of the previous methods with profile-editing software. This software can be
complex to use, but it lets you correct problems with a profile or simply adjust a profile to produce results more to
your taste.
See also
“Install a color profile” on page 416
Color-managing PDFs for printing
When you create Adobe PDFs for commercial printing, you can specify how color information is represented. The
easiest way to do this is using a PDF/X standard; however, you can also specify color-handling options manually in
the Output section of the PDF dialog box. For more information about PDF/X and how to create PDFs, search Help.

414
ADOBE ACROBAT 8 PROFESSIONAL
User Guide
In general, you have the following choices for handling colors when creating PDFs:
• (PDF/X-3) Does not convert colors. Use this method when creating a document that will be printed or displayed
on various or unknown devices. When you select a PDF/X-3 standard, color profiles are automatically embedded
in the PDF.
• (PDF/X-1a) Converts all colors to the destination CMYK color space. Use this method if you want to create a
press-ready file that does not require any further color conversions. When you select a PDF/X-1a standard, no
profiles are embedded in the PDF.
• (Illustrator and InDesign) Converts colors that have embedded profiles to the destination color space, but
preserves the numbers for those colors without embedded profiles. You can manually select this option in the
Output section of the PDF dialog box. Use this method if the document contains CMYK images that aren’t color-
managed and you want to make sure that the color numbers are preserved.
Note: All spot color information is preserved during color conversion; only the process color equivalents convert to the
designated color space.
See also
“Using a safe CMYK workflow” on page 408
Working with color profiles
About color profiles
Precise, consistent color management requires accurate ICC-compliant profiles of all of your color devices. For
example, without an accurate scanner profile, a perfectly scanned image may appear incorrect in another program,
simply due to any difference between the scanner and the program displaying the image. This misleading represen-
tation may cause you to make unnecessary, time-wasting, and potentially damaging “corrections” to an already satis-
factory image. With an accurate profile, a program importing the image can correct for any device differences and
display a scan’s actual colors.
A color management system uses the following kinds of profiles:
Monitor profiles Describe howthe monitoriscurrently reproducingcolor.Thisisthefirstprofileyoushouldcreate
because viewing color accurately on your monitor allows for critical color decisions in the design process. If what
you see on your monitor is not representative of the actual colors in your document, you will not be able to maintain
color consistency.
Input device profiles Describe what colors an input device is capable of capturing or scanning. If your digital camera
offers a choice of profiles, Adobe recommends that you select Adobe RGB. Otherwise, use sRGB (which is the default
for most cameras). Advanced users may also consider using different profiles for different light sources. For scanner
profiles, some photographers create separate profiles for each type or brand of film scanned on a scanner.
Output device profiles Describe the color space of output devices like desktop printers or a printing press. The color
management system uses output device profiles to properly map the colors in a document to the colors within the
gamut of an output device’s color space. The output profile should also take into consideration specific printing
conditions, such as the type of paper and ink. For example, glossy paper is capable of displaying a different range of
colors than matte paper.
Most printer drivers come with built-in color profiles. It’s a good idea to try these profiles before you invest in custom
profiles.
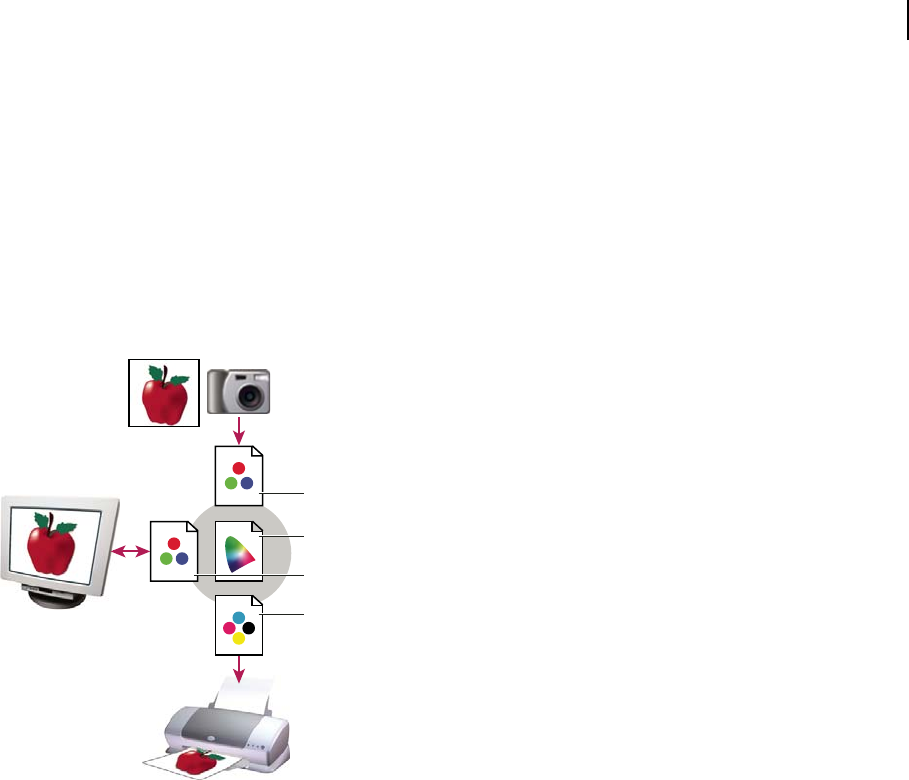
415
ADOBE ACROBAT 8 PROFESSIONAL
User Guide
Document profiles Define the specific RGB or CMYK color space of a document. By assigning, or tagging, a
document with a profile, the application provides a definition of actual color appearances in the document. For
example, R=127, G=12, B=107 is just a set of numbers that different devices will display differently. But when tagged
with the Adobe RGB color space, these numbers specify an actual color or wavelength of light–in this case, a specific
color of purple.
When color management is on, Adobe applications automatically assign new documents a profile based on Working
Space options in the Color Settings dialog box. Documents without assigned profiles are known as untagged and
contain only raw color numbers. When working with untagged documents, Adobe applications use the current
working space profile to display and edit colors.
A
B
C
D
Managing color with profiles
A. Profiles describe the color spaces of the input device and the document. B. Using the profiles’ descriptions, the color management system
identifies the document’s actual colors. C. The monitor’s profile tells the color management system how to translate the document’s numeric
values to the monitor’s color space. D. Using the output device’s profile, the color management system translates the document’s numeric values
to the color values of the output device so the correct appearance of colors is printed.
See also
“Calibrate and profile your monitor” on page 416
“Letting the printer determine colors when printing” on page 412
“Obtaining custom profiles for desktop printers” on page 413
“About color working spaces” on page 419
About monitor calibration and characterization
Profiling software can both calibrate and characterize your monitor. Calibrating your monitor brings it into
compliance with a predefined standard—for example, adjusting your monitor so that it displays color using the
graphics arts standard white point color temperature of 5000˚ K (Kelvin). Characterizing your monitor simply
creates a profile that describes how the monitor is currently reproducing color.

416
ADOBE ACROBAT 8 PROFESSIONAL
User Guide
Monitor calibration involves adjusting the following video settings:
Brightness and contrast The overall level and range, respectively, of display intensity. These parameters work just as
they do on a television. A monitor calibration utility helps you set an optimum brightness and contrast range for
calibration.
Gamma The brightness of the midtone values. The values produced by a monitor from black to white are
nonlinear—if you graph the values, they form a curve, not a straight line. Gamma defines the value of that curve
halfway between black and white.
Phosphors The substances that CRT monitors use to emit light. Different phosphors have different color character-
istics.
White point The color and intensity of the brightest white the monitor can reproduce.
Calibrate and profile your monitor
When you calibrate your monitor, you are adjusting it so it conforms to a known specification. Once your monitor
is calibrated, the profiling utility lets you save a color profile. The profile describes the color behavior of the
monitor—what colors can or cannot be displayed on the monitor and how the numeric color values in an image must
be converted so that colors are displayed accurately.
1 Make sure your monitor has been turned on for at least a half hour. This gives it sufficient time to warm up and
produce more consistent output.
2 Make sure your monitor is displaying thousands of colors or more. Ideally, make sure it is displaying millions of
colors or 24-bit or higher.
3 Remove colorful background patterns on your monitor desktop and set your desktop to display neutral grays.
Busy patterns or bright colors surrounding a document interfere with accurate color perception.
4 Do one of the following to calibrate and profile your monitor:
• In Windows, install and use a monitor calibration utility.
• In Mac OS, use the Calibrate utility, located on the System Preferences/Displays/Color tab.
• For the best results, use third-party software and measuring devices. In general, using a measuring device such as
a colorimeter along with software can create more accurate profiles because an instrument can measure the colors
displayed on a monitor far more accurately than the human eye.
Note: Monitor performance changes and declines over time; recalibrate and profile your monitor every month or so. If
you find it difficult or impossible to calibrate your monitor to a standard, it may be too old and faded.
Most profiling software automatically assigns the new profile as the default monitor profile. For instructions on how
to manually assign the monitor profile, refer to the Help system for your operating system.
Install a color profile
Colorprofilesareofteninstalledwhenadeviceisadded toyoursystem.Theaccuracyoftheseprofiles(oftencalled
generic profiles or canned profiles) varies from manufacturer to manufacturer. You can also obtain device profiles
from your service provider, download profiles from the web, or create custom profiles using professional profiling
equipment.
• In Windows, right-click a profile and select Install Profile. Alternatively, copy the profiles into the
WINDOWS\system32\spool\drivers\color folder.

417
ADOBE ACROBAT 8 PROFESSIONAL
User Guide
• In Mac OS, copy profiles into the /Library/ColorSync/Profiles folder or the
/Users/[username]/Library/ColorSync/Profiles folder.
After installing color profiles, be sure to restart Adobe applications.
See also
“Obtaining custom profiles for desktop printers” on page 413
Embed a color profile
To embed a color profile in a document you created in Illustrator, InDesign, or Photoshop, you must save or export
the document in a format that supports ICC profiles.
1 Save or export the document in one of the following file formats: Adobe PDF, PSD (Photoshop), AI (Illustrator),
INDD (InDesign), JPEG, Photoshop EPS, Large Document Format, or TIFF.
2 Select the option for embedding ICC profiles. The exact name and location of this option varies between applica-
tions. Search Adobe Help for additional instructions.
Embed a color profile (Acrobat)
YoucanembedacolorprofileinanobjectoranentirePDF.Acrobatattachestheappropriateprofile,asspecifiedin
theDestinationSpaceareaoftheConvertColorsdialogbox,totheselectedcolorspace in thePDF.Formoreinfor-
mation, see the color conversion topics in Complete Acrobat Help.
Changing the color profile for a document
Thereareveryfewsituationsthatrequireyoutochangethecolorprofileforadocument.This is becauseyourappli-
cation automatically assigns the color profile based on the settings you select in the Color Settings dialog box. The
only times you should manually change a color profile are when preparing a document for a different output desti-
nation or correcting a policy behavior that you no longer want implemented in the document. Changing the profile
is recommended for advanced users only.
You can change the color profile for a document in the following ways:
• Assign a new profile. The color numbers in the document remain the same, but the new profile may dramatically
change the appearance of the colors as displayed on your monitor.
• Remove the profile so that the document is no longer color-managed.
• (Acrobat, Photoshop and InDesign) Convert the colors in the document to the color space of a different profile.
The color numbers are shifted in an effort to preserve the original color appearances.
Assign or remove a color profile (Illustrator, Photoshop)
1 Choose Edit > Assign Profile.
2 Select an option, and click OK:
Don’t Color Manage This Document Removestheexistingprofilefromthe document.Selectthisoptiononlyifyou
are sure that you do not want to color-manage the document. After you remove the profile from a document, the
appearance of colors is defined by the application’s working space profiles.
Working [color model: working space] Assigns the working space profile to the document.

418
ADOBE ACROBAT 8 PROFESSIONAL
User Guide
Profile Lets you select a different profile. The application assigns the new profile to the document without
converting colors to the profile space. This may dramatically change the appearance of the colors as displayed on
your monitor.
See also
“Changing the color profile for a document” on page 417
Assign or remove a color profile (InDesign)
1 Choose Edit > Assign Profiles.
2 For RGB Profile and CMYK Profile, select one of the following:
Discard (Use Current Working Space) Removesthe existingprofilefromthe document.Selectthisoptiononlyifyou
are sure that you do not want to color-manage the document. After you remove the profile from a document, the
appearanceofcolorsisdefinedbytheapplication’sworkingspaceprofiles,andyoucannolongerembedaprofilein
the document.
Assign Current Working Space [working space] Assigns the working space profile to the document.
Assign Profile Lets you select a different profile. The application assigns the new profile to the document without
converting colors to the profile space. This may dramatically change the appearance of the colors as displayed on
your monitor.
3 Choose a rendering intent for each type of graphic in your document. For each graphic type, you can choose one
of the four standard intents, or the Use Color Settings Intent, which uses the rendering intent currently specified in
the Color Settings dialog box. For more information on rendering intents, search in Help.
The graphic types include the following:
Solid Color Intent Sets the rendering intent for all vector art (solid areas of color) in InDesign native objects.
Default Image Intent Sets the default rendering intent for bitmap images placed in InDesign. You can still override
this setting on an image-by-image basis.
After-Blending Intent Sets the rendering intent to the proofing or final color space for colors that result from trans-
parency interactions on the page. Use this option when your document includes transparent objects.
4 To preview the effects of the new profile assignment in the document, select Preview, and then click OK.
See also
“Changing the color profile for a document” on page 417
“View or change profiles for imported bitmap images (InDesign)” on page 409
Convert document colors to another profile (Photoshop)
1 Choose Edit > Convert To Profile.
2 Under Destination Space, choose the color profile to which you want to convert the document’s colors. The
document will be converted to and tagged with this new profile.
3 Under Conversion Options, specify a color management engine, a rendering intent, and black point and dither
options (if available). (See “Color conversion options” on page 422.)
4 To flatten all layers of the document onto a single layer upon conversion, select Flatten Image.

419
ADOBE ACROBAT 8 PROFESSIONAL
User Guide
5 To preview the effects of the conversion in the document, select Preview.
See also
“Changing the color profile for a document” on page 417
Convert document colors to another profile
YouconvertcolorsinaPDF usingtheConvertColorstoolonthe PrintProductiontoolbar.Formoreinformation,
see the color conversion topics in Complete Acrobat Help.
Color settings
Customize color settings
For most color-managed workflows, it is best to use a preset color setting that has been tested by Adobe Systems.
Changing specific options is recommended only if you are knowledgeable about color management and very
confident about the changes you make.
After you customize options, you can save them as a preset. Saving color settings ensures that you can reuse them
and share them with other users or applications.
• To save color settings as a preset, click Save in the Color Settings dialog box. To ensure that the application displays
the setting name in the Color Settings dialog box, save the file in the default location. If you save the file to a
different location, you must load the file before you can select the setting.
• To load a color settings preset that’s not saved in the standard location, click Load in the Color Settings dialog box,
select the file you want to load, and click Open.
Note: In Acrobat, you cannot save customized color settings. To share customized color settings with Acrobat, you must
create the file in InDesign, Illustrator, or Photoshop, and then save it in the default Settings folder. It will then be available
in the Color Management category of the Preferences dialog box. You can also add settings manually to the default
Settings folder.
About color working spaces
A working space is an intermediate color space used to define and edit color in Adobe applications. Each color model
has a working space profile associated with it. You can choose working space profiles in the Color Settings dialog box.
Aworkingspaceprofileactsasthesourceprofilefornewlycreateddocumentsthatuse theassociatedcolormodel.
For example, if Adobe RGB (1998) is the current RGB working space profile, each new RGB document that you
create will use colors within the Adobe RGB (1998) gamut. Working spaces also determine the appearance of colors
in untagged documents.
If you open a document embedded with a color profile that doesn’t match the working space profile, the application
uses a color management policy to determine how to handle the color data. In most cases, the default policy is to
preserve the embedded profile.

420
ADOBE ACROBAT 8 PROFESSIONAL
User Guide
See also
“About missing and mismatched color profiles” on page 420
“Color management policy options” on page 421
Working space options
To display working space options in Photoshop, Illustrator and InDesign, choose Edit > Color Settings. In Acrobat,
select the Color Management category of the Preferences dialog box.
To view a description of any profile, select the profile and then position the pointer over the profile name. The
description appears at the bottom of the dialog box.
RGB Determines the RGB color space of the application. In general, it’s best to choose Adobe RGB or sRGB, rather
than the profile for a specific device (such as a monitor profile).
sRGB is recommended when you prepare images for the web, because it defines the color space of the standard
monitor used to view images on the web. sRGB is also a good choice when you work with images from consumer-
level digital cameras, because most of these cameras use sRGB as their default color space.
Adobe RGB is recommended when you prepare documents for print, because Adobe RGB’s gamut includes some
printable colors (cyans and blues in particular) that can’t be defined using sRGB. Adobe RGB is also a good choice
when working with images from professional-level digital cameras, because most of these cameras use Adobe RGB
as their default color space.
CMYK Determines the CMYK color space of the application. All CMYK working spaces are device-dependent,
meaning that they are based on actual ink and paper combinations. The CMYK working spaces Adobe supplies are
based on standard commercial print conditions.
Gray (Photoshop) or Grayscale (Acrobat) Determines the grayscale color space of the application.
Spot (Photoshop) Specifies the dot gain to use when displaying spot color channels and duotones.
Note: In Acrobat, you can use the color space in an embedded output intent instead of a document color space for
viewing and printing. Select Output Intent Overrides Working Spaces. For more information on output intents, see
Complete Acrobat Help.
Adobe applications ship with a standard set of working space profiles that have been recommended and tested by
Adobe Systems for most color management workflows. By default, only these profiles appear in the working space
menus. To display additional color profiles that you have installed on your system, select Advanced Mode (Illustrator
and InDesign) or More Options (Photoshop). A color profile must be bi-directional (that is, contain specifications
for translating both into and out of color spaces) in order to appear in the working space menus.
Note: In Photoshop, you can create custom working space profiles. However, Adobe recommends that you use a standard
working space profile rather than create a custom profile. For more information, see the Photoshop support knowl-
edgebase at www.adobe.com/support/products/photoshop.html.
About missing and mismatched color profiles
For a newly created document, the color workflow usually operates seamlessly: Unless specified otherwise, the
document uses the working space profile associated with its color mode for creating and editing colors.

421
ADOBE ACROBAT 8 PROFESSIONAL
User Guide
However, some existing documents may not use the working space profile that you have specified, and some existing
documentsmaynotbecolor-managed.Itiscommontoencounter thefollowing exceptions toyour color-managed
workflow:
• You might open a document or import color data (for example, by copying and pasting or dragging and dropping)
from adocumentthatisnottaggedwithaprofile.Thisisoftenthecasewhenyouopenadocumentcreatedin an
application that either does not support color management or has color management turned off.
• You might open a document or import color data from a document that is tagged with a profile different from the
current working space. This may be the case when you open a document that was created using different color
management settings, or scanned and tagged with a scanner profile.
In either case, the application uses a color management policy to decide how to handle the color data in the
document.
If the profile is missing or does not match the working space, the application may display a warning message,
depending on options you set in the Color Settings dialog box. Profile warnings are turned off by default, but you
can turn them on to ensure the appropriate color management of documents on a case-by-case basis. The warning
messages vary between applications, but in general you have the following options:
• (Recommended) Leave the document or imported color data as it is. For example, you can choose to use the
embedded profile (if one exists), leave the document without a color profile (if one doesn’t exist), or preserve the
numbers in pasted color data.
• Adjust the document or imported color data. For example, when opening a document with a missing color profile,
you can choose to assign the current working space profile or a different profile. When opening a document with
a mismatched color profile, you can choose to discard the profile or convert the colors to the current working
space. When importing color data, you can choose to convert the colors to the current working space in order to
preserve their appearance.
Color management policy options
A color management policy determines how the application handles color data when you open a document or import
an image. You can choose different policies for RGB and CMYK images, and you can specify when you want warning
messages to appear. To display color management policy options, choose Edit > Color Settings.
To view a description of a policy, select the policy and then position the pointer over the policy name. The description
appears at the bottom of the dialog box.
RGB, CMYK, And Gray Specifies a policy to follow when bringing colors into the current working space (either by
opening files or importing images into the current document). (The Grayscale option is available for Photoshop
only.) Choose from the following options:
• Preserve Embedded Profiles Always preserves embedded color profiles when opening files. This is the recom-
mended option for most workflows because it provides consistent color management. One exception is if you’re
concerned about preserving CMYK numbers, in which case you should select Preserve Numbers (Ignore Linked
Profiles) instead.
• Convert To Working Space Converts colors to the current working space profile when opening files and
importing images. Select this option if you want to force all colors to use a single profile (the current working space
profile).
• Preserve Numbers (Ignore Linked Profiles) This option is available in InDesign and Illustrator for CMYK.
Preserves color numbers when opening files and importing images, but still allows you to use color management to

422
ADOBE ACROBAT 8 PROFESSIONAL
User Guide
view colors accurately in Adobe applications. Select this option if you want to use a safe CMYK workflow. In
InDesign, you can override this policy on a per-object basis by choosing Object > Image Color Settings.
• Off Ignores embedded color profiles when opening files and importing images, and does not assign the working
space profile to new documents. Select this option if you want to discard any color metadata provided by the original
document creator.
Profile Mismatches: Ask When Opening Displays a message whenever you open a document tagged with a profile
other than the current working space. You will be given the option to override the policy’s default behavior. Select
this option if you want to ensure the appropriate color management of documents on a case-by-case basis.
Profile Mismatches: Ask When Pasting Displays a message whenever color profile mismatches occur as colors are
imported into a document through pasting or dragging-and-dropping. You will be given the option to override the
policy’sdefaultbehavior.Selectthisoptionifyouwanttoensuretheappropriatecolormanagementofpastedcolors
on a case-by-case basis.
Missing Profiles: Ask When Opening Displays a message whenever you open an untagged document. You will be
given the option to override the policy’s default behavior. Select this option if you want to ensure the appropriate
color management of documents on a case-by-case basis.
Color conversion options
Color conversion options let you control how the application handles the colors in a document as it moves from one
color space to another. Changing these options is recommended only if you are knowledgeable about color
management and very confident about the changes you make. To display conversion options, choose Edit > Color
Settings, and select Advanced Mode (Illustrator and InDesign) or More Options (Photoshop). In Acrobat, select the
Color Management category of the Preferences dialog box.
Engine Specifies the Color Management Module (CMM) used to map the gamut of one color space to the gamut of
another. For most users, the default Adobe (ACE) engine fulfills all conversion needs.
To view a description of an engine or intent option, select the option and then position the pointer over the option
name. The description appears at the bottom of the dialog box.
Intent (Photoshop, Illustrator, InDesign) Specifies the rendering intent used to translate one color space to another.
Differences between rendering intents are apparent only when you print a document or convert it to a different
working space.
Use Black Point Compensation Ensures that the shadow detail in the image is preserved by simulating the full
dynamic range of the output device. Select this option if you plan to use black point compensation when printing
(which is recommended in most situations).
Use Dither (Photoshop) Controls whether to dither colors when converting 8-bit-per-channel images between color
spaces.WhentheUseDitheroptionisselected,Photoshopmixescolorsinthedestinationcolorspacetosimulatea
missing color that existed in the source space. Although dithering helps to reduce the blocky or banded appearance
of an image, it may also result in larger file sizes when images are compressed for web use.

423
ADOBE ACROBAT 8 PROFESSIONAL
User Guide
About rendering intents
A rendering intent determines how a color management system handles color conversion from one color space to
another. Different rendering intents use different rules to determine how the source colors are adjusted; for example,
colors that fall inside the destination gamut may remain unchanged, or they may be adjusted to preserve the original
range of visual relationships when translated to a smaller destination gamut. The result of choosing a rendering
intent depends on the graphical content of documents and on the profiles used to specify color spaces. Some profiles
produce identical results for different rendering intents.
In general, it is best to use the default rendering intent for the selected color setting, which has been tested by Adobe
Systems to meet industry standards. For example, if you choose a color setting for North America or Europe, the
default rendering intent is Relative Colorimetric. If you choose a color setting for Japan, the default rendering intent is
Perceptual.
You can select a rendering intent when you set color conversion options for the color management system, soft-proof
colors, and print artwork:
Perceptual Aims to preserve the visual relationship between colors so it’s perceived as natural to the human eye, even
though the color values themselves may change. This intent is suitable for photographic images with lots of out-of-
gamut colors. This is the standard rendering intent for the Japanese printing industry.
Saturation Tries to produce vivid colors in an image at the expense of color accuracy. This rendering intent is
suitable for business graphics like graphs or charts, where bright saturated colors are more important than the exact
relationship between colors.
Relative Colorimetric Compares theextremehighlight of thesourcecolorspacetothatofthe destinationcolorspace
and shifts all colors accordingly. Out-of-gamut colors are shifted to the closest reproducible color in the destination
color space. Relative Colorimetric preserves more of the original colors in an image than Perceptual. This is the
standard rendering intent for printing in North America and Europe.
Absolute Colorimetric Leaves colors that fall inside the destination gamut unchanged. Out-of-gamut colors are
clipped. No scaling of colors to destination white point is performed. This intent aims to maintain color accuracy at
the expense of preserving relationships between colors and is suitable for proofing to simulate the output of a
particular device. This intent is particularly useful for previewing how paper color affects printed colors.
Advanced controls in Photoshop
In Photoshop you display advanced controls for managing color by choosing Edit > Color Settings and selecting
More Options.
Desaturate Monitor Colors By Determines whether to desaturate colors by the specified amount when displayed on
the monitor. When selected, this option can aid in visualizing the full range of color spaces with gamuts larger than
that of the monitor. However, this causes a mismatch between the monitor display and the output. When the option
is deselected, distinct colors in the image may display as a single color.
Blend RGB Colors Using Gamma Controls how RGB colors blend together to produce composite data (for example,
when you blend or paint layers using Normal mode). When the option is selected, RGB colors are blended in the
color space corresponding to the specified gamma. A gamma of 1.00 is considered “colorimetrically correct” and
should result in the fewest edge artifacts. When the option is deselected, RGB colors are blended directly in the
document’s color space.
Note: When you select Blend RGB Colors Using Gamma, layered documents will look different when displayed in other
applications than they do in Photoshop.

424
Chapter 15: Printing
Whether you send a quick draft to an inkjet or laser printer, provide a multicolored document to an outside service
provider, or print a complex technical document with custom page sizes, you can set options in the Print dialog box
to ensure that the finished document appears as intended.
Quickstart
The following topics provide overview steps to some more complex printing tasks.
Print a booklet
When you create a booklet, pages are arranged on sheets of paper so that they are in the correct order when the paper
is collated, folded, and stapled.
Note: To print booklets, the printer must support duplex printing (printing on both sides of the paper).
1 Choose File > Print and select the printer.
2 Set Print Range to All.
3 Choose Booklet Printing from the Page Scaling menu.
4 Select additional page handling options as desired.
See also
“About booklets” on page 429
Preview color separations
You can preview separation plates and ink coverage to ensure that a document meets your requirements.
1 Choose Advanced > Print Production > Output Preview.
2 Choose Separations from the Preview menu, and do one of the following:
• To view or hide a separation, select or deselect it in the Separations list.
• To checkinkcoverage,movethe pointeroverthedocument.Inkcoveragepercentagesappearnexttoeachink name.
See also
“Preview color separations” on page 456
Print color separations
You can create separations on the system using Acrobat and the printer driver (host-based separations) or on the
output device’s RIP (in-RIP separations).
Note: You must use a PostScript printer to print color separations.
1 Choose File > Print. Choose the output device, and then click Advanced.

425
ADOBE ACROBAT 8 PROFESSIONAL
User Guide
2 Select Output on the left, and then choose Separations or In-RIP Separations from the Color menu.
3 Select a color profile and specify other print options as desired.
See also
“Print color separations” on page 441
Basic printing tasks
Print a PDF
If the desired printing option is in the Print dialog box, set it there rather than through the printer driver.
1 Make sure that you’ve installed the correct printer driver and PPD file for your printer. Printing results are
generally more predictable with the correct PPD.
2 Choose File > Print Setup (Windows) or File > Page Setup (Mac OS) to choose a paper size, page orientation, and
other general printing options. The options vary with different printers and drivers. See your printer driver
documentation for details.
3 To print comments, such as sticky notes, in the Preferences dialog box, choose Commenting and select Print Notes
And Pop-ups.
Note: To open Preferences in Windows, choose Edit > Preferences. In Mac OS, choose Acrobat > Preferences.
4 Click the Print button , or choose File > Print.
5 Choose a printer from the menu at the top of the Print dialog box.
6 (Mac OS) Choose an option from the Presets pop-up menu.
7 In Windows, click Properties to set any additional options available with the printer driver. In Mac OS, set printer
driver options in the Print Center.
8 To print comments or forms, select an option from the Comments And Forms pop-up menu.
9 Indicate which pages you want to print, and then click OK.
Print over the Internet
You can print open PDFs to a FedEx Kinkos office in the United States.
Note: This feature is only available in the United States.
1 Save the document, and then choose File > Send To FedEx Kinkos.
2 Click OK to upload the document to the FedEx Kinkos print services website. You will then be guided through
placing your print order.
Options in the Print dialog box
Most of the options in the Acrobat Print dialog box are the same for other applications.
Comments And Forms Specifies which visible content prints.
• Document Prints the document contents and form fields.

426
ADOBE ACROBAT 8 PROFESSIONAL
User Guide
• Document And Markups Prints document contents, form fields, and comments.
• Document And Stamps Prints the document, form fields, and stamps, but no other markups, such as note
comments and pencil lines.
• Form Fields Only Prints interactive form fields but doesn’t print document contents.
Current View/Selected Graphic Prints the page area (including text, comments, and so on) that is visible in the
current view. The option name changes depending on whether you have no pages selected (Current View), a page or
pages selected (Selected Pages), or an area on a page selected using the Snapshot tool (Selected Graphic).
Current Page Prints the page that is visible in the current view.
Pages Specifies the range of pages to print in the open PDF. Separate numbers in a range by using a hyphen, and
separatemultiple pagesorrangesbyusingcommasorspaces.IftheUseLogicalPageNumbersoptionisselectedin
Page Display Preferences, you can enter numbers that match the numbering printed on the pages using roman
numerals or actual page numbers. For example, if the first page of a document is numbered iii, you can enter iii or 1
toprintthatpage.SelectingOddPagesOnlyorEvenPages Onlyaffectswhich pagesinarangeprint.Forexample,
in a range that includes 2, 7–10 with Even Pages Only selected, only pages 2, 8, and 10 will print.
To print from a specific page to the end of the document, enter the page with a hyphen. For example, “11-” prints
page 11 to the last page of the document.
Subset Choose All Pages In Range, or choose Odd Pages Only or Even Pages Only to print only those pages within
the specified range.
Reverse Pages Prints pages in reverse order. If page ranges are entered, the pages print opposite of the order in which
they were entered. For example, if the Pages box shows 3–5, 7–10, selecting Reverse Pages prints pages 10–7, and
then 5–3.
Page Scaling Reduces, enlarges, or divides pages when printing.
• None Prints the upper left or center of a page (if auto-rotated and centered) without scaling. Pages or selections
that don’t fit on the paper are cropped.
• Fit To Printable Area Reduces or enlarges each page to fit the printable area of the currently selected paper size.
For PostScript® printers, the PPD determines the printable area of the paper.
• Shrink To Printable Area Shrinks large pages to fit the currently selected paper size but doesn’t enlarge small
pages. If an area is selected and is larger than the printable area of the currently selected paper, it’s scaled to fit the
printable area.
• Tile Large Pages Applies tiling to pages that are larger than the selected paper size at the specified scale. These
pages are mapped to multiple sheets of paper. If this option is selected, you can also specify settings for Tile Scale,
Overlap, Cut Marks, and Labels.
• Tile All Pages Applies tiling to all pages, regardless of size. However, only the pages that are larger than the selected
paper size at the specified scale are mapped to multiple sheets of paper. If this option is selected, you can also specify
settings for Tile Scale, Overlap, Cut Marks, and Labels.
• Multiple Pages Per Sheet Enables N-up printing, where multiple pages print on the same sheet of paper. If this
option is selected, you can also specify settings for Pages Per Sheet, Page Order, Print Page Border, and Auto-Rotate
Pages.
Note: N-up printing in Acrobat is independent of the N-up printing features of printer drivers. The Acrobat print settings
don’t reflect the N-up settings of the printer drivers. Select N-up printing either in Acrobat or in the printer driver, but
not both.

427
ADOBE ACROBAT 8 PROFESSIONAL
User Guide
• Booklet Printing Prints multiple pages on the same sheet of paper in the order required to read correctly when
folded. The printer must support duplex printing (printing on both sides of the sheet). Acrobat automatically enables
duplex printing, if available, for booklet printing.
Pages Per Sheet Prints a predefined number of pages, or a custom number (up to 99), horizontally and vertically
during N-up printing. If you select a predefined number from the menu, Acrobatautomatically selects the best paper
orientation.
Page Order Defines how the pages are ordered on paper during N-up printing. Horizontal places pages from left to
right, top to bottom. Horizontal Reversed places pages from right to left, top to bottom. Vertical places pages top to
bottom, left to right. Vertical Reversed places pages top to bottom, right to left. Both reversed options are suitable for
Asian-language documents.
Print Page Border Draws the crop box (the page boundary of PDF pages) during N-up printing.
Auto-Rotate Pages Adjusts the PDF’s orientation to match the orientation specified in the printer properties during
N-up printing.
Note: The Shrink To Printable Area option is always active for N-up printing. Therefore, the pages are always shrunk to
fit the available imaging area regardless of how the Auto-Rotate And Center option is set.
Choose Paper Source By PDF Page Size (Windows) Uses the PDF page size to determine the output tray rather than
the page setup option. This option is useful for printing PDFs that contain multiple page sizes on printers that have
different-sized output trays.
Print To File (Windows) Creates a device-dependent PostScript file of the document. The resulting file contains code
for enabling and controlling specific device features, making it less compatible with devices other than the target
device. For better results when creating PostScript files, use the Save As PostScript command.
Note: You don’t need to have a PostScript printer to create a PostScript file.
Print Color As Black (Windows) Forces all nonwhite color to print as black. This option is useful for printing
engineering drawings that have lightly colored lines.
Printing Tips If you’re connected to the Internet, this option connects to the Adobe website for information on how
to troubleshoot printing problems.
Advanced Opens one or more panels for setting additional printing options.
Summarize Comments Createsaseparate, printablePDFofthecommentsinadocument.Thisoptionisunavailable
whenyouprintfromaweb browserorprintmultipledocumentsinPDF packages.See“Print acommentsummary”
on page 184.
See also
“Downloading Asian fonts to a printer” on page 435
“Create print presets” on page 428
Print a portion of a page
1 Choose Tools > Select & Zoom > Snapshot Tool.
2 Drag around the area you want to print.
Acrobat copies the selected area to the clipboard.
3 Choose File > Print to print the selection.

428
ADOBE ACROBAT 8 PROFESSIONAL
User Guide
Print layers
Normally, when you print a PDF that contains layers, just the content that is visible on-screen is printed. However,
the creator of a layered PDF can specify that some layered content, such as watermarks or confidential information,
must (or must not) print, regardless of its visibility on-screen. If the document is designed to print differently from
how it currently appears on-screen, a message may appear in the Print dialog box. The Preview image in the Print
dialog box always shows the page as it will print.
Note: Towork withlayersinAcrobat,convertthesourcedocumenttoPDFusingapresetthatpreserveslayers,suchas
Acrobat 6 (PDF 1.5) or later.
View how layers print
1 Click the Layers icon in the navigation panel.
2 Choose Apply Print Overrides from the Options menu.
Note: Depending on the visibility settings specified when the PDF was created, Apply Print Overrides may be unavailable
in the Options menu.
Change print settings for a layer
1 Click the Layers icon in the navigation panel.
2 Expand the layers area, select a layer, and then select Layer Properties from the Options menu.
3 In the Layer Properties dialog box, choose one of the following from the Print pop-up menu:
Always Prints Forces the layer to print.
Never Prints Forces the layer not to print.
Prints When Visible Matches printed output to on-screen visibility.
Create print presets
A PDF can contain a set of print presets, a group of document-specific values that is used to set basic print options.
By creating a print preset for a document, you can avoid manually setting certain options in the Print dialog box each
time you print the document. It’s best to define print settings for a PDF at the time that you create it, but print presets
provide a means to add basic print settings to a PDF at any time.
1 Choose File > Properties, and click the Advanced tab.
2 In the Print Dialog Presets section, set options and click OK.
The next time you open the Print dialog box, the values will be set to the print preset values. These settings are also
used when you print individual documents in a PDF package.
Note: To retain a print preset for a PDF, you must save the PDF after creating the print preset.
Print Dialog Presets
Page Scaling Prepopulates the Page Scaling option in the Print dialog box with the option you choose:
• Default Uses the application default setting, which is Shrink To Printable Area.
• None Prevents automatic scaling to fit the printable area. This setting is useful for preserving the scale of page
content in engineering documents, or for ensuring that documents print at a particular point size to be legal.
DuplexMode For best results, the selected printer should support duplex printing if you select a duplex option.
• Simplex Prints on one side of the paper.

429
ADOBE ACROBAT 8 PROFESSIONAL
User Guide
• Duplex Flip Long Edge Prints on both sides of the paper; the paper flips along the long edge.
• Duplex Flip Short Edge Prints on both sides of the paper; the paper flips along the short edge.
Paper Source By Page Size Selects the option by the same name in the Print dialog box. Uses the PDF page size to
determine the output tray rather than the page setup option. This option is useful for printing PDFs that contain
multiple page sizes on printers that have different-sized output trays.
Print Page Range Prepopulates the Pages box in the Print Range section of the Print dialog box with the page ranges
you enter here. This setting is useful in a workflow where documents include both instruction pages and legal pages.
For example, if pages 1–2 represent instructions for filling out a form, and pages 3–5 represent the form, you can set
up your print job to print multiple copies of only the form.
Number Of Copies Prepopulates the Copies box in the Print dialog box. Choose a number from 2 to 5, or choose
Default to use the application default, which is one copy. This limitation prevents multiple unwanted copies from
being printed.
Other ways to print PDFs
About booklets
Booklets are documents with multiple pages arranged on sheets of paper that, when folded, present the correct page
order. You can create 2-up saddle-stitched booklets, where two side-by-side-pages, printed on both sides, are folded
onceandfastenedalongthefold. Thefirstpageprints on thesameprintedsheetasthelastpage,the secondpageon
the same sheet as the second-to-last page, and so on. Each page is automatically centered on the sheet, and large pages
are scaled (shrunk) to fit the printable area. When you collate, fold, and staple the double-sided pages, the result is a
single book with correct pagination.
To print booklets, your printer must support either automatic or manual duplex printing (printing on both sides of
the paper). Manual duplex printing requires two separate printing passes: one to print the front side, and another to
print the back side. To find out whether your printer supports duplex printing, check the printer manual, contact the
printer manufacturer, or click the Properties button in the Print dialog box and look for options that mention two-
sided or duplex printing.
1 2 34
3
1
1 2 3 4
Pages arranged in PDF (top), pages arranged in booklet layout (bottom), and pages printed and folded into new booklet
Print a booklet
1 Choose File > Print and select the printer.
2 Choose Booklet Printing from the Page Scaling menu.

430
ADOBE ACROBAT 8 PROFESSIONAL
User Guide
3 In the Print Range area, specify which pages to print:
• To print pages from front to back, select All.
• To divide a large booklet into smaller groupings, select Pages and specify a page range for the first grouping. Print
each page range separately.
• To print certain pages on a different paper or paper stock, specify those pages using the Sheets From/To option.
Click the Properties button and select the correct paper tray and any other options as necessary.
4 Choose additional page handling options. The Preview image changes as you specify options.
Booklet Subset Determines which sides of the paper print. Choose Both Sides to automatically print both sides of
the paper (your printer must support automatic duplex printing). Choose Front Side Only to print all pages that
appearon thefront sideofthepaper.Afterthesepages print,flip them,chooseFile>Printagain, andchooseBack
Side Only. Depending on the printer model, you might have to turn and reorder the pages to print the back sides.
To prevent others in a shared printing environment from printing on your pages before you print the back side,
consider printing the back side pages using a different paper tray.
Auto-Rotate Pages Automatically rotates each page for the best fit in the printable area.
Sheets From Specifies the first and last sheet to print. Acrobat determines which sheets must print to accommodate
the print job. For example, if you have a 16-page document, then sheets 1 through 4 print.
Binding Determines the orientation for the binding. Choose Left for text read left-to-right; choose Left (Tall) for
paper folded on the long side, where the printable area is long and narrow. Choose Right for text read right-to-left
or for Asian-style vertical reading; choose Right (Tall) for paper folded on the long side.
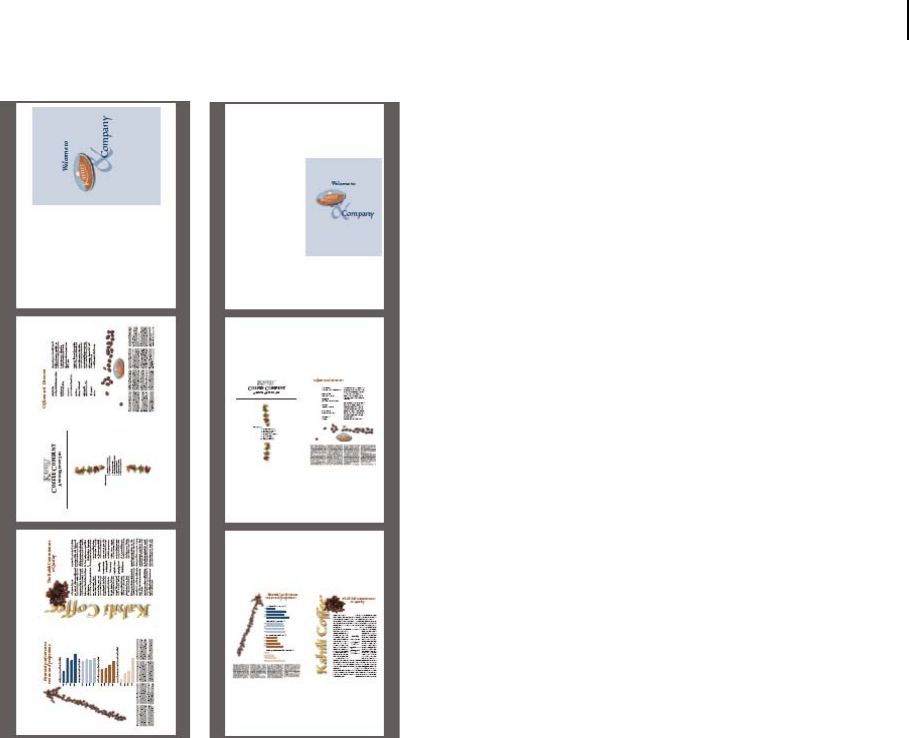
431
ADOBE ACROBAT 8 PROFESSIONAL
User Guide
Compare Right binding with Right (Tall).
Print documents in a PDF package
A PDF package contains multiple documents wrapped in one PDF. You can print the documents individually or
together.
1 Open the PDF package. You can select the cover sheet and print it on a different printer or paper stock.
2 Choose File > Print, and then choose one of the following commands:
Print Current Document Prints the open PDF.
Print All Documents Prints all the PDFs in the package.
Print Selected Documents Prints some of the PDFs in the package. (This option is available only when multiple files
are selected in the list of component documents.)
3 Choose applicable printing options, and click OK.
Documents are printed in the order they appear in the package.
Note: You must use the native application to print any component file that is not a PDF. When a non-PDF component
is selected in the PDF package component list, you can click the Open button that appears in the Acrobat document pane
to open the file’s native application, if it is installed on your computer.

432
ADOBE ACROBAT 8 PROFESSIONAL
User Guide
See also
“About PDF packages” on page 119
Print from the Bookmarks tab
You can print the pages associated with bookmarks directly from the Bookmarks tab. Bookmarks appear in a
hierarchy, with parent bookmarks and child (dependent) bookmarks. If you print a parent bookmark, all page
content associated with child-level bookmarks also print.
Not all bookmarks display page content, and therefore cannot be printed. For example, some bookmarks open a file
or play a sound. If you select a mix of printable and nonprintable bookmarks, the nonprintable bookmarks are
ignored.
Note: Bookmarks made from tagged content always display page content because the tagged content represents printable
elements in the document structure, such as headings and figures.
1 Open a PDF with bookmarks. If necessary, choose View > Navigation Panels > Bookmarks so the bookmarks
appear in the navigation pane.
2 Select one or more bookmarks, and then right-click/Control-click the selection.
3 Choose Print Page(s) from the menu.
See also
“About bookmarks” on page 327
“Add tagged bookmarks” on page 330
Printing custom sizes
Print an oversized document
Although you can create a PDF file as large as 15,000,000 inches (38,100,000 cm) in either direction, most desktop
printers cannot print such large pages. To print an oversized document on your desktop printer, you can print each
page in pieces, called tiles, and then trim and assemble those pieces.
You can also increase the scale of a standard-sized document and print it on multiple pages.
1 Choose File > Print.
2 From the Page Scaling menu, choose Tile All Pages if all pages of the document are oversized. If some of the pages
are standard-sized, choose Tile Large Pages.
3 (Optional) Set any of these options, referring to the Preview image to check the output results:
Tile Scale Adjusts the scaling. The scaling affects how the sections of the PDF page map to the physical sheet.
Overlap Specifies the minimum amount of duplicated information you want printed on each tile for ease in
assembly. The Overlap option uses the unit of measure specified for the document. The value should be greater than
the minimum nonprinting margins for the printer. You can specify up to half the size of the shortest side of the
document page to overlap. For example, tiles for a page that measures 11-by-17 inches (279.4mm-by-431.8mm) can
overlap up to 5.5 inches (139.7mm).

433
ADOBE ACROBAT 8 PROFESSIONAL
User Guide
Labels Includes the PDF name, date of printing, and tile coordinate on every sheet. For example, Page 1 (1,1) means
row 1, column 1 of the first page. Tile coordinates are used for reassembling the tiles.
Cut Marks Prints marks on each corner of a tiled page for ease of assembly. Use this option in conjunction with the
Overlap option. When you specify an overlapping edge and then superimpose those edges, you can use the cut marks
to line up the tiles.
Scale a document for printing
To print an oversized PDF on paper that has smaller dimensions, you can scale the document’s width and height to fit.
1 Choose File > Print.
2 From the Page Scaling menu, choose Fit To Printable Area or Shrink To Printable Area.
Advanced print settings
About PPD files
A PPD file (PostScript Printer Description file) customizes the behavior of the driver for your specific PostScript
printer. It contains information about the output device, including printer-resident fonts, available media sizes and
orientation, optimized screen frequencies, screen angles, resolution, and color output capabilities. It’s important to
set up the correct PPD before you print. Selecting the PPD that corresponds to your PostScript printer or imagesetter
populates the Print dialog box with the available settings for the output device. You can switch to a different one to
suit your needs. Applications use the information in the PPD file to determine which PostScript information to send
to the printer when printing a document.
Forbestprintingresults, Adoberecommendsthatyouobtain thelatestversion ofthePPD fileforyouroutputdevice
from the manufacturer. Many print service providers and commercial printers have PPDs for the imagesetters they
use. Be sure to store PPDs in the location specified by the operating system. For details, consult the documentation
for your operating system.
Select a PPD file
The steps for selecting a PPD file are different for each platform.
Select a PPD file in Windows
1 Depending on your version of Windows, do one of the following to open the Add Printer wizard:
• In Windows 2000, choose Start > Settings > Printers > Add Printer.
• In Windows XP, choose Start, open the Printers And Faxes control panel, and click Add A Printer.
2 Follow the instructions to add a printer and specify a PPD file.
Select a PPD file in Mac OS
1 Open the area where you add printers.
2 Click Add in the Printer List window.
3 From the top menu, choose a connection method.
4 Select a printer, or enter the printer’s IP address.

434
ADOBE ACROBAT 8 PROFESSIONAL
User Guide
5 From the bottom menu, select a printer model.
6 In the list that appears, select a PPD file, and then click Add.
About advanced print settings
If normal print settings don’t produce the results you expect, you may need to specify options in the Advanced Print
Setup dialog box. For example, if your printed output doesn’t match the document’s on-screen appearance, you may
need to try printing the document as an image. Or, if a PDF uses fonts that aren’t embedded, you must download the
fonts to the printer when you print the document.
Otheradvancedprintingoptionsletyouaddprintermarkstoyourprintedoutputandchoosehowtohandlecolor.
Set advanced print options
Print settings are preserved as long as the application is open. To use the settings again, you can save them in a file.
1 In the Print dialog box, click Advanced.
2 If a custom printer settings file exists with the settings you want, choose it from the Settings menu. Otherwise,
choose Acrobat Default.
To learn more about an option, select it. A description of it appears at the bottom of the dialog box.
3 If normal printing doesn’t produce the desired results, select Print As Image and choose a resolution from the
drop-down list.
4 Select any of the panels on the left side of the Advanced Print Setup dialog box, and set options for either
composite or separations output.
• Set color and other output conditions. See “Output options” on page 435.
• Set options for printer marks. See “Include marks and bleeds” on page 438.
• Set options for PostScript printers. See “PostScript options” on page 434.
Note: Acrobat sets the PostScript level automatically, based on the selected printer.
5 To save the settings, click Save As, specify a filename, and click OK. The print settings are saved as an .spf file.
6 Click OK to accept the settings and return to the Print dialog box.
PostScript options
Use the PostScript Options panel of the Advanced Print Setup dialog box to set options for a particular PostScript
printer, such as how to handle nonresident printer fonts and whether to download Asian fonts. In addition, if a PDF
contains device-dependent settings, such as halftones and transfer functions, these settings can be sent in the
PostScript output to override the default settings in the printer. To use these options, you must be connected to a
PostScript printer or have a PostScript printer driver installed with a PPD file selected.
Print Method Specifies the level of PostScript to generate for the pages. Choose the level of PostScript appropriate
for your printer.
Font And Resource Policy Specifies how fonts and resources in the document are sent to a printer when those fonts
and resources aren’t present on the printer.
• Send At Start Downloadsallfontsand resourcesatthestartoftheprintjob.Thefontsandresourcesremainon
the printer until the job has finished printing. This option is the fastest but uses the most printer memory.

435
ADOBE ACROBAT 8 PROFESSIONAL
User Guide
• Send By Range Downloads fonts and resources before printing the first page that uses them, and then discards
them when they are no longer needed. This option uses less printer memory. However, if a PostScript processor
reorders the pages later in the workflow, it might not reorder the font downloading correctly, resulting in missing
fonts. This option may not work with some printers.
• Send For Each Page Downloads all fonts and resources for a given page before the page prints, and then discards
the fonts when the page has finished printing. This option uses the least printer memory.
Download Asian Fonts Prints documents with Asian fonts that aren’t installed on the printer or embedded in the
PDF. The Asian fonts must be present on the system.
Emit CIDFontType2 As CIDFontType2 (PS Version 2015 And Greater) Preserves hinting information in the original
font when printing. If unselected, CIDFontType2 fonts are converted to CIDFontType0 fonts, which are compatible
with a wider range of printers. This option is available for PostScript 3 and PostScript Level 2 (PostScript version
2015 and later) output devices.
Print As Image Prints pages as bitmap images. Select this option if normal printing doesn’t produce the desired
results, and specify a resolution. This option is available only for PostScript printers.
Downloading Asian fonts to a printer
Select the Download Asian Fonts option in the Advanced Print Setup dialog box if you want to print a PDF with
Asian fonts that are not installed on the printer or embedded in the document. (Embedded fonts are downloaded
whetherornotthisoptionisselected.)YoucanusethisoptionwithaPostScriptLevel2orhigherprinter.Tomake
Asian fonts available for downloading to a printer, be sure you have downloaded the fonts to your computer using
the Custom or Complete installation option during installation of Acrobat.
If Download Asian Fonts is not selected, the PDF prints correctly only if the referenced fonts are installed on the
printer. If the printer has similar fonts, the printer substitutes those. If there are no suitable fonts on the printer,
Courier is used for the text.
If Download Asian Fonts does not produce the results you want, print the PDF as a bitmap image. Printing a
document as an image may take longer than using a substituted printer font.
Note: Some fonts cannot be downloaded to a printer, either because the font is a bitmap or because font embedding is
restricted in that document. In these cases, a substitute font is used for printing, and the printed output may not match
the screen display.
Output options
Use the Output panel of the Advanced Print Setup dialog box to set output options.
Color Presents composite and separations options. Other options become available in the Output panel depending
on your selection in this menu.
Color Profile Determines the profile used for handling colors during printing.
• Printer/PostScript Color Management Sends the document’s color data along with the document profile directly
to the PostScript printer and lets the printer convert the document to the printer color space. The exact results of the
color conversion can vary among printers. To use PostScript color management, you must have a printer that uses
PostScript Level 2 or later; it’s not necessary to install an ICC profile for the printer on your system.
• Same as Source (No Color Management) Discards all color management information and sends device color to
the printer, whether or not the document contains color management information.

436
ADOBE ACROBAT 8 PROFESSIONAL
User Guide
Apply Output Preview Settings Simulates the print space defined by the device identified in the Simulation Profile
menu of the Output Preview dialog box (choose Advanced > Print Production > Output Preview). This option allows
you to simulate the appearance of one device on another.
Simulate Overprinting Simulates the effects of overprinting spot inks in composite output and converts spot colors
to process colors for printing; the document itself is unchanged. This option is useful for printing devices that don’t
supportoverprintingand isavailableonlyifyou choose CompositefromtheColormenu.Ifyouintendtouseafile
for separations on a RIP (raster image processor) or for final output, don’t select this option.
Important: When printing to a printer that supports overprinting, make sure that this option is unselected, so the
printer’s native overprinting capabilities are used.
Transparency Flattener Preset Flattens transparent objects according to the preset you choose.
Use Maximum Available JPEG2000 Image Resolution Controls how resolution progression information, if present,
is used when generating PostScript. When selected, the maximum resolution data contained in the image is used.
Whenunselected,theresolutiondataisconsistentwith theresolutionsettingsontheTransparencyFlatteningpanel.
Ink Manager Modifies the way inks are treated while the current PDF is open.
See also
“Ink Manager overview” on page 461
About halftone screen frequency
In commercial printing, continuous tone is simulated by dots (called halftone dots) printed in rows (called lines or
line screens). Lines are printed at different angles to make the rows less noticeable. The Screening menu in the Output
section of the Print dialog box displays the recommended sets of line screens in lines per inch (lpi), and resolution
in dots per inch (dpi), based on the currently selected PPD. As you select inks in the ink list, the values in the
Frequency and Angle boxes change, showing you the halftone screen frequency and angle for that ink.
A high line-screen ruling (for example, 150 lpi) spaces the dots closely together to create a finely rendered image on
the press; a low line-screen ruling (60 lpi to 85 lpi) spaces the dots farther apart to create a coarser image. The size of
the dots is also determined by the line screen. A high line-screen ruling uses small dots; a low line-screen ruling uses
large dots. The most important factor in choosing a line-screen ruling is the type of printing press your job will use.
Ask your service provider how fine a line screen its press can hold, and make your choices accordingly.
B
D
A
C
Line screens
A. 65 lpi: Coarse screen for printing newsletters and grocery coupons B. 85 lpi: Average screen for printing newspapers C. 133 lpi: High-quality
screen for printing four-color magazines D. 177 lpi: Very fine screen for printing annual reports and images in art books
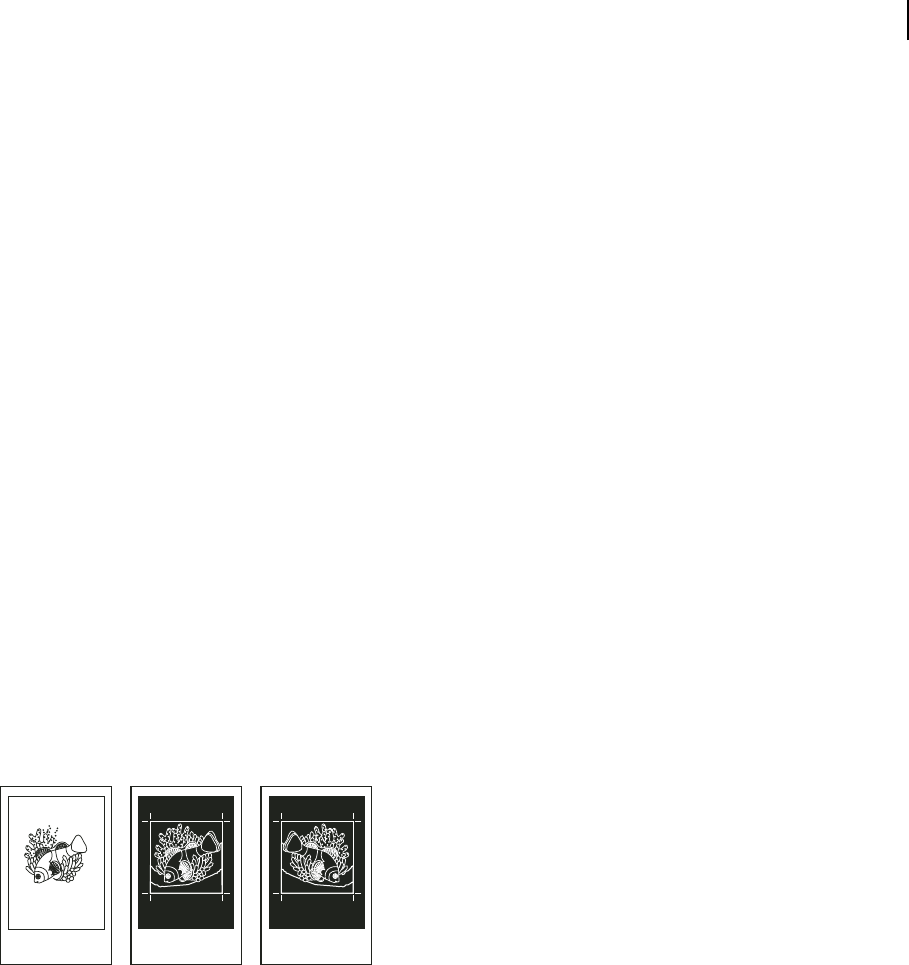
437
ADOBE ACROBAT 8 PROFESSIONAL
User Guide
The PPD files for high-resolution imagesetters offer a wide range of possible screen frequencies, paired with various
imagesetter resolutions. The PPD files for low-resolution printers typically have only a few choices for line screens,
usually coarser screens of between 53 lpi and 85 lpi. The coarser screens, however, give optimum results on
low-resolution printers. Using a finer screen of 100 lpi, for example, actually decreases the quality of your image
when you use a low-resolution printer for final output.
Specify halftone screen frequency
❖ In the Output panel of the Advanced Print Setup dialog box, do one of the following:
• To select one of the preset screen frequencies and printer resolution combinations, choose an option from the
Screening menu.
• To specify a custom halftone screen frequency, in the ink list, select the plate to be customized, and then enter the
lpi value in the Frequency box and a screen angle value in the Angle box.
Note: Before creating your own halftone screens, check with your print service provider for the preferred frequencies and
angles. Also, be aware that some output devices override the default frequencies and angles.
About emulsion and image exposure
Depending on the type of printing press used and how information is transferred from the film to the printing plates,
you may need to give your service provider film negatives or positives, with emulsion side up or down. Emulsion
referstothephotosensitivelayer on apieceoffilm orpaper.Typically,printserviceprovidersrequirenegativefilm
in the United States and positive film in Europe and Japan. Check with your service provider to determine which
emulsion direction they prefer.
Totellwhetheryouarelookingat theemulsionsideorthenonemulsionside (alsoreferredtoasthe base), examine
the final film under a good light. One side appears shinier than the other. The dull side is the emulsion side; the shiny
side is the base.
A B C
Emulsion options
A. Positive image B. Negative C. Negative with emulsion side down
Important: The emulsion and image exposure settings in the Print dialog box override any conflicting settings in the
printer driver. Always specify print settings using the Print dialog box.
Specify the emulsion and image exposure
1 Select Output on the left side of the Advanced Print Setup dialog box.
2 For Color, choose Separations.
3 For Flip, select one of the following options:
None Makes no changes to the orientation of the imageable area. Type that is in the image is readable (that is, “right
reading”) when the photosensitive layer is facing you. This is the default.
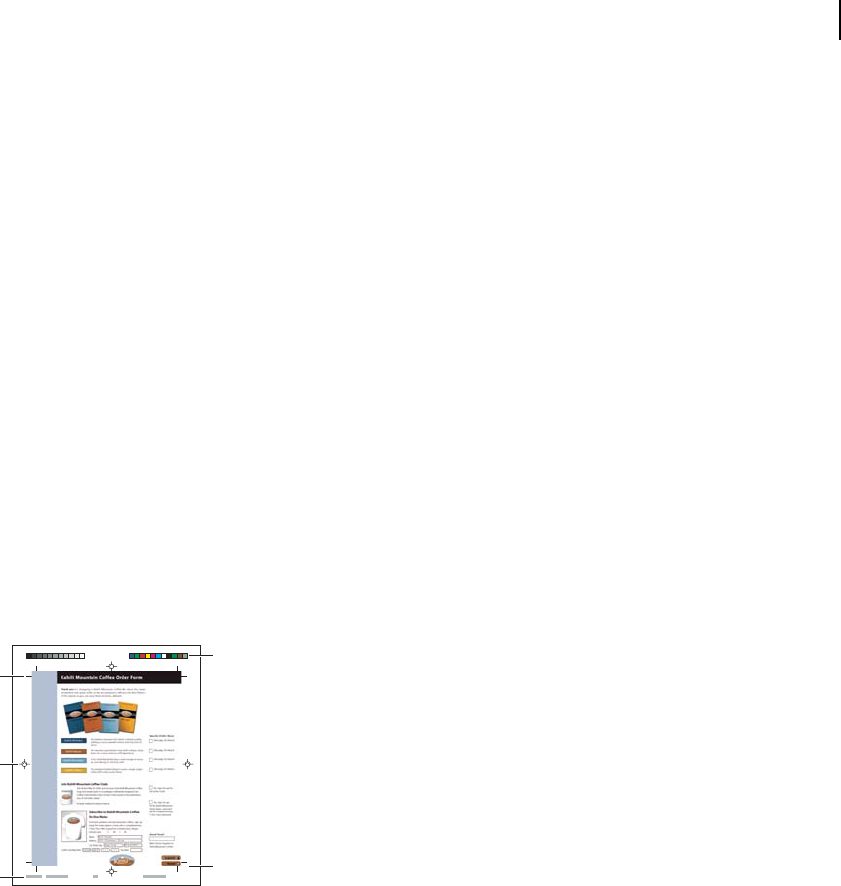
438
ADOBE ACROBAT 8 PROFESSIONAL
User Guide
Horizontal Mirrors the imageable area across a vertical axis so that it is “wrong reading.”
Vertical Mirrors the imageable area across a horizontal axis so that it is upside down.
Horizontal And Vertical Mirrors the imageable area across the horizontal and vertical axes so that it is wrong
reading. Type is readable when the photosensitive layer is facing away from you. Images printed on film are often
printed Horizontal And Vertical.
4 Select the Negative option for negative film; deselect it for positive film.
Note: The Negative option is also available if you choose In-RIP Separations from the Color menu.
Include marks and bleeds
You can place printer marks on the page to indicate the boundaries of document boxes supported by Adobe PDF,
such as trim boxes and bleed boxes. These marks are not added as page content; however, they are included in the
PostScript output.
The options in the Marks And Bleeds panel are unavailable under these circumstances:
• The PDF includes printer marks added using a different Acrobat feature, the Add Printer Marks tool.
• Thecrop,bleed,andtrimboxesareallthesamesize. Thecropbox isdefinedintheCropBoxdialogbox(choose
Advanced > Print Production > Crop Pages). If the artwork contains a bleed, make sure that the crop box is big
enough to accommodate the bleed box and other printer marks.
A
D
E
C
B
Printer marks
A. Trim marks B. Registration marks C. Page information D. Color bars E. Bleed marks
1 Select Marks And Bleeds on the left side of the Advanced Print Setup dialog box.
2 Choosetheprinter marksyouwant.Themarksappearinthepreviewontheleftsideof theAdvancedPrintSetup
dialog box.
See also
“Embed printer marks in a PDF” on page 463
Marks And Bleeds options
All Marks Creates all printer marks at once.
Line Weight Determines the weight of the lines for trim, bleed, and registration marks.

439
ADOBE ACROBAT 8 PROFESSIONAL
User Guide
Style Determines the appearance of the marks. You can choose default InDesign marks, or marks from other appli-
cations as listed.
Trim Marks Places a mark at each corner of the trim area to indicate the PDF trim box boundaries.
Bleed Marks Places a mark at each corner of the bleed box to indicate the PDF bleed box boundaries. A bleed box
defines the amount of extra area to image outside the defined page size.
Registration Marks Places marks outside the crop area for aligning the different separations in a color document.
Color Bars Adds a small square of color for each grayscale or process color. Spot colors converted to process colors
are represented using process colors. Your service provider uses these marks to adjust ink density on the printing
press.
Page Information Placespageinformationoutside thecropareaofthe page.Pageinformationincludes thefilename,
page number, current date and time, and color separation name.
Printing color
Preview how colors overprint
Overprint Preview mode provides an on-screen simulation that approximates how blending and overprinting will
appear in color-separated output. Overprinting effects can also be simulated when you output to a composite
printing device. Both of these methods are useful for proofing documents that will be color separated.
Compare appearance of artwork on-screen (left) with printed artwork (right).
❖ With the PDF open, choose Advanced > Print Production > Overprint Preview.
The overprint display turns on or off. If overprint previewing is on, a check mark appears next to the Overprint
Preview command.
Managing color
When you print a color-managed RGB or CMYK document, you can specify additional color management options
to keep color consistent in the output. For example, suppose the document contains a profile tailored for prepress
output, but you want to proof the colors on a desktop printer. In the Output panel of the Advanced Print settings
dialog box, you can temporarily convert the document’s colors to the color space of the desktop printer—the printer
profile is used instead of the current document profile when printing. In addition, you can send color data as RGB
values to printers using various RGB profiles.

440
ADOBE ACROBAT 8 PROFESSIONAL
User Guide
See also
“Understanding color management” on page 402
“Keeping colors consistent” on page 404
“Color-managing documents when printing” on page 412
“Working with color profiles” on page 414
About composite printing
When you print a color PDF, all of the colors used in the file print on one plate. This process is called composite
printing. The options available in the Output panel of the Advanced Print Setup dialog box depend on the selected
printer.
Artwork that will be commercially reproduced and that contains more than a single color must be printed on
separate master plates, one for each color. This process is called color separation. If you’re creating color separations,
you can print a color or grayscale composite proof to check your work.
Note: To create color separations, you need Acrobat 8 Professional or Acrobat 3D Version 8.
Consider the following issues when printing composites:
• Any overprinting options that you select print correctly only on a printer that supports overprinting. Since most
desktop printers don’t support overprinting, you can simulate the effects of overprinting by selecting Simulate
Overprinting in the Output panel of the Advanced Print Setup dialog box. Be aware that selecting Simulate
Overprinting converts spot colors to process colors for printing. If you intend to use a file for final output, do not
select this option.
• When you print to a black-and-white printer, a grayscale composite version of the pages is produced (unless you
select Print Color As Black in the main Print dialog box; this option prints all nonwhite color as black). If the
document contains color, visually correct grays are used to simulate that color. For example, the gray that
simulates a 20% tint of yellow is lighter than a 20% tint of black, since yellow is visually lighter than black.
Note: Remember that, like monitors, color printers vary greatly in color reproduction quality; thus, proofs from your
service provider are the best way to verify how the finished piece will look.
See also
“About separations” on page 441
Print a color composite
1 Choose File > Print, and choose a printer.
2 Specify page handling options.
3 Choose Document And Stamps from the Comments And Forms menu to print all visible content.
4 Click Advanced, and select Output on the left side of the dialog box.
5 Choose a composite option from the Color menu.
6 Specify other color and output settings, and click OK.
7 If the document contains objects with transparency settings, select an option from the Transparency Flattening
Preset menu.
8 (PostScript printing only) In the PostScript Options panel, specify options.

441
ADOBE ACROBAT 8 PROFESSIONAL
User Guide
See also
“About flattening” on page 465
About separations
To produce high-quality separations, it helps to be familiar with the basics of printing, including line screens,
resolution, process colors, and spot colors.
If you are using a print service provider to produce separations, you’ll want to work closely with its experts before
beginning each job and during the process.
To reproduce color and continuous-tone images, printers usually separate artwork into four plates—one plate for
each of the cyan (C), yellow (Y), magenta (M), and black (K) portions of the image. When inked with the appropriate
color and printed in register with one another, these colors combine to reproduce the original artwork. The process
of dividing the image into two or more colors is called color separating, and the films from which the plates are
created are called the separations.
Composite (left) and separations (right)
Print color separations
Acrobat supports host-based separations and in-RIP separations. The main difference between them is where the
separations are created—at the host computer (the system using Acrobat and the printer driver) or at the output
device’s RIP.
For host-based separations, Acrobat creates PostScript information for each of the separations required for the
document and sends that information to the output device. For in-RIP separations, the work of separating a file is
performed by the RIP. This method often takes less time than creating host-based separations, but it requires a
PostScript 3 output device with in-RIP separation capability. To produce in-RIP separations, you need a PPD file that
supports in-RIP separations, and any PostScript 3 output device or a PostScript Level 2 device whose RIP supports
in-RIP separations.
See also
“Previewing output” on page 454
“About preflight inspections” on page 473
Prepare to print separations
❖ Before you print separations, do the following:
• Calibrate your monitor. See “Calibrate and profile your monitor” on page 416.

442
ADOBE ACROBAT 8 PROFESSIONAL
User Guide
• Specify whether the document contains trapping information, if known. See “Declare the presence of trapping
information” on page 442.
• Preview separations and transparency flattening results. See “Preview color separations” on page 456 and
“Preview which areas of artwork will be flattened” on page 467.
• Run preflight inspections using desired criteria. See “Preflight profiles” on page 483.
Note: If you use a print service provider to produce separations, you’ll want to work closely with its experts before
beginning each job and throughout the process.
Print separations
1 Choose File > Print, and choose a printer.
2 Choose an option from the Comments And Forms menu.
3 Choose print range and page handling options.
4 Click Advanced.
5 If you created a custom printer settings file with the appropriate separation settings, choose it from the Settings
menu at the top of the Advanced Print Setup dialog box.
6 Select Output on the left, and choose an option from the Color menu:
• Choose Separations if the PPD doesn’t support in-RIP separations.
• Choose In-RIP Separations if the PPD supports in-RIP separations. Trapping options appear. From the menu,
choose Adobe In-RIP or Off. If you choose Adobe In-RIP, click Trap Presets and select a preset. Click OK.
7 Specify settings for halftone screen frequency and the angle at which the selected ink’s halftone screen is rotated.
8 If the document contains objects with transparency settings, select an option from the Transparency Flattening
Preset menu.
9 Under Ink Manager, deselect any color you don’t want to separate.
The four process colors (cyan, magenta, yellow, and black) always appear at the top of the color plate list, followed
by spot colors in alphabetical order.
10 Click the Ink Manager button to modify ink settings for color separations.
11 Click Marks And Bleeds on the left, and select All Marks.
12 Click PostScript Options on the left, and select settings as needed. Click OK to close the dialog box, and then
click OK again to print the separations.
Declare the presence of trapping information
If you are sending your PDF files to a print service provider, you can use the Document Properties dialog box to
specify whether a PDF contains trapping information. This detail can help prevent the service provider from adding
potentially conflicting trapping commands to the file. Trapping information can either be imported with other
PostScript information from the authoring application, or it can be created in Acrobat using trapping presets
supported by Adobe In-RIP Trapping.
1 Open the PDF file, and choose File > Properties.
2 Click the Advanced tab.
3 Choose an option from the Trapped menu, and click OK.
Ye s The file contains trapping information.

443
ADOBE ACROBAT 8 PROFESSIONAL
User Guide
No The file doesn’t contain trapping information.
Unknown You don’t know whether the file contains trapping information.
See also
“Adobe In-RIP trapping” on page 447
Saving separations as PostScript
Depending on the prepress software available, a service provider may be able to perform such prepress activities as
trapping, imposition, separating, and OPI replacement at the output device’s RIP. Therefore, your service provider
may prefer to receive a composite PostScript file of the document optimized for in-RIP separations rather than a
preseparated PostScript file.
Saving the file as PostScript preserves the separation settings, the PPD information, and any color conversions you
have specified in the Advanced Print Setup dialog box.
For best results when generating PostScript for reuse in a print production workflow, use the Save As command
rather than the Print To File option available in the Print dialog box.
See also
“PostScript options” on page 434

444
Chapter 16: Print production tools
Whether you’re a designer working on a creative piece or a print service provider preparing an Adobe PDF for final
output, you’ll find the print production tools essential to getting your job done.
Quickstart
The following topics provide overview steps for some common print production tasks.
Convert colors to a different space
For high-end output, you can convert document colors to a different color space—for example, from RGB to CMYK.
1 Choose Advanced > Print Production > Convert Colors.
2 For each of the document colors listed, select a conversion option from the Action menu.
3 Specify the destination space profile, blending profile, and other conversion options.
Use the TouchUp Object tool (Tools > Advanced Editing) to convert the color space of individual objects.
See also
“Convert colors to a different color space” on page 459
Separate spot colors as process
Converting a spot color is useful if the PDF contains more spot colors than are practical to print.
1 Choose Advanced > Print Production > Ink Manager.
2 Do one of the following:
• To convert individual colors, click the ink-type icon to the left of the spot color.
• To convert all spot colors, click Convert All Spots To Process.
Converting all spot colors removes ink aliases and may affect overprinting and trapping settings.
See also
“Separate spot colors as process” on page 462
Add printer marks
Add printer marks to a PDF to aid in prepress file preparation. You can add trim, bleed, and registration marks, as
well as color bars and page information.
1 Choose Advanced > Print Production > Add Printer Marks.
2 Specify the desired marks.
3 Specify the pages to mark.

445
ADOBE ACROBAT 8 PROFESSIONAL
User Guide
You can also add marks temporarily to a document using the Advanced Print Setup dialog box.
See also
“Embed printer marks in a PDF” on page 463
Preview transparency flattening
Use the transparency preview options to view objects in a PDF that are transparent, as well as those that will be
affected by transparency flattening.
1 Choose Advanced > Print Production > Flattener Preview.
2 Select a preview setting from the Highlight menu and a resolution level from the Preset menu.
3 Set desired options, such as the raster-to-vector balance and the line art, text, gradient, and mesh resolutions.
4 Specify where you want to apply the changes.
See also
“Transparency flattening” on page 465
Create flattener presets
You can automate the flattening process by saving flattening settings in a transparency flattener preset.
1 Choose Advanced > Print Production > Flattener Preview.
2 Choose the preset you want to base your new preset on, and then change the settings as desired.
3 Click Save and name the new preset.
If you need to start over, press the Reset button. Custom presets are immediately available from the Preset menu.
See also
“Create a flattener preset” on page 470
Tools for high-end output
Print production tools overview
Adobe Acrobat adds sophisticated print production tools that enable a complete PDF workflow for high-end color
output. The print production tools are in the Advanced menu and on the Print Production toolbar.
ABC D E F G H I J K
Print Production toolbar
A. Trap Presets B. Output Preview C. Preflight D. Convert Colors E. Ink Manager F. Add Printer Marks G. Crop Pages H. Fix Hairlines
I. Flattener Preview J. PDF Optimizer K. JDF Job Definitions

446
ADOBE ACROBAT 8 PROFESSIONAL
User Guide
Open the Print Production toolbar
❖ Choose Advanced > Print Production > Show Print Production Toolbar.
Print Production tools
Trap Presets Allows you to create and apply trap settings for later execution by an Adobe PostScript 3 RIP that
licenses Adobe In-RIP Trapping.
Output Preview Combines separation preview, soft proofing, color warnings, the full Ink Manager, and more in one
convenient dialog box.
Preflight Allows you to perform more than 400 predefined checks for all the common output errors that can come
with a designer’s file, and then correct all fixable errors. Preflight also checks files for PDF/X compliance, password
protection of preflight profiles, PostScript level compatibility, and more.
Convert Colors Converts RGB, CMYK, and Grayscale color spaces to the target color space. Convert Colors also
allows you to embed PDFs with ICC profiles.
Ink Manager Modifies the way inks are treated while the current PDF is open. The Acrobat Ink Manager uses the
same options and controls as other Adobe applications.
Add Printer Marks
Adds standard printer marks to a PDF page for positioning. These marks are embedded in the PDF.
Crop Pages Allows you to define the crop, trim, bleed, art, and media boxes on a page. The elements are important
for proper page positioning and placement of printer marks, especially for imposition.
Fix Hairlines Finds hairlines and replaces them with heavier-weight lines.
Flattener Preview Provides flattener presets to control the amount of rasterization that occurs during print output
or export to certain file formats, such as EPS. You can save these settings as a preset for future use. This tool also
includes a preview for viewing transparent objects and the effects your settings will have on those objects.
PDF Optimizer Provides many settings for inspecting, analyzing, and repairing documents, as well as eliminating
unneeded content to reduce file size.
JDF Job Definitions Allows you to create custom job definitions that can be edited and used in a production
environment. The JDF file may also include information necessary for the creation of PDFs appropriate for the
production process, including PDF conversion settings and preflight profiles.
Trapping color
About ink trapping
When an offset printed document uses more than one ink on the same page, each ink must be printed in register
(perfectly aligned) with any other inks that it abuts, so that there is no gap where the different inks meet. However,
it’s impossible to ensure exact registration for every object on every sheet of paper running through a printing press,
so misregistration of inks can occur. Misregistration causes an unintended gap between inks.
You can compensate for misregistration by slightly expanding one object so that it overlaps an object of a different
color—a process known as trapping. By default, placing one ink over another knocks out, or removes, any inks under-
neath to prevent unwanted color mixing; but trapping requires that inks overprint, or print on top of each other, so
that at least a partial overlap is achieved.

447
ADOBE ACROBAT 8 PROFESSIONAL
User Guide
Misregistration with no trap (left) and with trap (right)
Most traps employ spreading—expanding a light object into a dark object. Because the darker of two adjacent colors
defines the visible edge of the object or text, expanding the lighter color slightly into the darker color maintains the
visual edge.
Adobe In-RIP trapping
Acrobat can automatically trap color documents with the Adobe In-RIP Trapping engine, which is available on
Adobe PostScript output devices that support Adobe In-RIP Trapping.
Adobe In-RIP Trapping can precisely calculate and apply any necessary adjustments to the edges of type and graphics
throughout your document. It can apply effective trapping techniques to different parts of a single object, even if the
object overlaps several different background colors. Trapping adjustments are made automatically, and you can
define trap presets to address the trapping requirements of specific page ranges. The effects of trapping are apparent
only on color separations generated by the trapping engine; you cannot see the results on-screen within the program.
The trapping engine decides where to trap by detecting contrasting color edges. It then creates traps based on the
neutral densities (lightness or darkness) of abutting colors, in most cases by spreading lighter colors into adjacent
darker colors. The trapping settings you specify in the Trap Presets palette modify the trapping engine’s results.
Requirements
Adobe In-RIP Trapping requires the following software and hardware:
• A PPD (PostScript Printer Description) file for a printer that supports Adobe In-RIP Trapping. You must select
this PPD by using the operating system driver.
• An Adobe PostScript Level 2 or later output device that uses a RIP that supports Adobe In-RIP Trapping. To find
out if a PostScript output device supports Adobe In-RIP Trapping, contact the manufacturer or your print service
provider.
See also
“About PPD files” on page 433
Trap a PDF
Trapping is a complex process that depends on the interaction of various color, ink, and printing factors; the correct
settings vary, depending on specific press conditions. Do not change the default trap settings unless you’ve consulted
with your print service provider.
1 If necessary, choose Advanced > Print Production > Trap Presets to create a trap preset with custom settings for
your document and printing press conditions.
2 Assign the trap preset to a page range.

448
ADOBE ACROBAT 8 PROFESSIONAL
User Guide
3 Choose File > Print to open the Print dialog box, and then click Advanced.
4 Select Output from the list on the left.
5 For Color, choose In-RIP Separations.
6 For Trapping, choose Adobe In-RIP.
Note: This option works only when you target an output device that supports Adobe In-RIP Trapping.
7 Click Ink Manager. As necessary, select an ink, specify the following options (only if your service provider recom-
mends changing the settings), and then click OK:
Type Choose an ink type that describes the selected ink.
Neutral Density Type a value that differs from the default.
Trapping Sequence Type a value to set the order in which inks are printed.
8 Continue specifying other print options, and then click OK to print your document.
See also
“Adjusting ink neutral density values” on page 453
“Customize trapping for specialty inks” on page 453
“Adjust the trapping sequence” on page 454
Specify settings using trap presets
A trap preset is a collection of trap settings you can apply to pages in a PDF. Use the Trap Presets dialog box for
entering trap settings and saving a collection of settings as a trap preset. If you don’t apply a trap preset to a trapping
page range, that page range will use the [Default] trap preset, a collection of typical trap settings that are applied to
all pages of a new document.
Note: In Acrobat, trap presets and their assignments apply to the document only while it is open; trap settings are not
savedinthe PDF. ThisbehaviorisdifferentfromInDesign,wheretrappresets andtheirassignmentsare savedwiththe
InDesign document.
Create or modify a trap preset
1 Choose Advanced > Print Production > Trap Presets.
2 Select an existing preset as a starting point, and then click Create.
3 Specify the following options, and then click OK:
Name Type a name for the preset. You cannot change the name of either of the two built-in presets: [No Trap Preset]
and [Default].
Trap Width Type values to specify the amount of overlap for inks.
Trap Appearance Specify options for controlling the shape of the traps.
Images Specify settings that determine how to trap imported bitmap images.
Trap Thresholds Type values to specify the conditions under which trapping occurs. Many variables affect the values
you’ll need to enter here. For more information, consult with your print service provider, and see the other trapping
topics.
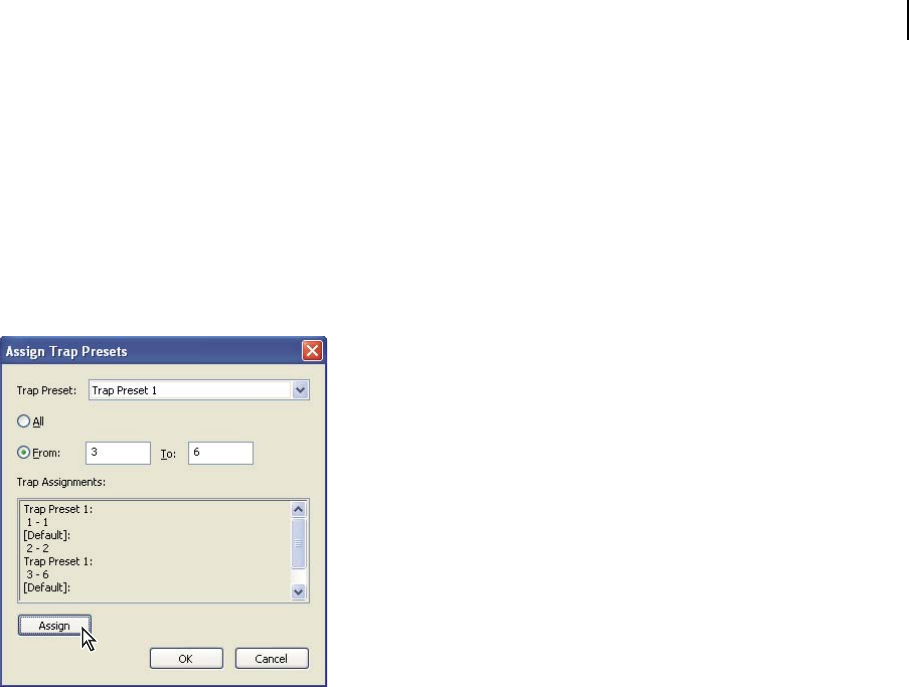
449
ADOBE ACROBAT 8 PROFESSIONAL
User Guide
Delete a trap preset
1 In the Assign Trap Presets dialog box, select the preset(s), and then click the Delete button.
2 Click OK to confirm the deletion.
Note: You cannot delete either of the two built-in presets: [No Trap Preset] and [Default].
Assign a trap preset to pages
You can assign a trap preset to a document or to a range of pages in a document. Pages with no abutting colors will
print faster if you disable trapping on those pages. Trapping doesn’t actually occur until you print the document.
Trap assignments list presets you have applied to various pages; trap assignments are updated each time you click Assign.
1 In the Assign Trap Presets dialog box, click Assign.
2 For Trap Preset, choose the preset you want to apply.
3 Select the pages you want to apply the trap preset to.
4 Click Assign, and then click OK.
Note: Ifyouclick OKwithoutclickingAssign,thedialogboxcloseswithoutmakinganychangestothetrapassignments.
Trap assignments previously made using the Assign button are preserved.
Disable trapping on pages
1 In the Trap Presets dialog box, click Assign.
2 Select the pages you want to disable trapping on and choose [No Trap Preset] in the Trap Preset menu.
3 Click Assign, and then click OK.
Trap preset options
You can change trap preset options whenever you create or edit a trap preset. The same trap preset options are
available in Acrobat and InDesign. In Acrobat, you can view trap presets by choosing Tools > Print Production >
Trap Presets. In InDesign, choose Window > Output > Trap Presets.
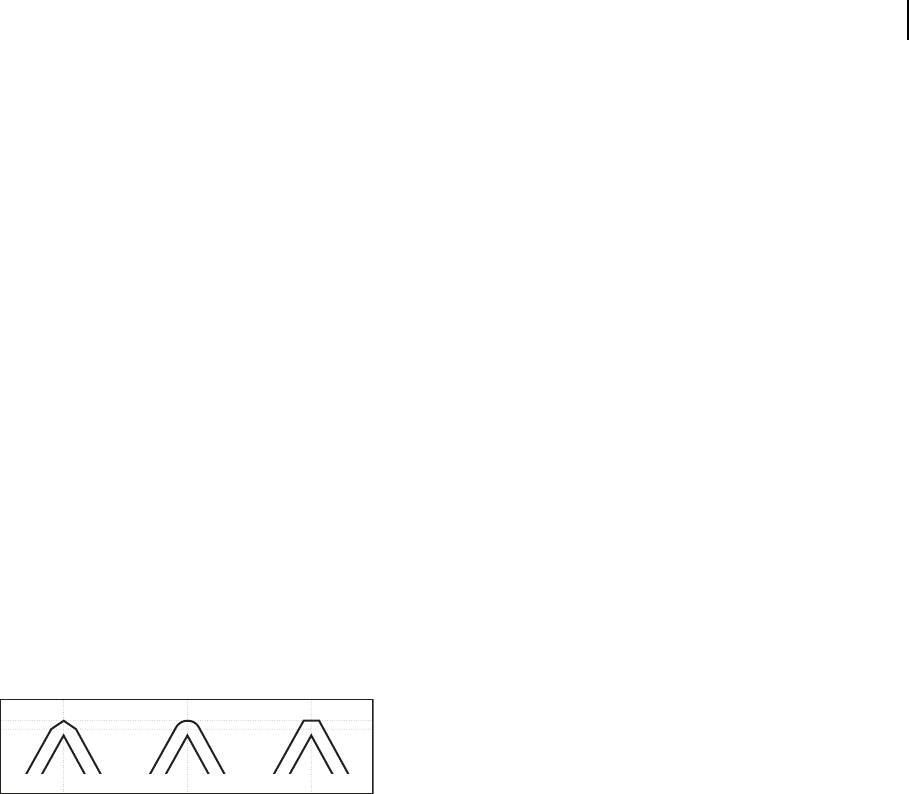
450
ADOBE ACROBAT 8 PROFESSIONAL
User Guide
Trap widths
Trap width is the amount of overlap for each trap. Differences in paper characteristics, screen rulings, and printing
press conditions require different trap widths. To determine the appropriate trap widths for each job, consult your
commercial printer.
Default Specifies the trap width in points for trapping all colors except those involving solid black. The default value
is 0p0.25.
Black Indicates the distance that inks spread into solid black, or the holdback amount—the distance between black
edges and underlying inks for trapping rich blacks. The default value is 0p0.5. This value is often set to be 1.5 to 2
times the value of the default trap width.
In InDesign, the value you set for Black Color determines the value for a solid black or a rich black, a process black
(K) ink mixed with color inks for increased opacity and richer color.
Note: (InDesign) If you choose Application Built-In trapping, and you specify a Default trap width or Black trap width
larger than 4 points, the resulting trap width is limited to 4 points. However, the value you specified will continue to be
displayed, because if you switch to Adobe In-RIP Trapping, traps larger than 4 points are applied as you specified.
Trap appearance
A join is where two trap edges meet at a common end point. You can control the shape of the outside join of two trap
segments and the intersection of three traps.
Join Style Controls the shape of the outside join of two trap segments. Choose from Miter, Round, and Bevel. The
default is Miter, which matches earlier trapping results to retain compatibility with previous versions of the Adobe
Trapping Engine.
Trap join examples, left to right: miter join, round join, bevel join
End Style Controls the intersection of three-way traps. Miter (the default) shapes the end of the trap to keep it away
from the intersecting object. Miter also matches earlier trapping results to retain compatibility with previous versions
of the Adobe Trapping Engine. Overlap affects the shape of the trap generated by the lightest neutral density object
that intersects with two or more darker objects. The end of the lightest trap is wrapped around the point where the
three objects intersect.

451
ADOBE ACROBAT 8 PROFESSIONAL
User Guide
Close-up of trap end examples: miter (left) and overlap (right)
Trap thresholds
You can adjust trap thresholds, as recommended by your prepress service provider, to correspond to your printing
conditions.
Step Specifies the color change threshold at which the trapping engine creates a trap. Some jobs need only the most
extreme color changes trapped, while others require traps for more subtle color changes. The Step value indicates the
degree to which components (such as CMYK values) of abutting colors must vary before trapping occurs.
To change how much the component inks in abutting colors can vary before causing those colors to trap, increase or
decrease the value for Step. The lower the Step value, the more often traps are created between colors. The default is
10%. For best results, use a value from 8% to 20%. Lower percentages increase sensitivity to color differences and
result in more traps.
Black Color Indicates the minimum amount of black ink required before the Black trap width setting is applied. The
default value is 100%. For best results, use a value no lower than 70%.
Black Density Indicates the neutral density value at or above which InDesign considers an ink to be black. For
example, if you want a dark spot ink to use the Black trap width setting, enter the neutral density value here. This
value is typically set near the default of 1.6.
Sliding Trap Indicates the percentage difference (between the neutral densities of abutting colors) at which the trap
is moved from the darker side of a color edge toward the centerline, to prevent abrupt shifts in trap placement and
create a more elegant trap. During trapping, the trapping engine adjusts (slides) the trap position—from spreading
the lighter color into the darker one, to straddling the centerline between them.
For example, setting the Sliding Trap value to 70% moves the point at which the trap begins to straddle the centerline
to the location where the lighter color exceeds 70% of the darker color in neutral density (lighter color’s neutral
density divided by darker color’s neutral density > 0.70). Colors of identical neutral density will always have their
traps exactly straddle the centerline, unless the Sliding Trap is set to 100%.
Trap Color Reduction Indicates the degree to which components from abutting colors are used to reduce the trap
color. This setting is useful for preventing certain abutting colors (such as pastels) from making an unsightly trap
that is darker than either color. Specifying a Trap Color Reduction lower than 100% begins to lighten the color of the
trap; a Trap Color Reduction value of 0% makes a trap with a neutral density equal to the neutral density of the darker
color.

452
ADOBE ACROBAT 8 PROFESSIONAL
User Guide
Trapping imported graphics
You can create a trap preset to control traps within images, and to control traps between bitmap images (such as
photographs and those saved in raster PDF files) and vector objects (such as those from a drawing program and
vector PDF files). Each trapping engine handles imported graphics differently. It’s important to be aware of these
differences when setting trapping options.
Trap Placement Provides options for determining where the trap falls when you trap vector objects (including
objects drawn in InDesign) to bitmap images. All options except Neutral Density create a visually consistent edge.
Center creates a trap that straddles the edge between objects and images. Choke causes objects to overlap the
abutting image. Neutral Density applies the same trapping rules as used elsewhere in the document. Trapping an
object to a photograph with the Neutral Density setting can result in noticeably uneven edges as the trap moves from
one side of the edge to another. Spread causes the bitmap image to overlap the abutting object.
Trap Objects To Images Ensures that vector objects (such as frames used as keylines) trap to images, using the Trap
Placement settings. If vector objects don’t overlap images in a trapping page range, consider turning this option off
to speed trapping of that page range.
Trap Images To Images Turns on trapping along the boundary of overlapping or abutting bitmap images. This
feature is on by default.
Trap Images Internally Turns on trapping among colors within each individual bitmap image (not just where they
touch vector artwork and text). Use this option only for page ranges containing simple, high-contrast images, such
as screen shots or cartoons. Leave it unselected for continuous-tone and other complicated images, as it will create
bad traps. Trapping is faster when this option is unselected.
Trap 1-Bit Images Ensures that 1-bit images trap to abutting objects. This option doesn’t use the Image Trap
Placement settings, because 1-bit images use only one color. In most cases, leave this option selected. In some cases,
such as with 1-bit images where pixels are widely spaced, selecting this option may darken the image and slow the
trapping.
About trapping black
When creating or editing presets, the value you type for Black Color determines what is considered solid black and
rich black. A rich black is any black color that uses a support screen—additional percentages of one or more process
inks to strengthen the black.
The Black Color setting is useful when you must compensate for extreme dot gain (as when using low-grade paper
stock). These situations cause black percentages lower than 100% to print as solid areas. By screening back blacks or
rich blacks (using tints of solid black) and decreasing the Black Color setting from its default of 100%, you can
compensate for dot gain and ensure that the trapping engine will apply the proper trap width and placement to black
objects.
When a color reaches the Black Color value, the Black trap width value is applied to all abutting colors, and keepaway
traps are applied to rich black areas using the Black trap width value.
If support screens extend all the way to the edge of a black area, any misregistration causes the edges of support
screens to become visible, creating an unwanted halo or distorting the edges of objects. The trapping engine uses a
keepaway, or a holdback, for rich blacks to keep support screens a specified distance away from edges of reversed-out
or light elements in the foreground, so that the light elements retain their sharpness. You control the distance of
support screens from the edges of black areas by specifying the Black trap width value.
Note: Don’t worry that the Black trap width setting will be too wide for trapping thin elements, such as black keylines
around graphics. In those cases, the trapping engine automatically overrides the Black trap width setting and limits the
trap to half the width of the thin element.

453
ADOBE ACROBAT 8 PROFESSIONAL
User Guide
Adjusting ink neutral density values
By adjusting the ink neutral density (ND) values that the selected trapping engine uses, you can determine the
precise placement of traps. The default ND values for process inks are based on the neutral density readings of
process ink swatches that conform to industry standards in different parts of the world. The language version deter-
mines which standard it conforms to. For example, the ND values for the U.S. English and Canadian versions
conform to the Specifications for Web Offset Publications (SWOP) solid ink density values published by the Graphic
Arts Technical Foundation of North America. You can adjust process ink neutral densities to match printing
industry standards in other parts of the world.
The trapping engine derives the ND values for a spot color from its CMYK equivalent. For most spot colors, the ND
values of their CMYK equivalents are accurate enough for proper trap creation. Spot inks that aren’t easily simulated
using process inks, such as metallic inks and varnishes, may need their ND values adjusted so that the trapping
engine can trap them correctly. By typing new values, you can ensure that an ink that is observably darker or lighter
is recognized that way by the trapping engine; the appropriate trap placement is then applied automatically.
You can get the appropriate neutral density value for a given ink by asking your commercial printer. The most
accurate method of determining an ink’s ND value is by measuring a swatch of the ink with a commercial densito-
meter. Read the “V” or visual density of the ink (don’t use process filters). If the value differs from the default setting,
type the new value in the ND text box.
Note: Changing the neutral density for a spot color affects only how that color will trap. It doesn’t change the appearance
of that color in your document.
Follow these guidelines when adjusting ND values:
Metallic and opaque inks Metallic inks are usually darker than their CMYK equivalents, while opaque inks obscure
any ink beneath them. In general, you should set the ND values for both metallic and opaque spot colors much
higher than their default values to ensure that these spot colors won’t spread.
Note: Setting an ink to Opaque or Opaque Ignore in the Type menu of the Ink Manager prevents an opaque ink from
spreading into other colors, unless another opaque ink has a higher ND value.
Pastel inks These inks are normally lighter than their process equivalents. You may want to set the ND value for
these inks lower than their default values to ensure that they spread into adjacent darker colors.
Other spot inks Some spot colors, such as turquoise or neon orange, are significantly darker or lighter than their
CMYK equivalents. You can determine whether this is the case by comparing printed swatches of the actual spot inks
to printed swatches of their CMYK equivalents. You can adjust the spot ink’s ND value higher or lower as necessary.
Customize trapping for specialty inks
Using certain inks involves special trapping considerations. For example, if you are using a varnish on your
document, you don’t want the varnish to affect trapping. However, if you’re overprinting certain areas with a
completely opaque ink, you don’t need to create traps for items underneath. Ink options are available for these situa-
tions. It’s usually best not to change the default settings, unless your prepress service provider recommends changing
them.
Note: The speciality inks and varnishes used in the document may have been created by mixing two spot inks or by
mixing a spot ink with one or more process inks.
1 Open the Ink Manager and select an ink that requires special treatment.
2 For Type, choose one of the following options, and then click OK:
Normal Use for traditional process inks and most spot inks.

454
ADOBE ACROBAT 8 PROFESSIONAL
User Guide
Transparent Use for clear inks to ensure that underlying items trap. Use this option for varnishes and dieline inks.
Opaque Use for heavy, nontransparent inks to prevent trapping of underlying colors but allow for trapping along
the ink’s edges. Use this option for metallic inks.
Opaque Ignore Use for heavy, nontransparent inks to prevent trapping of underlying colors and to prevent trapping
along the ink’s edges. Use this option for those inks, such as metallics and varnishes, that have undesirable interac-
tions with other inks.
Adjust the trapping sequence
The trapping sequence (also called the trapping order) matches the order in which inks are printed at the press, but
it doesn’t match the order in which separations are produced at the output device.
The trapping sequence is particularly important when you’re printing with multiple opaque colors, such as metallic
inks. Opaque inks with lower sequence numbers are spread under opaque inks with higher sequence numbers. This
process prevents the last applied ink from being spread, and it still creates good traps.
Note: Don’t alter the default trapping sequence without first consulting with your prepress service provider.
1 Open the Ink Manager. The current trapping sequence is displayed in the Sequence column of the inks list.
2 Select an ink, type a new value for Trapping Sequence, and then press Tab. The sequence number of the selected
ink changes, and the other sequence numbers change accordingly.
3 Repeat the previous step for as many inks as necessary, and then click OK.
Previewing output
Output Preview dialog box overview
The Output Preview dialog box simulates how your PDF looks in different conditions. The top part of the dialog box
has several controls for previewing how your document will look in print. The Preview menu allows you to switch
between previewing separations and previewing color warnings. When you select Separations, the bottom half of the
dialog box lists information about the inks in the file, as well as ink warning controls and total area coverage controls.
When you select Color Warnings, a warnings section replaces the separations section. The preview settings you
specify in the Output Preview dialog box are reflected directly in the open document.
Output Preview also includes access to the complete Ink Manager (as seen in the rest of Adobe Creative Suite) for
remapping spot-color inks in both printing and previewing. Ink mapping for previewing only applies when the
Output Preview dialog box is open.
Note: If you are using a color management system (CMS) with accurately calibrated ICC profiles and have calibrated
your monitor, the on-screen separation preview colors more closely match the final color separation output.
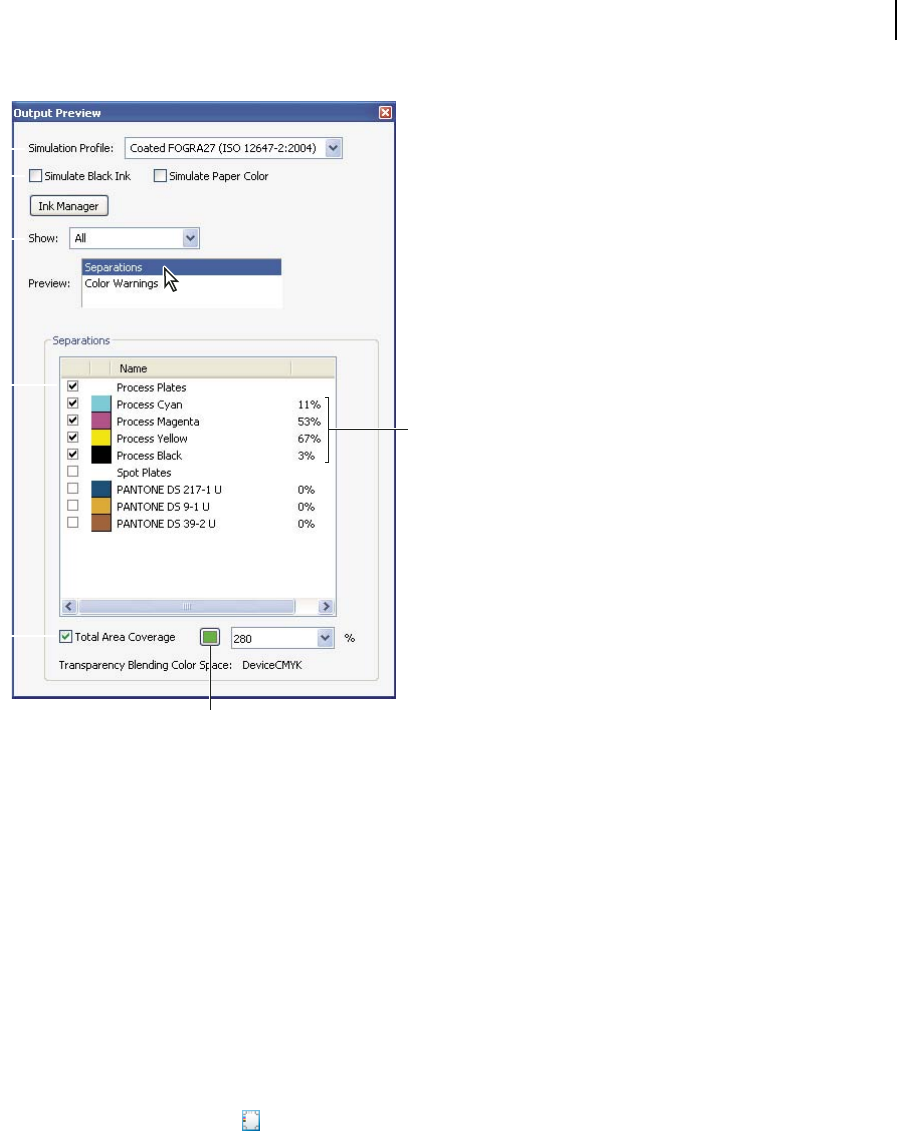
455
C
ADOBE ACROBAT 8 PROFESSIONAL
User Guide
A
B
D
F
E
G
Output Preview dialog box with separations selected
A. Simulation Profile B. Simulate options C. Show options D. Separations list E. TotalAreaCoverageoptions F. Ink percentages G. Color
display option
See also
“About color profiles” on page 414
“About monitor calibration and characterization” on page 415
“Ink Manager overview” on page 461
“Soft-proofing colors” on page 410
Open the Output Preview dialog box
❖ Do one of the following:
• Choose Advanced > Print Production > Output Preview.
• Select the Output Preview tool on the Print Production toolbar.
View colors by source space
You can limit which colors are displayed in the preview. When you select a source color space, you see only the
objects in that color space. Limiting colors is useful, for example, for seeing whether a page contains any RGB color
or where a spot color is used.
❖ In the Output Preview dialog box, select All or a single source from the Show menu.
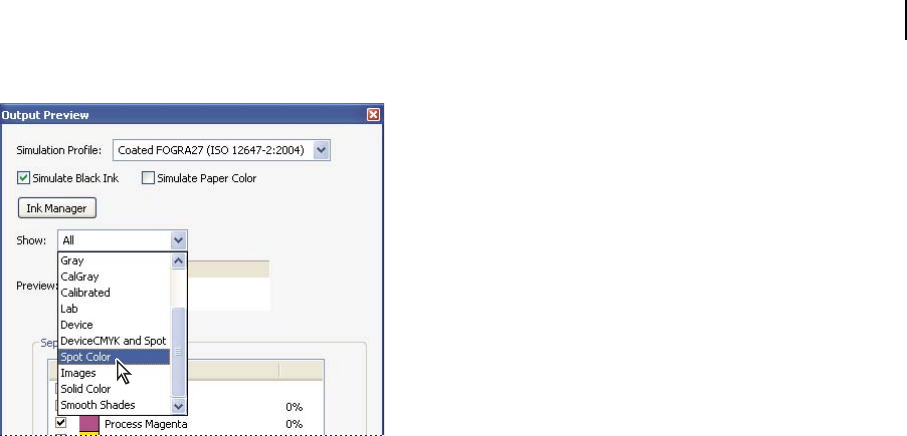
456
ADOBE ACROBAT 8 PROFESSIONAL
User Guide
Output Preview dialog box configured for showing spot colors
Preview color separations
You can preview separation plates and ink coverage to ensure that the printed piece meets your requirements.
Although previewing separations on your monitor can help you detect problems without the expense of printing
separations, it does not let you preview trapping, emulsion options, printer marks, and halftone screens and
resolution. Those settings are best verified with your print service provider using integral or overlay proofs.
Note: Objects on hidden layers are not included in an on-screen preview.
1 In the Output Preview dialog box, choose Separations from the Preview menu.
2 Do any of the following:
• To view oneormoreseparations,selecttheemptybox to theleftofeachseparationname.Each separationappears
in its assigned color.
• To hide one or more separations, deselect the box to the left of each separation name.
• To view all process or spot plates at once, select the box for Process Plates or Spot Plates.
Note: Asingleprocessorspotplateappearsasablackplate.Thismakesobjectsonalight-colored plate, such asyellow,
appear more visible.
See also
“Separate spot colors as process” on page 462
Check ink coverage
Too much ink can saturate paper and cause drying problems or change the expected color characteristics of the
document. Total Area Coverage specifies the total percentage of all inks used. For example, 280 means 280% ink
coverage, which could be accomplished with 60C, 60M, 60Y, and 100K. Ask your print service provider for the
maximum ink coverage of the press you will be printing on. You can then preview the document to identify areas
where total ink coverage exceeds the press’s limit.
1 In the Output Preview dialog box, choose Separations from the Preview menu.
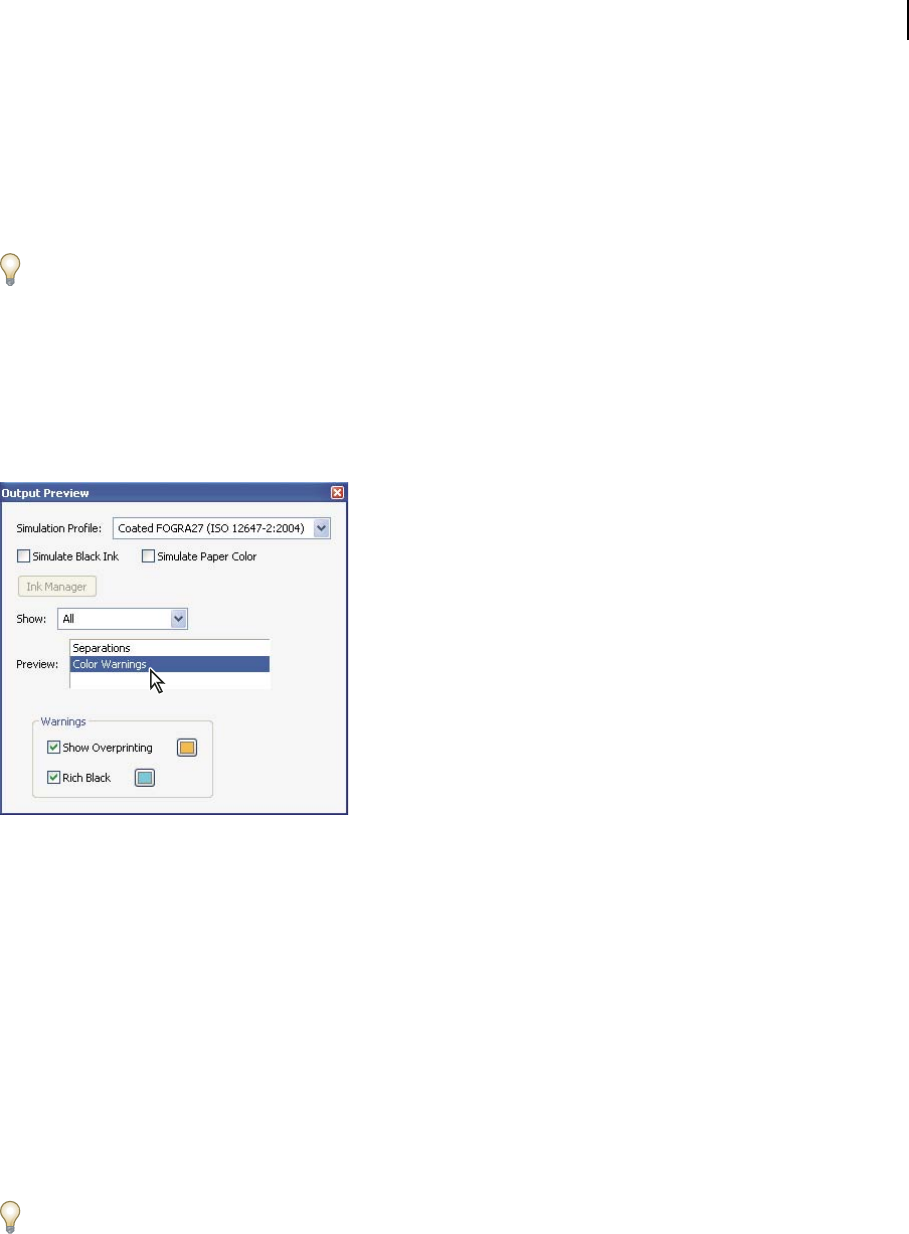
457
ADOBE ACROBAT 8 PROFESSIONAL
User Guide
2 Do one of the following:
• To check for specific area coverage, use the pointer to hover over that area in the document window. Ink coverage
percentages appear in the ink list next to each ink name.
• To check for total document coverage, select Total Area Coverage, and choose a number from the pop-up menu
or type a percentage in the box.
You can adjust ink coverage by converting some spot colors to process colors using the Ink Manager.
View color warnings
Output problems can occur when a document’s colors are not reproducible on a particular press, or when rich black
is used unintentionally on type. To diagnose such color problems before handing off a PDF for high-end output, you
can use the various color warnings in the Output Preview dialog box. Pixels in areas that trigger the warning are
displayed in the warning color, which is identified by the swatch color next to the warning type.
Output Preview dialog box configured for viewing color warnings
1 In the Output Preview dialog box, select the profile from the Simulation Profile menu that describes the target
output device.
2 Choose Color Warnings from the Preview menu.
3 Select either or both of the following options:
Show Overprinting Indicates where on the page overprinting will appear in color-separated output. If you select
Simulate Overprinting in the Output panel of the Advanced Print Setup dialog box, you can also see overprinting
effects when you output to a composite printing device. This option is useful for proofing color separations.
Rich Black Indicates areas that will print as rich black—process black (K) ink mixed with color inks for increased
opacity and richer color. Rich-black objects knock out the colors beneath, preventing background objects from
showing through. This effect is usually desirable only for large, black, display type. In most cases, rich black is
undesirable for body type, and is usually the result of an error, such as using RGB instead of CMYK for the type.
To change the warning color used in the preview, select a color from the swatches color picker.

458
ADOBE ACROBAT 8 PROFESSIONAL
User Guide
See also
“Soft-proof colors (Acrobat)” on page 412
Color conversion and ink management
About color conversion
Colors must often be converted when they are displayed on a monitor or sent to a printer. Conversion is necessary
when the color models do not match (for example, when CMYK color is displayed on an RGB monitor, or when a
document with images in an RGB color space is sent to a printer).
Acrobat uses the source color spaces of objects in a PDF to determine what (if any) color conversion is required, for
example, from RGB to CMYK. If a PDF contains objects with embedded color profiles, Acrobat manages the colors
using the embedded profiles rather than the default color spaces. For images and other objects in the PDF that
contain embedded color profiles, Acrobat uses the information in the profile to determine how to handle the
appearance of the color. For objects with managed colors (those with embedded color profiles), this conversion is
wellunderstood.Unmanagedcolors,however,donotuseprofiles,soonemustbetemporarilyusedforthe purpose
of conversion. The Color Management panel of the Preferences dialog box provides profiles for converting
unmanaged colors. You can also select specific profiles based on local press conditions.
See also
“Why colors sometimes don’t match” on page 402
“Working with color profiles” on page 414
Convert Colors dialog box overview
If your PDF will be output to a high-end device or incorporated in a prepress workflow, you can convert color objects
in the document to CMYK or another color space. Unlike other Acrobat features that temporarily convert colors
during printing or viewing, but leave the document colors unchanged, the Convert Colors feature actually changes
the color values in the document. In the Convert Colors dialog box, you can convert the colors of a single page or an
entire document.
Note: The Convert Colors dialog box converts all colors in the document to the destination color space. To convert only
the colors of selected objects, use the TouchUp Object tool.
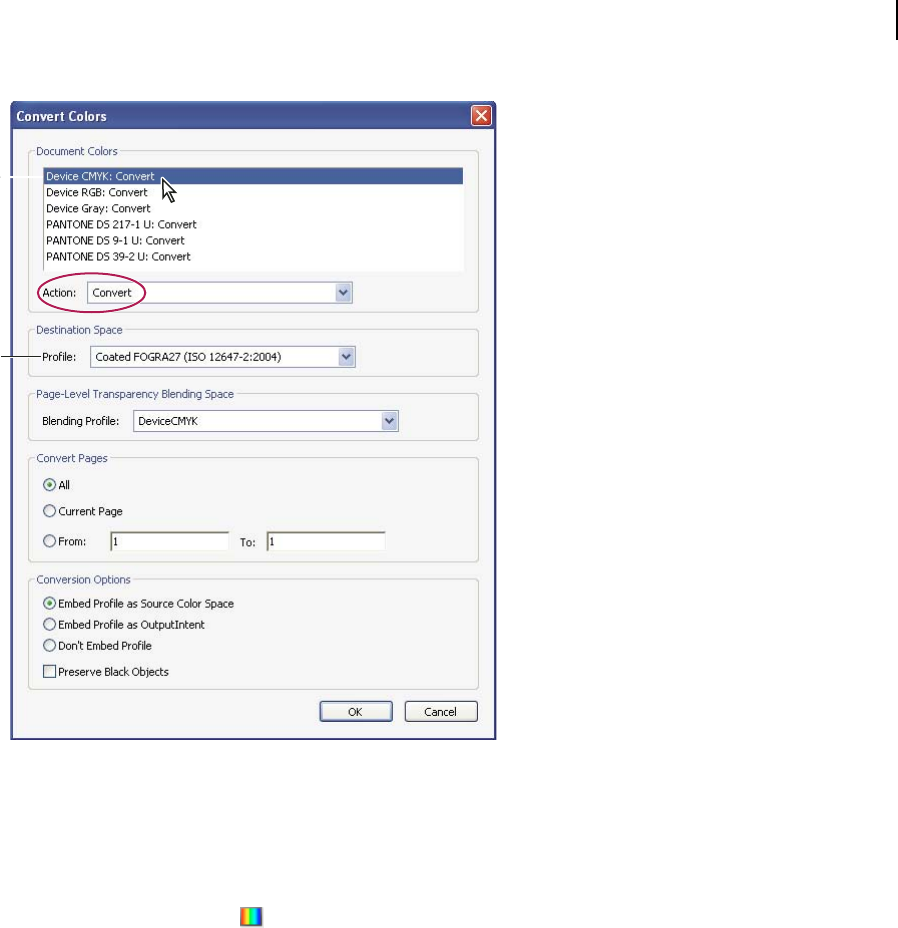
459
ADOBE ACROBAT 8 PROFESSIONAL
User Guide
A
B
Convert Colors dialog box
A. Document Colors B. Destination Space Profiles
Open the Convert Colors dialog box
❖ Do one of the following:
• Choose Advanced > Print Production > Convert Colors.
• Select the Convert Colors tool on the Print Production toolbar.
Convert colors to a different color space
Depending on the color spaces you select, color conversion either preserves, converts, or maps color values from the
source color space to the specified destination space as follows:
• Objects with untagged RGB data (DeviceRGB) convert from the working space RGB profile to the CMYK gamut
of the destination space. The same is done with untagged CMYK (DeviceCMYK) and grayscale (DeviceGray)
values.
• Objects in device-independent color spaces (CalGray, CalRGB, or Lab) can be preserved or converted. If
converted, Acrobat uses the device-independent object’s embedded profile information.
• Objects set in spot colors (including Separation, DeviceN, and NChannel color spaces) can be preserved,
converted, or mapped (aliased) to any other ink present in the document. Spot colors can also be mapped to a
CMYK process color, if the process color model of the destination space is CMYK. Spot colors mapped to other
inks can be previewed in the Output Preview dialog box.

460
ADOBE ACROBAT 8 PROFESSIONAL
User Guide
See also
“Working with color profiles” on page 414
“Previewing output” on page 454
“Create an ink alias for a spot color” on page 463
“About rendering intents” on page 423
Convert document colors
1 In the Convert Colors dialog box, select an option from the list of color spaces and colorants used in the
document.
2 Select an option from the Action menu:
Preserve Keeps objects in the selected color space when the document is output.
Convert Uses the destination space profile to convert color objects to a common ICC profile for an output device.
Decalibrate Removes embedded profiles from the color objects in that color space (or alternate space, if one is
specified for a spot color).
Map To Process [color] Maps spot colors to the destination space by way of another ink, called an alias. The Convert
Colors dialog box uses the settings in the Ink Manager as a starting point. If an alias is set up in the Ink Manger, it
will also be set up in the Convert Colors dialog box.
3 Specifythespacetowhich colorswillbeconverted.Thedestinationprofiledefinesthetargetoutputdeviceforthe
converted color spaces.
4 If the PDF includes groups of transparent objects, specify a blending space for the pages set for conversion.
Choose a device space or an ICC profile.
The blending space enables objects of multiple color spaces to blend when interacting transparently. If the PDF does
not include transparency groups, choose Leave Unchanged.
Note: This feature can improve output of legacy PDFs that use transparency but don’t specify a page-level blending space,
such as PDFs created from non-Adobe applications, or versions of Illustrator older than Creative Suite. These older PDFs
depend on the application or printer to choose the blending space.
5 Specify the pages to convert.
6 Select a conversion option:
Embed Profile As Source Color Space Tags all objects with the destination profile selected in the Profile menu. As an
example, a document might contain five objects: one in grayscale and two each in the RGB and CMYK color spaces.
In this case, you can embed a separate color profile to calibrate the color for each color space, for a total of three
profiles. This might be useful if your RIP performs color management of PDFs or if you are sharing PDFs with other
users.
Embed Profile As OutputIntent Uses the destination profile as the output intent. An output intent describes the color
reproduction characteristics of a possible output device or production environment in which the document will be
printed. The color spaces in the document will be DeviceGray, DeviceRGB, or DeviceCMYK, depending on the color
model of the destination profile. This destination profile replaces any existing output intent.
Don’t Embed Profile Does not tag objects with the profile.
Preserve Black Objects Preserves the color values of objects drawn in CMYK, RGB, or grayscale during conversion.
This option prevents text in RGB black from being converted to rich black when converted to CMYK.

461
ADOBE ACROBAT 8 PROFESSIONAL
User Guide
Convert object colors
IfcertainobjectsinthePDFdon’tmatchthecolorspaceofthe document,youcanusetheTouchUpObject tool
to correct them. Unlike the Convert Colors tool , which changes the color space of all colors in a PDF, the
TouchUp Object tool can change the color space of selected objects. For example, if you place an RGB image in a
CMYK document, you can use this tool to change only the RGB image and not affect the colors in the rest of the
PDF. You can change the color space temporarily or embed the profile with the object.
Note: The TouchUp Object tool doesn’t let you change the output intent, because that affects the entire document.
1 Choose Tools > Advanced Editing > TouchUp Object tool, and select the objects you want to convert.
2 Right-click/Control-click the selection, and choose Properties.
3 Click the Color tab.
4 From the Convert To menu, choose the profile for specifying the color space of the object. The current color space
of a single object (or identical color spaces for multiple objects) appears at the top of the Color tab for reference.
Different color spaces for multiple objects aren’t shown.
5 From the Rendering Intent menu, choose the translation method appropriate for the object.
6 (Optional) To embed the profile with the object, select Embed Profile.
7 Click Convert Colors.
Ink Manager overview
The Ink Manager provides control over inks at output time. Changes you make using the Ink Manager affect the
output, not how the colors are defined in the document.
Ink Manager options are especially useful for print service providers. For example, if a process job includes a spot
color, a service provider can open the document and change the spot color to the equivalent CMYK process color. If
a document contains two similar spot colors when only one is required, or if the same spot color has two different
names, a service provider can map the two to a single alias.
In a trapping workflow, the Ink Manager lets you set the ink density for controlling when trapping takes place, and
it lets you set the correct number and sequence of inks.
Note: InDesign and Acrobat share the same Ink Manager technology. However, only InDesign has the Use Standard Lab
Values For Spots option.
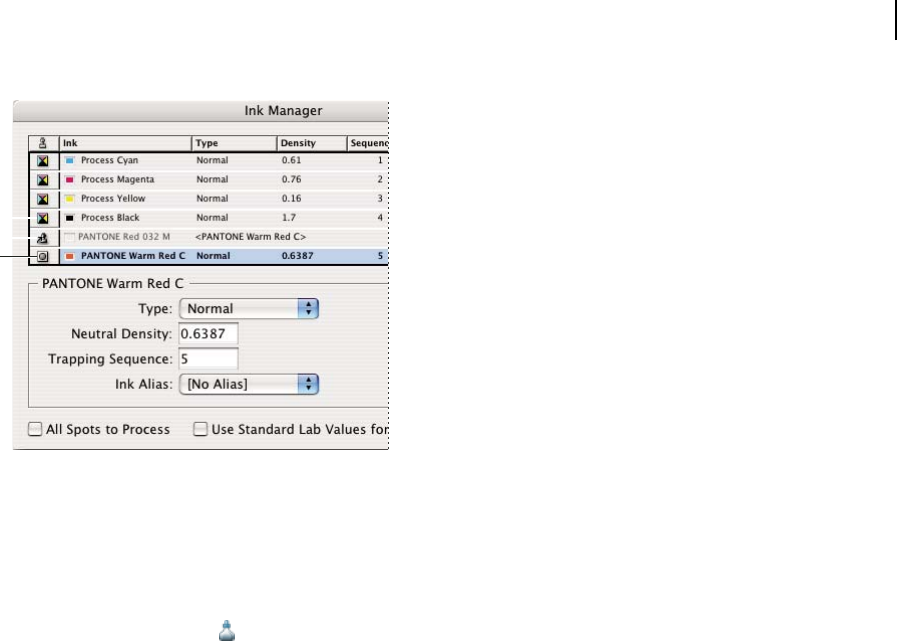
A
B
C
462
ADOBE ACROBAT 8 PROFESSIONAL
User Guide
Ink Manager
A. Process ink B. Aliased Spot ink C. Spot ink
Open the Ink Manager in Acrobat
Do one of the following:
• Choose Advanced > Print Production > Ink Manager.
• Select the Ink Manager tool on the Print Production toolbar.
• Choose Advanced > Print Production > Output Preview, and click Ink Manager.
• Choose File > Print, and click Advanced. In the Output panel of the Advanced Print Setup dialog box, click Ink
Manager.
• Choose File > Save As, and choose PostScript or Encapsulated PostScript for the file type. Click Settings, and then
click Ink Manager.
Open the Ink Manager in InDesign
Do one of the following:
• From the Separations Preview panel menu (Window > Output > Separations Preview), choose Ink Manager.
• Choose File > Print, and click Output. In the Output section, click Ink Manager.
Separate spot colors as process
Using the Ink Manager, you can convert spot colors to process colors. When spot colors are converted to process
color equivalents, they are printed as separations rather than on a single plate. Converting a spot color is useful if
you’ve accidentally added a spot color to a process color document, or if the document contains more spot colors
than are practical to print.
1 In the Ink Manager, do one of the following:
• To separate individual spot colors, click the ink-type icon to the left of the spot color or aliased spot color. A
process color icon appears. To change the color back to spot, click the icon again.
• To separate all spot colors, select Convert All Spots To Process. The icons to the left of the spot colors change to
process color icons. To restore the spot colors, deselect Convert All Spots To Process.

463
ADOBE ACROBAT 8 PROFESSIONAL
User Guide
Note: Selecting Convert All Spots To Process removes any ink aliases you’ve set up in the Ink Manager and can also affect
overprinting and trapping settings in the document.
2 (InDesign only) To use the Lab values of a spot color rather than CMYK definitions, choose Use Standard Lab
Values For Spots.
Create an ink alias for a spot color
You can map a spot color to a different spot or process color by creating an alias. An alias is useful if a document
contains two similar spot colors when only one is required, or if it contains too many spot colors. You can see the
effects of ink aliasing in the printed output, and you see the effects on-screen if Overprint Preview mode is on.
1 In the Ink Manager, select the spot color ink you want to create an alias for.
2 Choose an option in the Ink Alias menu. The ink type icon and ink description change accordingly.
Printer marks, cropping, and hairlines
About printer marks in PDFs
When you prepare a document for print production, a number of marks are needed to help the print service provider
align separation films for producing proofs, measure film for correct calibration and ink density, trim film to size,
and so on. Printer marks indicate the boundaries of document boxes supported by Adobe PDF, such as trim boxes
and bleed boxes.
You can add printer marks temporarily at print time using the Marks And Bleeds panel of the Advanced Print Setup
dialog box, or you can embed printer marks in the file (and optionally in a layer) using the Add Printer Marks dialog
box. For information about adding printer marks to just the printed output, see “Include marks and bleeds” on
page 438.
Note: A PDF created from Adobe InDesign CS and later can include printer marks, either in a separate layer or on the
page. You can view these marks using the Layers tab in Acrobat. If the printer marks were exported as a layer, any printer
marks you create using the Acrobat Add Printer Marks feature replace the InDesign printer marks. If the printer marks
are not in a layer, Acrobat printer marks overlay InDesign printer marks and might not align.
Embed printer marks in a PDF
1 Choose Advanced > Print Production > Add Printer Marks, or select the Add Printer Marks tool on the Print
Production toolbar.
2 Specify the pages to mark.
3 Specify the marks and settings.
See also
“Include marks and bleeds” on page 438
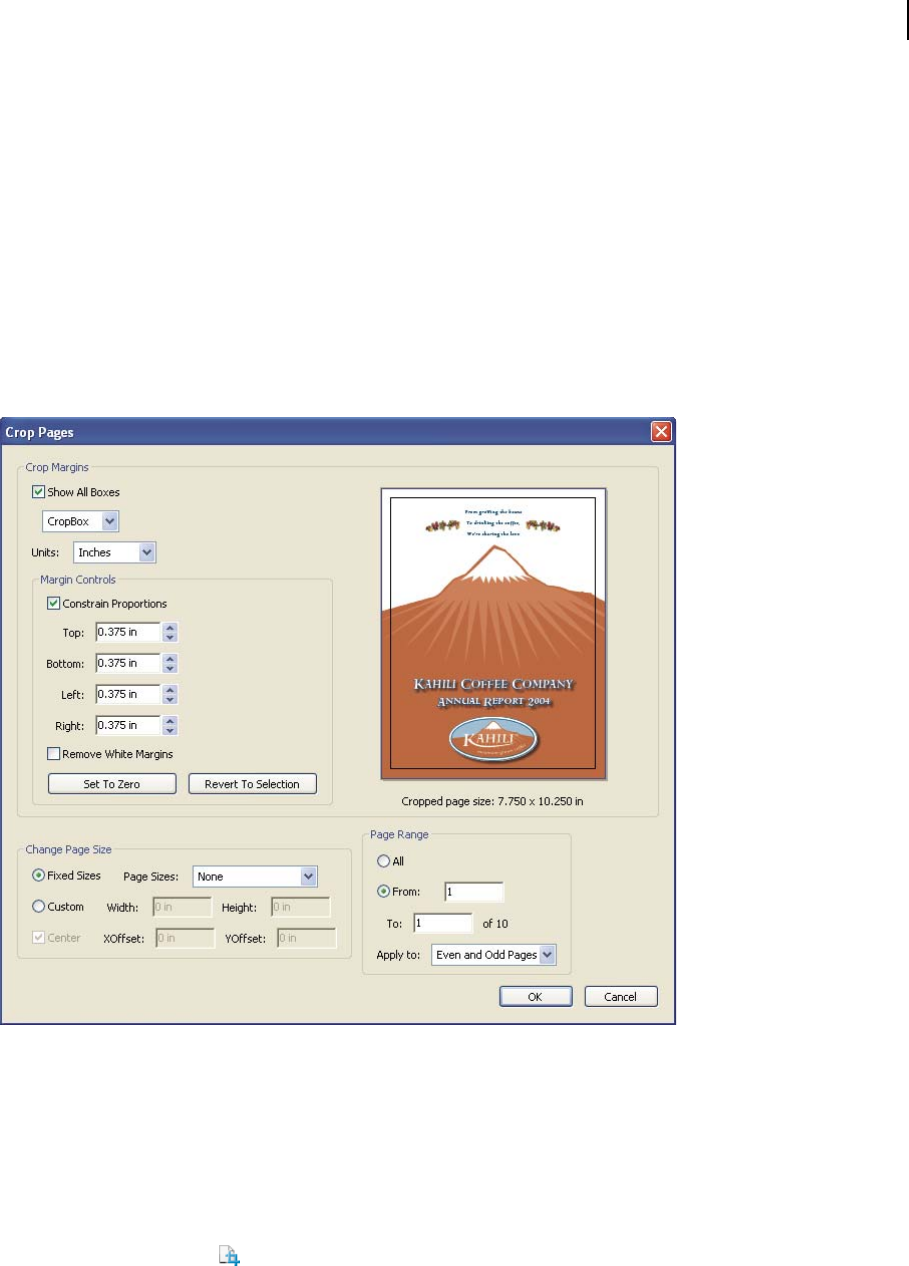
464
ADOBE ACROBAT 8 PROFESSIONAL
User Guide
Crop Pages dialog box overview
Use the Crop Pages dialog box to define boundaries for trim, bleed, and art when preparing your PDF for printing
and other output. You can adjust the margins of document boxes supported by Adobe PDF, including the media
(page size), trim, bleed, and art boxes. This capability is useful if the printer marks you add using the Add Printer
Marks tool (not the Marks And Bleeds panel of the Advanced Print Setup dialog box) would be clipped because the
crop box is too small to accommodate the marks. Print service providers can also use this tool to expand the page
size for imposition tasks.
You can switch between boxes without losing the margins you set for each. As you adjust individual boxes, the
preview in the Crop Pages dialog box is redrawn to reflect the new settings. For example, if you expand the crop or
media box, the page content “shrinks” in the preview.
Note: When the crop box is expanded, the media box adjusts accordingly.
See also
“Crop pages” on page 133
Display the Crop Pages dialog box
Do any of the following:
• Choose Advanced > Print Production > Crop Pages.
• Select the Crop Pages tool on the Print Production toolbar.
• Choose Document > Crop Pages.

465
ADOBE ACROBAT 8 PROFESSIONAL
User Guide
Fix hairlines
Very thin lines, called hairlines, are problematic in offset printing. If left as is in PDFs, they might not appear in the
final printed piece. The Fix Hairlines tool can find most hairlines and replace them with a heavier-weight line.
1 Choose Advanced > Print Production > Fix Hairlines, or select the Fix Hairlines tool on the Print Production
toolbar.
2 Enter a width for the hairline you want to find, and enter a replacement width.
Adjust hairline widths using increment arrows. Shift-click arrows to change widths by whole integers.
3 Select the unit of measurement from the Units menu.
4 (Optional) Select Include Type3 Fonts or Include Patterns to replace hairlines in Type 3 characters or patterns with
the same replacement width as other hairlines.
Font characters and patterns can be used in a variety of contexts in the same document (for example, different
magnification values), so changing the line width may produce unexpected results. Check the results if you select
these options, and adjust your selections as necessary.
5 Specify the pages to check.
Transparency flattening
About flattening
If your document or artwork contains transparency, to be output it usually needs to undergo a process called
flattening. Flattening divides transparent artwork into vector-based areas and rasterized areas. As artwork becomes
more complex (mixing images, vectors, type, spot colors, overprinting, and so on), so does the flattening and its
results.
Flattening may be necessary when you print or when you save or export to other formats that don’t support trans-
parency. To retain transparency without flattening when you create PDF files, save your file as Adobe PDF 1.4
(Acrobat 5.0) or later.
You can specify flattening settings and then save and apply them as transparency flattener presets. Transparent
objects are flattened according to the settings in the selected flattener preset.

466
ADOBE ACROBAT 8 PROFESSIONAL
User Guide
Note: Transparency flattening cannot be undone after the file is saved.
Overlapping art is divided when flattened.
For more information on transparency output issues, see the Print Resource Center on the Adobe website.
Flattener Preview dialog box overview
Use the preview options in the Flattener Preview dialog box to highlight the areas and objects that are transparent,
as well as those affected by transparency flattening. Transparent content is highlighted in red, and the rest of the
artwork appears in grayscale.
You can use this information to adjust the flattener options before you apply the settings, and then save them as
flattener presets. You can then apply these presets from other dialog boxes in the application, including PDF
Optimizer, the Advanced Print Setup dialog box, and the Settings dialog box for Save As PostScript.
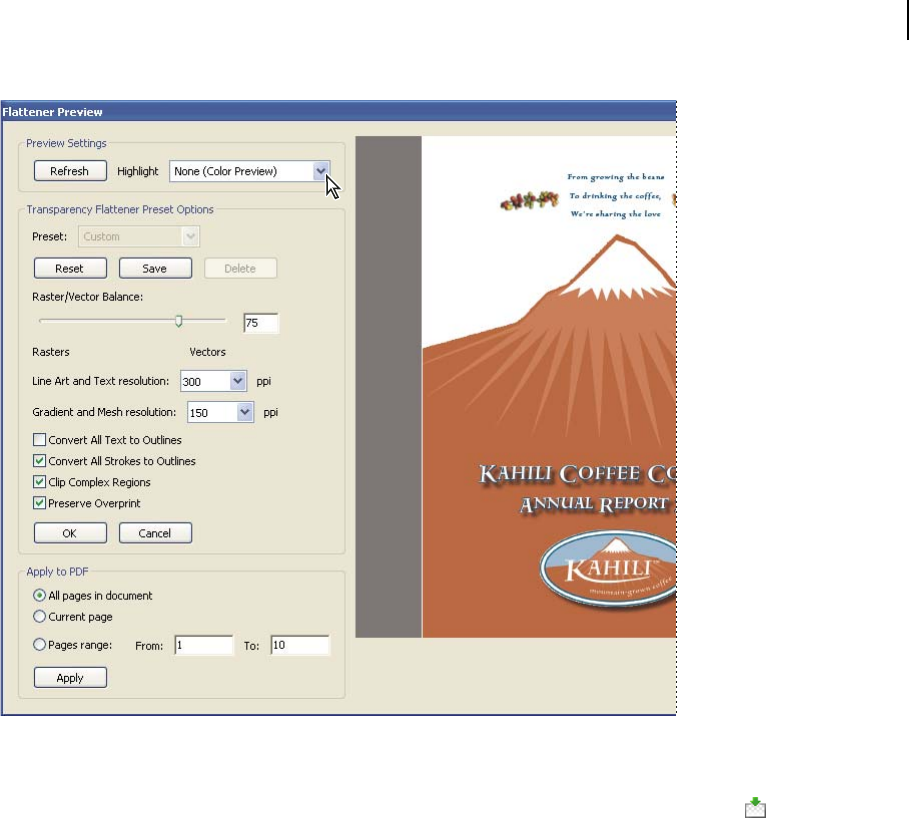
467
ADOBE ACROBAT 8 PROFESSIONAL
User Guide
Flattener Preview dialog box displays a preview of current PDF page using preview and flattener settings.
Open the Flattener Preview dialog box
❖ Choose Advanced > Print Production > Flattener Preview, or select the Flattener Preview button on the Print
Production toolbar.
Preview which areas of artwork will be flattened
Use the preview options in the Flattener Preview to highlight areas that are affected by flattening. You can use this
color-coded information to adjust flattening options.
Note: The Flattener Preview is not intended for precise previewing of spot colors, overprints, and blending modes.
Instead, use Overprint Preview mode for those purposes.
1 Display the Flattener Preview palette (or dialog box):
• In Illustrator, choose Window > Flattener Preview.
• In Acrobat, choose Advanced > Print Production > Flattener Preview.
• In InDesign, choose Window > Output > Flattener Preview.
2 From the Highlight menu, choose the kind of areas you want to highlight. The availability of options depends on
the content of the artwork.
3 Select the flattening settings you want to use: Either choose a preset or, if available, set specific options.
Note: (Illustrator) If the flattening settings aren’t visible, select Show Options from the palette menu to display them.

468
ADOBE ACROBAT 8 PROFESSIONAL
User Guide
4 If the artwork contains overprinted objects that interact with transparent objects, in Illustrator, select an option
from the Overprints menu. You can preserve, simulate, or discard overprints. In Acrobat, choose Preserve Overprint
to blend the color of transparent artwork with the background color to create an overprint effect.
5 At any time, click Refresh to display a fresh preview version based on your settings. Depending on the complexity
oftheartwork,youmayneedto waitafewsecondsforthepreviewimagetoappear.InInDesign,youcanalsochoose
Auto Refresh Highlight.
In Illustrator and Acrobat, to magnify the preview, click in the preview area. To zoom out, Alt-click/Option-click in
the preview area. To pan the preview, hold down the spacebar and drag in the preview area.
See also
“About flattening” on page 465
Transparency Flattener options
You can set Transparency Flattener options when creating, editing, or previewing flattener presets in Illustrator,
InDesign, or Acrobat.
Highlight (preview) options
None (Color Preview) Disables previewing.
Rasterized Complex Regions Highlights the areas that will be rasterized for performance reasons (as determined by
the Rasters/Vectors slider). Keep in mind that the boundary of the highlight area has a higher probability of
producing stitching problems (depending on the printer driver settings and the rasterization resolution). To
minimize stitching problems, select Clip Complex Regions.
Transparent Objects Highlights the objects that are sources of transparency, such as objects with partial opacity
(including images with alpha channels), objects with blending modes, and objects with opacity masks. In addition,
note that styles and effects may contain transparency, and overprinted objects may be treated as sources of trans-
parency if they are involved in transparency or if the overprint needs to be flattened.
All Affected Objects Highlights all objects that are involved in transparency, including transparent objects and
objects that are overlapped by transparent objects. The highlighted objects will be affected by the flattening process—
their strokes or patterns will be expanded, portions of them may get rasterized, and so on.
Affected Linked EPS Files (Illustrator only) Highlights all linked EPS files that are affected by transparency.
Affected Graphics (InDesign only) Highlights all placed content affected by transparency or transparency effects.
This option is useful for service providers who need to see graphics that require attention to print properly.
Expanded Patterns (Illustrator and Acrobat) Highlights all patterns that will be expanded if involved in trans-
parency.
Outlined Strokes Highlights all strokes that will be outlined if involved in transparency or because Convert All
Strokes To Outlines is selected.
Outlined Text (Illustrator and InDesign) Highlights all text that will be outlined if involved in transparency or
because Convert All Text To Outlines is selected.
Note: In the final output, outlined strokes and text may appear slightly different from native ones, especially very thin
strokes and very small text. However, the Flattener Preview doesn’t highlight this altered appearance.
Raster-Fill Text And Strokes (InDesign only) Highlights text and strokes that have rasterized fills as a result of
flattening.

469
ADOBE ACROBAT 8 PROFESSIONAL
User Guide
All Rasterized Regions (Illustrator and InDesign) Highlights objects and intersections of objects that will be
rasterized because there is no other way of representing them in PostScript or because they are more complex than
the threshold specified by the Rasters/Vectors slider. For example, the intersection of two transparent gradients will
always be rasterized, even if the Rasters/Vectors value is 100. The All Rasterized Regions option also shows raster
graphics (such as Photoshop files) involved in transparency, and raster effects such as drop shadows and feathers.
Note that this option takes longer to process than the others.
Transparency Flattener Preset options
Name/Preset Specifies the name of the preset. Depending on the dialog box, you can type a name in the Name text
box or accept the default. You can enter the name of an existing preset to edit that preset. However, you can’t edit the
default presets.
Raster/Vector balance Specifies the amount of vector information that will be preserved. Higher settings preserve
more vector objects, while lower settings rasterize more vector objects; intermediate settings preserve simple areas
in vector form and rasterize complex ones. Select the lowest setting to rasterize all the artwork.
Note: The amount of rasterization that occurs depends on the complexity of the page and the types of overlapping objects.
Line Art And Text Resolution Rasterizes all objects, including images, vector artwork, text, and gradients, to the
specified resolution. Acrobat and InDesign allow a maximum of 9600 pixels per inch (ppi) for line art, and 1200 ppi
for gradient mesh. Illustrator allows a maximum of 9600 ppi for both line art and gradient mesh. The resolution
affects the precision of intersections when flattened. Line Art and Text Resolution should generally be set to 600-
1200 to provide high-quality rasterization, especially on serif or small point sized type
Gradient And Mesh Resolution Specifies the resolution for gradients and Illustrator mesh objects rasterized as a
result of flattening, from 72 to 2400 ppi. The resolution affects the precision of intersections when flattened. Gradient
and mesh resolution should generally be set between 150 and 300 ppi, because the quality of the gradients, drop
shadows, and feathers will not improve with higher resolutions, but printing time and file size will increase.
Convert All Text To Outlines Converts all type objects (point type, area type, and path type) to outlines and discards
all type glyph information on pages containing transparency. This option ensures that the width of text stays
consistent during flattening. Note that enabling this option will cause small fonts to appear slightly thicker when
viewed in Acrobat or printed on low-resolution desktop printers. It doesn’t affect the quality of the type printed on
high-resolution printers or imagesetters.
Convert All Strokes To Outlines Converts all strokes to simple filled paths on pages containing transparency. This
option ensures that the width of strokes stays consistent during flattening. Note that enabling this option causes thin
strokes to appear slightly thicker and may degrade flattening performance.
Clip Complex Regions Ensuresthattheboundariesbetweenvectorartworkandrasterizedartwork fallalongobject
paths. This option reduces stitching artifacts that result when part of an object is rasterized while another part of the
object remains in vector form. However, selecting this option may result in paths that are too complex for the printer
to handle.
Stitching, where rasters and vectors meet

470
ADOBE ACROBAT 8 PROFESSIONAL
User Guide
Note: Some print drivers process raster and vector art differently, sometimes resulting in color stitching. You may be able
to minimize stitching problems by disabling some printer-driver-specific color-management settings. These settings vary
with each printer, so see the documentation that came with your printer for details.
(Illustrator only) Select Preserve Alpha Transparency (Flatten Transparency dialog box only) Preserves the overall
opacity of flattened objects. With this option, as when you rasterize artwork using a transparent background,
blending modes and overprints are lost but their appearance is retained within the processed artwork, along with the
level of alpha transparency. Preserve Alpha Transparency can be useful if you are exporting to SWF or SVG, since
both of these formats support alpha transparency.
(Illustrator only) Select Preserve Spot Colors And Overprints (Flatten Transparency dialog box only) Generally
preserves spot colors. It also preserves overprinting for objects that aren’t involved in transparency. Select this option
when printing separations if the document contains spot colors and overprinted objects. Deselect this option when
saving files for use in page-layout applications. With this option selected, overprinted areas that interact with trans-
parency are flattened, while overprinting in other areas is preserved. The results are unpredictable when the file is
output from a page-layout application.
Preserve Overprint (Acrobat only) Blends the color of transparent artwork with the background color to create an
overprint effect.
About transparency flattener presets
If you regularly print or export documents that contain transparency, you can automate the flattening process by
saving flattening settings in a transparency flattener preset. You can then apply these settings for print output as well
as for saving and exporting files to PDF 1.3 (Acrobat 4.0) and EPS and PostScript formats. In addition, in Illustrator
you can apply them when saving files to earlier versions of Illustrator or when copying to the clipboard; in InDesign
you can also apply them when exporting to SVG format; in Acrobat, you can also apply them when optimizing PDFs.
These settings also control how flattening occurs when you export to formats that don’t support transparency.
You can choose a flattener preset in the Advanced panel of the Print dialog box or of the format-specific dialog box
that appears after the initial Export or Save As dialog box. You can create your own flattener presets or choose from
the default options provided with the software. The settings of each of these defaults are designed to match the
quality and speed of the flattening with an appropriate resolution for rasterized transparent areas, depending on the
document’s intended use:
[High Resolution] For final press output and for high-quality proofs, such as separations-based color proofs.
[Medium Resolution] For desktop proofs and print-on-demand documents that will be printed on PostScript color
printers.
[Low Resolution] For quick proofs that will be printed on black-and-white desktop printers and for documents that
will be published on the web or exported to SVG.
Create a flattener preset
You can save transparency flattener presets in a separate file, making it easy to back them up or to make them
available to service providers, clients, or others in your workgroup. Once you create a custom flattener preset, you
can edit it in PDF Optimizer.
Flattener presets are stored in the same location as printer settings files:
(Windows) \Documents and Settings\[current user]\Application Data\Adobe\Acrobat\8.0\Preferences
(Mac OS) Users/[current user]/Library/Preferences/Acrobat/8.0

471
ADOBE ACROBAT 8 PROFESSIONAL
User Guide
Note: Flattener presets created in Acrobat have a different file format from those created in other Adobe applications, so
you cannot share them between applications.
1 Choose Advanced > Print Production > Flattener Preview, or select the Flattener Preview button on the Print
Production toolbar.
2 To base a preset on an existing one, select it from the Preset menu.
3 Set flattening options.
4 If necessary, click Reset to return to the original settings.
5 Click Save.
6 Type a name and click OK.
Note: To delete a custom preset, choose it from the Preset menu and press Delete.
See also
“Transparency Flattener options” on page 468
Apply a flattener preset
❖ Do one of the following:
• In the Flattener Preview dialog box, choose a preset from the menu, specify a page range, and click Apply.
• In the PDF Optimizer, select Transparency on the left, and then select a preset from the list.
• In the Advanced Print Setup dialog box, select the Output panel on the left, and then select a preset from the
Transparency Flattener Preset menu.
• Choose File > Save As, choose a PostScript file format (EPS or PS), and click Settings. In the Output panel, select
a preset from the Transparency Flattener Preset menu.
Edit a flattener preset in the PDF Optimizer
You can modify custom presets only.
1 Choose Advanced > Print Production > PDF Optimizer.
2 Select Transparency on the left.
3 Double-click the custom preset you want to edit, modify the settings, and click OK.

472
Chapter 17: Preflight
To verify that your Adobe PDF contains only the features, fonts, and formatting that you’ve specified, use the
Preflight tool to inspect and, in certain cases, correct the document’s contents.
Quickstart
The following topics provide overview steps for some common preflight tasks.
Preflight PDFs
Use the Preflight tool to determine a document’s validity for print production or other conditions. When you
preflight a document, you validate that the document contains only specific features, fonts, and formatting.
1 Choose Advanced > Preflight.
2 Select a profile from the list. To correct errors, select a profile that includes a fixup. These are denoted by a wrench
icon next to the profile.
3 Click Execute.
Results appear in the Preflight dialog box.
See also
“Analyzing documents for print readiness” on page 473
Add fixups to a profile
Adding a fixup to a profile allows you to fix errors identified during a preflight inspection.
1 Choose Advanced > Preflight, and click Edit.
2 Select the desired profile, and then choose Unlock from the pop-up menu at the top of the dialog box.
3 Select Fixups from the list under the profile.
4 Select the desired fixup in the right column and click the left arrow .
You can add multiple fixups covering different areas to a profile.
See also
“Add fixups to a profile” on page 493
Create a PDF/X-compliant file
You can validate PDF content using PDF/X criteria, and then save the PDF as a PDF/X-compliant file.
1 Choose Advanced > Preflight.
2 Choose Options > Convert Current PDF To PDF/X.
3 Select PDF/X-1a, PDF/X-3, or PDF/X-4, and specify other conversion options.

473
ADOBE ACROBAT 8 PROFESSIONAL
User Guide
4 If the conversion succeeds, save the PDF. If it fails, view the results.
Preflight cannot modify conditions that make the conversion invalid. It provides only a list of those conditions.
See also
“Convert PDFs to PDF/X or PDF/A” on page 497
Analyzing documents for print readiness
About preflight inspections
The Preflight tool analyzes the contents of a PDF to determine its validity for print production and a variety of other
conditions that you can specify. Preflight inspects the file against a set of user-defined values, called preflight profiles.
Depending on the profile, the preflight inspection can also correct certain errors. Preflight lists the results in the
Preflight dialog box and in the optional reports.
Preflight identifies issues with colors, fonts, transparency, image resolution, PDF version compatibility, and more.
Preflight also includes tools for examining PDF syntax or the actual PDF structure of a document.
Before you use the Preflight tool or create a PDF for print, follow these recommendations:
• If you created PDFs using Acrobat Distiller, InDesign, or Illustrator, optimize them for print or press using the
predefined settings in Distiller or InDesign PDF styles, or using settings provided by your print service provider.
• Use CMYK or DeviceN (the Adobe PostScript 3 color space for representing common elements such as duotones,
tritones, and quadtones) in a four-color process job.
• Embed all fonts from within the authoring application. Embedding ensures that fonts aren’t substituted.
See also
“Choose an Adobe PDF preset for converting files” on page 99
“Accessing and embedding fonts using Distiller” on page 113
About the Preflight dialog box
Use the Preflight dialog box to control all aspects of the preflight inspection. This box is available from the Advanced
menu (Advanced > Preflight or Advanced > Print Production > Preflight) when you have a PDF open. You can also
select the Preflight tool from the Print Production toolbar.
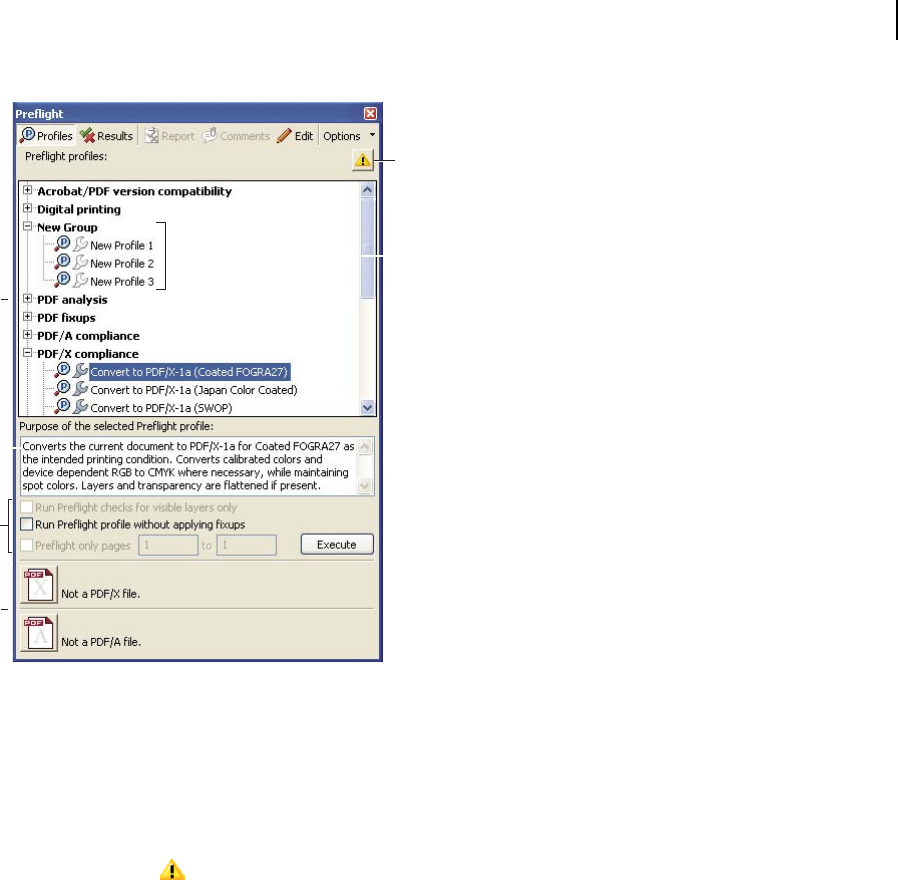
474
ADOBE ACROBAT 8 PROFESSIONAL
User Guide
B
A
C
D
E
G
F
Preflight dialog box
A. Commands B. Preflight profiles C. Profile description D. Preflight options E. PDF/X and PDF/A status F. Display Settings Alert
G. Groups
Run a preflight inspection
You can use or modify an existing profile, or create your own.
1 Open the PDF and select Advanced > Preflight.
2 If the Warning icon appears in the upper right of the Preflight dialog box, click it to see potential problems in
viewing the PDF. These might include overprinting elements, or the influence of color management with or without
an embedded output intent. Click Adjust to resolve the conflict, or just close the dialog box.
3 Select a profile from the list.
Profiles are organized in groups that you can expand and collapse. Profiles with the gray wrench icon include fixups
that can correct errors in your file. The text beneath the profile name describes the profile’s purpose.
Important: Fixups permanently change the PDF. If you execute a fixup and want to undo the changes, choose Edit >
Undo immediately. You will not be prompted to save fixups.
4 For the options with check boxes, do any of the following:
• Specify a page range for the inspection.
• Specify whether to limit the inspection to visible layers. Selecting this option disables any fixups.
• Run the inspection without fixing errors. Select this option if you want to view errors without changing the PDF.
5 Click Execute, or choose Execute Preflight Profile from the Options menu. When the inspection is finished, the
results appear in the Preflight dialog box. If you get a message that fixups are disabled, make sure that you have not
selected Run Preflight Checks For Visible Layers Only.

475
ADOBE ACROBAT 8 PROFESSIONAL
User Guide
You can also double-click a profile in the list to run the preflight inspection.
See also
“About preflight profiles” on page 483
“Convert PDFs to PDF/X or PDF/A” on page 497
Preflight preferences
Use the Preflight Preferences dialog box to control how results are reported and to specify output intents when
creating PDF/X files. A PDF may have an embedded output intent containing an ICC profile. You can copy this
profile to your computer and use it just as you would any other ICC profile.
Open the Preflight Preferences dialog box by choosing Options > Preflight Preferences. You can then use the tabs to
set the preferences you want.
See also
“Create output intents” on page 501
General tab
The General tab includes options for specifying how dialog box elements and preflight results are displayed:
Maximum Number Of Results To Be Displayed Per Type Of Check Specifies how many instances of a mismatch
appear in the Results list. Use the Per Page (Under “Further Matches”) option to nest additional results under the
Further Matches section in the Results list.
Degree Of Detail When Displaying Results Specifies how much detail appears in the Preflight Results list. You can
specify no details, only important details, or all details. For example, suppose you select Show List Of Results With
Most Important Details, and you select the profile “List all objects not 4c.” If your document includes five RGB
images, then for each image, one single line entry will be included in the results, indicating such things as size,
resolution, and color space.
Output intent options
You can set the following options on the Output Intents tab of the Preflight Preferences dialog box. For more infor-
mation on using output intents, see “Output intents” on page 500.
Name The name of the output intent.
Output Intent Profile (ICC Profile) The ICC profile that describes the characterized printing condition for which the
document has been prepared and that is required for PDF/X-compliance. Click Browse to select one from the default
Profiles folder.
Output Condition Identifier Thereference namespecifiedbytheICCregistryofregisteredstandardprintingcondi-
tions. Choose from the list of output conditions—the description appears in the Output Condition box—or choose
Custom and create your own.
Registry The URL giving more information about the output intent profile name. For the standard printing condi-
tions registered with the ICC, this entry must be http://www.color.org/.

476
ADOBE ACROBAT 8 PROFESSIONAL
User Guide
Output Condition A description of the intended printing condition of the job, including type of printing (for
example, offset commercial), paper type, and screen frequency. You can modify this description for output condi-
tions you edit or create from scratch.
Locked This option is a safeguard against accidental modification of the output intent. All the text fields are
dimmed.
Highlighting tab
The Highlighting tab includes options for identifying problem objects on a PDF page. The Highlighting preferences
control both the appearance of masks in mask reports and the appearance of lines on-screen when you double-click
Highlighting in the Preflight Results window. You set highlighting properties for each type of alert: Error, Warning,
and Info.
Color/Opacity Click Color to choose colors from a color spectrum. Specify the opacity of the color.
Draw Border For Bounding Box Draws the same lines in a mask report that you see on-screen when you double-click
a result in the Preflight Results window. This is useful for identifying objects in a mask report when an image
occupies the entire page. In this case you won’t see the mask, but you will see the lines around objects.
Line Style/Thickness Click Line Style to select the line pattern (lines, dots, or dashes). Specify the line width
(thickness).
Viewing preflight results, objects, and resources
About preflight results
You can view the results of a preflight inspection as a list, as comments, or individually in the Preflight dialog box.
In the Results list, mismatches appear according to their severity, with all errors first, followed by warnings, and then
just information. An alert icon appears next to each check that did not meet the criteria specified in the preflight
profile.
Preflight dialog box with problem objects
477
ADOBE ACROBAT 8 PROFESSIONAL
User Guide
Theiconsatthetopof thePreflight dialogboxindicatethatatleastoneissueofaparticularseverityhasbeenfound:
thered erroricon ,theyellowwarningicon ,andtheblueInfoicon forinformationonly(with noerrors
or warnings). The green check mark means that no problems were found.
See also
“Preflight alert options” on page 488
View results in a list
The Preflight dialog box lists the issues flagged after an inspection that tests against the criteria specified in the
selected profile.
1 Run a preflight inspection.
2 When the results appear, do any of the following:
• If details are available, expand an area to see details about the problem object. Only the first few problems are
listed. Your Preflight preferences determine how additional results, if any, are listed.
• To see more information, select Show Detailed Information About Document at the bottom of the dialog box.
• To see an object in a separate view, select Show Selected Page Object In Snap View.
• If you switched to a different view in the Preflight dialog box, such as the Profiles list, you can get back to the
Results list by clicking the Results button at the top of the dialog box, or choosing Show Most Recent Results from
the Options menu.
• To see an object in context on the PDF page, double-click the item. The object is highlighted with a dotted line for
easieridentification.Thisisusefulwhenanobjectsuchasafont existsin multipleplacesin thedocument.Insome
cases, the item is an attribute of an object (for example, a color space). In those cases, the inspection finds the
objects that use the attribute.
You can change the type of line, its thickness, and its color on the Highlighting tab of Preflight preferences.
Problem object on the PDF page
See also
“Preflight preferences” on page 475
“Run a preflight inspection” on page 474
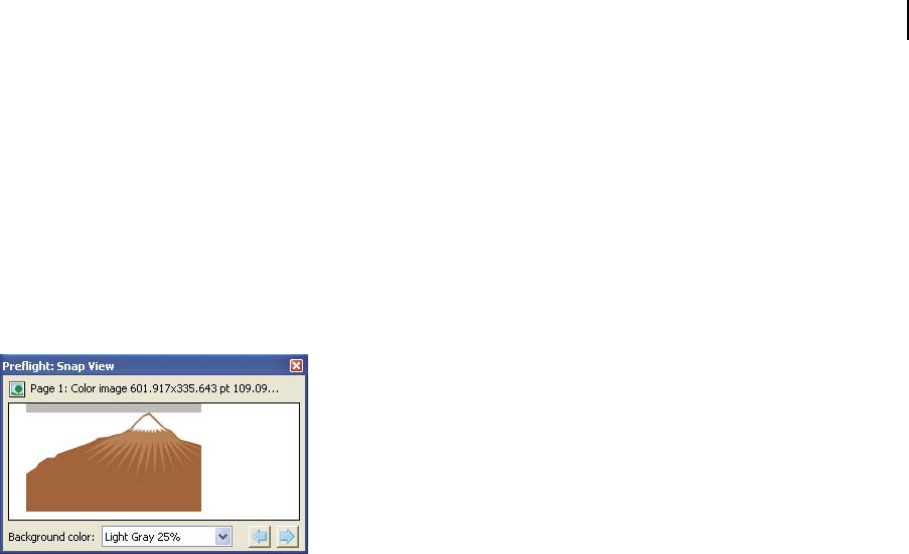
478
ADOBE ACROBAT 8 PROFESSIONAL
User Guide
Use Snap View to view a problem object
Use Snap View to isolate an item when you’re working with pages containing complex, overlapping areas. Some
items, such as document information fields or page labels, cannot be displayed.
1 Expand an area to display the problem objects found during the inspection.
2 Select a problem object in the list.
3 Select Show Selected Page Object In Snap View.
4 In the Preflight Snap View window, choose an option from the Background Color menu. All problem objects are
displayed on this color in Snap View.
Snap view of problem object
View resources and general information
The Overview section of the Preflight dialog box lists all types of properties and resources for the document,
including the color spaces, fonts, patterns, halftone settings, graphic states, and images used. It also lists general
information about the analyzed document, such as the application used to create it, the date it was created, and the
date it was last modified. The document information also indicates whether the PDF contains notes, forms,
hypertext links, metadata, or similar items.
1 In the Preflight dialog box with results showing, select Show Detailed Information About Document. Overview
and preflight information appear.
2 Expand the Overview and Preflight Information sections to view details.
3 In the Overview section, expand a property to list the document’s resources.
479
ADOBE ACROBAT 8 PROFESSIONAL
User Guide
Document resources, including color spaces, fonts, and images found in problem objects
See also
“About additional checks and properties” on page 488
View results as comments
You can embed preflight results as comments in the PDF and then view them as you would any PDF comments. For
example, you can click Comments in the navigation pane to list each comment (or filtered comment) in a list.
See also
“View comments” on page 181
Insert and view preflight comments
1 In the Preflight dialog box, click Comments, or choose Insert Preflight Results As Comments from the Options
menu.
Each problem object is highlighted using the border style specified in Preflight preferences.
You can change the type of line, its thickness, and color on the Highlighting tab of Preflight preferences.
2 If prompted, click Embed if you want to embed comments, regardless of how many exist.
3 In the PDF, hold the pointer over a comment to view its contents.

480
ADOBE ACROBAT 8 PROFESSIONAL
User Guide
Sample PDF report with a sticky note
Remove preflight comments
❖ In the Preflight dialog box, choose Remove Preflight Comments from the Options menu.
Preflight reports
Create a results report
You can capture the results of a preflight inspection in various types of reports. You can capture the results in a text
file, an XML file, or a single PDF file. A PDF report can include just an overview, or detailed information presented
in different ways.
A PDF report includes information about the document and problem objects in layers, which you turn on or off in
the Layers panel of the navigation pane.
Note: You can also create an inventory of all objects and resources used in the PDF.
Create a report of preflight results
1 In the Preflight dialog box, click Report, or choose Create Report from the Options menu.
2 Specify a name and location for the report. The suffix “_report” is automatically added to the report name.
3 Select the type of report and click Save.
Report types
PDF Report Creates a summary of problems accompanied by details that are shown using transparent masks,
comments, or layers for each problem object.
• Overview Condenses the preflight results into a short document that includes applied fixups, a results summary,
and document information.
• Details Reports additional information about each problem object—for example, where the object is located on
the page. Problems Highlighted By Transparent Masks places a colored mask, similar to a Photoshop mask, over
areas to make the problem areas stand out. You can change the mask color using Preflight preferences. Problems
Highlighted By Comments inserts preflight results as comments. Problems Highlighted By Layers shows the file

481
ADOBE ACROBAT 8 PROFESSIONAL
User Guide
separated into layers of mismatches or found objects according to the criteria used in the profile itself. Another layer
called Other Objects includes objects that have nothing to do with the profile used.
XML Report Produces a structured report for workflow systems that can interpret and process the preflight results.
For details, contact your print service provider.
Text Report Produces a report in plain text format, with each line indented according to the hierarchy in the
Preflight Results dialog box. You can open the report in a text editor.
Hide or show layers in a PDF report
1 In the navigation pane, click the Layers button to open the Layers panel.
2 In the Layers panel, expand the report and click the square to the left of a layer name to hide or show the layer.
About inventory reports
An inventory report shows resources used in a PDF, including color spaces, images, patterns, shadings, metadata, and
fonts and glyphs in each font family. Related information is grouped together and arranged on a PDF page so that
you can scan and locate items. You can run an inventory report before or after you run a preflight inspection. Unlike
a preflight results report, which provides only the information requested by checks in the selected profile, an
inventory report does not filter the PDF content. Together, a preflight inspection report and an inventory report can
help you identify and fix problems.
The information in an inventory report can be useful when you perform tasks such as these:
• Exploring files that seem unusual, such as those created by an unknown application, or files with slow screen
redraw or copy-and-paste actions that don’t work.
• Examining processing issues, such as failure to print correctly, or problems encountered during color conversion,
imposition, placement on an InDesign page, and so on.
• Identifying aspects of a PDF that are not ideal, such as the inadvertent embedding of a font because of an
unnoticed space character on a master page, or cropped images with extraneous image data, or objects that are
not of the expected type (such as type or vector objects converted to images or merged with an image).
• Providing additional information about an object besides its presence. For example, by locating a spot color in the
inventory report, you can determine whether it is used by itself or in combination with other colorants, such as in
a duotone image. Or you can determine which glyphs in a font are embedded, what they look like, and which
character they are supposed to represent. This information can help you resolve a missing-glyph error.
• Exploring XMP metadata embedded with the file, such as its author, resolution, color space, copyright, and
keywords applied to it. This information is stored in a standardized way using the Extensible Metadata Platform
(XMP) standard.
Create an inventory of PDF content
1 In the Preflight dialog box, choose Create Inventory from the Options menu.
2 Select the types of objects and resources you want included in the inventory. In addition to fonts, colors, images,
and so on, you can include the following information:
Form XObjects Objects that are referenced within a PDF. For example, if a PDF contains many occurrences of the
same object, it exists as a single resource that is referenced many times.
Include XMP Metadata Includes information embedded in the PDF that can be used by an XMP-enabled application
or device in the workflow. This information can include meaningful descriptions and titles, searchable keywords, the

482
ADOBE ACROBAT 8 PROFESSIONAL
User Guide
author’s name, and copyright information. If you select Include Advanced Fields, you can include the fields and
structures used for storing the metadata using namespaces and properties. This advanced information appears as a
text-based tree view of all the XMP data in the PDF, both for the document as well as for those images in the PDF
for which XMP metadata is present.
Note: You can also view the metadata for the PDF document as a whole in the Document Properties dialog box. Choose
File > Properties, click the Description tab, and then click Additional Metadata. To see the advanced fields, click
Advanced from the list on the left.
3 (Optional) Save the report.
Advanced inspections
Viewing preflight problems inside the PDF structure
If you have advanced knowledge of the PDF file format, you may want to explore the technical reasons for a preflight
mismatch by examining the internal structure of the PDF and its fonts. Preflight includes three options for in-depth
inspection of a PDF. Technically skilled users can use these tools to analyze the objects and fonts that caused a
mismatch.
For detailed information on PDF structure, refer to PDF Reference Fifth Edition: Adobe Portable Document Format
Version 1.6(English only) on the Adobe website. You should also have intimate knowledge of font internal structures,
or have font specifications for Type 1, TrueType, and OpenType fonts at hand. The font specifications are listed in
the bibliography of the guide.
Note: You can navigate the PDF and fonts in the windows that appear, but you can’t edit the PDF structure or fonts.
Browse the internal PDF structure
View thestructureofaPDF,asdefinedbycontentstreams andcosobjects, in atreearray.(Content streams represent
pages, form XObjects, Type 3 font characters, and the appearance of comments and form fields. Cos objects include
such items as color space, images, and XObjects.)
Check PDF syntax, view the results of a fixup, or determine the cause of a mismatch. Choose between five view
modes that organize content streams in different ways. You cannot edit the PDF in the Internal PDF Structure
window.
Note: Do not confuse the internal structure with the logical structure in tagged PDFs that improves accessibility for low-
or non-sighted readers. The internal structure is a superset of all objects in the document, including tags.
Before you can browse the internal PDF structure, you must run a preflight check.
1 In the Preflight window, choose Browse Internal Structure from the Options menu.
The Internal PDF Structure window opens, showing a tree view of the document information and the document
catalog (the root of the document’s object hierarchy).
2 Expand each tree item to view the document structure.
3 Click the Page button to view the structure of each page.
4 To change how content streams appear in the tree view, select a view mode in the toolbar:
Classic Displaysthecontentstreamasasequenceofpagecontent operators. Expandthesubtreeforanoperator
to view its operands. This is the default view.

483
ADOBE ACROBAT 8 PROFESSIONAL
User Guide
Q Groups all operators in the content stream that belong to the same graphic state nesting level within a pair of
the q/Q operators. Expand the subtree for a q/Q pair to view the operator and parameters inside.
BMC Si
BT/ET
Snippet
milar to Q, but arranges content streams by marked content (BMC/EMC) nesting levels.
Arranges content streams by text blocks, which are enclosed by BT and ET operators.
Displays content streams as a series of snippets. A snippet is a contiguous group of objects that share the
same graphic state. In this view, each snippet represents a type of drawing operation (for example, paint area) and its
graphic state.
You can also view content streams as snippets by selecting Show Selected Page Object In Snap View in the Preflight
window.
Browse the internal font structure
View the internal structure of embedded fonts in a PDF in greater detail than the preflight results with a graphical
view that shows the outline and coordinates of each glyph. You can determine the source of various preflight
problems, such as mismatches caused by inconsistent glyph widths.
Before you can browse the internal font structure, you must run a preflight check.
1 In the Preflight window, choose Browse Internal Structure Of All Document Fonts from the Options menu.
To view the structure of a single font, expand the Fonts entry in the results, select a font, and choose Browse Internal
Font Structure from the Options menu.
2 To view the glyph details, click any of the following buttons:
Display Grid Shows the origin of the glyph’s coordinate space, indicated by two green-colored orthogonal lines.
Display Boxes Shows the area used by the selected glyph and the maximum area used by all glyphs using blue
lines that coincide on the top and bottom.
Display Filling Shows the areas of a filled glyph as medium gray.
Display Points Shows all the points used to define the glyph’s outline. Black points indicate the outline’s contour. Red
points indicate bezier curves and are offset from the outline’s contour.
Display Cursor Shows the position of the currently selected point, indicated by two magenta-colored orthogonal
lines. This button is available only if Display Points is selected.
3 To adjust the size of the glyph display area, drag the handle between the tree view and the glyph display area up
or down.
Preflight profiles
About preflight profiles
The success of a preflight inspection depends on how well you define the criteria for the inspection. The inspection
criteria are packaged in a file called a preflight profile. A preflight profile includes one or more checks; each check
includes one or more property statements that validate the PDF content. Preflight shows an error only if all the
property statements in the check are in error. In the Preflight Edit Profile dialog box, you can specify which values
to useandhowtohandlemismatches.For example, youcan choose aprofilethat simplyreportsmismatches,or one
that automatically fixes a mismatch according to its specified parameters. A profile with a fixup has the gray wrench
icon next to it.
484
ADOBE ACROBAT 8 PROFESSIONAL
User Guide
Adobe Acrobat includes several predefined preflight profiles, organized into groups, such as Digital Printing, PDF
Analysis, Prepress, and PDF/A or PDF/X Compliance. You can use the predefined profiles as is or modify them to
create custom profiles. The checks that make up the profiles (called rules in previous versions of Acrobat) are
organizedbycategories,suchasDocument,Pages,Images,andsoon.Eachcheckinacategory governsaparticular
document property.
To help you determine what document properties the preflight profile analyzes—and thus how to set parameters—
you can review information about each selected check in the Preflight Edit Profile dialog box. This information
describes what criteria the check uses to analyze, and possibly fix, a document property.
See also
“About additional checks and properties” on page 488
View profiles
1 Do one of the following:
• If the Preflight dialog box is not open, choose Advanced > Preflight.
• If the Results list or another panel is displayed in the Preflight dialog box, click the Profiles button at the top of the
Preflight dialog box, or choose Show Preflight Profiles from the Options menu.
2 Expand the profile groups as desired.
The list includes all predefined profiles, and any custom profiles you’ve created.
Preflight Edit Profile dialog box overview
The Preflight Edit Profile dialog box lists all available profiles and shows which document properties are being
analyzed. From this dialog box you can unlock and lock a profile, create a new group for organizing profiles, and
specify inspection criteria. You can access additional options and information by expanding the profile.
To open the Preflight Edit Profile dialog box, expand a profile group in the Preflight dialog box, select a profile, and
click Edit (or choose Edit Preflight Profiles from the Options menu).
A
D
B
C
Preflight Edit Profile dialog box
A. Profile B. Predefined set of checks C. More options D. Profiles groups

485
ADOBE ACROBAT 8 PROFESSIONAL
User Guide
Add and remove profiles
You can create your own custom preflight profiles. Before you create a new profile from scratch, review existing
profiles for ones that achieve results similar to those you want. If possible, duplicate an existing profile and modify
only the relevant portion.
Apreflightprofilemustcontainat leastonecheckandonepropertythatvalidatethePDFcontent.Whenyou build
a check from scratch, you can use existing properties or create new properties as you go. For best results when
creating and modifying profiles, add only as many checks as you need to validate the PDF content, and keep the
checks and properties simple and straightforward. For example, you can use a PDF/X profile to check for certain
criteria, and then add checks for non-PDF/X criteria, such as image resolution.
See also
“Add checks to a profile” on page 491
“Create or modify custom checks” on page 492
“Add fixups to a profile” on page 493
“Create or modify fixups” on page 496
Create a new profile
1 In the Preflight Edit Profile dialog box, do one of the following:
• Click the Create icon
• To base the new profile on an existing one, select a profile and click the Duplicate icon
2 Type a name and purpose for the new profile, assign it to a group, and specify other options as desired.
By default, newly created profiles appear under the Custom Profiles group, unless you assigned them to a different
group.
3 Expand the profile in the column on the left.
4 Modify checks (as provided).
5 Add additional checks and fixups.
Create a profile group
1 In the Preflight Edit Profile dialog box, choose New Group from the Group menu.
2 Type a name for the group and click OK.
Remove a profile
❖ In the Preflight Edit Profile dialog box, select the profile and click Delete
Import or export preflight profiles
Preflight profiles can be shared with other users. For example, print service providers can provide them to their
customers to ensure that jobs pass an inspection defined by those profiles before the jobs are handed off. Users in a
workgroup can create their own profiles as a way to check a document before uploading to the web or printing to a
special printer, or to check in-house production.
To exchange a profile, you package it for import and export. The package includes all checks and properties for the
selected profile.
.
.
.
486
ADOBE ACROBAT 8 PROFESSIONAL
User Guide
Import a preflight profile
1 Do one of the following:
• In the Preflight dialog box, choose Import Preflight Profile from the Options menu.
• In the Preflight Edit Profile dialog box, click the Import icon
2 Locate the preflight package file (.kfp extension), and click Open. The profile appears in the Profiles list under the
Imported Profiles group.
3 If the profile is locked, choose Unlocked from the pop-up menu in the Preflight Edit Profile dialog box.
4 If prompted, enter the password.
Double-clicking a profile on your computer, or dragging profiles to the Acrobat window or Acrobat application icon
installs them in the correct place on your computer.
The profile can be edited.
Export a preflight profile
1 To lock the profile before you export it, choose Locked from the pop-up menu in the Preflight Edit Profile dialog
box. You can also select Password Protected and enter a password.
2 Do one of the following:
• In the Preflight dialog box, choose Export Preflight Profile from the Options menu.
• In the Preflight Edit Profile dialog box, click the Export icon
3 Specify a name and location for the package, and click Save.
To export a profile from the Preflight dialog box, select the profile and choose Export Preflight Profile from the
Options menu.
Lock, unlock, and password-protect profiles
You can prevent unauthorized changes to preflight profiles by locking profiles and giving them passwords. This may
be useful if preflight profiles are shared among several users. You can lock or password-protect preflight profiles
when you first create them or any time you save the preflight profiles. By default, all predefined preflight profiles are
locked.
.
.
Unlocking a locked preflight profile
Lock a profile
1 In the Preflight Edit Profile dialog box, select a profile.
2 Choose Locked from the pop-up menu at the upper left of the dialog box.
The options become unavailable.
Password protect a profile
1 In the Preflight Edit Profile dialog box, select a profile.

487
ADOBE ACROBAT 8 PROFESSIONAL
User Guide
2 Choose Password Protected from the pop-up menu at the upper left of the dialog box.
3 Type and reenter the password, and click OK. You can use uppercase and lowercase letters, numerals, or punctu-
ation marks.
The options become unavailable.
Unlock or unprotect a profile
1 In the Preflight Edit Profile dialog box, select a profile.
2 Choose Unlocked from the pop-up menu at the upper left of the dialog box.
3 If prompted, enter the correct password, and click OK.
Change profile settings
You can change the settings of a single profile.
See also
“Preflight Edit Profile dialog box overview” on page 484
“Lock, unlock, and password-protect profiles” on page 486
“Add and remove profiles” on page 485
Change general profile settings
1 Open the Preflight Edit Profile dialog box.
2 Expand the profile group and select a profile.
3 If the profile is locked, choose Unlocked from the pop-up menu.
4 Change any of the following settings:
• Enter a new name for the profile, and describe it in the Purpose box.
• To apply password protection to the profile, select Password Protected from the pop-up menu. When prompted,
type and reenter the password, and click OK. Otherwise, choose Unlocked.
• Enter your name and email address.
• Assigntheprofiletoagroup.Selectanexistinggroupfromthemenu,orselectNewGroup,typeaname,andclick
OK. Groups are sorted alphabetically.
5 When you finish editing a password-protected profile, select Locked from the pop-up menu. You may also want
to password-protect it again.
6 Click OK, or click Save to save your changes without closing the dialog box.
Modify existing check and alert settings
1 Open the Preflight Edit Profile dialog box.
2 Expand the profile group and select a profile.
3 If the profile is locked, choose Unlocked from the pop-up menu.
4 Expand the profile to view the groups of properties available for the profile.
5 Select a property group.
488
ADOBE ACROBAT 8 PROFESSIONAL
User Guide
6 Set options to specify the criteria for the inspection. Options vary according to the selected category of properties
under the profile. You can select or deselect criteria, edit values, or activate a property.
7 Select an alert option from the pop-up menu to specify how to handle mismatches during the inspection.
8 Click OK, or click Save to save your changes without closing the dialog box.
Preflight alert options
For each check in a profile, you specify how to handle mismatches during the inspection. You can select from the
menu next to each alert icon. The icon for the alert appears next to the check in the Preflight dialog box.
Error Generates an error message for this check (or any checks in this category). Choose this option for
mismatches that you must correct before proceeding to the next stage in the workflow.
Warning Generates a warning message for this check (or any checks in this category). Choose this option for
mismatches that you want to know about and may need to correct before final output.
Info Generates a simple note for this check (or any checks in this category). Choose this option for mismatches
that you want to know about but do not need to correct before final output.
Inactive Never generates an alert message for this check (or any checks in this category). Choose this option for
mismatchesthatwill notaffecttheoutputqualityofthePDFdocument. Youmustchangethestate from Inactiveto
any other state to make the text boxes available.
View a profile summary
You can view a description of each check and its inspection criteria for a given profile by creating a profile summary.
❖ In the Preflight dialog box, select a profile, and choose Create Profile Summary from the Options menu.
A profile summary is a PDF file.
Additional checks
About additional checks and properties
The Preflight tool includes a collection of additional checks (called rules in previous versions of Acrobat) that you
can add to a profile. These checks are available from the Custom Checks section of each profile. You can modify these
checks in a variety of ways, depending on the PDF property they describe.
Some properties are defined by a simple statement that is either true or false for a given object in a PDF—for example,
“Font is not embedded” or “Color managed color used.” Some property statements specify relationships between the
actual value of a property (for example, text size or spot color name) and the value you enter in the dialog box (for
example, “12” or “Deep blue”). Other statements compare numerical values.

489
ADOBE ACROBAT 8 PROFESSIONAL
User Guide
Relationship
between property
value and typed
value
Relationship
between numerical
values
Boolean properties
is equal to is not equal to is less than is true
contains does not contain is less than or equal
to
is not true
begins with does not begin with is equal to
ends with does not end with is not equal to
is contained in is not contained in is greater than
is greater than or
equal to
Property groups
The properties for defining a check are grouped in categories. You can view a list of all property groups in the Edit
Check dialog box. In addition, you can view the individual properties that make up each group, as well as an expla-
nation of how the Preflight tool uses the properties.
The following property groups are available:
Tex t Includes informationabouthowtextisrendered,whetheritisscaledanamorphicallyorslanted,orwhetherit
can be mapped to Unicode and thus copied or exported correctly.
Font Describes all aspects of a font in which text is rendered. Note that text size is a text property, not a font property,
because a font can be used at many sizes throughout a PDF document. Text size is included in the Text property
group.
Image Includes image resolution, bit depth, number of pixels, rendering intent, and more.
Colors Includes color characteristics, such as color spaces, alternate color spaces, patterns, and spot colors. Alternate
color spaces enable Acrobat to display or print certain spot colors and multicomponent spot colors (DeviceN). For
example, to reproduce the color orange on a monitor or printer, the PDF requires an alternate color space (made up
of RGB or CMYK colors) that defines what the spot color looks like.
ICC Color Spaces Includes properties for accessing the characteristics in the embedded ICC profiles, which define
the ICC color spaces. ICC profiles contain data for translating device-dependent color to a device-independent color
space, such as Lab. This helps you reproduce color consistently across different platforms, devices, and ICC-
compliant applications (such as Adobe Illustrator and Adobe InDesign). A document that contains objects in
different color spaces (such as RGB, CMYK, and Grayscale) could have different ICC profiles for calibrating the color
for each color space.
Graphic State Properties For Fill Includes graphic state information about how areas are filled, particularly the color
values of the current color space.
Graphic State Properties For Stroke Includes graphic state information about how lines are drawn, particularly the
color values of the current color space, as well as line-specific properties, such as thickness.
General Graphic State Properties Includes settings that control how text, graphics, or images are displayed in a PDF
page. Overprint settings, for example, are included here.
Halftone Includes graphic state settings relevant to prepress operations, such as screen angles, frequencies, and spot
shapes.

490
ADOBE ACROBAT 8 PROFESSIONAL
User Guide
Page Description Includes general information about objects on a PDF page, such as the type of object (for example,
whether it is an image, a piece of text, or a smooth shade) or whether it is inside or outside the viewable area of the
page, or how far it is from the trim box.
OPI Includes properties for analyzing all existing OPI links (comments), whether from OPI version 1.3 or 2.0. The
possible OPI entries in a PDF are the same as in PostScript files.
Embedded PostScript Refers to thePostScriptcodethatcanbeembeddedintothe PDF.Thereare threeproperties:
one for a PostScript operator used directly in a page description; one for PostScript code embedded in a PostScript
XObject; and one for an early form of a PostScript XObject, a PostScript Form XObject.
Object Metadata Includes information embedded with the object, such as its creator, resolution, color space,
copyright, and keywords applied to it. For example, if a Photoshop image with metadata is placed in an InDesign
document, and the document is converted to PDF, this information can be retrieved and checked by properties in
this group.
Annotations Includes most characteristics of comments and drawing markups, traps, and printer marks.
Form Fields Includes properties for form fields.
Layers Checks for optional content, which may affect the appearance of a page.
Pages Includes page numbers and page sizes that represent the various document boxes supported by Adobe PDF
1.3 and later technology (media box, bleed box, trim box, and art box). This group also includes plate names for PDF
pages that belong to a preseparated PDF.
Document Includes all the pieces of information that apply to the PDF as a whole, such as whether the document is
encrypted, contains form fields, or contains bookmarks.
Document Info ListsallthestandardentriesthatcanalsobeaccessedbytheDocumentInfodialogboxin Acrobat,
and information that has been standardized by the ISO 15930 standard (PDF/X).
Document Metadata Includesinformationembeddedwithinthe document,suchasitstitle, author,copyright,and
keywords applied to it. This information is also available in the Document Metadata section of the Document
Properties dialog box in Acrobat. (Choose File > Properties, click the Description tab, and then click Additional
Metadata.)
Structured PDF Includes several basic properties for the tagging structure in a tagged PDF, for which the PDF/A
standard defines constraints.
Output Intents For PDF/X Or PDF/A Defines which output process the PDF has been prepared for. A PDF intended
for high-resolution printed output typically contains an output intent with an embedded ICC profile, for use by a
proofing device or a device’s RIP (raster image processor).
Output Intent For PDF/X Or PDF/A (ICC Profile Properties) Includes properties for accessing information from an
ICC profile embedded in the output intent. This group includes the same properties as ICC profiles for objects, such
as profilenameand type.The ICCprofile describesthe output conditionofthe device wherethedocument willbe
imaged.
Efficiency Of PDF Content Stream Helps determine how efficiently page descriptions are encoded. For example, it is
possible to include the text Hello as a text operator for the whole word, or as several text operators for each character
in the word. The latter is less efficient and reduces the speed of page rendering. The efficiency checks return
percentages for several types of operators. A smaller value in most cases is better than a higher value.
Errors In PDF Syntax Returns information about specific errors in a PDF’s syntax. For example, if certain keys
requiredbythePDF specificationare notincluded, Acrobatmaystillbeabletorenderthefile.ForpredictablePDF
rendering, however, it is preferable to encode all PDFs in strict compliance with the PDF specification.
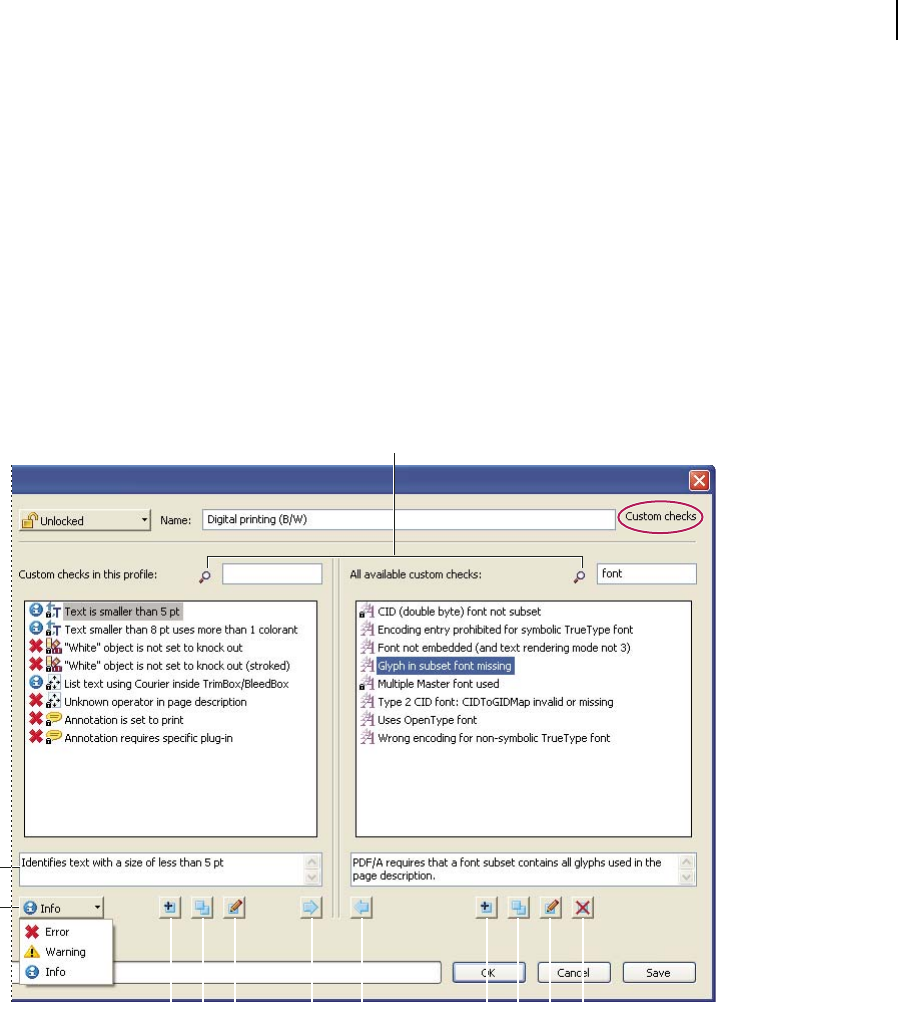
491
C
ADOBE ACROBAT 8 PROFESSIONAL
User Guide
Errors In Structured PDF Returns information about errors in the tag structure of a tagged PDF. For example, an
error is returned if the type of a tagged object is not properly specified. The properties in this group help identify
errors in tag structure.
Errors In PDF Content Stream Returns information about errors in the page descriptions in a PDF. For example,
three number operands are required to define RGB color. If there are fewer than three operators, it is not possible to
render the page. Properties in this group help determine the reasons why a PDF page isn’t rendered.
Preflight Edit Profile dialog box overview (Custom Checks)
The Profiles list in the Preflight Edit Profile dialog box contains predefined profiles included with Acrobat, and any
custom profiles you’ve created. If you select Custom Checks, you get more options for selecting and modifying items.
The buttons at the bottom of the column perform basic editing functions, such as duplicating, removing, and
creating. The search box helps you locate a specific check.
A
D E F GH I J K L
B
Custom checks
A. Search B. Description C. Alerts D. Create New Check And Include in Current Profile E. DuplicateCheckAndAssignToCurrentProfile
F. Edit Check G. Remove Check From Profile H. Include In Profile I. New Check J. Duplicate Check K. Edit Check L. Delete Check
Add checks to a profile
Acrobat includes several predefined preflight profiles, which you can use as is or modify to create custom profiles.
You can modify a profile that nearly meets your needs by adding one or more checks that analyze the document using
different criteria. For example, an existing check might detect all text that is not plain black—that is, text that uses
black plus some amount of cyan, magenta, and yellow. Because this could be a problem when you print small text,
youcouldmodifythechecksothatitflagstextobjectsthatusemorethanonecolorandhaveatext sizeequaltoor
smaller than 12 points.

492
ADOBE ACROBAT 8 PROFESSIONAL
User Guide
You can reuse a check in any profile where it’s needed. Keep in mind, however, that if you modify a check that’s being
used in multiple profiles, the check is modified in every profile that uses it. To avoid making unnecessary modifica-
tions, rename the check for a particular profile. Before editing a preflight profile, you must unlock it.
1 In the Preflight dialog box, select a profile, and click the Edit button , or choose Edit Preflight Profiles from the
Options menu.
2 Choose Unlocked from the pop-up menu at the upper left.
3 Select Custom Checks from the list of items displayed under the profile name.
4 Work with the panels by doing any of the following:
• To quickly find a specific check, type all or part of its name in the search box. Only those items containing the
search term are displayed. Removing the name from the search box displays all the checks again.
• To add a check to the profile, select the check in the right panel, click the left-facing arrow, and adjust the alert
type,ifneeded,from thepop-upmenuatthe lowerleftofthe dialogbox.Thealerttype,whichisErrorbydefault,
specifies what kind of alert the Preflight tool displays if it finds a mismatch. You can add as many checks as needed.
• To remove a check from the profile, select it in the left panel, and click the right-facing arrow.
• Double-click a check to edit it.
See also
“About preflight profiles” on page 483
“Lock, unlock, and password-protect profiles” on page 486
“See where a check or property is used” on page 493
“Correcting problem areas” on page 493
Create or modify custom checks
Although you can modify any unlocked predefined check, it’s best to leave the predefined checks as they were
configured. Instead, you can create a new check or base a check on an existing one.
1 In the Preflight dialog box, select a profile, and click the Edit button , or choose Edit Preflight Profiles from the
Options menu.
2 Choose Unlocked from the pop-up menu at the upper left.
3 If necessary, expand the profile to display the categories underneath.
4 Select Custom Checks.
5 (Optional) Choose Info from the alert menu to prevent the Preflight tool from failing objects that don’t match this
check.
6 In the Preflight Edit Profile dialog box, do one of the following:
• Click the New icon
• To base the new check on an existing one, select a check and click the Duplicate icon
7 In the Edit/Duplicate Check dialog box, do any of the following, and then click OK:
• Type a name and description in the boxes on the left.
.
.

493
ADOBE ACROBAT 8 PROFESSIONAL
User Guide
• Type the message you want to display when the check finds a mismatch (fires) and when it doesn’t find a
mismatch.Forexample,ifyou’redefiningacheck againsttheuseofspotcolors, yourmessagewhennomismatch
is found could be “Document has no spot colors.”
• Select whether to apply the check to page contents, annotations, form fields, or all those objects.
• For Group, specify the group from which properties are to be used.
• For Property, select properties and specify criteria to be evaluated against.
See where a check or property is used
❖ Double-click a check, and then click Usage in the Edit Check dialog box to see which profiles use the check.
Correcting problem areas
About preflight fixups
YoucanusethePreflighttooltofixmanyerrorsinadocument.Todothis,youadderrorcorrections,called fixups,
to a profile. The fixup automatically corrects the problem, if possible, or provides information so that you can correct
theprobleminthesourcefile.Aprofilewithafixuphasthegraywrenchiconnexttoit.Anoutlineofawrenchmeans
that no fixups are associated with the profile.
Preflight includes several predefined fixups that you can add to a profile. These cover a broad range of errors that
affect color, fonts, images, print production, compliance with international standards like PDF/X and PDF/A, and
other areas. Preflight also includes a toolkit for creating your own fixups.
Note: A fixup permanently changes the document.
For example, fixups can perform the following actions to correct errors:
• Convert color spaces, just as the Convert Color feature does.
• Repair documents and eliminate unneeded content to reduce file size, just as PDF Optimizer does.
• Convert the PDF to a different version.
• Widen hairlines.
• Flatten transparency.
• Remove objects outside the trim and bleed boxes.
• Prepare the PDF for PDF/X or PDF/A conversions.
• Set document information.
Add fixups to a profile
The Preflight tool includes a collection of fixups that you can add to a profile. These are all available from the Fixups
section of each profile.
1 Open the Preflight dialog box, and click Edit.
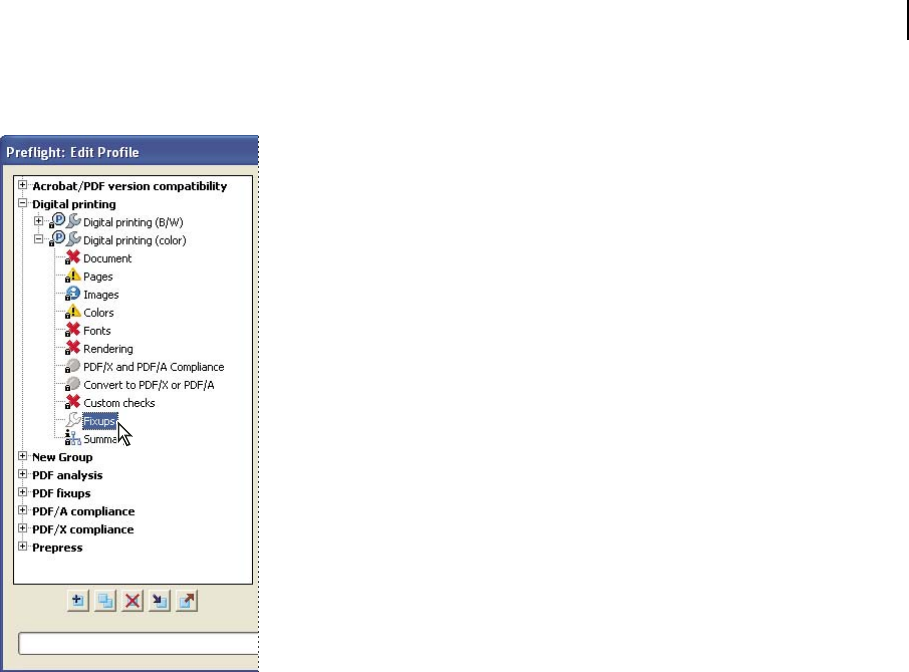
494
ADOBE ACROBAT 8 PROFESSIONAL
User Guide
2 Expand the category with the profile you want, and then expand the profile.
3 If necessary, unlock the profile so that you can modify it. Choose Unlock from the pop-up menu at the top.
4 Select Fixups from the items under the profile.
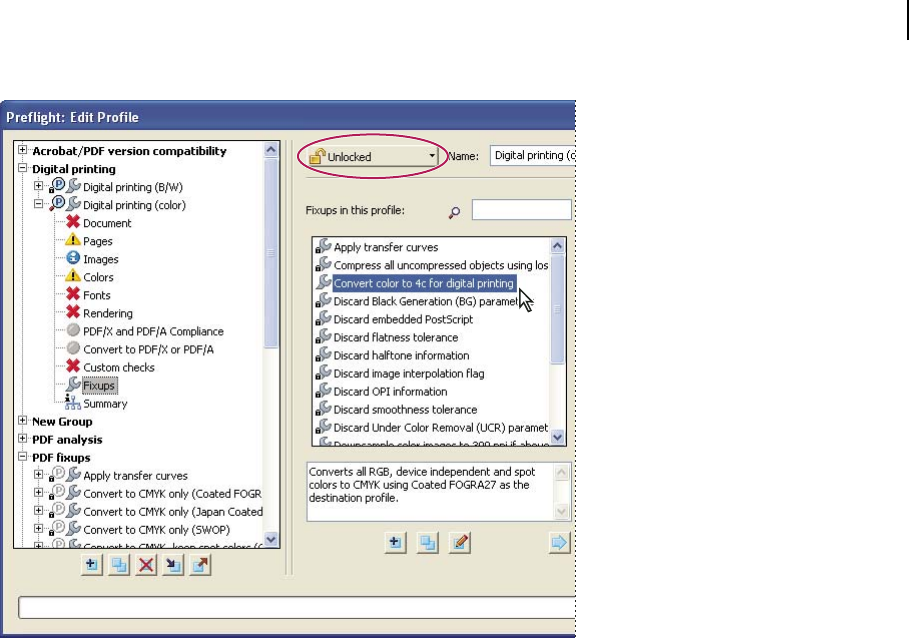
495
ADOBE ACROBAT 8 PROFESSIONAL
User Guide
Fixups are available from the Fixups section of each profile.
5 Select a fixup from the column on the right and click the left-facing arrow to move the fixup to the column on the
left.
You can add as many fixups as you want.
Note: To remove a fixup from a profile, select the fixup from the list on the left and click the right-facing arrow.
Edit Fixup dialog box overview
The Edit Fixup dialog box lists the types of predefined fixups you can add to a profile, and the values associated with
each fixup. You can use the Edit Fixup dialog box to change the values associated with a fixup, or create a custom
fixup based on an existing one. Like checks, fixups are organized by categories.
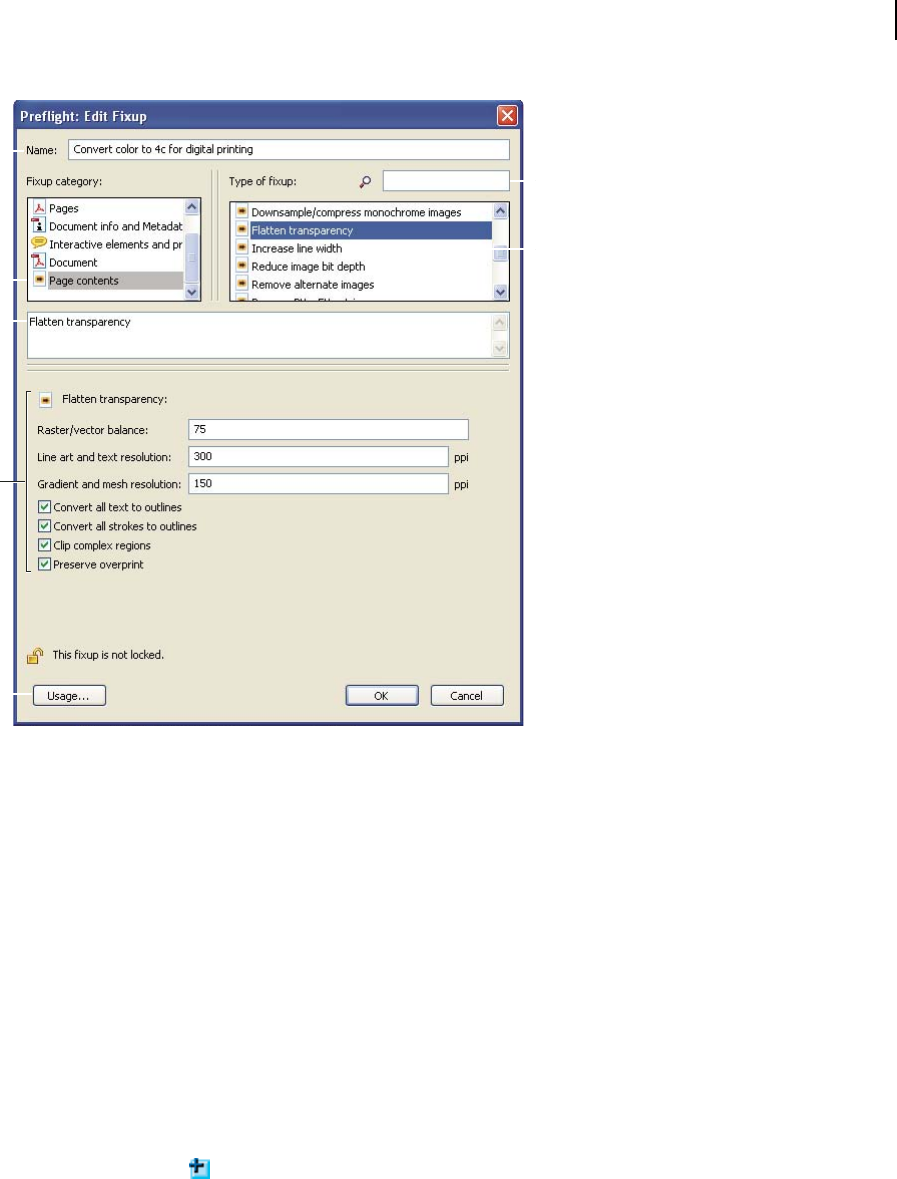
496
ADOBE ACROBAT 8 PROFESSIONAL
User Guide
A
B
C
E
G
F
D
Edit Fixup dialog box
A. Fixup name B. Fixup categories C. Description D. Fixup criteria E. Button for seeing which profiles use the fixup F. Search G. Areas in
the fixup that can be modified
Create or modify fixups
You may want to create a custom fixup for certain jobs or output devices. The settings you specify determine such
things as what output intent is used, what color conversions take place, how images are compressed and sampled,
and what PDF compatibility level the PDF must support. Although you can modify any of the predefined fixups, as
long as they are unlocked, it is better to duplicate an existing fixup and change its values. This technique is particu-
larly useful if the fixup belongs to multiple locked profiles, and you don’t want to find and unlock all those profiles.
A duplicated fixup is unlocked by default because it does not yet belong to a profile.
Create a new fixup
1 In the Preflight Profile dialog box, click the Edit button.
2 Select a profile and unlock it.
3 Select the Fixups category on the left, under the profile.
4 Click the Create button
5 Name the fixup and specify criteria.
Create a fixup based on an existing one
1 In the Preflight Profile dialog box, click the Edit button.
.

497
ADOBE ACROBAT 8 PROFESSIONAL
User Guide
.
2 Select the Fixups category on the left, under the profile.
3 To unlock the fixup so that you can modify it, choose Unlocked from the pop-up menu at the top.
4 In the Preflight Edit Profile dialog box, select the fixup you want to modify, and click the Duplicate button
5 In the Duplicate Fixup dialog box, select a category in the left column, and then select an option in the right
column. The options in the right column are the areas you can modify.
6 To see which profiles currently use this fixup, click Usage. You may need to unlock other profiles before you can
modify the fixup.
7 Do any of the following, and click OK:
• To rename the fixup, type in the Name box at the top.
• To change the description of the area you’re modifying, type in the box just below the categories.
• To change how an error is handled, specify options or values for each selected fixup option.
PDF/X- and PDF/A-compliant files
About PDF/X and PDF/A standards
PDF/X and PDF/A standards are defined by the International Organization for Standardization (ISO). PDF/X
standards apply to graphic content exchange; PDF/A standards apply to long-term archiving of electronic
documents. During PDF conversion, the file that is being processed is checked against the specified standard. If the
PDF will not meet the selected ISO standard, a message appears, asking you to choose between canceling the
conversion or going ahead with the creation of a non-compliant file.
The most widely used standards for a print publishing workflow are several PDF/X formats: PDF/X-1a, PDF/X-3,
and (in 2007) PDF/X-4. The most widely used standards for PDF archiving are PDF/A-1a and PDF/A-1b (for less
stringent requirements).
Note: For more information on PDF/X and PDF/A, see the ISO website and the Adobe website.
Convert PDFs to PDF/X or PDF/A
You can validate PDF content against PDF/X or PDF/A criteria and save a copy of the PDF as PDF/X or PDF/A,
provided it complies with the specified requirements. For example, under certain circumstances, an ICC profile that
describes the destination device is required for PDF/X-1a, PDF/X-3, and PDF/X-4 compliance. If your document
doesn’t have an embedded ICC output profile, you can embed one before saving.
Note: You can also create PDF/X- and PDF/A-compliant files using Acrobat Distiller.
The PDF/X or PDF/A icon at the lower left of the Preflight dialog box indicates the PDF/X or PDF/A status of the
current document.

498
ADOBE ACROBAT 8 PROFESSIONAL
User Guide
ABC D E
PDF/X buttons (similar PDF/A buttons appear)
A. Convert to PDF/X B. Verify PDF/X C. Not a valid PDF/X D. Valid PDF/X E. Remove PDF/X
1 If the PDF/X or PDF/A icon at the lower left of the Preflight dialog box indicates that the PDF is not PDF/X- or
PDF/A-compliant, do one of the following:
• Click the icon next to the text “Not a PDF/X file” or “Not a PDF/A file.”
• Choose Convert Current PDF To PDF/X (or PDF/A) from the Options menu.
2 Select a PDF/X or PDF/A standard.
3 Specify conversion options, and click OK.
4 Do one of the following, depending on the results of the conversion:
• If the conversion succeeds, save the PDF. A green check mark appears in the Preflight dialog box.
• Iftheconversionfails,viewthe resultsintheResultslist, orclickReporttosee theresults.AredXappearsinthe
Preflight dialog box. When prompted, click OK to view the Preflight results.
See also
“About PDF/X and PDF/A standards” on page 497
“Adobe PDF settings” on page 102
PDF/X and PDF/A conversion options
PDF/X and PDF/A versions Select the PDF/X or PDF/A version to convert the PDF to.
Trapped Key (PDF/X only) A PDF/X-compliant file requires the Trapped key to be set to True or False. If you know
that the document contains trapping information, select Set Trapped Key To “True.” If you don’t know the trapping
status or if you know that the document does not contain trapping information, select Set Trapped Key To “False.”
Set Output Condition To Indicates the printing condition for which the document has been prepared.
Use Embedded Output Intent If Present Uses an output intent that has already been embedded in the PDF.
Omit ICC Profile Unless Embedding Is Required An ICC profile is not required for an output intent. PDF/X-1a in
many cases does not require embedding the profile. PDF/X-3 does not require embedding the profile unless a
device-independent color is used. PDF/X-4 always requires embedding. PDF/A in many cases does not require
embedding an ICC profile.
Verify a PDF against PDF/X or PDF/A criteria
PDF/X and PDF/A files can be created in a variety of ways, such as by using Acrobat Distiller. If you open a PDF/X
or PDF/A file created by Distiller or another application and start the Preflight tool, you may see the Verify PDF/X
icon or Verify PDF/A icon at the bottom left of the Preflight dialog box. This icon indicates that you need to
verify that the file is PDF/X or PDF/A compliant. The PDF/X or PDF/A standard used to create the file and the color
settings file associated with the file appear next to the icon.
1 In the Preflight dialog box, click the Verify PDF/X icon or Verify PDF/A icon. Preflight reports whether the PDF
complies with the PDF/X or PDF/A standard used to create it. A green check mark appears in the icon if the verifi-
cation succeeds. A red X appears in the icon if the verification fails.
499
ADOBE ACROBAT 8 PROFESSIONAL
User Guide
2 After verification, view the results in the Results list, or click Results to see them.
Remove PDF/X or PDF/A information
You can remove all PDF/X- or PDF/A-specific information, such as the output condition or the GTS_PDFX version
key. This is useful if a PDF/X- or PDF/A-compliant file has been modified, if you want to start over, or if an ICC
profile increases the file size too much.
1 In the Preflight dialog box, click the Remove PDF/X icon or the Remove PDF/A icon . The icon of a
PDF/X- or PDF/A-compliant file has a green check mark in the lower right corner.
2 When prompted, click Yes.
Automating document analysis
About droplets and batch processing
If you routinely use the same preflight profile to inspect documents, you can use a droplet or a batch-processing
command to process files.
A droplet in Preflight is a small application that runs a Preflight inspection on one or more PDFs that you drag onto
the Droplet icon . You can save a droplet on the desktop or to another location on your computer.
Like droplets, batch processing inspects multiple files at once, separates successful files from problem files, and creates
reports in designated locations. In addition, hot folders can convert multiple file types (JPEG, HTML, RTF, and so
on) to PDF or to PDF/X using conversion settings you specify; inspect the files using specified profiles; and output
them in any format Acrobat supports, including PDF and PostScript.
Note: If you are inspecting only files, you probably don’t need to save changes or save copies in output folders.
See also
“Processing in batches” on page 364
“Create a results report” on page 480
Create and edit a droplet for running a preflight inspection
When youinspect filesusingadroplet,youcanseparatesuccessfulfilesfrom problemfiles,andreviewresultsinan
optional report.
See also
“Create a results report” on page 480
Create a droplet
1 Choose Create Preflight Droplet from the Options menu in the Preflight dialog box.
2 Choose a Preflight profile from the pop-up menu. Create a new one if the exact profile you need is not listed.
3 Specify settings for handling the PDFs after the preflight inspection, and then save the droplet.

500
ADOBE ACROBAT 8 PROFESSIONAL
User Guide
Edit droplet settings
1 Double-click the Droplet icon , or choose Edit Preflight Droplet from the Options menu of the Preflight dialog box.
2 Change the settings you want to modify, and then save the droplet.
Droplet settings
Use the droplet options to specify how the Preflight tool processes PDFs when you drag them onto the Droplet icon.
Note: You also specify these options when you run a preflight inspection using batch processing. (See “Processing in
batches” on page 364.)
Keep Profile [profile] Uses the currently selected profile for the preflight inspection.
Capture Inserts the profile being used in the droplet into the profile list under the Imported Profiles category.
Change Profile Provides a menu of all available profiles. You can select a different profile for the preflight inspection.
Run Preflight Profile Without Applying Fixups Inspects and reports on problems without correcting them. This
option is available only if you choose a profile that includes a fixup for correcting problems.
Copy PDF File Places a copy of the PDF in the Success or Error folder.
Move PDF File Moves the inspected PDF to the Success or Error folder.
Save Alias Of PDF File Places a link to the PDF in the Success or Error folder, so that the original file is not moved
from its location.
Create Report And Save In Success/Error Folder Lets you specify the type of report and amount of detail. This report
indicates the results of the preflight inspection.
Settings Lets you change report options.
Success/Error Folder Lets you specify a folder and location for the files and optional reports.
Display A Summary PDF Creates a report of files that generated mismatches during the inspection. The report
indicates the location of each file; the path to the file is an active link.
Output intents
About output intents in PDFs
An output intent describes the final destination device you will use to reproduce the color in the PDF, such as the
separations printing device. Output intents can override working spaces during viewing and printing, but they do
not convert the colors in the PDF.
Note: In a PDF/X1-a workflow, the output intent describes the working CMYK space. In a PDF/X-3 workflow, the
embedded ICC profile in the output intent is used to convert any objects with color-managed color to the color space of
the ICC profile in the output intent. In most cases this will be CMYK, but can also be RGB or Grayscale.
There are two kinds of output intents: One includes an embedded device profile that defines the color space of the
destination device, such as U.S. Web Coated (SWOP) v2; the other is a name that defines the destination color space
andusuallynamesastandardoutput condition.Usinganamedoutputintentratherthananembeddedprofile helps
reduce the size of a PDF, but this is typically only possible for PDF/X-1a files, or PDF/X-3 files that do not contain
color-managed color.

501
ADOBE ACROBAT 8 PROFESSIONAL
User Guide
You include output intents when you create PDF/X (or PDF/A) files, using the Standards panel of the Adobe PDF
Settings dialog box. (You access Adobe PDF Settings differently, depending on the application you’re using.) You can
also use third-party plug-ins to include output intents. For documents with named output intents rather than
embedded profiles, the program looks for the color profile associated with the named intent.
See also
“Adobe PDF settings” on page 102
Create output intents
1 On the Output Intents tab of Preflight Preferences, do one of the following:
• To create a new output intent from scratch, click the Create A New Output Intent icon
• To create an output intent based on an existing one, select an option from the list on the left, and then click the
Duplicate Selected Output Intent icon . An integer is appended to the name of the duplicated output intent.
2 Set output intent options.
See also
“Preflight preferences” on page 475
Extract an output intent for reuse
YoucanextractanembeddedoutputintentfromanotherPDF,andthenaddittothelistofoutputintentsin Preflight
preferences.
1 On the Output Intents tab of Preflight Preferences, click Capture.
2 Locate the file with the embedded output intent you want and open it.
Theoutputintentappearsattheendof thelist,with anamethatindicatesitwascapturedfromacertaintypeoffile,
for example, “Captured Output Intent from PDF/X file.”
Export an ICC profile from an output intent
1 On the Output Intents tab of Preflight Preferences, select the output intent and click Export ICC Profile.
2 Specify a name and location, and click Save.
The ICC profile appears with the other ICC profiles in the Profiles folder.
Delete an output intent
1 On the Output Intents tab of Preflight Preferences, select the output intent and click Delete .
2 Confirm the deletion.
.
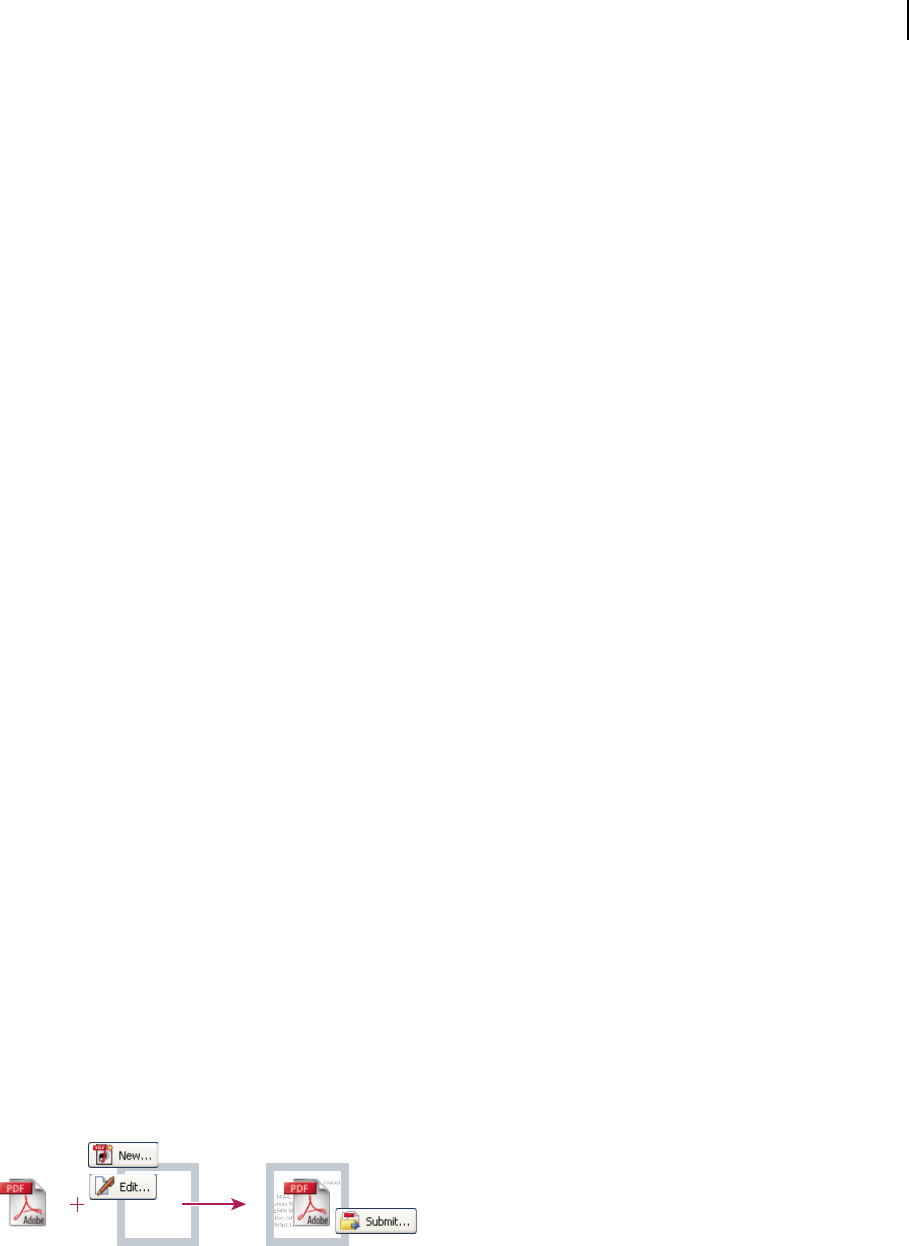
502
Chapter 18: JDF instructions
You can create custom product definitions and save them as Job Definition Format (JDF) files.
Job definition format (JDF) files
About JDF files
A JobDefinitionFormatfile (JDF file) is based on XML, a nonproprietary information carrier that can link and refer
filestomultipleproductiondevices.UsingJDF,contentcreatorsandprintserviceproviderscan describetheintent
of a printed piece, as well as each process step required to achieve that intent. A JDF job definition file is like a self-
directed electronic job ticket that holds not only the job content (InDesign files or PDFs, for example) but also
instructions to interact with JDF-enabled production systems. Jobs are automatically routed through each workflow
step—from PDF creation, through preflight and correction, to final print production.
What does a JDF file include?
JDF files include such data as media and ink requirements, production quantities, customer information, and
product descriptions. The JDF file also includes references to files that contain pages and describes how those pages
should be ordered to make the product. In addition, the JDF file may include certain information necessary for the
creation of PDFs appropriate for the production process, including PDF conversion settings and preflight profiles.
Depending on the job definition instructions and the results of specified processes, a JDF file may also include a
validation stamp, indicating that the print job was built according to the settings and verified.
Process validation
The ability to embed PDF conversion and preflight settings in a JDF package, and to verify that steps and processes
werecompletedsuccessfully,ensurestheintegrityofthefilesbeforethejobentersprintproduction.Forexample,a
print service provider or content originator can use JDF to control PDF creation and preflight inspection automati-
cally. This is done by specifying the PDF conversion settings and preflight profile that a job must conform to before
it can enter the workflow production system. If the process is completed successfully, a validation stamp is added to
the JDF, and validation text appears on the computer screen.
How are JDF job definitions generated?
JDF job definitions can be generated directly from within Acrobat 8 software or based on a JDF template supplied by
the print provider. These templates typically include Adobe PDF conversion settings, preflight profiles, and
sometimes other commonly used job specifications. Because JDF job definitions are based on XML, they can start
as high-level definitions describing only a rough outline of a printed piece and be modified later to add more
concrete details. Or, they can be completely created in one session.
: Jane Shilbey, Production
Li Jenu. 80 lb. coated
Spot colors: PMS
PMS 110-C Service
Bureau Negative emulsion up.
C=54% M=23% Y=89% K=12%
ditor: Jane Shilbey, Production
Artist: Li Jenu. 80 lb. coated
cardstock. Spot colors: PMS
ditor: Jane Shilbey, Production
Artist: . .
cardst PMS
343-C, vice
e emulsion up.
K=12%
Jenu. 80 lb. coated
cardstock. Spot colors: PMS
AB C
Basic JDF workflow
A. PDF file B. New or edited JDF job definitions C. PDF associated with job definitions, ready to be submitted to a JDF device
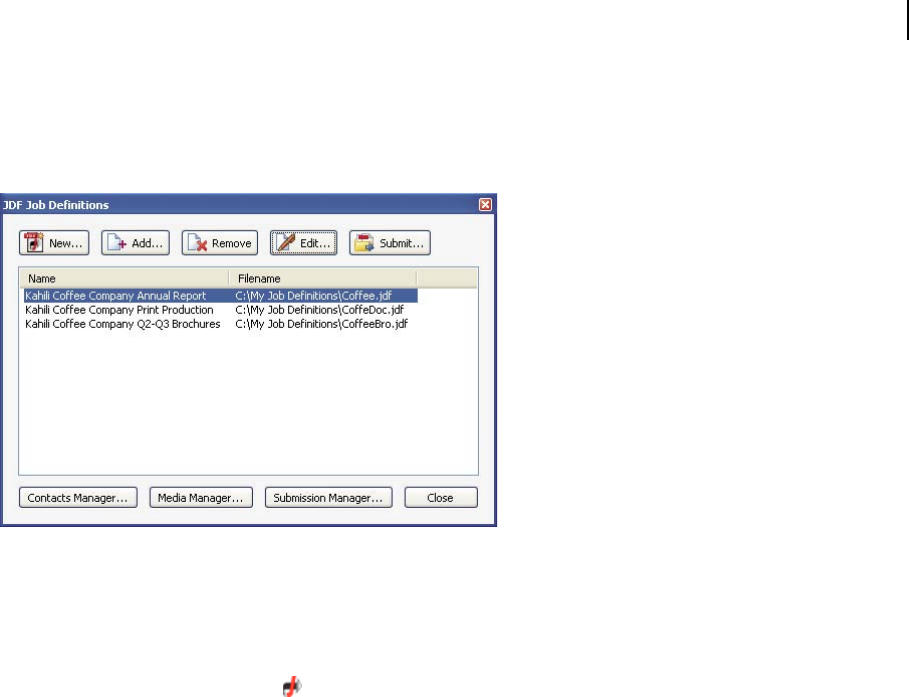
503
ADOBE ACROBAT 8 PROFESSIONAL
User Guide
View JDF job definitions
A JDF job definition in Acrobat contains references to the files to be printed as well as instructions and information
for print service providers at the production site.
JDF Job Definitions dialog box
Open the JDF Job Definitions dialog box
❖ Use either of the following methods:
• Choose Advanced > Print Production > JDF Job Definitions.
• Select the JDF Job Definitions tool on the Print Production toolbar.
• You can also double-click a JDF file on your computer to start Acrobat and list the JDF file in the dialog box.
View specifications of the print job
The components of a print job, their individual specifications, and the order in which they will be printed are listed
in a document hierarchy, which appears on the left side of the Edit JDF Job Definition dialog box.
1 In the JDF Job Definitions dialog box, select an item in the list, and click Edit.
2 In the document hierarchy on the left of the Edit JDF Job Definition dialog box, expand areas to list the compo-
nents of a section, and then do any of the following:
• Select the job definition name—the first item in the hierarchy—to view basic print job specifications and customer
information. The JDF definition may be labeled “Product.”
• Select a section—the second level in the hierarchy—to view page layout, media, and ink specifications.
• Select a file to see information specific to that file.
3 Click tabs to view different specifications.
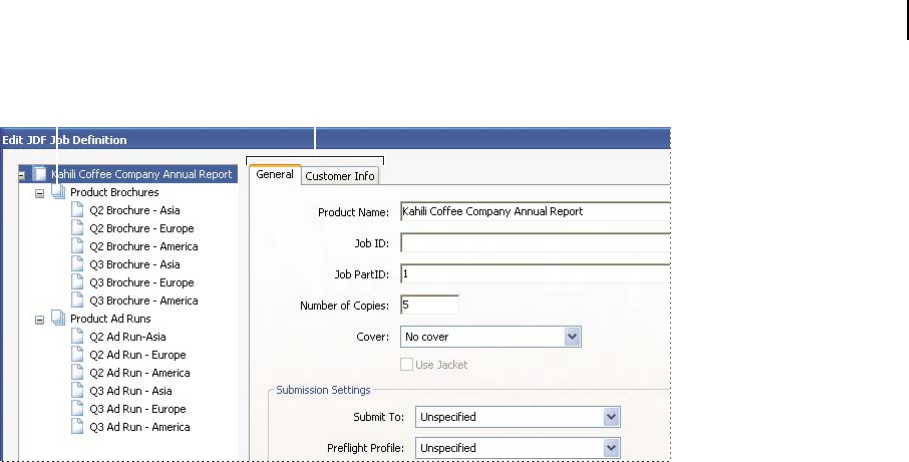
504
ADOBE ACROBAT 8 PROFESSIONAL
User Guide
AB
Edit JDF Job Definition dialog box
A. Document hierarchy B. JDF job definitions tabs
Create JDF job definitions
You can create new JDF job definitions in a variety of ways using the JDF Job Definitions dialog box. Each resulting
JDF file can be edited and used in a production environment. Commercial printers who routinely print certain types
of jobs may find it useful to create several JDF files that match these job types, and use them as templates. Using a
template saves time and avoids costly mistakes, but may not be appropriate for every job. Before you construct a new
job definition from scratch, review existing job definitions for ones that achieve results similar to what you want.
1 In the JDF Job Definitions dialog box, click New.
2 Select a method of creating a new job definition:
New Creates a blank job definition.
Based On The Document Uses the properties of a currently open PDF, such as size and number of pages. Select a
document from the list on the right, which displays the names of files currently open in Acrobat.
Based On The Job Definition Creates a copy of an existing job definition with all its properties, including the list of
referenced files. Be sure that the page content is changed before you proceed with the rest of your workflow. If you
select this option, a list of available job definitions for your selection appears to the right, which shows a list of JDF
files present in the JDF Job Definitions dialog box.
3 Specify which version of the JDF specification your job definition will be compatible with.
Note: The default is 1.2. This option is not available if Based On The Job Definition is selected in step 2. In this case, the
version is the same as that of the selected job definition.
4 Click Browse to specify the name and location, and then click Save.
5 In the Create New Job Definition dialog box, click Create (or Create And Edit to display the specifications for
modification).
Edit JDF job definitions
Job definitions can come from a number of sources, including InDesign CS2 and later, and Acrobat 7.0 Professional
and later. You can edit these job definitions using the Edit JDF Job Definitions dialog box.

505
ADOBE ACROBAT 8 PROFESSIONAL
User Guide
TheContactsManagerandMediaManagerbothopendialogboxesforspecifying informationyoucanapplytoeach
component in the print job.
See also
“Adobe PDF presets” on page 100
“Adobe PDF settings” on page 102
“Preflight profiles” on page 483
“Specify contact information for a print job” on page 506
Edit a job definition
You can add various types of files to the JDF, including PDFs, InDesign files, Word files, PostScript files, and so on.
1 In the JDF Job Definitions dialog box, select the job definition, and click Edit.
2 Expand the items on the left, and do any of the following:
• To change the order in which the components will be printed, select a component and click the Move Up or Move
Down button at the bottom.
• To add a second-level element to the hierarchy, click Add Section.
• To add a file to the job definition, click Add File, locate the file, and then specify the page range you want to include
in the print job using options in the General tab.
Add the files in the order in which they will be printed—for example, front cover, body, back cover.
• To modify other settings, select a component, click a tab, and modify the settings as desired.
3 When you finish, click OK, or click another tab to edit more options.
General tab options
Product Name A unique name for the product or print job.
Job ID/Job Part ID Job identification or reference code used by people involved with the job.
Submit To Lists the available production sites that have been set up using the Submission Manager. Select the
production site for the print the job, or leave as Unspecified to postpone this decision until submit time. (See “Create
submission site instructions” on page 509.)
Preflight Profile UsesthecriteriaintheselectedpreflightprofiletovalidatetheAdobePDFfilesintheprintjob.The
preflight profile is determined by the production site specified in the Submit To option.
PDF Conversion Settings Converts non-Adobe PDF files using the settings in the selected Adobe PDF settings file.
The conversion settings are determined by the production site specified in the Submit To option.
Preflight Status Indicates whether the JDF file and its associated documents have been submitted and inspected
using the Preflight tool. This option also indicates whether any issues were identified. This information is embedded
in JDF audit, a metadata element that JDF-enabled production systems can read to determine if the PDF is ready to
move to the next step of the process.
Description Lets you add comments to the job definition for the receiver of the job definition.
Use Binding Exposes the Type and Side menus for setting a binding specification.

506
ADOBE ACROBAT 8 PROFESSIONAL
User Guide
Customer Info tab options
Use the Customer Info options to identify the customer and others critical to the project.
Billing Code A code to bill charges incurred during production.
Customer ID Customer identification used to match this job definition to a billing or higher-level MIS (Management
Information System). This ID is usually the internal customer number of the MIS that created the job.
Customer Job The name that the customer uses to refer to the job.
Customer Order ID The internal order number that represents the contract between the commercial printer and the
customer. This number is usually provided when the order is placed, and then referenced on any correspondence
between the printer and the customer referring to this job, including bills, change orders, deliveries, and so on.
Contacts A list of people involved with the job and their roles.
Specify contact information for a print job
You specify the contact information for your print job using the Contacts Manager.
Specify or update contact information
1 In the JDF Job Definitions dialog box, click Contacts Manager, and then make a selection:
• Click Add to specify a new contact.
• Select a contact in the list, and click Edit to update the information.
• Select a contact in the list, and click Duplicate to base a new contact on an existing one.
2 In the Contact Information dialog box, fill in the name and address text boxes.
3 Do one of the following to update the Communication Channels section:
• Click Add to enter new information. The options change according to the type of communication channel you
choose.
• Select an item in the list, and click Edit to update the information.
• Select an item in the list, and click Remove.
Add a contact to a job definition
1 In the JDF Job Definitions dialog box, select a job definition, and click Edit.
2 Click the Customer Info tab.
3 In the Contacts section, click Add.
4 Choose a name from the Contact pop-up menu.
5 Double-click a job function in the right column, or choose job functions in the right column, and click the Add
button. You can choose from the default list or add custom job functions.

507
ADOBE ACROBAT 8 PROFESSIONAL
User Guide
Add Contact dialog box
6 If the contact information isn’t correct, click Edit and update the information.
7 When prompted, choose whether to update the contact in the current job definition, or update the information
in the Contacts Manager as well.
Add a job function to a job definition
1 In the JDF Job Definitions dialog box or on the Customer Info tab, click Contacts Manager.
2 Click Additional Contact Types.
3 Update the list of job functions and contact types, as needed:
• Click Add to enter a new job function.
• Select a job function in the list, and click Edit to update the information.
• Select a job function in the list, and click Remove.
Define media specifications for a print job
You specify the media for each component of your print job using the Media Manager. If you know the stock brand,
you can specify it. Otherwise, you describe the characteristics of the medium, and a particular stock is matched to
those characteristics at the production site.
Define media specifications
1 In the JDF Job Definitions dialog box, click the Media Manager button.
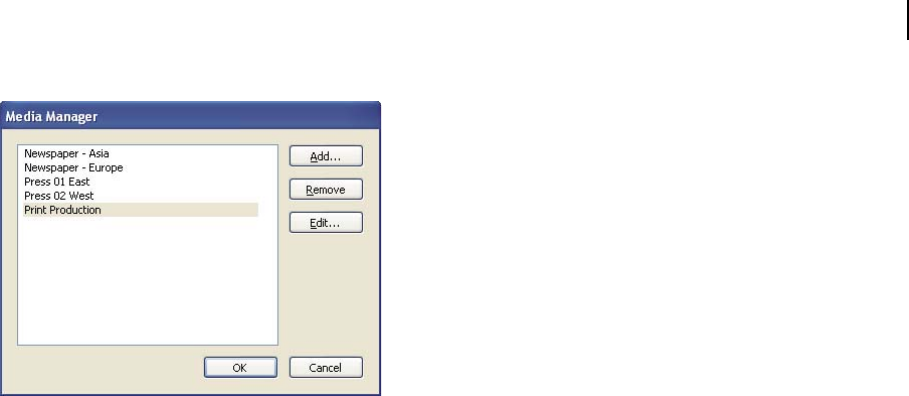
508
ADOBE ACROBAT 8 PROFESSIONAL
User Guide
Media Manager dialog box
2 Enter the media specifications that you want to apply:
• Click Add to enter new information.
• Select an item in the list, and click Edit to update the information.
• Select an item in the list, and click Remove.
Add a media specifications to a job definition
1 In the JDF Job Definitions dialog box, select a job definition and click Edit.
2 In the document hierarchy, select a section in the second level of the hierarchy.
3 Select an option from the Media pop-up menu.
4 If a media option doesn’t exist, or there is no media appropriate for the job definition, click the Media Manager
button.
5 Update the media specifications, as needed:
• Click Add to enter new information.
• Select an item in the list, and click Edit to update the information.
• Select an item in the list, and click Remove.
Media options
Use Media options to specify paper requirements.
Description Unique identifier for the media.
Media Type Paper or transparency.
User Media Type A description of the type of media.
Grade The grade of the paper. The offset printing grades are based on a scale of 1 through 5, where Gloss-Coated is
“1” and Uncoated, Yellowish is “5.”
Weight The intended weight of the media, measured in grams per square meter (g/m2).
Thickness The thickness of the chosen medium, measured in microns (m).
Opacity The opacity of the media. Use Opaque for two-sided printing when you don’t want the printing on the other
side to show through under normal light. Use translucent for back-lit viewing.

509
ADOBE ACROBAT 8 PROFESSIONAL
User Guide
Texture The intended texture of the media.
Front/Back Coating The prepress coating applied to the front and back surfaces of the media.
Stock Brand The brand name associated with the media.
Stock Type Available stock types. Note that Offset includes book stock.
Brightness Reflectance percentage.
Recycled Amount The percentage, between 0 and 100, of recycled material the media must contain.
Color Media color.
Shade The color’s shade, light or dark.
Clear An option for specifying whether the color is translucent.
Add and remove JDF job definitions
YoucanreuseandshareJDFjobdefinitionswithotherusers.Forexample,printserviceproviderscanprovidethem
to their customers to ensure that print jobs are specified correctly before the jobs are handed off to production.
Add job definitions to the job list
1 In the JDF Job Definitions dialog box, click Add.
2 Locate the JDF job definition file (.jdf extension) and click Open, or double-click the job definition file.
The job definition appears in the JDF Job Definitions list.
Remove job definitions from the job list
❖ In the JDF Job Definitions dialog box, select the job definition, and click Remove.
Submitting print jobs
Create submission site instructions
At any time, you can prepare your JDF package (the JDF file and PDF file) for submission using submission site
instructions. Any preflight profile or PDF conversion settings file embedded in the job definition is used in the
submission process.
See also
“Adobe PDF presets” on page 100
“Adobe PDF settings” on page 102
“Run a preflight inspection” on page 474
Create submission site instructions
1 In the JDF Job Definitions dialog box, select the job definition, and click Submission Manager.
2 Click Add, or select an item in the list and click Edit or Duplicate.
3 Set submission site options.

510
ADOBE ACROBAT 8 PROFESSIONAL
User Guide
Note: The options you set are automatically invoked when you submit the job to a JDF-enabled production system.
Remove submission site instructions
1 In the JDF Job Definitions dialog box, select the job definition, and click Submission Manager.
2 Select an item in the list, and click Remove.
Submission site options
Use options in the Submission Setup dialog box to specify which actions to perform on the print job during the
submission process.
Name A unique name for the submission site.
Default PDF Conversion Settings When the job definition is sent through the submission process, any referenced
non-Adobe PDF files are converted to Adobe PDF. The conversion settings come from either the PDF Conversion
Settings embedded in the job definition or the Default PDF Conversion Settings pop-up menu in the Submission
Site dialog box. Any PDFs referenced by the job definition before submission are not affected by the specified PDF
Conversion Settings.
Verify That PDF Files Are Consistent With The JDF Job Definition Compares the information in the job definition
with the associated files, and verifies that all associated files exist and are linked to the appropriate URL. Any incon-
sistencies in page sizes, inks, and the number of pages available in the associated documents result in an error. For
example, an error is reported if the job definition specifies that pages 1 through 12 from document A will be used
but document A contains only 8 pages. You can either fix the job definition to match the document, use other
features to fix the document, or continue without making changes.
Note: Not all errors are fixable.
Combine PDF Files Into A Single PDF File Combines PDFs in the document hierarchy into a single PDF. A
nonprinting annotation can optionally be added to the corner of each page, indicating the section name and page
number of that page within the section.
Important: This feature is not recommended for workflows that rely on PDF/X compatibility, because changes to the
referenced PDFs may make them noncompliant with the PDF/X specification. Any noncompliance will be tested if the
Preflight option is selected with an appropriate PDF/X profile.
Insert Blank Pages Inserts blank pages into the combined PDF where no PDF pages are referenced (for example, if
a section has been specified to contain 12 pages but no PDF has been referenced).
Include Annotations Adds annotations to the submitted PDFs to indicate their position in the job.
Preflight PDF Files Runs a preflight inspection of the associated PDFs. The preflight profile used is either the
Preflight profile embedded in the job definition or the one selected in the Default Preflight profile pop-up menu in
the Submission Site dialog box.
Convert To MIME Package And Submit To JMF Device Packages the JDF file and associated PDFs as a single MIME
(Multipurpose Internet Mail Extensions) file. MIME is a specification for formatting non-ASCII messages so that
they can be sent over the Internet, ensuring they do not get separated from each other. This allows the package to be
sent to an output device that supports Job Messaging Format (JMF), at the URL you specify. JMF enables electronic
devices to communicate over a network.
Submit To Folder Submits the JDF file and associated PDFs to the folder you specify in the Path box.
Prompt User For A Folder Location At Submit Time Unlike the Submit To Folder option, this option lets you specify
a folder to receive the submitted JDF and associated PDFs when the job is submitted.

511
ADOBE ACROBAT 8 PROFESSIONAL
User Guide
Submit files to a production system
When you are ready to hand off the print job to submission, submit the job definition and associated PDFs to a
preconfigured JDF-enabled production system. Depending on your selections in the Submission Setup dialog box,
inconsistencies between the job definition and the PDF are listed, followed by the results of a preflight inspection.
1 In the JDF Job Definitions dialog box, select the job definition and click Submit.
2 If the Submission Site field is unspecified, choose a submission site from the Submit To menu. Otherwise, the
submission site specified in the job will be shown and used.
3 Click Start.
4 If inconsistency errors are listed in the Submit dialog box, select them to see if you can correct them in the job
definition. The Update JDF button becomes available if you can. (You can also click Next and Previous to move
among the fixable errors.)
5 To update the job definition, select an error and click Update JDF. The job definition is automatically updated,
and the error disappears. Some errors cannot be fixed completely. In this case, a warning appears in place of the
previous error.
6 When you have corrected all fixable errors, click Continue.
7 If you selected Preflight in the Submission Site dialog box, Acrobat performs a preflight inspection of the PDF and
displays the results.
8 Click OK to close the Preflight dialog box and continue the submission.
The Submit dialog box indicates the results of the submission process. If the submission fails, an alert describes why
it failed. A JDF file isn’t written, and a JDF package isn’t sent to a JDF device.
See also
“Create submission site instructions” on page 509
“About preflight results” on page 476

512
Chapter 19: Adobe Version Cue
Using Adobe Version Cue
About Version Cue
Adobe Version Cue® is a file-version manager included with Adobe Creative Suite that integrates versioning and asset
management into your existing workflows within and across Adobe Creative Suite components, including Adobe
Photoshop CS2, Adobe InDesign CS2, Adobe Illustrator CS2, Adobe GoLive CS2, Adobe Acrobat, and Adobe
Bridge. Version Cue consists of two components: a server included with Adobe Creative Suite that you can install
locally or on a centralized server, and a client that’s automatically installed with Adobe Creative Suite components,
Adobe InCopy, and Acrobat.
You can use Version Cue in a single Adobe Creative Suite component, such as Photoshop, or across multiple compo-
nents, such as Photoshop and Illustrator, to track changes to a file as you work on it. Use Version Cue to enable
efficient workgroup collaboration by way of file sharing, version control, and online reviews.
Youcan useBridgetoaccessVersionCueServers,projects, andfiles,andtoquicklyviewandcompareinformation
about Version Cue-managed assets. For more information about using Bridge with Version Cue, see Adobe Creative
Suite Help.
If youuseAdobeCreativeSuite,orifyouhaveaccesstoasharedVersionCueprojectandhavebeengrantedappro-
priate privileges by the project’s owner, you can use the Version Cue Workspace Administration utility to create and
manage users and groups, projects, and PDF reviews. For more information, see “About the Version Cue Adminis-
tration utility” on page 533
Version Cue streamlines the following tasks:
• Creating historical versions of your files.
• Maintaining file security.
• Organizing files into private or shared projects.
• Browsing with file thumbnails, and searching file information and version comments.
• Reviewing file information, comments, and file status in private and shared projects while you browse.
See also
“Availability of Version Cue features” on page 512
Availability of Version Cue features
Different Version Cue features are available in different environments:
• If youuseAcrobat8butnotAdobeCreativeSuite,youcangainaccesstothefullVersionCuefeaturesetbypartic-
ipating in a shared project; that is, you can gain access if another user on your network installs Adobe Creative
Suite and gives you access to a Version Cue project in a Version Cue Workspace.
• If you use Adobe Creative Suite, you have access to the full set of Version Cue features, including Version Cue
Administration.

513
ADOBE ACROBAT 8 PROFESSIONAL
User Guide
See also
“About the Adobe dialog box” on page 513
“Getting the most out of Version Cue” on page 513
Getting the most out of Version Cue
In Version Cue, you create projects that you and other users can access through Adobe Creative Suite components,
InCopy, and Acrobat 8. Projects keep related files together in one place. Version Cue manages the files in these
projects. Because Version Cue works in all Adobe Creative Suite components, InCopy, and Acrobat 8, your design
process isn’t interrupted when you work on individual files within a project.
You can use Version Cue in a single application, such as Photoshop CS2, to track changes to a file as you work on it.
In addition, workgroups or an individual can use Version Cue across applications. Multiple users can manage
projects that contain files from all Adobe Creative Suite components and Acrobat 8. Projects can include non-Adobe
files, such as text documents, billing forms, or spreadsheets. When you keep all managed files related to a project in
one place, you eliminate the task of tracking down important files.
Here’s an example of how you might use Version Cue with Adobe Creative Suite. You start by creating a new project
and adding a Photoshop file containing the main image for a printed piece. Then, you add art from Illustrator and
text from InDesign. Next, you add GoLive web elements to leverage your printed content for use in a web page. As
you and your team work on each piece of the project, Version Cue creates versions to keep track of changes. When
it’s time to present the project, you create a PDF of each project file and use the Version Cue Administration utility
to set up an online PDF review. Your customers, supervisors, or peer reviewers view and comment on the project
using Acrobat.
See also
“Create and edit projects” on page 517
“Availability of Version Cue features” on page 512
About the Adobe dialog box
In Adobe Creative Suite 2.0 components (except for GoLive and Acrobat 7), and in InCopy CS2, you can use the
Adobedialogbox when youchoosetheOpen,Import,Export,Place,Save,orSave Ascommands,evenifyoudon’t
use Version Cue. In Acrobat 8, you can use the Adobe dialog box when you choose the Open, Save, or Save As
commands, even if you don’t use Version Cue.
The Adobe dialog box displays additional information, including thumbnails, which make it easy to identify files.
You can use the Adobe dialog box when working with both Adobe and non-Adobe files.
By default, when you choose the Open, Save, or Save As commands, the Operating System (OS) dialog box appears.
Tousethe Adobedialogboxinsteadandsetitasthedefault,clickUse AdobeDialog. UsetheViewmenuoptionsto
customize the display. You can change back to the OS dialog box at any time by clicking Use OS Dialog.
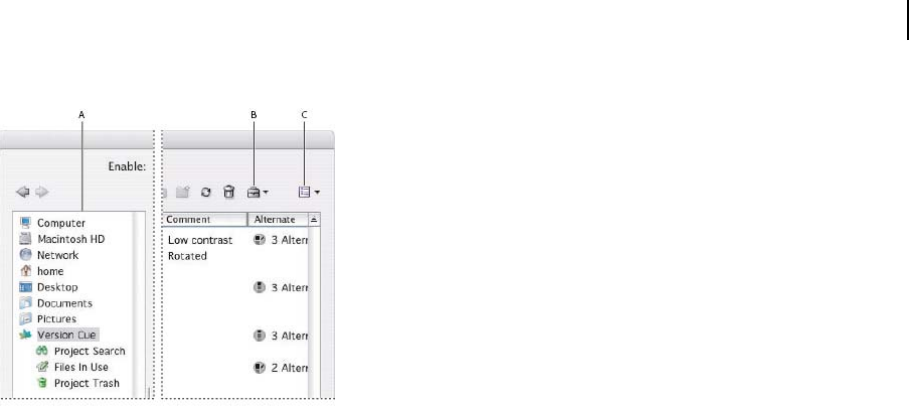
514
ADOBE ACROBAT 8 PROFESSIONAL
User Guide
Adobe dialog box
A. Favorites panel B. Project Tools menu C. View menu
You can use the Adobe dialog box to accomplish these tasks:
• Add frequently used files and folders to the Favorites panel for quick access.
• View thumbnail images of files.
• Determine whether a file is open in Acrobat 8 or another Adobe Creative Suite application on your computer.
• Rename or delete files (Mac OS only).
• View metadata about files in the Properties panel. Metadata includes author, keyword, and copyright information.
• Access Version Cue projects and files as well as non-Version Cue files.
• View detailed information about Version Cue projects, such as the status of individual files.
• View and work with Version Cue versions.
• Search for files in a Version Cue project.
• Move Version Cue files to the Project Trash.
• Determine which Version Cue files are in use, and who is using them.
• Create a new Version Cue project, or connect to an existing Version Cue project.
See also
“View Version Cue Workspace, project, and file information” on page 516
“Availability of Version Cue features” on page 512
Turn Version Cue on or off
By default, access to Version Cue is turned off in Acrobat 8. You must manually turn on Version Cue in Acrobat 8 to
use it. If you disable Version Cue, you won’t have access to any Version Cue Workspace.
For information about turning Version Cue on or off in Adobe Creative Suite components, see Adobe Creative Suite Help.
1 Choose Edit > Preferences > Documents (Windows) or Acrobat > Preferences > Documents (Mac OS).
2 Select or deselect Enable Version Cue File-Version Manager.

515
ADOBE ACROBAT 8 PROFESSIONAL
User Guide
See also
“Availability of Version Cue features” on page 512
Working with Version Cue projects
About Version Cue projects
Version Cue uses projects to store related files and folders. Projects are stored on Version Cue Workspaces.
If you work independently, you create a project to gather all the files you need and use Version Cue features, such as
versions. In a workgroup, depending on your workflow, you can create one Version Cue project for files that everyone
in your workgroup collaborates on, a different project for files that don’t require collaboration, and yet another
project restricted to specific users.
When you first open a Version Cue project, Version Cue creates a folder named “Version Cue” in your My
Documents(Windows)orDocuments(Mac OS) folder,andaddsafolderfortheprojectto it.Whenyouopenafile
from that project, Version Cue adds a working copy ofthefiletotheprojectfolder.Asyoueditandsaveintermediate
changestoyourfile,youareactuallyeditingintheworkingcopy;theoriginalfileontheVersionCueWorkspaceis
protected.
After you open a Version Cue project, a shortcut to that project appears in the Open or Save dialog boxes. Remote
Version Cue Workspaces also appear in this list after you access them.
Version Cue uses a special folder for each project: the documents folder. When you access the project, Version Cue
automatically opens the documents folder and temporarily displays the project title as the folder name. You’ll also
see the documents folder if you open the working copies folder.
See also
“About working copies” on page 520
“Availability of Version Cue features” on page 512
Open a project
Note: You can perform this task only if you have access to the full Version Cue feature set, available in Adobe Creative
Suite or in a shared workspace. See “Availability of Version Cue features” on page 512 for more information.
1 Choose File > Open. If the button is visible, click Use Adobe Dialog (if you see the Use OS Dialog button, you’re
already using the Adobe dialog box). Click Version Cue in the Favorites panel.
2 To open a Version Cue Workspace, double-click it.
Note: If you don’t see a desired Version Cue Workspace, choose Refresh from the Tools menu.
3 To open a project, double-click it.
If theUseAdobeDialogbuttondoesn’t appear intheOpenorSaveAsdialogboxes,makesurethatyou’veturnedon
the Version Cue preference in Acrobat.

516
ADOBE ACROBAT 8 PROFESSIONAL
User Guide
See also
“About the Adobe dialog box” on page 513
“Connect to remote projects” on page 516
“Adding files and folders to a project” on page 522
Connect to remote projects
Note: You can perform this task only if you have access to the full Version Cue feature set, available in Adobe Creative
Suite or in a shared workspace. See “Availability of Version Cue features” on page 512 for more information.
When you need to work on Version Cue projects that are located remotely, on a different subnet, you can use the IP
address of the computer to access that Version Cue Workspace. Workspaces on computers within your subnet should
be visible automatically.
The Version Cue Workspace can communicate with applications that are WebDAV enabled. When Version Cue is
runningonaserver,youcanuse it asaWebDAVserver. However, thenativeversioningfeaturesinVersionCueare
moresophisticatedthanthoseavailablethroughWebDAV.WebDAVcapabilitiesareprovided forlegacyworkflows.
See also
“About the Adobe dialog box” on page 513
“Log in to and out of the Version Cue Administration utility” on page 535
“Availability of Version Cue features” on page 512
Connect to a remote project
1 Choose File > Open. If you are using the OS Dialog box, click Use Adobe Dialog. Click Version Cue in the
Favorites panel. Choose Connect To from the Project Tools menu
2 In the Connect To dialog box, enter the Version Cue Client URL (the Version Cue IP or DNS address), a colon,
and the port number (3703)—for example, http://153.32.235.230:3703. If you have connected to the workspace
before, it’s not necessary to enter the port number.
You can display the Version Cue Workspace Administration utility login page to identify the Version Cue Client
URLs that remote users and WebDAV applications need to access the workspace.
3 Click OK. After you connect to a remote Version Cue Workspace, the dialog box displays all available Version Cue
projects in that workspace.
A shortcut to the remote workspace is automatically included in your list of available Version Cue Workspaces.
Connect to a project using WebDAV
❖ Refer to your application’s documentation for information on using its WebDAV features, and then use the
Version Cue WebDAV Client URL, the port number (3703), “webdav”, and the project name to identify the project
you want to work with—for example, http://153.32.235.230:3703/webdav/project_name.
View Version Cue Workspace, project, and file information
Note: You can perform this task only if you have access to the full Version Cue feature set, available in Adobe Creative
Suite or in a shared workspace. See “Availability of Version Cue features” on page 512 for more information.
1 Choose File > Open.
.

517
ADOBE ACROBAT 8 PROFESSIONAL
User Guide
.
2 If the button is available, click Use Adobe Dialog (if you see the Use OS Dialog button instead, you are already
using the Adobe dialog box).
3 Click Version Cue in the Favorites panel.
You can resize the Favorites panel to display items with long names: place your cursor over the vertical line to the
right of the Favorites panel and drag it to the right.
4 To change the display of Version Cue Workspaces, projects, or files in the dialog box, do any of the following:
• To view the properties of a file, click the toggle to display the Properties panel.
• To change the display of a project, choose a display option from the View menu
• To sort items in a column, while in detail view, click the column heading. Click the column heading again to
reverse the order.
• To show or hide columns of information while in list view, right-click/Control-click the Name column heading,
and choose Show All, Hide All, or a column name. (The Name column can’t be hidden.) Visible columns have a
check mark to the left of the column name.
• To change the location of a column, drag the column heading to the left or right of another column heading
(Windows), or press Command+Option and drag the column heading to the left or right of another column
heading (Mac OS). The Name column can’t be moved.
• To resize a column of information, drag the vertical dividing line between column headings or double-click the
line to automatically resize the column to fit the widest item in it.
5 To display information about a file, project, or Version Cue Workspace, do one of the following:
• Place the pointer over the item. A summary of file information appears in a tool tip.
• Right-click/Control-click the file and choose Versions to display information about a file’s versions.
See also
“About the Adobe dialog box” on page 513
“Version Cue file statuses” on page 521
Create and edit projects
To begin using Version Cue, you need to create a Version Cue project. When you work with Version Cue, you decide
what a project entails. For example, you can create a project to organize files for an entire publishing effort, or you
cancreateaprojecttomanagefilesforspecific aspectsofanadvertisingcampaign.Youcanuseaprojecttoorganize
assets related to a particular customer or use a project to separate private files from files that are worked on collab-
oratively. You can add files to projects at any time.
When you create a Version Cue project, you specify a project name, the Version Cue Workspace that hosts the
project, and a project description. You specify whether to share the project or keep it private. Shared projects are
available to other users; however, you can password-protect shared projects to restrict access to specific users. You
can create private projects on a workspace installed on your computer. If you create a project on a computer that is
used as a server, it must be shared to be accessible.
You can create projects by using an Adobe Creative Suite component, InCopy, Acrobat 8, or the Version Cue Admin-
istration utility. The Version Cue Administration utility provides options for specifying advanced project properties.
You create new Version Cue projects with it by importing a folder of files. These files are used as the project starting
point.
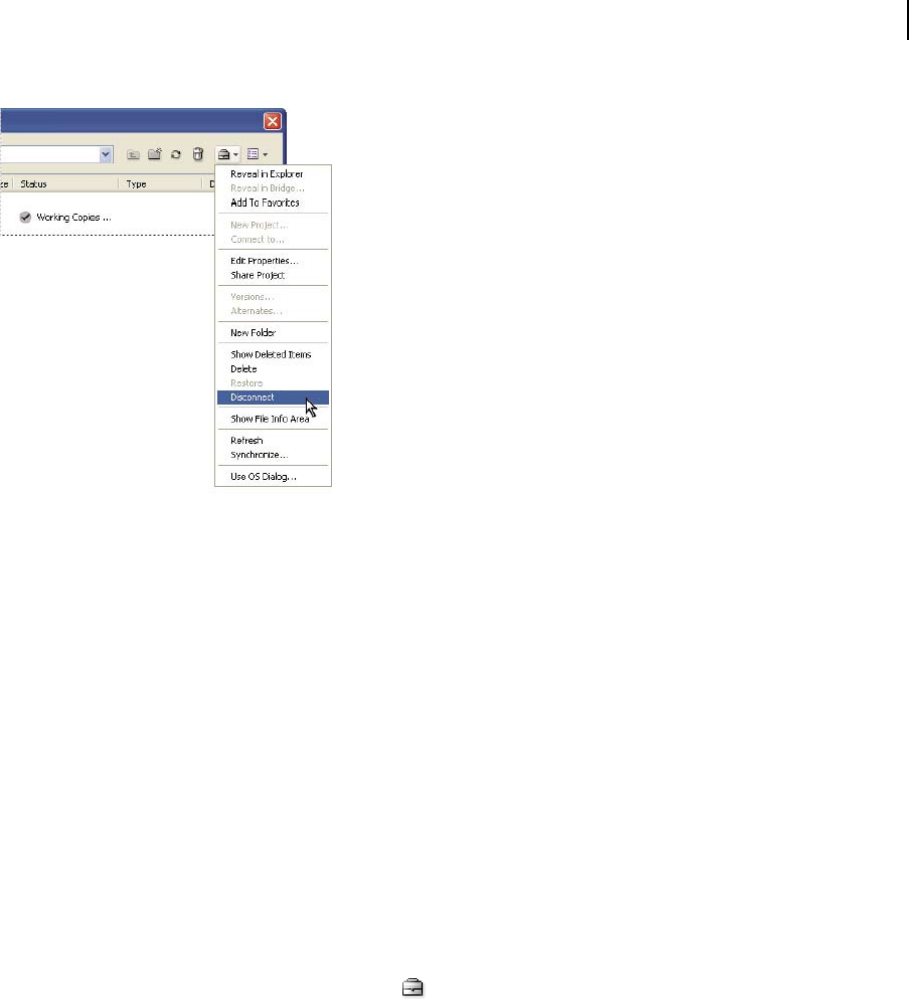
518
ADOBE ACROBAT 8 PROFESSIONAL
User Guide
Project Tools menu contains frequently used commands.
See also
“Share or unshare a project” on page 519
“Availability of Version Cue features” on page 512
“About the Adobe dialog box” on page 513
“Disconnecting from projects” on page 526
“Delete files and folders” on page 527
“Log in to and out of the Version Cue Administration utility” on page 535
Create a project
Note: You can perform this task only if you have access to the full Version Cue feature set, available in Adobe Creative
Suite or in a shared workspace. See “Availability of Version Cue features” on page 512 for more information.
1 Choose File > Open. Click Use Adobe Dialog if you’re using the OS dialog box.
2 Click Version Cue in the Favorites panel.
3 Choose New Project from the Project Tools menu .
4 Choose a location for the project from the Location menu.
5 Enter a name for the project in the Project Name box and a description in the Project Info box. (The description
you enter appears as a tool tip when the pointer is over the project in the list of workspaces.)
6 To make this project and its files available to others, select Share This Project With Others. (If the Version Cue
Workspace is on a computer other than your own, the Version Cue project is shared by default.)
7 Click OK.

519
ADOBE ACROBAT 8 PROFESSIONAL
User Guide
Edit the properties of a project
Note: You can perform this task only if you have access to the full Version Cue feature set, available in Adobe Creative
Suite or in a shared workspace. See “Availability of Version Cue features” on page 512 for more information.
1 ChooseFile >Open.ClickUse AdobeDialogifyou’reusingtheOSdialogbox.Double-click thehostVersionCue
Workspace. Select the project, and then choose Edit Properties from the Project Tools menu.
2 In the Edit Properties dialog box, do any of the following, and click Save:
• To change the project name, enter a name in the Project Name text box. The new name will not be reflected on
your (or your workgroup’s) working copies project folder until you disconnect from and reconnect to the project.
• To change the description of the project, enter text in the Project Info box.
• To make this project and its files available to other users, select Share This Project With Others. (If the Version
Cue Workspace is on a computer being used as a server, the Version Cue project is shared by default.) To unshare
a shared project, deselect Share This Project With Others. Note, however, that this action does not delete any
working copies currently in project folders on the workgroup’s computers.
• Toviewthelocationofworkingcopiesonyourcomputer,expandLocalProjectFiles.Toopenthefolder,choose
Show Files In Explorer (Windows) or Show Files In Finder (Mac OS). To change the location of the files, click
Change Location and choose the new location for working copies.
Note: Make sure that you use the Change Location feature to relocate working copies, rather than moving the project
folder manually in the file system.
• Click Advanced Administration to enable lock protection, edit or assign users, or require users to log in to the
project. When prompted, log in to Version Cue Administration. Depending on your privileges, this option may
not be available.
3 Click Cancel to close the Open dialog box (Version Cue saves your settings even though you clicked Cancel).
Share or unshare a project
Note: You can perform this task only if you have access to the full Version Cue feature set, available in Adobe Creative
Suite or in a shared workspace. See “Availability of Version Cue features” on page 512 for more information.
Atanytime,youcanchangeaproject’ssharedstatus.ProjectsonaVersionCueWorkspacethatotheruserscanaccess
are shared by default and can’t be made private. Note that unsharing a project does not delete any working copies
currently in the working copies project folders of your workgroup.
Note: IftheVersionCueWorkspaceisinstalledonacomputerthatuses afirewallandyouwanttosharetheworkspace
with others, make sure that TCP ports 3703 and 427 are left open. If you’re using a Windows machine, deselect the
Internet Connection Firewall option. (For information on the Internet Connection Firewall option, see Windows Help.)
1 Choose File > Open. Click Use Adobe Dialog if you’re using the OS Open dialog box.
2 Click Version Cue in the Favorites panel, and then double-click the host Version Cue Workspace.
3 Select the project, and then do one of the following:
• To share the project, choose Share Project from the Project Tools menu .
• To unshare the project, choose Unshare Project from the Project Tools menu.
• Choose Edit Properties from the Project Tools menu. Select or deselect Share This Project With Others, and click
Save. After you edit the project properties, click Cancel to close the Open dialog box (your settings are saved even
though you clicked Cancel).

520
ADOBE ACROBAT 8 PROFESSIONAL
User Guide
See also
“About the Adobe dialog box” on page 513
“View Version Cue Workspace, project, and file information” on page 516
Working with files in Version Cue
About working copies
Version Cue projects and files reside in the Version Cue Workspace on the host computer. The master copies of files
added to the project, including file versions and other file data, such as comments, version dates, and user IDs, are
savedonthishostcomputer. When youworkinfilesfromaVersion Cueproject,you’reediting a working copy of the
master file on your computer, not the master file on the Version Cue Workspace, which remains protected and
untouched.
As you work, use the Save command to save changes periodically. This command does not create a new version of
the master file but updates your working copy. A new version is created only when you choose the Save A Version
command. This command first updates the working copy, and then adds a new version to the master file on the
VersionCueWorkspace.When theworking copyofafilematches(isthesameversionas) thecurrentversioninthe
workspace, the file is synchronized.
Using working copies of master files, several people can work with the most recent version of a master file. For
example, if two people need access to the same illustration during overlapping periods of time, Version Cue lets each
person work with a working copy of the most recent file version. The second person to access the illustration is
informed that the file is already in use. At that time, the second person can decide whether to continue working with
the file.
Working copies allow you to work on a file even when the host workspace is unavailable, or offline. Though some
features, such as versions, can’t be used when you’re working offline, you can edit files and save your work. When the
workspace is online again, you can save a version to update the master file.
There are times when you may wish to delete the working copies of your project files. For example, you may want to
free up space on your hard drive, or are completely finished working on the project. Disconnecting from a project
deletes the working copies project folder on your hard drive. You can do this at any time if none of the working copies
areInUsebyyou.Ifyouaccidentallydisconnectfromaproject,newworkingcopiesarerecreatedthenext timeyou
access the project files. If a project is deleted from either the host workspace or your local computer, you can use
working copies to recreate the project with the most current versions of the files.
To relocate working copies of a project, edit the project’s properties and use the Change Location feature. For instruc-
tions, see “Create and edit projects” on page 517.
See also
“Disconnecting from projects” on page 526
“Delete files and folders” on page 527
“Editing and synchronizing offline files” on page 531
“Restore a file or folder deleted from a project” on page 528

521
ADOBE ACROBAT 8 PROFESSIONAL
User Guide
“Version Cue file statuses” on page 521
“Availability of Version Cue features” on page 512
File protection in Version Cue
VersionCueautomaticallyinformsothersthat afileisbeingedited.VersionCueassignsInUsestatustoafilewhen
you open and edit a file that isn’t being edited by another user. When you save a version, Version Cue removes the
file’s In Use status.
At times two people may need to work with a file simultaneously. For example, User A may begin editing a file but
be called away before saving a version. If User B works on the file while User A is away, Version Cue ensures that the
two files don’t overwrite each other in the project. User A’s working copy won’t reflect the changes made by User B,
and vice versa. When finished with the file, both users can save a new version of the file to the Version Cue
Workspace. Version Cue alerts all current users of the file about the presence of a new version in the Version Cue
Workspace and gives them the option of downloading the latest version or continuing their current edits. (Version
Cue alerts users who have the file open or who reopen a file that was previously closed while In Use.)
You can use the Version Cue Workspace Administration utility to assign lock protection to a Version Cue project.
Only the first user to begin editing an available file in a lock-protected project can save the next version of that file
to the Version Cue project. Other users who edit that file simultaneously can’t save changes to a new version of that
file, even after the first user saves a version. These other users must save the changes as completely new files with
their own version thread.
See also
“About working copies” on page 520
“Availability of Version Cue features” on page 512
Version Cue file statuses
FilesthataremanagedbyVersion Cuearealwaysmarkedwith astatusiconthatdescribesthestateof thefileonthe
VersionCue Workspace.Youcanviewafile’sstatuswhilebrowsing thefiles in aVersionCueproject.Afilecanhave
more than one status at the same time (in some cases only one status is shown).
Each file status has a corresponding icon:
Open Thefileisopenonyourcomputer.Thisstatuslets youmakeinformeddecisionsaboutwhetherit’sappro-
priate, for example, to place a file into a layout while the file is still being edited. The Open status is indicated only
for files on your computer.
In Use By Me You are editing the file. Version Cue assigns this status to a file when you make an edit to the file
that changes its content.You can manually mark a file In Use before you edit it to indicate to others that you intend
to make changes to the content.
Synchronized The latest known version of the file is available for editing and you have a working copy of it on
your computer. Version Cue assigns this status when you save a version of the file you’re editing, or when you
manually synchronize a project.
No Working Copy No local copy of the file exists. This status indicates that it will take a few moments to create a
working copy before you can edit the file.
In Use By [user name] Another user is editing the file and has not yet saved a new version.
Conflicted Copies There is a version conflict, or both you and another user are editing the file.

522
ADOBE ACROBAT 8 PROFESSIONAL
User Guide
Only Copy The file in the working copies folder is the only copy known to Version Cue and has not been
synchronized with the Version Cue Workspace. This scenario can occur when a file has been saved in an existing
project for the first time while the workspace is offline. Because the workspace is offline, Version Cue displays the
Offline Copy status until the workspace is back online, and then changes the status to Only Copy. Version Cue also
displays this status if you drag a file from one folder into the working copies folder using the file system instead of
Bridge (not recommended). You can edit the file, but it’s important to synchronize (upload the file to the workspace)
after you save your changes.
Offline Copy There is a local copy of the file in your working copies folder, but the Version Cue Workspace is
offline.Thereisnowayof checkingwhetherthelocalcopyissynchronizedwiththelatestversionontheworkspace.
You can edit an offline copy and save these changes; however, you must save a version or synchronize the file once
the workspace comes back online.
Outdated Copy A local copy exists, but there is a newer version of the file in the workspace. This status indicates
that it will take a few moments to create an up-to-date working copy before you can edit the file.
Unavailable The Version Cue Workspace is offline or you don’t have access privileges. There is no way of
checking the status of the local copy with the workspace. You can edit the local copy and save these changes; however,
you must save a version or synchronize the file once the workspace comes back online.
Deleted Thefileorfolderhasbeen deletedfromthe project,butnotyetpermanently erased.(Youcanrestorea
deleted file or folder).
See also
“About working copies” on page 520
“Synchronize files” on page 533
“Edit a file in use by another user” on page 524
“Delete files and folders” on page 527
“Availability of Version Cue features” on page 512
Adding files and folders to a project
To save versions of a file and take advantage of Version Cue file management, you must add or save the file to a
Version Cue project. You can add assets such as swatch libraries to projects to share them with your workgroup. You
can also add non-Adobe files to Version Cue projects. You can add files using any of the following methods:
• Add files one at a time from within InCopy, an Adobe Creative Suite component, or Acrobat 8.
• Place files directly in the project’s working copies folder, and then synchronize the project to add the files. For
more information, see “About Version Cue projects” on page 515.
See also
“Create and edit Version Cue projects” on page 538
“Availability of Version Cue features” on page 512
“About the Adobe dialog box” on page 513
“Editing and synchronizing offline files” on page 531

523
ADOBE ACROBAT 8 PROFESSIONAL
User Guide
Add a file to a project
Note: You can perform this task only if you have access to the full Version Cue feature set, available in Adobe Creative
Suite or in a shared workspace. See “Availability of Version Cue features” on page 512 for more information.
1 Open the file.
2 Choose File > Save As. Click Use Adobe Dialog if you’re using the OS dialog box.
3 Double-click the host Version Cue Workspace.
4 Double-click the project to open it.
5 Enter a comment for the first version in the Version Comments box, and click Save.
Add files to a project folder
Note: You can perform this task only if you have access to the full Version Cue feature set, available in Adobe Creative
Suite or in a shared workspace. See “Availability of Version Cue features” on page 512 for more information.
You can add files by dragging them into the documents folder of a Version Cue project.
1 Do one of the following:
• Locate the project folder inside the My Documents/Version Cue (Windows) or Documents/Version Cue
(Mac OS) folder on your computer.
• If the project folder isn’t already in the My Documents/Version Cue (Windows) or Documents/Version Cue
(Mac OS) folder on your hard disk, create a new folder inside the Version Cue folder. Give the folder the same
name as the existing Version Cue project on the Version Cue Workspace. Inside the new project folder, create a
new folder and name it “documents.”
Note: These steps work only if the project already exists. You cannot create a new project using this method.
2 Move or copy the items you want to add to the documents folder.
3 Choose File > Open. Click Use Adobe Dialog if you’re using the OS dialog box.
4 Click Version Cue in the Favorites panel. Open the Version Cue Workspace, and select the project.
5 Choose Synchronize from the Project Tools menu . Once the synchronization is complete, the files are added
to the project.
Open a file from a project
Note: You can perform this task only if you have access to the full Version Cue feature set, available in Adobe Creative
Suite or in a shared workspace. See “Availability of Version Cue features” on page 512 for more information.
After you add or save a file to a Version Cue project, the file is automatically managed by Version Cue.
1 ChooseFile >Open. ClickUse AdobeDialogifyou’reusing theOSdialogbox,and thenclickVersion Cueinthe
Favorites panel.
2 Double-click the host Version Cue Workspace.
3 Double-click the project that contains the file you want to open.
4 Select the file and click Open.

524
ADOBE ACROBAT 8 PROFESSIONAL
User Guide
See also
“Edit a file in use by another user” on page 524
“Update a file with the most recent version” on page 524
“About the Adobe dialog box” on page 513
“Search for files in a project” on page 525
Edit a file in use by another user
Note: You can perform this task only if you have access to the full Version Cue feature set, available in Adobe Creative
Suite or in a shared workspace. See “Availability of Version Cue features” on page 512 for more information.
If you don't notice that a file’s status is In Use when you open it, Version Cue displays an In Use By alert to remind
you that someone else is already editing a working copy of the file.
1 Open the file, and click one of the following options when the In Use By alert appears:
No, Close Document Closes the file without any alterations.
Yes, Keep Open Keeps the file open so you can work on the document.
2 If you continue working with the document and make a change to the content, Version Cue displays an alert to
remind you that there is the possibility of creating conflicting copies. Click one of the following:
Discard Changes Displays the most recent version of the file from the Version Cue Workspace and discards your
changes to the working copy.
Continue Editing Lets you edit the working copy without overwriting the changes made in another user’s working
copy of the same file (Version Cue will prompt each user to save a new version of the file).
3 If the project doesn’t have lock protection applied to it, you can save a new version of your edits. Version Cue
displays an alert warning you that conflicting edits will occur if you continue. Click one of the following:
Cancel Returns you to the open document without saving a version.
Save Version Anyway Updates the master file in the Version Cue Workspace with the new version. (Version Cue
displays an alert to the other user to note that a newer version of the file has been created by you.)
At any point, you can close the document and discard any changes you’ve made.
See also
“Update a file with the most recent version” on page 524
Update a file with the most recent version
Note: You can perform this task only if you have access to the full Version Cue feature set, available in Adobe Creative
Suite or in a shared workspace. See “Availability of Version Cue features” on page 512 for more information.

525
ADOBE ACROBAT 8 PROFESSIONAL
User Guide
If another user creates a new version of a file that you have open or that is still marked In Use By Me, Version Cue
prompts you to update your document with the latest version when you open it or attempt to make changes to it, or
when you bring the document window frontmost in a group of documents.
❖ When the prompt appears, click one of the following:
Discard Changes Updates the document with the most recent version from the Version Cue project. You can
continue editing the file after it is updated. You lose any changes you’ve made even if you have already saved those
changes to the working copy with a Save command.
Continue Editing Leaves the document as is. You can continue editing the file without overwriting the changes in
the more recent version. Instead, you’re prompted to either save a new version of the file when you close it, or to
discard your changes.
See also
“Edit a file in use by another user” on page 524
Save changes to a file
Note: You can perform this task only if you have access to the full Version Cue feature set, available in Adobe Creative
Suite or in a shared workspace. See “Availability of Version Cue features” on page 512 for more information.
If you want to save changes, but you aren’t ready to save a new version as you edit a file you have opened from a
Version Cue project, you can use the File > Save command to save your changes to the working copy on your
computer. Until you save a new version to the shared Version Cue Workspace, these changes won’t be available to
anyother user.You canalsoclosethefileonceyou save changestoafile,and thenreopenitandsaveaversionlater.
❖ To save changes to your working copy, choose File > Save.
Search for files in a project
Note: You can perform this task only if you have access to the full Version Cue feature set, available in Adobe Creative
Suite or in a shared workspace. See “Availability of Version Cue features” on page 512 for more information.
Metadata is automatically added to Version Cue project files as you work with them. You can quickly locate files in
a Version Cue project by searching for specific information such as titles, authors, copyright data, keywords, dates,
and locations. The search feature searches through existing files, as well as files deleted from projects.
1 Choose File > Open.
2 If the button is visible, click Use Adobe Dialog (if you see the Use OS Dialog button instead, you are already using
the Adobe dialog box).
3 Click Version Cue in the Favorites panel.
4 Double-click the host Version Cue Workspace.
5 Double-click the project you want to search.
6 Click Project Search .
7 Enter information in Project Search.
If you open an older version of a file found as the result of a search, the filename will be prefaced with “Version <X> -”.
Note: Itis bestto treatolderversionsasview-onlywhenopenedastheresult ofasearch. Althoughyoucan edit an older
version in its native application, do so only if you intend for this version to become a separate asset. To edit a previous
version, first promote it to the new, current version, and then make changes.

526
ADOBE ACROBAT 8 PROFESSIONAL
User Guide
See also
“About the Adobe dialog box” on page 513
“Version Cue file statuses” on page 521
“View and compare versions” on page 530
Disconnecting from projects
Disconnecting from projects
Disconnecting from a project erases the working copies of files on your computer while leaving the master copies on
the Version Cue Workspace intact. Disconnecting also removes shortcuts to the project from the Adobe dialog box.
You may want to disconnect to free up more space on your hard drive. Or, you might disconnect from a project if
someone else in your workgroup deletes a project from the Version Cue Workspace (your working copies are not
touched by that deletion).
As long as you have saved a version of the working copies there is no harm in discarding them by disconnecting.
When you access the project again, new working copies will be created for the current versions of the files you open.
If you have working copies with the In Use By Me status, you will not be permitted to disconnect from a project until
you have saved a version of those files.
When you disconnect from a project, only the working copies and shortcuts on your computer are erased. Leaving
the project intact on the workspace allows others, as well as yourself, to access the master files. When you delete a
project, all working copies and shortcuts on your own computer, along with the master copies of files and folders in
the Version Cue Workspace, are erased. However, any working copies and shortcuts on other computers your co-
workersoryou previouslyusedtoaccesstheprojectarenot erased.Tocompletelyremovetheprojectanderasethose
working copies and shortcuts, you must select the shortcut or project folder and disconnect, even though the project
has already been deleted.
See also
“Delete files and folders” on page 527
“Disconnect from a project” on page 526
“About working copies” on page 520
“Availability of Version Cue features” on page 512
Disconnect from a project
Note: You can perform this task only if you have access to the full Version Cue feature set, available in Adobe Creative
Suite or in a shared workspace. See “Availability of Version Cue features” on page 512 for more information.
Disconnecting from a project removes the files from your computer but doesn’t delete the project from the host
Version Cue Workspace.
1 Choose File > Open. Click Use Adobe Dialog if you’re using the OS dialog box.
2 Click Version Cue in the Favorites panel.
3 Open the Version Cue Workspace and select the project from which you want to disconnect.

527
ADOBE ACROBAT 8 PROFESSIONAL
User Guide
4 Choose Disconnect from the Project Tools menu.
Note: You can select any project icon or shortcut to the project when you want to disconnect.
Deleting files, folders, and projects
Delete files and folders
Deleting afileorfolderfromVersionCueisatwo-stepprocessthatsafeguardsagainstaccidentaldeletions.Thefirst
step is deleting the file or folder and giving it the Deleted status. Deleting hides the file or folder from normal view
butdoesnoteraseit.Thesecondstepispermanentlydeletinganderasingthefileorfolderanditspreviousversions.
When you delete a folder, the folder and all folders and files nested inside it are hidden and given a Deleted status.
When you permanently delete a folder, its entire contents are erased.
Any user with appropriate privileges can delete files and folders unless the files or folders are marked In Use. In a
workgroup, if a user is editing a file that you need to delete, you can reset the file’s lock by using the Version Cue
Administration utility.
You can restore files or folders that have a Deleted status. Restoring reinstates Version Cue management. Restored
files and folders appear in their previous location in the project folder hierarchy. (Deleted files and folders maintain
their relationship within the project hierarchy until they are permanently deleted.)
You can show hidden and deleted files or folders, and view them in search results. Additionally, Version Cue has a
Project Trash view from which you can view all deleted files in a project. Use Project Trash to view and handle all
deleted files without navigating through the project folder hierarchy.
See also
“About working copies” on page 520
“Manage Version Cue projects” on page 541
“Availability of Version Cue features” on page 512
“View Version Cue Workspace, project, and file information” on page 516
Delete files or folders from a project
Note: You can perform this task only if you have access to the full Version Cue feature set, available in Adobe Creative
Suite or in a shared workspace. See “Availability of Version Cue features” on page 512 for more information.
1 Choose File > Open. Click Use Adobe Dialog if you’re using the OS dialog box.
2 Click Version Cue in the Favorites panel.
3 Double-click the host Version Cue Workspace.
4 Double-click the project that contains the file or folder you want to delete.
5 Select the file or folder you want to delete.
6 Do one of the following:
• Choose Delete from the Project Tools menu
• Click the Delete icon .

528
ADOBE ACROBAT 8 PROFESSIONAL
User Guide
Note: IfShowDeletedItems isnotselectedinthe ProjectToolsmenu,thefile willbecomehiddenandremovedfromview.
If Show Deleted Items is selected, the file or folder will remain visible with the status Deleted.
Delete a file or folder permanently
Note: You can perform this task only if you have access to the full Version Cue feature set, available in Adobe Creative
Suite or in a shared workspace. See “Availability of Version Cue features” on page 512 for more information.
1 Choose File > Open. Click Use Adobe Dialog if you’re using the OS dialog box.
2 Click Version Cue in the Favorites panel.
3 Open the Version Cue Workspace and project that contains the file or folder you want to delete permanently.
4 Choose Show Deleted Items from the Project Tools menu.
5
Selectthefileorfolderyou wanttopermanentlydelete,andchooseDeletePermanent from theProject Toolsmenu.
6 Click OK.
Delete a project
Note: You can perform this task only if you have access to the full Version Cue feature set, available in Adobe Creative
Suite or in a shared workspace. See “Availability of Version Cue features” on page 512 for more information.
Deleting a project from Version Cue permanently erases all of its master files (including versions) and folders from
the Version Cue Workspace. This is a one-step process (with confirmation). Deleting a project automatically deletes
theworkingcopiesoffilesonyourcomputeraswellasany shortcutstothatproject.However,the workingcopiesof
files created on other users’ computers are not deleted until they disconnect from the deleted project. You cannot
restore deleted projects directly in Version Cue, nor can you delete a project if any user has files that are marked In Use.
1 Choose File > Open. Click Use Adobe Dialog if you’re using the OS dialog box.
2 Click Version Cue in the Favorites panel.
3 Do one of the following:
• Double-click the host Version Cue Workspace and select the project.
• Click the project shortcut.
4 Choose Delete from the Project Tools menu.
5 Click OK in the confirmation dialog box.
You can also delete projects using the Version Cue Administration utility.
See also
“Manage Version Cue projects” on page 541
“Disconnect from a project” on page 526
“About the Adobe dialog box” on page 513
Restore a file or folder deleted from a project
Note: You can perform this task only if you have access to the full Version Cue feature set, available in Adobe Creative
Suite or in a shared workspace. See “Availability of Version Cue features” on page 512 for more information.
1 Choose File > Open. Click Use Adobe Dialog if you’re using the OS dialog box.

529
ADOBE ACROBAT 8 PROFESSIONAL
User Guide
.
2 Click Version Cue in the Favorites panel.
3 Double-click the host Version Cue Workspace.
4 Double-click the project that contains the file or folder you want to restore and do one of the following:
• ClickProjectTrashintheFavoritespanel,selectthefileyouwanttorestore,and chooseRestorefromtheProject
Tools menu
• Choose Show Deleted Items from the Project Tools menu (deleted file and folder names appear in gray in the
dialog box). Select the file or folder you want to restore, and choose Restore from the Project Tools menu.
5 Choose Refresh from the Project Tools menu to update the dialog box.
The file or folder is restored to its original location in the Version Cue project.
Note: To restore a file in a previously deleted folder, you must first restore the folder. Doing so restores the folder and all
its contents.
Version Cue versions
About Version Cue versions
Versions provide a convenient method of retaining work that was performed in different stages. At any point in your
design process, you can save a version of the file, which Version Cue saves and tracks. Each version is a snapshot of
the file. You can use versions to review ideas or changes with team members or a client before selecting a final
version, or to recover from destructive changes.
Version Cue prevents users from overwriting each other’s work. With this protection capability, multiple users can
work on a file simultaneously. When more than one user is working on a file, Version Cue alerts them all when one
user saves a new version, allowing everyone to update the file and work in the latest version.
You don’t have to save a version every time you save your changes. Using the File > Save command works the same
way in Version Cue-managed files as in non-Version Cue files. You need only save a version when you want to create
a snapshot of the file. Instead of choosing File > Save As and saving a new copy of a design, you save a version, which
allows you to track changes as they occur.
If you want to continue your work using a previous version instead of the current version, promote the previous
version to the next current version (do this instead of opening the previous version directly). This process keeps the
previous version intact, should you decide to return to it again in the future. If you want a previous version, along
with the current version, to be available for use in a project, you can save the previous version as a separate asset.
You can view previous versions in their native applications. When you no longer need to keep previous versions of
files, you can delete them individually or in batches.
See also
“View and compare versions” on page 530
“Availability of Version Cue features” on page 512
Save a version
Note: You can perform this task only if you have access to the full Version Cue feature set, available in Adobe Creative
Suite or in a shared workspace. See “Availability of Version Cue features” on page 512 for more information.

530
ADOBE ACROBAT 8 PROFESSIONAL
User Guide
To save a new version of a file, you use the Save A Version command, which saves your changes to the Version Cue
Work sp ac e.
1 Choose File > Save A Version.
2 In the Save A Version dialog box, enter comments you want to associate with this version.
3 Click Save.
View and compare versions
Versions are always available for you to view and compare. The Versions dialog box displays thumbnails of all file
versions alongside comments, dates, and the login name of the user who created the version. Each version is
numbered sequentially. You can view any version at any time. You can also promote aversion,thatis, makeaprevious
version the current one. You can also delete versions if they are irrelevant or if you need to save disk space. When
you delete older versions, the version numbers of the remaining versions remain the same.
The commenting features of Version Cue maintain a descriptive history of files. Each time you save or promote a
version, you can describe what changes you made. This history helps you track changes made at different stages.
Also, your version comments are searchable; you can search for a particular word to find a version quickly.
See also
“Availability of Version Cue features” on page 512
“About the Adobe dialog box” on page 513
View versions
Note: You can perform this task only if you have access to the full Version Cue feature set, available in Adobe Creative
Suite or in a shared workspace. See “Availability of Version Cue features” on page 512 for more information.
1 Choose File > Open. Click Use Adobe Dialog if you’re using the OS dialog box.
2 Click Version Cue in the Favorites panel.
3 Double-click the host Version Cue Workspace. Double-click the project to open it.
4 Click the name of the file whose versions you want to view.
5 Choose Versions from the Project Tools menu .
6 In the Versions dialog box, do any of the following:
• To create a new file version from an older version, select the version and click Promote To Current Version.
• To open an earlier version in its own window and view details only or create a separate asset from the earlier version,
click View Version. The version number appears in the file’s title bar to remind you that you shouldn’t edit it.
• To delete a version, select the version and click Delete.
View a previous version in its native application
Note: You can perform this task only if you have access to the full Version Cue feature set, available in Adobe Creative
Suite or in a shared workspace. See “Availability of Version Cue features” on page 512 for more information.
❖ In the Versions dialog box, click the version you want to open and click View Version.
Note: The file status is Never Saved, because the previous version is only a snapshot of a previous stage of a file.

531
ADOBE ACROBAT 8 PROFESSIONAL
User Guide
Version Cue opens the previous version in its own window. You can then edit the previous version and save it as a
new asset. If you edit the previous version, your changes won’t be reflected in the current version unless you promote
the earlier version.
Promote a version
Note: You can perform this task only if you have access to the full Version Cue feature set, available in Adobe Creative
Suite or in a shared workspace. See “Availability of Version Cue features” on page 512 for more information.
Promotingaprevious versionautomaticallysavesacopyof that previousversionasthe currentversion.Any changes
made between its creation and promotion don’t appear in the new current version.
1 In the Versions dialog box, select the version you want to promote, and click Promote To Current Version.
2 Type a version comment in the Save A Version dialog box. Then click Continue to complete the promotion.
Delete a version
Note: You can perform this task only if you have access to the full Version Cue feature set, available in Adobe Creative
Suite or in a shared workspace. See “Availability of Version Cue features” on page 512 for more information.
❖ In the Versions dialog box, click the version you want to delete and click Delete. To delete multiple versions, Shift-
click/Control-click the versions and click Delete. When prompted, confirm the deletion.
Note that the remaining versions are not renumbered.
Using the Version Cue Administration utility, you can delete multiple previous versions of all files in a project simul-
taneously. By using this method, you can retain past versions by date or by number of versions to keep. See “About
the Version Cue Administration utility” on page 533.
See also
“Manage Version Cue projects” on page 541
“Create and edit Version Cue projects” on page 538
Editing and synchronizing offline files
Editing and synchronizing offline files
When you need to work on files from a Version Cue project while the Version Cue Workspace is unavailable on the
network, you can edit working copies on your computer. When the Version Cue Workspace is available again, you
must synchronize your files with the workspace to save your latest version to the Version Cue Workspace. You can
synchronize an entire project, just a folder in the project, or a selected file.
Working copies are normally copied on your computer when you open a project from an online workspace.
However, if you haven’t yet edited the file, you can prepare to work offline by synchronizing the entire Version Cue
project, or just the files you need, while the workspace is still online to ensure that you have working copies.
When you are working offline, you can’t create multiple versions because the Save A Version command is
unavailable.

532
ADOBE ACROBAT 8 PROFESSIONAL
User Guide
In Version Cue, if you intend to work on a file offline, you can manually mark the file In Use before you take your
work offline. When you mark a file In Use, Version Cue creates a working copy of the file for you. When a file’s status
is In Use, Version Cue protects the file. When you synchronize your file, the status of the file returns to Synchronized.
See also
“Availability of Version Cue features” on page 512
Manually mark a file as In Use
Note: You can perform this task only if you have access to the full Version Cue feature set, available in Adobe Creative
Suite or in a shared workspace. See “Availability of Version Cue features” on page 512 for more information.
1 Choose File > Open. Click Version Cue in the Favorites panel, and then navigate to the file. Select one or more
files. Right-click/Control-click a file, and then choose Mark In Use.
2 When you finish editing the file offline and the Version Cue workspace is again available, synchronize the file.
Version Cue automatically creates a new version of the file. If the workspace becomes available while you still have
the file open, simply save a version.
If you haven’t made any changes, you can manually cancel the In Use By Me status, by choosing Cancel Mark In Use
from the context menu.
See also
“Synchronize files” on page 533
Edit working copies of files from an offline project
Note: You can perform this task only if you have access to the full Version Cue feature set, available in Adobe Creative
Suite or in a shared workspace. See “Availability of Version Cue features” on page 512 for more information.
1 Choose File > Open. Click Use Adobe Dialog if you’re using the OS dialog box.
2 Click Version Cue in the Favorites panel.
3 Double-click the host Version Cue Workspace.
4 Double-clicktheVersion Cueproject thatcontains thefile. It maytakeVersion Cueafewseconds to verifythat a
Version Cue Workspace or project is unavailable.
5 Double-click a file to open it (the Offline Copy status allows you to open the file).
6 When you finish editing the file, choose File > Save As to save the changes to the working copy. When the Version
Cue Workspace becomes available again, synchronize your files.
See also
“Editing and synchronizing offline files” on page 531
“Synchronize files” on page 533

533
ADOBE ACROBAT 8 PROFESSIONAL
User Guide
Synchronize files
Note: You can perform this task only if you have access to the full Version Cue feature set, available in Adobe Creative
Suite or in a shared workspace. See “Availability of Version Cue features” on page 512 for more information.
1 Choose File > Open. Click Use Adobe Dialog if you’re using the OS dialog box.
2 Click Version Cue in the Favorites panel.
3 Select the project that contains the master file, and do one of the following:
• To synchronize the entire project, choose Synchronize from the Project Tools menu
• To synchronize just a folder or one or more files, open the project, select the folder or files that you want to
synchronize, and choose Synchronize from the Project Tools menu.
4 If the master file on the Version Cue Workspace is newer than your working copy and you’ve edited the working
copy, a File Conflict dialog box appears. Specify one or more of the following:
Apply The Following Action To All Subsequent Conflicts Automatically applies the selected option every time there
is a file conflict.
Save a Version Saves your working copy as a new file version to the Version Cue Workspace.
Skip This File Prevents the most recent version from the Version Cue Workspace from being downloaded. (This
option also prevents a version of your working copy from being saved to the workspace.) Choose this option only if
you want to keep your edits and disregard the other changes in the master file.
The Version Cue Administration utility
About the Version Cue Administration utility
Using the Version Cue Administration utility, you can do more advanced tasks that affect a specified project or an
entireVersionCueWorkspace.YouhaveaccesstotheVersionCue AdministrationutilityifyouuseAdobeCreative
Suite or if you have access to a shared project and that project’s owner has granted you access permission to the
Administration utility.
The following table lists the Version Cue-related tasks that you can accomplish through Adobe Creative Suite
components or Acrobat and those that you can accomplish through the Version Cue Administration utility.
.
Task Acrobat or
Adobe Creative
Suite component
Version Cue
Administration
Create, edit, and delete Version
Cue projects
Yes Yes
Share a project with anyone who
is using Acrobat, Adobe Creative
Suite, an Adobe Creative Suite
component, or a WebDAV-
enabled application
Yes Yes
Delete a file version Yes Yes
Delete multiple file versions at
once
Yes Yes

534
ADOBE ACROBAT 8 PROFESSIONAL
User Guide
Task Acrobat or
Adobe Creative
Suite component
Version Cue
Administration
Create Version Cue projects from
remote files via FTP
No Yes
Create Version Cue projects from
remote files via WebDAV
No Yes
Import Version Cue 1.0 projects No Yes
Back up Version Cue projects and
restore backup versions of a
project
No Yes
View the amount of disk space a
project uses, its lock protection
status, its creator, and its creation
date
No Yes
Duplicate or export Version Cue
projects
No Yes
Edit Version Cue Workspace pref-
erences
No Yes
Add and edit users, and define
their project privileges
No Yes
Change the properties of a
Version Cue project to require
users to log in before accessing it
No Yes
View all users and their privileges
for all projects in the Version Cue
Workspace
No Yes
Remove all In Use locks in a
project or those created by a
specified user
No Yes
View Version Cue Workspace logs
and reports
No Yes
Add files to an existing project Yes No
Create file versions Yes No
View file comments and other
information
Yes No
Search for files using file informa-
tion (metadata)
Yes No
Initiate and manage a web-based
review of PDF files in Version Cue
projects
No Yes

535
ADOBE ACROBAT 8 PROFESSIONAL
User Guide
Log in to and out of the Version Cue Administration utility
When you install Version Cue on your computer, Version Cue automatically creates a default user login ID with
administrator privileges. You should change the password for this default user login, as it is publicly available for
initial installation and setup. Until you change the default password, the default user login ID can only be used
directly from the computer the Version Cue workspace is located on, not across a network. If Version Cue is installed
on your computer, you can start using the web-based Version Cue Administration utility with the Version Cue
default login ID (system) and password (system).
Users working in a group with a login ID and password can log in to the Version Cue Administration utility. The
tasks that workgroup users can perform are limited by the privileges assigned to their Version Cue login ID by the
administrator. However, users whose access level is set to None can’t log in to the Version Cue Administration utility.
You can display the Version Cue Administration login web page in the following ways:
• By opening the Version Cue preferences and clicking the Advanced Administration button.
• By clicking the Advanced Administration button in an Adobe Creative Suite component or in Acrobat 8.
• By typing the IP address of the Version Cue Workspace directly into a web browser.
• By selecting Advanced Administration from the Version Cue system tray icon (Windows) or the Version Cue
menu (Mac OS).
See also
“Choosing user privileges” on page 546
Log in to Version Cue Administration from an Adobe Creative Suite component or from Acrobat 8
1 Choose File > Open, and click Use Adobe Dialog.
2 Select the Version Cue Workspace you want to administer.
3 Choose Edit Properties from the Tools menu
4 Click Advanced Administration in the Edit Properties dialog box.
5 Type your assigned Version Cue login ID and password in the text boxes. (The default for both the ID and
password is “system.”)
6 Click Log In.
Log in to Version Cue Administration from a web browser
1 In a web browser, type the IP or DNS address of the computer on which the Version Cue Workspace is installed.
Precede the address with http:// and follow it with a colon and the port number—for example,
http://153.32.235.230:3703 (IP) or http://myserver.mycompany.com:3703 (DNS). The default port number is 3703.
Note: If you have Version Cue 1.0 installed on your computer, the default port number for Version Cue 2.0 is 50800.
Once Version Cue 1.0 is uninstalled, Version Cue 2.0 defaults to 3703.
2 A browser window displays the Adobe Version Cue Administration login page. Type your assigned Version Cue
login ID and password in the text boxes. (The default for both the ID and password is “system.”)
3 Click Log In.
.

536
ADOBE ACROBAT 8 PROFESSIONAL
User Guide
Log in to Version Cue Administration from the Version Cue Preferences dialog box
1 Do one of the following:
• (Windows) Double-click the Version Cue icon in the system tray and click Advanced Administration.
• (Windows) Right-click the Version Cue icon in the system tray and then choose Version Cue CS2 Preferences.
On Windows, double-click the Version Cue icon to open preferences dialog box.
•
(Mac OS) Click the Version Cue icon at the top of the screen, and then choose Advanced Administration from the menu.
• (Mac OS) Control-click the Version Cue icon and choose Version Cue CS2 Preferences.
2 Type your assigned Version Cue login ID and password in the text boxes. (The default for both the ID and
password is “system.”)
3 Click Log In.
Log out of Version Cue Administration
❖ Click Log Off at the top of the page.
About Version Cue Administration integrity checks
Each time the Version Cue Workspace restarts, it performs an integrity check and performs repairs if necessary. To
ensure best performance, restart the Version Cue Workspace periodically so it can perform the integrity check and
self-repair.
Set Version Cue Workspace Administration preferences
1 Log in to the Version Cue Administration utility.
2 Do one of the following:
• Click the Advanced tab, and then click Preferences.
• On the Home page, click Perform Advanced Tasks, and then click Preferences.
3 Set any of the following options:
Workspace Name Tochange theVersionCueWorkspacename,typeanameinthetextbox.Thisnameidentifiesthe
Version Cue Workspace in Acrobat or in Adobe Creative Suite components using Version Cue.
Make This Version Cue Workspace Visible To Others. When selected, gives other computers access to the Version
Cue Workspace.
Note: If the Version Cue Workspace is installed on a Windows computer that uses a firewall and you want to share the
workspace with others, make sure that TCP ports 3703 and 427 are left open and deselect the Internet Connection
Firewall option (see Windows Help).
Only Grant Access To Existing Users Specifies whether Version Cue projects are available to a user. Make sure to set
access properties for each desired project and to edit the project’s list of assigned users.
Log Level Defines the amount of information in reports generated by the Version Cue Workspace system. Choose a
log level: Error to list only Version Cue Workspace errors; Warning to list workspace errors and warnings; or Info to
list errors, warnings, and information about tasks performed.

537
ADOBE ACROBAT 8 PROFESSIONAL
User Guide
Log Size Sets the maximum size, in kilobytes, for a system report. To reduce the log file size by saving it as a
compressed GZ file, select Compress Log File.
FTP Proxy Specifies the default FTP Proxy server for users importing projects from or exporting projects to an FTP
server, or publishing with GoLive to an FTP server.
HTTP Proxy Specifies the default HTTP Proxy server for users importing projects from or exporting projects to a
WebDAV server, or publishing with GoLive to a WebDAV server.
Color Scheme Sets the background colors of the tabs.
4 Click Save, and then restart Version Cue Administration.
Migrate from Version Cue 1.0 to Version Cue 2.0
If you currently use Version Cue 1.0, you need to migrate your projects and user data to Version Cue 2.0. Keep the
following in mind:
• Version Cue 1.0 and Version Cue 2.0 Workspaces can be installed and function on the same computer (using
different ports) simultaneously.
• If Version Cue 1.0 and Version Cue 2.0 Workspaces are installed on the same computer, Adobe Creative Suite 1.0
components and Acrobat 7 work only with the Version Cue 1.0 Workspace, because they can communicate only
with the port that the Version Cue 1.0 Workspace uses.
Note: If youuninstall theVersion Cue1.0 Workspaceandthen restarttheVersionCue2.0 Workspace,theVersion Cue
2.0 Workspace then uses the Version Cue 1.0 Workspace’s port, allowing Adobe Creative Suite 1.0 components, Adobe
Creative Suite 2.0 components, and Acrobat 7 and 8 to work with the Version Cue 2.0 Workspace.
• If only the Version Cue 2.0 Workspace is installed, Adobe Creative Suite 1.0 components and Acrobat 7 will work
with it.
• Adobe Creative Suite 2.0 components and Acrobat 8 work only with Version Cue 2.0 Workspaces.
• Adobe Creative Suite 1.0 components and Acrobat 7 work with both Version Cue 1.0 and Version Cue 2.0
Workspaces simultaneously as long as the workspaces are not located on the same computer.
• You can import Version Cue 1.0 projects and users using the Version Cue Administration utility.
1 After installing Version Cue 2.0, restart the Version Cue 1.0 Workspace. This activates a migration plug-in.
2 Log in to the Version Cue Administration utility.
3 Click the Advanced tab, and then click Import Version Cue 1.0 Data.
4 Select the data you’d like to migrate to Version Cue 2.0:
• Projects and users. Click Next. Select the check box next to the names of any projects you want to import, and click
Next. Then, select the check box next to the names of any users you want to import, and click Next.
•
Only projects. Click Next. Then, select the individual projects you want to import, and choose whether to import
all the users assigned to those projects (at this point, you cannot select individual users; you must import either all
users or no users). Click Next. If you choose to import the users, select the users you want to import, and click Next.
• Only users. Click Next, and, in the next page, select the check box next to the names of any users you want to
import.
5 When the migration process is complete, verify the information you’re importing, and confirm the migration.
6 Uninstall Version Cue 1.0.

538
ADOBE ACROBAT 8 PROFESSIONAL
User Guide
7 Restart the Version Cue 2.0 Workspace. This step resets the port to allow access from both Acrobat 7 and 8, Adobe
Creative Suite 1.0, and Adobe Creative Suite 2.0 components.
Creating, editing, and managing projects in Version
Cue Administration
Create and edit Version Cue projects
You can create a new blank Version Cue project, a project from the files in a folder on the computer where the Version
Cue Server is installed, or a project from a WebDAV or FTP server.
See also
“Back up and restore projects” on page 543
Create a new blank Version Cue project
1 Do one of the following:
• On the Home tab, click Create A Project.
• Click the Projects tab, and then click New.
2 In the New Project content frame, click Blank Project to create an empty Version Cue project. Click Next to display
the Create Blank Project content frame.
3 Type a name for your project in the Project Name box.
4 To specify how to treat the imported content’s URL encoding, choose an option from the URL Encoding menu.
5 Set any of the following options:
Share This Project With Others Givesotherusersaccesstothe project.Userscanbeon your subnetwork,ortheycan
be given the Version Cue Workspace IP or DNS address and port number to gain access to the Version Cue
Work sp ac e.
Require Login For This Project Ensuresthatonlyuserswith aVersion CueloginIDandpasswordhaveaccesstothe
project.
Enable Lock Protection For This Project Restricts file versioning to sequential versions.
URL Encoding Specifies how the content’s URL encoding is treated. UTF-8 is the default setting.
%HH Escaping Requires that a nonsafe character be encoded as a percent symbol (%) followed by two hexadecimal
digits.
6 Click Save.
7 If you chose to require login, do any of the following in the User Privileges content frame, and then click Save:
• Chooseanoptionnexttoeach usernamein thePrivilegescolumnorchooseanoptionfromthe SetAll Tomenu
to define each user’s access. These options won’t work unless you select Require Login For This Project.
• To let a user publish the project with GoLive CS2 to a specified FTP or WebDAV server, select the check box in
the Publishing Privilege column next to the user name.

539
ADOBE ACROBAT 8 PROFESSIONAL
User Guide
Create a new Version Cue project from a folder
Youcan createaVersionCueprojectfrom thefilesinafolderonthecomputerwherethe VersionCue Workspaceis
installed.
1 Log in to Version Cue Administration.
2 Do one of the following:
• On the Home tab, click Create A Project.
• Click the Projects tab, and then click New.
3 In the New Project content frame, click Import From Folder.
4 If the content you’re importing is a website, select Import Folder As A Website to import the content to the
project’s web-content folder. To specify the folder to import from, click Browse and select any file in the folder; then
click Open. Alternatively, you can type the path to the desired Version Cue Workspace folder in the text box.
5 Type a name for your project in the Project Name box.
6 Set any of the following options:
Share This Project With Others Givesotherusersaccesstothe project.Userscanbeon your subnetwork,ortheycan
be given the Version Cue Workspace IP or DNS address and port number to gain access to the workspace.
Require Login For This Project Ensuresthatonlyuserswith aVersion CueloginIDandpasswordhaveaccesstothe
project. Note that if you select this option after a user gains access, the user can still gain access without logging in.
Make sure that you change privileges as needed in the project’s list of users.
Enable Lock Protection For This Project Restricts file versioning to sequential versions.
Comments Stores any remarks you type about the project.
URL Encoding Specifies how the content’s URL encoding is treated. UTF-8 is the default setting.
%HH Escaping Requires that a nonsafe character be encoded as a percent symbol (%) followed by two hexadecimal
digits.
7 Do any of the following in the Assigned Users content frame, and then click Save:
• To define each user’s access to the project, choose an option next to each user name in the Privileges column or
choose an option from the Set All To menu. These options won’t work unless you select Require Login For This
Project.
• To let a user publish the project with GoLive CS to a specified FTP or WebDAV server, select the check box in the
Publishing Privilege column next to the user name.
Create a new Version Cue project from a WebDAV server or FTP server
1 Log in to Version Cue Administration.
2 Do one of the following:
• On the Home tab, click Create A Project.
• Click the Projects tab, and then click New.
3 In the New Project content frame, do one of the following:
• Click Import From WebDAV Server.
• Click Import From FTP Server.

540
ADOBE ACROBAT 8 PROFESSIONAL
User Guide
4 If the content you’re importing is a website, select Import FTP/WebDAV As A Website to import the content to
the project’s web-content folder.
• In the FTP Server or WebDAV Server box, specify the WebDAV server from which to import files, and type the
port number in the Port box.
• To specify a folder, type its path in the Directory box.
• If a user name and password are required to access the server, type that information in the User Name and
Password boxes.
• To use a proxy server to connect to the server, select Proxy.
5 Type a name for your project in the Project Name box.
6 To specify how to treat the imported content’s URL encoding, choose an option from the URL Encoding menu.
7 To comply with the URL syntax requiring nonsafe characters to be encoded as a percent symbol (%) followed by
two hexadecimal digits, select %HH Escaping.
8 Do any of the following and then click Next:
• To give other Version Cue or WebDAV users access to the project, select Share This Project With Others. (Users
must either be on your subnetwork or be given the Version Cue Workspace IP or DNS address and port number.)
• To require users to log in with a Version Cue login ID and password before accessing the project, select Require
Login For This Project. If selected, this option ensures that only Version Cue users you specify can log in and
access the project.
Note: If you select this option after other users have already accessed the project without being authenticated, those users
can still access the project without logging into it. Make sure that you change their privileges as needed in the project’s
list of assigned users.
• To restrict file versioning to sequential versions, select Enable Lock Protection For This Project.
• To include remarks regarding the project, type them in the Comments box.
9 Do any of the following in the User Privileges content frame, and then click Save:
• To define each user’s access to the project, choose an option next to each user name in the Privileges column or
choose an option from the Set All To menu.
• To let a user publish the project with GoLive to a specified FTP or WebDAV server, select the check box in the
Publishing Privilege column next to the user name.
Note: You don’t need to assign users in order to give others access to your Version Cue project. Just make sure to deselect
Require Login For This Project in the project properties.
Edit Version Cue project properties
1 Log in to the Version Cue Administration utility.
2 Click the Projects tab, and then click a project name.
3 Set any of the following options:
Share This Project With Others Givesotherusersaccesstotheproject.Users canbeonyoursubnetwork, orbe given
the Version Cue Workspace IP or DNS address and port number.
Require Login For This Project EnsuresthatonlyuserswithaVersionCuelogin IDandpasswordhaveaccesstothe
project. Note that if you select this option after a user gains access, the user can still gain access without logging in.
Make sure that you change privileges as needed in the project’s list of users.

541
ADOBE ACROBAT 8 PROFESSIONAL
User Guide
Enable Lock Protection For This Project Restricts file versioning to sequential versions.
Comments Stores any remarks you type about the project.
Backup Configuration Allows you to back up your project or edit backup settings.
4 Click Save, or click Reset to return the properties to their original values.
Manage Version Cue projects
You can duplicate or delete Version Cue projects in the Version Cue Administration utility, as well as remove file
locks and delete file versions.
Duplicate a project to start a new project with the same users and privileges. Version Cue duplicates the folder
hierarchy within the project structure, and you can use that as a basis for the new project. Delete any files from the
duplicated project that are no longer necessary.
A user with system administrator privileges or with project-specific administer privileges can remove file locks.
Removing file locks forces the removal of the In Use status of files designated by specific project or by users
throughout all the projects.
Delete file versions to improve performance. Each time you save a file version, the version is stored on the Version
CueWorkspace database.Thisdatabasecreatesafileversionhistorythatletsyouquickly returntoanyformerstate
of the file. Although a version history is useful, an extensive history takes up a lot of disk space and can degrade the
performance of the Version Cue Workspace.
Duplicate a Version Cue project
1 Log in to the Version Cue Administration utility.
2 Click the Projects tab.
3 Select the check box next to the name of the project, and click Duplicate.
4 In the Duplicate Project content frame, type a unique name for the project.
5 Edit the project properties.
6 Click Duplicate.
Delete a Version Cue project in the Version Cue Administration utility
1 Log in to the Version Cue Administration utility.
2 Click the Projects tab, and do one of the following:
• To delete one or more projects, select the check box next to the name of each project you want to delete.
• To delete all listed projects, select the check box next to the Project Name column label.
3 Click Delete. The Delete Project content frame appears. Click Delete again, or click Cancel to cancel the deletion.
Remove file locks from a Version Cue project
1 Log in to the Version Cue Workspace Administration utility.
2 Click the Advanced tab , and then click Reset Locks (under Maintenance).
3 Do any of the following:
• Choose a project from the Project Name menu.
• Choose a user from the User Name menu.

542
ADOBE ACROBAT 8 PROFESSIONAL
User Guide
4 Click Reset Locks to remove the specified file locks.
Delete file versions in a project
1 Log in to the Version Cue Workspace Administration page.
2 Click the Advanced tab , and then click Remove Old Versions.
3 Choose a project from the Project Name menu.
4 To delete versions, select Delete All Versions Older Than, and then choose a month, day, and year.
5 To specify the maximum number of versions to remain in the workspace after you click Delete, select Number Of
Versions To Keep, and then type a number in the text box.
6 Click Delete.
Export Version Cue projects
YoucanexportthemostrecentversionofallprojectfilesfromtheVersionCueWorkspace. Youcan usethisexport
tomovethesefilesfromonehostcomputer(or server)toanother ortocreateapackageofthemostrecentfiles for
output or simply to create an archive of the final versions. Version Cue still manages projects moved between
computers.
If you want to move a project, you should decide whether to back it up (so that all past versions are also moved) or
export (so that only the current versions of project files are moved). For more information about backing up a
project, see “Back up and restore projects” on page 543.
Export a Version Cue project to your computer
1 Log in to the Version Cue Administration utility.
2 Do one of the following:
• Click the Projects tab. Select the check box next to the project you want to export, and click Export.
• Click the Advanced tab, and then click Export Project. The Export Project content frame appears. Select the
project you want to export from the Project Name menu.
3 In the Export Project page, choose the name of the project you want to export, and then choose File from the
Protocol menu.
4
Click Browse, and specify the folder to which you want to export the project. Select any file in the folder, and click Open.
5 Click Export.
Export a Version Cue project to an FTP or WebDAV server
1 Log in to the Version Cue Administration utility.
2 Do one of the following:
• Click the Projects tab. Select the check box next to the project you want to export, and click Export.
• Click the Advanced tab, and then click Export Project. The Export Project content frame appears. Choose the
project you want to export from the Project Name menu.
3 In the Export Project page, choose the name of the project you want to export and then choose either FTP or
WebDAV from the Protocol menu.
4 Specify the FTP or WebDAV server address in the Server Address text box. You don’t need to precede the address
with the chosen protocol. If you want, you can change the default port number in the Port box.

543
ADOBE ACROBAT 8 PROFESSIONAL
User Guide
5 To specify a folder, type its path in the Directory box.
6 If a user name and password are required to access the server, type that information in the User Name and
Password boxes.
7 To use a proxy server to connect to the server, select Proxy.
8 If you are connecting to the server through a firewall, or if you specified a port other than 21, select Use Passive
Mode. (This is an option only if you choose FTP in the Protocol menu.)
9 Click Export.
Back up and restore projects
The Version Cue Administration utility creates backups of all the information in a Version Cue project. Project
backups are stored on the Version Cue file system, in the Backups folder. You can then easily restore a backup copy
that represents a Version Cue project as it was on a specific date. Restored project backups do not replace the original
Version Cue project; restored projects are given different project names. You can use a project backup to move a
project from one Version Cue Workspace to another while retaining all the versions of that project.
You can customize a backup configuration for your projects. You can back up a project using a new configuration or
an existing configuration. A backup configuration includes the ability to schedule a recurring backup for the project.
It’s important to back up projects in a Version Cue Workspace from time to time. Rather than doing this project by
project, you can instead back up the complete Version Cue Workspace. You can also use this backup to move a
complete workspace from one computer to another. If you restore a backup copy of the Version Cue Workspace, all
current data on the workspace, including Version Cue projects, files, and versions, is replaced by the backup.
Workspace backup files are saved to the default Backups folder in the Version Cue application folder.
Toreplacecurrentprojects onaVersionCueWorkspacewith apreviousversion,youfirstrestorethebackup.When
you do this, Version Cue Administration turns off automatically. You must restart Version Cue on the host
workspace; it cannot be done remotely.
See also
“Create and edit Version Cue projects” on page 538
Back up a Version Cue project
The backup configuration used to back up a project is set in the Version Cue project preferences.
1 Log in to the Version Cue Administration utility.
2 Click the Projects tab.
3 Select the check box next to the project name, and then click Backup.
4 In the Backup Name text box, accept the name, or type a new name.
5 Choose the project components you want to back up: Files (which is always selected), Project File Versions to back
up all versions of the files, Project Metadata to back up embedded information entered in Acrobat or Adobe Creative
Suite components, and Users/User Assignments to back up information about the users and their project privileges.
6 Click Backup. When the backup is complete, a status page appears.
Restore a Version Cue project backup copy
1 Log in to the Version Cue Administration utility.
2 Click the Projects tab.

544
ADOBE ACROBAT 8 PROFESSIONAL
User Guide
3 Click Backup List.
4 Click the name of the backup that you want to restore.
5 In the New Project Name box, type a name that is different from those of other projects in the Version Cue
Work sp ac e.
6 Do any of the following, and then click Restore:
• To retain the list of users that were assigned to the project, select Restore Users.
• To retain the same privileges for each assigned user, select Restore User Assignments.
• To add remarks, type them in the Comments box.
Create a new backup configuration
New backup configurations are created in the project’s preferences. When you create a new configuration, it becomes
the default for the project.
1 Log in to the Version Cue Administration utility.
2 Click the Projects tab.
3 Select the name of the project for which you want to create a new backup configuration.
4 Under Backup Configurations on the Edit Properties page, click New.
5 Type a name for the backup configuration in the Configuration Name box.
6 Select what youwanttobackupinthe Includelistofoptions:Files(whichisalwaysselected),ProjectFileVersions
to back up all the versions of the project, Project Metadata to back up embedded information entered in Acrobat or
Adobe Creative Suite components, and Users/User Assignments to back up information about the users and their
project privileges.
7 (Optional) Add remarks to the backup file in the Comments box.
8 Chooseanoption from theRepeatmenuifyouwantbackupstooccurautomatically(chooseDon’tRepeatifyou
want to back up the project manually).
9 Click Save to save the new configuration and to see a list of backup configurations.
Back up all data in the Version Cue Workspace
1 Log in to the Version Cue Administration utility.
2 Click the Advanced tab , and then click Backup Version Cue Data.
3 To add remarks about the workspace backup, type them in the Comments box.
4 Click Save. After the backup is complete, click OK to view the list of workspace backups.
Replace a project with a previous backup
1 Log in to the Version Cue Administration utility.
2 Click the Advanced tab, and then click Administer Backups.
3 Click the name of the backup you want to restore. Click Restore. The Version Cue Workspace turns off. Close the
browser. (Notice that the Version Cue icon in the system tray indicates that it’s off .)
4 Turn on the Version Cue Workspace.
5 Log in to the Version Cue Administration utility.

545
ADOBE ACROBAT 8 PROFESSIONAL
User Guide
Working with users and privileges
Create and edit users
All users with a Version Cue user name and login (except those whose access level is set to None) can log in to the
Version Cue Workspace Administration utility. However, the tasks they can perform are limited by the privileges
assigned to their user names.
To restrict the Version Cue projects that a user can access, you can edit the project’s existing user names. Or, to
restrict access further, you can create new Version Cue user names and assign them to a specific project. Creating
new names gives you the most control over a project.
Note: Only users who have system administrator privileges can create new user names.
If you’ve configured the Version Cue Workspace to be visible to others in the Version Cue Administration utility, you
don’t need to create and assign Version Cue user names to let other Adobe Creative Suite, Acrobat, or WebDAV users
access your Version Cue projects and the Version Cue Workspace. The users simply need either to be on your
subnetwork or be given the Version Cue Workspace IP or DNS address and port number. After a user accesses the
Version Cue Workspace without using a Version Cue user name, the user name for the user’s own computer is
automatically added to the list of users in the Version Cue Workspace, and the password is left blank.
If you’ve configured the Version Cue Workspace so it grants access only to existing users, you’ll need to create
Version Cue user names to let other Adobe Creative Suite, Acrobat, or WebDAV users access your Version Cue
projects and the Version Cue Workspace.
Create new Version Cue user names
1 Log in to the Version Cue Administration utility.
2 Do one of the following:
• From the Home page, click Add A User.
• Click the Users tab, and then click New in the content frame.
3 In the New User content frame, choose the level of access to give the user from the Admin Access Level menu:
None Denies the user access to the Version Cue Workspace Administration utility; however, the user can access
Version Cue projects while working in an Adobe Create Suite component or in Acrobat.
User Gives the user access to some administrator privileges, such as viewing other users’ information, creating new
projects, and backing up and restoring projects.
System Administrator Grants the user all privileges.
4 Type the user’s name in the User Name box.
5 Type a unique login in the Login box. The login is needed in Adobe Creative Suite components or in Acrobat, if
a project requires it, to log in to the Version Cue Workspace Administration utility.
6 Type a password for the user in the Password box, and type it again in the Verify Password box.
7 (Optional) Type a phone number, an email address, and comments in the remaining text boxes. Make sure to enter
an email address if the user will participate in Version Cue PDF reviews and will receive email invitations.
8 To define the user’s project access, choose the user’s project privileges next to each project name in the Privileges
column. To give the user the same privileges for every project, choose an option from the Set All To menu.
9 To let a user publish a project to a specified FTP or WebDAV server, select the check box in the Publishing
Privilege column next to the project name.

546
ADOBE ACROBAT 8 PROFESSIONAL
User Guide
10 Click Save.
Edit a Version Cue user name
To edit a user’s privileges, you need system administrator privileges.
1 Log in to the Version Cue Workspace Administration page.
2 Do one of the following:
• Click Edit Users in the Home page.
• Click the Users tab.
3 Click the user name you want to edit.
4 Edit the user properties and privileges.
5 Click Save.
Duplicate or delete a Version Cue user name
You can duplicate a Version Cue user to set up a new user with the same project privileges as the original user.
Complete this procedure, and then change the duplicate user name and login as required.
1 Log in to the Version Cue Workspace Administration page.
2 Click the Users tab.
3 Selectthecheck boxnexttoeachusernameyou wanttoduplicateordelete. Toselectalllistedusernames,select
the check box next to the User Name column label.
4 Do one of the following:
• Click Duplicate. Edit the user’s properties in the Duplicate User content frame and click Save.
• Click Delete. To confirm the deletion, click Delete in the Delete User content frame.
Choosing user privileges
Version Cue user logins are associated with one of three levels of privilege: None, User, or System Administrator.
Users with privileges set to None can’t access the Version Cue Workspace Administration utility but can access
Version Cue projects while working in an Adobe Creative Suite component, Acrobat, or an application that supports
WebDAV. The following table describes the privileges associated with the User and System Administrator levels.
Administration utility task User System Administrator
Create and update Version Cue user login IDs No Yes
Read other Version Cue users’ login information Yes Yes
Update own user login information excluding login ID
privilege level
Yes Yes
Duplicate and delete user IDs No Yes
Import and export user lists No Yes
Create new projects (users must have Project Creation
Allowed selected in their privileges)
Yes Yes
Delete or restore project backups No Yes
Perform all tasks listed in the Advanced content frame No Yes

547
ADOBE ACROBAT 8 PROFESSIONAL
User Guide
Administration utility task User System Administrator
Change the Version Cue Administration utility color
scheme in the Advanced preferences
Yes Yes
Reset locks and remove file versions from projects to
which the user is assigned and also granted adminis-
trator privileges
Yes Yes
Back up, delete, and restore all Version Cue Workspace
data
No Yes
View Version Cue Workspace information, logs, and
reports; and save reports
Yes Yes
Delete reports for projects to which the user is assigned
and also granted administrator privileges
Yes Yes
Import and export users
If you want to add a set of users to another computer with a Version Cue Workspace, you can export the list and then
copy it to the UsersExport folder in the Version Cue application folder of another computer with a Version Cue
Work sp ac e.
Export a list of users
1 Log in to the Version Cue Administration utility.
2 Click the Users tab.
3 Select the check box next to each user name you want to export. To select all listed user names, select the check
box next to the User Name column label.
4 Click Export List. The Export Users content frame displays the list of users to be exported.
5 Click Next, and type a name for the list in the Name box. If you like, type remarks in the Comments box.
6 Click Save. The Export Users content frame displays the list of exported users.
7 The location of the user list appears under the Export Users heading. To import this list into another Version Cue
Workspace, copy this file into the destined workspace’s Data/UsersExport folder in the Version Cue application
folder. Note that this folder can be moved and may be in a different location on the workspace.
Import users from a list
1 Log in to the Version Cue Administration utility.
2 Click the Users tab, and then click Import Users.
3 Click the name of the user list you want to import.
4 Select the check box next to each user name you want to import, or select the check box next to the User Name
column label to select all listed user names.
5 Click Next.

548
ADOBE ACROBAT 8 PROFESSIONAL
User Guide
Viewing logs, reports, and workspace information
Viewing Version Cue Workspace information and reports
You can display the Version Cue Workspace version, name, licensee, serial number, Java version, database version,
Version Cue client URL (IP or DNS address), WebDAV client URL, copyright, and patent information with the
Version Cue Workspace Administration utility.
UserswhoareworkinginAdobeCreativeSuiteor AcrobatcanusetheVersionCueClientURL toconnecttoVersion
Cue projects when they’re not on the workspace’s subnetwork. Users who are working in applications that support
WebDAV can use the WebDAV Client URL to connect to Version Cue projects.
You can also display and manage three kinds of reports (import, export, and publish) and the Version Cue
Workspace log file, which tracks all server operations according to the level of detail you specify.
Display time varies according to the size of the log file. The default log file size is 1024 KB. If the log file exceeds a
specified size limit, the system creates a new log file and saves the old one. Log files are saved in the Logs folder,
located in the Version Cue application folder.
View Version Cue Workspace information
1 Log in to the Version Cue Administration utility.
2 Do any of the following:
• Click the Home tab. Workspace information is listed under About This Workspace.
• Click the Advanced tab, and then select Workspace Info.
• Click About at the top of the page to display copyright and patent information. A window opens, listing infor-
mation about the Version Cue Workspace.
View the Version Cue Workspace log file
1 Log in to the Version Cue Administration utility.
2 Click the Advanced tab, and then select Workspace Log. The Workspace Log content frame displays information
about the Version Cue Workspace history.
3 Do any of the following:
• To change the number of rows displayed, choose an option from the Rows To Display menu.
• To navigate to a different page of the log, click Next, End, Beginning, or Previous, if available.
View a Version Cue report
1 Log in to the Version Cue Administration utility.
2 Click the Advanced tab, and then select Reports.
3 Choose the type of report you want to view from the Reports menu.
4 To view available reports from a single project, choose the project name from the Filter By menu. To view available
reports from all projects on the Version Cue Workspace, choose All.
5 Clicktheproject’snameintheProjectNamecolumn. Thecontent framedisplaysthereport.Chooseoptionsfrom
the available menus to change how the report appears.

549
ADOBE ACROBAT 8 PROFESSIONAL
User Guide
6 To save an HTML copy of the report to your computer, click Save, and specify a location.
7 To return to the report list, click Report List.
Delete Version Cue reports
1 Log in to the Version Cue Administration utility.
2 Click the Advanced tab, and then select Reports.
3 Choose the type of report you want to delete from the Reports menu:
• To delete all reports from a single project, choose the project name from the Filter By menu.
• To delete all reports from two or more projects on the Version Cue Workspace, choose All.
4 Select the check box next to each project whose reports you want to delete. To select all project reports, select the
check box next to the Project Name column label.
5 Click Delete.
Version Cue PDF reviews
About Version Cue PDF reviews
Using Version Cue you can set up and conduct web-based reviews of PDF documents that are in a Version Cue
Workspace. You can invite selected reviewers by email, create the email message in your email program, and include
a direct link to the review document in the message. Invited reviewers only need Adobe Acrobat software and a
VersionCue logintoaccess thePDFdocument usingtheir webbrowser.Asthe reviewprogresses,reviewersupload
their comments to the Version Cue Workspace. In an open review, all reviewers can see each other’s comments in
the PDF document as the review progresses.
You can specify when the review ends or stop a review at any time. When a review is complete, you can view all
comments either in the context of the original document or as a list in the Version Cue Administration utility. When
you view the comments in the context of the PDF document, all of the Acrobat commenting tools are available,
including printing.
Version Cue PDF reviews are especially useful in the late stages of a project when there isn’t time to arrange a tradi-
tional paper-based review. They are also useful when reviewers are dispersed over a wide geographical area. Aggre-
gated comments make it easy to summarize comments and track the progress of the review.
Start a new Version Cue PDF review
You use the Version Cue Administration utility to initiate and manage a Version Cue PDF review. From the Version
Cue PDF review area in the utility, you can start reviews and invite reviewers, find reviews in which you’re partici-
pating, search for review documents, view review comments (as well as filter the comments by reviewer), stop
reviews, and delete finished reviews. You can also reopen completed reviews.
Keep in mind the following requirements for using Version Cue PDF review:
• TouseVersion CuePDFreview,reviewersneedaVersionCueloginname andprivilegesthatallowthem tologin
to the Version Cue Workspace hosting the review.
• To view the PDF and add comments, users need Acrobat 7.0 Professional or later. For more information about
commenting in Acrobat, see Acrobat Help.

550
ADOBE ACROBAT 8 PROFESSIONAL
User Guide
• To access a review, users need an Internet connection.
You can start a Version Cue PDF review for any version of any PDF document that is in a Version Cue Workspace,
provided that you have appropriate privileges to access the Version Cue Administration utility. Only one version of
a PDF document may be in active review at any point in time.
At any time, to return to the main Version Cue CS2 Review page, click the Home button . To return to Version
Cue Administration, click Version Cue CS2 Administration.
1 Log in to the Version Cue Administration utility. (For instructions, see “Log in to and out of the Version Cue
Administration utility” on page 535.)
2 Click the Version Cue CS2 Review link at the top of the page.
3 Do one of the following:
• On the main Version Cue CS2 Review page, click Start A Review.
• Click the Documents tab, and choose Not Started from the Review Status menu.
4 In the Document List, click the name of the PDF document you want to review.
5 Choose the version you want to review, and then click Start Review.
6 On the Start Review page, enter review information:
• To set an end date for the review, select Deadline, and then choose the end date from the Year, Month, and Day
menus.
• To let reviewers see each other’s comments, select Open under Review Mode. Select Private if you want reviewers
to see only their own comments.
• If you want to add a description of the review, type the information in the Description box.
• To add reviewers, select the reviewers’ names in the Reviewers section (click the check box next to the Reviewers
column label to select or deselect all reviewers).
Note: If a reviewer is outside your everyday workgroup and doesn’t have a Version Cue login, you’ll need to set one up
in advance. You must also provide network access—typically through a firewall—for outside reviewers.
7 Click Next.
8 To send an email invitation to reviewers, select Send E-Mail Invitation, and then modify the Mail Subject and Mail
Message as desired. In the E-Mail Recipients section, choose reviewers you wish to invite by email.
9 Click Start Review to activate the review.
10 If you chose to invite reviewers by email, Version Cue starts your email program and displays an email message
addressed to the reviewers. The message includes a direct link to the document being reviewed. Confirm the
contents of the message, and send it.
Manage PDF reviews
After you locate a PDF review, you can open it, view or delete review comments, stop or restart a review, or delete
the review from the Version Cue Workspace.
When you delete a review, Version Cue permanently removes the review comments. However, review comments for
a PDF file are also deleted if you permanently delete the file itself from the Version Cue Workspace. Note that if you
delete only a version of a PDF file from the workspace, the review comments for that version are deleted.

551
ADOBE ACROBAT 8 PROFESSIONAL
User Guide
See also
“Start a new Version Cue PDF review” on page 549
“Delete files and folders” on page 527
Locate PDF reviews
1 Log in to the Version Cue Administration utility.
2 Click the Version Cue CS2 Review link at the top of the page.
3 Do one of the following:
• If you don’t know the name of the PDF document under review, or want to view all active reviews, click Active
ReviewsontheHometab. Alternatively, clicktheDocumentstab andchooseActivefromtheReview Statusmenu.
• If you don’t know the name of the PDF document for which a review has been completed, or want to view all
completed reviews, click Finished Reviews on the Home tab. Alternatively, click the Documents tab and choose
Finished from the Review Status menu.
• If you want to search for a PDF document that is under review or for which a review has been completed, click
Search Documents on the Home tab, and choose search criteria from the Project Name, Review Status, and List
Entries menus. To find a PDF document by its name, enter the name or part of it in the Document Name field.
Click Search.
Open an active or completed PDF review
1 Locate the active or completed review.
2
Click the PDF document name in the Document List, and then select any of the versions in the Document History list.
Stop a PDF review
1 Locate the active review.
2 Click the PDF document name in the Document List.
3 In the Document History list, select the active review and click Stop Review.
Restart a completed PDF review
1 Locate the completed review.
2 Click the PDF document name in the Document List.
3 In the Document History list, select the completed review and click Start Review. Adjust review settings as desired.
Note: After you click Start Review, you see a series of screens that refer to starting, rather than restarting, a review.
However, this procedure does restart the review of the existing document.
Delete a PDF review
1 Locate the active or completed review.
2 Click the PDF document name in the Document List.
3 In the Document History list, select a version and click Delete Review.
4 When Version Cue prompts you to delete the review, click Delete.
Edit review settings
1 Locate the active or completed review.

552
ADOBE ACROBAT 8 PROFESSIONAL
User Guide
2 Click the PDF document name in the Document List.
3 Select one of the versions in the Document History list, and click Edit Review Settings.
4 Do any of the following:
• Tosetorchangeanenddateforthereview,selectDeadline,andthenchoosetheenddatefromtheYear,Month,
and Day menus.
• To let reviewers see each other’s comments, select Open under Review Mode. Select Private if you want reviewers
to see only their own comments.
• If you want to add or edit a description of the review, type the information in the Description box.
• To add or remove reviewers, select or deselect the reviewers’ names in the Reviewers section (click the check box
next to the Reviewers column heading to select or deselect all reviewers).
5 Click Next.
6 To send an email invitation to reviewers, select Send E-Mail Invitation, and then modify Mail Subject and Mail
Message as desired. In the E-Mail Recipients section, choose reviewers you wish to invite by email.
7 Click Save Review. If you chose to invite reviewers by email, Version Cue starts your email program and displays
an email message addressed to the reviewers. This message includes a direct link to the document being reviewed.
Confirm the contents of the message, and send it.
Set viewing options in the Document List
You can filter the Document List on the Documents tab by doing one or more of the following:
• To display only PDF documents in a specific project, choose that project from the Project menu.
• To limit the number of documents displayed, choose an option from the List Entries menu (use the arrows to the
right of the List Entries menu to view additional files).
• To limit the list according to document name, enter part of a document name in the Document Name field and
press Enter (Windows) or Return (Mac OS). (To view all files again, delete the text in the Document Name field
and press Enter or Return.)
• To sort the list by the entries in a column, click the column heading. (Click the heading again to reverse the sort
order.)
View or delete PDF review comments
Review comments include, in addition to the text of the comment itself, information about who created the comment
and when, what type of comment was created, and what page of the document the comment appears on. Different
comment types are distinguished by their icons. You can use any of the Acrobat commenting tools in a Version Cue
PDF review.
Version Cue stores review comments in the Version Cue Workspace. You can view comments in the Version Cue
Administration utility or directly in the PDF document. To view all review comments directly in the document, you
must access the document either by using the link from the review invitation or by opening the review document
from the Version Cue Administration utility. (If you open the review document from the Open dialog box in
Acrobat, the review comments aren’t visible.)
For more information about Acrobat commenting tools, search for “commenting” in Acrobat Help.
1 Locate the review (see “Manage PDF reviews” on page 550).
2 Click the PDF document in the Document List.

553
ADOBE ACROBAT 8 PROFESSIONAL
User Guide
3 Do one of the following:
• To view all review comments directly in the PDF document, click the version name.
• To view review comments in the Version Cue Administration utility, select the version in the Document History
list and click View Comments.
To view any of the comments in the context of the PDF document, select a comment and then click Open In Acrobat.
• To delete review comments in the Version Cue Administration utility, select the comment and click Delete
Comments. (To select all comments, click the check box next to the Page column heading.)

554
Chapter 20: Keyboard shortcuts
This section lists common shortcuts for moving around a document.
Keyboard shortcuts
Keys for selecting tools
To enable single-key shortcuts, choose Edit > Preferences > General, and then select the Use Single-Key Accelerators
To Access Tools option.
Tool Windows action Mac OS action
Hand tool H H
Temporarily select
Hand tool
Spacebar Spacebar
Select tool V V
Snapshot tool G G
Current zoom tool Z Z
Temporarily select
Dynamic Zoom tool
(when Marquee
Zoom tool is
selected)
Shift Shift
Temporarily zoom
out (when Marquee
Zoom tool is
selected)
Ctrl Option
Select Object tool R R
Object Data tool O O
Article tool A A
Crop tool C C
Link tool L L
Button tool F F
Cycle through forms
tools: Button, Check
Box, Combo Box, List
Box, Radio Button,
Text Field, Digital
Signature
Shift+F Shift+F
Movie tool M M
Sound tool Shift+M Shift+M
555
ADOBE ACROBAT 8 PROFESSIONAL
User Guide
Tool Windows action Mac OS action
TouchUp Text tool T T
TouchUp Object tool Shift+T Shift+T
Distance tool B B
Cycle through
measuring tools:
Distance, Perimeter,
Area
Shift+B Shift+B
Keys for editing
Result Windows Action Mac OS Action
Select all content Ctrl+A Command+A
Deselect all content Ctrl+Shift+A Command+Shift+A
Fit page Ctrl+0 Command+0
Keys for working with comments
To enable single-key shortcuts, select the Use Single-Key Accelerators To Access Tools option in General preferences.
Result Windows Action Mac OS Action
Sticky Note tool S S
Text Edits tool E E
Stamp tool K K
Current highlighting
tool
U U
Cycle through high-
lighting tools: High-
lighter, Cross-Out
Text, Underline Text
Shift+U Shift+U
Arrow tool D D
Cycle through
drawing markup
tools: Rectangle,
Oval, Arrow, Line,
Polygon, Polygon
Line
Shift+D Shift+D
Cloud tool Q Q
Text Box tool X X
Attach file as
comment
J J
Cycle through attach
tools: Attach File,
Attach Sound, Paste
Clipboard Image
Shift+J Shift+J
556
ADOBE ACROBAT 8 PROFESSIONAL
User Guide
Result Windows Action Mac OS Action
Move focus to
comment
Tab Tab
Move focus to next
comment
Shift+Tab Shift+Tab
Open pop-up
window for
comment that has
focus
Enter Return
Send and receive
comments in
browser-based
review
O O
Go back online I I
Keys for navigating a PDF
Result Windows Action Mac OS Action
Previous screen Page Up Page Up
Next screen Page Down Page Down
First page Home or
Shift+Ctrl+Page Up
or Shift+Ctrl+Up
Arrow
Home or
Shift+Command+Up
Arrow
Last page End or
Shift+Ctrl+Page
Down or
Shift+Ctrl+Down
Arrow
End or
Shift+Command+Do
wn Arrow
Previous page Left Arrow or
Ctrl+Page Up
Left Arrow or
Command+Page Up
Next page Right Arrow or
Ctrl+Page Down
Right Arrow or
Command+Page
Down
Previous view Alt+Left Arrow Command+Left
Arrow
Next view Alt+Right Arrow Command+Right
Arrow
Previous document
(with multiple PDFs
open in a single
document window)
Alt+Shift+Left Arrow Not available
Next document (with
multiple PDFs open
in a single document
window)
Alt+Shift+Right
Arrow
Not available
Scroll up Up Arrow Up Arrow

557
ADOBE ACROBAT 8 PROFESSIONAL
User Guide
Result Windows Action Mac OS Action
Scroll down Down Arrow Down Arrow
Scroll (when Hand
tool is selected)
Spacebar Spacebar
Zoom in Ctrl+equal sign Command+equal
sign
Zoom out Ctrl+hyphen Command+hyphen
Keys for general navigating
Result Windows Action Mac OS Action
Show/hide menu bar F9 Shift+Command+M
Move focus to menus F10 Control+F2
Move focus to
toolbar in browser
Shift+F8 Shift+F8
Move to next open
document (when
focus is on document
pane)
Ctrl+F6 Command+F6
Move to previous
open document
(when focus is on
document pane)
Ctrl+Shift+F6 Command+Shift+F6
Close current docu-
ment
Ctrl+F4 Command+F4
Close all open
windows
Ctrl+Shift+W Command+Shift+W
Move focus to next
tabbed page or
palette
F6 F6
Move focus to
previous pane or
panel
Shift+F6 Shift+F6
Move focus to next
comment, link, or
form field in the
document pane
Tab Tab
Move focus to docu-
ment pane
F5 F5
Move focus to
previous comment,
link, or form field in
the document pane
Shift+Tab Shift+Tab
Activate selected
tool, item (such as a
movie or bookmark),
or command
Spacebar or Enter Spacebar or Enter
558
ADOBE ACROBAT 8 PROFESSIONAL
User Guide
Result Windows Action Mac OS Action
Open context menu Shift+F10 Control+click
Close context menu F10 Esc
Return to Hand tool
or Select tool
Esc Esc
Move focus to next
tab in a tabbed
dialog box
Ctrl+Tab Not available
Move to next search
result and highlight it
in the document
F3 F3 or Command+G
Select text (with
Select tool selected)
Shift+Arrow keys Shift+Arrow keys
Select next word or
deselect previous
word (with Select
tool selected)
Ctrl+Right Arrow or
Left Arrow
Command+Right
Arrow or Left Arrow
Keys for working with navigation panels
Result Windows Action Mac OS Action
Show/hide naviga-
tion pane
F4 F4
Open and move
focus to navigation
pane
Ctrl+Shift+F5 Command+Shift+F5
Move focus among
the document,
message bar, and
navigation panels
F6 F6
Move focus to next
element of the active
navigation panel:
Trash Can, Options
menu, Close box,
panel contents, or
panel button
Tab Tab
Move to previous or
next navigation
panel and make it
active (when focus is
on the panel button)
Up Arrow or Down
Arrow
Up Arrow or Down
Arrow
Move to next naviga-
tion panel and make
it active (when focus
is anywhere in the
navigation pane)
Ctrl+Tab Not available
Expand the current
bookmark (focus on
Bookmarks panel)
Right Arrow or
Shift+plus sign
Right Arrow or
Shift+plus sign
559
ADOBE ACROBAT 8 PROFESSIONAL
User Guide
Result Windows Action Mac OS Action
Collapse the current
bookmark (focus on
Bookmarks panel)
Left Arrow or minus
sign
Left Arrow or minus
sign
Expand all book-
marks
Shift+* Shift+*
Collapse selected
bookmark
Forward Slash (/) Forward Slash (/)
Move focus to next
item in a navigation
panel
Down Arrow Down Arrow
Move focus to
previous item in a
navigation panel
Up Arrow Up Arrow
Keys for navigating the Help window
Result Windows Action Mac OS Action
Open Help window F1 F1 or Command+?
Close Help window Ctrl+W or Alt+F4 Command+Q
Move focus between
navigation pane and
topic pane
Ctrl+Tab Not available
Move focus to the
next link within a
pane
Tab Not available
Move focus to the
previous link within a
pane
Shift+Tab Not available
Keys for navigating the How To panel
Result Windows Action Mac OS Action
Open or close How
To panel
Shift+F4 Shift+F4
Open and move
focus to How To
panel
Shift+F1 Shift+F1
Go to How To home
page from a How To
topic
Home Not available
Move focus between
the elements of the
How To panel and
the header of the
How To panel
Ctrl+Tab or
Ctrl+Shift+Tab
Not available

560
ADOBE ACROBAT 8 PROFESSIONAL
User Guide
Result Windows Action Mac OS Action
Move focus down
through the
elements of the How
To panel
Tab Tab
Move focus up
through the
elements of the How
To panel
Shift+Tab Shift+Tab
Go forward to next
page in How To panel
viewing history
Right Arrow Right Arrow
Go back to previous
page in How To panel
viewing history
Left Arrow Left Arrow

561
Index
Numerics
3D content
3D preferences 399
bookmarking views 398
commenting 400
converting to PDF 386
cross sections 393
defined views 397
editing 391
file properties 387
interacting with 388
JavaScripts 401
measuring 395
Model Tree 391
moving and resizing 387
viewing 390, 391, 393, 397
3D tool 387
3D toolbar 388
A
absolute colorimetric intent 106
accelerators, single-key 296
accessibility
alternative text 288
automatic scrolling 296
bookmarks 288
checking 290
creating forms 304
creating PDFs 299
elements of 288
fonts 288
forms 213
Full Check 291
keyboard shortcuts 296
language 288, 313
links 312
of Help 3
preferences 293
Quick Check 290
Read Out Loud 298
reading order 289, 307
searchable text 288
security 289, 313
tags 289
web pages 301
Accessibility Setup Assistant 293
accessible text
about 297
compared to plain text 145
Acrobat Connect 160
Acrobat Distiller
defining document boxes 109
naming files 97
settings 97, 99, 101
watched folders 98
Acrobat Self-Sign Security. See
Default Certificate Security
Acrobat. See Adobe Acrobat
actions
adding to links 336
adding to media clips 338
adding to pages 337
mouse 232
opening 337
page opening and closing 337
types of 337
activation of software 1
Actual Size command 38
Add Tags To Document 305
additional usage rights 155
Adobe Acrobat
comparing versions 109
compatibility with earlier
versions 47
new features 9
presets for exporting to 100
version compatibility 103
Adobe Bridge
Creative Suite color settings 404,
406
Adobe Design Center 7
Adobe dialog box, in Version
Cue 513
Adobe Digital Editions 53
Adobe Help 2
Adobe LiveCycle Designer 206, 212
Adobe PDF conversion settings 100
Adobe PDF options
Advanced settings 107
color options 105
Font settings 104
overriding 111
settings 101
watched folders 99
Adobe PDF printer
creating custom page sizes 72
creating PDF 69
printing preferences 70
setting properties 71
Adobe PDF settings. See Adobe PDF
options
Adobe Photoshop
as image editor 353
resampling and compressing
images with 111
Adobe Policy Server (APS) 270
Adobe PostScript levels 441
Adobe RGB color space 420
Adobe Version Cue
connecting to remote projects 516
disconnecting in 526
features, availability of 512
migrating to version 2.0 537
projects folder 515
publishing projects with
GoLive 538
Adobe Version Cue Administration
utility
about 535
deleting projects in 541
duplicating projects in 541
editing project properties 541
exporting projects 542
setting workspace preferences 536
Adobe Version Cue projects
adding files to 522
backup and restoration 543
connecting to remote projects 516
copying 542
creating and editing 517
disconnecting from 526
opening 515

562
INDEX
opening files in 523
properties 540
restricting access to 545
synchronizing 531
using lock protection in 540
working copies 515
Adobe Version Cue Workspaces
changing the display of 517
creating user IDs in 545
deleting shortcuts 526
displaying information about 548
logs 536, 548
renaming 536
Adobe Video Workshop 4
Advanced Adobe PDF options 107
Advanced Search Options pane 372
Allow Layer State to Be Set by User
Information option 33
Allow PostScript File To Override Job
Options 107, 111
alt text. See alternative text
alternate images, deleting 346
alternate text, in document
conversion 145
alternative text
about 288
adding 311
adding for abbreviations 318
adding in Tags tab 317
analyzing 3D models. See measuring
angles, measuring 395
Annotations property group 490
Apply Print Overrides option 428
approving PDFs
about 191
initiating approval workflows 192
signing 279
Arabic language 54
Area tool 43
Arrow tool 177
arrows
creating 177
deleting 177
art boxes 36, 133
art, edit original 353
Article tool 341
articles
about 340
combining 343
deleting 342
editing 341
navigating 32
reading 338
setting properties 343
Asian fonts, downloading 435
Asian text
adding comments in 178
converting to PDF (Windows) 53
converting web pages to PDF 88
embedding 53
printing as bitmap images 53
width only versions 114
aspect ratio, retaining in clips 383
Assign Profile command 417, 418
assistive technology, and
AutoSave 46
Attach File As Comment tool 180
attaching
files to PDFs 180
sound 179
source files 85
attachments
searching 369
securing 268
audio clips. See media clips
auditing space usage 343
author
name on comments 170
searching by 372
AutoCAD
creating PDFs from 83
Auto-Complete
about 202
preferences 199
automatically inspecting files 499
Automatically Scroll
about 296
command 28
autosave
about 46
file 46
preferences 33
saving 46
B
background
adding 129
defining page content as 306
downloading 32
removing 131
background, in 3D models 391
Background Removal option 66
barcodes
in Acrobat forms 203
base (nonemulsion side) 437
batch processing
overview 364
defining a command sequence 365
hot folders 499
page thumbnails 326
selecting files for 366
stopping 364
batch sequences
adding interactive pauses 366
creating 366
editing 365
bicubic downsampling 104
bit depth, images 489
bitmap images
print quality of 436
black generation 106
black point compensation 422
black, in composite proofs 440
bleed boxes 36, 133
Bleed Marks option 439
bleeds 109
page size and 72
printer marks and 463
blending space, transparency 458,
460
booklet printing 429
bookmarks
for 3D views 397
accessibility 288
appearance 327
creating for new and changed
pages 340
creating from web pages 93
defined 327
deleting 344
destination 327
finding current 26
generating 143
hiding after use 27
in PDF layers 362
managing 327
navigating with 26

563
C
INDEX
printing associated pages 432
searching 369, 372
showing and hiding 26
tagged 330
tagged, organizing web pages 339
Bookmarks tab, opening 26
bookshelf 53
Boolean operators
about 372
searching text with 373
braille printers, creating text for 297
breaks, line 350
Bridge. See Adobe Bridge
browser-based reviews
about 155
initiating 159
keyboard shortcuts for 555
preferences 156
tracking reviews 165
browsers. See web browsers
buttons
about 232
editing 233
forms 211
importing data with 240
labeling 233
labels 22
measuring 43
pop-up effects 235
reset form 239
showing and hiding 22
Submit 238
byte-serving 31
CAD (Computer Aided Design)
converting smooth lines to
curves 344
CalRGB color space 105
Capture command 501
cascading style sheets 88
Catalog preferences 379
catalogs
See also indexes, catalog
about 376
CCITT compression filters 111
CD-ROM, publishing PDF files
to 376
certificates
collecting 258
creating 254
deleting 261
directory servers and 262
managing 260
setting trust levels 261
sharing 258
verifying 260
certifying
checklist 281
documents 281
CGI
applications 238
export values 240
characters, inserting 350
check boxes, as form elements 211
checks
described in Preflight 488
viewing in profiles 491
Chinese text
See also Asian text
adding comments in 178
choking. See trapping
CID fonts Type 2, preserving hinting
information 435
Circle tool. See Oval tool
circles
creating 177
deleting 177
Clean Up panel (PDF Optimizer) 344
CMYK
color profiles 106
color space, converting images
to 106
collaborating, in Version Cue 517
Collections, organizing PDFs 48
color
See also color separations
of grid lines 43
in online displays 105
mapping between color spaces 105
options for 105
preventing shifts in text 105
Color Bars option 439
color gamuts 402
color images, resampling and
compressing 104
color management
See also color profiles, color
settings
about 402, 403, 404
color settings reference 419
considerations for importing
images 407, 408
considerations for printing
documents 412
considerations for process and
spot colors 407
creating a viewing
environment 403
for online graphics 409, 410
for PDFs 410, 413
image files 105
printer-based 435
setting up 405
soft-proofing colors 410, 411, 412
synchronizing color settings 406
when printing 439
color management conversion
options
JPEG 143
PNG 144
TIFF 145
color model working space 417
color plate list (Ink Manager) 442
color profiles
about 414
assigning and removing 417
assigning and removing from
documents 417
converting 418
for desktop printers 413
for imported images 407, 408, 409
for monitors 415, 416
installing 416
managing when converting
colors 460
warning messages for 420
color separations
about 441
adjusting ink density values 453
dot gain control 452
host-based 441
ink coverage limits 456
previewing on-screen 456
producing 442
saving as PostScript 443
spot and process colors 442

564
INDEX
color settings
See also color management
color conversions 422
color management policies 420
customizing 419
for Adobe applications 406
presets for 419
rendering intents 422, 423
synchronizing with other
applications 406
working spaces 419, 420
color spaces
converting 105
converting to destination
space 458
defining and calibrating 106
colors
See also color management, color
model
viewing by source space 455
Colors property group 489
columns, selecting 147
Combine Files button 51
combining
layered PDF files 363
PDF files 510
combo boxes
about form elements 211
Calculation options 227
formatting 228
commenting
on a PDF 161
rights 155
comments
in 3D models 400
appearance 171
checking for 163
connecting lines 170
entering for Version Cue
projects 540
expanding in Comments list 181
filtering 182
finding 185
font and font size 170
forms 205
grouping comments 177
indicating text edits 173
keyboard shortcuts for 555
name that appears 170
navigating 181
opening 172
preferences 170
printing 170, 184, 425
publishing for other reviewers 164
saving an archive copy 166
searching 369
searching by 372
sending in email 164
showing and hiding 185
sorting 182
spell checking 186
sticky notes 172
summarizing and printing 184
text boxes compared to notes 178
viewing locked 171
comparing
PDF and JDF files 510
versions of signed documents 286
compatibility
between versions 103
changing PDF version 142
settings for 103
with earlier versions of Acrobat 47
components of a print job,
viewing 503
composite printing 440
compressing
about 111
files by image type 111
files in Acrobat Distiller 111
images 143
in PDF Optimizer 344
line art 104
with Adobe Photoshop 111
compression options
JPEG 143
lossy and lossless 344
methods 111
PNG 144
reducing file size 344
setting in Acrobat Distiller 103
TIFF 145
Conflicted Copies file status, in
Version Cue 521
Connect To command 516
connection speed, setting 32
contact information, specifying for
print job 506
Contacts Manager 505
Content tab 314
content, protecting 266
continuous-tone images,
compressing 112
conversion settings
Adobe PDF printer 69
converting web pages 93
customizing 101
display 94
for image files 104
presets 100
Convert To Profile command 418
converting
See also exporting
AutoCAD files 83
colors in document 458
files to PDF in job definition 510
image files 61
images in web pages 94
JDF files to MIME 510
Microsoft Office files 73, 75
paper forms to PDF forms 212
PDF files to MIME 510
smooth lines to curves 346
Visio drawings 81
converting web pages
about 88
background options 94
dragging and dropping 93
HTML page display options 94
preserving structure 93
showing Bookmarks tab 95
verifying stored images 95
wrapping lines 94
Copy Link Location command 92
copying
See also copying and pasting
files to clipboard, OLE 125
ICC profiles 475
limiting with Default Certificate
Security 267
pages using page thumbnails 136
PDFs 45
prohibited 263
web link URLs 92
copying and pasting
exporting PDF images 146
font substitution 146
images from Clipboard 148
prohibited 146

565
INDEX
selecting images 148
selecting text 146
Snapshot tool 149
copypage operator, PostScript 107
Create Link 312
Create PDF From Clipboard
Image 62
Create PDF From Scanner
command 63
Create PDF of Comments Summary
command 185
creating
accessible forms 304
accessible PDFs 299
backgrounds and watermarks 129,
131
bookmarks for web pages 339
EPS files 142
headers and footers 125
HTML files 143
JPEG files 142
PNG files 144
PostScript files 142
preflight profiles 485, 489
RTF or Word files 145
tagged PDFs 299
TIFF files 145
creating PDFs
Adobe PDF printer 69
from AutoCAD files 83
by dragging and dropping 61
in Internet Explorer 89
from Microsoft applications 73, 75
from multiple files 51
PDF/X-compliant files 108
by scanning 63
from screen captures 62
using the Print command 69
from web pages 88
Crop Pages dialog box 464
Crop tool 134
cropping pages 133
cross sections, 3D content 393
cross-out text 173
Cross-Out Text tool 175
curved lines, converting from smooth
lines 346
Custom document properties 357
customer information for print
job 506
customizing
See also preferences
PDF conversion settings 101
stamps 175
D
dashes, inserting 350
data from applications, deleting 346
date, searching by 372
Default Certificate Security,
encrypting files 266
default state, PDF layers 361
defaults
3D views 397
zoom setting 33
Delete command, in Version Cue 528
Delete Pages command 136
Delete Permanent command 528
Deleted file status, in Version
Cue 522
deleting
articles 342
bookmarks 344
comments 172, 174, 185
data from applications 346
destinations 334
files from Version Cue
projects 527, 528
form data 201
headers and footers 127
links 333, 344
markups 174, 177, 185
objects and data 344
output intents 501
page thumbnails 324
pages 136
PDF/A information from files 499
PDF/X information from files 499
projects in Version Cue 528
versions with Version Cue
Administration utility 541
Descreen option 66
Design Center 7
Designer
See Adobe LiveCycle Designer
Deskew option 66
desktop printers, color profiles
for 413
Despeckle option 66
destinations
about 333, 334
creating 334
deleting 334
in PDF layers 362
listing 333, 334
moving to 334
device-dependent
color 105
PostScript files 427
print options 434
DeviceN color space 442, 473
dictionaries
adding words to 186
excluding words 186
Digital Editions 53
digital IDs
certificates in 258
creating 254
defined 253
deleting 257
hardware tokens 255
protecting 257
roaming IDs 255
selecting default 256
setting a default 256
setting passwords 256
setting timeouts 256
smart cards 255
what to do if lost or stolen 257
digital signatures
about 275
about form elements 211
adding 279
adding a handwritten signature
to 276
adding in a browser 280
adding time stamps to 277
appearance 277
certifying signatures 281
digital IDs 254, 256
editing fields 227
fields 279
invalid, causes of 283
searching 369
using graphics tablets 278
validating 282
verifying 258
what the icons mean 282

566
INDEX
digitally signed documents
optimizing 344
dimmed menu items, security 247
disabilities. See accessibility
Discard Objects panel (PDF
Optimizer) 344
Discard User Data panel (PDF
Optimizer) 344
displaying
art, trim, and bleed boxes 36
large images 33
low-resolution images 144
Distance tool
3D models 395
about 43
Distiller. See Acrobat Distiller
distribution lists, editing for
security 268
docking toolbars 21
document boxes, defining in Acrobat
Distiller 109
Document Info property group 490
document integrity, checking 280
document message bar
in forms 211
review options 162
Document Metadata property
group 490
Document Open password 264
document pane, defined 15
document profiles. See color profiles
document properties
Advanced 357
base URL 357
creating metadata 357
custom 357
description panel 356
embedded data objects 358
fonts 356
including custom in indexes 378
Initial View 354, 355
PDF Information 356
searching 369
security 356
Document Properties command 354,
356, 357
Document property group 490
document structure, deleting 346
Documents preferences 33
dot gain, compensating for 452
double-byte fonts 113
downloading
documents from web 32
downloads 8
updates, plug-ins, and tryouts 8
Downsample Images option
(scanning) 68
downsampling
See also compressing
average 104
reducing file size 344
droplet, Preflight 499
DSC comments, retaining 108
duplicating, Version Cue
projects 541
Dynamic Zoom tool 37
E
eBooks 53
Edge Shadow Removal option 66
Edit Alternate Text 307
Edit Batch Sequence command 366
Edit Form Field Text, in context
menu 307
Edit Properties command 519
editing
3D models 391
articles 341
headers and footers 127
images 348
limiting in PDF files 267
links 332, 333
objects 348
preflight checks 491
preflight profiles 491
prohibiting 263
text 347, 348
Efficiency Of PDF Content Stream
property group 490
em dashes, inserting 350
email
forms 205, 206
opening PDFs from 25
sending comments in 164
email-based reviews
about 154
participating in 161
starting 158
tracking reviews 165
email-based Submit buttons,
creating 238
embedded index 375
Embedded PostScript property
group 490
embedded thumbnails, deleting 346
embedding
all fonts 104
finding font folders 113
fonts with TouchUp Text tool 350
fonts, threshold 105
thumbnails 103
EMF file format 465
emulsion options 437
Enable Right-To-Left Language
Options option 54
Enable Unicode Support option 254
encrypted documents
creating 264
opening 247
removing encryption 268, 269
searching 371
encrypting
creating digital IDs 254
documents 264
files, security policies 269
encryption, removing 267
engineering documents
converting smooth lines to
curves 346
thickening thin lines 465
envelopes, sending files in
secured 268
epilogue files 108
EPS files 108
Error alert 488
Errors in PDF Content Stream
property group 491
Errors in PDF Syntax property
group 490
Errors In Structured PDF property
group 491
errors, correcting in PDFs 493
excluding words, spell check 186
Export PDF button 142
exporting
See also saving
form data 205
form values 240
layers 362
PDF images 146

567
INDEX
PDF to HTML, XML 143
PDF to JPEG, JPEG2000 142
PDF to PNG 144
PDF to PostScript or EPS 142
PDF to RTF or Word files 145
PDF to text 145
PDF to TIFF 145
PDF to XPDF 142
preflight profiles 485
Version Cue projects 542
Extensible Metadata Platform
(XMP) 357
extracting pages 135
Extras 6
F
Fast Web View 68, 69
Favorite Places, organizing PDFs 51
FDF (Form Data Format)
forms and 205
features, new 9
fields
clearing form data 201
filling 204
filling in forms 201
types of 211
figure, defining content as 306
file attachments
creating 336
deleting 336
dragging 335
opening 30
searching 336
file conflicts in Adobe Version
Cue 533
file formats
See also individual formats,
exporting, and saving
file locks, removing in Version
Cue 541
file properties, for 3D content 387
file protection, in Version Cue 521
file size
auditing 343
optimizing 47
and page thumbnails 103
reducing 47, 136
file status, in Version Cue 521
file versions. See versions
files
See also PDFs
attaching to documents 180
automatically inspecting 499
combining layered PDF 363
film negatives 437
filtering comments 182
Find All OCR Suspects command 68
Find Comment command 185
Find First OCR Suspect command 68
Find toolbar 369
FIPS mode 264
First Page button 26
Fit In Window command. See Fit
Page command
Fit Page command 37
Fit Visible command 37
Fit Width button 37
Fix Hairlines tool 465
fixups. See preflight fixups
Flash movies. See media clips
Flash Player 381
flattening
See also Preflight
about 465
form fields 344
layers 363
presets for 470
presets, creating and editing 471
previewing 467
transparency 344
floating panels 23
folders
Preflight 499
searching for fonts 113
watched 98
font installation 1
Font property group 489
font substitution, in copied text 146
fonts
See also Asian text
Adobe PDF settings 104
changing 348
default 105
downloading Asian 53
embedding in PDFs 113
embedding with TouchUp Text
tool 350
for comments 170
getting information on 356
listed in document properties 356
multiple master 113
PostScript names 115
subsetting 105, 113
substituting 113, 114
viewing preflight results 478
footers
adding 125
adding during web conversion 93
deleting 127
editing 127
form actions
resetting 338
showing fields 338
submitting 338
form fields
See also forms, signature fields
accessibility 213
appearance 222
buttons 232, 233, 239
Calculation options 227
converting paper forms to PDF
forms 212
creating multiple 215
creating with Acrobat Forms
tools 214
defining content as 306
in digital signatures 279
export values 240
exporting data 205
flattening 346
making interactive 212
measuring distances 43
moving manually 218
pop-up effects 235
positioning with grids 215
properties 231
reading out loud 299
recognition in scanned forms 212
rulers 43
searching 203
securing 266
spanning pages 203
tabbing order of 326
validating 230
Form Fields property group 490

568
INDEX
forms
See also form fields
about types of 198
accessibility 213
Auto-Complete 199, 202
barcodes 203
Calculation options 227
clearing 201
collecting data over the web 238
commenting in 205
creating with Acrobat Forms
tools 214
elements of 211
email-based Submit buttons 238
emailing 205, 206
exporting data 205
filling 201, 203, 204
form field recognition 212
highlight colors 199
import data actions and
buttons 240
importing data 204
interactive 199, 212
JavaScript, using in 214
non-interactive 199
passwords 199
positioning fields with grids 215
preferences 199
printing 199, 425
Reset Form buttons 239
saving 199
scanning 212
searching 203, 369
security 199
spanning fields 203
spell checking 186, 203
Submit actions and buttons 238
submitting 199, 206
tabbing fields 326
validating 230
web 238
Forms toolbar 215
fragmented images, merging 346
Free Text tool. See Text Box tool
FTP server
exporting Version Cue projects
to 542
publishing Version Cue projects
to 539, 540
specifying an FTP proxy server in
Version Cue 537
FTP transfer, PostScript files 98
Full Check 291
Full Screen view
exiting 30, 33
opening documents in 17
reading documents in 30
slide presentations 353
G
gamut warnings 457
gamuts 402
General Graphic State property
group 489
General preferences 33
generating
bookmarks 143
Go To, destination 334
going to actions 337
gradients, banding 103
Graphic Arts Technical Foundation
of North America (GATF) 453
Graphic State Properties For Fill
property group 489
Graphic State Properties For Stroke
property group 489
graphics tablets, signing PDFs 278
graphics. See images
grayed out menu items, security 247
grayscale images
color space profiles 106
resampling and compressing 104
grids
about 42
changing units 42
displaying behind transparent
objects 36
showing and hiding 42
snap to 42
to position form fields 215
guides
changing colors of 43
for positioning form fields 215
ruler 43
H
hairlines, replacing 465
halftone screens
specifying 436
halftones
preserving information 107
property group 489
Halo Removal option 66
Hand tool
browsing through documents 17
with Down arrow 32
moving around pages 42
selecting temporarily 18
text selection 33
handicap. See accessibility
handwritten signatures, creating the
appearance of 276
hard returns, inserting 350
hardware tokens, signing and 255
headers
adding 125
adding during web conversion 93
deleting 127
editing 127
headings, defining content as 306
Hebrew language 54
Help
about 2
Help, keyboard shortcuts for 559
hiding
bookmarks 26
comments 182
Model Tree 391
parts of 3D models 393
Properties toolbar 22
thumbnails 27
toolbars 21
High Quality Print, PDF preset 100
Highlight Color preferences 199
Highlighter tool 175
highlighting options 476
highlighting text (markup) 173
History (in Organizer)
deleting 52
locating PDFs with 48
holdback (trapping) 450, 452
host-based separations 441
hot folders 499

569
I
INDEX
How To pages, keyboard shortcuts
for 559
HTML files, converting to PDF 61, 88
HTTP Proxy server, specifying in
Version Cue 537
hyphens, inserting 350
ICC Color Spaces property group 489
ICC profiles
See also color profiles
custom 106
embedding in images 105
exporting from output intents 501
extracting 475
saving locally 475
IDs, in Version Cue 545
image compression
See also compressing, compression
options
setting in Acrobat Distiller 104
image editor, selecting 353
Image property group 489
images
checking changes in downloaded
web pages 95
conversion settings 104
converting to CalRGB 105
converting to PDF 61
converting web pages to PDF 94
copying and pasting 148
deleting versions 346
displaying large 33
downloading from the web 88
downsampling and
compressing 111, 344
editing 348
exporting 146
merging fragments 346
placing in PDFs 350
resampling and compressing 103
searching metadata in 369
smoothing jagged edges 104
stamps 175
suppressing display 33
unexpected monochrome viewing
results 103
Images panel (PDF Optimizer) 344
imagesetting
halftone screens 436
Import Version Cue 1.0 Data
command 537
importing
data buttons 240
form data 204, 240
form data actions 337
preflight profiles 485
In Use By <user> file status, in
Version Cue 521
In Use By alerts in Version Cue 524
In Use By Me file status, in Version
Cue 521
Inactive alert 488
index
embedded 375
index definition file (PDX) 376
indexes, catalog
about 376
automating updates 380
creating 377
cross-platform guidelines 376
document properties
guidelines 376
excluding numbers from 378
excluding subfolders 378
excluding words from 378
including custom properties 378
including structure tags 378
including XMP fields 378
moving 380
PDF v1.0 files and 378
preferences 379
preparing PDF files for 376
Readme files 379
reducing size of 378
stopping a build 377
updating 379
Indicate Text Edits tool 173, 174
Info alert 488
Info panel 45
information about documents 356
initial state, layers 361
Initial View, document
properties 354, 356
initiating e-mail reviews 158
ink coverage
checking 456
limits 456
Ink Manager 448, 461
ink sequence (trapping order) 454
ink warnings 457
inks
aliasing 463
printing one at a time 442
screen angle and frequency 436
specialty 453
input device profiles 414, 416
Insert Object command 125
Insert Pages command 124
Insert Text At Cursor tool 174
inserting
special characters 350
text, text edit comments 173
inspecting
PDFs 473
installation 1
installing
Adobe Digital Editions 53
interactive forms 199
interactivity
adding buttons 232
adding media clips 382
interlacing, in PNG files 144
International Color Consortium
(ICC) 404
International Coordinating
Committee for Telephony and
Telegraphy (CCITT)
compression 112
Internet
review settings 156
settings 32
uploading PDF files for review 159
Internet Explorer
converting web pages 89
opening PDFs 25
inventory report, PDF content 481
ISO standards 497
J
Japanese text
See also Asian text
adding comments in 178
JavaScript
with 3D content 401
in forms 214
in media clips 384
running a JavaScript action 338
support, Web Capture 88

570
L
INDEX
JDF (Job Definition Format) files
associating with PDF files 502
preparing for JDF workflow 509
job definitions
adding and removing 509
adding files 504
contact information, adding 506
converting files 510
creating 504
editing 504
preflighting documents 510
submitting to production
systems 511
viewing 503
joboptions file, default location 102
JPEG compression 111
JPEG images
searching by 372
jumping to pages 337
K
keepaway traps 452
keyboard shortcuts
exiting Full Screen view 33
in Help 3
single key accelerators 33
keywords, searching by 372
knockouts, colors 446
Korean text
See also Asian text
adding comments in 178
Lab spot colors 463
labels, showing and hiding 22
language
accessibility 288
right-to-left 54
support 54
Last Page button 26
Layer Properties dialog box 361
Layer Properties option 428
layer state, setting with user
information 361
layers
about 360
adding content 363
in AutoCAD conversions 83
flattening 363
from Visio files 82
hiding 361
locked 360
merging 363
navigating 362
printing 360
searching 369
viewing 360
Layers command 428
Layers property group 490
lighting, 3D models 391
line art
compressing 104
defined 111
line breaks, inserting 350
Line tool 177
Line Weight option (Marks And
Bleeds) 438
Line Weights view 42
lines
creating 177
deleting 177
increasing width of 465
lining up objects, guides 43
Link tool 331
linked files
color management
considerations 407
links
to 3D views 397
accessibility 312
adding actions 336
creating 332
deleting 333, 344
editing 332, 333
opening movies and sounds 30
underlining 94
working with 331
list boxes, about form elements 211
LiveDocs 2
loading XMP metadata 358
lock protection, in Version Cue 540,
541
Locked option
actions 337
output intents 476
locked PDF documents,
passwords 263
locking
comments 171
documents for security 264
PDF layers 360
toolbars 22
logins
creating in Version Cue
Administration utility 545
entering in Version Cue
Administration utility 535
privilege levels, in Version Cue 546
logs, in Version Cue 536, 548
long dashes, inserting 350
looping media files 385
lossy and lossless compression 112,
344
lost work, recovering 46
Loupe tool 38
M
Macromedia Breeze. See Acrobat
Connect
magnifying views 37
See also zooming
managing
embedded index 375
Mark In Use command 532
marking up documents
grouping markups 177
icons for 172
viewing 172
markups. See marking up documents
master files, in Version Cue 520
measurement units
grids 42
measuring
3D model dimensions 395
preferences, for 3D models 397
Measuring toolbar 43
media clips
Acrobat 5 compatible
properties 386
Acrobat 6 compatible
properties 386
adding 382
adding actions 338
play mode 385
playback settings 385
playing 30, 381
playing via buttons 232

571
INDEX
renditions 383
retaining correct proportions 383
system requirements 385
Media Manager 505, 507
media specifications, defining for
print job 507, 508
meetings, initiating 160
menu item actions, executing 337
merging PDF layers 363
metadata 490
creating document properties 357
loading XMP files 358
searching by 372
searching for, in Version Cue 525
viewing 357
metallic inks, trapping 453
Microsoft applications
attaching Excel files to
documents 180
converting files to PDF 73, 75
PDF settings for Office files 75
starting email-based reviews 158
Visio 358
Microsoft Word
creating PDFs from 75
migrating to Adobe Version Cue
2.0 537
MIME files 510
mobile devices, preparing PDFs
for 297
Model Tree
3D models and 388
overview 391
monitor profiles 414, 415, 416
mouse actions
about 232
triggers 338
Movie tool 382
movies. See media clips
moving
3D models 387
pages, with page thumbnails 136
MP3 files. See media clips
MPEG files. See media clips
multimedia. See media clips
Multiple Pages Per Sheet option 426
multiple windows 41
My Computer, finding PDFs 48, 51
N
navigating
articles 32
with bookmarks 26
keyboard shortcuts for 557
layers 360, 362
with page thumbnails 27, 324
navigation pane
defined 15
showing and hiding 23
navigation shortcuts 3
navigation tabs
keyboard shortcuts for 558
ND. See neutral density
negatives
printing 437
network servers
review settings 156
reviewing files 159
neutral density
adjusting 453
Black Density and 451
measuring 453
values 453
New features 9
New Project command 518
New Window command 41
No Working Copy file status, in
Version Cue 521
nonbreaking spaces, inserting 350
non-compliant PDF/X files 109
None privilege, in Version Cue 546
non-English language support 54
non-interactive forms 199
non-PostScript printers, and paper
size 72
note comments
about 172
adding to markups 174
printing 184
numbering
See also headers and footers
logical page numbers 36
pages 139
N-up printing 426
O
Object Data tool 358
Object Linking and Embedding
(OLE) 125
Object Metadata property group 490
objects
clipping 352
deleting 344
editing 352
editing source file 353
flipping 352
moving 351
placing in PDFs 350
rotating 351, 352
scaling 352
searching data of 369
selecting 351
Office X 75
Offline Copy file status, in Version
Cue 522
online comments
preferences 156
server settings 156
online resources 6
Only Copy file status, in Version
Cue 522
opaque inks, trapping 453
Open cross-document links in the
same window 33
Open file status, in Version Cue 521
Open Organizer command 49
opening
actions 337
file attachments 30
in Full Screen view 17, 353, 354
password-protected
documents 263
web links 90, 92
web links as new documents 90, 92
web links in a browser 340
opening view, defining 354
OPI (Open Prepress Interface)
comments 108
property group 490
Optimizer. See PDF Optimizer
optimizing
about 47
auditing space usage 343
Fast Web View option 344
improving performance 47
options 344
PDF files 68
PDF Optimizer 343
PDFs 344

572
INDEX
organizational policies 269
orientation
page layout 40
rotating 40
orthographic projection, 3D
models 391
Outdated Copy file status, in Version
Cue 522
output device profiles 413, 414, 416
output intent
about 500
creating 501
defining in Acrobat Distiller 109
deleting 501
exporting embedded ICC
profiles 501
extracting embedded 501
for PDF/A or PDF/X 490
for PDF/A or PDF/X (ICC Profile
Properties) 490
options 475
preview 454
preview settings 436
profile name 109
Oval tool 177
ovals
creating 177
deleting 177
overprinting
See also trapping
preserving settings 107
previewing 439
simulating 436, 440
overriding layer print settings 428
Oversized Pages, PDF preset 100
P
packages, printing PDF 431
page actions, open and close 337
Page Description property group 490
Page Display preferences 33, 133
Page Info command, converting web
pages 339
Page Information option 439
page layout, setting 40
page order, printing multiple pages
per sheet 427
Page Setup command (Mac OS) 425
page size, as opposed to paper size 72
page thumbnails
creating 324
deleting 324, 326
displaying 27
embedding 103, 326
jumping to pages with 27
moving and copying pages
with 136
navigation 324
replacing pages 138
resizing view 39
page transitions
for slideshow 353
in Full Screen view 353
setting 355
page triggers 338
page view, defining 354
page-at-a-time downloading 31, 33,
68
pages
deleting 136
jumping to 337
layout 40
logical 36
moving 136
orienting 40, 135
printing 434
renumbering 138
replacing 136, 138
rotating 135
scaling 426
scanning 63
setting actions for 337
Pages Per Sheet option 427
Pages property group 490
Pan & Zoom Window command 38
paper forms to PDF forms 212
paper size, as opposed to page size 72
paragraph returns, inserting 350
participating in email-based
reviews 161
passwords
and dimmed features 365
forms 199
opening documents 263, 264
preflight profiles 486, 487
removing 265
required to open PDF 247
setting permissions 264
signatures 254
tips for creating 257
Paste Special command 125
pastel inks, trapping 453
pasting
images 148
tables 148
text 146
text as a comment 178
pauses, inserting in batch
sequences 366
PDF conversion settings 100
PDF export presets
about 100
Acrobat 6 Layered 100
creating 100
PDF images, exporting to other file
formats 146
PDF Information, document
properties 356
PDF Optimizer
about 343
auditing space usage 343
options 344
PDF presets 100
PDF toolbar 73
PDF version capabilities 103, 109
PDF/A
removing information from
file 499
saving PDFs as 497
verifying files 498
PDF/SigQ compliant PDFs 280
PDF/X
about the format 108
compliance in PostScript files 108
converting files to 108
removing information from
files 499
saving PDFs as 497
verifying files 498
PDF/X-compliant files
color management
considerations 413
standards 497
PDFMaker
about 73
converting AutoCAD files 83
converting Microsoft Office
files 73, 75
converting web pages 88

573
INDEX
PDFs
approving 279
associating with JDF files 502
certifying 281
color management
considerations 410, 413
compliance with PDF/X
standard 497
correcting errors 493
creating. See creating PDF files
editing signed 284
forms. See forms
from scanned pages 63
from web pages 88
getting information on 356
metadata 357
moving 136
navigating 27
preparing for JDF workflow 509
printing 434
recent documents list 33
saving a copy 45, 46
security 263, 365, 486
submitting to production
systems 511
transparency in 465
PDX (.pdx) files 376
Pencil Eraser tool 177
Pencil tool 177
perceptual intent 106
performance. See optimization
Perimeter tool 43
Permissions password 264
personal information, removing
from PDFs 344
photographs, compressing 112
Photoshop. See Adobe Photoshop
PICT file format
flattening during export 465
pixel warnings 457
placing objects 350
plain text compared to accessible
text 145
Play mode 385
playback settings, media clips 385
player controls, media files 381
playing
movies 30
sound clips 30
plug-ins
in Adobe Store 8
managing 53
policies
about 269
applying to document 273
creating 271
encrypting files 269
managing 272
removing from a document 273
revoking PDFs protected by 273
Polygon tool 177
polygons
creating 177
deleting 177
pop-up bar, replying to
comments 182
pop-ups
buttons 235
preference settings 170
PostScript files
creating with Print command 98,
427
FTP transfer 98
naming 98
portable job ticket 107
setting options for 434
varying compression with 111
PostScript Language Level
compatibility 143
PostScript Printer Description file.
See PPD files
PPD files
about 433
in file conversion 142
selecting in Mac OS 433
trapping and 447
versions 433
preferences
3D content 399
Acrobat Distiller 97
autosaving 46
Catalog indexing 379
converting in Internet Explorer 90
Documents panel 33
forms 199
General panel 33
Measuring, for 3D models 397
Page Display 33
Preflight 475
Reviewing 156
Search 375
preflight checks
adding to profiles 491, 492
creating 485
editing 491
viewing 491
preflight fixups
about 493
adding to profiles 493
creating 496
editing 495, 496
preflight profiles
about 473, 483
categories of checks 491
categories of rules 484
creating 489
importing and exporting 485
limiting access to 486
locking 486
property categories 489
protecting 486
viewing conditions and rules 491
preflighting documents
in job definitions 510
preflight package 485
problem areas 473
viewing results 476
prepress
tools 445
prepress, Ink Manager options 461
presentations
preferences 33
setting up 353
Preserve Black Objects option 460
preserving
black generation settings 106
document information 108
EPS information 108
halftone information 107
Level 2 copypage semantics 107
OPI comments 108
overprint settings 107
transfer functions 106
under color removal settings 106
presets
for converting files 100
flattening 470

574
INDEX
PDF export 100
transparency flattener 469
Press Quality, Adobe PDF
settings 101
previewing
colors. See soft-proofing
font substitutions 114
margins or document boxes 464
output conditions 454
separations 456
Print As Image option 434, 435
print jobs
contact information,
specifying 506
customer information,
defining 506
media specifications, defining 507
preparing for submission to
production 509
product information, defining 505
specifications, defining 504
specifications, viewing 503
print production
converting colors 458
fixing hairlines 465
tools for output 445
print settings
advanced options 434
general options 425
marks and bleeds 463
output 439
PostScript 434
Print Setup command
(Windows) 425
Print To File command
(Windows) 427
printer marks, space required for
printing 463
printer-based color management 435
printing
See also print settings
area on a page 427
Asian text 53
booklets 429
bookmark contents 432
color as grayscale 440
color management
considerations 412
comments 170, 184
composites 440
forms 199
general printing options 425
grayscale proofs 440
layers, documents with 362, 428
layers, overrides 428
multiple pages per sheet 426
negatives 437
not allowed, security 263, 267
online services 425
PDF documents 425
PDF packages 431
preferences, Adobe PDF printer 70
properties, Adobe PDF printer 71
transparent artwork 465
using color management 439
process colors
about 441
color management
considerations 407
printing 441
product information for print job 505
production site instructions, creating
and removing 509
projects, sharing using Version Cue
Administration utility 540
prologue files 108
Promote To Current Version
command 531
Proof Setup command 411
proofreading marks and
comments 173
properties
3D files 387
Adobe PDF printer 71
groups for preflight checks 488
movies 385, 386
PDF layers 361
Properties Bar command 23
Properties toolbar 22
Proximity (searches) 373
publishing, Version Cue projects
with GoLive 538
Q
quality of images. See compression
Quick Check 290
QuickTime files. See media clips
R
radio buttons, in forms 211
read me file 1
Read Mode 30
Read Out Loud 298
reading articles 32, 338
reading order
about 289
accessibility 289
checking 307
editing 307
TouchUp Reading Order tool 305
RealOne files. See media clips
RealPlayer 381
recent documents, listing 33
recognition of paper form fields 212
recovering lost changes 46
Rectangle tool 177
rectangles
creating 177
deleting 177
redact page content 249
Redaction tools 249
reducing file size 47, 136, 343
reflow
about 297
correcting with Content tab 314
correcting with TouchUp Reading
Order tool 307
Refresh command, in Version
Cue 515
registration 1
Registration Marks option 439
registration of software 1
Registry option 475
relative colorimetric intent 106
removing
See also deleting
hidden content 248
page thumbnails 324
sensitive content. See Redaction
tools
working copies in Version Cue 526
renaming
layers 361
PDFs 46
rendering intents 106, 423
rendering modes for 3D content 390
rendering modes, for 3D 391
renditions
about 383
setting system requirements 385
renumbering pages 138

575
INDEX
Reopen Documents to Last Viewed
Page option 33
repeating media clips 385
replacing
hairlines 465
pages 136
reports
PDF inventory 481
preflight inspection 480
requirements, system 1
Reset Form button 239
resetting
form actions 338
toolbars 21
resizing
magnifying and reducing 37
note comments 172
pages 37
placed 3D models 387
using thumbnails 39
resolution
See also downsampling and
halftone screens
images 489
page display 33
setting in Acrobat Distiller 103
Restore command, in Version
Cue 529
restoring
files 46
toolbars 21
restricted documents 264
restricting
attachments 247
URLs 247
restrictions, removing 267
resubmitting form data, refreshing
web pages 340
returning review comments 161
Revert command 46
reviewing documents
inviting additional reviewers 160
inviting reviewers 158
participating in review 161
preferences 156
rejoining 165
replying to comments 183
reviewing others’ comments 172
saving a copy with comments 166
starting a shared review 157
starting an email-based review 158
tracking reviews 165
viewing a list of comments 181
RGB color space profiles 106
RGB color space, Adobe 420
rich black, preventing 460
Rich Content PDF, Adobe PDF
settings 101
right-to-left language options 54
roaming ID, signing PDFs 255
rollovers 235
Rotate Pages command 40
rotating pages 135
changing view 40
RSA security 254
RSS, subscribing to 168
ruler guides, creating 43
Run Length compression 111
Run Sequence command 364
running a JavaScript action 338
S
saturation intent 106
Save A Version command 530
Save As command, renaming
documents 46
saving
See also exporting and saving,
formats
as accessible text 145
as certified document 281
automatically 33
changes 46
copy of PDF document 45
copy of signed document 280
documents digitally signed in a
browser 280
forms 199
images to image format 146
metadata 358
optimizing for Fast Web View 69
PDF compatibility 142
PDF Settings inside file 107
PDFs 46
transparent artwork 465
saving, formats
EPS 142
HTML 143
JPEG, JPEG2000 142
PNG 144
PostScript 142
RTF 145
text 143
TIFF 145
Word 145
XML 143
scaling
pages for printing 426
pages for web conversion 93
Scan To PDF command 63
Scanning
tips 66
scanning
compressing images 68
creating PDF from 63
screen captures, converting to
PDF 62
screen magnifiers. See accessibility
screen readers. See accessibility
scrolling
automatic 296
automatically 28
default page layout 33
searching
Advanced Search 372
Boolean 373
by document properties 372
comments 185
in Version Cue projects 525
indexes 376
multiple documents 371
preferences 375
results display 356
Section 508 (U.S. government). See
accessibility
security
accessibility 289, 313
assigning user IDs in Version
Cue 545
attachments 268
batch processing 365
certifying documents 281
changing in Default Certificate
Security 268
distribution lists 268
envelopes 268
FIPS mode 264
for preflight profiles 486
forms 199
limit access to PDFs 264

576
INDEX
media clips 385
methods of 263
passwords 70, 96, 263
policies 269
removing restrictions 265, 267
RSA key algorithms 254
watched folders 99
security hardware tokens 255
Select All command 40, 147
selecting
images 148
objects 351
tables 148
text 146, 147
Send By Email For Review
command 158
Separations option (trapping) 448
separations. See color separations
servers, network
review settings 156
uploading review files 159
setting layer visibility action 338
Share Project command 519
shared review
initiating 157
participating in 161
tracking documents in 165
sharing projects
Adobe Creative Suite 519
using Version Cue Administration
utility 540
sharing your desktop 160
Show Documents in Windows
Taskbar 33
Show Splash Screen option 33
showing
bookmarks 26
comments 182
comments on 3D content 400
field actions 338
Model Tree 391
Properties toolbar 22
showpage 107
thumbnails 27
toolbars 21
signature. See digital signature
Signatures tab 284
signing
checking integrity of PDFs 280
PDFs 279
Simulate Ink Black option 412
Simulate Overprinting option 436,
440
Simulate Paper White option 412
Single Page layout 40
single-key accelerators 296
single-key tool access 33
slide presentations, setting up 353
slide show. See Full Screen
sliding traps 451
Smallest File Size, Adobe PDF
settings 101
smart cards, signing and 255
Snap To Grid command 42
Snap View, activating 478
Snapshot tool
copying text and images 149
selecting print area 427
soft-proofing
about 410
in Acrobat 412
in Photoshop, Illustrator and
InDesign 411
software
activation 1
registration 1
software downloads 8
sorting comments 182
sound clips, adding 382
special characters, inserting 350
special effects buttons 232
Specifications for Web Offset
Publications. See SWOP
standards
Speed Launcher 52
spell checking
adding words to dictionary 186
forms and comments 186, 203
while typing 186
SPF (print settings) files 434
split window 41
spot colors
CMYK equivalents 461, 462
color management
considerations 407
converting to process 462
specialty inks 453
spreading. See trapping
spreadsheets, split view 41
Square tool. See Rectangle tool
squares
creating 177
deleting 177
sRGB color space 409, 420
stamps
adding to documents 175
customizing 175
dynamic 175
editing 175
moving and resizing 175
status, tracking distilled files 97
Stemming (searches) 373
sticky notes
comments 172
strikethrough, indicating deleted
text 173
stroke width, constant 42
Structured PDF property group 490
Style option (Marks and Bleeds) 439
Submission Manager 509
submit-by-email forms 199
submitting
comments 162
files to production systems 511
form actions 338
online forms 199
subsampling 104
subscribing to web services 168
subsetting fonts
specifying a threshold 105
text editing 350
summarizing comments 184
support screens 452
SWOP standards 453
Synchronized file status, in Version
Cue 521
synchronizing
files, in Version Cue 533
System Administrator privileges, in
Version Cue 546
system requirements 1
system requirements, media clips 30,
385
T
tabbing order 326
table of contents. See bookmarks

577
INDEX
tables
copying 148
defining content as 306
fixing tags in 319
tagged bookmarks
deleting 137
organizing web pages with 339
updating with 340
tags
about 289
accessibility 289
adding alternative text 311
alternative text 317
creating PDFs with 299
deleting 346
editing 308
editing for figures and tables 310
including in indexes 378
reference 319
removing and replacing 312
searching 369
web pages 301
Tags tab 315
temp files, allowing in movies 385
text
accessible, converting 145
adding 349
Asian. See Asian text
copying and pasting 146
copying, prohibited 146
editing 347, 348
exporting 143
preventing color shifts 105
scanned 146
searching 369
selecting 147
unrecognizable 146
text attributes, editing 348
Text Box tool 178
text edits, commenting
adding notes to markups 174
deleting 174, 185
text fields
about form elements 211
Calculation options 227
editing 225, 226
formatting 228
text files, converting to PDF 61
Text property group 489
Thai language 54
threaded comments, replying 182
threshold, font embedding 105
thumbnails. See page thumbnails
time stamps
in digital signatures 277
validating certificates for 285
tips for scanning 66
toolbars
3D 388
docking 21
Forms 215
locking and unlocking 22
restoring to default 21
selecting buttons 17
showing and hiding 21
showing and hiding labels 22
tools
3D navigation 388
3D tool 387
prepress 445
print production 445
selecting 17
single-key access 33
Total Area Coverage option 456
touch up tools 348
TouchUp Reading Order tool 305
tracked PDF documents, review 161
Tracker, reviewing 165
tracking status of distilled files 97
transfer functions 106
transitions 353
transparency
See also flattening
blending space 458, 460
flattener presets 469
flattening, about 344
flattening, options for 471
grids, displaying 36
printing and saving 465
Transparency Flattener Presets
command 471
Transparency panel (PDF
Optimizer) 344
trap appearance
end style 450
holdback amount 450
join 450
width 450, 452
trap presets
applying to specific pages 449
saving and loading 448
trap styles. See trap presets
trapped value, defining in Acrobat
Distiller 109
trapping
about 446
choking 452
CMYK values and step limit 451
compensating for dot gain 452
controlling ink density 461
dark spot colors as black 451
declaring presence of 442
imported graphics 452
keep away traps 452
keylines to images 452
preventing dark traps 451
sequence or order 454
specific pages in a document 449
spreading 447
thresholds for 451
using black or rich black 452
triggers, action 338
trim boxes 36
Trim Marks option 439
troubleshooting
preflight problems 473
trusted identities
adding contacts 259
checking 268
for distributing encrypted
documents 266
tryouts 8
Type 1 fonts 114
Type 32 fonts 114
Typewriter tool 349
U
Unavailable file status, in Version
Cue 522
undercolor removal (UCR) 106
Underline Text tool 175
underlining links 94
Undo Headers/Footers
command 128
unicode, digital signatures 254
unlocking toolbars 22
Unshare Project command 519
updates 8

578
V
INDEX
updating
Adobe application software 52
embedded index 375
uploading
files for review 159
Upload for Browser-Based Review
command 159
URLs
restricting 247
specifying for browser-based
reviews 156
usage rights 155
Use Adobe Dialog command 513
Use Current Properties As New
Defaults command 231
Use Only Certified Plug-ins
option 33
Use Page Cache option 33
user IDs
creating in Version Cue
Administration utility 545
deleting or duplicating in Version
Cue Administration utility 546
user passwords. See passwords
user policies 269
users
assigning to Version Cue
projects 538, 539, 540
privilege levels, in Version Cue 546
validating
form fields 230
signatures 282
time period for signatures 260
time stamp certificates 285
vector graphics 111
verifying
consistency in PDF and JDF
files 510
PDF/A files 498
PDF/X files 498
version compatibility 103
versions
deleting in Version Cue 531
deleting with Version Cue
Administration utility 541
in Version Cue 520
promoting, in Version Cue 531
saving, in Version Cue 530
using, in Version Cue 529
viewing and comparing in Version
Cue 530
video clips. See media clips
Video Workshop 4
videos, playing 30
Vietnamese language 54
View Signed Version command 286
View Web Links command 92
viewing
3D content 390, 391, 397
file attachments 30
job definitions 503
magnification 37
PDF conversion results 75
PDF forms 198
preflight results 476, 477, 478
tables and spreadsheets 41
views
comments in 3D models 400
defining for 3D content 397
visibility, layers 361
Visio
defining layers for PDF
conversion 82
viewing object data 358
W
Warning alert 488
warning color 457
watched folders
prologue and epilogue files 98
setting up 98
unavailable 97
watermarks
accessibility 314
adding 131
removing 133
WAV files. See media clips
web browsers
displaying PDFs in 31
opening PDFs from 25
Web Capture
converting web pages to PDF 88
display options 94
web forms 238
web graphics
color management
considerations 409
web graphics, color management
considerations 410
web links, opening in new PDF 90, 92
web pages
adding headers and footers 93
adding to PDFs 89
appending all linked 92
appending to documents 92
Asian-language, converting to
PDF 88
backgrounds 94
conversion settings 93
converted to Adobe PDF 339
converting images in 94
converting in Internet Explorer 89
getting information on 339
refreshing 340
reorganizing converted 339
tags and accessibility 301
updating converted 340
wrapping lines 94
web services, subscribing to 168
WebDAV servers
connecting to Version Cue
projects 516
exporting Version Cue projects
to 542
publishing Version Cue projects
to 539, 540
websites
organizing multiple PDFs for 376
restricting 247
review settings 156
uploading PDF files for review 159
width-only fonts. See Asian fonts
windows
multiple 41
split 41
spreadsheet split 41
Windows Built-In player 381
Windows Media Player 381
WMF file format 465
WMV files. See media clips
Word documents
adding information from 76
Word. See Microsoft Word
work area, customizing 19
working files
editing, in Version Cue 531
using, in Version Cue 520

579
X
INDEX
working spaces, color 419, 420
wrapping lines, converting web
pages 94
XIF format, searching metadata
in 369
XML, source code document
information 357
XMP format
indexing fields 378
metadata 357, 369
Z
zero width spaces, inserting 350
ZIP compression 111, 112
zooming
changing magnification 37
default setting 33
Dynamic Zoom tool 37
Loupe tool 38
Pan & Zoom Window 38
selecting tools temporarily 18
view 37
