Adobe After Effects CC (2015) Help 2015 En
User Manual: adobe After Effects - CC (2015) - Help Free User Guide for Adobe After Effects Software, Manual
Open the PDF directly: View PDF ![]() .
.
Page Count: 750 [warning: Documents this large are best viewed by clicking the View PDF Link!]
- Legal notices
- Contents
- Chapter 1: What's new
- New features summary
- Chapter 2: Workspace and workflow
- Planning and setup
- Setup and installation
- General user interface items
- Workflows
- Dynamic Link and After Effects
- Keyboard shortcuts reference
- General (keyboard shortcuts)
- Projects (keyboard shortcuts)
- Preferences (keyboard shortcuts)
- Panels, viewers, workspaces, and windows (keyboard shortcuts)
- Activating tools (keyboard shortcuts)
- Compositions and the work area (keyboard shortcuts)
- Time navigation (keyboard shortcuts)
- Previews (keyboard shortcuts)
- Views (keyboard shortcuts)
- Footage (keyboard shortcuts)
- Effects and animation presets (keyboard shortcuts)
- Layers (keyboard shortcuts)
- Showing properties and groups in the Timeline panel (keyboard shortcuts)
- Showing properties in the Effect Controls panel (keyboard shortcuts)
- Modifying layer properties (keyboard shortcuts)
- 3D layers (keyboard shortcuts)
- Keyframes and the Graph Editor (keyboard shortcuts)
- Text (keyboard shortcuts)
- Masks (keyboard shortcuts)
- Paint tools (keyboard shortcuts)
- Shape layers (keyboard shortcuts)
- Markers (keyboard shortcuts)
- Motion tracking (keyboard shortcuts)
- Saving, exporting, and rendering (keyboard shortcuts)
- Keyboard shortcuts graphic
- Working with After Effects and other applications
- After Effects keyboard shortcuts
- Workspaces, panels, and viewers
- Preferences
- The Preferences menu
- Reset preferences
- Reveal preferences
- General preferences
- Previews preferences
- Display preferences
- Import preferences
- Output preferences
- Grids & Guides preferences
- Labels preferences
- Media & Disk Cache preferences
- Video Preview preferences
- Appearance preferences
- Auto-Save preferences
- Memory & Multiprocessing preferences
- Audio Hardware and Audio Output Mapping preferences
- Sync Settings
- Migrate settings from previous versions
- The Preferences menu
- Sync Settings
- Modify keyboard shortcuts
- Chapter 3: Projects and compositions
- Projects
- Precomposing, nesting, and pre-rendering
- Composition basics
- Timecode and time display units
- Chapter 4: Importing footage
- Importing and interpreting footage items
- Importing and interpreting video and audio
- Preparing and importing 3D image files
- Working with footage items
- CINEMA 4D and Cineware
- Importing from After Effects and Adobe Premiere Pro
- Preparing and importing still images
- Chapter 5: Layers and properties
- Creating layers
- Selecting and arranging layers
- Select layers
- Change the stacking order for selected layers
- Coordinate systems: composition space and layer space
- Move layers in space
- Separate dimensions of Position to animate components individually
- Align or distribute layers in 2D space
- Trim, extend, or slip-edit a layer
- Remove part of the duration of a layer
- Place or move a layer in time
- Arrange layers in time sequentially
- Copy or duplicate a layer
- Split a layer
- Auto-Orientation options
- Additional resources for selecting and arranging layers
- Managing layers
- View and change layer information
- Layer switches and columns in the Timeline panel
- Toggle visibility or influence of a layer or property group
- Solo a layer
- Lock or unlock a layer
- Color labels for layers, compositions, and footage items
- Show and hide layers in the Timeline panel
- Layer image quality and subpixel positioning
- Continuously rasterize a layer containing vector graphics
- Layer properties
- Blending modes and layer styles
- 3D layers
- Cameras, lights, and points of interest
- Chapter 6: Views and previews
- Previewing
- Preview video and audio
- Use preview to play video and audio
- Configure Preview behaviors
- Stop a Preview
- Using Preview Shortcut to stop a Preview
- Using the Play/Stop button to stop a Preview
- Default preview settings
- Loop options for previews
- Preview only audio
- Manually preview (scrub) video and audio
- Audio panel options
- Additional tips and options for previewing
- Move the current-time indicator (CTI)
- Zoom in or out in time for a composition
- Choose a viewer to always preview
- Preview modes and Viewer Quality preferences
- Region of interest (ROI)
- Work area
- Snapshots
- Preview on an external video monitor
- Preview video and audio
- Modifying and using views
- Video preview with Mercury Transmit
- Previewing
- Chapter 7: Animation and Keyframes
- Face Tracking
- Animation basics
- Setting, selecting, and deleting keyframes
- Editing, moving, and copying keyframes
- Assorted animation tools
- Tracking and stabilizing motion
- Speed
- Animating with Puppet tools
- Tracking 3D camera movement
- 3D camera tracker effect
- Analyzing footage and extracting camera motion
- Attaching content into a scene containing a solved camera
- Moving the target to attach content to different location
- Resizing a target
- Selecting and deselecting track points
- Deleting unwanted track points
- Creating a "shadow catcher" layer
- Effects controls for the 3D camera tracker
- Ground plane and origin in 3D Camera Tracker effect
- Auto-delete Points Across Time
- 3D camera tracker effect
- Time-stretching and time-remapping
- Time-stretch a layer
- Reverse the playback direction of a layer
- Reverse keyframes without reversing layer playback
- Time-remapping
- Time-remapping overview
- Time-remap a layer
- Freeze the current frame for the duration of the layer
- Freeze the first frame without changing the speed
- Freeze a frame in the middle of the duration of a layer
- Remap time using the Graph Editor
- Remap time in a Layer panel
- Time-remap audio pitch
- Change the pitch of an audio layer
- Remove clicks from new In and Out points
- Online resources for time-remapping
- Frame blending
- Keyframe interpolation
- Chapter 8: Color
- Creative Cloud Libraries
- Color basics
- Color management
- Color management and color profiles
- Calibrate and profile your monitor
- Choose a working color space and enable color management
- Linearize working space and enable linear blending
- Interpret a footage item by assigning an input color profile
- Assign an output color profile
- Enable or disable display color management
- Simulate how colors will appear on a different output device
- Broadcast-safe colors
- Chapter 9: Drawing, painting, and paths
- Paint tools: Brush, Clone Stamp, and Eraser
- Overview of shape layers, paths, and vector graphics
- Creating shapes and masks
- Creating masks
- Create a rectangular or elliptical mask numerically
- Create a mask from channel values with Auto-trace
- Creating shapes and shape layers
- Vector Art Footage-to-Shape Conversion | CC, CS6
- Create a shape or mask by dragging with shape tools
- Create a Bezier shape or mask using the Pen tool
- Create a shape or mask the size of the layer
- Create shapes or masks from text characters
- Copy a path from Illustrator, Photoshop, or Fireworks
- Create a mask or shape from a motion path
- Duplicate a shape group while transforming
- Creating Contrasting Color for Mask Path
- Managing and animating shape paths and masks
- Rotoscoping introduction and resources
- View mask paths and shapes
- Select shape paths, shapes, and shape groups
- Select masks, segments, and vertices
- Lock or unlock masks
- Move vertices in free-transform mode
- Convert a path between manual Bezier and RotoBezier
- Modify a Bezier mask path or shape path
- Change a mask path numerically
- Designate the first vertex for a Bezier path
- Animate a mask path with Smart Mask Interpolation
- Move a mask or pan a layer behind a mask
- Shape attributes, paint operations, and path operations for shape layers
- Mask Tracking
- Compositing Options and Mask Reference
- Chapter 10: Text
- Live Text Templates
- Creating and editing text layers
- About text layers
- Best practices for creating text and vector graphics for video
- Scripts and expressions for working with text
- Enter point text
- Enter paragraph text
- Select and edit text in text layers
- Resize a text bounding box
- Move a text layer
- Convert point or paragraph text
- Change the direction of text
- Convert text from Photoshop to editable text
- Formatting characters and the Character panel
- Examples and resources for text animation
- Example: Animate characters with per-character 3D properties
- Example: Offset characters
- Example: Animate characters with the Wiggly selector
- Example: Animate text tracking
- Example: Use selectors to animate specific words
- Example: Create a write-on animation
- Example: Animate text with multiple selectors
- Example: Animate text position with expressions
- Example: Animate text as a timecode display
- Animating text
- Extruding text and shape layers
- About beveled and extruded text and shape layers
- The Ray-traced 3D renderer
- Limitations of the Ray-traced 3D renderer
- Additional features of a Ray-traced 3D composition
- Creating a Ray-traced 3D composition
- Previewing Ray-traced 3D compositions
- Monitoring and changing the composition renderer
- Creating beveled and extruded text and shape layers
- Beveled and extruded vector artwork
- Bending a footage layer
- New material options
- Environment layer
- Formatting paragraphs and the Paragraph panel
- Chapter 11: Transparency and compositing
- Roto Brush, Refine Edge, and Refine Matte effects | CC
- Alpha channels, masks, and mattes
- About alpha channels and mattes
- About masks
- Copy, cut, save, reuse, and delete masks
- Control mask path color
- Mask modes
- Expand or contract the edges of a mask
- Soften (feather) the edges of a mask
- Variable-width mask feathering | CC, CS6
- Track mattes and traveling mattes
- Preserve underlying transparency during compositing
- Resources for Imagineer mocha shape for After Effects
- Compositing and transparency overview and resources
- Keying
- Chapter 12: Effects and animation presets
- Effects and animation presets overview
- Animation presets overview and resources
- Effects overview and resources
- Resources for Cycore FX (CC) effects
- Compound effects and control layers
- Effects with a Comp Camera attribute
- Effect Controls panel
- Effects and Presets panel
- Apply an effect or animation preset
- Delete or disable effects and animation presets
- Remove an effect or animation preset
- Effect control points
- Randomness and random seeds
- Animation preset list
- Detail-preserving Upscale effect
- Effect list
- 3D Channel effects
- Blur & Sharpen effects
- Channel effects
- Color Correction effects
- Distort effects
- Expression Controls effects
- Generate effects
- Keying effects
- Matte effects
- Noise & Grain effects
- Perspective effects
- Simulation effects
- Stylize effects
- Text effects
- Time effects
- Transition effects
- Utility effects
- Obsolete effects
- Audio effects
- Blur and Sharpen effects
- About Blur & Sharpen effects
- Bilateral Blur effect
- Box Blur effect
- Camera Lens Blur effect
- Channel Blur effect
- Compound Blur effect
- Directional Blur effect
- Fast Blur effect
- Gaussian Blur effect
- Lens Blur effect
- Radial Blur effect
- Reduce Interlace Flicker effect
- Sharpen effect
- Smart Blur effect
- Unsharp Mask effect
- Keying effects
- Transition effects
- Noise and Grain effects
- Work with Grain effects
- Work with noise samples in Grain effects
- Working with added or matched grain
- Add Grain effect
- Dust & Scratches effect
- Fractal Noise effect
- Match Grain effect
- Median effect
- Noise effect
- Noise Alpha effect
- Noise HLS effect and Noise HLS Auto effect
- Remove Grain effect
- Turbulent Noise effect
- Channel effects
- Distort effects
- Additional resources for Distort effects
- Resources for Digieffects FreeForm
- Bezier Warp effect
- Bulge effect
- Corner Pin effect
- Displacement Map effect
- Liquify effect
- Magnify effect
- Mesh Warp effect
- Mirror effect
- Offset effect
- Optics Compensation effect
- Polar Coordinates effect
- Reshape effect
- Ripple effect
- Smear effect
- Spherize effect
- Transform effect
- Turbulent Displace effect
- Twirl effect
- Warp effect
- Warp Stabilizer effect (CS5.5 and later)
- Wave Warp effect
- Utility effects
- Color Correction effects
- Auto Color and Auto Contrast effects
- Auto Levels effect
- Black & White effect
- Brightness & Contrast effect
- Broadcast Colors effect
- Change Color effect
- Change To Color effect
- Channel Mixer effect
- Color Balance effect
- Color Balance (HLS) effect
- Color Link effect
- Color Stabilizer effect
- Colorama effect
- Curves effect
- Equalize effect
- Exposure effect
- Gamma/Pedestal/Gain effect
- Hue/Saturation effect
- Leave Color effect
- Levels effect
- Levels (Individual Controls) effect
- Photo Filter effect
- PS Arbitrary Map effect
- Selective Color effect
- Shadow/Highlight effect
- Tint effect
- Tritone effect
- Vibrance effect
- Simulation effects
- Common Lighting controls and Material controls
- Card Dance effect
- Caustics effect
- Foam effect
- Particle Playground effect
- Use Particle Playground
- Particle content and particle generators
- Cannon controls
- Grid controls
- Layer Exploder and Particle Exploder
- Layer Map controls
- Replace default Cannon particles with text
- Replace default Grid particles with text
- Using Selection Text values to differently affect subsets of text
- Changing a particle over its lifespan
- Gravity controls
- Repel controls
- Wall controls
- Affects controls
- Use Particle Playground Property Mapper controls
- Min and Max controls for Property Mappers
- Operator controls for the Ephemeral Property Mapper
- Control layers for Particle Playground
- Improving performance with Particle Playground
- Shatter effect
- Wave World effect
- Obsolete effects
- Generate effects
- 4-Color Gradient effect
- Advanced Lightning effect
- Audio Spectrum effect
- Audio Waveform effect
- Beam effect
- Cell Pattern effect
- Checkerboard effect
- Circle effect
- Ellipse effect
- Eyedropper Fill effect
- Fill effect
- Fractal effect
- Gradient Ramp effect | CC
- Grid effect
- Lens Flare effect
- Paint Bucket effect
- Radio Waves effect
- Stroke effect
- Vegas effect
- Write-on effect
- Matte effects
- 3D Channel effects
- Stylize effects
- Text effects
- The Rolling Shutter Repair effect
- Perspective effects
- Effects and animation presets overview
- Chapter 13: Markers
- Chapter 14: Memory, storage, performance
- Improve performance
- Improve performance before starting After Effects
- Improve performance by optimizing memory, cache, and multiprocessing settings
- Improve performance using Global Performance Cache | CC, CS6
- Improve performance by simplifying your project
- Improve performance by modifying screen output
- Improve performance when using effects
- GPU (CUDA, OpenGL) features
- Memory and storage
- Memory (RAM) usage in 64-bit After Effects
- Advantages of a 64-bit application and 64-bit address space
- Memory & Multiprocessing preferences
- Render multiple frames simultaneously
- When After Effects temporarily disables multiprocessing with Render Multiple Frames Simultaneously
- Memory pool shared between After Effects, Premiere Pro, and Adobe Media Encoder
- Memory & Multiprocessing Details dialog box
- Memory (RAM) requirements for rendering
- Purging memory (RAM)
- Troubleshooting memory issues
- Online resources about memory and multiprocessing
- Storage requirements for output files
- Caches: RAM cache, disk cache, and media cache
- The global performance cache
- Memory (RAM) usage in 64-bit After Effects
- Improve performance
- Chapter 15: Expressions and automation
- Plug-ins
- Automation
- Expression basics
- About expressions
- Add, edit, and remove expressions
- Example: Use the expression language reference to write an expression
- Show expressions and the expression graph
- Writing expressions for source text
- Add comments to an expression
- Save and reuse expressions
- Expression Controls effects
- Convert an expression to keyframes
- The expression language
- Expression errors
- Expression language reference
- Global objects, attributes, and methods (expression reference)
- Time conversion methods (expression reference)
- Vector Math methods (expression reference)
- Random Numbers methods (expression reference)
- Interpolation methods (expression reference)
- Color Conversion methods (expression reference)
- Other Math methods (expression reference)
- Comp attributes and methods (expression reference)
- Footage attributes and methods (expression reference)
- Layer Sub-objects attributes and methods (expression reference)
- Layer General attributes and methods (expression reference)
- Layer Properties attributes and methods (expression reference)
- Layer 3D attributes and methods (expression reference)
- Layer Space Transforms methods (expression reference)
- Camera attributes and methods (expression reference)
- Light attributes and methods (expression reference)
- Effect attributes and methods (expression reference)
- Mask attributes and methods (expression reference)
- Property attributes and methods (expression reference)
- Key attributes and methods (expression reference)
- MarkerKey attributes (expression reference)
- Expression examples
- Online resources for expression examples
- Expression example: Make a layer revolve in a circle
- Expression example: Rotate the hands of a clock
- Expression example: Position one layer between two others
- Expression example: Create a trail of images
- Expression example: Create a bulge between two layers
- Expression example: Fade opacity of a 3D layer based on distance from camera
- Expression example: Make a 3D layer invisible if facing away from camera
- Expression example: Flip layer horizontally if facing away from camera
- Expression example: Animate scale at each layer marker
- Expression example: Start or stop wiggle at specific time
- Expression example: Match camera focal plane to another layer
- Scripts
- Chapter 16: Rendering and Exporting
- Basics of rendering and exporting
- Rendering and exporting overview
- Render and export with the Render Queue panel
- Manage render items
- Render and export a movie using the render queue
- Render item statuses
- Manage render items and change render statuses
- Pause or stop rendering
- Information shown for current render operations
- Change the render-complete sounds
- Online resources for rendering and exporting with the render queue
- Render and export with Adobe Media Encoder
- Supported output formats
- Collect files in one location
- Specify filenames and locations for rendered output
- Render settings
- Output modules and output module settings
- Encoding and compression options for movies
- QuickTime (MOV) encoding and compression settings
- Post-render actions
- Render with OpenGL
- Supported GPUs for ray-traced 3D renderer
- Using the GoPro CineForm codec in After Effects
- Rendering and exporting still images and still-image sequences
- Automated rendering and network rendering
- Export an After Effects project as an Adobe Premiere Pro project
- Rendering and exporting for Flash Professional and Flash Player
- Converting movies
- Basics of rendering and exporting
- Chapter 17: System Requirements
Adobe® Aer Eects®
CC
Help


iii
Last updated 6/8/2015
Contents
Chapter 1: What's new
New features summary . . . . . . . . . . . . . . . . . . . . . . . . . . . . . . . . . . . . . . . . . . . . . . . . . . . . . . . . . . . . . . . . . . . . . . . . . . . . . . . . . . . . . . . . . . . . . . . . .1
Chapter 2: Workspace and workflow
Planning and setup . . . . . . . . . . . . . . . . . . . . . . . . . . . . . . . . . . . . . . . . . . . . . . . . . . . . . . . . . . . . . . . . . . . . . . . . . . . . . . . . . . . . . . . . . . . . . . . . . . . . .6
Setup and installation . . . . . . . . . . . . . . . . . . . . . . . . . . . . . . . . . . . . . . . . . . . . . . . . . . . . . . . . . . . . . . . . . . . . . . . . . . . . . . . . . . . . . . . . . . . . . . . . 10
General user interface items . . . . . . . . . . . . . . . . . . . . . . . . . . . . . . . . . . . . . . . . . . . . . . . . . . . . . . . . . . . . . . . . . . . . . . . . . . . . . . . . . . . . . . . . . . 11
Workflows . . . . . . . . . . . . . . . . . . . . . . . . . . . . . . . . . . . . . . . . . . . . . . . . . . . . . . . . . . . . . . . . . . . . . . . . . . . . . . . . . . . . . . . . . . . . . . . . . . . . . . . . . . . . 14
Dynamic Link and After Effects . . . . . . . . . . . . . . . . . . . . . . . . . . . . . . . . . . . . . . . . . . . . . . . . . . . . . . . . . . . . . . . . . . . . . . . . . . . . . . . . . . . . . . . . 17
Keyboard shortcuts reference . . . . . . . . . . . . . . . . . . . . . . . . . . . . . . . . . . . . . . . . . . . . . . . . . . . . . . . . . . . . . . . . . . . . . . . . . . . . . . . . . . . . . . . . . 20
Working with After Effects and other applications . . . . . . . . . . . . . . . . . . . . . . . . . . . . . . . . . . . . . . . . . . . . . . . . . . . . . . . . . . . . . . . . . . . . . 37
After Effects keyboard shortcuts . . . . . . . . . . . . . . . . . . . . . . . . . . . . . . . . . . . . . . . . . . . . . . . . . . . . . . . . . . . . . . . . . . . . . . . . . . . . . . . . . . . . . . 42
Workspaces, panels, and viewers . . . . . . . . . . . . . . . . . . . . . . . . . . . . . . . . . . . . . . . . . . . . . . . . . . . . . . . . . . . . . . . . . . . . . . . . . . . . . . . . . . . . . . 42
Preferences . . . . . . . . . . . . . . . . . . . . . . . . . . . . . . . . . . . . . . . . . . . . . . . . . . . . . . . . . . . . . . . . . . . . . . . . . . . . . . . . . . . . . . . . . . . . . . . . . . . . . . . . . . 49
Sync Settings . . . . . . . . . . . . . . . . . . . . . . . . . . . . . . . . . . . . . . . . . . . . . . . . . . . . . . . . . . . . . . . . . . . . . . . . . . . . . . . . . . . . . . . . . . . . . . . . . . . . . . . . . 52
Modify keyboard shortcuts . . . . . . . . . . . . . . . . . . . . . . . . . . . . . . . . . . . . . . . . . . . . . . . . . . . . . . . . . . . . . . . . . . . . . . . . . . . . . . . . . . . . . . . . . . . 55
Chapter 3: Projects and compositions
Projects . . . . . . . . . . . . . . . . . . . . . . . . . . . . . . . . . . . . . . . . . . . . . . . . . . . . . . . . . . . . . . . . . . . . . . . . . . . . . . . . . . . . . . . . . . . . . . . . . . . . . . . . . . . . . . 56
Precomposing, nesting, and pre-rendering . . . . . . . . . . . . . . . . . . . . . . . . . . . . . . . . . . . . . . . . . . . . . . . . . . . . . . . . . . . . . . . . . . . . . . . . . . . . 59
Composition basics . . . . . . . . . . . . . . . . . . . . . . . . . . . . . . . . . . . . . . . . . . . . . . . . . . . . . . . . . . . . . . . . . . . . . . . . . . . . . . . . . . . . . . . . . . . . . . . . . . . 65
Timecode and time display units . . . . . . . . . . . . . . . . . . . . . . . . . . . . . . . . . . . . . . . . . . . . . . . . . . . . . . . . . . . . . . . . . . . . . . . . . . . . . . . . . . . . . . 71
Chapter 4: Importing footage
Importing and interpreting footage items . . . . . . . . . . . . . . . . . . . . . . . . . . . . . . . . . . . . . . . . . . . . . . . . . . . . . . . . . . . . . . . . . . . . . . . . . . . . . 73
Importing and interpreting video and audio . . . . . . . . . . . . . . . . . . . . . . . . . . . . . . . . . . . . . . . . . . . . . . . . . . . . . . . . . . . . . . . . . . . . . . . . . . 87
Preparing and importing 3D image files . . . . . . . . . . . . . . . . . . . . . . . . . . . . . . . . . . . . . . . . . . . . . . . . . . . . . . . . . . . . . . . . . . . . . . . . . . . . . . . 92
Working with footage items . . . . . . . . . . . . . . . . . . . . . . . . . . . . . . . . . . . . . . . . . . . . . . . . . . . . . . . . . . . . . . . . . . . . . . . . . . . . . . . . . . . . . . . . . . 96
CINEMA 4D and Cineware . . . . . . . . . . . . . . . . . . . . . . . . . . . . . . . . . . . . . . . . . . . . . . . . . . . . . . . . . . . . . . . . . . . . . . . . . . . . . . . . . . . . . . . . . . . 101
Importing from After Effects and Adobe Premiere Pro . . . . . . . . . . . . . . . . . . . . . . . . . . . . . . . . . . . . . . . . . . . . . . . . . . . . . . . . . . . . . . . . 109
Preparing and importing still images . . . . . . . . . . . . . . . . . . . . . . . . . . . . . . . . . . . . . . . . . . . . . . . . . . . . . . . . . . . . . . . . . . . . . . . . . . . . . . . . . 113
Chapter 5: Layers and properties
Creating layers . . . . . . . . . . . . . . . . . . . . . . . . . . . . . . . . . . . . . . . . . . . . . . . . . . . . . . . . . . . . . . . . . . . . . . . . . . . . . . . . . . . . . . . . . . . . . . . . . . . . . . 122
Selecting and arranging layers . . . . . . . . . . . . . . . . . . . . . . . . . . . . . . . . . . . . . . . . . . . . . . . . . . . . . . . . . . . . . . . . . . . . . . . . . . . . . . . . . . . . . . . 127
Managing layers . . . . . . . . . . . . . . . . . . . . . . . . . . . . . . . . . . . . . . . . . . . . . . . . . . . . . . . . . . . . . . . . . . . . . . . . . . . . . . . . . . . . . . . . . . . . . . . . . . . . . 137
Layer properties . . . . . . . . . . . . . . . . . . . . . . . . . . . . . . . . . . . . . . . . . . . . . . . . . . . . . . . . . . . . . . . . . . . . . . . . . . . . . . . . . . . . . . . . . . . . . . . . . . . . . 142
Blending modes and layer styles . . . . . . . . . . . . . . . . . . . . . . . . . . . . . . . . . . . . . . . . . . . . . . . . . . . . . . . . . . . . . . . . . . . . . . . . . . . . . . . . . . . . . 154
3D layers . . . . . . . . . . . . . . . . . . . . . . . . . . . . . . . . . . . . . . . . . . . . . . . . . . . . . . . . . . . . . . . . . . . . . . . . . . . . . . . . . . . . . . . . . . . . . . . . . . . . . . . . . . . . 161
Cameras, lights, and points of interest . . . . . . . . . . . . . . . . . . . . . . . . . . . . . . . . . . . . . . . . . . . . . . . . . . . . . . . . . . . . . . . . . . . . . . . . . . . . . . . . 166

iv
AFTER EFFECTS
Contents
Last updated 6/8/2015
Chapter 6: Views and previews
Previewing . . . . . . . . . . . . . . . . . . . . . . . . . . . . . . . . . . . . . . . . . . . . . . . . . . . . . . . . . . . . . . . . . . . . . . . . . . . . . . . . . . . . . . . . . . . . . . . . . . . . . . . . . . 178
Modifying and using views . . . . . . . . . . . . . . . . . . . . . . . . . . . . . . . . . . . . . . . . . . . . . . . . . . . . . . . . . . . . . . . . . . . . . . . . . . . . . . . . . . . . . . . . . . 190
Video preview with Mercury Transmit . . . . . . . . . . . . . . . . . . . . . . . . . . . . . . . . . . . . . . . . . . . . . . . . . . . . . . . . . . . . . . . . . . . . . . . . . . . . . . . . 196
Chapter 7: Animation and Keyframes
Face Tracking . . . . . . . . . . . . . . . . . . . . . . . . . . . . . . . . . . . . . . . . . . . . . . . . . . . . . . . . . . . . . . . . . . . . . . . . . . . . . . . . . . . . . . . . . . . . . . . . . . . . . . . . 198
Animation basics . . . . . . . . . . . . . . . . . . . . . . . . . . . . . . . . . . . . . . . . . . . . . . . . . . . . . . . . . . . . . . . . . . . . . . . . . . . . . . . . . . . . . . . . . . . . . . . . . . . . 207
Setting, selecting, and deleting keyframes . . . . . . . . . . . . . . . . . . . . . . . . . . . . . . . . . . . . . . . . . . . . . . . . . . . . . . . . . . . . . . . . . . . . . . . . . . . 211
Editing, moving, and copying keyframes . . . . . . . . . . . . . . . . . . . . . . . . . . . . . . . . . . . . . . . . . . . . . . . . . . . . . . . . . . . . . . . . . . . . . . . . . . . . . 215
Assorted animation tools . . . . . . . . . . . . . . . . . . . . . . . . . . . . . . . . . . . . . . . . . . . . . . . . . . . . . . . . . . . . . . . . . . . . . . . . . . . . . . . . . . . . . . . . . . . . 220
Tracking and stabilizing motion . . . . . . . . . . . . . . . . . . . . . . . . . . . . . . . . . . . . . . . . . . . . . . . . . . . . . . . . . . . . . . . . . . . . . . . . . . . . . . . . . . . . . . 228
Speed . . . . . . . . . . . . . . . . . . . . . . . . . . . . . . . . . . . . . . . . . . . . . . . . . . . . . . . . . . . . . . . . . . . . . . . . . . . . . . . . . . . . . . . . . . . . . . . . . . . . . . . . . . . . . . . 244
Animating with Puppet tools . . . . . . . . . . . . . . . . . . . . . . . . . . . . . . . . . . . . . . . . . . . . . . . . . . . . . . . . . . . . . . . . . . . . . . . . . . . . . . . . . . . . . . . . 251
Tracking 3D camera movement . . . . . . . . . . . . . . . . . . . . . . . . . . . . . . . . . . . . . . . . . . . . . . . . . . . . . . . . . . . . . . . . . . . . . . . . . . . . . . . . . . . . . . 258
Time-stretching and time-remapping . . . . . . . . . . . . . . . . . . . . . . . . . . . . . . . . . . . . . . . . . . . . . . . . . . . . . . . . . . . . . . . . . . . . . . . . . . . . . . . . 262
Keyframe interpolation . . . . . . . . . . . . . . . . . . . . . . . . . . . . . . . . . . . . . . . . . . . . . . . . . . . . . . . . . . . . . . . . . . . . . . . . . . . . . . . . . . . . . . . . . . . . . . 271
Chapter 8: Color
Creative Cloud Libraries . . . . . . . . . . . . . . . . . . . . . . . . . . . . . . . . . . . . . . . . . . . . . . . . . . . . . . . . . . . . . . . . . . . . . . . . . . . . . . . . . . . . . . . . . . . . . 278
Color basics . . . . . . . . . . . . . . . . . . . . . . . . . . . . . . . . . . . . . . . . . . . . . . . . . . . . . . . . . . . . . . . . . . . . . . . . . . . . . . . . . . . . . . . . . . . . . . . . . . . . . . . . . 280
Color management . . . . . . . . . . . . . . . . . . . . . . . . . . . . . . . . . . . . . . . . . . . . . . . . . . . . . . . . . . . . . . . . . . . . . . . . . . . . . . . . . . . . . . . . . . . . . . . . . . 291
Chapter 9: Drawing, painting, and paths
Paint tools: Brush, Clone Stamp, and Eraser . . . . . . . . . . . . . . . . . . . . . . . . . . . . . . . . . . . . . . . . . . . . . . . . . . . . . . . . . . . . . . . . . . . . . . . . . . . 303
Overview of shape layers, paths, and vector graphics . . . . . . . . . . . . . . . . . . . . . . . . . . . . . . . . . . . . . . . . . . . . . . . . . . . . . . . . . . . . . . . . . 312
Creating shapes and masks . . . . . . . . . . . . . . . . . . . . . . . . . . . . . . . . . . . . . . . . . . . . . . . . . . . . . . . . . . . . . . . . . . . . . . . . . . . . . . . . . . . . . . . . . . 318
Managing and animating shape paths and masks . . . . . . . . . . . . . . . . . . . . . . . . . . . . . . . . . . . . . . . . . . . . . . . . . . . . . . . . . . . . . . . . . . . . 329
Shape attributes, paint operations, and path operations for shape layers . . . . . . . . . . . . . . . . . . . . . . . . . . . . . . . . . . . . . . . . . . . . . . 340
Mask Tracking . . . . . . . . . . . . . . . . . . . . . . . . . . . . . . . . . . . . . . . . . . . . . . . . . . . . . . . . . . . . . . . . . . . . . . . . . . . . . . . . . . . . . . . . . . . . . . . . . . . . . . . 347
Compositing Options and Mask Reference . . . . . . . . . . . . . . . . . . . . . . . . . . . . . . . . . . . . . . . . . . . . . . . . . . . . . . . . . . . . . . . . . . . . . . . . . . . 349
Chapter 10: Text
Live Text Templates . . . . . . . . . . . . . . . . . . . . . . . . . . . . . . . . . . . . . . . . . . . . . . . . . . . . . . . . . . . . . . . . . . . . . . . . . . . . . . . . . . . . . . . . . . . . . . . . . . 352
Creating and editing text layers . . . . . . . . . . . . . . . . . . . . . . . . . . . . . . . . . . . . . . . . . . . . . . . . . . . . . . . . . . . . . . . . . . . . . . . . . . . . . . . . . . . . . . 353
Formatting characters and the Character panel . . . . . . . . . . . . . . . . . . . . . . . . . . . . . . . . . . . . . . . . . . . . . . . . . . . . . . . . . . . . . . . . . . . . . . . 359
Examples and resources for text animation . . . . . . . . . . . . . . . . . . . . . . . . . . . . . . . . . . . . . . . . . . . . . . . . . . . . . . . . . . . . . . . . . . . . . . . . . . . 365
Animating text . . . . . . . . . . . . . . . . . . . . . . . . . . . . . . . . . . . . . . . . . . . . . . . . . . . . . . . . . . . . . . . . . . . . . . . . . . . . . . . . . . . . . . . . . . . . . . . . . . . . . . 371
Extruding text and shape layers . . . . . . . . . . . . . . . . . . . . . . . . . . . . . . . . . . . . . . . . . . . . . . . . . . . . . . . . . . . . . . . . . . . . . . . . . . . . . . . . . . . . . . 382
Formatting paragraphs and the Paragraph panel . . . . . . . . . . . . . . . . . . . . . . . . . . . . . . . . . . . . . . . . . . . . . . . . . . . . . . . . . . . . . . . . . . . . . 387
Chapter 11: Transparency and compositing
Roto Brush, Refine Edge, and Refine Matte effects | CC . . . . . . . . . . . . . . . . . . . . . . . . . . . . . . . . . . . . . . . . . . . . . . . . . . . . . . . . . . . . . . . . 390
Alpha channels, masks, and mattes . . . . . . . . . . . . . . . . . . . . . . . . . . . . . . . . . . . . . . . . . . . . . . . . . . . . . . . . . . . . . . . . . . . . . . . . . . . . . . . . . . 401
Compositing and transparency overview and resources . . . . . . . . . . . . . . . . . . . . . . . . . . . . . . . . . . . . . . . . . . . . . . . . . . . . . . . . . . . . . . 412
Keying . . . . . . . . . . . . . . . . . . . . . . . . . . . . . . . . . . . . . . . . . . . . . . . . . . . . . . . . . . . . . . . . . . . . . . . . . . . . . . . . . . . . . . . . . . . . . . . . . . . . . . . . . . . . . . 413

v
AFTER EFFECTS
Contents
Last updated 6/8/2015
Chapter 12: Effects and animation presets
Effects and animation presets overview . . . . . . . . . . . . . . . . . . . . . . . . . . . . . . . . . . . . . . . . . . . . . . . . . . . . . . . . . . . . . . . . . . . . . . . . . . . . . . 418
Detail-preserving Upscale effect . . . . . . . . . . . . . . . . . . . . . . . . . . . . . . . . . . . . . . . . . . . . . . . . . . . . . . . . . . . . . . . . . . . . . . . . . . . . . . . . . . . . . 446
Effect list . . . . . . . . . . . . . . . . . . . . . . . . . . . . . . . . . . . . . . . . . . . . . . . . . . . . . . . . . . . . . . . . . . . . . . . . . . . . . . . . . . . . . . . . . . . . . . . . . . . . . . . . . . . . 446
Audio effects . . . . . . . . . . . . . . . . . . . . . . . . . . . . . . . . . . . . . . . . . . . . . . . . . . . . . . . . . . . . . . . . . . . . . . . . . . . . . . . . . . . . . . . . . . . . . . . . . . . . . . . . 455
Blur and Sharpen effects . . . . . . . . . . . . . . . . . . . . . . . . . . . . . . . . . . . . . . . . . . . . . . . . . . . . . . . . . . . . . . . . . . . . . . . . . . . . . . . . . . . . . . . . . . . . . 458
Keying effects . . . . . . . . . . . . . . . . . . . . . . . . . . . . . . . . . . . . . . . . . . . . . . . . . . . . . . . . . . . . . . . . . . . . . . . . . . . . . . . . . . . . . . . . . . . . . . . . . . . . . . . 465
Transition effects . . . . . . . . . . . . . . . . . . . . . . . . . . . . . . . . . . . . . . . . . . . . . . . . . . . . . . . . . . . . . . . . . . . . . . . . . . . . . . . . . . . . . . . . . . . . . . . . . . . . 477
Noise and Grain effects . . . . . . . . . . . . . . . . . . . . . . . . . . . . . . . . . . . . . . . . . . . . . . . . . . . . . . . . . . . . . . . . . . . . . . . . . . . . . . . . . . . . . . . . . . . . . . 483
Channel effects . . . . . . . . . . . . . . . . . . . . . . . . . . . . . . . . . . . . . . . . . . . . . . . . . . . . . . . . . . . . . . . . . . . . . . . . . . . . . . . . . . . . . . . . . . . . . . . . . . . . . . 504
Distort effects . . . . . . . . . . . . . . . . . . . . . . . . . . . . . . . . . . . . . . . . . . . . . . . . . . . . . . . . . . . . . . . . . . . . . . . . . . . . . . . . . . . . . . . . . . . . . . . . . . . . . . . 510
Utility effects . . . . . . . . . . . . . . . . . . . . . . . . . . . . . . . . . . . . . . . . . . . . . . . . . . . . . . . . . . . . . . . . . . . . . . . . . . . . . . . . . . . . . . . . . . . . . . . . . . . . . . . . 527
Color Correction effects . . . . . . . . . . . . . . . . . . . . . . . . . . . . . . . . . . . . . . . . . . . . . . . . . . . . . . . . . . . . . . . . . . . . . . . . . . . . . . . . . . . . . . . . . . . . . . 531
Simulation effects . . . . . . . . . . . . . . . . . . . . . . . . . . . . . . . . . . . . . . . . . . . . . . . . . . . . . . . . . . . . . . . . . . . . . . . . . . . . . . . . . . . . . . . . . . . . . . . . . . . 548
Obsolete effects . . . . . . . . . . . . . . . . . . . . . . . . . . . . . . . . . . . . . . . . . . . . . . . . . . . . . . . . . . . . . . . . . . . . . . . . . . . . . . . . . . . . . . . . . . . . . . . . . . . . . 579
Generate effects . . . . . . . . . . . . . . . . . . . . . . . . . . . . . . . . . . . . . . . . . . . . . . . . . . . . . . . . . . . . . . . . . . . . . . . . . . . . . . . . . . . . . . . . . . . . . . . . . . . . . 586
Matte effects . . . . . . . . . . . . . . . . . . . . . . . . . . . . . . . . . . . . . . . . . . . . . . . . . . . . . . . . . . . . . . . . . . . . . . . . . . . . . . . . . . . . . . . . . . . . . . . . . . . . . . . . 603
3D Channel effects . . . . . . . . . . . . . . . . . . . . . . . . . . . . . . . . . . . . . . . . . . . . . . . . . . . . . . . . . . . . . . . . . . . . . . . . . . . . . . . . . . . . . . . . . . . . . . . . . . 604
Stylize effects . . . . . . . . . . . . . . . . . . . . . . . . . . . . . . . . . . . . . . . . . . . . . . . . . . . . . . . . . . . . . . . . . . . . . . . . . . . . . . . . . . . . . . . . . . . . . . . . . . . . . . . 610
Text effects . . . . . . . . . . . . . . . . . . . . . . . . . . . . . . . . . . . . . . . . . . . . . . . . . . . . . . . . . . . . . . . . . . . . . . . . . . . . . . . . . . . . . . . . . . . . . . . . . . . . . . . . . . 620
The Rolling Shutter Repair effect . . . . . . . . . . . . . . . . . . . . . . . . . . . . . . . . . . . . . . . . . . . . . . . . . . . . . . . . . . . . . . . . . . . . . . . . . . . . . . . . . . . . . 622
Perspective effects . . . . . . . . . . . . . . . . . . . . . . . . . . . . . . . . . . . . . . . . . . . . . . . . . . . . . . . . . . . . . . . . . . . . . . . . . . . . . . . . . . . . . . . . . . . . . . . . . . 623
Chapter 13: Markers
Layer markers and composition markers . . . . . . . . . . . . . . . . . . . . . . . . . . . . . . . . . . . . . . . . . . . . . . . . . . . . . . . . . . . . . . . . . . . . . . . . . . . . . 628
XMP metadata . . . . . . . . . . . . . . . . . . . . . . . . . . . . . . . . . . . . . . . . . . . . . . . . . . . . . . . . . . . . . . . . . . . . . . . . . . . . . . . . . . . . . . . . . . . . . . . . . . . . . . 632
Chapter 14: Memory, storage, performance
Improve performance . . . . . . . . . . . . . . . . . . . . . . . . . . . . . . . . . . . . . . . . . . . . . . . . . . . . . . . . . . . . . . . . . . . . . . . . . . . . . . . . . . . . . . . . . . . . . . . 638
GPU (CUDA, OpenGL) features . . . . . . . . . . . . . . . . . . . . . . . . . . . . . . . . . . . . . . . . . . . . . . . . . . . . . . . . . . . . . . . . . . . . . . . . . . . . . . . . . . . . . . . 641
Memory and storage . . . . . . . . . . . . . . . . . . . . . . . . . . . . . . . . . . . . . . . . . . . . . . . . . . . . . . . . . . . . . . . . . . . . . . . . . . . . . . . . . . . . . . . . . . . . . . . . 643
Chapter 15: Expressions and automation
Plug-ins . . . . . . . . . . . . . . . . . . . . . . . . . . . . . . . . . . . . . . . . . . . . . . . . . . . . . . . . . . . . . . . . . . . . . . . . . . . . . . . . . . . . . . . . . . . . . . . . . . . . . . . . . . . . . 654
Automation . . . . . . . . . . . . . . . . . . . . . . . . . . . . . . . . . . . . . . . . . . . . . . . . . . . . . . . . . . . . . . . . . . . . . . . . . . . . . . . . . . . . . . . . . . . . . . . . . . . . . . . . . 656
Expression basics . . . . . . . . . . . . . . . . . . . . . . . . . . . . . . . . . . . . . . . . . . . . . . . . . . . . . . . . . . . . . . . . . . . . . . . . . . . . . . . . . . . . . . . . . . . . . . . . . . . . 656
Expression language reference . . . . . . . . . . . . . . . . . . . . . . . . . . . . . . . . . . . . . . . . . . . . . . . . . . . . . . . . . . . . . . . . . . . . . . . . . . . . . . . . . . . . . . . 670
Expression examples . . . . . . . . . . . . . . . . . . . . . . . . . . . . . . . . . . . . . . . . . . . . . . . . . . . . . . . . . . . . . . . . . . . . . . . . . . . . . . . . . . . . . . . . . . . . . . . . 693
Scripts . . . . . . . . . . . . . . . . . . . . . . . . . . . . . . . . . . . . . . . . . . . . . . . . . . . . . . . . . . . . . . . . . . . . . . . . . . . . . . . . . . . . . . . . . . . . . . . . . . . . . . . . . . . . . . 698
Chapter 16: Rendering and Exporting
Basics of rendering and exporting . . . . . . . . . . . . . . . . . . . . . . . . . . . . . . . . . . . . . . . . . . . . . . . . . . . . . . . . . . . . . . . . . . . . . . . . . . . . . . . . . . . 700
Supported GPUs for ray-traced 3D renderer . . . . . . . . . . . . . . . . . . . . . . . . . . . . . . . . . . . . . . . . . . . . . . . . . . . . . . . . . . . . . . . . . . . . . . . . . . 717
Using the GoPro CineForm codec in After Effects . . . . . . . . . . . . . . . . . . . . . . . . . . . . . . . . . . . . . . . . . . . . . . . . . . . . . . . . . . . . . . . . . . . . . 719
Rendering and exporting still images and still-image sequences . . . . . . . . . . . . . . . . . . . . . . . . . . . . . . . . . . . . . . . . . . . . . . . . . . . . . . 722
Automated rendering and network rendering . . . . . . . . . . . . . . . . . . . . . . . . . . . . . . . . . . . . . . . . . . . . . . . . . . . . . . . . . . . . . . . . . . . . . . . . 723
Export an After Effects project as an Adobe Premiere Pro project . . . . . . . . . . . . . . . . . . . . . . . . . . . . . . . . . . . . . . . . . . . . . . . . . . . . . . 730

vi
AFTER EFFECTS
Contents
Last updated 6/8/2015
Rendering and exporting for Flash Professional and Flash Player . . . . . . . . . . . . . . . . . . . . . . . . . . . . . . . . . . . . . . . . . . . . . . . . . . . . . . 731
Converting movies . . . . . . . . . . . . . . . . . . . . . . . . . . . . . . . . . . . . . . . . . . . . . . . . . . . . . . . . . . . . . . . . . . . . . . . . . . . . . . . . . . . . . . . . . . . . . . . . . . 738
Chapter 17: System Requirements
System requirements for After Effects . . . . . . . . . . . . . . . . . . . . . . . . . . . . . . . . . . . . . . . . . . . . . . . . . . . . . . . . . . . . . . . . . . . . . . . . . . . . . . . . 744
1
Last updated 6/8/2015
Chapter 1: What's new
New features summary
Create dynamic, visually stunning motion graphics and visual effects wherever inspiration strikes. After Effects
connects with Creative Cloud mobile and desktop apps seamlessly, allowing your creativity to inspire you — wherever
you are.
Creative Cloud Libraries
New in After Effects CC 2015 | June
The inclusion of Creative Cloud Libraries in After Effects CC 2015 puts all your creative assets right at your finger tips.
All your favorite assets can now be accessed from within the Libraries panel in After Effects.
You can save, access, and reuse assets stored in Creative Cloud Libraries across Adobe's desktop (such as Photoshop,
Illustrator, and more) and mobile apps (such as Adobe Hue CC).
Library sharing makes it easy to collaborate with teams and maintain consistency across projects with common assets
like graphics, colors, Looks, or type styles.
Select Win dow > Libraries to open the Libraries panel in After Effects.
You can also choose assets from the Creative Cloud Market.
For more information about using Creative Cloud Libraries, see .
Integration with Adobe Stock
Adobe Stock is a new service that sells millions of high-quality, royalty-free photos, illustrations, and graphics.
You can search for Adobe Stock content directly from within After Effects, using the Libraries panel (Window >
Libraries) by clicking the Search Adobe Stock button in the panel. You can then purchase a license for an asset you want
to use and include it in your After Effects Library. Or, you can add an unlicensed preview (watermarked) copy to your
Library and purchase a license for it later.
For more information, see Add photos using Adobe Stock .
Changes to Preview workflow
Uninterrupted Preview
Enhanced in After Effects CC 2015 | June 2015
You can now make changes to a project while previewing within After Effects. View design iterations, adjust properties,
and even resize panels without stopping playback of your compositions.

2
What's new
Last updated 6/8/2015
In previous versions of After Effects, after you started a preview in a composition, layer, or footage viewer, clicking
anywhere in the user interface would stop preview. Previews will now continue, until you stop the preview manually.
For more information, see Previewing.
Unified and Configurable Preview
Enhanced in After Effects CC 2015 | June 2015
You can now customize Preview behaviors using the updated Preview panel. If you're new to After Effects, you will find
the default Preview, started by pressing Spacebar, intuitive with real-time playback of audio and cached frames. For you,
the experienced After Effects user, Preview options are configurable to suit your working style.
Note that the these new changes have dissolved the differences between the old RAM preview and Standard preview
(spacebar) behaviors, and After Effects no longer uses those terms. Preview is now considered to be unified, with user-
configurable behaviors.
New controls in the Preview panel allow you to configure preview behaviors for each keyboard shortcut: audio, looping,
caching, range, and layer controls.
For more information, see Previewing.
Face Tracker
New in After Effects CC 2015 | June 2015
After Effects CC 2015 now includes face tracking capabilities. You can detect and track human faces with exceptional
accuracy by managing the level of detail you track.
Simple mask tracking lets you quickly apply effects only to a face, such as selective color correction or blurring a
person’s face, and more. However, with Face Tracking, you can also track specific points on the face such as pupils,
mouth, and nose, allowing you to isolate and work on these facial features with greater detail. For example, change
colors of the eyes or exaggerate mouth movements without frame-by-frame adjustments.
Face Tracking also lets you extract and copy facial measurements. Tracking of facial measurements tells you details such
as how open the mouth is and how open each eye is. You can also export detailed tracking data to Adobe Character
Animator for performance-based character animation.
For more information, see Face Tracking.
Integration with Adobe Character Animator (Preview)
New in After Effects CC 2015 | June 2015
Adobe Character Animator (Preview), a companion application, tracks your facial movements, records a voice over,
and even triggers bodily movement with simple keyboard actions and automated features that give life to characters
you create in Illustrator or Photoshop. When you talk, your character talks. When you feign surprise, so does your
character. When you’re grumpy, your character is too.
Adobe Character Animator is for two different types of artists: those who want to rig complex characters without
creating a confusing tangle of expressions, and those who just want to create simple characters easily. Either way, once
the character is set up in Photoshop or Illustrator, Adobe Character Animator brings it to life. It does this by users acting
out a performance in front of their webcam and talking into their microphone.
For more information, see Adobe Character Animator .
Note: For the After Effects CC 2015 release, Adobe Character Animator is only available as a technological preview.

3
What's new
Last updated 6/8/2015
Interactive performance improvements
Enhanced in After Effects CC 2015 | June 2015
There are significant architectural code changes in After Effects CC 2015 release that allow the user interface and image
rendering to be processed separately by the CPU. The following improvements are a direct result of these changes:
•The user interface is now much more responsive as it no longer needs to wait for frames to finish rendering.
Conversely, frames can continue to render while you work with the user interface. This responsiveness makes for a
smoother interaction with the user interface at all times.
•Far fewer instances of delays or beach ball during a Preview.
•You can now interrupt or cancel frame renders by making a change to the composition.
•Fast scrubbing, even when the frames take a long time to render.
•Faster image caching.
•More efficient evaluation of expressions.
•Previews continue to play back while After Effects is in the background.
Changes to expression evaluation
Enhanced in After Effects 2015 | June 2015
Evaluation of expressions in After Effects has been significantly enhanced. Overall, you may find that expressions are
evaluated faster; the improvement will vary depending on the expression.
When an expression fails to evaluate, there are two major changes:
1Expression errors appear in a warning banner at the bottom of the Composition panel instead of in a dialog box.
The expression is not disabled.
2The expression will continue to evaluate and will display the warning banner until the problem with the expression
is fixed.
On the right side of the expression error warning banner are Left, Down, and Right arrow buttons:
1Click the Left or Right arrow buttons to display the previous or next expression error when multiple expressions fail
to evaluate.
2Click the Down arrow to display the property with the failing expression in the Timeline panel. The expression error
text is clipped to the width of the Composition panel. To see the full expression error in a dialog box, click on the
yellow error triangle icon for the expression in the Timeline panel.
User interface enhancements
Color icons for compositions and image sequences
Icons for compositions and image sequences in the Project and Timeline panels are now multicolored instead of
monochrome.
Preference for user interface highlight brightness

4
What's new
Last updated 6/8/2015
In Preferences > Appearance there is a new Highlight Colors section wherein you can in which you can adjust the
brightness of interactive controls and focus indicators.
You can see the changes to the slider values reflected live in the user interface behind the Preferences dialog.
Panel group enhancements
Several changes have been made to how panel groups work
•No tab well for single panels - When there is only one panel in a panel group, the tab well does not appear. You can
still drag other panels into the tab row to dock them in that panel group.
•Menu instead of scroll bar - When there are more panel tabs than that will fit in the width of a panel group, a menu
( >>) appears on the right side of the tab well instead of a scroll bar. You can choose a tab from the tab well.
•Panel Group Settings sub-menu - In panel menus, panel group commands have been moved to the Panel Group
Settings sub-menu:
•Close Panel Group
•Undock Panel Group
•Maximize Panel Group
•Close Other Panels In Group: In panel menus, there is a new command to close other panels in the same group.
Maxon Cineware 2.0.15 plug-in
Enhanced in After Effects CC 2015 | June 2015
Cineware 2.0.15 for After Effects includes the following enhancements:
•CINEMA 4D Layers are no longer automatically synchronized - When adding multiple instances of a CINEMA 4D
scene layer in a composition, including adding Multi-Pass layers, Cineware no longer automatically synchronizes
CINEMA 4D Layers. You will see an on/offcheckbox at the top of the Effect Controls panel that has been relabeled
to Synchronize AE Layer. When this preference is enabled, the Render Settings and Camera options on all instances
of the layer will automatically synchronize as before, but CINEMA 4D layers can be set independently. If this
checkbox is disabled for a specific CINEMA 4D scene layer, then none of that layer's settings will synchronize with
the rest of the layers in the composition.
•Updated CINEMA 4D Layers dialog window - "Non-Layer Items" has been renamed "Items not on Layers". By
unchecking this setting, all objects that are not associated with any CINEMA 4D Layers will be turned off.
•Resizable dialog windows - The CINEMA 4D Layers and Cineware Settings dialogs have been updated so they can
be resized as needed.
Miscellaneous updates
Removal of Memory and Multiprocessing preference
The Multiprocessing preference has been removed due to the inclusion of new threading architecture in After Effects
CC 2015. The preference that was earlier named Memory and Multiprocessing is now named only Memory.
The Composition > Cache Work Area In Background command was dependent on the Multiprocessing feature. This
functionality has been removed.

5
What's new
Last updated 6/8/2015
•Brainstorm has been removed in After Effects CC 2015. You can still use Brainstorm in After Effects CC 2014 and
earlier versions/releases. You can read about using Brainstorm in AFter Effects in the Use Brainstorm to experiment
and explore settingsarticle.
•RED camera raw (.r3d) file decoding has been updated with the newest RED SDK. New functionality includes
Dragon Enhanced Blacks, REDcolor4, and DRAGONcolor 2.

6
Last updated 6/8/2015
Chapter 2: Workspace and workflow
Planning and setup
Planning your work
Correct project settings, preparation of footage, and initial composition settings can help you to avoid errors and
unexpected results when rendering your final output movie. Before you begin, think about what kind of work you’ll be
doing in After Effects and what kind of output you intend to create. After you have planned your project and made some
basic decisions about project settings, you’ll be ready to start importing footage and assembling compositions from
layers based on that footage.
The best way to ensure that your movie is suitable for a specific medium is to render a test movie and view it using the
same type of equipment that your audience will use to view it. It’s best to do such tests before you have completed the
difficult and time-consuming parts of your work, to uncover problems early.
Aharon Rabinowitz provides an article on the Creative COW website about planning your project with the final
delivery specifications in mind.
For more information about encoding and compression options, see this FAQ entry: “FAQ: What is the best format for
rendering and exporting from After Effects?”
Storyboards and scripts (screenplays)
Before you begin shooting footage or creating animations, it is often best to start by planning your movie with
storyboards and a script (screenplay).
You can use Adobe Photoshop and Adobe Illustrator to create storyboards. You can use Adobe Story to collaboratively
write and manage screenplays. Adobe Story also converts information from a screenplay into XMP metadata that can
automate the creation of shooting scripts, shot lists, and more.
Acquiring, choosing, and preparing footage
Before importing footage, first decide which media and formats you'll use for your finished movies, and then determine
the best settings for your source material. Often, it’s best to prepare footage before importing it into After Effects.
For example, if you want an image to fill your composition frame, configure the image in Adobe Photoshop so that the
image size and pixel aspect ratio match the composition size and pixel aspect ratio. If the image is too large when you
import it into After Effects, you’ll increase the memory and processor requirements of the compositions that use it. If
the image is too small, you’ll lose image quality when you scale it to the desired size. See Pixel aspect ratio and frame
aspect ratio.
If you can shoot footage with consistent lighting and colors—and otherwise prevent the need to do a lot of tedious
utility work in post-production—then you’ll have more time for creative work.

7
Workspace and workflow
Last updated 6/8/2015
If possible, use uncompressed footage or footage encoded with lossless compression. Lossless compression means
better results for many operations, such as keying and motion tracking. Certain kinds of compression—such as the
compression used in DV encoding—are especially bad for color keying, because they discard the subtle differences in
color that you depend on for good bluescreen or greenscreen keying. It’s often best to wait until the final rendering
phase to use compression other than lossless compression. See Keying introduction and resources.
If possible, use footage with a frame rate that matches that of your output, so that After Effects doesn’t have to use frame
blending or similar methods to fill in missing frames. See Frame rate.
The kind of work that you’ll be doing in After Effects and the kind of output movie that you want to create can even
influence how you shoot and acquire your footage. For example, if you know that you want to animate using motion
tracking, consider shooting your scene in a manner that optimizes for motion tracking—for example, using tracking
markers. See Motion tracking workflow.
Also consider shooting at a larger frame size than what you need for final delivery if you want "head-room" for post-
production, whether for fake pans and zooms, or for stabilization.
Project settings
Project settings fall into three basic categories: how time is displayed in the project, how color data is treated in the
project, and what sampling rate to use for audio. Of these settings, the color settings are the ones that you need to think
about before you do much work in your project, because they determine how color data is interpreted as you import
footage files, how color calculations are performed as you work, and how color data is converted for final output. See
Color managementand Timecode and time display units .
If you enable color management for your project, the colors that you see are the same colors that your audience will see
when they view the movie that you create.
Note: Click the color depth indicator at the bottom of the Project panel to open the Project Settings dialog box. Alt-click
(Windows) or Option-click (Mac OS) to cycle through color bit depths: 8 bpc, 16 bpc, and 32 bpc. See Color depth and high
dynamic range color.
Composition settings
After you prepare and import footage items, you use these footage items to create layers in a composition, where you
animate and apply effects. When you create a composition, specify composition settings such as resolution, frame size,
and pixel aspect ratio for your final rendered output. Although you can change composition settings at any time, it’s
best to set them correctly as you create each new composition to avoid unexpected results in your final rendered output.
For example, the composition frame size should be the image size in the playback medium. See Composition settings.
If you’ll be rendering and exporting a composition to more than one media format, always match the pixel dimensions
for your composition to the largest pixel dimensions used for your output. Later, you can use output modules in the
Render Queue panel to encode and export a separate version of the composition for each format. See Output modules and
output module settings.
Performance, memory, and storage considerations
If you work with large compositions, make sure that you configure After Effects and your computer to maximize
performance. Complex compositions can require a large amount of memory to render, and the rendered movies can
take a large amount of disk space to store. Before you attempt to render a three-hour movie, make sure that you have
the disk space available to store it. See Storage requirements for output files .
If your source footage files are on a slow disk drive (or across a slow network connection), then performance will be
poor. When possible, keep the source footage files for your project on a fast local disk drive. Ideally, you’ll have three
drives: one for source footage files, one from which the application runs, and one for rendered output.

8
Workspace and workflow
Last updated 6/8/2015
For more information, see Improve performanceand Memory & Multiprocessing preferences .
Planning for playback on computer monitors and mobile devices
When you create a movie for playback on a personal computer—whether downloaded from the Web or played from a
CD-ROM—specify composition settings, render settings, and output module settings that keep file size low. Consider
that a movie with a high data rate may not play well from an older CD-ROM drive that cannot read data from the disc
fast enough. Similarly, a large movie may take a long time to download over a dial-up network connection.
When rendering your final movie, choose a file type and encoder appropriate for the final media. The corresponding
decoder must be available on the system used by your intended audience; otherwise they will not be able to play the
movie. Common codecs (encoders/decoders) include the codecs installed with media players such as Flash Player,
Windows Media Player, and QuickTime Player.
Aharon Rabinowitz provides an article on the Creative COW website about planning your project with the final
delivery specifications in mind.
Trish and Chris Meyer provide an article on the Artbeats website that describes some of the considerations for creating
video for the Web.
For more information about encoding and compression options for After Effects, see this FAQ entry: “FAQ: What is
the best format for rendering and exporting from After Effects?”
Mobile devices
Many of the considerations for creating movies for playback on mobile devices, such as mobile phones and the Apple
iPod, are similar to the considerations for creating movies for playback on personal computers—but the limitations are
even more extreme. Because the amount of storage (disk space) and processor power are less for mobile phones than
for personal computers, file size and data rate for movies must be even more tightly controlled.
Screen dimensions, video frame rates, and color gamuts vary greatly from one mobile device to another.
Use these tips when shooting video for mobile devices:
•Tight shots are better. It’s hard to see a face on a tiny screen unless it’s shot in relative close-up.
•Light your subjects well, and keep them separated from the background; the colors and brightness values between
background and subject should not be too similar.
•Avoid excessive zooming and rolling, which hinder temporal compression schemes.
•Because stable (non-shaky) video is easier to compress, shoot video with a tripod to minimize the shaking of the
camera.
•Avoid using auto-focus and auto-exposure features. When these features engage, they change the appearance of all
of the pixels in an image from one frame to the next, making compression using interframe encoding schemes less
efficient.
Use these tips when working in After Effects (for mobile devices):
•Use a lower frame rate (12-24 fps) for mobile devices.
•Use motion-stabilization tools and noise-reduction or blur effects before rendering to final output, to aid the
compressor in reducing file size.
•Match the color palette to the mobile devices that you are targeting. Mobile devices, in general, have a limited color
gamut.
•Consider using cuts and other fast transitions instead of zooming in and out or using fades and dissolves. Fast cuts
also make compression easier.

9
Workspace and workflow
Last updated 6/8/2015
Cross-platform project considerations
After Effects project files are compatible with Mac OS and Windows operating systems, but some factors—mostly
regarding the locations and naming of footage files and support files—can affect the ease of working with the same
project across platforms.
Project file paths
When you move a project file to a different computer and open it, After Effects attempts to locate the project’s footage
files as follows: After Effects first searches the folder in which the project file is located; second, it searches the file’s
original path or folder location; finally, it searches the root of the directory where the project is located.
If you are building cross-platform projects, it’s best if the full paths have the same names on Mac OS and Windows
systems. If the footage and the project are on different volumes, make sure that the appropriate volume is mounted
before opening the project and that network volume names are the same on both systems.
It’s best to store footage in the same folder as the project file or in another folder within that folder. Here’s a sample
hierarchy:
/newproject/project_file.aep
/newproject/source/footage1.psd
/newproject/source/footage2.avi
You can then copy the new project folder in its entirety across platforms, and After Effects will properly locate all of the
footage.
Use the Collect Files feature to gather copies of all the files in a project into a single folder. You can then move the folder
containing the copied project to the other platform. See Collect files in one location.
File-naming conventions
Name your footage and project files with the appropriate filename extensions, such as .mov for QuickTime movies and
.aep for After Effects projects. If files will be used on the Web, be sure that filenames adhere to applicable conventions
for extensions and paths.
Note: For After Effects CS6 and earlier versions, do not use high-ASCII or other extended characters in filenames that will
be used cross-platform.
Supported file types
Some file types are supported on one platform but not others. See Supported import formatsand Supported output
formats.
Resources
Ensure that all fonts, effects, codecs, and other resources are available on both systems. Such resources are often plug-
ins.
If you use a native After Effects effect in a project on one operating system, the effect will still work on the other
operating system to which you’ve transferred your project. However, some third-party effects and other third-party
plug-ins may not continue to operate, even if you have versions of these plug-ins on the target system. In such cases,
you may need to reapply some third-party effects.

10
Workspace and workflow
Last updated 6/8/2015
More Help topics
Adobe Story workflow
Composition settings
Output modules and output module settings
Render settings
Plug-ins
Fonts
Setup and installation
To submit a feature request or bug report about After Effects, choose Help > Send Feedback.
Installing the software
Before installing Adobe After Effects software, review the complete system requirements .
In addition to the full version of Adobe After Effects, you can also install additional copies on additional computers to
use as After Effects render engines to assist with network rendering. You install render engines in the same manner as
the full version of the application. You run the render engine using the Adobe After Effects Render Engine shortcut in
the Adobe After Effects folder.
Limitations of the trial version
The trial version of After Effects includes all of the codecs that are included with the full version of After Effects. This
means that you can import and export to all of the supported file formats using the trial version. The free trial version
of Adobe After Effects software does not include some features that depend upon software licensed from parties other
than Adobe. For example, Cycore (CC) effects, mocha-AE, mocha Shape, FreeForm, and Color Finesse are available
only with the full version of Adobe After Effects software. (Keylight is included, however.) If your installation of After
Effects is missing some third-party components, contact your system administrator to ensure that all licensed
components have been installed correctly.
Activate the software
Activation is a simple, anonymous process. After installation, your Adobe software attempts to contact Adobe to
complete the license activation process. No personal data is transmitted.
A single-user retail license activation supports two computers. For example, you can install the software on a desktop
computer at work and on a laptop computer at home.
For more information on product licensing and activation, see the Read Me file or go to the Adobe website.
More Help topics
Network rendering with watch folders and render engines
Plug-ins
11
Workspace and workflow
Last updated 6/8/2015
General user interface items
Activate a tool
The Tools panel can be displayed as a toolbar across the top of the application window or as a normal, dockable panel.
Note: Controls related to some tools appear only when the tool is selected in the Tools panel.
•Click the button for the tool. If the button has a small triangle at its lower-right corner, hold down the mouse button
to view the hidden tools. Then, click the tool you want to activate.
•Press the keyboard shortcut for the tool. (Placing the pointer over a tool button displays a tool tip with the name and
keyboard shortcut for the tool.)
•To cycle through hidden tools within a tool category, repeatedly press the keyboard shortcut for the tool category.
(For example, press the Q key repeatedly to cycle through the pen tools.)
•To momentarily activate a tool, hold down the key for the desired tool; release the key to return to the previously
active tool. (This technique does not work with all tools.)
•To momentarily activate the Hand tool, hold down the spacebar, the H key, or the middle mouse button. (The
middle mouse button does not activate the Hand tool under a few circumstances, including when the Unified
Camera tool is active.)
To pan around in the Composition, Layer, or Footage panel, drag with the Hand tool. Hold Shift, too, to pan faster.
To show or hide panels most relevant to the active tool, click the panel button if available. For example, clicking this
button when a paint tool is active opens or closes the Paint and Brushes panels. Select the Auto-Open Panels option in
the Tools panel to automatically open the relevant panels when certain tools are activated.
Open panel, viewer, and context menus
Panel menus provide commands relative to the active panel or frame. Viewer menus provide lists of compositions,
layers, or footage items that can be shown in the viewer, as well as commands for closing items and locking the viewer.
Context menus provide commands relative to the item that is context-clicked. Many items in the After Effects user
interface have associated context menus. Using context menus can make your work faster and easier.
•To open a p anel menu, click the button in the upper-right corner of the panel.
•To open a viewer menu, click the name of the active composition, layer, or footage item in the viewer tab.
•To open a context menu, right-click (Windows or Mac OS) or Control-click (Mac OS). This action is sometimes
referred to as context-clicking.
Columns
The Project, Timeline, and Render Queue panels contain columns.
•To show or hide columns, right-click (Windows) or Control-click (Mac OS) a column heading (or choose Columns
from the panel menu), and select the columns that you want to show or hide. A check mark indicates that the
column is shown.
12
Workspace and workflow
Last updated 6/8/2015
Note: In general, the search and filter functions in the Project and Timeline panels only operate on the content of columns
that are shown.
•To reorder columns, select a column name and drag it to a new location.
•To resize columns, drag the bar next to a column name. Some columns cannot be resized.
•To sort footage items in the Project panel, click the column heading. Click once more to sort them in reverse order.
Search and filter in the Timeline, Project, and Effects & Presets panels
The Project, Timeline, and Effects & Presets panels each contain search fields that you can use to filter items in the
panel.
•To place the insertion point in a search field, click in the search field.
•To place the insertion point in the search field for the active panel, choose File > Find or press Ctrl+F (Windows) or
Command+F (Mac OS).
•To clear the search field, click the button that appears to the right of the text in the search field.
When you type in the search field, the list of items in the panel is filtered, showing some items and hiding others. Only
items with entries that match the search query that you’ve typed are shown. The folders, layers, categories, or property
groups that contain the matched items are also shown, to provide context.
In general, only text in columns that are shown is searched for this filtering operation. For example, you may need to
show the Comments column to search and filter by the contents of comments. (See Columns.)
If one or more layers are selected in a composition, the filtering operation in the Timeline panel only affects selected
layers. In this case, unselected layers are not filtered out (hidden) if they don’t match the search query. However, if no
layers are selected in the composition, the filtering operation applies to all layers in the composition. This behavior
matches that for showing and hiding of layer properties by pressing their property shortcut keys. (See Show or hide
properties in the Timeline panel.)
Clearing the search field and ending the search causes expanded folders and property groups to collapse (close).
Therefore, it’s easier to work with the items that are found by the filter operation if you operate on them before you clear
the search field and end the search.
If the text that you type in the search field in the Project or Timeline panel contains spaces, the spaces are treated as
and-based operators. For example, typing dark solid matches footage items or layers named Dark Red Solid and Dark
Gray Solid. In the Effects & Presets panel, spaces are treated as space characters in the search field. For example, typing
change color matches the Change Color effect, but not the Change To Color effect.
Project, Timeline, and Effects & Presets panels accept or-based searching. In an or-based search, a comma denotes an
or, with and-based operators taking precedence over or-based ones. For example, sometimes the name of the property
that determines the amount for a blur effect is Amount, sometimes it is Blurriness, and sometimes it is Blur Radius. If
you search for Amount, Blurriness, Radius, then you will see the equivalent values for all of your blur effects.
When you type in a search field, recent search strings that match your input appear.
This search method also allows a way to save items you use often via a menu that opens when you click the search icon
in the search field. The search menu consists of two lists, separated by a divider. The top list contains the six most recent
searches, with the most recent one at the top. The bottom list contains saved search items. As you type, the top list filters
to show matching terms.
•To save a search item, Shift-click it in the top list of the search menu. Up to ten items may be saved.
•To delete a saved search item from either list, hover the mouse over the the item to highlight it, and then press Delete
or Backspace.

13
Workspace and workflow
Last updated 6/8/2015
See this video on the Video2Brain website to learn about the new features for searching and filtering in panels.
Examples of searches in the Project panel
•To show only footage items for which the name or comment contains a specific string, start typing the string.
•To show only footage items for which the source file is missing, type the entire word missing. (This search works
whether or not the File Path column is shown, which is an exception to the general rule that only shown columns
are searched.)
•To show only unused footage items, type the entire word unused.
•To show only used footage items, type the entire word used.
•To show only Cineon footage items, type Cineon with the Type column shown.
Examples of searches in the Timeline panel
•To show only layers and properties for which the name or comment contains a specific string, type the string. For
example, type starch to show pins created by the Puppet Starch tool.
•To show only properties that have an expression that uses a specific method, type the method name.
•To show only layers with a specific label, type the label name. (See Color labels for layers, compositions, and footage
items.)
Click the swatch for a label to see the context menu that lists the label names. Alternatively, drag the right edge of the
Label column heading to expand the column to read the label names.
Scroll or zoom with the mouse wheel
You can use the mouse wheel to zoom in the Timeline, Composition, Layer, and Footage panels. You can use the mouse
wheel to scroll in the Timeline, Project, Render Queue, Flowchart, Effect Controls, Metadata, and Effects & Presets
panels.
•To zoom into the center of the panel, or into the feature region when tracking, roll the mouse wheel forward.
•To zoom out of the center of the panel, or out of the feature region when tracking, roll the mouse wheel backward.
•To zoom into the area under the pointer, hold down Alt (Windows) or Option (Mac OS) as you roll the mouse wheel
forward. In the Timeline, Footage, and Layer panels, this action zooms in time when the pointer is over the time
navigator or time ruler.
•To zoom out of the area under the pointer, hold down Alt (Windows) or Option (Mac OS) as you roll the mouse
wheel backward. In the Timeline, Footage, and Layer panels, this action zooms in time when the pointer is over the
time navigator or time ruler.
•To scroll vertically, roll the mouse wheel forward or backward.
•To scroll horizontally, hold down Shift as you roll the mouse wheel backward or forward. In the Timeline, Footage,
and Layer panels, Shift-rolling backward moves forward in time and vice versa when the pointer is over the time
navigator or time ruler.
You can scroll or zoom with the mouse wheel in a panel even if it is not currently active, as long as the pointer is over it.
Undo changes
You can undo only those actions that alter the project data. For example, you can undo a change to a property value,
but you cannot undo the scrolling of a panel or the activation of a tool.

14
Workspace and workflow
Last updated 6/8/2015
You can sequentially undo as many as 99 of the most recent changes made to the project.
To avoid wasting time undoing accidental modifications, lock a layer when you want to see it but do not want to modify
it.
•To undo the most recent change, choose Edit > Undo [action] or Ctrl-Z
•To undo a change and all changes after it, choose Edit > History, and select the first change that you want to undo.
•To revert to the last saved version of the project, choose File > Revert. All changes made and footage items imported
since you last saved are lost. You cannot undo this action.
After Effects user interface tips
•Use ClearType text anti-aliasing on Windows. ClearType makes the outlines of system text, such as menus and
dialog boxes, easier to read. See Windows Help for information on how to enable ClearType text anti-aliasing.
•To show tool tips, select the Show Tool Tips preference (Edit > General > Preferences (Windows) or After Effects >
Preferences > General (Mac OS)).
•Use a workspace that contains the Info panel, and leave that panel in front of other panels in its panel group
whenever possible. The Info panel shows messages about what After Effects is doing, information about items under
the pointer, and much more.
•In Windows, disable the Aero compositing mode. Hardware acceleration of panels and OpenGL features perform
better in After Effects when Windows is operating in Basic mode. For information, see the Microsoft website.
•Use context menus.
•Use keyboard shortcuts.
More Help topics
Activating tools (keyboard shortcuts)
Effects and Presets panel
Organize, view, manage, and trim footage items
Select layers
Zoom an image for preview
Zoom in or out in time for a composition
Move or adjust a camera or working 3D view with the Camera tools
Lock or unlock a layer
Workflows
General workflow in After Effects

15
Workspace and workflow
Last updated 6/8/2015
Overview of general workflow in After Effects
Whether you use Adobe After Effects to animate a simple title, create complex motion graphics, or composite realistic
visual effects, you generally follow the same basic workflow, though you may repeat or skip some steps. For example,
you may repeat the cycle of modifying layer properties, animating, and previewing until everything looks right. You
may skip the step of importing footage if you intend to create graphical elements entirely in After Effects.
1. Import and organize footage
After you create a project, import your footage into the project in the Project panel. After Effects automatically
interprets many common media formats, but you can also specify how you want After Effects to interpret attributes
such as frame rate and pixel aspect ratio. You can view each item in a Footage panel and set its start and end times to
fit your composition. For more information, see Importing and interpreting footage items .
2. Create, arrange, and composite layers in a composition
Create one or more compositions. Any footage item can be the source for one or more layers in a composition. You can
arrange the layers spatially in the Composition panel or arrange them in time using the Timeline panel. You can stack
layers in two dimensions or arrange them in three dimensions. You can use masks, blending modes, and keying tools
to composite (combine), the images of multiple layers. You can even use shape layers, text layers, and paint tools to
create your own visual elements. For more information, see Composition basics, Creating layers, Compositing and
transparency overview and resources, Overview of shape layers, paths, and vector graphics , and Creating and editing
text layers .
3. Modify and animate layer properties
You can modify any property of a layer, such as size, position, and opacity. You can make any combination of layer
properties change over time, using keyframes and expressions. Use motion tracking to stabilize motion or to animate
one layer so that it follows the motion in another layer. For more information, see Animation basics, Expression basics,
and Tracking and stabilizing motion (CS5) .
4. Add effects and modify effect properties
You can add any combination of effects to alter the appearance or sound of a layer, and even generate visual elements
from scratch. You can apply any of the hundreds of effects, animation presets, and layer styles. You can even create and
save your own animation presets. You can animate effect properties, too, which are simply layer properties within an
effect property group. For more information, see Effects and animation presets overview .
5. Preview
Previewing compositions on your computer monitor or an external video monitor is fast and convenient, even for
complex projects. You can change the speed and quality of previews by specifying their resolution and frame rate, and
by limiting the area and duration of the composition that you preview. You can use color management features to
preview how your movie will look on another output device. For more information, see Previewingand Color
management.
6. Render and export
Add one or more compositions to the render queue to render them at the quality settings you choose and to create
movies in the formats that you specify. You can use File > Export or Composition > Add to Render Queue.
For more information, see Basics of rendering and exporting and the encoding quick start section in Adobe Media
Encoder.
Online resources for general workflow in After Effects
Read a basic step-by-step introduction to the general workflow in an excerpt from After Effects Classroom in a Book.

16
Workspace and workflow
Last updated 6/8/2015
Read Trish and Chris Meyer’s step-by-step introduction to creating a basic animation in a PDF excerpt from their book,
The After Effects Apprentice.
For an overview of After Effects project navigtion, see the video tutorial, “Walking Through A Mini Project,” by Jeff
Sengstack and Infinite Skills.
Basic workflow tutorial: Create a simple movie
This tutorial assumes that you have already started After Effects and have not modified the empty default project. This
example skips the step of importing footage and shows you instead how to create your own synthetic visual elements.
After you have rendered a final movie, you can import it into After Effects to view it and use it as you would any other
footage item.
Some people prefer to use the mouse and menus to interact with After Effects, whereas others prefer to use keyboard
shortcuts for common tasks. For several steps in this example, two alternative commands are shown that produce the
same result—the first demonstrating the discoverability of menu commands and the second demonstrating the speed
and convenience of keyboard shortcuts. You’ll likely find that you use some combination of keyboard shortcuts and
menu commands in your work.
1Create a new composition:
•Choose Composition > New Composition.
•Press Ctrl+N (Windows) or Command+N (Mac OS).
2Change the Duration value in the Composition Settings dialog box by entering 5.00 (5 seconds), choose Web Video
from the Preset menu, and click OK.
3Create a new text layer:
•Choose Layer > New > Text.
•Press Ctrl+Alt+Shift+T (Windows) or Command+Option+Shift+T (Mac OS).
4Type your name. Press Enter on the numeric keypad or press Ctrl+Enter (Windows) or Command+Return (Mac
OS) on the main keyboard to exit text-editing mode.
5Set an initial keyframe for the Position property:
•Click the triangle to the left of the layer name in the Timeline panel, click the triangle to the left of the Transform
group name, and then click the stopwatch button to the left of the Position property name.
•Press Alt+Shift+P (Windows) or Option+Shift+P (Mac OS).
6Activate the Selection tool:
•Click the Selection Tool button in the Tools panel.
•Press V.
7Using the Selection tool, drag your text to the bottom-left corner of the frame in the Composition panel.
8Move the current-time indicator to the last frame of the composition:
•Drag the current-time indicator in the Timeline panel to the far right of the timeline.
•Press End.
9Using the Selection tool, drag your text to the top-right corner of the frame in the Composition panel.
A new keyframe is created at this time for the Position property. Motion is interpolated between keyframe values.
10 Preview your animation using standard preview:
•Click the Play button in the Preview panel. Click Play again to stop the preview.

17
Workspace and workflow
Last updated 6/8/2015
•Press the spacebar. Press the spacebar again to stop the preview.
11 Apply the Glow effect:
•Choose Effect > Stylize > Glow.
•Type glow in the search field at the top of the Effects & Presets panel to find the Glow effect. Double-click the
effect name.
12 In the Render Queue panel, click the underlined text to the right of Output To. In the Output Movie To dialog box,
choose a name and location for the output movie file, and then click Save. For the location, choose something easy
to find, like your desktop.
13 Click the Render button to process all items in the render queue. The Render Queue panel shows the progress of the
rendering operation. A sound is generated when rendering is complete.
You’ve created, rendered, and exported a movie.
You can import the movie that you’ve created and preview it in After Effects, or you can navigate to the movie and play
it using a movie player such as QuickTime Player or Windows Media Player.
More Help topics
Activating tools (keyboard shortcuts)
Import footage items
Dynamic Link and After Effects
Dynamic Link features work only between applications of the same major version, such as the 2014 release of After
Effects CC with the 2014 release of Premiere Pro CC. Dynamic Link features do not work between applications that are
not of the same major version, such as After Effects CC and Premiere Pro CS6. For CS6 versions of the applications,
Dynamic Link features are only available with the Creative Suite Production Premium and Creative Suite Master
Collection editions; Dynamic Link features do not work between CS6 applications that have been installed and
activated as separate applications.
About Dynamic Link
In the past, sharing media assets among post-production applications required you to render and export your work
from one application before importing it into another. This workflow was inefficient and time-consuming. If you
wanted to change the original asset, you rendered and exported the asset again. Multiple rendered and exported
versions of an asset consume disk space, and they can lead to file-management challenges.
Dynamic Link offers an alternative to this workflow. You can create dynamic links between After Effects and Adobe
Premiere Pro. Creating a dynamic link is as simple as importing any other type of asset. Dynamically linked assets
appear with unique icons and label colors to help you identify them. Dynamic links are saved in projects generated by
these applications.
Create and link to After Effects compositions with Dynamic Link
You can create new After Effects compositions, and dynamically link to them from Adobe Premiere Pro. You can also
dynamically link to existing After Effects compositions from Adobe Premiere Pro.

18
Workspace and workflow
Last updated 6/8/2015
Create a composition from clips in Adobe Premiere Pro
You can replace selected clips in Adobe Premiere Pro with a dynamically linked After Effects composition based on
those clips. The new composition inherits the sequence settings from Adobe Premiere Pro.
1Open Premiere Pro and select the clips you want to replace.
2Right-click any of the selected clips.
3Select Replace With After Effects Composition.
After Effects opens (if it is not already open) and a new linked composition is created.
Create a dynamically linked composition from Adobe Premiere Pro
Creating a new dynamically linked composition from Adobe Premiere Pro launches After Effects. After Effects then
creates a project and composition with the dimensions, pixel aspect ratio, frame rate, and audio sample rate of the
originating project. (If After Effects is already running, it creates a composition in the current project.) The new
composition name is based on the Adobe Premiere Pro project name, followed by Linked Comp [x].
1In Adobe Premiere Pro, choose File > Adobe Dynamic Link > New After Effects Composition. In the 2014 version
of Premiere Pro, you can import compositions using Media Browser. See the following sections in Premiere Pro for
more information:
•Import files with Media Browser
•Adobe Dynamic Link
2If the After Effects Save As dialog box appears, enter a name and location for the After Effects project, and click Save.
When you create a dynamically linked After Effects composition, the composition duration is set to 30 seconds. To
change the duration, select the composition in After Effects, choose Composition > Composition Settings. Click the
Basic tab, and specify a new value for Duration.
Link to an existing composition
For best results, match composition settings (such as dimensions, pixel aspect ratio, and frame rate) to the settings in
the Adobe Premiere Pro.
❖Do one of the following:
•In Adobe Premiere Pro, choose File > Adobe Dynamic Link > ImportAfter Effects Composition. Choose an After
Effects project file (.aep), and then choose one or more compositions.
•In Adobe Premiere Pro, choose an After Effects project file and click Open. Then choose a composition in the
displayed dialog box and click OK.
•Drag one or more compositions from the After Effects Project panel to the Adobe Premiere Pro Project panel.
•Drag an After Effects project file into the Premiere Pro Project panel. If the After Effects project file contains
multiple compositions, the Import Composition dialog box opens.
Note: You can link to a single After Effects composition multiple times in a single Adobe Premiere Pro project.
Modify a dynamically linked composition in After Effects
Use the Edit Original command in Adobe Premiere Pro to modify a linked After Effects composition. Once the
composition is open in After Effects, you can change the composition without having to use the Edit Original
command again.
1Select the After Effects composition in Adobe Premiere Pro, or choose a linked clip in the Timeline, and choose Edit
> Edit Original.

19
Workspace and workflow
Last updated 6/8/2015
2Change the composition in After Effects. Then, switch back to Adobe Premiere Pro to view your changes.
The changes made in After Effects appear in Adobe Premiere Pro. Adobe Premiere Pro stops using any preview files
rendered for the clip before the changes.
Note: You can change the name of the composition in After Effects after creating a dynamic link to it from Adobe Premiere
Pro. Adobe Premiere Pro does not update the linked composition name in the Project panel. Adobe Premiere Pro does retain
the dynamic link, however.
Delete a dynamically linked composition or clip
You can delete a linked composition from an Adobe Premiere Pro project at any time, even if the composition is used
in a project.
You can delete linked clips from the timeline of an Adobe Premiere Pro sequence or timeline at any time.
❖In Adobe Premiere Pro, select the linked composition or clip and press the Delete key.
Create a linked sequence in Adobe Premiere Pro with Dynamic Link
Link to a new sequence
Creating an Adobe Premiere Pro sequence from After Effects launches Adobe Premiere Pro. Adobe Premiere Pro then
creates a project and sequence with the dimensions, pixel aspect ratio, frame rate, and audio sample rate of the
originating project. (If Adobe Premiere Pro is already running, it creates a sequence in the current project.)
❖In After Effects, choose File > Adobe Dynamic Link > New Premiere Pro Sequence.
Link to an existing sequence
For best results, match sequence settings and project settings in Adobe Premiere Pro (such as dimensions, pixel aspect
ratio, and frame rate) to those settings in the After Effects project.
Do one of the following:
•In After Effects, choose File > Adobe Dynamic Link > Import Premiere Pro Sequence. Choose an Adobe Premiere
Pro project, and then choose one or more sequences.
•Drag one or more sequences from the Adobe Premiere Pro Project panel to the After Effects Project panel.
Dynamic Link performance
A linked clip can refer to a complex source composition. Actions you perform on the complex source composition
require additional processing time. After Effects takes time to apply the actions and make the final data available to
Adobe Premiere Pro. In some cases, the additional processing time delays preview or playback.
To reduce playback delays, do one of the following:
•take the linked composition offline
•disable a linked clip to temporarily stop referencing a composition
•render the composition and replace the dynamically linked composition with the rendered file
If you commonly work with complex source compositions, try adding RAM or a faster processor.

20
Workspace and workflow
Last updated 6/8/2015
Note: A linked After Effects composition will not support Render Multiple Frames Simultaneously multiprocessing. See
Improve performance by optimizing memory, cache, and multiprocessing settings.
More Help topics
Working with Adobe Premiere Pro and After Effects
Importing from After Effects and Adobe Premiere Pro
Keyboard shortcuts reference
General (keyboard shortcuts)
Result Windows Mac OS
Select all Ctrl+A Command+A
Deselect all F2 or Ctrl+Shift+A F2 or Command+Shift+A
Rename selected layer, composition, folder,
effect, group, or mask
Enter on main keyboard Return
Open selected layer, composition, or footage
item
Enter on numeric keypad Enter on numeric keypad
Move selected layers, masks, effects, or render
items down (back) or up (forward) in stacking
order
Ctrl+Alt+Down Arrow or Ctrl+Alt+Up Arrow Command+Option+Down Arrow or
Command+Option+Up Arrow
Move selected layers, masks, effects, or render
items to bottom (back) or top (front) of
stacking order
Ctrl+Alt+Shift+Down Arrow or
Ctrl+Alt+Shift+Up Arrow
Command+Option+Shift+Down Arrow or
Command+Option+Shift+Up Arrow
Extend selection to next item in Project panel,
Render Queue panel, or Effect Controls panel
Shift+Down Arrow Shift+Down Arrow
Extend selection to previous item in Project
panel, Render Queue panel, or Effect Controls
panel
Shift+Up Arrow Shift+Up Arrow
Duplicate selected layers, masks, effects, text
selectors, animators, puppet meshes, shapes,
render items, output modules, or
compositions
Ctrl+D Command+D
Quit Ctrl+Q Command+Q
Undo Ctrl+Z Command+Z
Redo Ctrl+Shift+Z Command+Shift+Z
Purge All Memory Ctrl+Alt+/ (on numeric keypad) Command+Option+/ (on numeric keypad)
Interrupt running a script Esc Esc
Display filename corresponding to the frame
at the current time in the Info panel
Ctrl+Alt+E Command+Option+E
21
Workspace and workflow
Last updated 6/8/2015
Projects (keyboard shortcuts)
Preferences (keyboard shortcuts)
Panels, viewers, workspaces, and windows (keyboard shortcuts)
Note: (Mac OS) Shortcuts involving function keys F9-F12 may conflict with shortcuts used by the operating system. See
Mac OS Help for instructions to reassign Dashboard & Expose shortcuts.
Result Windows Mac OS
New project Ctrl+Alt+N Command+Option+N
Open project Ctrl+O Command+O
Open most recent project Ctrl+Alt+Shift+P Command+Option+Shift+P
New folder in Project panel Ctrl+Alt+Shift+N Command+Option+Shift+N
Open Project Settings dialog box Ctrl+Alt+Shift+K Command+Option+Shift+K
Find in Project panel Ctrl+F Command+F
Cycle through color bit depths for project Alt-click bit-depth button at bottom of Project
panel
Option-click bit-depth button at bottom of
Project panel
Open Project Settings dialog box Click bit-depth button at bottom of Project
panel
Click bit-depth button at bottom of Project
panel
Result Windows Mac OS
Open Preferences dialog box Ctrl+Alt+; (semicolon) Command+Option+; (semicolon)
Restore default preferences settings Hold down Ctrl+Alt+Shift while starting After
Effects
Hold down Command+Option+Shift while
starting After Effects
Result Windows Mac OS
Open or close Project panel Ctrl+0 Command+0
Open or close Render Queue panel Ctrl+Alt+0 Command+Option+0
Open or close Tools panel Ctrl+1 Command+1
Open or close Info panel Ctrl+2 Command+2
Open or close Preview panel Ctrl+3 Command+3
Open or close Audio panel Ctrl+4 Command+4
Open or close Effects & Presets panel Ctrl+5 Command+5
Open or close Character panel Ctrl+6 Command+6
Open or close Paragraph panel Ctrl+7 Command+7
Open or close Paint panel Ctrl+8 Command+8
Open or close Brushes panel Ctrl+9 Command+9
Open or close Effect Controls panel for
selected layer
F3 or Ctrl+Shift+T F3 or Command+Shift+T
Open Flowchart panel for project flowchart Ctrl+F11 Command+F11

22
Workspace and workflow
Last updated 6/8/2015
Activating tools (keyboard shortcuts)
Note: You can activate some tools only under certain circumstances. For example, you can activate a camera tool only when
the active composition contains a camera layer.
To momentarily activate a tool with a single-letter keyboard shortcut, hold down the key; release the key to return to
the previously active tool. To activate a tool and keep it active, press the key and immediately release it.
Switch to workspace Shift+F10, Shift+F11, or Shift+F12 Shift+F10, Shift+F11, or Shift+F12
Close active viewer or panel (closes content
first)
Ctrl+W Command+W
Close active panel or all viewers of type of
active viewer (closes content first). For
example, if a Timeline panel is active, this
command closes all Timeline panels.
Ctrl+Shift+W Command+Shift+W
Split the frame containing the active viewer
and create a new viewer with opposite
locked/unlocked state
Ctrl+Alt+Shift+N Command+Option+Shift+N
Maximize or restore panel under pointer ` (accent grave) ` (accent grave)
Resize application window or floating window
to fit screen. (Press again to resize window so
that contents fill the screen.)
Ctrl+\ (backslash) Command+\ (backslash)
Move application window or floating window
to main monitor; resize window to fit screen.
(Press again to resize window so that contents
fill the screen.)
Ctrl+Alt+\ (backslash) Command+Option+\ (backslash)
Toggle activation between Composition
panel and Timeline panel for current
composition
\ (backslash) \ (backslash)
Cycle to previous or next item in active viewer
(for example, cycle through open
compositions)
Shift+, (comma) or Shift+. (period) Shift+, (comma) or Shift+. (period)
Cycle to previous or next panel in active frame
(for example, cycle through open Timeline
panels)
Alt+Shift+, (comma) or Alt+Shift+. (period) Option+Shift+, (comma) or Option+Shift+.
(period)
Activate a view in a multi-view layout in the
Composition panel without affecting layer
selection
click with middle mouse button click with middle mouse button
Result Windows Mac OS
Cycle through tools Alt-click tool button in Tools panel Option-click tool button in Tools panel
Activate Selection tool V V
Activate Hand tool H H
Temporarily activate Hand tool Hold down spacebar or the middle mouse
button.
Hold down spacebar or the middle mouse
button.
Activate Zoom In tool Z Z
Activate Zoom Out tool Alt (when Zoom In tool is active) Option (when Zoom In tool is active)
Result Windows Mac OS

23
Workspace and workflow
Last updated 6/8/2015
Compositions and the work area (keyboard shortcuts)
Activate Rotation tool W W
Activate Roto Brush tool Alt+W Option+W
Activate and cycle through Camera tools
(Unified Camera, Orbit Camera, Track XY
Camera, and Track Z Camera)
C C
Activate Pan Behind tool Y Y
Activate and cycle through mask and shape
tools (Rectangle, Rounded Rectangle, Ellipse,
Polygon, Star)
Q Q
Activate and cycle through Type tools
(Horizontal and Vertical)
Ctrl+T Command+T
Activate and cycle between the Pen and Mask
Feather tools. Note - You can turn off this
setting in the Preferences dialog box.
G G
Temporarily activate Selection tool when a
pen tool is selected
Ctrl Command
Temporarily activate pen tool when the
Selection tool is selected and pointer is over a
path (Add Vertex tool when pointer is over a
segment; Convert Vertex tool when pointer is
over a vertex)
Ctrl+Alt Command+Option
Activate and cycle through Brush, Clone
Stamp, and Eraser tools
Ctrl+B Command+B
Activate and cycle through Puppet tools Ctrl+P Command+P
Temporarily convert Selection tool to Shape
Duplication tool
Alt (in shape layer) Option (in shape layer)
Temporarily convert Selection tool to Direct
Selection tool
Ctrl (in shape layer) Command (in shape layer)
Result Windows Mac OS
New composition Ctrl+N Command+N
Open Composition Settings dialog box for
selected composition
Ctrl+K Command+K
Set beginning or end of work area to current
time
B or N B or N
Set work area to duration of selected layers or,
if no layers are selected, set work area to
composition duration
Ctrl+Alt+B Command+Option+B
Open Composition Mini-Flowchart for active
composition
Tab Tab
Activate the most recently active composition
that is in the same composition hierarchy
(network of nested compositions) as the
currently active composition
Shift+Esc Shift+Esc

24
Workspace and workflow
Last updated 6/8/2015
Time navigation (keyboard shortcuts)
Previews (keyboard shortcuts)
Result Windows Mac OS
Go to specific time Alt+Shift+J Option+Shift+J
Go to beginning or end of work area Shift+Home or Shift+End Shift+Home or Shift+End
Go to previous or next visible item in time
ruler (keyframe, layer marker, work area
beginning or end)
note: Also goes to beginning, end, or base frame
of Roto Brush span if viewing Roto Brush in Layer
panel.
J or K J or K
Go to beginning of composition, layer, or
footage item
Home or Ctrl+Alt+Left Arrow Home or Command+Option+Left Arrow
Go to end of composition, layer, or footage
item
End or Ctrl+Alt+Right Arrow End or Command+Option+Right Arrow
Go forward 1 frame Page Down or Ctrl+Right Arrow Page Down or Command+Right Arrow
Go forward 10 frames Shift+Page Down or Ctrl+Shift+Right Arrow Shift+Page Down or Command+Shift+Right
Arrow
Go backward 1 frame Page Up or Ctrl+Left Arrow Page Up or Command+Left Arrow
Go backward 10 frames Shift+Page Up or Ctrl+Shift+Left Arrow Shift+Page Up or Command+Shift+Left Arrow
Go to layer In point I I
Go to layer Out point O O
Go to previous In point or Out point Ctrl+Alt+Shift+Left Arrow Command+Option+Shift+Left Arrow
Go to next In point or Out point Ctrl+Alt+Shift+Right Arrow Command+Option+Shift+Right Arrow
Scroll to current time in Timeline panel D D
Result Windows Mac OS
Start or stop preview spacebar, 0 on numeric keypad, Shift+0 on
numeric keypad
spacebar, 0 on numeric keypad, Shift+0 on
numeric keypad
Reset preview settings to replicate RAM
Preview and Standard Preview behaviors
Alt + click Reset on Preview panel Option + click Reset on Preview panel
Preview only audio, from current time . (decimal point) on numeric keypad* . (decimal point) on numeric keypad* or
Control+. (period) on main keyboard
Preview only audio, in work area Alt+. (decimal point) on numeric keypad* Option+. (decimal point) on numeric keypad*
or Control+Option+. (period) on main
keyboard
Manually preview (scrub) video Drag or Alt-drag current-time indicator,
depending on Live Update setting
Drag or Option-drag current-time indicator,
depending on Live Update setting
Manually preview (scrub) audio Ctrl-drag current-time indicator Command-drag current-time indicator
Preview number of frames specified by
Alternate Preview preference (defaults to 5)
Alt+0 on numeric keypad* Option+0 on numeric keypad* or
Control+Option+0 (zero) on main keyboard
25
Workspace and workflow
Last updated 6/8/2015
Note: Some shortcuts are marked with an asterisk (*) to remind you to make sure that Num Lock is on when you use the
numeric keypad.
Views (keyboard shortcuts)
Toggle Mercury Transmit video preview / (on numeric keypad) / (on numeric keypad), Control+/ on main
keyboard
Take snapshot Shift+F5, Shift+F6, Shift+F7, or Shift+F8 Shift+F5, Shift+F6, Shift+F7, or Shift+F8
Display snapshot in active viewer F5, F6, F7, or F8 F5, F6, F7, or F8
Purge snapshot Ctrl+Shift+F5, Ctrl+Shift+F6, Ctrl+Shift+F7, or
Ctrl+Shift+F8
Command+Shift+F5, Command+Shift+F6,
Command+Shift+F7, or Command+Shift+F8
Fast Previews > Off Ctrl+Alt+1 Command+Option+1
Fast Previews > Adaptive Resolution Ctrl+Alt+2 Command+Option+2
Fast Previews > Draft Ctrl+Alt+3 Command+Option+3
Fast Previews > Fast Draft Ctrl+Alt+4 Command+Option+4
Fast Previews > Wireframe Ctrl+Alt+5 Command+Option+5
Result Windows Mac OS
Turn display color management on or off for
active view
Shift+/ (on numeric keypad) Shift+/ (on numeric keypad)
Show red, green, blue, or alpha channel as
grayscale
Alt+1, Alt+2, Alt+3, Alt+4 Option+1, Option+2, Option+3, Option+4
Show colorized red, green, or blue channel Alt+Shift+1, Alt+Shift+2, Alt+Shift+3 Option+Shift+1, Option+Shift+2,
Option+Shift+3
Toggle showing straight RGB color Alt+Shift+4 Option+Shift+4
Show alpha boundary (outline between
transparent and opaque regions) in Layer
panel
Alt+5 Option+5
Show alpha overlay (colored overlay on
transparent regions) in Layer panel
Alt+6 Option+6
Show Refine Edge X-ray (After Effects CC 12.0
and later)
Alt+X Option+X
Center composition in the panel Double-click Hand tool Double-click Hand tool
Zoom in in Composition, Layer, or Footage
panel
. (period) on main keyboard . (period) on main keyboard
Zoom out in Composition, Layer, or Footage
panel
, (comma) , (comma)
Zoom to 100% in Composition, Layer, or
Footage panel
/ (on main keyboard) / (on main keyboard)
Zoom to fit in Composition, Layer, or Footage
panel
Shift+/ (on main keyboard) Shift+/ (on main keyboard)
Zoom up to 100% to fit in Composition, Layer,
or Footage panel
Alt+/ (on main keyboard) Option+/ (on main keyboard)

26
Workspace and workflow
Last updated 6/8/2015
Footage (keyboard shortcuts)
Set resolution to Full, Half, or Custom in
Composition panel
Ctrl+J, Ctrl+Shift+J, Ctrl+Alt+J Command+J, Command+Shift+J,
Command+Option+J
Open View Options dialog box for active
Composition panel
Ctrl+Alt+U Command+Option+U
Zoom in time = (equal sign) on main keyboard = (equal sign) on main keyboard
Zoom out time - (hyphen) on main keyboard - (hyphen) on main keyboard
Zoom in Timeline panel to single-frame units
(Press again to zoom out to show entire
composition duration.)
; (semicolon) ; (semicolon)
Zoom out in Timeline panel to show the entire
composition duration (Press again to zoom
back in to the duration specified by the Time
Navigator.)
Shift+; (semicolon) Shift+; (semicolon)
Prevent images from being rendered for
previews in viewer panels
Caps Lock Caps Lock
Show or hide safe zones ' (apostrophe) ' (apostrophe)
Show or hide grid Ctrl+' (apostrophe) Command+' (apostrophe)
Show or hide proportional grid Alt+' (apostrophe) Option+' (apostrophe)
Show or hide rulers Ctrl+R Command+R
Show or hide guides Ctrl+; (semicolon) Command+; (semicolon)
Turn snapping to grid on or off Ctrl+Shift+' (apostrophe) Command+Shift+' (apostrophe)
Turn snapping to guides on or off Ctrl+Shift+; (semicolon) Command+Shift+; (semicolon)
Lock or unlock guides Ctrl+Alt+Shift+; (semicolon) Command+Option+Shift+; (semicolon)
Show or hide layer controls (masks, motion
paths, light and camera wireframes, effect
control points, and layer handles)
Ctrl+Shift+H Command+Shift+H
Result Windows Mac OS
Import one file or image sequence Ctrl+I Command+I
Import multiple files or image sequences Ctrl+Alt+I Command+Option+I
Open movie in an After Effects Footage panel Double-click the footage item in the Project
panel
Double-click the footage item in the Project
panel
Add selected items to most recently activated
composition
Ctrl+/ (on main keyboard) Command+/ (on main keyboard)
Replace selected source footage for selected
layers with footage item selected in Project
panel
Ctrl+Alt+/ (on main keyboard) Command+Option+/ (on main keyboard)
Replace source for a selected layer Alt-drag footage item from Project panel onto
selected layer
Option-drag footage item from Project panel
onto selected layer
Delete a footage item without a warning Ctrl+Backspace Command+Delete
27
Workspace and workflow
Last updated 6/8/2015
Effects and animation presets (keyboard shortcuts)
Layers (keyboard shortcuts)
Note: Some operations do not affect shy layers.
Open Interpret Footage dialog box for
selected footage item
Ctrl+Alt+G Command+Option+G
Remember footage interpretation Ctrl+Alt+C Command+Option+C
Edit selected footage item in application with
which it’s associated (Edit Original)
Ctrl+E Command+E
Replace selected footage item Ctrl+H Command+H
Reload selected footage items Ctrl+Alt+L Command+Option+L
Set proxy for selected footage item Ctrl+Alt+P Command+Option+P
Result Windows Mac OS
Delete all effects from selected layers Ctrl+Shift+E Command+Shift+E
Apply most recently applied effect to selected
layers
Ctrl+Alt+Shift+E Command+Option+Shift+E
Apply most recently applied animation preset
to selected layers
Ctrl+Alt+Shift+F Command+Option+Shift+F
Result Windows Mac OS
New solid layer Ctrl+Y Command+Y
New null layer Ctrl+Alt+Shift+Y Command+Option+Shift+Y
New adjustment layer Ctrl+Alt+Y Command+Option+Y
Select layer (1-999) by its number (enter digits
rapidly for two-digit and three-digit numbers)
0-9 on numeric keypad* 0-9 on numeric keypad*
Toggle selection of layer (1-999) by its number
(enter digits rapidly for two-digit and three-
digit numbers)
Shift+0-9 on numeric keypad* Shift+0-9 on numeric keypad*
Select next layer in stacking order Ctrl+Down Arrow Command+Down Arrow
Select previous layer in stacking order Ctrl+Up Arrow Command+Up Arrow
Extend selection to next layer in stacking
order
Ctrl+Shift+Down Arrow Command+Shift+Down Arrow
Extend selection to previous layer in stacking
order
Ctrl+Shift+Up Arrow Command+Shift+Up Arrow
Deselect all layers Ctrl+Shift+A Command+Shift+A
Scroll topmost selected layer to top of
Timeline panel
X X
Show or hide Parent column Shift+F4 Shift+F4
Show or hide Layer Switches and Modes
columns
F4 F4

28
Workspace and workflow
Last updated 6/8/2015
Setting the sampling method for selected
layers (Best/Bilinear)
Alt+B Option+B
Setting the sampling method for selected
layers (Best/Bicubic)
Alt+Shift+B Option+Shift+B
Turn off all other solo switches Alt-click solo switch Option-click solo switch
Turn Video (eyeball) switch on or off for
selected layers
Ctrl+Alt+Shift+V Command+Option+Shift+V
Turn off Video switch for all video layers other
than selected layers
Ctrl+Shift+V Command+Shift+V
Open settings dialog box for selected solid,
light, camera, null, or adjustment layer
Ctrl+Shift+Y Command+Shift+Y
Paste layers at current time Ctrl+Alt+V Command+Option+V
Split selected layers (If no layers are selected,
split all layers.)
Ctrl+Shift+D Command+Shift+D
Precompose selected layers Ctrl+Shift+C Command+Shift+C
Open Effect Controls panel for selected layers Ctrl+Shift+T Command+Shift+T
Open layer in Layer panel (opens source
composition for precomposition layer in
Composition panel)
Double-click a layer Double-click a layer
Open source of a layer in Footage panel
(opens precomposition layer in Layer panel)
Alt-double-click a layer Option-double-click a layer
Reverse selected layers in time Ctrl+Alt+R Command+Option+R
Enable time remapping for selected layers Ctrl+Alt+T Command+Option+T
Move selected layers so that their In point or
Out point is at the current time
[ (left bracket) or ] (right bracket) [ (left bracket) or ] (right bracket)
Trim In point or Out point of selected layers to
current time
Alt+[ (left bracket) or Alt+] (right bracket) Option+[ (left bracket) or Option+] (right
bracket)
Add or remove expression for a property Alt-click stopwatch Option-click stopwatch
Add an effect (or multiple selected effects) to
selected layers
Double-click effect selection in Effects &
Presets panel
Double-click effect selection in Effects &
Presets panel
Set In point or Out point by time-stretching Ctrl+Shift+, (comma) or Ctrl+Alt+, (comma) Command+Shift+, (comma) or
Command+Option+, (comma)
Move selected layers so that their In Point is at
beginning of composition
Alt+Home Option+Home
Move selected layers so that their Out point is
at end of composition
Alt+End Option+End
Lock selected layers Ctrl+L Command+L
Unlock all layers Ctrl+Shift+L Command+Shift+L
Set Quality to Best, Draft, or Wireframe for
selected layers
Ctrl+U, Ctrl+Shift+U, or Ctrl+Alt+Shift+U Command+U, Command+Shift+U,
Command+Option+Shift+U
Cycle forward or backward through blending
modes for selected layers
Shift+ - (hyphen) or Shift+= (equal sign) on
the main keyboard
Shift+ - (hyphen) or Shift+= (equal sign) on
the main keyboard
Find in Timeline panel Ctrl+F Command+F

29
Workspace and workflow
Last updated 6/8/2015
Note: Some shortcuts are marked with an asterisk (*) to remind you to make sure that Num Lock is on when you use the
numeric keypad.
Showing properties and groups in the Timeline panel (keyboard shortcuts)
Note: This table contains double-letter shortcuts (for example, LL). To use these shortcuts, press the letters in quick
succession.
Result Windows Mac OS
Find in Timeline panel Ctrl+F Command+F
Toggle expansion of selected layers to show
all properties
Ctrl+` (accent grave) Command+` (accent grave)
Toggle expansion of property group and all
child property groups to show all properties
Ctrl-click triangle to the left of the property
group name
Command-click triangle to the left of the
property group name
Show only Anchor Point property (for lights
and cameras, Point Of Interest)
A A
Show only Audio Levels property L L
Show only Mask Feather property F F
Show only Mask Path property M M
Show only Mask Opacity property TT TT
Show only Opacity property (for lights,
Intensity)
T T
Show only Position property P P
Show only Rotation and Orientation
properties
R R
Show only Scale property S S
Show only Time Remap property RR RR
Show only instances of missing effects FF FF
Show only Effects property group E E
Show only mask property groups MM MM
Show only Material Options property group AA AA
Show only expressions EE EE
Show only modified properties UU UU
Show only paint strokes, Roto Brush strokes,
and Puppet pins
PP PP
Show only audio waveform LL LL
Show only properties with keyframes or
expressions
U U
Show only selected properties and groups SS SS
30
Workspace and workflow
Last updated 6/8/2015
Showing properties in the Effect Controls panel (keyboard shortcuts)
Modifying layer properties (keyboard shortcuts)
Hide property or group Alt+Shift-click property or group name Option+Shift-click property or group name
Add or remove property or group from set
that is shown
Shift+property or group shortcut Shift+property or group shortcut
Add or remove keyframe at current time Alt+Shift+property shortcut Option+property shortcut
Result Windows Mac OS
Toggle expansion of selected effects to show
all properties
Ctrl+` (accent grave) Command+` (accent grave)
Toggle expansion of property group and all
child property groups to show all properties
Ctrl-click triangle to the left of the property
group name
Command-click triangle to the left of the
property group name
Result Windows Mac OS
Modify property value by default increments Drag property value Drag property value
Modify property value by 10x default
increments
Shift-drag property value Shift-drag property value
Modify property value by 1/10 default
increments
Ctrl-drag property value Command-drag property value
Open Auto-Orientation dialog box for
selected layers
Ctrl+Alt+O Command+Alt+O
Open Opacity dialog box for selected layers Ctrl+Shift+O Command+Shift+O
Open Rotation dialog box for selected layers Ctrl+Shift+R Command+Shift+R
Open Position dialog box for selected layers Ctrl+Shift+P Command+Shift+P
Center selected layers in view (modifies
Position property to place anchor points of
selected layers in center of current view)
Ctrl+Home Command+Home
Move selected layers 1 pixel at current
magnification (Position)
arrow key arrow key
Move selected layers 10 pixels at current
magnification (Position)
Shift+arrow key Shift+arrow key
Move selected layers 1 frame earlier or later Alt+Page Up or Alt+Page Down Option+Page Up or Option+Page Down
Move selected layers 10 frames earlier or later Alt+Shift+Page Up or Alt+Shift+Page Down Option+Shift+Page Up or Option+Shift+Page
Down
Increase or decrease Rotation (Z Rotation) of
selected layers by 1°
+ (plus) or - (minus) on numeric keypad + (plus) or - (minus) on numeric keypad
Increase or decrease Rotation (Z Rotation) of
selected layers by 10°
Shift++ (plus) or Shift+- (minus) on numeric
keypad
Shift++ (plus) or Shift+- (minus) on numeric
keypad
Increase or decrease Opacity (or Intensity for
light layers) of selected layers by 1%
Ctrl+Alt++ (plus) or Ctrl+Alt+- (minus) on
numeric keypad
Control+Option++ (plus) or
Control+Option+- (minus) on numeric keypad
Result Windows Mac OS

31
Workspace and workflow
Last updated 6/8/2015
3D layers (keyboard shortcuts)
Note: (Mac OS) Shortcuts involving function keys F9-F12 may conflict with shortcuts used by the operating system. See
Mac OS Help for instructions to reassign Dashboard & Expose shortcuts.
Increase or decrease Opacity (or Intensity for
light layers) of selected layers by 10%
Ctrl+Alt+Shift++ (plus) or Ctrl+Alt+Shift+-
(minus) on numeric keypad
Control+Option+Shift++ (plus) or
Control+Option+Shift+- (minus) on numeric
keypad
Increase Scale of selected layers by 1% Ctrl++ (plus) or Alt++ (plus) on numeric
keypad
Command++ (plus) or Option++ (plus) on
numeric keypad
Decrease Scale of selected layers by 1% Ctrl+- (minus) or Alt+- (minus) on numeric
keypad
Command+- (minus) or Option+- (minus) on
numeric keypad
Increase Scale of selected layers by 10% Ctrl+Shift++ (plus) or Alt+Shift++ (plus) on
numeric keypad
Command+Shift++ (plus) or Option+Shift++
(plus) on numeric keypad
Decrease Scale of selected layers by 10% Ctrl+Shift+- (minus) or Alt+Shift+- (minus) on
numeric keypad
Command+Shift+- (minus) or Option+Shift+-
(minus) on numeric keypad
Modify Rotation or Orientation in 45°
increments
Shift-drag with Rotation tool Shift-drag with Rotation tool
Modify Scale, constrained to footage frame
aspect ratio
Shift-drag layer handle with Selection tool Shift-drag layer handle with Selection tool
Reset Rotation to 0° Double-click Rotation tool Double-click Rotation tool
Reset Scale to 100% Double-click Selection tool Double-click Selection tool
Scale and reposition selected layers to fit
composition
Ctrl+Alt+F Command+Option+F
Scale and reposition selected layers to fit
composition width, preserving image aspect
ratio for each layer
Ctrl+Alt+Shift+H Command+Option+Shift+H
Scale and reposition selected layers to fit
composition height, preserving image aspect
ratio for each layer
Ctrl+Alt+Shift+G Command+Option+Shift+G
Result Windows Mac OS
Switch to 3D view 1 (defaults to Front) F10 F10
Switch to 3D view 2 (defaults to Custom View
1)
F11 F11
Switch to 3D view 3 (defaults to Active
Camera)
F12 F12
Return to previous view Esc Esc
New light Ctrl+Alt+Shift+L Command+Option+Shift+L
New camera Ctrl+Alt+Shift+C Command+Option+Shift+C
Move the camera and its point of interest to
look at selected 3D layers
Ctrl+Alt+Shift+\ Command+Option+Shift+\
Result Windows Mac OS

32
Workspace and workflow
Last updated 6/8/2015
Keyframes and the Graph Editor (keyboard shortcuts)
Note: (Mac OS) Shortcuts involving function keys F9-F12 may conflict with shortcuts used by the operating system. See
Mac OS Help for instructions to reassign Dashboard & Expose shortcuts.
With a camera tool selected, move the camera
and its point of interest to look at selected 3D
layers
F F
With a camera tool selected, move the camera
and its point of interest to look at all 3D layers
Ctrl+Shift+F Command+Shift+F
Turn Casts Shadows property on or off for
selected 3D layers
Alt+Shift+C Option+Shift+C
Result Windows Mac OS
Toggle between Graph Editor and layer bar
modes
Shift+F3 Shift+F3
Select all keyframes for a property Click property name Click property name
Select all visible keyframes and properties Ctrl+Alt+A Command+Option+A
Deselect all keyframes, properties, and
property groups
Shift+F2 or Ctrl+Alt+Shift+A Shift+F2 or Command+Option+Shift+A
Move keyframe 1 frame later or earlier Alt+Right Arrow or Alt+Left Arrow Option+Right Arrow or Option+Left Arrow
Move keyframe 10 frames later or earlier Alt+Shift+Right Arrow or Alt+Shift+Left
Arrow
Option+Shift+Right Arrow or
Option+Shift+Left Arrow
Set interpolation for selected keyframes (layer
bar mode)
Ctrl+Alt+K Command+Option+K
Set keyframe interpolation method to hold or
Auto Bezier
Ctrl+Alt+H Command+Option+H
Set keyframe interpolation method to linear
or Auto Bezier
Ctrl-click in layer bar mode Command-click in layer bar mode
Set keyframe interpolation method to linear
or hold
Ctrl+Alt-click in layer bar mode Command+Option-click in layer bar mode
Easy ease selected keyframes F9 F9
Easy ease selected keyframes in Shift+F9 Shift+F9
Easy ease selected keyframes out Ctrl+Shift+F9 Command+Shift+F9
Set velocity for selected keyframes Ctrl+Shift+K Command+Shift+K
Add or remove keyframe at current time. For
property shortcuts, see Showing properties
and groups in the Timeline panel (keyboard
shortcuts).
Alt+Shift+property shortcut Option+property shortcut

33
Workspace and workflow
Last updated 6/8/2015
Text (keyboard shortcuts)
Result Windows Mac OS
New text layer Ctrl+Alt+Shift+T Command+Option+Shift+T
Align selected horizontal text left, center, or
right
Ctrl+Shift+L, Ctrl+Shift+C, or Ctrl+Shift+R Command+Shift+L, Command+Shift+C, or
Command+Shift+R
Align selected vertical text top, center, or
bottom
Ctrl+Shift+L, Ctrl+Shift+C, or Ctrl+Shift+R Command+Shift+L, Command+Shift+C, or
Command+Shift+R
Extend or reduce selection by one character
to right or left in horizontal text
Shift+Right Arrow or Shift+Left Arrow Shift+Right Arrow or Shift+Left Arrow
Extend or reduce selection by one word to
right or left in horizontal text
Ctrl+Shift+Right Arrow or Ctrl+Shift+Left
Arrow
Command+Shift+Right Arrow or
Command+Shift+Left Arrow
Extend or reduce selection by one line up or
down in horizontal text
Shift+Up Arrow or Shift+Down Arrow Shift+Up Arrow or Shift+Down Arrow
Extend or reduce selection by one line to right
or left in vertical text
Shift+Right Arrow or Shift+Left Arrow Shift+Right Arrow or Shift+Left Arrow
Extend or reduce selection one word up or
down in vertical text
Ctrl+Shift+Up Arrow or Ctrl+Shift+Down
Arrow
Command+Shift+Up Arrow or
Command+Shift+Down Arrow
Extend or reduce selection by one character
up or down in vertical text
Shift+Up Arrow or Shift+Down Arrow Shift+Up Arrow or Shift+Down Arrow
Select text from insertion point to beginning
or end of line
Shift+Home or Shift+End Shift+Home or Shift+End
Move insertion point to beginning or end of
line
Home or End Home or End
Select all text on a layer Double-click text layer Double-click text layer
Select text from insertion point to beginning
or end of text frame
Ctrl+Shift+Home or Ctrl+Shift+End Command+Shift+Home or
Command+Shift+End
Select text from insertion point to mouse click
point
Shift-click Shift-click
In horizontal text, move insertion point one
character left or right; one line up or down;
one word left or right; or one paragraph up or
down
Left Arrow or Right Arrow; Up Arrow or Down
Arrow; Ctrl+Left Arrow or Ctrl+Right Arrow; or
Ctrl+Up Arrow or Ctrl+Down Arrow
Left Arrow or Right Arrow; Up Arrow or Down
Arrow; Command+Left Arrow or
Command+Right Arrow; or Command+Up
Arrow or Command+Down Arrow
In vertical text, move insertion point one
character up or down; one left or right; one
word up or down; or one paragraph left or
right
Up Arrow or Down Arrow; Left Arrow or Right
Arrow; Ctrl+Up Arrow or Ctrl+Down Arrow; or
Ctrl+Left Arrow or Ctrl+Right Arrow
Up Arrow or Down Arrow; Left Arrow or Right
Arrow; Command+Up Arrow or
Command+Down Arrow; or Command+Left
Arrow or Command+Right Arrow
Select word, line, paragraph, or entire text
frame
Double-click, triple-click, quadruple-click, or
quintuple-click with Type tool
Double-click, triple-click, quadruple-click, or
quintuple-click with Type tool
Turn All Caps on or off for selected text Ctrl+Shift+K Command+Shift+K
Turn Small Caps on or off for selected text Ctrl+Alt+Shift+K Command+Option+Shift+K
Turn Superscript on or off for selected text Ctrl+Shift+= (equals) Command+Shift+= (equals)
Turn Subscript on or off for selected text Ctrl+Alt+Shift+= (equals) Command+Option+Shift+= (equals)
Set horizontal scale to 100% for selected text Ctrl+Shift+X Command+Shift+X
Set vertical scale to 100% for selected text Ctrl+Alt+Shift+X Command+Option+Shift+X
34
Workspace and workflow
Last updated 6/8/2015
Masks (keyboard shortcuts)
Auto leading for selected text Ctrl+Alt+Shift+A Command+Option+Shift+A
Reset tracking to 0 for selected text Ctrl+Shift+Q Command+Shift+Control+Q
Justify paragraph; left align last line Ctrl+Shift+J Command+Shift+J
Justify paragraph; right align last line Ctrl+Alt+Shift+J Command+Option+Shift+J
Justify paragraph; force last line Ctrl+Shift+F Command+Shift+F
Decrease or increase font size of selected text
by 2 units
Ctrl+Shift+, (comma) or Ctrl+Shift+. (period) Command+Shift+, (comma) or
Command+Shift+. (period)
Decrease or increase font size of selected text
by 10 units
Ctrl+Alt+Shift+, (comma) or Ctrl+Alt+Shift+.
(period)
Command+Option+Shift+, (comma) or
Command+Option+Shift+. (period)
Increase or decrease leading by 2 units Alt+Down Arrow or Alt+Up Arrow Option+Down Arrow or Option+Up Arrow
Increase or decrease leading by 10 units Ctrl+Alt+Down Arrow or Ctrl+Alt+Up Arrow Command+Option+Down Arrow or
Command+Option+Up Arrow
Decrease or increase baseline shift by 2 units Alt+Shift+Down Arrow or Alt+Shift+Up Arrow Option+Shift+Down Arrow or
Option+Shift+Up Arrow
Decrease or increase baseline shift by 10 units Ctrl+Alt+Shift+Down Arrow or
Ctrl+Alt+Shift+Up Arrow
Command+Option+Shift+Down Arrow or
Command+Option+Shift+Up Arrow
Decrease or increase kerning or tracking 20
units (20/1000 ems)
Alt+Left Arrow or Alt+Right Arrow Option+Left Arrow or Option+Right Arrow
Decrease or increase kerning or tracking 100
units (100/1000 ems)
Ctrl+Alt+Left Arrow or Ctrl+Alt+Right Arrow Command+Option+Left Arrow or
Command+Option+Right Arrow
Toggle paragraph composer Ctrl+Alt+Shift+T Command+Option+Shift+T
Result Windows Mac OS
New mask Ctrl+Shift+N Command+Shift+N
Select all points in a mask Alt-click mask Option-click mask
Select next or previous mask Alt+` (accent grave) or Alt+Shift+` (accent
grave)
Option+` (accent grave) or Option+Shift+`
(accent grave)
Enter free-transform mask editing mode Double-click mask with Selection tool or
select mask in Timeline panel and press Ctrl+T
Double-click mask with Selection tool or
select mask in Timeline panel and press
Command+T
Exit free-transform mask editing mode Esc Esc
Scale around center point in Free Transform
mode
Ctrl-drag Command-drag
Move selected path points 1 pixel at current
magnification
arrow key arrow key
Move selected path points 10 pixels at current
magnification
Shift+arrow key Shift+arrow key
Toggle between smooth and corner points Ctrl+Alt-click vertex Command+Option-click vertex
Redraw Bezier handles Ctrl+Alt-drag vertex Command+Option-drag vertex
Result Windows Mac OS

35
Workspace and workflow
Last updated 6/8/2015
Paint tools (keyboard shortcuts)
Note: Some shortcuts are marked with an asterisk (*) to remind you to make sure that Num Lock is on when you use the
numeric keypad.
Invert selected mask Ctrl+Shift+I Command+Shift+I
Open Mask Feather dialog box for selected
mask
Ctrl+Shift+F Command+Shift+F
Open Mask Shape dialog box for selected
mask
Ctrl+Shift+M Command+Shift+M
Result Windows Mac OS
Swap paint background color and foreground
colors
X X
Set paint foreground color to black and
background color to white
D D
Set foreground color to the color currently
under any paint tool pointer
Alt-click Option-click
Set foreground color to the average color of a
4-pixel x 4-pixel area under any paint tool
pointer
Ctrl+Alt-click Command+Option-click
Set brush size for a paint tool Ctrl-drag Command-drag
Set brush hardness for a paint tool Ctrl-drag, then release Ctrl while dragging Command-drag, then release Command
while dragging
Join current paint stroke to the previous
stroke
Hold Shift while beginning stroke Hold Shift while beginning stroke
Set starting sample point to point currently
under Clone Stamp tool pointer
Alt-click Option-click
Momentarily activate Eraser tool with Last
Stroke Only option
Ctrl+Shift Command+Shift
Show and move overlay (change Offset value
of aligned Clone Stamp tool or change Source
Position value of unaligned Clone Stamp tool)
Alt+Shift-drag with Clone Stamp tool Option+Shift-drag with Clone Stamp tool
Activate a specific Clone Stamp tool preset 3, 4, 5, 6, or 7 on the main keyboard 3, 4, 5, 6, or 7 on the main keyboard
Duplicate a Clone Stamp tool preset in Paint
panel
Alt-click the button for the preset Option-click the button for the preset
Set opacity for a paint tool Digit on numeric keypad (for example,
9=90%, 1=10%)*
Digit on numeric keypad (for example,
9=90%, 1=10%)*
Set opacity for a paint tool to 100% . (decimal) on numeric keypad* . (decimal) on numeric keypad*
Set flow for a paint tool Shift+a digit on numeric keypad (for example,
9=90%, 1=10%)*
Shift+a digit on numeric keypad (for example,
9=90%, 1=10%)*
Set flow for a paint tool to 100% Shift+. (decimal) on numeric keypad* Shift+. (decimal) on numeric keypad*
Move earlier or later by number of frames
specified for stroke Duration
Ctrl+Page Up or Ctrl+Page Down (or 1 or 2 on
the main keyboard)
Command+Page Up or Command+Page
Down (or 1 or 2 on the main keyboard)
Result Windows Mac OS

36
Workspace and workflow
Last updated 6/8/2015
Shape layers (keyboard shortcuts)
Markers (keyboard shortcuts)
Result Windows Mac OS
Group selected shapes Ctrl+G Command+G
Ungroup selected shapes Ctrl+Shift+G Command+Shift+G
Enter free-transform path editing mode Select Path property in Timeline panel and
press Ctrl+T
Select Path property in Timeline panel and
press Command+T
Increase star inner roundness Page Up when dragging to create shape Page Up when dragging to create shape
Decrease star inner roundness Page Down when dragging to create shape Page Down when dragging to create shape
Increase number of points for star or polygon;
increase roundness for rounded rectangle
Up Arrow when dragging to create shape Up Arrow when dragging to create shape
Decrease number of points for star or
polygon; decrease roundness for rounded
rectangle
Down Arrow when dragging to create shape Down Arrow when dragging to create shape
Reposition shape during creation Hold spacebar when dragging to create shape Hold spacebar when dragging to create shape
Set rounded rectangle roundness to 0 (sharp
corners); decrease polygon and star outer
roundness
Left Arrow when dragging to create shape Left Arrow when dragging to create shape
Set rounded rectangle roundness to
maximum; increase polygon and star outer
roundness
Right Arrow when dragging to create shape Right Arrow when dragging to create shape
Constrain rectangles to squares; constrain
ellipses to circles; constrain polygons and
stars to zero rotation
Shift when dragging to create shape Shift when dragging to create shape
Change outer radius of star Ctrl when dragging to create shape Command when dragging to create shape
Result Windows Mac OS
Set marker at current time (works during
preview and audio-only preview)
* (multiply) on numeric keypad * (multiply) on numeric keypad or Control+8
on main keyboard
Set marker at current time and open marker
dialog box
Alt+* (multiply) on numeric keypad Option+* (multiply) on numeric keypad or
Control+Option+8 on main keyboard
Set and number a composition marker (0-9) at
the current time
Shift+0-9 on main keyboard Shift+0-9 on main keyboard
Go to a composition marker (0-9) 0-9 on main keyboard 0-9 on main keyboard
Display the duration between two layer
markers or keyframes in the Info panel
Alt-click the markers or keyframes Option-click the markers or keyframes
Remove marker Ctrl-click marker Command-click marker

37
Workspace and workflow
Last updated 6/8/2015
Motion tracking (keyboard shortcuts)
Saving, exporting, and rendering (keyboard shortcuts)
Note: On Mac OS, some keyboard commands used to interact with the operating system conflict with keyboard commands
for interacting with After Effects. Select Use System Shortcut Keys in the General preferences to override the After Effects
keyboard command in some cases in which there’s a conflict with the Mac OS keyboard command.
Keyboard shortcuts graphic
Click the link below to download a pdf of about 50 of the more commonly used and pouplar keyboard shortcuts.
AE_KeyboardShortcuts.pdf
Working with After Effects and other applications
Working with Adobe Bridge and After Effects
Adobe Bridge is the control center for Adobe Creative Suite software. Use Adobe Bridge to browse for project templates
and animation presets; run cross-product workflow automation scripts; view and manage files and folders; organize
your files by assigning keywords, labels, and ratings to them; search for files and folders; and view, edit, and add
metadata.
•To open Adobe Bridge from After Effects, choose File > Browse In Bridge.
Result Windows Mac OS
Move feature region, search region, and
attach point 1 pixel at current magnification
arrow key arrow key
Move feature region, search region, and
attach point 10 pixels at current magnification
Shift+arrow key Shift+arrow key
Move feature region and search region 1 pixel
at current magnification
Alt+arrow key Option+arrow key
Move feature region and search region 10
pixels at current magnification
Alt+Shift+arrow key Option+Shift+arrow key
Result Windows Mac OS
Save project Ctrl+S Command+S
Increment and save project Ctrl+Alt+Shift+S Command+Option+Shift+S
Save As Ctrl+Shift+S Command+Shift+S
Add active composition or selected items to
render queue
Ctrl+Shift+/ (on main keyboard) Command+Shift+/ (on main keyboard)
Add current frame to render queue Ctrl+Alt+S Command+Option+S
Duplicate render item with same output
filename as original
Ctrl+Shift+D Command+Shift+D

38
Workspace and workflow
Last updated 6/8/2015
•To reveal a file in Adobe Bridge, select a file in the Project panel and choose File > Reveal In Bridge.
•To use Adobe Bridge to browse for animation presets, choose Animation > Browse Presets.
Adobe Bridge is part of the Creative Cloud suite of applications and can be downloaded and installed through Creative
Cloud. See the help documentation and the Adobe Bridge CC product page for more information.
See this video to get an overview of Adobe Bridge CC.
After Effects includes template projects that include entire DVD menus for you to use as a basis for your own DVD
menus. To use Adobe Bridge to browse and import these template projects, choose File > Browse Template Projects. (See
Template projects and example projects.)
Working with Photoshop and After Effects
If you use Photoshop to create still images, you can use After Effects to bring those still images together and make them
move and change. In After Effects, you can animate an entire Photoshop image or any of its layers. You can even
animate individual properties of Photoshop images, such as the properties of a layer style. If you use After Effects to
create movies, you can use Photoshop to refine the individual frames of those movies.
Comparative advantages for specific tasks
The strengths of After Effects are in its animation and automation features. This means that After Effects excels at tasks
that can be automated from one frame to another. For example, you can use the motion tracking features of After Effects
to track the motion of a microphone boom, and then automatically apply that same motion to a stroke made with the
Clone Stamp tool. In this manner, you can remove the microphone from every frame of a shot, without having to paint
the microphone out by hand on each frame.
In contrast, Photoshop has excellent tools for painting and drawing.
Deciding which application to use for painting depends on the task. Paint strokes in Photoshop directly affect the pixels
of the layer. Paint strokes in After Effects are elements of an effect, each of which can be turned on or off or modified
at any time. If you want to have complete control of each paint stroke after you’ve applied it, or if you want to animate
the paint strokes themselves, use the After Effects paint tools. If the purpose of applying a paint stroke is to permanently
modify a still image, use the Photoshop paint tools. If you are applying several paint strokes by hand to get rid of dust,
consider using the Photoshop paint tools.
The animation and video features in Photoshop Extended include simple keyframe-based animation. After Effects uses
a similar interface, though the breadth and flexibility of its animation features are far greater.
After Effects can also automatically create 3D layers to mimic the planes created by the Photoshop Vanishing Point
feature.
Exchanging still images
After Effects can import and export still images in many formats, but you will usually want to use the native Photoshop
PSD format when transferring individual frames or still image sequences between After Effects and Photoshop.
When importing or exporting a PSD file, After Effects can preserve individual layers, masks, layer styles, and most
other attributes. When you import a PSD file into After Effects, you can choose whether to import it as a flattened image
or as a composition with its layers separate and intact.
It is often a good idea to prepare a still image in Photoshop before importing it into After Effects. Examples of such
preparation include correcting color, scaling, and cropping. It is often better for you to do something once to the source
image in Photoshop than to have After Effects perform the same operation many times per second as it renders each
frame for previews or final output.

39
Workspace and workflow
Last updated 6/8/2015
By creating your new PSD document from the Photoshop New File dialog box with a Film & Video preset, you can start
with a document that is set up correctly for a specific video output type. If you are already working in After Effects, you
can create a new PSD document that matches your composition and project settings by choosing File > New > Adobe
Photoshop File.
Exchanging movies
You can also exchange video files, such as QuickTime movies, between Photoshop and After Effects. When you open a
movie in Photoshop, a video layer is created that refers to the source footage file. Video layers allow you to paint
nondestructively on the movie’s frames, much as After Effects works with layers with movies as their sources. When
you save a PSD file with a video layer, you save the edits that you made to the video layer, not edits to the source footage
itself.
You can also render a movie directly from Photoshop. For example, you can create a QuickTime movie from Photoshop
that can then be imported into After Effects.
Color
After Effects works internally with colors in an RGB (red, green, blue) color space. Though After Effects can convert
CMYK images to RGB, you should do video and animation work in Photoshop in RGB.
If relevant for your final output, it is better to ensure that the colors in your image are broadcast-safe in Photoshop
before you import the image into After Effects. A good way to do this is to assign the appropriate destination color
space—for example, SDTV (Rec. 601)—to the document in Photoshop. After Effects performs color management
according to color profiles embedded in documents, including imported PSD files.
Working with Flash and After Effects
If you use Adobe® Flash® to create video or animation, you can use After Effects to edit and refine the video. For
example, from Flash you can export animations and applications as QuickTime movies or Flash Video (FLV) files. You
can then use After Effects to edit and refine the video.
If you use After Effects to edit and composite video, you can then use Flash to publish that video.
Flash and After Effects use separate terms for some concepts that they share in common. The following table lists the
differences between the terms used in the two applications:
Additional resources
The following articles provide additional information about using Flash and After Effects together:
•Richard Harrington and Marcus Geduld provide an excerpt, "Flash Essentials for After Effects Users", of their book
After Effects for Flash | Flash for After Effects on the Peachpit website. In this chapter, Richard and Marcus explain
Flash in terms that an After Effects user can understand. http://www.peachpit.com/articles/article.aspx?p=1350895
After Effects Flash Professional
Composition Movie Clip
Composition frame (Composition panel) Stage
Project panel Library panel
Project files FLA files
Render and export a movie Publish SWF file

40
Workspace and workflow
Last updated 6/8/2015
•Richard Harrington and Marcus Geduld also provide "After Effects Essentials for Flash Users", another excerpt from
their book After Effects for Flash | Flash for After Effects. In this chapter, Richard and Marcus explain After Effects
in terms that a Flash user can understand. http://www.peachpit.com/articles/article.aspx?p=1350894
•Robert Powers provides a video tutorial on the Slippery Rock NYC website that shows the basics of using After
Effects from the perspective of someone who is familiar with Flash Professional.
Exporting QuickTime video from Flash
If you create animations or applications with Flash, you can export them as QuickTime movies using the File > Export
> Export Movie command in Flash. For a Flash animation, you can optimize the video output for animation. For a Flash
application, Flash renders video of the application as it runs, allowing the user to manipulate it. This lets you capture
the branches or states of your application that you want to include in the video file.
Importing and publishing video in Flash
When you import a movie file into Flash, you can use various techniques, such as scripting or Flash components, to
control the visual interface that surrounds your video. For example, you might include playback controls or other
graphics. You can also add graphic layers on top of the movie for composite results.
Composite graphics, animation, and video
Flash and After Effects each include many capabilities that allow you to perform complex compositing of video and
graphics. Which application you choose to use will depend on your personal preferences and the type of final output
you want to create.
Flash is the more web-oriented of the two applications, with its small final file size. Flash also allows for run-time
control of animation. After Effects is oriented toward video and film production, provides a wide range of visual effects,
and is generally used to create video files as final output.
Both applications can be used to create original graphics and animation. Both use a timeline and offer scripting
capabilities for controlling animation programmatically. After Effects includes a larger set of effects.
Both applications allow you to place graphics on separate layers for compositing. These layers can be turned on and off
as needed. Both also allow you to apply effects to the contents of individual layers.
In Flash, composites do not affect the video content directly; they affect only the appearance of the video during
playback in Flash Player. In contrast, when you composite with imported video in After Effects, the video file you
export actually incorporates the composited graphics and effects.
Because all drawing and painting in After Effects is done on layers separate from any imported video, it is always non-
destructive. Flash has both destructive and nondestructive drawing modes.
Importing Flash SWF files into After Effects
Flash has a unique set of vector art tools that make it useful for a variety of drawing tasks not possible in After Effects
or Adobe® Illustrator®. You can import SWF files into After Effects to composite them with other video or render them
as video with additional creative effects. Interactive content and scripted animation are not retained. Animation
defined by keyframes is retained.
Each SWF file imported into After Effects is flattened into a single continuously rasterized layer, with its alpha channel
preserved. Continuous rasterization means that graphics stay sharp as they are scaled up. This import method allows
you to use the root layer or object of your SWF files as a smoothly rendered element in After Effects, allowing the best
capabilities of each tool to work together.

41
Workspace and workflow
Last updated 6/8/2015
Working with Adobe Premiere Pro and After Effects
Adobe Premiere Pro is designed to capture, import, and edit movies. After Effects is designed to create motion graphics,
apply visual effects, composite visual elements, perform color correction, and perform other post-production tasks for
movies.
You can easily exchange projects, compositions, sequences, tracks, and layers between After Effects and Adobe
Premiere Pro:
•You can import an Adobe Premiere Pro project into After Effects. See Import an Adobe Premiere Pro project.
•You can export an After Effects project as an Adobe Premiere Pro project. See Export an After Effects project as an
Adobe Premiere Pro project .
•You can copy and paste layers and tracks between After Effects and Adobe Premiere Pro. See Copy between After
Effects and Adobe Premiere Pro.
•You can render and replace After Effects compositions in Premiere Pro to speed up VFX-heavy sequences. See
Render and Replace After Effects compositions in Adobe Premiere Pro .)
If you have Adobe Premiere Pro, you can do the following:
•Use Adobe Dynamic Link to work with After Effects compositions in Adobe Premiere Pro. A dynamically linked
composition appears as a clip in Adobe Premiere Pro.
•Use Adobe Dynamic Link to work with Adobe Premiere Pro sequences in After Effects. A dynamically linked
sequence appears as a footage item in After Effects.
•Start After Effects from within Premiere Pro and create a new composition with settings that match the settings of
your Premiere Pro project.
•Select a set of clips in Adobe Premiere Pro and convert them to a composition in After Effects.
For information on using Dynamic Link with After Effects and Premiere Pro, see Dynamic Link and After Effects and
Dynamic Link sections in Adobe Premiere Pro Help.
Working with Adobe Media Encoder and After Effects
You can use Adobe Media Encoder to export video from After Effects. Use Adobe Media Encoder to encode formats
like H.264, MPEG-2, and WMV. Formats such as these are encoded at a higher quality than the Render Queue. Other
formats, are available in Adobe Media Encoder, but not in After Effects. For example, the DNxHD format is available
in Adobe Media Encoder CC, but not in After Effects CC.
You can add After Effects project files to a watch folder in Adobe Media encoder, and the project is automatically added
to the encoding queue Adobe Media Encoder. See the Import files with Watch folder section in Adobe Media Encoder
for detailed information.
For details about using Adobe Media Encoder with After Effects, see Render and export with Adobe Media Encoder.
See this tutorial to learn how to export After Effects compositions using Adobe Media Encoder.
Edit in Adobe Audition
While working in After Effects, you can use the more comprehensive audio-editing capabilities of Adobe Audition to
fine-tune your audio. You can use the Edit in Adobe Audition command to start Adobe Audition from within After
Effects.

42
Workspace and workflow
Last updated 6/8/2015
If you edit an audio-only file (for example, a WAV file) in Adobe Audition, you change the original file. If you edit a
layer that contains both audio and video (for example, an AVI file), you edit a copy of the source audio file.
1Select the layer that contains the audio that you want to edit. The item must be of a type that is editable in Adobe
Audition.
2Choose Edit > Edit In Adobe Audition to open the clip in Edit view in Adobe Audition.
3Edit the file, and then do one of the following:
•If you’re editing an audio-only layer, choose File > Save to apply your edits to the original audio file. You can also
choose File > Save As to apply your edits to a copy of the audio file. If you choose File > Save As, import the copy
of the file into After Effects.
•If you’re editing a layer that contains both audio and video, choose File > Save As. After you save the file, import
it into After Effects. Then, add it to the composition, and mute the original audio in the audio-video clip by
deselecting the Audio switch in the Timeline panel.
Note: Any effects applied to audio in After Effects aren’t included in the copy that is sent to Adobe Audition.
Tutorials and resources about using Adobe Audition to modify audio from After Effects can be found on this post from
the After Effects Region of Interest blog.
More Help topics
Adobe Bridge
Template projects and example projects
Animation presets overview and resources
Preparing and importing Photoshop files
3D object layers from Photoshop
Video and animation overview
3D
Vanishing Point
Web links, chapter links, cue points, and markers
Importing from Adobe After Effects
After Effects keyboard shortcuts
Keyboard shortcuts are a great way to speed up your tasks and also work more efficiently. Here is a downloadable
shortcuts graphic of about 50 of the more commonly used and popular After Effects shortcuts.
AfterEffects_KeyboardShortcuts.pdf
The complete list of After Effects keyboard shortcuts is available here .
Workspaces, panels, and viewers
43
Workspace and workflow
Last updated 6/8/2015
Workspaces and panels
Adobe video and audio applications provide a consistent, customizable user interface. Although each application has
its own set of panels, you move and group panels in the same way in each application.
The main window of a program is the application window. Panels are organized in this window in an arrangement
called a workspace.
Each application includes several predefined workspaces that optimize the layout of panels for specific tasks. You can
also create and customize your own workspaces by arranging panels in the layout that best suits your working style for
specific tasks.
You can drag panels to new locations, move panels into or out of a group, place panels alongside each other, and undock
a panel so that it floats in a new window above the application window. As you rearrange panels, the other panels resize
automatically to fit the window.
A Application window B Grouped panels C Individual panel
To increase the available screen space, use multiple monitors. When you work with multiple monitors, the application
window appears on the main monitor, and you place floating windows on the second monitor. Monitor configurations
are stored in the workspace.
Workspaces are stored in XML files in the preferences folder. With some caveats regarding monitor size and layout,
these workspaces can be moved to another computer and used there.
•(Windows) [drive]:\Users\[user_name]\AppData\Roaming\Adobe\After Effects\13.0\ModifiedWorkspaces
•(Mac OS) [drive]/Users/[user_name]/Library/Preferences/Adobe/After Effects/13.0/ModifiedWorkspaces
See this video tutorial about workspaces by Andrew Devis on the Creative Cow website for more details.
Choose a workspace
•Choose Window > Workspace, and select the desired workspace.
•Choose a workspace from the Workspace menu in the Tools panel.
•If the workspace has a keyboard shortcut assigned, press Shift+F10, Shift+F11, or Shift+F12.
To assign a keyboard shortcut to the current workspace, choose Window > Assign Shortcut To [Workspace Name]
Workspace.
44
Workspace and workflow
Last updated 6/8/2015
Save, reset, or delete workspaces
Save a custom workspace
As you customize a workspace, the application tracks your changes, storing the most recent layout. To store a specific
layout more permanently, save a custom workspace. Saved custom workspaces appear in the Workspace menu, where
you can return to and reset them.
❖Arrange the frames and panels as desired, and then choose Window > Workspace > New Workspace. Type a name
for the workspace, and click OK.
Note: (After Effects, Premiere Pro) If a project saved with a custom workspace is opened on another system, the application
looks for a workspace with a matching name. If the application cannot find a match (or the monitor configuration doesn’t
match), it uses the current local workspace.
Reset a workspace
Reset the current workspace to return to its original, saved layout of panels.
❖Choose Window > Workspace > Reset workspace name.
Delete a workspace
1Choose Window > Workspace >Delete Workspace.
2Choose the workspace you want to delete, and then click OK.
Note: You cannot delete the currently active workspace.
Dock, group, or float panels
You can dock panels together, move them into or out of groups, and undock them so they float above the application
window. As you drag a panel, drop zones—areas onto which you can move the panel—become highlighted. The drop
zone you choose determines where the panel is inserted, and whether it docks or groups with other panels.
Docking zones
Docking zones exist along the edges of a panel, group, or window. Docking a panel places it adjacent to the existing
group, resizing all groups to accommodate the new panel.
Grouping zones
45
Workspace and workflow
Last updated 6/8/2015
Grouping zones exist in the middle of a panel or group, and along the tab area of panels. Dropping a panel on a grouping
zone stacks it with other panels.
Dock or group panels
1If the panel you want to dock or group is not visible, choose it from the Window menu.
2Do one of the following:
•To move an individual panel, drag the gripper area in the upper-left corner of a panel’s tab onto the desired drop
zone.
•To move an entire group, drag the group gripper in the upper-right corner onto the desired drop zone.
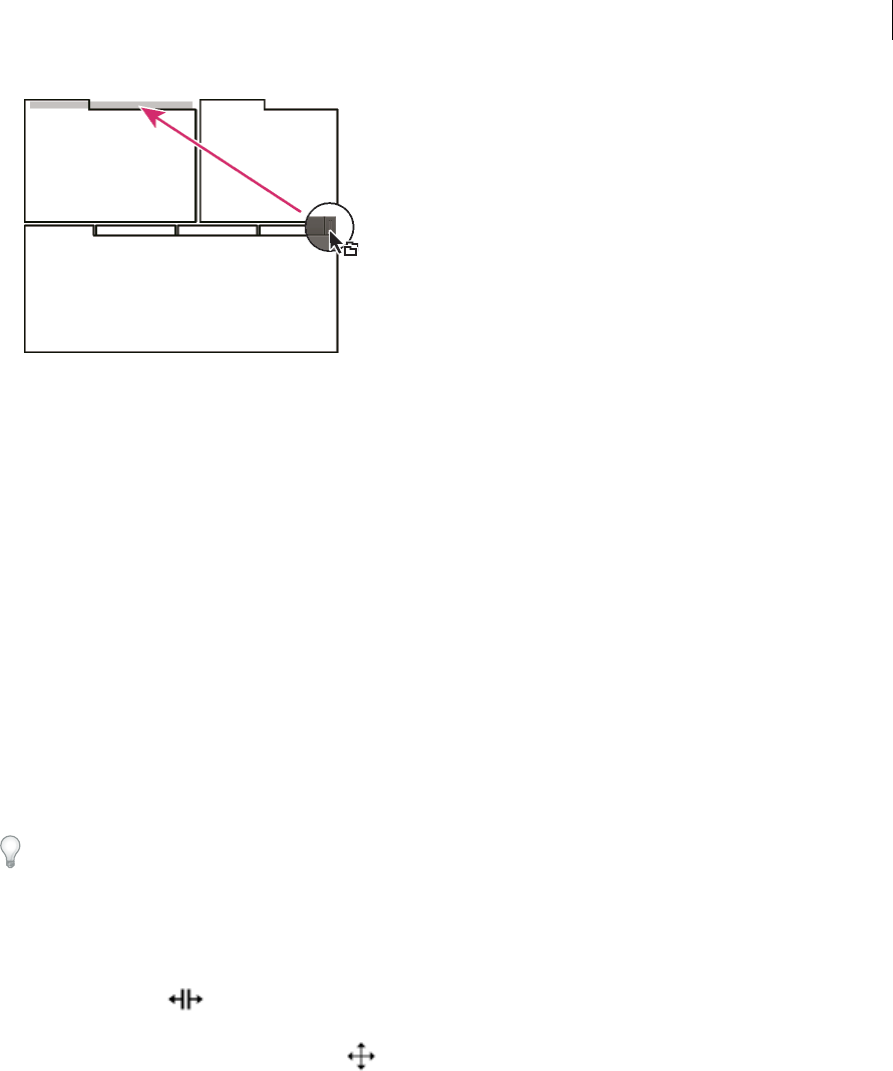
46
Workspace and workflow
Last updated 6/8/2015
The application docks or groups the panel, according to the type of drop zone.
Undock a panel in a floating window
When you undock a panel in a floating window, you can add panels to the window and modify it similarly to the
application window. You can use floating windows to use a secondary monitor, or to create workspaces like the
workspaces in earlier versions of Adobe applications.
❖Select the panel you want to undock (if it’s not visible, choose it from the Window menu), and then do one of the
following:
•Choose Undock Panel or Undock Frame from the panel menu. Undock Frame undocks the panel group.
•Hold down Ctrl (Windows®) or Command (Mac OS®), and drag the panel or group from its current location.
When you release the mouse button, the panel or group appears in a new floating window.
•Drag the panel or group outside the application window. (If the application window is maximized, drag the panel
to the Windows taskbar.)
Resize panel groups
To quickly maximize a panel beneath the pointer, press the ` (accent grave) key. (The accent grave is the unshifted
character under the tilde, ~, on standard US keyboards.) Press the key again to return the panel to its original size.
When you drag the divider between panel groups, all groups that share the divider are resized.
1Do either of the following:
•To resize either horizontally or vertically, position the pointer between two panel groups. The pointer becomes
a double arrow .
•To resize in both directions at once, position the pointer at the intersection between three or more panel groups.
The pointer becomes a four-way arrow .
2Hold down the mouse button, and drag to resize the panel groups.
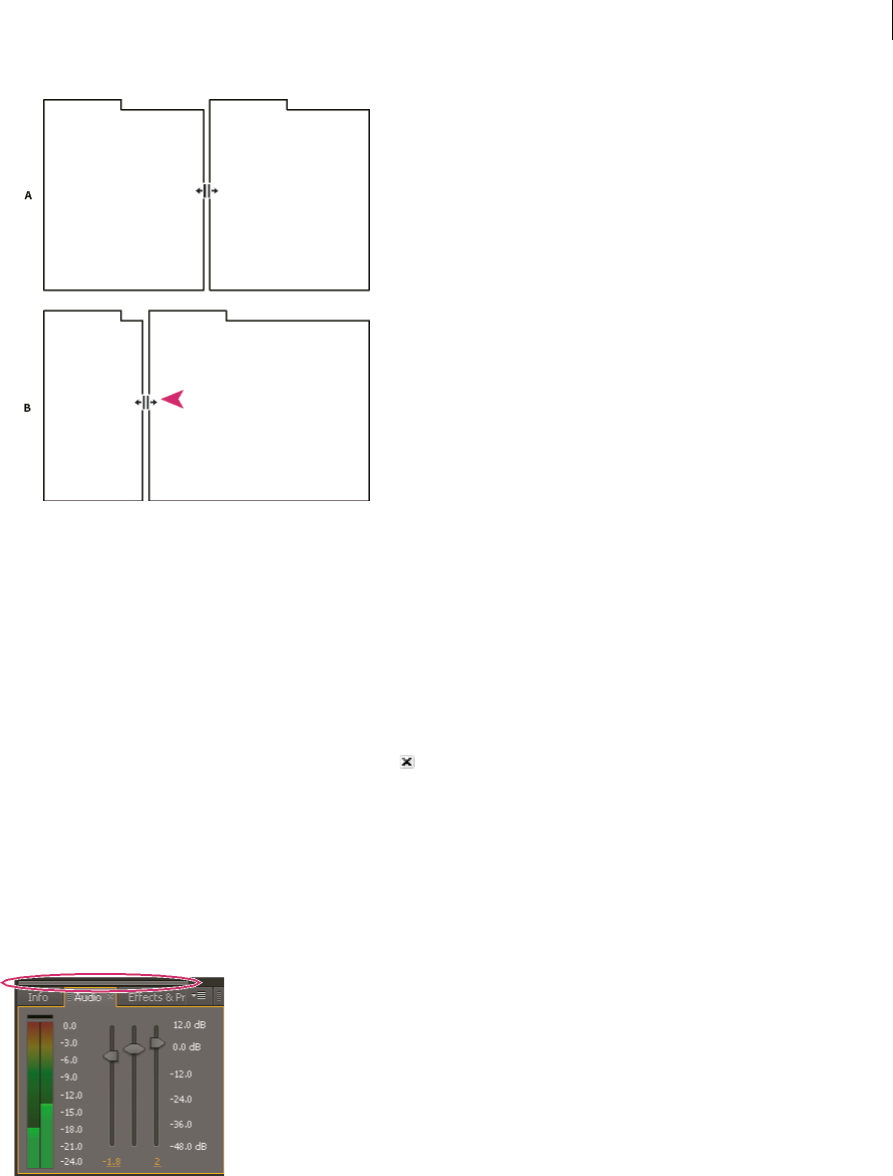
47
Workspace and workflow
Last updated 6/8/2015
A Original group with resize pointer B Resized groups
Open, close, and show panels and windows
Even if a panel is open, it may be out of sight, beneath other panels. Choosing a panel from the Window menu opens it
and brings it to the front of its group.
When you close a panel group in the application window, the other groups resize to use the newly available space. When
you close a floating window, the panels within it close, too.
•To open or close a panel, choose the panel from the Window menu.
•To close a panel or window, click its Close button . If you accidentally close a panel, choose the panel from the
Window menu, and the panel will be displayed again.
•To open or close a panel, use its keyboard shortcut.
•If a frame contains multiple panels, place the pointer over a tab and roll the mouse scroll wheel forward or backward
to change which panel is active.
•If a frame contains more grouped panels than can be shown at once, drag the scroll bar that appears above the tabs.
Viewers
A viewer is a panel that can contain multiple compositions, layers, or footage items, or multiple views of one such item.
The Composition, Layer, Footage, Flowchart, and Effect Controls panels are viewers.

48
Workspace and workflow
Last updated 6/8/2015
Locking a viewer prevents the currently displayed item from being replaced when you open or select a new item.
Instead, when a viewer is locked and a new item is opened or selected, After Effects creates a new viewer panel for that
item. If you select the item from the viewer menu of a locked viewer, a new viewer isn't created; the existing viewer is
used.
Instead of housing multiple items in a single viewer and using the viewer menu to switch between them, you can choose
to open a separate viewer for each open composition, layer, or footage item. When you have multiple viewers open, you
can arrange them by docking or grouping them, like any other panels.
For example, you can create one Composition viewer each for different 3D views (Top, Bottom, Back, Front, custom
views) so that you can maximize each of the views with the ` (accent grave) keyboard shortcut, which maximizes or
restores the panel under the pointer.
To create a custom workspace with multiple viewers, ensure that all viewers are unlocked before you save the workspace.
Locked viewers are associated with a specific project context and are therefore not saved in the preferences file.
•To create a new viewer, choose New from the viewer menu. (See Open panel, viewer, and context menus.)
•To lock or unlock a viewer, choose Locked from the viewer menu, or click the Toggle Viewer Lock button.
•To lock the current viewer, split the current frame, and create a new viewer of the same type in the new frame, press
Ctrl+Alt+Shift+N (Windows) or Command+Option+Shift+N (Mac OS).
•To cycle forward or backward through the items in the viewer menu list for the active viewer, press Shift+period (.)
or Shift+comma (,).
Edit this, look at that (ETLAT) and locked Composition viewers
If a Composition viewer is locked, the Timeline panel for another composition is active, and the Composition viewer
for the active composition is not shown, then most commands that affect views and previews operate on the
composition for which the viewer is shown.
For example, pressing the spacebar can start a standard preview for the composition visible in a locked Composition
viewer rather than the composition associated with the active Timeline panel.
This behavior facilitates a working setup sometimes referred to as edit-this-look-at-that (ETLAT). The most common
scenario in which this behavior is useful is the scenario in which you make a change in the Timeline panel for a nested
(upstream) composition and want to preview the result of the change in a containing (downstream) composition.
Note: ETLAT behavior works for keyboard shortcuts for zooming, fitting, previewing, taking and viewing snapshots,
showing channels, showing and hiding grids and guides, and showing the current frame on a video preview device.
To prevent this behavior, unlock the Composition viewer or show the Composition viewer for the composition that you
want to view or preview.
See this video on the Video2Brain website to learn about the improvements in ETLAT (edit-this-look-at-that) workflow
in After Effects CS5.5 and later.
More Help topics
Panels, viewers, workspaces, and windows (keyboard shortcuts)
Choose a viewer to always preview
Previews (keyboard shortcuts)
Views (keyboard shortcuts)
About precomposing and nesting

49
Workspace and workflow
Last updated 6/8/2015
Preferences
The following sections describe the Preferences menu and and the various tasks that can be performed using this menu.
The Preferences menu
To open the Preferences menu, go to:
•Edit > Preferences > [category name] (Windows)
•After Effects > Preferences > [category name] (Mac OS)
Use the following keyboard shortcuts to open the Preferences > General menu:
•Ctrl+Alt+; (semicolon) (Windows)
•Command+Option+; (semicolon) (Mac OS)
Reset preferences
To restore the default preference settings, press and hold the following keys while the application is starting.
•Ctrl+Alt+Shift (Windows)
•Command+Option+Shift (Mac OS)
To restore default keyboard shortcuts, Alt-click (Windows) or Option-click (Mac OS) the OK button.

50
Workspace and workflow
Last updated 6/8/2015
Reveal preferences
Preferences, including keyboard shortcuts and workspaces, are stored as files in the following locations:
•(Windows) \Users\\AppData\Roaming\Adobe\After Effects\13.0
•(Mac OS) /Users//Library/Preferences/Adobe/After Effects/13.0
To reveal the preferences in After Effects without searching on your hard drive, go to:
•Edit > Preferences > General and click Reveal Preferences in Explorer button (Windows)
•After Effects > Preferences > General and click Reveal Preferences in Finder button (Mac OS)
It is recommended that you do not modify the files in this directory manually; use the Preferences dialog box to modify
the preferences. For information on modifying keyboard shortcuts, see Modify keyboard shortcuts. For information
on managing workspaces, see Workspaces and Panels.
Note: The Library folder in Mac OS X is hidden. See the following article to learn how to access hidden user files on Mac
OS:http://helpx.adobe.com/x-productkb/global/access-hidden-user-library-files.html
The following list briefly describes the different options listed under the Edit > Preferences menu, especially those
options that are not self-explanatory.
General preferences
•Levels Of Undo: Undo changes
•Path Point Size: Specifies size of Bezier direction handles and vertices for masks and shapes, direction handles for
motion paths, and other similar controls.
•Show Tool Tips: After Effects user interface tips
•Create Layers At Composition Start Time: Layers overview
•Switches Affect Nested Comps: About precomposing and nesting
•Default Spatial Interpolation To Linear: About spatial and temporal keyframe interpolation
•Preserve Constant Vertex Count When Editing Masks: Designate the first vertex for a Bezier path
Pen Tool Shortcut Toggles B etween Pen and MaskFeather Tools: Variable-widt h mask fe ather
•Synchronize Time Of All Related Items: Preferences and composition settings that affect nested compositions
•Expression Pick Whip Writes Compact English: Edit an expression with the pick whip
•Create Split Layers Above Original Layer: Split a layer
•Allow Scripts To Write Files And Access Network: Loading and running scripts
•Enable JavaScript Debugger: After Effects scripting guide at the Adobe After Effects Developer Center on the Adobe
website
•Use System Color Picker: Choose a color picker
•Create New Layers At Best Quality: Layer image quality and subpixel positioning
•Use System Shortcut Keys (Mac OS only): Keyboard shortcuts reference
•Dynamic Link with After Effects Uses Project File Name with Highest Number: About Dynamic Link (Production
Premium or Master Collection only)

51
Workspace and workflow
Last updated 6/8/2015
Previews preferences
•Adaptive Resolution Limit: Preview modes and Fast Previews preferences
Also, see Fast Previews (CS6).
The GPU Information dialog box is available to check the texture memory for your GPU, and to set the ray-tracing
preference to the GPU, if it is available. The OptiX version number is available, as well as the Copy button to copy
the general information at the top of the dialog box to the system clipboard.
•Viewer Quality (Zoom Quality and Color Management Quality): Viewer Quality preferences
•Audio Preview Duration: Preview video and audio
Display preferences
•Motion Path: Motion paths
•Disable Thumbnails In Project Panel: Composition thumbnail images
•Show Rendering Progress In Info Panel And Flowchart: Preview video and audio
•Hardware Accelerate Composition, Layer, And Footage Panels: Improve performance
Import preferences
•Still Footage: Create layers from footage items or change layer source
•Sequence Footage: Import a single still image or a still-image sequence
•Interpret Unlabeled Alpha As: Alpha channel interpretation: premultiplied or straight
•Drag Import Multiple Items As: Import footage items by dragging
•There is a dropdown menu to choose drop-frame or non-drop-frame timecode for Indeterminate Media NTSC,
which applies to imports like still image sequences in which timecode values are not present or are unknown.
Output preferences
•Segment Sequences At, Segment Movie Files At, and Audio Block Duration: Segment settings
•Use Default File Name And Folder: Name output files automatically
Grids & Guides preferences
•Safe zones, grids, guides, and rulers
Labels preferences
•Color labels for layers, compositions, and footage items
Media & Disk Cache preferences
•Enable Disk Cache and Maximum Disk Cache Size: Caches: RAM cache, disk cache, and media cache
•Conformed Media Cache and Clean Database & Cache: Media cache
•Create Layer Markers From Footage XMP Metadata and Write XMP IDs To Files On Import: XMP metadata in
After Effects
Video Preview preferences
•Preview on an external video monitor

52
Workspace and workflow
Last updated 6/8/2015
Appearance preferences
•Use Label Color For Layer Handles And Paths and Use Label Color For Related Tabs: Color labels for layers,
compositions, and footage items
•Cycle Mask Colors: Cycle through colors for mask paths
•Use Gradients: Use gradients in user interface.
•Brightness: Brightens or darkens user interface (UI) colors.
Auto-Save preferences
Project links embedded in QuickTime, Video for Windows files
Memory & Multiprocessing preferences
Memory & Multiprocessing preferences
Audio Hardware and Audio Output Mapping preferences
Preview video and audio
Sync Settings
The Sync Settings feature enables you to synchronize preferences and settings through the Creative Cloud. For detailed
information, see the Sync Settings article.
Migrate settings from previous versions
After Effects will prompt you to migrate settings from a previous version if it finds a preference folder from a previous
version and no preference folder for the current version. This occurs when you start After Effects for the first time and
when you delete the entire preferences folder.
If you want to migrate settings from your previous version of After Effects, see the Migrating your settings from a
previous minor version of After Effects section.
Sync Settings
When you work on multiple computers, managing and syncing preferences among the computers can be time-
consuming, complex, and error prone.
The new Sync Settings feature in After Effects enables you to sync preferences and settings via Creative Cloud. For
example, if you use two computers, the Sync Settings feature makes it easy for you to keep those settings synchronized
across these two computers.
The synchronization takes place via your Adobe Creative Cloud account. Settings are uploaded to your Creative Cloud
account and then are downloaded and applied on the other computer. You can also synchronize settings from another
Creative Cloud account. After Effects creates a user profile on your computer and uses it to synchronize settings to and
from the associated Creative Cloud account.
You can initiate the synchronization manually; it does not happen automatically and it cannot be scheduled.

53
Workspace and workflow
Last updated 6/8/2015
Synchronize your settings
To initiate the synchronization, choose Edit > [your Adobe ID] > Sync Settings Now (Windows) or After Effects > [your
Adobe ID] > Sync Settings Now.
•Download Settings: Synchronize Settings from Creative Cloud to your computer; overwrite the local version with
the Creative Cloud version of settings.
•Upload Settings: Synchronize settings from this local computer to Creative Cloud.
Progress and details about the synchronization is displayed in the Info panel (Window > Info).
Restart After Effects to apply downloaded preferences after using Sync Settings .
Synchronize settings from a different account
By default, the Adobe ID associated with the license for the product is used to synchronize the preferences. To use a
different Adobe ID to synchronize the settings, from the Edit menu (Windows) or After Effects menu (Mac OS), choose
[your Adobe ID] > Use Settings From a Different Account. Enter the Adobe ID and password.
Managing synchronization
Clear Settings
Select Edit > [your Adobe ID] > Clear Settings (Windows) or After Effects [your Adobe ID] > Clear Settings (Mac OS),
to clear all settings and reset them to the default state. Clear Settings also resets the token that is used to indicate the
user's settings that was used to sync the settings.
Click Quit to clear the current preferences, and close After Effects. When the application is launched again, default
preferences are set.
Manage Sync Settings
To change the settings for the Sync Settings feature (Windows):
•Click Edit > [your Adobe ID] > Manage Sync Settings
•Click Edit > Preferences > Sync Settings
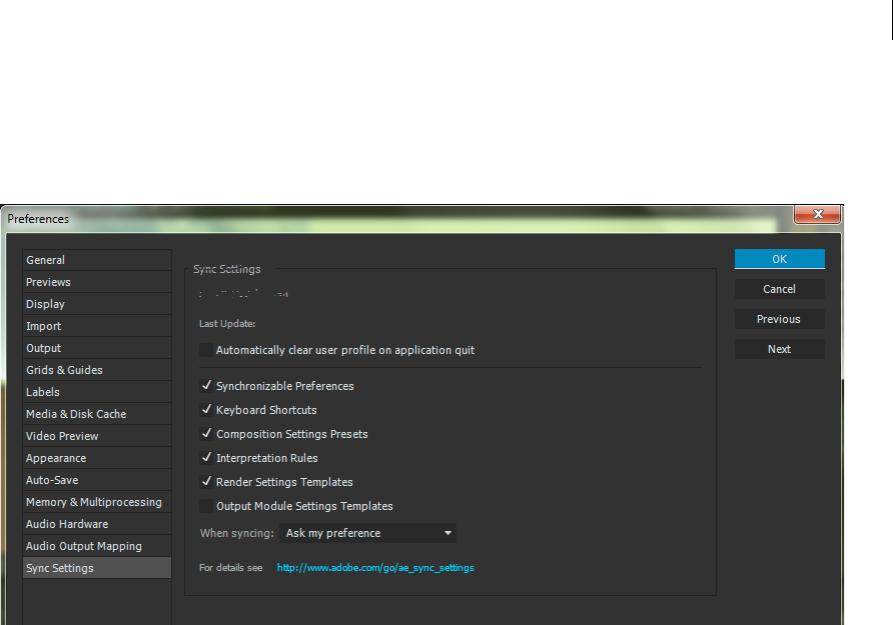
54
Workspace and workflow
Last updated 6/8/2015
To change the settings for the Sync Settings feature (Mac OS):
•Click After Effects > [your Adobe ID] > Manage Sync Settings
•Click After Effects > Preferences > Sync Settings
You can change the following settings in the settings dialog:
Automatically clear user profile on application quit Enable this option to clear the user profile when you quit After
Effects. On next launch, preferences are fetched from the default Adobe ID used to license the product.
Select the preferences to synchronize.
1Synchronizable Preferences
2Keyboard Shortcuts
3Composition Settings Presets
4Interpretation Rules
5Render Settings Templates
6Output Module Settings Templates
Note: Synchronizable preferences refer to preferences that are not dependent on computer or hardware settings.
Note: Keyboard shortcuts created for Windows synchronize only with Windows and Mac OS keyboard shortcuts
synchronize only with Mac OS.
Choose one of the following options from the drop-down menu to instruct After Effects when to synchronize the
settings :
•Ask my preference
•Always Upload Settings
•Always Download Settings
Note: The Sync Settings feature does not synchronize files that are manually placed in the preferences folder location.

55
Workspace and workflow
Last updated 6/8/2015
Modify keyboard shortcuts
To modify keyboard shortcuts in After Effects, do the following:
1In After Effects, depending on your operating system, select:
•Edit > Preferences > General (Windows)
•After Effects > Preferences > General (Mac OS)
2On the Preferences dialog, click the Reveal Preferences in Explorer (Windows) or Reveal Preferences in Finder
(MAC OS) button.
3The Install Directory is opened, with the Preferences file selected. Depending on your operating system, open either
of the following files:
•Adobe After Effects <version> Win en_US Shortcuts.txt OR
•Adobe After Effects <version> Mac en_US Shortcuts.txt
You can modify keyboard shortcuts in this text file.
Note: If you modify a keyboard shortcut to a combination that already exists, it results in a conflict. Ensure that the new
combination you enter has not been used already.
Note: On Mac OS, some keyboard commands for interacting with the operating system conflict with keyboard commands
for interacting with After Effects. Select Use System Shortcut Keys in the General preferences to override the After Effects
keyboard command in some cases in which there’s a conflict with the Mac OS keyboard command.

56
Last updated 6/8/2015
Chapter 3: Projects and compositions
Projects
About projects
An After Effects project is a single file that stores compositions and references to all of the source files used by footage
items in that project. Compositions are collections of layers. Many layers use footage items (such as movies or still
images) as a source, though some layers—such as shape layers and text layers—contain graphics that you create within
After Effects.
A project file has the filename extension .aep or .aepx. A project file with the .aep filename extension is a binary project
file. A project file with the .aepx filename extension is a text-based XML project file.
The name of the current project appears at the top of the application window.
A template project file has the filename extension .aet. (See Template projects and example projects.)
XML project files
Text-based XML project files contain some project information as hexadecimal-encoded binary data, but much of the
information is exposed as human-readable text in string elements. You can open an XML project file in a text editor
and edit some details of the project without opening the project in After Effects. You can even write scripts that modify
project information in XML project files as part of an automated workflow.
Elements of a project that you can modify in an XML project file:
•Marker attributes, including comments, chapter point parameters, and cue point parameters
•File paths of source footage items, including proxies
•Composition, footage item, layer, and folder names and comments
Note: Footage item names are exposed in string elements in XML project files only if the names have been customized.
Footage item names derived automatically from the names of source files and solid color names are not exposed in string
elements
Some strings, such as workspace and view names, are exposed as human-readable strings, but modifications made to
these strings are not respected when After Effects opens the project file.
Note: Do not use the XML project file format as your primary file format. The primary project file format for After Effects
is the binary project file (.aep) format. Use the XML project file format to save a copy of a project and as an intermediate
format for automation workflows.
To save an XML project (.aepx) file as a binary project (.aep) file, choose File > Save As and enter a file name ending
with .aep, without the x. (See Save and back up projects in After Effects CS5 .)

57
Projects and compositions
Last updated 6/8/2015
Project links embedded in QuickTime, Video for Windows files
When you render a movie and export it to a container format, you can embed a link to the After Effects project in the
container file.
To import the project, import the container file, and choose Project from the Import As menu in the Import File dialog
box. If the container file contains a link to a project that has been moved, you can browse to locate the project.
Create and open projects
Only one project can be open at a time. If you create or open another project file while a project is open, After Effects
prompts you to save changes in the open project, and then closes it. After you create a project, you can import footage
into the project.
•To create a project, choose File > New > New Project.
•To open a project, choose File > Open Project, locate the project, and then click Open.
Jeff Almasol provides a script on his redefinery website that creates and saves a new project for each selected
composition in the current project.
Template projects and example projects
A template project is a file with the filename extension .aet. You can use the many template projects included with After
Effects—including DVD menu templates—as the basis for your own projects, and you can create new templates base
on your projects
Note: After Effects CC does not install template projects, however, you can download the same template projects that came
with previous versions of After Effects on the After Effects Exchange. For more information, see this post on the After Effects
team blog.
When you open a template project, After Effects creates a new, untitled project based on the template. Saving changes
to this new project does not affect the template project.
A great way to see how advanced users use After Effects is to open one of the template projects included with After
Effects, open a composition to activate it, and press U or UU to reveal only the animated or modified layer properties.
Viewing the animated and modified properties shows you what changes the designer of the template project made to create
the template.
Often, the creator of a template project locks layers that should be left unmodified, and leaves layers that should be
modified unlocked. This is a convenient way to prevent accidental or inappropriate modifications.
For more sources of After Effects example projects and template projects, see After Effects community resources on the
Adobe website.
See this video tutorial by Andrew Devis on the Creative Cow website for information about where to find template
projects and sample expressions included with After Effects.
Open a template project
•To open a template project, choose File > Open Project. On Windows, choose Adobe After Effects Project Template
from the Files Of Type menu.
Create a template project
•To convert a project to a template project, change the filename extension from .aep to .aet.
58
Projects and compositions
Last updated 6/8/2015
•To save a copy of a project as a template project, choose File > Save A Copy, and then rename the copy with the
filename extension .aet.
Save and back up projects in After Effects
•To save a project, choose File > Save.
•To save a copy of the project with a new automatically generated name, choose File > Increment And Save, or press
Ctrl+Alt+Shift+S (Windows) or Command+Option+Shift+S (Mac OS).
•A copy of the current project is saved in the same folder as the original project. The name of the copy is the name of
the original followed by a number. If the name of the original ends with a number, that number is increased by 1.
•To save the project with a different name or to a different location, choose File > Save As > Save As. The open project
takes the new name and location; the original file remains unchanged.
•To save the project as a copy in the XML project file format, choose File > Save As > Save A Copy As XML. (See
About projects.)
•To save a copy of the project with a different name or to a different location, choose File > Save As > Save A Copy.
The open project retains its original name and location, and a copy is created with the new settings but is not opened.
•In After Effects CC (12), to save a project that can be opened in After Effects CS6, choose File > Save As > Save A
Copy As CS6.
•In After Effects CC 2014, to save a project that can be opened in After Effects CC (12), choose File > Save As > Save
A Copy As CC (12).
To save a copy of the project and copies of assets used in the project to a single folder on disk, use the Collect Files
command. (See Collect files in one locationsection for details).
Note: New features in the current version of After Effects that are used in a project will be ignored in the project that is saved
in the format of the previous version of After Effects.
Flowchart panel
In the flowchart for each project or composition, individual boxes (or tiles) represent each composition, footage item,
and layer. Directional arrows represent the relationships between components.
Note: The Flowchart panel shows you only the existing relationships. You cannot use it to change relationships between
elements.
Nested compositions and other elements that make up the composition appear when you expand a composition tile.
Mid-gray lines between tiles in the flowchart indicate that the Video or Audio switch for those items is deselected in
the Timeline panel. Black or light gray lines indicate that the switch is selected, depending on the Brightness setting in
the Appearance preferences.
•To open the project flowchart, press Ctrl+F11 (Windows) or Command+F11 (Mac OS), or click the Project
Flowchart button at the top of the vertical scroll bar on the right edge of the Project panel.
•To open a composition flowchart, select the composition and choose Composition > Composition Flowchart, or
click the Composition Flowchart button at the bottom of the Composition panel.
•To activate (select) an item, click its tile in the Flowchart panel.
When you click a composition in the flowchart, it becomes active in the Project panel and the Timeline panel. When
you click a layer, it becomes active in the Timeline panel. When you click a footage item, it becomes active in the
Project panel.

59
Projects and compositions
Last updated 6/8/2015
•To customize the appearance of the flowchart, use the Flowchart panel menu and the buttons along the bottom of
the panel.
For tool tips identifying the buttons in the Flowchart panel, let your pointer hover over a button until the tool tip
appears.
•To delete elements, select them and press Delete. If the selected element is a footage item or composition, it is deleted
from the project and no longer appears in the Timeline and Project panels. If the selected element is a layer, it is
deleted from the composition in which it appears.
•To access the context menu for a selected element, right-click (Windows) or Control-click (Mac OS) the icon to the
left of the name in the element tile. The icons have various appearances, depending on the element type, such as
layers and compositions . For example, you can use the context menu for a layer to work with masks and
effects, or to change switches, apply transformations, and adjust layer image quality.
Note: When you change element properties in the Flowchart panel, be careful to context-click the icon in the tile, not the
name of the element. The context menu associated with the element icon is different from the one that opens from the
element name.
Rich Young provides additional information about the Flowchart panel and the Composition Mini-flowchart on the
After Effects Portal website.
More Help topics
Automation
Import an After Effects project
Lock or unlock a layer
Layer switches and columns in the Timeline panel
Opening and navigating nested compositions
Precomposing, nesting, and pre-rendering
About precomposing and nesting
If you want to group some layers that are already in a composition, you can precompose those layers. Precomposing
layers places them in a new composition, which replaces the layers in the original composition. The new nested
composition becomes the source for a single layer in the original composition. The new composition appears in the
Project panel and is available for rendering or use in any other composition. You can nest compositions by adding an
existing composition to another composition, just as you would add any other footage item to a composition.
Precomposing a single layer is useful for adding transform properties to a layer and influencing the order in which
elements of a composition are rendered.
Nesting is the inclusion of one composition within another. The nested composition appears as a layer in the containing
composition.
A nested composition is sometimes called a precomposition, which is occasionally abbreviated in casual use to precomp
or pre-comp. When a precomposition is used as the source footage item for a layer, the layer is called a precomposition
layer.

60
Projects and compositions
Last updated 6/8/2015
During rendering, the image data and other information can be said to flow from each nested composition into the
composition that contains it. For this reason, nested compositions are sometimes referred to as being upstream of the
compositions that contain them, and the containing compositions are said to be downstream of the nested compositions
that they contain. A set of compositions connected through nesting is called a composition network. You can navigate
within a composition network using the Composition Navigator and Mini-Flowchart. (See Opening and navigating
nested compositions.)
Precompositions in After Effects are similar to Smart Objects in Adobe Photoshop.
Uses for precomposing and nesting
Precomposing and nesting are useful for managing and organizing complex compositions. By precomposing and
nesting, you can do the following:
•Apply complex changes to an entire composition - You can create a composition that contains multiple layers, nest
the composition within the overall composition, and animate and apply effects to the nested composition so that all
of the layers change in the same ways over the same time period.
•Reuse anything you build - You can build an animation in its own composition and then drag that composition
into other compositions as many times as you want.
•Update in one step - When you make changes to a nested composition, those changes affect every composition in
which it is used, just like changes made to a source footage item affect every composition in which it is used.
•Alter the default rendering order of a layer - You can specify that After Effects render a transformation (such as
rotation) before rendering effects, so that the effect applies to the rotated footage.
•Add another set of transform properties to a layer - The layer that represents the composition has its own
properties, in addition to the properties of the layers that it contains. This allows you to apply an additional set of
transformations to a layer or set of layers.
Preferences and composition settings that affect nested compositions
Because a precomposition is itself a layer, you can control its behavior using layer switches and composition switches
in the Timeline panel. You can choose whether changes made to the switches in the containing composition are
propagated to the nested composition. To prevent layer switches from affecting nested compositions, choose Edit >
Preferences > General (Windows) or After Effects > Preferences > General (Mac OS), and then deselect Switches Affect
Nested Comps.
In the Advanced tab of the Composition Settings dialog box (Composition > Composition Settings), choose Preserve
Resolution When Nested or Preserve Frame Rate When Nested Or In Render Queue for a composition to retain its own
resolution or frame rate, and not inherit those settings from the containing composition. For example, if you
deliberately used a low frame rate in a composition to create a jerky, hand-animated result, you should preserve the
frame rate for that composition when it is nested. Similarly, the results of rotoscoping may look wrong when converted
to a different frame rate or resolution. Use this setting instead of the Posterize Time effect, which is less efficient.
Jeff Almasol provides a script on his redefinery website that makes toggling the Preserve Resolution When Nested or
Preserve Frame Rate When Nested Or In Render Queue preference setting more convenient.
Changing the current time in one panel updates the current time in other panels associated with that composition. By
default, the current time is also updated for all compositions related to the current composition by nesting. To prevent
compositions related by nesting from updating their current times when you change the current time in one
composition, deselect the Synchronize Time Of All Related Items preference (Edit > Preferences > General (Windows)
or After Effects > Preferences > General (Mac OS)).

61
Projects and compositions
Last updated 6/8/2015
Online resources about precomposing and nesting
Angie Taylor provides an extensive discussion and explanation of animation using nesting, parenting, expressions, and
null object layers in a PDF excerpt from her book Creative After Effects 7: Workflow Techniques for Animation, Visual
Effects, and Motion Graphics.
Chris and Trish Meyer provide an introduction to precomposing and nesting in a PDF excerpt from the “Parenting and
Nesting” chapter of their book After Effects Apprentice: Real-World Skills for the Aspiring Motion Graphics Artist.
Chris and Trish Meyer share tips on setting up a composition hierarchy so that making changes in a project is easier in
this article from the ProVideo Coalition website.
See this page on aescripts website for the Un-Precompose script, which extracts layers from a precomposition.
See this page on aescripts website for the Zorro-The Layer Tagger script, which allows you to group layers in your
composition using tags rather than precomposing.
Precompose layers
Precomposing layers places them in a new composition (sometimes called a precomposition), which replaces the layers
in the original composition. Precomposing a single layer is useful for adding transform properties to a layer and
influencing the order in which elements of a composition are rendered.
1Select the layers in the Timeline panel, and choose Layer > Pre-compose or press Ctrl+Shift+C (Windows) or
Command+Shift+C (Mac OS).
2Select one of the following:
Leave All Attributes In Leaves the properties and keyframes of the precomposed layer in the original composition,
applied to the new layer that represents the precomposition. The frame size of the new composition is the same as
the size of the selected layer. This option is not available when you select more than one layer, a text layer, or a shape
layer.
Move All Attributes Into The New Composition Moves the properties and keyframes of the precomposed layers one
level further from the root composition in the composition hierarchy. When you use this option, changes you
applied to the properties of the layers remain with the individual layers within the precomposition. The frame size
of the new composition is the same as the frame size of the original composition.
Jeff Almasol provides a script on his redefinery website that precomposes selected layers to the duration of the selected
layers, with options for head and tail durations for more editing flexibility.
Opening and navigating nested compositions
Nested compositions are sometimes referred to as being upstream of the compositions that contain them, and the
containing compositions are said to be downstream of the nested compositions that they contain. The root composition
is the most downstream; the most deeply nested composition is the most upstream. A composition flow path is a chain
of compositions that are related to one another by containing or being nested within one another. A composition
network is the entire set of compositions that are related to one another through nesting.
After Effects provides several ways to open a nested composition (precomposition):
•Double-click the composition entry in the Project panel.
•Double-click a precomposition layer in the Timeline panel. Alt-double-click (Windows) or Option-double-click
(Mac OS) to open the precomposition layer as a layer in the Layer panel.
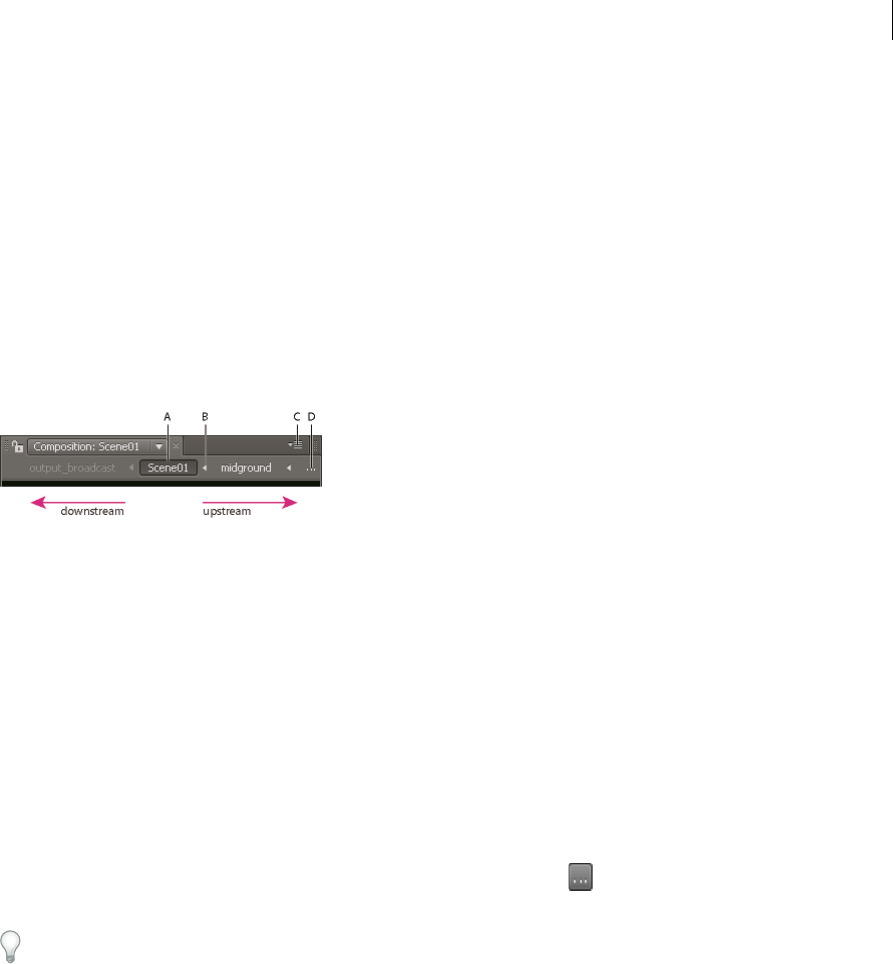
62
Projects and compositions
Last updated 6/8/2015
Note: Double-clicking a precomposition layer when a paint tool or the Roto Brush tool is active opens the layer in the Layer
panel.
•To open the most recently active composition in the same composition network as the currently active composition,
press Shift+Esc.
•Use the Composition Navigator.
•Use the Composition Mini-Flowchart.
The Composition Navigator
The Composition Navigator is a bar along the top edge of the Composition panel that shows the composition active in
that viewer in relation to other compositions in the same composition network. The compositions shown are the most
recently active compositions in the flow path of the currently active composition.
A Active (current) composition B Arrow for opening Composition Mini-Flowchart C Panel menu button D Ellipsis
Arrows between the composition names indicate the direction in which pixel information flows for this flow path. The
default is to show compositions in the Composition Navigator bar with downstream compositions on the left and
upstream compositions on the right. This default is indicated by the Flow Right To Left option in the Composition
panel menu. To show compositions in the other order, choose Flow Left To Right. This setting is a global preference; it
applies to all compositions and to the Composition Mini-Flowchart view.
The names of downstream compositions are dim to indicate that their contents are not used or shown in the active
composition.
•To show or hide the Composition Navigator bar, choose Show Composition Navigator from the Composition panel
menu.
•To activate any composition shown in the Composition Navigator bar, click the composition name.
•If the flow path is too long to show in the Composition panel, an ellipsis button appears at the left or right edge
of the Composition Navigator bar. To temporarily show the entire flow path, click the ellipsis button.
To scroll through a long flow path, place the pointer over a composition button in the Composition Navigator and roll
the mouse scroll wheel.
The Composition Mini-Flowchart
The Composition Mini-Flowchart is a transient control that you can use to quickly navigate within a composition
network. When you open the Composition Mini-Flowchart, it shows the compositions immediately upstream and
downstream of the selected composition.
Colors in the Composition Mini-Flowchart are based on the label colors assigned to compositions in the Project panel.
If a composition is used multiple times within one composition, the multiple instances of the nested composition
appear as one entry with a number in parentheses indicating the number of instances.
To open the Composition Mini-Flowchart, do one of the following:
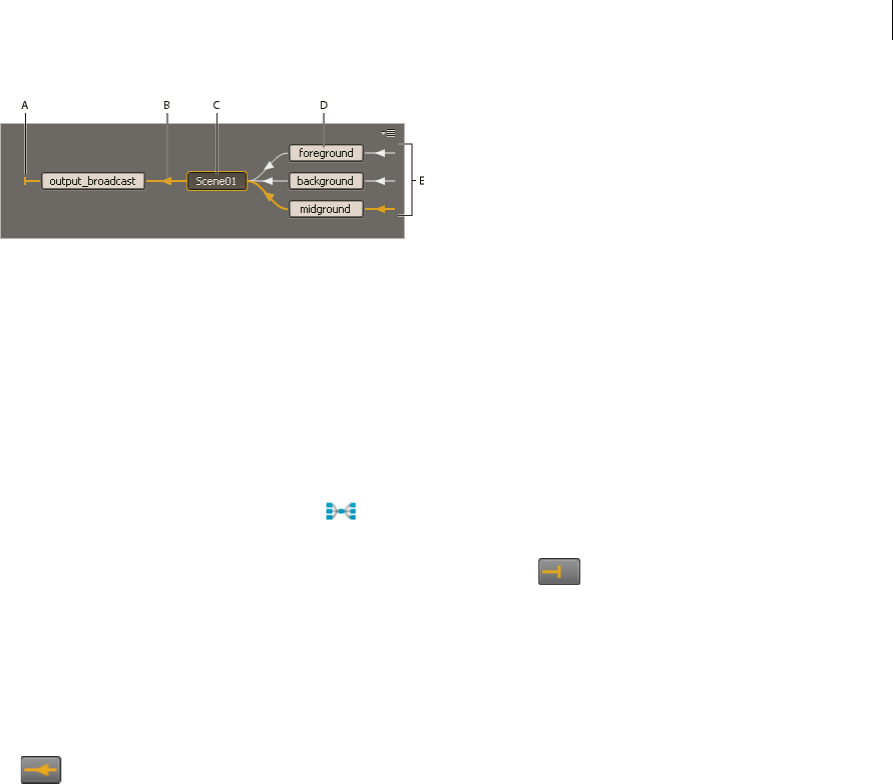
63
Projects and compositions
Last updated 6/8/2015
A Indicator that composition does not flow into other compositions B Flow direction C Active (current) composition D Upstream compositions
E Indicators that other compositions flow into these compositions
•Tap the Shift key when a Composition, Layer, or Timeline panel is active.
Note: Do not hold the Shift key down; press it briefly. Tapping the Shift key to open the Composition Mini-Flowchart doesn’t
work if the insertion point is in a search field, text field, or expression field.
•Click the arrow to the right of a composition name in the Composition Navigator bar.
•Choose Composition Mini-Flowchart from the Composition menu, the Composition panel menu, or the Timeline
panel menu.
•Click the Composition Mini-Flowchart button at the top of the Timeline panel.
As with the Composition Navigator, you can choose whether to show the flow direction from left to right or from right
to left. Arrows indicate the direction of the flow. If a composition has a next to it instead of an arrow, then the
composition either does not have any compositions flowing into it or it does not flow into any compositions.
Upstream compositions in the Composition Mini-Flowchart are sorted from top to bottom either alphabetically or by
layer order. To switch between these sorting orders, press the S key when the Composition Mini-Flowchart is open.
When sorting by layer order, a composition used multiple times is sorted according to its topmost instance in the
stacking order. Downstream compositions are always sorted alphabetically.
To navigate among and select compositions in the Composition Mini-Flowchart, use the arrow keys or click the arrow
or buttons on either side of a composition. To activate the selected composition, press the spacebar or Enter
(Windows) or Return (Mac OS). To close the Composition Mini-Flowchart without taking any action, press Esc, tap
Shift, or click outside the Composition Mini-Flowchart.
Rich Young provides additional information about the Flowchart panel and the Composition Mini-flowchart on the
After Effects Portal website.
Pre-render a nested composition
A complex nested composition can take a long time to render, either for previews or for final output. If you have a
nested composition that you do not expect to work on further, you can save time during each rendering operation by
pre-rendering the nested composition into a movie and replacing the composition with the rendered movie. You can
still modify the original nested composition, because it remains in the Project panel. If you make a significant change
to the original nested composition, render it again.
Pre-rendering a nested composition is especially beneficial when you will use it multiple times in a project.
Note: Apply your final output settings when you pre-render the nested composition.
1Select the composition in the Project or Composition panel.
2Choose Composition > Pre-render.
The Pre-render command adds the composition to the render queue and sets the Import & Replace Usage post-
render action to replace the composition with the rendered movie.
3In the Render Queue panel, adjust settings as necessary, and click the Render button to render the composition.

64
Projects and compositions
Last updated 6/8/2015
See this video tutorial on the Video2Brain website about how to save time with pre-rendering and proxies in After
Effects.
Note: An alternative to replacing the composition with the movie is to use the rendered movie as a proxy for the nested
composition.
Render order and collapsing transformations
A composition consists of layers stacked on top of one another in the Timeline panel. When the composition is
rendered—either for previewing or for final output—the bottom layer is rendered first. Within each raster (non-vector)
layer, elements are applied in the following order: masks, effects, transformations, and layer styles. For continuously
rasterized vector layers, the default rendering order is masks, followed by transformations, and then effects.
Transformations are changes to those properties grouped under the Transform category in the Timeline panel,
including Anchor Point, Position, Scale, Rotation, and Opacity. What you see in the Layer panel is the result of the
rendering before transformations are performed.
Note: For additional control over when transformations are performed, you can apply the Transform effect and reorder it
with respect to other effects.
In a group of effects or masks, items are processed from top to bottom. For example, if you apply the Circle effect and
then apply the Magnify effect, the circle is magnified. However, if you drag the Magnify effect above (before) the Circle
effect in the Effect Controls or Timeline panel, the circle is drawn after the magnification and isn’t magnified.
After a layer has been rendered, rendering begins for the next layer. The rendered layer below may be used as input to
the rendering of the layer above—for example, for determining the result of a blending mode.
If a composition contains other compositions nested within it, the nested composition is rendered before other layers
in the containing composition.
Note: Some effects ignore masks on the layer to which they’re applied. To have such an effect operate on a masked layer,
pre-compose the layer with the mask applied, and then apply the effect to the pre-composed layer. (See About precomposing
and nesting.)
Collapsing transformations
If the Collapse Transformations switch is selected for a nested composition, then the transformations for the nested
composition are not performed until after the masks and effects for the containing composition are rendered. This
render order allows the transformations for the nested composition and the containing composition to be combined—
or collapsed—and performed together. The same is true for vector layers that are not continuously rasterized.
Note: Instead of a Collapse Transformations switch, vector layers have a Continuously Rasterize switch in the same
location. Vector layers include shape layers, text layers, and layers with vector graphic files as the source footage. Text layers
and shape layers are always continuously rasterized.
Collapsing transformations can, for example, preserve resolution when a layer is scaled down by half in a nested
composition, and the nested composition is scaled up by a factor of two in the containing composition. In this case,
rather than performing both transformations and losing image data in the process, one transformation can be
performed—doing nothing, because the individual transformations cancel each other.
If transformations are not collapsed, a nested composition that contains 3D layers is rendered as a 2D image of the 3D
arrangement, using the default composition camera. This rendering prevents the nested composition from intersecting
with 3D layers, casting shadows on 3D layers, and receiving shadows from 3D layers in the containing composition.
The nested composition is also not controlled by the cameras and lights of the containing composition.

65
Projects and compositions
Last updated 6/8/2015
If transformations are collapsed, the 3D properties of the layers in the nested composition are exposed to the containing
composition. Thus, the nested composition can intersect with 3D layers, cast shadows on 3D layers, and receive
shadows from 3D layers in the containing composition. The containing composition's camera and lights can also
control the nested composition.
Essentially, collapsing transformations for a nested composition tells After Effects to not flatten and crop the layers in
the precomposition. Because an adjustment layer operates on the composite of all of the layers beneath it within the
same composition, an adjustment layer within a nested composition with collapsed transformations will force the
flattening and cropping that collapsing transformations would normally prevent.
When a closed mask (with mask mode other than None), a layer style, or an effect is applied to a nested composition
with collapsed transformations, the layers in the nested composition are first rendered on their own, then masks and
effects are applied, and then the result is composited into the main composition. This rendering order means that the
blending modes of the nested layers are not applied to any underlying layers in the main composition, and that 3D
layers above and below the collapsed layer cannot intersect or cast shadows on each other.
Online resources
Chris and Trish Meyer explain collapsing transformations and continuous rasterization in this article on the ProVideo
Coalition website.
More Help topics
Create layers from footage items or change layer source
3D layer interactions, render order, and collapsed transformations
Layer switches and columns in the Timeline panel
Parent and child layers
Post-render actions
Placeholders and proxies
Basics of rendering and exporting
Change the stacking order for selected layers
Composition basics
About compositions
A composition is the framework for a movie. Each composition has its own timeline. A typical composition includes
multiple layers that represent components such as video and audio footage items, animated text and vector graphics,
still images, and lights. You add a footage item to a composition by creating a layer for which the footage item is the
source. You then arrange layers within a composition in space and time, and composite using transparency features to
determine which parts of underlying layers show through the layers stacked on top of them. (See Layers and properties
and Transparency and compositing .)
A composition in After Effects is similar to a movie clip in Flash Professional or a sequence in Premiere Pro.

66
Projects and compositions
Last updated 6/8/2015
You render a composition to create the frames of a final output movie, which is encoded and exported to any number
of formats. (See Basics of rendering and exporting .)
Simple projects may include only one composition; complex projects may include hundreds of compositions to
organize large amounts of footage or many effects.
In some places in the After Effects user interface, composition is abbreviated as comp.
Each composition has an entry in the Project panel. Double-click a composition entry in the Project panel to open the
composition in its own Timeline panel. To select a composition in the Project panel, right-click (Windows) or Control-
click (Mac OS) in the Composition panel or Timeline panel for the composition and choose Reveal Composition In
Project from the context menu.
Use the Composition panel to preview a composition and modify its contents manually. The Composition panel
contains the composition frame and a pasteboard area outside the frame that you can use to move layers into and out
of the composition frame. The offstage extents of layers—the portions not in the composition frame—are shown as
rectangular outlines. Only the area inside the composition frame is rendered for previews and final output.
The composition frame in the Composition panel in After Effects is similar to the Stage in Flash Professional.
When working with a complex project, you may find it easiest to organize the project by nesting compositions—putting
one or more compositions into another composition. You can create a composition from any number of layers by
precomposing them. If you are finished modifying some layers of your composition, you can precompose those layers
and then pre-render the precomposition, replacing it with a rendered movie. (See Precomposing, nesting, and pre-
rendering.)
You can navigate within a hierarchy of nested compositions using the Composition Navigator and Composition Mini-
Flowchart. (See Opening and navigating nested compositions.)
Use the Flowchart panel to see the structure of a complex composition or network of compositions.
Timeline button Click this button at the bottom of the Composition panel to activate the Timeline panel for the
current composition.
Press the backslash (\) key to switch activation between the Composition panel and Timeline panel for the current
composition.
Comp button Click this button in the upper-right corner of the Timeline panel to activate the Composition panel
for the current composition.
Flowchart button Click this button at the bottom of the Composition panel to activate the Flowchart panel for the
current composition.
Learn tutorials
Go to the following tutorials to learn more about compositions:
•Create a composition
•Add assets to a composition
•Add layers to a composition
Create a composition
You can change composition settings at any time. However, it’s best to specify settings such as frame aspect ratio and
frame size when you create the composition, with your final output in mind. Because After Effects bases certain
calculations on these composition settings, changing them late in your workflow can affect your final output.
67
Projects and compositions
Last updated 6/8/2015
Note: You can override some composition settings when rendering to final output. For example, you can use different frame
sizes for the same movie. For more information see Render settingsand Output modules and output module settings.
When you create a composition without changing settings in the Composition Settings dialog box, the new
composition uses the settings from the previous time that composition settings were set.
Note: New compositions do not inherit the previous Preserve Frame Rate When Nested Or In Render Queue and Preserve
Resolution When Nested settings.
Jeff Almasol provides a script on his redefinery website that creates and saves a new project for each selected
composition in the current project. If a folder is selected in the Project panel when you create a new composition, the
new composition is placed in the selected folder.
Create a composition and manually set composition settings
❖Choose Composition > New Composition, or press Ctrl+N (Windows) or Command+N (Mac OS).
Create a composition from a single footage item
❖Drag the footage item to the Create A New Composition button at the bottom of the Project panel or choose File
> New Comp From Selection.
Composition settings, including frame size (width and height) and pixel aspect ratio, are automatically set to match
the characteristics of the footage item.
Create a single composition from multiple footage items
1Select footage items in the Project panel.
2Drag the selected footage items to the Create A New Composition button at the bottom of the Project panel, or
choose File > New Comp From Selection.
3Select Single Composition and other settings in the New Composition From Selection dialog box:
Use Dimensions From Choose the footage item from which the new composition gets composition settings,
including frame size (width and height) and pixel aspect ratio.
Still Duration The duration for the still images being added.
Add To Render Queue Add the new composition to the render queue.
Sequence Layers, Overlap, Duration, and Transition Arrange the layers in a sequence, optionally overlap them in
time, set the duration of the transitions, and choose a transition type.
Create multiple compositions from multiple footage items
1Select footage items in the Project panel.
2Drag the selected footage items to the Create A New Composition button at the bottom of the Project panel, or
choose File > New Comp From Selection.
3Select Multiple Compositions and other settings in the New Composition From Selection dialog box:
Still Duration The duration of the compositions created from still images.
Add To Render Queue Add the new compositions to the render queue.
Duplicate a composition
1Select the composition in the Project panel.
2Choose Edit > Duplicate or press Ctrl+D (Windows) or Command+D (Mac OS).
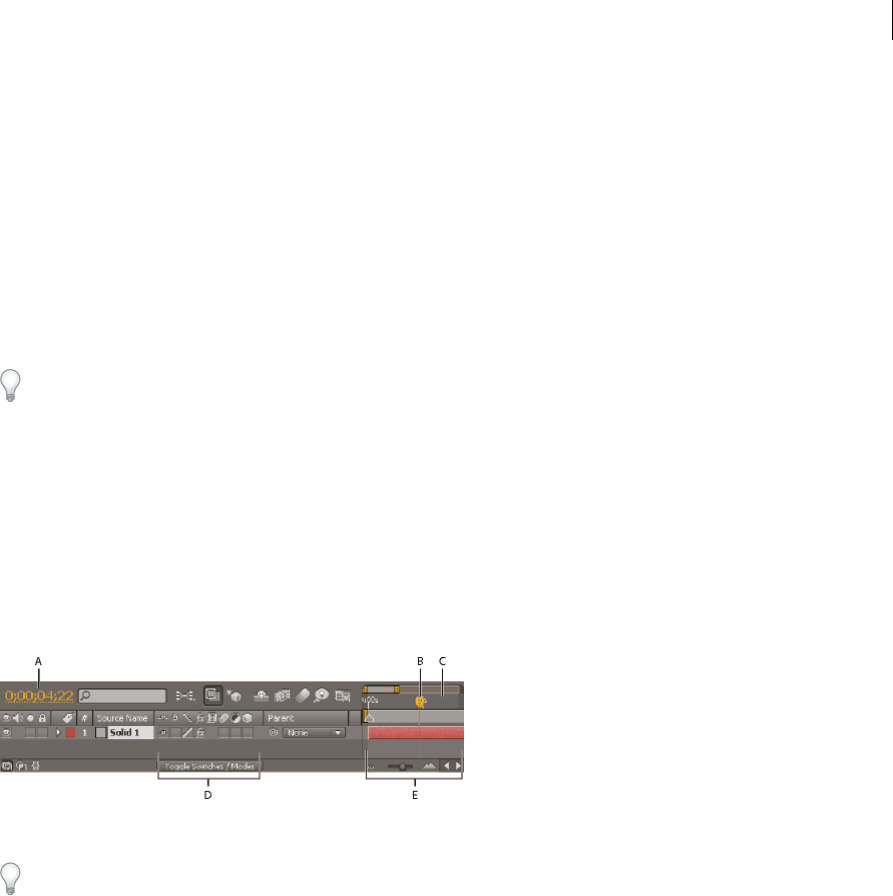
68
Projects and compositions
Last updated 6/8/2015
Create compositions for playback on mobile devices
Screen dimensions and video frame rates vary from one mobile device to another. For information on acquiring footage
for playback on mobile devices, see Planning for playback on computer monitors and mobile devices.
Timeline panel
Each composition has its own Timeline panel. You use the Timeline panel to perform many tasks, such as animating
layer properties, arranging layers in time, and setting blending modes. The layers at the bottom of the layer stacking
order in the Timeline panel are rendered first and—in the case of 2D image layers— appear farthest back in the
Composition panel and in the final composite.
To cycle forward through Timeline panels, press Alt+Shift+period (.) (Windows) or Option+Shift+period (.) (Mac OS).
To cycle backward through Timeline panels, press Alt+Shift+comma (,) (Windows) or Option+Shift+comma (,) (Mac
OS).
The current time for a composition is indicated by the current-time indicator (CTI), the vertical red line in the time
graph. The current time for a composition also appears in the current time display in the upper-left corner of the
Timeline panel. For more information on moving the current-time indicator, see Move the current-time indicator
(CTI).
The left side of the Timeline panel consists of columns of controls for layers. The right side of the Timeline panel—the
time graph—contains a time ruler, markers, keyframes, expressions, duration bars for layers (in layer bar mode), and
the Graph Editor (in Graph Editor mode).
A Current-time display B Current-time indicator (CTI) C Time ruler D Layer switches E Time graph
Press the backslash (\) key to switch activation between the Composition panel and Timeline panel for the current
composition.
Composition settings
You can enter composition settings manually, or you can use composition settings presets to automatically set frame
size (width and height), pixel aspect ratio, and frame rate for many common output formats. You can also create and
save your own custom composition settings presets for later use. Resolution, Start Timecode (or Start Frame), Duration,
and Advanced composition settings are not saved with composition settings presets.
Note: The limit for composition duration is three hours. You can use footage items longer than three hours, but time after
three hours does not display correctly. The maximum composition size is 30,000x30,000 pixels. A 30,000x30,000 8-bpc
image requires approximately 3.5 GB; your maximum composition size may be less, depending on your operating system
and available RAM.
Working with composition settings
•To open the Composition Settings dialog box to change composition settings, do one of the following:
•Select a composition in the Project panel or activate the Timeline or Composition panel for a composition, and
choose Composition > Composition Settings, or press Ctrl+K (Windows) or Command+K (Mac OS).
69
Projects and compositions
Last updated 6/8/2015
•Right-click (Windows) or Control-click (Mac OS) a composition in the Project panel or Composition panel (not
on a layer), and choose Composition Settings from the context menu.
•To save a custom composition settings preset, set Width, Height, Pixel Aspect Ratio, and Frame Rate values in the
Composition Settings dialog box, and then click the Save button .
•To delete a composition settings preset, choose it from the Preset menu in the Composition Settings dialog box, and
click the Delete button .
•To restore default composition settings presets, Alt-click (Windows) or Option-click (Mac OS) the Delete button
or the Save button in the Composition Settings dialog box.
Note: You cannot move custom composition settings presets from one system to another, as they are embedded into the
preferences file.
•To scale an entire composition, choose File > Scripts > Scale Composition.jsx.
Note: Ensure all layers are unlocked in the selected composition or the script will fail.
Jeff Almasol provides a script on his redefinery website to set the frame rate and duration of the current composition
and all compositions nested within it.
Christopher Green provides a script (Selected_Comps_Changer.jsx) on his website with which you can change the
composition settings for compositions selected in the Project panel.
Basic composition settings
Start Timecode or Start Frame Timecode or frame number assigned to the first frame of the composition. This value
does not affect rendering; it merely specifies where to start counting from.
Background Color Use the color swatch or eyedropper to pick a composition background color. (See Select a color or
edit a gradient.)
note: When you add one composition to another (nesting), the background color of the containing composition is
preserved, and the background of the nested composition becomes transparent. To preserve the background color of
the nested composition, create a solid-color layer to use as a background layer in the nested composition.
For information on specific Basic composition settings not listed here, see the related sections:
•Pixel aspect ratio and frame aspect ratio
•Frame rate
•Resolution
Advanced composition settings
After Effects includes an updated advanced section to allow for ray-traced 3D renderer options. The 3D renderer plug-
in has been renamed as, "Renderer" for these choices because you are choosing one renderer or another for a
composition.
To choose a composition type, select one of the following from the Renderer menu:
•Classic 3D
•Ray-traced 3D
Click the Options button to launch the Ray-traced 3D Renderer Options dialog box. You can also Ctrl-click (Windows)
or Command-click (Mac OS) the Current Renderer Indicator button in the upper-right of the Composition panel to
launch the dialog box.

70
Projects and compositions
Last updated 6/8/2015
Here you can choose:
•Ray-tracing quality: Click the Ray-tracing quality setting to change it according to your workflow.
•Higher values for ray-tracing quality decrease noise but greatly increase render time.
•Ray-tracing quality controls the number of rays fired per pixel (for example, a value of 4 fires 16 or 4x4 rays, and
8 fires 64 rays).
•A larger number produces a more accurate pixel at the expense of computation time.
•A value of 1 will provide better performance, but there won't be any reflection blur (for example, it is always
sharp), soft shadow, depth of field, or motion blur.
Increasing the Ray-tracing Quality value will not increase the sharpness. Instead it decreases the noise inherent in point
sampling. You should use the lowest value that produces an acceptable amount of noise or no noise.
•Anti-aliasing Filter: Controls the method of averaging the fired rays for a pixel. None fires all rays within the
bounds of a pixel, whereas the others spreads the grid of fired rays partially across adjacent pixels to produce a better
average. Box, Tent, and Cubic (which is not bicubic) are listed in the order of better quality.
•None
•Box
•Tent
•Cubic
The anti-aliasing filter controls the amount of blurriness. None gives the sharpest result but the edges of the projection
catcher may look aliased, with Box blur, Triangle, and Cubic giving blurrier results.
Note: Ray-traced 3D layers use Ray-tracing Quality to control the appearance of motion blur.Depth of field calculations in
Ray-traced 3D are more accurate than they are in Classic 3D (and previously in Advanced 3D).
Anchor Click an arrow button to anchor layers to a corner or edge of the composition as it is resized.
For information on specific Advanced composition settings not listed here, see the related sections:
•Specify resolution to use for rendering shadows
•Preferences and composition settings that affect nested compositions
•Motion blur
Composition thumbnail images
You can choose which frame of a composition to show as a thumbnail image (poster frame) for the composition in the
Project panel. By default, the thumbnail image is the first frame of the composition, with transparent portions shown
as black.
•To set the thumbnail image for a composition, move the current-time indicator to the desired frame of the
composition in the Timeline panel, and choose Composition > Set Poster Time.
•To add a transparency grid to the thumbnail view, choose Thumbnail Transparency Grid from the Project panel
menu.
•To hide the thumbnail images in the Project panel, choose Edit > Preferences > Display (Windows) or After Effects
> Preferences > Display (Mac OS) and select Disable Thumbnails In Project Panel.

71
Projects and compositions
Last updated 6/8/2015
More Help topics
Creating layers
Preview video and audio
Flowchart panel
Basics of rendering and exporting
About precomposing and nesting
Show and hide layers in the Timeline panel
The Graph Editor
Columns
Keyboard shortcuts
Timecode and time display units
Many quantities in After Effects are either points in time or spans of time, including the current time, layer In and Out
points, and durations of layers, footage items, and compositions.
By default, After Effects displays time in Society of Motion Picture and Television Engineers (SMPTE) timecode: hours,
minutes, seconds, and frames. You can change to another system of time display, such as frames, or feet and frames of
16mm or 35mm film.
You may want to see time values in feet plus frames format, for example, if you are preparing a movie for eventual output
to film; or in simple frame numbers if you plan to use your movie in an animation program such as Flash. The format
you choose applies to the current project only.
Note: Changing the time display format does not alter the frame rate of your assets or output—it changes only how frames
are numbered for display in After Effects.
Video-editing workstations often use SMPTE timecode that is recorded onto videotape for reference. If you are creating
video that will be synchronized with video that uses SMPTE timecode, use the default timecode display style.
In After Effects CS5.5 and later, timecode from source files can be displayed from a variety of file formats. Source
timecode is found in several areas of the interface including the Project panel, Project Settings dialog box, Composition
Settings dialog box and Preferences dialog box. See Source timecodefor more information.
Change time-display units
•To cycle through Timecode Base, or Frames / Feet + Frames (depending if you have the “Use Feet + Frames” option
checked in the Project Settings), Ctrl-click (Windows) or Command-click (Mac OS) the current-time display. The
current-time display is in the upper-left corner of the Timeline panel and at the bottom of the Layer, Composition,
and Footage panels. (See Timeline panel.) The option that is not selected in Project Settings will be displayed as
smaller text underneath.
•To change time display units, choose File > Project Settings, and choose from the options in the Time Display Style
section.

72
Projects and compositions
Last updated 6/8/2015
Options for time-display units
Timecode Displays time as timecode in the time rulers of the Timeline, Layer and Footage panels, using either Use
Media Source (source timecode) or starting at 00:00:00:00. Select the Timecode option to use timecode instead of
Frames. Note that there are no options for choosing frame rate or drop-frame / non-drop-frame, as source timecode is
detected and used instead.
Note: You may have both drop-frame and non-drop-frame timecode in any composition within a project.
Frames Displays frame number instead of time. Use this setting for convenience when doing work that you are
integrating with a frame-based application or format, like Flash or SWF. To use Frames, select Frames and deselect Feet
+ Frames.
Feet + Frames Displays the number of feet of film, plus frames for fractional feet, for 16mm or 35mm film. To use Feet
+ Frames, select Frames and select Feet + Frames.
Frame Count Determines the starting number for the time display style for Frames.
Timecode Conversion Timecode value of the item is used for the starting number (if the item has source timecode). If
there is no timecode value, counting begins with zero. Timecode Conversion causes After Effects to behave as it has in
previous versions, where the frame count and the timecode count of all assets are mathematically equivalent.
Start at 0 The counting for frames begins at zero.
Start at 1 The counting for frames begins at one.
Note: The new options of “Start at 0” and “Start at 1” allow you to specify different frame counting schemes between the
“Frames” and “Timecode.” For example, you might choose to honor the source timecode of footage items, but count frames
beginning at zero or one.
Source timecode
Source timecode support file formats After Effects can read and use timecode for most formats including: QuickTime,
DV, AVI, P2, MPEG-2, MPEG-4, h.264, AVCHD, RED, XDCAM EX, XDCAM HD, WAV and DPX image sequence
importers.
Project panel Source timecode is displayed in columns in the Project panel: Media Start, Media End, Media Duration
and Tape Name. These refer to the source’s start, end and total duration. In addition, columns have been added for In,
Out, and Duration, which reflect the In and Out points set by the user in the Footage panel for footage item, or the work
area for compositions.
Project Settings The Project Settings dialog box has been substantially reworked to accommodate the source timecode
feature set. For details, see Options for time-display units .
Composition Settings dialog box The Composition Settings dialog box has been changed to accomodate the source
timecode feature set. For details, see Frame rate.
Preferences dialog box The Preferences dialog box’s Import pane has been changed to support source timecode
features. See Import preferences.
Online resources about timecode
Trish and Chris Meyer provide an article on the ProVideo Coalition website that describes the difference between drop-
frame and non-drop-frame timecode.
Chris Pirazzi provides technical details about timecode on his Lurker's Guide to Video website.

73
Last updated 6/8/2015
Chapter 4: Importing footage
Importing and interpreting footage items
About imported files and footage items
You import source files into a project as the basis for footage items and use them as sources for layers. The same file can
be the source for multiple footage items, each with its own interpretation settings. Each footage item can be used as the
source for one or more layers. You work with collections of layers in a composition.
You primarily work with footage items in the Project panel. You can use the Footage panel to evaluate footage and
perform simple editing tasks, such as trimming the duration of a footage item.
You can import many different kinds of files, collections of files, or components of files as sources for individual footage
items, including moving image files, still-image files, still-image sequences, and audio files. You can even create footage
items yourself within After Effects, such as solids and precompositions. You can import footage items into a project at
any time.
When you import files, After Effects does not copy the image data itself into your project but creates a reference link to
the source of the footage item, which keeps project files relatively small.
If you delete, rename, or move an imported source file, you break the reference link to that file. When a link is broken,
the name of the source file appears in italics in the Project panel, and the File Path column lists it as missing. If the
footage item is available, you can reestablish the link—usually just by double-clicking the item and selecting the file
again.
You can find footage items for which the source items are missing by typing missing in the search field in the Project
panel. See Search and filter in the Timeline, Project, and Effects & Presets panels.
To reduce rendering time and increase performance, it is often best to prepare footage before you import it into After
Effects. For example, it is often better to scale or crop a still image in Photoshop before you bring it into After Effects,
rather than scaling and cropping the image in After Effects. It is better to perform an operation once in Photoshop than
to force After Effects to perform the same action many times per second—once for each frame in which the image
appears.
To save time and minimize the size and complexity of a project, import a source item as a single footage item and then
use it multiple times in a composition. It is occasionally useful, however, to duplicate a footage item and interpret each
differently. For example, you can use the same footage at two different frame rates.
If you use another application to modify a footage item that is used in a project, the changes appear in After Effects the
next time that you open the project or select the footage item and choose File > Reload Footage.
To replace the source footage item for a layer with another footage item, without affecting changes made to the layer
properties, select the layer and then Alt-drag (Windows) or Option-drag (Mac OS) the new footage item onto the layer
in the Timeline panel.

74
Importing footage
Last updated 6/8/2015
To replace all uses of selected footage items with another footage item, select footage items in the Project panel, and then
Alt-drag (Windows) or Option-drag (Mac OS) the new footage item onto a selected footage item in the Project panel.
When After Effects imports video and audio in some formats, it processes and caches versions of these items that it can
readily access when generating previews. This caching greatly improves performance for previews, because the video
and audio items do not need to be reprocessed for each preview. See Media cache .
For more information about importing assets, see this video tutorial on the Creative COW website by Andrew Devis.
Native encoding and decoding of QuickTime files
After Effects can natively decode and encode QuickTime (.mov) files using the GoPro Cineform codecs on Mac OS and
Windows. This means that you do not need to install additional codecs to use and create such files.
Supported import formats
Some filename extensions—such as MOV, AVI, MXF, FLV, and F4V—denote container file formats rather than
denoting a specific audio, video, or image data format. Container files can contain data encoded using various
compression and encoding schemes. After Effects can import these container files, but the ability to import the data
that they contain is dependent on which codecs (specifically, decoders) are installed.
By installing additional codecs, you can extend the ability of After Effects to import additional file types. Many codecs
must be installed into the operating system (Windows or Mac OS) and work as a component inside the QuickTime or
Video for Windows formats. Contact the manufacturer of your hardware or software for more information about
codecs that work with the files that your specific devices or applications create.
Importing and using some files requires the installation of additional import plug-ins. (See Plug-ins.)
Adobe Premiere Pro can capture and import many formats that After Effects can’t import natively. You can bring data
from Adobe Premiere Pro into After Effects in many ways. (See Working with Adobe Premiere Pro and After Effects.)
For workflow guides and updates for P2, RED, XDCAM, AVCCAM, and DSLR cameras and footage, see the Adobe
website.
Audio formats
•Adobe Sound Document (ASND; multi-track files imported as merged single track)
•Advanced Audio Coding (AAC, M4A)
•Audio Interchange File Format (AIF, AIFF)
•MP3 (MP3, MPEG, MPG, MPA, MPE)
•Video for Windows (AVI; requires QuickTime on Mac OS)
•Waveform (WAV)
Still-image formats
•Adobe Illustrator (AI, AI4, AI5, EPS, PS; continuously rasterized)
•Adobe PDF (PDF; first page only; continuously rasterized)
•Adobe Photoshop (PSD)
•Bitmap (BMP, RLE, DIB)
•Camera raw (TIF, CRW, NEF, RAF, ORF, MRW, DCR, MOS, RAW, PEF, SRF, DNG, X3F, CR2, ERF)
•Cineon/DPX (CIN, DPX; 10 bpc)
•Discreet RLA/RPF (RLA, RPF; 16 bpc; imports camera data)

75
Importing footage
Last updated 6/8/2015
•EPS
•GIF
•JPEG (JPG, JPE)
•Maya camera data (MA)
•Maya IFF (IFF, TDI; 16 bpc)
•OpenEXR (EXR, SXR, MXR; 32 bpc)
•PICT (PCT)
•Portable Network Graphics (PNG; 16 bpc)
•Radiance (HDR, RGBE, XYZE; 32 bpc)
•SGI (SGI, BW, RGB; 16 bpc)
•Softimage (PIC)
Note: 3D Channel effect plug-ins from fnord software are included with After Effects to provide access to multiple layers
and channels of OpenEXR files. (See Using channels in OpenEXR files.)
Note: After Effects can also read ZPIC files corresponding to imported PIC files. See Importing and using 3D files from other
applications.)
•Targa (TGA, VDA, ICB, VST)
•TIFF (TIF)
You can import files of any still-image format as a sequence. See Preparing and importing still images .
Video and animation formats
•Animated GIF (GIF)
•Support for ARRIRAW files from the ARRI ALEXA, or ARRIFLEX D-21 cameras
•The following are known issues with ARRIRAW:
The importer works in 16 bit, so set your project to 16 or 32 bpc.
There is no exposure or color space control in the importer, and no importer options at all.
Footage is always decoded at full resolution, even if a lower frame size is needed.
Metadata is not exposed as XMP, so is not available in After Effects.
Collect Files does not work with ARRIRAW footage.
•CinemaDNG
Note:CinemaDNG is a subset of CameraRAW. A subset of CameraRAW settings can be accessed via More Options in
the Interpret Footage dialog box. Color management for CinemaDNG includes the same color spaces as After Effects
existing CameraRAW: Adobe RGB, sRGB IEC619662.1, ColorMatch RGB, and ProPhoto RGB.
•For more information on CinemaDNG, and to download the CinemaDNG importer, go to the Adobe Labs website.
•DV (in MOV or AVI container, or as containerless DV stream)
•Electric Image (IMG, EI)
Project formats
•Adobe Premiere Pro 1.0, 1.5, 2.0, CS3, CS4, CS5 (PRPROJ; 1.0, 1.5, and 2.0 Windows only)

76
Importing footage
Last updated 6/8/2015
•Adobe After Effects 6.0 and later binary projects in After Effects CS5 (AEP, AET)
•Adobe After Effects 6.5 and later binary projects in After Effects CS5.5 and later (AEP, AET)
•Adobe After Effects CS4 and later XML projects (AEPX)
The Automatic Duck Pro Import AE plug-in is now bundled with the application, and called Pro Import After Effects.
With it, you can import AAF and OMF files from an Avid system, XML files from Final Cut Pro 7, or earlier, and project
files from Motion 4, or earlier. For more information on using Pro Import After Effects, see its User Guide, accessible
by choosing File > Import > Pro Import After Effects, then clicking the Help button.
You can also import Final Cut Pro projects into Premiere Pro and then bring that project's components into After
Effects.
In this video by Todd Kopriva and video2brain, learn how to import projects using Pro Import After Effects. We
demonstrate using a Final Cut Pro project, but the same procedure works for other formats, such as XML, AAF, and
OMF.
Note: After Effects can also read EIZ files corresponding to imported EI files. See Importing and using 3D files from other
applications.)
•FLV, F4V
•Media eXchange Format (MXF)
MXF is a container format. After Effects can only import some kinds of data contained within MXF files. After Effects
can import the Op-Atom variety of MXF files used by Panasonic video cameras to record to Panasonic P2 media. After
Effects can import video from these MXF files using the AVC-Intra 50, AVC-Intra 100, DV, DVCPRO, DVCPRO50,
and DVCPRO HD codecs. After Effects can also import XDCAM HD files in MXF format, the MXF OP1format, which
contains MPEG-2 video that complies with the XDCAM HD format.
•MPEG-1, MPEG-2, and MPEG-4 formats: MPEG, MPE, MPG, M2V, MPA, MP2, M2A, MPV, M2P, M2T, M2TS
(AVCHD), AC3, MP4, M4V, M4A
Note: Some MPEG data formats are stored in container formats with filename extensions that are not recognized by After
Effects; examples include .vob and .mod. In some cases, you can import these files into After Effects after changing the
filename extension to one of the recognized filename extensions. Because of variations in implementation in these container
formats, compatibility is not guaranteed.
For information about MPEG formats, see the MPEG website and the MPEG page on the Wikipedia website.
•PSD file with video layer (requires QuickTime)
•QuickTime (MOV; 16 bpc, requires QuickTime)
Note: David Van Brink provides the qt_tools toolset on his omino website. This toolset is useful for converting and
examining QuickTime files.
•RED (R3D)
Note: R3D files are interpreted as containing 32-bpc colors in a non-linear HDTV (Rec. 709) color space. The RED R3D
Source Settings color adjustments don't preserve overbright values. Color adjustments done within After Effects do preserve
overbright colors when you work in 32-bpc (bits per channel) color. To avoid clipping, manipulate exposure in After Effects,
rather than in the footage interpretation stage in the RED R3D Source Settings dialog box. (For more information on using
R3D files, see the RED website and the Adobe website.)
•SWF (continuously rasterized)

77
Importing footage
Last updated 6/8/2015
Note: SWF files are imported with an alpha channel. Audio is not retained. Interactive content and scripted animation are
not retained. Animation defined by keyframes in the main, top-level movie is retained.
•Video for Windows (AVI, WAV; requires QuickTime on Mac OS)
•Windows Media File (WMV, WMA, ASF; Windows only)
•XDCAM HD and XDCAM EX
Note: After Effects can import Sony XDCAM HD assets if they were recorded to MXF files. After Effects cannot import
XDCAM HD assets in IMX format. After Effects can import Sony XDCAM EX assets stored as essence files with the .mp4
filename extension in a BPAV directory. For information about the XDCAM format, see this PDF document on the Sony
website.
Import footage items
You can import media files into your project either by using the Import dialog box or by dragging. The imported
footage items appear in the Project panel.
If the Interpret Footage dialog box appears after you import a footage item, it contains an unlabeled alpha channel, and
you must select an alpha channel interpretation method or click Guess to let After Effects determine how to interpret
the alpha channel. (See Alpha channel interpretation: premultiplied or straight.)
Import footage items using the Import dialog box
1Choose File > Import > File, choose File > Import > Multiple Files, or double-click an empty area of the Project
panel.
If you choose Import Multiple Files, then you can perform the next step more than once without needing to choose
an Import command multiple times.
To display only supported footage files (excluding project files), choose All Footage Files from the Files Of Type
(Windows) or Enable (Mac OS) menu.
2Do one of the following:
•Select a file, and then click Open.
•Ctrl-click (Windows) or Command-click (Mac OS) multiple files to select them, and then click Open.
•Click a file and then Shift-click another file to select a range of files, and then click Open.
•(Windows only) Select an entire folder, and then click Import Folder.
Note: If the Sequence option is selected, multiple files from the folder are imported as a sequence of still images.
Import footage items by dragging
If you always want the layered still-image files that you drag into After Effects to be imported as a composition, choose
Edit > Preferences > Import (Windows) or After Effects > Preferences > Import (Mac OS), and choose Composition or
Composition - Retain Layer Sizes from the Drag Import Multiple Items As menu. (See Import a still-image sequence as a
composition.)
•To import a single file, drag it from Windows Explorer (Windows) or the Finder (Mac OS) into the Project panel.
•To import the contents of a folder as a sequence of still images that appear in the Project panel as a single footage
item, drag a folder from Windows Explorer (Windows) or the Finder (Mac OS) into the Project panel.
•To import the contents of the folder as individual footage items that appear in the Project panel in a folder, Alt-drag
a folder from Windows Explorer (Windows) or Option-drag a folder from the Finder (Mac OS) into the Project
panel.

78
Importing footage
Last updated 6/8/2015
•To import a rendered output file from the Render Queue panel, drag the corresponding output module from the
Render Queue panel into the Project panel.
Note: If you drag an output module from the Render Queue panel into the Project panel before rendering, After Effects
creates a placeholder footage item. References to the placeholder footage item are automatically replaced when the output
module is rendered; the placeholder footage item itself is not replaced.
Interpret footage items
After Effects uses a set of internal rules to interpret each footage item that you import according to its best guess for the
source file’s pixel aspect ratio, frame rate, color profile, and alpha channel type. If After Effects guesses wrong, or if you
want to use the footage differently, you can modify these rules for all footage items of a particular kind by editing the
interpretation rules file (interpretation rules.txt), or you can modify the interpretation of a specific footage item using
the Interpret Footage dialog box.
The interpretation settings tell After Effects the following about each footage item:
•How to interpret the interaction of the alpha channel with other channels (See Alpha channel interpretation:
premultiplied or straight.)
•What frame rate to assume for the footage item (See Frame rate.)
•Whether to separate fields and, if so, what field order to assume (See Interlaced video and separating fields.)
•Whether to remove 3:2 or 24Pa pulldown (See Remove 3:2 or 24Pa pulldown from video.)
•The pixel aspect ratio of the footage item (See Pixel aspect ratio and frame aspect ratio.)
•The color profile of the footage item (See Interpret a footage item by assigning an input color profile.)
Note: In all of these cases, the information is used to make decisions about how to interpret data in the imported footage
item—to tell After Effects about the input footage. The interpretation settings in the Interpret Footage dialog box should
match the settings used to create the source footage file. Do not use the interpretation settings to try to specify settings for
your final rendered output.
Generally, you don’t need to change interpretation settings. However, if a footage item isn’t of a common kind, After
Effects may need additional information from you to interpret it correctly.
You can use the controls in the Color Management section of the Interpret Footage dialog box to tell After Effects how
to interpret the color information in a footage item. This step is usually only necessary when the footage item does not
contain an embedded color profile.
When you preview in the Footage panel, you see the results of the footage interpretation operations.
Jeff Almasol provides a script on his redefinery website that you can use to make guessing the 3:2 pulldown, 24Pa
pulldown, or alpha channel interpretation more convenient.
Note: Select Preview in the Interpret Footage dialog box to preview the results of the settings made in this dialog box before
you accept the changes.
Interpret a single footage item using the Interpret Footage dialog box
❖Select a footage item in the Project panel and do one of the following:
•Click the Interpret Footage button at the bottom of the Project panel.
•Drag the footage item to the Interpret Footage button.
•Choose File > Interpret Footage > Main.
•Press Ctrl+Alt+G (Windows) or Command+Option+G (Mac OS).

79
Importing footage
Last updated 6/8/2015
Interpret a proxy using the Interpret Footage dialog box
❖Select the original footage item in the Project panel and do one of the following:
•Alt-click (Windows) or Option-click (Mac OS) the Interpret Footage button at the bottom of the Project
panel.
•Alt-drag (Windows) or Option-drag (Mac OS) the footage item to the Interpret Footage button.
•Choose File > Interpret Footage > Proxy.
Apply Interpret Footage settings to multiple footage items
You can ensure that different footage items use the same settings by copying interpretation settings from one item and
applying them to others.
1In the Project panel, select the item with the interpretation settings that you want to apply.
2Choose File > Interpret Footage > Remember Interpretation.
3Select one or more footage items in the Project panel.
4Choose File > Interpret Footage > Apply Interpretation.
Edit interpretation rules for all items of a specific kind
The interpretation rules file contains the rules that specify how After Effects interprets footage items. In most cases,
you don’t need to customize the interpretation rules file. When you import a footage item, After Effects looks for a
match in the interpretation rules file, and then determines interpretation settings for the footage item. You can override
these settings after importing, using the Interpret Footage dialog box.
In most cases, the name of the interpretation rules file is interpretation rules.txt; however, some updates to After Effects
install a new interpretation rules file with a name that indicates the updated version number, and the updated
application uses this new file. If you’ve made changes to the old interpretation rules file, you may need to apply those
changes to the new file, too.
Locations of the interpretation rules file in After Effects CC:
•(Windows) <drive>\Users\<username>\AppData\Roaming\Adobe\After Effects <13.0>
•(Mac OS) <drive>/Users/<username>/Library/Preferences/Adobe/After Effects <13.0>
Locations of the interpretation rules file in previous versions of After Effects CC:
•(Windows) <drive>\Users\<username>\AppData\Roaming\Adobe\After Effects <12.x>
•(Mac OS) <drive>/Users/<username>/Library/Preferences/Adobe/After Effects <12.x>
1Quit After Effects.
2As a precaution, make a backup copy of the interpretation rules file. By default, this file is in the same location as the
After Effects application.
3Open the interpretation rules file in a text editor.
4Modify the settings according to the instructions in the file.
Note: You must supply a four-character file-type code for each footage type or codec. If you don’t know the code for a
file or codec in a project, press Alt (Windows) or Option (Mac OS) as you select the file in the Project panel. The file-
type code and codec code (if the file is compressed) appear in the last line of the file description at the top of the Project
panel.
5Save interpretation rules.txt.

80
Importing footage
Last updated 6/8/2015
Alpha channel interpretation: premultiplied or straight
Image files with alpha channels store transparency information in one of two ways: straight or premultiplied. Although
the alpha channels are the same, the color channels differ.
With straight (or unmatted) channels, transparency information is stored only in the alpha channel, not in any of the
visible color channels. With straight channels, the results of transparency aren’t visible until the image is displayed in
an application that supports straight channels.
With premultiplied (or matted) channels, transparency information is stored in the alpha channel and also in the visible
RGB channels, which are multiplied with a background color. Premultiplied channels are sometimes said to be matted
with color. The colors of semitransparent areas, such as feathered edges, are shifted toward the background color in
proportion to their degree of transparency.
Some software lets you specify the background color with which the channels are premultiplied; otherwise, the
background color is usually black or white.
Straight channels retain more accurate color information than premultiplied channels. Premultiplied channels are
compatible with a wider range of programs, such as Apple QuickTime Player. Often, the choice of whether to use images
with straight or premultiplied channels has been made before you receive the assets to edit and composite. Adobe
Premiere Pro and After Effects recognize both straight and premultiplied channels, but only the first alpha channel they
encounter in a file containing multiple alpha channels.
Setting the alpha channel interpretation correctly can prevent problems when you import a file, such as undesirable
colors at the edge of an image or a loss of image quality at the edges of the alpha channel. For example, if channels are
interpreted as straight when they are actually premultiplied, semitransparent areas retain some of the background color.
If a color inaccuracy, such as a halo, appears along the semitransparent edges in a composition, try changing the
interpretation method.
You can use the Remove Color Matting effect to remove the fringes from the semi-transparent areas of a layer by
unmultiplying it.
Aharon Rabinowitz provides a video tutorial on the Creative COW website that describes how and when to use the
Remove Color Matting effect.
Set the alpha channel interpretation for a footage item
1In the Project panel, select a footage item.
2Choose File > Interpret Footage > Main.
3If you want to switch the opaque and transparent areas of the image, select Invert Alpha.

81
Importing footage
Last updated 6/8/2015
4In the Alpha section, select an interpretation method:
Guess Attempts to determine the type of channels used in the image. If After Effects cannot guess confidently, it
beeps.
Ignore Disregards transparency information contained in the alpha channel.
Straight - Unmatted Interprets the channels as straight.
Premultiplied - Matted With Color Interprets channels as premultiplied. Use the eyedropper or color picker to
specify the color of the background with which the channels were premultiplied.
Set the default alpha channel preferences
1Choose Edit > Preferences > Import (Windows) or After Effects > Preferences > Import (Mac OS).
2Choose options from the Interpret Unlabeled Alpha As menu. The options in this menu are similar to the options
in the Interpret Footage dialog box. Ask User specifies that the Interpret Footage dialog box opens each time a
footage item with an unlabeled alpha channel is imported.
Frame rate
The composition frame rate determines the number of frames displayed per second, and how time is divided into
frames in the time ruler and time display. In other words, the composition frame rate specifies how many times per
second images are sampled from the source footage items, and it specifies the time divisions at which keyframes can be
set.
Note: After Effects contains a menu for drop-frame or non-drop-frame timecode in the Composition Settings dialog box.
In previous releases, this option was a global setting per project.
This video form the “After Effects CS5: Learn by Video” series provides an introduction to frame rates for footage items,
compositions, and rendered movies, and how to modify each kind of frame rate to achieve the desired result.
Composition frame rate is usually determined by the type of output that you are targeting. NTSC video has a frame rate
of 29.97 frames per second (fps), PAL video has a frame rate of 25 fps, and motion picture film typically has a frame
rate of 24 fps. Depending on the broadcast system, DVD video can have the same frame rate as NTSC video or PAL
video, or a frame rate of 23.976. Cartoons and video intended for CD-ROM or the web are often 10–15 fps.
Setting the composition frame rate to twice the rate of the output format causes After Effects to display each field of
interlaced source footage as its own, separate frame in the Composition panel. This process lets you set keyframes on
individual fields and gain precision when animating masks.
When you render a movie for final output, you can choose to use the composition frame rate or another frame rate.
The ability to set the frame rate for each output module is useful when you are using the same composition to create
output for multiple media.
Each motion-footage item in a composition can also have its own frame rate. The relationship between the footage-item
frame rate and the composition frame rate determines how smoothly the layer plays. For example, if the footage-item
frame rate is 30 fps and the composition frame rate is 30 fps, then whenever the composition advances one frame, the
next frame from the footage item is displayed. If the footage-item frame rate is 15 fps and the composition frame rate
is 30 fps, then each frame of the footage item appears in two successive frames of the composition. (This assumes, of
course, the simple case in which no time stretching or frame blending has been applied to the layer.)
Ideally, use source footage that matches the final output frame rate. This way, After Effects renders each frame, and the
final output does not omit, duplicate, or interpolate frames. If, however, the source footage has a frame rate slightly
different from what you want to output to (for example, 30-fps footage and 29.97-fps final output), you can make the
footage frame rate match the composition frame rate by conforming it.

82
Importing footage
Last updated 6/8/2015
Conforming the frame rate of a footage item does not alter the original file, only the reference that After Effects uses.
When conforming, After Effects changes the internal duration of frames but not the frame content. Afterward, the
footage plays back at a different speed. For example, if you conform the frame rate from 15 fps to 30 fps, the footage
plays back twice as fast. In most cases, conform the frame rate only when the difference between the footage frame rate
and the output frame rate is small.
Note: Conforming can change the synchronization of visual footage that has an audio track, because changing the frame
rate changes the duration of the video but leaves the audio unchanged. If you want to stretch both audio and video, use the
Time Stretch command. (See Time-stretch a layer.) Keyframes applied to the source footage remain at their original
locations (which retains their synchronization within the composition but not the visual content of the layer). You may need
to adjust keyframe locations after conforming a footage item.
You can change the frame rate for any movie or sequence of still images. For example, you can import a sequence of ten
still images and specify a frame rate for that footage item of 5 frames per second (fps); this sequence would then have
a duration of two seconds when used in a composition.
Note: When you import a sequence of still images, it assumes the frame rate specified by the Sequence Footage preference
in the Import category. The default rate is 30 frames per second (fps). You can change the frame rate after importing by
reinterpreting the footage item. (See Interpret footage items.)
Lower frame rates tend to give the impression of unreality, so many people prefer to work at a lower frame rate such as
24 frames per second for creative work instead of working at the 29.97 frames per second that is standard for NTSC
video.
Note: If you remove 3:2 pulldown from interlaced video footage, After Effects automatically sets the frame rate of the
resulting footage item to four-fifths of the original frame rate. When removing 3:2 pulldown from NTSC video, the resulting
frame rate is 24 fps.
The frame rate of the composition should match the frame rate of the final output format. In most cases, you can simply
choose a composition settings preset. In contrast, set the frame rate for each footage item to the frame rate of the
original source footage.
Trish and Chris Meyer provide tips and tricks regarding conforming footage items to a specific frame rate in an article
(PDF) on Artbeats website.
Trish and Chris Meyer provide links to technical reference materials about frame rates and other details of digital video
on the ProVideo Coalition website.
Change frame rate for a footage item
1Select the footage item in the Project panel.
2Choose File > Interpret Footage > Main.
3Select Conform To Frame Rate, enter a new frame rate for Frames Per Second, and then click OK.
Instead of using Interpret Footage to change a footage item’s frame rate, you can time-stretch a layer based on the footage
item. For example, time-stretch a layer by 100.1% to convert between 30fps and 29.97fps. Time-stretching modifies the
speed of audio as well as video. (See Time-stretch a layer.)
Change frame rate for a composition
1Choose Composition > Composition Settings.
2Do one of the following:
•Choose a composition settings preset from the Preset menu.
•Set the Frame Rate value.

83
Importing footage
Last updated 6/8/2015
Note: Jeff Almasol provides a script on is redefinery website to set the frame rate and duration of the current composition
and all compositions nested within it.
Pixel aspect ratio and frame aspect ratio
Pixel aspect ratio (PAR) is the ratio of width to height of one pixel in an image. Frame aspect ratio (sometimes called
image aspect ratio or IAR) is the ratio of width to height of the image frame.
Most computer monitors use square pixels, but many video formats—including ITU-R 601 (D1) and DV—use non-
square rectangular pixels.
Some video formats output the same frame aspect ratio but use a different pixel aspect ratio. For example, some NTSC
digitizers produce a 4:3 frame aspect ratio, with square pixels (1.0 pixel aspect ratio), and a frame with pixel dimensions
of 640x480. D1 NTSC produces the same 4:3 frame aspect ratio but uses nonsquare pixels (0.91 pixel aspect ratio) and
a frame with pixel dimensions of 720x486. D1 pixels, which are always nonsquare, are vertically oriented in systems
producing NTSC video and horizontally oriented in systems producing PAL video.
If you display nonsquare pixels on a square-pixel monitor without alteration, images and motion appear distorted; for
example, circles distort into ellipses. However, when displayed on a video monitor, the images are correct. When you
import D1 NTSC or DV source footage into After Effects, the image looks slightly wider than it does on a D1 or DV
system. (D1 PAL footage looks slightly narrower.) The opposite occurs when you import anamorphic footage using
D1/DV NTSC Widescreen or D1/DV PAL Widescreen. Widescreen video formats have a frame aspect ratio of 16:9.
Note: To preview non-square pixels on a computer monitor, click the Toggle Pixel Aspect Ratio Correction button at the
bottom of the Composition panel. The quality of the pixel aspect ratio correction for previews is affected by the Zoom
Quality preference in the Previews category. (See Viewer Quality preferences.)
A Square pixels and 4:3 frame aspect ratio B Nonsquare pixels and 4:3 frame aspect ratio C Nonsquare pixels displayed on a square-pixel
monitor

84
Importing footage
Last updated 6/8/2015
If a footage item uses nonsquare pixels, After Effects displays the pixel aspect ratio next to the thumbnail image for the
footage item in the Project panel. You can change the pixel aspect ratio interpretation for individual footage items in
the Interpret Footage dialog box. By ensuring that all footage items are interpreted correctly, you can combine footage
items with different pixel aspect ratios in the same composition.
After Effects reads and writes pixel aspect ratios directly from QuickTime movies. For example, if you import a movie
captured as widescreen (16:9 DV), After Effects automatically tags it correctly. Similarly, AVI and PSD files contain
information that explicitly indicates the pixel aspect ratio of the images.
If a footage item does not contain information that explicitly indicates the pixel aspect ratio of the image, After Effects
uses the pixel dimensions of the footage item frame to make a guess. When you import a footage item with either the
D1 pixel dimensions of 720x486 or the DV pixel dimensions of 720x480, After Effects automatically interprets that
footage item as D1/DV NTSC. When you import a footage item with the D1 or DV pixel dimensions of 720x576, After
Effects automatically interprets that footage item as D1/DV PAL. However, you can make sure that all files are
interpreted correctly by looking in the Project panel or the Interpret Footage dialog box.
Note: Make sure to reset the pixel aspect ratio to Square Pixels when you import a square-pixel file that happens to have a
D1 or DV pixel dimensions—for example, a non-DV image that happens to have pixel dimensions of 720x480.
The pixel aspect ratio setting of the composition should match the pixel aspect ratio of the final output format. In most
cases, you can simply choose a composition settings preset. In contrast, set the pixel aspect ratio for each footage item
to the pixel aspect ratio of the original source footage.
Trish and Chris Meyer provide tips and tricks regarding pixel aspect ratio in two PDF documents on the Artbeats
website:
•Pixel aspect ratio, part 1
•Pixel aspect ratio, part 2
Chris Pirazzi provides technical details about aspect ratios on his Lurker's Guide to Video website.
Upgrade pixel aspect ratios to correct values
After Effects CS3 and earlier used pixel aspect ratios for standard-definition video formats that ignore the concept of
clean aperture. By not accounting for the fact that clean aperture differs from production aperture in standard-definition
video, the pixel aspect ratios used by After Effects CS3 and earlier were slightly inaccurate. The incorrect pixel aspect
ratios cause some images to appear subtly distorted.
Note: The clean aperture is the portion of the image that is free from artifacts and distortions that appear at the edges of
an image. The production aperture is the entire image.
Chris Meyer explains why the corrected pixel aspect ratios are better and how some workflows are affected in the “New
Pixel Aspect Ratios” video in the After Effects CS4 New Creative Techniques series on the Lynda.com website.
Todd Kopriva summarizes information about the corrected pixel aspect ratios in a post on the Adobe website.
The following table provides details about pixel aspect ratio values in After Effects:
format value in After Effects CS4 and later previous value
D1/DV NTSC 0.91 0.9
D1/DV NTSC Widescreen 1.21 1.2
D1/DV PAL 1.09 1.07
D1/DV PAL Widescreen 1.46 1.42
85
Importing footage
Last updated 6/8/2015
This discrepancy is limited to these older, standard-definition formats for which clean aperture differs from production
aperture. This discrepancy doesn’t exist in newer formats.
New projects and compositions created in After Effects CS4 and later use the correct pixel aspect ratio values by default.
Projects and compositions created in After Effects CS3 or earlier are upgraded to use the correct pixel aspect ratios
when these projects are opened in After Effects CS4 and later.
Note: If you have a custom interpretation rules file, then you should update it with the correct pixel aspect ratio values.
If you use square-pixel footage items that are designed to fill the frame in a composition with non-square pixels, you
may find that the change in pixel aspect ratios causes a difference in behavior. For example, if you previously created
768x576 square-pixel footage items to use in a PAL D1/DV composition, you should now create those items with
square-pixel dimensions of 788x576.
Composition settings presets for square-pixel equivalents of standard definition formats have changed as follows:
Change pixel aspect ratio interpretation for a footage item
1Select a footage item in the Project panel.
2Choose File > Interpret Footage > Main.
3Choose a ratio from the Pixel Aspect Ratio menu and click OK.
Change pixel aspect ratio for a composition
1Choose Composition > Composition Settings.
2Do one of the following:
•Choose a composition settings preset from the Preset menu.
•Choose a value from the Pixel Aspect Ratio menu.
format pixel dimensions in After Effects CS4 and
later
previous pixel dimensions
NTSC D1 square-pixel equivalent 720x534 720x540
NTSC D1 Widescreen square-pixel equivalent 872x486 864x486
PAL D1/DV square-pixel equivalent 788x576 768x576
PAL D1/DV Widescreen square-pixel
equivalent
1050x576 1024x576
86
Importing footage
Last updated 6/8/2015
Common pixel aspect ratios
More Help topics
Create layers from footage items or change layer source
Footage (keyboard shortcuts)
Camera Raw
Supported output formats
Import assets in Panasonic P2 format
Importing assets from tapeless formats
Importing XML project files from Final Cut Pro
Import a single still image or a still-image sequence
Footage (keyboard shortcuts)
Footage (keyboard shortcuts)
Remove Color Matting effect
Pixel aspect ratio When to use
Square pixels 1.0 Footage has a 640x480 or 648x486 frame size,
is 1920x1080 HD (not HDV or DVCPRO HD), is
1280x720 HD or HDV, or was exported from an
application that doesn’t support nonsquare
pixels. This setting can also be appropriate for
footage that was transferred from film or for
customized projects.
D1/DV NTSC 0.91 Footage has a 720x486 or 720x480 frame size,
and the desired result is a 4:3 frame aspect
ratio. This setting can also be appropriate for
footage that was exported from an
application that works with nonsquare pixels,
such as a 3D animation application.
D1/DV NTSC Widescreen 1.21 Footage has a 720x486 or 720x480 frame size,
and the desired result is a 16:9 frame aspect
ratio.
D1/DV PAL 1.09 Footage has a 720x576 frame size, and the
desired result is a 4:3 frame aspect ratio.
D1/DV PAL Widescreen 1.46 Footage has a 720x576 frame size, and the
desired result is a 16:9 frame aspect ratio.
Anamorphic 2:1 2.0 Footage was shot using an anamorphic film
lens, or it was anamorphically transferred from
a film frame with a 2:1 aspect ratio.
HDV 1080/DVCPRO HD 720, HD Anamorphic
1080
1.33 Footage has a 1440x1080 or 960x720 frame
size, and the desired result is a 16:9 frame
aspect ratio.
DVCPRO HD 1080 1.5 Footage has a 1280x1080 frame size, and the
desired result is a 16:9 frame aspect ratio.
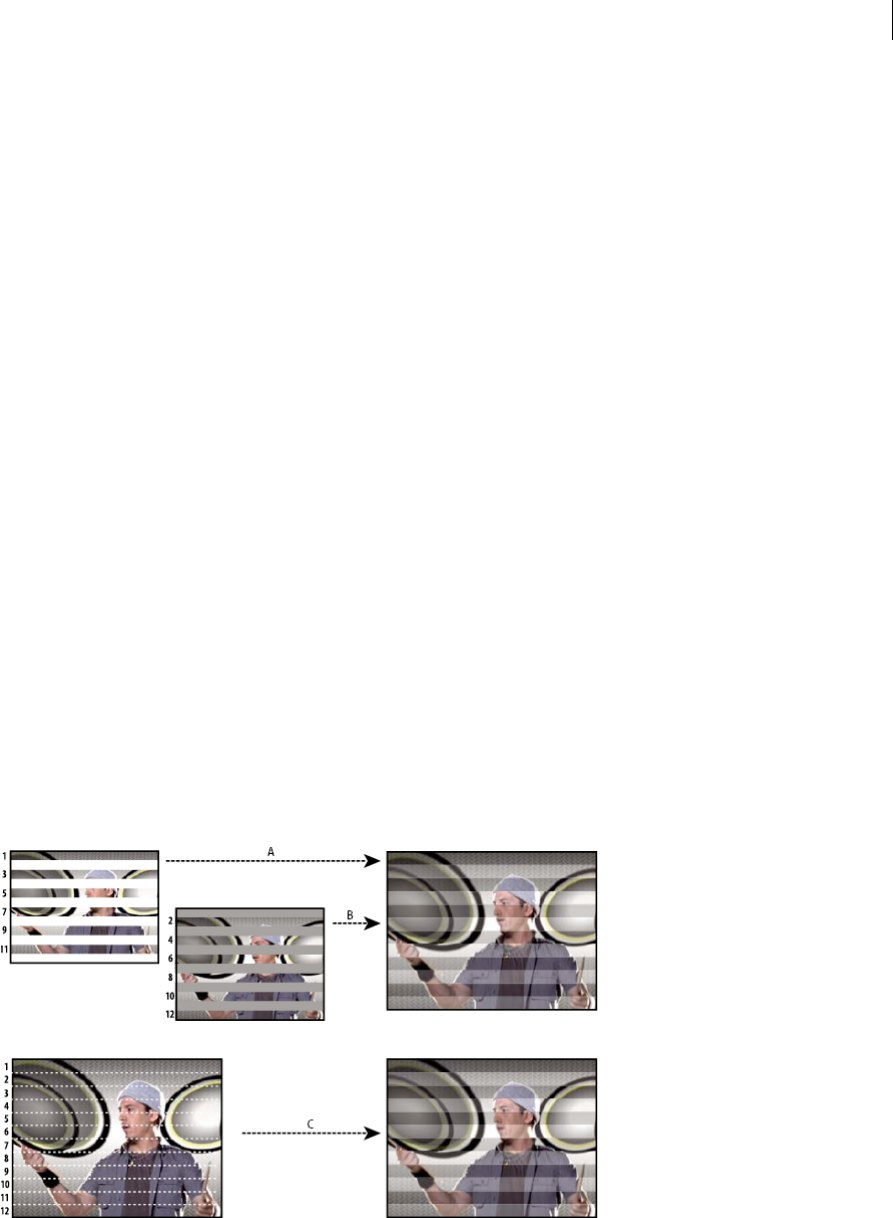
87
Importing footage
Last updated 6/8/2015
Render settings
Converting movies
Importing and interpreting video and audio
Interlaced video and separating fields
Interlacing is a technique developed for transmitting television signals using limited bandwidth. In an interlaced
system, only half the number of horizontal lines for each frame of video are transmitted at a time. Because of the speed
of transmission, the afterglow of displays, and the persistence of vision, the viewer perceives each frame in full
resolution. All of the analog television standards use interlacing. Digital television standards include both interlaced
and noninterlaced varieties. Typically, interlaced signals are generated from interlaced scanning, whereas noninterlaced
signals are generated from progressive scanning.
Each interlaced video frame consists of two fields. Each field contains half the number of horizontal lines in the frame;
the upper field (or Field 1) contains the odd-numbered lines, and the lower field (or Field 2) contains the even-numbered
lines. An interlaced video monitor displays each frame by first drawing all of the lines in one field and then drawing all
of the lines in the other field. Field order specifies which field is drawn first. In NTSC video, new fields are drawn to the
screen approximately 60 times per second, corresponding to a frame rate of approximately 30 frames per second.
Noninterlaced video frames aren’t separated into fields. A progressive-scan monitor displays a noninterlaced video
frame by drawing all the horizontal lines, from top to bottom, in one pass. Computer monitors are almost all
progressive-scan monitors, and most video displayed on computer monitors is noninterlaced.
The terms progressive and noninterlaced are thus closely related and are often used interchangeably, but progressive
scanning refers to the recording or drawing of the scan lines by a camera or monitor, whereas noninterlaced refers to the
fact that the video data itself isn’t separated into fields.
A For interlaced video, entire upper field (odd-numbered lines) is drawn to screen first, from top to bottom, in one pass. B Next, entire lower field
(even-numbered lines) is drawn to screen, from top to bottom, in one pass. C For noninterlaced video, entire frame (all lines in counting order)
is drawn to screen, from top to bottom, in one pass.

88
Importing footage
Last updated 6/8/2015
Separate video fields
If you want to use interlaced or field-rendered footage (such as NTSC video) in an After Effects project, you get the best
results if you separate the video fields when you import the footage. After Effects separates video fields by creating a
full frame from each field, preserving all of the image data from the original footage.
Separating fields is critical if you plan to make significant changes to the image. When you scale, rotate, or apply effects
to interlaced video, unwanted artifacts, such as crossed fields, are often introduced. By separating fields, After Effects
accurately converts the two interlaced frames in the video to noninterlaced frames, while preserving the maximum
amount of image quality. Using noninterlaced frames allows After Effects to apply edits and effects consistently and at
the highest quality.
After Effects creates field-separated footage from a single formerly interlaced frame by splitting it into two independent
frames. Each new frame has only half the information of the original frame, so some frames may appear to have a lower
resolution than others when viewed at Draft quality. When you render the final composition, After Effects reproduces
high-quality interlaced frames for output. When you render a movie at Best quality, After Effects interpolates between
the scan lines of a field to produce maximum image quality.
If your output will not be interlaced, it’s best to use noninterlaced source footage, to avoid the need to separate fields.
However, if a noninterlaced version of your source footage is not available, interlaced footage will work fine.
Always separate fields for interlaced footage. Never separate fields for noninterlaced footage items.
You can only remove pull-down after you have separated fields.
When you render a composition containing field-separated footage, set the Field Rendering option to the same field
order as your video equipment. If you don’t field-render the composition, or if you field-render with the incorrect
settings, the final movie may appear too soft, jerky, or distorted.
To quickly give video footage a more film-like appearance, import the footage twice, and interpret each footage item
with a different field order. Then add them both to the same composition and blend them together. The misinterpreted
layer adds some film-like blur.
After Effects automatically separates fields for D1 and DV video footage items. You can manually separate fields for all
other types of video footage in the Interpret Footage dialog box.
1Select the footage item in the Project panel.
2Choose File > Interpret Footage > Main.
3Choose an option from the Separate Fields menu.
4Click Preserve Edges (Best Quality Only) to increase image quality in nonmoving areas when the image is rendered
at Best quality. Then click OK.
Note: If the field settings in the Interpret Footage dialog box are correct for the input footage and the field settings in the
Render Settings dialog box are correct for the output device, you can mix footage items of different field orders in a
composition. If either of these settings is incorrect, however, the frames will be in the correct order, but the field order may
be reversed, resulting in jerky, unacceptable images.
Determine the original field order
The field order for an interlaced video footage item determines the order in which the two video fields (upper and
lower) are displayed. A system that draws the upper lines before the lower lines is called upper-field first; one that draws
the lower lines before the upper lines is called lower-field first. Many standard-definition formats (such as DV NTSC)
are lower-field first, whereas many high-definition formats (such as 1080i DVCPRO HD) are upper-field first.
The order in which the fields are displayed is important, especially when the fields contain motion. If you separate video
fields using the wrong field order, motion does not appear smooth.

89
Importing footage
Last updated 6/8/2015
Some programs, including After Effects, label the field order when rendering interlaced video files. When you import
a labeled video file, After Effects honors the field order label automatically. You can override this field order by applying
different footage interpretation settings.
If a file does not contain a field order label, you can match the original field order of your footage. If you are not sure
which field order was used to interlace a footage item, use this procedure to find out.
1Select the item in the Project panel.
2Choose File > Interpret Footage > Main.
3In the Interpret Footage dialog box, select Upper Field First from the Separate Fields menu, and then click OK.
4In the Project panel, press Alt (Windows) or Option (Mac OS) as you double-click the footage to open it in the
Footage panel.
5If the Preview panel is not visible, choose Window > Preview.
6In the Footage panel, find a segment that contains one or more moving areas.
7Using the Next Frame button in the Preview panel, step forward at least five frames in the Footage panel. Moving
areas should move consistently in one direction. If the moving areas move backward every other frame, the wrong
field-separation option has been applied to the footage.
Online resources about fields and interlaced video
Chris Pirazzi provides technical details of fields and interlacing on his Lurker's Guide to Video website.
This video from the “After Effects CS5: Learn by Video” series provides an introduction to fields and interlacing, and
shows how to avoid common problems.
Trish and Chris Meyer provide a variety of materials about interlacing, field order, field dominance, field rendering,
and separating fields:
•article (PDF) introducing interlacing and field separation on the Artbeats website
•article introducing interlacing and field order on the ProVideo Coalition website
•article clarifying meanings of the terms field order and field dominance on the ProVideo Coalition website
•video overview of fields and interlacing on the Lynda.com website
Remove 3:2 or 24Pa pulldown from video
When you transfer 24-fps film to 29.97-fps video, you use a process called 3:2 pulldown, in which the film frames are
distributed across video fields in a repeating 3:2 pattern. The first frame of film is copied to fields 1 and 2 of the first
frame of video, and also to field 1 of the second video frame. The second frame of film is then spread across the next
two fields of video—field 2 of the second video frame and field 1 of the third frame of video. This 3:2 pattern is repeated
until four frames of film are spread over five frames of video, and then the pattern is repeated.
The 3:2 pulldown process results in whole frames (represented by a W) and split-field frames (represented by an S). The
three whole video frames contain two fields from the same film frame. The remaining two split-field frames contain a
video frame from two different film frames. The two split-field frames are always adjacent to each other. The phase of
3:2 pulldown refers to the point at which the two split-field frames fall within the first five frames of the footage.
Phase occurs as a result of two conversions that happen during 3:2 pulldown: 24-fps film is redistributed through 30-
fps video, so each of four frames of 24-fps film is spread out over five frames of 30(29.97)-fps video. First, the film is
slowed down 0.1% to match the speed difference between 29.97 fps and 30 fps. Next, each film frame is repeated in a
special pattern and mated to fields of video.
90
Importing footage
Last updated 6/8/2015
When importing interlaced video that was originally transferred from film, you can remove the 3:2 pulldown that was
applied during the transfer from film to video as you separate fields so that effects you apply in After Effects don’t
appear distorted.
It’s important to remove 3:2 pulldown from video footage that was originally film so that effects you add in After Effects
synchronize perfectly with the original frame rate of film. Removing 3:2 pulldown reduces the frame rate by 1/5—from
30 to 24 fps or from 29.97 to 23.976 fps, which also reduces the number of frames you have to change. To remove 3:2
pulldown, you must also indicate the phase of the 3:2 pulldown.
After Effects also supports Panasonic DVX100 24p DV camera pulldown, called 24P Advance (24Pa). Some cameras
use this format to capture 23.976 progressive-scan imagery using standard DV tapes.
Before you remove 3:2 pulldown, separate the fields as either upper-field first or lower-field first. Once the fields are
separated, After Effects can analyze the footage and determine the correct 3:2 pulldown phase and field order. If you
already know the phase and field order, choose them from the Separate Fields and the Remove menus in the Interpret
Footage dialog box.
1In the Project panel, select the footage item from which to remove 3:2 pulldown.
2Choose File > Interpret Footage > Main.
3In the Fields and Pulldown section, select Upper Field First or Lower Field First from the Separate Fields menu.
4Do one of the following and click OK:
•If you know the phase of the 3:2 or 24Pa pulldown, choose it from the Remove menu.
•To have After Effects determine the correct settings, click Guess 3:2 Pulldown or Guess 24Pa Pulldown.
Note: If your footage file contains frames from different sources, the phase may not be consistent. If the phase is
inconsistent, import the footage multiple times, once for each phase, and interpret each footage item with a different
setting. Then, add each footage item to your composition and trim each layer to use only the appropriate frames. In
other words, if you have an asset that has multiple pulldown phases, then you need to cut that asset into pieces and
remove pulldown separately for each of the pieces. This can come up if the asset is a movie that has been edited together
from several sources in an NLE.
Online resources about pulldown
Chris Meyer provides a video tutorial on identifying pulldown on the Lynda.com website.
Chris and Trish Meyer provides an overview of 3:2 pulldown in an article on the Artbeats website.
Chris Meyer provides links to resources about pulldown on the ProVideo Coalition website.

91
Importing footage
Last updated 6/8/2015
Import assets in Panasonic P2 format
A P2 card is a solid-state memory device that plugs into the PCMCIA slot of a Panasonic P2 video camera. The digital
video and audio data from the video camera is recorded onto the card in a structured, codec-independent format
known as MXF (Media eXchange Format). Specifically, Adobe Premiere Pro and After Effects support the Panasonic
Op-Atom variant of MXF, with video in AVC-Intra 50, AVC-Intra 100, DV, DVCPRO, DVCPRO50, and DVCPRO HD
formats. A clip is said to be in the P2 format if its audio and video are contained in Panasonic Op-Atom MXF files, and
these files are located in a specific folder structure.
The root of the P2 folder structure is a CONTENTS folder. Each essence item (an item of video or audio) is contained
in a separate MXF wrapper file; the video MXF files are in the VIDEO subfolder, and the audio MXF files are in the
AUDIO subfolder. The relationships between essence files and the metadata associated with them are tracked by XML
files in the CLIP subfolder.
Note: Adobe Premiere Pro and After Effects do not support proxies recorded by Panasonic P2 camcorders in P2 card
PROXY folders.
The video and audio on a P2 card are already in a digital form, as if the P2 card were a hard disk, so no capture step is
involved in importing media from a P2 card. The process of reading the data from the card and converting it to a format
that can be used in a project is sometimes referred to as ingest.
For your computer to read P2 cards, you must install the appropriate driver, which you can download from the
Panasonic website. Panasonic also provides the P2 Viewer application, with which you can browse and play media
stored on a P2 card.
Because Panasonic P2 cards use the FAT32 file system, each file is limited to a size of 4 GB. When a shot is recorded
that requires more than the 4 GB, a P2 camera creates another file and continues recording the shot to the new file
without interruption. This is referred to as clip spanning, because the shot spans more than one file or clip. Similarly, a
camera may span a shot across files on different P2 cards: if the camera has more than one P2 card loaded, it will record
the shot until it runs out of room on the first P2 card, create a new file on the next P2 card with available space, and
continue recording the shot to it. Although a single shot can be recorded to a group of multiple spanned clips, the
multiple-file shot is designed to be treated as a single clip or footage item in a video editing application. For After Effects
to automatically import a group of spanned clips simultaneously and assemble them into a single footage item, they
must all have been recorded to the same P2 card and none of the files can be missing, including the associated XML
metadata file.
1(Optional) Copy the entire contents of the P2 card to a hard disk.
Though it is possible to import assets into Adobe Premiere Pro or After Effects directly from a P2 card, it is usually
more efficient to copy the contents of the P2 card to a hard disk before importing.
2Choose File > Import.
3Navigate to the CONTENTS folder.
4Select one or more MXF files:
•To import a video essence item and its associated audio essence items, select the MXF files from the VIDEO
folder.
•To import only the audio essence items, select the MXF files from the AUDIO folder.
•To import a group of spanned clips for a shot that were recorded onto the same P2 card, select only one of the
MXF files in the group from the VIDEO folder. The group is imported as a single footage item with a duration
equal to the total duration of all the spanned clips it includes. If you select more than one of these spanned clips,
you import duplicates of the whole group of spanned clips, as duplicate footage items in the Project panel.

92
Importing footage
Last updated 6/8/2015
You cannot import spanned clips from a shot that spans two different cards as a single footage item. Rather, you must
select a single MXF file belonging to the shot from each card to create a separate footage item for the part of the shot
recorded on each card. For example, if a group of spanned clips for a single shot itself spans two cards, you must
select a spanned clip from the group on card 1 and another from the group on card 2. This imports the contents of
the shot into two footage items in the Project panel.
The Date column in the Project panel shows when each source clip was acquired. After you import spanned clips, you
can use the Date value to determine their correct chronological order within the shot.
Note: After Effects can’t directly export to the P2 format. To render and export to the P2 format, use Adobe Media Encoder
or Premiere Pro.
For additional information on the Panasonic P2 format and workflows with Adobe digital video software, see the
Adobe website:
•Adobe workflow guides for P2, RED, XDCAM, AVCCAM, and DSLR cameras and footage
•P2 workflow guide for Adobe digital video products
•Dave Helmly’s video introduction to the P2 workflow in After Effects
More Help topics
Interpret footage items
Introduce 3:2 pulldown
Importing assets from tapeless formats
Export to Panasonic P2 format
File formats supported for export
Preparing and importing 3D image files
Importing 3D images from Photoshop and Illustrator
3D object layers in PSD files
Adobe Photoshop CC can import and manipulate 3D models (3D objects) in several popular formats. Photoshop can
also create 3D objects in basic, primitive shapes.
After Effects cannot import 3D objects from PSD files.
See working with 3d layers video on the learn tutorials page.
Vanishing Point exchange
When you use the Vanishing Point feature in Photoshop Extended, you can then use the File > Export For After Effects
(.vpe) command to save the results as a collection of PNG files—one for each plane—and a .vpe file that describes the
geometry of the scene. You can then import the .vpe file into After Effects. After Effects uses the information in the .vpe
file to re-create the scene as a composition containing a camera layer and one perspective-corrected 3D layer for each
PNG file.

93
Importing footage
Last updated 6/8/2015
The camera is on the negative z axis, at (x,y)=(0,0). The point of interest for the camera is in the center of the
composition. The camera zoom is set according to the field of view in the Vanishing Point scene.
The 3D layers for the planes in the scene have a parent layer with its anchor point at the center of the composition, so
the whole scene can be transformed together.
Vanishing Point exchange only works well for images that have square pixels in Photoshop.
Bob Donlon provides a tutorial on his blog that shows how to use Vanishing Point Exchange.
Aharon Rabinowitz provides a video tutorial on the Creative COW website that shows how to use Vanishing Point
Exchange.
Lester Banks provides a video tutorial on his website that demonstrates how to use Vanishing Point in Photoshop
Extended and then either bring the 3D scene into After Effects as a .vpe file or bring the 3D scene in as a 3D object layer
in a PSD file.
Andrew Kramer provides a video tutorial on his Video Copilot website that shows how to use Vanishing Point
Exchange.
Importing PSD files as 3D scenes
Paul Tuersley provides a script on the AE Enhancers website that turns a layered PSD file into a 3D scene in After
Effects. The script creates a composition and adds expressions to the layers from the PSD file. When you move the
layers along the z axis, the scene looks exactly like the original artwork through the Active Camera view. You can
animate the camera around the scene to see that the layers are at different depths in 3D space.
Illustrator 3D effects
The effects in the 3D category in Illustrator—Extrude & Bevel, Revolve, and Rotate—give a three-dimensional
appearance to any vector graphics object, including text and drawings. If you want to add depth to your vector art and
text, consider creating it in Illustrator, using the 3D effects, and then importing the results into After Effects.
Importing and using 3D files from other applications
After Effects can import 3D-image files saved in Softimage PIC, RLA, RPF, OpenEXR, and Electric Image EI format.
These 3D-image files contain red, green, blue, and alpha (RGBA) channels, as well as auxiliary channels with optional
information, such as z depth, object IDs, texture coordinates, and more.
Though you can import composited files with 3D information into After Effects, you cannot modify or create 3D
models directly with After Effects.
After Effects treats each composited 3D file from another application as a single 2D layer. That layer, as a whole, can be
given 3D attributes and treated like any After Effects 3D layer, but the objects contained within that 3D file cannot be
manipulated individually in 3D space. To access the 3D depth information and other auxiliary channel information in
3D image files, use the 3D Channel effects. (See 3D Channel effects.)
3D Channel effect plug-ins from fnord software are included with After Effects to provide access to multiple layers and
channels of OpenEXR files. (See Using channels in OpenEXR files.)
After Effects can also import baked camera data, including focal length, film size, and transformation data, from Maya
project files as a single composition or two compositions. (See Baking and importing Maya data.)
After Effects imports camera data saved with RLA or RPF sequence files. (See Import RLA or RPF data into a camera
layer.)

94
Importing footage
Last updated 6/8/2015
Softimage PIC files have a corresponding ZPIC file that contains the z-depth channel information. Although you can’t
import a ZPIC file, you can access the additional channel information as long as the ZPIC file is stored in the same
folder as the imported PIC file.
Similarly, Electric Image (EI) files can have associated EIZ files with z-depth channel data. As with ZPIC files, you
cannot import EIZ files into After Effects; instead, you simply store them in the same folder as the EI files. For
information about creating EIZ files, see your Electric Image documentation.
Note: Some 3D applications, such as Cinema 4D, can export an After Effects composition directly.
A common technique when working in a 3D modeling application is to insert null objects, such as null lights or null
locator nodes in the locations where you want to composite in an image in After Effects. Then, after you have imported
the 3D file into After Effects, you can use these null objects as a reference for the placements of other visual elements.
Online resources about importing and using 3D files from other applications
Lutz Albrecht provides a two-part document on the Adobe website about integrating 3D applications with After Effects.
These articles cover the creation of UV maps, mattes, and channels from various 3D applications, including Maxon
Cinema 4D, NewTek Lightwave, and Luxology modo. The articles then show you how to use RE:Vision Effects RE:Map
and fnord ProEXR plug-ins to use that data in After Effects.
Tyson Ibele provides tutorials on his website that show how to use output from 3ds Max (3D Studio MAX) in After
Effects.
Dave Scotland provides a pair of tutorials on the CG Swot website in which he demonstrates how to create RPF files in
a 3D application and how to use RPF files in After Effects. The first part explains the RPF format and how to create RPF
files in 3DS Max. The second part shows how to use the Object ID and Z depth information in an RPF file within After
Effects, using the ID Matte, Depth of Field, Depth Matte, and Fog 3D effects.
Eran Stern provides a video tutorial on the Artbeats website that demonstrates the use of 3D tracking software that
solves for camera movement so that additional elements can be composited into the scene and appear to honor the
same camera movement. This video tutorial uses Pixel Farm PFHoe, but the techniques can be applied to almost any
matchmoving software.
Bartek Skorupa provides a tutorial on his website about using Blender and exporting the animation to After Effects.
You c an al s o w at ch t h e camera tracking in Blender tutorial that shows focuses on lens distortion issues.
Harrison Ambs provides a two-part video tutorial on the CGTUTS+ website that demonstrates how to import data
from Cinema 4D into After Effects:
•part 1
•part 2
Paul Tuersley provides a script on the AE Enhancers website for transferring a composition from After Effects to
Cinema 4D.
Import RLA or RPF data into a camera layer
After Effects imports camera data saved with RLA or RPF sequence files. That data is incorporated into camera layers—
one for each camera in the sequence—that After Effects creates in the Timeline panel. You can access the camera data
of an imported RLA or RPF sequence and create a camera layer containing that data.
1Add the sequence to a composition, and select its layer in the Timeline panel.
2Choose Animation > Keyframe Assistant > RPF Camera Import.

95
Importing footage
Last updated 6/8/2015
Note: To create an RLA or RPF file with the camera data in 3D Studio Max, save your rendering in RPF format with
Coverage, Z Depth, and Alpha Channels enabled.
Dave Scotland provides a pair of tutorials on the CG Swot website in which he demonstrates how to create RPF files
in a 3D application and how to use RPF files in After Effects. The first part explains the RPF format and how to create
RPF files in 3DS Max. The second part shows how to use the Object ID and Z depth information in an RPF file
within After Effects, using the ID Matte, Depth of Field, Depth Matte, and Fog 3D effects.
Baking and importing Maya data
After Effects imports camera data from Maya project files. Before importing Maya camera information, you need to
bake it. Baking camera data makes it easier to animate with keyframes later in your project. Baking places a keyframe
at each frame of the animation. You can have 0, 1, or a fixed number of keyframes for each camera or transform
property. For example, if a property is not animated in Maya, either no keyframes are set for this property or one
keyframe is set at the start of the animation. If a property has more than one keyframe, it must have the same number
as all of the other animation properties with more than one keyframe.
Reduce import time by creating or saving the simplest Maya file possible. In Maya, reduce keyframes by deleting static
channels before baking, and save a version of the Maya project that contains the camera animation only.
Note: The following transformation flags are not supported: query, relative, euler, objectSpace, worldSpace,
worldSpaceDistance, preserve, shear, scaleTranslation, rotatePivot, rotateOrder, rotateTranslation, matrix, boundingBox,
boundingBoxInvisible, pivots, CenterPivots, and zeroTransformPivots. After Effects skips these unsupported flags, and no
warnings or error messages appear.
By default, After Effects treats linear units specified in the Maya file as pixels.
You can import camera data from Maya project files (.ma) and work with the data as a single composition or two
compositions.
For each Maya file you import, After Effects creates either one or two compositions:
•If the Maya project has a square pixel aspect ratio, After Effects creates a single, square-pixel composition containing
the camera data and transformations.
•If the Maya project has a nonsquare pixel aspect ratio, After Effects creates two compositions. The first composition,
which has a filename prefixed by Square, is a square-pixel composition containing the camera data. The second, or
parent, composition is a nonsquare-pixel composition that retains the dimensions of the original file and contains
the square-pixel composition. When working with imported camera data, use 3D layers and square-pixel footage in
the square-pixel composition, and use all nonsquare-pixel footage in the containing composition.
When you import a Maya file with a 1-node camera, After Effects creates a camera in the square-pixel composition that
carries the camera’s focal length, film size, and transformation data.
When you import a Maya file with a 2-node or targeted camera, After Effects creates a camera and an additional parent
node in the square-pixel composition. The parent node contains only the camera’s transformation data. After Effects
imports 2-node cameras automatically with the locator node as the point of interest, with the Auto-Orientation option
of the camera set to Orient Towards Point Of Interest.
After Effects doesn’t read 3-node cameras.
Note: After Effects reads only the rendering cameras in Maya files and ignores the orthographic and perspective cameras.
Therefore, always generate a rendering camera from Maya, even if it’s the same as the perspective camera. If you apply the
FilmFit camera setting, make sure to use either horizontal or vertical FilmFit, not fill.

96
Importing footage
Last updated 6/8/2015
After Effects can read Maya locator nodes, which enable you to track objects from the Maya scene as it is translated into
After Effects. After Effects creates a null layer and applies the relevant transformations to it if the name of a Maya locator
node contains the word Null, NULL, or null. Avoid parenting locator nodes to each other in Maya; instead, parent the
locator nodes to geometry.
Note: After Effects doesn’t read World or Underworld coordinates in the LocatorShape. Use a transform node to place them.
More Help topics
3D layers
Cameras, lights, and points ofinterest
Working with footage items
Organize, view, manage, and trim footage items
Compositions and footage items are listed in the Project panel. Unlike items in the Timeline panel and Effect Controls
panel, the order of items in the Project panel has no influence on the appearance of the movies that you create. You can
organize footage items and compositions however you like, including organizing them using folders. Solid-color
footage items are automatically placed in the Solids folder.
Folders that you create in the Project panel exist only in the Project panel. You can expand a folder to reveal its contents,
and put folders inside other folders. To move a file or folder to the top level of the Project panel, drag it to the gray
information area at the top of the panel.
You can use the search field in the Project panel to find footage items that meet various criteria, such as those with
missing source files. See Search and filter in the Timeline, Project, and Effects & Presets panels.
For a helpful video tutorial about organizing assets in the Project panel, see this video tutorial by Jeff Sengstack and
Infinite Skills.
Scripts for managing footage items
Jeff Almasol provides a script on his redefinery website that automatically writes specified information about footage
items or layers to the Comment fields for the respective items in the Project panel or Timeline panel.
Christopher Green provides a script (Project_Items_Renamer.jsx) on his website with which you can rename
compositions and footage items selected in the Project panel. You can search and replace text in the names, append
characters to the beginning or end of the names, or trim a specified number of characters from the beginning or end
of the names.
Lloyd Alvarez provides a script on the After Effects Scripts website with which you can search an After Effects project
and replace the file paths for the sources of footage items. This is convenient for swapping out source files, updating a
project after moving sources, or updating a project after moving it to a different computer system.
Show information for items
•To show information about a footage item or composition, select it in the Project panel. Information is displayed at
the top of the Project panel next to the thumbnail image.
•To show the file creator ID for a footage item, Alt-click (Windows) or Option-click (Mac OS) it in the Project panel.

97
Importing footage
Last updated 6/8/2015
Create a folder
❖Choose File > New > New Folder, or click the Create A New Folder icon at the bottom of the Project panel.
Rename and sort items
•To rename a composition, footage item, or folder, do one of the following:
•Select the item in the Project panel, press Enter (Windows) or Return (Mac OS), and enter the new name.
•Right-click (Windows) or Control-click (Mac OS) the item, choose Rename, and enter the new name.
•To rename the Comment column, right-click (Windows) or Control-click (Mac OS) the column heading and choose
Rename This.
You can use the Comment column to create a custom sorting option. Rename the column, enter corresponding
information for each item (for example, camera number), and then sort by that column.
•To sort items by entries in any column, click the column name in the Project panel.
Copy items
•To duplicate or copy an item in the Project panel, select it and choose Edit > Duplicate or Edit > Copy.
•To copy a footage item to Windows Explorer (Windows) or the Finder (Mac OS), drag the footage item from the
Project panel to the desktop.
Reveal footage items
•To reveal where a footage item is used in a composition, right-click (Windows) or Control-click (Mac OS) the
footage item in the Project panel and choose Reveal In Composition; then select the specific instance you want to
reveal (composition name, layer name).
•To reveal the source footage item for a layer in the Project panel, right-click (Windows) or Control-click (Mac OS)
the layer in the Timeline panel, and then choose Reveal Layer Source In Project.
•To reveal the location of a footage item in Adobe Bridge, Windows Explorer, or the Finder, right-click (Windows)
or Control-click (Mac OS) the footage item in the Project panel and choose Reveal In Bridge, Reveal In Windows
Explorer, or Reveal In Finder.
Refresh footage items
❖To refresh footage items selected in the Project panel to use the current versions of the source footage files, choose
File > Reload Footage.
View footage item in the Footage panel or media player assigned by operating system
When items are previewed in the Footage panel, they show the results of the footage interpretation operations. (See
Interpret footage items.)
•To open a footage item in a Footage panel, double-click the footage item in the Project panel.
•To open selected footage items in the Footage panel, press Enter on the numeric keypad when the Project panel is
active.
Note: To open the source for a footage item using the player application associated with that file type, Alt-double-click
(Windows) or Option-double-click (Mac OS) the footage item in the Project panel. See the documentation for your
operating system for instructions for changing the associations between applications and file types.
98
Importing footage
Last updated 6/8/2015
Trim footage items in the Footage panel
You can use the Set In Point , Set Out Point , Ripple Insert Edit , and Overlay Edit controls in the Footage
panel to trim a footage item and insert it into a composition. Trimming in the Footage panel can be more convenient
than adding the footage item to a composition and then trimming its layer in the Timeline panel.
Edit footage in its original application
You can open and edit a footage item in the application in which it was created, directly from an After Effects project.
The original application must be installed on the computer that you are using, which must have enough available RAM
for it to run. When you edit and save changes to the footage in the original application, the changes are applied to all
instances of the footage when After Effects becomes the active application.
Note: If you’re editing footage that has an alpha channel, make sure that you’re viewing and editing all of the channels,
including the alpha channel, in the other application. Otherwise, changes you make may not be applied to the alpha
channel, and it may become misaligned with the color channels.
When you edit a still-image sequence selected in the Timeline or Composition panel, the individual image that is
currently displayed opens. When you edit a still-image sequence selected in the Project panel, the first image in the
sequence opens.
1In the Project panel, Composition panel, or Timeline panel, select the footage item or a layer that uses the footage
item as its source. If you selected a still-image sequence from the Composition or Timeline panel, move the current-
time indicator to the frame displaying the still image you want to edit.
2Choose Edit > Edit Original.
3Edit the footage in its original application, and save the changes.
Remove items from a project
Before reducing your project, removing unused footage, or consolidating footage, consider making a backup by
incrementing and saving your project first. (See Save and back up projects in After Effects .)
Carl Larsen demonstrates the use of the Collect Files command and the Consolidate All Footage command in a video
tutorial on the Creative COW website that shows how to organize, consolidate, and archive project files and footage.
•To remove an item from a project, select the item in the Project panel and press Delete.
•To remove all unused footage items from a project, choose File > Remove Unused Footage.
•To remove all duplicate footage items from a project, Choose File > Consolidate All Footage. After Effects considers
footage items to be duplicates only if they use the same Interpret Footage settings.
When a duplicate item is removed, layers that refer to the duplicate item are updated to refer to the remaining copy.
•To remove unselected compositions and unused footage items from selected compositions in the Project panel,
choose File > Reduce Project. This command is available only when the Project panel is active.
This command removes both unused footage items and all other compositions that are not included within a
selected composition as nested (subordinate) compositions.
If the selected composition includes items that are turned off (that is, the Video or Audio switch is deselected in the
Timeline panel), the Reduce Project command does not remove those items.

99
Importing footage
Last updated 6/8/2015
If an expression in a selected composition refers to an element in a nonsubordinate composition, Reduce Project
removes the nonsubordinate composition and the applied expression. A message appears after you choose Reduce
Project to remind you of this possibility, so you can undo the command if needed. To avoid removing the
expressions from a nonsubordinate composition, drag the nonsubordinate composition into the composition that
refers to it. Then deselect the Audio and Video switches for the composition that you added.
The SaveCompAsProject script from Sebastian Perier on the AEScripts website saves selected compositions as
individual projects.
Placeholders and proxies
When you want to temporarily use a substitute for a footage item, use either a placeholder or a proxy.
Placeholder A still image of color bars used to temporarily take the place of a missing footage item. Use a placeholder
when you are building a composition and want to try out ideas for a footage item that is not yet available. After Effects
generates placeholders automatically, so you do not have to provide a placeholder footage item.
Proxy Any file used to temporarily replace a footage item, but most often a lower-resolution or still version of an
existing footage item used to replace the original. Often, storyboard images are used as proxies. You can use a proxy
either before you have the final footage or when you have the actual footage item but you want to speed up previewing
or rendering of test movies. You must have a file available to use as a proxy.
Any masks, attributes, expressions, effects, and keyframes that you apply to the layer are retained when you replace its
placeholder or proxy with the final footage item.
In the Project panel, After Effects marks the footage name to indicate whether the actual footage item or its proxy is
currently in use:
•A filled box indicates that a proxy item is currently in use throughout the project. The name of the proxy appears in
bold type at the top of the Project panel when the footage item is selected.
•An empty box indicates that the footage item is in use throughout the project, though a proxy has been assigned.
•No box indicates that no proxy is assigned to the footage item.
Work with placeholders and missing footage items
For best results, set the placeholder to the same size, duration, and frame rate as the actual footage.
If After Effects cannot find source footage when you open a project, the footage item appears in the Project panel
labeled Missing, and the name of the missing footage appears in italics. Any composition using that item replaces it
with a placeholder. You can still work with the missing item in the project, and any effects you applied to the original
footage remain intact. When you replace the placeholder with the source footage, After Effects places the footage in its
correct location in all the compositions that use it.
You can find footage items for which the source items are missing by typing missing in the search field in the Project
panel. See Search and filter in the Timeline, Project, and Effects & Presets panels.
•To use a placeholder, choose File > Import > Placeholder.
•To replace the selected footage item with a placeholder, choose File > Replace Footage > Placeholder.
•To replace a placeholder with the actual footage item, select the placeholder you want to replace in the Project panel,
choose File > Replace Footage > File, and locate the actual footage.

100
Importing footage
Last updated 6/8/2015
Work with proxies for footage items
When you use a proxy, After Effects replaces the actual footage with the proxy in all compositions that use the actual
footage item. When you finish working, you can switch back to the actual footage item in the project list. After Effects
then replaces the proxy with the actual footage item in any composition.
When you render your composition as a movie, you may choose to use either all the actual high-resolution footage
items or their proxies. You may want to use the proxies for a rendered movie if, for example, you simply want to test
motion using a rough movie that renders quickly.
For best results, set a proxy so that it has the same frame aspect ratio as the actual footage item. For example, if the actual
footage item is a 640x480-pixel movie, create and use a 160x120-pixel proxy. When a proxy item is imported, After
Effects scales the item to the same size and duration as the actual footage. If you create a proxy with a frame aspect ratio
that is different from the frame aspect ratio of the actual footage item, scaling takes longer.
❖In the Project panel, do any of the following:
•To locate and use a proxy, select a footage item, choose File > Set Proxy > File, locate, and select the file you want
to use as a proxy, and click Open.
•To toggle between using the original footage and its proxy, click the proxy indicator to the left of the footage
name.
•To stop using a proxy, select the original footage item, and choose File > Set Proxy > None.
Create a proxy
Use the Create Proxy command to create a proxy from footage or compositions selected in the Project panel or the
Timeline panel. This command adds the selected footage to the Render Queue panel and sets the Post-Render Action
option to Set Proxy.
1Open a footage item or composition in the Project or Timeline panel.
2Move the current-time indicator in the Footage panel to the frame that you want to use as the proxy still item, or for
the poster frame for the movie footage item.
3Choose one of the following commands:
•File > Create Proxy > Still to create a still image proxy.
•File > Create Proxy > Movie to create a moving image proxy.
4Specify a name and output destination for the proxy.
5In the Render Queue panel, specify render settings, and click Render.
Create placeholders for output
You can create placeholder files that can be used in different compositions. For example, you can create a placeholder
for an item in the render queue that will create a 24-fps movie and then drag that placeholder into a 30-fps composition.
Then, when you render the 30-fps composition, After Effects first renders the placeholder at 24 fps and uses this
rendered version as it renders the 30-fps composition.
❖Drag the Output Module heading for a queued item from the Render Queue panel to the Project panel. After Effects
creates a placeholder for output in the Project panel and sets the Post-Render Action option for the item to Import
& Replace Usage.
Additional resources for working with placeholders and proxies
Trish and Chris Meyer give tips on prerendering and proxies in After Effects in this article on the ProVideo Coalition
website.

101
Importing footage
Last updated 6/8/2015
Andrew Kramer provides a video tutorial with tips for working with proxies, output modules, and output module
templates on the Video Copilot website.
Jeff Almasol provides a script on his redefinery website that creates, sets, and unsets proxies and placeholders.
Charles Bordenave (nab) provides a script on the After Effects Scripts website with which you can create proxies for
multiple selected items.
Chris and Trish Meyer explain how to use Footage Proxies with RED footage in After Effects with this article on the
Pro Video Coalition website.
See this video tutorial on the Video2Brain website by Todd Kopriva for information about saving time by pre-rendering
and using proxies in After Effects.
Loop a footage item
If you intend to loop a visual footage item continuously in your project, you only need to create one cycle of the footage
item in After Effects.
1In the Project panel, select the footage item to loop.
2Choose File > Interpret Footage > Main.
3Type an integer value for Loop and click OK.
Lloyd Alvarez provides a script on the After Effects Scripts website that automatically loops a footage item,
composition, or layer.
More Help topics
Collect files in one location
Color labels for layers, compositions, and footage items
Projects (keyboard shortcuts)
Trim, extend, or slip-edit a layer
Footage (keyboard shortcuts)
Render settings
Post-render actions
CINEMA 4D and Cineware
Cinema 4D is a popular 3D modeling and animation software from Maxon(www.maxon.net).
Closer integration with CINEMA 4D allows you to use Adobe After Effects and Maxon CINEMA 4D together. You can
create a CINEMA 4D file (.c4d) from within After Effects and you can work with complex 3D elements, scenes, and
animations.
To enable interoperability, CINEWARE (previously CINERENDER), the Maxon CINEMA 4D rendering engine, is
integrated with Adobe After Effects. After Effects can render Cinema 4D files, and you can control some aspects of
rendering, camera, and scene content on a per-layer basis. This streamlined workflow does not require you to create
intermediate pass or image sequence files.

102
Importing footage
Last updated 6/8/2015
Maxon CINEMA 4D Lite
Maxon CINEMA 4D Lite R16 application gets installed along with After Effects. You can create, import, and edit
Cinema 4D files. However, if you have another edition of CINEMA 4D, such as CINEMA 4D Prime, you can use it
instead. The CINEMA 4D Lite application gives you the ability to edit, create, and work with native Cinema 4D files.
The features in the Lite version are similar to CINEMA 4D Prime.
The default behavior uses the higher version of the installed Cinema 4D application.
See this tutorial to learn to use Cinema 4D Lite with After effects cameras and lights.
Watch this vide o Overview of CINEMA 4D Lite by Chris Meyer.
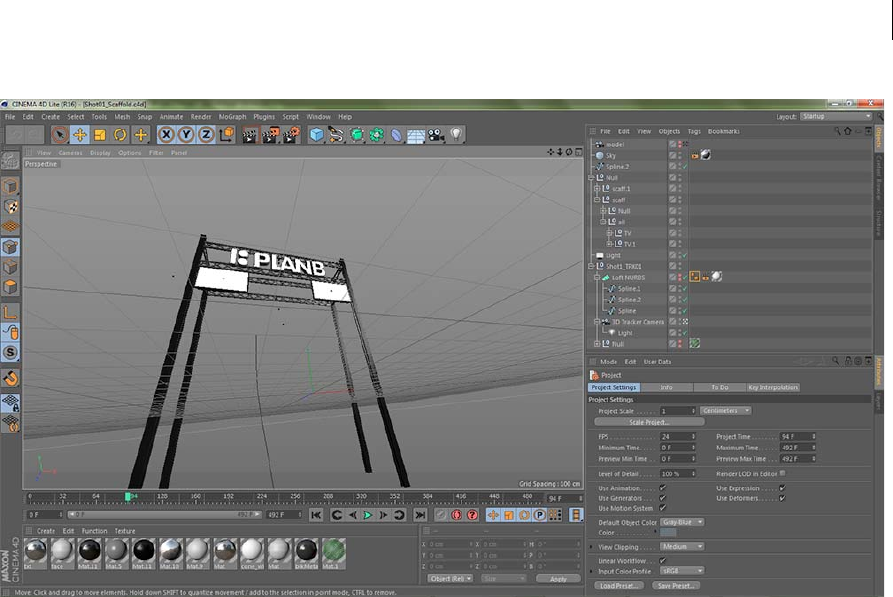
103
Importing footage
Last updated 6/8/2015
Working with Cinema 4D files
There are several options available to create, import, and edit Cinema 4D files from within After Effects.
Import Cinema 4D files
To import Cinema 4D files into After Effects, do the following:
1Choose File > Import > File.
2Select the Cinema 4D file and click Import. The file is placed in the Project panel as a footage item. You can place
the footage item on an existing composition, or create a matching composition.
Note: When you place the footage on a new composition using the new composition icon in the project panel, a composition
is created that matches the Cinema 4D file settings and then a CINEMA 4D layer is created and the 3D scene is placed on
it. If you drop the footage in an existing composition, the footage will pick up the composition size/aspect instead.
Note: Before importing, enable Save Polygons For Melange and Save Animation For Melange preferences in CINEMA 4D
application preferences. These settings are especially useful in cases where Cinema 4D frames depend on previous frames.
Edit Cinema 4D files
You can edit Cinema 4D files placed in compositions or Cinema 4D source items in the Project window. The files open
in the CINEMA 4D Lite application. If you have a different version of CINEMA 4D installed, that is used to edit the
file instead. See Edit footage in its original application.
You can choose the version of Cinema 4D you want to use with Edit Original. See Updates to Cineware Effect
For more information, see the video by Jeff Sengstack on Importing and editing Cinema 4D files.

104
Importing footage
Last updated 6/8/2015
Create Cinema 4D files
You can create a Cinema 4D file from within After Effects.
1Choose File > New > Maxon CINEMA 4D File or Layer > New > Maxon CINEMA 4D File.
2Specify a name and location of the file.
3The CINEMA 4D application opens.
4Create a C4D scene and choose File > Save to save the file.
For more information, see this video by Jeff Sengstack on Creating CINEMA 4D files.
CINEWARE effect
The integration of CINEWARE (previously CINERENDER), which is based on the CINEMA 4D render engine,
enables rendering of layers based on CINEMA 4D files directly in After Effects. The CINEWARE effect lets you control
the render settings, and provides some control over the render quality-speed tradeoff. You can also specify cameras,
passes, or C4D layers used for a render. The CINEWARE effect is automatically applied when you create a layer based
on C4D footage on the composition. Each CINEMA 4D layer has its own render and display settings.
For more information, see Understanding the CINEWARE effect and render engine on Adobe TV.
Synchronize Layer
The Synchronize Layer setting enables you to automatically synchronize your Cineware settings with all the layers in a
composition. When you add multiple instances of a CINEMA 4D scene layer in a composition, including adding Multi-
Pass layers, you will see a new checkbox, Synchronize Layer at the top of the Effect Controls panel. When the box is
checked (default), the Cineware effect settings on all instances of the layer synchronize automatically. If the checkbox
is disabled for a specific CINEMA 4D scene layer, then that layer's settings will not synchronize with the rest of the
layers in the composition.
Render settings
The cineware render settings determine how to render the scene inside After Effects. These settings can help you speed
up the rendering process while you're working.
Renderer Determines which renderer to use. The following options are available :
•Standard (Final): Uses the Standard renderer as specified in the C4D file. Use the CINEMA 4D application to edit
these settings.
•Standard (Draft): Uses the Standard renderer but turns off slower settings like anti-aliasing for better interactivity.
•Software: Uses the settings to provide the fastest rendering, by letting you choose Display settings. Shaders and
multi-passes are not displayed. Use the Software renderer to preview while you continue to work on the
composition.
Note: Render Multiple Frames Simultaneously multiprocessing is disabled when using C4D layers.
Display This option is only enabled when you choose the Software renderer. The available options are Current Shading,
Wireframe, and Box. The wireframe and box modes provide a simplified representation of the scene.
No Textures/Shader Check this option to speed up your render by not rendering textures and shaders.
No pre-calculation Check this option to speed up your render by disabling pre-calculations for computing motion
dynamics or particle simulations. Do not check this option for final rendering.
Keep Textures in RAM Check this option to cache textures in the RAM so that they are not reloaded from disk and can
be accessed more quickly. On the other hand, if you cache large textures, it may lead to reduction in available RAM.

105
Importing footage
Last updated 6/8/2015
Apply to All Each CINEMA 4D layer has its own Render settings. Click Apply to All to set the current settings to all
other instances of the C4D file in the composition. If you want different layers to have different settings, then don't use
this option. If settings are mismatched when they should be the same, it can slow down the rendering and cause render
mismatches.
Note: The Apply to All option has been removed in the October 2014 release of (Cineware) After Effects CC.
Project Settings
The following project settings are available in the Cineware effect:
•Camera
•Cinema 4D Layers
•Multi-Pass (Linear Workflow)
•Commands
Camera Choose the camera to use for rendering.
•CINEMA 4D Camera: Uses the camera that is defined as the render view camera in CINEMA 4D, or the default
camera if none is defined.
•Select CINEMA 4D camera: Use this option to choose a camera. When this option is enabled, click Set Camera.
•Centered Comp Camera: Use this option to use the After Effects camera, and recalculate the CINEMA 4D co-
ordinates to adapt to the After Effect co-ordinates. When you import an existing C4D file (typically modeled around
0,0,0) to be rendered with a new After Effects camera (which is centered on the comp), use this option to render the
C4D model in the After Effects comp center. Otherwise the model may be unexpectedly shifted due to origin
difference.
•Comp Camera: Use this option to use the active After Effects camera. For this option to work, you must have added
an After Effects camera. For example, use this option for a camera that has been added by extracting it from a
Cinema 4D project (since those cameras reference Cinema 4D's coordinate system with 0,0,0 at the center of the
Cinema 4D viewport). This option is suited for cameras that are added to After Effects by using the Layer > New >
Camera command.
CINEMA 4D Layers Enable and select the CINEMA 4D layers to render.
Set Layers Click to choose layers. Click the Set Layers button to choose one or more layers. In CINEMA 4D, layers let
you organize multiple elements. You can use CINEMA 4D layers to composite between elements in the After Effects
comp.
Apply to All Click Apply to All to set the current layer's camera settings to all other instances of the C4D file in the
composition.
Note: The Apply to All option has been removed in the October 2014 release of (Cineware) After Effects CC.
Multi-Pass (Linear Workflow) Use the CINEMA 4D Multi-Pass option to specify which pass to render. The multi-pass
features are only available when using the Standard renderer.
Multi-Passes give you the ability to quickly make fine adjustments to a C4D scene by compositing different kinds of
passes together in After Effects, such as adjusting just the shadows or reflections in the scene. For the results to match
Cinema 4D's default Linear Workflow project setting, you must work in a project in which colors are blended in linear
light (either in a color-managed linear working space or with Blend Colors Using 1.0 Gamma set in the Project Settings
dialog box).
Set Multi-Pass Click to select which pass to render on this layer. This option is only available if CINEMA 4D Multi-
Pass option is enabled.

106
Importing footage
Last updated 6/8/2015
Defined Multi-Passes When enabled, adds the passes explicitly added in the .c4d file. This can include passes other
than Image Layers.
Add Image Layers Use this option to create multiple pass layers with proper blending modes depending on the setting
of Defined Multi-Passes. When the Defined Multi-Passes option is enabled, Add Image Layers restricts you to just
adding the passes defined in the Cinema 4D render settings rather than adding all supported types.
Note: When adding image layers, the layer that was originally selected will be placed at the bottom of the Timeline stack,
and renamed with RGBA Image appended to the layer name to reflect its multi-pass type.
Commands Use the following commands.
Comp Camera into CINEMA 4D Click Merge to add the current After Effects camera as a C4D camera in the C4D file.
This modifies the C4D file. Use File > Revert to Saved in C4D to see the newly added After Effects camera. This
command is especially useful to transfer camera data created by the 3D Camera Tracker effect. AE is prefixed to the
camera name.
Note: If you merge again, the previous camera is not updated. A new copy is created instead.
CINEMA 4D Scene Data Click Extract to create 3D data such as cameras, lights, solids or nulls for objects that have an
External Compositing tag applied in the Cinema 4D project.
Always enable Save Polygons for Melange option and Save Animation for Melange option in the CINEMA 4D
preferences to avoid problems extracting scene data in After Effects.
Note: Depending on your computer's security settings, you may see some warnings about TCP communication. This is
because After Effects and the background Cinema 4D renderer communicate using TCP which some security software may
interpret as dangerous malware communication. For example , Mac OS may require you to confirm if you want to run this
software "downloaded from the internet". Confirm that you want to run this software.If you are able to import a .c4d file,
but it fails to render, check if your Mac OS gatekeeper or your firewall has blocked the background Cinema 4D renderer
from functioning and communicating with After Effects. For Mac users, set Allow Applications Downloaded From (under
the General tab of Security and Privacy system preferences) to Anywhere.The TCP port used is defined in the Options in
the CINEWARE effect, and this value is stored in the After Effects preferences file.
Updates to Cineware Effect
You can now specify the instance of Cinema 4D that you want to use in the Cineware plug-in.
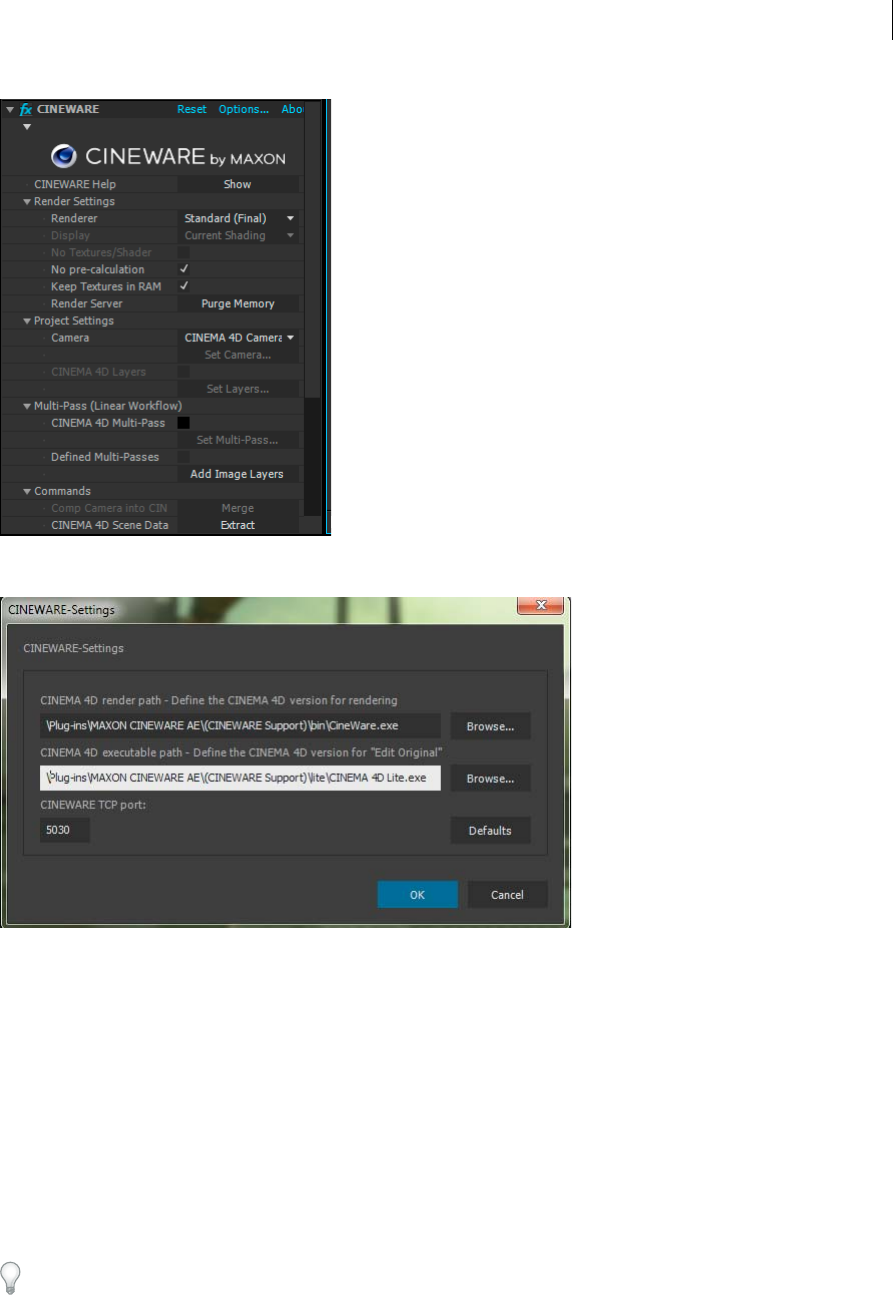
107
Importing footage
Last updated 6/8/2015
Click Cineware Effect > Options and choose from the following settings:
•Cinema 4D Render Path - Choose the version of Cinema 4D (R14, R15, or R16) for rendering in After Effects. For
example, you can choose to use Cinema 4D Studio, Broadcast, Prime, or Visualize if you have it installed.
•Cinema 4D Executable Path - Choose the version of Cinema 4D to use when opening a .c4d file with Edit Original
or when creating a new Cinema 4D file from After Effects. The default Cinema 4D Lite application is located at :
•C:\Program Files\Adobe\Adobe After Effects CC\Support Files\Plug-Ins\MAXON CINEWARE
AE\(CINEWARE Support)\lite\CINEMA 4D Lite.exe (Windows)
•/Applications/Adobe After Effects CC 2014/Plug-ins/MAXON CINEWARE AE/(CINEWARE
Support)/Lite/CINEMA 4D Lite.app (Mac OS).
After using a full retail version of CINEMA 4D as renderer, if you want to switch back to the default Cineware renderer,
click the Defaults button in the Cineware-Settings dialog box.

108
Importing footage
Last updated 6/8/2015
Switch render paths
Follow the steps below to switch render paths (such as changing Cinema 4D rendering application):
1Options > Browse To Set Render Path
2Select the new application
3Exit After Effects
4Launch After Effects
5Click Edit > Purge > All Memory & Disk Cache for the new settings to take effect.
If you experience a connection failure after switching the renderer, exit After Effects, wait for 20-30 seconds, and then
relaunch the application again.
New rendering capabilities
When you choose Cinema 4D R14, R15, or R16 (retail version) as the renderer, you can use new rendering capabilities
within the After Effects Cineware plug-in that is beyond the default renderer, such as Physical renderer and Sketch and
Toon.
To use the Physical renderer, do the following:
1Choose the Physical renderer in the Cinema 4D Render Settings dialog.
1From the Render menu, choose Render > Edit Render Settings.
2In the Render Settings dialog, set the pop-up to Renderer: Physical.
3Click Physical and set other settings such Depth of Field or Motion Blur options.
4Save the .c4d file with the renderer settings.
5The renderer specified in Cinema 4D is the one that will be used by the Cineware effect when the Renderer Settings
option in the effect is set to Standard (Final) and Standard (Draft).
To render Sketch and Toon, do the following:
1From the Create menu in the Cinema 4D application, choose Create > Material > Sketch Material.
1In the Render Settings dialog, set the pop-up to Renderer: Standard.
2In the Render Settings dialog, ensure that Sketch and Toon post effects are added and checked.
3Save the .c4d file with Sketch and Toon enabled.
4Sketch and Toon will be rendered by the Cineware effect when the renderer settings in the effect is set to Standard
(Final).
Note: You can control Sketch and Toon for individual objects in the Object manager by adding Tags > Sketch Tags >
Sketch Style (see the Maxon Cinema 4D Help documentation for more information about Sketch and Toon).
Note: The following versions of Cinema 4D are compatible with this version of Cineware:
•R14.042 or above. Use the Cinema 4D online updater to install the current version.
•R15.037 or above
•R16
Note:

109
Importing footage
Last updated 6/8/2015
Learn tutorial: Insert 3D objects
Importing from After Effects and Adobe Premiere Pro
Import an After Effects project
You can import one After Effects project into another. Everything from the imported project—including footage items,
compositions, and folders—appears inside a new folder in the current Project panel.
You can import an After Effects project from a different operating system, as long as you maintain the filenames, folder
names, and either full or relative paths (folder locations) for all files in the project. To maintain relative paths, the source
footage files must reside on the same volume as the project file. Use the File > Collect Files command to gather copies
of all files in a project or composition into a single location. (See Cross-platform project considerations.)
1Choose File > Import > File.
2Select the After Effects project to import, and click Open.
If the operating system that you are using does not support a file format, if the file is missing, or if the reference link is
broken, After Effects substitutes a placeholder item containing color bars. You can reconnect the placeholder to the
appropriate file by double-clicking the entry in the Project panel and navigating to the source file. In most cases, you
need to relink only one footage file. After Effects locates other missing items if they’re in the same location.
Note: When you render a movie and export it to the QuickTime (MOV), Video for Windows (AVI) format, you can embed
a link to the project in the container file. To import the project, import the MOV, AVI, FLV, or F4V file, and choose Project
from the Import As menu in the Import File dialog box. If the file contains a link to a project that has been moved, you can
browse to locate the project..
Learn how to create photorealistic visual content by inserting 3D objects directly into After Effects compositions
using the Live 3D Pipeline with the included Maxon Cinema 4D Lite.

110
Importing footage
Last updated 6/8/2015
Import an Adobe Premiere Pro project
Note: Importing an Adobe Premiere Pro project into After Effects does not use Dynamic Link. After Effects can’t import a
Premiere Pro project if one or more sequences in it are already dynamically linked to After Effects. (See Working with Adobe
Premiere Pro and After Effects.)
When you import an Adobe Premiere Pro project, After Effects imports it into the Project panel as both a new
composition containing each Adobe Premiere Pro clip as a layer, and as a folder containing each clip as an individual
footage item. If your Adobe Premiere Pro project contains bins, After Effects converts them to folders within the Adobe
Premiere Pro project folder. After Effects converts nested sequences to nested compositions.
Not all features of an Adobe Premiere Pro project are preserved when the project is imported into After Effects. The
same features are preserved when you import a Premiere Pro project into After Effects as when you copy and paste
between Premiere Pro and After Effects. (See Importing from After Effects and Adobe Premiere Pro .)
After Effects preserves the order of clips in the timeline, the footage duration (including all trimmed In and Out points),
and marker and transition locations. After Effects bases the arrangement of layers in the Timeline panel on the
arrangement of clips in the Adobe Premiere Pro Timeline panel. After Effects adds Adobe Premiere Pro clips to the
Timeline panel as layers in the order in which they appeared—from the bottom up and from left to right—in the Adobe
Premiere Pro Timeline panel. After Effects preserves changes made to the speed of a clip, for example, with the Clip >
Speed command, and these changes appear as a value in the Stretch column in the After Effects Timeline panel.
After Effects imports effects common to Adobe Premiere Pro and After Effects, and preserves keyframes for these
effects.
Transitions and titles (except for dissolves) included in your Adobe Premiere Pro project appear in the After Effects
composition as solid layers with their original location and duration.
Audio Level keyframes are preserved.
1Choose File > Import > File or File > Import > Adobe Premiere Pro Project.
If you choose Import > Adobe Premiere Pro Project, then only Adobe Premiere Pro projects are shown.
2Select a project, and click OK.
3Do any of the following:
•To import only one sequence, choose a sequence from the menu.
•To import audio, select Import Audio.
To add a single item from a track in an Adobe Premiere Pro project, copy the item in Adobe Premiere Pro, and choose
Edit> Paste in After Effects.
Copy between After Effects and Adobe Premiere Pro
•From the After Effects Timeline panel, you can copy layers based on audio or video footage items (including solids)
and paste them into the Adobe Premiere Pro Timeline panel.
•From the Adobe Premiere Pro Timeline panel, you can copy assets (any items in a track) and paste them into the
After Effects Timeline panel.
•From either After Effects or Adobe Premiere Pro, you can copy and paste footage items to the other’s Project panel.
Note: You can’t, however, paste footage items from the After Effects Project panel into the Adobe Premiere Pro Timeline
panel.
If you want to work with all clips or a single sequence from an Adobe Premiere Pro project, use the Import command
instead to import the project into After Effects.

111
Importing footage
Last updated 6/8/2015
Use Adobe Dynamic Link to create dynamic links, without rendering, between new or existing compositions in After
Effects and Adobe Premiere Pro. (See About Dynamic Link)
Copy from After Effects to Adobe Premiere Pro
You can copy a layer based on a footage item from an After Effects composition and paste it into an Adobe Premiere
Pro sequence. Adobe Premiere Pro converts these layers to clips in the sequence and copies the source footage item to
its Project panel. If the layer contains an effect that is also used by Adobe Premiere Pro, Adobe Premiere Pro converts
the effect and all of its settings and keyframes.
You can also copy nested compositions, Photoshop layers, solid-color layers, and audio layers. Adobe Premiere Pro
converts nested compositions to nested sequences, and solid-color layers to color mattes. You cannot copy shape, text,
camera, light, or adjustment layers to Adobe Premiere Pro.
1Start Adobe Premiere Pro (you must start Adobe Premiere Pro before you copy the layer in After Effects).
2Select a layer (or layers) from the After Effects Timeline panel.
Note: If you select multiple layers and the layers don’t overlap in After Effects, they’re placed on the same track in Adobe
Premiere Pro. On the other hand, if the layers overlap in After Effects, the order in which you select them determines
the order of their track placement in Adobe Premiere Pro. Each layer is placed on a separate track, and the last selected
layer appears on Track 1. For example, if you select layers from top to bottom, the layers appear in the reverse order in
Adobe Premiere Pro, with the bottom-most layer on Track 1.
3Choose Edit > Copy.
4In Adobe Premiere Pro, open a sequence in the Timeline panel.
5Move the current-time indicator to the desired location, and choose either Edit > Paste or Edit > Paste Insert.
Results of pasting into Adobe Premiere Pro
When you paste a layer into an Adobe Premiere Pro sequence, keyframes, effects, and other properties in the copied
layer are converted as follows:
After Effects item Converted to in Adobe Premiere Pro Notes
Audio volume property Channel Volume filter
Blending modes Blending modes supported by Adobe
Premiere Pro are converted
Effect properties and keyframes Effect properties and keyframes, if the effect
also exists in Adobe Premiere Pro
Adobe Premiere Pro lists unsupported effects
as offline in the Effect Controls panel. Some
After Effects effects have the same names as
those in Adobe Premiere Pro, but since they’re
actually different effects, they aren’t
converted.
Expressions Not converted
Layer markers Clip markers
Masks and mattes Not converted
Stereo Mixer effect Channel Volume filter
Time Remap property Time Remapping effect

112
Importing footage
Last updated 6/8/2015
Copy from Adobe Premiere Pro to After Effects
You can copy a video or audio asset from an Adobe Premiere Pro sequence and paste it into an After Effects
composition. After Effects converts assets to layers and copies the source footage items into its Project panel. If the asset
contains an effect that is also used by After Effects, After Effects converts the effect and all of its settings and keyframes.
You can copy color mattes, stills, nested sequences, and offline files, too. After Effects converts color mattes into solid-
color layers and converts nested sequences into nested compositions. When you copy a Photoshop still image into After
Effects, After Effects retains the Photoshop layer information. You cannot paste Adobe Premiere Pro titles into After
Effects, but you can paste text with attributes from the Adobe Premiere Titler into After Effects.
1Select an asset from the Adobe Premiere Pro Timeline panel.
2Choose Edit > Copy.
3In After Effects, open a composition in the Timeline panel.
4With the Timeline panel active, choose Edit > Paste. The asset appears as the topmost layer in the Timeline panel.
Note: To paste the asset at the current-time indicator, place the current-time indicator and press Ctrl+Alt+V (Windows)
or Command+Option+V (Mac OS).
Results of pasting into After Effects
When you paste an asset into an After Effects composition, keyframes, effects, and other properties in a copied asset
are converted as follows:
Time Stretch property Speed property Speed and time stretch have an inverse
relationship. For example, 200% stretch in
After Effects converts to 50% speed in Adobe
Premiere Pro.
Transform property values and keyframes Motion or Opacity values and keyframes The keyframe type—Bezier, Auto Bezier,
Continuous Bezier, or Hold—is retained.
Source settings for R3D source files Source settings for R3D source files
Adobe Premiere Pro asset Converted to in After Effects Notes
Audio track Audio layers Audio tracks that are either 5.1 surround or
greater than 16-bit aren’t supported. Mono
and stereo audio tracks are imported as one or
two layers.
Bars and tone Not converted
Blending modes Converted
Clip marker Layer marker
Color mattes Solid-color layers
Crop filter Mask layer
Frame Hold Time Remap property
Motion or Opacity values and keyframes Transform property values and keyframes Keyframe type—Bezier, Auto Bezier,
Continuous Bezier, or Hold—is retained.
Sequence marker Markers on a new solid-color layer To copy sequence markers, you must either
copy the sequence itself or import the entire
Adobe Premiere Pro project as a composition.
After Effects item Converted to in Adobe Premiere Pro Notes

113
Importing footage
Last updated 6/8/2015
Note: When you import a Premiere Pro project into After Effects, features are converted in the same manner as they are
converted when copying from Premiere Pro to After Effects.
More Help topics
Collect files in one location
Placeholders and proxies
About precomposing and nesting
Preparing and importing still images
Preparing still-image files for importing
You can import individual still images into After Effects or import a series of still images as a sequence. For information
about the still-image formats that After Effects imports, see Supported import formats.
After Effects works internally in an RGB color space, but it can import and convert CMYK images. However, when
possible, you should work in an RGB color space in applications such as Illustrator and Photoshop when creating
images for video, film, and other non-print media. Working in RGB provides a larger gamut and more accurately
reflects your final output.
Before you import a still image into After Effects, prepare it as completely as possible to reduce rendering time. It is
usually easier and faster to prepare a still image in its original application than to modify it in After Effects. Consider
doing the following to an image before importing it into After Effects:
•Make sure that the file format is supported by the operating system you plan to use.
•Crop the parts of the image that you do not want to be visible in After Effects.
Speed property Time Stretch property Speed and time stretch have an inverse
relationship. For example, 50% speed in
Adobe Premiere Pro is converted to 200%
stretch in After Effects.
Time Remapping effect Time Remap property
Titles Not converted
Universal counting leaders Not converted
Video and audio transitions Opacity keyframes (Cross dissolve only) or
solid-color layers
Video effect properties and keyframes Effect properties and keyframes, if the effect
also exists in After Effects
After Effects doesn’t display unsupported
effects in the Effect Controls panel.
Volume and Channel Volume audio filters Stereo mixer effect Other audio filters are not converted.
Source settings for R3D source files Source settings for R3D source files
Adobe Premiere Pro asset Converted to in After Effects Notes

114
Importing footage
Last updated 6/8/2015
Note: Illustrator files can have fractional dimensions (for example, 216.5x275.5 pixels). When importing these files, After
Effects compensates for the fractional dimensions by rounding up to the next whole number of pixels (for example, 217x278
pixels). This rounding results in a black line at the right (width) or bottom (height) edge of the imported image. When
cropping in Illustrator, make sure that the dimensions of the cropped area are whole numbers of pixels.
•If you want to designate areas as transparent, create an alpha channel or use the transparency tools in applications
such as Photoshop or Illustrator.
•If final output will be broadcast video, avoid using thin horizontal lines (such as 1-pixel lines) for images or text
because they may flicker as a result of interlacing. If you must use thin lines, add a slight blur so that the image or
text appears in both video fields instead of flickering between them. (See Interlaced video and separating fieldsand
Best practices for creating text and vector graphics for video.)
•If final output will be broadcast video, make sure that important parts of the image fall within the action-safe and
title-safe zones. When you create a document in Illustrator or Photoshop using a preset for film and video, the safe
zones are shown as guide lines. (See Safe zones, grids, guides, and rulers.)
•If the final output will be broadcast video, keep colors within the broadcast-safe ranges. (See Broadcast-safe colors.)
•Save the file using the correct naming convention. For example, if you plan to import the file into After Effects on
Windows, use a three-character filename extension.
•Set the pixel dimensions to the resolution and frame aspect ratio that you will use in After Effects. If you plan to
scale the image over time, set image dimensions that provide enough detail at the largest size the image has in the
project. After Effects supports a maximum image size of 30,000x30,000 pixels for importing and rendering files. The
size of image that you can import or export is influenced by the amount of physical RAM available to After Effects.
The maximum composition dimensions are also 30,000x30,000 pixels.
Note: The image size or pixel dimensions setting in Photoshop (or other image-editing application) is relevant for the
preparation of image data for import into After Effects—not dpi (dots per inch) or ppi (pixels per inch) settings. The image
size determines how many pixels wide and tall an image is, whether those pixels are the tiny ones on a mobile device or the
big ones on a motion billboard. The dpi or ppi settings are relevant to printing an image and to the scale of copied and
pasted paths.
Import a single still image or a still-image sequence
You can import still image files as individual footage items, or you can import a series of still image files as a still-image
sequence, which is a single footage item in which each still image is used as a single frame.
To import multiple image files as a single still-image sequence, the files must be in the same folder and use the same
numeric or alphabetic filename pattern (such as Seq1, Seq2, Seq3).
When you import a file that appears to After Effects to be one file in a still-image sequence, After Effects by default
imports all other files in the same folder that appear to be in the same sequence. Similarly, when you select multiple
files that appear to be in a sequence, After Effects by default imports them as a sequence. You can see what After Effects
is about to import by looking at the bottom of the Import dialog box. You can also import images and sequences by
dragging files and folders into the Project panel.
To prevent After Effects from importing unwanted files when you want to import only a single file, or to prevent After
Effects from interpreting multiple files as a sequence, deselect the Sequence option in the Import dialog box. After Effects
remembers this setting and thereafter uses it as the default.
You can import multiple sequences from the same folder simultaneously by selecting files from different sequences and
selecting Multiple Sequences at the bottom of the Import dialog box.
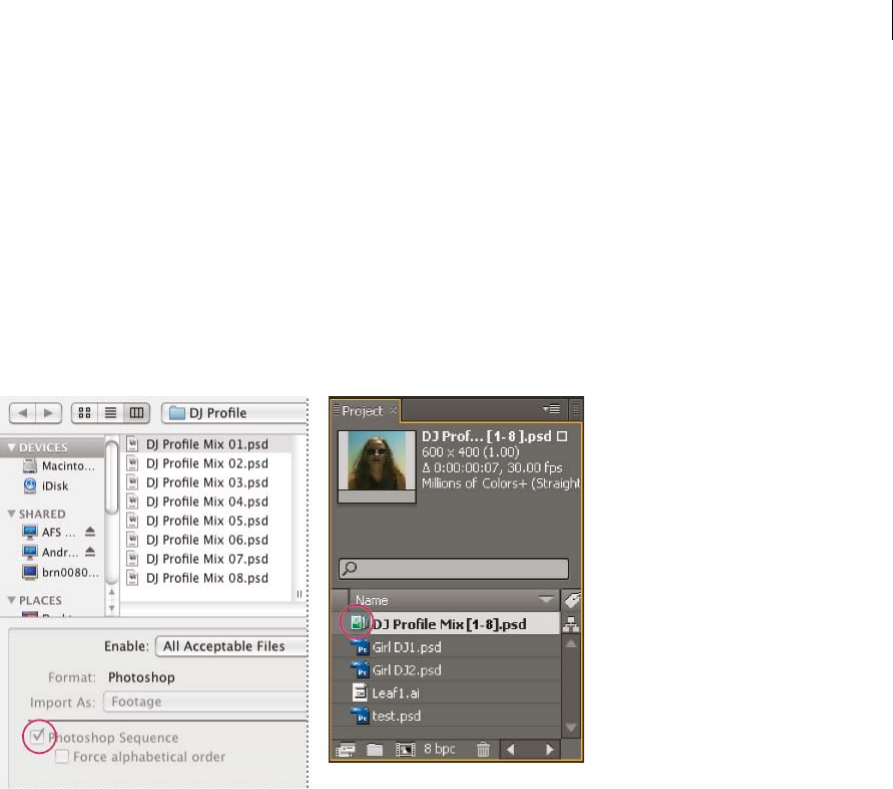
115
Importing footage
Last updated 6/8/2015
When importing a sequence of still images, you can use the Force Alphabetical Order option in the Import dialog box
to import a sequence with gaps in its numbering (for example, Seq1, Seq2, Seq3, Seq5). If you import a sequence with
gaps in its numbering without selecting this option, After Effects warns you of missing frames and replaces them with
placeholders.
After Effects uses settings of the first image in the sequence to determine how to interpret the images in the sequence.
If the image files in a sequence are of a layered file type—such as Adobe Photoshop or Adobe Illustrator documents—
then you can choose to import the sequence as a standard footage item, or as a composition in which each layer in each
file is imported as a separate sequence and appears as a separate layer in the Timeline panel.
Note: When you render a composition that contains a numbered sequence, the output module uses the start frame number
as the first frame number. For example, if you start to render on frame 25, the name of the file is 00025.
Import a still-image sequence as a single footage item
1Choose File > Import > File.
2Select any file in the sequence. To import a subset of files in a sequence, select the first file, hold down Shift, and then
select the last file to import.
3Choose Footage from the Import As menu.
4Click Open (Windows) or Import (Mac OS).
5In the [filename] dialog box, choose one of the following from the Choose Layer menu:
Merged Layers Imports the sequence as a sequence footage item in which the layers in the file, if any, are merged
into one layer.
Choose Layer Imports the sequence as a sequence footage item in which the same layer from each source file—for
example, layer 3—is imported and used in the sequence. If you choose this option for a PSD sequence, then you can
also choose whether to ignore layer styles or merge them into the layer. You must also choose a Footage Dimensions
option: Layer Size matches the dimensions of the layer to the content of the layer; Document Size matches the
dimensions of the layer to the size of the original document.
6Click OK.
If at any time you decide that you want access to the individual components of the footage item, you can convert it to
a composition. See Convert a merged footage item into a composition.

116
Importing footage
Last updated 6/8/2015
Import a still-image sequence as a composition
When you import a Photoshop or Illustrator file as a composition, you have access to the individual layers, blending
modes, adjustment layers, layer styles, masks, guides, and other features created in Photoshop or Illustrator. The
imported composition and a folder containing each of its layers as footage items appears in the Project panel.
1Choose File > Import > File.
2Select any file in the sequence. To import a subset of files in a sequence, select the first file, hold down Shift, and then
select the last file to import.
3Choose one of the following from the Import As menu:
Composition - Retain Layer Sizes Import the layers, each with its original dimensions.
One reason to import as a composition with layers at their original dimensions (rather than importing each layer at
the composition frame size) is so that each layer has its anchor point set at the center of the cropped graphics object,
rather than at the center of the composition frame. This more often makes transformations work more as you’d
expect and prefer when animating individual layers of an imported graphic item. For example, if you have a car with
a separate layer for each wheel, importing as a composition with layers at their original sizes puts the anchor point
of each wheel in the center of the wheel, which makes rotating the wheels work as you’d expect.
Composition Import layers and have the dimensions of each match the dimensions of the composition frame.
4Click Open (Windows) or Import (Mac OS).
Convert a merged footage item into a composition
When you import a layered file, such as a Photoshop or Illustrator file, as footage, all of its layers are merged together.
If at any time you decide that you want access to the individual components of the footage item, you can convert it to
a composition.
•To convert all instances of a footage item, select it in the Project panel and choose File > Replace Footage > With
Layered Comp.
•To convert only one instance of the footage item, select the layer in the Timeline panel, and choose Layer > Convert
To Layered Comp.
Note: It may take a few moments to convert a merged footage item to a layered composition.
Change the frame rate of a sequence
When you import a sequence of still images, it assumes the frame rate specified by the Sequence Footage preference in
the Import category. The default rate is 30 frames per second (fps). You can change the frame rate after importing by
reinterpreting the footage item:
❖Select the sequence in the Project panel, choose File > Interpret Footage > Main, and then enter a new value for
Assume This Frame Rate.
For more information, see Frame rate.
Preparing and importing Photoshop files
Note: For information and instructions that apply to all kinds of still image files, see Preparing still-image files for
importingand Import a single still image or a still-image sequence.
Because After Effects includes the Photoshop rendering engine, After Effects imports all attributes of Photoshop files,
including position, blending modes, opacity, visibility, transparency (alpha channel), layer masks, layer groups
(imported as nested compositions), adjustment layers, layer styles, layer clipping paths, vector masks, image guides, and
clipping groups.

117
Importing footage
Last updated 6/8/2015
Before you import a layered Photoshop file into After Effects, prepare it thoroughly to reduce preview and rendering
time. Avoid problems importing and updating Photoshop layers by doing the following:
•Organize and name layers. If you change a layer name in a Photoshop file after you have imported it into After
Effects, After Effects retains the link to the original layer. However, if you delete a layer, After Effects is unable to
find the original layer and lists it as Missing in the Project panel.
•Make sure that each layer has a unique name. This is not a requirement of the software, but helps to keep you from
becoming confused.
•If you think that you might add layers to the Photoshop file in Photoshop after you have imported it into After
Effects, go ahead and add a small number of placeholder layers before you import the file into After Effects. When
you refresh the file in After Effects, it will not pick up any layers that have been added since the file was imported.
•Unlock layers in Photoshop before importing into After Effects. This is not necessary for most kinds of layers, but
it is required for some kinds of layers. For example, background layers that must be converted to RGB may not be
imported correctly if they are locked.
A convenient command within After Effects is Layer > New > Adobe Photoshop File, which adds a layer to a
composition and then opens the source of that layer in Photoshop for you to begin creating a visual element, such as a
background layer for your movie. The layer in Photoshop is created with the correct settings for your After Effects
composition. As with many of the Creative Suite applications, you can use the Edit Original command in After Effects
to open a PSD file in Photoshop, make and save changes, and have those changes appear immediately in the movie that
refers to the PSD source file. Even if you don’t use Edit Original, you can use the Reload Footage command to have After
Effects refresh its layers to use the current version of the PSD file. (See Create a layer and new Photoshop footage
itemand Edit footage in its original application.)
Note: One good way to prevent interlace flicker from thin horizontal lines in still images is to run the Interlace Flicker
Removal action in Photoshop before you bring the still images into After Effects. Photoshop includes several video actions
for utility purposes such as this.
Online resources about preparing and importing Photoshop files
Richard Harrington and Ian Robinson provide a free sample chapter from their “Motion Graphics with Adobe Creative
Suite 5 Studio Techniques” book on the Peachpit Press website. This chapter shows how to prepare Illustrator and
Photoshop files.
See this video tutorial by Andrew Devis on the Creative Cow website about importing and using Photoshop PSD files
in After Effects.
Color modes
Layered Photoshop (PSD) files need to be saved in RGB or Grayscale color mode for After Effects to import them as a
composition and to separate the layers. CMYK, LAB, Duotone, Monotone, and Tritone color modes are not supported
for layered files; After Effects will import a file that uses one of these color modes as a single, flattened image.
(Regarding the other color modes available in Photoshop such as Bitmap and Indexed: Photoshop does not support
layers in these color modes.)
To determine or change the color mode of a document in Photoshop, choose Image > Mode. (The color mode is also
displayed in the title bar of the document window.)
Masks and alpha channels
Adobe Photoshop supports a transparent area and one optional layer mask (alpha channel) for each layer in a file. You
can use these layer masks to specify how different areas within a layer are hidden or revealed. If you import one layer,
After Effects combines the layer mask (if present) with the transparent area and imports the layer mask as a straight
alpha channel.

118
Importing footage
Last updated 6/8/2015
If you import a layered Photoshop file as a merged file, After Effects merges the transparent areas and layer masks of
all the layers into one alpha channel that is premultiplied with white.
When you import a Photoshop file as a composition, vector masks are converted to After Effects masks. You can then
modify and animate these masks within After Effects.
Photoshop clipping groups, layer groups, and Smart Objects
If the layered Photoshop file contains clipping groups, After Effects imports each clipping group as a precomposition
nested within the main composition. After Effects automatically applies the Preserve Underlying Transparency option
to each layer in the clipping-group composition, maintaining transparency settings. These nested precompositions
have the same dimensions as the main composition.
Paul Tuersley provides a script on the AE Enhancers forum that crops the precompositions to the size of their contents,
while retaining their correct position in the main composition.
Photoshop layer groups are imported as individual compositions.
It is often valuable to group layers into Smart Objects in Photoshop so that you can import meaningful collections of
Photoshop layers as individual layers in After Effects. For example, if you used 20 layers to create your foreground
object and 30 layers to create your background object in Photoshop, you probably don’t need to import all of those
individual layers into After Effects if all that you want to do is animate your foreground object flying in front of your
background object; consider grouping them into a single foreground Smart Object and a single background Smart
Object before importing the PSD file into After Effects.
Photoshop layer styles and blending modes
After Effects also supports blending modes and layer styles applied to the file. When you import a Photoshop file with
layer styles, you can choose the Editable Layer Styles option or the Merge Layer Styles Into Footage option:
Editable Layer Styles Matches appearance in Photoshop and preserves supported layer style properties as editable.
Note: A layer with a layer style interferes with intersection of 3D layers and the casting of shadows.
Merge Layer Styles Into Footage Layer styles are merged into the layer for faster rendering, but the appearance may not
match the appearance of the image in Photoshop. This option doesn’t interfere with intersection of 3D layers or casting
of shadows.
Photoshop video layers
Photoshop files can contain video and animation layers. After Effects can import these files like any other Photoshop
files, either as a footage item with all layers merged together or as a composition with each Photoshop layer separate
and editable in After Effects. (Working with Photoshop video layers requires QuickTime 7.1 or later.)
Note: After Effects can’t import a Photoshop video layer that uses an image sequence as its source.
In After Effects CS6 and later, video layer support in Photoshop .psd documents has been removed. The layers will still
have a duration, but won't play. Animating layers with available properties in the Photoshop animation timeline (like
Position and Opacity) are supported.
3D object layers in PSD files
Adobe Photoshop Extended can import and manipulate 3D models (3D objects) in several popular formats. Photoshop
can also create 3D objects in basic, primitive shapes. See 3D object layers from Photoshop .
Scaling and resizing
Though it's not very well suited for movies, the content-aware scaling feature in Photoshop is very useful for extending
and scaling still images. This feature can be useful when repurposing images for wide-screen formats that were created
for standard-definition formats.

119
Importing footage
Last updated 6/8/2015
Preparing and importing Illustrator files
Note: For information and instructions that apply to all kinds of still image files, see Preparing still-image files for
importingand Import a single still image or a still-image sequence.
Before you save an Illustrator file for importing into After Effects, consider doing the following:
•Create your document in Illustrator using one of the Video And Film document profiles. In addition to creating a
document at the appropriate size for video or film work, this creates a document with two artboards: one at the
appropriate frame size, and one much larger. When you bring such a document into After Effects, the area outside
the smaller artboard isn’t cropped and lost; it’s retained outside of the composition frame. This only works for an
Illustrator document with multiple layers imported as a composition.
•To ensure that Illustrator files appear correctly in After Effects, select Create PDF Compatible File in the Illustrator
Options dialog box.
•To copy paths between Illustrator and After Effects, make sure that the Preserve Paths option is selected in the Files
& Clipboard section of the Illustrator Preferences dialog box.
•To ensure that files rasterize most faithfully in After Effects, save your file in AI format instead of Illustrator 8.x or
9.x EPS format.
•To separate objects in an Illustrator file into separate layers, use the Release To Layers command in Illustrator. Then,
you can import the layered file into After Effects and animate the layers separately.
•If you are working with Edit Original to move objects and layers in Illustrator, import the Illustrator document into
After Effects as a composition with document-sized layers (not using the Retain Layer Size option).
When you import an Illustrator file, After Effects makes all empty areas transparent by converting them into an alpha
channel.
Note: When you’ve imported an Illustrator file, you can specify whether anti-aliasing is to be performed at higher quality
or at higher speed. Select the footage item in the Project panel and choose File > Interpret Footage > Main, and click the
More Options button at the bottom of the dialog box.
After Effects does not read embedded color profiles from Illustrator files. To ensure color fidelity, assign an input color
profile to the Illustrator footage item that matches the color profile with which the Illustrator file was created.
After Effects can’t read blending modes from AI documents saved as a version later than Illustrator CS2. If you need to
retain blending mode information when importing a file into After Effects from Illustrator, save the document as an
Illustrator CS2 document.
For information on preserving sharpness of vector graphics (avoiding pixelation), see Continuously rasterize a layer
containing vector graphics.
Online resources for preparing and importing Illustrator files
Eran Stern provides a video tutorial on the Creative COW website that shows how to create text in Illustrator for use in
After Effects.
Dave Nagel provides instructions on the DMN website for importing an Illustrator document into After Effects with
the Illustrator objects on separate layers in After Effects.
In a thread on the After Effects user-to-user forum, JETalmage provides a script that converts sub-layers in Illustrator
into top-level layers. This is a necessary step in preparing an Illustrator file for importing into After Effects if you intend
to animate these items independently.
Steve Holmes provides a tutorial on the Layers Magazine website that shows how to create and prepare vines, swirls,
and flourishes in Illustrator and then import, reveal, and animate them in After Effects using the Stroke effect.

120
Importing footage
Last updated 6/8/2015
Richard Harrington and Ian Robinson provide a free sample chapter from their “Motion Graphics with Adobe Creative
Suite 5 Studio Techniques” book on the Peachpit Press website. This chapter shows how to prepare Illustrator and
Photoshop files.
Importing camera raw files with Camera Raw
You can import sequences of camera raw files much as you import sequences of other kinds of still image files.
After Effects applies the settings for the first camera raw image in the sequence to all of the images in the sequence that
do not have their own XMP sidecar files. After Effects does not check the Camera Raw database for image settings.
Note: Camera raw files are uncompressed. Their large size may increase rendering time.
•Choose File > Import > File.
•Select the camera raw file, and click Open.
•Make any necessary adjustments in the Camera Raw dialog box, and click OK.
You can adjust a camera raw image after importing it. To open the image in the Camera Raw dialog box, select the
footage item in the Project panel, choose File > Interpret Footage > Main, and click More Options.
Note: You can’t assign an input color profile to a camera raw image for use in a color-managed project. For information on
how colors are automatically interpreted, see Interpret a footage item by assigning an input color profile.
Todd Kopriva provides links to free excerpts from books about Camera Raw by Conrad Chavez, Bruce Fraser, Jeff
Schewe, Ben Willmore, and Dan Ablan on his blog.
Cineon and DPX footage items
A common part of the motion-picture film production workflow is scanning the film and encoding the frames into the
Cineon or DPX file format. The DPX (Digital Picture Exchange) format is a standard format closely related to the
Cineon format.
You can import Cineon 4.5 or Digital Picture Exchange (DPX) files directly into an After Effects project as individual
frames or as a sequence of numbered stills. Once you have imported a Cineon or DPX file, you can use it in a
composition and then render the composition as an image sequence.
To preserve the full dynamic range of motion-picture film, Cineon files are stored using logarithmic 10-bpc color.
However, After Effects internally uses 8-bpc, 16-bpc, or 32-bpc color, depending on the color bit depth of the project.
Work with Cineon files in a 16- or 32-bpc project—by default, After Effects stretches the logarithmic values to the full
range of values available.
Cineon data has a 10-bit white point of 685 and a 10-bit black point of 95. Values above 685 are retained, but are treated
as highlights. Rather than abruptly clipping highlights to white, After Effects interprets highlights using a gradual ramp
defined by the Highlight Rolloff value. You can modify the 10-bit white point and 10-bit black point input levels and
the output (converted) white point and black point levels to match your specific footage items or creative needs.
Use a project color depth of 32 bpc when working with Cineon footage items so that highlights are preserved, in which
case you don’t need to roll off the highlights.
When you choose DPX/Cineon Sequence from the Format menu in the Output Module Settings dialog box, you can
then open the Cineon Settings dialog box to set output options. Choose whether to output DPX (.dpx) files or
FIDO/Cineon 4.5 (.cin) files in the File Format section of the Cineon Settings dialog box.

121
Importing footage
Last updated 6/8/2015
After Effects provides three basic ways of working with the colors in Cineon footage items:
•The easiest—and recommended—way is to enable color management and assign an input color profile to a Cineon
footage item in the Color Management tab of the Interpret Footage dialog box, corresponding to the film stock on
which the footage was recorded. If creating output for film, use the same profile as the output color profile so that
the output file matches the film stock. One advantage of using color management features to work with Cineon
footage items is that compositing with images from other footage types is made easier. See Interpret a footage item
by assigning an input color profile.
•If you need the settings for the interpretation of the Cineon footage item to change over time, then you can apply
the Cineon Converter effect to a layer that uses the Cineon footage item as its source. See Cineon Converter effect.
•If you need to manually modify the settings for a Cineon footage item, or if you don’t want to use color management,
then you can use the Cineon Settings dialog box. To open this dialog box, click the Cineon Settings button in the
Color Management tab of the Interpret Footage dialog box.
Manual settings in the Cineon Settings dialog box:
Converted Black Point Specifies the black point used for the layer in After Effects.
Converted White Point Specifies the white point used for the layer in After Effects.
10 Bit Black Point Specifies the black level (minimum density) for converting a 10-bit Cineon layer.
10 Bit White Point Specifies the white level (maximum density) for converting a 10-bit Cineon layer.
Current Gamma Specifies the target gamma value.
Highlight Rolloff Specifies the rolloff value used to correct bright highlights. To get over range values when working in
32 bpc, set the value to 0.
Logarithmic Conversion Converts the Cineon sequence from log color space to the target gamma specified by the
Current Gamma setting. When you’re ready to produce output from the Cineon file, it is important that you reverse the
conversion. (To convert from logarithmic to linear, set Current Gamma to 1.)
Units Specifies the units After Effects uses to display dialog values.
More Help topics
Memory and storage
Copy a path from Illustrator, Photoshop, or Fireworks
Output modules and output module settings
Import footage items
Layer styles
Working with Photoshop and After Effects
Interpret a footage item by assigning an input color profile
Copy a path from Illustrator, Photoshop, or Fireworks
Importing camera raw files with Camera Raw
Color management

122
Last updated 6/8/2015
Chapter 5: Layers and properties
Creating layers
Layers overview
Layers are the elements that make up a composition. Without layers, a composition is only an empty frame. Use as many
layers as necessary to create your composition. Some compositions contain thousands of layers, whereas some
compositions contain only one layer.
Layers in After Effects are similar to tracks in Adobe Premiere Pro. The primary difference is that each After Effects
layer can have no more than one footage item as its source, whereas a Premiere Pro track typically contains multiple
clips. Layers in After Effects are also similar to layers in Photoshop, though the interface for working with layers differs.
Working with layers in the Timeline panel in After Effects is similar to working with layers in the Layers panel in
Photoshop.
You can create several kinds of layers:
•Video and audio layers that are based on footage items that you import, such as still images, movies, and audio tracks
•Layers that you create within After Effects to perform special functions, such as cameras, lights, adjustment layers,
and null objects
•Solid-color layers that are based on solid-color footage items that you create within After Effects
•Synthetic layers that hold visual elements that you create within After Effects, such as shape layers and text layers
•Precomposition layers, which use compositions as their source footage items
When you modify a layer, you do not affect its source footage item. You can use the same footage item as the source for
more than one layer and use the footage differently in each instance. (See Importing and interpreting footage items.)
Changes made to one layer do not affect other layers, unless you specifically link the layers. For example, you can move,
rotate, and draw masks for one layer without disturbing any other layers in the composition.
After Effects automatically numbers all layers in a composition. By default, these numbers are visible in the Timeline
panel next to the layer name. The number corresponds to the position of that layer in the stacking order. When the
stacking order changes, After Effects changes all numbers accordingly. The layer stacking order affects rendering order
and therefore affects how the composition is rendered for previews and final output. (See Render order and collapsing
transformations.)
New layers for most commands are created immediately above an existing selected layer. If no layer is selected, the
new layer is created at the top of the stack. This behavior applies to the following layers:
•Layer > New > Text
•Layer > New > Solid
•Layer > New > Light
•Layer > New > Camera

123
Layers and properties
Last updated 6/8/2015
•Layer > New > Null Object
•Layer > New > Shape Layer
•Layer > New > Adjustment Layer
•Layer > New > Adobe Photoshop File
•Layer > New > MAXON CINEMA 4D File
It is possible to match the duration of the new layer to the duration of the selected layer.
Earlier versions of After Effects created new layers at the top of the stack by default.
Layers in the Layer, Composition, and Timeline panels
After you add a layer to a composition, you can reposition the layer in the Composition panel. In the Timeline panel,
you can change a layer’s duration, starting time, and place in the layer stacking order. You can also change any of the
properties of a layer in the Timeline panel. (See Layer properties in the Timeline panel.)
You can perform many tasks—such as drawing masks—in either the Composition panel or the Layer panel. However,
other tasks—such as tracking motion and using the paint tools—must be performed in the Layer panel.
The Layer panel shows you a layer before any transforms are applied to the layer. For example, the Layer panel does not
show the result of modifying the Scale property of a layer. To see a layer in context with other layers and with the results
of transforms, use the Composition panel.
Layers that are not based on a source footage item are synthetic layers. Synthetic layers include text layers and shape
layers. You cannot open a synthetic layer in the Layer panel. You can, however, precompose a synthetic layer and open
the precomposition in the Layer panel.
To view changes to a layer (such as masks or effects) in the Layer panel, select Render in the Layer panel. Deselect
Render to view the original, unaltered layer.
Opening layers and layer sources
•To open a layer other than a precomposition layer in the Layer panel, double-click the layer, or select the layer and
choose Layer > Open Layer.
•To open the source composition of a precomposition layer in the Composition panel, double-click the layer, or select
the layer and choose Layer > Open Composition.
•To open the source footage item of a layer, Alt-double-click (Windows) or Option-double-click (Mac OS) the layer,
or select the layer and choose Layer > Open Layer Source.
If you right-click (Windows) or Control-click (Mac OS) a layer, you can choose Open Footage or Open Composition to
open the layer’s source item.
•To open a precomposition layer in the Layer panel, Alt-double-click (Windows) or Option-double-click (Mac OS)
the layer, or select the layer and choose Layer > Open Layer.
Create layers from footage items or change layer source
You can create a layer from any footage item in the Project panel, including another composition. After you add a
footage item to a composition, you can modify and animate the resulting layer.
When you add a composition to another composition, you create a layer that uses the composition that you added as
its source. (See Precomposing, nesting, and pre-rendering.)
124
Layers and properties
Last updated 6/8/2015
The Still Footage preference setting (Preferences > Import) controls the default duration of layers that use still footage
items as their sources. By default, when you create a layer with a still image as its source, the duration of the layer is the
duration of the composition. You can change the duration of the layer after it’s created by trimming the layer.
Note: By default, new layers begin at the beginning of the composition duration. You can instead choose to have new layers
begin at the current time by deselecting the Create Layers At Composition Start Time preference (Edit > Preferences >
General (Windows) or After Effects > Preferences > General (Mac OS)).
Often, the next step after adding a layer to a composition is scaling and positioning the layer to fit in the frame. (See
Scale or flip a layer.)
Create layers from one or more footage items
When you create layers from multiple footage items, the layers appear in the layer stacking order in the Timeline panel
in the order in which they were selected in the Project panel.
1Select one or more footage items and folders in the Project panel.
2Do one of the following:
•Drag the selected footage items to the Composition panel.
Hold Shift while dragging to snap the layer to the center or edges of the composition.
•Drag the selected footage items to the Timeline panel. When you drag the item into the layer outline, a highlight
bar indicates where the layer will appear when you release the mouse button. If you drag the item over the time
graph area, a time marker indicates where the In point of the layer will be when you release the mouse button.
Hold Shift while dragging to snap the In point to the current-time indicator.
•Drag the selected footage items to the composition name or icon in the Project panel, or press Ctrl+/ (Windows)
or Command+/ (Mac OS). New layers are created immediately above a selected layer and at the center of the
composition. If no layer is selected, then new layers are created at the top of the layer stack.
Create a layer from a trimmed footage item
You can trim a moving-image footage item in the Footage panel before inserting a layer based on that footage item into
a composition.
1Double-click a footage item in the Project panel to open it in the Footage panel. (See View footage items in the
Footage panel.)
2Move the current-time indicator in the Footage panel to the frame that you want to use as the In point of the layer,
and click the Set In Point button at the bottom of the Footage panel.
3Move the current-time indicator in the Footage panel to the frame that you want to use as the Out point of the layer,
and click the Set Out Point button at the bottom of the Footage panel.
4To create a layer based on this trimmed footage item, click an Edit button at the bottom of the Footage panel:
Overlay Edit
Creates the new layer at the top of the layer stacking order, with the In point set at the current time in the Timeline
panel.
Ripple Insert Edit

125
Layers and properties
Last updated 6/8/2015
Also creates the new layer at the top of the layer stacking order, with the In point set at the current time in the
Timeline panel, but splits all other layers. Newly created split layers are moved later in time so that their In points
are at the same time as the Out point of the inserted layer.
Replace layer sources with references to another footage item
1Select one or more layers in the Timeline panel
2Alt-drag (Windows) or Option-drag (Mac OS) a footage item from the Project panel onto a selected layer in the
Timeline panel.
Solid-color layers and solid-color footage items
You can create layers of any solid color and any size (up to 30,000x30,000 pixels). Solid-color layers have solid-color
footage items as their sources. Solid-color layers and solid-color footage items are both usually called solids.
Solids work just like any other footage item: You can add masks, modify transform properties, and apply effects to a
layer that has a solid as its source footage item. Use solids to color a background, as the basis of a control layer for a
compound effect, or to create simple graphic images.
Solid-color footage items are automatically stored in the Solids folder in the Project panel.
Jeff Almasol provides a script on his redefinery website with which you can rename the selected solid footage items in
the Project panel. You can use this script to, for example, include the pixel dimensions, aspect ratio, and RGB color
values in the name.
Note: In After Effects CS6 and later, new solid layers are 17% gray (45/255) so they can contrast with the new default darker
user interface brightness
Create a solid-color layer or solid-color footage item
•To create a solid footage item but not create a layer for it in a composition, choose File > Import > Solid.
•To create a solid footage item and create a layer for it in the current composition, choose Layer > New > Solid or
press Ctrl+Y (Windows) or Command+Y (Mac OS).
To create a layer that fits the composition when you create a solid-color layer, choose Make Comp Size.
Modify settings for solid-color layers and solid-color footage items
•To modify settings for the selected solid-color layer or footage item, choose Layer > Solid Settings.
To apply the changes to all solid-color layers that use the footage item, select Affect All Layers That Use This Solid.
If you don’t select this option, you create a new footage item, which becomes the source for the selected layer.
Adjustment layers
When you apply an effect to a layer, the effect applies only to that layer and no others. However, an effect can exist
independently if you create an adjustment layer for it. Any effects applied to an adjustment layer affect all layers below
it in the layer stacking order. An adjustment layer at the bottom of the layer stacking order has no visible result.
Because effects on adjustment layers apply to all layers beneath them, they are useful for applying effects to many layers
at once. In other respects, an adjustment layer behaves like other layers; for example, you can use keyframes or
expressions with any adjustment layer property.
Note: A more accurate description is that the adjustment layer applies the effect to the composite created from all layers
below the adjustment layer in the layer stacking order. For this reason, applying an effect to an adjustment layer improves
rendering performance compared with applying the same effect separately to each of the underlying layers.

126
Layers and properties
Last updated 6/8/2015
If you want to apply an effect or transformation to a collection of layers, you can precompose the layers and then apply
the effect or transformation to the precomposition layer. (See Precompose layers.)
Use masks on an adjustment layer to apply an effect to only parts of the underlying layers. You can animate masks to
follow moving subjects in the underlying layers.
•To create an adjustment layer, choose Layer > New > Adjustment Layer, or press Ctrl+Alt+Y (Windows) or
Command+Option+Y (Mac OS).
•To convert selected layers to adjustment layers, select the Adjustment Layer switch for the layers in the Timeline
panel or choose Layer > Switches > Adjustment Layer.
Note: You can deselect the Adjustment Layer switch for a layer to convert it to a normal layer.
Online resources about adjustment layers
Andrew Kramer provides a video tutorial on his Video Copilot website in which he shows how to use an adjustment
layer to apply an effect to only a short duration and to only specific portions of a movie.
Eran Stern provides a video tutorial on the Creative COW website that demonstrates the use of lights as adjustment
layers, to precisely control which layers are affected by which lights.
Lloyd Alvarez provides a script on his After Effects Scripts website that creates an adjustment layer above each selected
layer, with each new adjustment layer trimmed to the duration of the selected layer.
Create a layer and new Photoshop footage item
When you create an Adobe Photoshop file from After Effects, Photoshop starts and creates a new PSD file. This PSD
file consists of a blank Photoshop layer that has the same dimensions as your composition, with the appropriate title-
safe, and action-safe guides. The color bit depth of the PSD file is the same as the color bit depth of your After Effects
project.
The newly created PSD file is automatically imported into After Effects as a footage item. Any changes that you save in
Photoshop appear in the footage item in After Effects.
•To create a Photoshop footage item and use it as the source for a new layer in the current composition, choose Layer
> New > Adobe Photoshop File. The Photoshop layer is added as the top layer in your composition.
•To create a Photoshop footage item with the settings of the most recently open composition, without adding it to a
composition, choose File > New > Adobe Photoshop File.
More Help topics
Layers (keyboard shortcuts)
Precompose layers
Creating and editing text layers
3D layers
Cameras, lights, and points of interest
About shapes and shape layers
Null object layers
Working with footage items
Trim, extend, or slip-edit a layer

127
Layers and properties
Last updated 6/8/2015
Apply an effect or animation preset
Creating masks
Preparing and importing Photoshop files
Working with Photoshop and After Effects
Selecting and arranging layers
Select layers
Selected layers that also have properties selected are indicated with a hollow highlight in the Timeline panel. A selected
layer that has no properties selected is indicated with a solid highlight.
To scroll the topmost selected layer to the top of the Timeline panel, press X.
•To select a layer, click the layer in the Composition panel, click its name or duration bar in the Timeline panel, or
click its name in the Flowchart panel.
•To select a layer that is obscured in the Composition panel, right-click (Windows) or Control-click (Mac OS) over
the layer in the Composition panel, and choose Select > [layer name].
•To select a layer if the layer is open in its own Layer panel, choose the layer name from the Window menu or the
Layer panel viewer menu.
•To select a layer by position number, type the layer number on the numeric keypad. If the layer number has more
than one digit, type the digits quickly so that After Effects can recognize them as one number.
•To select the next layer in the stacking order, press Ctrl+Down Arrow (Windows) or Command+Down Arrow (Mac
OS). To select the previous layer, press Ctrl+Up Arrow (Windows) or Command+Up Arrow (Mac OS).
•To extend the selection to the next layer in the stacking order, press Ctrl+Shift+Down Arrow (Windows) or
Command+Shift+Down Arrow (Mac OS). To extend the selection to the previous layer in the stacking order, press
Ctrl+Shift+Up Arrow (Windows) or Command+Shift+Up Arrow (Mac OS).
•To select all layers, choose Edit > Select All while the Timeline or Composition panel is active. To deselect all layers,
choose Edit > Deselect All. If the composition’s Hide Shy Layers switch is selected, using Select All when the
Timeline panel is active doesn’t select shy layers. (See Show and hide layers in the Timeline panel.)
•To deselect any currently selected layers and select all other layers; with at least one layer selected, choose Invert
Selection from the context menu in the Composition or Timeline panel.
•To select all layers that use the same color label, click the color label in the Timeline panel, and choose Select Label
Group, or select a layer with that color label and choose Edit > Label > Select Label Group.

128
Layers and properties
Last updated 6/8/2015
•To select all child layers assigned to a parent layer, select the parent layer and choose Select Children from the
context menu in the Composition or Timeline panel. The child layers are added to the existing selection.
•You can select multiple layers in the Composition panel . Drag with the Selection tool to create a selection box
(marquee) around the layers to select them. Hold Shift while clicking or dragging to select additional layers or to
deselect layers.
Lloyd Alvarez provides a script on his After Effects Scripts website with which you can tag layers and then select, shy,
and solo layers according to their tags. The tags are appended to comments in the Comments field in the Timeline
panel.
Change the stacking order for selected layers
The vertical arrangement of layers in the Timeline panel is the layer stacking order, which is directly related to the
render order. You can change the order in which layers are composed with one another by changing the layer stacking
order.
Note: Because of their depth properties, the stacking order of 3D layers in the Timeline panel does not necessarily indicate
their spatial position in the composition.
•In the Timeline panel, drag the layer names to a new position in the layer stacking order.
•To move the selected layers up one level in the layer stacking order, press Ctrl+Alt+Up Arrow (Windows) or
Command+Option+Up Arrow (Mac OS); to move the selected layers down one level, press Ctrl+Alt+Down Arrow
(Windows) or Command+Option+Down Arrow (Mac OS).
•To move the selected layers to the top of the layer stacking order, press Ctrl+Alt+Shift+Up Arrow (Windows) or
Command+Option+Shift+Up Arrow (Mac OS); to move the selected layers to the bottom, press
Ctrl+Alt+Shift+Down Arrow (Windows) or Command+Option+Shift+Down Arrow (Mac OS).
•Choose Layer > Arrange, and then choose Bring Layer Forward, Send Layer Backward, Bring Layer To Front, or
Send Layer To Back.
When you copy (or cut) and paste layers, the layers are pasted so that they appear from top to bottom in the Timeline
panel in the same order in which they were selected before the copy (or cut) operation. You can Ctrl-click (Windows) or
Command-click (Mac OS) layers to select them in any arbitrary order, cut them, and then immediately paste them to
reorder the layers in the order in which they were selected.
Jeff Almasol provides a script on his redefinery website with which you can change the stacking order of layers in a
composition by sorting according to In point, Out point, selection order, layer name, or random order.
Coordinate systems: composition space and layer space
The coordinate system for each layer is its layer space. The coordinate system for each composition is its composition
space. Property values for items that exist within a layer—such as effect control points and anchor points—exist in layer
space and are measured from the origin in the layer space of that layer. The Position property of a layer, however,
describes where the layer is within a composition and is therefore measured in the composition space of that
composition.
As you move the pointer over the layer frame in the Layer panel, the Info panel displays the coordinates of the pixel
under the pointer in layer space. The X coordinate represents position on the horizontal axis, and the Y coordinate
represents position on the vertical axis. Values for these coordinates are in pixels. The X and Y coordinates are relative
to the origin (0,0), which is fixed at the upper left corner of the layer.
129
Layers and properties
Last updated 6/8/2015
You can modify the zero point of the rulers, but you can’t modify the origin of layer space. If the zero point differs from
the origin, X' and Y' coordinates appear in the Info panel below the X and Y coordinates, indicating coordinates based
on the zero point of the rulers.
When you move the pointer over the composition frame in the Composition panel, the Info panel displays coordinates
in composition space. As you drag a layer, the lower portion of the Info panel displays the coordinates of the anchor
point of the layer.
Move layers in space
When you move a layer in space, you modify its Position property.
You can separate the components of a Position property into individual properties—X Position, Y Position, and (for 3D
layers) Z Position—so that you can modify or animate each independently. (See Separate dimensions of Position to
animate components individually.)
Jeff Almasol provides a script on his redefinery website that places a new null layer on the line between the anchor
points of two selected layers; you use a slider control on the null layer to reposition the null layer along this line.
To move selected layers so that their anchor points are at the center in the current view, choose Layer > Transform >
Center In View or press Ctrl+Home (Windows) or Command+Home (Mac OS).
To move a layer so that its anchor point is at the center of the composition, right-click (Windows) or Control-click (Mac
OS) the Position property, choose Edit Value, choose % Of Composition in the Units menu, and enter 50 for each of the
components of the Position property.
To avoid softening of an image that is not moving, make sure that a layer’s Position values are non-fractional values.
This avoids resampling that is used when a layer with image quality set to Best is placed on subpixels.
Move layers by dragging in the Composition panel
To snap the edges of a layer to grids or guides as you drag, choose View > Snap To Grid or View > Snap To Guides.
•Select one or more layers, and then drag a selected layer using the Selection tool .
When you move a layer by dragging it in the Composition panel, the Info panel shows the change in the Position
property as you drag.
Move layers by directly modifying the Position property
1Select one or more layers.
2Press P to show the Position property in the Timeline panel.
3Modify the Position property in the Timeline panel.
Move layers with arrow keys
1Select one or more layers.
2To move selected layers one pixel left, right, up, or down, press an arrow key. To move 10 pixels, hold Shift as you
press the arrow key.
The arrow keys move the layer one pixel at the current magnification. To move a layer more precisely with the arrow
keys, zoom in the Composition panel. (See Zoom an image for preview.)

130
Layers and properties
Last updated 6/8/2015
Separate dimensions of Position to animate components individually
By default, each Position property has two or three components, with each holding the value for one of the spatial
dimensions (axes). You can separate the components of a Position property into individual properties—X Position, Y
Position, and (for 3D layers) Z Position. Separating dimensions allows you to modify or animate the position of a layer
along the x axis, y axis, and z axis independently.
To decompose selected Position properties into individual X Position, Y Position, and (for 3D layers) Z Position
properties, do one of the following:
•Choose Animation > Separate Dimensions.
•Right-click (Windows) or Control-click (Mac OS) a Position property and choose Separate Dimensions from the
context menu.
•Click the Separate Dimensions button at the bottom of the Graph Editor.
To recompose a set of individual Position properties into a single Position property with multiple components, use the
same commands that you use to separate dimensions.
Note: When you recompose separate Position properties into a single Position property, some information about the motion
path and speed is lost, because the multiple Bezier curves used to represent the individual components are collapsed into a
single Bezier curve at each keyframe. When you separate dimensions, some information about speed is lost, but the motion
path does not change. You should work with separate dimensions or without separate dimensions for each property for an
entire project, rather than toggling back and forth.
The decision of whether to work with separate dimensions depends on what you’re trying to accomplish. Using one
property for position has the advantage of providing smooth motion more easily. Also, using a single property for
position enables the use of roving keyframes, which provides uniform speed. Working with separate dimensions for
position sacrifices some of this automatic smoothing to gain greater control of spatial animation. Working with
separate dimensions also makes some simulations easier, especially in cases in which the simulated forces acting on a
layer are orthogonal (perpendicular) to one another.
For example, if you are animating a ball flying horizontally and bouncing vertically, you can do so more easily by
separating dimensions. The X Position property can be animated with two keyframes, one for the start position and
one for the end position. This horizontal animation represents the speed of the throw. The Y Position property can be
animated with a single expression that simulates the acceleration due to gravity and the vertical bouncing from the
floor. A similar example is a boat drifting down a river in a variable crosswind.
Note: After Effects CS3 included a Separate XYZ Position animation preset that accomplished something similar to the
Separate Dimensions feature, though the animation preset is not as robust.
Align or distribute layers in 2D space
Use the Align panel to line up or evenly space selected layers. You can align or distribute layers vertically or horizontally.
1Select the layers to align or distribute.
2Choose Selection or Composition from the Align Layers To menu.
Selection Aligns selected layers according to the layer boundaries of the selected layers.
Composition Aligns selected layers according to the boundaries of the composition frame.
3In the Align panel, click the button representing the desired type of alignment or distribution.
•To distribute, you must select three or more layers. When Selection is chosen in the Align Layers To menu, you must
select two or more layers to align. When Composition is chosen in the Align Layers To menu, you must select one
or more layers to align.
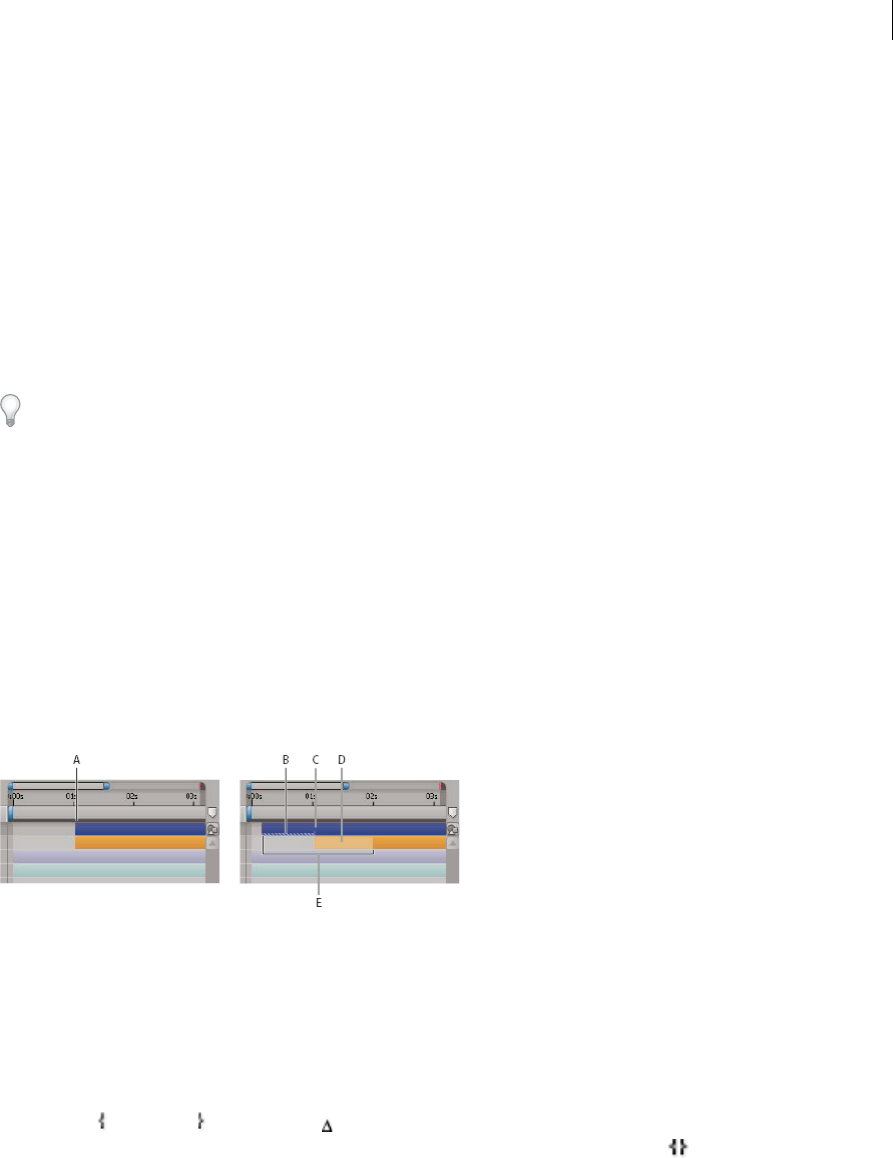
131
Layers and properties
Last updated 6/8/2015
•When Selection is chosen in the Align Layers To menu, each alignment option aligns selected layers to the layer that
most closely represents the new alignment. For example, for right-edge alignment, all selected layers align to the
selected layer with the edge that is farthest to the right.
•A distribution option evenly spaces selected layers between the two most extreme layers. For example, for a vertical
distribution option, the selected layers are distributed between the topmost and bottommost selected layers.
•When you distribute layers of different sizes, the spaces between layers may not be uniform. For example,
distributing layers by their centers creates equal space between the centers—but different-sized layers extend by
different amounts into the space between layers.
•Alignment or distribution options cannot move locked layers.
•The Align panel does not affect alignment of characters within a text layer.
To move selected layers so that their anchor points are at the center in the current view, choose Layer > Transform >
Center In View or press Ctrl+Home (Windows) or Command+Home (Mac OS).
Charles Bordenave (nab) provides a script on the After Effects Scripts website, with which you can distribute layers in
3D space.
Trim, extend, or slip-edit a layer
The beginning of the duration of a layer is its In point, and the end is its Out point. The duration is the span between
the In point and the Out point, and the bar that extends from the In point to the Out point is the layer duration bar.
To trim a layer is to modify its In or Out point so that the layer has a different duration. When you trim a layer that is
based on moving source footage, you affect which frames of the source footage item are shown in the layer; the first
frame to appear is at the In point, and the last frame to appear is at the Out point. Trimming a layer doesn’t cut frames
from the footage item; it only affects what frames are played for the layer.
A Original In point B Negative layer time indicator for still image layer C Original In point D Slip-edit bar, representing excluded frames for
motion footage layer E New In points
When you use a footage item as a source for different layers, you can trim each layer differently to show different
portions of the source. Trimming a layer does not alter the footage item or the original source file.
You can trim a layer by changing the In and Out points in the Layer panel or the Timeline panel. (You can also trim a
footage item before using it to create a layer. See Create layers from footage items or change layer source.)
The In point , Out point , and duration values for a layer are shown at the bottom of the Layer panel. To show this
information for all layers in the Timeline panel, click the In/Out/Duration/Stretch button in the lower-left corner of
the Timeline panel. The duration, In point, and Out point for the selected layer are also shown in the Info panel.
In the Layer panel, In and Out points are expressed in layer time. In the Timeline panel, In and Out points are expressed
in composition time. The duration is the same in both cases (unless time-remapping or time-stretching is enabled for
the layer).
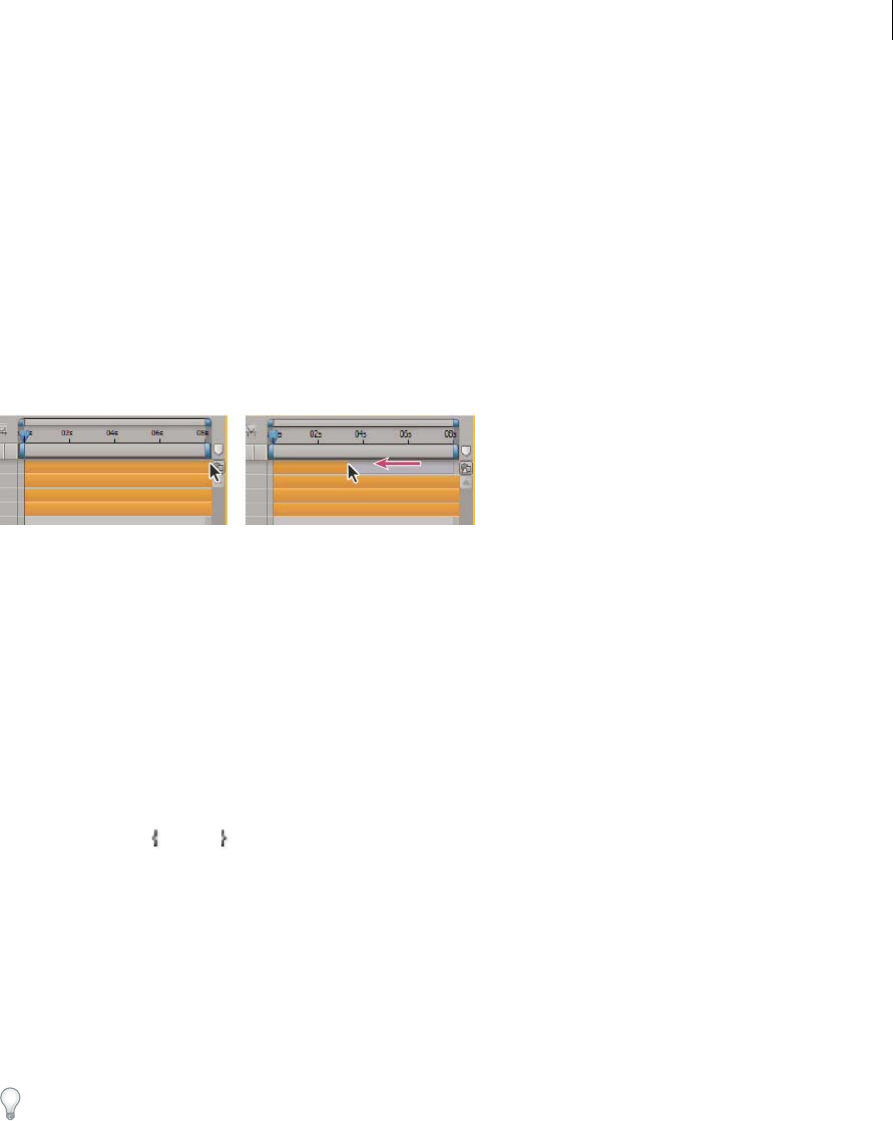
132
Layers and properties
Last updated 6/8/2015
You can extend many kinds of layers for any duration, extending their In points and Out points out past their original
times. This capability applies to time-remapped layers, shape layers, layers based on still-image footage items, camera
layers, light layers, and text layers. If you extend a layer back in time so that the layer extends into negative layer time
(past layer time zero), a series of hash marks on the bottom of the layer bar indicates the portions of the layer that are
in negative layer time. This indication is useful if you’ve applied effects to the layer—such as Particle Playground or
Shatter—that use layer time to calculate their results.
Online resources for trimming, extending, and editing layers
Jeff Almasol provides a script on his redefinery website that creates a panel with controls for moving various
combinations of items in time: layer In point, layer Out point, layer source frames, keyframes, and markers.
Trim or extend layers in the Timeline panel
1Select one or more layers in the Timeline panel.
2Do one of the following:
•Drag either end of a layer duration bar.
•Move the current-time indicator to the time at which you want to set the In point or Out point. To set the In point
to the current time, press Alt+[ (Windows) or Option+[ (Mac OS). To set the Out point to the current time, press
Alt+] (Windows) or Option+] (Mac OS).
Trim or extend a layer in the Layer panel
•Open the layer in the Layer panel and drag either end of the layer duration bar.
•Move the current-time indicator in the Layer panel to the time at which you want the footage to begin or end, and
then click the In or Out button to set the In or Out point to the current time.
Slip-edit a layer
After you’ve trimmed a layer based on moving footage, a pale slip-edit bar represents the frames of the footage item that
you are excluding from the composition. This pale rectangle does not appear for a trimmed layer based on a still footage
item. You can choose which frames are played within a trimmed duration by dragging the slip-edit bar. The In and Out
points of the layer are not affected.
Moving only the In or Out point of a layer doesn’t move keyframes. Dragging the layer duration bar moves all
keyframes. Dragging the slip edit bar moves selected keyframes, but does not move unselected keyframes.
When performing a slip edit, you probably want to move some keyframes with the source footage—such as mask
keyframes. Other keyframes should stay where they are in time. Press Shift+F2 to deselect keyframes and leave the layer
selected.
•Drag the slip-edit bar to the left or right.
•Drag the layer to the left or right with the Pan Behind (Anchor Point) tool.
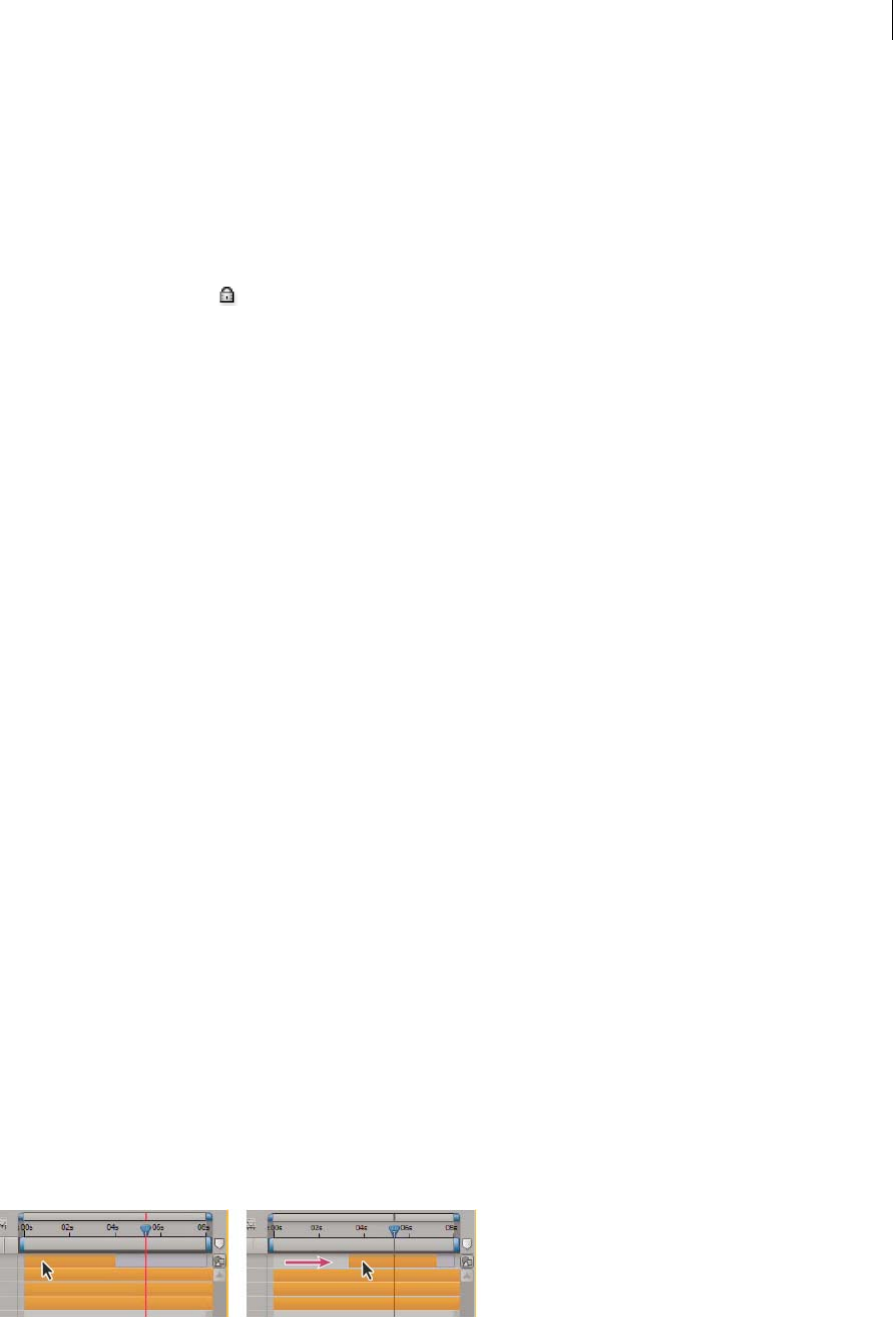
133
Layers and properties
Last updated 6/8/2015
Remove part of the duration of a layer
1In the Timeline panel, set the work area to include only the portion of the layers’ duration to remove: Move the
current-time indicator to the time that the work area is to begin, and press B. Move the current-time indicator to the
time at which the work area is to end, and press N.
2Do one of the following:
•Select the layers from which to remove a section.
•Select the Lock switch for layers that you do not want affected by the extraction. Press F2 to deselect all layers.
Note: If no layers are selected, the following step removes the section from all unlocked layers.
3Do one of the following:
•To remove the section and leave a gap of the same duration as the removed section, choose Edit > Lift Work Area.
•To remove the section, choose Edit > Extract Work Area. The gap is closed by ripple deletion.
Place or move a layer in time
The layer duration bar represents the layer duration visually. The In, Out, and Duration columns in the Timeline panel
represent the layer duration numerically.
Note: To choose which columns are visible in the Timeline panel, choose Columns from the panel menu, or right-click
(Windows) or Control-click (Mac OS) a column heading.
These procedures move the entire layer in time.
•To set the In point or Out point numerically, click the number in the In or Out column for the layer in the Timeline
panel.
•To move the In point or Out point to the current time, Alt-click (Windows) or Option-click (Mac OS) the number
in the In or Out column for the layer in the Timeline panel.
•To move the In points of selected layers to the beginning of the composition, press Alt+Home (Windows) or
Option+Home (Mac OS).
•To move the Out points of selected layers to the end of the composition, press Alt+End (Windows) or Option+End
(Mac OS).
•To move selected layers one frame later, press Alt+Page Down (Windows) or Option+Page Down (Mac OS). To
move selected layers 10 frames later, press Alt+Shift+Page Down (Windows) or Option+Shift+Page Down (Mac
OS).
•To move selected layers one frame earlier, press Alt+Page Up (Windows) or Option+Page Up (Mac OS). To move
selected layers 10 frames earlier, press Alt+Shift+Page Up (Windows) or Option+Shift+Page Up (Mac OS).
•To move the entire layer in time by dragging, drag the layer duration bar to the left or right. To snap the layer
duration bar to significant points in time (such as markers, or the start or end of the composition), Shift-drag the
layer duration bar.
Note: When you drag a layer in the Timeline panel, the Info panel displays the name, duration, change in time, and In and
Out points for the layer.
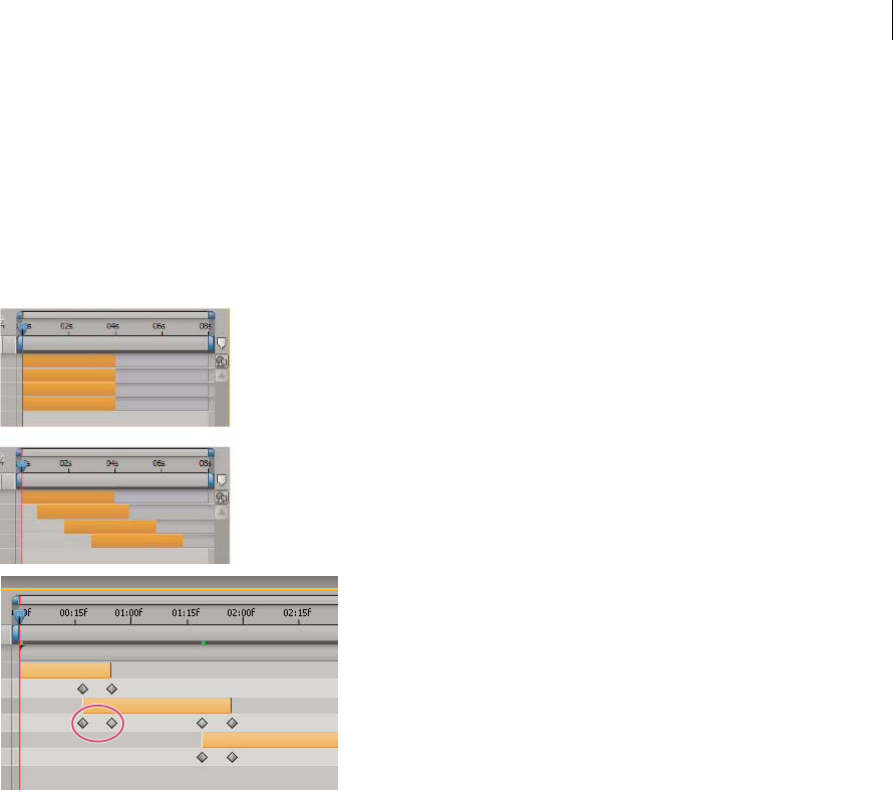
134
Layers and properties
Last updated 6/8/2015
Jeff Almasol provides a script on his redefinery website with which you can move selected layers as a group, aligning
the group to a specific time in the composition.
Arrange layers in time sequentially
Use the Sequence Layers keyframe assistant to automatically arrange layers in a sequence. When you apply the
keyframe assistant, the first layer you select remains at its initial time, and the other selected layers move to new times
in the Timeline panel based on the order in which you selected them.
For a layer to be put into a sequence, its duration must be less than the length of the composition so that it leaves time
for other layers. (See Trim, extend, or slip-edit a layer.)
1In the Timeline panel, hold down Ctrl (Windows) or Command (Mac OS) and select layers in sequential order,
beginning with the layer to appear first.
2Choose Animation > Keyframe Assistant > Sequence Layers.
3In the Sequence Layers dialog box, do one of the following:
•To arrange the layers end to end, leave the Overlap option unselected.
•To overlap layers, select Overlap, enter a Duration value for the duration of the overlap, and select a transition.
Select Cross Dissolve Front And Back Layers to use the transparency of the selected layers; otherwise, choose
Dissolve Front Layer.
•To leave gaps between the layers, select Overlap and enter a negative Duration value.
Copy or duplicate a layer
When you copy a layer, you copy all of its properties, including effects, keyframes, expressions, and masks.
Duplicating a layer is a shortcut with which you copy and paste the layer with one command. Duplicating a layer with
a track matte preserves the relative ordering of the layer and its track matte.

135
Layers and properties
Last updated 6/8/2015
When you paste layers, they are placed in the order in which you selected them before copying. The first layer selected
is the last one to be placed, so it ends up on the top in the layer stacking order. If you select layers from the top first,
they end up in the same stacking order when pasted.
If you have a component of a layer—such as a mask or keyframe—selected when you copy, you copy only that
component. Before copying, press Shift+F2 to deselect all of the components of a layer and leave the layer itself selected.
•To copy selected layers and place the In points of the copies at the current time, choose Edit > Copy, and then press
Ctrl+Alt+V (Windows) or Command+Option+V (Mac OS).
•To copy selected layers and place the copies at the same times as the originals, choose Edit > Copy, and then choose
Edit > Paste.
To place copies at the top of the layer stack in the Timeline panel instead of immediately above the originals, press F2 to
deselect the originals before you paste.
•To duplicate selected layers, choose Edit > Duplicate or press Ctrl+D (Windows) or Command+D (Mac OS).
Split a layer
In the Timeline panel, you can split a layer at any time, creating two independent layers. Splitting a layer is a time-saving
alternative to duplicating and trimming the layer—something you might do when you want to change the stacking-
order position of the layer in the middle of the composition.
Note: To make new split layers appear above the original layer in the Timeline panel, select Create Split Layers Above
Original Layer (Edit > Preferences > General (Windows) or After Effects > Preferences> General (Mac OS)). Deselect this
option to make the layers appear below the original layer.
1Select one or more layers.
2Move the current-time indicator to the time at which to split the layers.
3Choose Edit > Split Layer.
When you split a layer, both resulting layers contain all of the keyframes that were in the original layer in their original
positions. Any applied track mattes retain their order, on top of the layer.
After you split a layer, the duration of the original layer ends at the point of the split, and the new layer starts at that
point in time.
If no layer is selected when you choose Edit > Split Layer, all layers are split at the current time.
Paul Tuersley provides a script on the AE Enhancers forum for splitting layers at layer markers.
Lloyd Alvarez provides a script on his After Effects Scripts website that automatically detects edits in a footage layer and
splits it into a separate layer for each edit (or places a layer marker at each edit).
Auto-Orientation options
The auto-orientation options (Layer > Transform > Auto-Orient) for each layer specify how its orientation depends on
motion paths, points of interest, and cameras.
Off The layer rotates freely, independent of the motion path, point of interest, or other layers.
Orient Along Path The layer faces in the direction of the motion path. For example, use this option for a camera to
depict the perspective of a driver who is looking at the road ahead while driving.
Orient Towards Camera The layer is always oriented so that it faces the active camera. This option is available for 3D
layers; this option is not available for 2D layers, cameras, or lights. 3D text layers have an additional option, Orient Each
Character Independently, which orients each character around its individual anchor point. Selecting Orient Each

136
Layers and properties
Last updated 6/8/2015
Character Independently enables per-character 3D properties for the text layer if they aren’t already enabled. (See Per-
character 3D text properties.)
Orient Towards Point Of Interest The camera or light always points at its point of interest. This option is not available
for layers other than cameras and lights. (See Cameras, lights, and points of interest .)
Note: If you specify an auto-orientation option for a layer, and then change its Orientation or X, Y, or Z Rotation properties,
the layer orientation is offset by the new values. For example, you can set a camera with Orient Along Path, and then rotate
the camera 90 degrees to the right to depict the perspective of a passenger looking out the side window of a car as it moves.
The automatic orientation to point to the point of interest occurs before the Rotation and Orientation transformations
are applied. To animate a camera or light with the Orient Towards Point Of Interest option to look temporarily away
from the point of interest, animate the Rotation and Orientation transform properties.
Dan Ebberts provides an expression on his MotionScript website that auto-orients a layer along only one axis. This is
useful, for example, for having characters turn from side to side to follow the camera while remaining upright.
Additional resources for selecting and arranging layers
Jeff Almasol provides a script on his redefinery website that creates a panel with controls for moving various
combinations of items in time: layer In point, layer Out point, layer source frames, keyframes, and markers.
Trish and Chris Meyer provide an introduction to moving, trimming, reordering, and sequencing layers in a PDF
excerpt from the “Layer Control” chapter of their book After Effects Apprentice: Real-World Skills for the Aspiring
Motion Graphics Artist.
More Help topics
Parent and child layers
Color labels for layers, compositions, and footage items
Search and filter in the Timeline, Project, and Effects & Presets panels
Layers (keyboard shortcuts)
Render order and collapsing transformations
3D layer interactions, render order, and collapsed transformations
Safe zones, grids, guides, and rulers
Layer anchor points
Layer properties
Effects and animation presets overview
Modifying layer properties (keyboard shortcuts)
Safe zones, grids, guides, and rulers
Align and justify text
Timeline panel
Work are a
Layer switches and columns in the Timeline panel
Timeline panel
137
Layers and properties
Last updated 6/8/2015
Copy and paste keyframes
3D layers
Motion paths
Managing layers
Jeff Almasol provides a script on his redefinery website that renders and exports each of the selected layers separately.
For example, use this script if layers represent different versions of an effect or different parts of an effect that you want
to render as separate passes for flexibility in how they get composited.
View and change layer information
•To rename a layer or property group, do one of the following:
•Select the item in the Timeline panel, press Enter (Windows) or Return (Mac OS), and enter the new name.
•Right-click (Windows) or Control-click (Mac OS) the item in the Timeline panel, choose Rename, and enter the
new name.
•To alternate between viewing the names of source footage items and the names of layers in the Timeline panel, click
the Layer Name/Source Name column heading in the Timeline panel.
Note: When the layer name and the source footage name are the same, square brackets appear around the layer name in
the layer name view, like this: [layer name]
•To show the name of the source footage file for a selected layer in the Info panel, press Ctrl+Alt+E (Windows) or
Command+Option+E (Mac OS).
•To see what footage item is the source for a layer, right-click (Windows) or Control-click (Mac OS) the layer in the
Timeline panel and choose Reveal Layer Source In Project.
The source footage item is selected in the Project panel.
You can filter layers in the Timeline panel to show only layers with properties that match a search string or certain other
characteristics. See Search and filter in the Timeline, Project, and Effects & Presets panelsand Showing properties and
groups in the Timeline panel (keyboard shortcuts).
Jeff Almasol provides a script on his redefinery website that automatically writes specified information about footage
items or layers to the Comment fields for the respective items in the Project panel or Timeline panel.
Christopher Green provides a script (Selected_Layers_Renamer.jsx) on his website with which you can rename
multiple layers selected in the Timeline panel. You can search and replace text in the names, append characters to the
beginning or end of the names, trim a specified number of characters from the beginning or end of the names, or
replace the names with numbers in a series.
Layer switches and columns in the Timeline panel
Many of characteristics of a layer are determined by its layer switches, which are arranged in the Timeline panel in
columns. By default, the A/V Features column appears to the left of the layer name, and the Switches and Modes
(Transfer Controls) columns appear to the right, but you can arrange columns in a different order. (See Columns.)
To show or hide columns in the Timeline panel, click the Layer Switches , Transfer Controls , or
In/Out/Duration/Stretch button in the lower-left corner of the Timeline panel. Press Shift+F4 to show or hide the
Parent column. Press F4 to toggle the Switches and Modes columns.
138
Layers and properties
Last updated 6/8/2015
The results of some layer switch settings depend on the settings of composition switches, which are in the upper right
of the layer outline in the Timeline panel.
Quickly change the state of a switch for multiple layers by clicking the switch for one layer and dragging up or down that
column for the adjacent layers.
Jeff Almasol provides a script on his redefinery website that creates a panel with which you can save and restore the
layer switch settings for all layers in a composition.
Switches in the A/V Features column
Video
Toggles layer visuals on or off. (See Toggle visibility or influence of a layer or property group.)
Audio
Toggles layer sounds on or off.
Solo
Includes the current layer in previews and renders, ignoring layers without this switch set. (See Solo a layer.)
Lock
Locks layer contents, preventing all changes. (See Lock or unlock a layer.)
Switches in the Switches column
Shy
Hides the current layer when the Hide Shy Layers composition switch is selected. (See Show and hide layers in the
Timeline panel.)
Collapse Transformations/Continuously Rasterize
Collapses transformations if the layer is a precomposition; continuously rasterizes if the layer is a shape layer, text layer,
or layer with a vector graphics file (such as an Adobe Illustrator file) as the source footage. Selecting this switch for a
vector layer causes After Effects to rerasterize the layer for each frame, which improves image quality, but also increases
the time required for previewing and rendering. (See Render order and collapsing transformationsand Continuously
rasterize a layer containing vector graphics.)
Quality
Toggles between Best and Draft options for layer quality for rendering, including rendering to the screen for previews.
(See Layer image quality and subpixel positioning.)
Effect
Select to render the layer with effects. The switch does not affect the setting for individual effects on the layer. (See
Delete or disable effects and animation presets.)
Frame Blend
Sets frame blending to one of three states: Frame Mix , Pixel Motion , or off. If the Enable Frame Blending
composition switch is not selected, the frame blending setting of the layer is irrelevant. (See Frame blending.)
Motion Blur
Toggles motion blur on or off for the layer. If the Enable Motion Blur composition switch is not selected, the motion
blur setting of the layer is irrelevant. (See Motion blur.)
Adjustment Layer
139
Layers and properties
Last updated 6/8/2015
Identifies the layer as an adjustment layer. (See Adjustment layers.)
3D Layer
Identifies the layer as a 3D layer. If the layer is a 3D layer with 3D sublayers—as is the case for a text layer with per-
character 3D properties—the switch uses this icon: . (See 3D layers overview and resources.)
Toggle visibility or influence of a layer or property group
The Video (eyeball) switch for a layer controls whether the visual information for a layer is rendered for previews or
final output. If the layer is an adjustment layer, the Video switch controls whether the effects on the layer are applied to
the composite of the layers below it. If the layer is a camera or light, the Video switch controls whether the layer is on
or off.
Several components of layers—such as paint strokes, path operations in shape layers, and text animators in text layers—
each have their own Video switches. You can use the Video switch to toggle the visibility and influence of these items
individually.
•To turn off the visibility of a layer deselect the Video switch for the layer.
•To select the Video switch for all layers, choose Layer > Switches > Show All Video.
•To deselect the Video switch for all layers except the selected layers, choose Layer > Switches > Hide Other Video.
Solo a layer
You can isolate one or more layers for animating, previewing, or final output by soloing. Soloing excludes all other layers
of the same type from being rendered—both for previews in the Composition panel and for final output. For example,
if you solo a video layer, any lights and audio layers are unaffected, so they appear when you preview or render the
composition. However, the other video layers do not appear.
•To solo one or more layers, select the layers in the Timeline panel, and click the Solo icon to the left of the layer
names.
•To solo one layer and unsolo all other layers, Alt-click (Windows) or Option-click (Mac OS) the Solo icon to the
left of the layer name.
The Video switch is dimmed for other layers when a layer is soloed, indicating that the other layers are not visible.
Lloyd Alvarez provides a script on his After Effects Scripts website with which you can tag layers and then select, shy,
and solo layers according to their tags. The tags are appended to comments in the Comments column in the Timeline
panel.
Lock or unlock a layer
The Lock switch prevents layers from being edited accidentally. When a layer is locked, you cannot select it in either
the Composition or Timeline panels. If you try to select or modify a locked layer, the layer flashes in the Timeline panel.
When a layer is locked, the Lock icon appears in the A/V Features column, which appears by default to the left of
the layer name in the Timeline panel.
•To lock or unlock a layer, click the Lock switch for the layer in the Timeline panel.
•To unlock all layers in the active composition, choose Layer > Switches > Unlock All Layers.
140
Layers and properties
Last updated 6/8/2015
Color labels for layers, compositions, and footage items
You can use labels (colored boxes in the Label column) in the Project panel and Timeline panel to organize and manage
compositions, footage items, and layers. By default, different label colors indicate different kinds of footage items, but
you can assign label colors to indicate whatever categories you choose.
Rename label groups to help you to organize and categorize layers and footage items. To see label names in the Label
column, widen the column to greater than the default width.
•To select all layers with the same label color, select a layer with that label color and choose Edit > Label > Select Label
Group.
•To change the color of a label for one layer, click the label in the Timeline panel and choose a color.
•To change the color of a label for all layers with that label color, select one of the layers belonging to the label group,
choose Edit > Label > Select Label Group, and choose Edit > Label > [color name].
•To change the names and default colors for labels, choose Edit > Preferences > Labels (Windows) or After Effects >
Preferences > Labels (Mac OS).
•To change the default associations of label colors with source types, choose Edit > Preferences > Labels (Windows)
or After Effects > Preferences > Labels (Mac OS).
•To disable the use of a layer’s label color for layer handles and motion paths, choose Edit > Preferences > Appearance
(Windows) or After Effects > Preferences > Appearance (Mac OS), and deselect Use Label Colors For Layer Handles
And Paths.
•To disable the use of a layer, footage item, or composition’s label color in the tabs of corresponding panels, choose
Edit > Preferences > Appearance (Windows) or After Effects > Preferences > Appearance (Mac OS), and deselect
Use Label Colors For Related Tabs.
Note: By default, the panel label colors do not respond to the Brightness control in the Appearance preferences. To make the
Brightness control affect panel label colors, select the Affects Label Colors option in the Appearance preferences.
Show and hide layers in the Timeline panel
You can mark a layer as shy and then use the Hide Shy Layers composition switch at the top of the Timeline panel
to hide all shy layers in the Timeline panel layer outline. Making layers shy is useful for making room in the Timeline
panel to show the layers and layer properties that you want to adjust.
The icon in the Switches column indicates whether a layer is shy or not shy .
Shy layers are still rendered, both for previews and for final output. To exclude layers from previews or final output, use
the Video switch or make the layer a guide layer.
•To toggle a layer between shy and not shy, click the Shy switch for the layer, or select the layer in the Timeline panel
and choose Layer > Switches > Shy.
•To toggle between hiding and showing all shy layers, click to select or deselect the Hide Shy Layers composition
switch at the top of the Timeline panel, or choose Hide Shy Layers from the Timeline panel menu.
You can also filter layers in the Timeline panel to show only layers with properties that match a search string or certain
other characteristics. See Search and filter in the Timeline, Project, and Effects & Presets panelsand Showing properties
and groups in the Timeline panel (keyboard shortcuts).
Lloyd Alvarez provides a script on his After Effects Scripts website with which you can tag layers and then select, shy,
and solo layers according to their tags. The tags are appended to comments in the Comments field in the Timeline
panel.

141
Layers and properties
Last updated 6/8/2015
Layer image quality and subpixel positioning
The quality setting of a layer determines how precisely it is rendered, as well as influencing the precision of other
calculations involving the layer, such as motion tracking and the use of the layer as a control layer for a compound
effect.
The default quality of new layers is determined by the Create New Layers At Best Quality preference in the General
preferences category.
Duplicated or split layers retain the Quality setting of the original layer.
To toggle between Best and Draft quality of selected layers, click the Quality switch in the Timeline panel. To choose
from all three options, choose Layer > Quality:
Best Displays and renders a layer using subpixel positioning, anti-aliasing, 3D shading, and complete calculation of any
applied effects. Best requires the most time for rendering—both for previews and for final output.
Draft Displays a layer so that you can see it, but only at rough quality. Draft quality displays and renders a layer without
anti-aliasing and subpixel positioning, and some effects are not precisely calculated.
Wireframe Displays a layer as a box, without layer contents. Layer wireframes are displayed and rendered faster than
layers rendered with Best or Draft settings.
Subpixel positioning
Property values (like Position and Anchor Point) in After Effects are not restricted to integer values; they can have
fractional values, too. This allows for smooth animation, as a value is interpolated from one keyframe to another. For
example, if a Position value goes from [0,0,0] at a keyframe at time 0 to a value of [0,0,80] at time 1 second in a 25-
frames-per-second composition, then the value at frame 1 is [0,0,3.2].
After Effects calculates all spatial values, like Position and effect control points, to a precision of 1/65,536 of a pixel. This
is called subpixel precision.
If the pixels of a layer aren't positioned directly on the pixel boundaries of the composition, a small amount of blur
occurs—very similar to anti-aliasing. This blur is not a problem for an object in motion, because objects in motion have
motion blur, but it can soften fine details in a static image. Also, if an image is moving slowly or at just the wrong speed,
the image can appear to oscillate between sharpness and blurriness.
Because the default anchor point for a layer is the center of an object, odd-sized objects have non-integer anchor points
and appear soft when positioned at integer values. To minimize blurriness and in-and-out of focus result, follow these
guidelines:
•Create graphics with odd or even dimensions, based on the dimensions of the composition. For example, if the
composition is 640x480 pixels, create graphics with even dimensions (such as 100x100 pixels); if the composition is
99x99 pixels, create graphics with odd dimensions (such as 75x53 pixels).
•Set the position information for graphics (including the hold position and final position keyframes) to integers and
not fractional numbers.
Continuously rasterize a layer containing vector graphics
When you import vector graphics, After Effects automatically rasterizes them. However, if you want to scale a layer that
contains vector graphics above 100%, then you need to continuously rasterize the layer to maintain image quality. You
can continuously rasterize vector graphics in layers based on Illustrator, SWF, EPS, and PDF files. Continuously
rasterizing causes After Effects to rasterize the file as needed based on the transformation for each frame. A
continuously rasterized layer generally produces higher-quality results, but it may render more slowly.
Shape layers and text layers are always continuously rasterized.
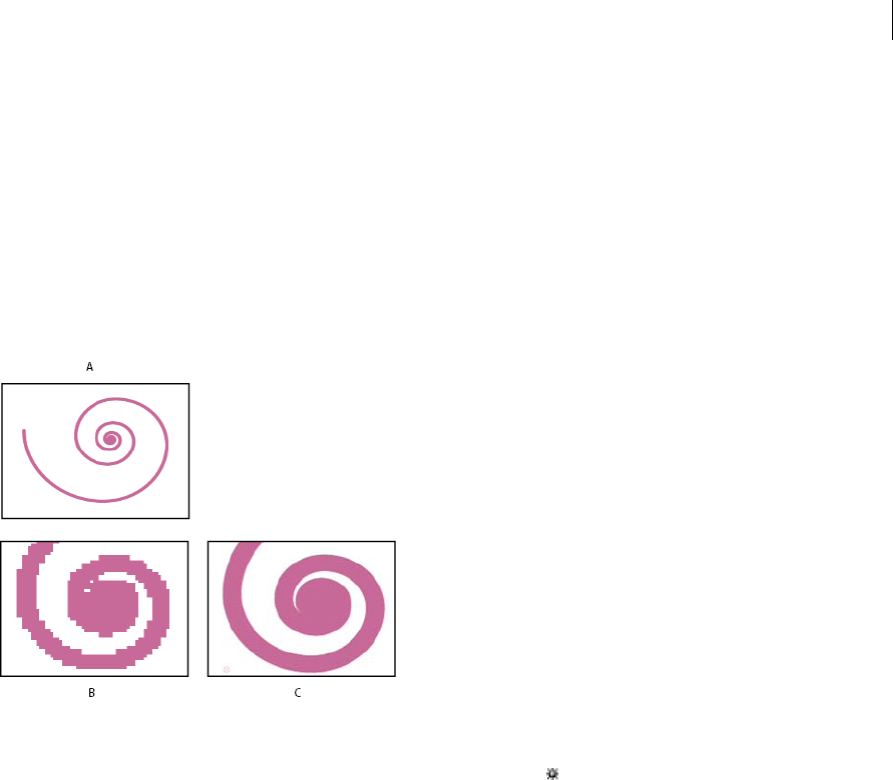
142
Layers and properties
Last updated 6/8/2015
When you apply an effect to a continuously rasterized layer, the results may differ from the results of applying the effect
to a layer without continuous rasterization. This difference in results is because the default rendering order for the layer
changes. The default rendering order for a layer without continuous rasterization is masks, followed by effects, and then
transformations; whereas the default rendering order for a continuously rasterized layer is masks, followed by
transformations, and then effects.
Whether or not you continuously rasterize, if you view and render a composition using Best Quality, After Effects anti-
aliases (smooths) the vector graphics.
You cannot open or interact with a continuously rasterized layer in a Layer panel. A result of this limitation is that you
can’t paint directly on a continuously rasterized layer. However, you can copy and paste paint strokes from other layers.
A Original B Enlarged with Continuously Rasterize switch turned off C Enlarged with Continuously Rasterize switch turned on
❖In the Timeline panel, click the layer’s Continuously Rasterize switch , which is the same as the Collapse
Transformations switch for precomposition layers.
More Help topics
Select layers
Working with footage items
Timeline panel
Layers (keyboard shortcuts)
Select a color or edit a gradient
Preview modes and Viewer Quality preferences
About vector graphics and raster images
Render order and collapsing transformations
Layer properties

143
Layers and properties
Last updated 6/8/2015
Layer properties in the Timeline panel
Each layer has properties, many of which you can modify and animate. The basic group of properties that every layer
has is the Transform group, which includes Position and Opacity properties. When you add certain features to a layer—
for example, by adding masks or effects, or by converting the layer to a 3D layer—the layer gains additional properties,
collected in property groups.
All layer properties are temporal—they can change the layer over time. Some layer properties, such as Opacity, have
only a temporal component. Some layer properties, such as Position, are also spatial—they can move the layer or its
pixels across composition space.
You can expand the layer outline to display layer properties and change property values.
Most properties have a stopwatch . Any property with a stopwatch can be animated—that is, changed over time. (See
About animation, keyframes, and expressions.)
Properties in the Effects property group (effect properties) are also layer properties. Many effect properties can also be
modified in the Effect Controls panel.
Show or hide properties in the Timeline panel
•To expand or collapse a property group, click the triangle to the left of the layer name or property group name.
•To expand or collapse a property group and all of its children, Ctrl-click (Windows) or Command-click (Mac OS)
the triangle.
•To expand or collapse all groups for selected layers, press Ctrl+` (accent grave) (Windows) or Command+` (accent
grave) (Mac OS).
•To reveal an effect property in the Timeline panel, double-click the property name in the Effect Controls panel.
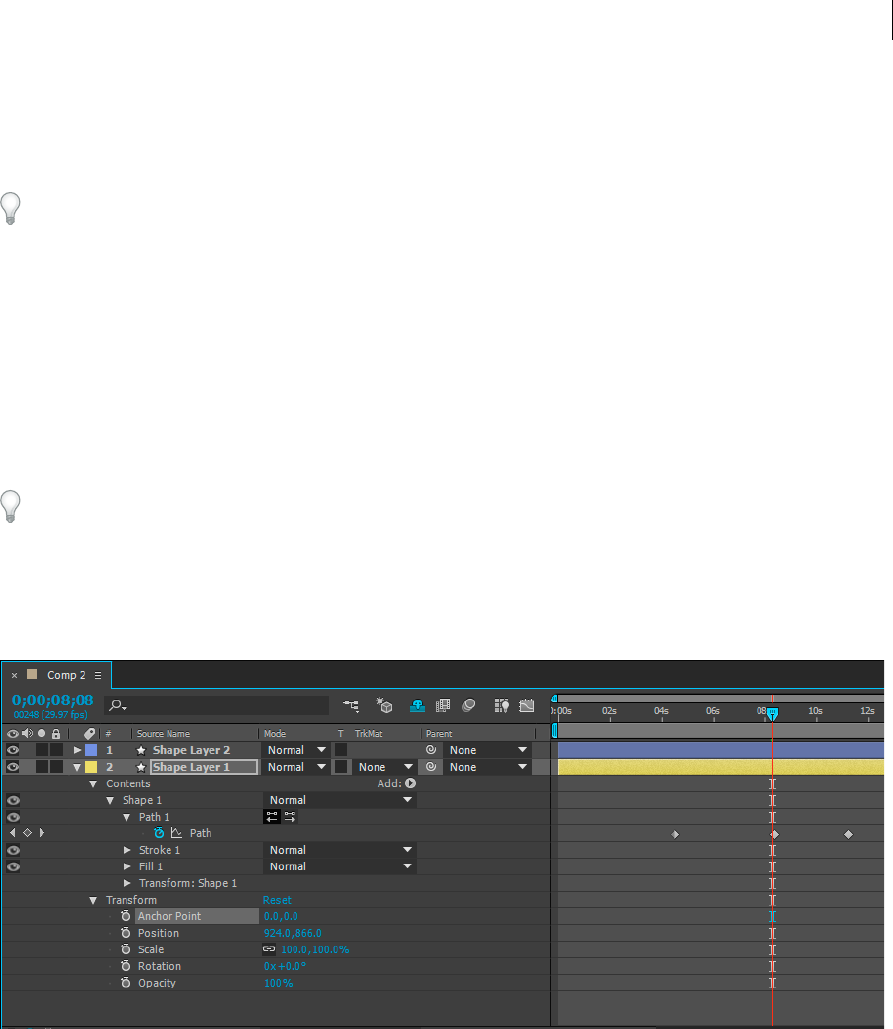
144
Layers and properties
Last updated 6/8/2015
•To hide a property or property group, Alt+Shift-click (Windows) or Option+Shift-click (Mac OS) the name in the
Timeline panel.
•To show only the selected properties or property groups in the Timeline panel, press SS.
The SS shortcut is especially useful for working with paint strokes. Select the paint stroke in the Layer panel, and press
SS to open the property group for that stroke in the Timeline panel.
•To show only a specific property or property group, press its shortcut key or keys. (See Showing properties and
groups in the Timeline panel (keyboard shortcuts).)
•To add a property or property group to the properties shown in the Timeline panel, hold Shift while pressing the
shortcut key for the property or property group.
•To show only properties that have been modified from their default values, press UU, or choose Animation > Reveal
Modified Properties.
•To show only properties that have keyframes or expressions, press U, or choose Animation > Reveal Animating
Properties.
The U and UU commands are especially useful for learning how animation presets, template projects, or other
animated items work, because they isolate the properties that were modified by the designer of those items.
You can also filter layers in the Timeline panel to show only layers with properties that match a search string. See Search
and filter in the Timeline, Project, and Effects & Presets panels.
Select a property or property group in the Timeline panel
•To select a property or property group—including all values, keyframes, and expressions—click the name in the
layer outline in the Timeline panel.
Copy or duplicate a property or property group in the Timeline panel
•To copy properties from one layer or property group to another, select the layer, property, or property group, press
Ctrl+C (Windows) or Command+C (Mac OS), select the target layer, property, or property group, and press Ctrl+V
(Windows) or Command+V (Mac OS).
•To duplicate a property group, select the property group and press Ctrl+D (Windows) or Command+D (Mac OS).

145
Layers and properties
Last updated 6/8/2015
You can only duplicate some property groups, including shapes, masks, and effects. However, you can’t duplicate
top-level property groups such as Contents, Masks, Effects, and Transforms. If you attempt to duplicate a top-level
property group, the entire layer is duplicated, instead.
Copy a value from a layer property that contains no keyframes
You can copy the current value of a layer property to another layer, even when the original layer contains no keyframes.
1In the Timeline panel, show the layer property containing the value you want to copy.
2Click the name of the layer property to select it.
3Choose Edit > Copy.
4Select the layer into which you want to paste the value.
5If the target layer contains keyframes, move the current-time indicator to the time where you want to paste the value.
If the target layer does not contain keyframes, the new value applies to the entire duration of the layer.
6Choose Edit > Paste.
Set a property value
If multiple layers are selected and you change a property for one layer, then the property is changed for all selected
layers. Sliders, angle controls, and some other property controls are only available in the Effect Controls panel.
To change the units for a property, right-click (Windows) or Control-click (Mac OS) the underlined value, choose Edit
Value, and choose from the Units menu. The available units are different for different property types. You can’t change
the units for some properties.
•Place the pointer over the underlined value, and drag to the left or right.
•Click the underlined value, enter a new value, and then press Enter (Windows) or Return (Mac OS).
Note: You can enter simple arithmetic expressions for property values and other number entries. For example, you can enter
2*3 instead of 6, 4/2 instead of 2, and 2e2 instead of 200. Such entries can be especially useful when incrementing a value
by a specific amount from its original value.
•Right-click (Windows) or Control-click (Mac OS) the underlined value and choose Edit Value.
•Drag the slider left or right.
•Click a point inside the angle control or drag the angle control line.
Note: After you click inside the angle control, you can drag outside it for more precision.
•To increase or decrease the property value by 1 unit, click the underlined value and press the Up Arrow or Down
Arrow key. To increase or decrease by 10 units, hold Shift while pressing the Up Arrow or Down Arrow key. To
increase or decrease by 0.1 units, hold Ctrl (Windows) or Command (Mac OS) while pressing the Up Arrow or
Down Arrow key.
•To reset properties in a property group to their default values, click Reset next to the property group name. To reset
an individual property, right-click (Windows) or Control-click (Mac OS) the property name (not the value) and
choose Reset from the context menu.
If the property contains keyframes, a keyframe is added at the current time with the default value.
Alan Shisko provides a video tutorial on his Motion Graphics 'n Such blog shows how to use label colors and multiple
selections to rapidly change properties for multiple layers simultaneously.
Charles Bordenave (nab) provides a script on the After Effects Scripts website that sets the properties in the Transform
group for selected layers to random values within constraints that you set.
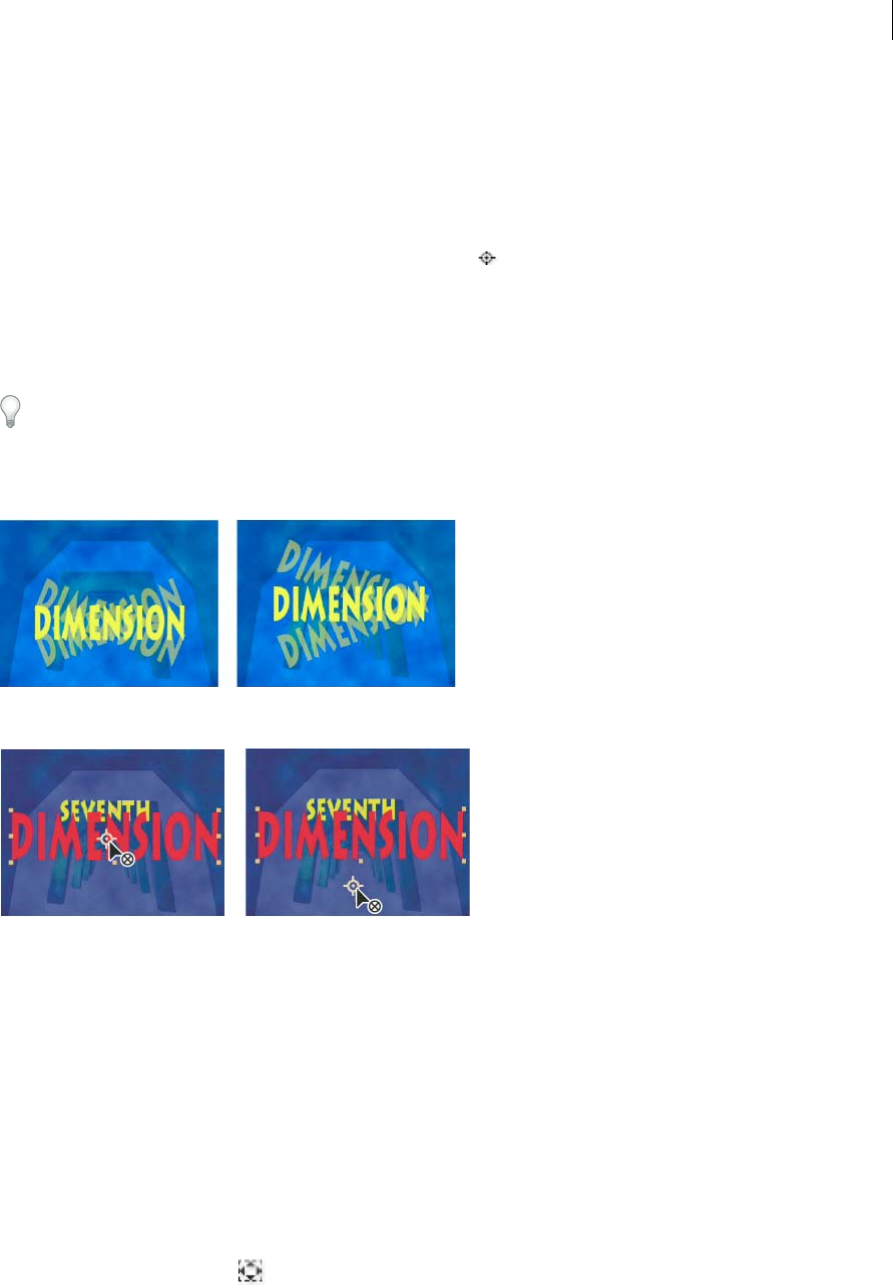
146
Layers and properties
Last updated 6/8/2015
The LockProperties script, available from the After Effects Scripts website, locks only specified properties so that you
can prevent accidental changes.
Layer anchor points
Transformations, such as rotation and scale, occur around the anchor point (sometimes called transformation point or
transformation center) of the layer. By default, the anchor point for most layer types is at the center of the layer.
Though there are times when you’ll want to animate the anchor point, it’s most common to set the anchor point for a
layer before you begin animating. For example, if you’re animating an image of a person made up of one layer for each
body part, you’ll probably want to move the anchor point of each hand to the wrist area so that the hand rotates around
that point for the whole animation.
The easiest way to pan and scan over a large image is to animate Anchor Point and Scale properties.
Alan Shisko provides a detailed video tutorial on his website, demonstrating how to create a complex 3D environment
from 3D layers, beginning with simple 2D assets. Manipulating layer anchor points is a crucial part of this tutorial.
Note: If you don’t see the anchor point in the Layer panel, select Anchor Point Path from the View menu at the lower-right
area of the Layer panel.
Move a layer anchor point
•Drag the anchor point using the Selection tool in the Layer panel
Note: Layers of some types, such as text layers and shape layers, can’t be opened in the Layer panel.
•To move a layer anchor point 1 pixel, choose Anchor Point Path from the View menu at the lower-right area of the
Layer panel, and press an arrow key. To move 10 pixels, hold Shift as you press an arrow key. Pixel measurements
are at the current magnification in the Layer panel.
•To move a layer anchor point in the Composition panel without moving the layer, select the layer and use the Pan
Behind (Anchor Point) tool to drag the anchor point.

147
Layers and properties
Last updated 6/8/2015
Note: Moving an anchor point with the Pan Behind (Anchor Point) tool changes Position and Anchor Point values so that
the layer remains where it was in the composition before you moved the anchor point. To change only the Anchor Point
value, Alt-drag (Windows) or Option-drag (Mac OS) with the Pan Behind (Anchor Point) tool.
Charles Bordenave (nab) provides a script on the After Effects Scripts website that moves the anchor points of selected
layers without moving the layers in the composition frame.
Reset a layer anchor point
•To reset the anchor point to its default location in the layer, double-click the Pan Behind (Anchor Point) tool
button in the Tools panel.
•To reset the anchor point to its default location in the layer, Alt-double-click (Windows) or Option-double-click
(Mac OS) the Pan Behind (Anchor Point) tool button. The layer moves to the center of the composition
Scale or flip a layer
As with other transformations, scaling of a layer occurs around the anchor point of the layer. If you move the anchor
point away from the center of the layer, the layer may move when you flip it. Some layers—such as camera, light, and
audio-only layers—don’t have a Scale property.
You can scale a layer beyond the composition frame.
For information on scaling exponentially, as with a zoom lens, see Use Exponential Scale to change the speed of scaling.
For information on scaling or resizing entire movies rather than a single layer, see Scaling a movie upand Scaling a
movie down.
To flip a layer is to multiply the horizontal or vertical component of its Scale property value by -1. A layer flips around
its anchor point.
•To flip selected layers, choose Layer > Transform > Flip Horizontal or Layer > Transform > Flip Vertical.
•To scale a layer proportionally in the Composition panel, Shift-drag any layer handle.
•To scale a layer freely in the Composition panel, drag a corner layer handle.
•To scale one dimension only in the Composition panel, drag a side layer handle.
•To increase or decrease Scale for a selected layer by 1%, hold down Alt (Windows) or Option (Mac OS) as you press
+ or – on the numeric keypad.
•To increase or decrease Scale for selected layers by 10%, hold down Alt+Shift (Windows) or Option+Shift (Mac OS)
as you press + or – on the numeric keypad.
•To scale an entire composition, choose File > Scripts > Scale Composition.jsx.
•To scale and center selected layers to fit in the composition frame, choose Layer > Transform > Fit To Comp.
•To scale and center selected layers to fit the width or height of the composition frame, while preserving the aspect
ratio of the layer, choose Layer > Transform > Fit To Comp Width, or Layer > Transform > Fit To Comp Height.
•To scale a layer proportionally in the Timeline panel, select the layer, press S to display the Scale property, click the
Constrain Proportions icon to the left of the Scale values, and enter a new value for the x, y, or z scale.
To activate the Constrain Proportions icon and match the height to the width, Alt-click (Windows) or Option-click
(Mac OS) it.
•To scale to a specific set of pixel dimensions, right-click (Windows) or Control-click (Mac OS) the Scale value in the
Timeline panel, choose Edit Value, and change the units to pixels in the Scale dialog box. Select Include Pixel Aspect
Ratio to see and adjust dimensions in terms of the composition’s pixel aspect ratio.

148
Layers and properties
Last updated 6/8/2015
Scaling down a raster (non-vector) layer sometimes causes a slight softening or blurring of the image. Scaling up a
raster layer by a large factor can cause the image to appear blocky or pixelated.
Adobe Photoshop provides fine control over resampling methods used for scaling of images. For fine control of
resampling, you can export frames to Photoshop to change the image size and then import the frames back into After
Effects.
Though it's not very well suited for movies, the content-aware scaling feature in Photoshop is very useful for extending
and scaling still images. This feature can be useful when repurposing images for wide-screen formats that were created
for standard-definition formats.
For a list of plug-ins that provide high-quality scaling—including some designed to create high-definition images from
standard-definition sources—go to the Toolfarm website.
For a script that scales multiple compositions simultaneously, go to the AE Enhancers forum.
Lloyd Alvarez provides a script on the After Effects Scripts website that scales selected layers to fit the composition
frame, and provides options for cropping or letterboxing.
Aharon Rabinowitz provides a video tutorial on the Creative COW website that demonstrates the uses of changing and
animating a 3D layer's Scale property, including changing only the z dimension of Scale.
Rotate a 2D layer
As with other transformations, rotation of a layer occurs around the anchor point of the layer.
To reveal the Rotation property value for selected layers in the Timeline panel, press R.
The first part of the Rotation property value is the number of whole rotations; the second part is the fractional rotation
in degrees.
For information on rotating 3D layers, see Rotate or orient a 3D layer.
•To rotate a layer by dragging in the Composition panel, drag the layer using the Rotation tool . To constrain
rotation to 45° increments, hold down Shift as you drag.
•To rotate selected layers by 1 degree, press plus (+) or minus (-) on the numeric keypad.
•To rotate selected layers by 10 degrees, press Shift+plus (+) or Shift+minus (-) on the numeric keypad.
Adjust audio volume levels
When you use footage containing audio, the default audio level for playback is 0 dB, meaning that the level is unadjusted
in After Effects. Setting a positive decibel level increases volume, and setting a negative decibel level decreases volume.
Note: Double-clicking an Audio Levels keyframe activates the Audio panel.
The VU meter in the Audio panel displays the volume range for the audio as it plays. The red blocks at the top of the
meter represent the volume limit of your system.
For more precision in setting audio levels by dragging sliders, increase the height of the Audio panel.
❖In the Audio panel, to adjust volume, do one of the following:
•To set the level of the left and right channels together, drag the center slider up or down.
•To set the level of the left channel, drag the left slider up or down, or type a new value in the levels box at the
bottom of the left slider.
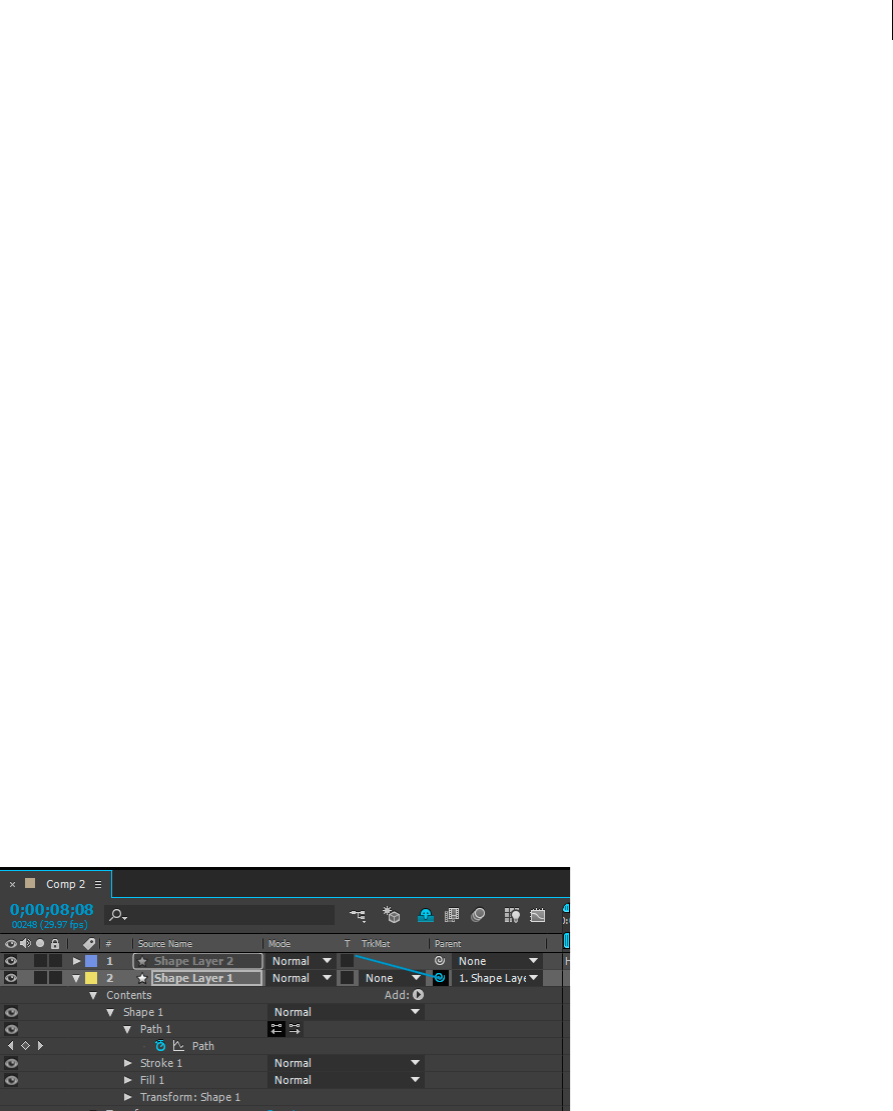
149
Layers and properties
Last updated 6/8/2015
•To set the level of the right channel, drag the right slider up or down, or type a new value in the levels box at the
bottom of the right slider.
Parent and child layers
To synchronize changes to layers by assigning one layer’s transformations to another layer, use parenting. After a layer
is made a parent to another layer, the other layer is called the child layer. When you assign a parent, the transform
properties of the child layer become relative to the parent layer instead of to the composition. For example, if a parent
layer moves 5 pixels to the right of its starting position, then the child layer also moves 5 pixels to the right of its
position. Parenting is similar to grouping; transformations made to the group are relative to the anchor point of the
parent.
Parenting affects all transform properties except Opacity: Position, Scale, Rotation, and (for 3D layers) Orientation.
Note: When parenting layers, helpful text describing alternate parenting behaviors is displayed on the layer bar below the
mouse position and in the Info panel.
A layer can have only one parent, but a layer can be a parent to any number of layers in the same composition.
You can animate child layers independent of their parent layers. You can also parent using null objects, which are
hidden layers.
You cannot animate the act of assigning and removing the parent designation—that is, you cannot designate a layer as
a parent at one point in time and designate it as a normal layer at a different point in time.
When you create a parenting relationship, you can choose whether to have the child take on the transform property
values of the parent or retain its own. If you choose to have the child take on the transform property values of the parent,
the child layer jumps to the parent’s position. If you choose to have the child retain its own transform property values,
then the child stays where it is. In both cases, subsequent changes to the transform property values of the parent are
applied to the child. Similarly, you can choose whether the child jumps when the parenting relationship is removed.
Note: When parenting layers, you can use the Shift key to move the child layer to the location of the parent. This can be
useful when you want to attach a layer to a null, but have the layer move to the location of the parent null (for example,
attaching a 3D text layer to a null layer created from the 3D Camera Tracker).
Note: To show or hide the Parent column in the Timeline panel, choose Columns > Parent from the Timeline panel menu.
•To parent a layer, in the Parent column, drag the pick whip from the layer that is to be the child layer to the layer
that is to be the parent layer.
•To parent a layer, in the Parent column, click the menu of the layer that you want to be the child, and choose a parent
layer name from the menu.

150
Layers and properties
Last updated 6/8/2015
•To remove a parent from a layer, in the Parent column, click the menu of the layer to remove the parent from, and
choose None.
•To extend the selection to include all child layers of a selected parent layer, right-click (Windows) or Control-click
(Mac OS) the layer in the Composition or Timeline panel, and choose Select Children.
•To make a child layer jump when a parent is assigned or removed, hold down Alt (Windows) or Option (Mac OS)
as you assign or remove the parent.
•To remove a parent from a layer (that is, set Parent to None), Ctrl-click (Windows) or Command-click (Mac OS) the
parenting pick whip of the child layer in the Timeline panel. Alt+Ctrl-click (Windows) or Option+Command-click
(Mac OS) the parenting pick whip of the child layer to remove the parent and cause the child layer to jump.
Online resources about parent and child layers
Paul Tuersley provides a script on the AE Enhancers forum for duplicating a parent layer and all of its children,
preserving the parenting hierarchy.
Angie Taylor provides a character animation tutorial on her Creative After Effects website that shows how to use
parenting and expressions. Angie provides a more extensive discussion and explanation of animation using parenting,
expressions, and null object layers in a PDF excerpt from her book Creative After Effects 7: Workflow Techniques for
Animation, Visual Effects, and Motion Graphics.
Trish and Chris Meyer provide an introduction to parenting in a PDF excerpt from the “Parenting and Nesting” chapter
of their book After Effects Apprentice: Real-World Skills for the Aspiring Motion Graphics Artist.
Carl Larsen provides a video tutorial on the Creative COW website that demonstrates how to use expressions and
parenting to relate the rotation of a set of wheels to the horizontal movement of a vehicle.
Carl Larsen provides a pair of video tutorials on the Creative COW website in which he explains the basics of parenting
and then uses an expression involving the toWorld method to trace the path of an animated child layer:
•part 1
•part 2
Robert Powers provides a video tutorial on the Slippery Rock NYC website that demonstrates the use of parenting and
the Puppet tools to animate a character.
Null object layers
To assign a parent layer, but keep that layer from being a visible element in your project, use a null object. A null object
is an invisible layer that has all the properties of a visible layer so that it can be a parent to any layer in the composition.
Adjust and animate a null object as you would any other layer. You use the same commands to modify settings for a
null object that you use for a solid-color layer (Layer > Solid Settings).
You can apply Expression Controls effects to null objects and then use the null object as a control layer for effects and
animations in other layers. For example, when working with a camera or light layer, create a null object layer and use
an expression to link the Point Of Interest property of the camera or light to the Position property of the null layer. Then,
you can animate the Point Of Interest property by moving the null object. It is often easier to select and see a null object
than it is to select and see the point of interest.
A composition can contain any number of null objects. A null object is visible only in the Composition and Layer panels
and appears in the Composition panel as a rectangular outline with layer handles. Effects are not visible on null objects.
❖To create a null object, select the Timeline or Composition panel and choose Layer > New > Null Object.

151
Layers and properties
Last updated 6/8/2015
Note: The anchor point of a new null object layer appears in the upper-left corner of the layer, and the layer is anchored in
the center of the composition at its anchor point. Change the anchor point as you would for any other layer.
If a null object is visually distracting in your composition frame, consider dragging it out of the frame, onto the
pasteboard.
Andrew Kramer provides a video tutorial on his Video Copilot website that demonstrates the use of a null object to
animate a 3D stroke.
Angie Taylor provides an extensive discussion and explanation of animation using parenting, expressions, and null
object layers in a PDF excerpt from her book Creative After Effects 7: Workflow Techniques for Animation, Visual
Effects, and Motion Graphics.
Guide layers
You c an cre ate guide layers from existing layers to use for reference in the Composition panel, to help you position and
edit elements. For example, you can use guide layers for visual reference, for audio timing, for timecode reference, or
for storing comments to yourself.
A guide layer icon appears next to the name of a guide layer or its source in the Timeline panel.
By default, guide layers aren’t rendered when you create output but can be rendered when desired by changing the
render settings for the composition.
Note: Guide layers in nested compositions can’t be viewed in the containing composition.
•To convert selected layers to guide layers, choose Layer > Guide Layer.
•To render a composition with its visible guide layers, click Render Settings in the Render Queue panel, and choose
Current Settings from the Guide Layers menu in the Render Settings dialog box.
•To render a composition without rendering guide layers, click Render Settings in the Render Queue panel, and
choose All Off from the Guide Layers menu in the Render Settings dialog box.
Use Brainstorm to experiment and explore settings
Brainstorm creates multiple temporary variants of your composition and displays them in a grid. You can save any
number of these variants, apply one to the current composition, or redo the Brainstorm operation using only the
variants that you choose as input.
Brainstorm uses genetic algorithms to mutate and select property values used as input into each Brainstorm operation.
You decide which variants to include as input to each generation and how much mutation (randomness) to use.
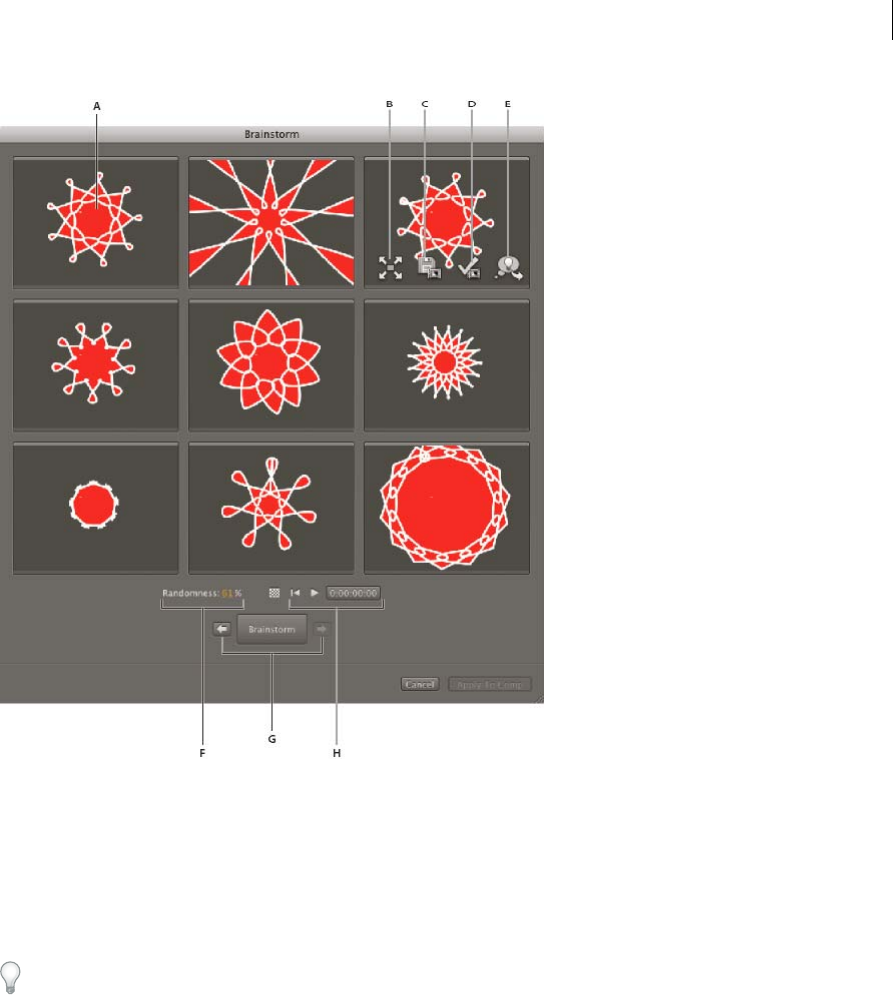
152
Layers and properties
Last updated 6/8/2015
A Original composition (original in center tile when using Brainstorm on single numeric value) B Maximize Tile C Save As New Composition
D Apply To Composition E Use In Next Brainstorm F Randomness control (Spread control when using Brainstorm on single numeric value)
G Back and Forward to previous and next generations H Playback controls
With Brainstorm, you can rapidly accomplish the following:
•Compare the results of multiple values for a single property so that you can find the value that works best.
•Explore the results of randomly modifying any number of properties to achieve a creative result.
Open a template project or apply an animation preset to a layer, select some properties (or entire property groups), and
then use Brainstorm to quickly modify these properties. Starting from such complete material, you can use Brainstorm
to very quickly create your own projects and animations.
You can use Brainstorm on any number of properties and property groups, from one or more layers in the same
composition. For example, you can use Brainstorm to refine the single Stroke Width property for a star on a shape layer;
or you can select the entire Contents property group and use Brainstorm to explore the entire space of properties for
all shapes on the layer.
You can use Brainstorm on any property that has numeric values or options in a pop-up menu in the Timeline panel.
Examples of properties on which you can’t use Brainstorm are Source Text, Mask Path, and the Histogram property for
the Levels effect; however, you can use Brainstorm on the properties of the Levels (Individual Controls) effect.
Brainstorm operates on all selected keyframes. For a property with no keyframes, Brainstorm operates on the global,
constant value.

153
Layers and properties
Last updated 6/8/2015
If you use Brainstorm on a single one-dimensional property (such as Opacity, but not Position), the Randomness value
that controls the amount of variation (mutation) is replaced by a Spread value. The variants that are presented in the
Brainstorm dialog box are then not random, but represent a range of values around the central value. The original
composition appears in the center tile of the dialog box, and you can only select one variant on which to base the next
Brainstorm operation.
Though you can’t directly use Brainstorm on expressions, you can use Brainstorm on the properties of Expression
Control effects, to which expressions can refer.
1Set a work area and region of interest for the duration and spatial area of the composition that you want to preview
during the Brainstorm session. (See Work areaand Region of interest (ROI).)
2Select one or more properties or property groups in the Timeline panel, and click the Brainstorm button at the
top of the Timeline panel.
The variant compositions all play in the Brainstorm dialog box simultaneously. Controls for each variant are only
visible when the pointer is over it. Use the playback controls at the bottom of the Brainstorm dialog box to play,
pause, or rewind the previews.
3In the Brainstorm dialog box, do any of the following:
•To get a better look at a variant, click its Maximize Tile button. Click the Restore Tile Size button to
return to the grid view of all variants.
•To show or hide the transparency grid, click the Toggle Transparency Grid button at the bottom of the
Brainstorm dialog box.
•To mark a variant for inclusion in the next Brainstorm operation, click the Include In Next Brainstorm
button for that variant.
•To save a variant as a new composition in the current project, click the Save As New Composition button
for that variant.
•To increase the randomness or spread for the next generation, adjust the Randomness or Spread value at the
bottom of the Brainstorm dialog box. Make this number small for precision work; make it larger for
experimentation and exploration.
4(Optional) To create another generation of variants from the variants marked for inclusion in the next Brainstorm
operation, click Brainstorm at the bottom of the Brainstorm dialog box and return to step 2. If you click Brainstorm
without marking any variants for inclusion, the Brainstorm operation is repeated using the same input as the current
generation.
If the Brainstorm operation uses Randomness, the variants marked for input into the next generation are included
unchanged into the next generation, and remain in their positions in the dialog box. If the Brainstorm operation
uses Spread, only one variant is carried into the next generation, and it appears in the center tile.
Repeat this cycle until you have found the variant that you want to save as the current composition.
You can move back or forward a generation by clicking the arrow buttons on either side of the Brainstorm button at
the bottom of the Brainstorm dialog box. If you move back a generation and then perform another Brainstorm
operation, the later generations are lost.
Note: Press Esc to close the Brainstorm dialog box.
Note: If you use the Save As New Composition feature and the current composition contains expressions that refer to itself
using the comp("<name>") format, then the saved compositions’ expressions will refer to the original composition, not each
saved composition. If your expression needs to rely on the settings in its own composition, use the thisComp object instead.

154
Layers and properties
Last updated 6/8/2015
More Help topics
Effect Controls panel
Layers (keyboard shortcuts)
Modifying layer properties (keyboard shortcuts)
Keyframes and the Graph Editor (keyboard shortcuts)
Showing properties and groups in the Timeline panel (keyboard shortcuts)
Selecting and arranging layers
Show or hide layer controls in the Composition panel
Image size and resolution
Preview video and audio
Columns
Expression Controls effects
Render settings
Blending modes and layer styles
Work with layer blending modes
Blending modes for layers control how each layer blends with or interacts with layers beneath it. Blending modes for
layers in After Effects (formerly referred to as layer modes and sometimes called transfer modes) are identical to
blending modes in Adobe Photoshop.
Most blending modes modify only color values of the source layer, not the alpha channel. The Alpha Add blending
mode affects the alpha channel of the source layer, and the silhouette and stencil blending modes affect the alpha
channels of layers beneath them.
You can’t directly animate blending modes by using keyframes. To change a blending mode at a certain time, split the
layer at that time and apply the new blending mode to the part of the layer that continues. You can also use the
Compound Arithmetic effect, the results of which are similar to the results of blending modes but can change over time.
Each layer has a blending mode, even if that blending mode is the default Normal blending mode.
Note: To blend colors with a gamma value of 1, choose File > Project Settings and select Blend Colors Using 1.0 Gamma.
Deselect this option to blend colors in the working color space for the project. (See Linearize working space and enable linear
blending.)
Blending modes for multiple masks on a single layer are called mask modes.
Some effects include their own blending mode options. For details, see the descriptions of the individual effects.
•To cycle through blending modes for selected layers, hold down the Shift key and press - (hyphen) or = (equal sign)
on the main keyboard.

155
Layers and properties
Last updated 6/8/2015
Note: These shortcuts provide a convenient way to experiment with the appearance of various blending modes.
•To apply a blending mode to selected layers, choose a blending mode from the menu in the Mode column in the
Timeline panel or from the Layer > Blending Mode menu.
•To show the Modes column in the Timeline panel, choose Columns > Modes from the panel menu, or click the
Expand Or Collapse The Transfer Controls button at the lower-left corner of the Timeline panel.
Trish and Chris Meyer provide tips and tricks for using blending modes to achieve a filmic look in this PDF document
on the Artbeats website.
Trish and Chris Meyer explain how to use blending modes, layer styles, and the Displacement Map effect to make text
blend in to appear to be part of a surface in the PDF article “Writing on the Wall” on the Artbeats website.
Blending mode reference
All blending modes described in this section are available for blending between layers. Some of these options are
available for paint strokes, layer styles, and effects.
For in-depth information about the concepts and algorithms behind these blending modes as implemented in several
Adobe applications, see section 7.2.4 of version 1.7 of the PDF reference on the Adobe website.
The blending mode menu is subdivided into eight categories based on similarities between the results of the blending
modes. The category names do not appear in the interface; the categories are simply separated by dividing lines in the
menu.
Normal category Normal, Dissolve, Dancing Dissolve. The result color of a pixel is not affected by the color of the
underlying pixel unless Opacity is less than 100% for the source layer. The Dissolve blending modes turn some of the
pixels of the source layer transparent.
Subtractive category Darken, Multiply, Color Burn, Classic Color Burn, Linear Burn, Darker Color. These blending
modes tend to darken colors, some by mixing colors in much the same way as mixing colored pigments in paint.
Additive category Add, Lighten, Screen, Color Dodge, Classic Color Dodge, Linear Dodge, Lighter Color. These
blending modes tend to lighten colors, some by mixing colors in much the same way as mixing projected light.
Complex category Overlay, Soft Light, Hard Light, Linear Light, Vivid Light, Pin Light, Hard Mix. These blending
modes perform different operations on the source and underlying colors depending on whether one of the colors is
lighter than 50% gray.
Difference category Difference, Classic Difference, Exclusion, Subtract, Divide. These blending modes create colors
based on the differences between the values of the source color and the underlying color.
HSL category Hue, Saturation, Color, Luminosity. These blending modes transfer one or more of the components of
the HSL representation of color (hue, saturation, and luminosity) from the underlying color to the result color.
Matte category Stencil Alpha, Stencil Luma, Silhouette Alpha, Silhouette Luma. These blending modes essentially
convert the source layer into a matte for all underlying layers.
The stencil and silhouette blending modes use either the alpha channel or luma values of a layer to affect the alpha
channel of all layers beneath the layer. Using these blending modes differs from using a track matte, which affects only
one layer. Stencil modes cut through all layers, so that you can, for example, show multiple layers through the alpha
channel of the stencil layer. Silhouette modes block out all layers below the layer with the blending mode applied, so
you can cut a hole through several layers at once. To keep the silhouette and stencil blending modes from cutting
through or blocking all layers underneath, precompose the layers that you want to affect and nest them in your
composition.
Chris and Trish Meyer explain stencil blending modes in an article on the ProVideo Coalition website.

156
Layers and properties
Last updated 6/8/2015
Utility category Alpha Add, Luminescent Premul. These blending modes serve specialized utility functions.
Blending mode descriptions
In the following descriptions, these terms are used:
•The source color is the color of the layer or paint stroke to which the blending mode is applied.
•The underlying color is the color of the composited layers below the source layer or paint stroke in the layer stacking
order in the Timeline panel.
•The result color is the output of the blending operation; the color of the composite.
Note: Some color values in the following descriptions are given in terms of the 0.0-1.0 scale from black to white.
Normal The result color is the source color. This mode ignores the underlying color. Normal is the default mode.
Dissolve The result color for each pixel is either the source color or the underlying color. The probability that the result
color is the source color depends on the opacity of the source. If opacity of the source is 100%, then the result color is
the source color. If opacity of the source is 0%, then the result color is the underlying color. Dissolve and Dancing
Dissolve do not work on 3D layers.
Dancing Dissolve Same as Dissolve, except that the probability function is recalculated for each frame, so the result
varies over time.
Darken Each result color channel value is the lower (darker) of the source color channel value and the corresponding
underlying color channel value.
Multiply For each color channel, multiplies source color channel value with underlying color channel value and divides
by maximum value for 8-bpc, 16-bpc, or 32-bpc pixels, depending on the color depth of the project. The result color is
never brighter than the original. If either input color is black, the result color is black. If either input color is white, the
result color is the other input color. This blending mode simulates drawing with multiple marking pens on paper or
placing multiple gels in front of a light. When blending with a color other than black or white, each layer or paint stroke
with this blending mode results in a darker color.
Color Burn The result color is a darkening of the source color to reflect the underlying layer color by increasing the
contrast. Pure white in the original layer does not change the underlying color.
Classic Color Burn The Color Burn mode from After Effects 5.0 and earlier, renamed Classic Color Burn. Use it to
preserve compatibility with older projects; otherwise, use Color Burn.
Linear Burn The result color is a darkening of the source color to reflect the underlying color. Pure white produces no
change.
Darker Color Each result pixel is the color of darker of the source color value and the corresponding underlying color
value. Darker Color is similar to Darken, but Darker Color does not operate on individual color channels.
Add Each result color channel value is the sum of the corresponding color channel values of the source color and
underlying color. The result color is never darker than either input color.

157
Layers and properties
Last updated 6/8/2015
Lighten Each result color channel value is the higher (lighter) of the source color channel value and the corresponding
underlying color channel value.
Screen Multiplies the complements of the channel values, and then takes the complement of the result. The result color
is never darker than either input color. Using the Screen mode is similar to projecting multiple photographic slides
simultaneously onto a single screen.
Color Dodge The result color is a lightening of the source color to reflect the underlying layer color by decreasing the
contrast. If the source color is pure black, the result color is the underlying color.
Classic Color Dodge The Color Dodge mode from After Effects 5.0 and earlier, renamed Classic Color Dodge. Use it to
preserve compatibility with older projects; otherwise, use Color Dodge.
Linear Dodge The result color is a lightening of the source color to reflect the underlying color by increasing the
brightness. If the source color is pure black, the result color is the underlying color.
Lighter Color Each result pixel is the color of lighter of the source color value and the corresponding underlying color
value. Lighter Color is similar to Lighten, but Lighter Color does not operate on individual color channels.
Overlay Multiplies or screens the input color channel values, depending on whether or not the underlying color is
lighter than 50% gray. The result preserves highlights and shadows in the underlying layer.
Soft Light Darkens or lightens the color channel values of the underlying layer, depending on the source color. The
result is similar to shining a diffused spotlight on the underlying layer. For each color channel value, if the source color
is lighter than 50% gray, the result color is lighter than the underlying color, as if dodged. If the source color is darker
than 50% gray, the result color is darker than the underlying color, as if burned. A layer with pure black or white
becomes markedly darker or lighter, but does not become pure black or white.
Hard Light Multiplies or screens the input color channel value, depending on the original source color. The result is
similar to shining a harsh spotlight on the layer. For each color channel value, if the underlying color is lighter than 50%
gray, the layer lightens as if it were screened. If the underlying color is darker than 50% gray, the layer darkens as if it
were multiplied. This mode is useful for creating the appearance of shadows on a layer.
Linear Light Burns or dodges the colors by decreasing or increasing the brightness, depending on the underlying color.
If the underlying color is lighter than 50% gray, the layer is lightened because the brightness is increased. If the
underlying color is darker than 50% gray, the layer is darkened because the brightness is decreased.
Vivid Light Burns or dodges the colors by increasing or decreasing the contrast, depending on the underlying color. If
the underlying color is lighter than 50% gray, the layer is lightened because the contrast is decreased. If the underlying
color is darker than 50% gray, the layer is darkened because the contrast is increased.
Pin Light Replaces the colors, depending on the underlying color. If the underlying color is lighter than 50% gray, pixels
darker than the underlying color are replaced, and pixels lighter than the underlying color do not change. If the
underlying color is darker than 50% gray, pixels lighter than the underlying color are replaced, and pixels darker than
the underlying color do not change.
Hard Mix Enhances the contrast of the underlying layer that is visible beneath a mask on the source layer. The mask
size determines the contrasted area; the inverted source layer determines the center of the contrasted area.
Difference For each color channel, subtracts the darker of the input values from the lighter. Painting with white inverts
the backdrop color; painting with black produces no change.

158
Layers and properties
Last updated 6/8/2015
If you have two layers with an identical visual element that you want to align, place one layer on top of the other and
set the blending mode of the top layer to Difference. Then, you can move one layer or the other until the pixels of the
visual element that you want to line up are all black—meaning that the differences between the pixels are zero and therefore
the elements are stacked exactly on top of one another.
Classic Difference The Difference mode from After Effects 5.0 and earlier, renamed Classic Difference. Use it to
preserve compatibility with older projects; otherwise, use Difference.
Exclusion Creates a result similar to but lower in contrast than the Difference mode. If the source color is white, the
result color is the complement of the underlying color. If the source color is black, the result color is the underlying
color.
Subtract Subtracts the source color from the underlying color. If the source color is black, the result color is the
underlying color. Result color values can be less than 0 in 32-bpc projects.
Divide Divides underlying color by source color. If the source color is white, the result color is the underlying color.
Result color values can be greater than 1.0 in 32-bpc projects.
Hue Result color has luminosity and saturation of the underlying color, and the hue of the source color.
Saturation Result color has luminosity and hue of the underlying color, and the saturation of the source color.
Color Result color has luminosity of the underlying color, and hue and saturation of the source color. This blending
mode preserves the gray levels in the underlying color. This blending mode is useful for coloring grayscale images and
for tinting color images.
Luminosity Result color has hue and saturation of the underlying color, and luminosity of the source color. This mode
is the opposite of the Color mode.
Stencil Alpha Creates a stencil using the alpha channel of the layer.
Stencil Luma Creates a stencil using the luma values of the layer. The lighter pixels of the layer are more opaque than
the darker pixels.
Silhouette Alpha Creates a silhouette using the alpha channel of the layer.
Silhouette Luma Creates a silhouette using the luma values of the layer. Creates transparency in painted areas of the
layer, allowing you to see underlying layers or background. The luminance value of the blend color determines opacity
in the result color. The lighter pixels of the source cause more transparency than the darker pixels. Painting with pure
white creates 0% opacity. Painting with pure black produces no change.
Alpha Add Composites layers normally, but adds complementary alpha channels to create a seamless area of
transparency. Useful for removing visible edges from two alpha channels that are inverted relative to each other or from
the alpha channel edges of two touching layers that are being animated.
Note: Sometimes, when layers are aligned edge-to-edge, seams can appear between the layers. This is especially an issue
with 3D layers that are joined to one another at the edges to build a 3D object. When the edges of a layer are anti-aliased,
there's some partial transparency at the edges. When two areas of 50% transparency overlap, the result is not 100% opacity
but 75% opacity, because the default operation is multiplication. (50% of the light gets through one layer, and then 50% of
the remainder gets through the next layer, so 25% gets through the system.) This is like partial transparency in the real
world. But, in some cases, you don't want this default blending. You want the two 50% opacity areas to combine to make
a seamless, opaque join. You want the alpha values to be added. In these cases, use the Alpha Add blending mode.
Luminescent Premul Prevents clipping of color values that exceed the alpha channel value after compositing by adding
them to the composition. Useful for compositing rendered lens or light effects (such as lens flare) from footage with
premultiplied alpha channels. May also improve results when compositing footage from matting software from other
manufacturers. When applying this mode, you may get the best results by changing interpretation of the premultiplied-
alpha source footage to straight alpha.

159
Layers and properties
Last updated 6/8/2015
Layer styles
Photoshop provides a variety of layer styles—such as shadows, glows, and bevels—that change the appearance of a layer.
After Effects can preserve these layer styles when importing Photoshop layers. You can also apply layer styles in After
Effects and animate their properties.
You can copy and paste any layer style within After Effects, including layer styles imported into After Effects in PSD
files. Richard Harrington provides a video tutorial on the Creative COW website that shows how to bring a library of
layer styles from Photoshop into After Effects so that you can use, modify, copy, and paste the custom layer styles in After
Effects.
In addition to the layer styles that add visual elements—like a drop shadow or a color overlay—each layer’s Layer Styles
property group contains a Blending Options property group. You can use the Blending Options settings for powerful
and flexible control over blending operations.
Though layer styles are referred to as effects in Photoshop, they behave more like blending modes in After Effects. Layer
styles follow transformations in the standard render order, whereas effects precede transformations. Another difference
is that each layer style blends directly with the underlying layers in the composition, whereas an effect is rendered on
the layer to which it’s applied, the result of which then interacts with the underlying layers as a whole.
When you import a Photoshop file that includes layers as a composition, you can retain editable layer styles or merge
layer styles into footage. When you import only one layer that includes layer styles, you can choose to ignore the layer
styles or merge layer styles into footage. At any time, you can convert merged layer styles into editable layer styles for
each After Effects layer based on a Photoshop footage item.
After Effects can preserve all layer styles in imported Photoshop files, but you can only add and modify some layer
styles and controls within After Effects.
Note: For details about each layer style and its properties, see Photoshop Help.
Layer styles that you can apply and edit in After Effects
Drop Shadow Adds a shadow that falls behind the layer.
Inner Shadow Adds a shadow that falls inside the contents of the layer, giving the layer a recessed appearance.
Outer Glow Adds a glow that emanates outward from the contents of the layer.
Inner Glow Adds a glow that emanates inward from the contents of the layer.
Bevel And Emboss Adds various combinations of highlights and shadows.
Use the Bevel And Emboss layer style rather than the Bevel Alpha effect if, for example, you want to apply different
blending modes to the highlights and shadows of a bevel.
Satin Applies interior shading that creates a satiny finish.
Color Overlay Fills the contents of the layer with a color.
Gradient Overlay Fills the contents of the layer with a gradient.
Stroke Outlines the contents of the layer.
Add, remove, and convert layer styles
•To convert merged layer styles into editable layer styles, select one or more layers and choose Layer > Layer Styles >
Convert To Editable Styles.
•To add a layer style to selected layers, choose Layer > Layer Styles, and choose a layer style from the menu.
•To remove a layer style, select it in the Timeline panel and press Delete.

160
Layers and properties
Last updated 6/8/2015
•To remove all layer styles from selected layers, choose Layer > Layer Styles > Remove All.
When a layer style is applied to a vector layer—such as a text layer, a shape layer, or a layer based on an Illustrator
footage item—visual elements that apply to the edges of the contents of the layer apply to the outlines of the vector
objects, such as text characters or shapes. When a layer style is applied to a layer based on a non-vector footage item,
the layer style applies to the edges of the layer’s bounds or masks.
You can apply a layer style to a 3D layer, but a layer with a layer style can’t intersect with other 3D layers or interact with
other 3D layers for casting and receiving shadows. 3D layers on either side of a layer with a layer style can’t intersect
one another or cast shadows on one another.
When you use the Layer > Convert To Editable Text command on a text layer from a Photoshop file, any layer styles on
that layer are also converted to editable layer styles.
Layer style settings
Each layer style has its own collection of properties in the Timeline panel.
Align With Layer Uses the bounding box of the layer to calculate the gradient fill.
Altitude For the Bevel And Emboss layer style, the elevation of the light source above the layer, in degrees.
Choke Shrinks the boundaries of the matte of an Inner Shadow or Inner Glow before blurring.
Distance The offset distance for a Shadow or Satin layer style
Highlight Mode, Shadow Mode Specifies the blending mode of a bevel or emboss highlight or shadow.
Jitter Varies the application of the colors and opacity of a gradient, which reduces banding.
Layer Knocks Out Drop Shadow Controls the visibility of a drop shadow in a semitransparent layer.
Reverse Flips the orientation of a gradient.
Scale Resizes the gradient.
Spread Expands the boundaries of the matte before blurring.
Use Global Light Set this option to On to use the Global Light Angle and Global Light Altitude in the Blending Options
property group instead of the Angle and Altitude settings for each individual layer style. This option is useful if you
have multiple layer styles applied to the same layer and want to animate the position of the light for all of them.
Blending options for layer styles
Each layer style has its own blending mode, which determines how it interacts with underlying layers. The underlying
layer in this context may or may not include the layer to which the layer style is applied. For example, a drop shadow
does not blend with the layer to which it’s applied, because the shadow falls behind the layer; whereas an inner shadow
does blend with the layer to which it’s applied.
Layer styles can be categorized as interior layer styles or exterior layer styles. Interior layer styles affect the opaque pixels
of the layer to which they’re applied. Interior layer styles include Inner Glow, Inner Shadow, Color Overlay, Gradient
Overlay, Satin, and Bevel And Emboss. Exterior layer styles do not blend with the pixels of the layer to which they’re
applied, but only interact with the underlying layers. Exterior layer styles include Outer Glow and Drop Shadow.
If Blend Interior Styles As Group is set to On, interior layer styles use the blending mode of the layer.
If you modify the Opacity property of a layer, the opacity of the contents of the layer and the opacity of the layer styles
are all affected. If, however, you modify the Fill Opacity property in the Blending Options property group, the opacity
of the layer styles is unaffected. For example, if a text layer has the Drop Shadow layer style applied, decreasing the Fill
Opacity to 0 makes the text disappear, but the drop shadow remains visible.

161
Layers and properties
Last updated 6/8/2015
Use the Blend Ranges From Source option to use the advanced blending options set for the Photoshop file that
determine what blending operations to perform based on the color characteristics of the input layer.
Online resources about layer styles
Dave Scotland provides a video tutorial on the CG Swot website that demonstrates how to create a metallic textured
logo using layer styles in After Effects.
Exclude channels from blending
You can exclude one or more of the color channels of a layer from blending operations.
The Blending Options property group is only included for a layer if the layer has had a layer style added to it. To add a
Blending Options property group without a layer style, add an arbitrary layer style and then immediately delete it; the
Blending Options property group and its containing Layer Styles property group remain.
1Expand the Blending Options property group for the layer in the Layer Styles property group in the Timeline panel.
2To exclude a channel from blending, set Red, Green, or Blue to Off in the Advanced Blending property group.
You can animate these properties, so you can exclude a channel from blending at some times but include the channel
at other times.
More Help topics
Mask modes
Split a layer
Color basics
Preparing and importing Photoshop files
Render order and collapsing transformations
3D layer interactions, render order, and collapsed transformations
Layer effects and styles
3D layers
3D layers overview and resources
The basic objects that you manipulate in After Effects are flat, two-dimensional (2D) layers. When you make a layer a
3D layer, the layer itself remains flat, but it gains additional properties: Position (z), Anchor Point (z), Scale (z),
Orientation, X Rotation, Y Rotation, Z Rotation, and Material Options properties. Material Options properties specify
how the layer interacts with light and shadows. Only 3D layers interact with shadows, lights, and cameras.

162
Layers and properties
Last updated 6/8/2015
Any layer can be a 3D layer, except an audio-only layer. Individual characters within text layers can optionally be 3D
sublayers, each with their own 3D properties. A text layer with Enable Per-character 3D selected behaves just like a
precomposition that consists of a 3D layer for each character. All camera and light layers have 3D properties.
By default, layers are at a depth (z-axis position) of 0. In After Effects, the origin of the coordinate system is at the upper-
left corner; x (width) increases from left to right, y (height) increases from top to bottom, and z (depth) increases from
near to far. Some video and 3D applications use a coordinate system that is rotated 180 degrees around the x axis; in
these systems, y increases from bottom to top, and z increases from far to near.
You can transform a 3D layer relative to the coordinate space of the composition, the coordinate space of the layer, or
a custom space by selecting an axis mode.
You can add effects and masks to 3D layers, composite 3D layers with 2D layers, and create and animate camera and
light layers to view or illuminate 3D layers from any angle. When rendering for final output, 3D layers are rendered
from the perspective of the active camera. (See Create a camera layer and change camera settings.)
All effects are 2D, including effects that simulate 3D distortions. For example, viewing a layer with the Bulge effect from
the side does not show a protrusion.
As with all masks, mask coordinates on a 3D layer are in the 2D coordinate space of the layer.
Note: After Effects 7.0 and earlier included a Standard 3D rendering plug-in; this plug-in is not included with After Effects
CS3 or later. In After Effects 6.0 and later, the default plug-in for rendering 3D layers has been the Advanced 3D rendering
plug-in. When you open a project that was created with the Standard 3D rendering plug-in, the project is converted to use
the Advanced 3D rendering plug-in. As third-party plug-ins become available, you can choose them from the Advanced
section of the Composition Settings dialog box.
Convert 3D layers
When you convert a layer to 3D, a depth (z) value is added to its Position, Anchor Point, and Scale properties, and the
layer gains Orientation, Y Rotation, X Rotation, and Material Options properties. The single Rotation property is
renamed Z Rotation.
When you convert a 3D layer back to 2D, the Y Rotation, X Rotation, Orientation, and Material Options properties are
removed, including all values, keyframes, and expressions. (These values cannot be restored by converting the layer
back to a 3D layer.) The Anchor Point, Position, and Scale properties remain, along with their keyframes and
expressions, but their z values are hidden and ignored.
Convert a layer to a 3D layer
❖Select the 3D Layer switch for the layer in the Timeline panel, or select the layer and choose Layer > 3D Layer.
Convert a text layer to a 3D layer with per-character 3D properties enabled
❖Choose Animation > Animate Text > Enable Per-Character 3D, or choose Enable Per-Character 3D from the
Animate menu for the layer in the Timeline panel.
163
Layers and properties
Last updated 6/8/2015
Convert a 3D layer to a 2D layer
❖Deselect the 3D Layer switch for the layer in the Timeline panel, or select the layer and choose Layer > 3D Layer.
Show or hide 3D axes and layer controls
3D axes are color-coded arrows: red for x, green for y, and blue for z.
•To show or hide 3D axes, camera and light wireframe icons, layer handles, and the point of interest, choose View >
Show Layer Controls.
If the axis that you want to manipulate is difficult to see, try a different setting in the Select View Layout menu at the
bottom of the Composition panel.
•To show or hide a set of persistent 3D reference axes, click the Grid And Guides Options button at the bottom
of the Composition panel, and choose 3D Reference Axes.
Chris and Trish Meyer provide a video tutorial on the ProVideo Coalition website that demonstrates the use of the 3D
axis layer controls.
Move a 3D layer
1Select the 3D layer that you want to move.
2Do one of the following:
•In the Composition panel, use the Selection tool to drag the arrowhead of the 3D axis layer control
corresponding to the axis along which you want to move the layer. Shift-drag to move the layer more quickly.
•In the Timeline panel, modify the Position property values.
Press P to show Position.
•To move selected layers so that their anchor points are at the center in the current view, choose Layer > Transform
> Center In View or press Ctrl+Home (Windows) or Command+Home (Mac OS).
Chris and Trish Meyer provide a video tutorial on the ProVideo Coalition website that demonstrates the use of the 3D
axis layer controls.
Rotate or orient a 3D layer
You can turn a 3D layer by changing its Orientation or Rotation values. In both cases, the layer turns around its anchor
point. The Orientation and Rotation properties differ in how the layer moves when you animate them.
When you animate the Orientation property of a 3D layer, the layer turns as directly as possible to reach the specified
orientation. When you animate any of the X, Y, or Z Rotation properties, the layer rotates along each individual axis
according to the individual property values. In other words, Orientation values specify an angular destination, whereas
Rotation values specify an angular route. Animate Rotation properties to make a layer turn multiple times.
Animating the Orientation property is often better for natural, smooth motion, whereas animating the Rotation
properties provides more precise control.
Rotate or orient a 3D layer in the Composition panel
1Select the 3D layer that you want to turn.
2Select the Rotation tool , and choose Orientation or Rotation from the Set menu to determine whether the tool
affects Orientation or Rotation properties.

164
Layers and properties
Last updated 6/8/2015
3In the Composition panel, do one of the following:
•Drag the arrowhead of the 3D axis layer control corresponding to the axis around which you want to turn the
layer.
•Drag a layer handle. Dragging a corner handle turns the layer around the z axis; dragging a left or right center
handle turns the layer around the y axis; dragging a top or bottom handle turns the layer around the x axis.
•Drag the layer.
Shift-drag to constrain your manipulations to 45-degree increments.
Rotate or orient a 3D layer in the Timeline panel
1Select the 3D layer that you want to turn.
2In the Timeline panel, modify the Rotation or Orientation property values.
Press R to show Rotation and Orientation properties.
Online resources about rotating and orienting 3D layers
Donat Van Bellinghen provides some expressions on the AE Enhancers forum for placing and orienting a 3D layer in
the plane defined by three points.
Chris and Trish Meyer provide a video tutorial on the ProVideo Coalition website that demonstrates the use of the 3D
axis layer controls.
Axis modes
Axis modes specify on which set of axes a 3D layer is transformed. Choose a mode in the Tools panel.
Local Axis mode Aligns the axes to the surface of a 3D layer.
World Axis mode Aligns the axes to the absolute coordinates of the composition. Regardless of the rotations you
perform on a layer, the axes always represent 3D space relative to the 3D world.
View Axis mode Aligns the axes to the view you have selected. For example, suppose that a layer has been rotated
and the view changed to a custom view; any subsequent transformation made to that layer while in View Axis mode
happens along the axes corresponding to the direction from which you are looking at the layer.
Differences between the axis modes are only relevant when you have a 3D camera in a composition.
Note: The Camera tools always adjust along the local axes of the view, so the action of the Camera tools is not affected by
the axis modes.
Angie Taylor explains 3D axis modes in this tutorial.
3D layer interactions, render order, and collapsed transformations
The positions of certain kinds of layers in the layer stacking order in the Timeline panel prevent groups of 3D layers
from being processed together to determine intersections and shadows.
A shadow cast by a 3D layer does not affect a 2D layer or any layer that is on the other side of the 2D layer in the layer
stacking order. Similarly, a 3D layer does not intersect with a 2D layer or any layer that is on the other side of the 2D
layer in the layer stacking order. No such restriction exists for lights.
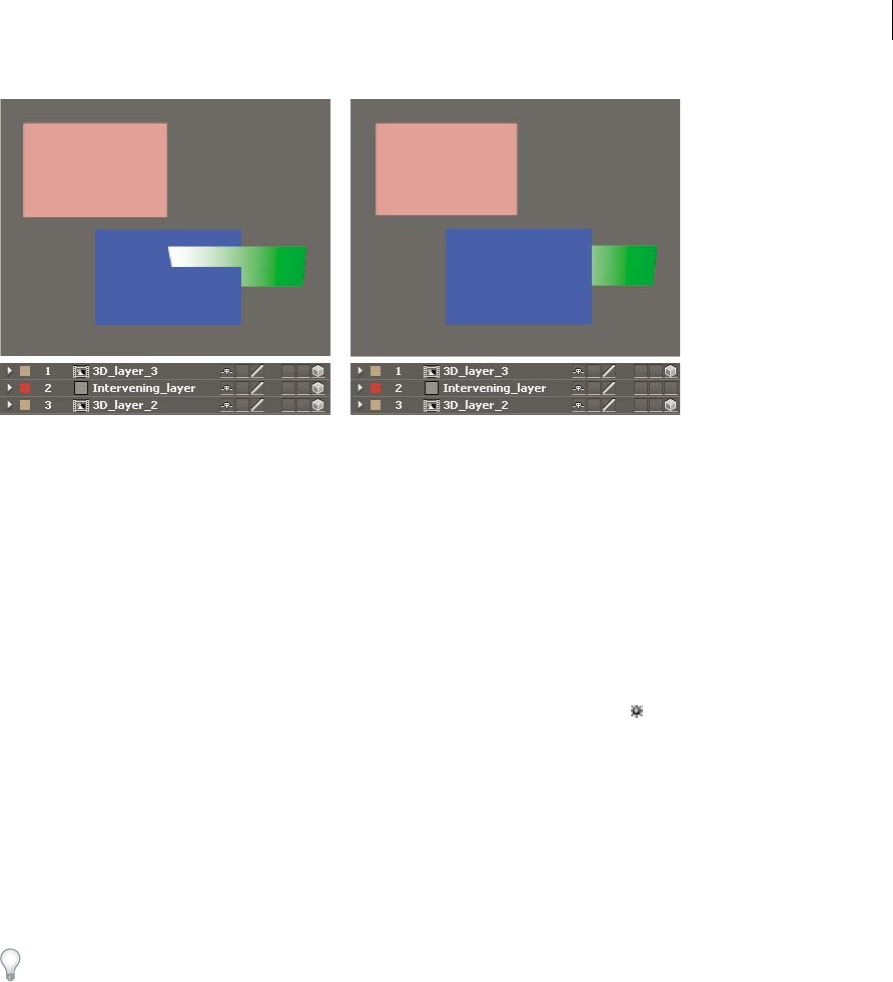
165
Layers and properties
Last updated 6/8/2015
Just like 2D layers, other types of layers also prevent 3D layers on either side from intersecting or casting shadows on
one another:
•An adjustment layer
•A 3D layer with a layer style applied
•A 3D precomposition layer to which an effect, closed mask (with mask mode other than None), or track matte has
been applied
•A 3D precomposition layer without collapsed transformations
A precomposition with collapsed transformations (Collapse Transformations switch selected) does not interfere with
the interaction of 3D layers on either side—as long as all of the layers in the precomposition are themselves 3D layers.
Collapsing transformations exposes the 3D properties of the layers that compose the precomposition. Essentially,
collapsing transformations in this case allows each 3D layer to be composited into the main composition individually,
rather than creating a single 2D composite for the precomposition layer and compositing that into the main
composition. The tradeoff is that this setting removes your ability to specify certain layer settings for the
precomposition as a whole—such as blending mode, quality, and motion blur.
Shadows cast by continuously rasterized 3D layers (including text layers) are not affected by effects applied to that layer.
If you want the shadow to show the results of the effect, then precompose the layer with the effect.
To ensure that the shadow remains where expected on a 3D layer with a track matte, precompose the 3D layer and the
track matte layer together (but don’t collapse transformations), and then apply the shadow to the precomposition.
Effects on continuously rasterized vector layers with 3D properties are rendered in 2D and then projected onto the 3D
layer. OpenGL rendering does not support this kind of projection, so results may differ when rendering using OpenGL.
This projection does not occur for compositions with collapsed transformations.
More Help topics
Per-character 3D text properties
Importing and using 3D files from other applications
3D layers (keyboard shortcuts)
Cameras, lights, and points of interest
Layer 3D attributes and methods (expression reference)

166
Layers and properties
Last updated 6/8/2015
Layer switches and columns in the Timeline panel
Show or hide layer controls in the Composition panel
Selecting and arranging layers
Layer properties
Coordinate systems: composition space and layer space
Render order and collapsing transformations
Precompose layers
Continuously rasterize a layer containing vector graphics
Preparing and importing Photoshop files
Effects with a Comp Camera attribute
3D layers
Cameras, lights, and points of interest
Create a camera layer and change camera settings
You can view 3D layers from any angle and distance using camera layers. Just as it’s easier in the real world to move
cameras through and around a scene than it is to move and rotate the scene itself, it’s often easiest to get different views
of a composition by setting up a camera layer and moving it around in a composition.
You can modify and animate camera settings to configure the camera to match the real camera and settings that were
used to record footage with which you’re compositing. You can also use camera settings to add camera-like behaviors—
from depth-of-field blur to pans and dolly shots—to synthetic effects and animations.
Cameras affect only 3D layers and 2D layers with an effect with a Comp Camera attribute. With effects that have a
Comp Camera attribute, you can use the active composition camera or lights to view or light an effect from various
angles to simulate more sophisticated 3D effects. After Effects can interact with Photoshop 3D layers by means of the
Live Photoshop 3D effect, which is a special example of a Comp Camera effect.
Note: After Effects does not support the Live Photoshop 3D effect.
You can choose to view a composition through the active camera or through a named custom camera. The active
camera is the topmost camera in the Timeline panel at the current time for which the Video switch is selected. The
active camera view is the point of view used for creating final output and nesting compositions. If you have not created
a custom camera, then the active camera is the same as the default composition view.
All cameras are listed in the 3D View menu at the bottom of the Composition panel, where you can access them at any
time.
It’s often easiest to adjust a camera when using one of the custom 3D views. You can’t—of course—see the camera to
manipulate it when you’re looking through the camera itself.
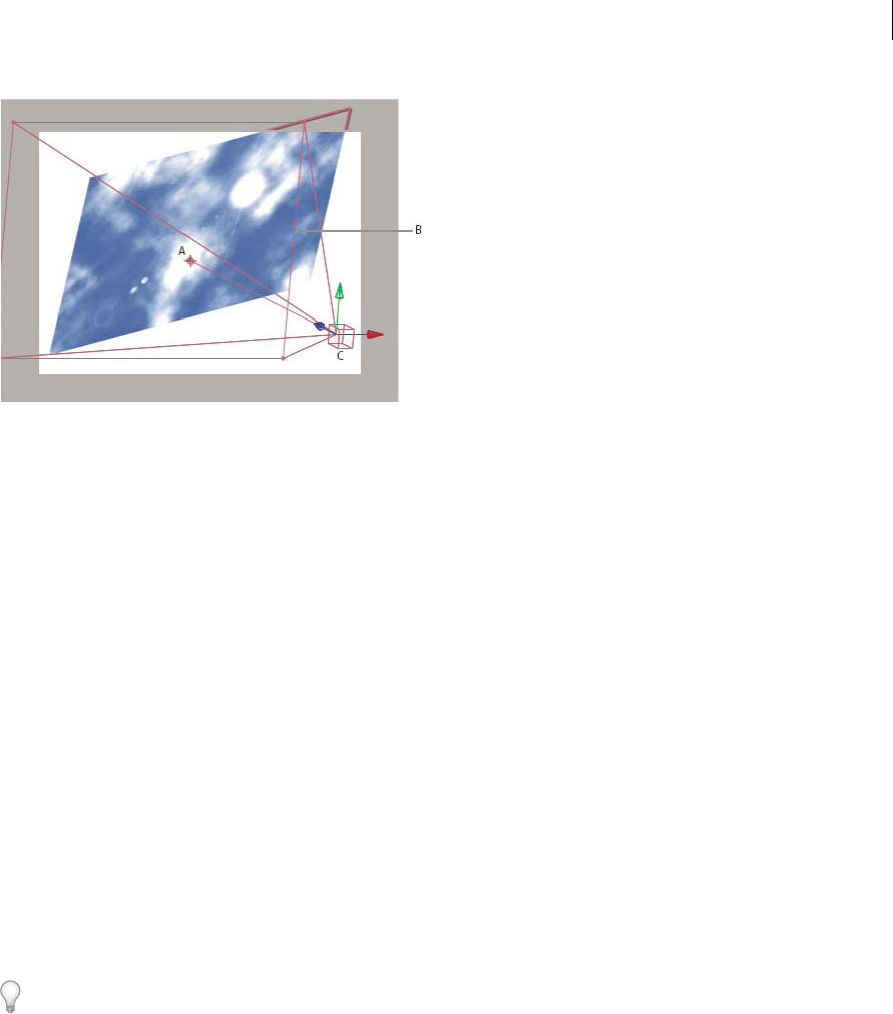
167
Layers and properties
Last updated 6/8/2015
A Point of interest B Frame C Camera
Note: If you import or open an After Effects 5.x project containing a 3D composition that used a default camera, After
Effects adds an AE 5.x Default Camera to the composition.
Create a camera layer
❖Choose Layer > New > Camera, or press Ctrl+Alt+Shift+C (Windows) or Command+Option+Shift+C (Mac OS).
Note: By default, new layers begin at the beginning of the composition duration. You can instead choose to have new
layers begin at the current time by deselecting the Create Layers At Composition Start Time preference (Edit >
Preferences > General (Windows) or After Effects > Preferences > General (Mac OS)).
Change camera settings
You can change camera settings at any time.
❖Double-click the camera layer in the Timeline panel, or select the layer and then choose Layer > Camera Settings.
Note: By default, the Preview option in the Camera Settings dialog box is selected. This option shows the changes in the
composition as you make them in the Camera Settings dialog box.
Camera settings
You can change camera settings at any time by double-clicking the layer in the Timeline panel or selecting the layer and
choosing Layer > Camera Settings.
Select Preview in the Camera Settings dialog box to show results in the Composition panel as you modify settings in the
dialog box.
Note: The three things that affect depth of field are focal length, aperture, and focus distance. Shallow (small) depth of field
is a result of long focal length, short focus distance, and a larger aperture (smaller F-stop). A shallower depth of field means
a larger depth-of-field blur result. The opposite of a shallow depth of field is deep focus—meaning a smaller depth-of-field
blur because more is in focus.
Camera properties relating to camera lens blur and shape include Iris Shape, Iris Rotation, Iris Roundness, Iris Aspect
Ratio, Iris Diffraction Fringe, Highlight Gain, Highlight Threshold, and Highlight Saturation.
Type One-Node Camera or Two-Node Camera. A one-node camera orients around itself, whereas a two-node camera
has a point of interest and orients around that point. Making a camera a two-node camera is the same as setting a
camera’s auto-orientation option (Layer > Transform > Auto-Orient) to Orient Towards Point Of Interest. (See Auto-
Orientation options.)

168
Layers and properties
Last updated 6/8/2015
Name The name of the camera. By default, Camera 1 is the name of first camera that you create in a composition, and
all subsequent cameras are numbered in ascending order. You should choose distinctive names for multiple cameras to
make it easier to distinguish them.
Preset The type of camera settings you want to use. The presets are named according to focal lengths. Each preset is
meant to represent the behavior of a 35mm camera with a lens of a certain focal length. Therefore, the preset also sets
the Angle Of View, Zoom, Focus Distance, Focal Length, and Aperture values. The default preset is 50mm. You can also
create a custom camera by specifying new values for any of the settings.
Zoom The distance from the lens to the image plane. In other words, a layer that is the Zoom distance away appears at
its full size, a layer that is twice the Zoom distance away appears half as tall and wide, and so on.
Angle Of View The width of the scene captured in the image. The Focal Length, Film Size, and Zoom values determine
the angle of view. A wider angle of view creates the same result as a wide-angle lens.
Depth Of Field Applies custom variables to the Focus Distance, Aperture, F-Stop, and Blur Level settings. Using these
variables, you can manipulate the depth of field to create more realistic camera-focusing effects. (The depth of field is
the distance range within which the image is in focus. Images outside the distance range are blurred.)
Focus Distance The distance from the camera to the plane that is in perfect focus.
Add this expression to the Focus Distance property to lock the focal plane to the camera's point of interest so that the
point of interest is in focus: length(position, pointOfInterest)
Lock To Zoom Makes the Focus Distance value match the Zoom value.
Note: If you change the settings of the Zoom or Focus Distance options in the Timeline panel, the Focus Distance value
becomes unlocked from the Zoom value. If you need to change the values and want the values to remain locked, then use
the Camera Settings dialog box instead of the Timeline panel. Alternatively, you can add an expression to the Focus
Distance property in the Timeline panel: Select the Focus Distance property, and choose Animation > Add Expression; then
drag the expression pick whip to the Zoom property. (See Expression basics.)
Aperture The size of the lens opening. The Aperture setting also affects the depth of field—increasing the aperture
increases the depth of field blur. When you modify Aperture, the values for F-Stop change to match it.
Note: In a real camera, increasing the aperture also allows in more light, which affects exposure. Like most 3D compositing
and animation applications, After Effects ignores this result of the change in aperture values
F-Stop Represents the ratio of the focal length to aperture. Most cameras specify aperture size using the f-stop
measurement; thus, many photographers prefer to set the aperture size in f-stop units. When you modify F-Stop,
Aperture changes to match it.
Blur Level The amount of depth-of-field blur in an image. A setting of 100% creates a natural blur as dictated by the
camera settings. Lower values reduce the blur.
Film Size The size of the exposed area of film, which is directly related to the composition size. When you modify Film
Size, the Zoom value changes to match the perspective of a real camera.
Focal Length The distance from the film plane to the camera lens. In After Effects, the position of the camera
represents the center of the lens. When you modify Focal Length, the Zoom value changes to match the perspective of
a real camera. In addition, the Preset, Angle Of View, and Aperture values change accordingly.
Units The units of measurement in which the camera setting values are expressed.
Measure Film Size The dimensions used to depict the film size.
Note: For best results, work in 32-bpc with Linearize Working Space selected in the project settings.

169
Layers and properties
Last updated 6/8/2015
Camera Commands
After Effects has camera commands that can be used separately or with the Create Stereo 3D Rig function. To use the
camera commands, select a camera layer, and then choose Layer > Camera.
Link Focus Distance to Point of Interest Creates an expression on the selected camera layer’s Focus Distance property,
setting the property’s value to the distance between the camera and its point of interest.
Link Focus Distance to Layer Creates an expression on the selected camera layer’s Focus Distance property to be the
distance between the camera’s position and another layer. This method allows the focus to follow the other layer
automatically.
Set Focus Distance to Layer Sets the value of the Focus Distance property at the current time to the distance at the
current time between the camera and the selected layer.
Online resources about cameras
For a video tutorial that shows how to create and modify a camera and use the Camera tools, see the Adobe website.
Dale Bradshaw provides a script and sample project for automating the rigging of a camera on the Creative Workflow
Hacks website.
Mark Christiansen provides tips and detailed techniques for working with cameras in the “Virtual Cinematography in
After Effects” chapter of After Effects Studio Techniques on the Peachpit Press website. This chapter includes
information about matching lens distortion, performing camera moves, performing camera projection (camera
mapping), using rack focus, creating boke blur, using grain, and choosing a frame rate to match your story-telling.
Trish and Chris Meyer provide a tutorial for using 3D layers, lights, and cameras in a PDF excerpt from their book After
Effects Apprentice on the Focal Press website.
Richard Harrington provides a video tutorial on the Creative COW website that shows how to use the Camera tools
and camera views in After Effects to create a camera move with 3D layers. (This tutorial is the second in a two-part
series. Part 1 concentrates on working with photographs to isolate and create sky in Photoshop for use in After Effects.)
Andrew Kramer provides a two-part video tutorial on his Video Copilot website that demonstrates basic camera
mapping and camera projection. In this tutorial, he shows how to project an image onto 3D layers using lights and light
transmission properties.
•part 1
•part 2
Create a light and change light settings
A light layer can affect the colors of the 3D layers that it shines on, depending on the light’s settings and the Material
Options properties of the 3D layers. Each light, by default, points to its point of interest.
Lights can be used to illuminate 3D layers and to cast shadows. You can use lights to match lighting conditions of the
scene into which you are compositing or to create more interesting visual results. For example, you can use light layers
to create the appearance of light streaming through a video layer as if it were made of stained glass.
You can animate all of the settings for a light, except for the light type and the Casts Shadows property.
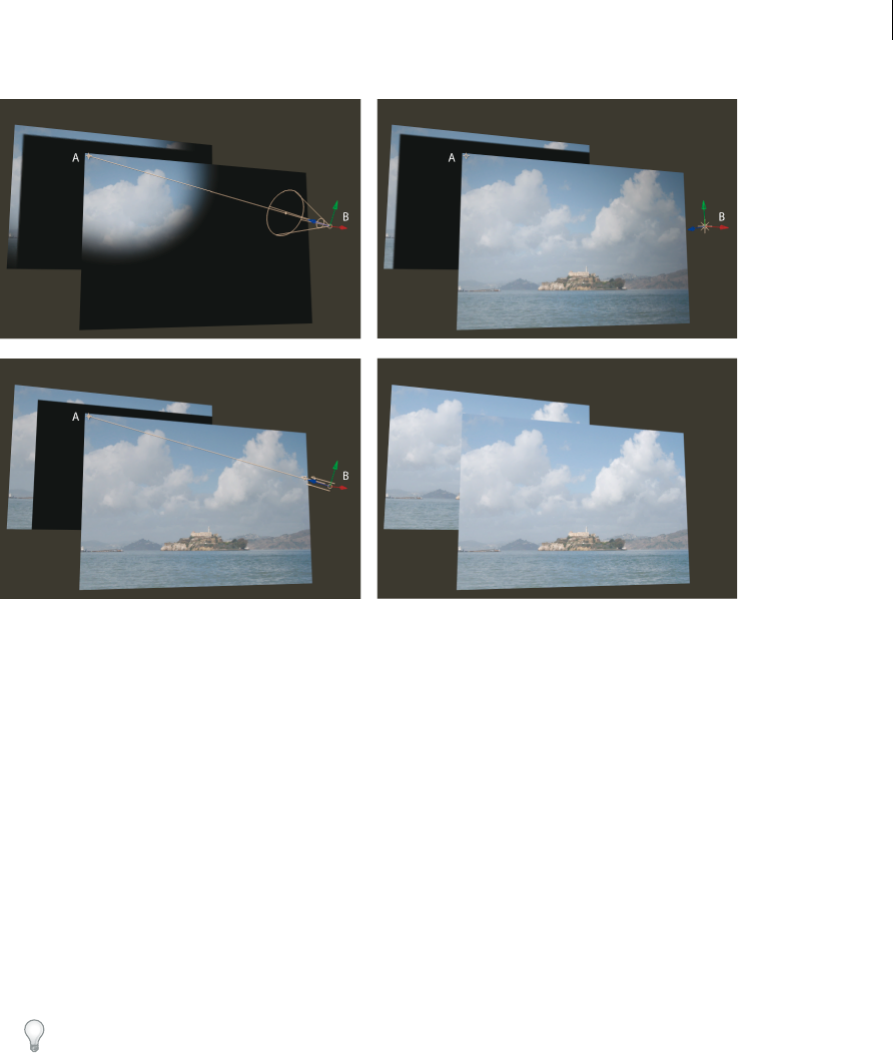
170
Layers and properties
Last updated 6/8/2015
A Point of interest B Light icon
You can specify which 3D layers a light affects by designating the light as an adjustment layer: place the light in the
Timeline panel above the layers on which you want it to shine. Layers that are above a light adjustment layer in the layer
stacking order in the Timeline panel do not receive the light, regardless of the positions of the layers in the Composition
panel.
Create a light
❖Choose Layer > New > Light, or press Ctrl+Alt+Shift+L (Windows) or Command+Option+Shift+L (Mac OS).
Note: By default, new layers begin at the beginning of the composition duration. You can instead choose to have new
layers begin at the current time by deselecting the Create Layers At Composition Start Time preference (Edit >
Preferences > General (Windows) or After Effects > Preferences > General (Mac OS)).
Change light settings
❖Double-click a light layer in the Timeline panel or select the layer and choose Layer > Light Settings.
Select Preview in the Light Settings dialog box to show results in the Composition panel as you modify settings in the
dialog box.
Light settings
Light Type Parallel emits directional, unconstrained light from an infinitely distant source, approximating the light
from a source like the Sun. Spot emits light from a source that is constrained by a cone, like a flashlight or a spotlight
used in stage productions. Point emits unconstrained omnidirectional light, like the rays from a bare light bulb.
Ambient creates light that has no source but rather contributes to the overall brightness of a scene and casts no shadows.

171
Layers and properties
Last updated 6/8/2015
Note: Because the position in space of an Ambient light does not affect its influence on other layers, an Ambient light does
not have an icon in the Composition panel.
Intensity The brightness of the light. Negative values create nonlight. Nonlight subtracts color from a layer. For
example, if a layer is already lit, creating a directional light with negative values also pointing at that layer darkens an
area on the layer.
Color The color of the light.
Cone Angle The angle of the cone surrounding the source of a light, which determines the width of the beam at a
distance. This control is active only if Spot is selected for Light Type. The cone angle of a Spot light is indicated by the
shape of the light icon in the Composition panel.
Note: In After Effects CS6 or later, a selected spot light's cone can be extended to the point of interest.
Cone Feather The edge softness of a spotlight. This control is active only if Spot is selected for Light Type.
Falloff The type of falloff for a parallel, spot, or point light. Falloff describes how a light’s intensity is lessened over
distance.
For details, tutorials, and resources about light falloff, see this article on the Adobe website.
Falloff types include the following:
None Illumination does not decrease as the distance between the layer and the light increases.
Smooth Indicates a smooth linear falloff starting at the Falloff Start radius and extending the length specified by Falloff
Distance.
Inverse Square Clamped Indicates a physically accurate falloff starting at the Falloff Start radius and decreasing
proportionally to the inverse square of the distance away.
Radius Specifies the radius of falloff from a light. Inside this distance, the light is a constant light. Outside this distance,
the light falls off.
Falloff Distance Specifies the distance a light falls off from a light.
Casts Shadows Specifies whether the light source causes a layer to cast a shadow. The Accepts Shadows material option
must be On for a layer to receive a shadow; this setting is the default. The Casts Shadows material option must be On
for a layer to cast shadows; this setting is not the default.
Press Alt+Shift+C (Windows) or Option+Shift+C (Mac OS) to toggle Casts Shadows for selected layers. Press AA to
show Material Options properties in the Timeline panel.
Shadow Darkness Sets the darkness of the shadow. This control is active only if Cast Shadows is selected.
Shadow Diffusion Sets the softness of a shadow based on its apparent distance from the shadowing layer. Larger values
create softer shadows. This control is active only if Casts Shadows is selected.
Online resources about lights
Eran Stern provides a video tutorial on the Creative COW website that demonstrates the use of lights as adjustment
layers, to precisely control which layers are affected by which lights.
Chris and Trish Meyer provide tips about shadows and lights in 3D in an article on the ProVideo Coalition website.
Trish and Chris Meyer provide a tutorial for using 3D layers, lights, and cameras in a PDF excerpt from their book After
Effects Apprentice on the Focal Press website.
Chris and Trish Meyer provide a tutorial on the Artbeats website that demonstrates how to use lights and 3D layers to
project a video onto other layers, such as onto a wall.
172
Layers and properties
Last updated 6/8/2015
Adjust a 3D view or move a camera, light, or point of interest
Camera layers and light layers each include a Point Of Interest property, which specifies the point in the composition
at which the camera or light points. By default, the point of interest is at the center of the composition. You can move
the point of interest at any time.
A one-node camera ignores the point of interest. (See Camera settings.)
To make a light ignore its point of interest, select an option other than Orient Towards Point Of Interest in the light’s
Auto-Orientation options. (See Auto-Orientation options.)
Note: As with all properties, you can also modify a camera or light’s properties directly in the Timeline panel.
Move a camera, light, or point of interest with the Selection and Rotation tools
1Select a camera or light layer.
2Using the Selection or Rotation tool, do one of the following:
•To move the camera or light and its point of interest, position the pointer over the axis you want to adjust, and
drag.
•To move the camera or light along a single axis without moving the point of interest, Ctrl-drag (Windows) or
Command-drag (Mac OS) the axis.
•To move the camera or light freely without moving the point of interest, drag the camera icon or light icon.
•To move the point of interest, drag the point of interest icon .
Move or adjust a camera or working 3D view with the Camera tools
You can adjust the Position and Point Of Interest properties of a camera layer by using the Camera tools in the
Composition panel.
You can also use the Camera tools to adjust a working 3D view, a 3D view that is not associated with a camera layer. You
can think of 3D views as being virtual cameras through which you can view and preview a composition. The working
3D views include the custom views and the fixed orthographic views (Front, Left, Top, Back, Right, or Bottom). The
working 3D views are useful for placing and previewing elements in a 3D scene. If you use a Camera tool to adjust a
working 3D view, no layer property values are affected.
After you’ve modified a 3D view, you can reset it by choosing View > Reset 3D View.
You can’t use the Orbit Camera tool on the fixed orthographic views.
For information on choosing and using 3D views, see Choose a 3D view.
1In the 3D View menu at the bottom of the Composition panel, choose the camera or 3D view to adjust.
2Activate a Camera tool.
You can activate a Camera tool by selecting it in the Tools panel or pressing C to cycle through the Camera tools.
The easiest way to switch between the various Camera tools is to select the Unified Camera tool and use the
buttons on a three-button mouse.
Orbit Camera Rotates the 3D view or camera by moving around the point of interest. (To temporarily activate the
Orbit Camera tool when the Unified Camera Tool is selected, hold the left mouse button.)
Shift-dragging with the Unified Camera tool selected temporarily activates the Orbit Camera tool and constrains
rotation to one axis.
Track XY Camera Adjusts the 3D view or camera horizontally or vertically. (To temporarily activate the Track XY
Camera tool when the Unified Camera Tool is selected, hold the middle mouse button.)

173
Layers and properties
Last updated 6/8/2015
Track Z Camera Adjusts the 3D view or camera along the line to the point of interest. If you are using an
orthographic view, this tool adjusts the scale of the view. (To temporarily activate the Track Z Camera tool when the
Unified Camera Tool is selected, hold the right mouse button.)
3Drag in the Composition panel. You can continue a drag operation outside the panel after you’ve begun dragging
within the panel.
After you’ve modified a 3D view, you can reset it by choosing View > Reset 3D View.
Move or adjust a camera or working 3D view to look at layers
You can also move a camera or adjust a 3D view to look at selected layers or all layers. After Effects changes the point
of view and direction of view to include the layers that you have selected.
•To adjust a 3D view or move a camera to look at selected layers, choose View > Look At Selected Layers.
•To adjust a 3D view or move a camera to look at all layers, choose View > Look At All Layers.
For keyboard shortcuts for these commands, see 3D layers (keyboard shortcuts).
Tips and online resources for moving and animating cameras and lights
Before moving a camera, choose a view other than Active Camera. If you use Active Camera view, you are looking
through the camera, which makes it harder to manage.
By default, a camera's wireframe is only visible when the camera is selected. To always show the camera wireframe, set
the view options for the Composition panel (View > View Options). (See Show or hide layer controls in the
Composition panel.)
When working with a camera or light layer, create a null object layer and use an expression to link the Point Of Interest
property of the camera or light to the Position property of the null layer. Then, you can animate the Point Of Interest
property by moving the null object. It is often easier to select and see a null object than it is to select and see the point
of interest.
In After Effects, there is a camera command, “Create Orbit Null.” This parents the selected camera layer to a new null
layer. The new null layer is renamed, based on the camera’s name appended with Orbit Null
Trish and Chris Meyer show you how to use the Create Orbit Null camera command in this video tutorial on Adobe TV.
For a video tutorial that shows how to create and modify a camera and use the Camera tools, see the Adobe website.
Trish and Chris Meyer provide a video tutorial on the ProVideo Coalition website that demonstrates the use of the
Camera tools to adjust cameras and 3D views.
Trish and Chris Meyer provide a tutorial for using 3D layers, lights, and cameras in a PDF excerpt from their book After
Effects Apprentice on the Focal Press website.
Mark Christiansen provides tips and detailed techniques for working with cameras in the “Virtual Cinematography in
After Effects” chapter of After Effects Studio Techniques on the Peachpit Press website. This chapter includes
information about matching lens distortion, performing camera moves, performing camera projection (camera
mapping), using rack focus, creating boke blur, using grain, and choosing a frame rate to match your story-telling.
Richard Harrington provides a video tutorial on the Creative COW website that shows how to use the Camera tools
and camera views in After Effects to create a camera move with 3D layers. (This tutorial is the second in a two-part
series. Part 1 concentrates on working with photographs to isolate and create sky in Photoshop for use in After Effects.)
Rich Young provides a set of expressions on his AE Portal website that use the toWorld method link a camera and light
to a layer with the CC Sphere effect.

174
Layers and properties
Last updated 6/8/2015
Andrew Devis of Creative Cow has created a 3 tutorial series on Animating a Camera:
•Animating a Camera 1: Camera Difficulties
•Animating a Camera 2: Simple Rig
•Animating a Camera 3: Controllers & Point of View
This video from video2brain demonstrates the command to create a new camera orbit null.
Material Options properties
3D layers have Material Options properties, which determine how a 3D layer interacts with light and shadow.
Casts Shadows Specifies whether a layer casts shadows on other layers. The direction and angle of the shadows are
determined by the direction and angle of the light sources. Set Casts Shadows to Only if you want the layer to be
invisible but still cast a shadow.
Use the Only setting and a nonzero Light Transmission setting to project the colors of an invisible layer onto another
layer. Steve Holmes provides a video tutorial on the Artbeats website in which he demonstrates how to use layers with
Cast Shadows set to Only to cast shadows of specific shapes within a 3D scene.
Light Transmission The percentage of light that shines through the layer, casting the colors of the layer on other layers
as a shadow. 0% specifies that no light passes through the layer, casting a black shadow. 100% specifies that the full
values of the colors of the shadow-casting layer are projected onto the layer accepting the shadow.
Use partial light transmission to create the appearance of light passing through a stained glass window.
Accepts Shadows Specifies whether the layer shows shadows cast on it by other layers. There is an “Only” option in the
Accepts Shadows for when you want to render only a shadow on a layer.
Accepts Lights Specifies whether the color of a layer is affected by light that reaches it. This setting does not affect
shadows.
Ambient Ambient (nondirectional) reflectivity of the layer. 100% specifies the most reflectivity; 0% specifies no
ambient reflectivity.
Diffuse Diffuse (omnidirectional) reflectivity of the layer. Applying diffuse reflectivity to a layer is like draping a dull,
plastic sheet over it. Light that falls on this layer reflects equally in all directions. 100% specifies the most reflectivity;
0% specifies no diffuse reflectivity.
Specular Specular (directional) reflectivity of the layer. Specular light reflects from the layer as if from a mirror. 100%
specifies the most reflectivity; 0% specifies no specular reflectivity.
Shininess Determines the size of the specular highlight. This value is active only if the Specular setting is greater than
zero. 100% specifies a reflection with a small specular highlight. 0% specifies a reflection with a large specular highlight.
Metal The contribution of the layer color to the color of the specular highlight. 100% specifies that the highlight color
is the color of the layer. For example, with a Metal value of 100%, an image of a gold ring reflects golden light. 0%
specifies that the color of the specular highlight is the color of the light source. For example, a layer with a Metal value
of 0% under a white light has a white highlight.

175
Layers and properties
Last updated 6/8/2015
Specify resolution to use for rendering shadows
The Advanced 3D rendering plug-in is used to render compositions containing intersecting 3D layers. To render
shadows, the plug-in uses shadow maps, which are images rendered from the point of view of each light source.
Normally, shadow resolution is computed automatically based on the composition resolution and the quality settings
of the layers. If normal resolution doesn’t create the quality you want, odr renders too slowly, you can adjust the shadow
map resolution. For example, if shadows are blurry and the Shadow Diffusion material option is set to 0, increase the
shadow map resolution. Or, if shadows render too slowly, decrease the shadow map resolution.
When a shadow-casting layer intersects another layer, sometimes a small gap occurs behind the intersection that is
supposed to be shadowed. To decrease the size of the gap, increase the shadow map resolution.
Stereoscopic 3D
Stereoscopic 3D video can be created with Adobe After Effects CS5, and there are new workflows and tools available
for it in After Effects CS5.5 and later.
For tutorials, details, and resources about stereoscopic 3D in After Effects CS5.5, see this article on the Adobe website.
For an overview of stereoscopic 3D workflow in After Effects, see Understanding Stereoscopic 3D in After Effects.
Mark Christiansen shows compositing stereoscopic 3D footage (using free clip from Art Beats).
Stereoscopic 3D camera rig (CS5.5)
After Effects has a Create Stereo 3D Rig menu command, allowing you to turn a 3D composition into a stereoscopic
3D composition. The Stereo 3D Rig creates all the elements for you, including the 3D Glasses effect.
Make a stereoscopic 3D camera rig by first creating a composition with 3D elements in it. A composition that contains
items such as a 3D collapsed precomposition or 3D elements in the composition itself works well. If you already have
a camera in use, you can select it when creating the stereoscopic 3D camera rig. If no camera is selected, then a new
camera (named Master Cam) is created. Choose Layer > Camera > Create Stereo 3D Rig. The rig only works with two-
node cameras.
The rig is produced by creating a master camera or by using the existing selected camera in the composition. There are
left eye [compare Left Eye] and right eye [compare Right Eye] compositions. Each composition has a camera linked to
the master camera, the original composition nested in them, and an output stereo 3D composition [compare Stereo
3D]. The output stereo 3D composition nests both eye compositions and contains a layer called Stereo 3D Controls.
This layer contains a Stereo 3D Controls effect for controlling the rig and a 3D Glasses effect that combines the left and
right eye compositions into a stereo image. (see 3D Glasses effect.)
Note: The Stereo 3D Controls effect is an effect built as part of the Stereo 3D Rig and does not reside in the Effects and
Presets panel.
The Stereo 3D Controls effect has the following settings for Camera Separation and Convergence:
Configuration Center places the left and right camera on either side of the master camera. Hero Left places the left
camera in the same spot as the master camera with the right camera to the right. Conversely, Hero Right places the right
camera at the master camera position with the left camera to the left.
Stereo Scene Depth Controls the interaxial separation between the cameras as a percentage of the composition’s width.
That way, if the composition is resized, the separation amount is constant. This setting starts low at a value of 3% to
keep the effect subtle. Ideally, this value does not need to increase to more than 14%-30% for reasonable 3D footage.
However, it can be bigger depending on the scene content (objects are very close together) and the camera field of view,
for example.

176
Layers and properties
Last updated 6/8/2015
Note: Altering this value changes how deep the Stereo 3D appears to go into and out of the scene. It can cause eye strain if
pushed too far, however. Altering this value changes how deep the Stereo 3D appears to go into and out of the scene. It can
cause eye strain if pushed too far, however. Altering this value changes how deep the Stereo 3D appears to go into and out
of the scene. It can cause eye strain if pushed too far, however. Altering this value changes how deep the Stereo 3D appears
to go into and out of the scene. It can cause eye strain if pushed too far, however.
Converge Cameras When off, the cameras remain parallel to the master camera but offset to either side. When on, the
position remains offset. However, the Point of Interest of the left and right cameras are joined at the location based upon
the following two properties.
Converge To and Convergence Z Offset Determines the Z distance away from the camera that the screen appears to be
when looking through 3D glasses. Everything farther in Z space appears to be pushed into the screen, and everything
closer appears to pop out of the screen. When working without converge the cameras check box on, and cameras are
parallel, changing the scene convergence has the same effect as changing the Z offset. Use difference mode to set
different elements in the scene to screen space in that case. (see 3D Glasses effect.)
Getting started with stereoscopic 3D
If you are working with stereoscopic 3D, you don’t necessarily need a 3D television. For example, you can use anaglyph
(red-cyan) 3D glasses and view 3D stereoscopic footage right in the Composition panel. However, you can use a 3D
television for doing live editing with a 3D television and active shutter glasses, as well. For that workflow, you’ll need a
few things before getting started:
•A monitor or television that supports 3D stereoscopic viewing.
•Glasses for viewing stereoscopic 3D television.
Note: For this workflow, use active shutter glasses that require an emitter device. Make sure that you are using the glasses
that the television manufacturer recommends.
•Stereoscopic footage or a 3D composition.
Once you have gathered these items, do the following:
1Connect the 3D TV to your computer with an HDMI cable (DVI is acceptable if HDMI is not available).
2Create a 3D composition in After Effects. Make sure that the composition size matches the current resolution of
your output monitor.
3Make a new Composition panel for your Stereo 3D composition. Lock the composition, and then drag it to your 3D
TV monitor.
4Ensure that the Composition panel is set to 100%.
5Type Control + \(backslash) twice to set the composition to full screen for the 3D TV. Set the dimensions of the
composition and the 3D TV to be the same.
6Switch the 3D view in the 3D Glasses effect to one of the following:
•Stereo Pair
•Over Under
•Interlaced
7Turn on 3D mode for your 3D TV and match the format to what was set in 3D View for the 3D Glasses effect. (Stereo
Pair, and Over Under are supported on most 3D TVs.
8Put on your 3D glasses, and edit your composition in true stereoscopic 3D.

177
Layers and properties
Last updated 6/8/2015
Stereoscopic 3D tips
•If you are working with3D stereoscopic footage in the Composition panel and you do not have a 3D television, you
can work with the anaglyph format. Ordinary red and cyan anaglyph 3D glasses work best for this 3D stereoscopic
workflow.
•Increase or decrease Stereo Scene Depth to change how deep the 3D environment appears.
•Turn on Converge Cameras and change the Convergence Z Offset to move different objects behind and in front of
the screen. Objects closer to the camera than the Z offset appears in front of the screen, objects farther away appears
behind it.
•You can make your composition’s depth of field to match your stereoscopic camera’s convergence by doing one of
the following:
•When using “Link Focus Distance to Point of Interest” on the master camera, and converge cameras for the rig,
the depth of field and stereoscopic 3D convergence matches.
•If you want the depth of field to change over time, you can animate the focus distance of the master camera. Then,
set the convergence point to converge from “Camera Position”, and set an expression linking the convergence Z
offset to the master camera’s Focus Distance
More Help topics
Auto-Orientation options
Effects with a Comp Camera attribute
Choose a view layout and share view settings
Auto-Orientation options
Adjustment layers
Choose a 3D view
Choose a view layout and share view settings
3D layers

178
Last updated 6/8/2015
Chapter 6: Views and previews
Previewing
Enhanced in After Effects CC 2015 | June 2015
•Uninterrupted preview: You can now make changes to the open project while a preview is playing back in After
Effects.
•Simplified and configurable preview: You can now customize Preview behaviors using the updated Preview panel.
If you're new to After Effects, you will find the default Preview intuitive with real-time playback of cached frames.
For you, the experienced After Effects user, Preview options are configurable to suit your working style.
Preview video and audio
Though it is common to speak of rendering as if this term only applies to final output, the processes of creating previews
to show in the Footage, Layer, and Composition panels are also kinds of rendering.
You can preview all or part of your composition as you work, without rendering to final output. Many of the controls
for previewing are in the Preview panel.
Use preview to play video and audio
After Effects allocates RAM to play video and audio in the Timeline, Layer, or Footage panel at real-time speed. The
number of frames that can be stored for real-time playback depends on the amount of RAM available and the settings
in the Preview panel.
The default preview behavior is configured to produce a preview that best emulates real-time playback. When you press
spacebar (default keyboard shortcut), After Effects starts a preview with audio, and caches frames until the available
RAM is filled.
❖To start a preview of video and audio, do any of the following:
•Press any of Preview Shortcut keys (Spacebar, Numpad-0, or Shift+Numpad-0). Each shortcut key results in a
different Preview behavior, based on the Preview settings assigned to each of the keys. You can configure the
Preview behavior for each shortcut key by modifying settings in the Preview panel. For more information, see
Configure Preview Behaviors .
•Click the (Play) button in the Preview panel. When you click the Play button, settings assigned for the
Shortcut, currently displayed in the Preview panel, is used.
•Select Composition > Preview > Play. When you select the Play option, settings assigned for the Shortcut,
currently displayed in the Preview panel, is used.
Configure Preview behaviors
You can configure the Preview options to suit your working style. Controls in the Preview panel allow you to configure
preview behaviors for each keyboard shortcut (Spacebar, Numpad 0, and Shift + Numpad 0): audio, looping, caching,
range, and layer controls.

179
Views and previews
Last updated 6/8/2015
To configure settings for Preview, do the following:
1The Preview panel is open by default in most Workspaces within After Effects. However, if the Preview panel is
closed, select Window > Preview to open it.
2In the Preview panel, you can modify the following settings to configure Preview behavior:
Shortcut Choose a keyboard shorctut to play/stop a preview: Spacebar, Numpad 0, and Shift + Numpad 0. The
Preview behavior depends on the settings specified for the currently selected Shortcut key.
Reset Restore default preview settings for all shortcut keys.
To restore preview settings for all shortcut keys to closely match their behaviors in previous versions (After Effects
CC 2014 and older), hold the Option (Mac OS) or Alt (Windows) key, and click the Reset button.
Loop Specify if you want the Preview to play in a loop.
Mute Audio Mute audio during a Preview.
Preview Favors Specify if you want Preview to favor the Frame Rate or Length. You can use the Preview Favors
option to optimize caching and playback behavior for better Frame Rate performance or unlimited Length of
preview.
When Preview Favors is set to Frame Rate:
•After Effects renders and caches frames until the available RAM is filled, and then plays the cached frames in
real-time.
•During the rendering and caching phase, frames are rendered and cached as fast as possible. Playback of cached
frames begins immediately, but no faster than real-time.
•If the cache fills available RAM before all frames in the range are rendered, only the frames in the cache are
previewed.
•When the caching phase is completed, real-time playback will begin from the time defined by the Play From
control, or simply continue if rendering was faster than real-time.
When Preview Favors is set to Length:
•Playback begins by rendering and caching frames with only a small advance buffer, but no faster than real time.
•The entire range will preview; if the cache fills available RAM before all frames in the range are rendered, the
oldest frames in the cache are discarded.
•Real-time playback only occurs if the frames render faster than real-time, or after the first loop if the entire range
fits in the cache.
•The Length option is best-suited when previewing frames that render faster than real-time, which is often the
case in the Footage panel, or when previewing a range too long to fit all of the frames in the cache.
For both of these options:
•Playback begins immediately, simultaneous with frame rendering and caching.
•Audio plays, if enabled. When playback speed is less than real-time, audio will stutter in order to maintain sync
with video. The audio stutter is more likely to occur if Mute Audio When Preview Is Not Real-Time option in
Preferences (Preferences > Preview) is disabled.
Range Defines the range of frames that are previewed:
•Work Area: Only the frames within the work area.

180
Views and previews
Last updated 6/8/2015
•Work Area - Extended by Current Time: Work area is dynamically extended the work area with reference to the
position of the current-time indicator (CTI).
•If the CTI is placed before the work area, the length of the range is from the current time to the work area end
point.
•If the CTI is placed after the work area, the length of the range is from the work area start point to the current
time; unless From Current Time is enabled, in which case the length of the range is from the work area start
point to the last frame of the composition, layer, or footage.
•If the CTI is placed inside the work area, the range is the work area with no extension.
•Entire Duration: All frames of the composition, layer, or footage.
Layer Controls Choose whether to display layer controls for selected layers and other viewer panel overlays during
preview. When preview is stopped, layer controls and overlays return to their previous visibility setting.
Viewer panel overlays include guide lines, safe margins, grids, and 3D reference axes.
•Off shows no layer controls or overlays during preview.
•Use Current Settings shows the viewer's layer controls and overlays during preview.
To choose which layer controls to show for the current viewer, open the View Options dialog (View > View
Options).
To choose which overlays to show for the current viewer, open the Choose Grid and Guide Options menu at the
bottom of the viewer panel.
While a preview is playing back, you can dynamically show or hide layer controls using shortcut keys: Cmd + Shift
+H (Mac OS) or Control + Shift + H (Windows).
Note: Showing or hiding layer controls during a preview does not affect the state of the Layer Controls option in the
Preview panel.
Frame Rate Specify a Frame Rate for the preview. Select Auto if you want the preview and composition frame rates
to be equal.
Skip Select the number of frames you want to skip while previewing to improve playback performance.
Resolution Specify preview resolution. Value specified in the Resolution drop-down overrides resolution setting of
the composition.
Stop a Preview
You can stop a preview using any of the following ways:
•Press any of the preview keyboard shortcuts: Spacebar, Numpad-0, or Shift + Numpad-0.
•Click the Play/Stop button in the Preview panel.
•Choose Composition > Preview > Play Current Preview.
•Press either of the audio preview keyboard shortcuts: Numpad-period (.) or Option/Alt + Numpad-period (.)
•Press the Esc key.
When a preview stops, two scenarios are considered:
•If you stop a preview before all frames in the range have been rendered, whether to start playback of cached frames
before all frames in the range have been rendered. This scenario is only when the preview was started with Preview
Favors set to Frame Rate.
181
Views and previews
Last updated 6/8/2015
•Whether the CTI stays at the current time or moves to the playback time (the time at which you stopped the
preview).
Using Preview Shortcut to stop a Preview
Using the preview keyboard shortcuts (Spacebar, Numpad-0, or Shift + Numpad-0) to stop a preview, results in
different stop behaviors:
•Spacebar: CTI moves to the playback time. If frame rendering is interrupted, playback of the cached frames begins.
•Numpad-0: CTI stays at the current time. If frame rendering is interrupted, playback of the cached frames begins.
•Shift + Numpad-0: CTI stays at the current time. If frame rendering is interrupted, playback of the cached frames
begins.
Note: The stop behavior for the preview shortcuts is a result of the shortcut you pressed to stop the preview, not the shortcut
you used to start the preview.
Using the Play/Stop button to stop a Preview
The Play/Stop button in the Preview panel and Composition > Preview > Play Current Preview are linked to the
shortcut currently displayed in the Preview panel. Using these actions to stop a preview will have the same result as
pressing the currently displayed shortcut key.
Default preview settings
The following are the default preview settings for each of the preview Shortcut keys:
Loop options for previews
Click the Loop Options button in the Preview panel until it shows the desired state:
Loop Repeatedly plays preview from beginning to end.
Spacebar Numpad-0 Shift + Numpad-0
•Loop: on
•Audio: on
•Preview Favors: Frame Rate
•Range: Work Area Extended by Current
Time
•Play From: Current Time
•Layer Controls: Off
•Frame Rate: Auto
•Skip: 0
•Resolution: Auto
•Full Screen: disabled
When Spacebar is used to stop a
preview:
•CTI: moves to playback time
•Interrupt caching: start playback
•Loop: on
•Audio: on
•Preview Favors: Frame Rate
•Range: Work Area
•Play From: Start of Range
•Layer Controls: Off
•Frame Rate: Auto
•Skip: 0
•Resolution: Auto
•Full Screen: disabled
When Numpad-0 is used to stop a
preview:
•CTI: stays at current time
•Interrupt caching: start playback
•Loop: on
•Audio: on
•Preview Favors: Frame Rate
•Range: Work Area Extended by
CurrentTime
•Play From: Start of Range
•Layer Controls: Off
•Frame Rate: Auto
•Skip: 1
•Resolution: Auto
•Full Screen: disabled
When Shift + Numpad-0 is used to
stop a preview:
•CTI: stays at current time
•Interrupt caching: start playback

182
Views and previews
Last updated 6/8/2015
Play Once Plays preview once.
Preview only audio
When you preview only audio, it plays immediately at real-time speed, unless you’ve applied Audio effects other than
Stereo Mixer, in which case you may have to wait for audio to render before it plays.
Note: If audio must be rendered for a preview, then only the amount of audio specified by the Duration setting in the
Previews preferences is rendered and played for the preview. The default is 30 seconds.
Set the sample rate for audio for the entire project in the Project Settings dialog box (File > Project Settings). CD-quality
sound is 44.1 KHz, 16-bit stereo.
The Audio Hardware and Audio Output Mapping preferences determine the behavior of audio previews. These
preferences do not affect final output. The output module settings determine the quality of audio in final output. For
best-quality audio previews, choose an ASIO device if one is available in the Default Device menu in the Audio
Hardware preferences. Otherwise, choose one of the devices for your system, such as the After Effects WDM Sound
device (Windows) or one of the Built-in devices (Mac OS).
•To preview only audio from the current time, choose Composition > Preview > Audio Preview (Here Forward) or
press the decimal point key (.) on the numeric keypad.
•To preview only audio in the work area, choose Composition > Preview > Audio Preview (Work Area) or press
Alt+decimal point (.) (Windows) or Option+decimal point (.) (Mac OS) on the numeric keypad.
Manually preview (scrub) video and audio
•To manually pre view (scrub) video in the Timeline panel or go to a specific frame, drag the current-time indicator.
•To scrub audio in the Timeline panel, Ctrl+Alt-drag (Windows) or Command+Option-drag (Mac OS) the current-
time indicator.
•To scrub audio and video in the Timeline panel, Ctrl-drag (Windows) or Command-drag (Mac OS) the current-time
indicator.
If you stop moving the current-time indicator while keeping the mouse button depressed, a short section of audio loops.
To manually preview (scrub) only the frames that are already rendered and cached into the RAM cache, press Caps
Lock before dragging the current-time indicator. This prevents After Effects from trying to render other frames when
you drag over or past them. This technique is useful when you want to manually preview some frames that you rendered
using preview settings that used an option to skip every other frame.
Audio panel options
During previews, the Audio panel volume unit (VU) meter actively displays audio volume levels. At the top of the VU
meter, signals indicate when the audio is clipping—a distortion that occurs when the audio signal exceeds the maximum
level that the audio device allows.
To view the VU meter and levels controls in more detail, increase the height of the Audio panel.
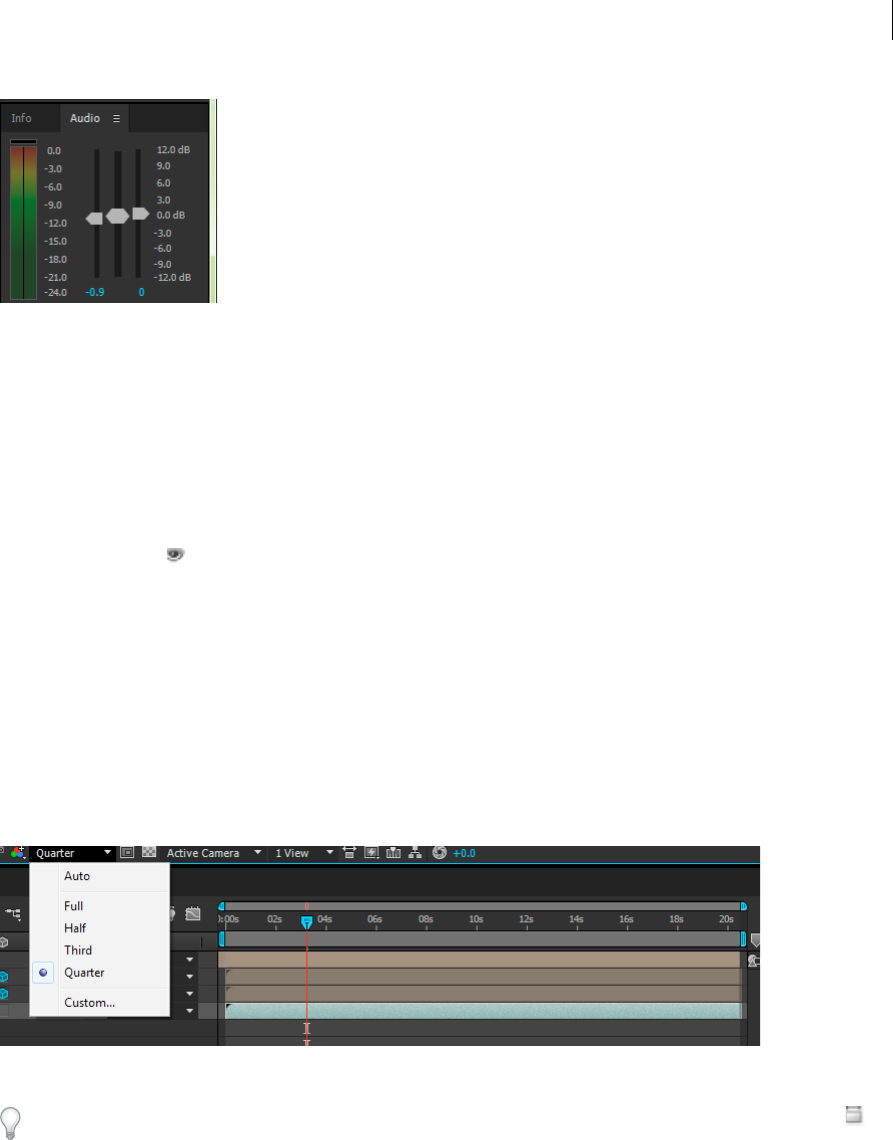
183
Views and previews
Last updated 6/8/2015
Choose Options in the Audio panel menu to specify the following options:
Units Choose whether to display audio levels in decibels or in percentages. 100% equals 0 decibels (0 dB).
Slider Minimum The minimum audio level to display in the Audio panel.
Additional tips and options for previewing
•With all previewing methods—as with rendering to final output—a layer is only visible in rendered previews if its
Video layer switch is selected.
•The following are some of the factors that influence the speed with which previews are rendered:
•layer switches
•Fast Previews settings
•preference settings
•composition settings.
Use the Resolution/Down Sample Factor setting menu which is one of the simplest and most influential of the preview
settings controls. Choose a value other than Full from this menu to see all previews at a lower resolution.
To turn pixel-aspect ratio correction on or off for previews, click the Toggle Pixel Aspect Ratio Correction button at
the bottom of the panel. The quality of the pixel aspect ratio correction is determined by the Zoom Quality preference.
(See Viewer Quality preferences.)
•When possible, preview on the same kind of device that your audience will use to view your final output. For
example, you can preview on an external video monitor.
•If color management is enabled, you can preview a composition, layer, or footage item as it will appear in the output
color space. (See Simulate how colors will appear on a different output device.)
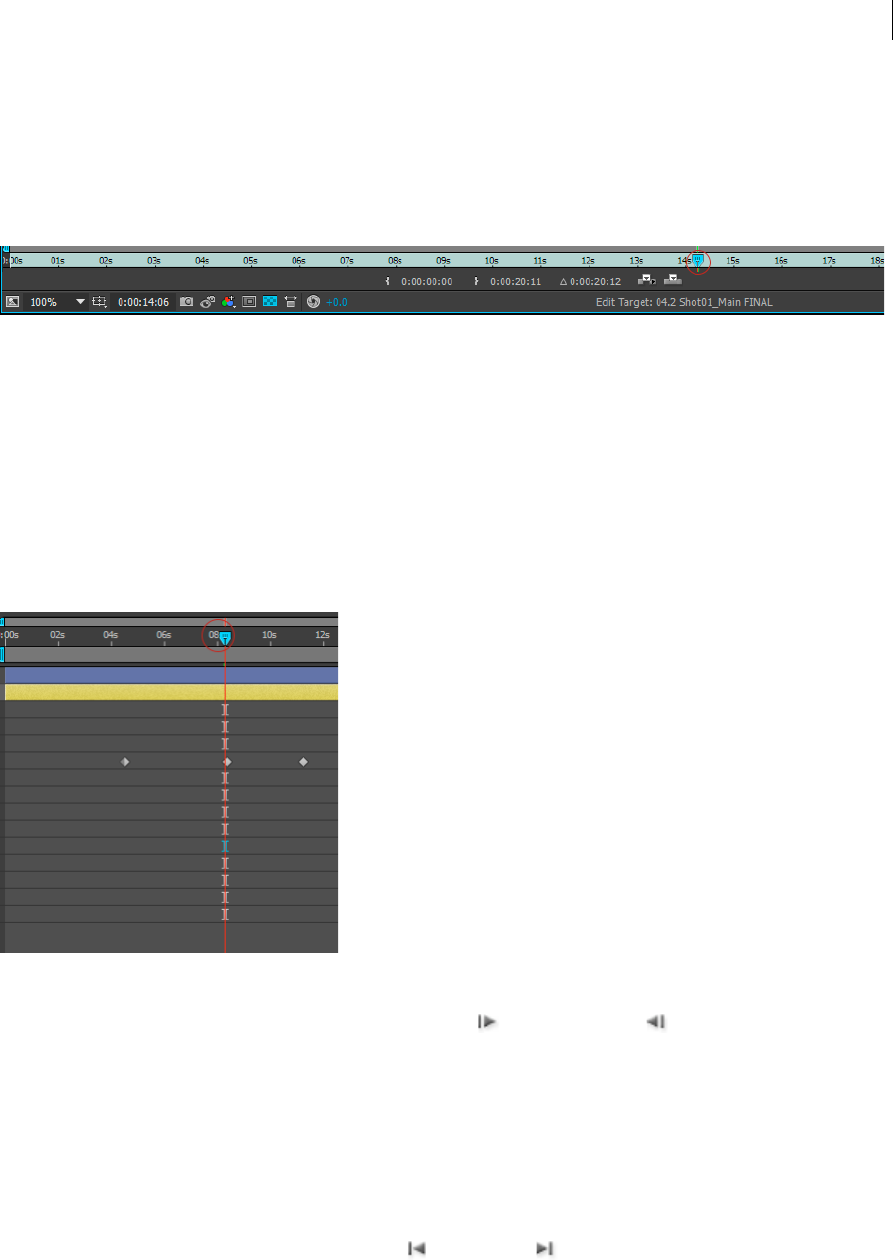
184
Views and previews
Last updated 6/8/2015
Note: Select Show Rendering Progress In Info Panel And Flowchart (Edit > Preferences > Display (Windows) or After
Effects > Preferences > Display (Mac OS)) to see additional information in the Info panel or the project Flowchart panel
during rendering, either for previews or for final output.
Move the current-time indicator (CTI)
The most basic way of previewing frames is to manually preview by moving or dragging the current-time indicator
(CTI).
The time ruler visually represents the time dimension of a composition, a layer, or a footage item. In a Layer or Footage
panel, the time ruler appears near the bottom of the panel. For a Composition panel, the time ruler appears in the
corresponding Timeline panel. The time rulers in different panels represent different durations. The time ruler in a
Layer or Footage panel represents the duration of the contents of that panel; the time ruler in the Timeline panel
represents the duration of the entire composition.
On a time ruler, the current-time indicator indicates the frame you are viewing or modifying.
•To go forward or backward one frame, click the Next Frame or Previous Frame button in the Preview panel,
or press Page Down or Page Up.
•To go forward or backward ten frames, Shift-click the Next Frame or Previous Frame button, or press Shift+Page
Down or Shift+Page Up.
•To go forward a specific period of time or number of frames, click the current-time display, and then enter the plus
sign (+) followed by the timecode or number of frames to advance. For example, enter +20 to go forward 20 frames
or 1:00 to go forward one second. Precede the value by the minus sign (-) to go backward. For example, enter +-20
to go backward 20 frames or +-1:00 to go backward one second.
•To go to the first or last frame, click the First Frame or Last Frame button in the Preview panel, or press Home
or End.
•To go to the first or last frame of the work area, press Shift+Home or Shift+End.
185
Views and previews
Last updated 6/8/2015
•To go to a specific frame, click in the time ruler; click the current-time display in the Footage, Layer, Composition,
or Timeline panel; or press Alt+Shift+J (Windows) or Option+Shift+J (Mac OS). You can also drag the current-time
display in the Timeline panel to modify the value.
•Shift-drag the current-time indicator to snap to keyframes, markers, In and Out points, the beginning or end of the
composition, or the beginning or end of the work area.
If you scrub the CTI while a preview is playing, preview will stop. To scrub the CTI without stopping a preview, hold
Option/Alt while scrubbing.
Zoom in or out in time for a composition
•In the Timeline panel, click the Zoom In button or the Zoom Out button , or drag the zoom slider between
the buttons.
•On the main keyboard, press the = (equal sign) key to zoom in or press the – (hyphen) key to zoom out in time.
•Drag the Time Navigator Start or Time Navigator End brackets to zoom in or out on a section of the composition
time ruler.
Note: When you click the Time Navigator in the Timeline panel, the Info panel shows the times of the beginning and end
of the Time Navigator duration.
•To zoom out to show the entire composition duration, press Shift+; (semicolon) with the Composition panel or
Timeline panel active. Press Shift+; again to zoom back in to the duration specified by the Time Navigator.
•To zoom out to show the entire composition duration, Shift-double-click the Time Navigator. Shift-double-click it
again to zoom back in to the duration specified by the Time Navigator.
•To zoom in to show individual frames in the time ruler, double-click the Time Navigator. Double-click the Time
Navigator again to zoom out to show the entire composition duration.
For additional ways to zoom and scroll in time using the mouse scroll wheel, see Scroll or zoom with the mouse wheel.
When zoomed in time, press D to center the time graph on the current time.
Choose a viewer to always preview
Designating a viewer as the default panel to preview is especially useful when you have a Composition viewer that
represents your final output and you always want to preview that viewer, even when you’re changing settings in other
panels.
The panel that’s set to always preview appears frontmost for the duration of the preview.
•Click the Always Preview This View button in the lower-left corner of the panel. OR
•Click the Primary Viewer button in the lower-left corner of the panel.
Primary Viewer Button
The Primary Viewer button is located next to the Always Preview This View button in the lower left of the
Composition, Layer, and Footage viewer panels.
Primary Viewer functions similarly to Always Preview This View, except that Primary Viewer only defines which
viewer or view is used for audio and external video preview.
•Only one view can be set as Primary Viewer; enabling it for a viewer or view disables it in any other viewer or view
where it had previously been enabled.

186
Views and previews
Last updated 6/8/2015
•When Primary Viewer is disabled, the most recently active viewer or view is used for audio and external video
preview.
•When you switch to a different viewer or view, that viewer or view takes control of audio and external video preview.
Note: When multiple views are open, previews use the frontmost composition view for 2D compositions and the Active
Camera view for 3D compositions. To turn off the Active Camera, deselect Previews Favor Active Camera in the Preview
panel menu.
Preview modes and Viewer Quality preferences
After Effects provides several options for previewing that make various tradeoffs between speed and fidelity.
Preview modes and Fast Previews preferences
Each preview mode provides a different balance between quality and speed for playback and for updating of images
during interactions, such as when you drag a layer in the Composition panel or modifying a property value in the
Timeline panel.
Draft 3D and Live Update modes apply to all views of a composition.
Draft 3D Disables lights, shadows, and depth-of-field blur for cameras. To turn Draft 3D mode on or off, click the Draft
3D button at the top of the Timeline panel.
Live Update Updates images in the Composition or Layer panel during interactions. When Live Update is deselected,
After Effects displays wireframe representations during interactions.
To temporarily toggle Live Update mode, hold Alt (Windows) or Option (Mac OS) while dragging to move a layer,
modify a property value, or move the current-time indicator.
To prevent After Effects from updating images in the Footage, Layer, and Composition panels, press Caps Lock. When
you make a change that would otherwise appear in a panel, After Effects adds a red bar at the bottom of the panel with
a text reminder that image refresh is disabled. After Effects continues to update panel controls such as motion paths, anchor
points, and mask outlines as you move them. To resume panel updates and display all changes, press Caps Lock again.
Pressing Caps Lock is a good way to prevent views from being refreshed for each frame during rendering for final output.
Note: When you are using OpenGL to render previews and are previewing on a video monitor, the preview shown on the
video monitor doesn’t update as you interact with elements of your composition until you have released the mouse at the
end of an interaction. (See Preview on an external video monitor.)
Fast Previews
The Fast Previews options range from higher quality but slower performance (Off), to lower quality but higher
performance (Wireframe).
Off (Final Quality) Fast Previews is off. Use this mode when previewing the final quality of your composition.
Adaptive Resolution Attempts to downsample footage while dragging a layer or scrubbing a property value. For the
ray-traced 3D compositions, Adaptive Resolution will reduce the ray-tracing quality based on the current adaptive
resolution:
•At 1/2, the ray-tracing quality value is cut in half.
•at 1/4, it will be reduced to at most 4.
•at 1/8 or 1/16, it will be reduced to at most 2.

187
Views and previews
Last updated 6/8/2015
You can change the adaptive resolution limit in Edit > Preferences > Previews (Windows) or Premiere Pro > Preferences
> Previews (Mac OS).
Draft Available in Ray-traced 3D compositions only. This option reduces the ray-tracing quality (number of rays fired
by the ray tracer) to 1.
Fast Draft When laying out a complex scene, or if you are working in a ray-traced 3D composition, you can use Fast
Draft mode for previewing. In ray-traced 3D compositions, Fast draft mode supports for beveled, extruded, and curved
3D layers. When previewing, the scene is downsampled to speed up the loading of textures to the GPU. In Fast Draft
mode, each frame of video is still read in to the renderer as needed. The downsample factor is set at 1/4 resolution, and
effects and track mattes are on.
Wireframe Useful for setting up and previewing complex compositions.
•In Draft, Fast Draft, and Wireframe modes, the Current Renderer menu button's lightning bolt appears orange. In
Adaptive Resolution, it appears orange when the composition is downsampled. In these modes, the name of the
mode appears in the upper-right corner of the Composition view.
•If adjusting a property or scrubbing through the Timeline takes a long time in Off, Adaptive Resolution, or Draft
modes, the scene will temporarily switch to show wireframes. The frame will finish rendering when you stop
moving the mouse.
•If you are in a ray-traced 3D composition in Draft mode, and then switch to it to a Classic 3D composition, the fast
preview mode automatically switches to Adaptive Resolution.
•If you want to update more than one active view when scrubbing while holding down the Ctrl (Windows) or
Command (Mac OS) key, enable the "Share View Options" option in the Select View Layout popup menu.
•Press the Current Renderer menu button in the upper right corner of the Composition panel to quickly open the
current renderer settings in the Composition Settings dialog box. This method is applicable to a 3D layer, camera,
or light in the composition.
Changing the Fast Previews mode to match your workflow is important, especially when working with ray-traced 3D
compositions.
Keyboard shortcuts for Fast Previews
Video Tutorial for Fast Previews
Viewer Quality preferences
In the Previews preferences category, you can choose the quality and speed of color management and zoom operations
used in previews.
From the Zoom Quality or Color Management Quality menu, choose one of the following:
•Faster
Quality name Shortcut
Off (Final Quality) Ctrl+Alt+1 (Windows) / Cmd+Option+1 (Mac OS)
Adaptive Resolution Ctrl+Alt+2 (Windows) / Cmd+Option+2 (Mac OS)
Draft Ctrl+Alt+3 (Windows) / Cmd+Option+3 (Mac OS)
Fast Draft Ctrl+Alt+4 (Windows) / Cmd+Option+4 (Mac OS)
Wireframe Ctrl+Alt+5 (Windows) / Cmd+Option+5 (Mac OS)

188
Views and previews
Last updated 6/8/2015
•More Accurate Except Cached Preview
•More Accurate
The Zoom Quality preference affects the quality of scaling performed for pixel aspect ratio correction in the
Composition and Layer panels.
Note: The More Accurate Except Cached Preview option uses the more accurate operations for manual previews and
standard previews, but uses the faster operations for previews.
Note: When the Show Channel menu is set to an option that shows straight colors ( RGB Straight, Alpha Overlay, or Alpha
Boundary), the Viewer Quality preference is ignored, and the preview is created as if the Viewer Quality settings were
Faster.
Region of interest (ROI)
The region of interest (ROI) is the area of the composition, layer, or footage item that is rendered for previews. Create
a smaller region of interest to use less processing power and memory when previewing, thereby improving interaction
speed and increasing preview duration.
By default, changing the region of interest does not affect file output. You can change the size of your composition and
select what portion is rendered by cropping to the region of interest.
Note: When the region of interest is selected, the Info panel displays the horizontal and vertical distances of the top (T), left
(L), bottom (B), and right (R) edges of the region from the top-left corner of the composition.
•To draw a region of interest, click the Region Of Interest button at the bottom of the Composition, Layer, or
Footage panel, and then drag to select a viewable area of the panel.
To start over with the marquee tool, hold down Alt (Windows) or Option (Mac OS) and click the Region Of Interest
button.
•To switch between using the region of interest and using the full composition, layer, or footage frame, click the
Region Of Interest button.
•To move or resize the region of interest, drag its edges or handles. Shift-drag a corner handle to resize while
preserving aspect ratio.
•To crop the composition to the region of interest, choose Composition > Crop Comp To Region Of Interest.
•To crop the output to the region of interest, choose Use Region Of Interest in the Crop section of the Output Module
Settings dialog box. (See Output module settings.)
To create the equivalent of a region of interest for a single layer, you can draw a temporary mask around the part of the
layer that you are working with. The area outside of the mask will not be rendered. This can make working with a small
portion of a large layer much faster. Be careful, though, since not rendering the pixels outside of the mask can change the
composition’s appearance significantly. (See Creating masks.)
Work area
The work area is the part of the duration of a composition that is rendered for previews or final output. In the Timeline
panel, the work area appears in a lighter shade of gray.
•To set the work area start time or end time to the current time, press B (begin) or N (end), respectively.
•To set the work area, move the start and end work area markers in the time ruler.

189
Views and previews
Last updated 6/8/2015
•To move the work area, drag the center of the work area bar left or right.
•To expand the work area to the size of the composition, double-click the center of the work area bar.
•To show the duration of the work and the times of its beginning and end in the Info panel, click the work area bar.
Snapshots
When you want to compare one view to another in a Composition, Layer, or Footage panel, take a snapshot. For
example, you may want to compare two frames at different times in a movie.
Snapshots taken in one kind of panel can be displayed in another kind. For example, you can take a snapshot of a Layer
panel and display the snapshot in a Composition or Footage panel. Displaying a snapshot does not replace the content
of the panel. If the snapshot has a different size or aspect ratio than the panel in which you display it, the snapshot is
resized to fit the current view.
Snapshots are for reference only and do not become part of the layer, composition, or rendered movie.
A sound is generated when you take a snapshot.
•To take a snapshot, click the Take Snapshot button at the bottom of the panel or press Shift+F5, Shift+F6,
Shift+F7, or Shift+F8.
•To view the most recent snapshot taken with the Take Snapshot button or Shift+F5, click and hold the Show
Snapshot button at the bottom of the panel.
•To view a specific snapshot, press and hold F5, F6, F7, or F8.
•To purge a snapshot, hold down Ctrl+Shift (Windows) or Command+Shift (Mac OS) and press F5, F6, F7, or F8.
•To free all memory used to store snapshots, choose Edit > Purge > Snapshot.
Preview on an external video monitor
You can preview the contents of your Layer, Footage, or Composition panel on an external video monitor. Previewing
on a video monitor requires additional hardware, such as a video capture card or a FireWire port.
With the After Effects CC June 2014 release, previews can be displayed on a second monitor connected to your video
display card, such as, via DVI, DisplayPort, or HDMI. If you are using a video capture card to connect an external video
monitor, install the appropriate drivers and connect the monitor to view previews. If you are using a FireWire port, first
connect a digital camcorder or similar device to the port; then connect the video monitor to the device. For more
information on setting up FireWire previews, see the documentation for your digital camcorder, VCR, or other device.
1Choose Edit > Preferences > Video Preview (Windows) or After Effects > Preferences > Video Preview (Mac OS).
2To enable video output to an external device, choose from the following options:
•Adobe DV: This is the FireWire option.

190
Views and previews
Last updated 6/8/2015
•Adobe Monitor x: These are your attached computer monitors that can receive video preview data through the
graphics card.
•Third-party video hardware: These entries differ depending on what third-party hardware you have connected.
AJA Kona 3G, Blackmagic Playback and Matrox Player are typical examples.
3Choose Disable video output when in the Background option to prevent video frames from being sent to the
external monitor when After Effects is not the foreground application.
4Choose Video preview during render queue output option to send video frames to the external monitor when After
Effects is rendering frames in the render queue.
The video preview sent to an external monitor using Mercury Transmit is color-managed (treating the external video
preview monitor as an HDTV Rec. 709 device). For more information, see the Video preview with Mercury
Transmitarticle.
Note: The Wireframe preview mode does not preview at all to the the video preview monitor. (See Preview modes and
Viewer Quality preferencesand Choose a working color space and enable color management.)
More Help topics
Previews (keyboard shortcuts)
Memory & Multiprocessing preferences
Layer switches and columns in the Timeline panel
Time navigation (keyboard shortcuts)
Workspaces, panels, and viewers
Preferences
Render with OpenGL
Basics of rendering and exporting
Modifying and using views
Choose a view layout and share view settings
The Composition panel can show one, two, or four views at a time. By default, viewer options (such as grids and rulers)
affect only the currently active view.
•To choose a view layout, choose an option from the Select View Layout menu at the bottom of the Composition
panel.
•To scroll through view layouts, place the pointer over the Select View Layout menu and roll the mouse wheel.
•To apply view settings to all views in the current layout, choose Share View Options from the Select View Layout
menu. Hold Ctrl (Windows) or Command (Mac OS) to temporarily reverse this behavior.
To activate a view without affecting the selection of layers in a composition, use the middle mouse button to click within
the view’s pane in the Composition panel.

191
Views and previews
Last updated 6/8/2015
Choose a 3D view
You can view your 3D layers from several angles, using orthographic views, custom views that employ perspective, or
camera views.
The working 3D views include the custom views and the fixed orthographic views (Front, Left, Top, Back, Right, or
Bottom). The orthographic views show layer positions in the composition but do not show perspective. The working
3D views are not associated with a camera layer. The working 3D views are useful for placing and previewing elements
in a 3D scene. 3D layers appear in working 3D views; 2D layers do not appear in working 3D views.
Note: The Composition panel displays a label within each view (such as Top or Right) to indicate which view is associated
with which camera perspective. To hide these labels, choose Show 3D Labels from the Composition panel menu.
You can adjust the point of view and direction of view for the custom views with the Camera tools, or you can look at
selected layers or all layers. (See Adjust a 3D view or move a camera, light, or point of interest.)
•Choose a view from the 3D View menu at the bottom of the Composition panel.
•Choose View > Switch 3D View, and choose a view from the menu.
•Choose View > Switch To Last 3D View.
•To switch to the previous 3D view, press Esc.
•To choose one of the 3D views with keyboard shortcuts, press F10, F11, or F12.
To change which 3D view is assigned to a keyboard shortcut, switch to a view and then press Shift and the keyboard
shortcut. For example, to make F12 the shortcut for Top view, switch to Top view and then press Shift+F12. You can
also use the View > Assign Shortcut To menu command for this purpose.
Show or hide layer controls in the Composition panel
You can assign different options to each view in the Composition panel, so that you can see any combination of camera
and light wireframes, layer handles, mask and shape paths, effect control points, and motion path controls.
•To choose which layer controls to show in a view, choose View > View Options, or press Ctrl+Alt+U (Windows) or
Command+Option+U (Mac OS).
•To show or hide layer controls in a view, choose View > Show Layer Controls, or press Ctrl+Shift+H (Windows) or
Command+Shift+H (Mac OS). This command also shows or hides the 3D reference axes.
•To show or hide mask paths and shape paths in a view, click the Toggle Mask And Shape Path Visibility button at
the bottom of the Composition panel.
Zoom an image for preview
Note: For information on scaling a layer, not just zooming in or out of the preview image, see Scale or flip a layer.
The Magnification Ratio control in the lower-left corner of a Composition, Layer, or Footage panel shows and controls
the current magnification. By default, the magnification is set to fit the current size of the panel. When you change
magnification, you change the appearance of the preview in the panel that you are previewing, not the actual resolution
and pixels of the composition.
The quality of zooming for previews can be set using the Zoom Quality preference. (See Viewer Quality preferences.)
Note: After Effects renders vector objects before zooming (scaling for preview), so some vector objects may appear jagged
when you zoom in on them. This apparent pixelation for zooms does not affect scaling of layers or rendering to final output.
•To zoom in to or out from the center of the active view, press the period (.) key or the comma (,) key. Each keypress
additionally increases or decreases the magnification.

192
Views and previews
Last updated 6/8/2015
•To zoom in to or out from the center of the view using the mouse scroll wheel, place the pointer over the panel and
move the scroll wheel.
•To zoom in on or out from a specific point using the mouse scroll wheel, place the pointer over the panel and hold
Alt (Windows) or Option (Mac OS) as you move the scroll wheel.
•To zoom in on a specific point using the Zoom tool , click the area in the panel you want to magnify. Each click
additionally magnifies the image, centering the display on the point you click. You can also drag the tool to magnify
a specific area.
•To zoom out from a specific point using the Zoom tool, Alt-click (Windows) or Option-click (Mac OS) the point
that you want to be the center of the zoomed-out view. Each click additionally decreases the magnification of the
image, centering the display on the point you click.
•To zoom the active view to 100%, double-click the Zoom tool button in the Tools panel.
•To zoom to fit or to zoom to a preset magnification, choose a zoom level from the Magnification Ratio menu. To
change the magnification of all views in a Composition panel, hold Ctrl (Windows) or Command (Mac OS) while
choosing a zoom level from the menu. Choose Fit to make the image fit the Composition panel; choose Fit Up To
100% to limit the zoom level to 100%.
To pan around in the Composition, Layer, or Footage panel while zoomed in, drag with the Hand tool, which you can
activate by holding down the spacebar, the H key, or the middle mouse button. Hold Shift, too, to pan faster.
For additional ways to zoom and scroll using the mouse scroll wheel, see Scroll or zoom with the mouse wheel.
Resolution
In the context of printing and other media with fixed linear dimensions, resolution refers to linear pixel density: the
number of pixels or dots in a certain span, expressed in such terms as ppi (pixels per inch) and dpi (dots per inch).
In video, film, and computer graphics contexts, the linear measurements of the images are variable, so it doesn’t make
sense to refer to the number of pixels per inch or any other linear measure. Consider, for example, that the same
640x480 movie can be shown on the tiny screen of a mobile device, the monitor of a desktop computer, and a huge
motion billboard. The number of pixels per inch is different for each of these presentation devices, even though the
number of pixels may be the same.
In this context, the term resolution refers to a relative quantity: a ratio of the number of pixels that are rendered to the
number of pixels in a source image. For each view, there are two such ratios—one for the horizontal dimension and one
for the vertical dimension.
Each composition has its own Resolution setting, which affects the image quality of the composition when it’s rendered
for previews and final output. Rendering time and memory for each frame are roughly proportional to the number of
pixels being rendered.
When you render a composition for final output, you can use the current Resolution settings for the composition or set
a resolution value in the Render Settings dialog box that overrides the composition settings. (See Render settings.)
You can choose from the following Resolution settings in the Composition Settings (Composition > Composition
Settings) dialog box or from the Resolution/Down Sample Factor menu at the bottom of the Composition panel:
Auto (available only for previews) Adapts the resolution of the view in the Composition panel to render only the pixels
necessary to preview the composition at the current zoom level. For example, if the view is zoomed out to 25%, then
the resolution automatically adapts to a value of 1/4—shown as (Quarter)—as if you had manually chosen Quarter. If
a panel contains multiple views, the resolution adapts to the view with the highest zoom level. This setting gives the best
image quality while also avoiding rendering pixels unnecessary for the current zoom level.
193
Views and previews
Last updated 6/8/2015
Note: The Auto setting is ignored for compositions for which the Advanced composition setting Preserve Resolution When
Nested is selected.
Full Renders each pixel in a composition. This setting gives the best image quality, but takes the longest to render.
Half Renders one-quarter of the pixels contained in the full-resolution image—half the columns and half the rows.
Third Renders one-ninth of the pixels contained in the full-resolution image.
Quarter Renders one-sixteenth of the pixels contained in the full-resolution image.
Custom Renders the image at the horizontal and vertical resolutions that you specify.
Note: The resolution (down-sample factor) of a Layer viewer is tied to the resolution of the Composition viewer for the
composition in which the layer is contained.
View a color channel or alpha channel
You can view red, green, blue, and alpha channels—together or separately—in a Footage, Layer, or Composition panel
by clicking the Show Channel button at the bottom of the panel and choosing from the menu. When you view a
single color channel, the image appears as a grayscale image, with the color value of each pixel mapped to a scale from
black (0 value for the color) to white (maximum value for the color).
To see color values displayed in the channel’s own color instead of white, choose Colorize from the Show Channel menu.
When you preview the alpha channel, the image appears as a grayscale image, with the transparency value of each
pixel mapped to a scale from black (completely transparent) to white (completely opaque).
Note: When you choose RGB Straight, which shows straight RGB values before they are matted (premultiplied) with the
alpha channel, pixels with complete transparency are undefined and therefore may contain unexpected colors.
You can view other channel values, such as saturation and hue, by applying the Channel Combiner effect and choosing
Lightness from the To menu.
To switch between showing the alpha channel and showing all RGB channels, Alt-click (Windows) or Option-click (Mac
OS) the Show Channel button.
Alpha Boundary and Alpha Overlay view modes are only available in the Layer panel, and they are intended for use
with the Roto Brush effect. For information on these modes, see Layer panel view options .
Adjust exposure for previews
You can adjust the exposure (in f-stop units) for previews with the Adjust Exposure control, which is located to the right
of the Reset Exposure button at the bottom of a Composition, Layer, or Footage panel. Each viewer can have its own
Adjust Exposure setting.
When the Adjust Exposure control is set to a value other than zero, the Reset Exposure button is orange .
The Adjust Exposure control doesn’t affect final output, only how video appears during previews. To make tonal
adjustments to a layer that appear in final output, use the Exposure effect.
The Adjust Exposure control is useful for finding the black point or white point in an image. For example, drag the value
control to the right (positive values) until the entire image is white except for one area; that area is the darkest area in
the image.
194
Views and previews
Last updated 6/8/2015
To check the quality of a composite, drag the Adjust Exposure control far to the left and far to the right and look for
places where the composited elements differ too much in color or luminance. This technique—sometimes called gamma
slamming—is useful for ensuring that a composite will look good and be convincing in contexts other than the one in which
you’re working. For example, a composite that is adequate in a dark scene may be less convincing when the scene is color-
corrected to brighten the scene.
•To adjust exposure for a viewer, drag the Adjust Exposure control to the left or right, or click the control and enter
a value in the box.
•To reset exposure, click the Reset Exposure button. To return to the most recent nonzero setting, click the button
again.
Safe zones, grids, guides, and rulers
In the Footage, Layer, and Composition panels, you can display safe zone margins, grids, rulers, and guide lines to align
and arrange visual elements. After Effects preserves guides when importing Photoshop files saved with guides.
Safe-zone margins, grids, and guides are not rendered, either for RAM previews or for final output.
The size of proportional grids increases or decreases when the composition size changes; the size of standard grid
squares remains the same regardless of composition size.
•To change settings for safe-zone margins, grids, and guides, choose Edit > Preferences > Grids & Guides (Windows)
or After Effects > Preferences > Grids & Guides (Mac OS).
•To show or hide safe zones, grids, guides, or rulers, click the Grid And Guides Options button and choose the
appropriate item, or use a menu command or keyboard shortcut in the View menu.
•To toggle between showing and hiding the safe zones, Alt-click (Windows) or Option-click (Mac OS) the Grid And
Guide Options button.
•To make layer edges and mask edges snap to grids or guides, choose View > Snap To Grid or View > Snap To Guides.
•To create a guide line, drag from either ruler.
•To delete a guide line, drag it to a ruler using the Selection tool.
•To delete all guide lines, choose View > Clear Guides.
•To move a guide line, drag it using the Selection tool.
•To lock or unlock guides, choose View > Lock Guides. Locking a guide prevents it from being accidentally moved.
•To set the zero point (origin) for the rulers, drag the crosshair from the intersection of the two rulers (in the upper-
left corner) into the image area. Reset the zero point by double-clicking the intersection of the rulers. The position
of the pointer measured from the new zero point is shown in the Info panel as X' and Y' coordinates.
195
Views and previews
Last updated 6/8/2015
About title-safe and action-safe zones
Television sets enlarge a video image and allow some portion of its outer edges to be cut off by the edge of the screen.
This kind of cropping is known as overscan. The amount of overscan is not consistent between television sets, so you
should keep important parts of a video image within certain margins, in areas known as safe zones. Safe-zone margins
represent the percentage of image dimensions not included in the safe zone. You should always design from one edge
of the frame to the other, because computer monitors and some television sets may show the entire frame.
The conventional action-safe zone is 90% of the width and height of the frame, which corresponds to a margin of 5%
on each side. Keep important visual elements within this zone.
The conventional title-safe zone is 80% of the width and height of the frame, which corresponds to a margin of 10% on
each side. Keep text that you intend for the audience to read within this zone.
Compositions with a frame aspect ratio equal to or near 16:9 have two additional center-cut safe-zone indicators. The
center-cut indicators show which parts of a 16:9 composition may be cut off when the image is shown on a 4:3 display.
Such cropping is a concern when creating images for high-definition displays that may also be shown on standard-
definition television sets. By default, the center-cut action-safe margin is 32.5% (16.25% on each side), and the center-
cut title-safe margin is 40% (20% on each side).
Note: The center-cut safe-zone margins are only shown if the frame aspect ratio for the composition is equal to or near 16:9.
A Grid B Center-cut title-safe zone C Center-cut action-safe zone D Title-safe zone E Action-safe zone
Aharon Rabinowitz provides a video tutorial in the Multimedia 101 series on the Creative COW website that explains
safe zones.
Additional resources for viewing and previewing
When you want to view certain crucial frames in a composition—such as when showing them to a client for interim
approval—you may want to create a contact sheet. Jeff Almasol provides a script that creates a contact sheet that consists
of a grid of specific individual frames from a composition. You specify which frames to show by setting layer markers.
For more information, go to Jeff Almasol's redefinery website.
More Help topics
Viewers
3D layers
Cameras, lights, and points ofinterest
Views (keyboard shortcuts)

196
Views and previews
Last updated 6/8/2015
About alpha channels and mattes
Alpha channel interpretation: premultiplied or straight
Video preview with Mercury Transmit
Video preview using Mercury Transmit-based system
In the June 2014 release of After Effects CC, the video preview system for external monitors has been replaced with the
Mercury Transmit-based system.
What is Mercury Transmit?
Mercury Transmit is a software interface used by Adobe digital applications to send video frames to external video
device. Video device manufacturers such as AJA, BlackMagic Design, Bluefish444, and Matrox provide plug-ins that
route the video frames from Mercury Transmit to their hardware.
Video preview using Mercury Transmit sends the contents of the Composition, Layer, or Footage panel viewer to an
external monitor. The external monitor can be one of the following:
•A video monitor connected through third-party video hardware such as AJA, Blackmagic, or Matrox I/O devices
•A DV device connected over FireWire
•A computer monitor connected to your video display card via such as HDMI,DVI, VGA, or DisplayPort
The setting of the Resolution menu in the Composition panel determines the resolution for the external video preview.
Note: As with the earlier video preview system, overlays such as user interface controls, guides, warning banners and other
items drawn by OpenGL are not sent to the external monitor. This also means that Fast Draft and Wireframe preview
modes do not send image data to the external monitor.
Video preview preferences
The video preview preferences are located under Preferences > Video Preview. The following settings are available:
•Enable Mercury Transmit: Toggle video preview with Mercury Transmit. Use the '/' on the numeric keypad to
toggle this option. On a Mac computer without a numeric keypad, use Control+Shift+/ on the main keyboard.
•Video Device: You can check the box next to any option that appears here to enable video output to the specified
device.
•Adobe DV: Use this option for DV devices connected via FireWire.
•Adobe Monitor x: Lists the attached computer monitors that can receive video preview data through the
graphics card.
•Third-party video hardware: A list of third-party hardware that you have connected is displayed. AJA Kona 3G,
Blackmagic Playback, or Matrox Player are some examples of third-party video hardware. Click Setup to view
the options available for each one.
•Disable video output when in the Background: Choose this option to prevent video frames from being sent to the
external monitor when After Effects is not the foreground application.
•Video preview during render queue output: Choose this option to send video frames to the external monitor when
After Effects is rendering frames in the render queue.

197
Views and previews
Last updated 6/8/2015
If you are previewing an image that does not exactly match the preview monitor's pixel dimensions, the third-party I/O
device will scale the image. The manner of scaling differs between devices and is in some cases controllable through
the Setup options for the device. The setting of the Resolution menu in the Composition panel determines the
resolution for the external video preview.
If you experience slow RAM preview frame rates when Mercury Transmit is enabled, try one or more of the following:
•Reduce the resolution in the Composition or Preview panel
•Reduce the RAM preview frame rate in the Preview panel
•Reduce the project color depth to 16-bpc or 8-bpc
•Disable color management (set the project’s working space to None).
Also see Tim Kurkoski's blog about the new Mercury Transmit feature.
More Help topics
Preview on an external video monitor

198
Last updated 6/8/2015
Chapter 7: Animation and Keyframes
Face Tracking
Face Tracking Overview
Face Tracking lets you accurately detect and track human faces. Simple mask tracking lets you quickly apply effects only
to a face, such as selective color correction or blurring a person’s face, and more.
However, with Face Tracking, you can track specific parts of the face such as pupils, mouth, and nose, allowing you to
isolate and work on these facial features with greater detail. For example, change colors of the eyes or exaggerate mouth
movements without frame-by-frame adjustments.
After Effects also lets you measure facial features. Tracking of facial measurements tells you details such as how open
the mouth or an eye is. With each data point isolated, you could greatly refine content. Furthermore, you can also export
detailed tracking data to Adobe Character Animator for performance-based character animation.
The face tracker works largely automatically, but you can obtain better results by starting the analysis on a frame
showing a front, upright view of the face. Adequate lighting on the face can improve the accuracy of face detection.
In the Tracker panel, there are two face-tracking options:
•Face Tracking (Outline Only): Use this option if all you want to track is the outline of the face.
•Face Tracking (Detailed Features): Use this option if you want to detect eye (including eyebrow and pupil), nose,
and mouth locations, and optionally, extract measurements of various features. This option is required if you want
to use the tracking data in Character Animator.
If you are using the Detailed Features option, a Face Track Points effect is applied to the layer. The effect contains
several 2D effect control points with keyframes, each of which is attached to detected facial features (for example,
the corners of the eyes and mouth, locations of pupils, the tip of the nose).
Tracking outline of a face
1In After Effects, select File > Import > File. Browse to the location of the footage, and add it to the Project.
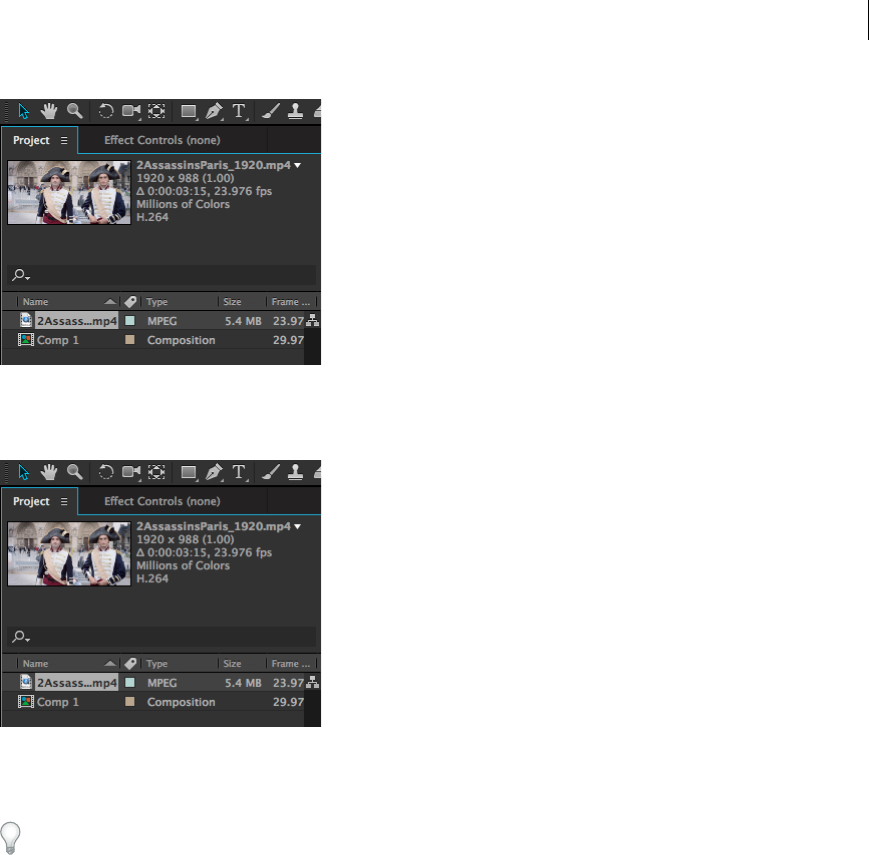
199
Animation and Keyframes
Last updated 6/8/2015
2Drag the footage from the Project panel into a Composition to add a layer.
3Position the current time indicator (CTI) to a frame showing a front, upright view of the face you want to track.
Face detection is improved if the initial frame to track has a face looking forward and is oriented upright.
200
Animation and Keyframes
Last updated 6/8/2015
4Draw a closed mask loosely around the face, enclosing the eyes and mouth. The mask defines the search region to
locate facial features. If multiple masks are selected, the topmost mask is used.
5With the Mask selected, select Win do w > Trackerto open the Tracker panel. Set the tracking Method to Face
Tracking (Outline Only).
201
Animation and Keyframes
Last updated 6/8/2015
6In the Tracker panel, track forward or backward one frame at a time to ensure that tracking is functioning correctly,
and then, click the button to begin analyzing all frames.
7Once the analysis is complete, face tracking data is made available within the composition.
Tracking detailed features and extracting facial measurements
1In After Effects, select File > Import > File. Browse to the location of the footage, and add it to the Project.
2Drag the footage from the Project panel into a Composition to add a layer.

202
Animation and Keyframes
Last updated 6/8/2015
3Position the Current Time Indicator to a frame showing a front, upright view of the face you want to track.
Face detection is improved if the initial frame to track has a face looking forward and is oriented upright.
4Draw a closed mask loosely around the face, enclosing the eyes and mouth. The mask defines the search region to
locate facial features. If multiple masks are selected, the topmost mask is used.
203
Animation and Keyframes
Last updated 6/8/2015
5With the Mask selected, select Win do w > Trackerto open the Tracker panel. Set the tracking Method to Face
Tracking (Detailed Features).
6In the Tracker panel, track forward or backward one frame at a time to ensure that tracking is functioning correctly,
and then, click the button to begin analyzing all frames.
7After the analysis is complete, the tracking data is made available within a new Effect called Face Track Points. You
can choose to access face tracking data within the composition or the Effects (Win do w > Effect Controls) panel.
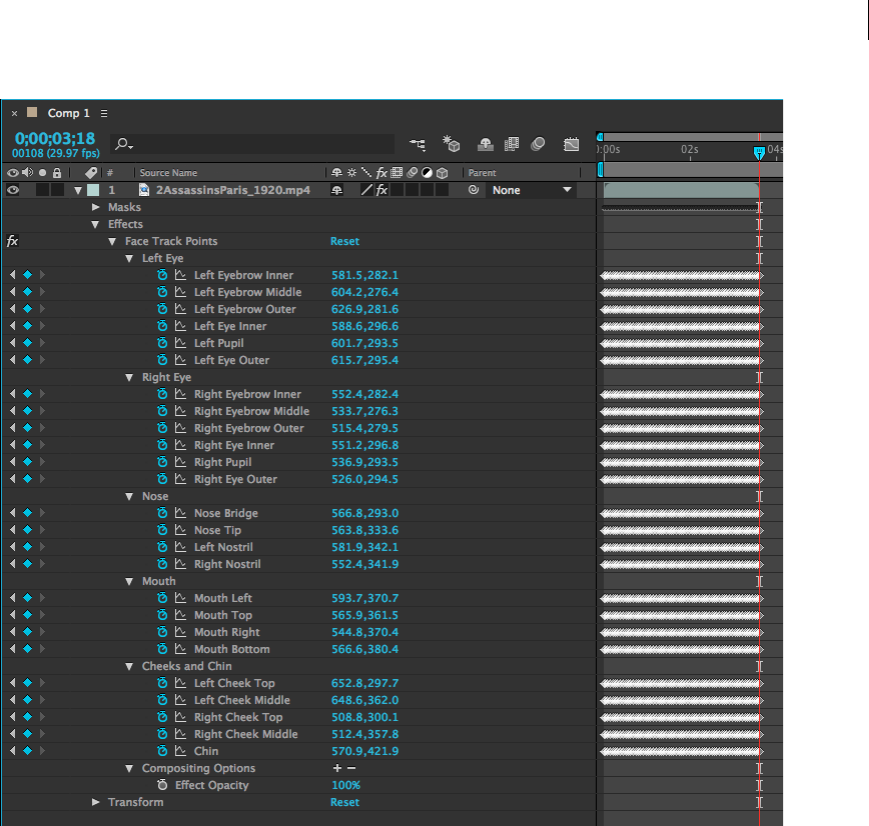
204
Animation and Keyframes
Last updated 6/8/2015
8Move the current-time indicator to a frame showing a neutral expression on the face (the rest pose). Face
measurements on other frames are relative to the rest pose frame. In the Tracker panel, click Set Rest Pose.
9In the Tracker Panel, click Extract & Copy Face Measurements. A Face Measurements effect is added to the layer,
and keyframes are created based on calculations made from the Face Track Points keyframe data. The Face
Measurements keyframe data is copied to the system clipboard for use in Character Animator.
Note: The keyframes for Face Measurements are generated based on the Face Track Points keyframe data, relative to
the Rest Pose (refer to Step 8).
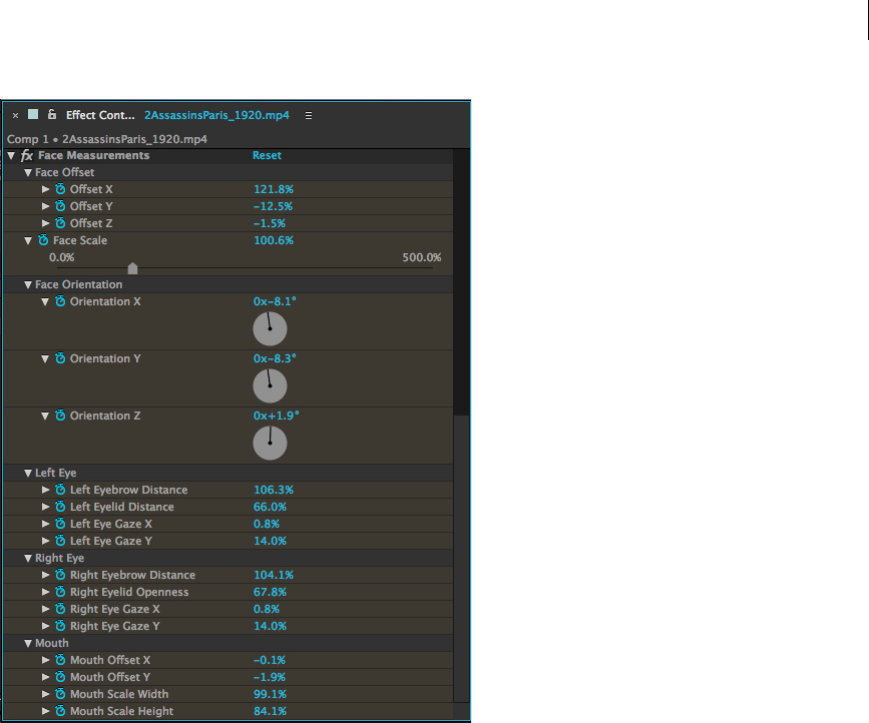
205
Animation and Keyframes
Last updated 6/8/2015
Face tracking data reference
Face Track Points
Left Eye Tracking data for the position of the left eye. Face tracker records x and y coordinates for the following points
on the left eye:
•Left Eyebrow Inner
•Left Eyebrow Middle
•Left Eyebrow Outer
•Left Eye Inner
•Left Eye Pupil
•Left Eye Outer
Right Eye Tracking data for the position of the right eye. Face tracker records x and y coordinates for the following
points on the right eye:
•Right Eyebrow Inner
•Right Eyebrow Middle
•Right Eyebrow Outer

206
Animation and Keyframes
Last updated 6/8/2015
•Right Eye Inner
•Right Eye Pupil
•Right Eye Outer
Nose Tracking data for the position of the Nose. Face tracker records x and y coordinates for the following points on
the nose:
•Nose Bridge
•Nose Tip
•Right Nostril
•Left Nostril
Mouth Tracking data for the position of the Mouth. Face tracker records x and y coordinates for the following points
on the mouth:
•Mouth Left
•Mouth Right
•Mouth Top
•Mouth Bottom
Cheeks and Chin Tracking data for the position of Cheeks and Chin. Face tracker records x and y coordinates for the
following points:
•Left Cheek Top
•Left Cheek Middle
•Right Cheek Top
•Right Cheek Middle
•Chin
Face Measurements
If you have used the Detailed Features option, you can extract even more information in the form of parametric
measurements of facial features, known as Face Measurements. All measurements shown for the face you tracked are
relative to the Rest Pose frame.
Face Offset Indicates the position of the face, offsetting to 0% at Rest Pose frame. The following data points are made
available indicating offset values on x, y, and z axes:
•Offset X
•Offset Y
•Offset Z
Face Orientation Indicates three-dimensional orientations of the face. Orientation is measured using the following
data points, indicative of x, y, and z axes:
•Orientation X
•Orientation Y
•Orientation Z
Left Eye Indicates various points of measurement for the left eye, and includes the following data points:
•Left Eyebrow Distance
207
Animation and Keyframes
Last updated 6/8/2015
•Left Eyelid Openness
•Left Eye Gaze X
•Left Eye Gaze Y
Right Eye Indicates various points of measurement for the right eye, and includes the following data points:
•Right Eyebrow Distance
•Right Eyelid Openness
•Right Eye Gaze X
•Right Eye Gaze Y
Mouth Indicates various points of measurement for the mouth, and includes the following data points:
•Mouth Offset X
•Mouth Offset Y
•Mouth Scale Width
•Mouth Scale Height
Animation basics
About animation, keyframes, and expressions
Animation is change over time. You animate a layer or an effect on a layer by making one or more of its properties
change over time. For example, you can animate the Opacity property of a layer from 0% at time zero to 100% at time
1 second to make the layer fade in. Any property with a stopwatch button to the left of its name in the Timeline panel
or Effect Controls panel can be animated.
A Active stopwatch B Inactive stopwatch
You animate layer properties using keyframes, expressions, or both.
Many animation presets include keyframes and expressions so that you can simply apply the animation preset to the
layer to achieve a complex animated result.
You work with keyframes and expressions in After Effects in one of two modes: layer bar mode or Graph Editor mode.
Layer bar mode is the default, which shows layers as duration bars, with keyframes and expressions aligned vertically
with their properties in the Timeline panel. Graph Editor mode does not show layer bars, and shows keyframes and
expression results in value graphs or speed graphs. (See The Graph Editor.)
208
Animation and Keyframes
Last updated 6/8/2015
Keyframes
Keyframes are used to set parameters for motion, effects, audio, and many other properties, usually changing them over
time. A keyframe marks the point in time where you specify a value for a layer property, such as spatial position, opacity,
or audio volume. Values between keyframes are interpolated. When you use keyframes to create a change over time,
you typically use at least two keyframes—one for the state at the beginning of the change, and one for the new state at
the end of the change. (See Set or add keyframes.)
When the stopwatch is active for a specific property, After Effects automatically sets or changes a keyframe for the
property at the current time whenever you change the property value. When the stopwatch is inactive for a property,
the property has no keyframes. If you change the value for a layer property while the stopwatch is inactive, that value
remains the same for the duration of the layer.
Note: When Auto-keyframe mode is on, the stopwatch is activated automatically for a property when it’s modified. (See
Auto-keyframe mode.)
If you deactivate the stopwatch, all keyframes for that layer property are deleted, and the constant value for the property
becomes the value at the current time. Don’t deactivate the stopwatch unless you’re sure that you want to permanently
delete all of the keyframes for that property.
Change the keyframe icons in layer bar mode to numbers by choosing Use Keyframe Indices in the Timeline panel
menu.
Note: When a layer property that contains keyframes is collapsed, gray dots (summary keyframe indicators) for the
property group show that there are keyframes contained within it.
Some tools, such as Motion Sketch and the Puppet tools, automatically set keyframes for you to match motion that you
sketch.
Expressions
Expressions use a scripting language based on JavaScript to specify the values of a property and to relate properties to
one another. You can create simple expressions by connecting properties with the pick whip. (See About expressions.)
Online animation resources
See the video tutorial, "Animating Transform Properties With Keyframes," by Jeff Sengstack and Infinite Skills.
Aharon Rabinowitz provides some video tutorials that introduce animation as part of the Multimedia 101 series,
including “How Does Computer Animation Work?” and “What is interpolation?”
Shaun Freeman's website provides links to information about the theory and practice of animation, especially character
animation.
For a step-by-step tutorial that demonstrates the animation of individual layers from a Photoshop (PSD) file, see the
“Animating Layers in After Effects“ chapter of the After Effects Classroom in a Book on the Peachpit Press website.
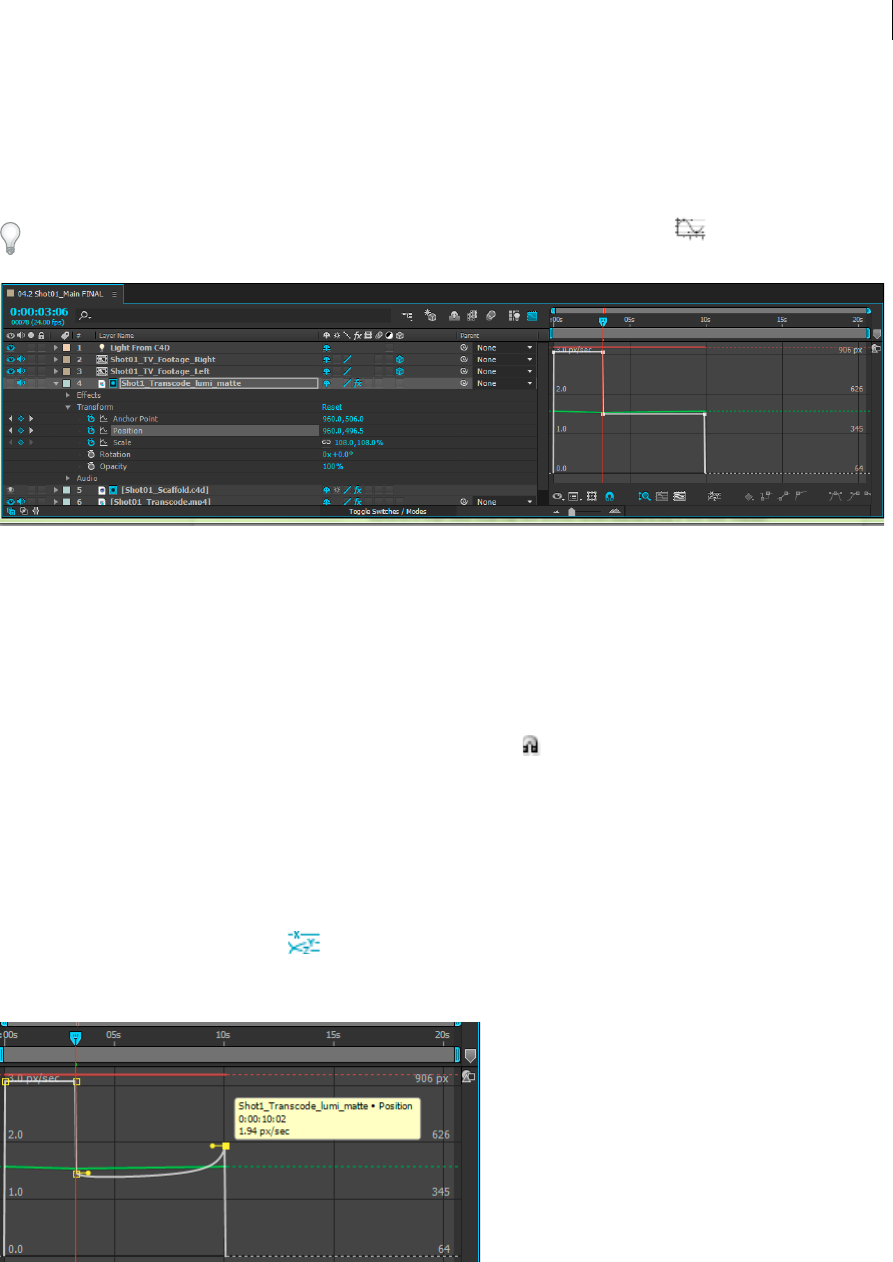
209
Animation and Keyframes
Last updated 6/8/2015
The Graph Editor
The Graph Editor represents property values using a two-dimensional graph, with composition time represented
horizontally (from left to right). In layer bar mode, on the other hand, the time graph represents only the horizontal
time element, without showing a graphical, vertical representation of changing values.
To toggle between layer bar mode and Graph Editor mode, click the Graph Editor button in the Timeline panel or
press Shift+F3.
Two types of graphs are available in the Graph Editor: value graphs, which show property values; and speed graphs,
which show rates of change of property values. For temporal properties, such as Opacity, the Graph Editor defaults to
the value graph. For spatial properties, such as Position, the Graph Editor defaults to the speed graph. For information
on viewing and editing keyframe values, see View or edit a keyframe value.
In the Graph Editor, each property is represented by its own curve. You can view and work on one property at a time,
or you can view multiple properties simultaneously. When more than one property is visible in the Graph Editor, each
property’s curve has the same color as the property’s value in the layer outline.
When you drag a keyframe in the Graph editor with the Snap button selected, the keyframe snaps to keyframe
values, keyframe times, the current time, In and Out points, markers, the beginning and end of the work area, and the
beginning and end of the composition. When the keyframe snaps to one of these items, an orange line appears in the
Graph Editor to indicate the object you’re snapping to. Hold Ctrl (Windows) or Command (Mac OS) after you’ve begun
dragging to temporarily toggle snapping behavior.
Keyframes in Graph Editor mode may have direction handles attached to one or both sides. Direction handles are used
to control Bezier interpolation.
You can use the Separate Dimensions button at the bottom of the Graph Editor to separate the components of a
Position property into individual properties—X Position, Y Position, and (for 3D layers) Z Position—so that you can
modify or animate each independently. (See Separate dimensions of Position to animate components individually.)
210
Animation and Keyframes
Last updated 6/8/2015
Online resources about the Graph Editor
Antony Bolante provides information, tips, illustrations about using the Graph Editor in an article on the Peachpit Press
website.
Specify which properties are shown in the Graph Editor
❖Click the Show Properties button at the bottom of the Graph Editor, and select from the following options:
Show Selected Properties Displays selected properties in the Graph Editor.
Show Animated Properties Displays animated properties of selected layers in the Graph Editor.
Show Graph Editor Set Displays properties that have the Graph Editor switch selected. This switch is next to
the stopwatch, to the left of the property name, when the stopwatch is active—that is, when the property has
keyframes or expressions.
Note: Aharon Rabinowitz provides tips for using this control and showing the audio waveform for a deselected layer on
the Creative COW website.
Graph options in the Graph Editor
Click the Graph Type And Options button at the bottom of the Graph Editor to select from the following options:
Auto-Select Graph Type Automatically selects the appropriate graph type for a property: speed graphs for spatial
properties (such as Position), and value graphs for other properties.
Edit Value Graph Displays the value graph for all properties.
Edit Speed Graph Displays the speed graph for all properties.
Show Reference Graph Displays the unselected graph type in the background for viewing only. (The gray numbers to
the right of the Graph Editor indicate the values for the reference graph.)
Show Audio Waveforms Displays the audio waveform for any layer that has at least one property in the Graph Editor.
Show Layer In/Out Points Displays In and Out points of all layers that have a property in the Graph Editor. In and Out
points appear as curly braces.
Show Layer Markers Displays layer markers in the Graph Editor, if they exist, for any layer that has at least one property
in the Graph Editor. Layer markers appear as small triangles.
Show Graph Tool Tips Toggles the graph tool tips on and off.
Show Expression Editor Shows or hides the expression editor field.
Allow Keyframes Between Frames Allows placement of keyframes between frames for fine-tuning animation.
Pan and zoom in the Graph Editor
•To pan vertically or horizontally, drag with the Hand tool
To activate the Hand tool momentarily when using another tool, press and hold the spacebar or the middle mouse
button.
•To pan vertically, roll the mouse scroll wheel.
•To pan horizontally, press the Shift key as you roll the mouse scroll wheel.
•To zoom in, click with the Zoom tool.
•To zoom out, Alt-click (Windows) or Option-click (Mac OS) with the Zoom tool.
211
Animation and Keyframes
Last updated 6/8/2015
•To zoom using the mouse scroll wheel, press Alt (Windows) or Option (Mac OS) while scrolling to zoom
horizontally. Press Ctrl (Windows) or Command (Mac OS) to zoom vertically.
•To zoom horizontally, Alt-drag (Windows) or Option-drag (Mac OS) to the left with the Zoom tool to zoom out or
to the right to zoom in.
•To zoom vertically, Alt-drag (Windows) or Option-drag (Mac OS) up with the Zoom tool to zoom in or down to
zoom out.
Note: You cannot pan or zoom vertically when Auto Zoom Height is selected.
Auto Zoom Height and Fit
Auto Zoom Height
Toggles Auto Zoom Height mode, which automatically scales the height of the graph so that it fits the height of the
Graph Editor. The horizontal zoom must still be adjusted manually.
Fit Selection
Adjusts the value (vertical) and time (horizontal) scale of the graph to fit the selected keyframes in the Graph Editor.
Fit All
Adjusts the value (vertical) and time (horizontal) scale of the graph to fit all of the graphs in the Graph Editor.
More Help topics
Keyframe interpolation
Expression basics
Animation presets overview and resources
Keyframes and the Graph Editor (keyboard shortcuts)
Showing properties and groups in the Timeline panel (keyboard shortcuts)
About the speed graph
Setting, selecting, and deleting keyframes
What are keyframes?
Keyframes are used to set parameters for motion, effects, audio, and many other properties, usually changing them over
time. A keyframe marks the point in time where you specify a value for a layer property, such as spatial position, opacity,
or audio volume. Values between keyframes are interpolated. When you use keyframes to create a change over time,
you typically use at least two keyframes—one for the state at the beginning of the change, and one for the new state at
the end of the change.
When the stopwatch is active for a specific property, After Effects automatically sets or changes a keyframe for the
property at the current time whenever you change the property value. When the stopwatch is inactive for a property,
the property has no keyframes. If you change the value for a layer property while the stopwatch is inactive, that value
remains the same for the duration of the layer.

212
Animation and Keyframes
Last updated 6/8/2015
Set or add keyframes
When the stopwatch is active for a specific property, After Effects automatically adds or changes a keyframe for the
property at the current time whenever you change the property value.
To activate the stopwatch and enable keyframing, do one of the following
•Click the Stopwatch icon next to the property name to activate it. After Effects creates a keyframe at the current
time for that property value.
•Choose Animation > Add [x] Keyframe, where [x] is the name of the property you are animating.
Add a keyframe without changing a value
❖Do one of the following:
•Click the keyframe navigator button for the layer property.
•Choose Animation > Add [x] Keyframe, where [x] is the name of the property you are animating.
•Click a segment of the layer property’s graph in the Graph Editor with the Pen tool .
Auto-keyframe mode
The Auto-keyframe button is a switch located at the top of the Timeline panel, to the right of the composition
switches. Click the Auto-keyframe button to turn Auto-keyframe mode on or off.
When Auto-keyframe mode is on, modifying a property automatically activates its stopwatch and adds a keyframe at
the current time.
Note: Auto-keyframe mode doesn’t automatically activate the stopwatch for properties that aren’t interpolated, such as
menus, checkboxes, and the Source Text property.
Auto-keyframe mode is off by default. When Auto-keyframe mode is off, modifying properties and animating with
keyframes behave as in previous versions of After Effects.
Move the current-time indicator (CTI) to a keyframe
After you set the initial keyframe for a property, After Effects displays the keyframe navigator. You can use the keyframe
navigator to move from keyframe to keyframe or to set or remove keyframes. When the keyframe navigator box is filled
with a yellow diamond , the current-time indicator lies precisely at a keyframe for that layer property. When
the keyframe navigator box is not filled , the current-time indicator lies between keyframes.
To detach the keyframe navigator from the A/V Features column to function as its own column, choose Column > Keys
from the Timeline panel menu.
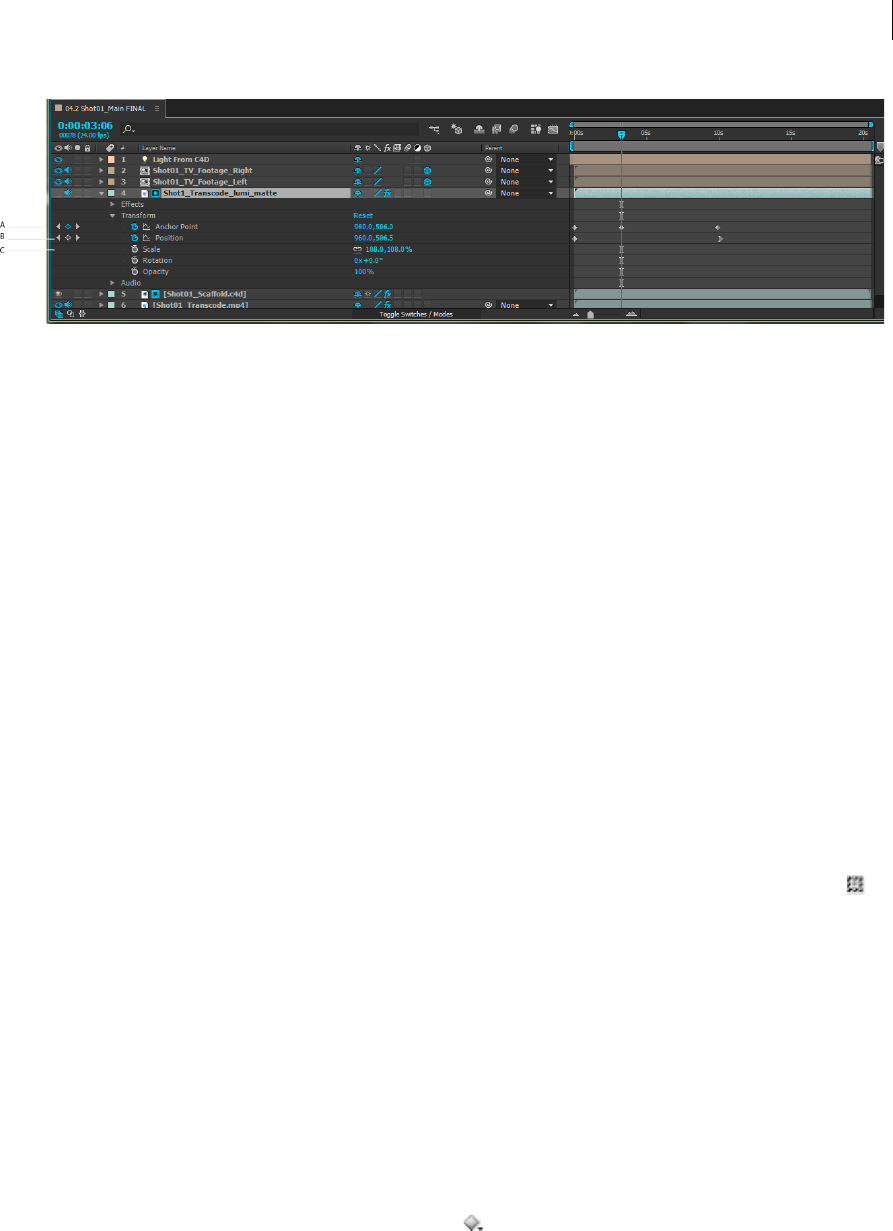
213
Animation and Keyframes
Last updated 6/8/2015
A Keyframe at current time B No keyframe at current time C No keyframes for layer property
•To move to the next or previous keyframe, click a keyframe navigator arrow.
•To snap to a keyframe or marker, Shift-drag the current-time indicator.
•To move to the next or previous visible item in the time ruler (keyframe, marker, or work area end), press K or J.
For instructions for moving the current-time indicator to other elements and times, see Move the current-time
indicator (CTI).
Select keyframes
In layer bar mode, selected keyframes are yellow. Unselected keyframes are gray.
In Graph Editor mode, the appearance of a keyframe icon depends on whether the keyframe is selected, unselected, or
semi-selected (another keyframe in the same property is selected). Selected keyframes are solid yellow. Unselected
keyframes retain the color of their corresponding graph. Semi-selected keyframes are represented by a hollow yellow
box.
•To select a keyframe, click the keyframe icon.
•To select multiple keyframes, Shift-click the keyframes or drag a marquee (selection box) around the keyframes. If
a keyframe is selected, Shift-clicking it deselects it; Shift-dragging to draw a marquee around selected keyframes
deselects them.
Note: To toggle viewing of the free-transform bounding box in the Graph Editor, click the Show Transform Box button at
the bottom of the Graph Editor.
•To select all keyframes for a layer property, Alt-click (Windows) or Option-click (Mac OS) a segment between two
keyframes in the Graph Editor, or click the layer property name in the layer outline.
•To select all keyframes for a property that have the same value, right-click (Windows) or Control-click (Mac OS) a
keyframe, and choose Select Equal Keyframes.
•To select all keyframes that follow or precede a selected keyframe, right-click (Windows) or Control-click (Mac OS)
a keyframe, and choose Select Previous Keyframes or Select Following Keyframes.
Note: The Select Previous/Following Keyframes commands aren’t available if more than one keyframe is selected.
Keyframe menu commands
When you select one or more keyframes, the keyframe menu becomes available at the bottom of the Graph Editor.

214
Animation and Keyframes
Last updated 6/8/2015
To open the keyframe menu, right-click (Windows) or Control-click (Mac OS) a keyframe.
[Value] Displays the value of the selected keyframe. If more than one keyframe is selected, the Display Value command
is available, which displays the value of the highlighted keyframe in the selection.
Edit Value Opens a dialog box in which you can edit the value of the keyframe.
Select Equal Keyframes Selects all keyframes in a property that have the same value.
Select Previous Keyframes Selects all keyframes preceding the currently selected keyframe.
Select Following Keyframes Selects all keyframes following the currently selected keyframe.
Toggle Hold Keyframe Holds the property value at the value of the current keyframe until the next keyframe is reached.
Keyframe Interpolation Opens the Keyframe Interpolation dialog box.
Rove Across Time Toggles Rove Across Time for spatial properties.
Keyframe Velocity Opens the Keyframe Velocity dialog box.
Keyframe Assistant Opens a submenu with the following options:
Convert Audio To Keyframes Analyzes amplitude within the composition work area and creates keyframes to represent
the audio.
Convert Expression To Keyframes Analyzes the current expression and creates keyframes to represent the property
values it describes.
Easy Ease Automatically adjusts the influence into and out of a keyframe to smooth out sudden changes.
Easy Ease In Automatically adjusts the influence into a keyframe.
Easy Ease Out Automatically adjusts the influence out of a keyframe.
Exponential Scale Converts the rate of change in scale from linear to exponential.
RPF Camera Import Imports RPF camera data from third-party 3D modeling applications.
Sequence Layers Opens the Sequence Layers assistant.
Time-Reverse Keyframes Reverses selected keyframes in time.
Delete or disable keyframes
•To delete any number of keyframes, select them, and then press the Delete key.
•To delete one keyframe in the Graph Editor, Ctrl-click (Windows) or Command-click (Mac OS) a keyframe with
the Selection tool.
•To delete all keyframes for one layer property, click the stopwatch button to the left of the name of the layer
property to deactivate it.
When you click the stopwatch button to deactivate it, keyframes for that property are permanently removed and the
value of that property becomes the value at the current time. You cannot restore deleted keyframes by clicking the
stopwatch button again. Deleting all keyframes does not delete or disable expressions.
•To temporarily disable keyframes for a property, add an expression that sets the property to a constant value. For
example, you can add this very simple expression to the Opacity property to set it to 100%: 100.
Click the Enable Expression button to toggle the expression on and off, which toggles the keyframes off and on as a side
effect.

215
Animation and Keyframes
Last updated 6/8/2015
If you accidentally delete keyframes, choose Edit > Undo.
Jeff Almasol provides a script on his redefinery website that automatically removes keyframes based on specified
criteria—for example, all keyframes in the work area, all odd-numbered keyframes.
More Help topics
About animation, keyframes, and expressions
The Graph Editor
Move the current-time indicator (CTI)
Keyframes and the Graph Editor (keyboard shortcuts)
Showing properties and groups in the Timeline panel (keyboard shortcuts)
The Graph Editor
Keyframe interpolation
Expression basics
Editing, moving, and copying keyframes
View or edit a keyframe value
Before you change a keyframe, make sure that the current-time indicator is positioned at an existing keyframe. If you
change a property value when the current-time indicator is not at an existing keyframe, After Effects adds a new
keyframe. However, if you double-click a keyframe to modify it, the current-time indicator location is not relevant, nor
is it relevant when you change the interpolation method of a keyframe.
•Move the current-time indicator to the time of the keyframe. The value of the property appears next to the property
name, where you can edit it.
•Right-click (Windows) or Control-click (Mac OS) the keyframe. The keyframe value appears at the top of the
context menu that appears. Choose Edit Value to edit the value, if desired.
•Place the pointer over a keyframe in layer bar mode to see the time and value of the keyframe.
•Place the pointer over a keyframe in Graph Editor mode to see the layer name, property name, time, and value of
the keyframe. Place the pointer over a segment between keyframes to see the corresponding information at any time.
•Click a keyframe in layer bar mode to show the keyframe’s time and interpolation method in the Info panel.
•Click a keyframe or segment between keyframes in Graph Editor mode to show a property’s minimum and
maximum values and the speed at the current time in the Info panel.
•Alt-click (Windows) or Option-click (Mac OS) two keyframes in layer bar mode to display the duration between
them in the Info panel.
Jeff Almasol provides a script on his redefinery website that creates new layer markers (either on the selected layer or
on a new null layer) with comments that provide information about keyframes at the same times.

216
Animation and Keyframes
Last updated 6/8/2015
Copy and paste keyframes
You can copy keyframes from only one layer at a time. When you paste keyframes into another layer, they appear in the
corresponding property in the destination layer. The earliest keyframe appears at the current time, and the other
keyframes follow in relative order. The keyframes remain selected after pasting, so you can immediately move them in
the destination layer.
You can copy keyframes between layers for the same property (such as Position) or between different properties that
use the same type of data (such as between Position and Anchor Point).
Note: When copying and pasting between the same properties, you can copy from more than one property to more than
one property at a time. However, when copying and pasting to different properties, you can copy only from one property to
one property at a time.
1In the Timeline panel, display the layer property containing the keyframes you want to copy.
2Select one or more keyframes.
3Choose Edit > Copy.
4In the Timeline panel containing the destination layer, move the current-time indicator to the point in time where
you want the keyframes to appear.
5Do one of the following:
•To paste to the same property of the copied keyframes, select the destination layer.
•To paste to a different property, select the destination property.
6Choose Edit > Paste.
Edit keyframe values using a spreadsheet or text editor
You can copy and paste keyframe data as tab-delimited text for use in a spreadsheet program (such as Microsoft Excel)
or other text-editing program. You can use a spreadsheet program to perform numerical analysis on keyframe data or
create or edit keyframe values.
You can copy and paste most properties, including the Transform properties (such as Position and Opacity), Material
Options properties, and motion trackers.
You can use the motion tracking tools to track the motion of an object in a layer, and then paste the tracker data into a
spreadsheet to perform numerical analysis on the data.
Some utility applications, such as Imagineer Systems mocha for After Effects (mocha-AE), copy keyframe data to the
clipboard so that you can paste it into the appropriate layer in After Effects.
You can copy keyframes from only one layer at a time as tab-delimited text.
1In the Timeline panel, select keyframes for one or more properties on the same layer. To select all keyframes for a
property, click the name of the property.
2Move the current-time indicator to the first selected keyframe.
Place a composition marker at the time of the first selected keyframe so that you will know where to paste the
modified keyframes in the last step. (See Layer markers and composition markers .)
3With the keyframes selected, choose Edit > Copy.

217
Animation and Keyframes
Last updated 6/8/2015
4Paste keyframe data into the spreadsheet. Assuming that the first column in the spreadsheet is labeled A and the first
row is labeled 1, you should paste into cell A1. Frame numbers appear in column B. Property values appear in
columns C, D, and E, depending on the dimensions of the property. (Position in a 3D layer has values in all three
columns; Opacity has only a value in column C.)
5Edit the numerical information for the keyframes. Do not change any text other than frame numbers and property
values.
6Select the cells that contain your data. The upper-left cell in your selection should be A1. The bottom row of your
selection should be the row that contains the text End of Keyframe Data.
7Copy the data from the spreadsheet.
8In After Effects, move the current-time indicator to the time at which you want to paste the new keyframe data. This
time is usually the time of the first keyframe that you selected and copied at the beginning of this procedure.
9Choose Edit > Paste.
Move keyframes in time
You can move keyframes in time, either individually or as a group.
Jeff Almasol provides a versatile script on his redefinery website that creates a panel with controls for moving various
combinations of items in time—layer In point, layer Out point, layer source frames, keyframes, and markers.
Move keyframes to another time
With multiple keyframes selected, you can copy or delete them simultaneously or move the keyframes together without
changing their positions relative to each other.
1Select one or more keyframes.
2Drag any of the selected keyframe icons to the desired time. If you selected multiple keyframes, then all of the
selected keyframes maintain their relative distance from the keyframe that you drag.
You can also move selected keyframes in time (one frame earlier or later) by pressing the Alt (Windows) or Option (Mac
OS) key with the left arrow or right arrow key.
Move a keyframe to a specific time
1Move the current-time indicator to the desired time.
2Do one of the following:
•In layer bar mode, hold down Shift after you begin to drag a keyframe icon to the current-time indicator.
•In Graph Editor mode, drag a keyframe to the current-time indicator.
When you drag over the current-time indicator, the keyframe snaps to the current-time indicator.
Expand or contract a group of keyframes in layer bar mode
1Select at least three keyframes.
2Hold down Alt (Windows) or Option (Mac OS) and drag the first or last selected keyframe to the desired time.
Move a layer duration bar but not its keyframes
1Place a composition marker at the time at which the first keyframe appears. (See Composition markers.)
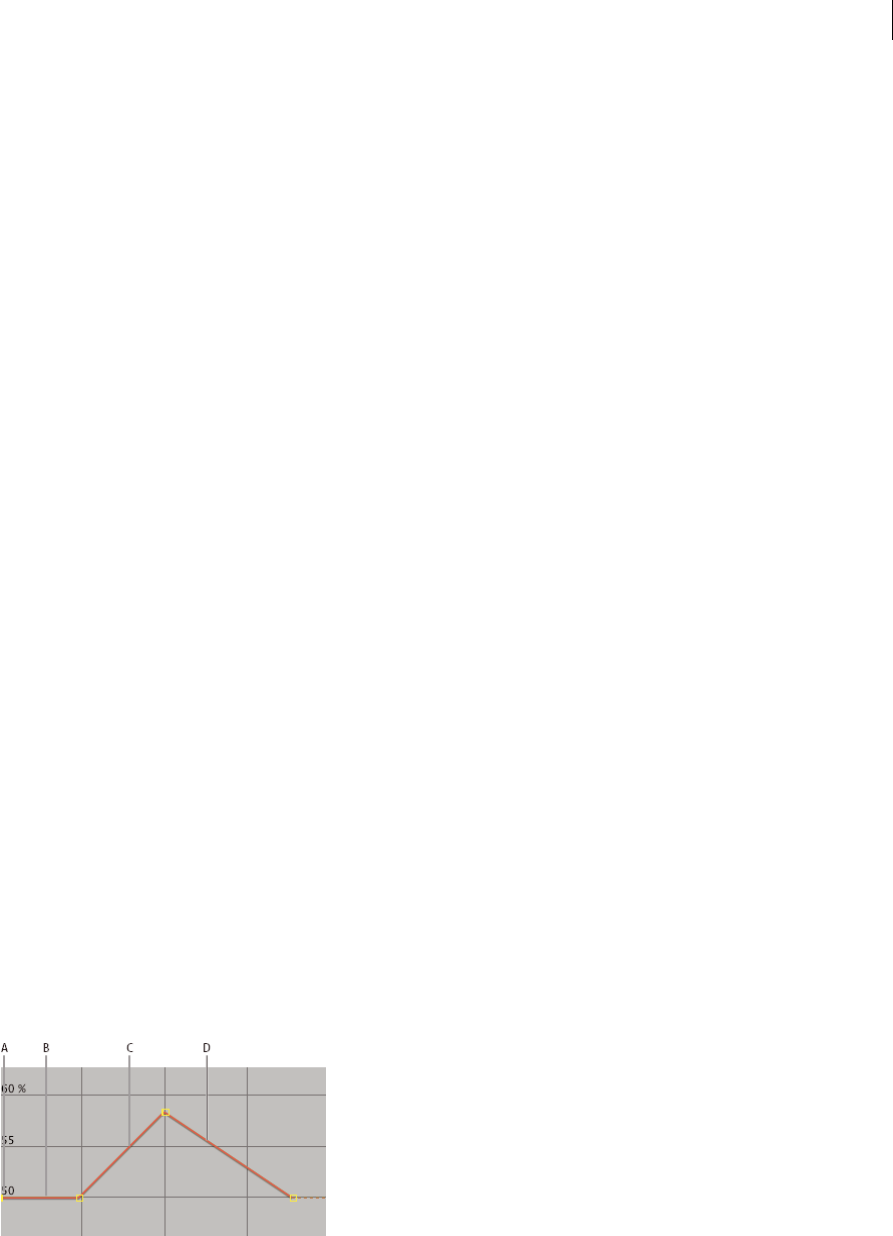
218
Animation and Keyframes
Last updated 6/8/2015
2In the layer outline, click the name of one or more layer properties containing the keyframes you want to keep at the
same times.
3Choose Edit > Cut.
4Move or stretch the layer duration bar to its new In and Out points.
5Move the current-time indicator to the composition marker at the time at which the first keyframe appeared before
you cut the keyframes.
6Choose Edit > Paste.
Change multiple keyframe values at once
You can change the values of multiple keyframes on multiple layers at one time; however, all keyframes you select must
belong to the same layer property. The way the selected values change depends on the method you use to make the
change:
•If you change a value numerically, all selected keyframes use the new value exactly. In other words, you make an
absolute change. For example, if you select several Position keyframes on a motion path and numerically specify a
Position value for one of them, all selected keyframes change to the same position value.
•If you change a value by dragging the underlined value, all selected keyframes change by the same amount. In other
words, you make a relative change. For example, if you select several Position keyframes on a motion path and drag
the underlined value for one of them, all selected keyframe values change by the same amount.
•If you change a value graphically in the Composition or Layer panel, all selected keyframes change using the
difference between the old and new values, not the values themselves. In other words, you make a relative change.
For example, if you select several Position keyframes on a motion path and then drag one of them 10 pixels to the
left, they all move 10 pixels to the left of their original positions.
You can also change the value of several layers at once in layer bar mode by parenting them.
Mathias Möhl provides the KeyTweak script (available on the After Effects Extension page), with which you can modify
many keyframes on a property simultaneously. With KeyTweak, you can modify a few keyframes manually, and the
script modifies the remaining keyframes in between accordingly. KeyTweak is especially useful for Mask Path
keyframes in a rotoscoping workflow. (See Rotoscoping introduction and resources.)
Move or change keyframes in the Graph Editor
A value graph in the Graph Editor displays the values for each keyframe and the interpolated values between keyframes.
When the value graph of a layer property is level, the value of the property is unchanged between keyframes. When the
value graph goes up or down, the value of a layer property increases or decreases between keyframes.
A Keyframe. B A level value graph indicates unchanging values. C A rising graph indicates increasing values. D A falling graph indicates
decreasing values.
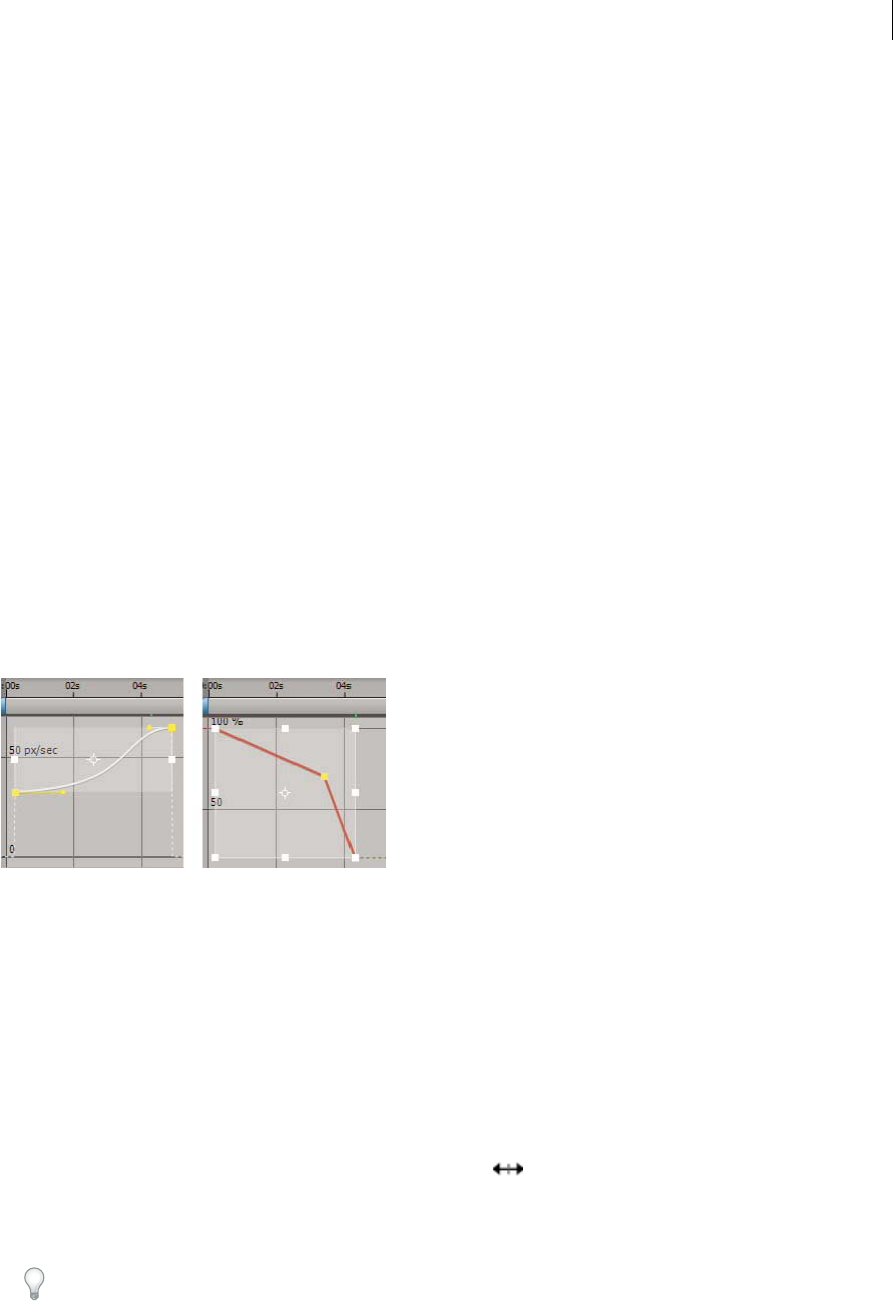
219
Animation and Keyframes
Last updated 6/8/2015
You can change layer property values by moving the points (keyframes) on the value graph up or down. For example,
you can increase the value of a Rotation keyframe by dragging the keyframe marker on the Rotation property’s value
graph higher up on the graph.
Note: Values for the Anchor Point, Mask Path, effect control points, 3D Orientation, and Position properties are spatial, so
they use speed graphs by default instead of value graphs.
Modify a single keyframe in the Graph Editor
1In the Timeline panel, show a temporal property for a layer.
2If necessary, click the Graph Editor button or press Shift+F3 to enter Graph Editor mode.
3If necessary, add a keyframe at the point in time you want the change to occur.
4Drag the keyframe up or down to set a new value for the layer property.
Modify multiple keyframes in the Graph Editor
You can edit and move multiple keyframes simultaneously using the Graph Editor. When you select multiple keyframes
with the Show Transform Box button selected, a free-transform bounding box surrounds the selected keyframes, and
an anchor point appears in the center of the bounding box to mark the center point for the transformation. You can
move the selected keyframes in time or value by dragging the bounding box or its handles. You can also change the
position of the anchor point.
Adjusting a free-transform bounding box in a value graph moves the selected keyframes in time and value. Adjusting
a free-transform bounding box in a speed graph moves the selected keyframes in time only.
1Switch to the Graph Editor view and display the keyframes you want to adjust.
2Using the Selection tool, do one of the following:
•To select keyframes, Shift-click the keyframes or drag to draw a marquee around the keyframes.
•To select all keyframes for a property, Alt-click (Windows) or Option-click (Mac OS) a segment between two
keyframes.
3Do any of the following:
•To move keyframes in time or value, place the pointer inside the bounding box and drag. Shift-drag to constrain
the move horizontally or vertically.
•To move keyframes in time or value by scaling the bounding box, place the pointer on a bounding box handle.
When the pointer changes to a straight, double-sided arrow , drag the bounding box to a new size. Shift-drag
to constrain the ratio of width to height. Ctrl-drag (Windows) or Command-drag (Mac OS) to scale around the
anchor point of the bounding box. When dragging a corner handle, Alt-drag (Windows) or Option-drag (Mac
OS) to move only that handle.
Scale by negative amounts to reverse the keyframes in time.

220
Animation and Keyframes
Last updated 6/8/2015
To taper keyframe values vertically, Ctrl+Alt-drag (Windows) or Command+Option-drag (Mac OS). Tapering
keyframe values allows you to reduce or expand the amplitude of a repeated animation.
To move one side of the bounding box up or down, Ctrl+Alt+Shift-drag (Windows) or Command+Option+Shift-
drag (Mac OS).
To move the anchor point of the bounding box, place the Selection tool over the anchor point until the tool changes
to the Move Anchor Point tool , and then drag.
More Help topics
Keyframe menu commands
Layer properties in the Timeline panel
About animation, keyframes, and expressions
Keyframes and the Graph Editor (keyboard shortcuts)
Showing properties and groups in the Timeline panel (keyboard shortcuts)
Select keyframes
The Graph Editor
Parent and child layers
Assorted animation tools
Motion paths
When you animate spatial properties—including Position, Anchor Point, and effect control point properties—the
motion is shown as a motion path. A motion path appears as a sequence of dots, where each dot marks the position of
the layer at each frame. A box in the path marks the position of a keyframe.
Motion paths are simply an alternative visual, spatial way of viewing and working with spatial properties and their
keyframes, in addition to the ways that you work with properties in the Timeline panel. You can modify a motion path
by changing an existing keyframe or adding a new keyframe. You can modify the shape of a motion path by changing
the spatial interpolation methods for its keyframes. (See About spatial and temporal keyframe interpolation.)
The density of dots between the boxes in a motion path indicates the relative speed of the layer or effect control point.
Dots close together indicate a lower speed; dots farther apart indicate a greater speed.
Note: Right-click (Windows) or Command-click (Mac OS) a keyframe to open its context menu.
Using the Pen tool or Selection tool to edit keyframes for a spatial property in the Composition or Layer panel is like
modifying a Bezier path for a mask or for a shape on a shape layer. (See About paths.)
A motion path is less complex and generally easier to modify when you use fewer keyframes to describe the path. You
can use the Smoother to remove extraneous keyframes from a motion path.
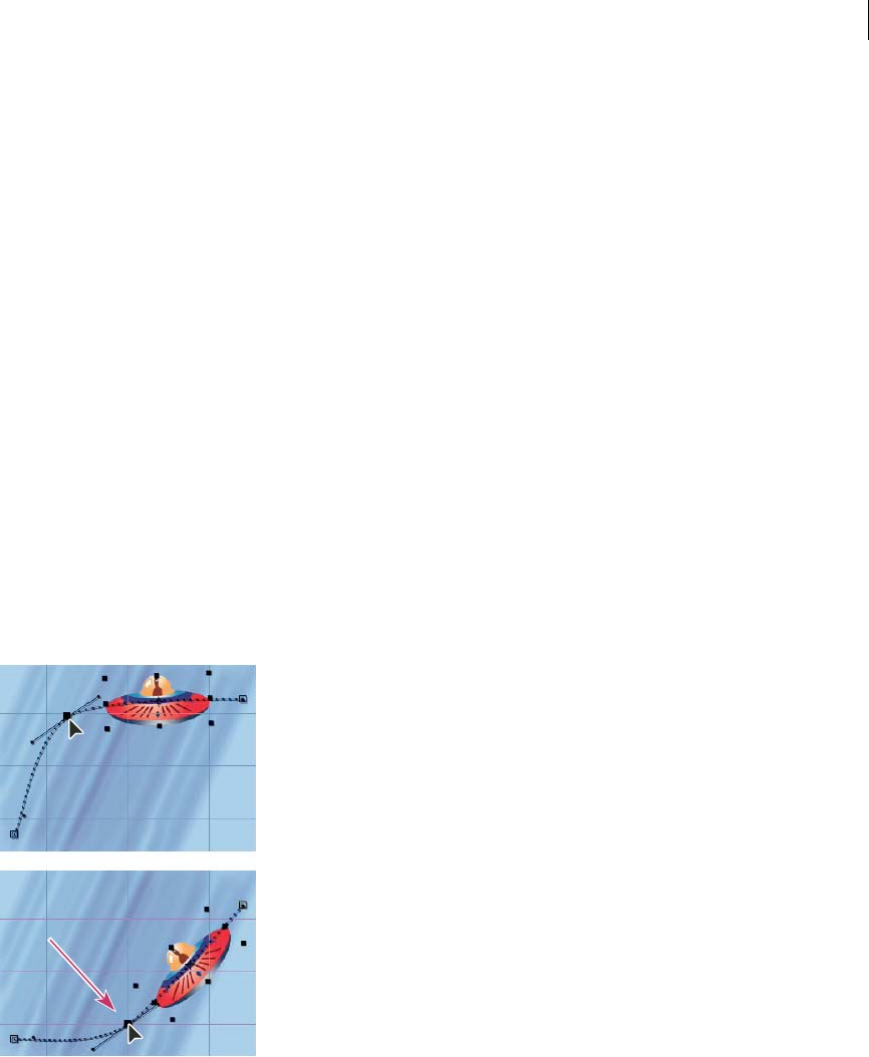
221
Animation and Keyframes
Last updated 6/8/2015
Show motion path controls
Position motion paths appear in the Composition panel. Anchor Point and effect control point motion paths appear in
the Layer panel.
•To show motion path controls in the Composition panel, choose View > View Options, and select Effect Controls,
Keyframes, Motion Paths, and Motion Handles. To see a Position motion path in the Composition panel, the
Position property must be selected.
•To show motion path controls in the Layer panel, choose the property or effect from the View menu at the bottom
of the Layer panel.
•To specify how many keyframes to show for a motion path, choose Edit > Preferences > Display (Windows) or After
Effects > Preferences > Display (Mac OS), and select an option in the Motion Path section.
•To specify the size of Bezier direction handles for motion paths, choose Edit > Preferences > General (Windows) or
After Effects > Preferences > General (Mac OS), and edit the Path Point Size value.
Move motion path keyframes
1In the Timeline panel, select the layer for which to modify the motion path.
2If you cannot see the keyframe you want to modify in the Composition panel or Layer panel, move the current-time
indicator to the keyframe.
3In the Composition panel or Layer panel, use the Selection tool to drag a keyframe or its handles.
Note: The current-time indicator does not need to be located on a keyframe before you drag it.
You can move multiple keyframes at one time by selecting them in the Timeline panel before you drag them in the
Composition panel or Layer panel. To move the entire motion path, select all keyframes by clicking the property
name in the Timeline panel before dragging a keyframe in the Composition panel.

222
Animation and Keyframes
Last updated 6/8/2015
Add a keyframe to a motion path using the Pen tool
1Display the motion path that you want to modify in the Composition panel or Layer panel.
2Select the Pen tool or Add Vertex tool from the Tools panel.
3In the Composition panel, place the Pen tool over the motion path where you want to add the new keyframe and
click to add the keyframe.
A new keyframe appears at the frame you clicked, on the motion path and in the Timeline panel. To move the
keyframe, use the Selection tool.
Note: Though the results are different, the techniques for manipulating motion-path curves with the Pen tool work in
much the same way as the techniques used to create and modify other Bezier paths, such as mask and shape paths.
Sketch a motion path with Motion Sketch
You can draw a path for the motion of a selected layer using Motion Sketch, which records the position of the layer and
the speed at which you draw. As you draw, a Position keyframe is generated at each frame.
Motion Sketch does not affect keyframes that you have set for other properties. For example, if you set Rotation
keyframes for an image of a ball, you can use Motion Sketch to generate Position keyframes, so that the ball appears to
roll along the path you created.
John Dickinson provides a demonstration of Motion Sketch in a video tutorial on his Motionworks website.
1In the Composition or Timeline panel, select the layer for which you want to sketch a motion path.
2In the Timeline panel, set the work-area markers to the duration in which you want to sketch motion.
3If you want to hear the audio in your composition as you sketch, make sure that the Mute Audio button is not
selected in the Preview panel.
4Choose Window > Motion Sketch.
5Select the appropriate Motion Sketch options:
Show Wireframe Displays a wireframe view of the layer as you sketch the motion path.
Show Background Displays the static contents of the frame at which you started sketching in the Composition panel
while you sketch. This option is useful if you want to sketch motion relative to other images in your composition.

223
Animation and Keyframes
Last updated 6/8/2015
Smoothing Eliminates unnecessary keyframes from the motion path. This setting has the same result as using the
Tolerance setting with the Smoother. Higher values produce smoother curves, but too high a value may not preserve
the shape of the curve that you draw.
Note: You can smooth a motion path after it has been created by using the smooth expression or the Smoother.
Capture Speed At The ratio of the speed of the recorded motion to the speed of playback. If Capture Speed At is
100%, the motion is played back at the speed at which it was recorded. If Capture Speed At is greater than 100%, the
motion plays back slower than it was recorded.
6Click Start Capture and then drag in the Composition panel to create the motion path. Release the mouse button to
stop capturing.
Note: After Effects automatically ends capturing when the capture time reaches the end of the work area (which, by
default, is the composition duration).
Create a motion path from a mask, shape, or paint path
You can create a motion path from any of several types of paths:
•A Mask Path property
•A shape Path property on a shape layer
•A Path property for a paint stroke
•A path copied from Illustrator or Photoshop
You can paste any of these paths into the Position or Anchor Point property for a layer, or into the position property of
an effect control point. The pasted keyframes are set to rove in time, except for the first and last ones, to create a constant
velocity along the path.
By default, the duration of the pasted motion path is 2 seconds. You can adjust the duration by dragging the first or last
keyframe in the Timeline panel.
1Copy a path to the clipboard:
•Select a Path property in the Timeline panel, and choose Edit > Copy.
•Select a path in Illustrator or Photoshop, and choose Edit > Copy.
2In the Timeline panel, select the property into which to paste the path.
3Place the current-time indicator at the time for the first keyframe of the motion path.
4Choose Edit > Paste.
Andrew Devis shows how to use paths from Illustrator as motion paths in After Effects in this video on the Creative
COW website.
Motion blur
When you view one frame of motion-picture film or video containing a moving object, the image is often blurred,
because a frame represents a sample of time (in film, a frame is 1/24 of a second long). In that time, a moving object
occupies more than one position as it travels across the frame, so it doesn’t appear as a sharp, still object. The faster the
object moves, the more it is blurred. The camera shutter angle and shutter phase also affect the appearance of the blur,
determining how long the shutter stays open and when the shutter opens relative to the beginning of the frame.

224
Animation and Keyframes
Last updated 6/8/2015
In contrast, in a single frame of a computer-generated animation, you may not be able to tell which objects are moving
because all moving objects may appear as sharp and clear as nonmoving objects. Without motion blur, layer animation
produces a strobe-like effect of distinct steps instead of an appearance of continuous change. Adding motion blur to
layers that you animate in After Effects makes motion appear smoother and more natural.
You enable motion blur for each layer individually, and you also determine whether the motion blur is rendered for
previews and final output. Use the Enable Motion Blur composition switch at the top of the Timeline panel to enable
or disable motion blur rendering for previews. Modify the render settings in the Render Queue panel to enable or
disable motion blur rendering for final output. If the Switches Affect Nested Comps preference in the General
preferences category is enabled, then nested compositions obey the setting for the compositions in which they’re
contained. (See About precomposing and nesting.)
Motion blur slows rendering, so you may want to disable the composition switch while working, and only enable it
when you need to see the finished result.
To enable motion blur for a layer, do one of the following:
•Click the Motion Blur layer switch for the layer in the Timeline panel.
•Select the layer and choose Layer > Switches > Motion Blur.
The number of samples that After Effects uses to calculate motion blur adapts for each layer, depending on the motion
of that layer. This adaptivity provides high-quality motion blur without unnecessarily sampling the motion of a slow-
moving layer as frequently as the motion of a fast-moving layer. High sampling rates decrease rendering performance.
When motion blur is enabled for a composition and the Timeline panel is zoomed in so that you can see individual
frames, a light gray region around the current-time indicator indicates the shutter phase and shutter angle. The width
of the column shows the shutter angle, and the offset of the column shows the shutter phase. This visual indication
shows how individual frames are sampled to calculate motion blur within this composition.
You can use motion blur when you animate a layer—for example, moving a layer of text across the screen. You cannot
add motion blur to motion that already exists within a layer by means of the Motion Blur layer switch and Enable
Motion Blur composition switch.
If you want to smooth live-action video to which you assigned a frame rate much lower or higher than the original, use
frame blending, not motion blur.
Motion blur settings in the Advanced tab of Composition Settings
Samples Per Frame The minimum number of samples. This minimum is the number of samples used for frames for
which After Effects is not able to determine an adaptive sampling rate based on layer motion. This sample rate is used
for 3D layers and shape layers.
Adaptive Sample Limit The maximum number of samples.
Shutter Angle The shutter angle is measured in degrees, simulating the exposure allowed by a rotating shutter. The
shutter angle uses the footage frame rate to determine the simulated exposure, which affects the amount of motion blur.
For example, entering 90° (25% of 360°) for 24-fps footage creates an effective exposure of 1/96 of a second (25% of 1/24
of a second). Entering 1° applies almost no motion blur, and entering 720° applies a large amount of blur.
Shutter Phase The shutter phase is also measured in degrees. It defines an offset that determines when the shutter
opens relative to the beginning of a frame. Adjusting this value can help if an object with motion blur applied appears
to lag behind the position of the object without motion blur applied.
A Shutter Phase value that is -1/2 of the Shutter Angle value is best for a layer that is composited on top of another using
motion tracking data. (For example, Shutter Phase = -90, Shutter Angle = 180.) This setting combination causes a blur
that is centered on the original object.

225
Animation and Keyframes
Last updated 6/8/2015
Apply motion blur to a mask
Motion blur creates a blur based on the movement of a mask in the composition. You can apply motion blur to
individual masks. Within each composition, the Enable Motion Blur composition switch must be selected for any layer
or any mask within a layer to exhibit motion blur.
1Select one or more masks.
2Choose Layer > Masks > Motion Blur, and choose one of the following options:
Same As Layer The mask will have motion blur only if the Motion Blur switch is selected for the layer.
On The mask will have motion blur regardless of the setting of the Motion Blur switch for the layer.
Off The mask will not have motion blur.
Additional resources about motion blur
Mark Christiansen explains some of the concepts surrounding motion blur, shutter speed, and shutter angle on the
ProVideo Coalition website.
Trish and Chris Meyer provide instructions on the ProVideo Coalition website for shooting footage and using motion
blur to smooth motion.
Andrew Kramer provides a video tutorial on his Video Copilot website in which he demonstrates the advantages of
using 32-bpc color with motion blur. (See Color depth and high dynamic range color.)
The ReelSmart Motion Blur effect from RE:Vision Effects analyzes motion from frame to frame within a layer and uses
this information to add motion blur to motion within the layer. For information, see the RE:Vision Effects website.
To achieve a result similar to the result of ReelSmart Motion Blur, apply the Timewarp effect, set Speed to 100, enable
motion blur within the effect, and use the manual shutter control features to adjust the motion blur.
Smooth motion and velocity by removing extra keyframes
Smooth motion paths, value curves, and velocity curves to eliminate bumpiness or excess keyframes using the
Smoother, which adds keyframes or removes unnecessary keyframes.
You can also use the smooth expression method for this purpose, without removing keyframes. (See Property attributes
and methods (expression reference).)
Although you can smooth a curve for any property, the Smoother is most useful when applied to curves that have been
automatically generated by Motion Sketch, where you may have excess keyframes. Applying the Smoother to keyframes
that have been set manually may result in unexpected changes to the curve.
Note: To avoid the need to use the Smoother on a path generated by Motion Sketch, set the Smoothing option in the Motion
Sketch panel before sketching the motion path.
When you apply the Smoother to properties that change spatially (such as Position), you can smooth only the spatial
curve (the curve defined by the motion). When you apply the Smoother to properties that change only in time (such
as Opacity), you can smooth only the value and velocity curves (the curve defined by the value or the velocity).
In addition to adding keyframes or eliminating unnecessary keyframes, the Smoother also applies Bezier interpolation
at each keyframe when smoothing the temporal curve. (See Keyframe interpolation methods.)
1In the Timeline panel, either select all the keyframes for a property to smooth the entire curve, or select at least three
keyframes to smooth only a portion of a curve.

226
Animation and Keyframes
Last updated 6/8/2015
2Choose Window > Smoother. In the Apply To menu, the Smoother automatically selects Spatial Path or Temporal
Graph, depending on the type of property for which you selected keyframes in step 1.
3Set a value for Tolerance. The units of Tolerance match the units of the property you are smoothing. New keyframe
values will vary no more than the specified value from the original curve. Higher values produce smoother curves,
but too high a value may not preserve the original shape of the curve.
4Click Apply and preview the results.
5If necessary, choose Edit > Undo Smoother to reset the keyframes, adjust the value for Tolerance, and then reapply
the Smoother.
Add randomness to a property with the Wiggler
You can add randomness to any property as it varies over time by using the Wiggler.
You can also use the wiggle expression method for this purpose. In most cases, it is easier to use the expression than to
use the Wiggler. (See Property attributes and methods (expression reference).)
Depending on the property and the options you specify, the Wiggler adds a certain number of deviations to a property
by adding keyframes and randomizing interpolations coming into or out of existing keyframes. You need at least two
keyframes to use the Wiggler.
Using the Wiggler, you can more closely simulate natural movement within specified limits. For example, add
randomness to an animated butterfly to produce fluttering. Add it to brightness or opacity to simulate the flicker of an
old projector.
1Select a range of keyframes for the property.
2Choose Window > Wiggler.
3For Apply To, select the type of curve you want the Wiggler to change. If you selected keyframes for a property that
varies spatially, you can select Spatial Path to add deviations to the motion, or Temporal Graph to add deviations to
the velocity. If you selected keyframes for a property that does not vary spatially, you can select only Temporal
Graph.
4Select a Noise Type option to specify the type of deviation due to randomly distributed pixel values (noise):
Smooth Noise Produces deviations that occur more gradually, without sudden changes.
Jagged Noise Produces sudden changes.
5Select the dimensions of the property you want to affect:
X, Y, or Z Adds deviations to only one dimension of the selected property. Choose the dimension from the menu.
All Independently Independently adds a different set of deviations to each dimension.
All The Same Adds the same set of deviations to all dimensions.
6Set Frequency to specify how many deviations (keyframes) per second After Effects adds to the selected keyframes.
A low value produces only occasional deviations, while a high value produces more erratic results. A value less than
1 creates keyframes at intervals of less than one per second. For example, a value of 0.5 creates one keyframe every
2 seconds.
7Set Magnitude to specify the maximum size of the deviations. After Effects sets the specified magnitude to the units
of the selected property, so a value for one property may produce very different results in another property.
8Click Apply and preview the results.
9If necessary, choose Edit > Undo Wiggler to reset the keyframes, adjust the values for Frequency and Magnitude,
and then reapply the Wiggler.

227
Animation and Keyframes
Last updated 6/8/2015
Convert audio to keyframes
The Convert Audio To Keyframes keyframe assistant analyzes audio amplitude within the work area and creates
keyframes for audio amplitude.
❖With the composition active in the Composition panel or Timeline panel, choose Animation > Keyframe Assistant
> Convert Audio To Keyframes.
This keyframe assistant creates an Audio Amplitude layer representing all audio sources in the composition, with three
Expression Controls effects with Slider properties that contain the keyframes: Left Channel, Right Channel, and Both
Channels.
To make use of the keyframes created by this keyframe assistant, link the changes in audio amplitude to other layer
properties. For example, use an expression to link the audio keyframes to the Scale property of a layer to make the layer
grow and shrink as the amplitude increases and decreases.
Online resources for converting audio to keyframes
Aharon Rabinowitz provides a video tutorial on the Creative COW website that shows how to link the audio amplitude
keyframes to other properties—in this case the properties of the Wave Warp effect, to synchronize animation with
sound.
John Dickinson provides a video tutorial on his Motionworks website that shows how to use the Convert Audio To
Keyframes keyframe assistant to animate the opacity of a layer and one of the properties of the Grid effect to the beat
of the music in a soundtrack.
Nathan Gambles provides an expression on the Video C opilot website that ducks (reduces the volume of) audio on one
layer when the volume of audio on another layer increases. This technique is useful, for example, for automatically
decreasing the volume of a soundtrack when dialog occurs. This expression for the Stereo Mixer effect depends on the
Convert Audio To Keyframes keyframe assistant having been applied to the other audio layer.
Lloyd Alvarez provides a script on his After Effects Scripts website that adds markers, splits a layer, or adds a new text
layer with incrementing numbers based on audio intensity.
Andrew Devis provides a pair of video tutorials on the Creative COW website that show in detail how to use the linear
expression method along with the Convert Audio To Keyframes command.
More Help topics
Layer properties in the Timeline panel
About animation, keyframes, and expressions
Modify a Bezier mask path or shape path
Work are a
About animation, keyframes, and expressions
Copy a path from Illustrator, Photoshop, or Fireworks
About paths
Frame blending
Render settings
Effects overview and resources

228
Animation and Keyframes
Last updated 6/8/2015
Select keyframes
Expression basics
Tracking and stabilizing motion
Motion tracking overview and resources
With motion tracking, you can track the movement of an object and then apply the tracking data for that movement to
another object—such as another layer or an effect control point—to create compositions in which images and effects
follow the motion. You can also stabilize motion, in which case the tracking data is used to animate the tracked layer to
compensate for movement of an object in that layer. You can link properties to tracking data using expressions, which
opens up a wide variety of uses.
After Effects tracks motion by matching image data from a selected area in a frame to image data in each succeeding
frame. You can apply the same tracking data to different layers or effects. You can also track multiple objects in the same
layer.
Note: In After Effects, you can track camera motion and place 3D objects in 2D footage much more easily using the 3D
camera tracker. For more information, see Tracking 3D camera movement.
Note: You can stabilize shaky footage a lot easier using the Warp Stabilizer. For more information, see Stabilize motion
with the Warp Stabilizer effect .
Uses for motion tracking and stabilization
Motion tracking has many uses. Here are some examples:
•Combining elements filmed separately, such as adding video to the side of a moving city bus or a star to the end of
a sweeping wand.
•Animating a still image to match the motion of action footage, such as making a cartoon bumblebee sit on a swaying
flower.
•Animating effects to follow a moving element, such as making a moving ball glow.
•Linking the position of a tracked object to other properties, such as making stereo audio pan from left to right as a
car races across the screen.
•Stabilizing footage to hold a moving object stationary in the frame to examine how a moving object changes over
time, which can be useful in scientific imaging work.
•Stabilizing footage to remove the jostling (camera shake) of a handheld camera.
Depending on the encoder you use, it is possible to decrease the size of your final output file by stabilizing motion
footage. Random motion, such as from the jostling of a handheld camera, can make it difficult for many compression
algorithms to compress your video.
Motion tracking user interface and terminology overview
You set up, initiate, and apply motion tracking with the Tracker panel.
As with all properties, you can modify, animate, manage, and link tracking properties in the Timeline panel.
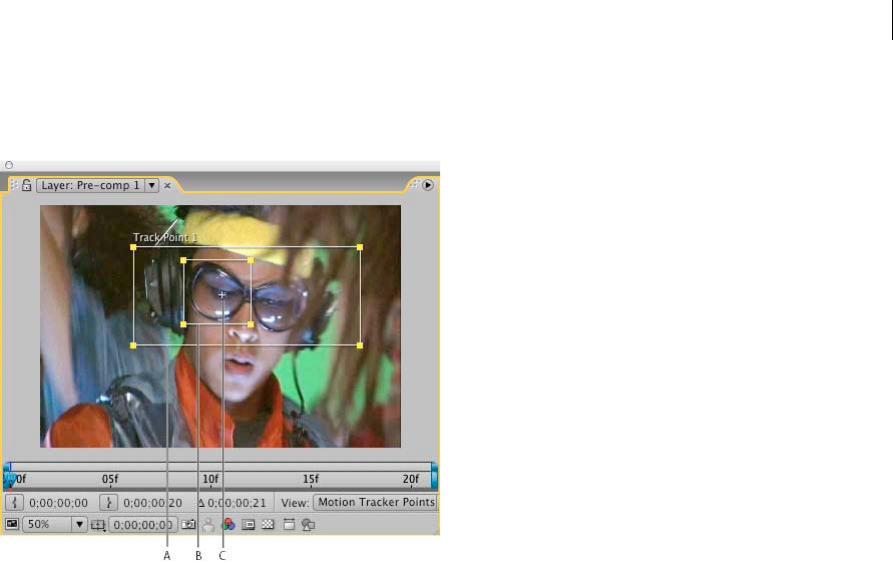
229
Animation and Keyframes
Last updated 6/8/2015
You specify areas to track by setting track points in the Layer panel. Each track point contains a feature region, a search
region, and an attach point. A set of track points is a tracker.
A Search region B Feature region C Attach point
Feature region The feature region defines the element in the layer to be tracked. The feature region should surround a
distinct visual element, preferably one object in the real world. After Effects must be able to clearly identify the tracked
feature throughout the duration of the track, despite changes in light, background, and angle.
Search region The search region defines the area that After Effects will search to locate the tracked feature. The tracked
feature needs to be distinct only within the search region, not within the entire frame. Confining the search to a small
search region saves search time and makes the search process easier, but runs the risk of the tracked feature leaving the
search region entirely between frames.
Attach point The attach point designates the place of attachment for the target —the layer or effect control point to
synchronize with the moving feature in the tracked layer.
Note: When you begin tracking, After Effects sets the quality of the motion source layer to Best and the resolution to Full
in the Composition and Layer panels, which makes the tracked feature easier to find and enables subpixel processing and
positioning.
After Effects uses one track point to track position, two track points to track scale and rotation, and four points to
perform tracking using corner pinning.
Online resources for motion tracking and stabilization
Curtis Sponsler provides detailed instructions and explanations for tracking and stabilizing motion in a PDF excerpt
from his book The Focal Easy Guide to After Effects.
Chris and Trish Meyer provide a video tutorial on the ProVideo Coalition website that demonstrates and explains the
basics of motion tracking.
This video from the After Effects CS5: Learn By Video series shows how to combine motion tracking and the Clone
Stamp tool to remove an object from a scene.
Angie Taylor provides a tutorial on the Digital Arts website that shows how to use tracking data and the Clone Stamp
tool to apply copies of an object in a scene while matching a camera move.

230
Animation and Keyframes
Last updated 6/8/2015
Michele Yamazaki provides a tutorial on the Toolfarm website that shows how to use motion tracking to obscure a logo
in motion footage.
Sean Kennedy provides a set of detailed tutorials on the SimplyCG website that demonstrate advanced motion tracking
techniques:
•Basic 2D tracking
•Planar tracking
•Motion tracking and compositing computer-generated elements into a scene
•Screen tracking and replacement
Sean Kennedy provides a free script, TrackerViz, that makes tracking motion and applying tracking data to masks
easier. You can get TrackerViz and a series of detailed instructions on the SimplyCG website.
Eran Stern provides a video tutorial on the Artbeats website that demonstrates the use of 3D tracking software that
solves for camera movement so that additional elements can be composited into the scene and appear to honor the
same camera movement. This video tutorial uses Pixel Farm PFHoe, but the techniques can be applied to almost any
matchmoving software.
This post on the AE Enhancers forum describes and links to an animation preset from Donat van Bellinghen for scaling
a set of Corner Pin effect points.
This post on the AE Enhancers forum describes and links to a script from Paul Tuersley that takes a stabilized layer,
precomposes it, and then adds expressions that counter the stabilization.
This post on the AE Enhancers forum describes and links to a script from Paul Tuersley that can make a difficult
tracking job easier by averaging multiple sets of tracking data.
Jeff Almasol provides a script on his redefinery website that creates a null layer with an expression that sets the Position
property to be the average of the values of motion tracking track points for the selected layer.
Jörgen Persson provides a script on the After Effects Scripts website with which you can import tracking data from
Apple Shake into After Effects.
Mathias Möhl provides useful scripts for motion tracking—including MochaImport, KeyTweak, and Tracker2Mask—
on his website. Mathias also provides video tutorials explaining the use of the scripts.
Resources for mocha for After Effects (mocha AE)
After Effects includes Imagineer Systems mocha for After Effects (mocha-AE), a stand-alone planar tracking
application that can export tracking data for use in compositions in After Effects. For many tracking tasks, mocha-AE
provides superior results with greater convenience than do the native After Effects tracking features. For more
information, see the mocha-AE documentation, which is available from the Help menu in the mocha-AE application.
To launch mocha AE from within After Effects, do one the following:
•Animation > Track in mocha AE
•Edit > Paste mocha mask
Note: The free trial version of Adobe After Effects software does not include some features that depend upon software
licensed from parties other than Adobe. For example, mocha for After Effects, some effect plug-ins are available only with
the full version of Adobe After Effects software. (See Setup and installation.)
Todd Kopriva provides a basic introduction to using mocha-AE for motion tracking in "Overview of the mocha-AE
interface and workflow" on the video2brain website.

231
Animation and Keyframes
Last updated 6/8/2015
The Imagineer website provides several video tutorials and other resources for learning to use mocha-AE with After
Effects.
Adobe TV has a mocha-AE channel, which includes several video tutorials about using mocha planar tracking and
rotoscoping utilities.
Chris and Trish Meyer provide a video tutorial that introduces mocha for After Effects on the Lynda.com website.
Chris and Trish Meyer provide tips about mocha-AE and mocha shape, including tips about variable-width feather, in
an article on the ProVideo Coalition website.
David Torno provides extensive video tutorials that show how to use mocha-AE as part of a workflow to replace one
face with another in a movie. Todd Kopriva provides links and details on his After Effects Region of Interest blog.
Mathias Möhl provides the MochaImport script and a set of related tutorials on his website. MochaImport automates
common parts of the workflow of using mocha-AE with After Effects.
Jeff Foster provides a tutorial on the ProVideo Coalition website that demonstrates the use of mocha for After Effects
to replace a sign on the side of a moving truck in a shaky video clip.
Note: After Effects also includes the mocha shape for After Effects (mocha shape AE) plug-in, which converts paths from
mocha-AE into mattes in After Effects. (See Resources for Imagineer mocha shape for After Effects.)
Note: The free trial version of Adobe After Effects software does not include some features that depend upon software
licensed from parties other than Adobe. For example, mocha for After Effects, some effect plug-ins are available only with
the full version of Adobe After Effects software. (See Setup and installation.)
Motion tracking workflow
The implicit first step of any workflow is to determine the result that you want to achieve before you begin. What type
of motion will you track, and what will you apply the tracking data to?
As with many workflows in the real world, you may have to repeat some of these steps. You can track a layer as many
times as desired and apply any combination of tracking results.
Set up the shot
For motion tracking to go smoothly, you must have a good feature to track, preferably a distinctive object or region.
For best results, prepare the object or region that you are tracking before you begin shooting. Because After Effects
compares image data from one frame to the next to produce an accurate track, attaching high-contrast markers to the
object or region lets After Effects more easily follow the motion from frame to frame. Lightweight, brightly colored balls
(such as ping-pong balls) placed on the feature work well, in part because their appearance is the same from all angles.
The number of markers that you use corresponds to the number of points you are tracking. For example, if you’re
tracking four points using the Perspective Corner Pinning option, you’ll track four features, to correspond to the four
corners of the layer to attach. The more markers you add to your subject before shooting, the more features you’ll have
for tracking—but the more items you may have to remove later from the image with the Clone Stamp tool. You don’t
need to add a marker for each feature if a distinctive object or region is already at the appropriate location.
If you’re tracking a large object or the set itself—such as for matchmoving—you can get good results by using a grid of
uniformly spaced triangles of a uniform size as tracking markers.
Add the appropriate number of track points
When you choose a mode from the Track Type menu in the Tracker panel, After Effects places the appropriate number
of track points in the Layer panel for that mode. You can add more track points to track additional features with one
tracker.
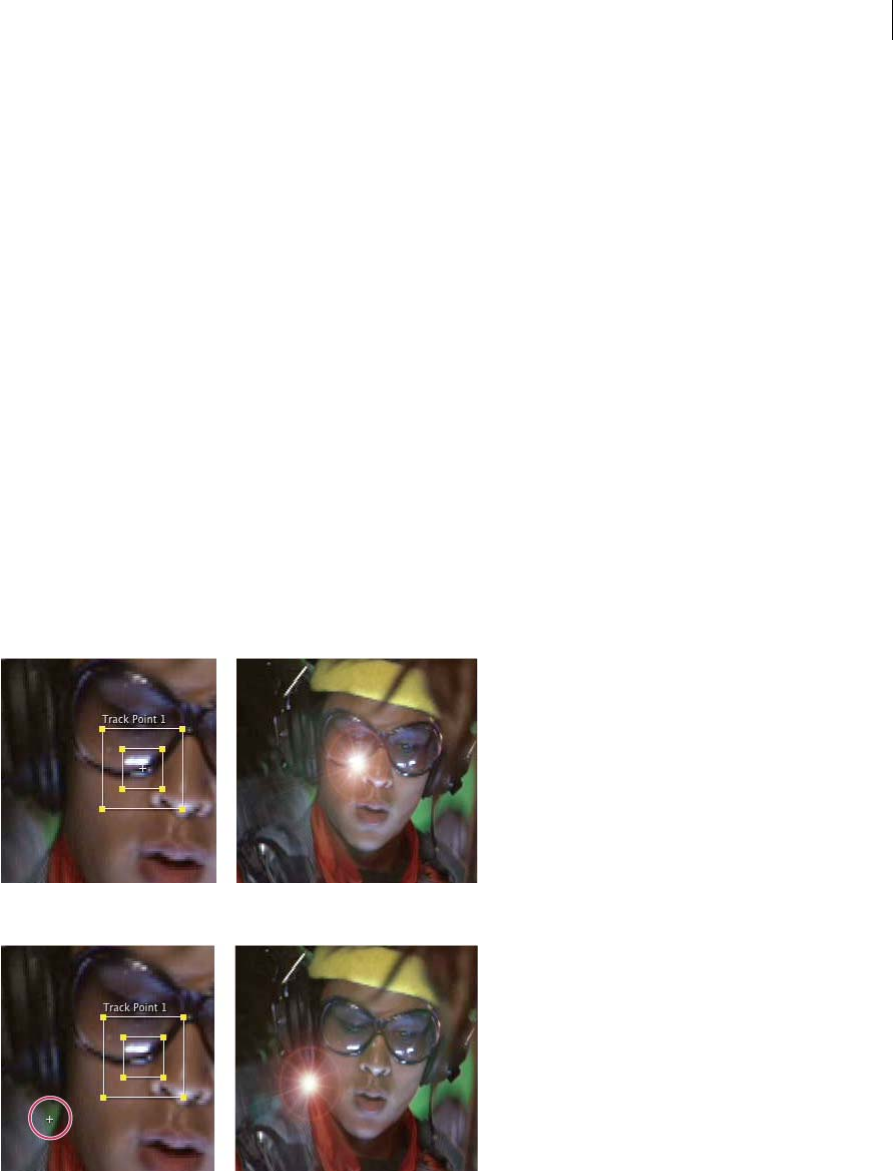
232
Animation and Keyframes
Last updated 6/8/2015
Select features to track, and place feature regions
Before you begin tracking, view the entire duration of the shot to determine the best features to track. What is clearly
identifiable in the first frame may later blend into the background because the angle, lighting, or surrounding elements
have changed. A tracked feature may disappear off the edge of the frame or be obscured by another element at some
point in the scene. Though After Effects can extrapolate the motion of a feature, your chances for successful tracking
are highest if you step through the entire shot to select the best candidates for tracking.
A good tracked feature has these characteristics:
•Visible for the entire shot
•A contrasting color from the surrounding area in the search region
•A distinct shape within the search region
•A consistent shape and color throughout the shot
Set the attach point offset
The attach point is where the target layer or effect control point will be placed. The default attach point position is in
the center of the feature region. You can move the attach point to offset the position of the target relative to the position
of the tracked feature by dragging the attach point in the Layer panel before tracking.
For example, to animate a cloud above a person’s head, position the feature region on the head and move the attach
point above the head. If you left the attach point centered in the feature region, the cloud would be attached to that point
and would obscure the head.
Adjust the feature region, search region, and tracking options
Place each feature region control tightly around its tracked feature, completely enclosing the tracked feature, but
including as little of the surrounding image as possible.

233
Animation and Keyframes
Last updated 6/8/2015
The size and position of the search region depend on the movement of the feature you want to track. The search region
must accommodate the movement of the tracked feature, but only the frame-to-frame movement, not its movement
throughout the shot. As After Effects locates the tracked feature in a frame, both the feature region and search region
move to the new location. Therefore, if the frame-to-frame movement of the tracked feature is gradual, then the search
region needs to be only slightly larger than the feature region. If the feature changes position and direction quickly, then
the search region needs to be big enough to encompass the largest position and direction change in any pair of frames.
You can also set tracking options that determine such things as which color channels are compared to find a match to
the feature region.
Analyze
You perform the actual motion tracking step by clicking one of the Analyze buttons in the Tracker panel. When tracking
a tricky set of features, you may want to analyze a frame at a time.
Repeat as necessary
Because of the changing nature of an image in motion, automatic tracking is rarely perfect. In moving footage, the shape
of a feature changes, along with the lighting and surrounding objects. Even with careful preparation, a feature generally
changes during a shot and at some point no longer matches the original feature. If the change is too great, After Effects
may not be able to track the feature, and the track point will wander or drift.
When the analysis begins to fail, return to the frame where tracking was still accurate and repeat steps 5 and 6: adjust
and analyze.
Apply tracking data
If you’re using any Track Type setting other than Raw, you apply tracking data by clicking Apply, after making sure that
the correct target is shown for Motion Target. You apply tracking data from a Raw tracking operation by copying
keyframes from the trackers to other properties or by linking properties with expressions.
You can also adjust the Attach Point or Attach Point Offset property after tracking in the Timeline panel, which can be
useful when applying the same tracking data to multiple targets that you want to distribute around the tracked feature.
Note: If the layer that you’re attaching has motion blur enabled, make sure that the Shutter Phase value is set to -1/2 times
the Shutter Angle value. This combination of settings centers the motion blur on the attach point. Otherwise, the attached
object may appear to lead or lag the object that it’s attached to.
You can apply the tracking data to a null object layer and parent the layer that you want to animate to the null object
layer.
Track or stabilize motion with the point tracker
Tracking motion and stabilizing motion are essentially the same process, only with a different target and result. Use
Track Motion to track motion and apply the results to a different layer or effect control point. Use Stabilize Motion to
track motion and apply the results to the tracked layer to compensate for that motion (for example, to remove camera
shake).
To stabilize a layer, After Effects tracks the motion of a feature in the layer that should be stationary in the frame, and
then uses the tracking data to set keyframes to perform the opposite motion. You can stabilize to remove any
combination of changes in position, rotation, and scale, while leaving desired motion unaffected. For example, if the
camera is panning, deselect Position but select Scale and Rotation as the properties to stabilize.

234
Animation and Keyframes
Last updated 6/8/2015
When you select Rotation or Scale in the Tracker panel, you set two track points in the Layer panel. A line connects the
attach points; an arrow points from the first attach point (the base) to the second. If possible, place the feature regions
on opposite sides of the same object, or at least on objects that are the same distance from the camera. The farther apart
the regions, the more accurate the calculations and the better the result.
After Effects calculates rotation by measuring the change of angle of the line between the attach points. When you apply
the tracking data to the target, After Effects creates keyframes for the Rotation property.
After Effects calculates scale by comparing the distance between attach points on each frame with the distance between
the attach points on the start frame. When you apply the tracking data to the target, After Effects creates keyframes for
the Scale property.
When you track motion using either parallel or perspective corner pinning, After Effects applies keyframes for the
Corner Pin effect to the layer to scale and skew the target layer as necessary to fit the four-sided area defined by the
feature regions. The feature regions should lie in a single plane in the real world—for example, on the side of a bus, on
the same wall, or on the floor. The attach points should also all lie in a single plane, but not necessarily the same plane
as the feature regions.
Note: For parallel corner pinning only: To change which point is inactive, Alt-click (Windows) or Option-click (Mac OS)
the feature region of the point to make inactive. (One point must remain inactive to keep the lines parallel.)
1Select the layer to track in the Timeline panel.
2Do one of the following:
•Click Track Motion in the Tracker panel (or choose Animation > Track Motion), click Edit Target, and choose
the target to apply the tracking data to.
•Click Stabilize Motion in the Tracker panel (or choose Animation > Stabilize Motion). The target layer is the
tracked (source) layer.
3Select Position, Rotation, and/or Scale to specify what kinds of keyframes to generate for the target.
4Move the current-time indicator to the frame from which to begin tracking.
5Using the Selection tool, adjust the feature region, search region, and attach point for each track point.
6In the Tracker panel, click either the Analyze Forward or Analyze Backward button to begin tracking.
If the tracking ceases to be accurate, click the Stop button , correct the problem as described in Correct a motion
track, and resume analysis.
7When you are satisfied with the position of the feature region and attach point throughout the track, click the Apply
button to apply the motion to the specified target.
After Effects creates keyframes for the target layer.
When tracking position and applying this position data to a target, you can choose to apply only the x (horizontal)
or y (vertical) component of motion. For example, you can apply the tracking data to the x axis to make a speech
bubble (the motion target) remain at the top of the frame even when the actor (the motion source) moves
downward.
•X And Y (default) allows motion along both axes.
•X Only restricts the motion target to horizontal movement.
•Y Only restricts the motion target to vertical movement.
To bypass the Motion Tracker Apply Options dialog box and use the previous setting, hold Alt (Windows) or Option
(Mac OS) as you click Apply.

235
Animation and Keyframes
Last updated 6/8/2015
Note: You can change the order of steps 1-3 by first selecting the property to which to apply the tracking data (Scale,
Position, or Rotation) and then choosing Animation > Track This Property. After Effects prompts you to choose the layer
to use as a motion source.
When you stabilize a layer, the compensating motion may itself cause the layer to move too far in one direction,
exposing the background in the composition or moving action out of the action-safe zone. You can correct this with a
small change in scale for the layer. Find the frame where the problem is most severe, and then increase or decrease the
scale of the layer until the problem is resolved. This technique adjusts the scale for the duration of the layer; you can
also animate scale to correct this problem by zooming in and out at different times.
Motion tracking controls
You set up, initiate, and apply motion tracking with the Tracker panel.
Motion Source The layer that contains the motion to track.
Note: Layers are available in the Motion Source menu if they have source footage items that can contain motion or if they
are composition layers. You can precompose a layer to make it available in the Motion Source menu.
Current Track The active tracker. You can modify settings for a tracker at any time by selecting the tracker from this
menu.
Track Type The tracking mode to use. The motion tracking itself is the same for each of these modes; they differ in the
number of track points and how the tracking data is applied to the target:
•Stabilize tracks position, rotation, and/or scale to compensate for movement in the tracked (source) layer. When
tracking position, this mode creates one track point and generates Anchor Point keyframes for the source layer.
When tracking rotation, this mode creates two track points and produces Rotation keyframes for the source layer.
When tracking scale, this mode creates two track points and produces Scale keyframes for the source layer.
•Transform tracks position, rotation, and/or scale to apply to another layer. When tracking position, this mode
creates one track point on the tracked layer and sets Position keyframes for the target. When tracking rotation, this
mode creates two track points on the tracked layer and sets Rotation keyframes for the target. When tracking scale,
this mode creates two track points and produces Scale keyframes for the target.
•Parallel Corner Pin tracks skew and rotation, but not perspective; parallel lines remain parallel, and relative
distances are preserved. This mode uses three track points in the Layer panel—and calculates the position of the
fourth—and sets keyframes for four corner points in a Corner Pin effect property group, which is added to the
target. The four attach points mark the placement of the four corner points.
•Perspective Corner Pin tracks skew, rotation, and perspective changes in the tracked layer. This mode uses four track
points in the Layer panel and sets keyframes for four corner points in a Corner Pin effect property group, which is
added to the target. The four attach points mark the placement of the four corner points. This option is useful for
attaching an image to an opening door or the side of a bus that’s turning a corner.
•Raw tracks position only. Use Raw to generate tracking data that you won’t apply using the Apply button. For
example, you can copy and paste the keyframes for the Attach Point property to the Position property for a paint
stroke; or, you can link effect properties for the Stereo Mixer effect to the x coordinate of the Attach Point property
using expressions. Tracking data is stored on the tracked layer. The Edit Target button and the Apply button are not
available with this tracking option. You can add track points to a tracker by choosing New Track Point from the
Tracker panel menu.
Motion Target The layer or effect control point that the tracking data is applied to. After Effects adds properties and
keyframes to the target to move or stabilize it. Change the target by clicking Edit Target. No target is associated with a
tracker if Raw is selected for Track Type.

236
Animation and Keyframes
Last updated 6/8/2015
Analyze buttons Begins the frame-to-frame analysis of the track point in the source footage:
•Analyze 1 Frame Backward : Analyze the current frame by moving back to the previous frame.
•Analyze Backward : Analyze from the current-time indicator backward to the beginning of the trimmed layer
duration.
•Analyze Forward : Analyze from the current-time indicator to the end of the trimmed layer duration.
•Analyze 1 Frame Forward : Analyze the current frame by advancing to the next frame.
Note: While analysis is in progress, the Analyze Backward and Analyze Forward buttons change to a Stop button, with
which you can stop analysis when the track drifts or otherwise fails.
Reset Restores the feature region, search region, and attach point to their default positions and deletes the tracking data
from the currently selected track. Tracker control settings and keyframes already applied to the target layer remain
unchanged.
Apply Sends the tracking data (in the form of keyframes) to the target layer or effect control point.
Motion tracking options
These settings apply to a tracker, a group of track points that is generated in one tracking session. You can modify these
settings by clicking Options in the Tracker panel.
Track Name The name for a tracker. You can also rename a tracker by selecting it in the Timeline panel and pressing
Enter on the main keyboard (Windows) or Return (Mac OS).
Tracker Plug-in The plug-in used to perform motion tracking for this tracker. By default, this option displays Built-in,
the only tracking plug-in included with After Effects.
Channel The components of the image data to use for comparison when searching for a match for the feature region.
Select RGB if the tracked feature is a distinct color. Select Luminance if the tracked feature has a different brightness
than the surrounding image (such as a burning candle carried through a room). Select Saturation if the tracked feature
has a high concentration of color, surrounded by variations of the same color (such as a bright red scarf against a brick
wall).
Process Before Match Temporarily blurs or sharpens an image to improve tracking. Blur reduces noise in the footage.
Usually a value of 2 to 3 pixels is enough to produce better tracks in grainy or noisy footage. Enhance exaggerates or
refines the edges of an image and makes them easier to track.
Note: After Effects blurs or enhances the layer only for tracking. This blurring does not affect the motion source layer.
Track Fields Temporarily doubles the frame rate of the composition and interpolates each field to a full frame to track
motion in both fields of interlaced video.
Subpixel Positioning When selected, keyframes are generated to a precision of a fraction of a pixel. When deselected,
the tracker rounds off values to the nearest pixel for generated keyframes.
Adapt Feature On Every Frame Causes After Effects to adapt the tracked feature for each frame. The image data that is
searched for within the search region is the image data that was within the feature region in the previous frame, rather
than the image data that was in the feature region at the beginning of analysis.
If Confidence Is Below Specifies the action to perform when the Confidence property value is below the percentage
value that you specify.
Note: To determine an acceptable confidence threshold, track the motion and then examine the Confidence values for the
track point in the Timeline panel for problematic frames. Specify a confidence value that is slightly larger than the largest
confidence value for the problematic frames.
•Select Continue Tracking to ignore the Confidence value. This behavior is the default behavior.

237
Animation and Keyframes
Last updated 6/8/2015
•Select Stop Tracking to stop the motion tracking.
•Select Extrapolate Motion to estimate the position of the feature region. Attach-point keyframes aren’t created for
low-confidence frames, and attach-point keyframes for the low-confidence frames from previous tracks are deleted.
•Select Adapt Feature to use the original tracked feature until the confidence level falls below the specified threshold.
At that point, After Effects adapts the tracked feature to be the contents of the feature region in the frame preceding
the one that has low confidence and continues tracking. This option isn’t available if Adapt Feature On Every Frame
is selected in the Motion Tracker Options dialog box; enabling feature adaptiveness causes After Effects to adapt the
feature region with every frame regardless of the confidence level.
Options Opens the Tracker Plug-in Options dialog box, which includes options for the AE Original Built-in Tracker.
This command is only available if you choose to use the older After Effects tracker plug-in.
Note: To show or hide motion paths in the Layer panel, select or deselect the Display Motion Paths option in the panel menu
of the Tracker panel. (The panel menu is the menu that you access by clicking the icon in the upper-right corner of a panel.)
You can also use commands in this menu to add a new track point, reveal the current track in the Timeline panel, and
toggle whether the feature region magnification is enabled.
Motion tracking properties in the Timeline panel
Each time you click Track Motion or Stabilize Motion in the Tracker panel (or choose Animation > Track Motion or
Animation > Stabilize Motion), a new tracker is created for the layer in the Timeline panel. Each tracker contains track
points, which are property groups that store the tracking data after tracking has been performed. Trackers are grouped
in the Motion Trackers property group for each layer in the Timeline panel.
To show a tracker in the Timeline panel, select the tracker from the Current Track menu in the Tracker panel and press
SS.
You can rename trackers and track points and modify and animate their property values in the Timeline panel just as
you do for other layer properties and property groups. You must click Apply in the Tracker panel to apply the property
changes to the target.
Feature Center Position of the center of the feature region.
Feature Size Width and height of the feature region.
Search Offset Position of the center of the search region relative to the center of the feature region.
Search Size Width and height of the search region.
Confidence Property through which After Effects reports the amount of certainty regarding the match made for each
frame. In general, Confidence is not a property that you modify.
Attach Point Position assigned to the target layer or effect control point.
Attach Point Offset Position of the attach point relative to the center of the feature region.
Adjust the track point
When you set up motion tracking, it’s often necessary to refine your track point by adjusting the feature region, search
region, and attach point. You can resize or move these items independently or in groups by dragging using the Selection
tool. To help you define the area to be tracked, the image area within the feature region is magnified to 400% while you
move the region.
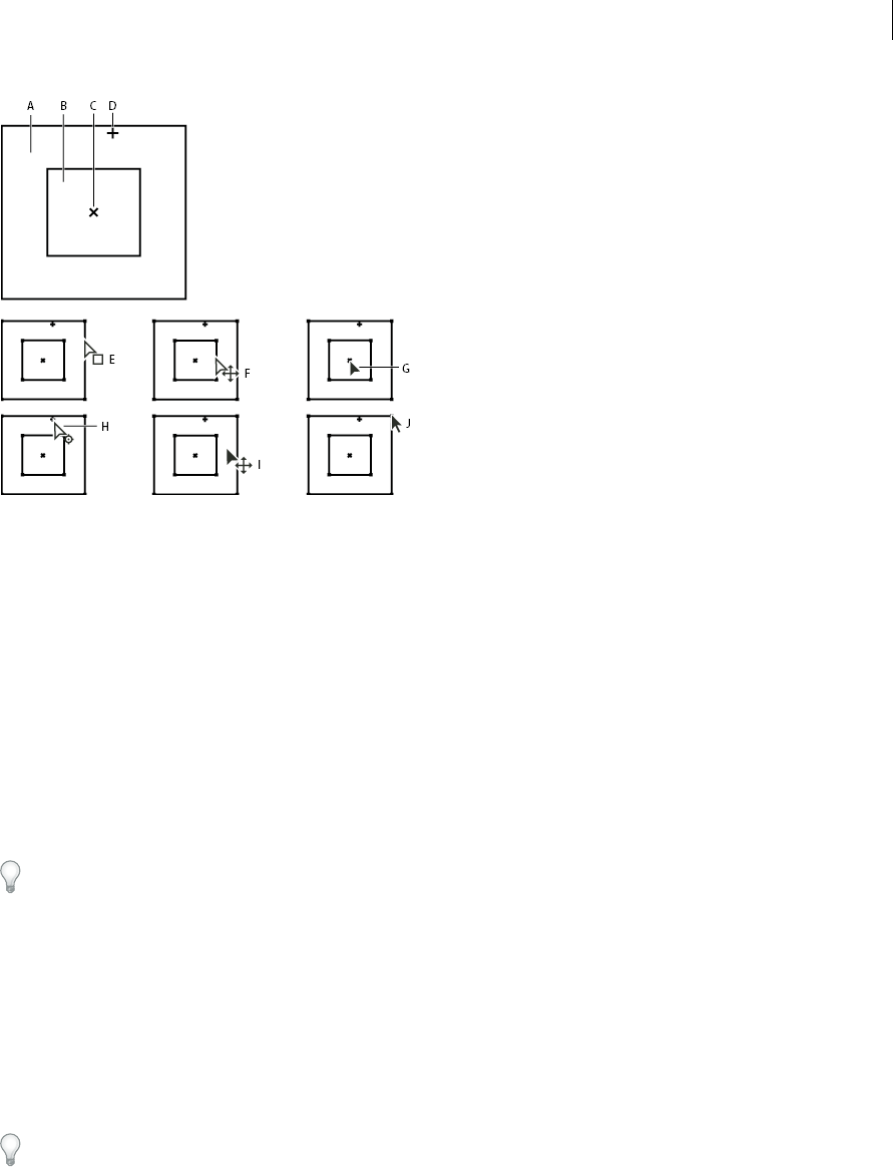
238
Animation and Keyframes
Last updated 6/8/2015
A Search region B Feature region C Keyframe marker D Attach point E Moves search region F Moves both regions G Moves entire track point
H Moves attach point I Moves entire track point J Resizes region
•To turn on or off feature region magnification, choose Magnify Feature When Dragging from the Tracker panel
menu.
•To move the feature region, search region, and attach point together, drag inside the track point area (avoiding the
region edges and the attach point), or press the Up, Down, Left, or Right Arrow key. Hold Shift while pressing an
arrow key to move by an increment 10 times as large.
•To move only the feature and search regions together, drag the edge of the feature region, or Alt-drag (Windows) or
Option-drag (Mac OS) with the Selection tool inside the feature or search region. You can also hold Alt (Windows)
or Option (Mac OS) while pressing the Up, Down, Left, or Right Arrow key. Hold Alt+Shift (Windows) or
Option+Shift (Mac OS) while pressing an arrow key to move by an increment 10 times as large.
•To move only the search region, drag the edge of the search region.
Offset the search region center from the feature region center in the direction in which the tracked feature is traveling.
•To move only the attach point, drag the attach point.
•To resize the feature or search region, drag a corner handle.
•To make all of the sides of the region match the length of the longest side, and to resize the region relative to the
original center point of the region, Shift-drag a corner handle.
•To make all of the sides of the region match the length of the longest side, and to resize the region relative to a
particular corner handle, Ctrl+Shift-drag (Windows) or Command+Shift-drag (Mac OS) the opposite corner
handle.
To restrict the movement of the track point to the x (horizontal) or y (vertical) axis during tracking, resize the height or
width of the search region to match the height or width of the feature region.
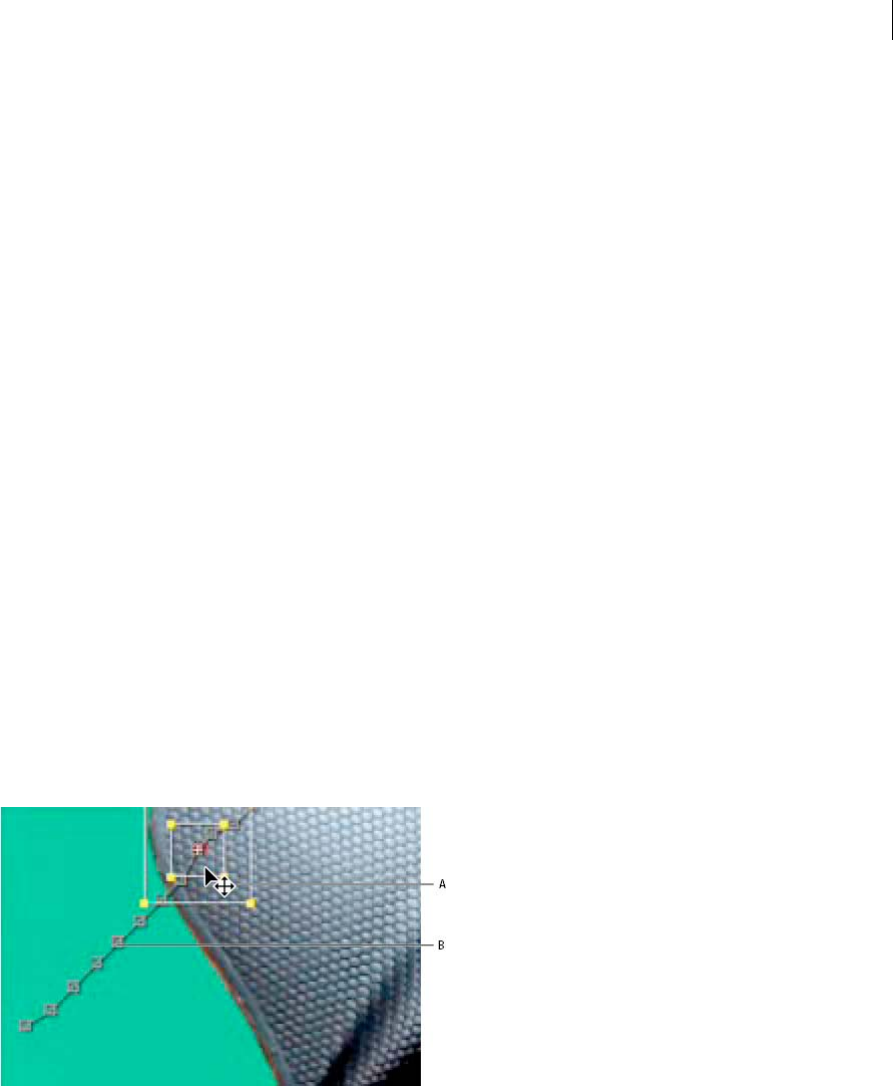
239
Animation and Keyframes
Last updated 6/8/2015
Apply tracking data to a new target
After you’ve tracked a motion source layer, you can apply the tracking data stored on that layer to any number of other
target layers and effect control points. For example, you can apply the track to the position of a light bulb and to the
effect control point of the Lens Flare effect.
1In the Tracker panel, choose the tracked layer from the Motion Source menu.
2Choose the track that contains the tracking data you want from the Current Track menu.
3Click Edit Target, and choose the target.
4In the Tracker panel, click the Apply button.
Correct a motion track
As an image moves in a shot, the lighting, surrounding objects, and angle of the object can all change, making the once
distinct feature no longer identifiable at the subpixel level. Also, if the search region is too small, the tracked feature may
leave its bounds from one frame to the next.
Learning to choose a trackable feature takes time. Even with careful planning and practice, the feature region can drift
away from the desired feature. Re-adjusting the feature and search regions, changing the tracking settings, and trying
again is a standard part of automatic tracking. It’s not necessary to get a single good track in one try. You may need to
track the shot in sections, redefining the feature region in places where the feature changes and the region drifts. You
may even need to choose a different feature to track, one with movement that closely matches that of the feature to
track, and use the attach point offset to place the target.
After you’ve tracked motion, each track point has a motion path in the Layer panel that shows the position of the center
of the feature region. You can fine-tune the keyframes of the motion path in the Layer panel as you would any other
motion path. Modifying the motion path is most useful when you want to manually change the motion tracking data
before applying it to a target. In some cases, it may be easier to manually modify the motion path created by the motion
tracker than to get a perfect track.
A Moving the feature and search regions B Keyframe marker
Correct drifting by adjusting the feature and search regions
1Move the current-time indicator to the last well-tracked frame.
2Alt-drag (Windows) or Option-drag (Mac OS) the feature and search regions only (not the attach point) to the
correct location.

240
Animation and Keyframes
Last updated 6/8/2015
3If you are correcting the track for one frame, go to step 4. If you are correcting the track for several contiguous
frames, adjust the feature region and search region if necessary, and click Analyze. Watch the tracking to make sure
that it is accurate. If the tracking is not accurate, then click the button again to stop tracking, adjust the feature
region, and begin again.
4When you are satisfied with the track, click Apply to apply the keyframes to the target layer or effect control point.
Correct drifting by modifying tracking settings
1Move the current-time indicator to the last well-tracked frame.
2In the Tracker panel, click Options.
3Change settings in the Motion Tracker dialog box as appropriate. (See Motion tracking options.)
4In the Tracker panel, click the Analyze Forward or the Analyze Backward button.
5Watch the tracking to make sure that it is accurate. If the tracking is not accurate, then click the button again to stop
tracking, adjust the settings, and begin again.
6When you are satisfied with the track, click Apply to apply the keyframes to the target layer or effect control point.
Stabilize motion with the Warp Stabilizer effect
You can stabilize motion with the Warp Stabilizer effect. It removes jitter caused by camera movement, making it
possible to transform shaky, handheld footage into steady, smooth shots. See Tracking and stabilizing motion for more
information about using the point tracker for stabilizing motion.
For video tutorials, details, and resources about the Warp Stabilizer effect, see this article on the Adobe website.
In After Effects CC the effect is named Warp Stabilizer VFX.
Stabilize with the Warp Stabilizer effect
To stabilize motion using the Warp Stabilizer effect, do the following:
1Select the layer you want to stabilize.
2Do one of the following:
In After Effects CC
•Choose Effect > Distort > Warp Stabilizer VFX.
•Go to the Effects & Presets panel > Distort and apply the Warp Stabilizer VFX to the layer.
•Right-click the footage item in the Timeline panel and choose Warp Stabilizer VFX.
In After Effects CS6:
•Choose Animation > Warp Stabilizer.
•In the Tracker panel, click the Warp Stabilizer button.
•Right-click the footage item in the Timeline panel and choose Warp Stabilizer.
After the effect is added to the layer, analysis of the footage begins immediately in the background. As analysis
begins, the first of two banners displays in the Composition panel indicating that analysis is occurring. When
analysis is complete, the second banner displays a message that stabilization is occurring.
You are free to work with the footage or elsewhere in the project while these steps are occurring.

241
Animation and Keyframes
Last updated 6/8/2015
Warp Stabilizer VFX / Warp Stabilizer settings
Analyze
There is no need to press this button when you first apply Warp Stabilizer, it is pressed for you automatically. The
Analyze button remains dimmed until some change takes place. For example, if you adjust a layer’s In or Out points, or
there is an upstream change to the layer source. Click the button to reanalyze the footage.
Note: Analysis does not take into account any masks or effects that are applied directly to the same layer. Pre-compose and
place them in the upstream composition if you want them to be analyzed.
Cancel
Cancels an analysis in progress. During analysis, status information appears next to the Cancel button.
Stabilization
Stabilization settings allow for adjusting the stabilization process.
Result Controls the intended result for the footage (Smooth or No Motion).
•Smooth motion (default): Retains the original camera movement but makes it smoother. When selected,
Smoothness is enabled to control how smooth the camera movement becomes.
•No Motion: Attempts to remove all camera motion from the shot. When selected, the Crop Less <-> Smooth More
function is disabled in the Advanced section. This setting is used for footage where at least a portion of the main
subject remains within the frame for the entire range being analyzed.
Smoothness Chooses how much the camera’s original motion is stabilized. Lower values are closer to the camera’s
original motion while higher values are smoother. Values above 100 require more cropping of the image. Enabled when
the Result is set to Smooth Motion.
Method Specifies the most complex operation the Warp Stabilizer performs on the footage to stabilize it:
•Position Tracking is based on position data only and is the most basic way footage can be stabilized.
•Position, Scale And Rotation Stabilization is based upon position, scale, and rotation data. If there are not enough
areas to track, Warp Stabilizer chooses the previous type (Position).
•Perspective: Uses a type of stabilization in which the entire frame is effectively corner-pinned. If there are not
enough areas to track, Warp Stabilizer chooses the previous type (Position, Scale, Rotation).
•Subspace Warp (default): Attempts to warp various parts of the frame differently to stabilize the entire frame. If
there are not enough areas to track, Warp Stabilizer choose the previous type (Perspective).
The method in use on any given frame can change across the course of the clip based on the tracking accuracy.
note: In some cases, Subspace Warp can introduce unwanted warping, and Perspective can introduce unwanted
keystoning. You can prevent anomalies by choosing a simpler method.
Preserve Scale (After Effects CC) When enabled, prevents the Warp Stabilizer from trying to adjust forward and
backward camera movements with scale adjustments.
Borders
Borders settings adjust how borders (the moving edges) are treated for footage that is stabilized.

242
Animation and Keyframes
Last updated 6/8/2015
Framing Controls how the edges appear in a stabilizing result. Framing can be set to one of the following:
•Stabilize Only: Displays the entire frame, including the moving edges. Stabilize Only shows how much work is
being done to stabilize the image. Using Stabilize Only allows you to crop the footage using other methods. When
selected, the Auto-scale section and Crop Less <-> Smooth More property are disabled.
•Stabilize, Crop: Crops the moving edges without scaling. Stabilize, Crop is identical to using Stabilize, Crop, Auto-
scale, and setting Maximum Scale to 100%. With this option enabled, the Auto-scale section is disabled, but the Crop
Less <-> Smooth More property is enabled.
•Stabilize, Crop, Auto-scale (default): Crops the moving edges and scales up the image to refill the frame. The
automatic scaling is controlled by various properties in the Auto-scale section.
•Stabilize, Synthesize Edges: Fills in the blank space created by the moving edges with content from frames earlier
and later in time (controlled by Synthesizes Input Range in the Advanced section). With this option, the Auto-scale
section and Crop Less <-> Smooth More are disabled.
Note: It is possible for artifacts to appear when there is movement at the edge of the frame not related to camera movement.
Auto-scale Displays the current auto-scale amount, and allows you to set limits on the amount of auto-scaling. Enable
Auto-scale by setting framing to Stabilize, Crop, Auto-scale.
•Maximum Scale: Limits the maximum amount a clip is scaled up for stabilization.
•Action-Safe Margin: When non-zero, specifies a border around the edge of the image that you don’t expect to be
visible. Thus, auto-scale does not try to fill it.
Additional Scale Scales up the clip with the same result as scaling using the Scale property under Transform, but avoids
an extra resampling of the image.
Advanced
Detailed Analysis When set to on, makes the next Analysis phase do extra work to find elements to track. The resulting
data (stored in the project as part of the effect) is much larger and slower with this option enabled.
Rolling Shutter Ripple The stabilizer automatically removes the rippling associated with stabilized rolling shutter
footage. Automatic Reduction is the default. Use Enhanced Reduction if the footage contains larger ripples. To use
either method, set the Method to Subspace Warp or Perspective.
Crop Less <-> Smooth More When cropping, controls the trade-off between smoothness and scaling of the cropping
rectangle as it moves over the stabilized image. Lower values are smooth, however, more of the image is viewed. At
100%, the result is the same as the Stabilize Only option with manual cropping.
Synthesis Input Range (seconds) Used by Stabilize, Synthesize Edges framing, controls how far backward and forward
in time the synthesis process goes to fill in any missing pixels.

243
Animation and Keyframes
Last updated 6/8/2015
Synthesis Edge Feather Selects the amount of feather for the synthesized pieces. It is enabled only when using the
Stabilize, Synthesize Edges framing. Use the feather control to smooth over edges where the synthesized pixels join up
with the original frame.
Synthesis Edge Cropping Trims off the edges of each frame before it is used to combine with other frames when using
the Stabilize, Synthesize Edges framing option. Use the cropping controls to crop off bad edges that are common in
analog video capture, or low quality optics. By default, all edges are set to zero pixels.
Hide Warning Banner Use when you don’t want to reanalyze footage even though there is a warning banner indicating
that it must be reanalyzed.
The following settings are only available in After Effects CC
Objective Determines the aim for the effect: for stabilizing, for temporary stabilization to perform visual effects work,
or to composite a layer into a shaky scene. Choose an objective:
•Stabilize - Default option for normal stabilization
•Reversible Stabilization and Reverse Stabilization - Use these options to apply an effect to a region. Use two instances
of the Warp Stabilizer VFX effect, one with Reversible Stabilization to steady a shaky object, and a duplicate instance
with Reverse Stabilization to insert the shake back in, so that any effects you apply after Reversible Stabilization
appear within the original scene.
•Apply Motion to Target and Apply Motion to Target over Original - Use these options to composite a layer into a
shaky scene to apply the stabilized motion onto a different layer.
Target Layer Choose a layer to which the stabilized motion is applied using the Apply Motion to Target or Apply
Motion to Target over Original options.
Show Track Points Determines if track points are displayed.
Track Point Size Determines the size of the displayed track points
Auto-delete Points Across Time When you delete track points in a composition panel, corresponding track points on
the same object, are deleted at other times on the layer. You do not need to manually delete the track points frame-by-
frame.
Warp Stabilizer workflow tips
1Apply the Warp Stabilizer VFX/ Warp Stabilizer.
2While Warp Stabilizer is analyzing your footage, you can adjust settings or work on a different part of your project.
3Choose Stabilization > Result > No Motion if you want to completely remove all camera motion. Choose
Stabilization > Result > Smooth Motion if you want to include some of the original camera movement in the shot.
4If the result is good, you’re done with stabilization. If not, do one or more of the following:
•If the footage is too warped, or distorted, switch the Method to Position, Scale, Rotation.
•If there are occasional rippled distortions, and footage was shot with a rolling shutter camera, set Advanced >
Rolling Shutter Ripple to Enhanced Reduction.
•Try checking Advanced > Detailed Analysis.
5If the result is too cropped, reduce either Smoothness or Crop Less <-> Smooth More. Crop Less <-> Smooth More
is much more responsive, as it doesn’t require a restabilize phase.
6If you want to get a feel for how much work the stabilizer is actually doing, set the Framing to Stabilize Only.

244
Animation and Keyframes
Last updated 6/8/2015
When Framing is set to one of the cropping options and the cropping gets extreme, a red banner appears saying, “To
avoid extreme cropping set Framing to Stabilize Only or adjust other parameters”. In this situation, you can either set
Framing to Stabilize Only, or Stabilize, Synthesize Edges. Other options include reducing the value of Crop Less <->
Smooth More, or reducing Smoothness. Or, if you are satisfied with the results, enable the Hide Warning Banner
option.
More Help topics
Expression basics
Work are a
Scale or flip a layer
Motion paths
Tracking 3D Camera Movement | CC, CS6
Speed
Controlling speed between keyframes
When you animate a property in the Graph Editor, you can view and adjust the rate of change (speed) of the property
in the speed graph. You can also adjust speed for spatial properties in the motion path in the Composition or Layer
panel.
In the Composition or Layer panel, the spacing between dots in a motion path indicates speed. Each dot represents a
frame, based on the frame rate of the composition. Even spacing indicates a constant speed, and wider spacing indicates
a higher speed. Keyframes using Hold interpolation display no dots because there is no intermediate transition between
keyframe values; the layer simply appears at the position specified by the next keyframe. (See Motion paths.)
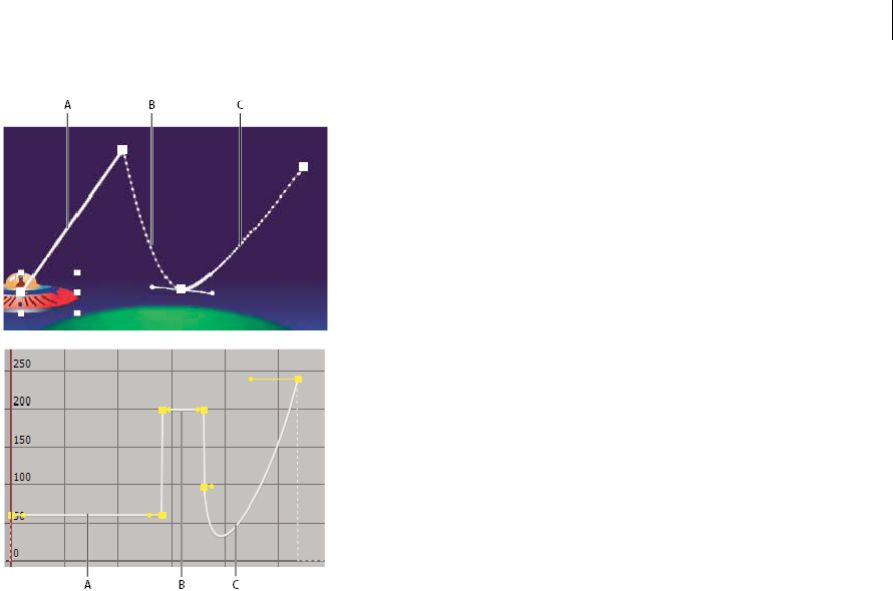
245
Animation and Keyframes
Last updated 6/8/2015
A Dots are close together, indicating lower speed (top); speed is constant (bottom). B Dots are far apart, indicating greater speed (top); speed is
constant (bottom). C Inconsistent spacing of dots indicates changing speed (top); speed decreases and then increases (bottom).
For information about keyframe interpolation, see Keyframe interpolation.
The following factors affect the speed at which a property value changes:
•The time difference between keyframes in the Timeline panel. The shorter the time interval between keyframes, the
more quickly the layer has to change to reach the next keyframe value. If the interval is longer, the layer changes
more slowly, because it must make the change over a longer period of time. You can adjust the rate of change by
moving keyframes forward or backward along the timeline.
•The difference between the values of adjacent keyframes. A large difference between keyframe values, such as the
difference between 75% and 20% opacity, creates a faster rate of change than a smaller difference, such as the
difference between 30% and 20% opacity. You can adjust the rate of change by increasing or decreasing the value of
a layer property at a keyframe.
•The interpolation type applied for a keyframe. For example, it is difficult to make a value change smoothly through
a keyframe when the keyframe is set to Linear interpolation, but you can switch to Bezier interpolation at any time,
which provides a smooth change through a keyframe. If you use Bezier interpolation, you can adjust the rate of
change even more precisely using direction handles.
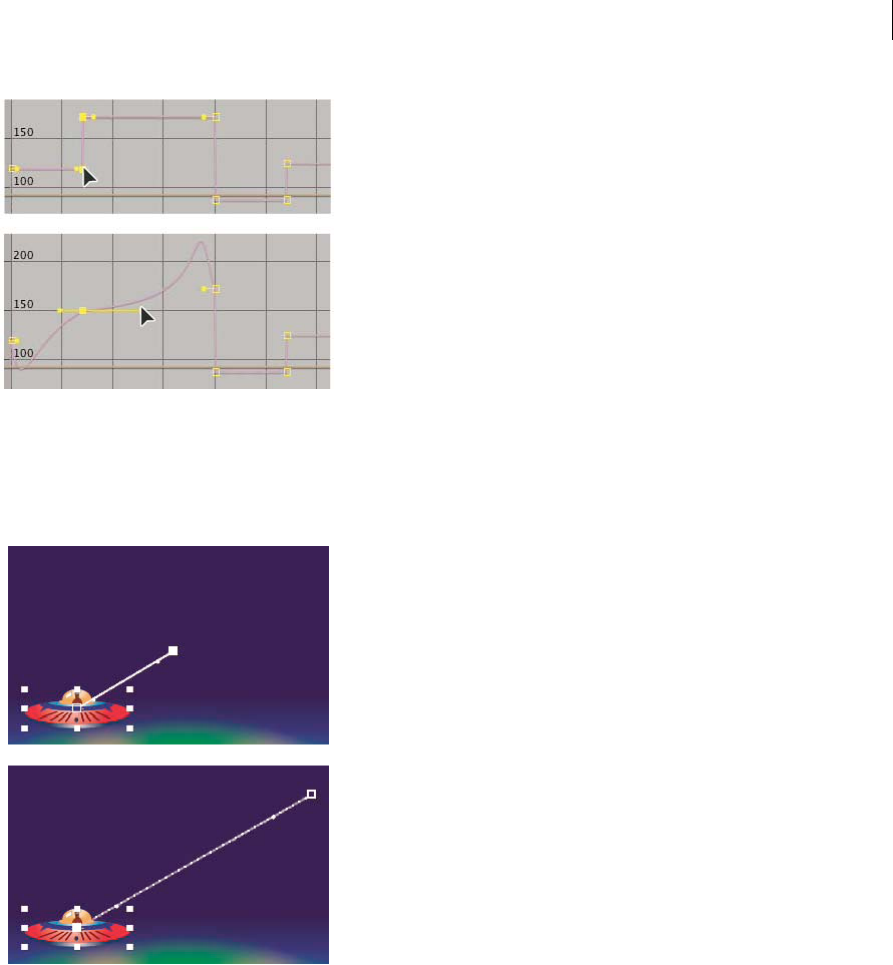
246
Animation and Keyframes
Last updated 6/8/2015
Control speed between keyframes without using the speed graph
•In the Composition or Layer panel, adjust the spatial distance between two keyframes on the motion path. Increase
speed by moving one keyframe position farther away from the other, or decrease speed by moving one keyframe
position closer to the other.
•In layer bar mode or in the Graph Editor, adjust the time difference between two keyframes. Decrease speed by
moving one keyframe farther away from the other, or increase speed by moving one keyframe closer to the other.
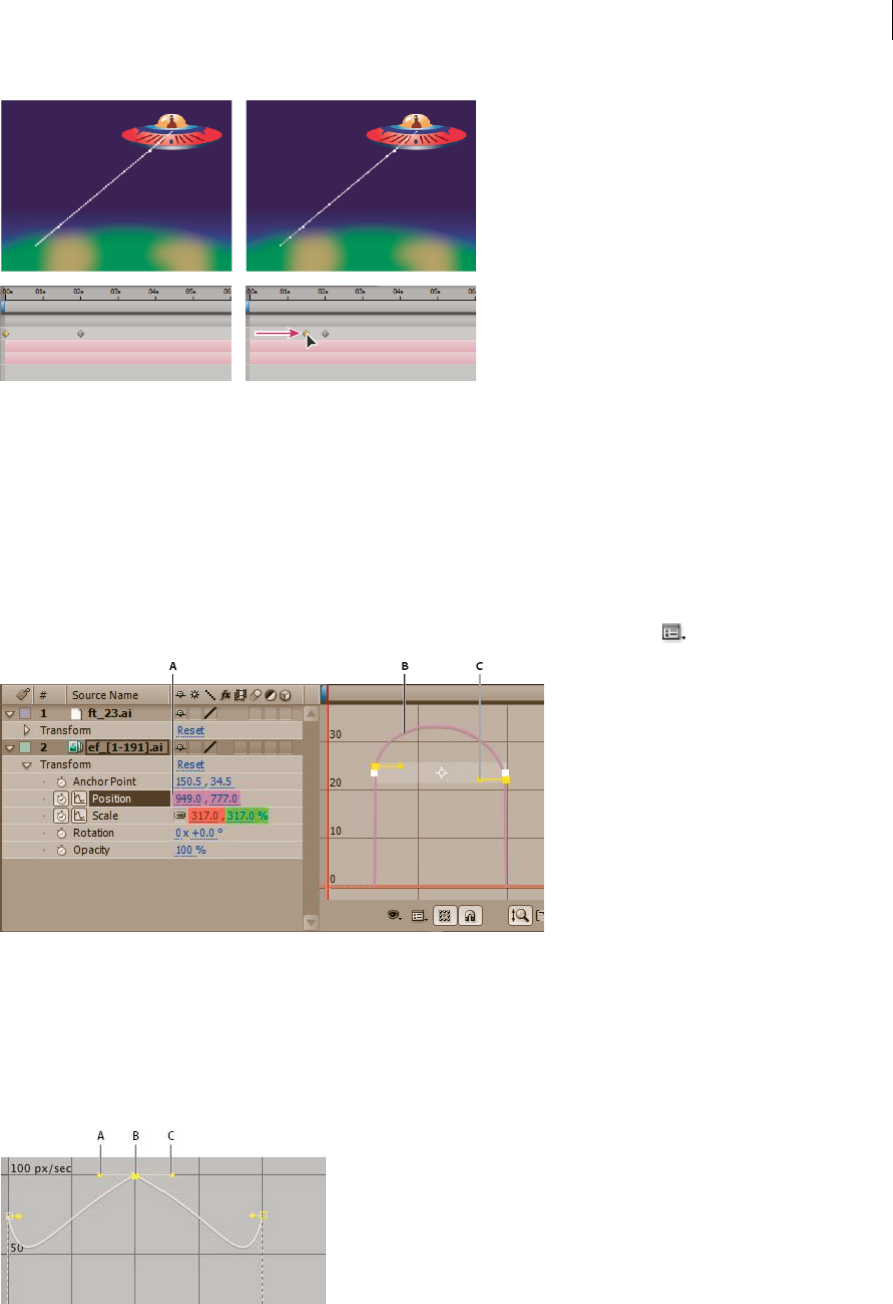
247
Animation and Keyframes
Last updated 6/8/2015
•Apply the Easy Ease keyframe assistant, which automatically adjusts the speed of change as motion advances toward
and retreats from a keyframe.
About the speed graph
You can fine-tune changes over time using the speed graph in the Graph Editor. The speed graph provides information
about and control of the value and rate of change for all spatial and temporal values at any frame in a composition.
In the speed graph, changes in the graph height indicate changes in speed. Level values indicate constant speed; higher
values indicate increased speed.
To view the speed graph, choose Edit Speed Graph from the Choose Graph Type menu .
A Value at the current-time indicator B Speed graph C Direction handle (controls speed)
By adjusting the rise and fall of the speed graph, you can control how quickly or slowly a value changes from keyframe
to keyframe. You can control the values approaching and leaving a keyframe together, or you can control each value
separately. The incoming handle increases the speed or velocity when you drag it up, and decreases the speed or velocity
when you drag it down. The outgoing handle influences the next keyframe in the same way. You can also control the
influence on speed by dragging the handles left or right.
A Incoming direction handle B Speed control C Outgoing direction handle
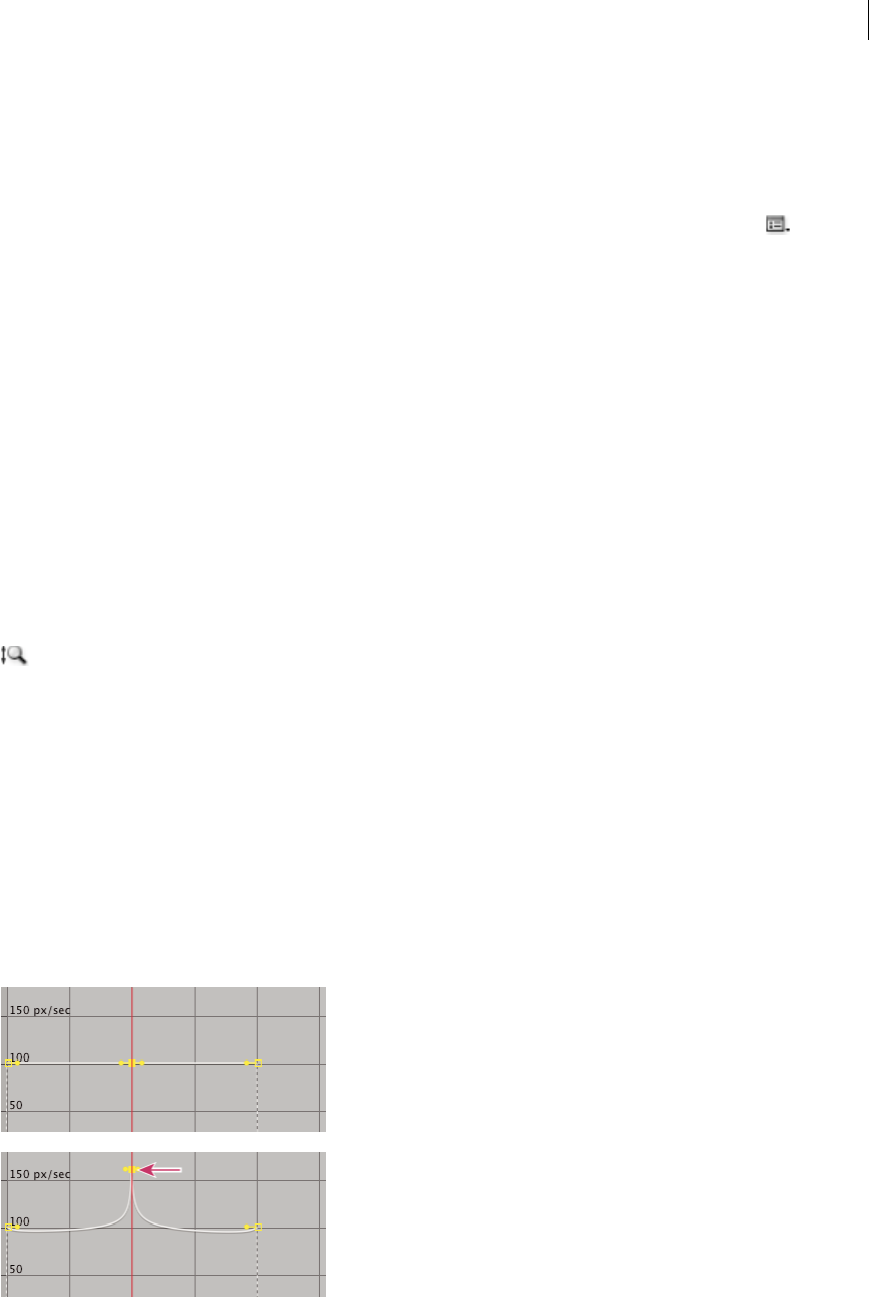
248
Animation and Keyframes
Last updated 6/8/2015
Note: If you want a handle to have influence over more than one keyframe, use roving keyframes.
Control speed with the speed graph
1In the Timeline panel, expand the outline for the keyframe you want to adjust.
2Click the Graph Editor button and select Edit Speed Graph from the Graph Type And Options menu .
3Using the Selection tool, click the keyframe you want to adjust.
4(Optional) Do one of the following:
•To split the incoming and outgoing direction handles, Alt-drag (Windows) or Option-drag (Mac OS) a direction
handle.
•To join the direction handles, Alt-drag (Windows) or Option-drag (Mac OS) a split direction handle up or down
until it meets the other handle.
5Do any of the following:
•Drag a keyframe with joined direction handles up to accelerate or down to decelerate entering and leaving the
keyframe.
•Drag a split direction handle up to accelerate or down to decelerate the speed entering or leaving a keyframe.
•To increase the influence of the keyframe, drag the direction handle away from the center of the keyframe. To
decrease the influence, drag the direction handle toward the center of the keyframe.
Note: When you drag a direction handle beyond the top or bottom of the Graph Editor with Auto Zoom Graph Height
on, After Effects calculates a new minimum or maximum value based on how far you dragged outside the graph,
and it redraws the graph so that all the values you specify for that layer property are visible in the graph by default.
Create a bounce or peak
Use direction handles to simulate the type of acceleration seen in a bouncing ball. When you create this type of result,
the speed graph appears to rise quickly and peak.
1In the Timeline panel, expand the outline for the keyframe you want to adjust.
2Click the Graph Editor button and display the speed graph for the property.
3Make sure the interpolation method for the keyframe you want to peak is set to Continuous Bezier or Bezier.
4Drag the desired keyframe (with joined direction handles) up until it is near the top of the graph.
5Drag the direction handles on either side of the keyframe toward the center of the keyframe.
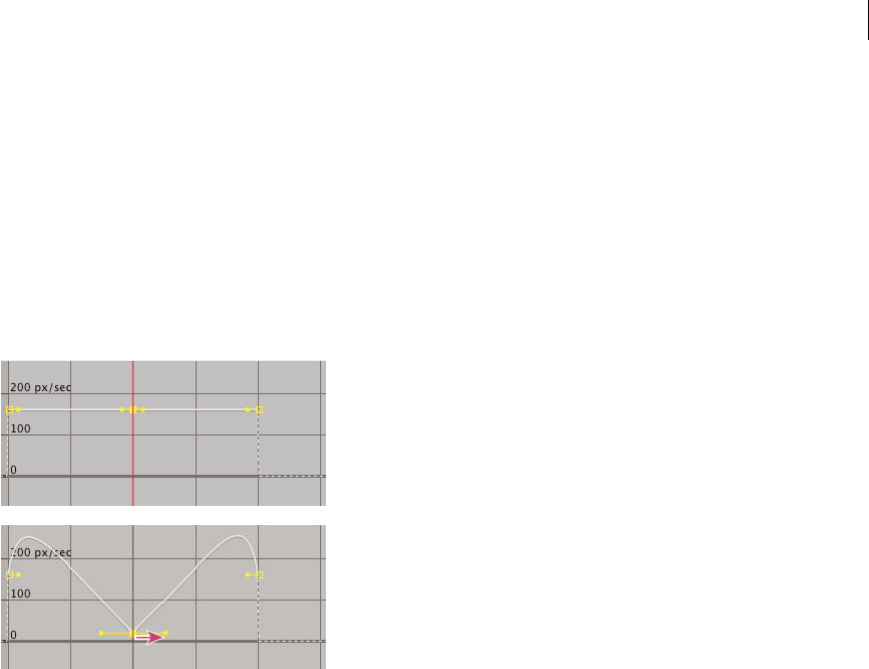
249
Animation and Keyframes
Last updated 6/8/2015
Start or stop change gradually
Direction handles can create gradual starts and stops, such as a boat slowing to a stop and then starting again. When
you use this technique, the speed graph resembles a smooth U shape.
1In the Timeline panel, expand the outline for the keyframe you want to adjust.
2Click the Graph Editor button and display the speed graph for the property.
3Make sure the interpolation method for the keyframe you want to adjust is set to Continuous Bezier or Bezier.
4At the desired keyframe, drag the direction handle down until it is near the bottom of the graph.
5Drag the direction handles on either side of the keyframe away from the center of the keyframe.
Adjust influence of a direction handle on an adjacent keyframe
Along with controlling the level of acceleration and deceleration, you can also extend the influence of a keyframe
outward or inward in relation to an adjacent keyframe. Influence determines how quickly the speed graph reaches the
value you set at the keyframe, giving you an additional degree of control over the shape of the graph. The direction
handle increases the influence of a keyframe value in relation to the neighboring keyframe when you drag it toward the
neighboring keyframe, and it decreases the influence on the neighboring keyframe when you drag it toward the center
of its own keyframe.
1In the Timeline panel, expand the outline for the keyframe you want to adjust.
2Click the Graph Editor button and display the speed graph for the property.
3Using the Selection tool, click a keyframe and drag the direction handle left or right.
Change speed numerically
You may want to specify speed more precisely than you can by dragging keyframes in the speed graph. In such cases,
specify speed numerically in the Keyframe Velocity dialog box.
The options and units in the dialog box vary depending on the layer property you are editing and may also vary for
plug-ins.
1Display the speed graph for the keyframe you want to adjust.
2Select the keyframe you want to edit, and then choose Animation > Keyframe Velocity.
3Enter values for Speed for Incoming and Outgoing Velocity.
4Enter a value for Influence to specify the amount of influence toward the previous keyframe (for incoming
interpolation) or the next keyframe (for outgoing interpolation).
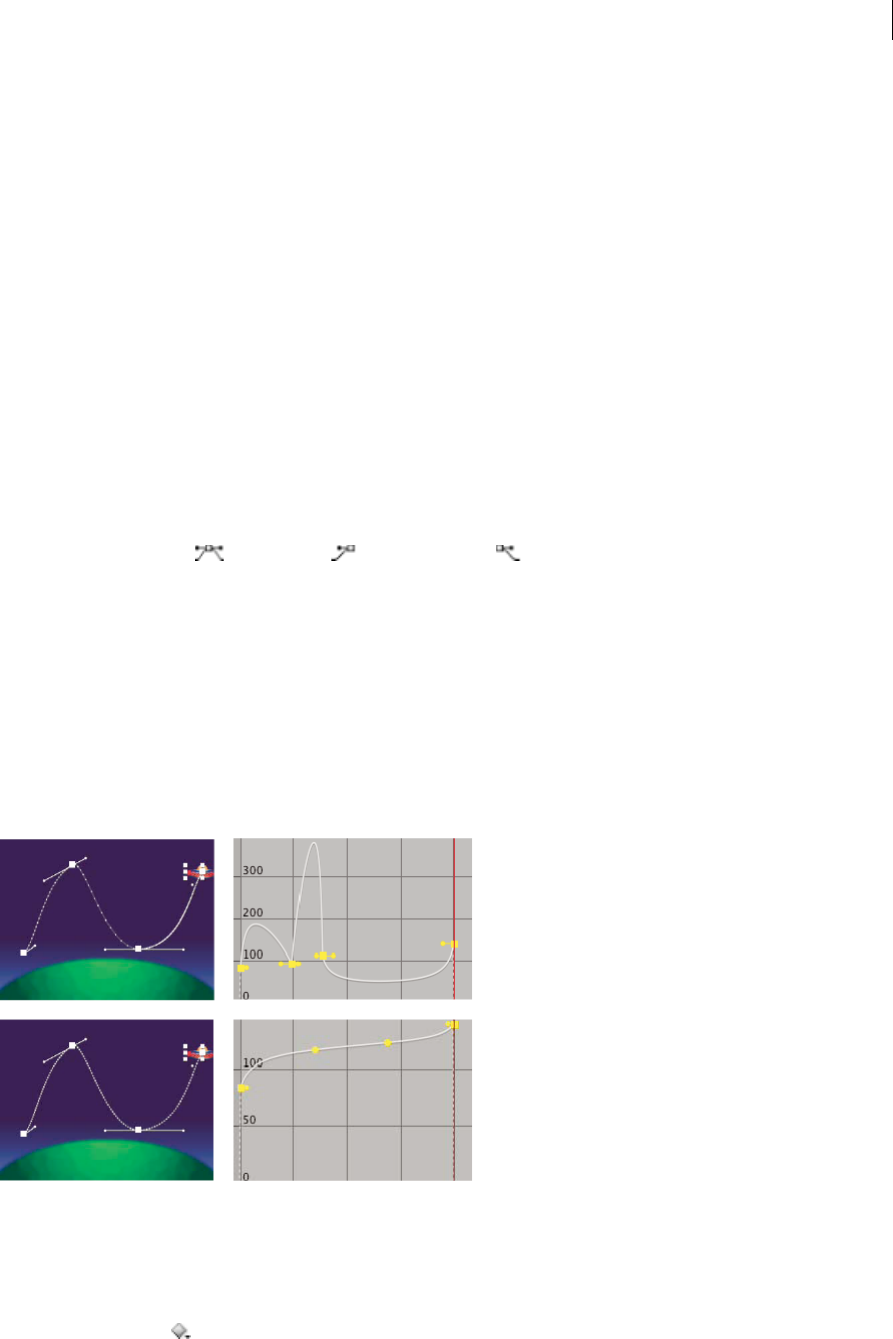
250
Animation and Keyframes
Last updated 6/8/2015
5To create a smooth transition by maintaining equal incoming and outgoing velocities, select Continuous.
Note: By default, the proportions of the current Scale or Mask Feather values are preserved as you edit the values. If you
don’t want to preserve proportions, click the link icon next to the property values in the Timeline panel to remove the icon.
Automatically ease speed
Although you can manually adjust the speed of a keyframe by dragging direction handles, using Easy Ease automates
the work.
After you apply Easy Ease, each keyframe has a speed of 0 with an influence of 33.33% on either side. When you ease
the speed of an object, for example, the object slows down as it approaches a keyframe, and gradually accelerates as it
leaves. You can ease speed when coming into or out of a keyframe, or both.
1In the Graph Editor or in layer bar mode, select a range of keyframes.
2Do one of the following:
• Choose Animation > Keyframe Assistant > Easy Ease (to ease speed coming both into and out of selected
keyframes), Easy Ease In (to ease speed coming into selected keyframes), or Easy Ease Out (to ease speed coming
out of selected keyframes).
•Click the Easy Ease , Easy Ease In , or Easy Ease Out button located at the bottom of the Graph Editor.
Smooth motion with roving keyframes
Using roving keyframes, you can easily create smooth movement across several keyframes at once. Roving keyframes
are keyframes that are not linked to a specific time; their speed and timing are determined by adjacent keyframes.
When you change the position of a keyframe adjacent to a roving keyframe in a motion path, the timing of the roving
keyframe may change.
Roving keyframes are available only for spatial layer properties, such as Position, Anchor Point, and effect control
points. In addition, a keyframe can rove only if it is not the first or last keyframe in a layer, because a roving keyframe
must interpolate its speed from the previous and next keyframes.
1In layer bar mode or in the Graph Editor, set up the keyframes for the motion you want to smooth.
2Determine the beginning and ending keyframes for the range you want to smooth.
3Do one of the following:
•For every keyframe in the range (except the beginning and ending keyframes), select Rove Across Time in the
keyframe menu .

251
Animation and Keyframes
Last updated 6/8/2015
•Select the keyframes you want to rove and choose Animation > Keyframe Interpolation. Then choose Rove
Across Time from the Roving menu.
The intermediate keyframes adjust their positions on the timeline to smooth the speed curve between the beginning
and ending keyframes.
Revert to a nonroving keyframe
•Select the roving keyframe option from the keyframe menu, or drag the roving keyframe left or right.
•Select the keyframes you want to change, and choose Animation > Keyframe Interpolation. Then choose Lock To
Time from the Roving menu.
Use Exponential Scale to change the speed of scaling
You can simulate a realistic acceleration of a zoom lens when working with 2D layers by using Exponential Scale, which
converts linear scaling of a layer to exponential scaling. Exponential Scale is useful for creating a cosmic zoom, for
example. Zooming optically with a lens is not linear—the rate of change of scaling increases as you zoom in.
1In layer bar mode or in the Graph Editor, hold down the Shift key and select starting and ending keyframes for the
scale property.
2Choose Animation > Keyframe Assistant > Exponential Scale.
Note: Exponential Scale replaces any existing keyframes between the selected starting and ending keyframes.
More Help topics
The Graph Editor
About animation, keyframes, and expressions
Modify Bezier direction handles in the Graph Editor
Animating with Puppet tools
Puppet tools overview and resources
Use the Puppet tools to quickly add natural motion to raster images and vector graphics, including still images, shapes,
and text characters.
Note: Though the Puppet tools work within an effect (the Puppet effect), you don’t apply the effect using the Effect menu or
the Effects & Presets panel. Use the Puppet tools in the Tools panel to directly apply and work with the effect in the Layer
panel or Composition panel.
The Puppet effect works by deforming part of an image according to the positions of pins that you place and move.
These pins define what parts of the image should move, what parts should remain rigid, and what parts should be in
front when parts overlap.
Each Puppet tool is used to place and modify a specific type of pin:
Puppet Pin tool
Use this tool to place and move Deform pins.
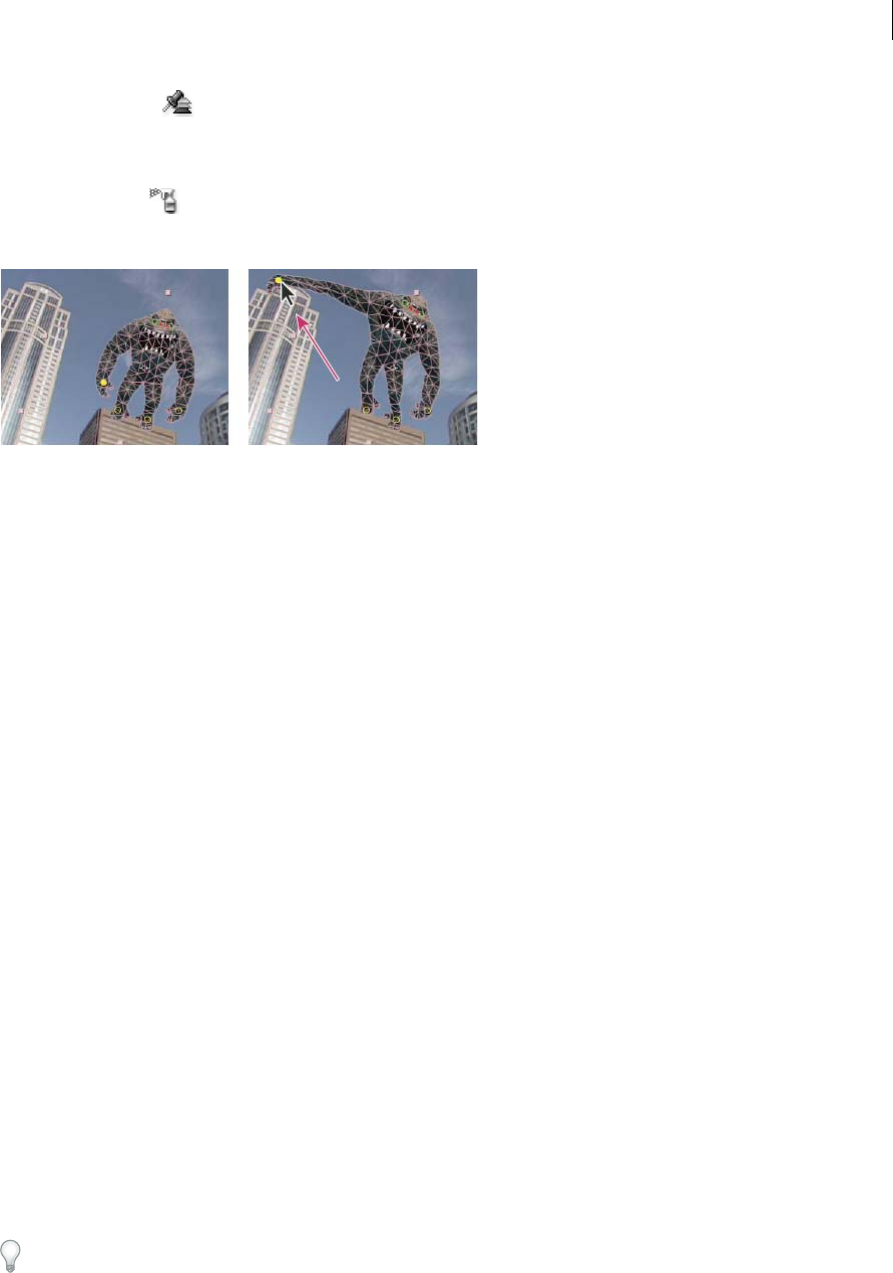
252
Animation and Keyframes
Last updated 6/8/2015
Puppet Overlap tool
Use this tool to place Overlap pins, which indicate which parts of an image should appear in front of others when
distortion causes parts of the image to overlap one another.
Puppet Starch tool
Use this tool to place Starch pins, which stiffen parts of the image so that they are distorted less.
When you place the first pin, the area within an outline is automatically divided into a mesh of triangles. An outline is
only visible when the Puppet effect has been applied and a Puppet tool pointer is over the area that the outline defines.
(See How the Puppet effect creates outlines.) Each part of the mesh is also associated with the pixels of the image, so
the pixels move with the mesh.
Note: To show the mesh, select Show in the Tools panel.
When you move one or more Deform pins, the mesh changes shape to accommodate this movement, while keeping the
overall mesh as rigid as possible. The result is that a movement in one part of the image causes natural, life-like
movement in other parts of the image.
For example, if you place Deform pins in a person’s feet and hands and then move one of the hands to make it wave, the
motion in the attached arm is large, but the motion in the waist is small, just as in the real world.
If a single animated Deform pin is selected, its Position keyframes are visible in the Composition panel and Layer panel
as a motion path. You can work with these motion paths as you work with other motion paths, including setting
keyframes to rove across time. (See Smooth motion with roving keyframes.)
You can have multiple meshes on one layer. Having multiple meshes on one layer is useful for deforming several parts
of an image individually—such as text characters—as well as for deforming multiple instances of the same part of an
image, each with a different deformation.
The original, undistorted mesh is calculated at the current frame at the time at which you apply the effect. The mesh
does not change to accommodate motion in a layer based on motion footage, nor does the mesh update if you replace
a layer’s source footage item.
Note: Don’t animate the position or scale of a continuously rasterized layer with layer transformations if you are also
animating the layer with the Puppet tools. The render order for continuously rasterized layers—such as shape layers and
text layers—is different from the render order for raster layers. You can precompose the shape layer and use the Puppet tools
on the precomposition layer, or you can use the Puppet tools to transform the shapes within the layer. (See Render order
and collapsing transformationsand Continuously rasterize a layer containing vector graphics.)
The motion created by the Puppet tools is sampled by motion blur if motion blur is enabled for the layer and the
composition, though the number of samples used is half of the value specified by the Samples Per Frame value. (See
Motion blur.)
You can use expressions to link the positions of Deform pins to motion tracking data, audio amplitude keyframes, or
any other properties.

253
Animation and Keyframes
Last updated 6/8/2015
Online resources for the Puppet tools
Trish and Chris Meyer give tips for using the Puppet tools on the ProVideo Coalition website.
Aharon Rabinowitz provides a tutorial on the Creative COW website that shows a creative way to use the Puppet tools
with a particle generator to simulate airflow over a car.
Eran Stern provides a video tutorial on the Creative COW website that shows how to duplicate an object using the
Puppet Pin tool.
Robert Powers provides a video tutorial on the Slippery Rock NYC website that demonstrates the use of parenting and
the Puppet tools to animate a character.
Dave Scotland provides a video tutorial on the CG Swot website that demonstrates how to create a looping character
animation using the Puppet tools.
Kert Gartner provides a video tutorial on the VFX Haiku website that shows how to add organic motion to images using
the wiggle expression method on Puppet pins.
Daniel Gies provides a detailed series of video tutorials in which he demonstrates the use of inverse kinematics and the
Puppet tools to rig and animate a character.
Manually animate an image with the Puppet tools
The stopwatch switch is automatically set for the Position property of a Deform pin as soon as the pin is created.
Therefore, a keyframe is set or modified each time that you change the position of a Deform pin. This auto-keyframing
is unlike most properties in After Effects, for which you must explicitly set the stopwatch switch by adding a keyframe
or an expression to animate each property. The auto-animation of Deform pins makes it convenient to add them and
animate them in the Composition panel or Layer panel, without manipulating the properties in the Timeline panel.
1Select the layer that contains the image to animate.
2Using the Puppet Pin tool , do one of the following in the Composition panel or the Layer panel:
•Click any nontransparent pixel of a raster layer to apply the Puppet effect and create a mesh for the outline created
by auto-tracing the alpha channel of a layer.
•Click within a closed path on a vector layer to apply the Puppet effect and create a mesh for the outline defined
by that path.
•Click within a closed, unlocked mask to apply the Puppet effect and create a mesh for the outline defined by the
mask path.
•Click outside all closed paths on a vector layer to apply the Puppet effect without creating a mesh. Outlines are
created for paths on the layer, though an outline is only visible when a Puppet tool pointer is over the area that
the outline defines. Place the pointer over the area enclosed by a path to see the outline in which a mesh will be
created if you click that point. (See How the Puppet effect creates outlines.) Click within an outline to create a
mesh.
A Deform pin is placed where you clicked to create the mesh.
Note: If an image is too complex for the Puppet effect to generate a mesh with the current Triangle value, a “Mesh
Generation Failed” message appears in the Info panel. Increase the Triangle value in the Tools panel and try again.
3Click in one or more places within the outline to add more Deform pins.
Use as few pins as possible to achieve your desired result. The natural deformation provided by the Puppet effect
can be lost if you over-constrain the image. Just add pins to the parts of the figure that you know that you want to
control. For example, when animating a person waving, add a pin to each foot to hold them to the ground, and add
a pin to the waving hand.

254
Animation and Keyframes
Last updated 6/8/2015
4Go to another time in the composition, and move the position of one or more of the Deform pins by dragging them
in the Composition or Layer panel with the Puppet Pin tool. Repeat this step until you have completed your
animation.
You can modify the motion paths of the Deform pins using the same techniques that you use to modify any other
motion paths.
Note: After Effects no longer draws the tinted fill for the original layer region when hovering using the Puppet Pin tool.
Record animation by sketching motion with the Puppet Pin tool
You can sketch the motion path of one or more Deform pins in real time—or at a speed that you specify—much as you
can sketch the motion path of a layer using Motion Sketch.
If your composition contains audio, you can sketch motion in time with the audio.
Before you begin recording motion, you may want to configure settings for recording. To open the Puppet Record
Options dialog box, click Record Options in the Tools panel.
Speed The ratio of the speed of the recorded motion to speed of playback. If Speed is 100%, the motion is played back
at the speed at which it was recorded. If Speed is greater than 100%, the motion plays back slower than it was recorded.
Smoothing Set this value higher to remove more extraneous keyframes from the motion path as it’s drawn. Creating
fewer keyframes makes motion smoother.
Use Draft Deformation The distorted outline that is shown during recording does not take Starch pins into account.
This option can improve performance for a complex mesh.
Note: This procedure assumes that you have already placed Deform pins in the object to animate. For information on
placing Deform pins, see Manually animate an image with the Puppet tools.
1Select one or more Deform pins.
2Go to the time at which to begin recording motion.
3In the Composition panel or Layer panel, hold the Ctrl (Windows) or Command (Mac OS) key to activate the
Puppet Sketch tool. Ctrl-drag (Windows) or Command-drag (Mac OS) the pins to animate.
Recording of motion begins when you click to begin the drag. Recording ends when you release the mouse button.
The color of the outline for the mesh for which motion is being sketched is the same as the color of the pin (yellow).
Reference outlines, for other meshes on the same layer, match the label color of the layer.
The current-time indicator returns to the time at which recording began, so that you can repeat the recording
operation with more Deform pins or redo the recording operation with the same pins.
You can modify the motion paths of the Deform pins using the same techniques that you use to modify any other
motion paths. The motion path for a pin is shown only if it is the only pin selected.
Try creating several duplicate meshes and sketching motion for each mesh. When you have multiple meshes in the same
instance of the Puppet effect, you can sketch motion for one mesh while seeing the reference outlines of the others,
allowing you to follow their movements, either roughly or precisely.
How the Puppet effect creates outlines
When a Puppet mesh is created, its boundaries are determined by an outline, which can be defined by any of the
following types of closed paths:
•An unlocked mask path
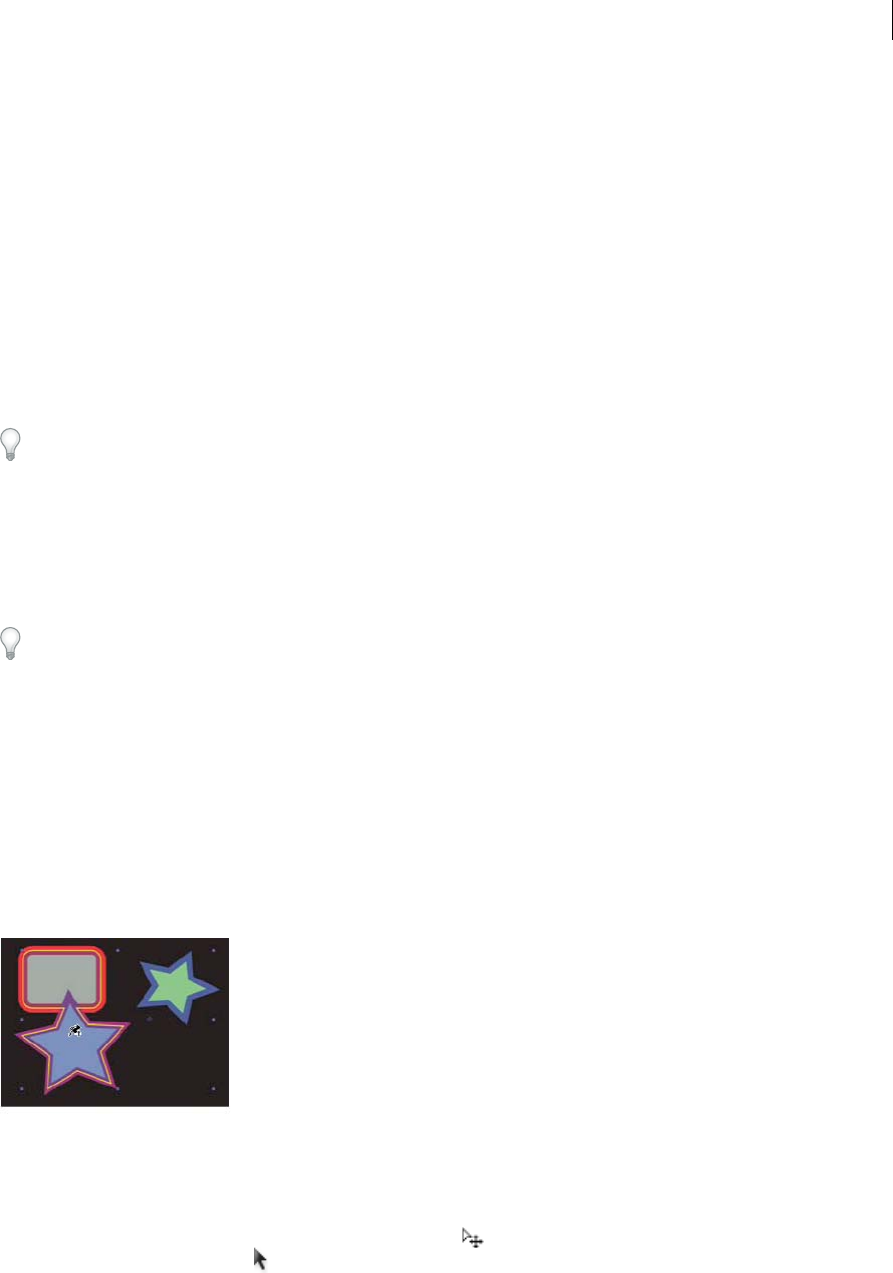
255
Animation and Keyframes
Last updated 6/8/2015
•A shape path on a shape layer
•A text character’s outline
If a layer has no unlocked masks, shapes, or text characters on it when you apply the Puppet effect, it uses Auto-trace
to create paths from the alpha channel. These paths are only used by the Puppet effect in the determination of outlines
and do not appear as masks on the layer. If the layer is a raster layer with no alpha channel, the result is a single
rectangular path around the bounds of the layer. For a complex image, or to configure Auto-trace settings, use Auto-
trace before using the Puppet tools. (See Create a mask from channel values with Auto-trace.)
A text character that consists of multiple disjoint closed paths (such as the letter i) is treated as multiple separate paths.
The stroke of a shape or text character is not used in the determination of outlines; only the path is used. To encompass
a stroke within a mesh created from such items, increase the Expansion value. The default value of 3 pixels for
Expansion encompasses a stroke that extends 3 pixels or less from its path.
Apply paint strokes to a layer using the Brush tool with the Paint On Transparent option. Painting with this option
selected creates a raster layer with only the paint strokes, defined by an alpha channel. You can then use the Puppet tools
to animate the paint strokes. Do not use a mask on the layer.
If multiple masks, shapes, or characters overlap on the same layer, an outline is created from the union of the
overlapping shapes, overlapping characters, or overlapping masks. If a mask overlaps a text character or shape, outlines
are created for the entire character or shape, for the portion of the character or shape that is inside the mask, and for
the mask itself.
To distort multiple disjoint characters or shapes as one object, surround the individual objects with a mask (with mask
mode set to None), and use the mask path as the outline with which to create the mesh. You can delete the mask after
you have created the mesh.
If the Puppet effect has already been applied to a layer, outlines appear with a yellow highlight as you move a Puppet
tool pointer over them. You can choose the outline in which to place an initial pin to create a mesh. A mesh is created
each time that you click within an outline with a Puppet tool.
If the Puppet effect has not already been applied to a layer, outlines for that layer have not yet been calculated. When
you click, the Puppet effect calculates outlines and determines whether you have clicked within an outline. If so, it
creates a mesh defined by the outline in which you clicked. Otherwise, you can move the pointer around in the layer to
select the outline in which to place a pin and create a mesh. Moving the pointer around in the layer is useful for seeing
the outlines of various objects and choosing which outlines to use to create a mesh.
Work with Puppet pins and the distortion mesh
•To show the mesh for the Puppet effect, select Show in the options section of the Tools panel.
•To select or move a pin, click or drag it with the Move tool . To activate the Move tool, place the pointer on a pin
while either the Selection tool or the corresponding Puppet tool is active.

256
Animation and Keyframes
Last updated 6/8/2015
•To select multiple pins, Shift-click them, or use the marquee-selection tool to drag a marquee-selection box
around them. To activate the marquee-selection tool, place the pointer for a Puppet tool outside all meshes and
outlines or hold the Alt (Windows) or Option (Mac OS) key.
•To select all pins of one kind (Deform, Starch, or Overlap), select one pin of that kind and press Ctrl+A (Windows)
or Command+A (Mac OS).
•To delete selected pins, press the Delete key. If the pin has multiple keyframes, and only the keyframe at the current
time is selected, pressing Delete deletes only that keyframe; pressing Delete again deletes the pin.
•To reset Deform pins to their original locations at the current time, click Reset for the Puppet effect in the Timeline
panel or Effect Controls panel. To remove all pins and meshes from an instance of the Puppet effect, click Reset
again.
Sometimes, you want to animate an image from an initial position, through an intermediate position, and back to the
initial position. Rather than manually dragging the pins back to their initial positions at the end of the animation, place
the current-time indicator at the end time and click Reset. Only the keyframes at the current time are reset.
•To increase or decrease the number of triangles used in a mesh, modify the Triangle value in the options section of
the Tools panel or in the Timeline panel. Modifying the Triangle value sets the value for a selected mesh or, if no
mesh is selected, sets the value for meshes created later.
A higher number of triangles gives smoother results but takes longer to render. Small objects, like text characters,
usually distort well with only 50 triangles, whereas a large figure may require 500. The number of triangles used may
not match the Triangle value exactly; this value is a target only.
•To expand the mesh beyond the original outline, increase the Expansion property in the options section of the Tools
panel or in the Timeline panel. Modifying the Expansion property sets the value for a selected mesh or, if no mesh
is selected, sets the value for meshes created later. Expanding the mesh is useful for encompassing a stroke.
•To duplicate an object using Puppet Pin tool, click within the original outline. Clicking within the original outline
creates a new mesh, with its own copy of the pixels from within the original outline. You can also duplicate a Mesh
group in the Timeline panel to achieve the same result, which is sometimes easier than clicking within the original
outline without clicking the mesh to create a pin.
Puppet Overlap controls
When you are distorting one part of an image, you may want to control which parts of the image appear in front of
other parts. For example, you may want to keep an arm in front of the face as you make the arm wave. Use the Puppet
Overlap tool to apply Overlap pins to the parts of an object for which you want to control apparent depth.
You apply Puppet Overlap pins to the original outline, not to the deformed image.
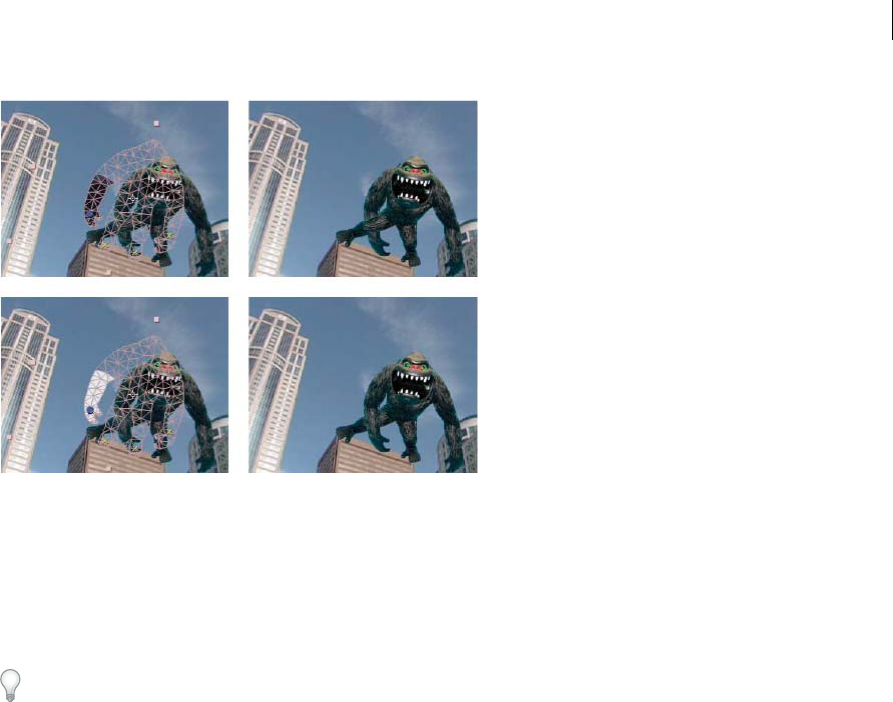
257
Animation and Keyframes
Last updated 6/8/2015
Each Overlap pin has the following properties:
In Front The apparent proximity to the viewer. The influence of Overlap pins is cumulative, meaning that the In Front
values are added together for places on the mesh where extents overlap. You can use negative In Front values to cancel
out the influence of another Overlap pin at a specific location.
An area of the mesh that is not influenced by Overlap pins has an implicit In Front value of 0. The default value for a
new Overlap pin is 50.
When animating the In Front value, you should usually use Hold keyframes. You do not usually want to interpolate
gradually from an element being in front to an element being in back.
Extent How far from the Overlap pin its influence extends. The influence ends abruptly; it does not decrease gradually
with distance from the pin. Extent is indicated visually by a fill in the affected parts of the mesh. The fill is dark if In
Front is negative; the fill is light if In Front is positive.
Puppet Starch controls
When you are distorting one part of an image, you may want to prevent other parts from being distorted. For example,
you may want to preserve the rigidity of an arm as you move a hand to make it wave. Use the Puppet Starch tool to apply
Starch pins to the part of an object that you want to keep rigid.
You apply Puppet Starch pins to the original outline, not to the deformed image.
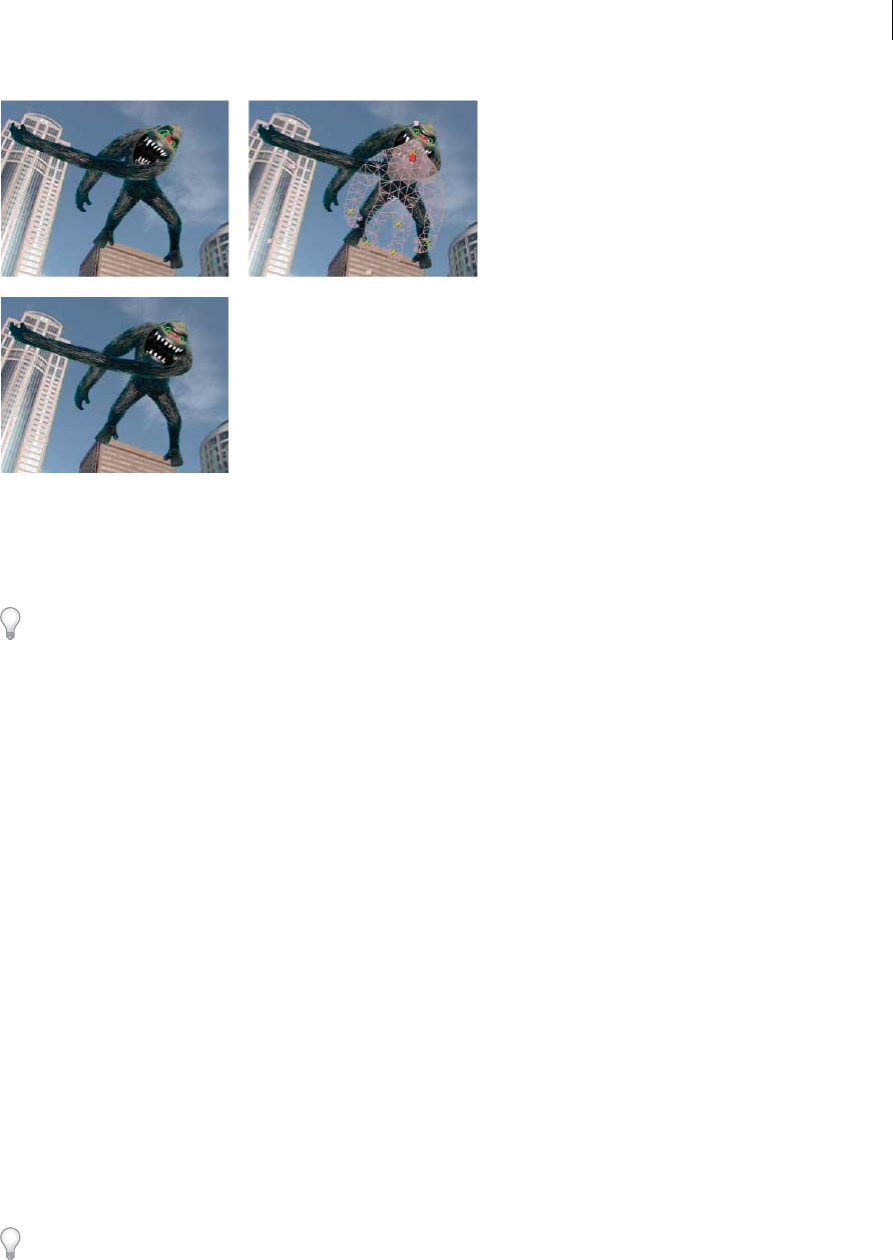
258
Animation and Keyframes
Last updated 6/8/2015
Each Starch pin has the following properties:
Amount The strength of the stiffening agent. The influence of Starch pins is cumulative, meaning that the Amount
values are added together for places on the mesh where extents overlap. You can use negative Amount values to cancel
out the influence of another Starch pin at a specific location.
If you notice image tearing near a Deform pin, use a Starch pin with a very small Amount value (less than 0.1) near
the Deform pin. Small Amount values are good for maintaining image integrity without introducing much rigidity.
Extent How far from the Starch pin its influence extends. The influence ends abruptly; it does not decrease gradually
with distance from the pin. Extent is indicated visually by a pale fill in the affected parts of the mesh.
In addition to animating still images, you can use the Puppet effect on a layer with motion footage as its source. For
example, you could distort the contents of the entire composition frame to match the motion of an object within the
frame. In this case, consider creating a mesh for the entire layer, using the layer boundaries as the outline, and using the
Puppet Starch tool around the edges to prevent the edges of the layer from distorting.
More Help topics
Motion paths
Expression basics
Tracking 3D camera movement
3D camera tracker effect
The 3D camera tracker effect analyzes video sequences to extract camera motion and 3D scene data. The 3D camera
motion allows you to correctly composite 3D elements over your 2D footage.
Like the Warp Stabilizer, the 3D camera tracker effect performs analysis using a background process. Feel free to adjust
settings or work on a different part of your project while analysis is taking place.
For details about using the 3D camera tracker effect, see this video tutorial by Angie Taylor from Learn by Video.

259
Animation and Keyframes
Last updated 6/8/2015
Analyzing footage and extracting camera motion
1With a footage layer selected, do one of the following:
1Choose Animation > Track Camera, or choose Track Camera from the layer context menu.
2Choose Effect > Perspective > 3D Camera Tracker.
3In the Tracker panel, click the Track Camera button. The 3D Camera Tracker effect is applied. The analysis and
solving phases occur in the background, with status appearing as a banner on the footage and next to the Cancel
button.
4Adjust the settings, as needed.
The 3D solved track points appears as small colored x's. You can use these track points to place content into the scene.
You can select more than one layer at a time for camera tracking using the 3D camera tracker effect.
Attaching content into a scene containing a solved camera
1With the effect selected, select the track point or multiple track points (defining a best-fit plane) to use as the attach
point.
1Hover between three neighboring unselected track points that can define a plane, a semitransparent triangle
appears between the points. A red target appears, showing the orientation of the plane in 3D space.
2Draw a marquee-selection box around multiple track points to select them.
3Right-click above the selection or target, and then choose the type of content to create. The following types can be
created:
•Tex t
•Solid
•Null layer for the center of the target
•Text, solid, or null layer for each selected point
•"Shadow catcher" layer (a solid that accepts shadows only) for the created content by using the Create Shadow
Catcher command in the context menu.
Note: A shadow catcher layer also creates a light if one does not exist.
If creating multiple layers, each one has a unique numbered name. If creating multiple text layers, In and Out points
are trimmed to match the point durations.
Moving the target to attach content to different location
To move the target so that you can attach content to a different location, do the following:
1When above the center of the target, the "move" cursor appears for repositioning the target.
2Drag the center of the target to desired location.
Once at the intended location, you can attach content by using the commands in the context menu.
If the size of the targets is too small or too large to see, you can resize them to help visualize the planes. The target size
also controls the default size of text and solid layers created using the context menu commands.

260
Animation and Keyframes
Last updated 6/8/2015
Resizing a target
To resize a target, do one of the following:
•Adjust the Target Size property.
•Press Alt-click (Windows) or Option-click (Mac OS) as you drag from the center of the target. When above the
center of the target, a cursor with horizontal arrows allows you to resize the target.
Selecting and deselecting track points
To select track points, do one of the following:
•Click a track point.
•Click between three adjacent track points.
•Draw a marquee-selection box around multiple points.
•Shift-click or draw a Shift-marquee selection box around the track points to add multiple track points to the current
selection.
To deselect track points, do one of the following:
•Alt-click (Windows) or Option-click (Mac OS) selected track points.
•Click away from a track point.
Moving objects can confuse the 3D camera tracker effect. It can interpret points for stationary objects close to the
camera as moving due to parallax. To help solve the camera, delete bad or unwanted points.
Deleting unwanted track points
To delete unwanted track points, do the following:
1Select the track points.
2Press Delete or choose Delete Selected Points from the context menu.
After deleting unwanted track points, the camera is resolved. You can delete additional points while resolving takes
place in the background. Deleting 3D points deletes the corresponding 2D points, as well.
Creating a "shadow catcher" layer
You can quickly create a "shadow catcher" layer, used to create realistic shadows for the effect. A shadow catcher layer
is white solid the same size as the footage, but set to accept shadows only.
To create a shadow catcher layer, use the Create Shadow Catcher, Camera and Light commands in the context menu.
If necessary, adjust the position and scale of the shadow catcher layer so the cast shadow appears as desired. This
command also creates a shadow-casting light (a light that is switched on, and casts shadows) if one does not exist in the
composition.
Effects controls for the 3D camera tracker
The effect has the following controls and settings:
Analyze/Cancel Starts or stops the background analysis of the footage. During analysis, status appears as a banner on
the footage and next to the Cancel button.
Shot Type Specifies whether the footage was captured with a fixed horizontal angle of view, variable zoom, or a specific
horizontal angle of view. Changing this setting requires a resolve.

261
Animation and Keyframes
Last updated 6/8/2015
Horizontal Angle of View Specifies the horizontal angle of view the solver uses. Enabled only when Shot Type is set to
Specify Angle of View.
Show Track Points Identifies detected features as 3D points with perspective hinting (3D Solved) or 2D points captured
by the feature track (2D Source).
Render Track Points Controls if the track points are rendered as part of the effect.
Note: When the effect is selected, track points are always shown, even if Render Track Points is not selected. When enabled,
the points are displayed into the image allowing them to be seen during preview.
Track Point Size Changes the displayed size of the track points.
Create Camera Creates the 3D camera. A camera is automatically added when you create a text, solid, or null layer from
the context menu.
Advanced controls Advanced controls for the 3D camera tracker effect:
•Solve Method: Provides hints about the scene to help in solving the camera. Solve the camera by trying the
following:
•Auto Detect: Automatically detects the scene type.
•Typical: Specifies the scene as that which are not purely rotational, or mostly flat.
•Mostly Flat Scene: Specifies the scene as mostly flat, or planar.
•Tripod Pan: Specifies the scene as purely rotational.
•Method Used: When Solve Method is set to Auto Detect, this displays the actual solve method used.
•Average Error: Displays the average distance (in pixels) between the original 2D source points and a reprojection
of the 3D solved points onto the 2D plane of the source footage. If a track/solve was perfect, this error would be 0
and there would be no visible difference if you toggled between 2D Source and 3D Solved track points. You can use
this value to tell if deleting points, changing the solve method, or making other changes is lowering this value, and
thus improving the track.
•Detailed Analysis: When checked, makes the next analysis phase do extra work to find elements to track. The
resulting data (stored in the project as part of the effect) is much larger and slower with this option enabled.
•Auto-delete Points Across Time: With the new Auto-delete Track Points Across Time option, when you delete track
points in the Composition panel, corresponding track points (i.e., track points on the same feature/object) are
deleted at other times on the layer. You don’t need to delete the track points frame by frame to improve the quality
of the track. For example, you can delete track points on a person running through the scene, whose motion should
not be considered for the determination of how the camera was moving in the shot.
•Hide Warning Banner: Use when you don't want to reanalyze footage even though there is a warning banner
indicating that it be reanalyzed.
Ground plane and origin in 3D Camera Tracker effect
In After Effects CC, you can define a ground plane (reference plane) and origin, for example, the (0,0,0) point of the
coordinate system within the 3D Camera Tracker effect.
1Analyze the scene using the 3D Camera Tracker effect
2Select a set of tracking points. This action causes the bullseye target to appear, showing the plane defined by the
selected tracking points.
3Optionally drag the target by its center to reposition it along the plane, and place the center is where you want the
origin to be.

262
Animation and Keyframes
Last updated 6/8/2015
4Right-click (Windows) or Control-click (Mac OS) the target and choose Set Ground Plane And Origin.
This action does not have any visible result, but the reference plane and origin of the coordinate system are saved for
this scene. Any items that you create from within this instance of the 3D Camera Tracker effect are created using this
plane and origin.
Note: If you choose Set Ground Plane And Origin again, a warning tells you that objects already created using a different
ground plane and origin are not to be updated using the new ground plane and origin.
Auto-delete Points Across Time
In the Advanced section of the effect properties, there is a new option: Auto-delete Points Across Time.
If this option is on, when you delete track points in the Composition panel, corresponding track points (for example,
track points on the same feature or object) are deleted at other times on the layer, so it isn't necessary to delete the track
points frame by frame to improve the quality of the track. For example, you can delete track points on a person running
through the scene, whose motion should not be considered for the determination of how the camera was moving in the
shot. This method works for both 2D Source and 3D Solved track points.
You can delete selected track points with the Delete key or by context-clicking and choosing Delete Selected Points.
Note: Even with the new Auto-delete Points Across Time feature, you can instead or additionally define an alpha channel
for the layer to prevent the 3D Camera Tracker effect from considering a specific part of the image for determining a
camera.
Exporting 3D Camera Tracker data to 3D applications
You can export 3D Camera Tracker data to 3D applications like MAXON CINEMA 4D.
Do the following:
1Download plug-ins for exporting camera tracking data. For example, from Maxon.net
2Install the plug-ins to the plug-ins folder.
3Choose File > Export > (plug-in manufacturer]. For Cinema4D, choose Cinema 4D Exporter.
4Name the file and click Save.
5Open the file in the 3D application.
For more information about exporting camera tracker data, and how to import rendered objects back in to After
Effects, see this video tutorial by Chris and Trish Meyer.
Time-stretching and time-remapping
Time-stretching, time-remapping, and the Timewarp effect are all useful for creating slow motion, fast motion, freeze
frame, or other retiming results.
For information on the Timewarp effect, see Timewarp effect .
Andrew Kramer provides a video tutorial on his Video Copilot website that demonstrates time-stretching, time-
remapping, and frame blending.
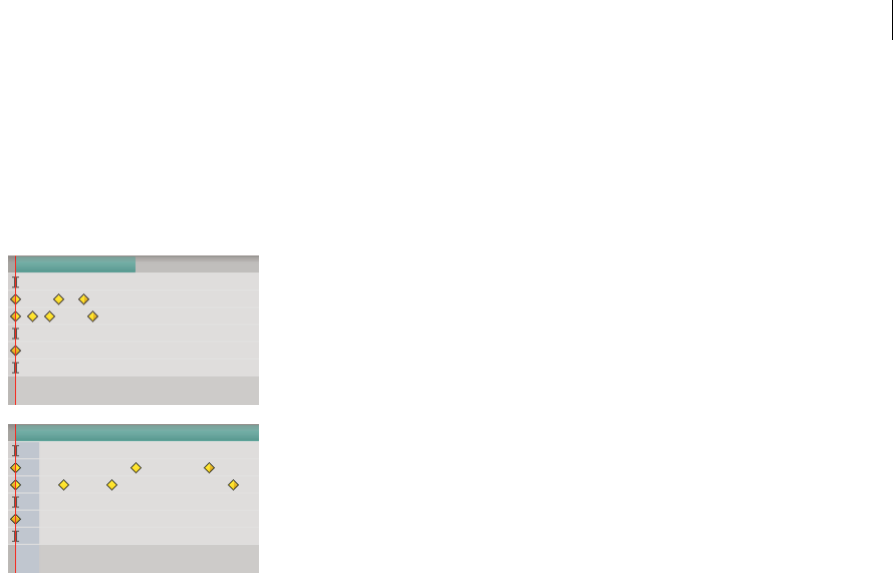
263
Animation and Keyframes
Last updated 6/8/2015
Time-stretch a layer
Speeding up or slowing down an entire layer by the same factor throughout is known as time-stretching. When you
time-stretch a layer, the audio and the original frames in the footage (and all keyframes that belong to the layer) are
redistributed along the new duration. Use this command only when you want the layer and all layer keyframes to
change to the new duration.
If you time-stretch a layer so that the resulting frame rate is very different from the original frame rate, the quality of
motion within the layer may suffer. For best results when time-remapping a layer, use the Timewarp effect.
Time-stretch a layer from a specific time
1In the Timeline or Composition panel, select the layer.
2Choose Layer > Time > Time Stretch.
3Type a new duration for the layer, or type a Stretch Factor.
4To specify the point in time from which the layer will be time-stretched, click one of the Hold In Place options, and
then click OK.
Layer In-point Holds the starting time of the layer at its current value and time-stretches the layer by moving its Out
point.
Current Frame Holds the layer at the position of the current-time indicator (also the frame displayed in the
Composition panel), and time-stretches the layer by moving the In and Out points.
Layer Out-point Holds the ending time of the layer at its current value and time-stretches the layer by moving its In
point.
Time-stretch a layer to a specific time
1In the Timeline panel, move the current-time indicator to the frame where you want the layer to begin or end.
2Display the In and Out columns by choosing Columns > In and Columns > Out from the Timeline panel menu.
3Do one of the following:
•To stretch the In point to the current time, press Ctrl (Windows) or Command (Mac OS) as you click the In time
for the layer in the In column.
•To stretch the Out point to the current time, press Ctrl (Windows) or Command (Mac OS) as you click the Out
time for the layer in the Out column.

264
Animation and Keyframes
Last updated 6/8/2015
Time-stretch a layer but not its keyframes
When you time-stretch a layer, the positions of its keyframes stretch with it by default. You can circumvent this behavior
by cutting and pasting keyframes.
1Make a note of the time at which the first keyframe appears. (Placing a composition marker is a good way to mark
the time.)
2In the Timeline panel, click the name of one or more layer properties containing the keyframes you want to keep at
the same times.
3Choose Edit > Cut.
4Move or stretch the layer to its new In and Out points.
5Move the current-time indicator to the time at which the first keyframe appeared before you cut the keyframes.
6Choose Edit > Paste.
Reverse the playback direction of a layer
When you reverse the direction at which a layer plays back, all keyframes for all properties on the selected layer also
reverse order. The layer itself maintains its original In and Out points relative to the composition.
Note: For best results, precompose the layer and then reverse the layer inside the precomposition. For more information on
this process, see About precomposing and nesting.
1In a Timeline panel, select the layer you want to reverse.
2Choose Layer > Time > Time-Reverse Layer, or press Ctrl+Alt+R (Windows) or Command+Option+R (Mac OS).
Reverse keyframes without reversing layer playback
You can select and reverse keyframes across multiple layers and properties, but each set of keyframes for a property is
reversed only within its original time range and not that of any other selected property. Markers in the Timeline panel
are not reversed, so you may need to move markers after reversing keyframes.
1In the Timeline panel, select a range of keyframes you want to reverse.
2Choose Animation > Keyframe Assistant > Time-Reverse Keyframes.
Time-remapping
Time-remapping overview
You can expand, compress, play backward, or freeze a portion of the duration of a layer using a process known as time-
remapping. For example, if you are using footage of a person walking, you can play footage of the person moving
forward, and then play a few frames backward to make the person retreat, and then play forward again to have the
person resume walking. Time-remapping is good for combinations of slow motion, fast motion, and reverse motion.
The Timewarp effect provides similar features with more control over some aspects of frame blending, but with
additional limitations as a result of being applied as an effect.
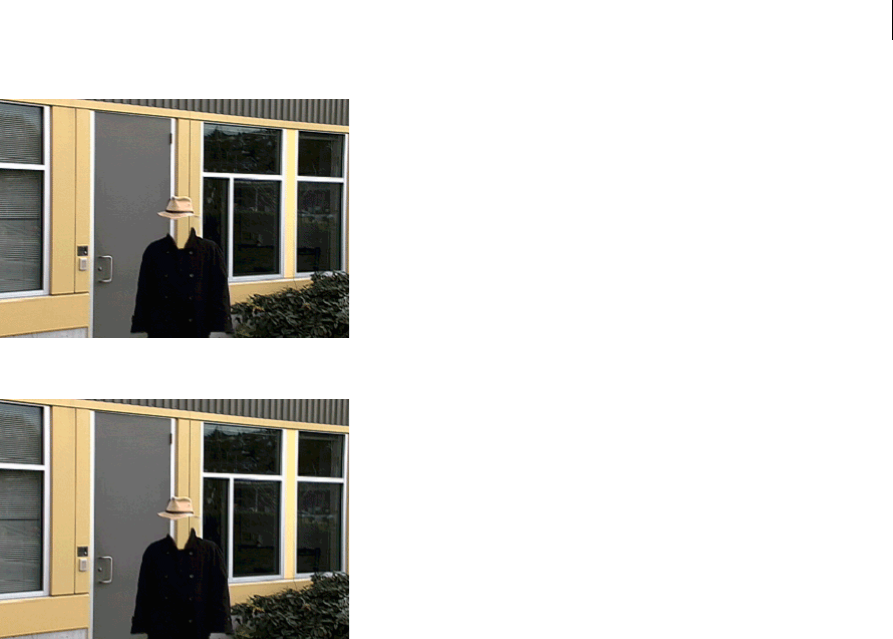
265
Animation and Keyframes
Last updated 6/8/2015
When you apply time-remapping to a layer containing audio and video, the audio and video remain synchronized. You
can remap audio files to gradually decrease or increase the pitch, play audio backward, or create a warbled or scratchy
sound. Still-image layers cannot be time-remapped.
You can remap time in either the Layer panel or the Graph Editor. Remapping video in one panel displays the results
in both. Each provides a different view of the layer duration:
•The Layer panel provides a visual reference of the frames you change, as well as the frame number. The panel
displays the current-time indicator and a remap-time marker, which you move to select the frame you want to play
at the current time.
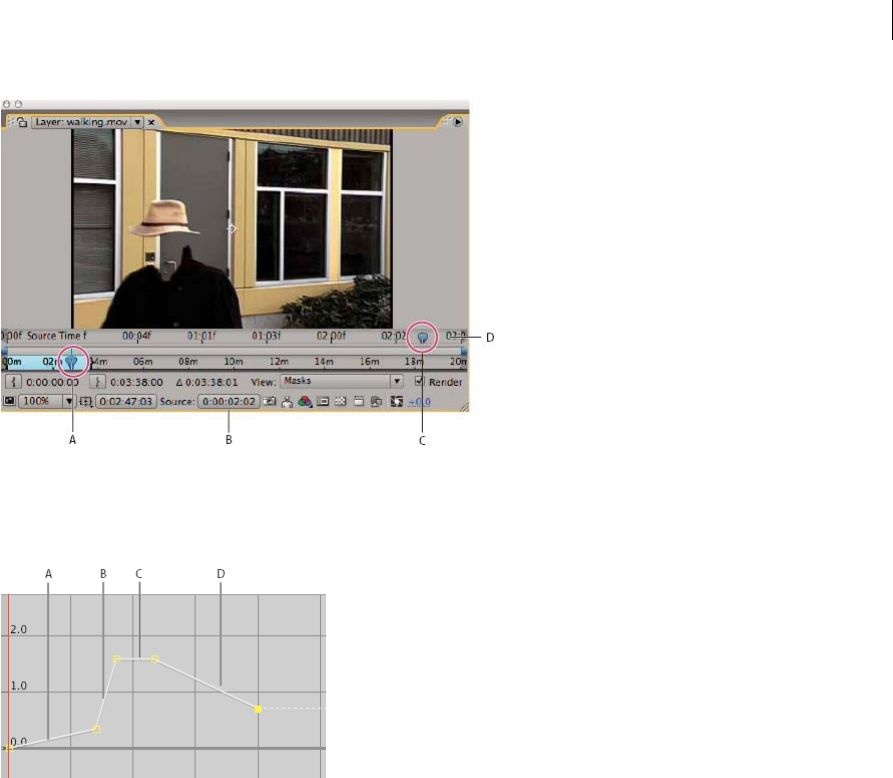
266
Animation and Keyframes
Last updated 6/8/2015
•The Graph Editor provides a view of the changes you specify over time by marking your changes with keyframes
and a graph like the one displayed for other layer properties.
When remapping time in the Graph Editor, use the values represented in the Time Remap graph to determine and
control which frame of the movie plays at which point in time. Each Time Remap keyframe has a time value associated
with it that corresponds to a specific frame in the layer; this value is represented vertically on the Time Remap value
graph. When you enable time remapping for a layer, After Effects adds a Time Remap keyframe at the start and end
points of the layer. These initial Time Remap keyframes have vertical time values equal to their horizontal position on
the timeline.
By setting additional Time Remap keyframes, you can create complex motion results. Each time you add a Time Remap
keyframe, you create another point at which you can change the speed or direction of playback. As you move the
keyframe up or down in the value graph, you adjust which frame of the video is set to play at the current time. After
Effects then interpolates intermediate frames and plays the footage forward or backward from that point to the next
Time Remap keyframe. In the value graph, reading from left to right, an upward angle indicates forward playback, while
a downward angle indicates reverse playback. The amount of the upward or downward angle corresponds to the speed
of playback.
Similarly, the value that appears next to the Time Remap property name indicates which frame plays at the current time.
As you drag a value graph marker up or down, this value changes accordingly and a Time Remap keyframe is set, if
necessary. You can click this value and type a new one, or drag the value to adjust it.
The original duration of the source footage may no longer be valid when remapping time, because parts of the layer no
longer play at the original rate. If necessary, set a new duration for the layer before you remap time.

267
Animation and Keyframes
Last updated 6/8/2015
As with other layer properties, you can view the values of the Time Remap graph as either a value graph or a speed
graph.
If you remap time and the resulting frame rate is very different from the original, the quality of motion within the layer
may suffer. Apply frame blending to improve time remapping for slow motion or fast motion.
Note: Use the information shown in the Info panel to guide you as you work with time-remapping. The ratio given in the
units of seconds/sec indicates the current speed of playback—the number of seconds of the original layer being played for
each second after time-remapping.
Time-remap a layer
You can time-remap all or part of a layer to create many different results, such as freeze-frame or slow-motion results.
(See Time-remapping.)
Freeze the current frame for the duration of the layer
1In a Composition or Timeline panel, select the layer.
2Place the current-time indicator on the frame that you want to freeze.
3Choose Layer > Time > Freeze Frame.
Time-remapping is enabled, and a Hold keyframe is placed at the position of the current-time indicator to freeze the
frame.If you previously enabled time-remapping on the layer, any keyframes you created are deleted when you apply
the Freeze Frame command.
Freeze the first frame without changing the speed
1In a Composition or Timeline panel, select the layer that you want to remap.
2Choose Layer > Time > Enable Time Remapping.
This command adds two Time Remap keyframes by default, one at the beginning of the layer and one at the end.
3Move the current-time indicator to where you want the movie to begin.
4Click the Time Remap property name to select the start and end keyframes.
5Drag the first keyframe to the current-time indicator, which moves the start and end keyframes. (If you are working
in the Graph Editor, drag the bounding box—not the keyframe or a handle—so that both keyframes move.)
Freeze a frame in the middle of the duration of a layer
1In a Composition or Timeline panel, select the layer that you want to remap.
2Choose Layer > Time > Enable Time Remapping.
This command adds two Time Remap keyframes by default, one at the beginning of the layer and one at the end.
3Move the current-time indicator to the frame that you want to freeze, and set a Time Remap keyframe at the current
time by clicking the keyframe navigator diamond for the Time Remap property.
4Select the last two Time Remap keyframes (the second and third keyframes) and drag them to the right.
5Press F2 to deselect the keyframes, and then click the second (middle) keyframe to select it.
6Press Ctrl+C (Windows) or Command+C (Mac OS) to copy the keyframe.
7Press Ctrl+V (Windows) or Command+V (Mac OS) to paste the keyframe at the current time. You should not have
moved the current-time indicator since step 3.
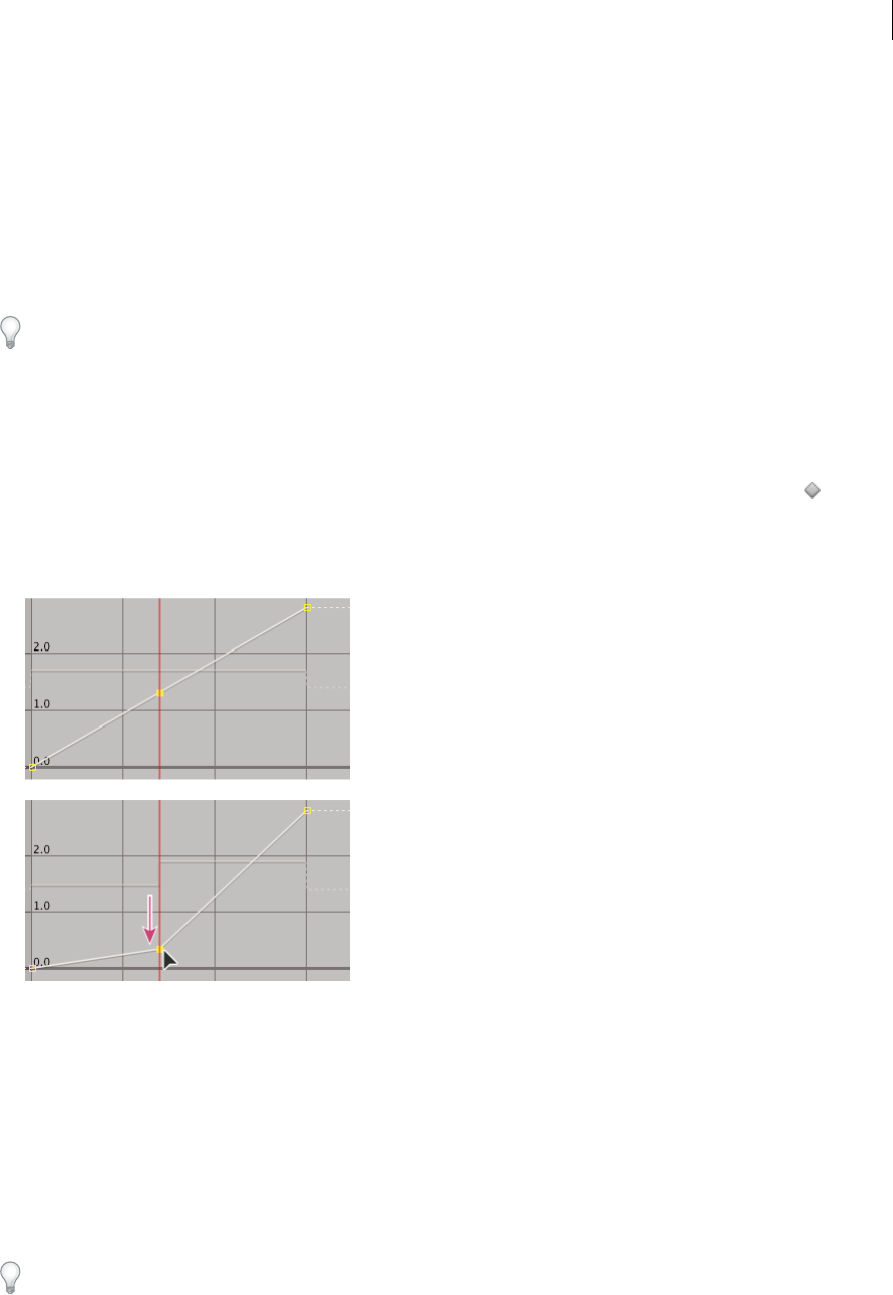
268
Animation and Keyframes
Last updated 6/8/2015
8(Optional) To extend the layer so that its duration is increased to accommodate the time added by the freeze-frame
operation, press the K key twice to move the current-time indicator to the last Time Remap keyframe, and press
Alt+] (Windows) or Option+] (Mac OS).
The portion of the layer between the first and second keyframes plays at an unaltered rate (the same as for the non-
time-remapped layer), as does the portion of the layer between the third and fourth keyframes. The second and third
keyframes are identical, so a single frozen frame plays during the time between those two keyframes.
Remap time using the Graph Editor
To switch between Graph Editor mode and layer bar mode, press Shift+F3.
1In a Composition or Timeline panel, select the layer you want to remap.
2Choose Layer > Time > Enable Time Remapping.
3In the Timeline panel, click the name of the Time Remap property to select it.
4Move the current-time indicator to the time at which to add a keyframe, and click the keyframe button in the
keyframe navigator to add a keyframe.
5In the Graph Editor, drag the keyframe marker up or down, watching the Time Remap value as you drag. To snap
to other keyframes, Shift-drag.
•To slow the layer down, drag the keyframe down. (If the layer is playing in reverse, drag up.)
•To speed the layer up, drag the keyframe up. (If the layer is playing in reverse, drag down.)
•To play frames backward, drag the keyframe down to a value below the previous keyframe value.
•To play frames forward, drag the keyframe up to a value above the previous keyframe value.
•To freeze the previous keyframe, drag the current keyframe marker to a value equal to the previous keyframe
value so that the graph line is flat. Another method is to select the keyframe and choose Animation > Toggle Hold
Keyframe, and then add another keyframe where you want the motion to start again.
Before you move a time-remap keyframe, it’s a good idea to select all subsequent time-remap keyframes in the layer
first. This selection will preserve the timing of the rest of the layer when you remap time for the current keyframe.

269
Animation and Keyframes
Last updated 6/8/2015
Remap time in a Layer panel
1Open the Layer panel for the layer you want to remap.
2Choose Layer > Time > Enable Time Remapping. A second time ruler appears in the Layer panel above the default
time ruler and the navigator bar.
3On the lower time ruler, move the current-time indicator to the first frame where you want the change to occur.
4On the upper time ruler, the remap-time marker indicates the frame currently mapped to the time indicated on the
lower time ruler. To display a different frame at the time indicated on the lower time ruler, move the remap-time
marker accordingly.
5Move the current-time indicator on the lower time ruler to the last frame where you want change to occur.
6Move the remap-time marker on the upper time ruler to the frame you want to display at the time indicated on the
lower time ruler:
•To move the preceding portion of the layer forward, set the remap-time marker to a later time than the current-
time indicator.
•To move the preceding portion of the layer backward, set the remap-time marker to an earlier time than the
current-time indicator.
•To freeze a frame, set the remap-time marker to the frame you want frozen. Then, move the current-time
indicator (lower ruler) to the last point in time where the frame will appear frozen and move the remap-time
marker again to the frame you want frozen.
Time-remap audio pitch
The speed graph of the Time Remap property directly relates to the pitch of an audio file. By making subtle changes to
the speed graph, you can create a variety of interesting effects. To avoid screeching audio, you may want to keep the
Speed value below 200%. When the speed is too high, use the Levels controls, located under the Audio property, to
control the volume.
You may hear clicks at the beginning and end of an audio (or an audio and video) layer after setting new In and Out
points in the Time Remap graph. Use the Levels controls to remove these clicks.
Change the pitch of an audio layer
1In a Composition or Timeline panel, select the layer you want to remap.
2Choose Layer > Time > Enable Time Remapping.
3Click the Graph Editor button in the Timeline panel to display the Graph Editor, if necessary.
4Click the Choose Graph Type And Options button at the bottom of the Graph Editor and choose Edit Speed Graph.

270
Animation and Keyframes
Last updated 6/8/2015
5Move the current-time indicator to the frame where you want change to begin, and then click the Add A Keyframe
button.
6On the speed graph below the keyframe, drag a marker, watching the Speed value as you drag.
•To lower the pitch, drag the speed graph marker down.
•To increase the pitch, drag the speed graph marker up.
Remove clicks from new In and Out points
1If necessary, choose panel > Audio.
2In the Timeline panel, select the audio (or audio and video) layer to which you applied time-remapping.
3Expand the layer outline to display the Audio property and then the Audio Levels property.
4Move the current-time indicator to the new In point and choose Animation > Add Audio Levels Keyframe.
5In the Audio panel, change the decibel value to 0.0.
6Press the Page Up key on your keyboard to move the current-time indicator to the previous frame.
7In the Audio panel, change the decibel level to -96.0.
8Move the current time to the new Out point and set the decibel level to 0.
9Press the Page Down key to move the current-time indicator to the next frame.
10 In the Audio panel, change the decibel level to -96.0.
You can change the decibel Slider Minimum value in the Audio Options dialog box, which is available from the
Audio panel menu.
Online resources for time-remapping
Aharon Rabinowitz provides a tutorial on the Creative COW website that shows how to use time-remapping to do lip-
synching. This same basic concept can be used for many kinds of character animation.
Robert Powers provides a video tutorial on the Slippery Rock NYC website that demonstrates how to use time-
remapping to animate a character to synchronize mouth movement with audio (lip synch).
Charles Bordenave (nab) provides a script on the After Effects Scripts website that automatically modulates time-
remapping on a layer according to audio amplitude.
Sam Morris provides a tutorial that introduces time-remapping on his website.
Andrew Kramer provides a video tutorial on his Video Copilot website that demonstrates time-stretching, time-
remapping, and frame blending.
Frame blending
When you time-stretch or time-remap a layer to a slower frame rate or to a rate lower than the frame rate of its
composition, movement can appear jerky. This jerky appearance results because the layer now has fewer frames per
second than the composition. Likewise, the same jerky appearance can occur when you time-stretch or time-remap a
layer to a frame rate that is faster than the frame rate of its composition. To create smoother motion when you slow
down or speed up a layer, use frame blending. Don’t apply frame blending unless the video of a layer has been re-
timed—that is, the video is playing at a different frame rate than the frame rate of the source video.
After Effects provides two types of frame blending: Frame Mix and Pixel Motion. Frame Mix takes less time to render,
but Pixel Motion provides much better results, especially for footage that has been drastically slowed down.
271
Animation and Keyframes
Last updated 6/8/2015
The Quality setting you select also affects frame blending. When the layer is set to Best quality, frame blending results
in smoother motion but may take longer to render than when set to Draft quality.
Note: When working with a frame-blended layer in Draft mode, After Effects always uses Frame Mix interpolation to
increase rendering speed.
You can also enable frame blending for all compositions when you render a movie.
Use frame blending to enhance the quality of time-altered motion in a layer that contains live-action footage—video,
for example. You can apply frame blending to a sequence of still images, but not to a single still image. If you are
animating a layer—for example, moving a text layer across the screen—use motion blur.
Note: You can't apply frame blending to a precomposition layer (a layer that uses a nested composition as its source footage
item). You can, however, apply frame blending to the layers within the nested composition if those layers themselves are
based on motion footage items, such as video or image sequences.
1Select the layer in the Timeline panel.
2Do one of the following:
•Choose Layer > Frame Blending > Frame Mix.
•Choose Layer > Frame Blending > Pixel Motion.
A check mark by the appropriate Frame Blending command (Frame Mix or Pixel Motion) indicates that it is applied to
the selected layer. Also, the Frame Blending switch appears in the Switches column for the layer in the Timeline
panel. Remove frame blending either by clicking the Frame Blending switch or by choosing the appropriate Frame
Blending command again.
Regardless of the state of the layer switches, if frame blending is off for the composition, it is off for all layers in the
composition. You set frame blending for the composition by choosing Enable Frame Blending from the Timeline panel
menu, or clicking the Enable Frame Blending button at the top of the Timeline panel.
Motion blur can make it harder for Pixel Motion to find discrete objects in each frame, which makes the calculation of
motion vectors less reliable. For better results when using Pixel Motion to create slow motion, use footage with less
motion blur.
More Help topics
About animation, keyframes, and expressions
The Graph Editor
Preview video and audio
Layer image quality and subpixel positioning
Keyframe interpolation
About spatial and temporal keyframe interpolation
Interpolation is the process of filling in the unknown data between two known values. You set keyframes to specify a
property’s values at certain key times. After Effects interpolates values for the property for all times between keyframes.
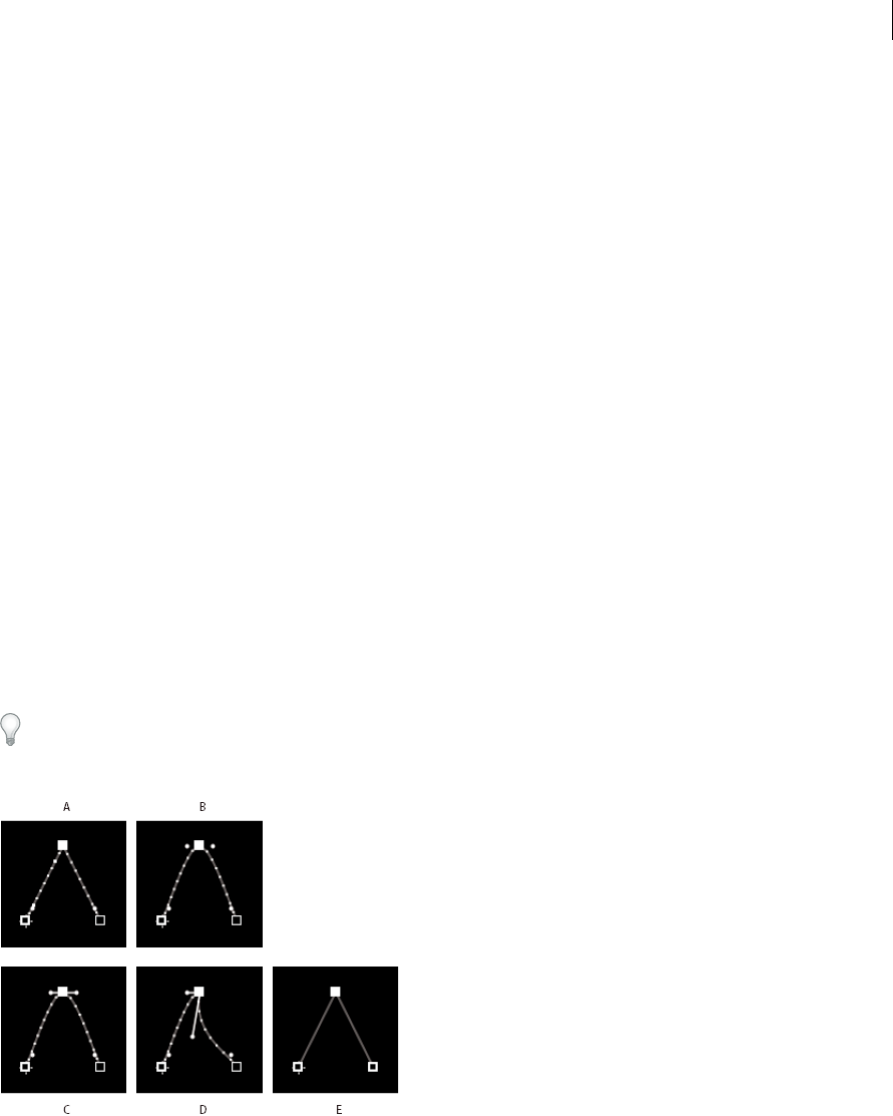
272
Animation and Keyframes
Last updated 6/8/2015
Because interpolation generates the property values between keyframes, interpolation is sometimes called tweening.
Interpolation between keyframes can be used to animate movement, effects, audio levels, image adjustments,
transparency, color changes, and many other visual and audio elements.
After you create keyframes and motion paths to change values over time, you may want to make more precise
adjustments to the way that change occurs. After Effects provides several interpolation methods that affect how the in-
between values are calculated.
Temporal interpolation is the interpolation of values in time; spatial interpolation is the interpolation of values in space.
Some properties—such as Opacity—have only a temporal component. Other properties—such as Position—also have
spatial components.
Temporal interpolation and the value graph
Using the value graph in the Graph Editor, you can make precise adjustments to the temporal property keyframes
you’ve created for your animation. The value graph displays x values as red, y values as green, and z values (3D only) as
blue. The value graph provides complete information about the value of keyframes at any point in time in a composition
and allows you to control it. In addition, the Info panel displays the temporal interpolation method of a selected
keyframe.
Spatial interpolation and the motion path
When you apply or change spatial interpolation for a property such as Position, you adjust the motion path in the
Composition panel. The different keyframes on the motion path provide information about the type of interpolation
at any point in time. The Info panel displays the spatial interpolation method of a selected keyframe.
When you create spatial changes in a layer, After Effects uses Auto Bezier as the default spatial interpolation.
To change the default to linear interpolation, choose Edit > Preferences > General (Windows) or After Effects >
Preferences > General (Mac OS), and select Default Spatial Interpolation To Linear. Changing the preference setting
does not affect keyframes that already exist or new keyframes on properties for which keyframes already exist.
A Linear B Auto Bezier C Continuous Bezier D Bezier E Hold
In some cases, the Auto Bezier spatial interpolation for Position keyframes can cause undesired back-and-forth
(boomerang) motion between two keyframes with equal values. In such a case, you can change the earlier keyframe to
use Hold interpolation or change both keyframes to use Linear interpolation.
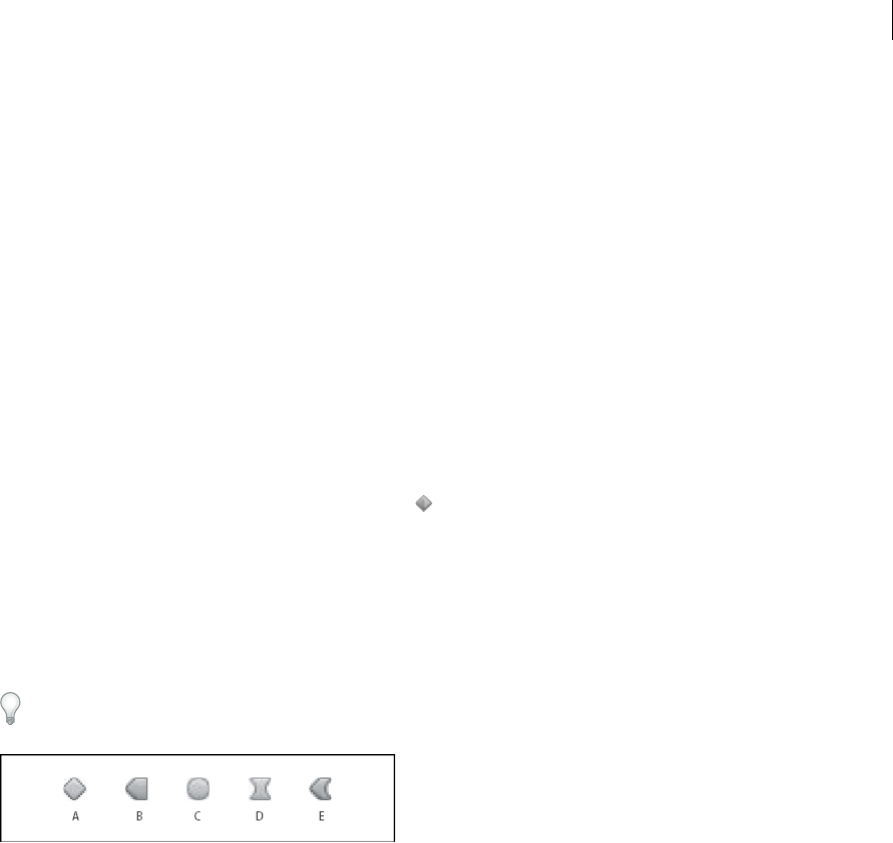
273
Animation and Keyframes
Last updated 6/8/2015
Online resources about keyframe interpolation
Aharon Rabinowitz provides some video tutorials—including “How Does Computer Animation Work?” and “What is
interpolation?”—that introduce animation as part of the Multimedia 101 series.
Aharon Rabinowitz provides a pair of video tutorials on the Creative COW website that describe the issue and solution
for the boomerang motion problem that arises from unintentionally having Auto Bezier spatial interpolation set for
keyframes of equal value:
•Part 1
•Part 2
Antony Bolante provides information and illustrations about keyframe interpolation in an article on the Peachpit Press
website.
Keyframe interpolation methods
In layer bar mode, the appearance of a keyframe icon depends on the interpolation method you choose for the interval
between keyframes. When half of the icon is dark gray , the dark half indicates that no keyframe is adjacent to that
side, or that its interpolation is overridden by the Hold interpolation applied to the preceding keyframe.
By default, a keyframe uses one interpolation method, but you can apply two methods: the incoming method applies
to the property value as the current time approaches a keyframe, and the outgoing method applies to the property value
as the current time leaves a keyframe. When you set different incoming and outgoing interpolation methods, the
keyframe icon in layer bar mode changes accordingly. It displays the left half of the incoming interpolation icon and
the right half of the outgoing interpolation icon.
To toggle between keyframe icons and keyframe numbers, select Use Keyframe Icons or Use Keyframe Indices from the
Timeline panel menu.
A Linear B Linear in, Hold out C Auto Bezier D Continuous Bezier or Bezier E Linear in, Bezier out
All interpolation methods used by After Effects are based on the Bezier interpolation method, which provides direction
handles so that you can control the transitions between keyframes. Interpolation methods that don’t use direction
handles are constrained versions of Bezier interpolation and are convenient for certain tasks.
To learn more about how different interpolation methods affect temporal properties, experiment by setting up at least
three keyframes with different values for a temporal layer property—such as Opacity—and change the interpolation
methods as you view the value graph in Graph Editor mode in the Timeline panel.
To learn more about how different interpolation methods affect a motion path, experiment by setting up three
keyframes for a spatial property—such as Position—with different values on a motion path, and change the
interpolation methods as you preview the motion in the Composition panel.
Note: To change interpolation methods, right-click a keyframe, select Keyframe Interpolation from the menu that appears,
and then select an option from the Temporal Interpolation menu.
To clarify the examples in the following descriptions of interpolation methods, the result of each method is described
as if you had applied it to all of the keyframes for a layer property. In practice, you can apply any available interpolation
method to any keyframe.

274
Animation and Keyframes
Last updated 6/8/2015
No interpolation
No interpolation is the state in which a layer property has no keyframes—when the stopwatch is turned off and the I-
beam icon appears in the Timeline panel under the current-time indicator. In this state, when you set the value of a
layer property, it maintains that value for the duration of the layer, unless overridden by an expression. By default, no
interpolation is applied to a layer property. If any keyframes are present for a layer property, some type of interpolation
is in use.
Linear interpolation
Linear interpolation creates a uniform rate of change between keyframes, which can add a mechanical look to
animations. After Effects interpolates the values between two adjacent keyframes as directly as possible without
accounting for the values of other keyframes.
If you apply Linear interpolation to all keyframes of a temporal layer property, change begins instantly at the first
keyframe and continues to the next keyframe at a constant speed. At the second keyframe, the rate of change switches
immediately to the rate between it and the third keyframe. When the layer reaches the final keyframe value, change
stops instantly. In the value graph, the segment connecting two keyframes with Linear interpolation appears as a
straight line.
Bezier interpolation
Bezier interpolation provides the most precise control because you manually adjust the shape of the value graph or
motion path segments on either side of the keyframe. Unlike Auto Bezier or Continuous Bezier, the two direction
handles on a Bezier keyframe operate independently in both the value graph and motion path.
If you apply Bezier interpolation to all keyframes of a layer property, After Effects creates a smooth transition between
keyframes. The initial position of the direction handles is calculated using the same method used in Auto Bezier
interpolation. After Effects maintains existing direction handle positions as you change a Bezier keyframe value.
Unlike other interpolation methods, Bezier interpolation lets you create any combination of curves and straight lines
along the motion path. Because the two Bezier direction handles operate independently, a curving motion path can
suddenly turn into a sharp corner at a Bezier keyframe. Bezier spatial interpolation is ideal for drawing a motion path
that follows a complex shape, such as a map route or the outline of a logo.
Existing direction handle positions persist as you move a motion-path keyframe. The temporal interpolation applied
at each keyframe controls the speed of motion along the path.
Auto Bezier interpolation
Auto Bezier interpolation creates a smooth rate of change through a keyframe. You may use Auto Bezier spatial
interpolation to create the path of a car turning on a curving road.
As you change an Auto Bezier keyframe value, the positions of Auto Bezier direction handles change automatically
to maintain a smooth transition between keyframes. The automatic adjustments change the shape of the value graph
or motion path segments on either side of the keyframe. If the previous and next keyframes also use Auto Bezier
interpolation, the shape of the segments on the far side of the previous or next keyframes also changes. If you adjust an
Auto Bezier direction handle manually, you convert it to a Continuous Bezier keyframe .
Auto Bezier is the default spatial interpolation.
Continuous Bezier interpolation
Like Auto Bezier interpolation, Continuous Bezier interpolation creates a smooth rate of change through a keyframe.
However, you set the positions of Continuous Bezier direction handles manually. Adjustments you make change the
shape of the value graph or motion path segments on either side of the keyframe.
275
Animation and Keyframes
Last updated 6/8/2015
If you apply Continuous Bezier interpolation to all keyframes of a property, After Effects adjusts the values at each
keyframe to create smooth transitions. After Effects maintains these smooth transitions as you move a Continuous
Bezier keyframe on either the motion path or the value graph.
Hold interpolation
Hold interpolation is available only as a temporal interpolation method. Use it to change the value of a layer property
over time, but without a gradual transition. This method is useful for strobe effects, or when you want layers to appear
or disappear suddenly.
If you apply Hold temporal interpolation to all keyframes of a layer property, the value of the first keyframe holds steady
until the next keyframe, when the values change immediately. In the value graph, the graph segment following a Hold
keyframe appears as a horizontal straight line.
Even though Hold interpolation is available only as a temporal interpolation method, the keyframes on the motion path
are visible, but they are not connected by layer-position dots. For example, if you animate the Position property of a
layer using Hold interpolation, the layer holds at the position value of the previous keyframe until the current-time
indicator reaches the next keyframe, at which point the layer disappears from the old position and appears at the new
position.
You can easily freeze the current frame for the duration of the layer using the Freeze Frame command. To freeze a
frame, position the current time indicator at the frame you want to freeze. Make sure that the layer is selected and then
choose Layer > Time > Freeze Frame. Time-remapping is enabled, and a Hold keyframe is placed at the position of the
current time indicator to freeze the frame.
Note: If you previously enabled time-remapping on the layer, any keyframes you created are deleted when you apply the
Freeze Frame command.
You can use Hold interpolation only for outgoing temporal interpolation (for the frames following a keyframe). If you
create a keyframe following a Hold keyframe, the new keyframe uses incoming Hold interpolation.
To apply or remove Hold interpolation as outgoing interpolation for a keyframe, select the keyframe in the Timeline
panel, and choose Animation > Toggle Hold Keyframe.
Apply and change keyframe interpolation methods
You can apply and change the interpolation method for any keyframe. You can apply changes using the Keyframe
Interpolation dialog box, or you can apply them directly to a keyframe in layer bar mode, in a motion path, or in the
Graph Editor. You can also change the default interpolation After Effects uses for spatial properties.
For information on using Easy Ease controls to automatically ease speed between keyframes, see Controlling speed
between keyframes.
Change interpolation method with the Keyframe Interpolation dialog box
The Keyframe Interpolation dialog box provides options for setting temporal and spatial interpolation and—for spatial
properties only—roving settings.
1In layer bar mode or in the Graph Editor, select the keyframes you want to change.
2Choose Animation > Keyframe Interpolation.
3For Temporal Interpolation, choose one of the following options:
Current Settings Preserves the interpolation values already applied to the selected keyframes. Choose this option
when multiple or manually adjusted keyframes are selected and you do not want to change the existing settings.
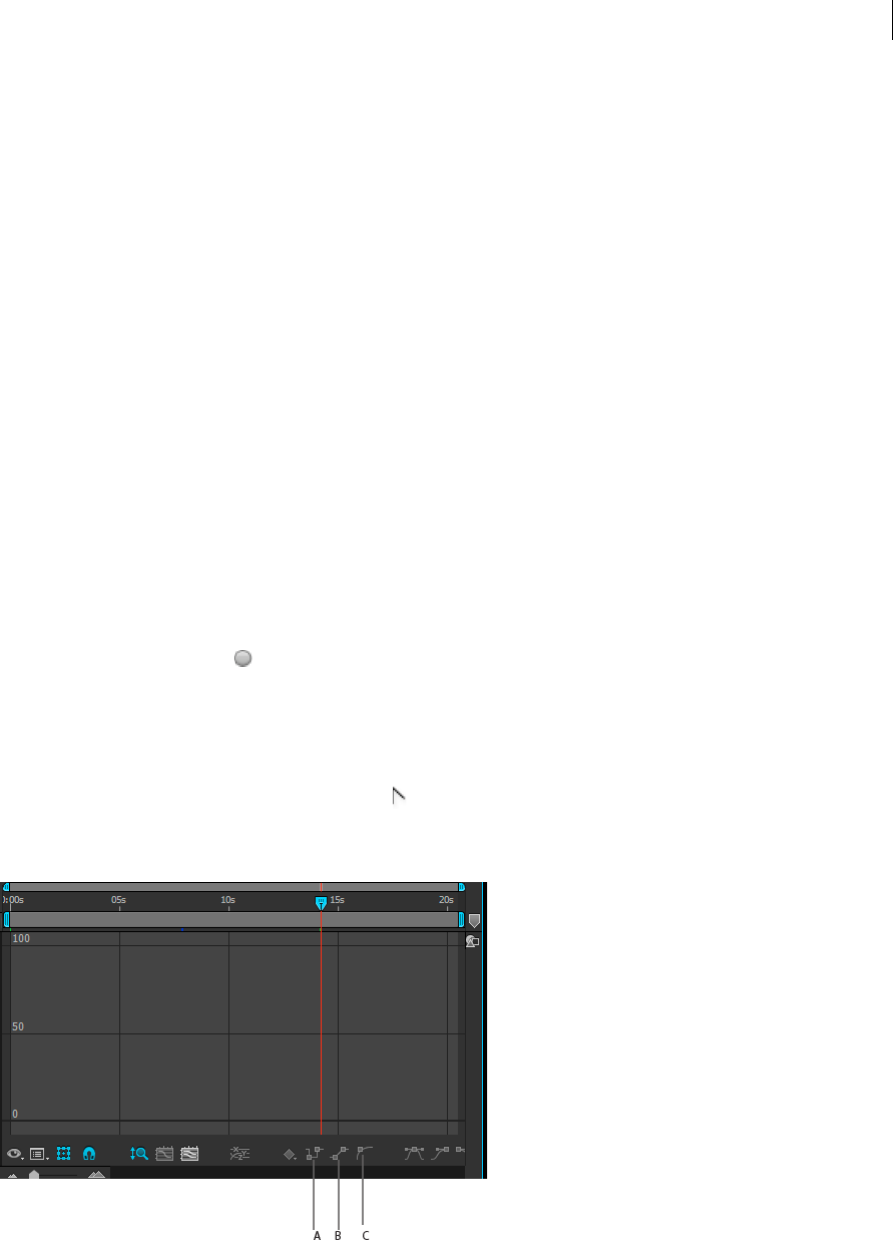
276
Animation and Keyframes
Last updated 6/8/2015
Linear, Bezier, Continuous Bezier, Auto Bezier, and Hold Apply a temporal interpolation method using default
values.
4If you selected keyframes of a spatial layer property, choose one of the following options for Spatial Interpolation:
Current Settings Preserves the interpolation settings already applied to the selected keyframes.
Linear, Bezier, Continuous Bezier, and Auto Bezier Apply a spatial interpolation method using default values.
5If you selected keyframes of a spatial layer property, use the Roving menu to choose how a keyframe determines its
position in time, and then click OK:
Current Settings Preserves the currently applied method of positioning the selected keyframes in time.
Rove Across Time Smooths the rate of change through the selected keyframes by automatically varying their
position in time, based on the positions of the keyframes immediately before and after the selection.
Lock To Time keeps the selected keyframes at their current position in time. They stay in place unless you move
them manually.
For more information on smoothing the rate of change through selected keyframes, see Smooth motion with roving
keyframes.
Change interpolation method with the Selection tool in layer bar mode
❖Using the Selection tool, do one of the following:
•If the keyframe uses Linear interpolation, Ctrl-click (Windows) or Command-click (Mac OS) the keyframe to
change it to Auto Bezier .
•If the keyframe uses Bezier, Continuous Bezier, or Auto Bezier interpolation, Ctrl-click (Windows) or
Command-click (Mac OS) the keyframe to change it to Linear.
Change interpolation method in the Graph Editor
•Click the keyframe with the Convert Vertex tool to toggle between linear and Auto Bezier interpolation.
•Select one or more keyframes, and then click the Hold, Linear, or Auto Bezier button at the bottom of the screen to
change the interpolation method.
A Convert selected keyframes to Hold B Convert seleced keyframes to Linear C Convert selected keyframes to Auto Bezier
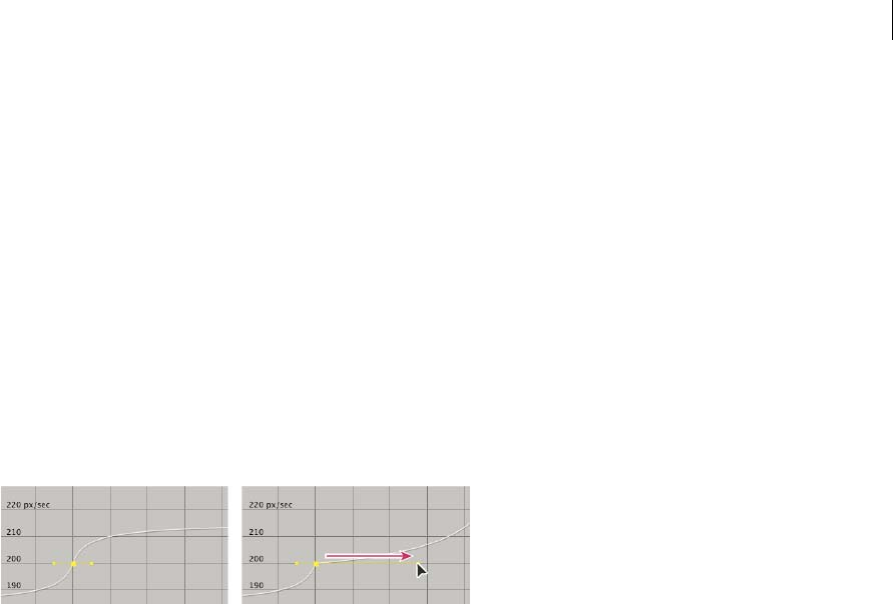
277
Animation and Keyframes
Last updated 6/8/2015
Modify Bezier direction handles in the Graph Editor
In the Graph Editor, keyframes that use Bezier interpolation have direction handles attached to them. You can retract,
extend, or rotate the direction handles to fine-tune the Bezier interpolation curve in a value graph. You can retract or
extend the direction handles to fine-tune the curve in a speed graph.
By default, when you retract or extend a direction handle, the opposite handle on the keyframe moves with it. Splitting
direction handles makes the two direction handles attached to a keyframe behave independently.
•To retract or extend direction handles, drag the direction handle toward or away from the center of its keyframe with
the Selection tool.
•To split direction handles, Alt-drag (Windows) or Option-drag (Mac OS) a keyframe with the Selection tool. You
can also Alt-drag (Windows) or Option-drag (Mac OS) outside a keyframe to draw new handles, whether or not
handles already exist.
•To manipulate the direction handles of two neighboring keyframes simultaneously, drag the value graph segment
between the keyframes.
More Help topics
Controlling speed between keyframes
The Graph Editor
Keyframes and the Graph Editor (keyboard shortcuts)
Showing properties and groups in the Timeline panel (keyboard shortcuts)
About animation, keyframes, and expressions
Select keyframes

278
Last updated 6/8/2015
Chapter 8: Color
Creative Cloud Libraries
About Creative Cloud Libraries
Creative Cloud Libraries makes your assets available to you anywhere. Create images, colors, text styles, color looks,
and more in Photoshop, Illustrator, and mobile apps like Adobe Shape CC or Adobe Hue CC, and then easily access
them across other desktop and mobile apps for a seamless creative workflow.
To learn more, see Creative Cloud Libraries.
Using Creative Cloud Libraries
In After Effects, Creative Cloud Libraries are available from within the Libraries panel. The Libraries panel is open in
the default workspace, Standard, and also the All Panels workspace. It is docked on the right-hand side of these
workspaces.
To open the Libraries panel, select either:
•File > Import > From Libraries OR
•Window > Libraries
You can use the creative assets in After Effects in many different ways:
•You can drag graphics assets from the Libraries panel to the Project panel to import them into your project.
•Vector assets in your library that were created with mobile apps like Shape CC can be imported into After Effects
and converted into shape layers for high-quality vector animations.
•Text layer graphics added to your library from Photoshop can be imported into After Effects and converted to
editable text layers with live layer styles.
Note: Asset types other than graphics that are in your library cannot be directly applied, but they can be viewed and
managed in the Libraries panel. You can also use the Eyedropper tool in After Effects to pick from your library colors,
similar to the Adobe Color Themes panel.
Location of Library assets
Library assets imported into After Effects are copied to your user folder at the following locations:
•Mac OS X: Users/<user_name>/Documents/Adobe/After Effects CC 2015/User Libraries/
•Windows: C:\Users\<user_name>\Documents\Adobe\After Effects CC 2015\User Libraries\

279
Color
Last updated 6/8/2015
Accessing Creative Cloud Libraries
You can access libraries in the following ways:
Across projects Whatever you save in the Libraries panel becomes available for use across After Effects projects that
you are working on.
Across computers Libraries are synced to Creative Cloud. Your Library becomes available on any computer that you
are signed into using your Creative Cloud with your Adobe ID.
Across apps Whatever you save in the Libraries panel becomes automatically available across desktop and mobile apps
that support Creative Cloud Libraries.
For example, you can access Libraries from desktop apps such as Adobe Premiere Pro CC or Photoshop CC, and mobile
apps such as Adobe Hue and Premiere Clip.
Add a Creative Cloud library
You can create any number of libraries to organize your assets. The libraries that you create are displayed in the Libraries
panel in After Effects.
To create a library, do the following:
1Click the drop-down in the Libraries panel, and select Create New Library.
2Type a name for the library, and click Create.
Use assets in a library
Graphic Assets
Graphics assets can be imported into your After Effects project, like any other asset you would import from your local
disks. To import graphics assets into your project, do either of the following:
•Right-click on a graphic asset and choose Import.
OR
•Select a graphic asset in the Libraries panel, and drag it to the Project panel.
Vector graphics in your library that were created with Illustrator or Shape can be imported into After Effects. After
adding them to a composition, these graphics can then be converted into shape layers for high-quality vector
animations.
Photoshop text layer graphics added to your library can be imported into After Effects, and can be converted to editable
text layers with live layer styles.
Changing the Drag Import Multiple Items As setting in Preferences > Import affects how PSD and AI assets are
imported from a library.
Looks
Looks are color lookup tables (LUT) that can be added to your library using Adobe Hue CC or Adobe Premiere Pro CC
2015, and can then be applied to a layer in After Effects. Looks are an easy way to enhance your project by modifying
the image's color or to apply color grading, usually done using another application like SpeedGrade.
Looks from the Libraries panel are read using the Apply Color LUT effect, the same as LUT files from other sources.

280
Color
Last updated 6/8/2015
To apply a look from the Libraries panel, do any of the following:
•Select a layer in the composition, right-click on a look in the Libraries panel, and choose Apply Look.
•Drag a look from the Libraries panel onto a layer in the Composition, Layer, Effect Controls, or Timeline panels.
•Drag a look from the Libraries panel onto the title row of an existing Apply Color LUT effect on a layer in the
Timeline or Effect Controls panels. After Effects will add the Apply Color LUT effect to the target layer and apply
the look. If the Apply Color LUT effect is already present on a layer, applying a look from the Libraries panel reuses
the existing instance of the effect. You can use this approach to tryout different looks on the same layer.
Add assets from Adobe Stock
Adobe Stock is a service that sells millions of high-quality, royalty-free photos, illustrations, and graphics.
You can start a search of Adobe Stock assets from within After Effects:
1Select Window > Library to open the Library panel in After Effects.
2Click the Search Adobe Stock button at the bottom of the Libraries panel.
3In the page that is displayed, search the Stock library for the asset you want to use.
Once you locate an asset that you want to use, you can purchase a license immediately and add the asset to your Library,
which will then appear in the Libraries panel within After Effects. Or, you can add an unlicensed preview
(watermarked) version of the asset to your Library.
If you add a preview version of an asset to your Library, you can license it later. To license the asset, click/right-click it,
and from the context menu select "License this image".
Note: If you use a preview (watermarked) image in After Effects and license it later, the unlicensed preview version in your
Libraries panel is replaced with a licensed version with no watermark. However, you’ll have to manually replace the
preview version of any clip that was already used in a compositon.
Share libraries with Creative Cloud users
You can share your libraries with other Creative Cloud users to view, edit, or use the contents of a shared library.
If a Creative Cloud subscriber has shared a library with you, you can further share it with other Creative Cloud users.
Share a library
1In the Libraries panel, click the pop-up menu on the panel tab, and choose Collaborate.
2In the browser page that appears, provide an e-mail address and optional message for the person that you would like
to share the library with.
Join a shared library
1Launch the Adobe Creative Cloud for Desktop app, and log in with your Adobe ID credentials.
2If a library has been shared with you, you see a notification in the Home panel.
3Click the Accept button available for each library collaboration invitation.
Color basics

281
Color
Last updated 6/8/2015
Color depth and high dynamic range color
Color depth (or bit depth) is the number of bits per channel (bpc) used to represent the color of a pixel. The more bits
for each RGB channel (red, green, and blue), the more colors each pixel can represent.
In After Effects, you can work in 8-bpc, 16-bpc, or 32-bpc color.
In addition to color bit depth, a separate characteristic of the numbers used to represent pixel values is whether the
numbers are integers or floating-point numbers. Floating-point numbers can represent a much larger range of numbers
with the same number of bits. In After Effects, 32-bpc pixel values are floating-point values.
8-bpc pixels can have values for each color channel from 0 (black) to 255 (pure, saturated color). 16-bpc pixels can have
values for each color channel from 0 (black) to 32,768 (pure, saturated color). If all three color channels have the
maximum, pure-color value, the result is white. 32-bpc pixels can have values under 0.0 and values over 1.0 (pure,
saturated color), so 32-bpc color in After Effects is also high dynamic range (HDR) color. HDR values can be much
brighter than white.
Setting the color depth and modifying color display settings
The color depth setting for a project determines the bit depth for color values throughout a project.
To set the color depth for a project, do one of the following:
•Alt-click (Windows) or Option-click (Mac OS) the Project Settings button in the Project panel.
•Choose File > Project Settings or click the Project Settings button in the Project panel, and choose a color depth from
the Depth menu.
You can specify a color depth for each render item, which overrides the project color depth when rendering for final
output. You can also specify the color depth to use for each output item in the output module settings. (See Render
settingsand Output modules and output module settings.)
To change the format in which color values are shown in the Info panel and in some effect controls, choose an option
such as Percent or Web from the Info panel menu. Choosing Auto Color Display automatically switches between 8 bpc,
16 bpc, and 32 bpc, depending on the color depth of the project.
Though many effects can work with all color depths, some effects work only with lower color depths. You can set the
Effects & Presets panel to only show effects that work with your current project color depth. (See Effects and Presets
panel.)
Comparative advantages of each color depth
The dynamic range (ratio between dark and bright regions) in the physical world far exceeds the range of human vision
and of images that are printed on paper or displayed on a monitor. Low dynamic range 8-bpc and 16-bpc color values
can represent RGB levels only from black to white, which is only a small segment of the dynamic range in the real world.
High dynamic range (HDR), 32-bpc floating-point color values can represent brightness levels much greater than
white, including objects as bright as a flame or the Sun.
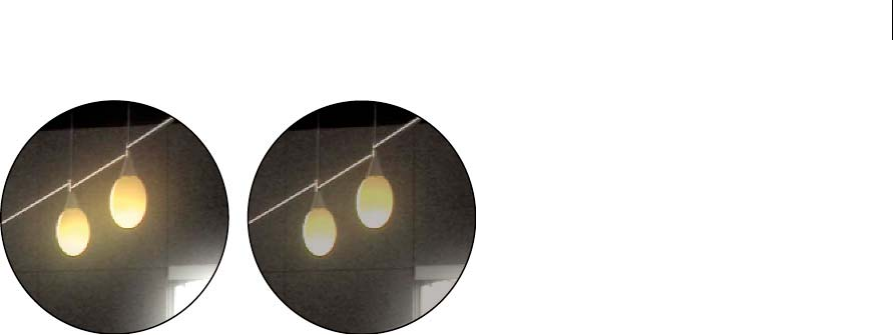
282
Color
Last updated 6/8/2015
Set the project color depth to 32 bpc to work with HDR footage or to work with over-range values—values above 1.0
(white) that aren’t supported in 8- or 16-bpc mode. Over-range values preserve the intensity of highlights, which is as
useful for synthetic effects such as lights, blurs, and glows as it is for working with HDR footage. The headroom
provided by working in 32 bpc prevents many kinds of data loss during operations such as color correction and color
profile conversion.
Even if you’re using 8-bpc footage and are creating movies in 8-bpc formats, you can obtain better results by having the
project color depth set to 16 bpc or 32 bpc. Working in a higher bit depth provides higher precision for calculations and
greatly reduces quantization artifacts, such as banding in gradients.
Note: Merely increasing the color depth within a project won’t eliminate gradients if the output format has a low bit depth.
To mitigate banding, After Effects introduces dithering of colors when the colors are converted to 8-bpc colors, including
when rendering and exporting to an 8-bpc format. This dithering is not introduced for previews. To force dithering for
previews, apply an 8-bpc effect that does nothing—such as the Arithmetic effect with the default values—to an adjustment
layer.
Because 16-bpc frames use half the memory of 32-bpc frames, rendering previews in a 16-bpc project is faster, and
previews can be longer than in a 32-bpc project. 8-bpc frames use even less memory, but the tradeoff between quality
and performance can be obvious in some images at a project color depth of 8 bpc.
Special considerations for working with high dynamic range color
You can use the HDR Compander effect to compress the dynamic range of a layer with an HDR footage item as its
source. In this way, you can use tools that don’t support HDR color, such as 8-bpc and 16-bit effects. When you’re done,
use the HDR Compander to undo the dynamic range compression. The HDR Highlight Compression effect lets you
compress the highlight values in an HDR image so that they fall within the value range of a low dynamic range image.
Because we can see only a subset of the luminance values in a real-world scene in an HDR image on a monitor, it is
sometimes necessary to adjust the exposure—the amount of light captured in an image—when working with an HDR
image. Adjusting the exposure of an HDR image is like adjusting the exposure when photographing a scene in the real
world, allowing you to bring detail out of very dark areas or very bright areas. You can use the Exposure effect to change
the color values of a layer for final output, or you can just adjust the exposure in a specific viewer for preview purposes.
Note: Because some operations—including glows, blurs, and some blending modes—behave differently in 32-bpc mode as
compared with 8-bpc or 16-bpc mode, your composition may look significantly different when you switch between high
dynamic range and low dynamic range project settings.
Additional resources about high dynamic range color
Chris Meyer explains what floating-point, 32-bpc, HDR color is good for in a video overview on the Lynda.com
website.
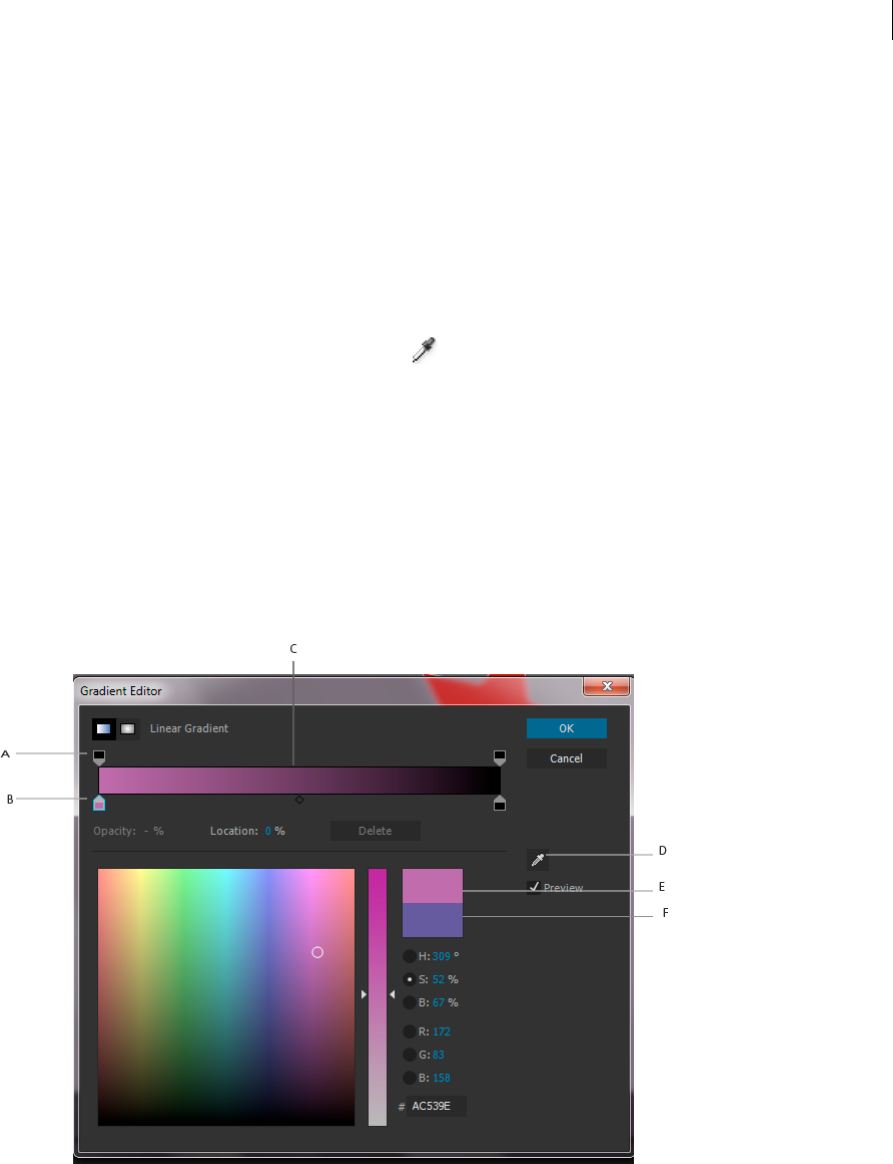
283
Color
Last updated 6/8/2015
Kert Gartner provides some visual examples and a brief explanation on his VFX Haiku website that demonstrate the
benefits of working with 32-bpc color.
Andrew Kramer provides a video tutorial on his Video Copilot website in which he demonstrates the advantages of
using 32-bpc color with motion blur.
On his fnord website, Brendan Bolles explains how to use the Color Profile Converter effect and film color profiles to
adjust colors and perform tone mapping to make an HDR image appear as if it were shot on motion picture film.
Select a color or edit a gradient
In many contexts, you can click an eyedropper button to activate the eyedropper tool, or you can click a color
swatch to open a color picker. If you use the Adobe Color Picker, you can also activate the eyedropper from the Adobe
Color Picker dialog box.
If you click a gradient swatch (Linear Gradient or Fill Gradient) for a stroke or fill in a shape layer, the Adobe Color
Picker opens as the Gradient Editor, with additional controls for editing gradients included at the top of the dialog box.
You can also click Edit Gradient in the Timeline panel to open the Gradient Editor.
Andrew Devis shows how to modify gradient fills and strokes for shape layers, plus other options, in a video on the
Creative COW website.
Note: The sampleImage expression method is another way to sample color values. Use this method to use color values of
specific pixels as input into an expression. (See Layer General attributes and methods (expression reference).)
A Opacity Stop B Color Stop C Opacity midpoint D Eyedropper E New color rectangle F Original color rectangle
Choose a color picker
•To choose the system color, choose Edit > Preferences > General (Windows) or AfterEffects > Preferences > General
(Mac OS) and check the Use System Color Picker box.

284
Color
Last updated 6/8/2015
•To use the Adobe Color Picker, keep the Use System Color Picker box unchecked and select Window > Extensions
> Adobe Color Themes.
Jeff Almasol provides the PickerSwitcher script on his redefinery website, which toggles the Use System Color Picker
setting. Use this script when you prefer to use the Adobe Color Picker for certain tasks, but the operating system color
picker for others, and want a quick way to change this setting.
Select a color with the eyedropper tool
1Click the eyedropper button, and move the pointer to the pixel that you want to sample. The color swatch next to
the eyedropper button dynamically changes to the color under the eyedropper.
2Do one of the following:
•To select the color of a single pixel, click the pixel.
•To sample the color average of a 5-pixel-by-5-pixel area, Ctrl-click (Windows) or Command-click (Mac OS) the
area.
Note: When sampling from within the composition frame of the Composition panel, the eyedropper by default ignores
the composition background color and samples only straight color channels. To sample color channels premultiplied with
the composition background color, press Shift as you click with the eyedropper. Shift-clicking with the eyedropper
samples colors as they appear in the composition frame in the Composition panel.
Press the Escape key to deactivate the eyedropper.
Select a color with the Adobe Color Picker
In the Adobe Color Picker, you can choose colors using one of the color models, or use the color slider and the color
field to choose your color.
The following color models are available:
•HSB
•RGB
•Lab
•CMYK
•Hex
Use the color slider to pick a color:
•Drag the triangles along the color slider, or click inside the color slider to adjust the colors displayed in the color
spectrum.
•Click or drag inside the large square color spectrum to select a color. A circular marker indicates the location of the
color in the color spectrum.
1Click Windows > Extensions > Adobe Color Themes to display the Adobe Color Picker.
2(Optional) To prevent panels from updating with the results of your color selection until you accept the color by
clicking OK, deselect Preview in the Color Picker dialog box. The Preview option is not available in all contexts.
Note: Selecting Preview is convenient for seeing the results of your color selections before you commit them, but it can
also decrease performance, as new images are rendered for the preview in the Composition panel or Layer panel.
3Enter the component values in the text boxes. Select the component you want to use to display the color spectrum:
HSB

285
Color
Last updated 6/8/2015
For HSB, specify hue (H) as an angle, from 0° to 360°, that corresponds to a location on the color wheel. Specify
saturation (S) and brightness (B) as percentages (0–100).
H Displays all hues in the color slider. Selecting a hue in the color slider displays the saturation and brightness range
of the selected hue in the color spectrum, with the saturation increasing from left to right and brightness increasing
from bottom to top.
S Displays all hues in the color spectrum with their maximum brightness at the top of the color spectrum,
decreasing to their minimum at the bottom. The color slider displays the color that’s selected in the color spectrum
with its maximum saturation at the top of the slider and its minimum saturation at the bottom.
B Displays all hues in the color spectrum with their maximum saturation at the top of the color spectrum,
decreasing to their minimum saturation at the bottom. The color slider displays the color that’s selected in the color
spectrum with its maximum brightness at the top of the slider and its minimum brightness at the bottom.
RGB
For RGB, specify component values. You can set colors to under-range and over-range values (outside the range 0.0–
1.0) in an HDR project.
R Displays the red color component in the color slider with its maximum brightness at the top of the slider and its
minimum brightness at the bottom. When the color slider is set to minimum brightness, the color spectrum displays
colors created by the green and blue color components. Using the color slider to increase the red brightness mixes
more red into the colors displayed in the color spectrum.
G Displays the green color component in the color slider with its maximum brightness at the top of the slider and
its minimum brightness at the bottom. When the color slider is set to minimum brightness, the color spectrum
displays colors created by the red and blue color components. Using the color slider to increase the green brightness
mixes more green into the colors displayed in the color spectrum.
B Displays the blue color component in the color slider with its maximum brightness at the top of the slider and its
minimum brightness at the bottom. When the color slider is set to minimum brightness, the color spectrum displays
colors created by the green and red color components. Using the color slider to increase the blue brightness mixes
more blue into the colors displayed in the color spectrum.
CMYK
Specify each component value as a percentage of cyan, magenta, yellow, and black in the text field to get a specific
color.
Lab
L Denotes the luminance of a color (from 0 to 100)
a The extent of red or green in a color (from -128 to +127)
b The extent of blue or yellow in a color (from -128 to +127)
Hex
Enter values in hexadecimal form. Numbers can range from #000000 to #ffffff. For example, #000000 represents
black, and #ffffff represents white.
Edit a gradient
A gradient is defined by color stops and opacity stops. Each stop has a location along the gradient and a value for color
or opacity. The values between stops are interpolated. By default, the interpolation is linear, but you can drag the opacity
midpoint or color midpoint between two stops to alter the interpolation.
•To add a color stop or opacity stop, click below or above the gradient bar in the Gradient Editor dialog box.
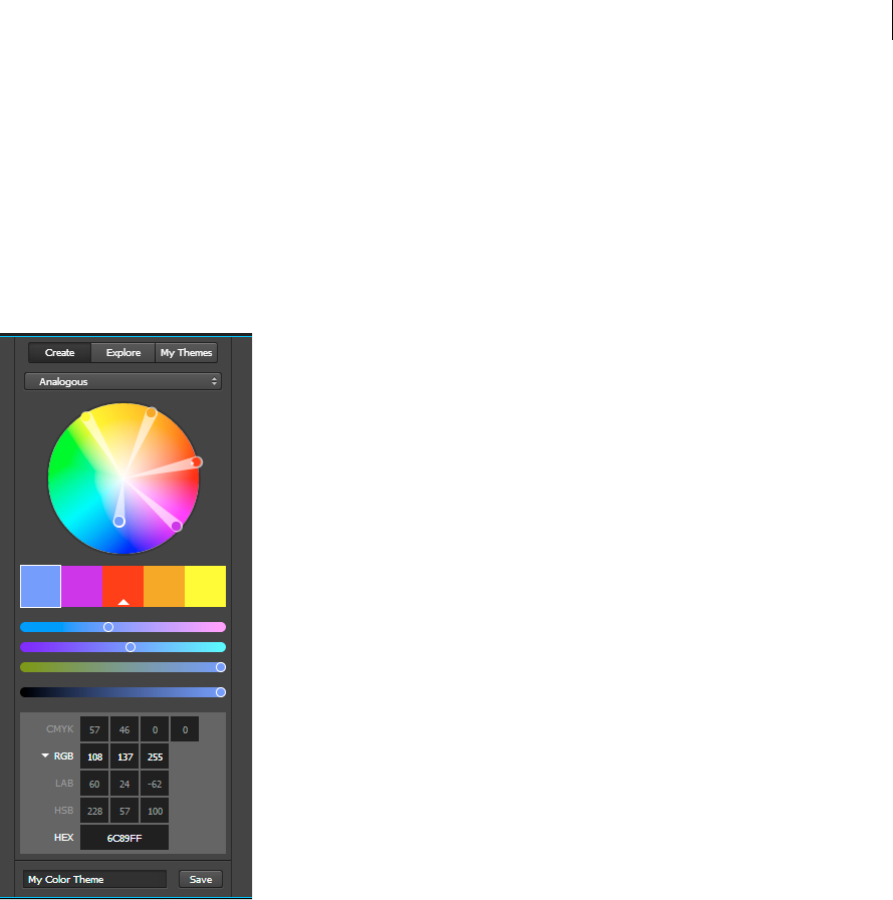
286
Color
Last updated 6/8/2015
•To remove a stop, drag it away from the gradient bar, or select the stop and click Delete.
•To edit the value of a stop, select it and adjust the Opacity value or use the Adobe Color Picker controls beneath the
gradient editor controls.
•To choose a gradient type, click the Linear Gradient or Radial Gradient button in the upper-left corner of the
Gradient Editor dialog box.
Note: Use the Style property to choose a gradient type for the Gradient Overlay layer style.
Learn tutorial
You can create and save color themes, explore and search existing themes, and browse your saved color themes using
your Adobe Creative Cloud profile. See this tutorial to learn to use Adobe Color in After Effects.
Color correction, color grading, and color adjustment
When you assemble a composition, you often need to adjust or correct the colors of one or more of the layers. Such
adjustments can be for any of several reasons. Some examples:
•You need to make it seem as if multiple footage items were shot under the same conditions so that they can be
composited or edited together.
•You need to adjust the colors of a shot so that it seems to have been shot at night instead of day.
•You need to adjust the exposure of an image to recover detail from the over-exposed highlights.
•You need to enhance one color in a shot because you will be compositing a graphic element over it with that color.
•You need to restrict colors to a particular range, such as the broadcast-safe range.

287
Color
Last updated 6/8/2015
The terms color correction and color grading are often used interchangeably, though the term color grading is sometimes
used to refer distinctly to color adjustments made for creative purposes rather to correct problems with color. The term
color correction is used in the broad, general sense in After Effects.
After Effects includes many built-in effects for color correction, including the Curves effect, the Levels effect, and other
effects in the Color Correction effects category. You can also use the Apply Color LUT effect to apply the color
mappings in a color lookup table for color correction purposes. (See Color Correction effectsand Apply Color LUT
effect.)
The Camera Raw plug-in can be used to correct and adjust still images in JPEG, TIFF, and various camera raw formats.
The Synthetic Aperture Color Finesse plug-in included with After Effects includes excellent color-correction tools.
After Effects CC and CS6 include Synthetic Aperture Color Finesse 3. (See Resources for Synthetic Aperture Color
Finesse.)
Additional resources for color correction and adjustment
This article on the Adobe website collects several video tutorials and other resources for color correction and color
grading in After Effects and Premiere Pro.
John Dickinson provides visual aids on his Motionworks website that illustrate how to use the Curves and Levels effects
for color adjustments:
•Curves effect diagram on Motionworks website
•Levels effect diagram on Motionworks website
This video from After Effects: Learn By Video series shows how to combine motion tracking and rotoscoping to isolate
and selectively color-correct an actor's face.
The Rebel CC animation preset is a simple, telecine-style color-correction tool for coloring or grading a movie. This
animation preset uses expressions to control the Levels (Individual Controls) effect. To learn more and download the
animation preset, see Stu Maschwitz's ProLost blog.
Stu Maschwitz provides a post on his ProLost blog that discusses color correcting for skin tones, with links to some
resources about test setups that show various skin tones on a vectorscope.
Mark Christiansen provides tips and detailed techniques for color correction, color adjustment, and color matching in
the “Color Correction in Adobe After Effects” chapter of After Effects Studio Techniques on the Peachpit Press website.
Rich Young collects tutorials and presets for bleach bypass, cross-process, and other looks in an article on the ProVideo
Coalition website.
Using histograms to adjust color
A histogram is a representation of the number of pixels at each luminance value in an image. A histogram that has
nonzero values for each luminance value indicates an image that takes advantage of the full tonal range. A histogram
that doesn’t use the full tonal range corresponds to a dull image that lacks contrast.
A common color-correction task is adjusting an image to spread out the pixel values more evenly from left to right on
the histogram, instead of having them bunched up at one end or the other. Applying the Levels effect and adjusting its
Input White and Input Black properties in the histogram is an easy and effective way to accomplish this task for many
images.

288
Color
Last updated 6/8/2015
Resources for Synthetic Aperture Color Finesse
The Synthetic Aperture Color Finesse plug-in included with After Effects includes excellent color-correction tools.
Synthetic Aperture provides tutorials and additional information about using Color Finesse on their website.
Color Finesse installs its documentation in the plug-in’s subfolder in the Plug-ins folder. After Effects CC and CS6
include Synthetic Aperture Color Finesse 3. (See Plug-ins.)

289
Color
Last updated 6/8/2015
Color models and color spaces
A color model is a way of describing color using numbers so that computers can operate on them. The color model used
within After Effects is the RGB color model, in which each color is described in terms of amounts of red, green, and
blue light added together to make the color. Other color models include CMYK, HSB, YUV, and XYZ.
A color space is a variant of a color model. A color space is distinguished by a gamut (range of colors), a set of primary
colors (primaries), a white point, and a tone response. For example, within the RGB color model are several color spaces,
including—in decreasing order of gamut size—ProPhoto RGB, Adobe RGB, sRGB IEC61966-2.1, and Apple RGB.
Although each of these color spaces defines color using the same three axes (R, G, and B), their gamuts and tone
response curves are different.
Though many devices use red, green, and blue components to record or express color, the components have different
characteristics—for example, blue for one camera is not exactly the same as blue for another camera. Each device that
records or expresses color has its own color space. When an image moves from one device to another, image colors may
look different because each device interprets the RGB values in its own color space.
Color management uses color profiles to convert colors from one color space to another, so colors look the same from
one device to another.
Gamma and tone response
The tone response for a color space is the relationship of light intensity to the signal that creates or records (perceives)
the light.
The human visual system does not respond linearly to light. In other words, our perception of how bright a light is does
not double when twice as many photons hit our eyes in a given time. Similarly, the display elements of a CRT monitor
do not emit light that is twice as bright when a voltage twice as great is applied. The relationship of light intensity to
signal intensity for a display device is expressed by a power function. The exponent of this power function is called
gamma. In general, the relationship of light intensity to signal intensity for an input device is the inverse of the
relationship for an output device, though the gamma values may differ for input and output devices to accommodate
the difference between scene lighting and lighting of the viewing environment.
Note: Moving the midtone slider (such as the Gamma control for the Levels effect) in a color-correction histogram has the
same result as modifying gamma, changing the tone response curve without moving the white point. Modifying the curve
in the Curves effect also modifies tone response, but not necessarily with a gamma curve.
Charles Poynton provides an excellent set of resources on his website regarding gamma and other color technology.
Linear tone response: when gamma equals 1
Raising any number to the power of 1 gives the original number as a result. A gamma of 1.0 is used to express the
behavior of light in the natural world, outside the context of our nonlinear perceptual systems. A system with gamma
of 1.0 is sometimes said to operate in linear light, whereas a system encoded with a gamma other than 1.0 to match the
human visual system is said to be perceptual.
If you have enabled color management (by specifying a working color space), you can perform all color operations in
linear light by linearizing the working color space. A linearized color space uses the same primaries and white point as
the nonlinear version; the tone response curve is just made into a straight line.
Many compositing operations, such as combining colors with blending modes, benefit from being performed in a linear
color space. For the most natural and realistic blending of colors, work in a linear color space. If you have not enabled
color management, you can still perform blending operations using a gamma of 1.0. (See Linearize working space and
enable linear blending.)

290
Color
Last updated 6/8/2015
System gamma, device gamma, and the difference between scene and viewing environment
The gamma value for an entire system—from capture, through production, to display in the viewing environment—is
the product of the gamma values used for each of the phases in the system. This product is not always 1.0, as it would
be if the operations performed for encoding exactly matched (inverted) the operations performed for decoding. One
reason for a system gamma other than 1.0 is that a difference often exists between the lighting conditions in which a
scene is captured and the lighting conditions in which it is viewed. (Consider that you usually watch a movie in a dim
environment, but the scenes aren’t normally shot in a dim environment.)
For example, the device gamma for an HD camera is approximately 1/1.9, and the device gamma for an HD display is
approximately 2.2. Multiplying these values gives a system gamma of approximately 1.15, which is appropriate for the
somewhat dim television viewing conditions of a typical living room. The system gamma for motion picture
production is much higher (approximately 1.5–2.5) to accommodate the darker viewing environment of a movie
theater. The gamma for the film negative is approximately 1/1.7, and the gamma for the projection film is approximately
3–4.
Color profiles are said to be scene-referred if their tone-response curves are based on the conditions in the typical scene.
Color profiles are said to be output-referred if their tone-response curves are based on the conditions in the typical
viewing environment.
By default when you use color management, After Effects automatically adjusts the contrast of images when converting
between scene-referred color profiles and output-referred color profiles. This automatic conversion (image state
adjustment) is based on the gamma values specified in the HDTV video standard.
•To disable this automatic color transformation, deselect Compensate For Scene-referred Profiles in the Project
Settings dialog box (File > Project Settings).
The Compensate For Scene-referred Profiles feature also exists in Adobe Photoshop CS4 and later, but this feature does
not exist in other applications. To match the colors in other applications—including After Effects CS3 and earlier—
disable this automatic conversion. When you open a project created in After Effects CS3 or earlier, the Compensate For
Scene-referred Profiles option is deselected.
Each instance of the Color Profile Converter effect can also be set to either compensate for scene-referred profiles, not
compensate for scene-referred profiles, or use the setting indicated by the project’s Compensate For Scene-referred
Profiles option. (See Color Profile Converter effect .)
For additional information about the compensation for scene-referred profiles, see this blog post by Todd Kopriva and
Peter Constable on the Adobe website.
Trish and Chris Meyer provide an article on the ProVideo Coalition website that adds some practical information
regarding scene-referred and display-referred color profiles.
QuickTime and gamma in non-color-managed projects
After Effects 7.0 and earlier used QuickTime codecs to decode several kinds of media, and the gamma adjustments
performed by QuickTime on Windows were different from the gamma adjustments performed on Mac OS. The gamma
adjustments performed by After Effects CS3 and later differ from the gamma adjustments performed by these
QuickTime codecs. Gamma adjustments performed by After Effects CS3 and later on Windows are the same as gamma
adjustments performed by After Effects CS3 and later on Mac OS. Also, by not using QuickTime codecs, After Effects
preserves over-range values in 32-bpc projects.
Select Match Legacy After Effects QuickTime Gamma Adjustments in the Project Settings dialog box to accomplish
any of the following:
•Avoid color shifts when working with projects created in After Effects 7.0 or earlier
•Match the colors in a project created in After Effects 7.0 or earlier

291
Color
Last updated 6/8/2015
•Ensure that colors in the Composition panel match colors in QuickTime player
The Match Legacy After Effects QuickTime Gamma Adjustments option is selected by default for projects created in
After Effects 7.0 or earlier. You should create new projects without this option selected.
More Help topics
Adjust exposure for previews
Exposure effect
Broadcast-safe colors
Color management
Color management
The After Effects color management video provides an introduction to color management explaining how it works and
how to use it.
Color management and color profiles
Overview of color management
Color information is communicated using numbers. Because different devices use different methods to record and
display color, the same numbers can be interpreted differently and appear to us as different colors. A color management
system keeps track of all of these different ways of interpreting color and translates between them so that images can
look the same regardless of the device used to display them.
In general, a color profile is a description of a device-specific color space in terms of the transformations required to
convert its color information to a device-independent color space.
In the specific case of working within After Effects, ICC color profiles are used to convert to and from the working color
space in the following general workflow:
1An input color profile is used to convert each footage item from its color space into the working color space. A
footage item may contain an embedded input color profile, or you can assign the input color profile in the Interpret
Footage dialog box or interpretation rules file. (See Interpret a footage item by assigning an input color profile.)
2After Effects performs all of its color operations in the working color space. You assign a working color space
(project working space) in the Project Settings dialog box. (See Choose a working color space and enable color
management.)
3Colors are converted from the working color space to the color space of your computer monitor through the
monitor profile. This conversion ensures that your composition will look identical on two different monitors, if the
monitors have been properly profiled. This conversion does not change the data within the composition. You can
choose whether to convert colors for your monitor using the View > Use Display Color Management menu
command. (See Enable or disable display color management.)
4Optionally, After Effects uses a simulation profile to show you on your computer monitor how the composition will
look in its final output form on a different device. You control output simulation for each view through the View >
Simulate Output menu. (See Simulate how colors will appear on a different output device.)

292
Color
Last updated 6/8/2015
5An output color profile for each output module is used to convert the rendered composition from the working color
space to the color space of the output medium. You choose an output color profile in the Output Module Settings
dialog box. (See Assign an output color profile.)
By default when you use color management, After Effects automatically adjusts colors to compensate for the differences
in gamma between scene-referred color profiles and output-referred color profiles. (See Gamma and tone response.)
Note: An alternative approach to color management is to manually apply color transformations using color lookup tables
(LUTs). (See Apply Color LUT effect.)
Benefits of color management
Color management provides many benefits, including the following:
•The colors in imported images appear as the creators of the images intended.
•You have more control over how colors are blended within your project, for everything from motion blur to anti-
aliasing.
•The movies that you create will look as you intend when viewed on devices other than your computer monitor.
If you don’t enable color management for your project, then the colors in your composition are dependent on the color
characteristics of your monitor: the colors that you see are the colors that your monitor displays based on RGB numbers
in your footage items. Because different color spaces use the same RGB numbers to represent different colors, the colors
that you see and composite may not be the colors that the creator of the footage intended. In fact, the colors may be
very far from the intended colors.
By setting a working color space for the project (which enables color management), you do two things:
•You define a common color space for compositing and other color operations.
•You control the appearance of colors in your composition.
If a footage item has an embedded color profile (for example, the footage item is a Photoshop PSD file), then the colors
intended by the person who created the image can be accurately reproduced in your composition. The color profile
contains the information that determines how to convert the RGB numbers in the image file into a device-independent
color space; the color profile of the monitor can then be used to determine which RGB numbers in the color space of
your monitor represent the colors intended for the footage item. This automatic conversion becomes even more
important as you import footage items with many different color profiles, from many different sources.
The color conversion process takes no effort on your part. The colors simply appear on your monitor just like they
appeared when the image was created. Your monitor may have a limited gamut compared to the color space that you
choose for the working space, and colors can be clipped when displayed on the monitor. However, you still have the full
range of color data in your project, and the colors are not clipped internally.
When you are ready to output your composition, you can use color management to transform your colors into the space
appropriate for your output media. At this stage, you are preserving the appearance of colors as you intend them to look.
Color profiles
The file format for color profiles is standardized by the ICC (International Color Consortium), and the files that contain
them usually end with the .icc filename extension. After Effects comes with a large number of color profiles for color
spaces for common (and some not so common) input and output types.
After Effects loads color profiles from multiple locations, including the following:
•Mac OS: Library/ColorSync/Profiles
•Mac OS: Library/Application Support/Adobe/Color/Profiles

293
Color
Last updated 6/8/2015
•Windows: WINDOWS\system32\spool\drivers\color
•Windows: Program Files\Common Files\Adobe\Color\Profiles
You can create a custom ICC profile using Adobe Photoshop. In Photoshop, choose Edit > Color Settings. The RGB and
CMYK menus in the Working Spaces area of the Photoshop Color Settings dialog box include options for saving and
loading ICC profiles and defining custom profiles.
All color profiles used in a project are saved in the project, so you do not need to manually transfer color profiles from
one system to another to open the project on another system.
Note: The NTSC (1953) color profile corresponds to obsolete television equipment and should not be used. For standard-
definition NTSC television, use one of the SDTV NTSC color profiles.
When you choose a profile—for input, output, or simulation—the motion-picture film profiles do not appear unless
your footage is Cineon footage or you select Show All Available profiles. If your footage is Cineon footage, only the
motion-picture film profiles appear, unless you select Show All Available Profiles.
Color management tips
Be sure to read the helpful text in the Interpret Footage, Project Settings, and Output Module Settings dialog boxes.
This text helps you to understand the color conversions that will be done as you interpret footage, composite, and
output rendered movies.
Make sure that your work environment provides a consistent light level and color temperature. For example, the color
characteristics of sunlight change throughout the day, which can alter the way colors appear on your screen, so keep
shades closed or work in a windowless room.
Online resources about color management
Trish and Chris Meyer provide an overview of color management in an article on the Artbeats website.
Johan Steen provides a detailed article on his website that explains color management in After Effects. The article also
describes how to calibrate and profile a monitor, how to use color management in Photoshop, and how to work in a
linear color space.
For information on color profiles, see the International Color Consortium website.
Calibrate and profile your monitor
When you calibrate your monitor, the profiling utility lets you save a color profile that describes the color behavior of
the monitor. This profile contains information about what colors can be reproduced on the monitor and how the color
values in an image must be converted so that colors are displayed accurately. After Effects and your operating system
can use this information to ensure that the colors that you see on your monitor look like the colors in the output movies
that you create.
Note: Monitor performance changes and declines over time; recalibrate and profile your monitor every month or so. If you
find it difficult or impossible to calibrate your monitor to a standard, it may be too old and faded.
1Make sure that your monitor has been turned on for at least half an hour, giving it sufficient time to warm up and
produce more consistent output.
2Make sure that your monitor is displaying millions of colors (24 bits per pixel) or higher.
3If you do not have profiling software that uses a hardware measuring device, remove colorful background patterns
on your monitor desktop and set your desktop to display neutral grays. Busy patterns or bright colors surrounding
a document interfere with accurate color perception.

294
Color
Last updated 6/8/2015
4Do one of the following to calibrate and profile your monitor:
•For best results, use third-party software and measuring devices. In general, using a measuring device such as a
colorimeter along with software can create more accurate profiles because an instrument can measure the colors
displayed on a monitor far more accurately than the human eye can.
Most profiling software automatically assigns the new profile as the default monitor profile. For instructions on
how to manually assign the monitor profile, see the documentation for your operating system.
•In Mac OS, use the Calibrate utility, located in the System Preferences > Displays > Color tab.
Choose a working color space and enable color management
You turn color management on for a project by choosing a working color space (Working Space) for the project in the
Project Settings dialog box. You control color management for each footage item with the Interpret Footage dialog box
or interpretation rules file. You control color management for each output item in the Output Module Settings dialog
box.
If Working Space is set to None in the Project Settings dialog box, color management is off for the project.
Choosing a working color space is an essential step in managing color in a project. Colors of footage items are converted
into the working color space as a common color space for compositing.
For best results, when working with 8-bpc color, match the working color space to the output color space. If you are
rendering to more than one output color space, you should set the project color depth to 16 bpc or 32 bpc, at least for
rendering for final output. The working color space should match the output color space that has the largest gamut. For
example, if you plan to output to Adobe RGB and sRGB, then use Adobe RGB as your working color space, because
Adobe RGB has a larger gamut and can therefore represent more saturated colors. To preserve over-range values, work
in 32-bpc color for its high dynamic range.
Suggestions for working color space choices:
•SDTV NTSC or SDTV PAL is a good choice if you’re making a movie for standard-definition broadcast television,
including standard-definition DVD.
•HDTV (Rec. 709) is a good choice if you’re making a movie for high-definition television. This color space uses the
same primaries as sRGB, but it has a larger gamut, so it makes a good working space for many kinds of work.
•ProPhoto RGB with a linear tone response curve (gamma of 1.0) is a good choice for digital cinema work.
•sRGB IEC61966-2.1 is a good choice if you’re making a movie for the Web, especially cartoons.
The color spaces available in After Effects vary based on the color profiles installed on your computer. (See Color
profiles.)
1Choose File > Project Settings.
2Choose a working color space from the Working Space menu.
Color management and Mercury Transmit
In earlier versions of After Effects, previews sent to an external video monitor were not color managed. The color values
sent to the video monitor are from the working color space for the project. To preview video colors, you have to choose
a value for Working Space in the Project Settings dialog box that matches the color space of the preview device.
Similarly, colors in a composition sent to Adobe Premiere Pro using Dynamic Link are in the working color space of
the After Effects project.
In the June 2014 release of After Effects CC, video previews sent to an external monitor using Mercury Transmit is color
managed. See the Preview on an external video monitorsection for details.

295
Color
Last updated 6/8/2015
To manage colors in a dynamically linked composition or for video previews, create a new composition and nest your
composition within it; then apply the Color Profile Converter effect to the nested composition, with Input Profile set to
Project Working Space. For video previews, then set Output Profile to match the color space of the video preview device.
(See Color Profile Converter effect .)
Color management and Dynamic Link
When color management is enabled for an After Effects project, compositions viewed over Dynamic Link are
transformed using the Rec. 709 color profile. This prevents color or gamma shifts in the appearance of these
compositions in Premiere Pro and Adobe Media Encoder.
Dynamic Link always assumes that all incoming frames are in Rec. 709. In After Effects CC June 2014 release and
earlier, compositions in a color managed project were sent to Dynamic Link in the project's working color space; they
were not adjusted for Dynamic Link's assumption of Rec. 709. This mismatch resulted in a noticeable color or gamma
shift when the project's working color space was significantly different from Rec. 709 or when Linearize Working Space
(under File > Project Settings) was enabled.
In the latest release of After Effects CC, a color transformation is applied to the composition as a last step before the
images are passed to Dynamic Link for use in Premiere Pro or Adobe Media Encoder. This corrects the composition
image to the color space used by Dynamic Link, similar to how the View > Enable Display Color Management option
in After Effects corrects the image for your monitor.
Linearize working space and enable linear blending
If you have enabled color management (by specifying a working color space), you can perform all color operations in
linear light by linearizing the working color space. A linearized color space uses the same primaries and white point as
the nonlinear version; the tone response curve for the linearized color space is just a straight line. (See Gamma and tone
response.)
If you have not enabled color management, you can still perform blending operations using a gamma of 1.0.
By performing operations in a linear color space, you can prevent certain edge and halo artifacts, such as the fringing
that appears when high-contrast, saturated colors are blended together. Many color operations benefit from working in
a linear color space, including those operations involved in image resampling, blending between layers with blending
modes, motion blur, and anti-aliasing.
If you want to use a linearized working color space, do so when you set up the project, instead of switching later.
Otherwise, colors chosen in the color picker will change when you switch to a linear working color space, because
colors inside After Effects are interpreted to be in the working color space.
Note: A linearized working color space works best with higher color depths—16 bpc and 32 bpc—and is not recommended
for 8-bpc color.
❖Choose File > Project Settings, and do one of the following:
•To linearize the working color space, choose Linearize Working Space.
•To blend colors in a linear color space, choose Blend Colors Using 1.0 Gamma. This option affects only blending
between layers. The result is that opacity fades, motion blur, and other features that rely on blending modes are
affected.
Additional resources about linear color spaces and linear blending
Stu Maschwitz’s ProLost blog has several posts that are useful for learning about how, when, and why to work in a linear
color space versus a non-linear color space. In this post, Stu summarizes the reasons and techniques for working in a
linear color space and using linear blending.

296
Color
Last updated 6/8/2015
On the ProVideo Coalition website, Mark Christiansen provides some examples of the results of enabling linear
blending, as well as explaining a little more what linear blending means.
Interpret a footage item by assigning an input color profile
You control color management for each footage item using the Interpret Footage dialog box.
The input color profile determines what calculations are performed when converting the colors of a footage item into
the working color space for the project. If a working space has not been set—that is, if color management is not on for
the project—then you cannot assign an input color profile.
In some cases, files that you import have ICC profiles embedded in them. When you import these files, you can be
confident that the colors that you see are as the producer of the footage originally intended. After Effects can read and
write embedded color profiles for Photoshop (PSD), TIFF, PNG, and JPEG files.
If a footage item does not have an embedded color profile, you can assign an input color profile using the Interpret
Footage dialog box or by adding or modifying a rule in the interpretation rules file (interpretation rules.txt). After
Effects interprets the footage item as if the source footage was created using this color profile, so be certain to assign a
profile that matches (or at least approximates) that used to create the source footage.
Note: If a source footage item was created by an application that doesn’t use color management—such as a movie rendered
from a 3D application—the input color profile is essentially the monitor profile of the system on which the image was
designed and created.
1Select a footage item in the Project panel.
2Choose File > Interpret Footage > Main.
3In the Color Management tab of the Interpret Footage dialog box, choose a value from the Assign Profile menu.
If you don’t see the profile that you want in the Assign Profile menu, select Show All Available Profiles.
4Read the information in the Description area of the dialog box to confirm that the conversion is the one that you
want, and click OK.
Non-RGB footage items (such as CMYK, Y'CbCr, and camera raw images) cannot be assigned an input profile. Their
native color space is displayed in the Interpret Footage dialog box. Conversion of non-RGB color values to RGB color
values is handled automatically for each format.
If you don’t assign an input color profile, and After Effects doesn’t have a rule in the interpretation rules file with which
to make an interpretation, the colors of the footage item are assumed to be in the working color space of the project.
When color management is enabled, the input color profile for a footage item is shown in the information area at the
top of the Project panel.
The Interpret As Linear Light option determines whether the assigned input color profile is interpreted as being linear
(gamma equals 1.0). This option also works when color management is turned off for the project. (See Gamma and
tone response.)
You can prevent the conversion of colors into the working color space for a single footage item by selecting Preserve
RGB in the Color Management tab of the Interpret Footage dialog box. This option preserves RGB numbers; color
appearance is not preserved. Turning off color management for a specific footage item is useful when the footage item
is not intended for visual display, but is instead intended for use as a control layer—for example, a displacement map.
Assign an output color profile
You control color management for each output item using the Output Module Settings dialog box.

297
Color
Last updated 6/8/2015
Note: When you export to SWF format, you use the Export menu, not the Render Queue panel, so the output module
settings are not available for this output type. If color management is enabled for the project, After Effects automatically
converts colors from the working color space of the project to the sRGB IEC61966-2.1 color space when exporting to SWF.
The output color profile for a render item determines what calculations are performed when converting the colors of a
rendered composition from the working color space of the project to the color space for the output medium. If a project
working space has not been set—that is, if color management is not on for the project—then you cannot assign an
output color profile.
For example, after creating a movie in an HDTV (Rec. 709) working color space for output to film, you likely want to
output to a log-encoded Cineon/DPX color space using a film output color profile. If, on the other hand, you’re creating
a movie for high-definition television, you should choose an HDTV (Rec. 709) output profile.
The output color profile for a render item is part of an output module and is displayed in the output module group in
the Render Queue panel. You can assign multiple output modules to one render item, each with its own output color
profile, allowing you to create output movies for various media from one rendered movie.
The Convert To Linear Light option determines whether the colors are output to a linear color profile (gamma equals
1.0). It is seldom a good idea to output to linear light for 8-bpc or 16-bpc color, so the default setting for Convert To
Linear Light is On For 32 bpc. (See Gamma and tone response.)
Some file formats—such as Photoshop (PSD), PNG, TIFF, and JPEG—allow for the embedding of a color profile. If you
embed a color profile in an output file, then you can be more certain that programs that use the file will correctly
interpret its color information.
After Effects chooses a rendering intent based on the output color profile that you choose. For most output types, the
rendering intent is relative colorimetric (with black point compensation); for output to film negative, the rendering
intent is absolute colorimetric.
You can prevent the conversion of colors from the working color space for a single output item by selecting Preserve
RGB in the Color Management tab of the Output Module Settings dialog box. This option preserves RGB numbers;
color appearance is not preserved. Turning off color management for a specific footage item is useful when the footage
item is not intended for visual display, but is instead intended for use as a control layer—for example, a displacement
map.
1Click the underlined text next to the Output Module heading for the render item in the Render Queue panel.
2In the Color Management tab of the Output Module Settings dialog box, choose a value from the Output Profile
menu:
sRGB IEC61966-2.1 For display in web browsers and other web-based environments.
SDTV NTSC or SDTV PAL For display on standard-definition television. If the codec that you are using does not
adjust luma levels, choose a 16-235 profile to compress luma levels.
Kodak 5218/7218 Printing Density For film-out corresponding to the scene capture of Kodak 5218 camera negative
film.
If you don’t see the profile that you want in the Output Profile menu, select Show All Available Profiles. This option
shows the motion-picture film color profiles.
3Read the information in the Description area of the dialog box to confirm that the conversion is the one that you
want, and click OK.

298
Color
Last updated 6/8/2015
Enable or disable display color management
When color management is on, the default behavior is for RGB pixel values to be converted to the color space of your
computer monitor from the working color space for the project. Color appearance is preserved; RGB numbers are not
preserved. This behavior is adequate for most uses, but you sometimes need to see how the colors are actually going to
look when viewed through a system that does not use color management. For example, you may need to see how the
colors will appear when viewed in a web browser.
When display color management is off, the RGB color values are sent directly to your monitor, without any conversion
through the monitor profile. RGB numbers are preserved; color appearance is not preserved.
When display color management is on for a viewer, a yellow plus sign appears in the Show Channel And Color
Management Settings button at the bottom of the viewer.
For each viewer (Composition, Layer, or Footage panel), you can choose whether to manage display colors, which
involves the conversion of colors from the working color space to the color space of the monitor.
1Activate a Composition, Layer, or Footage panel.
2Do one of the following to toggle between enabling and disabling display color management:
•Click the Show Channel And Color Management Settings button at the bottom of the viewer, and choose Use
Display Color Management.
•Choose View > Use Display Color Management.
•Press Shift+/ (on the numeric keypad).
Output simulation settings (including No Output Simulation) are remembered.
Simulate how colors will appear on a different output device
Often, you need to preview how a movie will appear on a device other than your computer monitor. One purpose of
color management is to ensure that colors look the same on every device, but color management in After Effects can’t
overcome scenarios like the following:
•An output device for which you’re creating your movie has a smaller gamut than the working color space of your
project, so the device is unable to represent some colors.
•The colors in your movie are displayed by a device or software that does not use color management to convert colors.
For example, when you are creating a movie using a computer monitor and a high-definition video monitor, you may
need to see how the movie will look when transferred to a specific film stock and projected under standard theater
viewing conditions.
In such situations, you’ll want to preview how colors will appear when they’re displayed on a device other than your
computer monitor. Output simulation requires display color management.
During output simulation, colors are converted from the working color space for the project to the color space of the
monitor through the following flow:
1. Colors are converted from working color space for the project to output color space. Colors are converted from the
working color space to the color space of the output type using the output color profile (the same profile that will be
used for rendering to final output).
2. Colors are converted from output color space to color space of simulated playback device. If Preserve RGB is not
selected, colors are converted from the output color space to the color space of the presentation medium using the
simulation profile. This setting presumes that the simulated device also performs color management and will convert
colors for display. Color appearance is preserved; RGB numbers are not preserved.

299
Color
Last updated 6/8/2015
If Preserve RGB is selected, the color values are not converted in this step. Instead, the numeric RGB color values are
preserved and are re-interpreted to be in the color space of the simulated device. One use of this simulation is to see
how a movie will look when played back on a device other than the one for which it was intended or a device that does
not perform color management.
Note: Use Preserve RGB when simulating the combination of a capture film stock and a print film stock.
3. Colors are converted from color space of simulated playback device to color space of your monitor. Colors are
converted from the presentation device color space to the color space of your computer monitor using the monitor
profile.
When you create an output simulation preset, you can choose a profile to use for each of these steps.
Even if you’re using a preset output simulation, you can choose the Custom option in the View > Simulate Output menu
after selecting the preset to see a representation of which color conversions and reinterpretations are occurring for that
simulation type.
Output simulation applies only to a specific viewer (Composition, Layer, or Footage panel) and works only for
previews. Color conversions for output simulation are performed when values are sent to the display. Actual color
numbers in the project are not changed.
As with all color space conversions, simulating output decreases performance somewhat, so you may not want to
simulate output when performing tasks that require real-time interaction.
Note: Merely applying the correct profiles can’t compensate for different color gamuts for different devices. For example,
common LCD monitors for personal computers do not have the gamut necessary to fully simulate HDTV output.
You can press Shift+/ (on the numeric keypad) to turn display color management on or off. Turning display color
management off also turns off output simulation. Simulation settings (including No Output Simulation) are
remembered when display color management is off.
Simulate output for previews
1Activate a Composition, Layer, or Footage panel.
2Choose View > Simulate Output, and choose an output type to simulate.
Note: Output simulation relies on display color management, which is on by default. If display color management is off,
choose View > Use Display Color Management.
No Output Simulation Display color management is on, but no conversion is performed to simulate an output type.
Legacy Macintosh RGB (Gamma 1.8) Show how colors will appear when displayed by a non–color managed
application on a Macintosh computer with a gamma of 1.8—the value used by Mac OS before Mac OS X 10.6. This
option is not available if Linearize Working Space is selected.
Internet Standard RGB (sRGB) Show how colors will appear when displayed by a non–color managed application
with a gamma of 2.2. This option is not available if Linearize Working Space is selected.
Kodak 5218 To Kodak 2383 Show how colors will appear when output to the Kodak 5218 negative film stock and
then projected from Kodak 2383 positive film stock in a theater environment.

300
Color
Last updated 6/8/2015
Note: The DPX Theater Preview and DPX Standard Camera profiles provided by After Effects 7.0 for use with the Proof
Colors command have been replaced by the Kodak 2383 and Kodak 5218 profiles used with the Simulate Output
command.
Custom If you don’t see an entry for the output type that you want to simulate, you can create your own output
simulation preset by choosing Custom. You can specify a profile to use for each of the conversion or reinterpretation
steps.
•To preview how a movie will look if you output the movie to a device and view it on that device, use the same
value for Output Profile and Simulation Profile.
•To preview how a movie will look if you output the movie to one device and then view it on another, color-
managed device, use different values for Output Profile and Simulation Profile, and deselect Preserve RGB.
•To preview how a movie will look if you output the movie to one device and view it on another device, use
different values for Output Profile and Simulation Profile, and select Preserve RGB.
You can choose an output simulation preset for each view. Custom output simulation settings are shared between all
views.
To toggle between no output simulation and the most recently used output simulation, click the Show Channel And
Color Management Settings button at the bottom of the viewer and choose Simulate Output.
Simulate an output type in a movie rendered for final output
Color management for output simulation is only for previews, but you can render a movie with a look that simulates a
particular output type. For example, you can render a movie for HDTV that simulates a film appearance, which is
especially useful for creating dailies when doing film work.
1Choose Layer > New > Adjustment Layer to create a new adjustment layer at the top of your composition.
2Choose Effect > Utility > Color Profile Converter to apply the Color Profile Converter to the adjustment layer.
3Choose Edit > Duplicate to duplicate the effect.
4In the Effect Controls panel, set the following options for the first instance of the effect:
Input Profile Project Working Space
Output Profile The type of output to simulate; for example, a film printing density profile, such as Kodak 5218/7218
Printing Density
Intent Absolute Colorimetric
5In the Effect Controls panel, set the following options for the second instance of the effect:
Input Profile The type of playback to simulate; for example, a theater preview profile
Output Profile The color space of the output medium; for example HDTV (Rec. 709)
Intent Relative Colorimetric
To enable and disable this type of output simulation, you can turn the adjustment layer on and off by selecting and
deselecting its Video switch in the Timeline panel.

301
Color
Last updated 6/8/2015
Broadcast-safe colors
Analog video signal amplitude is expressed in IRE units (or volts in PAL video). Values between 7.5 and 100 IRE units
are considered broadcast-safe; colors in this range do not cause undesired artifacts such as audio noise and color
smearing. (In practice, some spikes over 100 IRE are legal, but for simplicity 100 IRE is considered the legal maximum
here.) This range of 7.5-100 IRE is equivalent to a range from black to white of 64-940 in 10-bpc values for Y' in Y'CbCr,
which corresponds to 16-235 in 8-bpc values. Therefore, many common video devices and software systems interpret
16 as black and 235 as white, instead of 0 and 255. These numbers don’t directly correspond to RGB values.
If you notice that colors of imported footage look wrong—blacks don’t look black enough, and whites don’t look white
enough—make sure that you’ve assigned the correct input color profile. The common video color profiles included
with After Effects include variants that account for these limited ranges, such as the HDTV (Rec. 709) 16-235 color
profile, which interprets 16 as black and 235 as white.
Note: Some video cards and encoders assume that output is in the range 0-255, so limiting colors in your composition and
rendered movie may be redundant and lead to an undesired compression of the color range. If colors of your output movie
look dull, try assigning an output color profile that uses the full range of colors.
If colors look washed out, apply the Levels effect and look at the histogram to see if the lowest and highest color values
are at or near 16 and 235. If so, then this footage should be interpreted using one of the 16-235 input color profiles.
You can use the Broadcast Colors effect to reduce luminance or saturation to a safe level, but the best way to limit output
colors to the broadcast-safe range is to create your composition to not use colors out of this range. (See Broadcast Colors
effect.)
Keep in mind the following guidelines:
•Avoid pure black and pure white values.
•Avoid using highly saturated colors.
•Render a test movie and play it on a video monitor to ensure that colors are represented accurately.
Rather than using the Broadcast Colors effect to reduce the luminance or saturation of colors, you can use this effect
with the Key Out Unsafe or Key Out Safe option. Apply the effect to an adjustment layer at the top of the layer stack to
show which parts of the image are outside the broadcast-safe range.
The Color Finesse plug-in included with After Effects includes excellent tools that can help you keep your colors within
the broadcast-safe range. For more information, see the Color Finesse documentation in the folder containing the
Color Finesse plug-in. (See Color correction, color grading, and color adjustment.)
Note: After Effects 7.0 had an Expand ITU-R 601 Luma Levels option in the Interpret Footage dialog box. When opened
in After Effects CS3 or later, footage items in projects created with this option are assigned a corresponding profile.
Trish and Chris Meyer provide details about broadcast-safe colors in an article on the ProVideo Coalition website.
More Help topics
Interpret footage items
Output modules and output module settings
Color models and color spaces
Color depth and high dynamic range color
Blending modes and layer styles

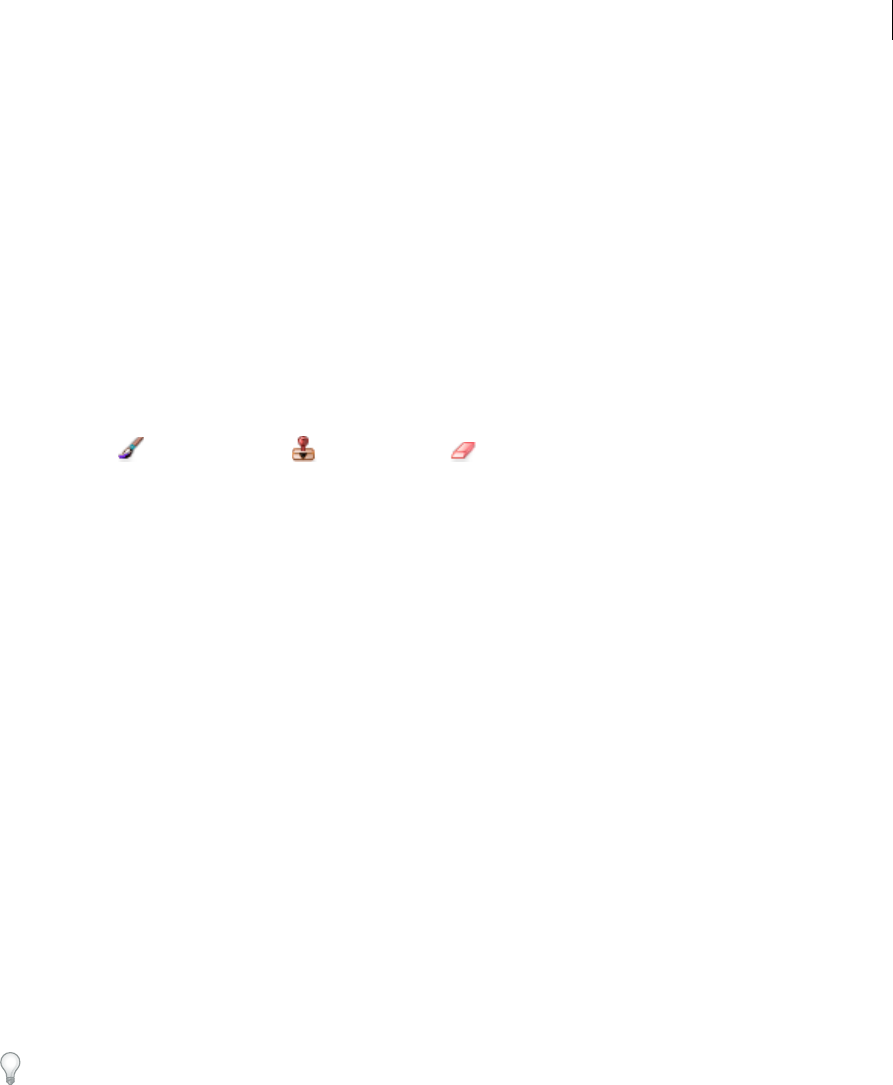
303
Last updated 6/8/2015
Chapter 9: Drawing, painting, and paths
Paint tools: Brush, Clone Stamp, and Eraser
Paint tools and paint strokes
The Brush tool , Clone Stamp tool , and Eraser tool are all paint tools. You use each in the Layer panel to
apply paint strokes to a layer. Each paint tool applies brush marks that modify the color or transparency of an area of a
layer without modifying the layer source.
Each paint stroke has its own duration bar, Stroke Options properties, and Transform properties, which you can see
and modify in the Timeline panel. Each paint stroke is, by default, named for the tool that created it, with a number that
indicates the order in which it was drawn.
At any time after you draw a paint stroke, you can modify and animate each of its properties using the same techniques
that you use to modify the properties and duration of a layer. You can copy paint stroke path properties to and from
properties for mask paths, shape layer paths, and motion paths. For even more power and flexibility, you can link these
properties using expressions. (See Creating shapes and masks and Add, edit, and remove expressions.)
Note: To specify settings for a paint stroke before you apply it, use the Paint and Brushes panels. To change and animate
properties for a paint stroke after you’ve applied it, work with properties of the stroke in the Timeline panel.
Individual brush marks are distributed along each paint stroke—though the marks may appear to merge together to
form a continuous stroke with the default settings. Brush settings for each brush in the Brushes panel determine the
shape, spacing, and other properties of brush marks; you can also modify these Stroke Options properties for each
stroke in the Timeline panel.
In After Effects, paint strokes are vector objects, which means that they can be scaled up without loss of quality. Paint
strokes in some applications, such as Photoshop, are raster objects. (See About vector graphics and raster images.)
Groups of paint strokes appear in the Timeline panel as instances of the Paint effect. Each instance of the Paint effect
has a Paint On Transparent option. If you select this option, the layer source image and all effects that precede this
instance of the Paint effect in the effect stacking order are ignored; the paint strokes are applied on a transparent layer.
For some painting, drawing, cloning, and retouching tasks, you may want to take advantage of the sophisticated paint
tools provided by Adobe Photoshop. See Working with Photoshop and After Effects.
Note: The Roto Brush tool shares some features with the paint tools, and you can work with Roto Brush strokes in many of
the same ways as paint strokes. For information about the Roto Brush tool and Roto Brush strokes, see Roto Brush strokes,
spans, and base frames .
Chris and Trish Meyer give tips for using After Effects paint tools, including the Clone Stamp tool, in an article on the
ProVideo Coalition website.
Common operations for paint tools and strokes
•To show paint strokes on selected layers in the Timeline panel, press PP.
304
Drawing, painting, and paths
Last updated 6/8/2015
•To select paint strokes in the Layer panel, use the Selection tool to click a paint stroke or drag a box around portions
of multiple paint strokes.
To momentarily activate the Selection tool, press and hold V.
•To show only selected paint strokes in the Timeline panel, select paint strokes and press SS.
•To rename a paint stroke, select the paint stroke in the Timeline panel and press Enter on the main keyboard
(Windows) or Return (Mac OS); or right-click (Windows) or Control-click (Mac OS) the name and choose Rename.
•To reorder paint strokes within an instance of the Paint effect, drag a Paint stroke to a new location in the stacking
order in the Timeline panel.
•To reorder an instance of the Paint effect to interleave it with other effects, drag the effect to a new location in the
stacking order in the Timeline panel.
•To target a specific instance of the Paint effect for the addition of new paint strokes, choose from the View menu at
the bottom of the Layer panel.
•To hide a paint stroke from view (and from rendered output), deselect the Video switch for the paint stroke.
•To open or close the Paint panel and Brushes panel when a paint tool is selected, click the Toggle The Paint Panels
button .
Common paint tool settings in the Paint panel
To use the Paint panel, first select a paint tool from the Tools panel.
Opacity For Brush and Clone strokes, the maximum amount of paint applied. For Eraser strokes, the maximum
amount of paint and layer color removed.
Flow For Brush and Clone strokes, how quickly paint is applied. For Eraser strokes, how quickly paint and layer color
are removed.
Mode How pixels in the underlying image are blended with the pixels painted on by the Brush or Clone stroke. (See
Blending mode reference.)
Channels Which channels of the layer the Brush stroke or Clone stroke affect. When you choose Alpha, the stroke only
affects opacity, so swatches are grayscale. Painting the alpha channel with pure black has the same result as using the
Eraser tool.
Duration The duration of the paint stroke. Constant applies the stroke from the current frame to the end of the
duration of the layer. Single Frame applies the stroke to the current frame only. Custom applies the stroke to the
specified number of frames, beginning with the current frame. Write On applies the stroke from the current frame to
the end of the duration of the layer and animates the End property of the stroke to match the motion with which the
stroke was drawn..
When you have a paint tool active, you can press 1 or 2 (on the main keyboard) to move the current-time indicator
forward or backward the number of frames specified by the Duration setting in the Paint panel.
Brushes and the Brushes panel
To use the Brushes panel, first select a paint tool from the Tools panel.
Choose a brush gallery display mode
❖Choose a display mode from the Brushes panel menu: Text Only, Small Thumbnail, Large Thumbnail, Small List,
or Large List.
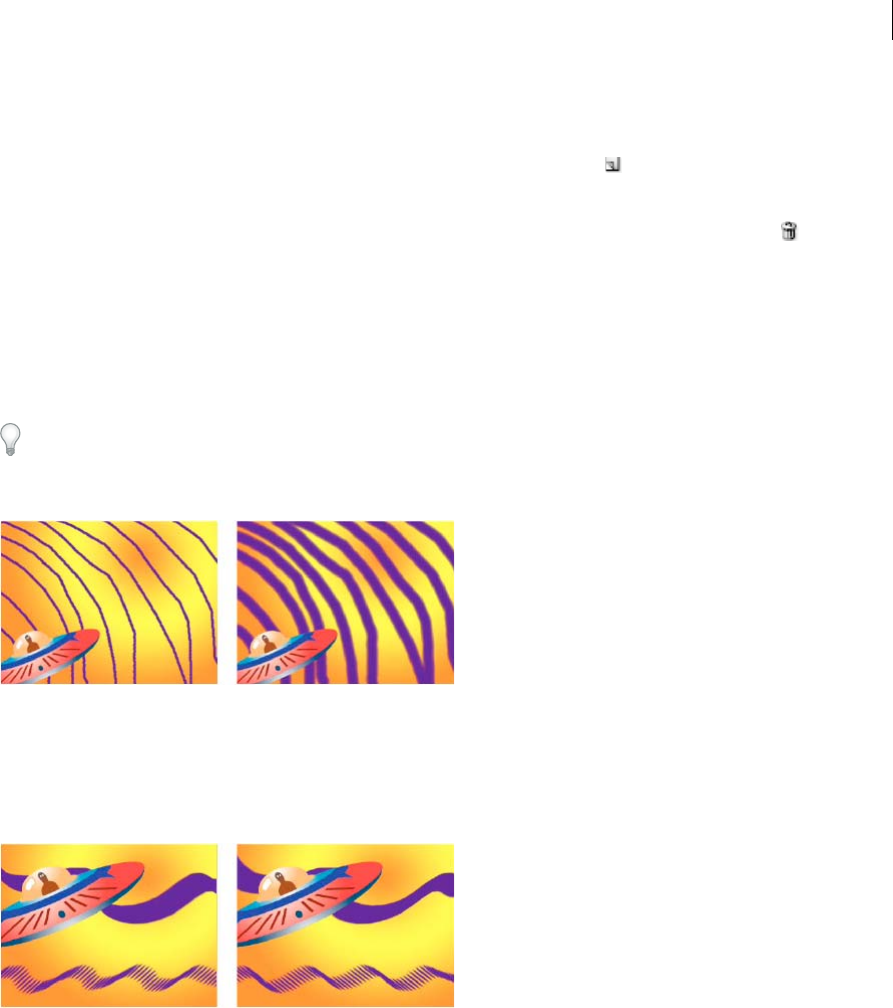
305
Drawing, painting, and paths
Last updated 6/8/2015
Create and manage preset brushes
•To create a new preset brush, specify the desired settings in the Brushes panel, and then choose New Brush from the
Brushes panel menu or click the Save Current Settings As New Brush button .
•To rename a preset brush, select the brush and choose Rename Brush from the panel menu.
•To delete a preset brush, choose Delete Brush from the panel menu or click the Delete Brush button .
•To restore the default set of preset brushes, choose Reset Brush Tips from the Brushes panel menu. To retain the
custom brushes you created, click Append when the dialog box prompts you to replace current brushes with the
default brushes.
Note: Preset brushes are saved in the preferences file, so they persist between projects.
Brush properties
Ctrl-drag (Windows) or Command-drag (Mac OS) the brush in the Layer panel to adjust Diameter; release the key and
continue to drag to adjust Hardness.
Diameter Controls the size of the brush.
Angle The angle by which the long axis of an elliptical brush is rotated from horizontal.
note: Brush angles can be expressed in both positive and negative values. For example, a brush with a 45º angle is equivalent
to a brush with a -135º angle.
Roundness The ratio between the short and long axes of a brush. A value of 100% indicates a circular brush, a value of
0% indicates a linear brush, and intermediate values indicate elliptical brushes.
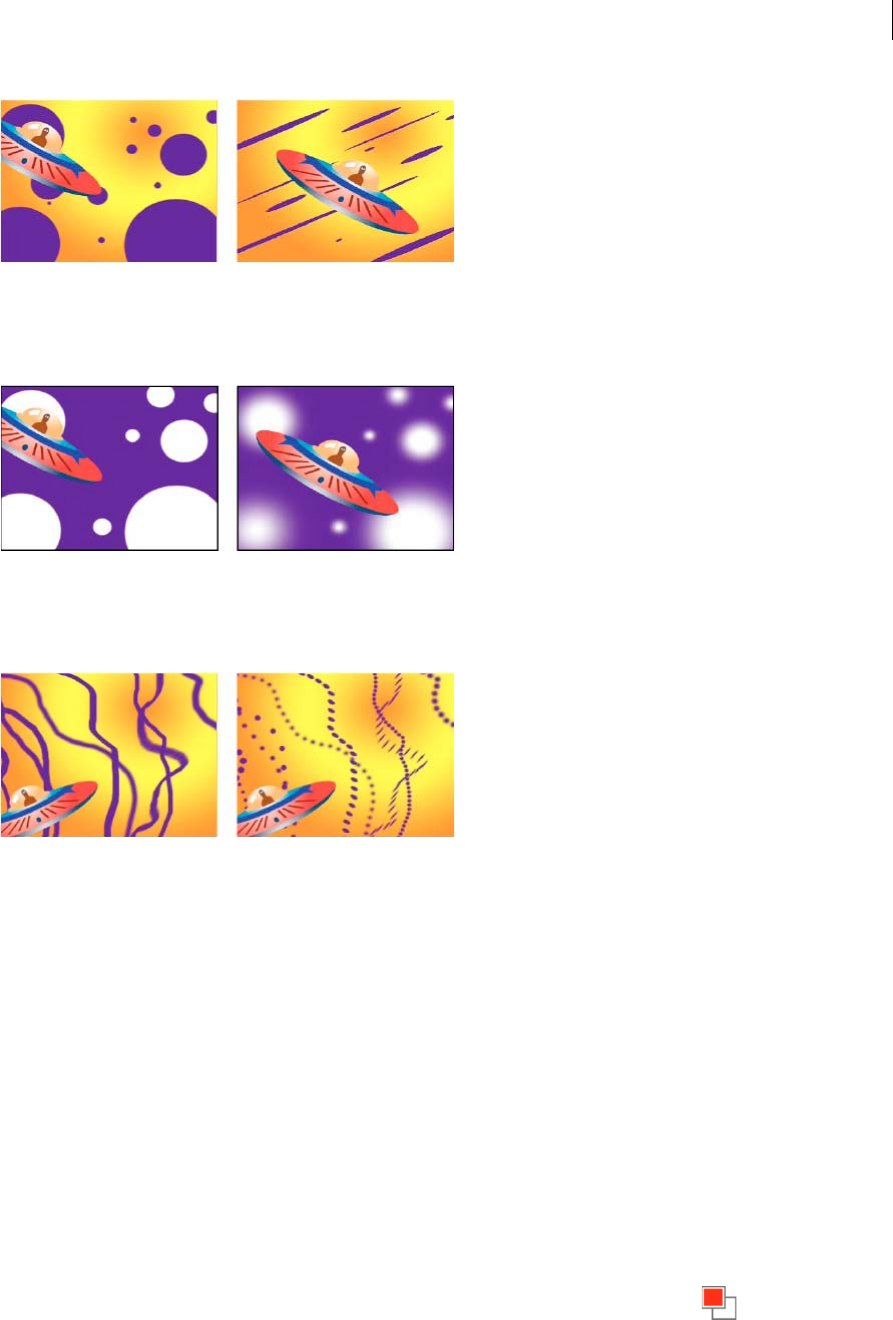
306
Drawing, painting, and paths
Last updated 6/8/2015
Hardness Controls the transition of a brush stroke from 100% opaque at the center to 100% transparent at the edges.
Even with high Hardness settings, only the center is fully opaque.
Spacing The distance between the brush marks in a stroke, measured as a percentage of the brush diameter. When this
option is deselected, the speed at which you drag to create the stroke determines the spacing.
Brush Dynamics These settings determine how the features of a pressure-sensitive digitizing tablet—such as a Wacom
pen tablet—control and affect brush marks. For each brush, you can choose Pen Pressure, Pen Tilt, or Stylus Wheel for
Size, Angle, Roundness, Opacity, and Flow to indicate what features of the pen tablet you would like to use to control
brush marks. For example, you can vary the thickness of brush marks by setting Size to Pen Pressure and pressing more
firmly when drawing some portions of the stroke. If Size is not set to Off, Minimum Size specifies the size of the
thinnest brush mark.
Paint with the Brush tool
Use the Brush tool to paint on a layer in the Layer panel with the current foreground color.
Note: To specify settings for a paint stroke before you apply it, use the Paint and Brushes panels. To change and animate
properties for a paint stroke after you’ve applied it, work with the properties of the stroke in the Timeline panel.
Select a color for the Brush tool
Do any of the following with the Brush tool active:
•To select a foreground color with the Color Picker, click the Set Foreground Color button in the Paint panel.
307
Drawing, painting, and paths
Last updated 6/8/2015
•To select a foreground color from anywhere on the screen with the eyedropper, select the eyedropper in the
Paint panel and then click to sample the color under the pointer. Ctrl-click (Windows) or Command-click (Mac OS)
to sample the average color of a 3-pixel by 3-pixel square.
You can quickly activate the eyedropper for use within the Layer panel by pressing Alt (Windows) or Option (Mac OS)
when the pointer is in the Layer panel.
•To switch the foreground color with the background color, press X or click the Switch Foreground And Background
Colors button .
•To reset the foreground color and background color to black and white, press D.
Note: To change or animate the color of a brush stroke after painting, use the Color property in the Stroke Options group
in the Timeline panel.
Paint with the Brush tool
1Select the Brush tool .
2Choose settings and a brush in the Paint panel and Brushes panel.
3In the Layer panel, drag with the Brush tool to paint on the layer.
Each time you release the mouse button, you stop drawing a stroke. When you drag again, you create a new stroke.
Shift-drag to resume drawing the previous stroke.
Paint on individual frames with the Brush tool
You can paint on individual frames over a series of frames to create an animation or to obscure unwanted details in your
footage.
If your output will be interlaced, double the frame rate of your composition before painting on individual frames. (See
Frame rate.)
1Select the Brush tool.
2In the Paint panel, choose Custom from the Duration menu, and specify the duration in frames. To paint on each
frame, set the Duration value to 1. Set other options in the Paint panel and Brushes panel as desired.
3In the Layer panel, drag with the Brush tool to paint on the layer.
Each time you release the mouse button, you stop drawing a stroke. When you drag again, you create a new stroke.
Shift-drag to resume drawing the previous stroke.
4Press 2 on the main keyboard to advance the number of frames specified by the Custom duration setting, and then
repeat the previous step.
Note: To move back the Custom number of frames, press 1 on the main keyboard.
If you use a pen tablet, map the keyboard shortcuts to the buttons on your pen to work more efficiently. See the
documentation for your pen tablet for instructions.
Clone Stamp tool
You can use the Clone Stamp tool to copy pixel values from one place and time and apply them at another place and
time. For example, you can use the Clone Stamp tool to remove wires by copying from a clear patch of sky, or you can
create a herd of cows from one cow in the source footage and offset the copies in time.
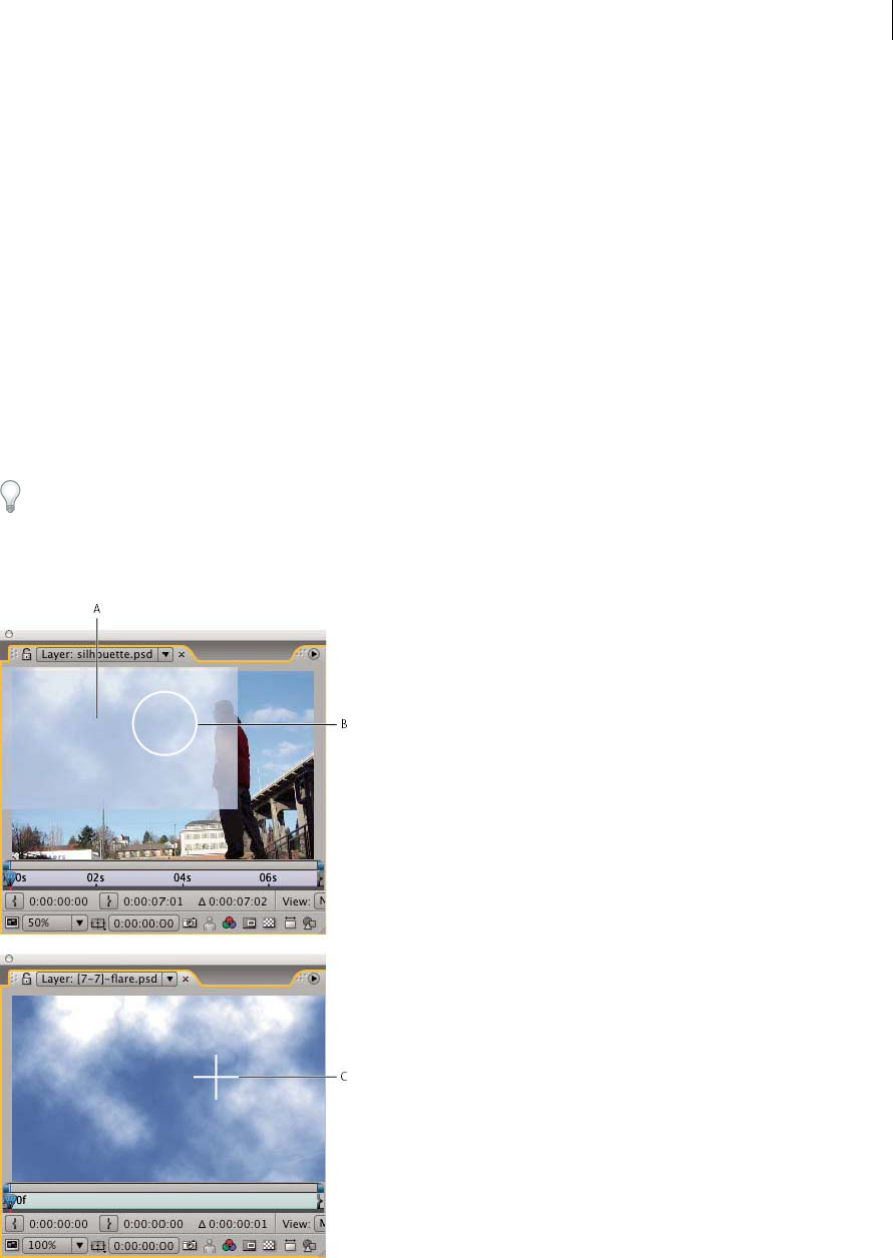
308
Drawing, painting, and paths
Last updated 6/8/2015
The Clone Stamp tool samples the pixels from a source layer and applies the sampled pixel values to a target layer; the
target layer can be the same layer or a different layer in the same composition. If the source layer and target layer are
the same, the Clone Stamp tool samples paint strokes and effects in the source layer, in addition to the layer source
image.
This video from the After Effects: Learn By Video series shows how to combine motion tracking and the Clone Stamp
tool to remove an object from a scene.
Angie Taylor provides a tutorial on the Digital Arts website that shows how to use tracking data and the Clone Stamp
tool to apply copies of an object in a scene while matching a camera move.
Eran Stern provides a video tutorial on the Creative COW website that shows how to use the Clone Stamp tool to create
copies of an object and offset them from one another in space and time.
Use the Clone Stamp tool
As with all paint tools, you use the Clone Stamp tool in the Layer panel.
If the source layer and target layer are different layers, open each layer in a different viewer. Press Ctrl+Alt+Shift+N
(Windows) or Command+Option+Shift+N (Mac OS) to split and lock the current viewer.
You can identify what result a stroke will have before you make it by using the clone source overlay, a semi-transparent
image of the source layer.
A Clone source overlay B Current stroke point C Current sample point
309
Drawing, painting, and paths
Last updated 6/8/2015
Note: To specify settings for a paint stroke before you apply it, use the Paint and Brushes panels. To change and animate
properties for a paint stroke after you’ve applied it, work with the properties of the stroke in the Timeline panel.
Select Aligned in the Paint panel to make the position of the sample point (Clone Position) change for subsequent
strokes to match the movement of the Clone Stamp tool in the target Layer panel. In other words, with the Aligned
option selected, you can use multiple strokes to paint on one copy of the sampled pixels. In contrast, deselecting the
Aligned option causes the sample point to stay the same between strokes, meaning that you begin painting on pixels
from the original sample point each time you drag again to create a new clone stroke.
For example, select Aligned to use multiple clone strokes to copy one whole cow—which would be difficult to do in one
continuous stroke—and deselect Aligned to copy one flower into dozens of places in the target layer to make a field of
flowers, using one clone stroke per copy.
Select Lock Source Time to clone a single source frame (at composition time Source Time); deselect Lock Source Time
to clone subsequent frames, with a time offset (Source Time Shift) between the source frame and the target frame. The
clone source time automatically loops back to the starting sample point when the current sampling point goes beyond
the end of the duration of the source layer. This looping is especially helpful when you have a lot of frames to repair in
the target layer but only a few good frames in the source layer.
1Open a composition that contains both the source layer and the target layer.
2Open the source layer in a Layer panel and move the current-time indicator to the frame from which to begin
sampling.
Note: You can manually manipulate the time and coordinates from which sampling begins by modifying the Offset,
Source Time Shift, Source Position, or Source Time values in the Paint panel. You can reset them to zero with the Reset
button.
3Alt-click (Windows) or Option-click (Mac OS) with the Clone Stamp tool on the source layer in the Layer panel to
set the sampling point.
4Open the target layer in a Layer panel and move the current-time indicator to the frame at which to begin painting
the clone stroke.
5Drag in the target layer to paint on cloned pixel values from the source layer. To help you identify what the Clone
Stamp tool is sampling as you apply clone strokes, a crosshair identifies the point being sampled.
Each time you release the mouse button, you stop drawing a stroke. When you drag again, you create a new stroke.
Shift-drag to resume drawing the previous stroke.
Click the Difference Mode button next to the Clone Source Overlay option in the Paint panel or modify the
opacity of the overlay to help you better line up elements and see the results of your clone strokes. To temporarily
show the clone source overlay, press Alt+Shift (Windows) or Option+Shift (Mac OS). Alt+Shift-drag (Windows) or
Option+Shift-drag (Mac OS) to change the position of the source layer.
Each clone stroke includes properties in the Timeline panel that are unique to the Clone Stamp tool and correspond to
settings made in the Paint panel before the clone stroke is created:
Clone Source The sampled layer.
Clone Position The (x, y) location of the sample point within the source layer.
Clone Time The composition time at which the source layer is sampled. This property appears only when Lock Source
Time is selected.
Clone Time Shift The time offset between the sampled frame and the target frame. This property appears only when
Lock Source Time is not selected.

310
Drawing, painting, and paths
Last updated 6/8/2015
After clone strokes have been created, their properties in the Timeline panel can be modified and animated. For
example, you can clone a bird flying across the screen by cloning it in one frame, tracking the motion of the bird, and
then linking the Clone Position property to the Attach Point property of tracker with an expression.
You can set a blending mode for clone strokes, just as for other paint strokes. For example, consider using the Darken
blending mode to remove light-colored scratches, and using the Lighten blending mode to remove dark-colored
blemishes and dust.
Work with clone presets
Use clone presets to save and reuse clone source settings: Source Layer, Aligned, Lock Source Time, Source Time Shift,
Offset, and Source Position values. Clone presets are saved in the preferences file, so they can be reused in other
projects. To work with clone presets, first select the Clone Stamp tool.
•To select a clone preset, press 3, 4, 5, 6, or 7 on the main keyboard, or click a Clone Preset button in the Paint
panel.
•To modify a clone preset, select it and adjust the Clone Options settings as desired.
•To copy the settings from one clone preset to another, select the clone preset from which to copy, and Alt-click
(Windows) or Option-click (Mac OS) the Clone Preset button for the clone preset to which you want to paste the
settings.
Eraser tool
If you use the Eraser tool in Layer Source & Paint or Paint Only mode, it creates Eraser strokes that can be modified
and animated. In contrast, using the Eraser tool in Last Stroke Only mode only affects the last paint stroke drawn and
does not create an Eraser stroke.
To temporarily use the Eraser tool in Last Stroke Only mode, Ctrl+Shift-drag (Windows) or Command+Shift-drag
(Mac OS).
1Select the Eraser tool from the Tools panel.
2Choose settings in the Paint panel.
3Select a brush in the Brushes panel, and set brush options.
4Drag through the area you want to erase in the Layer panel.
Each time you release the mouse button, you stop drawing a stroke. When you drag again, you create a new stroke.
Shift-drag to resume drawing the previous stroke.
Note: If you use a pen tablet, pressing the eraser side of the pen to the tablet temporarily activates the Eraser tool.
Animate and edit paint strokes
You animate a paint stroke by setting keyframes or expressions for its properties. After Effects animates paint stroke
properties—even the Path property of a paint stroke—by interpolating values for all frames between keyframes.
By modifying and animating the Start and End properties of a paint stroke, you can control how much of a stroke is
shown at any time. For example, by automatically animating the End property from 0% to 100% with the Write On
setting, you can make a paint stroke appear to be drawn on over time.
As with all properties, you can link paint stroke properties to other properties using expressions. For example, you can
make a paint stroke follow a moving element in your footage by tracking the moving element and then linking the
Position property of the paint stroke to the Attach Point property of the tracker.

311
Drawing, painting, and paths
Last updated 6/8/2015
Rotoscoping is a special case of painting or drawing on individual frames in which some item in the frame is being
traced. Often, rotoscoping refers to drawing animated masks rather than paint strokes. (See Rotoscoping introduction
and resources.)
Scott Squires provides a pair of movies on his Effects Corner website that show how to rotoscope, both painting and
masking:
•Rotoscoping - Part 1
•Rotoscoping - Part 2
Eran Stern provides a video tutorial on the Creative COW website that shows how to animate a set of paint strokes to
interpolate between several hand-drawn pictures so that each morphs into the next.
Animate a paint stroke by sketching with Write On
If you choose Write On from the Duration menu in the Paint panel, the End property is automatically animated to
match the motion that you used to draw the stroke.
Note: After Effects also includes a Write-on effect. (See Write-on effect.)
1Select a paint tool in the Tools panel.
2In the Paint panel, choose Write On from the Duration menu.
3Drag in the Layer panel to apply a paint stroke to the layer.
As you paint, your movements are recorded in real time and determine the rate at which the resulting stroke is
drawn to the screen for output. Recording begins when you click within the layer in Layer panel. When you release
the mouse button, the current time returns to the time at which you started painting; this behavior is so that you can
record more paint strokes for animated playback starting from the same time.
You can animate the Trim Paths operation on a shape path to accomplish a similar result as animating a paint stroke
with Write On. (See Alter shapes with path operations.)
Animate a paint stroke path
1Select a paint tool in the Tools panel.
2In the Paint panel, choose Single Frame, Constant, or Custom from the Duration menu.
3In the Layer panel, drag to create a paint stroke.
4Using the Selection tool, select the paint stroke.
To momentarily activate the Selection tool, press and hold V.
5Press SS to show the selected paint stroke in the Timeline panel.
6Click the triangle next to the paint stroke name to expand its list of properties.
7Click the stopwatch for the Path property to create an initial Path keyframe.
8Drag the current-time indicator to another time.
9While the stroke is still selected, drag in the Layer panel using a paint tool to create a paint stroke. A second Path
keyframe appears in the Timeline panel.
By creating a stroke while a stroke is selected, you replace the selected stroke, which is sometimes referred to as
stroke targeting.

312
Drawing, painting, and paths
Last updated 6/8/2015
If you are not satisfied with the way that the path is interpolated, consider creating your path as a mask, using Smart
Mask Interpolation to fine-tune the interpolation, and then copying the Mask Path property keyframes to the paint
stroke Path property. (See Animate a mask path with Smart Mask Interpolation.)
More Help topics
Blending mode reference
Layer properties in the Timeline panel
Paint tools (keyboard shortcuts)
Select a color or edit a gradient
Blending mode reference
Viewers
Add, edit, and remove expressions
Managing and animating shape paths and masks
Overview of shape layers, paths, and vector graphics
About vector graphics and raster images
Vector graphics are made up of lines and curves defined by mathematical objects called vectors, which describe an
image according to its geometric characteristics. Examples of vector graphics elements within After Effects include
mask paths, shapes on shape layers, and text on text layers.
Raster images (sometimes called bitmap images) use a rectangular grid of picture elements (pixels) to represent images.
Each pixel is assigned a specific location and color value. Video footage, image sequences transferred from film, and
many other types of images imported into After Effects are raster images.
Vector graphics maintain crisp edges and lose no detail when resized, because they are resolution-independent. This
resolution-independence makes vector graphics a good choice for visual elements, such as logos, that will be used at
various sizes.
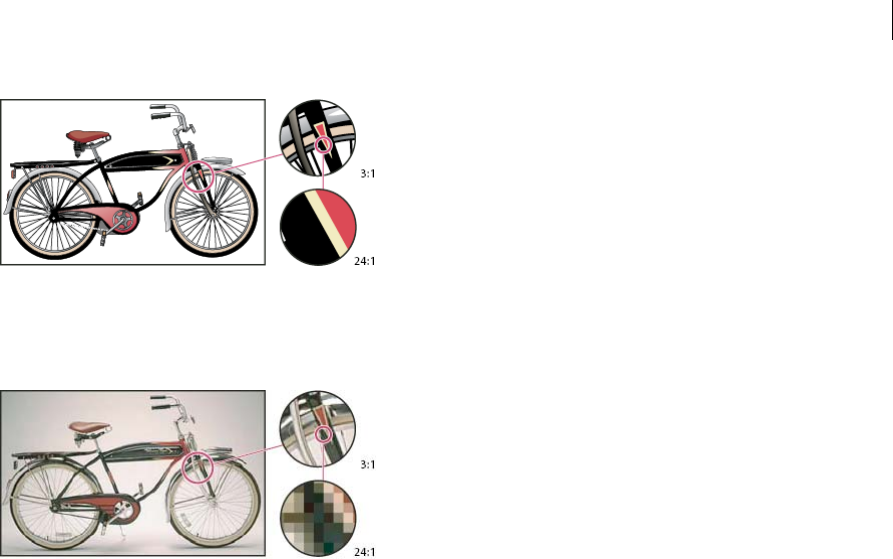
313
Drawing, painting, and paths
Last updated 6/8/2015
Raster images each consist of a fixed number of pixels, and are therefore resolution-dependent. Raster images can lose
detail and appear jagged (pixelated) if they are scaled up.
Some images are created as vector graphics in another application but are converted to pixels (rasterized) when they are
imported into After Effects. If a layer is continuously rasterized, After Effects reconverts the vector graphics to pixels
when the layer is resized, preserving sharp edges. Vector graphics from SWF, PDF, EPS, and Illustrator files can be
continuously rasterized.
Aharon Rabinowitz’s “What are Raster and Vector Graphics?” video tutorial—part of the Multimedia 101 series on the
Creative COW website—provides a general introduction to raster images and vector graphics.
About paths
Several features of After Effects—including masks, shapes, paint strokes, and motion paths—rely on the concept of a
path. Tools and techniques for creating and editing these various kinds of paths overlap, but each kind of path has its
own unique aspects.
A path consists of segments and vertices. Segments are the lines or curves that connect vertices. Vertices define where
each segment of a path starts and ends. Some Adobe applications use the terms anchor point and path point to refer to
a vertex.
You change the shape of a path by dragging its vertices, the direction handles at the end of the direction lines (or tangents)
of each vertex, or the path segment itself.
As a path exits a vertex, the angle and length of the outgoing direction line for that vertex determine the path. As the
path approaches the next vertex, the path is less influenced by the outgoing direction line of the previous vertex and
more influenced by the incoming direction line of the next vertex.
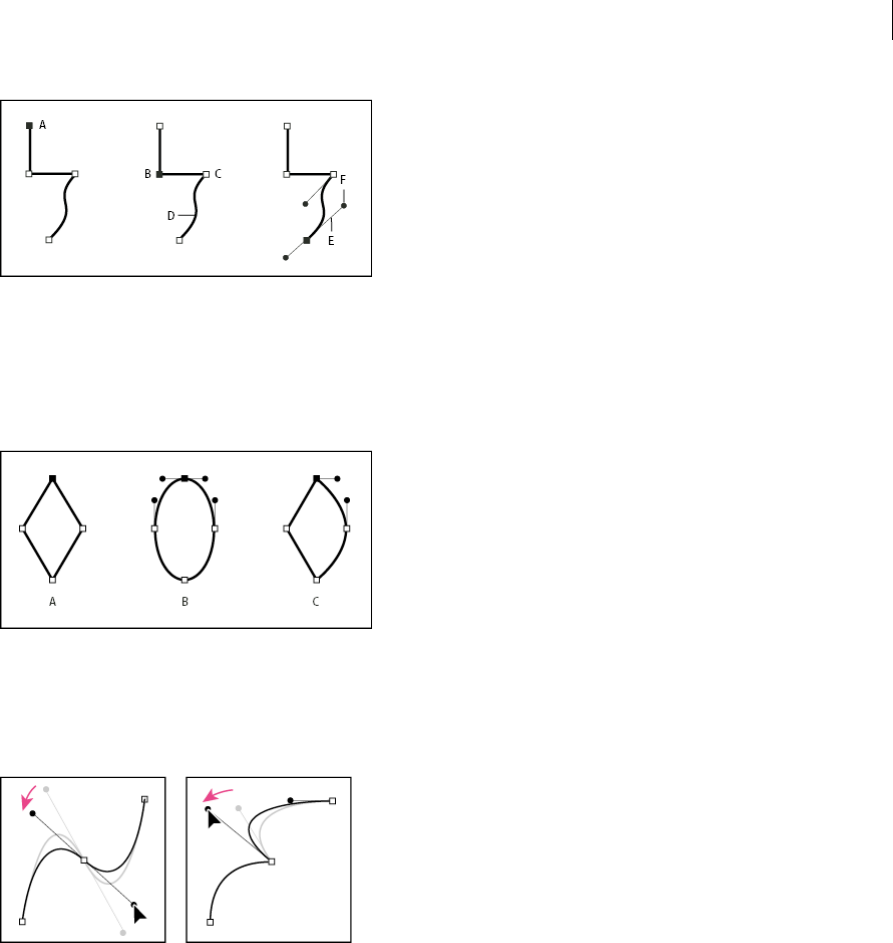
314
Drawing, painting, and paths
Last updated 6/8/2015
A Selected vertex B Selected vertex C Unselected vertex D Curved path segment E Direction line (tangent) F Direction handle
Paths can have two kinds of vertices: corner points and smooth points. At a smooth point, path segments are connected
as a smooth curve; the incoming and outgoing direction lines are on the same line. At a corner point, a path abruptly
changes direction; the incoming and outgoing direction lines are on different lines. You can draw a path using any
combination of corner and smooth points. If you draw the wrong kind of point, you can change it later.
A Four corner points B Four smooth points C Combination of corner and smooth points
When you move a direction line for a smooth point, the curves on both sides of the point adjust simultaneously. By
contrast, when you move a direction line on a corner point, only the curve on the same side of the point as the direction
line is adjusted.
A path can either be open or closed. An open path has a beginning point that is not the same as its end point; for
example, a straight line is an open path. A closed path is continuous and has no beginning or end; for example, a circle
is a closed path.
You can draw paths in common geometric shapes—including polygons, ellipses, and stars—with the shape tools, or you
can use the Pen tool to draw an arbitrary path. Paths drawn with the Pen tool are either manual Bezier paths or
RotoBezier paths. The main difference between RotoBezier and manual Bezier paths is that direction lines are
calculated automatically for RotoBezier paths, making them easier and faster to draw.
When you use the shape tools (Rectangle, Rounded Rectangle, Ellipse, Polygon, or Star) to draw a shape path on a shape
layer, you can create one of two kinds of paths: a parametric shape path or a Bezier shape path. (See About shapes and
shape layers.)

315
Drawing, painting, and paths
Last updated 6/8/2015
You can link mask paths, paint stroke paths, and Bezier shape paths using expressions. You can also copy and paste
between mask paths, paint stroke paths, Bezier shape paths, motion paths, and paths from Adobe Illustrator,
Photoshop, and Adobe Fireworks. (See Creating shapes and masks .)
For shape paths, you can use the Merge Paths path operation (similar to the Pathfinder effects in Adobe Illustrator) to
combine multiple paths into one path. (See Merge Paths options.)
When you want text or an effect to follow a path, the path must be a mask path.
A path itself has no visual appearance in rendered output; it is essentially a collection of information about how to place
or modify other visual elements. To make a path visible, you apply a stroke to it. In the case of a mask path, you can
apply the Stroke effect. In the case of a path for a shape layer object, the default is for a path to be created with a stroke
property group (attribute) after the path property group in the Timeline panel.
A color or gradient applied to the area inside the area bounded by a path is a fill.
Note: To specify the size of Bezier direction handles and vertices for masks and shapes, choose Edit > Preferences > General
(Windows) or After Effects > Preferences > General (Mac OS), and edit the Path Point Size value.
About shapes and shape layers
Shape layers contain vector graphics objects called shapes. By default, a shape consists of a path, a stroke, and a fill. (See
About pathsand Strokes and fills for shapes.)
You create shape layers by drawing in the Composition panel with the shape tools or the Pen tool. (See Creating shapes
and masks .)
Shape paths have two varieties: parametric shape paths and Bezier shape paths. Parametric shape paths are defined
numerically, by properties that you can modify and animate after drawing, in the Timeline panel. Bezier shape paths
are defined by a collection of vertices (path points) and segments that you can modify in the Composition panel. You
work with Bezier shape paths in the same way that you work with mask paths. All mask paths are Bezier paths.
You can modify a shape path by applying path operations, such as Wiggle Paths and Pucker & Bloat. You apply a stroke
to a path or fill the area defined by a path with color by applying paint operations. (See Shape attributes, paint
operations, and path operations for shape layers .)
Shape paths, paint operations, and path operations for shapes are collectively called shape attributes. You add shape
attributes using the Add menu in the Tools panel or in the Timeline panel. Each shape attribute is represented as a
property group in the Timeline panel, with properties that you can animate, just as you do with any other layer property.
(See About animation, keyframes, and expressions.)
The color bit depth of a shape layer is the same as the project as a whole: 8, 16, or 32 bpc. (See Color depth and high
dynamic range color.)
Shape layers are not based on footage items. Layers that are not based on footage items are sometimes called synthetic
layers. Text layers are also synthetic layers and are also composed of vector graphics objects, so many of the rules and
guidelines that apply to text layers also apply to shape layers. For example, you can’t open a shape layer in a Layer panel,
just as you can’t open a text layer in a Layer panel.
You can save your favorite shapes as animation presets. (See Save an animation preset.)
Online resources for shape layers
For a video tutorial creating shape layers from vector layers, visit the learn tutorials page.

316
Drawing, painting, and paths
Last updated 6/8/2015
Trish and Chris Meyer provide an introduction to shape layers in a PDF excerpt from the “Shape Layers” chapter of
their book Creating Motion Graphics with After Effects (5th Edition). Trish and Chris Meyer also provide a video
introduction to shape layers on the ProVideo Coalition website and tips about shape layers on the ProVideo Coalition
website.
You can download additional animation presets that take advantage of per-character 3D text animation from the After
Effects Exchange on the Adobe website.
Chris Zwar provides an animation preset on his website that creates a target cross-hair using a single shape layer, with
a wide variety of custom properties that make controlling and modifying the cross-hair animation easy and obvious.
Groups and render order for shapes and shape attributes
Though the default is for a shape to consist of a single path, a single stroke, and a single fill—arranged from top to
bottom in the Timeline panel—much of the power and flexibility of shape layers arises from your ability to add and
reorder shape attributes and create more complex compound shapes.
You can group shapes or shape attributes that are at the same grouping level within a single shape layer.
A group is a collection of shape attributes: paths, fills, strokes, path operations, and other groups. Each group has its
own blending mode and its own set of transform properties. By assembling shapes into groups, you can work with
multiple shapes simultaneously—such as scaling all shapes in the group by the same amount or applying the same
stroke to each shape. You can even place individual shapes or individual shape attributes within their own groups to
isolate transformations. For example, you can scale a path without scaling its stroke by grouping the path by itself.
When you add a shape attribute using the Add menu in the Tools panel or Timeline panel, the attribute is added within
the group that is selected. You can drag groups and attributes to reorder them in the Timeline panel. By reordering and
grouping shapes and shape attributes, you can affect their rendering order with respect to other shapes and shape
attributes.
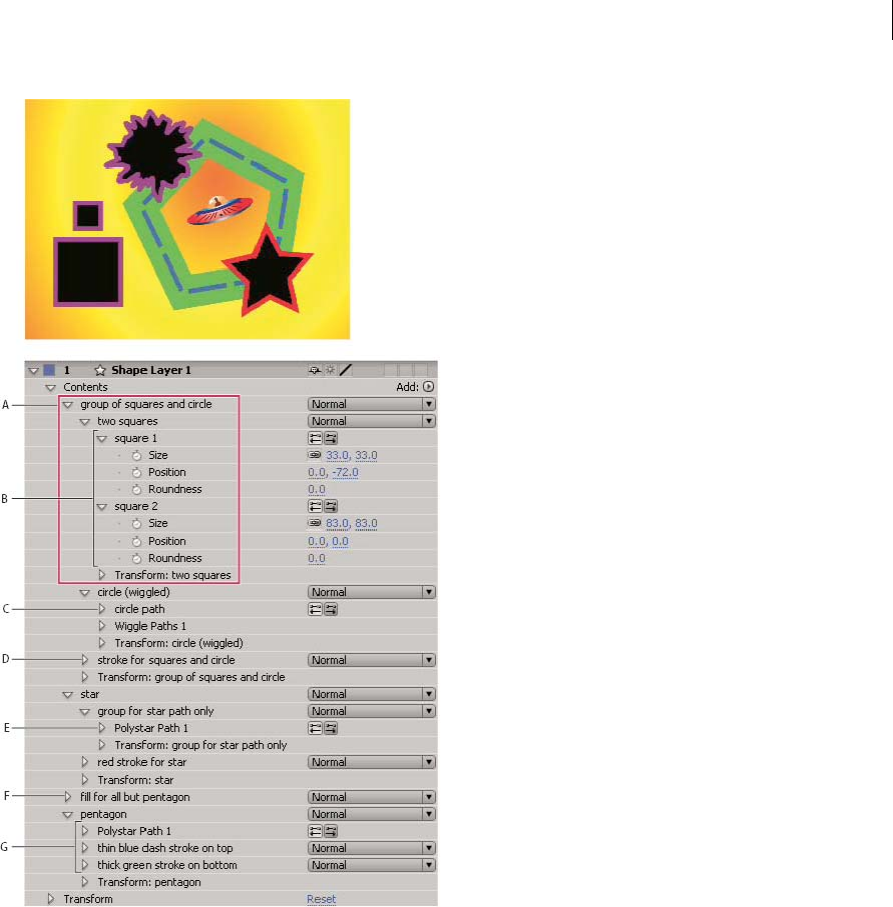
317
Drawing, painting, and paths
Last updated 6/8/2015
A Two shapes in a group B Two paths in a compound shape C Circle path with Wiggle Paths applied D One stroke applied to all paths above it
E Star path in a group by itself F One fill applied to all paths above it G One path with two strokes
Render order for shapes within a shape layer
The rules for rendering a shape layer are similar to the rules for rendering a composition that contains nested
compositions:
•Within a group, the shape at the bottom of the Timeline panel stacking order is rendered first.
•All path operations within a group are performed before paint operations. This means, for example, that the stroke
follows the distortions in the path made by the Wiggle Paths path operation. Path operations within a group are
performed from top to bottom. (See Alter shapes with path operations.)
•Paint operations within a group are performed from the bottom to the top in the Timeline panel stacking order. This
means, for example, that a stroke is rendered on top of (in front of) a stroke that appears after it in the Timeline
panel. To override this default behavior for a specific fill or stroke, choose Above Previous In Same Group for the
Composite property of the fill or stroke in the Timeline panel. (See Strokes and fills for shapes.)
Path operations and paint operations apply to all paths above them in the same group.

318
Drawing, painting, and paths
Last updated 6/8/2015
Transform properties for shape groups and shape paths
Each group has its own Transform property group. This Transform property group is represented in the Timeline panel
with a property group named Transform: [group name] and in the Composition panel as a dashed box with handles.
You can group a path by itself and transform only the path using its new Transform property group.
Introducing an additional Transform property group for a single path is useful, for example, for creating complex
motion—such as spinning about one anchor point while also revolving along an orbit. The transformations of a group
affect all shapes within the group; this behavior is the same as the behavior of layer parenting. (See Parent and child
layers.)
Each shape path also has intrinsic properties that affect the position and shape of the path. For parametric shape paths,
these properties (such as Position and Size) are parameters visible in the Timeline panel. For Bezier shape paths, these
properties are defined for each vertex but are contained within the Path property. When you modify a Bezier path using
the free-transform bounding box, you modify these intrinsic properties for the vertices that constitute that path. (See
About shapes and shape layers.)
Group shapes or shape attributes
❖Select one or more shapes or shape attributes, and do one of the following:
•Choose Layer > Group Shapes.
•Press Ctrl+G (Windows) or Command+G (Mac OS).
When you group shapes, the anchor point for the group is placed in the center of the bounding box for the group.
Ungroup shapes or shape attributes
❖Select a single group, and do one of the following:
•Choose Layer > Ungroup Shapes.
•Press Ctrl+Shift+G (Windows) or Command+Shift+G (Mac OS).
Create an empty shape group
❖Choose Group (Empty) from the Add menu in the Tools panel or in the Timeline panel.
More Help topics
Continuously rasterize a layer containing vector graphics
Best practices for creating text and vector graphics for video
About text layers
About masks
Creating shapes and masks
Add, edit, and remove expressions
Creating shapes and masks
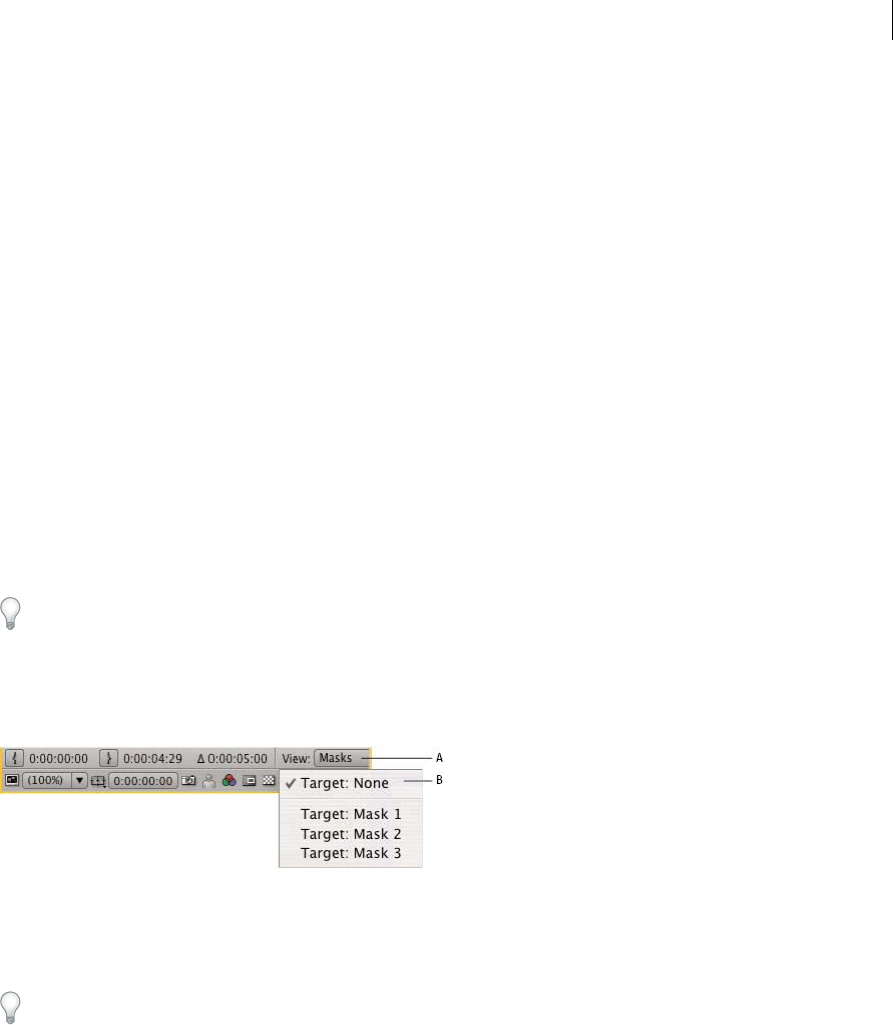
319
Drawing, painting, and paths
Last updated 6/8/2015
Creating masks
You can create one or more masks for each layer in a composition using any of the following methods:
•Draw a path using the shape tools or Pen tool. Drawing a mask path is similar to drawing a shape path. (See Create
a shape or mask by dragging with shape toolsand Create a Bezier shape or mask using the Pen tool.)
•Specify the dimensions of the mask path numerically in the Mask Shape dialog box. (See Create a rectangular or
elliptical mask numerically.)
•Convert a shape path to a mask path by copying the shape’s path to the Mask Path property.
•Convert a motion path to a mask path. (See Create a mask or shape from a motion path.)
•Trace color or alpha channel values to create a mask using the Auto-trace command. (See Create a mask from
channel values with Auto-trace.)
•Paste a path copied from another layer or from Adobe Illustrator, Photoshop, or Fireworks. (See Copy a path from
Illustrator, Photoshop, or Fireworks.)
•Convert a text layer to one or more editable masks on a solid-color layer by using the Create Masks From Text
command. (See Create shapes or masks from text characters.)
When you create masks on a layer, the mask names appear in the Timeline panel outline in the order in which you create
the masks. To organize and keep track of your masks, rename them.
To rename a mask, select it and press Enter (Windows) or Return (Mac OS), or right-click (Windows) or Control-click
(Mac OS) the mask name and choose Rename.
When creating additional masks for one layer in the Layer panel, make sure that the Target menu in the Layer panel is
set to None; otherwise, you replace the targeted mask instead of creating a new mask. You can also lock a mask to
prevent changes to it.
A View menu B Target menu
When creating or editing masks, look in the Info panel for information such as the mask name and the number of
vertices in the mask.
To create a mask that you can move independently of the primary layer that it is masking, do the following:
1Create the mask on a separate white solid layer, and use that solid layer as a track matte for the primary layer.
2Use parenting to make the solid layer a child of the primary layer, so that the mask moves with the primary layer as
if it were applied directly. Because the solid layer is a child layer, it can also be animated independently of its parent.
3You can use motion tracking to make the solid layer (and therefore the mask) follow moving objects in the primary
layer. (See Convert a layer into a track matteand Parent and child layers.)
Create a rectangular or elliptical mask numerically
1Select a layer in the Composition panel, or display a layer in the Layer panel.
2Choose Layer > Mask > New Mask. A new mask appears in the Composition or Layer panel with its handles at the
outer edges of the frame.

320
Drawing, painting, and paths
Last updated 6/8/2015
3Choose Layer > Mask > Mask Shape.
4Select Reset To, choose Rectangle or Ellipse from the Shape menu, and specify the size and location of the bounding
box for the mask.
Create a mask from channel values with Auto-trace
1You can convert the alpha, red, green, blue, or luminance channel of a layer to one or more masks by using the Auto-
trace command.
2Auto-trace creates as many Bezier masks as necessary to outline the specified channel values in the layer.
3It also creates masks with the smallest number of vertices possible while conforming to the settings that you choose.
4You can modify a mask created with Auto-trace as you would any other mask, and you can link its path to other path
types, such as shape paths on a shape layer, using expressions.
When you apply Auto-trace, affected layers are automatically set to Best Quality to ensure accurate results.
To reduce the number of masks created by Auto-trace, apply a keying effect to the layer to isolate your subject before
applying Auto-trace.
1In the Timeline panel, do one of the following:
•To create mask keyframes at a single frame, drag the current-time indicator to the desired frame.
•To create mask keyframes across a range of frames, set a work area that spans that range.
2Select one or more layers.
3Choose Layer > Auto-trace.
4Select one of the following:
Current Frame Creates mask keyframes at only the current frame.
Work Area Creates mask keyframes for frames within the work area.
5Set any of the following options:
Invert Inverts the input layer before searching for edges.
Blur Blurs the original image before generating the tracing result. Select this option to reduce small artifacts and to
smooth jagged edges in the tracing result. Deselect this option to closely trace details in a high-contrast image.
Specify the radius, in pixels, of the area used for the blurring operation. Larger values result in more blur.
Tolerance How far, in pixels, the traced path is allowed to deviate from the contours of the channel.
Threshold Specifies, as a percentage, the value that a pixel’s channel must have for that pixel to be considered part
of an edge. Pixels with channel values over the threshold are mapped to white and are opaque; pixels with values
under the threshold are mapped to black and are transparent.
Minimum Area Specifies the smallest feature in the original image that will be traced. For example, a value of 4
removes features smaller than 2 pixels wide by 2 pixels high from the tracing result.
Corner Roundness Specifies the roundness of the mask curve at vertices. Enter a higher value for smoother curves.
Apply To New Layer Applies the mask to a new solid the same size as the selected layer. This control is automatically
selected for layers that have Collapse Transformations enabled—it creates a new layer the same size as the
composition that contains the layer.
Preview Select to preview the mask results and the results of the various options of the Auto-trace command.

321
Drawing, painting, and paths
Last updated 6/8/2015
Creating shapes and shape layers
You create a shape layer by drawing in the Composition panel with a shape tool or the Pen tool. You can then add shape
attributes to existing shapes or create new shapes within that shape layer. By default, if you draw in the Composition
panel when a shape layer is selected, you create a new shape within that shape layer, above the selected shapes or group
of shapes. If you draw in the Composition panel using a shape tool or Pen tool when an image layer other than a shape
layer is selected, you create a mask.
Press F2 to deselect all layers before drawing in the Composition panel to create a new shape layer.
You can create shapes and shape layers using any of the following methods:
•Draw a path using the shape tools or Pen tool. Drawing a mask path is similar to drawing a shape path. (See Create
a shape or mask by dragging with shape toolsand Create a Bezier shape or mask using the Pen tool.)
•Convert a text layer to shapes on a shape layer by using the Create Shapes From Text command. (See Create shapes
or masks from text characters.)
•Convert a mask path to a shape path.
•Convert a motion path to a shape path. (See Create a mask or shape from a motion path.)
•Paste a path copied from another layer or from Adobe Illustrator, Photoshop, or Fireworks. (See Copy a path from
Illustrator, Photoshop, or Fireworks.)
•Create a new, empty shape layer by choosing Layer > New > Shape Layer.
In most cases, a new shape has a fill and a stroke that correspond to the Fill and Stroke settings in the Tools panel at the
time that the shape is drawn. You can use the same controls in the Tools panel to change these attributes for a selected
shape after it has been drawn. Shapes created from text are created with fills and strokes that match the fills and strokes
of the original text.
Note: To draw a mask on a shape layer, click the Tool Creates Mask button in the Tools panel with a shape tool or Pen
tool active. For more information about creating masks, see Creating masks.
Aharon Rabinowitz provides a video tutorial on the Creative COW website that shows how to combine multiple paths
into a single compound shape using the Merge Paths path operation.
Vector Art Footage-to-Shape Conversion | CC, CS6
In previous versions of After Effects you could import an Illustrator (.ai), EPS (.eps), or PDF (.pdf) file, however you
could not modify the file. Now you can create a shape layer from a vector art footage layer, and then modify it.
With the ability to bevel and extrude objects in After Effects, you can extrude the artwork (for example, extruded logos),
as well. See Extruding text and shape layers .
To convert a vector art footage layer to shape layer:
❖Choose Layer > Create Shapes from Vector Layer. A matching shape layer will appear above the footage layer, and
the footage layer will be muted.
The following issues are known:
•Not all features of Illustrator files are currently preserved. Examples include: opacity, images, and gradients.
•Converted shapes ignore PAR overrides specified in the Interpret Footage dialog box.
•Gradients and unsupported types may show as 50% gray shapes.
•Files with thousands of paths may import very slowly without feedback.
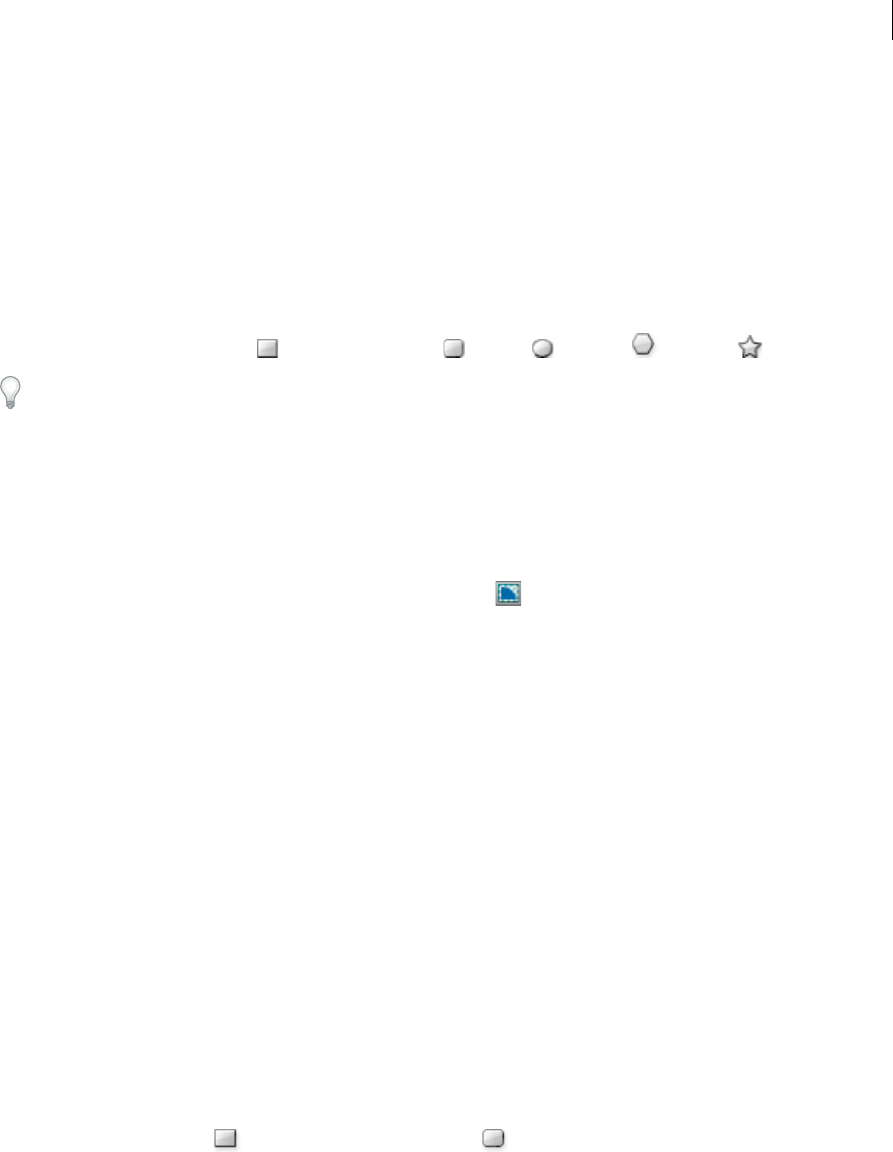
322
Drawing, painting, and paths
Last updated 6/8/2015
•The menu command works on a single selected layer at a time.
•If you import an Illustrator file as a composition (i.e., several layers), you cannot convert all of those layers in one
pass. However, you can import the file as footage, and then use the command to convert the single footage layer
to shapes.
In this video by Todd Kopriva and video2brain, see how to quickly convert vector graphics from Illustrator to shape
layers and animate the paths in After Effects CS6. This process is much simpler than previous versions of After Effects.
Create a shape or mask by dragging with shape tools
The shape tools are the Rectangle , Rounded Rectangle , Ellipse , Polygon , and Star tools.
To activate and cycle through the shape tools, press Q.
A polygon is a star without an Inner Radius or Inner Roundness property, so the name of the shape created for a
polygon or a star is the same: polystar.
You can create a mask by dragging with a shape tool on a selected layer in the Composition panel or Layer panel. You
can create a shape by dragging with a shape tool on a selected shape layer in the Composition panel. If you drag with a
shape tool in the Composition panel with no layer selected, you create a shape on a new shape layer.
Note: To draw a mask on a shape layer, click the Tool Creates Mask button in the Tools panel with a shape tool active.
When you create a shape by dragging with a shape tool in the Composition panel, you create a parametric shape path.
To instead create a Bezier shape path, press the Alt (Windows) or Option (Mac OS) key before you click to begin
dragging. You can release the key before you complete the drag operation. All mask paths are Bezier paths. (See About
shapes and shape layers.)
Dragging starts when you click in the Composition panel or Layer panel to begin drawing, and ends when you release
the mouse button. Pressing modifier keys at different times during a single dragging operation achieves different
results:
•To reposition a shape or mask as you are drawing, hold the spacebar or the middle mouse button while dragging.
•To scale a circle, ellipse, square, rounded square, rectangle, or rounded rectangle around its center while drawing,
hold the Ctrl (Windows) or Command (Mac OS) key after you begin dragging. Don’t release the key until you have
released the mouse button to finish drawing.
•To cancel the drawing operation, press Esc.
Note: Each shape tool retains the settings of the most recent drawing operation with that tool. For example, if you draw a
star and modify the number of points to be 10, then the next star that you draw will also have 10 points. To reset settings
for a tool and create a shape with the default settings, double-click the tool in the Tools panel. (See Create a shape or mask
the size of the layer.)
Draw rectangles, rounded rectangles, squares, and rounded squares
1Select the Rectangle tool or the Rounded Rectangle tool , and do one of the following:
•To draw a rectangle or rounded rectangle, drag diagonally.
•To draw a square or rounded square, Shift-drag diagonally.
2(Optional) If drawing a rounded rectangle or rounded square, do the following before releasing the mouse button:
•To increase or decrease the corner roundness, press the Up Arrow key or the Down Arrow key, or roll the mouse
wheel forward or backward.
•To set corner roundness to the minimum or maximum, press the Left Arrow key or the Right Arrow key.
323
Drawing, painting, and paths
Last updated 6/8/2015
3Release the mouse button to finish drawing. If drawing a square or rounded square, release the Shift key after
releasing the mouse button.
Note: Squares are created to be square according to the pixel aspect ratio of the composition. If the pixel aspect ratio of the
composition is not 1, then squares only appear square in the Composition panel if the Toggle Pixel Aspect Ratio button is
selected at the bottom of the Composition panel.
Draw ellipses and circles
1Select the Ellipse tool , and do one of the following:
•To draw an ellipse, drag diagonally.
•To draw a circle, Shift-drag diagonally.
2Release the mouse button to finish drawing. If drawing a circle, release the Shift key after releasing the mouse button.
Note: Circles are created to be circular according to the pixel aspect ratio of the composition. If the pixel aspect ratio of the
composition is not 1, then circles only appear circular in the Composition panel if the Toggle Pixel Aspect Ratio button is
selected at the bottom of the Composition panel.
Draw polygons and stars
1Select the Polygon tool or the Star tool , and do one of the following:
•Drag to scale and rotate the polygon or star as you draw it.
•Shift-drag to scale the polygon or star as you draw it, preventing rotation.
2(Optional) Do the following before releasing the mouse button:
•To add or remove points, press the Up Arrow key or the Down Arrow key, or roll the mouse wheel forward or
backward.
•To increase or decrease the outer roundness, press the Left Arrow key or the Right Arrow key.
•To keep the inner radius of a star constant as you move the mouse to increase the outer radius, hold the Ctrl
(Windows) or Command (Mac OS) key.
•To increase or decrease the inner roundness of a star, press the Page Up key or the Page Down key.
3Release the mouse button to finish drawing. If Shift-dragging to prevent rotation, release the Shift key after releasing
the mouse button.
Create a Bezier shape or mask using the Pen tool
You can create a Bezier mask using the Pen tool on a selected layer in the Composition panel or Layer panel. You can
create a shape with a Bezier path using the Pen tool on a selected shape layer in the Composition panel. If you draw
with the Pen tool in the Composition panel with no layer selected, you create a shape on a new shape layer.
Creating a RotoBezier path is similar to creating a manual Bezier path. The primary difference is that direction lines
for vertices and curvature for path segments are automatically calculated.
Create a manual Bezier path using the Pen tool
1With the Pen tool selected and the RotoBezier option deselected in the Tools panel, click in the Composition panel
where you want to place the first vertex.
2Click where you want to place the next vertex. To create a curved segment, drag the direction line handle to create
the curve that you want.
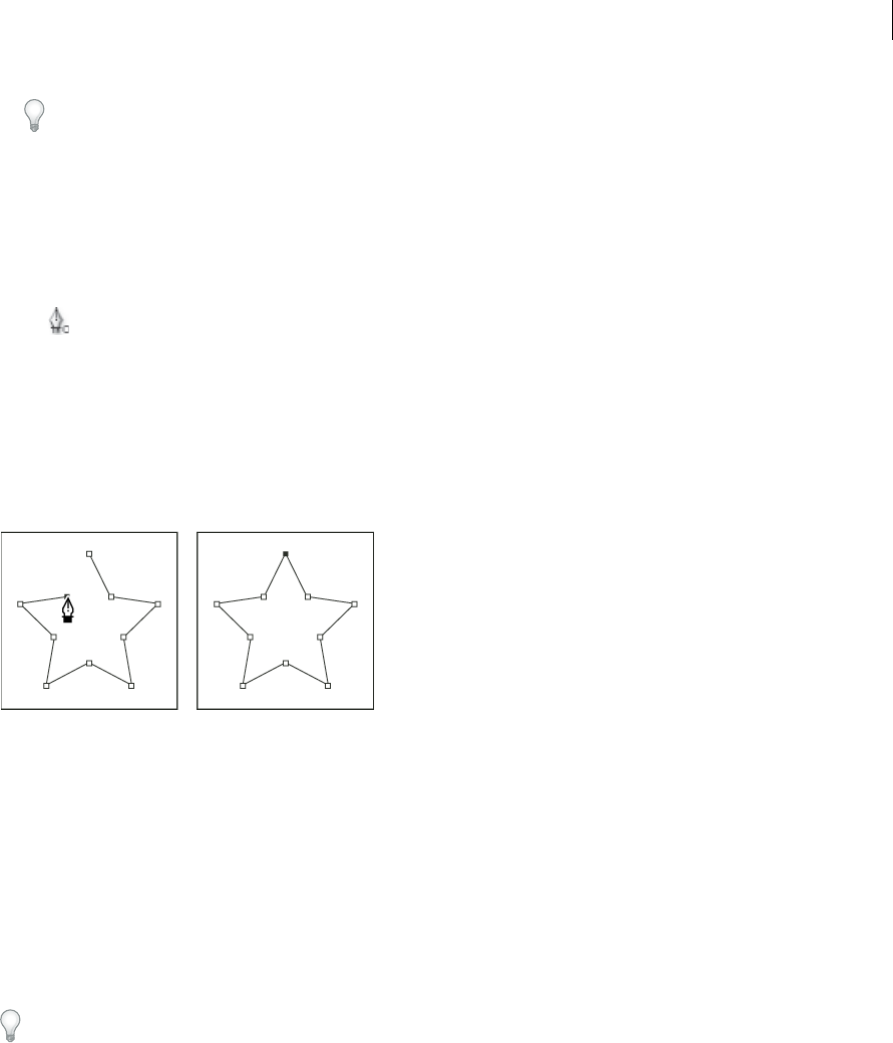
324
Drawing, painting, and paths
Last updated 6/8/2015
To reposition a vertex after you’ve clicked to place it but before you’ve released the mouse button, hold the spacebar
while dragging.
The last vertex that you add appears as a solid square, indicating that it is selected. Previously added vertices become
hollow, and deselected, as you add more vertices.
3Repeat step 2 until you are ready to complete the path.
4Complete the path by doing one of the following:
•To close the path, place the pointer over the first vertex and, when a closed circle icon appears next to the pointer
, click the vertex.
Note: You can also close a path by double-clicking the last vertex or choosing Layer > Mask And Shape Path > Closed.
•To leave the path open, activate a different tool, or press F2 to deselect the path.
Draw straight manual Bezier path segments with the Pen tool
The simplest path that you can draw with the Pen tool is a straight line, made by clicking with the Pen tool to create two
vertices. By continuing to click, you create a path made of straight line segments connected by corner points.
1Place the Pen tool where you want the straight segment to begin, and click to place a vertex. (Do not drag.)
2Click again where you want the segment to end. (Shift-click to constrain the angle between segments at the corner
point to a whole multiple of 45°.)
3Continue clicking to set vertices for additional straight segments.
Draw curved manual Bezier path segments with the Pen tool
You create a curved path segment by dragging direction lines. The length and direction of the direction lines determine
the shape of the curve.
Shift-drag to constrain the angle of the direction lines to whole multiples of 45°. Alt-drag (Windows) or Option-drag
(Mac OS) to modify only the outgoing direction line.
1Place the Pen tool where you want the curve to begin, and hold the mouse button down.
A vertex appears, and the Pen tool pointer changes to an arrowhead.
2Drag to modify the length and direction of both direction lines for a vertex, and then release the mouse button.

325
Drawing, painting, and paths
Last updated 6/8/2015
A Placing the Pen tool B Starting to drag (mouse button pressed) C Dragging to extend direction lines
3Place the Pen tool where you want the curved segment to end, and do one of the following:
•To create a C-shaped curve, drag in the direction opposite from the direction that you dragged the previous
direction line, and then release the mouse button.
A Starting to drag B Dragging away from previous direction line, creating a C curve C Result after releasing mouse button
•To create an S-shaped curve, drag in the same direction as the previous direction line, and then release the mouse
button.
A Starting to drag B Dragging in same direction as previous direction line, creating an S curve C Result after releasing mouse button
4Continue dragging the Pen tool from different locations to create a series of smooth curves.
Create a shape or mask the size of the layer
1Select the destination for the new mask or shape:
•To create a shape on an existing shape layer, select the shape layer.
•To create a shape on a new shape layer with the dimensions of the composition, deselect all layers by pressing F2.
•To create a mask, select a layer in the Timeline panel, Layer panel, or Composition panel. To create a mask on a
shape layer, select Tool Creates Mask in the Tools panel with a shape tool active.
•To replace a mask path, select the mask in the Timeline panel, Layer panel, or Composition panel.
•To replace a shape path, select the shape path (not the group) in the Composition panel or Timeline panel.
2In the Tools panel, double-click the Rectangle , Rounded Rectangle , Ellipse , Polygon , or Star tool.

326
Drawing, painting, and paths
Last updated 6/8/2015
Create shapes or masks from text characters
The Create Shapes From Text command extracts the outlines for each character, creates shapes from the outlines, and
puts the shapes on a new shape layer. You can then use these shapes as you would any other shapes.
The Create Masks From Text command extracts the outlines for each character, creates masks from the outlines, and
puts the masks on a new solid-color layer. You can then use these masks as you would any other masks.
Some font families, such as Webdings, include characters that are graphical images, rather than text. Converting text
from these font families can be a good way to get started with simple graphical elements in shape layers.
Create shapes from text
1Select the text to convert to shapes:
•To create shapes for all characters in a text layer, select the text layer in the Timeline panel or Composition panel.
•To create shapes for specific characters, select the characters in the Composition panel.
2Do one of the following:
•Choose Layer > Create Shapes From Text.
•Right-click (Windows) or Control-click (Mac OS) the layer or text and choose Create Shapes From Text from the
context menu.
The Video switch for the text layer is turned off.
The new shape layer is created at the top of the layer stacking order. The new layer contains one shape group for each
selected character, plus fill and stroke properties that match the fills and strokes of the text.
For characters that consist of compound paths—such as i and e—multiple paths are created and combined with the
Merge Paths path operation.
Effects, masks, layer styles, and keyframes and expressions for properties in the Transform property group of the text
layer are copied to the new shape layer or solid-color layer.
Create masks from text
1Select the text to convert to masks:
•To create masks for all characters in a text layer, select the text layer in the Timeline panel or Composition panel.
•To create masks for specific characters, select the characters in the Composition panel.
2Do one of the following:
•Choose Layer > Create Masks From Text.
•Right-click (Windows) or Control-click (Mac OS) the layer or text and choose Create Masks From Text from the
context menu.
The Video switch for the text layer is turned off.
The new solid-color layer is created at the top of the layer stacking order.
For characters that consist of compound paths—such as i and e—multiple masks are created and combined with the
Subtract mask mode.
Copy a path from Illustrator, Photoshop, or Fireworks
You can copy a path from Illustrator, Photoshop, or Fireworks and paste it into After Effects as a mask path or shape
path.
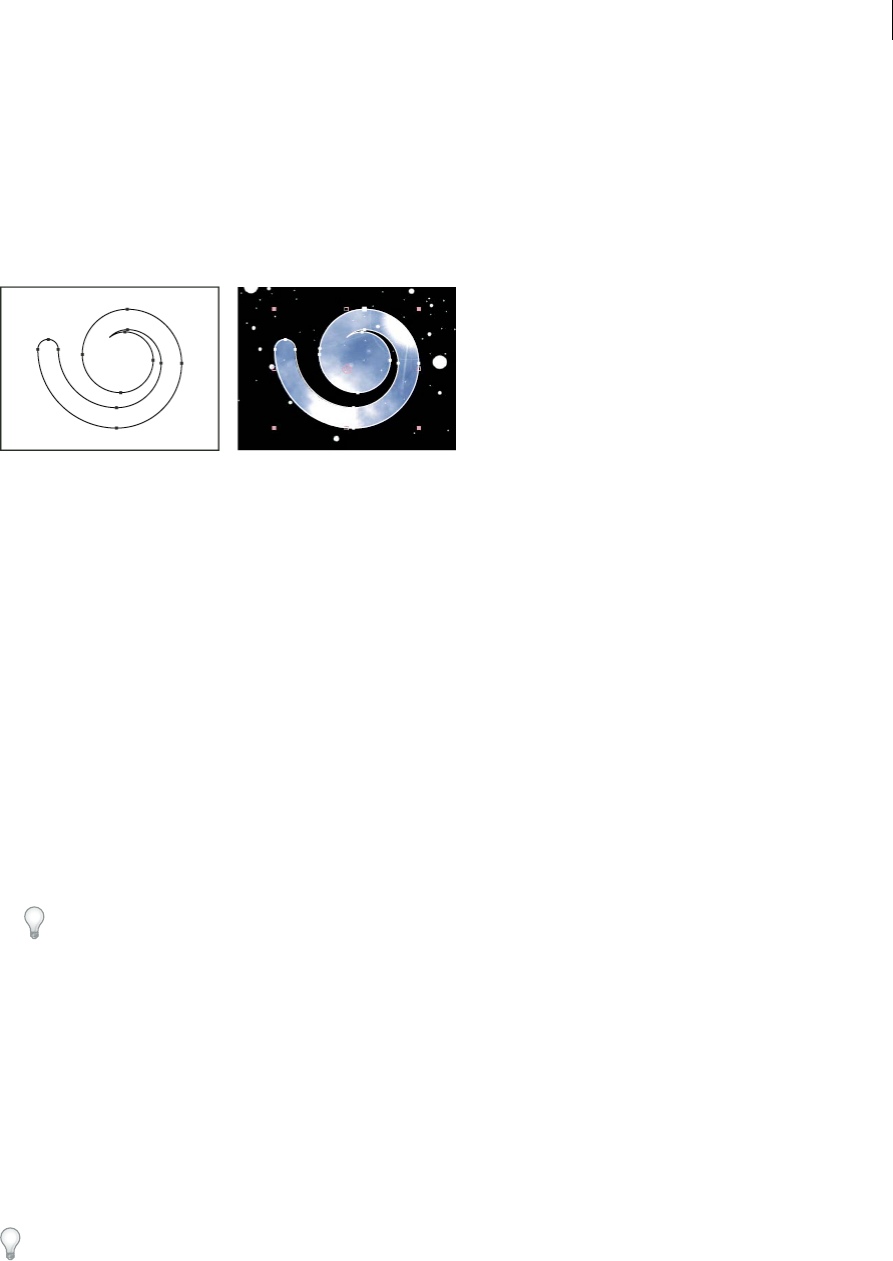
327
Drawing, painting, and paths
Last updated 6/8/2015
To make the data copied from Illustrator compatible with After Effects, the AICB option must be selected in the Files
& Clipboard section of the Adobe Illustrator Preferences dialog box.
For a path imported from Photoshop to be scaled correctly, the Photoshop document must have a resolution of 72 dpi.
72 dpi is the Resolution setting of documents created in Photoshop using a Film & Video preset.
note: You can also use a copied Illustrator, Photoshop, or Fireworks path as an After Effects motion path. See Create a
motion path from a mask, shape, or paint path for more information.
1In Illustrator, Photoshop, or Fireworks, select an entire path, and then choose Edit > Copy.
2In After Effects, do one of the following to define a target for the paste operation:
•To create a new mask, select a layer.
•To replace an existing mask path or shape path, select its Path property.
Note: To paste a path as a shape path, you must select the Path property of an existing shape in a shape layer. This
selection tells After Effects what the target of the paste operation is; if the target isn’t specified in this way, After Effects
assumes that the target is the entire layer and therefore draws a new mask. If there is no Path property—perhaps because
the shape layer is empty—then you can draw a placeholder path with the Pen tool and then paste the path from
Illustrator into the placeholder path.
3Choose Edit > Paste.
If you paste multiple paths into a shape path, the first path goes into the shape path, and the remaining paths are
pasted into new mask paths. This behavior is because the paths other than the first one don’t have a clearly defined
target, so they are added to the entire layer as masks.
To paste multiple paths into multiple shape paths simultaneously, first create and select multiple placeholder shape
paths in After Effects. Trish and Chris Meyer provide details of this technique, plus related tips and tricks on the
ProVideo Coalition website.
Andrew Devis shows how to use paths from Illustrator as motion paths in After Effects in this video on the Creative
COW website.
Create a mask or shape from a motion path
You can copy position keyframes, anchor point keyframes, or an effect control point’s position keyframes and paste
those keyframes into a selected mask path or shape path. When you create mask paths or shape paths from motion
paths, make sure that you copy keyframes from a single Position property only—do not copy the keyframes of any other
property.
Draw a motion path with Motion Sketch and then paste the path into a mask path or shape path.
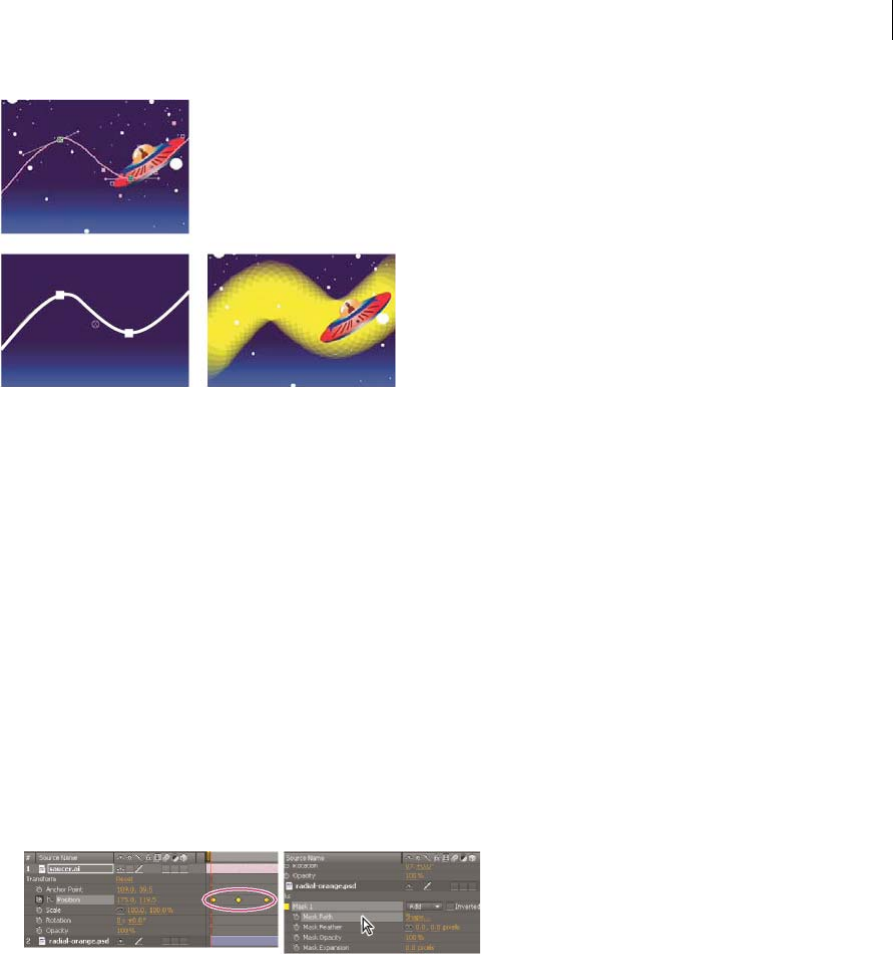
328
Drawing, painting, and paths
Last updated 6/8/2015
Note: When copying between a mask path to a motion path, keep in mind that the mask path’s values are expressed in the
coordinate system of the layer (layer space), whereas the motion path’s values are expressed in the coordinate system of the
composition (composition space). This difference may cause the pasted path to be offset, requiring you to reposition the path
after pasting it. (See Coordinate systems: composition space and layer space.)
Create a mask path from a motion path
1In the Timeline panel, click the name of the Position property or Anchor Point property from which you want to
copy the motion path. (This selects all keyframes. To select only some of the keyframes of a motion path, Shift-click
them.)
2Choose Edit > Copy.
3To create a new mask, select the layer on which to create the mask, and choose Layer > Mask > New Mask.
4In the Timeline panel, click the name of the Mask Path property for the mask into which to paste the keyframes from
the motion path.
5Choose Edit > Paste.
Create a shape path from a motion path
1In the Timeline panel, click the name of the Position property or Anchor Point property from which you want to
copy the motion path. (This selects all keyframes. To select only some of the keyframes of a motion path, Shift-click
them.)
2Choose Edit > Copy.
3To create a new shape layer, press F2 to deselect all layers, then click in the Composition panel with the Pen tool to
create a single-point Bezier path.
4Press SS to reveal the Path property for the shape. Click the name of the Path property into which to paste the
keyframes from the motion path.
5Choose Edit > Paste.

329
Drawing, painting, and paths
Last updated 6/8/2015
Duplicate a shape group while transforming
When a shape group is selected in group selection mode, you can duplicate the group while moving, rotating, or scaling
it in the Composition panel.
•Hold the Alt (Windows) or Option (Mac OS) key as you drag to transform a group.
The pointer changes to a duplication pointer ( or ) as you hold the key and place the pointer near the group
transform box.
Creating Contrasting Color for Mask Path
When the Use Contrasting Color For Mask Path preference (under Preferences > Appearance) is enabled, After Effects
analyzes the colors near the point where you start drawing a mask. After Effects then chooses a label color that is
different from the colors in that region. It also avoids the color of the last mask drawn.
More Help topics
About masks
About shapes and shape layers
Keying overview and tips
Work are a
Shape layers (keyboard shortcuts)
Keyboard shortcuts
About text layers
Preparing and importing Illustrator files
Drawing
Motion paths
Select a shape group in group selection mode
Managing and animating shape paths and masks
You animate mask paths and shape paths in much the same way that you animate other properties: set keyframes for
the Mask Path or Path property, set paths at each keyframe, and After Effects will interpolate between these specified
values.
Rotoscoping introduction and resources
Rotoscoping (or just roto in casual usage) is the drawing or painting on frames of a movie, using visual elements in the
movie as a reference. A common kind of rotoscoping is tracing a path around an object in a movie and using that path
as a mask to separate the object from its background. This allows you to work with the object and the background
separately, so you can do things like apply different effects to the object than to its background or replace the
background.

330
Drawing, painting, and paths
Last updated 6/8/2015
Note: After Effects includes the Roto Brush and Refine Edge tools, which can be used to accomplish many of the same tasks
as conventional rotoscoping, but in far less time. For information about using the Roto Brush tool, see Roto Brush, Refine
Edge, and Refine Matte effects | CC.
If a background or foreground object is a consistent, distinct color, you can use color keying instead of rotoscoping to
remove the background or object. If the footage was shot with color keying in mind, color keying is much easier than
rotoscoping. (See Keying introduction and workflow.)
Rotoscoping in After Effects is mostly a matter of drawing masks, animating the mask path, and then using these masks
to define a matte. Many additional tasks and techniques make this job easier, such as using motion tracking on the
object before you begin drawing masks, and then using the motion tracking data to make a mask or matte automatically
follow the object.
Rotoscoping tips
•Immediately after beginning to draw a mask, press Alt+Shift+M (Windows) or Option+Shift+M (Mac OS) to turn
on keyframing for that mask and set a keyframe. This way, you won’t edit a mask frame-by-frame for several minutes
(or longer) and then realize that you lost all of your work on previous frames because you forgot to click the
stopwatch to make the mask path animated.
•Draw your masks on a white solid layer with its Video (eyeball) switch off, above the (locked) footage layer. This way,
you run no risk of accidentally moving the footage layer when you manipulate the mask, and you can also much
more easily apply tracking data to the mask. (You apply the tracking data to the invisible solid layer that holds the
mask.) This also means that you don't lose your cached preview frames each time you manipulate the mask. (See
Toggle visibility or influence of a layer or property group and Lock or unlock a layer.)
•Turn on the Preserve Constant Vertex Count preference. (See Designate the first vertex for a Bezier path.)
•When possible, transform (rotate, scale, move) the whole mask or a subset of the mask vertices instead of moving
the vertices individually. This is both for efficiency and to avoid the chatter that comes from inconsistent movement
across frames. (See Move vertices in free-transform mode.)
•Manual motion tracking is less time-consuming than manual rotoscoping. The more effort you spend getting good
tracking data for various parts of your scene and object, the less time you'll spend drawing and fine-tuning masks.
(See Tracking and stabilizing motion .)
•In After Effects CC and CS6, use the Variable-width mask feathering | CC, CS6feature for more control when
feathering objects.
Online resources about rotoscoping
This video from the After Effects CS5: Learn By Video series shows how to combine motion tracking and rotoscoping
to isolate and selectively color-correct an actor's face.
Scott Squires provides a pair of movies on his Effects Corner website that show how to rotoscope, both painting and
masking:
•Rotoscoping - Part 1
•Rotoscoping - Part 2
Chris and Trish Meyer provide some tips on animating masks, including using Smart Mask Interpolation, on the
ProVideo Coalition website.
Alejandro Pérez provides a script on the AE Enhancers forum with which you can use tracking data to position
individual mask vertices.
331
Drawing, painting, and paths
Last updated 6/8/2015
Mathias Möhl provides the KeyTweak script on his website, with which you can modify many keyframes on a property
simultaneously. With KeyTweak, you can modify a few keyframes manually, and the script modifies the remaining
keyframes in between accordingly. KeyTweak is especially useful for Mask Path keyframes in a rotoscoping workflow.
Rich Young provides several resources for rotoscoping on his After Effects Portal website.
View mask paths and shapes
•To view mask paths for selected layers in the Timeline panel, press M.
•To view selected masks or shapes in the Timeline panel, press SS (press the S key twice).
•To view mask and shape paths in the Composition panel, click the Toggle Mask And Shape Path Visibility button
at the bottom of the Composition panel.
•To view mask paths in the Layer panel, choose Masks from the Layer panel View menu.
•To hide a mask path while showing others, lock the mask by selecting its Lock switch in the Timeline panel, and
then choose Layer > Mask > Hide Locked Masks.
•To isolate selected masks and hide others, choose Layer > Mask > Lock Other Masks, and then choose Layer > Mask
Hide Locked Masks.
Select shape paths, shapes, and shape groups
You can select shape layers and their components at any of four levels of selection, referred to as selection modes:
Layer selection mode The entire shape layer is selected. Transformations apply to the transform properties for the
layer, in the Transform property group that is at the same level as the Contents property group.
Group selection mode An entire shape group is selected. Transformations apply to the transform properties for the
group, in the Transform property group within the shape group in the Timeline panel.
Free-transform mode Multiple vertices on one or more Bezier paths are selected. A free-transform bounding box is
shown around the vertices in the Composition panel. By operating on this box, you can move multiple vertices with a
single transformation. Transformations apply to the vertices themselves, which are contained within the Path property
in the Timeline panel.
Path-editing mode Only vertices are selected. In this mode, you can perform path-editing operations, such as adding
vertices to a path and moving individual vertices.
When a pen tool is active, path-editing mode is active. To remain in path-editing mode, select the Pen tool; press V or
Ctrl (Windows) or Command (Mac OS) to temporarily activate the Selection tool as needed.
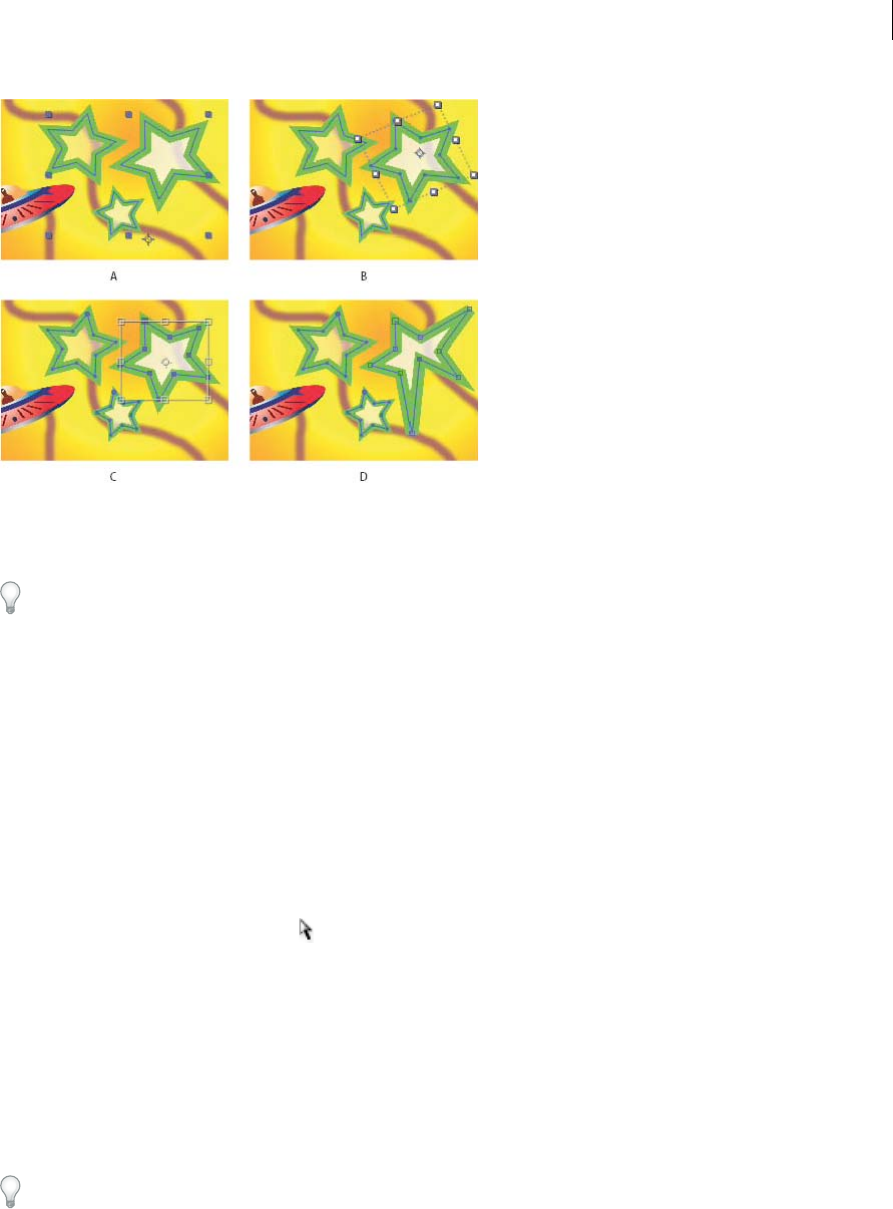
332
Drawing, painting, and paths
Last updated 6/8/2015
A Layer selection B Group selection C Free-transform D Path editing
For information on selecting masks, see Select masks, segments, and vertices.
Press Ctrl+A (Windows) or Command+A (Mac OS) with a shape vertex selected to select all vertices on that path. Press
again to select all shapes. Press again to select all layers.
Select a shape layer
•Click the layer name or layer duration bar in the Timeline panel.
•Using the Selection tool, click within the layer bounds in the Composition panel.
•To deselect all shapes on a layer but leave the shape layer selected, click within the layer bounds but outside all shape
paths.
Select a shape group in group selection mode
•Using the Selection tool, double-click a member of the group in the Composition panel. Each time that you double-
click, you descend another level in the group hierarchy.
•To activate the Direct Selection tool , hold Ctrl (Windows) or Command (Mac OS) with the Selection tool
selected. Click a shape in the Composition panel with the Direct Selection tool to directly select that shape’s group,
regardless of how deeply nested the shape is in the group hierarchy.
•To select a group that is contained within the same group as the group that is already selected, click the group to
select.
•To add a group to a selection, Shift-click it. You can combine the Shift key with double-clicking and with the Direct
Selection tool to add more deeply nested groups to the selection.
Select paths and vertices in path-editing mode
To specify the size of Bezier direction handles and vertices for masks and shapes, choose Edit > Preferences > General
(Windows) or After Effects > Preferences > General (Mac OS), and edit the Path Point Size value.
•To select a vertex, click the vertex with the Selection tool. To add vertices to the selection, Shift-click them.
•To select a path segment, click the segment with the Selection tool. To add segments to the selection, Shift-click
them.
333
Drawing, painting, and paths
Last updated 6/8/2015
•To select an entire path, Alt-click (Windows) or Option-click (Mac OS) a segment or vertex of the path with the
Selection tool, or select any portion of the path and press Ctrl+A (Windows) or Command+A (Mac OS).
•To select vertices by dragging, select a path or portion of a path to enter path-editing mode, and then drag with the
marquee-selection tool to draw a marquee-selection box around the vertices to select. To add vertices to the
selection, hold down the Shift key as you draw additional marquee-selection boxes.
Select all points on a path and enter free-transform mode
•Double-click a path segment while in path-editing mode or in group selection mode for a single shape.
•Select the Path property in the Timeline panel and press Ctrl+T (Windows) or Command+T (Mac OS).
Select masks, segments, and vertices
Unlike layers, masks can have more than one level of selection. You can select a mask as a whole path, which is
appropriate when you want to move or resize a mask. However, if you want to change the path of a mask, select one or
more points on it. Selected points appear solid, and unselected points appear hollow.
To specify the size of Bezier direction handles and vertices for masks and shapes, choose Edit > Preferences > General
(Windows) or After Effects > Preferences > General (Mac OS), and edit the Path Point Size value.
Select or deselect masks in the Layer or Composition panel
•To select a vertex on a mask, click the vertex with the Selection tool . To add vertices to the selection, Shift-click
them.
•To select a mask segment, click the segment with the Selection tool. To add segments to the selection, Shift-click
them.
•To select an entire mask, Alt-click (Windows) or Option-click (Mac OS) a segment, vertex, or handle of a mask with
the Selection tool, or select any portion of the mask and choose Edit > Select All or press Ctrl+A (Windows) or
Command+A (Mac OS). To add masks to the selection, Alt+Shift-click (Windows) or Option+Shift-click (Mac OS)
them.
•To select masks by dragging, select a mask or portion of a mask to enter mask editing mode and then drag with the
Selection tool to draw a marquee-selection box completely around the vertices or masks that you want to select. To
add masks or vertices to the selection, hold down the Shift key as you draw additional marquee-selection boxes.
•To select all masks on a layer, select a mask on the layer, and choose Edit > Select All or press Ctrl+A (Windows) or
Command+A (Mac OS).
•To deselect all masks, press Ctrl+Shift+A (Windows) or Command+Shift+A (Mac OS).
•To select an adjacent mask on a layer, press Alt+accent grave (`) (Windows) or Option+accent grave (`) (Mac OS)
to select the next mask, or Shift+Alt+accent grave (`) (Windows) or Shift+Option+accent grave (`) (Mac OS) to
select the previous mask.
•To deselect a mask, click anywhere other than on the mask.
•To remove a vertex or segment from a selection, Shift-click the vertex or segment.
To use the Selection tool when the Pen tool is selected, hold down Ctrl (Windows) or Command (Mac OS).
Select masks in the Timeline panel
1Click the right arrow next to a layer name to expand it.
2Click the right arrow next to the Masks heading to expand it, revealing all masks on that layer.
334
Drawing, painting, and paths
Last updated 6/8/2015
3Do any of the following:
•To select one mask, click its name.
•To select a contiguous range of masks, Shift-click the names of the first and last masks in the range.
•To select discontiguous masks together, Ctrl-click (Windows) or Command-click (Mac OS) the names of any
masks you want to include.
Note: You can select only whole masks in the Timeline panel. To select individual vertices on a mask, use the Composition
or Layer panel.
Lock or unlock masks
Locking a mask prevents you from selecting it in the Timeline, Composition, and Layer panels or setting it as a target
in the Layer panel. Use this feature to avoid unwanted changes to the mask.
1In the Timeline panel, expand the Masks property group.
2In the A/V Features column, click the box underneath the Lock icon next to the mask you want to lock or unlock.
A mask is locked and cannot be selected when its Lock switch is selected—that is, when the Lock icon appears in
the box.
Note: To unlock multiple masks at one time, select one or more layers and choose Layer > Mask > Unlock All Masks.
To isolate selected masks and hide others, choose Layer > Mask > Lock Other Masks, and then choose Layer > Mask
Hide Locked Masks.
Move vertices in free-transform mode
You can scale and rotate an entire mask or shape path (or selected vertices in one or more paths) using the Free
Transform Points command. When you use this command, a free-transform bounding box surrounds the selected
vertices, and an anchor point appears in the center of the bounding box to mark the anchor point for the current
transformation. You can scale and rotate the selected vertices by dragging the bounding box or its handles. You can also
change the reference point from which the vertices are rotated or scaled by moving the bounding box anchor point. The
free-transform bounding box handles and anchor point exist independently of the handles and anchor point for the
layer.
Note: When you animate rotation using Free Transform Points, the vertices of the mask are interpolated in a straight line
from keyframe to keyframe. For this reason, the results may be different from what you expect.
1Display the layer containing the paths that you want to transform in the Composition or Layer panel.
2Using the Selection tool, do one of the following:
•To transform any number of vertices, select the vertices that you want to transform and choose Layer > Mask
And Shape Path > Free Transform Points.
•To transform an entire mask or shape path, select it in the Timeline panel and choose Layer > Mask And Shape
Path > Free Transform Points.
3To move the anchor point of the bounding box, place the Selection tool over the bounding box anchor point until
the Selection tool changes to a move anchor point icon . Drag to position the anchor point.

335
Drawing, painting, and paths
Last updated 6/8/2015
4Do any combination of the following:
•To move the path or selected vertices, position the pointer inside the bounding box and drag.
•To scale the path or selected vertices, position the pointer on a bounding box handle and, when the pointer
changes to a straight, double-sided arrow , drag to a new size. Hold down Shift as you drag to constrain the
scale. Hold down Ctrl (Windows) or Command (Mac OS) as you drag to scale around the anchor point of the
bounding box.
•To rotate the path or selected vertices, position the pointer just outside the free-transform bounding box and,
when the pointer changes to a curved double-sided arrow , drag to rotate.
5To exit free-transform mode, press Esc, Enter (Windows), or Return (Mac OS).
Convert a path between manual Bezier and RotoBezier
You can convert any manual Bezier mask path or manual Bezier shape path to a RotoBezier path. If the manual Bezier
path has direction handles that have been adjusted, this conversion changes the shape of the path, because After Effects
calculates the curvature of RotoBezier segments automatically.
The conversion of a RotoBezier path to a manual Bezier path does not change the shape of the path.
1Select a mask in the Layer, Composition, or Timeline panel, or select a shape path in the Composition or Timeline
panel.
2Choose Layer > Mask And Shape Path > RotoBezier.
Modify a Bezier mask path or shape path
You can change a Bezier mask path using the Selection tool and pen tools in the Layer or Composition panel. You can
change a Bezier shape path using the Selection tool and pen tools in the Composition panel.
The pen tools—Add Vertex, Delete Vertex, and Convert Vertex tools—are grouped with the Pen tool in the Tools panel.
To reveal these tools in the Tools panel, click and hold the Pen tool in the Tools panel.
In most cases, the appropriate pen tool becomes active when you place the Pen tool pointer in a particular context. For
example, the Delete Vertex tool becomes active when you place the Pen tool pointer over an existing vertex, and the Add
Vertex tool becomes active when you place the Pen tool pointer over a path segment. To manually activate and cycle through
these tools, press G.
When modifying a path, make sure that you click only existing vertices or segments; otherwise, you may create a new
path instead.
Move, add, or delete a vertex
❖Do one of the following:
•To move a vertex, drag the vertex with the Selection tool .
To temporarily switch from the Pen tool to the Selection tool, press V or Ctrl (Windows) or Command (Mac OS).
•To add a vertex to a mask, use the Add Vertex tool to click the segment between two existing vertices.
•To delete a vertex from a mask, use the Delete Vertex tool to click the vertex.
336
Drawing, painting, and paths
Last updated 6/8/2015
Adjust a path segment
❖Do one of the following with the Selection tool:
•Drag a vertex.
•Drag the direction handles extending from an adjoining smooth vertex.
•Drag a curved segment.
Dragging a curved segment on a RotoBezier mask also moves the vertices.
Toggle a vertex between a smooth point and a corner point
❖Click the vertex with the Convert Vertex tool .
To activate the Convert Vertex tool when the Pen tool is selected, hold down Alt (Windows) or Option (Mac OS).
Adjust the tension of a RotoBezier mask
1If you want to adjust the tension of more than one vertex simultaneously, then select them.
2Using the Convert Vertex tool , drag a vertex.
To activate the Convert Vertex tool when the Pen tool is selected, hold down Alt (Windows) or Option (Mac OS).
The Adjust Tension pointer appears as you drag a vertex of the RotoBezier mask.
Clicking a vertex instead of dragging sets the vertex to a corner point (100% tension); clicking again sets the vertex
to a smooth point (33% tension). Dragging up or to the right decreases the tension of the selection, increasing the
curve of adjacent path segments; dragging down or to the left increases the tension of the selection, decreasing the
curve of adjacent path segments.
To view the tension value of a vertex, look in the Info panel as you adjust the tension.
Change a mask path numerically
1Select the mask.
2In the Timeline panel, expand the Mask properties.
3Next to the Mask Path property, click the underlined word, and specify the changes in the Mask Shape dialog box.
Designate the first vertex for a Bezier path
To animate a path, After Effects designates the topmost vertex at the initial keyframe as the first vertex and numbers
each successive vertex in ascending order from the first vertex. After Effects then assigns the same numbers to the
corresponding vertices at all successive keyframes. After Effects interpolates the movement of each vertex from its
initial position at one keyframe to the position of the correspondingly numbered vertex at the next keyframe. At any
time during an animation, you can designate another vertex as the first vertex; this causes After Effects to renumber
the vertices of the path. Renumbering vertices causes path animation to change, because After Effects then maps the
new vertex numbers to the corresponding old vertex numbers still saved at successive keyframes.
When copying a closed path into a motion path, the vertex designated as the first vertex of the closed path is used as
the beginning of the motion path. All motion paths are open paths.

337
Drawing, painting, and paths
Last updated 6/8/2015
Some shape path operations, such as Trim Paths, also use the first vertex as input to determine how to modify the path.
Note: By default, when you add a vertex to a path, the new vertex appears on the path throughout the duration of the path
but reshapes the path only at the time at which it was added. When you delete a vertex from a path at a specific point in
time, the vertex is deleted from the path throughout the duration of the path. Prevent After Effects from adding and deleting
vertices throughout the duration of the path by choosing Edit > Preferences > General (Windows) or After Effects >
Preferences > General (Mac OS), and deselecting Preserve Constant Vertex Count When Editing Masks.Note: Preserve
Constant Vertex Count When Editing Masks is called "Preserve Constant Vertex and Feather Count when Editing Masks",
in After Effects CC and CS6.
1Create an animated path.
2In the Timeline panel, move the current-time indicator to the point where you want to designate a new first vertex.
3Select the vertex to designate as the first vertex.
4Choose Layer > Mask And Shape Path > Set First Vertex.
Note: The vertex designated as the first vertex appears slightly larger than the other vertices in the Composition panel.
Animate a mask path with Smart Mask Interpolation
Smart Mask Interpolation provides a high level of control for creating mask path keyframes and smooth, realistic
animation. After you select the mask path keyframes to interpolate, Smart Mask Interpolation creates intermediate
keyframes based on settings you provide. The Info panel displays the progress of the interpolation and the number of
keyframes created.
1Choose Window > Mask Interpolation.
2Select at least two adjacent mask path keyframes.
3Set options in the Mask Interpolation panel, and then click Apply.
Note: To interrupt the interpolation process, press Esc. The Info panel indicates that the process has been interrupted
and reports the number of keyframes created.
Keyframe Rate Specifies the number of keyframes that Smart Mask Interpolation creates per second between the
selected keyframes. For example, a value of 10 creates a new keyframe every 1/10 of a second. Choose Auto to set
the keyframe rate equal to the composition frame rate, which appears in parentheses. Create more keyframes for
smoother animation; create fewer keyframes to reduce render time.
Note: Regardless of the keyframe rate you choose, Smart Mask Interpolation always adds keyframes at the frame just
after the first mask path keyframe and at the frame just before the second mask path keyframe. For example, if you
interpolate between keyframes at 0 seconds and 1 second in a 30-fps composition with a keyframe rate of 10 keyframes
per second, mask path keyframes are added at frame numbers 1, 3, 6, 9, 12, 15, 18, 21, 24, 27, and 29.
Keyframe Fields Doubles the keyframe rate. When this option is selected, and Keyframe Rate is set to the
composition frame rate, a keyframe is added at each video field. Select this option for animated masking for
interlaced video. If this option is not selected, the mask may slip off the object that you are attempting to key out.
For more information about fields in interlaced video, see Interlaced video and separating fields.
Use Linear Vertex Paths Specifies that vertices in the first keyframe move along a straight path to their
corresponding vertices in the second keyframe. Leave this option unselected if you want some vertices to interpolate
along curved paths; for example, when the desired interpolation involves rotating parts. If this option is not selected,
Smart Mask Interpolation creates a natural path for the mask.
Bending Resistance Specifies how susceptible the interpolated mask path is to bending instead of stretching. A
value of 0 specifies that, as the mask path animates, it bends more than it stretches; a value of 100 specifies that the
mask path stretches more than it bends.

338
Drawing, painting, and paths
Last updated 6/8/2015
Quality Specifies how strictly Smart Mask Interpolation matches vertices from one keyframe to another. A value of
0 specifies that a particular vertex in the first keyframe matches only the same-numbered vertex in the second
keyframe. For example, the tenth vertex in the first keyframe must match the tenth vertex in the second keyframe.
A value of 100 means that a vertex in the first keyframe can potentially match any vertex in the second keyframe.
Higher values usually yield better interpolations; however, the higher the value, the longer the processing time.
Add Mask Path Vertices Specifies that Smart Mask Interpolation adds vertices to facilitate quality interpolations. In
general, Smart Mask Interpolation works best when the mask paths have dense sets of vertices. Also, a vertex on the
first mask path cannot match the middle of a curve or straight-line segment on the second mask path, so sometimes
you must add vertices before matching to produce the desired result. Smart Mask Interpolation does not modify the
original keyframes. Only the new mask path keyframes computed by Smart Mask Interpolation have additional
vertices.
The value you set specifies how finely the input mask paths are subdivided. Pixels Between Vertices specifies the
distance, in pixels, between vertices on the larger perimeter mask path after subdivision. Total Vertices specifies the
number of vertices on the interpolated mask paths. Percentage Of Outline specifies that a vertex is added at each
indicated percent of the mask path outline length. For example, a value of 5 means that a vertex is added at each
successive segment of the outline that represents 5% of the total perimeter. To use only the vertices that were on the
path at the first frame, do not select this option.
Note: Smart Mask Interpolation may add vertices at existing vertex locations even if Add Mask Path Vertices is not
selected. If two vertices on one mask path match a single vertex on the other, the single vertex is duplicated at the same
location so that the segment between the two vertices shrinks to that location.
Matching Method Specifies the algorithm that Smart Mask Interpolation uses to match vertices on one mask path
to vertices on the other. Auto applies the matching algorithm for curves if either of the two selected keyframes has
a curved segment; otherwise, it applies the polylines algorithm. Curve applies the algorithm for mask paths that have
curved segments. Polyline applies the algorithm for mask paths that have only straight segments.
Note: The mask path keyframes added by Smart Mask Interpolation are polylines when Polyline Matching Method is
selected, regardless of whether the input mask paths contained curved segments.
Use 1:1 Vertex Matches Specifies that Smart Mask Interpolation creates a vertex on one mask path that matches the
same-numbered vertex on the other mask path. On each of the input mask paths, Smart Mask Interpolation matches
the first vertices, the second vertices, the third vertices, and so forth. If the two paths have unequal numbers of
vertices, this action may produce undesirable results.
First Vertices Match Specifies that Smart Mask Interpolation matches the first vertices in the two mask path
keyframes. If not selected, Smart Mask Interpolation searches for the best first-vertex match between the two input
mask paths.
Note: To ensure good results, make sure that the first vertices of the input mask paths match, and then select First
Ver tices Match.
Additional resources about animating masks with Smart Mask Interpolation
Chris and Trish Meyer provide some tips on animating masks, including using Smart Mask Interpolation, on the
ProVideo Coalition website.
Move a mask or pan a layer behind a mask
You can adjust the area that is visible through a mask by either moving the mask in the Layer or Composition panel or
panning (moving) the layer behind the mask in the Composition panel. When you move a mask, the Position values of
the masked layer remain constant, and the mask moves in relation to other objects in the Composition panel.
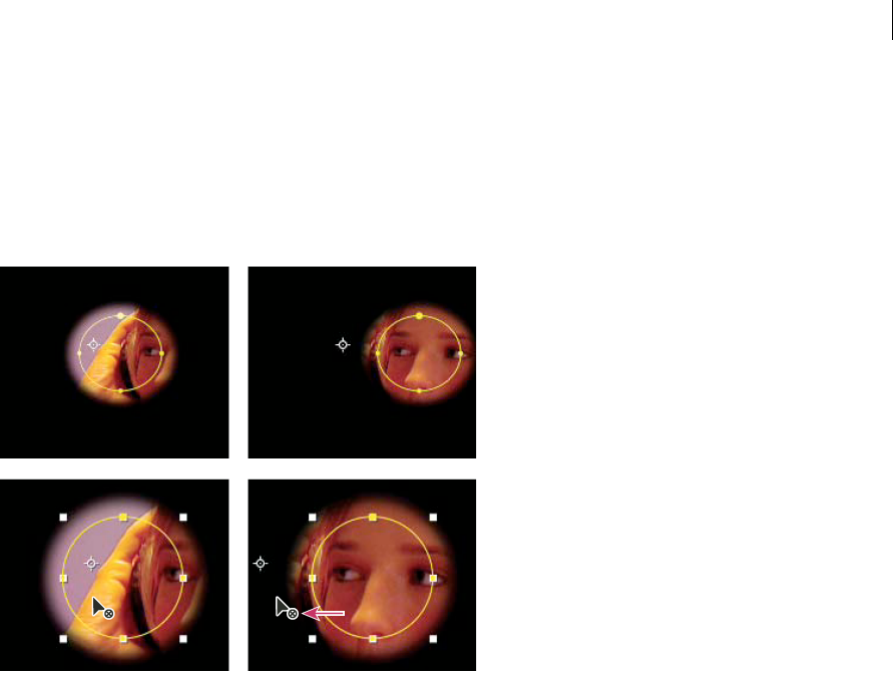
339
Drawing, painting, and paths
Last updated 6/8/2015
When you use the Pan Behind (Anchor Point) tool to pan a layer behind a mask, the position of the mask remains
constant in the Composition panel but changes in the Layer panel. The Position values of the masked layer change in
relation to the composition. As you pan past the edges of the layer frame, the Mask Path values on the layer also change.
Using the Pan Behind (Anchor Point) tool saves steps; without it, you would have to change the Position and Mask Path
properties of the masked layer manually. You can animate a layer panning behind another layer by setting keyframes
for the Position and Mask Path properties of the masked layer.
Move a mask
1Select the mask or masks you want to move.
2In the Composition panel, drag the mask or masks to a new location. To constrain the movement of the mask or
masks to horizontal or vertical, hold down Shift after you start dragging.
Pan a layer behind its mask
1Select the Pan Behind (Anchor Point) tool in the Tools panel.
2Click inside the mask area in the Composition panel and drag the layer to a new position.
More Help topics
About masks
Creating masks
About paths
Keyboard shortcuts
Keyframe interpolation

340
Drawing, painting, and paths
Last updated 6/8/2015
Shape attributes, paint operations, and path operations
for shape layers
Adding attributes to shape layers
After a shape layer has been created, you can add attributes—paths, paint operations, and path operations—by using
the Add menu in the Tools panel or in the Timeline panel.
By default, the new attributes are inserted into the selected shape group or groups according to the following rules:
•New paths are added below existing paths and groups.
•New path operations—such as Zig Zag and Wiggle Paths—are added below existing path operations. If no path
operations are present, new path operations are added below existing paths.
•New paint operations—strokes and fills—are added below existing paths and above existing strokes and fills.
To override these rules and place a new attribute at the end of the group, below all attributes, hold the Alt (Windows)
or Option (Mac OS) key as you click to choose an item from the Add menu.
The Repeater operation is always added at the end of the group.
Strokes and fills for shapes
Andrew Devis shows how to modify gradient fills and strokes for shape layers, plus other options, in a video on the
Creative COW website.
Strokes and fills for shapes are paint operations that add colored pixels to a path or to the area defined by a path. A
stroke or a fill can consist of a solid color, or it can use a gradient of colors. Strokes can be continuous, or they can consist
of a periodic series of dashes and gaps. Each stroke and fill has its own blending mode, which determines how it
interacts with other paint operations in the same group.
By default, paint operations within a group are performed from the bottom to the top in the Timeline panel stacking
order. This means, for example, that a stroke is rendered on top of (in front of) a stroke that appears after it in the
Timeline panel. To override this default behavior for a specific fill or stroke, choose Above Previous In Same Group for
the Composite property for the fill or stroke in the Timeline panel.
Note: When you add a stroke or fill using the Add menu in the Tools panel or Timeline panel, the paint operation is added
below existing paths and above existing strokes and fills. To place a new stroke at the end of the group, hold the Alt
(Windows) or Option (Mac OS) key as you click to choose an item from the Add menu.
New shapes are created with fill and stroke properties depicted by the swatch buttons next to the underlined Fill and
Stroke text controls in the Tools panel. You can also modify the fill colors, stroke colors, fill type, and stroke type for
selected shapes using these controls. The Fill and Stroke controls are only visible in the Tools panel when a shape layer
is selected or a drawing tool is active.
If multiple shapes are selected, with different fill or stroke properties, then the swatch button next to the Fill or Stroke
control contains a question mark. You can still modify the fill and stroke properties using these controls, and the
corresponding properties for all selected shapes are set to the same value.
Fills and strokes can be any of four types:
None No paint operation is performed.
Solid color The entire fill or stroke consists of one color.

341
Drawing, painting, and paths
Last updated 6/8/2015
Linear gradient The fill or stroke consists of colors and opacity values defined by a linear gradient and then mapped
onto the composition along a single axis from the Start Point to the End Point.
Radial gradient The fill or stroke consists of colors and opacity values defined by a linear gradient, which are mapped
onto the composition along a radius extending outward from the Start Point at the center to the End Point at the
circumference of a circle. You can offset the starting point by modifying the Highlight Length and Highlight Angle
values.
You can animate and interpolate gradients by adding keyframes to the Colors property and using the Color Picker in
Gradient Editor mode to add, modify, and remove color stops and opacity stops. You can also save gradients as
animation presets. (See Save an animation preset.)
The colors of strokes and fills for shape layers are not rendered as high-dynamic range colors. Color values under 0.0
or over 1.0 are clipped to fall within the range of 0.0 to 1.0.
Choose stroke or fill type and blending options
•To choose a fill type or stroke type for new shapes, or set the blending mode or opacity for a fill or stroke for new
shapes, click the underlined Fill or Stroke text control in the Tools panel. To cycle through fill types or stroke types
for existing shapes, select the shapes before using these controls.
•To cycle through fill types or stroke types for new shapes, Alt-click (Windows) or Option-click (Mac OS) the swatch
button next to the underlined Fill or Stroke text control in the Tools panel. To choose a fill type or stroke type for
existing shapes, select the shapes before using these controls.
Choose a solid color or edit a gradient for a stroke or fill
•To choose a solid color or gradient for fills or strokes for new shapes, click the swatch button next to the underlined
Fill or Stroke text control in the Tools panel. To choose a solid color or gradient for fills or strokes for existing shapes,
select the shapes before using the controls.
Modify the color mapping for a gradient
A gradient is a range of color and opacity values that you can customize in the Gradient Editor dialog box. You can also
customize how those colors are applied to a stroke or fill by modifying the Start Point and End Point, which determine
the direction and scale of the gradient. For example, you can modify these points to stretch the colors of a gradient over
a larger area, or orient a linear gradient so that colors fade from top to bottom instead of from left to right. For a radial
gradient, you define the center of gradient, its radius, and the offset of a highlight.
By default, when you create a shape path by drawing with the Pen tool, the control points for the gradient are placed in
the center of the layer. You can adjust these points after you finish drawing.
You can modify the Start Point, End Point, Highlight Angle, and Highlight Length properties in the Timeline panel.
You can also modify these properties directly in the Composition panel.
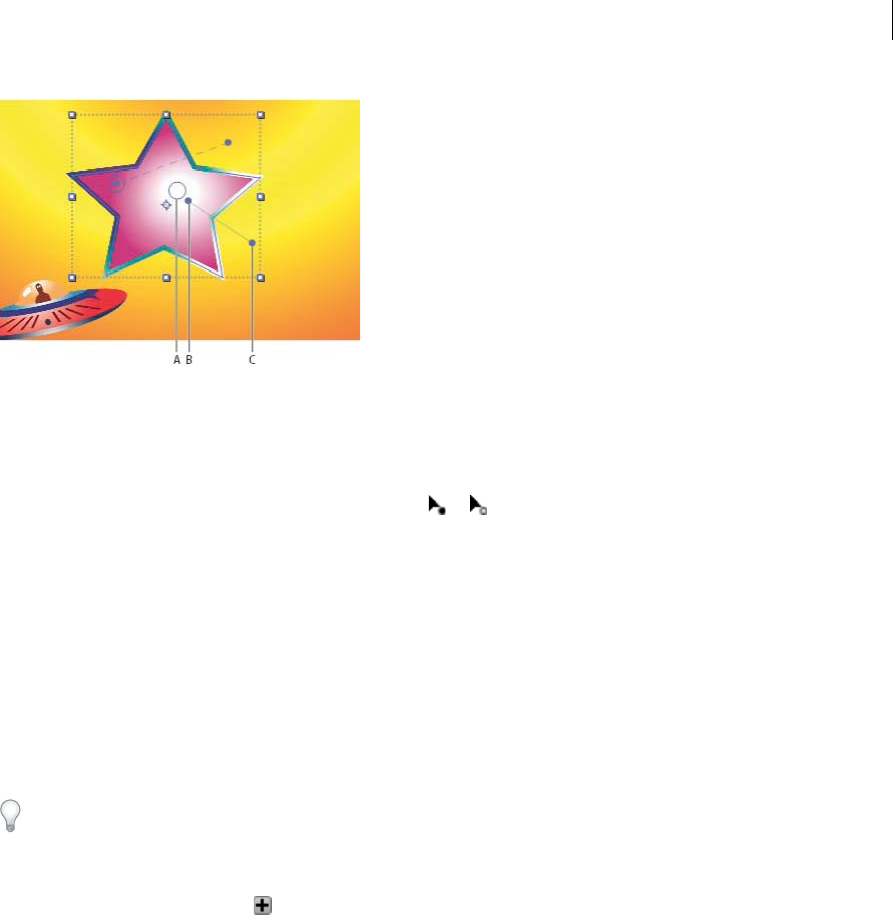
342
Drawing, painting, and paths
Last updated 6/8/2015
A Highlight control point B Start Point C End Point
1Select the group in which the gradient is contained.
2With the Selection tool active, drag the Start Point, End Point, or Highlight controls in the Composition panel.
The Selection tool turns to a gradient control pointer or when placed over a gradient control.
Set stroke width
•To set stroke width for new shapes in pixels (px), drag the underlined Stroke Width control (which is located to the
right of the Stroke controls in the Tools panel), or click the control and enter a value in the box. To set the stroke
width for existing shapes, select them before using the Stroke Width control.
Create a dashed stroke
You create a dashed stroke by adding any number of dashes and gaps to the Dashes property group for the stroke. The
dashes and gaps in this property group are repeated as many times as necessary to cover the entire path. The Offset
property determines at what point on the path the stroke begins.
Animate the Offset property to create a moving trail of dashes, like the lights on a marquee.
1Expand the property group for a stroke in the Timeline panel.
2Click the Add A Dash Or Gap button to add a dash and gap to one cycle of the dashed-line pattern. You can add
up to three dashes for each stroke pattern.
3Modify the Dash and Gap properties to make the dashes and gaps the lengths that you want.
Line Cap options for strokes
The Line Cap property for a dashed stroke determines the appearance of the ends of the stroke segments (dashes).
Butt Cap The stroke ends at the end of the path.
Round Cap The stroke extends beyond the end of the path for a number of pixels equal to the stroke width in pixels.
The cap is a semicircle.
Projecting Cap The stroke extends beyond the end of the path for a number of pixels equal to the stroke width in pixels.
The end is squared off.
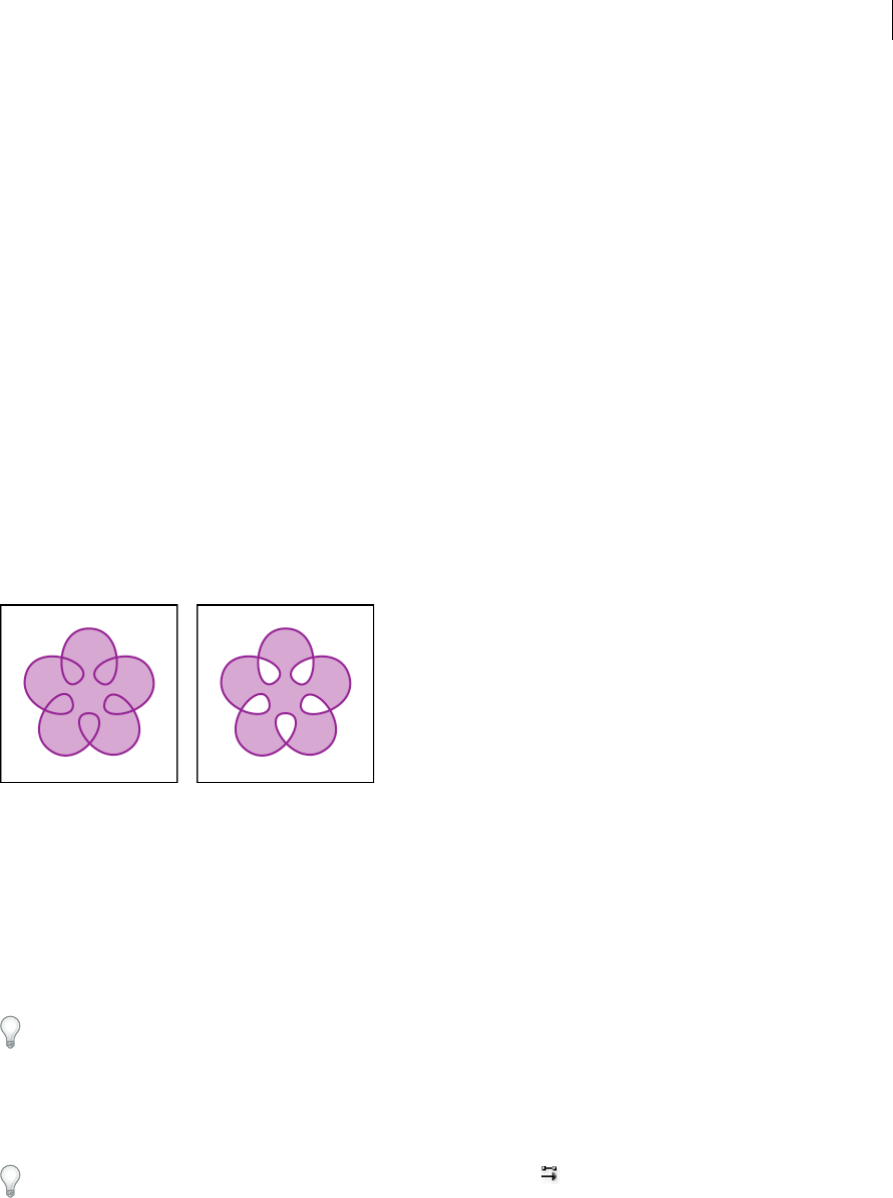
343
Drawing, painting, and paths
Last updated 6/8/2015
Line Join options for strokes
The Line Join property for a stroke determines the appearance of the stroke where the path suddenly changes direction
(turns a corner).
Miter Join A pointed connection. The Miter Limit value determines the conditions under which a beveled join is used
instead of a miter join. If the miter limit is 4, then when the length of the point reaches four times the stroke weight, a
bevel join is used instead. A miter limit of 1 causes a bevel join.
Round Join A rounded connection.
Bevel Join A squared-off connection.
Fill rules for shapes
A fill operation works by painting color in the area defined as inside a path. Determining what is considered inside a
path is easy when the path is something simple, like a circle. However, when a path intersects itself, or when a
compound path consists of paths enclosed by other paths, determining what is considered inside is not as easy.
After Effects uses one of two rules to determine what is considered inside a path for the purpose of creating fills. Both
rules count the number of times that a straight line drawn from a point crosses the path on its way out of the area
surrounded by a path. The nonzero winding fill rule considers path direction; the even-odd fill rule does not.
After Effects and Illustrator use the nonzero winding fill rule as the default.
Even-odd fill rule If a line drawn from a point in any direction crosses the path an odd number of times, then the point
is inside; otherwise, the point is outside.
Nonzero winding fill rule The crossing count for a line is the total number of times that the line crosses a left-to-right
portion of the path minus the total number of times that the line crosses a right-to-left portion of the path. If a line
drawn in any direction from the point has a crossing count of zero, then the point is outside; otherwise, the point is
inside.
A more intuitive way to think of the nonzero winding rule is to think of a path as a loop of string. A point is considered
outside the path if you can put your finger at that point and then pull the string away without it being caught, wrapped
around your finger.
Because the nonzero winding fill rule takes path direction into account, using this fill rule and reversing the direction
of one or more paths in a compound path is useful for creating holes in compound paths.
To reverse the direction of a path, click the Reverse Path Direction On button for the path in the Timeline panel.

344
Drawing, painting, and paths
Last updated 6/8/2015
Alter shapes with path operations
Path operations are similar to effects. These live operations act nondestructively on a shape’s path to create a modified
path that other shape operations (such as fills and strokes) can apply to. The original path is not modified. Because path
operations are live, you can modify or remove them at any time. Path operations apply to all paths above them in the
same group; as with all shape attributes, you can reorder path operations by dragging, cutting, copying, and pasting in
the Timeline panel.
1In the Composition panel or Timeline panel, select the shape group into which to add the path operation.
2Choose a path operation from the Add menu in the Tools panel or the Timeline panel:
Merge Paths Combines paths into a compound path. (See Merge Paths options.)
Offset Paths Expands or contracts a shape by offsetting the path from the original path. For a closed path, a positive
Amount value expands the shape; a negative Amount value contracts it. The Line Join property specifies the
appearance of the path where offset path segments come together. A bevel join is a squared-off connection. A miter
join is a pointed connection. The miter limit determines the conditions under which a beveled join is used instead
of a miter join. If the miter limit is 4, then when the length of the point reaches four times the stroke weight, a bevel
join is used instead. A miter limit of 1 causes a bevel join.
Pucker & Bloat Pulls the vertices of a path outward while curving the segments inward (Pucker), or pulls the vertices
inward while curving the segments outward (Bloat).
Repeater Creates multiple copies of a shape, applying a specified transformation to each copy. (See Using the
Repeater to replicate shapes.)
Round Corners Rounds corners of paths. Higher Radius values cause greater roundness.
Trim Paths Animate the Start, End, and Offset properties to trim a path to create results similar to results achieved
with the Write-on effect and the Write On setting for paint strokes. If the Trim Paths path operation is below
multiple paths in a group, then you can choose to have the paths trimmed simultaneously or treated as a compound
path and trimmed individually.
Aharon Rabinowitz provides a video tutorial on the Creative COW website that shows how to use the Trim Paths
operation to animate a dashed line following a path on a map.
Twist Rotates a path more sharply in the center than at the edges. Entering a positive value twists clockwise; entering
a negative value twists counterclockwise.
Wiggle Paths Randomizes (wiggles) a path by converting it into a series of jagged peaks and valleys of various sizes.
The distortion is auto-animated, meaning that it changes over time without the need to set any keyframes or add
expressions.
Several properties for this path operation behave the same as properties of the same name for the Wiggly selector
for text animation. (See Wiggly selector properties.) The Correlation property specifies the amount of similarity
between the movement of a vertex and that of its neighbors; smaller values create more jagged results, as the position
of a vertex depends less on the position of its neighbors. The Correlation property is similar to Correlation for the
Wiggly selector, except that the Wiggle Paths version specifies the correlation between neighboring vertices instead
of neighboring characters. Set the maximum length for segment paths using an absolute or relative size. Set the
density of jagged edges (Detail) and choose between soft edges (Smooth) or sharp edges (Corner).
Animate the Size property to fade the wiggling up or down. To smoothly accelerate or decelerate the wiggling, set
Wiggles/Second to a constant value of 0, and animate the Temporal Phase property.
Wiggle Transform Randomizes (wiggles) any combination of the position, anchor point, scale, and rotation
transformations for a path. Indicate the desired magnitude of the wiggle for each of these transformations by setting
a value in the Transform property group that is contained in the Wiggle Transform property group. The wiggled
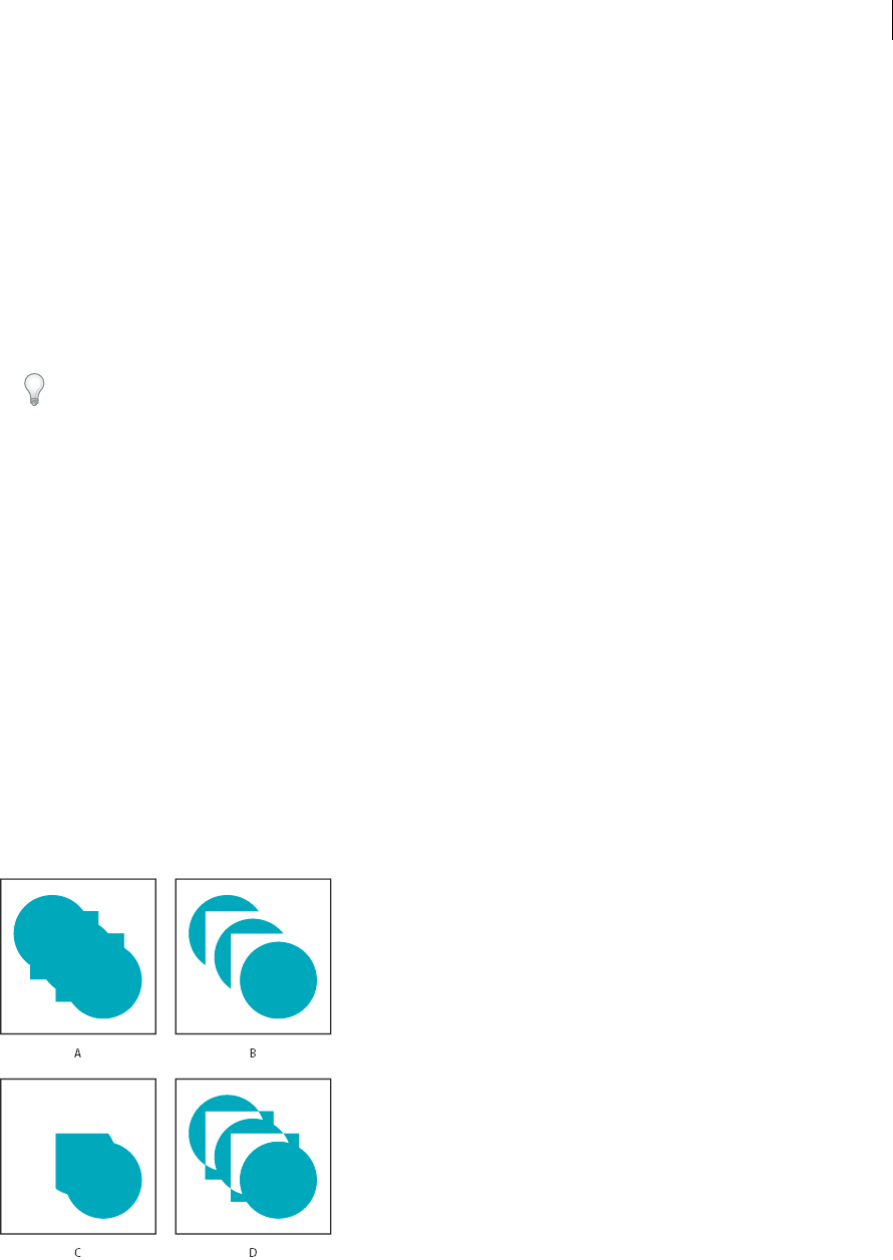
345
Drawing, painting, and paths
Last updated 6/8/2015
transformations are auto-animated, meaning that they change over time without the need to set any keyframes or
add expressions. The Wiggle Transform operation is especially useful following a Repeater operation, because it
allows you to randomize the transformations of each repeated shape separately. (See Using the Repeater to replicate
shapes.)
Several properties for this path operation behave the same as properties of the same name for the Wiggly selector
for text animation. (See Wiggly selector properties.) The Correlation property specifies the amount of similarity
between the wiggled transformations of a repeated shape and its neighbor within a set of repeated shapes.
Correlation is only relevant if a Repeater operation precedes the Wiggle Transform operation. When Correlation is
100%, all repeated items are transformed in the same way; when Correlation is 0%, all repeated items are
transformed independently.
When randomizing repeated shapes keep the following in mind: If the Wiggle Transform path operation precedes (is
above) the Repeater path operation, then all of the repeated shapes will be wiggled (randomized) in the same way.
If the Repeater path operation precedes (is above) the Wiggle Transform path operation, then each of the repeated shapes
will be wiggled (randomized) independently.
Chris Meyer provides a video tutorial on the ProVideo Coalition website that shows how to use the Wiggle
Transform path operation. This tutorial explains why you must use multiple instances of the Wiggle Transform path
operation if you want to wiggle multiple properties independently.
Andrew Devis shows how to use the Wiggle Transform path operation in a video on the Creative COW website.
Zig Zag Converts a path into a series of jagged peaks and valleys of uniform size. Set the length between peaks and
valleys using an absolute or relative size. Set the number of ridges per path segment, and choose between wavy edges
(Smooth) or jagged edges (Corner).
Merge Paths options
The Merge Paths path operation takes all of the paths above it in the same group as input. The output is a single path
that combines the input paths. The input paths are still visible in the Timeline panel, but they are essentially removed
from the rendering of the shape layer, so they don’t appear in the Composition panel. A fill and stroke are added after
the Merge Paths property group in the Timeline panel if a fill and stroke are not already present; otherwise, the output
path wouldn’t be visible.
A Add for all shapes B Subtract for squares C Intersect for squares D Exclude Intersections for squares

346
Drawing, painting, and paths
Last updated 6/8/2015
Aharon Rabinowitz provides a video tutorial on the Creative COW website that shows how to combine multiple paths
into a single compound shape using the Merge Paths path operation.
The Merge Paths path operation has the following options, each of which performs different calculations to determine
the output path:
Merge Merges all input paths into a single compound path. This option is the default used for shapes created from text
characters made up of multiple paths, like the letter e, when using the Create Shapes From Text command.
Add Creates a path that encompasses the union of the areas of the input paths.
Subtract Creates a path that encompasses only the areas defined by the topmost path, subtracting the area defined by
underlying paths.
Intersect Creates a path that encompasses only the areas defined by intersections between all input paths.
Exclude Intersections Creates a path that is the union of the areas defined by all input paths, minus the areas defined
by intersections between all input paths.
Using the Repeater to replicate shapes
The Repeater path operation creates virtual copies of all paths, strokes, and fills above it in the same group. The virtual
copies are not represented by separate entries in the Timeline panel, but they are rendered in the Composition panel.
Each copy is transformed according to its order in the set of copies and the values of the properties in the Transform
property group for that instance of the Repeater.
If the original shape is numbered 0, the next copy is numbered 1, and so on, then the result of the Repeater is to apply
each transformation in the Transform property group n times to copy number n.
Consider the example of the Repeater applied to a shape with the Copies value set to 10 and the Position property in
the Transform property group for the Repeater set to (0.0, 8.0). The original shape remains in its original position, (0.0,
0.0). The first copy appears at (0.0, 8.0), the second copy appears at (0.0, 16.0), the third copy appears at (0.0, 24.0), and
so on, until the ninth copy at (0.0, 72.0), for a total of ten shapes.
You can apply multiple instances of the Repeater within the same group. In other words, you can repeat the Repeater.
Using multiple instances of the Repeater is an easy way to create a grid of virtual copies of a single shape: just set the
Position property for one instance of the Repeater to modify the horizontal values, and another instance to modify
vertical values.

347
Drawing, painting, and paths
Last updated 6/8/2015
The Offset property value is used to offset the transformations by a specific number of copies. For example, if the
Copies value is 10 and the Offset value is 3, then the original shape is transformed by 3 times the amount specified in
the Transform property group, and the last copy is transformed by 12 times the amount specified in the Transform
property group.
Animating the Offset property is a good way to easily create interesting results.
The Composite option determines whether copies are rendered above (in front of) or below (behind) the copies that
precede them.
Use the Start Opacity value to set the opacity of the original shape, and the End Opacity value to set the opacity for the
last copy. Opacity values for copies in between are interpolated.
If you place the Repeater after a path, above the fill and stroke property groups for a shape, then the set of virtual copies
is filled or stroked as a compound path. If you leave the Repeater below the fill and stroke, then each copy is filled and
stroked individually. The difference is most apparent with gradient fills and strokes.
Add a Wiggle Transform path operation after a Repeater operation to randomize (wiggle) the position, scale, anchor
point, or rotation of the repeated copies within an instance of the Repeater. If the Wiggle Transform path operation
precedes (is above) the Repeater path operation, then all of the repeated shapes will be wiggled (randomized) in the same
way. If the Repeater path operation precedes (is above) the Wiggle Transform path operation, then each of the repeated
shapes will be wiggled (randomized) independently.
Eran Stern provides a video tutorial on the Creative COW website that shows how to use the Repeater operation.
Chris Zwar provides an example project on his website that uses the Card Dance effect and a shape layer with the
Repeater operation to simulate a halftone color separation for any image or video.
More Help topics
About shapes and shape layers
Groups and render order for shapes and shape attributes
Select a color or edit a gradient
Mask Tracking
The rigid mask tracker transforms a mask so that it follows the motion of an object (or objects) in a movie. You usually
create and use masks to hide clips from the final output, select a part of the image or video to apply effects, or combine
clips from different sequences.
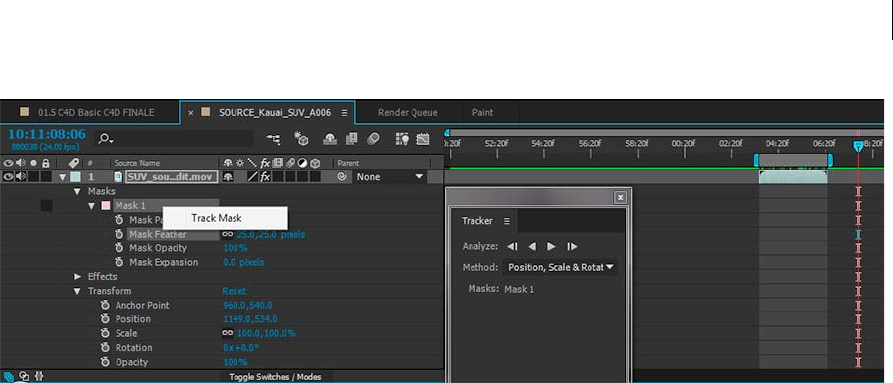
348
Drawing, painting, and paths
Last updated 6/8/2015
To use the mask tracker, select a mask and click the Mask Path setting under the mask. Right-click the selected mask
and select Track Mask to begin tracking a mask.
When a mask is selected, the Tracker panel switches to mask tracking mode, and displays the following controls:
•Track forward either one frame at a time or until the end of the layer.
•Track backward either one frame at a time or until the end of the layer.
•Different methods with which you can choose to modify position, scale, rotation, skew, and perspective of the mask.
If the Tracker panel is not displayed, select a mask and go to Animation > Track Mask to display the panel. You can also
context-click a mask and choose Track Mask from the context menu.
The result of using the mask tracker can be seen in the application of keyframes for the Mask Path property; the mask
shape matches the transformations tracked in the layer, depending on the type of method that is chosen.
Other considerations when using the mask tracker
•For effective tracking, the tracked object must maintain the same shape throughout the movie, though the position,
scale, and perspective of the tracked object can change.
•You can select multiple masks before beginning the tracking operation, and keyframes are then added to the Mask
Path property for each selected mask.
•The layer being tracked must be a track matte, an adjustment layer, or a layer with a source that can contain motion.
This includes layers based on video footage and precompositions, but not solid-color layers or still images.
The mask tracking analysis searches for content inside the mask. Use the Mask Expansion property to expand or
contract the area of the mask.
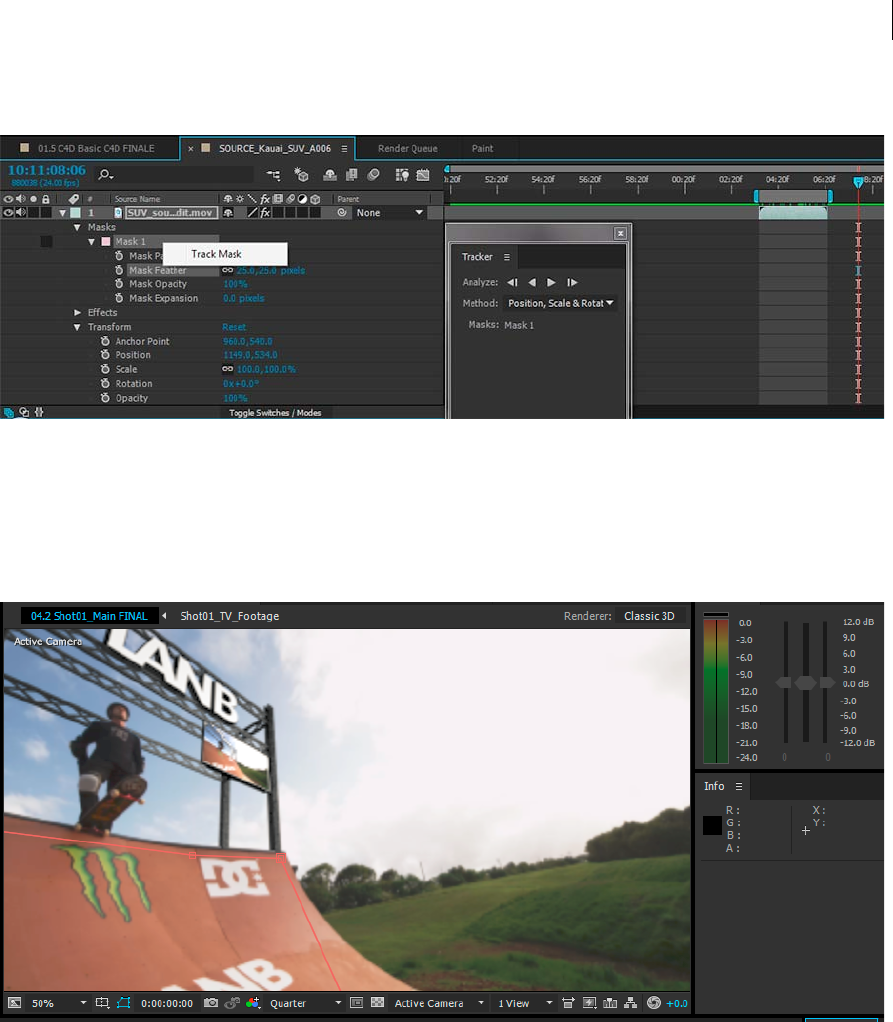
349
Drawing, painting, and paths
Last updated 6/8/2015
How to use the Track Mask effect (Learn tutorial)
Watch this tutorial to learn how to use the Track Mask effect in After Effects to add and shape mask elements that move
accurately through your Premiere Pro sequence.
How to use the Rigid Mask Tracker (Learn tutorial)
See this tutorial to learn how to use the rigid mask tracker in After Effects.
Compositing Options and Mask Reference
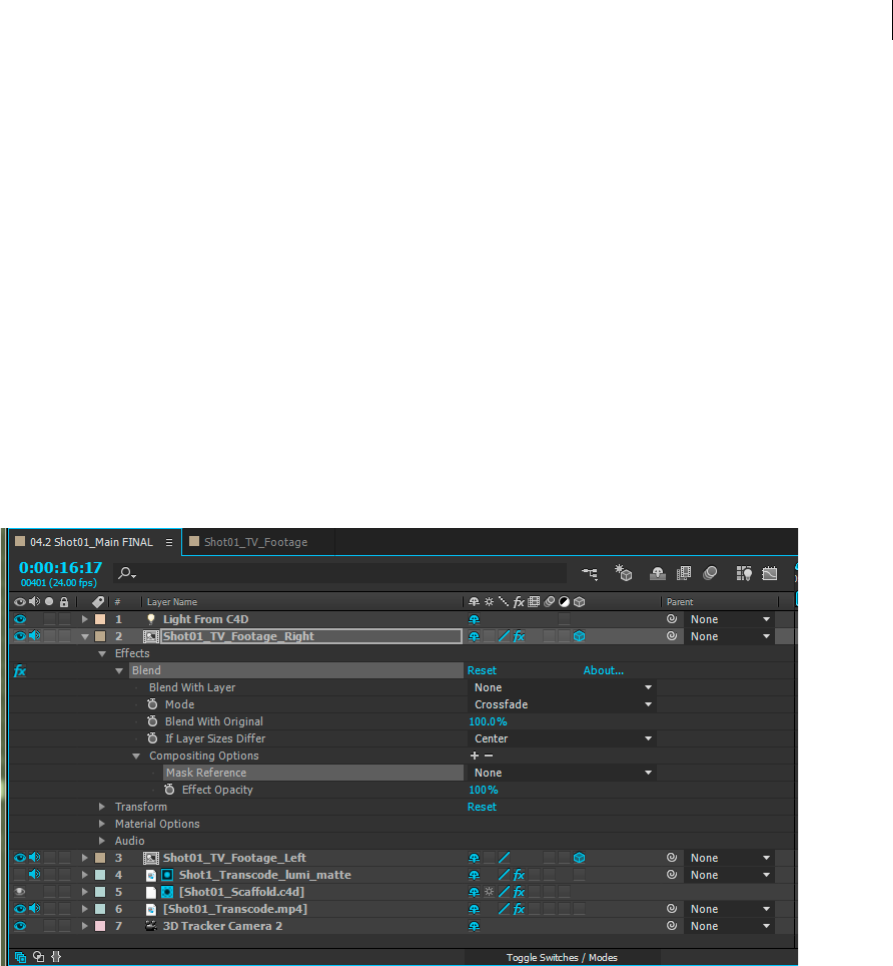
350
Drawing, painting, and paths
Last updated 6/8/2015
Effect Opacity Property
The property group of each effect includes a Compositing Options property group. There is a new Effect Opacity
property which provides similar functionality to every effect as the Blend With Original controls. With the Effect
Opacity property, you can change the global opacity and it will affect the entire effect. There is no need to add a mask
separately.
The Blend With Original controls group lets you precisely apply any effect to a particular area of an image by masking
the desired area.
For more information, see the Blend effecteffect section.
About Mask Reference
Use the new Mask Reference option to restrict the area of effects that is applied to a layer. The Mask Reference property
is found under the Compositing Options under each effect in the Timeline panel.
Create a Mask Reference
Click the '+' sign under the Compositing Options in the Timeline panel and choose a mask from the Mask Reference
menu.
While creating a mask reference, keep in mind the following considerations :
•You can only choose a mask on the same layer as the effect.
•You can add as many mask references as you like.
•You can reference an existing mask.
•You cannot create a new mask from an After Effects effect.
When a mask is applied to a layer, a dynamic stream is created under the Masks options which shows the list of masks
applied to a layer. When a new mask is created, this list is automatically updated.
351
Drawing, painting, and paths
Last updated 6/8/2015
Changes to a mask that is referenced by an effect will change where the effect is composited. For example, you can
feather the mask or use per-vertex feathering to change the edge of the effect composite. Changing the opacity changes
the overall intensity of the effect per for every mask.
You can also use mask modes and combine multiple masks to apply an effect only to the area of intersection of masks.
For more information, see the Mask modessection.
Effect masks and layer masks
An effect mask cannot be used to modify the alpha channel of a layer. Hence an effect mask cannot be used as a layer
mask.
For more information about layer masks, see the Preparing and importing Photoshop filessection.
Learn tutorial
Watch this tutorial to learn how to limit an effect to a specific area using a mask on the layer, and change properties on
a per-mask basis.

352
Last updated 6/8/2015
Chapter 10: Text
Live Text Templates
About Live Text Templates
You can create text template compositions in After Effects wherein the source text can be edited in Premiere Pro. Any
composition with text layers can be used as a text template, and unlocked text layers in that composition can be edited
in Premiere Pro.
Using Live Text Templates in After Effects
1Create an After Effects composition with one or more text layers.
2In the Advanced tab of the Composition Settings dialog box, choose Expose As Text Template.
3Animate, add effects, or perform any other action that you want to on the text layer.
4Click the Lock icon to lock any text layers that you do not want to be edited in Premiere Pro. The locked text layer
will not be visible in Premiere Pro.
5Open Premiere Pro.
6In Premiere Pro, click File > Import to import the After Effects composition.
7Load the composition in the Source Monitor.
8The new After Effects Editable Text category is displayed in the Effect Controls panel in Premiere Pro.
9Edit the source text items in the Effect Controls panel in Premiere Pro, and verify that this appears in the content in
Premiere Pro. The changes do not affect the original material in After Effects.
10 The edited text is sent from Premiere Pro to After Effects and the original text in After Effects is replaced.
11 In After Effects, you can modify some aspects of the composition, including properties of the text layer, such as
position and color.
12 The text is rendered and then sent back to Premiere Pro.
Note: You can modify the source text in After Effects for one of the text layers where the text was changed in Premiere Pro.
The text does not change in Premiere Pro.
See the Live text templates section in Premiere Pro for details specific to Premiere Pro.
353
Text
Last updated 6/8/2015
Learn tutorial
Watch this tutorial to learn how to create live text templates in After Effects that are editable in Premiere Pro.
Creating and editing text layers
About text layers
You can add text to a composition using text layers. Text layers are useful for many purposes, including animated titles,
lower thirds, credit rolls, and dynamic typography.
You can animate the properties of entire text layers or the properties of individual characters, such as color, size, and
position. You animate text using text animator properties and selectors. 3D text layers can optionally contain 3D
sublayers, one for each character. (See Animate text with text animatorsand Per-character 3D text properties.)
Text layers are synthetic layers, meaning that a text layer does not use a footage item as its source—though you can
convert text information from some footage items into text layers. Text layers are also vector layers. As with shape layers
and other vector layers, text layers are always continuously rasterized, so when you scale the layer or resize the text, it
retains crisp, resolution-independent edges. You cannot open a text layer in its own Layer panel, but you can work with
text layers in the Composition panel.
After Effects uses two kinds of text: point text and paragraph text. Point text is useful for entering a single word or a
line of characters; paragraph text is useful for entering and formatting the text as one or more paragraphs.
You can copy text from other applications such as Adobe Photoshop, Adobe Illustrator, Adobe InDesign, or any text
editor, and paste it into a text layer in After Effects. Because After Effects also supports Unicode characters, you can
copy and paste these characters between After Effects and any other application that also supports Unicode (which
includes all Adobe applications).

354
Text
Last updated 6/8/2015
Text formatting is included in the Source Text property. Use the Source Text property to animate formatting and to
change the characters themselves (for example, change the letter b to the letter c).
Best practices for creating text and vector graphics for video
Text that looks good on your computer screen as you are creating it can sometimes look bad when viewed in a final
output movie. These differences can arise from the device used to view the movie or from the compression scheme used
to encode the movie. The same is true for other vector graphics, such as shapes in shape layers. In fact, the same
problems can occur in raster images, but the small and sharp details of vector graphics cause the problems most often.
Keep in mind the following as you create and animate text and vector graphics for video:
•You should always preview your movie on the same kind of device that your audience will use to view it, such as an
NTSC video monitor. (See Preview on an external video monitor.)
•Avoid sharp color transitions, especially from one highly saturated color to its complementary color. Sharp color
transitions are difficult for many compression schemes—such as the compression schemes in MPEG and JPEG
standards—to encode. These compression schemes can cause visual noise near sharp transitions. For analog
television, the same sharp transitions can cause spikes outside the allowed range for the signal, also causing noise.
•When text will be over moving images, make sure that the text has a contrasting border (such as a glow or a stroke)
so that the text is still readable when something the same color as the fill passes behind the text.
•Avoid thin horizontal elements, which can vanish from the frame if they happen to be on an even scan line during
an odd field, or vice versa. The height of the horizontal bar in a capital H, for example, should be three pixels or
greater. You can thicken horizontal elements by increasing font size, using a bold (or faux bold) style, or applying a
stroke. (See Formatting characters with the Character panel.)
•When animating text to move vertically—for scrolling credits, for example—move the text vertically at a rate in
pixels per second that is an even multiple of the field rate for the interlaced video format. Such a rate of movement
prevents a kind of twitter that can come from the text movement being out of phase with the scan lines. For NTSC,
good values include 0, 119.88, and 239.76 pixels per second; for PAL, good values include 0, 100, and 200 pixels per
second.
Apply the Autoscroll - Vertical animation preset in the Behaviors category to quickly create a vertical text crawl (for
example, a credit roll).
•To avoid the risk of twitter that comes with vertical motion, thin graphical elements, and fields, consider presenting
credits as a sequence of blocks of text separated by transitions, such as opacity fades.
Fortunately, many problems with text in video and compressed movie formats can be solved with one simple technique:
Apply a blur to the text layer. A slight blur can soften color transitions and cause thin horizontal elements to expand.
The Reduce Interlace Flicker effect works best for the purpose of reducing twitter; it applies a vertical directional blur
but doesn't blur horizontally, so it degrades the image less than other blurs.
Philip Hodgetts provides tips on the Creative COW website for getting the best results when creating text or vector
graphics for video.
355
Text
Last updated 6/8/2015
Scripts and expressions for working with text
Christopher Green provides a script (crg_Text_from_File.jsx) on his website that creates one or multiple text layers
based on the contents of a text file. You can either create one text layer from all of the text, or you can create one layer
for each line in the text file. The script also provides options for leading and other spacing.
Todd Kopriva provides an example script on the Adobe website that demonstrates the text formatting features available
through the scripting interface.
Salahuddin Taha provides a script on the After Effects Scripts website that enables entry of Arabic text (which flows
from right to left).
Michael Cardeiro provides a script on the After Effects Scripts website that makes multiple versions of your
compositions using information from a spreadsheet or database. The script goes through your spreadsheet line by line,
making a new version of your composition with text layers in the composition receiving text from the spreadsheet
automatically.
The After Effects Scripts website provides many scripts for working with text. Paul Tuersley provides a script on the
After Effects Scripts website that allows you to search for and edit text layers throughout your After Effects project,
create your own text style presets, and apply them to multiple layers.
Paul Tuersley provides a script on the AE Enhancers forum for importing Substation Alpha (SSA) karaoke files and
automatically creating animated text layers from them.
Jeff Almasol provides a script on his redefinery website for editing the source text of text layers.
Jeff Almasol provides a script on his redefinery website that converts various plain text punctuation into their “smart”
typographical representations (for example, (c) is converted to the copyright symbol, ©).
Jeff Almasol provides a script on his redefinery website that sets keyframes for the Source Text property of a text layer
and sets the values to text from a text file; the keyframes are placed at times specified by layer markers on the text layer.
For examples of expressions for the Source Text property, see Writing expressions for source text and MarkerKey
attributes (expression reference).
Enter point text
When you enter point text, each line of text is independent—the length of a line increases or decreases as you edit the
text, but it doesn’t wrap to the next line.
The small line through the type tool pointer marks the position of the text baseline. For horizontal text, the baseline
marks the line on which the text rests; for vertical text, the baseline marks the center axis of the characters.
When you enter point text, it is created using the properties currently set in the Character panel. You can change these
properties later by selecting the text and modifying settings in the Character panel.
1Do one of the following to create a text layer:
•Choose Layer > New > Text. A new text layer is created and an insertion point for the Horizontal Type tool
appears in the center of the Composition panel.
•Double-click a Type tool. A new text layer is created and an insertion point for the appropriate type tool appears
in the center of the Composition panel.
•Select the Horizontal Type tool or the Vertical Type tool , and then click in the Composition panel to
set an insertion point for the text.
356
Text
Last updated 6/8/2015
Note: The pointer for a type tool changes depending on whether it is over a text layer in the Composition panel. When
the pointer is not directly over a text layer, it appears as a new text pointer ; click to create a new text layer. Shift-
click always creates a new text layer.
2Enter text characters by typing. Press Enter on the main keyboard (Windows) or Return (Mac OS) to begin a new
line.
Note: You can also choose Edit > Paste to paste text that you have copied from any application that uses Unicode
characters. Text receives the formatting of the first character in the text layer into which it is pasted.
3To end text-editing mode, press Enter on the numeric keypad, select another tool, or press Ctrl+Enter (Windows)
or Command+Return (Mac OS).
Enter paragraph text
When you enter paragraph text, the lines of text wrap to fit the dimensions of the bounding box. You can enter multiple
paragraphs and apply paragraph formatting.
You can resize the bounding box at any time, which causes the text to reflow within the adjusted rectangle.
When you enter paragraph text, it has the properties set in the Character and Paragraph panels. You can change these
properties later by selecting the text and modifying settings in the Character and Paragraph panels.
1Select the Horizontal Type tool or the Vertical Type tool .
2Do one of the following in the Composition panel to create a text layer:
•Drag to define a bounding box from a corner.
•Alt-drag (Windows) or Option-drag (Mac OS) to define a bounding box around a center point.
Note: The pointer for a type tool changes depending on whether it is over a text layer in the Composition panel. When
the pointer is not directly over a text layer, it appears as a new text pointer ; drag to create a new text layer. Shift-
drag always creates a new text layer.
3Enter text by typing. Press Enter on the main keyboard (Windows) or Return (Mac OS) to begin a new paragraph.
Press Shift+Enter on the main keyboard (Windows) or Shift+Return (Mac OS) to create a soft carriage return, which
begins a new line without beginning a new paragraph. If you enter more text than can fit in the bounding box, the
overflow icon appears on the bounding box.
Note: You can also choose Edit > Paste to paste text that you have copied from any application that uses Unicode
characters. Text receives the formatting of the first character in the text layer into which it is pasted.
4To end text-editing mode, press Enter on the numeric keypad, select another tool, or press Ctrl+Enter (Windows)
or Command+Return (Mac OS).
Select and edit text in text layers
You can edit text in text layers at any time. If you set the text to follow a path, designate it as a 3D layer, transform it, or
animate it, you can still continue to edit it. Before you can edit text, you must select it.
To disable the Path Options property group for a text layer, click the visibility (eyeball) switch for the Path Options
property group. Temporarily disabling the Path Options property group can make editing and formatting text easier.
357
Text
Last updated 6/8/2015
The pointer for a type tool changes, depending on whether it is over a text layer in the Composition panel. When the
pointer for a type tool is directly over a text layer, it appears as the edit text pointer ; click to place the insertion point
in the existing text.
❖To select text with a type tool, do one of the following:
•To select a range of text, drag over the text.
•To select a range of text, click, move the pointer, and then Shift-click.
•To select a word, double-click it. To select a line, triple-click it. To select a paragraph, quadruple-click it. To select
all text in a layer, quintuple-click anywhere in the text.
•To use the arrow keys to select text, hold down Shift and press the Right Arrow or Left Arrow key. To use the
arrow keys to select words, hold down Shift+Ctrl (Windows) or Shift+Command (Mac OS) and press the Right
Arrow or Left Arrow key.
To select all text in a text layer and activate the most recently used type tool, double-click the text layer in the Timeline
panel.
Online resources for selecting and editing text in text layers
Jeff Almasol provides a script on his redefinery website for editing the source text of text layers.
Jeff Almasol provides a script on his redefinery website that converts various plain text punctuation into their “smart”
typographical representations (for example, (c) is converted to the copyright symbol, ©).
Jeff Almasol provides a script on his redefinery website that sets keyframes for the Source Text property of a text layer
and sets the values to text from a text file; the keyframes are placed at times specified by layer markers on the text layer.
Resize a text bounding box
1With a type tool active, select the text layer in the Composition panel to display the bounding box handles.
2Position the pointer over a handle—the pointer turns into a double arrow —and do one of the following:
•Drag to resize in one direction.
•Shift-drag to maintain the proportion of the bounding box.
•Ctrl-drag (Windows) or Command-drag (Mac OS) to scale from the center.
Move a text layer
You can drag with the move pointer in the Composition panel to move a text layer. To activate the move pointer
without leaving text editing mode, move the type tool away from the text in the Composition panel; when you see the
move pointer , drag to move the text. You can also hold down the Ctrl (Windows) or Command (Mac OS) key to
momentarily activate the move pointer.
Convert point or paragraph text
Note: When you convert paragraph text to point text, all characters outside the bounding box are deleted. To avoid losing
text, resize the bounding box so that all text is visible before conversion.
1Using the Selection tool , select the text layer.
Note: You can’t convert the text layer if it’s in text-editing mode.
2Using a type tool, right-click (Windows) or Control-click (Mac OS) anywhere in the Composition panel, and choose
Convert To Paragraph Text or C onvert To Point Text.

358
Text
Last updated 6/8/2015
When you convert from paragraph text to point text, a carriage return is added at the end of each line of text, except
the last line.
To display the bounding box of paragraph text and automatically select a type tool, double-click the text layer in the
Timeline panel.
Change the direction of text
Horizontal text flows from left to right; multiple lines of horizontal text lie from top to bottom. Vertical text flows from
top to bottom; multiple lines of text lie from right to left.
A Horizontal point text B Horizontal point text converted to vertical C Horizontal paragraph text D Horizontal paragraph text converted to
vertical
1Using the Selection tool , select the text layer.
Note: You can’t convert text in text-editing mode.
2Using a type tool, right-click (Windows) or Control-click (Mac OS) anywhere in the Composition panel, and choose
Horizontal or Vertical.
Convert text from Photoshop to editable text
Text layers from Photoshop retain their style and remain editable in After Effects.
If you imported the Photoshop document as merged layers, then you must first select the layer and choose Layer >
Convert To Layered Comp to decompose the imported Photoshop document into its layers.
1Add the Photoshop text layer to your composition and select it.
2Cho ose L ayer > Convert To Editable Text.
The layer becomes an After Effects text layer and no longer uses the Photoshop text layer as its source footage item.
If the layer contains layer styles, the layer styles are converted to editable layer styles as if the Layer > Layer Styles >
Convert To Editable Styles command had been used on the layer before converting the text to editable text.

359
Text
Last updated 6/8/2015
More Help topics
Examples and resources for text animation
Apply an effect or animation preset
Formatting paragraphs with the Paragraph panel
Type
Preparing and importing Photoshop files
Layer styles
Formatting characters and the Character panel
Use the Character panel to format characters. If text is selected, changes you make in the Character panel affect only
the selected text. If no text is selected, changes you make in the Character panel affect the selected text layers and the
text layer’s selected Source Text keyframes, if any exist. If no text is selected and no text layers are selected, the changes
you make in the Character panel become the new defaults for the next text entry.
•To display the Character panel, choose Window > Character; or, with a type tool selected, click the panel button
in the Tools panel.
To open the Character and Paragraph panels automatically when a type tool is active, select Auto-Open Panels in the
Tools panel.
•To reset Character panel values to the default values, choose Reset Character from the Character panel menu.
Note: You open the panel menu by clicking the panel menu button in the upper-right tab of the panel.
After Effects doesn't provide a character style for underlining text, but you can underline text with a variety of other
graphical elements. Possibilities include using a shape layer containing a path with a stroke, applying a stroke to an open
mask, using the Write-on Effect, and using an animated series of tightly spaced (kerned) underscore or dash characters. For
a discussion of why underlining is considered bad typographic form and how you can create underlines in After Effects, see
this post on the Creative COW After Effects forum.
Fonts
A font is a complete set of characters—letters, numbers, and symbols—that share a common weight, width, and style.
In addition to the fonts installed on your system in the standard location for your operating system, After Effects uses
font files in this local folder:
Windows Program Files\Common Files\Adobe\Fonts
Mac OS Library/Application Support/Adobe/Fonts
If you install a Type 1, TrueType, OpenType, or CID font into the local Fonts folder, the font appears in Adobe
applications only.
If the formatting for a character specifies a font that is unavailable on your computer system, another font will be
substituted, and the missing font name will appear in brackets. Font substitution sometimes occurs when you open a
project on Mac OS that was created on Windows, because the set of default fonts differs between the two operating
systems.
360
Text
Last updated 6/8/2015
When you select a font, you can select the font family and its font style independently. The font family (or typeface) is
a collection of fonts sharing an overall design; for example, Times. A font style is a variant version of an individual font
in the font family; for example, regular, bold, or italic. The range of available font styles varies with each font. If a font
doesn’t include the style you want, you can apply faux styles—simulated versions of bold, italic, superscript, subscript,
all caps, and small caps styles. If more than one copy of a font is installed on your computer, an abbreviation follows the
font name: (T1) for Type 1 fonts, (TT) for TrueType fonts, or (OT) for OpenType fonts.
The font size determines how large the type appears in the layer. In After Effects, the unit of measurement for fonts is
pixels. When a text layer is at 100% scale value, the pixel values match composition pixels one-to-one. So if you scale
the text layer to 200%, the font size appears to double; for example, a font size of 10 pixels in the layer looks like 20 pixels
in the composition. Because After Effects continuously rasterizes text, the resolution remains high when you increase
the scale values.
Note: When choosing fonts and styles from the menus in the Character panel, press Enter (Windows) or Return (Mac OS)
to accept an entry, or press Esc to exit the menu without applying a change.
For information about what fonts are installed with After Effects CS5, see these pages on the Adobe website:
•Useful Details About Creative Suite 5 (CS5) Fonts
•Fonts included with Adobe Creative Suite 5 Applications
You can use the Adobe Font Finder on the Adobe website to browse and search fonts by various characteristics.
Choose a font family
•Click in the Font Family menu box, and begin typing the name. Continue typing until the desired font family name
appears.
•To choose the previous or next font family in the menu, place the pointer over the Font Family menu box and use
your mouse scroll wheel; or click in the Font Family menu box, and press the Up Arrow or Down Arrow.
•Click the arrow to the right of the Font Family menu box, and press the key for the first letter of the font family name.
Press the key again to advance through the font families with names that begin with that letter.
Choose a font style
•Choose from the Font Style menu in the Character panel.
•If the font family you chose does not include a bold or italic style, you can click the Faux Bold button or the Faux
Italic button in the Character panel to apply a simulated style.
Choose a font size
•Enter or select a new value for Size in the Character panel.
Spacing between characters and lines: non-breaking spaces, kerning,
tracking, and leading
Leading is the spacing between lines of text. Kerning is the process of adding or subtracting space between specific letter
pairs. Tracking is the process of creating an equal amount of spacing across a range of letters. Positive kerning or
tracking values move characters apart (increasing the spacing from the default); negative values move characters closer
together (reducing the spacing from the default).
Note: When you open a project that was last saved in After Effects 6.0, text in the project may lie differently than in After
Effects 6.0 because of improvements in kerning behavior.
361
Text
Last updated 6/8/2015
Tracking and manual kerning are cumulative, so you can first adjust individual pairs of letters and then tighten or
loosen a block of text without affecting the relative kerning of the letter pairs.
Note: Values for kerning and tracking affect Japanese text, but normally these options are used to adjust the aki (spacing)
between Roman characters.
Create a non-breaking space
If a set of characters is set to be non-breaking, the characters animate together as if they were a single word.
1Select the characters you want to prevent from breaking.
2Choose No Break from the Character panel menu.
Note: You open the panel menu by clicking the panel menu button in the upper-right tab of the panel.
Specify leading
❖In the Character panel, do one of the following:
•Choose the desired leading from the Leading menu .
•Select the existing leading value, and enter a new value.
•Drag the underlined leading value.
Specify kerning
You can automatically kern type using metrics kerning or optical kerning. Metrics kerning uses kern pairs, which are
included with most fonts. Kern pairs contain information about the spacing of specific pairs of letters such as LA, To,
Tr, Ta, Tu, Te, Ty, Wa, WA, We, Wo, Ya, and Yo. After Effects uses metrics kerning by default so that specific pairs are
automatically kerned when you import or type text. Some fonts include robust kern-pair specifications.
For fonts for which metrics kerning provides inadequate results, or for two different typefaces or sizes in a line, you
may want to use the optical kerning option. Optical kerning adjusts the spacing between adjacent characters based on
their shapes.
You can also use manual kerning to adjust the space between two letters.
Alan Shisko provides an article and video tutorial about kerning on his Motion Graphics 'n Such blog.
•To use the built-in kerning information for a font, choose Metrics from the Kerning menu in the Character
panel.
•To adjust kerning manually, click between two characters with a type tool, and set a numeric value for Kerning
in the Character panel.
Note: If a range of text is selected, you can’t manually kern the characters. Instead, use tracking.
Specify tracking
•To specify tracking, set a numeric value for Tracking in the Character panel.
362
Text
Last updated 6/8/2015
Text fills and strokes
For text, a fill is applied to the area inside the shape of an individual character; a stroke is applied to the outline of the
character. After Effects applies a stroke to a character by centering the stroke on the character’s path; half of the stroke
appears on one side of the path, and the other half of the stroke appears on the other side of the path.
The Character panel lets you apply both color fill and color stroke to text, control the stroke width, and control the
stacking position of the fill and stroke. You can change these properties for individual, selected characters; selected
Source Text keyframes; all text in a layer; or all text across multiple selected layers.
You can also control the compositing order of the fill and stroke for a text layer using the All Fills Over All Strokes or
All Strokes Over All Fills options, which override the Fill Over Stroke or Stroke Over Fill properties of individual
characters.
Note: For text that has per-character 3D properties, you cannot control the order of stroke and fill operations between
characters; the Fill & Stroke menu in the More Options property group in the Timeline panel is unavailable, and the All
Fills Over All Strokes and All Strokes Over All Fills options in the Character panel do nothing.
Add a stroke (outline) to text
1Select the characters to which you want to add a stroke.
2Set a stroke size with the Stroke Width property in the Character panel.
3Set the stroke color with the Stroke Color control in the Character panel.
4Choose one of the following in the Character panel to control the position of the stroke:
Stroke Over Fill, Fill Over Stroke The stroke of only selected text appears over or behind the fill.
All Strokes Over All Fills, All Fills Over All Strokes Strokes appear over or behind fills in the entire text layer.
Change text fill or stroke color
The text you enter gets its color from the Fill Color and Stroke Color controls in the upper-right corner of the Character
panel. Select text to change its color after the text has already been entered.
•To set fill or stroke color using the color picker, click the Fill Color or Stroke Color control. To set fill or stroke color
using the eyedropper, click the eyedropper button and then click anywhere on the screen to sample the color.
•To swap colors for fill and stroke, click the Swap Fill And Stroke button .
•To remove fill or stroke, click the No Fill Color button or No Stroke Button. Only one of these buttons is available,
depending on whether the Fill Color or Stroke Color box is forward.
•To set the fill or stroke to black or white, click the Set To Black or Set To White button.
•To bring the Fill Color or Stroke Color box forward, click it.
Change text stroke line join
The line join type for a stroke determines the shape of the stroke when two segments of the stroke intersect. You set the
line join type for a text stroke with the Line Join setting in the panel menu of the Character panel, which you open by
clicking the panel menu button in the upper-right tab of the Character panel.
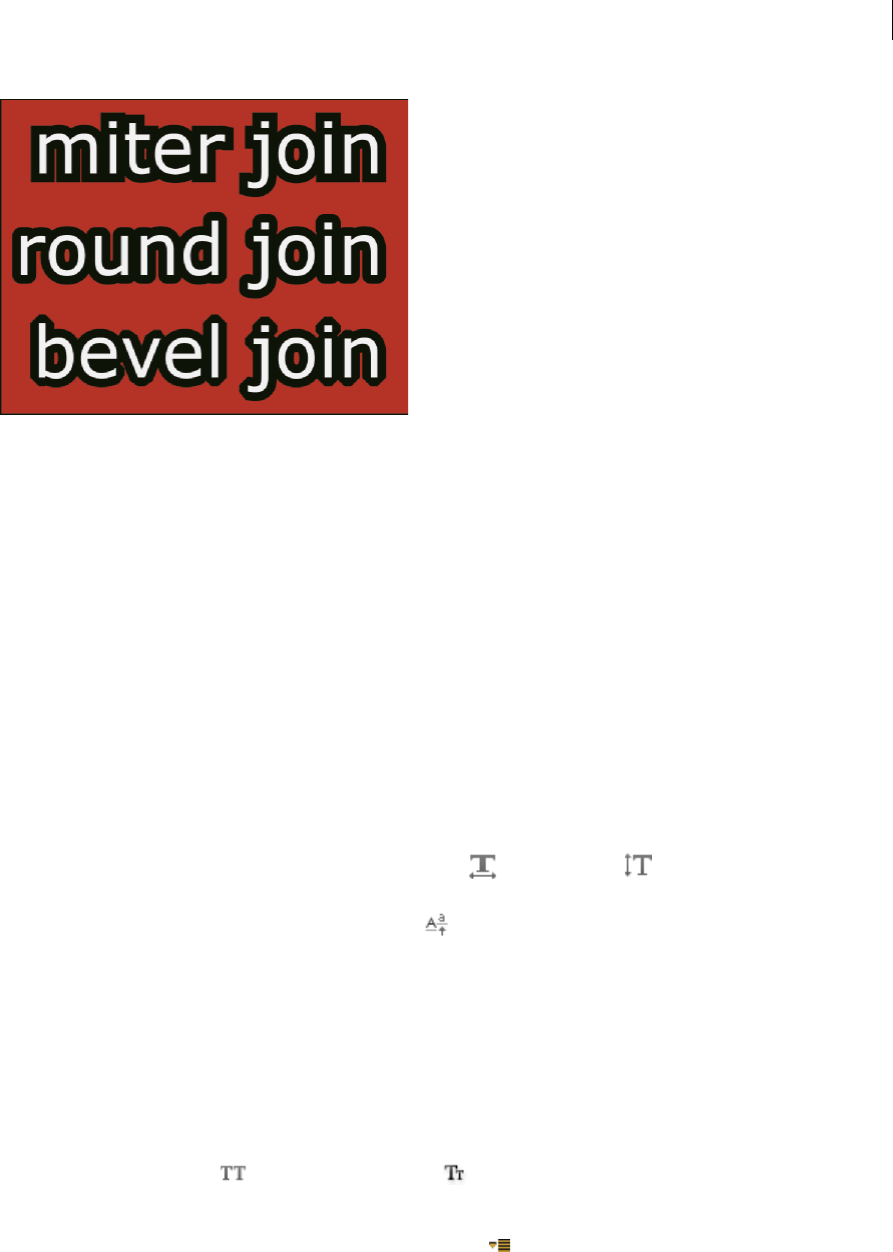
363
Text
Last updated 6/8/2015
❖Choose Miter, Round, or Bevel from the Line Join menu.
Blend overlapping characters in a text layer
1In the Timeline panel, expand the text layer and the More Options group.
2Choose a blending mode from the Inter-Character Blending menu.
Note: To blend a text layer with the layers beneath it, specify a blending mode from the Modes column in the Timeline
panel.
Inter-character blending is not available for text layers with per-character 3D properties.
Text scale and baseline shift
Horizontal scale and vertical scale specify the proportion between the height and width of the text. Unscaled characters
have a value of 100%. You can adjust scale to compress or expand selected characters in both width and height.
Baseline shift controls the distance that text appears from its baseline, either raising or lowering the selected text to
create superscripts or subscripts.
•To adjust scale, enter a new percentage for Horizontal Scale or Vertical Scale in the Character panel, or drag
the underlined value.
•To specify baseline shift, set a value for Baseline Shift in the Character panel. A positive value moves horizontal
text above and vertical text to the right of the baseline; a negative value moves text below or to the left of the baseline.
Change the case of text
You can enter or format text as uppercase characters, either all caps or small caps. When you format text as small caps,
After Effects uses the small caps designed as part of the font, if they are available. If the font does not include small caps,
After Effects generates faux small caps.
Note: Small Caps formatting does not change characters that were originally typed in uppercase.
•Click the All Caps button or the Small Caps button in the Character panel.
•Choose All Caps or Small Caps from the Character panel menu.
Note: You open the panel menu by clicking the panel menu button in the upper-right tab of the panel.
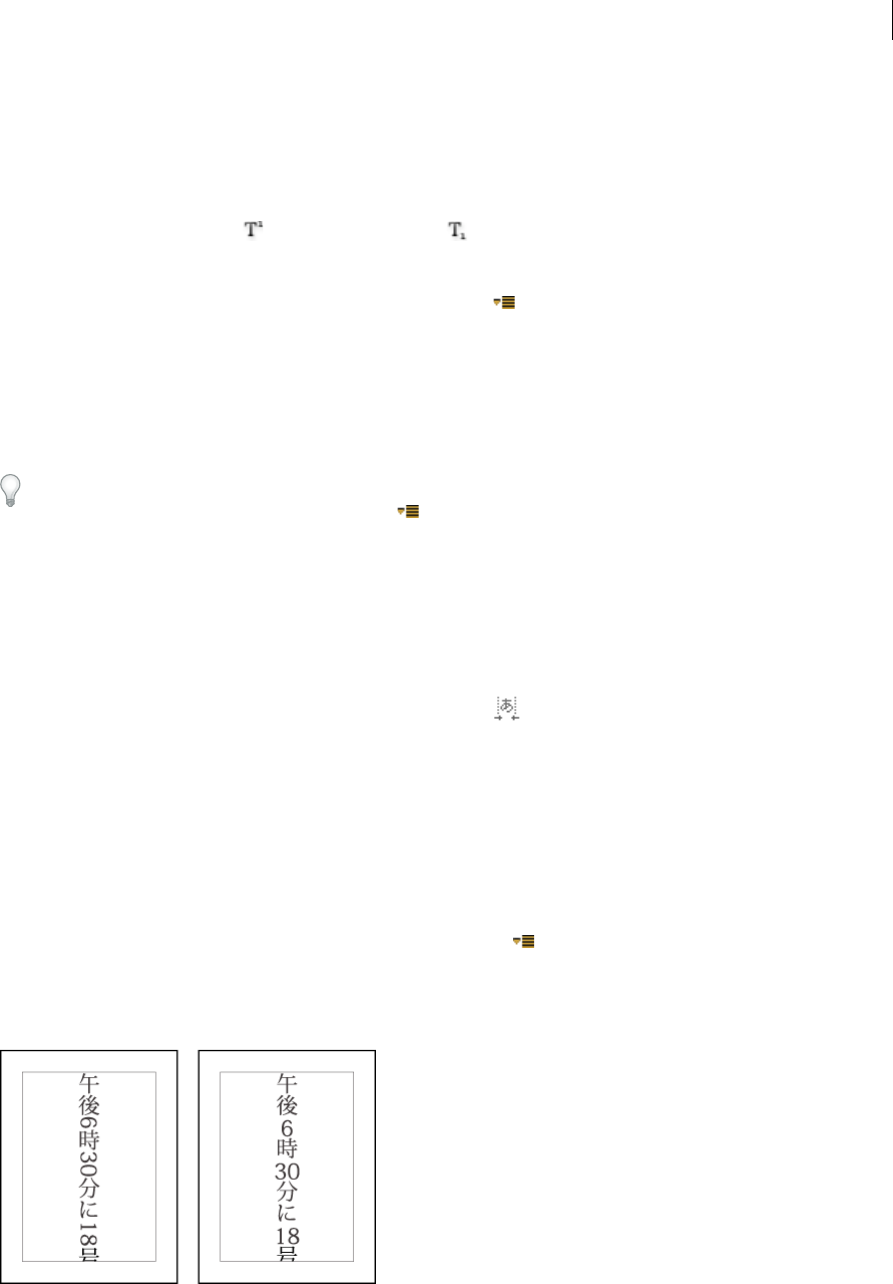
364
Text
Last updated 6/8/2015
Format text as superscript or subscript
Superscript characters are reduced in size and shifted above the text baseline; subscript characters are reduced in size
and shifted below the text baseline. If the font does not include superscript or subscript characters, After Effects
generates faux superscript or subscript characters.
•Click the Superscript button or the Subscript button in the Character panel.
•Choose Superscript or Subscript from the Character panel menu.
Note: You open the panel menu by clicking the panel menu button in the upper-right tab of the panel.
Chinese, Japanese, and Korean text
After Effects provides several options for working with Chinese, Japanese, and Korean (CJK) text. Characters in CJK
fonts are often referred to as double-byte characters because they require more than one byte of information to express
each character.
To display CJK font names in English, choose Show Font Names In English from the Character panel menu. You open
the panel menu by clicking the panel menu button in the upper-right tab of the panel.
Adjust tsume
Tsume reduces the space around a character by a specified percentage value. The character itself is not stretched or
squeezed as a result. When tsume is added to a character, spacing around both sides of the character is reduced by an
equal percentage.
1Select the characters you want to adjust.
2In the Character panel, enter or select a percentage for Tsume . The greater the percentage, the tighter the
compression between characters. At 100% (the maximum value), no space exists between the character’s bounding
box and its em box.
Specify how leading is measured
1Select the paragraphs you want to adjust.
2Choose Top-To-Top Leading or Bottom-To-Bottom Leading from the Paragraph panel menu. A check mark
indicates which option is selected.
Note: You open the panel menu by clicking the panel menu button in the upper-right tab of the panel.
Use tate-chuu-yoko
Tate-chuu-yoko (also called kumimoji and renmoji) is a block of horizontal text laid out within a vertical text line.
1Select the characters that you want to rotate.
365
Text
Last updated 6/8/2015
2Choose Tate-Chuu-Yoko from the Character panel menu. (A check mark indicates that the option is turned on. To
turn off the option, choose Tate-Chuu-Yoko again.)
Note: You open the panel menu by clicking the panel menu button in the upper-right tab of the panel.
Using tate-chuu-yoko does not prevent you from editing and formatting text; you can edit and apply formatting
options to rotated characters as you do to other characters.
Smart quotes
Smart quotes, or printer’s quotation marks, use a curved left or right quotation mark instead of straight quotation marks.
❖To use smart quotes, choose Use Smart Quotes from the Character panel menu.
Note: You open the panel menu by clicking the panel menu button in the upper-right tab of the panel.
More Help topics
Text (keyboard shortcuts)
Blending modes and layer styles
Per-character 3D text properties
Examples and resources for text animation
Chris and Trish Meyer provide a video tutorial on the ProVideo Coalition website about entering, editing, formatting,
and typesetting text.
Harry Frank provides a tutorial on animating text with text animators on the Digital Arts Online website.
Aharon Rabinowitz provides a video tutorial on the Creative COW website that shows a few ways to make 3D extruded
text in After Effects, using duplicate layers or the Shatter effect.
In the “After Effects Text Tips” series of video tutorials on the Creative COW website, Aharon Rabinowitz demonstrates
how to use multiple text animators to create and fine-tune complex text animations.
Steve Holmes provides a tutorial on the Layers Magazine website that uses three text animators and per-character 3D
text animation to create a text animation.
Colin Braley provides a tutorial and example project on his website that show how to use an expression on the Source
Text property to animate text to overcome some of the limitations of the Numbers effect.
Eran Stern provides a set of video tutorials on the Creative COW website that show how to use the text animation
features to create a variety of simple animations, including some that use punctuation and other non-alphanumeric
symbols as simple vector graphics elements:
•Part 1
•Part 2
Eran Stern provides a video tutorial on the Creative COW website that demonstrates how to use per-character 3D text
animation to animate text along a path in the shape of a 3D tornado.
Rhys Enniks provides a video tutorial on his website in which he uses expressions and multiple text animators and range
selectors to animate text as if it is being typed onto a computer screen.

366
Text
Last updated 6/8/2015
Angie Taylor provides a tutorial on the Digital Arts website that shows how to use per-character 3D text animation
together with a common workaround for simulating extruded 3D text.
Eran Stern provides a video tutorial on the Artbeats website that shows how to use the After Effects text animation
system as a particle system.
Rich Young collects several resources and tutorials for creating extruded 3D text in After Effects.
On the ProVideo Coalition website, Chris & Trish Meyer provide several tips for animating text in After Effects.
Toby Pitman shows tricks for using shape layers to animate text on the MacProVideo website.
Example: Animate characters with per-character 3D properties
This example illustrates how you can easily animate individual characters in 3D so that each character steps out of line
and takes a bow.
1Create a new composition.
2Create a new text layer with the word ovation.
3Choose Animation > Animate Text > Enable Per-character 3D.
4Choose Animation > Animate Text > Position.
5Choose Animation > Animate Text > Rotation.
6In the Timeline panel, in the Animator group, set the X Rotation property to 45, and set the Position value to (0.0,
0.0, -100.0).
7Expand Range Selector 1.
8Click the stopwatch icon for the Offset property to set an initial keyframe with the value at 0 seconds.
9Set the Offset property value to -15%.
10 Set the End property value to 15%.
11 Move the current-time indicator to 10 seconds, and set the Offset value to 100%.
12 Press the R key to show the Rotation properties for the entire layer.
13 Set the Y Rotation value for the layer to -45, rotating the entire layer so that you can more easily see the 3D motion
of the characters.
14 Preview the composition.
Example: Offset characters
This example illustrates how you can easily animate random characters so that they gradually form a legible word or
phrase by specifying a Character Offset value and animating the range selector.
367
Text
Last updated 6/8/2015
1Create a new composition.
2Create a new text layer with the word Galaxy.
3Choose Animation > Animate Text > Character Offset.
4In the Timeline panel, set the Character Offset value to 5.
5Expand Range Selector 1.
6Click the Start stopwatch to set an initial keyframe at 0 seconds and set the value to 0%.
7Move the current-time indicator to 5 seconds and set the Start value to 100%.
8Set Character Alignment to Center.
9Preview the composition.
Example: Animate characters with the Wiggly selector
This example demonstrates how easy it is to animate the position of individual characters. It also shows how the Wiggly
selector can create a dramatic change to the animation simply by adding it to the layer.
1Create a new composition.
2Create a new text layer with the word Galaxy and set the color to blue in the Character panel.
3Choose Animation > Animate Text > Position.
4In the Timeline panel, drag the y value of the Position property to the left until all of the characters are out of the
frame.
5Expand Range Selector 1.
6Click the Start stopwatch and leave it at 0% at 0 seconds; then move the current-time indicator to 5 seconds and set
Start to 100%.
368
Text
Last updated 6/8/2015
7Preview the composition.
8Collapse the Animator 1 group.
9Make sure that nothing is selected except the text layer name in the Timeline panel, and choose Fill Color > Hue
from the Animate menu. A new animator group, Animator 2, appears in the Timeline panel.
10 Set Fill Hue to 1x+0.0.
11 Expand the Range Selector 1 for Animator 2.
12 Click the Start stopwatch and leave it at 0% at 0 seconds; then move the current-time indicator to 5 seconds and set
Start to 100%.
13 Preview the animation. The colors change now as they drop from the top of the screen, but they all use the same
color and end up the same, original color.
14 With Fill Hue selected, choose Selector > Wiggly from the Add menu.
15 Expand the Wiggly Selector 1 property and choose Add from the Mode menu.
16 Preview the composition.
Note: If you add the Fill Hue property to Animator 1 and then add the Wiggly selector, both the position and the colors
wiggle, instead of just the colors.
Example: Animate text tracking
This example shows you how easy it is to isolate characters when tracking a line of text. Using the Tracking and Line
Anchor animator properties, you can easily move all but one or a few characters.
1Create a new composition.
2Create a new text layer and type 3579.
3With the text layer selected, click the Center Text button in the Paragraph panel.
4Choose View > Show Grid.
5In the Timeline panel, select the text layer and choose Animation > Animate Text > Tracking.
6Make sure that Before & After is specified in the Track Type menu.
7Click the Tracking Amount stopwatch and leave the value 0 at 0 seconds.
8Move the current-time indicator to 5 seconds and drag the Tracking Amount value until all characters are off the
screen.
9Preview the animation.
10 With the current-time indicator at 0, take a snapshot of the Composition panel. You will use this snapshot, and the
grids, to determine the original location of the number 7 at the end of the animation.
11 Move the current-time indicator to 5 seconds.
12 Click the Show Snapshot button.
13 In the Timeline panel, select Animator 1 and choose Line Anchor from the Add menu.
369
Text
Last updated 6/8/2015
14 Drag the Line Anchor value until the 7 is positioned in approximately its original position in the center of the
Composition panel.
15 Click the Show Snapshot button in the Composition panel to see the exact location of the 7 in its original location.
Adjust the Line Anchor value to position the character in the original location.
16 Preview the animation.
Example: Use selectors to animate specific words
This example shows how to use selectors to limit an animation to a specific word.
1Create a new composition.
2Create a new text layer with the words Speeding Saucer.
3Choose Animation > Animate Text > Skew.
4In the Timeline panel, set the Skew value to 35.
5Expand Range Selector 1.
6Make sure the current-time indicator is at 0 seconds and click the End stopwatch.
7In the Composition panel, drag both selector bars to the left side of the S in Speeding.
8Move the current-time indicator to 2 seconds and drag the right selector bar to the right side of the g in Speeding.
9Preview the composition.
Example: Create a write-on animation
You can easily create the appearance of writing on the screen by using the Opacity animator property.
1Create a new composition.
2Create a text layer with the characters 01234.
3Choose Animation > Animate Text > Opacity.
4Set Opacity to 0%.
5Expand the Range Selector 1 and click the stopwatch icon for Start.
6In the Composition panel, drag the start selector to the left edge of the text (the value will be at 0).
7Move the current-time indicator to 5 seconds and drag the start selector in the Composition panel to the right edge
of the text (the value will be 5).
8Preview the composition.

370
Text
Last updated 6/8/2015
Note: By default, the Smoothness property is set to 100%. To create a typewriter appearance, expand the Advanced
property and set Smoothness to 0%.
Example: Animate text with multiple selectors
This example uses the selectorValue parameter in an Expression selector with the Wiggly selector to make a string of
characters flash on and off randomly.
1Create a new composition.
2Create a new text layer.
3In the Timeline panel, choose Opacity from the Animate menu for the text layer.
4Expand the text layer and its animator in the Timeline panel.
5Select the Range Selector and delete it.
6Choose Add > Selector > Wiggly next to the Animator property group for the text layer.
7Choose Add > Selector > Expression. If the Wiggly selector doesn’t come before the Expression selector, drag the
Wiggly selector above the Expression selector.
8Expand the Expression Selector.
9Expand the Amount property to reveal the expression. The following expression appears by default:
selectorValue * textIndex/textTotal
10 Replace the default expression text with the following expression:
r_val=selectorValue[0];
if(r_val < 50)r_val=0;
if(r_val > 50)r_val=100;
r_val
11 Set the opacity to 0%, and preview the composition.
Example: Animate text position with expressions
This example uses the textIndex and textTotal attributes with the wiggle expression to animate a line of text.
1Create a new composition.
2Create a new text layer.
3Expand the text layer in the Timeline panel to view the text properties. Add a Position animator group from the
Animate menu.
4Delete the default Range selector, Range Selector 1.
5Add an Expression selector by selecting the Add menu, then choosing Selector > Expression. Expand the Expression
selector to reveal its options.
6Expand the Amount property to reveal the expression. The following expression appears by default:
selectorValue * textIndex/textTotal
7Replace the default expression with the following expression:
seedRandom(textIndex);
amount=linear(time, 0, 5, 200*textIndex/textTotal, 0);
wiggle(1, amount);
The linear method is used in this example to ramp down the maximum wiggle amount over time.

371
Text
Last updated 6/8/2015
8Set the vertical position value. The greater the value, the more the characters wiggle.
9Preview your composition.
Example: Animate text as a timecode display
❖With no layers selected in the Timeline panel, double-click the Current Time Format animation preset in the Effects
& Presets panel. (You can locate the animation preset by typing its name in the Contains field in the Effects & Presets
panel.)
A new text layer is created, with an expression on the Source Text property that makes the text show the current time
in the time display format set for the project.
You can use other expressions in the Global category to display time in another format.
To see the expressions on a layer, select the layer and press EE.
More Help topics
Create a composition
Enter point text
Text selectors
Set or add keyframes
Preview video and audio
Snapshots
Timecode and time display units
Time conversion methods (expression reference)
Animating text
About text animation
Animating text layers is useful for many purposes, including animated titles, lower thirds, credit rolls, and dynamic
typography.
As with other layers in After Effects, you can animate entire text layers. However, text layers offer additional animation
features with which you can animate the text within the layers. You can animate text layers by using any of the following
methods:
•Animate the Transform properties, as you would any other layer, to change the entire layer, not its text contents.
•Apply text animation presets. (See Text animation presets.)
•Animate the source text of the layer, so that the characters themselves change to different characters or use different
character or paragraph formats over time. (See Select and edit text in text layersand Writing expressions for source
text.)

372
Text
Last updated 6/8/2015
•Use text animators and selectors to animate many properties of individual characters or a range of characters. (See
Animate text with text animators.)
To smooth the edges and movement of animated text, enable motion blur for the text layer. See Motion blur for more
information.
For a video tutorial on animating text, go to the Adobe website.
Text animation presets
Browse and apply text animation presets as you would any other animation presets. You can browse and apply
animation presets in After Effects using the Effects & Presets panel or Adobe Bridge. To open the Presets folder in
Adobe Bridge, choose Browse Presets from the Effects & Presets panel menu or from the Animation menu. (See Apply
an effect or animation preset and Animation presets.)
A great way to see how advanced users use After Effects is to apply an animation preset, and press U or UU to reveal
only the animated or modified layer properties. Viewing the animated and modified properties shows you what changes
the designer of the animation preset made to create the animation preset.
Tips, notes, and caveats for text animation presets
The text animation presets were created in an NTSC DV 720x480 composition, and each text layer uses 72-point
Myriad Pro. Some preset animations move the text on, off, or through the composition. The animation preset position
values may not be appropriate for a composition that is much larger or smaller than 720x480; for example, an animation
that is supposed to start outside the frame may start inside the frame. If the text isn’t positioned as expected or the text
disappears unexpectedly, adjust the position values for the text animator in the Timeline panel or Composition panel.
After you apply a 3D Text animation preset, you may need to rotate the layer or add a camera to rotate around the layer
to see the results of the 3D animation.
Text animation presets in the Paths category automatically replace the source text with the name of the animation preset
and change the font color to white. These animation presets may also change other character properties.
The Fill And Stroke category of animation presets contains presets that may change the fill color and stroke properties
of the preset that you apply. If the animation preset requires a stroke or fill color, the animation works only if you have
assigned one to your text.
Additional online resources for animation presets
You can download additional animation presets that take advantage of per-character 3D text animation from the After
Effects Exchange on the Adobe website.
For a list of animation presets included with After Effects, see Animation preset list.
Animate text with text animators
Animating text with animators and selectors consists of three basic steps:
•Add an animator to specify which properties to animate.
•Use a selector to specify how much each character is affected by the animator.
•Adjust the animator properties.
Note: To always affect all characters in the layer, delete the default selector. In this case, animating a text layer is not much
different from animating any other layer.
373
Text
Last updated 6/8/2015
Usually, you don’t need to set keyframes or expressions for the animator properties. It’s common to only set keyframes
or expressions for the selector and specify only the ending values for the animator properties.
1Select a text layer in the Timeline panel, or select the specific characters that you want to animate in the Composition
panel.
2Do one of the following:
•Choose Animation > Animate Text and then choose a property from the menu.
Note: The Enable Per-Character 3D menu item does not add an animator. It adds 3D properties to the layer and to the
individual characters, for which you can then add animators.
•Choose a property from the Animate menu, located in the Switches/Mode column of the Timeline panel.
3In the Timeline panel, adjust the animator property values. Often, you simply set the property that you want to
animate to its ending value and then use the selectors to control everything else.
4Expand the Range Selector property group and set keyframes for Start or End properties by clicking the stopwatch
for the property and doing one of the following:
•Set the values for Start and End in the Timeline panel.
You may find it easier to think in terms of numbers of characters than percentages for the Start and End properties
of a range selector. To show these properties in numbers of characters (including spaces), choose Index for Units in
the Advanced property group of a range selector.
•Drag the selector bars in the Composition panel. The pointer changes to the selector movement pointer
when it is over the middle of a selector bar.
5To refine the selection, expand Advanced and specify options and values as desired.
For example, to animate opacity gradually from the first character to the last, you can add an animator for Opacity, set
the Opacity value (in the Animator property group) to 0, and then set keyframes for the End property of the default
selector to 0% at 0 seconds and 100% at a later time.
374
Text
Last updated 6/8/2015
You can create elaborate animations using several animators and several selectors, each of which adds its influence to
the text animation.
Text animator properties
Animator properties work much like other layer properties, except that their values only influence the characters that
are selected by the selectors for the animator group. Choose Enable Per-Character 3D to add 3D properties to a text
layer; this command does not add properties to an animator group.
•To add an animator group to a text layer, select the text layer in the Timeline panel, and choose a property from the
Animation > Animate Text menu or from the Animate menu for the layer in the Switches/Modes column in the
Timeline panel. A new animator group, along with a default selector and the chosen animator property, appears in
the Timeline panel.
•To add a new animator property to an existing animator group, select the animator group in the Timeline panel, and
choose the property from Animation > Animate Text menu or from the Add menu for the animator group in the
Timeline panel. The new animator property appears within the same group as the existing animator property and
shares the existing selectors.
•To delete an animator property or animator group, select it in the Timeline panel and press Delete.
•To remove animators from a text layer, select the text layer in the Timeline panel, and choose Animation > Remove
All Text Animators.
•To copy an animator group, select it in the Timeline panel and choose Edit > Copy. To paste the animator group,
select a layer and choose Edit > Paste.
•To rename an animator group, make sure that it is the only thing selected, and then press Enter (Windows) or Return
(Mac OS); or right-click (Windows) or Control-click (Mac OS) the name and choose Rename.
•To reorder an animator group, drag it to a new location in the stacking order in the Timeline panel.

375
Text
Last updated 6/8/2015
Animator properties
Anchor Point Anchor point for the characters: the point about which transformations—such as scaling and rotation—
are performed. (See Text anchor point properties.)
Position The position of the characters. You can specify values for this property in the Timeline panel, or you can
modify it by selecting it in the Timeline panel and then dragging the layer in the Composition panel using the Selection
tool, which changes to a move tool when positioned over text characters. Dragging with the move tool does not
affect the z (depth) component of Position.
Scale The scale of the characters. Because scale is relative to the anchor point, changes to the z component of Scale
have no apparent result unless the text also has an Anchor Point animator with a nonzero z value.
Skew The slant of the characters. The Skew Axis specifies the axis along which the character is skewed.
Rotation, X Rotation, Y Rotation, Z Rotation If per-character 3D properties are enabled, you can set the rotation about
each axis individually. Otherwise, only Rotation (which is the same as Z Rotation) is available.
All Transform Properties All of the Transform properties are added at once to the animator group.
Line Anchor The alignment for the tracking in each line of text. A value of 0% specifies left alignment, 50% specifies
center alignment, and 100% specifies right alignment.
Line Spacing The space between lines of text in a multiline text layer.
Character Offset The number of Unicode values to offset selected characters. For example, a value of 5 advances the
characters in the word five steps alphabetically, so the word offset becomes tkkxjy.
Character Value The new Unicode value for selected characters, replacing each character with one character
represented by the new value. For example, a value of 65 replaces all of the characters in a word with the 65th Unicode
character (A), so the word value becomes AAAAA.
Character Range Specifies limits on the character. This property appears whenever you add the Character Offset or
Character Value property to a layer. Choose Preserve Case & Digits to keep characters in their respective groups.
Groups include uppercase Roman, lowercase Roman, digits, symbols, Japanese katakana, and so forth. Choose Full
Unicode to allow for unlimited character changes.
Blur The amount of Gaussian blur to be added to the characters. Horizontal and vertical blur amounts can be specified
separately.
Text selectors
Each animator group includes a default range selector. You can replace the default selector, add additional selectors to
an animator group, and remove selectors from a group.
Selectors are a lot like masks: You use selectors to specify which part of a range of text you want to affect, and by how
much. You can use multiple selectors and specify a Mode setting for each one to determine how it interacts with the
text and with other selectors in the same animator group. If you have only one selector, Mode specifies the interaction
between the selector and the text—Add is the default behavior; and Subtract inverts the influence of the selector.
If you delete all selectors from an animator group, the values of the animator properties apply to all characters in the
layer. This technique is useful because properties of the text specified by the Character panel cannot otherwise be
animated (except by using Hold keyframes on the Source Text property itself).
376
Text
Last updated 6/8/2015
Use a Wiggly selector to vary a selection within a specified amount over time. Use expression selectors to use
expressions to dynamically specify how much you want characters to be affected by an animator property.
•To add a selector using the Timeline panel, select an animator group in the Timeline panel and choose Selector from
the Add menu for the animator group, or choose Animation > Add Text Selector. Choose Range, Wiggly, or
Expression from the submenu.
•To add a selector using the Composition panel, select a range of characters in the Composition panel, right-click
(Windows) or Control-click (Mac OS) the text, and choose Add Text Selector from the context menu. Choose
Range, Wiggly, or Expression from the submenu.
•To delete a selector, select it in the Timeline panel and press Delete.
•To rename a selector, make sure that it is the only thing selected, and then press Enter (Windows) or Return (Mac
OS); or right-click (Windows) or Control-click (Mac OS) the name and choose Rename.
•To copy a selector, select it in the Timeline panel and choose Edit > Copy. To paste the selector, select a layer and
choose Edit > Paste.
•To reorder a selector, drag it to a new location in the stacking order in the Timeline panel.
Common selector properties
Mode Specifies how each selector combines with the text and with selector above it, similar to how multiple masks
combine when you apply a mask mode. For example, if you want to wiggle only a specific word, use a range selector on
that word and then add a Wiggly selector and set it to Intersect mode.
Amount Specifies how much the range of characters is affected by animator properties. At 0%, the animator properties
do not affect the characters. At 50%, half of each property value affects the characters. This option is useful for
animating the result of animator properties over time. Using an expression selector, you can use expressions to
dynamically set this option.
Units and Based On The units for Start, End, and Offset. You can use either the percentage or index units and base the
selection on the characters, characters excluding spaces, words, or lines. If you select Characters, After Effects counts
spaces and effectively pauses the animation between words as it animates the spaces between words.
377
Text
Last updated 6/8/2015
Range selector properties
Range selectors include the following properties, in addition to properties common with other selectors:
Start and End The beginning and end of the selection. You can modify the Start and End properties by dragging the
selector bars in the Composition panel when the selector is selected in the Timeline panel.
Offset The amount to offset the selection from the selection specified by the Start and End properties. To set Offset in
the Composition panel while you edit the Start or End values, Shift-click the Start or End selector bars with the
Selection tool.
Shape Controls how characters are selected between the Start and End of the range. Each option modifies the selection
by creating transitions between selected characters using the chosen shape. For example, when animating the y Position
values of text characters using Ramp Down, the characters gradually move at an angle from the lower left to the upper
right. You can specify Square, Ramp Up, Ramp Down, Triangle, Round, and Smooth.
Using different Shape options, you can greatly change the appearance of an animation.
Smoothness Determines the amount of time the animation takes to transition from one character to another when you
use the Square shape.
Ease High and Ease Low Determines the speed of change as selection values change from fully included (high) to fully
excluded (low). For example, when Ease High is 100%, the character changes more gradually (eases into the change)
while it is fully to partially selected. When Ease High is -100%, the character changes quickly while it is fully to partially
selected. When Ease Low is 100%, the character changes more gradually (eases into the change) while it is partially
selected to unselected. When Ease Low is -100%, the character changes quickly while it is partially selected to
unselected.
Randomize Order Randomizes the order in which the property is applied to the characters specified by the Range
selector. (By contrast, when you use the Wiggly selector, the value of the animator property is randomized.)

378
Text
Last updated 6/8/2015
Random Seed Calculates the randomized order of a range selector when the Randomize Order option is set to On.
When Random Seed is zero, the seed is based on its animator group. If you want to duplicate an animator group and
retain the same randomized order as in the original animator group, set Random Seed to a value other than zero.
Wiggly selector properties
The Wiggly selector includes the following properties, in addition to properties common with other selectors:
Max Amount and Min Amount Specifies the amount of variation from the selection.
Wiggles/Second How many variations from the set selection occur per second.
Correlation Correlation between variations for each character. At 100%, all characters wiggle by the same amount at
the same time, and at 0%, all characters wiggle independently.
Temporal and Spatial Phase (revolutions + degrees) The variation of wiggle, based on the phase of your animation in
time (temporal) or per character (spatial).
Lock Dimensions Scales each of the dimensions of the wiggled selection by the same value. This option is useful when
wiggling the Scale property.
Random Seed See Randomness and random seeds.
Jonathan Fowler provides a video tutorial on his website that shows how to use the Wiggly Selector to randomly animate
(offset) characters to create a fluctuating string of binary digits (1s and 0s).
Expression selector properties
Expand the Expression Selector property group and the Amount property group to reveal the expression field in the
Timeline panel. By default, the Amount property begins with the expression selectorValue * textIndex/textTotal.
Expression selectors allow you to express the selector values for each character. The expression is evaluated once per
character. Each time it is evaluated, the input parameter textIndex is updated to match the index of the character.
Apply the Text Bounce or Inch Worm animation preset to a text layer to see how expression selectors can be used. To
see all expressions on a layer, select the layer and press EE.
In addition to the expression elements you use elsewhere, you can use the following attributes to animate selections in
any number of interesting ways:
textIndex Returns the index of the character, word, or line.
textTotal Returns the total number of characters, words, or lines.
selectorValue Returns the value of the previous selector. Think of this value as the input from the selector above the
expression selector in the stacking order.
Note: The attributes textIndex, textTotal, and selectorValue can be used only with the expression selector. Using them
elsewhere results in a syntax error.
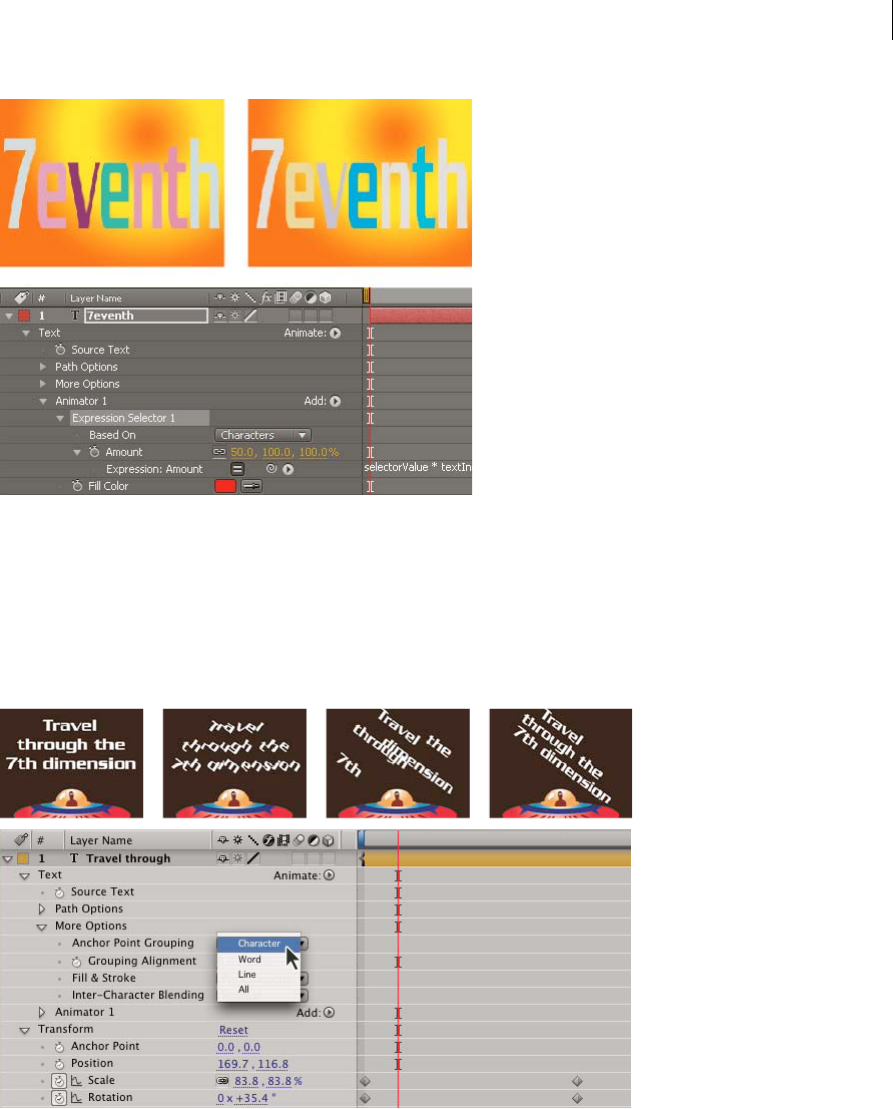
379
Text
Last updated 6/8/2015
Text anchor point properties
Text animators animate character position, rotation, and size-related properties relative to an anchor point. You can use
the text property, Anchor Point Grouping, to specify whether the anchor point used for transformations is that of each
character, each word, each line, or the entire text block. In addition, you can control the alignment of the anchor points
of the characters relative to the anchor point of the group with the Grouping Alignment property.
1Expand the text layer in the Timeline panel, and expand the More Options property group.
2Do any of the following:
•Choose how to group the character anchor points from the Anchor Point Grouping menu.
•Lower the Grouping Alignment values to move each anchor point up and to the left.
•Raise the Grouping Alignment values to move each anchor point down and to the right.

380
Text
Last updated 6/8/2015
To center the anchor point in a string of capital letters, try a Grouping Alignment value of 0%, -50%. To center the
anchor point in a string of lowercase letters, or if you’re using both lowercase and uppercase letters, try 0%, -25%.
When you select certain properties in the Timeline panel for a text animation, anchors points are shown in the
Composition panel. These properties include Anchor Point Grouping, Grouping Alignment and the animator
properties Anchor Point, Position, Scale, Rotation (including per-character 3D versions: X Rotation, Y Rotation, Z
Rotation).
Per-character 3D text properties
You can move, scale, and rotate individual characters in three dimensions using 3D animator properties. These
properties become available when you enable per-character 3D properties for the layer. Position, Anchor Point, and
Scale gain a third dimension; and two additional Rotation properties (X Rotation and Y Rotation) become available.
The single Rotation property for 2D layers is renamed to Z Rotation.
3D text layers have an auto-orientation option, Orient Each Character Independently, which orients each character
around its individual anchor point to face the active camera. Selecting Orient Each Character Independently enables
per-character 3D properties for the text layer if they aren’t already enabled. (See Auto-Orientation options.)
Enabling per-character 3D properties causes each character in the text layer to behave like an individual 3D layer within
the text layer, which behaves like a precomposition with collapsed transformations. Per-character 3D layers intersect
with other 3D layers following the standard rules for 3D precompositions with collapsed transformations. (See 3D layer
interactions, render order, and collapsed transformations.)
A text layer itself automatically becomes a 3D layer when you enable 3D properties for its characters. Therefore, a text
layer becomes a 3D layer when a per-character 3D property is added to the layer—whether by copying and pasting the
Y Rotation property from another layer or applying a 3D Text animation preset.
A per-character 3D layer is designated by a special icon in the Switches column.
Inter-character blending and the Fill & Stroke options in the More Options property group are not available for per-
character 3D layers.
Per-character 3D layers can decrease rendering performance. When you convert a layer from per-character 3D to 2D,
the animator properties and dimensions specific to per-character 3D layers are lost. Re-enabling per-character 3D will
not restore values for these properties.
•To enable per-character 3D animator properties for a text layer, select the layer and choose Enable Per-character 3D
from the Animation > Animate Text menu or from the Animate menu for the layer in the Timeline panel.
•To disable per-character 3D animator properties for a text layer and convert the layer to a 2D layer, click the Per-
character 3D switch for the layer in Switches column in the Timeline panel.
•To disable per-character 3D animator properties for a text layer but keep it as a 3D layer, choose Enable Per-
character 3D to deselect it.
Online resources for per-character 3D text animation
You can download additional animation presets that take advantage of per-character 3D text animation from the After
Effects Exchange on the Adobe website.
Trish and Chris Meyer introduce per-character 3D text animation in n a video on the ProVideo Coalition website.
Eran Stern provides a video tutorial on the Creative COW website that demonstrates how to use per-character 3D text
animation to animate text along a path in the shape of a 3D tornado.
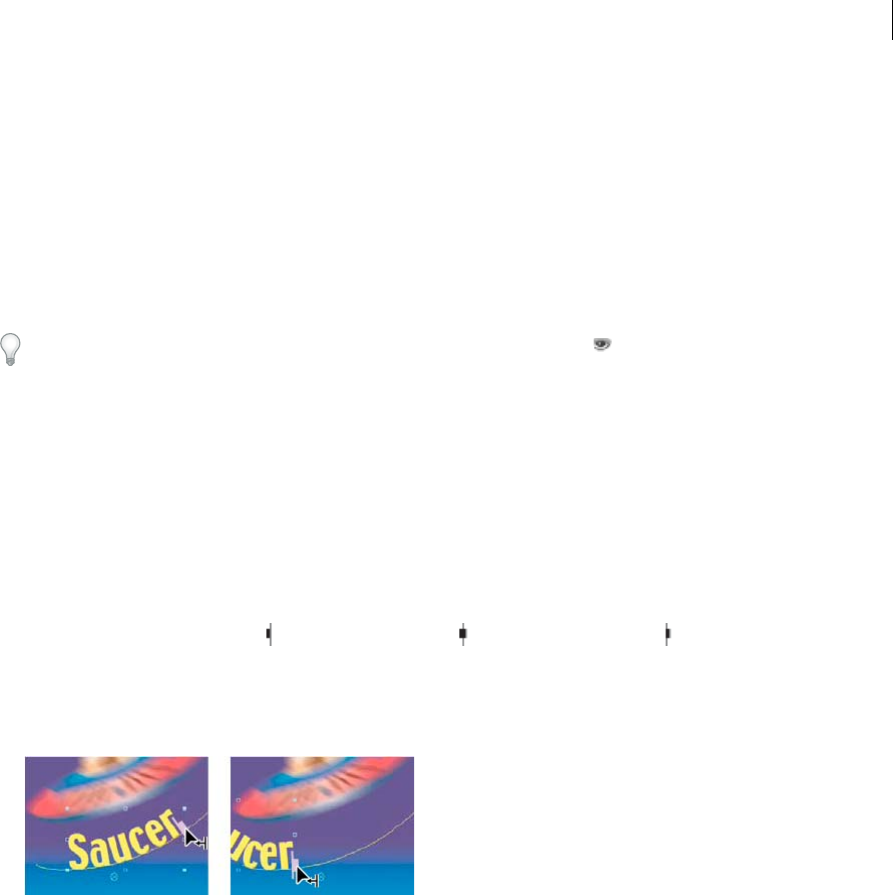
381
Text
Last updated 6/8/2015
Angie Taylor provides a tutorial on the Digital Arts website that shows how to use per-character 3D text animation
together with a common workaround for simulating extruded 3D text.
Creating and animating text on a path
When you have a mask on a text layer, you can make the text follow the mask as a path. You can then animate the text
along that path, or animate the path itself. You can use open or closed masks to create paths for text. After you create
the path, you can modify it at any time. When using a closed mask as a text path, make sure to set the mask mode to
None.
To disable the Path Options property group for a text layer, click the visibility (eyeball) switch for the Path Options
property group. Temporarily disabling the Path Options property group can make editing and formatting text easier.
Position text along a mask path
1Create a text layer and enter text.
2With the text layer selected, use the Pen tool or a mask tool to draw a mask in the Composition panel.
3In the Timeline panel, expand the Path Options property group for the text layer and select the mask from the Path
menu. The text automatically uses the alignment specified in the Paragraph panel.
4To reposition the text on the path, change the text margins using the First Margin and Last Margin properties in the
Timeline panel, or do one of the following in the Composition panel:
•Drag the left margin control , center margin control , or right margin control to move text along the path.
•Shift-drag any margin control to snap the control to the mask vertices.
Note: Select a property in the Text property group in the Timeline panel to see the margin controls in the Composition
panel. The text alignment determines which controls are available.
Text path properties
Use the Path Options properties to specify a path and alter the way that individual characters appear on the path—
perpendicular to the path, aligned to the left or right, reversed, and so on. Animating Path Options properties is an easy
way to animate text along a path.
Reverse Path Reverses the direction of the path.
Perpendicular To Path Rotates each character so that it is perpendicular to the path.
Force Alignment Positions the first character at the beginning of the path (or at the specified First Margin location),
positions the last character at the end of the path (or at the specified Last Margin location), and evenly spaces the
remaining characters between the first and last characters.
First Margin Specifies the position of the first character in pixels, relative to the start of the path. First Margin is ignored
when text is right-aligned and Force Alignment is Off.
Last Margin Specifies the position of the last character in pixels, relative to the end of the path. Last Margin is ignored
when text is left-aligned and Force Alignment is Off.

382
Text
Last updated 6/8/2015
More Help topics
About animation, keyframes, and expressions
Apply an effect or animation preset
Examples and resources for text animation
Expression basics
Mask modes
Example: Animate characters with per-character 3D properties
Creating masks
Mask modes
Extruding text and shape layers
About beveled and extruded text and shape layers
In computer graphics, an extruded object is one that appears to be three-dimensional. This 3D appearance is most
apparent when moving the object, or moving a camera around the object. Bevel is the control over the edges for an
extruded object.
You can create beveled and extruded text and shape layers by working in a Ray-traced 3D composition. This is a new
composition that uses a new Ray-traced renderer. See
In order to work with beveled and extruded text and shape layers, work in a Ray-traced 3D composition. See .
Ray-traced 3D compositions are rendered on either qualified NVIDIA GPUs or all CPU cores installed in your
computer. If you do not have a qualified GPU, CPU rendering will occur automatically. GPU rendering is preferable
since the performance is much faster, and the quality is better.See this page on the Adobe website for a full list of
qualified video cards that are capable of rendering a Ray-traced 3D composition.
Depending on your hardware and complexity of your composition, objects within Ray-traced 3D compositions can be
difficult to manipulate. If you are having a difficult time manipulating objects in the Ray-traced 3D composition, you
can use Fast Previews. Fast Previews mode is ideal to use for roughing in, and experimenting with extruded text and
shape layer animations. For details, see Fast Previews.
If your computer supports Ray-traced 3D rendering on the GPU and CPU, you can force rendering to occur on the CPU
(for example, if you are using a headless environment.). For more information, see Setting preferences for OpenGL and
the GPU.
The Ray-traced 3D renderer
The new Ray-traced renderer is now available as a composition renderer. It is separate from the existing Advanced 3D
(now called Classic 3D) composition renderer that has been the default renderer in previous versions. The Ray-traced
3D renderer is a radical departure from the existing scanline renderer. It can handle reflections, transparency, index of
refraction, environment maps, in addition to the existing material options.

383
Text
Last updated 6/8/2015
Existing capabilities like soft shadows, motion blur, depth-of-field blur, intra-character shadowing, projection of an
image onto a surface with any light type, and intersection of layers are supported. 2D layer backdrops at the bottom of
the stacking order are visible, and you can look through translucent objects to see them.
In this video by Todd Kopriva and video2brain, learn how to use the Ray-traced 3D renderer to render extruded text
and shape layers. We experiment with a text element to show the advantages and disadvantages of various quality
settings.
Limitations of the Ray-traced 3D renderer
The following features are not rendered by the Ray-traced 3D renderer:
•Blending modes
•Track mattes
•Layer styles
•Masks and effects on continuously rasterized layers, including text and shape layers
•Masks and effects on 3D precomposition layers with collapsed transformations
•Preserve Underlying Transparency
Additional features of a Ray-traced 3D composition
Features of a Ray-traced 3D composition also include:
•
•Additional material options (reflection, index of refraction, transparency)
•
Creating a Ray-traced 3D composition
It is necessary to work in a Ray-traced 3D composition for extruded text and shapes, bendable layers, and associated
features. You can create a Ray-traced 3D composition, or turn an existing composition into a Ray-traced 3D
composition. To create a Ray-traced 3D composition, do the following:
1Create a new composition.
2Open the Composition Settings dialog box for the composition.
3Click the Advanced tab, then set the Rendering Plug-in (now called Renderer) to Ray-traced 3D.
To turn an existing composition into a Ray-traced 3D composition, omit the first step.
Your composition is now a Ray-traced 3D composition that allows for extruded text and shapes.
For more information about the Advanced composition settings, ray-tracing quality, and anti-alias filtering, see
Advanced composition settings.
Note: In a Ray-traced 3D composition, camera layers no longer have Iris Diffraction Fringe, Highlight Gain, Highlight
Threshold, and Highlight Saturation properties.
Previewing Ray-traced 3D compositions
When previewing 3D Ray-traced compositions, you can choose a different Fast Previews mode to achieve a more
suitable workflow. See Fast Previews .

384
Text
Last updated 6/8/2015
Monitoring and changing the composition renderer
With the addition of the new Ray-traced renderer, a Current Renderer button has been added to the upper-right corner
of the Composition panel to make it easier to tell which composition renderer ("Classic 3D" or "Ray-traced 3D") is in
use, and to modify renderer settings. This button appears only when there are 3D layers, including cameras and lights,
in the composition.
To change the composition renderer: Click the button to open the Advanced tab of the Composition Settings dialog
box.
To modify the current renderer's options: Ctrl-click (Windows) or Cmd-click (Mac) the button.
Creating beveled and extruded text and shape layers
In the Ray-traced renderer, 3D text and shape layers can have an extrusion or bevel. For a beveled and extruded text or
shape layer, do the following:
1Create a Ray-traced 3D composition
2Create a new text or shape layer
3Enable the 3D for the layer
4Adjust controls for bevel and extrusion
To control their appearance, use these properties in the layer's Geometry Options section in the Timeline panel:
•Bevel Style: The form of the bevel. Options are None (default), Angular, Concave, and Convex.
•Bevel Depth: The size in pixels (horizontally and vertically) of the bevel.
•Hole Bevel Depth: The size of bevel for inner parts of a text character, such as the hole in an "O". It's expressed as a
percentage of the Bevel Depth.
•Extrusion Depth: The pixel thickness of the extrusion. The side (extruded) surface is perpendicular to the front
surface.
These new 3D objects are based on the geometry of swept surfaces, which is a radical departure from the pixel-based
text and shapes in the Classic 3D renderer. As such, masking, effects, and track mattes don't make sense when applied
to geometry. The geometrical properties of text and shapes are preserved, so character styles like kerning, font size, and
subscript are supported.
The following issues are known:
•Fill or stroke gradients are not supported on 3D shape layers.
•Even-odd winding in shapes does not currently work properly. You might need to use a Merge Paths operator
instead.
•Shapes with self-intersecting paths might not be filled correctly. Also, objects with compound paths containing
multiple nested holes might not render correctly.
See this video by Brian Maffitt to learn about ray-traced 3D featured and extruded layers.
Beveled and extruded vector artwork
You can create a shape layer from a vector art footage layer, and then modify the shape layer. Once a vector layer has
been converted into a shape layer, you can bevel and extrude it.
For more information about creating shape layers from vector artwork, see Vector Art Footage-to-Shape Conversion |
CC, CS6.

385
Text
Last updated 6/8/2015
Bending a footage layer
In the Ray-traced renderer, 3D footage and nested composition layers have the following geometry options for curving
them around a vertical axis:
•Curvature: The amount of bend (as a percentage). It defaults to 0% (no bend), but can go between -100% and 100%
to simulate video walls or the flapping of wings.
•Segments: The smoothness of or number of facets in the bend, with a lower number producing a coarser look with
wider facets.
Masks and effects can be applied, but these types of layers cannot be beveled or extruded. Also, masks and effects will
be ignored on collapsed 3D composition layers.
In this video, Todd Kopriva and video2brain show you how to you bend and curve 2D layers in 3D space. You can use
this technique to create a curved backdrop.
New material options
Materials are used for the surfaces of 3D objects, and material options are the properties for the surfaces that dictate
how the objects interact with light. After Effects has several material options properties, and ways to apply materials to
extruded text and shape layers.
The Material Options section for a layer in the Timeline panel now contains the following new properties:
•Appears in Reflections: Indicates if the layer appears in other reflective layers' reflections.
•The On and Off options control if the reflection appears, but the layer itself is visible.
•The Only option is like the On option that it is reflected but the layer itself is invisible.
•Reflection Intensity: Controls how much of other reflective 3D objects and the environment map appears on this
object.
•Reflections get slightly brighter and the material becomes more mirror-like based on the viewing angle, based
on the Reflection Rolloff property value. Reflections when viewing a surface at a glancing angle will be brighter
than when viewing directly at the surface. Reflections are also more energy conserving in that diffusion is
automatically decreased per pixel as the glancing angle decreases (that is, closer to viewing across the surface
than straight on it).
•In addition, you can control the glossiness of the reflection (from blurry to nearly mirror-like) by adjusting the
Specular Shininess property.
•Reflection Sharpness: Controls the sharpness or blurriness of reflections.
•Higher values produce sharper reflections whereas lower values make them blurrier.
•Increase the Ray-tracing Quality to at least 3 if you cannot see the result of this setting.
•Reflection Rolloff: For a reflective surface, controls the amount of Fresnel effect (that is, the intensity of reflections
at glancing angles).
•Transparency: Controls the material's transparency, and is separate from the layer's Opacity setting (but Opacity
does factor into the object's transparency).
•You can have a fully transparent surface but still get reflections and specular highlights to appear.
•If the layer opacity is lowered, it would reduce the overall appearance. Also, the layer's alpha is honored, so if
alpha is 0 the ray misses it completely.

386
Text
Last updated 6/8/2015
•Transparency Rolloff: For a transparent surface, controls the amount of transparency relative to the viewing angle.
Transparency will be the specified value when viewing directly at a surface and more opaque when viewing at a
glancing angle (for example, along the edges of a curved object if looking directly at it).
•Index of Refraction: Controls how light bends through 3D layers, and hence how objects behind a semitransparent
layer appear. For a list of indexes, see http://en.wikipedia.org/wiki/List_of_refractive_indices.
•These properties are applied to all surfaces of a 3D text or 3D shape layer, but you can override them with text
animators or shape operators.
The materials Intensity, and Shininess have been updated, and renamed to be Specular Intensity, and Specular
Shininess, respectively. For information about existing material options, see Material Options properties.
Note: the Ray-traced 3D renderer uses an energy-conserving shader that adjusts direct lighting components (diffuse
and ambient) and transparency based on reflection intensity and transparency, and specular intensity based on
reflection rolloff. Specifically:
•Reflection Intensity is calculated with rolloff (Reflection Rolloff)
•Transparency is calculated with rolloff (Transparency Rolloff)
•Specular Intensity is calculated with rolloff (Reflection Rolloff)
•Diffuse and Ambient are reduced by (100% - Reflection Intensity) * (100% - Transparency)
•Transparency is then reduced by (100% - Reflection Intensity)
For example:
•if Reflection Intensity is 50% and Transparency 100%, Diffuse and Ambient will become 0% (value% * (100-
50)*(100-100)/100). Specular Intensity is reduced by the Reflection Rolloff amount. Transparency will drop to 50%
(100% * (100-50)/100).
•If Reflection Intensity is 50% and Transparency 50%, Diffuse and Ambient will become 25% of their existing values,
and Specular Intensity is reduced by the Reflection Rolloff amount. Transparency will drop to 25%.
•If Reflection Intensity is 100%, Diffuse, Ambient, and Transparency will become 0%. Specular Intensity will be
reduced by the Reflection Rolloff amount.
Some existing Material Options have new names: Specular is now Specular Intensity, and Shininess is now Specular
Shininess.
Note: Color is not included in the material definition. A text or shape layer gets its color from the Character panel (for
text) or shape operators (for shapes). However, you can override material properties by using the existing text animator
and shape operator support. For 3D text layers, the Fill Color, Stroke Color, and Stroke Width options in the Animate
pop-up menu get replaced with Front, Back, Bevel, and Side submenus of material options.
For 3D shape layers, the Gradient Fill and Gradient Stroke shape operators get replaced with Front, Back, Bevel, and
Side submenus of material options. However, because the fill or stroke defines the geometry for a shape layer, the Fill
and Stroke shape operators are still available in case you want to add them.
Note: Fill and stroke gradients for shape layers are ignored at this time.
This video tutorial by Todd Kopriva and video2brain, looks at the new and changed material options for extruded 3D
layers. Manipulate the reflectiveness, shininess, and transparency of a text object, and also add animators.
In this video tutorial by Learn by Video, see how a 3D layer's material options can help to create a sense of depth and
realism.
To target specific geometry for changing properties of a beveled and extruded object, and to get advice about specular
highlights, see this video tutorial by Chris and Trish Meyer and Lynda.com

387
Text
Last updated 6/8/2015
Environment layer
In the Ray-traced renderer, you can use a 3D footage, or nested composition layer, as a spherically mapped environment
around the scene. This environment map layer will be seen on reflective objects.
To set a footage or nested composition layer as an environment layer: Choose Layer > Environment Layer. The layer
turns into a 3D layer, a small "globe" icon appears next to its name, and the following reduced set of properties (under
"Options") appears in the Timeline panel:
•Orientation and X/Y/Z Rotation: Rotates the backdrop environment and how it appears in reflections, which can
be helpful to hide the seam between edges of the layer.
•Opacity: Controls the opacity of the environment as a backdrop, but not in reflections.
•Appears in Reflections: Controls how the environment map is used in the scene. You can have the environment
appear in reflective objects in addition to seeing it as a backdrop (On), appear only in reflective objects and not as a
backdrop (Only), or only as a backdrop and not in reflections (Off).
Although you can set any footage or nested composition layer as an environment layer, like cameras, the topmost visible
(non-muted) environment layer at the current time will be used. Also, environment layers, being used in reflections,
won't appear in Fast Draft mode. Any semi-transparent regions in the environment layer will show the composition's
background color in the backdrop, but not in reflections.
Similar to adjustment lights, you can enable the Adjustment Layer switch for an environment layer so it appears only
in 3D reflective layers below it in the layer stacking order.
Note: If you parent an environment layer to a layer with negative scale, the orientation will be flipped (as expected).
This video by Todd Kopriva and video2brain demonstrates the use of environment layers. You will learn how to make
a 2D layer into an environment layer to be used as a backdrop and source of reflections in 3D scenes.
Formatting paragraphs and the Paragraph panel
A paragraph is any range of text with a carriage return at the end. Use the Paragraph panel to set options that apply to
entire paragraphs, such as the alignment, indentation, and leading (line spacing). For point text, each line is a separate
paragraph. For paragraph text, each paragraph can have multiple lines, depending on the dimensions of the bounding
box.
If the insertion point is in a paragraph or text is selected, changes you make in the Paragraph panel affect only
paragraphs that are at least partially selected. If no text is selected, changes you make in the Paragraph panel affect the
selected text layers and the text layer’s selected Source Text keyframes, if any exist. If no text is selected and no text layers
are selected, the changes you make in the Paragraph panel become the new defaults for the next text entry.
•To display the Paragraph panel, choose Window > Paragraph; or, with a type tool selected, click the panel button
in the Tools panel.
To open the Character and Paragraph panels automatically when a type tool is active, select Auto-Open Panels in the
Tools panel.
•To reset values in the Paragraph panel to the default values, choose Reset Paragraph from the Paragraph panel menu.
Note: You open the panel menu by clicking the panel menu button in the upper-right tab of the panel.

388
Text
Last updated 6/8/2015
Align and justify text
You c an align text to one edge of a paragraph (left, center, or right for horizontal text; top, center, or bottom for vertical
text) and justify text to both edges of a paragraph. Alignment options are available for both point text and paragraph
text; justification options are available only for paragraph text.
•To specify alignment, in the Paragraph panel, click an alignment option:
: Aligns horizontal text to the left, leaving the right edge of the paragraph ragged.
: Aligns horizontal text to the center, leaving both edges of the paragraph ragged.
: Aligns horizontal text to the right, leaving the left edge of the paragraph ragged.
: Aligns vertical text to the top, leaving the bottom edge of the paragraph ragged.
: Aligns vertical text to the center, leaving both the top and bottom edges of the paragraph ragged.
: Aligns vertical text to the bottom, leaving the top edge of the paragraph ragged.
•To specify justification for paragraph text, in the Paragraph panel, click a justification option:
: Justifies all horizontal lines except the last, which is left-aligned.
: Justifies all horizontal lines except the last, which is center-aligned.
: Justifies all horizontal lines except the last, which is right-aligned.
: Justifies all horizontal lines including the last, which is force-justified.
: Justifies all vertical lines except the last, which is top-aligned.
: Justifies all vertical lines except the last, which is center-aligned.
: Justifies all vertical lines except the last, which is bottom-aligned.
: Justifies all vertical lines including the last, which is force-justified.
Indent and space paragraphs
Indentation specifies the amount of space between text and the bounding box or line that contains the text. Indentation
affects only the selected paragraph or paragraphs, so you can easily set different indentations for paragraphs.
•To indent paragraphs, enter a value in the Paragraph panel for an indentation option:
Indent Left Margin: Indents text from the left edge of the paragraph. For vertical text, this option controls the
indentation from the top of the paragraph.
Indent Right Margin: Indents text from the right edge of the paragraph. For vertical text, this option controls the
indentation from the bottom of the paragraph.
Indent First Line: Indents the first line of text in the paragraph. For horizontal text, the first line indent is relative
to the left indent; for vertical text, the first line indent is relative to the top indent. To create a first line hanging
indentation, enter a negative value.
•To change space above or below paragraphs, enter a value in the Paragraph panel for Space Before and Space
After .

389
Text
Last updated 6/8/2015
Hanging punctuation for Roman fonts
Hanging punctuation controls whether punctuation marks fall inside or outside the margins. If hanging punctuation is
turned on for Roman fonts, then periods, commas, single quotation marks, double quotation marks, apostrophes,
hyphens, em dashes, en dashes, colons, and semicolons appear outside the margins.
❖To enable or disable hanging punctuation for Roman fonts, choose Roman Hanging Punctuation from the
Paragraph panel menu.
Note: You open the panel menu by clicking the panel menu button in the upper-right tab of the panel.
Note: When you use Roman Hanging Punctuation, any double-byte punctuation marks available in Chinese, Japanese,
and Korean fonts in the selected range do not appear outside the margins.
Text composition methods
The appearance of text on the page depends on a complex interaction of processes called text composition. Using the
word spacing, letter spacing, and glyph spacing options you’ve selected, After Effects evaluates possible line breaks and
chooses the one that best supports the specified parameters.
After Effects offers two composition methods, which you choose from the Paragraph panel menu.
Note: You open the panel menu by clicking the panel menu button in the upper-right tab of the panel.
Adobe Single-line Composer Offers a traditional approach to composing text one line at a time. This option is useful
if you prefer to have manual control over how lines break. If spacing must be adjusted, the Single-line Composer first
tries to compress, rather than expand text.
Adobe Every-line Composer Considers a network of breakpoints for a range of lines and thus can optimize earlier lines
in the paragraph to eliminate especially unattractive breaks later on. Working with multiple lines of text results in more
even spacing and fewer hyphens. The Every-line Composer approaches composition by identifying possible
breakpoints, evaluating them, and assigning a weighted penalty based on these principles:
•Highest importance is given to evenness of letter and word spacing. Possible breakpoints are evaluated and
penalized according to how much they deviate from optimal spacing.
•After breakpoint penalty values are identified for a range of lines, they are squared, magnifying the bad breakpoints.
The composer then uses the good breakpoints.
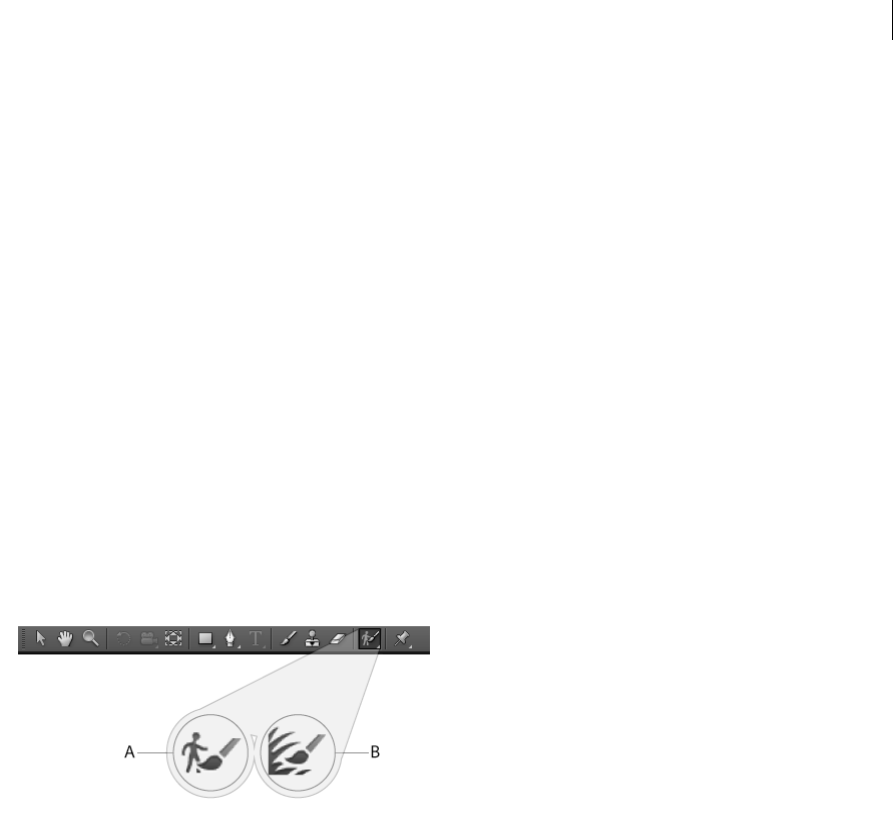
390
Last updated 6/8/2015
Chapter 11: Transparency and
compositing
Roto Brush, Refine Edge, and Refine Matte effects | CC
Separating a foreground object, such as an actor, from a background is a crucial step in many visual effects and
compositing workflows. When you’ve created a matte that isolates an object, you can replace the background,
selectively apply effects to the foreground, and much more.
Roto Brush & Refine Edge tools
The Roto Brush tool and the Refine Edge tool provide an alternative, faster workflow for segmentation and creation of
a matte.
A Roto Brush B Refine Edge
Roto Brush
Use this tool to create the initial matte to separate an object from its background. With the Roto Brush tool, you draw
strokes on representative areas of the foreground and background elements. Then After Effects uses that information
to create a segmentation boundary between the foreground and background elements. The strokes that you make on
one area helps After Effects differentiate between foreground and background on adjacent frames. Various techniques
are used to track regions across time, and this information is used to propagate segmentation forward and backward in
time. Each stroke that you make is used to improve the results on nearby frames. Even if an object moves or changes
shape from one frame to the next, the segmentation boundary adapts to match the object.
Refine Edge tool
Use the Refine Edge tool to improve the existing matte by creating partial transparency along areas that contain fine
details such as hair or fur.

391
Transparency and compositing
Last updated 6/8/2015
Roto Brush & Refine Edge effect
This effect is applied automatically when the first Roto Brush or Refine Edge stroke is drawn in the layer panel. Use this
effect to control the settings for the Roto Brush & Refine Edge tools. After you have created a segmentation boundary
and the boundary edges that need refining, use the Roto Brush Matte and Refine Edge Matte properties to improve the
matte.
•Strokes, spans, and base frames
When you first draw a Roto Brush stroke, the frame on which you are drawing becomes a base frame. The
segmentation information is propagated forward and backward through time—20 frames forward and 20 frames
backward. (Segmentation information is the information about what is defined as foreground and what is defined
as background.) The range of frames thus influenced by this base frame is its Roto Brush & Refine Edge span. Little
arrows in the span bar in the Layer panel show the direction in which the information is being propagated. If you
draw a corrective stroke anywhere where the arrows point to the right, the information from that stroke is
propagated forward; if you draw a corrective stroke anywhere where the arrows point to the left, information from
that stroke is propagated backward. If you draw a stroke anywhere outside of a Roto Brush span, then you create a
new base frame and span.
You can work your way forward a frame at a time from a base frame, making corrective strokes, and you don't have
to worry about your strokes changing results on frames that you've already worked on. You can do the same thing
going backward from a base frame.
The influence of each corrective stroke propagates forward or backward to affect all frames in that direction within
the span, regardless of when the stroke is made. For example, if the base frame is at frame 10, you make a corrective
stroke at frame 20, and then you make a corrective stroke at frame 15, then frame 20 will be affected by both of these
corrective strokes—just as if you had made the corrective strokes in the other order.
Each time that you make a stroke within a span, the span grows, unless it can't because the span in which you're
drawing is adjacent to another span.
•To manually change a span duration, drag either end of a span.
•To delete a span, right-click (Windows) or Control-click (Mac OS) a span and choose Remove Span.
•To delete all spans, delete the instance of the Roto Brush & Refine Edge effect.
When you move to a frame within a span, After Effects must calculate how the stroke information from the other
frames in the span affects the frame to which you've moved. The Info panel shows the message “Roto Brush
propagating” as this calculation is being performed. This information is cached, so this propagation doesn't need to
happen every time that you move to a frame. Green bars in a span indicate frames with cached information.
Choosing Edit > Purge Image Caches purges Roto Brush & Refine Edge caches, too.
•Tips for working with the Roto Brush and Refine Edge tools
•When drawing strokes to define a foreground object with the Roto Brush tool, begin by drawing strokes along
the center of the object’s features. For example, draw a stroke along the skeleton rather than along the outline of
an arm. Unlike conventional rotoscoping, which requires precise manual definition of boundaries, using the
Roto Brush tool works by defining representative regions. After Effects can then extrapolate from those regions
to determine where the boundaries are. Before you draw a stroke along a boundary to attempt to get a precise
segmentation, be sure that you've drawn foreground strokes down the center of the object and made at least some
rough background strokes on the other side of the boundary.
•If you draw a Roto Brush or Refine Edge stroke over the wrong area of the image, undo that stroke. (See Undo
changes .) However, if After Effects misinterprets your Roto Brush stroke and includes or excludes too much of
the image, don’t undo; further teach Roto Brush by drawing additional strokes to include or exclude regions.

392
Transparency and compositing
Last updated 6/8/2015
•Work with resolution set to Full when using the Roto Brush or Refine Edge tools. Fast Previews modes, such as
Adaptive Resolution, don’t work well with these tools, because switching resolutions requires a full recalculation
of the segmentation and transparency information. For this reason, Fast Previews modes are turned off when you
draw a Roto Brush or Refine Edge stroke. Both the Composition and Layer panels share the Fast Previews setting.
(See Resolution .)
•Use the Roto Brush and Refine Edge tools in a composition with a frame rate set to match the frame rate of the
layer's source footage item. A warning banner appears at the bottom of the frame in the Composition panel if the
frame rate of the composition doesn't match the frame rate of the layer's source footage item. (See Frame rate .)
•When you've gotten everything as good as you can with the Roto Brush & Refine Edge effect, you can touch up
the matte further using other compositing features in After Effects—such as by painting on the alpha channel.
(See Compositing and transparency overview and resources .)
Roto Brush & Refine Edge workflow
1Switch to the Roto Brush or Refine Edge tool by pressing Alt+W (Windows) or Option+W (Mac OS).
Note: Once selected, you can press Alt+W (Windows) or Option+W (Mac OS) to toggle between these tools.
2Open the layer in the Layer panel.
Note: When the Roto Brush or Refine Edge tool is active, double-clicking a layer in the Timeline or Composition panel
opens the layer in the Layer panel by default. Uncheck Open Layer panel when Double-clicking with Paint, Roto Brush,
and Refine Edge Tools option under General Preferences.
3Preview the movie in the Layer panel to find a frame in which the greatest amount of the foreground object is in the
frame and in which the separation between the foreground and background is as clear as possible.
The frame on which you draw your first stroke is a base frame. (See Roto Brush & Refine Edge workflow.)
4Drag in the Layer panel to draw a foreground stroke on the object that you want to isolate from the background.
When you are drawing a foreground stroke, the Roto Brush tool’s pointer is a green circle with a plus sign in the
middle.
Note: Draw the stroke down the center of the object, not along the edge. (See Tips for working with the Roto Brush tool .)
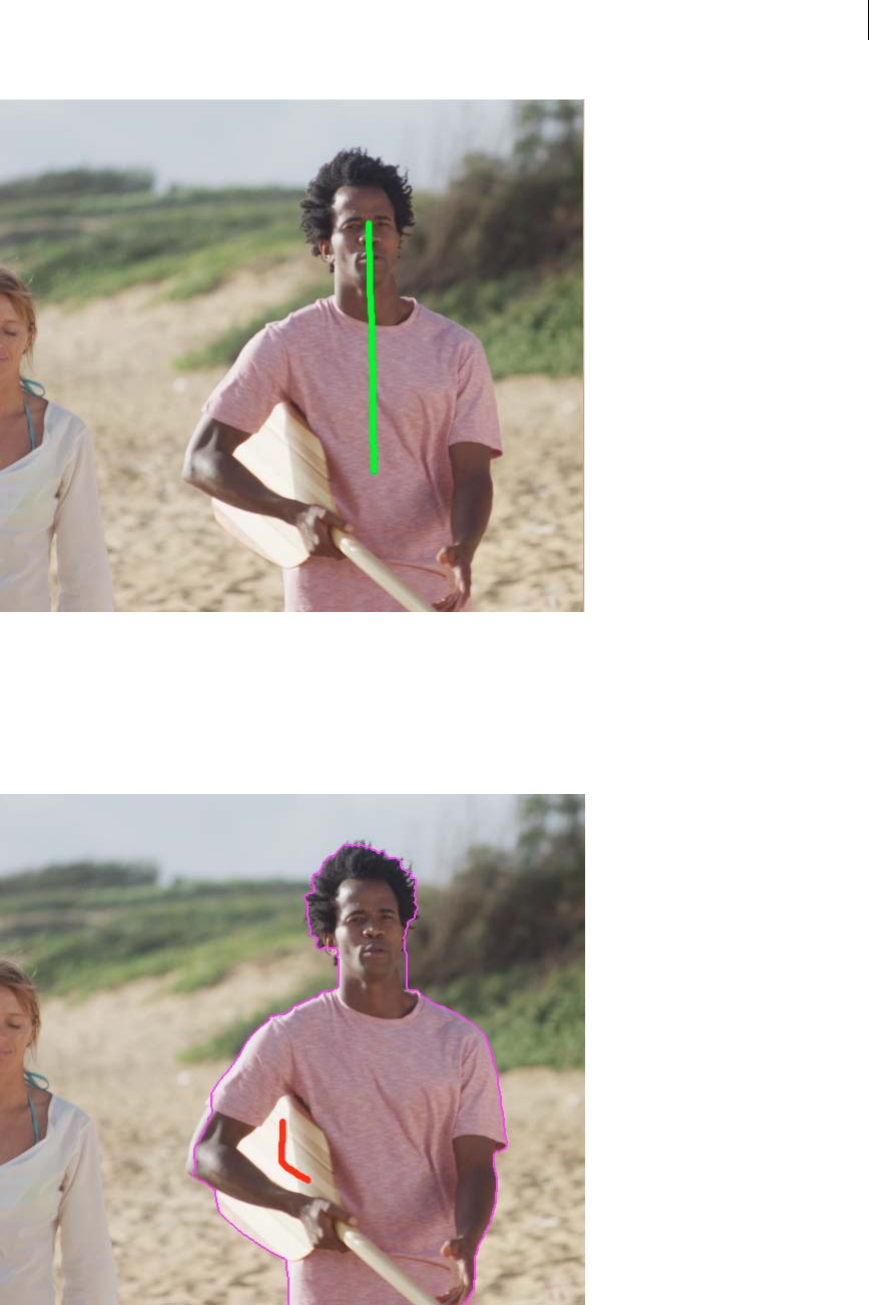
393
Transparency and compositing
Last updated 6/8/2015
The magenta outline that appears around the foreground object in Alpha Boundary view mode is the segmentation
boundary, the rough line that separates the foreground from the background. You can also view the segmentation
using other view modes. (See Layer panel view options .)
5Alt-drag (Windows) or Option-drag (Mac OS) to draw a background stroke on the area that you want to define as
the background. When you are drawing a background stroke, the Roto Brush tool’s pointer is a red circle with a
minus sign in the middle.

394
Transparency and compositing
Last updated 6/8/2015
6Repeat the steps of drawing foreground and background strokes on the base frame until the segmentation is as
precise and complete as possible. You should make the segmentation on the base frame as good as possible; the
segmentation of other frames is based on the segmentation defined on the base frame.
Try for a segmentation boundary that is within a couple of pixels of your desired edge. You can modify properties
in the Roto Brush & Refine Edge effect, such as Feather and Contrast to refine the initial segmentation further. (See
Roto Brush & Refine Edge, Refine Hard Matte, and Refine Soft Matte effect reference .)
You can resize the Roto Brush tool’s tip to make finer strokes. Broad strokes are best for initial work, but fine strokes
are useful for details. (See Roto Brush strokes, spans, and base frames .)
7Press Page Down or 2 to move forward one frame.
After Effects uses motion tracking, optical flow, and various other techniques to propagate the information from the
base frame to the current frame to determine the segmentation boundary.
8If the segmentation boundary that After Effects calculates for the current frame is not where you want it to be, you
can make corrective strokes to teach After Effects what is foreground and what is background. Draw foreground
strokes and background strokes as needed to correct the segmentation. Corrective strokes propagate in one
direction, away from the base frame.
Note: You can also modify properties in the Roto Brush Propagation property group to affect how After Effects
propagates the segmentation information from previous frames to the current frame. (See Roto Brush & Refine
Edge, Refine Hard Matte, and Refine Soft Matte effect reference .)
9Repeat the steps of moving one frame at a time and making corrective strokes until you have created a segmentation
boundary for the entire duration that you want to segment.
10 If you have drawn Roto Brush strokes, the Fine-tune Roto Brush Matte option is enabled in the Roto Brush & Refine
Edge effect properties. Modify properties in the Roto Brush Matte property group as needed. (See Roto Brush &
Refine Edge, Refine Hard Matte, and Refine Soft Matte effect reference .)
11 Go back to the base frame and switch to the Refine Edge tool. Draw Refine Edge strokes for areas that need partial
transparency. Draw the strokes along or across the edge of the matte indicated by a magenta line. When you are
drawing a Refine Edge stroke, the Refine Edge tool’s pointer is a blue circle with a plus sign in the middle. The first
refine Edge stroke changes the view to Refine Edge X-ray view mode. See Layer panel view options.
You should make the refinement strokes on the base frame as good as possible and cover all areas that contain a
mixture of foreground and background; the refinement of other frames is based on the initial refinement areas
defined on the base frame.
395
Transparency and compositing
Last updated 6/8/2015
12 Repeat and use the Refine Edge tool on other frames until the refinement is as precise and complete as possible. Press
Alt/Option to erase Refine Edge strokes.
13 If you've used the Refine Edge brush, the Fine-tune Refine Edge Matte option in the Roto Brush & Refine Edge effect
properties is selected. Modify properties in the Refine Edge Matte property group as needed. (See Roto Brush &
Refine Edge, Refine Hard Matte, and Refine Soft Matte effect reference .)
When you are done, click the Freeze button in the lower-tight corner of the Layer panel to cache, lock, and save the
Roto Brush & Refine Edge propogation information. (See Freezing (caching, locking, and saving) Roto Brush
segmentation .)
Freezing (caching, locking, and saving) Roto Brush segmentation
When the View menu in the Layer panel is set to Roto Brush & Refine Edge, a Freeze button appears in the lower-right
corner of the Layer panel. Click this button to cache and lock segmentation for all Roto Brush & Refine Edge spans for
the layer within the composition work area. This preserves the matte and saves it with the project, preventing the Roto
Brush & Refine Edge effect from re-propogating the segmentation when you open the project again or make changes.
If After Effects has already calculated segmentation information for a frame when you click the Freeze button, then this
information is cached. If the segmentation has not been calculated for a frame within a Roto Brush & Refine Edge span,
then After Effects must calculate the segmentation before freezing.
Frames with frozen (cached and locked) segmentation information are represented by blue bars in the Roto Brush &
Refine Edge span view in the Layer panel.
Note: If you click Stop in the dialog box, After Effects stops adding frames to the cache, but Roto Brush & Refine Edge
segmentation is still locked with the segmentation information cached up until the point that you clicked Stop.
To unfreeze Roto Brush & Refine Edge segmentation, click the Freeze button again.
When Roto Brush & Refine Edge segmentation is frozen, you can place the pointer over the Freeze button to see a
tooltip that tells you when the cached information was created.

396
Transparency and compositing
Last updated 6/8/2015
When Roto Brush & Refine Edge segmentation is frozen, the pointer for the Roto Brush & Refine Edge tools has a slash
through it. It indicates that new strokes won't affect the result untill you unfreeze.
The information that is cached and locked is the result of Roto Brush & Refine Edge strokes and the properties in the
Roto Brush Propagation property group of the Roto Brush & Refine Edge effect. Making changes to any of these items
(for example, by drawing new Roto Brush strokes or modifying properties in the Roto Brush Propagation property
group) has no influence on the result of the Roto Brush & Refine Edge effect until you unfreeze segmentation. The
properties in the Roto Brush Matte and Refine Edge Matte property groups are not frozen.
Frozen Roto Brush & Refine Edge segmentation information is cached and locked while the application is running, and
the cached information is saved with the project.
Layer panel view options
You can choose these view modes from the Show Channel menu in the Layer panel, by clicking the buttons in the Layer
panel, or by using keyboard shortcuts. You can use the controls at the bottom of the Layer panel to change the color and
opacity of the overlays used in Alpha Boundary and Alpha Overlay mode.
Refine Edge X-ray Shows areas of partial transparency created by the Refine Edge strokes as an X-ray. (Alt+X or
Option+X). When you change Roto Brush & Refine Edge parameters that aren't visible in the X-ray view (for example,
Chatter Reduction), the view switches back to the previous view so you can see the result of the change.
Alpha Shows alpha channel of the layer (Alt+4 or Option+4).
Alpha Boundary Shows source layer with foreground and background unchanged, with segmentation boundary
overlaid as a colored outline (Alt+5 or Option+5).
Alpha Overlay Shows source layer with foreground unchanged and background overlaid with a solid color (Alt+6 or
Option+6).
Note: The Refine Edge X-ray, Alpha Boundary, and Alpha Overlay view modes are turned off when the View menu in the
Layer panel is changed to anything other than Roto Brush and Refine Edge tools.
Refine Hard Matte and Refine Soft Matte effects
Use the Refine Hard Matte and Refine Soft Matte effects to fine-tune a matte created using traditional methods such a
creating masks or color keying. The properties and controls of these effects are similar to those in the Roto Brush &
Refine Edge effect.
Refine Hard Matte Use the Refine Hard Matte effect to improve the edges of an existing hard-edged alpha channel. The
Refine Hard Matte effect is an updated version of the Refine Matte effect in After Effects CS5-CS6.
Refine Soft Matte Use the new Refine Soft Matte effect to define a soft matte. This effect uses additional processing to
automatically calculate finer edge details and transparent areas.

397
Transparency and compositing
Last updated 6/8/2015
Roto Brush & Refine Edge, Refine Hard Matte, and Refine Soft Matte effect
reference
The Roto Brush & Refine Edge effect properties in the Roto Brush Propagation property group affect segmentation
between foreground and background and how that segmentation information is used for contiguous frames in a span.
Other properties of the Roto Brush & Refine Edge effect affect the matte that is generated based on the initial
segmentation. The Refine Hard Matte effect is similar to the Roto Brush Matte, with additional options such as Use
Motion Blur and Decontaminate Edge Colors properties. The Refine Soft Mattte effect is simiar to Refine Edge Matte
with additional options such as Use Motion Blur and Decontaminate Edge Colors.
•Roto Brush and Refine Edge effect
Property Description
Roto Brush Propagation Properties in the Roto Brush Propagation property group (except
for View Search Region) affect all Roto Brush calculations. Any
change to these properties requires a recalculation and
propagation of the segmentation information from a base frame.
Also, the results on a base frame itself are not affected by changes
to these properties; therefore, it’s best to change these properties
when the current-time indicator is a frame or two away from a base
frame, so that you can see the result of the changes.
Search Radius The radius of the area within which After Effects searches when
looking for pixels that match from one frame to the next. You can
change how the search radius adapts to regions with more or less
motion using the Motion Threshold and Motion Damping
properties. If the search radius is too small, some motion may be
missed; if the search radius is too large, extraneous motion may be
detected.
Motion Threshold and Motion Damping These two properties control how the search region is constrained
based on motion. Change Motion Threshold to set the motion
level below which is considered no motion, where the search
region will shrink to nothing. Motion Damping affects the
remaining areas that are considered to be in motion. As you
increase Motion Damping, the search region is tightened, with
slow-moving areas tightening more than fast-moving areas.
Constraining the search region in areas with little motion can
reduce edge chatter in these regions. Constraining the search
region too much will cause the automatic boundary detection to
fall off the edge of the object.
View Search Region Renders the search region as yellow, and the foreground and
background as a grayscale image (with the background dimmer
than the foreground). The value of this property affects the
rendered output of the Roto Brush & Refine Edge effect, not just an
intermediate stage of the effect's operation. Its main use is to help
you pick values for Search Radius, Motion Threshold, and Motion
Damping.
Edge Detection Choose whether to favor the segmentation boundary calculated
for the current frame in isolation or the segmentation calculated
based on the previous frame when determining the edge
between foreground and background. The Balanced option
considers the current frame and surrounding frames equally.
Foreground objects with colors that match the background will
usually benefit from Favor Predicted Edges.
Use Alternate Color Estimation Subtly changes the process by which the effect determines what is
foreground and what is background. Sometimes checking it helps
with segmentation; sometimes it doesn't.

398
Transparency and compositing
Last updated 6/8/2015
Invert Foreground/Background Inverts which strokes are considered foreground strokes and
which strokes are considered background strokes in the
segmentation phase.
Fine-tune Roto Brush Matte Enable or disable finer adjustments for Roto Brush Matte. These
controls are used to adjust the segmentation boundary defined by
foreground and background strokes.
Roto Brush Matte Properties under the Roto Brush Matte group affect the Roto Brush
matte, and are used to adjust the segmentation boundary defined
by foreground and background strokes. Areas marked by the
Refine Edge tool are not affected by the properties in this group.
Feather Increasing this value reduces the sharpness of the curves in the
segmentation boundary by smoothing along the edge.
Contrast Contrast of the segmentation boundary. This property does
nothing if Feather is 0. Unlike the Feather property, Contrast
applies across the edge.
Shift Edge The amount of expansion of the matte relative to the value of the
Feather property. The result is very similar to that of the Choke
property in the Matte Choker effect, but the value is given from -
100% to 100% (instead of -127 to 127).
Reduce Chatter Increase this property to reduce erratic changes to edges from one
frame to the next. This property determines how much influence
the current frame should have when performing a weighted
average across adjacent frames to make the matte edges not
move erratically from one frame to the next. If the Reduce Chatter
value is high, the chatter reduction is strong, and the current frame
is considered less. If the Reduce Chatter value is low, the chatter
reduction is weak, and the current frame is considered more. If the
Reduce Chatter value is 0, only the current frame is considered for
matte refinement.
Tip: If the foreground object isn’t moving, but the matte edges are
moving and changing, increase the value of the Reduce Chatter
property.
If the foreground object is moving, but the matte edge isn’t
moving, decrease the value of the Reduce Chatter property.
Render Refine Edge Determines if the result of the entire effect is rendered. Disable it
to render results from Roto Brush only while excluding the results
from the Refine Edge.
Base Refine Edge Radius Adds a uniform band along the entire segmentation boundary
that behaves like a hand-drawn stroke with the Refine Edge tool
on each base frame. The width of the strokes is determined by this
value.
If you use a non-zero Base Refine Edge Radius value, it effectively
makes edges that were previously only defined by Roto Brush
strokes as if they were drawn using Refine Edge Strokes.
Fine-tune Refine Edge Matte Enable or disable the property group for Refine Edge Matte. These
controls are used to control Refine Edge parameters.
Refine Edge Matte The properties under this group determine the Refine Edge
properties. The properties do not affect the entire layer, but only
the area defined by the Refine Edge strokes.
Smooth Smoothens along the alpha boundary, preserving semi-
transparent detail across the boundary.
Feather Blurs the alpha channel in the refined area.

399
Transparency and compositing
Last updated 6/8/2015
•Refine Hard Matte effect
Contrast Contrast of the alpha channel in the refined area.
Shift Edge The amount of expansion of the matte relative to the value of the
Feather property. The result is very similar to that of the Choke
property in the Matte Choker effect, but the value is given from -
100% to 100% (instead of -127 to 127).
Chatter Reduction Enable or disable Chatter Reduction. Choose More Detailed or
Smoother (Slower).
Reduce Chatter Increase this property to reduce erratic changes to edges from one
frame to the next. Max of 100% for More Detailed, max of 400% for
Smoother (Slower).
Use Motion Blur Check this option to render the matte with motion blur. The high-
quality option is slower, but generates a cleaner edge. You can also
control the number of samples and the shutter angle, which have
the same meaning as they do in the context of motion blur in the
composition settings. (See Motion blur .)
Decontaminate Edge Colors Check this option to decontaminate (clean) the color of edge
pixels. The background color is removed from foreground pixels,
which helps to fix halos and the contamination of motion-blurred
foreground objects with background color. The strength of this
cleaning is determined by Decontamination Amount.
Decontaminate Amount Determines the strength of the Decontaminate Edge Colors.
Extend Where Smoothed Only functional when Reduce Chatter is greater than 0 and
Decontaminate Edge Colors is selected. Edges that are moved in
order to reduce chatter are cleaned.
Increase Decontamination Radius Amount (in pixels) by which to increase the radius value for the
cleaning of edge colors, in addition to any cleaning that covers
feather, motion blur, and extended decontamination.
View Decontamination Map Shows which pixels will be cleaned by decontamination of edge
colors (white pixels in the map).
Property Description
Feather Increasing this value reduces the sharpness of the curves in the
matte by smoothing along the edge.
Contrast Determines the contrast of the matte. This property does nothing
if Feather is 0. Unlike the Feather property, Contrast applies across
the edge.
Shift Edge The amount of expansion of the matte relative to the value of the
Feather property. The result is very similar to that of the Choke
property in the Matte Choker effect, but the value is given from -
100% to 100% (instead of -127 to 127).

400
Transparency and compositing
Last updated 6/8/2015
•Refine Soft Matte effect
Reduce Chatter Increase this property to reduce erratic changes to edges from one
frame to the next. This property determines how much influence
the current frame should have when performing a weighted
average across adjacent frames to make the matte edges not
move erratically from one frame to the next. If the Reduce Chatter
value is high, the chatter reduction is strong, and the current frame
is considered less. If the Reduce Chatter value is low, the chatter
reduction is weak, and the current frame is considered more. If the
Reduce Chatter value is 0, only the current frame is considered for
matte refinement.
Tip: If the foreground object isn’t moving, but the matte edges are
moving and changing, increase the value of the Reduce Chatter
property.
If the foreground object is moving, but the matte edge isn’t
moving, decrease the value of the Reduce Chatter property.
Use Motion Blur Check this option to render the matte with motion blur. The high-
quality option is slower, but generates a cleaner edge. You can also
control the number of samples and the shutter angle, which have
the same meaning as they do in the context of motion blur in the
composition settings. (See Motion blur .)
In the Refine Hard Matte effect, if you want any motion blur you'll
need this on.
Decontaminate Edge Colors Check this option to decontaminate (clean) the color of edge
pixels. The background color is removed from foreground pixels,
which helps to fix halos and the contamination of motion-blurred
foreground objects with background color. The strength of this
cleaning is determined by Decontamination Amount.
Decontaminate Amount Determines the strength of decontamination.
Extend Where Smoothed Only functional when Reduce Chatter is greater than 0 and
Decontaminate Edge Colors is selected. Edges that are moved in
order to reduce chatter are cleaned.
Increase Decontamination Radius Amount (in pixels) by which to increase the radius value for the
cleaning of edge colors, in addition to any cleaning that covers
feather, motion blur, and extended decontamination.
View Decontamination Map Shows which pixels will be cleaned by decontamination of edge
colors (white pixels in the map).
Property Description
Calculate Edge Details Computes semi-transparent edges, pulling out details within the
edge region.
Additional Edge Radius Adds a uniform band along the entire refinement boundary that
behaves like a hand-drawn stroke with the Refine Edge tool on
each base frame. The width of the stroke is determined by this
value.
View Edge Region Renders the edge region as yellow, and the foreground and
background as a grayscale image (with the background dimmer
than the foreground).
Smooth Smoothens along the alpha boundary, preserving semi-
transparent detail across the boundary.
Feather Blurs the alpha channel in the refined area.
401
Transparency and compositing
Last updated 6/8/2015
Alpha channels, masks, and mattes
About alpha channels and mattes
Color information in After Effects is contained in three channels: red (R), green (G), and blue (B). In addition, an image
can include an invisible fourth channel, called an alpha channel, that contains transparency information. Sometimes,
such an image is referred to as an RGBA image, indicating that it contains an alpha channel.
Contrast Contrast of the alpha channel in the refined area.
Shift Edge The amount of expansion of the matte relative to the value of the
Feather property. The result is very similar to that of the Choke
property in the Matte Choker effect, but the value is given from -
100% to 100% (instead of -127 to 127).
Chatter Reduction Enable or disable Chatter Reduction. Choose More Detailed or
Smoother (Slower).
Reduce Chatter Increase this property to reduce erratic changes to edges from one
frame to the next. Max of 100% for More Detailed, max of 400% for
Smoother (Slower).
More Motion Blur Check this option to render the matte with motion blur. The high-
quality option is slower, but generates a cleaner edge. You can also
control the number of samples and the shutter angle, which have
the same meaning as they do in the context of motion blur in the
composition settings. (See Motion blur .)
In Refine Soft Matte effect, any motion blur that's in the source
image is already retained, you only need this option if you want
more than what is in the footage.
Decontaminate Edge Colors Check this option to decontaminate (clean) the color of edge
pixels. The background color is removed from foreground pixels,
which helps to fix halos and the contamination of motion-blurred
foreground objects with background color. The strength of this
cleaning is determined by Decontamination Amount.
Decontaminate Amount Determines the strength of decontamination.
Extend Where Smoothed Only functional when Reduce Chatter is greater than 0 and
Decontaminate Edge Colors is selected. Edges that are moved in
order to reduce chatter are cleaned.
Increase Decontamination Radius Amount (in pixels) by which to increase the radius value for the
cleaning of edge colors, in addition to any cleaning that covers
feather, motion blur, and extended decontamination.
View Decontamination Map Shows which pixels will be cleaned by decontamination of edge
colors (white pixels in the map).
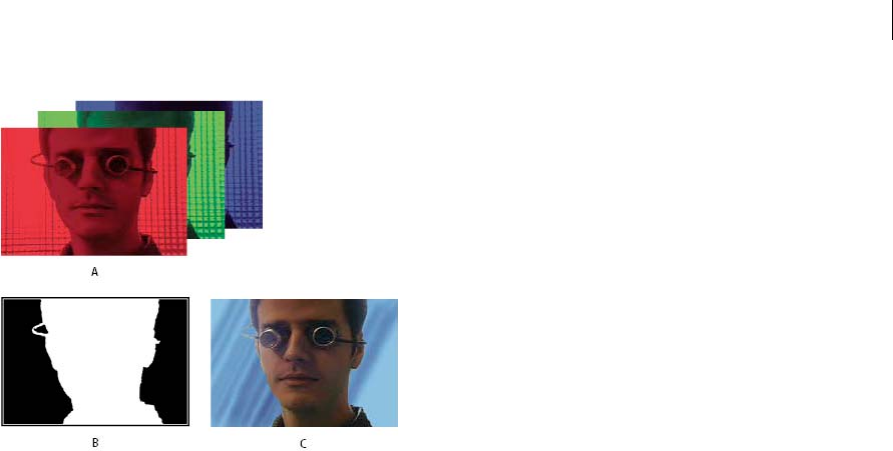
402
Transparency and compositing
Last updated 6/8/2015
A Separated color channels B Alpha channel represented as a grayscale image C Composite using all four channels with a background showing
through transparent areas
Many file formats can include an alpha channel, including Adobe Photoshop, ElectricImage, FLV, TGA, TIFF, EPS,
PDF, and Adobe Illustrator. AVI and QuickTime (saved at a bit depth of Millions Of Colors+), can also contain alpha
channels, depending upon the codec (encoder) used to generate the images stored in these containers. For Adobe
Illustrator EPS and PDF files, After Effects automatically converts empty areas to an alpha channel.
When specifying the color depth for an output image, the plus sign (as in Millions Of Colors+) denotes an alpha
channel. Similarly, choosing to output to 32 bits per pixel implies an output depth of 8 bits per channel for each of four
channels: RGBA.
Some programs can store multiple alpha channels in one image, but After Effects only interprets the fourth channel as
an alpha channel.
Note: The term alpha channel technically refers to the fourth (A) channel in an RGBA image file, regardless of whether that
channel is used for communicating transparency information. However, since that fourth channel is used so often to
communicate transparency information, the terms alpha and transparency have become nearly synonymous in common
usage. It's important to remember, though, that this connection is essentially arbitrary. Some formats may use other
channels for transparency information, and other formats may use the fourth channel for something other than
transparency information.
The Knoll Unmult plug-in can be used to create an alpha channel from the dark areas of a layer. This works well for a
layer with a light effect (such as a lens flare or fire) that you want to composite on top of another layer. For information,
see the Red Giant Software website.
When you view an alpha channel in the Composition panel, white indicates complete opacity, black indicates complete
transparency, and shades of gray indicate partial transparency.
A matte is a layer (or any of its channels) that defines the transparent areas of that layer or another layer. White defines
opaque areas, and black defines transparent areas. An alpha channel is often used as a matte, but you can use a matte
other than the alpha channel if you have a channel or layer that defines the desired area of transparency better than the
alpha channel does, or in cases where the source image doesn’t include an alpha channel.
Aharon Rabinowitz provides an introduction to alpha channels, “What is an Alpha Channel?”—part of the Multimedia
101 series on the Creative COW website.
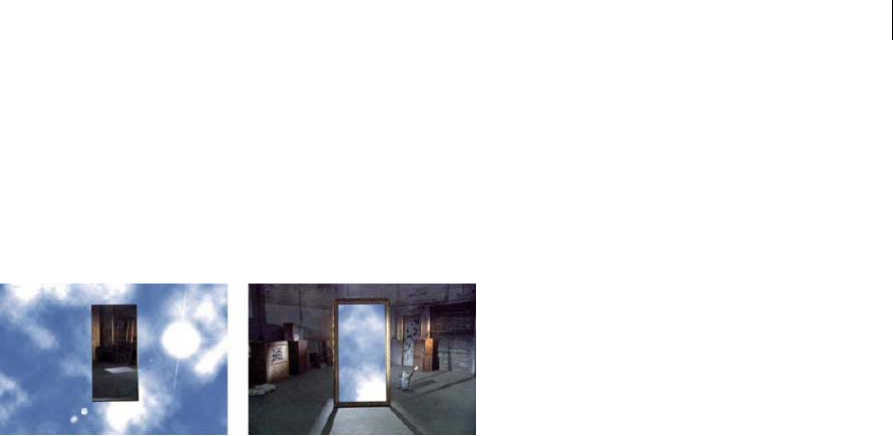
403
Transparency and compositing
Last updated 6/8/2015
About masks
A mask in After Effects is a path that is used as a parameter to modify layer attributes, effects, and properties. The most
common use of a mask is the modification of an alpha channel of a layer, which determines the transparency of the
layer at each pixel. Another common use of a mask is as a path along which to animate text. (See Creating and animating
text on a path.)
For more information on paths in general, see About paths.
Closed-path masks can create transparent areas for a layer. Open paths cannot create transparent areas for a layer but
are useful as parameters for an effect. Effects that can use an open or closed mask path as input include Stroke, Path
Text, Audio Waveform, Audio Spectrum, and Vegas. Effects that can use closed masks (but not open masks) as input
include Fill, Smear, Reshape, Particle Playground, and Inner/Outer Key.
A mask belongs to a specific layer. Each layer can contain multiple masks.
You can draw masks in common geometric shapes—including polygons, ellipses, and stars—with the shape tools, or
you can use the Pen tool to draw an arbitrary path.
In most ways, drawing mask paths is the same as drawing shape paths on shape layers, though the editing and
interpolation of mask paths have a few additional features. You can link a mask path to a shape path using expressions,
which allows you to bring the benefits of masks into shape layers, and vice versa. See Creating shapes and masks and
Editing and animating shape paths and masks .
The position of a mask in the stacking order in the Timeline panel affects how it interacts with other masks. You can
drag a mask to different positions within the Masks property group in the Timeline panel.
The Mask Opacity property for a mask determines the influence that a closed mask has on the alpha channel of the
layer inside the mask area. A Mask Opacity value of 100% corresponds to an interior area that is completely opaque.
The area outside the mask is always completely transparent. To invert what is considered inside and what is considered
outside for a specific mask, select Invert next to the mask name in the Timeline panel.
Online resources about masks
Trish and Chris Meyer provide an introduction to masks in a PDF excerpt from the “Creating Transparency” chapter
of their book After Effects Apprentice: Real-World Skills for the Aspiring Motion Graphics Artist.
This sample chapter from the After Effects CS5 Classroom in a Book on the Peachpit Press website shows how to create,
use, and modify masks.
Chris and Trish Meyer provide tips about drawing and using masks in this article on the ProVideo Coalition website.
Copy, cut, save, reuse, and delete masks
You can reuse masks in other layers and compositions, which is especially useful for Bezier masks you’ve spent a long
time perfecting. Mask paths are stored inside a composition in a project file.

404
Transparency and compositing
Last updated 6/8/2015
Mathias Möhl provides the CopyMask2Layers script, with which you can copy masks from one layer to others while
preserving the masks’ position and shape.
Copy, cut, duplicate, or paste a mask
Note: When working with a mask path—rather than the entire mask, including its other properties—select the Mask Path
property. This is especially important when transferring mask paths to shape paths, motion paths, and so on.
•To copy or cut selected masks to the clipboard, choose Edit > Copy or Edit > Cut.
•To duplicate selected masks, choose Edit > Duplicate.
•To paste a mask onto a layer, select the layer and then choose Edit > Paste. If a mask is selected, this operation
replaces the selected mask.
Save a mask
1In the Timeline panel for the composition containing the layer and mask you want to save, expand the layer and its
mask properties.
2Do one of the following:
•To save an animated mask, select the mask keyframes you want to save.
•To save a nonanimated mask, select the mask.
3Copy the mask or keyframes, and paste the mask or keyframes to a new layer. The new layer can be a simple solid.
Create a project with compositions just for storing complex masks. When you want to use a mask from another project,
import that project into your current project.
Note: You can also save masks as animation presets. (See Animation presets.)
Reuse a mask
1Open the composition containing the mask you want to reuse. If you saved the mask in another project, import the
project and then open the composition containing the mask.
2In the Timeline panel, expand the layer and mask properties for the mask.
3Select the mask or keyframes.
4Copy the mask or keyframes, and paste the mask or keyframes to the layer to which you want to apply the mask.
Delete masks
•To delete one mask, select the mask in the Timeline panel and press Delete.
•To delete all masks, select the layer containing the masks you want to remove and choose Layer > Masks > Remove
All Masks.
Control mask path color
To help you identify and work with masks, the Composition and Layer panels outline a mask path with color, and the
Timeline panel displays that same color next to the name of the mask. By default, After Effects uses the color yellow for
all masks. To make each mask more distinctive, you can manually change the color of a mask using the Timeline panel,
or you can set After Effects to cycle through mask colors for new masks.
Change mask path color
1Select the mask in the Timeline panel.

405
Transparency and compositing
Last updated 6/8/2015
2Click the color swatch to the left of the mask name, pick a new color, and click OK.
Cycle through colors for mask paths
1Choose Edit > Preferences > Appearance.
2Select Cycle Mask Colors.
Mask modes
Blending modes for masks (mask modes) control how masks within a layer interact with one another. By default, all
masks are set to Add, which combines the transparency values of any masks that overlap on the same layer. You can
apply a mode to each mask, but you can’t animate the mode of a mask—that is, you can’t set keyframes or expressions
for a mask mode property to make it change over time.
You choose a mask mode for a mask from the menu next to the mask name in the Timeline panel.
The first mask that you create interacts with the alpha channel of the layer. If that channel doesn’t define the entire
image as opaque, then the mask interacts with the layer frame. Each additional mask you create interacts with masks
located above it in the stacking order in the Timeline panel. The results of mask modes vary depending on the modes
set for the masks higher in the stacking order. Mask modes only operate between masks on the same layer.
Using mask modes, you can create complex compound masks with multiple transparent areas. For example, you can
set a mask mode that combines two masks and sets the opaque area to the areas where the two masks intersect.
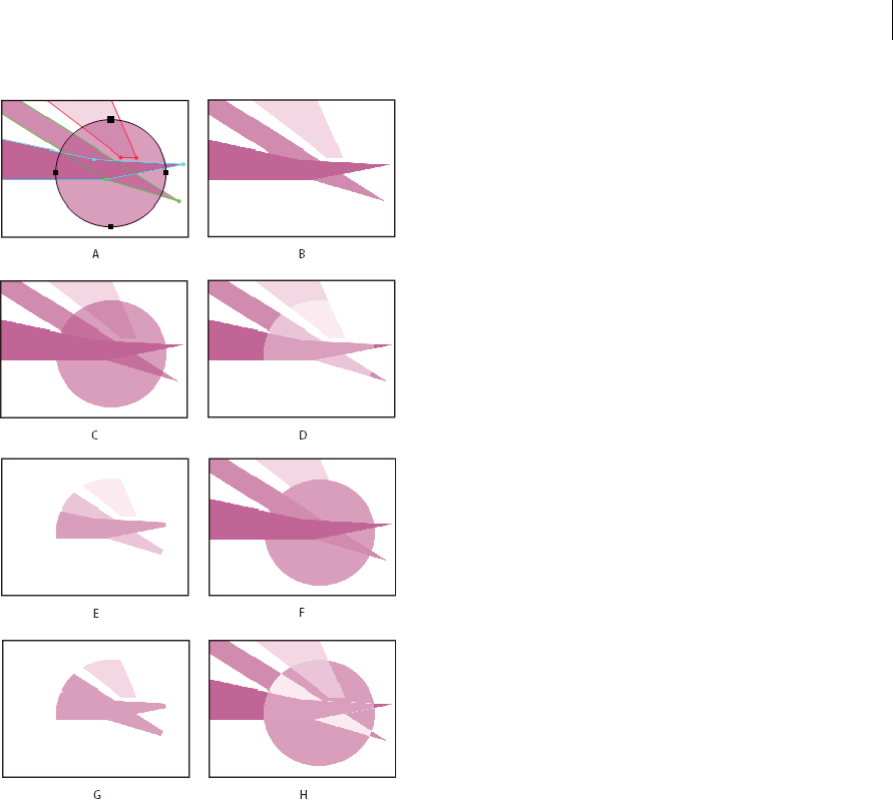
406
Transparency and compositing
Last updated 6/8/2015
A Original masks B None C Add D Subtract E Intersect F Lighten G Darken H Difference
None The mask has no direct influence on the alpha channel of the layer. This option is useful when you are only using
the path of the mask for an effect such as Stroke or Fill, or if you are using the mask path as the basis for a shape path.
Add The mask is added to the masks above it in the stacking order. The influence of the mask is cumulative with the
masks above it.
Subtract The influence of the mask is subtracted from the masks above it. This option is useful when you want to create
the appearance of a hole in the center of another mask.
Intersect The mask is added to the masks above it in the stacking order. In areas where the mask overlaps the masks
above it, the influence of the mask is cumulative with the masks above it. In areas where the mask does not overlap with
the masks above it, the result is complete opacity.
Lighten The mask is added to the masks above it in the stacking order. Where multiple masks intersect, the highest
transparency value is used.
Darken The mask is added to the masks above it in the stacking order. Where multiple masks intersect, the lowest
transparency value is used.
Difference The mask is added to the masks above it in the stacking order. In areas where the mask does not overlap the
masks above it, the mask operates as it would alone on the layer. In areas where the mask overlaps the masks above it,
the influence of the mask is subtracted from the masks above it.
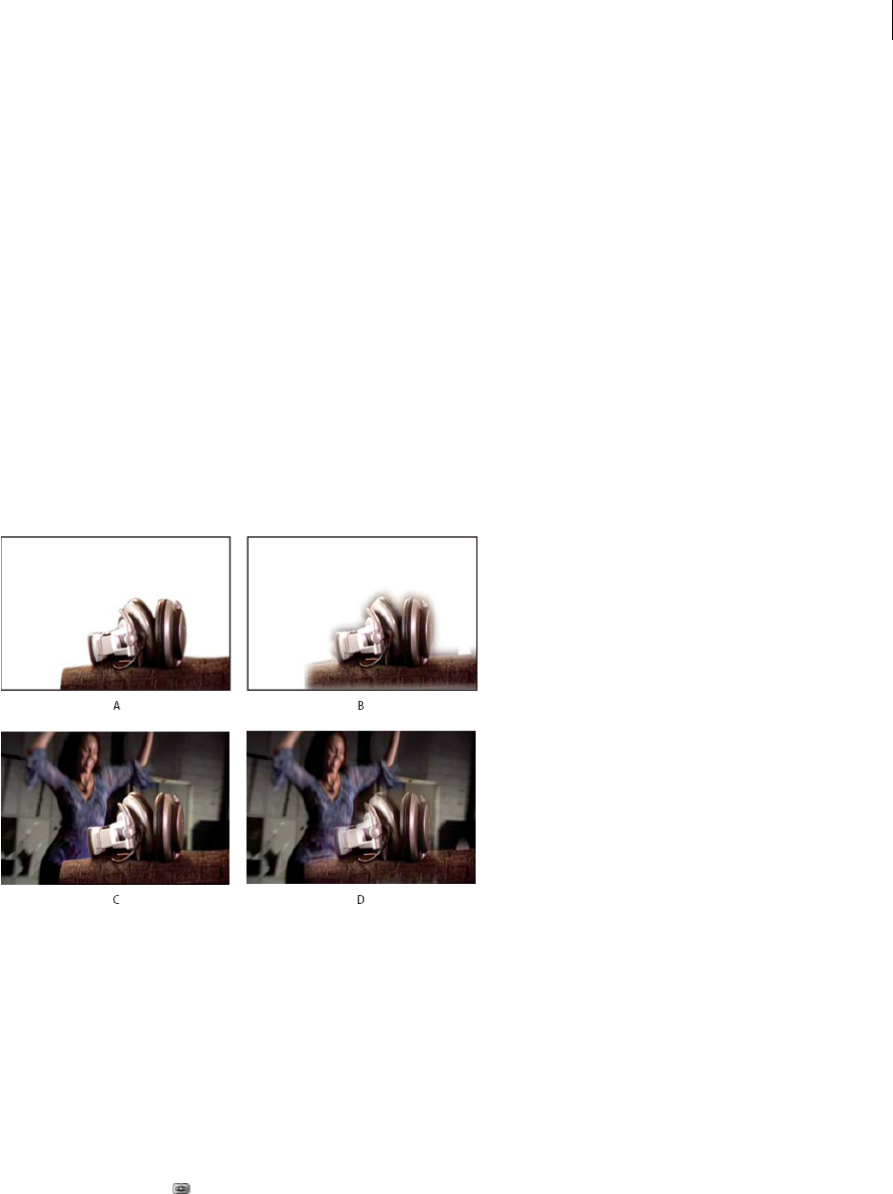
407
Transparency and compositing
Last updated 6/8/2015
Expand or contract the edges of a mask
To expand or contract the area influenced by a mask, use the Mask Expansion property.
Mask expansion affects the alpha channel but not the underlying mask path; the mask expansion is essentially an offset
that determines how far, in pixels, from the mask path the influence of the mask on the alpha channel extends.
1In the Timeline panel, expand the Mask properties of the layer you want to adjust.
2Drag the underlined value for Mask Expansion.
Todd Kopriva provides a visual aid and further explanation regarding mask expansion—and why it creates rounded
corners—on his blog on the Adobe website.
Soften (feather) the edges of a mask
Feathering softens the edges of a mask by fading it from more transparent to less transparent over a user-defined
distance. Using the Mask Feather property, you make mask edges hard-edged or soft-edged (feathered). By default, the
feather width straddles the mask edge, half inside, and half outside. For example, if you set the feather width to 25, the
feathering extends 12.5 pixels inside the mask edge and 12.5 pixels outside it.
A Masked layer with 5-pixel feather B Masked layer with 40-pixel feather C Result with 5-pixel feather D Result with 40-pixel feather
You can also extend or contract the mask edges using the Mask Expansion property to control where the mask
feathering appears. (See Expand or contract the edges of a mask.)
Mask feathering takes place only within the dimensions of the layer. Therefore, the path of a feathered mask should
always be slightly smaller than the layer area and should never move to the very edge of the layer. If a mask feather
extends beyond the layer area, the feathered edge ends abruptly.
1To display the Mask Feather property for selected layers, press F.
2(Optional) To constrain horizontal and vertical feather amounts to change proportionally, select the Constrain
Proportions switch next to the Mask Feather property.
3Modify the Mask Feather property as you would any other property—by dragging the underlined value or clicking
the underlined value and entering an amount in the text input field.
Note: Because the mask feather causes the opacity values to vary according to a Gaussian distribution, the area influenced
by the feather actually extends beyond the number of pixels specified. The magnitude of the feather’s influence beyond the
specified feather range is very small. This gradual, Gaussian fall-off appears more natural than would a linear fall-off.

408
Transparency and compositing
Last updated 6/8/2015
Variable-width mask feathering | CC, CS6
Earlier versions of After Effects had the ability to add a feathered edge to a closed mask, but the width (extent) of the
feather was the same around the mask. A new Mask Feather tool (available in the same tool menu as the Pen tool) has
been added to let you define points along a closed mask that should have varying widths.
This video by Todd Kopriva and video2brain introduces the variable-width mask feathering feature. Assign multiple
feather points to an object to show how those feather points interact to create interesting effects.
To cre ate a fe ather point:
A selected feather point has a small black dot at its handle.
Feather points define both the outer feather boundary and inner feather boundary. If no feather extent handles are
inside the mask, the inner feather boundary is the mask path. The mask feather extends from the inner to the outer
feather boundary.
To select multiple feather points:
Using the Selection or Mask Feather tool, Shift-click the feather points' extent handles.
To toggle the selection of a feather point:
Shift-click the feather point.
To move a feather point, do either of the following:
•Using the Selection or Mask Feather tool, drag the feather extent handle.
You can move multiple selected feather points in unison by dragging one of them, and scale multiple feather extents by
dragging one of the feather extent handles.
You can "sweep" feather points around corner points on a mask.
•With the Mask Feather tool active, press Left or Right Arrow to move the feather along the path, or the Up or Down
Arrow to lengthen or shorten the feather's width.
You can move multiple selected feather points, and move longer distances/widths by holding down the Shift key.
To snap a feather point to the mask path:
Drag the feather extent handle across the mask path. It will stop at the mask path.
To control the falloff of the feather:
Choose Layer > Mask > Feather Falloff, and then select one of the following:
•Smooth (default)
•Linear
To adjust the tension (smoothness or curvature) of a feather boundary through a feather point:
Hold down the Alt (Windows) or Option (MacOS) key while dragging from a feather extent handle to adjust the
tension. The Info panel shows the current tension for a handle.
To set Hold interpolation for a feather point (for constant feather radius up to the next feather point):
Hold down the Alt (Windows) or Option (MacOS) key while dragging from a feather extent handle to adjust the
tension. The Info panel shows the current tension for a handle.
To set Hold interpolation for a feather point (for constant feather radius up to the next feather point):

409
Transparency and compositing
Last updated 6/8/2015
Enable the Hold option from the context menu above the feather point. The feather point handle changes to be pointy
in the direction of constant radius.
To quickly create a feathered edge for a specific mask segment:
Hold down the Shift key as you click the mask segment (between vertices, not above them). The pointer changes to
indicate that you are in this mode. Drag from the segment to adjust the extent. Note the following behavior:
•If just two mask vertices are selected, the feathered edge will be the contiguous segments between them.
•If both vertices of the clicked segment are selected (that is, the segment is selected), the feathered edge will expand
to include contiguous selected segments.
•If all or no vertices on the mask are selected, or if the first two conditions don't apply, the feathered edge will be only
the clicked segment.
To delete a feather point :
Using the Selection or Mask Feather tool, select a feather extent handle, then press Delete. You can delete multiple
selected feather points.
Note: The pointer changes to selection mode instead of delete vertex mode when over a mask vertex.
Tips for variable-width mask feathering (Mask Feather tool)
•Temporarily switch between Pen and Mask Feather tools by holding down the 'G' shortcut.
You can turn this behavior off in Edit > Preferences > General (Windows), or After Effects > Preferences > General
(Mac OS).
•View information about the number of feather points on a mask, a feather extent's length, position, and tension, and
feather falloff setting in the Info panel.
•Hide the feather boundaries for a specific view by deselecting the "Mask Feather Boundaries" option in the View
Options dialog box. You can still interact with the boundaries (for example, adding new feather points) where they
would've been drawn.
•Control feather point counts across Mask Path keyframes by using the "Preserve Constant Vertex and Feather Count
when Editing Masks" option in General preferences.
•Change the value of a feather point's tension, radius, and corner angle from a dialog box by using the commands in
the context menu for a feather point. Hold down the Ctrl (Windows) or Cmd (Mac OS) key when hovering over a
mask vertex to switch to Selection tool behavior.
•Hold down the Ctrl (Windows) or Cmd (MacOS) key when hovering over a tangent handle to switch to the Convert
Ver tex tool.
Chris & Trish Meyer introduce the new variable-width mask feather feature in a free video from their After Effects
Apprentice series.
Track mattes and traveling mattes
When you want one layer to show through holes defined by another layer, set up a track matte. For example, you can
use a text layer as a track matte for a video layer to allow the video to only show through the shapes defined by the text
characters. The underlying layer (the fill layer) gets its transparency values from the values of certain channels in the
track matte layer—either its alpha channel or the luminance of its pixels.
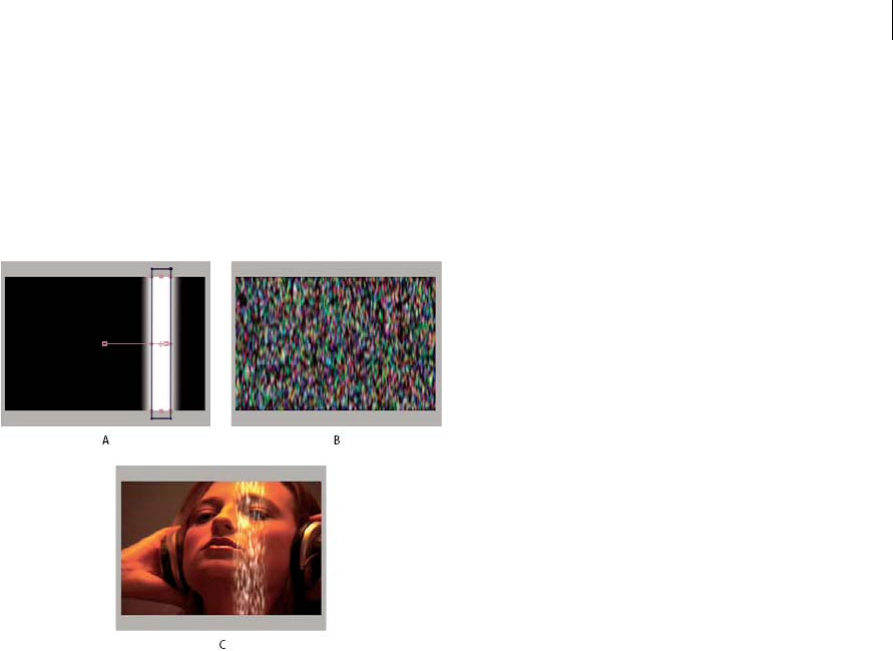
410
Transparency and compositing
Last updated 6/8/2015
Defining the transparency of a layer based on the luminance of the track matte’s pixels is useful when you want to create
a track matte using a layer without an alpha channel or a layer imported from a program that can’t create an alpha
channel. In both cases—using alpha channel mattes and using luminance mattes—pixels with higher values are more
transparent. In most cases, you use a high-contrast matte so that areas are either completely transparent or completely
opaque. Intermediate shades should appear only where you want partial or gradual transparency, such as along a soft
edge.
A Track matte layer: a solid with a rectangular mask, set to Luma Matte. The mask is animated to travel across the screen. B Fill layer: a solid
with a pattern effect. C Result: the pattern is seen in the shape of the track matte. This is then composited over an additional image layer.
A track matte only applies to the layer directly beneath it. To apply a track matte to multiple layers, first precompose
the multiple layers, and then apply the track matte to the precomposition layer.
After Effects preserves the order of a layer and its track matte after you duplicate or split the layer. Within the duplicated
or split layers, the track matte layer remains on top of the fill layer. For example, if your composition contains layers A
and B, where A is the track matte and B the fill layer, duplicating or splitting both of these layers results in the layer
order ABAB.
If you animate the position or other transformations of the track matte layer, it’s called a traveling matte. If you want to
animate the track matte and fill layers using identical settings, consider precomposing them.
Convert a layer into a track matte
The TrkMat menu shares a column with the blending modes menu. To show the TrkMat menu, make sure that the
Modes column is visible. (See Columns.)
1In the Timeline panel, drag the layer to use as the track matte directly above the layer to use as the fill layer.
2Define transparency for the track matte by choosing one of the following options from the TrkMat menu for the fill
layer:
No Track Matte No transparency created; next layer above acts as a normal layer.
Alpha Matte Opaque when alpha channel pixel value is 100%.
Alpha Inverted Matte Opaque when alpha channel pixel value is 0%.
Luma Matte Opaque when the luminance value of a pixel is 100%.
Luma Inverted Matte Opaque when the luminance value of a pixel is 0%.

411
Transparency and compositing
Last updated 6/8/2015
If you choose an option other than No Track Matte, After Effects converts the next layer above into a track matte, turns
off the video of the track matte layer, and adds a track matte icon next to the name of the track matte layer in the
Timeline panel.
Note: Although the video is turned off for the matte layer, you can still select the layer to reposition, scale, or rotate it. Select
the layer in the Timeline panel, and then drag the center (indicated by a circle with an X) of the layer in the Composition
panel.
Using a track matte is similar to using the Preserve Underlying Transparency option, which causes a layer to get its
transparency from the transparency of the composite of the layers below it in the layer stacking order. (See Preserve
underlying transparency during compositing.)
Tips for working with track mattes
•Use the Levels effect to increase the contrast between light and dark parts of the matte layer. This reduces the
problem of having a lot of mid-range values, which translate to partial transparency. (Usually, mattes are most useful
when they define areas as entirely transparent or entirely opaque, except at the edges.)
•To use a channel other than the alpha channel of the matte layer as a matte, use one of the Channel effects (such as
the Shift Channels effect) to route the desired channel’s value into the alpha channel.
•To animate a track matte to move with the layer that it’s matting, make the track matte a child of the layer that it’s
matting. (See Parent and child layers.)
Online resources about track mattes
Trish and Chris Meyer provide an introduction to mattes in a PDF excerpt from the “All About Track Mattes” chapter
of their book Creating Motion Graphics with After Effects (4th Edition).
Harry Frank provides a video tutorial on his graymachine website in which he demonstrates how to use effects on track
matte layers to create custom fade-on transitions.
Preserve underlying transparency during compositing
The Preserve Underlying Transparency option causes a layer to get its transparency from the transparency of the
composite of the layers below it in the layer stacking order. In other words, the opaque areas of the layer with this option
selected appear only when positioned over opaque areas in underlying layers. This behavior is similar to the behavior
of a track matte, except that a track matte can only be a single layer and a track matte must be above the layer in the
layer stacking order. (See Track mattes and traveling mattes.)
This option is useful for creating results such as glints or light reflecting off a polished surface.
The behavior of a layer with the Preserve Underlying Transparency option selected is similar to the behavior of a
clipping mask in Adobe Photoshop.
❖Select the T option in the Modes column for the layer.
Aharon Rabinowitz provides a short video tutorial about the Preserve Underlying Transparency option on the Creative
COW website.
Tim Clapham provides an explanation and demonstration on his website of the Preserve Underlying Transparency
switch.

412
Transparency and compositing
Last updated 6/8/2015
Resources for Imagineer mocha shape for After Effects
After Effects includes Imagineer Systems mocha for After Effects (mocha-AE), a stand-alone planar tracking
application that can export tracking data for use in compositions in After Effects. (See Resources for mocha for After
Effects (mocha AE).)
After Effects also includes the mocha shape for After Effects (mocha shape) plug-in, which converts paths from mocha-
AE into mattes in After Effects.
Note: The free trial version of Adobe After Effects software does not include some features that depend upon software
licensed from parties other than Adobe. For example, mocha shape for After Effects, and some effect plug-ins are available
only with the full version of Adobe After Effects software. (See Setup and installation.).
You don’t apply the mocha shape effect to a layer directly. Rather, you copy path data to the clipboard in the mocha-AE
application and then paste it onto a layer in After Effects. The paths from mocha-AE are converted to instances of the
mocha shape effect to create a matte.
The Imagineer website provides several video tutorials and other resources for learning to use mocha-AE and mocha
shape with After Effects.
Chris and Trish Meyer provide tips about mocha-AE and mocha shape, including tips about variable-width feather, in
an article on the ProVideo Coalition website.
More Help topics
Alpha channel interpretation: premultiplied or straight
Creating shapes and masks
Managing and animating shape paths and masks
Split a layer
Set Matte effect
Compositing and transparency overview and resources
Compositing overview
To create a composite from multiple images, you can make parts of one or more of the images transparent so that other
images can show through. You can make portions of a layer transparent using any of several features in After Effects,
including the following:
•Roto Brush and Refine Edge tools in CC ( See Roto Brush and Refine Edge)
•masks (See About masksand Rotoscoping introduction and resources.)
•mattes (See Track mattes and traveling mattes.)
•painting on the alpha channel (See Paint with the Brush tool .)
•the Preserve Underlying Transparency layer option (See Preserve underlying transparency during compositing.)
•keying effects (See Keying.)
To make an entire layer uniformly transparent or semi-transparent, modify its Opacity property.

413
Transparency and compositing
Last updated 6/8/2015
Layers can also be composited together without modifying the transparency of the layers themselves. For example, you
can use blending modes or some of the Channel effects to blend image data from multiple layers into a composite. (See
Blending modes and layer styles and Channel effects.)
After Effects also includes the mocha shape for After Effects (mocha shape AE) plug-in, which converts paths from
mocha-AE into mattes in After Effects. (See Resources for Imagineer mocha shape for After Effects.)
Adobe Photoshop is an excellent application for performing many compositing tasks, including defining areas of
transparency using its selection and painting tools. You can use Adobe Photoshop together with After Effects for
optimum efficiency and best results when doing compositing work.
Online resources for compositing
Aharon Rabinowitz provides an introduction to compositing, “What is Compositing?”—part of the Multimedia 101
series on the Creative COW website.
Mark Christiansen provides a detailed overview of compositing—covering masks, mattes, blending modes, and alpha
channels—in a chapter from his After Effects Studio Techniques book posted on the Adobe Press website.
Chris and Trish Meyer provide a tutorial on the Artbeats website that demonstrates how to create a light wrap, so that
a foreground element blends in more convincingly with a background.
Rich Young collects tutorials and resources for creating light wraps on the After Effects Portal website.
Rich Young collects resources and tutorials for various methods of creating vignettes.
Rich Young collects resources for sky replacement on the ProVideo Coalition website.
Chris Zwar provides tips on color keying and compositing on his website.
Jeff Foster provides free sample chapters from his book The Green Screen Handbook: Real World Production
Techniques. The sample chapters cover basic compositing, color keying, garbage mattes, hold-out mattes, and how to
avoid common problems with greenscreen shots. For more information, see Todd Kopriva's blog.
Compositing fire, explosions, muzzle flashes
Mark Christiansen provides tips and detailed techniques for creating and compositing fire, explosions, muzzle flashes,
bullet hits, and energy blasts in the “Pyrotechnics: Creating Fire, Explosions, and Energy Phenomena in After Effects”
chapter of After Effects Studio Techniques on the Peachpit Press website.
Compositing fog, smoke, and clouds
Mark Christiansen provides tips and detailed techniques for creating and compositing fog, smoke, mist, rain, and snow
in the “Climate: Air, Water, Smoke, Clouds in After Effects” chapter of After Effects Studio Techniques on the Peachpit
Press website.
Daniel Broadway provides tips for compositing fog or mist into a scene on his website.
Keying

414
Transparency and compositing
Last updated 6/8/2015
Keying introduction and resources
Note: When a background is not of a consistent and distinctive color, you can’t remove the background with keying effects.
Under these conditions, you may need to use rotoscoping—the manual drawing or painting on individual frames to isolate
a foreground object from its background. (See Rotoscoping introduction and resources.)
About keying: color keys, luminance keys, and difference keys
Keying is defining transparency by a particular color value or luminance value in an image. When you key out a value,
all pixels that have colors or luminance values similar to that value become transparent.
Keying makes it easy to replace a background, which is especially useful when you work with objects too complex to
mask easily. When you place a keyed layer over another layer, the result forms a composite, in which the background
is visible wherever the keyed layer is transparent.
You often see composites made with keying techniques in movies, for example, when an actor appears to dangle from
a helicopter or float in outer space. To create this effect, the actor is filmed in an appropriate position against a solid-
color background screen. The background color is then keyed out and the scene with the actor is composited over a
new background.
The technique of keying out a background of a consistent color is often called bluescreening or greenscreening, although
you don’t have to use a blue or green screen; you can use any solid color for a background. Red screens are often used
for shooting non-human objects, such as miniature models of cars and space ships. Magenta screens have been used
for keying work in some feature films renowned for their visual effects. Other common terms for this kind of keying
are color keying and chroma keying.
Difference keying works differently from color keying. Difference keying defines transparency with respect to a
particular baseline background image. Instead of keying out a single-color screen, you can key out an arbitrary
background. To use difference keying, you must have at least one frame that contains only the background; other frames
are compared to this frame, and the background pixels are made transparent, leaving the foreground objects. Noise,
grain, and other subtle variations can make difference keying very difficult to use in practice.
Keying effects, including Keylight
After Effects includes several built-in keying effects, as well as the Academy Award-winning Keylight effect, which
excels at professional-quality color keying. (See Keying effectsand Matte effects.)
For information on the Keylight effect, see its documentation in the folder in which the Keylight plug-in is installed, or
on the Foundry website.
Keylight is included in the trial version of After Effects. See Third-party plug-ins included with After Effects.
Note: Though the color keying effects built into After Effects can be useful for some purposes, you should try keying with
Keylight before attempting to use these built-in keying effects. Some keying effects—such as the Color Key effect and the
Luma Key effect—have been superseded by more modern effects like Keylight.
Mark Christiansen provides tips and techniques for using Keylight in an excerpt from his book After Effects Studio
Techniques: Visual Ef fects and C ompositing on the Peachpit Press website. In an excerpt from the “Color Keying in
After Effects” chapter of After Effects Studio Techniques, Mark Christiansen provides detailed tips and techniques for
color keying, including advice on which keying effects to avoid and how to overcome common keying challenges.
For a step-by-step tutorial demonstrating the use of the Color Difference Key effect, the Matte Choker effect, the Spill
Suppressor effect, and garbage masks, see the “Keying in After Effects” chapter of the After Effects Classroom in a Book
on the Peachpit Press website.

415
Transparency and compositing
Last updated 6/8/2015
Jeff Foster provides free sample chapters from his book The Green Screen Handbook: Real World Production
Techniques. The sample chapters cover basic compositing, color keying, garbage mattes, hold-out mattes, and how to
avoid common problems with greenscreen shots. For more information, see the Adobe website.
Rich Young collects more tips and resources for keying on his After Effects Portal website.
Tips on color keying and compositing from experienced compositor, Chris Zwar.
Chris & Trish Meyer shares tips & resources for color keying with Keylight and other effects.
Note: Keep in mind that generating a high-quality key can require the application of multiple keying effects in sequence
and careful modification of their properties, especially if the footage was shot without considering the requirements of the
compositor.
Shooting and acquiring footage for keying
Keying footage that was not acquired correctly is much more difficult than is keying footage that was acquired with
keying in mind. For best results, use Adobe OnLocation™ to monitor color and lighting as you acquire footage for color
keying.
For tips on shooting footage so that color keying is easier and more successful, see Jonas Hummelstrand’s General
Specialist website.
Alex Lindsay provides an article on the ProVideo Coalition website about setting up and lighting a green background
in preparation for color keying work. In part two of his greenscreen primer on the ProVideo Coalition website, Alex
Lindsay provides detailed information about cameras, codecs, and capture systems to use when acquiring footage for
color keying.
•Light your color screen uniformly, and keep it free of wrinkles.
•Start with the highest-quality materials you can gather, such as film that you scan and digitize.
•Use uncompressed footage (or, at least, files with the least possible amount of compression). Many compression
algorithms, especially the algorithms used in DV, HDV, and Motion JPEG, discard subtle variations in blue—which
may be necessary to create a good key from a bluescreen. Use footage with the least color subsampling possible—
for example, 4:2:2 rather than 4:2:0 or 4:1:1. (For information about color subsampling, see the Wikipedia website
and the Adobe website.)
Robbie Carman and Richard Harrington provide an excerpt on the Peachpit website from their book Video Made On
A Mac that demonstrates how to plan, shoot, key, and composite a greenscreen shot.
Tips for keying with After Effects
•Noise and compression artifacts can cause problems for keying, especially difference keying. Often, applying a slight
blur before keying can reduce noise and compression artifacts enough to improve keying results. For example,
blurring the blue channel for DV footage can smooth out noise in a bluescreen.
The KeyerforDV animation preset available through the AE Enhancers forum automates the process of blurring the
blue and green channels before keying DV footage.
•Use a garbage matte to roughly outline your subject so that you don’t have to waste time keying out parts of the
background far from the foreground subject. (See Use a garbage matte.)
•Use a hold-out matte to roughly protect areas that are of a similar color to the background from being keyed out.
(See Use a hold-out matte.)

416
Transparency and compositing
Last updated 6/8/2015
•To help you view transparency, temporarily change the background color of the composition, or include a
background layer behind the layer you are keying out. As you apply the keying effect to the layer in the foreground,
the composition background (or a background layer) shows through, making it easy to view transparent areas. (See
Composition settings.)
•For evenly lit footage, adjust keying controls on only one frame. Choose the most intricate frame of the scene, one
involving fine detail such as hair and transparent or semitransparent objects, such as smoke or glass. If the lighting
is constant, the same settings you apply to the first frame are applied to all subsequent frames. If lighting changes,
you may need to adjust keying controls for other frames. Place keyframes for the first set of keying properties at the
start of the scene. If you are setting keyframes for one property only, use Linear interpolation. For footage that
requires keyframes for multiple interacting properties, use Hold interpolation. If you set keyframes for keying
properties, you may want to check the results frame by frame. Intermediate keying values may appear, producing
unexpected results.
•To key well-lit footage shot against a color screen, start with the Color Difference Key. Add the Spill Suppressor (or
the Advanced Spill Suppressor effect) to remove traces of the key color, and then use one or more of the other Matte
effects, if necessary. If you are not satisfied with the results, try starting again with the Linear Color Key.
•To key well-lit footage shot against multiple colors or unevenly lit footage shot against a bluescreen or greenscreen,
start with the Color Range key. Add the Spill Suppressor (or the Advanced Spill Suppressor effect) and other effects
to refine the matte. If you are not completely satisfied with the results, try starting with or adding the Linear Color
Key.
•To key dark areas or shadows, use the Extract Key on the Luminance channel.
•To make a static background scene transparent, use the Difference Matte Key. Add the Simple Choker and other
effects as needed to refine the matte.
•After you have used a key to create transparency, use Matte effects to remove traces of key color and create clean
edges.
•Blurring the alpha channel after keying can soften the edges of the matte, which can improve compositing results.
Use a garbage matte
A garbage matte (or junk matte) removes unneeded portions of the scene, resulting in a rough area that contains only
the subject that you want to keep. When you are working with a poorly lit or uneven color screen (for example, a
bluescreen or greenscreen), sketching a garbage matte around the subject can greatly reduce the amount of work that
you have to do in keying out the background. However, if you spend a lot of time making a perfect garbage matte that
exactly outlines the subject—essentially rotoscoping—you lose the time-saving advantage of keying.
1Create a mask to roughly outline a subject.
2Apply one or more keying effects to mask out the remainder of the background.
3Apply Matte effects as necessary to fine-tune the matte.
Aharon Rabinowitz provides a video tutorial on the Creative COW website that shows how to create a super-tight
garbage matte using Auto-trace.
Use a hold-out matte
Use a hold-out matte (also known as a hold-back matte) to patch a scene to which a keying effect has been applied.
A hold-out matte is a masked-out portion of a duplicate of a layer that you have keyed. The duplicate is masked to
include only the area of the image that contains the key color that you want to preserve as opaque. The hold-out matte
is then placed directly on top of the keyed layer.
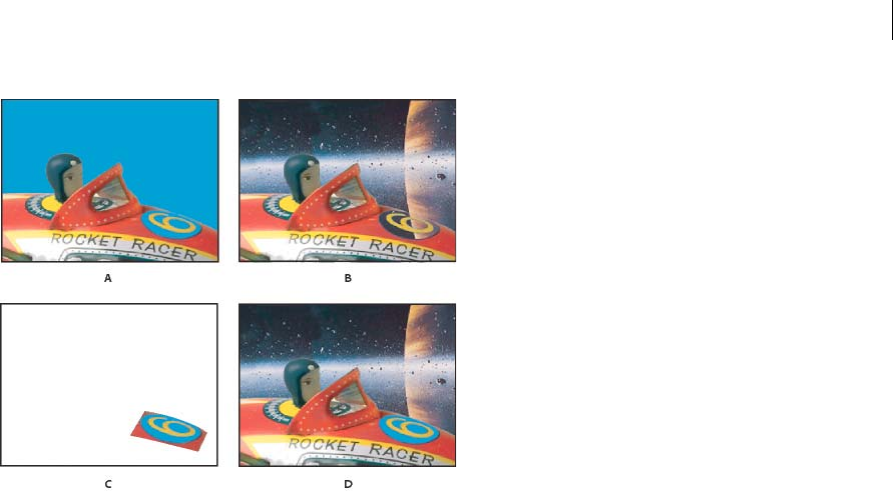
417
Transparency and compositing
Last updated 6/8/2015
A Original bluescreen image. The background for the number is also blue. B After keying, the background for the number is also transparent.
C Hold-out matte containing the part of the image you want to remain opaque D When the hold-out matte is placed on top of the keyed image,
the background for the number is now opaque.
1Duplicate the layer containing the color screen.
2Apply keying effects and Matte effects to the original layer to create transparency.
3On the duplicate layer, create masks to mask out everything in the image except the area that you want to preserve.
4Make sure that the copy (the hold-out matte) is positioned directly on top of the keyed layer.
Note: Don’t change Transform properties of only one of the layers after making the duplicate; keep the layers moving
together. Consider parenting one to the other. (See Parent and child layers.)
More Help topics
Keying effects
Matte effects
Creating shapes and masks

418
Last updated 6/8/2015
Chapter 12: Effects and animation presets
Effects and animation presets overview
Animation presets overview and resources
With animation presets, you can save and reuse specific configurations of layer properties and animations, including
keyframes, effects, and expressions. For example, if you created an explosion using several effects with complex
property settings, keyframes, and expressions, you can save all of those settings as a single animation preset. You can
then apply that animation preset to any other layer.
Many animation presets don’t contain animation; rather, they contain combinations of effects, transform properties,
and so on. A behavior animation preset uses expressions instead of keyframes to animate layer properties.
Animation presets can be saved and transferred from one computer to another. The filename extension for an
animation preset is .ffx.
After Effects includes hundreds of animation presets that you can apply to your layers and modify to suit your needs,
including many text animation presets. (See Text animation presets.)
You can browse and apply animation presets in After Effects using the Effects & Presets panel or Adobe Bridge. To open
the Presets folder in Adobe Bridge, choose Browse Presets from the Effects & Presets panel menu or from the
Animation menu.
A great way to see how advanced users use After Effects is to apply an animation preset, and press U or UU to reveal
only the animated or modified layer properties. Viewing the animated and modified properties shows you what changes
the designer of the animation preset made to create the animation preset.
Downloading, installing, and moving animation presets
•The animation presets that are installed with After Effects are in the Presets folder located in the Program
Files\Adobe\Adobe After Effects CC\Support Files (Windows) or Applications/Adobe After Effects CC (Mac OS)
folder.
•Animation presets that you create are saved by default in the Presets folder located inMy Documents\Adobe\After
Effects CC (Windows) or Documents/Adobe/After Effects CC (Mac OS).
You can add a single new animation preset or an entire folder of new animation presets to either of the Presets folders.
When After Effects starts, it searches both of the Presets folders and their subfolders for installed animation presets and
adds them to the Effects & Presets panel. After Effects ignores the contents of folders with names that begin and end in
parentheses; for example, the contents of the folder (archived_animation_presets) are not loaded.
Note: Animation presets appear in the Effects & Presets panel only if they are located in one of the Presets folders or a
subfolder of one of the Presets folders. If you move a preset to a new folder, place a shortcut (Windows) or an alias (Mac
OS) of that folder in the Presets folder.

419
Effects and animation presets
Last updated 6/8/2015
Animation presets are loaded and initialized only when the Effects & Presets panel is shown. If the Effects & Presets
panel is closed or hidden behind another panel, the animation presets are not initialized.
Save an animation preset
1Select any combination of properties (for example, Position and Scale) and property groups (for example, Paint and
Transform). If you are selecting only effects, you can select them in the Effect Controls panel.
2Choose Save Animation Preset from the Animation menu or from the Effects & Presets panel menu.
3Specify a name and location for the file, and then click Save.
For the animation preset to appear in the Effects & Presets panel, it must be saved in the Presets folder.
Note: If the animation preset does not appear in the Effects & Presets panel, choose Refresh List from the Effects & Presets
panel menu.
Online resources for animation presets
You can download additional animation presets—including a set of animation presets that make use of shape layers and
per-character 3D text animation—from the Adobe Add-Ons page.
If you apply an animation preset from the Animation Presets > Shapes > Backgrounds category, you can see a custom
Animated Shape Control effect in the Effect Controls panel. This custom effect is a specialized expression control effect
that was created specifically for these animation presets. You can copy and paste this effect to other layers, or you can save
it as an animation preset itself so that you can apply it elsewhere.
You can also download animation presets from many After Effects community websites, such as the AE Enhancers
forum.
For a list of animation presets included with After Effects, see Animation preset list.
Andrew Kramer provides many animation presets on his Video Copilot website.
Effects overview and resources
After Effects includes a variety of effects, which you apply to layers to add or modify characteristics of still images,
video, and audio. For example, an effect can alter the exposure or color of an image, add new visual elements,
manipulate sound, distort images, remove grain, enhance lighting, or create a transition.
Effects are sometimes mistakenly referred to as filters. The primary difference between a filter and an effect is that a
filter permanently modifies an image or other characteristic of a layer, whereas an effect and its properties can be
changed or removed at any time. In other words, filters operate destructively, and effects operate non-destructively.
After Effects uses effects exclusively, so changes are non-destructive. A direct result of the ability to change the
properties of effects is that the properties can be changed over time, or animated.
Note: Path operations on shape layers, such as Zig Zag and Pucker & Bloat—which you apply through the shape layer’s
Add menu—are called effects in Adobe Illustrator, but they function differently from other effects in After Effects.
You browse and apply effects using the Effects & Presets panel. You modify effect properties using the Effect Controls
panel or Timeline panel or by moving effect control points in the Layer panel or Composition panel.
You can apply multiple instances of the same effect to a layer, rename each instance, and set the properties for each
instance separately.
Chris and Trish Meyer provide a video on the Focal Press website that introduces effects and animation presets and
shows how to use the Effects & Presets panel. Chris & Trish Meyer give tips on applying and using effects in an article
on the ProVideo Coalition website.

420
Effects and animation presets
Last updated 6/8/2015
Note: If you open a project that uses an effect for which After Effects has not loaded the plug-in, a warning dialog box
appears, and instances of the effect have Missing: at the beginning of its name in the Timeline panel and Effect Controls
panel. To show all instances of missing effects in the Timeline panel for the active composition, press FF.
Effect plug-ins
All effects are implemented as plug-ins, including the effects that are included with After Effects. Plug-ins are small
software modules—with filename extensions such as .aex, .pbk, and .pbg—that add functionality to an application. Not
all plug-ins are effect plug-ins; for example, some plug-ins provide features for importing and working with certain file
formats. The Photoshop Camera Raw plug-in, for example, provides After Effects with its ability to work with camera
raw files. (See Plug-ins.)
Many effect plug-ins are written in C/C++; increasingly, many image-manipulation effect plug-ins are written in the
Adobe Pixel Bender language.
Because effects are implemented as plug-ins, you can install and use additional effects that parties other than Adobe
provide, including effects that you create yourself. You can add a single new effect or an entire folder of new effects to
the Plug-ins folder, which is located by default in one of these folders:
•(Windows) Program Files\Adobe\Adobe After Effects CC\Support Files
•(Mac OS) Applications/Adobe After Effects CC
When After Effects starts, it searches the Plug-ins folder and its subfolders for all installed effects and adds them to the
Effect menu and to the Effects & Presets panel. After Effects ignores the contents of folders with names that begin and
end in parentheses; for example, the contents of the folder (archived_effects) are not loaded.
After Effects comes with several third-party plug-ins, including Foundry Keylight, Synthetic Aperture Color Finesse,
Digieffects FreeForm, Imagineer mocha shape, fnord ProEXR, and CycoreFX HD plug-ins. These plug-ins are installed
by default with the full version of Adobe After Effects software. Some of these plug-ins are not included with the trial
version of Adobe After Effects. (See Third-party plug-ins included with After Effects.).
After Effects includes Synthetic Aperture Color Finesse 3.
The installers for some plug-ins install their documentation in the same directory as the plug-ins themselves.
The EXtractoR and IDentifier plug-ins from fnord software are included with After Effects to provide access to multiple
layers and channels of OpenEXR files. See ProEXR plug-ins, IDentifier and EXtractoR.
Animating effects
You animate effect properties in the same way that you animate any other properties—by adding keyframes or
expressions to them. In most cases, even effects that rely on animation for their normal use require that you set some
keyframes or expressions. For example, animate the Transition Completion property of a Transition effect or the
Evolution setting of the Turbulent Noise effect to turn a static effect into a dynamic effect.
Color depth
Many effects support processing of image color and alpha channel data at a depth of 16 or 32 bits per channel (bpc).
Using an 8-bpc effect in a 16-bpc or 32-bpc project can result in a loss of color detail. If an effect supports only 8 bpc,
and your project is set to 16 bpc or 32 bpc, the Effect Controls panel displays a warning icon next to the effect name.
You can set the Effects & Presets panel to list only the effects that support the color depth of the current project. (See
Color depth and high dynamic range color.)
Render order

421
Effects and animation presets
Last updated 6/8/2015
The order in which After Effects renders masks, effects, layer styles, and transform properties—called the render
order—may affect the final result of an applied effect. By default, effects appear in the Timeline panel and Effect
Controls panel in the order in which they were applied. Effects are rendered in order from top to bottom in this list. To
change the order in which effects are rendered, drag the effect name to a new position in the list. (See Render order and
collapsing transformations .)
Adjustment layers
To apply an effect to only a specific portion of a layer, use an adjustment layer.
An effect applied to an adjustment layer affects all layers below it in the layer stacking order in the Timeline panel. (See
Adjustment layers.)
Andrew Kramer provides a video tutorial on his Video Copilot website in which he shows how to use an adjustment
layer to apply an effect to only a short duration and to only specific portions of a movie.
Expression Controls effects
Expression Controls effects do not modify existing layer properties; rather, these effects add layer properties that
expressions can refer to. (See Expression Controls effects.)
Preventing edge clipping with the Grow Bounds effect
Because an effect is applied to a layer, the results of some effects are constrained to within the bounds of the layer, which
can make the effect appear to end abruptly. You can apply the Grow Bounds effect to a layer to temporarily extend the
layer for the purpose of calculating the results of other effects. This process is not necessary for newer effects, which
tend to be 32-bpc effects.
Managing effects and effect properties with scripts
Paul Tuersley provides a script on the AE Enhancers forum with which you can search compositions for effects and
turn them on or off.
Paul Tuersley provides a script on the AE Enhancers forum that makes synchronizing changes to effect properties on
multiple layers easier.
Effects applied with tools
Some effects—including the Puppet effect, the Paint effect, and the Roto Brush effect—are applied to a layer with a tool,
rather than being applied directly in the same manner as other effects. (See Animating with Puppet tools , Paint tools
and paint strokes, and Compositing overview.)
Resources for Cycore FX (CC) effects
CycoreFX HD (1.7.1) is included in the installation of After Effects CC and CS6. There is 16-bpc support in all effects,
and 32-bpc (float) support in 35 effects. Included are 12 additional plug-ins. CycoreFX HD plug-ins have support for
motion blur, lights, more controls, and options.
This video by Todd Kopriva and video2brain introduces the new Cycore effects and improved color bit depth. You will
learn how to apply a couple of these effects and see what it means to use different bit depths.
Documentation—including tutorials and example projects—for the Cycore FX (CC) plug-ins is available on the Cycore
website.
Alan Shisko provides a video tutorial on the ProVideo Coalition website that demonstrates the use of the CC RepeTile
effect.

422
Effects and animation presets
Last updated 6/8/2015
Bob Donlon provides the following tutorial about the CC Particle Systems II effect on the Adobe website:
•simulating fire
Eran Stern provides a video tutorial on his website that demonstrates the CC Particle System II and CC Mr. Mercury
effects.
Compound effects and control layers
Several effects rely on a control layer (or layer map) as input. These compound effects use the pixel values of the control
layer to determine how to affect the pixels of the layer that the effect is applied to (the destination layer). In some cases,
the effect uses the brightness values of the pixels in the control layer; in some cases, the effect uses the individual
channel values of the pixels in the control layer.
For example, the Displacement Map effect uses the brightness values of a control layer to determine how far to shift
pixels of the underlying layer, and in which direction. The Shatter effect can use two control layers—one to customize
the shapes of the shattered pieces and one to control when specific parts of the destination layer explode.
The compound effect ignores effects, masks, and transformations of a control layer. To use the results of effects, masks,
and transformations on a layer, precompose the layer and use the precomposition layer as the control layer.
It is common to use a control layer that is not itself visible—that is, its Video switch is off.
Most compound effects include a Stretch Map To Fit option (or a similarly named option), which temporarily stretches
or shrinks a control layer to the dimensions of the destination layer. This provides a pixel in the control layer
corresponding to each pixel in the destination layer. If you deselect this option, the calculations for the compound effect
are performed as if the control layer is centered on the destination layer at its original size.
You can create control layers by drawing or painting in an image-editing program, such as Adobe Photoshop.
Chris and Trish Meyer explain compound effects and how to work with them on the ProVideo Coalition website.
Tips for creating control layers:
•For many compound effects, neutral gray pixels in the control layer correspond to null operations. Therefore, a
neutral gray solid layer is a good starting point for creating a control layer.
•Apply the Turbulent Noise effect to a layer and precompose it to create a good control layer for turbulent or
atmospheric results.
•You can create a control layer by precomposing a white solid layer, a black solid layer, and a mask on the top layer
that determines which areas are white and black. Increasing the feather of a mask softens the transition between
black and white values.
•The contrast between adjacent pixel values determines how smoothly the values change across the surface of the
control layer. To create smooth changes, paint using a soft or anti-aliased brush, or apply gradients. To create abrupt
changes, avoid intermediate shades, using a few widely spaced shades, such as 50% gray, black, and white.
Effects with a Comp Camera attribute
Some effects can use the camera and lights within the same composition. These effects include Card Dance, Card Wipe,
and Shatter. Some of these effects always use the composition camera, whereas others include light and camera options
in the Effect Controls panel.
Note: The Live Photoshop 3D effect behaves as an effect with a Comp Camera attribute. This effect only appears on a layer
when the layer is a 3D object layer from a PSD file. See 3D object layers from Photoshop .

423
Effects and animation presets
Last updated 6/8/2015
When you apply an effect with a Comp Camera attribute to a 2D layer, the effect can track the camera and light
positions within the composition and render a 3D image on the 2D layer that it is applied to. The results of the effect
appear to be three-dimensional; however, the layer with the Comp Camera attribute applied remains a 2D layer and
consequently has the following characteristics:
•3D layers above and below it in the Timeline panel cannot intersect with each other or cast shadows on each other.
•It cannot intersect with 3D layers or cast or accept shadows.
Note: The image is rendered on the layer, not the composition, so make sure that you apply these effects to layers that are
the same size as the composition and are exactly centered in the composition.
Chris and Trish Meyer provide an article on the ProVideo Coalition website that explains how to use a simple set of
expressions to orient a layer with a Comp Camera effect so that it integrates with other 3D layers in a composition.
Effect Controls panel
When you apply an effect to a layer, the Effect Controls panel opens, listing the effect you applied and controls to change
the property values for the effect. You can also work with effects and change most effect property values in the Timeline
panel. However, the Effect Controls panel has more convenient controls for many kinds of properties, such as sliders,
effect control point buttons, and histograms.
The Effect Controls panel is a viewer, which means that you can have Effect Controls panels for multiple layers open at
once and can use the viewer menu in the tab of the panel to select layers.
•To open or close the Effect Controls panel for the selected layer, press F3.
•To select an effect, click it. To select the next or previous effect in the stacking order, press the Down arrow key or
the Up arrow key, respectively.
•To expand or collapse selected effects, press the Right Arrow key or Left Arrow key, respectively.
•To expand or collapse a property group, click the triangle to the left of the effect name or property group name.
•To expand or collapse a property group and all of its children, Ctrl-click (Windows) or Command-click (Mac OS)
the triangle.
•To expand or collapse all property groups for selected effects, press Ctrl+` (accent grave) (Windows) or
Command+` (accent grave) (Mac OS).
•To reset all of the properties of an effect to their default values, click Reset at the top of the entry for the effect in the
Effect Controls panel.
•To duplicate selected effects, choose Edit > Duplicate, or press Ctrl+D (Windows) or Command+D (Mac OS).
•To move an effect to a different place in the rendering order, drag the effect up or down in the effect stack.
•To set the properties of an effect to the properties used in an animation preset, choose from the Animation Presets
menu at the top of the entry for the effect in the Effect Controls panel.
•To show the Animation Presets menu in the Effect Controls panel, select Show Animation Presets in the panel
menu.
•To modify the range of an effect property, right-click (Windows) or Control-click (Mac OS) the underlined property
value for the control and choose Edit Value from the context menu.

424
Effects and animation presets
Last updated 6/8/2015
Effects and Presets panel
Browse and apply effects and animation presets with the Effects & Presets panel. An icon identifies each item in the
panel by type. Numbers within the icons for effects indicate whether the effect works on a maximum of 8, 16, or 32 bits
per channel.
You can scroll through the list of effects and animation presets, or you can search for effects and animation presets by
typing any part of the name in the search box at the top of the panel.
The options that you choose in the Effects & Presets panel menu determine which items are shown:
Show Effects For All Color Depths Shows effects that work with any color depth, not only the effects that work with the
depth of the current project.
Show Effects Shows all available effects.
Show Animation Presets Shows all animation presets, including animation presets saved by you in the Presets folder.
The panel organizes effects and animation presets according to the option that you select from the panel menu:
Categories, Explorer Folders (Windows) or Finder Folders (Mac OS), or Alphabetical.
Use the following commands in the panel menu to manage your effects and animation presets:Reveal In Explorer
(Windows) or Reveal In Finder (Mac OS)Opens the folder that contains the effect or animation preset selected in the
Effects & Presets panel. Refresh ListUpdates the list of effects and animation presets.
Chris and Trish Meyer provide a video on the Focal Press website that introduces effects and animation presets and
shows how to use the Effects & Presets panel.
Apply an effect or animation preset
Chris & Trish Meyer give tips on applying and using effects in an article on the ProVideo Coalition website.
•To apply an effect or animation preset to a single layer, drag the effect or animation preset from the Effects & Presets
panel to a layer in the Timeline, Composition, or Effect Controls panel.
Note: When you drag an effect or animation preset onto a layer in the Composition panel, the name of the layer under the
pointer is shown in the Info panel. If you have not selected a layer, double-clicking an animation preset will create a new
layer and apply the preset to the layer. Double-clicking an effect when no layer is selected does nothing.
•To apply an effect or animation preset to one or more layers, select the layers, and then double-click the effect or
animation preset in the Effects & Presets panel.
•To apply an effect to one or more layers, select the layers, and then choose Effect > [category] > [effect].
•To apply a recently used or saved animation preset to one or more layers, select the layers, choose Animation >
Recent Animation Presets, and then choose the animation preset from the list.
•To apply the most recently applied animation preset to one or more layers, select the layers, and then press
Ctrl+Alt+Shift+F (Windows) or Command+Option+Shift+F (Mac OS).
•To apply the most recently applied effect to one or more layers, select the layers, and then press Ctrl+Alt+Shift+E
(Windows) or Command+Option+Shift+E (Mac OS).
•To apply an animation preset to one or more layers using Adobe Bridge, select the layers, choose Animation >
Browse Presets, navigate to the animation preset, and then double-click it.
•To apply the effect settings from an animation preset to the current instance of an effect, choose the animation preset
name from the Animation Presets menu for the effect in the Effect Controls panel.
•To copy effects from one layer to one or more layers, select the effects in the Timeline panel or Effect Controls panel,
choose Edit > Copy, select the target layers, and choose Edit > Paste.
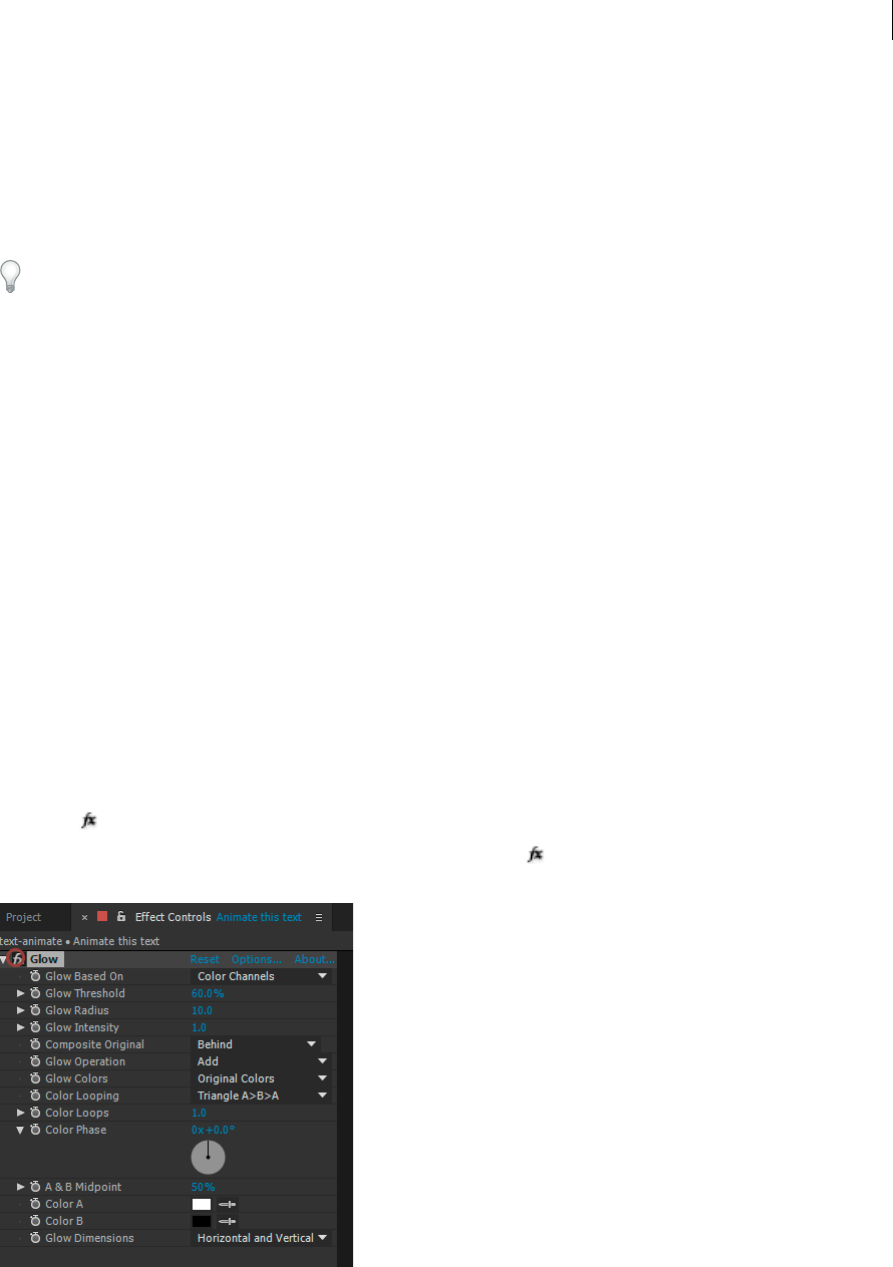
425
Effects and animation presets
Last updated 6/8/2015
Note: Applying an effect or animation preset to a layer selects the layer.
By default, when you apply an effect to a layer, the effect is active for the duration of the layer. However, you can make
an effect start and stop at specific times or make the effect more or less intense over time by using keyframes or
expressions or by applying the effect to an adjustment layer.
Animation presets are applied at the current time.
To see what changes have been made by applying an animation preset to a layer, select the layer and press UU to show
modified properties or press U to show properties with keyframes or expressions.
Delete or disable effects and animation presets
After you’ve applied effects to a layer, you can temporarily disable one or all of the effects on the layer so that you can
concentrate on another aspect of your composition. Effects that are disabled are not rendered, either for previews or for
final output. However, in the Render Queue panel, you can specify that the composition is rendered for final output
with all effects on, regardless of which effects are rendered for previews in the Composition panel. Disabling an effect
does not delete the keyframes created for any of the effect properties; all keyframes remain until the effect is deleted
from the layer.
You can’t disable an animation preset or delete it from a layer as a unit. You can, of course, individually delete or disable
the effects, keyframes, and expressions that it comprises.
•To delete one effect from a layer, select the effect name in the Effect Controls panel or Timeline panel, and press
Delete.
•To delete all effects from one or more layers, select the layers in the Timeline or Composition panel and choose Effect
> Remove All or press Ctrl+Shift+E (Windows) or Command+Shift+E (Mac OS).
Note: This command eliminates all keyframes for the deleted effects. If you choose Remove All accidentally, immediately
choose Edit > Undo Delete Effect or Edit > Undo Remove All Effects to restore the effects and keyframes.
•To temporarily disable one effect, select the layer in the Effect Controls or Timeline panel, and then click the Effect
switch to the left of the effect name.
•To temporarily disable all effects on a layer, click the Effect switch in the Switches column for the layer in the
Timeline panel.
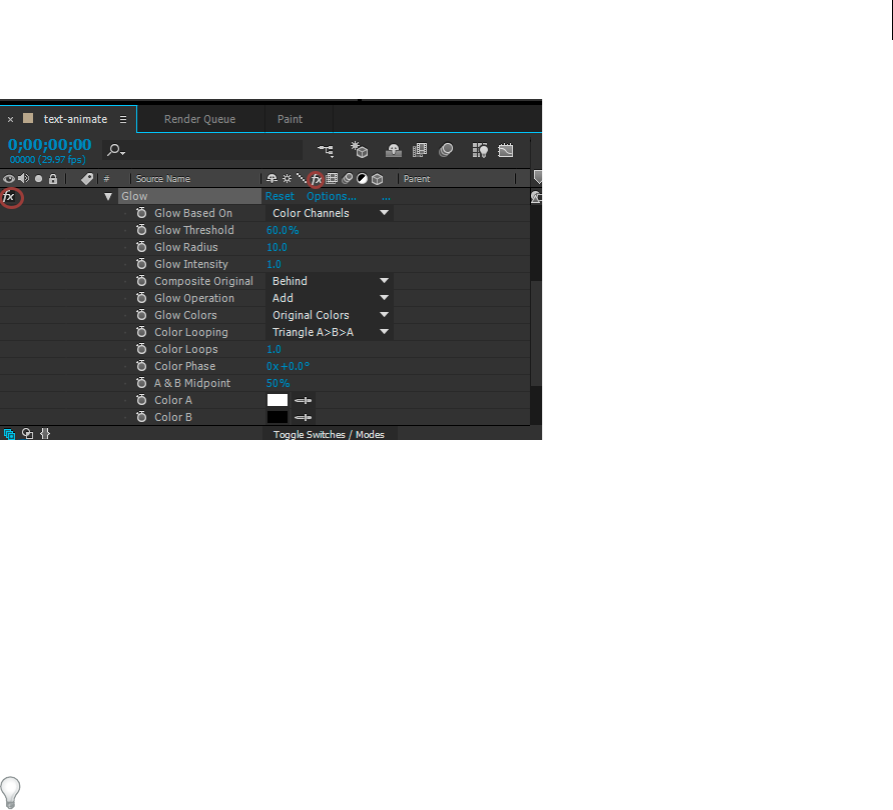
426
Effects and animation presets
Last updated 6/8/2015
Remove an effect or animation preset
You can remove an effect or animation preset from the folder in which After Effects searches for these items, preventing
it from being loaded and from being shown in the Effects & Presets panel or Effect menu.
1Select the effect or animation preset in the Effects & Presets panel.
2Choose Reveal In Explorer (Windows) or Reveal In Finder (Mac OS) from the panel menu.
3Move the effect (.aex) or animation preset (.ffx) file out of the Plug-ins or Presets folder.
4Choose Refresh List from the Effects & Presets panel menu to update the list of animation presets in the panel.
The list of effects is only updated when the application starts.
Rather than removing effects or animation presets entirely, consider creating a subfolder in the Plug-ins or Presets folder
for effects or animation presets that you seldom use. After Effects ignores the contents of folders with names that begin
and end with parentheses, such as (archive_folder).
Effect control points
Some effects have effect control points, which determine how the effect affects the layer. For example, the Advanced
Lightning effect has two effect control points—Origin and Direction—which specify where the lightning begins and in
which direction it points.
Effect control points are in layer space for layers that are not continuously rasterized and for which transformations are
not collapsed. If a layer is continuously rasterized or has collapsed transformations, then effect control points are in
composition space. (See Coordinate systems: composition space and layer spaceand Render order and collapsing
transformations.)
Vector layers (including shape layers and text layers) are always continuously rasterized, so their effect control points
are always in composition space. (See Continuously rasterize a layer containing vector graphics.)
Null object layers, solid-color layers, and other layers based on source footage items by default have effect control points
in layer space.
View an effect control point
•To view an effect control point in the Layer panel, choose the effect name from the View menu at the bottom of the
Layer panel.
427
Effects and animation presets
Last updated 6/8/2015
•To view an effect control point in the Composition panel, select the effect name in the Timeline panel or Effect
Controls panel.
Note: To view effect control points in the Composition panel, select Show Layer Controls in the View menu and select Effect
Controls in View Options (View > View Options).
Move an effect control point
•In the Composition panel or Layer panel, drag the effect control point .
•In the Effect Controls panel, click the effect control point button ; then, in the Composition or Layer panel, click
where you want the effect control point.
•In the Timeline or Effect Controls panel, drag or enter values for the x and y coordinates for the effect control point
as you would to modify any other property.
Randomness and random seeds
Because true randomness is not repeatable, many effects simulate randomness by using a calculation that generates
seemingly random results for each value of a Random Seed property. Multiple instances of the same effect give the same
results if all of their settings—including the Random Seed property values—are the same. This allows you to get
predictable, deterministic results, while still achieving the appearance of randomness.
Changing the Random Seed value doesn’t make things more or less random; it only makes them seem random in a
different way.
You can add randomness to any property with the expressions in the Random Numbers category.
Animation preset list
For information about using, browsing, and previewing animation presets, see Animation presets overview and
resources.
Backgrounds
•Apparition
•Blocks
•Cinders
•Circuit
•Cosmic Power
•Creepy
•Curtain
•Deep Tissue
•Fog Lights
•Germs
•Green Crystals
•Indigestion
•Infection

428
Effects and animation presets
Last updated 6/8/2015
•Lightning Bend
•Magma
•Orb
•Pixels
•Racing Rectangles
•Red Speed
•River
•Rose Light
•Silk
•Smoke Rising
•Sweeping Curves
Behaviors
•Autoscroll - horizontal
•Autoscroll - vertical
•Drift Over Time
•Fade In Over Layer Below
•Fade In+Out - frames
•Fade In+Out - msec
•Fade Out Over Layer Below
•Opacity Flash - layer markers
•Opacity Flash - random
•Rotate Over Time
•Scale Bounce - layer markers
•Scale Bounce - random
•Wiggle - gelatin
•Wiggle - position
•Wiggle - rotation
•Wiggle - scale
•Wiggle - shear
•Wigglerama
Image - Creative
•Bloom - brights+darks
•Bloom - brights
•Bloom - crystallize
•Colorize - blue wash
•Colorize - gold dip

429
Effects and animation presets
Last updated 6/8/2015
•Colorize - infrared
•Colorize - moonshadows
•Colorize - red hand tint
•Colorize - royal purple
•Colorize - sepia
•Colorize - sky blue
•Colorize - sky orange
•Colorize - sunset gradient
•Contrast - luminance
•Contrast - saturation
•Dimension - bevel+shadow
•Dimension - glow+shadow
•Grayscale
•Inset Video - framed
•Inset Video - torn edges
•Left Third - scoop mask NTSC
•Left Third - scoop mask PAL
•Lower Third - scoop mask NTSC
•Lower Third - scoop mask PAL
•Lower Third Holdout - darken
•Lower Third Holdout - saturate
•Mood Lighting - amorphous
•Mood Lighting - digital
•Mood Lighting - streaks
•Vignette Lighting
Image - Special Effects
•Bad TV 1 - warp
•Bad TV 2 - old
•Bad TV 3 - weak
•Cracked Tiles
•Embossed Multiple Exposure
•Light Leaks - layer markers
•Light Leaks - random
•Motion Registration Errors
•Night Vision

430
Effects and animation presets
Last updated 6/8/2015
Image - Utilities
•Compress-Expand Dynamic Range
•Crop Edges
•Flip + Flop
•Flip
•Flop
•Invert Alpha
•Keying - blue blur
•Keying - green blur
•Levels - computer to video
•Levels - video to computer
•Reduce DV blockiness
•Sample Image Expression
Shapes
Backgrounds
•Box Swarm
•Kaleidoscopic
•Nerve Net - Circular
•Nerve Net - Linear
•Nerve Net - Penta
Backgrounds 2*
•Autumn Leaves*
•Blue Hibiscus*
•Butterfly Resolve*
•Fabric of Space*
•Floral Explosion*
•Jellyfish Web*
•Sharps*
Elements
•60s Text Bar
•Chasing Line - Boxes
•Chasing Line - Dots
•Marquee Chasers
•Mod Boxes
•Ring Chart
•Wireframe Worm

431
Effects and animation presets
Last updated 6/8/2015
Elements 2*
•Box Grid*
•Crosshatch Focus*
•Deconstructionist*
•Deploy*
•Geo Logo*
•Graph Paper*
•Honeycomb*
•Iris Flare*
•Kaleidorganic*
•Kaleidoscopic Seaweed*
•Light Bulb Sign*
•Mandathorns*
•Neon Flower*
•Protection*
•Pulsing Snake*
•Radar Stopwatch*
•Spiral Magic*
•Swoop*
•Tun nel D rain*
•Woven C elt ic*
•Woven Springs*
Lower Thirds*
•LT_blue double slant+anim*
•LT_blue double-still*
•LT_dashed underscore-still*
•LT_double bubble-still*
•LT_fade bar-still*
•LT_neutral gradient+anim*
•LT_neutral gradient-still*
•LT_red skew glow+anim*
•LT_slant underscore-still*
•LT_underhook-still*
Sprites - Animated
•Alien Face - animated
•Circular - cellular division

432
Effects and animation presets
Last updated 6/8/2015
•Dancing Knot
•Mandala - animated
•Phase Scope
•SpiroMandala
•TwinkleStar
Sprites - Animated 2*
•Pulsing Circles*
•Spiralgear*
•Sunflower - animated*
Sprites - Still
•Alien Calligraphy
•Alien Face
•Box - dashed lines
•Bullseye
•Circular - half round
•Circular - tri dash
•Crosshair - brackets
•Crosshair - round
•Crosshair - square
•Fan Blades
•Flower Power
•Gear
•Holy Light
•Indian Sun
•Mandala
•RayStar-4
•RayStar-8
•Rounded Bracket - beveled
•Rounded Bracket - double
•Seaside Daisy
•Tri Cog
Sprites - Still 2*
•Spiral*
•Sunflower - still*
Symbol Families*
•Braille* (numbers, letters, punctuation, contractions, and fragments)

433
Effects and animation presets
Last updated 6/8/2015
•I Ching* (hexagrams and trigrams)
•Pictograms*
•Schematic* (antennas, batteries, capacitors, diodes, grounds, inductors, logic symbols, resistors, transformers,
transistors, tubes)
Sound Effects
•Blaster
•Busy
•CallAdobe
•DialTone-US
•DTMF
•PhoneCompany
•RingingPhone-US
Synthetics
•Blue Bars
•Cells
•Digital
•Ethereal
•Gold Ambiance
•Lightning - Horizontal
•Lightning - Vertical
•Mosaic
•Orange Streaks
•Smoke - Drifting
•Starburst Spin
Text
3D Text
•3D Basic Position Z Cascade
•3D Basic Position Z Typeon
•3D Basic Rotate X Cascade
•3D Basic Rotate Y Cascade
•3D Bouncing In Centered
•3D Fall Back Scale & Skew
•3D Fall Back Scramble & Blur
•3D Flip In Rotate X
•3D Flip Out Rotate X
•3D Flip Up Reflection

434
Effects and animation presets
Last updated 6/8/2015
•3D Flutter In From Left
•3D Flutter In Random Order
•3D Flutter Out From Right
•3D Fly Down & Unfold
•3D Fly Down Behind Camera
•3D Fly Down Random & Rotate Y
•3D Lines Zoom In
•3D Rain Down Words & Colors
•3D Random Spike Tumble
•3D Resolve Position
•3D Rotate around Circle
•3D Rotate in by Character
•3D Rotate out by Word
•3D Scramble in Position Z
•3D Spiral Down & Unfold
•3D Spiral Rotate In by Line
•3D Spiral Rotate Out by Line
•3D Swing Around on Path
•3D Tumble Words Forward
•3D Twist & Color Characters
3D Text 2*
•3D Blur Flip Up Random*
•3D Character Lineup*
•3D Falling Like Leaves*
•3D Flip Over Heels*
•3D Fumble Up*
•3D Ghost Landing*
•3D Pop Forward Fadeout*
•3D Pop Forward Unblur*
•3D Take a Bow*
•3D Triple Twist XYZ*
•3D Tumble X and Turn*
•3D Twisty Ribbons*
•3D Unsteady Swing*
•3D Words Jump in XYZ*
•3D Words Wiggles in XYZ*

435
Effects and animation presets
Last updated 6/8/2015
Animate In
•Center Spiral
•Characters Shuffle In
•Decoder Fade In
•Drop In By Character
•Espresso Eye Chart
•Fade Up And Flip
•Fade Up Characters
•Fade Up Lines
•Fade Up Words
•Fly In From Bottom
•Fly In With A Twist
•Pop Buzz Words
•Raining Characters In
•Random Fade Up
•Random Shuffle In
•Random Word Shuffle In
•Slow Fade On
•Smooth Move In
•Spin In By Character
•Spin In By Word
•Straight In By Character
•Straight In By Word
•Straight In Multi-Line
•Stretch In Each Line
•Stretch In Each Word
•Twirl On Each Line
•Twirl On Each Word
•Typewriter
•Wipe In To Center
Animate Out
•Encoder Fade Out
•Fade Out By Character
•Fade Out Slow
•Raining Characters Out
•Random Fly Off

436
Effects and animation presets
Last updated 6/8/2015
•Random Word Fly Off
•Slide Off Right By Character
•Slide Off Right By Word
•Stretch Out Each Line
•Stretch Out Each Word
•Twirl Off Each Line
•Twirl Off Each Word
Blurs
•Blur By Word
•Bullet Train
•Evaporate
•Foggy
•Jiggy
•Transporter
Curves and Spins
•Bloom Flower
•Clockwise Entry
•Counter Rotate
•Dust Devil
•Lasso Tumble
•Lasso
•Musical Chairs
•Newton
•Pinwheel
•Radial Flare
•Retrograde
•Rotate
•Somersault
•Spin Fast
•Spiral Exit
•Spiral In
•Spirograph
•Swoopy Entry
•Tea Leaves
•Tire Rim
•Whirl In

437
Effects and animation presets
Last updated 6/8/2015
Expressions
•Buzz Words
•Current Time Format
•Dictionary
•Frame Number
•Inch Worm
•Text B ounce
Fill and Stroke
•Chasing Strokes
•Fill Color Wipe
•Flicker Color - scale
•Flicker Color
•Flicker Green
•Inflammation
•Pulse Blue
•Pulse Orange
•Pulsing Strokes
•Rotate Hue
•Sliding Color Flicker
•Stroke Ease Down
•Wiggly Stroke Width By Line
•Wiggly Stroke Width
Graphical
•Bars Blinky
•Bars Lime
•Blue Note
•Cut Shapes
•Exchange
•Green Dots
•Hazard
•Red Circles
•Scratchy Film
•Snowflakes
•White Trim
•Yel low B oxe s

438
Effects and animation presets
Last updated 6/8/2015
Lights and Optical
•Blue Flash
•Broadway
•Bubble Pulse
•Emerge
•Exposure
•Flash
•Flicker Exposure
•Fluctuate
•Fluorescent Light
•Office Light
•Overlay
•Pulse Exposure
•Shadows
•Silhouettes
•Sonar Ping
•Spin Flash
•Word Flash
Mechanical
•Algorithm Loop
•Algorithm
•Automation
•Bad Reception
•Doppler
•Electro Magnet
•Helicopter
•Insert Text
•Kinematic
•Mechanical
•Pistons
•Rack & Pinion
•Roadtrip
•Scale Bounce
•Screen Roll
•Stairstep
•Submarine

439
Effects and animation presets
Last updated 6/8/2015
•Underscore
•Warp 9.8
Miscellaneous
•Angle Fly-In
•Back Flip
•Blow Away
•Bounce In
•Bungee
•Chaotic
•Clay Pigeons
•Dot.Com
•Elbow Room
•Explosion
•Hop, Skip, And A Jump
•Pendulum
•Punching Bag
•Question
•Rattle
•Roll Bounce
•Sequential Jump
•Six-Shooter
•Slide Bounce
•Slip In Out
•Smokey
•Squeeze
•Superhero
•Swing Up
•Twisty Ribbons
•Vanishing Point
•Wiggly Lines
•Yo- Yo
Multi-Line
•Alphabet Soup
•Contract - Expand
•Currents
•Data Packet

440
Effects and animation presets
Last updated 6/8/2015
•Data Stream
•Dealer
•Encryption
•Fly In By Characters
•Fly In By Words
•Front - Back
•Frontside - Backside
•Ideas
•Incoming
•Jetstream 2
•Jetstream
•Multi-Line Flip
•Outgoing - Incoming
•Pneumatic
•Production
•Stack Right Left
•Weekdays
•Word Pro cessor
•Zippy
Organic
•Autumn
•Boiling
•Boomerang
•Bounce Diagonal
•Chewing Gum
•Climber
•Dip-Bounce
•Double-Helix
•Drop Bounce
•Fish Bait
•Flutter
•Flying Formation
•Horsefly
•Hummingbird
•Insect Wipe
•Insects
•Labrador

441
Effects and animation presets
Last updated 6/8/2015
•Leapfrog
•Loose Line
•Ocean Tide
•Quiver
•Ripple
•Rubber Floor
•Rubber
•Sea-Sick
•Shuffle
•Simmer
•Slice And Dice
•Sprouts
•Tag Team
•Wheatfield
•Wind Current
•Wobble
Paths
•360 Loop
•Antelope
•Ants
•Back Stage
•Balance
•Balloon Man
•Balloon
•Bouncing
•Bubble Pop
•Bump And Slide On
•Centipede
•Circuit Board
•Conveyor Belt
•Double Spiral
•Down And Out
•Downhill Slide Off
•Downhill Slide On
•Frenzy
•Hurdles
•Karate Chop

442
Effects and animation presets
Last updated 6/8/2015
•Loop On And Off
•Lyrical
•Organism
•Paper Clip
•Pipes
•Raquetball
•Rat Nest
•Reel To Reel
•Rope Bridge
•Serpent
•Slippery Slope
•Spiral Long
•Spiral
•Springy
•Squirmy
•Stairwell
•Symmetry
•Tchotchke
•Walk Of Stars
•Zig-Zag
Rotation
•Drip Down
•Flip Up
•Full Rotation
•Loopy Loop
•Random Rotation
•Rotate Chars
•Rotate Per Word
•Spin In
•Swirly Rotation
•Whirlwind
Scale
•Large Scale
•Let's Dance
•Scale Down Word
•Scale Down

443
Effects and animation presets
Last updated 6/8/2015
•Scale Up Word
•Scale Up
•Wiggly Scale Wipe
•Zoom Away
•Zoom Forward
Tracking
•Contract
•Decrease Tracking
•Extend
•Increase Tracking
•Magnify
•Spasm
•Stretchy
Transform
• Separate XYZ Position
See Separate dimensions of Position to animate components individually.
Transitions
Transitions - Dissolves
•Block Dissolve - digital
•Block Dissolve - random
•Block Dissolve - scanlines
•Boxes - concentric NTSC
•Boxes - concentric PAL
•Boxes - random NTSC
•Boxes - random PAL
•Boxes - stroked NTSC
•Boxes - stroked PAL
•Dissolve - blobs
•Dissolve - dither
•Dissolve - ripple
•Dissolve - sand
•Dissolve - unmelt
•Dissolve - vapor
•Fade - dip to black
•Fade - flash to white
•Fade - overexposed

444
Effects and animation presets
Last updated 6/8/2015
•Ovals - concentric NTSC
•Ovals - concentric PAL
•Ovals - random NTSC
•Ovals - random PAL
Transitions - Movement
•Card Wipe - 2D fractured
•Card Wipe - 3D pixelstorm
•Card Wipe - 3D swing
•Fly to Inset
•Slide - drop
•Slide - straight
•Slide - swoop
•Slide - variable
•Stretch & Blur
•Stretch & Slide
•Stretch - diagonal bottom
•Stretch - diagonal top
•Stretch - horizontal
•Stretch - vertical
•Stretch Over - horizontal
•Stretch Over - vertical
•Zoom - 2D spin
•Zoom - 3D tumble
•Zoom - bubble
•Zoom - spiral
•Zoom - wobbling
Transitions - Wipes
•Band Wipe - build NTSC
•Band Wipe - build PAL
•Band Wipe - crossing NTSC
•Band Wipe - crossing PAL
•Band Wipe - zigzag NTSC
•Band Wipe - zigzag PAL
•Barn Doors
•Checker Wipe - NTSC
•Checker Wipe - PAL

445
Effects and animation presets
Last updated 6/8/2015
•Clam Shell
•Clock Wipe
•Corner Reveal
•Grid Wipe
•Iris - cross
•Iris - diamond
•Iris - points
•Iris - round
•Iris - square
•Iris - star unfold
•Iris - star
•Iris - sunburst unfold
•Iris - sunburst
•Linear Wipe
•Paint On - NTSC
•Paint On - PAL
•Radial Wipe - bottom
•Radial Wipe - top
•Venetian Blinds
•Wedge Wipe
More Help topics
Working with Adobe Bridge and After Effects
Plug-ins
Layer switches and columns in the Timeline panel
Cameras, lights, and points of interest
3D layers
Viewers
Search and filter in the Timeline, Project, and Effects & Presets panels
Color depth and high dynamic range color
Adjustment layers
Set a property value
Layer properties in the Timeline panel
Random Numbers methods (expression reference)

446
Effects and animation presets
Last updated 6/8/2015
Detail-preserving Upscale effect
The Detail-preserving Upscale effect is capable of scaling up images by large amounts while preserving details in the
image. The sharpness of sharp lines and curves is preserved. For example, you can scale up from SD frame sizes to HD
frame sizes, or from HD frame sizes to digital cinema frame sizes.
This effect is very closely related to the Preserve Details resampling option in the Image Size dialog box in Photoshop.
For more information, see Resizing Images in Photoshop.
Effect controls
The following controls are available for the Detail-preserving Upscale effect:
•Fit To Comp Width: Sets Scale percentage so that the layer's width matches the composition's width.
•Fit To Comp Height: Sets Scale percentage so that the layer's height matches the compositions's height.
•Scale: The minimum value is 100%.
•Reduce Noise: Used to apply noise reduction before the scaling calculations. Increase the value so that noise is not
mistakenly treated as a detail that should be preserved.
•Detail: High values increase the sharpness or contrast of edges; however ringing or halo artifacts may be introduced.
Low values of Detail keep the edges more smooth and natural.
•Alpha: Processes the alpha channel differently from the color channels. You can choose to process the alpah channel
differently than the color channels, for performance reasons. The default is Bicubic.
The Detail-preserving Upscale effect is slower than other scaling alternatives, such as using the layer's native bilinear
or bicubic scaling in the Transform property group.
Effect list
Note: Effects marked as third-party effects are not available with the trial version of Adobe After Effects software. However,
After Effects CS5.5 and later does include the Keylight effect in the trial version. For information about these effects, see
Third-party plug-ins included with After Effects.
3D Channel effects
•3D Channel Extract effect
•Depth Matte effect
•Depth Of Field effect
•Fog 3D effect
•ID Matte effect
Third-party effects:
•EXtractoR effect
•IDentifier effect
•ID Matte

447
Effects and animation presets
Last updated 6/8/2015
Blur & Sharpen effects
•Bilateral Blur effect
•Box Blur effect
•Camera Lens Blur effect
•Channel Blur effect
•Compound Blur effect
•Directional Blur effect
•Fast Blur effect
•Gaussian Blur effect
•Lens Blur effect
•Radial Blur effect
•Reduce Interlace Flicker effect
•Sharpen effect
•Smart Blur effect
•Unsharp Mask effect
Third-party effects:
•CC Cross Blur effect (CS6)
•CC Radial Blur effect
•CC Radial Fast Blur effect
•CC Vector Blur effect
Channel effects
•Arithmetic effect
•Blend effect
•Calculations effect
•Channel Combiner effect
•Compound Arithmetic effect
•Invert effect
•Minimax effect
•Remove Color Matting effect
•Set Channels effect
•Set Matte effect
•Shift Channels effect
•Solid Composite effect
Third-party effects:
•CC Composite effect

448
Effects and animation presets
Last updated 6/8/2015
Color Correction effects
•Auto Color and Auto Contrast effects
•Auto Levels effect
•Black & White effect
•Brightness & Contrast effect
•Broadcast Colors effect
•Change Color effect
•Change To Color effect
•Channel Mixer effect
•Color Balance effect
•Color Balance (HLS) effect
•Color Link effect
•Color Stabilizer effect
•Colorama effect
•Curves effect
•Equalize effect
•Exposure effect
•Gamma/Pedestal/Gain effect
•Hue/Saturation effect
•Leave Color effect
•Levels effect
•Levels (Individual Controls) effect
•Photo Filter effect
•PS Arbitrary Map effect
•Selective Color effect
•Shadow/Highlight effect
•Tint effect
•Tritone effect
•Vibrance effect
Third-party effects:
•CC Color Neutralizer effect (CS6)
•CC Color Offset effect
•CC Kernel effect (CS6)
•CC Toner effect
Distort effects
•Bezier Warp effect

449
Effects and animation presets
Last updated 6/8/2015
•Bulge effect
•Corner Pin effect
•Displacement Map effect
•Liquify effect
•Magnify effect
•Mesh Warp effect
•Mirror effect
•Offset effect
•Optics Compensation effect
•Polar Coordinates effect
•Reshape effect
•Ripple effect
•Smear effect
•Spherize effect
•Transform effect
•Turbulent Displace effect
•Twirl effect
•Warp effe c t
•Warp Stabilizer effect (CS5.5 and later)
•Wave Warp ef fect
Third-party effects:
•CC Bend It effect
•CC Bender effect
•CC Blobbylize effect
•CC Flo Motion effect
•CC Griddler effect
•CC Lens effect
•CC Page Turn effect
•CC Power Pin effect
•CC Ripple Pulse effect
•CC Slant effect
•CC Smear effect
•CC Split effect
•CC Split 2 effect
•CC Tiler effect

450
Effects and animation presets
Last updated 6/8/2015
Expression Controls effects
See Expression Controls effects.
•Angle Control effect
•Checkbox Control effect
•Color Control effect
•Layer Control effect
•Point Control effect
•Slider Control effect
Generate effects
•4-Color Gradient effect
•Advanced Lightning effect
•Audio Spectrum effect
•Audio Waveform effect
•Beam effect
•Cell Pattern effect
•Checkerboard effect
•Circle effect
•Ellipse effect
•Eyedropper Fill effect
•Fill effect
•Fractal effect
•Grid effect
•Lens Flare effect
•Paint Bucket effect
•Radio Waves effect
•Ramp effect
•Scribble effect
•Stroke effect
•Vegas effec t
•Write-on effect
Third-party effects:
•CC Glue Gun effect
•CC Light Burst 2.5 effect
•CC Light Rays effect
•CC Light Sweep effect
•CC Threads effect (CS6)

451
Effects and animation presets
Last updated 6/8/2015
Keying effects
•Color Difference Key effect
•Color Key effect
•Color Range effect
•Difference Matte effect
•Extract effect
•Inner/Outer Key effect
•Linear Color Key effect
•Luma Key effect
•Spill Suppressor effect
•Advanced Spill Suppressor effect
Third-party effects:
•CC Simple Wire Removal effect
•Keylight
Matte effects
•Matte Choker effect
•Roto Brush and Refine Matte
•Simple Choker effect
Third-party effects:
•mocha shape
Noise & Grain effects
•Add Grain effect
•Dust & Scratches effect
•Fractal Noise effect
•Match Grain effect
•Median effect
•Noise effect
•Noise Alpha effect
•Noise HLS effect and Noise HLS Auto effect
•Remove Grain effect
•Turbulent Noise effect
Perspective effects
•3D Glasses effect
•Bevel Alpha effect

452
Effects and animation presets
Last updated 6/8/2015
•Bevel Edges effect
•Drop Shadow effect
•Radial Shadow effect
Third-party effects:
•CC Cylinder effect
•CC Environment effect (CS6)
•CC Sphere effect
•CC Spotlight effect
Simulation effects
•Card Dance effect
•Caustics effect
•Foam effect
•Particle Playground effect
•Shatter effect
•Wave World effect
Third-party effects:
•CC Ball Action effect
•CC Bubbles effect
•CC Drizzle effect
•CC Hair effect
•CC Mr. Mercury effect
•CC Particle Systems II effect
•CC Particle World effect
•CC Pixel Polly effect
•CC Rainfall effect (CS6)
•CC Scatterize effect
•CC Snowfall effect (CS6)
•CC Star Burst effect
Stylize effects
•Brush Strokes effect
•Cartoon effect
•Color Emboss effect
•Emboss effect
•Find Edges effect
•Glow effect

453
Effects and animation presets
Last updated 6/8/2015
•Mosaic effect
•Motion Tile effect
•Posterize effect
•Roughen Edges effect
•Scatter effect
•Strobe Light effect
•Texturize effect
•Threshold effect
Third-party effects:
•CC Block Load effect (CS6)
•CC Burn Film effect
•CC Glass effect
•CC Kaleida effect
•CC Mr. Smoothie effect
•CC Plastic effect (CS6)
•CC RepeTile effect
•CC Threshold effect
•CC Threshold RGB effect
Text effects
•Numbers effect
•Timecode effect
Time effects
•Echo effect
•Posterize Time effect
•Time Difference effect
•Time Displacement effect
•Timewarp effect
Third-party effects:
•CC Force Motion Blur effect
•CC Time Blend effect
•CC Time Blend FX effect
•CC Wide Time effect
Transition effects
•Block Dissolve effect

454
Effects and animation presets
Last updated 6/8/2015
•Card Wipe effect
•Gradient Wipe effect
•Iris Wipe effect
•Linear Wipe effect
•Radial Wipe effect
•Venetian Blinds effect
Third-party effects:
•CC Glass Wipe effect
•CC Grid Wipe effect
•CC Image Wipe effect
•CC Jaws effect
•CC Light Wipe effect
•CC Line Sweep effect (CS6)
•CC Radial ScaleWipe effect
•CC Scale Wipe effect
•CC Twister effect
•CC WarpoMatic effect (CS6)
Utility effects
•Apply Color LUT effect
•Cineon Converter effect
•Color Profile Converter effect
•Grow Bounds effect
•HDR Compander effect
•HDR Highlight Compression effect
Third-party effects:
•CC Overbrights effect (CS6)
Obsolete effects
Effects in the Obsolete category are retained for compatibility with projects created with previous versions of After
Effects. When updating projects or creating new projects, you should use alternative effects and techniques rather than
effects in the Obsolete category.
•Basic 3D effect
Use 3D layers instead. See 3D layers.
•Basic Text effect
Use text layers instead. See Creating and editing text layers .
•Lightning effect

455
Effects and animation presets
Last updated 6/8/2015
Use the Advanced Lighting effect instead. See Advanced Lightning effect.
•Path Text effect
Use text layers instead. See Creating and animating text on a path.
Audio effects
Trish and Chris Meyer provide tips about audio effects on the ProVideo Coalition website.
Backwards effect
The Backwards effect reverses the audio of a layer by playing the audio from the last frame to the first frame. The frames
remain in their original order in the Timeline panel. Select Swap Channels to swap left and right channels.
Harry Frank and Aharon Rabinowitz provide a video tutorial on the All Bets Are Off website that shows how to use the
Backwards effect and the Reverb effect to create a creepy reverse echo result.
Bass & Treble effect
The Bass & Treble effect boosts (increases) or cuts (decreases) the low frequencies (bass) or the high frequencies (treble)
of the audio. For greater control, use the Parametric EQ effect.
Delay effect
The Delay effect repeats audio after a specified amount of time. This effect simulates sound bouncing off a surface, such
as a wall.
To simulate the acoustic ambience of a room, use the Reverb effect.
Delay Time Time between the original sound and its echo, in milliseconds.
Delay Amount Volume of the first delayed audio, as a fraction of the original.
Feedback Amount of the echo that is fed back into the delay line to create subsequent echoes.
Dry Out, Wet Out The amounts of the original (dry) sound and delayed (wet) sound in the final output. Values of 50%
are commonly used.
Flange & Chorus effect
Flange is an audio effect caused by mixing the original audio with a copy that is delayed by a varying amount that cycles
over time. The frequency of the copy is also offset by an amount related to the delay. Chorus uses a larger delay, to make
one voice or instrument sound like many.
The default settings for the Flange & Chorus effect are for flange. To create a chorus result, use values something like
the following: 40 for Voice Separation Time (or higher for a greater chorus result), 4 for Voices, 0.1 for Modulation Rate,
50% for Modulation Depth, and 90 for Voice Phase Change, with Stereo Voices selected.
Voice Separation Time The time in milliseconds that separates each voice. Each voice is a delayed version of the
original sound. Use values of 6 or lower for flange, and higher values for chorus.
Voices The number of voices in the processed (wet) audio.
Modulation Rate The rate in Hz at which the modulation cycles.

456
Effects and animation presets
Last updated 6/8/2015
Modulation Depth The amount of modulation.
Voice Phase Change The modulation phase difference in degrees between each subsequent voice. Divide 360 by the
number of voices to find the optimum value.
Invert Phase Inverts the phase of the processed (wet) audio, emphasizing more of the high frequencies; not inverting
the phase emphasizes more of the low frequencies.
Stereo Voices Alternates assignment of voices to one of the two channels so that the first voice appears in the left
channel, the second in the right channel, the third in the left, and so on. To hear stereo voices, preview or render in
stereo.
Dry Out, Wet Out The amounts of the original (dry) sound and delayed (wet) sound in the final output. Values of 50%
are commonly used.
High-Low Pass effect
The High-Low Pass effect sets a limit above or below which frequencies can pass. High Pass allows frequencies above
the limit and blocks frequencies below. Conversely, Low Pass allows frequencies below the limit and blocks frequencies
above. Use High-Low Pass to do the following:
•Enhance or attenuate (reduce) a sound. For example, using High Pass can reduce traffic noise, which often is
concentrated at low frequencies, while minimally affecting a voice recording. Using Low Pass can remove high-
frequency sounds, such as static and buzzing.
•Change the focus from one sound to another over time. For example, in audio that contains both music and voice,
you can fade out the music while gradually bringing in the voice.
•Protect equipment from potentially damaging frequencies.
•Direct certain frequencies to specific equipment. For example, use Low Pass to isolate sounds intended for a
subwoofer.
To check the frequencies that you filter out, switch to the opposite Filter Options value and preview audio.
Cutoff Frequency All frequencies below (High Pass) or above (Low Pass) are removed. If the unwanted sound changes
over time, animate this property.
To identify the frequencies of unwanted sound, use the Audio Spectrum effect.
Dry Out, Wet Out The amounts of the original (dry) sound and delayed (wet) sound in the final output. Common
values for removing frequencies are 0% for Dry Out and 100% for Wet Out.
Modulator effect
The Modulator effect adds both vibrato and tremolo to audio by modulating (varying) the frequency and amplitude.
Modulation Type The type of waveform to use. Sine produces smoother modulation. Triangle produces more abrupt
modulation.
Modulation Rate The rate in Hz of the modulation.
Modulation Depth The amount of frequency modulation.
Amplitude Modulation The amount of amplitude modulation.

457
Effects and animation presets
Last updated 6/8/2015
Parametric EQ effect
The Parametric EQ effect emphasizes or attenuates specific frequency ranges. Parametric EQ is useful for enhancing
music, such as boosting low frequencies to bring up bass.
If you have audio with an unwanted sound (such as a beep from a forklift in the background), you can isolate and cut
the frequency range of the beep to attenuate the sound.
Using this effect, you can enhance up to three different bands of audio. As you adjust controls, a frequency-response
graph indicates the combined equalization curve you create; band 1 is red, band 2 is green, and band 3 is blue. You may
find it easier to specify controls if you determine in advance the frequency-response curve you want.
To identify the frequencies of unwanted sound, use the Audio Spectrum effect.
Band Enabled Activates an equalization band and its controls.
Frequency The center of the frequency band to modify.
Bandwidth The width of the frequency band to modify.
Boost/Cut The amount by which to boost (increase) or cut (decrease) the amplitude of the frequencies inside the
specified band. Positive values boost; negative values cut.
Reverb effect
The Reverb effect simulates a spacious or acoustically live interior by simulating random reflections of a sound off a
surface.
Harry Frank and Aharon Rabinowitz provide a video tutorial on the All Bets Are Off website that shows how to use the
Backwards effect and the Reverb effect to create a creepy reverse echo result.
Reverb Time The average time, in milliseconds, between the original audio and the reverberated audio.
Diffusion Specifies how much the effect scatters the original audio. More diffusion can make the audio sound farther
from the microphone.
Decay Specifies the amount of time it takes for the effect to subside. A higher value simulates a larger space.
Brightness Specifies the amount of detail preserved from the original audio. High brightness simulates a room with
live (highly reflective) acoustics.
Dry Out, Wet Out The amounts of the original (dry) sound and delayed (wet) sound in the final output. Values of 50%
are commonly used.
Stereo Mixer effect
The Stereo Mixer effect mixes the left and right channels of audio and pans the entire signal from one channel to the
other.
Invert Phase Inverts the phase of both channels of the stereo signal. Use this control to prevent two sounds at the same
frequency from canceling each other out.

458
Effects and animation presets
Last updated 6/8/2015
Tone effect
The Tone effect synthesizes simple audio tones to create sounds, such as the low rumble of a submarine, a telephone
ringing in the background, sirens, or a laser blast. You can have up to five tones for each instance of the Tone effect, to
create a chord. When you apply this effect to a layer with audio, the dry (original, unprocessed) audio is ignored, and
only the tone plays.
You can also apply the Tone effect to a layer that has no audio, such as a solid layer, to synthesize audio.
Note: The Tone effect doesn’t generate audio on a placeholder layer; for the effect to generate audio, replace the placeholder
with a footage item.
Waveform Options Specifies the type of waveform to use. Sine waves produce the purest tones. Square waves produce
the most distorted tones. Triangle waves have elements of both sine waves and square waves but are closer to sine waves.
Saw waves have elements of both sine waves and square waves but are closer to square waves.
Frequency Frequency in Hz. To turn off a tone, set its frequency to 0.0.
Level Changes the amplitude of all tones in this instance of the effect. To avoid clipping and popping, use a Level value
that is no greater than 100 divided by the number of frequencies you use. For example, if you use all five frequencies,
specify 20%.
Note: To avoid clicks at the end of a tone, set a keyframe for the desired Level value at the frame immediately before the
end of the tone, and then set a keyframe for a Level value of 0.0 at the end of the tone. This technique works well for any
audio that you end abruptly.
More Help topics
Preview video and audio
Audio Spectrum effect
Set or add keyframes
Blur and Sharpen effects
Third-party effects in this category included with After Effects:
•CC Cross Blur effect
•CC Radial Blur effect
•CC Radial Fast Blur effect
•CC Vector Blur effect
See Third-party plug-ins included with After Effects.
About Blur & Sharpen effects
In general, blur effects sample the area around a pixel and assign to the pixel a new value that is the average of the
sampled values. Increased blurriness is the result of increasing the size of the sample, whether the size is expressed as a
radius or a length.
459
Effects and animation presets
Last updated 6/8/2015
Some blur effects have a Repeat Edge Pixels option. Select this option to make the blur algorithm operate as if the pixel
values beyond the edge of the layer are the same as the values of the edge pixels. This option keeps edges sharp,
preventing them from darkening and becoming more transparent—the result of being averaged with a lot of zeroes.
Deselect this option to make the blur algorithm operate as if the pixel values beyond the edge of the layer are zero.
Note: Film grain and noise are removed from an image when you blur it. To make the image look more realistic, you may
want to add noise back to the image so that it doesn’t look retouched. (See Noise & Grain effects .)
Stu Maschwitz compares the Box Blur, Fast Blur, and Gaussian Blur effects in a post on his ProLost blog.
Bilateral Blur effect
The Bilateral Blur effect selectively blurs an image so that edges and other details are preserved. Areas with high
contrast—where pixel values differ by a large amount—are blurred less than areas of low contrast.
The primary difference between the Bilateral Blur effect and the Smart Blur effect is that edges and details are still
blurred a small amount by the Bilateral Blur effect. The result is a softer, dreamier look than that achieved by the Smart
Blur effect with equivalent settings.
The result of the Bilateral Blur effect is very similar to the result of the Surface Blur filter in Adobe Photoshop.
Eran Stern provides a demonstration of the Bilateral Blur effect on the Motionworks website.
This effect works with 8-bpc, 16-bpc, and 32-bpc color.
Threshold The radius of the blur is automatically decreased in areas where an edge or other prominent detail feature
exists. The Threshold value determines how the Bilateral Blur effect decides what areas contain features to be preserved
and what areas should be blurred by the full amount. A lower Threshold value causes more fine details to be preserved.
A higher Threshold value causes a more simplistic result, with fewer details preserved.
Radius A larger radius for a blur means that more pixels are averaged together to determine each pixel value, so
increasing the Radius value increases the blurriness.
Colorize When Colorize is not selected, the Bilateral Blur effect operates on one value for each pixel: its luminance
value, which is a weighted average of its R, G, and B color channel values. The result is a monochromatic image.
When Colorize is selected, the Bilateral Blur effect operates on each color channel individually. The result is a color
image.
Box Blur effect
Box Blur is similar to Fast Blur and Gaussian Blur, but Box Blur has the added advantage of an Iterations property,
which allows you to control the quality of the blur.
Stu Maschwitz compares the Box Blur, Fast Blur, and Gaussian Blur effects in a post on his ProLost blog.
This effect works with 8-bpc, 16-bpc, and 32-bpc color.
Iterations How many times the blur is sequentially applied to the image. A value around 3 gives a blur similar in quality
to Fast Blur. A higher number of iterations creates smoother transitions between colors and increases the blur, but it
also increases the render time. The default value creates boxy results.

460
Effects and animation presets
Last updated 6/8/2015
Camera Lens Blur effect
The effect is a replacement for the Lens Blur effect. The effect has a larger blur radius (500), and is much faster than the
Lens Blur effect. The Camera Lens Blur effect also does not disable Render Multiple Frames Simultaneously
multiprocessing, as its predecessor did.
For details, tutorials, and resources about the Camera Lens Blur effect, camera depth-of-field settings, and camera
commands, see this article on the Adobe website.
This effect works with 8-bpc, 16-bpc, and 32-bpc color.
Note: Descriptions of the Camera Lens Blur effect’s properties also apply to the camera layer’s Camera Options properties
group with the same (or similar) names.
Iris Properties Iris properties include Shape, Roundness, Aspect Ratio, Rotation, and Diffraction Fringe.
Diffraction Fringe Creates a halo around the edge of an iris that simulates light bending, concentrating around the edge
of the iris blades. When set to 100, a natural normal halo that is based on the area represented in the shape of the blur
is visible. At 500, all the energy of the blur is pushed from inside the blur to the ring/halo. This effect, in essence,
emulates a catadioptric lens.
Blur Map A control layer can be used as a blur map to affect Camera Lens Blur effect properties.
Layer Layer to use as the blur map.
Channel Luminance, color, or alpha channel for the blur map.
Blur Focal Distance The value from the control layer that corresponds to zero blurring. The difference between the Blur
Focal Distance value and a value from the control layer dictates the amount of blurriness for the corresponding area on
the layer with the effect applied.
Highlight Modifies color values of the pixels that are above the threshold. Higher highlight values produce the best
results for getting a good blooming blur/glow effect.
Gain The amount of energy fed into pixels that are above the threshold. Depending on how bright a pixel is above the
threshold, the pixel value is increased in brightness by this relative amount.
Threshold The luminosity limit on what is boosted by Gain. Pixels much brighter than the threshold are boosted more
than those pixels slightly above it. Setting the threshold to 0 boosts any pixel with a brightness higher than 0. Setting it
to 1 effectively eliminates any highlight (unless the image contains overbrights).
Saturation The amount of color retained in the boosted pixel. Setting it to 0 pushes the boosted colors toward white
(what the old Lens Blur effect used to do). Setting to 100 attempts to retain as much color as possible. This saturation
of the highlights is especially noticeable in situations with colored lights (like a city scape at night), in which the colors
create a multicolored tapestry of bokeh.
Edge Behavior See About Blur & Sharpen effectsfor information about how Repeat Edge Pixels options are treated in
blur effects.
Use Linear Working Space Produces a result similar to a project set to a linearized working color space. Check this
property (or set it from the project settings) to see realistic bokeh effects from your images.
Note: In addition to enabling the Use Linear Working Space check box, be sure to work in 32-bpc color. Working with a
lower color bit depth causes quantization.
Forward and backward compatibility
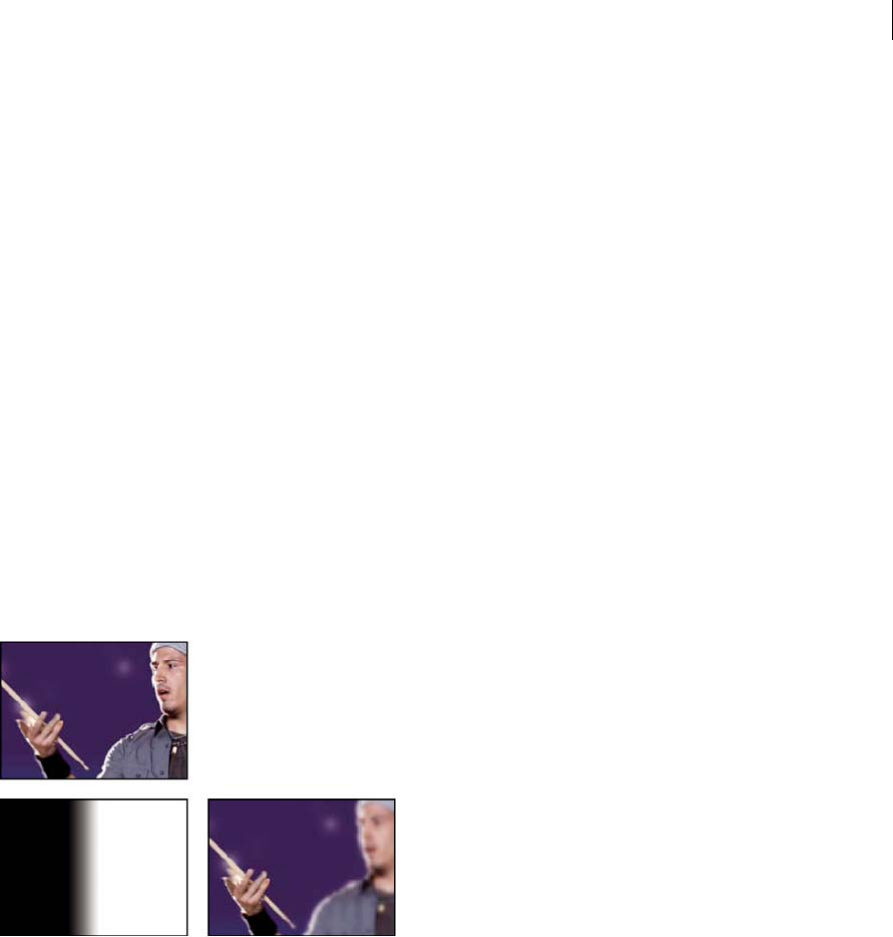
461
Effects and animation presets
Last updated 6/8/2015
If the Camera Lens Blur effect is added to an After Effects CS5.5 and later project, and then saved as an After Effects
CS5 project (see Save and back up projects in After Effects CS5.5 and later .), a warning appears stating that the effect
is missing. Projects created in After Effects CS5 or earlier using the Lens Blur effect retains that effect when opened in
After Effects CS5.5 and later. However, you cannot directly apply the Lens Blur effect in After Effects CS5.5 or later.
Channel Blur effect
The Channel Blur effect individually blurs the red, green, blue, or alpha channels of a layer.
Note: If you have noise or artifacts primarily in one color channel—such as MPEG compression artifacts in the blue
channel of DV footage—use Channel Blur to clean up the noise in that channel, leaving the other channels sharp.This effect
works with 8-bpc, 16-bpc, and 32-bpc color.
Compound Blur effect
The Compound Blur effect blurs pixels in the effect layer based on the luminance values of a control layer, also known
as a blur layer or blurring map. By default, bright values in the blur layer correspond to more blurring of the effect layer,
while dark values correspond to less blurring; select Invert Blur for light values to correspond to less blurring.
This effect is useful for simulating smudges and fingerprints, or changes in visibility caused by atmospheric conditions
such as smoke or heat, especially with animated blur layers such as those generated with the Turbulent Noise effect.
This effect works with 8-bpc, 16-bpc, and 32-bpc color.
Maximum Blur The maximum amount, in pixels, that any part of the affected layer can be blurred.
Stretch Map To Fit Stretches the control layer to the dimensions of the layer to which it is applied; otherwise, the control
layer is centered on the effect layer.
Steve Holmes provides a video tutorial on the Artbeats website that demonstrates the use of the Compound Blur effect.
Directional Blur effect
The Directional Blur effect gives a layer the illusion of motion.
Andrew Kramer provides a video tutorial on his Video Copilot website in which he demonstrates the use of the
Directional Blur effect to make a gun slide look as if it is moving quickly.
This effect works with 8-bpc, 16-bpc, and 32-bpc color.
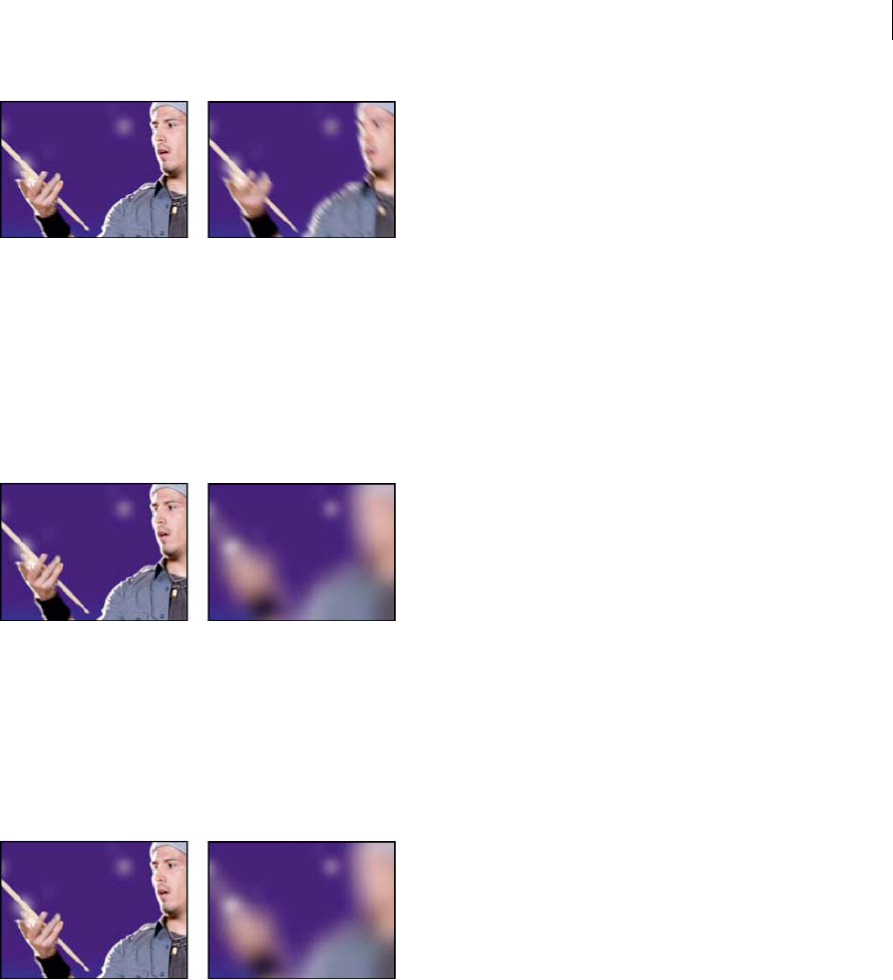
462
Effects and animation presets
Last updated 6/8/2015
Direction The direction of the blur. The blur is applied equally on either side of the center of a pixel; therefore, a setting
of 180° and a setting of 0° produce the same results.
Fast Blur effect
When layer quality is set to Best, Fast Blur is a close approximation of Gaussian Blur.
Stu Maschwitz compares the Box Blur, Fast Blur, and Gaussian Blur effects in a post on his ProLost blog.
This effect works with 8-bpc, 16-bpc, and 32-bpc color.
Gaussian Blur effect
The Gaussian Blur effect blurs and softens the image and eliminates noise. The quality setting of the layer doesn’t affect
Gaussian Blur.
Stu Maschwitz compares the Box Blur, Fast Blur, and Gaussian Blur effects in a post on his ProLost blog.
This effect works with 8-bpc, 16-bpc, and 32-bpc color.
Lens Blur effect
The Lens Blur effect simulates the blurring of objects not in the focal plane of a camera. The appearance of the blur
depends on the control layer used as a depth map and the iris settings for the simulated camera aperture.
In After Effects CS5.5 and later, the Lens Blur effect has been replaced by the Camera Lens Blur effect. (See Camera
Lens Blur effect (CS5.5) .)
Richard Bird provides a video tutorial on the AETUTS+ website that shows how to use the Lens Blur effect to create a
tilt-shift result.
Andrew Kramer provides a video tutorial on his Video Copilot website that demonstrates how to use the Lens Blur
effect to create the look of a shallow depth of field.
This effect works with 8-bpc and 16-bpc color.
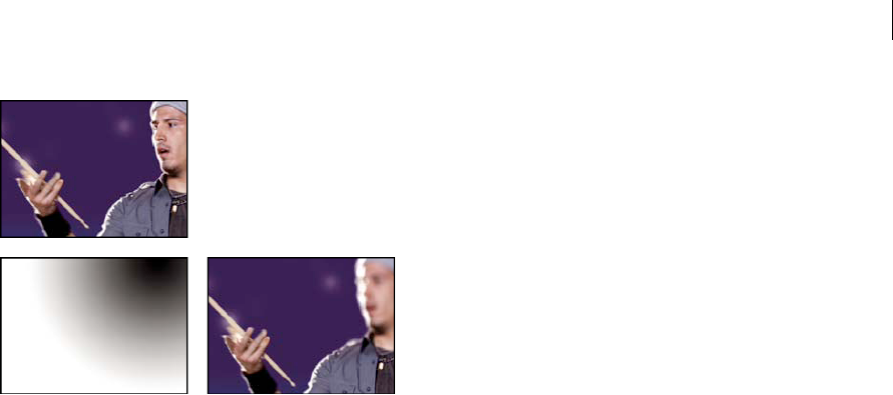
463
Effects and animation presets
Last updated 6/8/2015
Depth Map Layer The control layer from which the depth map is taken.
Depth Map Channel The channel of the control layer to use as the depth map. Pixels with low values correspond to low
depth (near the camera); pixels with high values correspond to high depth (far from the camera). Select Invert Depth
Map to invert this relationship.
Blur Focal Distance Depth of the focal plane, where pixels are in focus.
Iris Shape The polygon to use as the iris shape.
Iris Blade Curvature The roundness of the edges of the iris.
Iris Rotation The rotation of the iris.
Iris Radius The size of the iris. Increase this value for greater blur.
Specular Threshold All pixels with a brightness value greater than Specular Threshold are treated as specular
highlights.
Specular Brightness Brightness of specular highlights.
Noise controls Film grain and noise are removed when you blur an image. To make the image look more realistic, you
may want to add noise back to the image so that it doesn’t look retouched. To add noise, set Noise Amount, and choose
a noise type from the Noise Distribution menu. To add noise without affecting the color in your image, choose
Monochromatic Noise.
Stretch Map To Fit Stretches the control layer to the dimensions of the layer to which it is applied; otherwise, the control
layer is centered on the affected layer.
Radial Blur effect
The Radial Blur effect creates blurs around a point, simulating the result of a zooming or rotating camera.
You can specify the level of anti-aliasing applied at Best quality; no anti-aliasing is applied at Draft quality. At Draft
quality, the blur appears somewhat grainy. You may prefer the draft results for special effects, but the grain may flicker
on interlaced displays.
This effect works with 8-bpc, 16-bpc, and 32-bpc color.
464
Effects and animation presets
Last updated 6/8/2015
Type Spin blurs in arcs around the Center point, as if the camera were rotating; Amount specifies degrees of rotation.
Zoom blurs radially outward from the center point; Amount specifies the length of the blur.
Reduce Interlace Flicker effect
The Reduce Interlace Flicker effect reduces high vertical frequencies to make images more suitable for use in an
interlaced medium (such as NTSC video). For example, images with thin horizontal lines can flicker when broadcast.
Reduce Interlace Flicker applies a vertical directional blur to soften horizontal edges to reduce the flickering.
This effect works with 8-bpc, 16-bpc, and 32-bpc color.
Note: Flicker may result from fields that haven’t been separated.
Sharpen effect
The Sharpen effect increases the contrast where color changes occur. The quality setting of the layer doesn’t affect
Sharpen.
This effect works with 8-bpc, 16-bpc, and 32-bpc color.
Smart Blur effect
The Smart Blur effect blurs an image while preserving lines and edges within the image. For example, you can use the
Smart Blur effect to smoothly blur shaded areas while retaining crisp outlines of text and vector graphics.
This effect works with 8-bpc and 16-bpc color.
Radius How far the filter searches for dissimilar pixels to blur.
Threshold How different the values of pixels should be before they are eliminated.
Mode What parts of the image receive the blur. Normal specifies that the blur be applied to the entire selection, whereas
Edge Only and Overlay Edge specify that the blur be applied only to the edges of color transitions. Where significant
contrast occurs, Edge Only applies black-and-white edges, and Overlay Edge applies white.
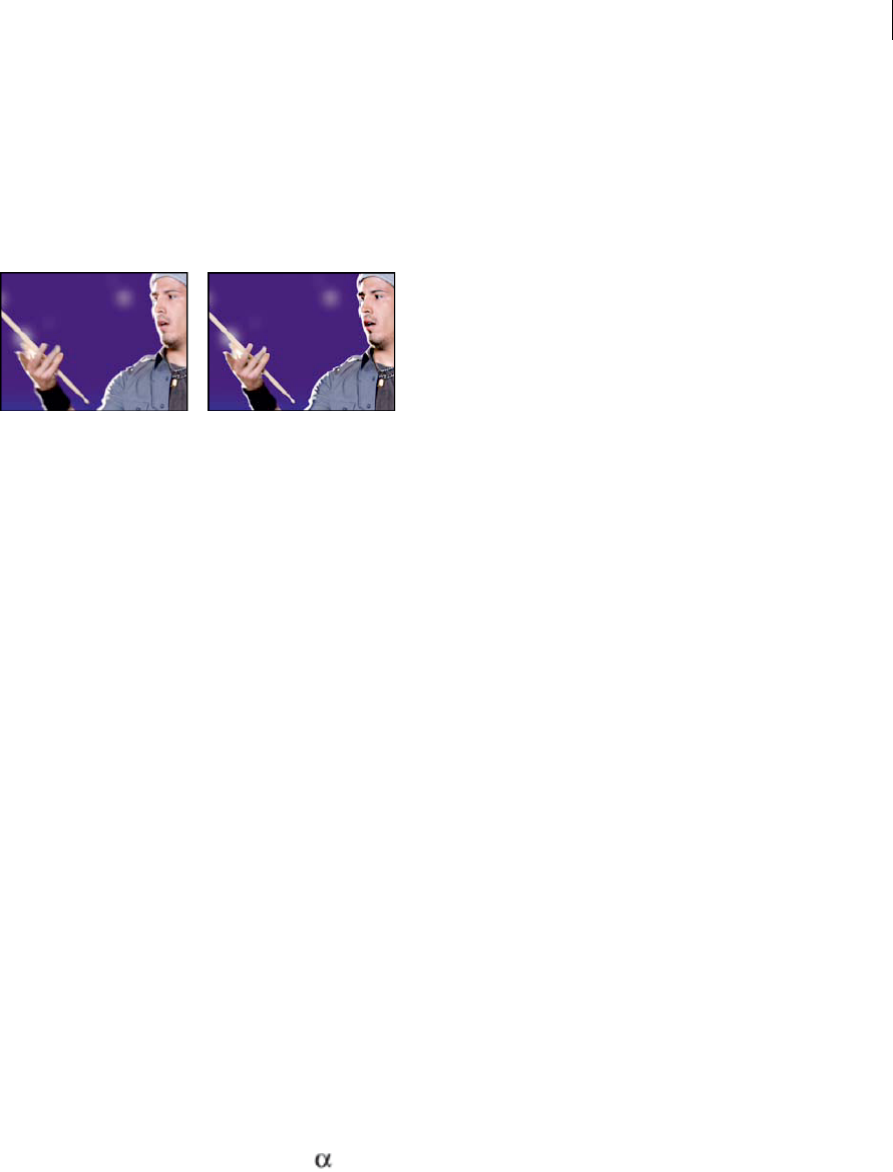
465
Effects and animation presets
Last updated 6/8/2015
Unsharp Mask effect
The Unsharp Mask effect increases the contrast between colors that define an edge.
Chris and Trish Meyer provide instructions on the ProVideo Coalition website for using the Unsharp Mask effect with
the CC Composite effect to sharpen an image without creating undesired color halo artifacts.
This effect works with 8-bpc, 16-bpc, and 32-bpc color.
Radius The distance from the edge at which pixels are adjusted for contrast. If you specify a low value, only pixels near
the edge are adjusted.
Threshold The greatest difference between adjacent pixels for which contrast isn’t adjusted. A lower value produces a
greater result. A value that is too low causes contrast for the entire image to be adjusted and can generate noise or cause
unexpected results.
More Help topics
Blur filters
Compound effects and control layers
Interlaced video and separating fields
Keying effects
Color Difference Key effect
Note: Though the color keying effects built into After Effects can be useful for some purposes, you should try keying with
Keylight before attempting to use these built-in keying effects. Some keying effects have been superseded by more modern
effects like Keylight.
For information about keying in general, including links to tutorials and other resources, see Keying introduction and
resources.
The Color Difference Key effect creates transparency from opposite starting points by dividing an image into two
mattes, Matte Partial A and Matte Partial B. Matte Partial B bases the transparency on the specified key color, and Matte
Partial A bases transparency on areas of the image that don’t contain a second, different color. By combining the two
mattes into a third matte, called the alpha matte, the Color Difference Key creates well-defined transparency values.
The Color Difference Key produces high-quality keying for all well-lit footage items shot against a bluescreen or
greenscreen and works especially well with images that contain transparent or semitransparent areas, such as smoke,
shadows, or glass.
This effect works with 8-bpc and 16-bpc color.

466
Effects and animation presets
Last updated 6/8/2015
Use the Color Difference Key effect
1Select the layer that you want to make partially transparent, and choose Effect > Keying > Color Difference Key.
Note: To use any of the eyedroppers in the Layer panel, choose Color Difference Key from the View menu in the Layer
panel.
2In the Effect Controls panel, choose Matte Corrected from the View menu. To view and compare the source image,
both partial mattes, and the final matte at the same time, choose [A, B, Matte] Corrected, Final from the View menu.
Other views available in the View menu are described in step 10.
3Select the appropriate key color: To key out a bluescreen, use the default blue color. To key out a nonblue screen,
select a key color in one of the following ways:
•Thumbnail eyedropper: Select and then click in the Composition panel or the original thumbnail image on an
appropriate area.
•Key Color eyedropper: Select and then click in the Composition or Layer panel on an appropriate area.
•Key Color swatch: Click to select a color from the specified color space.
Note: The eyedropper tools move the sliders accordingly. Use the sliders in step 9 to fine-tune the keying results.
4Click the matte button to display the final combined matte in the matte thumbnail.
5Select the Black eyedropper, and then click inside the matte thumbnail on the lightest area of black to specify
transparent regions. The transparency values in the thumbnail and Composition panel are adjusted.
6Select the White eyedropper, and then click inside the matte thumbnail on the darkest area of white to specify
opaque regions. The opaque values in the thumbnail and the Composition panel are adjusted.
To produce the best possible key, make the black and white areas as different as you can so that the image retains as
many shades of gray as possible.
7Select a matching accuracy from the Color Matching Accuracy menu. Choose Faster unless you use a screen that
isn’t a primary color (red, blue, or yellow). For those screens, choose More Accurate, which increases rendering time
but produces better results.
8To further adjust transparency values, repeat steps 5 and 6 for one or both of the partial mattes. Click the Partial
Matte B button or the Partial Matte A button to select a partial matte, and then repeat the steps.
9Adjust transparency values for each partial matte and for the final matte by dragging one or more of the following
sliders in the Matte Controls section:
•Black sliders adjust the transparency levels of each matte. You can adjust the same levels using the Black
eyedropper.
•White sliders adjust the opaque levels of each matte. You can adjust the same levels using the White eyedropper.
•Gamma sliders control how closely the transparency values follow a linear progression. At a value of 1 (the
default), the progression is linear. Other values produce nonlinear progressions for particular adjustments or
visual effects.
10 When adjusting individual mattes, choose from the View menu to compare the mattes with and without
adjustments:
•Choose Uncorrected to view a matte without adjustments.
•Choose Corrected to view a matte with all adjustments.
11 Before closing the Effect Controls panel, select Final Output from the View menu. Final Output must be selected for
After Effects to render the transparency.

467
Effects and animation presets
Last updated 6/8/2015
To remove traces of reflected key color from the image, apply Spill Suppressor using Better For Color Accuracy. If the
image still has a lot of color, apply the Simple Choker or Matte Choker effect.
Color Key effect
Note: Starting with the October 2013 release of After Effects CC, the Color Key effect has been moved to the Obsolete effects
category. Use other effects such as the Keylight effect instead.
For information about keying in general, including links to tutorials and other resources, see Keying introduction and
resources.
The Color Key effect keys out all image pixels that are similar to a specified key color. This effect modifies only the alpha
channel of a layer.
This effect works with 8-bpc and 16-bpc color.
Key out a single color with the Color Key effect
1Select the layer that you want to make partially transparent, and choose Effect > Keying > Color Key.
2In the Effect Controls panel, specify a key color in one of two ways:
•Click the Key Color swatch to open the Color dialog box and specify a color.
•Click the eyedropper, and then click a color on the screen.
3Drag the Color Tolerance slider to specify the range of color to key out. Lower values key out a smaller range of
colors near the key color. Higher values key out a wider range of color.
4Drag the Edge Thin slider to adjust the width of the border of the keyed area. Positive values enlarge the mask,
increasing the transparent area. Negative values shrink the mask, decreasing the transparent area.
5Drag the Edge Feather slider to specify the softness of the edge. Higher values create a softer edge but take longer to
render.
Color Range effect
Note: Though the color keying effects built into After Effects can be useful for some purposes, you should try keying with
Keylight before attempting to use these built-in keying effects. Some keying effects have been superseded by more modern
effects like Keylight.
For information about keying in general, including links to tutorials and other resources, see Keying introduction and
resources.
The Color Range effect creates transparency by keying out a specified range of colors in either the Lab, YUV, or RGB
color space. You can use this key on screens that consist of more than one color or on bluescreens or greenscreens that
have been unevenly lit and contain different shades of the same color.
This effect works with 8-bpc color.
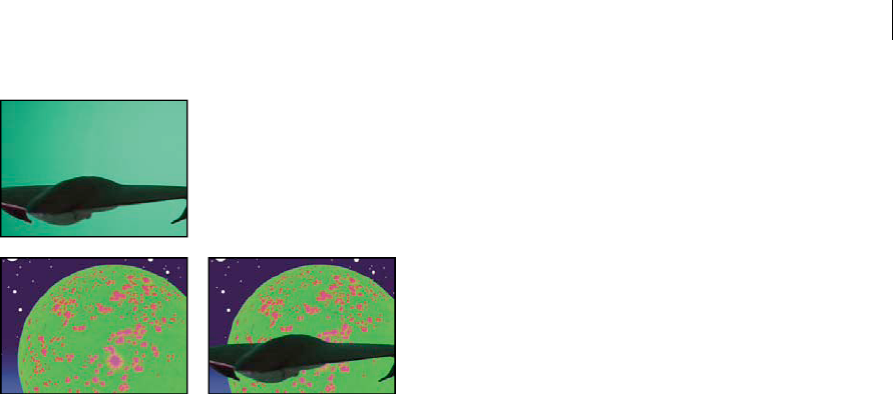
468
Effects and animation presets
Last updated 6/8/2015
Use the Color Range effect
1Select the layer that you want to make partially transparent, and choose Effect > Keying > Color Range.
2Choose Lab, YUV, or RGB from the Color Space menu. If you have trouble isolating the subject using one color
space, try using a different one.
3Select the Key Color eyedropper, and then click in the matte thumbnail to select the area that corresponds to a color
in the Composition panel you want to make transparent. Typically, this first color is the one that covers the largest
area of the image.
Note: To use the eyedroppers in the Layer panel, choose Color Range from the View menu in the Layer panel.
4Select the plus eyedropper, and then click other areas in the matte thumbnail to add other colors or shades to the
range of colors keyed out for transparency.
5Select the minus eyedropper, and then click areas in the matte thumbnail to subtract other colors or shades from the
range of colors keyed out.
6Drag the Fuzziness slider to soften the edges between transparent and opaque regions.
7Use the sliders in the Min and Max controls to fine-tune the color range you selected with the plus and minus
eyedroppers. The L, Y, R sliders control the first component of the specified color space; the a, U, G sliders control
the second component; and the b, V, B sliders control the third component. Drag the Min sliders to fine-tune the
beginning of the color range. Drag the Max sliders to fine-tune the end of the color range.
Difference Matte effect
The Difference Matte effect creates transparency by comparing a source layer with a difference layer, and then keying
out pixels in the source layer that match both the position and color in the difference layer. Typically, it’s used to key
out a static background behind a moving object, which is then placed on a different background. Often the difference
layer is simply a frame of background footage (before the moving object has entered the scene). For this reason, the
Difference Matte effect is best used for scenes that have been shot with a stationary camera and an unmoving
background.
This effect works with 8-bpc and 16-bpc color.
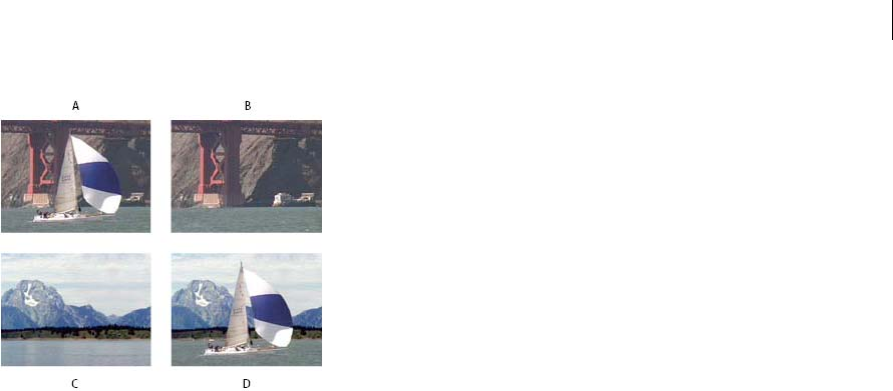
469
Effects and animation presets
Last updated 6/8/2015
A Original image B Background image C New background image D Final composite image
Use the Difference Matte effect
1Select a motion footage layer as the source layer.
2In the source layer, find a frame that consists only of background, and save the background frame as an image file.
(See Render and export a single frame of a composition.)
3Import the image file into After Effects, and add it to the composition.
The imported image becomes the difference layer. Make sure that its duration is at least as long as the duration of
the source layer.
Note: If the shot doesn’t contain a full background frame, you may be able to assemble the full background by combining
parts of several frames in After Effects or Photoshop. For example, you can use the Clone Stamp tool to take a sample
of the background in one frame, and then paint the sample over part of the background in another frame.
4Turn off the display of the difference layer by clicking the Video switch in the Timeline panel.
5Make sure that the original source layer is selected, and then choose Effect > Keying > Difference Matte.
6In the Effect Controls panel, choose Final Output or Matte Only from the View menu. (Use the Matte Only view to
check for holes in the transparency. To fill undesired holes after you complete the keying process, see Close a hole
in a matte.)
7Select the background file from the Difference Layer menu.
8If the difference layer isn’t the same size as the source layer, choose one of the following controls from the If Layer
Sizes Differ menu:
Center Places the difference layer in the center of the source layer. If the difference layer is smaller than the source
layer, the rest of the layer fills with black.
Stretch To Fit Stretches or shrinks the difference layer to the size of the source layer. Background images may
become distorted.
9Adjust the Matching Tolerance slider to specify the amount of transparency based on how closely colors must match
between the layers. Lower values produce less transparency; higher values produce more transparency.
10 Adjust the Matching Softness slider to soften the edges between transparent and opaque areas. Higher values make
matched pixels more transparent but don’t increase the number of matching pixels.
11 If the matte still contains extraneous pixels, adjust the Blur Before Difference slider. This slider suppresses noise by
slightly blurring both layers before the comparison is made.
Note: The blurring occurs only for the comparison and doesn’t blur final output.

470
Effects and animation presets
Last updated 6/8/2015
12 Before closing the Effect Controls panel, make sure to select Final Output from the View menu to ensure that After
Effects renders the transparency.
Extract effect
The Extract effect creates transparency by keying out a specified brightness range, based on a histogram of a specified
channel. It’s best used to create transparency in an image shot against a black or white background or against a
background that is dark or bright but consists of more than one color.
Note: The controls for this effect are similar to the controls of the Extract effect in Adobe Premiere Pro, but the purpose and
results of the effect are different.
This effect works with 8-bpc and 16-bpc color.
Use the Extract effect
In the Effect Controls panel, the Extract effect displays a histogram for a channel specified in the Channel menu. The
histogram displays a representation of the brightness levels in the layer, showing the relative number of pixels at each
level. From left to right, the histogram extends from the darkest (a value of 0) to the lightest (a value of 255).
Using the transparency control bar beneath the histogram, you can adjust the range of pixels that are made transparent.
The position and shape of the bar in relation to the histogram determine transparency. Pixels corresponding to the area
covered by the bar remain opaque; pixels corresponding to the areas not covered by the bar are made transparent.
1Select the layer you want to make partially transparent, and choose Effect > Keying > Extract.
2If you are keying out bright or dark areas, choose Luminance from the Channel menu. To create visual effects,
choose Red, Green, Blue, or Alpha.
3Adjust the amount of transparency by dragging the transparency control bar in the following ways:
•Drag the upper right or upper left selection handles to adjust the length of the bar and to shorten or lengthen the
transparency range. You can also adjust the length by moving the White Point and Black Point sliders. Values
above the white point and below the black point are made transparent.
•Drag the lower right or lower left selection handles to taper the bar. Tapering the bar on the left affects the
softness of transparency in the darker areas of the image; tapering it on the right affects the softness in the lighter
areas. You can also adjust the softness levels by adjusting White Softness (lighter areas) and Black Softness
(darker areas).
Note: To taper the edges of the transparency control bar, first shorten the transparency bar.
•Drag the entire bar left or right to position it under the histogram.
Inner/Outer Key effect
Note: Though the color keying effects built into After Effects can be useful for some purposes, you should try keying with
Keylight before attempting to use these built-in keying effects. Some keying effects have been superseded by more modern
effects like Keylight.
For information about keying in general, including links to tutorials and other resources, see Keying introduction and
resources.
The Inner/Outer Key effect isolates a foreground object from its background.
This effect works with 8-bpc and 16-bpc color.

471
Effects and animation presets
Last updated 6/8/2015
Use the Inner/Outer Key effect
To use the Inner/Outer key, create a mask to define the inside and outside edge of the object you want to isolate. The
mask can be fairly rough—it doesn’t need to fit exactly around the edges of the object.
In addition to masking a soft-edged object from its background, Inner/Outer Key modifies the colors around the
border to remove contaminating background colors. This color decontamination process determines the contribution
of the background to the color in each border pixel, and then removes that contribution—thus removing the halo that
can appear if a soft-edged object is matted against a new background.
1Select the border of the object that you want to extract by doing one of the following:
•Draw a single closed mask near the border of the object; then select the mask from the Foreground menu and
leave the Background menu set to None. Adjust the Single Mask Highlight Radius to control the size of the
border around this mask. (This method works well only on objects with simple edges.)
•Draw two closed masks: an inner mask just inside the object, and an outer mask just outside the object. Make
sure that any fuzzy or uncertain areas of the object lie within these two masks. Select the inner mask from the
Foreground menu and the outer mask from the Background menu.
Note: Make sure that the mask mode for all masks is set to None.
2If you want, move the masks around to find the location that provides the best results.
3To extract more than one object, or to create a hole in an object, draw additional masks and then select them from
the Additional Foreground and Additional Background menus. For example, to key out a person’s hair blowing in
the wind against a blue sky, draw the inner mask inside the head, draw the outer mask around the outside edge of
the hair, and then draw an additional mask around the gap in the hair where you can see sky. Select the additional
mask from the Additional Foreground menu to extract the gap and remove the background image.
4Create additional open or closed masks to clean up other areas of the image, and then select them from the Cleanup
Foreground or Cleanup Background menu. Cleanup Foreground masks increase the opacity along the mask;
Cleanup Background masks decrease the opacity along the mask. Use the Brush Radius and Brush Pressure options
to control the size and density of each stroke.
Note: You can select the Background (outer) mask as a Cleanup Background mask to clean up noise from the
background portions of the image.
5Set Edge Thin to specify how much of the border of the matte is affected by the key. A positive value moves the edge
away from the transparent region, increasing the transparent area; a negative value moves the edge toward the
transparent region and increases the size of the foreground area.
6Increase the Edge Feather values to soften edges of the keyed area. High Edge Feather values take longer to render.
7Specify the Edge Threshold, which is a soft cutoff for removing low-opacity pixels that can cause unwanted noise in
the image background.
8Select Invert Extraction to reverse the foreground and background regions.
9Set Blend With Original to specify the degree to which the resulting extracted image blends with the original image.
Linear Color Key effect
Note: Though the color keying effects built into After Effects can be useful for some purposes, you should try keying with
Keylight before attempting to use these built-in keying effects. Some keying effects have been superseded by more modern
effects like Keylight.
For information about keying in general, including links to tutorials and other resources, see Keying introduction and
resources.

472
Effects and animation presets
Last updated 6/8/2015
Linear keys create a range of transparency across an image. A linear key compares each pixel in the image to the key
color you specify. If the color of a pixel closely matches the key color, it becomes completely transparent. Pixels that
don’t match as well are made less transparent, and pixels that don’t match at all remain opaque. The range of
transparency values, therefore, forms a linear progression.
The Linear Color Key effect uses RGB, hue, or chroma information to create transparency from a specified key color.
This effect works with 8-bpc, 16-bpc, and 32-bpc color.
Apply the Linear Color Key effect
In the Effect Controls panel, the Linear Color Key effect displays two thumbnail images; the left thumbnail image
represents the unaltered source image, and the right thumbnail image represents the view you’ve selected in the View
menu.
You can adjust the key color, the matching tolerance, and the matching softness. The matching tolerance specifies how
closely pixels must match the key color before they start becoming transparent. The matching softness controls the
softness of edges between the image and the key color.
You can also reapply this key to preserve a color that was made transparent by the first application of the key. For
example, if you key out a medium-blue screen, you may lose some or all of a light-blue piece of clothing your subject is
wearing. You can bring back the light-blue color by applying another instance of the Linear Color Key and choosing
Keep This Color from the Key Operation menu.
1Select a layer as the source layer, and then choose Effect > Keying > Linear Color Key.
2In the Effect Controls panel, choose Key Colors from the Key Operation menu.
3Choose a color space from the Match Colors menu. In most cases, use the default RGB setting. If you have trouble
isolating the subject using one color space, try using a different color space.
4In the Effect Controls panel, choose Final Output from the View menu. The view you choose appears in the right
thumbnail and in the Composition panel. To see other results, work in one of the other views:
Source Only Shows the original image without the key applied.
Matte Only Shows the alpha channel matte. Use this view to check for holes in the transparency. To fill undesired
holes after you complete the keying process, see Close a hole in a matte.
5Select a key color in one of the following ways:
•Select the Thumbnail eyedropper, and then click an appropriate area in the Composition panel or the original
thumbnail image.
•Select the Key Color eyedropper, and then click an appropriate area in the Composition or Layer panel.
•To preview transparency for different colors, select the Key Color eyedropper, hold down the Alt key (Windows)
or Option key (Mac OS), and move the pointer to different areas in the Composition panel or the original
thumbnail image. The transparency of the image in the Composition panel changes as you move the pointer over
different colors or shades. Click to select the color.
•Click the Key Color swatch to select a color from the specified color space. The selected color becomes
transparent.
note: The eyedropper tools move the sliders accordingly. Use the sliders in steps 6 and 7 to fine-tune the keying results.
To use eyedroppers in the Layer panel, choose Linear Color Key from the View menu in the Layer panel.

473
Effects and animation presets
Last updated 6/8/2015
6Adjust matching tolerance in one of the following ways:
•Select the Plus (+) or the Minus (-) eyedropper, and then click a color in the left thumbnail image. The Plus
eyedropper adds the specified color to the key color range, increasing the matching tolerance and the level of
transparency. The Minus eyedropper subtracts the specified color from the key color range, decreasing the
matching tolerance and the level of transparency.
•Drag the matching tolerance slider. A value of 0 makes the entire image opaque; a value of 100 makes the entire
image transparent.
7Drag the Matching Softness slider to soften the matching tolerance by tapering the tolerance value. Typically, values
under 20% produce the best results.
8Before closing the Effect Controls panel, make sure to select Final Output from the View menu to ensure that After
Effects renders the transparency.
Preserve a color after applying Linear Color Key
1In the Effect Controls panel or Timeline panel, turn off any current instances of keys or matte effects by deselecting
the Effect option to the left of the key name or tool name. Deselecting the option causes the original image to appear
in the Composition panel so that you can select a color to preserve.
2Choose Effect > Keying > Linear Color Key. A second set of Linear Color Key controls appears in the Effect Controls
panel below the first set.
3In the Effect Controls panel, choose Keep Colors from the Key Operation menu.
4Select the color you want to keep.
5In the first application of the Linear Color Key effect, choose Final Output from the View menu in the Effect
Controls panel, and then turn other instances of the Linear Color Key effect back on to examine the transparency.
You may need to adjust colors or reapply the key a third time to get the results you need.
Luma Key effect
Note: Starting with the October 2013 release of After Effects CC, the Luma Key effect has been moved to the Obsolete effects
category and users are recommended to use other effects such as the Keylight effect.
For information about keying in general, including links to tutorials and other resources, see Keying introduction and
resources.
The Luma Key effect keys out all the regions of a layer with a specified luminance or brightness. The quality setting of
the layer doesn’t influence the Luma Key effect.
Use this effect if the object from which you want to create a matte has a greatly different luminance value than its
background. For example, if you want to create a matte for musical notes on a white background, you can key out the
brighter values; the dark musical notes become the only opaque areas.
This effect works with 8-bpc and 16-bpc color.
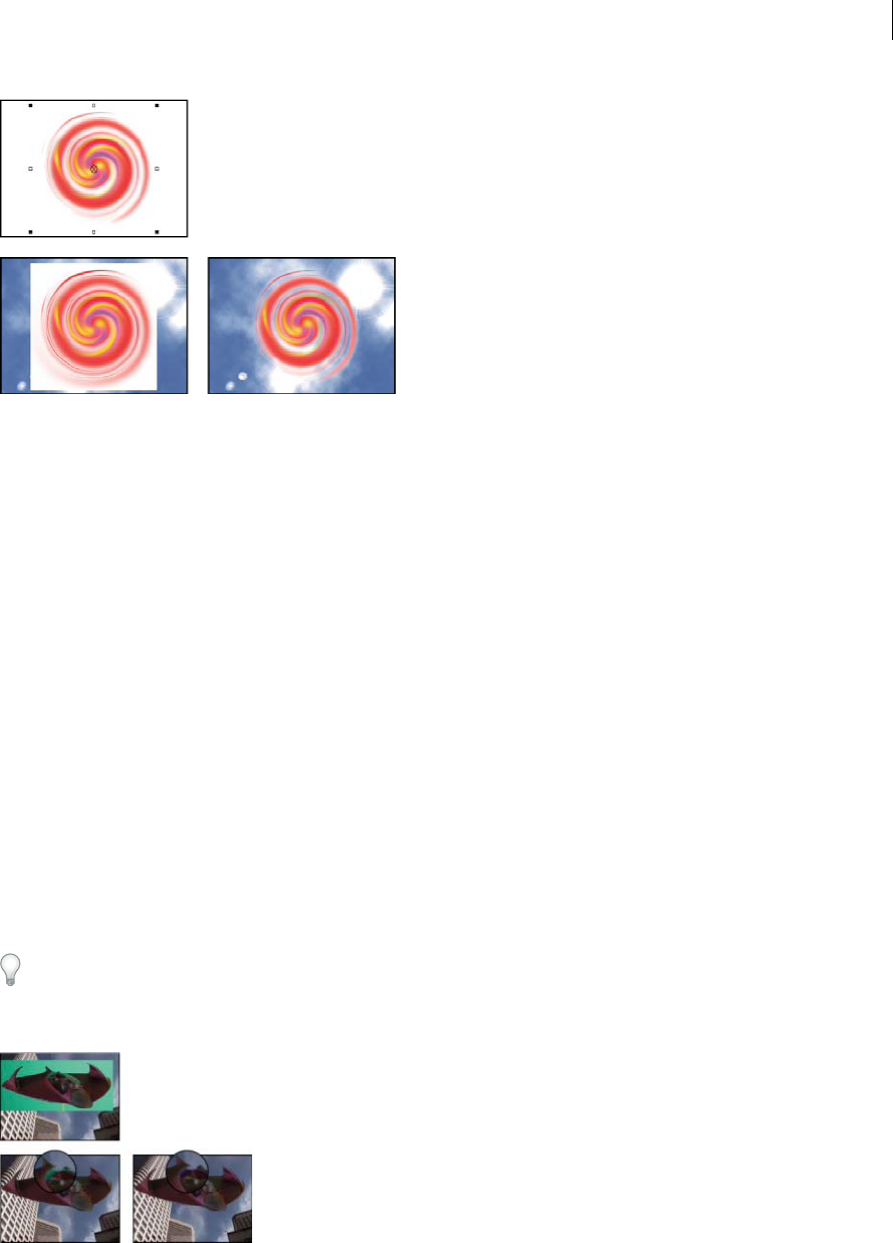
474
Effects and animation presets
Last updated 6/8/2015
Key out a luminance value with the Luma Key effect
1Select the layer that you want to make partially transparent, and choose Effect > Keying > Luma Key.
2Select a Key Type to specify the range to be keyed out.
3Drag the Threshold slider in the Effect Controls panel to set the luminance value you want the matte to be based on.
4Drag the Tolerance slider to specify the range of values to be keyed out. Lower values key out a smaller range of
values near the threshold. Higher values key out a wider range of values.
5Drag the Edge Thin slider to adjust the width of the border of the keyed area. Positive values make the mask grow,
increasing the transparent area. Negative values shrink the mask.
6Drag the Edge Feather slider to specify the softness of the edge. Higher values create a softer edge but take longer to
render.
Spill Suppressor effect
Note: Starting with the June 2014 release of After Effects CC, the Spill Suppressor effect has been moved to the Obsolete
effects category and users are recommended to use the Advanced Spill Suppressor effect.
The Spill Suppressor effect removes traces of the key color from an image with a screen that’s already been keyed out.
Typically, the Spill Suppressor is used to remove key color spills from the edges of an image. Spills are caused by light
reflecting off the screen and onto the subject.
If you’re not satisfied with the results from using the Spill Suppressor, try applying the Hue/Saturation effect to a layer
after keying, and then decrease the saturation value to de-emphasize the key color.(See Hue/Saturation effect )
This effect works with 32-bit color.
Use the Spill Suppressor effect
1Select the layer, and choose Effect > Keying > Spill Suppressor.

475
Effects and animation presets
Last updated 6/8/2015
2Choose the color you want to suppress in one of the following ways:
•If you already keyed out the color with a key in the Effect Controls panel, click the Color To Suppress eyedropper,
and then click the screen color in the Key Color swatch for the key.
•In Spill Suppressor, click the Key Color swatch and choose a color from the color wheel.
Note: To use the eyedropper in the Layer panel, choose Spill Suppressor from the View menu in the Layer panel.
3From the Color Accuracy menu, choose Faster to suppress blue, green, or red. Choose Better to suppress other
colors, because After Effects may need to analyze the colors more carefully to produce accurate transparency. The
Better option may increase rendering time.
4Drag the Suppression slider until the color is adequately suppressed.
Key Cleaner and Advanced Spill Suppressor effect
Key Cleaner effect
The Key Cleaner effect recovers alpha-channel detail from a scene keyed by a typical keying effect, including recovering
detail lost due to compression artifacts.
If you see that unwanted semi-transparency effects have crept in along edges that should be sharp, use an effect mask
(with a little mask feather) to restrict the Key Cleaner effect to the intended area.
Advanced Spill Suppressor effect
The Advanced Spill Suppressor effect removes color spill on a foreground subject from a colored background used for
color keying.
The Advanced Spill Suppressor effect has two methods for spill suppression:
1Standard - The Standard method is simpler, automatically detects the dominant key color, and requires less user
input.
2Ultra - The Ultra method is based on the spill suppression in the Ultra Key effect in Premiere Pro. See the Ultra Key
section in Premiere Pro for details about the Ultra Key.
An easy way of applying these effects is by using the Keylight + Key Cleaner + Spill Suppressor animation preset.
Note: Starting with the June 2014 release of After Effects CC, the Spill Suppressor effect has been moved to the Obsolete
effects category and users are recommended to use the Advanced Spill Suppressor effect.
Keylight effect
After Effects includes several built-in keying effects, as well as the Academy Award–winning Keylight effect, which
excels at professional-quality color keying. For information on the Keylight effect, see its documentation in the folder
in which the Keylight plug-in is installed. (See Plug-ins.)
For information about keying in general, including links to tutorials and other resources, see Keying introduction and
resources.
Third-party effects in this category included with After Effects:
•Keylight effect
•CC Simple Wire Removal effect
476
Effects and animation presets
Last updated 6/8/2015
Note: The Key Color property is already linked with an expression to the Keylight effect's Screen Colour property, so you
don't need to change it unless you want to use a different color for the despill process. To use a different color for the despill
process, just disable or remove the Keylight expression.
See Third-party plug-ins included with After Effects.
Using the Keylight + Key Cleaner + Advanced Spill Suppressor animation preset
Follow the steps below to apply the Keylight effect with the Key Cleaner and Advanced Spill Suppressor effect:
1Use the Keylight + Key Cleaner + Advanced Spill Suppressor animation preset (in the Image-Utlities folder inder
Animation Presets) to apply the three effects in order to the layer.The Advanced Spill Suppressor effect is turned off
by default to allow you to sample the key color in the Keylight effect or if the footage does not have any color spill
to be removed.
477
Effects and animation presets
Last updated 6/8/2015
2Use the Keylight effect's Screen Colour eyedropper to sample the key color from the layer in the Composition panel.
Adjust other Keylight effect settings as you normally would to get the best results.
3Turn on the effect switch for the Advanced Spill Suppressor effect to remove color spill from the scene, if required.
If you see unwanted semitransparency along edges that should be sharp, use an effect mask (with a little bit of mask
feather) to restrict Key Cleaner to the intended area.See Variable-width mask feathering | CC, CS6and Soften (feather)
the edges of a maskarticles for information on mask feathering
Using Key Cleaner and Advanced Spill Suppressor effects with other keying effects
Follow the steps below to apply the Key Cleaner and Advanced Spill Suppressor effect to a keying effect other than the
Keylight effect:
1Apply the keying effect to the layer.
2Set the effect to the equivalent of the Keylight effect's Indeterminate Result setting, so that the keying effect gives the
full RGB result without attempting to perform its own spill suppression.
3Apply the Key Cleaner effect after the keying effect.
4Apply the Advanced Spill Suppressor effect after the Key Cleaner effect.
Learn Tutorial
Watch this video to learn how to get better keying results from compressed or badly shot green-screen footage with the
new Key Cleaner effect and remove color spill with the Advanced Spill Suppressor controls.
More Help topics
Keying introduction and resources
Matte Choker effect
Simple Choker effect
Transition effects
Third-party effects in this category included with After Effects:
•CC Glass Wipe effect
•CC Grid Wipe effect
•CC Image Wipe effect
•CC Jaws effect
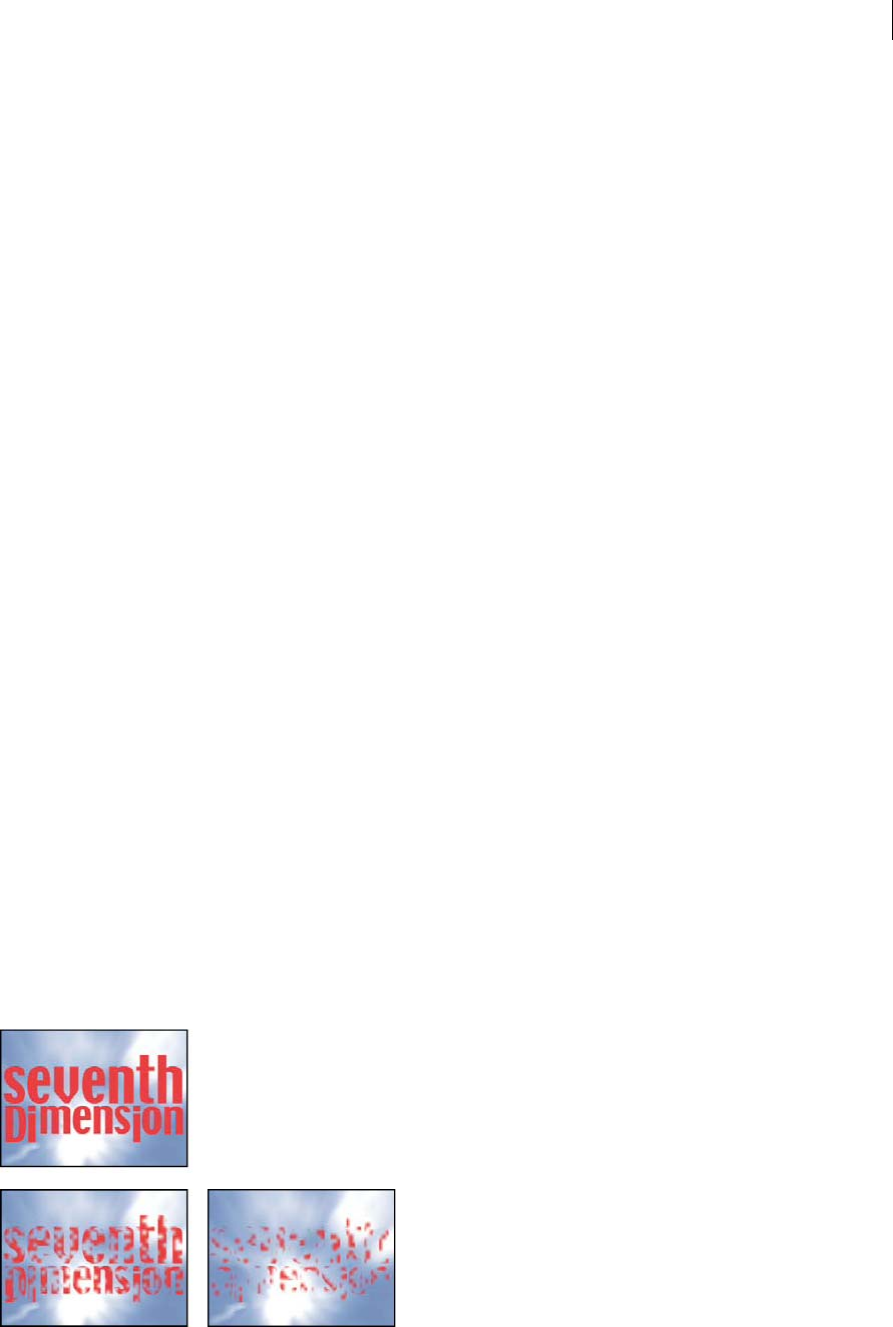
478
Effects and animation presets
Last updated 6/8/2015
•CC Light Wipe effect
•CC Line Sweep effect (CS6 or later)
•CC Radial ScaleWipe effect
•CC Scale Wipe effect
•CC Twister effect
•CC WarpoMatic effect (CS6 or later)
See Third-party plug-ins included with After Effects.
Online resources about transitions and Transition effects
For an example of how to use animation presets to create custom transitions, see this entry in Stu Maschwitz’s ProLost
blog. From this page, you can download the Film Burn animation preset, which adds film-like flicker to layers and adds
a film burn transition to the ends of the durations of layers.
Chris Zwar provides an example project on his website that uses the Displacement Map effect, the Turbulent Displace
effect, the Texturize effect, and a combination of Blur and Color Correction effects to create a transition in which an
image appears as a watercolor image washed onto a rough piece of paper.
Carl Larsen provides a tutorial on the Creative COW website that shows how to use the Motion Tile effect to create a
whip-pan transition between two layers.
Dave Scotland provides a video tutorial on the CG Swot website that uses the Fractal Noise effect to create a transition
between still images.
About Transition effects and the Transition Completion property
All Transition effects except the Iris Wipe effect have a Transition Completion property. When this property is 100%,
the transition is complete, and the underlying layers show through; the layer to which the effect is applied is entirely
transparent. You typically animate this property from 0% to 100% over the time of the transition.
Block Dissolve effect
The Block Dissolve effect makes a layer disappear in random blocks. The width and height of the blocks, in pixels, can
be set independently. At Draft quality, the blocks are placed with pixel precision and have sharply defined edges; at Best
quality, the blocks can be positioned with subpixel precision and have soft edges.
This effect works with 8-bpc and 16-bpc color.
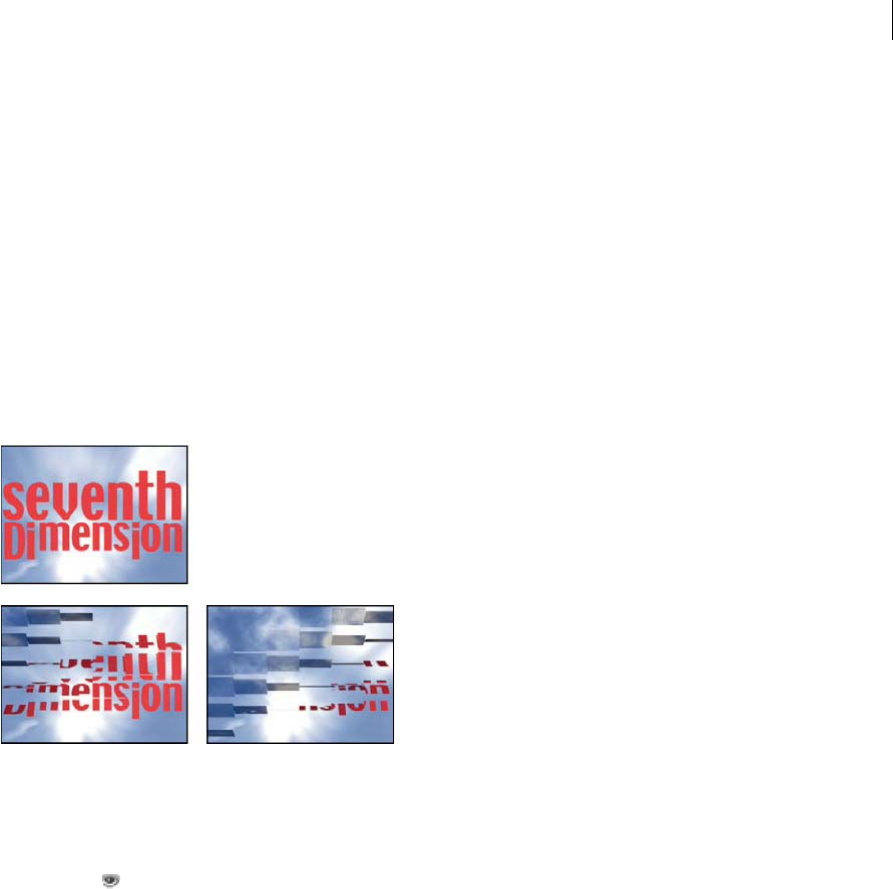
479
Effects and animation presets
Last updated 6/8/2015
Card Wipe effect
Note: For information on properties shared by the Card Wipe and Card Dance effects, see Common Lighting controls and
Material controls
This effect simulates a group of cards displaying a picture and then flipping to display another picture. Card Wipe
provides control over the number of rows and columns of cards, the flip direction, and the transition direction
(including the ability to use a gradient to determine flip order). You can also control randomness and jitter to make the
effect appear more realistic. By varying the rows and columns, you can also create venetian blind and Chinese lantern
effects.
The Card Wipe effect shares many controls with the Card Dance effect.
This effect works with 8-bpc color.
Basic controls
Transition Width The width of the area that actively changes from the original to the new image.
Back Layer The layer that appears in segments on the backs of the cards. You can use any layer in the composition; its
Video switch can even be turned off. If the layer has effects or masks, precompose the layer first.
Rows & Columns Specifies the interaction of the numbers of rows and columns. Independent makes both the Rows and
Columns sliders active. Columns Follows Rows makes only the Rows slider active. If you choose this option, the
number of columns is always the same as the number of rows.
Rows The number of rows, up to 1000.
Columns The number of columns, up to 1000, unless Columns Follows Rows is selected.
Note: Rows and columns are always evenly distributed across a layer, so unusually shaped rectangular tiles don’t appear
along the edges of a layer, unless you’re using an alpha channel.
Card Scale The size of the cards. A value smaller than 1 scales the cards down, revealing the underlying layer in the
gaps. A value greater than 1 scales the cards up, creating a blocky mosaic as they overlap each other.
Flip Axis The axis around which each card flips.
Flip Direction The direction in which the cards flip around their axes.
Flip Order The direction in which the transition occurs. You can also use a gradient to define a custom flip order: Cards
flip first where the gradient is black and last where the gradient is white.
Gradient Layer The gradient layer to use for the Flip Order. You can use any layer in the composition.

480
Effects and animation presets
Last updated 6/8/2015
Timing Randomness Randomizes the timing of the transition. If this control is set to 0, the cards flip in order. The
higher the value, the more random the order in which the cards flip.
Camera System Whether to use the effect’s Camera Position properties, the effect’s Corner Pins properties, or the
default composition camera and light positions to render 3D images of the cards.
Camera Position controls
X Rotation, Y Rotation, Z Rotation Rotate the camera around the corresponding axis. Use these controls to look at the
cards from the top, side, back, or any other angle.
X, Y Position Where the camera is positioned in x,y space.
Z Position Where the camera is positioned along the z axis. Smaller numbers move the camera closer to the cards, and
larger numbers move the camera away from the cards.
Focal Length The distance from the camera to the image. Smaller numbers zoom in.
Transform Order The order in which the camera rotates around its three axes, and whether the camera rotates before
or after it’s positioned using the other Camera Position controls.
Corner Pins controls
Corner Pinning is an alternative camera control system. Use it as an aid for compositing the result of the effect into a
scene on a flat surface that is tilted with respect to the frame.
Upper Left Corner, Upper Right Corner, Lower Left Corner, Lower Right Corner Where to attach each of the corners of
the layer.
Auto Focal Length Controls the perspective of the effect during the animation. If Auto Focal Length is unselected, the
focal length you specify is used to find a camera position and orientation that place the corners of the layer at the corner
pins, if possible. If not, the layer is replaced by its outline, drawn between the pins. If Auto Focal Length is selected, the
focal length required to match the corner points is used, if possible. If not, it interpolates the correct value from nearby
frames.
Focal Length Overrides the other settings if the results you’ve obtained aren’t what you need. If you set the Focal Length
to something that doesn’t correspond to what the focal length would be if the pins were actually in that configuration,
the image may look unusual (strangely sheared, for example). But if you know the focal length that you are trying to
match, this control is the easiest way to get correct results.
Jitter controls
Adding jitter (Position Jitter and Rotation Jitter) makes this transition more realistic. Jitter works on the cards before,
during, and after the transition occurs. If you want the jitter to happen only during the transition, start with the Jitter
Amount at 0, animate it up to the desired amount during the transition, and then animate it back down to 0 at the
completion of the transition.
Position Jitter Specifies the amount and speed of jitter at the x, y, and z axes. X, Y, and Z Jitter Amount specify the
amount of extraneous movement. The X, Y, and Z Jitter Speed values specify the speed of jitter for each Jitter Amount
option.
Rotation Jitter Specifies the amount and speed of rotation jitter around the x, y, and z axes. X, Y, and Z Rotation Jitter
Amount specify the amount of rotational jitter along an axis. A value of 90° makes it possible for a card to rotate up to
90° in either direction. The X, Y, and Z Rot Jitter Speed values specify the speed of rotational jitter.
481
Effects and animation presets
Last updated 6/8/2015
Gradient Wipe effect
The Gradient Wipe effect causes pixels in the layer to become transparent based on the luminance values of
corresponding pixels in another layer, called the gradient layer. Dark pixels in the gradient layer cause the
corresponding pixels to become transparent at a lower Transition Completion value. For example, a simple grayscale
gradient layer that goes from black on the left to white on the right causes the underlying layer to be revealed from left
to right as Transition Completion increases.
This effect works with 8-bpc and 16-bpc color.
The gradient layer can be a still image or a moving image. The gradient layer must be in the same composition as the
layer to which you apply Gradient Wipe.
You can create gradient layers in many ways, such as using the Ramp effect or creating them in Photoshop or Illustrator.
Transition Softness The degree to which the transition is gradual for each pixel. If this value is 0%, pixels in the layer
to which the effect is applied are either completely opaque or completely transparent. If this value is greater than 0%,
pixels are semitransparent at the intermediate stages of the transition.
Gradient Placement How the pixels of the gradient layer are mapped to the pixels of the layer to which the effect is
applied:
Tile Gradient Uses multiple tiled copies of the gradient layer.
Center Gradient Uses a single instance of the gradient layer in the center of the layer.
Stretch Gradient To Fit Resizes the gradient layer horizontally and vertically to fit the entire area of the layer.
Invert Gradient Inverts the influence of the gradient layer; lighter pixels in the gradient layer create transparency at a
lower Transition Completion value than do darker pixels.
Iris Wipe effect
The Iris Wipe effect creates a radial transition that reveals an underlying layer. Specify the number of points used to
create the iris using a range of 6 to 32 points, and specify whether an inner radius is used. If Use Inner Radius is selected,
you can specify values for both Inner Radius and Outer Radius; the iris isn’t visible if Outer Radius, Inner Radius, or
both are set to 0. The iris is roundest if both Outer Radius and Inner Radius are set to the same value.
The Iris Wipe effect is the only Transition effect that doesn’t have a Transition Completion property. To animate the Iris
Wipe effect to expose the underlying layers, animate the Radius properties.
This effect works with 8-bpc and 16-bpc color. In After Effects CS6 or later, this effect works in 32-bit color.
482
Effects and animation presets
Last updated 6/8/2015
Linear Wipe effect
The Linear Wipe effect performs a simple linear wipe of a layer in a specified direction. At Draft quality, the edge of the
wipe isn’t anti-aliased; at Best quality, the edge of the wipe is anti-aliased and the feather is smooth.
Wipe Angle The direction that the wipe travels. For example, at 90° the wipe travels from left to right.
This effect works with 8-bpc and 16-bpc color. In After Effects CS6 or later, this effect works in 32-bit color.
In a video tutorial on the Artbeats website, Steve Holmes demonstrates the use of non-animated instances of the Linear
Wipe effect to crop a layer from various angles with softly feathered edges.
Radial Wipe effect
The Radial Wipe effect reveals an underlying layer using a wipe that circles around a specified point. At Best quality,
the edges of the wipe are anti-aliased.
Start Angle The angle at which the transition starts. With a start angle of 0°, the transition starts at the top.
Wipe Specifies whether the transition moves clockwise or counterclockwise, or alternates between the two.
This effect works with 8-bpc and 16-bpc color. In After Effects CS6 or later, this effect works in 32-bit color.
483
Effects and animation presets
Last updated 6/8/2015
Venetian Blinds effect
The Venetian Blinds effect reveals an underlying layer using strips of specified direction and width. At Draft quality,
the strips are animated with pixel precision; at Best quality, the strips are animated with subpixel precision.
This effect works with 8-bpc and 16-bpc color.
More Help topics
About animation, keyframes, and expressions
Randomness and random seeds
Common Lighting controls and Material controls
Noise and Grain effects
484
Effects and animation presets
Last updated 6/8/2015
Work with Grain effects
Almost every digital image captured from the real world contains grain or visual noise caused by the recording,
encoding, scanning, or reproduction processes and by the equipment used to create the image. Examples include the
faint static of analog video, compression artifacts from digital cameras, halftone patterns from scanned prints, CCD
noise from digital image sensors, and the characteristic speckle pattern of chemical photography, known as film grain.
Noise isn’t necessarily bad; it’s often added to images to create a mood or tie elements together, such as adding film grain
to a computer-generated object to integrate it into a photographed scene. However, noise can be unwanted for aesthetic
reasons. Archival footage or high-speed photography may appear unpleasantly grainy; digital compression artifacts or
halftone patterns may mar an image; or noise may interfere with technical processes such as bluescreen compositing.
Technical reasons also exist for reducing noise. For example, compression algorithms usually achieve smaller file sizes
if the input material is less noisy, so noise reduction is a valuable preprocessing step for work such as DVD creation and
video streaming.
The Add Grain, Match Grain, and Remove Grain effects allow you to manipulate grain that appears more or less evenly
over an entire image. Grain effects can’t correct image problems that affect only a few pixels, such as dust, salt and
pepper noise, or analog video dropouts.
The Add Grain effect generates new grain from nothing; it doesn’t take samples from existing grain. Instead, parameters
and presets for different types of film can be used to synthesize different types of grain.
The Remove Grain and Match Grain effects use a two-step process to manipulate grain without affecting the edges,
sharpness, or highlights of an image. First, the grain is sampled, either automatically or manually; second, the grain is
analyzed and portrayed by a mathematical model, which the effect uses to add, remove, or match the grain.
Apply a grain effect
Each grain effect is applied with default settings and is displayed in Preview viewing mode, which has a preview region
framed by a white border and centered on the image. The preview region displays the results of the grain effect on a
portion of your image, for speed and comparison purposes. The grain effects are almost fully automatic but also offer
many controls to achieve precise results. You can also selectively apply the grain effects to portions of your image using
the extensive Blend With Original features provided with each effect.
1Select the layer, and choose Effect > Noise & Grain > [effect].
2Choose a viewing method from the Viewing Mode control in the Effect Controls panel:
Preview Displays the current settings of the applied effect in a 200x200-pixel area.
Blending Matte Shows the current color matte or mask, or the combination of both, which results from the current
settings of the Blend With Original controls group.

485
Effects and animation presets
Last updated 6/8/2015
Final Output Renders the full active frame, using the current settings of the effect.
3Adjust the controls for the effect in the Effect Controls panel.
The preview region in the Composition panel reflects any changes you make.
4Choose Final Output from the Viewing Mode control.
Apply a grain effect to a selected area
The Blend With Original controls group lets you precisely apply a grain effect to a particular area of an image by
masking and matting the desired area. You can choose between two selection techniques or use a combination of
both:Color MatchingExcludes any area of the image that matches a selected color. By inverting the matte, you can also
selectively process such an area.Masking LayerUses any layer in the current composition as a mask to selectively
process or exclude an area of the current layer or track.
When any grain effect is first applied, the Amount value of the Blend With Original controls group is set to 0%; this
value determines the percentage of blending between the original image and the processed version. At 0%, no blending
occurs and the selected effect is applied to the entire image at full strength; at 100%, white areas of the blending matte
are unchanged from the original image.
Any mask or matte works in a similar way: The white pixels in it exclude that area of the original image from processing
by the grain effect; the black pixels process normally. At 100% Amount, the white areas fully blend with the original so
that they are completely excluded from the processing. This behavior remains true when the match is inverted.
Regardless of the Amount value, the black areas of the matte or mask are always processed. The Amount slider affects
only the areas under the white pixels in the matte or mask. It affects only how each grain effect treats the white areas of
the matte or mask.
1Apply a grain effect to the image.
2Do any of the following in the Effect Controls panel:
•To create a matte around the area to which you want to apply or exclude the grain effect, use the Color Matching
controls in the Blend With Original controls group.
•To mask the current layer with another layer or track, use the Masking Layer controls.
3Adjust the Blur Matte value to soften the matte and to produce a softer transition between the affected and
unaffected areas of the image.
4If you’re using both a color matte and a layer mask, choose one of the following from the Combine Match And Mask
Using menu:
Screen Makes the matte white wherever either the mask or the color match is white.
Multiply Makes the matte white where both of the inputs are white.
5Reduce the Amount value to let more of the original image show through the grain.
6Choose Final Output from the Viewing Mode control.
Generate a color-matching matte
When a grain effect is first applied, a neutral gray color is used to generate a default color-matching matte, so that in
most images a visible matte appears. The Color Matching group of controls uses color matching to precisely define a
matte. The matte isolates portions of the image where the layer that uses the grain effect is blended with the input.
1Apply a grain effect to the image.

486
Effects and animation presets
Last updated 6/8/2015
2To select a color to exclude from or restrict to the effect, do one of the following adjacent to the Matching Color
control in the Blend With Original and Color Matching controls groups:
•Click the color swatch and select a color in the Color Picker dialog box.
•Click the eyedropper and click a color anywhere on the screen.
3Do one of the following:
•To prevent the grain effect from affecting the selected color, make sure that the Invert Match control is deselected.
•To restrict the grain effect to the selected color, leaving the rest of the image unaffected, select Invert Match.
4If you want to exclude colors that are similar to the matching color, increase the Matching Tolerance value, which
sets a threshold for color matching. As the value increases, the matte includes pixels with colors increasingly
different from the matching color.
5Choose an option from the Match Color Using control if you want to change the default criterion (RGB) used to
determine that a color is similar to the matching color.
6Adjust the Matching Softness controls to determine the width of the transition band between completely matched
and completely unmatched pixels or how smoothly the affected areas blend with the original image.
7Select Invert Match if you want to invert the matte so that the white areas become black and the black areas become
white. (The matching color is black in the matte and is processed by the grain effect regardless of the Amount setting.
The inversion doesn’t affect any other settings.)
8If you’re using both a color matte and a layer mask, choose one of the following from the Combine Match And Mask
Using menu:
Screen Makes the matte white wherever either the mask or the color match is white.
Multiply Makes the matte white where both of the inputs are white.
9Choose Final Output from the Viewing Mode control.
Generate a layer matte
In some cases, you may want to use a different layer or track as a mask for the layer that uses a grain effect. This type
of mask allows unlimited control over exactly which parts of an image are modified and by how much.
1Apply a grain effect to the image.
2In the Effect Controls panel, choose the layer that you want to use as a mask from the Mask Layer control in the
Blend With Original and Masking Layer controls groups.
3Choose a masking mode from one of the standard track matte mode options.
4If the masking layer is a different size than the current layer, choose one of the following from the If Mask Size Differs
pop-up menu in the Masking Layer controls:
Center Centers the masking layer over the current layer.
Stretch To Fit Resizes the masking layer to match the dimensions of the current layer.
5If you’re using both a color matte and a layer mask, choose one of the following from the Combine Match And Mask
Using menu:
Screen Makes the matte white wherever either the mask or the color match is white.
Multiply Makes the matte white where both of the inputs are white.
6Choose Final Output from the Viewing Mode control.
487
Effects and animation presets
Last updated 6/8/2015
Change the preview region
You can use the Preview Region controls group to change the position or the size of the preview region for a grain effect.
Because adding or removing grain can affect sharpness of detail, you may want to preview an area of fine detail, such
as a human face or some text. When you remove grain with the Remove Grain effect, a best practice is to preview an
area where the grain is most clearly visible or most objectionable, such as a large expanse of solid color.
You’ll achieve the best results by experimenting, applying small increments to each of several controls in the Effect
Controls panel, and viewing the results in the Composition panel after every adjustment.
1After applying a grain effect, click the Center button in the Preview Region group of controls in the Effect
Controls panel.
A cross hair is centered in the Composition panel.
2In the image, click the desired center of the preview region.
The preview region redraws, centered in the new position.
3To change the dimensions of the preview region, change the Width and Height values in the Effect Controls panel
to the desired size, in pixels. (Larger preview regions can result in slower rendering.)
4Select Show Box if you want to outline the preview region in color. If you want to change the outline color, next to
Box Color do one of the following:
•Click the color swatch and select a color in the Color Picker dialog box.
•Click the eyedropper button, and click a color anywhere on the screen.
5View the results:
•To view the fine detail of the noise structure, zoom into the preview region.
•To examine the noise in each channel independently, click the corresponding color channel icon in the
Composition panel.
•To increase the interaction speed and preview duration, use the Region Of Interest feature in the Composition
panel to reduce the area that’s processed. (See Region of interest (ROI).)
•To retain an image of the current frame in its current state, click Take Snapshot in the Composition panel.
You can then click Show Snapshot to view the most recent snapshot instead of the active composition, and to
toggle between the current and previous states of the preview region. This technique is extremely useful for
evaluating subtle adjustments. (See Snapshots.)
•To compare the preview region with and without the grain effect, click the Effect switch next to the name of
the grain effect in the Effect Controls panel to temporarily disable the effect. Click Take Snapshot in the
Composition panel, click the Effect switch again to re-enable the effect, and then click and hold down Show
Snapshot to display the snapshot of the image without the effect.
Work with noise samples in Grain effects
Noise sampling is the first and most important step in removing noise from an image or in matching the noise of one
image in another image. Normally, this process is entirely automatic. For fine control, you can switch to Manual mode
and adjust the samples using the Sampling controls group in the Effect Controls panel.

488
Effects and animation presets
Last updated 6/8/2015
A noise sample should be a solid block of uniform color that clearly displays the noise pattern present in the image. The
objective is to extract samples of pure noise, without any image features that the algorithm could misconstrue as grain.
For example, extract samples from a piece of sky, a background wall, or an area of fleshtone. All samples should be
selected from the normal range of the film, DV, or video stock. Avoid underexposed or overexposed areas lacking in
information, especially areas where pixel values have been clipped to pure black or white. Within this normal exposure
range, it’s best to select samples with various RGB values and colors—for example, one sample from a bright area, one
from a dark area, and one from an area with midtones.
The number of samples in automatic mode is high to ensure that the algorithm has enough good noise data, even if
finding good samples in a particular image is difficult. In addition, automatic mode may override the number of
samples you’ve set if the effect can’t find enough good samples. You can vary the size of the samples in either automatic
or manual mode; however, increasing sample size doesn’t guarantee better results, especially if the resulting samples
include more substantial variations in RGB values. Sample size should be reduced if a particular image doesn’t contain
sufficiently large areas of constant color values. Conversely, increasing the sample size may give better results if the
image contains large featureless areas.
Manually reposition noise samples
Automatic grain or sample selection generally gives acceptable results for the Match Grain or Remove Grain effect, but
you can choose to manually position and resize each sample or change the sample number. For example, you may want
to reposition samples if the automatic sampling selected a uniform area that is underexposed or overexposed and that
lacks information about grain structure.
Noise samples for the Match Grain and Remove Grain effects are always extracted from the source layer without
regarding any effects or masks already applied to the layer; this method results in more accurate sampling. If you want
the samples to include the existing effects, precompose or pre-render the source layer with the effects and then apply
the grain effect to the resulting source layer.
Avoid sample areas with the following characteristics: sharp edges, color gradients, highlights, textures such as grass or
water ripples, fine detail such as hair or tree leaves, and overexposed or underexposed areas lacking in information.
1In the Effect Controls panel, choose Noise Samples from the Viewing Mode menu.
The samples appear as small white squares (24x24 pixels) overlaid on the source image.
2Choose Manual from the Sample Selection pop-up menu in the Sampling controls group.
3To remove the least desirable samples from the image, try reducing the Number Of Samples value.
4To move a noise sample, do one of the following:
•Click the point parameter for the noise sample in the Noise Sample Points controls group. A cross hair
appears in the composition, centered on that sample. Click the desired location in the Composition panel to place
the sample.
•Using the Selection tool , drag the sample point in the Composition panel to the desired location.
•Enter the desired horizontal and vertical coordinates in the Effect Controls panel.
Note: The number of sample points that are enabled corresponds to the current value of the Number Of Samples.
5Repeat for each sample point you want to move.

489
Effects and animation presets
Last updated 6/8/2015
Change the sampling source frame
By default, the Remove Grain and Match Grain effects take noise samples from the first frame of the layer, but you can
choose to sample the noise from a different frame. Changing the frame may be useful if large lighting or exposure
variations occur between frames within the layer.
1Decide which frame you want to sample; make sure that the project settings Display Style is set to Frames,
numbering from zero. The number of the current frame then appears in blue in the upper-left corner of the Timeline
panel. Enter that frame number as the Source Frame value in the Sampling controls group.
2Choose Noise Samples from the Viewing Mode menu.
The selected frame appears in the Composition panel, and its automatic samples appear on the image.
Change the noise sample box color
You can set the viewing mode for the Remove Grain or Match Grain effect to Noise Samples to see the areas sampled
by the effect. Sampled areas are automatically framed with a white outline. If you prefer, you can change the color of
these noise sample boxes.
❖Next to the Sample Box Color control in the Sampling controls group, do one of the following:
•Click the color swatch, and select a color in the Color Picker.
•Click the eyedropper, and click a color anywhere in the application window.
Working with added or matched grain
The Add Grain effect creates new grain or noise in an image by building the grain from nothing or by basing the
properties of the grain on presets. The Match Grain effect also creates new grain in an image but by matching the grain
in a different image. Both effects share several controls in the Effect Controls panel that let you control the color, tonal
range, blending mode, and animation properties of the grain.
Adjusting the tones of added or matched grain
The precise grain pattern present in any frame of film isn’t uniform throughout the frame but may depend on the tonal
values of the content at each pixel. For example, in chemical film grain, the sizes of the silver halide crystals vary with
the exposure level.
The Add Grain and Match Grain effects let you reproduce these subtle changes in grain patterns across areas of an
image by using the Shadows, Midtones, Highlights, and Midpoint controls in the Application controls group. These
controls let you define how much grain is added to each tonal area and also to each channel in the image. For example,
you can add more grain to overexposed areas of the blue channel to give an image of sky a grainier look.
You can use the Application controls group for the Add Grain or Match Grain effect to do the following:
•To define how much grain is added to each tonal area in an image, adjust the Shadows, Midtones, and Highlights
values.
•To define the midpoint of the tonal range of the image for grain application purposes, adjust the Midpoint slider. By
default, this slider is centered at 0.5, which represents the middle of the range of pixel values—127 for 8-bpc images
and 16384 for 16-bpc images.
•For even finer control, use the Channel Balance controls to adjust the grain in the shadow, midtone, and highlight
areas independently for each channel.
Animating added or matched grain

490
Effects and animation presets
Last updated 6/8/2015
By default, the grain or noise generated by the Add Grain and Match Grain effects moves at the same speed as the source
material to accurately simulate realistic noise. Slowing down the noise processes may be useful for aesthetic effect or to
keep the added noise from buzzing and drawing attention to itself. These effects have an internal randomizer that
changes the positions of the noise pixels between frames. But you can also change the appearance of the noise between
layers on the same frame while keeping every other parameter constant.
You can use the Animation controls group for the Add Grain or Match Grain effect to do the following:
•To specify the frame rate of the added grain, as a multiple of the destination frame rate, adjust the Animation Speed
value in the Animation controls group in the Effect Controls panel. At higher Animation Speed values, the lifespan
of the grains is lower. At the default value of 1, the grain moves at the same rate as the frames. At lower values, the
grain changes more slowly, which can be useful for giving the appearance of film grain. At zero, the grain is
stationary over time.
•To use interpolation to create smooth transitions between the generated noise frames, select Animate Smoothly.
This control matters only if Animation Speed is less than 1.
•To change the appearance of the noise between layers on the same frame, adjust the Random Seed value. Each
Random Seed value represents one of 100 possible variations in the appearance; changing the value doesn’t make
the results more or less random.
Blending and adjusting the color of added or matched grain
You can adjust the color, saturation, and blending behavior of the grain generated by the Add Grain or Match Grain
effect.
Several factors can affect the apparent color of the grain that these effects generate, including the following:
•The color value of the underlying pixel in the source image.
•The Saturation value of the noise.
•The Tint Color and Tint Amount values, if you have modified these settings from the defaults.
•The Blending Mode value in the Application controls group.
•The amount of noise applied, if any, to each channel individually using the Channel Intensities controls group.
Using the Color controls group in the Effect Controls panel, you can adjust any of the following:
Monochromatic Gives the added noise a single tint. By default, the tones are black and white, but you can change the
Tint Color to make it a gradient of any color. (The Saturation and Channel Intensities controls aren’t available if
Monochromatic is selected.)
Tint Amount Controls the depth and intensity of the color shift.
Tint Color Controls the color the added noise shifts toward.
Saturation Controls the amount and vividness of the color.
The Blending Mode in the Application controls determines how the color value of the generated noise combines with
the color value of the underlying source layer at each pixel:
Film Makes the generated grain appear embedded in the image. This mode affects darker colors more than lighter ones,
just as the grain in a film negative appears.
Multiply Multiplies the color values of the noise and the source. However, the result may be either lighter or darker
than the original, because the noise may have either a positive or negative value.
Add Combines the color values of the pixel in the source with the noise. However, the result isn’t always lighter than
the original because the noise created by grain effects can have either a positive or negative value.

491
Effects and animation presets
Last updated 6/8/2015
Screen Multiplies the inverse brightness values of the noise and the source. The effect is like printing from a multiple
exposure on a negative. The result is always brighter than the original.
Overlay Combines the behavior of Film and Multiply: Both shadows and highlights get less grain, while midtones get
a full application of grain.
Add Grain effect
The Add Grain effect generates new noise from nothing and does not take samples from existing noise. Instead,
parameters and presets for different types of film can be used to synthesize many different types of noise or grain. You
can modify virtually every characteristic of this noise, control its color, apply it to the image in several ways, even
animate it or apply it selectively to only a part of your image.
This effect works with 8-bpc and 16-bpc color.
The distribution of the added noise over the color channels does affect the overall color of the resulting image. With a
dark background, the noise tends to add to the image visually, so a red tint or more noise in the red channel gives a
reddish hue to the image. With a bright background, the noise tends to subtract from the image visually, so a red tint
or more noise in the red channel gives a cyan color. The result also depends on the Blending Mode control in the
Application controls group.
Note: The actual grain of your image may vary from the film presets, because of factors such as exposure and scanning
resolution.
You can use the controls for the Add Grain effect to do the following:
•To reproduce the grain of a particular film or photographic stock, choose the film type from the Preset menu for the
Add Grain effect in the Effect Controls panel.
•To adjust the intensity and size of the applied grain and introduce a blur, adjust the Tweaking controls group for the
Add Grain effect in the Effect Controls panel.
•To modify the color of the added noise, adjust the Color controls.
•To define how the color value of the generated noise combines with the color value of the underlying destination
layer at each pixel, choose a Blending Mode in the Application controls group.
•To define how much grain is added to each tonal area in your image and the midpoint, adjust the Shadows,
Midtones, Highlights, and Midpoint values in the Application controls group.
•To animate the added grain, adjust the properties in the Animation controls group.
•To apply the effect to the entire image, choose Final Output from the Viewing Mode menu.
Tweaking controls for Grain effects
The Match Grain and Add Grain effects share a group of Tweaking controls. You can use these controls to modify the
intensity and size of the noise and to introduce a blur, all of which can be done across the three channels or individually
for each channel. You can also change the aspect ratio of the applied grain.
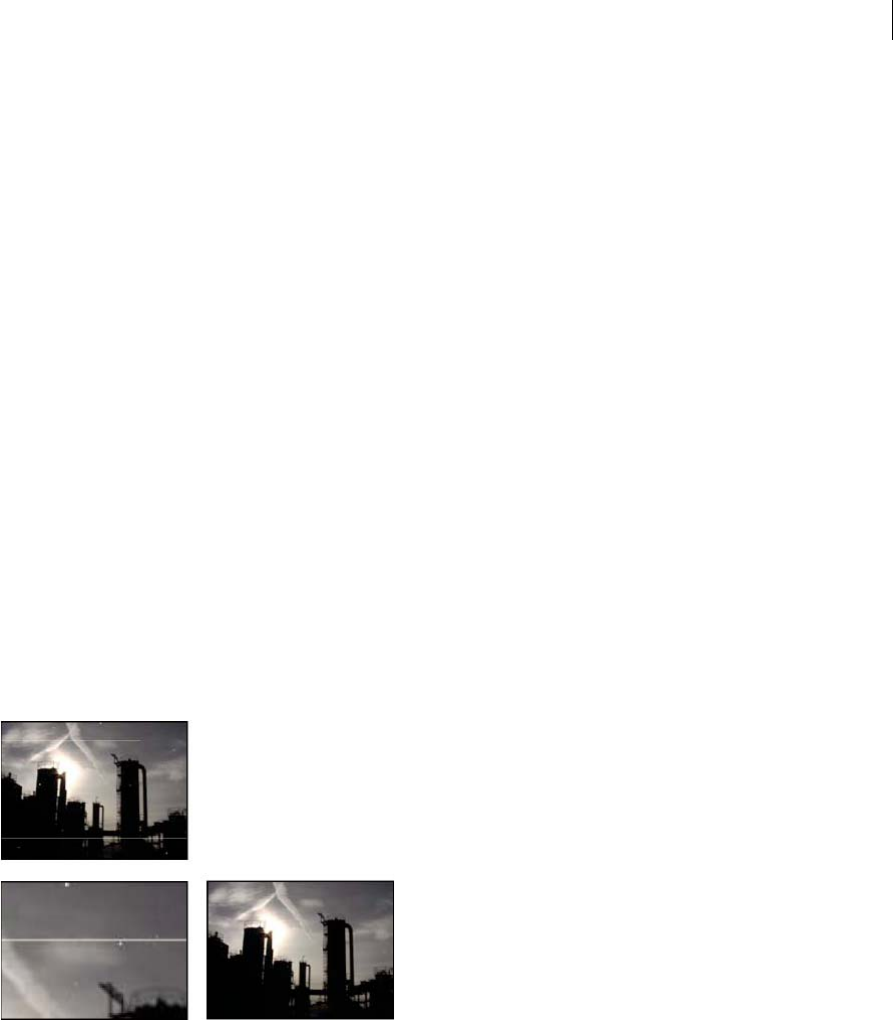
492
Effects and animation presets
Last updated 6/8/2015
Note: The values of the Tweaking controls are relative to the noise sampled in the source layer: a value of 1.0 leaves that
property of the source noise unchanged, while higher and lower values alter the applied noise.
Adjust any of the following controls in the Tweaking controls group:
Intensity Controls the amount of variation in brightness and color strength between pixels in the generated noise,
which determines the visibility of the noise. Increasing the value does not change the position or size of each grain but
makes the grain appear to pop more; lower values give a more subtle muted appearance.
Channel Intensities Controls the contrast between pixels in the generated noise separately for each channel. For
example, you may want to add more grain to the blue channel to emulate film.
Size Adjusts the size of the generated grain in pixels.
Channel Size Adjusts the size of the generated grain in pixels independently for each channel.
Softness Sets the amount of softness in the grain.
Aspect Ratio Controls the ratio of the width of the generated grain over a constant height of 1; this setting is useful for
emulating the effect of anamorphic lenses or for aesthetic effects. A value higher than 1 stretches the grain horizontally;
values smaller than 1 squash it horizontally.
Dust & Scratches effect
The Dust & Scratches effect reduces noise and defects by changing dissimilar pixels within a specified radius to be more
like their neighboring pixels. To achieve a balance between sharpness of the image and hiding defects, try various
combinations of Radius and Threshold settings.
This effect works with 8-bpc and 16-bpc color.
Radius How far the effect searches for differences among pixels. High values make the image blurry. Use the smallest
value that eliminates the defects.
Threshold How different pixels can be from their neighbors without being changed by the effect. Use the highest value
that eliminates the defects.
Fractal Noise effect
The Fractal Noise effect uses Perlin noise to create grayscale noise that you can use for organic-looking backgrounds,
displacement maps, and textures, or to simulate things like clouds, fire, lava, steam, flowing water, or vapor.
This effect works with 8-bpc, 16-bpc, and 32-bpc color.

493
Effects and animation presets
Last updated 6/8/2015
The Evolution controls create subtle changes in the shape of the fractal noise. Animating these controls results in
smooth changes of the noise over time, creating results that resemble, for example, passing clouds or flowing water.
Chris Zwar provides an article on the Creative COW website that explains how the Fractal Noise effect works, including
many details and images regarding the inner workings of the effect.
Stu Maschwitz provides an example project on his ProLost blog that uses the Fractal Noise effect to create the corona
of the Sun.
Maltaannon (Jerzy Drozda, Jr.) provides a video tutorial on the Creative COW website that shows how to use the Fractal
Noise effect to create a star field and then use a star field as a skybox to provide a distant backdrop in a 3D world.
The Turbulent Noise effect is essentially a modern, higher-performance implementation of the Fractal Noise effect. The
Turbulent Noise effect takes less time to render, and it’s easier to use for creating smooth animations. The Turbulent
Noise effect also more accurately models turbulent systems, with smaller noise features moving more quickly than
larger noise features. The primary reason to use the Fractal Noise effect instead of the Turbulent Noise effect is for the
creation of looping animations, since the Turbulent Noise effect doesn’t have Cycle controls.
Note: Because the controls for the two effects are nearly identical, you can use most instructions and tutorials created for
the Fractal Noise effect to instead guide your use of the Turbulent Noise effect. (See Turbulent Noise effect.)
Controls
Fractal Type The fractal noise is created by generating a grid of random numbers for each noise layer. The Complexity
setting specifies the number of noise layers. The Fractal Type setting determines the characteristics of this grid.
Noise Type The type of interpolation to use between the random values in the noise grid.
Invert Inverts the noise. Black areas become white, and white areas become black.
Contrast The default value is 100. Higher values create larger, more sharply defined areas of black and white in the
noise, generally revealing less subtle detail. Lower values result in more areas of gray, softening or muting the noise.
Overflow Remaps color values that fall outside the range of 0–1.0, using one of the following options:
Clip Remaps values so that any value above 1.0 is displayed as pure white, and any value below 0 is displayed as pure
black. The Contrast value influences how much of the image falls outside this range. Higher values result in a mostly
black and/or white image with less gray area. Therefore, higher contrast settings display less subtle detail. When used
as a luma matte, the layer has sharper, better-defined areas of transparency.
Soft Clamp Remaps values on an infinite curve so that all values stay in the range. This option reduces contrast and
makes noise appear gray with few areas of pure black or pure white. When used as a luma matte, the layer contains
subtle areas of transparency.
Wrap Back Remaps triangularly, so that values above 1.0 or below 0 fall back into the range. This option reveals subtle
detail when Contrast is set above 100. When used as a luma matte, the layer reveals more detailed textured areas of
transparency.
Allow HDR Results No remapping is performed. Values outside the range of 0-1.0 are preserved.
Transform Settings to rotate, scale, and position the noise layers. The layers appear as if they are at different depths if
you select Perspective Offset.
Complexity The number of noise layers that are combined (according to the Sub Settings) to create the fractal noise.
Increasing this number increases the apparent depth and amount of detail in the noise.

494
Effects and animation presets
Last updated 6/8/2015
Note: Increasing Complexity results in longer rendering times. If appropriate, try reducing the Size rather than increasing
Complexity to achieve similar results and avoid longer rendering. A trick to increase apparent complexity without
increasing rendering time is to use a negative or very high Contrast or Brightness setting and choose Wrap Back for
Overflow.
Sub Settings The fractal noise is generated by combining layers of noise. The Sub Settings control how this
combination occurs and how the properties of the noise layers are offset from one another. Scaling successive layers
down creates finer details.
Sub Influence How much influence each successive layer has on the combined noise. At 100%, all iterations have the
same amount of influence. At 50%, each iteration has half as much influence as the previous iteration. A value of 0%
makes the effect appear exactly as if Complexity is 1.
Sub Scaling, Rotation, and Offset The scale percentage, angle, and position of a noise layer relative to the previous
noise layer.
Center Subscale Calculates each noise layer from the same point as the previous layer. This setting can result in the
appearance of duplicated noise layers stacked on top of each other.
Evolution Uses progressive revolutions that continue to change the image with each added revolution. This method is
unlike typical revolutions that refer to a setting on the dial control for which the result is the same for every multiple of
360°. For Evolution, the appearance at 0° is different from the appearance at 1 revolution, which is different from the
appearance at 2 revolutions, and so on. To return the Evolution setting to its original state (for example, to create a
seamless loop), use the Cycle Evolution option.
You can specify how much the noise evolves over a period of time by animating Evolution. The more revolutions within
a given amount of time, the more rapidly the noise changes. Large changes in the Evolution value over a short period
of time may result in flashing.
To create a seamless loop, use Cycle Evolution, and set Evolution keyframes at full revolutions with no degrees—
partially completed revolutions may interrupt the loop.
Evolution Options Options for Evolution.
You can easily create new fractal noise animations by reusing previously created Evolution cycles and changing only the
Random Seed value. Using a new Random Seed value alters the noise pattern without disturbing the Evolution
animation.
Instead of animating Evolution over the entire composition, save rendering time by prerendering and looping one short
Evolution cycle for the duration you want.
Cycle Evolution Creates a cycle of Evolution that loops over the set amount of time. This option forces the Evolution
state to return to its starting point, creating a smooth progressive cycle, a nonrepeating cycle, or a loop segment.
To ensure that a cycle completes full revolutions, choose a Cycle value that either matches or is evenly divisible by the
number of revolutions set for Evolution.
Cycle (in Revolutions) Specifies the number of revolutions that the noise cycles through before it repeats. The amount
of time between Evolution keyframes determines the speed of these Evolution cycles. This option affects only the
evolution of the noise, not Transform or other controls. For example, if you view two identical states of noise with
different Size or Offset settings, they don’t appear the same.
Note: Cycle is available only if Cycle Evolution is selected.
Random Seed Sets a random value from which to generate the noise. Animating the Random Seed property results in
flashing from one set of noise to another (within that fractal type), which is usually not the result that you want. For
smooth animation of noise, animate the Evolution property.
Opacity Opacity of the noise.

495
Effects and animation presets
Last updated 6/8/2015
Blending Mode The blending operation between the fractal noise and the original image. These blending modes are
identical to the ones in the Modes column in the Timeline panel, with the following exceptions:
None Renders the fractal noise only and does not composite on the original layer.
Hue Renders the fractal noise as hue values instead of grayscale. The Saturation and Lightness of the original layer are
maintained. If the original layer is grayscale, nothing happens.
Saturation Renders the fractal noise as saturation values instead of grayscale. The Hue and Lightness of the original
layer are maintained. If the original layer is grayscale, nothing happens.
Create a seamless loop using Fractal Noise
1Select a layer in the Timeline panel, and choose Effect > Noise & Grain > Fractal Noise.
2Set two keyframes for Evolution.
3Adjust the time between keyframes and the number of Evolution revolutions until you are satisfied with the
animation of the noise.
4Select Cycle Evolution.
5Set a value for Cycle.
The evolution completes the number of revolutions you specify for Cycle in the amount of time determined by the
distance between Evolution keyframes. Determine the Cycle value by considering how much of this cycle you need
to render before it repeats. Choose the shortest length appropriate for your project to save rendering time.
Initially, the last frame of a cycle is identical to the first frame. To create a seamless loop, skip the last frame by setting
the Out point of the layer one frame before the last frame of the cycle:
6Move the current-time indicator to the time where the cycle completes. For example, if the Cycle is set to 2, locate
the frame when the Evolution value is 2.
Note: If you set keyframes for other Fractal Noise controls, return them to their initial settings where the cycle begins to
repeat in the timeline, or the controls don’t loop.
7Move the current-time indicator back one frame.
8Trim the Out point of the layer to this frame.
9Pre-render this layer, and import the pre-rendered movie into your project.
10 Select the imported footage item in the Project panel, and choose File > Interpret Footage. Then set Loop to the
number of loops required for the duration of the layer in the project.
Match Grain effect
The Match Grain effect matches the noise between two images. This effect is especially useful for compositing and in
bluescreen/greenscreen work. The Match Grain effect only adds noise and can’t remove it, so if the destination is
already noisier than the source, an exact match is not possible. In this case, you can first use the Remove Grain effect
to clean up the destination and then apply the Match Grain effect to the result to get a perfect match.
The Match Grain effect uses noise sampling as its starting point. Basically, entire frames of new noise are synthesized
to match the noise samples. You can modify the noise in many ways before the effect is applied to the new image, such
as duplicating the noise from an image but making the noise larger and redder before applying the noise to another
image.
The Match Grain effect shares some controls with the Add Grain effect. (See Add Grain effect.)
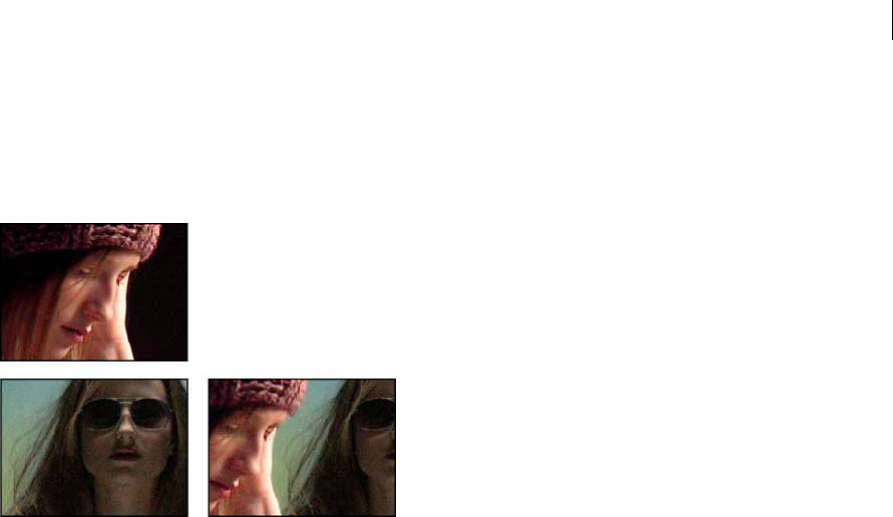
496
Effects and animation presets
Last updated 6/8/2015
Note: The Match Grain effect samples the noise on the frame in the source layer that corresponds to the first frame in the
destination layer. If the source layer is not present at that frame, or if the noise samples contain transparent areas, no noise
is sampled or applied.
This effect works with 8-bpc and 16-bpc color.
Match noise or grain between images
1Make sure that the source and the destination layers are in the same composition.
2Select the destination layer to which you want to add grain.
3Choose Effect > Noise & Grain > Match Grain.
4Choose a layer from the Noise Source Layer control in the Effect Controls panel to specify the source layer from
which you want to sample the grain. (The Noise Source Layer control lists only layers that are in the Timeline panel.)
The grain is automatically sampled and applied to the preview region on the destination layer. If you need an
automatic match, you can skip the remaining steps.
5If there already is significant noise in the destination layer before choosing a noise source layer and this causes a
grain mismatch, adjust the Compensate For Existing Noise slider to avoid grain build-up.
6Do any of the following:
•To adjust the intensity and size of the applied grain and to introduce a blur, adjust the Tweaking controls.
•To modify the color of the added noise, adjust the Color controls.
•To determine how the color value of the generated noise combines with the color value of the underlying
destination layer at each pixel, choose a Blending Mode in the Application controls group.
•To define how much grain is added to each tonal area in your image and the midpoint, adjust the Shadows,
Midtones, Highlights, and Midpoint values in the Application controls group.
7If you want to change the effect view, choose any of the following from the Viewing Mode menu in the Effect
Controls panel:
Noise Samples Shows the areas that have been sampled to extract the current noise model. Selecting the source layer
causes it to appear in the Composition panel, with its noise sample squares displayed.
Compensation Samples Shows the noise samples that have been automatically extracted from the destination
image.
Preview Displays the current settings of the applied effect in a 200x200 pixel area.
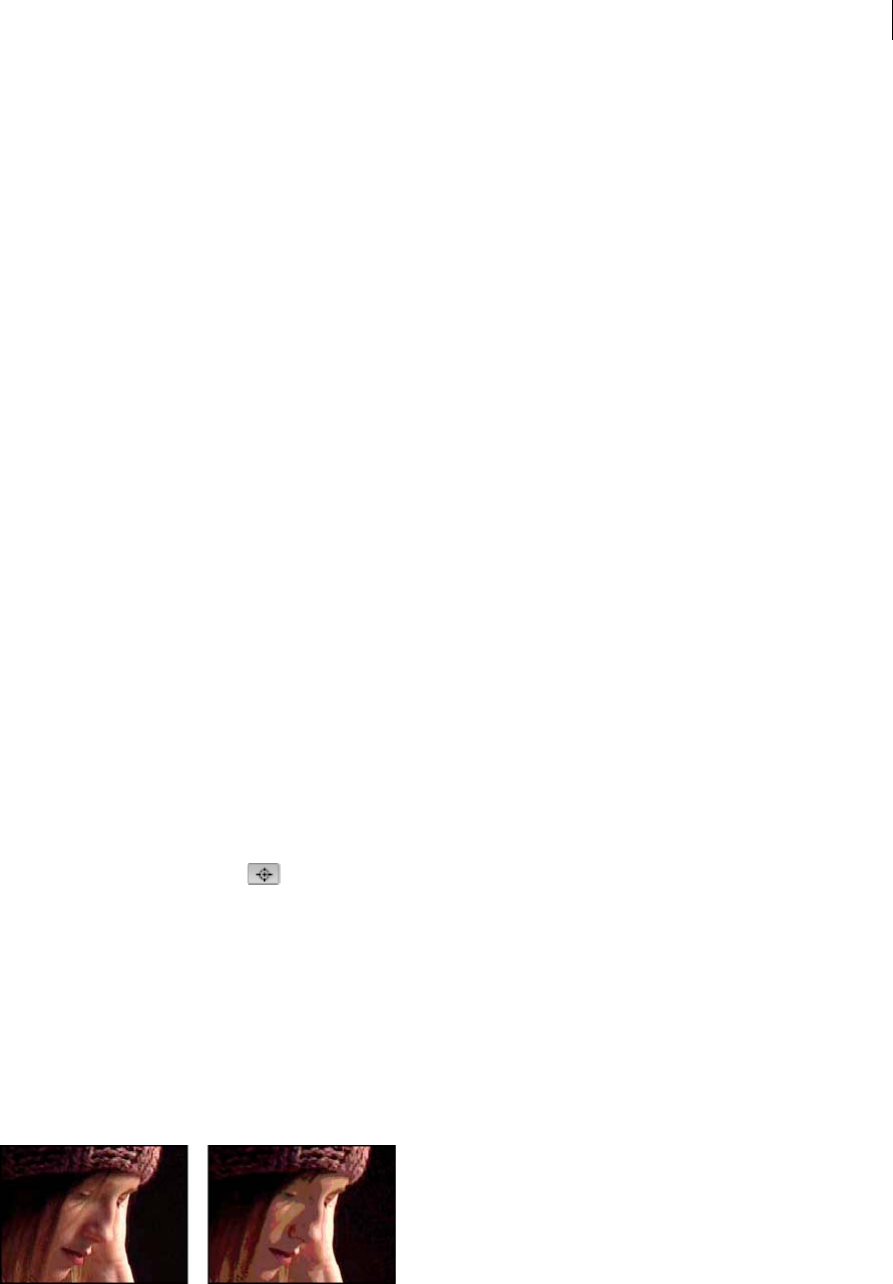
497
Effects and animation presets
Last updated 6/8/2015
Blending Matte Shows the current color matte or mask, or the combination of both, which results from the current
settings of the Blend With Original controls group.
Final Output Renders the full active frame, using the current settings of the effect.
8Animate the added grain, if desired.
9Choose Final Output from the Viewing Mode control.
Compensate for existing noise when matching noise
If you’re trying to match the grain between images with the Match Grain effect, and your destination layer already has
its own visible grain, a grain mismatch or grain build-up may occur. To prevent these problems, the Compensate For
Existing Noise control extracts a noise model from both the source and the destination and then modifies the noise
from the source to account for the noise already present in the destination, before applying it to the destination.
To use this control automatically, set the Compensate For Existing Noise slider to 100%. You can then view the noise
samples in the destination layer by choosing Compensation Samples in the Viewing Mode menu. You can also
reposition the samples in the destination image by setting Sampling Mode to Manual, which makes the Compensation
Sample Points available for manual repositioning.
1Apply the Match Grain effect to the destination layer.
2In the Effect Controls panel, adjust the Compensate For Existing Noise value under the Match Grain effect as
needed. The noise in the source layer and the noise in the destination layer are sampled, and their difference is
calculated, so that only enough noise to match the destination layer to the source layer is applied to the destination.
3To modify the noise samples, choose Noise Samples from the Viewing Mode menu, change the Sampling > Sample
Selection control to Manual, and then expand the Compensation Sample Points. The current value of Number Of
Samples determines how many points are available.
4To reposition each sample point, do any of the following:
•Drag each sample point in the Composition panel to a new location.
•Enter new x and y coordinates adjacent to the sample point under the Compensation Sample Points controls in
the Effect Controls panel.
•Click the point parameter for the Compensation Sample Point in the Effect Controls panel, and then click
where you want to move the point in the Composition panel.
5Choose Final Output from the Viewing Mode control.
Median effect
The Median effect replaces each pixel with a pixel that has the median color value of neighboring pixels with the
specified Radius. At low Radius values, this effect is useful for reducing some types of noise. At higher Radius values,
this effect gives an image a painterly appearance.
This effect works with 8-bpc and 16-bpc color.
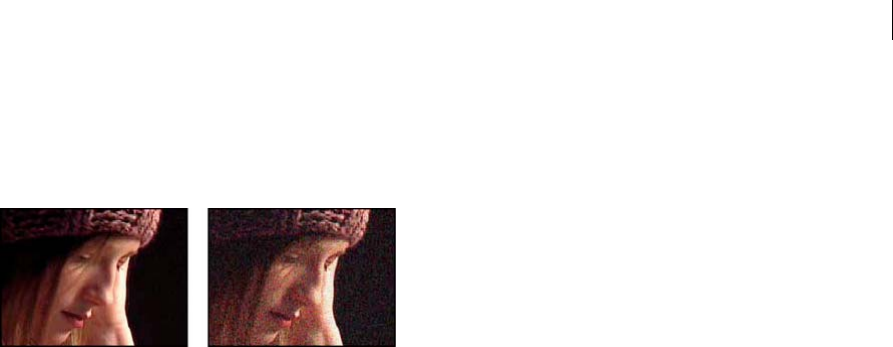
498
Effects and animation presets
Last updated 6/8/2015
Noise effect
The Noise effect randomly changes pixel values throughout the image.
This effect works with 8-bpc, 16-bpc, and 32-bpc color.
Amount Of Noise The amount of noise to add.
Noise Type Use Color Noise adds random values to the red, green, and blue channels individually. Otherwise, the same
random value is added to all channels for each pixel.
Clipping Clips color channel values. Deselecting this option causes more apparent noise. This control does not work
in a 32-bpc project.
Noise Alpha effect
The Noise Alpha effect adds noise to the alpha channel.
This effect works with 8-bpc color.
Noise The type of noise. Unique Random creates equal amounts of black and white noise. Squared Random creates
high-contrast noise. Uniform Animation creates animated noise, and Squared Animation creates animated high-
contrast noise.
Amount The magnitude of the noise.
Original Alpha How to apply the noise to the alpha channel:
Add Produces equal amounts of noise in the transparent and opaque areas of the clip.
Clamp Produces noise in the opaque areas only.
Scale Increases the amount of noise proportionate to the level of opacity and produces no noise in 100% transparent
areas.
Edges Produces noise only in partially transparent areas, such as the edge of the alpha channel.
Overflow How the effect remaps values that fall outside the grayscale range of 0-255:
Clip Values above 255 are mapped to 255. Values below 0 are mapped to 0.
Wrap Back Values above 255 or below 0 are reflected back into the 0-255 range. For example, a value of 258 (255+3) is
reflected to 252 (255-3), and a value of -3 is reflected to 3.
Wrap Values above 255 and below 0 are wrapped back around into the 0-255 range. For example, a value of 258 wraps
around to 2, a value of 256 wraps around to 0, and a value of -3 wraps around to 253.
Random Seed An input value to the random number generator for the noise. This control is active only if you choose
Uniform Random or Squared Random.
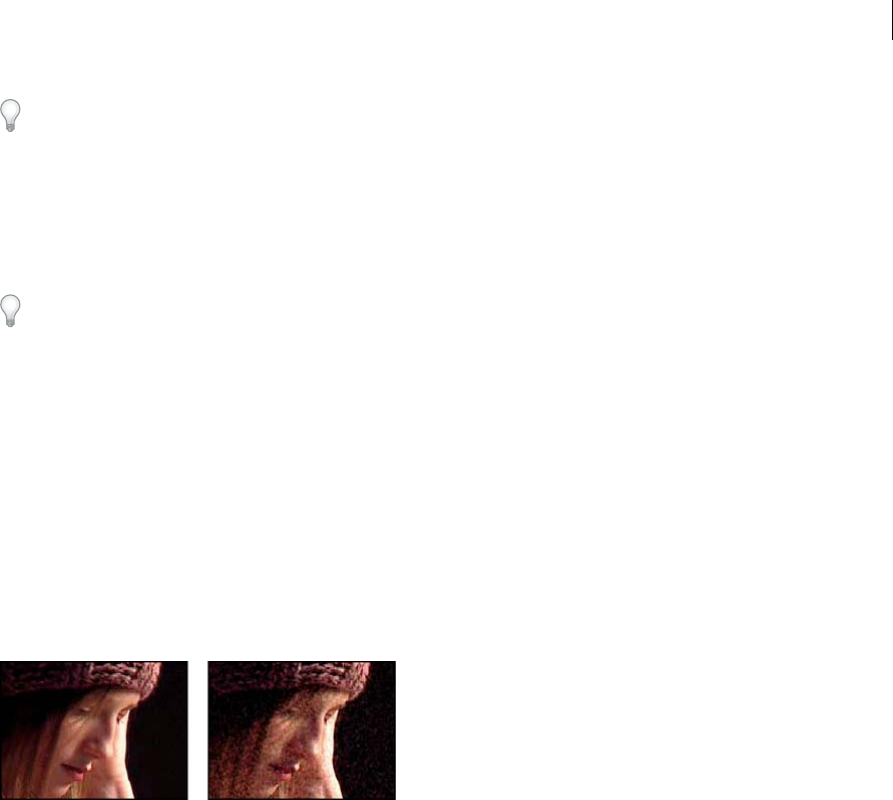
499
Effects and animation presets
Last updated 6/8/2015
To produce flashing noise, animate the Random Seed control. To create smoothly animated noise, animate the Noise
Phase value.
Noise Phase Specifies the placement of noise. This control is active only if you choose Uniform Animation or Squared
Animation.
Noise Options (Animation) How noise is animated.
Alter the timing of the Noise Phase keyframes to adjust the speed of the Noise Phase cycles.
To save time animating the Noise Phase value, use the Cycle Noise option to create a seamless noise loop. Then, render
the layer, and re-import it as a new source footage item.
Cycle Noise Produces a cycle of noise that plays through once in the specified amount of time.
Cycle Specifies the numbers of revolutions of the Noise Phase that the noise cycles through before it repeats (available
only when Cycle Noise is selected).
Noise HLS effect and Noise HLS Auto effect
The Noise HLS and Noise HLS Auto effects add noise to the hue, lightness, and saturation components of an image.
The noise generated by the Noise HLS Auto effect is automatically animated noise; you choose the speed of the
animation. To animate the Noise HLS effect, use keyframes or expressions. Controls for these effects are the same
except for the Noise Phase or Noise Animation Speed control, which controls noise animation.
These effects work with 8-bpc color.
Noise The type of noise. Uniform produces uniform noise. Squared creates high-contrast noise. Grain produces
grainlike noise similar to film grain.
Hue The amount of noise added to hue values.
Lightness The amount of noise added to lightness values.
Saturation The amount of noise added to saturation values.
Grain Size This control is active only for the Grain type of noise.
Noise Phase (Noise HLS only) An input value to the random number generator for the noise. When you set keyframes
for Noise Phase, the effect cycles through the phases to create animated noise. Greater value differences between
keyframes increase the speed of the noise animation.
Noise Animation Speed (Noise HLS Auto only) The speed of the noise animation. To accelerate or decelerate the noise
animation, animate this property.
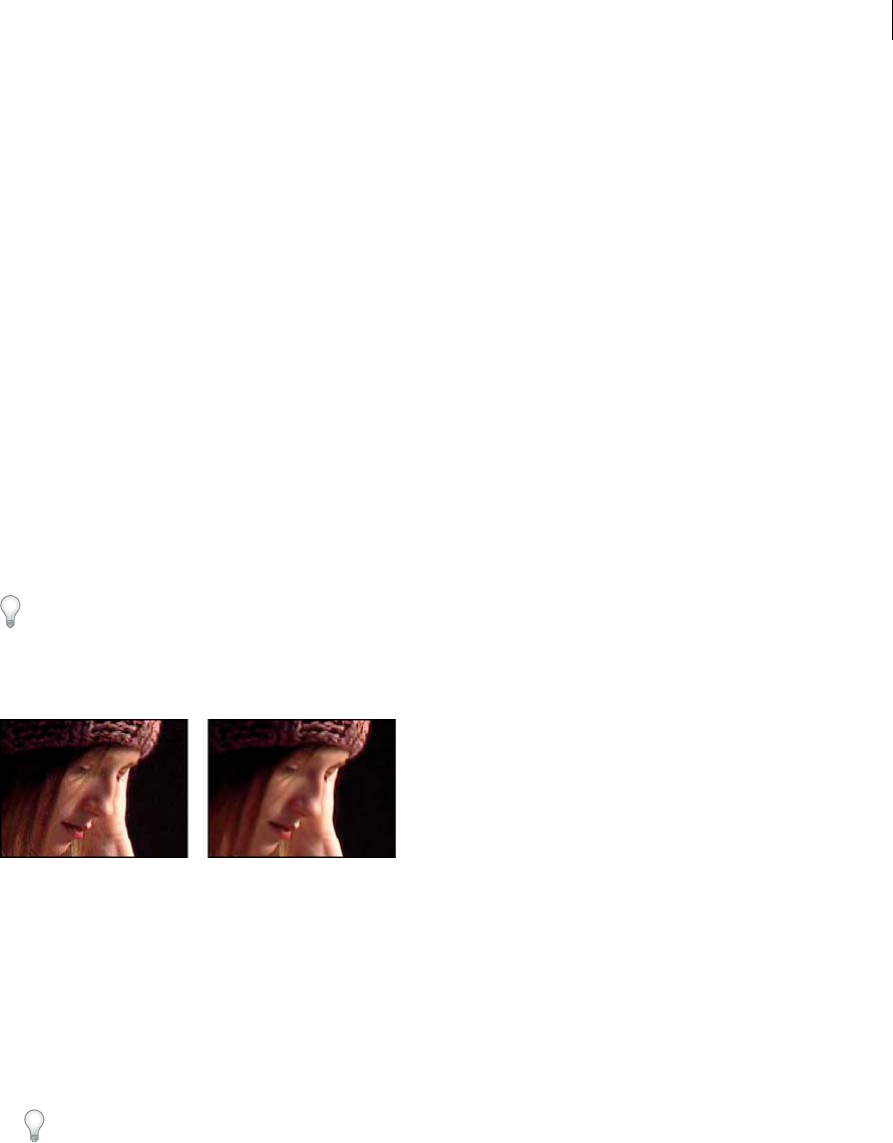
500
Effects and animation presets
Last updated 6/8/2015
Remove Grain effect
To remove grain or visual noise, use the Remove Grain effect. This effect uses sophisticated signal processing and
statistical estimation techniques in an attempt to restore the image to how it would look without the grain or noise.
While many techniques, such as applying a mild Gaussian Blur effect or the Median effect, reduce the visibility of noise
in an image, the tradeoff is an unavoidable loss of sharpness and highlights. The Remove Grain effect, in contrast,
differentiates fine image detail from grain and noise and preserves the image detail as much as possible.
The Remove Grain effect provides several options to precisely balance the reduction in noise and the amount of
sharpness retained in the image. Additionally, the Remove Grain effect can analyze the differences between frames to
further improve noise reduction and sharpness; since this process operates over time, it is called temporal filtering.
Note: Good degraining depends on good noise sampling. The results of the automatic sampling depend on the image content
and noise type. You can also change the number, size, and position of the samples to get the best results for a particular
image.
The Temporal Filtering controls of the Remove Grain effect use a statistical algorithm to blend the current frame with
previous and next frames. These controls are especially effective in removing compression artifacts from DV or video
footage.
To properly evaluate the results of this filter, the result must be viewed in real time, either with a review or by viewing
a movie rendered to a file.
To increase the speed of the Remove Grain effect preview, adjust the Remove Grain controls in order in the Effect
Controls panel. Specifically, the most efficient workflow is to find effective degraining settings first and to adjust the last
three controls last.
This effect works with 8-bpc and 16-bpc color.
Remove noise or grain from an image
1Select the layer, and choose Effect > Noise & Grain > Remove Grain.
2Adjust any of the following using the Noise Reduction Settings controls group:
•To adjust the overall amount of noise in the image, adjust the Noise Reduction value.
•To adjust the amount of noise on each channel individually, adjust the Red, Green, and Blue Noise Reduction
values in the Channel Noise Reduction controls.
You can easily create new fractal noise animations by reusing previously created Evolution cycles and changing only
the Random Seed value. Using a new Random Seed value alters the noise pattern without disturbing the Evolution
animation.
3Adjust the Passes value to control the maximum noise radius that can be detected:
•If your grain is large and chunky, try increasing the Passes value. A higher number of passes reduces larger-sized
noise.
•If your render time is longer than desired because your file size is large, try lowering the number of passes to
reduce the memory usage and render time.

501
Effects and animation presets
Last updated 6/8/2015
Note: Once the optimum number of passes is applied, additional passes have no effect.
4Choose one of the following from the Mode pop-up menu:
Multichannel Degrains all channels of a color image together, which generally produces the best results on color
images. This mode takes advantage of correlations between channels to improve the accuracy of the denoising
process.
Single Channel Degrains each channel independently. Use this mode for a monochromatic image or if
Multichannel causes objectionable color artifacts.
5Adjust any of the following in the Fine Tuning controls group to improve the balance between noise reduction and
retained sharpness:
Chroma Suppression Suppresses some of the chroma from the noise to clean up the image. If the noise is colorful,
increasing this control can help remove it. Setting the amount too high may strip some chroma from the image itself.
(Chroma Suppression has no effect on grayscale images and isn’t available if the Noise Reduction Settings Mode is
Single Channel.)
Texture Controls the amount of low-level noise that passes through to the output. This setting is especially useful
to reduce objectionable artifacts or to retain finely textured areas such as wood grain or brick. Lower values result
in a smoother, possibly artificial-looking result. Higher values may leave the output unchanged from the input.
Noise Size Bias Controls how the noise reduction process responds to variations in noise size within the same
image. The default value of zero treats all sizes equally. Negative values leave larger residual noise and more
aggressively remove smaller-sized grain. Positive values leave smaller noise and more aggressively remove noise of
larger size.
Clean Solid Areas Controls the extent to which adjacent pixels with low variations in value are smoothed out by the
noise reduction process. This setting is helpful for large areas of solid color that need to be as clean as possible.
Settings that are too high can smooth out nearly solid areas of the image, resulting in an artificial appearance.
6Adjust the Unsharp Mask controls to return subtle edge detail that the degraining removed.
7Use the Temporal Filtering controls to perform interframe noise reduction.
8To change the effect view, choose any of the following from the Viewing Mode pop-up menu:
Noise Samples Shows the areas that have been sampled to extract the current noise model.
Preview Displays the current settings of the applied effect in a 200x200 pixel area.
Blending Matte Shows the current color matte or mask, or the combination of both, which results from the current
settings of the Blend With Original controls group.
9Choose Final Output from the Viewing Mode control.
Add temporal filtering to a layer
1Apply the Remove Grain effect to your image.
2Place the Remove Grain preview region over the area of the image that has the most subtle changes from frame to
frame or that has the most moving image detail.
3Select Enable in the Temporal Filtering controls.
4Adjust the Amount value to 100%.
5Render the composition and export it.
6If you see unwanted streaking or blurs around moving objects, reduce the Motion Sensitivity value, and then
preview or render it again.

502
Effects and animation presets
Last updated 6/8/2015
7Try the following techniques if you want to improve the results:
•To quickly reduce noise in a movie that has a lot of buzzing noise, set the Noise Reduction value to zero and the
Temporal Filtering Amount to 100%, and render the movie.
•To speed up previews, apply temporal filtering to your layer after all the settings for a single frame have been
adjusted.
•To retain effects on a layer and also apply temporal filtering to it, precompose the selected layer (choose Layer >
Precompose), and then apply the Remove Grain effect to that layer.
Sharpen an image with Unsharp Mask controls
The Remove Grain effect contains Unsharp Mask controls, which increase the contrast of edges and fine details to help
restore some of the sharpness that may have been lost during the grain reduction process.
❖Do any of the following:
•Increase the Unsharp Mask controls Amount value to obtain acceptable sharpening without generating
undesirable artifacts or bringing back too much grain.
•Increase the Threshold value to remove any unwanted artifacts that resulted from the sharpening.
•Adjust the Radius to change the area over which Unsharp Mask finds details.
•Adjust the Noise Reduction value until the image begins to lose sharpness; then decrease the value a little, and
then apply the Unsharp Mask controls to sharpen the image.
Turbulent Noise effect
The Turbulent Noise effect uses Perlin noise to create grayscale noise that you can use for organic-looking backgrounds,
displacement maps, and textures, or to simulate things like clouds, fire, lava, steam, flowing water, or vapor.
The Turbulent Noise effect is essentially a modern, higher-performance implementation of the Fractal Noise effect. The
Turbulent Noise effect takes less time to render, and it’s easier to use for creating smooth animations. The Turbulent
Noise effect also more accurately models turbulent systems, with smaller noise features moving more quickly than
larger noise features. The primary reason to use the Fractal Noise effect instead of the Turbulent Noise effect is for the
creation of looping animations, since the Turbulent Noise effect doesn’t have Cycle controls.
Note: Because the controls for the two effects are nearly identical, you can use most instructions and tutorials created for
the Fractal Noise effect to instead guide your use of the Turbulent Noise effect. (See Fractal Noise effect.)
The Evolution controls create subtle changes in the shape of the noise. Animating these controls results in smooth
changes of the noise over time, creating results that resemble, for example, passing clouds or flowing water.
This effect works with 8-bpc, 16-bpc, and 32-bpc color.
Controls
Fractal Type The fractal noise is created by generating a grid of random numbers for each noise layer. The Complexity
setting specifies the number of noise layers. The Fractal Type setting determines the characteristics of this grid.
Noise Type The type of interpolation to use between the random values in the noise grid.
Invert Inverts the noise. Black areas become white, and white areas become black.
Contrast The default value is 100. Higher values create larger, more sharply defined areas of black and white in the
noise, generally revealing less subtle detail. Lower values result in more areas of gray, softening or muting the noise.
Overflow Remaps color values that fall outside the range of 0–1.0, using one of the following options:

503
Effects and animation presets
Last updated 6/8/2015
Clip Remaps values so that any value above 1.0 is displayed as pure white, and any value below 0 is displayed as pure
black. The Contrast value influences how much of the image falls outside this range. Higher values result in a mostly
black and/or white image with less gray area. Therefore, higher contrast settings display less subtle detail. When used
as a luma matte, the layer has sharper, better-defined areas of transparency.
Soft Clamp Remaps values on an infinite curve so that all values stay in the range. This option reduces contrast and
makes noise appear gray with few areas of pure black or pure white. When used as a luma matte, the layer contains
subtle areas of transparency.
Wrap Back Remaps triangularly, so that values above 1.0 or below 0 fall back into the range. This option reveals subtle
detail when Contrast is set above 100. When used as a luma matte, the layer reveals more detailed textured areas of
transparency.
Allow HDR Results No remapping is performed. Values outside the range of 0-1.0 are preserved.
Transform Settings to rotate, scale, and position the noise layers. The layers appear as if they are at different depths if
you select Perspective Offset.
Complexity The number of noise layers that are combined (according to the Sub Settings) to create the noise.
Increasing this number increases the apparent depth and amount of detail in the noise.
Note: Increasing Complexity results in longer rendering times. If appropriate, try reducing the Size rather than increasing
Complexity to achieve similar results and avoid longer rendering. A trick to increase apparent complexity without
increasing rendering time is to use a negative or very high Contrast or Brightness setting and choose Wrap Back for
Overflow.
Sub Settings The noise is generated by combining layers of noise. The Sub Settings control how this combination
occurs and how the properties of the noise layers are offset from one another. Scaling successive layers down creates
finer details.
Sub Influence How much influence each successive layer has on the combined noise. At 100%, all iterations have the
same amount of influence. At 50%, each iteration has half as much influence as the previous iteration. A value of 0%
makes the effect appear exactly as if Complexity is 1.
Sub Scaling The scale percentage of a noise layer relative to the previous noise layer.
Evolution Uses progressive revolutions that continue to change the image with each added revolution. This method is
unlike typical revolutions that refer to a setting on the dial control for which the result is the same for every multiple of
360°. For Evolution, the appearance at 0° is different from the appearance at 1 revolution, which is different from the
appearance at 2 revolutions, and so on.
You can specify how much the noise evolves over a period of time by animating Evolution. The more revolutions within
a given amount of time, the more rapidly the noise changes. Large changes in the Evolution value over a short period
of time may result in flashing.
Evolution Options
Turbulence Factor The amount by which the speed of smaller noise features differs from the speed of larger noise
features. A value of 0 makes the movement of the noise resemble the noise generated by the Fractal Noise effect, in
which smaller noise features move at the same speed as larger noise features. A larger value makes the multiple layers
of noise appear to roil in a manner more like that of natural turbulence in a fluid.
Random Seed Sets a random value from which to generate the noise. Animating the Random Seed property results in
flashing from one set of noise to another (within that fractal type), which is usually not the result that you want. For
smooth animation of noise, animate the Evolution property.

504
Effects and animation presets
Last updated 6/8/2015
You can easily create new noise animations by reusing previously created Evolution cycles and changing only the
Random Seed value. Using a new Random Seed value alters the noise pattern without disturbing the Evolution
animation.
Opacity The opacity of the noise.
Blending Mode The blending operation between the noise and the original image. These blending modes are identical
to the ones in the Modes column in the Timeline panel, with the following exceptions:
For a description of each blending mode, see Blending mode reference.
None Renders the fractal noise only and does not composite on the original layer.
Hue Renders the fractal noise as hue values instead of grayscale. The Saturation and Lightness of the original layer are
maintained. If the original layer is grayscale, nothing happens.
Saturation Renders the fractal noise as saturation values instead of grayscale. The Hue and Lightness of the original
layer are maintained. If the original layer is grayscale, nothing happens.
Channel effects
Third-party effects in this category included with After Effects:
•CC Composite effect
See Third-party plug-ins included with After Effects.
Additional resources about Channel effects
Satya Meka provides the Separate RGB effect plug-in on the After Effects Scripts website. This effect—which was
written with Pixel Bender—offsets, scales, and rotates each color channel of an image separately.
Chris Forrester provides a video tutorial on his website that shows how to use the Channel Mixer, Shift Channels, and
Set Matte effects to create mattes from color ID passes from 3D applications. He also provides an animation preset that
sets up the parameters in the Channel Mixer effect for the use of an RGBCMY color ID pass.
Arithmetic effect
The Arithmetic effect performs various simple mathematical operations on the red, green, and blue channels of an
image.
This effect works with 8-bpc color.
Operator The operation to perform between the value you specify for each channel and the existing value of that
channel for each pixel in the image:
And, Or, and Xor Apply bitwise logical operations.
Add, Subtract, Multiply, and Difference Apply basic math functions.
Max Set the channel value of the pixel to the greater of the specified value and the original value of the pixel.
Min Set the channel value of the pixel to the lesser of the specified value and the original value of the pixel.
Block Above Set the channel value of the pixel to zero if the original value of the pixel is greater than the value specified;
otherwise, leave the original value.

505
Effects and animation presets
Last updated 6/8/2015
Block Below Set the channel value of the pixel to zero if the original value of the pixel is less than the value specified;
otherwise, leave the original value.
Slice Set the channel value of the pixel to 1.0 if the original value of the pixel is above the specified value; otherwise, set
the value to zero. In both cases, the values for the other color channels are set to 1.0.
Screen Multiplies the complements of the channel values, and then takes the complement of the result. The result color
is never darker than either input color.
Clip Result Values Prevents all functions from creating color values that exceed the valid range. If this option isn’t
selected, some color values may wrap around.
Blend effect
The Blend effect blends two layers using one of five modes.
You can blend layers more easily and quickly using blending modes, but you can’t animate blending modes. The
advantage of using the Blend effect is that you can animate it. (See Blending modes and layer styles .)
This effect works with 8-bpc and 16-bpc color.
John Dickinson explains the use of the Blend effect in an entry in the A-Z series on the Motionworks website.
Blend With Layer The layer to blend with (the secondary or control layer).
Note: To use a layer as a control layer for the Blend effect but not show the layer in the rest of the composition, deselect the
control Video switch for the control layer. (See Layer switches and columns in the Timeline panel.)
Mode Blending mode:
•Color Only colorizes each pixel in the original image based on the color of each corresponding pixel in the
secondary image.
•Tint Only is similar to Color Only but tints pixels in the original image only if they’re already colored.
•Darken Only darkens each pixel in the original image that is lighter than the corresponding pixel in the secondary
image.
•Lighten Only lightens each pixel in the original image that is darker than the corresponding pixel in the secondary
image.
•Crossfade causes the original image to fade out while the secondary image fades in.
Note: You can create a crossfade without applying an effect by animating the Opacity property of one layer on top of
another. However, this technique doesn’t work if the frontmost layer has any transparent portions (which allow the other
layer to show through, even when at full opacity). The Crossfade mode creates a proper crossfade between two layers, even
if both have transparent regions.
Blend With Original The transparency of the effect. The result of the effect is blended with the original image, with the
effect result composited on top. The higher you set this value, the less the effect affects the layer. For example, if you set
this value to 100%, the effect has no visible result on the layer; if you set this value to 0%, the original image doesn’t
show through.
If Layer Sizes Differ Specifies how to position the control layer. The quality setting of the layer affects Blend only if
Stretch To Fit is selected and if the layers are of different sizes. Stretching at Best quality is much smoother.
Calculations effect
The Calculations effect combines channels of one layer with the channels of a second layer.

506
Effects and animation presets
Last updated 6/8/2015
This effect works with 8-bpc and 16-bpc color.
Input Channel The channel to extract and use as input to the blending operation. RGBA displays all channels normally.
Gray converts all color channel values for a pixel to the luminance value of the original pixel. Red, Green, or Blue
converts all color channel values for a pixel to the value of the selected color channel for the original pixel. Alpha
converts all channels to the value of the alpha channel for the original pixel.
Invert Input Inverts the layer (subtracts each channel value from 1.0) before the effect extracts the specified channel
information.
Second Layer The control layer with which Calculations blends the original layer.
Second Layer Channel The channel to be blended with the input channels.
Second Layer Opacity The opacity of the second layer. Use a setting of 0% for the second layer to have no influence on
the output.
Invert Second Layer Inverts the second layer (subtracts each channel value from 1.0) before the effect extracts the
specified channel information.
Stretch Second Layer To Fit Stretches the second layer to the dimensions of the original layer before blending. Deselect
to center the second layer on the original layer.
Preserve Transparency Ensures that the alpha channel of the original layer isn’t modified.
Channel Combiner effect
The Channel Combiner effect extracts, displays, and adjusts channel values for a layer.
Note: You can use this effect to view any channel as a grayscale image by choosing the channel from the From menu and
choosing Lightness Only from the To menu.
This effect works with 8-bpc color.
Chris and Trish Meyer provide instructions on the ProVideo Coalition website for using the Channel Combiner effect
with the Levels effect to affect only the luma (detail) information in an image—or, conversely, to only affect the color
information in an image.
Use 2nd Layer Retrieve values from Source Layer, which can be any layer in the composition.
From Which values to use as input; the first several items in the menu are multichannel combinations of input and
output options, so they don’t require you to set a To value.
•Saturation Multiplied uses the saturation value multiplied by the lightness value, where lightness is the minimum
distance to black or white. For example, a dark or light blue pixel has a lower value than a bright or pure blue pixel.
This option represents the most common view of the saturation value of a pixel.
•Min RGB uses the lowest value among the red, green, and blue channel values.
•Max RGB uses the highest value among the red, green, and blue channel values.
To The channels to which to apply the values. Choose Red Only, Green Only, and Blue Only to apply the value to one
channel only and set the other color channels to zero. Choose Alpha Only to apply the value to the alpha channel and
set the color channels to 1.0. When you select Hue Only, the applied hue value is combined with 50% lightness and
100% saturation. When you select Lightness Only, the applied lightness value is combined with 0% saturation, which
then gives the hue no influence. When you select Saturation Only, the applied saturation values are combined with 0%
hue and 50% lightness.
Invert Inverts (subtracts from 1.0) the output channel values.
Solid Alpha Makes the alpha channel value 1.0 (complete opacity) throughout the layer.

507
Effects and animation presets
Last updated 6/8/2015
Compound Arithmetic effect
The Compound Arithmetic effect mathematically combines the layer to which it is applied with a control layer. The
Compound Arithmetic effect is intended only to provide compatibility with projects created in earlier versions of After
Effects that use the Compound Arithmetic effect. Using blending modes is usually more effective than using the
Compound Arithmetic effect.
This effect works with 8-bpc color.
Second Source Layer The layer to use with the current layer in the given operation.
Operator The operation to perform between the two layers.
Operate On Channels The channels to which the effect is applied.
Overflow Behavior How the effect remaps values that fall outside the grayscale range of 0-255.
Clip Values above 255 are mapped to 255. Values below 0 are mapped to 0.
Wrap Values above 255 and below 0 are wrapped back around into the 0-255 range. For example, a value of 258 wraps
around to 2, a value of 256 wraps around to 0, and a value of -3 wraps around to 253.
Scale The maximum and minimum values are remapped to 255 and 0, and intermediate values are stretched or
compressed to fit within this range.
Stretch Second Source To Fit Scales the second layer to match the size (width and height) of the current layer. If this
option is deselected, the second layer is placed at the current size of its source, aligned with the upper left corner of the
source layer.
Blend With Original The transparency of the effect. The result of the effect is blended with the original image, with the
effect result composited on top. The higher you set this value, the less the effect affects the layer. For example, if you set
this value to 100%, the effect has no visible result on the layer; if you set this value to 0%, the original image doesn’t
show through.
Invert effect
The Invert effect inverts the color information of an image.
This effect works with 8-bpc, 16-bpc, and 32-bpc color.
Channel Which channel or channels to invert. Each group of items operates in a particular color space, inverting either
the entire image in that color space or only a single channel.
RGB/Red/Green/Blue RGB inverts all three of the additive color channels. Red, Green, and Blue each invert an
individual color channel.
HLS/Hue/Lightness/Saturation HLS inverts all three of the calculated color channels. Hue, Lightness, and Saturation
each invert an individual color channel.
YIQ/Luminance/In Phase Chrominance/Quadrature Chrominance YIQ inverts all three NTSC luminance and
chrominance channels. Y (luminance), I (in-phase chrominance), and Q (quadrature chrominance) each invert an
individual channel.
Alpha Inverts the alpha channel of the image. The alpha channel isn’t a color channel; it specifies transparency.
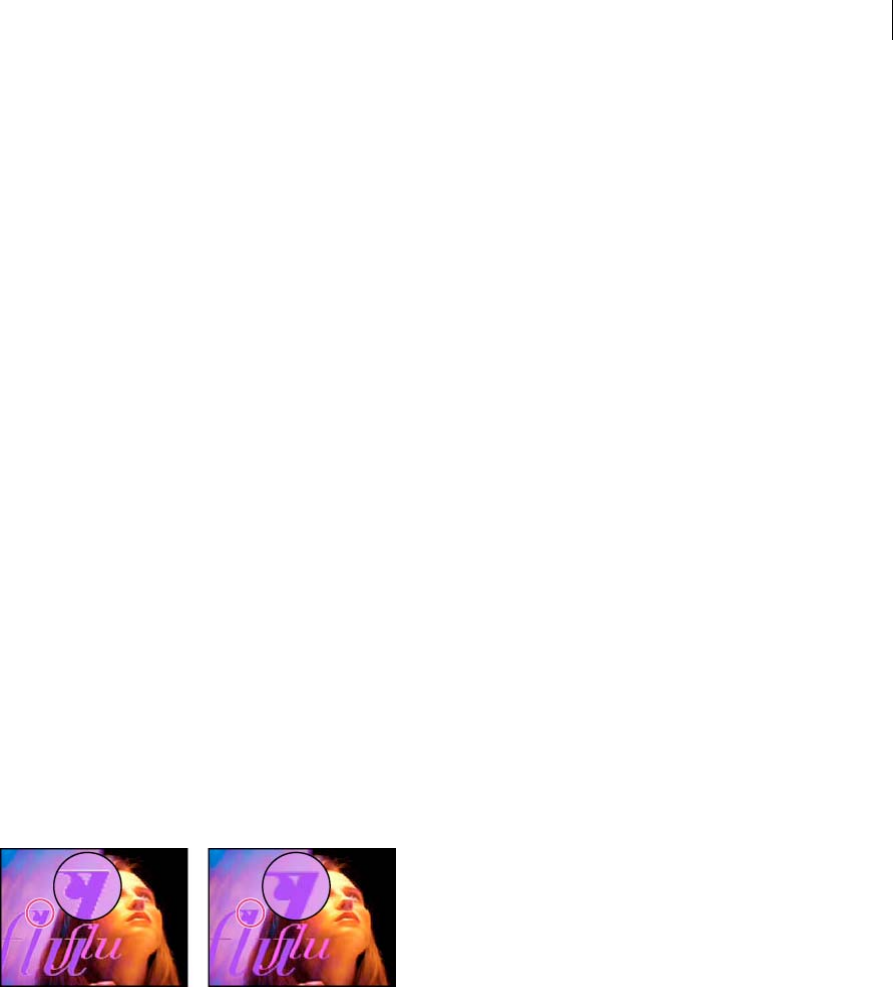
508
Effects and animation presets
Last updated 6/8/2015
Blend With Original The transparency of the effect. The result of the effect is blended with the original image, with the
effect result composited on top. The higher you set this value, the less the effect affects the layer. For example, if you set
this value to 100%, the effect has no visible result on the layer; if you set this value to 0%, the original image doesn’t
show through.
Minimax effect
The Minimax effect assigns each channel of a pixel the minimum or maximum value for that channel found within a
specified radius.
This effect can be used to enlarge or reduce a matte. For example, a white solid area surrounded by black shrinks one
pixel on each side using Minimum and a radius of 1.
The quality setting of the layer doesn’t affect Minimax.
This effect works with 8-bpc and 16-bpc color.
Operation Minimum assigns each channel of a pixel the minimum value for the specified channel within the specified
radius. Maximum assigns each channel of a pixel the maximum value. Minimum Then Maximum performs the
Minimum operation and then the Maximum operation. Maximum Then Minimum performs the Maximum operation
and then the Minimum operation.
Direction The axis along which to scan for values. Horizontal & Vertical scans all directions.
Remove Color Matting effect
The Remove Color Matting effect removes color fringes (halos) from layers with premultiplied color channels. Halos
often occur when an area of partial transparency retains the color of the original background and is composited into a
context with a different background color. Use this effect in conjunction with effects that create transparency—such as
keying effects—to achieve more control over the appearance of areas of partial transparency. (See Alpha channel
interpretation: premultiplied or straight.)
This effect works with 8-bpc, 16-bpc, and 32-bpc color.
Use Background Color to specify the new background color. To allow this effect to generate color values outside the
range 0.0-1.0 when working in 32-bpc color, deselect Clip HDR Values.
The Remove Color Matting effect was previously known as the Unmultiply effect. The old name refers to the fact that
this effect functions by unpremultiplying color channels—removing the result of the background color being
premultiplied with the color channels of the layer in areas of partial transparency. This functionality differs from Knoll
Unmult and other effects that synthesize an alpha channel from the color channels in an image.
Aharon Rabinowitz provides a video tutorial on the Creative COW website that describes how and when to use the
Remove Color Matting effect.
Todd Kopriva provides a post on the Adobe website that describes the use of the Remove Color Matting and Shift
Channels effects to remove black backgrounds from images.
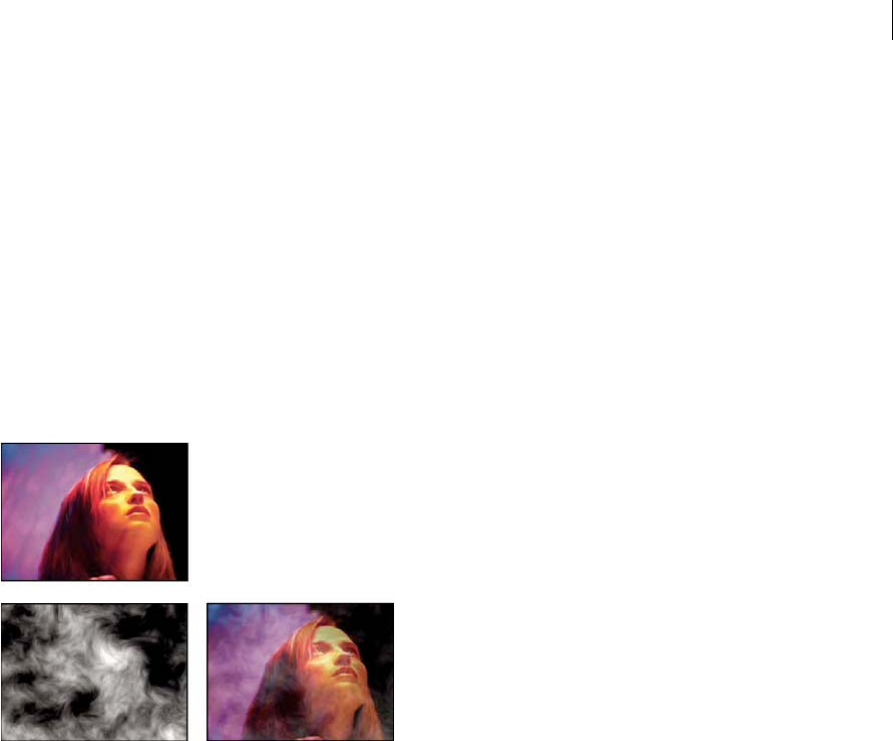
509
Effects and animation presets
Last updated 6/8/2015
Set Channels effect
The Set Channels effect copies channels from control layers (source layers) to the red, green, blue, and alpha channels
of the effect layer. For example, you can take the luminance values of the pixels of a control layer and use them as the
blue values for the pixels of the effect layer.
This effect works with 8-bpc and 16-bpc color.
Set Matte effect
The Set Matte effect replaces the alpha channel (matte) of a layer with a channel from another layer above it for the
creation of traveling matte results. The Set Matte effect is intended only to provide compatibility with projects created
in earlier versions of After Effects that use the Set Matte effect.
This effect works with 8-bpc and 16-bpc color. In After Effects CS6 or later, this effect works in 32-bit color.
Sometimes, it’s easier and faster to create traveling mattes by using a track matte instead of using the Set Matte effect.
However, using the Set Matte effect provides some advantages over defining a layer as a track matte layer. The layer used
as the matte with the Set Matte effect can be anywhere in the layer stacking order, unlike a track matte layer, which must
be directly above the matted layer in the layer stacking order. Also, one layer can be used as the matte for multiple layers
with the Set Matte effect. (See Track mattes and traveling mattes.)
Take Matte From Layer The layer to use as the replacement matte.
Use For Matte The channel to use for the matte.
Invert Matte Inverts the transparency values of the matte.
Stretch Matte To Fit Scales the selected layer to match the size of the current layer. If Stretch Matte To Fit is deselected,
the layer designated as the matte is centered in the first layer.
Composite Matte With Original Composites the new matte with the current layer, rather than replacing it. The resulting
matte allows the image to show through only where the current matte and the new matte both have some opacity.
Premultiply Matte Layer Premultiplies the new matte layer with the current layer.
Shift Channels effect
The Shift Channels effect replaces red, green, blue, and alpha channels in the image with values from other channels.
This effect works with 8-bpc, 16-bpc, and 32-bpc color.
Take Channel From The channel to use as a source.

510
Effects and animation presets
Last updated 6/8/2015
Todd Kopriva provides a post on the Adobe website that describes the use of the Remove Color Matting and Shift
Channels effects to remove black backgrounds from images.
Solid Composite effect
The Solid Composite effect offers a quick way to create a composite of a new color solid behind the original source layer.
This effect works with 8-bpc, 16-bpc, and 32-bpc color.
Source Opacity The opacity of the source layer.
Color The color of the solid.
Opacity The opacity of the solid.
Blending Mode The blending mode used to combine the layer and the solid color.
More Help topics
Blending modes and layer styles
Distort effects
You can use each of the Distort effects to distort (morph) an image.
Third-party effects in this category included with After Effects:
•CC Bend It effect
•CC Bender effect
•CC Blobbylize effect
•CC Flo Motion effect
•CC Griddler effect
•CC Lens effect
•CC Page Turn effect
•CC Power Pin effect
•CC Ripple Pulse effect
•CC Slant effect
•CC Smear effect
•CC Split effect
•CC Split 2 effect
•CC Tiler effect
See Third-party plug-ins included with After Effects.
Additional resources for Distort effects
Aharon Rabinowitz provides a project on his All Bets Are Off website that demonstrates the use of the CC Page Turn
effect to tear a piece of paper.
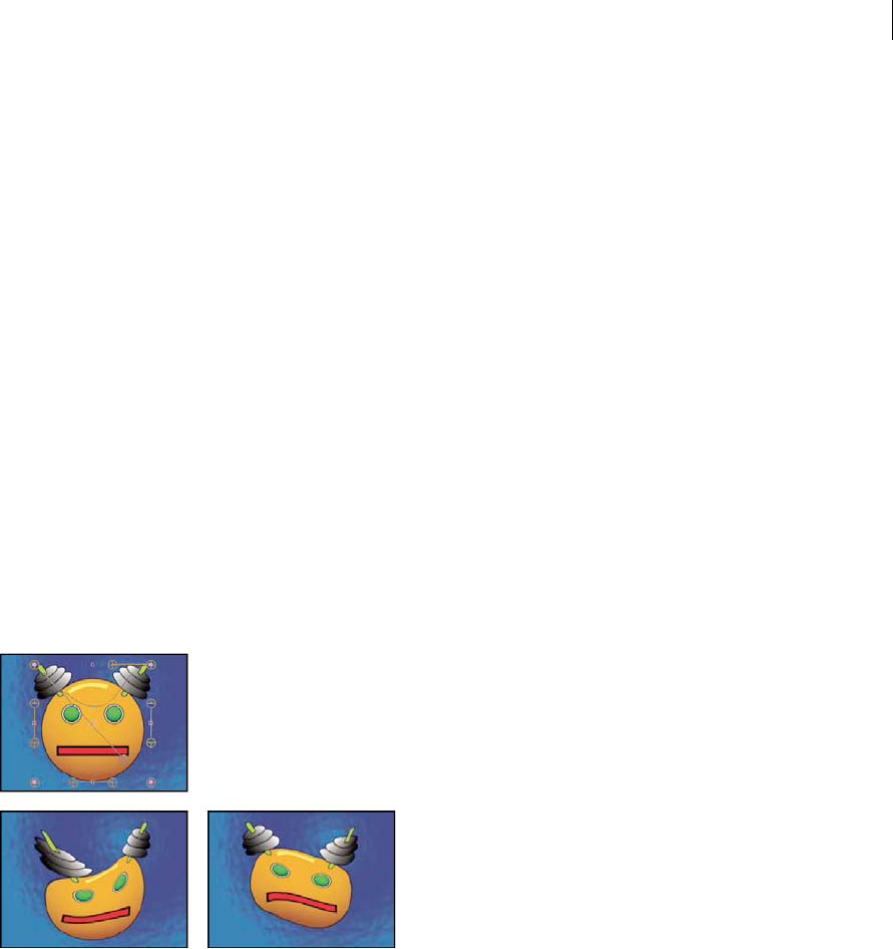
511
Effects and animation presets
Last updated 6/8/2015
Resources for Digieffects FreeForm
Note: Digieffects FreeForm is not included with the free trial version of After Effects. See Third-party plug-ins included with
After Effects.
Digieffects FreeForm is an effect that distorts 2D layers in 3D space, using displacement maps and meshes that you
define, control, and animate.
Documentation for Digieffects FreeForm is available on the Digieffects website.
Chris Bobotis of Mettle Communications provides tutorials and examples for FreeForm on his website.
Toolfarm hosts a Digieffects forum on Toolfarm website, where expert users of FreeForm post tutorials and answer
questions.
Todd Kopriva provides links to additional resources for Digieffects FreeForm on the Adobe website.
Bezier Warp effect
The Bezier Warp effect shapes an image using a closed Bezier curve along the boundary of a layer. The curve consists
of four segments. Each segment has three points (a vertex and two tangents).
Andrew Kramer provides a video tutorial on his Video Copilot website that demonstrates the use of the Bezier Warp
effect.
This effect works with 8-bpc and 16-bpc color.
The positions of the vertices and tangents determine the size and shape of a curved segment. Dragging these points
reshapes the curves that form the edge, thus distorting the image. For example, you can use Bezier Warp to reshape one
image to fit another, as in wrapping a label around a jar. Bezier Warp is also useful for correcting lens aberrations, such
as the fisheye effect (barrel distortion) that can occur with a wide-angle lens; using Bezier Warp, you can bend the image
back to achieve an undistorted look. By animating the effect and choosing a high quality setting, you can create fluid
visual effects, such as a jiggling gelatin dessert or a fluttering flag.
Bulge effect
The Bulge effect distorts an image around a specified point, making the image appear to bulge toward or away from the
viewer, depending on the options you select.
Eran Stern explains how to use the Bulge effect in a video tutorial on the Motionworks website.
This effect works with 8-bpc and 16-bpc color.
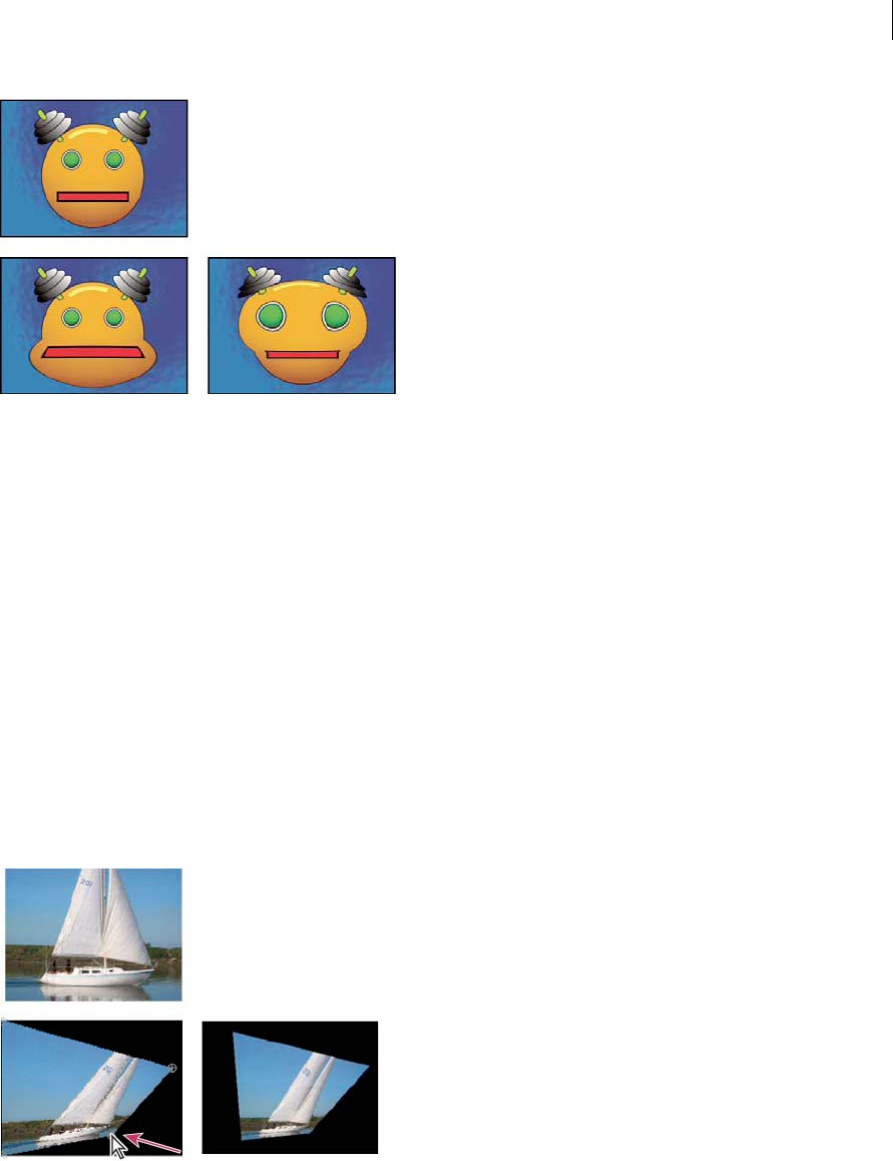
512
Effects and animation presets
Last updated 6/8/2015
Horizontal Radius and Vertical Radius The width and height of the distorted area, in pixels. You can also set the radius
values by dragging the selection handles in the layer.
Bulge Height The apparent depth of the bulge. Positive values push the bulge toward the viewer. Negative values pull
the bulge away from the viewer.
Taper Radius The shallowness of the sides of the bulge. A taper radius of 0 produces a steep, pronounced bulge.
Antialiasing The amount of edge smoothing (blending of colors) at the boundaries of the bulge. Anti-aliasing is applied
only when the layer quality is set to Best.
Pin All Edges Prevents the edges of the layer from bulging.
Corner Pin effect
The Corner Pin effect distorts an image by repositioning each of its four corners. Use it to stretch, shrink, skew, or twist
an image or to simulate perspective or movement that pivots from the edge of a layer, such as a door opening. You can
also use it to attach a layer to a moving rectangular region tracked by the motion tracker. You can move the corner pins
in the Composition panel, the Timeline panel, or the Effect Controls panel.
This effect works with 8-bpc, 16-bpc, and 32-bpc color.
The AE Enhancers forum describes and links to an animation preset from Donat van Bellinghen for scaling a set of
Corner Pin effect points.
The CC Power Pin effect—one of the Cycore FX plug-ins included with After Effects—provides some additional
features. For information, see the Cycore website.
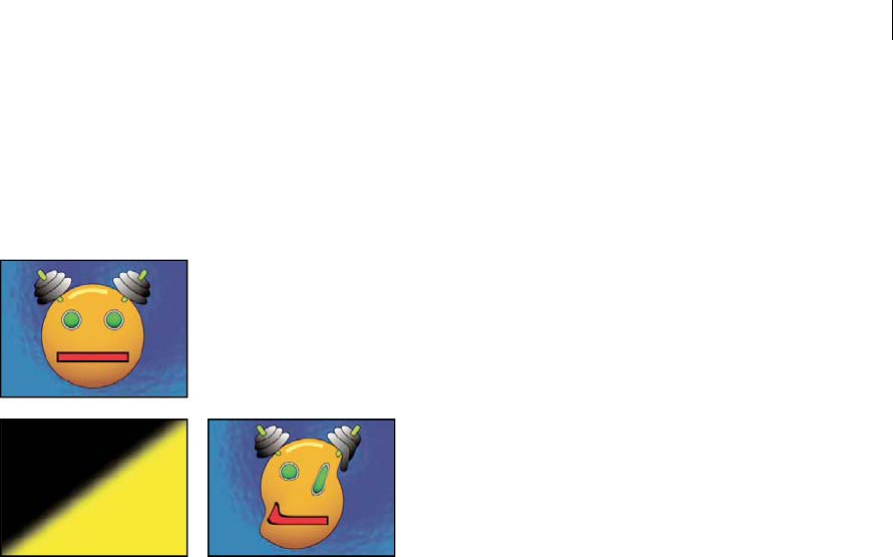
513
Effects and animation presets
Last updated 6/8/2015
Displacement Map effect
The Displacement Map effect distorts a layer by displacing pixels horizontally and vertically based on the color values
of pixels in the control layer specified by the Displacement Map Layer property. The type of distortion created by the
Displacement Map effect can vary greatly, depending on the control layer and options you select.
This effect works with 8-bpc, 16-bpc, and 32-bpc color.
The displacement is determined from the color values of the displacement map. The color values range from 0 to 255.
Each value is converted into a scale ranging from -1 to 1. The displacement amount is calculated by multiplying the
converted value by the maximum displacement amount you specify. A color value of 0 produces maximum negative
displacement (–1 * maximum displacement). A color value of 255 produces maximum positive displacement. A color
value of 128 produces no displacement.
The effect uses the control layer specified by Displacement Map Layer, without considering any effects or masks. If you
want to use the control layer with its effects, precompose it. If the control layer isn’t the same size as the layer to which
the effect is applied, it is centered, stretched, or tiled depending on the setting for Displacement Map Behavior.
Select Expand Output to allow the results of the effect to extend beyond the original boundaries of the layer to which
it’s applied. Select Wrap Pixels Around to copy pixels displaced outside the original layer boundaries to the opposite
side of the layer; that is, pixels pushed off the right side appear on the left side, and so on.
Online resources for the Displacement Map effect
Rick Gerard provides additional explanation and an example project for the Displacement Map effect on his website.
Eran Stern provides a video tutorial on the Creative COW website that shows how to use the Displacement Map effect
with a text layer and some smoke footage to create a smoky text title sequence.
Trish and Chris Meyer explain how to use blending modes, layer styles, and the Displacement Map effect to make text
blend in to appear to be part of a surface in the PDF article “Writing on the Wall” on the Artbeats website.
Chris Zwar provides an example project on his website that uses the Displacement Map effect, the Turbulent Displace
effect, the Texturize effect, and a combination of Blur and Color Correction effects to create a transition in which an
image appears as a watercolor image washed onto a rough piece of paper.
Robert Powers provides a video tutorial on the Slippery Rock NYC website that shows how to create and use a depth
matte and use it as a control layer for the Displacement Map effect. The result is then used by the 3D Glasses effect to
create a stereoscopic image.
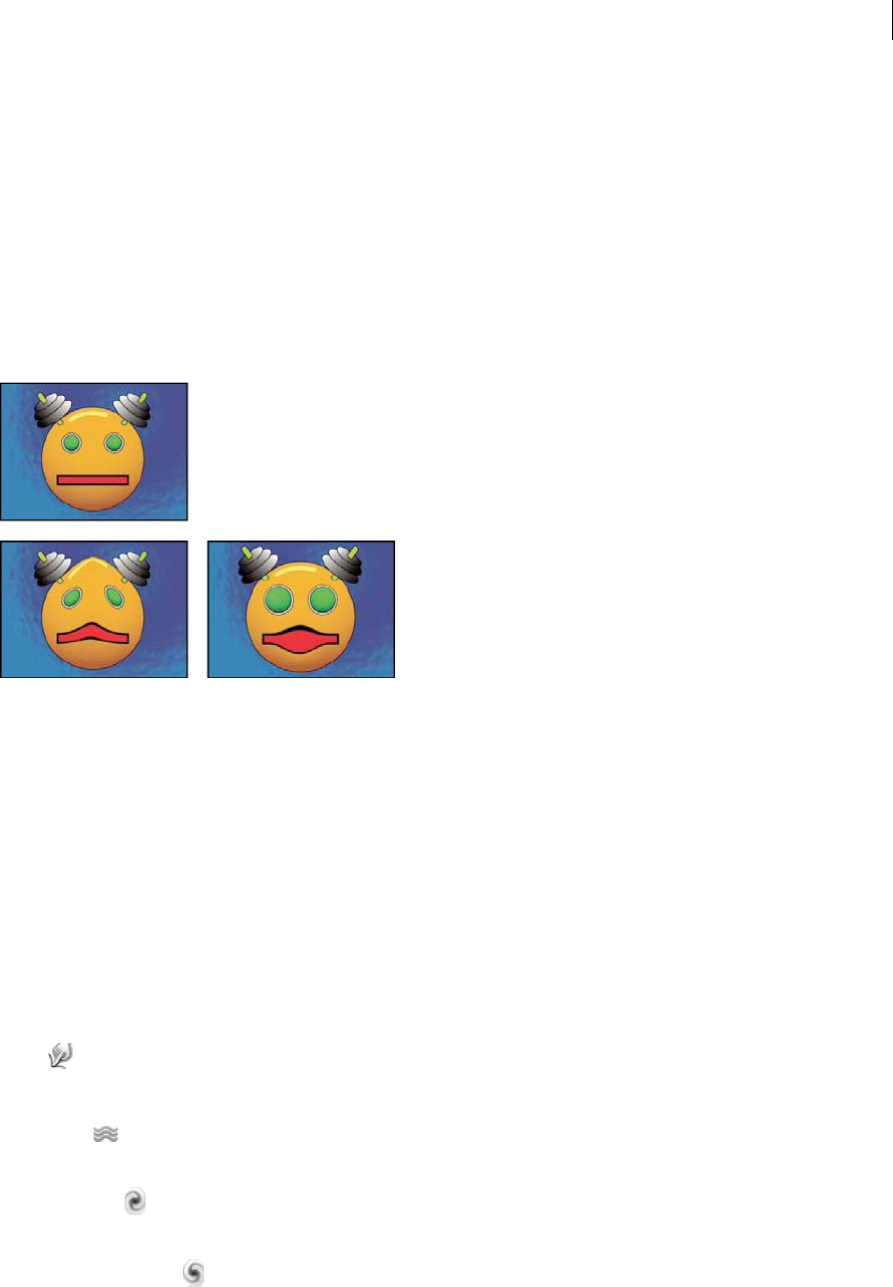
514
Effects and animation presets
Last updated 6/8/2015
Liquify effect
The Liquify effect lets you push, pull, rotate, enlarge, and shrink areas in a layer. Several Liquify tools distort the brush
area when you hold down the mouse button or drag. The distortion is concentrated at the center of the brush area, and
the effect intensifies as you hold down the mouse button or repeatedly drag over an area.
You can limit the area of a layer you distort by using Freeze Area Mask. Use the Reconstruction mode to lessen or undo
distortions you’ve created.
The Liquify effect can extend beyond the boundaries of the target layer. This extension is useful when the target layer
is smaller than the composition.
This effect works with 8-bpc and 16-bpc color.
Andrew Kramer provides a video tutorial on his Video Copilot websitethat demonstrates the use of the Liquify effect
to distort (morph) a human face into the face of a demon.
Mask properties
Freeze Area Mask Determines the area of the image in which mask opacity and feather settings affect the distortion.
Areas outside the mask are distorted; areas within the mask are distorted according to Mask Opacity and Mask Feather
settings.
Mask Opacity Determines how the distortion affects the area within the mask. If Mask Opacity is set to 100%, the
distortion doesn’t affect the area within the mask; if it’s set to 50%, the area within the mask is somewhat affected. If you
set Mask Opacity to 100%, make sure to feather the mask to prevent jagged edges on the mask.
Mask Feather The width of the feather used to blend pixels between the masked area and the nonmasked area.
Tools
Warp
Pushes pixels forward as you drag.
Turbulence
Smoothly scrambles pixels. This setting is useful for creating fire, clouds, waves, and similar effects.
Twirl Clockwise
Rotates pixels clockwise as you hold down the mouse button or drag.
Twirl Counterclockwise
Rotates pixels counterclockwise as you hold down the mouse button or drag.
515
Effects and animation presets
Last updated 6/8/2015
Pucker
Moves pixels toward the center of the brush area as you hold down the mouse button or drag.
Bloat
Moves pixels away from the center of the brush area as you hold down the mouse button or drag.
Shift Pixels
Moves pixels perpendicular to the stroke direction.
Reflection
Copies pixels to the brush area.
Clone
Copies the distortions from around a source location to the current mouse location. Set the source location by Alt-
clicking (Windows) or Option-clicking (Mac OS) the source point.
Reconstruction
Reverses distortions or applies them in different ways.
Distort an image with the Liquify effect
1Select the layer, and choose Effect > Distort > Liquify.
2In the Layer panel, create a mask to freeze areas of the image, and then set mask properties.
3In the Effect Controls panel do the following:
•Choose the mask you created from the Freeze Area Mask pop-up menu.
•Specify a brush size and brush pressure. A low brush pressure makes changes occur more slowly, so it’s easier to
stop them at exactly the right moment.
•Specify a turbulent jitter to control how tightly the Turbulence tool scrambles pixels.
•Select View Mesh under the View Options control.
•Set a distortion mesh offset if desired.
•Drag the Distortion Percentage slider to specify the amount of distortion.
4Use the tools to distort the preview of the image.
5Use the Reconstruction tool to fully or partially reverse the distortions or to change the image in new ways.
Undo distortions with the Liquify effect
Use the Reconstruction tool and its modes to reverse distortions or redo them in new ways.
1Select the Reconstruction tool, and then choose a mode from the Reconstruction Mode pop-up menu:
Revert Changes unfrozen areas back to their predistorted state.
Displace Reconstructs unfrozen areas to match the displacement at the starting point for the reconstruction. You
can use Displace to move all or part of the preview image to a different location.
Amplitwist Reconstructs unfrozen areas to match the displacement, rotation, and overall scaling that exist at the
starting point.
Affine Reconstructs unfrozen areas to match all local distortions that exist at the starting point, including
displacement, rotation, horizontal and vertical scaling, and skew.
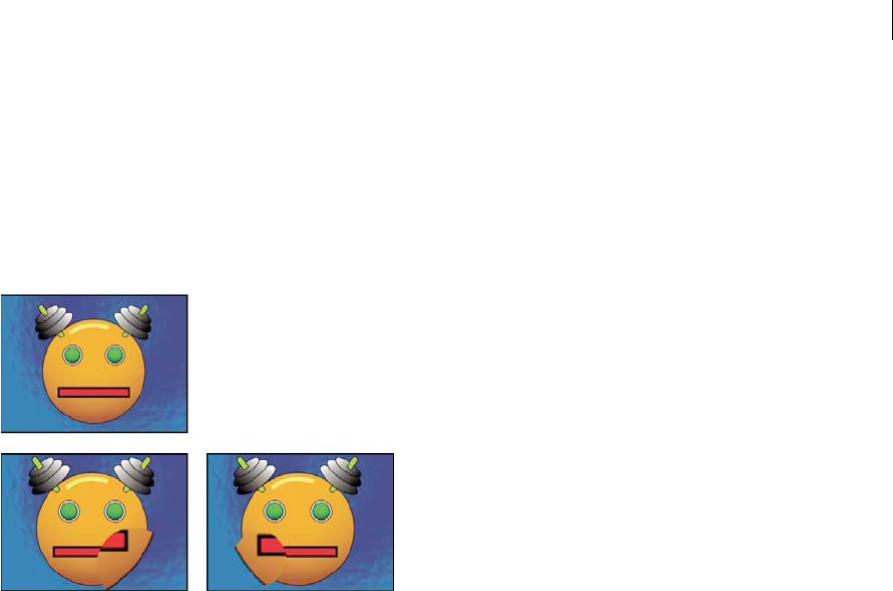
516
Effects and animation presets
Last updated 6/8/2015
2Drag the area to restore. The restoration occurs more quickly at the brush center.
Magnify effect
The Magnify effect enlarges all or part of an image. This effect can act like a magnifying glass placed over an area of the
image, or you can use it to scale the entire image far beyond 100% while maintaining resolution.
This effect works with 8-bpc color.
Shape The shape of the magnified area.
Center The center point of the magnified area.
Magnification Percentage by which to scale the magnified area.
Link How the Magnification setting affects the size and edge feathering of the magnified area. Setting Link to any value
other than None disables the Resize Layer option.
None The size and edge feathering of the magnified area don’t depend on the Magnification setting.
Size To Magnification The radius of the magnified area is equal to the Magnification value (a percentage) times the Size
value.
Size & Feather To Magnification The radius of the magnified area is equal to the Magnification value (a percentage)
times the Size value. The thickness of the edge feather is equal to the Magnification value times the Feather value.
Size The radius of the magnified area, in pixels.
Feather The amount of edge feather, in pixels.
Opacity The opacity of the magnified area, as a percentage of the opacity of the original layer.
Scaling The type of scaling used to magnify the image:
Standard This method maintains sharpness in the image but produces pixelated edges at higher values.
Soft Uses spline algorithms. If you scale the image beyond 100%, Soft reduces edge pixelation and maintains image
quality. Soft works well at large magnification amounts.
Scatter Creates scatter or noise in the image as the image enlarges.
Blending Mode The blending mode used to combine the magnified area with the original layer. The None option
displays transparent pixels around the magnified area.
Resize Layer If Resize Layer is selected, the magnified area can extend beyond the boundaries of the original layer.
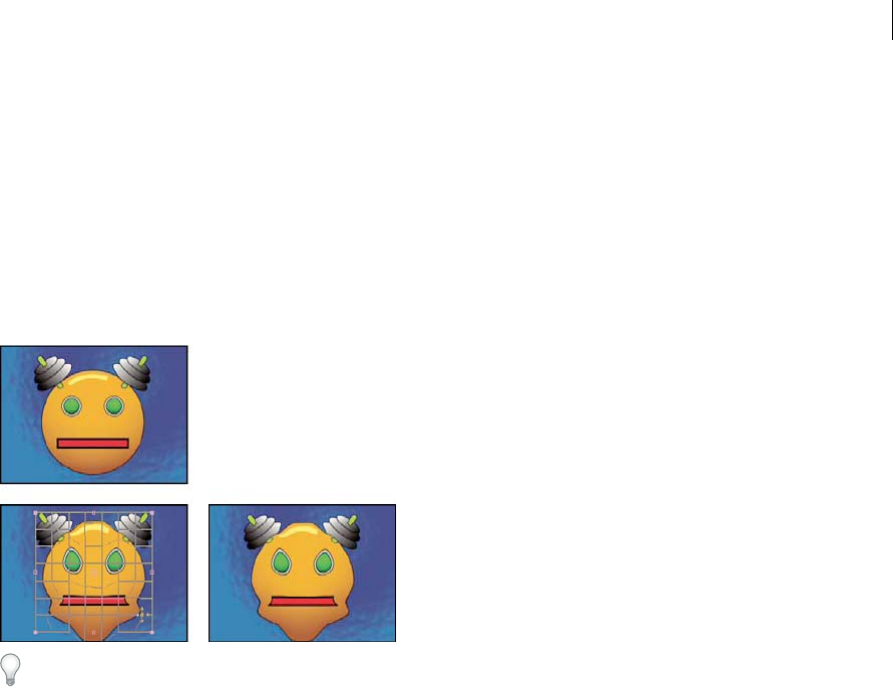
517
Effects and animation presets
Last updated 6/8/2015
Mesh Warp effect
The Mesh Warp effect applies a grid of Bezier patches over a layer, which you can manipulate to distort areas of an
image. Each corner of a patch includes a vertex and two to four tangents (points that control the curvature of the line
segment that makes up the edge of the patch). The number of tangents depends on whether the vertex is in a corner,
on an edge, or inside the grid. By moving the vertices and tangents, you can manipulate the shape of the curved line
segment. The finer the grid, the tighter the adjustments you can make to the area of the image inside the patch.
The Mesh Warp effect is commonly used to morph a pair of images to create a transition from one image to another.
This effect works with 8-bpc and 16-bpc color.
To select multiple vertices, Shift-click the vertices.
Rows, Columns Specify up to 31 patches vertically (Rows) or horizontally (Columns). For broader distortion, use fewer
patches. For finer control, use more. Drag the vertices and tangents to change the grid shape. The image follows the
grid shape according to the elasticity setting and the boundary created by the adjacent patch.
Quality Specifies how closely the image follows the shape defined by the curve. The higher the quality value, the more
closely the image follows the shape. Higher quality settings require more rendering time.
Distortion Mesh Click the stopwatch to animate the distortion over time.
Note: Each patch becomes a boundary for the distortion. For example, when you stretch a patch, the area of the image in
the patch stretches, squishing the area of the image in the adjacent patch. The boundary of the adjacent patch protects the
image inside it from being squished to zero. In other words, you can’t push an image out of its patch.
Mirror effect
The Mirror effect splits the image along a line and reflects one side onto the other.
Reflection Center The position of the line about which the reflection occurs.
Reflection Angle The angle of the line about which the reflection occurs. An angle of 0° reflects the left side onto the
right. An angle of 90° reflects the top onto the bottom.
This effect works with 8-bpc and 16-bpc color.
Offset effect
The Offset effect pans the image within a layer. Visual information pushed off one side of the image appears on the
opposite side. One use of the Offset effect is to create a looping background from a layer. At Best quality, the offset is
performed with subpixel precision.

518
Effects and animation presets
Last updated 6/8/2015
Lloyd Alvarez provides a simple expression on the AE Enhancers forum that you can apply to the Shift Center To
property to simulate a poorly timed film projector.
Shift Center To The new position of the center point of the original image.
Blend With Original The transparency of the effect. The result of the effect is blended with the original image, with the
effect result composited on top. The higher you set this value, the less the effect affects the layer. For example, if you set
this value to 100%, the effect has no visible result on the layer; if you set this value to 0%, the original image doesn’t
show through.
This effect works with 8-bpc and 16-bpc color.
Optics Compensation effect
Use the Optics Compensation effect to add or remove camera lens distortion. Elements composited with mismatched
lens distortion cause anomalies in the animation. For example, tracked objects in a distorted scene don’t match the
scene area because linear objects don’t follow the distortion of the scene.
This effect works with 8-bpc, 16-bpc, and 32-bpc color.
Field Of View (FOV) The field of view (FOV) of the distorted footage. The FOV is relative to the size of the source layer
and the selected FOV Orientation. The distortion amount is relative to FOV. No general rule defines what FOV value
applies to different lenses. Zooming in reduces the FOV, and zooming out increases it. Consequently, if footage includes
different zoom values, you’ll need to animate the FOV value.
Reverse Lens Distortion Reverses the lens distortion. For example, to remove wide-angle lens distortion, set Field Of
View to 40.0 and select Reverse Lens Distortion. Selecting Reverse Lens Distortion enables the Resize control.
FOV Orientation The axis on which the Field Of View value is based. This setting is useful when matching computer-
generated elements to the rendered view angle.
View Center Specifies an alternate center point of view. This setting is useful when using custom lenses that aren’t
centered. However, in most cases, this control should be left untouched.
Optimal Pixels Maintains as much pixel information as possible through the distortion. When selected, FOV values are
no longer reversible.
Resize Resizes the layer when the applied distortion stretches the layer beyond its boundaries. To use this control, first
select Reverse Lens Distortion, and then choose an option. Off doesn’t resize the layer. Max 2X resizes the layer to a
maximum of twice the original width and height. Max 4X resizes the layer to a maximum of four times the original
width and height. Unlimited resizes the layer as far as it is stretched. This option may require a large amount of memory.
Add and match lens distortion with Optics Compensation
To match FOV values, layers must be the same size. However, if you select Resize, you can apply Optics Compensation
again and reverse the distortion using the same value (reversed). You can then apply another effect between the two
instances of Optics Compensation.
If you resize a layer using Optics Compensation and then precompose it into a larger composition, you cannot reverse
the distortion using the same value until you enlarge the precomposed layer to accommodate the expanded layer.
1Select the layer with the distortion, and choose Effect > Distort > Optics Compensation.
2In the Effect Controls panel, adjust the FOV until a distorted edge or line appears straight. Note the FOV value.
3Select the computer graphic layer you want to distort, and apply Optics Compensation to it using the FOV value
from step 2.
4Select Reverse Lens Distortion.
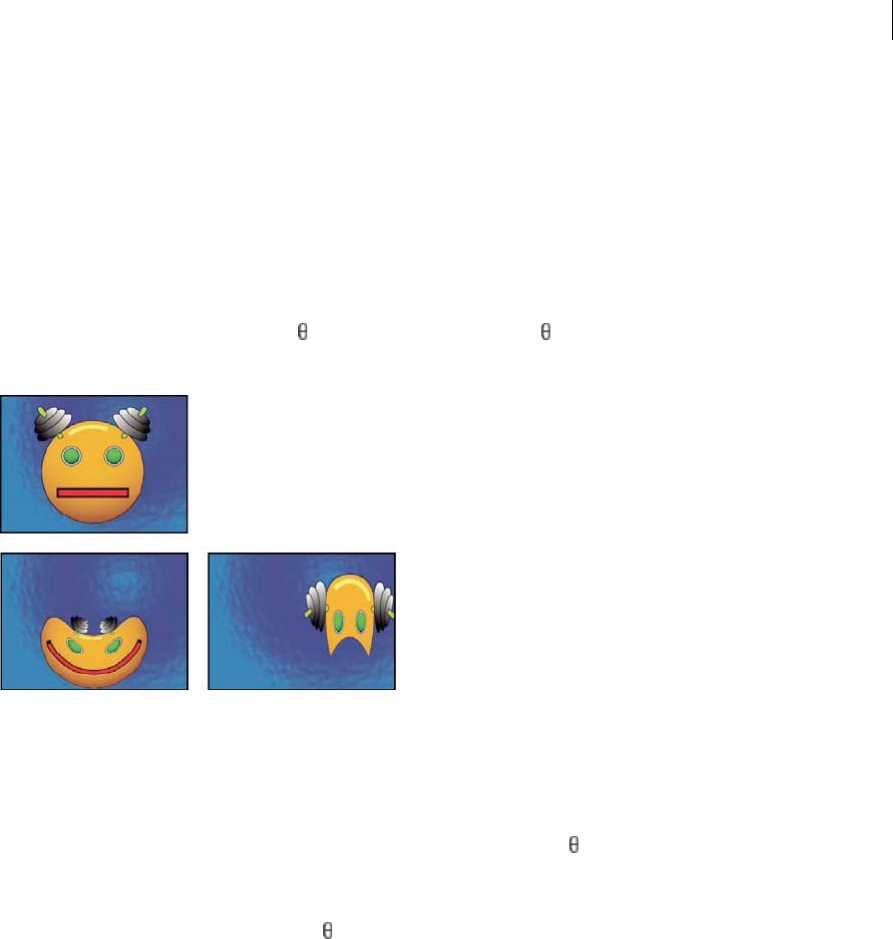
519
Effects and animation presets
Last updated 6/8/2015
5Remove Optics Compensation from the footage layer.
Polar Coordinates effect
The Polar Coordinates effect distorts a layer by transposing each pixel in the (x,y) coordinate system of the layer to the
corresponding position in the polar coordinate system, or the reverse. This effect produces unusual and surprising
distortions that can vary greatly depending on the image and the controls you select. The standard coordinate system
specifies points by measuring the horizontal distance (x axis) and the vertical distance (y axis) from the origin. Each
point is specified as (x,y). The polar coordinate system specifies points by measuring the length of a radius from the
origin (r) and its angle from the x axis ( ). Each point is specified as (r, ).
This effect works with 8-bpc, 16-bpc, and 32-bpc color.
Stu Maschwitz provides an example project on his ProLost blog that uses the Fractal Noise effect and Colorama effect
to create the corona of the Sun and then uses the Polar Coordinates effect to wrap the line of noise around into a circle.
Interpolation Specifies the amount of distortion. At 0%, no distortion occurs.
Type of Conversion The conversion process to use:
Rect To Polar Moves pixels by using (x,y) coordinates from each pixel as (r, ) coordinates. For example, an (x,y)
coordinate of (2,3) becomes a polar coordinate with a radius of 2 and a degree of 3. Horizontal lines distort into circles,
and vertical lines into radial lines.
Polar To Rect Moves pixels by using the (r, ) coordinates from each pixel as the (x,y) coordinates. For example, polar
coordinates of radius 10 and 45° become (x,y) coordinates of (10,45).
Reshape effect
The Reshape effect transforms one shape into another shape on the same layer, dragging the underlying image with it.
The image is distorted to fit the shape of the new area. You create or import up to three masks to define the area you
want to distort: the source mask, the destination mask, and the boundary mask (optional).
Chris Zwar provides a tutorial on the Creative COW website that demonstrates the use of the Reshape effect to morph
one face into another. This tutorial provides many useful tips regarding the use and editing of correspondence points.
This effect works with 8-bpc and 16-bpc color.
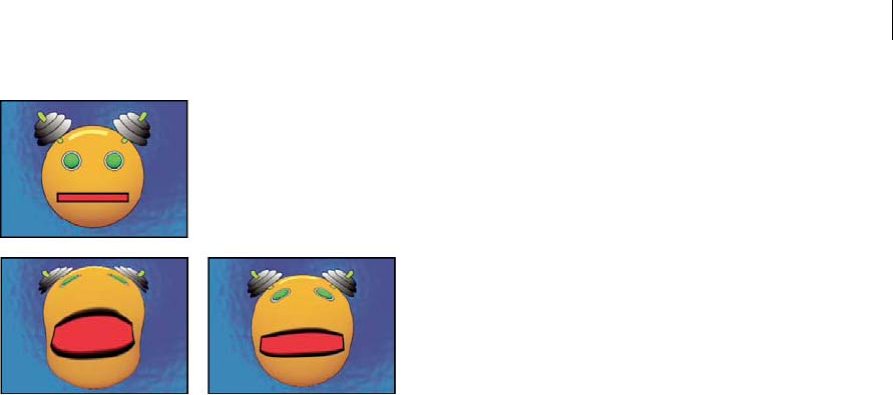
520
Effects and animation presets
Last updated 6/8/2015
By default, After Effects assigns the masks a function (source, destination, or boundary) based on the order in which
you create or import them. You can also specify different masks. Use a closed path for each mask. All three masks must
be on the layer to which you apply the Reshape effect, although you can copy masks from another layer.
Source Mask The mask that contains the image area you want to reshape. If not specified, After Effects uses the second
mask created as the Source mask. In the Composition and Layer panels, a red outline defines the source mask.
Destination Mask The mask that determines the shape of the final image. If not specified, After Effects uses the third
mask created as the Destination mask. In the Composition and Layer panels, a yellow outline defines the destination
mask.
Boundary Mask Specifies what part of the image is reshaped. Anything outside the boundary isn’t altered. If not
specified, After Effects uses the first mask created as the Boundary mask. In the Composition and Layer panels, a blue
outline defines the boundary mask.
Percent The amount of reshaping. This value is useful for creating partial distortions that increase over time.
Elasticity Specifies how closely the image follows the shape defined by the curve. Stiff acts like cold rubber, allowing
the image to distort the least amount. Super Fluid acts like hot rubber, allowing the image to distort in a fluid fashion.
The other settings fall between. The more fluid elasticity settings require more rendering time. If the final image doesn’t
follow the curve as expected, use the following elasticity guidelines:
•In general, use the stiffest setting possible that doesn’t create a polygonal image. Use a higher elasticity setting if the
final image looks polygonal but the curves are smooth.
•Use Stiff, Less Stiff, or Below Normal if the source and destination masks are similar in shape and have low curvature
(few curved segments that change direction radically).
•Use Normal, Absolutely Normal, or Above Average if the source and destination masks are dissimilar and have mild
curvature.
•Use Loose, Liquid, or Super Fluid if the masks are very dissimilar and have extreme curvature.
Correspondence Pairs Shows the number of points on the source mask that are associated with, or mapped to, points
on the destination mask. These points appear in the Composition panel and control the interpolation of the distortion
through space. To precisely control the distortion, you can add, delete, or move the points on either mask.
You move the correspondence points with the Selection tool, and you add and remove correspondence points with the
Add Vertex and Delete Vertex tools, which you activate by holding the Alt (WIndows) or Option (Mac OS) key. You
can only manipulate correspondence points when the effect instance is selected in the Effect Controls panel.
A mask can have an unlimited number of correspondence points, but the more correspondence points it has, the longer
the effect takes to render. If the distortion appears twisted, try adding more correspondence points at distinguishing

521
Effects and animation presets
Last updated 6/8/2015
points along the masks. (If the arc lengths of the curves between correspondence points are too different, twisting may
result.)
Interpolation Method Specifies how After Effects determines the distortion of each video or animation frame in the
interval between keyframes or if no keyframes exist.
Discrete Requires no keyframes because it calculates the distortion at each frame. Discrete produces the most accurate
results but requires more rendering time.
Linear (Default) Requires two or more keyframes and performs a straight-line interpolation between the keyframes.
Linear produces steady changes between keyframes and sharp changes at keyframes.
Smooth Requires three or more keyframes and approximates the distortion using cubic curves, producing distortions
with graceful motion.
Use the Reshape effect
1Open the layer in a Layer panel.
2Create or import the source, destination, and boundary masks into the layer.
Name each mask so that you can easily recognize it in the Mask menu in the Effect Controls panel.
3In the Timeline panel, choose None from the Mode menu for each mask.
4Position the boundary mask to specify the area of the image that will remain unaltered. Areas within the boundary
mask are distorted; areas outside the mask remain unaltered. Keep the boundary mask as far as possible from the
source and destination masks to avoid foldovers.
5Scale and position the source mask over the image.
6Scale and position the destination mask to indicate the final shape. Distortions work best if the source and
destination masks are in approximately the same location.
7Make the Composition or Timeline panel active, select the layer, and then choose Effect > Distort > Reshape.
8From the Mask menus, choose the source, destination, and boundary masks.
9Adjust the Percent control, and choose an option for Elasticity.
10 In the Composition panel, add, delete, or move correspondence points on the masks to control the distortion:
•To add a point, Alt-click (Windows) or Option-click (Mac OS) the mask.
•To delete a point, Alt-click or Option-click the point.
•To move a point, drag it to a new location.
•To change the interpolation of a pair of points, Shift-click a point. Smooth interpolation works best with round
masks, while linear interpolation works best with angular masks. You can combine smooth and linear
interpolation in the same composition.
11 Choose an interpolation method, and preview the distortion. If Linear or Smooth produces undesired results, add
more keyframes. If Discrete produces undesired results, choose another method.
Ripple effect
The Ripple effect creates the appearance of ripples in a specified layer, moving away from a center point in concentric
circles. The effect is similar to dropping a stone in a pond. You can also specify that ripples move toward the center
point.

522
Effects and animation presets
Last updated 6/8/2015
Animate ripples at a constant speed using the Wave Speed control. This control doesn’t require keyframes for
animation. Animate ripples at varying speeds by creating keyframes for the Ripple Phase control.
This effect works with 8-bpc and 16-bpc color.
Radius Controls the distance the ripples travel from the center point. The Radius value is a percentage of the image
size. If the center of the ripple is the center of the layer and the radius is set to 100, the ripples travel to the edge of the
image. A value of 0 produces no ripples. Like ripples in water, ripples in the layer become smaller as they travel farther
from the center.
To create a single-wave ripple, set Radius to 100, Wave Width to a value in the range from 90 to 100, and Wave Height
as desired.
Center Of Ripple Specifies the center of the effect.
Type Of Conversion Specifies how the ripples are created. Asymmetric produces more realistic-looking ripples;
asymmetric ripples include lateral motion and produce more distortion. Symmetric produces motion that travels only
outward from the center point; symmetric ripples produce less distortion.
Wave Speed Sets the speed at which the ripples travel outward from the center point. When you specify a wave speed,
the ripples are automatically animated at a constant speed (without keyframes) across the time range. A negative value
makes the ripples move toward the center, and a value of 0 produces no movement. To vary wave speed over time, set
this control to 0, and then create a keyframe for the Ripple Phase property of the layer.
Wave Width Specifies the distance, in pixels, between wave peaks. Higher values produce long, undulating ripples, and
low values produce many small ripples.
Wave Height Specifies the height of the ripple wave. Taller waves produce greater distortion.
Ripple Phase Specifies the point along the waveform at which a wave cycle begins. The default value of 0° starts the
wave at the midpoint of its downward slope; 90° starts it at the lowest point in the trough; 180° starts it at the midpoint
of the upward slope, and so on.
Smear effect
Using the Smear effect, you define an area within an image and then move that area to a new location, stretching, or
smearing, the surrounding part of the image with it. Use masks to define the area you want to distort.
This effect works with 8-bpc and 16-bpc color.
To use Smear, first create or import two masks: the source mask and the boundary mask. You can create masks on the
layer in After Effects or use masks created in Adobe Illustrator. To use a mask created in Illustrator, copy the mask and
paste it into a layer in After Effects. Masks must be closed to work with Smear; if a mask is an open trace, After Effects
closes it when you select it. Both masks must be on the same layer as the footage to which you apply the Smear effect,
although you can copy masks from another layer.
When you move the source mask within the image, Smear stretches the portion of the image inside the boundary mask
to follow the edges of the source mask. The boundary mask tries to protect the image outside it from being stretched.
Both the original position of the source mask (set in the Layer panel) and the offset position of the source mask are
displayed in the Composition panel. A light red outline indicates the first position of the source mask; a dark outline
indicates the new position.
You can animate the position, size, and rotation of the source mask as it moves to its offset position. You can also
animate the original position of the source mask in the Layer panel.

523
Effects and animation presets
Last updated 6/8/2015
Processing can take up to several minutes with certain settings. Computation time increases as the source mask gets
closer to the boundary mask. Processing is interrupted when you click a control.
Source Mask Specifies a mask as the source mask. By default, After Effects selects the second mask you create or import
for the layer as the source mask.
Note: You must specify both a boundary mask and a source mask to create a distortion.
Boundary Mask Specifies a mask as the boundary mask. By default, After Effects selects the first mask you create or
import as the boundary mask.
Mask Offset Specifies a destination position for the source mask. The offset is a position specified by x and y
coordinates, which appear to the right of the Offset button. To set an offset location, click the Offset button, and then
click the image in the desired location. To set the offset position numerically, type a new value for each axis. When you
don’t need the precision provided by Mask Offset, you can simply drag the source mask offset in the Composition panel.
Note: Unwanted undulations may occur if the source mask is close to the boundary mask during animation.
Mask Rotation Rotates the source mask around its center point, between 0° and 360°.
Mask Scale Scales the source mask (at its offset position) larger or smaller, in relation to its original position.
Percent Specifies what percentage of the smear is performed. For example, when Percent is set to 50%, Smear performs
half of the smear you have specified by moving, scaling, and rotating the source mask. This value doesn’t affect the
location of the original and offset positions of the source mask; it affects only the percentage of the effect that is
performed.
Elasticity Specifies how closely the image follows the shape defined by the curve. Stiff distorts the least, while Super
Fluid distorts the most. In general, use the stiffest setting possible that doesn’t create polygonal images.
Interpolation Method Specifies a method for the interpolation that Smear performs between keyframes. Linear
requires two or more keyframes and performs a straight-line interpolation between the keyframes. Discrete produces
animations in which the distortions change at keyframes. Smooth requires three or more keyframes and approximates
the distortion using cubic curves, producing distortions with graceful motion. If you need further precision in the
animation between keyframes, add more keyframes. For example, a distortion representing a 90-degree rotation
between two keyframes appears as a folding of the image. To make this distortion more fluid, add a keyframe for every
10°.
Use the Smear effect
1Open the layer in a Layer panel.
2Create or paste the masks to use as the boundary mask and the source mask.
3Position the boundary mask to specify the area of the layer you don’t want Smear to affect.
4Scale and position the source mask over the area you want to move.
5Make the Composition panel active, and choose Effect > Distort > Smear.
6Enter a Percent value to specify the amount of smear applied.
7In the Composition panel, move the source mask to its destination position by dragging it or by using the Mask
Offset value.
8Use the Mask Rotation control to rotate the source mask, and use the Mask Scale control to scale it.
9Drag the Percent slider as needed, and choose a setting for Elasticity.

524
Effects and animation presets
Last updated 6/8/2015
Spherize effect
The Spherize effect distorts a layer by wrapping a region of the image onto a sphere. The quality setting of the layer
influences the Spherize effect. Best quality samples the displaced pixels to subpixel precision; Draft quality samples to
the nearest whole pixel.
This effect works with 8-bpc and 16-bpc color.
Transform effect
The Transform effect applies two-dimensional geometric transformations to a layer. This effect supplements the
transform properties available for each layer in the Timeline panel. Anchor Point, Position, Rotation, Scale, and Opacity
properties function much the same as the layer transform properties in the Timeline panel.
You can specify the shutter angle for motion blur for this layer independently of the shutter angle for the composition.
(Motion blur must be enabled for the layer and for the composition for this to be relevant.)
Note: This effect is relative to the input layer. Therefore, to make a layer rotate around the upper left corner, open the layer
in the Layer panel, choose Transform from the Layer panel menu, and then move the anchor point and the position to the
upper left corner.
This effect works with 8-bpc and 16-bpc color.
Skew Skew amount.
Skew Axis The axis about which skew occurs.
Aharon Rabinowitz provides a video tutorial on his All Bets Are Off website that shows how to use the Skew properties
of the Transform effect to simulate perspective in the movement of a cloud layer based on a still image.
Turbulent Displace effect
The Turbulent Displace effect uses fractal noise to create turbulent distortions in an image. For example, use it to create
flowing water, funhouse mirrors, and waving flags.
Rhys Enniks provides a demonstration of the Turbulent Displace effect in part 2 of his “Rain over water” tutorial on his
website.
This effect works with 8-bpc, 16-bpc, and 32-bpc color.
Displacement The type of turbulence used. Turbulent Smoother, Bulge Smoother, and Twist Smoother each perform
the same operations as Turbulent, Bulge, and Twist, except that the Smoother options create smoother warps and take
longer to render. Vertical Displacement warps the image vertically only. Horizontal Displacement warps the image
horizontally only. Cross Displacement warps the image both vertically and horizontally.
Amount Higher values cause more distortion.
Size Higher values cause larger areas of distortion.
Offset (Turbulence) Determines the portion of the fractal shape that is used to create the distortion.
Complexity Determines the level of detail in the turbulence. Lower values cause smoother distortions.
Evolution Animating this setting results in changes of the turbulence over time.

525
Effects and animation presets
Last updated 6/8/2015
Note: Although the Evolution value is set in units called revolutions, it’s important to realize that these revolutions are
progressive. The Evolution state continues to progress infinitely at each new value. Use the Cycle Evolution option to return
the Evolution setting to its original state at each revolution.
Evolution Options Evolution Options provide controls that render the effect for one short cycle and then loop it for the
duration of the layer. Use these controls to pre-render turbulence elements into loops, and thus speed up rendering
time.
Cycle Evolution Creates a loop that forces the Evolution state to return to its starting point.
Cycle The number of revolutions of the Evolution setting that the fractal cycles through before it repeats. The amount
of time between Evolution keyframes determines the timing of the Evolution cycles.
Note: The Cycle control affects only the state of the fractal, not geometrics or other controls, so you can get different results
with different Size or Offset settings.
Random Seed Specifies a value from which to generate the fractal noise. Animating this property results in flashing
from one set of fractal shapes to another (within the same fractal type), which is not usually the result that you want.
For smooth transition of the fractal noise, animate the Evolution property.
Note: Create new turbulence animations by reusing previously created Evolution cycles and changing only the Random
Seed value. Using a new Random Seed value alters the noise pattern without disturbing the Evolution animation.
Pinning Specifies which edges to pin so that the pixels along those edges aren’t displaced.
Resize Layer Enables the distorted image to expand past the original bounds of the layer.
Create a seamless loop using Turbulent Displace
1Set two keyframes for the Evolution control, using full revolutions only.
2Adjust the time between keyframes, and the number of Evolution revolutions until you’re satisfied with the
appearance of the displacement.
3Select Cycle Evolution.
4Set a value for Cycle that’s evenly divisible by the number of revolutions that you set for Evolution.
5In the Timeline panel, move the current-time indicator to the time where the cycle completes. For example, if the
Cycle value is 2, find the frame where the Evolution value is 2 revolutions.
6Move the current-time indicator back one frame, to prevent a duplicate frame in the seamless loop.
7Press the right bracket key (]) to trim the layer Out point to the current time.
8Pre-render this layer, and import it into the project.
9Set this prerendered footage item to loop. (See Loop a footage item.)
Note: If you set keyframes for any of the other controls, you must return them to their initial settings at the point on the
Timeline panel where the cycle begins to repeat. Otherwise, these properties don’t loop.
Twirl effect
The Twirl effect distorts an image by rotating a layer around its center. The image is distorted more sharply in its center
than at the edges, causing a whirlpool result at extreme settings. Because distortion in this effect is significant, After
Effects uses special anti-aliasing techniques to produce the highest-quality image. As a result, the Twirl effect can be
especially slow to render.

526
Effects and animation presets
Last updated 6/8/2015
This effect works with 8-bpc, 16-bpc, and 32-bpc color.
Angle How far to twirl the image. Positive angles twirl the image clockwise; negative angles twirl it counterclockwise.
For a whirlpool result, animate the angle.
Twirl Radius How far the twirl extends from the twirl center. This value is a percentage of width or height of the layer,
whichever is greater. A value of 50, for example, produces a twirl that extends to the edges of the layer.
Warp effect
Use Warp to distort or deform layers. The warp styles work much like the Warp effects in Adobe Illustrator and Warp
Text in Adobe Photoshop.
This effect works with 8-bpc and 16-bpc color.
Warp Stabilizer effect (CS5.5 and later)
Warp Stabilizer is a new option for stabilizing unsteady footage. For details see Stabilize motion with the Warp Stabilizer
effect (CS5.5 and later) .
Wave Warp effect
The Wave Warp effect produces the appearance of a wave traveling across an image. You can produce a variety of
different wave shapes, including square, circular, and sine waves. The Wave Warp effect is automatically animated at a
constant speed across the time range (without keyframes or expressions). To vary speeds, set keyframes or expressions.
This effect works with 8-bpc and 16-bpc color.
Wave Type The shape of the wave.
Wave Height The distance, in pixels, between wave peaks.
Wave Width The size of the wave in pixels.
Direction The direction the wave travels across the image. For example, a value of 225° makes the waves travel
diagonally from upper right to lower left.
Wave Speed The speed (in cycles per second) at which the waves travel. A negative value reverses the wave direction,
and a value of 0 produces no movement. To vary wave speed over time, set this control to 0, and then set keyframes or
expressions for the Phase property.
Pinning Which edges to pin so that the pixels along those edges aren’t displaced.

527
Effects and animation presets
Last updated 6/8/2015
Phase The point along the waveform at which a wave cycle begins. For example, 0° starts the wave at the midpoint of
its downward slope, and 90° starts it at the lowest point in the trough.
Antialiasing Sets the amount of anti-aliasing, or edge smoothing, to perform on the image. In many cases, lower
settings produce satisfactory results; a high setting can greatly increase rendering time. Anti-aliasing is performed only
if the layer quality setting is Best.
More Help topics
Tracking and stabilizing motion (CS5)
Motion blur
Utility effects
Third-party effects:
•CC Overbrights effect (CS6 or later)
Apply Color LUT effect
Apply the Apply Color LUT effect to a layer to transform the colors of the layer according to a color lookup table (LUT).
LUTs are sometimes used to perform manual color correction or color management tasks.
Note: In general, within After Effects, color management is performed using a standard workflow using ICC profiles, not
color LUTs. (See Color management.)
This effect works with 8-bpc, 16-bpc, and 32-bpc color.
When you apply the effect, you are prompted to choose a .3dl or .cube LUT file. You can also change the LUT loaded
into an instance of the Apply Color LUT effect by clicking Choose LUT in the effect’s controls.
The Apply Color LUT effect can use .3dl files with floating-point values or 3DMESH/Mesh keywords, or those saved
from an ASSIMILATE SCRATCH system (i.e., that have SCRATCH in the comments at the top of the file).
There is also added support for overrange IRIDAS .cube files, IRIDAS .look files, and cineSpace .csp files.
A LUT can be visualized as a three-dimensional coordinate system (a 3D cube), with each axis representing color
transformations for the range of all values for a color channel. Points along each axis define the color transformations
for each color channel. After Effects can read and use 3D LUTs that have all three axes the same length (same number
of points), with each axis containing 64 or fewer points. For example, After Effects can read and use a 17x17x17 3D LUT.
You can create LUTs using commands in the File > Export menu—such as Autodesk > Smoke (3dl)—in the full
interface of the Color Finesse plug-in.
Cineon Converter effect
The Cineon Converter effect provides a high degree of control over color conversions of Cineon frames, but in most
cases you should convert the colors in a Cineon file using color management features. (See Cineon and DPX footage
items.)
This effect works with 8-bpc, 16-bpc, and 32-bpc color.

528
Effects and animation presets
Last updated 6/8/2015
To use the Cineon Converter effect, import a Cineon file and leave it in its default state; After Effects either condenses
the colors to 8 bpc or expands them to 16 bpc or 32 bpc, depending on the mode you work in. You can then apply the
Cineon Converter effect to the file and precisely adjust the colors while interactively viewing the results in the
Composition panel. You can set keyframes or expressions to adjust for changes in tone over time—use keyframe
interpolation and ease handles to precisely match the most irregular lighting changes. Consider using other Color
Correction effects to perform these corrections instead. (See Color Correction effects.)
The 10 bits of data available in each Cineon channel for each pixel make it easier to enhance an important range of tones
while preserving overall tonal balance. By carefully specifying the range, you can create a version of the image that
faithfully resembles the original.
Note: Each computer monitor has unique display characteristics that affect your perception of color. For best results when
evaluating tonal balance, use the Info panel in After Effects to see the true color values of pixels as you move the pointer
over them.
Pete O’Connell provides an article on the Creative COW website that describes the use of the Cineon Converter effect.
Conversion Type How the Cineon file is converted. Log To Linear converts an 8-bpc logarithmic non-Cineon layer that
you plan to render as a Cineon sequence. Linear To Log converts a layer containing an 8-bpc linear proxy of a Cineon
file into an 8-bpc logarithmic file so that its display characteristics are consistent with the original Cineon file. Log To
Log detects an 8-bpc or 10-bpc logarithmic Cineon file when you plan to render it as an 8-bpc logarithmic proxy.
Note: For compatibility, obsolete versions of each option appear if you open a project that uses an earlier version of the
Cineon Converter effect.
10 Bit Black Point The black point (minimum density) for converting a 10-bpc logarithmic Cineon layer.
Internal Black Point The black point used for the layer in After Effects.
10 Bit White Point The white point (maximum density) for converting a 10-bpc logarithmic Cineon layer.
Internal White Point The white point used for the layer in After Effects.
Gamma Increase or decrease Gamma to lighten or darken midtones, respectively.
Highlight Rolloff The rolloff value used to correct bright highlights. If adjusting the brightest areas makes the rest of
the image appear too dark, use Highlight Rolloff to adjust these bright highlights. If highlights appear as white blotches,
increase Highlight Rolloff until details are visible. An image with high contrast may require a high rolloff value.
Color Profile Converter effect
The Color Profile Converter effect converts a layer from one color space to another by specifying input and output
profiles.
In most cases, you should use automatic color management features to convert from one color space to another, rather
than using the Color Profile Converter to manually do the conversions. (See Color management.)
Note: In general, you should either work with color management features or use the Color Profile Converter—not both.
The profiles you select are embedded in the project, so you can use them even if you transfer the project to a computer
that doesn’t have the same profiles. When converting from one color space to another, you can specify how After Effects
handles the color conversion by selecting a rendering intent. You can also choose whether to linearize the input or
output profile.
This effect works with 8-bpc, 16-bpc, and 32-bpc color.

529
Effects and animation presets
Last updated 6/8/2015
To convert the color profile of the layer, select a color profile from the Input Profile menu. Select Project Working Space
to use the profile specified in the project settings (File > Project Settings). To linearize the input profile, select the
Linearize Input Profile option. Then select an output profile from the Output Profile menu. To linearize the output
profile, select the Linearize Output Profile. In the Intent menu, select a rendering intent.
Rendering intent options determine how source colors are adjusted. For example, colors that fall inside the destination
gamut may remain unchanged, or they may be adjusted to preserve the original range of visual relationships when
translated to a smaller destination gamut.
The result of choosing a rendering intent depends on the graphical content of an image and on the profiles used to
specify color spaces. Some profiles produce identical results for different rendering intents.
When specifying a rendering intent, you can choose to use black point compression. Black point compression ensures
that the shadow detail in the image is preserved by simulating the full dynamic range of the output device.
The following rendering intents are available for the Color Profile Converter effect:
Perceptual Attempts to preserve the visual relationship between colors so it’s perceived as natural to the human eye,
even though the color values themselves may change. This intent is suitable for images with many of out-of-gamut
colors.
Saturation Attempts to produce vivid colors in an image at the expense of color accuracy. This rendering intent is
suitable for images, such as graphic logos, in which bright saturated colors are more important than the exact
relationship between colors.
Relative Colorimetric Compares the extreme highlight of the source color space to the extreme highlight of the
destination color space and shifts all colors accordingly. Out-of-gamut colors are shifted to the closest reproducible
color in the destination color space. This rendering intent preserves more of the original colors in an image than
Perceptual. This rendering intent is used by default throughout After Effects.
Absolute Colorimetric Leaves colors that fall inside the destination gamut unchanged. Out-of-gamut colors are clipped.
No scaling of colors to the destination white point is performed. This intent aims to maintain color accuracy at the
expense of preserving relationships between colors.
Use the Scene-ref. Profile Compensation control to determine whether each instance of the Color Profile Converter
effect compensates for scene-referred profiles:
On Compensates for scene-referred profiles.
Off Doesn’t compensate for scene-referred profiles.
Use Project Setting Uses the setting indicated by the project’s Compensate For Scene-referred Profiles option.
For an explanation of scene-referred profiles, see System gamma, device gamma, and the difference between scene and
viewing environment.
Note: If you open an After Effects 7 project that uses DPX Scene and DPX Theater color profiles in the Color Profile
Converter effect, After Effects CS5 does not automatically update these profiles to the new equivalent profiles (Kodak
5218/7218 Printing Density and Kodak 2383 Theater Preview). Instead, the profiles are listed as Embedded. You can
convert your project by manually assigning the new profiles in After Effects CS5. However, if the same profiles were assigned
to the footage or selected in Proof Colors in After Effects 7, they are automatically updated to the new profiles in After Effects
CS5. (Proof Colors has been replaced by Output Simulation.)
On his fnord website, Brendan Bolles explains how to use the Color Profile Converter effect and film color profiles to
adjust colors and perform tone mapping to make an HDR image appear as if it were shot on motion picture film.
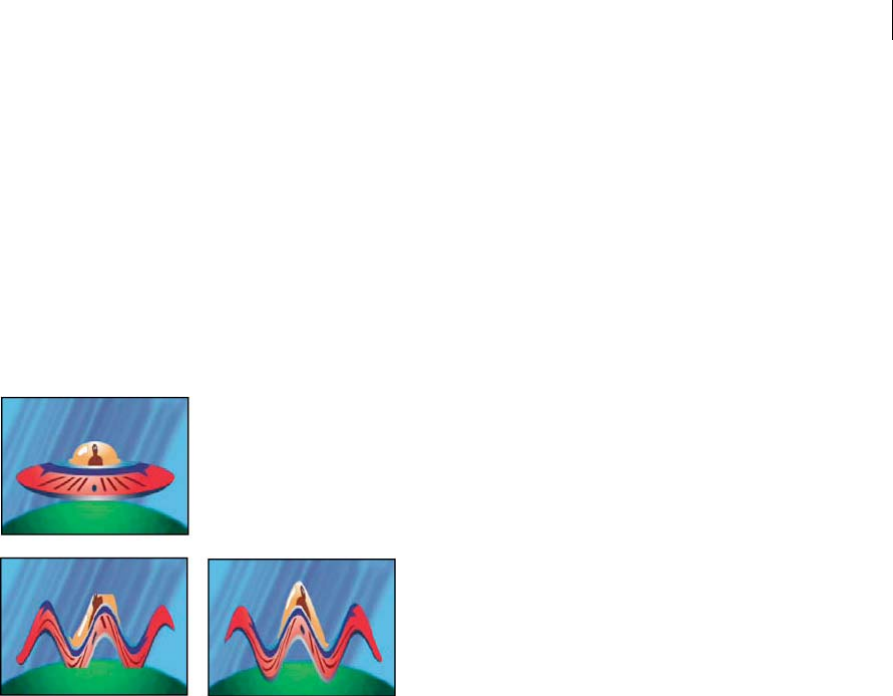
530
Effects and animation presets
Last updated 6/8/2015
Grow Bounds effect
The Grow Bounds effect increases the layer size for the effect that directly follows it. This effect is most useful with
layers that have Collapse Transformations / Continuously Rasterize enabled, because they render using a buffer that’s
the size of the composition. For example, if you apply Drop Shadow to a text layer that’s partially out of the composition
frame, the shadow is clipped because only the portion of the text that’s in the composition frame casts a shadow.
Applying the Grow Bounds effect before the Drop Shadow effect prevents the shadow from being cut off. The number
of pixels you specify increases the height and width of the layer buffer.
Note: You should not need to use this effect when working with effects that work with 32-bpc color, because these effects
have been updated to automatically compensate for layer size.
This effect works with 8-bpc, 16-bpc, and 32-bpc color.
HDR Compander effect
The HDR Compander (compressor/expander) effect gives you a way to work with tools that don’t support high-
dynamic-range color—such as 8-bpc and 16-bpc effects—without sacrificing the high dynamic range of footage.
The HDR Compander effect works by first compressing the highlight values in the HDR image so that they fall within
the range of an 8-bpc or 16-bpc (low-dynamic-range) image, and then expanding the values back to the 32-bpc range.
Apply the HDR Compander effect to a layer once in the effect stack above low-dynamic-range effects, and once below
low-dynamic-range effects.
Because the first instance of the HDR Compander effect compresses the range of values through sampling, some
precision is lost. For this reason, use the HDR Compander effect only if you accept the tradeoff of some precision in
values for the sake of high dynamic range.
This effect works with 8-bpc, 16-bpc, and 32-bpc color.
Apply the HDR Compander effect
1Apply the HDR Compander effect to a layer in a 32-bpc project.
2Select Compress Range for Mode.
3Set Gain to the maximum value to be represented in the compressed range—that is, the highest white value in the
image. Don’t set Gain too high; the more of the 16-bpc value that you use for highlights, the more compressed the
midtones (the majority of the pixels) will be, and the more data is lost in this process.
4Set Gamma. Gamma affects the distribution of values in the range, allowing more precision in specific areas of the
range.

531
Effects and animation presets
Last updated 6/8/2015
5Apply whatever low-dynamic-range effects you choose to the layer.
6Apply another instance of the HDR Compander effect to the layer. Make sure that the second instance of HDR
Compander is ordered after (below) any 8-bpc or 16-bpc effects you’ve applied.
7Select Expand Range for Mode for the second instance of the HDR Compander effect.
8Set Gain and Gamma to the same values as set in the first instance of the HDR Compander effect.
A more convenient way to use the HDR Compander effect is to apply the Compress-Expand Dynamic Range animation
preset. This animation preset consists of an expression and two instances of the HDR Compander effect: The first
instance has Compress Range selected, and the second has Expand Range selected. The expression automatically sets the
Gain and Gamma for the second instance to be the same as that which you set for the first instance. Insert whatever low-
dynamic-range effects you choose between these two instances of the HDR Compander effect.
HDR Highlight Compression effect
The HDR Highlight Compression effect compresses the color values in a high -dynamic-range image so that they fall
within the value range of a low-dynamic-range image.
Adjust the amount of compression by setting the Amount property for the effect. If the Amount value is set to 100%,
color values are compressed so that no pixel has any channel value outside the low dynamic range of 0.0–1.0. At
Amount settings less than 100%, the effect can still bring some detail into the visible range from highlight and shadow
regions.
More Help topics
Color correction, color grading, and color adjustment
Color depth and high dynamic range color
Color Correction effects
For general information about color correction and color adjustment, including links to tutorials and other resources,
see Color correction, color grading, and color adjustment.
Third-party effects in this category included with After Effects:
•CC Color Neutralizer effect
•CC Color Offset effect
•CC Kernel effect
•CC Toner effect
See Third-party plug-ins included with After Effects.
Auto Color and Auto Contrast effects
The Auto Color effect adjusts the contrast and color of an image after analyzing the shadows, midtones, and highlights
of the image. The Auto Contrast effect adjusts the overall contrast and mixture of colors. Each effect maps the lightest
and darkest pixels in the image to white and black, and then redistributes the intermediate pixels. The result is that
highlights appear lighter and shadows appear darker.
Because Auto Contrast and Auto Color don’t adjust channels individually, they don’t introduce or remove color casts.
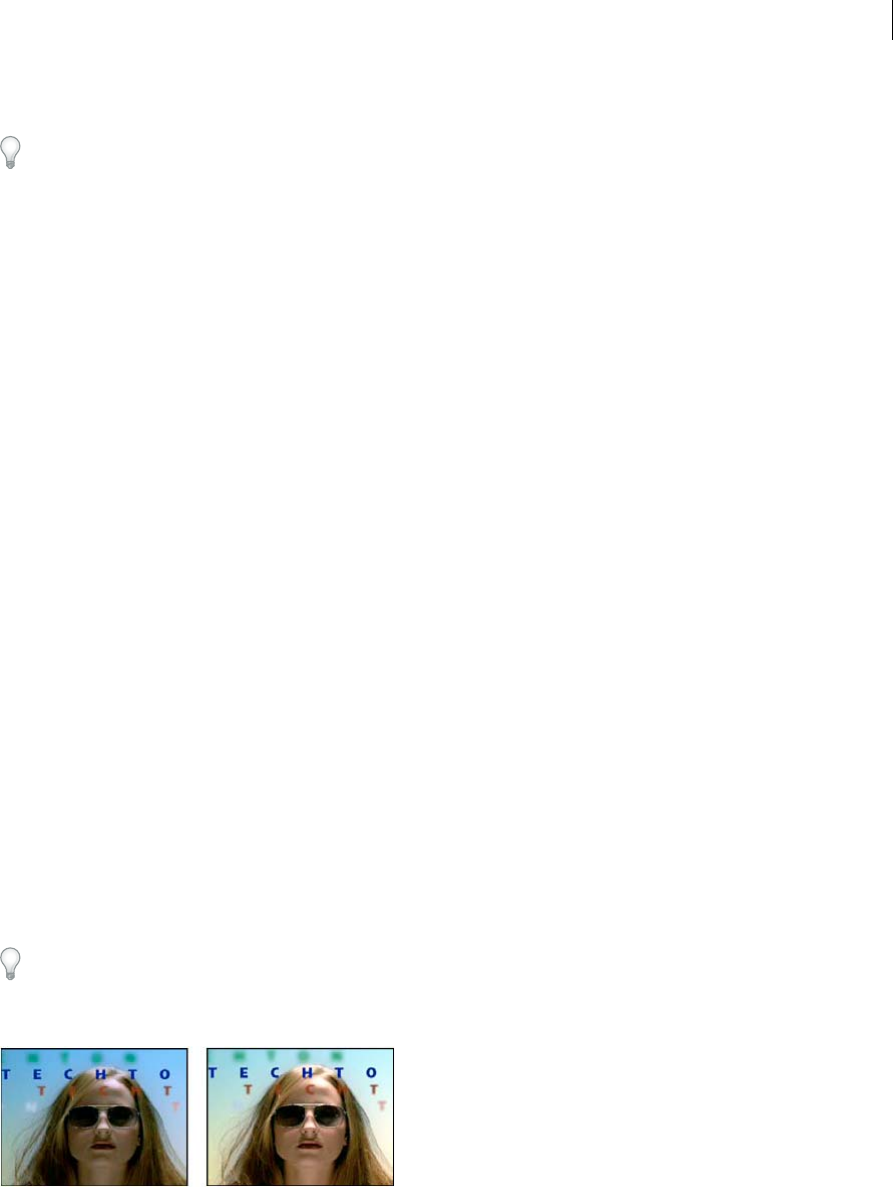
532
Effects and animation presets
Last updated 6/8/2015
The Auto Levels effect uses many of the same controls as the Auto Color and Auto Contrast effects.
A quick way to remove (or at least reduce) the flicker caused by fluctuations in exposure and color from one frame to
the next is to apply the Auto Color effect. This is useful, for example, in reducing the flicker of old film or for correcting
for the flickering color of a light source.
These effects work with 8-bpc and 16-bpc color.
Temporal Smoothing The range of adjacent frames, in seconds, analyzed to determine the amount of correction
needed for each frame, relative to its surrounding frames. If Temporal Smoothing is 0, each frame is analyzed
independently, without regard for surrounding frames. Temporal Smoothing can result in smoother looking
corrections over time.
Scene Detect If selected, frames beyond a scene change are ignored when surrounding frames are analyzed for
temporal smoothing.
Black Clip, White Clip How much of the shadows and highlights are clipped to the new extreme shadow and highlight
colors in the image. Setting the clipping values too high reduces detail in the shadows or highlights. A value in the range
from 0.0% to 1% is recommended. By default, shadow and highlight pixels are clipped by 0.1%—that is, the first 0.1%
of either extreme is ignored when the darkest and lightest pixels in the image are identified. The lowest and highest
values within the range after clipping are then mapped to output black and output white. This method ensures that
input black and input white values are based on representative rather than extreme pixel values.
Snap Neutral Midtones (Auto Color only) Identifies an average nearly neutral color in the frame and then adjusts the
gamma values to make the color neutral.
Blend With Original The transparency of the effect. The result of the effect is blended with the original image, with the
effect result composited on top. The higher you set this value, the less the effect affects the layer. For example, if you set
this value to 100%, the effect has no visible result on the layer; if you set this value to 0%, the original image doesn’t
show through.
Auto Levels effect
The Auto Levels effect maps the lightest and darkest values in each color channel in the image to white and black, and
then redistributes the intermediate values. As a result, highlights appear lighter and shadows appear darker. Because
Auto Levels adjusts each color channel individually, it may remove or introduce color casts.
See Auto Color and Auto Contrast effectsfor explanations of the controls for this effect.
A quick way to remove (or at least reduce) the flicker caused by fluctuations in exposure from one frame to the next is
to apply the Auto Levels effect. This is useful, for example, in reducing the flicker of old film.
This effect works with 8-bpc and 16-bpc color.
Black & White effect
The Black & White effect converts a color image to grayscale, providing control over how individual colors are
converted.

533
Effects and animation presets
Last updated 6/8/2015
This effect works with 8-bpc and 16-bpc color.
Decrease or increase the property value for each color component to convert that color channel to a darker or lighter
shade of gray.
To tint the image with a color, select Tint and click the color swatch or eyedropper to specify a color.
The Black & White effect is based on the Black & White adjustment layer type in Photoshop.
Richard Harrington provides a video tutorial on the Creative COW website that demonstrates the use of the Black &
White effect.
Brightness & Contrast effect
The Brightness & Contrast effect adjusts the brightness and contrast of an entire layer (not individual channels). The
default value of 0.0 indicates that no change is made. Using the Brightness & Contrast effect is the easiest way to make
simple adjustments to the tonal range of the image. It adjusts all pixel values in the image at once—highlights, shadows,
and midtones.
This effect works with 8-bpc, 16-bpc, and 32-bpc color.
Rich Young collects tutorials and resources about the Brightness & Contrast effect and alternatives to it on his After
Effects Portal website.
Broadcast Colors effect
Note: The Color Finesse plug-in included with After Effects includes excellent tools that can help you keep your colors
within the broadcast-safe range. For more information, see the Color Finesse documentation in the Color Finesse subfolder
in the Plug-ins folder. (See Plug-ins.)
The Broadcast Colors effect alters pixel color values to keep signal amplitudes within the range allowed for broadcast
television.
Use the Key Out Unsafe and Key Out Safe settings for How To Make Color Safe to determine which portions of the
image the Broadcast Colors effect affects at the current settings.
Note: A more reliable way to keep colors within the broadcast-safe range for your output type is to use color management
features to set the output color profile accordingly, such as to SDTV (Rec. 601 NTSC). This method ensures that color values
in the range 0.0–1.0 in your working color space are converted to broadcast-safe values. (See Broadcast-safe colors.)
This effect works with 8-bpc color.
Broadcast Locale The broadcast standard for your intended output. NTSC (National Television Standards Committee)
is the North American standard and is also used in Japan. PAL (Phase Alternating Line) is used in most of Western
Europe and South America.
How To Make Color Safe How to reduce signal amplitude:
Reduce Luminance Reduces the brightness of a pixel by moving it toward black. This setting is the default.
Reduce Saturation Moves the color of a pixel toward a gray of similar brightness, making the pixel less colorful. For the
same IRE level, reducing saturation alters the image more noticeably than does reducing luminance.
Maximum Signal Amplitude (IRE) The maximum amplitude of the signal in IRE units. A pixel with a magnitude above
this value is altered. The default is 110. Lower values affect the image more noticeably; higher values are more risky.

534
Effects and animation presets
Last updated 6/8/2015
Change Color effect
The Change Color effect adjusts the hue, lightness, and saturation of a range of colors.
This effect works with 8-bpc and 16-bpc color.
View Corrected Layer shows the results of the Change Color effect. Color Correction Mask shows a grayscale matte
that indicates the areas of the layer that will be changed. White areas in the color correction mask are changed the most,
and dark areas are changed the least.
Hue Transform The amount, in degrees, to adjust hue.
Lightness Transform Positive values brighten the matched pixels; negative values darken them.
Saturation Transform Positive values increase saturation of matched pixels (moving toward pure color); negative
values decrease saturation of matched pixels (moving toward gray).
Color To Change The central color in the range to be changed.
Matching Tolerance How much colors can differ from Color To Change and still be matched.
Matching Softness The amount that the effect affects unmatched pixels, in proportion to their similarity to Color To
Change.
Match Colors Determines the color space in which to compare colors to determine similarity. RGB compares colors in
an RGB color space. Hue compares the hues of colors, ignoring saturation and brightness—so bright red and light pink
match, for example. Chroma uses the two chrominance components to determine similarity, ignoring luminance
(lightness).
Invert Color Correction Mask Inverts the mask that determines which colors to affect.
Change To Color effect
The Change To Color effect (formerly Change Color HLS effect) changes a color you select in an image to another color
using hue, lightness, and saturation (HLS) values, leaving other colors unaffected.
Change To Color offers flexibility and options unavailable in the Change Color effect. These options include tolerance
sliders for hue, lightness, and saturation for exact color matching, and the ability to select the exact RGB values of the
target color that you want to change to.
Carl Larsen provides a video tutorial on the Creative COW website that demonstrates the use of the Change To Color
effect to remove color fringes caused by chromatic aberration.
This effect works with 8-bpc and 16-bpc color.
From The center of the color range to change.

535
Effects and animation presets
Last updated 6/8/2015
To The color to change matched pixels to.
Tip: To animate a color change, set keyframes or expressions for the To color.
Change Which channels the effect affects.
Change By How to change colors. Setting To Color performs a direct change of affected pixels to the target color.
Transforming To Color transforms affected pixel values toward the target color, using HLS interpolation; the amount
of change for each pixel depends on how close the color of the pixel is to the From color.
Tolerance How much colors can differ from the From color and still be matched. Expand this control to reveal separate
sliders for Hue, Lightness, and Saturation values.
Note: Use the View Correction Matte option to better identify which pixels are matched and affected.
Softness The amount of feather to use for the edges of the correction matte. Higher values create smoother transitions
between areas affected by the color change and unaffected areas.
View Correction Matte Shows a grayscale matte that indicates the amount to which the effect affects each pixel. White
areas are changed the most, and dark areas are changed the least.
Channel Mixer effect
The Channel Mixer effect modifies a color channel using a mix of the current color channels. Use this effect to make
creative color adjustments not easily done with the other color adjustment tools: Create high-quality grayscale images
by choosing the percentage contribution from each color channel, create high-quality sepia-tone or other tinted images,
and swap or duplicate channels.
[output channel]-[input channel] The percentage of the input channel value to add to the output channel value. For
example, a Red-Green setting of 10 increases the value of the red channel for each pixel by 10% of the value of the green
channel for that pixel. A Blue-Green setting of 100 and a Blue-Blue setting of 0 replaces the blue channel values with
the green channel values.
[output channel]-Const] The constant value (as a percentage) to add to the output channel value. For example, a Red-
Const setting of 100 saturates the red channel for every pixel by adding 100% red.
Monochrome Uses the value of the red output channel for the red, green, and blue output channels, creating a grayscale
image.
This effect works with 8-bpc and 16-bpc color.
Color Balance effect
The Color Balance effect changes the amount of red, green, and blue in the shadows, midtones, and highlights of an
image.
Preserve Luminosity preserves the average brightness of the image while changing the color. This control maintains the
tonal balance in the image.
This effect works with 8-bpc and 16-bpc color.

536
Effects and animation presets
Last updated 6/8/2015
Color Balance (HLS) effect
The Color Balance (HLS) effect alters the hue, lightness, and saturation of an image. This effect is intended only to
provide compatibility with projects created in earlier versions of After Effects that use the Color Balance (HLS) effect.
For new projects, use the Hue/Saturation effect, which operates the same as the Hue/Saturation command in Adobe
Photoshop. You can convert a movie to grayscale by setting the Saturation to –100.
This effect works with 8-bpc and 16-bpc color.
Color Link effect
The Color Link effect colorizes one layer with the average pixel values of another layer. This effect is useful for quickly
finding a color that matches the color of a background layer.
This effect works with 8-bpc color.
John Dickinson provides a video tutorial on his Motionworks website in which he demonstrates the use of the Color
Link effect to blend a foreground layer with a background layer.
Source Layer The layer from which to sample colors. If you choose None, the layer to which the effect is applied is used
as the source layer, taking into account any masks and other effects applied to the layer. If you choose the name of the
layer from the menu, the source layer without masks and effects is used.
Sample Specifies what values are sampled and what operation is performed on them.
Clip The percentage of pixels to ignore at the extreme channel values. This clipping is useful for reducing the influence
of noise or other nonrepresentative pixels.
Stencil Original Alpha The effect places a stencil of the original alpha channel of the layer over the new value.
Opacity The opacity of the effect. The result of the effect is blended with the original image, with the effect result
composited on top. The lower you set this value, the less the effect affects the layer. For example, if you set this value to
0%, the effect has no visible result on the layer; if you set this value to 100%, the original image doesn’t show through.
Blending Mode The blending mode to use to combine the effect result with the original layer. These blending modes
aren’t available when averaging alpha channel values in the layer.
Color Stabilizer effect
The Color Stabilizer effect samples the color values of a single reference frame, or pivot frame, at one, two, or three
points; it then adjusts the colors of other frames so that the color values of those points remain constant throughout the
duration of the layer. This effect is useful for removing flicker from footage and equalizing the exposure of footage with
color shifts caused by varying lighting situations.
Tip: Use this effect to remove the flicker common to time-lapse photography and stop-frame animation.
You can animate the effect control points that define the sample areas to track objects for which you want to stabilize
colors. The greater the difference in color values between the sample points, the better the effect works.
This effect works with 8-bpc and 16-bpc color.
Set Frame Sets the pivot frame. Display the frame that has the area of brightness or color that you want to match, and
click Set Frame.
Stabilize What to stabilize:
Brightness Brightness is stabilized using one sample point (Black Point).

537
Effects and animation presets
Last updated 6/8/2015
Levels Color is stabilized using two sample points (Black Point and White Point).
Curves Color is stabilized using all three sample points (Black Point, White Point, and Mid Point).
Black Point Place this point on a dark area to stabilize.
Mid Point Place this point on a midtone area to stabilize.
White Point Place this point on a bright area to stabilize.
Sample Size Radius, in pixels, of sampled areas.
Colorama effect
The Colorama effect is a versatile and powerful effect for converting and animating colors in an image. Using the
Colorama effect, you can subtly tint an image or radically change its color palette.
Colorama works by first converting a specified color attribute to grayscale and then remapping the grayscale values to
one or more cycles of the specified output color palette. One cycle of the output color palette appears on the Output
Cycle wheel. Black pixels are mapped to the color at the top of the wheel; increasingly lighter grays are mapped to
successive colors going clockwise around the wheel. For example, with the default Hue Cycle palette, pixels
corresponding to black become red, while pixels corresponding to 50% gray become cyan.
This effect works with 8-bpc and 16-bpc color.
Andrew Kramer provides a video tutorial on his Video Copilot website that demonstrates the use of the Colorama effect
to create a procedural matte as a first step in replacing a sky.
Input Phase controls
Get Phase From The color attribute to use as input. Choose Zero to use a color attribute from another layer.
Add Phase The second layer to use as input. To use only this layer as input, select Zero for Get Phase From; otherwise,
both the Add Phase layer and the layer to which the effect is applied are used. You can choose the layer to which the
effect is applied to add a second input attribute from the same layer.
Add Phase From The color attribute from the second layer to use as input.
Add Mode How input values are combined:
Wrap Adds the values of the two attributes for each pixel. Values above 100% are wrapped around the cycle again. For
example, a sum of 125% wraps around to 25%.
Clamp Adds the values of the two attributes for each pixel. Values above 100% are clipped to 100%.
Average Averages the values of the two attributes for each pixel. Because the average of two values that are each in the
range 0% to 100% is never over 100%, wrapping and clamping by this operation are never necessary. Average is
therefore the safest option for predictable output.
Screen Screens the second layer over the original layer; the brighter areas in the second layer brighten the first layer,
and the darker areas in the second layer are discarded. Screen mode is especially useful for compositing fire, lens flares,
and other lighting effects.
Phase Shift The point on the Output Cycle wheel at which the mapping of the input colors begins. A positive value
moves the starting point clockwise around the Output Cycle wheel.
Tip: Animate Phase Shift to cycle colors around the wheel.

538
Effects and animation presets
Last updated 6/8/2015
Output Cycle controls
Use Preset Palette Presets for the Output Cycle. The top palettes are designed for quick color correction and
adjustment tasks. The bottom choices offer a variety of built-in color palettes for creative results.
Output Cycle Customize the output color palette by altering the colors and locations of the triangles on the Output
Cycle wheel. The triangles specify the location on the color wheel where a specific color occurs. The color between
triangles is smoothly interpolated, unless Interpolate Palette is deselected. Each Output Cycle can have 1-64 triangles.
•To change the location of a triangle, drag the triangle. Shift-drag to snap the triangle to 45-degree increments. At
the top of the wheel, the triangle snaps to either the start position or end position depending on whether you drag
from the left or right.
•To add a triangle, click in or near the wheel, and select a color from the color picker. Click slightly to the left of the
top arrows for the end color, and slightly to the right for the start color.
•To duplicate a triangle, Ctrl-drag (Windows) or Command-drag (Mac OS) the triangle.
•To delete a triangle, drag it away from the wheel.
•To change the opacity, select a triangle on the color wheel and then drag the attached triangle above the opacity
slider. Make sure that Modify Alpha is selected if you want the opacity information to affect your output.
Note: When you animate the Output Cycle, the position and color of a triangle are interpolated between keyframes. For
best results, make sure that all keyframes have the same number of Output Cycle triangles.
Cycle Repetitions How many iterations of the Output Cycle the input color range is mapped to. The default value of 1
maps the input range to one iteration of the Output Cycle, from input black at the top of the Output Cycle wheel,
clockwise to input white at the top of the Output Cycle wheel. A value of 2 maps the input range to two iterations of the
Output Cycle. Use this option to create a simple palette and repeat it many times throughout a gradient.
Interpolate Palette Colors between triangles are interpolated smoothly. When this option is deselected, output colors
are posterized.
Modify controls
Modify controls specify which color attributes the Colorama effect modifies. For subtle refinement of images, choose
the same color attribute for Input Phase and Modify. For example, choose Hue from both menus to simply adjust Hue.
Modify The color attribute to modify.
Modify Alpha Modifies alpha channel values.
Note: If you apply Colorama to a layer with an alpha channel, and the Output Cycle doesn’t contain alpha information,
the anti-aliased edges of the layer may appear pixelated. To smooth the edges, deselect Modify Alpha. If Modify Alpha is
selected and the Output Cycle contains alpha information, the output is affected even if you’ve selected None from the
Modify menu. Using this method, you can adjust the levels of only the alpha channel without also changing the RGB
information.
Change Empty Pixels The influence of the Colorama effect extends to transparent pixels. (This setting works only if
Modify Alpha is selected.)
Pixel Selection, Masking, and other controls
These controls determine which pixels the effect affects. For the Matching controls for Pixel Selection to work,
Matching Mode must be set to anything other than Off.
Matching Color The center of the range of colors of pixels that the Colorama effect modifies. To select a specific color
in the image using the eyedropper, turn off the Colorama effect temporarily by clicking its Effect switch in the Effect
Controls panel.

539
Effects and animation presets
Last updated 6/8/2015
Matching Tolerance How far a color can be from Matching Color and still be affected by the Colorama effect. When
Matching Tolerance is 0, the Colorama effect only affects the exact color selected for Matching Color. When Matching
Tolerance is 1, all colors are matched; this value essentially turns off Matching Mode.
Matching Softness How smoothly the matched pixels blend into the rest of the image. For example, if you have an
image of a person wearing a red shirt and blue pants, and you want to change the color of the pants from blue to red,
subtly adjust Matching Softness to spread the matching from the blue in the pants into the shadows of the pants folds.
If you adjust it too high, the matching spreads to the blue of the sky; if you adjust it even higher, the matching spreads
to the red shirt.
Matching Mode What color attributes are compared to determine matching. In general, use RGB for high-contrast
graphics and Chroma for photographic images.
Mask Layer The layer to use as a matte. Masking Mode specifies what attribute of the Mask Layer is used to define the
matte. The matte determines which pixels of the layer to which the effect is applied are affected by the effect.
Composite Over Layer Shows modified pixels composited on top of the original layer. Deselect this option to show only
modified pixels.
Blend With Original The transparency of the effect. The result of the effect is blended with the original image, with the
effect result composited on top. The higher you set this value, the less the effect affects the layer. For example, if you set
this value to 100%, the effect has no visible result on the layer; if you set this value to 0%, the original image doesn’t
show through.
Curves effect
The Curves effect adjusts the tonal range and tone response curve of an image. The Levels effect also adjusts tone
response, but the Curves effect gives you more control. With the Levels effect you make the adjustments using only
three controls (highlights, shadows, and midtones). With the Curves effect, you can arbitrarily map input values to
output values using a curve defined by 256 points.
You can load and save arbitrary maps and curves to use with the Curves effect.
This effect works with 8-bpc, 16-bpc, and 32-bpc color.
When you apply the Curves effect, After Effects displays a graph in the Effect Controls panel that you use to specify a
curve. The horizontal axis of the graph represents the original brightness values of the pixels (input levels); the vertical
axis represents the new brightness values (output levels). In the default diagonal line, all pixels have identical input and
output values. Curves displays brightness values from 0 to 255 (8 bit) or 32768 (16 bit), with shadows (0) on the left.
John Dickinson provides visual aids on his Motionworks website that illustrate how to use the Curves effect for color
adjustments.
Use the Curves effect
1Choose Effect > Color Correction > Curves.
2If the image has more than one color channel, choose the channel you want to adjust from the Channel menu. RGB
alters all channels using a single curve.
3Use the Bezier tool and the Pencil tool to modify or draw a curve. (To activate a tool, click the Bezier button or the
Pencil button .)
To smooth the curve, click the Smooth button. To reset the curve to a line, click the Line button.
540
Effects and animation presets
Last updated 6/8/2015
The curve type is determined by the last tool used to modify it. You can save arbitrary map curves modified by the
Pencil tool as .amp (Photoshop lookup) files. You can save curves modified by the Bezier tool as .acv (Photoshop spline)
files.
Equalize effect
The Equalize effect alters the pixel values of an image to produce a more consistent brightness or color component
distribution. The effect works similarly to the Equalize command in Adobe Photoshop. Pixels with 0 alpha (completely
transparent) values aren’t considered, so masked layers are equalized based on the mask area.
This effect works with 8-bpc color.
Equalize RGB equalizes the image based on red, green, and blue components. Brightness equalizes the image based on
the brightness of each pixel. Photoshop Style equalizes by redistributing the brightness values of the pixels in an image
so that they more evenly represent the entire range of brightness levels.
Amount To Equalize How much to redistribute the brightness values. At 100%, the pixel values are spread as evenly as
possible; lower percentages redistribute fewer pixel values.
Exposure effect
Use the Exposure effect to make tonal adjustments to footage, either to one channel at a time or to all channels at once.
The Exposure effect simulates the result of modifying the exposure setting (in f-stops) of the camera that captured the
image. The Exposure effect works by performing calculations in a linear color space, rather than in the current color
space for the project. The Exposure effect is designed for making tonal adjustments to high–dynamic range (HDR)
images with 32-bpc color, but you can use the effect on 8-bpc and 16-bpc images.
This effect works with 8-bpc, 16-bpc, and 32-bpc color.
Master Adjust all channels simultaneously.
Individual Channels Adjust channels individually.
Exposure Simulates the exposure setting on the camera that captures the image, multiplying all light intensity values
by a constant. The units for Exposure are f-stops.
Offset Darkens or brightens the shadows and midtones with minimal change to the highlights.
Gamma Correction The amount of gamma correction to use for adding an additional power-curve adjustment to the
image. Higher values make the image lighter; lower values make the image darker. Negative values are mirrored around
zero (that is, they remain negative but still get adjusted as if they were positive). The default value is 1.0, which
corresponds to no additional adjustment.
Bypass Linear Light Conversion Select to apply the Exposure effect to the raw pixel values. This option can be useful if
you manage color manually using the Color Profile Converter effect.
Gamma/Pedestal/Gain effect
The Gamma/Pedestal/Gain effect adjusts the response curve independently for each channel. For pedestal and gain, a
value of 0.0 is completely off, and a value of 1.0 is completely on.

541
Effects and animation presets
Last updated 6/8/2015
The Black Stretch control remaps the low pixel values of all channels. Large Black Stretch values brighten dark areas.
Gamma specifies an exponent describing the shape of the intermediate curve. The Pedestal and Gain controls specify
the lowest and highest attainable output value for a channel.
This effect works with 8-bpc color.
Hue/Saturation effect
The Hue/Saturation effect adjusts the hue, saturation, and lightness of individual color components in an image. This
effect is based on the color wheel. Adjusting the hue, or color, represents a move around the color wheel. Adjusting the
saturation, or purity of the color, represents a move across its radius. Use the Colorize control to add color to a grayscale
image converted to RGB, or to add color to an RGB image.
This effect works with 8-bpc, 16-bpc, and 32-bpc color.
Channel Control The color channel you want to adjust. Choose Master to adjust all colors at once.
Channel Range The definition of the color channel chosen from the Channel Control menu. Two color bars represent
the colors in their order on the color wheel. The upper color bar shows the color before the adjustment; the lower bar
shows how the adjustment affects all of the hues at full saturation. Use the adjustment slider to edit any range of hues.
Master Hue Specifies the overall hue of the channel chosen from the Channel Control menu. Use the dial, which
represents the color wheel, to change the overall hue. The underlined value displayed above the dial reflects the number
of degrees of rotation around the wheel from the original color of a pixel. A positive value indicates clockwise rotation;
a negative value indicates counterclockwise rotation. Values range from –180 to +180.
Master Saturation, Master Lightness Specify the overall saturation and lightness of the channel chosen from the
Channel Control menu. Values range from –100 to +100.
Colorize Adds color to a grayscale image converted to RGB, or adds color to an RGB image—for example, to make it
look like a duotone image by reducing its color values to one hue.
Colorize Hue, Colorize Saturation, Colorize Lightness Specify the hue, saturation, and lightness of the color range
chosen from the Channel Control menu. After Effects displays only the sliders for the Channel Control menu choice.
Adjust colors with the Hue/Saturation effect
1Choose Effect > Color Correction > Hue/Saturation.
2From the Channel Control menu, choose which colors to adjust:
•Choose Master to adjust all colors at once.
•Choose a preset color range for the color you want to adjust, and then use the sliders for that color range.
3For Hue, type a value or drag the dial.
4For Saturation, type a value or drag the slider. The color shifts away from or toward the center of the color wheel,
relative to the beginning color values of the selected pixels.
5For Lightness, type a value or drag the slider.
Colorize an image or create a monotone result
1Choose Effect > Color Correction > Hue/Saturation.
2Select Colorize. The image is converted to the hue of the current foreground color. The lightness value of each pixel
doesn’t change.
3Drag the Colorize Hue dial to select a new color if desired.
542
Effects and animation presets
Last updated 6/8/2015
4Drag the Colorize Saturation and Colorize Lightness sliders.
Modify the range of Hue/Saturation effect adjustments
1From the Channel Control menu, choose an individual color. (By default, the range of color selected when you
choose a color component is 30° wide, with 30° of fall-off on either side. Setting the fall-off too low can produce
dithering in the image.)
2Do any of the following:
•Drag one or both of the white triangles to adjust the amount of feather without affecting the range.
•Drag one or both of the vertical white bars to adjust the range. Increasing the range decreases the fall-off, and
vice versa.
Leave Color effect
The Leave Color effect desaturates all colors on a layer except colors similar to the color specified by Color To Leave.
For example, a movie of a basketball game could be decolored except for the orange of the ball itself.
John Dickinson provides an example of using the Leave Color effect on his Motionworks website.
This effect works with 8-bpc color.
Amount To Decolor How much color to remove. 100% causes areas of the image dissimilar to the selected color to
appear as shades of gray.
Tolerance The flexibility of the color-matching operation. 0% decolors all pixels except pixels that exactly match Color
To Leave. 100% causes no color change.
Edge Softness The softness of the color boundaries. High values smooth the transition from color to gray.
Match Colors Determines whether RGB values or HSB values are compared. Choose Using RGB to perform more strict
matching that usually decolors more of the image. For example, to leave dark blue, light blue, and medium blue, choose
Using HSB and choose any shade of blue as Color To Leave.
Levels effect
The Levels effect remaps the range of input color or alpha channel levels onto a new range of output levels, with a
distribution of values determined by the gamma value. This effect functions much the same as the Levels adjustment
in Photoshop.
This effect works with 8-bpc, 16-bpc, and 32-bpc color.
John Dickinson provides visual aids on his Motionworks website that illustrate how to use the Levels effect for color
adjustments.
Chris and Trish Meyer provide instructions on the ProVideo Coalition website for using the Channel Combiner effect
with the Levels effect to affect only the luma (detail) information in an image—or, conversely, to only affect the color
information in an image.

543
Effects and animation presets
Last updated 6/8/2015
By choosing Alpha from the Channel menu, you can use the Levels effect to convert completely opaque or completely
transparent areas of a matte to be semitransparent, or to convert semitransparent areas to be completely opaque or
completely transparent. Because transparency is based on the monochrome alpha channel, the controls for this effect
refer to complete transparency as black and complete opacity as white.
•Use Output Black Level of 0 and Input Black Level greater than 0 to convert a range of semitransparent areas to be
completely transparent.
•Use Output White Level of 1.0 and Input White Level less than 1.0 to convert a range of semitransparent areas to be
completely opaque.
•Use Output Black Level greater than 0 to convert a range of completely transparent areas to be semitransparent.
• Use Output White Level less than 1.0 to convert a range of completely opaque areas to be semitransparent.
Note: The Levels (Individual Controls) effect functions like the Levels effect but allows you to adjust the individual color
values for each channel, so you can add expressions to individual properties or animate one property independently of the
others. (See Levels (Individual Controls) effect.)
Channel The channels to be modified.
Histogram Shows number of pixels with each luminance value in an image. (See Color correction, color grading, and
color adjustment.)
Tip: Click the histogram to alternate between showing colorized versions of the histograms for all color channels and
only showing the histogram for the channel or channels selected in the Channel menu.
Input Black and Output Black Pixels in the input image with a luminance value equal to the Input Black value are given
the Output Black value as their new luminance value. The Input Black value is represented by the upper left triangle
below the histogram. The Output Black value is represented by the lower left triangle below the histogram.
Input White and Output White Pixels in the input image with a luminance value equal to the Input White value are
given the Output White value as their new luminance value. The Input White value is represented by the upper right
triangle below the histogram. The Output White value is represented by the lower right triangle below the histogram.
Gamma The exponent of the power curve that determines the distribution of luminance values in the output image.
The Gamma value is represented by the middle triangle below the histogram.
Clip To Output Black and Clip To Output White These controls determine the results for pixels with luminance values
that are less than the Input Black value or greater than the Input White value. If clipping is on, pixels with luminance
values less than the Input Black value are mapped to the Output Black value; pixels with luminance values above the
Input White value are mapped to the Output White value. If clipping is off, the resulting pixel values can be less than
the Output Black value or greater than the Output White value and the Gamma value affects.
Levels (Individual Controls) effect
The Levels (Individual Controls) effect functions like the Levels effect but allows you to adjust the individual color
values for each channel. As a result, you can add expressions to individual properties or animate one property
independently of the others. To see each control individually, click the arrow next to the channel color to expand it.
For information on the controls for this effect, see Levels effect.
This effect works with 8-bpc, 16-bpc, and 32-bpc color.
544
Effects and animation presets
Last updated 6/8/2015
Photo Filter effect
The Photo Filter effect mimics the technique of putting a colored filter in front of the camera lens to adjust the color
balance and color temperature of the light transmitted through the lens and exposing the film. You can choose a color
preset to apply a hue adjustment to an image, or you can specify a custom color using the color picker or the eyedropper.
You can use the Photo Filter effect controls to do the following:
•To use a color preset for the filter color, choose an option from the Filter pop-up menu.
•To select a custom color for the filter color, click the color swatch for the Color control to select a color using the
color picker, or click the eyedropper and click a color anywhere on the computer screen.
•To set the amount of color applied to the image, adjust Density.
•To ensure that the image isn’t darkened by the effect, select Preserve Luminosity.
To retain Photo Filter adjustment layers created in Photoshop, import the Photoshop file into your After Effects project
as a composition rather than as footage. If you changed your default Photoshop color settings, After Effects may not be
able to exactly match the color of the Photo Filter.
This effect works with 8-bpc and 16-bpc color. In After Effects CS6 or later, this effect works in 32-bit color.
Chris and Trish Meyer demonstrate the Photo Filter effect in a video tutorial on the ProVideo Coalition website.
Warming Filter (85) and Cooling Filter (80) Color conversion filters that tune the white balance in an image. If an image
was photographed with a lower color temperature of light (yellowish), the Cooling Filter (80) makes the image colors
bluer to compensate for the lower color temperature of the ambient light. Conversely, if the photo was taken with a
higher color temperature of light (bluish), the Warming Filter (85) makes the image colors warmer to compensate for
the higher color temperature of the ambient light.
Warming Filter (81) and Cooling Filter (82) Light balancing filters for minor adjustments in the color quality of an
image. The Warming Filter (81) makes the image warmer (yellower), and the Cooling Filter (82) makes the image
cooler (bluer).
Individual Colors Apply a hue adjustment to the image depending on the color preset you choose. Your choice of color
depends on how you use the Photo Filter command. If a photo has a color cast, you can choose a complement color to
neutralize the color cast. You can also apply colors for special color effects or enhancements. For example, the
Underwater color simulates the greenish-blue color cast common to underwater photography.
PS Arbitrary Map effect
The PS Arbitrary Map effect is intended only to provide compatibility with projects created in earlier versions of After
Effects that use the Arbitrary Map effect. For new work, use the Curves effect.
The PS Arbitrary Map effect applies a Photoshop arbitrary map file to a layer. An arbitrary map adjusts the brightness
levels of an image, remapping a specified brightness range to darker or brighter tones. In the Curves window in
Photoshop, you can create an arbitrary map file for the entire image or for individual channels.
This effect works with 8-bpc and 16-bpc color.

545
Effects and animation presets
Last updated 6/8/2015
You can import and apply an arbitrary map file with Options in the Effect Controls panel. When loaded into After
Effects, the specified arbitrary map is applied to the layer or to one or more channels of the layer, depending on how it
was created. If you don’t select an arbitrary map, After Effects applies the default map (linear distribution of brightness)
to the layer. Although you can’t import .acv or Photoshop spline files into the After Effects PS Arbitrary Map effect, you
can convert these files in Photoshop to create files that are compatible with the After Effects Curves effect.
To convert .acv and Photoshop spline files, load the .acv file (Windows) or the Photoshop spline file (Mac OS) in the
Curves dialog box, click the Pencil tool, and then save the file as an .amp file (Windows) or Photoshop lookup file (Mac
OS).
Phase Cycles through the arbitrary map. Increasing the phase shifts the arbitrary map to the right (as viewed in the
Curves dialog box); decreasing the phase shifts the map to the left.
Apply Phase Map To Alpha Applies the specified map and phase to the alpha channel of the layer. If the specified map
doesn’t include an alpha channel, After Effects uses the default map (linear distribution of brightness) for the alpha
channel.
Selective Color effect
Selective color correction is a technique used by scanners and separation programs to change the amount of process
colors in each of the primary color components in an image. You can modify the amount of a process color in any
primary color selectively—without affecting the other primary colors. For example, you can use selective color
correction to decrease the cyan in the green component of an image while leaving the cyan in the blue component
unaltered.
Note: The Selective Color effect is provided in After Effects primarily to ensure fidelity with documents imported from
Photoshop that use the Selective Color adjustment layer type.
Even though Selective Color uses CMYK colors to adjust an image, you can use it on RGB images.
This effect works with 8-bpc and 16-bpc color.
Choose from one of two values from the Method menu:
Relative
Changes the existing amount of cyan, magenta, yellow, or black by its percentage of the total. For example, if you start
with a pixel that is 50% magenta and add 10%, 5% is added to the magenta (10% of 50% = 5%) for a total of 55%
magenta. (This option cannot adjust pure specular white, which contains no color components.)
Absolute
Adjusts the color in absolute values. For example, if you start with a pixel that is 50% magenta and add 10%, the magenta
ink is set to a total of 60%.
Note: The adjustment is based on how close a color is to one of the options in the Colors menu. For example, 50% magenta
is midway between white and pure magenta and receives a proportionate mix of corrections defined for the two colors.
The color that is affected is the color chosen in the Colors menu.
The Details property group provides an alternate interface for adjusting colors and matches the properties shown in
the Timeline panel.
546
Effects and animation presets
Last updated 6/8/2015
Shadow/Highlight effect
The Shadow/Highlight effect brightens shadowed subjects in an image and reduces the highlights in an image. This
effect doesn’t darken or lighten an entire image; it adjusts the shadows and highlights independently, based on the
surrounding pixels. You can also adjust the overall contrast of an image. The default settings are for fixing images with
backlighting problems.
This effect works with 8-bpc and 16-bpc color.
Auto Amounts If this option is selected, the Shadow Amount and Highlight Amount values are ignored, and amounts
are used that are automatically determined to be appropriate for lightening and restoring detail to the shadows.
Selecting this option also activates the Temporal Smoothing control.
Shadow Amount The amount to lighten shadows in the image. This control is active only if you deselect Auto
Amounts.
Highlight Amount The amount to darken highlights in the image. This control is active only if you deselect Auto
Amounts.
Temporal Smoothing The range of adjacent frames, in seconds, analyzed to determine the amount of correction
needed for each frame, relative to its surrounding frames. If Temporal Smoothing is 0, each frame is analyzed
independently, without regard for surrounding frames. Temporal Smoothing can result in smoother-looking
corrections over time.
Scene Detect If this option is selected, frames beyond a scene change are ignored when surrounding frames are
analyzed for temporal smoothing.
Blend With Original The transparency of the effect. The result of the effect is blended with the original image, with the
effect result composited on top. The higher you set this value, the less the effect affects the clip. For example, if you set
this value to 100%, the effect has no visible result on the clip; if you set this value to 0%, the original image doesn’t show
through.
Expand the More Options category to reveal the following controls:
Shadow Tonal Width and Highlight Tonal Width The range of adjustable tones in the shadows and highlights. Lower
values restrict the adjustable range to only the darkest and lightest regions, respectively. Higher values expand the
adjustable range. These controls are useful for isolating regions to adjust. For example, to lighten a dark area without
affecting the midtones, set a low Shadow Tonal Width value so that when you adjust the Shadow Amount, you’re
lightening only the darkest areas of an image. Specifying a value that is too large for a given image may introduce halos
around strong dark to light edges. The default settings attempt to reduce these artifacts. These halos may occur if the
Shadow or Highlight Amount value is too large; they can also be reduced by decreasing these values.
Shadow Radius and Highlight Radius The radius (in pixels) of the area around a pixel that the effect uses to determine
whether the pixel resides in a shadow or a highlight. Generally, this value should roughly equal the size of the subject
of interest in the image.
Color Correction The amount of color correction that the effect applies to the adjusted shadows and highlights. For
example, if you increase the Shadow Amount value, you bring out colors that were dark in the original image; you may
want these colors to be more vivid. The higher the Color Correction value, the more saturated these colors become. The
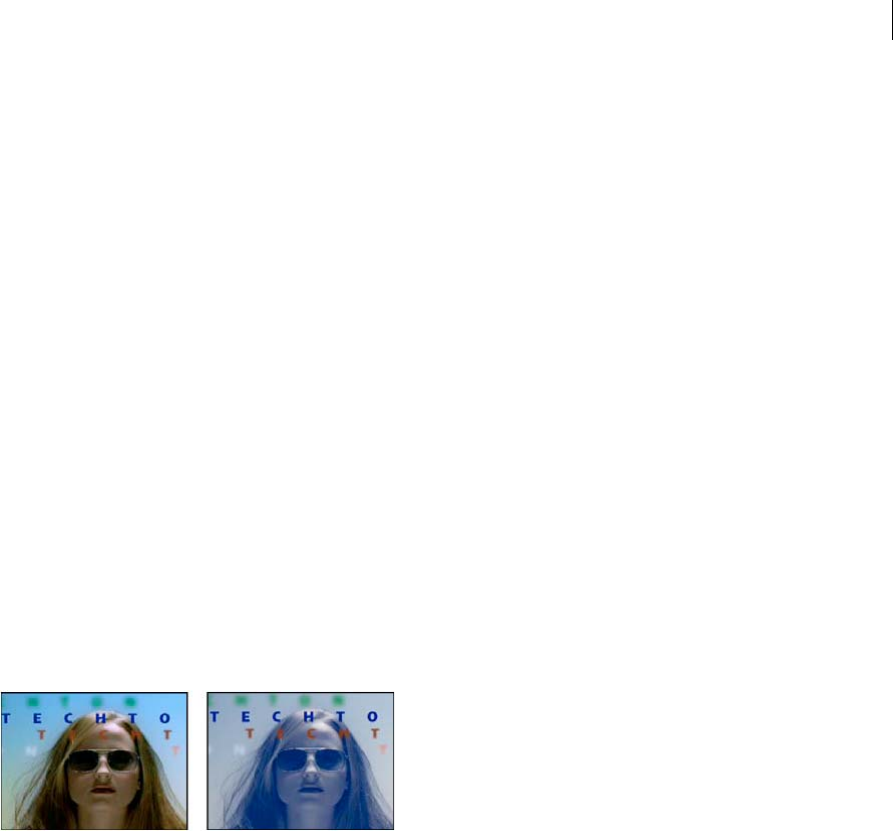
547
Effects and animation presets
Last updated 6/8/2015
more significant the correction that you make to the shadows and highlights, the greater the range of color correction
available.
Note: If you want to change the color over the whole image, use the Hue/Saturation effect after applying the
Shadow/Highlight effect.
Midtone Contrast The amount of contrast that the effect applies to the midtones. Higher values increase the contrast
in the midtones alone, while concurrently darkening the shadows and lightening the highlights. A negative value
reduces contrast.
Black Clip, White Clip How much of the shadows and highlights are clipped to the new extreme shadow and highlight
colors in the image. Setting the clipping values too high reduces detail in the shadows or highlights. A value in the range
from 0.0% to 1% is recommended. By default, shadow and highlight pixels are clipped by 0.1%—that is, the first 0.1%
of either extreme is ignored when identifying the darkest and lightest pixels in the image, which are then mapped to
output black and output white. This method ensures that input black and input white values are based on representative
rather than extreme pixel values.
Tint effect
The Tint effect tints a layer by replacing the color values of each pixel with a value between the colors specified by Map
Black To and Map White To. Pixels with luminance values between black and white are assigned intermediate values.
Amount To Tint specifies the intensity of the effect.
For more complex tinting, use the Colorama effect.
This effect works with 8-bpc, 16-bpc, and 32-bpc color.
Tritone effect
The Tritone effect alters the color information of a layer by mapping bright, dark, and midtone pixels to colors that you
select. The Tritone effect is like the Tint effect, except with midtone control.
This effect works with 8-bpc, 16-bpc, and 32-bpc color.
Blend With Original The transparency of the effect. The result of the effect is blended with the original image, with the
effect result composited on top. The higher you set this value, the less the effect affects the layer. For example, if you set
this value to 100%, the effect has no visible result on the layer; if you set this value to 0%, the original image doesn’t
show through.
Vibrance effect
The Vibrance effect adjusts saturation so that clipping is minimized as colors approach full saturation. Colors that are
less saturated in the original image are affected by the Vibrance adjustments more than are colors that are already
saturated in the original image.
The Vibrance effect is especially useful for increasing saturation in an image without over-saturating skin tones. The
saturation of colors with hues in the range from magenta to orange is affected less by Vibrance adjustments.

548
Effects and animation presets
Last updated 6/8/2015
This effect works with 8-bpc and 16-bpc color.
To affect less-saturated colors more than more saturated colors and protect skin tones, modify the Vibrance property.
To adjust the saturation of all colors equally, modify the Saturation property.
The Vibrance effect is based on the Vibrance adjustment layer type in Photoshop.
More Help topics
Color correction, color grading, and color adjustment
Gamma and tone response
Adjust exposure for previews
Simulation effects
Third-party effects in this category included with After Effects:
•CC Ball Action effect
•CC Bubbles effect
•CC Drizzle effect
•CC Hair effect
•CC Mr. Mercury effect
•CC Particle Systems II effect
•CC Particle World effect
•CC Pixel Polly effect
•CC Rainfall effect
•CC Scatterize effect
•CC Snowfall effect
•CC Star Burst effect
Note: Existing projects with CC Rain and CC Snow will still render, but are obsolete effects. CC Rainfall and CC Snowfall
are the newer versions.
See Third-party plug-ins included with After Effects.
Common Lighting controls and Material controls
Several of the Simulation effects have some common controls. The Card Wipe effect also shares many controls with the
Card Dance effect.
Lighting controls
Light Type Specifies which type of light you want to use. Distant Source simulates sunlight and casts shadows in one
direction, where all the light rays strike the object from virtually the same angle. Point Source is similar to a light bulb
and casts shadows in all directions. First Comp Light uses the first light layer in the composition, which can use a variety
of settings.

549
Effects and animation presets
Last updated 6/8/2015
Light Intensity Specifies the power of the light. The higher the value, the brighter the layer. Other lighting settings
affect the overall light intensity as well.
Light Color Specifies the color of light.
Light Position Specifies the position of the light in x,y space. To position the light interactively, Alt-drag (Windows) or
Option-drag (Mac OS) the effect point for the light.
Light Depth Specifies the position of the light in z space. Negative numbers move the light behind the layer.
Ambient Light Distributes light over the layer. Increasing this value adds an even illumination to all objects and
prevents shadows from being completely black. Setting Ambient Light to pure white and setting all other light controls
to 0 makes the object fully lit and eliminates any 3D shading from the scene.
Material controls
The Material controls specify reflection values.
Diffuse Reflection Gives objects form-defining shading. Shading depends on the angle at which the light strikes the
surface and is independent of the position of the viewer.
Specular Reflection Takes into account the position of the viewer. It models the reflection of the light source back to
the viewer. It can create the illusion of shininess. For realistic effects, you can animate this control by using higher and
higher values to mask the transition from filtered to nonfiltered versions of the layer.
Highlight Sharpness Controls shininess. Shiny surfaces produce small, tight reflections, whereas duller surfaces spread
the highlight into a larger region. Specular highlights are the color of the incoming light. Because light is typically white
or off-white, broad highlights can desaturate an image by adding white to the surface color.
In general, use the following process to adjust lighting: Set Light Position and Diffuse Reflection to control the overall
light level and shading in a scene. Then adjust Specular Reflection and Highlight Sharpness to control the strength and
spread of highlights. Finally, adjust Ambient Light to fill in the shadows.
Card Dance effect
Note: For information on properties shared by several of the Simulation effects, see Common Lighting controls and Material
controls.
This effect creates the appearance of card choreography by dividing layers into numerous cards and then controlling all
geometric aspects of the cards by using a second layer. For example, Card Dance can simulate an extruded pin
sculpture, a crowd doing the wave, or letters floating on the surface of a pond.
Chris Zwar provides an example project on his website that uses the Card Dance effect and a shape layer with the
Repeater operation to simulate a halftone color separation for any image or video.
This effect works with 8-bpc color.
550
Effects and animation presets
Last updated 6/8/2015
Apply Card Dance to the layer to use for the front of the cards. To set the view, use the rotation or perspective controls,
or match the perspective of the effect in any scene by corner-pinning.
For example, select a vertical grayscale gradient layer (black on top, white on bottom) from the Gradient Layer 1 menu,
and then select Intensity 1 from the X Rotation Source menu. Card Dance uses the intensity of the gradient to animate
the x-axis rotation of the cards. It assigns a numeric value to the center pixel of each card on the gradient layer, based
on the intensity of the pixel. Pure white equals 1, pure black equals –1, and 50% gray equals 0. Card Dance then
multiplies that value by the X Rotation Multiplier value and rotates each card that amount. If X Rotation Multiplier is
set to 90, the cards in the top row rotate almost 90° backward, the cards in the bottom row rotate almost 90° forward,
and cards in middle rows rotate by lesser amounts. Cards in the 50% gray area don’t rotate at all.
If you want half of the cards in a layer to come in from the right, and the other half to come in from the left, create a
gradient layer that is half black and half white. Set the gradient as the source for X Position, and set X Position Multiplier
to 5, and animate it to 0. The cards in the black area initially appear at the left, and the cards in the white area initially
appear at the right.
Rows, Columns, Layer, and Order controls
Rows & Columns Specifies the interaction of the numbers of rows and columns. Independent makes both the Rows and
Columns sliders active. Columns Follows Rows makes only the Rows slider active. If you choose this option, the
number of columns is always the same as the number of rows.
Rows The number of rows, up to 1000.
Columns The number of columns, up to 1000, unless Columns Follows Rows is selected.

551
Effects and animation presets
Last updated 6/8/2015
Note: Rows and columns are always evenly distributed across a layer, so unusually shaped rectangular tiles don’t appear
along the edges of a layer—unless you use an alpha channel.
Back Layer The layer that appears in segments on the backs of the cards. You can use any layer in the composition; its
Video switch can even be turned off. If the layer has effects or masks, precompose the layer first.
Gradient Layer 1 The first control layer to use to make the cards dance. You can use any layer. Grayscale layers produce
the most predictable results. The gradient layer acts as a displacement map for animating the cards.
Gradient Layer 2 The second control layer.
Rotation Order The order in which the cards rotate around multiple axes when using more than one axis for rotation.
Transformation Order The order in which the transformations (scale, rotation, and position) are performed.
Position, Rotation, and Scale controls
Position (X, Y, Z), Rotation (X, Y, Z), and Scale (X, Y) specify the transformation properties you want to adjust. Because
Card Dance is a 3D effect, you can control these properties separately for each axis of the cards. However, because the
cards themselves are still 2D, they have no inherent depth—hence the absence of z scaling.
Source Specifies the gradient layer channel you want to use to control the transformation. For example, select Intensity
2 to use the intensity from Gradient Layer 2.
Multiplier The amount of transformation applied to the cards.
Offset The base value from which the transformation begins. It is added to the transformation value (a card’s center
pixel value times the Multiplier amount) so that you can start the transformation from some place other than 0.
Camera System and Camera Position controls
Camera System Specifies whether to use the effect’s Camera Position properties, the effect’s Corner Pins properties, or
the default composition camera and light positions to render 3D images of the cards.
X Rotation, Y Rotation, Z Rotation Rotate the camera around the corresponding axis. Use these controls to look at the
cards from the top, side, back, or any other angle.
X, Y Position Where the camera is positioned along the x and y axes.
Z Position Where the camera is positioned along the z axis. Smaller numbers move the camera closer to the cards, and
larger numbers move the camera away from the cards.
Focal Length The zoom factor. Smaller numbers zoom in.
Transform Order The order in which the camera rotates around its three axes, and whether the camera rotates before
or after it is positioned using the other Camera Position controls.
Corner Pins controls
Corner Pinning is an alternative camera control system. Use it as an aid for compositing the result of the effect into a
scene on a flat surface that is tilted with respect to the frame.
Upper Left Corner, Upper Right Corner, Lower Left Corner, Lower Right Corner Where to attach each of the corners of
the layer.
Auto Focal Length Controls the perspective of the effect during the animation. When Auto Focal Length is deselected,
the focal length you specify is used to find a camera position and orientation that place the corners of the layer at the
corner pins. If this isn’t possible, the layer is replaced by its outline, drawn between the pins. When Auto Focal Length
is selected, the focal length required to match the corner points is used, if possible. If not, it interpolates the correct
value from nearby frames.
552
Effects and animation presets
Last updated 6/8/2015
Focal Length Overrides the other settings if the results you’ve obtained aren’t what you need. If you set the Focal Length
to something that doesn’t correspond to what the focal length would be if the pins were actually in that configuration,
the image may look unusual (strangely sheared, for example). But if you know the focal length that you are trying to
match, manually setting Focal Length is the easiest way to get correct results.
Caustics effect
Note: For information on properties shared by several of the Simulation effects, see Common Lighting controls and Material
controls.
This effect simulates caustics—reflections of light at the bottom of a body of water, created by light refracting through
the surface of the water. The Caustics effect generates this reflection and creates realistic water surfaces when used with
Wave World and Radio Waves.
Eran Stern provides a video tutorial on the Creative COW website in which he demonstrates how to use the Caustics
effect with the Wave World effect.
Note: The Caustics effect ignores masks and alpha channels on the layer to which it is applied. You can precompose the
layer with the effect and apply the mask to the precomposition layer, or you can precompose the layer with the mask and
apply the effect to the precomposition layer, depending on what result you want to achieve. (See Precomposing, nesting, and
pre-rendering .)
This effect works with 8-bpc color.
To get the most realistic results from Caustics, render the Bottom layer separately, with Render Caustics enabled and
Surface Opacity at 0. Then precompose, and use the resulting layer as the Bottom layer for another Caustics effect with
Render Caustics off. With this process you can offset, scale, or otherwise manipulate the Bottom layer in the precomposed
composition, and thus simulate lighting that doesn’t come from straight overhead.
Bottom controls
The Bottom controls specify the appearance of the bottom of the body of water:
Bottom Specifies the layer at the bottom of the body of water. This layer is the image that is distorted by the effect,
unless Surface Opacity is 100%.
Scaling Makes the bottom layer larger or smaller. If the edges of the bottom layer show, because of the refraction of the
light through the waves, scale up the bottom layer. Scaling down is useful for tiling a layer to make a complex pattern.
Repeat Mode Specifies how a scaled-down bottom layer is tiled. Once uses only one tile, basically turning tiling off.
Tiles uses the traditional tiling method of abutting the right edge of one bottom layer tile to the left edge of another
bottom layer tile. This option works well if the bottom layer contains a repeating pattern, like a logo, that needs to read

553
Effects and animation presets
Last updated 6/8/2015
a certain way. Reflected abuts each edge of a bottom layer tile to a mirrored copy of the tile. This option can eliminate
a hard edge where the two tiles meet.
If Layer Size Differs Specifies how to handle the bottom layer when it is smaller than the composition.
Blur Specifies the amount of blur applied to the bottom layer. To make the bottom sharp, set this control to 0. Higher
values make the bottom appear increasingly blurry, especially where the water is deeper.
Water controls
Water Surface Specifies the layer to use as the surface of the water. Caustics uses the luminance of this layer as a height
map for generating a 3D water surface. Light pixels are high, and dark pixels are low. You can use a layer created by
using t he Wave World or R adio Waves effect; precompose the layer b efore using it with Caust ics.
Wave Height Adjusts the relative height of the waves. Higher values make the waves steeper and the surface
displacement more dramatic. Lower values smooth the Caustics surface.
Smoothing Specifies the roundness of the waves by blurring the water surface layer. High values eliminate detail. Low
values show imperfections in the water surface layer.
Water Depth Specifies depth. A small disturbance in shallow water moderately distorts the view of the bottom, but the
same disturbance in deep water distorts the view greatly.
Refractive Index Affects the way the light bends as it passes through the liquid. A value of 1 does not distort the bottom.
The default value of 1.2 accurately simulates water. To add distortion, increase the value.
Surface Color Specifies the color of the water.
Surface Opacity Controls how much of the bottom layer is visible through the water. If you want a milky effect, increase
the Surface Opacity and Light Intensity values; a value of 0 results in a clear liquid.
Set Surface Opacity to 1.0 to perfectly reflect a sky later. With a suitable texture map, you can use this technique to create
the effect of liquid mercury.
Caustics Strength Displays the caustics, the concentrations of light on the bottom surface, caused by the lensing effect
of the water waves. This control changes the way everything looks: The dark spots of the waves get much darker, and
the light spots get much lighter. If you don’t set a value for this control, the effect distorts the bottom layer when the
waves pass over it, but it doesn’t render the lighting effect.
Sky controls
Sky Specifies the layer above the water. Scaling makes the sky layer larger or smaller. If the edges of the sky layer show,
scale the layer up. Scaling down is useful for tiling a layer to make a complex pattern.
Repeat Mode Specifies how a scaled-down sky layer is tiled. Once uses only one tile, basically turning tiling off. Tiles
uses the traditional tiling method of abutting the right edge of one layer tile to the left edge of another layer tile. This
option works well if the layer contains a repeating pattern, like a logo, that needs to read a certain way. Reflected abuts
each edge of a layer tile to a mirrored copy of the tile. This option can eliminate a hard edge where the two tiles meet.
If Layer Size Differs Specifies how to handle the layer when it is smaller than the composition. Intensity specifies the
opacity of the sky layer. Convergence specifies how close the sky and the bottom or water layer appear, controlling the
extent to which the waves distort the sky.
554
Effects and animation presets
Last updated 6/8/2015
Foam effect
This effect generates bubbles that flow, cling, and pop. Use the controls for the effect to adjust attributes for the bubbles
such as stickiness, viscosity, life span, and bubble strength. You can control exactly how the foam particles interact with
each other and with their environment, and specify a separate layer to act as a map, controlling precisely where the foam
flows. For example, you can have particles flow around a logo or fill a logo with bubbles.
This effect works with 8-bpc color.
You can also substitute any image or movie for bubbles. For example, you can create swarms of ants, flocks of birds, or
crowds of people.
Note: On a frame-by-frame basis, Foam renders quickly, but the slightest adjustment in the initial settings is likely to result
in very different output a few seconds into the simulation. When making adjustments to Physics controls, the farther into
the simulation you are, the longer the adjustments take to render, because each adjustment results in the simulation being
recalculated all the way back to the beginning. Not every frame takes this long to calculate; once Foam adjusts to the change,
rendering speeds up again.
View controls
Draft Displays the bubbles without fully rendering them. Using Draft mode is a fast way to preview the behavior of the
bubbles. Draft mode is the only way to preview the universe edges, the Flow Map alignment, and the Producer location,
orientation, and size. Blue ellipses represent bubbles. A red ellipse represents the Producer Point. A red rectangle
represents the bubble universe.
Draft + Flow Map Displays the Draft view wireframe superimposed over a grayscale representation of the flow map, if
selected.
Rendered Displays the final output of the animation.
Producer controls
The Producer controls specify the location where the bubbles originate, as well as the speed at which they are generated:
Producer Point The center of the area from which the bubbles can be produced.
Producer X Size, Producer Y Size Adjust the width and height of the area from which the bubbles can be produced.
Producer Orientation Adjusts the rotation (orientation) of the area from which the bubbles can be produced. Producer
Orientation has no noticeable effect when Producer X Size and Producer Y Size are identical.
Zoom Producer Point Specifies whether the producer point and all of its associated keyframes remain relative to the
universe (selected) or to the screen (unselected) when you zoom in or out on it. For example, if you set a position for
Producer Point in the upper-left corner of the layer and then zoom out on that layer, the producer point stays in the

555
Effects and animation presets
Last updated 6/8/2015
upper-left corner of the screen if you don’t select Zoom Producer Point. If you select Zoom Producer Point, the point
moves with the universe as it is zoomed out, and the point ends up closer to the center of the screen.
Production Rate Determines the rate at which bubbles are generated. This control does not affect the number of
bubbles per frame. Rather, the rate is the average number of bubbles generated every 30th of a second. Higher numbers
yield more bubbles.
If a large number of bubbles appear in the same point at the same time, some may pop. If you want a lot of foam,
increase the values for Producer X Size and Producer Y Size so that the bubbles don’t immediately pop each other.
Bubbles controls
Size Specifies the average size for adult bubbles. Size Variance, Bubble Growth Speed, and Random Seed also affect the
size of a bubble in any particular frame.
Size Variance Specifies the range of possible bubble sizes. This control uses the Size value as the average and creates
smaller-than-average and larger-than average bubbles by using the range you specify here. For example, a default
bubble Size of 0.5 and default Size Variance of 0.5 generate bubble sizes ranging from 0 to 1 (0.5 –.5 = 0 and 0.5 + 0.5 =
1).
Lifespan Specifies the maximum life of a bubble. This value is not absolute; if it were, the bubbles would all pop after
the same lifespan, as if they were hitting a wall. Rather, this value is a target lifespan; some bubbles pop early, and others
may last until the end.
Bubble Growth Speed Specifies how fast a bubble reaches full size. When a bubble is released from the producer point,
it generally starts out rather small. If you set this value too high and you specify a small producer area, the bubbles pop
each other, and the effect generates fewer bubbles than expected.
Strength Influences how likely a bubble is to pop before it reaches its Lifespan limit. Lowering the Strength for a bubble
makes it more likely to pop early in its life, when forces like wind and flow maps act upon it. Lower values are good for
soap bubbles. The highest value is recommended for flocking animations.
Set this value low, and set Pop Velocity high to create chain reactions of popping bubbles.
Physics controls
The Physics controls specify the motion and behavior of the bubbles:
Initial Speed Sets the speed of the bubble as it is emitted by the producer point. The other Physics parameters affect
this speed.
Low Initial Speed values in conjunction with the default producer size don’t affect the results much because the bubbles
bounce off each other. For more control over initial speed, increase the values for Producer X Size and Producer Y Size
Initial Direction Sets the initial direction in which the bubble moves as it emerges from the producer point. Other
bubbles and other Physics controls also affect the direction.
Wind Speed Sets the speed of the wind that pushes the bubbles in the direction specified by Wind Direction.
Wind Direction Sets the direction in which the bubbles blow. Animate this control to create turbulent wind effects.
Wind affects bubbles if Wind Speed is greater than 0.
Turbulence Applies small random forces to the bubbles, making them behave chaotically.
Wobble Amount Randomly changes the shape of bubbles from perfectly round to a more natural elliptical shape.
Repulsion Controls whether bubbles bounce off each other, stick to each other, or pass through each other. At a value
of 0, bubbles don’t collide; they pass through each other. The higher the Repulsion value, the more likely bubbles are to
interact with each other when they collide.

556
Effects and animation presets
Last updated 6/8/2015
Pop Velocity Controls how popping bubbles affect each other. When a bubble pops, it affects other bubbles around it
by leaving a hole that other bubbles can fill, pushing other bubbles away, or popping other bubbles. The higher the
value, the more popping bubbles affect one another.
Viscosity Specifies the rate at which bubbles decelerate after being released from the producer point, and controls the
speed of the flow of the bubbles. A high Viscosity value creates resistance as the bubbles get farther away from the
producer point, causing them to slow down. If Viscosity is set high enough, the bubbles stop. The thicker the substance,
the higher the Viscosity. For example, if you want to create the effect of bubbles traveling through oil, set Viscosity fairly
high, so that the bubbles meet resistance as they travel. To create the effect of bubbles floating in air, set Viscosity fairly
low.
Stickiness Causes bubbles to clump together and makes them less vulnerable to other Physics controls like Wind
Direction. The higher the Stickiness, the more likely the bubbles are to form clusters and cling. Use Stickiness and
Viscosity to create a bubble cluster.
Zoom and Universe Size controls
Zoom Zooms in or out around the center of the bubble universe. To create large bubbles, increase the Zoom value
instead of the Size value because large bubble sizes can be unstable.
Universe Size Sets the boundaries of the bubble universe. When bubbles completely leave the universe, they pop and
are gone forever. By default, the universe is the size of the layer. Values greater than 1 create a universe that stretches
beyond the borders of the layer. Use higher values to make bubbles flow in from outside the frame, or make it possible
to zoom out and bring them back into the picture. Using a value lower than 1 clips the bubbles before they reach the
edge of the layer. For example, when you want to confine bubbles to a specific area, such as inside a mask shape, set
Universe Size a little larger than the mask size to remove all the extra bubbles and speed up the rendering process.
Rendering controls
The Rendering controls specify the appearance of the bubbles, including their texture and reflection:
Blend Mode Specifies the relative transparency of bubbles as they intersect. Transparent blends the bubbles smoothly
together, allowing you to see the bubbles through each other. Solid Old On Top makes a younger bubble appear to be
underneath an older bubble and eliminates transparency. Use this setting to simulate bubbles flowing toward you. Solid
New On Top makes younger bubbles appear to be on top of older bubbles and also eliminates transparency. Use this
setting to make bubbles appear as if they are flowing downhill.
Bubble Texture Specifies the bubble texture. Use a preset texture, or create your own. To see the texture, make sure that
View is set to Rendered. To create your own texture, select User Defined, and from the Bubble Texture Layer menu,
choose the layer you want to use as the bubble.
Note: The preset bubble textures are prerendered 64x64 images. If you zoom in above 64x64, the bubble appears blurry. To
avoid this blurriness, use a higher-resolution custom bubble.
Bubble Texture Layer Specifies the layer you want to use as the bubble image. To use this control, choose User Defined
from the Bubble Texture menu. If you want the layer to appear only as a bubble, turn off the video switch for the layer
in the Timeline panel.
Note: You can use any file type that After Effects supports. If you plan on zooming in or using a large bubble size, make
sure that the resolution of the layer is high enough to avoid blurring. Remember, the item doesn’t have to be a normal
bubble. You can make blood cells, starfish, insects, space aliens, or flying monkeys. If it’s a layer in your composition, it can
be a bubble.
Bubble Orientation Determines the direction that the bubble rotates. Fixed releases the bubble from the producer right
side up and keeps it that way. Use this control if the bubble has built-in highlights and shading, as all of the preset
bubbles do. Physical Orientation buffets and spins bubbles around by the forces on them, creating a chaotic scene.

557
Effects and animation presets
Last updated 6/8/2015
Bubble Velocity faces the bubble in the direction of its motion. This setting is the most useful for flocking-style
animations.
Environment Map Specifies the layer that is reflected in the bubbles. If you want to use this layer only for the reflection,
turn off the video switch for a layer.
Reflection Strength Controls how much of the selected Environment Map is reflected in the bubbles. The higher the
value, the more the reflection obscures the original bubble texture. Reflections appear only on opaque pixels, so bubbles
with high amounts of transparency, such as the Spit preset, don’t reflect much.
Reflection Convergence Controls how much your Environment Map is distorted as it is mapped onto the bubbles. A
value of 0 projects the map flat on top of all of the bubbles in the scene. As the value increases, the reflection distorts to
account for the spherical shape of each bubble.
Flow Map controls
The Flow Map controls specify the map that the flow of the foam follows:
Flow Map Specifies the layer used to control the direction and speed of the bubbles. Use a still image layer; if you select
a movie as the flow map layer, only the first frame is used. A flow map is a height map based on luminance: White is
high, and black is low. White is not infinitely high; if a bubble travels fast enough, it can travel past a white obstacle.
Make sure that the map is a little blurry; sharp edges can create unpredictable results. For example, to make bubbles
flow through a canyon, create a flow map with a white canyon rim, a black canyon, and blurry gray walls. Use wind to
blow the bubbles in the direction you want them to flow, and the walls of the canyon contain them. You can also use a
gentle gradient on the floor of the canyon to control the flow direction.
Note: If the bubbles don’t follow the map, use the Simulation Quality control. Also, try blurring the flow map a little to
make sure that it does not have excessively abrupt edges.
Flow Map Steepness Controls the difference between white and black as they are used to determine steepness. If the
bubbles are ricocheting randomly off the flow map, decrease this value.
Flow Map Fits Specifies whether the flow map is relative to the layer or to the universe. The flow map resizes itself to
fit whichever you specify. This control is useful when you want to enlarge the universe but the flow map is designed for
a particular layer, or when you want the bubbles to start outside the frame and be affected by the flow map as they arrive
in the frame.
Simulation Quality Increases the precision, and therefore the realism, of the simulation. However, the higher the value,
the longer the composition takes to render. Normal generally produces good results and takes the least amount of time
to render. High returns better results but takes longer to render. Intense increases the rendering time but produces more
predictable bubble behavior. Use this option if the bubbles aren’t following the flow map. It often solves problems of
erratic behavior that can occur with small bubbles, high bubble speeds, and steep slopes.
Particle Playground effect
The Particle Playground effect lets you animate a large number of similar objects independently, such as a swarm of
bees or a snow storm. Use the Cannon to create a stream of particles from a specific point on the layer, or use the Grid
to generate a plane of particles. The Layer Exploder and Particle Exploder can create new particles from existing layers
or particles. You can use any combination of particle generators on the same layer.
David Van Brink provides a video walkthrough and downloadable example project on the omino website that show
several things that you can do with the Particle Playground effect, including how to use the Kinetic Friction ephemeral
property mapper.
Brian Peterson provides a tutorial on the Videomaker website that shows how to use the Particle Playground effect to
create a flock of birds.
558
Effects and animation presets
Last updated 6/8/2015
This effect works with 8-bpc color.
Start by creating a stream or plane of particles, or by exploding an existing layer into particles. Once you have a layer of
particles, you can control their properties, such as speed, size, and color. You can replace the default dot particles with
images from an existing layer to create, for example, an entire snowstorm from a single snowflake layer. You can also
use text characters as particles. For example, you can shoot words across the screen, or you can create a sea of text in
which a few letters change color, revealing a message.
Use Cannon, Grid, Layer Exploder, and Particle Exploder controls to generate particles. Use Layer Map controls to
specify a layer in place of each default dot particle. Use Gravity, Repel, and Wall controls to influence overall particle
behavior. Use Property Mapper controls to influence particle properties. Use Options to set options, including options
for substituting text characters in place of dots.
Note: Because of the complexity of Particle Playground, you may experience long computation, preview, and render times.
Use Particle Playground
1Select the layer on which you want particles to exist, or create a new solid layer.
2Choose Effect > Simulation > Particle Playground. The layer becomes an invisible layer in which only the particles
are visible. Animating the layer in the Timeline panel animates the entire layer of particles.
3Set up a particle generator to determine how particles are created. You can shoot a stream of particles from the
Cannon, generate a flat plane full of particles from the Grid, or use the Layer Exploder to create particles from an
existing layer. If you’ve already created particles, you can apply the Particle Exploder to explode them into more new
particles.
4Select your particles. By default, Particle Playground creates dot particles. You can replace the dots with a layer
already in the composition or with text characters you specify.
5Specify the overall behavior of some or all particles. Use Gravity to pull particles in a specified direction, Repel to
push particles apart from or toward one another, or Wall to contain or exclude particles from a certain area.
6Use a layer to specify the behavior of individual particles. You can modify controls that change particle motion, such
as speed and force, and controls that change particle appearance, such as color, opacity, and size.
The Particle Playground effect renders with anti-aliasing when the layer to which it is applied is set to Best quality.
It also applies motion blur to moving particles when both the Motion Blur layer switch and the Enable Motion Blur
composition switch are on.
When you use a layer as a source for particles, Particle Playground ignores any changes you’ve made to that layer
within that composition, such as changing the Position values. Instead, it uses the layer in its original state. To keep
changes for a layer when you use it as a particle source, precompose the layer and use the precomposition layer as
the control layer. (See Compound effects and control layers.)

559
Effects and animation presets
Last updated 6/8/2015
Particle content and particle generators
Particle Playground can generate three kinds of particles: dots, a layer, or text characters. You can specify only one kind
of particle per particle generator.
Create particles by using the Cannon, the Grid, the Layer Exploder, and the Particle Exploder. The Grid creates particles
in an organized grid format with straight rows and columns. The exploders create particles randomly, like firecracker
sparks.
The particle generators set the attributes of particles at the moment they are created. After creation, Gravity, Repel,
Wall, Exploder, and Property Mapper controls influence particle behavior. For example, if you want particles to stick to
grid intersections, you might use the Static Friction option in the Persistent Property Mapper to hold particles in place.
Otherwise, as soon as particles are created, they begin moving away from their original grid positions.
Cannon controls
The Cannon is on by default; to use a different method to create particles, first turn off the Cannon by setting Particles
Per Second to zero. The Cannon creates particles in a continuous stream.
Position Specifies the (x,y) coordinates from which particles are created.
Barrel Radius Sets the size of the barrel radius for the Cannon. Negative values create a circular barrel, and positive
values create a square barrel. For a narrow source, such as a ray gun, specify a low value. For a wide source, such as a
school of fish, specify a high value.
Particles Per Second Specifies how often particles are created. A value of 0 creates no particles. A high value increases
the density of the particle stream. If you don’t want the Cannon to fire continuously, set keyframes for this control so
that the value is 0 at the times when you don’t want to create any particles.
Direction Sets the angle at which particles are fired.
Direction Random Spread Specifies how much each particle’s direction deviates randomly from the cannon direction.
For example, specifying a 10-degree spread sprays particles in random directions within +/–5° of the cannon direction.
For a highly focused stream, such as a ray gun, specify a low value. For a stream that widens quickly, specify a high value.
You can specify up to 360°.
Velocity Specifies the initial speed of particles in pixels per second as they emanate from the Cannon.
Velocity Random Spread Specifies the amount of random velocity of particles. A higher value results in more variation
in the velocity of particles. For example, if you set Velocity to 20 and Velocity Random Spread to 10, particles leave the
Cannon at velocities ranging from 15 to 25 pixels per second.
Color Sets the color of dots or text characters. This control has no effect if you use a layer as the particle source.
Particle Radius Sets the radius of dots, in pixels, or the size of text characters in points. This control has no effect if you
use a layer as the particle source.
Grid controls
The Grid creates a continuous plane of particles from a set of grid intersections. The movement of Grid particles is
completely determined by the Gravity, Repel, Wall, and Property Mapper settings. By default, the Force control of
Gravity is on, so Grid particles fall toward the bottom of the frame.
With the Grid, a new particle appears on every frame at each grid intersection. You can’t adjust this frequency, but if
you want to turn off the Grid or make the Grid stop generating particles at specific times, set the Particle Radius/Font
Size control to 0, or use keyframes to animate the value of the Particles Across and Particles Down controls. To make
more particles appear in each frame, increase the values for Particles Across and Particles Down.

560
Effects and animation presets
Last updated 6/8/2015
Note: By default, the Cannon is on and the Grid is off. If you are using the Grid and want to stop the Cannon from
generating particles, turn off the Cannon by setting its Particles Per Second value to 0.
Position Specifies the (x,y) coordinates of the grid center. When a grid particle is created, it is centered over its grid
intersection, regardless of whether it is a dot, a layer, or a text character. If you’re using text characters as particles, the
Use Grid option in the Edit Grid Text dialog box is on by default, placing each character on its own grid intersection,
so normal character spacing, word spacing, and kerning do not apply. If you want text characters to appear at the grid
position with normal spacing, use a text alignment other than the Use Grid option.
Width, Height Specify the dimensions of the grid, in pixels.
Particles Across, Particles Down Specify the number of particles to distribute horizontally and vertically across the grid
area. Particles are generated only when the value is 1 or more.
Note: If the Width, Height, Particles Across, and Particles Down controls are not available, the Use Grid option has been
turned off in the Edit Grid Text dialog box.
Color Sets the color of dots or text characters. This control has no effect if you use a layer as the particle source.
Particle Radius/Font Size Sets the radius of dots in pixels or the size of text characters in points. This control has no
effect if you use a layer as the particle source.
Layer Exploder and Particle Exploder
The Layer Exploder explodes a layer into new particles, and the Particle Exploder explodes a particle into more new
particles. In addition to explosion effects, the exploders are also handy for simulating fireworks or for rapidly increasing
the number of particles.
The following guidelines can help you control particles resulting from an explosion:
•A layer is exploded once for each frame. By default, this creates a continuous shower of particles for the duration of
the composition. If you want to start or stop a layer explosion, animate the Radius of New Particles control by using
keyframes so that its value is zero at times when you don’t want particles to be created.
•If the source of the layer is a nested composition, you can set different Opacity values or In and Out points for the
layers within the nested composition to make the exploding layer transparent at different points in time. The Layer
Exploder does not create particles where the source of the layer is transparent.
•To change the position of the exploding layer, precompose the layer with its new position (use the Move All
Attributes Into The New Composition option), and then use the precomposed layer as the exploding layer.
•When you explode particles, the new particles inherit the position, velocity, opacity, scale, and rotation of the
original particles.
•After layers or particles explode, Gravity, Repel, Wall, and Property Mapper controls influence the movement of
particles.
Some Persistent Property Mapper and Ephemeral Property Mapper options can make explosions more realistic. For
example, change Opacity to make the resulting particles fade out, or change the Red, Green, and Blue color channels to
make resulting particles change color as they appear to cool.
Explode Layer (Layer Exploder only) Specifies the layer you want to explode. To make the video disappear the moment
the particles appear, either turn off the video for the layer or trim the Out point of the layer.
Radius Of New Particles Specifies the radius of the particles resulting from the explosion. This value must be smaller
than the radius of the original layer or particle.
Velocity Dispersion Specifies, in pixels per second, the maximum speed of the range within which Particle Playground
varies the velocity of the resulting particles. High values create a more dispersed or cloudlike explosion. Low values
keep the new particles closer together and can make the exploded particles resemble a halo or shockwave.

561
Effects and animation presets
Last updated 6/8/2015
Affects Specifies which particles the Layer Exploder and Particle Exploder affect.
Layer Map controls
By default, the Cannon, Grid, Layer Exploder, and Particle Exploder create dot particles. To replace the dots with a layer
in the composition, use the Layer Map. For example, if you use a movie of a single bird flapping its wings as a particle
source layer, After Effects replaces all dots with an instance of the bird movie, creating a flock of birds. A particle source
layer can be a still image, a solid, or a nested After Effects composition.
A multiframe layer is any layer with a source that varies over time, such as a movie or a composition. When you map
new particles to a multiframe layer, use the Time Offset Type control to specify how you want to use the frames of the
layer. For example, use Absolute to map an unchanging image onto a particle, or use Relative to map an animating
sequence of frames onto a particle. You can randomize both Absolute and Relative across particles.
Note: When you choose a layer for Layer Map, Particle Playground ignores any changes that you made to that layer within
that composition. Instead, it uses the layer in its original state. To keep transformations, effects, masks, rasterization
options, expressions, or keyframe changes for a layer when you use it as a particle source, precompose the layer.
Use Layer Specifies the layer you want to use as the particles.
Time Offset Type Specifies how you want to use the frames of a multiframe layer. For example, if you are using a layer
of a bird flapping its wings and you choose Relative for Time Offset Type with a Time Offset of 0, the flapping wings for
all the instances of the bird are synchronized. While this may be realistic for a marching band, it is not realistic for a
flock of birds. To make each bird start flapping its wings from a different frame in the layer, use Relative Random.
RelativeStarts playing the layer at a frame based on the Time Offset you specify, relative to the current time of the effect
layer; then advances in step with the current time of the Particle Playground layer. If you specify a Time Offset of 0, all
particles show the frame that corresponds to the current time of the effect layer. If you choose a Time Offset of 0.1 (and
your composition is set to 30 fps), each new particle displays the frame that is 0.1 seconds after the previous particle’s
frame. Regardless of the Time Offset you specify, the first particle always displays the frame of the source layer that
corresponds to the current time of the effect layer.AbsoluteDisplays a frame from the layer based on the Time Offset
you specify, regardless of the current time. Choose Absolute when you want a particle to show the same frame of a
multiframe source layer for its entire lifespan, instead of cycling through different frames as the effect layer advances
in time. For example, if you choose Absolute and specify a Time Offset of 0, every particle shows the first frame of the
source layer for its entire lifespan. If you want to show a frame other than the first frame, move the layer earlier in time
until the frame you want to show corresponds to the In point of the Particle Playground layer. If you specify a Time
Offset of 0.1, for example, each new particle displays a frame that is 0.1 second after the frame of the previous particle
(or every third frame of a 30-fps animation).Relative RandomStarts playing the layer from a frame chosen at random,
within the range between the current time of the effect layer and the Random Time Max you specify. For example, if
you choose Relative Random and specify a Random Time Max of 1, each particle starts playing from a layer frame
chosen at random from between the current time and 1 second after the current time. If, for another example, you
specify a negative Random Time Max value of - 1, the Random Time Max is before the current time, so that the range
within which new particles start playing advances as the current time advances. However, the range is always between
the current time and one second earlier than the current time.Absolute RandomTakes a frame at random from the
layer, by using a time in the range from 0 to the Random Time Max you specify. Choose Absolute Random when you
want each particle to represent a different single frame of a multiframe layer. For example, if you choose Absolute
Random and specify a Random Time Max of 1, each particle shows a layer frame from a random time between 0
seconds and 1 second into the duration of the layer.
Time Offset Specifies the frame from which to start playing sequential frames from the layer.
Affects Specifies which particles the Layer Map controls affect.

562
Effects and animation presets
Last updated 6/8/2015
Replace default Cannon particles with text
You can use text characters as particles. For example, you can type a message that the Cannon shoots across the frame.
You can also change the attributes of any three sets of characters. For example, you can make some of the characters
larger or brighter than others.
1In the Effect Controls panel, click Options.
2Click Edit Cannon Text.
3Type text in the box, and then set the following options:
•For Font/Style, choose the font and style for Cannon characters.
•For Order, click to specify the sequence in which characters exit the Cannon. The sequence is relative to the
character order typed in the box. For example, if the Cannon Direction is set to 90° (making it point to the right),
English text must exit the Cannon last letter first to be in readable order. Therefore, select Right to Left.
•For Loop Text, select to continuously generate the characters you typed. Deselect to generate only one instance
of the characters.
4Click OK to close the Edit Cannon Text dialog box, and then click OK to close the Particle Playground dialog box.
5Click the right-facing triangle next to Cannon so that it points downward.
6Click the Font Size value, type a value of 10 or greater, and press Enter (Windows) or Return (Mac OS).
If you want to stop replacing default particles with text, delete all text from the box in the Edit Cannon Text dialog
box.
Replace default Grid particles with text
1In the Effect Controls panel, click Options, and then click Edit Grid Text.
2Set the following options:
•For Font/Style, choose the font and style for Grid characters.
•For Alignment, click Left, Center, or Right to position text in the box at the Position specified in the Grid control,
or click Use Grid to position each letter in the text on consecutive grid intersections.
•For Loop Text, select to repeat the characters you typed until all the grid intersections contain one character. Grid
intersections are specified by the Particle Across and Particle Down controls. Deselect to generate only one
instance of the text. (This option is available only if you select Use Grid alignment.)
3Type text in the box. If Use Grid alignment is selected and you want to skip a grid intersection, type a space. To force
the next character down to the next grid row, press Enter (Windows) or Return (Mac OS).
4Click OK to close Edit Grid Text, and then click OK to close the Particle Playground dialog box.
5Click the right-facing triangle next to Grid so that it points downward.
6Click the Font Size value, type a value of 10 or greater, and press Enter (Windows) or Return (Mac OS).
If you want to stop replacing default particles with text, delete all text from the box in the Edit Grid Text dialog box.
Using Selection Text values to differently affect subsets of text
You can differently affect only certain subsets of text particles by specifying Selection Text values. To open the Particle
Playground options dialog box, click Options at the top of the Particle Playground entry in the Effect Controls panel.
(This is the same place where you can specify the text used by the Grid or Cannon emitters.) Then enter text in one or
more of the Selection Text fields, and click OK. After doing this, you can then choose one of the Selection Text sets from
the Character menu under one of the Affects property groups. For example, you can make gravity only affect the letter
e by entering e in Selection Text 1 and then choosing Selection Text 1 in Gravity > Affects > Characters.

563
Effects and animation presets
Last updated 6/8/2015
Note: The string matching is case-sensitive, and it does include punctuation marks and other symbols.
As with all text features, consider using this feature with symbol fonts, like wingdings.
Changing a particle over its lifespan
Some controls affect the particle from birth: Cannon, Grid, Layer Exploder, and Particle Exploder. Others affect the
particle after birth and over the course of its lifespan: Gravity, Repel, Wall, Persistent Property Mapper, and Ephemeral
Property Mapper. To have full control over particle movement and appearance, you must balance these controls.
For example, if you want to use the Cannon to shoot sparks that fade over time, it may seem that you need only animate
the Color control of the Cannon. However, using this method, you change only the color of each new particle as it’s
created. To control the color for the lifespan of particles, create a layer map and use one of the Property Mappers to alter
the color channels of the particles.
The following list covers common particle behavior and how you can influence it.
Speed At particle creation, particle velocity is set by the Cannon and the exploders; Grid particles have no initial speed.
After particle creation, use the Force control in the Gravity and Repel control groups. You can also influence the speed
of individual particles by using a layer map to set values for the Speed, Kinetic Friction, Force, and Mass properties in
the Property Mappers.
Direction At particle creation, the Cannon includes particle direction; the Layer Exploder and Particle Exploder send
new particles in all directions; and Grid particles have no initial direction. After particle creation, direction can be
influenced by the Direction control in the Gravity control group or by specifying a Boundary (mask) in the Wall control
group. You can also influence the direction of individual particles by using a layer map to set values for the Gradient
Force, X Speed, and Y Speed properties in the Property Mappers.
Area Use a Wall mask to contain particles to a different area or to remove all barriers. You can also restrict particles to
an area by using a layer map to set values for the Gradient Force property in the Property Mappers.
Appearance At particle creation, the Cannon, Grid, Layer Exploder, and Particle Exploder set particle size unless you
replace the default dots with a layer map. The Cannon and Grid set the initial color, while the Layer Exploder and
Particle Exploder take color from the exploded dot, layer, or character. The Options dialog box affects the initial
appearance of text. After particle creation, you can use the Property Mappers to set values for Red, Green, Blue, Scale,
Opacity, and Font Size.
Rotation At particle creation, the Cannon and Grid set no rotation; the Particle Exploder takes rotation from the
exploded dot, layer, or character. Use Auto-Orient Rotation to make particles rotate automatically along their respective
trajectories. For example, a particle can point up as it climbs an arc, and point down as it descends. Rotation isn’t easily
visible for a dot particle. It is easier to observe only when you replace the dot particle with text characters or a layer.
After particle creation, use a layer map to set values for the Angle, Angular Velocity, and Torque property in the
Property Mappers.
Note: To select Auto-Orient Rotation, click Options for the Particle Playground effect in the Effect Controls panel.
Gravity controls
Use Gravity controls to pull existing particles in a direction you specify. Particles accelerate in the direction of gravity.
Apply in a vertical direction to create falling particles, such as rain or snow, or rising particles, such as champagne
bubbles. Apply in a horizontal direction to simulate wind.
Force Specifies the force of gravity. Positive values increase the force, pulling particles more strongly. Negative values
reduce the force.

564
Effects and animation presets
Last updated 6/8/2015
Force Random Spread Specifies a range of randomness for the Force. At zero, all particles fall at the same rate. At a
higher value, particles fall at slightly different rates. Although pure gravity accelerates all objects equally, increasing the
Force Random Spread value can produce more realistic results with subjects such as leaves falling through air, where
enough air resistance exists to vary the rates of descent of the leaves.
Direction Specifies the angle along which gravity pulls. The default is 180°, which simulates the real world by pulling
particles toward the bottom of the frame.
Affects Specifies a subset of the layer’s particles to which Gravity applies.
Repel controls
Repel controls specify how nearby particles repel or attract each other. This feature simulates adding a positive or
negative magnetic charge to each particle. You can specify which particles, layers, or characters are the repelling force
and which are repelled.
Note: If you want to repel an entire layer of particles away from a specific area, use the Property Mapper controls, Wall or
Gradient Force.
Force Specifies the repel force. Greater values repel particles with more force. Negative values result in particle
attraction.
Force Radius Specifies the radius (measured in pixels) within which particles are repelled. Another particle must be
within this radius to be repelled.
Repeller Specifies which particles act as the repellers or attractors to another subset you specify by using the Affects
control.
Affects Specifies a subset of the layer’s particles to which repulsion or attraction applies.
Wall controls
Wall controls contain particles, limiting the area within which particles can move. A wall is a closed mask that you
create by using a mask tool, such as the Pen tool. When a particle hits the wall, it bounces off at a velocity based on the
force with which it hit.
Boundary Specifies the mask to use as the wall. You can create a new mask by drawing one on the effect layer.
Affects controls
Many Particle Playground controls include Affects controls. Affects controls specify which particles the encompassing
control affects. For example, the Affects controls within the Particle Exploder controls specify which particles the
Particle Exploder affects.
Particles From Specifies the particle generator or combination of particle generators whose particles you want to affect.
Selection Map Specifies the layer map that influences which particles are affected.
Note: The simulation space is not bounded by the dimensions of the layer to which Particle Playground is applied. You may
need to use a selection map that is larger than the Particle Playground layer so that the selection map affects dots that are
not visible.
Characters Specifies the characters you want to affect. This control applies only if you are using text characters as the
particle type.
Older/Younger Than Specifies the age threshold, in seconds, above or below which you want to affect a particle. Positive
values affect older particles, and negative values affect younger particles. For example, a value of 10 means that as soon
as a particle reaches 10 seconds, it changes to the new value.

565
Effects and animation presets
Last updated 6/8/2015
Age Feather Specifies the age range in seconds within which the Older/Younger Than value is feathered, or softened.
Feathering creates a gradual, rather than abrupt, change. For example, if you set Older/Younger Than to 10 and Age
Feather to 4, about 20% of particles start changing when they’re 8 seconds old, 50% change when they’re 10 seconds old
(the Older/Younger Than value), and the remainder change by the time they’re 12 seconds old.
Use Particle Playground Property Mapper controls
You can control specific properties of individual particles by using a layer map and either the Persistent Property
Mapper or the Ephemeral Property Mapper. You can’t alter a specific particle directly, but you can use a layer map to
specify what happens to any particle that passes over a specific pixel in the layer. Particle Playground interprets the
brightness of each layer map pixel as a specific value. The Property Mapper associates a specific layer map channel (Red,
Green, or Blue) with a specific property, so that as a particle passes over a certain pixel, the brightness value at that pixel
modifies the property.
A particle property can be modified in either a persistent or an ephemeral way:
•A persistent change to a particle property retains the most recent value set by a layer map for the remaining lifespan
of the particle, unless the particle is modified by another control such as Repel, Gravity, or Wall. For example, if you
use a layer map to modify particle size and you animate the layer map so it exits the frame, the particles keep the last
size value set by the layer map after it exits the frame.
•An ephemeral change to a particle property causes the property to revert to its original value after each frame. For
example, if you use a layer map to modify particle size and you animate the layer map so that it exits the frame, each
particle returns to its original size value as soon as no layer map pixels correspond to it. Similarly, if you apply an
operator such as Add, each time a particle passes over a different layer map pixel, the value of the layer map pixel is
added to the original value of the particle.
In both the Persistent and Ephemeral Property Mappers, you can control up to three particle properties independently
by using a single RGB image as a layer map. Particle Playground achieves this independent three-component control
by extracting brightness values separately from the red, green, and blue channels in the image. You don’t have to use all
three channels if you want to modify only one property. To change only one property or change up to three properties
using the same values, use a grayscale image as the layer map because the RGB channels are identical.
In combination with keyframes or expressions, the Property Mappers provide complete control over individual particle
properties in space and time. Using layer maps, you can change particle properties at any location within a frame. By
applying keyframes or expressions to Property Mapper options and animating a layer map, you can control how particle
properties change.
1For Use Layer As Map, choose a layer map to use as the source for values that modify particle values. The layer map
must be part of the composition.
2To apply the effect to a subset of particles, specify the Affects controls as necessary.
3Choose a property for each of the Map Red To, Map Green To, and Map Blue To controls. You don’t have to map
properties to all of the color channels. For example, if you want to change scale over an image map, you can map the
color red to scale without setting other properties.
4Specify the minimum and maximum values you want the layer map to produce for each Map To group. Min is the
value to which a black pixel is mapped, and Max is the value to which a white pixel is mapped. The complete tonal
distribution between Min and Max is then scaled proportionally.
5If using the Ephemeral Property Mapper, you can apply an operator to the value of a particle property and the value
of the corresponding layer map pixel.

566
Effects and animation presets
Last updated 6/8/2015
Note: Because particle properties use many kinds of units, such as pixels, degrees, and seconds, you may want to
compress or expand the range of values from the layer map so that all the resulting values are usable in the measurement
system of a specific particle property. First, use the Min and Max controls, which define the range of values to use from
the layer map. If further adjustment is necessary and you’re using the Ephemeral Property Mapper, use the Operator
control and choose a mathematical operator to amplify, attenuate, or limit the effect of a layer map.
In both the Persistent and Ephemeral Property Mappers, you can use the alpha channel of a layer map to make more
subtle changes to the value of a particle property. For example, particles over a layer-map pixel in which the alpha
channel value is 255 are fully affected, while lower values affect particles less. Layer-map pixels that are completely
transparent have no effect on particle properties.
When you choose any of the following properties, Particle Playground copies the value from the layer map (that is,
the layer selected in the Use Layer as a Map menu) and applies it to the particle.
None Modifies no particle property.
Red, Green, Blue Copy the value of the red, green, or blue channel of a particle within a range of 0.0–1.0.
Kinetic Friction Copies the amount of resisting force against a moving object, typically within a range of 0.0–1.0.
Increase this value to slow down or stop moving particles, as if braking.
Static Friction Copies the amount of inertia that holds a stationary particle in place, typically within a range of 0.0–
1.0. At zero, a particle moves when any other force, such as gravity, is present. If you increase this value, a stationary
particle requires more of another force to start moving.
Angle Copies the direction in which the particle points, in degrees relative to the particle’s original angle. The angle
is easily observable when a particle is a text character or a layer without radial symmetry.
Angular Velocity Copies the velocity of particle rotation in degrees per second. This setting determines how fast a
particle rotates around its own axis.
Torque Copies the force of particle rotation. The angular velocity of a particle is increased by a positive torque and
is increased more slowly for particles of greater mass. Brighter pixels affect angular velocity more forcefully; if
enough torque is applied against angular velocity, the particle starts spinning in the opposite direction.
Scale Copies the scale value of a particle along both the x and y axes. Use this control to stretch a particle
proportionally. A value of 1.0 scales the particle to its full size; a value of 2.0 scales it 200%, and so on.
X Scale, Y Scale Copy the scale value of a particle along the x or y axis. Use these properties to stretch a particle
horizontally or vertically.
X, Y Copy the position of a particle along the x or y axis in the frame, in pixels. A value of zero specifies a position
at the left of the frame (for X) or at the top of the frame (for Y).
Gradient Velocity Copies the velocity adjustment based on areas of a layer map on both the x and y planes of
motion.
X Speed, Y Speed Copy the horizontal speed (x-axis velocity) or vertical speed (y-axis velocity) of a particle in pixels
per second.
Gradient Force Copies the force adjustment based on areas of a layer map on both the x and y planes of motion. The
pixel brightness values in the color channel define the resistance to particle force at each pixel, so the color channel
acts like a layer map of hills and valleys that decrease or increase particle force. In the layer map, areas of equal
brightness result in no adjustment, similar to flat land. Lower pixel values represent less resistance to a particle’s
force, similar to a downhill grade. Higher pixel values represent more resistance to a particle’s force, similar to an
uphill grade. For best results, use a soft-edged layer map image.

567
Effects and animation presets
Last updated 6/8/2015
If you are using a layer map for Gradient Force where flat areas equal no adjustment, and you are using the Min
and Max controls (not the Min or Max operators) to set the range of values for Gradient Force, set them to positive
and negative values of the same number (for example, –30 and +30). This ensures that the middle of the range remains
centered at zero.
X Force Copies the coercion along the x axis of motion. Positive values push a particle to the right.
Y Force Copies the coercion along the y axis of motion. Positive values push a particle down.
Opacity Copies the transparency of a particle, where zero is invisible, and 1 is solid. Adjust this value to fade
particles in or out.
Mass Copies the particle mass, which interacts with all properties that adjust force, such as Gravity, Static Friction,
Kinetic Friction, Torque, and Angular Velocity. It takes greater force to move particles with a larger mass.
Lifespan Copies the elapsed length of time a particle exists, in seconds. At the end of its lifespan, the particle is
removed from the layer. The default lifespan is effectively immortal.
Character Copies the value that corresponds to an ASCII text character, making it replace the current particle.
Applies only if you’re using text characters as particles. You can specify which text characters appear by painting or
drawing shades of gray on the layer map that correspond to the ASCII characters you want. A value of zero produces
no character. For US English characters, use values in the range 32–127. The range of possible values can
accommodate Japanese characters. For more information about the ASCII character values for a font you’re using,
see the documentation for the font, use a utility such as Character Map (Windows), or contact the font
manufacturer.
Note: If you simply want to make certain characters spell a message, it’s much easier to type the text directly in the
Options dialog box. The Character property is more useful as a secret message effect in which you scramble text
characters.
Font Size Copies the point size of characters. Applies only if you’re using text characters as particles. Increase this
value to make characters larger.
Time Offset Copies the Time Offset value used by the Layer Map. Applies only if you used the Layer Map control to
specify a multiframe layer (such as a movie) as a particle source.
Scale Speed Copies the scale of a particle. Positive values expand the particle, and negative values shrink the
particle. Particles expand or shrink by a percentage per second.
Min and Max controls for Property Mappers
When the overall range of layer map brightness values is too wide or narrow, use Min and Max to stretch, compress, or
shift the range of values produced by the layer map. The following examples describe when you may want to adjust Min
and Max:
•You want to set the smallest font size for your text to 10 points and the largest size to 96 points. Set the Min value to
10 and the Max value to 96.
•You set the initial color of a particle and then use a layer map to change particle colors. If you find that the color
changes aren’t dramatic enough, you can lower the Min value and raise the Max value to increase the contrast of the
color changes.
•You set the initial velocity of a particle and then use a layer map to affect the X Speed value. However, you find that
the difference between the fastest and slowest particles is too great. By raising the Min value and lowering the Max
value for the layer map channel that is mapped to the X Speed value, you narrow the resulting range of particle
speeds.

568
Effects and animation presets
Last updated 6/8/2015
•You use a layer map to affect the Scale property of particles and find that the smallest particles aren’t small enough
while the largest resulting particles are too large. In this case, the entire output range needs to be shifted down; lower
both the Min and Max values.
•You have a layer map that modifies particles in the opposite direction from the one you want. Swap the Min and
Max values, which has the same result as inverting the layer map.
Note: The alpha channel of the layer map is used as the selection map for the Persistent and Ephemeral Property Mappers.
Operator controls for the Ephemeral Property Mapper
When you use the Ephemeral Property Mapper controls, Particle Playground replaces the value of a particle’s property
with the value represented by the layer map pixel at the particle’s current location. You can also amplify, attenuate, or
limit the resulting values by specifying a mathematical operator and then using both the value of a particle’s property
and its corresponding layer map pixel value.
Set
Replaces the value of a particle property by the value of the corresponding layer map pixel. For example, to replace the
value of a particle property with the brightness value of the corresponding pixel on the layer map, use Set. This operator
is the most predictable and is the default.
Add
Uses the sum of the value of a particle property and the value of the corresponding layer map pixel.
Difference
Uses the absolute value of the difference of the value of a particle property and the brightness value of the corresponding
pixel on the layer map. Because it takes the absolute value of the difference, the resulting value is always positive. This
operator is useful when you want to limit values to only positive values. If you’re trying to model realistic behavior, the
Difference operator may not be ideal.
Subtract
Starts with the value of a particle property and subtracts the value of the brightness value of the corresponding pixel on
the layer map.
Multiply
Multiplies the value of a particle property by the brightness value of the corresponding pixel on the layer map and uses
the result.
Min
Compares the brightness value of the layer map to the value of the particle property and uses the lower value. To limit
a particle property so that it is less than or equal to a value, use the Min operator and set both the Min and Max controls
to that value. If you use a white solid as a layer map, you need only set the Max control to that value.

569
Effects and animation presets
Last updated 6/8/2015
Max
Compares the brightness value of the layer map to the value of the particle property and uses the higher value.
To amplify existing values of properties, try applying the Add operator with positive values or the Multiply operator with
values above 1.0. To attenuate (tone down) property value changes, try applying the Multiply operator using values in
the range 0.0–1.0.
Control layers for Particle Playground
Particle Playground can use a control layer to control a particle property, such as opacity. For general information about
creating and using control layers, see Compound effects and control layers.
Regardless of the color depth of the image that you use as a control layer, Particle Playground always uses its red, green,
and blue channels as if each were an 8-bpc grayscale image. If you create a control layer using colors, the Property
Mapper property groups in Particle Playground can extract the brightness values from each RGB color channel
separately.
The alpha channel in a control layer modifies the color values in the control layer before Particle Playground uses the
control layer’s pixel values. Areas where the alpha channel value is 0 (transparent areas of a control layer) don’t affect
particle values. Areas where the alpha channel has a value greater than 0 (semitransparent and opaque areas of a control
layer) affect the particle value to a degree proportional to the value of the alpha channel. When you use the Persistent
and Ephemeral Property Mapper property groups, the range set for the Min and Max controls also affects the value
applied to a particle.
Particle Playground can extract brightness values separately from the red, green, and blue channels in an image. If you
want to create different layer maps for each channel, use a program that can edit individual color channels, such as
Adobe Photoshop, and then paint or paste each layer map into its own channel. Save the control layer as an RGB image
in a format After Effects can import. The image may look unusual when viewed in RGB mode, because it’s intended to
be used as a single hidden layer containing three different layer maps, not as a visible image layer.
If you already have three separate images, you can combine them into a single RGB file by using the Set Channels effect.
Set Channels can load each image into its own channel in a combined file, making it suitable for use as an RGB layer
map.
Improving performance with Particle Playground
Keep in mind the following when working with the Particle Playground effect:
•When you’re generating a Particle Playground effect, keep an eye on the Info panel to see how many particles are
being produced. If an effect contains more than 10,000 particles, it can greatly slow rendering. If you notice
performance problems, set Particles Per Second and/or Particles Down to relatively low values (in the range 1–100).
•The Grid and Layer Exploder generate particles on every frame, which may generate too many particles for the effect
you’re creating and slow down rendering. To avoid continuous particle generation, animate these controls to decline
to zero over time: Layer Exploder, Radius of New Particles, Grid Width and Height, Particle Radius, and Font Size.
Then Particle Playground generates new particles only at the start of a sequence.
•When you apply a Particle Playground effect to a layer, the particle positions aren’t limited to the bounds of that
layer. To control particles that you can’t see or that appear near the edge of the image, use a Selection or Property
Map that’s larger than the area of the Particle Playground layer. Also, note that After Effects takes the alpha channel
of an image map into account. If you want transparent areas of your map to affect the particles, precompose the map
layer with a black solid behind it.
570
Effects and animation presets
Last updated 6/8/2015
To specify field rendering with a Particle Playground effect, select Enable Field Rendering in the Particle Playground
options dialog box. Then Particle Playground calculates the simulation at double the frame rate of the current
composition, which is what field rendering requires.
Shatter effect
Note: For information on properties shared by several of the Simulation effects, see Common Lighting controls and Material
controls.
The Shatter effect explodes images. Use the controls for the effect to set explosion points and adjust the strength and
radius. Anything outside the radius doesn’t explode, leaving portions of the layer unaltered. You can choose from a
variety of shapes for the shattered pieces (or create custom shapes) and extrude the pieces to give them bulk and depth.
You can even use a gradient layer to precisely control the timing and order of an explosion. For example, you can import
a logo and use Shatter to blow a logo-shaped hole in a layer.
Brian Maffitt provides more than two hours of video explanation and tutorials for the Shatter effect in a series of videos
from Total Training. The interface has changed since these videos were created, but the information is still valuable.
Note: To reverse the temporal direction of the Shatter effect (that is, have the pieces come together instead of fly apart),
apply the effect, precompose the layer, and then time-reverse the precomposition layer.
This effect works with 8-bpc color.
Online resources about the Shatter effect
Aharon Rabinowitz provides a video tutorial on the Creative COW website that shows how make 3D extruded text in
After Effects using the Shatter effect.
Chris and Trish Meyer provide an article on the ProVideo Coalition website that explains how to use a simple set of
expressions to orient a layer with the Shatter effect so that it integrates with other 3D layers in a composition.
Andrew Kramer provides a video tutorial on his Video Copilot website that demonstrates the use of the Shatter effect
to make a planet explode.
Lloyd Alvarez provides a video tutorial on the AETUTS+ website that demonstrates the use of the Shatter effect with a
custom shatter map to cause a person to disintegrate.
View controls
The View control specifies exactly how a scene appears in the Composition panel by using the following views:
Rendered Displays the pieces with textures and lighting—as they will look at final output. Use this view when
rendering the animation.

571
Effects and animation presets
Last updated 6/8/2015
Wireframe Front View Displays the layer from a full-screen, straight-on camera angle with no perspective. Use this
view to adjust effect points and other parameters that are hard to see from an angle. In addition, the outlines of the
shatter map are visible so you can precisely position, rotate, and scale the shatter pattern. It’s handy to toggle between
this view and the perspective view you use for the scene.
Wireframe Displays the correct perspective of the scene, so you can quickly set up the camera the way you like it and
fine-tune the Extrusion Depth.
Wireframe Front View + Forces Displays the wireframe front-view representation of the layer, plus a blue
representation of each force sphere.
Wireframe + Forces Displays the wireframe view, plus a blue representation of the force spheres. This view includes
camera controls, so you can position everything precisely in 3D space.
Render control
The Render control renders the whole scene (the default), the unshattered layer, or the shattered pieces independently.
For example, if you want to apply the Glow effect only to shattered pieces and not to the portions of the layer that remain
intact, create the explosion and duplicate the layer. Next, for the back layer, choose Layer from the Render menu, and
for the front layer, choose Pieces. Then apply the Glow effect to the front layer.
Shape controls
Shape controls specify the shape and appearance of the shattered pieces.
Pattern Specifies the preset pattern to use for the exploded pieces.
Custom Shatter Map Specifies the layer you want to use as the shape of the exploded pieces.
White Tiles Fixed Prevents pure white tiles in a custom shatter map from being exploded. You can use this control to
force certain parts of a layer to remain intact.
Use this control when your shatter map uses images or letters such as O: Set the portion you don’t want to blow out,
such as the centers of the O and the background, to pure white and set the rest to another pure color.
Repetitions Specifies the scale of the tile pattern. This control works only in conjunction with the preset shatter maps,
which all seamlessly tile. Increasing this value increases the number of pieces on the screen by scaling down the size of
the shatter map. Consequently, the layer breaks into more and smaller pieces. Animating this control is not
recommended, as it can cause sudden jumps in the number and size of shatter pieces.
Direction Rotates the orientation of a preset shatter map, relative to the layer. As with Repetitions, animating this
control results in sudden jumps in the animation and is not recommended.
Origin Precisely positions a preset shatter map on the layer. This option is useful if you want to line up portions of an
image with specific shattered pieces. Animating this control results in sudden jumps in the animation and is not
recommended.
Extrusion Depth Adds a third dimension to the exploded pieces. The higher the value, the thicker the pieces. In
Rendered view, this effect isn’t visible until you start the shatter or rotate the camera. As you set this control higher, the
pieces may pass through each other. While this is generally not a problem in full-speed animations, it may become
visible when the pieces grow thick and move slower.
Force 1 and Force 2 controls
Force 1 and Force 2 controls define the blast areas by using two different Forces.
Position Specifies the current center point of the blast in (x,y) space.

572
Effects and animation presets
Last updated 6/8/2015
Depth Specifies the current center point in z space, or how far in front of or behind the layer the blast point is. Adjust
Depth to determine how much of the blast radius is applied to the layer. The blast radius defines a sphere, and the layer
is basically a plane; therefore, only a circular slice of the sphere intersects the plane. The farther away the layer is from
the center of the blast, the smaller the circular slice. When pieces explode, they fly away from the force center. Depth
determines which way the pieces fly: Positive values cause the pieces to explode forward, toward the camera (assuming
the default camera settings of 0, 0, 0); negative values cause pieces to blow backward, away from the camera. To see the
result of the Depth setting, use the Wireframe + Force Sphere view.
Radius Defines the size of the blast sphere. The radius is the distance from the center of a circle (or sphere) to the edge.
By adjusting this value, you can fine-tune exactly which pieces explode. Changing this value can vary the speed and
completeness of the explosion. Animating it from small to large generates an expanding, shockwave explosion.
Note: To begin the shattering at a time other than layer time zero, animate the Radius property, not the Strength property.
Pieces inside the force sphere defined by the Radius property are pulled outside the frame by gravity even if Strength is set
to 0. Use Hold keyframes on the Radius property with the value 0 until the time when you want the shattering to start.
Strength Specifies the speed at which the exploded pieces travel—how hard they are blown away from or sucked back
into the blast point. A positive value blows the pieces away from the blast point; a negative value sucks the pieces into
the blast point. The greater the positive value, the faster and farther they fly away from the center point. The greater the
negative value, the faster the pieces launch themselves toward the center of the force sphere. Once the pieces are
launched, the force sphere no longer affects them; the Physics settings take over. A negative Strength value does not
suck the pieces into a black hole; instead, the pieces fly through each other and back out the other side of the sphere.
Setting Strength low causes the pieces to break up into shapes, creating cracks in the layer, but it doesn’t blow the pieces
apart. If gravity is set to anything other than 0, the pieces are pulled in the direction of gravity after they break up.
Note: A shatter piece is made up of vertices (points or dots that define the corners of the shape), edges (lines that connect
the dots), and planes (walls of the shape). Shatter determines when a shape has come in contact with a force sphere based
on when a vertex comes in contact with the sphere.
Gradient controls
Gradient controls specify the gradient layer used to control the timing of an explosion and the pieces that the blast
affects.
Shatter Threshold Specifies which pieces in the force sphere shatter according to the corresponding luminance of the
specified gradient layer. If Shatter Threshold is set to 0%, no pieces in the force sphere shatter. If it is set to 1%, only the
pieces in the force sphere corresponding to white (or nearly white) areas on the gradient layer shatter. If it is set to 50%,
all the pieces in the force sphere corresponding to white-to-50%-gray areas on the gradient layer shatter. If it is set to
100%, all pieces in the force sphere shatter. Because there are 256 shades of gray (including black and white), each
percentage point represents approximately 2.5 shades of gray.
Animating Shatter Threshold influences the timing of the explosion. If you leave it set to 0%, the layer never explodes.
However, if you set a Shatter Threshold keyframe at 50%, the pieces of your layer in the force field that correspond to
areas of your gradient layer that range from white to 50% gray explode. If you then animate Shatter Threshold up to
100%, the remaining pieces in the force sphere explode.
Gradient Layer Specifies the layer to use to determine when specific areas of the target layer shatter. White areas shatter
first; black areas shatter last. Shatter determines which pixels correspond to which pieces by subdividing the layer into
pieces, each with a center point or balance point. If you superimpose the shatter map over the gradient layer, the
gradient layer pixels that are precisely under each balance point control the explosion.

573
Effects and animation presets
Last updated 6/8/2015
Note: Some shapes have a balance point that falls outside the actual area of the shape—for example, the letters C and U.
When designing a gradient layer in such a situation, avoid using grayscale versions of letters. Instead, use larger shapes that
cover the balance point of each character.
Invert Gradient Inverts the pixel values in the gradient. White becomes black, and black becomes white.
Physics controls
Physics controls specify the way the pieces move and fall through space.
Rotation Speed Specifies the speed at which pieces rotate around the axis set by the Tumble Axis control, allowing you
to simulate different rotation speeds for different materials. In nature, similarly shaped pieces spin at different speeds
based on their mass and air friction. For example, a brick spins faster than Styrofoam.
Tumble Axis Specifies the axis that the pieces spin around. Free spins the pieces in any direction. None eliminates all
rotation. X, Y, and Z spin the pieces only around the selected axis. XY, XZ, and YZ spin the pieces only around the
selected combination of axes.
Note: Any application of z-axis rotation appears only when a second force hits the layer. The pieces do not rotate from the
first blast if only z-axis rotation is selected.
Randomness Affects the initial velocities and spins generated by the force sphere. When this control is set to 0, pieces
fly directly away from the center point of a blast (assuming a positive force). Since real explosions are rarely orderly,
Randomness allows you to vary things a little bit.
Viscosity Specifies how fast pieces decelerate after being blown apart. The higher the Viscosity value, the more
resistance the pieces encounter as they move and spin. If Viscosity is set high enough, the pieces quickly come to a stop.
To replicate an explosion in water or sludge, set Viscosity to a high value. In air, set it to a medium value, and for an
explosion in space, set it low, or to 0.
Mass Variance Specifies the theoretical weight of the pieces as they explode. For example, a large piece is heavier than
a small piece and therefore does not fly as far or as fast when it encounters the blast. The default setting of 30% for Mass
Variance gives a realistic approximation of this law of physics. Setting Mass Variance to 100% greatly exaggerates the
difference between the behavior of large versus small pieces. Setting it to 0% makes all pieces behave the same,
regardless of their size.
Gravity Determines what happens to the pieces after they break up and blow apart. The higher the gravity setting, the
faster the pieces are sucked in the direction set by Gravity Direction and Gravity Inclination.
Gravity Direction Defines the direction in (x,y) space that the pieces travel when affected by gravity. The direction is
relative to the layer. If Gravity Inclination is set to -90 or 90, Gravity Direction has no effect.
Gravity Inclination Determines the direction in z space that the pieces travel once they explode. A value of 90 explodes
the pieces forward, relative to the layer. A value of -90 explodes them backward, relative to the layer.
Textures controls
Textures controls specify the texture of the pieces.
Color Specifies the color of the piece as defined by the Front Mode, Side Mode, and Back Mode menus. This color may
or may not be visible depending on the Mode settings: When a Mode setting is Color, Tinted Layer, Color + Opacity,
or Tinted Layer + Opacity, the selected color is factored into the appearance of the piece.
Opacity Controls the opacity of the corresponding Mode setting. A Mode setting must be Color + Opacity, Layer +
Opacity, or Tinted Layer + Opacity for the opacity to affect the appearance of the piece. You can use the Opacity control
in conjunction with texture maps to create the look of semitransparent materials.

574
Effects and animation presets
Last updated 6/8/2015
Front Mode, Side Mode, Back Mode Determine the appearance of the front, sides, and back of the pieces. Color applies
the selected color to the applicable side of the piece. Layer takes the layer chosen in the corresponding Layer menu and
maps it to the applicable side of the piece. Tinted Layer blends the chosen layer with the selected color; the effect is
similar to viewing the layer through a colored filter. Color + Opacity combines the selected color and the Opacity
amount. With Opacity at 1, the applicable side is given the selected color. With Opacity at 0, the applicable side is
transparent. Layer + Opacity combines the chosen layer and the Opacity amount. With Opacity at 1, the chosen layer
is mapped to the applicable side. With Opacity at 0, the applicable side is transparent. Tinted Layer + Opacity combines
the tinted chosen layer and the Opacity amount. With Opacity at 1, the tinted chosen layer is mapped to the applicable
side. With Opacity at 0, the applicable side is transparent.
Note: If you apply Shatter to a layer containing an alpha channel that you want to use for transparency, use the same
texture (or at least another layer with an identical alpha channel) for the front, sides, and back of the pieces to make all
sides transparent.
Front Layer, Side Layer, Back Layer Specify the layer to be mapped onto the corresponding side of the piece. Front
Layer maps the chosen layer to the front of the piece. Back Layer maps the chosen layer backward to the layer. If Layer
is chosen for both Front Mode and Back Mode, and the same layer is specified for each, each shattered piece has the
same pixel information on both sides. Side Layer maps an extrusion of the chosen layer to the extruded sides of the
piece, as if the chosen layer is also mapped to the front and back, and the layer has been sliced through.
Note: If you choose a layer with an effect applied, the effect does not show up in the texture unless you precompose the layer.
However, if you select None, the layer to which you have applied Shatter, along with any effects that occur before Shatter,
is used as the texture map, with no precomposing required.
Camera System and Camera Position controls
Camera System Whether to use the effect’s Camera Position properties, the effect’s Corner Pins properties, or the
default composition camera and light positions to render 3D images.
X Rotation, Y Rotation, Z Rotation Rotate the camera around the corresponding axis. Use these controls to look at the
cards from the top, side, back, or any other angle.
X, Y Position Where the camera is positioned in (x,y) space.
Z Position Where the camera is positioned along the z axis. Smaller numbers move the camera closer to the cards, and
larger numbers move the camera away from the cards.
Focal Length The zoom factor. Smaller numbers zoom in.
Transform Order The order in which the camera rotates around its three axes, and whether the camera rotates before
or after it is positioned using the other Camera Position controls.
Corner Pins controls
Corner pinning is an alternative camera control system. Use it as an aid for compositing the result of the effect into a
scene on a flat surface that is tilted with respect to the frame.
Upper Left Corner, Upper Right Corner, Lower Left Corner, Lower Right Corner Where to attach each of the corners of
the layer.
Auto Focal Length Controls the perspective of the effect during the animation. If this option is deselected, the focal
length you specify is used to find a camera position and orientation that place the corners of the layer at the corner pins,
if possible. If not, the layer is replaced by its outline, drawn between the pins. If this option is selected, the focal length
required to match the corner points is used, if possible. If not, the correct value is interpolated from nearby frames.
Focal Length Overrides the other settings if the results you’ve obtained aren’t what you need. If you set the Focal Length
to something that doesn’t correspond to what the focal length would be if the pins were actually in that configuration,
575
Effects and animation presets
Last updated 6/8/2015
the image may look unusual (strangely sheared, for example). But if you know the focal length that you are trying to
match, this option is the easiest way to get correct results.
Creating a custom shatter map
All layers in After Effects are represented as an RGBA image, including black-and-white images. The Shatter effect
calculates the luminance threshold of each channel to create a custom shatter map. Shatter calculates the 50%
luminance threshold of each channel, creating an image composed of only eight colors: red, green, blue, yellow,
magenta, cyan, white, and black. These eight colors become possible combinations of the channels set either all the way
on (255) or all the way off (0). The shatter layer splits along the edges of these different colored sections.
When designing custom shatter maps, you can find it useful to manually set a threshold for each channel of the image
at 50% (you can use the Curves effect to do so). When you set the threshold, you can see how the image will be broken
into pieces. Alternatively, you can create custom shatter maps by drawing an image using only the eight colors listed
above, with no intermediate shades or anti-aliasing.
Note: Use the Colorama effect to posterize the colors of an image to these eight colors. Turn off Interpolate Palette in the
Colorama effect controls. See Colorama effect.
The alpha channel determines whether a shattered piece exists. A white alpha channel value results in a shattered piece,
and a black alpha channel value results in no piece. Using an alpha channel, you can make a tile map with holes in it or
generate simple 3D models like extruded text.
Note: The custom shatter map determines the shapes of the pieces a layer shatters into, but not when the pieces shatter. The
timing is determined by the Force controls and can be further controlled by a gradient layer.
The Toolfarm web site provides a tutorial that shows how to create a custom shatter map for some real-world bricks.
Wave World effect
Use this effect to create a grayscale displacement map for use with other effects such as Caustics or Colorama. This
effect creates waves based on a simulation of the physics of liquids. Waves emanate from an effect point, interact with
each other, and realistically reflect off their environment. Use Wave World to create a top-down view of a logo, with
waves reflecting off the logo and the sides of the layer.
Eran Stern provides a video tutorial on the Creative COW website in which he demonstrates how to use the Caustics
effect with the Wave World effect.
This effect works with 8-bpc color.
576
Effects and animation presets
Last updated 6/8/2015
To understand how this effect works, consider the following information about the physics of waves: A wave consists
of a peak and a trough. The amplitude of a wave is the height, or distance, between the peak and trough. The wavelength
is the distance from one peak to the next. Frequency is the number of waves per second passing a fixed point.
View controls
View controls specify the method used to preview the Wave World effect. Choose one of the following views:
Height Map Displays the highest points as bright pixels and the lowest points as dark pixels. Use this view when
creating a displacement map.
Wireframe Preview Provides a visual depiction of how the wave is being created. The grayscale output represents a
height map: White represents the highest possible wave, and black represents the lowest. The two rectangular outlines
represent these two extremes: The cyan rectangle represents pure white, and the violet rectangle represents pure black.
The green grid represents the ground layer; it is flat by default but can be distorted by using a grayscale image. The white
grid represents the surface of the water.
Wireframe controls
Wireframe controls fine-tune the appearance of the wireframe model. These controls don’t affect the grayscale output.
Horizontal Rotation Rotates the wireframe preview around the horizontal axis (right and left). As you adjust this
control, the distortion of the wireframe model keeps the entire wireframe model in full view.
Vertical Rotation Rotates the wireframe preview around the vertical axis (up and down).
Vertical Scale Distorts the wireframe preview vertically so that you can see heights more easily. It doesn’t affect the
grayscale output.
Height Map controls
Height Map controls specify the appearance of the height map.
Note: While adjusting Brightness and Contrast, keep the wave surface layer between the cyan and violet rectangles. If a
peak pokes through the cyan rectangle, it clips at pure white. If a trough pokes through the bottom of the violet rectangle, it
clips at pure black. If you want to create a displacement map, try to avoid clipping because it shows up as flat peaks and
valleys, which look unnatural.
Brightness Adjusts the overall height of the water surface. Adjusting it brightens or darkens the overall grayscale
output. If you use Wave World for displacement, this control moves the surface of the water up or down.
Contrast Changes the difference between the grays of the peaks and troughs, making the difference more or less
extreme. Lower values even out the grays, and higher values create a wider range from black to white (until clipping
occurs).

577
Effects and animation presets
Last updated 6/8/2015
Gamma Adjustment Controls the slope of the waves in relation to the Brightness. Results are visible only in Height Map
view. Higher values result in rounder peaks and narrower valleys, while lower values result in smoother valleys and
pointier peaks.
Render Dry Areas As Specifies how the water surface is rendered when a dry area exists. Dry areas are created when a
portion of the ground layer rises above the surface of the water. You can manipulate the dry area by using the Steepness
control.
This control is useful for compositing a Wave World effect into a scene. For example, you can use a precomposed Wave
World scene with transparency as a displacement map for the Caustics effect, and as a track matte for the effect layer.
Transparency Controls the clarity of the water by adjusting how opaque the alpha channel is in shallower areas. For
example, you can easily see to the bottom of a pool filled with fresh water, but you can see only an inch or two into a
pool filled with coffee. This control is most useful when compositing a Wave World effect into another scene. For
example, you can use a Wave World composition as a source layer for Caustics, and also as a track matte for the effect
layer.
Simulation controls
The Simulation controls specify the resolution of the water surface and ground grids.
Grid Resolution Specifies the number of horizontal and vertical divisions that make up the wave surface and ground
grids. Higher values greatly increase the precision of the simulation but require more memory and increase rendering
time.
Grid Res Downsamples Reduces the internal simulation resolution when the output resolution decreases, increasing
the rendering speed. However, the result may cause the output to look very different.
Wave Speed Specifies how fast waves travel away from their starting point.
Damping Specifies how quickly the energy of a wave is absorbed by the liquid it travels through. The higher the value,
the quicker the wave energy is absorbed, and the shorter the distance the wave travels.
Wave Speed, Damping Specify the apparent viscosity of the liquid, and the apparent size of the body of liquid. For
example, waves in water move faster and farther than waves in honey; waves in a sink move much faster and fade out
much more quickly than waves in a lake.
Note: Wave World is optimized for small- to medium-sized bodies of water—anything from a teacup to a small lake. Large
bodies of water, like an ocean, include swells or wide, stable waves with no apparent slowdown. Even at the lowest settings,
Wave World cannot generate swells because the waves fade out relatively quickly.
Reflect Edges Specifies how waves bounce off the edges of the layer and back into the scene.
Pre-roll (seconds) Specifies when the waves start moving. By default, the effect starts with a still surface without waves
or ripples. Use this control to start the waves moving before the layer begins. The settings at the first frame of the effect
are applied to the layer during the pre-roll.
Ground controls
The Ground controls specify the appearance of the ground layer.
Ground Specifies the layer that appears at the bottom of the water. If you use an animated layer for the ground, Wave
World samples only the first frame. Wave World determines the intersection of the water surface with the edge of the
ground, computes the waves bouncing off the shore, and properly adjusts the speed of the waves depending on the
depth. The brightness of the layer determines the ground surface: White represents higher elevation, and black
represents lower elevation.

578
Effects and animation presets
Last updated 6/8/2015
Steepness Adjusts the steepness of the ground by expanding and contracting the height of the displaced wireframe.
The mesh is locked at the black level, so it always grows up from the bottom. In other words, you cannot adjust the
bottom of a canyon to be deeper; instead, you can adjust the rim to be higher. To make the canyon deeper, combine a
higher Steepness setting with a lower Height setting.
Height Controls the distance between the water surface and the deepest possible point of the ground. Use this control
to make the body of water deeper or shallower. When you change the depth of the water, the waves behave accordingly:
They move faster in deep water and slower in shallow water. (Adjusting the Height control when using the wireframe
preview may appear to lower the ground level, but the wireframe camera always moves with the water level.)
Wave Strength Controls how big the resulting waves are when the ground height or steepness is animated. A value of
0 results in no waves.
Note: You can create a pulsing wave effect by animating the steepness of the ground so that the ground pokes through the
water, producing waves. Then use the Wave Strength control to intensify the effect.
Producer 1 and Producer 2 controls
The Producer controls specify the point at which the waves begin.
Type Specifies the type of producer. Ring creates a wave as if a stone were dropped into a pond; waves radiate outward
in circles (or ellipses, depending on the size settings of the effect point). Line creates waves that emanate from the
producer position in a line instead of an ellipse. This setting is useful for creating waves that look as though they were
generated from much farther away. The waves are produced perpendicular to the edges of the line. The length of the
line is based on the Height/Length setting.
Position Specifies the location of the center of the wave producer.
Height/Length Specifies the (vertical) height of a Ring producer and adjusts the length of a Line producer.
Width Specifies the (horizontal) width of the producer area.
Angle Specifies the angle of the wave producer area for the Line and Ring types. This control sets the orientation of the
line and thus controls the initial direction of the waves, which emanate from either side of the line, perpendicular to its
length.
Amplitude Controls the height of the produced wave. Higher values create more dramatic waves but may result in
clipping, which you can repair by using the Brightness and Contrast controls.
Frequency Controls how many waves are produced per second. A value of 1 has the effect of waves surfacing once
every second.
Phase Specifies where in the wave phase the wave begins. For example, with the default setting of 0°, the first
disturbance in the liquid is a convex wave (projecting upward from the surface of the water). With Phase set to 180°,
the first disturbance in the liquid is a concave wave.
More Help topics
Randomness and random seeds
Precompose layers
Reverse the playback direction of a layer

579
Effects and animation presets
Last updated 6/8/2015
Obsolete effects
Effects in the Obsolete category are retained for compatibility with projects created with previous versions of After
Effects. When updating projects or creating new projects, you should use alternative effects and techniques rather than
effects in the Obsolete category.
Basic 3D effect
If you are working on a project that was created in an older version of After Effects and the Basic 3D effect is applied to
one or more layers, you can continue to use the Basic 3D effect; otherwise, use the 3D layer switch to convert layers to
3D layers. (See 3D layers.)
This effect works with 8-bpc color.
The Basic 3D effect manipulates a layer in 3D space.
The quality setting of the layer affects Basic 3D. Draft quality calculates pixel location to the nearest integer value; Best
quality calculates pixel location to the subpixel level.
Swivel Controls horizontal rotation (rotation around a vertical axis). You can rotate past 90° to see the back side of the
image, which is the mirror image of the front.
Tilt Controls vertical rotation (rotation around a horizontal axis).
Distance To Image The distance from the image to the viewer.
Specular Highlight Adds a glint of light that reflects off the surface of the layer. The light source for the specular
highlight is always above, behind, and to the left of the viewer. Because the light comes from above, the image must be
tilted backward to see this reflection. The specular highlight can be viewed only at Best quality. When Draw Preview
Wireframe is selected, the specular highlight is indicated by a red plus sign (+) if it isn’t visible on the layer (that is, if
the center of the highlight doesn’t intersect the layer) and a green plus sign (+) if the highlight is visible.
Preview Draws a wireframe outline of the 3D image. The wireframe outline renders quickly. To see the final results,
deselect Draw Preview Wireframe when you finish manipulating the wireframe image. The preview wireframe is drawn
only at Draft quality; when you switch to Best quality, the image content is drawn. This way, you won’t accidentally
render a Best quality movie in Preview mode.
Basic Text effect
If you are working on a project that was created in an older version of After Effects and the Basic Text effect is applied
to one or more layers, you can continue to use the Basic Text effect; otherwise, use text layers for greater control over
text formatting and text animation. (See Creating and editing text layers .)
The Basic Text effect places text on an existing layer—unlike text created on text layers or imported text created in
Adobe Photoshop or Adobe Illustrator, either of which becomes its own layer.
This effect works with 8-bpc color.
Note: The width and height of text aren’t constrained by the dimensions of the layer; the layer dimensions merely define
the visible region of the text.
Position The position of the text on the layer.
Note: The Alignment setting in the Basic Text dialog box affects the behavior of the Position point. The point always
positions the vertical center of the text relative to the layer. However, if the text is left-aligned, the point positions the left
edge; if the text is center-aligned, the point positions the center; and if the text is right-aligned, the point positions the right
edge.

580
Effects and animation presets
Last updated 6/8/2015
Lightning effect
If you are working on a project that was created in an older version of After Effects and the Lightning effect is applied
to one or more layers, you can continue to use this effect; otherwise, use the Advanced Lightning effect. (See Advanced
Lightning effect.)
This effect works with 8-bpc color.
Start Point, End Point Where the lightning begins and ends.
Segments The number of segments that form the main lightning bolt. Higher values produce more detail but reduce
the smoothness of motion.
Amplitude The size of undulations in the lightning bolt as a percentage of the layer width.
Detail Level, Detail Amplitude How much detail is added to the lightning bolt and any branches. For Detail Level,
typical values are in the range 2–3. For Detail Amplitude, a typical value is 0.3. Higher values for either control are best
for still images but tend to obscure animation.
Branching The amount of branching (forking) that appears at the ends of bolt segments. A value of 0 produces no
branching; a value of 1.0 produces branching at every segment.
Rebranching The amount of branching from branches. Higher values produce treelike lightning bolts.
Branch Angle The angle between a branch and the main lightning bolt.
Branch Seg. Length The length of each branch segment as a fraction of the average length of the segments in the
lightning bolt.
Branch Segments The maximum number of segments for each branch. To produce long branches, specify higher
values for both Branch Seg. Length and Branch Segments.
Branch Width The average width of each branch as a fraction of the width of the lightning bolt.
Speed How fast the lightning bolt undulates.
Stability How closely the lightning follows the line defined by the start and end points. Lower values keep the lightning
bolt close to the line; higher values create significant bouncing. Use Stability with Pull Force to simulate a Jacob’s Ladder
effect and cause the lightning bolt to snap back to a position along the start line after it has been pulled in the Pull Force
direction. A Stability value that is too low doesn’t allow the lightning to be stretched into an arc before it snaps back; a
value that is too high lets the lightning bolt bounce around.
Fixed Endpoint Determines whether the end point of the lightning bolt remains fixed in place. If this control isn’t
selected, the end of the bolt undulates around the end point.
Width, Width Variation The width of the main lightning bolt and how much the width of different segments can vary.
Width changes are randomized. A value of 0 produces no width changes; a value of 1 produces the maximum width
changes.
Core Width The width of the inner glow, as specified by the Inside Color value. Core Width is relative to the total width
of the lightning bolt.
Outside Color, Inside Color The colors used for the outer and inner glows of the lightning bolt. Because the Lightning
effect adds these colors on top of existing colors in the composition, primary colors often produce the best results.
Bright colors often become much lighter, sometimes becoming white, depending on the brightness of colors beneath.
Pull Force, Pull Direction The strength and direction of a force that pulls the lightning bolt. Use the Pull Force value
with the Stability value to create a Jacob’s Ladder appearance.

581
Effects and animation presets
Last updated 6/8/2015
Random Seed An input value for the random noise generator that is the basis of the Lightning effect. If the random
movement of the lightning interferes with another image or layer, enter a new value for Random Seed until you find
one that works for you.
Blending Mode The blending mode to use to composite the lightning on top of the original layer. These blending
modes work identically to the ones in the Timeline panel.
Rerun At Each Frame Regenerates the lightning at each frame. To make the lightning behave the same way at the same
frame every time you run it, don’t select this option. Selecting this option increases rendering time.
Path Text effect
If you are working on a project that was created in an older version of After Effects and the Path Text effect is applied
to one or more layers, you can continue to use the Path Text effect; otherwise, use text layers for greater control over
text formatting and text animation. (See Creating and animating text on a path.)
The Path Text effect lets you animate text along a path. You can define a path as a straight line, a circle of any diameter,
or a Bezier curve. You can also import a path created in another application, such as Adobe Photoshop or Adobe
Illustrator. The Path Text effect can work with nonsquare pixels, adjusting both character shape and path shape
accordingly.
This effect works with 8-bpc color.
Note: If you use Adobe Type Manager (ATM) and large text looks blocky or doesn’t otherwise render properly, increase the
Character Cache Size in the ATM control column.
When changing the shape of a Bezier path over time, make sure to create initial keyframes for all four path control
points; moving a control point without an initial keyframe doesn’t move it over time. You may find it easier to animate
a path by modifying the motion paths of individual control points in the Layer panel.
Note: Handles appear in the Composition panel only if the effect is selected in the Effect Controls panel and if you aren’t
animating text along a mask or path.
If you want to move a Bezier path across the composition, and you don’t want to change its shape, animate the layer
rather than the path. If you want to stretch, shrink, or wag one side of the Bezier path while keeping the other half in
the same position, move a tangent-vertex pair together. To do so, create keyframes for both by dragging the outer circle
of the appropriate vertex.
Note: When animating the control points of a Bezier path, don’t confuse the Bezier path shape with the Bezier spatial
interpolation of the keyframes. Like keyframes for other position controls, keyframes for the vertex or tangent of a Bezier
path can be set to either linear or Bezier. You specify default spatial interpolation in General Preferences. You can specify
spatial interpolation for individual keyframes by choosing Animation > Keyframe Interpolation.
You can apply motion blur to motion that you create with the Path Text effect. Blurring occurs on each character. Like
motion blur for layers, blurring for characters is more visible when movement is quick. For example, blurring is
pronounced when you choose negative jitter values, which produce jumpy motion.
Path Options controls
Shape Type Defines the shape of the path. The Path Text effect name must be selected in the Effect Controls panel to
make the path visible in the Composition panel.
Bezier Shapes text along a Bezier curve, defined by four control points (Vertex 1/Circle Center, Tangent 1/Circle Point,
Tangent 2, and Vertex 2). Characters that don’t fit on the path are placed off the end in a straight line.

582
Effects and animation presets
Last updated 6/8/2015
Circle Shapes text around the circumference of a circle, defined by two control points (Tangent 1/Circle Point, and
Vertex 1/Circle Center). If the text is longer than the circumference of the circle, the text overlaps itself. If an arbitrary
path is chosen and if the path is closed, this property forms the text around the path, as opposed to looping it.
Loop Shapes text around the circumference of the circle, defined by two control points (Vertex 1/Circle Center, and
Tangent 1/Circle Point). If text is longer than the circumference of the circle, it flows off the Tangent 1 point in a straight
line. You can also use margin controls to make text enter or exit a circle in a straight line.
Line Shapes text in a straight line, defined by two control points (Vertex 1/Circle Center, and Vertex 2). As with the
Bezier path, the distance between the two control points doesn’t affect the spacing of the text, unless alignment is set to
Force.
Control Points Specify the points on the path.
Tangent 1/Circle Point Specifies the following points: starting tangent for a Bezier curve, diameter of a circle and
starting or ending point of text (depending on the specified alignment), and diameter of a loop and the point where
text enters.
Vertex 1/Circle Center Specifies the starting vertex for a Bezier curve, center of a circle or loop, and starting or ending
point for text on a line (depending on the specified alignment).
Tangent 2 Specifies the ending tangent of the Bezier curve. The line between Tangent 2 and Vertex 2 specifies the slope
of the curve at its ending point. For circles or loops, Tangent 2 is ignored.
Vertex 2 Specifies the ending vertex of a Bezier curve and the angle of a line. For circles or loops, Vertex 2 is ignored.
Custom Path Specifies an arbitrary path. You can use a mask created in the Layer panel or in Adobe Illustrator.
Reverse Path Reverses the path.
Character controls
Size Size of the characters.
Tracking Average distance between characters.
Kerning Controls the horizontal distance between two characters. If you change the text, specified kerning is preserved
for all unchanged character pairs. You cannot use the Undo command to undo kerning changes. To change horizontal
spacing between characters over time, use Kerning Jitter Max or create keyframes for Tracking.
Kerning Pair Specifies the pair of characters to kern. Click the arrow to move among the pairs.
Kerning Value The amount of kerning to apply.
Orientation Specifies the orientation or rotation values of each character.
Character Rotation Each character is rotated by the specified number of degrees from its current angle. The center of
rotation is on the point where the character intersects the path. Perpendicular To Path changes the initial angle of the
characters.
Perpendicular To Path Rotates each character so that it’s perpendicular to the path. If Perpendicular To Path is
deselected, characters always remain upright (unless rotated by Character Rotation).
Vertical Writing Rotates each character so it’s vertical along the path.
Rotate Roman Characters Rotates Roman characters vertically along the path; if Rotate Roman Characters isn’t
selected, only non-Roman characters are rotated.
Horizontal Shear Slants characters left or right, similar to italics. The slant is based on the point where the character
intersects the path. To slant characters from their centers, set Baseline Shift to make the path go through the centers of
the characters.

583
Effects and animation presets
Last updated 6/8/2015
Horizontal Scale, Vertical Scale Resize the characters by the specified percentage in the horizontal and vertical
directions. Text is scaled from the initial rasterization size, specified for Size. Setting the scaling percentage greater than
100 may result in blurred edges. For best results, set Size to a point size that doesn’t require scaling beyond 100% to
achieve the largest desired text size. For example, to increase the text size from 44 to 88 points, set Size to 88 and specify
a starting value for both Vertical and Horizontal Scale at 50%; then increase both scale values to 100% if you want the
text displayed at 88 points.
Paragraph controls
Alignment Specifies the horizontal alignment of the text on the specified path.
Left Places the first character at the position specified by Left Margin; all other characters are drawn relative to it. Right
Margin is ignored.
Right Places the last character at the position specified by Right Margin; all other characters are drawn relative to it.
Left Margin is ignored.
Center Centers the text between Left Margin and Right Margin.
Force Places the first character at the position specified by Left Margin and the last character at the position specified
by Right Margin, spacing all other characters evenly between. Tracking is ignored.
Left Margin, Right Margin Specify the margins. Left Margin specifies the position of the first character in pixels, relative
to the starting point; Right Margin specifies the position of the last character, relative to the ending point. In path
shapes, the starting point for Bezier curves and lines is Vertex 1, and the starting point for circles and loops is Tangent
1. The ending point for Bezier curves and lines is Vertex 2, and the ending point for circles and loops is Tangent 1. To
move text across the path shape that you’ve defined, create keyframes or expressions for the Left or Right margins
(depending on the specified alignment). Positive values move the text to the right; negative values move it to the left.
Line Spacing Specifies the space between lines of characters.
Baseline Shift Specifies the distance in pixels between the path and the bottom of the characters. Depending on the
path shape, text may appear to be better spaced if the path passes through the centers of the characters. You can set
Baseline Shift to a negative value so that the centers of characters lie on the path.
Advanced controls
Visible Characters The number of characters that appear at the current time. Animate Visible Characters to display one
or more characters at a time to create the appearance of typing characters. Positive values specify the number of visible
characters from the beginning of the text to the end. Negative values specify the number of visible characters from the
end of the text to the beginning. Remember that spaces are characters, too.
You can also use this control with Fade Time to fade in characters. When Fade Time is 0, the next character appears
when the value of Visible Characters is halfway to the next whole number. For example, the second character appears
when the value of Visible Characters is 1.5, the third character appears when the value is 2.5, and so on. A Fade Time
value of 0 produces the appearance of typing characters.
Note: Visible Characters doesn’t alter the positions of characters defined by the path and other controls.
Fade Time Specifies a range of time over which a particular character is partially visible. Fade Time works in
conjunction with Visible Characters. If Fade Time is 0, each letter appears fully opaque at the appropriate Visible
Characters value. If Fade Time is 100%, a particular character is displayed with greater and greater opacity as the value
of Visible Characters increases between whole numbers. The exact opacity of the character is equal to the fractional
part of the Visible Characters value. For example, the eighth character is displayed at 10% opacity if the value of Visible
Characters is 7.10 and Fade Time is 100%; the same character is displayed at 60% opacity if the value of Visible
Characters is 7.60, and so on.

584
Effects and animation presets
Last updated 6/8/2015
For Fade Time values between 0% and 100%, the opacity of the character is defined as a range across the halfway point
between whole-number values of Visible Characters. For example, if Fade Time is 20%, the eighth character begins to
appear at a Visible Character value of 7.40 and is fully opaque at 7.60. If Fade Time is set to 60%, the same character
begins to appear at a value of 7.20 and is fully opaque at 7.80.
Mode The blending mode used if characters overlap.
Jitter Settings Specify the maximum amount of deviation added randomly to baseline, kerning, rotation, or scale.
Higher values produce greater deviations. Positive values produce smooth motion; negative values produce jumpy
motion. Movement is created without keyframes or expressions, although you can use keyframes or expressions to
change the maximum values.
A specific jitter value generates the same seemingly random motion for identical text and settings. If a composition
contains duplicate animated text, you can generate different motion for each instance of the text by changing a setting
but making the change invisible. For example, you could add a space to a second instance of text, and then adjust the
kerning so that the space isn’t visible. This method creates an invisible change that generates different motion.
You can specify the following Jitter options:
Baseline Jitter Max Sets a maximum distance, in pixels, that characters are randomly moved above or below the path
after Baseline Shift is applied.
Kerning Jitter Max Sets a maximum distance, in pixels, that characters are randomly moved apart from one another
along the horizontal axis after kerning and tracking are applied.
Rotation Jitter Max Sets a maximum amount, in degrees, that characters are randomly rotated after Character Rotation
is applied.
Scale Jitter Max Sets a maximum amount, as a percentage, that characters are randomly scaled after Horizontal Scale
and Vertical Scale are applied. For best results, characters should not scale greater than 100%.
Move vertices, circle centers, and tangents
•To move the Vertex 1/Circle Center and the Tangent 1/Circle Point together, drag the outer circle of the Vertex
1/Circle Center.
•To move only the Vertex 1/Circle Center, drag its cross hair.
•To automatically snap the Tangent 1/Circle Point on top of the Vertex 1/Circle Center, select the Pen tool and then
click the outer circle of Tangent 1 (Windows) or Command-click the outer circle (not the cross hair) of Tangent 1
(Mac OS).
•To snap the Tangent 1/Circle Point to increments of 45° from the Vertex 1/Circle Center, Shift-drag the outer circle
of Tangent 1.
•To move Vertex 2 and Tangent 2 together, drag the outer circle of Vertex 2.
•To move only Vertex 2, drag its cross hair.
Color Key effect
For information about keying in general, including links to tutorials and other resources, see Keying introduction and
resources.
The Color Key effect keys out all image pixels that are similar to a specified key color. This effect modifies only the alpha
channel of a layer.
This effect works with 8-bpc and 16-bpc color.
1Select the layer that you want to make partially transparent, and choose Effect > Keying > Color Key.

585
Effects and animation presets
Last updated 6/8/2015
2In the Effect Controls panel, specify a key color in one of two ways:
•Click the Key Color swatch to open the Color dialog box and specify a color.
•Click the eyedropper, and then click a color on the screen.
3Drag the Color Tolerance slider to specify the range of color to key out. Lower values key out a smaller range of
colors near the key color. Higher values key out a wider range of color.
4Drag the Edge Thin slider to adjust the width of the border of the keyed area. Positive values enlarge the mask,
increasing the transparent area. Negative values shrink the mask, decreasing the transparent area.
5Drag the Edge Feather slider to specify the softness of the edge. Higher values create a softer edge but take longer to
render.
Luma Key effect
The Luma Key effect keys out all the regions of a layer with a specified luminance or brightness. The quality setting of
the layer doesn’t influence the Luma Key effect.
Use this effect if the object from which you want to create a matte has a greatly different luminance value than its
background. For example, if you want to create a matte for musical notes on a white background, you can key out the
brighter values; the dark musical notes become the only opaque areas.
This effect works with 8-bpc and 16-bpc color.
Key out a luminance value with the Luma Key effect
1Select the layer that you want to make partially transparent, and choose Effect > Keying > Luma Key.
2Select a Key Type to specify the range to be keyed out.
3Drag the Threshold slider in the Effect Controls panel to set the luminance value you want the matte to be based on.
4Drag the Tolerance slider to specify the range of values to be keyed out. Lower values key out a smaller range of
values near the threshold. Higher values key out a wider range of values.
5Drag the Edge Thin slider to adjust the width of the border of the keyed area. Positive values make the mask grow,
increasing the transparent area. Negative values shrink the mask.
6Drag the Edge Feather slider to specify the softness of the edge. Higher values create a softer edge but take longer to
render.
Spill Suppressor Effect
The Spill Suppressor effect removes traces of the key color from an image with a screen that’s already been keyed out.
Typically, the Spill Suppressor is used to remove key color spills from the edges of an image. Spills are caused by light
reflecting off the screen and onto the subject.
If you’re not satisfied with the results from using the Spill Suppressor, try applying the Hue/Saturation effect to a layer
after keying, and then decrease the saturation value to de-emphasize the key color. (See Hue/Saturation effect.)
This effect works with 8-bpc and 16-bpc color. In After Effects CS6 or later, this effect works in 32-bit color.
Use the Spill Suppressor effect:
1Select the layer, and choose Effect > Keying > Spill Suppressor.

586
Effects and animation presets
Last updated 6/8/2015
2Choose the color you want to suppress in one of the following ways :
•If you already keyed out the color with a key in the Effect Controls panel, click the Color To Suppress eyedropper,
and then click the screen color in the Key Color swatch for the key.
•In Spill Suppressor, click the Key Color swatch and choose a color from the color wheel. To use the eyedropper
in the Layer panel, choose Spill Suppressor from the View menu in the Layer panel.
3From the Color Accuracy menu, choose Faster to suppress blue, green, or red. Choose Better to suppress other
colors, because After Effects may need to analyze the colors more carefully to produce accurate transparency. The
Better option may increase rendering time.
4Drag the Suppression slider until the color is adequately suppressed.
Generate effects
Third-party effects in this category included with After Effects:
•CC Glue Gun effect
•CC Light Burst 2.5 effect
•CC Light Rays effect
•CC Light Sweep effect
•CC Threads effect
See Third-party plug-ins included with After Effects.
4-Color Gradient effect
The 4-Color Gradient effect produces a four-color gradient. The gradient is defined by four effect points, the positions
and colors of which can be animated using the Positions & Colors controls. The gradient is composed of four solid-
color circles blended together, each with an effect point as its center.
This effect works with 8-bpc and 16-bpc color.
Blend Higher values create more gradual transitions between colors.
Jitter The amount of jitter (noise) in the gradient. The jitter, which reduces banding, affects only those areas where
banding could occur.
Opacity The opacity of the gradient, as a fraction of the Opacity value for the layer.
Blending Mode The blending mode to use in combining the gradient with the layer.
Advanced Lightning effect
The Advanced Lightning effect creates simulations of electrical discharges. Unlike the Lightning effect, Advanced
Lightning doesn’t self-animate. Animate the Conductivity State or other properties to animate the lightning.
The Advanced Lighting effect includes the Alpha Obstacle feature, with which you can make the lightning go around
designated objects.
Chris Zwar provides a detailed description on his website of how he used the Advanced Lightning effect to simulate
blood vessel capillaries.
Eran Stern provides a video introduction to the Advanced Lightning effect on the Motionworks website.

587
Effects and animation presets
Last updated 6/8/2015
This effect works with 8-bpc color.
Lightning Type Specifies the characteristics of the lightning.
note: The type determines the nature of the Direction/Outer Radius contextual control. In the Breaking type, the branches
are focused toward the Direction point as the distance between Origin and Direction increases.
Origin Specifies the point of origin for the lightning.
Direction, Outer Radius This control changes depending on the Lightning Type:
Not In Use The Direction or Outer Radius control is not available if Lightning Type is Vertical.
Outer Radius Specifies the distance that the lightning travels from its origin. This control is enabled if Omni or
Anywhere is selected as the lightning type. Use it to terminate the lightning at a defined distance from the origin.
Direction Specifies the direction that the lightning travels. This control is enabled if any of the following lightning types
are selected: Direction, Strike, Breaking, Bouncy, and Two-Way Strike.
Conductivity State Changes the path of the lightning.
Core Settings These controls adjust various characteristics of the core of the lightning.
Glow Settings These controls adjust the glow of the lightning.
note: To disable the glow, set Glow Opacity to 0. This setting can speed up rendering time greatly.
Alpha Obstacle Specifies the influence of the alpha channel of the original layer on the path of the lightning. When
Alpha Obstacle is greater than zero, the lightning attempts to wrap itself around opaque areas of the layer, seeing them
as an obstacle. When Alpha Obstacle is less than zero, the lightning tries to stay inside the opaque areas, avoiding the
transparent areas. The lighting can cross the boundaries between opaque and transparent areas, but Alpha Obstacle
values further from zero cause the crossing to happen less often.
note: If Alpha Obstacles is set to a value other than 0, it’s not always possible to preview the correct result in less than full
resolution; full resolution may reveal new obstacles. Be sure to check the result in full resolution before final rendering.
Turbulence Specifies the amount of turbulence in the lightning path. Higher values result in a more complex strike
containing more branches and forks, and lower values produce simpler strikes with fewer branches.
Forking Specifies what percentage of a branch is forked. Turbulence and Alpha Obstacle settings influence forking.
Decay Specifies the amount of continuous decay or dissipation of the lightning strength and influences where the
opacity of the forks begins to fade.
Decay Main Core Decays the main core along with its forks.
Composite On Original Composites the lightning with the original layer using the Add blending mode. When
deselected, only the lightning is visible.
Complexity Specifies the complexity of the turbulence in the lightning.
Min. Forkdistance Specifies the minimum pixel distance between new forks. Lower values create more forks in the
lightning. Higher values result in fewer forks.
Termination Threshold Specifies the level at which a path terminates, based on resistance in the atmosphere and
possible alpha collision. At lower values, the path terminates more easily when encountering resistance or alpha
obstacles. At higher values, the path more persistently moves around alpha obstacles.
note: Increasing Turbulence or Complexity values causes resistance to increase in some areas. These areas change as
conductivity changes. Increasing the Alpha Obstacle value causes resistance to increase at alpha edges.
Main Core Collision Only Calculates collisions only on the main core. The forks aren’t affected. This control is relevant
only if you select Alpha Obstacle.
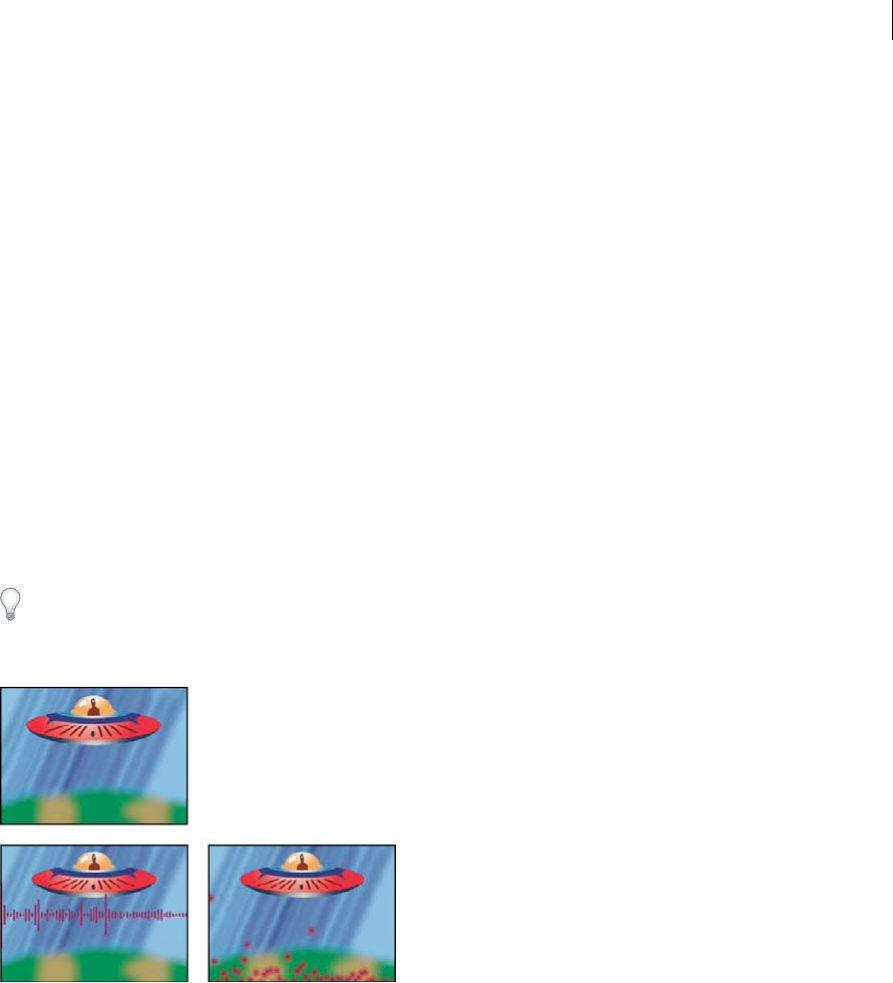
588
Effects and animation presets
Last updated 6/8/2015
Fractal Type Specifies the type of fractal turbulence used to create the lightning.
Core Drain Specifies the percentage by which the core strength is drained when creating a new fork. Increasing this
value reduces the opacity of the core where new forks appear. Because forks draw their strength from the main core,
decreasing this value reduces the opacity of the forks as well.
Fork Strength Specifies the opacity of the new fork. This amount is measured as a percentage of the Core Drain value.
Fork Variation Specifies the amount of variation in the opacity of the fork and determines how much the fork opacity
deviates from the amount set for Fork Strength.
Audio Spectrum effect
Apply the Audio Spectrum effect to a video layer to display the audio spectrum of a layer that contains audio (and
optionally video). The effect displays the magnitude of audio levels at frequencies in the range that you define using
Start Frequency and End Frequency. This effect can display the audio spectrum in several different ways, including
along a mask path.
Jerzy Drozda, Jr. provides a demonstration of the Audio Spectrum effect on the Motionworks website.
Note: Audio Spectrum uses the audio source footage without time-remapping, effects, stretch, or levels. To display the
spectrum with such effects, precompose the audio layer before applying the Audio Spectrum effect.
To prevent other masks on the layer from clipping the output of the Audio Spectrum effect, set their mask modes to
None. (See Mask modes.)
This effect works with 8-bpc, 16-bpc, and 32-bpc color.
Audio Layer The audio layer you want to use as input.
Start Point, End Point Specifies the position at which the spectrum starts or ends if Path is set to None.
Path The mask path along which to display the audio spectrum.
Use Polar Path The path starts from a single point and appears as a radial graph.
Start Frequency, End Frequency The lowest and highest frequencies, in hertz, to display.
Frequency Bands The number of frequency bands into which to divide displayed frequencies.
Maximum Height Maximum height, in pixels, of a displayed frequency.
Audio Duration Duration of audio, in milliseconds, used to calculate the spectrum.
Audio Offset Time offset in milliseconds used to retrieve the audio.
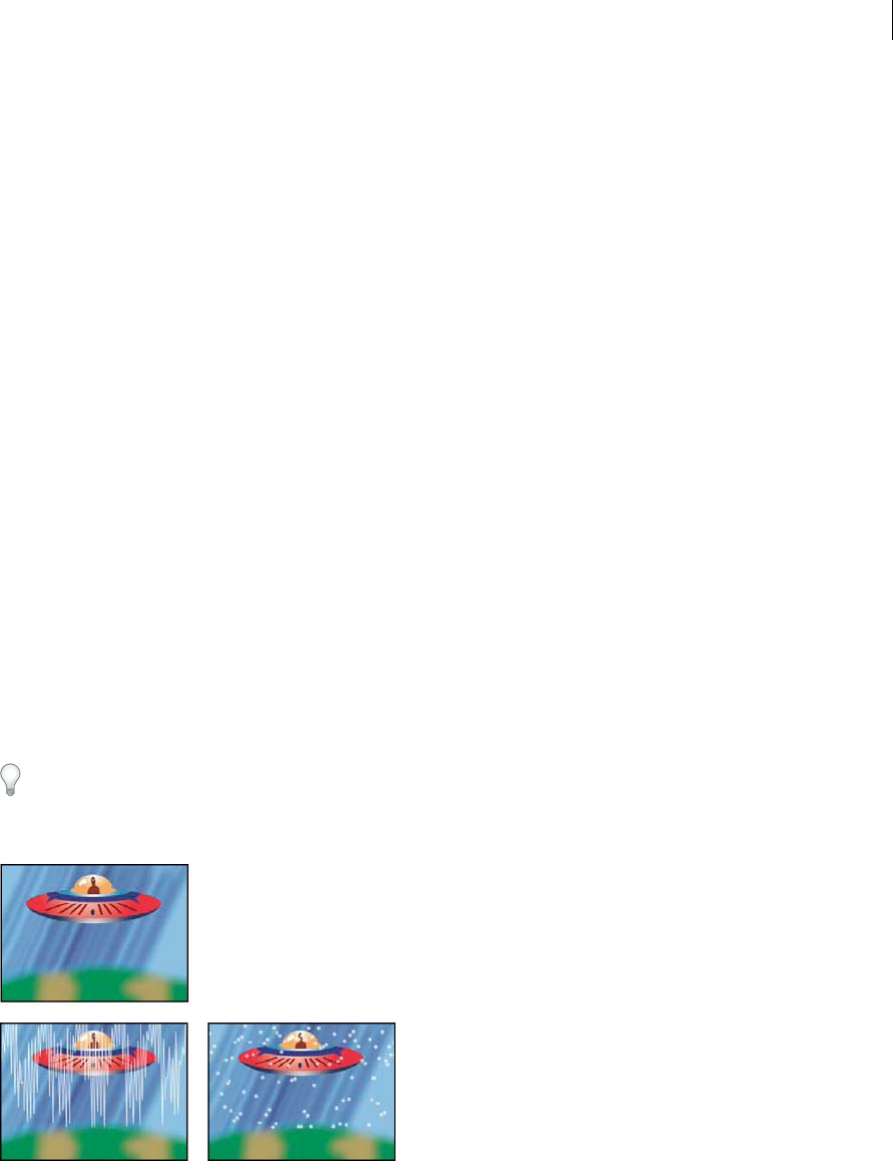
589
Effects and animation presets
Last updated 6/8/2015
Thickness Thickness of the bands.
Softness How feathered or blurry the bands appear.
Inside Color, Outside Color Inside and outside colors of the bands.
Blend Overlapping Colors Specifies that overlapping spectrums are blended.
Hue Interpolation If the value is greater than 0, the frequencies displayed rotate through the hue color space.
Dynamic Hue Phase If selected, and the Hue Interpolation is greater than 0, the Start color shifts to the maximum
frequency in the range of displayed frequencies. This setting allows the hue to follow the fundamental frequency of the
spectrum displayed as it changes.
Color Symmetry If selected, and the Hue Interpolation is greater than 0, the start and end colors are the same. This
setting allows color continuity on closed paths.
Display Options Specifies whether to display frequency as Digital, Analog Lines, or Analog Dots.
Side Options Specifies whether to display the spectrum above the path (Side A), below the path (Side B), or both (Side
A & B).
Duration Averaging Specifies that audio frequencies are averaged to reduce randomness.
Composite On Original If selected, displays the original layer with the effect.
Audio Waveform effect
Apply the Audio Waveform effect to a video layer to display the audio waveform of a layer that contains audio (and
optionally video). You can display the audio waveform in several different ways, including along an open or closed mask
path. note: Audio Waveform uses the audio source footage without time-remapping, effects, stretch, or levels. To display
the spectrum with such effects, precompose the audio layer before applying the Audio Waveform effect.
To prevent masks on the layer from clipping the output of the Audio Waveform effect, set their mask modes to None.
(See Mask modes.)
This effect works with 8-bpc, 16-bpc, and 32-bpc color.
Audio Layer The audio layer you want to display as a waveform.
Start Point, End Point The position at which the waveform starts and ends, if Path is set to None.
Path If set to None, the audio waveform is displayed along the path of the layer.
Displayed Samples Number of samples to display in the waveform.
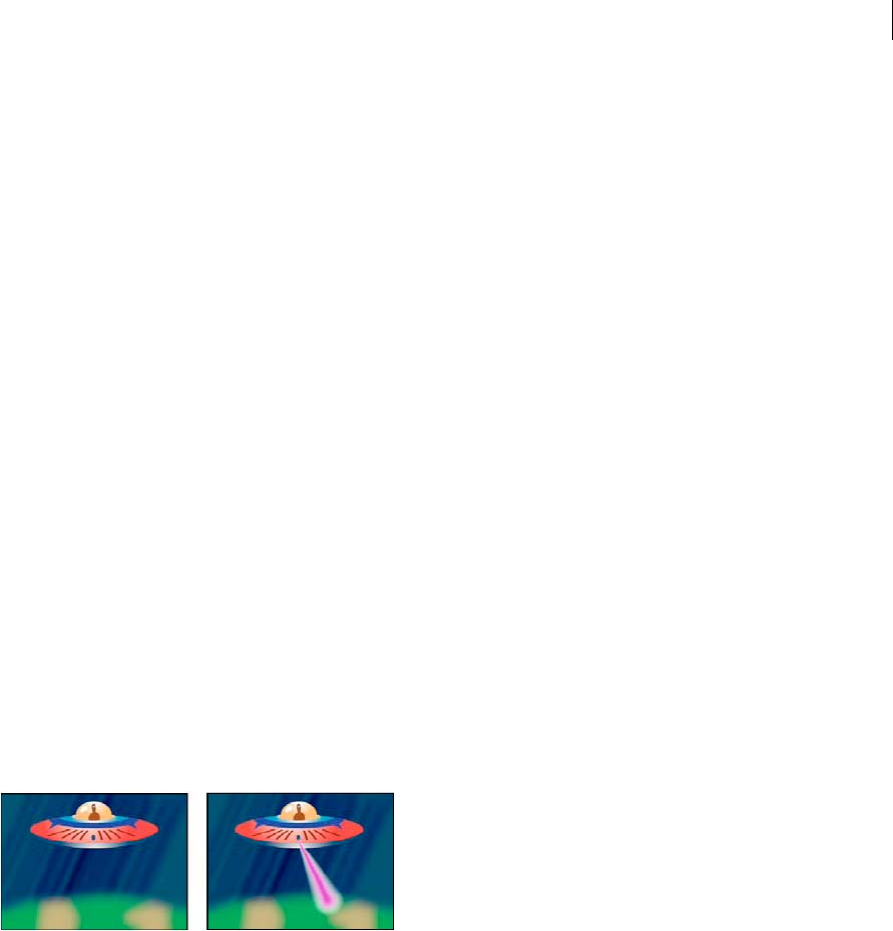
590
Effects and animation presets
Last updated 6/8/2015
Maximum Height Maximum height, in pixels, of a displayed frequency.
Audio Duration Duration of audio, in milliseconds, used to calculate the waveform.
Audio Offset Time offset, in milliseconds, used to retrieve the audio.
Thickness The thickness of the waveform.
Softness How feathered or blurry the waveform appears.
Inside Color, Outside Color The inside and outside colors of the waveform.
Waveform Options Mono combines the left and right channels of the audio layer. Nonstereo audio layers play as Mono.
Display Options Digital displays each sample as a single vertical line connecting the minimum and maximum source
sample. This option simulates the display used on digital equipment. Analog Lines displays each sample as a line
connecting the previous and next sample from either the minimum or maximum audio source sample. This option
simulates the retracing seen in the display of an analog oscilloscope. Analog Dots displays each sample as a dot
representing either the minimum or maximum audio source sample.
Composite On Original Composites the audio waveform with the original layer using the Add blending mode. When
deselected, only the audio waveform is visible.
Beam effect
The Beam effect simulates the movement of a beam, such as a laser beam. You can make the beam shoot, or you can
create a wandlike beam with a stationary start or end point. The beam looks best when motion blur is enabled and the
shutter angle is set to 360.
John Dickinson provides a video tutorial and example project on the Motionworks website that demonstrate the use of
the Beam effect.
This effect works with 8-bpc, 16-bpc, and 32-bpc color.
The Length control specifies the length of the beam based on a percentage of the Time specified. For example, a setting
of 100% means that the visible beam length is at its maximum when the Time control is 50%. Time specifies the time
of the beam’s travel from start to end as a percentage. The 3D Perspective control uses 3D perspective based on start
and end thickness if Time is animated.
Cell Pattern effect
The Cell Pattern effect generates cellular patterns based on cellular noise. Use it to create static or moving background
textures and patterns. The patterns can be used in turn as textured mattes, as transition maps, or as a source for
displacement maps.
John Dickinson provides an example project on the Motionworks website that demonstrates the use of the Cell Pattern
effect in a seamlessly looping background animation.
Richard Harrington provides additional information and examples for using the Cell Pattern effect on his website.
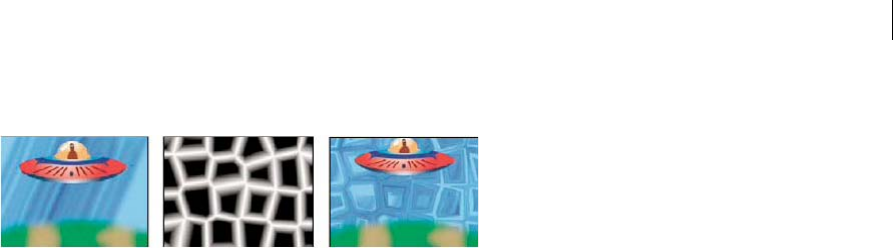
591
Effects and animation presets
Last updated 6/8/2015
This effect works with 8-bpc color.
Cell Pattern The cell pattern to use. HQ denotes high-quality patterns that render with more definition than their
unmarked counterparts. Mixed Crystals is available only as a high-quality option.
note: The Static Plates option is identical in appearance to the Plates option. However, when evolving, the static plates
retain a uniform lightness value, whereas the plates shift the lightness of the cell pattern.
Invert Inverts the cell pattern. Black areas become white, and white areas become black.
Contrast/Sharpness Specifies the contrast of the cell pattern when you use the Bubbles, Crystals, Pillow, Mixed
Crystals, or Tubular cell pattern. The control specifies sharpness for any of the Plate or Crystallize options.
note: The option chosen from the Overflow menu affects the contrast.
Overflow How the effect remaps values that fall outside the grayscale range of 0-255. Overflow isn’t available if
sharpness-based cell patterns are chosen.
Clip Values above 255 are mapped to 255. Values below 0 are mapped to 0. Contrast amount controls how much of the
image falls outside the range 0-255; higher contrast amounts result in a mostly black or white image, with less gray.
Therefore, less subtle cellular detail appears at higher contrast settings.
Soft Clamp Remaps grayscale values to fall inside the 0–255 range. Contrast appears reduced; cells are mostly gray with
few areas of pure black or white.
Wrap Back Values above 255 or below 0 are reflected back into the 0-255 range. For example, a value of 258 (255+3) is
reflected to 252 (255-3), and a value of -3 is reflected to 3. With this setting, Contrast values above 100 increase
complexity and detail.
Disperse How randomly the pattern is drawn. Lower values cause more uniform or gridlike cell patterns.
note: If you set the Disperse value above 1.0, set the layer to Best quality to avoid artifacts.
Size The size of the cells. The default size is 60.
Offset Determines the portion of the fractal shape used to create the pattern.
Tiling Options Choose Enable Tiling to create a pattern built of repeating tiles. Cells Horizontal and Cells Vertical
determine how many cells wide and how many cells high each tile is.
Evolution Animating this setting results in changes of the pattern over time.
note: Although the Evolution value is set in units called revolutions, it’s important to realize that these revolutions are
progressive. The Evolution state continues to progress infinitely at each new value. Use the Cycle Evolution option to return
the Evolution setting to its original state at each revolution.
Evolution Options Evolution Options provide controls that render the effect for one short cycle and then loop it for the
duration of your clip. Use these controls to pre-render cell pattern elements into loops, and thus speed up rendering
time.
Cycle Evolution Creates a loop that forces the Evolution state to return to its starting point.

592
Effects and animation presets
Last updated 6/8/2015
Cycle The number of revolutions of the Evolution setting that the cell pattern cycles through before it repeats. The
amount of time between Evolution keyframes determines the timing of the Evolution cycles.
note: The Cycle control affects only the state of the cell pattern, not geometrics or other controls, so you can get different
results with different Size or Offset settings.
Random Seed Specifies a value from which to generate the cell pattern. Animating this property results in flashing
from one cell pattern to another (within the same cell pattern type), which is not usually the result that you want. For
smooth transition of the cell pattern, animate the Evolution property.
note: Create new cell pattern animations by reusing previously created Evolution cycles and changing only the Random
Seed value. Using a new Random Seed value alters the cell pattern without disturbing the Evolution animation.
Checkerboard effect
The Checkerboard effect creates a checkerboard pattern of rectangles, half of which are transparent.
This effect works with 8-bpc color.
Anchor The point of origin of the checkerboard pattern. Moving this point offsets the pattern.
Size From How the dimensions of the rectangles are determined:
Corner Point The dimensions of each rectangle are the dimensions of the rectangle with opposite corners defined by
the Anchor and Corner points.
Width Slider The height and width of a rectangle are equal to the Width value, meaning that the rectangles are squares.
Width & Height Sliders The height of a rectangle is equal to the Height value. The width of a rectangle is equal to the
Width value.
Feather Thickness of the edge feather within the checkerboard pattern.
Color The color of the nontransparent rectangles.
Opacity The opacity of the colored rectangles.
Blending Mode The blending mode to use to composite the checkerboard pattern on top of the original layer. These
blending modes work identically to the ones in the Timeline panel, except for the default None mode, which renders
the checkerboard pattern only.
Circle effect
The Circle effect creates a customizable solid disk or ring.
This effect works with 8-bpc color.
Edge None creates a solid disk. The other options all create rings. Each option corresponds to a different set of
properties that determine the shape and edge treatment of the ring:
Edge Radius The difference between the Edge Radius property and the Radius property is the thickness of the ring.
Thickness The Thickness property sets the thickness of the ring.
Thickness * Radius The product of the Thickness property and the Radius property is the thickness of the ring.
Thickness & Feather * Radius The product of the Thickness property and the Radius property is the thickness of the
ring. The product of the Feather property and the Radius property is the feather of the ring.
Feather The thickness of the feather.
Invert Circle Inverts the matte.

593
Effects and animation presets
Last updated 6/8/2015
Blending Mode The blending mode used to combine the shape and the original layer. These blending modes behave
like the blending modes in the Timeline panel, except for None, which displays only the shape, without the original
layer.
Ellipse effect
The Ellipse effect draws an ellipse.
This effect works with 8-bpc, 16-bpc, and 32-bpc color.
Eyedropper Fill effect
The Eyedropper Fill effect (formerly the Color Picker effect) applies a sampled color to the source layer. This effect is
useful for quickly picking a solid color from a sample point on the original layer or picking a color value from one layer
and using blending modes to apply this color to a second layer.
This effect works with 8-bpc color.
Sample Point The center of the sampled area.
Sample Radius The radius of the sampled area.
Average Pixel Color Which color values are sampled:
Skip Empty Samples the average RGB color values, excluding the color values of transparent pixels.
All Samples the average of all RGB color values, including color values of transparent pixels.
All Premultiplied Samples the average of all RGB color values, premultiplied with the alpha channel.
Including Alpha Samples the average of all RGB color and alpha channel values. This setting results in the sampled
color also containing the average transparency of the sampled pixels.
Maintain Original Alpha Maintains the alpha channel of the original layer. If you choose Including Alpha in the
Average Pixel Color menu, the original alpha is stenciled over the sampled color.
Blend With Original The transparency of the effect. The result of the effect is blended with the original image, with the
effect result composited on top. The higher you set this value, the less the effect affects the layer. For example, if you set
this value to 100%, the effect has no visible result on the layer; if you set this value to 0%, the original image doesn’t
show through.
Fill effect
The Fill effect fills specified masks with a specified color. If you want to add both a stroke and a fill to a closed path, the
order in which you apply the stroke and fill determines the visible width of the stroke: If the fill is applied before the
stroke, the full stroke brush size is visible; if the stroke is applied before the fill, the fill appears on top of the stroke,
obscuring the half of the stroke that falls inside the path.
This effect works in 32-bit color.
Fractal effect
The Fractal effect renders the Mandelbrot or Julia set, creating colorful textures. When you first apply the effect, the
picture you see is the classic sample of the Mandelbrot set; the set is the area that is colored black. Any pixel outside the
set is colorized, depending on how close it is to the set.
This effect works with 8-bpc and 16-bpc color.

594
Effects and animation presets
Last updated 6/8/2015
Set Choice Specifies the set used. Mandelbrot is the typical Mandelbrot set. Mandelbrot Inverse is the Mandelbrot set
mathematically inverted. Julia always changes depending on the center point from the Mandelbrot set and can produce
the set of all possible Julia sets. Julia Inverse is the inverse of the Julia set. To see a Julia set, you may want to set the
magnification to a negative value, because these sets tend to fill up the complex plane outside the normal boundary.
Mandelbrot Over Julia is the same as Mandelbrot, except that it changes when the Julia center point changes.
Mandelbrot Inverse over Julia is the same as Mandelbrot Inverse, except that it changes when the Julia center point
changes.
Mandelbrot, Julia Specify the settings for the specified set. X (Real) and Y (Imaginary) specify the pixels at the center
of the image for either the Mandelbrot or Julia set. Magnification specifies the magnification of the effect. Escape Limit
specifies how many times the calculation looks for a color for a given pixel before it assigns the color black. It also sets
the maximum number of line segments the Selection tool can use when tracing the path of a point. Higher numbers
require longer render times.
Color Specifies the color of the effect:
Overlay Displays a ghosted version of the opposite set. For example, when viewing the Julia set, use this control to
display a ghosted version of the Mandelbrot set. When you select Overlay, a white cross hair with a black drop shadow
appears so you can see the exact point at the center of the opposite set. This control is useful because the Julia set
depends on the center point of the Mandelbrot set.
Transparency Specifies whether black pixels are transparent. If you choose Solid Color from the Palette menu, this
control specifies whether everything inside or outside the set is transparent.
Palette Specifies the palette to use when drawing the set. Lightness Gradient creates a gradient that ranges from black
to white, passing through the hue specified by the Hue control. Then it applies the same gradient eight more times, each
time using the hue 45° away on the color wheel. The Cycle Steps control specifies the number of colors in the gradient.
Hue Wheel uses all the color from the Hue color wheel, with maximum brightness and saturation. Black And White
uses alternating bands of black and white. Solid Color turns everything transparent except the inside of the set, which
uses the color specified by the Hue control. Select Transparent to get the opposite result.
Hue Specifies the hue for solid colors and the starting hue for color gradients. This control works well for creating
smooth color changes or for cycling through the palette. Cycle Steps specifies the number of bands of different color
that appear before the cycle starts over. Cycle Offset specifies where, other than the beginning, a cycle starts.
Edge Highlight Highlights the edges between color bands. This control requires low-quality mode. If you want to use
high-quality edge highlighting, use the Find Edges effect instead.
High Quality Settings Specify the oversampling settings for the effect:

595
Effects and animation presets
Last updated 6/8/2015
Oversample Method Specifies the method used to oversample the effect: Edge Detect-Fast-May Miss Pixels performs
a simple edge detection and oversamples only those pixels. This option is the fastest, especially in areas with a lot of
solid color, such as black, and it generally produces results indistinguishable from Brute Force. Brute Force-Slow-Every
Pixel oversamples every pixel in the image. It is slow but precise.
Oversample Factor Specifies the amount of oversampling to perform. For example, a value of 4 specifies that each pixel
is sampled 16 times (4x4=16) and that the average color is used. Higher values produce better quality output but require
longer render times.
Use tools with the Fractal effect
When the Fractal effect is selected in the Effect Controls panel, you can use After Effects tools in the following way. (If
you don’t want the Fractal tools active, deselect the effect before using tools.)
•Use the Selection tool and click while holding the Alt (Windows) or Option (Mac OS) key. If the path leads out of
the bounded rectangle (-2, -2, 2, 2), it has gone into infinity; in such a case, the starting-point color is based on how
many line segments it takes to reach infinity. If the path ends within the rectangle, it’s colored black.
•Use the Zoom tool to zoom in or out on a particular point, or hold down Ctrl (Windows) or Command (Mac OS),
click and hold the Magnifying tool over the center of the image, and navigate from the center. For example, to zoom
straight in, stay in the center; to move up, drag up a little and then quickly move back to the center.
•Use the Hand tool to pan the image. Press Ctrl (Windows) or Command (Mac OS) to pan the opposite fractal. For
example, when viewing the Julia set, press Ctrl (Windows) or Command (Mac OS) to pan the Mandelbrot set and
see how the Julia set depends on the center point of the Mandelbrot set.
•Use the arrow keys to pan the center point by 1 pixel. Press Shift as you press an arrow key to adjust the point by 10
pixels. Press Ctrl (Windows) or Command (Mac OS) as you press an arrow key to adjust the center point of the
opposite set.
Gradient Ramp effect | CC
The Gradient Ramp effect creates a color gradient. You can create linear or radial ramps, and vary the position and
colors of the ramp over time. Use the Start Of Ramp and End Of Ramp properties to specify the start and end positions.
Use the Ramp Scatter control to disperse the ramp colors and eliminate banding.
This effect works with 8-bpc, 16-bpc, and 32-bpc color.
Note: Ramps often don’t broadcast well; severe banding occurs because the broadcast chrominance signal doesn’t contain
sufficient resolution to reproduce the ramp smoothly. The Ramp Scatter control dithers the ramp colors, eliminating the
banding apparent to the human eye.
Grid effect
Use the Grid effect to create a customizable grid. Render this grid in a solid color or as a mask in the alpha channel of
the source layer. This effect is good for generating design elements and mattes within which other effects can be applied.
John Dickinson provides a video tutorial on his Motionworks website that demonstrates the use of the Grid effect.
This effect works with 8-bpc color.
Use Grid with the Advanced Lightning effect to create lightning forks that follow a grid pattern.
Anchor The point of origin of the grid pattern. Moving this point offsets the pattern.
Size From How the dimensions of the rectangles are determined:
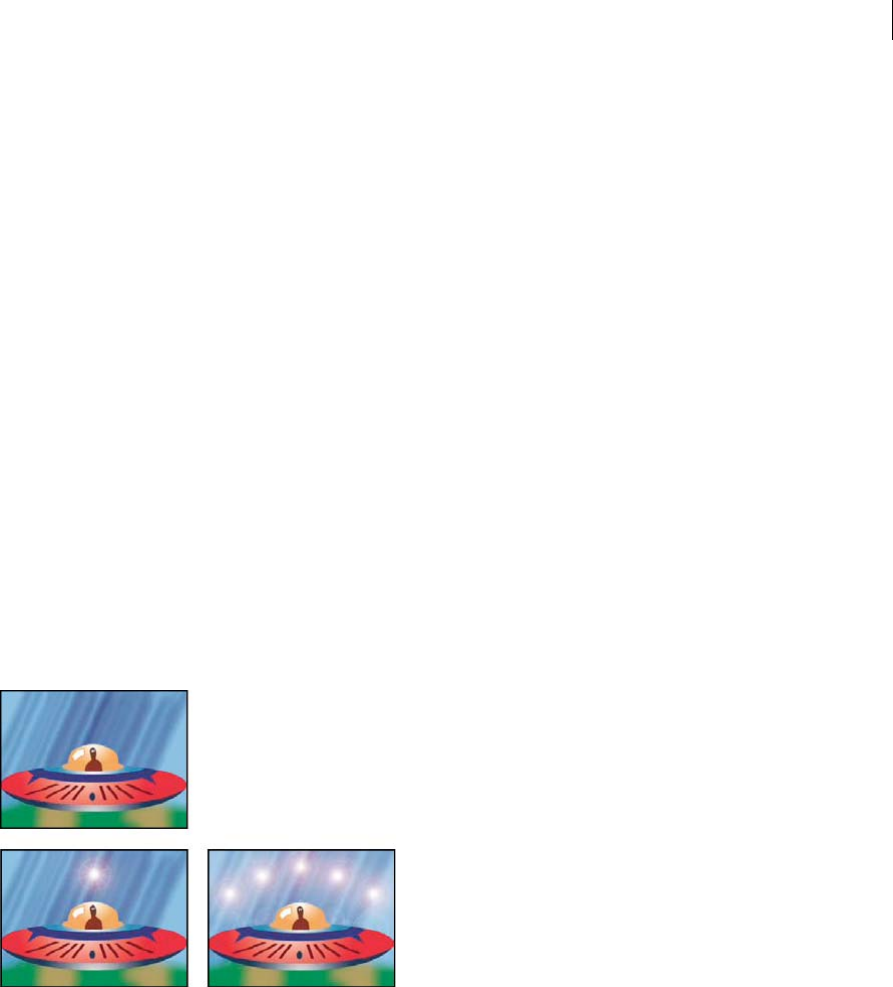
596
Effects and animation presets
Last updated 6/8/2015
Corner Point The dimensions of each rectangle are the dimensions of the rectangle with opposite corners defined by
the Anchor and Corner points.
Width Slider The height and width of a rectangle are equal to the Width value, meaning that the rectangles are squares.
Width & Height Sliders The height of a rectangle is equal to the Height value. The width of a rectangle is equal to the
Width value.
Border The thickness of the grid lines. A value of 0 causes the grid to disappear.
note: The anti-aliasing of the grid borders may cause the visible thickness to vary.
Feather The softness of the grid.
Invert Grid Inverts the transparent and opaque areas of the grid.
Color The color of the grid.
Opacity The opacity of the grid.
Blending Mode The blending mode to use to composite the grid on top of the original layer. These blending modes
work identically to the ones in the Timeline panel, except for the default None mode, which renders the grid only.
Lens Flare effect
The Lens Flare effect simulates the refraction caused by shining a bright light into the camera lens. Specify a location
for the center of the flare by clicking anywhere inside the image thumbnail or by dragging its cross hair.
This effect works with 8-bpc color.
Paint Bucket effect
The Paint Bucket effect (formerly Basic Fill effect) is a nondestructive paint effect that fills an area with a solid color. It
works much like the Paint Bucket tool in Adobe Photoshop. Use the Paint Bucket effect for colorizing cartoon-type
outlined drawings or replacing areas of color in an image.
This effect works with 8-bpc color.
Fill Point The effect fills an area that contains the Fill Point. The area is determined by analyzing pixels that neighbor
the Fill Point and expanding the fill area by adding matching pixels. How far the fill color spreads depends upon the
Tolerance setting, as well as the option you choose from the Fill Selector menu.
Fill Selector Which values to operate on:

597
Effects and animation presets
Last updated 6/8/2015
Color & Alpha Specifies that the effect fills the RGB and alpha channels of the fill area with the new color.
Straight Color Specifies that the effect fills only the RGB channels of the fill area with the new color.
Transparency Specifies that the effect fills only the transparent areas near the fill point. You must set a fill point in a
transparent area for this option to work.
Opacity Specifies that the effect fills only the opaque areas near the fill point. You must set a fill point in an opaque
area for this option to work.
Alpha Channel Specifies that the effect fills either the opaque or transparent areas in the whole image, depending upon
the alpha channel value at the point you set the fill point.
Tolerance How far the color values of a pixel can be from the Fill Point color values and still match. Higher values
expand the range of pixels that the effect fills.
View Threshold Shows what pixels match—that is, which pixels are within the Tolerance value of the color values of the
Fill Point pixel. This option is especially useful in tracking leaks. If a small gap exists, the color can flow over and fill
areas not intended to be filled.
Stroke How the effect treats the edges of the filled area:
Antialias Anti-aliases the edges of the filled area.
Feather Creates a feathered edge for the filled area. Feather Softness values create a more gradually disappearing edge.
Spread Expands the area of the fill color. The Spread Radius value indicates the number of pixels the fill color extends
beyond the edge of the fill area.
Choke Contracts the area of the fill color. The Spread Radius value indicates the number of pixels the fill color shrinks
from the edge of the fill area.
Stroke Confines the fill to only the border of the selected area. The Stroke Width value indicates the width of the
stroke, in pixels.
Color The fill color.
Opacity Opacity of the filled area.
Blending Mode The blending mode to use to composite the result of the effect on top of the original layer. All of these
blending modes operate like the blending modes in the Timeline panel, except for Fill Only. Use Fill Only to show only
the fill.
Note: If you apply multiple instances of Paint Bucket to a layer, be sure not to set more than one to use the Fill Only blending
mode. If you set more than one instance to use this blending mode, only the first application of the effect is shown.
Radio Waves effect
The Radio Waves effect creates radiating waves from a stationary or animated effect control point. You can use this
effect to generate pond ripples, sound waves, or intricate geometric patterns. Use the Reflection control to make the
shapes bounce off the sides of the layer. You can also use Radio Waves to create realistic wave displacement maps that
work well with the Caustics effect.
Satya demonstrates animation of the mask that the radio wave shape is based on. He also demonstrates that you can get
smooth, organic contours (rather than discrete waves) by using a very high value for Frequency, together with carefully
chosen Fade-in Time and Fade-out Time settings.
This effect works with 8-bpc color.
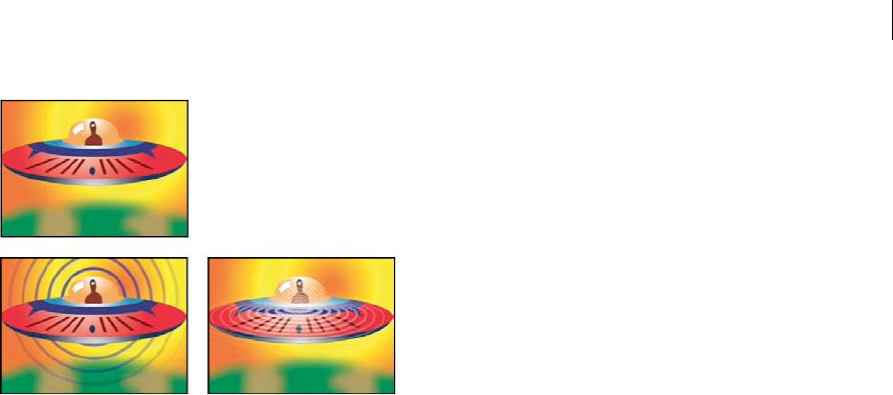
598
Effects and animation presets
Last updated 6/8/2015
Producer Point The point from which the waves appear.
Parameters Are Set At Specifies whether parameters can be animated for individual waves. Birth specifies that each
wave maintains the same parameter settings over time. Each Frame specifies that the waves change as the parameters
change. For example, if you create a star wave with an animated rotation property, select Birth to offset each star from
the previous one to create a twisting tunnel, or select Each Frame to make all the stars rotate in unison as the rotation
property changes.
Render Quality Controls the quality of the output. Radio Waves creates smooth, anti-aliased shapes by rendering high-
resolution versions of the shapes and then scaling them down by oversampling. For example, to create a 100x100-pixel
image, it may generate a 400x400-pixel image and then scale it down using 4x oversampling. Oversampling provides
high-quality results but results in long render times. This option works only with Best quality mode.
Wave Type What to base the wave shape on.
Polygon What kind of polygon to use for the wave shape. These controls are available if Polygon is chosen for Wave
Type.
Sides Three sides create a triangle, four create a square, and so on. Size values above 64 result in a smooth circle. You
can also approximate a circle by setting Sides to 3, Curve Size to 1, and Curvyness to about 0.62.
Curve Size Specifies how much of each side is curved at each point.
Curvyness Specifies how extreme the curve is at each point of the wave.
Star Specifies that the polygon is shaped like a star. To change the number of points on the star, change the number of
sides.
Star Depth Specifies the angles of a star by controlling the distance between inner points and the center of the star.
Mask Specifies the mask used to create a wave. This control is available if you choose Mask from the Wave Type pop-
up menu.
Image Contour controls
You can base the wave shape on the contours of an image by choosing Image Contours for Wave Type.
Source Layer The layer to use as input for the creation of the image contours. Select an animated layer to emit moving
shapes. A well-defined outline, high-contrast grayscale layer, or alpha channel works well as a source. The Radio Waves
effect detects edges and converts sources into outlines.

599
Effects and animation presets
Last updated 6/8/2015
Source Center Specifies the center point of the shape, relative to the source layer. For example, if you isolate a shape
that is positioned in the left half of the frame, the shape radiates to the left by default; you can move the source center
anywhere on the layer.
Value Channel The color attributes of the source layer used to define the image contours.
Invert Input Inverts the chosen value channel option.
Value Threshold Specifies the threshold for the chosen value channel. It determines the percentage value at which
everything below it or above it is mapped to either white or black. This control can make a big difference in the shape
of the wave.
Pre-Blur Smooths out the value channel before the value threshold is sampled. If you have a high-contrast image, such
as white on black, and you want the wave to follow the edges very closely, set this option to 0.
Tolerance Defines how tightly the wave conforms to the layer. A high setting results in sharp corners; a low value can
make the wave shape more sensitive to noise.
Contour Specifies the shape in the source layer that you want to use as the emitted wave. Contour numbers the shapes
by their order in the frame from top to bottom, left to right. The shape in the upper-left corner is number 1.
Wave Motion controls
Wave Motion controls specify how the wave emits from the center point.
Frequency Specifies the number of waves per second flowing out of the producer point.
Expansion Specifies the speed at which the wave travels from the producer point once it is born. This option doesn’t
affect the number of waves per second.
Orientation Specifies the rotation of the shape at birth around its center point. To animate the rotation, use the Spin
control.
Direction Specifies the initial direction of a wave if Velocity is greater than 0. By default, particles are emitted from the
producer point in an expanding radial pattern.
Velocity Specifies the speed at which the wave moves in the specified direction.
Spin Controls the continued rotation of a shape after it is born.
Lifespan (sec) Specifies the time, in seconds (including the fade-in and fade-out times), that the wave exists.
Tip: To prevent waves from abruptly disappearing when their lifetime ends, use the Fade Out Time control.
Reflection Specifies whether the waves bounce off the edges of the layer and back into the scene. This option is effective
for generating displacement maps for use as water ripples.
Stroke controls
Stroke controls specify the appearance of the stroke of a wave.
Profile Controls the appearance of the stroke that defines the shape. The outline of the shape is animated in the wave
that emanates from the effect point. The quality of the stroke is defined as a 3D wave type.
Color Specifies the color of the stroke.
Opacity Specifies the maximum possible opacity of the stroke. The actual opacity of the stroke takes into account this
setting in conjunction with the Fade-in Time and Fade-out Time controls.
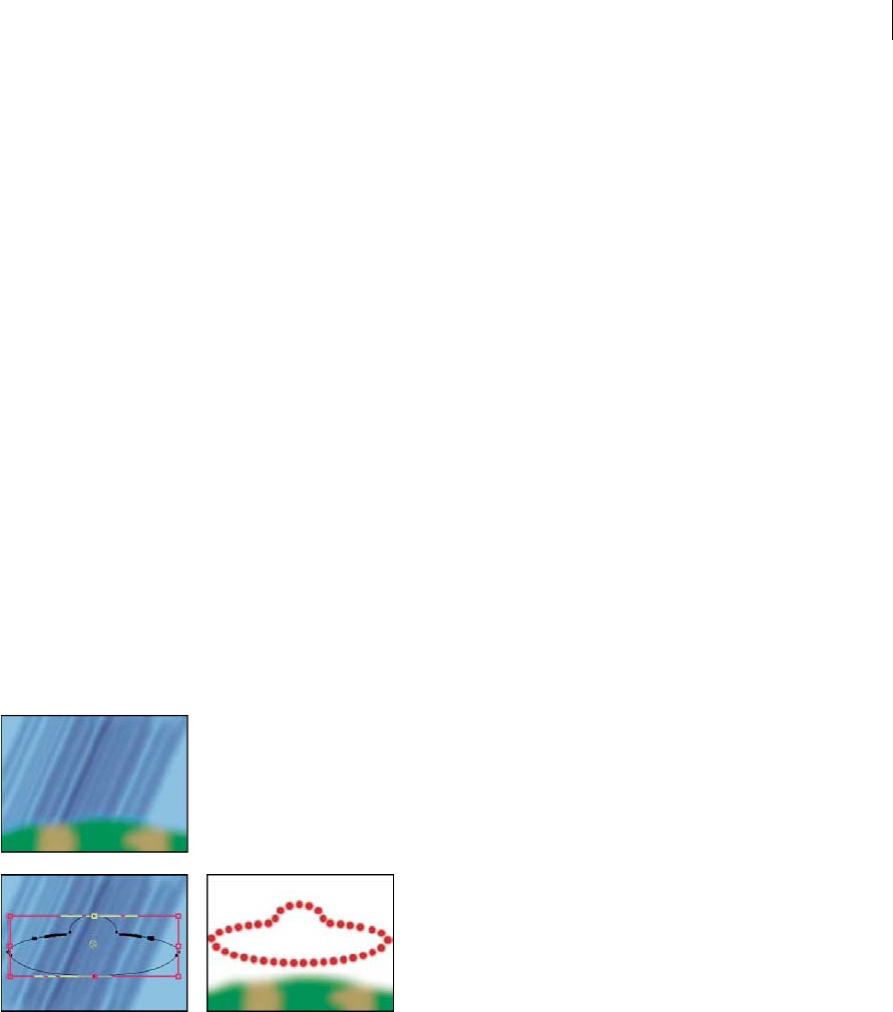
600
Effects and animation presets
Last updated 6/8/2015
Fade-in Time Specifies the amount of time it takes the wave to fade into view. Fade-in Time is measured in seconds and
begins with 0 opacity at birth. For example, if the Lifespan is 3 seconds and Fade-in Time is 1 second, the stroke is
completely transparent at birth and fades smoothly to full opacity at 1 second.
Fade-out Time Specifies the amount of time it takes the wave to fade out of view. Fade-out Time is measured backward
in time from the end of the Lifespan. If the Lifespan is 3 seconds and Fade-out Time is 1 second, the wave begins to fade
out at 2 seconds. If the sum of Fade-in Time and Fade-out Time is greater than the Lifespan value, the intersection point
of the two fades is calculated so that the wave doesn’t reach full transparency. If either Fade-in Time or Fade-out Time
is longer than the Lifespan, that amount is truncated to equal the Lifespan.
Start Width Specifies the width of the shape at its birth. End Width specifies the width of the shape at the end of its
lifespan.
Stroke effect
The Stroke effect creates a stroke or border around the path defined by one or more masks. You can also specify stroke
color, opacity, and spacing, as well as brush characteristics. Specify whether the stroke appears on top of the image, on
a transparent image, or if it reveals the original alpha channel. To use a path created in Illustrator, copy the path and
paste it into a layer in After Effects.
This effect works with 8-bpc color.
Andrew Kramer provides a video tutorial on his Video Copilot website that demonstrates the use the Stroke effect to
reveal an image as if it is being written by hand on a wall.
Steve Holmes provides a tutorial on the Layers Magazine website that shows how to create and prepare vines, swirls,
and flourishes in Illustrator and then import, reveal, and animate them in After Effects using the Stroke effect.
Brush Hardness Specifies the edge quality of the stroke, between hard and soft.
Spacing Specifies the spacing between stroke segments.
Paint Style Specifies whether the stroke is applied to the original layer or to a transparent layer.
Vegas effect
The Vegas effect generates running lights and other path-based pulse animations around an object. You can outline just
about anything, surround it with lights or longer pulses, and then animate it to create the appearance of lights chasing
around the object.
This effect works with 8-bpc color.

601
Effects and animation presets
Last updated 6/8/2015
John Dickinson provides an example on his Motionworks website of an EKG (electrocardiogram) simulation created
using the Vegas effect.
Stroke What to base the stroke on: Image Contours or Mask/Path.
Image Contours If Image Contours is chosen from the Stroke menu, you specify what layer to take the image contours
from and how to interpret the input layer.
Input Layer The layer whose image contours are used. High-contrast, grayscale layers, and alpha channels work well
and are easy to work with.
Invert Input Inverts the input layer before creating the stroke.
If Layer Sizes Differ Determines how to adjust the layers if the size of the input layer differs from the size of the layer to
which Vegas is applied. Center centers the input layer in the composition at its original size. Stretch To Fit scales the
input layer to match the layer to which Vegas is applied.
Channel The color attribute of the input layer used to define the contours.
Threshold The percentage value at which everything below or above is mapped to either white or black. This property
is important in determining the location of the edges that the effect strokes.
Pre-Blur Smooths out the input layer before the threshold is sampled. Set this option to 0 if you have a high-contrast
image and want the stroke to follow the edges very closely.
Tolerance Defines how tightly the stroke conforms to the input layer. A high value results in sharp corners, while low
values can make the stroking sensitive to noise.
Render Specifies whether to apply the effect to a selected contour or to all contours in the layer.
Selected Contour Specifies the contour to use when Selected Contour is selected from the Render menu. Contours are
numbered from upper-left to lower-right; the contour with the highest point is number 1, the second highest point is
number 2, and so on.
Shorter Contours Have Specifies whether shorter contours have fewer segments. By default, the effect breaks each
contour into the same number of segments. For example, if you apply the effect to the letter R, the outside contour may
look fine with 32 segments, but the inside contour may be almost solid. To resolve this issue, select Fewer Segments.
Mask/Path The mask or path to use for the stroke. You can use either closed or open masks.
Segments Specifies the number of segments used to create each stroked contour. For example, if the effect is applied
to the word Vegas and Segments is set to 10, the outline of each of the letters, plus the inner contours of e, g, and a, are
broken into 10 segments.
Length Determines the length of the stroke of a segment in relation to its maximum possible length. For example, if
Segments is set to 1, the maximum length of a stroke is one complete trip around the object outline. If Segments is set
to 3, the maximum length of a segment is 1/3 of the total outline, and so on.
Segment Distribution Determines the spacing of the segments. Bunched puts the segments together like boxcars in a
train: The shorter the segment length, the shorter the overall length of the train. Even spaces the segments evenly
around the contour.
Rotation Animates the segments around the contour. For example, to create the appearance of running lights, start
with a large number of segments set to 50% of their length, and then animate Rotation to move the lights around the
shapes.
Random Phase Specifies that the stroke starting point is different for each contour. By default, the effect strokes a
contour beginning at its highest point on the screen. In the event of a tie, it starts at the leftmost highest point.

602
Effects and animation presets
Last updated 6/8/2015
Blend Mode Determines how the stroke is applied to the layer. Transparent creates the effect on a transparent
background. Over places the stroke over the existing layer. Under places the stroke behind the existing layer. Stencil
uses the stroke as an alpha channel mask, filling the stroke with the pixels of the original layer.
Color Specifies the color of the stroke, unless Stencil is chosen for Blending Mode.
Width Specifies the width of the stroke in pixels. Fractional values are supported.
Hardness Determines how sharp or blurry the edges of the stroke are. A value of 1 creates a slight blur; a value of 0.0
blurs the line so that few solid areas of color remain.
Start, End Opacity Specify the opacity at the beginning or end of the stroke.
Mid-point Opacity Specifies the opacity of the midpoint of the stroke. This control works in terms of relative opacity,
not absolute opacity. Setting it to 0 makes the change in opacity smooth from the start point to the end point, as if there
were no midpoint at all.
Mid-point Position Specifies the location of the midpoint within a segment: Lower values move the midpoint closer to
the beginning; higher values move the midpoint closer to the end. Use this control to move the midpoint opacity from
the center of the stroke.
Write-on effect
The Write-on effect animates strokes on a layer. For example, you can simulate the action of hand-writing of cursive
text or signatures. note: A convenient way to animate Brush Position is to use Motion Sketch to create Position keyframes
on a new solid layer and then use an expression on the Brush Position property to link it to the Position property on the
new solid layer. (See Sketch a motion path with Motion Sketchand Add, edit, and remove expressions.)
This effect works with 8-bpc color.
Other methods of animating paint strokes and text are also available. For example, you can animate text by using the
type tools and text animators, and you can animate a paint stroke applied with a paint tool. Paint strokes can have a
Write-on Duration setting, which you can use to create similar results as with the Write-on effect. You can also animate
shape paths for a similar result with the Trim Paths operation. (See Animating text, Animate and edit paint strokes, and
Shape attributes, paint operations, and path operations for shape layers .)
Brush Position The position of the brush. Animate this property to create a stroke.
Stroke Length (secs) The duration, in seconds, of each brush mark. If this value is 0, the brush mark has unlimited
duration. Use a single, constant, nonzero value to create a snakelike movement of the stroke. Animate this value to make
the stroke expand and contract.
Brush Spacing (secs) The time interval, in seconds, between brush marks. Smaller values produce smoother paint
strokes but take more time to render.
Paint Time Properties and Brush Time Properties Specifies whether paint properties and brush properties are applied
to each brush mark or to the entire stroke. Choose None to apply values at each time to all brush marks in the stroke.
Choose a property name for each brush mark to retain the value for that property at the time that the brush mark was
drawn. For example, if you choose Color, then each brush mark keeps the color specified by the Color value at the time
that the mark was drawn.
Paint Style How the paint stroke interacts with the original image:
On Original Image Paint stroke appears over original image.
On Transparent Paint stroke appears over transparency; the original image doesn’t appear.
Reveal Original Image The original image is revealed by the paint stroke.
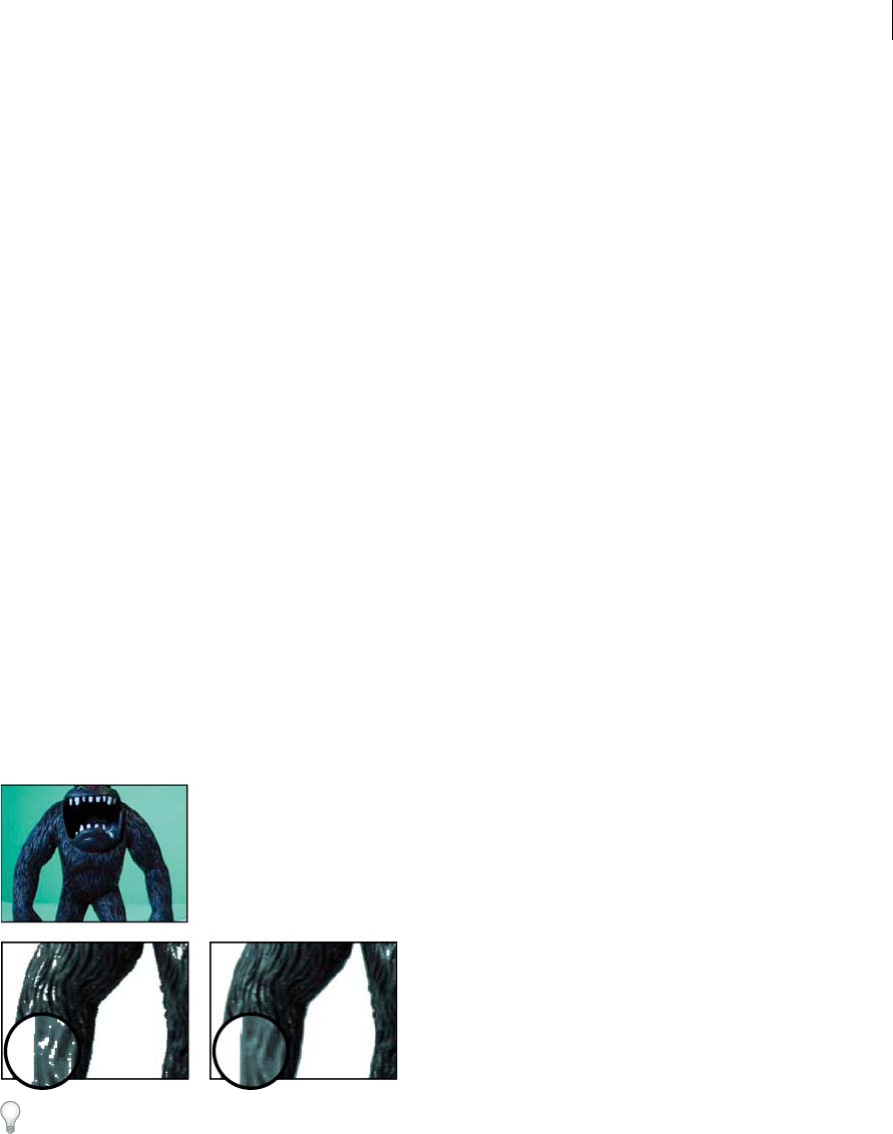
603
Effects and animation presets
Last updated 6/8/2015
More Help topics
Randomness and random seeds
About masks
Randomness and random seeds
Matte effects
For information on the Refine Matte effect and the Roto Brush effect, see Roto Brush effect and Refine Matte effect
reference .
Third-party effects in this category included with After Effects:
•mocha shape effect
See Third-party plug-ins included with After Effects.
Matte Choker effect
The Matte Choker effect repeats a sequence of choking and spreading the matte to fill undesired holes (transparent
areas) in opaque regions. The repetition is necessary because the entire matte must be choked and spread; the spreading
fills the hole, but the edges of the matte must be choked back to preserve the matte shape.
The process of choking and spreading occurs in two stages, each with its own set of identical controls. Typically, stage
two does the opposite of stage one. After a specified number of back-and-forth adjustments (which Matte Choker
handles automatically), the hole is filled.
This effect works with 8-bpc and 16-bpc color.
You can use the Matte Choker effect to only blur the alpha channel. To use this effect as an alpha-channel blur, set Gray
Level Softness to 100%.
Close a hole in a matte
1Select the layer, and choose Effect > Matte > Matte Choker.
2Set stage-one controls (the first three properties) to spread the matte as far as possible without altering its shape, as
follows:
Geometric Softness Specifies (in pixels) the largest spread or choke.

604
Effects and animation presets
Last updated 6/8/2015
Choke Sets the amount of choke. Negative values spread the matte; positive values choke it.
Gray Level Softness Specifies how soft to make the edges of the matte. At 0%, the matte edges contain only fully
opaque and fully transparent values. At 100%, the matte edges have a full range of gray values but may appear
blurred.
3Set stage-two controls (the next three properties) to choke the matte by the same amount as the amount by which
you spread it in stage one.
4(Optional) Use the Iterations property to specify how many times After Effects repeats the spread-and-choke
sequence. You may need to try a few different settings so that the sequence is repeated as many times as necessary
to close any unwanted holes.
Simple Choker effect
The Simple Choker effect shrinks or expands the edges of a matte in small increments to create a cleaner matte. The
Final Output view displays the image with the effect applied, and the Matte view provides a black-and-white view of
the image with black areas indicating transparency and white areas indicating opacity. Choke Matte sets the amount of
choke. Negative values spread the matte; positive values choke it.
This effect works with 8-bpc, 16-bpc, and 32-bpc color.
More Help topics
Keying introduction and resources
3D Channel effects
Third-party effects in this category included with After Effects:
•EXtractoR effect
•IDentifier effect
•ID Matte
See Third-party plug-ins included with After Effects.

605
Effects and animation presets
Last updated 6/8/2015
About 3D Channel effects, including ProEXR effects
The 3D Channel effects work on 2D layers—specifically, 2D layers with 3D information in auxiliary channels. The
sources of these 2D layers are image sequences that represent 3D scenes that have been rendered out of a 3D
application.
Use 3D Channel effects to integrate 3D scenes into 2D composites and to modify those 3D scenes. You can import 3D
image files saved in RLA, RPF, Softimage PIC/ZPIC, and Electric Image EI/EIZ formats. For PIC and EI files, the 3D
channel information is in the ZPIC and EIZ files, respectively. You don’t import ZPIC and EIZ files, but as long as
they’re in the same folder with the PIC and EI files, you have access to their 3D channels using the 3D Channel effects.
The 3D Channel effects don’t affect other types of files.
3D Channel effects read and manipulate the additional channels of information, including z-depth, surface normals,
object ID, texture coordinates, background color, unclamped RGB, and material ID. You can layer 3D elements along
the z axis, insert other elements in a 3D scene, blur areas in a 3D scene, isolate 3D elements, apply a foggy effect with
depth, and extract 3D channel information for use as parameters in other effects.
If you convert a layer with a 3D Channel effect to 3D and view the layer from anywhere but the front and center, it
doesn’t appear as expected.
To display depth and other channel values for a pixel in the Info panel, apply a 3D Channel effect, and then—with the
effect selected—click the pixel in the Composition panel or Layer panel using the Selection tool.
Lutz Albrecht provides a two-part document on the Adobe website about integrating 3D applications with After Effects.
These articles cover the creation of UV maps, mattes, and channels from various 3D applications, including Maxon
Cinema 4D, NewTek Lightwave, and Luxology modo. The articles then show you how to use RE:Vision Effects RE:Map
and fnord ProEXR plug-ins to use that data in After Effects.
Dave Scotland provides a pair of tutorials on the CG Swot website in which he demonstrates how to create RPF files in
a 3D application and how to use RPF files in After Effects. The first part explains the RPF format and how to create RPF
files in 3DS Max. The second part shows how to use the Object ID and Z depth information in an RPF file within After
Effects, using the ID Matte, Depth of Field, Depth Matte, and Fog 3D effects.
Chris & Trish Meyer give tips on using the 3D Channel effects in an article on the ProVideo Coalition website.
Using channels in OpenEXR files
3D Channel effects can make use of the channels in OpenEXR files—such as a depth channel—if the channels have
been tagged. Unlike some other formats, like RPF, in which a specific set of channels is defined to always represent
specific properties of a scene, the OpenEXR format is an arbitrary collection of channels with no inherent meaning.
The R, G, B, and A channels are reserved to represent red, green, blue, and alpha values, but other channels can be used
for any other characteristics. To map channel names to the values of a specific type for use by other effects, you can use
a file with the name OpenEXR_channel_map.txt. If this file is in the same folder as the OpenEXR format plug-in, the
OpenEXR plug-in will use the information in this file to tag channels when it imports an OpenEXR file.
An OpenEXR_channel_map.txt file is not included with After Effects, but you can download one as part of the ProEXR
package from the fnord software website. The sample OpenEXR_channel_map.txt file available from the fnord
software website includes documentation describing its use.
The ProEXR package from the fnord software website also includes the ProEXR Comp Creator plug-in. This plug-in
can create a layer from each of the channels of an OpenEXR file. For example, the layers can represent the output from
a set of render passes from a 3D application.
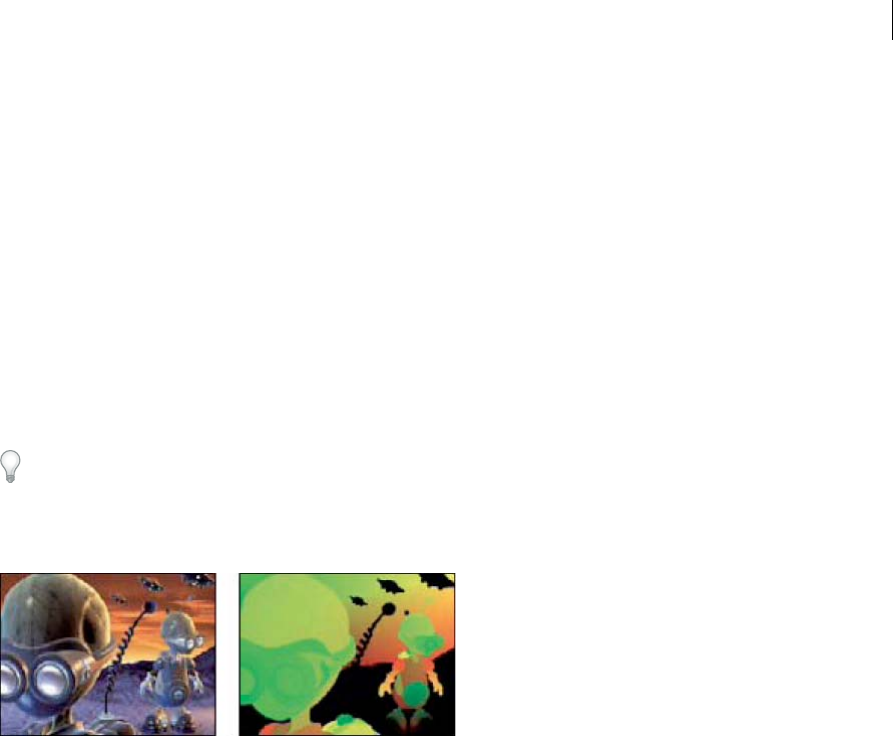
606
Effects and animation presets
Last updated 6/8/2015
ProEXR plug-ins, IDentifier and EXtractoR
The EXtractoR and IDentifier plug-ins from fnord software are included with After Effects to provide access to multiple
layers and channels of OpenEXR files.
Documentation for fnord ProEXR plug-ins is available in a PDF document on the fnord software website, which
includes links to a sample multi-channel EXR file and an After Effects project that uses it. The instructions in the fnord
document regarding the removal of the OpenEXR plug-ins don’t apply to After Effects CS5.
3D Channel Extract effect
The 3D Channel Extract effect makes auxiliary channels visible as either grayscale or multichannel color images. You
can then use the resulting layer as a control layer for other effects. For example, extract the depth information in a 3D
channel image file and then use it as an influence map in the Particle Playground effect, or extract values from the
unclamped RGB channel to produce a matte that generates glowing highlights.
To display 3D channel values for a pixel in the Info panel, apply the 3D Channel Extract effect, choose the channel from
the 3D Channel menu in the Effect Controls panel, and then click the pixel in the Composition panel or Layer panel
using the Selection tool.
This effect works with 8-bpc color.
White Point, Black Point The value that is mapped to white or black.
3D Channel The channel to extract from the 3D image:
Z-Depth Represents the distance of a given shaded pixel from the camera. White represents the greatest distance; black
pixels are closest to the camera. Effects such as the Lens Blur effect can use this information to generate depth-of-field
effects. When you apply the channel directly as a luma matte, you get fog. This channel is anti-aliased.
Note: For best results, match the White Point and Black Point settings of the effect with the near and far settings of your
camera in the 3D application that generated the 3D image.
Object ID Each object can be assigned a separate ID value in the 3D application. You can use a map generated using
this channel to selectively apply effects to certain objects in a 3D scene—for example, to apply selective color
adjustments. This channel is not anti-aliased.
Texture UV This channel contains the mapping coordinates of the textures of your object, mapped to the red and green
channels. This channel is not anti-aliased.
This channel can be used to check your UV maps or as input for the Displacement Map effect.
Surface Normals This channel maps the direction vector of each point on the surface of an object to the RGB channels.
The vectors are relative to the camera. Third-party plug-ins can use this channel as the basis for dynamic relighting and
relief rendering. This channel is anti-aliased.
Coverage The behavior for this channel varies for various 3D applications. It is used to mark areas near the edges and
contours of objects to provide information about their anti-aliasing and overlap behavior.
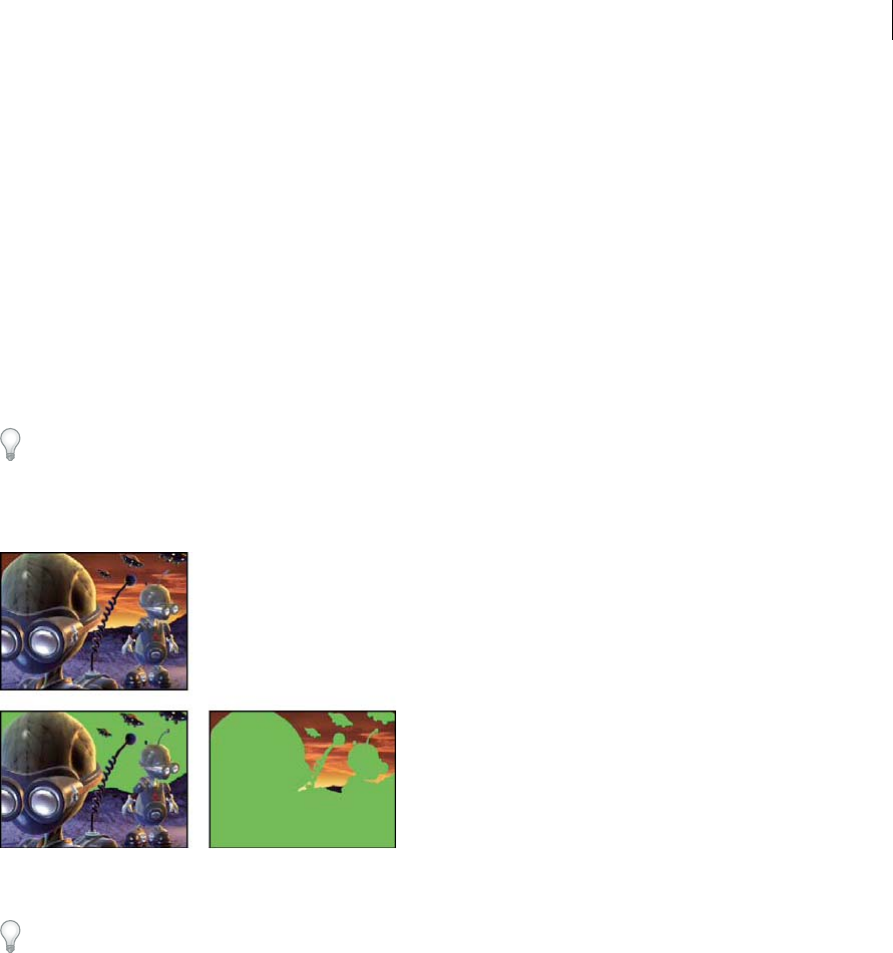
607
Effects and animation presets
Last updated 6/8/2015
Background RGB This channel contains all RGB pixel values of the background without any foreground objects. It is
mostly used to store dynamic environmental effects unique to 3D programs such as skies or backgrounds generated
from procedural textures. This channel is anti-aliased.
Unclamped RGB This channel contains the colors from the 3D application as they were presented to the 3D
application’s renderer before it applied exposure and gamma adjustments. This channel is anti-aliased.
Material ID Each material can be assigned a separate ID value in the 3D application. You can use a map generated using
this channel to selectively apply effects to certain materials in a 3D scene. This channel is not anti-aliased.
Depth Matte effect
The Depth Matte effect reads the depth information in a 3D image and slices the image anywhere along the z axis. For
example, you can remove a background in a 3D scene, or you can insert objects into a 3D scene.
To insert a layer into a 3D scene, apply the Depth Matte effect to the layer containing the 3D scene, set the Depth
property to the depth at which you want to insert the new layer, duplicate the 3D scene layer, select Invert for the 3D
scene layer on top, and place the new layer between the two 3D scene layers in the layer stacking order in the Timeline panel.
This effect works with 8-bpc, 16-bpc, and 32-bpc color.
Depth The z-axis value at which to slice the image. Everything with a depth value less than this Depth value is matted
out.
To determine the depth of an object, click it in the Composition panel or Layer panel using the Selection tool while the
effect is selected.
Feather The amount of feather along the edges of the matte.
Invert Select to matte out everything with a depth greater than the Depth value. Deselect to matte out everything with
a depth less than the Depth value.
Depth Of Field effect
The Depth Of Field effect simulates a camera that’s focusing at one depth (focal plane) in a 3D scene, blurring objects
at other depths. This effect uses the depth information from the auxiliary channel of an imported file representing a 3D
scene. To use the depth information that After Effects calculates for a camera layer, see Create a camera layer and change
camera settings.
This effect works with 8-bpc, 16-bpc, and 32-bpc color.
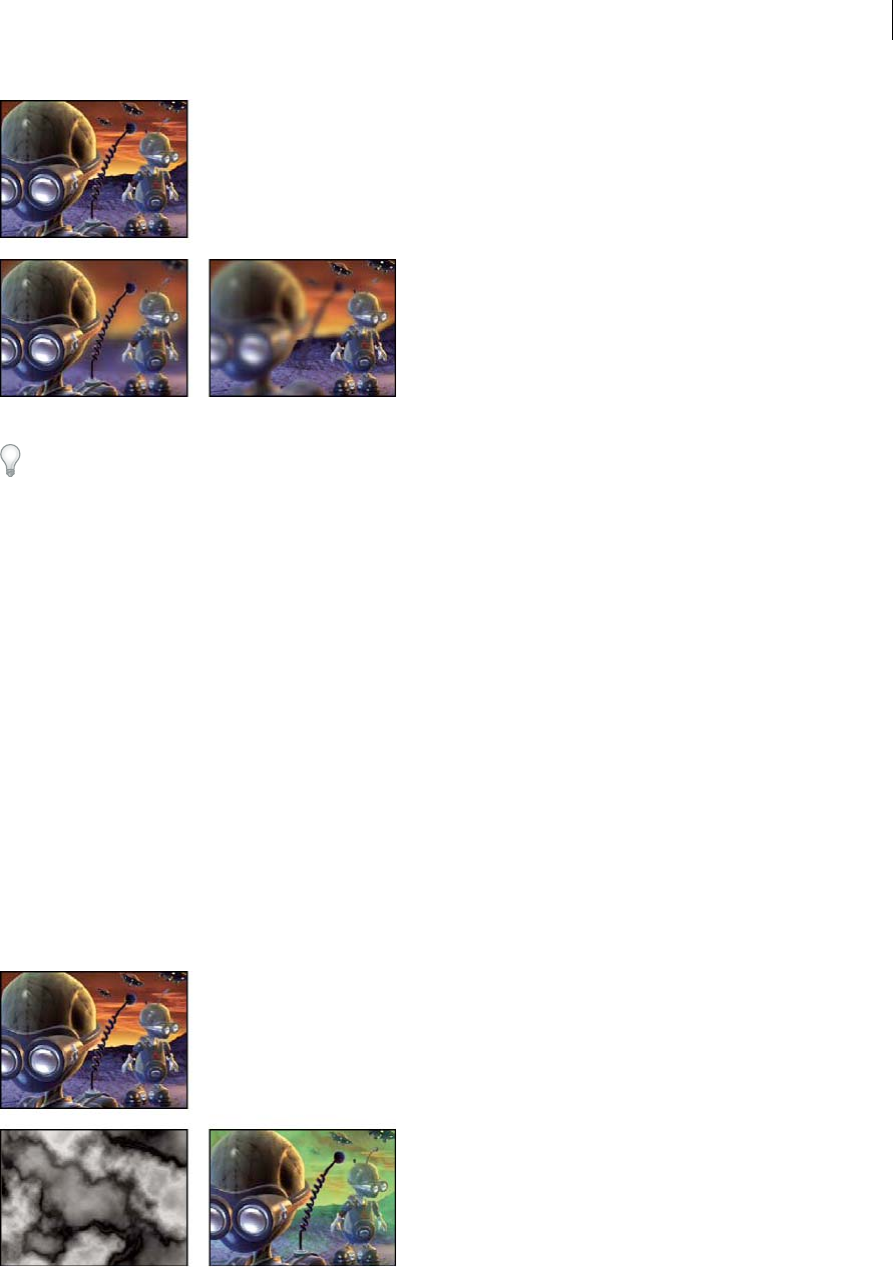
608
Effects and animation presets
Last updated 6/8/2015
Focal Plane The distance along the z axis of the focal plane from the camera.
To show the depth of an object in the Info panel, click the object in the Composition panel or Layer panel using the
Selection tool while the effect is selected.
Maximum Radius How much blur is applied to objects outside the focal plane.
Focal Plane Thickness Determines what depths are in focus on either side of the focal plane.
Focal Bias The higher the value, the more quickly elements drop out of focus with increasing distance from the focal
plane.
Dave Scotland provides a video tutorial on the CG Swot website in which he shows how to use the Depth Of Field effect,
even with a 3D file that has been rendered without optimal depth settings.
Fog 3D effect
The Fog 3D effect simulates fog by behaving as though a scattering medium is in the air that makes objects look more
diffuse as they get more distant along the z axis.
This effect works with 8-bpc, 16-bpc, and 32-bpc color.
Note: As with all effects in the 3D Channel effects category, the Fog 3D effect depends on depth information from image
sequence files of the kind rendered out of a 3D application. For general information on 3D Channel effects, see About 3D
Channel effects, including ProEXR effects. For information about simulating fog in After Effects, see Compositing fog,
smoke, and clouds.
Fog Start Depth Where along the z axis the diffuse scattering begins.
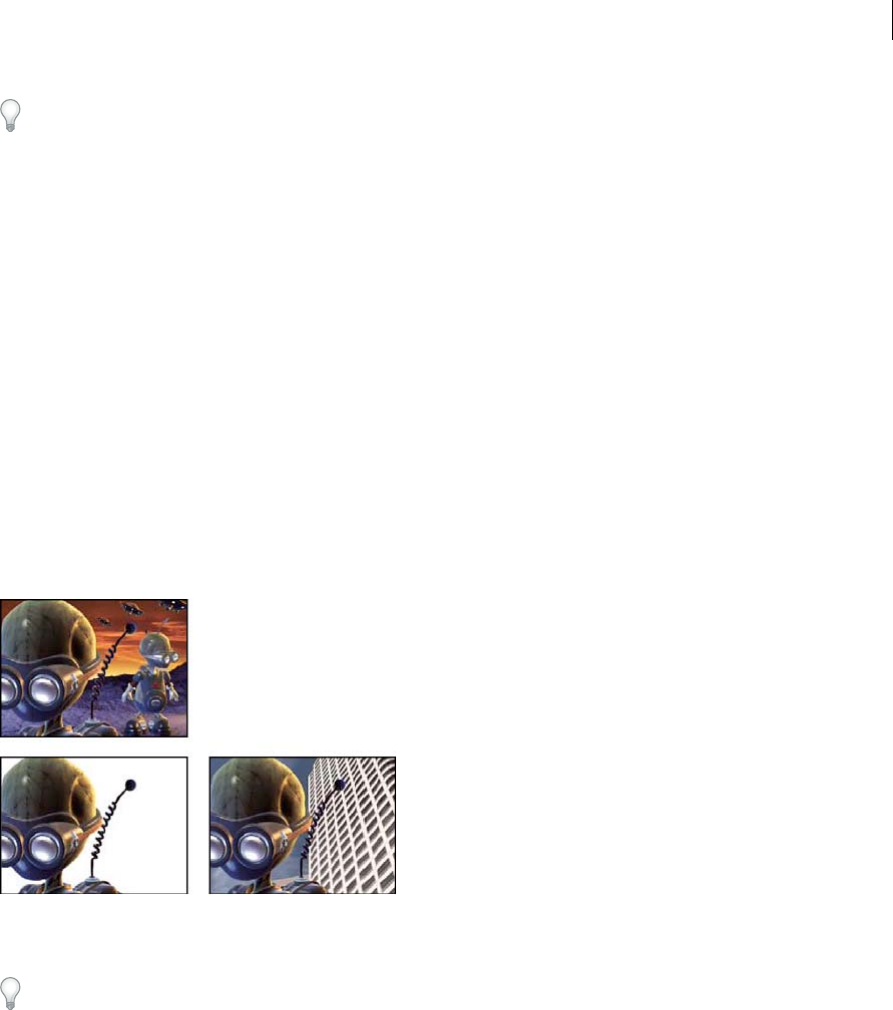
609
Effects and animation presets
Last updated 6/8/2015
To determine the depth of an object, click it in the Composition panel or Layer panel using the Selection tool while the
effect is selected.
Fog End Depth Where along the z axis the diffusion reaches its maximum.
Scattering Density Determines how quickly the scattering occurs. The higher the value, the more dense the fog appears
from its starting point.
Foggy Background Creates a foggy background (default). Deselect to create transparency at the back of the 3D scene
for compositing on top of another layer.
Gradient Layer (Optional) A grayscale layer to use as a control layer, the luminance values of which apply to fog density.
For example, use the Turbulent Noise effect to create a swirling control layer for atmospheric fog. Make sure that the
dimensions of the gradient layer are at least as great as the dimensions of the 3D scene layer.
Layer Contribution How much the gradient layer affects the fog density.
ID Matte effect
Many 3D programs tag each element in a scene with a unique Object ID. The ID Matte effect uses this information to
create a matte that excludes everything in the scene except the element you want.
This effect works with 8-bpc, 16-bpc, and 32-bpc color.
Aux. Channel Isolate elements based on Object ID or Material ID.
ID Selection The ID value for an object.
To determine the ID of an object, select the ID type from the Aux. Channel menu in the Effect Controls panel, and click
the object in the Composition panel or Layer panel using the Selection tool while the effect is selected. If Object ID is
selected for Aux. Channel, ID Selection automatically updates to the Object ID for the object you click.
Feather The amount of feather along the edges of the matte.
Invert Inverts the selection. Select to matte out the object specified by ID Selection. Deselect to matte out everything
but the object (default).
Use Coverage Creates a cleaner matte by removing the colors stored behind the object from the pixels along the edge
of the matte. This option works only if the 3D image contains a coverage channel that stores information about the
colors behind objects.
610
Effects and animation presets
Last updated 6/8/2015
More Help topics
Importing and using 3D files from other applications
3D layers
Stylize effects
Third-party effects in this category included with After Effects:
•CC Block Load effect (CS6 or later)
•CC Burn Film effect
•CC Glass effect
•CC Kaleida effect
•CC Mr. Smoothie effect
•CC Plastic effect (CS6 or later)
•CC RepeTile effect
•CC Threshold effect
•CC Threshold RGB effect
See Third-party plug-ins included with After Effects.
Brush Strokes effect
The Brush Strokes effect applies a rough painted look to an image. You can also use this effect to achieve a pointillist
style by setting the length of the brush strokes to 0 and increasing the stroke density. Although you specify the direction
of strokes, they’re scattered randomly by a small amount to give a more natural result. This effect alters the alpha
channel, as well as the color channels; if you masked out a portion of the image, the brush strokes paint over the edges
of the mask.
This effect works with 8-bpc color.
Stroke Angle The direction in which the strokes are made. The image is effectively shifted in this direction, potentially
causing some clipping at the layer boundaries. Applying the Grow Bounds effect before the Brush Strokes effect
effectively extends the boundaries of the layer to prevent this clipping.
Brush Size The size of the brush in pixels.
Stroke Length The maximum length of each stroke, in pixels.
Stroke Density Higher densities result in overlapping brush strokes.
Stroke Randomness Creates nonuniform strokes. The more randomness, the more the strokes vary from the brush and
stroke settings you’ve specified.
Paint Surface Specifies where brush strokes are applied:

611
Effects and animation presets
Last updated 6/8/2015
Paint On Original Image Puts the strokes on top of the unmodified layer. This setting is the default.
Paint On Transparent Causes only the strokes themselves to appear, leaving the layer transparent between the strokes.
Paint On White/Paint On Black Applies strokes over a white or black background.
Blend With Original The transparency of the effect. The result of the effect is blended with the original image, with the
effect result composited on top. The higher you set this value, the less the effect affects the layer. For example, if you set
this value to 100%, the effect has no visible result on the layer; if you set this value to 0%, the original image doesn’t
show through.
Cartoon effect
The Cartoon effect simplifies and smooths the shading and colors in an image and adds strokes to the edges between
features. The overall result is to decrease contrast in areas with low contrast and increase contrast in areas with high
contrast. The result can be an image that resembles a sketch or cartoon, or the result can be more subtle. You can use
the Cartoon effect to simplify or abstract an image for stylistic purposes, to call attention to areas of detail, or to obscure
the poor quality of the original footage.
An advantage that the Cartoon effect has over some other effects and techniques that provide a similar result is the
superior temporal coherence that the Cartoon effect provides. This means that the result of applying the Cartoon effect
does not vary greatly from one frame to the next if the two frames are very similar.
This effect works with 8-bpc, 16-bpc, and 32-bpc color.
The Cartoon effect works in three stages:
1It smooths the image and removes minor variations with a blurring operation similar to that used by the Bilateral
Blur effect. Modify the Detail Radius and Detail Threshold properties to control this phase.
2It finds edges in the image and applies a stroke to them, similar to the Find Edges effect. Modify properties in the
Edge and Advanced property groups to control how the edges are determined and how the strokes are drawn.
3It reduces the variations in luminance and color in the image, simplifying the shading and coloring. Modify
properties in the Fill property group to control this quantization (posterization).
Begin with Render set to Fill Only, and first achieve the result that you want for the colors of the image. Next, choose
either Edges or Fill & Edges, and establish the basic appearance that you want for the edges. Use the properties in the
Advanced property group to fine-tune the appearance after you’ve established the basic appearance using the other controls.
As with any other properties, you can animate the properties of the Cartoon effect. Settings that work well for one part
of a scene may not be optimal for another part of a scene. For example, you may want fewer colors and thicker edge
strokes for a close-up of a face than for an action scene with many subjects and a lot of detail.
Before applying the Cartoon effect, consider either setting the composition to a lower frame rate or using the Posterize
Time effect on the layer if you're trying to make a movie look like a cartoon. Consider that cartoons have much lower
frame rates than live action footage.
Chris Meyer provides a video tutorial about the Cartoon effect in the After Effects CS4 New Creative Techniques series
on the Lynda.com website.
612
Effects and animation presets
Last updated 6/8/2015
613
Effects and animation presets
Last updated 6/8/2015
Cartoon effect properties
Render Fill, Edges, or Fill & Edges. Determines which operations to perform and which results to display.
Detail Radius The radius for the blurring operation that is used to smooth the image and remove details before the
operation to find edges. A larger radius for a blur means that more pixels are averaged together to determine each pixel
value, so increasing the Detail Radius value increases the blurriness.
Detail Threshold The blur operation that the Cartoon effect performs is similar to that used by the Bilateral Blur effect.
(See Bilateral Blur effect.) The radius of the blur is automatically decreased in areas where an edge or other prominent
detail exists. The Detail Threshold value determines how the Cartoon effect decides what areas contain features to be
preserved and what areas should be blurred by the full amount. A lower Detail Threshold value causes more fine details
to be preserved. A higher Detail Threshold value causes a more simplistic cartoon-like result, with fewer details
preserved.
Fill The luminance values in the image are quantized (posterized) according to the settings of the Shading Steps and
Shading Smoothness properties. If the Shading Smoothness value is 0, then the result is very similar to a simple
posterization, with sharp transitions between values. A higher Shading Smoothness value causes the colors to blend
together more naturally, with more gradual transitions between posterized values, preserving gradients.
The smoothing phase considers the amount of detail that exists in the original image so that areas that are already
smooth (such as the gradient of a sky) are not quantized unless that Shading Smoothness value is low.
Edge These properties determine the basics of what is considered an edge and how the stroke applied to an edge
appears.
Threshold Determines how different two pixels must be for the Cartoon effect to consider them to be one either side
of an edge. Increase the Threshold value to cause more areas to be identified as edges.
Width The thickness of the stroke that is added to the edge.
Softness Increase this value to soften the transition between the edge’s stroke and the surrounding colors.
Opacity The opacity of the stroke applied to the edge.
Advanced Advanced settings related to edges and performance.
Edge Enhancement Positive values sharpen the edges; negative values spread the edges. The enhancement distorts the
entire image by warping pixels toward or away from the edges, which has the result of sharpening or spreading the
edges.

614
Effects and animation presets
Last updated 6/8/2015
Edge Black Level When this property is 0, only the pixels that have been identified as being part of an edge receive a
stroke; when Render is set to Edges, the image is white except in areas with a pure black stroke. Increase the Edge Black
Level property by a small amount to add shades of gray in the Edges phase of rendering. Increase this property by a
larger amount to approach a result that resembles white strokes on a black background.
Edge Contrast The contrast in the grayscale representation of the edges.
Performance If your computer includes a display card with a GPU that supports OpenGL, the Cartoon effect can use
the GPU to accelerate its processing.
Color Emboss effect
The Color Emboss effect works like the Emboss effect, without suppressing the original colors of the image.
This effect works with 8-bpc and 16-bpc color.
Emboss effect
The Emboss effect sharpens the edges of objects in an image and suppresses colors. The effect also highlights the edges
from a specified angle. The quality setting of the layer influences the Emboss effect by controlling the Relief setting.
Relief is calculated at the subpixel level in Best quality and rounded off to the pixel level in Draft quality.
This effect works with 8-bpc and 16-bpc color.
Direction The direction from which the highlight source shines.
Relief The apparent height of the embossing, in pixels. The Relief setting actually controls the maximum width of
highlighted edges.
Contrast Determines the sharpness of the image.
Blend With Original The transparency of the effect. The result of the effect is blended with the original image, with the
effect result composited on top. The higher you set this value, the less the effect affects the clip. For example, if you set
this value to 100%, the effect has no visible result on the clip; if you set this value to 0%, the original image doesn’t show
through.
615
Effects and animation presets
Last updated 6/8/2015
Find Edges effect
The Find Edges effect identifies the areas of an image that have significant transitions and emphasizes the edges. Edges
can appear as dark lines against a white background or colored lines against a black background. With the Find Edges
effect applied, images often look like sketches of the original.
Invert Inverts the image after the edges are found. If Invert isn’t selected, edges appear as dark lines on a white
background. If selected, edges appear as bright lines on a black background.
This effect works with 8-bpc color.
Glow effect
The Glow effect finds the brighter parts of an image and then brightens those pixels and surrounding pixels to create a
diffuse, glowing aura. The Glow effect can also simulate overexposure of brightly lit objects. You can base the glow on
either the original colors of the image or on its alpha channel. Glows based on alpha channels produce diffuse
brightness only at the edges of the image, between the opaque and transparent regions. You can also use the Glow effect
to create a gradient glow between two colors (A and B colors) and to create multicolor effects with looping.
Rendering the Glow effect at Best quality can change the appearance of the layer. This change is especially true if you
use Adobe Photoshop arbitrary maps to color the glows. Be sure to preview at Best quality before you render the effect.
Glows tend to be brighter and more realistic in 32-bpc projects, because the high dynamic range in a 32-bpc project
prevents the color values of the glow from being clipped. Consider working in 32-bpc color for this reason, even if footage
items don’t contain high–dynamic range color values.
Chris Meyer provides a basic overview of the parameters of the Glow effect in a video tutorial on the Lynda.com
website.
This effect works with 8-bpc, 16-bpc, and 32-bpc color.
Glow Based On Determines whether glow is based on color values or transparency values.
Glow Threshold Sets a threshold as a percentage brightness to which the glow isn’t applied. A lower percentage
produces glow on more of the image; a higher percentage produces glow on less of the image.
Glow Radius The distance, in pixels, that the glow extends out from the bright areas of the image. Larger values produce
diffuse glows; smaller values produce glows with sharp edges.
Glow Intensity The brightness of the glow.
Composite Original Specifies how to composite the effect results with the layer. On Top places the glow on top of the
image, using the blending method selected for Glow Operation. Behind places the glow behind the image, creating a
backlighting result. None separates the glow from the image.
To reduce the layer to the glow only, choose None for Composite Original and None for Glow Operation. To achieve a
glow effect for text that knocks out (blocks) all layers below it, choose Silhouette Alpha for Glow Operation. These glow
effects are more noticeable if the image has a feathered edge.
Glow Colors The colors of the glow. A & B Colors creates a gradient glow using the colors specified by Color A and
Color B controls.
616
Effects and animation presets
Last updated 6/8/2015
Color Looping The shape of the gradient curve to use if A & B Colors is selected for Glow Colors.
Color Loops Creates multicolor ringing in the glow, if you select two or more loops. A single loop cycles through the
gradient (or arbitrary map) specified for Glow Colors.
Note: You can create an arbitrary map (.amp) file by applying the Curves effect, selecting the pencil icon, then clicking the
save (floppy disk) icon. Use an arbitrary map file in the Glow effect by clicking the Options link, then selecting the .amp file.
Color Phase Where in the color cycle to begin color loops. By default, color loops begin at the origin of the first loop.
A & B Midpoint The midpoint specifies the balance between the two colors used in the gradient. Lower percentages use
less of the A color. Higher percentages use less of the B color.
Color A, Color B The color of the glow if you choose A & B Colors for Glow Colors.
Glow Dimensions Specifies whether the glow is horizontal, vertical, or both.
Mosaic effect
The Mosaic effect fills a layer with solid-color rectangles, pixelating the original image. This effect is useful for
simulating low-resolution displays and for obscuring faces. You can also animate it for a transition. At Best quality, the
edges of the rectangles are anti-aliased.
This effect works with 8-bpc and 16-bpc color.
Horizontal/Vertical Blocks The number of blocks in each row and column.
Sharp Colors Gives each tile the color of the pixel in the center of the corresponding region in the original image.
Otherwise, each tile is given the average color of the corresponding region in the original image.
Motion Tile effect
The Motion Tile effect replicates the source image across the output image. When you change the placement of the tiles,
it uses motion blur to accentuate the movement if motion blur is enabled.
This effect works with 8-bpc color.
Carl Larsen provides a tutorial on the Creative COW website that shows how to use the Motion Tile effect to create a
whip-pan transition between two layers.
Tile Center The center of the main tile.
Tile Width, Tile Height Dimensions of tiles as a percentage of the input layer dimensions.
Output Width, Output Height Dimensions of the output image as a percentage of the input layer dimensions.
Mirror Edges Flips adjacent tiles to form mirror images. If Phase is set to 0, selecting this option causes the edges of the
layer to be mirrored with the surrounding tiles.
Phase The horizontal or vertical offset of the tiles.
Horizontal Phase Shift Offsets tiles horizontally instead of vertically.
617
Effects and animation presets
Last updated 6/8/2015
Posterize effect
The Posterize effect posterizes colors; the number of colors is reduced and gradual color transitions are replaced by
abrupt color transitions. You specify the number of tonal levels (or brightness values) for each channel in an image. The
Posterize effect then maps pixels to the closest matching level. For example, choosing two tonal levels in an RGB image
gives you two tones for red, two tones for green, and two tones for blue. Values range from 2 to 255.
Level The number of tonal levels for each channel.
This effect works with 8-bpc, 16-bpc, and 32-bpc color.
Roughen Edges effect
The Roughen Edges effect makes an alpha channel rough and can add color to simulate rust and other kinds of
corrosion. This effect gives rasterized text or graphics a naturally rough look, like the look of old typewriter text.
This effect works with 8-bpc color.
Edge Type What kind of roughening to use.
Edge Color The color to apply to the edge for Rusty Color or Roughen Color, or to the fill for Photocopy Color.
Border How far, in pixels, the effect extends inward from the edge of the alpha channel.
Edge Sharpness Low values create softer edges. High values create sharper edges.
Fractal Influence The amount of roughening.
Scale The scale of the fractal used to calculate the roughness.
Stretch Width or Height The width or height of the fractal used to calculate the roughness.
Offset (Turbulence) Determines the portion of the fractal shape that is used to create the roughness.
Complexity Determines the level of detail in the roughness.
Note: Increasing complexity results in longer rendering times. Reduce the Scale value rather than increasing Complexity to
achieve similar results.
Evolution Animating this setting results in changes of the roughness over time.
618
Effects and animation presets
Last updated 6/8/2015
Note: Although the Evolution value is set in units called revolutions, it’s important to realize that these revolutions are
progressive. The Evolution state continues to progress infinitely at each new value. Use the Cycle Evolution option to return
the Evolution setting to its original state at each revolution.
Evolution Options Evolution Options provide controls that render the effect for one short cycle and then loop it for the
duration of your layer. Use these controls to pre-render your roughen elements into loops, and thus speed up rendering
time. Use the following controls to create a smooth, progressive, nonrepeating loop:
Cycle Evolution Creates a loop that forces the Evolution state to return to its starting point.
Cycle The number of revolutions of the Evolution setting that the fractal cycles through before it repeats. The amount
of time between Evolution keyframes determines the timing of the Evolution cycles.
Note: The Cycle control affects only the state of the fractal, not geometrics or other controls, so you can get different results
with different Size or Offset settings.
Random Seed Specifies a value from which to generate the roughness texture. Animating this property results in
flashing from one set of fractal shapes to another within the same fractal type. For smooth transition of the roughness,
use the Evolution control.
Note: Create new roughness animations by reusing previously created Evolution cycles and changing only the Random Seed
value. Using a new Random Seed value alters the noise pattern without disturbing the Evolution animation.
Scatter effect
The Scatter effect scatters the pixels in a layer, creating a blurry or smeared appearance. Without changing the color of
each individual pixel, the Scatter effect redistributes the pixels randomly, but in the same general area as their original
positions.
This effect works with 8-bpc and 16-bpc color.
Grain The direction in which to scatter the pixels—horizontally or vertically. Select None to scatter pixels in all
directions.
Scatter Randomness Specifies whether scattering changes at each frame. To animate scattering without keyframes or
expressions, select the Randomize Every Frame option.
Strobe Light effect
The Strobe Light effect performs an arithmetic operation on a layer or makes the layer transparent at periodic or
random intervals. For example, every 5 seconds the layer could become completely transparent for one-tenth of a
second, or the colors of a layer could invert at random intervals.

619
Effects and animation presets
Last updated 6/8/2015
This effect works with 8-bpc color.
Strobe Color The color of the strobe light.
Blend With Original The transparency of the effect. The result of the effect is blended with the original image, with the
effect result composited on top. The higher you set this value, the less the effect affects the layer. For example, if you set
this value to 100%, the effect has no visible result on the layer; if you set this value to 0%, the original image doesn’t
show through.
Strobe Duration (secs) How long, in seconds, each strobe lasts.
Strobe Period (secs) The time, in seconds, between the start of subsequent strobes.
Random Strobe Probability The probability that the strobe operation applies to any given frame.
Strobe Choose Makes Layer Transparent for each strobe to make the layer transparent. Choose Operates On Color
Only to use the operation specified by Strobe Operator.
Strobe Operator The operation to use for each strobe.
Texturize effect
The Texturize effect gives a layer the appearance of having the texture of another layer. For example, you could make
the image of a tree appear as if it had the texture of bricks, and control the depth of the texture and the apparent light
source. At Best quality, the texture layer is positioned and scaled with subpixel precision.
Chris Zwar provides an example project on his website that uses the Displacement Map effect, the Turbulent Displace
effect, the Texturize effect, and a combination of Blur and Color Correction effects to create a transition in which an
image appears as a watercolor image washed onto a rough piece of paper.
This effect works with 8-bpc color.
Texture Layer The source of the texture.
Light Direction The angle at which light hits the texture.
Texture Contrast The magnitude of the result.
Texture Placement How the texture layer is applied to the effect layer:
Tile Texture Applies the texture repeatedly.
Center Texture Positions the texture in the middle.
Stretch Texture To Fit Stretches the texture to the dimensions of the effect layer.

620
Effects and animation presets
Last updated 6/8/2015
Threshold effect
The Threshold effect converts grayscale or color images to high-contrast, black-and-white images. Specify a certain
level as a threshold; all pixels lighter than the threshold convert to white and all pixels darker convert to black.
This effect works with 8-bpc and 16-bpc color.
Text effects
Numbers effect
The Numbers effect generates random or sequential numbers in different formats, such as decimal number, dates, and
timecode—even the current date and time (at render time). You can use the Numbers effect to create counters of
various kinds. The maximum offset for sequential numbers is 30,000.
This effect works with 8-bpc color.
The following options and values are available in the Font Style dialog box: Font, Style, Direction, and Alignment. To
open this dialog box again, click Options at the top of the entry for the effect in the Effect Controls panel.
Type The numbering system:
Number Decimal numbers.
Number [Leading Zeros] Decimal numbers with five digits to the left of the decimal point.
Timecode [30], Timecode [25], and Timecode [24] Standard non-drop-frame timecode formats (XX:XX:XX:XX) using
the stated frame rate. The timecode types use the current time of the layer as the base.
Time Hours and minutes. If you also select Current Time/Date, the Value/Offset/Random Max value is ignored. If you
select Random, the time is bounded by 0 (12:00 AM) and the slider value.
Numerical Date, Short Date, and Long Date If you don’t also select Current Time/Date, the Value/Offset/Random Max
is the number of days since January 1, 1995 (0 on the slider corresponds to January 1, 1995). If you do select Current
Time/Date, Value/Offset/Random Max is the number of days since the current date (0 on the slider corresponds to the
current date). If you select Random, the date is bounded by 0 (either the current date or January 1, 1995) and the slider
value.

621
Effects and animation presets
Last updated 6/8/2015
Note: Leap years are considered.
Hexadecimal Base-16 numbers (digits from 0 to F). Hexadecimal numbers increment by 0x1 for every 0.0000125 that
the Value/Offset/Random Max value increases, and increments by 0x10000 for every 1.0 that the Value/Offset/Random
Max value increases. If you select Random, the number is bounded by 0 and the Value/Offset/Random Max value.
Random Values Random values limited by the Value/Offset/Random Max value. If Value/Offset/Random Max is 0,
values are random across their maximum possible range.
Value/Offset/Random Max Varies based on the chosen type and whether Random Values is selected.
Decimal Places Specifies the number of places to the right of the decimal point.
Current Time/Date Select for time and date numbers to be based on the current time and date.
Position The position of the numbers on the layer.
Display Options Specifies the use of a fill or stroke or a combination of both on the text. Fill Only fills the characters
with a color. Stroke Only strokes the edges of the characters with a color. Fill Over Stroke overlaps the fill color onto the
stroke color. Stroke Over Fill overlaps the stroke color onto the fill color.
Size Size of the characters.
Tracking Average distance between characters.
Proportional Spacing Numbers use proportional spacing instead of monospacing.
Composite On Original Text is composited on top of the original image. If Composite On Original isn’t selected, the
original image isn’t visible.
Alternatives to using the Numbers effect
Use text layers for greater control over text formatting and text animation. (See Creating and editing text layers .)
Apply the Current Time Format animation preset to a text layer to show the current time in the format corresponding
to the time display setting for the project.
Colin Braley provides a tutorial and example project on his website that show how to use an expression on the Source
Text property to animate text to overcome some of the limitations of the Numbers effect.
For a similar example, see Example: Animate text as a timecode display.
Timecode effect
The Timecode effect creates a text overlay that displays timecode or frame number information on a layer. This effect
doesn’t modify timecode embedded from external sources, such as QuickTime.
Use text layers for greater control over text formatting and text animation. (See Creating and editing text layers .)
Apply the Current Time Format animation preset to a text layer to show the current time in the format corresponding
to the time display setting for the project. (See Example: Animate text as a timecode display.)
This effect works with 8-bpc color.
Display Format Specifies whether timecode is displayed in the SMPTE format, in frame numbers, or in feet and frames
of 35mm or 16mm film.
Time Source The source used for the effect.
Layer Source
Timecode is displayed according to the timecode from the source footage of the layer.

622
Effects and animation presets
Last updated 6/8/2015
Composition
Timecode is displayed according to the timecode from the composition.
Custom
Allows access to the settings in the Custom section, the previous behavior of the effect. These are Time Units, Drop
Frame and Starting Frame.
Time Units Frame rate in frames per second (fps) to be used by this instance of the Timecode effect. This setting affects
only the numbers displayed by the Timecode effect; it has no influence on composition frame rate or the frame rate of
the source footage item for the layer.
Drop Frame Select Drop Frame to generate drop-frame timecode or deselect it to generate non-drop-frame timecode.
Starting Frame The frame number assigned to the first frame of the layer.
Text Position The position of the text overlay, in composition space.
Text Size The size of text, in points.
Text Color The color of the text.
Show Box Specifies whether the colored box behind the timecode value will display or not.
Box Color The color of the box behind the timecode value.
Opacity The opacity of the box behind the timecode value.
Composite on Original Specifies whether the box will be composited on the original or a transparent layer.
Alternatives to using the Timecode effect
Use text layers for greater control over text formatting and text animation. (See Creating and editing text layers .)
Apply the Current Time Format animation preset to a text layer to show the current time in the format corresponding
to the time display setting for the project.
Colin Braley provides a tutorial and example project on his website that show how to use an expression on the Source
Text property to animate text to overcome some of the limitations of the Timecode effect.
For a similar example, see Example: Animate text as a timecode display.
The Rolling Shutter Repair effect
A common problem for DSLR and other CMOS sensor-based cameras is that they typically have a lag time between
scanning lines of video. Since not all parts of the video are recorded at the same time, this can cause Digital cameras
with CMOS sensors often have a rolling shutter, which captures a frame of video one scan line at a time. Due to time
lag between scan lines, not all parts of the image are recorded at exactly the same time. If the camera is moving or
subject is moving, the rolling shutter can cause distortions.
The Rolling Shutter Repair effect (available in the Distort effect category) can be used to remove these distortion
artifacts.
After applying the effect, the following properties are available:
Rolling Shutter Rate: Specifies the percentage of the frame rate which is the scan time. DSLRs seem to be in the 50-
70% range, and iPhone is close to 100%. Adjust this value until distorted lines become vertical.

623
Effects and animation presets
Last updated 6/8/2015
Scan Direction: Specifies the direction that the rolling shutter scan takes place. Most cameras scan top-to-bottom of
the sensor, but of course you can mount a camera upside down or rotate a camera completely in the case of a smart
phone.Advanced section:
Method: Indicates if optical-flow analysis and pixel-motion retiming will be used to generate the unwarped frames
(Pixel Motion), or if a sparse point-tracking and warping method should be used (Warp).
Detailed Analysis: Performs a more detailed point-analysis in the warp. Available when using the Warp method.
Pixel Motion Detail: Specifies how detailed the optical-flow vector field computation should be. Available when using
the Pixel Motion method.
Note: Although the Warp Stabilizer effect has a rolling shutter repair effect within it, the standalone version has more
controls. There are also times when you want to repair a rolling shutter problem, but you do not need to stabilize the shot.
This video by Todd Kopriva and video2brain introduces the new Rolling Shutter Repair feature. Use the effect to correct
the distortion from a moving camera phone video.
Perspective effects
•CC Cylinder effect
•CC Environment effect
•CC Sphere effect
•CC Spotlight effect
See Third-party plug-ins included with After Effects.
3D Glasses effect
The 3D Glasses effect creates a single 3D image by combining a left and right 3D view. You can use images from 3D
programs or stereoscopic cameras as sources for each view.
For more information about stereoscopic 3D, see Cameras, lights, and points of interest .
The method you use to create the combined images dictates how you view them. For example, you can use 3D Glasses
to create an anaglyphic image, which is an image containing two slightly different perspectives of the same subject that
are tinted contrasting colors and superimposed on each other. To create an anaglyphic image, first combine views and
tint each one a different color. Then, use 3D glasses that have either red and green lenses or red and blue lenses to view
the resulting image stereoscopically.
The effect works in 8-bpc, 16-bpc, or 32-bpc color.
Robert Powers provides a video tutorial on the Slippery Rock NYC website that shows how to create and use a depth
matte and use it as a control layer for the Displacement Map effect. The result is then used by the 3D Glasses effect to
create a stereoscopic image.

624
Effects and animation presets
Last updated 6/8/2015
To avoid problems with flipped views, keep in mind the following guidelines:
•Use the same vertical dimensions for the composition and source images. A one-pixel difference produces the same
result as moving the position one pixel vertically.
•Make sure that the Position values for the layer are whole numbers (such as 240 instead of 239.7).
•If the left and right view images are interlaced, de-interlace them before using 3D Glasses to avoid field mismatch.
•Because 3D Glasses creates interlaced frames, don’t select an interlace option in the Render Settings dialog box.
Ghost effects occur if the luminance values of one color exceed the luminance values of another color to such an extent
that you can see the first color through the wrong lens of anaglyph glasses. For example, an excessive red luminance
value becomes visible through the blue lens. If you adjust the Balance value, test the results on the final output media.
If you set the Balance value too high, a reversed shadow may appear.
When you work with red and blue images, the blue color in glasses with red and blue lenses is actually cyan, not blue.
Red and cyan are complementary colors, producing the best separation because they filter each other out more
efficiently. When you work with red and green images, it may appear that the green isn’t as bright as the red. However,
viewing the images with red and green lenses produces an even result because green has a higher luminance value than
red.
Left View, Right View The layer to use as the left or right view. You only need to apply 3D Glasses to one layer in a
composition. If you use a second layer, make sure that the two layers are the same size. The second layer doesn’t need
to be visible in the composition.
Convergence Offset (Scene Convergence) The amount that the two views are offset. Use this control to affect where 3D
elements appear, either in front of, or behind the screen. Any areas that are aligned (left and right views, for example)
show the object in precisely the same spot on the screen. Anything in front of those areas in z space will protrude from
the screen. Anything behind those areas will be visible behind the screen when looking at the scene though stereo
glasses.
You can also use Convergence Offset (Scene Convergence) to realign uncalibrated camera views of rendered material,
such as, photos or images rendered from 3D programs. These are generally misaligned and require a negative
Convergence Offset value. If the original footage was shot with correct convergence, changing this value isn’t necessary.
Keyframing this value may result in erratic animation.
Note: There is improved (truer) handling of edge pixels when using Scene Convergence. Previously, edge pixels were
duplicated to fill to the edge, but that is no longer done. To eliminate vacant edges, scale the layer.
Vertical Alignment Controls the vertical offset of the left and right views relative to each other.
Units Specifies the unit of measure (Pixels or % of Source) for the Scene Convergence and Vertical Alignment values
when the 3D View is set to something other than Stereo Pair or Over Under.
Swap Left-Right Swaps the left and right views. It will also swap views for other 3D View modes.
3D View How the views are combined.
Stereo Pair (Stereo Pair (Side by Side)) Scales both layers to fit side by side within the bounding box of the effect layer.
Select Swap Left-Right to create cross-eyed vision. Selecting Stereo Pair disables Convergence Offset.
Over Under Scales both layers to fit one view on top of the other within the bounding box of the effect layer. Select Swap
Left-Right to create cross-eyed vision. Selecting Stereo Pair (Side by Side) disables Screen Convergence.
Interlace Upper L Lower R Takes the upper (first) field from the Left View layer, and the lower (second) field from the
Right View layer, and combines them into a sequence of interlaced frames. Use this option if you want to view the results
with polarized or LCD shutter glasses. Select Swap Left-Right to switch fields.
Red Green LR Tints the Right View layer red, and the Left View layer green using the luminance values of each layer.

625
Effects and animation presets
Last updated 6/8/2015
Red Blue LR Tints the Right View layer red and the Left View layer blue (cyan) using the luminance values of each layer.
Balanced Red Green LR Performs the same operation as Red Green LR but also balances the colors to reduce shadows
or ghosting effects caused by one view showing through the other. Setting a high value reduces the overall contrast.
Balanced Red Blue LR Performs the same operation as Red Blue LR but also balances the colors to reduce shadows or
ghosting effects.
Balanced Colored Red Blue Converts the layer into a 3D view using the RGB channels of the original layer. This option
maintains the original colors of the layer but may produce shadows and ghosting effects. To reduce these effects, adjust
the balance or desaturate the image, and then apply 3D Glasses. If you use CG images, raise the black level of both views
before applying the effect.
Balance Specifies the level of balance in a balanced 3D view option. Use this control to reduce shadows and ghost
effects. The default balance that 3D Glasses sets when you select the Balanced Colored Red Blue option is the ideal
value: If you set Balance to 0.0, 3D Glasses creates no 3D depth, and if you set Balance too high, 3D Glasses produces
a highly saturated output.
Rich Young collects resources for stereoscopic 3D on the After Effects Portal website.
Bevel Alpha effect
The Bevel Alpha effect gives a chiseled and lighted appearance to the alpha boundaries of an image, often giving 2D
elements a 3D appearance. If the layer is completely opaque, then the effect is applied to the bounding box of the layer.
The edge created by this effect is softer than the edge created by the Bevel Edges effect. This effect works especially well
for elements with text in the alpha channel.
For some purposes, the Bevel And Emboss layer style is preferable to the Bevel Alpha effect. For example, use the Bevel
And Emboss layer style rather than the Bevel Alpha effect if you want to apply different blending modes to the
highlights and shadows of a bevel. (See Layer styles.)
This effect works with 8-bpc and 16-bpc color.
Bevel Edges effect
The Bevel Edges effect gives a chiseled and lighted 3D appearance to the edges of an image. Edge locations are
determined by the alpha channel of the source image. Unlike Bevel Alpha, the edges created with this effect are always
rectangular, so images with nonrectangular alpha channels don’t produce the proper appearance. All edges have the
same thickness. At Best quality, edge thickness is interpolated for smooth visual results.
For some purposes, the Bevel And Emboss layer style is preferable to the Bevel Edges effect. (See Layer styles.)
This effect works with 8-bpc color.
626
Effects and animation presets
Last updated 6/8/2015
Drop Shadow effect
The Drop Shadow effect adds a shadow that appears behind the layer. The alpha channel of the layer determines the
shape of the shadow.
When you add a drop shadow to a layer, a soft-edged outline of the alpha channel of the layer appears behind it, as if a
shadow is cast on the background or underlying objects.
Drop Shadow can create a shadow outside the bounds of the layer. The quality setting of the layer affects the subpixel
positioning of the shadow and the smoothness of the soft edges of the shadow.
For some purposes, the Drop Shadow layer style is preferable to the Drop Shadow effect. (See Layer styles.)
This effect works in 32-bit color.
To render the shadow without the image, select Shadow Only.
Note: To apply a drop shadow to a layer that rotates, rotate the layer using the Transform effect and then apply the Drop
Shadow effect. You can also use nesting, precomposing, or an adjustment layer to achieve this result. If you don’t use one of
these methods, the shadow rotates with the layer.
Radial Shadow effect
The Radial Shadow effect creates a shadow from a point light source over the layer it’s applied to, rather than from an
infinite light source (as with the Drop Shadow effect). The shadow is cast from the alpha channel of the source layer,
allowing the color of that layer to influence the color of the shadow as light passes through semitransparent areas. You
can use this effect to make a 3D layer appear to cast a shadow onto a 2D layer.
This effect works with 8-bpc color.
Shadow Color The color of the shadow.
Note: The colors of the layer may override this option if you choose Glass Edges from the Render control menu. See the
Render and Color Influence controls for more information.
Opacity The opacity of the shadow.

627
Effects and animation presets
Last updated 6/8/2015
Light Source The location of the point light source.
Copy and paste position keyframes or expressions from a control point for another effect (for example, Lens Flare) to
quickly create a shadow that matches the light source for another effect.
Projection Distance The distance from the layer to the surface on which the shadow falls. The shadow appears larger
as this value increases.
Softness The softness of the edges of a shadow.
Render The type of shadow:
The more transparent the pixels in the layer are, the closer the shadow color matches the colors of the layer. If the layer
contains no semitransparent pixels, Glass Edge has little result.
Note: Anti-aliased edges produce colors in a shadow edge when you choose Glass Edge, even if the layer is fully opaque. The
colors of a layer shine through these anti-aliased edges, and the Shadow Color fills the center of the shadow.
Regular Creates a shadow based on the Shadow Color and Opacity values, regardless of semitransparent pixels in the
layer. (If Regular is chosen, the Color Influence control is disabled.)
Glass Edge Creates a colored shadow based on the color and opacity of the layer. If the layer contains semitransparent
pixels, the shadow uses both the color and transparency of the layer. This option creates the appearance, for example,
of sun shining through stained glass.
Color Influence The fraction of the color values of the layer that appear in the shadow. At 100%, the shadow takes on
the color of any semitransparent pixels in the layer. If the layer contains no semitransparent pixels, Color Influence has
little result, and the Shadow Color value determines the color of the shadow. Decreasing the Color Influence value
blends the colors of the layer in the shadow with the Shadow Color. Increasing Color Influence reduces the influence
of the Shadow Color.
Shadow Only Select to render only the shadow.
Resize Layer Select to allow the shadow to extend beyond the original boundaries of the layer.

628
Last updated 6/8/2015
Chapter 13: Markers
Layer markers and composition markers
Use composition markers and layer markers to store comments and other metadata and mark important times in a
composition or layer. Composition markers appear in the time ruler for the composition, whereas layer markers each
appear on the duration bar of a specific layer. Both kinds of markers can hold the same information.
Markers can refer to a single point in time or to a duration.
Composition markers in After Effects correspond to sequence markers in Adobe Premiere Pro. Layer markers in After
Effects correspond to clip markers in Adobe Premiere Pro.
When you render a composition that contains markers, the markers can be converted to web links, chapter links
(chapter points), or cue points, depending on the output format and values that you set in the marker dialog box.
Markers can also be exported as XMP metadata. (See XMP metadata.)
The default comment for a composition marker is a number, whereas the default comment for a layer marker is
nothing.
A marker that contains link or cue point data has a small dot in its icon.
A composition marker with duration of 1 second B composition marker with cue-point data C layer marker with duration of 2 seconds D layer
marker with cue-point data
Markers make it easier to align layers or the current-time indicator with specific points in time: When you drag a
keyframe, the current-time indicator, or a layer duration bar in the Timeline panel, hold down Shift to snap these items
to markers.
You can add markers during a preview or audio-only preview, which allows you to place markers at significant points
in the audio track of a layer.
•To view or edit a data for a marker, double-click the marker, or right-click (Windows) or Control-click (Mac OS) the
marker and choose Settings.
•To move a marker to a different time, drag the marker or double-click it and enter a time in the dialog box.
•To automatically create layer markers for a layer based on the temporal metadata in the layer’s source file, select the
Create Layer Markers From Footage XMP Metadata preference in the Media & Disk Cache preferences category.
This preference is on by default.
•To synchronize layer markers on a precomposition layer to corresponding composition markers for the source
composition, right-click (Windows) or Control-click (Mac OS) a layer marker and choose Update Markers From
Source. This command also removes any markers that you have added to the layer.
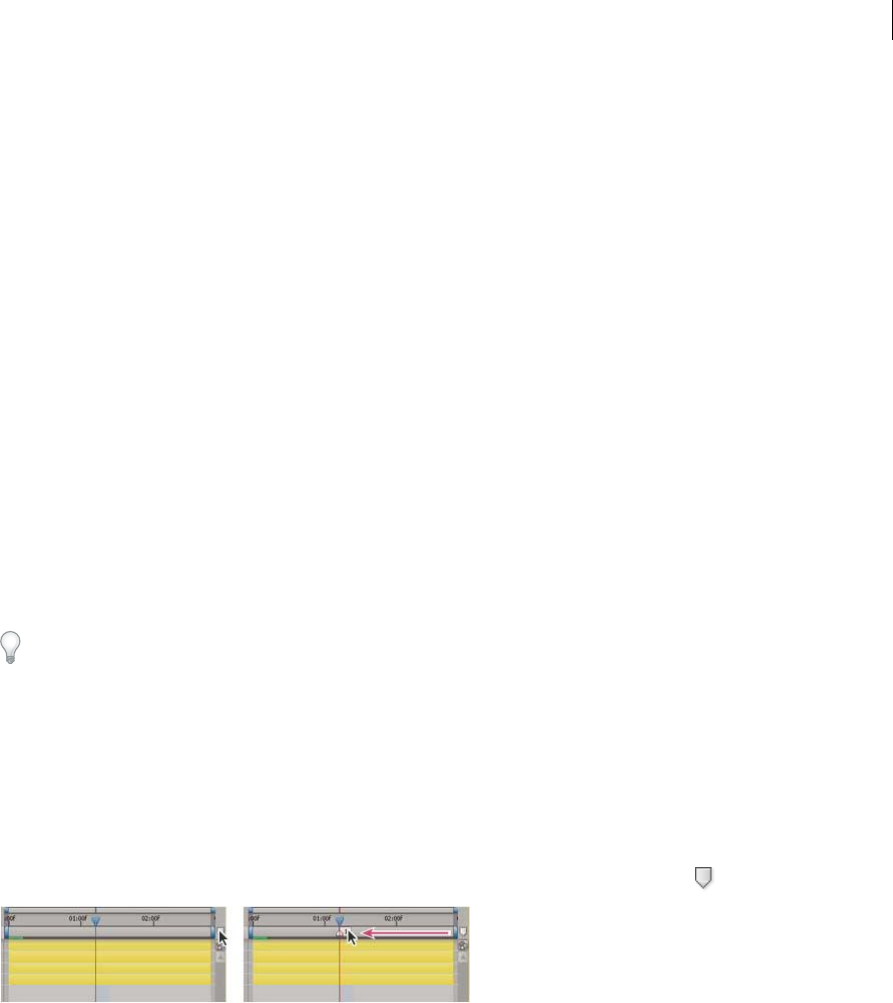
629
Markers
Last updated 6/8/2015
Note: If the layer uses a file (rather than a composition) as its source, this command restores the layer markers to those
representing the temporal XMP metadata for the source file.
If you add one composition to another, the original composition becomes nested as a layer in the containing
composition. All of the composition markers from the nested composition become layer markers in the timeline of the
containing composition. These markers are not linked to the original composition markers. Changes that you make to
the composition markers in the original composition do not affect layer markers in the nested composition. For
example, if you remove one of the original composition markers, the corresponding layer marker for the nested
composition remains in place.
Scripts and expressions can read and use data stored in markers. Because XMP metadata for source footage items can
be converted to layer markers, expressions and scripts can work with XMP metadata.
Composition markers
Composition markers appear as small triangles in the time ruler in the Timeline panel. You can have any number of
composition markers in a composition.
If you remove a numbered composition marker, the other markers remain numbered as they were. If you change the
comment from the default number, that number may be reused by a composition marker created later.
There can be at most one composition marker beginning at each time. If you add or move a composition marker to
start at the same point in time as another composition marker, the added or moved marker replaces the other marker.
For alternative keyboard shortcuts, see Markers (keyboard shortcuts).
•To add a blank composition marker at the current time, make sure that no layer is selected, and choose Layer > Add
Marker or press * (multiply) on the numeric keypad.
Note: Pressing * during a preview or audio-only preview adds a marker at the current time without interrupting the
preview.
•To add a composition marker at the current time and open the marker dialog box, make sure that no layer is selected,
and press Alt+* (Windows) or Option+* (Mac OS) on the numeric keypad.
•To add a composition marker from the bin, drag the marker from the Comp Marker Bin button.
•To add a numbered composition marker at the current time, press Shift + a number key (0–9) on the main keyboard.
Note: If the number you press is already used by another composition marker, After Effects does not create a new marker.
Instead, it moves the existing marker with that number to the new position.
•To remove a composition marker, drag the marker to the Comp Marker Bin button or Ctrl-click (Windows) or
Command-click (Mac OS) the marker.
•To lock all composition markers on a composition, right-click (Windows) or Control-click (Mac OS) a marker on
the composition, and choose Lock Markers.

630
Markers
Last updated 6/8/2015
Layer markers
Layer markers appear as small triangles on the duration bar of a layer. You can have any number of layer markers on a
layer.
Layer markers are retained when you render and export a movie to a QuickTime container.
For alternative keyboard shortcuts, see Markers (keyboard shortcuts).
•To add a layer marker to selected layers at the current time, choose Layer > Add Marker or press * (multiply) on the
numeric keypad.
Note: Pressing * during a preview or audio-only preview adds a marker at the current time without interrupting the
preview.
•To add a layer marker at the current time and open the marker dialog box, press Alt+* (Windows) or Option+* (Mac
OS) on the numeric keypad.
•To remove a layer marker, Ctrl-click (Windows) or Command-click (Mac OS) the marker.
•To remove all layer markers from selected layers, right-click (Windows) or Control-click (Mac OS) a marker, and
choose Delete All Markers.
•To lock all layer markers on a layer, right-click (Windows) or Control-click (Mac OS) a marker on the layer, and
choose Lock Markers.
•To replace all layer markers with markers containing temporal metadata from the source file for the layer, right-click
(Windows) or Control-click (Mac OS) a layer marker and choose Update Markers From Source.
Note: In After Effects CS6 or later, adding a layer marker no longer deselects other objects (masks, and effects, for example).
Web links, chapter links, cue points, and markers
You can associate a Uniform Resource Locator (URL) with a marker to create an automatic link to the site at that
address. After Effects embeds this information within certain kinds of movies, including SWF movies. When these
movies are played in a web browser, the embedded URL is recognized, initiating a jump to the specified URL. You can
target a specific frame in the site. For example, you can have specific web pages open when an instructional video
reaches specific points in the movie. (See Render and export a composition as a SWF file.)
Note: The web link functionality depends on the media player allowing the instructions to be sent to the web browser. For
information about the use of web links, see the documentation for the version of the media player that you’re using.
You can also associate a chapter reference point with a marker. Chapter links are similar to chapters used in CD-ROM
and DVD discs. Like the chapters of a book, a chapter link divides a movie into segments. Chapter links are supported
in QuickTime and Windows Media movies. Chapter markers are only exported if the Chapter field of the marker is not
blank.
Adobe Encore can read chapter references in After Effects layer markers when you export to the MPEG-2 file format or
use Dynamic Link. To be compatible with DVD format, make sure that markers are at least 15 frames apart.
Cue points in FLV and F4V files can each have any number of parameters, each with a name and a value. You can only
add three parameters using the marker dialog box. To work with more than three parameters, use the scripting
interface.
To convert selected properties to cue point parameters in layer markers, choose File > Scripts > Convert Selected
Properties To Markers.jsx. This script adds a layer marker on the layer at the same time as each keyframe for each
selected property. The markers’ cue point parameters indicate the name of the property and its value at that time. If the
selected property has an expression, a marker is created for each frame, with the values sampled at each frame.

631
Markers
Last updated 6/8/2015
To create a web link, chapter link, or cue point from a marker, do the following:
1Double-click a marker to open the marker dialog box.
2Enter information in the appropriate boxes in the marker dialog box:
•To create a web link, enter a Uniform Resource Locator in the URL box in the Chapter And Web Links area of
the marker dialog box. To activate a specific frame in a site, enter the filename of the frame for Frame Target.
•Enter the chapter name and number (if available) in the Chapter box in the Chapter And Web Links area of the
marker dialog box.
•Enter a name for the cue point, and names and values for any parameters. Select Event or Navigation to
determine what kind of cue point to create.
Scripts and utilities for working with markers
Paul Tuersley provides a script on the AE Enhancers forum for splitting layers at layer markers.
Lloyd Alvarez provides scripts on the After Effects Scripts website that do the following:
•Magnum, the Edit Detector automatically detects edits in a footage layer and places a layer marker at each edit (or
splits the layer into a separate layer for each edit).
•Zorro, the Layer Tagger allows you to tag layers and then select, shy, and solo layers according to their tags. The tags
are appended to comments in the Comments column in the Timeline panel and can also be added as layer markers.
•Layer Marker Batch Editor edits marker attributes on all selected layers, including Flash cue point attributes.
Jeff Almasol provides scripts on his redefinery website that do the following:
•rd_CopyMarkers copies layer markers from one layer to any number of other layers.
•rd_KeyMarkers creates new layer markers (either on the selected layer or on a new null layer) with comments that
provide information about keyframes at the same times.
•rd_MapTextFileToMarkers sets keyframes for the Source Text property of a text layer and sets the values to text from
a text file. The keyframes are placed at times specified by layer markers on the text layer.
•rd_MarkerNavigator creates a panel that makes navigating to markers and viewing their comments and other values
very convenient.
•rd_RemoveMarkers automatically removes markers from selected layers based on specified criteria (e.g., all markers
in work area).
•rd_Scooter creates a panel with controls for moving various combinations of items in time, including layer In point,
layer Out point, layer source frames, keyframes, and markers.
•rd_CountMarkers shows the number of markers on the selected layer.
Online resources about markers
To view video tutorials on working with markers, cue points, and XMP metadata go to the Adobe website:
•Converting metadata and markers to cue points: video tutorial demonstrating using Soundbooth, Flash
Professional, and After Effects to create and use cue points.
•Using markers and cue points: video overview of markers in Premiere Pro and After Effects.
•On his blog on the Adobe website, Michael Coleman provides a demonstration of how to convert tracking data in
After Effects into cue point data for use in Flash.

632
Markers
Last updated 6/8/2015
More Help topics
Scripts
Preview video and audio
MarkerKey attributes (expression reference)
About XMP metadata
XMP metadata in After Effects
Sharing markers with After Effects, Encore, and Flash
Chapter points
XMP metadata
About XMP metadata
Metadata is—in the simplest sense—data about data. In practical terms, metadata is a set of standardized information
about a file, such as author name, resolution, color space, copyright, and keywords applied to the file. For example, most
cameras attach some basic information to video files, such as date, duration, and file type. Other metadata can be
entered as shot-list information in OnLocation or at the capture stage in Adobe Premiere Pro. You can add additional
metadata with properties such as location, author name, and copyright. Because you can share, view, and use this
metadata across Adobe Creative Suite applications, you can use this information to streamline your workflow and
organize your files.
The Extensible Metadata Platform (XMP) is the metadata standard used by Adobe applications. Metadata that is stored
in other formats—such as Exif, IPTC (IIM), GPS, and TIFF—is synchronized and described with XMP so that it can
be more easily viewed and managed. For example, adjustments made to images with Adobe Camera Raw are stored as
XMP metadata. The XMP standard is based on XML.
A metadata schema is a collection of properties specific to a given workflow. The Dynamic Media schema, for example,
includes properties such as Scene and Shot Location that are tailored for digital video projects. Exif schemas, by
contrast, include properties tailored to digital photography, such as Exposure Time and Aperture Value. More general
properties, such as Date and Title, appear in the Dublin Core schema. To see a tool tip with information about a specific
schema or property, place the pointer over it in the Metadata panel. You can create your own schemas using commands
in the Metadata panel, and you can import schemas and share them with others as XML files.
Metadata is divided into two general categories: static metadata and temporal metadata. Static metadata is metadata that
applies to an entire asset. For example, the copyright and author information for a video clip apply to the entire clip.
Temporal metadata is metadata that is associated with a specific time within a dynamic media asset. Beat markers from
Soundbooth and the metadata generated by the Speech Search feature in Soundbooth and Premiere Pro are examples
of temporal metadata.
Adobe Story also converts information from a screenplay (script) into XMP metadata that can automate the creation
of shooting scripts, shot lists, and more.
Note: To start the Adobe Story service from within After Effects, choose File > Go To Adobe Story.
You can view static XMP metadata for a file in Adobe Bridge.

633
Markers
Last updated 6/8/2015
After Effects scripts and expressions can read and use data stored in markers. Because XMP metadata for source footage
items can be converted to layer markers, expressions and scripts can work with XMP metadata. Scripts can also operate
on the XMP metadata for a file outside of the After Effects context, both for the automation of common tasks and for
creative uses.
XMP metadata included in an F4V or FLV file can be read and used by ActionScript, so you can use XMP metadata to
add interactivity to a video playing in Flash Player. One application of this feature is searching within an FLV file for
temporal metadata, which can allow the user to begin playback at a specific word of dialog or at some other time
associated with a specific temporal metadata element.
To selectively add and remove (thin) XMP metadata for a file, use export templates and the Metadata Export dialog
box in Adobe Media Encoder.
Speech Search and XMP metadata
The Speech Search feature in Adobe Premiere Pro and Adobe Soundbooth provides the ability to convert speech in a
video or audio asset to text metadata. Each word is stored as a metadata element at the corresponding time in the
timeline.
When a file with Speech Search metadata is imported into After Effects and used as the source for a layer, each word
appears in a layer marker at the corresponding time. (This assumes that the Create Layer Markers From Footage XMP
Metadata is selected. See Working with XMP metadata in After Effects.)
Embedding XMP metadata versus including XMP metadata in sidecar files
In most cases, XMP metadata for a file is stored in the file itself. If it isn’t possible to write the information directly into
the file, XMP metadata is stored in a separate file called a sidecar file, with the filename extension .xmp. For information
on which file formats After Effects can write XMP metadata directly into, see XMP metadata in After Effects.
In most cases, XMP metadata remains with the file even when the file is converted to a different format—for example,
from PSD to JPG. XMP metadata is also retained when files are placed in a document or project in an Adobe Creative
Suite application.
Online resources about XMP metadata
Go to the XMP Developer Center section of the Adobe website for the XMP specification, information on integrating
XMP metadata with your software and workflow, the XMP SDK (software development kit), and forums about XMP
metadata.
XMP metadata in After Effects
For an introduction to XMP metadata, see About XMP metadata.
When After Effects imports a file with associated XMP metadata, you can view the static metadata in the Metadata
panel, convert the temporal metadata to layer markers, use the metadata to facilitate your work within After Effects,
and include the metadata in output files.
The After Effects scripting interface provides additional tools for using and interacting with XMP metadata.
Importing files with XMP metadata into After Effects
After Effects can import XMP metadata from many formats, including the following:
•camera formats: AVCHD, HDV, P2, XDCAM, XDCAM EX
•image formats: GIF, JPEG, PNG, PostScript, TIFF

634
Markers
Last updated 6/8/2015
•common multimedia container formats: FLV, F4V, QuickTime (MOV), Video for Windows (AVI), Windows Media
(ASF, WAV)
•authoring formats: InDesign documents, Photoshop documents (PSD), other native document formats for Adobe
applications
•MPEG formats (MP3, MPEG-2, MPEG-4)
•SWF
When you import a file that contains XMP metadata, After Effects shows a “Reading XMP metadata from footage”
status message while it reads the metadata from the source file.
One especially useful piece of metadata about each asset is its unique ID number, a value that distinguishes the asset
from all others at all stages of the workflow. The unique ID value enables the application to recognize a file as being the
same file as one encountered before, even if the filename has changed. One advantage of these unique ID values is that
each application can use this information to manage cached previews and conformed audio files, preventing additional
rendering and conforming.
The ID values used by XMP are Globally Unique Identifiers (GUIDs), 16-byte random numbers that are commonly used
to ensure uniqueness of values.
XMP ID values are written to source files when they are imported into After Effects if the Write XMP IDs To Files On
Import preference is selected in the Media & Cache preferences category. This preference setting affects other Adobe
applications, too; see the helpful text in the Preferences dialog box for details. If a file already has an XMP ID, then After
Effects doesn’t write a new one, and no change is made. Files created by recent versions of Adobe applications will, in
general, already have an XMP ID.
The Write XMP IDs To Files On Import preference is on by default.
Note: The Write XMP IDs To Files On Import preference only controls whether unique ID values are automatically written
to files when they are imported. This preference does not control whether XMP metadata is written to a file under other
circumstances, such as when you edit metadata in the Metadata panel.
Note: Because writing the ID to a file is considered a modification, the modification date of a source file may be updated
the first time the file is imported.
Working with XMP metadata in After Effects
The Metadata panel
In After Effects, the Metadata panel (Window > Metadata) shows static metadata only. Project metadata is shown at the
top of the panel, and Files metadata is shown at the bottom. Temporal metadata is visible in After Effects only as layer
markers.
Project metadata is shown in the Metadata panel as soon as you open the panel. You can add and change information
in any of the metadata categories. This information shows up in Bridge when the project file is selected and is also
embedded in files rendered and exported using the render queue when the Include Source XMP Metadata output
module option is selected.
To see Files metadata in the Metadata panel, you must first select a file in the Project panel. You can then add or change
information in any of the metadata categories. If you select multiple files, then changes that you make will be made in
all of the selected files. Any changes made to source file metadata are immediately written to the source files.
To change which metadata categories and fields are shown in the Metadata panel, choose Project Metadata Display
Preferences or Files Metadata Display Preferences from the Metadata panel menu.
Conversion of XMP metadata to layer markers

635
Markers
Last updated 6/8/2015
When you create a layer based on a footage item that contains XMP metadata, the temporal metadata can be converted
to layer markers.
❖To enable the automatic conversion of XMP metadata to layer markers, select the Create Layer Markers From
Footage XMP Metadata preference in the Media & Disk Cache preferences category.
During this conversion, After Effects shows a “Reading XMP markers from footage” status message.
These layer markers are fully editable, just as any other layer markers. (See Layer markers and composition markers .)
Changes made to the layer markers based on the source file’s XMP metadata do not affect the XMP metadata in the
source file.
To restore the layer markers for a layer to those read from the layer’s source’s XMP metadata, right-click (Windows) or
Control-click (Mac OS) any marker on the layer and choose Update Markers From Source. This command also removes
any markers that you have added to the layer. You can use this command to manually create layer markers from XMP
metadata if you did not have the Create Layer Markers From Footage XMP Metadata preference selected when you created
the layer.
For information on using expressions together with the contents of layer markers, see MarkerKey attributes (expression
reference).
Exporting XMP metadata from After Effects
When you render and export a composition, you can write XMP metadata to the output file that includes all of the XMP
metadata from the sources for that composition. This includes all of the composition markers and layer markers in the
composition, all of the XMP metadata from the source files on which the layers in the composition are based,
comments from the Comments columns in the Timeline panel and Project panel, and the project-level XMP metadata
for the project in which the composition is contained. XMP metadata from nested compositions is recursively
processed and included in the output.
To write all of the XMP metadata to the output file, select Include Source XMP Metadata in the output module settings
for the output file. If Include Source XMP Metadata is deselected, the only XMP metadata that is written to the output
file is a unique ID. (See Output modules and output module settings.)
Note: When Include Source XMP Metadata is on, in some cases, rendering and exporting can take a long time because of
the time that it takes to read and assemble XMP metadata from the source files. For this reason, the option is off by defa
In addition to storing XMP metadata in After Effects project (.aep, .aepx) files and source documents used by Adobe
applications (for example, .psd), After Effects can write XMP metadata directly into the files for many container
formats, including the following:
•FLV and F4V
•QuickTime (.mov)
•Video for Windows (.avi)
•Windows Media (.wmv)
•some MPEG formats (.mpg, .m2v, .mp4)
Note: XMP metadata is written to sidecar (.xmp) files for some MPEG formats.
For files of other types, the Include Source XMP Metadata option is unavailable.
When you render and export a file and include the source XMP metadata in the output file, XMP metadata is written
to an output file before the first frame of the composition is rendered. If the Render Details section of the Render Queue
panel is open, After Effects shows a “Gathering XMP Metadata from Sources” status message while it compiles the
metadata from the sources used in the composition being rendered.

636
Markers
Last updated 6/8/2015
XMP metadata that is written to a file is inserted in an XML data structure separate from the audio and video data itself.
You can view this plain-text XML data just as you view any other plain-text data, and you can use and manipulate it
with scripts of various kinds.
Note: After Effects writes startTimecode and altTimecode values into XMP metadata. You can view these values in the Start
Timecode and Alternate Timecode fields in the Dynamic Media schema in the Metadata panel.
Re-importing XMP metadata into After Effects
When you import a file into After Effects that has been rendered and exported from After Effects using the Include
Source XMP Metadata option, all of the XMP metadata that was written to the output file is available as layer markers
when the file is used as the source for a layer in a composition. This XMP metadata is not visible in the Metadata panel.
Note: When you import a file that contains XMP metadata and use that file as the source for a layer, After Effects filters
redundant XMP metadata. This prevents an accumulation of duplicate markers when you use a file in After Effects that
was rendered and exported out of the same project—for example, when pre-rendering a piece of a project.
About file, clip, and project XMP metadata
For the most part, Adobe video and audio applications deal with XMP metadata very similarly. Some small distinctions
exist, however, reflecting the unique workflow stage that each application addresses. When using applications in
tandem, an understanding of these slightly different approaches can help you get the most out of metadata.
Adobe OnLocation and Encore provide one set of metadata properties for all assets. However, Adobe Premiere Pro,
After Effects, and Soundbooth divide the Metadata panel into separate sections for different asset types.
Adobe Premiere Pro Separates metadata in these sections:
Clip Displays properties for clip instances you select in the Project panel or Timeline panel. This metadata is stored in
project files, so it appears only in Adobe Premiere Pro.
File Displays properties for source files you select in the Project panel. This metadata is stored directly in the source
files, so it appears in other applications, including Adobe Bridge.
After Effects Separates metadata in these sections:
Project Displays properties for the overall project. If you select Include Source XMP Metadata in the Output Module
Settings dialog box, this information is embedded into files you output from the Render Queue.
Files Displays properties for source files you select in the Project panel. (If you select a proxy, properties for the actual
file appear.)
ForAfter Effects, both Project and File properties are stored directly in files, so you can access this metadata in Adobe
Bridge.
Soundbooth Separates metadata in these sections:
Adobe Premiere Pro and Soundbooth also provide a Speech Analysis section with metadata that appears only in those
applications.
File Displays properties for the currently displayed audio or ASND file. This metadata is stored directly in such files,
so it appears in other applications. (Adobe Bridge, however, does not display metadata for ASND files.)
Clip Displays properties for multitrack clips you select in the Editor panel. This metadata is stored in the containing
ASND file, so it appears only in Soundbooth.

637
Markers
Last updated 6/8/2015
Show or hide XMP metadata
To optimize the Metadata panel for your workflow, show or hide entire schemas or individual properties, displaying
only those that you need.
1From the options menu for the Metadata panel, select Metadata Display.
2To show or hide schemas or properties, select or deselect them from the list.
Save, switch, or delete metadata sets
If you use multiple workflows, each requiring different sets of displayed metadata, you can save sets and switch between
them.
1From the options menu for the Metadata panel, select Metadata Display.
2Do any of the following:
•To save a customized set of displayed metadata, click Save Settings. Then enter a name, and click OK.
•To display a previously saved set of metadata, select it from the menu.
•To delete a previously saved set of metadata, select it from the menu, and click Delete Settings.
Create schemas and properties
If you have a unique, customized workflow that the default metadata options don’t address, create your own schemas
and properties.
1From the options menu for the Metadata panel, select Metadata Display.
2Click New Schema, and enter a name.
3In the list, click Add Property to the right of the schema name.
4Enter a property name, and select one of the following for Type:
Integer Displays whole numbers that you drag or click to change.
Real Displays fractional numbers that you drag or click to change.
Text Displays a text box (for properties similar to Location).
Boolean Displays a check box (for On or Off properties).
Edit XMP metadata
In Adobe video applications, similarly named properties are linked in the Metadata and Project panels. However, the
Metadata panel provides more extensive properties and lets you edit them for multiple files simultaneously.
Note: Instead of a Project panel, Soundbooth uses the Files panel.
1Select the desired files or clips.
2In the Metadata panel, edit text or adjust values as needed.
If you selected multiple items, the panel displays properties as follows:
•If a property matches for all items, the matching entry appears.
•If a property differs, <Multiple Values> appears. To apply matching values, click the text box, and type.
More Help topics
MarkerKey attributes (expression reference)

638
Last updated 6/8/2015
Chapter 14: Memory, storage, performance
Improve performance
You can improve performance by optimizing your computer system, After Effects, your project, and your workflow.
Some of the suggestions here improve performance not by increasing rendering speed but by decreasing time that other
operations require, such as opening a project.
By far, the best way to improve performance overall is to plan ahead, run early tests of your workflow and output
pipeline, and confirm that what you are delivering is what your client actually wants and expects. (See Planning your
work.)
For a series of free video tutorials about improving performance with After Effects and Premiere Pro, see the
video2brain website.
For additional resources about optimizing computer systems and After Effects for performance, see this article on the
Adobe website.
Lloyd Alvarez provides the BG Renderer script on the After Effects Scripts website, which allows you to render and
export compositions in the background while you continue to work in After Effects.
Improve performance before starting After Effects
•Make sure that you’ve installed the current version of After Effects, including any available updates. To check for
and install updates, choose Help > Updates. For more information about updates, go to the Downloads section of
the Adobe website.
•Make sure that you’ve installed the latest versions of drivers and plug-ins, especially video card drivers. To download
updates for drivers and plug-ins, go to the provider’s website.
•Make sure that your system has enough RAM. Optimum performance is achieved with computer systems with at
least 2 GB of installed RAM per processor core. See the documentation for your operating system and computer for
details on how to check the amount of installed RAM and how to install RAM.
•Quit applications that are not necessary for your work. If you run applications other than those with which After
Effects shares a memory pool, and you don’t allocate adequate memory to other applications, performance can be
greatly reduced when the operating system swaps RAM to the hard disk. (See Memory (RAM) usage in 64-bit After
Effects .)
For more information about improving performance by stopping software not necessary for your work, see this
video on the video2brain website.
•Stop or pause resource-intensive operations in other applications, such as video previews in Adobe Bridge.
•Make sure that your system includes a display card that supports OpenGL 2.0 or later. Though After Effects can
function without it, OpenGL accelerates various types of rendering, including rendering to the screen for previews.
See Render with OpenGL.

639
Memory, storage, performance
Last updated 6/8/2015
•In After Effects CC and CS6, OpenGL and the GPU are important for new features, such as Ray-Traced 3D
rendering on the GPU, Fast Draft previews, faster blitting to the screen, and a GPU enhanced Cartoon effect. For
more information. See Render with OpenGL.
•On Windows, disable the Aero compositing mode. Hardware acceleration of panels and OpenGL features perform
better in After Effects when Windows is operating in Basic mode. For information, see the Microsoft website.
•When possible, keep the source footage files for your project on a fast local disk drive. If your source footage files
are on a slow disk drive (or across a slow network connection), then performance will be poor. Ideally, use separate
fast local disk drives for source footage files and rendered output. For more information, see this video on the
video2brain website.
•A separate fast disk (or disk array) to assign the disk cache folder to, is ideal. Because of their speed, SSDs work well
for this function.
Improve performance by optimizing memory, cache, and multiprocessing
settings
•Allocate adequate memory for other applications.
•Use multiple processors to render multiple frames simultaneously by selecting the Render Multiple Frames
Simultaneously preference.
•Enable caching frames to disk for standard previews by selecting the Enable Disk Cache preference. In After Effects,
assign as much space as possible to the Disk Cache folder (on a separate fast drive) for best performance. See Disk
cache .
•Begin by using only a small number of processor cores (for example, four on a computer system with eight processor
cores) for Render Multiple Frames Simultaneously multiprocessing, and then increase the number of processors
used until you find the optimum number for your computer system and compositions.
Todd Kopriva provides more information about optimum memory and processor settings on the Adobe website.
See Memory & Multiprocessing preferencesfor additional information.
Improve performance using Global Performance Cache | CC, CS6
Import projects from After Effects CS5.5 and earlier into After Effects to take advantage of the Global Performance
Cache. For details, see Disk Cache .
The global performance cache improves performance by retaining frames stored in the disk cache between sessions,
saving rendering time as you work on a project or other projects that might use the same cached frames.
Improve performance by simplifying your project
By simplifying and dividing your project, you can prevent After Effects from using memory and other resources to
process elements that you are not currently working with. Also, by controlling when After Effects performs certain
processing, you can greatly improve overall performance. For example, you can avoid repeating an action that needs to
happen only once, or you can postpone an action until it is more convenient for you.
•Delete unused elements from your project. See Remove items from a project.
•Divide complex projects into simpler projects, and then recombine them before you render the finished movie. To
recombine projects, import all of the projects into a single project. See Import an After Effects project.
•Before rendering, put all of your source footage files on a fast, local disk—not the one that you’re rendering and
exporting to. A good way to do this is with the Collect Files command. See Collect files in one location.

640
Memory, storage, performance
Last updated 6/8/2015
•Pre-render nested compositions. Render a completed composition as a movie so that After Effects doesn’t rerender
the composition every time it is displayed. See Pre-render a nested composition.
•Substitute a low-resolution or still-image proxy for a source item when not working directly with that item. See
Placeholders and proxies.
•Lower the resolution for the composition. See Resolution.
•Isolate the layer you’re working on by using the Solo switch. See Solo a layer.
For more information about improving performance by isolating what you’re working on, see this video on the
video2brain website.
Improve performance by modifying screen output
You can improve performance in many ways that don’t affect how After Effects treats your project data, only how output
is drawn to the screen as you work. Although it is often useful to see certain items and information as you work, After
Effects uses memory and processor resources to update this information, so be selective in what you choose to display
as you work. You will likely need to see different aspects of your project at different points in your workflow, so you may
apply the following suggestions in various combinations at various stages.
•Turn off display color management and output simulation when not needed. See Simulate how colors will appear
on a different output device. The speed and quality of color management for previews are controlled by the Viewer
Quality preferences. See Viewer Quality preferences.
•Enable hardware acceleration of previews, which uses the GPU to assist in drawing previews to the screen. Choose
Edit > Preferences > Display (Windows) or After Effects > Preferences > Display (Mac OS), and select Hardware
Accelerate Composition, Layer, And Footage Panels.
•Close unneeded panels. After Effects must use memory and processor resources to update open panels, which may
slow the work that you are doing in another panel.
•Create a region of interest. If you are working on a small part of your composition, limit which portion of the
composition is rendered to the screen during previews. See Region of interest (ROI).
•Deselect Show Cache Indicators in the Timeline panel menu to prevent After Effects from displaying green and blue
bars in the time ruler to indicate cached frames. See Caches: RAM cache, disk cache, and media cache .
•Deselect the Show Rendering Progress In Info Panel And Flowchart preference to prevent the details of each render
operation for each frame from being written to the screen. See Display preferences.
•Hide Current Render Details in the Render Queue panel by clicking the triangle beside Current Render Details in
the Render Queue panel. See Basics of rendering and exporting.
•Press Caps Lock to prevent After Effects from updating Footage, Layer, or Composition panels. When you make a
change that would otherwise appear in a panel, After Effects adds a red bar with a text reminder at the bottom of
the panel. After Effects continues to update panel controls such as motion paths, anchor points, and mask outlines
as you move them. To resume panel updates and display all changes, press Caps Lock again.
Note: Pressing Caps Lock suspends updates (disables refresh) of previews in viewers during rendering for final output, too,
although no red reminder bar appears.
•Lower the display quality of a layer to Draft. See Layer image quality and subpixel positioning.
•Select Draft 3D in the Timeline panel menu, which disables all lights and shadows that fall on 3D layers. It also
disables the depth-of-field blur for a camera.
•In After Effects CC and CS6, use fast draft mode while laying out and previewing a ray-traced 3D composition by
selecting an option other than "Off" from the Fast Previews button.

641
Memory, storage, performance
Last updated 6/8/2015
•Deselect Live Update in the Timeline panel menu to prevent After Effects from updating compositions dynamically.
See Preview modes and Fast Previews preferences.
•Display audio waveforms in the Timeline panel only when necessary. See Showing properties and groups in the
Timeline panel (keyboard shortcuts).
•Disable pixel aspect ratio correction by clicking the Toggle Pixel Aspect Ratio Correction button at the bottom
of a Composition, Layer, or Footage panel. The speed and quality of pixel aspect ratio correction and other scaling
for previews are controlled by the Viewer Quality preferences. See Viewer Quality preferences.
•Deselect Mirror On Computer Monitor when previewing video on an external video monitor. See Preview on an
external video monitor.
•Hide layer controls, such as masks, 3D reference axes, and layer handles. See Show or hide layer controls in the
Composition panel.
•Lower the magnification for a composition. When After Effects displays the Composition, Layer, and Footage panels
at magnifications greater than 100%, screen redraw speed decreases. (See Zoom an image for preview.)
•Set the Resolution/Down Sample Factor value of the composition to Auto in the Composition panel, which prevents
the unnecessary rendering of rows or columns of pixels that aren’t drawn to the screen at low zoom levels. See
Resolution.
Improve performance when using effects
Some effects, such as blurs and distortions, require large amounts of memory and processor resources. By being
selective about when and how you apply these effects, you can greatly improve overall performance.
•Apply memory-intensive and processor-intensive effects later. Animate your layers and do other work that requires
real-time previews before you apply memory-intensive or processor-intensive effects (such as glows and blurs),
which may make previews slower than real time.
•Temporarily turn off effects to increase the speed of previews. See Delete or disable effects and animation presets.
•Limit the number of particles generated by particle effects. See Simulation effects.
•Rather than apply the same effect with the same settings to multiple layers, apply the effect to an adjustment layer.
When an effect is applied to an adjustment layer, it is processed once, on the composite of all of the layers beneath
it. See Adjustment layers.
GPU (CUDA, OpenGL) features
OpenGL, the GPU, and After Effects
OpenGL is a set of standards for high-performance processing of 2D and 3D graphics on the graphics processing unit
(GPU) for a wide variety of applications. OpenGL provides fast rendering for previews (Fast Draft mode).
After Effects can take advantage of GPU (graphics processing unit) on your graphics card for some specific kinds of
processing.
The GPU features in After Effects are of the following 3 categories:
•GPU-accelerated ray-traced 3D renderer (CUDA on specific graphics cards)
•Fast Draft mode and Hardware BlitPipe (OpenGL with somewhat stringent requirements)

642
Memory, storage, performance
Last updated 6/8/2015
•OpenGL swap buffer (OpenGL with looser requirements)
IMPORTANT: In general, After Effects does not require CUDA features of any specific set of Nvidia GPUs. Only the
GPU-accelerated ray-traced 3D renderer requires this. The other GPU features work on any GPU that meets certain
basic requirements, including AMD and Intel GPUs. Continue reading for more features.
Setting preferences for OpenGL and the GPU
OpenGL supports the drawing of interface items, such as, composition, footage, and layer panels. Other drawing
functions like grids, guides, rulers, and bounding boxes are now operated by OpenGL, as well. This feature is also
known as the "Hardware BlitPipe."
To enable OpenGL support for drawing interface items, click the Hardware Accelerate Composition, Layer, and
Footage Panels checkbox in Edit > Preferences > Display (Windows), or After Effects > Preferences > Display (Mac OS).
You can access information about the GPU, and OpenGL in the GPU Information dialog box. Choose Edit >
Preferences > Previews (Windows), or After Effects > Preferences > Previews (Mac OS), you have access to the GPU
Information dialog box. Click the GPU Information button to launch the GPU information dialog box. In this dialog
box, see information about the OpenGL capabilities for your installed GPU. The information helps you determine the
feature support levels for your GPU. You can also see if CUDA is available on your GPU, and which version that is
installed.
Note: The OpenGL-related checkboxes are now removed from Preferences > Previews as the previous OpenGL renderer
has been removed.Fast Draft mode has replaced the original OpenGL renderer. To enable Fast Draft, click the Fast Previews
button on the Composition panel, and choose Fast Draft. Fast Draft causes slight appearance differences in the Composition
panel, best suited for quick previewing. Fast Draft is useful for setting up, and previewing a composition for later rendering
in ray-traced 3D.
Note: If your GPU is not supported or you have an old driver, ray-traced 3D compositions render on the CPU using all
physical cores. If you have a GPU-supported configuration in a headless environment (for example, a render farm), you
can force ray-traced 3D compositions to render on the CPU by setting the Ray-tracing option in the GPU Information
dialog box. Renders done on the CPU match renders done on the GPU.
Note: The OpenGL Info button is now called the GPU Information button.
Hardware considerations for OpenGL, the GPU, and After Effects
When working with ray-traced 3D compositions, it is important to have the proper hardware installed in your
computer to work smoothly. An NVIDIA video display card that has on-board CUDA technology is required for
working with ray-traced 3D compositions with GPU acceleration.
Requirements for GPU/OpenGL features (ray-traced 3D and Fast Draft)
The following GPU and OpenGL-based features in After Effects require that features be categorized based on the
capabilities of your GPU:
•Ray-traced 3D renderer
•Rendering on the GPU
•Fast Draft previews mode
•Faster blitting to the screen (OpenGL SwapBuffer)
•Cartoon effect's "Use OpenGL When Available"
•Hardware Accelerate Composition, Layer, and Footage Panels" preference

643
Memory, storage, performance
Last updated 6/8/2015
Feature support levels
For OpenGL SwapBuffer This level simply requires a GPU that can do OpenGL 1.5, or greater, with Shader Model 3.0,
or greater. Most ATI and NVIDIA cards, and the Intel HD Graphics 3000 chipset (available in the MacBook Air, Mac
Mini, various Windows machines, etc.) and 4000 (Windows only at this time) are supported. If your GPU does not
support these requirements, software OS blitting like CS5.5 occurs, and there are improvements for software blitting in
After Effects, as well.
For Fast Draft previews, Hardware BlitPipe, and Cartoon GPU acceleration Includes Level 1 features. This level requires
OpenGL 2.0, or greater (with Shader Model 4.0, or greater, on Windows), and 256 MB, or greater, of texture memory.
Most ATI and NVIDIA cards released in the past five years, plus the Intel HD Graphics 3000/4000, support this level.
If your GPU does not support these requirements, these features will be disabled:
•Fast Draft mode
•The "Hardware Accelerate Composition, Layer, and Footage Panels" preference.
•The Cartoon effect's "Use OpenGL When Available" option (the Cartoon effect then runs on the CPU).
For Ray-traced 3D rendering on the GPU Includes Level 1 & 2 features (for machines with attached monitors). This
level requires a supported NVIDIA GPU and 512 MB, or greater, of texture memory. For a current list of supported
GPUs, see the Adobe website.
Install GPU drivers
Before working with After Effects and CUDA features, install the latest video driver for your NVIDIA GPU:
Windows: Install the latest WHQL-certified driver for your GPU: http://www.nvidia.com/page/drivers.html
Mac OS: Install the NVIDIA CUDA driver (v4.0.50 or later): http://www.nvidia.com/object/mac-driver-archive.html
You can update the CUDA driver via the CUDA panel in System Preferences or by going to the NVIDIA website.
Note: If your GPU is not supported or you have an old driver, ray-traced 3D compositions render on the CPU using all
physical cores. If you have a GPU-supported configuration in a headless environment (for example, a render farm), you
can force ray-traced 3D compositions to render on the CPU by setting the Ray-tracer option in the GPU Information dialog
box (available from Previews preferences). Renders done on the CPU match renders done on the GPU.
Note: Mac 10.6.8 only: If you use a Quadro 4000 GPU, install the Quadro 4000 driver for Mac. For more information, see
this blog post.
Memory and storage
Memory (RAM) usage in 64-bit After Effects
Advantages of a 64-bit application and 64-bit address space
The maximum amount of RAM that a 32-bit application can use is 4 GB, which is much less than the amount of RAM
that can be installed in modern computers and addressed by 64-bit operating systems. After Effects is now a 64-bit
application, so each process can use all of the RAM addressed by 64-bit Windows and Mac OS operating systems.

644
Memory, storage, performance
Last updated 6/8/2015
The ability of After Effects to use large amounts of RAM per process provides several advantages:
•You can render much larger compositions—both for preview and for final output—with larger frame sizes and larger
source files.
•Previews can be much longer.
•You can work with higher color bit depths without encountering memory limitations.
•After Effects can cache more items, which reduce the frequency with which frames and components of frames are
re-rendered.
Memory & Multiprocessing preferences
Set memory and multiprocessing preferences by choosing Edit > Preferences > Memory & Multiprocessing (Windows)
or After Effects > Preferences > Memory & Multiprocessing (Mac OS).
As you modify settings in the Memory & Multiprocessing dialog box, After Effects dynamically updates helpful text in
the dialog box that reports how it will allocate and use memory and CPUs.
The RAM Reserved For Other Applications preference is relevant whether or not Render Multiple Frames
Simultaneously is selected. The settings in the After Effects Multiprocessing category are relevant only if Render
Multiple Frames Simultaneously is selected.
Todd Kopriva provides information about optimum memory and processor settings on the Adobe website.
RAM Reserved For Other Applications Increase this value to leave more RAM available for the operating system and for
applications other than After Effects and the application with which it shares a memory pool. (See Memory pool shared
between After Effects, Premiere Pro, and Adobe Media Encoder .) If you know that you will be using a specific
application along with After Effects, check its system requirements and set this value to at least the minimum amount
of RAM required for that application. Because performance is best when adequate memory is left for the operating
system, you can’t set this value below a minimum baseline value.
Render multiple frames simultaneously
For a video tutorial about using Render Multiple Frames Simultaneously multiprocessing in After Effects, see the
video2brain website.
After Effects can start additional processes of the After Effects application to run in the background to assist the main
foreground application with the rendering of frames for previews or final output. These background processes have the
name AfterFX.exe (Windows) or aeselflink (Mac OS).
In this form of multiprocessing, each background process renders its own frame and runs on a separate processor core
(CPU). The number of processes used to render multiple frames simultaneously is never more than the number of
processors.
Note: On many computer systems, After Effects can use the virtual (logical) processor cores created by hyperthreading for
various forms of multiprocessing, including Render Multiple Frames Simultaneously multiprocessing.
The number of background processes that can run on your computer also depends on the total amount of installed
system RAM and the amount of RAM that is assigned to the After Effects application.
The amount of RAM required for each background process varies depending on your system configuration and
compositions.
Note: When the RAM cache (the RAM available for storing preview frames) is nearly full, the background processes cease
rendering and go into a low-memory-usage state, and the foreground process starts rendering—as if Render Multiple
Frames Simultaneously were off. This means that the rendering of a preview will be fast at first, and then the speed will step
down as rendering switches to only one processor core.

645
Memory, storage, performance
Last updated 6/8/2015
Using the Render Multiple Frames Simultaneously multiprocessing feature does not speed up the rendering of all
compositions. The rendering of some compositions is memory-intensive, such as when you are working with very large
background plates that are several thousands of pixels tall and wide. The rendering of some compositions is bandwidth-
intensive (I/O-intensive), such as when you are working with many source files, especially if they are not served by a fast,
local, dedicated disk drive. The Render Multiple Frames Simultaneously multiprocessing feature works best at
improving performance when the resource that is most exercised by the composition is CPU processing power, such as
when applying a processor-intensive effect like a glow or blur.
Because antivirus software operates by monitoring every read and write operation, such software can decrease
rendering speed, especially with the Render Multiple Frames Simultaneously preference selected.
Note: After Effects can also use multiple threads to accelerate rendering of a single frame. This form of multiprocessing
doesn’t depend on the Render Multiple Frames Simultaneously preference.
RAM Allocation Per Background CPU Specifies the minimum amount of RAM that will be allocated to each
background process, each of which runs on its own CPU (processor core). Setting this value lower can allow more CPUs
to be used simultaneously with a limited amount of RAM. However, if you set this value too low for the kinds of frames
that you are rendering, then the background processes will fail to render frames at all, and only the foreground process
will be used to render frames. For example, you should not set this value to low value of 0.75 GB if you are rendering
frames with the pixel dimensions of high-definition television or digital cinema.
The optimum amount of RAM to allocate for each of the background processes varies according to project settings (such
as color bit depth), composition settings (such as pixel dimensions of the composition frame), and what effects are
applied. For a typical standard-definition television project, at least 1 GB per background process is recommended. For a
typical project with HDTV-sized compositions, at least 2 GB per background process is recommended for optimum
performance. Start with these settings, but run some tests with your own computer systems and projects to determine the
best settings for your specific needs. Digital cinema projects and projects with larger frame sizes require even more RAM
per background process for optimum performance.
CPUs Reserved For Other Applications Set this value to a number other than 0 to prevent After Effects from using all
of the CPUs (processor cores) in your computer system. For example, if you have a computer with 8 CPUs, setting this
value to 2 leaves 6 CPUs for After Effects.
In many cases, performance is improved by using fewer than the maximum number of processors for Render Multiple
Frames Simultaneously multiprocessing, even when you have enough RAM for all of the processors. After Effects is a
multi-threaded application that can also use other forms of multiprocessing beyond just Render Multiple Frames
Simultaneously multiprocessing, and it is possible for the processors to become “over-scheduled” if these threads are
competing for the same resources as the background processes used for rendering with Render Multiple Frames
Simultaneously multiprocessing. Therefore, the best approach is to begin by using a small number of processors for Render
Multiple Frames Simultaneously multiprocessing; and then increase the number of processors used until you find the
optimum number for your computer system and compositions.
Note: If Render Multiple Frames Simultaneously is off, the RAM allocation is still available for the Cache Work Area in
Background feature.
When After Effects temporarily disables multiprocessing with Render Multiple Frames
Simultaneously
If After Effects can’t use background processes to render multiple frames simultaneously, a message appears in the Info
panel, and After Effects uses only the main foreground process to render all frames. These messages include the
following:
•“Insufficient RAM. Multiprocessing is off.”

646
Memory, storage, performance
Last updated 6/8/2015
•“Incompatible effect or expression. Multiprocessing is off.”
•“Incompatible preview mode. Multiprocessing is off.”
•“Incompatible composition. Multiprocessing is off.”
In general, the reasons for After Effects temporarily disabling Render Multiple Frames Simultaneously multiprocessing
fall into these categories:
•The rendering of a single frame requires more RAM than is available to the individual background processes.
•The project uses OpenGL for rendering of previews or final output. The Render Multiple Frames Simultaneously
multiprocessing feature works by using background processes on multiple CPU processor cores to render frames,
whereas rendering with OpenGL works by moving processing to the GPU. (See GPU features in After Effects .)
•The composition uses an effect that relies on GPU processing. These effects are generally effects implemented with
Pixel Bender.
•The composition contains a live Photoshop 3D layer. (See Using 3D object layers from Photoshop .). Note that live
Photoshop 3D layers are not supported.
•The composition uses an effect with a temporal component that renders much more quickly when the rendering
process has access to a cache of previous frames. These effects include some effects with a Temporal Smoothing
option.
•The composition uses an effect with a temporal component that requires frames to be rendered in strictly sequential
order.
If a composition uses any of the following effects, the composition will not be rendered with the Render Multiple
Frames Simultaneously multiprocessing feature:
•Auto Color
•Auto Contrast
•Auto Levels
•Particle Playground
•Shadow/Highlight
Note: Some third-party effects—such as CC Time Blend and RE:Vision Effects Video Gogh—are also incompatible with the
Render Multiple Frames Simultaneously multiprocessing feature.
If you are working in a ray-traced 3D composition, the composition will not be rendered with the Render Multiple
Frames Simultaneously multiprocessing feature.
Memory pool shared between After Effects, Premiere Pro, and Adobe Media Encoder
After Effects shares a memory pool with Adobe Media Encoder, and Premiere Pro. This is indicated in the Memory &
Multiprocessing preferences panel by the icons for each of these applications at the top of the panel. The icons are
dimmed for the applications that are not running.
A memory balancer prevents swapping of RAM to disk by dynamically managing the memory allocated to each of the
applications. Each application registers with the memory balancer with some basic information: minimum memory
requirements, maximum memory able to be used, current memory in use, and a priority. The priority has three settings:
low, normal, and highest. Highest is currently reserved for After Effects and Premiere Pro, when it is the active
application. Normal is for After Effects in the background or Adobe Media Encoder in the foreground. Low is for
background servers of Premiere Pro or Adobe Media Encoder in the background.

647
Memory, storage, performance
Last updated 6/8/2015
Note: An example of a practical result of the shared memory pool is that starting Premiere Pro will decrease the amount of
RAM available to After Effects for previews; quitting Premiere Pro will immediately free RAM for After Effects and extend
the possible duration of previews.
Memory & Multiprocessing Details dialog box
The Memory & Multiprocessing Details dialog box contains additional information about installed RAM and current
and allowed RAM usage. It also includes a multicolumn table listing processes related to Adobe Media Encoder, After
Effects, Premiere Pro, and Encore. The table includes information about each process, such as ID, Application Name,
Minimum Needed Memory, Maximum Usable Memory, Maximum Allowed Memory, Current Memory, and Current
Priority.
To open the dialog box, choose Edit > Preferences > Memory & Multiprocessing (Windows) or After Effects >
Preferences > Memory & Multiprocessing (Mac OS), and click the Details button at the bottom of the preferences dialog
box.
You can copy the information to the clipboard with the Copy button.
Memory (RAM) requirements for rendering
Memory requirements for rendering of a frame (either for previews or for final output) increase with the memory
requirement of the most memory-intensive layer in the composition.
After Effects renders each frame of a composition one layer at a time. For this reason, the memory requirement of each
individual layer is more relevant than the duration of the composition or the number of layers in the composition when
determining whether a given frame can be rendered with the available memory. The memory requirement for a
composition is equivalent to the memory requirement for the most memory-intensive single layer in the composition.
The memory requirements of a layer increase under several circumstances, including the following:
•Increasing the project’s color bit depth
•Increasing the composition resolution
•Using a larger source image
•Enabling color management
•Adding a mask
•Adding per-character 3D properties
•Precomposing without collapsing transformations
•Using certain blending modes, layer styles, or effects, especially those involving multiple layers
•Applying certain output options, such as 3:2 pulldown, cropping, and resizing
•Adding shadows or depth-of-field effects when using 3D layers
After Effects requires a contiguous block of memory to store each frame; it cannot store a frame in pieces in fragmented
memory. For information about how much RAM is required to store an uncompressed frame, see Storage requirements
for output files .
Note: For tips on decreasing memory requirements and increasing performance, see Improve performance by simplifying
your project.

648
Memory, storage, performance
Last updated 6/8/2015
Purging memory (RAM)
Occasionally, After Effects may display an alert message indicating that it requires more memory to display or render
a composition. If you receive an out-of-memory alert, free memory or reduce the memory requirements of the most
memory-intensive layers, and then try again.
You can free memory immediately with commands from the Edit > Purge menu:
•All Memory
•Image Cache Memory
•All Memory & Disk Cache (CC)
Troubleshooting memory issues
Error: “Unable to allocate enough memory to render the current frame....”
Either decrease the memory requirements for the rendering of this frame, or install more RAM.
Error: “Unable to allocate [n] MB of memory....”
Either decrease the memory requirements for the rendering of this frame, or install more RAM.
Error: “Image buffers of size [width]x[height] @ [depth] bpc ([n] GB) exceed internal limits...”
Decrease the memory requirements for the rendering of this frame.
Note: The maximum amount of memory that one frame can occupy is 2 GB.
Error: “Memory allocation of [n] GB exceeds internal limits...”
Decrease the memory requirements for the rendering of this frame.
Note: The maximum size for any single memory allocation is 2 GB.
Online resources about memory and multiprocessing
For a video that demonstrates some of the advantages of a 64-bit After Effects application and how to allocate memory
to After Effects and other applications, see the Adobe website.
Storage requirements for output files
Use the following formula to determine the number of megabytes required to store one uncompressed frame at full
resolution:
(height in pixels) x (width in pixels) x (number of bits per channel) / 2,097,152
Note: The value 2,097,152 is a conversion factor that accounts for the number of bytes per megabyte (220), the number of
bits per byte (8), and the number of channels per pixel (4).
Some example frame sizes and memory requirements, in megabytes (MB) per frame:
•DV NTSC (720x480) frame in an 8-bpc project: 1.3 MB
•D1/DV PAL (720x576) frame in an 8-bpc project: 1.6 MB
•HDTV (1920x1080) frame in a 16-bpc project: 16 MB
•4K digital cinema (4096x2304) frame in a 32-bpc project: 144 MB

649
Memory, storage, performance
Last updated 6/8/2015
Because video is typically compressed during encoding when you render to final output, you can’t just multiply the
amount of memory required for a single frame by the frame rate and composition duration to determine the amount
of disk space required to store your final output movie. However, such a calculation can give you a rough idea of the
maximum storage space you may need. For example, one second (approximately 30 frames) of uncompressed standard-
definition 8-bpc video requires approximately 40 MB. A feature-length movie at that data rate would require more than
200 GB to store. Even with DV compression, which reduces file size to 3.6 MB per second of video, this storage
requirement translates to more than 20 GB for a typical feature-length movie.
It is not unusual for a feature-film project—with its higher color bit depth, greater frame size, and much lower
compression ratios—to require terabytes of storage for footage and rendered output movies.
Caches: RAM cache, disk cache, and media cache
As you work on a composition, After Effects temporarily stores some rendered frames and source images in RAM, so
that previewing and editing can occur more quickly. After Effects does not cache frames that require little time to
render. Frames remain uncompressed in the image cache.
After Effects also caches at the footage and layer levels for faster previews; layers that have been modified are rendered
during the preview, and unmodified layers are composited from the cache.
When the RAM cache is full, any new frame added to the RAM cache replaces a frame cached earlier. When After
Effects renders frames for previews, it stops adding frames to the image cache when the cache is full and begins playing
only the frames that could fit in the RAM cache.
Green bars in the time ruler of the Timeline, Layer and Footage panels mark frames that are cached to RAM. Blue bars
in the Timeline panel mark frames that are cached to disk.
Layer Cache Indicators Layer cache indicators allow you to visualize cached frames on a per-layer basis. This is helpful
when trying to determine which layers are cached in a composition.
Enable the Layer Cache Indicators option by pressing Ctrl (Windows) or Command (Mac), and then choose Show
Cache Indicators in the Timeline panel menu.
The Show Cache Indicators option must be enabled in the menu to see the indicators.
Once Layer cache indicators are enabled they will be visible underneath each layer in the composition. Each layer
becomes slightly narrower to allow for the indicators. Like Timeline, Layer, and Footage panels, cache indicators may
appear as one of the following colors:
•Green: frames are cached into RAM
•Blue: frames are cached to disk
Showing the cache indicators decreases performance slightly.
The RAM cache is automatically purged when you quit After Effects.
You can choose to purge the RAM cache, or the RAM cache and the disk cache from the Edit > Purge menu.Purging
memory (RAM)
In After Effects CC, choose Edit > Purge > All Memory & Disk Cache to purge the contents of all RAM caches (like the
existing All Memory command) and the contents of the disk cache (like the existing Empty Disk Cache button in the
Media & Disk Cache preferences).
Note: Purging the disk cache for one version of After Effects doesn't purge the cache for other versions. For example, purging
the disk cache from After Effects CC won't affect the disk cache for After Effects CS6.

650
Memory, storage, performance
Last updated 6/8/2015
The global performance cache
Disk cache and other performance enhancements are referred to as the global performance cache, bringing major
improvements to workflow. The global performance cache consists of these features:
Global RAM cache : RAM cache is still available, even after you perform a function that would have erased it in past
versions of After Effects.Persistent disk cache : Frames cached to disk are still available, even after closing After
Effects.Cache work area in background : It is now possible to cache the work area of multiple compositions in the
background.Faster graphics pipeline : OpenGL now enhances the way interface items are drawn, including overlays.
For more information about the global performance cache, see the blog post entitled, "GPU (CUDA, OpenGL) features
in After Effects" on the After Effects Team blog.
In this video by Todd Kopriva and video2brain, learn about the global performance cache and persistent disk cache,
and see how these features make rendering and re-rendering layers much quicker and easier.
Note: The disk cache is not used for previews. It is only used for standard previews. (See Use standard preview to play video
.)
Global RAM cache RAM caching is vastly improved over previous versions. Global RAM Cache, offers these
advantages:
•Cached frames are restored after an undo/redo.
•Cached frames are restored when a composition or layer is returned to a previous state, such as turning a layer's
visibility off then back on.
•Reusable frames are recognized anywhere on the timeline (e.g., when using loop expressions, time remapping, or
copy/paste of keyframes), not just adjacent frames.
•Reusable frames are recognized on duplicated layers or duplicated compositions;
•Cache is automatically destroyed only when the render queue is used with settings set to Current Settings.
Disk Cache is enabled by default. For disk cache preferences, and to enable, or disable disk caching:
❖Choose Edit > Preferences > Media & Disk Cache (Windows) or After Effects > Preferences > Media & Disk Cache
(Mac OS), and select, or deselect Enable Disk Cache.
Disk cache preferences allow you to select a folder to contain your cache.
❖Click the Choose Folder button, and then click OK (Windows) or Choose (Mac OS).
To empty the disk cache:
❖Click the Empty Disk Cache button or select the Purge All Memory and Disk Cache option from the Edit menu.
Note: Even when disk caching is enabled, each frame must be able to fit into a contiguous block of RAM. Enabling the disk
cache doesn’t help with limitations regarding inadequate RAM to hold or render a single frame of your composition.
For the best performance with disk caching, select a folder that’s on a different physical hard disk than your source
footage. If possible, the folder should be on a hard disk that uses a different drive controller than the disk that contains
your source footage. A fast hard drive or SSD with as much space allocated as possible is recommended for the disk
cache folder. The disk cache folder can’t be the root folder of the hard disk.
As with the RAM cache, After Effects only uses the disk cache to store a frame if it’s faster to retrieve a frame from the
cache than to rerender the frame.

651
Memory, storage, performance
Last updated 6/8/2015
The Maximum Disk Cache Size setting specifies the number of gigabytes of hard disk space to use. The default disk
cache size is set to 10% of the volume's total size, up to 100 GB. In After Effects CS5.5, this amount is 20 GB, by default.
Because of this, many more frames are eligible for disk caching than in previous versions.
Note: The application checks to make sure that you have 10 GB free above what is set in Preferences > Media & Disk Cache.
After Effects warns you if there is not enough room for the disk cache.
Global RAM cache
RAM caching is vastly improved over previous versions. Global RAM cache, offers these advantages:
•Cached frames are restored after an undo/redo.
•Cached frames are restored when a composition or layer is returned to a previous state, such as turning a layer's
visibility off then back on.
•Reusable frames are recognized anywhere on the timeline (e.g., when using loop expressions, time remapping, or
copy/paste of keyframes), not just adjacent frames.
•Reusable frames are recognized on duplicated layers or duplicated compositions;
•Cache is not automatically destroyed by a render queue render at anything other than Current Settings.
In this video by Learn by Video you'll see how the RAM and disk caches are used to save time, and how you can render
compositions in the background so that you don't need to wait for a preview to be rendered before you can resume
work.
Persistent disk cache
Once you save a project, frames in the disk cache are retained even after you close the project or quit After Effects. This
protocol is called persistent disk cache.The disk cache is no longer emptied at the end of a session. With the persistent
disk cache feature, frames stored in the disk cache is retained between sessions. This saves rendering time as you work
on a project or other projects that use the same cached frames.
Upon opening a project, the disk cache is scanned looking for frames matching those in the project, and makes them
available for use. The disk cache contains frames from all projects you've opened in the same or earlier sessions, so disk-
cached frames from one project will be retrieved for reuse in other projects that need those same frames. As the cache
is scanned, blue marks gradually fill in on your timeline.
Because previous versions of After Effects didn't store everything on disk needed for this feature, resave CS5.5 and
earlier projects, to experience persistent caching.
Note: Roto Brush frames are not persistently cached.
Note: Cache Work Area in background also uses the disk cache to store frames. See Improve performance using Global
Performance Cache | CC, CS6.
Cache work area in background
You can fill the disk cache for a composition's work area (or multiple work areas in the same or multiple compositions)
while continuing to work. When you do not expect to make changes to a composition, especially if it is used in
downstream compositions, you can render the frames to the disk cache in the background. Normally, the application
tries to identify appropriate expensive-to-render frames that should be placed in the disk cache, but this command will
force those frames to be rendered to the disk cache for quicker retrieval next time they are needed.
1To cache to a composition to disk in the background:
Make sure that disk caching is enabled in Edit > Preferences > Media & Disk Cache (Windows) or Premiere Pro >
Preferences > Media & Disk Cache (MacOS).

652
Memory, storage, performance
Last updated 6/8/2015
Note: For best results, use a large disk cache on a fast drive that is different from the source footage drive. SSD drives
work well for disk caching.
2Set the work area for the frames to cache to disk.
3Choose Composition > Cache Work Area in Background, or use the keyboard shortcut Ctrl + Enter (Windows) or
Cmd + Enter (MacOS).
To cancel cache work area in background, choose Composition > Cancel Cache Work Area in Background.
The project is saved to a temporary file on disk, and then a background instance of After Effects is launched to render
it. Rendering progress appears in the Info panel. Rendered frames appear as blue cache marks because they are in the
disk cache. Layer caches and nested compositions will only get disk cached if worthwhile (expensive enough to render).
You can queue different sections of the same composition or different compositions or from even a different project,
but only one work area is being rendered at a time in the background.
Note: If you make a change to a queued work area, the existing render continues to use its previous settings. Blue cache
indicators will not reappear until you undo back to that state.
To cache multiple compositions in the background:
1Set the work area in each composition you want to cache.
2Select the compositions in the Project panel.
3Do one of the following:
•Choose Composition > Cache Work Area in Background
•Press Ctrl+Enter (Windows) or Cmd+Enter (MacOS)
•Choose Cache Work Area in Background from the contextual menu
To cancel the current and all pending background cache renders:
❖Choose Composition > Cancel Caching Work Area in Background.
If multiple background jobs are running, the number of jobs will appear as part of the menu command.
Media cache
When After Effects imports video and audio in some formats, it processes and caches versions of these items that it can
readily access when generating previews. Imported audio files are each conformed to a new .cfa file, and MPEG files
are indexed to a new .mpgindex file. The media cache greatly improves performance for previews, because the video
and audio items are not reprocessed for each preview.
Note: When you first import a file, you may experience a delay while the media is being processed and cached.

653
Memory, storage, performance
Last updated 6/8/2015
A database retains links to each of the cached media files. This media cache database is shared with Adobe Media
Encoder, Premiere Pro, Encore, Soundbooth, so each of these applications can each read from and write to the same set
of cached media files. If you change the location of the database from within any of these applications, the location is
updated for the other applications, too. Each application can use its own cache folder, but the same database keeps track
of them all.
❖Choose Edit > Preferences > Media & Disk Cache (Windows) or After Effects > Preferences > Media & Disk Cache
(Mac OS), and do one of the following:
•Click one of the Choose Folder buttons to change the location of the media cache database or the media cache
itself.
•Click Clean Database & Cache to remove conformed and indexed files from the cache and to remove their entries
from the database. This command only removes files associated with footage items for which the source file is
no longer available.
Note: Before clicking the Clean Database & Cache button, make sure that any storage devices that contain your
currently used source media are connected to your computer. If footage is determined to be missing because the storage
device on which it is located is not connected, the associated files in the media cache will be removed. This removal
results in the need to reconform or re-index the footage when you attempt to use the footage later.
Cleaning the database and cache with the Clean Database & Cache button does not remove files that are associated
with footage items for which the source files are still available. To manually remove conformed files and index files,
navigate to the media cache folder and delete the files. The location of the media cache folder is shown in the Conformed
Media Cache preferences. If the path is truncated, click the Choose Folder button to show the path.
Faster graphics pipeline
A faster graphics pipeline enhances the Global Performance Cache by drawing interface items much more quickly.
Previously, the operating system handled this. Now OpenGL handles these tasks, For more information, see GPU
(CUDA, OpenGL) features.

654
Last updated 6/8/2015
Chapter 15: Expressions and automation
Plug-ins
Plug-ins are small software modules—with filename extensions such as .aex, .pbk, .pbg, and .8bi—that add functionality
to an application. After Effects effects are implemented as plug-ins, as are some features for importing and working with
certain file formats. The Photoshop Camera Raw plug-in, for example, provides After Effects with its ability to work
with camera raw files.
Note: Because After Effects CS5 and later is a 64-bit application, only 64-bit plug-ins can run in After Effects CS5 and later.
Plug-ins created for previous, 32-bit versions of After Effects will not run in After Effects CS5 and later. To inquire about
availability of 64-bit versions of plug-ins, contact the plug-in vendor or provider.
Installing and loading plug-ins
You can obtain plug-ins for After Effects and other Adobe products from Adobe or other vendors. For specific
instructions for installing a plug-in, see its documentation.
When After Effects starts, it loads plug-ins from several folder, including the Plug-ins folder. If a plug-in doesn’t come
with an installer or with specific instructions for its installation, then you can usually install the plug-in by placing it in
the Plug-ins folder.
By default, the Plug-ins folder is in the following location:
•(Windows) Program Files\Adobe\Adobe After Effects <version>\Support Files
•(Mac OS) Applications/Adobe After Effects <version>
Several plug-ins come with After Effects and are automatically installed in the Plug-ins folder.
When loading plug-ins, After Effects ignores the contents of folders with names that begin and end in parentheses; for
example, the contents of the folder (archived_effects) are not loaded.
After Effects also loads plug-ins from a MediaCore folder, which is intended to hold plug-ins shared between After
Effects and Premiere Pro. Some third-party plug-in installers install their plug-ins in this folder. In general, unless
specifically instructed to do so, you don’t install plug-ins in the MediaCore folder. If you install a plug-in in this folder
that is not supported by one or more of the applications that read from this folder, you may encounter errors or other
problems.
Note: (Mac OS) Some third-party plug-in installers incorrectly install their plug-ins into the Mac OS X Package for After
Effects. To reveal these plug-ins, Control-click the After Effects application icon in the Finder and choose Show Package
Contents. You can then move the plug-ins into the After Effects Plug-ins folder.
When exchanging After Effects projects between computer systems, make sure that the plug-ins that the project
depends on are installed on both systems. Similarly, if you are rendering a composition with multiple computers on a
network, make sure that all plug-ins used in the composition are installed on all rendering computers.
On Mac OS, press Command+Option+Shift+Help to generate a list of all plug-ins loaded into After Effects (including
version numbers). For information on using this command on Windows or with a Macintosh keyboard that doesn't
have a Help button, see Todd Kopriva’s blog on the Adobe website.

655
Expressions and automation
Last updated 6/8/2015
Third-party plug-ins included with After Effects
After Effects comes with several third-party plug-ins. These plug-ins are installed by default with the full version of
Adobe After Effects software. Some of these plug-ins are not included with the trial version of Adobe After Effects
software.
Foundry Keylight Keylight installs its documentation in the plug-in’s subfolder in the Plug-ins folder. For more
information, see Keying effects, including Keylight.
Synthetic Aperture Color Finesse Color Finesse installs its documentation in the plug-in’s subfolder in the Plug-ins
folder. For more information, see Resources for Synthetic Aperture Color Finesse.
fnord ProEXR Documentation for ProEXR plug-ins is available in a PDF document on the fnord website. For more
information, see About 3D Channel effects, including ProEXR effects.
CycoreFX (CC) Documentation for Cycore FX plug-ins is available on the Cycore website. For more information, see
Resources for Cycore FX (CC) effects.
CycoreFX HD CycoreFX HD (1.7.1) is included in the installation of After Effects CS6. There is 16-bpc support in all
effects, and 32-bpc (float) support in 35 effects. Included are 12 additional plug-ins. CycoreFX HD plug-ins have
support for motion blur, lights, more controls, and options.
In this video by Todd Kopriva and video2brain, the new Cycore effects and improved color bit depth are shown. Learn
how to apply a couple of these effects and see what it means to use different bit depths.
Imagineer mocha shape AE Documentation for the mocha shape for After Effects (mocha shape AE) plug-in is
available on the Imagineer website.
Note: Unlike the similarly named mocha shape for After Effects (mocha shape AE), Imagineer mocha-AE is not a plug-in;
it is a separate, standalone planar tracker application. For more information, see Resources for mocha for After Effects
(mocha AE).
C/C++ plug-ins and the After Effects SDK
Many plug-ins for After Effects are written in the C/C++ programming language using the After Effects SDK. Effect
plug-ins written with C/C++ have the filename extension .aex. For information on developing plug-ins for After Effects
with the C/C++ SDK, go to the After Effects Developer Center section of the Adobe website.
Kas Thomas provides a tutorial on the MacTech website that shows step by step how to write an After Effects plug-in.
To ask questions about writing plug-ins with the C/C++ SDK for After Effects, go to the After Effects SDK user-to-user
forum.
Where to find more plug-ins for After Effects
For information on plug-ins available for After Effects, go to the After Effects plug-in page on the Adobe website and
the Toolfarm website.
To find plug-ins, scripts, projects, and other useful items, go to the Adobe Add-ons page.
For other sources of plug-ins, see After Effects community resources on the Adobe website.
More Help topics
Effects overview and resources

656
Expressions and automation
Last updated 6/8/2015
Automation
After Effects and other Adobe software with which it’s integrated provide many different means for automating various
processes.
You can automate animation and image processing within After Effects with expressions, scripts, and plug-ins. You can
automate rendering with aerender, network rendering, and post-render actions. You can also automate some tasks
using workflow automation scripts in Adobe Bridge. Because you can exchange data easily between Photoshop and
After Effects, you can use macros, actions, droplets, and scripts in Photoshop to automate the processing of images for
use in After Effects.
More Help topics
Expressions
Plug-ins
Scripts
Automated rendering and network rendering
Post-render actions
Automate tasks in Adobe
Expression basics
About expressions
When you want to create and link complex animations, but would like to avoid creating tens or hundreds of keyframes
by hand, try using expressions. An expression is a little piece of software—much like a script—that evaluates to a single
value for a single layer property at a specific point in time. Whereas scripts tell an application to do something, an
expression says that a property is something.
With expressions, you can create relationships between layer properties and use the keyframes of one property to
dynamically animate other layers. For example, you can use the pick whip to link path properties, so a mask can take
its path from a brush stroke or a shape layer object.
The expression language is based on the standard JavaScript language, but you do not need to know JavaScript to use
expressions. You can create expressions by using the pick whip or by copying simple examples and modifying them to
suit your needs.
Note: Two sources of example expressions are the Expression Sampler template project (File > Browse Template Projects)
and the animation presets in the Behaviors category (Animation > Browse Presets).
Animation presets can include expressions, or even consist entirely of an expression. Animation presets that use
expressions instead of keyframes are sometimes called behaviors.
After you add an expression to a property, you can continue to add or edit keyframes for the property. An expression
can take the value of a property as determined by its keyframes and use that as input to generate new, modified values.
For example, the following expression on the Rotation property of a layer adds 90 degrees to the value of the Rotation
property, in addition to the keyframed motion:
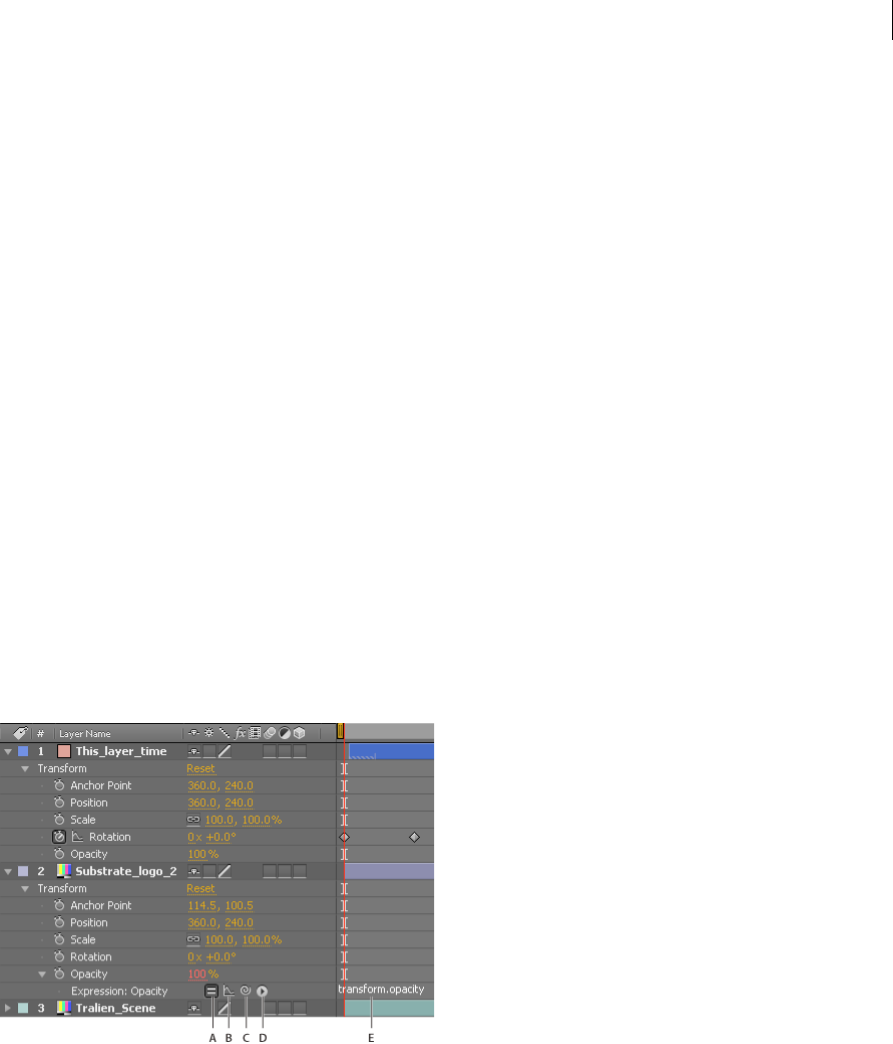
657
Expressions and automation
Last updated 6/8/2015
value + 90
Some methods—such as wiggle—operate directly on the keyframed property values. (See Property attributes and
methods (expression reference).)
The following expression on the Position property of a layer preserves the keyframed motion of the layer and causes it
to wiggle a little:
wiggle(10, 10)
Note: Using the wiggle expression is often much faster and easier than using the Wiggler.
When you are animating text, you can use the Expression selector to specify how much you want an animator property
to affect each text character. You can add one or more Expression selectors to an animator group, and that animator
group can contain one or more properties.
Add, edit, and remove expressions
You can enter entire expressions yourself, by manually typing them or by using the Expression Language menu; or you
can create an expression with the pick whip or paste it from an example or other property.
You can do all of your work with expressions in the Timeline panel, though it is sometimes more convenient to drag the
pick whip to a property in the Effect Controls panel. You enter and edit expressions in the expression field, a resizable
text field in the time graph. The expression field appears alongside the property in layer bar mode; the expression field
appears at the bottom of the Graph Editor in Graph Editor mode. You can write an expression in a text editor and then
copy it into the expression field. When you add an expression to a layer property, a default expression appears in the
expression field. The default expression essentially does nothing—it sets the property value to itself, which makes
tweaking the expression yourself easy.
A Enable Expression switch B Show Post-Expression Graph button C Pick whip D Expression Language menu E Expression field
While you are editing an expression, previews of all kinds are suspended; a red bar appears at the bottom of panels that
are waiting for you to exit text-editing mode.
The values for a property that contains an expression appear in red or pink type.
A good way to begin working with expressions is to create a simple expression with the pick whip and then adjust the
behavior of the expression using simple math operations, such as those listed in the following table:

658
Expressions and automation
Last updated 6/8/2015
For example, you can double the result by typing *2 at the end of the expression; or you can halve the result by typing
/2 at the end of the expression.
As you develop comfort editing expressions, you can combine these simple operations—and more. For example, you
can add /360*100 to the end of an expression to change its range from 0-360 to 0-100. This change would be useful if
you wanted to convert the values of a 360-degree dial to a slider that is measured in percentages.
The Expression Language menu in the Timeline panel contains language elements specific to After Effects that you can
use in an expression. This menu is helpful for determining valid elements and their correct syntax; use it as a reference
for available elements. When you choose any object, attribute, or method from the menu, After Effects automatically
inserts it in the expression field at the insertion point. If text is selected in the expression field, the new expression text
replaces the selected text. If the insertion point is not in the expression field, the new expression text replaces all text in
the field.
The Expression Language menu lists arguments and default values. This convention makes it easy to remember which
elements you can control when you write an expression. For example, in the language menu, the wiggle method in the
Property category appears as wiggle(freq, amp, octaves=1, amp_mult=.5, t=time). Five arguments are listed in the
parentheses following wiggle. The = in the last three arguments indicates that using those arguments is optional. If you
specify no values for them, they default to 1, .5, and the current time, respectively.
Note: You must replace the argument names written by the Expression Language menu with actual values.
Paul Tuersley provides a script on the AE Enhancers forum that automatically adds wiggle, smooth, and loop
expressions to selected properties. Using this script is a good way for a beginner to experiment with expressions.
Jeff Almasol provides a script that automatically processes expressions, making specified changes. For example, the
script can be used to automatically remove or enable disabled expressions. For more information, see Jeff Almasol’s
redefinery website.
Add, disable, or remove an expression
•To add an expression to a property, select the property in the Timeline panel and choose Animation > Add
Expression or press Alt+Shift+= (Windows) or Option+Shift+= (Mac OS); or Alt-click (Windows) or Option-click
(Mac OS) the stopwatch button next to the property name in the Timeline panel or Effect Controls panel.
•To temporarily disable an expression, click the Enable Expression switch . When an expression is disabled, a
slash appears through the switch .
•To remove an expression from a property, select the property in the Timeline panel and choose Animation > Remove
Expression, or Alt-click (Windows) or Option-click (Mac OS) the stopwatch button next to the property name in
the Timeline panel or Effect Controls panel.
Symbol Function
+add
- subtract
/divide
*multiply
*-1 perform opposite of original, such as counterclockwise instead of
clockwise
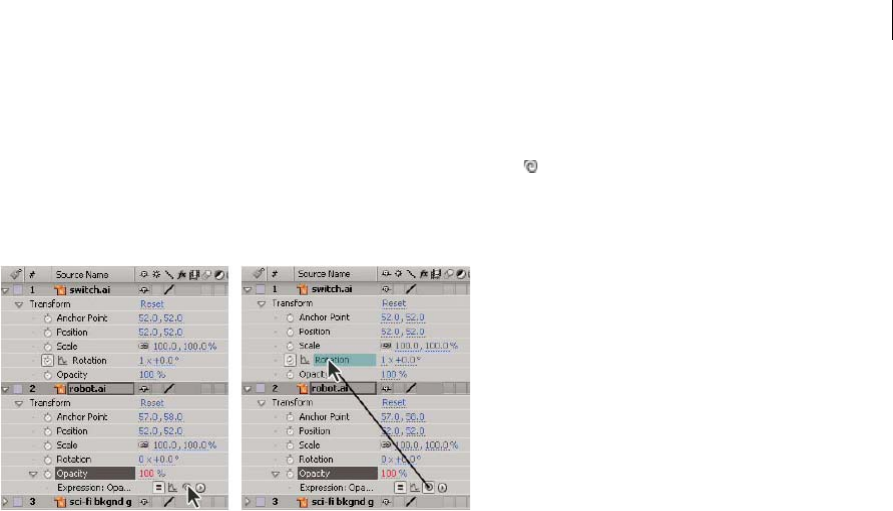
659
Expressions and automation
Last updated 6/8/2015
Edit an expression with the pick whip
If you are not familiar with JavaScript or the After Effects expression language, you can still take advantage of the power
of expressions by using the pick whip. You simply drag the pick whip from one property to another to link the
properties with an expression, and the expression text is entered in the expression field at the insertion point. If text is
selected in the expression field, the new expression text replaces the selected text. If the insertion point is not in the
expression field, the new expression text replaces all text in the field.
You can drag the pick whip to the name or value of a property. If you drag to the name of a property, the resulting
expression displays all the values as one. For example, if you drag the pick whip to the name of the Position property,
an expression like the following appears:
thisComp.layer("Layer 1").transform.position
If you drag the pick whip to one of the component values of the Position property (such as the y value), an expression
like the following appears, in which both the x and y coordinates of the property are linked to the y value of the Position
property:
temp = thisComp.layer("Layer 1").transform.position[1];
[temp, temp]
If the layer, mask, or effect that you drag the pick whip to does not have a unique name in its local context, After Effects
renames it. For example, if you have two or more masks named “Mask” on the same layer, and you drag the pick whip
to one of them, After Effects renames it “Mask 2”.
The format of expressions created by the pick whip is determined by the Expression Pick Whip Writes Compact English
preference (Edit > Preferences > General (Windows) or After Effects > Preferences > General (Mac OS)). By default,
the pick whip creates compact English expressions, which use the names for properties as they appear in the Timeline
panel for the properties within an expression. Because these names are coded into the application and never change,
these expressions can work when After Effects is running in another language. Any property names that you can change
are enclosed in double quotation marks and remain the same in any language. If you don’t plan on sharing your projects
across languages, you can deselect this preference. This preference does not affect effect names or effect properties.
Here is an example in compact English:
thisComp.layer("Layer 1").transform.position
Here is the same expression, not in compact English:
thisComp.layer("Layer 1")("Transform")("Position")
Note: Because the default is to use compact English, this document uses compact English in most examples and
illustrations.
1Drag the pick whip to another property in the Timeline panel or Effect Controls panel.

660
Expressions and automation
Last updated 6/8/2015
2Optionally, modify the default expression in the expression field.
Note: If you use the pick whip to create an expression to refer to a layer, and that layer has the same name as another layer
in the same composition, then the targeted layer’s name changes. The new layer name is the old layer name with a numeral
at the end. This change is necessary to ensure that the expression unambiguously refers to a single layer in the composition.
Edit an expression manually
1Click in the expression field to enter text-editing mode.
Note: When you enter text-editing mode, the entire expression is selected. To add to the expression, click within the
expression to place the insertion point; otherwise, you will replace the entire expression.
2Type and edit text in the expression field, optionally using the Expression Language menu.
To see more of a multiline expression, drag the bottom or top of the expression field to resize it.
3To exit text-editing mode and activate the expression, do one of the following:
•Press Enter on the numeric keypad.
•Click outside the expression field.
Example: Use the expression language reference to write an expression
Follow along with this example to learn how to use the After Effects expression language reference to write expressions.
The expression created in this example links the Position property of Solid 2 to the Position property of Solid 1, with
the movement of Solid 2 offset by 2 seconds from the movement of Solid 1.
1Create two solid layers: Solid 1 and Solid 2.
2Animate the Position property values for Solid 1 using keyframes. (See About animation, keyframes, and
expressions.)
3Select the Position property for Solid 2 and choose Animation > Add Expression or Alt-click (Windows) or Option-
click the stopwatch button for the property. The following expression appears by default:
transform.position
4Type the following directly over transform.position:
thisComp
5The element thisComp is a global attribute whose value is a Comp object representing the current composition. To
determine what can follow thisComp in your expression, look up the return value for thisComp under Global
objects, attributes, and methods (expression reference).
Note that thisComp returns a Comp object. Next, look at Comp attributes and methods (expression reference)to see
which attributes and methods you can use with a Comp object. One option is layer(index). The index, or number,
inside the parentheses specifies the layer that you want to use. For this example, we assume that Solid 1 is the first
layer in your composition. To retrieve values from the first layer in the active composition, type .layer(1) at the end
of the expression, to get the following:
thisComp.layer(1)
6Again, look at the expression elements reference to see that layer(index) returns a Layer object. Look at Layer
General attributes and methods (expression reference), and find the element you want to use. For example, if you
want to get the values of the Position property for the layer, type .position at the end of the expression to get the
following:
thisComp.layer(1).position

661
Expressions and automation
Last updated 6/8/2015
7From Layer General attributes and methods (expression reference), you can see that the position attribute returns a
property. Look up Property attributes and methods (expression reference)and notice that you can add a time factor
to the expression. To add a specific time, such as current time plus 2 seconds, type .valueAtTime(time+2)at the end
of the expression to get the following:
thisComp.layer(1).position.valueAtTime(time+2)
8From Property attributes and methods (expression reference), notice that the valueAtTime method returns a
Number or Array. When an expression returns a Number, Array, or Boolean (true or false), you cannot add further
attributes or methods to the expression (if you want, however, you can add arithmetic operators, such as +, -, *, and
/).
Show expressions and the expression graph
In Graph Editor mode, the single expression field appears as a resizable box at the bottom of the Graph Editor and
shows only the expression for the selected property. To show multiple expression fields simultaneously, the Timeline
panel must be in layer bar mode.
To toggle between layer bar mode and Graph Editor mode, press Shift+F3.
•To show only properties with expressions, select one or more layers, and then press EE.
•To show the expression field in the Graph Editor, choose Show Expression Editor from the Choose Graph Type And
Options menu at the bottom of the Graph Editor. When you add a new expression to a property, the expression
editor is shown, regardless of this setting.
To resize the expression field, drag its bottom edge up or down.
•To see how an expression changes the value or velocity graph, click the Show Post-Expression Graph button while
showing the value or velocity graph in the Graph Editor.
The dimly colored graph displays the value or velocity before the expression is applied, and the brightly colored
graph displays the value or velocity after the expression is applied. Turning on the graph overlay for the Position
property also changes the motion path display in the Composition panel so that you can see the expression-affected
path.
You can use the search field in the Timeline panel to search expressions as well as other components of a property. If the
search string appears in an expression, the property and its containing property groups and layer are shown in the
filtered set of search results.
Writing expressions for source text
The Source Text property of a text layer is interpreted by expressions as a JavaScript String. You can use the pick whip
to retrieve the source text from another text layer; however, only the style of the first character of the destination layer
is used.
For more information on the JavaScript String object, consult a JavaScript reference resource.
You can use "\r" in a string expression to start a new line of text. For example, to copy the original text from one layer
onto the same layer and repeat it in all uppercase characters on a new line, use the following expression:
text.sourceText + "\r" + text.sourceText.toUpperCase()

662
Expressions and automation
Last updated 6/8/2015
Adding a text layer to a composition and adding an expression to its Source Text property can be a great way to examine
the property values of other layers. For example, the following expression on a Source Text property reports the name
and value of the Opacity property for the next layer in the layer stacking order:
thisComp.layer(index + 1).name + "\rOpacity = " + thisComp.layer(index + 1).opacity.value
The following example reports the name of the footage item used as the source of the topmost image layer in the
stacking order at the current time that has its Video switch set.
source_footage_name = "";
for (i = 1; i <= thisComp.numLayers; i++){
if (i == index) continue;
my_layer = thisComp.layer(i);
if (! (my_layer.hasVideo && my_layer.active)) continue;
if (time >= my_layer.inPoint && time < my_layer.outPoint){
try{
source_footage_name = my_layer.source.name;
}catch(err1){
source_footage_name = my_layer.name
}
break;
}
}
source_footage_name
Aharon Rabinowitz provides a video tutorial and example expressions on Red Giant TV that show how to animate a
video game score with the Source Text property and a Slider effect (an Expression Controls effect).
Harry Frank provides a tutorial on his graymachine website that shows how to use expressions to read data from an
external text file.
Add comments to an expression
If you write a complex expression and intend for you or someone else to use it later, you should add comments that
explain what the expression does and how its pieces work.
•Type // at the beginning of the comment. Any text between // and the end of the line is ignored. For example: // This
is a comment.
For examples of this type of comment, see Expression example: Fade opacity of a 3D layer based on distance from
camera.
•Type /* at the beginning of the comment and */ at the end of the comment. Any text between /* and */ is ignored.
For example: /* This is a multiline comment. */
For examples of this type of comment, see Save and reuse expressions.
Save and reuse expressions
Once you have written an expression, you can save it for future use by copying and pasting it into a text-editing
application or by saving it in an animation preset or template project. However, because expressions are written in
relation to other layers in a project and may use specific layer names, you must sometimes modify an expression to
transfer it between projects.
You can define your own functions within expressions using normal JavaScript function syntax. In this example, a
function is defined that calculates the average of two values, and the last line uses this function:

663
Expressions and automation
Last updated 6/8/2015
function average(a, b)
{
return (a + b) / 2;
}
average(position, thisComp.layer(1).position);
Note: You must define each function fully within each expression in which it is used. There is no global library of functions
that you can add to.
If you want to save an expression for use in another project, you should add comments to the expression. (See Add
comments to an expression.) You should also use variables so that you can change a value in one place rather than
having to change it in several places.
For example, this expression has a multiline comment at the beginning that explains what the expression does and a
short comment after a variable is declared and initialized that tells what the variable is for:
/* This expression on a Source Text property reports the name
of a layer and the value of its Opacity property. */
var myLayerIndex = 1; // layer to inspect, initialized to 1, for top layer
thisComp.layer(myLayerIndex).name + ": \rOpacity = " +
thisComp.layer(myLayerIndex).opacity.value
You can save an animation preset that includes an expression and reuse it in other projects, as long as the expression
does not refer to properties that don’t exist in the other projects. When you save a preset in which a property has an
expression but no keyframes, only the expression is saved. If the property has one or more keyframes, the saved preset
contains the expression along with all keyframe values.
You can copy an expression from a layer property, with or without the keyframes for the property.
•To copy an expression and keyframes from one property to other properties, select the source layer property in the
Timeline panel, copy the layer property, select the target layer properties, and paste.
•To copy an expression from one property to other properties without copying keyframes, select the source property,
choose Edit > Copy Expression Only, select the target properties, and paste.
Copying an expression without keyframes is useful when you want to simultaneously copy multiple expressions and
paste them onto one or more new layers, or when you want to copy one expression and paste it onto more than one layer.
Note: As with pasting keyframes and other items, you can often paste the item into the target layer and rely on After Effects
to determine which property should be the target of the paste operation. For example, this works for copying Position
properties from one layer to another, but you must select the target property yourself if you are pasting an expression from
a Position property into a Scale property.
Paul Tuersley provides the pt_ExpressEdit script for managing and editing expressions.
Expression Controls effects
Use an Expression Controls effect to add a control that you can use to manipulate the values of one or many properties
by linking the property to the control using expressions. A single control can affect several properties at once.
The names for the Expression Control effects indicate what type of property control they provide: Angle Control,
Checkbox Control, Color Control, Layer Control, Point Control, Slider Control. After Effects CS5.5 and later includes
a 3D Point Control, as well.

664
Expressions and automation
Last updated 6/8/2015
If you apply an animation preset from the Animation Presets > Shapes > Backgrounds category, you can see a custom
Animated Shape Control effect in the Effect Controls panel. This custom effect is a specialized expression control effect
that was created specifically for these animation presets. You can copy and paste this effect to other layers, or you can save
it as an animation preset itself so that you can apply it elsewhere.
You apply Expression Controls effects to a layer in the same ways that you apply other effects, such as dragging the effect
onto the layer from the Effects & Presets panel.
You can apply Expression Controls effects to any layer; however, it is useful to apply them to a null layer, which you can
simply use as a controlling layer. You then add expressions to properties on other layers to take input from that control.
For example, you can add the Slider Control effect to a null layer (Null 1), and then apply this expression to the Position
properties of multiple layers:
position+[0,10*(index-1)*thisComp.layer("Null 1").effect("Slider Control")("Slider")]
In this example, as you drag the slider, each layer with this expression moves. The layers with greater index numbers
(layers toward the bottom in the Timeline panel) are shifted more than the layers with lower index numbers, at 10-pixel
intervals. You can set keyframes for the slider on the null layer, and all of the other layers animate accordingly.
It is often useful to rename each instance of an Expression Control effect to indicate its use. For example, renaming an
instance of the Color Control effect to sky color makes it easier to tell what the effect is controlling. You can rename each
instance of an Expression Control effect just as you rename any other effect: select it in the Timeline panel or Effect
Controls panel and press Enter on the main keyboard (Windows) or Return (Mac OS).
To modify the range of a control, right-click (Windows) or Control-click (Mac OS) the underlined property value for the
control and choose Edit Value from the context menu.
Additional resources about Expression Controls effects
Jerzy Drozda, Jr. (Maltaannon) provides a simple explanation and demonstration of the Angle Control effect and
Expression Controls effects in general on the Motionworks website.
Aharon Rabinowitz’s three-part “After Effects Expression Controls” series of video tutorials on the Creative COW
website introduces the Expression Controls effects and shows some basic examples of their uses.
Todd Kopriva provides instructions for using the sampleImage method and the Point Control effect to monitor colors
for a specified point during color correction on his After Effects Region of Interest blog.
Convert an expression to keyframes
In some situations, it’s useful to convert an expression to keyframes. For example, if you want to freeze the values in an
expression, you can convert the expression to keyframes and then adjust the keyframes accordingly; or, if an expression
takes a long time to evaluate, you can convert it to keyframes so that it renders more quickly. When you convert an
expression to keyframes, After Effects evaluates the expression, creating a keyframe at every frame, and then disables
the expression.
❖In the Timeline panel, select the property on which the expression is written and choose Animation > Keyframe
Assistant > Convert Expression To Keyframes.
The expression language
The After Effects expression language is based on JavaScript 1.2, with an extended set of built-in objects. After Effects
uses only the core standard JavaScript 1.2 language, not the web browser–specific extensions. After Effects contains its
own set of extension objects—such as Layer, Comp, Footage, and Camera—that you can use to get most of the values
in an After Effects project.

665
Expressions and automation
Last updated 6/8/2015
Though the expression language is based on a scripting language, a subtle but important difference exists between a
script and an expression: Whereas a script tells an application to do something, an expression says that a property is
something.
For more information about JavaScript, see a JavaScript reference resource.
When creating expressions, keep in mind the following:
•The value of an expression is the value of the last statement evaluated.
•JavaScript is a case-sensitive language.
•Semicolons are required to separate statements or lines.
•Spaces between words are ignored, except within a string.
In JavaScript, a value stored in an object is called a property. However, After Effects uses the term property to refer to
layer components as defined in the Timeline panel. For this reason, After Effects refers to JavaScript properties as either
methods or attributes. In general practice, the difference between a method and an attribute is that a method usually
does something to create its output (return) value, whereas an attribute simply refers to an existing value to determine
its output (return) value. You can tell a method from an attribute most easily by looking for the parentheses following
the method name, which surround any input arguments to the method.
An object is an item that can contain other objects, attributes, and methods. Compositions, layers, and footage items
are examples of objects. Specifically, compositions, layers, and footage items are global objects, which means that they
can be referred to in any context without reference to some higher-level object.
Accessing attributes and methods
You use the expression language to access attributes and methods of layer properties. To access a value, use a chain of
object references separated by the period (.) operator. To chain object references past the layer level (for example, to
refer to effect properties, masks, or text animators), you can also use parentheses. For example, to link the Opacity
property in Layer A to the Blurriness property of the Gaussian Blur effect in Layer B, enter the following expression in
the expression field for the Opacity property for Layer A:
thisComp.layer("Layer B").effect("Gaussian Blur")("Blurriness")
Reading this expression from left to right, you progress from the higher-level, containing object down to the specific
property:
•The global object used refers to the current composition: thisComp.
•A specific layer object within that composition is referred to by its name: layer("Layer B").
•A specific effect object within that layer is referred to by its name: effect("Gaussian Blur").
•A specific effect property within that effect is referred to by its name: ("Blurriness").
For the nth component of a multidimensional property, like the y component of an effect control point, append [n] at
the end, like this:
thisComp.layer("Layer B").effect("Advanced Lightning")("Origin")[1]
The default object for an expression is the property on which the expression is written, followed by the layer containing
the expression; therefore, you do not need to specify the property. For example, a wiggle expression written on the
Position property of a layer can be either of the following:
wiggle(5, 10)
position.wiggle(5, 10)
666
Expressions and automation
Last updated 6/8/2015
You do need to include the layer and property when retrieving them from outside the layer and property on which the
expression is written. For example, an expression written on the Opacity property of Layer B, linking it to the Rotation
property of Layer A would look like this expression:
thisComp.layer("Layer A").rotation
To see more examples of how this works, use the pick whip to link one layer property to another, and look at the
expressions it creates.
Jeff Almasol provides a script on his redefinery website with which you can determine how to refer to any property in
expressions.
Arrays and multidimensional properties
An Array is a type of object that stores an ordered set of numbers. An Array is represented as a list of numbers separated
by commas and surrounded by brackets, as in this example:
[10, 23]
You can assign an Array object to a variable, making it easy to refer to array values in other areas of the expression. For
example:
myArray = [10, 23]
The dimension of an Array object is the number of elements in the array. The dimension of myArray is 2. Different
properties in After Effects have different dimensions depending on the number of value arguments they have. In the
expression language, the values of properties are either single values (Number objects) or arrays (Array objects).
The following table provides examples of some properties and their dimensions:
You can access the individual elements of an Array object by using brackets and an index number to indicate which
element you want. The elements in an Array object are indexed starting from 0. Using the previous example,
myArray[0] is 10 and myArray[1] is 23.
The following two expressions are equivalent:
[myArray[0], 5]
[10, 5]
Dimension Property
1Rotation °
Opacity %
2Scale [x=width, y=height]
Position [x, y]
Anchor Point [x, y]
Audio Levels [left, right]
3Scale [width, height, depth]
3D Position [x, y, z]
3D Anchor Point [x, y, z]
Orientation [x, y, z]
4Color [red, green, blue, alpha]

667
Expressions and automation
Last updated 6/8/2015
The Position property arrays are indexed as follows:
•position[0] is the x coordinate of position.
•position[1] is the y coordinate of position.
•position[2] is the z coordinate of position.
Colors are represented as four-dimensional arrays [red, green, blue, alpha]. In projects with a color depth of 8 bpc or 16
bpc, each value in a color array ranges from 0 (black) to 1 (white). For example, red can range from 0 (no color) to 1
(red). So, [0,0,0,0] is black and transparent, and [1,1,1,1] is white and completely opaque. In projects with a color depth
of 32 bpc, values under 0 and over 1 are allowed.
If you use an index that is greater than the index of the highest-dimension component in an Array object, After Effects
returns an error. For example, myArray[2] causes an error, but position[2] returns the z coordinate of Position.
Many of the properties and methods in the After Effects expression language take Array objects as arguments or return
them as values. For example, thisLayer.position is an Array object that is either two-dimensional or three-dimensional
depending on whether the layer is 2D or 3D.
If you want to write an expression that keeps the y value of an animation of Position but fixes the x value at 9, you would
use the following:
y = position[1];
[9,y]
The following is even more succinct:
[9, position[1]]
This is an important point, so let’s look at one more example. If you want to combine the x position value from Layer
A with the y position value from Layer B, you would use the following:
x = thisComp.layer("Layer A").position[0];
y = thisComp.layer("Layer B").position[1];
[x,y]
You can create an expression that refers to just one value within the array of a 2D or 3D property. By default, the first
value is used, unless you specify otherwise. For example, if you drag the pick whip from the Rotation property of Layer
A to Scale property of Layer B, the following expression appears:
thisComp.layer("Layer B").scale[0]
By default, this expression uses the first value of the Scale property, which is width. If you prefer to use the height value
instead, drag the pick whip directly to the second value instead of the property name, or change the expression as
follows:
thisComp.layer("Layer B").scale[1]
Conversely, if you drag the pick whip from the Scale property of Layer B to the Rotation property of Layer A, After
Effects automatically creates a variable, assigns the one-dimensional Rotation property value to it, and then uses that
variable for both dimensions of the Scale property:
temp = thisComp.layer(1).transform.rotation;
[temp, temp]
Vectors
In After Effects, many properties and methods take or return vectors. After Effects refers to an array as a vector if it
represents either a point or direction in space. For example, After Effects describes position as returning a vector.

668
Expressions and automation
Last updated 6/8/2015
However, though a function like audioLevels does return a two-dimensional value (the left and right channel levels), it
is not called a vector because it does not represent a point or direction. Some functions in After Effects accept vector
arguments, but they are generally only useful when the values passed represent a direction. For example, cross(vec1,
vec2) computes a third vector that is at right angles to the input vectors. The cross product is useful when vec1 and vec2
are two vectors representing directions in space, but not if they just represent two arbitrary collections of numbers.
Indices and labels
Indexing for Layer, Effect, and Mask elements in After Effects starts from 1. For example, the first layer in the Timeline
panel is layer(1).
Generally, it is best to use the name of a layer, effect, or a mask instead of a number to avoid confusion and errors if the
layer, effect, or mask is moved, or if the arguments are changed during product updates and upgrades. When you use
a name, always enclose it in straight quotes. For example, the first of these expressions is easier to understand than the
second expression, and the first expression will continue to work even if you change the order of effects:
effect("Colorama").param("Get Phase From")
effect(1).param(2)
Expression time
Time within an expression is always in composition time (not layer time) and is measured in seconds. The default time
for any expression is the current composition time at which the expression is being evaluated. The following
expressions both use the default composition time and return the same values:
thisComp.layer(1).position
thisComp.layer(1).position.valueAtTime(time)
To use a relative time, add an incremental time value to the time argument. For example, to get the Position value 5
seconds before the current time, use the following expression:
thisComp.layer(1).position.valueAtTime(time-5)
Default time references to properties in nested compositions use the original default composition time, not remapped
time. However, if you use the source function to retrieve a property, the remapped time is used.
For example, if the source of a layer in the containing composition is a nested composition, and in the containing
composition you have remapped time, when you get the position values of a layer in the nested composition with the
following expression, the position values use the default time of the composition:
comp("nested composition").layer(1).position
However, if you access layer 1 using the source function, the position values use the remapped time:
thisComp.layer("nested composition").source.layer(1).position
Note: If you use a specific time in an expression, After Effects ignores the remapped time.
Because expressions operate on time in units of seconds (not frames), you sometimes need to use time conversion
methods to convert time values to perform operations on frames. (See Time conversion methods (expression
reference).)
Expression errors
If an expression cannot be processed, After Effects displays a message explaining the error and automatically disables
the expression. A yellow warning icon appears next to the expression; click the warning icon to view the error
message again.

669
Expressions and automation
Last updated 6/8/2015
To show expressions that have errors, select one or more layers, right-click (Windows) or Control-click (Mac OS) a
selected layer in the Timeline panel, and choose Reveal Expression Errors from the context menu.
Some expressions rely on the names of layers or properties in your project; if you change the name of a layer or property
that is involved in an expression, After Effects attempts to update the expression to use the new name. However, in some
complex cases, After Effects is unable to automatically update the expression, in which case the expression may produce
an error message, and you must update the expression yourself. Note: If you are running After Effects in a language other
than the one for which an expression was written, or if you have changed the names of items (such as layers, effects, or other
property groups), then the expression may not work until you modify the expression to use the new names or the strings
that match the language in which you are running After Effects. Because the examples in this document were created for
the default state of After Effects running in English, some examples in this document will not work without such
modification.
Note: The arguments for some After Effects effects have changed from the arguments in previous versions. If you have
existing expressions that use argument index references rather than argument names, you may need to update the
expressions to use argument names.
Precomposing multiple layers can also cause expressions that refer to a property of one of the layers to produce an error,
requiring you to update these expressions to refer to the layer within the new composition. This is especially a concern
with expressions that use thisComp instead of referring to a composition by its name. (See About precomposing and
nesting.)
Jeff Almasol provides a script on his redefinery website with which you can replace instances of thisComp with explicit
references to a composition’s name.
Online resources
Many of the examples in this section are based on examples provided by Dan Ebberts. Dan Ebberts also has an excellent
collection of example expressions and tutorials for learning how to work with expressions on his MotionScript website.
The AE Enhancers forum provides many examples and much information about expressions, as well as scripts and
animation presets.
Chris and Trish Meyer provide a simple video overview of expressions on the ProVideo Coalition website.
Chris and Trish Meyer provide a series of articles about expressions on the ProVideo Coalition website. These articles
contain many useful examples.
Chris and Trish Meyer share tips about expressions from their book _Creating Motion Graphics_ on the ProVideo
Coalition website.
More Help topics
Save an animation preset
About animation, keyframes, and expressions
Text selectors
About animation, keyframes, and expressions
The Graph Editor
Motion paths
Creating and editing text layers
Save an animation preset

670
Expressions and automation
Last updated 6/8/2015
Layer properties in the Timeline panel
Null object layers
Animation presets overview and resources
Color depth and high dynamic range color
Expression language reference
Use the After Effects expression elements along with standard JavaScript elements to write your expressions. You can
use the Expression Language menu at any time to insert methods and attributes into an expression, and you can use the
pick whip at any time to insert properties.
If an argument description contains an equal sign (=) and a value (such as t=time or width=.2), then the argument uses
the included default value if you don’t specify a different value.
Some argument descriptions include a number in square brackets—this number indicates the dimension of the
expected property or Array.
Some return-value descriptions include a number in square brackets—this number specifies the dimension of the
returned property or Array. If a specific dimension is not included, the dimension of the returned Array depends on
the dimension of the input.
The W3Schools JavaScript reference website provides information for the standard JavaScript language, including
pages for the JavaScript Math and String objects.
Global objects, attributes, and methods (expression reference)
comp(name) Return type: Comp.
Argument type: name is a String.
Retrieves another composition by name.
footage(name) Return type: Footage.
Argument type: name is a String.
Retrieves a footage item by name.
thisComp Return type: Comp.
Represents the composition containing the expression.
thisLayer Return type: Layer, Light, or Camera.
Represents the layer containing the expression. Because thisLayer is the default object, its use is optional. For example,
you can start an expression with thisLayer.width or width and get the same result.
thisProperty Return type: Property.
Represents the property containing the expression. For example, if you write an expression on the Rotation property,
you can start an expression with thisProperty to refer to the Rotation property.
time Return type: Number.
Represents the composition time, in seconds, at which the expression is being evaluated.

671
Expressions and automation
Last updated 6/8/2015
colorDepth Return type: Number.
Returns the project color depth value. For example, colorDepth returns 16 when the project color depth is 16 bits per
channel.
posterizeTime(framesPerSecond) Return type: Number.
Argument type: framesPerSecond is a Number.
The framesPerSecond value becomes the frame rate from which the rest of the expression operates. This expression
allows you to set the frame rate for a property to be lower than the frame rate of the composition. For example, the
following expression updates the property value with a random value once per second:
posterizeTime(1); random()
value Return type: Number, Array, or String.
Represents the value at the current time for the property containing the expression.
Time conversion methods (expression reference)
timeToFrames(t = time + thisComp.displayStartTime, fps = 1.0 / thisComp.frameDuration, isDuration = false) Return
type: Number.
Argument type: t and fps are Numbers; isDuration is a Boolean.
Converts the value of t, which defaults to the current composition time, to an integer number of frames. The number
of frames per second is specified in the fps argument, which defaults to the frame rate of the current composition (1.0
/ thisComp.frameDuration). The isDuration argument, which defaults to false, should be true if the t value represents
a difference between two times instead of an absolute time. Absolute times are rounded down toward negative infinity;
durations are rounded away from zero (up for positive values).
framesToTime(frames, fps = 1.0 / thisComp.frameDuration) Return type: Number.
Argument type: frames and fps are Numbers.
The inverse of timeToFrames. Returns the time corresponding to the frames argument, which is required. It doesn’t
have to be an integer. See timeToFrames for explanation of the fps argument.
timeToTimecode(t = time + thisComp.displayStartTime, timecodeBase = 30, isDuration = false) Return type: String.
Argument type: t and timecodeBase are Numbers; isDuration is a Boolean.
Converts the value of t to a String representing timecode. See timeToFrames for an explanation of the t and isDuration
arguments. The timecodeBase value, which defaults to 30, specifies the number of frames in one second.
timeToNTSCTimecode(t = time + thisComp.displayStartTime, ntscDropFrame = false, isDuration = false) Return type:
String.
Argument type: t is a Number, ntscDropFrame and isDuration are Booleans.
Converts t to a String representing NTSC timecode. See timeToFrames for an explanation of the t and isDuration
arguments. If ntscDropFrame is false (the default), the result String is NTSC non-drop-frame timecode. If
ntscDropFrame is true, the result String is NTSC drop-frame timecode.
timeToFeetAndFrames(t = time + thisComp.displayStartTime, fps = 1.0 / thisComp.frameDuration, framesPerFoot = 16,
isDuration = false) Return type: String.
Argument type: t, fps, and framesPerFoot are Numbers; isDuration is a Boolean.

672
Expressions and automation
Last updated 6/8/2015
Converts the value of t to a String representing feet of film and frames. See timeToFrames for an explanation of the t,
fps, and isDuration arguments. The framesPerFoot argument specifies the number of frames in one foot of film. It
defaults to 16, which is the most common rate for 35mm footage.
timeToCurrentFormat(t = time + thisComp.displayStartTime, fps = 1.0 / thisComp.frameDuration, isDuration = false)
Return type: String.
Argument type: t and fps are Numbers; isDuration is a Boolean.
Converts the value of t to a String representing time in the current Project Settings display format. See timeToFrames
for a definition of all of the arguments.
An optional ntscDropFrame argument was added to the timeToCurrentFormat() function in After Effects CS5.5 and
later. Default: ntscDropFrame = thisComp.ntscDropFrame.
If you want more control over the look of timecode in your footage, use the timeToCurrentFormat method or other
timeTo methods to generate the timecode instead of using the Timecode or Numbers effect. Create a text layer, add an
expression to the Source Text property, and enter timeToCurrentFormat() in the expression field. With this method, you
can format and animate the timecode text. In addition, the timecode uses the same display style defined by the current
project settings.
Vector Math methods (expression reference)
Vector Math functions are global methods that perform operations on arrays, treating them as mathematical vectors.
Unlike built-in JavaScript methods, such as Math.sin, these methods are not used with the Math prefix. Unless
otherwise specified, Vector Math methods are lenient about dimensions and return a value that is the dimension of the
largest input Array object, filling in missing elements with zeros. For example, the expression add([10, 20], [1, 2, 3])
returns [11, 22, 3].
JJ Gifford’s website provides explanations and examples that show how to use simple geometry and trigonometry with
expressions.
Chris and Trish Meyer provide additional information about vector math methods and arrays in an article on the
ProVideo Coalition website.
add(vec1, vec2) Return type: Array.
Argument type: vec1 and vec2 are Arrays.
Adds two vectors.
sub(vec1, vec2) Return type: Array.
Argument type: vec1 and vec2 are Arrays.
Subtracts two vectors.
mul(vec, amount) Return type: Array.
Argument type: vec is an Array, amount is a Number.
Multiplies every element of the vector by the amount.
div(vec, amount) Return type: Array.
Argument type: vec is an Array, amount is a Number.
Divides every element of the vector by the amount.
clamp(value, limit1, limit2) Return type: Number or Array.

673
Expressions and automation
Last updated 6/8/2015
Argument type: value, limit1, and limit2 are Numbers or Arrays.
The value of each component of value is constrained to fall between the values of the corresponding values of limit1
and limit2.
Chris and Trish Meyer provide additional information about the clamp method in an article on the ProVideo Coalition
website.
dot(vec1, vec2) Return type: Number.
Argument type: vec1 and vec2 are Arrays.
Returns the dot (inner) product of the vector arguments.
cross(vec1, vec2) Return type: Array [2 or 3].
Argument type: vec1 and vec2 are Arrays [2 or 3].
Returns the vector cross product of vec1 and vec2. Refer to a math reference or JavaScript guide for more information.
normalize(vec) Return type: Array.
Argument type: vec is an Array.
Normalizes the vector so that its length is 1.0. Using the normalize method is a short way of performing the operation
div(vec, length(vec)).
length(vec) Return type: Number.
Argument type: vec is an Array.
Returns the length of vector vec.
length(point1, point2) Return type: Number.
Argument type: point1 and point2 are Arrays.
Returns the distance between two points. The point2 argument is optional. For example, length(point1, point2) is the
same as length(sub(point1, point2)).
For example, add this expression to the Focus Distance property of a camera to lock the focal plane to the camera's point
of interest so that the point of interest is in focus:
length(position, pointOfInterest)
lookAt(fromPoint, atPoint) Return type: Array [3].
Argument type: fromPoint and atPoint are Arrays [3].
The argument fromPoint is the location in world space of the layer you want to orient. The argument atPoint is the point
in world space you want to point the layer at. The return value can be used as an expression for the Orientation property,
making the z axis of the layer point at atPoint. This method is especially useful for cameras and lights. If you use this
expression on a camera, turn off auto-orientation. For example, this expression on the Orientation property of a spot
light makes the light point at the anchor point of layer number 1 in the same composition: lookAt(position,
thisComp.layer(1).position)
Random Numbers methods (expression reference)
Note: The wiggle method—which is used to randomly vary a property value—is in the Property attributes and methods
category. (See Property attributes and methods (expression reference).)
seedRandom(offset, timeless=false) Return type: none.

674
Expressions and automation
Last updated 6/8/2015
Argument type: offset is a Number, timeless is a Boolean.
The random and gaussRandom methods use a seed value that controls the sequence of numbers. By default, the seed
is computed as a function of a unique layer identifier, the property within the layer, the current time, and an offset value
of 0. Call seedRandom to set the offset to something other than 0 to create a different random sequence.
Use true for the timeless argument to not use the current time as input to the random seed. Using true for the timeless
argument allows you to generate a random number that doesn’t vary depending on the time of evaluation.
The offset value, but not the timeless value, is also used to control the initial value of the wiggle function.
For example, this expression on the Opacity property sets the Opacity value to a random value that does not vary with
time:
seedRandom(123456, true); random()*100
The multiplication by 100 in this example converts the value in the range 0–1 returned by the random method into a
number in the range 0–100; this range is more typically useful for the Opacity property, which has values from 0% to
100%.
random() Return type: Number.
Returns a random number in the range 0–1.
In After Effects CC and CS6, the behavior of random() is changed to be more random when layer ids are close together.
The wiggle() expression is not affected.
random(maxValOrArray) Return type: Number or Array.
Argument type: maxValOrArray is a Number or Array.
If maxValOrArray is a Number, this method returns a number in the range from 0 to maxValOrArray. If
maxValOrArray is an Array, this method returns an Array with the same dimension as maxValOrArray, with each
component ranging from 0 to the corresponding component of maxValOrArray.
random(minValOrArray, maxValOrArray) Return type: Number or Array.
Argument type: minValOrArray and maxValOrArray are Numbers or Arrays.
If minValOrArray and maxValOrArray are Numbers, this method returns a number in the range from minValOrArray
to maxValOrArray. If the arguments are Arrays, this method returns an Array with the same dimension as the
argument with the greater dimension, with each component in the range from the corresponding component of
minValOrArray to the corresponding component of maxValOrArray. For example, the expression random([100, 200],
[300, 400]) returns an Array whose first value is in the range 100–300 and whose second value is in the range 200–400.
If the dimensions of the two input Arrays don’t match, higher-dimension values of the shorter Array are filled out with
zeros.
gaussRandom() Return type: Number.
Returns a random number. The results have a Gaussian (bell-shaped) distribution. Approximately 90% of the results
are in the range 0–1, and the remaining 10% are outside this range.
gaussRandom(maxValOrArray) Return type: Number or Array.
Argument type: maxValOrArray is a Number or Array.
When maxValOrArray is a Number, this method returns a random number. Approximately 90% of the results are in
the 0 to maxValOrArray range, and the remaining 10% are outside this range. When maxValOrArray is an Array, this
method returns an Array of random values, with the same dimension as maxValOrArray. 90% of the values are in the

675
Expressions and automation
Last updated 6/8/2015
range from 0 to maxValOrArray, and the remaining 10% are outside this range. The results have a Gaussian (bell-
shaped) distribution.
gaussRandom(minValOrArray, maxValOrArray) Return type: Number or Array.
Argument type: minValOrArray and maxValOrArray are Numbers or Arrays.
If minValOrArray and maxValOrArray are Numbers, this method returns a random number. Approximately 90% of the
results are in the range from minValOrArray to maxValOrArray, and the remaining 10% are outside this range. If the
arguments are Arrays, this method returns an Array of random numbers with the same dimension as the argument
with the greater dimension. For each component, approximately 90% of the results are in the range from the
corresponding component of minValOrArray to the corresponding component of maxValOrArray, and the remaining
10% are outside this range. The results have a Gaussian (bell-shaped) distribution.
noise(valOrArray) Return type: Number.
Argument type: valOrArray is a Number or an Array [2 or 3].
Returns a number in the range from -1 to 1. The noise is not actually random; it is based on Perlin noise, which means
that the return values for two input values that are near one another will also tend to be near one another. This type of
noise is useful when you want a sequence of seemingly random numbers that don’t vary wildly from one to the other—
as is usually the case when animating any apparently random natural motion. Example: rotation + 360*noise(time)
Interpolation methods (expression reference)
For all of the Interpolation methods, the argument t is often time or value, though it can have other values, instead. If
t is time, the interpolation between values happens over a duration. If t is value, then the expression maps one range of
values to a new range of values.
For additional explanations and examples of the Interpolation methods, see JJ Gifford’s website.
Chris and Trish Meyer provide additional information and examples for these methods in an article on the ProVideo
Coalition website.
Ian Haigh provides a script on After Effects Scripts website that you can use to easily apply advanced interpolation
method expressions—such as bounces—to properties.
Andrew Devis provides a pair of video tutorials on the Creative COW website that show in detail how to use the linear
expression method along with the Convert Audio To Keyframes command.
linear(t, tMin, tMax, value1, value2) Return type: Number or Array.
Argument type: t, tMin, and tMax are Numbers, and value1 and value2 are Numbers or Arrays.
Returns value1 when t <= tMin. Returns value2 when t >= tMax. Returns a linear interpolation between value1 and
value2 when tMin < t < tMax.
For example, this expression on the Opacity property causes Opacity values to ramp linearly from 20% to 80% over the
time from 0 seconds to 6 seconds:
linear(time, 0, 6, 20, 80)
This method—like all of the Interpolation methods—can also be used to convert from one range of values to another.
For example, this expression on the Opacity property converts the Opacity values from the range 0%-100% to the range
20%-80%:
linear(value, 0, 100, 20, 80)
linear(t, value1, value2) Return type: Number or Array.

676
Expressions and automation
Last updated 6/8/2015
Argument type: t is a Number, and value1 and value2 are Numbers or Arrays.
Returns a value that linearly interpolates from value1 to value2 as t ranges from 0 to 1. Returns value1 when t <= 0.
Returns value2 when t >= 1.
ease(t, value1, value2) Return type: Number or Array.
Argument type: t is a Number, and value1 and value2 are Numbers or Arrays.
Similar to linear with the same arguments, except that the interpolation eases in and out so that the velocity is 0 at the
start and end points. This method results in a very smooth animation.
ease(t, tMin, tMax, value1, value2) Return type: Number or Array.
Argument type: t, tMin, and tMax are Numbers, and value1 and value2 are Numbers or Arrays.
Similar to linear with the same arguments, except that the interpolation eases in and out so that the velocity is 0 at the
start and end points. This method results in a very smooth animation.
easeIn(t, value1, value2) Return type: Number or Array.
Argument type: t is a Number, and value1 and value2 are Numbers or Arrays.
Similar to ease, except that the tangent is 0 only on the value1 side and interpolation is linear on the value2 side.
easeIn(t, tMin, tMax, value1, value2) Return type: Number or Array.
Argument type: t, tMin, and tMax are Numbers, and value1 and value2 are Numbers or Arrays.
Similar to ease, except that the tangent is 0 only on the tMin side and interpolation is linear on the tMax side.
easeOut(t, value1, value2) Return type: Number or Array.
Argument type: t is a Number, and value1 and value2 are Numbers or Arrays.
Similar to ease, except that the tangent is 0 only on the value2 side and interpolation is linear on the value1 side.
easeOut(t, tMin, tMax, value1, value2) Return type: Number or Array.
Argument type: t, tMin, and tMax are Numbers, and value1 and value2 are Numbers or Arrays.
Similar to ease, except that the tangent is 0 only on the tMax side and interpolation is linear on the tMin side.
Color Conversion methods (expression reference)
Harry Frank provides a video tutorial on his graymachine website that shows how to use these color conversion
methods to change the color of the waves produced by the Radio Waves effect.
rgbToHsl(rgbaArray) Return type: Array [4].
Argument type: rgbaArray is an Array [4].
Converts a color in RGBA space to HSLA space. The input is an Array of normalized red, green, blue, and alpha channel
values, all in the range of 0.0 to 1.0. The resulting value is an Array of hue, saturation, lightness, and alpha channel
values, also in the range of 0.0 to 1.0. Example:
rgbToHsl.effect("Change Color")("Color To Change")
hslToRgb(hslaArray) Return type: Array [4].
Argument type: hslaArray is an Array [4].
Converts a color in HSLA space to RGBA space. This conversion is the opposite of the conversion performed by the
rgbToHsl method.

677
Expressions and automation
Last updated 6/8/2015
Other Math methods (expression reference)
Chris and Trish Meyer provide additional information about these methods in an article on the ProVideo Coalition
website.
degreesToRadians(degrees) Return type: Number.
Argument type: degrees is a Number.
Converts degrees to radians.
radiansToDegrees(radians) Return type: Number.
Argument type: radians is a Number.
Converts radians to degrees.
Comp attributes and methods (expression reference)
layer(index) Return type: Layer, Light, or Camera.
Argument type: index is a Number.
Retrieves the layer by number (order in the Timeline panel). Example: thisComp.layer(3)
layer(name) Return type: Layer, Light, or Camera.
Argument type: name is a String.
Retrieves the layer by name. Names are matched according to layer name, or source name if there is no layer name. If
duplicate names exist, After Effects uses the first (topmost) one in the Timeline panel. Example:
thisComp.layer("Solid 1")
layer(otherLayer, relIndex) Return type: Layer, Light, or Camera.
Argument type: otherLayer is a Layer object, and relIndex is a Number.
Retrieves the layer that is relIndex layers above or below otherLayer. For example, thisComp.layer(thisLayer, 1).active
returns true if the next layer down in the Timeline panel is active.
marker Return type: MarkerProperty.
Note: You cannot access a composition marker by marker number. If you have a project created in a previous version of
After Effects that uses composition marker numbers in expressions, you must change those calls to use marker.key(name)
instead. Because the default name of a composition marker is a number, converting the reference to use the name is often
just a matter of surrounding the number with quotation marks.
marker.key(index) Return type: MarkerKey.
Argument type: index is a Number.
Returns the MarkerKey object of the marker with the specified index. The index refers to the order of the marker in
composition time, not to the name of the marker. For example, this expression returns the time of the first composition
marker:
thisComp.marker.key(1).time
marker.key(name) Return type: MarkerKey.
Argument type: name is a String.

678
Expressions and automation
Last updated 6/8/2015
Returns the MarkerKey object of the marker with the specified name. The name value is the name of the marker, as
typed in the comment field in the marker dialog box, for example, marker.key("1"). For a composition marker, the
default name is a number. If more than one marker in the composition has the same name, this method returns the
marker that occurs first in time (in composition time). The value for a marker key is a String, not a Number. For
example, this expression returns the time of the composition marker with the name "0":
thisComp.marker.key("0").time
marker.nearestKey(t) Return type: MarkerKey.
Argument type: t is a Number.
Returns the marker that is nearest in time to t. For example, this expression returns the time of the composition marker
nearest to the time of 1 second:
thisComp.marker.nearestKey(1).time
This expression returns the time of the composition marker nearest to the current time:
thisComp.marker.nearestKey(time).time
marker.numKeys Return type: Number.
Returns the total number of composition markers in the composition.
numLayers Return type: Number.
Returns the number of layers in the composition.
activeCamera Return type: Camera.
Returns the Camera object for the camera through which the composition is rendered at the current frame. This
camera is not necessarily the camera through which you are looking in the Composition panel.
width Return type: Number.
Returns the composition width, in pixels.
Apply the following expression to the Position property of a layer to center the layer in the composition frame:
[thisComp.width/2, thisComp.height/2]
height Return type: Number.
Returns the composition height, in pixels.
duration Return type: Number.
Returns the composition duration, in seconds.
ntscDropFrame Return type: Boolean.
Returns true if the timecode is in drop-frame format. (After Effects CS5.5and later.)
displayStartTime Return type: Number.
Returns the composition start time, in seconds.
frameDuration Return type: Number.
Returns the duration of a frame, in seconds.
shutterAngle Return type: Number.
Returns the shutter-angle value of the composition, in degrees.

679
Expressions and automation
Last updated 6/8/2015
shutterPhase Return type: Number.
Returns the shutter phase of the composition, in degrees.
bgColor Return type: Array [4].
Returns the background color of the composition.
pixelAspect Return type: Number.
Returns the pixel aspect ratio of the composition.
name Return type: String.
Returns the name of the composition.
Footage attributes and methods (expression reference)
To use a footage item from the Project panel as an object in an expression, use the global footage method, as in
footage("file_name"). You can also access a footage object using the source attribute on a layer whose source is a footage
item.
width Return type: Number.
Returns the width of the footage item, in pixels.
height Return type: Number.
Returns the height of the footage item, in pixels.
duration Return type: Number.
Returns the duration of the footage item, in seconds.
frameDuration Return type: Number.
Returns the duration of a frame in the footage item, in seconds.
ntscDropFrame Return type: Boolean.
Returns true if the timecode is in drop-frame format. (After Effects CS5.5 and later.)
pixelAspect Return type: Number.
Returns the pixel aspect ratio of the footage item.
name Return type: String.
Returns the name of the footage item as shown in the Project panel.
Layer Sub-objects attributes and methods (expression reference)
Note: For After Effects CC and CS6, the Expression language menu, the "Layer Sub-objects", "Layer General", "Layer
Properties", "Layer 3D", and "Layer Space Transforms" have been arranged into a "Layer" submenu.
source Return type: Comp or Footage.
Returns the source Comp or source Footage object for the layer. Default time is adjusted to the time in the source.
Example: source.layer(1).position
sourceTime(t = time) Return type: Number.
Returns the layer source corresponding to time t. (After Effects CS5.5 and later.)

680
Expressions and automation
Last updated 6/8/2015
effect(name) Return type: Effect.
Argument type: name is a String.
After Effects finds the effect by its name in the Effect Controls panel. The name can be the default name or a user-
defined name. If multiple effects have the same name, the effect closest to the top of the Effect Controls panel is used.
Example:
effect("Fast Blur")("Blurriness")
effect(index) Return type: Effect.
Argument type: index is a Number.
After Effects finds the effect by its index in the Effect Controls panel, starting at 1 and counting from the top.
mask(name) Return type: Mask.
Argument type: name is a String.
The name can be the default name or a user-defined name. If multiple masks have the same name, the first (topmost)
mask is used. Example:
mask("Mask 1")
mask(index) Return type: Mask.
Argument type: index is a Number.
After Effects finds the mask by its index in the Timeline panel, starting at 1 and counting from the top.
Layer General attributes and methods (expression reference)
width Return type: Number.
Returns the width of the layer, in pixels. It is the same as source.width.
height Return type: Number.
Returns the height of the layer, in pixels. It is the same as source.height.
index Return type: Number.
Returns the index number of the layer in the composition.
parent Return type: Layer, Light, or Camera.
Returns the parent Layer object of the layer, if it has one. Example: position[0] + parent.width
hasParent Return type: Boolean.
Returns true if the layer has a parent or false if it doesn’t.
Use the hasParent attribute to determine if a layer has a parent layer. You can use this attribute even if the layer has no
parent layer at present. For example, the following expression indicates that the layer to which you apply it wiggles based
on the position of the parent. If the layer has no parent, then it wiggles based on its own position. If the layer is given a
parent later, then the behavior of the layer changes accordingly:
idx = index; if (hasParent) { idx = parent.index; } thisComp.layer(idx).position.wiggle(5,20)
inPoint Return type: Number.
Returns the In point of the layer, in seconds.

681
Expressions and automation
Last updated 6/8/2015
Note: In general, the value of outPoint is greater than the value of inPoint. However, if a layer is reversed in time, the value
of inPoint is greater than the value of outPoint. Similarly, the value of startTime can be greater than the value of inPoint.
outPoint Return type: Number.
Returns the Out point of the layer, in seconds.
startTime Return type: Number.
Returns the start time of the layer, in seconds.
hasVideo Return type: Boolean.
Returns true if the layer has video, or false if it doesn’t.
hasAudio Return type: Boolean.
Returns true if the layer has audio or false if it doesn’t.
active Return type: Boolean.
Returns true if the Video switch is on for the layer and the current time is in the range from the In point of the layer
to the Out point of the layer; false otherwise.
enabled Return type: Boolean.
Returns true if the Video switch is on for the layer; false otherwise.
audioActive Return type: Boolean.
Returns true if the Audio switch is on for the layer and the current time is in the range from the In point of the layer
to the Out point of the layer; false otherwise.
sampleImage(point, radius = [.5, .5], postEffect=true, t=time) Return type: Array [4].
Argument type: point is an Array [2], radius is an Array [2], postEffect is a Boolean, and t is a Number.
Samples the color and alpha channel values of a layer and returns the average alpha-weighted value of the pixels within
the specified distance of the point as an array: [red, green, blue, alpha]. If postEffect is true, the sampled values are for
the layer after masks and effects on that layer have been rendered; if postEffect is false, the sampled values are for the
layer before masks and effects have been rendered. The input value point is in layer space; the point [0,0] is the center
of the top-left pixel in the layer. The input value radius specifies the horizontal and vertical distance from the sample
center to the edges of the sampled rectangle. The default value samples one pixel.
Note: The postEffect parameter refers to effects applied directly to the layer, not to effects applied indirectly, such as with an
adjustment layer.
Note: Using sampleImage in an expression no longer disables multiprocessing.
This example samples a rectangle 4 pixels wide and 3 pixels high, centered around a point 100 pixels down and to the
right of the upper-left corner of the layer:
thisComp.layer(1).sampleImage([100, 100], [2, 1.5])
Dan Ebberts provides an example of how to use the sampleImage method on his MotionScript website.
The AE Enhancers forum provides an expression that uses the sampleImage method to measure a text layer or shape
layer and determine its effective bounding box.
Todd Kopriva provides instructions for using the sampleImage method and the Point Control effect to monitor colors
for a specified point during color correction on his After Effects Region of Interest blog.

682
Expressions and automation
Last updated 6/8/2015
Layer Properties attributes and methods (expression reference)
When you add masks, effects, paint, or text to a layer, After Effects adds new properties to the Timeline panel. There
are too many of these properties to list here, so use the pick whip to learn the syntax for referring to them in your
expressions.
anchorPoint Return type: Property [2 or 3].
Returns the anchor point value of the layer in the coordinate system of the layer (layer space).
position Return type: Property [2 or 3].
Returns the position value of the layer, in world space if the layer has no parent. If the layer has a parent, returns the
position value of the layer in the coordinate system of the parent layer (in the layer space of the parent layer).
scale Return type: Property [2 or 3].
Returns the scale value of the layer, expressed as a percentage.
rotation Return type: Property.
Returns the rotation value of the layer in degrees. For a 3D layer, it returns the z rotation value in degrees.
opacity Return type: Property.
Returns the opacity value for the layer, expressed as a percentage.
audioLevels Return type: Property [2].
Returns the value of the Audio Levels property of the layer, in decibels. This value is a 2D value; the first value represents
the left audio channel, and the second value represents the right. The value is not the amplitude of the audio track of
the source material. Instead, it is the value of the Audio Levels property, which may be affected by keyframes.
timeRemap Return type: Property.
Returns the value of the Time Remap property, in seconds, if Time Remap is enabled.
marker.key(index) Return type: MarkerKey.
Argument type: index is a Number.
Returns the MarkerKey object of the layer marker with the specified index.
marker.key(name) Return type: MarkerKey.
Argument type: name is a String.
Returns the MarkerKey object of the layer marker with the specified name. The name value is the name of the marker,
as typed in the comment field in the marker dialog box, for example, marker.key("ch1"). If more than one marker on
the layer has the same name, this method returns the marker that occurs first in time (in layer time). The value for a
marker key is a String, not a Number.
This expression on a property ramps the value of the property from 0 to 100 between two markers identified by name:
m1 = marker.key("Start").time; m2 = marker.key("End").time; linear(time, m1, m2, 0, 100);
marker.nearestKey(t) Return type: MarkerKey.
Argument type: t is a Number.
Returns the layer marker that is nearest in time to t. For example, this expression returns the time of the marker on the
layer nearest to the time of 1 second:
marker.nearestKey(1).time

683
Expressions and automation
Last updated 6/8/2015
This expression returns the time of the marker on the layer nearest to the current time:
marker.nearestKey(time).time
marker.numKeys Return type: Number.
Returns the total number of markers on the layer.
name Return type: String.
Returns the name of the layer.
Layer 3D attributes and methods (expression reference)
orientation Return type: Property [3].
Returns the 3D orientation value, in degrees, for a 3D layer.
rotationX Return type: Property.
Returns the x rotation value, in degrees, for a 3D layer.
rotationY Return type: Property.
Returns the y rotation value, in degrees, for a 3D layer.
rotationZ Return type: Property.
Returns the z rotation value, in degrees, for a 3D layer.
lightTransmission Return type: Property.
Returns the value of the Light Transmission property for a 3D layer.
castsShadows Return type: Property.
Returns a value of 1.0 if the layer casts shadows.
acceptsShadows Return type: Property.
Returns a value of 1.0 if the layer accepts shadows.
acceptsLights Return type: Property.
Returns a value of 1.0 if the layer accepts lights.
ambient Return type: Property.
Returns the ambient component value as a percentage.
diffuse Return type: Property.
Returns the diffuse component value as a percentage.
specular Return type: Property.
Returns the specular component value as a percentage.
shininess Return type: Property.
Returns the shininess component value as a percentage.
metal Return type: Property.
Returns the metal component value as a percentage.

684
Expressions and automation
Last updated 6/8/2015
Layer Space Transforms methods (expression reference)
Use layer space transform methods to transform values from one space to another, such as from layer space to world
space. The “from” methods transform values from the named space (composition or world) to the layer space. The “to”
methods transform values from the layer space to the named space (composition or world). Each transform method
takes an optional argument to determine the time at which the transform is computed; however, you can almost always
use the current (default) time.
Use “Vec” transform methods when transforming a direction vector, such as the difference between two position
values. Use the plain (non-”Vec”) transform methods when transforming a point, such as position. Composition
(comp) and world space are the same for 2D layers. For 3D layers, however, composition space is relative to the active
camera, and world space is independent of the camera.
Chris and Trish Meyer provide additional information about these methods in an article on the ProVideo Coalition
website.
toComp(point, t=time) Return type: Array [2 or 3].
Argument type: point is an Array [2 or 3], and t is a Number.
Transforms a point from layer space to composition space.
fromComp(point, t=time) Return type: Array [2 or 3].
Argument type: point is an Array [2 or 3], and t is a Number.
Transforms a point from composition space to layer space. The resulting point in a 3D layer may have a nonzero value
even though it is in layer space. Example: fromComp(thisComp.layer(2).position)
toWorld(point, t=time) Return type: Array [2 or 3].
Argument type: point is an Array [2 or 3], and t is a Number.
Transforms a point from layer space to view-independent world space. Example:
toWorld.effect("Bulge")("Bulge Center")
Dan Ebberts provides an expression on his MotionScript website that uses the toWorld method to auto-orient a layer
along only one axis. This is useful, for example, for having characters turn from side to side to follow the camera while
remaining upright.
Carl Larsen provides a pair of video tutorials on the Creative COW website in which he explains the basics of parenting
and then uses an expression involving the toWorld method to trace the path of an animated child layer:
•part 1
•part 2
Rich Young provides a set of expressions on his AE Portal website that use the toWorld method link a camera and light
to a layer with the CC Sphere effect.
fromWorld(point, t=time) Return type: Array [2 or 3].
Argument type: point is an Array [2 or 3], and t is a Number.
Transforms a point from world space to layer space. Example: fromWorld(thisComp.layer(2).position)
See Expression example: Create a bulge between two layersfor an example of how this method can be used.
toCompVec(vec, t=time) Return type: Array [2 or 3].
Argument type: vec is an Array [2 or 3], and t is a Number.

685
Expressions and automation
Last updated 6/8/2015
Transforms a vector from layer space to composition space. Example: toCompVec([1,0])
fromCompVec(vec, t=time) Return type: Array [2 or 3].
Argument type: vec is an Array [2 or 3], and t is a Number.
Transforms a vector from composition space to layer space. Example (2D layer):
dir=sub(position, thisComp.layer(2).position); fromCompVec(dir)
toWorldVec(vec, t=time) Return type: Array [2 or 3].
Argument type: vec is an Array [2 or 3], and t is a Number.
Transforms a vector from layer space to world space. Example: p1 = effect("Eye Bulge 1")("Bulge Center"); p2 =
effect("Eye Bulge 2")("Bulge Center"); toWorld(sub(p1, p2))
fromWorldVec(vec, t=time) Return type: Array [2 or 3].
Argument type: vec is an Array [2 or 3], and t is a Number.
Transforms a vector from world space to layer space. Example: fromWorld(thisComp.layer(2).position)
fromCompToSurface(point, t=time) Return type: Array [2].
Argument type: point is an Array [2 or 3], and t is a Number.
Projects a point located in composition space to a point on the surface of the layer (zero z-value) at the location where
it appears when viewed from the active camera. This method is useful for setting effect control points. Use with 3D
layers only.
Camera attributes and methods (expression reference)
Camera objects have the same attributes and methods as Layer objects, except for source, effect, mask, width, height,
anchorPoint, scale, opacity, audioLevels, timeRemap, and all of the material properties.
pointOfInterest Return type: Property [3].
Returns the point of interest values of a camera in world space.
zoom Return type: Property.
Returns the zoom values of a camera in pixels.
Here’s an expression for the Scale property of a layer that maintains the relative size of the layer in frame while changing
the z position (depth) of a layer or the Zoom value of a camera:
cam = thisComp.activeCamera; distance = length(sub(position, cam.position)); scale * distance / cam.zoom;
depthOfField Return type: Property.
Returns 1 if the Depth Of Field property of a camera is on, or returns 0 if the Depth Of Field property is off.
focusDistance Return type: Property.
Returns the focus distance value of a camera, in pixels.
aperture Return type: Property.
Returns the aperture value of a camera, in pixels.
blurLevel Return type: Property.
Returns the blur level value of a camera as a percentage.

686
Expressions and automation
Last updated 6/8/2015
active Return type: Boolean.
Returns true if the camera is the active camera for the composition at the current time: the Video switch for the
camera layer is on, the current time is in the range from the In point of the camera layer to the Out point of the camera
layer, and it is the first (topmost) such camera layer listed in the Timeline panel. Returns false otherwise.
Light attributes and methods (expression reference)
Light objects have the same attributes and methods as Layer objects, except for source, effect, mask, width, height,
anchorPoint, scale, opacity, audioLevels, timeRemap, and all of the material properties.
pointOfInterest Return type: Property [3].
Returns the point of interest values for a light in world space.
intensity Return type: Property.
Returns the intensity values of a light as a percentage.
color Return type: Property [4].
Returns the color value of a light.
coneAngle Return type: Property.
Returns the cone angle of a light, in degrees.
coneFeather Return type: Property.
Returns the cone feather value of a light as a percentage.
shadowDarkness Return type: Property.
Returns the shadow darkness value of a light as a percentage.
shadowDiffusion Return type: Property.
Returns the shadow diffusion value of a light, in pixels.
David Van Brink provides an instructional article and sample project on his omino pixel blog that show how to use
expressions with lights.
Effect attributes and methods (expression reference)
active Return type: Boolean.
Returns true if the effect is turned on (the Effect switch is selected).
param(name) Return type: Property.
Argument type: name is a String.
Returns a property within an effect. Effect control points are always in layer space. Example:
effect("Bulge").param("Bulge Height")
param(index) Return type: Property.
Argument type: index is a Number.
Returns a property within an effect. Effect control points are always in layer space. For example,
effect("Bulge").param(4) returns the Bulge Height property.

687
Expressions and automation
Last updated 6/8/2015
Mask attributes and methods (expression reference)
Note: You can link Mask Path properties to other path properties (paths in a shape layer and brush strokes), but the
properties are not accessible for direct numerical manipulation through expressions.
maskOpacity Return type: Property.
Returns the opacity value of a mask as a percentage.
maskFeather Return type: Property.
Returns the feather value of a mask, in pixels.
maskExpansion Return type: Property.
Returns the expansion value of a mask, in pixels.
invert Return type: Boolean.
Returns true if the mask is inverted or false if it is not.
Property attributes and methods (expression reference)
value Return type: Number, Array, or String.
Returns the value of a property at the current time.
valueAtTime(t) Return type: Number or Array.
Argument type: t is a Number.
Returns the value of a property at the specified time, in seconds.
For example, to have a property value for each frame chosen randomly from a set of four values, set your four values as
keyframes at 0, 1, 2, and 3 seconds, and then apply the following expression to the property:
valueAtTime(random(4))
Note: Dan Ebberts provides more examples and techniques for using the valueAtTime and velocityAtTime methods on his
MotionScript website.
velocity Return type: Number or Array.
Returns the temporal velocity value at the current time. For spatial properties, such as Position, it returns the tangent
vector value. The result is the same dimension as the property.
velocityAtTime(t) Return type: Number or Array.
Argument type: t is a Number.
Returns the temporal velocity value at the specified time.
speed Return type: Number.
Returns a 1D, positive speed value equal to the speed at which the property is changing at the default time. This element
can be used only for spatial properties.
speedAtTime(t) Return type: Number.
Argument type: t is a Number.
Returns the spatial speed value at the specified time.
wiggle(freq, amp, octaves=1, amp_mult=.5, t=time) Return type: Number or Array.

688
Expressions and automation
Last updated 6/8/2015
Argument type: freq, amp, octaves, amp_mult, and t are Numbers.
Randomly shakes (wiggles) the value of the property.
freq value is the frequency in wiggles per second.
amp value is the amplitude in units of the property to which it is applied.
octaves is the number of octaves of noise to add together. This value controls how much detail is in the wiggle. Make
this value higher than the default of 1 to include higher frequencies or lower to include amplitude harmonics in the
wiggle.
amp_mult is the amount that amp is multiplied by for each octave. This value controls how fast the harmonics drop off.
The default is 0.5; make it closer to 1 to have the harmonics added at the same amplitude as the base frequency, or closer
to 0 to add in less detail.
t is the base start time. This value defaults to the current time. Use this parameter if you want the output to be a wiggle
of the property value sampled at a different time.
Example: position.wiggle(5, 20, 3, .5) produces about 5 wiggles per second with an average size of about 20 pixels. In
addition to the main wiggle, two more levels of detailed wiggles occur with a frequency of 10 and 20 wiggles per second,
and sizes of 10 and 5 pixels, respectively.
This example, on a two-dimensional property such as Scale, wiggles both dimensions by the same amount:
v = wiggle(5, 10); [v[0], v[0]]
This example, on a two-dimensional property, wiggles only along the y axis:
freq = 3; amp = 50; w = wiggle(freq,amp); [value[0],w[1]];
Paul Tuersley provides a script on the AE Enhancers forum that automatically adds wiggle, smooth, and loop
expressions to selected properties.
Dan Ebberts provides an example expression and a detailed explanation on his MotionScript website that shows how
to use the time parameter of the wiggle method to create a looping animation.
temporalWiggle(freq, amp, octaves=1, amp_mult=.5, t=time) Return type: Number or Array.
Argument type: freq, amp, octaves, amp_mult, and t are Numbers.
Samples the property at a wiggled time. The freq value is the frequency in wiggles per second, amp is the amplitude in
units of the property to which it is applied, octaves is the number of octaves of noise to add together, amp_mult is the
amount that amp is multiplied by for each octave, and t is the base start time. For this function to be meaningful, the
property it samples must be animated, because the function alters only the time of sampling, not the value. Example:
scale.temporalWiggle(5, .2)
smooth(width=.2, samples=5, t=time) Return type: Number or Array.
Argument type: width, samples, and t are Numbers.
Smooths the property values over time, converting large, brief deviations in the value to smaller, more evenly
distributed deviations. This smoothing is accomplished by applying a box filter to the value of the property at the
specified time. The width value is the range of time (in seconds) over which the filter is averaged. The samples value is
the number of discrete samples evenly spaced over time; use a larger value for greater smoothness (but decreased
performance). Generally, you’ll want samples to be an odd number so that the value at the current time is included in
the average. Example: position.smooth(.1, 5)
loopIn(type="cycle", numKeyframes=0) Return type: Number or Array.

689
Expressions and automation
Last updated 6/8/2015
Loops a segment of time that is measured from the first keyframe on the layer forward toward the Out point of the layer.
The loop plays from the In point of the layer. The numKeyframes value determines what segment is looped: The
segment looped is the portion of the layer from the first keyframe to the numKeyframes+1 keyframe. For example,
loopIn("cycle", 3) loops the segment bounded by the first and fourth keyframes. The default value of 0 means that all
keyframes will loop.
You can use keyframe-looping methods to repeat a series of keyframes. You can use these methods on most properties.
Exceptions include properties that can’t be expressed by simple numeric values in the Timeline panel, such as the Source
Text property, path shape properties, and the Histogram property for the Levels effect. Keyframes or duration values
that are too large are clipped to the maximum allowable value. Values that are too small result in a constant loop.
Paul Tuersley provides a script on the AE Enhancers forum that automatically adds wiggle, smooth, and loop
expressions to selected properties.
loopOut(type="cycle", numKeyframes=0) Return type: Number or Array.
Loops a segment of time that is measured from the last keyframe on the layer back toward the In point of the layer. The
loop plays until the Out point of the layer. The segment to loop is determined by the specified number of keyframes.
The numKeyframes value sets the number of keyframe segments to loop; the specified range is measured backward
from the last keyframe. For example, loopOut("cycle", 1) loops the segment bounded by the last keyframe and second-
to-last keyframe. The default value of 0 means that all keyframes will loop. See the entry for loopIn for more
information.
David Van Brink provides an instructional article and sample project on his omino pixel blog that show how to use the
Echo effect, the Particle Playground effect, and the loopOut method to animate a swarm of stylized swimming bacteria.
loopInDuration(type="cycle", duration=0) Return type: Number or Array.
Loops a segment of time that is measured from the first keyframe on the layer forward toward the Out point of the layer.
The loop plays from the In point of the layer. The segment to loop is determined by the specified duration. The duration
value sets the number of composition seconds in a segment to loop; the specified range is measured from the first
keyframe. For example, loopInDuration("cycle",1) loops the first second of the entire animation. The default of 0 means
that the segment to loop begins at the layer Out point. See the entry for loopIn for more information.
loopOutDuration(type="cycle", duration=0) Return type: Number or Array.
Loops a segment of time that is measured from the last keyframe on the layer back toward the In point of the layer. The
loop plays until the Out point of the layer. The segment to loop is determined by the specified duration. The duration
loop type result
cycle (default) Repeats the specified segment.
pingpong Repeats the specified segment, alternating between forward and
backward.
offset Repeats the specified segment, but offsets each cycle by the
difference in the value of the property at the start and end of the
segment, multiplied by the number of times the segment has looped.
continue Does not repeat the specified segment, but continues to animate a
property based on the velocity at the first or last keyframe. For
example, if the last keyframe of a Scale property of a layer is 100%, the
layer continues to scale from 100% to the Out point, instead of looping
directly back to the Out point. This type does not accept a keyframes
or duration argument.

690
Expressions and automation
Last updated 6/8/2015
value sets the number of composition seconds in a segment to loop; the specified range is measured backward from the
last keyframe. For example, loopOutDuration("cycle", 1) loops the last second of the entire animation. The default of 0
means that the segment to loop begins at the layer In point. See the entry for loopIn for more information.
key(index) Return type: Key or MarkerKey.
Argument type: index is a Number.
Returns the Key or MarkerKey object by number. For example, key(1) returns the first keyframe.
key(markerName) Return type: MarkerKey.
Argument type: markerName is a String.
Returns the MarkerKey object with this name. Use only on marker properties.
nearestKey(t) Return type: Key or MarkerKey.
Returns the Key or MarkerKey object nearest to a designated time.
numKeys Return type: Number.
Returns the number of keyframes on a property. Returns the number of markers on a marker property.
Note: If you use the Separate Dimensions command to separate the dimensions of the Position property into individual
components, the number of keyframes changes, so the value returned by this method changes.
propertyGroup(countUp = 1) Return type: Group.
Returns a group of properties relative to the property on which the expression is written. For example, if you add the
propertyGroup(1) expression to the Rotation property of a brush stroke, the expression targets the Transform property
group, which contains the Rotation property. If you add propertyGroup(2) instead, the expression targets the Brush
property group. This method lets you establish name-independent relationships in the property hierarchy. This method
is especially useful when duplicating properties that contain expressions.
The numProperties method for propertyGroup returns the number of properties in the property group.
This example returns the number of properties in the group that contains the property on which the expression is
written:
thisProperty.propertyGroup(1).numProperties
propertyIndex Return type: Number.
Returns the index of a property relative to other properties in its property group, including property groups within
masks, effects, text animators, selectors, shapes, trackers, and track points.
name Return type: String.
Returns the name of the property or property group.
Example: Animating with the propertyGroup method and propertyIndex attribute
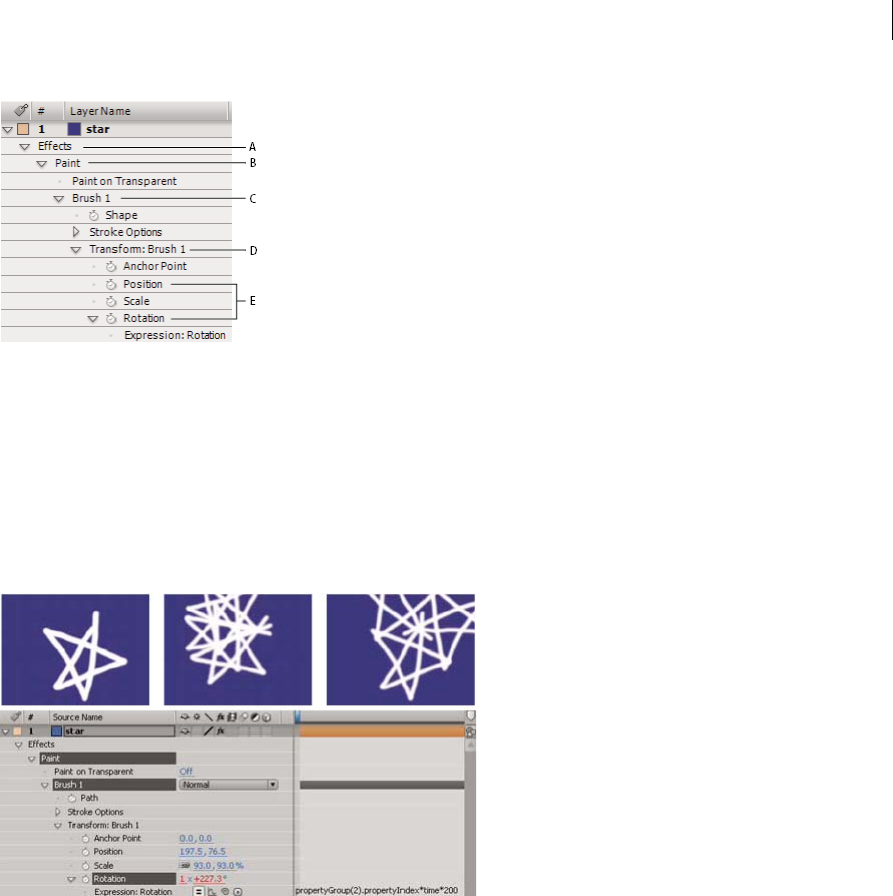
691
Expressions and automation
Last updated 6/8/2015
A propertyGroup(4) B propertyGroup(3) C propertyGroup(2) D propertyGroup(1) E Position propertyIndex value is 2; Rotation propertyIndex
value is 4.
In this example, the propertyGroup method for each brush stroke targets the Brush property group because that group
is two property groups up from the Rotation property. The propertyIndex attribute in each Brush stroke then returns
a unique value for each Brush stroke. The resulting value is then multiplied by the time and 200 and applied to each
rotation value, rotating each brush stroke differently, creating swirling paint strokes: propertyGroup(2).propertyIndex
* time * 200
propertyGroup(2).propertyIndex * time * 200
Key attributes and methods (expression reference)
When you access a Key object, you can get time, index, and value properties from it. For example, the following
expression gives you the value of the third Position keyframe: position.key(3).value.
The following expression, when written on an Opacity property with keyframes, ignores the keyframe values and uses
only the placement of the keyframes in time to determine where a flash should occur: d = Math.abs(time -
nearestKey(time).time); easeOut(d, 0, .1, 100, 0)
d = Math.abs(time - nearestKey(time).time);
easeOut(d, 0, .1, 100, 0)
value Return type: Number or Array.
Returns the value of the keyframe.
time Return type: Number.
Returns the time of the keyframe.

692
Expressions and automation
Last updated 6/8/2015
index Return type: Number.
Returns the index of the keyframe.
MarkerKey attributes (expression reference)
You can access values for composition markers and layer markers using the same methods. Access layer markers
through the thisLayer.marker object; access composition markers through the thisComp.marker object.
For the purpose of expressions, markers are a special type of Key object, so you can use methods such as
nearestKey(time) to access markers, and markers also have time and index attributes. The index attribute is not the
number (name) of the marker; it is the keyframe index number, representing the order of the marker in the time ruler.
Expressions have access to all of the values for a marker that you can set in the Composition Marker or Layer Marker
dialog box. This expression on the Source Text property of a text layer displays the time, duration, index, comment
(name), chapter, URL, frame target, and cue point name for the layer marker nearest the current time, and whether the
marker is for an event cue point:
m = thisLayer.marker.nearestKey(time);
s = "time:" + timeToCurrentFormat(m.time) + "\r" +
"duration: " + m.duration + "\r" +
"key index: " + m.index + "\r" +
"comment:" + m.comment + "\r" +
"chapter:" + m.chapter + "\r" +
"URL:" + m.url + "\r" +
"frame target: " + m.frameTarget + "\r" +
"cue point name: " + m.cuePointName + "\r" +
"Event cue point? " + m.eventCuePoint + "\r";
for (param in m.parameters){
s += "parameter: " + param + " value: " + m.parameters[param] + "\r";
}
s
Because the XMP metadata in a footage item can be converted into layer markers for a layer based on that item,
expressions can interact with XMP metadata. For information, see XMP metadata in After Effects.
Dan Ebberts provides a tutorial on the After Effects Developer Center that includes an example of using XMP metadata
with expressions.
duration Return type: Number.
Duration, in seconds, of marker.
comment Return type: String.
Contents of Comment field in marker dialog box.
chapter Return type: String.
Contents of Chapter field in marker dialog box.
url Return type: String.
Contents of URL field in marker dialog box.
frameTarget Return type: String.
Contents of Frame Target field in marker dialog box.
eventCuePoint Return type: Boolean.

693
Expressions and automation
Last updated 6/8/2015
Setting for cue point type in marker dialog box. True for Event; false for Navigation.
cuePointName Return type: String.
Contents of cue point Name field in marker dialog box.
parameters Return type: associative array of String values.
Contents of Parameter Name and Parameter Value fields in marker dialog box.
For example, if you have a parameter named “background color”, then you can use the following expression to access
its value at the nearest marker:
thisComp.marker.nearestKey(time).parameters["background color"]
More Help topics
Expression basics
Expression examples
Timecode and time display units
Keyframe interpolation
Automatically ease speed
Cameras, lights, and points ofinterest
Expression examples
Many of the examples in this section are based on expressions provided by Dan Ebberts.
Online resources for expression examples
Dan Ebberts provides example expressions and tutorials for learning how to work with expressions on his MotionScript
website. For example, Dan provides an excellent page about collision detection.
Trish and Chris Meyer provide a series of articles about expressions on the ProVideo Coalition website. These articles
contain many useful examples.
Colin Braley provides a tutorial and example project on his website that show how to use expressions to make one layer
repel others in a natural-seeming manner.
The AE Enhancers forum provides many examples and much useful information about expressions, as well as scripts
and animation presets. In this post on the AE Enhancers forum, Paul Tuersley provides a tutorial and example project
that show how to use expressions to animate several layers in a swarm.
Rick Gerard provides an example on his website that demonstrates rolling a square object along a floor so that the sides
stay in contact with the floor plane.
Carl Larsen provides a video tutorial on the Creative COW website that demonstrates how to use expressions and
parenting to relate the rotation of a set of wheels to the horizontal movement of a vehicle.

694
Expressions and automation
Last updated 6/8/2015
Marcus Geduld provides some examples from his book, After Effects Expressions, on the Focal Press website. In the
"String Manipulation" section, Marcus shows how to use basic JavaScript to manipulate the text in the Source Text
property of a layer. He even shows how to use an array of strings so that a layer's Source Text property can be set to a
specific word from a list. In the "Physical Simulations" section, Marcus shows how to use expressions for orbits,
bounces, jiggles, and collision detection.
Chris Zwar provides an example project on his website for automatically arranging still images or videos into a grid
(like a video wall). You can easily adjust position and spacing with sliders that are connected to a system of expressions.
There are three compositions in the project—one for stills, one for videos, and one to create an auto-storyboard in
which a video is sampled at user-defined intervals and aligned into a grid.
JJ Gifford’s website provides several example projects that demonstrate how to use expressions.
Rhys Enniks provides a video tutorial on his website in which he uses expressions and multiple text animators and range
selectors to animate text as if it is being typed onto a computer screen.
Maltaannon (Jerzy Drozda, Jr.) provides a video tutorial on his website that shows how to use expressions to create a
volume meter using the results of the Convert Audio To Keyframes command.
Harry Frank provides a tutorial on his graymachine website that shows how to use expressions to read data from an
external text file.
Expression example: Make a layer revolve in a circle
You can create an expression without using properties from other layers. For example, you can make a layer revolve in
a perfect circle.
1Select a layer, press P to reveal its Position property in the Timeline panel, and Alt-click (Windows) or Option-click
(Mac OS) the stopwatch to the left of the property name.
2Enter the following in the expression field:
[(thisComp.width/2), (thisComp.height/2)] + [Math.sin(time)*50, -Math.cos(time)*50]
Expression example: Rotate the hands of a clock
You can use the pick whip to link rotation values between layers to animate the hands on a clock—as the hour hand
moves from hour to hour, the minute hand rotates the full circumference of the clock face. This type of animation
would take a long time to create if you had to set each keyframe for both hand layers, but with the pick whip, you can
do it in a matter of minutes.
1Import or create two long, narrow solid-color layers: an hour hand and a minute hand. (See Solid-color layers and
solid-color footage items.)
2Set the anchor points at the ends of the layers. (See Layer anchor points.)
3Move the layers so that the anchor points are at the center of the composition. (See Move layers in space.)
4Set Rotation keyframes for the hour hand. (See Set or add keyframes.)
5Select the Rotation property for the minute hand and choose Animation > Add Expression.
6Drag the pick whip to the Rotation property for the hour hand. The following expression appears:
thisComp.layer("hour hand").rotation
7To make the minute hand rotate 12 times as fast as the hour hand, add *12 at the end of the expression as follows:
thisComp.layer("hour hand").rotation*12

695
Expressions and automation
Last updated 6/8/2015
Expression example: Position one layer between two others
This example expression positions and maintains one layer at a balanced distance between two other layers.
1Start with three layers. (See Creating layers.)
2Animate the positions of the first two layers in the Timeline panel. (See Motion paths.)
3Select the third layer, press P to reveal the Position property, and Alt-click (Windows) or Option-click (Mac OS) the
stopwatch button to the left of the property name.
4Enter the following in the expression field:
(thisComp.layer(1).position + thisComp.layer(2).position)/2
Expression example: Create a trail of images
This example expression instructs a layer to be at the same position as the next higher layer in the Timeline panel, but
delayed by a specified amount of time (in this case, 0.5 seconds). You can set similar expressions for the other geometric
properties.
1Start with two solid-color layers that are scaled to approximately 30% of the composition size. (See Solid-color layers
and solid-color footage items.)
2Animate the position of the first layer. (See Motion paths.)
3Select the second layer, press P to reveal the Position property, and Alt-click (Windows) or Option-click (Mac OS)
the stopwatch button to the left of the property name.
4Enter the following in the expression field:
thisComp.layer(thisLayer, -1).position.valueAtTime(time - .5)
5Duplicate the last layer five times by selecting it and pressing Ctrl+D (Windows) or Command+D (Mac OS) five
times.
All layers follow the same path, and each is delayed 0.5 seconds from the previous.
Dan Ebberts provides more examples and techniques for creating trails of images on his MotionScript website.
Expression example: Create a bulge between two layers
This example expression synchronizes the Bulge Center argument of the Bulge effect in one layer with the position of
another layer. For example, you can create an effect that looks like a magnifying glass moving over a layer, with the
contents under the magnifying glass bulging as the lens (that is, the overlying layer) moves. This expression uses the
fromWorld method, which makes the expression work correctly regardless of whether you move the magnifying glass
layer or the underlying layer. You can rotate or scale the underlying layer, and the expression stays intact.
You can also use other effects, such as Ripple, with this expression.
1Start with two layers. Make one layer a magnifying glass or similar object with a hole in the middle and name it
Magnifier. (See Creating layers.)
2Animate the position of the magnifying glass layer. (See Motion paths.)
3Apply the Bulge effect to the other layer. (See Apply an effect or animation preset.)
4Select the Bulge Center property of the Bulge effect in the Timeline panel and choose Animation > Add Expression,
or Alt-click (Windows) or Option-click (Mac OS) the stopwatch button for the property.
5Select the default expression text and type the following:
fromWorld(thisComp.layer("Magnifier").position)

696
Expressions and automation
Last updated 6/8/2015
Expression example: Fade opacity of a 3D layer based on distance from camera
❖Apply the following expression to the Opacity property of a 3D layer:
startFade = 500; // Start fade 500 pixels from camera.
endFade = 1500; // End fade 1500 pixels from camera.
try
{ // Check whether there's a camera
C = thisComp.activeCamera.toWorld([0,0,0]);
}
catch(err)
{ // No camera, so assume 50mm
w = thisComp.width * thisComp.pixelAspect;
z = (w/2)/Math.tan(degreesToRadians(19.799));
C = [0,0,-z];
}
P = toWorld(anchorPoint);
d = length(C,P);
linear(d,startFade,endFade,100,0)
The fade starts at a distance of 500 pixels from the camera and is complete at 1500 pixels from the camera. The linear
interpolation method is used to map distance values to opacity values.
Expression example: Make a 3D layer invisible if facing away from camera
❖Apply the following expression to the Opacity property of a 3D layer:
if (toCompVec([0, 0, 1])[2] > 0 ) value else 0
Dan Ebberts explains this expression on his MotionScript website.
Expression example: Flip layer horizontally if facing away from camera
❖Apply the following expression to the Scale property of a 3D layer:
if (toCompVec([0, 0, 1])[2] > 0 ) value else [-value[0], value[1], value[2]]
Expression example: Animate scale at each layer marker
❖Apply the following expression to a Scale property to make a layer wobble at each marker:
n = 0;
t = 0;
if (marker.numKeys > 0){
n = marker.nearestKey(time).index;
if (marker.key(n).time > time) n--;
}
if (n > 0) t = time - marker.key(n).time;
amp = 15;
freq = 5;
decay = 3.0;
angle = freq * 2 * Math.PI * t;
scaleFact = (100 + amp * Math.sin(angle) / Math.exp(decay * t)) / 100;
[value[0] * scaleFact, value[1] / scaleFact];

697
Expressions and automation
Last updated 6/8/2015
Expression example: Start or stop wiggle at specific time
You can use any expression in place of the wiggle expression used here, to begin and end the influence of any expression
at a specific time.
Apply the following expression to a property to wiggle it beginning at time 2 seconds:
timeToStart = 2;
if (time > timeToStart)
{
wiggle(3,25);
}
else
{
value;
}
Apply the following expression to a property to stop wiggling it at time 4 seconds:
timeToStop = 4;
if (time > timeToStop)
{
value;
}
else
{
wiggle(3,25);
}
Apply the following expression to a property to start wiggling it at time 2 seconds and stop wiggling it at time 4 seconds:
timeToStart = 2;
timeToStop = 4;
if ((time > timeToStart) && (time < timeToStop))
{
wiggle(3,25);
}
else
{
value;
}
Expression example: Match camera focal plane to another layer
❖Apply the following expression to the Focus Distance property of a camera layer to have its focus distance match the
distance to the anchor point of a layer named “target”:
target = thisComp.layer("target");
V1 = target.toWorld(target.anchorPoint) - toWorld([0,0,0]);
V2 = toWorldVec([0,0,1]);
dot(V1,V2);
Dan Ebberts explains this expression example in detail on his Motionscript website.
More Help topics
Add, edit, and remove expressions
Create a camera layer and change camera settings

698
Expressions and automation
Last updated 6/8/2015
Scripts
A script is a series of commands that tells an application to perform a series of operations. You can use scripts in most
Adobe applications to automate repetitive tasks, perform complex calculations, and even use some functionality not
directly exposed through the graphical user interface. For example, you can direct After Effects to reorder the layers in
a composition, find and replace source text in text layers, or send an e-mail message when rendering is complete.
After Effects scripts use the Adobe ExtendScript language, which is an extended form of JavaScript, similar to Adobe
ActionScript. ExtendScript files have the .jsx or .jsxbin filename extension.
For a description of the scripting capabilities available with After Effects, see the After Effects Scripting Guide on the
After Effects Developer Center.
Loading and running scripts
When After Effects starts, it loads scripts from the Scripts folder. By default, the Scripts folder is in the following
locations for After Effects:
•(Windows) Program Files\Adobe\Adobe After Effects <version>\Support Files
•(Mac OS) Applications/Adobe After Effects <version>
Scripts are also installed in user locations starting with After Effects CC 12.1. See the What's New in After Effects 12.2
for additional information.
Several scripts come with After Effects and are automatically installed in the Scripts folder.
Loaded scripts are available from the File > Scripts menu. If you edit a script while After Effects is running, you must
save your changes for the changes to be applied. If you place a script in the Scripts folder while After Effects is running,
you must restart After Effects for the script to appear in the Scripts menu, though you can immediately run the new
script using the Run Script File command.
Scripts in the ScriptUI Panels folder are available from the bottom of the Window menu. If a script has been written to
provide a user interface in a dockable panel, the script should be put in the ScriptUI folder. ScriptUI panels work much
the same as the default panels in the After Effects user interface.
Note: The default is for scripts to not be allowed to write files or send or receive communication over a network. To allow
scripts to write files and communicate over a network, choose Edit > Preferences > General (Windows) or After Effects >
Preferences > General (Mac OS), and select the Allow Scripts To Write Files And Access Network option.
•To run a loaded script, choose File > Scripts > [script name].
•To run a script that has not been loaded, choose File > Scripts > Run Script File, locate and select a script, and click
Open.
•To stop a running script, press Esc.
•To run a script from the command line, call afterfx.exe from the command line. Use the -r switch and the full path
of the script to run as arguments. This command does not open a new instance of the After Effects application; it
runs the script in the existing instance.
Example (for Windows):
afterfx -r c:\script_path\example_script.jsx
You can use this command-line technique—together with the software that comes with a customizable keyboard—to
bind the invocation of a script to a keyboard shortcut.

699
Expressions and automation
Last updated 6/8/2015
Sebastien Perier provides instructions on his website for assigning keyboard shortcuts to scripts so that you can run a
script with a single keystroke. This technique relies on the KeyEd Up script.
Jeff Almasol provides a script that creates a simple console panel. The console panel includes a text area in which you
can enter ExtendScript commands to be evaluated. There is no capturing of errors or messages; this console is only a
simple way of entering commands without having to create a script first. For information, see Jeff Almasol's redefinery
website.
On the AE Scripts website, Lloyd Alvarez offers a tip on how to run .jsxbin scripts if you don't have access to the Scripts
or ScriptUI Panels folder.
Scripts included with After Effects
After Effects provides several prewritten scripts to assist you in performing common tasks, and to provide a basis for
you to modify and create your own scripts.
Run the sample script Demo Palette.jsx to get an idea of what sorts of things you can do with scripts.
Writing and modifying scripts
You can write your own scripts for use in After Effects by using the script editor, which is part of the ExtendScript
Toolkit. The ExtendScript Toolkit provides a convenient interface for creating, debugging, and testing your own scripts.
Sometimes, all that you need to do is make a slight modification to an existing script to make it do what you want; such
slight modifications can often be performed with little knowledge of computer programming and scripting languages.
To start the script editor, choose File > Scripts > Open Script Editor.
A tutorial on the AE Enhancers forum leads the reader step by step through the creation of a script.
Jeff Almasol provides a set of scripting utilities—such as useful functions—to facilitate the creation of your own scripts
on his redefinery website.
David Torno provides a list of matchnames for After Effects scripts.
Where to find additional useful scripts
Find scripts, projects, and other useful items on the Adobe Add-ons website.
Dan Ebberts provides scripting tutorials and useful scripts in the scripting section of his MotionScript website.
Lloyd Alvarez provides a collection of useful scripts on his After Effects Scripts website.
The AE Enhancers forum provides example scripts and useful information about scripting (as well as expressions and
animation presets) in After Effects.
Jeff Almasol provides a collection of useful scripts on his redefinery website.
Dale Bradshaw provides scripts and tricks on his Creative Workflow Hacks website.
The nabscripts website provides many useful scripts.
Christopher Green provides many useful scripts on his website.

700
Last updated 6/8/2015
Chapter 16: Rendering and Exporting
Basics of rendering and exporting
Rendering and exporting overview
What is rendering?
Rendering is the creation of the frames of a movie from a composition. The rendering of a frame is the creation of a
composited two-dimensional image from all of the layers, settings, and other information in a composition that make
up the model for that image. The rendering of a movie is the frame-by-frame rendering of each of the frames that make
up the movie. For more information on how each frame is rendered, see Render order and collapsing transformations.
Though it is common to speak of rendering as if this term only applies to final output, the processes of creating previews
to show in the Footage, Layer, and Composition panels are also kinds of rendering. In fact, it is possible to save a
preview as a movie and use that as your final output. (See Preview video and audio .)
After a composition is rendered for final output, it is processed by one or more output modules that encode the
rendered frames into one or more output files. This process of encoding rendered frames into files for output is one
kind of exporting.
After you have completed creating a composition, you can output a movie file. There are two different methods of
outputting a movie file. Choose the one based on your needs.
You might need a movie file for the following reasons:
•You need a high quality movie (with or without an alpha channel) or image sequence that will be placed in a
Premiere Pro sequence, or used in another video editing, compositing, or 3D graphics application.
For creating a high quality movie file, render it with the Render Queue. See Render and export with the Render
Queue panel
•You need a compressed movie that will be played on the web, used for DVD, or Blu-ray disc.
For creating a high quality movie file that is compressed for the web, DVD, or Blu-ray disc, encode it with Adobe
Media Encoder either within After Effects with the Render Queue or by importing a composition into Adobe Media
Encoder. See, “Render and export with Adobe Media Encoder
Note: Some kinds of exporting don’t involve rendering and are for intermediate stages in a workflow, not for final output.
For example, you can export a project as an Adobe Premiere Pro project by choosing File > Export > Adobe Premiere Pro
Project. The project information is saved without rendering. In general, data transferred through Dynamic Link is not
rendered.
A movie can be made into a single output file (such as a movie in an F4V or FLV container) that contains all of the
rendered frames, or it can be made into a sequence of still images (as you would do when creating output for a film
recorder).

701
Rendering and Exporting
Last updated 6/8/2015
Aharon Rabinowitz provides an introduction to rendering in his “What is Rendering?” video tutorial—part of the
Multimedia 101 series on the Creative COW website.
There are two ways Adobe Media Encoder can create an output file from After Effects. You can output files by using
the Render Queue or you can import compositions directly into the standalone version of Adobe Media Encoder.
For the Render Queue, After Effects uses an embedded version of the Adobe Media Encoder to encode most movie
formats through the Render Queue panel. When you manage render and export operations with the Render Queue
panel, the embedded version of the Adobe Media Encoder is called automatically. The Adobe Media Encoder appears
only in the form of the export settings dialog boxes with which you specify some encoding and output settings. (See
Encoding and compression options for movies.)
Note: The embedded version of the Adobe Media Encoder used to manage export settings within After Effects output
modules does not provide all of the features of the full, stand-alone Adobe Media Encoder application.
Render and export with the Render Queue panel
The primary way of rendering and exporting movies from After Effects is through the Render Queue panel.
When you place a composition into the Render Queue panel, it becomes a render item. You can add many render items
to the render queue, and After Effects can render multiple items in a batch, unattended. When you click the Render
button in the upper-right corner of the Render Queue panel, all items with the status of Queued are rendered and
output in the order in which they are listed in the Render Queue panel.
You do not need to render a movie multiple times to export it to multiple formats with the same render settings. You
can export multiple versions of the same rendered movie by adding output modules to a render item in the Render
Queue panel.When working with multiple render items, it is often useful to add comments in the Comment column in the
Render Queue panel. If the Comment column is not visible, right-click (Windows) or Control-click (Mac OS) a column
heading, and choose Columns > Comment.
Manage render items
In the Render Queue panel, you can manage several render items at once, each with its own render settings and output
module settings.
Render settings determine the following characteristics :
•Output frame rate
•Duration
•Resolution
•Layer quality
Output module settings—which are applied after render settings—determine post-rendering characteristics such as
•Output format
•Compression options
•Cropping
•whether to embed a link to the project in the output file
You can create templates that contain commonly used render settings and output module settings.

702
Rendering and Exporting
Last updated 6/8/2015
Using the Render Queue panel, you can render the same composition to different formats or with different settings, all
with one click of the Render button:
•You can output to a sequence of still images, such as a Cineon sequence, which you can then transfer to film for
cinema projection.
•You can output using lossless compression (or no compression) to a QuickTime container for transfer to a non-
linear editing (NLE) system for video editing.
You can select, duplicate, and reorder render items using many of the same keyboard shortcuts that you use for working
with layers and other items. See General (keyboard shortcuts).
Note: To transfer the output rendered from After Effects to film or video, you must have the proper hardware for film or
video transfer, or have access to a service bureau that can provide transfer services.
Render and export a movie using the render queue
1Select the composition from which to make a movie in the Project panel, and then do one of the following to add
the composition to the render queue:
•Choose Composition > Add To Render Queue.
•Drag the composition to the Render Queue panel.
To create a new composition from a footage item and immediately add that composition to the render queue, drag
the footage item from the Project panel to the Render Queue panel. This is a convenient way to convert a footage
item from one format to another.
2Click the triangle next to the Output To heading in the Render Queue panel to choose a name for the output file
based on a naming convention, and then choose a location; or click the text next to the Output To heading to enter
any name. (See Specify filenames and locations for rendered output.)
3Click the triangle to the right of the Render Settings heading to choose a render settings template, or click the
underlined text to the right of the Render Settings heading to customize the settings. (See Render settings.)
4Choose a Log type from the Log menu.
When a log file has been written, the path to the log file appears under the Render Settings heading and Log menu.
5Click the triangle to the right of the Output Module heading to choose an output module settings template, or click
the underlined text to the right of the Output Module heading to customize the settings. You use the output module
settings to specify the file format of the output movie. In some cases, a format-specific dialog box opens after you
choose a format, in which you can specify format-specific settings. (See Output modules and output module
settingsand Encoding and compression options for movies.)
When an output name and location have been set, and render settings and an output module have been selected, the
entry in the Render column automatically becomes selected (shown by a check mark) and the status changes to
Queued. The status Queued means that the render item is in the render queue.
Press Caps Lock before you start rendering to prevent the Composition panel from displaying rendered frames. By
not updating the Composition panel, After Effects requires less time to process simple render items with many
frames.
6Click the Render button in the upper-right corner of the Render Queue panel.
Rendering a composition into a movie can take a few seconds or many hours, depending on the composition’s frame
size, quality, complexity, and compression method. As After Effects renders the item, you are unable to work in the
program. An audio alert indicates when rendering is complete.
See this tutorial to learn how to use the render queue to export files.

703
Rendering and Exporting
Last updated 6/8/2015
When rendering of a render item is complete, it remains in the Render Queue panel with its status changed to Done
until you remove the item from the Render Queue panel. You cannot rerender a completed item, but you can duplicate
it to create a new item in the queue with the same settings or with new settings.
After an item has been rendered, you can import the finished movie as a footage item by dragging its output module
from the Render Queue panel into the Project panel. (See Import footage items.)
Render item statuses
Each render item has a status, which appears in the Status column in the Render Queue panel:
Unqueued The render item is listed in the Render Queue panel but is not ready to render. Confirm that you have
selected the desired render settings and output module settings, and then select the Render option to queue the render
item.
Queued The render item is ready to render.
Needs Output An output filename has not been specified. Choose a value from the Output To menu, or click the
underlined Not Yet Specified text next to the Output To heading to specify a filename and path.
Failed After Effects was unsuccessful in rendering the render item. Use a text editor to view the log file for specific
information on why the rendering was unsuccessful. When a log file has been written, the path to the log file appears
under the Render Settings heading and Log menu.
User Stopped The rendering process was stopped.
Done The rendering process for the item is complete.
Manage render items and change render statuses
•Select the source composition for a render item in the Project panel - Right-click (Windows) or Control-click
(Mac OS) the render item and choose Reveal Composition In Project from the context menu.
•Remove a render item from the render queue (change its status from Queued to Unqueued) - Deselect the item
entry in the Render column. The item remains in the Render Queue panel.
•Change the status of a render item from Unqueued to Queued - Select the item in the Render column.
•Remove a render item from the Render Queue panel - Select the item and press Delete, or choose Edit > Clear.
•Rearrange items in the Render Queue panel - Drag an item up or down the queue. A heavy black line appears
between render items, indicating where the item will be placed. You can also reorder selected render items by
choosing Layer > Arrange, and then choosing Bring Render Item Forward, Send Render Item Backward, Bring
Render Item To Front, or Send Render Item To Back
•Move selected render items up (earlier) in the render queue - Press Ctrl+Alt+Up Arrow (Windows) or
Command+Option+Up Arrow (Mac OS).
•Move selected render items down (later) - Press Ctrl+Alt+Down Arrow (Windows) or Command+Option+Down
Arrow (Mac OS).
•Move selected render items to the top of the render queue - Press Ctrl+Alt+Shift+Up Arrow (Windows) or
Command+Option+Shift+Up Arrow (Mac OS).
•Move selected render items to the bottom (end) of the render queue - Press Ctrl+Alt+Shift+Down Arrow
(Windows) or Command+Option+Shift+Down Arrow (Mac OS).
•Duplicate a render item - Right-click (Windows) or Control-click (Mac OS) the render item and choose a
command from the context menu:
•Render with the same filename - Choose Duplicate With File Name.

704
Rendering and Exporting
Last updated 6/8/2015
•Render with a new filename - Choose Duplicate, click the underlined filename next to Output To, enter a new
filename, and click Save.
Pause or stop rendering
If the disk (to which an output module is writing) runs out of space, After Effects pauses the render operation. You can
clear additional disk space and then resume rendering and exporting.
•To pause rendering, click Pause. To resume rendering, click Continue.
While rendering is paused, you cannot change settings or use After Effects in any other way.
•To stop rendering with the purpose of starting the same render over again, Alt-click (Windows) or Option-click
(Mac OS) Stop.
The render item for which rendering was stopped is assigned the status User Stopped, and a new item with the status
of Queued is added to the Render Queue panel. The new item uses the same output filename and has the same
duration as the original render item.
•To stop rendering with the purpose of resuming the same render, click Stop.
The render item for which rendering was stopped is assigned the status User Stopped, and a new item with the status
of Unqueued is added to the Render Queue panel. The new item uses an incremented output filename and resumes
rendering at the before frame at which rendering was stopped—so the first frame of the new item is the last
successfully rendered frame of the stopped item.
Information shown for current render operations
Basic information about the current batch of renders is shown at the bottom of the Render Queue panel:
Message A status message. For example, Rendering 1 of 4.
RAM Memory available for the rendering process.
Renders Started The date and time at which the current batch of renders was started.
Total Time Elapsed The rendering time elapsed (not counting pauses) since the current batch of renders was started.
Most Recent Error The path where the log files are located.
To view more information about the current render operation, click the triangle to the left of the Current Render
heading. The Current Render pane collapses (closes) after a short time. To expand the pane so that it does not collapse
after a time-out period, Alt-click (Windows) or Option-click (Mac OS) the triangle next to the Current Render heading. To
view details of a completed render, review the log file. When a log file has been written, the path to the log file appears under
the Render Settings heading and Log menu.
Change the render-complete sounds
A chime plays when all items in the render queue have been rendered and exported; a different sound plays if a render
operation fails. You can change the render-complete sounds by replacing files named rnd_okay.wav and rnd_fail.wav
in the sounds folder. The sounds folder is in the following location:
•Program Files\Adobe\Adobe After Effects CC\Support Files (Windows)
•Applications/Adobe After Effects CC/Contents/Resources (Mac OS)
Online resources for rendering and exporting with the render queue
Lloyd Alvarez provides a script on his After Effects Scripts website that takes items that are ready to render in the render
queue and sends them to render in the background using aerender.

705
Rendering and Exporting
Last updated 6/8/2015
Jeff Almasol provides a script on his redefinery website that renders and exports each of the selected layers separately.
You might find this script useful if layers represent different versions of an effect or different parts of an effect that you
want to render as separate “passes” for flexibility in how they get composited.
Christopher Green provides a script (Queue_Comp_Sections.jsx) on his website with which you can use multiple guide
layers to designate multiple time spans to be rendered and exported separately through the render queue.
Render and export with Adobe Media Encoder
You can also import After Effects compositions directly into Adobe Media Encoder which offers the flexibility to
continue working in After Effects while files are processed. You also have options that are not available in the Render
Queue, like two pass encoding.
For information about the Adobe Media Encoder application, see Adobe Media Encoder Help .
To add a composition to Adobe Media Encoder, do the following:
1Drag the After Effects project containing the composition you want to encode into the Encdoding Queue in Adobe
Media Encoder.
2The Import After Effects Composition dialog box launches. Choose the composition you want to encode.
3Encode the file as you normally would by choosing presets and an output location in Adobe Media Encoder.
In After Effects CC, you can add a composition to Adobe Media Encoder from After Effects. Do one of the following:
•Choose Composition > Add To Adobe Media Encoder Queue
•Choose File > Export > Add to Adobe Media Encoder Queue
•Press Ctrl+Alt+M (Windows) or Command+Option+M (Mac OS)
Choosing formats and output settings
After Effects provides various formats and compression options for output. Which format and compression options
you choose depends on how your output will be used. For example, if the movie that you render from After Effects is
the final product that will be played directly to an audience, then you need to consider the medium from which you’ll
play the movie and what limitations you have on file size and data rate. By contrast, if the movie that you create from
After Effects is an intermediate product that will be used as input to a video editing system, then you should output
without compression to a format compatible with the video editing system. (See Planning your work.)
Aharon Rabinowitz provides an article on the Creative COW website about planning your project and deciding what
formats and settings to use for final output.
Keep in mind the fact that you can use different encoding and compression schemes for different phases of your
workflow. For example, you may choose to export a few frames as full-resolution still images (for example, TIFF files)
when you need approval from a customer about the colors in a shot; whereas you may export the movie using a lossy
encoding scheme (for example, H.264) when you need approval for the timing of the animation.
Supported output formats
You can add the ability to export other kinds of data by installing plug-ins or scripts provided by parties other than
Adobe. For example, Paul Tuersley provides a script on the AE Enhancers forum with which you export After Effects
composition data as Cinema 4D project data. Mark Christiansen provides an article on the ProVideo Coalition website
that links to scripts and plug-ins for exporting from After Effects for use in Cinema 4D, Maya, Lightwave, and other
3D applications. (See Plug-ins.)
Unless otherwise noted, all image file formats are exported at 8 bits per channel (bpc).

706
Rendering and Exporting
Last updated 6/8/2015
Video and animation formats
•3GPP (3GP)
•H.264 and H.264 Blu-ray
•MPEG-2
•MPEG-2 DVD
•MPEG-2 Blu-ray
•MPEG-4
•QuickTime (MOV)
•SWF
•Video for Windows (AVI; Windows only)
•Windows Media (Windows only)
To create an animated GIF movie, first render and export a QuickTime movie from After Effects. Then import the
QuickTime movie into Photoshop Extended and export the movie to animated GIF using Save For Web & Devices.
Video project formats
•Adobe Premiere Pro project (PRPROJ)
•XFL for Flash Professional (XFL)
Still-image formats
•Adobe Photoshop (PSD; 8, 16, and 32 bpc)
•Bitmap (BMP, RLE)
•Cineon (CIN, DPX; 16 bpc and 32 bpc converted to 10 bpc)
•Maya IFF (IFF; 16 bpc)
•JPEG (JPG, JPE)
•OpenEXR (EXR)
•PNG (PNG; 16 bpc)
•Radiance (HDR, RGBE, XYZE)
•SGI (SGI, BW, RGB, 16 bpc)
•Targa (TGA, VBA, ICB, VST)
•TIFF (TIF; 8, 16, and 32 bpc)
Audio-only formats
•Audio Interchange File Format (AIFF)
•MP3
•WAV
Collect files in one location
The Collect Files command gathers copies of all of the files in a project or composition into a single location. Use this
command before rendering, for archiving, or for moving a project to a different computer system or user account.

707
Rendering and Exporting
Last updated 6/8/2015
When you use the Collect Files command, After Effects creates a new folder and the following information is saved in
the new folder:
•A new copy of the project
•Copies of the footage files
•Proxy files as specified
•A report describing the files, effects, and fonts necessary to re-create the project and render the compositions.
After you collect files, you can continue making changes to a project, but be aware that those changes are stored with
the original project and not with the newly collected version.
1Choose File > Dependencies > Collect Files.
2In the Collect Files dialog box, choose an appropriate option for Collect Source Files.
All Collects all footage files, including unused footage and proxies.
For All Comps Collects all footage files and proxies used in any composition in the project.
For Selected Comps Collects all footage files and proxies used in compositions currently selected in the Project
panel.
For Queued Comps Collects all footage files and proxies used directly or indirectly in any of the compositions with
a Queued status in the Render Queue panel.
None (Project Only) Copies the project to a new location without collecting any source footage.
3Select other options, as appropriate:
Generate Report Only Selecting this option does not copy the files and proxies.
Obey Proxy Settings Use this option with compositions that include proxies to specify whether you want the copy
to include the current proxy settings. If this option is selected, only the files used in the composition are copied. If
this option is not selected, the copy contains both proxies and source files, so you can later change proxy settings in
the collected version.
Note: If you choose For Queued Comps in the Collect Source Files dialog box, After Effects uses the proxy settings from
the render settings, not the composition.
Reduce Project Removes all unused footage items and compositions from the collected files when the following
options are chosen in the Collect Source Files menu: For All Comps, For Selected Comps, and For Queued Comps.
Change Render Output To Use to redirect the output modules to render files to a named folder in the collected files
folder. This option ensures that you have access to your rendered files when you’re rendering the project from
another computer. Rendering status must be valid (Queued, Unqueued, or Will Continue) for the output modules
to render files to this folder.
Enable ‘Watch Folder’ Render You can use the Collect Files command to save projects to a specified watch folder
and then initiate watch-folder rendering over a network. After Effects also includes a render control file called
[project name]_RCF.txt, which signals to watching computers that the project is available for rendering. After Effects
and any installed render engines can then render the project together across a network. (See Set up watch-folder
rendering.)
Maximum Number Of Machines Use to specify the number of render engines or licensed copies of After Effects that
you want to allocate to render the collected project. Below this option, After Effects reports how many items in the
project will be rendered using more than one computer.
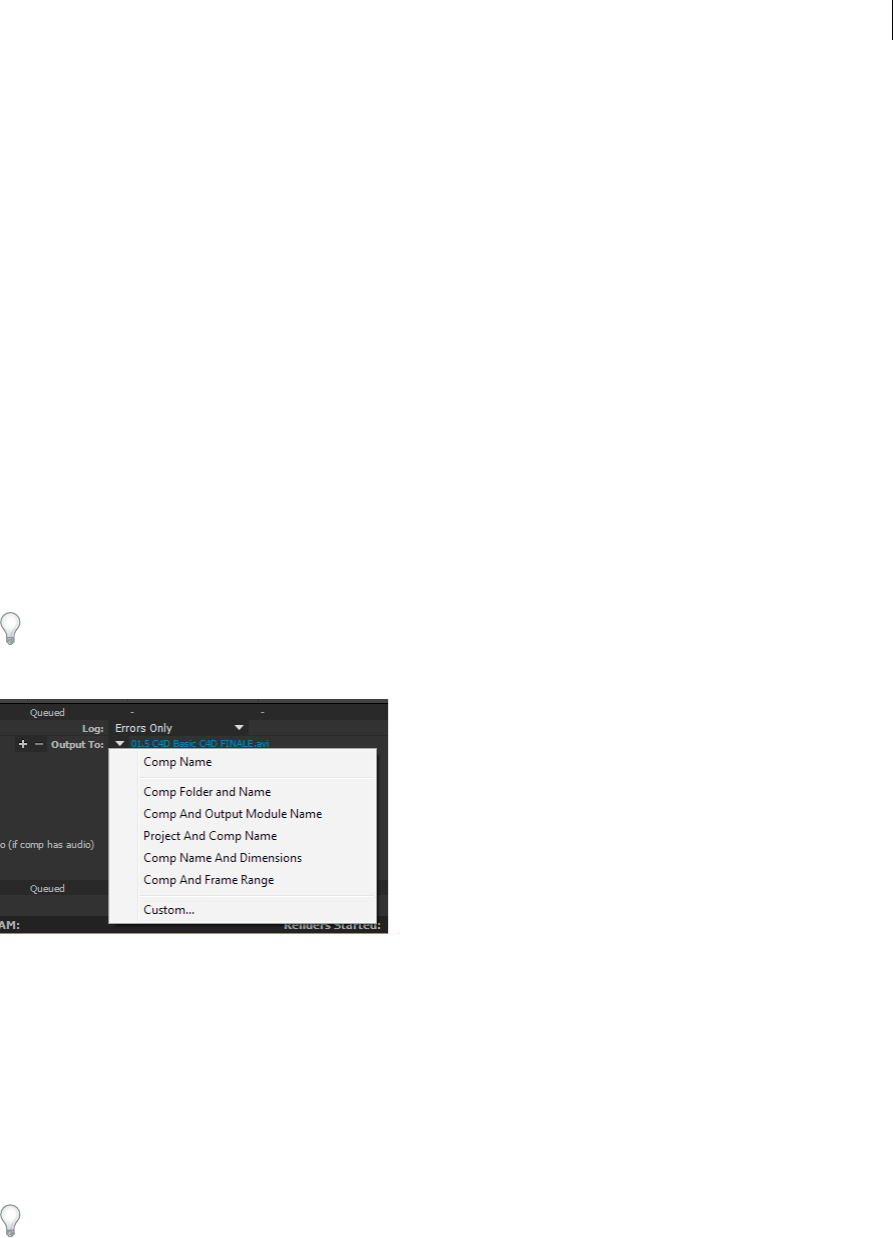
708
Rendering and Exporting
Last updated 6/8/2015
Note: If rendering time is unusually long, you may have set Maximum Number Of Machines too high, and the network
overhead required to track rendering progress among all computers is out of proportion to the time spent actually
rendering frames. The optimal number depends on many variables related to the network configuration and the
computers on it; experiment to determine the optimal number for your network.
4To add your own information to the report that will be generated, click Comments, enter your notes, and click OK.
The comments appear at the end of the report.
5Click Collect. Name the folder and specify a location for your collected files.
Once you start the file collection, After Effects creates the folder and copies the specified files to it. The folder
hierarchy is the same as the hierarchy of folders and footage items in your project. The new folder includes a
(Footage) folder and may include an output folder (if you selected Change Render Output To).
The names of these folders appear in parentheses to signal to any attending render engines that they should not search
these folders for projects.
Carl Larsen demonstrates the use of the Collect Files command and the Consolidate All Footage command in a video
tutorial on the Creative COW website that shows how to organize, consolidate, and archive project files and footage.
David Torno provides a script on the After Effects Scripts website that exports specified information about a project.
Specify filenames and locations for rendered output
You can locate a previously rendered item or check the destination of a queued render item by expanding the Output
Module group in the Render Queue panel and clicking the underlined file path, or by right-clicking (Windows) or
Control-clicking (Mac OS) the Output Module heading.
Specify the filename and location for a single render item
•To manually enter a filename and destination folder, click the underlined text next to the Output To heading.
•To name a file using a file naming template, click the triangle next to the Output To heading, and choose a template
from the menu.
Create and use a custom file naming template
You can use custom templates to name the output according to properties of the composition and project.
To make a file naming template the default template, hold down Ctrl (Windows) or Command (Mac OS) as you choose
the template from the Output To menu.
1In the Render Queue panel, choose Custom from the Output To menu.
2If you want to base the new file naming template on an existing template, choose the existing template from the
Preset menu.

709
Rendering and Exporting
Last updated 6/8/2015
3Click in the Template box where you want to insert a file naming rule, and do any of the following:
•To add a preset property to the filename, choose the property from the Add Property menu.
•Enter text in the Template box.
Note: Make sure that the insertion point is outside the square brackets ([ ]) of preset properties.
4Do any of the following:
•To save the file naming template as a preset for future use in the Output To menu, click the Save button . In the
Choose Name dialog box, enter a name for the file naming template, and click OK.
•To always use the selected file naming template, select Default.
•To apply the selected file naming template to the current Output Module, click OK.
Name output files automatically
The Use Default File Name And Folder preference ensures that all compositions added to the render queue are
automatically assigned a unique output filename (except for files created by saving previews, which still use the
composition name). When this option is selected, each render item is assigned the same folder name as the previous
render item until you change the path. If a composition is rendered more than once, After Effects adds a number to the
filename (for example, composition_name_1).
Note: Avoid using high-ASCII or other extended characters in filenames for projects to be used on different platforms or
rendered using a watch folder.
1Choose Edit > Preferences > Output (Windows) or After Effects > Preferences > Output (Mac OS).
2Select Use Default File Name And Folder.
Support for paths in templates
You can add paths to templates. Absolute paths can be defined in a template. For example, you can define and save a
template that always places rendered files in E:\Output\[compName].[extension]. See the File Name and Location
templates section in What's New in After Effects CC 12.2 for information about the new templates in After Effects CC
12.2 release.
Render settings
Render settings apply to each render item and determine how the composition is rendered for that specific render item.
By default, the render settings for a render item are based on the current project settings, composition settings, and
switch settings for the composition on which the render item is based. However, you can modify the render settings for
each render item to override some of these settings.
Render settings apply to the root composition for a render item, as well as all nested compositions.
Note: Render settings only affect the output of the render item with which they’re associated; the composition itself is not
affected.
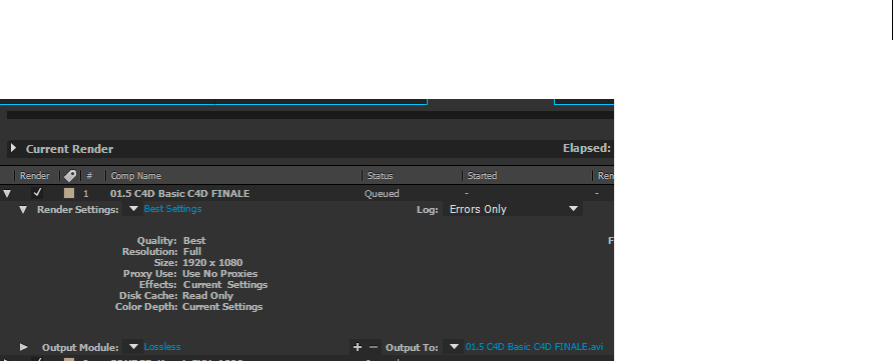
710
Rendering and Exporting
Last updated 6/8/2015
Change render settings
•To change render settings for a render item, click the render settings template name next to the Render Settings
heading in the Render Queue panel, and choose settings in the Render Settings dialog box.
•To apply a render settings template to selected render items, click the triangle next to the Render Settings heading
in the Render Queue panel, and choose a template from the menu. You can choose a custom render settings template
or one of the preset render settings templates:
Best Settings
Often used for rendering to final output.
Draft Settings
Often appropriate for reviewing or testing motion.
DV Settings
Similar to Best Settings, but with Field Rendering turned on, set to Lower Field First.
Multi-Machine Settings
Similar to Best Settings, but with Skip Existing Files selected to enable multi-machine rendering.
Note: The default render settings template is assigned to a render item when it is created. To change which render settings
template is the default, hold down Ctrl (Windows) or Command (Mac OS) as you choose a render settings template from
the menu.
Create, edit, and manage render settings templates
You perform the following tasks in the Render Settings Templates dialog box. To open the Render Settings Templates
dialog box, choose Edit > Templates > Render Settings, or click the triangle next to the Render Settings heading in the
Render Queue panel and choose Make Template.
•To make a new render settings template, click New, specify render settings, and click OK. Enter a name for the new
template.
•To edit an existing render settings template, choose a template from the Settings Name menu, click Edit, and specify
render settings.
Note: Changes to an existing template do not affect render items that are already in the render queue.
•To specify a default render settings template to be used when rendering movies, individual frames, pre-rendered
movies, or proxies, choose a template from a menu in the Defaults area of the Render Settings Templates dialog box.
•To save all currently loaded render settings templates to a file, click Save All.

711
Rendering and Exporting
Last updated 6/8/2015
•To load a saved render settings template file, click Load, select the render settings template file, and then click Open.
Render settings reference
Each of these settings overrides composition settings, project settings, or layer switch settings.
Log You can choose how much information After Effects writes to a render log file. If you choose Errors Only, After
Effects only creates the file if errors are encountered during rendering. If you choose Plus Settings, a log file is created
that lists the current render settings. If you choose Plus Per Frame Info, a log file is created that lists the current render
settings and information about the rendering of each frame. When a log file has been written, the path to the log file
appears under the Render Settings heading and Log menu.
Quality The quality setting to use for all layers. (See Layer image quality and subpixel positioning.)
Resolution Resolution of the rendered composition, relative to the original composition dimensions. (See Resolution.)
Note: If you render at reduced resolution, set the Quality option to Draft. Rendering at Best quality when reducing
resolution produces an unclear image and takes longer than Draft quality.
Disk Cache Determines whether the disk cache preferences are used during rendering. Read Only writes no new
frames to the disk cache while After Effects renders. Current Settings (default) uses the disk cache settings defined in
the Media & Disk Cache preferences. (See Disk cache .)
Proxy Use Determines whether to use proxies when rendering. Current Settings uses the settings for each footage item.
(See Placeholders and proxies.)
Effects Current Settings (default) uses the current settings for Effect switches . All On renders all applied effects. All
Off renders no effects.
Solo Switches Current Settings (default) uses the current settings for Solo switches for each layer. All Off renders as
if all Solo switches are off. (See Solo a layer.)
Guide Layers Current Settings renders guide layers in the top-level composition. All Off (the default setting) does not
render guide layers. Guide layers in nested compositions are never rendered. (See Guide layers.)
Color Depth Current Settings (default) uses the project bit depth. (See Color depth and high dynamic range color.)
Frame Blending On For Checked Layers renders frame blending only for layers with the Frame Blending switch set,
regardless of the Enable Frame Blending setting for the composition. (See Frame blending.)
Field Render Determines the field-rendering technique used for the rendered composition. Choose Off if you are
rendering for film or for display on a computer screen. (See Interlaced video and separating fields.)
3:2 Pulldown Specifies the phase of 3:2 pulldown. (See Introduce 3:2 pulldown.)
Motion Blur Current Settings uses the current settings for the Motion Blur layer switch and the Enable Motion Blur
composition switch. On For Checked Layers renders motion blur only for layers with the Motion Blur layer switch set,
regardless of the Enable Motion Blur setting for the composition. Off For All Layers renders all layers without motion
blur regardless of the layer switch and composition switch settings. (See Motion blur.)
Time Span How much of the composition to render. To render the entire composition, choose Length Of Comp. To
render only the part of the composition indicated by the work-area markers, choose Work Area Only. To render a
custom time span, choose Custom. (See Work area .)
Frame Rate The sampling frame rate to use when rendering the movie. Select Use Comp’s Frame Rate to use the frame
rate specified in the Composition Settings dialog box, or select Use This Frame Rate to use a different frame rate. The
actual frame rate of the composition is unchanged. The frame rate of the final encoded movie is determined by the
output module settings. (See Frame rate.)
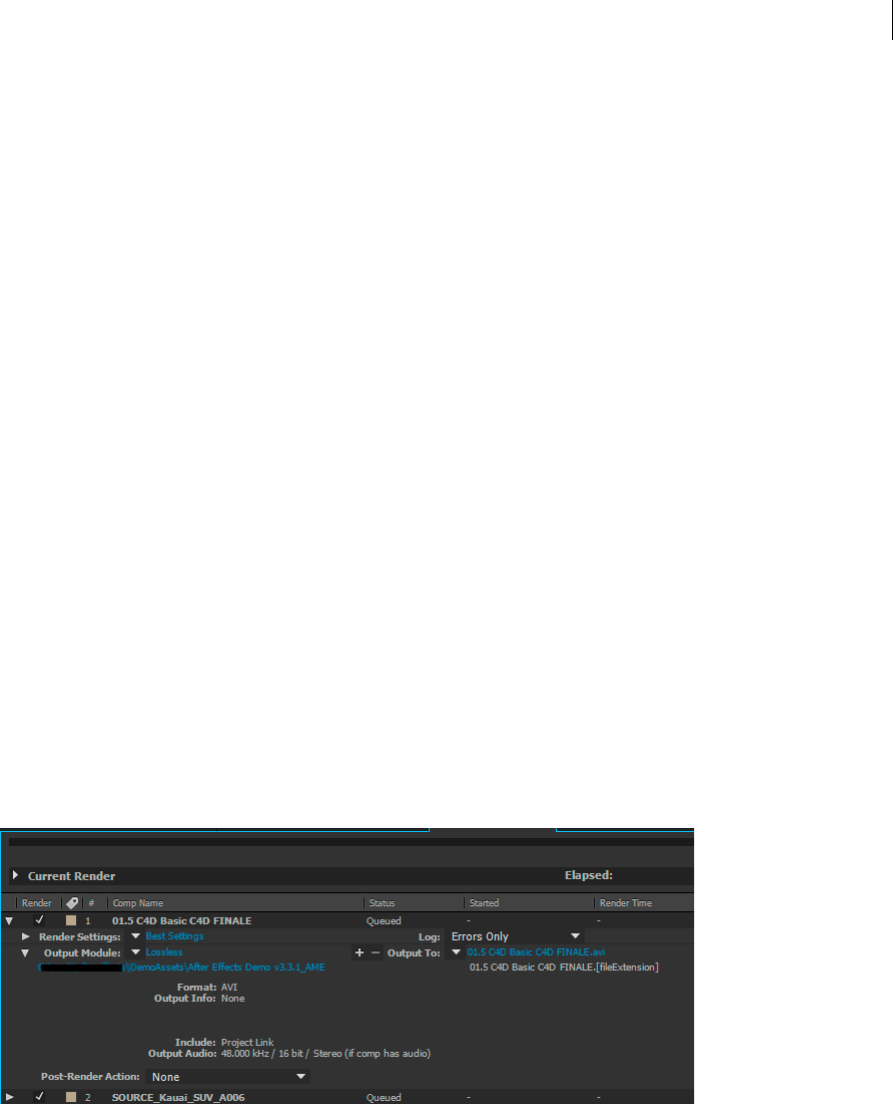
712
Rendering and Exporting
Last updated 6/8/2015
Skip Existing Files Lets you rerender part of a sequence of files without wasting time on previously rendered frames.
When rendering a sequence of files, After Effects locates files that are part of the current sequence, identifies the
missing frames, and then renders only those frames, inserting them where they belong in the sequence. You can also
use this option to render an image sequence on multiple computers. (See Render a still-image sequence with multiple
computers.)
Note: The current image sequence must have the same name as the existing image sequence, and the starting frame
number, frame rate, and time span must be the same. You must render to the folder that contains the previously rendered
frames.
Output modules and output module settings
Output module settings apply to each render item and determine how the rendered movie is processed for final output.
Use output module settings to specify file format, output color profile, compression options, and other encoding
options for final output.
You can also use output module settings to crop, stretch, or shrink a rendered movie; doing this after rendering is often
useful when you are generating multiple kinds of output from a single composition.
Output module settings are applied to the rendered output that is generated according to the render settings.
For some formats, an additional dialog box opens when you choose the format in the Output Module Settings dialog
box. You can modify these settings and use settings presets to specify format-specific options, such as compression
options.
You can apply multiple output modules to each render item, which is useful when you want to make more than one
version of a movie from one render. For example, you can automate the creation of a movie and its alpha matte, or you
can create high-resolution and low-resolution versions of a movie.
Note: Before rendering, check the Audio Output settings in the Output Module Settings dialog box to ensure that they are
correct. To render audio, Audio Output must be selected. If your composition does not include audio, do not select Audio
Output, so that the size of the rendered file does not increase needlessly.
You can set the output module of multiple render queue items at the same time. Select the render queue items, and then
choose an output module template from the Output Module Settings menu for one of the items.
You can drag an output module to the Project panel to import the finished movie or a placeholder into the project for
use as a footage item. (See Import footage items.)
Andrew Kramer provides a video tutorial with tips for working with proxies, output modules, and output module
templates on the Video Copilot website.

713
Rendering and Exporting
Last updated 6/8/2015
Change output module settings
•To change output module settings for a render item, click the underlined output module settings template name next
to the Output Module heading in the Render Queue panel, and choose settings in the Output Module Settings dialog
box.
•To apply an output module settings template to selected render items, click the triangle next to the Output Module
heading in the Render Queue panel, and choose a template from the menu.
You can choose a custom output module settings template or one of the preset output module settings templates.
Several templates are provided, including the Lossless template for creating movies for transfer to video, film, or an
NLE system.
Note: The default output module settings template is assigned to a render item when it is created. To change which output
module template is the default, hold down Ctrl (Windows) or Command (Mac OS) as you choose an output module
template from the menu.
To change output module settings for multiple output modules at once, select the output modules and then choose an
output module template. The template is applied to all selected output modules.
Create, manage, and edit output module templates
You perform the following tasks in the Output Module Templates dialog box. To open the Output Module Templates
dialog box, choose Edit > Templates > Output Module, or click the triangle next to the Output Module heading in the
Render Queue panel and choose Make Template.
•To make a new output module settings template, click New, specify output module settings, and click OK. Enter a
name for the new template.
•To edit an existing output module settings template, choose a template from the Settings Name menu, click Edit, and
specify output module settings.
Note: Changes to an existing template do not affect render items that are already in the render queue.
•To specify a default output module settings template to be used when processing movies, individual frames,
previews, pre-rendered movies, or proxies, choose a template from a menu in the Defaults area of the Output
Module Templates dialog box.
•To save all currently loaded output module templates to a file, click Save All.
•To load a saved output module template file, click Load, select the output module template file, and then click Open.
Add output modules to and remove output modules from render items
•To add a new output module with default settings to a single render item, click the plus sign to the left of the Output
To heading of the last output module for the render item.
•To remove an output module from a render item, click the minus sign to the left of the Output To heading of the
output module.
•To add a new output module with default settings to selected render items, choose Composition > Add Output
Module.
•To duplicate selected output modules, press Ctrl+D (Windows) or Command+D (Mac OS).
Output module settings
For information on using controls in the Color Management area of the Output Module Settings dialog box, see Assign
an output color profile.
Format Specifies the format for the output file or sequence of files.

714
Rendering and Exporting
Last updated 6/8/2015
Include Project Link Specifies whether to include information in the output file that links to the source After Effects
project. When you open the output file in another application, such as Adobe Premiere Pro, you can use the Edit
Original command to edit the source project in After Effects.
Include Source XMP Metadata Specifies whether to include XMP metadata in the output file from the files used as
sources for the rendered composition. XMP metadata can travel all the way through After Effects from source files, to
footage items, to compositions, to rendered and exported files. For all default output module templates, Include Source
XMP Metadata is deselected by default. (See Exporting XMP metadata from After Effects.)
Post-Render Action Specifies an action for After Effects to perform after the composition is rendered. (See Post-render
actions.)
Format Options Opens a dialog box in which you specify format-specific options.
Channels The output channels contained in the output movie. After Effects creates a movie with an alpha channel if
you choose RGB+Alpha, implying a depth of Millions of Colors+. Not all codecs support alpha channels.
Note: All files created with a color depth of Millions of Colors+, Trillions of Colors+, or Floating Point + have labeled alpha
channels; information describing the alpha channel is stored in the file. Therefore, you do not have to specify an alpha
interpretation each time you import an item created in After Effects.
Depth Specifies the color depth of the output movie. Certain formats may limit depth and color settings.
Color Specifies how colors are created with the alpha channel. Choose from either Premultiplied (Matted) or Straight
(Unmatted). (See Alpha channel interpretation: premultiplied or straight.)
Starting # Specifies the number for the starting frame of a sequence. For example, if this option is set to 38, After Effects
names the first frame [file_name]_00038. The Use Comp Frame Number option adds the starting frame number in the
work area to the starting frame of the sequence.
Resize Specifies the size of your output movie. Select Lock Aspect Ratio To if you want to retain the existing frame
aspect ratio when resizing the frame. Select Low Resize Quality when rendering tests, and select High Resize Quality
when creating a final movie. (See Scaling a movie downand Scaling a movie up.)
Crop Used to subtract or add rows or columns of pixels to the edges of the output movie. You can specify the number
of rows or columns of pixels to be added or subtracted from the top, left, bottom, and right sides of the movie. Use
positive values to crop, and use negative values to add rows or columns of pixels. Select Region Of Interest to export
only the region of interest selected in the Composition or Layer panel. (See Region of interest (ROI).)
By adding one row of pixels to the top and subtracting one row from the bottom of a movie, you can change the field
order.
Audio Output Specifies the sample rate, sample depth (8 Bits or 16 Bits), and playback format (Mono or Stereo).
Choose a sample rate that corresponds to the capability of the output format. Choose an 8-bit sample depth for playback
on the computer, and a 16-bit sample depth for CD and digital audio playback or for hardware that supports 16-bit
playback.
Note: The specifications for some formats impose limits on audio parameters. In such cases, audio options may be
unavailable for modification in the Output Module Settings dialog box. Also, audio options for some formats are set in the
export settings dialog box for that format. For example, to set audio output options for Windows Media, click Format
Options in the Output Module Settings dialog box.
Warning for mismatch in frame rate or dimensions
Some formats (for example, the Blu-ray formats) enforce constraints on frame dimensions and frame rate.

715
Rendering and Exporting
Last updated 6/8/2015
If you choose such a constrained output format, and your composition, its render settings, or its output module settings
don’t match the constraints, then After Effects shows a yellow warning icon and the message “Settings mismatch” at
the bottom of the Output Module Settings dialog box.
Click the warning icon to see a detailed message that describes how the output file will be modified to meet the format
constraints. You can go back and change composition settings, render settings, and output module settings if you don't
want After Effects to make the changes automatically in the output module.
For more information about output module constraints and the warnings for mismatches in frame rate, dimensions,
and pixel aspect ratio, see the Adobe website.
Encoding and compression options for movies
Compression is essential for reducing the size of movies so that they can be stored, transmitted, and played back
effectively. Compression is achieved by an encoder; decompression is achieved by a decoder. Encoders and decoders
are known by the common term codec. No single codec or set of settings is best for all situations. For example, the best
codec for compressing cartoon animation is generally not efficient for compressing live-action video. Similarly, the best
codec for playback over a slow network connection is generally not the best codec for an intermediate stage in a
production workflow. For information on planning your work with final output in mind, see Planning your work.
After Effects uses an embedded version of the Adobe Media Encoder to encode most movie formats through the
Render Queue panel. When you manage render and export operations with the Render Queue panel, the embedded
version of the Adobe Media Encoder is called automatically. The Adobe Media Encoder appears only in the form of the
export settings dialog boxes with which you specify some encoding and output settings.
Note: The embedded version of the Adobe Media Encoder used to manage export settings within After Effects output
modules does not provide all of the features of the full, stand-alone Adobe Media Encoder application. For information
about the full, stand-alone Adobe Media Encoder application, see Adobe Media Encoder Help .
For most output formats, you can specify format-specific encoding and compression options. In many cases, a dialog
box opens and presents these options when you choose a format to export to or click the Format Options button in the
Output Module settings dialog box. (See Output modules and output module settings.)
Note: In After Effects CC 2014, formats such as H.264, MPEG-2, and WMV have been removed from the Render Queue
because Adobe Media Encoder gives better results. Use Adobe Media Encoder to export to these formats.
QuickTime (MOV) encoding and compression settings
1In the Render Queue panel, click the underlined name of the output module.
2Choose QuickTime from the Format menu.
3Click Format Options in the Video Output section.
4In the QuickTime Options dialog box, choose a codec and set options according to the specific codec and your
needs:
Quality A higher Quality setting produces better image quality but results in a bigger movie file.
Key Frame Every In QuickTime terminology, the term key frames refers to something different from the change-
over-time keyframes placed in the After Effects Timeline panel. In QuickTime, key frames are frames that occur at
regular intervals in the movie. During compression, they are stored as complete frames. Each intermediate frame
that separates them is compared to the previous frame, and only changed data is stored. Using key frames greatly
reduces movie size and greatly increases the memory required to edit and render a movie. Shorter intervals between
key frames enable faster seeking and reverse playback, but can significantly increase the size of the file.
Frame Reordering Some codecs allow for frames to be encoded and decoded out of order for more efficient storage.

716
Rendering and Exporting
Last updated 6/8/2015
note: For more information on QuickTime, see the Apple website.
5Click OK.
6Specify other settings in the Output Module Settings dialog box.
Post-render actions
You can use post-render actions to automate simple tasks that occur after a composition is rendered.
A common example of the use of post-render actions is with pre-rendering: Choosing Composition > Pre-render adds
the selected composition to the render queue and sets the Post-Render Action option to Import & Replace Usage.
Note: You choose Post-Render Action options in the Output Module group, so be aware that changing the Output Module
template could also change the Post-Render Action option. (See Output modules and output module settings.)
1Expand the Output Module group in the Render Queue panel by clicking the arrow to the left of the Output Module
heading.
2Choose one of the following from the Post-Render Action menu:
None Performs no post-render action. This option is the default.
Import Imports the rendered file into the project as a footage item when the rendering is complete.
Import & Replace Usage Imports the rendered file into the project and substitutes it for the specified item. Drag the
pick whip to the item to replace in the Project panel to specify it.
Use the Import & Replace Usage option to create a chain of dependent render items. For example, you can set one
render item to use a watch folder and multiple computers to create a still-image sequence, and then the next render
item can render a single movie file from that still-image sequence. (See Network rendering with watch folders and render
engines.)
Set Proxy Sets the rendered file as a proxy for the specified item. Drag the pick whip to the item in the Project panel
item to specify it.
Render with OpenGL
OpenGL is a set of standards for high-performance processing of 2D and 3D graphics on the graphics processing unit
(GPU) for a wide variety of applications. To use OpenGL in After Effects, use a display card that supports OpenGL 2.0.
OpenGL and the GPU are important for new features, such as Ray-Traced 3D rendering on the GPU, Fast Draft
previews, faster blitting to the screen, and a GPU enhanced Cartoon effect. There is now a categorization of features
based on the GPU installed in your system.
•Level 1: For OpenGL SwapBuffer: Requires a GPU that has OpenGL 1.5 (or greater) with Shader Model 3.0 (or
greater). If your GPU does not support these requirements, software OS blitting takes place.
•Level 2: For Fast Draft previews, Hardware BlitPipe, Cartoon effect GPU enhancements, and Level 1 features:
Requires a GPU with OpenGL 2.0 (or greater) with Shader Model 4.0, (or greater on Windows. 256 (or more) MB
of texture memory is required. If your GPU does not support these requirements, these features will be disabled.
Most cards in systems currently in use will support Level 2 feature support.
•Level 3: For Ray-traced 3D rendering on GPU, with Level 1 and 2 features: Requires a supported NVIDIA GPU and
512 (or greater) MB of texture memory.
Note: Ray-traced 3D rendering will take place on the CPU using all physical cores will take place if your GPU is not
supported or the video driver is not updated.

717
Rendering and Exporting
Last updated 6/8/2015
For Quadro 4000 drivers and CUDA drivers for MacOS, see this blog post.
For information regarding specific OpenGL hardware, go to the After Effects section of the Adobe website.
On Windows, disable the Aero compositing mode. Hardware acceleration of panels and OpenGL features perform
better in After Effects when Windows is operating in Basic mode. For information, see the Microsoft website.
More Help topics
Supported import formats
Composition settings
Layer switches and columns in the Timeline panel
Placeholders and proxies
Pre-render a nested composition
Preview video and audio
Supported GPUs for ray-traced 3D renderer
This section provides the complete list of supported GPUs for the ray-traced 3D renderer for After Effects CC 2014.
You can find the complete system requirements for After Effects and Premiere Pro at the following links:
•After Effects system requirements
•Premiere Pro system requirements
Windows CUDA
•GeForce GTX 285
•GeForce GTX 470
•GeForce GTX 570
•GeForce GTX 580
•GeForce GTX 590
•GeForce GTX 670
•GeForce GTX 675MX
•GeForce GTX 680
•GeForce GTX 680MX
•GeForce GTX 690
•GeForce GTX 760
•GeForce GTX 770
•GeForce GTX 780
•GeForce GTX TITAN
•GeForce GT 650M
•Quadro CX

718
Rendering and Exporting
Last updated 6/8/2015
•Quadro FX 3700M
•Quadro FX 3800
•Quadro FX 3800M
•Quadro FX 4800
•Quadro FX 5800
•Quadro 2000
•Quadro 2000D
•Quadro 2000M
•Quadro 3000M
•Quadro 4000
•Quadro 4000M
•Quadro 5000
•Quadro 5000M
•Quadro 5010M
•Quadro 6000
•Quadro K2000
•Quadro K2100M
•Quadro K3000M
•Quadro K3100M
•Quadro K4000
•Quadro K4000M
•Quadro K4100M
•Quadro K5000
•Quadro K5000M
•Quadro K5100M
•Quadro K6000
•Tesla C2075
Mac OS
•GeForce GTX 285
•GeForce GTX 675MX
•GeForce GTX 680
•GeForce GTX 680MX
•GeForce GT 650M
•Quadro CX
•Quadro FX 4800
•Quadro 4000
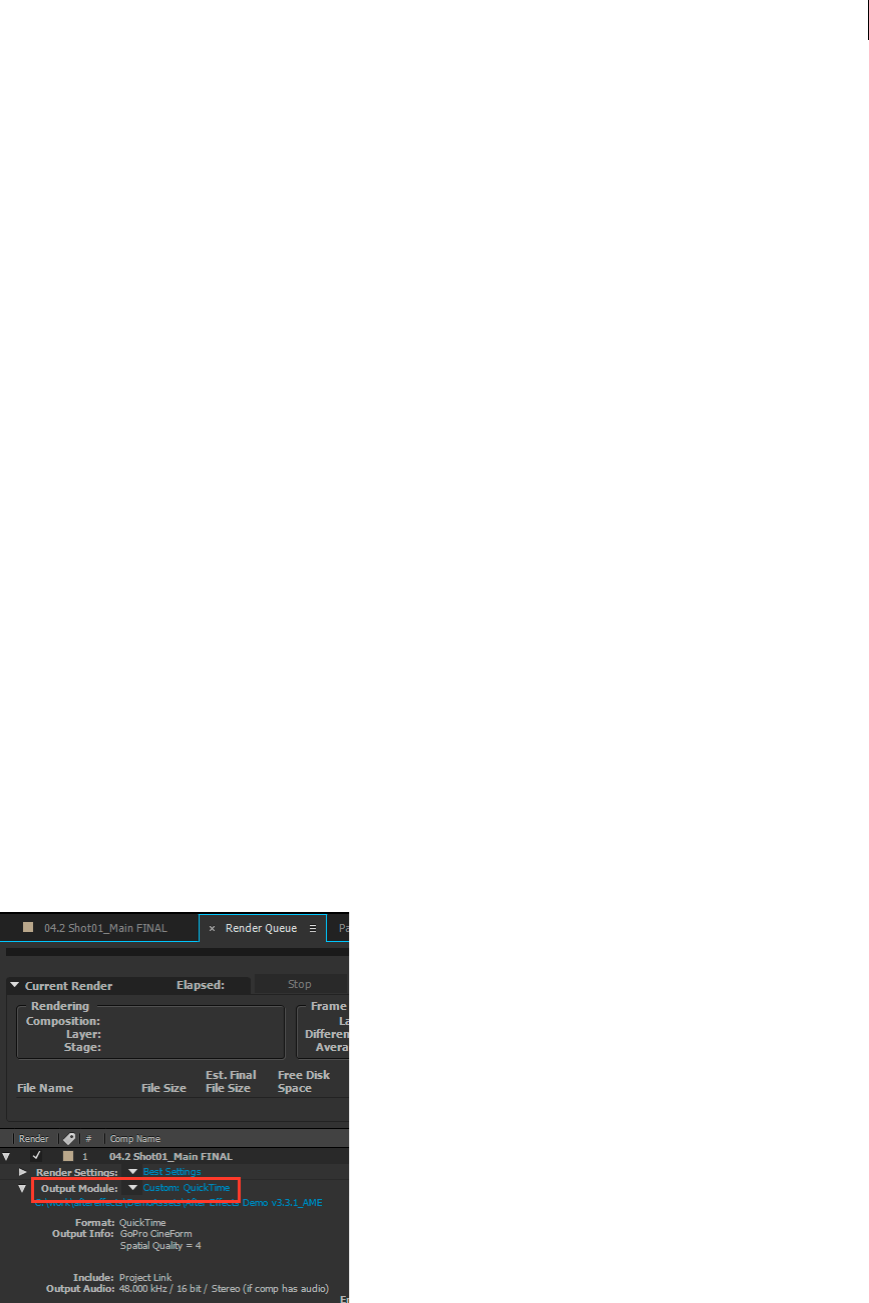
719
Rendering and Exporting
Last updated 6/8/2015
•Quadro K5000
Using untested and unsupported GPUs with After Effects
In the October 2013 release of After Effects CC, a new option was introduced under Edit > Preferences > Previews >
GPU Information to enable the users to use untested and unsupported GPUs. Check the "Enable untested, unsupported
GPU for CUDA acceleration of ray-traced 3D renderer" box so that After Effects uses the GPU-accelerated ray-traced
3D renderer with any GPU that meets minimum requirements.
In earlier versions of After Effects, if the installed hardware was not on the list of tested and supported GPUs, the GPU
menu item would be disabled (grayed out) and the following text displayed below the menu: GPU not available -
incompatible device or display driver".
Using the GoPro CineForm codec in After Effects
About the GoPro CineForm codec
The GoPro CineForm codec is a cross-platform intermediate codec that is commonly used in film and television
workflows that use HD or higher resolution media.
In the latest version of After Effects CC and Adobe Media Encoder CC, the GoPro CineForm codec can be used to
natively decode and encode QuickTime files (.mov). Hence you do not need to install additional codecs to create and
use QuickTime files.
GoPro CineForm codec settings
There are five compression quality settings and two pixel format settings that you can use to adjust your output when
using the GoPro CineForm codec. To export your After Effects projects with the GoPro CineForm codec, do the
following:
1Select a project in the Render Queue and click the Output Module setting.
2Choose QuickTime as the output format in the Format drop-down list and click Format Options.
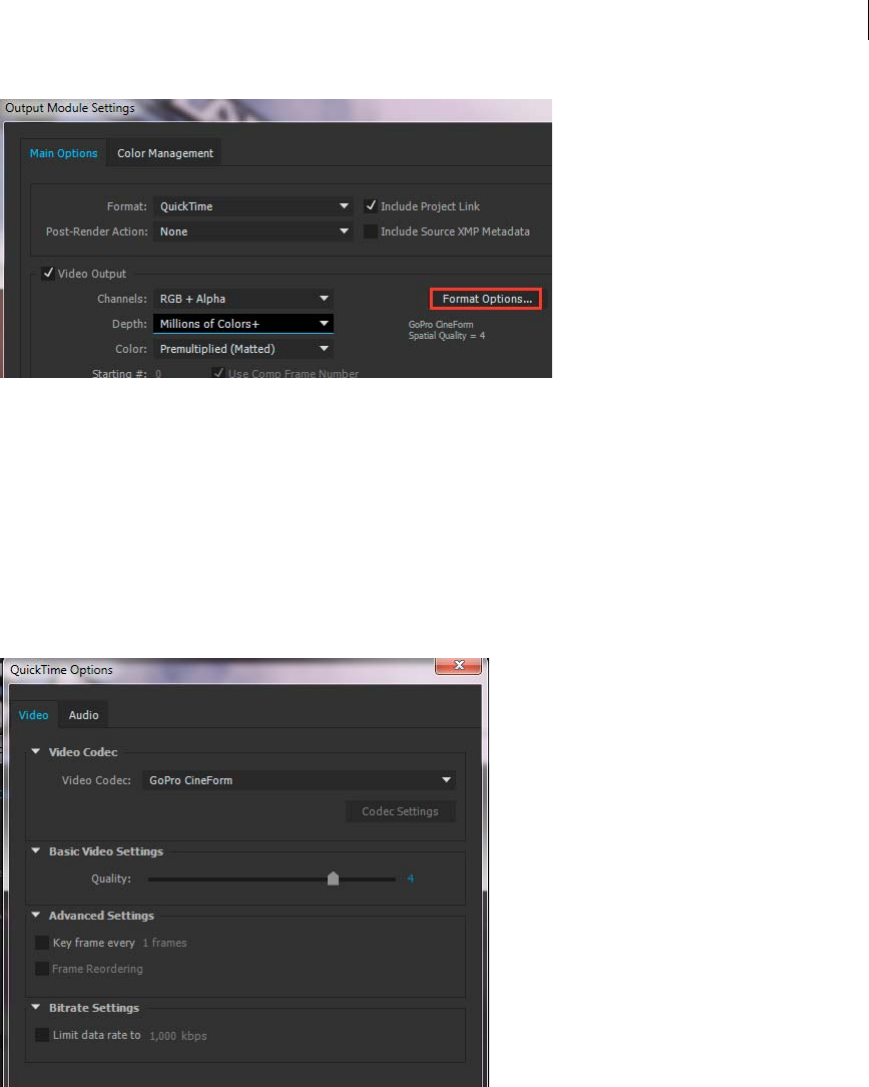
720
Rendering and Exporting
Last updated 6/8/2015
3Choose GoPro CineForm as the video codec in the QuickTime Options dialog box. Adjust the compression settings
using the Quality slider under the Basic Video Settings. The slider can be moved from a range of 1 to 5, with 1 for
the Low setting and 5 for Film Scan 2 setting. The default value is 4 (Film Scan).
1. Low
2. Medium
3. High
4. Film Scan
5. Film Scan 2
See the Understanding CineForm Quality settings article on the CineForm website for detailed information about
this setting.
4The GoPro CineForm codec can encode pixels in YUV 4:2:2 at 10 bits per channel, or RGBA 4:4:4:4 at 12 bits per
channel.
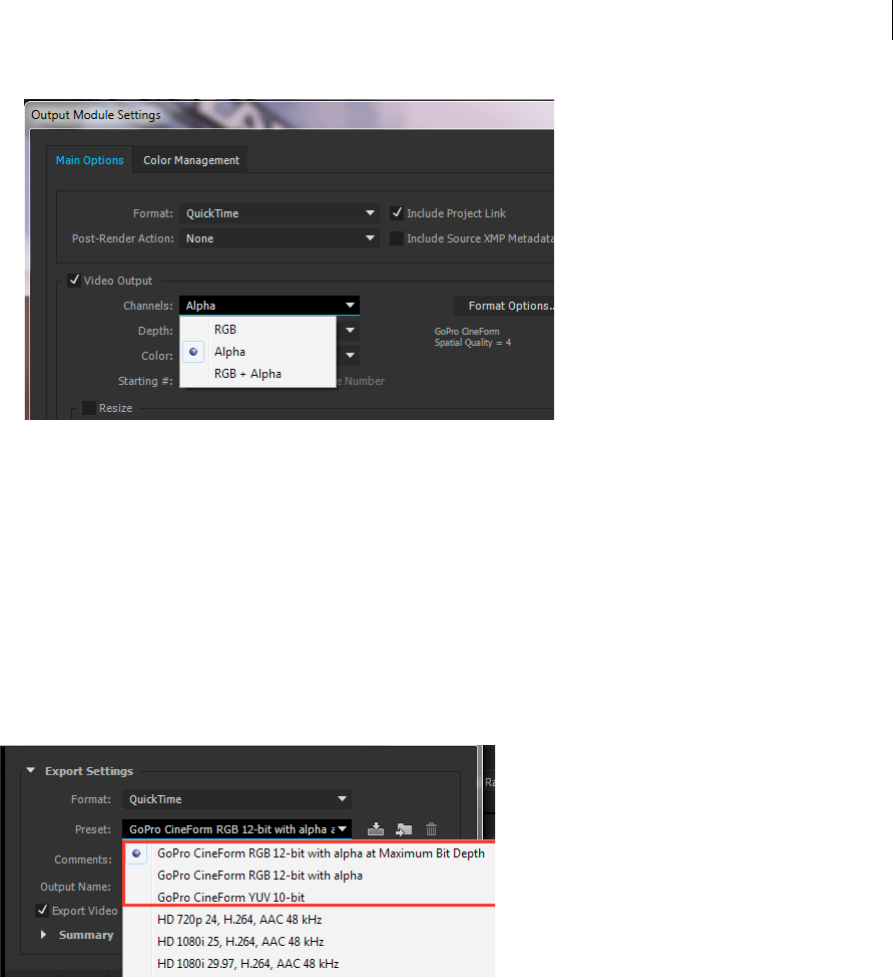
721
Rendering and Exporting
Last updated 6/8/2015
The encoded pixel format is based on the color depth and alpha channel settings that you choose in the Output
Module Settings dialog box. There are three Channels settings that can be set, RGB, Alpha, and RGB+Alpha:
•Set Channels to RGB or Alpha to encode to 10bpc YUV. In this case, Depth can only be set to Millions Of Colors.
•Set Channels to RGB+Alpha to encode to 12bpc RGBA. In this case Depth can be set to Millions of Colors+ or
Trillions of Colors+.
Note: After Effects renders the composition at the color depth specified in the Project and Render Settings, and the GoPro
CineForm encoder will resample the frames to 10-bit YUV or 12 bpc RGBA as appropriate.
5Click Render in the Render Panel to begin rendering your project with the GoPro CineForm settings.
GoPro CineForm settings in Adobe Media Encoder
When you want to output to QuickTime format in Adobe Media Encoder using the GoPro CineForm encoder, there
are three presets that you can use in the Export Settings dialog box:
1GoPro CineForm RGB 12-bit with alpha at Maximum Bit Depth
2GoPro CineForm RGB 12-bit with alpha
3GoPro CineForm YUV 10-bit
Note: The frames may be rendered at a higher or lower quality by Adobe Media Encoder, depending on the sources in use
and whether the Maximum Bit Depth option is enabled. The GoPro CineForm encoder will resample the frames to 10 bpc
YUV or 12 bpc RGBA as appropriate.

722
Rendering and Exporting
Last updated 6/8/2015
Other considerations
•You can edit the basic video settings, such as Frame Rate and Aspect ratio by unchecking the boxes next to each of
these settings. For unsupported sizes such as GoPro 2.7K, change the resolution settings and down-scale to 1080,2K,
or 4K or upscale to 6K.
•Due to the frame size limitations, frame width sizes should be divisible by 16, and frame height sizes should be
divisible by 8, regardless of bit depth. For example, the frame size of GoPro 2.7 is 2704x1524 and hence this is
currently not supported as its width of 1524 results in a partial frame size of 95.25.
More Help topics
CineForm codec support in Premiere Pro
Rendering and exporting still images and still-image
sequences
Rendering and exporting a sequence of still images
You can export a rendered movie as a sequence of still images, in which case each frame of the movie is output as a
separate still-image file. When you render one movie using multiple computers on a network, the movie is always
output as a still-image sequence. Many 3D animation programs accept sequences of still images. Sequences of PNG files
are often a good choice for transfer of visual elements from After Effects to Flash Professional.
If you are creating a movie for transfer to film, you will need to create a sequence of still images that you can then
transfer to film using a film recorder.
Creating a sequence of PSD files is a good way to transfer frames to Photoshop for touchup and editing. You can then
import the image sequence back into After Effects.
When specifying the output filename for a still-image sequence, you actually specify a file-naming template. The name
that you specify must contain pound signs surrounded by square brackets ([#####]). As each frame is rendered and a
filename created for it, After Effects replaces the [#####] portion of the name with a number indicating the order of the
frame in the sequence. For example, specifying mymovie_[#####].tga would cause output files to be named
mymovie_00001.tga, filmout_00002.tga, and so on.
The maximum number of frames in a still-image sequence is 32,766.
Render and export a single frame of a composition
You can export a single frame from a composition, either as an Adobe Photoshop (PSD) file with layers intact or as a
rendered image. This is useful for editing files in Adobe Photoshop, preparing files for Adobe Encore, creating a proxy,
or exporting an image from a movie for posters or storyboards.
The Photoshop Layers command preserves all layers from a single frame of an After Effects composition in the
resulting Photoshop file. Nested compositions up to five levels deep are preserved in the PSD file as layer groups. The
PSD file inherits the color bit depth from the After Effects project.
In addition, the layered Photoshop file contains an embedded composite (flattened) image of all the layers. This feature
ensures that the file is compatible with applications that don’t support Photoshop layers; such applications display the
composited image and ignore the layers.

723
Rendering and Exporting
Last updated 6/8/2015
A layered Photoshop file saved from After Effects may look different from the frame viewed in After Effects if the frame
uses features that Photoshop doesn’t support. For example, if the frame contains a blending mode that isn’t available in
Photoshop, a blending mode that most resembles it is substituted in the layer, but the embedded composite image
(viewable only by applications that don’t support Photoshop layers) looks the same. Alternatively, you can render the
frame using the Composition > Save Frame As > File command to export a flattened and rendered version of the file
to the PSD format.
PSD files generated by Save Frame As > Photoshop Layers have the sRGB IEC61966-2.1 ICC color profile embedded if
color management is disabled for the project (the project's working color space is set to None). If color management is
enabled for the project (the project's working color space is set to something other than None), then PSD files generated
by Save Frame As > Photoshop Layers have the color profile embedded that corresponds to the project's working color
space. (See Color management and color profiles.)
1Go to the frame that you want to export so that it is shown in the Composition panel.
2Do one of the following:
•To render a single frame, choose Composition > Save Frame As > File. Adjust settings in the Render Queue panel
if necessary, and then click Render.
•To export a single frame as an Adobe Photoshop file with layers, choose Composition > Save Frame As >
Photoshop Layers.
To change the default output settings for the Save Frame As > File command, change the settings for the Frame Default
render settings template (See Create, edit, and manage render settings templates.)
More Help topics
Render and export with the RenderQueue panel
Automated rendering and networkrendering
Automated rendering and network rendering
Automating rendering with aerender
The executable file aerender.exe is a program with a command-line interface with which you can automate rendering.
The executable file is located in the same folder as the primary After Effects application. The default locations for this
file are:
•Windows: \Program Files\Adobe\Adobe After Effects CC\Support Files
•Mac OS: /Applications/Adobe After Effects CC
You can use the aerender application to perform rendering operations on multiple computers as part of a render farm,
or you can use the aerender application on a single computer as part of a batch operation.
You use the program by entering the command aerender on the command line (or in a batch script), followed by a series
of optional arguments. Some of the arguments are simple options that take no arguments of their own (for example, -
reuse), whereas others take arguments of their own (for example, -project project_path).
Enter the command aerender -help to show usage information.

724
Rendering and Exporting
Last updated 6/8/2015
The version and build number of the application are written to standard output (stdout).
The render may be performed either by an already running instance of After Effects or by a newly started instance. By
default, aerender starts a new instance of After Effects, even if one is already running. To instead use the currently
running instance, use the –reuse argument.
This example command tells After Effects to render frames 1 through 10 of Composition_1 in project_1.aep to a
numbered sequence of Photoshop files using a multi-computer render:
aerender -project c:\projects\project_1.aep -comp "Composition_1" -s 1 -e 10
-RStemplate "Multi-Machine Settings" -OMtemplate "Multi-Machine Sequence"
-output c:\output\project_1\frames[####].psd
To render just Composition_1 to a specified file, enter this command:
aerender -project c:\projects\project_1.aep -comp "Composition_1" -output c
:\output\project_1\project_1.avi
To render everything in the render queue with current settings in the project file, enter this command:
aerender -project c:\projects\project_1.aep
Argument Description
–help Print usage message.
–version Display the version number of aerender to the console. Does not
render.
–v verbose_flag verbose_flag specifies the kind of messages reported:
ERRORS : Reports only fatal and problem errors.
ERRORS_AND_PROGRESS : (default) Reports errors and progress of
rendering.
–reuse Reuse the currently running instance of After Effects (if found) to
perform the render. When an already running instance is used,
aerender saves preferences to disk when rendering has completed,
but does not quit After Effects. If this argument is not used, aerender
starts a new instance of After Effects, even if one is already running. It
quits that instance when rendering has completed, and does not save
preferences.
–mem_usage image_cache_percentmax_mem_percent image_cache_percent specifies the maximum percentage of memory
used to cache already rendered images and footage.
max_mem_percent specifies the total percentage of memory that
After Effects can use. For both values, if installed RAM is less than a
given amount (n gigabytes), the value is a percentage of the installed
RAM, and is otherwise a percentage of n. The value of n is 2 GB for 32-
bit Windows, 4 GB for 64-bit Windows, and 3.5 GB for Mac OS.
–project project_path project_path is a file path or URI specifying a project file to open. If this
argument is not used, aerender works with the currently open project.
If no project is specified and no project is open, the result is an error.
–comp comp_name comp_name specifies a composition to render. If the composition is in
the render queue already, then the first instance of that composition
in the render queue is rendered. If the composition is in the project but
not in the render queue, then it is added to the render queue and
rendered. If this argument is not used, aerender renders the entire
render queue; in this case, only the –project, –log, –output, –v, –
mem_usage, and –close arguments are used, and all other arguments
are ignored.

725
Rendering and Exporting
Last updated 6/8/2015
Lloyd Alvarez provides a script on his After Effects Scripts website that takes items that are ready to render in the render
queue and sends them to render in the background using aerender.
–s start_frame start_frame is the first frame to render. If this argument is not used,
aerender uses the start frame in the file.
–e end_frame end_frame is the last frame to render. If this argument is not provided,
aerender uses the end frame in the file.
–i increment increment is the number of frames to advance before rendering a new
frame. A value of 1 (the default) causes normal rendering of all frames.
Higher values render a frame and use it increment times in output, and
then skip ahead increment frames to begin the cycle again. Higher
values result in faster renders but choppier motion.
–OMtemplate output_module_template output_module_template is the name of a template to apply to the
output module. If the template does not exist, using this argument
causes an error. If this argument is not used, aerender uses the
template already defined for the output module.
–RStemplate render_sett ings_template render_settings_template is the name of a template to apply to the
render item. If the template does not exist, using this argument causes
an error. If this argument is not used, aerender uses the render
template already defined for the item.
–output output_path output_path is a file path or URI specifying the destination for the final
output file. If this argument is not used, aerender uses the path
defined in the project file.
–log log_file_path log_file_path is a file path or URI specifying the location of the log file.
If this argument is not used, aerender uses standard output (stdout).
–sound sound_flag If sound_flag is ON, a sound is played when rendering is complete.
Default is OFF.
–close close_flag close_flag specifies whether or not to close the project when
rendering is complete, and whether or not to save changes:
DO_NOT_SAVE_CHANGES : (default) The project is closed without
saving changes.
SAVE_CHANGES : The project is closed and changes are saved.
DO_NOT_CLOSE : The project is left open if using an already-running
instance of After Effects. (New instances of After Effects must always
quit when done.)
-rqindex index_in_render_queue -rqindex works just like -comp, except that it won’t create a render
item from the composition automatically.
-mp Additional processes may be created to render multiple frames
simultaneously, depending on system configuration and preference
settings. (See Memory & Multiprocessing preferences .)
-continueOnMissingFootage The render operation continues even if a source footage item is
missing.
Argument Description
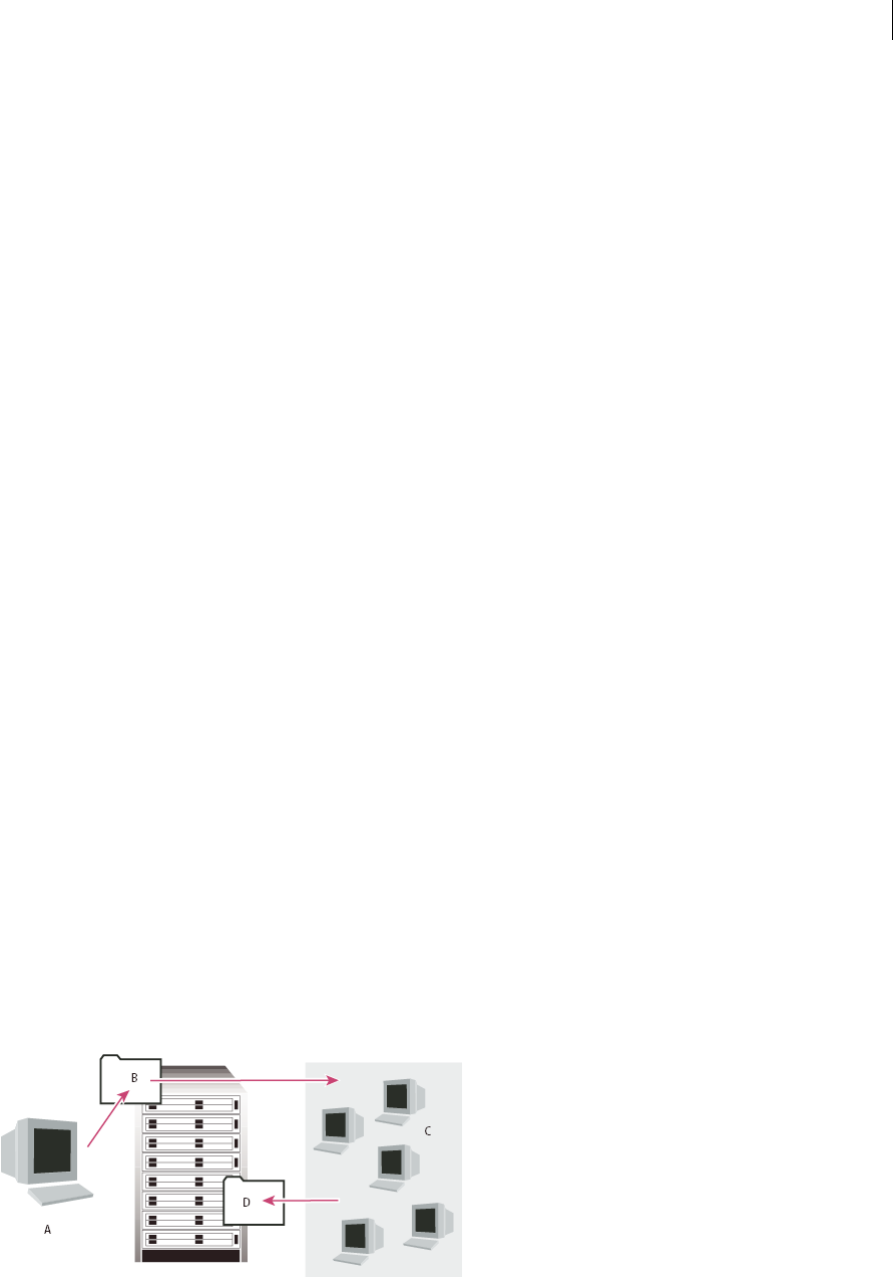
726
Rendering and Exporting
Last updated 6/8/2015
Network rendering with watch folders and render engines
You can render one or more compositions from a project using multiple computers over a network in a fraction of the
time that a single computer would require. Network rendering involves copying the project and source files to a
networked folder, and then rendering the project. (A network of computers used together to render a single
composition is sometimes called a render farm.) You can set this up to work with render-only versions of After Effects
called render engines.
You install render engines in the same manner as the full version of the application. You run the render engine using
the Adobe After Effects Render Engine shortcut in the Adobe After Effects CC folder. (See Setup and installation .)
After Effects CS5.5 had to be serialized on render-only machines (e.g., in a render farm) due to licensing issues. In After
Effects CS6 and later, you can now run aerender or use Watch Folder in a non-royalty bearing mode, so serialization
not required.
To enable non-royalty bearing mode, place a blank file named ae_render_only_node.txt into one of the following
locations, depending on the user account type:??
1Install After Effects on the render-only machine.
2Place a blank file named ae_render_only_node.txt into one of the following locations, depending on the user
account type:
•Mac locations:
/Users/<username>/Documents/
/Users/Shared/Adobe/
•Windows locations:
C:\Users\<username>\Documents
C:\Users\Public\Documents\Adobe
You cannot use a watch folder and multiple render engines to simultaneously render a single movie file. However, you
can use multiple render engines to render a movie as a sequence of still-image files. You can then use a post-render
action to create a single movie file from that still-image sequence. (See Post-render actions.)
When you have multiple render engines on multiple computers monitoring a watch folder, they cooperate to achieve
optimal efficiency. If your queued render items are set to Skip Existing Files (a Render Settings option), the render
engines all work on a single render item at once—no render engine renders any frame another render engine has
already worked on. If this option is not selected, each render engine handles a render item itself.
Rhys Enniks provides a video tutorial on his website that demonstrates the use of multiple computers on a network to
render a composition with a watch folder.
Network considerations

727
Rendering and Exporting
Last updated 6/8/2015
When working with multiple render engines on multiple computers, keep in mind the following guidelines:
• When possible, identify folders using absolute file paths so that the paths are correctly identified for all render
engines. Identifying folders using absolute file paths may mean mapping network drives to a particular drive letter
on all computers (for example, H:\renders\watch\). Avoid using relative paths (for example, \\renders\watch).
•Each Macintosh computer monitoring the watch folder must have a unique name. Because the default names of
computers are often identical, you should rename your computers to not use the default name.
•Make sure that all servers and clients (computers monitoring the watch folder) have hard drives with unique names.
•Do not use the same computer to serve a watch folder and to run After Effects in Watch Folder mode. Use a
dedicated server that’s accessible to all render engines to serve your watch folder.
•Do not render to or initiate Watch Folder mode on the root of a volume or a shared folder that appears as the root
when viewed from another computer. Specify a subfolder instead. Also, avoid using high-ASCII or other extended
characters and slashes in filenames. For multiple-computer rendering, After Effects includes the Multi-Machine
sample template that you can use as a starting point.
When rendering across a network that includes volumes using different network or operating systems, such as Windows,
Mac OS, Novell, and UNIX, make sure that you specify output files using a file-naming convention that’s compatible
with all rendering or destination volumes.
Project considerations
Make sure that you install all fonts, effects, and encoders (compressors) used in the project on all computers monitoring
the watch folder. If a computer monitoring the watch folder can’t find fonts, effects, or encoders used in a project, the
render fails.
When you install an After Effects render engine on a computer, it contains all the plug-ins included with After Effects.
If a composition uses a plug-in from another manufacturer, the plug-in must be present on all computers that will
render the composition. However, support for network rendering varies among plug-in manufacturers. Before you set
up a network to render effects created by third-party plug-ins, see the documentation for your plug-ins or contact the
plug-in manufacturers and get answers to the following questions:
•Does the license agreement for the plug-in allow installing multiple copies on a network for the purposes of
rendering?
•Are there any other limitations or tips that apply to using the plug-in for network rendering?
Collect Files folder considerations
When you use the File > Collect Files command, files relevant to a project are copied to a single folder. This folder
includes a copy of the project file, a render control file (RCF), and other files, depending on the options you choose in
the Collect Files dialog box. If you save the Collect Files folder to a networked computer other than a server, don’t run
a render engine on that computer. Avoid saving the Collect Files folder to a local disk, the root level of a disk (such as
C: in Windows or the Macintosh HD in Mac OS), or a shared folder, all of which can signify different locations to each
render engine. All render engines must interpret the path in the same way.
Once the collected files appear in the watch folder, all monitoring render engines start rendering automatically. If you
prefer, you can use the Collect Files command to store compositions and their source footage to a specified location and
then initiate the watch-folder rendering process later. Doing so renders the projects in alphabetical order, rather than the
order in which they were saved to the location.
Set up watch-folder rendering
1Install the After Effects render engine on as many computers as you want to involve in network rendering. (For
information on installing After Effects as a render engine, see Setup and installation .)

728
Rendering and Exporting
Last updated 6/8/2015
Note: If rendering time is unusually slow, you may be rendering to too many computers, and the network overhead
required to track rendering progress among all computers is out of proportion to the time spent actually rendering
frames. The optimal number depends on many variables related to the network configuration and the computers on it;
experiment to determine the optimal number for your network.
2Create a watch folder called AE Watch Folder on a computer that’s accessible to all of the After Effects render engines
on your network.
3In each render engine, choose File > Watch Folder, and select the watch folder that you’ve created.
4Create your projects and compositions, and set them up in the render queue with the render settings and output
modules you want to use. (All render items in the project must have output names; otherwise the Enable Watch
Folder Render option in the Collect Files dialog box isn’t available.)
5Choose File > Collect Files to copy completed projects to your specified watch folder. Once you choose Collect Files,
After Effects copies the project or composition and all source files to the watch folder.
Note: After Effects can’t copy source files that are larger than 2 GB using the Collect Files command: you must copy them
manually to the (Footage) folder in the Collect Files folder.
6Choose For Queued Comps from the Collect Source Files menu (unless you’re manually moving source files), and
then select Change Render Output To. This option creates a folder on the networked server for rendered files—all
of the render engines need access to this folder to complete their rendering tasks.
7Select Enable Watch Folder Render, click Collect, and name the Collect Files folder.
8Save the Collect Files folder to a networked computer, preferably to a networked server.
9Monitor the progress of the render engines by using a web browser to view HTML pages saved in the watch folder.
After Effects generates these pages automatically when the rendering begins. Click the Reload button in your
browser to see the updated status. These HTML pages describe any errors that occur.
After Effects renders the item to the specified destination folder. When After Effects finishes rendering all of the
queued items in a given project, it closes that project without saving it and then scans the watch folder for new
projects to render. Because it doesn’t save the project, After Effects ignores any Post-Render Actions in the Output
Module settings dialog box that specify to import the item when it is rendered.
Track dependencies of a watch-folder render
You can track render dependencies when you render over a network by setting Post-Render Action options. When you
set these options, After Effects confirms that all of the items that it needs to render are ready and available. For example,
if one item depends on another to render, and the first has not finished rendering or has received an error, the second
does not render.
You can use this process to render a single QuickTime or AVI movie from a watch-folder render. The movie is actually
created on only one computer.
Note: This procedure assumes that you have already created a multiple-computer watch-folder.
1In the Render Queue panel, drag the output module to the Project panel. After Effects creates a placeholder for that
item’s output.
2Drag the placeholder back to the Render Queue panel.
3Set the render settings and output module settings for the placeholder, and click Render.

729
Rendering and Exporting
Last updated 6/8/2015
Start in watch-folder mode
Watch-folder mode applies only to rendering from a folder on your local computer.
•To start After Effects in watch-folder mode automatically, save a project with the filename Watch This Folder.aep.
After Effects watches the folder containing the project if you open that project.
•To start After Effects in watch-folder mode when you start your computer, create a shortcut (Windows) or alias (Mac
OS) to the Watch This Folder.aep project and move it to your Startup folder (Windows) or your Startup Items folder
(Mac OS). After Effects watches the folder containing the project if you open that project.
•(Windows only) To start After Effects in watch-folder mode from the command line, choose Start > Run, and then
enter the following, modifying the application path to the exact name of the folder in which you installed After
Effects, and replacing C:\[temp] with the path to your watch folder: "C:\Program Files\Adobe\Adobe After Effects
CC\Support Files\afterfx.exe" -wf C:\[temp]
To start the After Effects render engine rather than the full version of After Effects, use the -re option with the command.
Note: You can also use this command line in batch files.
Render a still-image sequence with multiple computers
Although the preferred method of rendering for multiple computers is using the Watch Folder feature, you can also use
multiple computers and multiple copies of After Effects to render a composition across a network. You can use multiple
computers to render only still-image sequences; you cannot use multiple computers to render a single movie.
When you render a still-image sequence with multiple computers, rendering in each copy of After Effects starts at
approximately the same time. By specifying that each copy skip existing frames or frames in progress, multiple
computers can render the project simultaneously, writing the still-image sequence to a single folder.
You can use any number of computers for rendering; in general, the more computers, the faster the rendering. However,
if too many computers are used across a busy network, network traffic may slow down the entire process. You can detect
network slowdown by observing the time spent in the Compressing & Writing stage in the Current Render section of
the Render Queue panel.
Note: Adobe does not provide technical support for general network configuration; consult your network administrator.
Aharon Rabinowitz provides a video tutorial on the Creative COW website that goes through and explains the steps for
rendering a still-image sequence with multiple computers.
1Install After Effects on each computer that will be used to render the project. Make sure that you have the same fonts
installed on each computer.
Note: Do not share plug-ins across a network. Make sure that you have a copy of the plug-ins folder on each computer
that is running After Effects. When using third-party plug-ins, also be sure that the same plug-ins are available on all
computers and that you have sufficient licenses for the plug-ins.
2Open the project on one computer, select the composition, and then choose Composition > Add To Render Queue.
3Specify a sequence format in the Output Module area, and specify a folder in the Output To area. This folder must
be available for all the computers that are rendering.
4In the Render Queue panel, select Skip Existing Files in the Render Settings section so that multiple computers do
not render the same frames. Do not use multiple output modules for one render item when using Skip Existing Files.
5Save the project on the computer where you opened it in step 2.
6On each computer that will be rendering, open and save the project. Saving the project ensures that After Effects
records the new relative paths to each computer in the following step.

730
Rendering and Exporting
Last updated 6/8/2015
7Unless the network can handle large file transfers rapidly, copy the project file and all its source footage to each
rendering computer.
8Open the Render Queue panel on each computer and click Render. You do not need to start rendering on each
computer simultaneously, but to ensure equal workloads, start them at approximately the same time. As each
computer finishes rendering a frame, After Effects searches the Output folder for the next unrendered frame and
starts rendering again.
9You can stop and start any computer at any time. However, if you stop a computer without starting it again, the frame
that it was rendering may not be finished. If one or more computers stop during rendering, starting any one
computer ensures that all frames in the sequence get rendered.
Segment settings
Segment settings are in the Output preferences category.
Choose Edit > Preferences > Output (Windows) or After Effects > Preferences > Output (Mac OS).
After Effects can render sequences and movie files into segments that are limited to a specified number of files or by
file size. This is useful when preparing a movie for a medium such as CD-ROM, for which file or folder size may need
to be limited to chunks of 650 MB or less. Use the Segment Video-only Movie Files At value to set the maximum size
for segments in megabytes. Use the Segment Sequences At value to set the maximum number of still-image files in a
folder.
If you are exporting a movie that is larger than the maximum file size for your hard disk formatting scheme, then you
can set the Segment Video-only Movie Files At value to a value under this maximum. Hard disks formatted for
Windows can be formatted using the FAT, FAT32, or NTFS scheme. The maximum file size in the FAT scheme is 2 GB,
and the maximum file size in the FAT32 scheme is 4 GB. The maximum size for a file for NTFS is very large
(approximately 16 terabytes), so you are unlikely to reach this limit with a single movie.
Only movies that do not contain audio can be segmented. If an output module includes audio, the Segment Video-only
Movie Files At preference is ignored for that item.
The Segment Sequences At preference is ignored for any render item for which Skip Existing Files is selected in the
render settings. (See Render settings reference.)
Note: After Effects won’t render and export a segmented movie to the root directory (e.g., C:\). To render and export a
segmented movie, choose an output directory other than the root directory. (See Specify filenames and locations for
rendered output.)
More Help topics
Basics of rendering and exporting
Render and export with the Render Queue panel
Export an After Effects project as an Adobe Premiere Pro
project
You can export an After Effects project as an Adobe Premiere Pro project without rendering.
Note: After Effects projects saved as Adobe Premiere Pro projects cannot be opened by all versions of Adobe Premiere Pro.

731
Rendering and Exporting
Last updated 6/8/2015
When you export an After Effects project as an Adobe Premiere Pro project, Adobe Premiere Pro uses the settings from
the first composition in the After Effects project for all subsequent sequences. Keyframes, effects, and other properties
are converted in the same way as when you paste an After Effects layer into an Adobe Premiere Pro sequence. (See
Importing from After Effects and Adobe Premiere Pro .)
1Choose File > Export > Adobe Premiere Pro Project.
2Specify a filename and location for the project, and click Save.
Note: You can also import Adobe Premiere Pro projects and sequences into After Effects, copy and paste between After
Effects and Premiere Pro, and use Dynamic Link to exchange data between After Effects and Premiere Pro.
More Help topics
Working with Adobe Premiere Pro and After Effects
Dynamic Link and After Effects
Rendering and exporting for Flash Professional and
Flash Player
Note: You canot export files to FLV and F4V formats in the June 2014 and later versions of After Effects CC. Use After Effect
CC (June 2013) or below to export files to FLV and F4V formats.
You can render and export movies from After Effects as movies that can play in Adobe Flash Player. SWF files play
natively in Flash Player, whereas an FLV or F4V file must be contained in (or linked to from) a SWF file to play in Flash
Player. You can also export compositions to Flash Professional as XFL files.
This video from the After Effects CS5: Learn By Video series provides an overview of exporting to the various formats
for Flash Professional and Flash Player, and demonstrates the use and common issues with each.
XFL
XFL files are representations of compositions that can be opened in Flash CS4 Professional or later. XFL files are
essentially the XML equivalent of FLA files.
SWF
SWF files are small files that play in Flash Player. They are often used to deliver animated vector graphics (such as
cartoons), audio, and other data types over the Internet. SWF files also allow viewer interaction, such as clicking to
follow a web link, control animation, or provide input to a rich internet application (RIA). SWF files are the output
created from FLA files.
FLV and F4V
FLV and F4V files contain only pixel-based (rasterized) video, not vector graphics, and they aren’t interactive. FLA files
can contain and refer to FLV and F4V files, which are then embedded or linked in SWF files that play in Flash Player.
Export a composition as an XFL file to Flash Professional
You can export a composition from After Effects to the XFL format for further modification and use in Flash CS4
Professional or later. For example, you can use ActionScript in Flash Professional to add interactive animation to each
of the layers from an After Effects composition.

732
Rendering and Exporting
Last updated 6/8/2015
When you export a composition as an XFL file, After Effects attempts to export individual layers and keyframes,
preserving as much information for direct use in Flash Professional as it can. If After Effects can’t export an element of
a composition as unrendered data in an XFL file, the element is either ignored or rendered into a PNG or FLV item,
depending on whether you choose to ignore unsupported features.
About XFL files
XFL files are essentially the XML equivalent of FLA files. An XFL file is a compressed archive folder that contains a
Library folder and an XML document (DOMDocument.xml) that describes the FLA file. The Library folder contains
the assets referred to by the XML file. When you open an XFL file in Flash Professional, it extracts these items from the
XFL file and uses them to build a FLA document. You save the document from Flash Professional as a new FLA file;
you do not change the XFL file with Flash Professional.
If you want to examine or manually edit the contents of an XFL file, you can open the compressed archive file in the
same manner as any other .zip file. Changing the filename extension to .zip is not necessary, but it may make extracting
the files for this manual examination more convenient.
This video from the After Effects CS5: Learn By Video series demonstrates export to XFL.
Exporting a composition to XFL format
1To export the selected composition as an XFL file, choose File > Export > Adobe Flash Professional (XFL).
2In the Adobe Flash Professional (XFL) Settings dialog box, choose what After Effects will do with layers with
unsupported features:
Ignore Layers with unsupported features are not included in the XFL output.
Rasterize To Layers with unsupported features are rasterized. This means that the layers are rendered to a bitmap
format (an FLV file or a sequence of PNG images). Vectors are not preserved. This preserves the appearance of the
layer when the XFL file is used in Flash Professional. When rasterizing to a PNG sequence, identical adjacent frames
are rasterized only once, to a single PNG file that is referenced multiple times.
3(Optional) Click the Format Options button and modify the settings used for creating PNG sequences or FLV files.
If you click Format Options when FLV is chosen in the Format menu, the export settings dialog box opens. Though
you can modify such items as the bit rate, in general you won’t need to change many settings in this dialog box.
Changes that you make in this dialog box persist and are used for subsequent export operations, so be careful about
what you change.
If you make a change to the format options that you would like to undo, click the Reset To Defaults button in the
Adobe Flash Professional (XFL) Settings dialog box.
4In the Export As Adobe Flash Professional (XFL) dialog box, choose a location for the output files.
As the composition is being processed, a dialog box shows the progress of the export operation.
When After Effects creates an XFL file, it also saves a report ([XFLfile_name] report.html) to the same folder as the XFL
file. The report indicates the following:
•whether layers with unsupported features were rasterized or ignored
•whether each source item was rasterized (“rendered”) or passed through (“linked”)
•whether each layer was rasterized (“rendered”) or converted to a native Flash object

733
Rendering and Exporting
Last updated 6/8/2015
Working in Flash Professional with a FLA document created from an XFL file
The Library panel in Flash Professional is similar to the Project panel in After Effects. When Flash Professional creates
a FLA document from an XFL file, it creates symbols, folders, and video clips and organizes them in the Library panel.
Each item in the Library panel has a unique name—even if they are based on items with identical names in After
Effects—so that these items can be manipulated using ActionScript. This requirement for unique naming causes After
Effects to append underscore characters and numerals to many names when creating the XFL file.
When Flash Professional builds a FLA document from an XFL file that includes FLV files, the FLV files are embedded
in the timeline in Flash. Often, a more efficient way to construct a FLA document is to move the video files to an
external location referenced by the SWF file to stream the video. You can unembed FLV files as appropriate within Flash
Professional, by deleting the video and importing it again using the FLVPlayback component.
Note: In After Effects, the composition’s timeline begins at frame 0. In Flash Professional, the timeline begins at frame 1.
This difference causes the After Effects composition timeline and the corresponding Flash timeline to appear to be offset
from one another by one frame.
In After Effects, a composition can have pixel aspect ratios other than 1.0 (square pixels). Flash Professional only
supports a pixel aspect ratio of 1.0. When a composition is exported to XFL format, the FLA document is a square-pixel
document with a different number of pixels so that the appearance of the document in Flash Professional matches the
appearance of the composition in After Effects. Scale values in the XFL file preserve the appearance of the layers.
How features and data are preserved when exporting a composition to XFL format
When a composition is exported as an XFL file, After Effects goes through multiple stages, attempting at each stage to
export the maximum amount of information from layers and their source files.
If the composition uses PNG, JPEG, and FLV files as the sources for its layers, these source files are included in the XFL
output (passed through) unless the layers use features that force After Effects to transcode the source files or rasterize
the layers for export to XFL.
Note: Transcoding is the conversion of a source file from one format to another format, such as from GIF to PNG.
Rasterizing is the conversion of a layer to a bitmap image, incorporating all of the model information—such as vectors and
keyframes—into a flattened, pixel-based image for each frame.
Stage 1: Source files are passed through unchanged, if possible.
For a layer’s source file to be passed through to the XFL file, the layer must meet these requirements:
•The layer has a source footage item, and that footage item uses a PNG or JPEG sequence or FLV file as its source.
(The layer is not a text layer, camera layer, light layer, or shape layer.)
•The source footage item’s frame rate matches the composition’s frame rate.
•The layer’s source is not trimmed.
•The layer does not extend before the first frame or after the last frame of the composition work area.
•The layer has no properties other than Position, Anchor Point, Opacity, Scale, and Rotation. Because effects add
properties to layers, this requirement also means that the layer has no effects applied.
•The layer does not have motion blur, frame blending, or time-remapping applied.
•The layer does not have a track matte.
•There is no adjustment layer above the layer.
•Layers above do not use blending modes other than Normal.
•The layer does not have the Preserve Transparency option set, nor does any layer above it.
•The layer is not a 3D layer.

734
Rendering and Exporting
Last updated 6/8/2015
Stage 2: Remaining source files are converted to PNG sequences or FLV files, if possible.
If the only reason that a layer’s source file can’t be passed through to the XFL file is that it doesn’t use a PNG sequence,
JPEG sequence, or FLV file as its source, then the layer’s source is transcoded or rasterized to a PNG sequence or FLV
file, which is included in the XFL file. In this case, the layer’s Position, Opacity, Scale, and Rotation keyframes are
preserved and converted to keyframes in the XFL output. If multiple layers use the same source in After Effects and
meet all of the other pass-through requirements listed above, they will also share a common source in the document
created in Flash Professional. Precompositions can be rasterized as source items.
The XFL file created from a composition preserves the animation information for the layers in the composition.
Keyframes for the Position, Opacity, Scale, and Rotation properties are converted to keyframes in Flash Professional,
with one keyframe per frame for each animated property. Only 2D Position (x and y) keyframes and 2D (z) Rotation
keyframes are converted.
In After Effects, the Anchor Point property can be animated, but the transformation point in Flash Professional can’t
be animated. In Flash Professional, the transformation point is located at the top-left corner of the symbol. Keyframe
animations of transform properties (including Anchor Point) in After Effects are converted to animations based around
the transformation center in the exported XFL file.
Stage 3: Remaining layers are rasterized as individual layers, if possible.
If a layer doesn’t meet the requirements for its source file to be passed through, transcoded, or rasterized as a source
item, then the layer itself must be rasterized as a layer. Rasterizing a layer means that all of its keyframe information is
lost—all of the information is contained in the rasterized image frames themselves.
To be rasterized as an individual layer, a layer must meet these requirements:
•The layer is either based on a video footage item (including a solid) or is a shape layer or text layer. (The layer is not
a camera layer, light layer, or audio-only layer.)
•There is no adjustment layer above the layer.
•Layers above do not use blending modes other than Normal.
•The layer does not have a track matte.
•The layer does not have the Preserve Transparency option set, nor does any layer above it.
•The layer is not a 3D layer.
Stage 4: Remaining layers are rendered and rasterized together in bins.
If a layer doesn’t meet the requirements for rasterization to an individual layer, then it is rendered and rasterized
together with other layers in a group (bin). Bins of layers that are rasterized together are generally 3D layers, layers that
are composited together with blending modes, track mattes, and layers affected by an adjustment layer.
Limitations of exporting a composition to XFL format
When Flash Professional opens an XFL file, it must load all of the assets into memory. After Effects warns you when
you export a composition for which the assets will consume more than 580 MB. Similarly, After Effects warns you if
the amount of time that an XFL file will take to open in Flash Professional is very large because the number of frames
in a PNG sequence is greater than 1,050. You can still export a composition to XFL format if it exceeds these limits, but
you may not be able to open the XFL file with Flash Professional.
To prevent the long load times related to sequences with a large number of PNG files, consider pre-rendering layers
based on PNG sequences to FLV format.
After Effects relies on the embedded version of the Adobe Media Encoder to create FLV files. The Adobe Media
Encoder can’t create FLV files with pixel dimensions greater than 1920x1080.

735
Rendering and Exporting
Last updated 6/8/2015
When you export a composition to the XFL format from a 32-bpc project, the rendering of colors with values under 0
and over 1 does not produce results that preserve the appearance of the composition in After Effects. You should only
work in an 8-bpc or 16-bpc project when creating a composition that you intend to export to Flash Professional in XFL
format.
Audio is not exported to the XFL file.
Render and export a composition as a SWF file
SWF files are small files that play in Flash Player. They are often used to deliver animated vector graphics (such as
cartoons), audio, and other data types over the Internet. SWF files also allow viewer interaction, such as clicking to
follow a web link, control animation, or provide input to a rich internet application (RIA). SWF files are the output
created from FLA files.
While rendering and exporting a movie to a SWF file, After Effects maintains vector graphics as vector objects as much
as possible. However, raster images, blending modes, motion blur, some effects, and the contents of nested
compositions cannot be represented as vectors in the SWF file and are rasterized.
You can choose to ignore these unsupported items so that the SWF file includes only the After Effects features that can
be converted into native SWF elements, or you can choose to rasterize frames that contain unsupported features and
add them to the SWF file as JPEG-compressed bitmap images, which may reduce the efficiency of the SWF file.
Audio is encoded in MP3 format and added to the SWF file as an audio stream.
When After Effects creates a SWF file, it also saves a report ([SWFfile_name]R.htm) to the same folder as the SWF file.
The report also contains a link to the SWF file so that you can preview the output using the Flash Player plug-in. Open
the report in a browser to view the SWF file and see which items in the composition are unsupported.
The exported SWF file includes each unchanged item in the After Effects composition once, and then references it for
each use. If a layer is used in multiple frames, each use refers to the same object, even if the layer’s transform properties
(such as Position) are animated. However, if the content of the layer changes—for example, if a mask on the layer is
animated or if the source footage item for the layer is video—a new object is created for each frame in which the layer
is visible. If multiple layers in the composition share the same source footage item, the source is added once and is then
referenced for every additional layer that shares the source. If the source is an Illustrator file, a SWF movie clip is created
and referenced. Text characters are added as vectors once and then referenced on all subsequent frames, unless you
choose Fill Over Stroke from the Fill And Stroke options menu; in that case, the characters are added as vectors on every
frame.
Note: If color management is enabled for the project, then colors are converted from the working color space of the project
to the sRGB IEC61966-2.1 color space for output. This output color space is appropriate for movies shown in a web browser.
(See Color management.)
1Select the composition you want to export, and then choose File > Export > Adobe Flash Player (SWF).
2Enter a filename (making sure to include the .swf extension) and location, and then click Save.
3Specify options as appropriate, and then click OK.
Chris Jackson provides tips for rendering and exporting SWF files from After Effects in an excerpt from his book Flash
+ After Effects on the Focal Press website.
SWF export settings
JPEG Quality Specifies the quality of rasterized images. The higher the quality, the larger the file. (If you select Rasterize
for Unsupported Features, the JPEG Quality setting is used for all JPEG-compressed bitmap images exported to the
SWF file, including bitmap images generated from composition frames or Adobe Illustrator files.)

736
Rendering and Exporting
Last updated 6/8/2015
Unsupported Features Specifies whether to rasterize features that SWF format doesn’t support. Choose Ignore to
exclude unsupported features, or choose Rasterize to render all frames that contain unsupported features as JPEG-
compressed bitmap images and include them in the SWF file. If you choose Rasterize, the SWF exporter rasterizes
source files for each layer in the composition (except layers that use Illustrator files or solids as the source footage) and
nested compositions with Collapse Transformations enabled.
Audio Bit Rate The bit rate of the exported audio. Choose Auto to get the lowest bit rate available for the specified
Sample Rate and Channels settings. Higher bit rates increase file size. Audio in a SWF file is in MP3 format.
Loop Continuously Specifies that the exported SWF file loops continuously during playback. If you plan to specify
looping by writing HTML code to control Flash Player, deselect Loop Continuously.
Prevent Editing Creates a SWF file that can’t be modified by applications such as Flash Professional.
Include Object Names Includes layer, mask, and effect names in the file, for use as input to ActionScript programs.
Selecting this option increases file size. Rasterized objects are not named.
Each mask is exported as a separate SWF object, the name of which is the layer name followed by the mask name. If all
masks use Difference mode, all masks are exported as one SWF object, and the name is the layer name. Each text
character is exported as a separate SWF object.
Flatten Illustrator Artwork Splits all overlapping objects into non-overlapping pieces. When you select this option, you
don’t need to convert Illustrator text to outlines before exporting. (This option supports source files from Illustrator 9.0
or later.)
Flattening Illustrator artwork has advantages and disadvantages. When you flatten Illustrator artwork, text is exported
to SWF format properly, so you don’t need to convert text to outlines. Overlapping objects are removed, so composited
layers appear the same in both After Effects and the SWF file. End caps, joins, and transparency groups are exported
properly, and artwork outside crop marks, which is not visible in the SWF file, is not included. However, SWF files don’t
necessarily become smaller. In addition, the flattening process may introduce unsupported objects that are then
ignored or rasterized, and white fringes may appear around some objects. The process can be slow, memory-intensive,
and possibly ineffective for complex Illustrator artwork.
Include Layer Marker Web Links Makes layer markers behave as web links. The Include Layer Marker Web Links
option adds web links and a Get URL action to the SWF file by using information from layer markers. This option also
adds a frame label to each SWF frame that has a layer marker. You can specify how the browser opens the web link with
standard target commands (for example, _blank). (See Web links, chapter links, cue points, and markers.)
Target commands for web links in a SWF file
_blank Loads the web link into a new browser window.
_parent Loads the web link into the parent frame of the frame in which the current file is playing.
_self Loads the web link into the current frame.
_top Loads the web link into the top frame in the current window.
_level0 Loads another SWF file into level 0. The current file typically plays at level 0; another file loaded into level 0
usually replaces the current file. The URL must refer to another SWF file.
_level1 Loads another SWF file into level 1 if the URL refers to another SWF file.
Supported features for SWF format export
Layers After Effects text layers are exported to SWF format as vector graphics. The following layer types and layer
switches aren’t supported: track mattes, 3D layers, 3D cameras, 3D lights, adjustment layers, shape layers, Preserve
Transparency, Collapse Transformations, and motion blur. The Fill Over Stroke character option and the Blur animator

737
Rendering and Exporting
Last updated 6/8/2015
property aren’t supported, and only Normal blending mode is supported. Nested compositions aren’t supported and
are rasterized.
Masks Only masks with Add mask mode or Difference mask mode are supported; multiple masks in a layer must use
the same mask mode. If Add mode is specified, partial opacity and the Inverted option are also supported. Mask feather
is not supported. The result of overlapping masks with Add mode and partial opacity may appear differently in the SWF
file than in After Effects. (See Mask modes.)
Effects Path Text, Audio Waveform, and Audio Spectrum are supported for output to SWF format.
All Path Text options are supported, except the following: Composite On Original, Fill Over Stroke, and Difference
mode.
Lines drawn by the Audio Spectrum and Audio Waveform effects are converted to vectors. The following unsupported
features are ignored: Outside Color (only Inside Color is used), Softness, and Composite On Original. In addition, only
uniformly thick lines are included in the SWF file. For example, if you select the Use Polar Path option in Audio
Spectrum, lines become thicker farther from the center in After Effects, but in the SWF file the lines remain at the same
thickness.
The waveforms may increase the SWF file size, so decrease the Displayed Samples value in the Audio Waveform effect
or the Frequency Bands value in the Audio Spectrum effect, or decrease the frame rate to make the SWF file smaller.
Resolution SWF files are always created at full resolution (size of composition); JPEG-compressed bitmap images are
rendered at full resolution.
Adobe Illustrator files Only stroked paths and filled paths in CMYK or RGB color spaces are supported.
Layers that have Illustrator source files are converted to corresponding SWF items if the layer does not contain masks
or have Collapse Transformations enabled. Illustrator layers that contain masks or have Collapse Transformations
enabled are rasterized. The SWF file maintains the Illustrator crop marks. Artwork outside the crop marks is included
in the SWF file even though it’s not visible, thereby increasing the file size.
The SWF export report lists information for unsupported features in Illustrator files for the first frame in which the
Illustrator file is visible. Unsupported features are ignored or rasterized (depending on whether you’ve selected Ignore
or Rasterize Unsupported Features) on all frames in which the footage is visible.
Render and export a composition as an FLV or F4V file
FLV and F4V files contain only pixel-based (rasterized) video, not vector graphics, and they aren’t interactive.
The FLV and F4V formats are container formats, each of which is associated with a set of video and audio formats. FLV
files generally contain video data that is encoded using the On2 VP6 video codec and audio data encoded using an MP3
audio codec. F4V files generally contain video data that is encoded using an H.264 video codec and the AAC audio
codec.
Note: After Effects CS4 and earlier also provided the option to encode video data in FLV files using the Sorenson Spark
video codec.
You can play a movie in an FLV or F4V container file in many different ways, including the following:
•Import the file into the Flash Professional authoring application and publish the video in a SWF file.
•Play the movie in the Adobe Media Player (AMP).
•Preview the movie using Adobe Bridge.
After Effects markers can be included as cue points in an output FLV or F4V file. To transfer keyframes or global
property values into the Flash Professional authoring application from After Effects, run the Convert Selected Properties
To Markers.jsx script before rendering and exporting an FLV or F4V file.

738
Rendering and Exporting
Last updated 6/8/2015
You render and export a movie to the FLV or F4V container format using the render queue, just as you do with other
formats. (See Render and export a movie using the render queue.)
To include the alpha channel in the FLV output, use the On2 VP6 codec and select Encode Alpha Channel in the Video
tab of the export settings dialog box. After Effects premultiplies channels with black when encoding transparency in
FLV files. (See Alpha channel interpretation: premultiplied or straight.)
When you render and export a composition to the F4V or FLV format from a 32-bpc project, the rendering of colors
with values under 0 and over 1 does not produce results that preserve the appearance of the composition in After
Effects. To avoid unexpected results, you can work in an 8-bpc or 16-bpc project when creating a composition that you
intend to render and export to F4V or FLV format. Alternatively, you can work in a 32-bpc project, render and export
the composition to another format, and then convert the output file to F4V or FLV.
Online resources about FLV and F4V formats
This video from the After Effects CS5: Learn By Video series demonstrates export to FLV and F4V formats.
Jan Ozer provides technical details and tips in “Encoding options for H.264 video” on the Adobe Developer Connection
website for encoding video using the H.264 video codec.
Kush Amerasinghe provides an overview of H.264 and F4V in “H.264 for the rest of us“ on the Adobe Developer
Connection website.
Robert Reinhardt provides information about video for Flash Player in some sample chapters from his book Video with
Adobe Flash CS4 Professional Studio Techniques on the Peachpit website. In the "Compression primer" chapter, he
explains in detail the advantages and disadvantages of the On2 VP6 and H.264 video codecs.
More information about FLV and F4V formats—including the F4V specification—is available on the Adobe Developer
Connection website.
Fabio Sonnati provides recommendations for settings for H.264 (F4V) movies for mobile devices on the Adobe
Developer Connection website.
More Help topics
Working with Flash and After Effects
Basics of rendering and exporting
Encoding and compression options for movies
Converting movies
Convert footage items between video formats
You can use After Effects to convert one kind of video to another. When converting video, keep in mind the following
guidelines:
•Changes in resolution may result in a loss of picture clarity, especially when up-converting from a standard-
definition format to a high-definition format.

739
Rendering and Exporting
Last updated 6/8/2015
•Changes in frame rate may require the use of frame blending to smooth out the interpolated frames. For longer
footage items, the use of frame blending can result in very long render times.
1Import the footage you’re converting into a composition using the preset of the format you’re converting to.
Example: if you’re converting NTSC to PAL, add your NTSC footage item to a composition with the appropriate
PAL composition settings preset.
2Select the layer with the footage to be converted and choose Layer > Transform > Fit To Comp Width (or Fit To
Comp Height).
Note: For converting between two formats with the same frame aspect ratio, either of these two Fit commands does the
same thing; if the frame aspect ratios differ (for example, going from 4:3 to 16:9), fitting to width or height chooses
between cropping or letterboxing the resulting image.
3Do one of the following:
•If your footage has no scene cuts, choose Layer > Frame Blending > Pixel Motion. Pixel Motion provides the best
results for interpolation of frames, but may require long rendering times.
•If your footage has scene cuts, or if you want to sacrifice quality for shorter rendering times, choose Layer >
Frame Blending > Frame Mix.
4Choose Composition > Add To Render Queue.
5In the Render Queue panel, next to Render Settings, choose the appropriate preset from the menu. For example, if
you’re converting to DV footage, select DV Settings from the menu.
6In the Render Queue panel, next to Output Module, choose the appropriate output module preset from the menu,
or choose Custom to enter custom settings. For example, if you’re converting to DV PAL, choose the D1/DV-PAL
output module preset with the audio sampling rate that you require.
7Click the name of the output module preset that you chose in step 6 to select additional Format Options.
8Specify a name and destination for the output file using the controls to the right of the Output To heading in the
Render Queue panel. (See Specify filenames and locations for rendered output.)
9Click the Render button to render your movie.
Convert DV footage from PAL to NTSC using pulldown
Because After Effects can easily convert film (24 fps) to video (29.97 fps) using 3:2 pulldown, you can perform a clean
PAL-to-NTSC transfer by setting up 25-fps PAL video to act like 24-fps film. This lets you apply 3:2 pulldown to the
footage when converting to 29.97 fps. This technique works especially well for progressive (noninterlaced) PAL video.
1Create a new composition with the DV NTSC or DV NTSC Widescreen preset.
2Import your DV PAL footage into the new composition.
3Select the layer with the DV PAL footage, and choose Layer > Transform > Fit To Comp Width (or Fit To Comp
Height).
4Do one of the following:
•To preserve audio synchronization but slightly lower the pitch, choose Layer > Time > Time Stretch, and then
enter 95.904 in the Stretch Factor box.
•To preserve audio pitch but not synchronization, or for clips without audio, right-click (Windows) or Control-
click (Mac OS) the footage item in the Project panel, select Interpret Footage > Main, select Conform To Frame
Rate, and then enter 23.976 in the Conform To Frame Rate box.
5Choose Composition > Add To Render Queue.

740
Rendering and Exporting
Last updated 6/8/2015
6Choose Custom from the Render Settings menu.
7In the Render Settings pane, enable Field Rendering (choose the field order required by your output type), select any
option from the 3:2 Pulldown menu, and then click OK.
8Choose the output type from the Render Queue Output Module menu (for example, Microsoft DV NTSC 32 kHz).
9Specify a name and destination for the output file using the controls to the right of the Output To heading in the
Render Queue panel. (See Specify filenames and locations for rendered output.)
10 Click the Render button to render your movie.
Scaling a movie down
Several methods exist for producing a reduced-size movie from your composition, each with tradeoffs between speed
and quality:
Nest the composition Create a new composition at the smaller dimensions, and nest the large composition inside it.
For example, if you create a 640x480 composition, place it in a 320x240 composition. Use the Fit To Comp command
to scale the composition to fit the new smaller composition size: Press Ctrl+Alt+F (Windows) or Command+Option+F
(Mac OS), and then collapse transformations by choosing Layer > Switches > Collapse. The resulting composition
rendered at full resolution and best quality will have excellent image quality, better than if you had rendered using a
reduced resolution.
Resize the composition This method produces the highest quality reduced-size movie but is slower than nesting. For
example, if you create a 640x480 composition and render it at full resolution, you can set the Resize value in the Output
Module Settings dialog box to 50% to create a 320x240 movie. For a composition rendered at full resolution, the image
quality is excellent when the Resize Quality is set to High.
Note: Do not use resizing to change the vertical dimensions of a movie when field rendering is on. Resizing vertically mixes
the field order, which distorts motion. Use either cropping or composition nesting if you need to vertically resize a field-
rendered movie.
Crop the composition This method is ideal for reducing the size of a movie by a few pixels. Use the Crop options in the
Output Module Settings dialog box. Remember that cropping cuts off part of the movie, so objects centered in the
composition may not appear centered unless the movie is cropped evenly on opposite edges.
Note: In some special cases, After Effects will automatically crop rather than scale when creating an output movie with
dimensions that don’t match the dimensions of the composition. For example, when creating a 720x480 movie with a pixel
aspect ratio of 0.91 or 1.21 from a 720x486 composition, After Effects will crop instead of scale.
Crop to a region of interest To render just a portion of the composition frame, define a region of interest in the
Composition panel. Then, select the Region Of Interest option in the Output Module Settings dialog box before
rendering. (See Region of interest (ROI).)
Note: Cropping an odd number of pixels from the top of a field-rendered movie reverses the field order. For example, if you
crop one row of pixels from the top of a movie with Upper Field First field rendering, the field-rendering order then becomes
Lower Field First. Remember that if you crop pixels from the top of the movie, you need to add to the bottom row of the
movie to maintain the original size. If you don’t mind losing one scan line, this technique gives you a way to output two
movies from one render, each with a different field order.
Render the composition at a reduced resolution This method is the fastest for creating reduced-size movies. For
example, if you create a 640x480 composition, you can set the composition resolution to one half, reducing the size of
the rendered composition to 320x240. You can then create movies or images at this size. The reduced resolution reduces
the sharpness of the image and is best used for creating preview or draft movies.

741
Rendering and Exporting
Last updated 6/8/2015
Note: When rendering at reduced resolution, set the quality of the composition to Draft. Rendering at Best quality while
reducing resolution does not produce a clean image and takes longer to render than rendering at Draft quality.
Scaling a movie up
Increasing the size of the output from a rendered composition reduces the image quality of a movie and is not
recommended. If you must enlarge a movie, to maintain highest image quality, enlarge a composition that was rendered
at full resolution and highest quality using one of the following methods:
Nest the composition Create a new composition at the larger dimensions and nest the smaller composition inside it.
For example, if you create a 320x240 composition, you can place it in a 640x480 composition. Resize the composition
to fit the new larger composition size, and then collapse transformations by choosing Layers > Switches > Collapse. The
resulting composition rendered at full resolution and best quality will have better image quality than if you had resized
the movie. However, this method also renders slower than if you created a composition and resized it.
Note: To create a draft movie with specific dimensions, use both the Resize option and reduced resolution in the rendered
composition.
Resize the composition For example, if you create a 320x240 composition and render it at full resolution, you can set
the Resize value in the Output Module Settings dialog box to 200% to create a 640x480 movie. For a composition
rendered at full resolution, the image quality is usually acceptable.
Note: Do not use resizing to change the vertical dimensions of a movie with field rendering. Resizing vertically mixes the
field order, which distorts any motion. Use either cropping or composition nesting if you need to vertically resize a field-
rendered movie.
Crop the composition To enlarge a movie by a few pixels, increase the size using negative values for the Crop options
in the Output Module Settings dialog box. For example, to increase the size of a movie by 2 pixels, enter –2 in the
Cropping section of the Output Module Settings dialog box. Remember that negative cropping adds to one side of a
movie, so objects originally centered in the composition may not appear centered when the movie is cropped.
Note: Adding an odd number of pixels to the top of a field-rendered movie reverses the field order. For example, if you add
one row of pixels to the top of a movie with Upper Field First field rendering, the field-rendering order then becomes Lower
Field First. Remember that if you add pixels to the top of the movie, you need to crop from the bottom row of the movie to
maintain the original size.
Adobe Photoshop provides fine control over resampling methods used for scaling of images. For fine control of
resampling, you can export frames to Photoshop to change the image size and then import the frames back into After
Effects.
For a list of plug-ins that provide high-quality scaling—including some designed to create high-definition images from
standard-definition sources—see the Toolfarm website.
For a script that scales multiple compositions simultaneously, see the AE Enhancers forum.
Create a composition and render source footage items simultaneously
You can simultaneously create a composition from source footage and prepare it for rendering. This process is useful
when you want to change some characteristic of the source footage, such as frame rate or compression method, and
have that rendered version available in your project.
1Drag one or more footage items from the Project panel to the Render Queue panel, or select the footage items in the
Project panel and do one of the following:
•Choose Composition > Add to Render Queue.
•Press Ctrl+Shift+/ or Ctrl+M(Windows) or Command+Shift+/ or Command+M (Mac OS).

742
Rendering and Exporting
Last updated 6/8/2015
Note: If the Use System Shortcut Keys option is enabled in General preferences (Mac OS), the shortcut is Ctrl+Cmd+M.
2After Effects creates both a new item in the render queue and a new composition in the Project panel for each
footage item.
3Adjust the render settings as desired, and click Render.
Introduce 3:2 pulldown
If you are creating output for film that’s been transferred to video, or if you want to simulate a film look for animation,
use 3:2 pulldown. Footage items that were originally film transferred to video and had 3:2 pulldown removed when
imported into After Effects can be rendered back to video with 3:2 pulldown reintroduced. You can introduce 3:2
pulldown by choosing one of five different phases. (See Remove 3:2 or 24Pa pulldown from video.)
Note: It is important to match the phase of a segment that had 3:2 pulldown removed if it will be edited back into the video
footage it came from.
1In the Render Queue panel, select the render item and then click the underlined text next to the Render Settings
heading.
2For Field Render, choose a field order.
3For 3:2 Pulldown, choose a phase.
4Select other settings as appropriate, and then click Render.
Chris and Trish Meyer provides an overview of 3:2 pulldown in an article on the Artbeats website.
Test field-rendering order
When you render a composition containing separated footage, set the Field Rendering option to the same field order
as your video equipment. If you field-render with the incorrect settings, the final movie may appear too soft, jerky, or
distorted. A simple test can determine the order in which your video equipment requires fields.
Note: The field order might get altered if you change the hardware or software of your production setup. For example,
changing your device control software or VCR after setting the field order can reverse your fields. Therefore, any time you
change your setup, test the field-rendering order.
The test takes about 15 minutes and involves creating two movie versions of the same composition (one rendered with
Upper Field First and one with Lower Field First), and then playing the movies to see which choice looks right.
1Create a simple composition with the correct frame size and frame rate. Choose an NTSC or PAL preset in the
Composition Settings dialog box, and make the composition at least 3 seconds long.
2Within the composition, make a layer that is a small rectangular solid. The layer can be any color as long as it
contrasts sharply with the composition background. You may want to add a title (such as “Upper Field First”) to the
solid to make identification of the movie easier.
3Apply some fast movement to the solid using keyframes in its Position property. Set keyframes from the upper-left
of the Composition panel to the lower-right for 1 second.
4Save the project, and then drag the composition to the Render Queue panel.
5Click the underlined Render Settings name, and then choose Upper Field First from the Field Render menu.
6Click OK, and then click Render to make the movie.
7In the composition, change the color of the solid in the Composition panel, and add a new title, such as “Lower Field
First”, to identify it.

743
Rendering and Exporting
Last updated 6/8/2015
8Render the composition again, choosing Lower Field First from the Field Render menu in the Render Settings dialog
box.
9Record both movies to the same device.
10 Play both movies.
One movie will look distorted and have jumpy horizontal motion or shape distortion during vertical motion. The
other movie will play back smoothly, with sharply defined edges. Use the field order for the smooth-playing movie
whenever you render movies with that particular hardware configuration.
More Help topics
Output modules and output module settings
Render and export with the RenderQueue panel
Render settings

